

Page 1
My Presario - Getting Started
www.compaq.com
214905-004
214905-004.qxd 2/8/2001 11:53 AM Page 1
Page 2

Notice
© 2001 Compaq Computer Corporation
COMPAQ and the Compaq logo Registered in U.S. Patent and Trademark Office.
Microsoft and Windows are trademarks of Microsoft Corporation.
All other product names mentioned herein may be trademarks or registered trademarks of their respective
companies.
Compaq shall not be liable for technical or editorial errors or omissions contained herein.
The information in this document is subject to change without notice.
The information in this publication is subject to change without notice and is provided "AS IS" WITHOUT WARRANTY OF ANY KIND. THE ENTIRE RISK ARISING OUT OF THE USE OF THIS
INFORMATION REMAINS WITH RECIPIENT. IN NO EVENT SHALL COMPAQ BE LIABLE FOR
ANY DIRECT, CONSEQUENTIAL, INCIDENTAL, SPECIAL, PUNITIVE OR OTHER DAMAGES
WHATSOEVER (INCLUDING WITHOUT LIMITATION, DAMAGES FOR LOSS OF BUSINESS
PROFITS, BUSINESS INTERRUPTION OR LOSS OF BUSINESS INFORMATION), EVEN IF
COMPAQ HAS BEEN ADVISED OF THE POSSIBILITY OF SUCH DAMAGES. THE FOREGOING
SHALL APPLY REGARDLESS OF THE NEGLIGENCE OR OTHER FAULT OF EITHER PARTY
AND REGARDLESS OF WHETHER SUCH LIABILITY SOUNDS IN CONTRACT, NEGLIGENCE,
TORT, OR ANY OTHER THEORY OF LEGAL LIABILITY, AND NOTWITHSTANDING ANY
FAILURE OF ESSENTIAL PURPOSE OF ANY LIMITED REMEDY.
The limited warranties for Compaq products are exclusively set forth in the documentation accompanying
such products. Nothing herein should be construed as constituting a further or additional warranty.
Compaq Presario
Fourth Edition (February 2001)
Part Number 214905-004
Page 3

Page 4

C
Contents
Chapter 1 Introduction . . . . . . . . . . . . . . . . . . . . . . . . . . . . . . . . . . . . . . . . . . . . . . . . . . . . . 1-1
Who Should Read This Guide? . . . . . . . . . . . . . . . . . . . . . . . . . . . . . . . . . . . . . . . . .1-2
Using My Presario—Getting Started . . . . . . . . . . . . . . . . . . . . . . . . . . . .1-2
Symbols and Graphics Used . . . . . . . . . . . . . . . . . . . . . . . . . . . . . . . . . . . . . . . . . . .1-3
Computer Illustrations and Features . . . . . . . . . . . . . . . . . . . . . . . . . . .1-3
Where Can I Find Information? . . . . . . . . . . . . . . . . . . . . . . . . . . . . . . . . . . . . . . . 1-4
Warranty Certificate . . . . . . . . . . . . . . . . . . . . . . . . . . . . . . . . . . . . . . . . . . 1-4
Replacing Parts . . . . . . . . . . . . . . . . . . . . . . . . . . . . . . . . . . . . . . . . . . . . . . . 1-4
Upgrading Your Computer . . . . . . . . . . . . . . . . . . . . . . . . . . . . . . . . . . . . 1-4
Safety. . . . . . . . . . . . . . . . . . . . . . . . . . . . . . . . . . . . . . . . . . . . . . . . . . . . . . . . . . . . . . . . .1-5
Safety and Comfort . . . . . . . . . . . . . . . . . . . . . . . . . . . . . . . . . . . . . . . . . . . .1-5
How Do I Find Information on the CD-ROM? . . . . . . . . . . . . . . . . . . . . . . . . . . . 1-6
Using the My Presario—Learning More CD . . . . . . . . . . . . . . . . . . . . 1-6
Chapter 2 Setting Up Your Computer . . . . . . . . . . . . . . . . . . . . . . . . . . . . . . . . . . . . . . . .2-1
Your Computer at a Glance . . . . . . . . . . . . . . . . . . . . . . . . . . . . . . . . . . . . . . . . . . . 2-2
What’s in Front? . . . . . . . . . . . . . . . . . . . . . . . . . . . . . . . . . . . . . . . . . . . . . . 2-2
What’s in Back? . . . . . . . . . . . . . . . . . . . . . . . . . . . . . . . . . . . . . . . . . . . . . . 2-2
RESARIO–GETTING STARTED
MY P
ONTENTS-I
C
Page 5

Plug In and Go!. . . . . . . . . . . . . . . . . . . . . . . . . . . . . . . . . . . . . . . . . . . . . . . . . . . . . . . 2-3
Setting Up Your Computer . . . . . . . . . . . . . . . . . . . . . . . . . . . . . . . . . . . . 2-3
Compaq/Logitech Wireless Wheel Mouse . . . . . . . . . . . . . . . . . . . . . . . . . . . . . 2-4
Installing the Wireless Wheel Mouse . . . . . . . . . . . . . . . . . . . . . . . . . . 2-4
Registration. . . . . . . . . . . . . . . . . . . . . . . . . . . . . . . . . . . . . . . . . . . . . . . . . . . . . . . . . . 2-5
Registering with Compaq and Microsoft . . . . . . . . . . . . . . . . . . . . . . . 2-5
Internet Service Provider (ISP). . . . . . . . . . . . . . . . . . . . . . . . . . . . . . . . . . . . . . . . . 2-6
Setting Up an ISP Account . . . . . . . . . . . . . . . . . . . . . . . . . . . . . . . . . . . . 2-6
Printer Setup. . . . . . . . . . . . . . . . . . . . . . . . . . . . . . . . . . . . . . . . . . . . . . . . . . . . . . . . . 2-7
Setting Up Your Printer . . . . . . . . . . . . . . . . . . . . . . . . . . . . . . . . . . . . . . . 2-7
Chapter 3 Windows Basics . . . . . . . . . . . . . . . . . . . . . . . . . . . . . . . . . . . . . . . . . . . . . . . . . .3-1
Features of the Windows Desktop. . . . . . . . . . . . . . . . . . . . . . . . . . . . . . . . . . . . . 3-2
Viewing the Windows Desktop . . . . . . . . . . . . . . . . . . . . . . . . . . . . . . . . 3-2
Using the Start Menu . . . . . . . . . . . . . . . . . . . . . . . . . . . . . . . . . . . . . . . . . 3-3
Help . . . . . . . . . . . . . . . . . . . . . . . . . . . . . . . . . . . . . . . . . . . . . . . . . . . . . . . . . . . . . . . . . 3-4
Accessing Online Help . . . . . . . . . . . . . . . . . . . . . . . . . . . . . . . . . . . . . . . . 3-4
Chapter 4 Using Your Computer . . . . . . . . . . . . . . . . . . . . . . . . . . . . . . . . . . . . . . . . . . . 4-1
Keyboard Basics . . . . . . . . . . . . . . . . . . . . . . . . . . . . . . . . . . . . . . . . . . . . . . . . . . . . . . 4-2
Getting to Know the Standard Keyboard Keys . . . . . . . . . . . . . . . . . 4-2
Keyboard Buttons . . . . . . . . . . . . . . . . . . . . . . . . . . . . . . . . . . . . . . . . . . . . . . . . . . . . 4-3
Using CD/DVD Control Buttons . . . . . . . . . . . . . . . . . . . . . . . . . . . . . . . 4-3
Using Internet Zone Buttons . . . . . . . . . . . . . . . . . . . . . . . . . . . . . . . . . . 4-4
Using Quick Launch Web Buttons . . . . . . . . . . . . . . . . . . . . . . . . . . . . . 4-5
Assigning the My Program Button . . . . . . . . . . . . . . . . . . . . . . . . . . . . 4-6
Adjusting the Volume . . . . . . . . . . . . . . . . . . . . . . . . . . . . . . . . . . . . . . . . 4-6
Putting Your Computer to Sleep . . . . . . . . . . . . . . . . . . . . . . . . . . . . . . 4-7
ONTENTS-II
C
RESARIO–GETTING STARTED
MY P
Page 6

Waking Your Computer . . . . . . . . . . . . . . . . . . . . . . . . . . . . . . . . . . . . . . . 4-7
Understanding the System Status Lights . . . . . . . . . . . . . . . . . . . . . . 4-8
Scroll Mouse and Wireless Mouse . . . . . . . . . . . . . . . . . . . . . . . . . . . . . . . . . . . . . 4-9
Making Screen Selections . . . . . . . . . . . . . . . . . . . . . . . . . . . . . . . . . . . . . 4-9
Opening Software and Files . . . . . . . . . . . . . . . . . . . . . . . . . . . . . . . . . . . 4-9
Scrolling . . . . . . . . . . . . . . . . . . . . . . . . . . . . . . . . . . . . . . . . . . . . . . . . . . . . . 4-9
Autoscrolling . . . . . . . . . . . . . . . . . . . . . . . . . . . . . . . . . . . . . . . . . . . . . . . . 4-10
Speakers . . . . . . . . . . . . . . . . . . . . . . . . . . . . . . . . . . . . . . . . . . . . . . . . . . . . . . . . . . . . .4-11
Turning on the Speakers . . . . . . . . . . . . . . . . . . . . . . . . . . . . . . . . . . . . . .4-11
Disk, Hard Drive, CD-ROM, CD-RW, DVD-ROM, and Zip Drives . . . . . . . . . 4-12
Using the Disk Drive . . . . . . . . . . . . . . . . . . . . . . . . . . . . . . . . . . . . . . . . . 4-12
Using the Hard Drive . . . . . . . . . . . . . . . . . . . . . . . . . . . . . . . . . . . . . . . . 4-12
Inserting a CD into the CD-ROM, CD-RW, or DVD-ROM Drive . . . 4-13
Removing a Disc from a Drive . . . . . . . . . . . . . . . . . . . . . . . . . . . . . . . . 4-14
RESARIO–GETTING STARTED
MY P
Playing an Audio CD . . . . . . . . . . . . . . . . . . . . . . . . . . . . . . . . . . . . . . . . . 4-14
Playing a DVD-ROM Movie . . . . . . . . . . . . . . . . . . . . . . . . . . . . . . . . . . . 4-15
Creating Your Own CDs . . . . . . . . . . . . . . . . . . . . . . . . . . . . . . . . . . . . . . 4-16
Inserting a Disk Into the Zip Drive . . . . . . . . . . . . . . . . . . . . . . . . . . . . 4-17
Removing a Disk from the Zip Drive . . . . . . . . . . . . . . . . . . . . . . . . . . 4-17
Internet Video Camera . . . . . . . . . . . . . . . . . . . . . . . . . . . . . . . . . . . . . . . . . . . . . . 4-18
Using the Logitech QuickCam Internet Video Camera . . . . . . . . . 4-18
ONTENTS-III
C
Page 7

Chapter 5 Welcome to the Web . . . . . . . . . . . . . . . . . . . . . . . . . . . . . . . . . . . . . . . . . . . . .5-1
Basic Concepts . . . . . . . . . . . . . . . . . . . . . . . . . . . . . . . . . . . . . . . . . . . . . . . . . . . . . . . 5-2
What Is the Internet? . . . . . . . . . . . . . . . . . . . . . . . . . . . . . . . . . . . . . . . . . 5-2
What Is a Hyperlink? . . . . . . . . . . . . . . . . . . . . . . . . . . . . . . . . . . . . . . . . . . 5-2
Compaq Connection Helper . . . . . . . . . . . . . . . . . . . . . . . . . . . . . . . . . . . . . . . . . . 5-3
Setting the Internet Buttons to AOL . . . . . . . . . . . . . . . . . . . . . . . . . . . 5-3
Internet Connection . . . . . . . . . . . . . . . . . . . . . . . . . . . . . . . . . . . . . . . . . . . . . . . . . . 5-4
Connecting with Compaq.NET Powered by MSN . . . . . . . . . . . . . . . 5-4
Connecting with AOL . . . . . . . . . . . . . . . . . . . . . . . . . . . . . . . . . . . . . . . . . 5-4
Web Searches . . . . . . . . . . . . . . . . . . . . . . . . . . . . . . . . . . . . . . . . . . . . . . . . . . . . . . . . 5-5
Searching the Web Using Compaq.NET Powered by MSN . . . . . . . 5-5
Searching the Web Using AOL . . . . . . . . . . . . . . . . . . . . . . . . . . . . . . . . . 5-5
E-mail . . . . . . . . . . . . . . . . . . . . . . . . . . . . . . . . . . . . . . . . . . . . . . . . . . . . . . . . . . . . . . . 5-6
Setting Up Outlook Express E-mail . . . . . . . . . . . . . . . . . . . . . . . . . . . . 5-6
ONTENTS-IV
C
Typing an E-mail Message . . . . . . . . . . . . . . . . . . . . . . . . . . . . . . . . . . . . 5-6
Understanding E-mail Addresses . . . . . . . . . . . . . . . . . . . . . . . . . . . . . . 5-7
Sending an E-mail Using Outlook Express . . . . . . . . . . . . . . . . . . . . . 5-8
Sending an E-mail Using AOL . . . . . . . . . . . . . . . . . . . . . . . . . . . . . . . . . 5-9
Content Advisor . . . . . . . . . . . . . . . . . . . . . . . . . . . . . . . . . . . . . . . . . . . . . . . . . . . . . 5-10
Reading Your Outlook Express E-mail Messages . . . . . . . . . . . . . . 5-10
Reading Your AOL E-mail Messages . . . . . . . . . . . . . . . . . . . . . . . . . . 5-10
Restricting Internet Content . . . . . . . . . . . . . . . . . . . . . . . . . . . . . . . . . .5-11
My Presario Web Site . . . . . . . . . . . . . . . . . . . . . . . . . . . . . . . . . . . . . . . . . . . . . . . . .5-12
Checking Your Registration . . . . . . . . . . . . . . . . . . . . . . . . . . . . . . . . . . .5-12
RESARIO–GETTING STARTED
MY P
Page 8

Chapter 6 Common Tasks . . . . . . . . . . . . . . . . . . . . . . . . . . . . . . . . . . . . . . . . . . . . . . . . . 6-1
Print Basics . . . . . . . . . . . . . . . . . . . . . . . . . . . . . . . . . . . . . . . . . . . . . . . . . . . . . . . . . . 6-2
Using the Menu to Print . . . . . . . . . . . . . . . . . . . . . . . . . . . . . . . . . . . . . . 6-2
Digital Audio Files . . . . . . . . . . . . . . . . . . . . . . . . . . . . . . . . . . . . . . . . . . . . . . . . . . . . 6-3
Playing Digital Audio Files . . . . . . . . . . . . . . . . . . . . . . . . . . . . . . . . . . . . 6-3
Games . . . . . . . . . . . . . . . . . . . . . . . . . . . . . . . . . . . . . . . . . . . . . . . . . . . . . . . . . . . . . . . 6-4
Playing Preinstalled Games on Your Computer . . . . . . . . . . . . . . . . 6-4
Software . . . . . . . . . . . . . . . . . . . . . . . . . . . . . . . . . . . . . . . . . . . . . . . . . . . . . . . . . . . . . 6-5
Installing Software from a CD, DVD, or Disk . . . . . . . . . . . . . . . . . . . . 6-5
Installing Software Downloaded from the Internet . . . . . . . . . . . . 6-6
Chapter 7 Computer Upgrades . . . . . . . . . . . . . . . . . . . . . . . . . . . . . . . . . . . . . . . . . . . . . .7-1
Internal Components. . . . . . . . . . . . . . . . . . . . . . . . . . . . . . . . . . . . . . . . . . . . . . . . . 7-2
Accessing Internal Computer Components . . . . . . . . . . . . . . . . . . . . 7-2
Upgrading Components . . . . . . . . . . . . . . . . . . . . . . . . . . . . . . . . . . . . . . . . . . . . . . 7-3
Upgrading the CD-ROM, CD-RW, and DVD-ROM Drives . . . . . . . . . 7-3
Upgrading Computer Memory . . . . . . . . . . . . . . . . . . . . . . . . . . . . . . . . 7-5
Adding Components . . . . . . . . . . . . . . . . . . . . . . . . . . . . . . . . . . . . . . . . . . . . . . . . . 7-6
Adding the Optional Hard Drive . . . . . . . . . . . . . . . . . . . . . . . . . . . . . . . 7-6
Adding an Expansion or Option Card . . . . . . . . . . . . . . . . . . . . . . . . . . 7-8
Chapter 8 Need Some Help? . . . . . . . . . . . . . . . . . . . . . . . . . . . . . . . . . . . . . . . . . . . . . . . 8-1
Helpful Hints. . . . . . . . . . . . . . . . . . . . . . . . . . . . . . . . . . . . . . . . . . . . . . . . . . . . . . . . . 8-2
Entering BIOS (CMOS) Setup . . . . . . . . . . . . . . . . . . . . . . . . . . . . . . . . . . 8-2
Recovery CD. . . . . . . . . . . . . . . . . . . . . . . . . . . . . . . . . . . . . . . . . . . . . . . . . . . . . . . . . . 8-3
Using the Recovery CD . . . . . . . . . . . . . . . . . . . . . . . . . . . . . . . . . . . . . . . . 8-3
Compaq Support . . . . . . . . . . . . . . . . . . . . . . . . . . . . . . . . . . . . . . . . . . . . . . . . . . . . . 8-4
RESARIO–GETTING STARTED
MY P
ONTENTS-V
C
Page 9

Troubleshooting . . . . . . . . . . . . . . . . . . . . . . . . . . . . . . . . . . . . . . . . . . . . . . . . . . . . . 8-5
Glossary
Index
Audio . . . . . . . . . . . . . . . . . . . . . . . . . . . . . . . . . . . . . . . . . . . . . . . . . . . . . . . . 8-5
CD-ROM, CD-RW, or DVD-ROM . . . . . . . . . . . . . . . . . . . . . . . . . . . . . . . . 8-6
Disk Drive . . . . . . . . . . . . . . . . . . . . . . . . . . . . . . . . . . . . . . . . . . . . . . . . . . . . 8-7
Display (Monitor) . . . . . . . . . . . . . . . . . . . . . . . . . . . . . . . . . . . . . . . . . . . . . 8-9
Hard Drive . . . . . . . . . . . . . . . . . . . . . . . . . . . . . . . . . . . . . . . . . . . . . . . . . . 8-10
Internet Access . . . . . . . . . . . . . . . . . . . . . . . . . . . . . . . . . . . . . . . . . . . . . . .8-11
Keyboard and Scroll Mouse . . . . . . . . . . . . . . . . . . . . . . . . . . . . . . . . . . 8-12
Wireless Wheel Mouse . . . . . . . . . . . . . . . . . . . . . . . . . . . . . . . . . . . . . . . 8-14
Memory . . . . . . . . . . . . . . . . . . . . . . . . . . . . . . . . . . . . . . . . . . . . . . . . . . . . . 8-15
Power . . . . . . . . . . . . . . . . . . . . . . . . . . . . . . . . . . . . . . . . . . . . . . . . . . . . . . . 8-15
ONTENTS-VI
C
RESARIO–GETTING STARTED
MY P
Page 10
Introduction
Congratulations! As the owner of a new Compaq Internet PC, you
In This Chapter
Who Should Read This
Guide?, 1-2
Symbols and Graphics
Used, 1-3
Where Can I Find
Information?, 1-4
Safety, 1-5
have joined the worldwide community of Presario computer
users. Once your computer is set up and connected to the Internet,
you can explore vast regions of information, entertainment, and
online services.
1
How Do I Find Information
on the CD-ROM?, 1-6
RESARIO—GETTING STARTED
MY P
This guide is designed to help you:
Get acquainted with computer features you’ll want to try
➜
during the first few days or weeks.
Keep your computer running smoothly by using the tools on
➜
your computer.
Solve problems if they occur.
➜
NTRODUCTION
I
1 - 1
Page 11
Who Should
Using My Presario—Getting Started
Read This
Guide?
This guide is designed for
both beginners and
experienced computer
users.You can read the
guide from cover to cover
for basic information
about your computer, or
you can scan it for
information on a specific
topic.
The Glossary in the back
of this guide has brief
definitions of computer
terms in everyday
language. The electronic
Glossary on the My
Presario—Learning More
CD has even more terms.
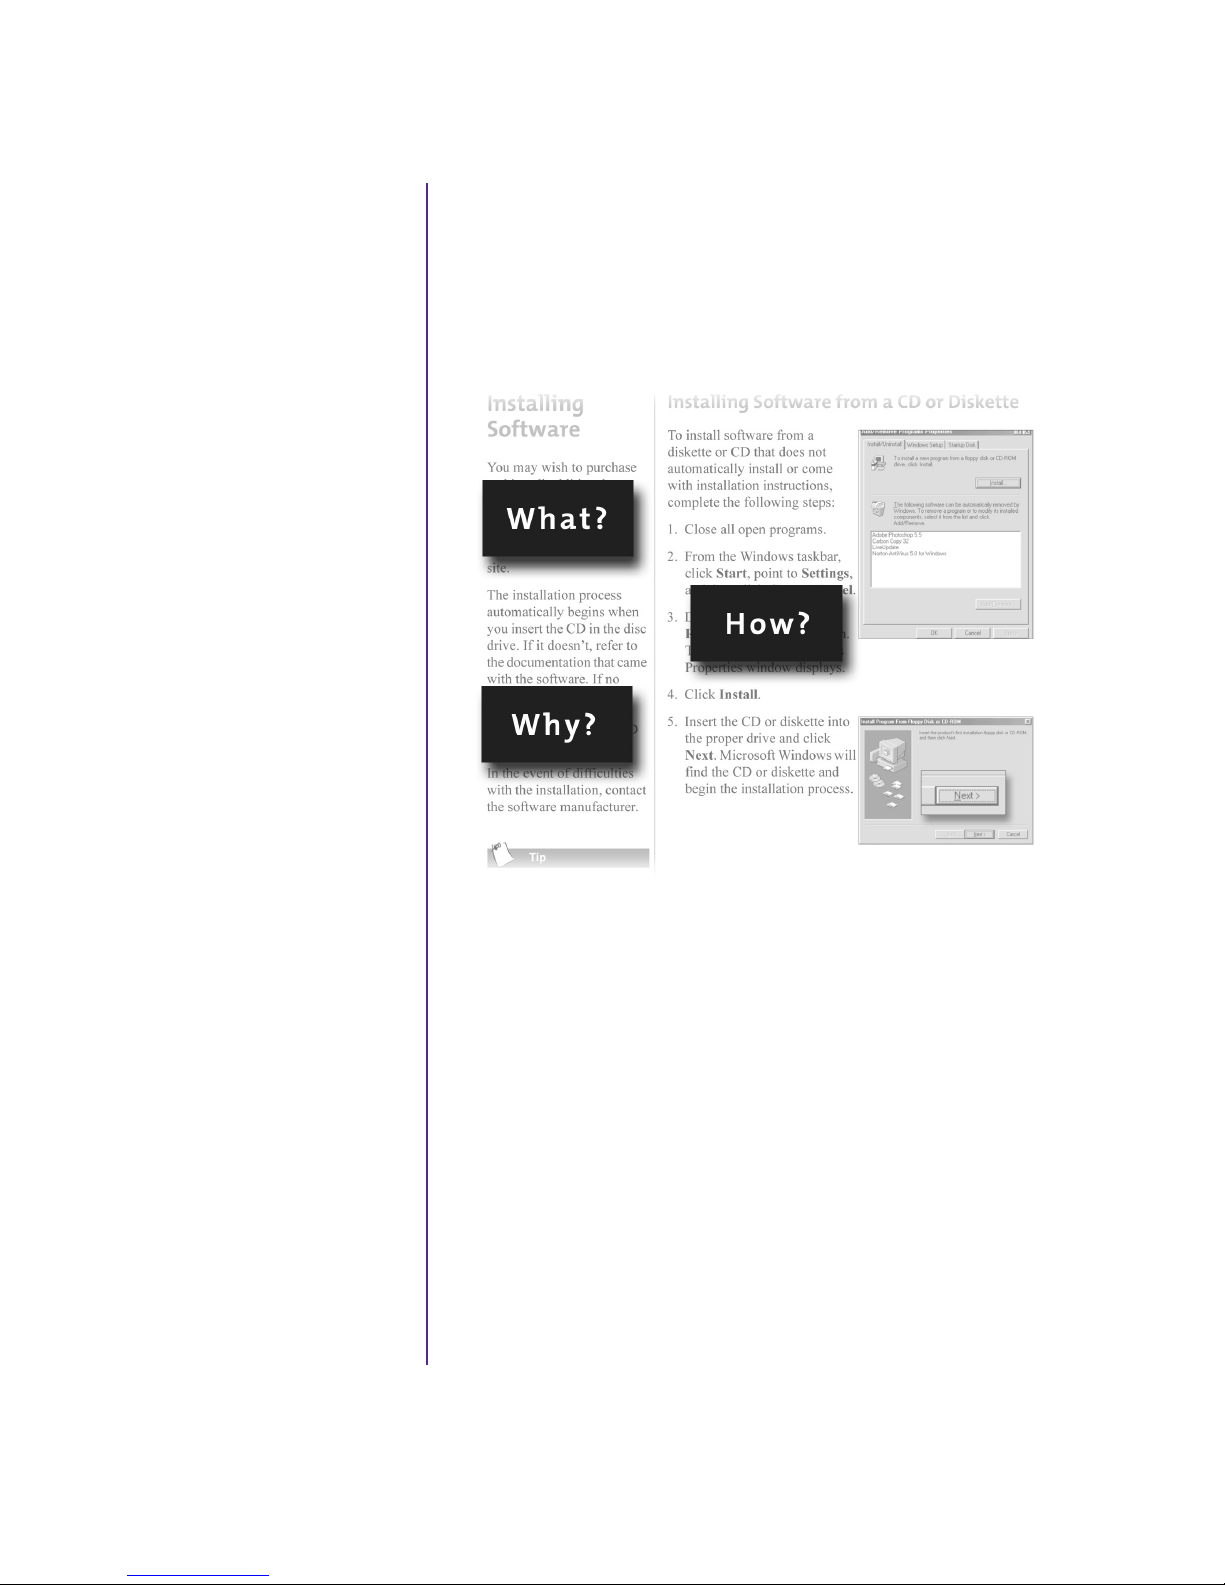
This easy-to-scan guide helps you find the information you want
as quickly as possible. The page layout allows you to see at a
glance how the information is organized.
This chapter shows you
how to use this guide and
directs you to other
sources of information.
NTRODUCTION
1-2 I
MY P
The left column lists major topics. It explains what the topic is
and why it is important to you. This column also lists important
warnings and useful tips, and it directs you to additional reference
materials.
The right column explains how to perform a procedure. It
contains step-by-step instructions and uses graphics to help you
visualize the task and to validate what you are doing as you do it.
Charts and tables may span the entire column.
RESARIO—GETTING STARTED
Page 12
Symbols and
Graphics Used
Warnings and cautions are
displayed to protect you
from injury, your
equipment from damage,
and your files from data
loss.
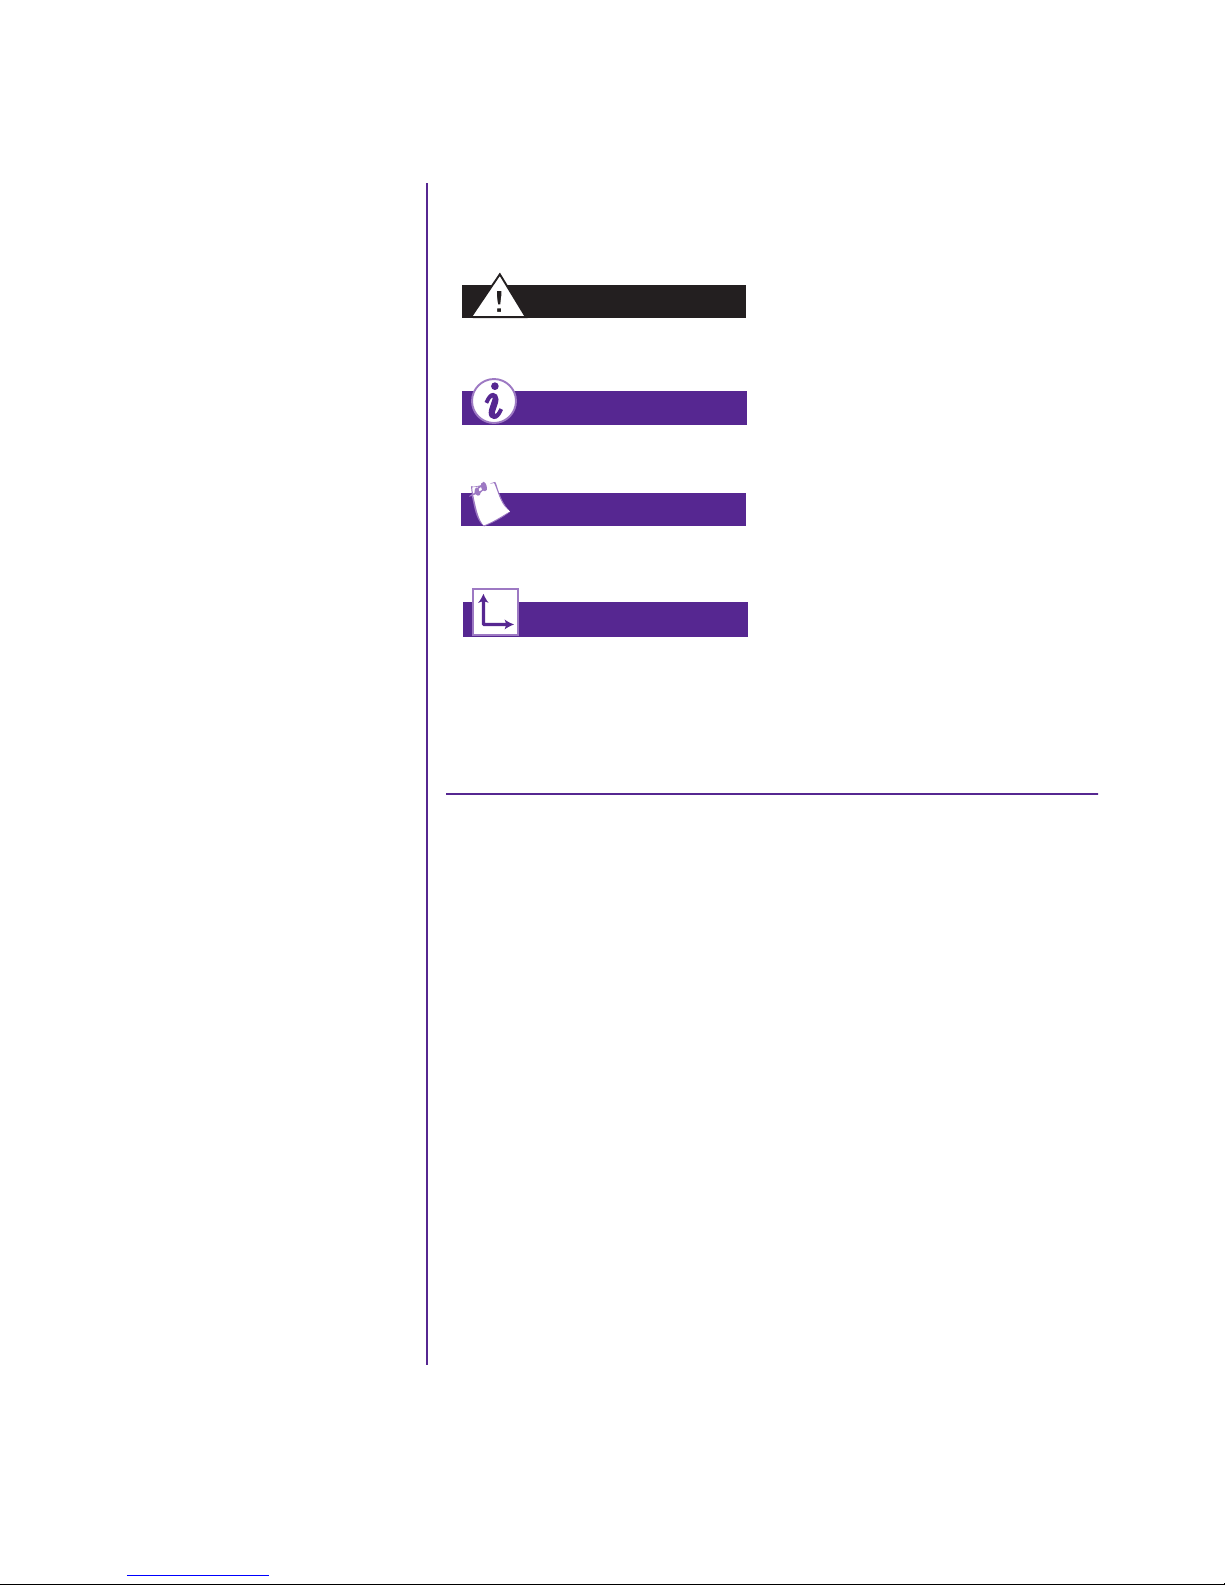
The following words and symbols have special meaning in this
guide and in the CD documentation:
Failure to follow directions may
Warning
result in bodily harm or loss of
life.
Understanding the background
Did you know ...
or concept may help you solve a
problem.
Helpful hints make using your
Tip
computer easier and faster.
Another document or another
See also ...
page in this document has
related information.
▲
Caution: Failure to follow directions may result in damage to
equipment or loss of data.
RESARIO—GETTING STARTED
MY P
Computer Illustrations and Features
The computer illustrations shown and the features described in
this guide may differ slightly from your Compaq Presario
Internet PC.
NTRODUCTION
I
1 - 3
Page 13

Where Can
Warranty Certificate
I Find
Information?
Information is available in
several forms: printed
documents, electronic
documents on the CD that
came with your computer,
and the Compaq Web site.
Use this guide as your first
point of reference, and
then refer to the following
documents:
Quick Set-Up poster
➜
Safety and Comfort
➜
flyer
Warranty Certificate
➜
My Presario—
➜
Learning More CD
The warranty details Compaq’s commitment to repair or replace
parts during the warranty period and lists important Compaq
telephone numbers. In the event of a mechanical problem, contact
Compaq, not the retailer who sold you the computer.
Keep the warranty in a safe place for future reference.
Replacing Parts
The Easy Access design of your Internet PC allows you to access
internal components—in most cases, without using any tools.
The My Presario—Learning More CD describes procedures for
upgrading and replacing computer components. If you experience
a problem and are unable to resolve the issue after referring to
this guide and the My Presario—Learning More CD, contact
Technical Support. If a replacement part is needed, the technician
will send the replacement part with illustrated instructions for
removing the factory-installed part and replacing it.
Presario Newsletter
➜
Getting Started:
➜
Microsoft Windows
manual
Did you know ...
The Compaq Web site is
available worldwide. As you
explore the Internet, go to
the following address for
information about products,
services, and exciting
activities:
www.compaq.com
NTRODUCTION
1-4 I
MY P
Upgrading Your Computer
Expand your Presario performance with upgrades like memory
and additional peripherals, such as a digital camera and a printer.
To learn more, visit the online store at:
www.compaq.com
RESARIO—GETTING STARTED
Page 14

Safety
Safety and Comfort
Your computer is an
electrical device. Treat it
with care to avoid personal
injury and damage to the
equipment.
Warning
To reduce the risk of electric
shock and damage to the
equipment, read the Safety
and Comfort guide on the My
Presario—Learning More
CD before performing any
procedures involving the
internal components of your
computer.
Did you know ...
For added protection during an
electrical storm, perform a
shutdown, then disconnect your
computer (and all peripherals)
from the power source (wall
outlet). After shutting down
your computer, unplug the
surge protector(s) from the
power source.
The My Presario—Learning More CD contains Safety and
Comfort information on how to:
Set up your work area for maximum comfort.
➜
Practice good posture, hand position, work habits, and health
➜
habits while using your computer.
Use a grounding plug to prevent electrical shorts, shocks, or
➜
fires.
Use a surge protector to regulate the flow of electricity to the
➜
computer, modem, and all peripherals, such as a printer,
speakers, and monitor.
Become static-free before removing the side panel.
➜
Don’t forget to plug your surge
protector(s) back in after the
storm has passed.
RESARIO—GETTING STARTED
MY P
NTRODUCTION
I
1 - 5
Page 15
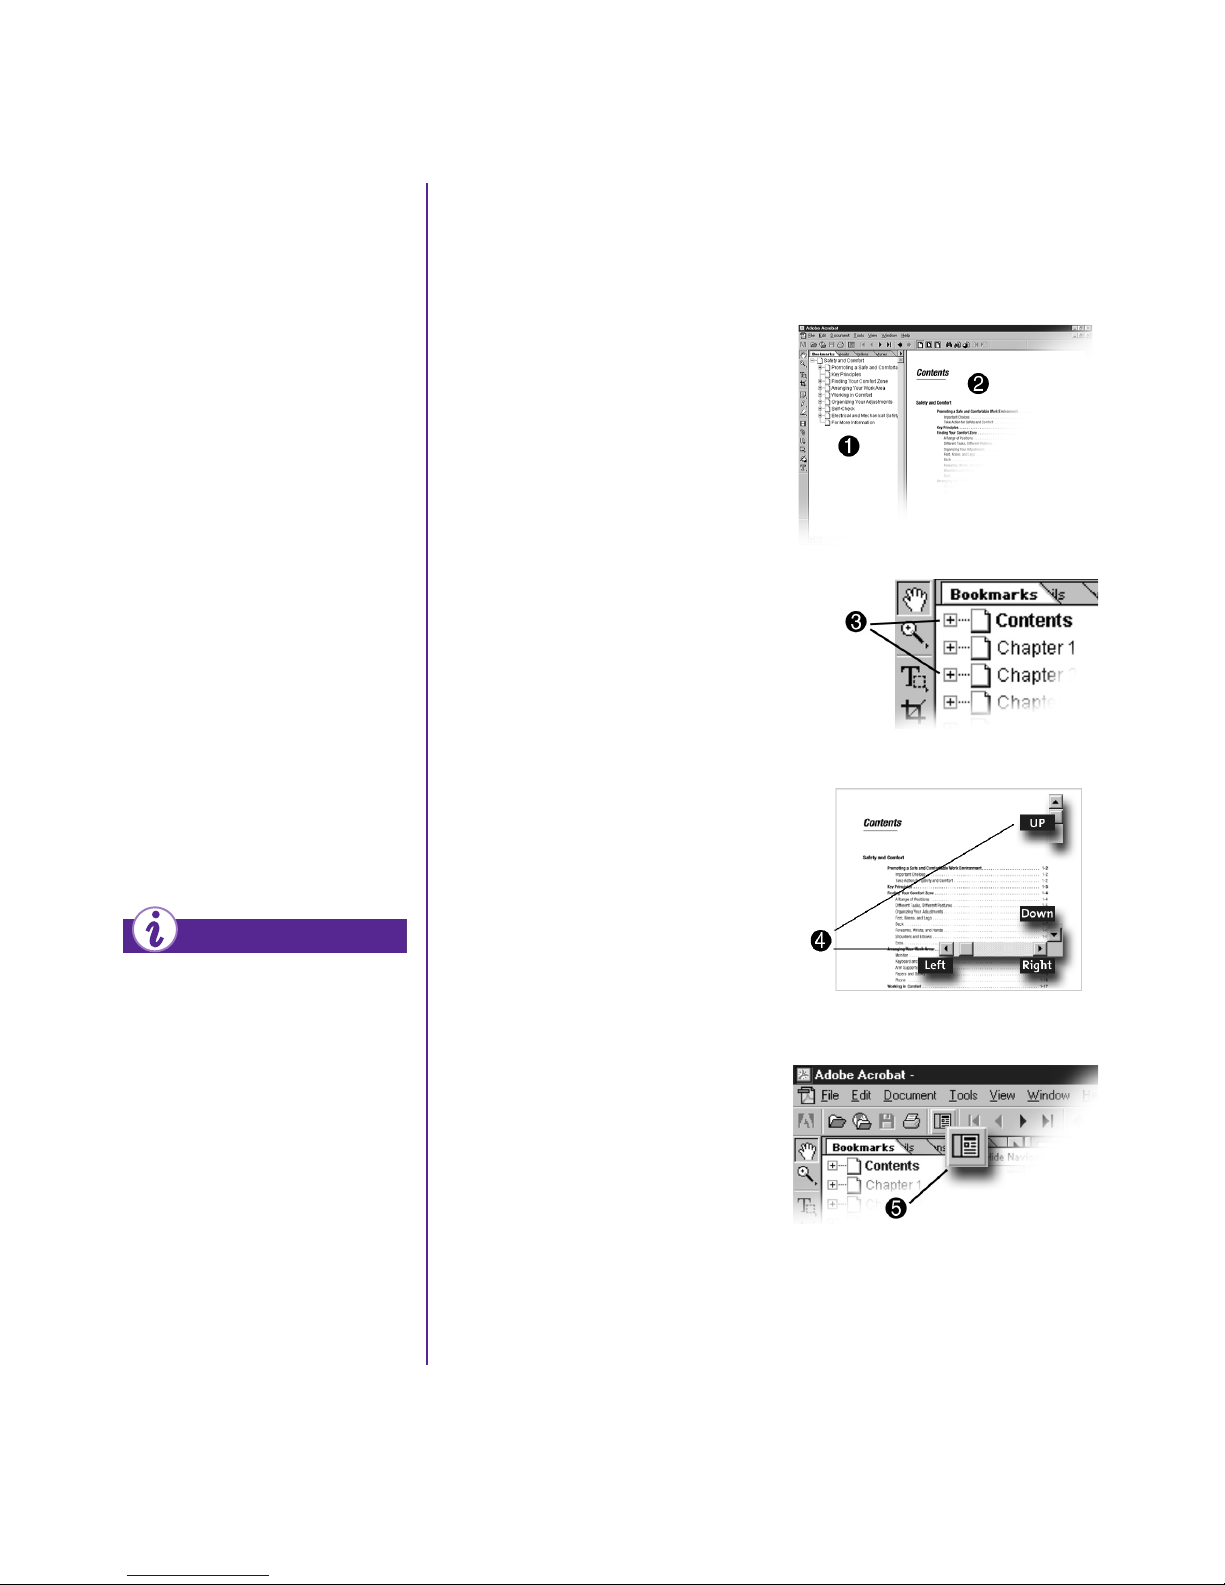
How Do I Find
Using the My Presario—Learning More CD
Information on
the CD-ROM?
The My Presario—
Learning More CD has
information on the
following topics:
Advanced features of
➜
your computer
Solving computer
➜
problems
Safety and comfort
➜
Compaq service and
➜
support
Upgrading your
➜
computer
Government
➜
regulatory information
1. Choose the topic or manual you want to learn more about by
clicking two times.
2. The screen displays the file
hierarchy in the navigation
panel on the left 1 and the
contents on the right 2.
sign 3
Note: Click the Plus
next to a topic in the left
panel to display subtopics.
+
3. Click the topic you want to
view. The screen displays the
topic you selected.
Note: If necessary, use the scroll
to view all of the
bar
4
page.
4. To view additional topics,
click topics from the
navigation panel 1.
Did you know ...
Electronic documents often
have hyperlinks to help you
find information quickly. When
you pass the cursor over a
hyperlink, a small hand
displayed. When you click a
hyperlink, it jumps to the
referenced page. Hyperlinks
are represented by navigation
buttons, colored text, and
images.
NTRODUCTION
1-6 I
MY P
S
is
Note: You can click the Show/
Hide Navigation Pane
button to close the
navigation panel and
enlarge the contents panel.
5. When you finish, click the
word exit (a hyperlink) in the
lower right corner of the
screen or click the Close
∫
button in the upper right
corner of the screen (on the
title bar).
Note: You can print individual pages
from the CD or the entire set
of documents.
5
RESARIO—GETTING STARTED
Page 16
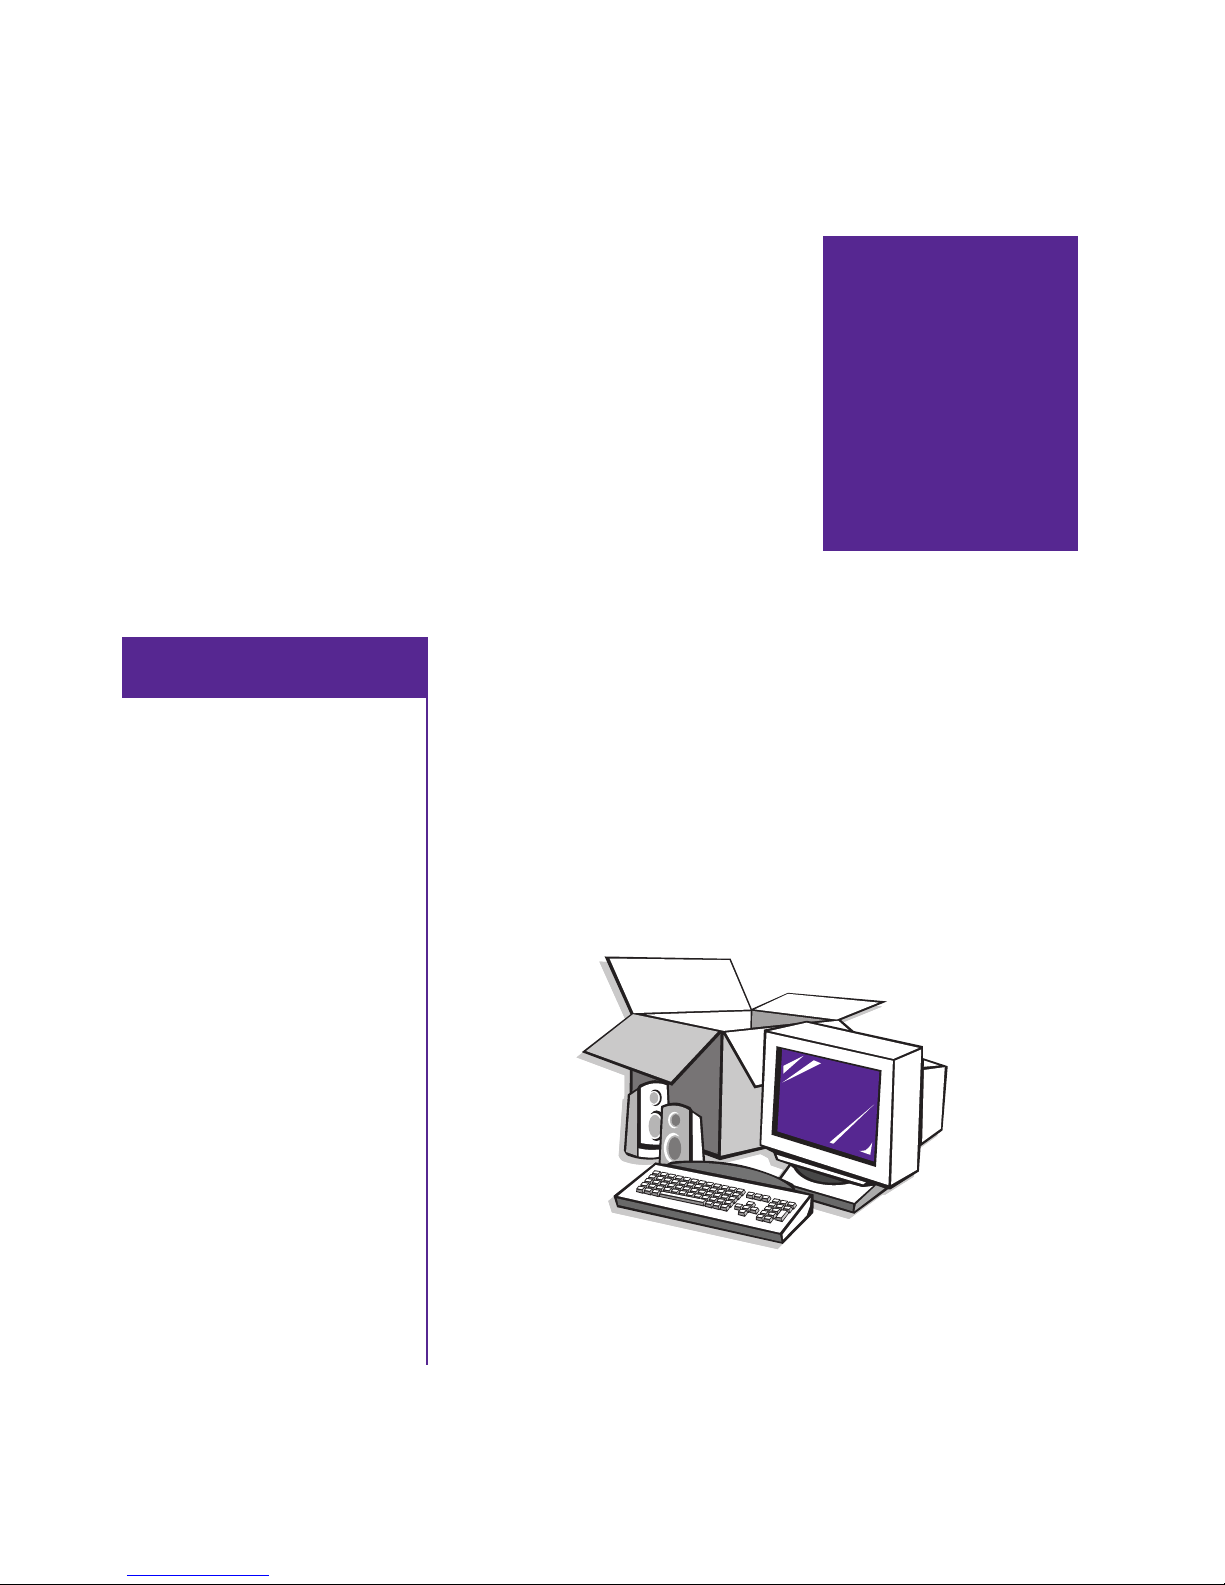
Setting Up
Your
Computer
Your Internet PC is designed for complete ease of use—from
In This Chapter
Your Computer at a Glance,
2-2
Plug In and Go!, 2-3
Compaq/Logitech
Wireless Wheel Mouse,
2-4
Registration, 2-5
TM
setting up your computer to upgrading your computer with new
components. This chapter introduces you to the internal and
external features of your computer. It also walks you through the
process of registering your computer and setting up an Internet
Service Provider (ISP) account. The remaining chapters of this
guide show you how easy it is to use your Compaq Presario.
Note: Illustrations and features shown may differ slightly from those of
your Computer.
2
Internet Service Provider
(ISP), 2-6
Printer Setup, 2-7
RESARIO—GETTING STARTED
MY P
ETTING UP YOUR COMPUTER
S
2-1
Page 17
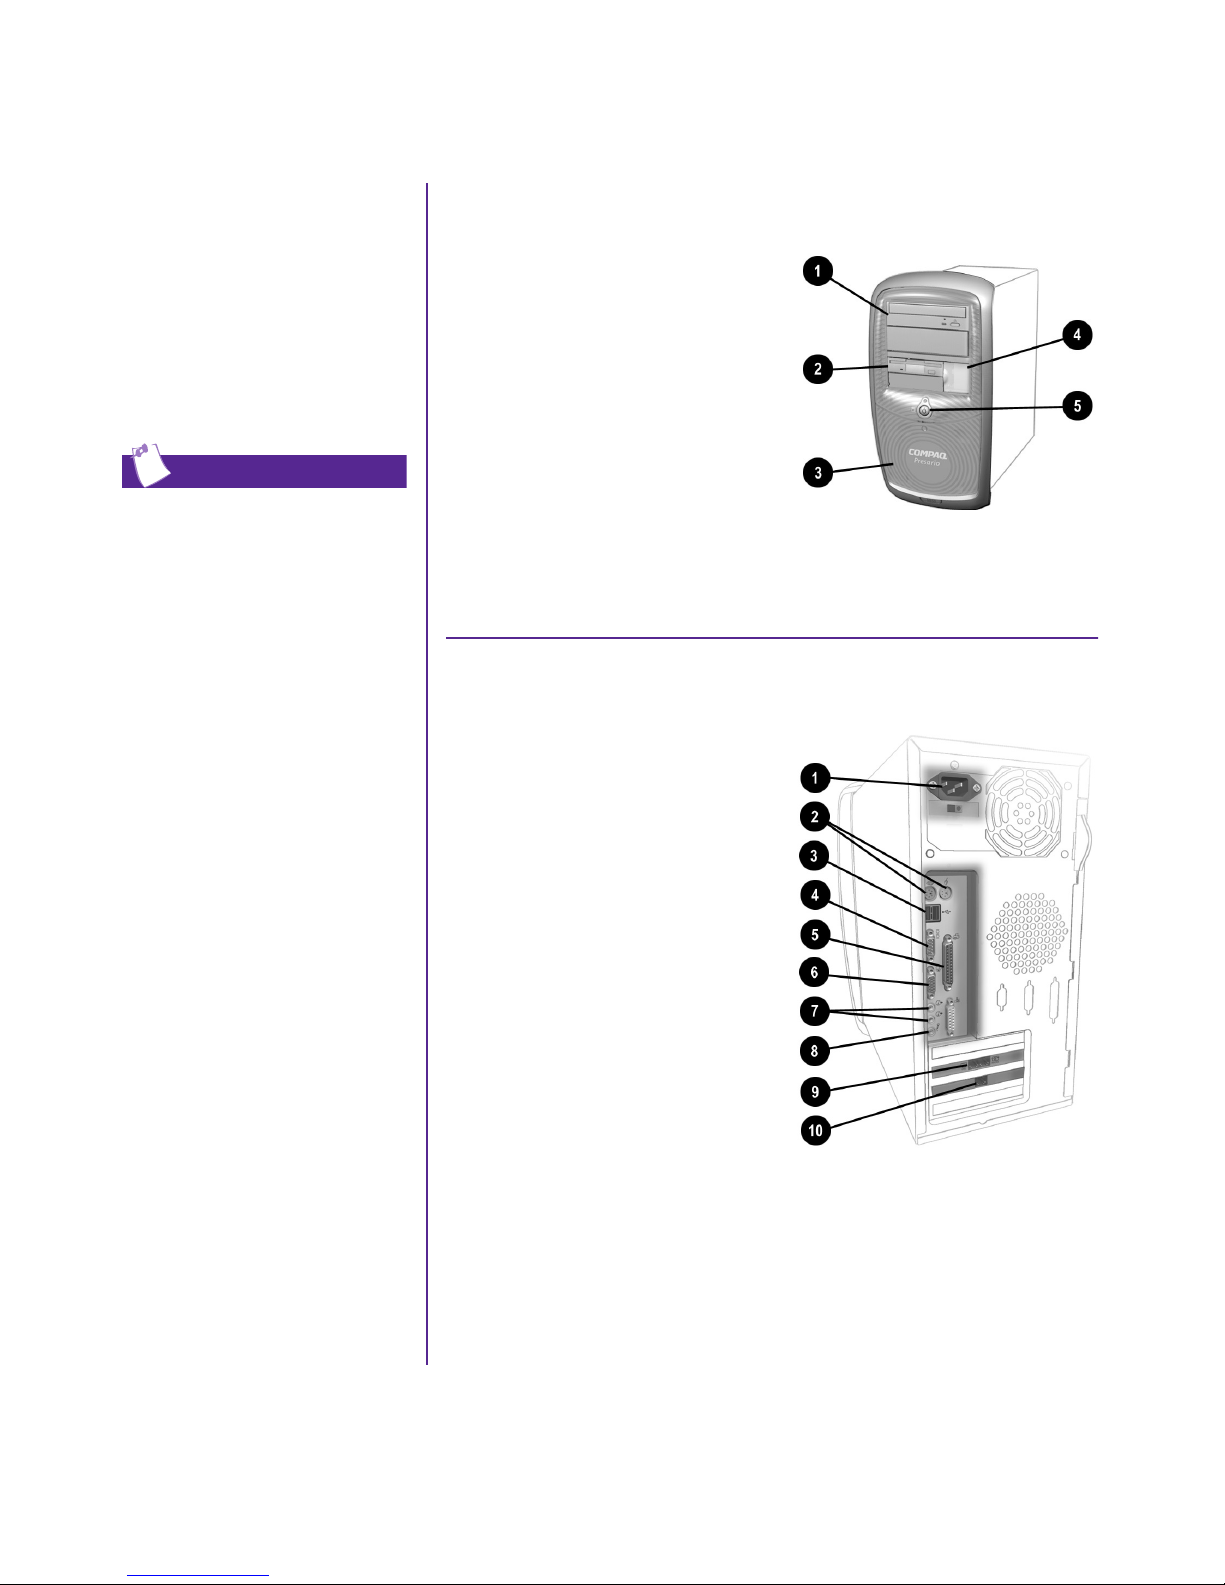
Your Computer
What’s in Front?
at a Glance
Before you begin, you’ll
want to become familiar
with the components of
your Compaq Presario.
Tip
Some components have
color-coded connectors that
match the ports on the back of
your computer.
1 CD-ROM, CD-RW, or
DVD-ROM drive
2 Disk drive
3 CD storage for storing five
CDs
4 Two USB connectors for
connecting USB devices
(varies by model)—ports
for connecting peripheral
devices, such as gamepads,
joysticks, and video cameras
5 Power button
What’s in Back?
1 Power port
2 PS/2 mouse port; PS/2
keyboard port
3 USB ports for connecting an
Internet keyboard or other
USB devices
4 Serial port for connecting a
serial peripheral device
5 Parallel port for connecting a
peripheral device, such as a
printer
6 Monitor port
7 Audio speaker ports
8 Microphone port
9 Modem port for connecting
to a phone link
Note: Connectors may vary by
model.
ETTING UP YOUR COMPUTER
2-2 S
MY P
- Ethernet port for connecting
to an Ethernet network
(if equipped)
RESARIO—GETTING STARTED
Page 18
Plug In and Go!
Setting Up Your Computer
If a cable is disconnected
or you move your
computer to another
location, this topic helps
you to set up again quickly.
Tip
It’s a good idea to purchase a
surge protector to protect your
computer from electrical spikes
and power surges.
See also ...
The Quick Set-Up poster that
came with your computer is a
visual guide to setting up your
computer.
Tip
If you have home networking,
refer to the home-networking
documentation located on the
My Presario—Learning More
CD for instructions for
connecting your phone lines.
Note: Do not set up the printer until
your computer is set up.
1. Connect the monitor
according to the color codes,
icons, and instructions from
the monitor manufacturer.
2. Connect the speaker cable
and microphone cable (if
applicable).
3. Connect the power cable.
4. Connect the keyboard to a
USB port on the back of the
unit and connect the mouse
to the PS/2 mouse port.
Note: If you have a wireless
wheel mouse, refer to
the next topic for further
instructions.
5. Connect the telephone cable
between the Modem Line
In
port and the wall outlet.
~
6. Plug the monitor and
computer power cables into
the wall outlet or a surge
protector.
RESARIO—GETTING STARTED
MY P
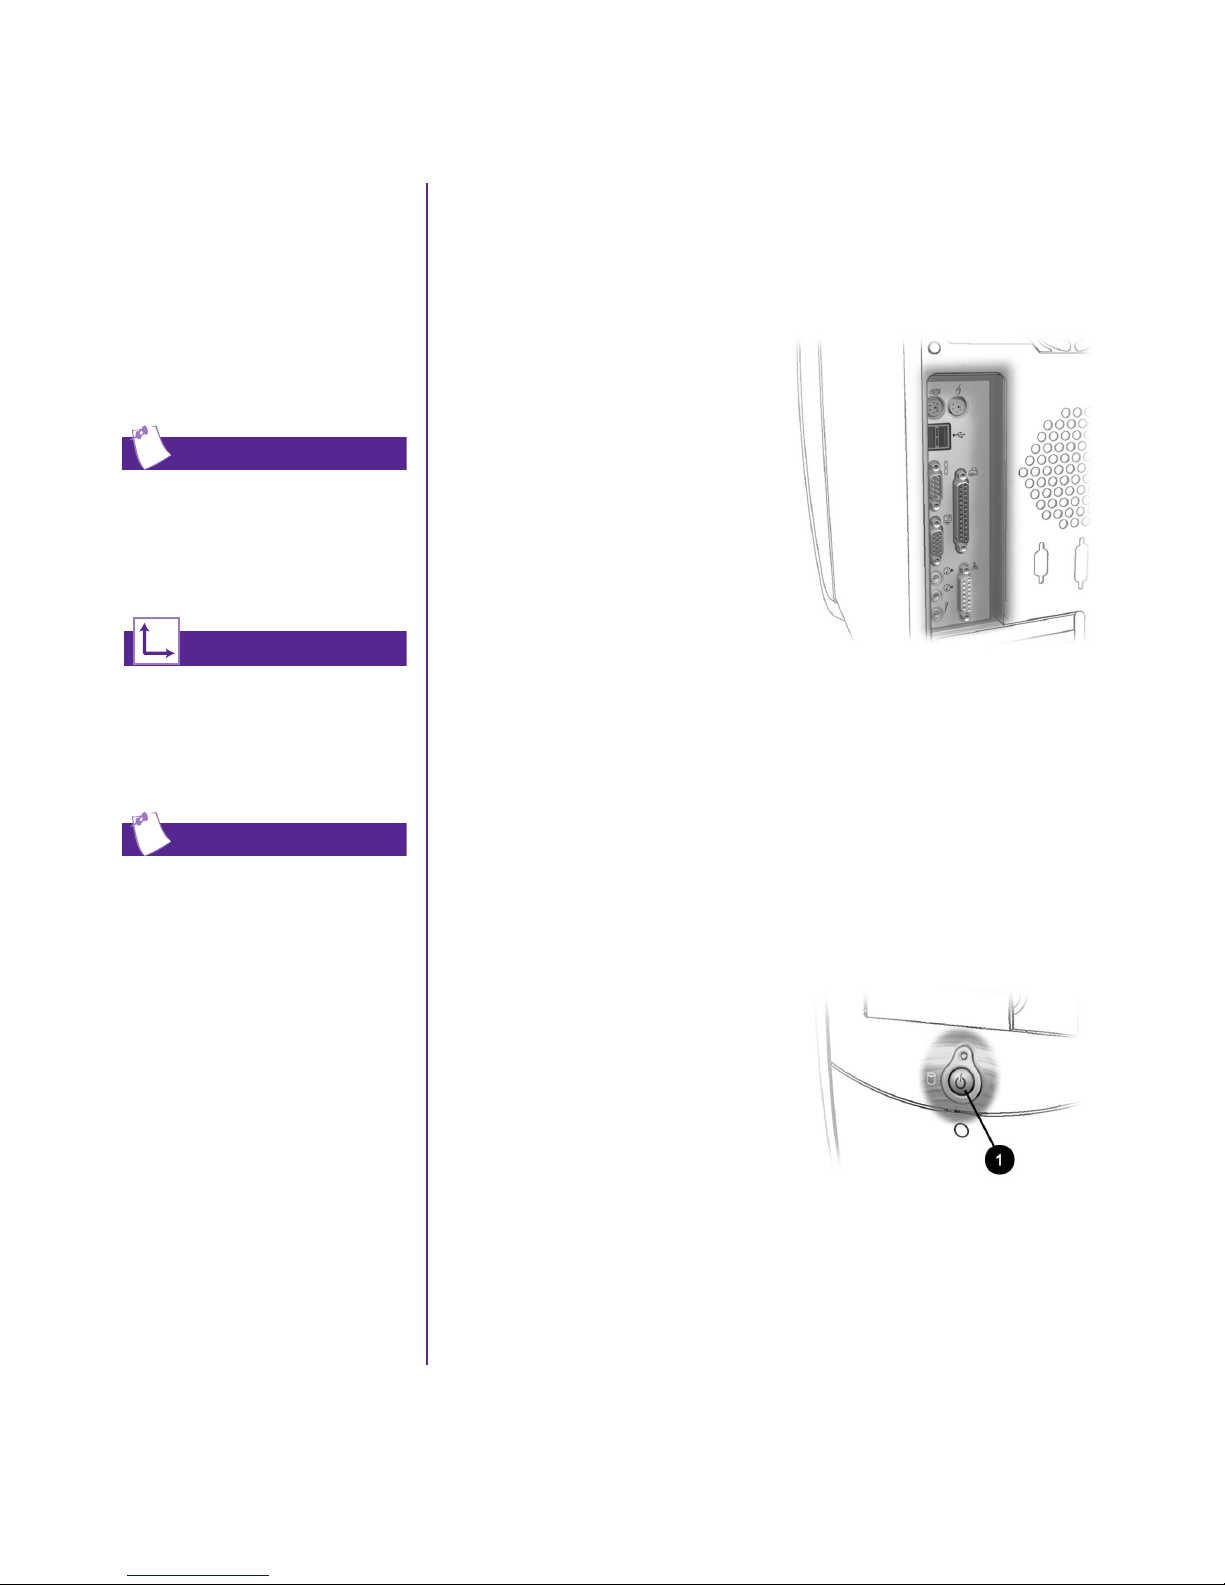
7. Turn on the monitor and
press the Power On 1 button
to turn on your computer.
Note: If you are setting up your
computer for the first time,
follow the on-screen instructions
to register both your operating
system and your computer.
ETTING UP YOUR COMPUTER
S
2-3
Page 19
Compaq/
TM
Logitech
Wireless Wheel
Mouse
(available on select models)
Did you know ...
The wireless wheel mouse does
not alert you when the batteries
are low. You must replace the
batteries approximately every
six months.
Tip
For optimal performance,
place the receiver at least eight
inches (twenty centimeters)
away from other electrical
devices, such as the computer,
the computer monitor, or
external storage devices.
See also ...
If your wireless wheel mouse
does not function properly after
installation, refer to the
“Troubleshooting” section in
Chapter 8 of this guide.
Installing the Wireless Wheel Mouse
Note: Before using your wireless wheel mouse, refer to the Comfort
Guidelines on Logitech’s Web site at:
www.logitech.com/cf/support/comfortguide.cfm
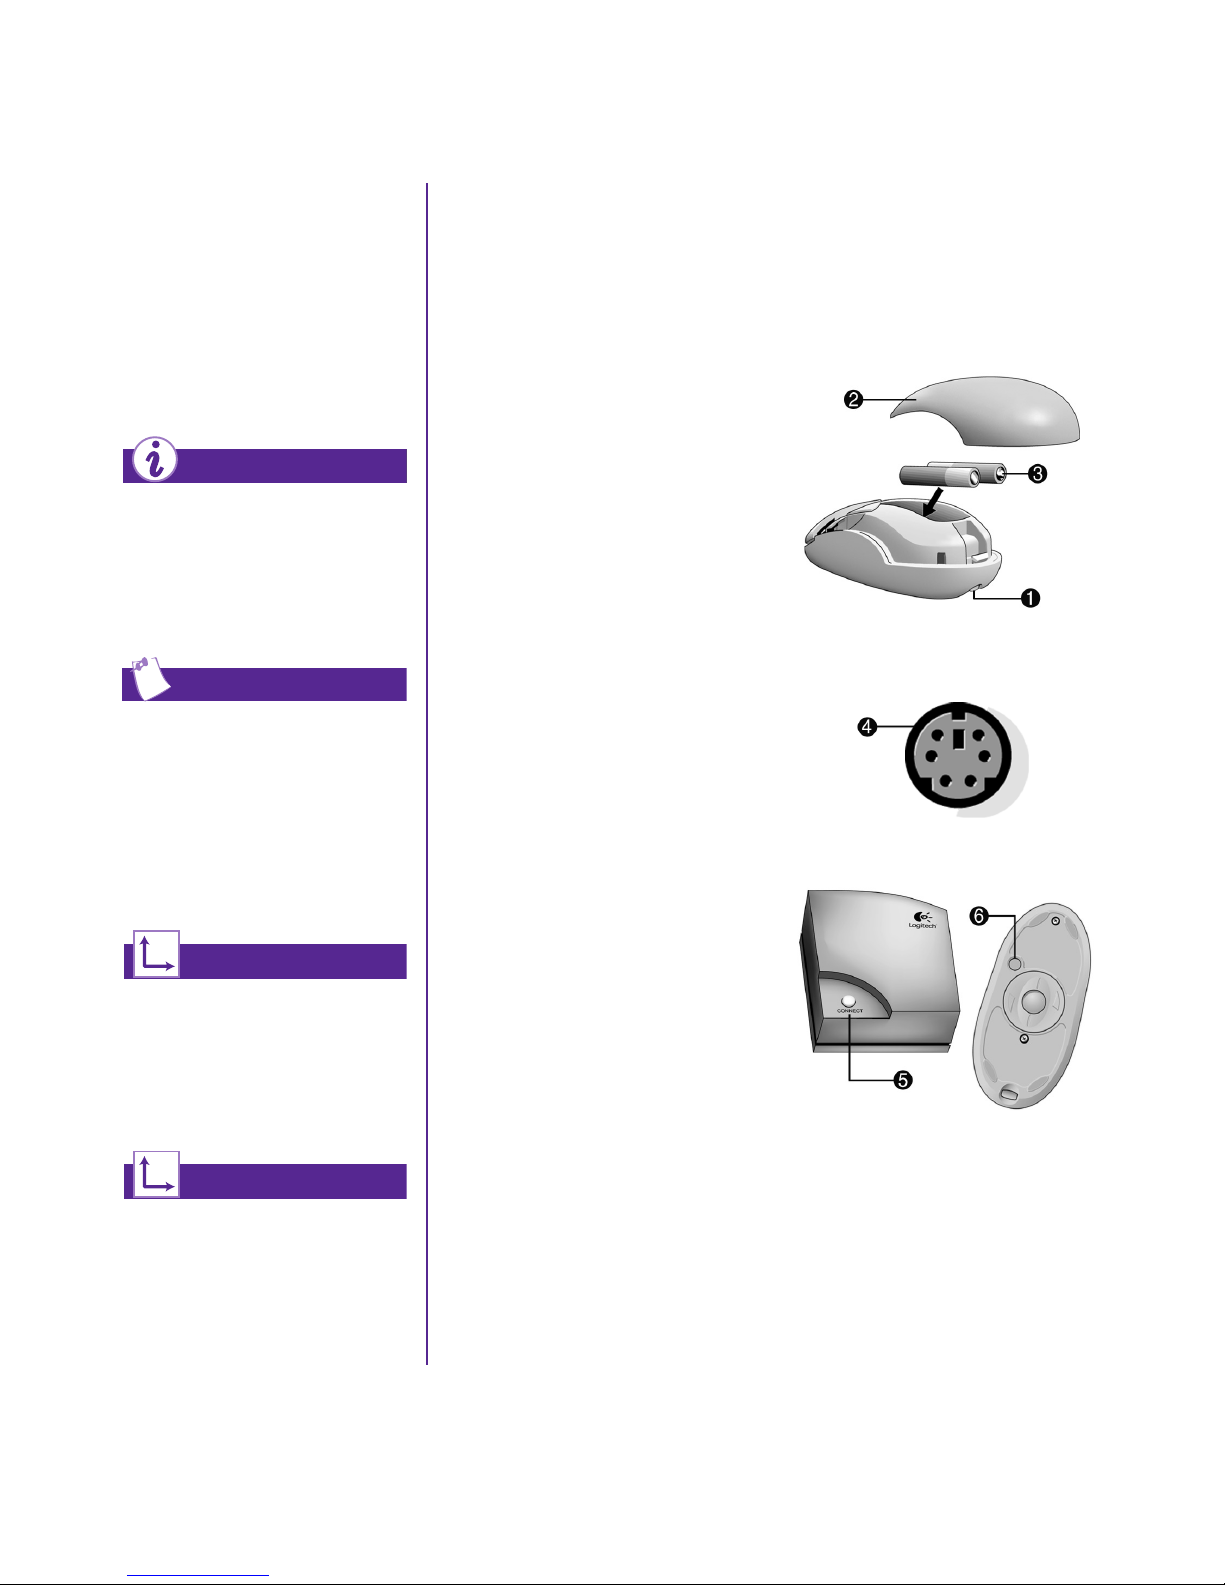
1. Remove the battery
compartment cover by
pressing the tab on the
bottom of the mouse 1 and
sliding off the cover 2.
2. Insert the two AAA alkaline
batteries 3 according to the
diagram inside the battery
compartment.
3. Turn off your computer.
4. Connect the receiver cable to
the PS/2 port 4 on the back of
your computer.
5. Turn on your computer.
6. Establish communication
between the mouse and the
receiver by pressing the
Connect button 5 on the
receiver, then pressing the
Connect button 6 under
the mouse.
See also ...
For information about using
your wireless wheel mouse,
refer to the “Scroll Mouse and
Wireless Mouse” section in
Chapter 4 of this guide.
ETTING UP YOUR COMPUTER
2-4 S
MY P
RESARIO—GETTING STARTED
Page 20
Registration
Registering with Compaq and Microsoft
The first time you turn on
your computer, you are
guided through the
registration process before
you access the Windows
desktop. It is very
important that you register
Windows with
➜
Microsoft.
Your computer with
➜
Compaq.
Registering with Microsoft
enables you to receive
software updates and
important notices about
new Microsoft products.
Registering with Compaq
enables you to receive
technical support for the
hardware, receive software
updates for Compaq
programs, and receive
other special offers.
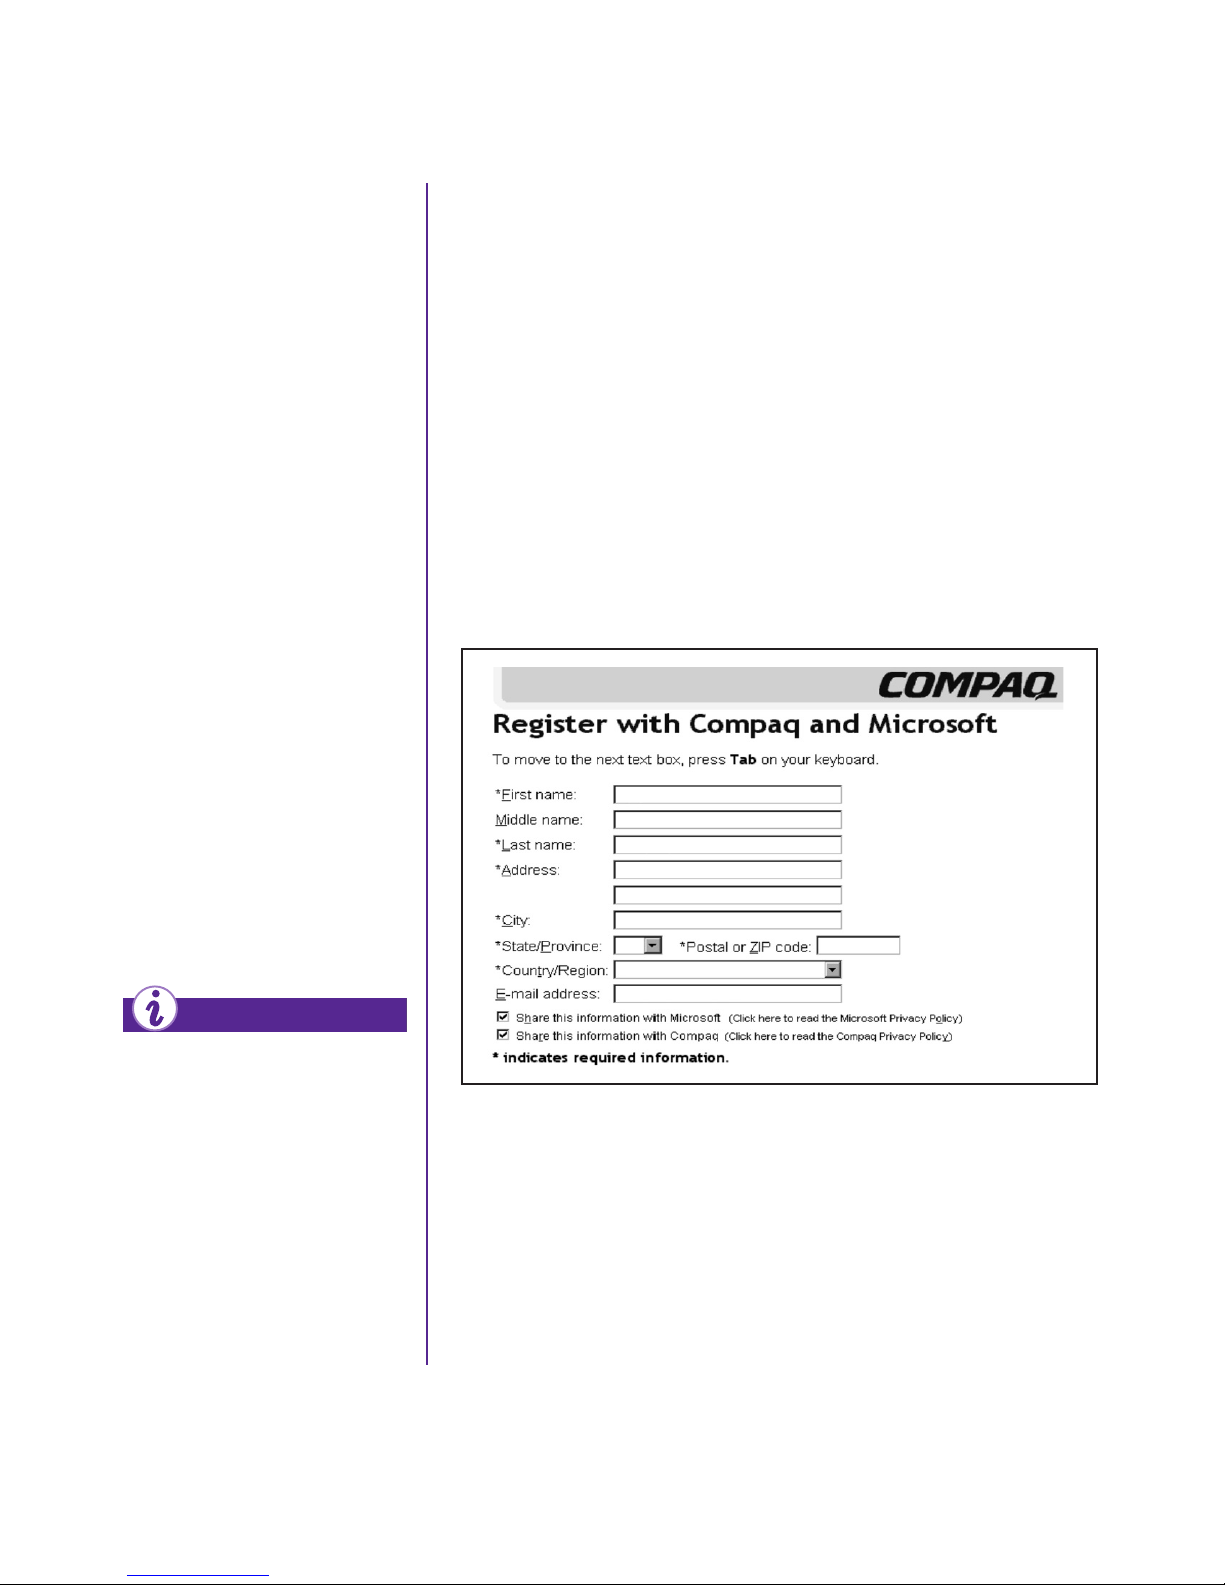
The registration screen allows you to register with Microsoft and
Compaq from the same display. When you have entered your
personal information (name, address, and so on), you can choose
to register with Micosoft or Compaq, or both.
To register the Windows operating system with Microsoft, fill in
the first check box. To register your computer with Compaq, fill
the second check box. We recommend that you check both boxes.
When you’ve f illed in the necessary registration information,
click the Next button to move to the next screen.
When you have finished, you are ready to set up an account with
an Internet Service Provider (ISP). Refer to the next page.
Did you know ...
Any time you install new
software or hardware, be sure
to register it with the
manufacturer.
RESARIO—GETTING STARTED
MY P
ETTING UP YOUR COMPUTER
S
2-5
Page 21
Internet Service
Setting Up an ISP Account
Provider (ISP)
An ISP gives you access to
the Internet. Just as you
need an account with a
cable company to have
cable service, you must
also have an ISP account
to access the Internet and
use e-mail.
After registering with Microsoft and Compaq, you are prompted
to set up an ISP account.
Note: Credit cards are required to register online with Compaq.NET powered
by MSN and with America Online. However, you can check your local
area for ISPs that offer other financial arrangements.
To set up your account, do one of the following:
If you want Compaq.NET powered by MSN as your ISP, click
➜
the Compaq.NET powered by MSN icon and follow the
on-screen instructions.
If you already have Compaq.NET powered by MSN as your
➜
ISP, click I already have Compaq.NET powered by MSN
and follow the on-screen instructions.
If you want America Online (AOL) as your ISP, click the
➜
America Online icon and follow the on-screen instructions.
If you already have America Online as your ISP, click
➜
I already have America Online and follow the on-screen
instructions.
After setting up your
Internet connection, you
can press the Instant
Internet
button on your
∆
Internet keyboard, and
then like magic—you’re
on the Web!
Did you know ...
If you have problems
connecting to an ISP, call the
ISP for assistance.
ETTING UP YOUR COMPUTER
2-6 S
MY P
If you already have an existing Internet account other than
➜
Compaq.NET powered by MSN or America Online, click
I Already Have an Internet Provider and follow the
on-screen instructions.
Note: If you do not sign up for an ISP account now, you can click the
Free Internet Trial icon on your desktop and sign up any time
you like.
RESARIO—GETTING STARTED
Page 22
Printer Setup
Setting Up Your Printer
After setting up and
registering your computer,
you are ready to set up
your printer.
A printer enables you to
print any document from
your My Presario—
Learning More CD, your
e-mail, and Web sites.
Did you know ...
Compaq registration must be
complete before you plug in
your printer and run the
printer setup software.
Did you know ...
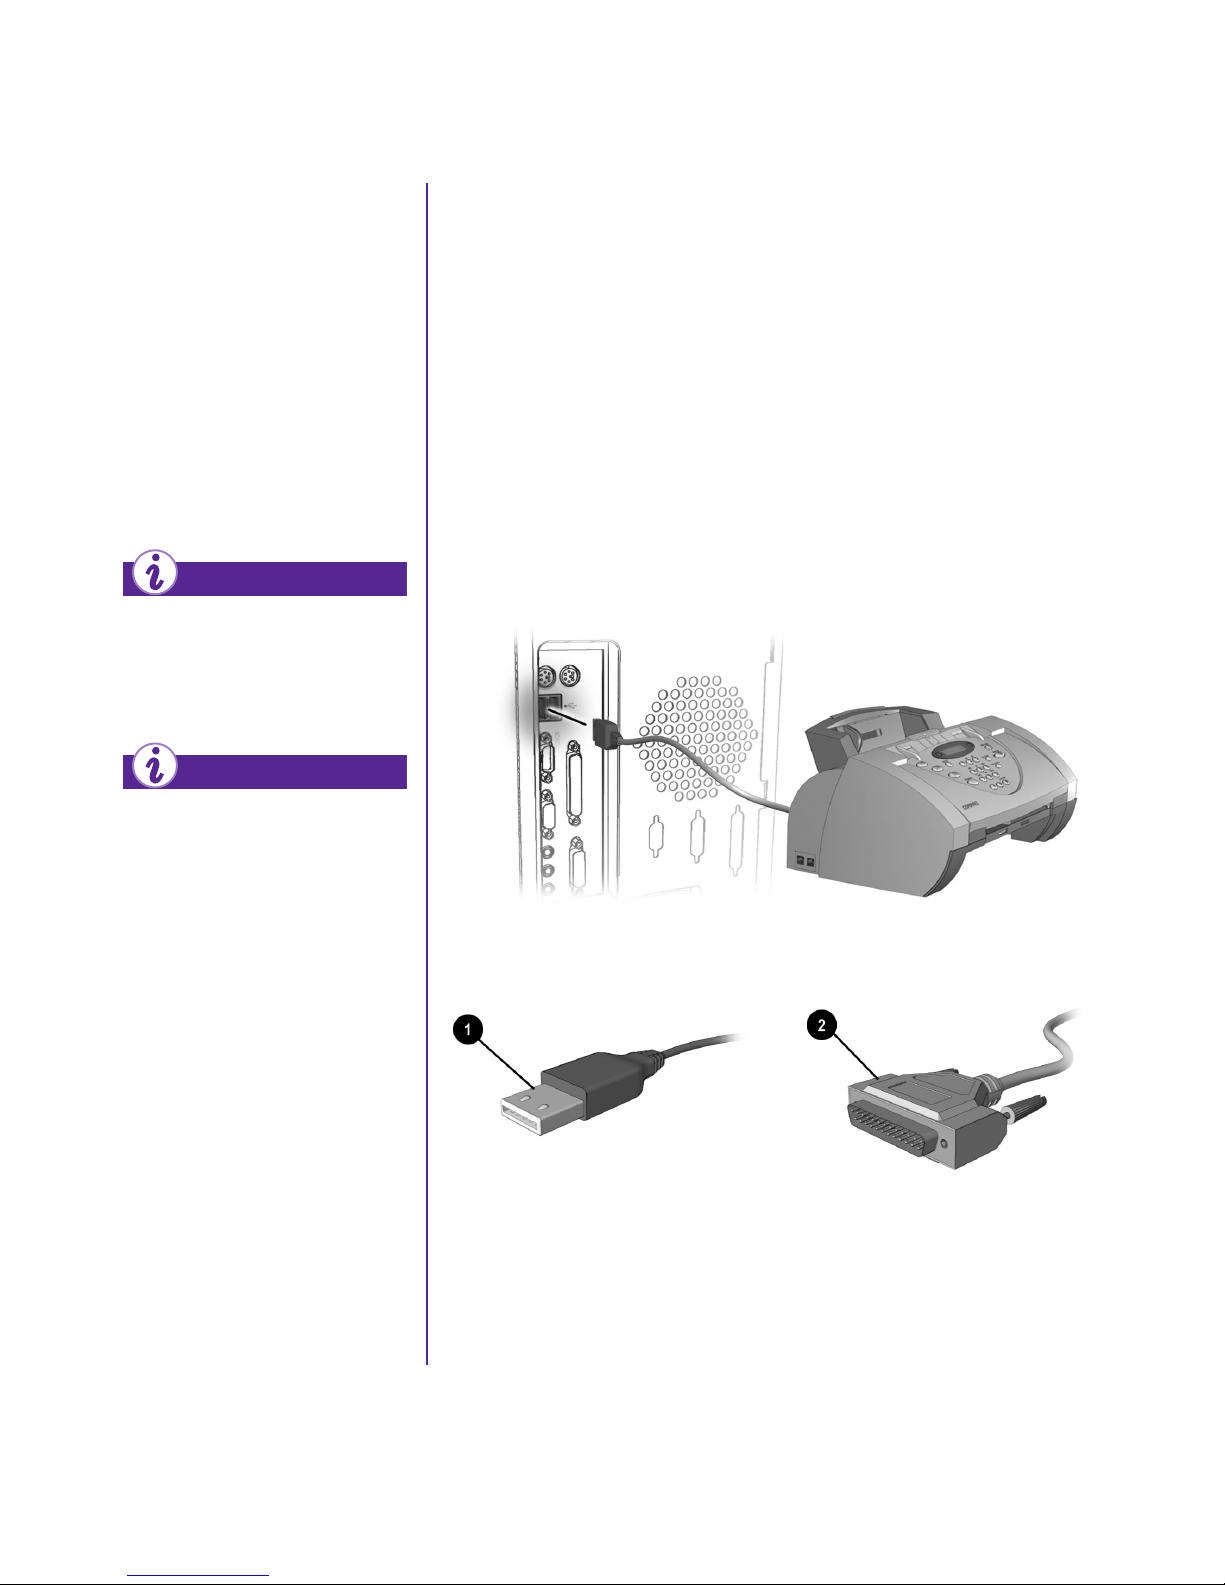
Most new computers have a
Universal Serial Bus (USB)
port for a printer that uses the
latest technology. Older
printers, which plug into a
parallel port, cannot be
connected to a USB port. Your
printer may use a USB plug
(rather than a parallel
plug
) for installation.
2
1
1. Complete the steps listed in the Plug In and Go! and
Registration sections on previous pages.
2. Set up the printer according to the printer manufacturer’s
instructions.
3. Connect the printer to the back of your computer according to
the icons.
4. Turn on your computer (if it’s not already on).
5. Turn on the printer.
6. Follow the on-screen instructions.
RESARIO—GETTING STARTED
MY P
Note: Location and style of connectors may vary by model.
ETTING UP YOUR COMPUTER
S
2-7
Page 23

ETTING UP YOUR COMPUTER
2-8 S
MY P
RESARIO—GETTING STARTED
Page 24
Windows
Basics
Microsoft Windows is the operating system that runs on your
In This Chapter
Features of the Windows
Desktop, 3-2
Help, 3-4
computer. Windows controls and manages your computer by
translating your mouse and keyboard instructions into a language
your computer can understand.
The Windows desktop is your personal workspace. By using the
mouse to click icons on the Windows desktop, you give your
computer instructions to perform tasks, such as accessing f iles,
copying files, connecting to the Internet, reading e-mail, and
more.
In this chapter, you will learn how to use the standard features of
the Windows desktop.
3
RESARIO—GETTING STARTED
MY P
INDOWS BASICS
W
3-1
Page 25
Features of
Viewing the Windows Desktop
the Windows
Desktop
Although computers vary
according to specific
hardware and software, the
Windows desktop has
many standard features.
In this section, you are
introduced to the major
components of the
desktop:
Icons
➜
Task ba r
➜
Start menu
➜
Help
➜
When you turn on your computer, Microsoft Windows starts
automatically. The first screen you see after Windows goes
through the startup process is the Windows desktop, the area in
which you work.
Note: The programs and icons displayed vary by model.
Did you know ...
Each time you access a
program, a button
program appears on the
Windows taskbar
button to switch to the desired
program.
INDOWS BASICS
3-2 W
for that
5
. Click a
3
MY P
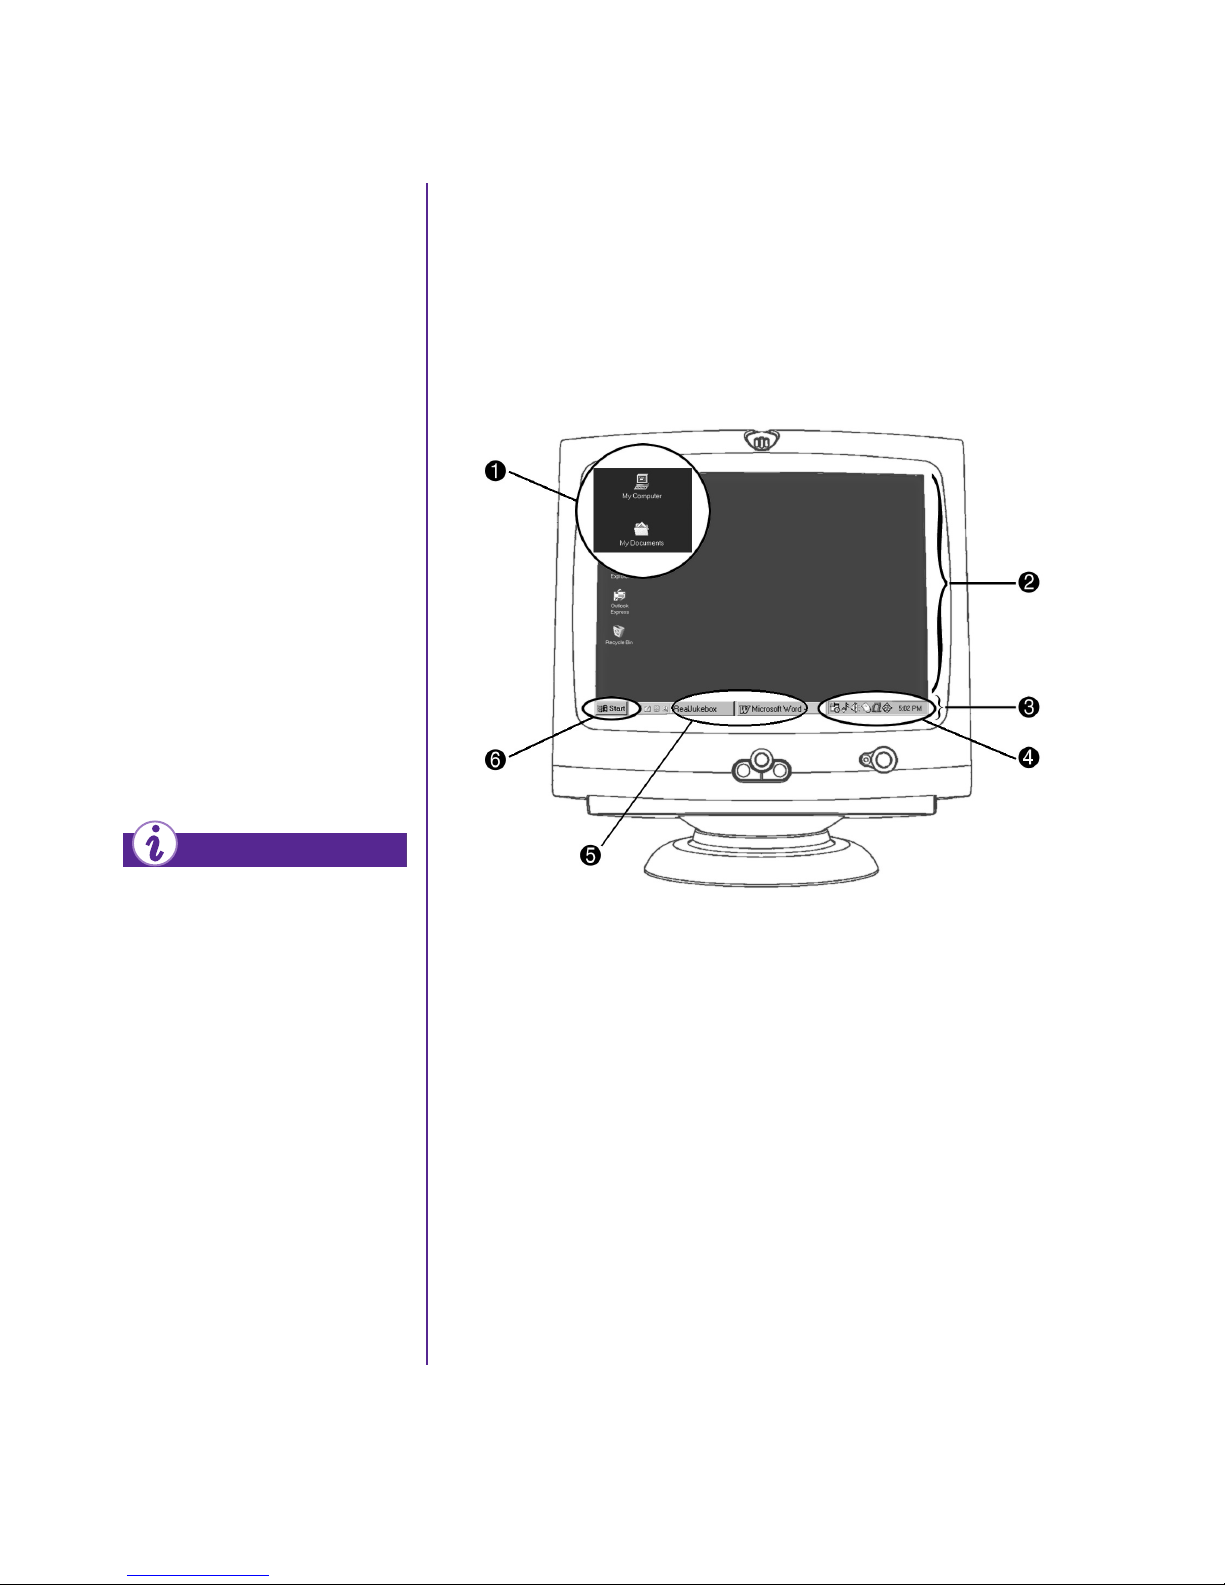
On the Windows desktop 2 there are several small graphics 1
(called icons). An icon represents a program, disk drive, file, or
folder, and provides easy access to the programs or documents
you use on a regular basis.
Across the bottom of the desktop is a gray bar (called the
Windows taskbar 3). The taskbar includes the Start button 6;
next to the Start button is the Quick Launch area (provides easy
access to Internet Explorer, Outlook Express, Show Desktop, and
Windows Media Player), buttons for each active program 5, and
the system tray (systray) 4. The taskbar allows you to pick and
choose options or activities, and it is displayed on your desktop.
The systray 4 contains icons for some of the system programs
that load automatically at startup. The system clock is also
displayed on the systray.
RESARIO—GETTING STARTED
Page 26
When you click the Start
button, a menu is
displayed that allows you
to select tasks.
Starting a program
➜
Finding or opening a
➜
document
Changing your
➜
computer settings
Shutting down the
➜
computer
Did you know ...
You should always turn off your
computer by selecting Shut
Down from the Start menu. If
you shut off your computer
before receiving the “It’s now
safe to turn off your computer.”
message, an error message is
displayed the next time you
turn on your computer.
Using the Start Menu
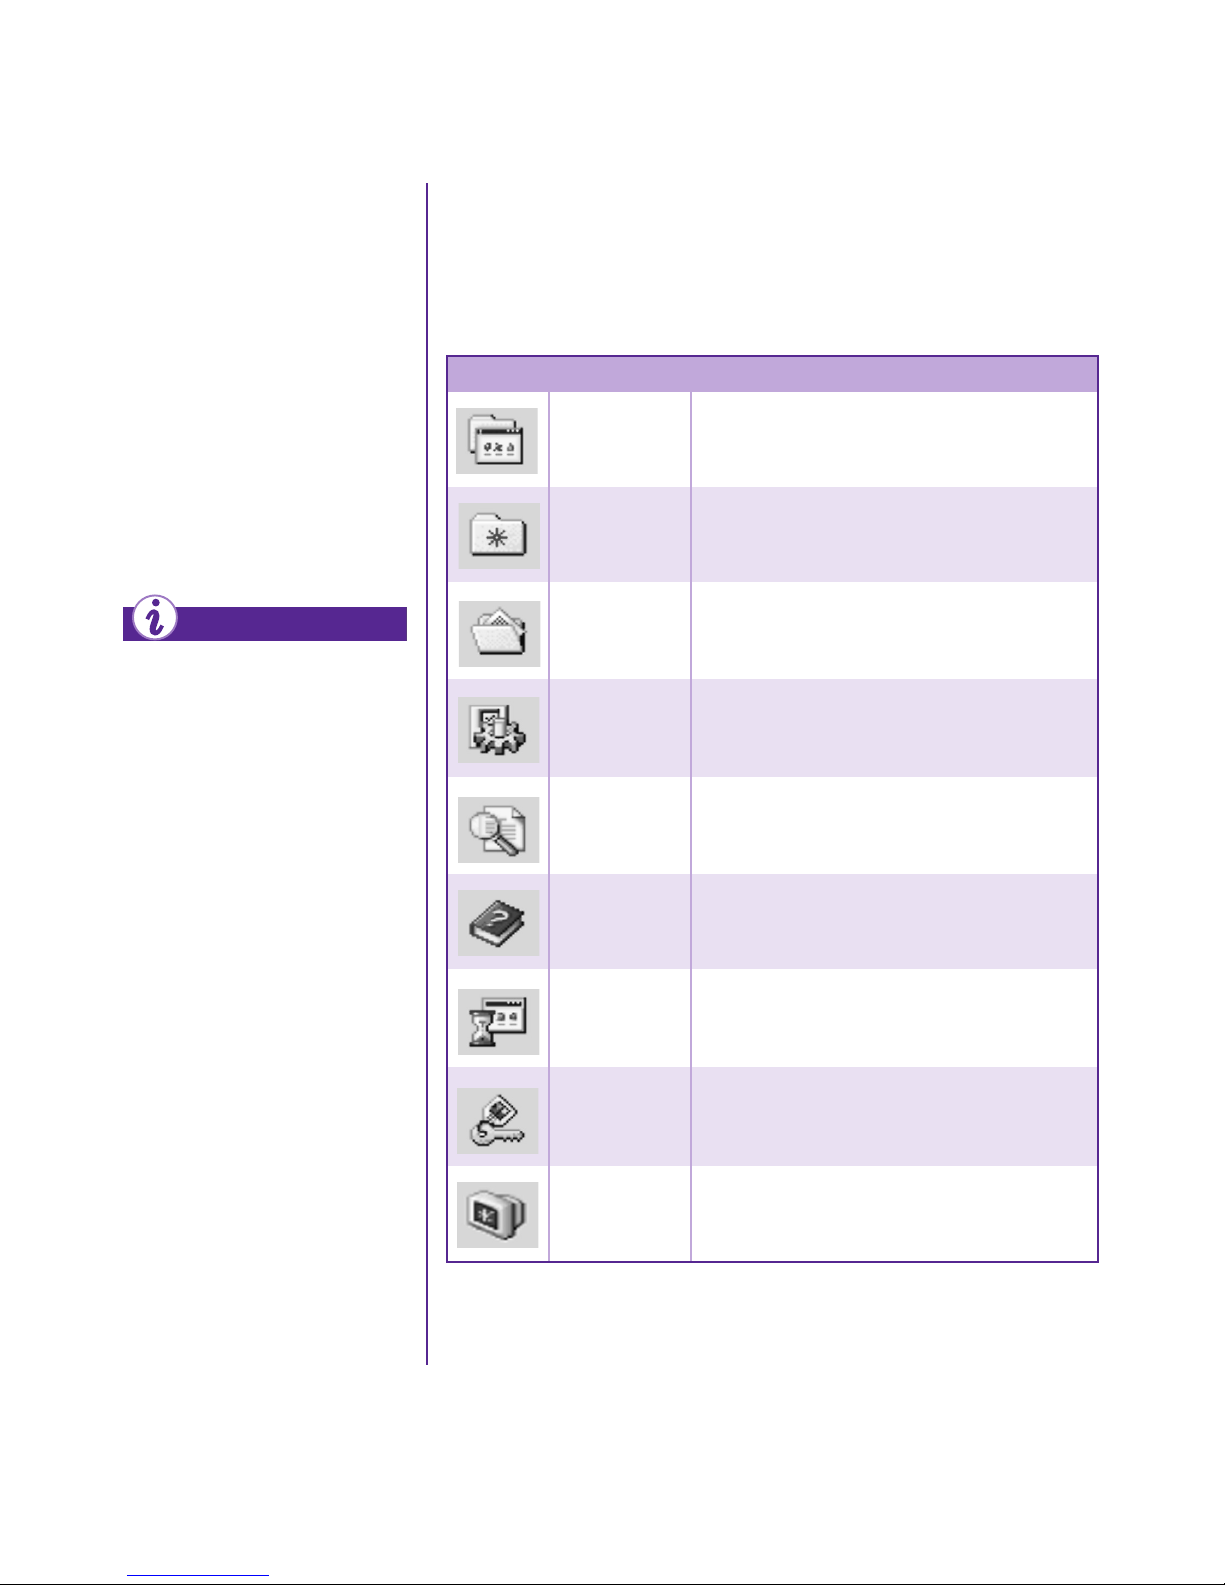
The following table lists some typical Start menu options and the
function of each option. The available Start menu options vary by
model.
Start Menu Options Functions
Programs Displays a list of programs available on your
computer.
Favorites
Documents Displays a recently accessed list of
Settings
Search Enables you to search for files or folders
Help
Opens your favorite files and Web pages.
documents which you can select to open
again.
Enables you to modify Windows desktop or
computer settings.
located on a drive that you specify.
Displays answers to your questions about
Microsoft Windows.
RESARIO—GETTING STARTED
MY P
Run Opens programs and Web pages.
Log Off
Logs off the current user so that a new user
can log on.
Shut Down Shuts down or restarts your computer.
INDOWS BASICS
W
3-3
Page 27
Help
Accessing Online Help
Microsoft Windows
includes online
documentation to help
answer your questions
about how the computer
operating system works.
Did you know ...
If you are not familiar with
the features of Microsoft
Windows, several tutorials are
available through Microsoft’s
online Help file.
The Microsoft Web site at
www.microsoft.com offers
numerous tools and
information about the
following topics:
➜
Windows
1. Click the Start button.
2. Select Help. The Help screen
is displayed with the cursor
in the Search field.
3. Enter a keyword in the
Search field and click Go.
➜
Internet Explorer
browser
➜
Microsoft Knowledge
Base
INDOWS BASICS
3-4 W
MY P
RESARIO—GETTING STARTED
Page 28
Using Your
Computer
In this chapter, you learn about the following exciting,
In This Chapter
Keyboard Basics, 4-2
Keyboard Buttons, 4-3
Scroll Mouse and Wireless
Mouse, 4-9
Speakers, 4-11
Disk, Hard Drive, CD-ROM,
CD-RW, DVD-ROM, and Zip
Drives, 4-12
easy-to-use features of your computer:
Keyboard: Become familiar
➜
with the keyboard and all its
capabilities, including
one-button access to the
Internet!
Scroll Mouse: See how easy
➜
it is to use the scroll mouse
and learn shortcuts to save
time.
Speakers: Enjoy the
➜
experience of high-quality
sound on your computer.
4
Internet Video Camera,
4-18
RESARIO—GETTING STARTED
MY P
Hard Drive, CD-ROM, and
➜
DVD-ROM Drives: Use the
various drives to listen to your
favorite CDs or watch movies.
Internet Video Camera:
➜
Understand the many capabilities
of an Internet video camera.
SING YOUR COMPUTER
U
4-1
Page 29
Keyboard
Basics
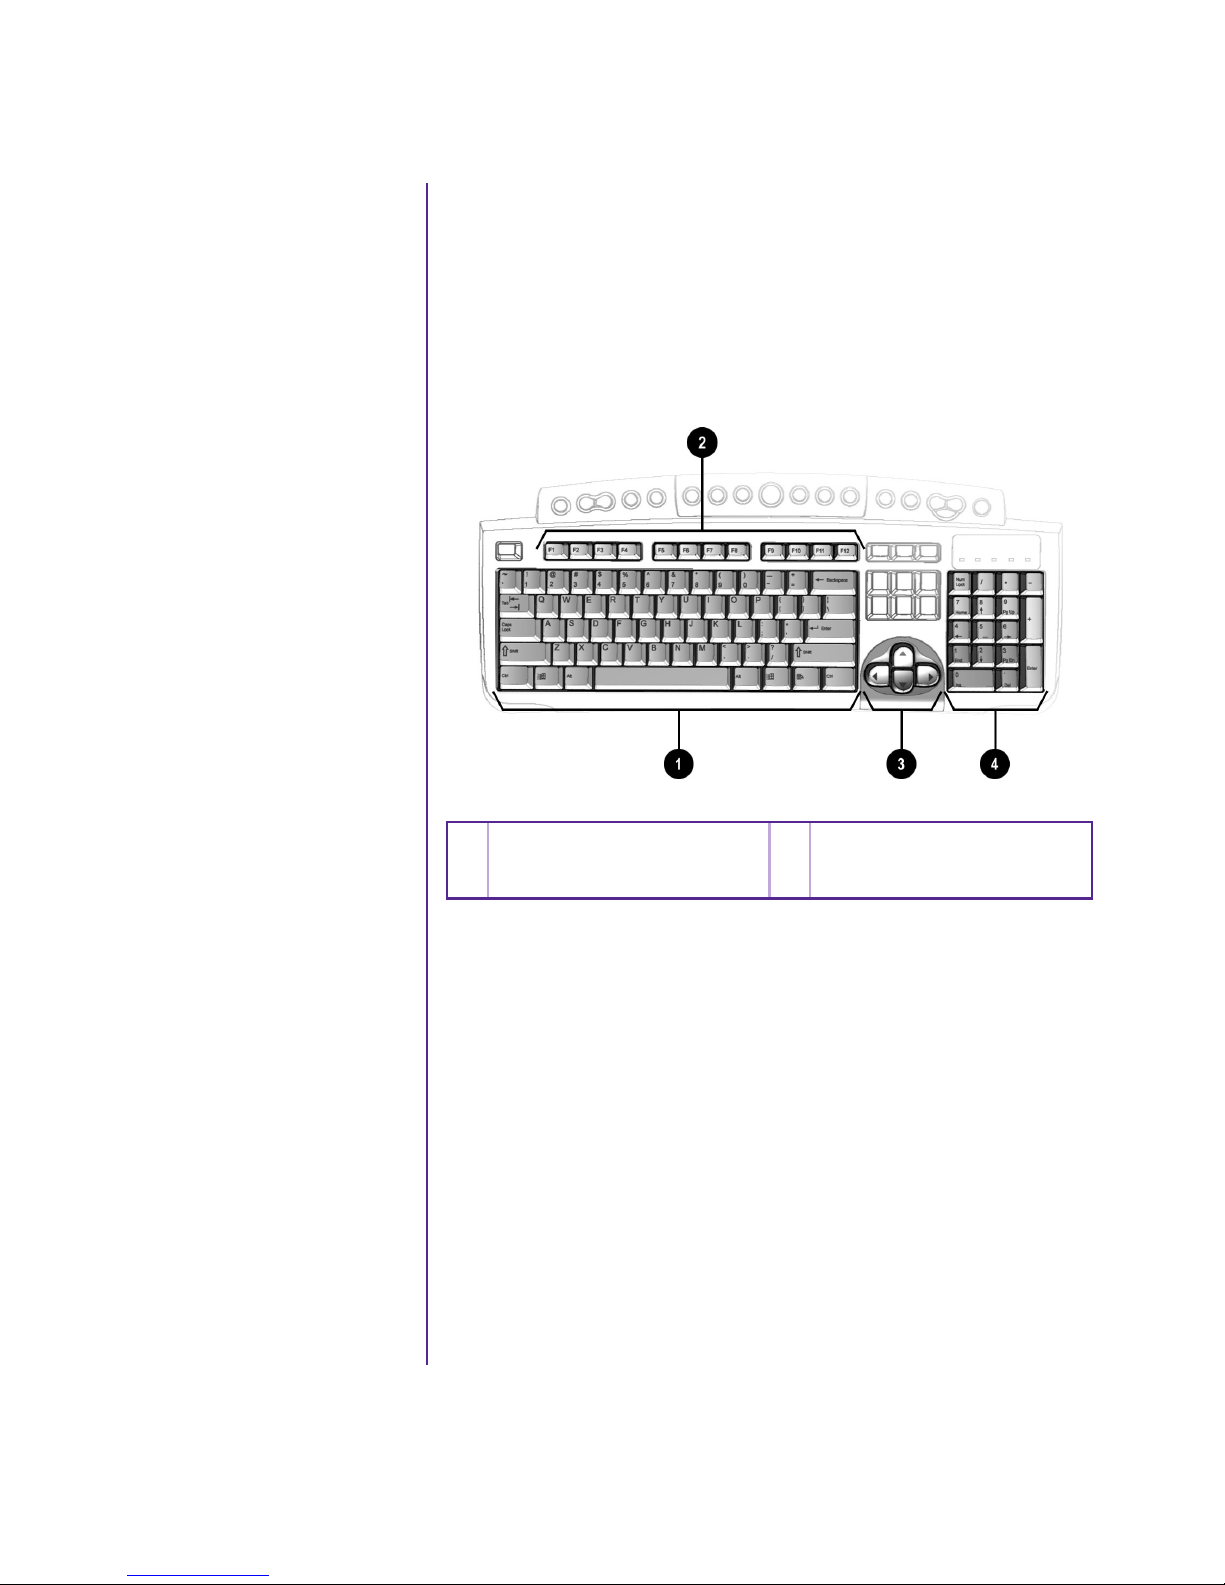
The standard keys perform
the following functions:
Main keys are the
➜
typewriter-style keys.
Function keys are the
➜
F1 through F12 keys.
Two of these keys are
active even without a
program running. F1
enables you to get help
on Windows-related
topics. F3 enables you
to search for files or
folders.
Arrow keys can be
➜
used for games and to
navigate through a
document or Web site.
These keys allow you
to move left, right, up,
and down, using the
keyboard instead of
the mouse.
Getting to Know the Standard
Keyboard Keys
Some keys have special functions when used alone or combined
with other keys. These functions vary depending on the program
you are using.
Main keys
1
Function keys
2
Note: Style of keyboard may vary.
3
4
Arrow keys
Numeric keys
Numeric keys work
➜
like a calculator
keypad.
SING YOUR COMPUTER
4-2 U
MY P
RESARIO—GETTING STARTED
Page 30
Keyboard
Buttons
The keyboard buttons
make it easier and faster to
get on the Internet, use
your favorite software, or
listen to your favorite CD.
You might even want to
watch a movie or send an
e-mail.
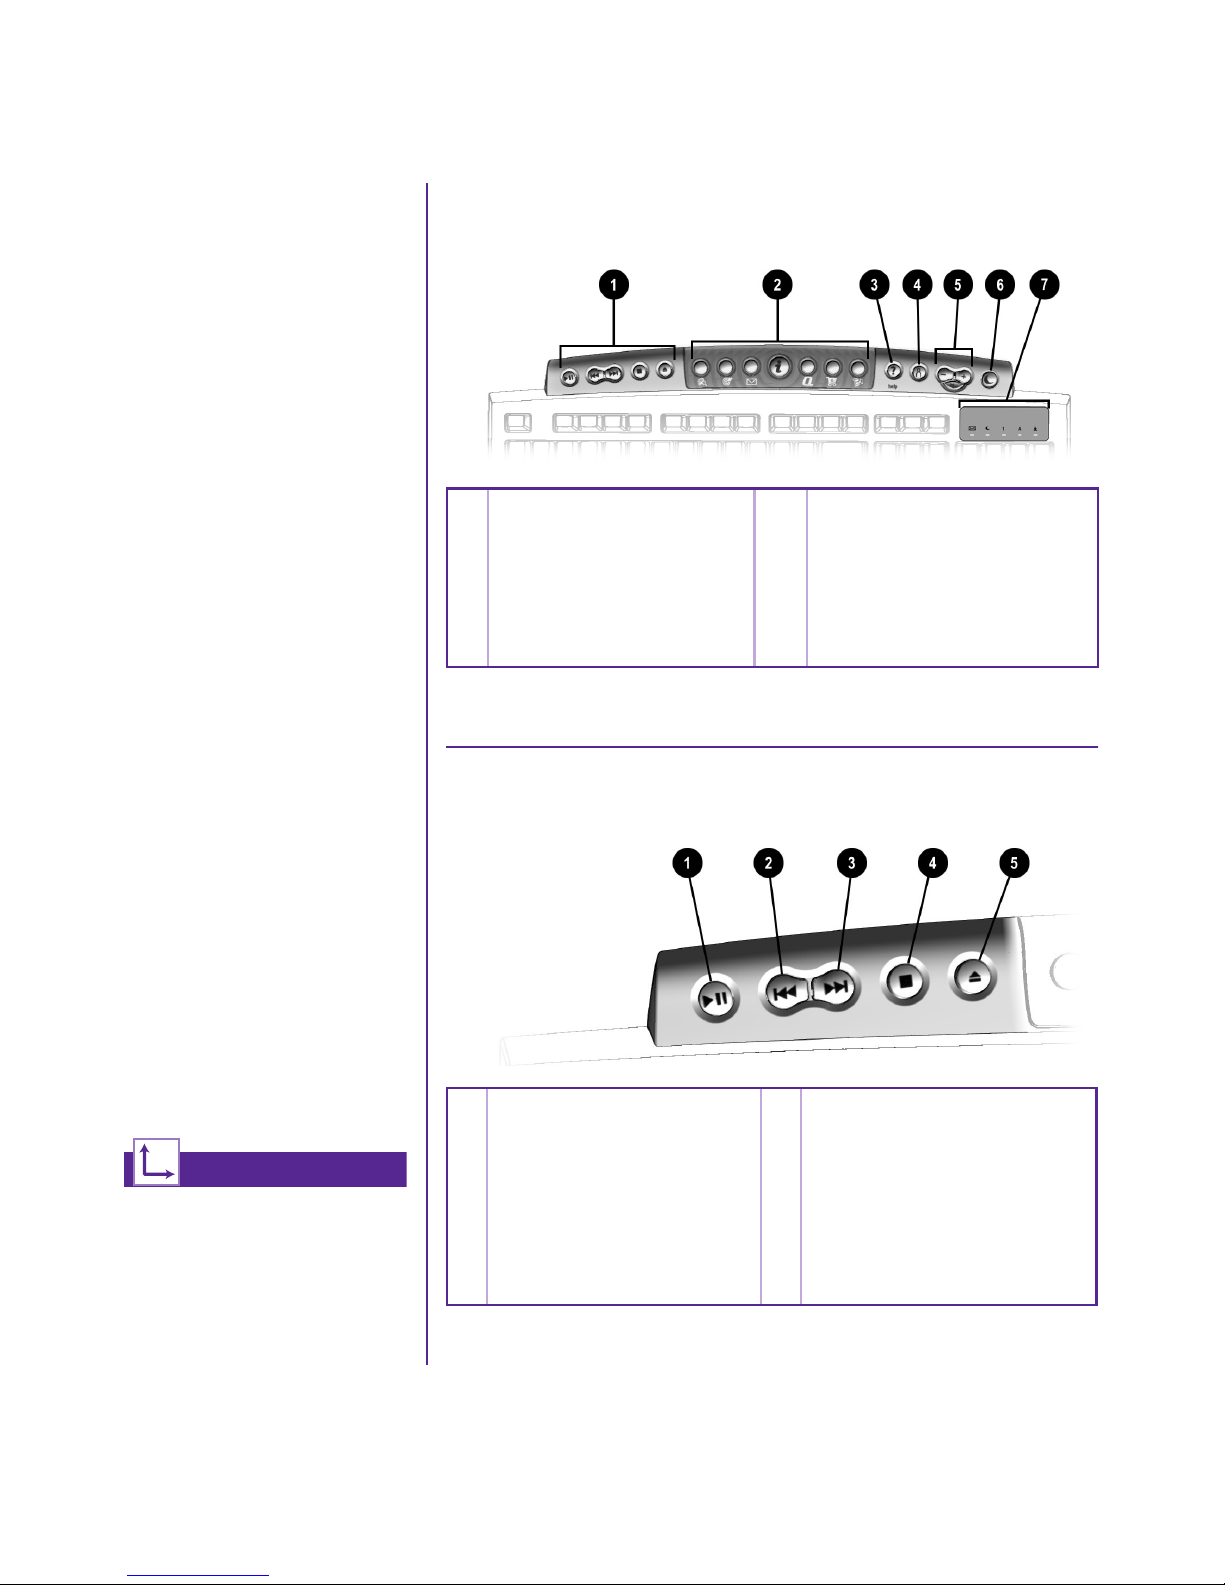
The keyboard buttons are shown in the following illustration.
They are discussed in detail on the following pages.
CD/DVD Control Buttons
1
Volume/Mute Buttons
5
The CD/DVD control
buttons provide a quick
and easy way to play a CD
or a DVD movie at the
touch of a button.
Many CDs begin playing
automatically when
inserted into the drive.
Refer to Playing an Audio
CD in this chapter to play
a CD.
See also ...
Refer to Adjusting the Volume
in this chapter to adjust the
volume when playing a CD or
a DVD.
Internet Zone Buttons
2
Quick Launch Help Button
3
Quick Launch My Program
4
Button
Sleep Button
6
LED Status Lights
7
Using CD/DVD Control Buttons
Play/Pause starts or stops a
1
CD or DVD temporarily.
Rewind/Previous Track
2
skips to the previous track.
Fast Forward/Next Track
3
skips to the next track.
Stop ends the CD or DVD play,
4
rewind, and fast forward
functions.
Eject/Load ejects or loads the
5
CD or DVD.
RESARIO—GETTING STARTED
MY P
Note: Buttons may vary by model.
SING YOUR COMPUTER
U
4-3
Page 31
Keyboard
Buttons, cont.
With the press of a
keyboard button, you can
get on the Internet fast,
read your e-mail, or check
out the latest in
entertainment.
Depending on which
Internet Service Provider
(ISP) you have, the default
options provided by the
Internet Zone buttons may
vary.
Did you know ...
Until you set up your Internet
Service Provider (ISP), each
Internet button takes you to a
window that guides you
through the ISP set-up process.
See also ...
Refer to the “Setting Up Your
Computer
guide for detailed information
about setting up your ISP.
”
chapter in this
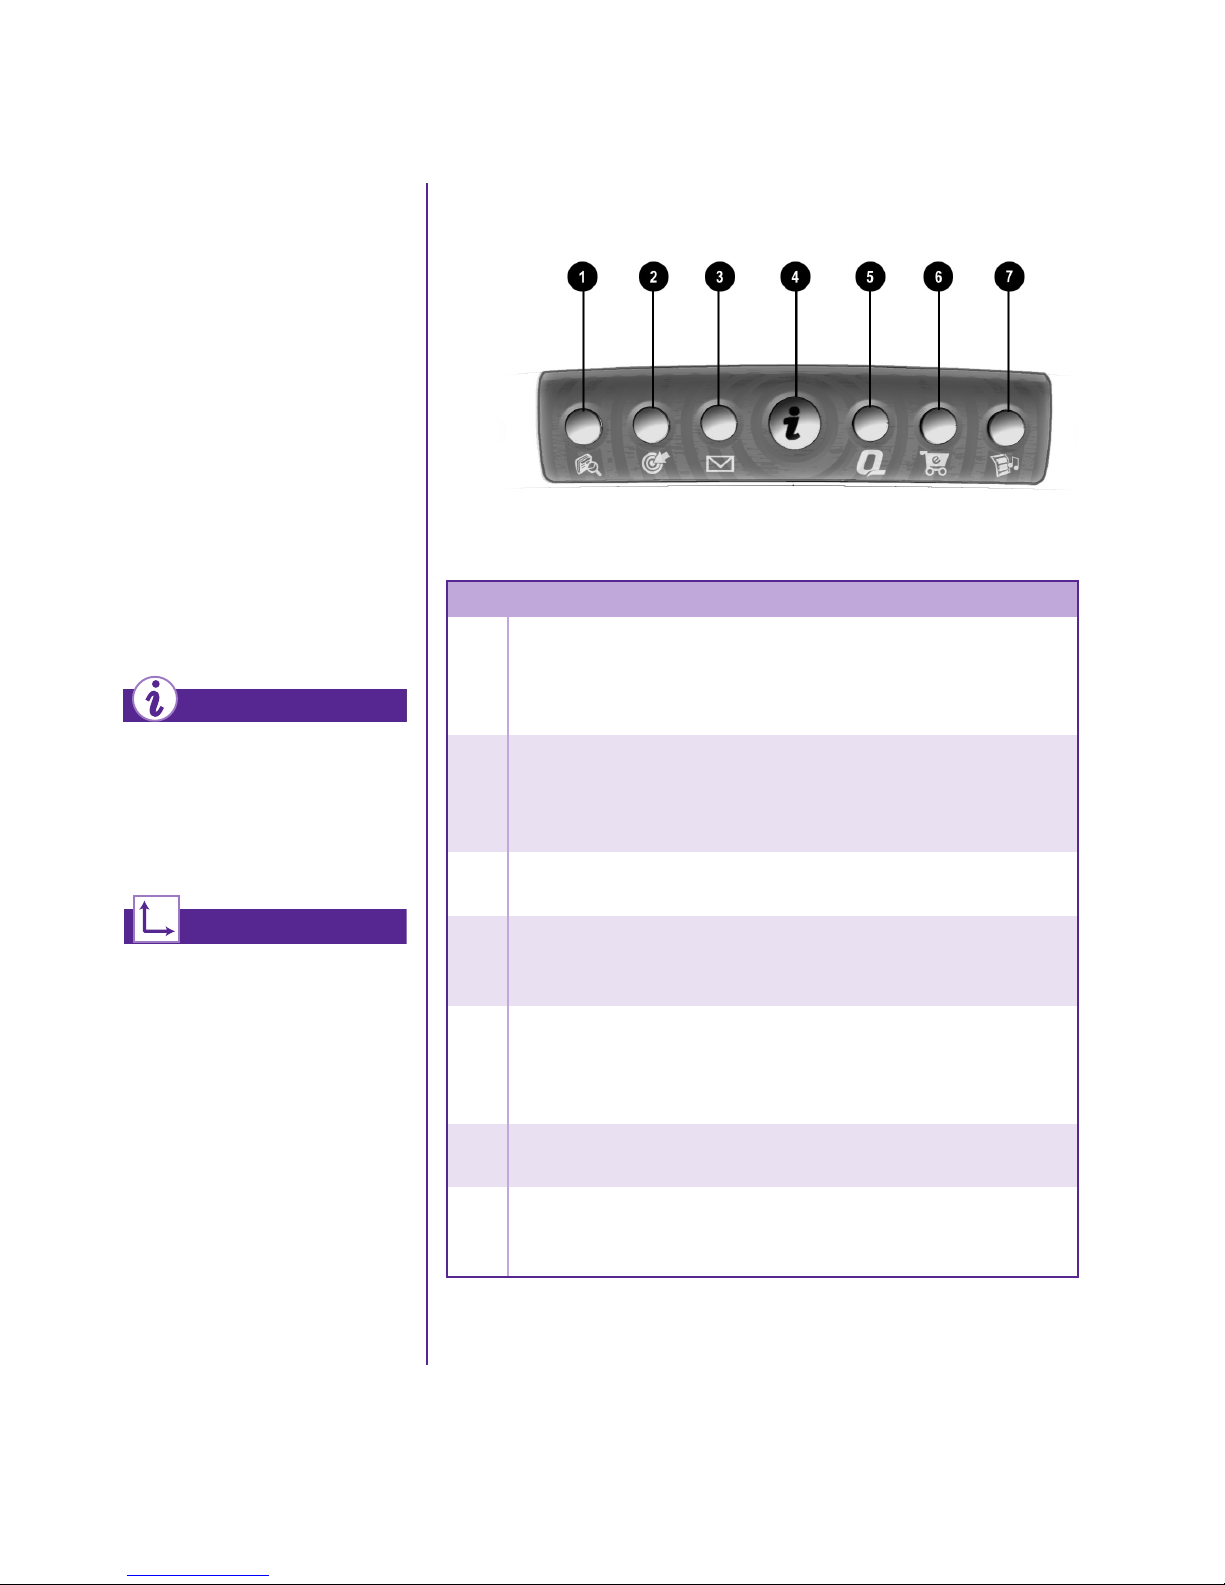
Using Internet Zone Buttons
Note: Button functions may vary by model and by region.
No. Description
1
2
3
4
5
Search accesses a Web site that helps you to locate news and
information on the Internet. Search for topics including news and
information, shopping, images, music, and video. The default
Web browser is Alta Vista.
Activity launches your favorite Internet Zone activity. The default
brings you to your Community center, a vibrant online community
experience with chat sessions, discussion boards, clubs, home
pages, photo albums, and more.
E-mail provides one-touch access for sending and reading your
e-mail.
Instant Internet provides your daily starting point to the Internet.
It connects you to a Web page filled with local weather, news,
sports, and financial information.
My Presario is your instant connection to Compaq for getting the
most out of your computer and the Internet. Learn about the top
Internet Zones, or venture into your favorite Activity Centers, and
get creative using the Web.
SING YOUR COMPUTER
4-4 U
MY P
6
7
Retail/Affinity Central provides an instant connection to your
computer store and a variety of leading consumer companies.
Entertainment is your online scoop for the world of
entertainment, featuring music downloads, streaming video,
Web casts, entertainment news, and reviews.
RESARIO—GETTING STARTED
Page 32
Keyboard
Buttons, cont.
You can access your
favorite program, Web site,
or document by pressing
the Quick Launch We b
buttons. These are the
Help
buttons.
and My Program D
G
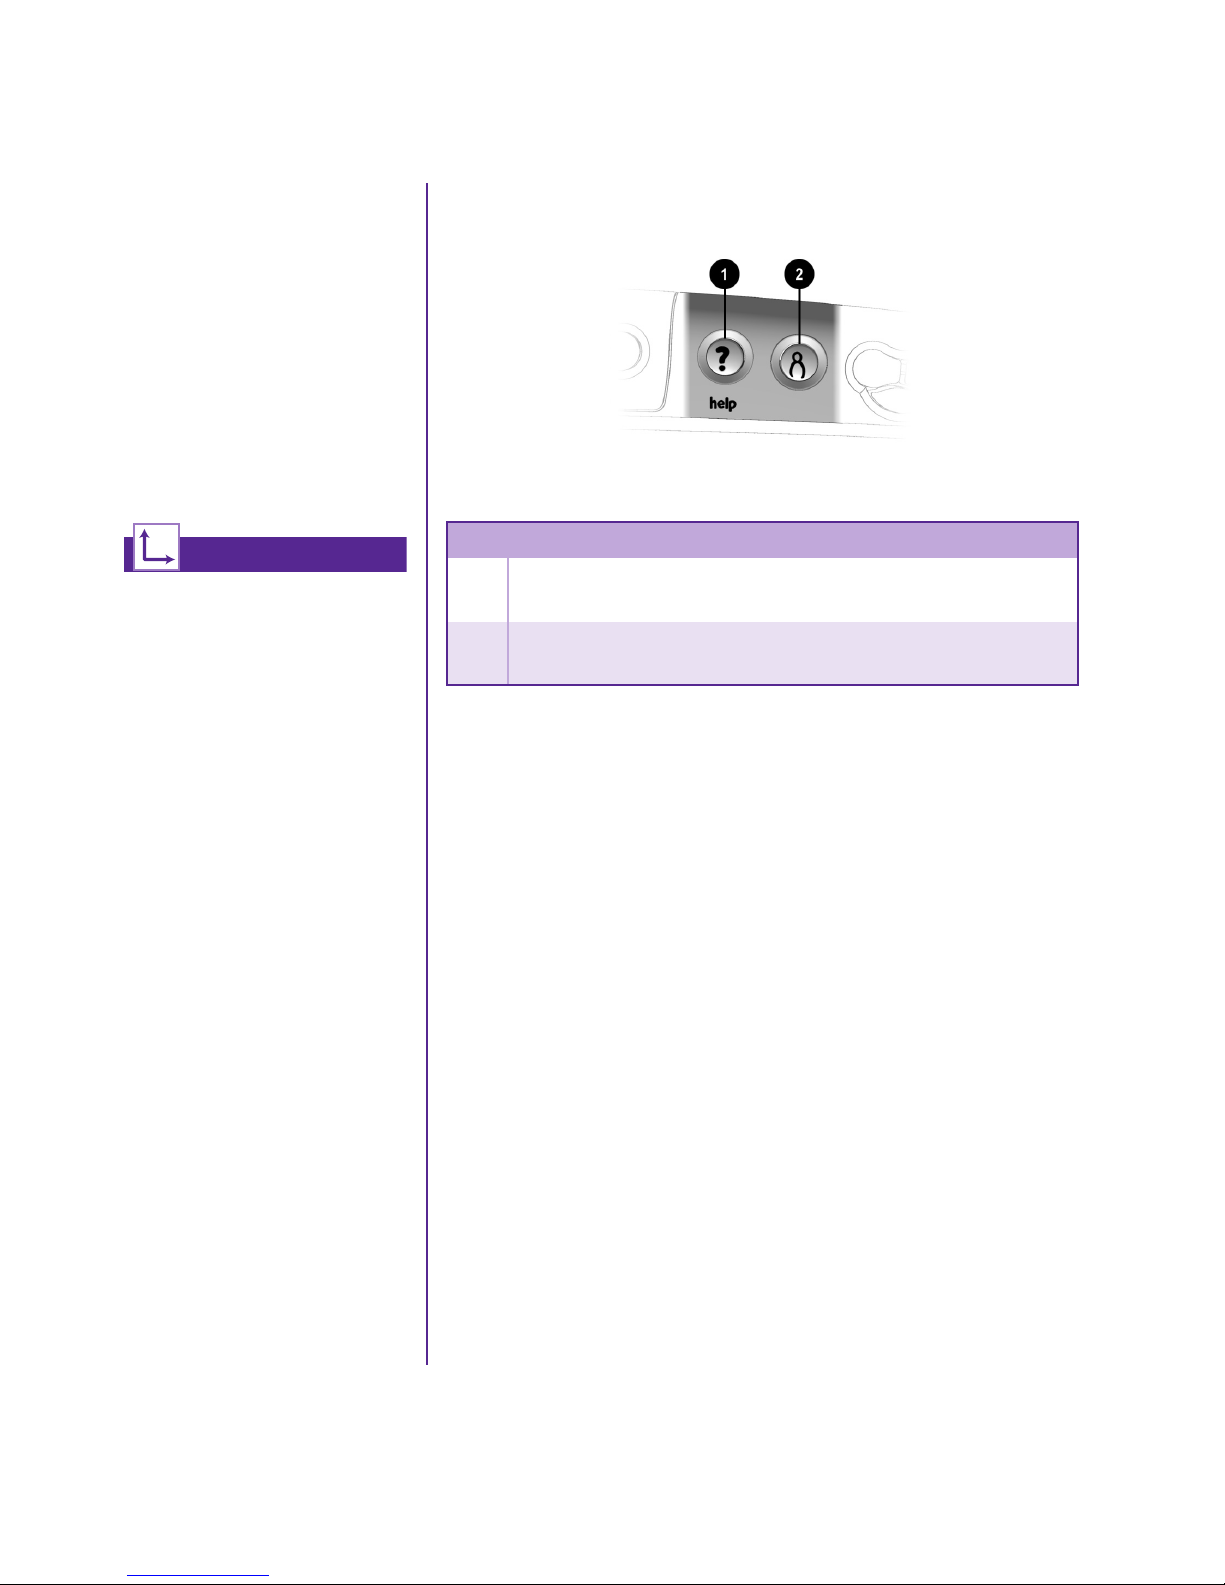
Using Quick Launch Web Buttons
See also ...
Refer to “Preventive
Maintenance
Presario—Learning More CD
for additional information on
service and support.
”
on the My
No. Description
1
2
Note: Buttons and their function may vary by model and region.
Help takes you to service and support information on the
Windows desktop.
My Program can be programmed to launch your favorite
software, Web site, or document.
RESARIO—GETTING STARTED
MY P
SING YOUR COMPUTER
U
4-5
Page 33
Keyboard
Assigning the My Program Button
Buttons, cont.
After you assign the
My Program D button
settings, pressing the
button opens your selected
software, Web site, or
document automatically.
See also ...
Instructions for reassigning the
My Program button are found
on the My Presario—Learning
More CD.
The Vo l u m e C o n t r o l
buttons allow you to
control the volume of your
computer. Or, if you want
silence, press the Mute a
button. It’s that simple!
Tip
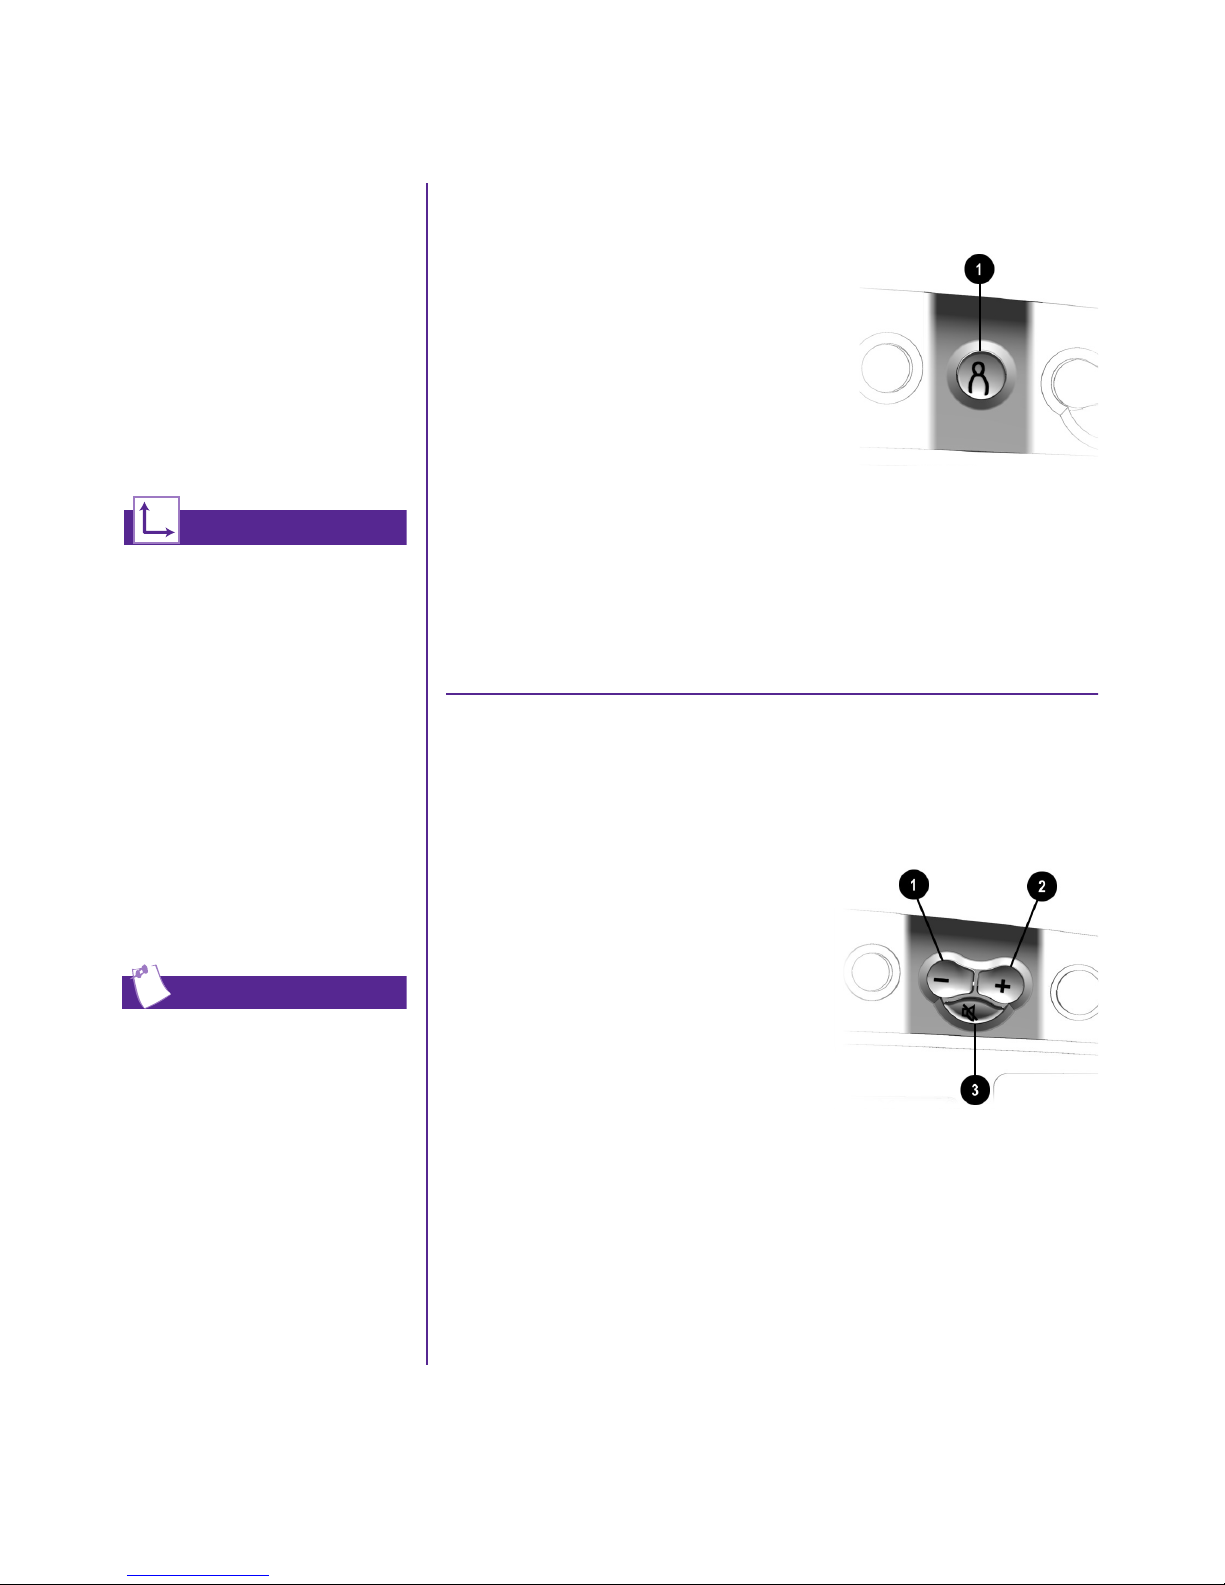
1. Press the My Program D button 1.
A window opens.
2. Select a program or Web site.
3. Click Next.
4. Select Program or Document.
5. Select the program or document you
want to assign to the My Program D button.
6. Click OK to verify your selection.
7. Click OK.
Adjusting the Volume
When listening to or viewing a CD or DVD, use the following
buttons on your keyboard to adjust the volume as needed:
Press the minus ‘ button 1
➜
to decrease the volume.
Press the plus ’ button 2
➜
to increase the volume.
You can also adjust the volume
by clicking the Speaker
icon located in the system tray
at the bottom-right corner of
the Windows taskbar.
SING YOUR COMPUTER
4-6 U
MY P
÷
Press the mute a button 3
➜
to turn off the sound.
RESARIO—GETTING STARTED
Page 34
Keyboard
Putting Your Computer to Sleep
Buttons, cont.
If you’re going to be away
from your computer but
want to leave the power on,
you can put your computer
to sleep. This process
allows you to run
programs while your
computer goes into a
low-power state, which
saves energy. However,
some software, such as
DVD software actively
playing a DVD, may
prevent the system from
going to sleep.
Tip
You can wake your computer
by moving the mouse, clicking
a mouse button, or pressing
any of the keyboard buttons.
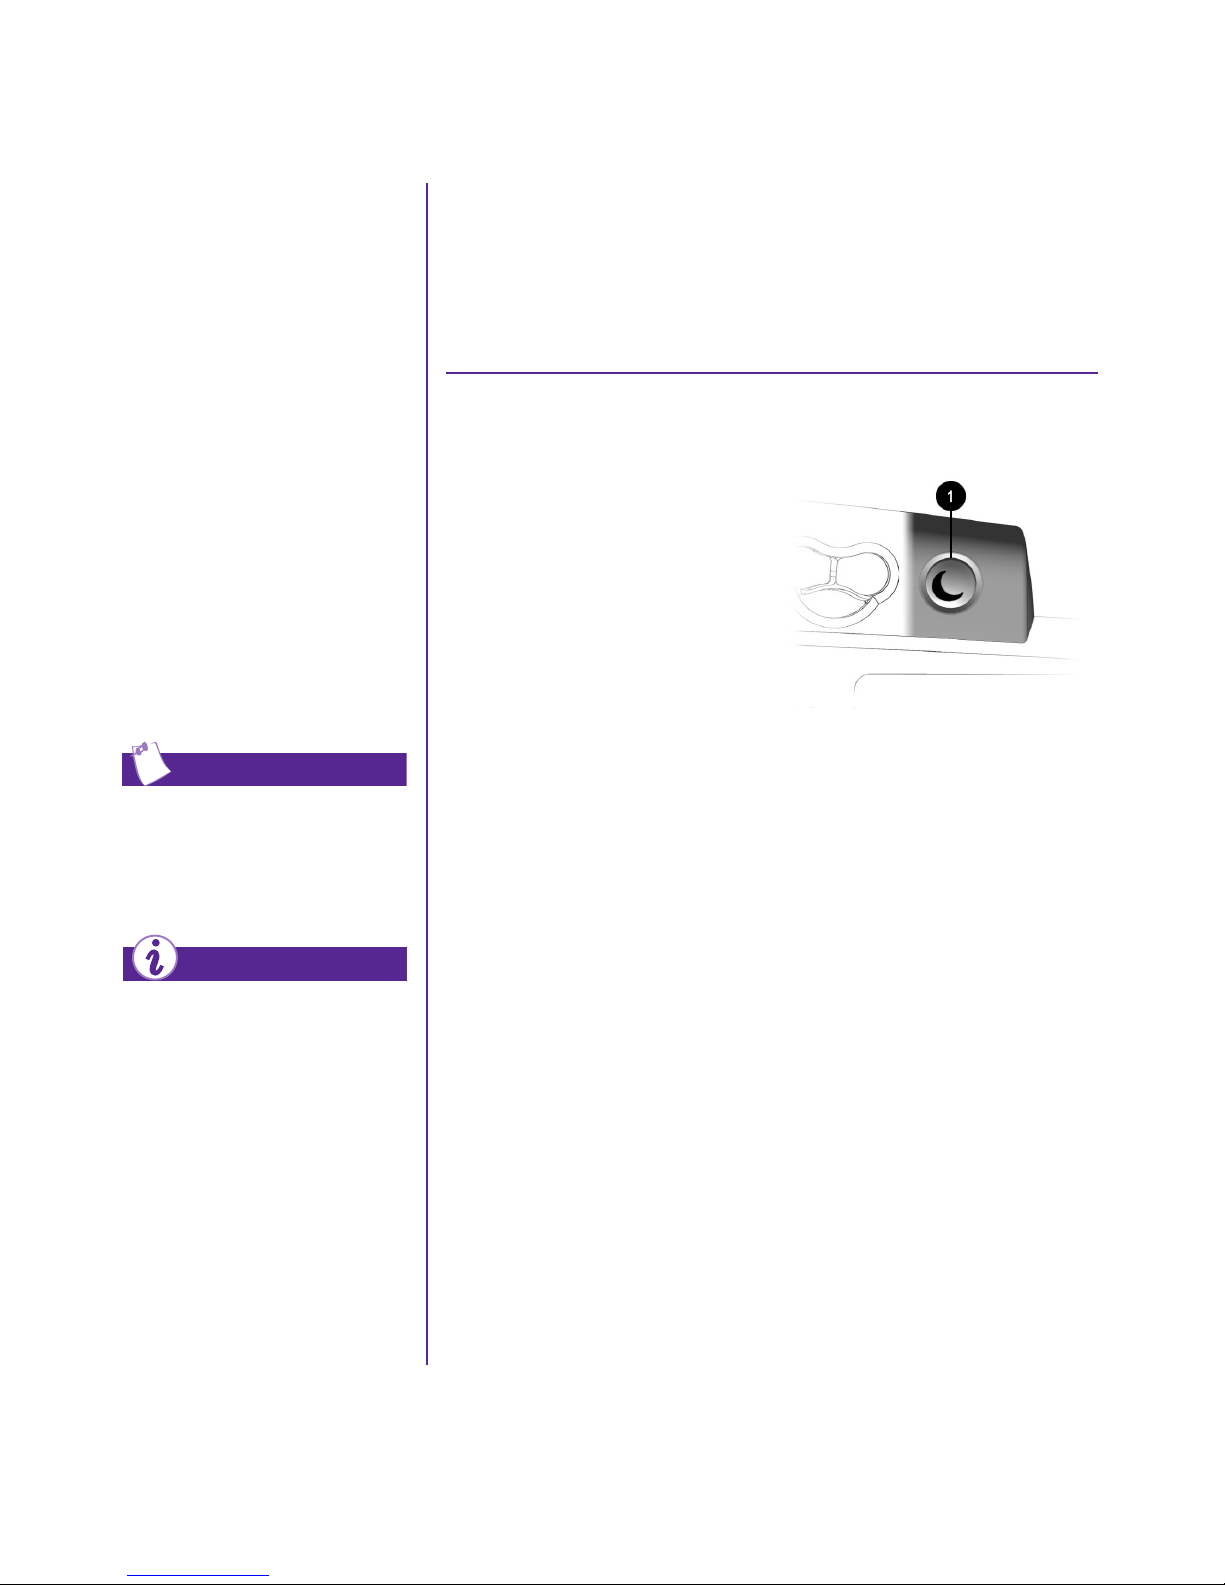
Press the Sleep E button 1 on the keyboard and your computer
goes to sleep. Or, your computer will go to sleep automatically if
no activity occurs within 20 minutes.
Waking Your Computer
Press the Sleep E button 1 on
the keyboard and your computer
wakes up.
Did you know ...
You can change the amount of
time that passes before your
computer goes to sleep. See the
My Presario—Learning More
CD for instructions.
RESARIO—GETTING STARTED
MY P
SING YOUR COMPUTER
U
4-7
Page 35
Keyboard
Understanding the System Status Lights
Buttons, cont.
The system lights on the
keyboard provide a quick
status of your computer
and keyboard settings.
Tip
Post Office Protocol (POP) is a
commonly used messaging
protocol. The most widely used
implementation of this protocol
is POP3. POP3 is a retrieval
protocol used to retrieve mail
messages from a POP server.
E-mail messages received by
the POP server are delivered to
a server mailbox, where they
reside until you retrieve them.
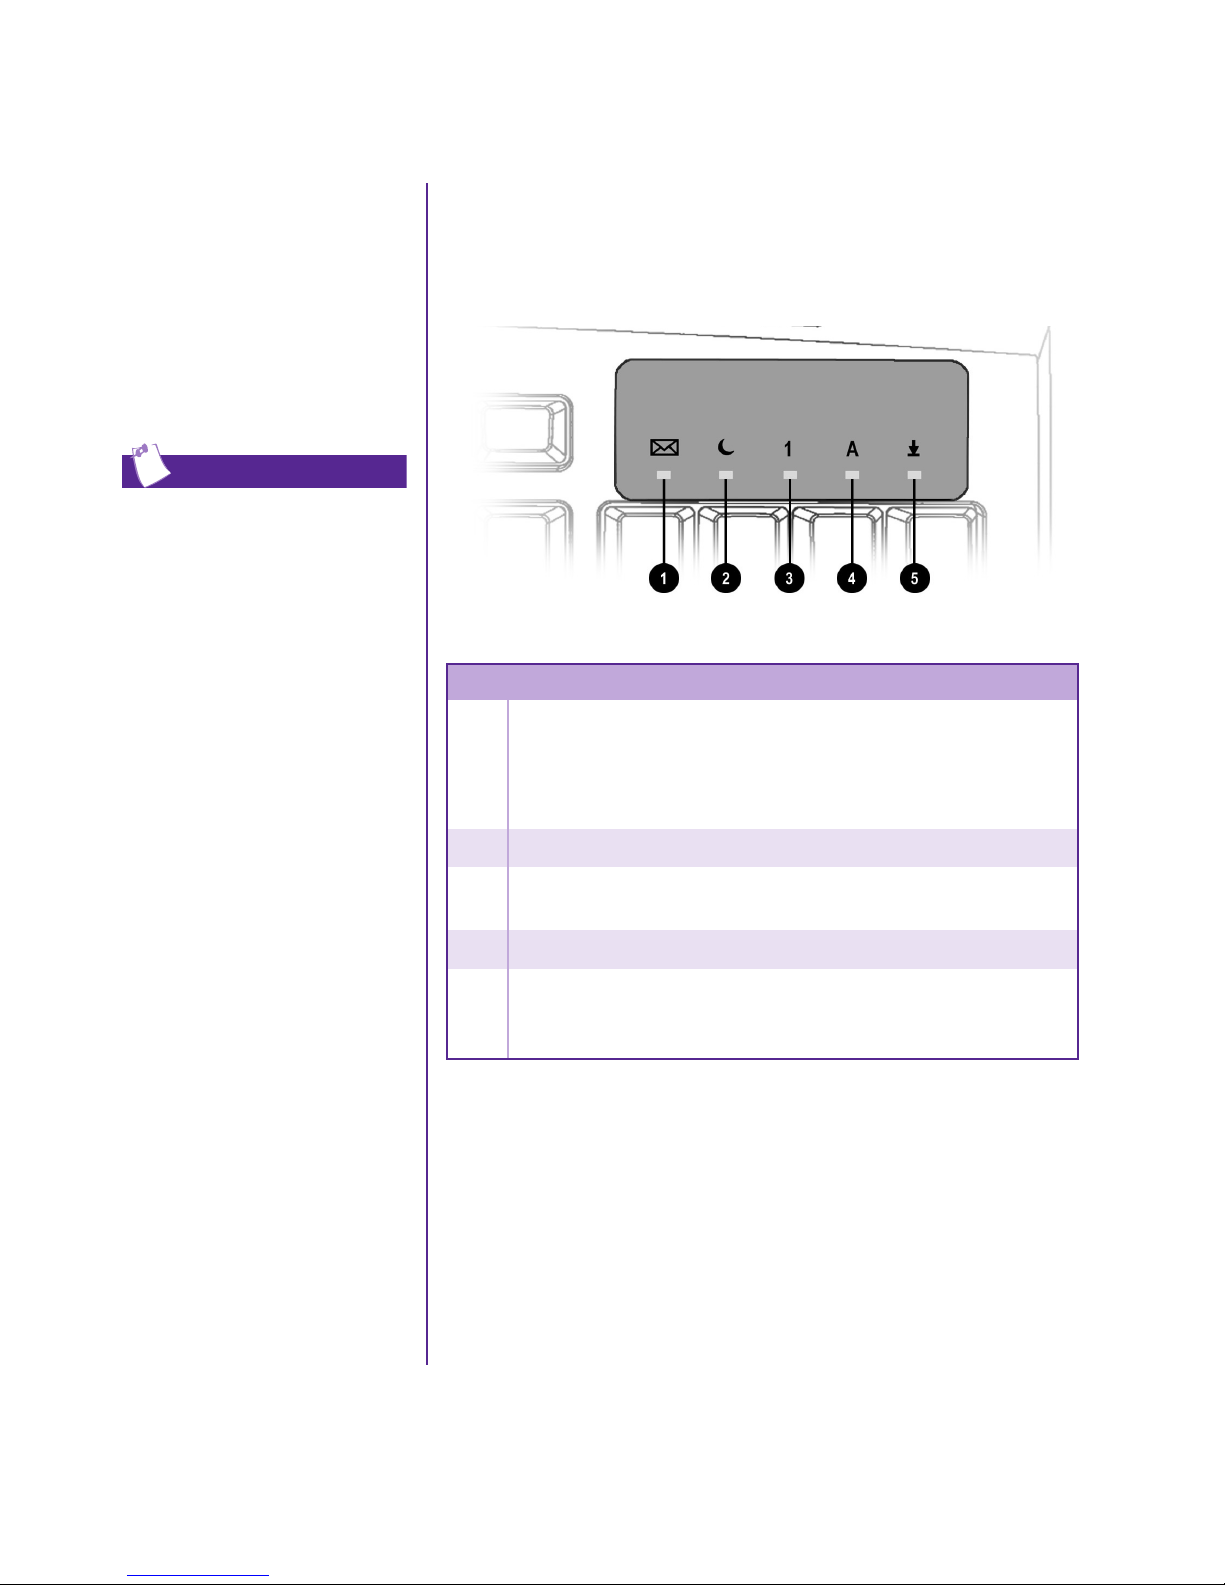
The system status lights are shown in the following illustration,
and the function of each light is explained.
No. Description
1
E-mail indicates when you have e-mail waiting to be read.
Note: This light works only with POP3 Internet services such as
Compaq.NET powered by MSN. The light does not work
with proprietary Internet services such as AOL.
SING YOUR COMPUTER
4-8 U
2
3
4
5
MY P
Sleep indicates the computer is in the sleep mode.
Num Lock indicates that you can use the numeric key pad to
type numbers.
Caps lock indicates all text typed will appear as capital letters.
Scroll lock indicates when the scroll-lock function is engaged,
enabling you to scroll through a document without moving the
cursor.
RESARIO—GETTING STARTED
Page 36
Scroll Mouse
Making Screen Selections
and Wireless
Mouse
Your computer comes with
a scroll mouse. The scroll
mouse directs a cursor on
the Windows desktop. Use
the mouse to move quickly
and easily through a
document or Web site.
Moving the scroll wheel
on your mouse forward or
backward through a
document or Web site is
faster than using the
scroll bar.
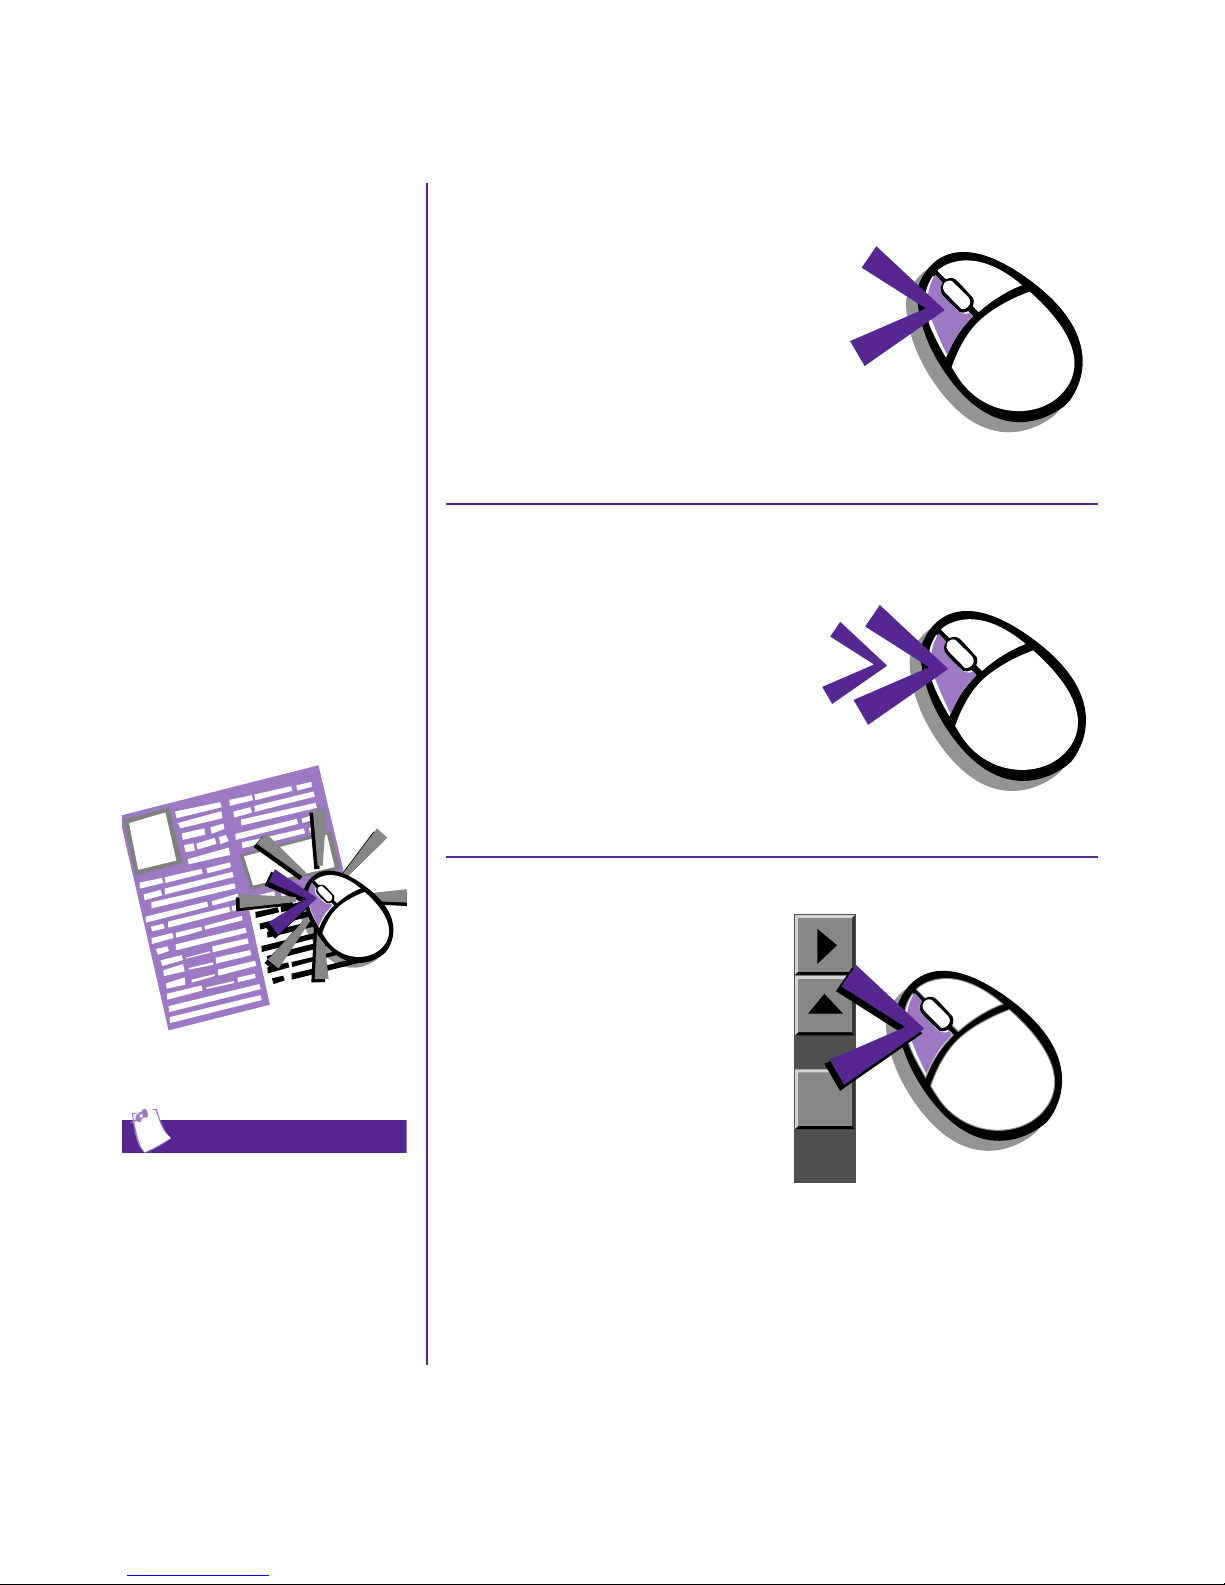
Click by pressing and releasing the
left mouse button quickly one time.
You will hear a single clicking sound.
Opening Software and Files
Double-click by quickly pressing
and releasing the left mouse button
twice.
Tip
Some mouse functions may not
work with all software.
RESARIO—GETTING STARTED
MY P
Scrolling
Click (and hold down) on the
scroll handle (the box in a
scroll bar area) and drag it up
or down until the desired text is
displayed in the window. Or
single-click the arrow buttons
to move up or down one line at
a time.
Positioning the cursor on the
scroll bar and clicking above
or below the scroll handle
moves the text up or down
a screen at a time.
SING YOUR COMPUTER
U
4-9
Page 37
Scroll Mouse
Autoscrolling
and Wireless
Mouse, cont.
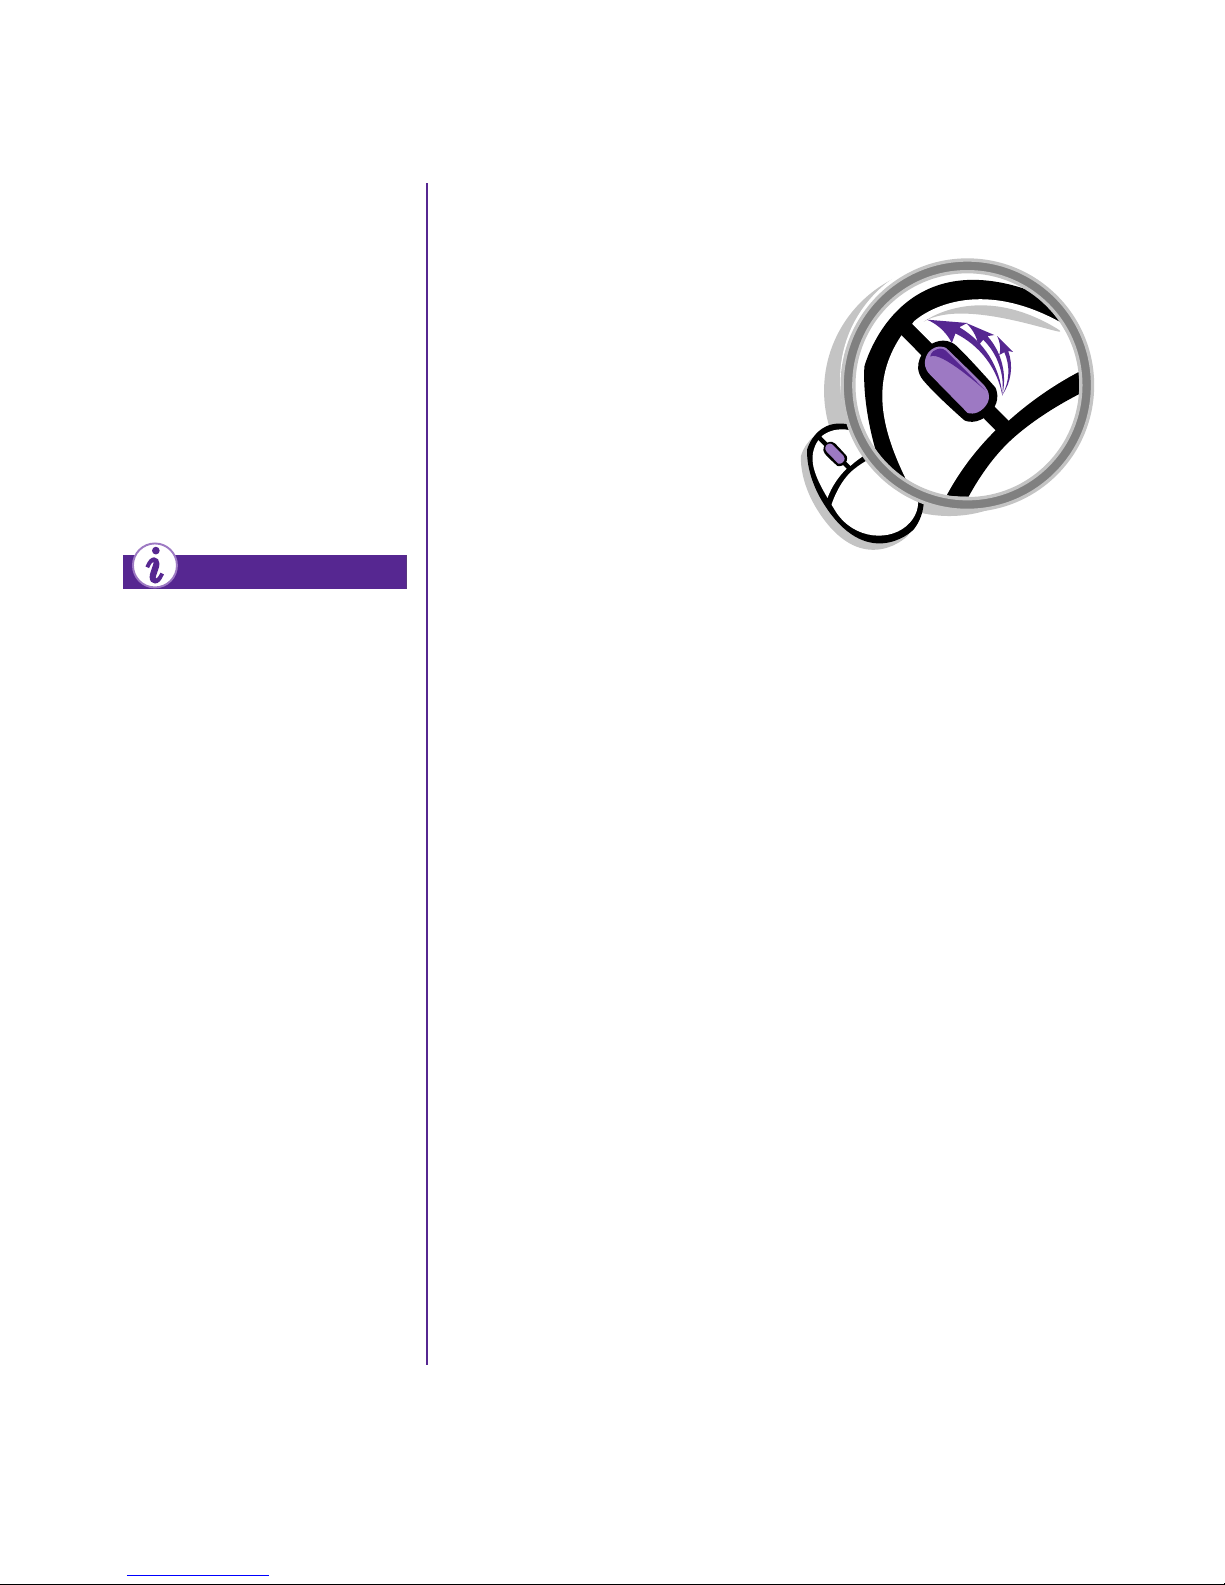
AutoScroll allows you to
move forward and
backward through a
document without having
to move the mouse or
mouse wheel continuously.
Did you know ...
The scroll mouse can be
customized for a left-handed
user from the Mouse Properties
dialog box. Click on Start /
Settings / Control Panel and
double-click on the mouse icon
to open the Mouse Properties
dialog box.
1. Open a program and press the
scroll wheel to begin
autoscrolling.
2. Move the mouse once in the
direction you want to scroll
(vertically, horizontally, or
diagonally). The farther you
move the cursor from the
starting point, the faster the
scrolling occurs.
3. To stop autoscrolling, press
a mouse button.
SING YOUR COMPUTER
4-10 U
MY P
RESARIO—GETTING STARTED
Page 38
Speakers
(available on select models)
Speaker options depend on
which model you purchase.
However, the JBL Platinum
Series are the standard
speakers that come with
most new Compaq Presario
monitors. You can use the
speakers freestanding or
mount them on the side of
the monitor. For more
information, see the
documentation that came
with the speakers.
To set up the speakers,
follow the directions on the
monitor’s Quick Set-Up
poster. If you purchased
speakers separately, follow
the instructions included.
Did you know ...
You can plug a digital MP3
portable audio player into the
Audio-In port on the right side
of the speaker (on JBL
Platinum Series speakers).
Other portable music players
include:
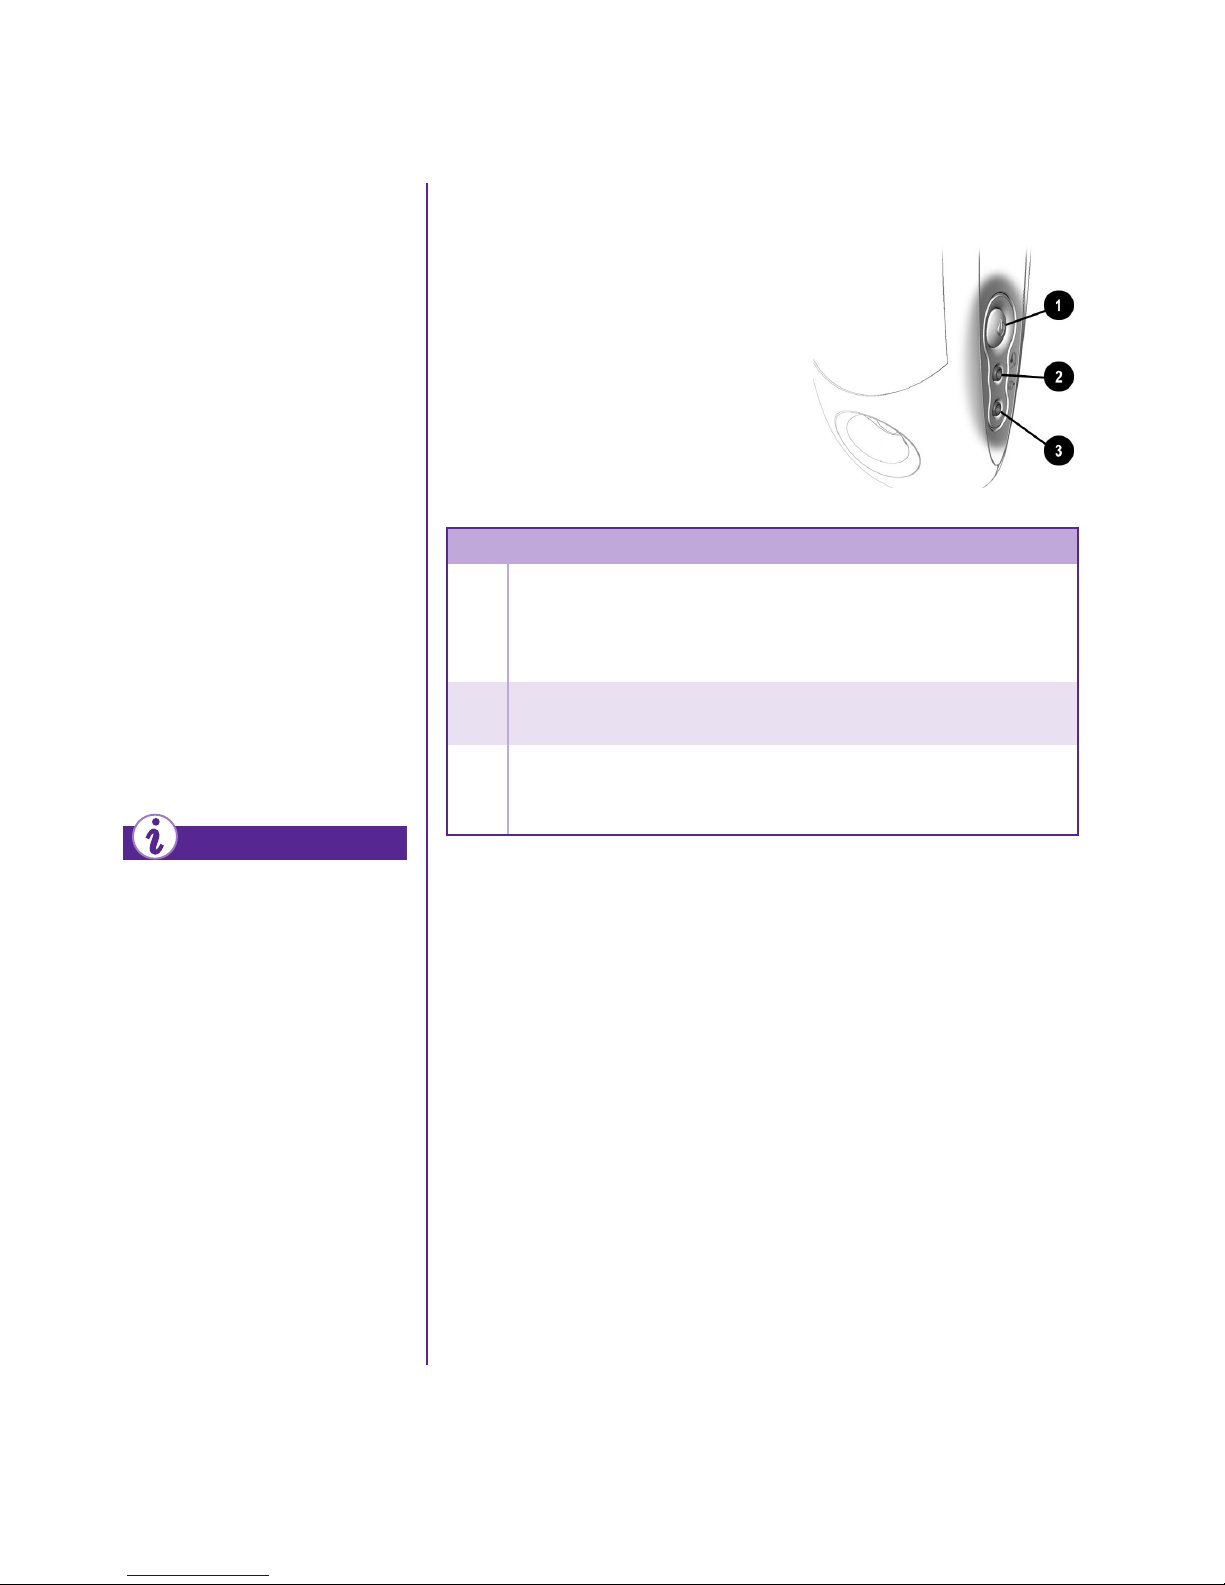
Turning on the Speakers
To turn the speakers on or off, press
the Power button on the right side
of the speaker. You can adjust the
volume after the button
No. Description
1
2
3
Note: The speakers receive power from the monitor, even when the monitor
Power Button—conveniently allows a quick power down when
not in use, or mutes the sound. Simply push the button so that it
pops out. Turn it to adjust the sound. The light indicates when the
power is on.
Headphone Jack—allows you to connect most stereo
headphones for your personal listening pleasure.
Audio-In Port—an advanced feature that lets you quickly
connect your favorite digital MP3 player (or any portable audio
device) to play audio directly through the speakers.
power is off. Your portable music player can be played through the
speakers without turning on your computer.
pops out.
➜
CD players
➜
Cassette players
➜
AM/FM Stereo
These devices connect with a
stereo cable (3.5 mm/3.5 mm
plug) available from most
electronics stores and
computer retailers.
RESARIO—GETTING STARTED
MY P
SING YOUR COMPUTER
U
4-11
Page 39
Disk, Hard
Using the Disk Drive
Drive, CD-ROM,
CD-RW,
DVD-ROM, and
Zip Drives
Your computer may have
one or more drives
depending on the model
you purchased:
Disk drive
➜
Hard drive
➜
CD-ROM drive
➜
CD-RW drive
➜
DVD-ROM drive
➜
Zip drive
➜
Each drive has a different
capacity for storing
information.
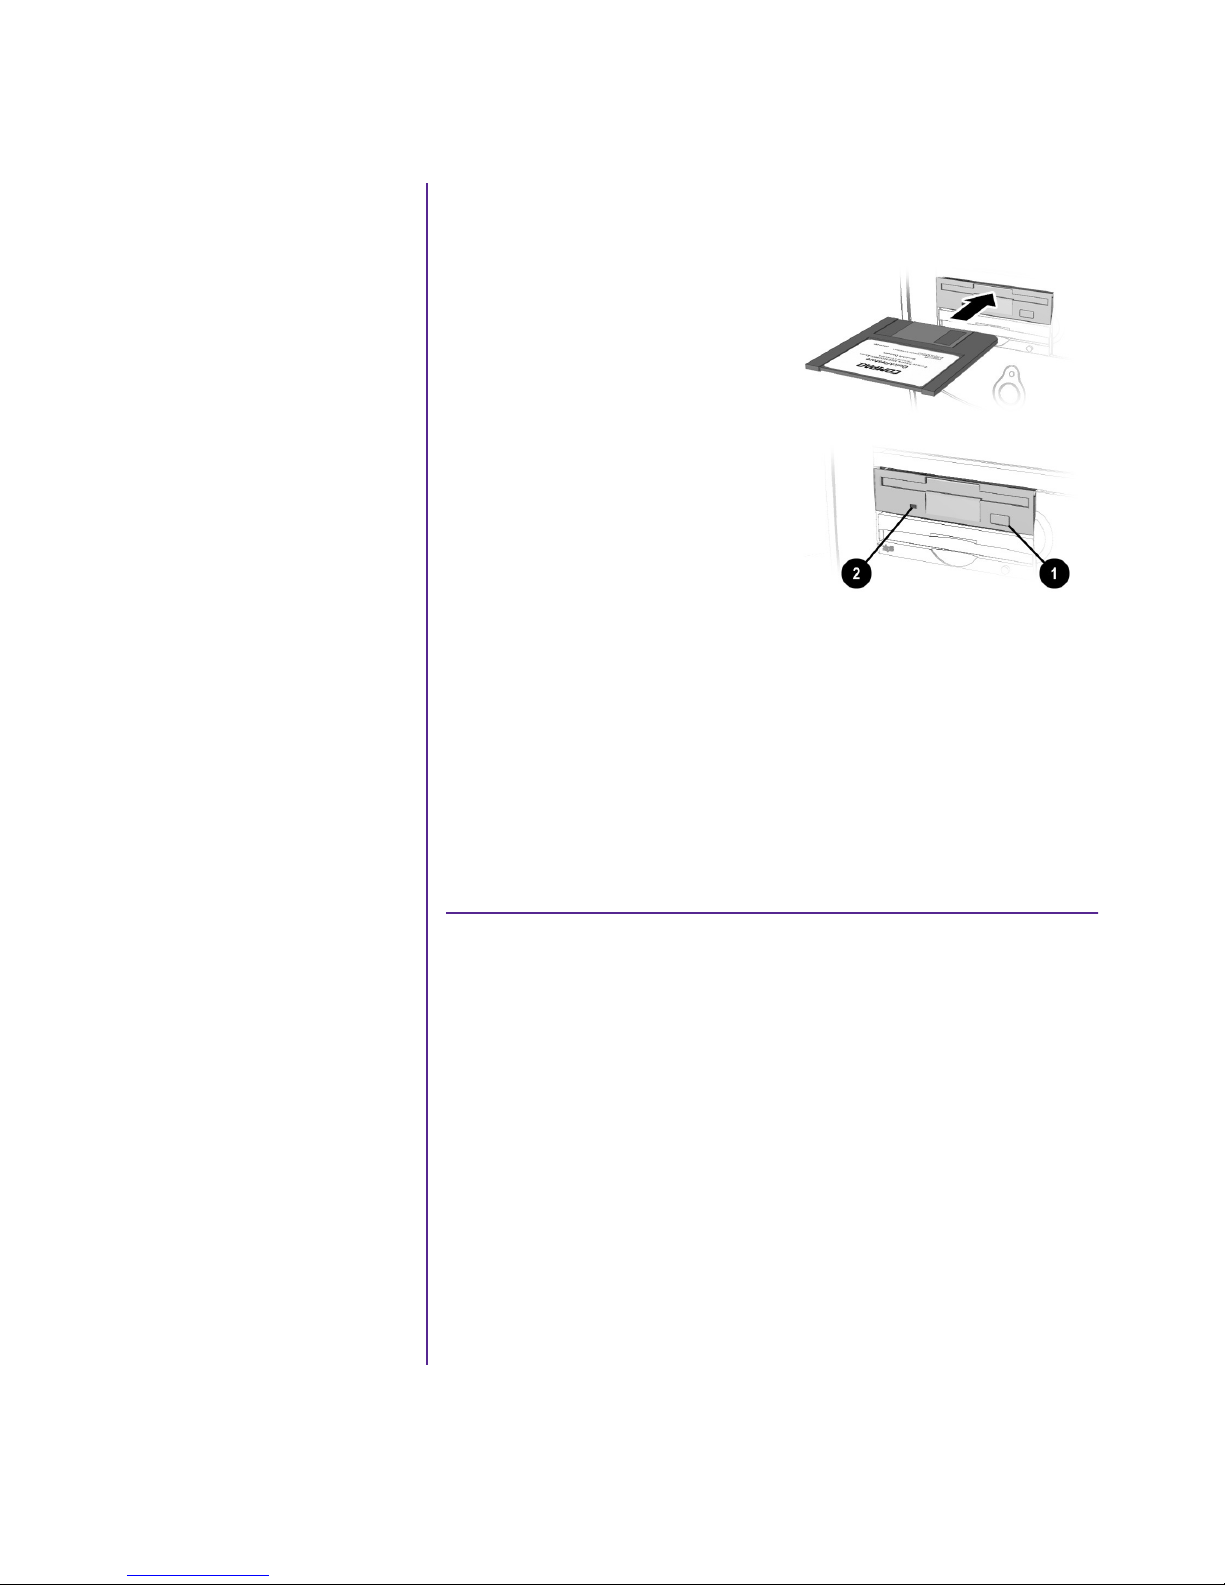
1. Hold a floppy disk with the
label facing up and the
arrow on the disk pointing
toward the drive; then gently
push the disk into the drive.
2. To remove a floppy disk,
press the Eject button 1
on the disk drive.
▲
Caution: Wait until the disk
drive activity is complete (the
activity light
before removing a floppy disk.
Removing a disk when the
drive is reading from or writing
to the disk can damage the disk
or the information stored on it.
Note: Remove the floppy disk from the drive
prior to shutting down Microsoft Windows.
stops glowing)
2
The disk drive uses a
floppy disk to store files.
Once information is
copied onto a floppy disk,
it remains there until you
delete or overwrite it.
The other drives are
discussed on the following
pages.
SING YOUR COMPUTER
4-12 U
MY P
Using the Hard Drive
The hard drive stores system files, software, and data files inside
your computer. When you install software, download files from
the Internet, receive e-mail and attachments, or create new files,
the computer saves them on your hard drive. The available storage
space is gradually filled. To regain storage space, you can delete
files or programs loaded on your computer, or save them on
external media such as disks, CD-R or CD-RW discs.
RESARIO—GETTING STARTED
Page 40
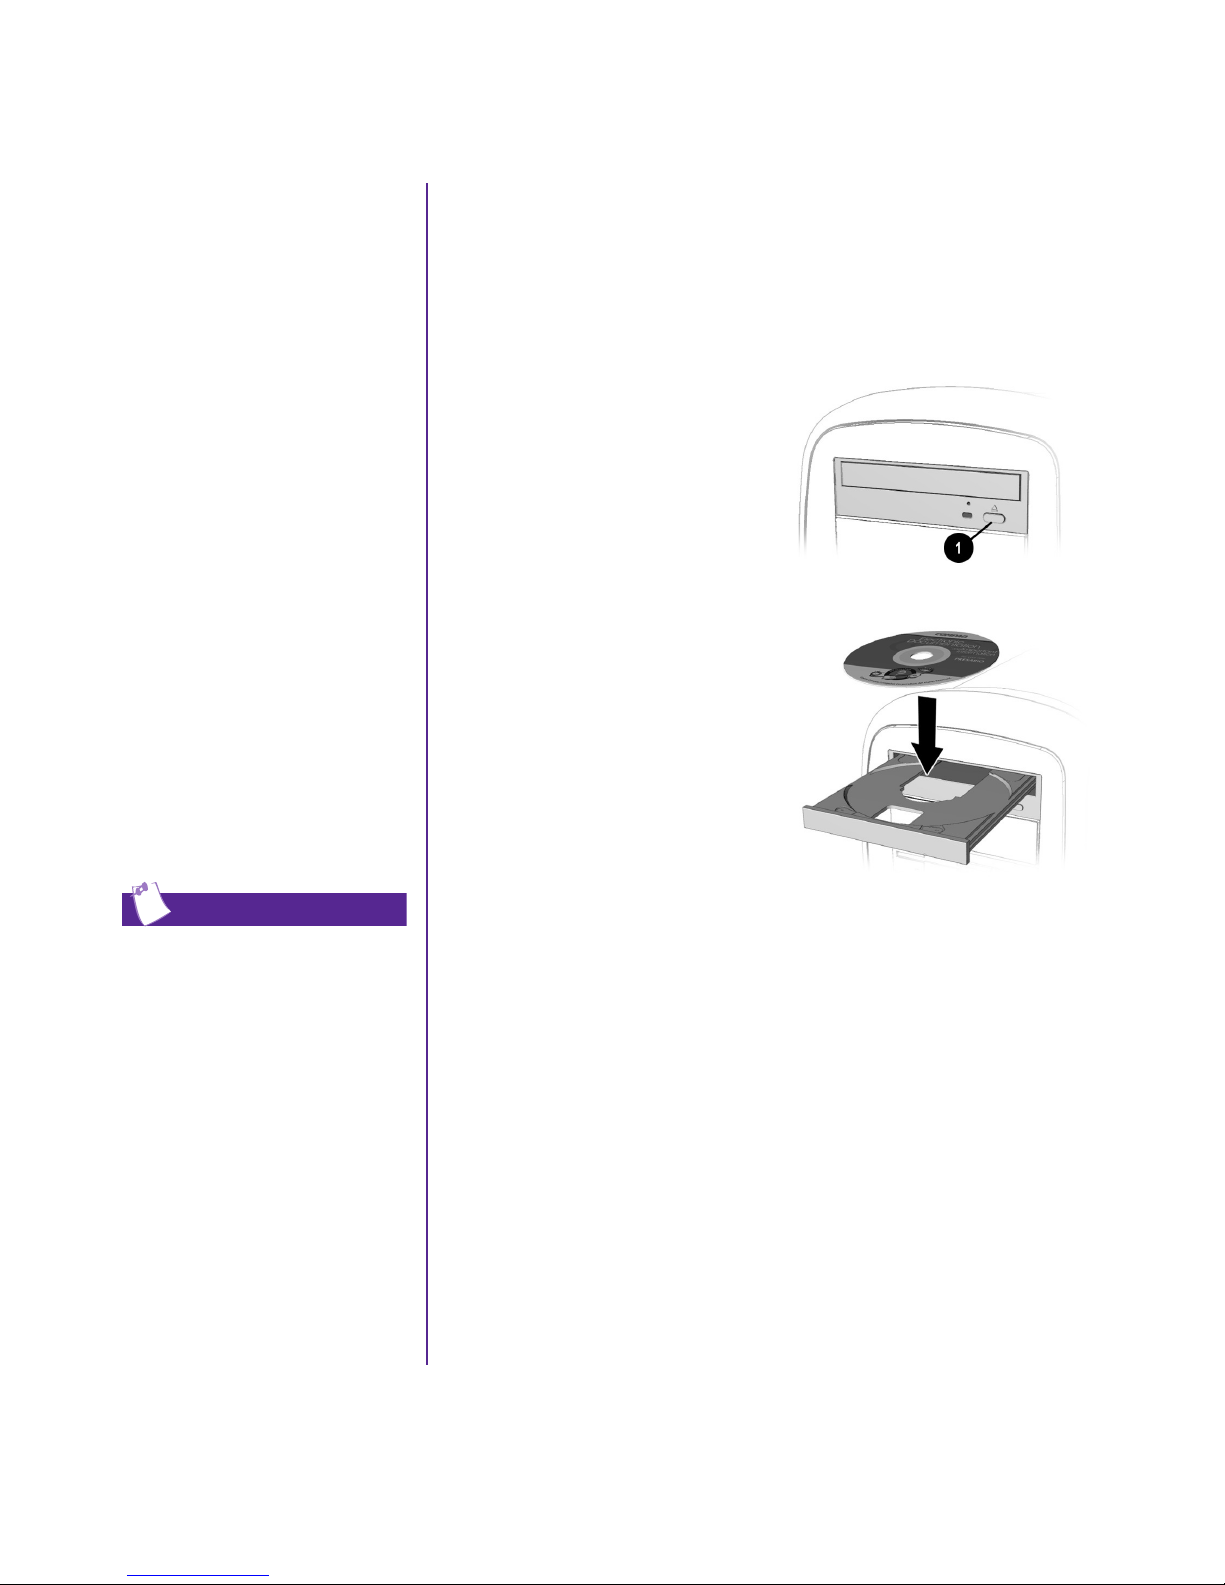
Disk, Hard
Drive, CD-ROM,
Inserting a CD into the CD-ROM, CD-RW, or
DVD-ROM Drive
(number and style of drives vary by model)
CD-RW,
DVD-ROM, and
Zip Drives, cont.
The CD-ROM drive
enables you to read data
from a CD or listen to a
music CD.
The CD-RW drive enables
you to read and write data
to a disc for storage, and
enables you to listen to
music or read data CDs.
The DVD-ROM drive
enables you to view your
favorite movies, listen to
music, or read information
from CDs.
Tip
Note: Your computer must be turned on
before you can insert or remove
a disc.
1. Press the Load/Eject ≤
1 button to open the drive.
2. Carefully lift the disc from
the CD case. Hold the disc by
the edges and the center hole
only, to avoid touching the
surface.
3. Place the disc, label side
facing up, into the round area
of the tray. If the tray
contains support tabs,
carefully slide the disc
under the tabs to position it
correctly in the tray.
4. Press the Load/Eject
1 button to close the drive.
≤
If a CD doesn’t play, make sure
the drive is closed.
RESARIO—GETTING STARTED
MY P
SING YOUR COMPUTER
U
4-13
Page 41
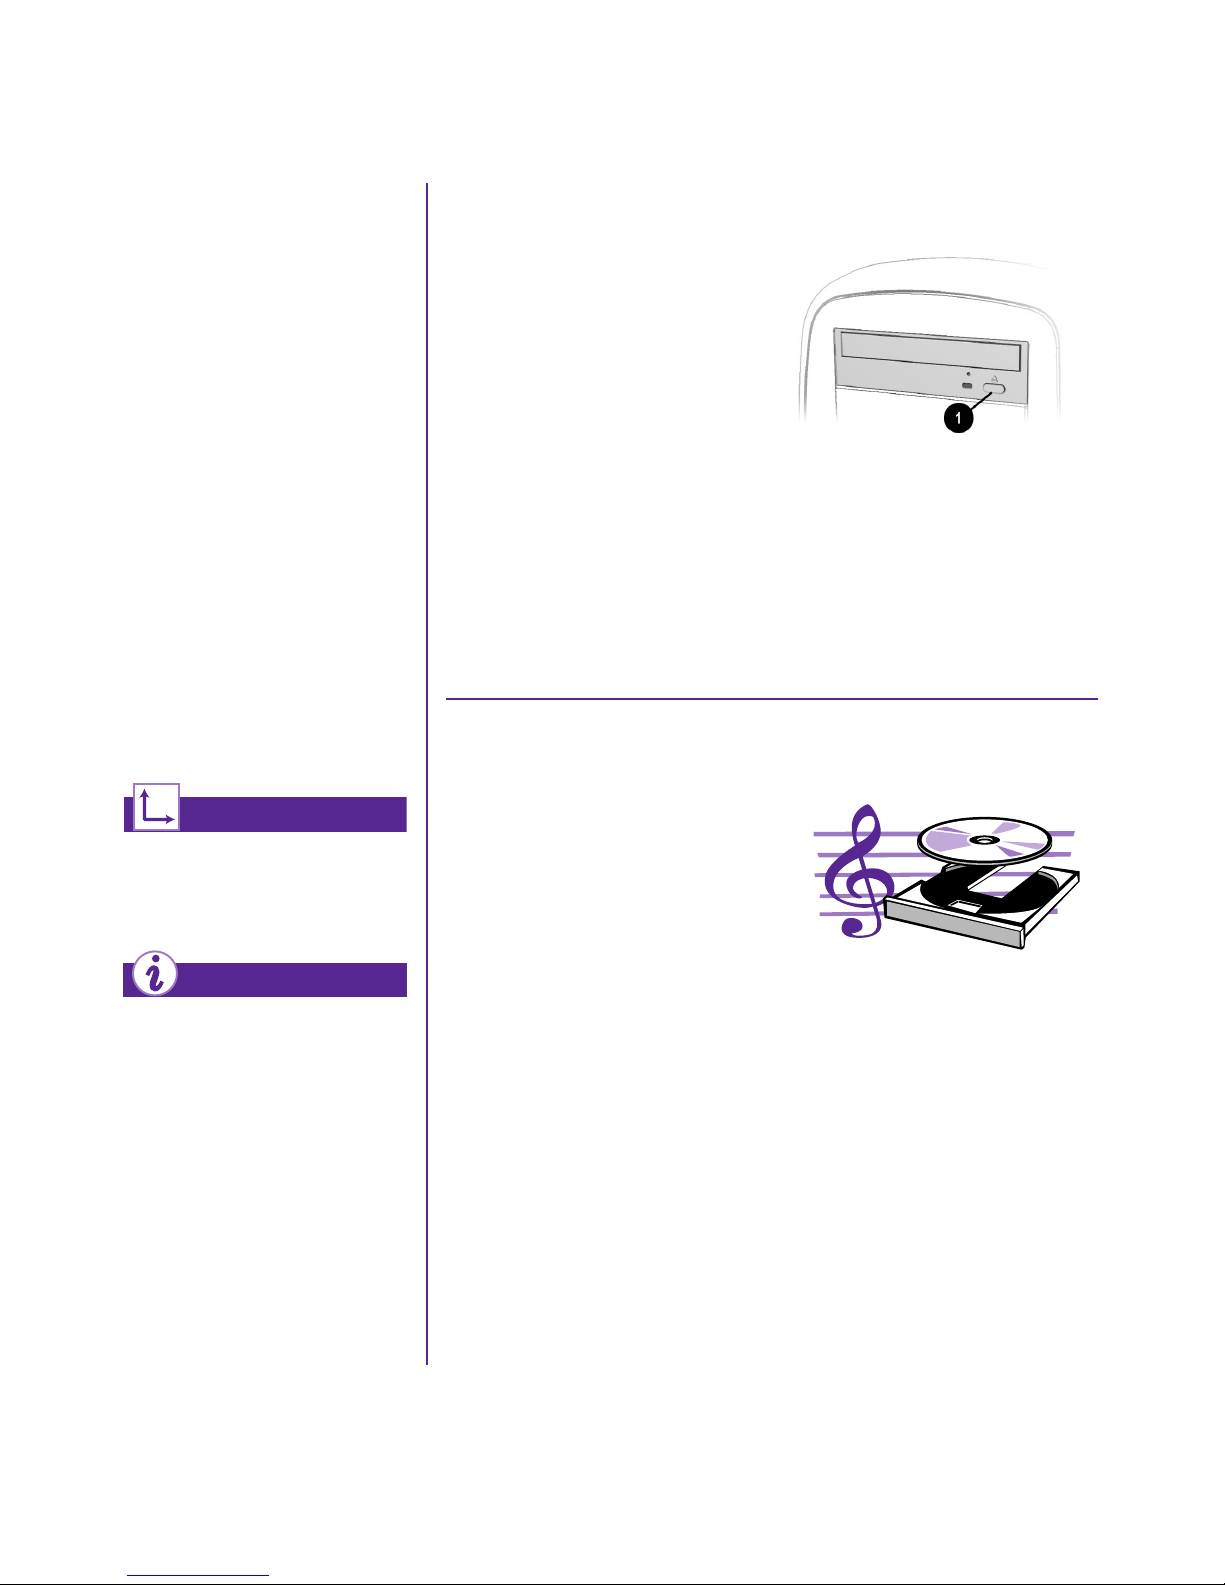
Disk, Hard
Removing a Disc from a Drive
Drive, CD-ROM,
CD-RW,
DVD-ROM, and
Zip Drives, cont.
A CD-ROM drive reads
CDs, CD-R, and CD-RW
media. A DVD-ROM drive
reads all CD media plus
DVD discs.
When you have finished
listening to the CD, store
the disc in the storage
compartment on the front
of your computer or in its
protective case.
See also ...
To adjust the volume, refer to
“Adjusting the Volume” in this
chapter.
Did you know ...
If the CD-ROM, CD-RW, or
DVD-ROM drive can’t play a
disc, check to be sure that the
disc is inserted with the label
face-up and properly seated in
the drive. The DVD-ROM drive
takes longer to begin playback
because it must determine the
type of media being played.
1. Press the Load/Eject ≤ 1
button to open the drive
2. Carefully lift the CD or the
DVD from the drive.
3. Press the Load/Eject
button on the front of the
drive to close the door.
4. Store the disc in its protective
case or in the storage
compartment on the front
of the computer.
.
≤
Playing an Audio CD
1. Insert a disc into the
CD-ROM or DVD-ROM
drive with the label face up.
2. If, after a few seconds, the
disc does not automatically
start playing, press the
Play/Pause ® button on
the keyboard.
3. Perform the following tasks using your Internet keyboard as
needed:
• Click the Play/Pause ® button to pause play.
• Click the Forward ¨ and Back ´ buttons to skip
tracks.
SING YOUR COMPUTER
4-14 U
MY P
• Click the Stop
button to stop playing the CD.
±
• Press the Eject button on the drive to remove the disc.
RESARIO—GETTING STARTED
Page 42
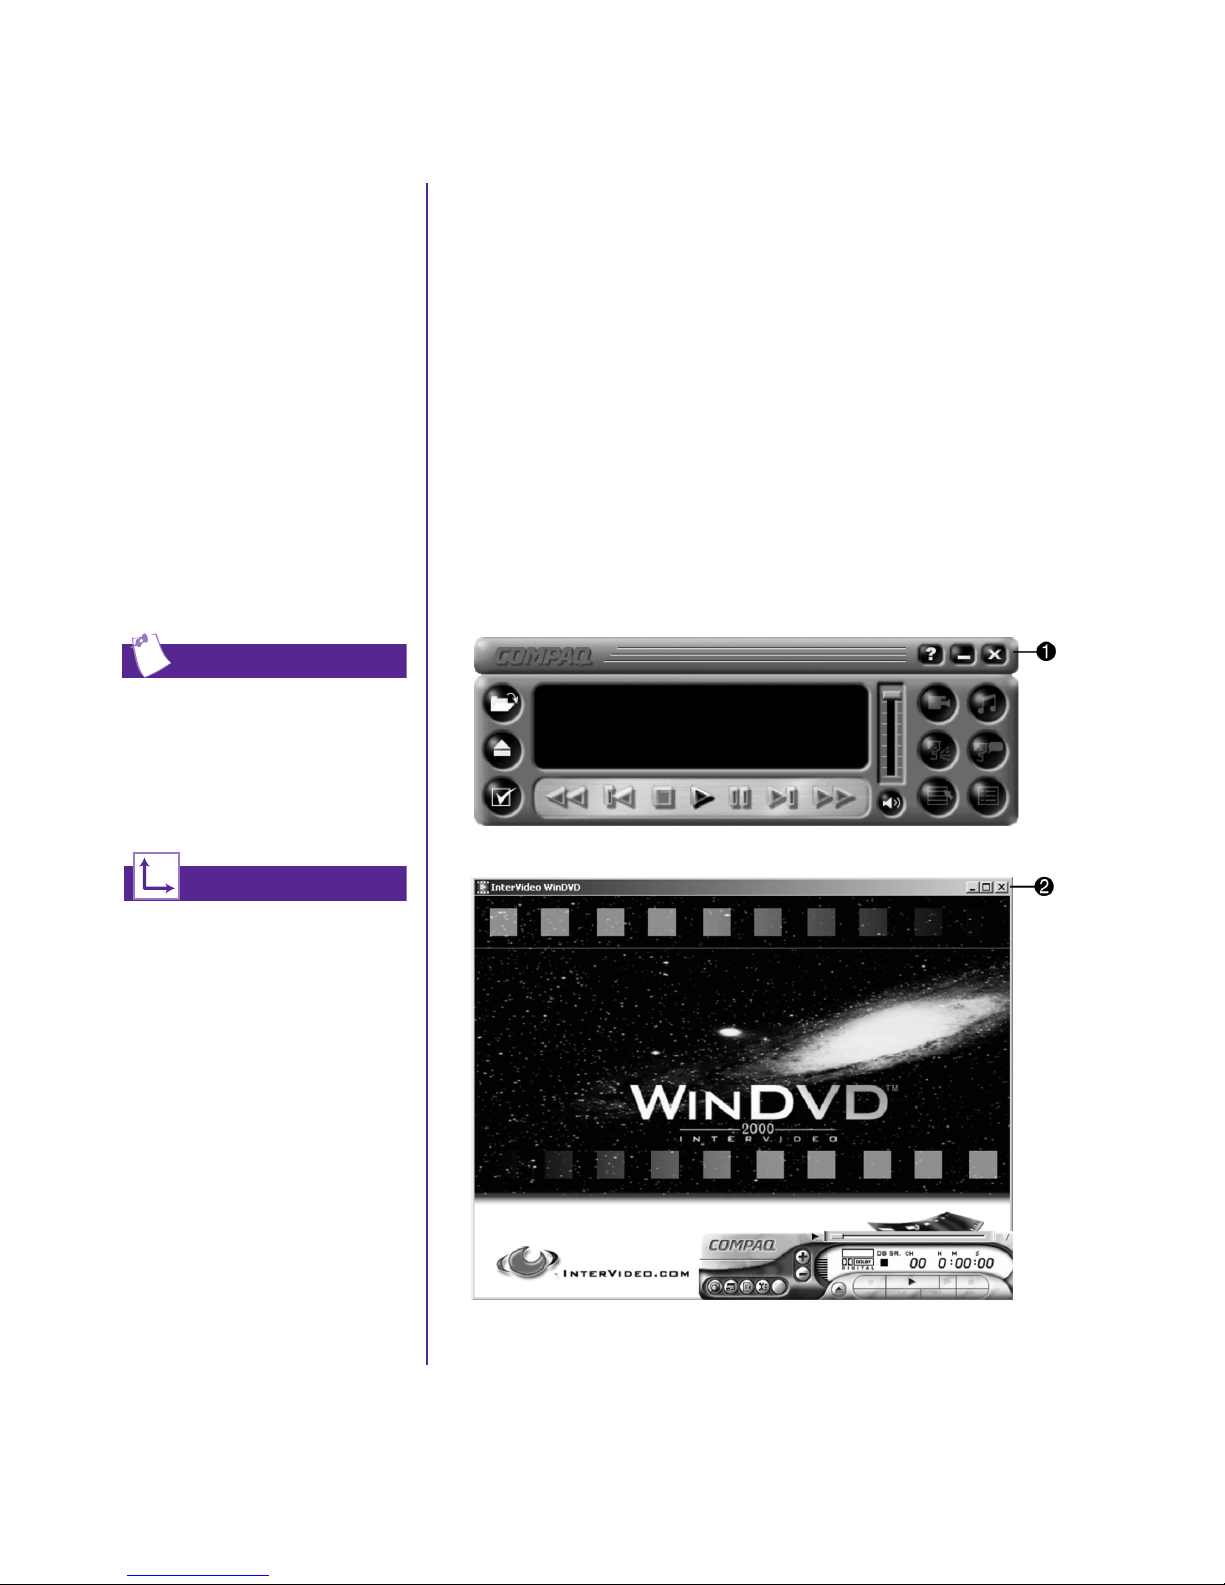
Disk, Hard
Playing a DVD-ROM Movie
Drive, CD-ROM,
CD-RW,
DVD-ROM, and
Zip Drives, cont.
You can only play a DVD
movie from a DVD-ROM
drive. When you finish
watching a movie, store
the DVD disc in its
protective case.
Tip
You can control the actions of
the DVD player (pause, rewind,
and so on.) from the CD/DVD
control buttons on the
keyboard.
1. For best performance, close all running programs before
inserting a DVD movie. Insert the DVD disc into the
DVD-ROM drive. Playback begins automatically.
2. If playback does not begin automatically, click the Start
button on the Windows taskbar.
3. Point to Programs, and then Compaq DVD Express 1.
(For the WinDVD player 2 [lower picture], point to Compaq
WinDVD.)
4. Choose Compaq DVD Player 1 (select DVD Player if you
have WinDVD 2) and then click the Play
button.
©
See also ...
Refer to “Adjusting the
Vo l u m e ” in this chapter to
adjust the volume when playing
a DVD disc.
RESARIO—GETTING STARTED
MY P
SING YOUR COMPUTER
U
4-15
Page 43
Disk, Hard
Creating Your Own CDs
Drive, CD-ROM,
CD-RW,
DVD-ROM, and
Zip Drives, cont.
The CD-RW drive allows
you to create your own CDs.
You can buy two types of
media: CD-R and CD-RW
discs.
CD-R media can be played
on most of the newer CD
players, CD-ROM, and
DVD-ROM drives. CD-R
media can be written to only
once. However, you can
write to CD-RW media
using multiple recording
sessions until you close out
the disc.
CD-RW media can be used
to make backups of your
personal CDs or hard disk.
These discs are re-usable
and can be erased and
rewritten to numerous times.
The Adaptec Easy CD
Creator software is intuitive.
When you place the cursor
over any of the functions, a
description of the function is
displayed.
CDs are created using the Adaptec Easy CD Creator (available on
select models). Various uses of the CD-RW drive are shown
below.
Note: Confirm that the Easy CD Creator software has been installed before
you begin creating CDs.
Media Uses
Audio Create personal music CDs with your favorite music
tracks and MP3/WMA files.
Data Create a data CD to store data, such as files or folders
from the hard disk. This feature is useful for backing up
important files or sharing data with other people.
Direct CD Write files directly to a CD-R/CD-RW just like you copy
files to a disk drive. Drag-and-drop files from one drive to
another in Microsoft Explorer without accessing Easy CD
Creator.
CD Copier Create an entire copy of a CD or a backup of data files.
Jewel Case
Creator
Note: There is an extensive online Help built into the software. To view online
Help you must load Adobe Acrobat Reader from the My Presario—
Learning More CD.
Make custom jewel case inserts and CD labels to indicate
the title and contents of a CD (labels are sold separately).
See also ...
For more information about using
the CD-ROM, CD-RW, or
DVD-ROM drives, refer to the My
Presario—Learning More CD.
SING YOUR COMPUTER
4-16 U
MY P
RESARIO—GETTING STARTED
Page 44
Disk, Hard
Drive, CD-ROM,
Inserting a Disk Into the Zip Drive
(available on select models)
CD-RW,
DVD-ROM, and
Zip Drives, cont.
The Zip drive makes
organizing, copying, storing,
and transporting large files
easy. The Zip drive uses a
Zip disk, which gives you
more storage space than a
floppy disk. A Zip disk
offers extra space for the
following types of tasks:
Storing files from the
➜
Internet
Backing up files from
➜
the hard drive
Storing games
➜
Saving school or class
➜
projects
Saving family files
➜
and budget records
Creating a multimedia
➜
library with image,
sound, and video files
Note: Your computer must be turned on
before you can insert a Zip disk.
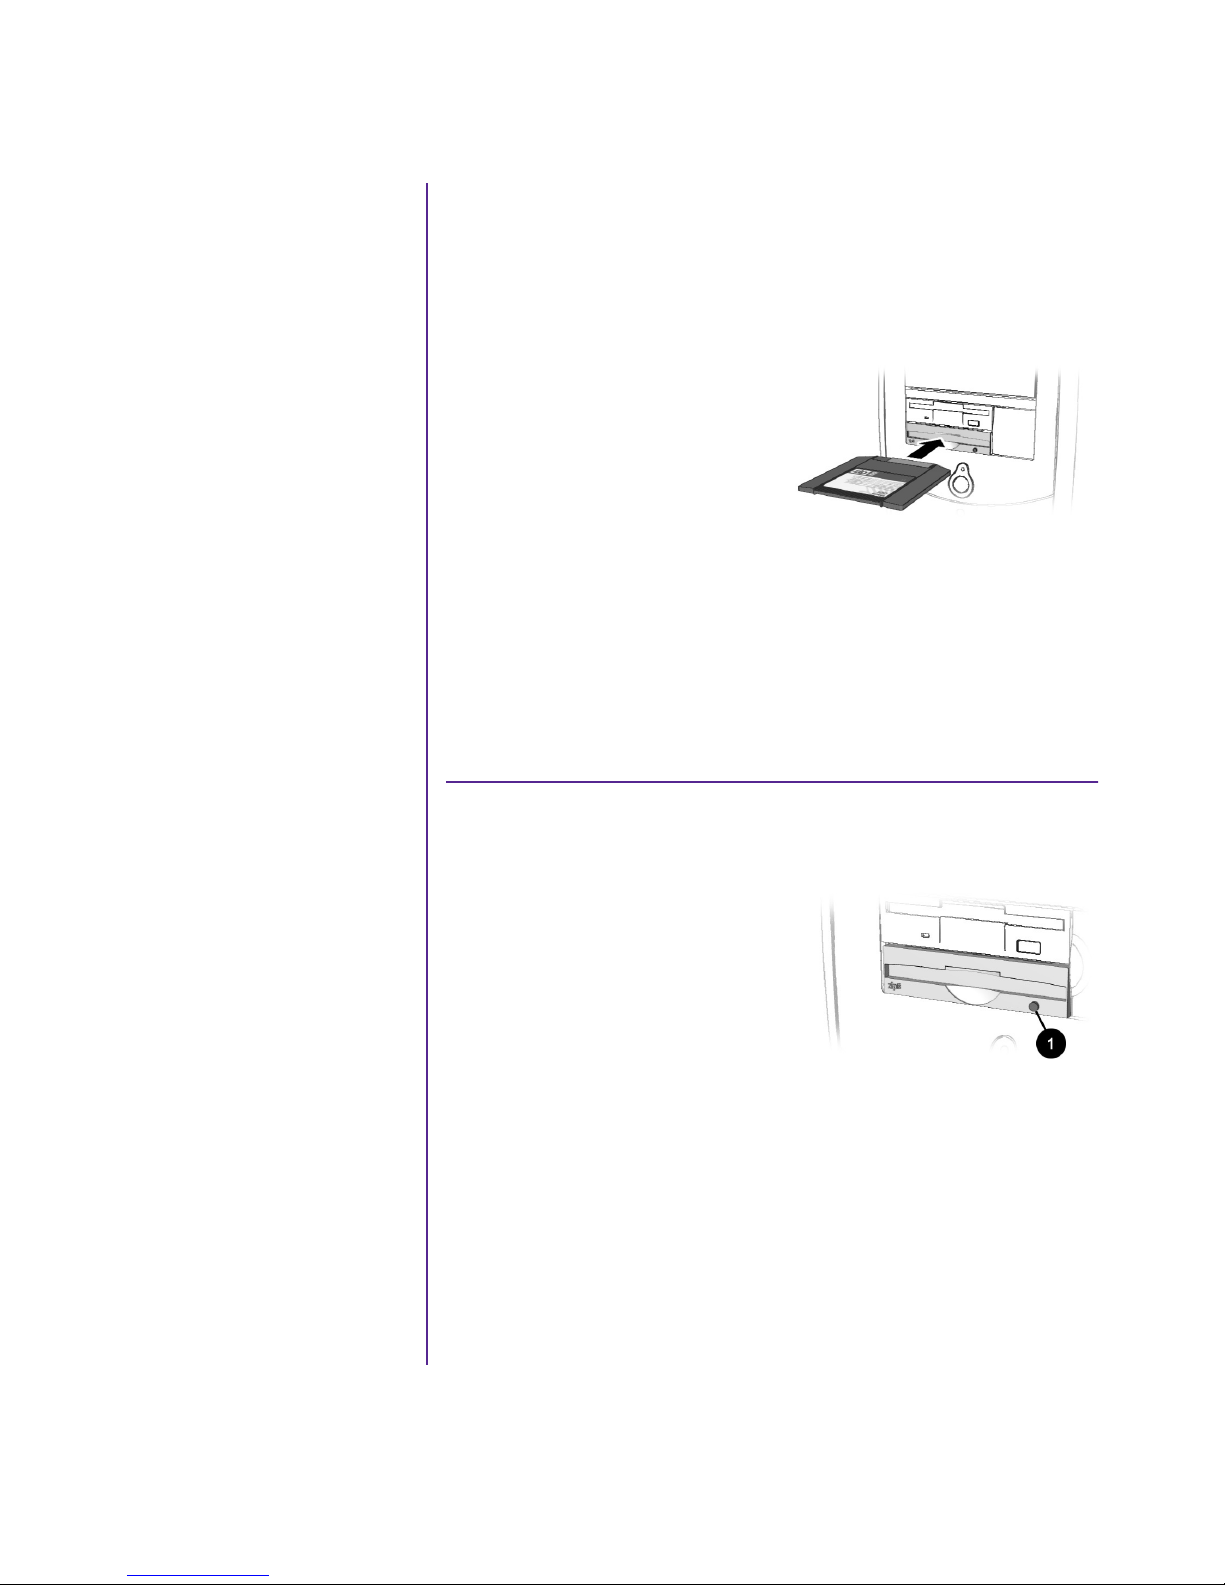
1. Hold the Zip disk,
label-side facing up, and
gently push the disk into
the Zip drive until you hear
it snap into place.
2. Right-click the Start
button, and select Explore.
3. Browse in Windows Explorer
to locate the Zip drive, which
shows the Zip drive n icon.
4. Move or copy files to and from
the Zip drive as needed.
Removing a Disk from the Zip Drive
1. Press the Disk Eject
button 1 to eject the disk.
2. Store the Zip disk in its
protective case.
Note: If you leave a Zip disk in the
drive when you turn off your
computer, the disk will be
ejected automatically.
RESARIO—GETTING STARTED
MY P
SING YOUR COMPUTER
U
4-17
Page 45
Internet Video
Camera
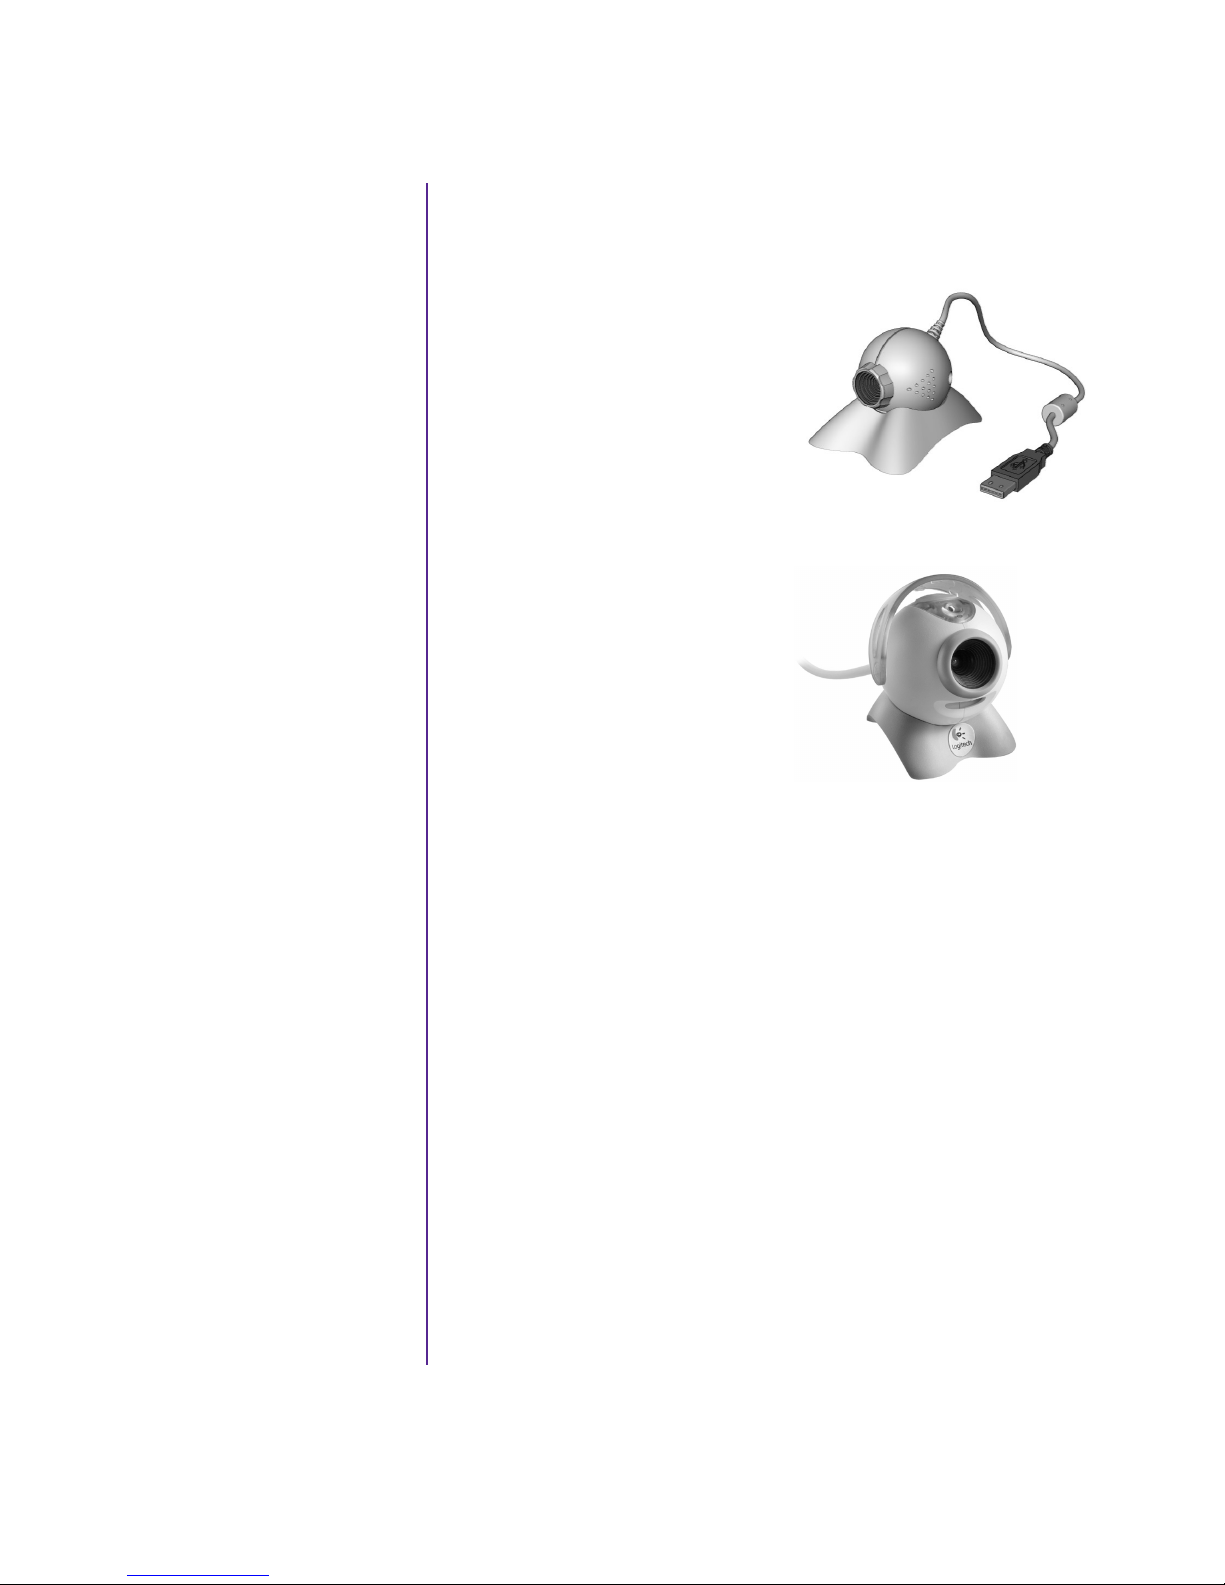
The Logitech QuickCam
Express Internet video
camera provides many
useful features:
Captures images at the
➜
touch of a button
Sends photo and video
➜
e-mail as easily as text
Allows video chatting
➜
for a face-to-face
get-together with
faraway friends and
family
Enables you to save,
➜
print, or send an image
over the Internet with
easy-to-use software
Quickly creates a
➜
personal video
Using the Logitech QuickCam Internet
Video Camera
The Logitech camera installs
within minutes. Refer to the
Logitech documentation packed
with the camera for detailed
operating instructions.
Note: Do NOT plug the camera into
your Internet PC until instructed
to do so during the QuickCam
software installation.
The camera software comes with
free access to the Logitech
Spotlife Web site which includes
15 MB of free Web space for:
Video broadcasting live over
➜
the Internet
Chatting directly with
➜
viewers using text or audio
Visit the Spotlife Web site at
www.compaq.com/go/spotlife
(available on select models)
Has one-click We b
➜
camming, which lets
you put the special
events in your life
online
SING YOUR COMPUTER
4-18 U
MY P
RESARIO—GETTING STARTED
Page 46
Welcome to
the Web
In just a few moments, you will
In This Chapter
Basic Concepts, 5-2
Compaq Connection Helper,
5-3
Internet Connection, 5-4
Web Searches, 5-5
E-mail, 5-6
Content Advisor, 5-10
be on the World Wide Web. It is
estimated that thousands of new
users will join you in connecting
to the Internet for the very first
time!
In this chapter, you begin to
explore the endless possibilities
of the Internet—e-mail,
shopping, news, entertainment,
research, education, and much
more. Separate procedures are
provided for Compaq.NET
powered by MSN and American
Online (AOL) users.
5
My Presario Web Site, 5-12
RESARIO—GETTING STARTED
MY P
Welcome to the World Wide Web.
You are about to enter a very exciting
new world!
ELCOME TO THE WEB
W
5-1
Page 47
Basic Concepts
What Is the Internet?
Internet, Web, URL,
hyperlinks, cyberspace—
sound confusing?
The Internet definitely has
its own terminology. Take
a few moments to
understand some basic
concepts that will help you
start surfing the Web.
To begin surfing, you need
to establish an Internet
Service Provider (ISP)
account.
See also ...
Refer to the “Setting Up Your
Computer” chapter in this
guide for information on how
to register for an ISP account.
The Internet is a network of
computers connected using
standard telephone lines. The
Internet is worldwide, like the
telephone system.
The Internet stores and transmits
documents, pictures, music, and
movies provided by computer
users from all over the world.
When information on a particular
topic, or on related topics, is
gathered in one location on the
Internet, that’s called a Web site.
What Is a Hyperlink?
Imagine you're reading a
newspaper. As you read page 1, it
says something like “For more
details, see page 3, column 2.”
ELCOME TO THE WEB
5-2 W
Hyperlinks in a Web site work
the same way. Use the mouse to
click a hyperlink and you can
move instantly from page to
page, Web site to Web site.
Linking files together is what
gives the Web its name, weaving
and connecting idea to idea,
all over the world.
MY P
RESARIO—GETTING STARTED
Page 48
Compaq
Setting the Internet Buttons to AOL
Connection
Helper
Once you have signed up
with an Internet Service
Provider (ISP), there are a
few things you need to
know to be able to surf the
We b.
If you choose
Compaq.NET powered by
MSN as your ISP, the
Internet buttons on your
keyboard are automatically
set. However, if you
choose AOL as your ISP,
you need to use the
Compaq Connection
Helper to reset the
following Internet buttons
on your keyboard:
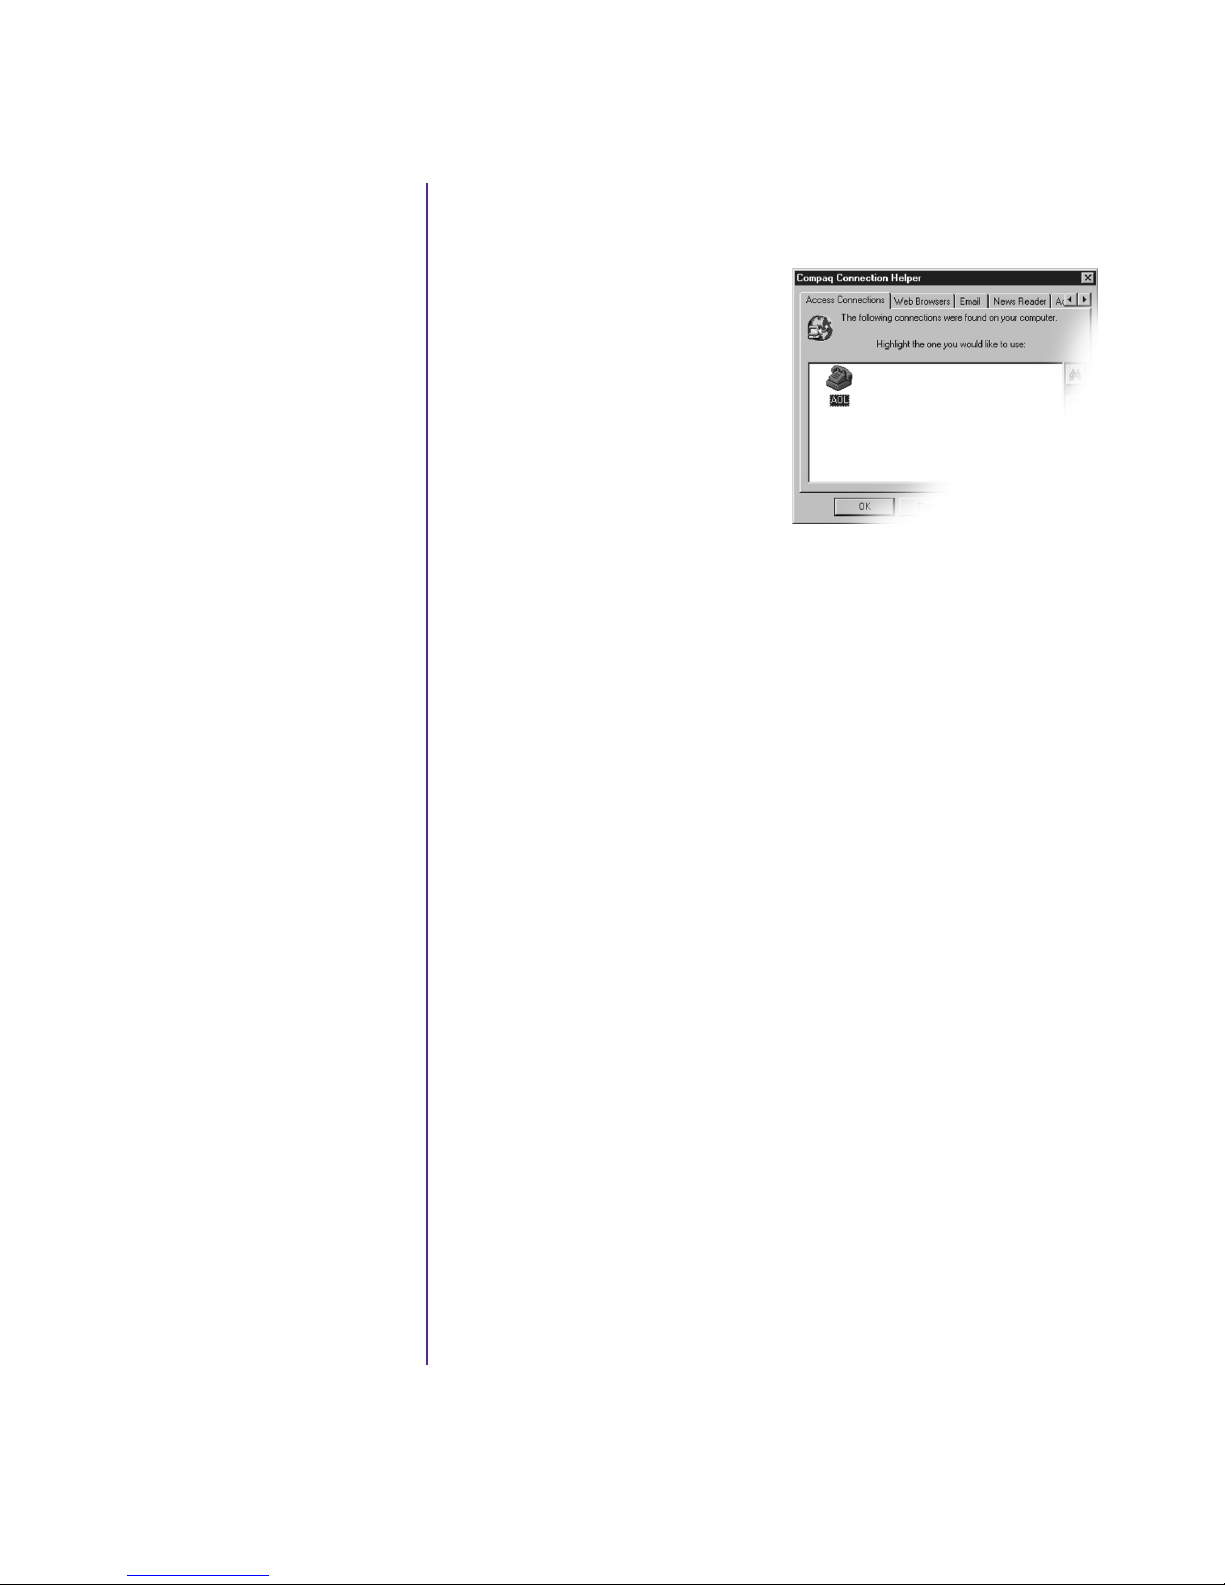
1. On the Windows taskbar,
click the Start button.
2. Point to Programs, and then
Compaq Utilities.
3. Choose Compaq
Connection Helper. The
Compaq Connection Helper
dialog box is displayed.
4. Double-click the AOL icon.
The Internet keyboard buttons
will now access AOL.
Instant Internet
➜
Search
➜
Instant E-mail ƒ
➜
RESARIO—GETTING STARTED
MY P
F
∆
ELCOME TO THE WEB
W
5-3
Page 49
Internet
Connection
Web pages are viewed with
a Web browser, such as
Microsoft Internet
Explorer or Netscape
Navigator. A Web browser
is a program that lets you
view and explore
information on the Web.
Common features of a
Web browser include:
Home page—your
➜
starting point for
exploring the Web
Bookmarks/
➜
Favorites—a list of
Internet addresses you
often visit
Connecting with Compaq.NET
Powered by MSN
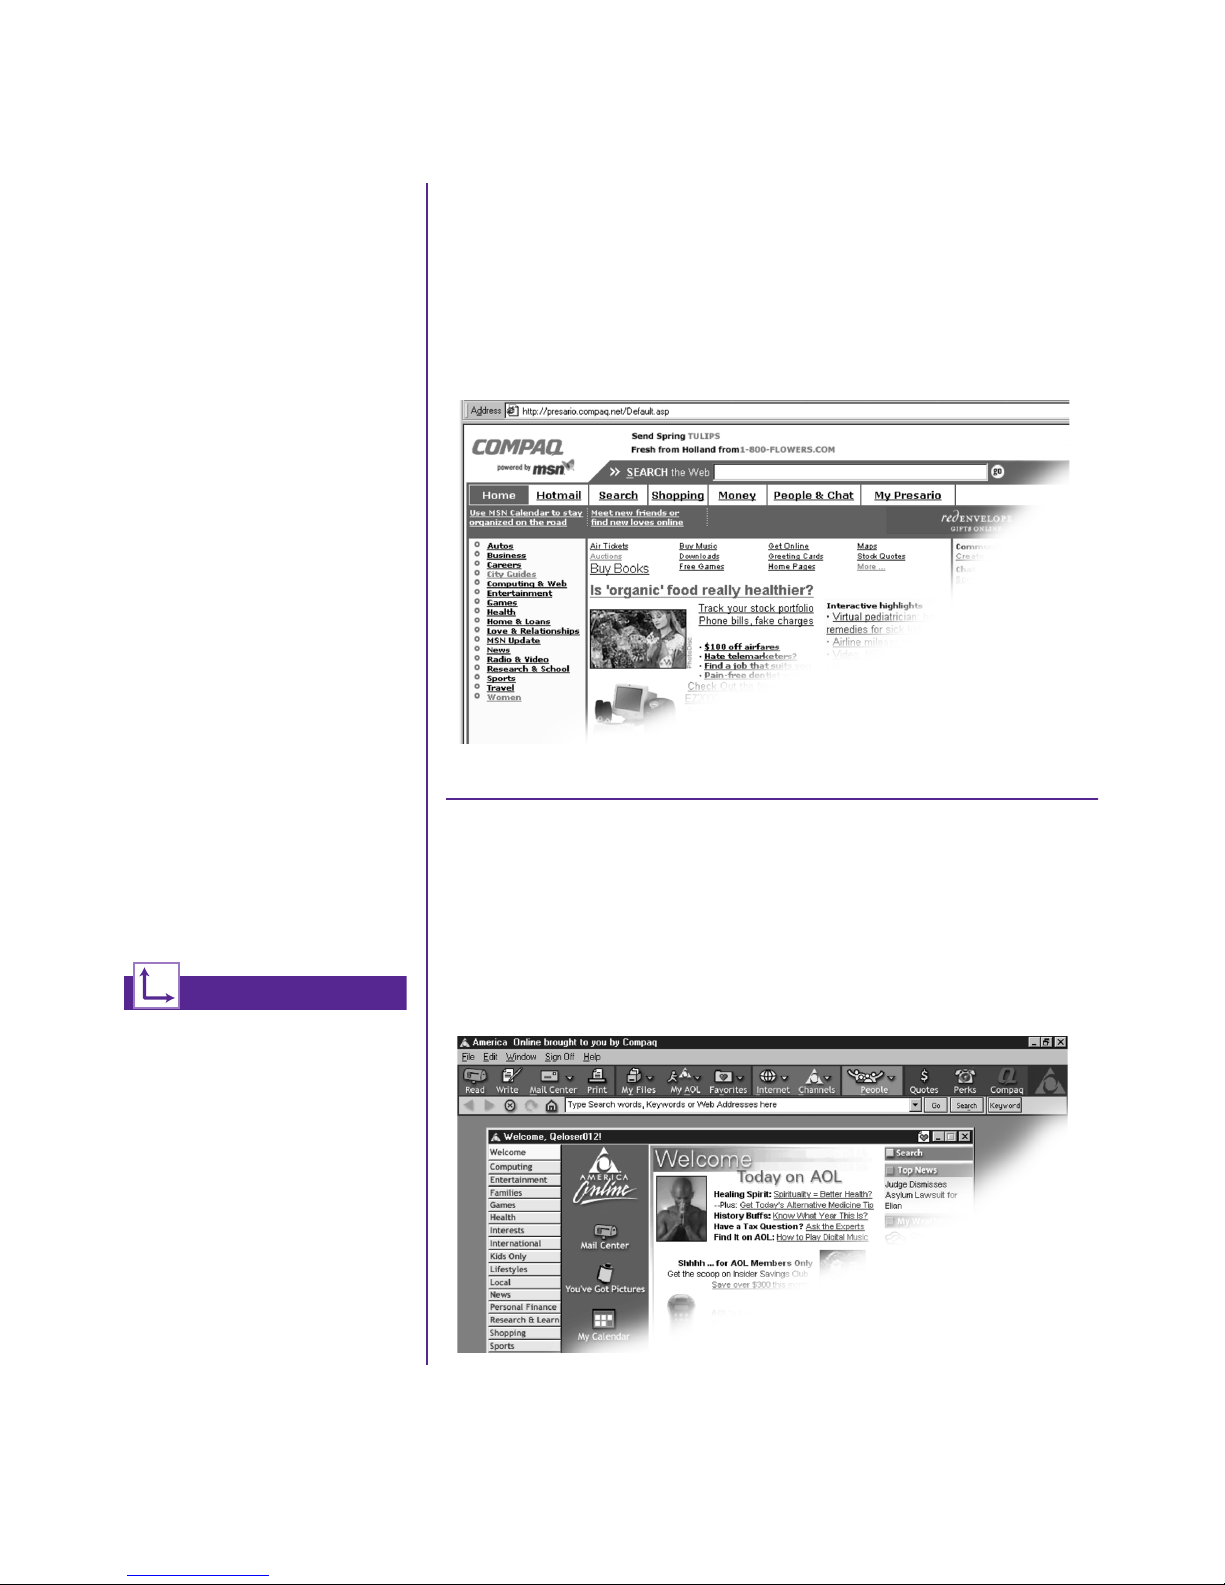
If you have chosen Compaq.NET powered by MSN as your ISP,
press the Instant Internet
powered by MSN home page.
button to access the Compaq.NET
∆
History list—a list of
➜
Web sites you have
visited
See also ...
The My Presario—Learning
More CD has more information
on Web browsers, e-mail, and
news reader settings.
Note: Depending on the version
of AOL you are using, your
screen may vary.
ELCOME TO THE WEB
5-4 W
MY P
Connecting with AOL
If you have chosen AOL as your ISP and completed “Setting the
Internet Buttons to AOL,” press the Instant Internet
access the AOL home page. The appearance of your screen varies
with the version of AOL.
button to
∆
RESARIO—GETTING STARTED
Page 50
Web Searches
One way to find what
you’re looking for on the
Web is to use a search
engine—your personal
guide to the Web.
A search engine takes
information that is
scattered on Web sites all
around the world and lists
it for easy viewing and
printing.
Searching the Web Using Compaq.NET
Powered by MSN
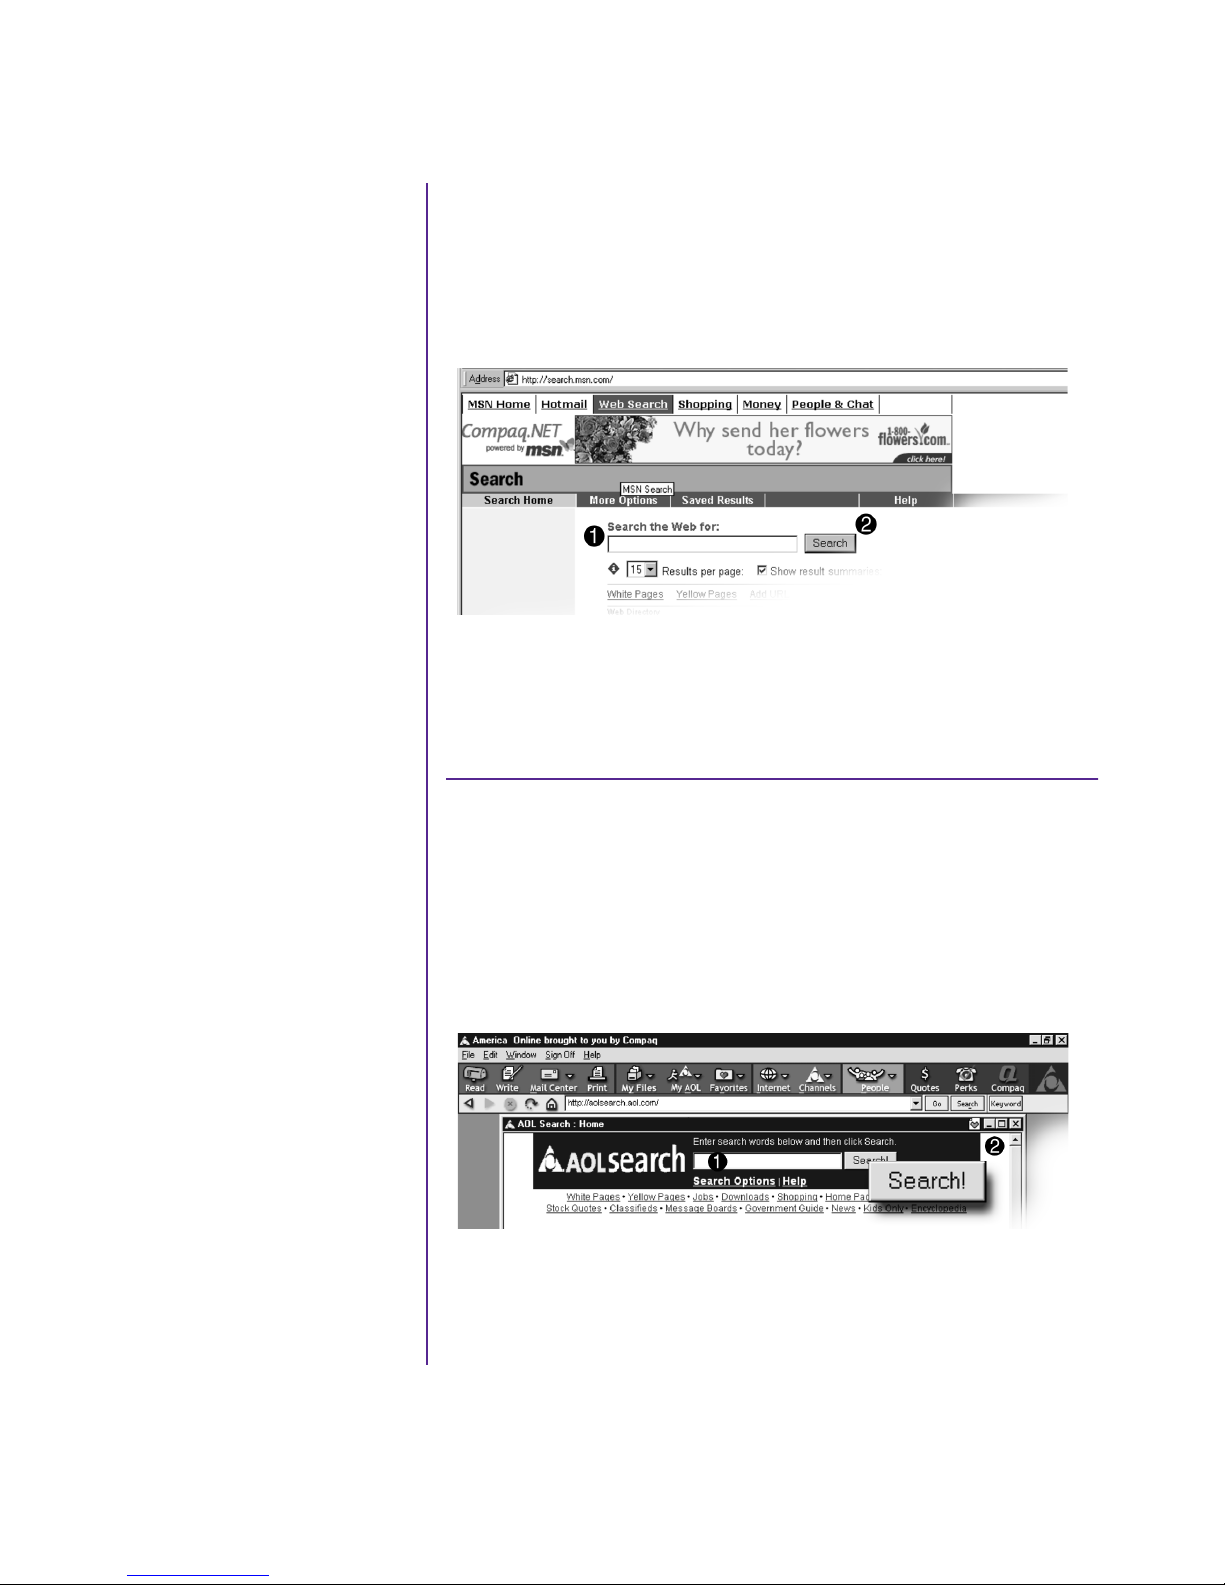
1. Press the Search
The search page is displayed.
2. Enter a keyword in the Search box 1.
3. Click the Search button 2. The search engine displays a list
of Web pages containing your keyword.
button on the Internet keyboard.
F
RESARIO—GETTING STARTED
MY P
Searching the Web Using AOL
1. Complete the “Setting the Internet Buttons to AOL”
procedure.
2. Press the Search
The AOL search page is displayed.
3. Enter a keyword in the Search box 1.
4. Click the Search! button 2. The search engine displays a list
of Web pages containing your keyword.
button on the Internet keyboard.
F
ELCOME TO THE WEB
W
5-5
Page 51
E-mail
Setting Up Outlook Express E-mail
E-mail (electronic mail) is
very similar to the mail the
postal carrier delivers to
your home or office,
except much faster.
You can send letters,
pictures, postcards, even
music and video clips, to
friends, family, and
co-workers in an instant.
Outlook Express is an
e-mail program that comes
with your computer. Other
e-mail programs include
AOL and Hotmail.
Tip
If you receive an error message
saying that your e-mail was
undeliverable, check the
address, punctuation, and
spacing, and then try sending it
again.
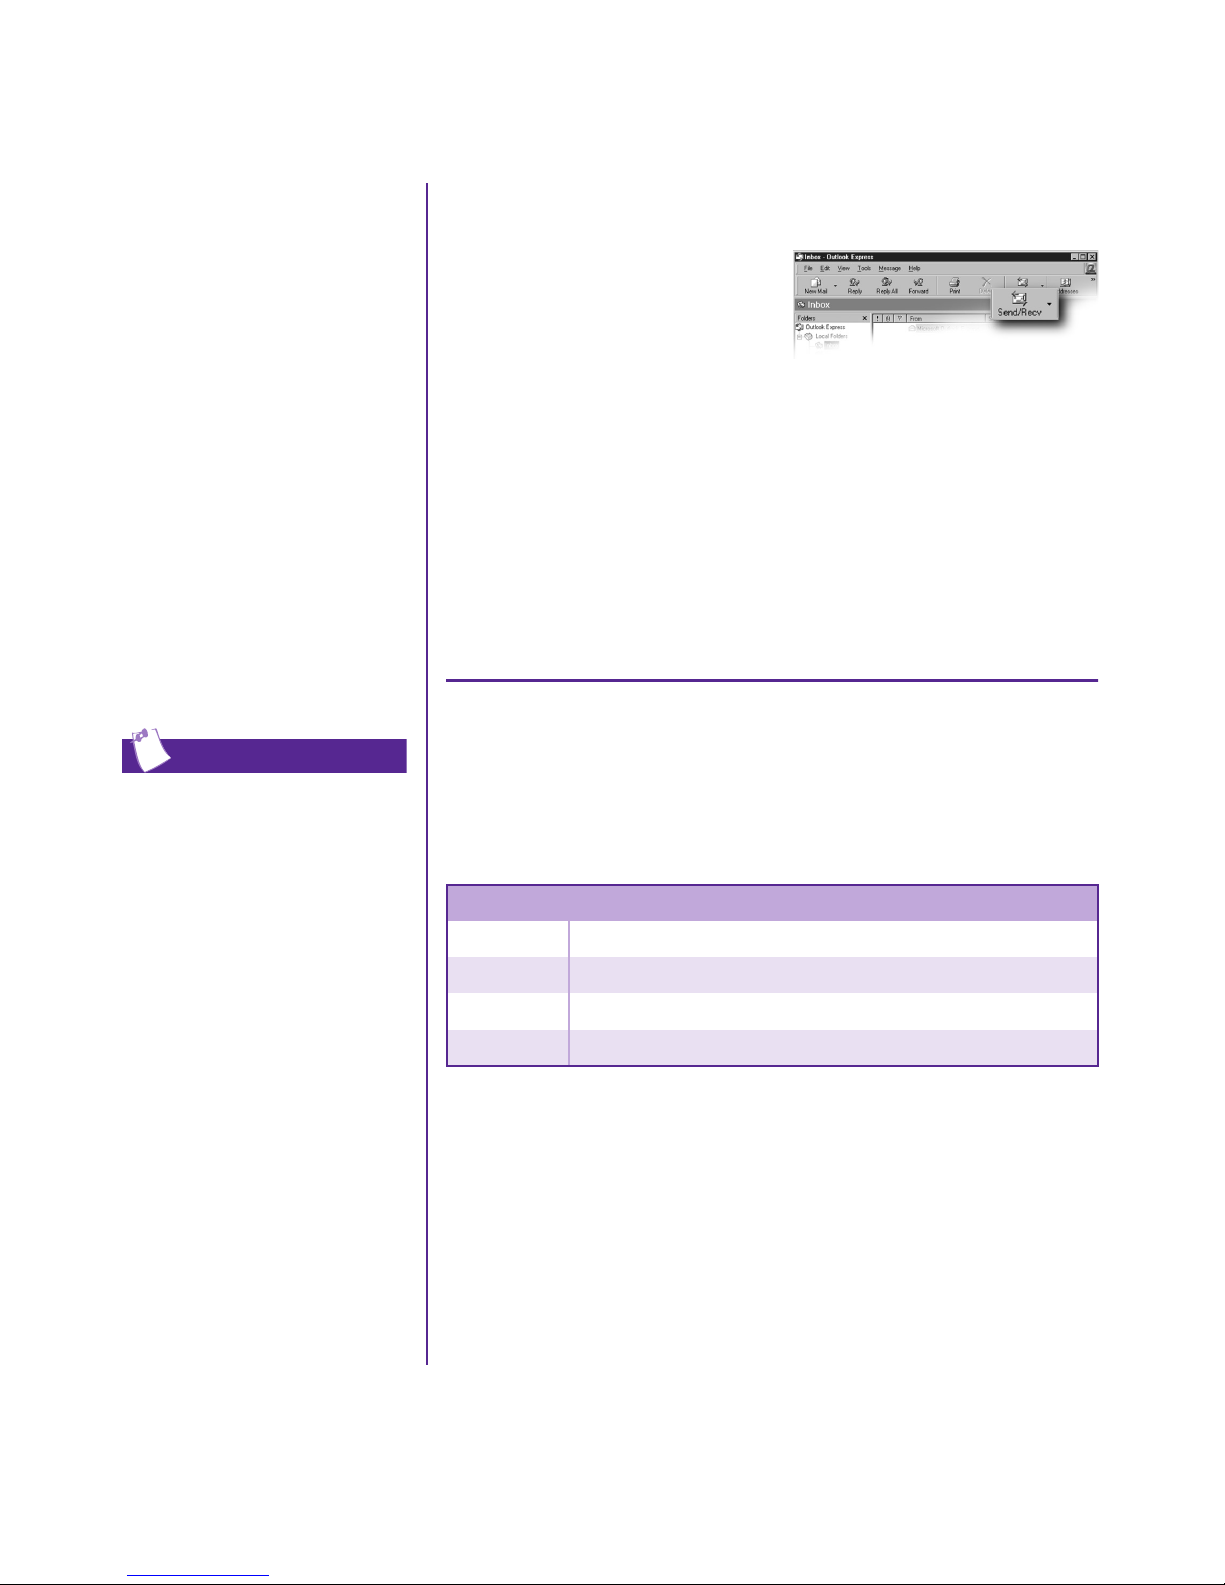
1. Press the Instant E-mail
ƒƒƒƒ
button on the Internet
keyboard.
2. Click the Send and Receive
button on the toolbar. A
dialog box requesting
your password is displayed.
3. Type a password.
4. Click Remember Password.
5. Click OK. You are now set
up and ready to use e-mail.
Typing an E-mail Message
Regardless of the e-mail software you choose, creating an e-mail
message is like filling out a form. When typing an e-mail
message, you must complete the following:
Feature Description
To : E-mail address of the recipient
ELCOME TO THE WEB
5-6 W
Cc:
Subject: Summary of your message in a few words
Message:
MY P
Person(s) receiving a copy of your message
Content of your message
RESARIO—GETTING STARTED
Page 52
E-mail, cont.
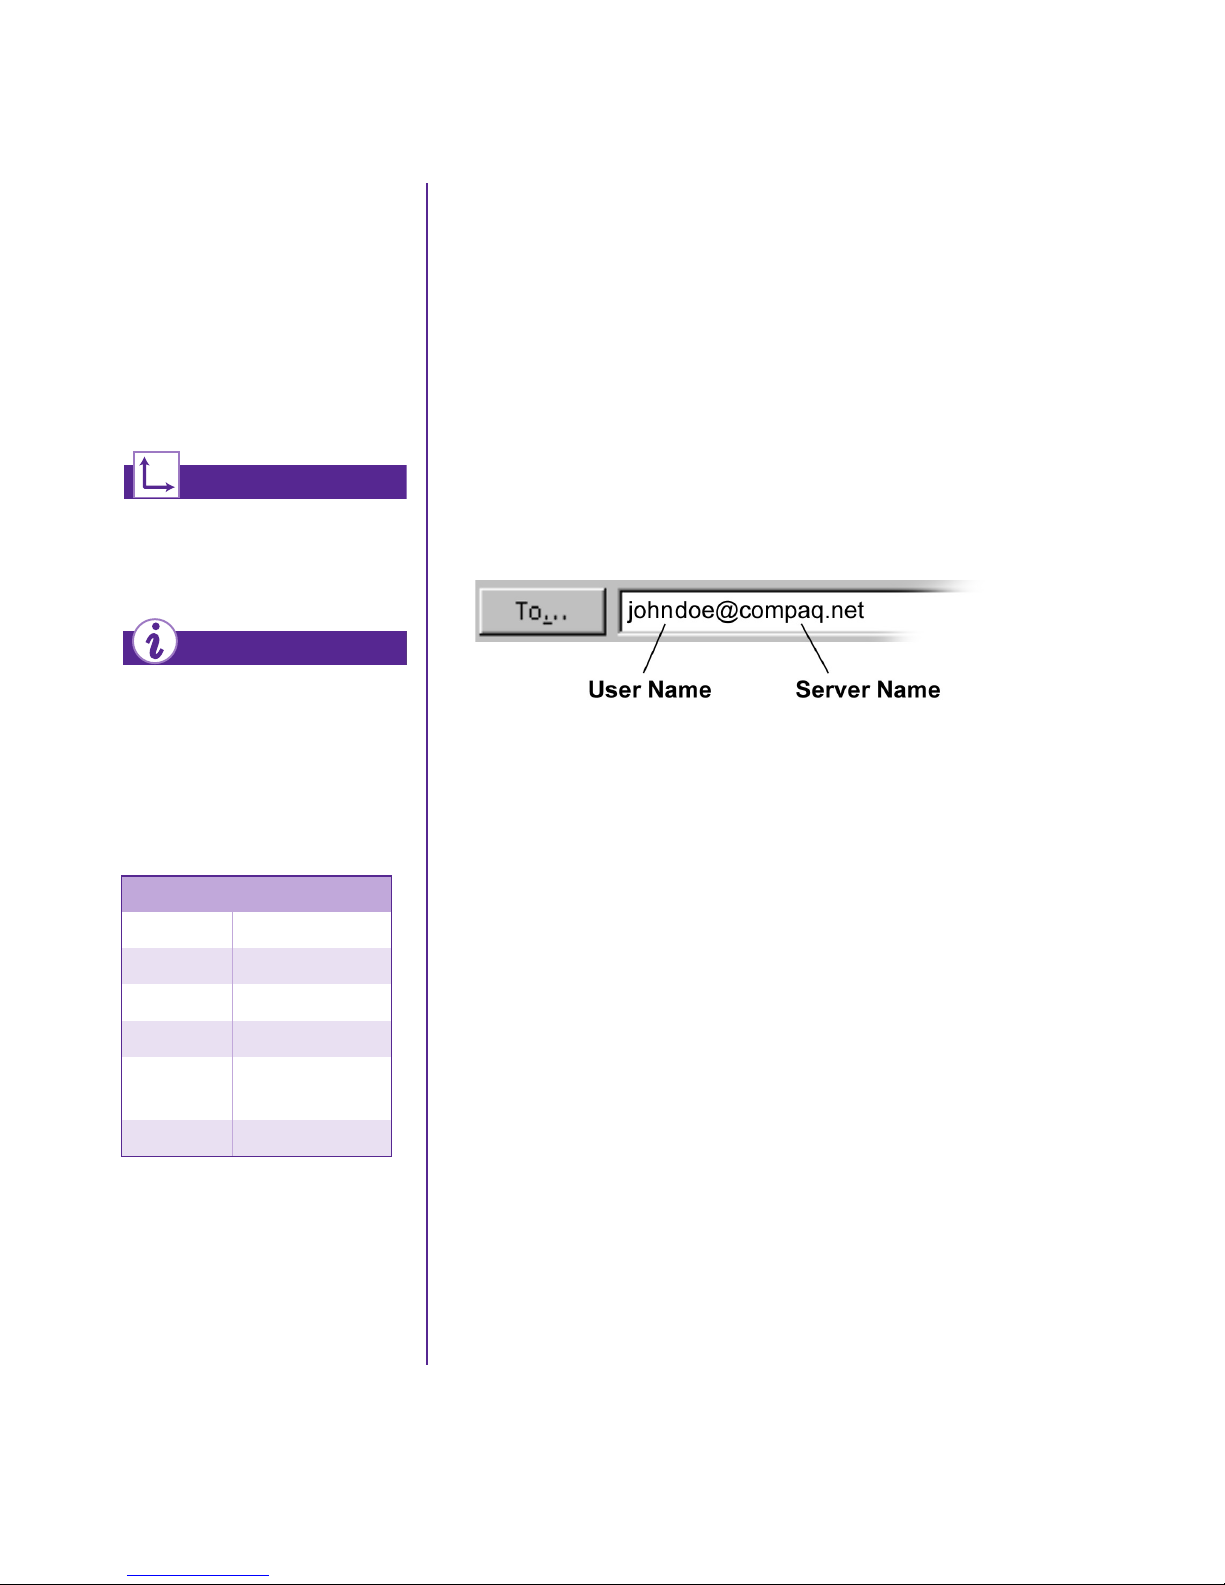
Understanding E-mail Addresses
To send and receive
e-mail, you need an e-mail
address so that your
Internet Service Provider
(ISP) will know where to
pick up and deliver mail.
See also ...
The My Presario—Learning
More CD has information on
finding e-mail addresses.
Did you know ...
E-mail extensions identify the
type of server where an
organization resides. Some of
the most common e-mail
extensions and their
descriptions are as follows:
Some ISPs allow you to pick an e-mail address, but others require
you to follow a set pattern:
your name
➜
@
➜
ISP server name
➜
ISP names can be longer and more complex, but basically
anything to the right of the @sign is the ISP server name and
anything to the left is the user name. For example:
Extension Description
.org organization
.com commercial
.net network
.edu education
.gov government
agencies
.mil military
RESARIO—GETTING STARTED
MY P
ELCOME TO THE WEB
W
5-7
Page 53
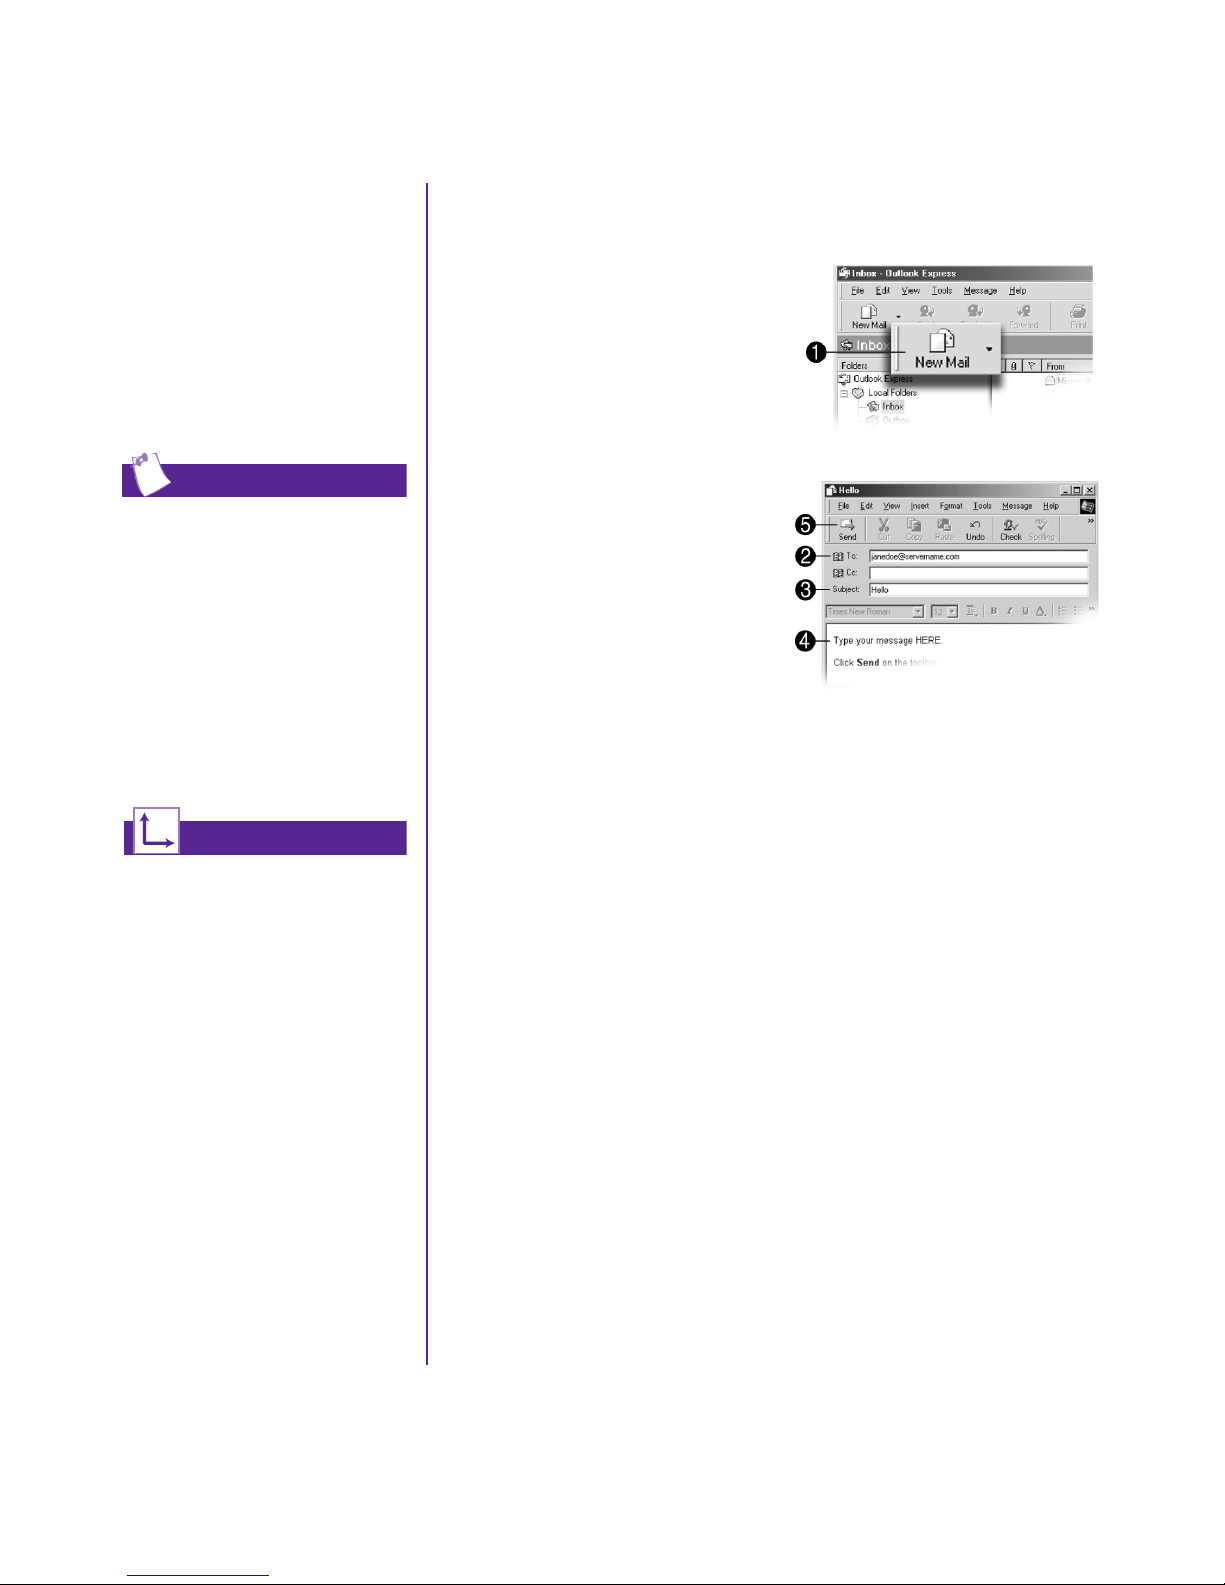
E-mail, cont.
Sending an E-mail Using Outlook Express
Now that you’ve connected
to an ISP, set up Outlook
Express, and have an
Internet address, it’s time
to write your first e-mail
message.
Tip
E-mail addresses are written in
a very specific way. Be sure the
e-mail address you enter
contains no spaces and has a
period after the server name.
Dashes and underscores may
be used. Capital letters may be
required. Ask e-mail recipients
exactly how to write their
e-mail address.
1. Press the Instant E-mail ƒ
button on the Internet
keyboard.
2. Click the New Mail Message
icon 1.
3. Type the recipient’s e-mail
address in the To box 2.
4. Type the subject of your
message in the Subject
box 3.
5. Type your message in the
message window 4.
6. Click Send 5.
See also ...
The My Presario—Learning
More CD has more information
on using e-mail.
ELCOME TO THE WEB
5-8 W
MY P
RESARIO—GETTING STARTED
Page 54
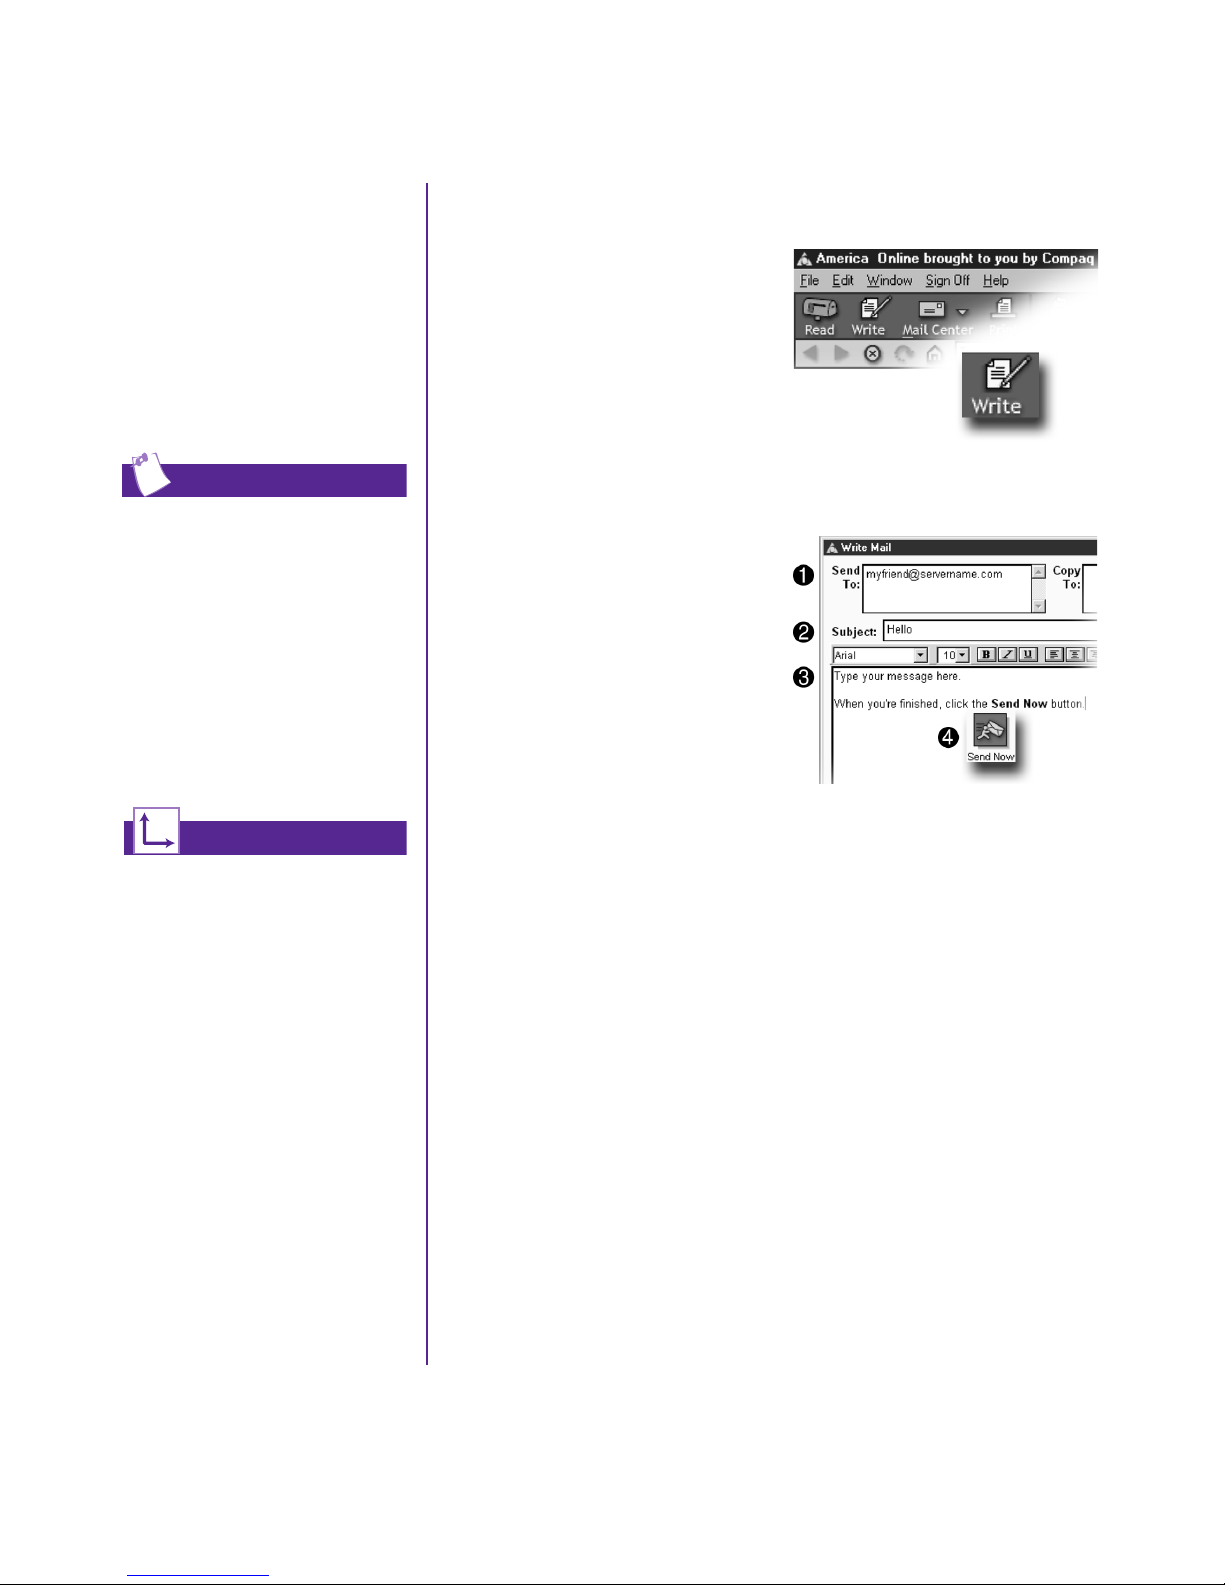
E-mail, cont.
Sending an E-mail Using AOL
Now that you’ve connected
to an ISP, set up Outlook
Express, and have an
Internet address, it’s time
to write your first e-mail
message.
Tip
E-mail addresses are written in
a very specific way. Be sure the
e-mail address you enter
contains no spaces and has a
period after the server name.
Dashes and underscores may
be used. Capital letters are not
required. Ask e-mail recipients
exactly how to write their
e-mail address.
1. Press the Instant E-mail
button on the Internet
keyboard.
2. Click the Write icon on the
AOL tool bar.
3. Type the recipient’s e-mail
address in the Send To
box 1.
4. Type the subject of your
message in the Subject
box 2.
5. Type your message in
the message window 3.
6. Click Send Now 4.
ƒ
See also ...
The My Presario—Learning
More CD has more information
on using e-mail.
RESARIO—GETTING STARTED
MY P
ELCOME TO THE WEB
W
5-9
Page 55
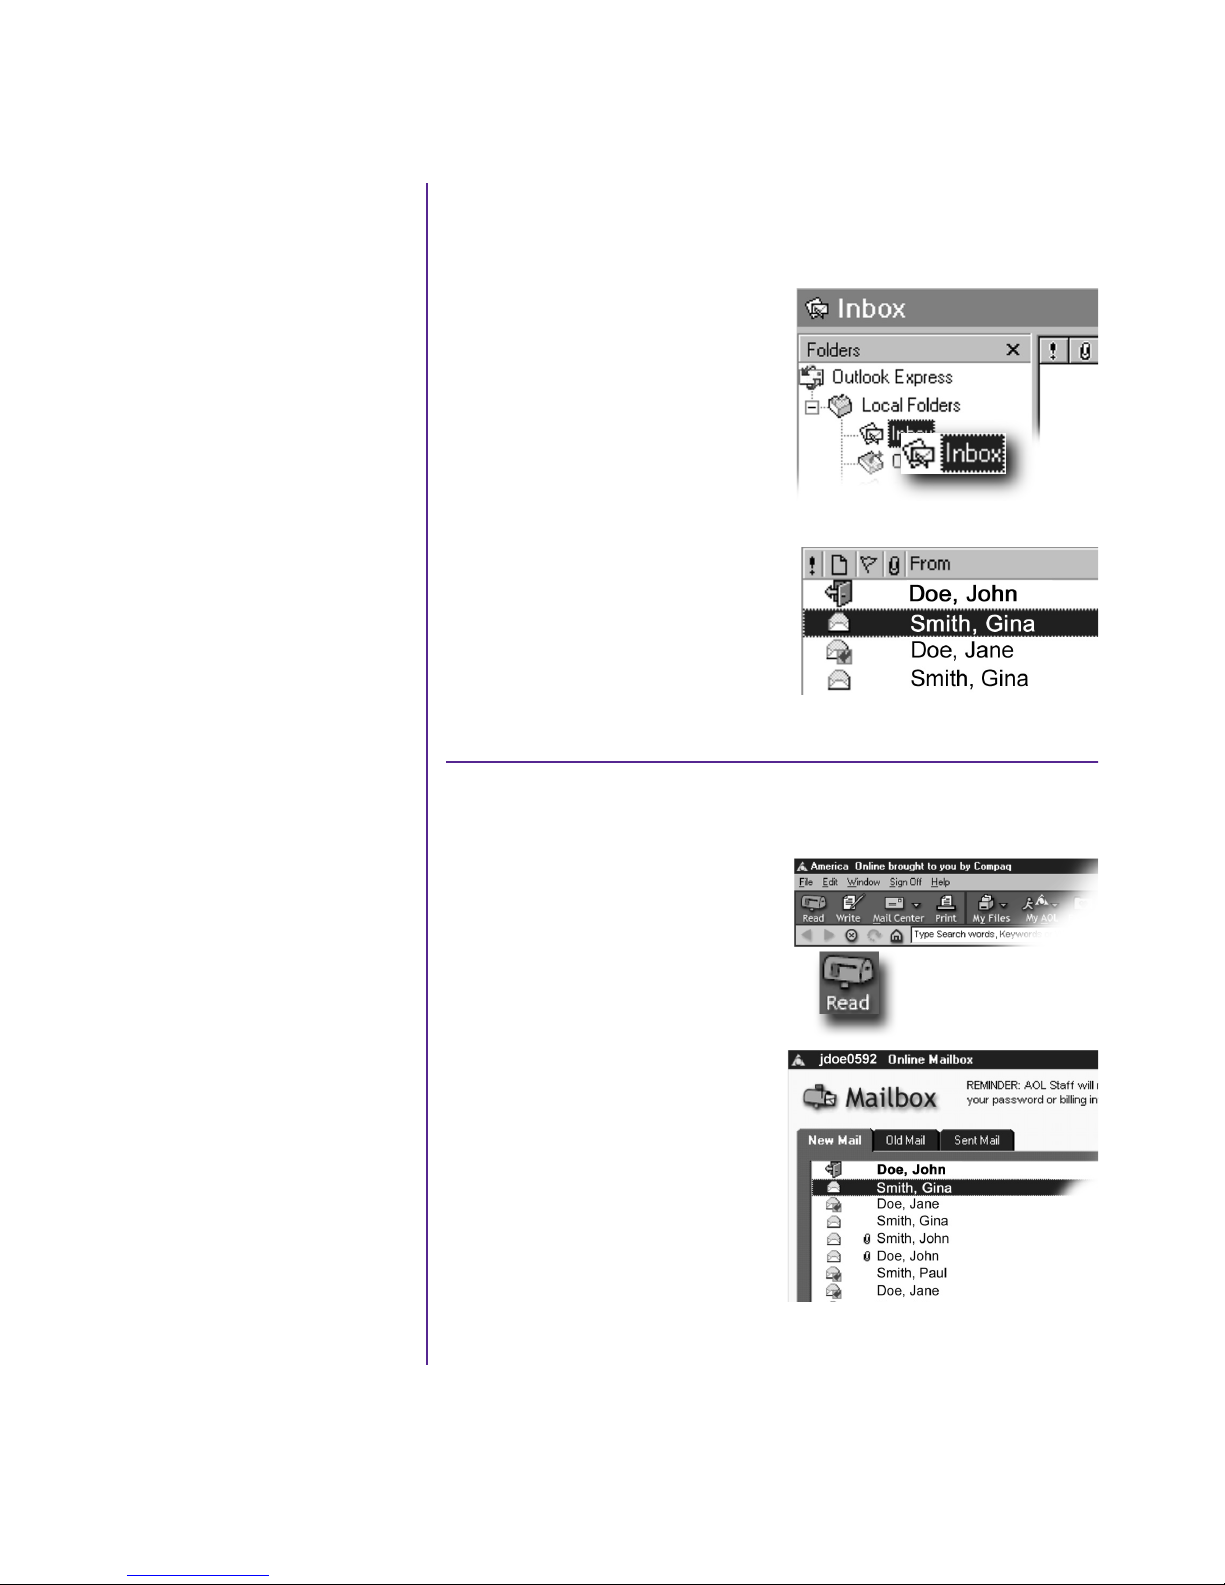
Content
Advisor
You receive e-mail
messages automatically,
even when your computer
is shut down! Your ISP
stores these messages until
you decide to open your
e-mail program and read
them.
Reading Your Outlook Express
E-mail Messages
1. Press the Instant E-mail ƒ
button on the Internet
keyboard.
2. Click Inbox. New messages
appear in bold type.
3. Double-click the message to
display the message text.
Your e-mail status light on
the keyboard will glow
when you have e-mail.
The e-mail status light
only works with POP3
Internet services such as
Compaq.NET powered by
MSN. The light does not
work with proprietary
Internet services such as
AOL.
4. Click the Close ∫
the upper right corner of the
screen to close the e-mail, or
press the Delete key on the
keyboard to delete the
message.
button in
Reading Your AOL E-mail Messages
1. Press the Instant E-mail
button on the Internet
keyboard.
2. Click the Read icon. New
messages appear in bold type.
3. Double-click the message to
display the message text.
ƒ
ELCOME TO THE WEB
5-10 W
MY P
4. Click the Close
the upper right corner of the
screen to close the e-mail, or
press the Delete key on the
keyboard to delete the
message.
button in
∫
RESARIO—GETTING STARTED
Page 56
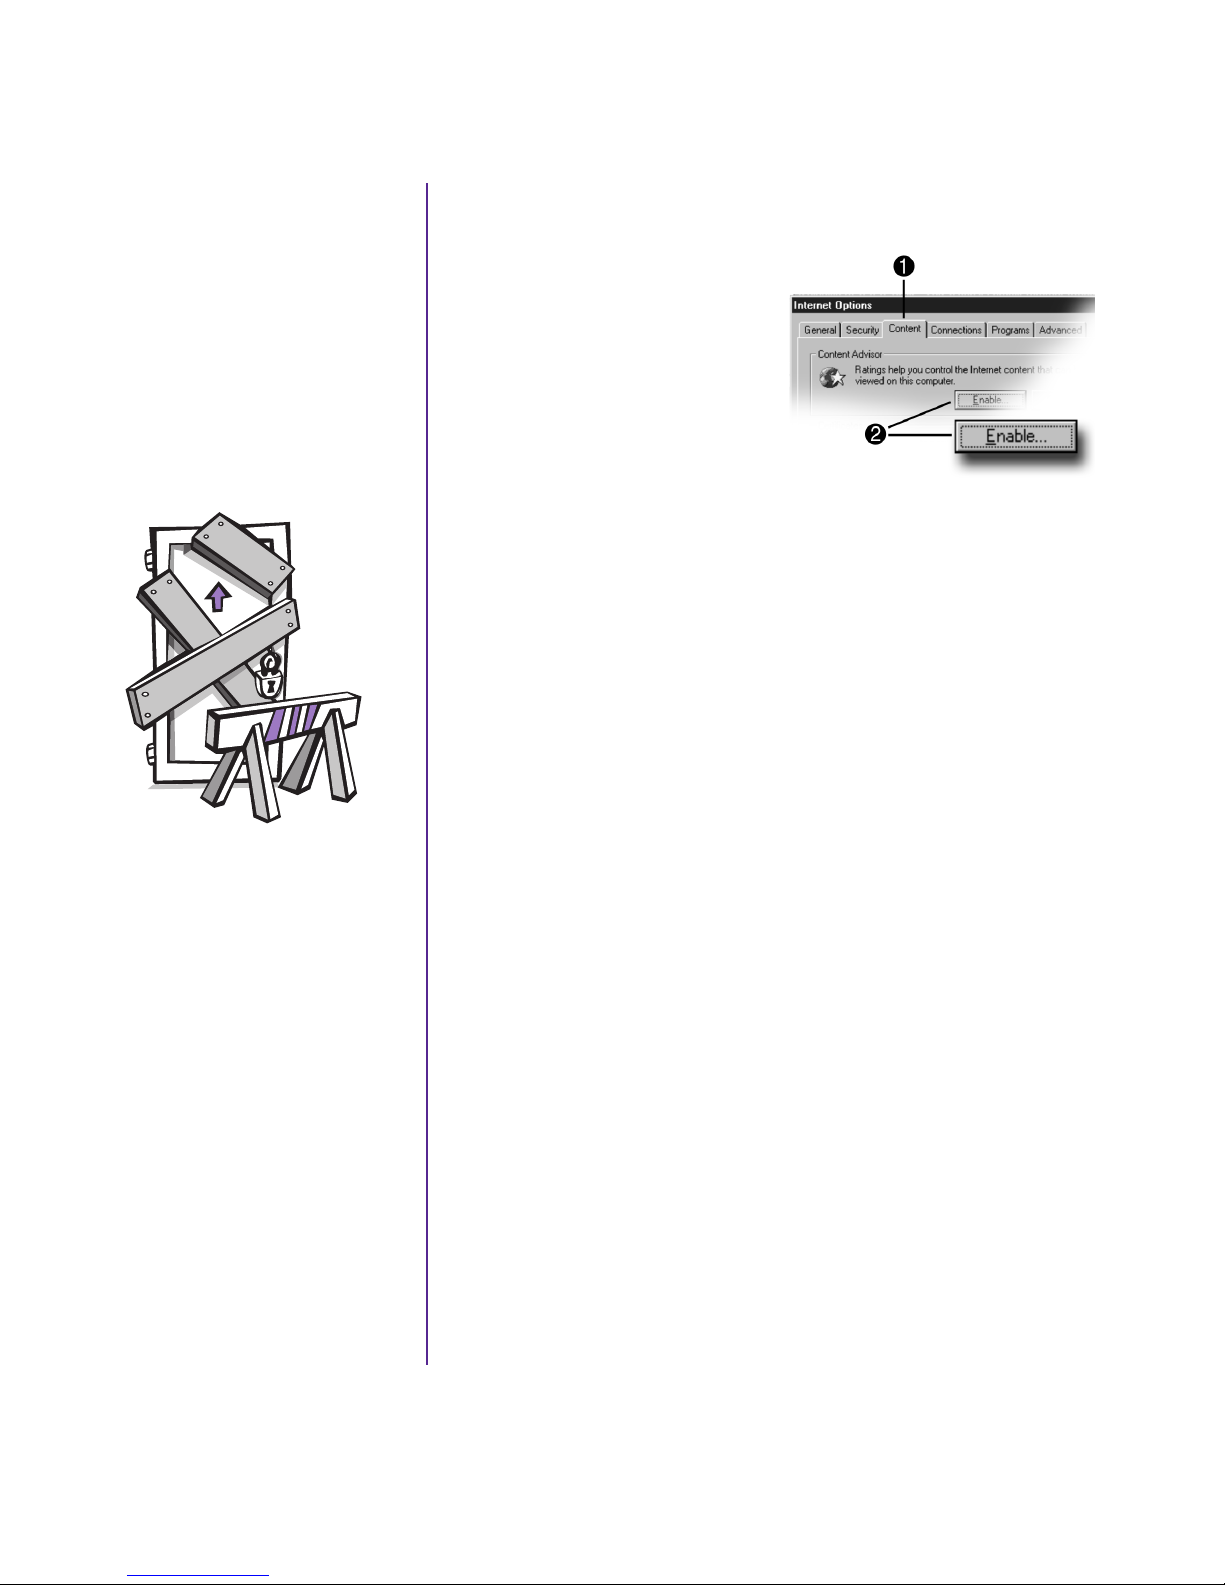
Content
Restricting Internet Content
Advisor, cont.
The Internet provides you
with access to a wide
variety of information, but
some information may not
be suitable for every
viewer.
1. On the Windows taskbar,
click Start, point to Settings,
then Control Panel, and then
Internet Tools.
2. Click the Content tab 1.
3. In the Content Advisor area,
click Enable 2.
4. Click Settings, and then
type your password in the
Password box.
5. Click a category in the list,
and then drag the slider to set
the limits you want to use.
6. Repeat this process for each
category you want to limit,
and then click OK.
With Content Advisor, you
can:
Control Internet
➜
access
Set up a password
➜
Set up a list of Web
➜
sites that people who
use your computer
cannot view
Adjust what types of
➜
content people who
use your computer can
view with or without
your permission
RESARIO—GETTING STARTED
MY P
ELCOME TO THE WEB
W
5-11
Page 57
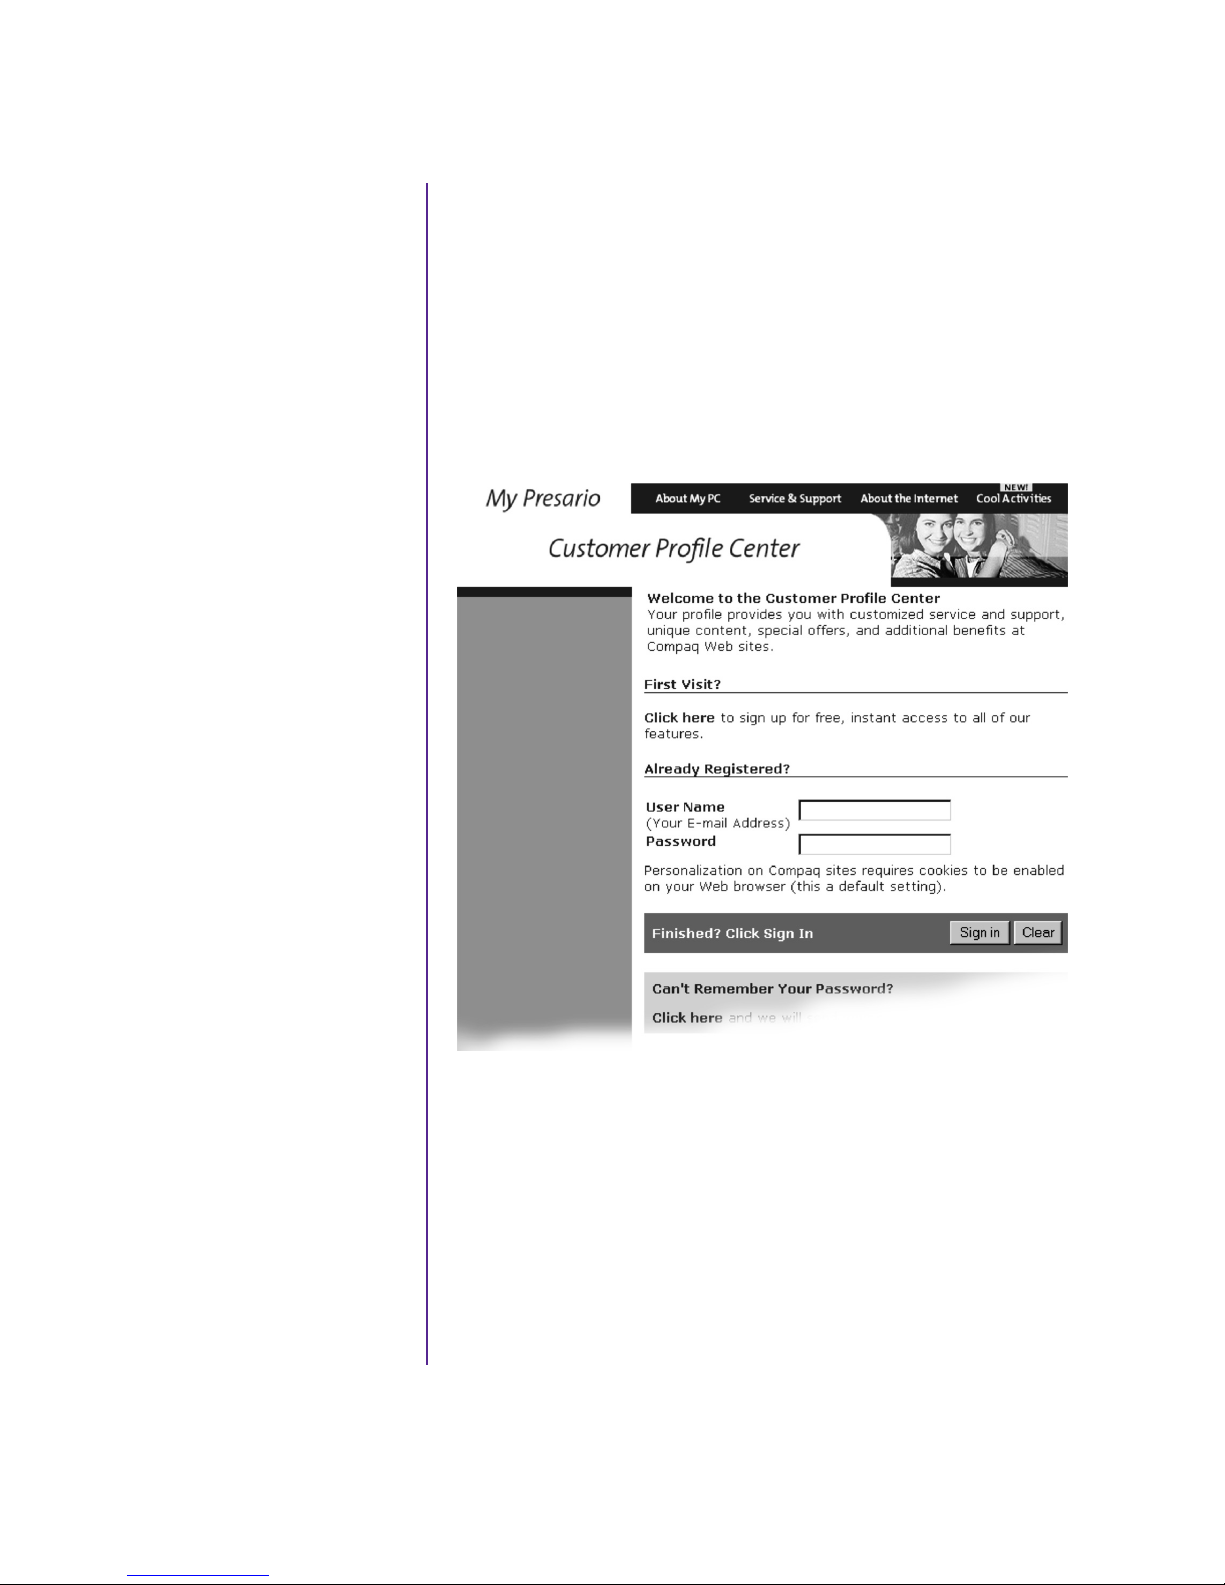
My Presario
Checking Your Registration
Web Site
One of the first places
you'll want to visit on the
Internet is the My Presario
Web site:
www.compaq.com/
mypresario
Whatever your interests,
Compaq has something for
everyone:
entertainment
➜
gaming
➜
travel
➜
health
➜
sports
➜
The My Presario Web site
has advice for home-based
businesses and how to be
more productive on your
computer, plus basic
information for first-time
Web surfers. This Web site
also has useful links to the
Compaq Store and to sales
and support. These links
get you to the information
you need quickly.
1. Press the D on the Internet keyboard. The Compaq My
Presario Web site is displayed.
2. Click Create My Profile.
3. Verify that your personal information is correct.
4. Click Sign in.
Press the D button and see
what Compaq and this
Web site have to offer you!
ELCOME TO THE WEB
5-12 W
MY P
RESARIO—GETTING STARTED
Page 58
Common
Tasks
In this chapter, you learn how to
In This Chapter
Print Basics, 6-2
perform some of the more
common activities with your new
Internet PC.
6
Digital Audio Files, 6-3
Games, 6-4
Software, 6-5
More details about these and
other everyday activities can be
found on the My Presario—
Learning More CD.
RESARIO—GETTING STARTED
MY P
OMMON TASKS
C
6-1
Page 59
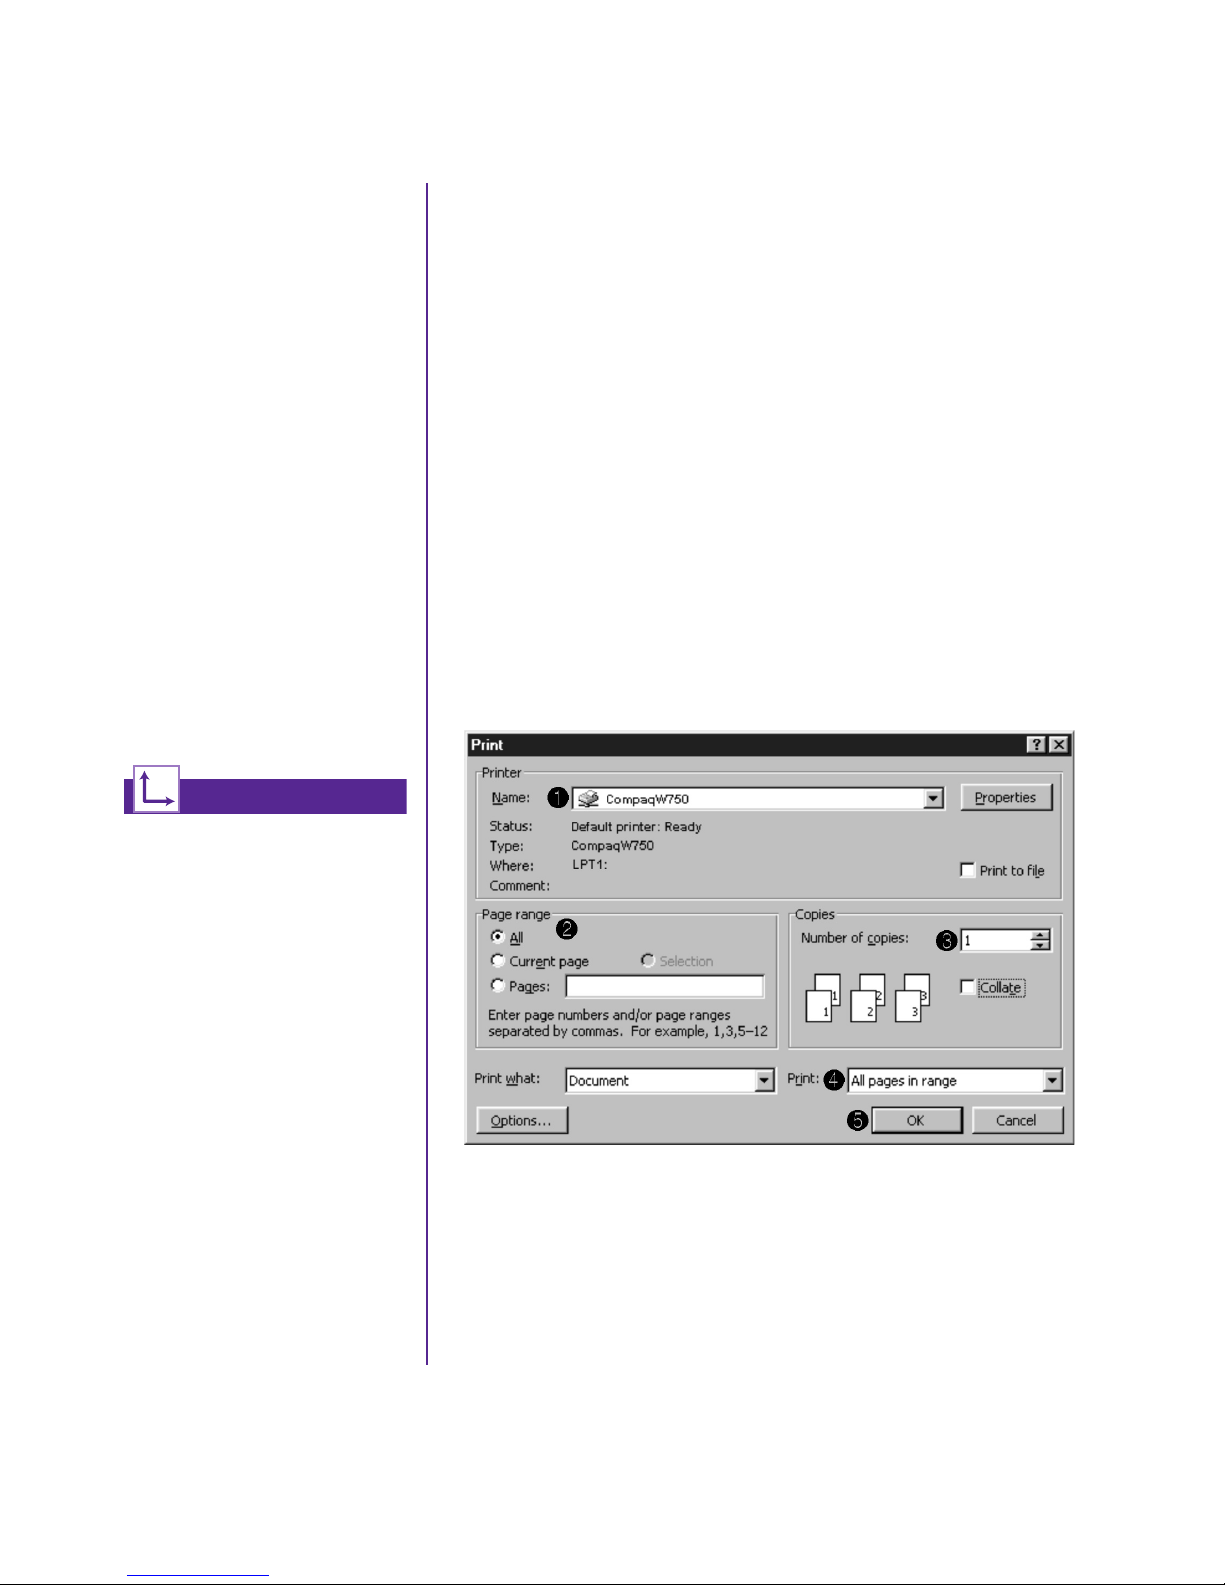
Print Basics
Using the Menu to Print
To print one or more pages
from a document file or
Web page, you have to
connect your printer and
install the necessary
software. These
procedures are detailed in
the “Setting Up Your
Computer” chapter in this
guide.
To see what the document
will look like when
printed, select the Print
Preview option from the
File menu. This option is
available in most software
packages.
See also ...
For additional information
about your printer, refer to the
manufacturer’s documentation.
1. Click File on the menu bar.
2. Click Print. The Print dialog box is displayed.
3. Select the printing options you want.
• Confirm which printer you are printing to 1.
• Choose the page range to print 2:
All pages
➜
The current page you are viewing
➜
A range of pages (for example, 1–4)
➜
• Confirm the number of copies you want to print 3.
• Select All, Odd, or Even pages in range 4.
OMMON TASKS
6-2 C
MY P
Note: These options vary depending on the printer installed.
4. Click OK 5.
RESARIO—GETTING STARTED
Page 60

Digital Audio
Playing Digital Audio Files
Files
In addition to music CDs,
your computer can play
digital audio files, such as
music downloaded from
the Internet.
You can download MP3
files and play them using
Audio Manager software
(available on select
models).
1. From the Windows taskbar, click the Start button.
2. Point to Programs and then select the Audio Manager
program. The Audio Manager is displayed.
3. Follow the on-screen instructions for creating and playing a
play list. For help with specific functions, press the F1 key or
choose Help Topics from the Help menu.
RESARIO—GETTING STARTED
MY P
OMMON TASKS
C
6-3
Page 61

Games
Your new Internet PC is
not only a powerful tool
for surfing the Internet and
running software, it can
also allow you to play
games. Your computer
came with several
Windows games
preinstalled, and many
more are available for
purchase or by
downloading them from
the Internet. You can play
games online with other
players from all over the
world.
Before purchasing a game,
check the computer
requirements (listed on the
outside of the game box)
to make sure that your
computer is configured
correctly for the game you
want to buy.
Playing Preinstalled Games
on Your Computer
1. On the Windows taskbar, click the Start button.
2. Point to Programs and then Games.
3. Click the icon for the game you want to play.
Did you know ...
You should always use the
same disc drive (CD-ROM or
DVD-ROM) that you used to
install a game when you play
the game. If you experience
problems installing or playing
a game, contact the game
manufacturer for assistance, or
visit their Web site for updates.
OMMON TASKS
6-4 C
MY P
RESARIO—GETTING STARTED
Page 62
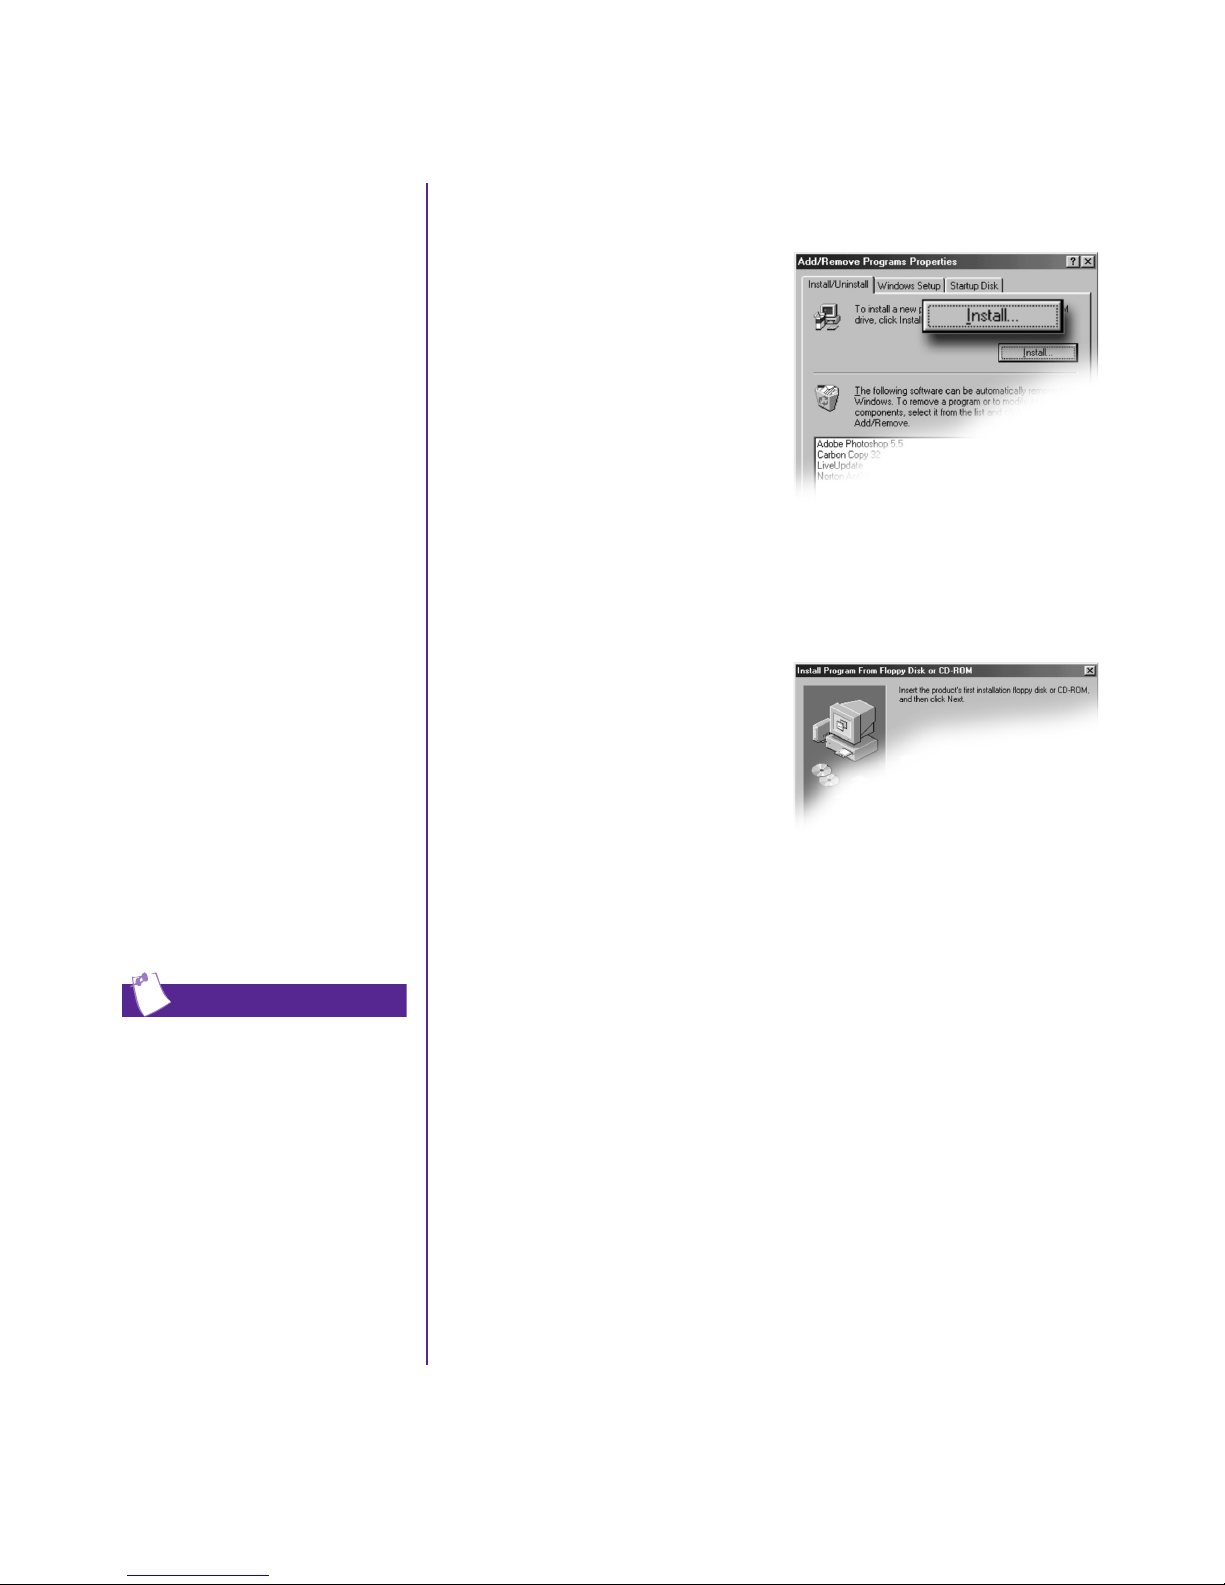
Software
Installing Software from a CD, DVD, or Disk
You may want to purchase
and install additional
software. Software can be
installed from a CD, DVD,
or disk, and it can be
downloaded from a
We b s i t e .
The installation process
begins automatically when
you insert the CD in the
disc drive. If the
installation process does
not begin automatically,
refer to the documentation
that came with the
software. If no
documentation exists,
follow the procedure listed
here to install software
from a CD or disk.
In the event of difficulties
with the installation,
contact the software
manufacturer.
1. Close all open programs, and
follow the installation
instructions for that software.
2. From the Windows taskbar,
click the Start button, point
to Settings, and then click
Control Panel.
3. Double-click the Add/
Remove Programs
¤
icon.
The Add/Remove Programs
Properties window is
displayed.
4. Click Install.
5. Insert the CD or disk
into the proper drive and
click Next. Microsoft
Windows begins the
installation process.
Tip
When selecting software for
your computer, make sure the
packaging states that it is
compatible with your version of
Microsoft Windows, your
computer memory, processor,
and available disk space.
RESARIO—GETTING STARTED
MY P
OMMON TASKS
C
6-5
Page 63
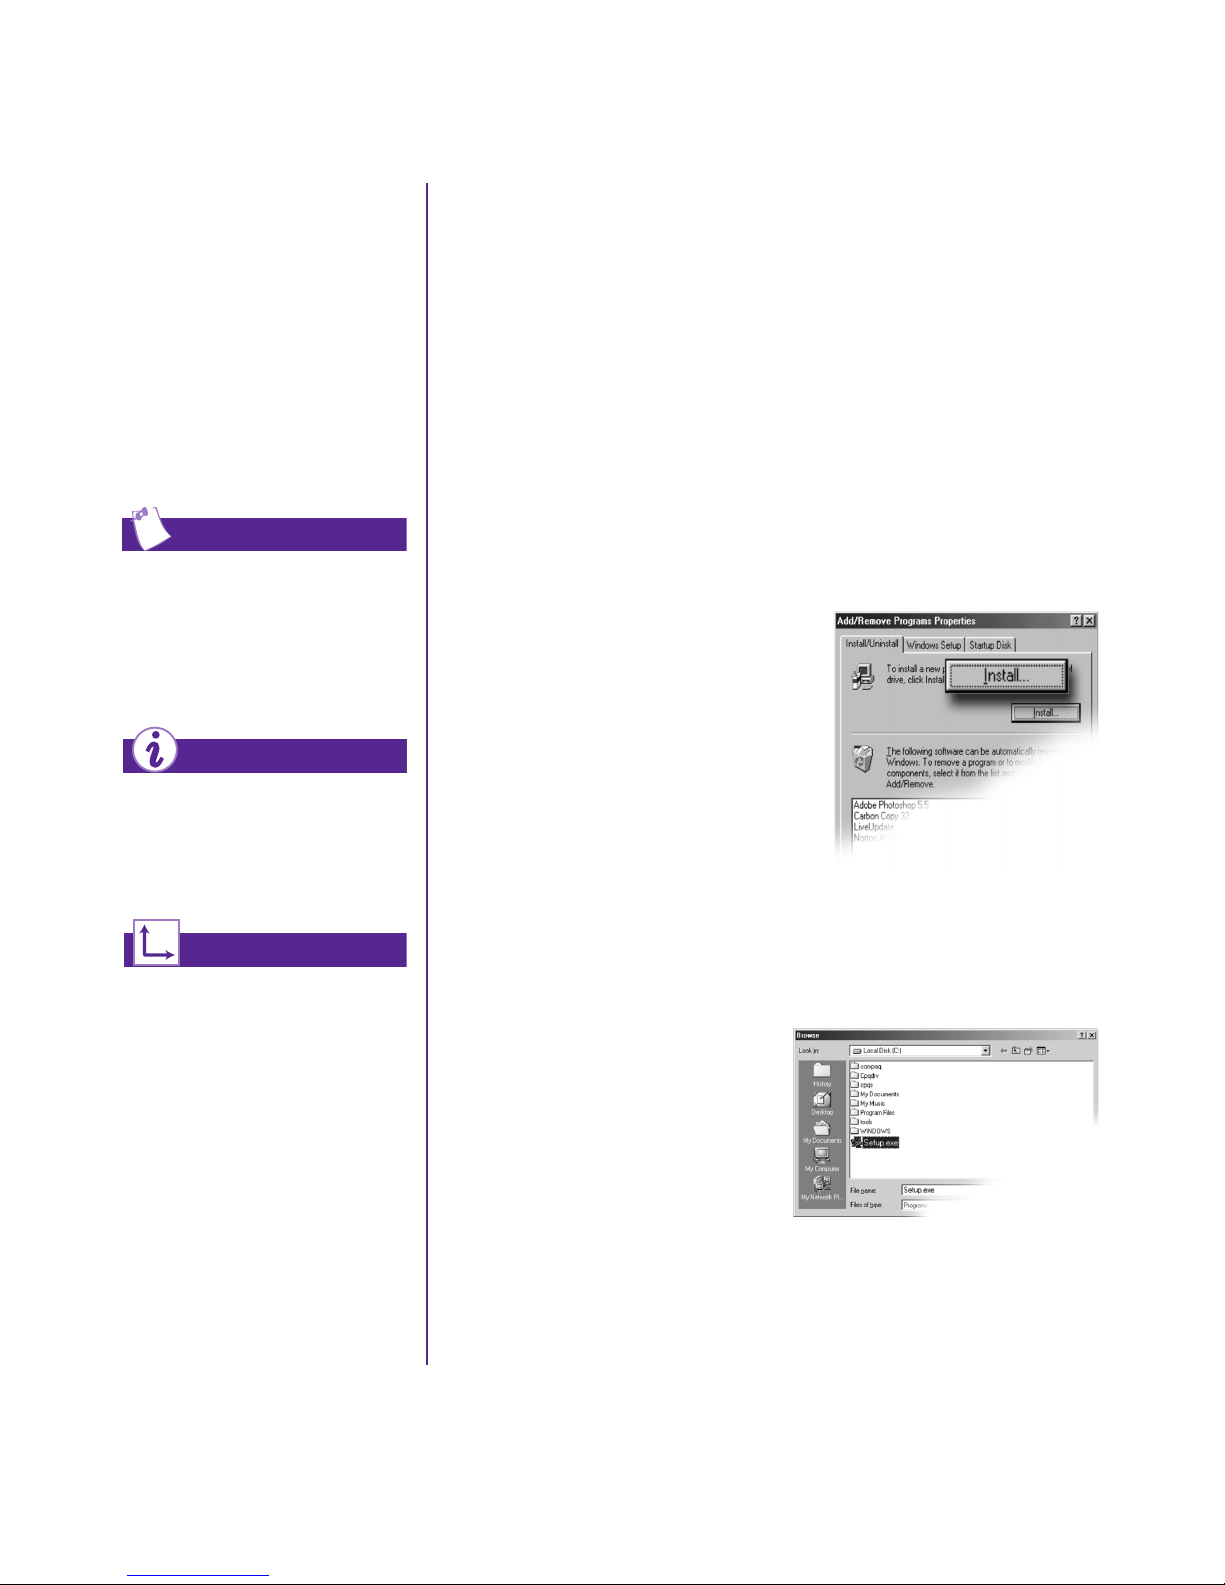
Software, cont.
If you download software
from a Web site, follow the
installation instructions
that are usually displayed
on the Web page. If
installation instructions are
not available, complete the
steps listed here.
Tip
Before downloading files of
any kind from the Internet,
make sure that call-waiting is
disabled and that your
anti-virus utility is running.
Did you know ...
If the download process is
interrupted, you must restart
the entire download procedure
from the beginning.
Installing Software Downloaded
from the Internet
1. Before you start downloading,
note the location on the hard
drive where the files will be
stored. Also, be sure that you
have enough hard drive space
available.
2. After the download is complete,
terminate your Internet connection.
3. Close all other open programs.
4. On the Windows taskbar,
click Start, point to Settings,
and then click Control Panel.
5. Double-click the
Add/Remove
Programs
window is displayed.
6. Click Install. A window
is displayed.
icon. This
¤
See also ...
For more information on
anti-virus software, see
“Preventive Maintenance” on
the My Presario—Learning
More CD.
OMMON TASKS
6-6 C
MY P
7. Click Next. The Run
Installation Program
window is displayed.
8. Click Browse.
9. Locate and select the
Setup.exe or Install.exe file
for the downloaded software.
10. Click Open to begin the
installation process.
RESARIO—GETTING STARTED
Page 64
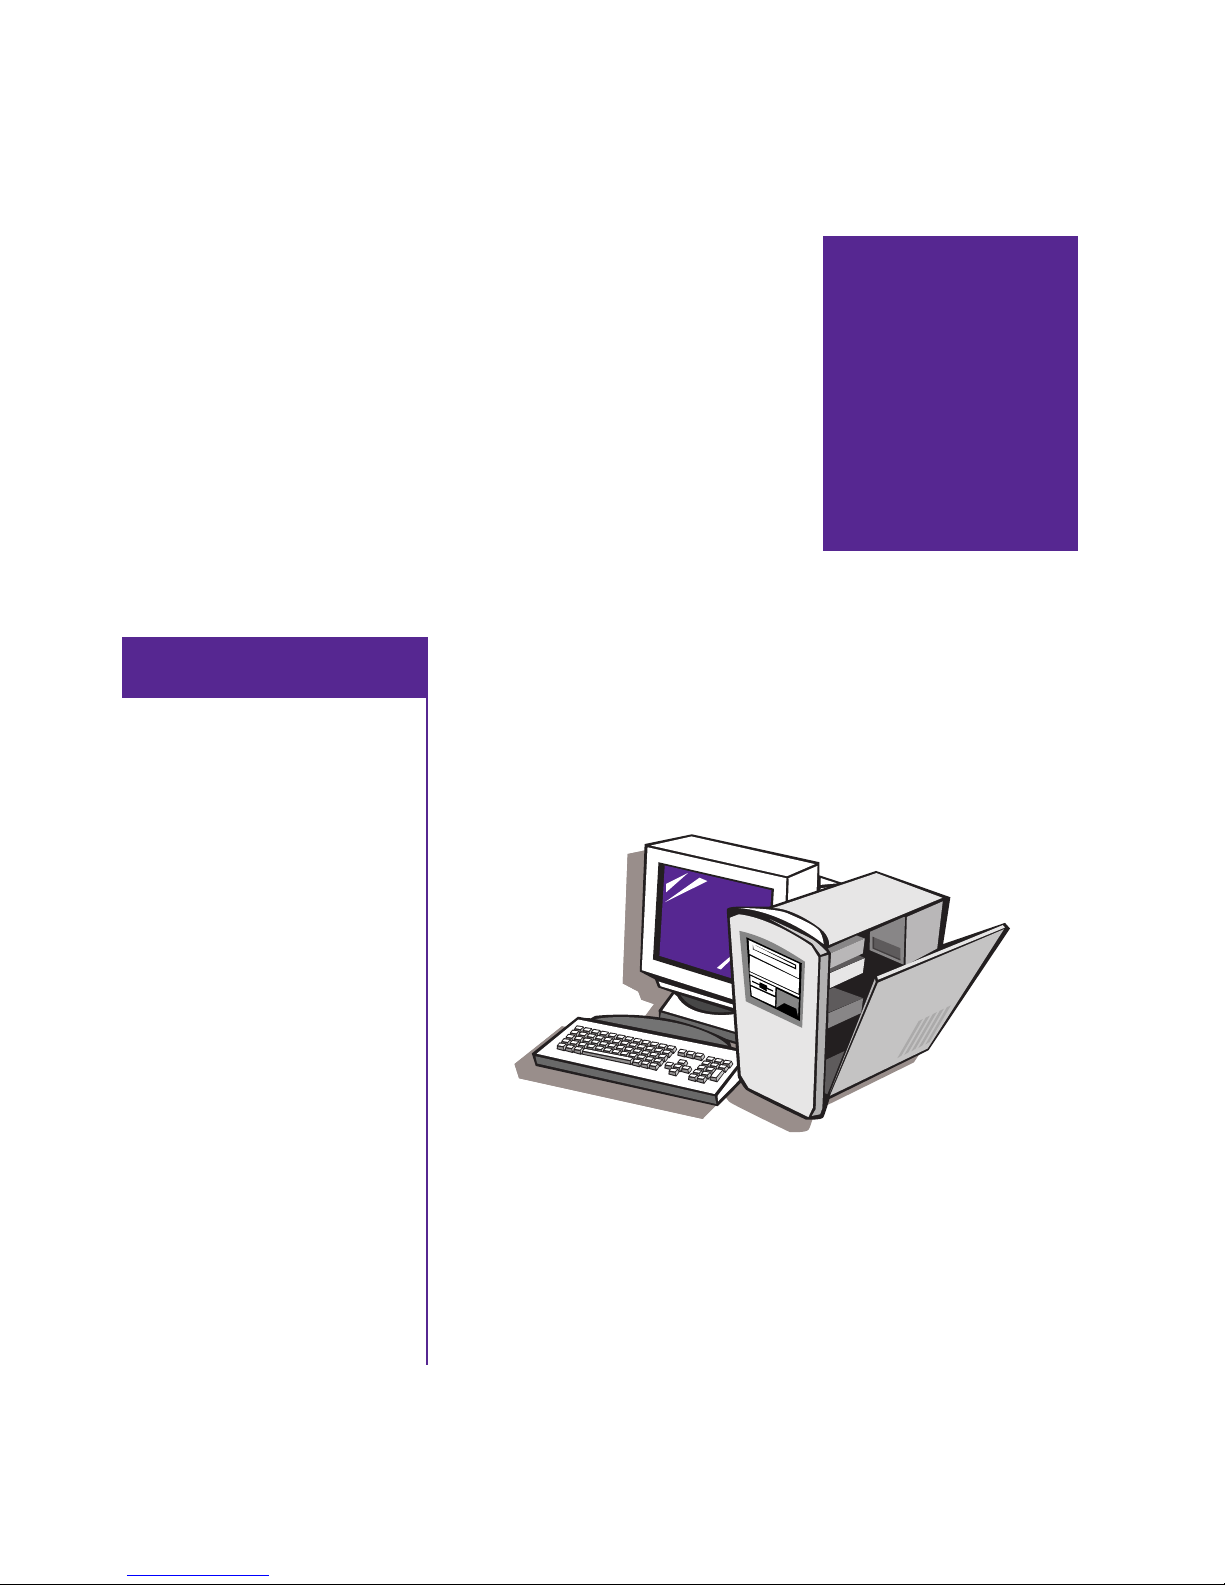
Computer
Upgrades
In this chapter, you learn how to access the internal parts of the
In This Chapter
computer and how to perform basic upgrades.
7
Internal Components, 7-2
Upgrading Components,
7-3
Adding Components, 7-6
Many components of the computer are replaceable and
upgradable. This chapter should be used as a supplement to the
instructions provided with your new component.
RESARIO—GETTING STARTED
MY P
OMPUTER UPGRADES
C
7-1
Page 65
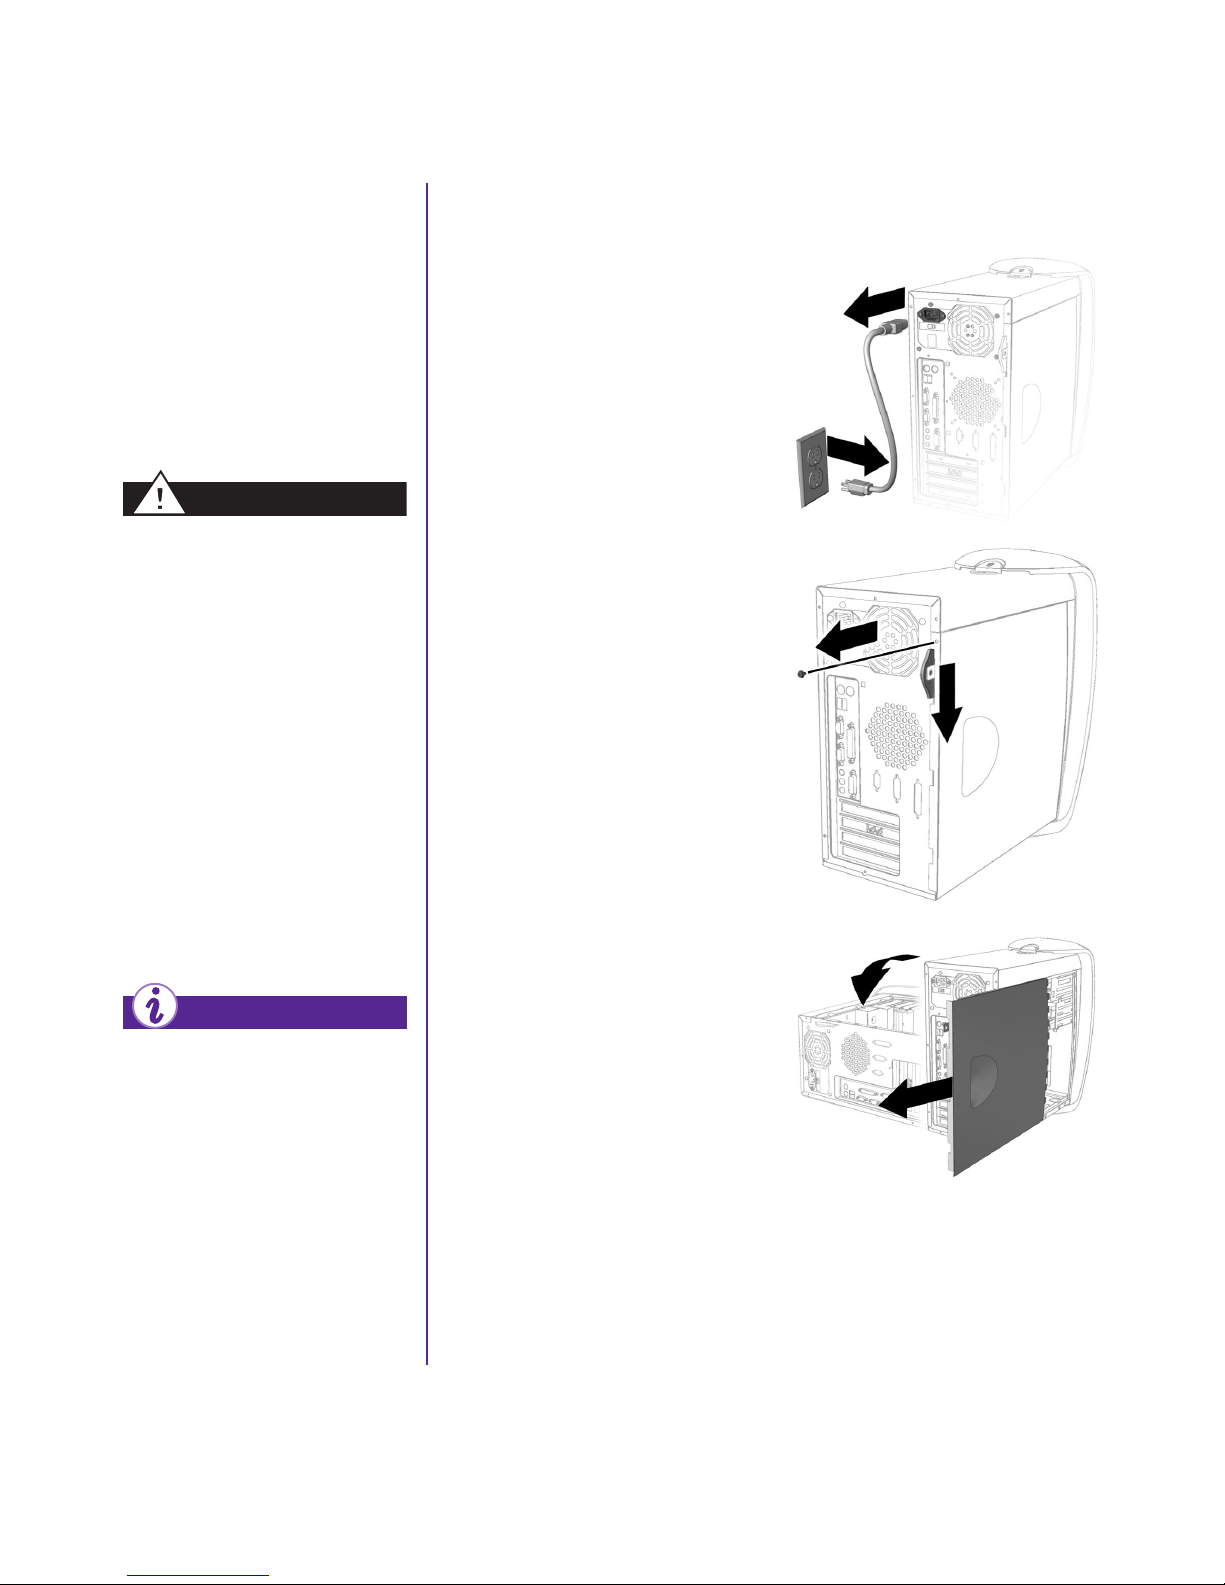
Internal
Accessing Internal Computer Components
Components
Your Computer is
constructed with an Easy
Access panel. This design
makes accessing the internal
parts easy.
Warning
Failure to disconnect the
power from the computer may
result in personal injury.
▲
Caution: Before working
with the components inside
the computer, you must
ground yourself and the
equipment to prevent
damage to the parts from
static electricity. To
discharge any static buildup,
touch a metal part of the
computer chassis before
touching any internal parts.
Did you know ...
The screw(s) securing the side
access panel are for shipping
purposes only and do not need
to be replaced.
1. Press the Power button to
turn off the computer.
2. Disconnect the power cable
from the wall and the
computer.
3. Remove the screw(s)
securing the side access
panel.
4. Locate the latch directly
below the screw, pull the
latch down, and hold it in the
down position.
5. Grasp the indented
hand-hold and slide the side
panel from the chassis.
6. Turn the computer on its side
with the open side facing up.
OMPUTER UPGRADES
7-2 C
MY P
RESARIO—GETTING STARTED
Page 66
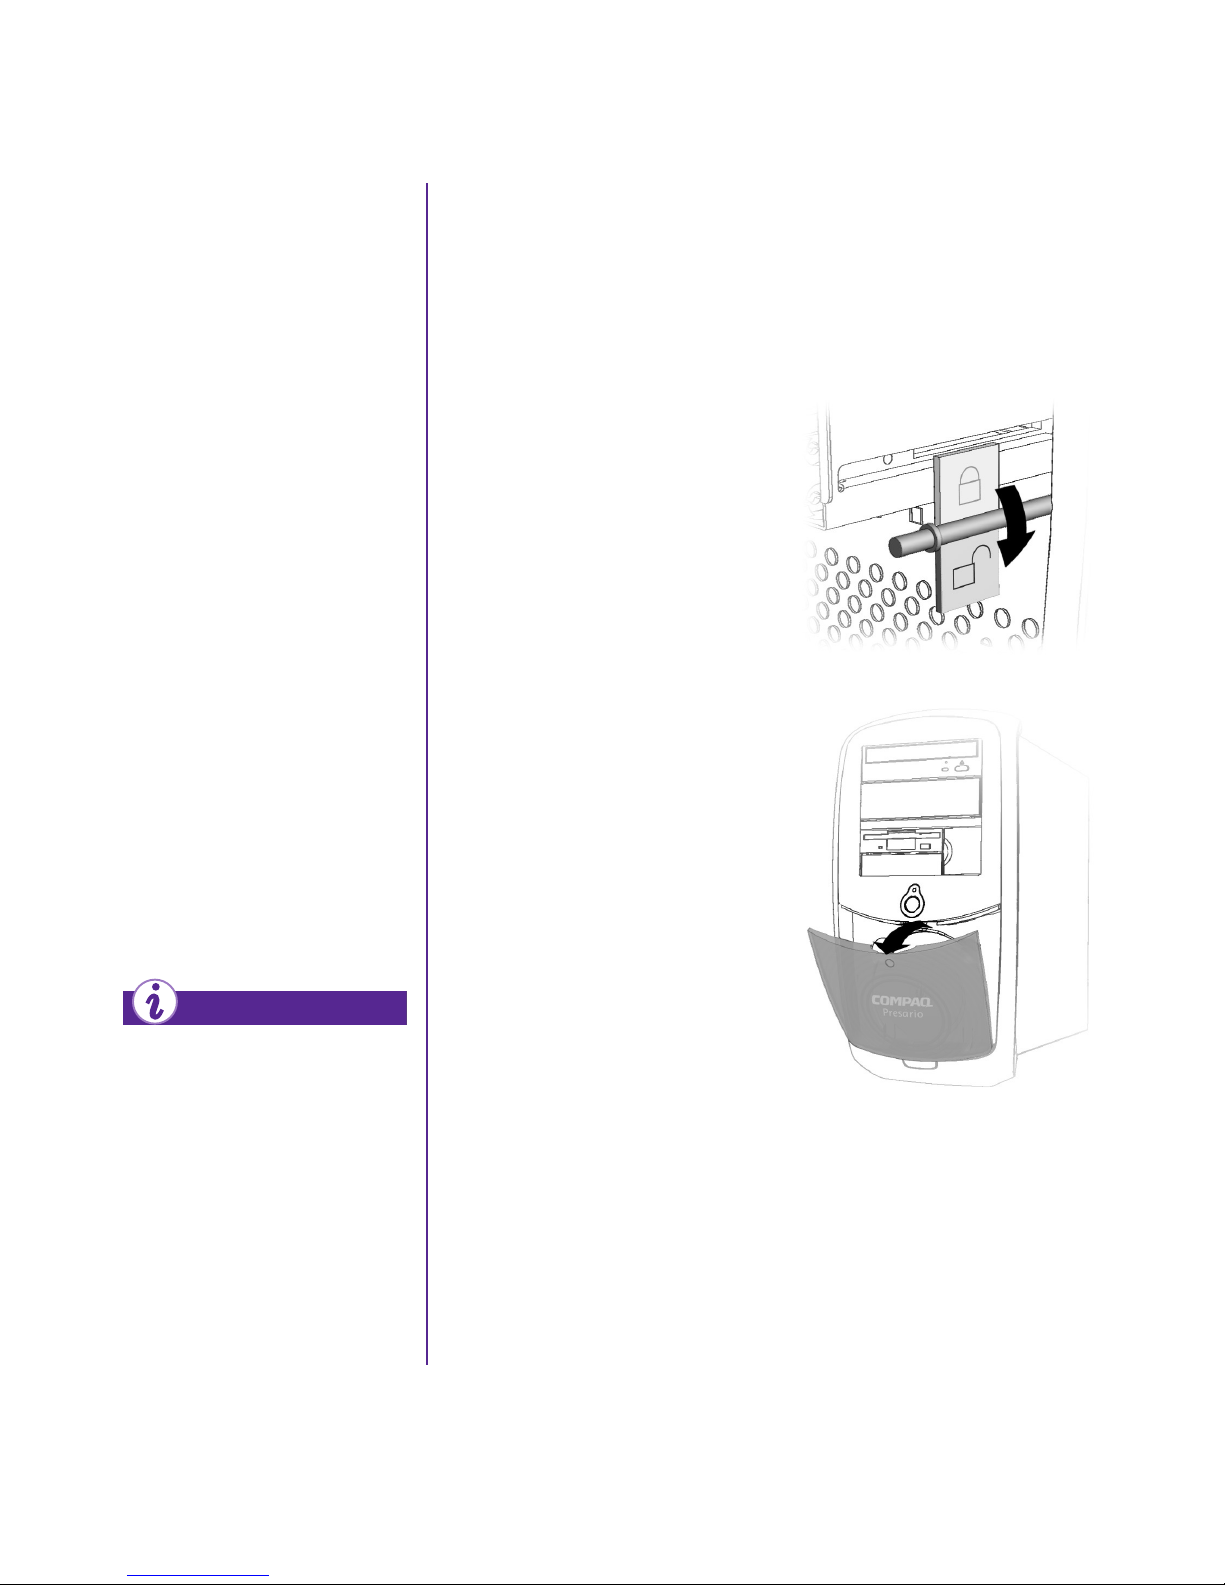
Upgrading
Components
The CD-ROM, CD-RW, and
DVD-ROM drives are often
called optical drives because
they use light to read and
write information.
Upgrading the CD-ROM, CD-RW,
and DVD-ROM Drives
1. Complete the “Accessing
Internal Computer
Components” procedure.
2. Locate the drive door lock
inside the chassis.
Your CD-ROM drive reads
data from a CD. They are a
popular choice for software
and data distribution due to
the combination of a large
storage capacity and
high-quality performance.
The CD-RW drive uses
advanced technology to
write and rewrite to compact
disc(s). CD-RW drives are
capable of writing multiple
formats to save data, video,
and audio files.
The DVD-ROM drive allows
you to listen to music or
watch movies.
Did you know ...
You do not have to place the
lock in the up position after
replacing the new drive(s).
3. Rotate the lock to the down
position to unlock the upper
front panel door.
4. Press the indentation located
on the lower front panel to
open the lower door.
RESARIO—GETTING STARTED
MY P
OMPUTER UPGRADES
C
7-3
Page 67
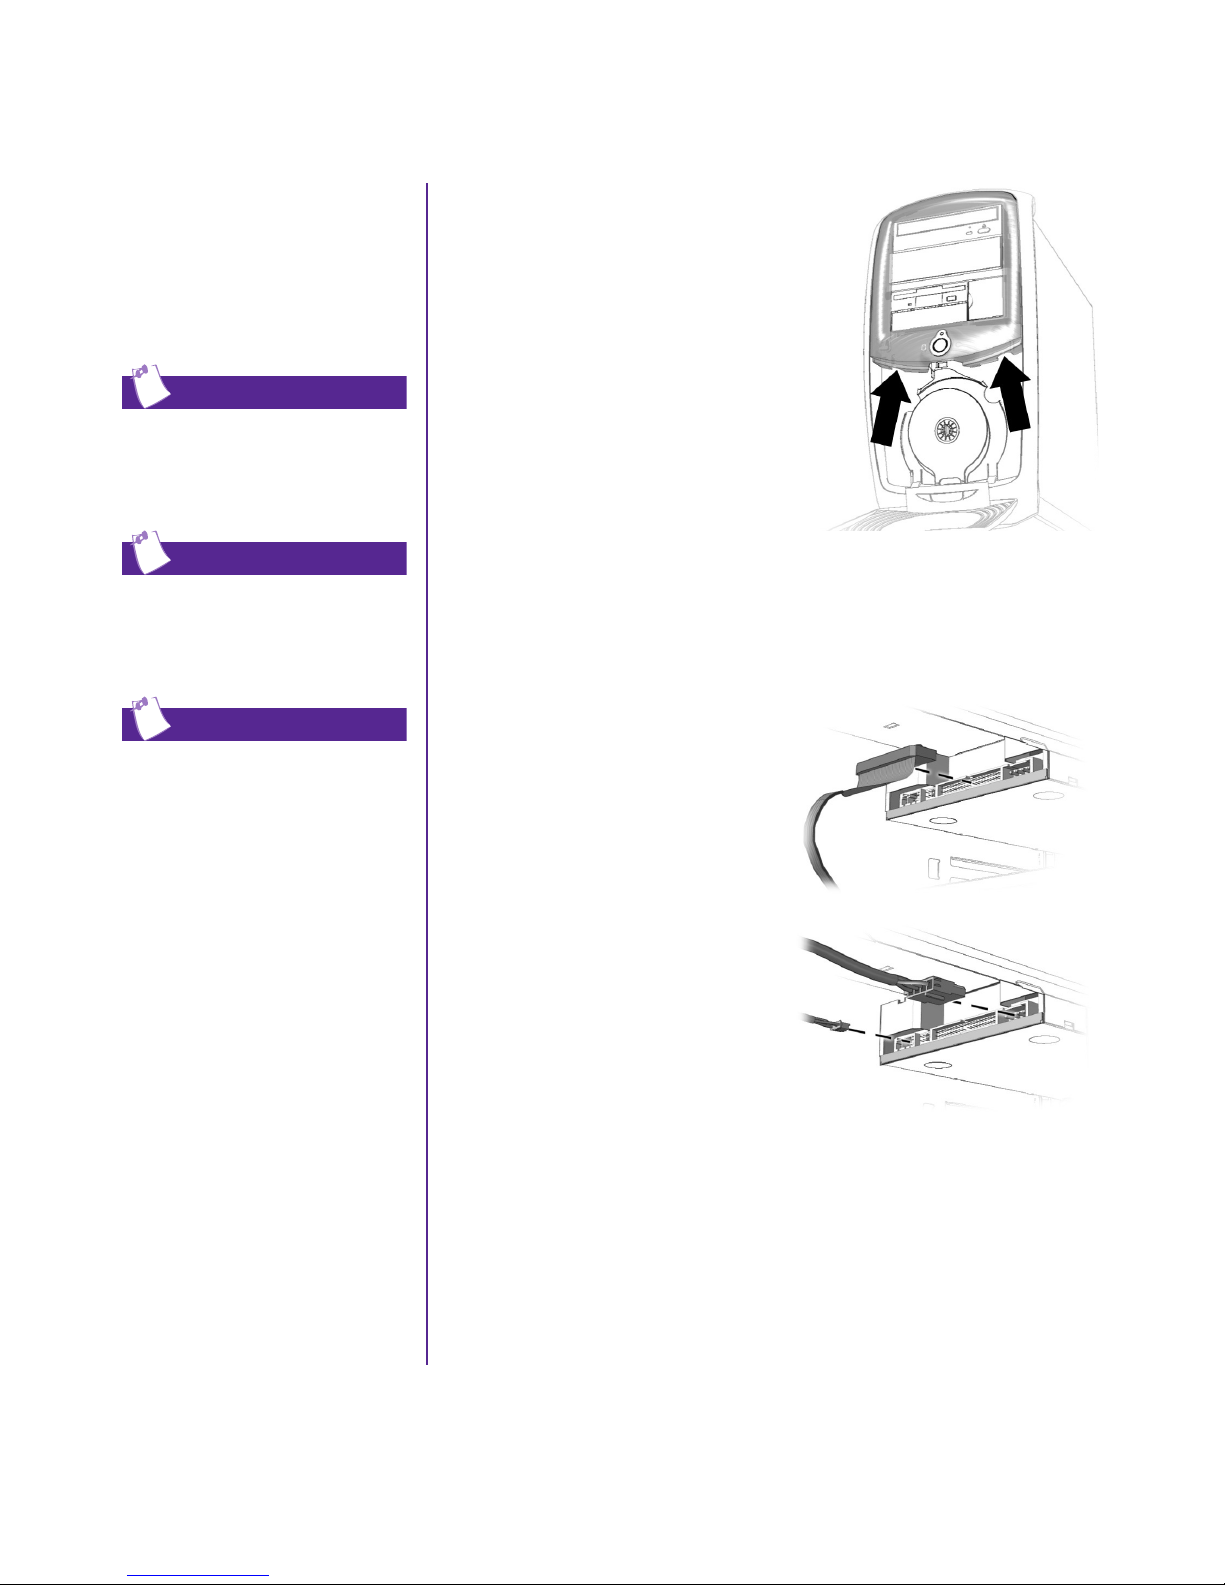
Upgrading
Components,
cont.
Tip
The upper front panel door is
designed with finger holes to
make opening the door easy.
Tip
The drive data cable has a
color pull-tab to help you
identify the cable.
5. Grasp under the bottom of the
upper front panel door, lift up,
and gently remove it from the
hooks.
6. Press in both sides of the drive
rails and pull the empty drive
bay from the front of the
computer.
7. Remove the rails from the
empty drive bay. Attach them
to the new drive by connecting
them to the industry-standard
holes located on each side.
8. Slide the drive into the empty
drive bay.
Tip
The drive rails snap on and off
the drive(s). Save the drive
rails that came with your
computer. They will be used on
your new drive(s).
9. Connect the data cable to the
new drive.
10. Connect the audio and power
cables to the new drive.
OMPUTER UPGRADES
7-4 C
MY P
RESARIO—GETTING STARTED
Page 68
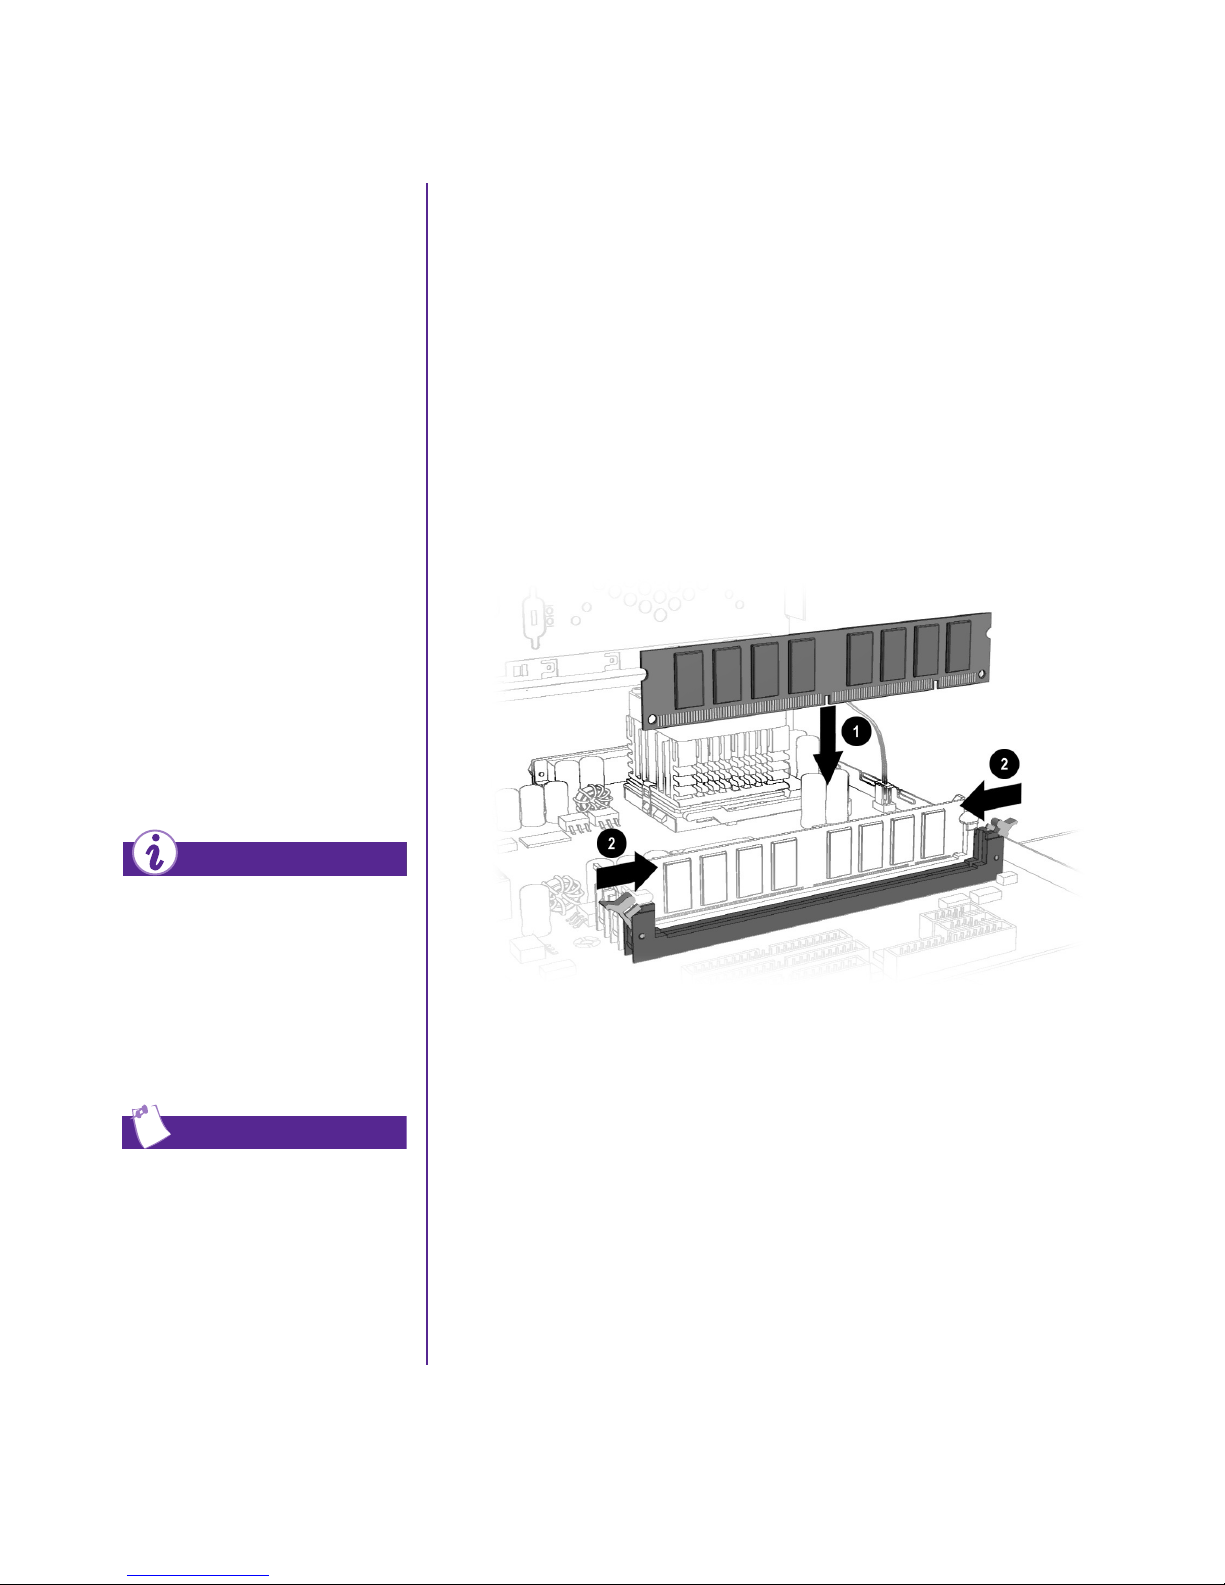
Upgrading
Upgrading Computer Memory
Components,
cont.
Random access memory
(RAM) is the working space
of your computer. Data and
instructions are stored
temporarily in memory. The
most powerful processor and
the fastest hard drive will
not perform well without the
workroom to keep the
program and data close at
hand.
There are several different
types of memory modules.
Your computer uses
Synchronous Dynamic
Access Memory (SDRAM).
1. Complete the “Accessing Internal Computer Components”
procedure.
2. Pull outward on the release latches found on both ends of the
memory slot 2.
3. Align the memory module 1 with the memory slot on the
system board.
4. Push the module carefully and firmly into the slot, ensuring
that the latches 2 on both ends snap into place.
Did you know ...
If a blank screen is displayed
after replacing the memory
module, the memory is
installed incorrectly. Repeat
the procedure to ensure that the
memory module is properly
positioned.
Tip
Upgrade the memory in your
computer with modules of the
type and speed that are
identical to the memory
originally installed in your
computer.
RESARIO—GETTING STARTED
MY P
Note: Press gently to ensure the memory module is properly positioned.
OMPUTER UPGRADES
C
7-5
Page 69
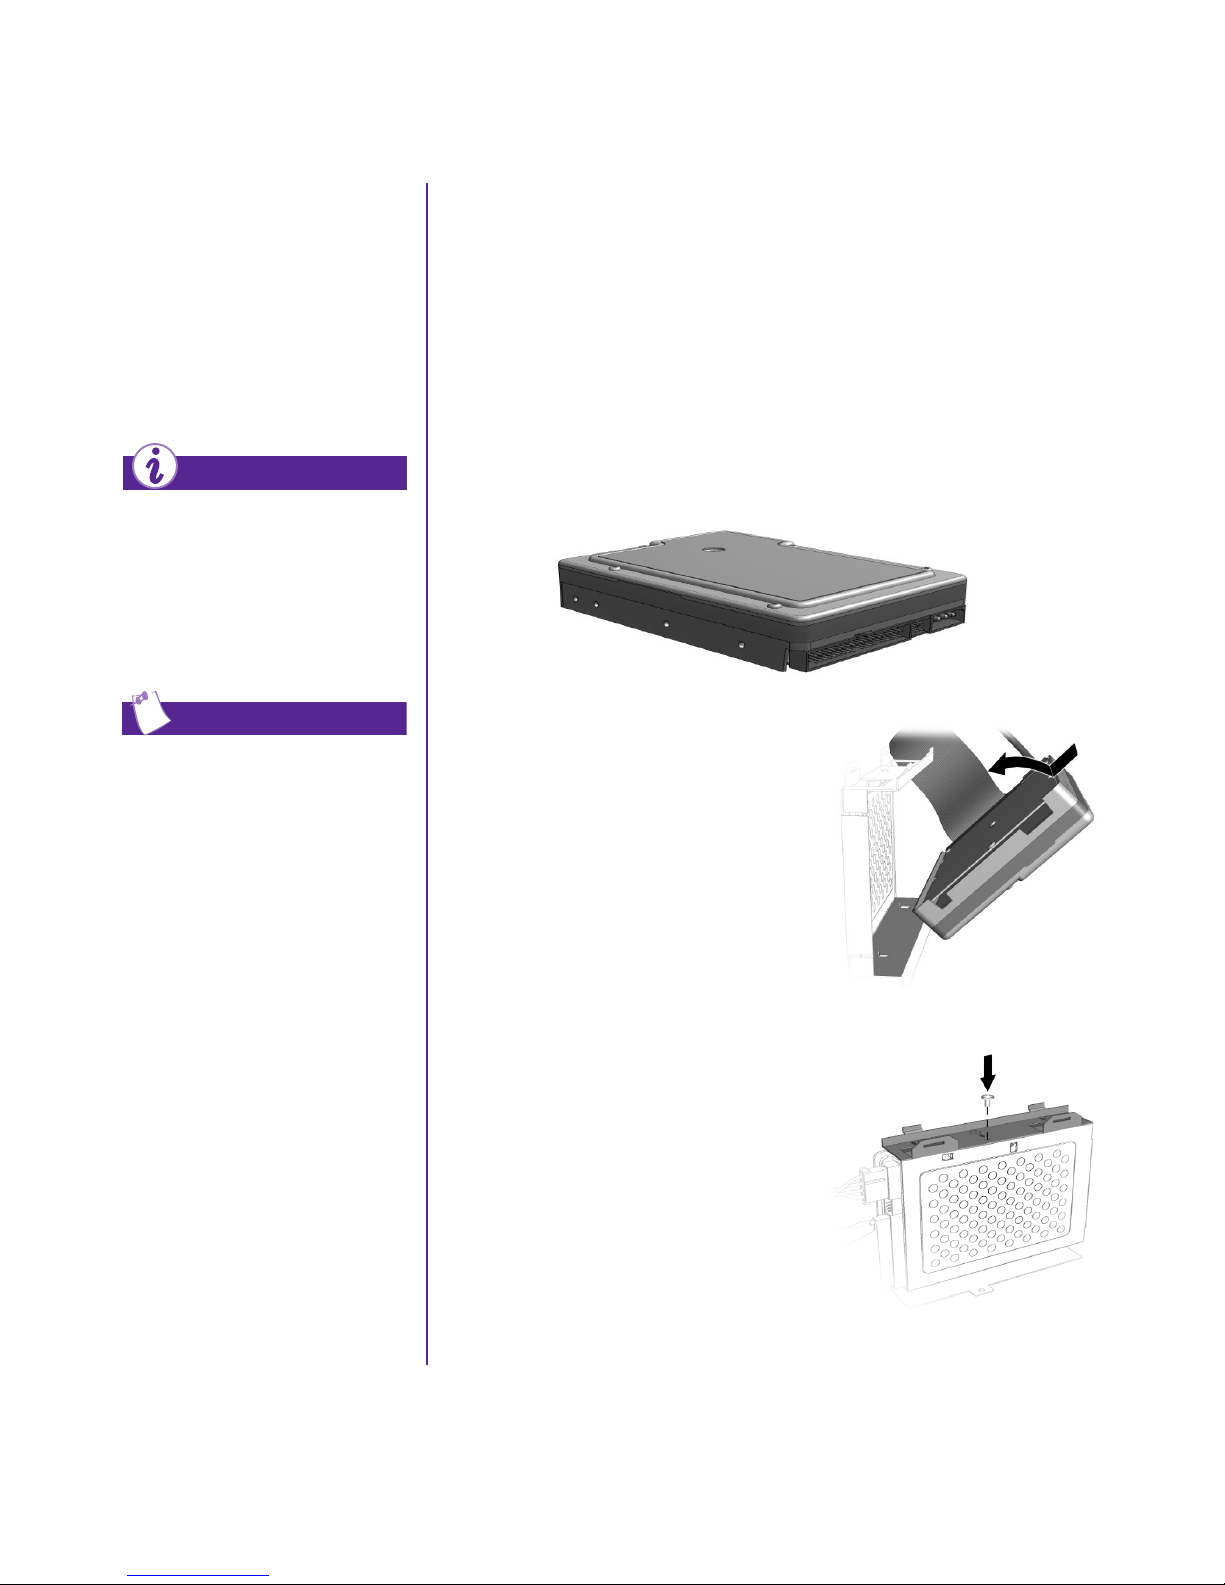
Adding
Adding the Optional Hard Drive
Components
The hard drive is used to
store information
permanently inside your
computer.
Did you know ...
You need a screw and a data
(ribbon) cable to install an
optional hard drive. The empty
bracket for the optional hard
drive already exists in your
computer chassis.
Tip
The existing hard drive data
cable has a color pull-tab to
help you identify the cable. You
must replace the existing data
cable for the optional hard
drive to function properly.
1. Complete the “Accessing Internal Computer Components”
procedure before adding an optional hard drive. The optional
hard drive shown may differ slightly from your particular
optional hard drive.
▲
Caution: Dropping the hard drive may cause the read/write heads
to dig into the media, resulting in damage to the heads and the
media, and loss of data.
2. Remove the screw that secures
the empty hard drive bracket to
the chassis included within the
system. Insert the second hard
drive, and line up the two pins
on the bracket with the holes on
the hard drive. Snap the optional
hard drive in place inside the
optional hard drive bracket.
OMPUTER UPGRADES
7-6 C
MY P
3. Insert the screw from your
purchased kit to secure the
hard drive to the bracket.
RESARIO—GETTING STARTED
Page 70
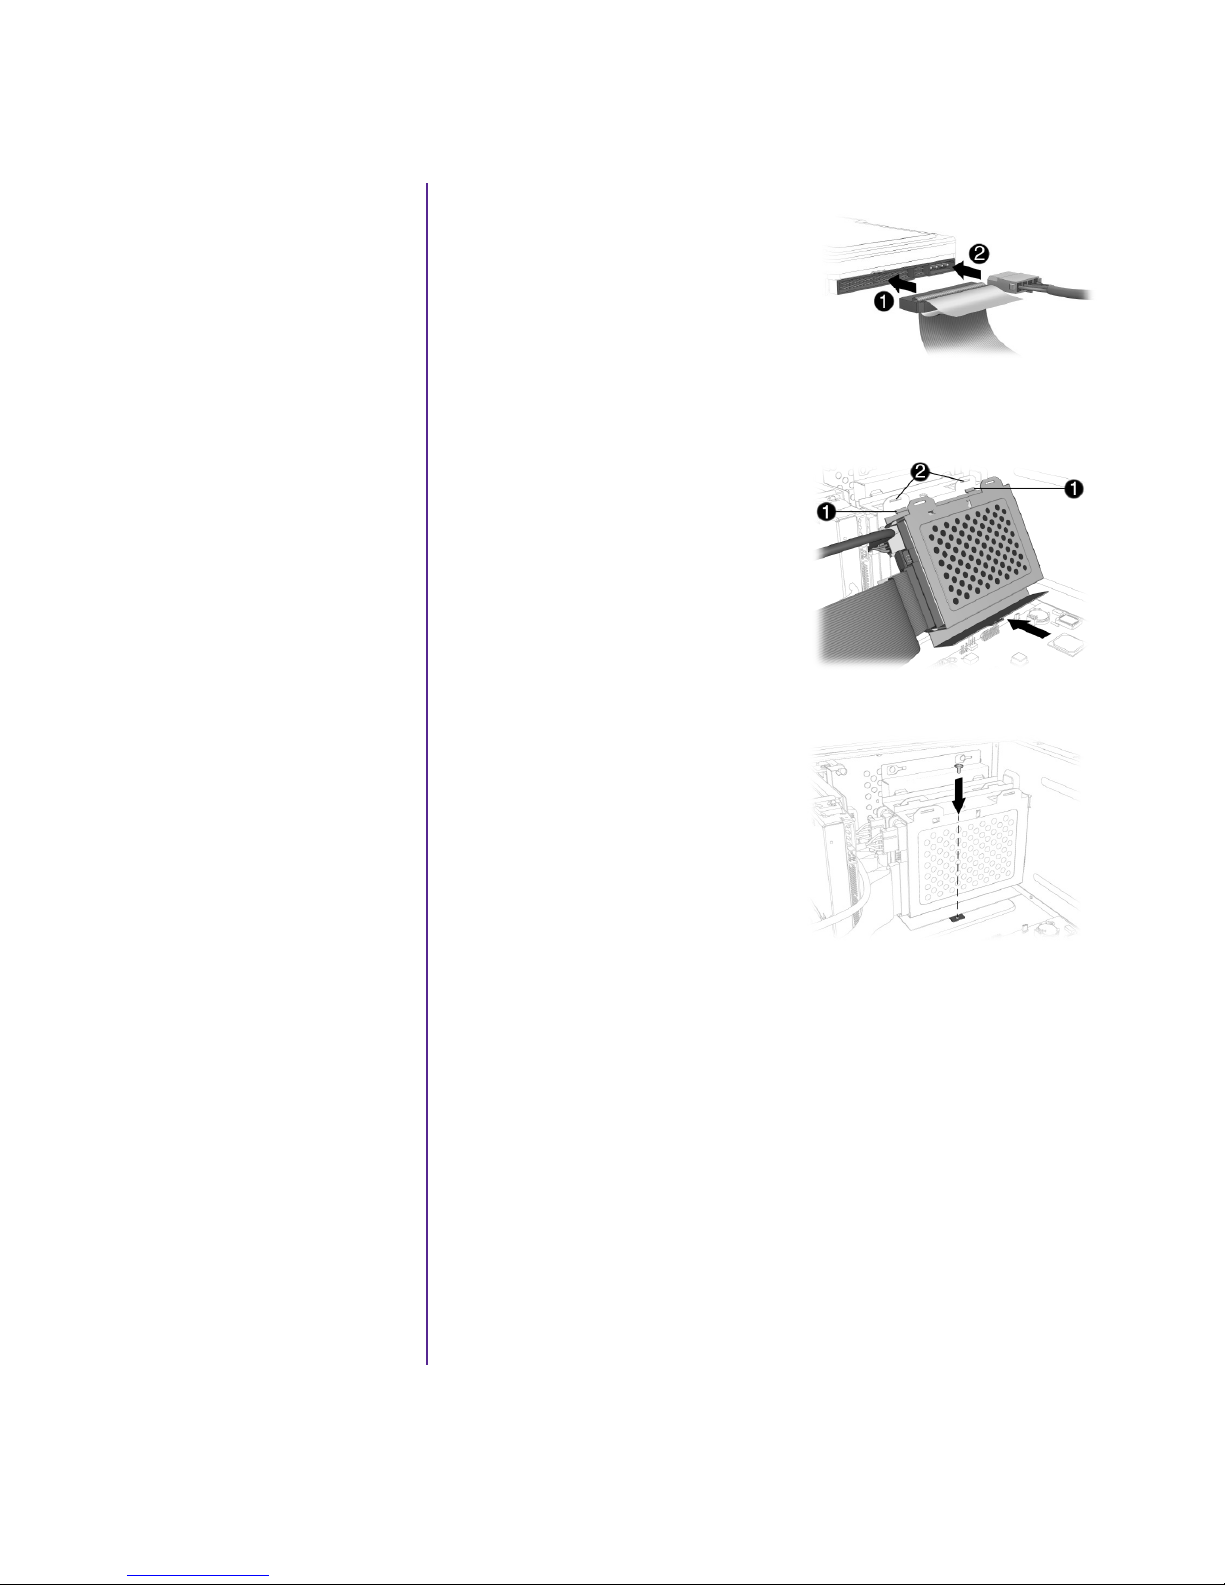
Adding
Components,
cont.
4. Line up the hard drive data
cable with the pins on the hard
drive. Make sure you do not
bend the pins. Connect the
hard drive data cable 1 and
power cable 2 to the new hard
drive.
5. Insert the optional hard drive
bracket tabs 1 into the
primary hard drive bracket
slots 2. Ensuring that all
cables are clear, push the base
of the optional hard drive
bracket into position.
6. Replace the screw securing
the optional hard drive
bracket to the chassis.
RESARIO—GETTING STARTED
MY P
OMPUTER UPGRADES
C
7-7
Page 71
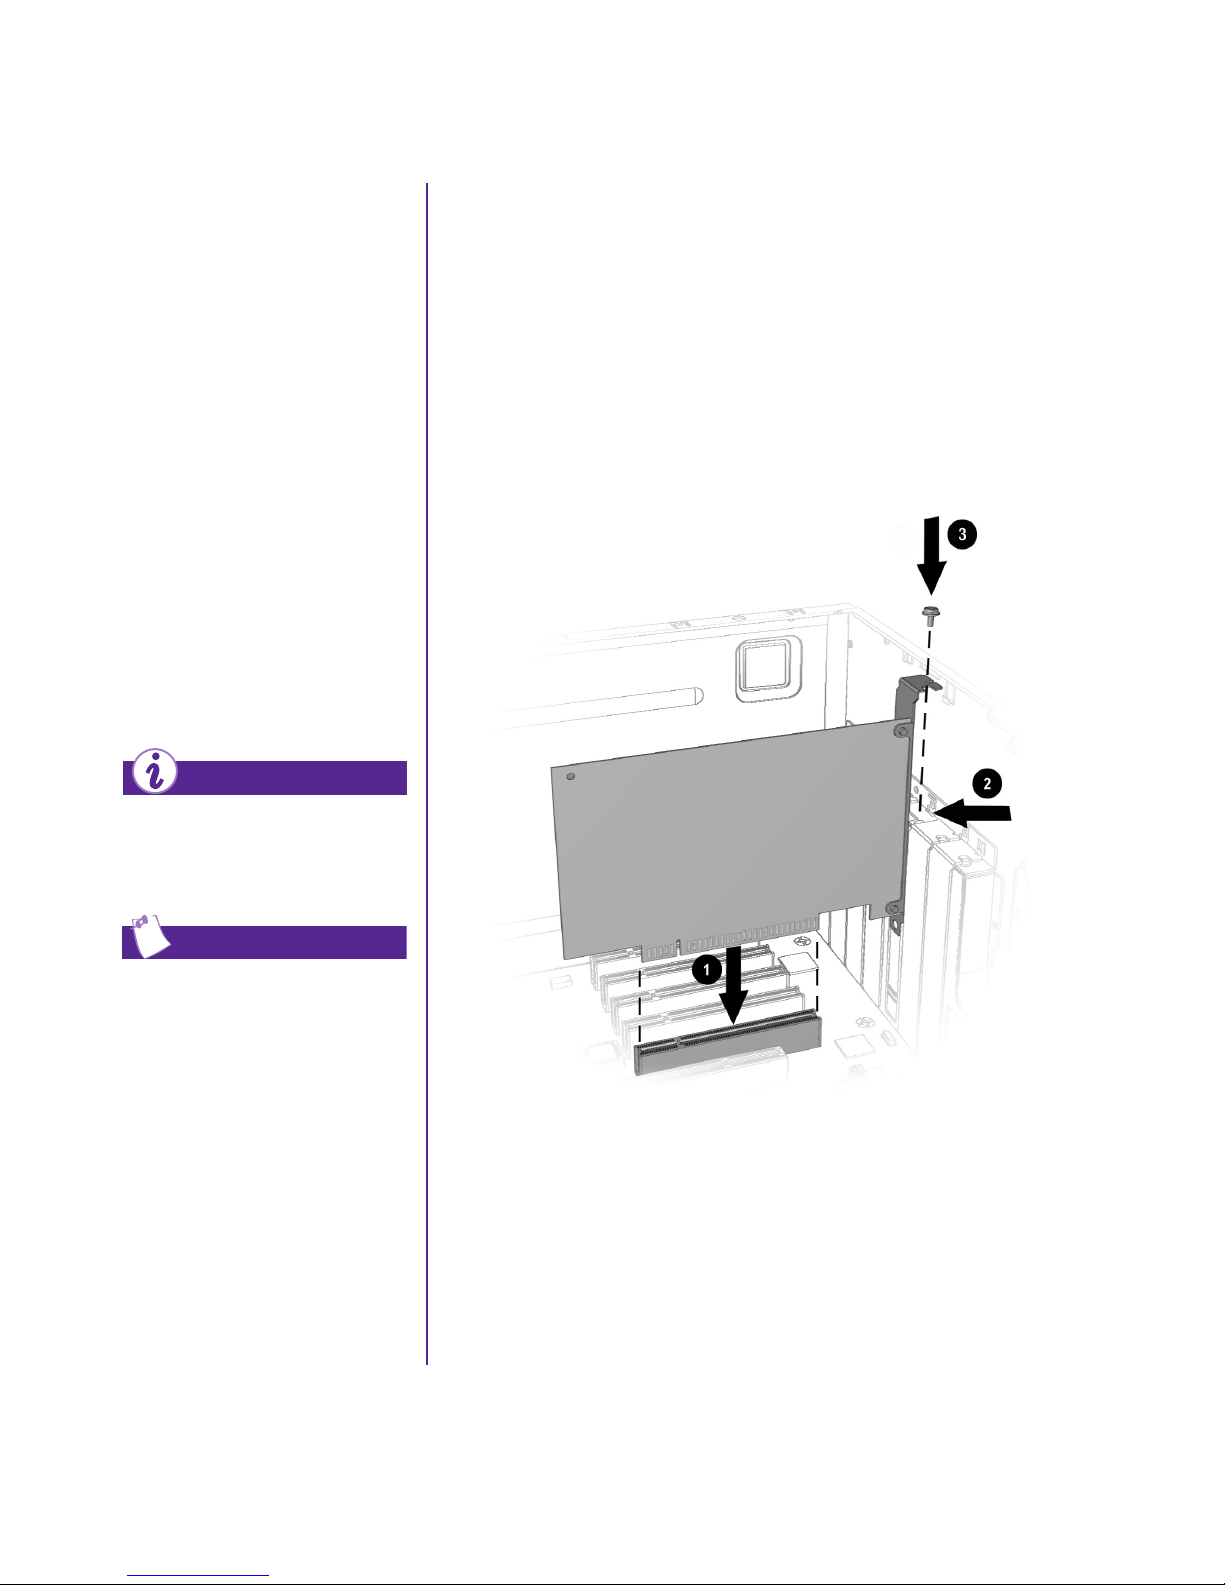
Adding
Adding an Expansion or Option Card
Components,
cont.
An expansion card is a
circuit board that fits into a
computer expansion slot to
add a certain function such
as a modem, sound or audio
card, Network Interface
Card (NIC), or Small
Computer System Interface
(SCSI) adapter.
This topic shows you how to
add or replace expansion
and option cards in your
computer.
Did you know ...
The type and number of
expansion slots may vary
by model.
Note: Some Presarios come with AGP slots for graphics card options only.
1. Complete the “Accessing Internal Computer Components”
procedure.
2. Align the card 1 with the connector on the system board and
with the rear connector slots 2 on the chassis.
3. Insert the card carefully and firmly into the connector on the
system board.
Tip
Be sure the expansion card is
properly positioned in the rear
connector slot on the chassis.
OMPUTER UPGRADES
7-8 C
MY P
4. Place the slot screw 3 into the chassis slot and secure the
expansion card to the chassis.
RESARIO—GETTING STARTED
Page 72
Need Some
Help?
This chapter provides information for identifying and solving
In This Chapter
Helpful Hints, 8-2
common problems that may occur with your computer. You can
easily diagnose and solve many computer problems on your own
without contacting a technician. In addition, you can find helpful
information on our Web site:
8
Recovery CD, 8-3
Compaq Support, 8-4
Troubleshooting, 8-5
www.compaq.com/consumersupport
RESARIO—GETTING STARTED
MY P
EED SOME HELP
N
? 8-1
Page 73

Helpful Hints
Did you know ...
For Compaq.NET technical
support, dial (toll free)
1-800-952-3513.
For Compaq.NET customer
support, dial (toll free)
1-800-952-3512.
If you encounter problems with your computer, monitor, or
software, review the following checklist before taking further
action:
Check that the computer and monitor are plugged into a
➜
working electrical outlet.
Check to see that the computer is turned on and the Power
➜
light
Check to see that the monitor is turned on and the Power light
➜
∏
located on the front of the computer is on.
∏
on the front of the monitor is on.
To avoid long-distance charges
when connecting to the
Internet, always use a local
area telephone number.
See also ...
For additional troubleshooting
information relating to your
printer or monitor, see the
documentation that came with
your equipment.
Turn up the brightness and contrast controls of the monitor if
➜
the screen is dim.
Check all cable connections for loose or incorrect
➜
connections.
Remove any disk from the disk drive before turning on your
➜
computer.
Run Windows Diagnostics to determine and repair minor
➜
problems. Refer to the My Presario—Learning More CD for
instructions.
Entering BIOS (CMOS) Setup
If you need to enter the BIOS setup, press the F10 key when the
cursor is blinking in the upper right corner of the display with the
word COMPAQ displayed in red on a black background. On most
models this is very soon after your computer powers on.
EED SOME HELP
8-2 N
? MY P
▲
Caution: The BIOS setup is for advanced users. Be careful when
changing the BIOS Setup. If you make a change to this setup, you may
disable some of your computer’s functionality.
RESARIO—GETTING STARTED
Page 74
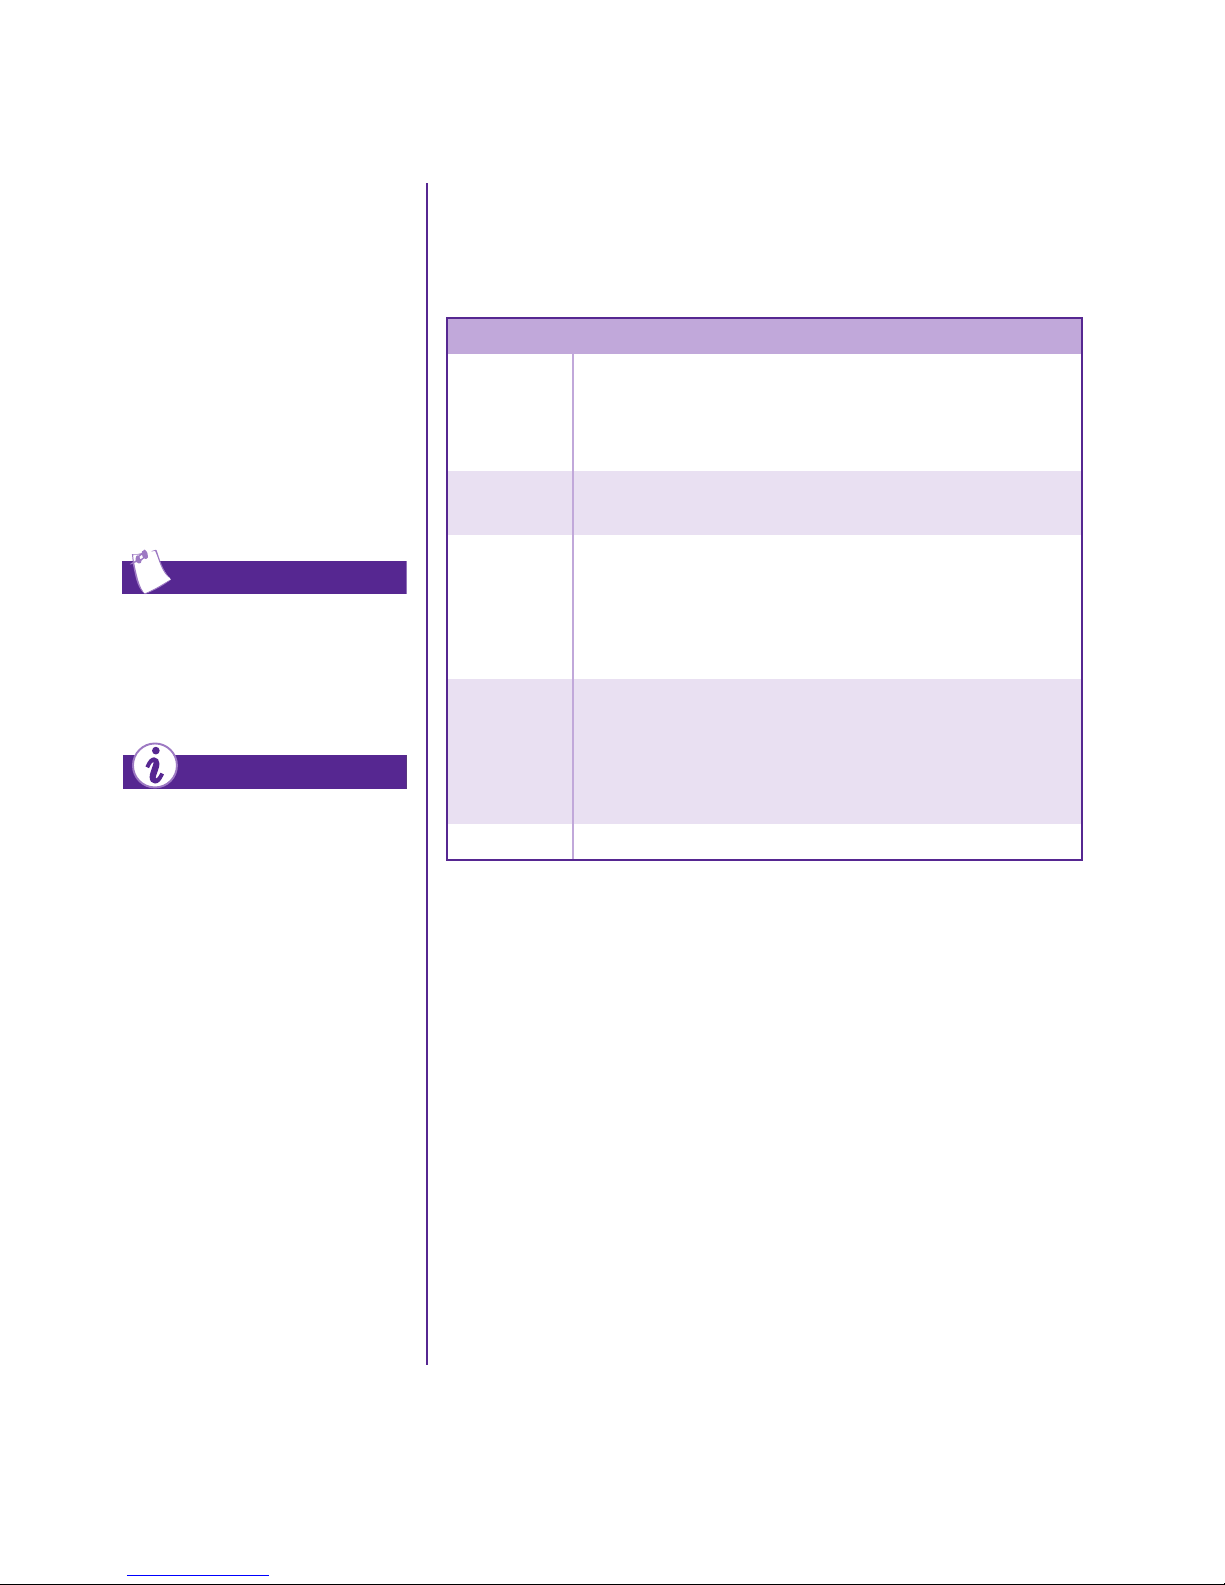
Recovery CD
Using the Recovery CD
The Recovery CD can
reinstall the software to its
original state when you
purchased the computer.
You also have the option of
restoring your computer to
the way it was when you
performed the last User
Backup.
Tip
User Backup creates
USER.PQI files. These files are
read-only—you cannot edit
their contents.
Did you know ...
Everything added to the drive
since the last User Backup is
lost when you perform a User
Recovery.
When you restart your computer with the Recovery CD in the
drive, the following menu is displayed:
Option Description
Emergency
Diskette
User
Backup
User
Restore
Factory
Restore
Exit Exits the Recovery CD.
Creates a recovery diskette which stores the software
option information that came with your computer. This
information is needed to restore your computer to the
condition it was in when you first unpacked it.
Creates a backup of the C drive. The backup is stored on
the D drive in USER.PQI files.
Extracts the data in the USER.PQI files from the D drive
and restores the desktop to the settings existing at the
time of your last User Backup. Any files, data, or
programs you added after your last User Backup are
deleted.
Restores the computer to its original factory condition.
You will need to re-enter your factory registration
information again, and you may be prompted to insert
your emergency disk. Any files, data, or programs you
added after receiving your computer are deleted.
RESARIO—GETTING STARTED
MY P
EED SOME HELP
N
? 8-3
Page 75

Compaq
Support
If you have a computer problem or question, check the following
resources for answers:
Review the “Need Some Help?” chapter in this guide for
➜
suggestions to solve the problem.
Press the Help
➜
G button on the keyboard to access service and
support information for your Presario, find information about
your computer and computer-related peripherals, and access
links to online technical help.
Visit the Compaq Web Site at:
➜
www.compaq.com
Contact Compaq Technical Support at the telephone number
➜
listed in your Certificate of Warranty.
EED SOME HELP
8-4 N
? MY P
RESARIO—GETTING STARTED
Page 76

Troubleshooting
If a solution does not solve
your problem, try all
solutions for the symptom
or try the solution a second
time.
Audio
Before contacting Technical Support, keep in mind that the
information needed to correct the problem may be at your
fingertips. Try pressing the Help G button on the keyboard.
This button accesses important service-and-support information
and tools.
Information in this section is divided into three areas: Symptom,
Problem, and Solution.
The Symptom line describes the symptom or warning message
for the type of problem you are having. The Problem column
identifies one or more reasons why the symptom may have
occurred. The Solution column describes what you should do to
try to solve the problem.
Note: Some of the symptoms listed for certain troubleshooting problems will
not apply to your computer. For problems relating specifically to the
monitor or printer, refer to the documentation that came with the
equipment.
Symptom Problem Solution
No sound Speaker cables are not properly
connected.
Volume is muted. On the Windows taskbar, click the
Computer is in Sleep mode. This
mode is identified when the Power
Status light on your Internet
keyboard is lit in amber.
Shut down your computer using the
normal shutdown procedure.
Reconnect the speakers. Refer to the
Quick Set-Up poster for instructions.
Volume
check box.
See Waking Your Computer in the
chapter “Using Your Computer” in
this guide.
icon and clear the Mute
÷
RESARIO—GETTING STARTED
MY P
EED SOME HELP
N
? 8-5
Page 77

CD-ROM, CD-RW,
or DVD-ROM
Symptom Problem Solution
CD-ROM, CD-RW, or DVD-ROM
drive cannot read a disc or
takes too long to start.
CD has been inserted upsidedown.
The DVD-ROM drive will take longer
to start because it has to determine
the type of media being played,
such as audio or video.
Re-insert the CD with the label
facing up.
Wait at least 30 seconds to let the
DVD-ROM drive determine the type
of media being played. If the disc
still does not start, read the other
solutions listed in this topic.
CD or DVD disc is dirty. Clean CD or DVD with a CD cleaning
kit, available from most computer
stores.
Windows does not detect CD-ROM
or DVD-ROM driver.
1. On the Windows taskbar, click
Start, point to Settings, and
then click Control Panel. The
Control Panel window is
displayed.
2. Double-click the System
m
icon. The System Properties
dialog box is displayed.
3. Click the Device Manager tab.
next to
4. Click the plus sign
’
the CD or DVD drive, and select
the installed driver.
5. Click the Remove button, and
click OK twice.
6. Restart your computer, and
let Windows detect the CD or
DVD driver.
Recording audio CDs is difficult
or impossible.
EED SOME HELP
8-6 N
? MY P
Wrong or poor quality media type. Verify that you are using the correct
media for the drive.
Try a different brand of media.
Quality varies widely between
manufacturers.
Note: See online Help in the Easy CD Creator software for detailed
troubleshooting tips.
RESARIO—GETTING STARTED
Page 78

Disk Drive
Symptom Problem Solution
Not reading drive: “Abort, Retry,
Fail?” message is displayed.
“Non-system disk or disk error”
message is displayed.
A non-formatted disk has been
inserted.
To format the disk:
1. Double-click the My Computer
icon on the Windows
g
desktop.
2. Select the disk (A) drive.
3. Click File, and point to Format.
4. Select the desired options, and
click Start to begin formatting
the disk.
Disk is damaged. Replace the disk with a new one.
A disk that does not contain the
system files needed to start your
computer has been inserted in
When drive activity stops, remove the
disk and press the Spacebar.
The computer should start up.
the drive.
Disk error has occurred. Restart your computer by pressing
the Start/Reset button. If the error
message returns, see the next
problem “System files have
been damaged.”
System files have been damaged.
1. Insert a start-up disk in the disk
drive.
2. Restart your computer.
3. At the A:> prompt, type SYS C:
and press the Enter key.
4. The following message is
displayed: SYSTEM
TRANSFERRED. This task
restores the system files to the
hard disk.
5. Restart your computer.
RESARIO—GETTING STARTED
MY P
Hard drive has failed. Call Compaq Technical Support. Refer
to your Certificate of Warranty
for details.
EED SOME HELP
N
? 8-7
Page 79

Symptom Problem Solution
Disk drive light stays on. Disk has been improperly inserted. Remove the disk and reinsert it as
follows: Insert the edge with the
sliding cover into the drive, face up,
and push the disk all the way in until
it stops.
Disk is damaged. Remove the disk and insert a new
disk. If a problem persists, run the
Windows Maintenance Wizard to
repair the drive:
1. From the Windows taskbar,
click the Start button.
2. Point to Programs, then
Accessories, then System
Tools, and then click
Maintenance Wizard.
3. Select Perform maintenance
now.
4. Click OK.
Disk drive cannot save
information to disk.
Disk is not formatted. To format the disk:
1. On the Windows desktop,
double- click the My Computer
icon.
g
2. Select the disk (A) drive.
3. Click File, and point to Format.
4. Select the desired options, and
click Start to begin formatting
the disk.
Disk is write-protected. Slide the write-protection tab to the
unlocked position on the disk.
Disk is full or the file is too big. Use another disk or compress the file
to reduce the size.
Disk is damaged. Replace the damaged disk.
EED SOME HELP
8-8 N
? MY P
RESARIO—GETTING STARTED
Page 80

Symptom Problem Solution
Disk drive cannot save
information to disk, cont.
File Save command not properly
executed.
When saving information to the disk
drive, verify that you are using the
correct drive letter.
Disk drive cannot read a disk. Disk drive has failed. Call Compaq Technical Support. Refer
to your Certificate of Warranty
for details.
Disk is not formatted. To format the disk:
1. On the Windows desktop, dou-
ble- click the My Computer
icon.
g
2. Select the disk (A) drive.
3. Click File, and point to Format.
4. Select the desired options, and
click Start to begin formatting
the disk.
Display (Monitor)
Symptom Problem Solution
Screen is blank, and monitor
power light is not lit.
Monitor power cable is not
connected to the monitor or to
the wall outlet.
Reconnect the power plug on the back
of the monitor and on the wall outlet.
Monitor is not turned on. Press the Power button on the front of
Screen is blank. Monitor connector cable is not
properly connected to the back
of the computer.
Screen saver is enabled. Press any key or move the mouse to
Computer is in Sleep mode, as
shown on the keyboard
LED panel.
If you have a flat-panel monitor
(available on select models), you
may need a Digital Video Interface
and connector.
RESARIO—GETTING STARTED
MY P
the monitor.
Inspect the monitor video connector
for bent pins. If no pins are bent,
reconnect the monitor connector cable
on the back of the computer.
make the screen display visible again.
See Waking Your Computer in the
“Using Your Computer” chapter
in this guide.
Refer to your Certificate of Warranty
for details.
EED SOME HELP
N
? 8-9
Page 81

Hard Drive
Symptom Problem Solution
Computer seems to be
locked up.
Hard drive error message is
displayed.
Hard drive fault protection error
message is displayed.
Program in use has stopped
responding to commands.
Attempt a normal Windows shutdown.
If this fails, press the Power button for
four or more seconds to turn off the
power. To restart your computer, press
the Power button again.
Part of hard drive has failed. Run the Windows Maintenance Wizard
to repair the drive:
1. From the Windows taskbar, click
the Start button.
2. Point to Programs, then
Accessories, then System Tools,
and then click Maintenance
Wizard. The Maintenance Wizard
is displayed.
3. Select Perform maintenance
now.
4. Click OK.
Part of the hard drive is about to
fail or could already have failed.
Call Compaq Technical Support. Refer
to your Certificate of Warranty for
details.
EED SOME HELP
8-10 N
? MY P
RESARIO—GETTING STARTED
Page 82

Internet Access
Symptom Problem Solution
Cannot connect to the Internet. Internet Service Provider (ISP)
account is not set up properly.
Modem is not set up properly. Reconnect the modem, verifying the
Web browser is not set up
properly.
Cannot automatically launch
Internet programs.
Internet takes too long to
You must log in to your ISP before
some programs will start.
Modem is not set up properly. Verify that the correct modem speed
download Web sites.
Verify Internet settings or contact
your ISP for assistance.
following connections: telephone line
to telephone (for external phone sets)
and telephone line to wall jack (from
computer to wall).
Verify that the Web browser is
installed and set up to work with your
ISP.
Log in to your ISP and launch the
desired program.
and COM port are selected:
1. Click Start and point to Settings.
2. Click Control Panel. The Control
Panel window is displayed.
3. Double-click Modems. Windows
detects the modem(s) you have
installed.
4. Click the Properties button.
An identification window
is displayed.
5. Verify that the correct modem
port is set and the maximum
speed of your modem is
selected. Reset these
settings if necessary.
6. Click OK to close the
identification window.
7. Click Close to close the Modems
Properties Window.
8. Click the Close
button in the
P
upper-right corner of the Control
Panel window to return to the
Windows desktop.
RESARIO—GETTING STARTED
MY P
EED SOME HELP
N
? 8-11
Page 83

Keyboard and
Scroll Mouse
Symptom Problem Solution
Keyboard commands and
typing are not recognized
by the computer.
Keyboard connector is not properly
connected.
1. On the Windows taskbar, click
the Start button.
2. On the Start menu, click Shut
Down... The Shut Down Windows dialog box is displayed.
3. Select the Shut down option.
4. Click OK.
5. After the shutdown is complete,
reconnect the keyboard to the
back of your computer and
restart your computer.
Program in use has stopped
responding to commands.
Shut down your computer using the
mouse. If your mouse cannot activate
a shutdown, refer to the problem
below: “Mouse connector is not
properly plugged into the back of
the computer.”
Keyboard needs repair. Refer to your Certificate of Warranty
for details.
EED SOME HELP
8-12 N
? MY P
RESARIO—GETTING STARTED
Page 84

Symptom Problem Solution
Mouse does not respond to
movement or is too slow.
Mouse will only move vertically
or horizontally.
Mouse connector is not properly
plugged into the back of the
computer.
Shut down your computer using
the keyboard:
1. Press the Ctrl and Esc keys at
the same time to display the
Start menu.
2. Use the up or down arrow key to
select Shut Down..., and then
press the Enter key.
3. Select the Shut down option.
You may need to use the up or
down arrow key.
4. Press the Enter key to
select OK.
5. After the shutdown is complete,
plug the mouse connector into
the back of your computer (or
the keyboard) and restart your
computer.
Mouse roller ball is dirty. Remove roller ball cover from bottom
of mouse and clean with mouse
cleaning kit available from most
computer stores.
RESARIO—GETTING STARTED
MY P
Program in use has stopped
responding to commands.
Shut down your computer using the
keyboard. Refer to the preceding
problem “Mouse connector is not
properly connected” for details about
shutting down using the keyboard.
Mouse needs repair. Call Compaq Technical Support. See
your Certificate of Warranty for
details.
EED SOME HELP
N
? 8-13
Page 85

Wireless Wheel
Mouse
Symptom Problem Solution
Mouse does not work after
installation or is not detected.
Receiver is not connected
properly.
Batteries are not installed properly. Reinstall the batteries according to
Communication between receiver
and mouse not established.
Poor reception. Receiver too close to other
electrical devices.
Try unplugging then reconnecting the
receiver cable to your computer.
The receiver cable goes into the
computer’s USB port or PS/2 mouse
port.
the diagram inside the battery
compartment.
Press the Connect button on the
receiver, then press the Connect
button under the mouse. See step 6
in the “Compaq/Logitech Wireless
Wheel Mouse” section for more
information.
Place the receiver at least 8 inches or
20 centimeters away from other
electrical devices, such as the
computer, the computer monitor, or
external storage devices.
If you are working on a metallic
surface, try turning the receiver on its
side.
Mouse stops functioning. Batteries are low. Replace the batteries.
EED SOME HELP
8-14 N
? MY P
RESARIO—GETTING STARTED
Page 86

Memory
Symptom Problem Solution
Insufficient memory message is
displayed.
All memory in the computer is
being used by open programs, and
memory is needed for a desired
task.
To avoid Windows running
unnecessary programs automatically
at startup:
1. From the Windows desktop,
click the Start button.
2. Select Run.
3. In the Open box, type
MSCONFIG.
4. Click OK. The System
Configuration Utility dialog
box is displayed.
5. Click the Startup tab, and clear
the check box(es) for any
unnecessary programs.
6. Close one or more programs,
and restart Windows to recover
memory. If the error message is
displayed again, repeat the
preceding steps and close one
or more programs.
Power
Symptom Problem Solution
Computer will not turn on. Line voltage selection switch is not
in the proper position for your
region (115V/230V).
Wall outlet is defective. Test the outlet by connecting a
“Illegal Operation has
Occurred” error message
is displayed.
RESARIO—GETTING STARTED
MY P
Software being used is not
Microsoft-certified for your version
of Windows.
Set the line voltage selection switch
to the correct setting for your region,
or call Compaq Technical Support for
assistance. Refer to your Certificate
of Warranty for details.
different electrical device to
the outlet.
Verify that the software is certified by
Microsoft for your version of Windows
(see program packaging for this
information).
EED SOME HELP
N
? 8-15
Page 87

Symptom Problem Solution
“Illegal Operation has
Configuration files are corrupt. If possible, save all data, close all
Occurred” error message is
displayed (continued).
Computer will not start. System files may have been
damaged. You will need to insert a
startup disk or the Windows
StartUp disk to restart
your computer.
programs, and restart your computer.
If the error message returns, you may
need to back up your data files and
use the Recovery CD. Refer to the
Recovery CD table in this chapter
for details.
▲
Caution: Factory Restore
reformats your hard drive; all data
files will be lost.
1. Insert a startup disk in the
disk drive.
2. Restart your computer.
3. At the A:> prompt, type SYS C:
and press the Enter key.
The following message will be
displayed: SYSTEM
TRANSFERRED. This task will
restore the system files to your
hard drive.
4. Remove the disk from the A
drive and restart your computer.
If this procedure does not restart your
computer, call Compaq Technical
Support. Refer to your Certificate of
Warranty for details.
EED SOME HELP
8-16 N
? MY P
Wrong memory modules were
used in the upgrade, or memory
modules were installed in the
wrong location.
Verify that you installed your memory
modules correctly by calling Compaq
Technical Support. Refer to your
Certificate of Warranty for details.
Hard drive has been damaged. Call Compaq Technical Support. Refer
to your Certificate of Warranty
for details.
RESARIO—GETTING STARTED
Page 88

G
Glossary
This Glossary defines commonly used terms to help new users understand computer concepts.
Some of the terms are used in this guide. An extensive Glossary is provided on the
My Presario—Learning More CD.
1394 port: A new type of connector for
plugging in peripherals with extremely fast
data transfer rates, such as video cameras.
Also known as a f irewire port.
B
back up: To copy files in case the original
files are lost or damaged.
browser: Software that searches for, displays,
and downloads text, graphics, sound, and
video from the Web.
C
click (left-click): To press and quickly release
the left mouse button to select
an item.
Ctrl+Alt+Delete: Pressing and holding down
the Ctrl key, then the Alt key, then the Delete
key, and then releasing all three
keys at once, to close a program that is
locked (not responding).
cursor: The blinking vertical line on the screen
that indicates where the next character will
appear when you type.
D
dialog box: A small window that requests
information from the user before a command
can be completed.
double-click: To press the left mouse button
two times in rapid succession to open
an item.
download: To receive files from another
computer on the Internet.
drive: A device that reads and sometimes
writes to storage media. Examples are
CD-ROM, CD-R, CD-RW, DVD-ROM, Zip,
disk, and hard drives.
drop-down menu: A list of options that is
displayed when you click a menu on the
menu bar or on the down arrow of a
dialog box.
RESARIO–GETTING STARTED
MY P
LOSSARY
G
-1
Page 89

E
e-mail (electronic mail): Written messages
sent over the Internet.
F
fax modem: A modem that allows your
computer to transmit and receive faxes.
file extension: A period and three characters
after a file name that indicate the program in
which the file was created. For example,
filename.doc. The .doc extension indicates
that the file was created in Microsoft Word.
G
game port: A connector on the back of the
computer for plugging in a gamepad,
joystick, or steering wheel.
hyperlink: An embedded link to another
document or Web site. When you position
the cursor over a hyperlink (colored text or
image), a small hand is displayed. When you
click the hyperlink, your browser displays the
new document or Web site.
I
icon: A small picture that represents a menu
command, file, program, tool, or peripheral.
Internet: A worldwide collection of computer
networks interconnected so that users can
share information electronically.
ISP (Internet service provider): A company
that provides access to the Internet. To use
the service, you need the ISP software, a user
name, a password, and access phone
number(s).
M
H
hard drive: Internal storage for permanent
storage of system files, program files, utility
files, and data files.
hardware: The physical components of a
computer—the parts you can physically
touch.
HTML (hypertext markup language): The
standard language for documents designed
for viewing on the Web with a browser. They
are easily identified by the file extension
.htm or .html. See file extension.
LOSSARY
G
-2 MY P
maximize: To enlarge (or maximize) the
window in a Windows-based program by
clicking the Maximize
button with an open square in the upper-right
corner of a window that has not been
maximized.
minimize: To shrink a running program
window into a button on the Windows
taskbar by clicking the Minimize
button—the button with the minus sign in the
upper-right corner of a window. Click the
button on the taskbar to view the window
again.
button—the
T
RESARIO–GETTING STARTED
Q
Page 90

modem: A device inside the computer that
converts data from digital format to analog
format so that it can be transferred through a
standard telephone line to another computer.
The modem in the receiving computer
converts the data back to digital format.
N
navigate: To move through a Web site or
online document by clicking the hyperlinks
embedded in the text or images.
network: Two or more computers linked
together to share resources, such as
programs, files, and printers.
O
pop-up menu: A list of options that pops up
when you right-click an icon on the desktop
or taskbar, the vacant part of the desktop, a
selection in a document, or a file in Windows
Explorer. See right-click.
program: A set of instructions, written in a
programming language understood by the
computer, that tells the hardware what tasks
to perform. See software.
R
RAM (random access memory): The main
memory of the computer—an erasable,
temporary memory that can be written to as
well as read. Parts of the operating system
and applications are loaded into RAM as
they are needed. Turning off the computer
erases any data that was in RAM.
OS (operating system): The interface that
enables a person and a computer to “talk” to
one another.
P
parallel port: A connector on the back of the
computer for plugging in a parallel cable
attached to a parallel device, such as a
printer.
peripheral: An external device connected to a
computer. Examples are a monitor, keyboard,
mouse, joystick, scanner, printer, and digital
camera.
RESARIO–GETTING STARTED
MY P
right-click: Pressing and quickly releasing the
right mouse button displays a menu of
options. See pop-up menu.
S
scroll: To move information gradually across
the screen with the use of scroll bars when a
document or Web page is too long or too
wide to view all at once.
search engine: A program accessed on the
Internet that allows you to search large
databases for information by using keywords
or phrases.
serial port: A small connector on the back of
the computer for plugging in a serial cable
attached to a serial device, such as a mouse
or keyboard.
LOSSARY
G
-3
Page 91

server: A computer with a large hard disk that
serves (provides information to) other
computers connected to it by a network. The
Internet is a network of servers. When you
send or receive e-mail, it travels from the
sender’s computer to the receiver’s computer
through a number of servers.
shortcut: An icon on the Windows desktop
that you double-click to launch a program.
software: A program you can install on a
computer from a disk, CD, DVD, Zip disk, or
the Internet. See program.
surf: To jump from place to place on the
Internet, searching for topics of interest, by
clicking hyperlinks. See hyperlink.
surge protector: A device that regulates the
flow of electricity to the computer and
prevents high-voltage surges from damaging
the equipment.
V
virus: A set of software instructions written to
harm computers.
W
window: A screen displayed on the Windows
desktop after you select an item or open a
program.
Windows desktop: The main screen you see
when your computer completes startup.
Windows taskbar: The gray bar you see
across the bottom of the screen when your
computer completes startup.
World Wide Web: A system of Internet
servers that support documents formatted in
HTML. See HTML.
U
upload: To send information to another
computer on the Internet.
URL (Uniform Resource Locator):
The address of a Web site, such as
www.compaq.com.
USB port (Universal Serial Bus port):
A connector for plugging in multiple,
ultra-high-speed peripherals. USB ports are
gradually replacing serial ports and parallel
ports and eliminating the need for so many
different connectors and cables.
LOSSARY
G
-4 MY P
Z
zipped file: A file that has been compressed to
a smaller size by compression software, such
as WinZip. It can be identified by the file
extension .zip. See file extension.
RESARIO–GETTING STARTED
Page 92

Index
I
Symbols
@ sign 5-7
A
AC power port 2-2
Adaptec Easy CD Creator
creating CDs
Add/Remove Programs
America Online
hyperlink
AOL
2-6
connecting with
icon
5-3
searching
Application and Web buttons
Help
4-5
My Program
arrow keys
audio
playing a CD
port
autoscrolling
2-2
4-2
2-6
5-5
4-10
2-6
4-16
4-5
4-14
5-4
6-5
B
BIOS setup 8-2
browser
common features
button
Back
4-14
CD/DVD Control
Close
Eject
Forward
Instant E-mail
Instant Internet
keyboard
My Program
Play/Pause
Quick Launch Web
Search
Send and Receive
sleep
Start
Stop
volume
5-10
4-14
4-14
5-5
4-7
3-2, 3-3, 5-3
4-14
4-6
4-3
4-14
5-6, 5-9
2-6
4-6
5-4
4-3
4-5
5-6
RESARIO–GETTING STARTED
MY P
NDEX
I
-1
Page 93

C
cable
speaker
CD
creating
recovery
CD drive
CD/CD-RW drive
replacing
CD/DVD drive
inserting a CD or DVD
CD/DVD-ROM
cleaning
Windows does not detect driver
CD/DVD-ROM Control buttons
Eject/Load
Fast Forward/Next Track
Play/Pause
Rewind/Previous Track
Stop
CD/DVD-ROM drive
CD-ROM drive
inserting a disc
removing a disc
CD-RW drive
backup disc
Compaq
registration
Web site
support
Compaq.NET
hyperlink
MSN
computer
changing settings
set up
problems
2-3
4-16
8-3
2-2, 7-3
7-3
8-6
4-3
4-3
4-3
2-2
7-3
4-16
2-5
1-4
8-4
2-6
5-3, 5-4, 5-5
2-2
8-4
2-2
4-13
4-13, 4-14
3-3
4-14
4-3
4-3
4-3
8-6
connector
color coding
Content Advisor
password
5-11
2-2
5-11
D
desktop 3-1, 3-2
features
icons
viewing
Did you know... notices defined
digital audio files
MP3
disk
disk error
drive
drive failure
printer set-up
reformatting
removing
using
double-click
downloading software
drive
7-3
CD
CD/DVD
CD-ROM
CD-RW
disk
DVD
DVD-ROM
hard drive
replacing DVD
Zip
DVD-ROM
playing a movie
3-2
3-2
3-2
6-3
6-3
8-7
2-2
8-7
2-7
8-7
4-12
4-12
4-9
4-12
2-2
2-2, 4-13
2-2, 4-12, 4-13, 7-3
2-2, 4-12
4-12
2-2, 4-13
4-12
7-3
4-12, 4-17
6-6
4-15
1-3
NDEX
I
-2 MY P
RESARIO–GETTING STARTED
Page 94

E
H
electronic documents 1-3
e-mail
address criteria
Close button
defined
delete key
extensions
Hotmail
Inbox
Instant E-mail
message window
Message/New Message
New Mail
Outlook Express
reading messages
receiving
Send and Receive
Send To box
sending
Subject box
To box
undeliverable
using
writing messages
energy saver
Ethernet
network
port
2-2
5-6
5-6
5-10
5-7, 5-8
5-8
5-7
4-7
2-2
5-7
5-10
5-10
5-7
5-9
5-8
5-6
5-7, 5-10
5-9
5-8
5-6
5-8
5-10
5-6
5-6
F
files 4-9
function keys F1 through F12
G
games 6-4
5-8
4-2
hard drive
backup
damaged
failure
problems with
storing system files
using
Help
Service and Support folder
Windows desktop
helpful hints
home networking
Hotmail
hyperlink
defined
5-6
4-16
8-7
4-12
1-6
8-16
8-2
5-2
2-3
8-10
I
icons 3-2
AOL
5-3
New Mail Message
install
downloaded files
software
wireless mouse
Instant E-mail
Instant E-mail button
internal components
Internet
defined
direct link to Compaq
hyperlink
parental controls
password
problems with
restricting content
searching
5-2
6-5
5-6
5-2
5-6
5-11
2-4
8-11
7-2
4-5
6-6
5-10
5-11
5-11
4-12
5-8
5-12
4-5
RESARIO–GETTING STARTED
MY P
NDEX
I
-3
Page 95

Internet buttons
Activity
E-mail
Entertainment
Instant E-mail
Instant Internet
My Presario
Retail/Affinity Central
Search
setting
Internet Service Provider
See also ISP
Internet Video Camera
features
ISP
5-2, 5-3, 5-4, 5-7, 5-8, 5-9, 5-10
account
MSN
problems with account
server name
user name
4-4
4-4
4-4, 5-3
5-3, 5-4
4-18
2-6
2-6
4-4
5-3
4-4, 5-3, 5-4
4-4
4-4
5-7
5-7
J
Jewel Case Creator 4-16
4-4
8-11
M
memory
problems with
replacing
Synchronous Dynamic Access Memory
(SDRAM)
microphone
port
2-2
Microsoft
registration
modem
line in
monitor
flat-panel monitor
port
problems with
mouse
See Scroll Mouse or Wireless Mouse
MP3
My Presario
registration
My Program button
assigning
6-3
2-2
2-3
7-5
4-6
2-5
5-12
8-16
8-9
8-9
7-5
K
keyboard
arrow keys
function keys F1 through F12
main keys
numeric keys
keyword
searching on the Internet
4-2
4-2
4-2
5-5
4-2
L
Logitech QuickCam Express
installing
NDEX
I
-4 MY P
4-18
Netscape Navigator 5-4
network
Ethernet
numeric keys
online Help
accessing
Index tab
Outlook Express
Inbox
setting up
5-10
N
2-2
4-2
O
3-4
3-4
5-6, 5-9
5-6
RESARIO–GETTING STARTED
Page 96

P
parallel port 2-2
parental controls
password
port
power
Power On button
printer
printing
problems
5-11
remembering
1394
2-2
audio
Ethernet
microphone
modem
monitor
parallel
power
PS2
serial
USB
port
problems with
setting up
documents
from the Internet
options
audio driver
computer
disk
disk drive
hard drive
hard drive damaged
hard drive failed
identifying
insufficient memory
Internet
2-2
2-2
2-2
2-2, 2-7
2-2
2-2
2-2
2-2, 2-7
2-2
6-2
8-5
8-7
8-11
2-2
2-7
8-4
8-8
8-10
2-2
6-2
8-5
8-5
5-11
5-6
8-16
2-2
8-7
6-2
8-16
8-15
8-11
8-12
8-7
Internet Service Provider
keyboard commands
memory
monitor
power
sleep mode
speakers
system files damaged
volume
wireless mouse
8-16
8-5
8-16
8-9
8-5
8-5
8-14
Q
Quick Launch Web buttons 4-5
Help
4-5
My Program
Quick Set-Up poster
4-5
2-3
R
recovery CD 8-3
removing programs
replacing
CD/CD-RW drive
DVD-ROM drive
memory
7-5
6-5
7-3
7-3
S
Scroll Mouse
autoscrolling
choosing button assignments
clicking
controlling cursor movements
customizing
double-clicking
dragging and dropping files
scrolling
setting up
wheel
4-9
4-9
4-9
4-9
4-9
4-10
4-9
4-9
4-9
4-9
RESARIO–GETTING STARTED
MY P
NDEX
I
-5
Page 97

SDRAM 7-5
search box
search engine
See also... notices defined
service and support
sleep mode
customizing
speakers
Audio In port
cassette player
CD player
MP3 player
turning on
volume control
Start button
shutting down your computer
Start menu options
Help
Log Off
Programs
search
Settings
Shut Down
start up disk
status lights
caps lock
e-mail
number lock
scroll lock
sleep
surge protector
system files
system tray
5-5
4-7, 8-9
3-3
3-3
4-8
4-8
3-2
5-5
4-7
4-11
4-11
4-11
4-11
3-2, 3-3
3-3
3-3
3-3
3-3
8-16
4-8
4-8
4-8
1-5, 2-3
8-16
8-4
4-11
4-11
1-3
3-3
U
upgrading components 7-2
V
video camera 4-18
volume
adjusting
4-6
W
waking your computer 4-7
Warning notices defined
warranty
Web
Windows
wireless mouse
World Wide Web
1-4
See also Internet
accessing favorite sites
browser
Compaq Store site
downloading files
keyword
My Presario site
searching
site
desktop
Help
installing
problems with
See also Internet
5-2
5-4
3-1, 3-2
3-4
5-5
5-5
2-4
8-14
5-12
6-6
5-12
Z
1-3
4-5
T
taskbar 3-2
Start button
Tip notices defined
NDEX
I
-6 MY P
3-2, 5-3
1-3
Zip drive or Zip disk
inserting a disk
removing a disk
4-17
4-17
RESARIO–GETTING STARTED
 Loading...