

HP Presario 1700, Presario 1702, Presario 1703, Presario 1705, Presario 1710 Supplementary Manual
...Page 1
© 2001 Compaq Computer Corporation.
All rights reserved. Printed in the United States,
Brazil, Canada, Japan, Singapore, Taiwan,
and the United Kingdom. Compaq is registered
in the U.S. Patent and Trademark Office.
183237-003
Mobile Internet-PC
Beyond Setup Guide
1700 Series
Presario
www.compaq.com
www.compaq.com
Page 2

Presario
Mobile Internet PC
Beyond Setup Guide
1700 Series
Page 3

Notice
© 2001 Compaq Computer Corporation
COMPAQ and the Compaq logo Registered in U.S. Patent and Trademark Office.
Microsoft and Windows are trademarks of Microsoft Corporation.
Intel, SpeedStep, and Pentium are trademarks of Intel Corporation.
All other product names mentioned herein may be trademarks or registered trademarks of their respective
companies.
Compaq shall not be liable for technical or editorial errors or omissions contained herein. The information in this document is subject to change without notice.
The information in this publication is subject to change without notice and is provided "AS IS"
WITHOUT WARRANTY OF ANY KIND. THE ENTIRE RISK ARISING OUT OF THE USE OF
THIS INFORMATION REMAINS WITH RECIPIENT. IN NO EVENT SHALL COMPAQ BE LIABLE
FOR ANY DIRECT, CONSEQUENTIAL, INCIDENTAL, SPECIAL, PUNITIVE OR OTHER
DAMAGES WHATSOEVER (INCLUDING, WITHOUT LIMITATION, DAMAGES FOR LOSS OF
BUSINESS PROFITS, BUSINESS INTERRUPTION OR LOSS OF BUSINESS INFORMATION),
EVEN IF COMPAQ HAS BEEN ADVISED OF THE POSSIBILITY OF SUCH DAMAGES. THE
FOREGOING SHALL APPLY REGARDLESS OF THE NEGLIGENCE OR OTHER FAULT OF
EITHER PARTY AND REGARDLESS OF WHETHER SUCH LIABILITY SOUNDS IN CONTRACT,
NEGLIGENCE, TORT, OR ANY OTHER THEORY OF LEGAL LIABILITY, AND
NOTWITHSTANDING ANY FAILURE OF ESSENTIAL PURPOSE OF ANY LIMITED REMEDY.
The limited warranties for Compaq products are exclusively set forth in the documentation accompanying
such products. Nothing herein should be construed as constituting a further or additional warranty.
Compaq Presario Mobile Internet PC 1700 Series
Third Edition (January 2001)
Part Number 183237-003
Page 4

CONTENTS
Chapter 1 Introduction . . . . . . . . . . . . . . . . . . . . . . . . . . . . . . . 1-1
Where Can I Find Information?. . . . . . . . . . . . . . . . . . . . 1-2
Printed Documents . . . . . . . . . . . . . . . . . . . . . . . . . 1-2
Symbols and Graphics . . . . . . . . . . . . . . . . . . . . . . . . . . 1-4
Symbols . . . . . . . . . . . . . . . . . . . . . . . . . . . . . . . . . . 1-4
Graphics . . . . . . . . . . . . . . . . . . . . . . . . . . . . . . . . . . 1-4
Safety . . . . . . . . . . . . . . . . . . . . . . . . . . . . . . . . . . . . . . . 1-5
Disconnecting Your Notebook from
the Power Source . . . . . . . . . . . . . . . . . . . . . . . . . . . 1-5
Chapter 2 Your Notebook at a Glance . . . . . . . . . . . . . . . . . . 2-1
Front of Your Presario Notebook . . . . . . . . . . . . . . . . . . 2-2
RESARIO MOBILE INTERNET
P
ERIES
1700 S
PC B
Components on Front . . . . . . . . . . . . . . . . . . . . . . . 2-2
Lower Front Panel . . . . . . . . . . . . . . . . . . . . . . . . . . 2-2
Internet Zone Buttons and Lights . . . . . . . . . . . . . . . 2-3
Function Keys . . . . . . . . . . . . . . . . . . . . . . . . . . . . . 2-5
Left Panel . . . . . . . . . . . . . . . . . . . . . . . . . . . . . . . . . . . . 2-6
Components on Left Side . . . . . . . . . . . . . . . . . . . . 2-6
EYOND SETUP GUIDE
ONTENTS
C
-i
Page 5

Right Panel. . . . . . . . . . . . . . . . . . . . . . . . . . . . . . . . . . . 2-7
Components on Right Side with CD, DVD,
or CD-RW Installed . . . . . . . . . . . . . . . . . . . . . . . . . 2-7
Components on Right Side with Diskette
or SuperDisk Drive Installed . . . . . . . . . . . . . . . . . . 2-7
Back Panel . . . . . . . . . . . . . . . . . . . . . . . . . . . . . . . . . . . 2-8
Components on Back . . . . . . . . . . . . . . . . . . . . . . . 2-8
Underside . . . . . . . . . . . . . . . . . . . . . . . . . . . . . . . . . . . . 2-9
Components on Underside . . . . . . . . . . . . . . . . . . . 2-9
QuikDock . . . . . . . . . . . . . . . . . . . . . . . . . . . . . . . . . . . 2-10
QuikDock Features . . . . . . . . . . . . . . . . . . . . . . . . 2-10
Chapter 3 Using Your Notebook . . . . . . . . . . . . . . . . . . . . . . 3-1
Power On! . . . . . . . . . . . . . . . . . . . . . . . . . . . . . . . . . . . 3-2
Plugging and Unplugging AC Power . . . . . . . . . . . . 3-2
Turning Your Notebook On and Off . . . . . . . . . . . . . 3-3
Using Battery Power . . . . . . . . . . . . . . . . . . . . . . . . 3-4
ONTENTS
C
Optimizing Processor Speed . . . . . . . . . . . . . . . . . . 3-5
TouchPad . . . . . . . . . . . . . . . . . . . . . . . . . . . . . . . . . . . . 3-6
Using the TouchPad Instead of a Mouse . . . . . . . . 3-6
Tapping and Double-Tapping . . . . . . . . . . . . . . . . . 3-7
Edge Motion . . . . . . . . . . . . . . . . . . . . . . . . . . . . . . 3-8
Display Options . . . . . . . . . . . . . . . . . . . . . . . . . . . . . . . 3-9
Changing Resolution . . . . . . . . . . . . . . . . . . . . . . . . 3-9
Adjusting Brightness . . . . . . . . . . . . . . . . . . . . . . . 3-10
Internet Zone Buttons. . . . . . . . . . . . . . . . . . . . . . . . . . 3-11
Reprogramming the Internet Zone Buttons . . . . . . 3-11
-ii P
RESARIO MOBILE INTERNET
EYOND SETUP GUIDE
PC B
1700 S
ERIES
Page 6

Storage Drives . . . . . . . . . . . . . . . . . . . . . . . . . . . . . . . 3-12
Identifying Your Storage Drives . . . . . . . . . . . . . . . 3-12
Using the Diskette Drive . . . . . . . . . . . . . . . . . . . . 3-12
Using the SuperDisk Drive . . . . . . . . . . . . . . . . . . 3-13
Security. . . . . . . . . . . . . . . . . . . . . . . . . . . . . . . . . . . . . 3-14
Using the Security Slot . . . . . . . . . . . . . . . . . . . . . 3-14
Power-On Password . . . . . . . . . . . . . . . . . . . . . . . 3-14
Chapter 4 Common Tasks . . . . . . . . . . . . . . . . . . . . . . . . . . . . 4-1
S-Video Connection . . . . . . . . . . . . . . . . . . . . . . . . . . . . 4-2
Connecting and Enabling S-Video . . . . . . . . . . . . . . 4-2
Setting Up Your Television Format . . . . . . . . . . . . . 4-3
Adjusting the Television Screen . . . . . . . . . . . . . . . 4-4
Switching Between Displays . . . . . . . . . . . . . . . . . . 4-4
Anti-Virus Software. . . . . . . . . . . . . . . . . . . . . . . . . . . . . 4-5
Using Anti-Virus Software . . . . . . . . . . . . . . . . . . . . 4-5
Chapter 5 Using the CD or DVD Drive . . . . . . . . . . . . . . . . . . 5-1
RESARIO MOBILE INTERNET
P
ERIES
1700 S
Recognizing a Computer Virus . . . . . . . . . . . . . . . . 4-6
Removing a Virus . . . . . . . . . . . . . . . . . . . . . . . . . . 4-6
Software and Hardware . . . . . . . . . . . . . . . . . . . . . . . . . 4-7
Adding and Removing Software . . . . . . . . . . . . . . . 4-7
Attaching Hardware Devices . . . . . . . . . . . . . . . . . . 4-9
CD or DVD Drive . . . . . . . . . . . . . . . . . . . . . . . . . . . . . . 5-2
Inserting a Disc . . . . . . . . . . . . . . . . . . . . . . . . . . . . 5-2
Removing a Disc . . . . . . . . . . . . . . . . . . . . . . . . . . . 5-3
Manually Ejecting a Disc . . . . . . . . . . . . . . . . . . . . . 5-3
EYOND SETUP GUIDE
PC B
ONTENTS
C
-iii
Page 7

FutureBay™ . . . . . . . . . . . . . . . . . . . . . . . . . . . . . . . . . . 5-4
Using the FutureBay . . . . . . . . . . . . . . . . . . . . . . . . 5-4
Audio CDs and Video Discs . . . . . . . . . . . . . . . . . . . . . . 5-5
Playing Audio CDs . . . . . . . . . . . . . . . . . . . . . . . . . . 5-5
Playing Non-DVD Video Discs . . . . . . . . . . . . . . . . 5-6
DVDs . . . . . . . . . . . . . . . . . . . . . . . . . . . . . . . . . . . . . . . 5-7
Using the DVD Player . . . . . . . . . . . . . . . . . . . . . . . 5-7
Playing a DVD Movie on a TV . . . . . . . . . . . . . . . 5-11
Using “Regionalized” DVDs . . . . . . . . . . . . . . . . . . 5-12
Video Display Options . . . . . . . . . . . . . . . . . . . . . . . . . 5-14
Showing and Hiding the DVD Panel . . . . . . . . . . . 5-14
Zooming the View . . . . . . . . . . . . . . . . . . . . . . . . . 5-14
CD-RW Basics . . . . . . . . . . . . . . . . . . . . . . . . . . . . . . . 5-15
Installing Adaptec Easy CD Creator™ 4
(available on select models) . . . . . . . . . . . . . . . . . 5-15
Using Adaptec Easy CD Creator 4 . . . . . . . . . . . . 5-17
ONTENTS
C
Preventing Buffer Underrun Errors . . . . . . . . . . . . 5-20
Accessing Easy CD Creator 4 User Information . . 5-21
Chapter 6 Let’s Go Surfing . . . . . . . . . . . . . . . . . . . . . . . . . . . 6-1
Basic Concepts . . . . . . . . . . . . . . . . . . . . . . . . . . . . . . . 6-2
What is the Internet? . . . . . . . . . . . . . . . . . . . . . . . . 6-2
What is the World Wide Web? . . . . . . . . . . . . . . . . . 6-3
Browsers . . . . . . . . . . . . . . . . . . . . . . . . . . . . . . . . . . . . 6-7
What is a Browser? . . . . . . . . . . . . . . . . . . . . . . . . . 6-7
Using Microsoft Internet Explorer . . . . . . . . . . . . . . 6-7
-iv P
RESARIO MOBILE INTERNET
EYOND SETUP GUIDE
PC B
1700 S
ERIES
Page 8

Search Engines . . . . . . . . . . . . . . . . . . . . . . . . . . . . . . . 6-9
Choosing a Search Engine . . . . . . . . . . . . . . . . . . . 6-9
Using a Search Engine . . . . . . . . . . . . . . . . . . . . . 6-10
Searching on the Web . . . . . . . . . . . . . . . . . . . . . . 6-11
Accessing Files from the Internet . . . . . . . . . . . . . 6-12
Chapter 7 Caring for Your Battery . . . . . . . . . . . . . . . . . . . . . 7-1
Battery Care . . . . . . . . . . . . . . . . . . . . . . . . . . . . . . . . . . 7-2
Using the Battery . . . . . . . . . . . . . . . . . . . . . . . . . . . 7-2
Storing the Battery . . . . . . . . . . . . . . . . . . . . . . . . . . 7-2
Recycling the Battery . . . . . . . . . . . . . . . . . . . . . . . . 7-3
Battery Calibration . . . . . . . . . . . . . . . . . . . . . . . . . . . . . 7-4
Calibrating the Battery . . . . . . . . . . . . . . . . . . . . . . . 7-4
Maximizing Battery Operating Time . . . . . . . . . . . . . 7-6
Fixing a Low-Battery Condition . . . . . . . . . . . . . . . . 7-7
Power Management . . . . . . . . . . . . . . . . . . . . . . . . . . . . 7-9
Chapter 8 Service . . . . . . . . . . . . . . . . . . . . . . . . . . . . . . . . . . . 8-1
RESARIO MOBILE INTERNET
P
ERIES
1700 S
Saving Energy . . . . . . . . . . . . . . . . . . . . . . . . . . . . . 7-9
What is Power Management? . . . . . . . . . . . . . . . . . 7-9
Preventive Maintenance. . . . . . . . . . . . . . . . . . . . . . . . . 8-2
Cleaning Your Notebook’s Exterior . . . . . . . . . . . . . 8-2
Cleaning the Keyboard . . . . . . . . . . . . . . . . . . . . . . 8-2
Cleaning the Display Screen . . . . . . . . . . . . . . . . . . 8-3
Cleaning the TouchPad . . . . . . . . . . . . . . . . . . . . . . 8-3
Cleaning the External Mouse . . . . . . . . . . . . . . . . . 8-4
Caring for Your Presario Notebook . . . . . . . . . . . . . 8-5
EYOND SETUP GUIDE
PC B
ONTENTS
C
-v
Page 9

Backup Utilities. . . . . . . . . . . . . . . . . . . . . . . . . . . . . . . . 8-6
Using Backup Devices . . . . . . . . . . . . . . . . . . . . . . . 8-6
Hard Disk Errors. . . . . . . . . . . . . . . . . . . . . . . . . . . . . . . 8-7
Using ScanDisk . . . . . . . . . . . . . . . . . . . . . . . . . . . . 8-7
Using Disk Cleanup . . . . . . . . . . . . . . . . . . . . . . . . . 8-7
Deleting Stored Files . . . . . . . . . . . . . . . . . . . . . . . . 8-8
Defragmenting Your Hard Disk . . . . . . . . . . . . . . . . 8-8
Hard Disk Space Management . . . . . . . . . . . . . . . . . . . 8-9
Checking the Hard Disk Space . . . . . . . . . . . . . . . . 8-9
Deleting Unnecessary Files . . . . . . . . . . . . . . . . . . . 8-9
Using the Recycle Bin . . . . . . . . . . . . . . . . . . . . . . 8-10
Chapter 9 Solutions . . . . . . . . . . . . . . . . . . . . . . . . . . . . . . . . . 9-1
Basic Solutions. . . . . . . . . . . . . . . . . . . . . . . . . . . . . . . . 9-2
Helpful Hints . . . . . . . . . . . . . . . . . . . . . . . . . . . . . . 9-2
Finding Solutions Quickly . . . . . . . . . . . . . . . . . . . . 9-2
ONTENTS
C
Frequently Asked Questions . . . . . . . . . . . . . . . . . . . . . 9-3
General Questions . . . . . . . . . . . . . . . . . . . . . . . . . . 9-3
Display Questions . . . . . . . . . . . . . . . . . . . . . . . . . . 9-4
Questions about Sound . . . . . . . . . . . . . . . . . . . . . . 9-5
Questions about Movies . . . . . . . . . . . . . . . . . . . . . 9-6
Questions about Peripherals . . . . . . . . . . . . . . . . . . 9-6
Questions about Upgrades . . . . . . . . . . . . . . . . . . . 9-6
Error Messages . . . . . . . . . . . . . . . . . . . . . . . . . . . . 9-7
-vi P
RESARIO MOBILE INTERNET
EYOND SETUP GUIDE
PC B
1700 S
ERIES
Page 10

Glossary
Index
Solution Tables. . . . . . . . . . . . . . . . . . . . . . . . . . . . . . . . 9-9
Audio and Video . . . . . . . . . . . . . . . . . . . . . . . . . . . 9-9
Battery and Power . . . . . . . . . . . . . . . . . . . . . . . . . 9-11
Mass-Storage . . . . . . . . . . . . . . . . . . . . . . . . . . . . 9-15
Game and Internet . . . . . . . . . . . . . . . . . . . . . . . . . 9-20
Keyboard and TouchPad . . . . . . . . . . . . . . . . . . . . 9-22
Memory and PC Card . . . . . . . . . . . . . . . . . . . . . . 9-25
RESARIO MOBILE INTERNET
P
ERIES
1700 S
PC B
EYOND SETUP GUIDE
ONTENTS
C
-vii
Page 11

ONTENTS
C
-viii P
RESARIO MOBILE INTERNET
EYOND SETUP GUIDE
PC B
1700 S
ERIES
Page 12
Introduction
Congratulations! As the owner of a new Presario Notebook
In This Chapter
Where Can I Find
Information?, 1-2
Symbols and Graphics, 1-4
Safety, 1-5
computer, you have joined the world-wide community of mobile
computer users. Once your Notebook is set up and connected to
the Internet, you can explore vast regions of information,
entertainment, and services online.
The
Beyond Setup Guide
computer users and beginners. This easy-to-scan guide helps you
find the information you want as quickly as possible. It’s also
designed to familiarize you with the following:
•
Features you’ll want to
try during the first few
days or weeks
•
Keeping your Notebook
running smoothly
•
Solving common problems
as they occur
is designed for both experienced
RESARIO MOBILE INTERNET
P
ERIES
1700 S
EYOND SETUP GUIDE
PC B
NTRODUCTION
I
1-1
Page 13
Where Can
Printed Documents
IFind
Information?
This section describes
the documentation that
came in the box with your
new Notebook.
See also
The Compaq Web site is
available worldwide. As you
explore the Internet, stop at the
following address for
information about products,
services, and special offers:
www.compaq.com
Tip
Beyond Setup Guide
The
also available on the Compaq
Web site:
www.compaq.com/mypresario
is
Your new Presario Notebook computer came with printed
documents containing helpful reference information.
If you have access to the Internet, you can also view
these and other documents on the Compaq Web site at
www.compaq.com/mypresario
Additional documents to those described here may vary per region.
Note:
.
Easy Setup Poster
This poster shows you how to set up your Notebook. When you
finish, fold the poster and store it with your documents for future
use. For more information about the hardware that came with
your new Notebook, refer to “Your Notebook at a Glance” later
in this guide.
Beyond Setup Guide
This easy-to-scan guide explains how to set up your Notebook
and get acquainted with its features. It also introduces:
•
Common computer tasks
•
The Internet
•
Notebook maintenance
•
Solutions for computer problems
•
Compaq service and support tools
NTRODUCTION
1-2 I
RESARIO MOBILE INTERNET
P
EYOND SETUP GUIDE
PC B
1700 S
ERIES
Page 14

Safety and Comfort Guide
This document explains how to protect your equipment from
damage, protect yourself from injury, and ensure your comfort
while using your Notebook.
Warranty Certificate
The warranty details the Compaq commitment to service during
the warranty period. Keep the warranty certificate in a safe place
for future reference.
Presario Operating System Manual
The
Presario Operating System Manual
explains how to
communicate with your Notebook using the Microsoft
®
Windows
•
File Management, which covers creating, saving, deleting,
operating system. It also introduces:
renaming, and moving files
•
Customizing the Windows desktop
•
Using the Windows online Help
The illustrations shown and the features described in
Note:
this document may differ slightly from your Presario
Notebook computer.
®
RESARIO MOBILE INTERNET
P
RIES
1700 SE
EYOND SETUP GUIDE
PC B
NTRODUCTION
I
1-3
Page 15
Symbols and
Symbols
Graphics
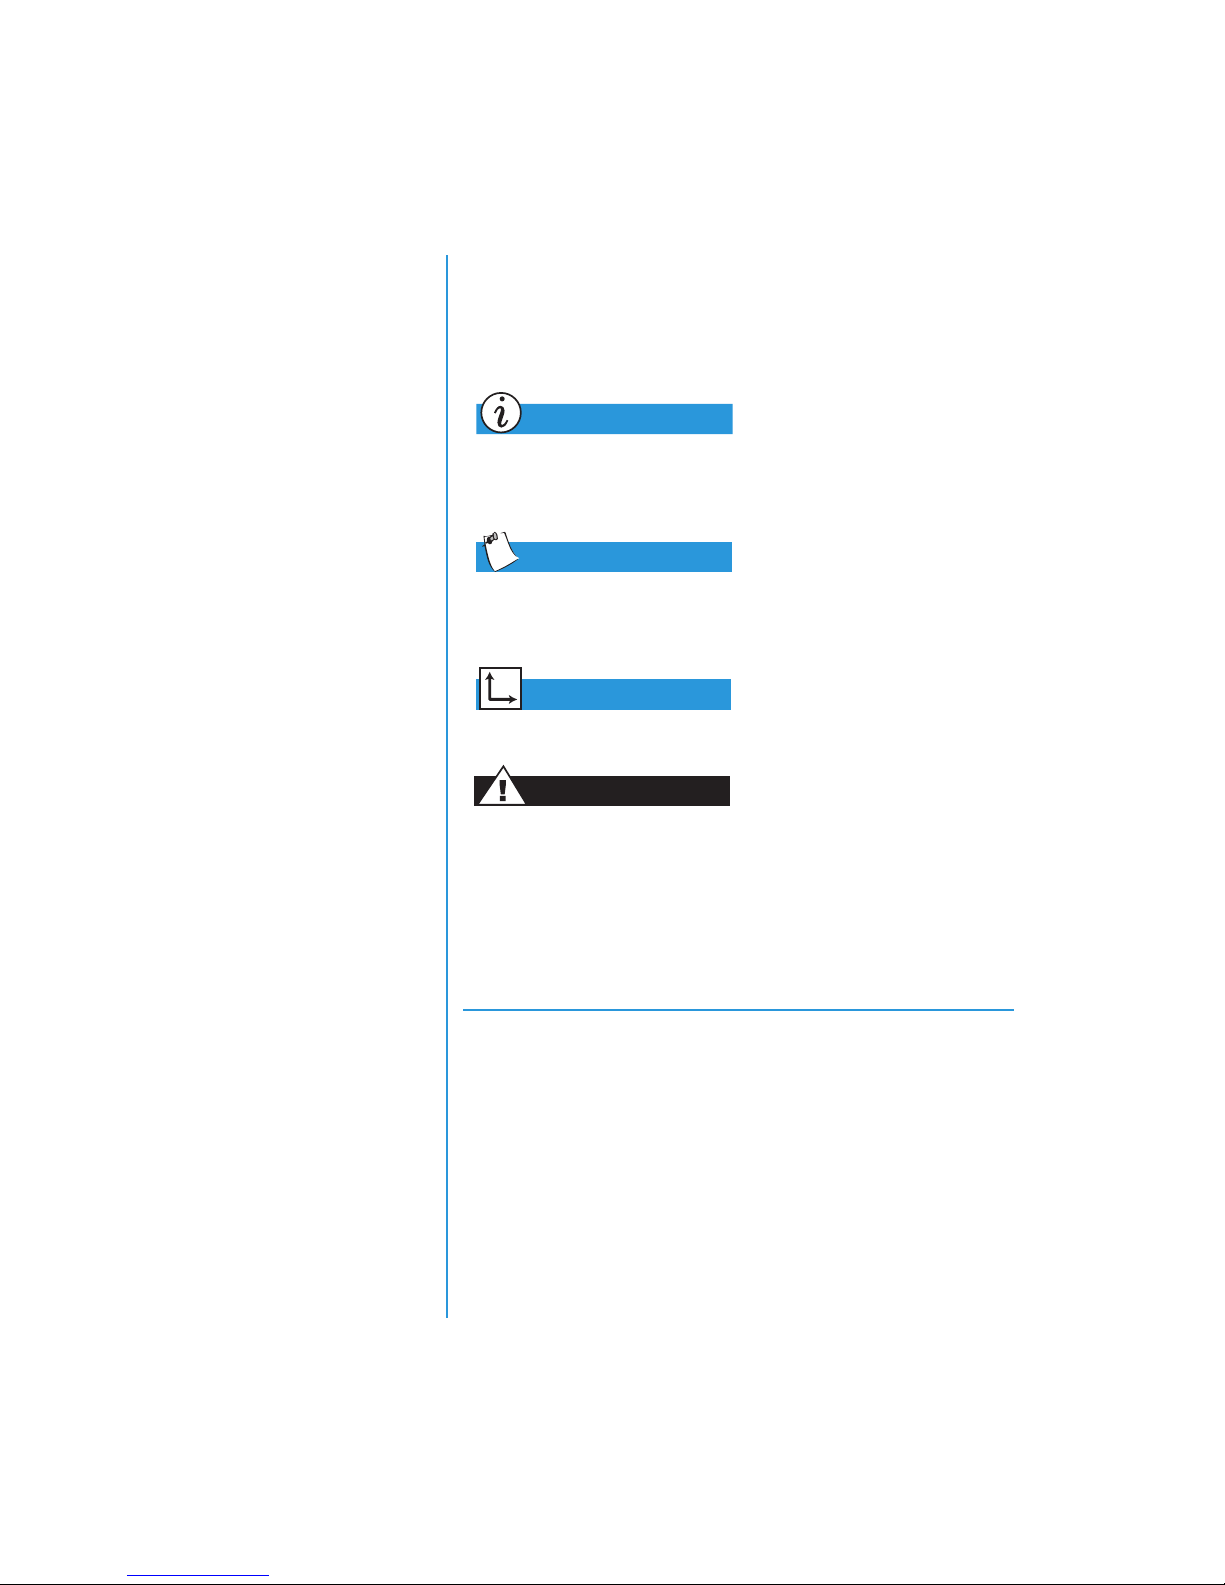
The following words and symbols have special meaning in this
guide and in the electronic documentation:
Important information that
Did you know...
may help you to solve a
problem.
Helpful hints that make
Tip
using your Notebook easier
and faster.
Another document or another
See also
page in this document that has
related information.
Failure to follow directions
Warning
may result in bodily harm or
loss of life.
1-4 I
NTRODUCTION
Failure to follow directions
Caution:
may result in equipment
damage or data loss.
Graphics
The illustrations shown and the features described in
this document may differ slightly from your Presario
Notebook computer.
RESARIO MOBILE INTERNET
P
EYOND SETUP GUIDE
PC B
1700 S
ERIES
Page 16
Safety
Disconnecting Your Notebook
from the Power Source
Warning
To reduce the risk of electric
shock and damage to the
equipment, read the
Comfort
To protect your equipment from
power surges, plug all power
cords into a high-quality surge
protector. If you have a
dedicated telephone line for the
modem, buy a surge protector
with a telephone jack.
After your Notebook is
safely disconnected from
AC power and the phone line,
you can run your Notebook
on battery power.
document
Did you know...
Tip
Safety and
.
To shut down your Notebook properly, complete the
following steps:
1. Close all open programs.
2. On the Windows taskbar, click
Shut Down…
The Shut down Windows dialog
Start
, then click
box is displayed.
3. Select the
Note:
the
Power
Shut down
If the Notebook does not turn off automatically, then press and hold
button until it shuts down.
option.
4. Unplug the power cord from the wall outlet and unplug the
modem line from the wall jack.
Protecting Your Notebook During an Electrical Storm
During an electrical storm, you should take the following
precautions to protect your Notebook from damage. You should
immediately disconnect your Notebook from the power source.
•
If you are not using a surge protector, unplug all power cords
from the wall outlets.
•
Disconnect your Notebook from the wall outlets.
RESARIO MOBILE INTERNET
P
RIES
1700 SE
EYOND SETUP GUIDE
PC B
•
Turn off the power button on all surge protectors.
•
If a telephone line from your Notebook is plugged directly
into the wall jack (without going through a surge protector),
unplug the line from the wall jack.
NTRODUCTION
I
1-5
Page 17

NTRODUCTION
1-6 I
RESARIO MOBILE INTERNET
P
EYOND SETUP GUIDE
PC B
1700 S
ERIES
Page 18
Your
Notebook
at a Glance
Before you begin using your new Presario Notebook, you’ll want
In This Chapter
Front of Your Presario
Notebook, 2-2
Left Panel, 2-6
Right Panel, 2-7
Back Panel, 2-8
to look at some of the basic components.
Underside, 2-9
QuikDock, 2-10
RESARIO MOBILE INTERNET
P
ERIES
1700 S
EYOND SETUP GUIDE
PC B
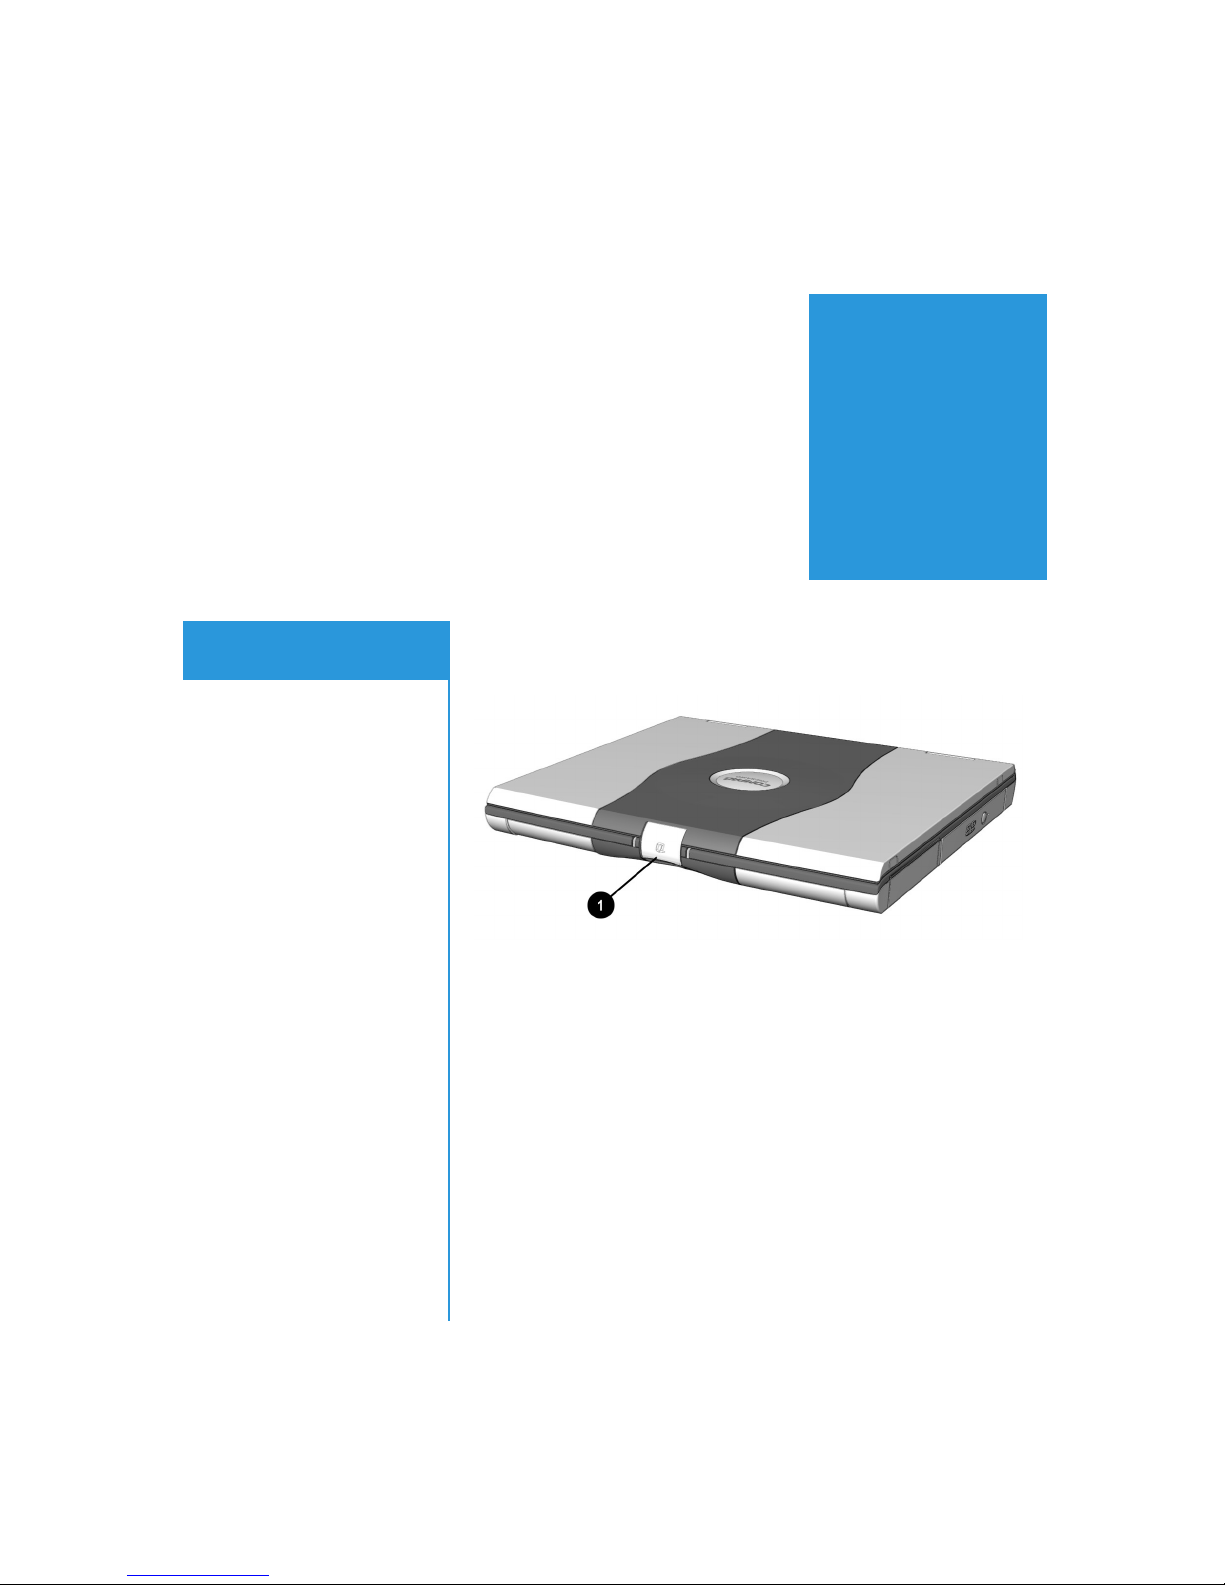
To open your new Notebook, lift the 1
and gently lift the lid up.
Display Release Latch
OUR NOTEBOOK AT AGLANCE
Y
2-1
Page 19
Front of
Your Presario
Notebook
Open the front of your
Notebook and take a look at
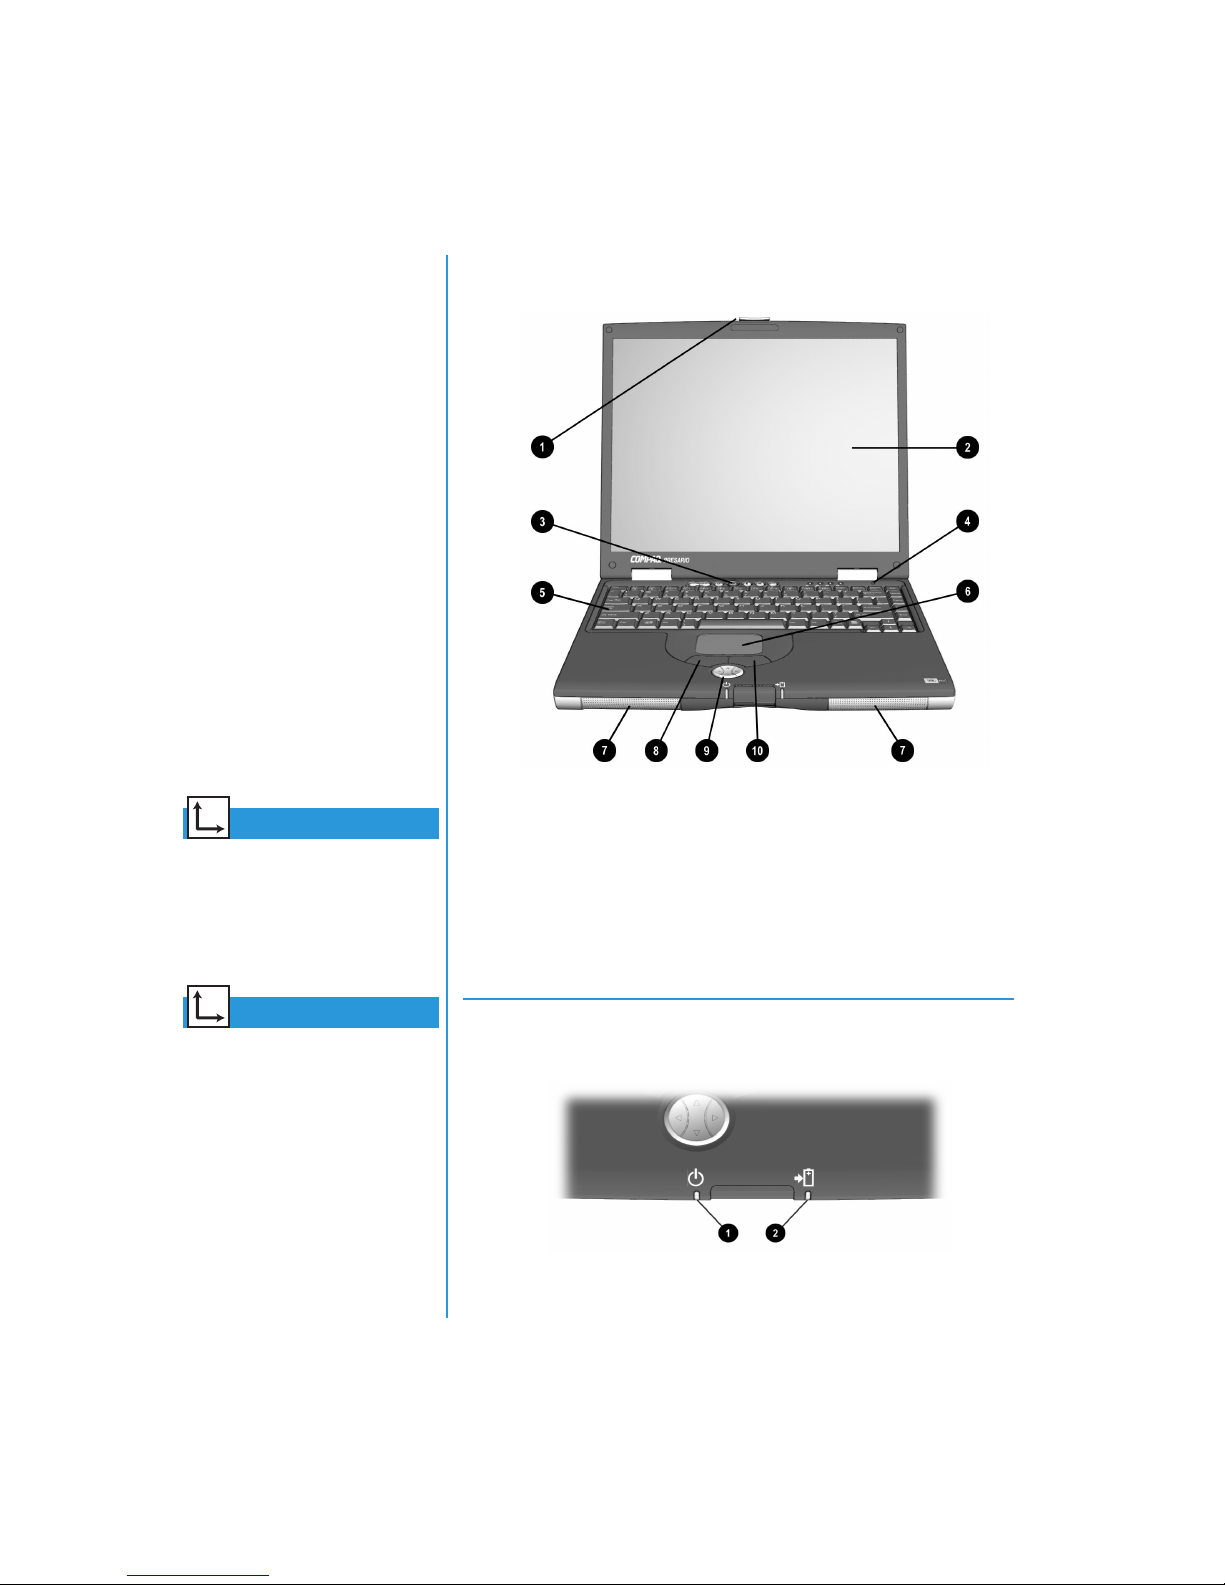
these components:
•
Components on Front
•
Lower Front Panel
•
Internet Zone Buttons
and Lights
•
Function Keys
Components on Front
See also
“Turning Your Notebook On
and Off” later in this guide to
learn more about how to start
and shut down your Notebook.
See also
“TouchPad” later in this guide
for more information on using
the TouchPad.
OUR NOTEBOOK AT AGLANCE
2-2 Y
Display Release Latch
1
Display
2
Power Button
3
Lid Switch
4
Keyboard
5
Lower Front Panel
Power Light
1
TouchPad
6
Speakers
7
Left TouchPad Button
8
Scroll Button
9
Right TouchPad Button
-
Battery Charge Light
2
RESARIO MOBILE INTERNET
P
EYOND SETUP GUIDE
PC B
1700 S
ERIES
Page 20
See also
“Reprogramming the Internet
Zone Buttons” later in this
guide to learn how
to program these buttons
to suit your needs.
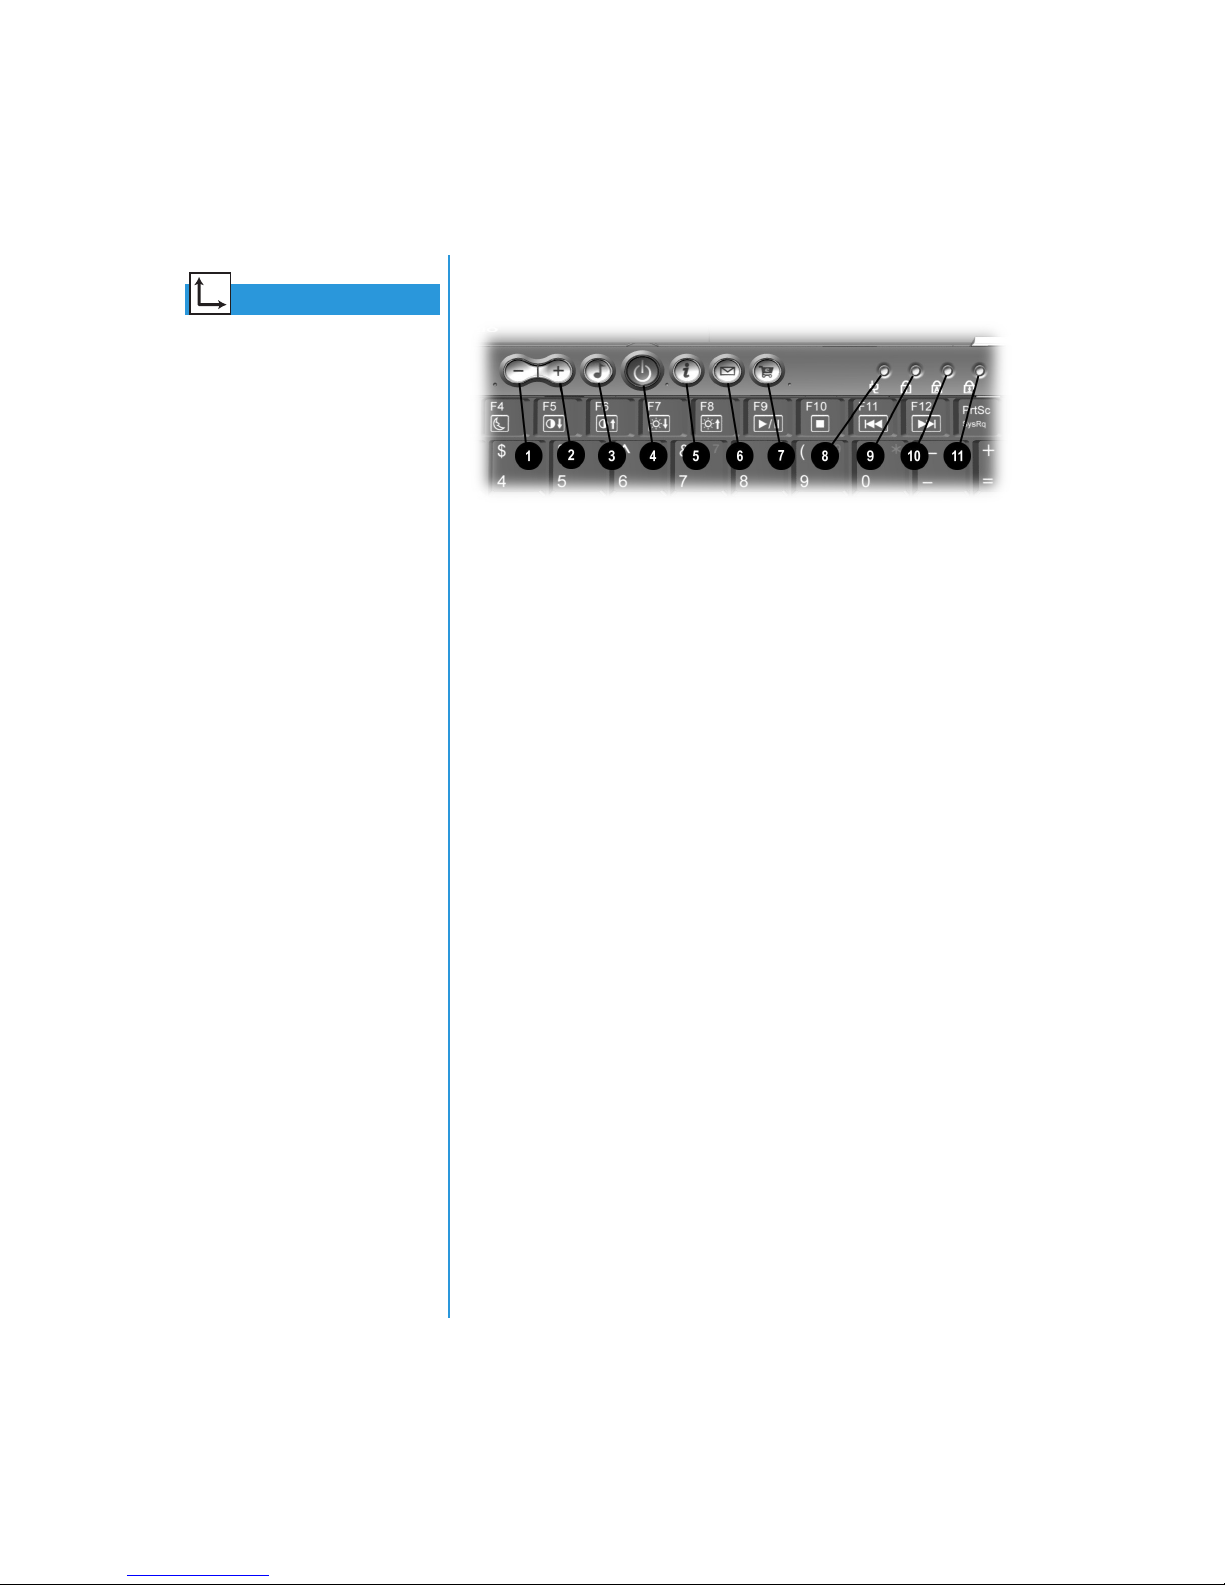
Internet Zone Buttons and Lights
Volume Down Button
1
Volume Up Button
2
Digital Audio Button
3
Power Button
4
Instant Internet Access Button
5
Instant E-Mail Button
6
Retail Central Button
7
AC Adapter Light
8
Num Lock Light
9
Caps Lock Light
-
Scroll Lock Light
q
RESARIO MOBILE INTERNET
P
ERIES
1700 S
EYOND SETUP GUIDE
PC B
OUR NOTEBOOK AT AGLANCE
Y
2-3
Page 21
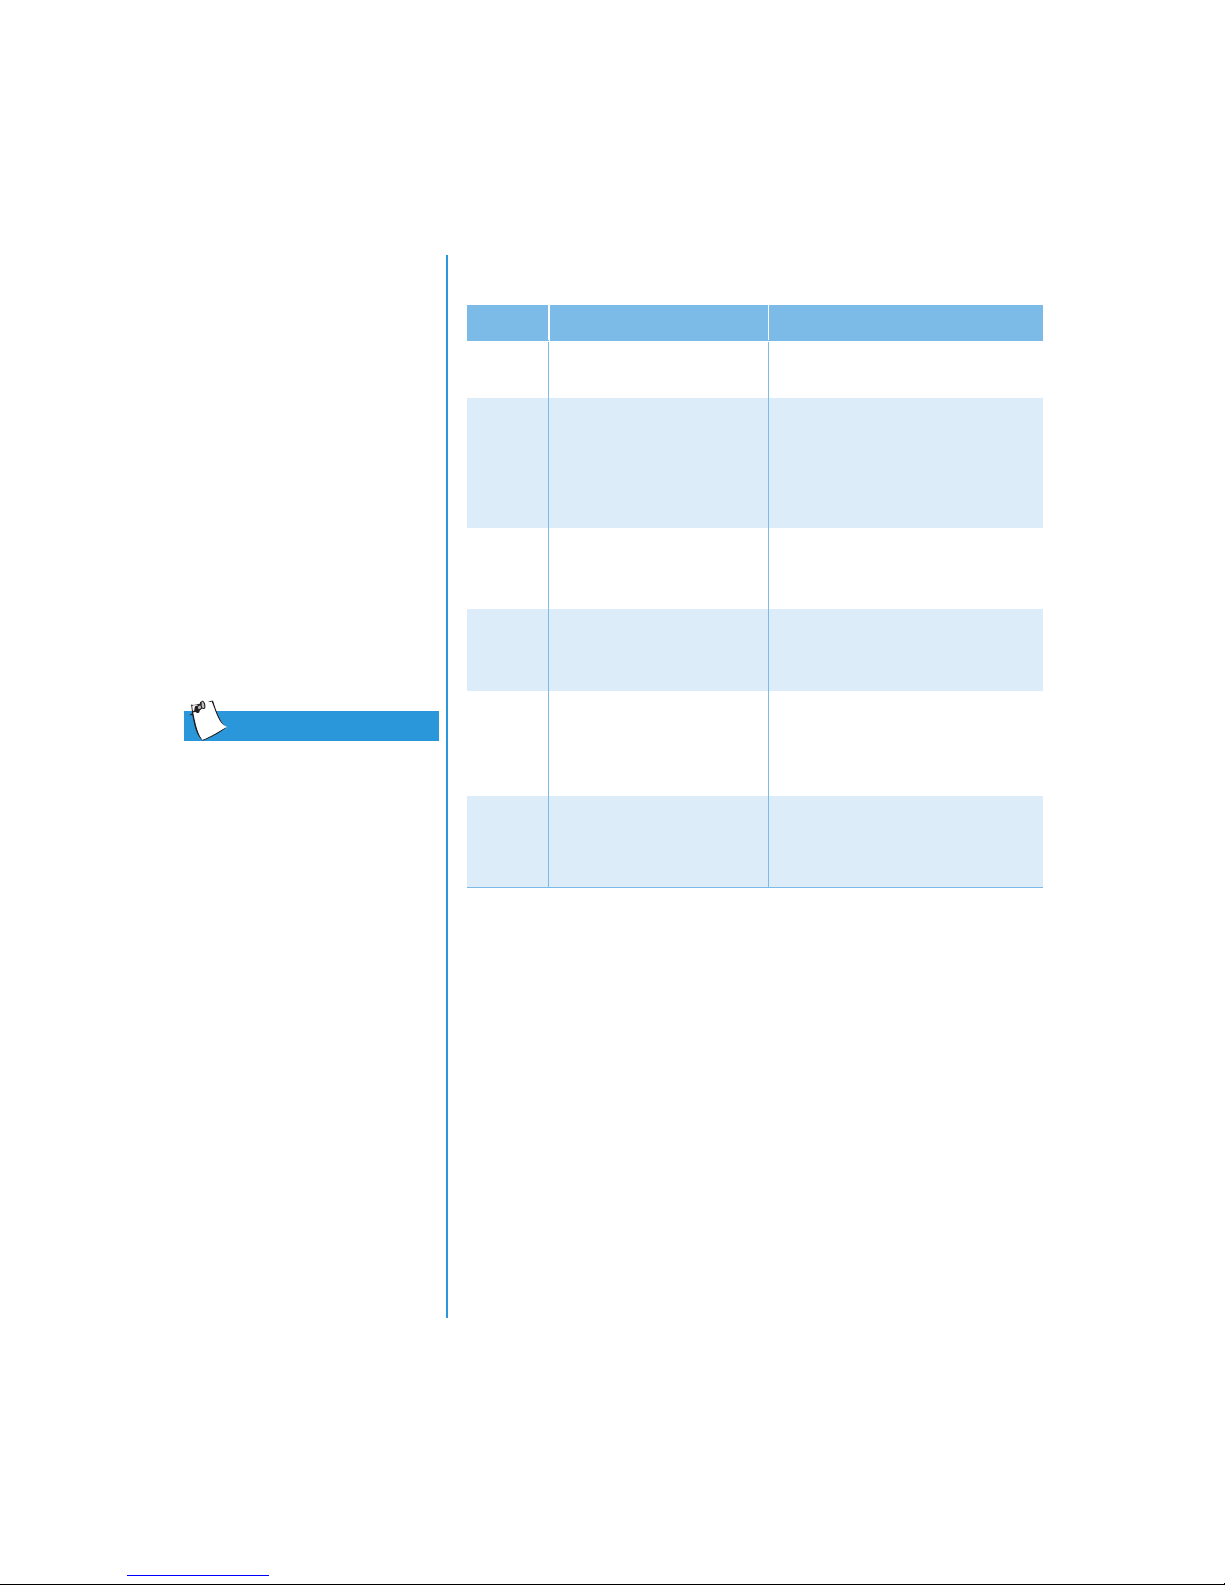
Before using these buttons, you must have access to the Internet.
Note:
Button Button Description Default Button Action
Tip
To access these features, press
and hold the Fn key, press the
function key, and then release
both keys simultaneously.
M
Æ
Ä
B
Ë
(Fn+F1)
(Fn+F2)
Digital Audio Launches Windows Media Player
to play MP3 music.
Instant Internet Access Provides your daily start point to
the Internet. It connects you to a
personalized Web page filled with
local weather, news, sports, and
financial information.
Instant E-mail Provides you with one-touch
access for sending and reading
your e-mail.
Retail Central Provides instant connection to
your Notebook store and a variety
of leading consumer companies.
My Presario Connects instantly to Compaq for
product information, helpful hints,
performance updates, service,
and more.
User Programmable
Favorite Launch Key
Can be reprogrammed to launch
any application or Web site.
OUR NOTEBOOK AT AGLANCE
2-4 Y
RESARIO MOBILE INTERNET
P
EYOND SETUP GUIDE
PC B
1700 S
ERIES
Page 22
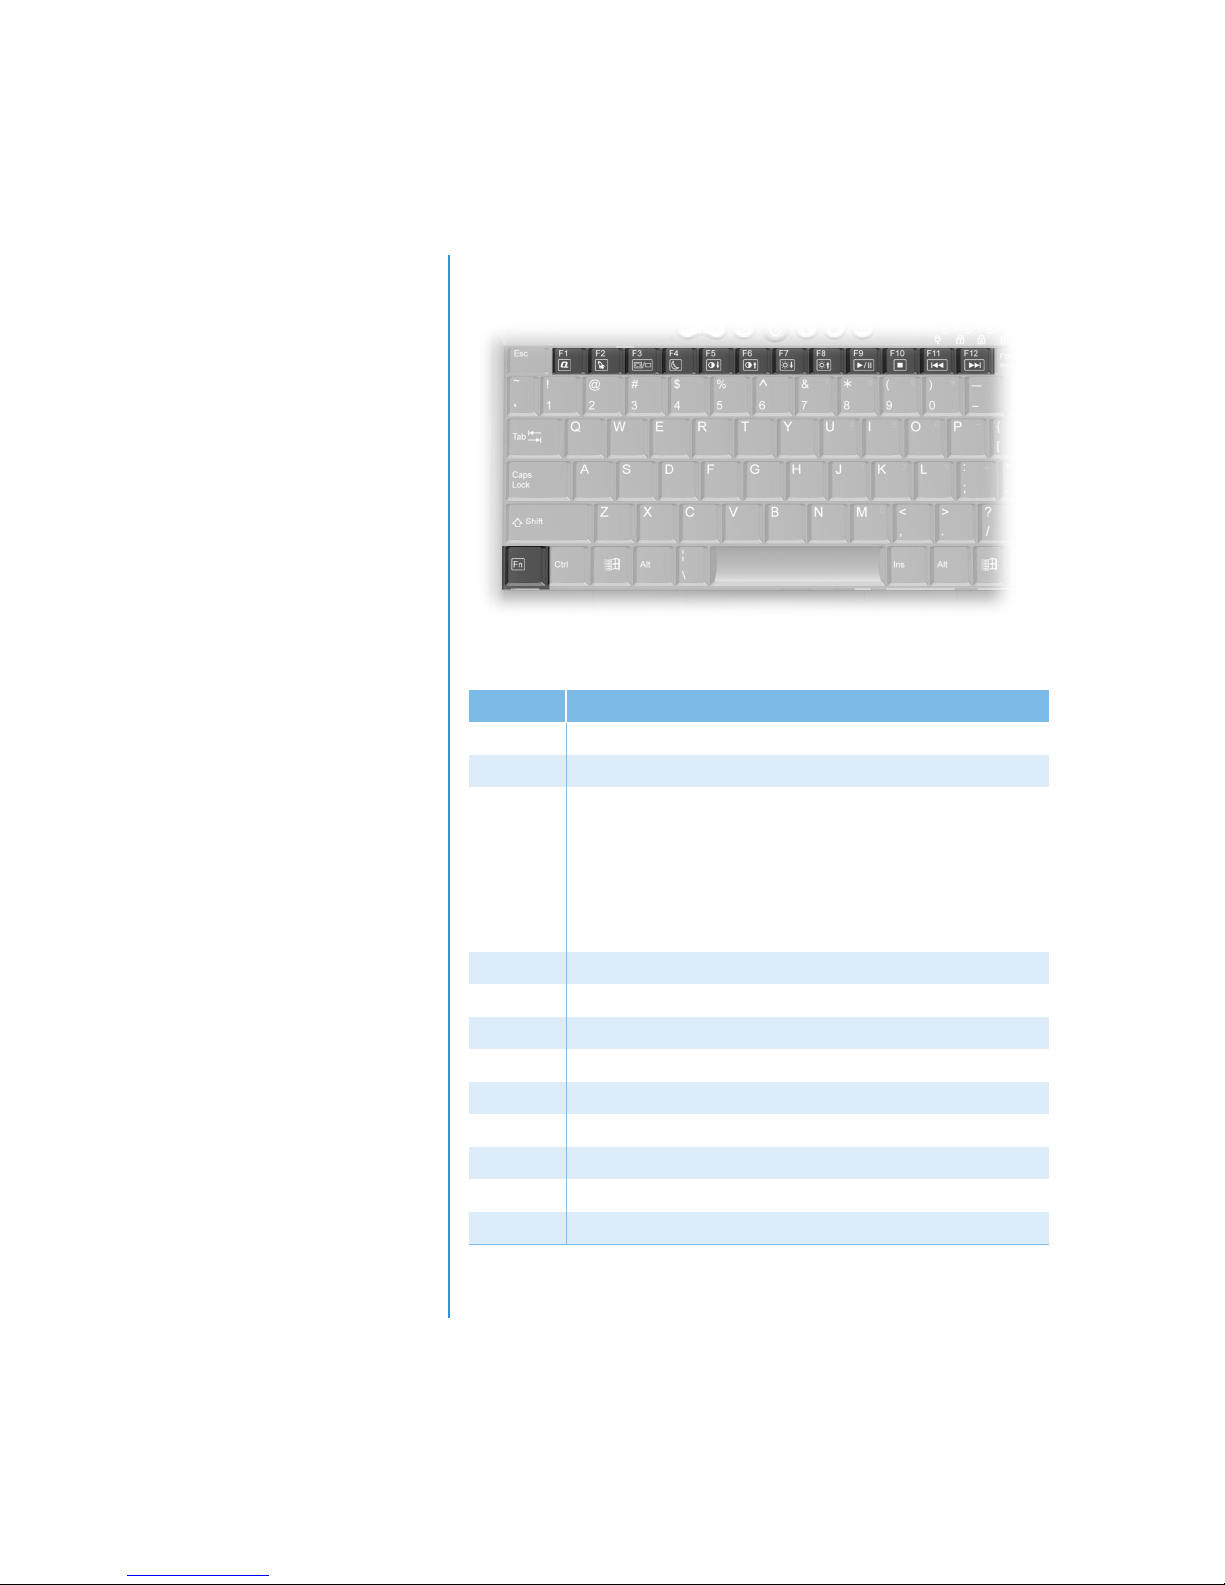
Function Keys
The following keys have already been assigned:
Button Description
F1 My Presario Web site launch key
F2 User programmable favorite launch key
F3 Switches between the display and external monitor in the
following order:
Display
External Monitor
Display and External Monitor
S-Video
F4 Sleep
*F5 Contrast control down
*F6 Contrast control up
F7 Brightness control down
F8 Brightness control up
F9 CD or DVD play/pause
F10 CD or DVD stop
F11 CD or DVD previous track
F12 CD or DVD next track
RESARIO MOBILE INTERNET
P
ERIES
1700 S
EYOND SETUP GUIDE
PC B
* Not functional with all display types.
OUR NOTEBOOK AT AGLANCE
Y
2-5
Page 23
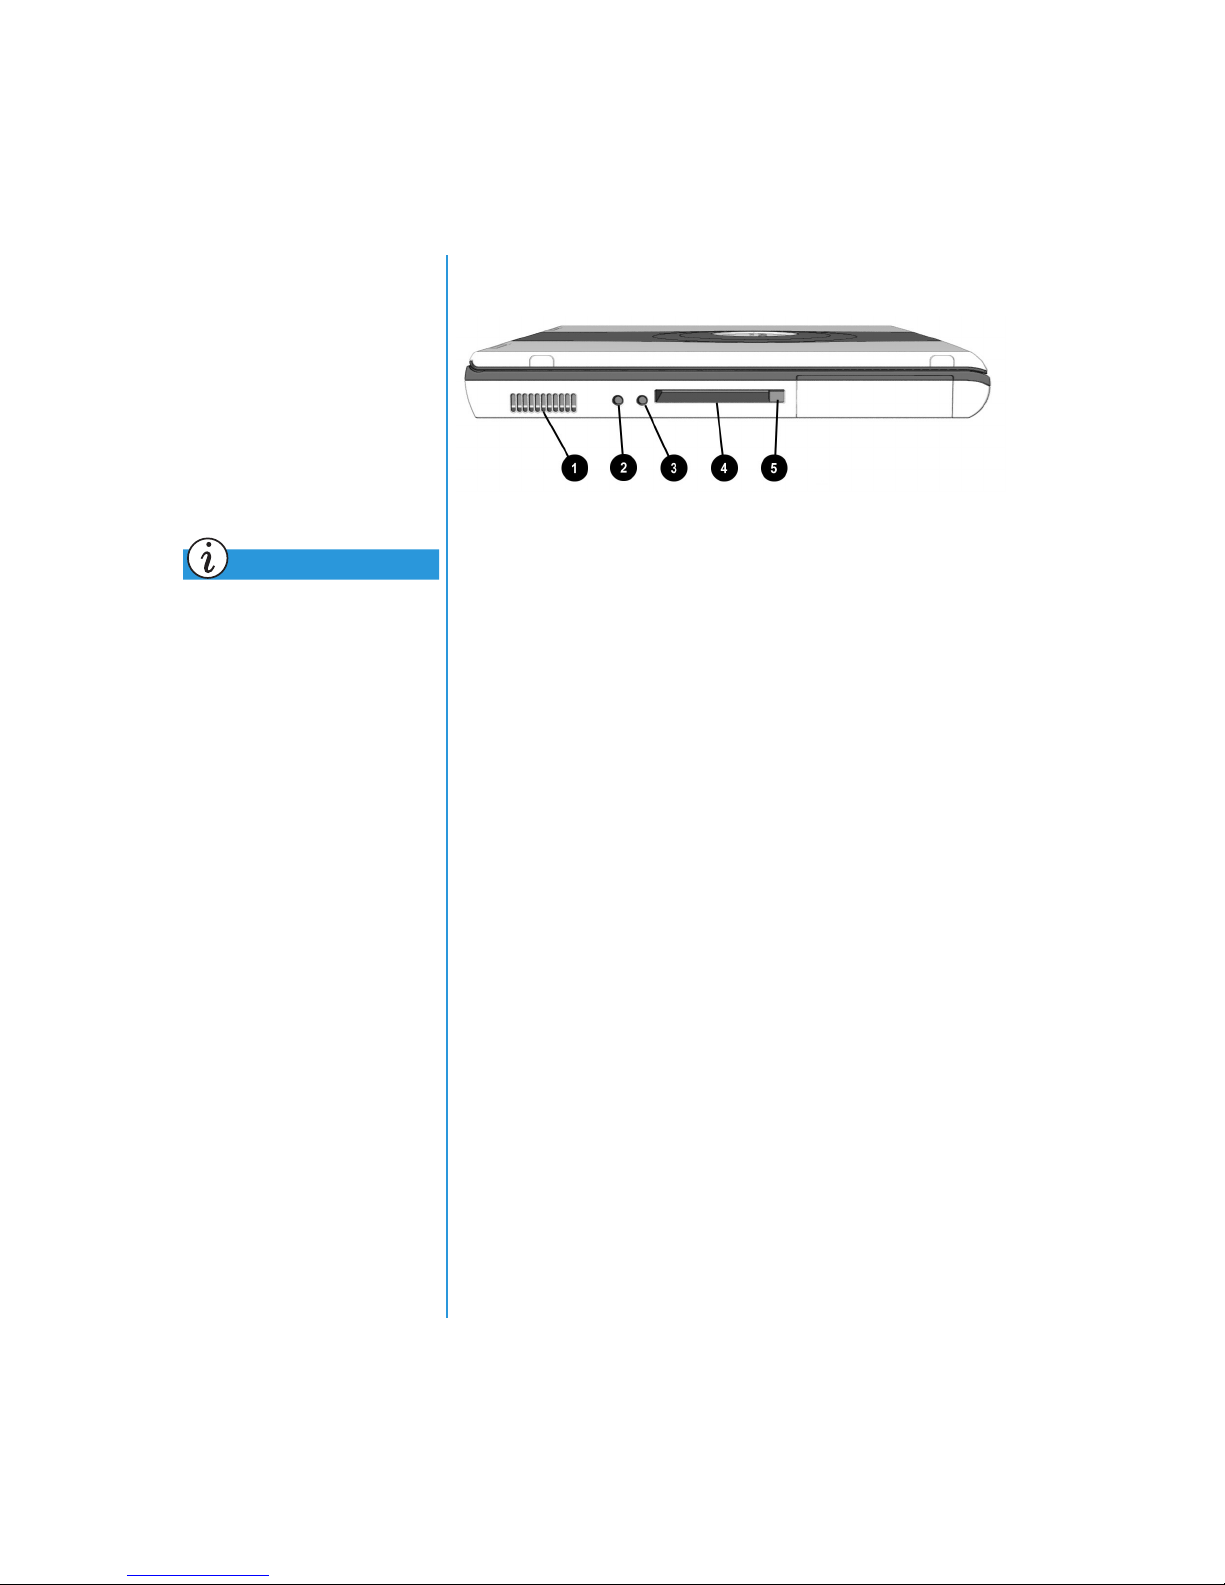
Left Panel
Take a look at the left side
of your Notebook. This is
where the microphone and
headphone jacks and PC
card slot are located.
Components on Left Side
Did you know...
PC Cards are credit card-sized
removable options that
expand the capability of
your Notebook.
Air Vent
1
Headphone Jack
2
Microphone Jack
3
PC Card Slot (Type I or II)
4
PC Card Eject Button
5
OUR NOTEBOOK AT AGLANCE
2-6 Y
RESARIO MOBILE INTERNET
P
EYOND SETUP GUIDE
PC B
1700 S
ERIES
Page 24
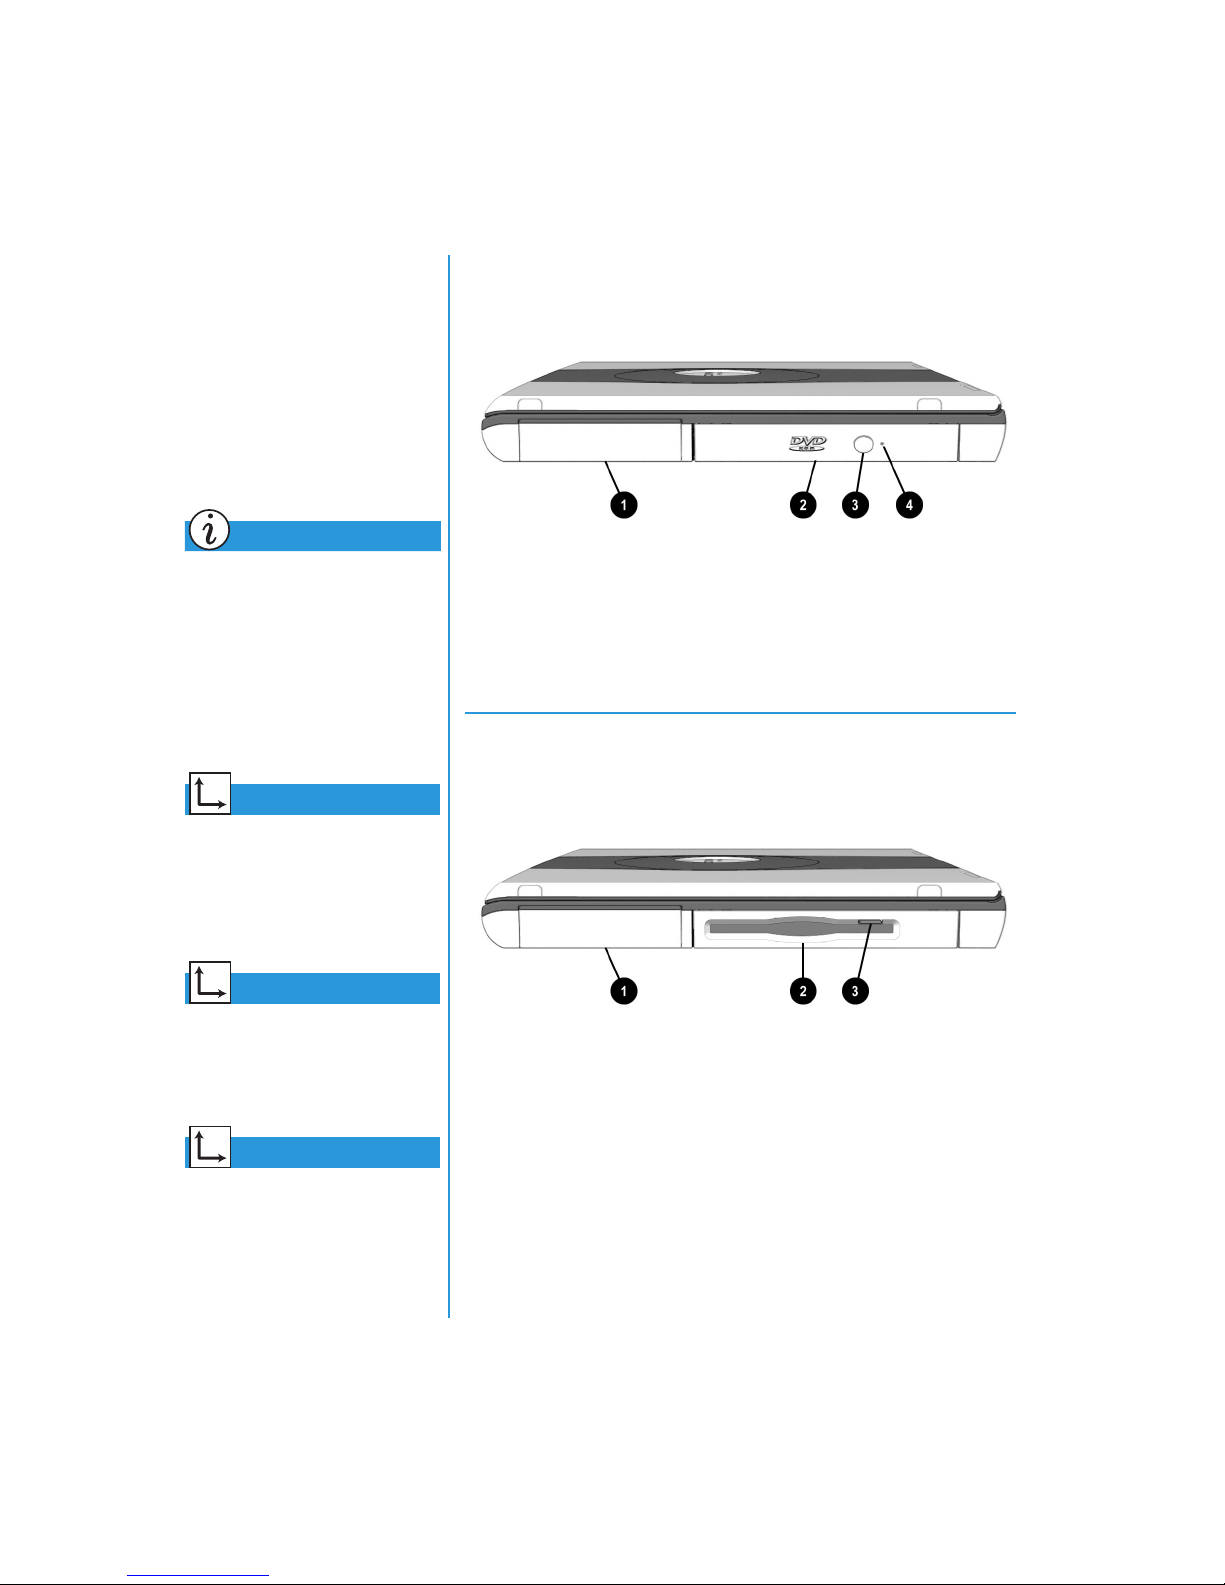
Right Panel
Take a look at the right
side of your Notebook.
This is where the battery
and the CD, DVD, CD-RW,
diskette, or SuperDisk drive
are located.
Did you know...
Your Presario Notebook is
equipped with a feature called
FutureBay
you to swap storage drives
(CD, DVD, CD-RW,
Diskette, or SuperDisk) in
your Notebook.
™
that allows
Components on Right Side with CD, DVD,
or CD-RW Installed
Battery Compartment
1
*FutureBay Removable CD,
2
DVD, or CD-RW Drive
*A DVD or CD-RW are available on select models.
CD or DVD Media Eject Button
3
CD or DVD Manual Eject Hole
4
Components on Right Side with Diskette or
See also
“Using the SuperDisk Drive”
later in this guide for more
information about the optional
SuperDisk drive.
See also
“CD-RW Basics” later in
this guide for more information
on CD-RW.
See also
“Using the FutureBay” later in
this guide.
RESARIO MOBILE INTERNET
P
ERIES
1700 S
EYOND SETUP GUIDE
PC B
SuperDisk Drive Installed
Battery Compartment
1
*FutureBay
2
Removable Diskette or
SuperDisk Drive
*SuperDisk is available on select models.
Diskette or SuperDisk Eject Button
3
OUR NOTEBOOK AT AGLANCE
Y
2-7
Page 25
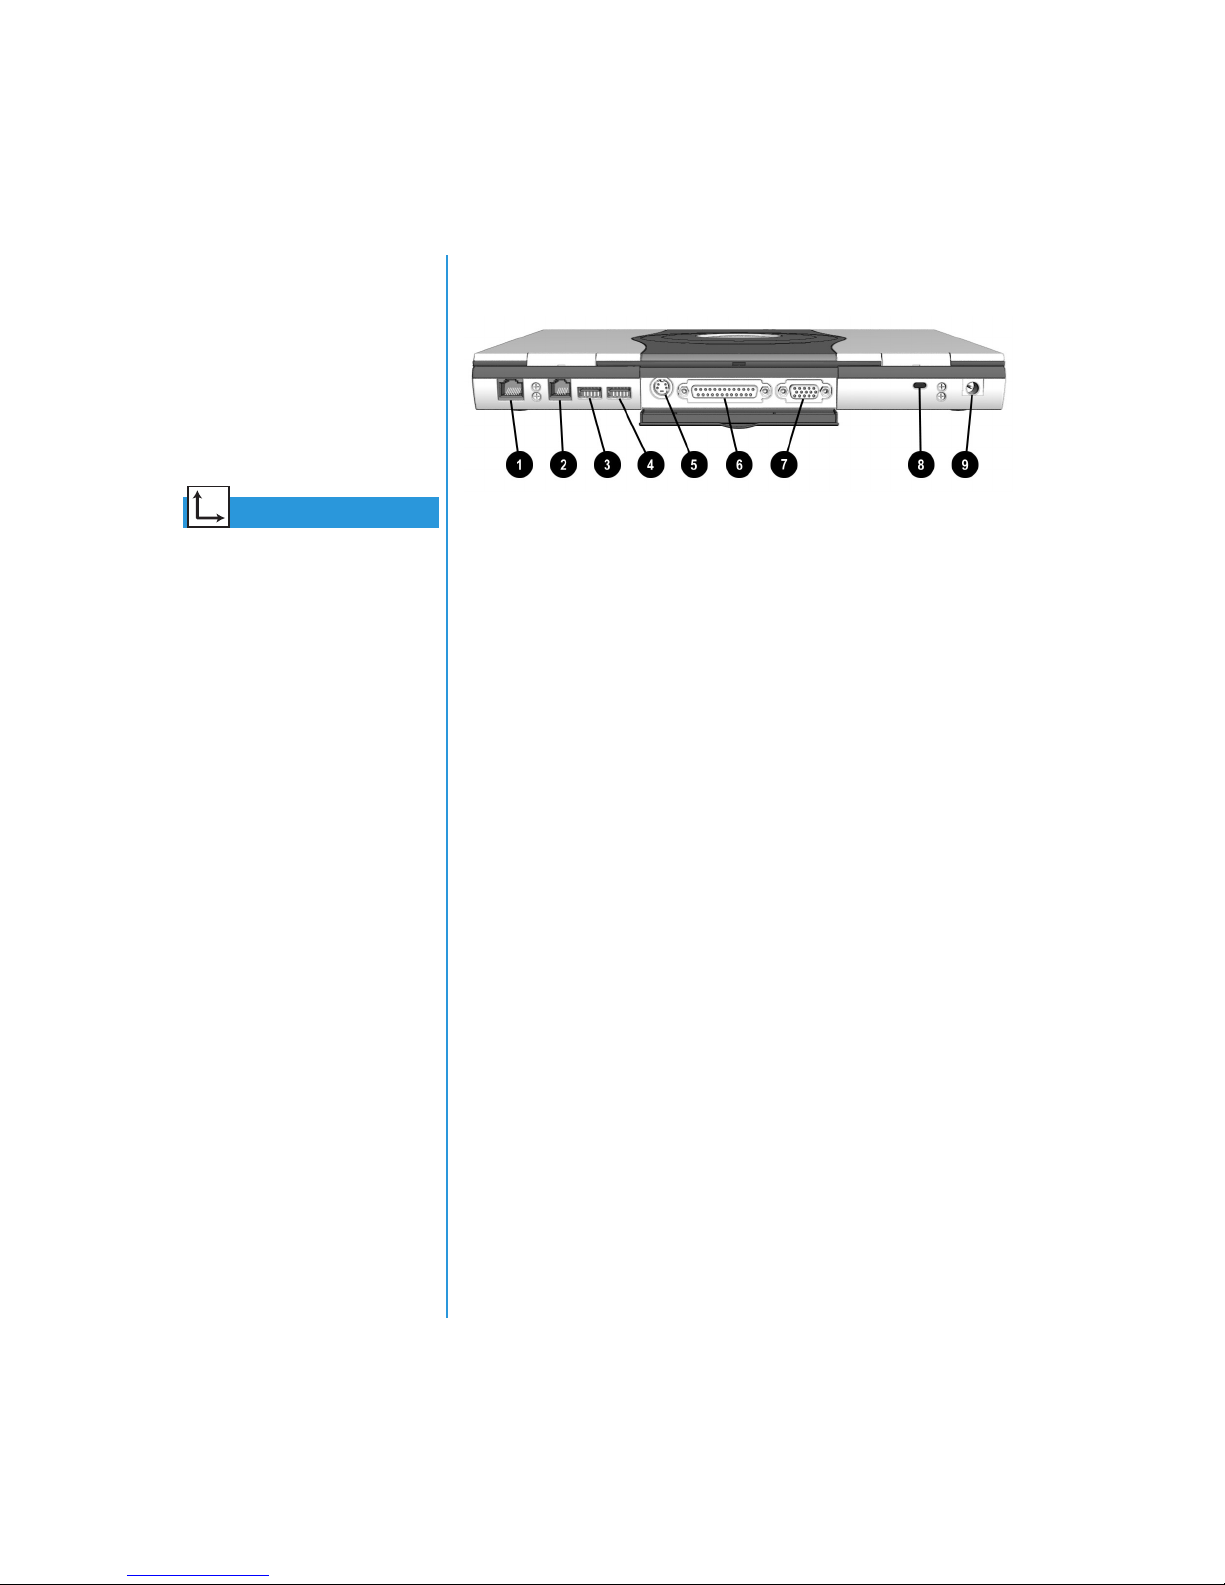
Back Panel
Take a look at the back of
your Notebook. This is
where you connect external
hardware such as a printer or
external monitor.
Components on Back
See also
“Attaching Hardware
Devices” later in this guide for
more information on attaching
external devices.
*Ethernet Port
1
Modem Port
2
USB Port
3
USB Port
4
S-Video Out Port
5
*Available on select models.
Printer/Parallel Port
6
External Monitor (VGA) Port
7
Security Slot
8
AC Adapter Connector
9
OUR NOTEBOOK AT AGLANCE
2-8 Y
RESARIO MOBILE INTERNET
P
EYOND SETUP GUIDE
PC B
1700 S
ERIES
Page 26
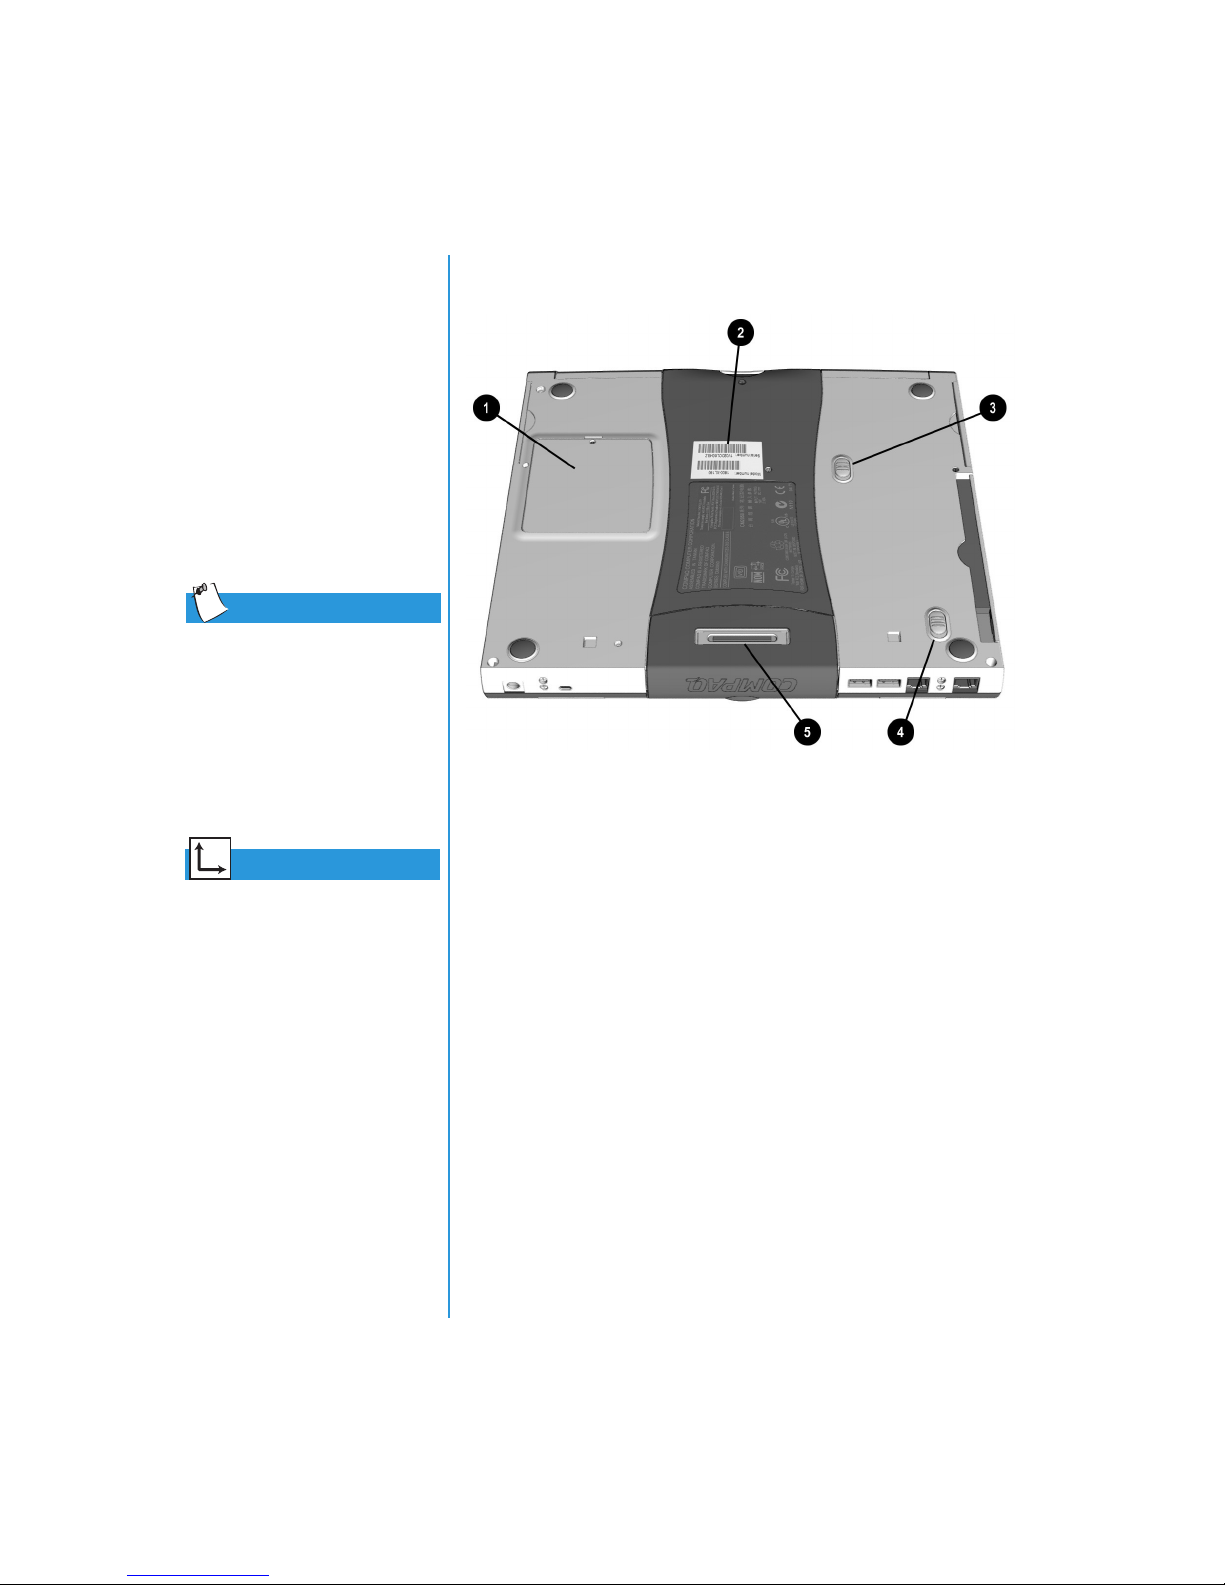
Underside
Here’s what’s on the
underside of your Notebook.
This is where the memory
compartment, the battery
release switch, and the
FutureBay release switch
are located.
Tip
Before calling Compaq
Customer Support you
will need the serial number
from the underside of
your Notebook.
Components on Underside
See also
“Using Battery Power” later
in this guide for more
information about the
Battery Release Switch.
RESARIO MOBILE INTERNET
P
ERIES
1700 S
EYOND SETUP GUIDE
PC B
Memory Compartment
1
Model and Serial Number
2
Battery Release Switch
3
FutureBay Release Switch
4
QuikDock Port
5
OUR NOTEBOOK AT AGLANCE
Y
2-9
Page 27
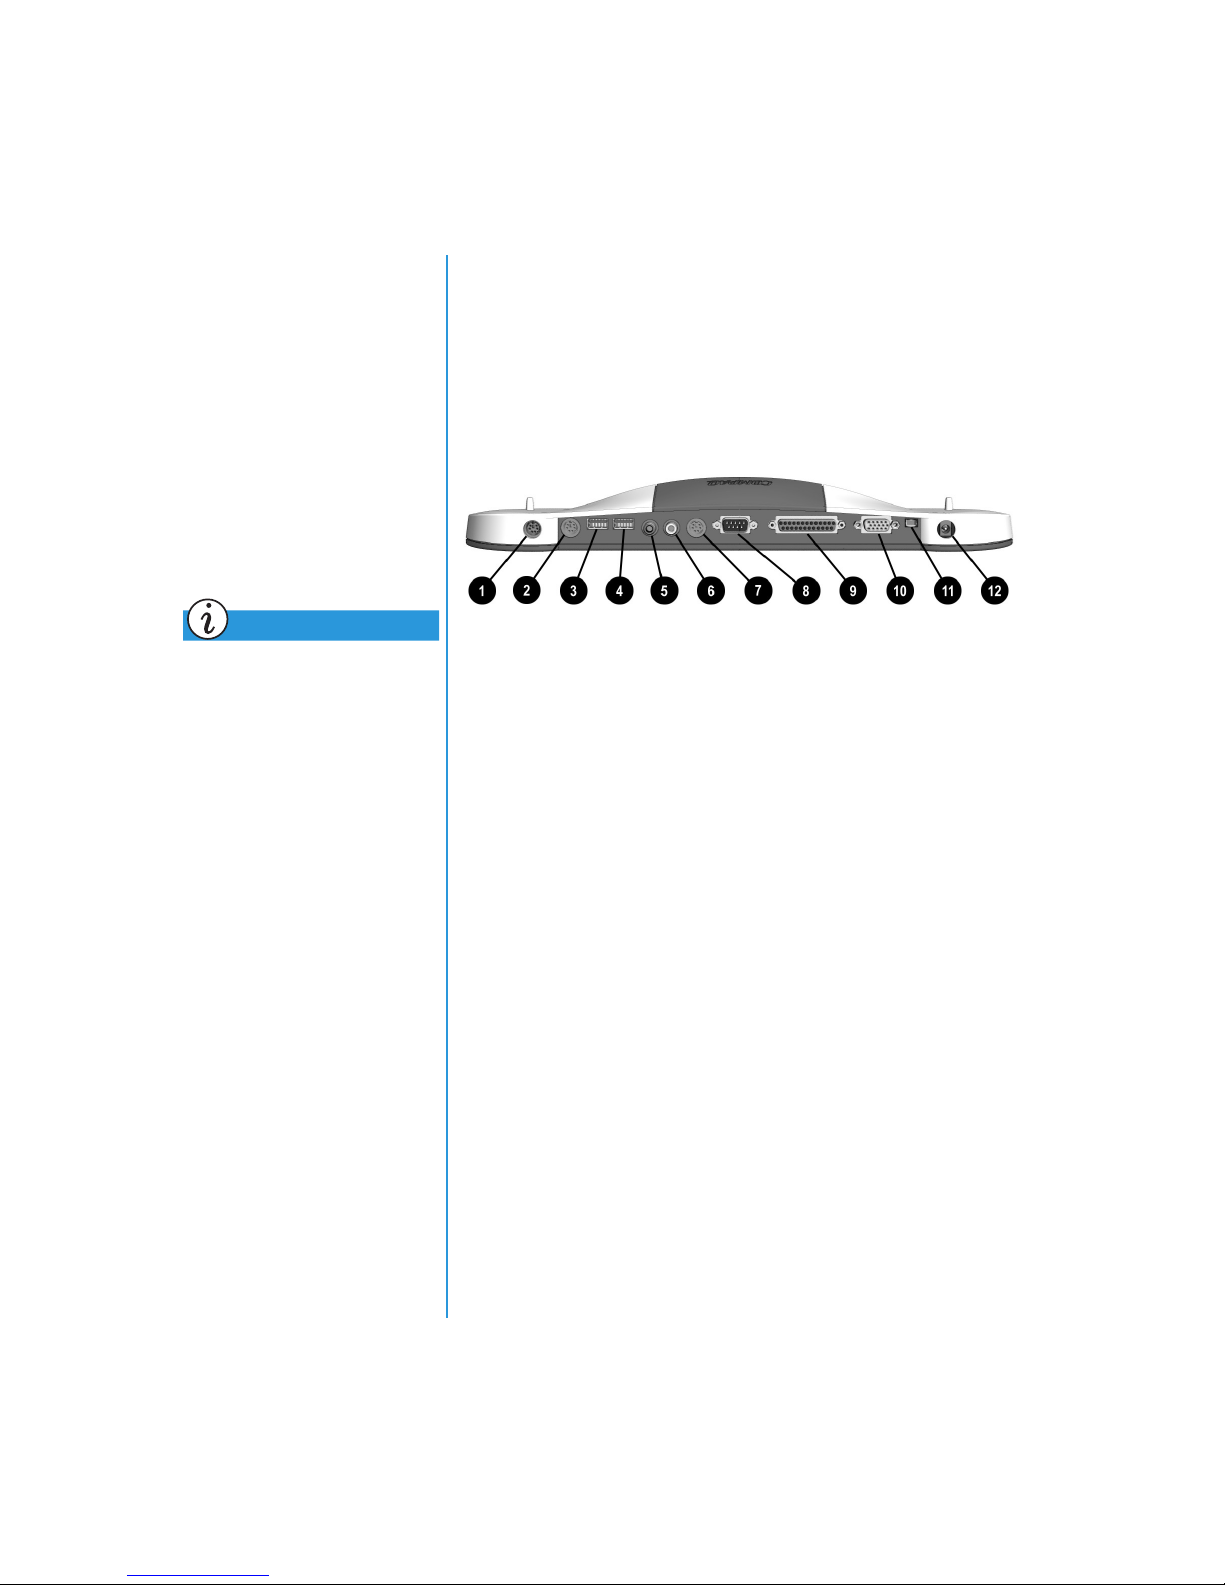
QuikDock
QuikDock Features
With the QuikDock you can
create a permanent work
space or “dock” for your
Notebook, complete with
external monitor, keyboard,
mouse, and printer.
Did you know...
QuikDock is an option that can
be purchased separately for
your Notebook. See the
Options Catalog
desktop for more information.
The catalog is only available in
selected areas. See your
Compaq authorized retailer
for details.
icon on the
A QuikDock provides external ports for various connectors,
allowing you to dock and remove your Notebook while your
hardware devices remain connected to the QuikDock. The
illustration and table below show where to connect external
devices to the QuikDock.
Keyboard
1
Mouse
2
USB
3
USB
4
SPDIF (Digital Audio)
5
Printer Composite-Video
6
* Not functional on all models
7
8
9
-
q
w
S-Video
Serial
Printer
Monitor
*1394
AC Power
OUR NOTEBOOK AT AGLANCE
2-10 Y
RESARIO MOBILE INTERNET
P
EYOND SETUP GUIDE
PC B
1700 S
ERIES
Page 28

Using Your
Notebook
Your Presario Notebook computer is designed for easy setup,
In This Chapter
Power On!, 3-2
TouchPad, 3-6
Display Options, 3-9
Internet Zone Buttons, 3-11
Storage Drives, 3-12
Security, 3-14
use, and upgrading. In this chapter, you’ll become familiar with
your Notebook features.
RESARIO MOBILE INTERNET
P
ERIES
1700 S
EYOND SETUP GUIDE
PC B
SING YOUR NOTEBOOK
U
3-1
Page 29
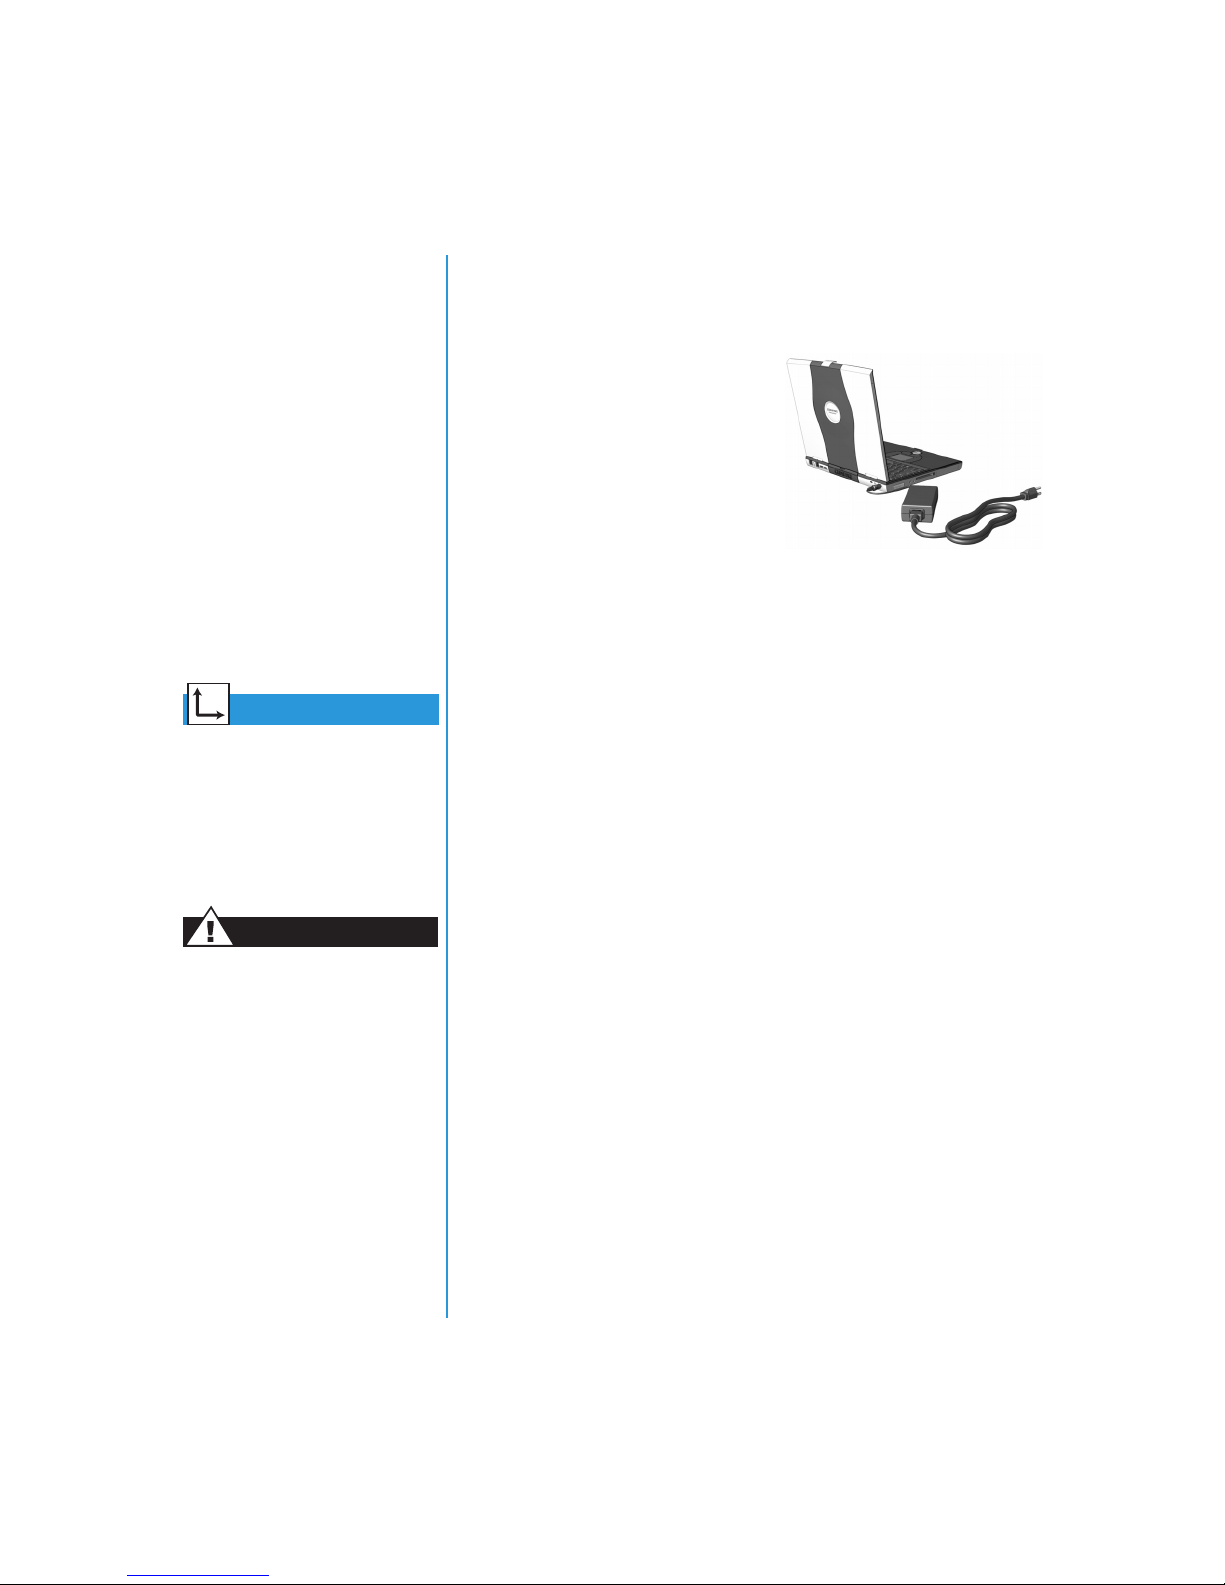
Power On!
Plugging and Unplugging AC Power
This section helps you get
your Notebook set up
and running.
•
Plugging and
Unplugging AC Power
•
Turning Your Notebook
On and Off
•
Using Battery Power
•
Optimizing
Processor Speed
See also
The Easy Setup Poster and the
“Government Approvals”
section in the Safety and
Comfort Guide for worldwide
power cord information.
Warning
To reduce the risk of electrical
shock, fire, or damage to the
equipment, do not use
converter kits sold for
appliances to power your
Notebook. Use only the
Compaq adapter that came
with your Notebook or a
Compaq replacement part.
Do’s
•
Ensure that you can reach the
electrical outlet easily.
•
Unplug the AC adapter from
the electrical outlet when you
want to disconnect AC power
from your Notebook.
•
When unplugging from the
electrical outlet, grasp the cord by the plug.
Don’ts
•
Do not leave the AC adapter plugged into the electrical outlet
when it is not connected to your Notebook.
•
Do not place anything on power cords or cables. Arrange
them so that no one accidentally steps on or trips over them.
Surge Protectors
Using surge protectors and line conditioners can substantially
reduce the risk of electrical shock and aid in protecting your
Notebook from power-source problems.
During a power surge, the voltage level of electricity coming
into your Notebook can increase and cause data loss or system
damage. Protect your Notebook and peripherals by connecting
them to a surge suppressor, which absorbs voltage surges and
prevents them from reaching your Notebook.
Caution:
phone line connected to the modem. To protect your Notebook
during electrical storms, use a telephone line surge protector.
High voltages can enter your Notebook through the
SING YOUR NOTEBOOK
3-2 U
RESARIO MOBILE INTERNET
P
EYOND SETUP GUIDE
PC B
1700 S
ERIES
Page 30
Why Use AC Power When I’ve Got a Battery?
When you’re not on the go, you’ll want to use your Notebook’s
AC adapter to supply power. This ensures that the battery is
always charged.
When your Notebook does not have a charged battery, you
should save your work and turn off your Notebook before
unplugging it from the AC power supply.
Did you know...
When a charged battery is in
your Notebook, you can simply
unplug it from AC power. Your
Notebook automatically
switches to battery power.
Did you know...
Hibernation is a state of
no-power consumption.
When your Notebook enters
this mode, the contents of
the memory are saved to
the hard disk and your
Notebook powers off.
Turning Your Notebook On and Off
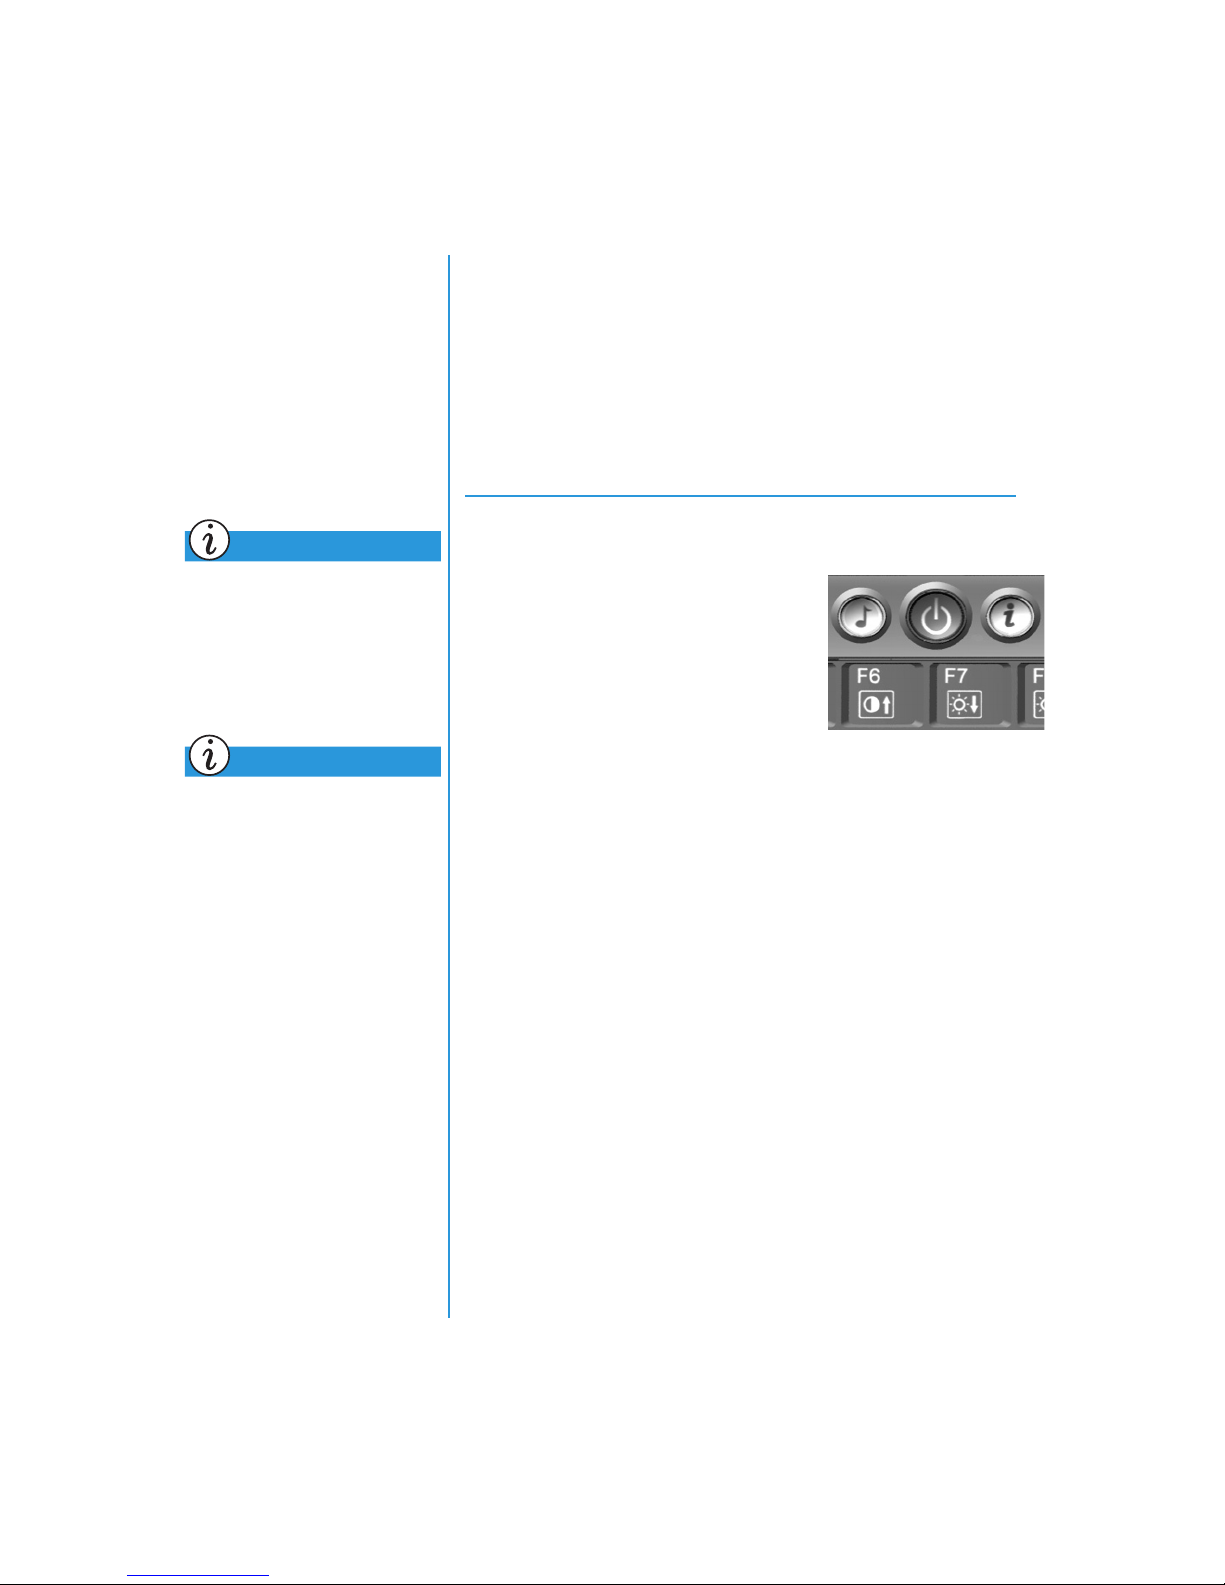
To turn on your Notebook, press the
Power
at the top of the keyboard.
To turn off your Notebook properly,
complete the following steps:
1. Save your work and exit all
2. Click the
3. Click the OK button. After a few seconds, your Notebook
Power Button Functionality
When your Notebook is on, pressing the
your Notebook in Hibernation mode. The settings for the Power
button are as follows:
»
button, which is located
open programs.
Shut down
Start
button, then click
option.
Shut Down
will turn off.
If your Notebook is not responding, press and hold down the
Note:
button until your Notebook shuts down.
Power
, and select the
Power
»
button places
RESARIO MOBILE INTERNET
P
ERIES
1700 S
EYOND SETUP GUIDE
PC B
•
Press and release once to enter Hibernation mode
•
Press and hold down to shut down your Notebook
»
You should only press and hold down the
Note:
down your Notebook if it is locked up or not responding. Compaq does
not recommend that you turn off your Notebook using this method under
normal circumstances. To turn off your Notebook properly, refer to the
procedure above.
Power
U
button to shut
SING YOUR NOTEBOOK
3-3
Page 31
Warning
Your Notebook contains a
lithium-ion battery pack.
Improper handling of the
battery pack can result in fire
and chemical burns. Do not
disassemble, crush, puncture,
short external contacts, dispose
of in water or fire, or expose it
to temperatures higher than
140° F (60° C). Replace only
with the Compaq battery pack
specified for your Notebook.
Using Battery Power
Inserting and Removing the Battery
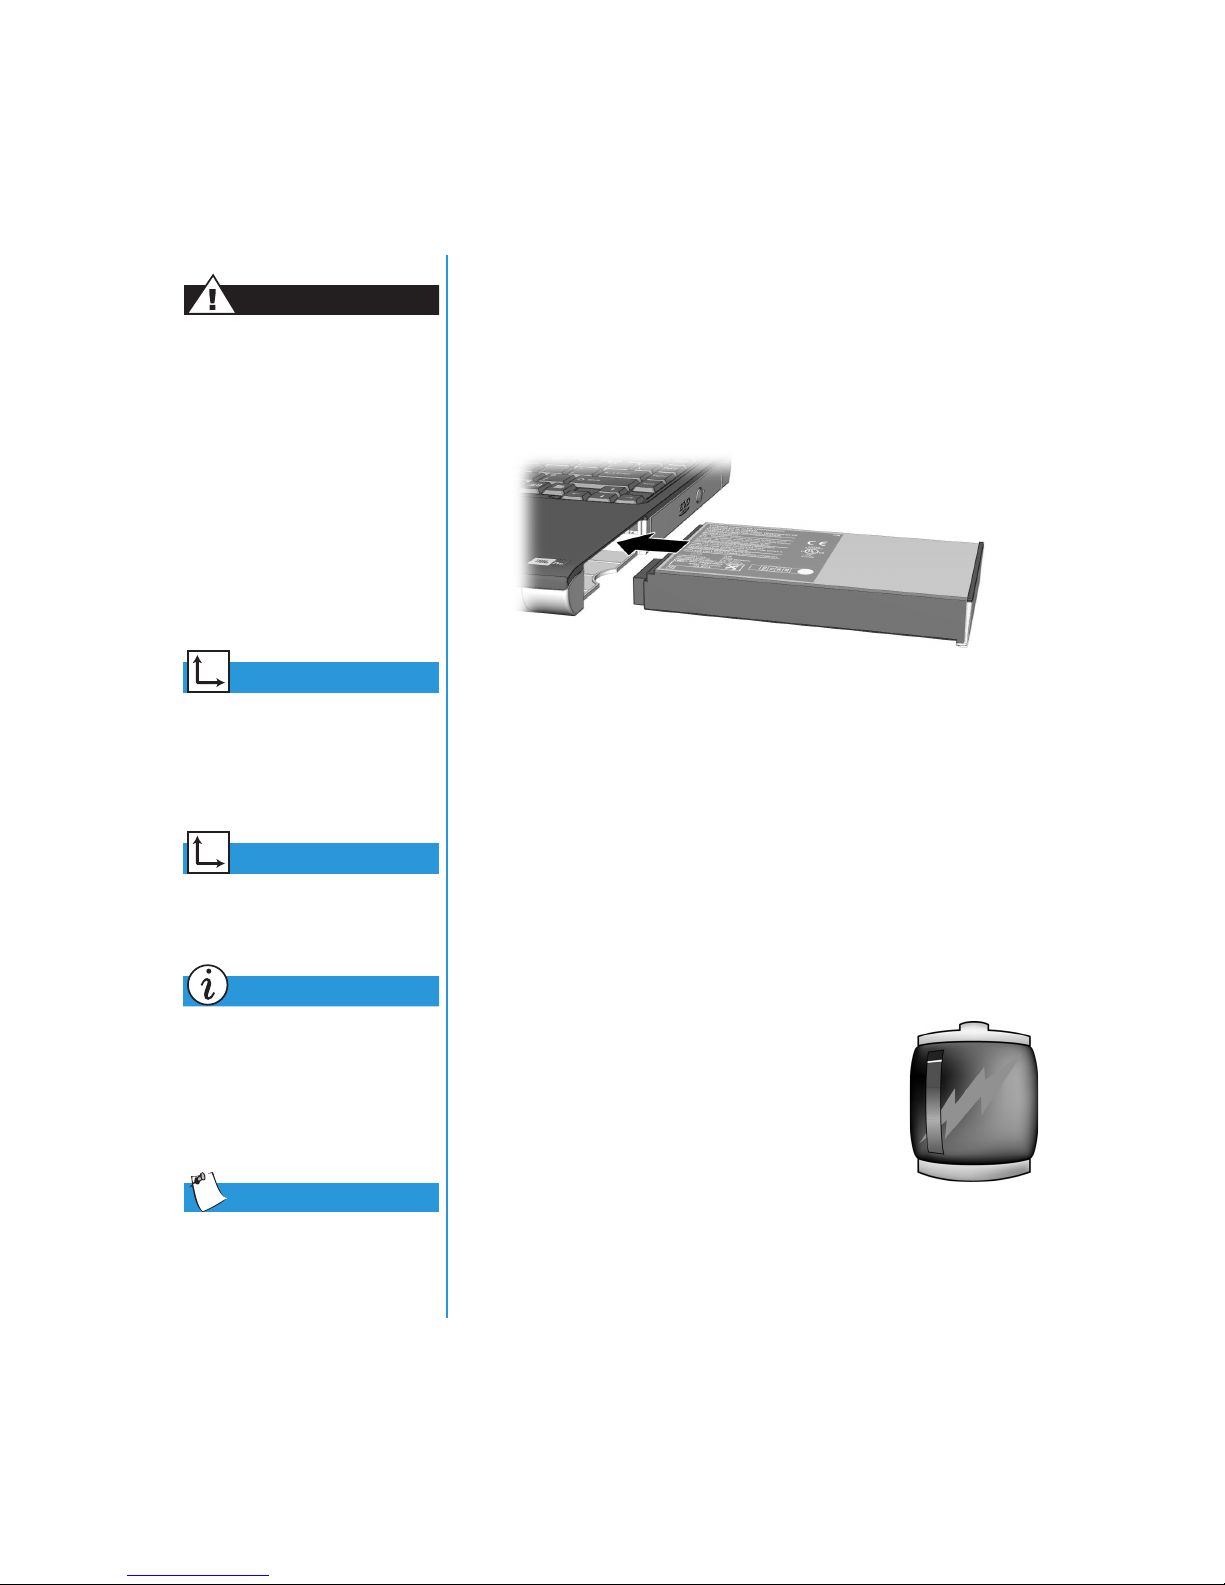
To insert the battery into the battery compartment, position the
battery so that the side with the label is turned up and slide the
battery into the compartment until it snaps into place.
See also
“Components on Underside”
in Chapter 2 of this guide for
help in locating the Battery
Release Switch.
See also
“Battery Care” later in
this guide.
Did you know...
The battery charges whether
your Notebook is on or off. It
continues charging until the
battery is fully charged or the
AC power is disconnected.
Tip
The battery will lose its
charge if not used for a
long time.
To remove the battery, complete the following steps:
1. Save your files.
2. If the AC adapter is not connected, turn off your Notebook.
3. Slide and hold the
Battery Release Switch
on the underside
of your Notebook to the front.
4. Use the tab on the battery to pull the battery out.
5. Release the Battery Release Switch.
Charging the Battery
To charge the battery, insert the battery in
the battery compartment and connect your
Notebook to AC power. Leave your Notebook
plugged into the electrical outlet until the
Battery Charging
displayed. This ensures that the battery
is fully charged.
If you will not be using your Notebook for an extended period of time,
Note:
Compaq recommends that you unplug the electrical cord from the outlet and
remove the battery while your Notebook is not in use.
7
icon is no longer
SING YOUR NOTEBOOK
3-4 U
RESARIO MOBILE INTERNET
P
EYOND SETUP GUIDE
PC B
1700 S
ERIES
Page 32
Optimizing Processor Speed
g
g
y
p
(available on select models)
Did you know...
When maximum performance
is selected, the processor
operates at full (100%) speed.
When battery optimized mode
is selected, the processor
operates at approximately
80% of the maximum
performance mode.
Some Presario Notebook models use the Pentium® III Processor
®
featuring Intel
SpeedStep™Technology. This technology gives
you the capability to optimize your Notebook’s processor speeds
based on the power source in use.
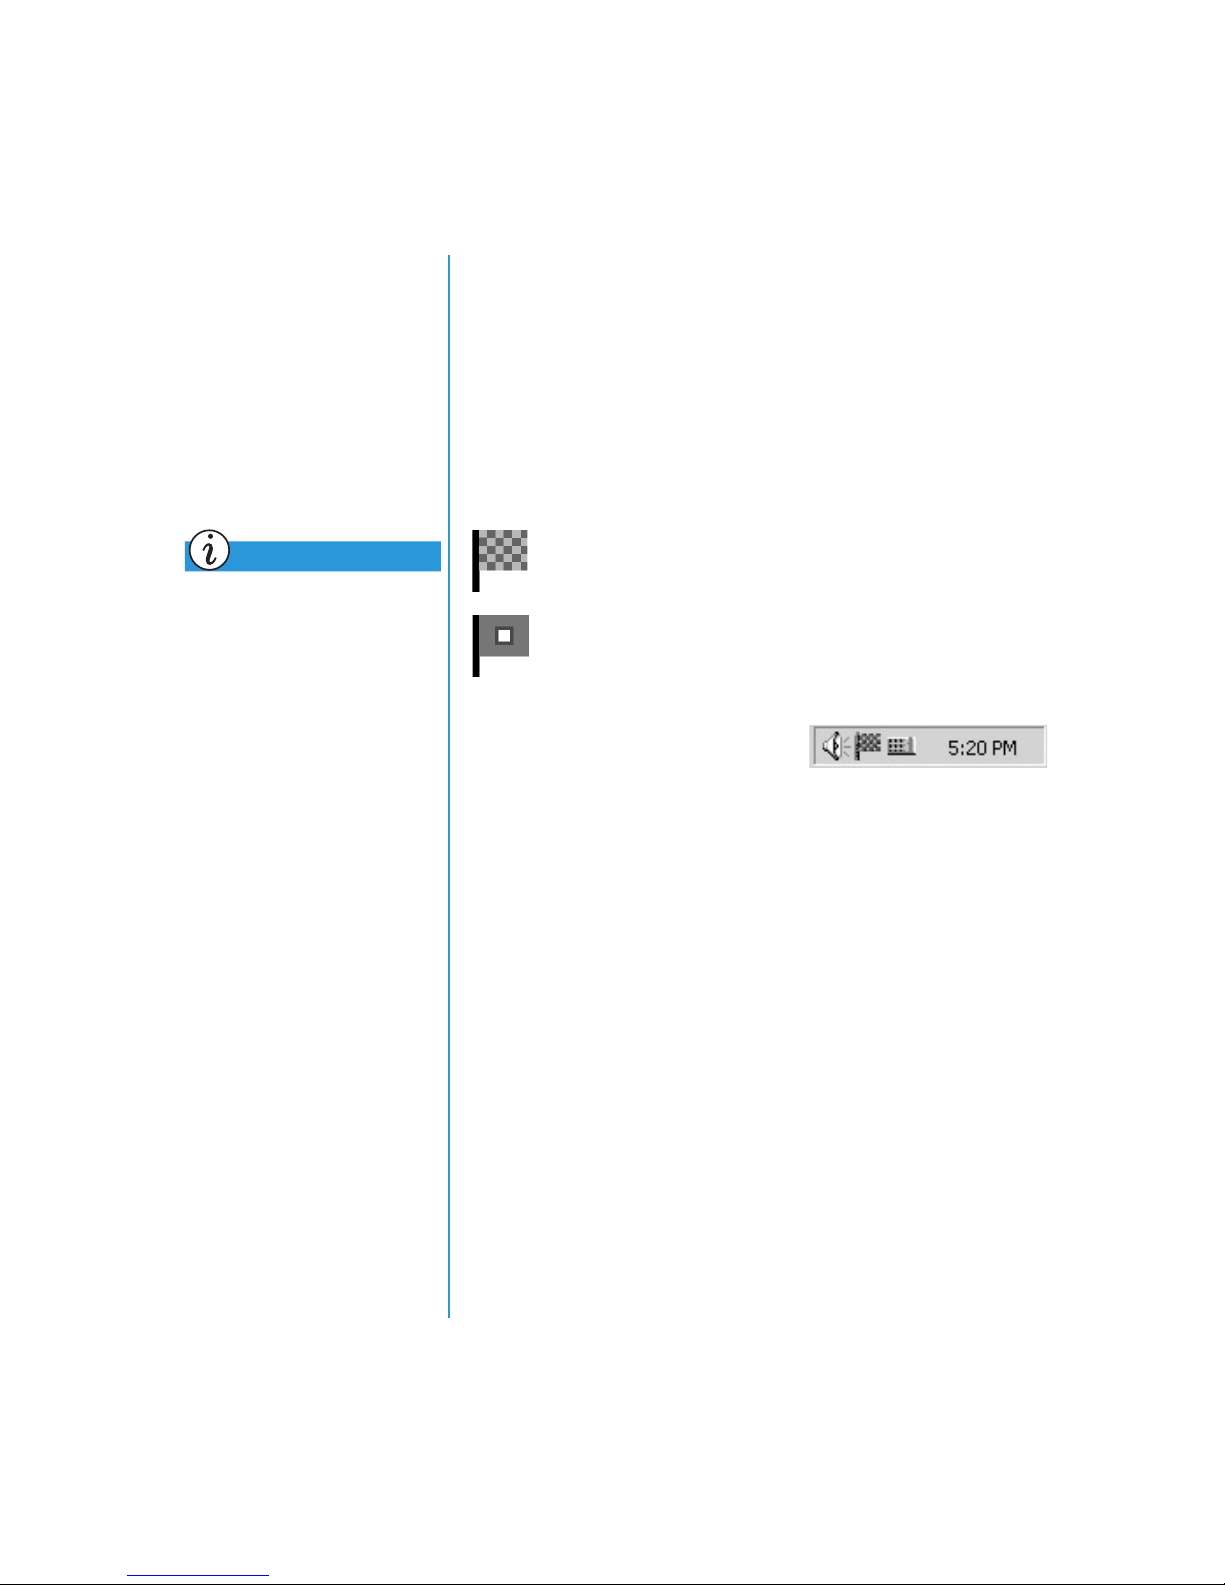
The default SpeedStep icons for each power source are
listed below:
The checkered fla
icon in the system tray on the
Windows taskbar indicates External AC Power and
Maximum Performance.
The non-checkered fla
on the Windows taskbar indicates Battery
tra
timized Performance.
O
icon in the system
To change the setting for either
power source, AC or battery, rightclick the
System Tray
Battery Optimized Performance
or
SpeedStep
icon in the
and select either
Maximum Performance
.
RESARIO MOBILE INTERNET
P
ERIES
1700 S
EYOND SETUP GUIDE
PC B
SING YOUR NOTEBOOK
U
3-5
Page 33
TouchPad
Using the TouchPad Instead of a Mouse
In this section you’ll learn
how to select, click
and double-click with
the TouchPad:
•
Using the TouchPad
Instead of a Mouse
•
Tapping and
Double-Tapping
•
Edge Motion
See also
“Preventive Maintenance”
later in this guide for tips on
keeping your TouchPad clean.
See also
“Attaching Hardware
Devices” later in this guide
to learn how to attach an
external mouse.
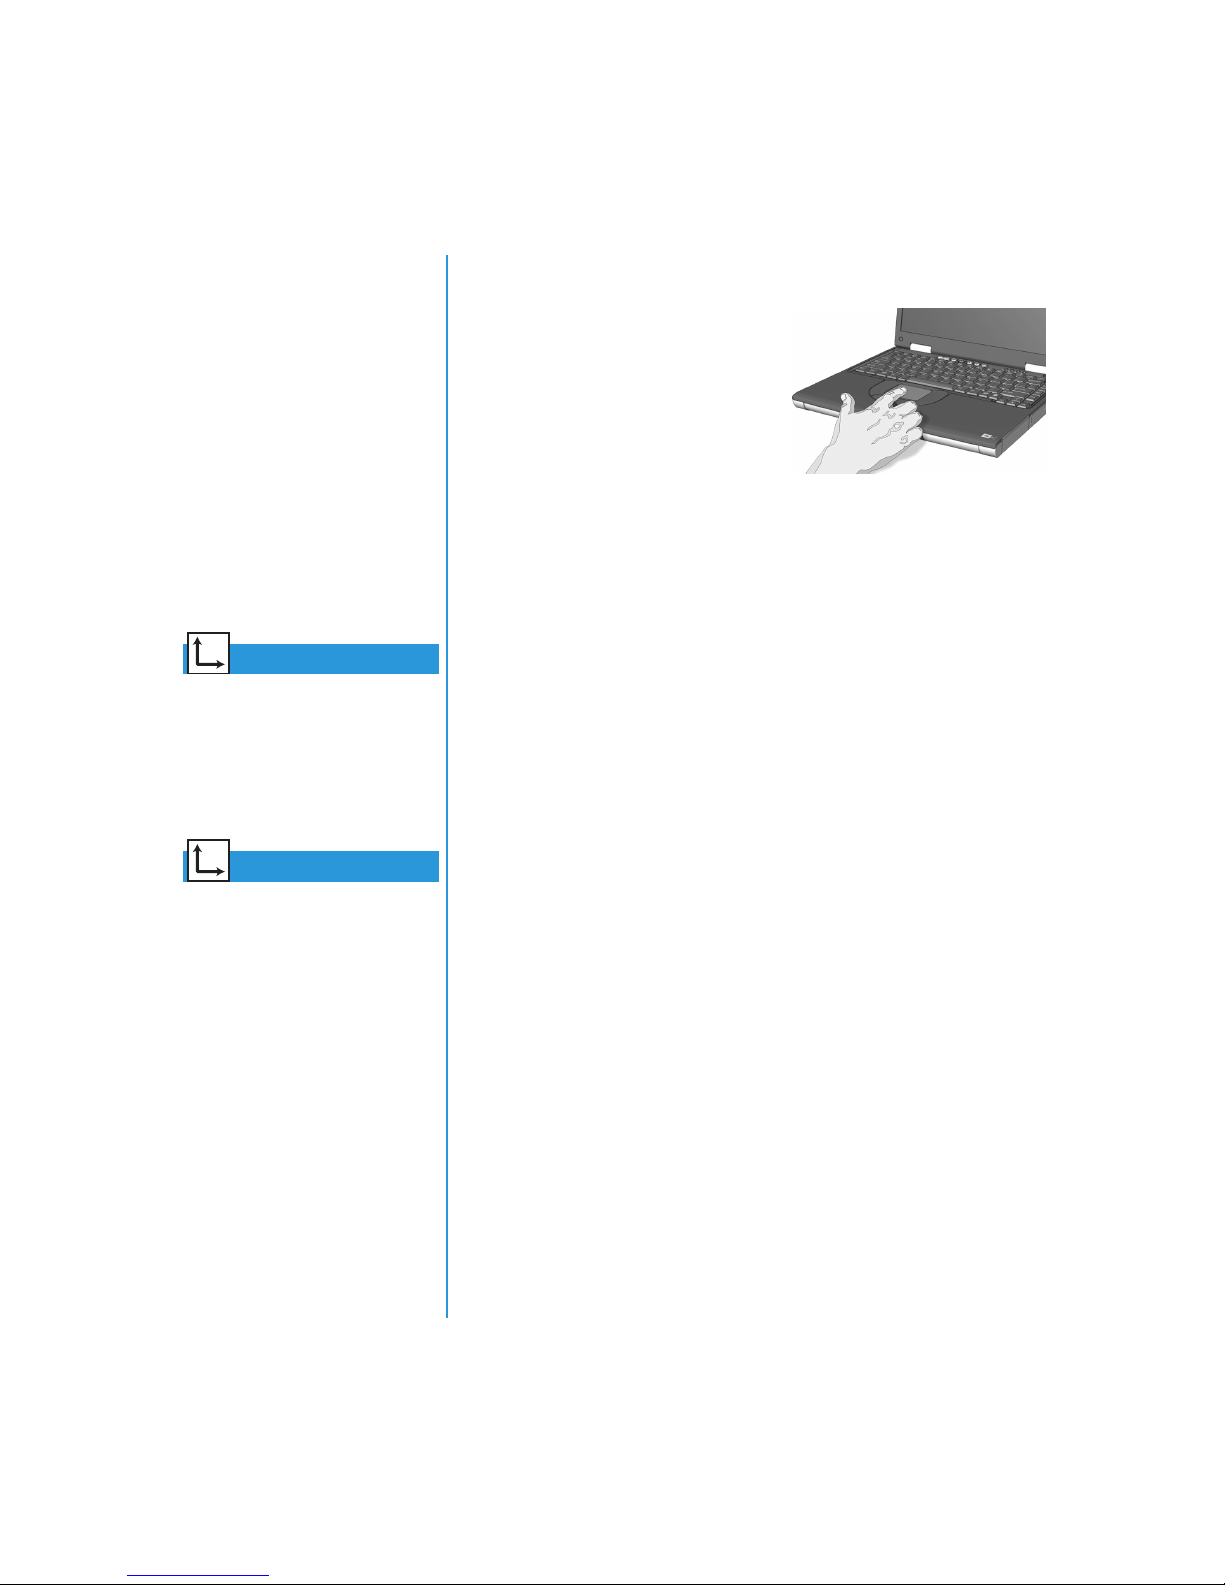
Just like the mouse, the TouchPad
lets you draw lines or point to items
on the Windows desktop. Try
dragging the pointer across the
screen by gently dragging your
finger across the TouchPad.
Left-Click
To left-click, press the
directly below the TouchPad. The left TouchPad button works as
the select or drag button. To double-click an item, move the
pointer over the item and press the left TouchPad button twice in
rapid succession.
Left
TouchPad button. It is located
Right-Click
The right TouchPad button works as the context menu or special
drag button. Press the
Right
TouchPad button to get
context-sensitive options.
Scroll Button
The Scroll button is the equivalent of the right, left, up and down
buttons of the scroll bars on the side and bottom of your screen.
To view other areas of a document or browser window, press the
Scroll
button in the desired direction.
SING YOUR NOTEBOOK
3-6 U
The Scroll button is only functional with some software applications.
Note:
RESARIO MOBILE INTERNET
P
PC B
EYOND SETUP GUIDE
ERIES
1700 S
Page 34
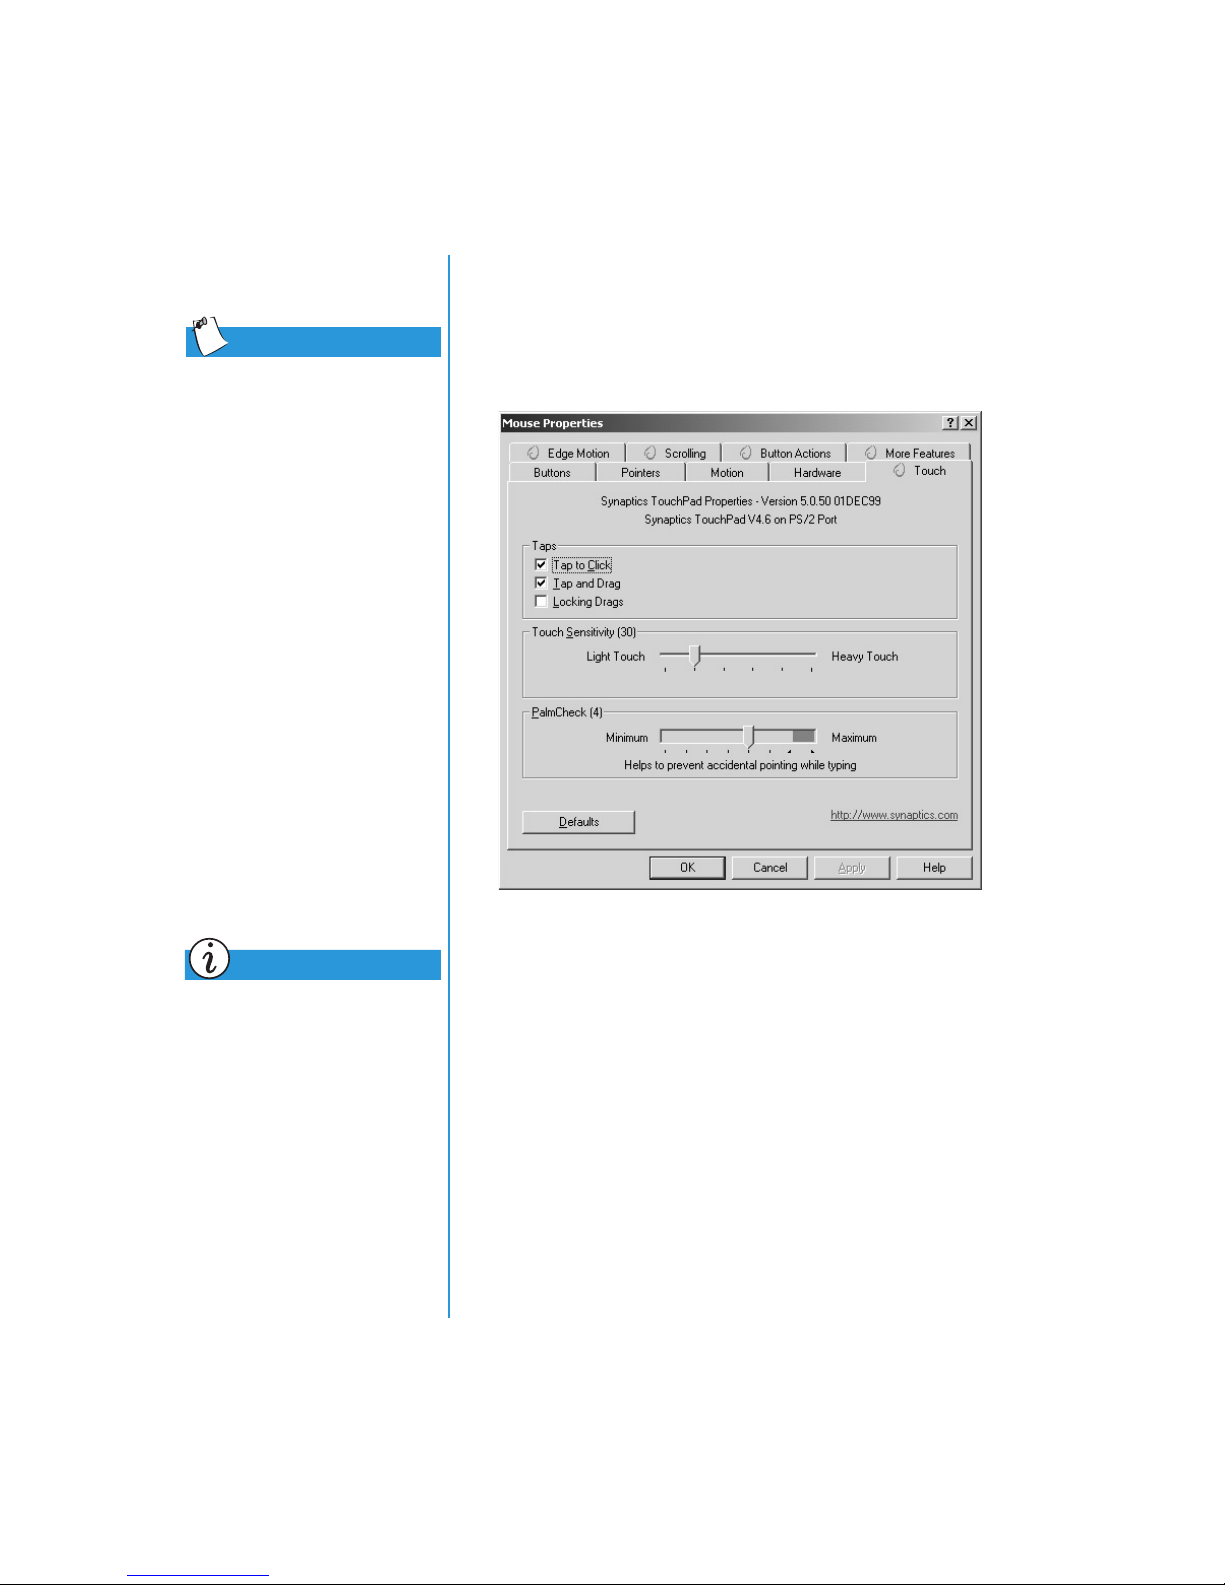
Tip
To get additional help for
setting advanced TouchPad
features, click the
Help
select
Properties
from the
dialog box.
button or
¹
Mouse
Tapping and Double-Tapping
Your TouchPad has a Tapping feature that works like the left
mouse button. If enabled, you can tap once on the TouchPad
to select an object and tap twice to double-click.
Did you know...
To help prevent accidental
pointing while typing, drag
the PalmCheck slider
towards maximum.
RESARIO MOBILE INTERNET
P
ERIES
1700 S
EYOND SETUP GUIDE
PC B
To turn on the tapping feature, complete the following steps:
1. From the Windows desktop, click
and then click
2. Double-click the
Control Panel
Mouse
icon to open the Mouse Properties
z
.
Start
, point to
Settings
dialog box.
3. Select the
Tou ch
tab and click the
Tap t o Click
check box to
turn on the tapping feature.
4. Click OK to accept the changes and close the dialog box.
SING YOUR NOTEBOOK
U
,
3-7
Page 35
Edge Motion
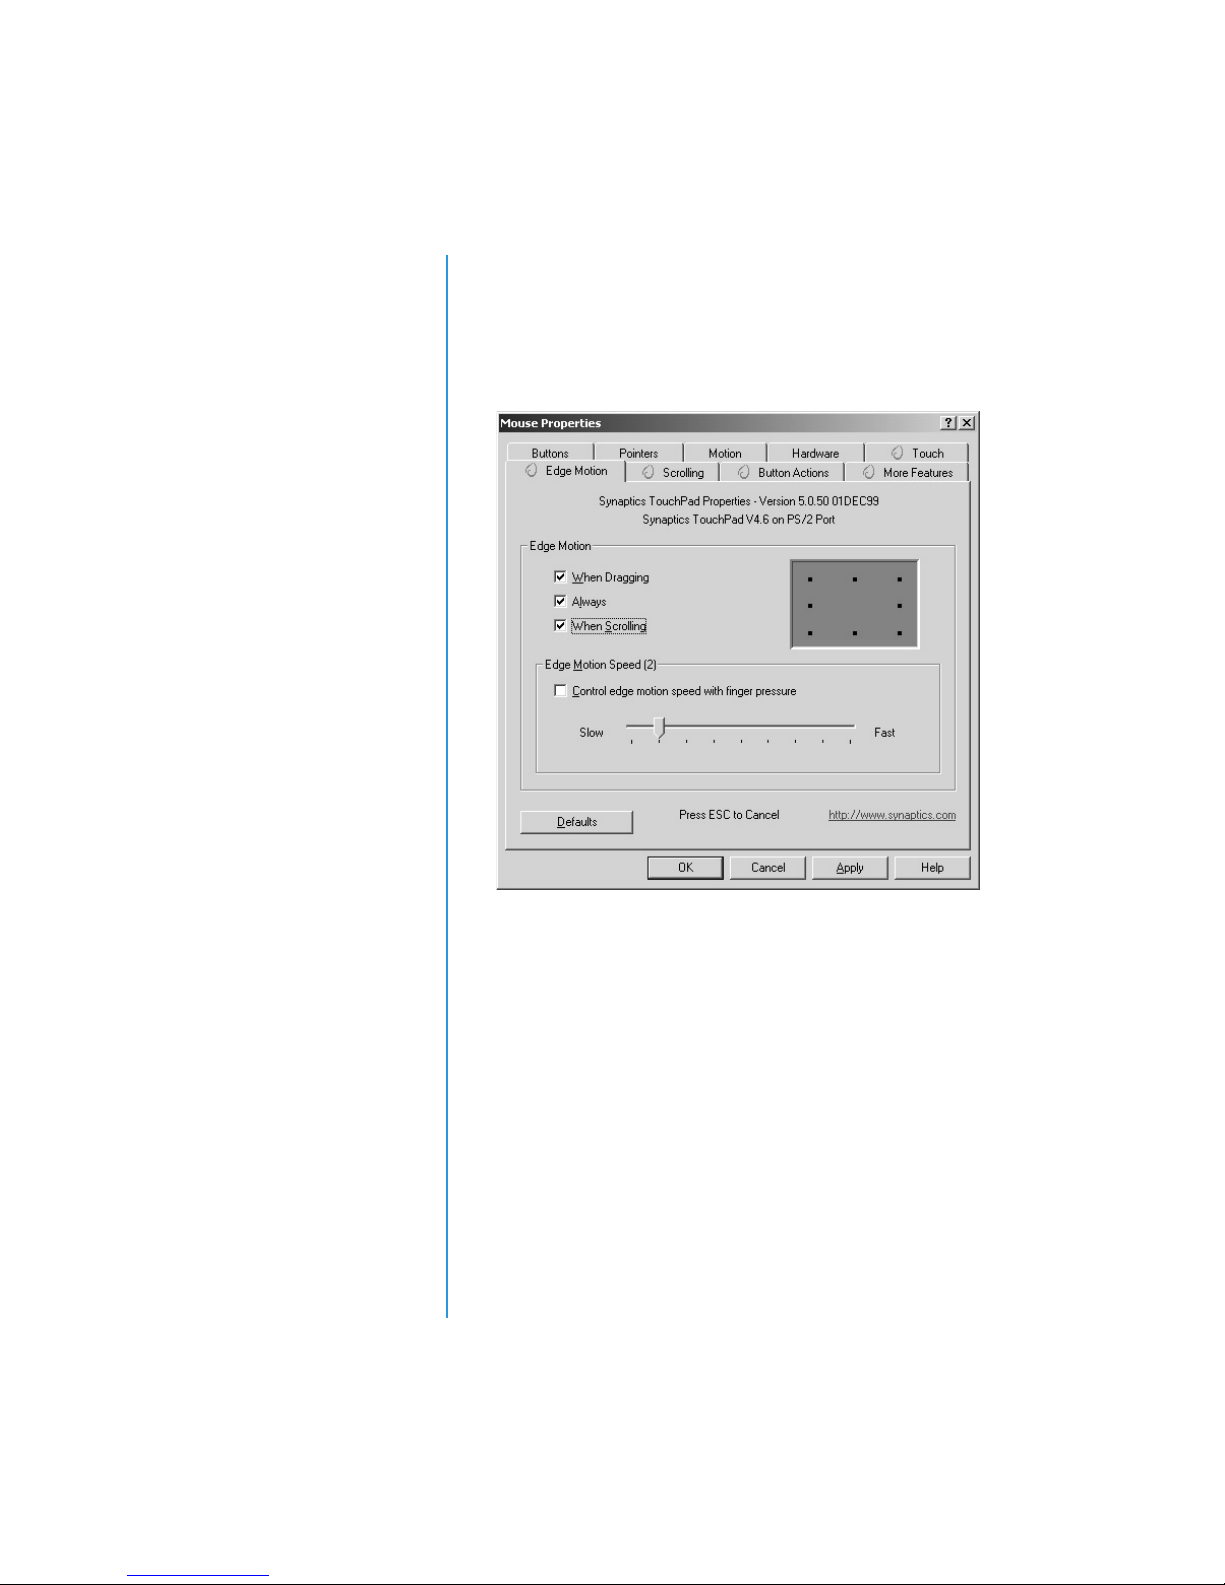
Edge Motion allows you to continue to scroll once your finger
reaches the edge of the TouchPad. When this feature is turned
on, the window continues to scroll until you lift your finger.
SING YOUR NOTEBOOK
3-8 U
To turn on Edge Motion, complete the following steps:
1. From the Windows desktop, click
and then click
2. Double-click the
3. Click the
4. Select
When Dragging, Always
Control Panel
Mouse
Edge Motion
z
tab.
.
icon.
Start
, point to
When Scrolling
, and
Settings
to
turn on Edge Motion.
5. Click OK to accept the changes and close the dialog box.
RESARIO MOBILE INTERNET
P
EYOND SETUP GUIDE
PC B
1700 S
,
ERIES
Page 36
Display Options
Changing Resolution
In this section:
•
Changing Resolution
•
Adjusting Brightness
Did you know...
Your Notebook’s display is
already set to its optimal
resolution. Compaq
recommends changing
the resolution setting only
if you encounter problems.
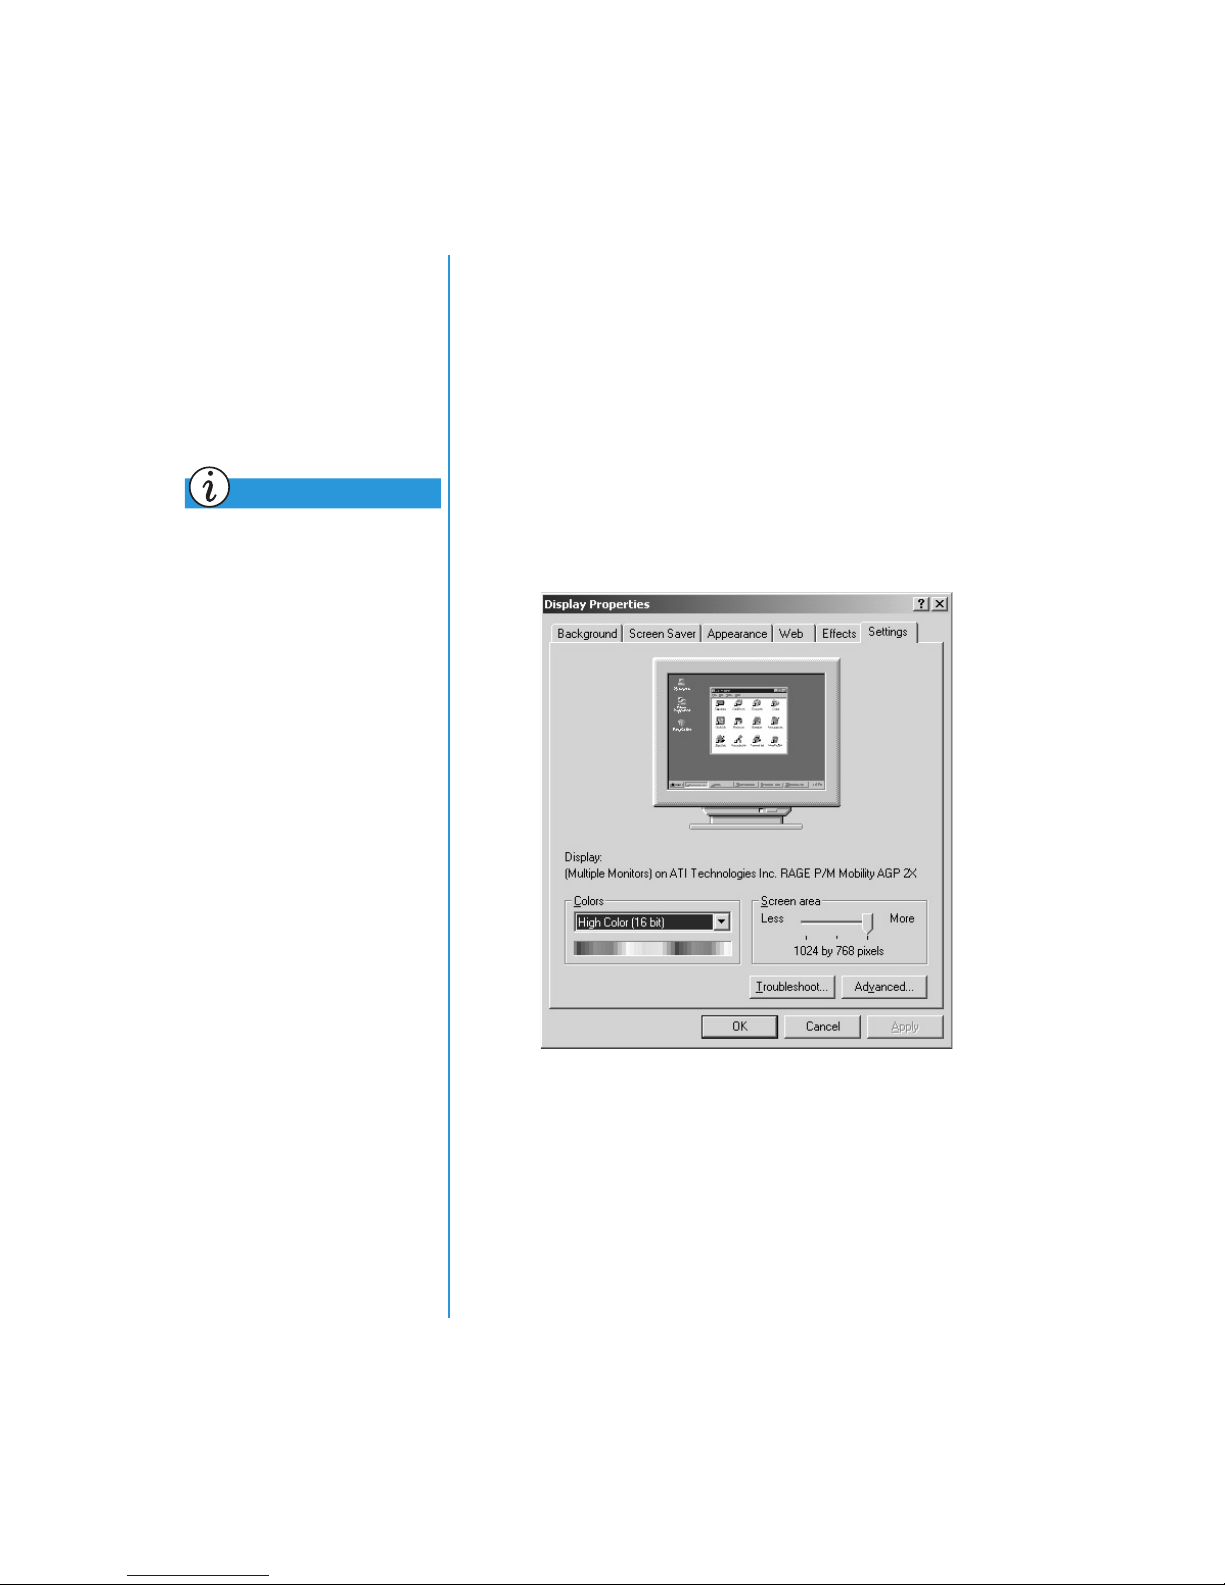
If the display only fills part of the screen or the default
resolution does not suit your needs, you may want to adjust
the display resolution.
To change the display resolution, complete these steps:
1. On the taskbar, click the
then click
2. Double-click
Control Panel
Display
to open the Display Options dialog
box, and then click the
Start
.
Settings
button, point to
tab.
Settings
, and
RESARIO MOBILE INTERNET
P
ERIES
1700 S
EYOND SETUP GUIDE
PC B
3. Under
Screen area
, click the
resolution slider
and drag it to
the desired resolution.
4. Click OK to accept the new settings, then close the
Panel
window.
SING YOUR NOTEBOOK
U
Control
3-9
Page 37
Adjusting Brightness
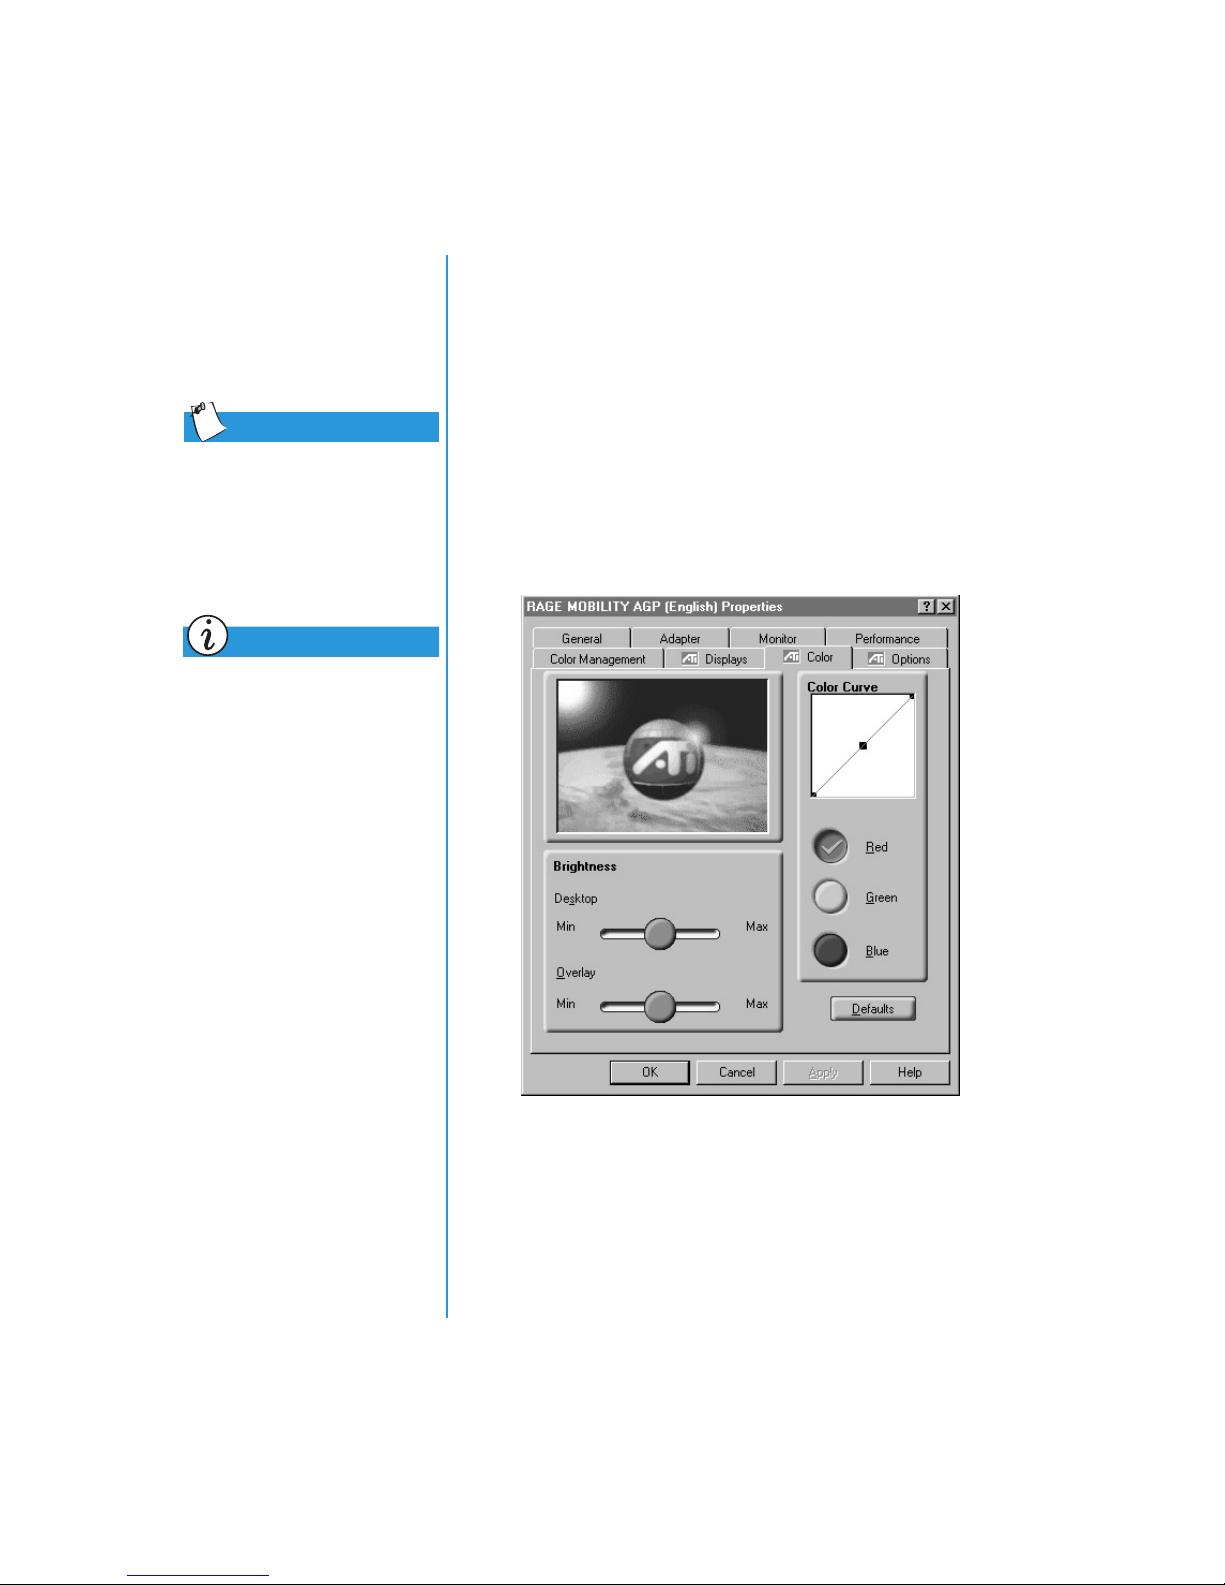
If your display is too faint or too bright, the brightness controls
may not be set properly. To correct this condition, complete the
following steps:
Tip
You can also adjust the
display brightness by
pressing
the brightness or
increase the brightness.
Key combinations such as the
example Fn+F7 used above
mean that you should press and
hold down the Fn key, press the
F7
keys simultaneously.
Fn+F7
Did you know...
key, and then release both
to decrease
Fn+F8
to
1. On the taskbar, click
Control Panel
2. Double-click
3. Click the
.
Display
Advanced
Start
, point to
and click the
button to open the
Settings
Settings
RAGE MOBILITYAGP Properties dialog box.
, and then click
tab.
SING YOUR NOTEBOOK
3-10 U
4. Click the
Desktop
Color
tab. Under
slider to the desired brightness.
Brightness
, click and drag the
5. Click OK to close the dialog box and click OK again to
close the Display Properties dialog box, then close the
Control Panel window.
RESARIO MOBILE INTERNET
P
EYOND SETUP GUIDE
PC B
1700 S
ERIES
Page 38
Internet Zone
Reprogramming the Internet Zone Buttons
Buttons
The Internet Zone buttons,
located above your
Notebook’s keyboard,
automatically connect you
to the Internet. These
buttons give you one-touch
access to your most
frequently used
Internet activities.
This section covers:
•
Reprogramming the
Internet Zone Buttons
See also
“Front of Your Presario
Notebook” in Chapter 2 of this
guide for descriptions of each
button and its default action.
You can reprogram the Internet Zone buttons to reflect your
personal preferences.
To reprogram your Internet Zone buttons, complete the
following steps:
1. On the taskbar, click
Control Panel
2. Double-click
.
Easy Access Buttons
Start
, point to
Settings
, and then click
and follow the
instructions provided.
RESARIO MOBILE INTERNET
P
ERIES
1700 S
EYOND SETUP GUIDE
PC B
SING YOUR NOTEBOOK
U
3-11
Page 39
Storage Drives
Identifying Your Storage Drives
•
Identifying Your
Storage Drives
•
Using the Diskette Drive
•
Using the SuperDisk
Drive
Did you know...
On select models, Compaq
provides a back-up utility
(or system save) that allows
you to save your data and
applications to a partitioned
drive located on your hard
disk. To determine the total
hard disk size, add the size
of both the C and D
drives together.
Your diskette drive, hard drive, and
CD, CD-RW, or DVD drive are
designated with letters of the
alphabet, as well as with icons.
3 1/2 Diskette _______
Standard Diskette Drive
or SuperDisk Drive
To determine your drive letters,
complete the following steps:
1. From the Windows desktop,
double-click the
My Computer
g
icon.
Local Diskette _______
The icons for each drive
and corresponding drive
letters are displayed in the
My Computer window.
CD, DVD, or CD-RW Drive
2. Use the icons to the right to
identify your drive.
The DVD, CD-RW, and SuperDisk drives are available only on
Note:
select models.
h
q
Hard Drive
¾
Drive _______
Tip
To prevent damage to the
diskette and the information
stored on it, wait until diskette
drive activity is complete
before removing the diskette.
SING YOUR NOTEBOOK
3-12 U
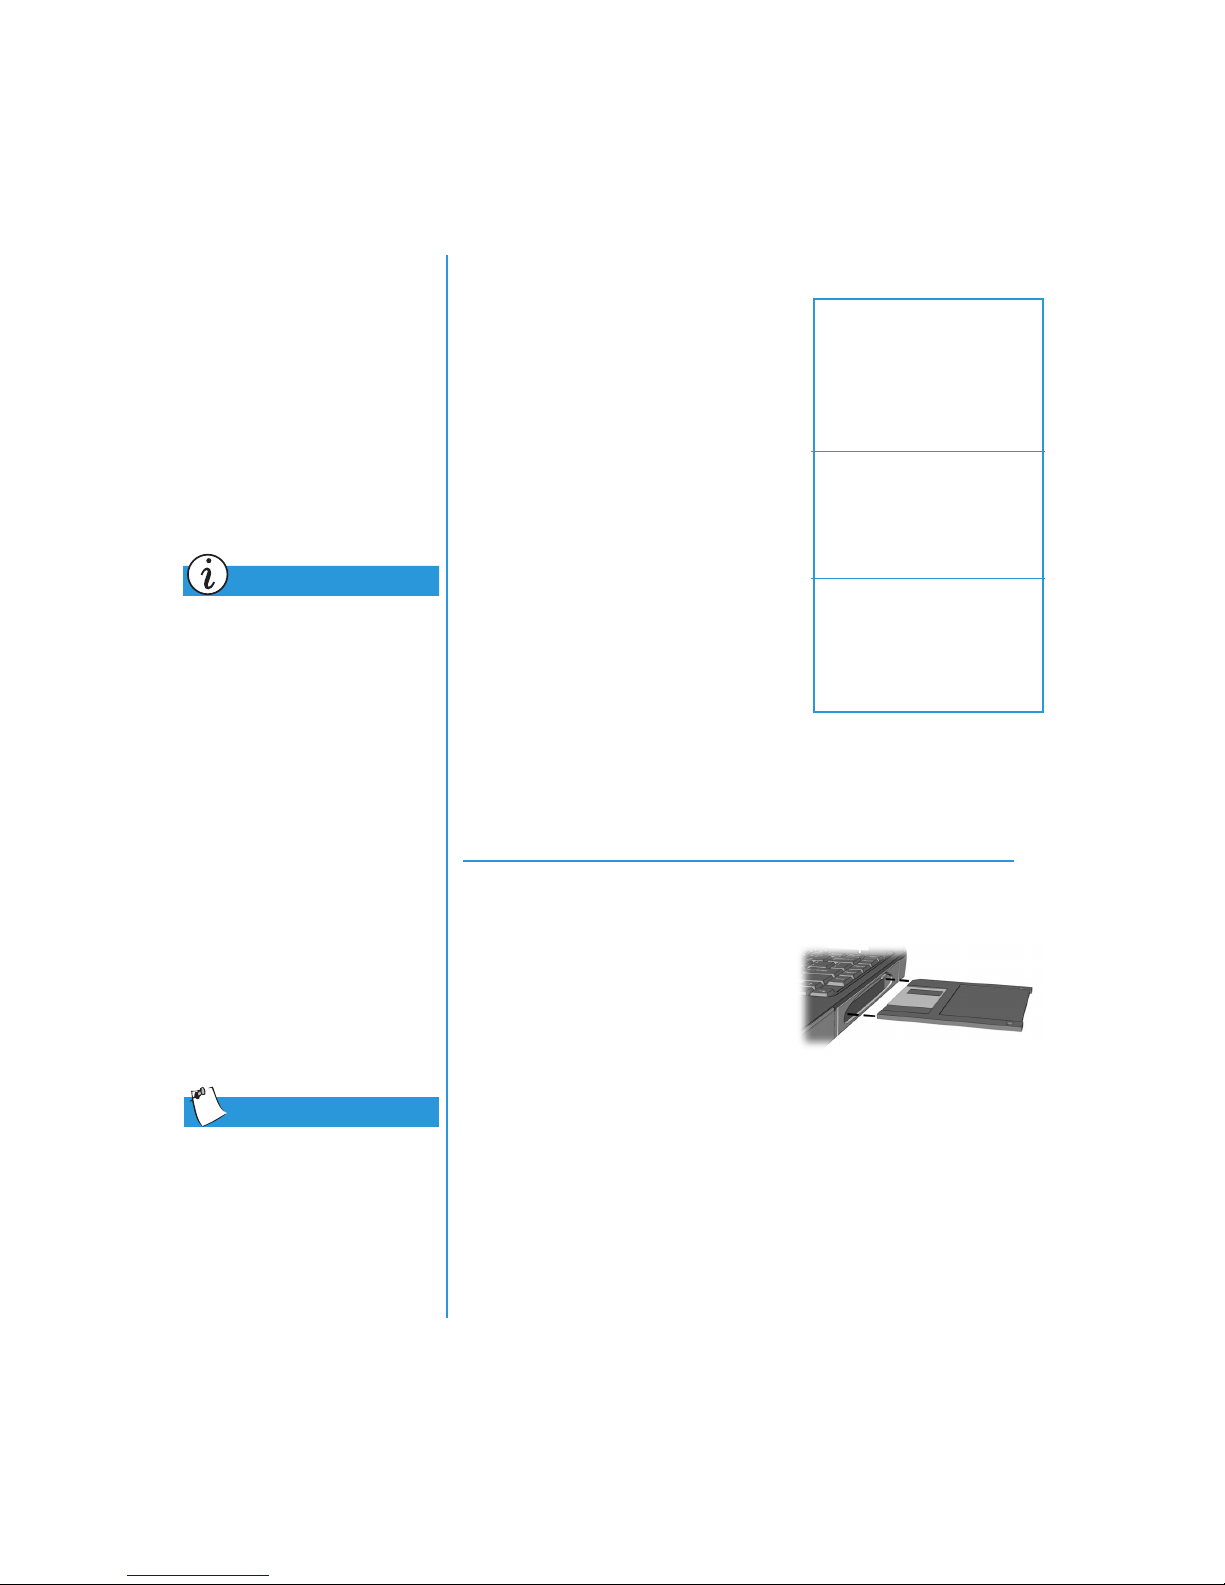
Using the Diskette Drive
To insert a diskette into the diskette
drive, hold the diskette with the
label facing up and the arrow on
the diskette pointing towards the
drive, and gently push the diskette
into the drive.
To remove a diskette, press the
diskette drive.
Your Presario Notebook is equipped with a feature called FutureBay
Note:
that allows you to swap storage drives (CD, DVD, CD-RW, Diskette, or
SuperDisk) in your Notebook. Refer to FutureBay in Chapter 5 of this
guide for information on swapping the drive.
Eject
button on the
RESARIO MOBILE INTERNET
P
EYOND SETUP GUIDE
PC B
1700 S
ERIES
Page 40

Using the SuperDisk Drive
(available on select models)
To insert a diskette into the SuperDisk drive, hold the diskette
with the label facing up and the arrow pointing towards the
drive, and gently push the diskette into the drive. To remove the
disk, press the
Eject
button on the diskette drive.
Did you know...
When your Notebook is off, you
cannot eject a disk from the
SuperDisk drive by pressing
the Eject button. You must eject
the disk manually.
Manually Ejecting a Disk
To manually remove a disk from the SuperDisk drive, insert the
end of a paper clip in the
Eject button, and push until the diskette pops out.
Your Presario Notebook is equipped with a feature called FutureBay
Note:
that allows you to swap storage drives (CD, DVD, CD-RW, Diskette, or
SuperDisk) in your Notebook. Refer to FutureBay in Chapter 5 of this
guide for information on swapping the drive.
Manual Eject Hole
located above the
RESARIO MOBILE INTERNET
P
ERIES
1700 S
EYOND SETUP GUIDE
PC B
SING YOUR NOTEBOOK
U
3-13
Page 41
Security
Using the Security Slot
In this section:
•
Using the Security Slot
•
Power-On Password
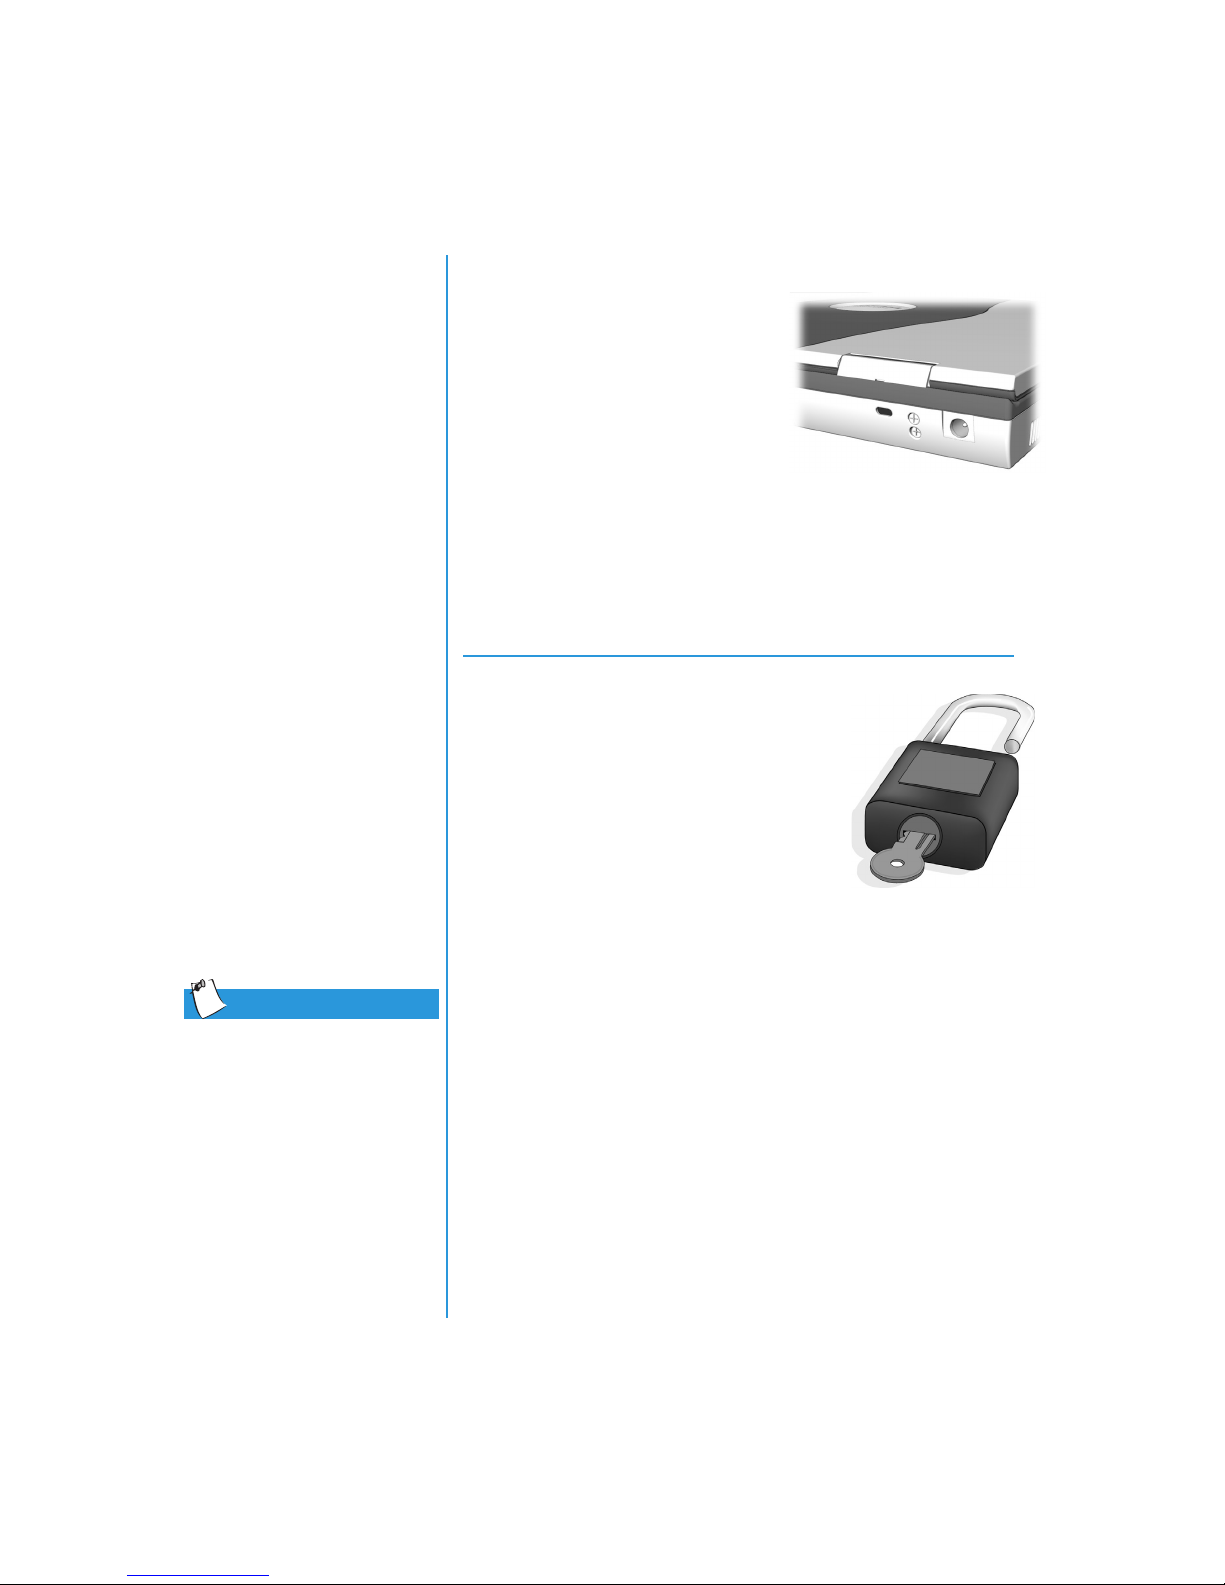
To use the security slot found on
the back of your Notebook,
complete the following steps:
1. Insert a locking device (such as
a Kensington lock) into the
security slot.
2. Turn the locking device clockwise 90 degrees.
To remove the locking device, turn the locking device
counter-clockwise 90 degrees and remove the device from
the slot.
Power-On Password
You can set a power-on password that
will secure the information you store on
the hard disk. When turning on your
Notebook, this password must be entered
before you can access your files.
Tip
Pressing the F9 key at
any point within the setup
returns your Notebook to the
default settings.
SING YOUR NOTEBOOK
3-14 U
Setting the Password
To set the power-on password, complete the following steps:
1. Press the Power button to turn on your Notebook.
2. After the Compaq logo is displayed, a cursor is shown in the
upper right corner of the screen for a few seconds. While the
cursor is visible, press the
Caution:
settings may affect the functionality of your Notebook.
F10 Setup is for experienced users only. Changing
3. Using your arrow keys, select the
menu bar.
F10
key.
Security
RESARIO MOBILE INTERNET
P
option from the
EYOND SETUP GUIDE
PC B
1700 S
ERIES
Page 42

4. Move to
Set Supervisor Password
. Press the
Enter
key.
5. Set your personal password, and press the
must confirm the password and press the
Caution:
forget or lose your password, a Compaq service technician must
reset your Notebook for you to be able to access your files.
6. Move to
Enable
select
7. Using the arrow keys, select
8. Make sure that
Enter
9. Select
Write your password down in a secure location. If you
Password on boot
using the +or-keys to
.
Exit
from the menu bar.
Exit Saving Changes
key.
Ye s
to save your changes and exit.
Enter
Enter
key. You
key again.
is selected. Press the
Your power-on password is now set. Every time you turn on
your Notebook, resume working from hibernation mode, or
access F10 Setup, you must enter this password.
Removing the Password
To remove a power-on password, complete the following steps:
RESARIO MOBILE INTERNET
P
ERIES
1700 S
EYOND SETUP GUIDE
PC B
1. Access
press the
F10
Setup as above, enter your current password, and
Enter
key. In the spaces to enter your new password
and confirm new password, press the
Enter
2. Move to
select
key again to exit the screen.
Password on boot
Disable
.
using the +or-key to
3. Using your arrow keys, select
4. Make sure that
Enter
5. Select
key.
Ye s
Exit Saving Changes
to save your changes and exit.
Enter
Exit
from the menu bar.
is selected. Press the
SING YOUR NOTEBOOK
U
key. Press the
3-15
Page 43

SING YOUR NOTEBOOK
3-16 U
RESARIO MOBILE INTERNET
P
EYOND SETUP GUIDE
PC B
1700 S
ERIES
Page 44
Common
Tasks
Now that your Presario Notebook computer is set up and
In This Chapter
S-Video Connection, 4-2
Anti-Virus Software, 4-5
Software and
Hardware, 4-7
running, you may want to explore and learn about some of the
common tasks performed by your Notebook.
RESARIO MOBILE INTERNET
P
ERIES
1700 S
EYOND SETUP GUIDE
PC B
OMMON TASKS
C
4-1
Page 45
S-Video
Connecting and Enabling S-Video
Connection
With an S-Video
connection, you can
play games on a bigger
screen or watch DVD
movies on TV instead of on
a Notebook display.
This section helps
you complete the
following tasks:
•
Connecting and
Enabling S-Video
•
Setting Up Your
Television Format
•
Adjusting the Television
Screen
•
Switching Between
Displays
To connect your Notebook and your television, you need an
S-Video cable to plug into your TV, VCR, or other device.
These cables can be purchased from a retail TV store or
a computer store.
To connect and enable S-Video, complete the following steps:
1. Connect your Notebook and your television with an S-Video
cable.
2. From the Windows taskbar, click
then click
3. Double-click the
Control Panel
Display
.
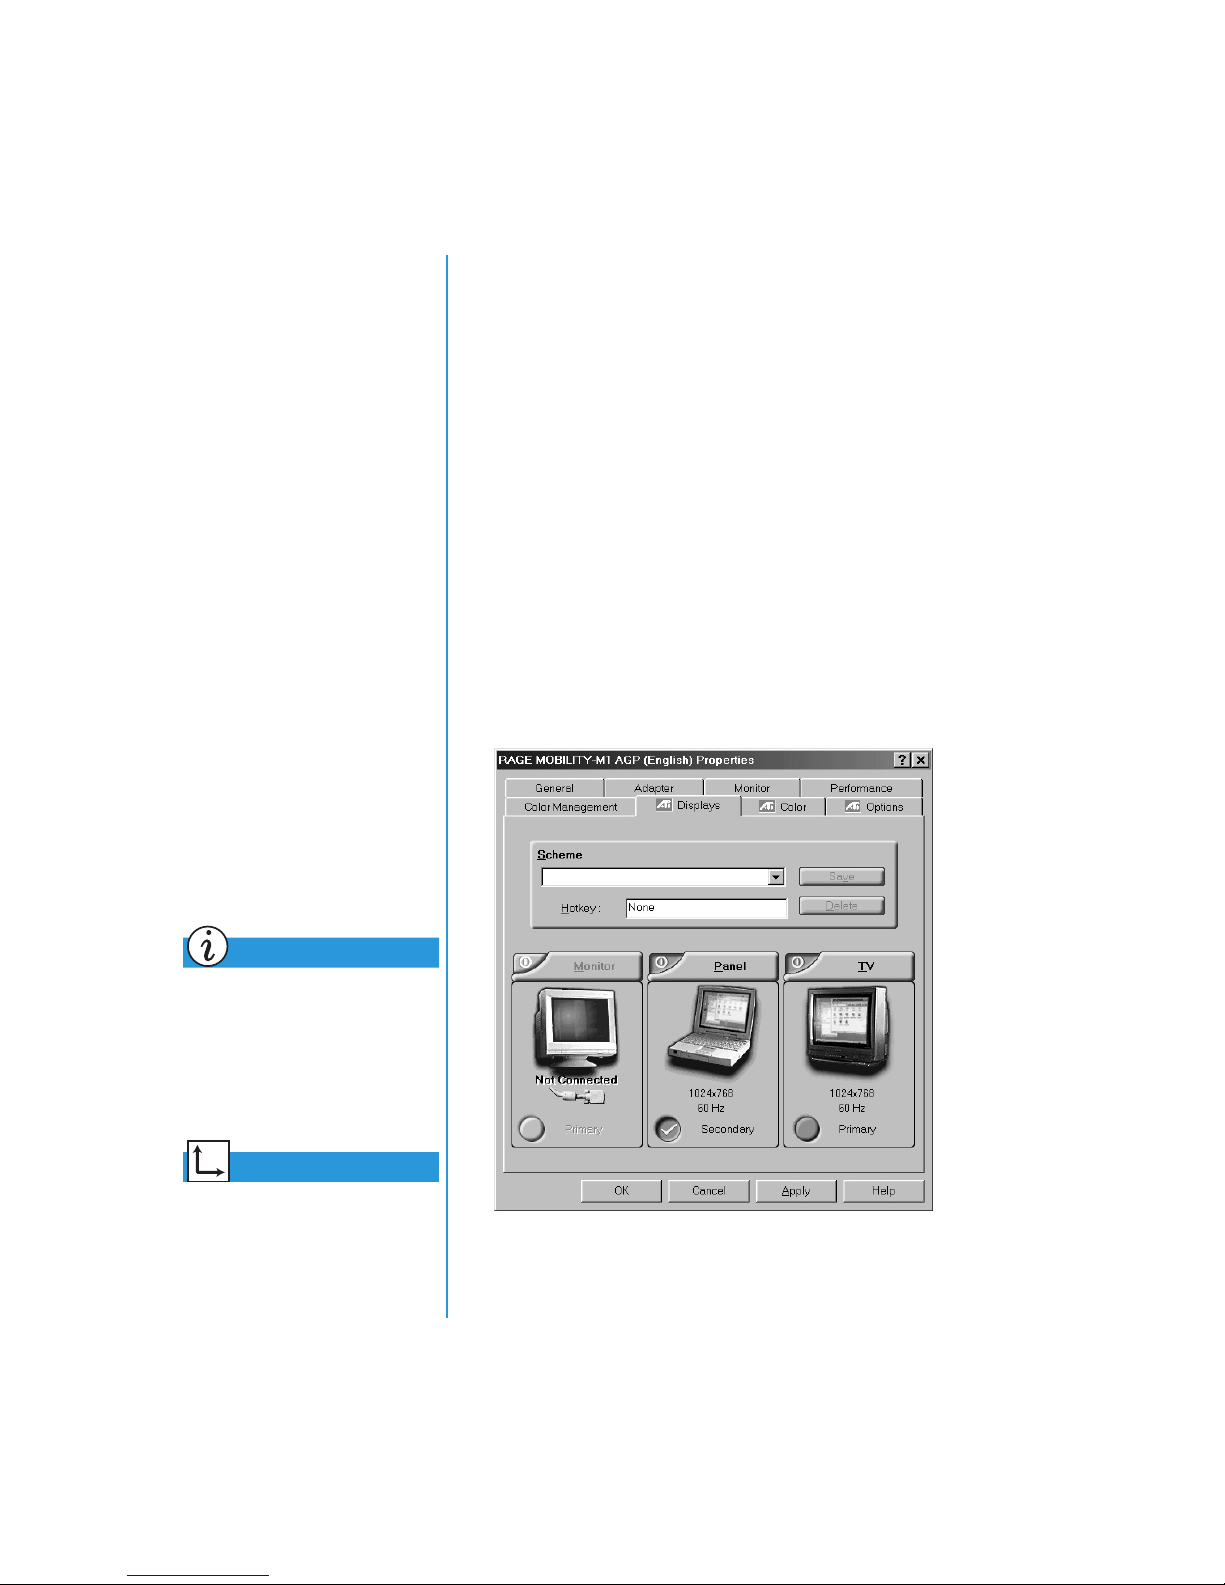
&
Properties dialog box and then
4. Click the
Advanced
button to open the RAGE MOBILITY
Start
icon to open the Display
click the
AGP Properties dialog box and then click the
, point to
Settings
Settings
Displays
tab.
,
tab.
Did you know...
Your TV may not have an
S-Video connector. See your
local electronics store dealer
for an S-Video adapter for your
Notebook.
See also
“Playing a DVD Movie on a
TV” later in this guide.
OMMON TASKS
4-2 C
RESARIO MOBILE INTERNET
P
EYOND SETUP GUIDE
PC B
1700 S
ERIES
Page 46

5. Click the top left corner of the TV button to enable S-Video.
S-Video is enabled if the button next to
Primary
is blue.
6. Click
Apply
to accept the changes and then click OK to exit
both dialog boxes.
7. If your Notebook asks you to restart Windows, click OK for
the new settings to take effect.
At this time, the display may be rolling. To correct this problem,
you must set your TV format.
Setting Up Your Television Format
To view images properly, you must set your Notebook to your
country’s standard for television transmission. To do this,
complete the following steps:
1. From the Windows taskbar, click
then click
2. Double-click the
Control Panel
Display
.
&
icon to open the Display
Properties dialog box and then click the
3. Click the
Advanced
button, then click the
Start
, point to
Settings
Settings
tab.
Displays
,
tab.
RESARIO MOBILE INTERNET
P
ERIES
1700 S
EYOND SETUP GUIDE
PC B
4. Click the right corner of the TV button.
5. Click the
6. Make sure
Format
tab.
Select by country
is selected.
7. Scroll to find your country, then select it.
8. Click OK to exit both dialog boxes.
9. If your Notebook asks you to restart Windows, click OK for
the new settings to take effect.
Your television format is now set and the television image
should be stable.
OMMON TASKS
C
4-3
Page 47

Did you know...
Adjusting the Television Screen
After you have enabled your television, you may need to adjust
the size or location of the image on your screen.
The resolution of your
Notebook display is much
greater than the resolution
of your TV. Image quality on
the TV varies from application
to application.
To make adjustments to your display, complete the following:
1. From the Windows taskbar, click
then click
2. Double-click the
Control Panel
Display
.
&
Start
icon to open the Display
Properties dialog box and then click the
3. Click the
Advanced
button to open the RAGE MOBILITY
AGP Properties dialog box, and then click the
4. Click the right corner of the
TV
button.
, point to
Settings
Settings
tab.
Displays
tab.
a. To change the brightness, contrast or color saturation,
click the
Attributes
tab and then click and drag the
sliders to the desired settings.
b. To change the position and screen size, click the
Adjustments
tab and click the appropriate buttons to
adjust as necessary.
5. Click OK to exit both dialog boxes.
,
4-4 C
OMMON TASKS
Switching Between Displays
You can switch between your television and your display or
external monitor by pressing
change is:
•
Display
•
External Monitor
•
Display and External Monitor
•
S-Video
Fn+F3
RESARIO MOBILE INTERNET
P
. The order in which they
EYOND SETUP GUIDE
PC B
1700 S
ERIES
Page 48
Anti-Virus
Using Anti-Virus Software
Software
Did you know...
Compaq provides anti-virus
scanning and free software
updates for one year through
the Internet.
A virus is a program that attaches
itself to a file on your Notebook
and then spreads from one file to
another. Viruses can damage data,
cause computers to malfunction,
and display annoying or offensive
messages. Some viruses may go
unnoticed for long periods of time
because they are activated on a
certain date or time. Protect your
Notebook from a virus by:
•
Using an anti-virus scanning program to scan for viruses on
your drives or diskettes. This scanning program is located in
the Start menu. If you need help using the program, select
Help
in the menu bar.
•
Backing up your files periodically to diskettes, a separate
hard drive, or a high-capacity storage drive.
•
Write-protecting diskettes. A virus cannot infect a
write-protected diskette.
•
Obtaining all software from reputable sources and checking
the software for viruses before installing it.
RESARIO MOBILE INTERNET
P
ERIES
1700 S
EYOND SETUP GUIDE
PC B
•
Using your anti-virus program to check files and programs
that are on diskettes, attached to e-mail messages, or
downloaded from the Internet.
•
Disabling macros on suspicious Microsoft Word and Excel
files. These programs warn you if a document that you are
opening contains a macro that might have a virus.
•
Updating your anti-virus program periodically to keep up
with new viruses.
OMMON TASKS
C
4-5
Page 49
Recognizing a Computer Virus
A computer virus is a program that damages or erases files or
programs. Your Notebook can become “infected” with a virus
when you open a contaminated program or file. Some signs
indicating that your Notebook may be infected include:
•
Strange characters or crude statements suddenly appearing
on your screen
•
Hard drive, memory, or software error messages
•
Damage to files or directories for no apparent reason
•
Strange responses to commands
•
Sharp decrease in performance or program speed
Removing a Virus
If you suspect your Notebook has
been infected with a virus, find and
remove the virus immediately using
an anti-virus program.
4-6 C
OMMON TASKS
After you have followed the
instructions provided by the
anti-virus program, complete the
following steps:
1. Turn off your Notebook and
leave it off for at least
30 seconds.
2. Turn on your Notebook and
rescan for the virus.
RESARIO MOBILE INTERNET
P
EYOND SETUP GUIDE
PC B
1700 S
ERIES
Page 50
Software and
Adding and Removing Software
Hardware
Discover how easy it is to
add and remove software,
attach new hardware
devices, or re-install deleted
hardware drivers. With
easy-to-follow instructions,
you can completely and
safely install or remove
software programs and
hardware devices with
no worries. This
section covers:
•
Adding and Removing
Software
•
Attaching Hardware
Devices
Software can be installed from a CD, a diskette, or downloaded
from a Web site. Many software CDs automatically begin the
installation process when placed in the CD drive. If you have
software that does not automatically begin the installation
process, you can install the software by using the Microsoft
Windows Add/Remove Programs utility.
Installing Software from a CD or Diskette
To install software from a diskette,
or from a CD that does not
automatically install, complete the
following steps:
1. Close all programs.
2. From the Windows taskbar, click the
Settings
, and then click
3. Double-click the
Add/Remove Programs
Control Panel
The Add/Remove Program Properties window is displayed.
4. Click
Install
.
Start
button, point to
.
Û
icon.
RESARIO MOBILE INTERNET
P
ERIES
1700 S
EYOND SETUP GUIDE
PC B
5. Insert the CD or diskette into the proper drive and click
Microsoft Windows finds the CD or diskette and begins the
installation process.
OMMON TASKS
C
Next
4-7
.
Page 51
Tip
Check the downloaded
program file for viruses
before installation.
Installing a Downloaded Program File
To install a program file that you have downloaded from the
Internet to your hard drive, complete the following steps:
1. Terminate your Internet connection.
2. Close all programs.
3. From the Windows taskbar, click the
Settings
, and then click
4. Double-click the
Add/Remove Programs
Control Panel
Start
button, point to
.
Û
icon to open
the Add/Remove Program Properties dialog box.
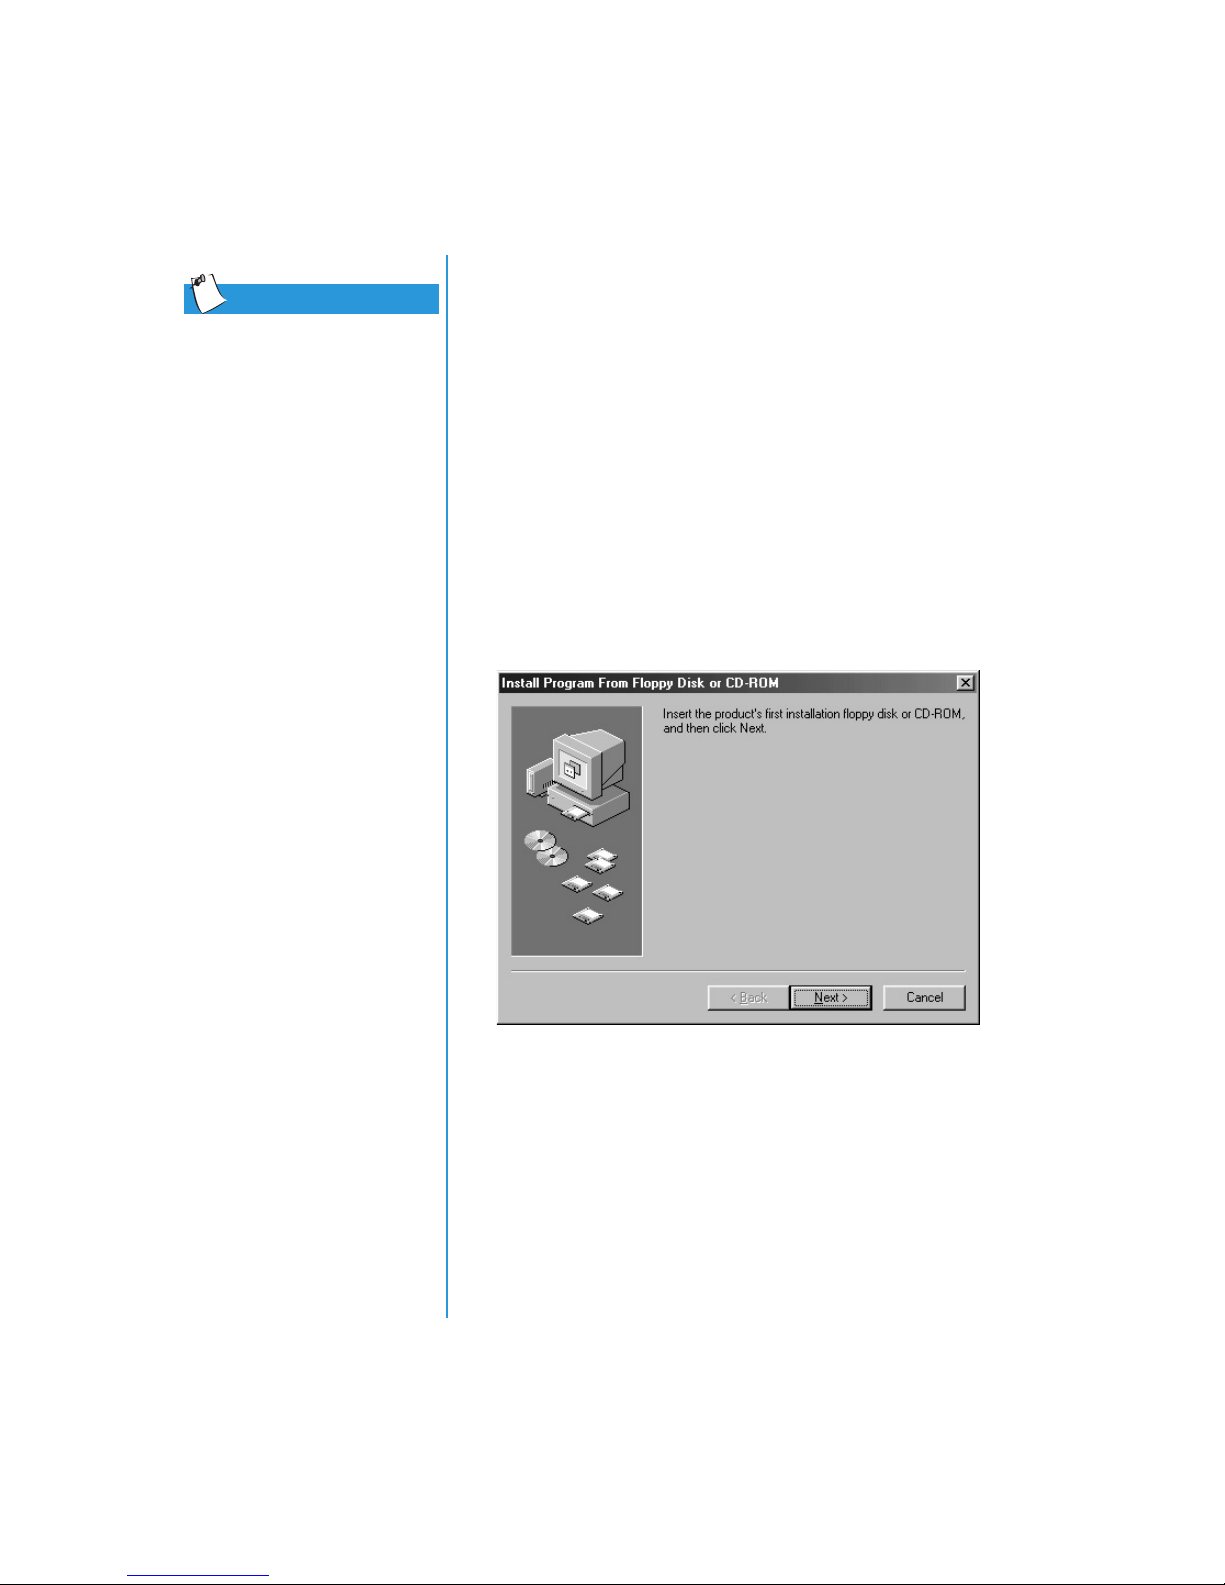
5. Click
Install
to open the Install Program from Floppy Disk or
CD-ROM window.
OMMON TASKS
4-8 C
6. Click
7. Click
Next
to open the Run Installation Program window.
Browse
to locate and select the
file for the downloaded software.
8. Click
Open
to begin the installation process.
P
setup.exe
RESARIO MOBILE INTERNET
or
install.exe
EYOND SETUP GUIDE
PC B
1700 S
ERIES
Page 52
Attaching Hardware Devices
To install a new hardware device such as a printer or gamepad to
your Notebook, complete the following steps:
1. Turn off your Notebook.
2. Connect the device to your Notebook according to the
instructions that come with it.
3. Turn on your Notebook.
You may be prompted to insert the Windows Installation CD or
diskettes. If this occurs, complete the following steps:
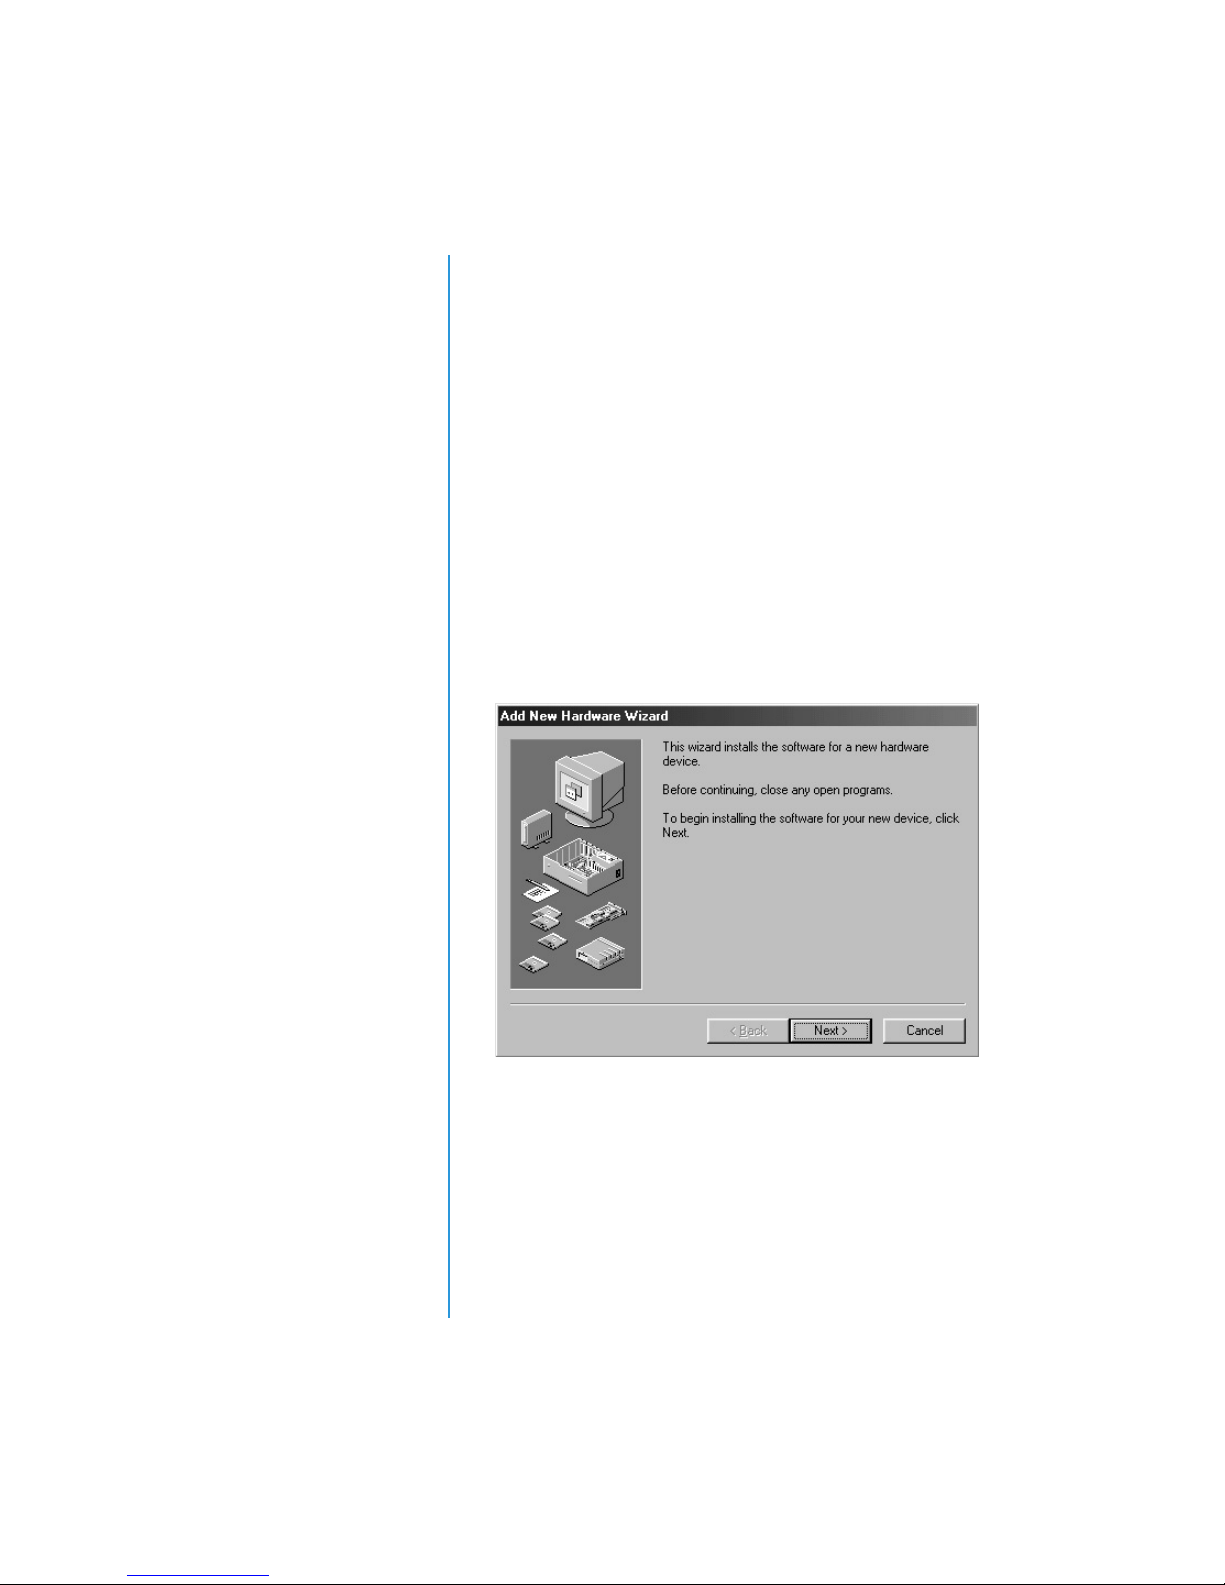
1. At the
Add New Hardware Wizard
, click
Next
to begin
installing the drivers and files necessary to make the new
hardware work.
2. Select
(Recommended)
Search for the best driver for your device
and click
Next
.
RESARIO MOBILE INTERNET
P
ERIES
1700 S
EYOND SETUP GUIDE
PC B
OMMON TASKS
C
4-9
Page 53

3. Select
Specify a location
C:\WINDOWS\OPTIONS\CABS
If
.
is not displayed in the
drop-down box, select it from the drop-down list or type it in
the box and click
Next
. The Wizard begins installing the
necessary files and drivers for the new hardware.
4. When the Wizard completes installing the files and drivers,
click the
Finish
button.
You may need to restart your Notebook for the new hardware to
be recognized by your Notebook.
OMMON TASKS
4-10 C
RESARIO MOBILE INTERNET
P
EYOND SETUP GUIDE
PC B
1700 S
ERIES
Page 54
Using the
CD or
DVD Drive
Who would ever have thought that
In This Chapter
CD or DVD Drive, 5-2
FutureBay™, 5-4
Audio CDs and Video
Discs, 5-5
DVDs, 5-7
Video Display
Options, 5-14
your home entertainment center
could fit in your lap or on a
desktop? Your Presario Notebook
computer allows you to listen to
your favorite music and (on select
models) watch your favorite
movies almost anywhere you go.
To help you understand what
options lie at your fingertips and
how to use these options, this
chapter includes information for:
•
Inserting and removing CD or DVD discs
CD-RW Basics, 5-15
RESARIO MOBILE INTERNET
P
ERIES
1700 S
EYOND SETUP GUIDE
PC B
•
Playing audio CDs
•
Playing both DVD and non-DVD videos
•
Adjusting the display options with the DVD Control Panel
•
Creating audio, data, and backup CDs
SING THE
U
CDOR DVD D
RIVE
5-1
Page 55
CD or DVD Drive
Inserting a Disc
This section covers:
•
Inserting a Disc
•
Removing a Disc
•
Manually Ejecting
a Disc
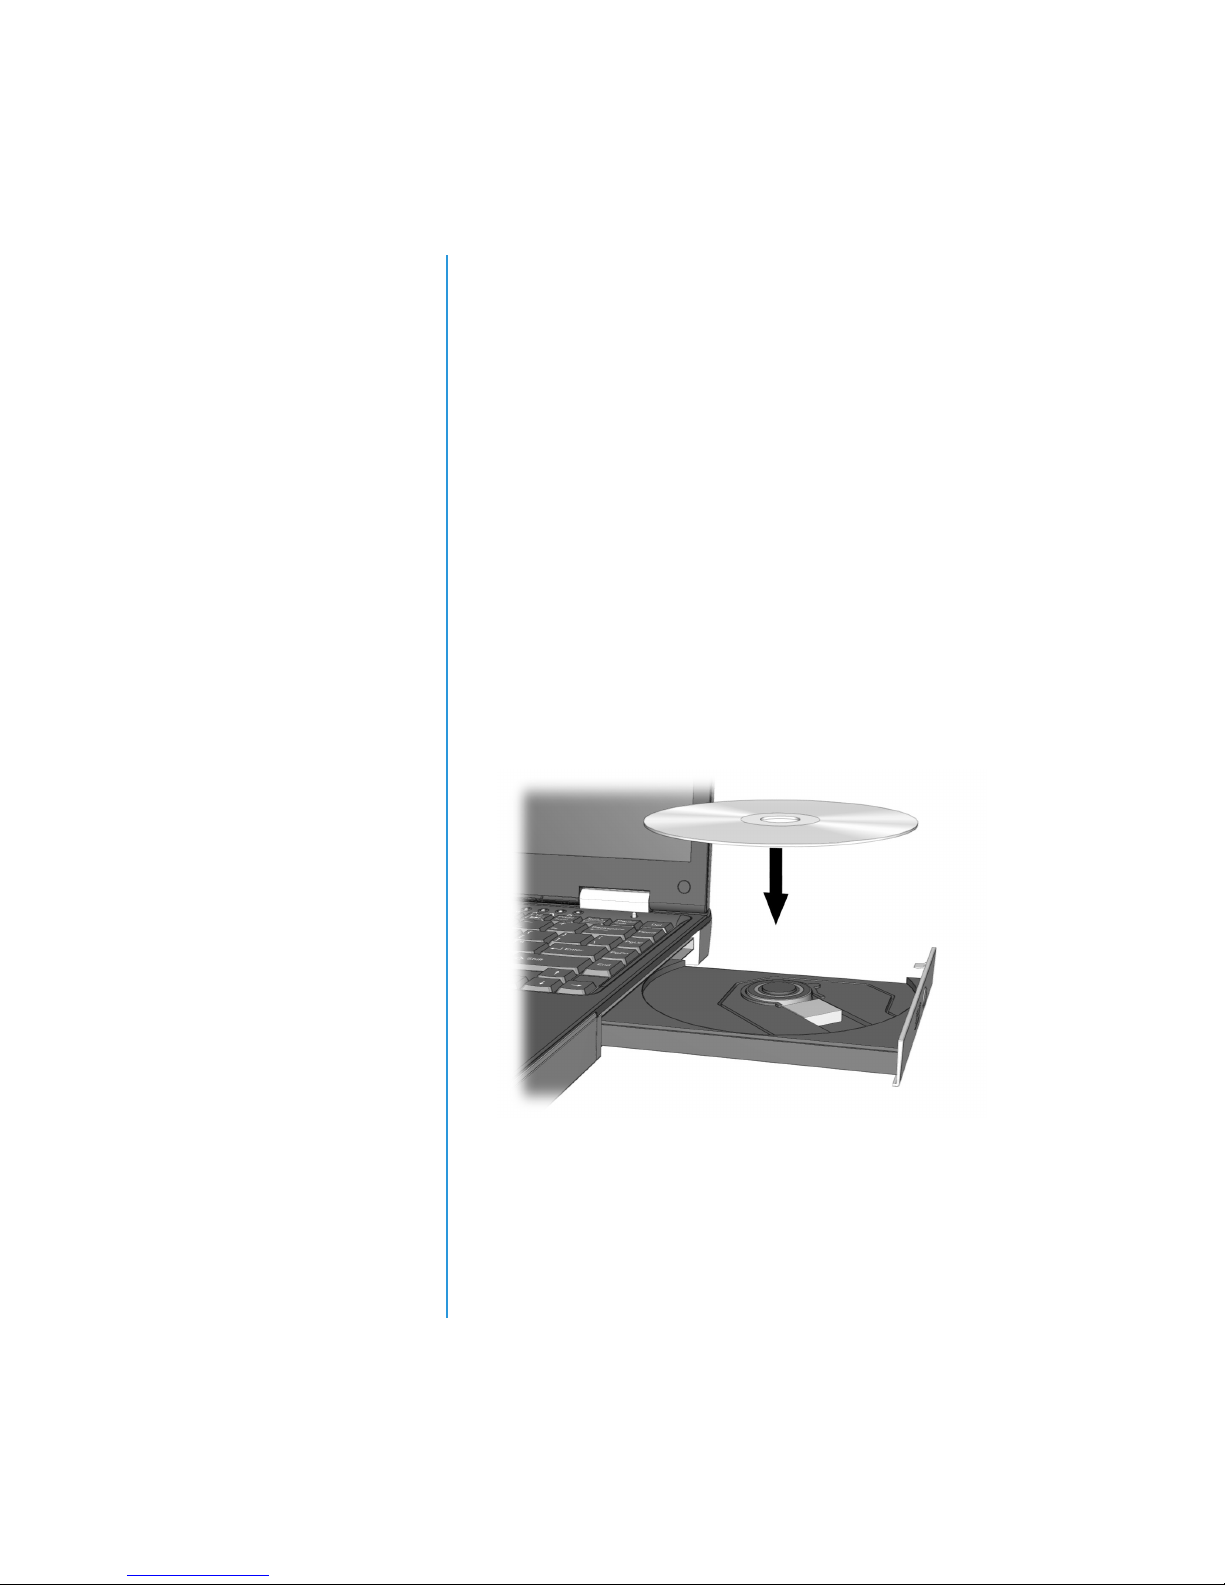
To load a disc into the disc drive, complete the following steps:
Caution:
and could potentially damage the drive.
1. Press the
Improper handling of a CD or DVD can damage the disc
Eject
button located on the front of the drive.
2. Remove a disc from its protective case, holding the disc by its
center hole and outer edge to avoid touching the surface.
3. Place the disc, label side up (unless it is a double-sided
DVD), into the round area of the tray. Gently press the disc
down onto the center spindle of the tray until the disc snaps
into place.
Caution:
onto the spindle in the center of the tray. You can damage the disc
and your Notebook if the disc is not seated properly.
Before closing the disc tray, ensure that the disc snaps
SING THE
5-2 U
CDOR DVD D
RIVE
4. Push the tray back into the drive until the drive locks
into place.
RESARIO MOBILE INTERNET
P
EYOND SETUP GUIDE
PC B
1700 S
ERIES
Page 56
Removing a Disc
To remove a disc from the drive,
complete the following steps:
Did you know...
If your Notebook power is off,
you will not be able to eject a
disc from the CD or DVD
drive. To remove a disc without
powering up your Notebook,
you must eject the disc from the
drive manually.
1. Press the
Eject
button on
the drive.
2. Remove a disc from the tray, gently pushing down on the
center spindle while pulling up on the outer edges. Avoid
touching the surface of the disc.
3. Push the tray back into the drive until it locks into place.
Manually Ejecting a Disc
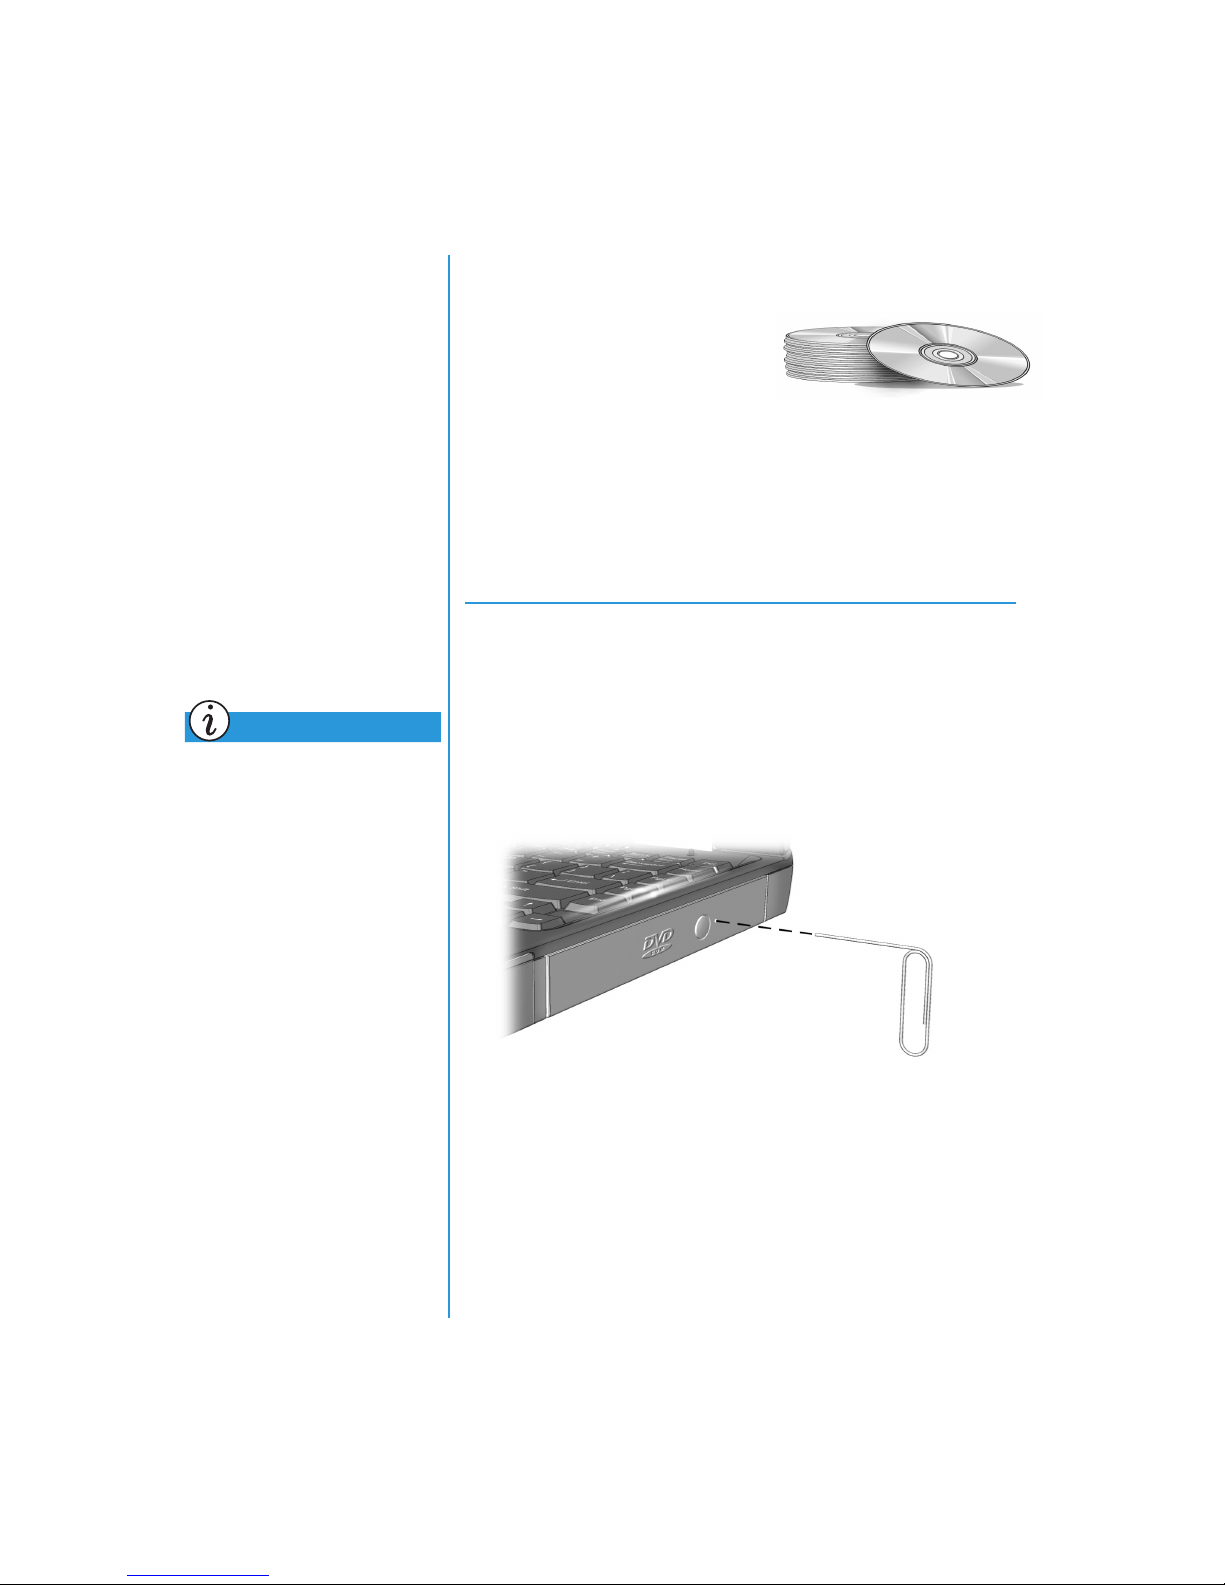
If you need to eject a disc when the power is off, complete the
following steps to eject the disc manually:
1. Make sure the power is off and any external power sources
are disconnected.
RESARIO MOBILE INTERNET
P
ERIES
1700 S
EYOND SETUP GUIDE
PC B
2. Insert a small rod or pin, such as a paper clip (approximately
1/16 inch in diameter and at least 3/8 inch in length) into
Manual Eject Hole
the
and push firmly as shown in the
figure above.
3. Remove the disc from the tray.
4. Gently push the tray back into the drive until it locks
into place.
SING THE
U
CDOR DVD D
RIVE
5-3
Page 57
FutureBay™
Using the FutureBay
Your new Notebook
provides you with the ability
to interchange drives (CD,
DVD, CD-RW, Diskette,
or SuperDisk) using a
drive-swapping design
called FutureBay.
Did you know...
You can insert a drive at any
time without clicking the
FutureBay icon whether your
Notebook is on or off.
See also
“Underside” in Chapter 2 of
this guide to locate the
FutureBay
release switch.
While using your Notebook, you can switch between drives with
ease. To switch from one drive to another, complete the
following steps:
N
1. Click the
taskbar, then select
icon located in the system tray on the Windows
Change device in swappable bay
. The
Bay Swap dialog box is displayed.
If you get the message, Device is busy now. Please close all files
Note:
and try again later. Click
and close your files.
OK
2. Slide and hold the FutureBay release switch while pulling out
the drive.
Refer to Chapter 2 in this guide to locate the release switch on the
Note:
underside of your Notebook.
3. After you remove the drive, insert the other drive, and click
OK
to close the dialog box.
SING THE
5-4 U
CDOR DVD D
RIVE
RESARIO MOBILE INTERNET
P
EYOND SETUP GUIDE
PC B
1700 S
ERIES
Page 58
Audio CDs and
Playing Audio CDs
Video Discs
In this section you’ll learn
how to play audio and video
discs with your Notebook.
This section covers:
•
Playing Audio CDs
•
Playing Non-DVD
Video Discs
Did you know...
You can also use the function
keys to play an audio CD.
These keys are shown in
"Function Keys" earlier in
this guide.
Did you know...
The compact disc (CD) is the
most common way to store
information to use on your
Notebook. Compact disks
hold more than 450 times
the information that can be
stored on a floppy disk.
To play an audio CD, insert the
disc into the CD or DVD drive.
After a few seconds the Compaq
CD Player opens and the disc
automatically starts playing.
If disc play does not start automatically, complete the
following steps:
1. On the Windows taskbar, click
Accessories, Entertainment
Start
, and then click
2. Once the CD Player opens, click the
, point to
Play
Programs
CD Player
.
button to begin
,
playing the CD.
3. Click the
To remove the disc from the drive, click the
Stop
button to stop playing the CD.
Eject
²
button on
the CD Player.
Disabling the Self-Starting Feature
(available on select operating systems)
To disable the self-starting feature, complete the following steps:
1. On the Windows taskbar, click
then click
2. Double-click the
Control Panel
System
.
m
icon to open the System
Properties dialog box.
Start
, point to
Settings
, and
RESARIO MOBILE INTERNET
P
ERIES
1700 S
EYOND SETUP GUIDE
PC B
3. Click the
CD-ROM
Device Manager
tab, and then double-click
from the list of devices.
4. Select your CD/DVD drive from this list. Click
open the CD/DVD System Properties dialog box.
5. Click the
Auto Insert Notification
Settings
tab, and ensure that the check box next to
is clear.
6. Click OK to close the dialog box.
SING THE
U
CDOR DVD D
Properties
RIVE
to
5-5
Page 59
Playing Non-DVD Video Discs
To play a video disc, insert the
disc into the CD or DVD drive.
After a few seconds, the disc
automatically starts playing.
If disc play does not start
automatically, complete the
following steps:
File
Start
button, point to
, and then click
, and then
Open
from
1. On the Windows taskbar, click the
Programs, Accessories, Entertainment
Windows Media Player
.
2. Once the player opens, select
the menu.
3. Click the
4. Locate and double-click the
Browse...
button.
CD Drive
¾
icon. You should
see a list of files and file folders.
CD movies are usually stored in a file folder that begins with the
Note:
letters MPEG.
5. Double-click the folder that contains the CD movie files.
6. Select a movie file and click the
Open
button. A viewing
window for the movie is displayed.
7. Click the
Play
button on the window to begin playing
the movie.
SING THE
5-6 U
CDOR DVD D
RIVE
RESARIO MOBILE INTERNET
P
EYOND SETUP GUIDE
PC B
1700 S
ERIES
Page 60
DVDs
In this section you’ll learn
how to play DVD discs with
your Notebook.
This section covers:
•
Using the DVD Player
•
Playing a DVD Movie
on a TV
•
Using “Regionalized”
DVDs
Using the DVD Player
(available on select models)
Your Notebook’s DVD Drive reserves the best seat in the house
for you, so you can watch all your favorite movies anytime,
anywhere. The DVD Player is simple and fun to use.
Did you know...
Digital Versatile Discs (DVDs)
look like CDs, but they store
movies. DVDs store about 28
times more information than
video CDs.
Did you know...
The DVD drive will take a few
seconds to start playback
because it must first determine
the type of media being played.
Tip
For the best playback quality,
close all other applications in
the background while playing
aDVD.
You have two options for starting the DVD Player:
•
Insert a DVD disc into the DVD drive. After a few seconds,
the Compaq DVD Player control panel opens and
playback begins.
•
If a DVD disc is already inserted in the drive, start the DVD
¨
player by pressing the
Play
button on the Status panel on
the front of your Notebook. The Compaq DVD Player
control panel opens and playback begins.
RESARIO MOBILE INTERNET
P
ERIES
1700 S
EYOND SETUP GUIDE
PC B
SING THE
U
CDOR DVD D
RIVE
5-7
Page 61
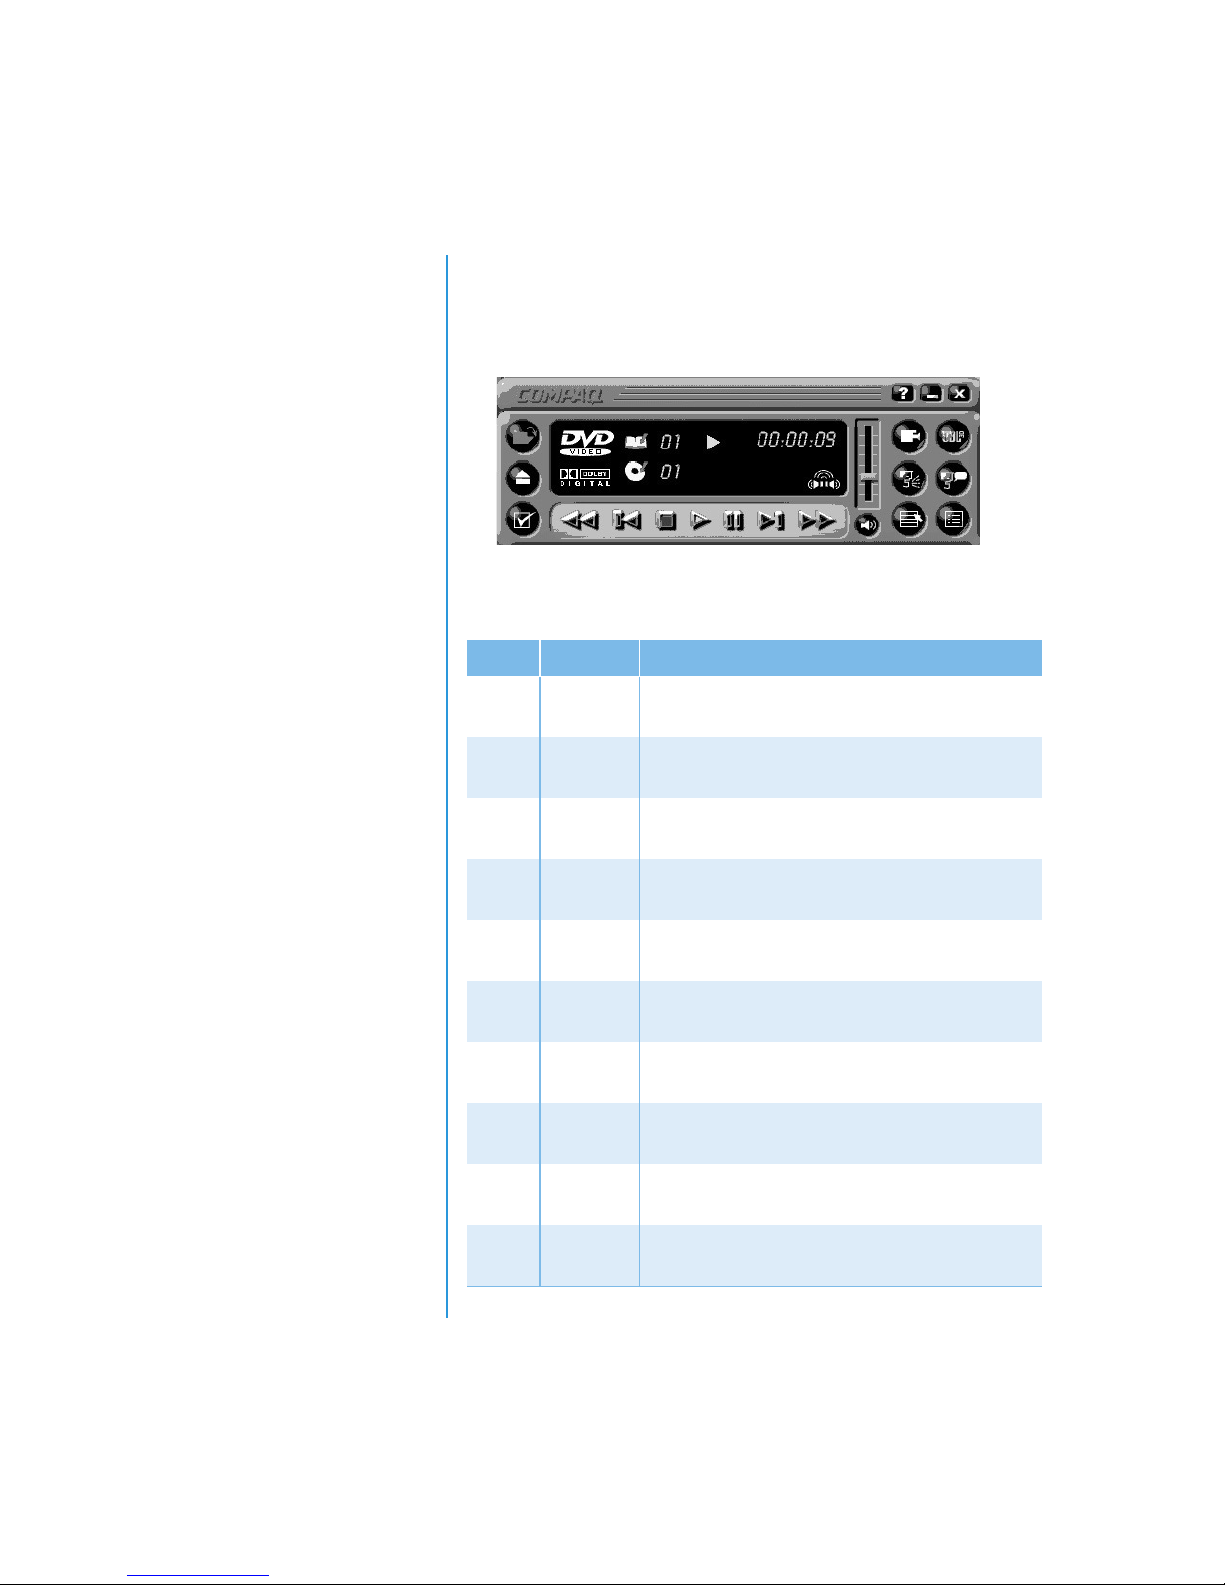
On-Screen Controls
The on-screen controls allow you to quickly and easily access
the features of the DVD Player.
The table below provides you with button identifications and
descriptions to help you operate the player.
Button Title Description
.
²
V
ª
®
°
©
Ì
¯
Open
Eject
DVD
Options
Rewind
Previous
Stop
Play
Pause
Next
Fast
Forward
Displays a list of files for playback.
Opens the DVD drive to load or remove discs.
Displays the
Display
Rewinds the content. Press
Moves to the previous track and resumes playback.
Stops the content playback and returns to the start of the
content file.
Begins playback of selected content.
Pauses playback. Press
resume playback.
Skips to the beginning of the next track.
Advances to a selected location. Press
resume playback.
DVD Options
and
Parental Controls
menu for selecting
.
to resume playback.
Play
or
Pause
Play
to
Play
Video
to
SING THE
5-8 U
CDOR DVD D
RIVE
RESARIO MOBILE INTERNET
P
EYOND SETUP GUIDE
PC B
1700 S
ERIES
Page 62
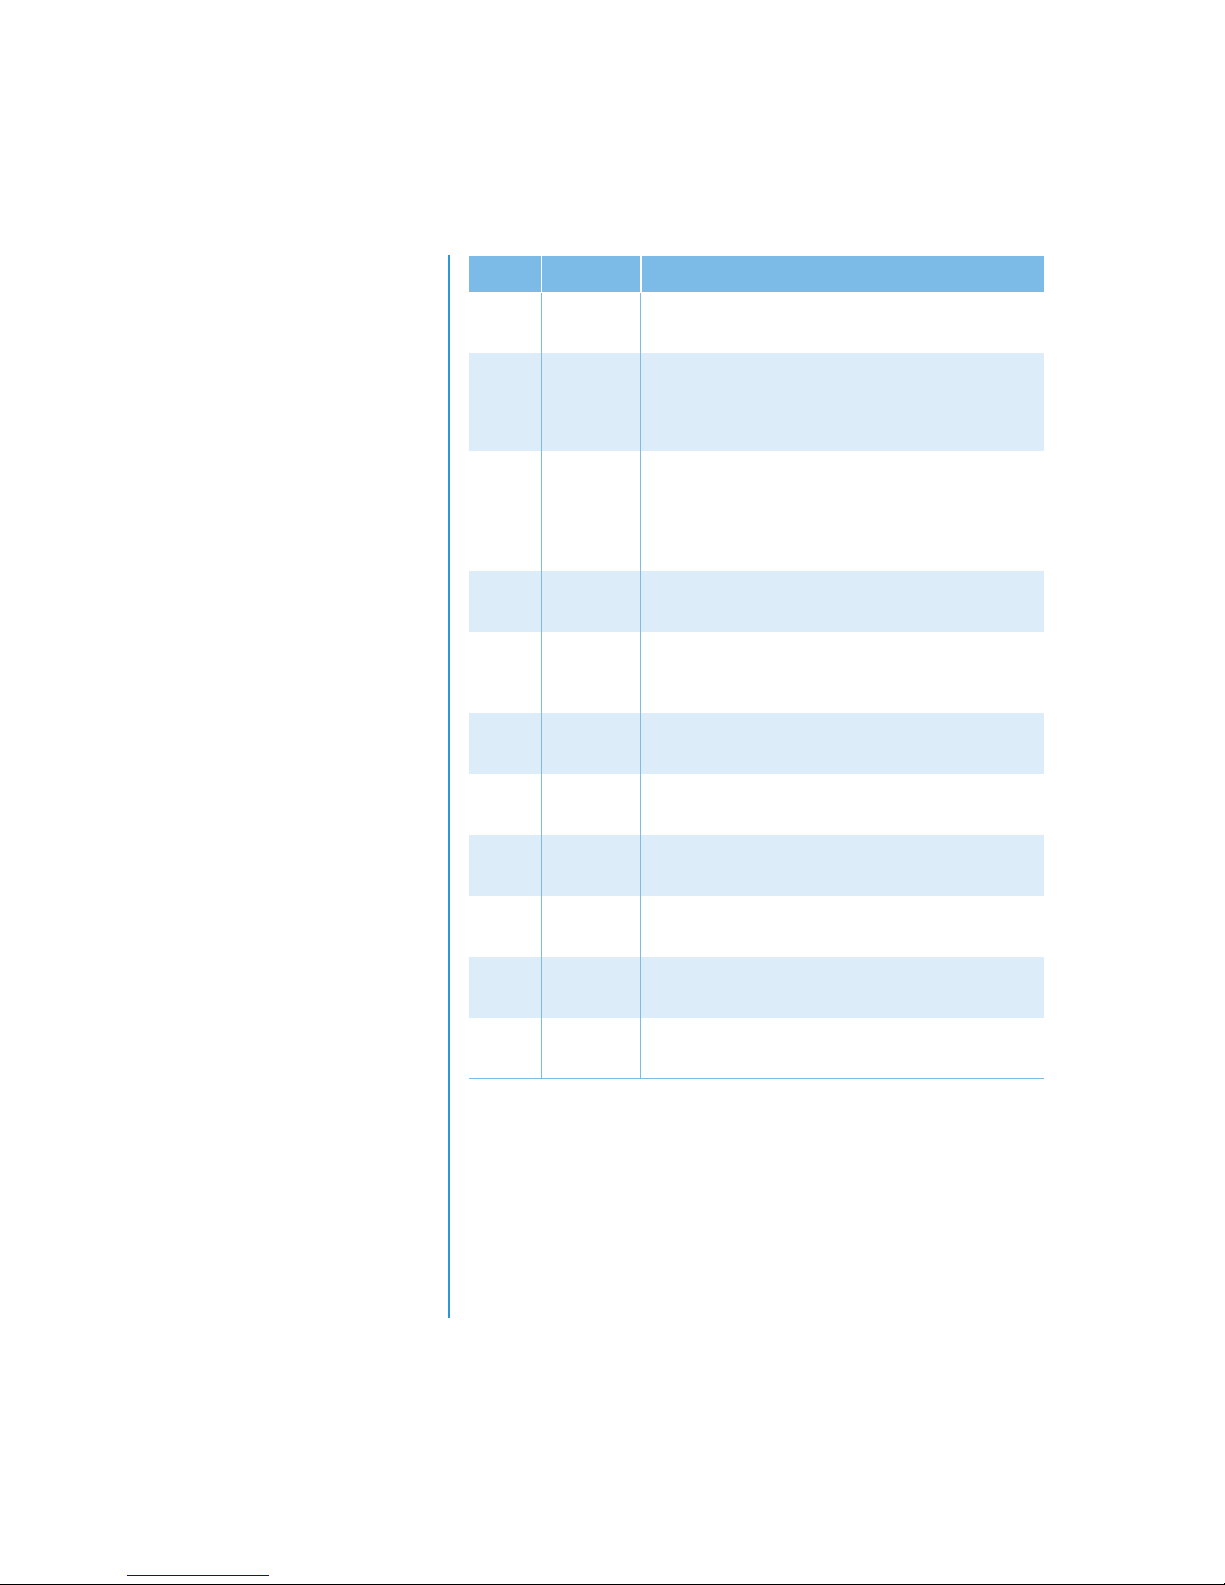
Button Title Description
I
d
c
|
}
+
Ê
Root Menu/
Resume
Change
Subtitle
Change
Audio
Title Menu/
Resume
Change
Camera
Angle
3D Audio
Volume
Mute
Shows what is available on the DVD for playback.
Displays or changes subtitles viewed on the window.
This feature is allowed only for DVD content with
subtitles. This feature is available only when the content
allows changes to the audio track.
Changes the playing audio track to audio of another track
located on the DVD. Most commonly used with
multi-language content to change the spoken/heard
language. This feature is available only when the content
allows changes to the audio track.
Displays the main title menu so you can select content.
Changes the camera angle of content being played. This
feature is allowed only for DVD content created using
multiple cameras and camera angles.
Activates the 3D Audio feature for virtual surround sound.
Increases the volume level when the bar is moved up and
decreases the volume level when the bar is moved down.
Turns the audio off. Press the
resume audio.
Mute
or
Volume
button to
RESARIO MOBILE INTERNET
P
ERIES
1700 S
EYOND SETUP GUIDE
PC B
º
Ü
¹
Close
Player
Minimize
Help
Closes the program.
Minimizes the size of the Display window of the program.
Shows the Help file.
SING THE
U
CDOR DVD D
RIVE
5-9
Page 63

Setting the Play Features
The DVD Player has two modes or play settings: the DVD mode
and the File mode. Use the DVD mode to play a standard DVD.
Use the File mode to play movie or MPEG files.
To play content from the File mode, complete the
following steps:
.
1. Click the
Open
The list of files is displayed.
2. Select the file you want to view.
icon on the DVD Player control panel.
3. Click
Open
. The content begins playing.
Not all of the following features are available on all DVDs:
•
If the DVD Player is in the File mode, the Subtitle
d
button is disabled.
•
If the DVD Player is in the DVD mode and your disc does
d
not have Subtitle language options, the Subtitle
button
is disabled.
•
If the DVD Player is in the DVD mode and your DVD has
Subtitle language options, the Subtitle
d
button is enabled.
When a DVD is inserted into the CD or DVD drive, the features
available on the DVD player are displayed. When a particular
feature is not available, the respective button does not respond
when clicked.
SING THE
5-10 U
CDOR DVD D
RIVE
RESARIO MOBILE INTERNET
P
EYOND SETUP GUIDE
PC B
1700 S
ERIES
Page 64

Did you know...
DVD movies can only be
viewed on one display at a
time. If two or more displays
are active (Notebook display
plus TV, for example), the
movie will show as a black box
or blank screen on one of the
displays. This is normal.
Playing a DVD Movie on a TV
Set up your S-Video connection following the procedures in the
“Common Tasks” chapter of this guide.
1. Once your S-Video connection is properly set up, start the
DVD player by one of these methods:
•
Insert a DVD disc into the drive. After a few seconds,
the Compaq DVD Player control panel opens and
playback begins.
•
If the disc is already inserted in the DVD drive, press
¨
Play
the
your Notebook. The Compaq DVD Player control panel
opens and playback begins.
button on the status panel on the front of
Tip
Press and hold the Fn key, and
then press the F3 key to switch
the display from your Notebook
to the TV.
2. Press the Fn+F3 keys to switch the display from your
Notebook to the attached TV.
You may need to press
Note:
image to the TV. Refer to Switching Between Displays in the Common
Tasks chapter of this guide for more information.
more than once to transfer the
Fn+F3
3. You can switch the display from the TV back to your
Notebook at any time by pressing Fn+F3again.
RESARIO MOBILE INTERNET
P
ERIES
1700 S
EYOND SETUP GUIDE
PC B
SING THE
U
CDOR DVD D
RIVE
5-11
Page 65
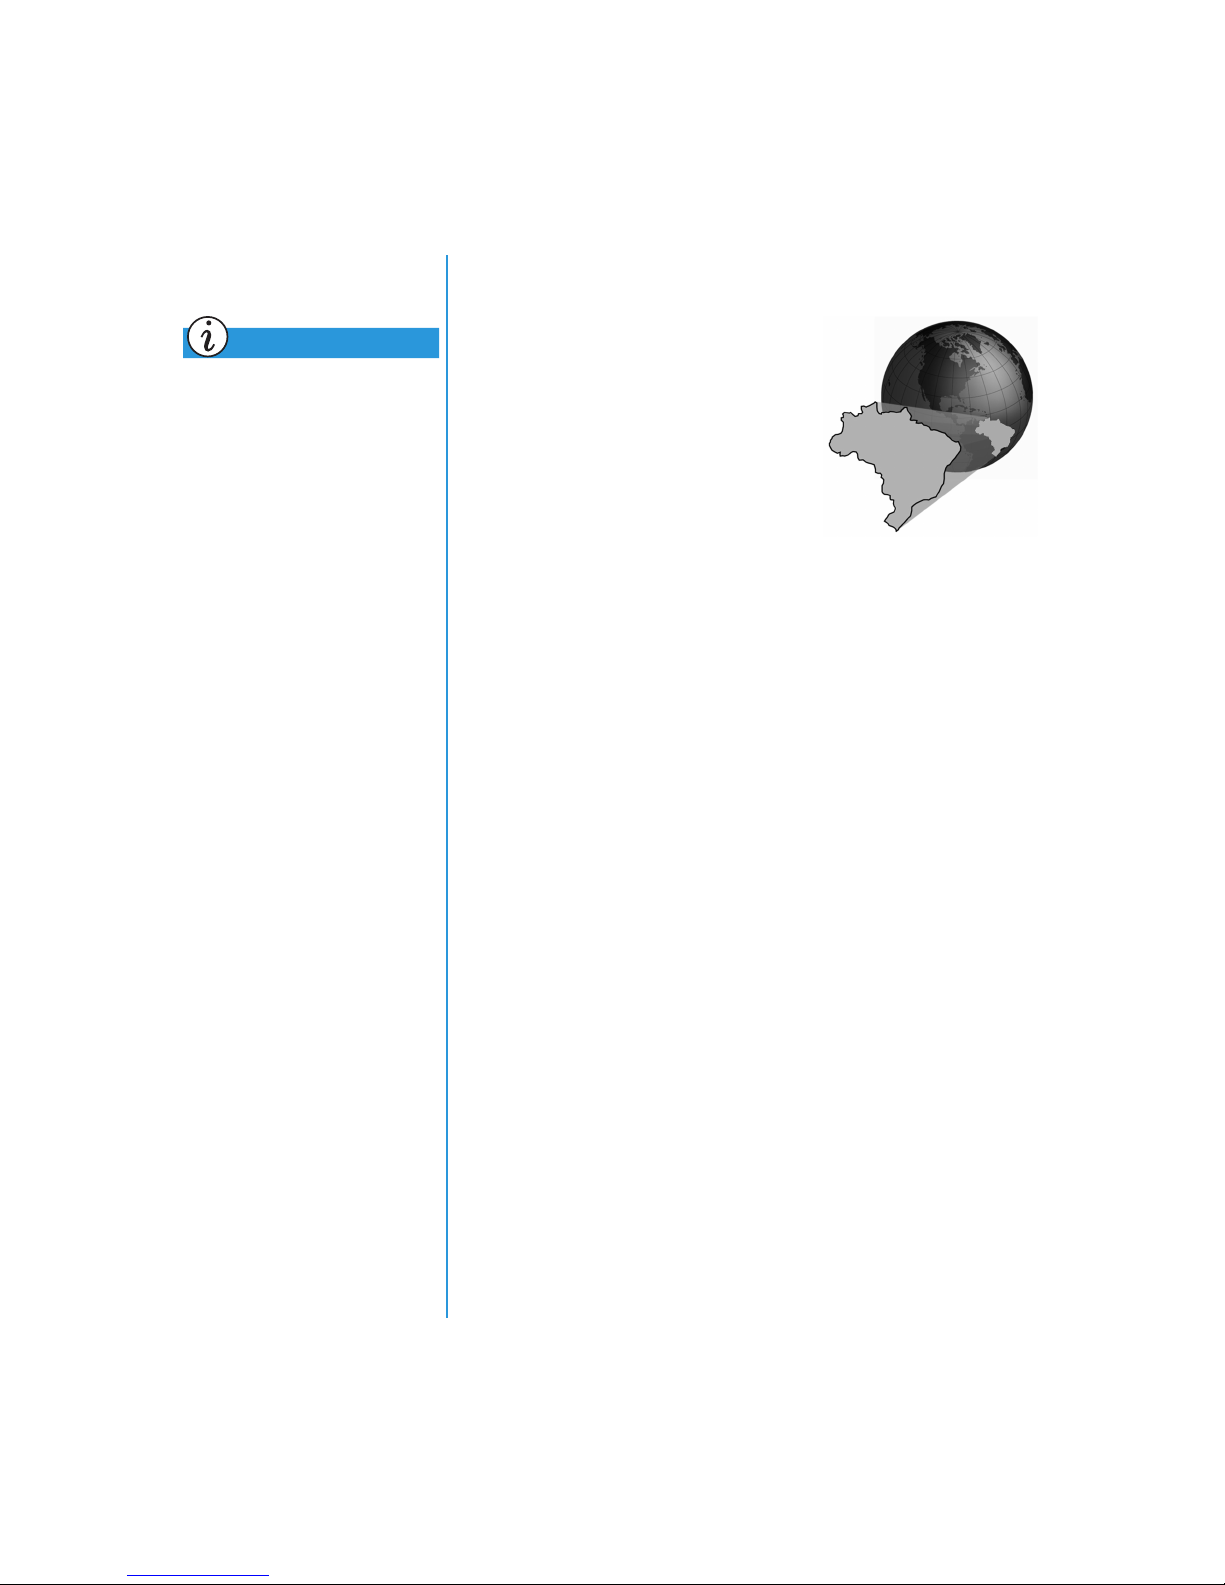
Did you know...
When attempting to play a
DVD that does not match the
drive’s region setting, you
will see the message, “
region is different from the
region of the drive… Do you
wish to change the
drive region?
To close the player without
changing the drive’s region
setting, clickNo.
”
The disk
Using “Regionalized” DVDs
Some models have a “regionalized”
feature that limits the playback of
discs to specific geographical regions.
If your Notebook has this feature, the
region code on the DVD drive must
match the region code on the disc.
Although the DVD drive region code
is set at the factory, some DVD drives
(depending on the make and model)
allow you to change the region code. If your Notebook has this
feature, you can change the code a maximum of five times.
To change the region setting
and play the DVD disc,
Ye s
click
on-screen instructions.
and follow the
Identifying Your Region Setting
If your Notebook offers the option to change region settings,
complete the following steps:
1. Insert a DVD disc into the DVD drive. The Compaq DVD
Player control panel opens automatically.
2. Click the
DVD Options
the player. The DVD Options dialog box opens.
3. Select the
DVD Region
the drive’s current region setting.
4. If the drive’s region setting matches the disc’s region setting,
click OK.
If the drives region setting does not match the disc, you will need
Note:
to select a new region to play the disc.
V
icon on the lower left corner of
tab. The selected option indicates
SING THE
5-12 U
CDOR DVD D
RIVE
RESARIO MOBILE INTERNET
P
EYOND SETUP GUIDE
PC B
1700 S
ERIES
Page 66
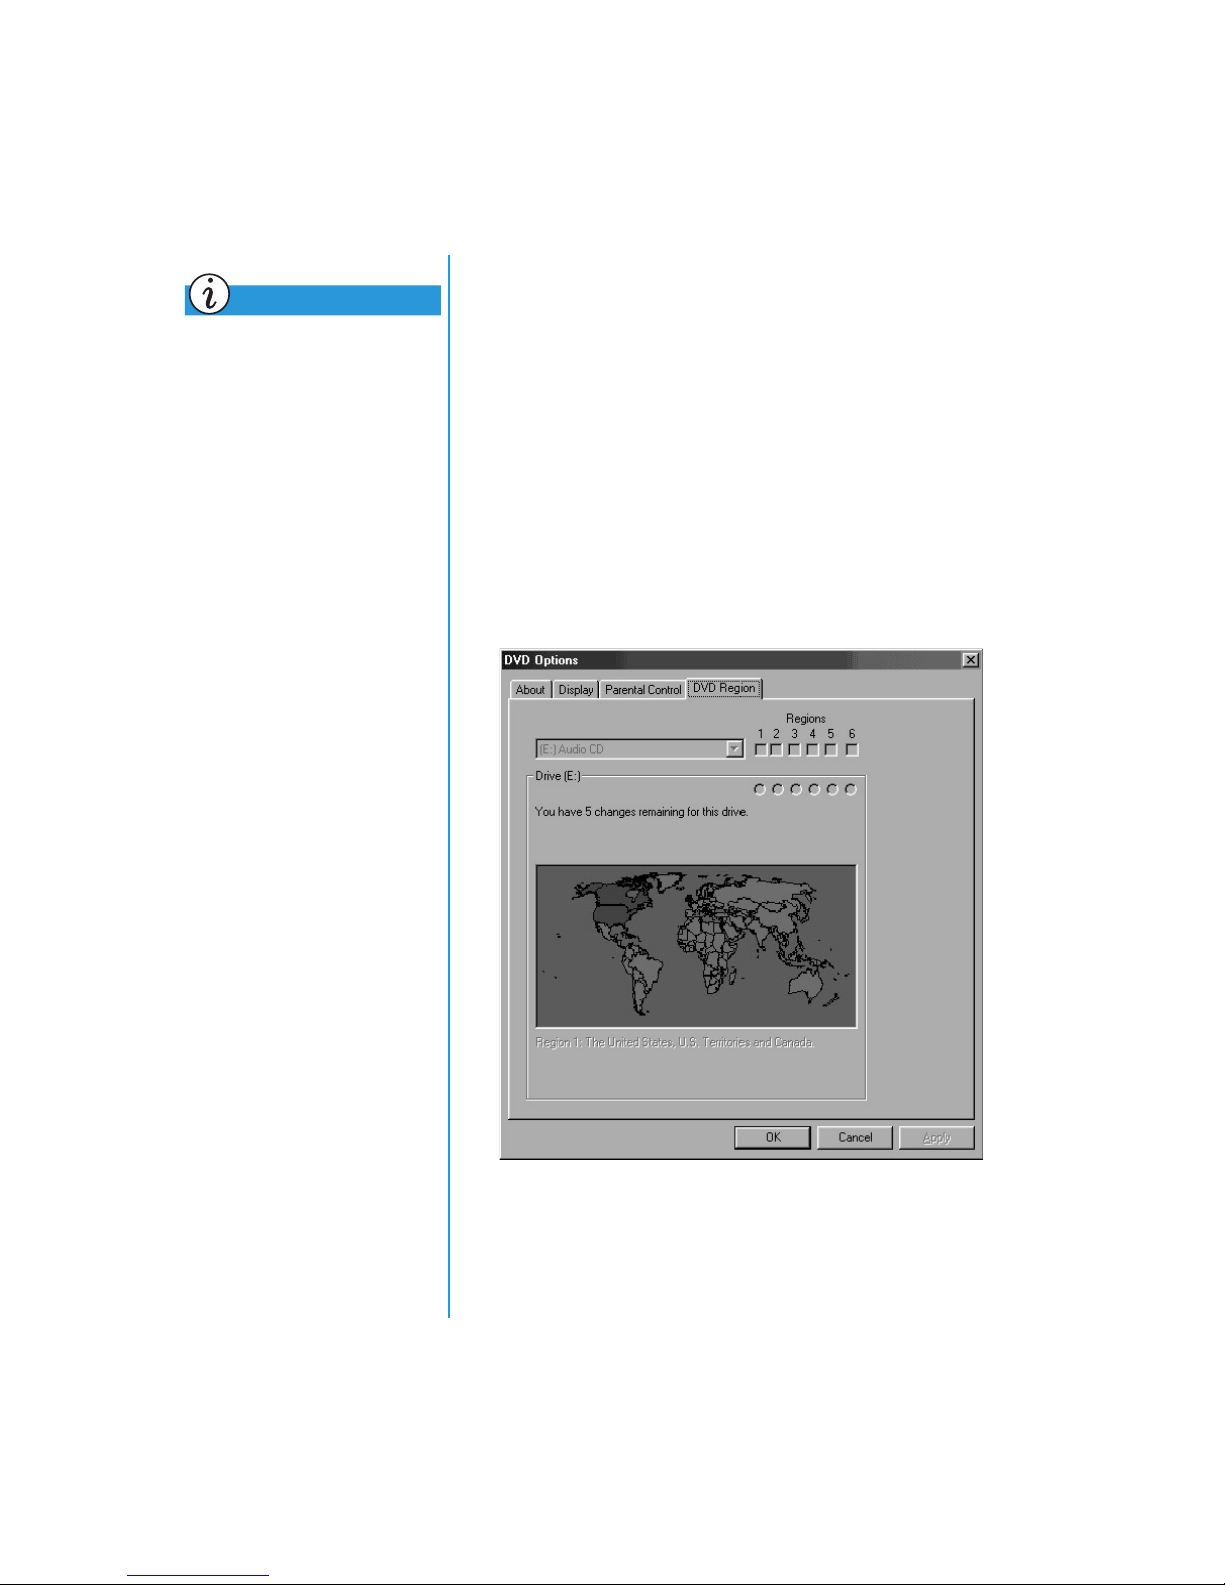
Did you know...
You can only change the region
code for the DVD drive five
times. The fifth setting change
you make becomes the
permanent region on the
player. Each time you make a
change to the drive’s region
setting, the remaining number
of changes allowed on the DVD
drive is displayed.
Selecting Your Region Setting
To change the DVD drive region setting, complete these steps:
1. With a DVD disc in the drive, open the Compaq DVD Player.
V
2. Click the
DVD Options
of the player to open the DVD Options dialog box.
3. Click the
DVD Region
4. Select the desired region from the displayed map or from the
options buttons.
You will only be allowed to select the region that matches the disc
Note:
inserted in the drive. All other options will appear dimmed.
icon on the lower left corner
tab.
RESARIO MOBILE INTERNET
P
ERIES
1700 S
EYOND SETUP GUIDE
PC B
5. Click OK to close the dialog box.
SING THE
U
CDOR DVD D
RIVE
5-13
Page 67

Video Display
Showing and Hiding the DVD Panel
Options
You already know how to
play DVDs and video CDs.
This section shows you
how to adjust the display
options while watching
videos on your Notebook.
To hide the DVD Player panel, click anywhere outside the DVD
control panel.
To view the DVD Player control panel when the DVD Content
Picture window is set to full-size, move the cursor to the edge of
the screen.
Zooming the View
To enlarge the DVD Player picture window to full-window
size, double-click anywhere on the picture.
To return to a smaller window, double-click anywhere on
the picture.
SING THE
5-14 U
CDOR DVD D
RIVE
RESARIO MOBILE INTERNET
P
EYOND SETUP GUIDE
PC B
1700 S
ERIES
Page 68
CD-RW Basics
If your Notebook has a
CD-RW drive, you can
create your own audio
and data CDs. This
section covers:
•
Installing Adaptec
Easy CD Creator™
4 (available on
select models)
•
Using Adaptec Easy
CD Creator 4
•
Preventing Buffer
Underrun Errors
•
Accessing Easy
CD Creator 4
User Information
Installing Adaptec Easy CD Creator™ 4
(available on select models)
Insert the
Adaptec Easy CD Creator 4
drive and complete the following steps to install the Adaptec
Easy CD Creator software.
Easy CD Creator and Direct CD
To install the Easy CD Creator, complete the following steps:
1. Once the CD is inserted, the Adaptec Installation dialog box
opens. Click
2. Follow the on-screen installation instructions.
3. When prompted, select a location on the hard disk to store the
Easy CD Creator program, or accept the recommended
location, and then click
4. When prompted, select a folder where the program icons will
be placed. Click
Easy CD Creator
Next
Next
to continue installation.
disc into the CD-RW
.
.
Did you know...
CD-RW refers to Compact
D
iscs (or Drives) that are
R
eadable and Writable.
Did you know...
You must close all other
Windows programs before
installing Adaptec Easy
CD Creator 4.
RESARIO MOBILE INTERNET
P
ERIES
1700 S
EYOND SETUP GUIDE
PC B
5. When prompted, insert the
Adaptec Update Diskette
if one
was provided with the Adaptec Easy CD Creator software.
Follow the on-screen instructions to continue the installation.
If an Adaptec Update Diskette did not come with the software, click
Note:
and follow the on-screen instructions to continue installation.
Skip
6. When the installation is complete, click
Finish
.
To install the Direct CD program, complete the following steps:
1. On the Adaptec Installation Window, click
Direct CD
.
2. Follow the on-screen installation instructions.
3. When prompted, select a location on the hard disk to store the
Direct CD program, or accept the recommended location,
and then click
Next
.
4. When prompted, select a folder where the program icons will
be placed. Click
Next
to continue the installation.
SING THE
U
CDOR DVD D
RIVE
5-15
Page 69

5. When prompted, insert the Adaptec Update Diskette if one
was provided with the Adaptec Easy CD Creator software.
Follow the on-screen instructions to continue the installation.
If an Adaptec Update Diskette did not come with the software, click
Note:
and follow the on-screen instructions to continue installation.
Skip
6. When the installation is complete, click
Finish
.
Take Two
Take Two is used to back up the contents of your hard disk to a
single or multiple CDs. After your data is backed up to CD, you
can easily restore all selected files.
To install Take Two, complete the following steps:
1. From the Adaptec Installation dialog box, click
and follow the on-screen installation instructions.
2. When prompted, select a location on the hard disk to store the
Take Two program, or accept the recommended location, and
then click
Next
.
3. When prompted, select a folder where the program icons will
be placed. Click
Next
to continue installation.
4. When prompted, insert the Adaptec Update Diskette if one
was provided with the Adaptec Easy CD Creator software.
Follow the on-screen instructions to continue the installation.
Take Two
SING THE
5-16 U
CDOR DVD D
RIVE
If an Adaptec Update Diskette did not come with the software, click
Note:
and follow the on-screen instructions to continue installation.
Skip
5. When setup is complete, click OK.
RESARIO MOBILE INTERNET
P
EYOND SETUP GUIDE
PC B
1700 S
ERIES
Page 70
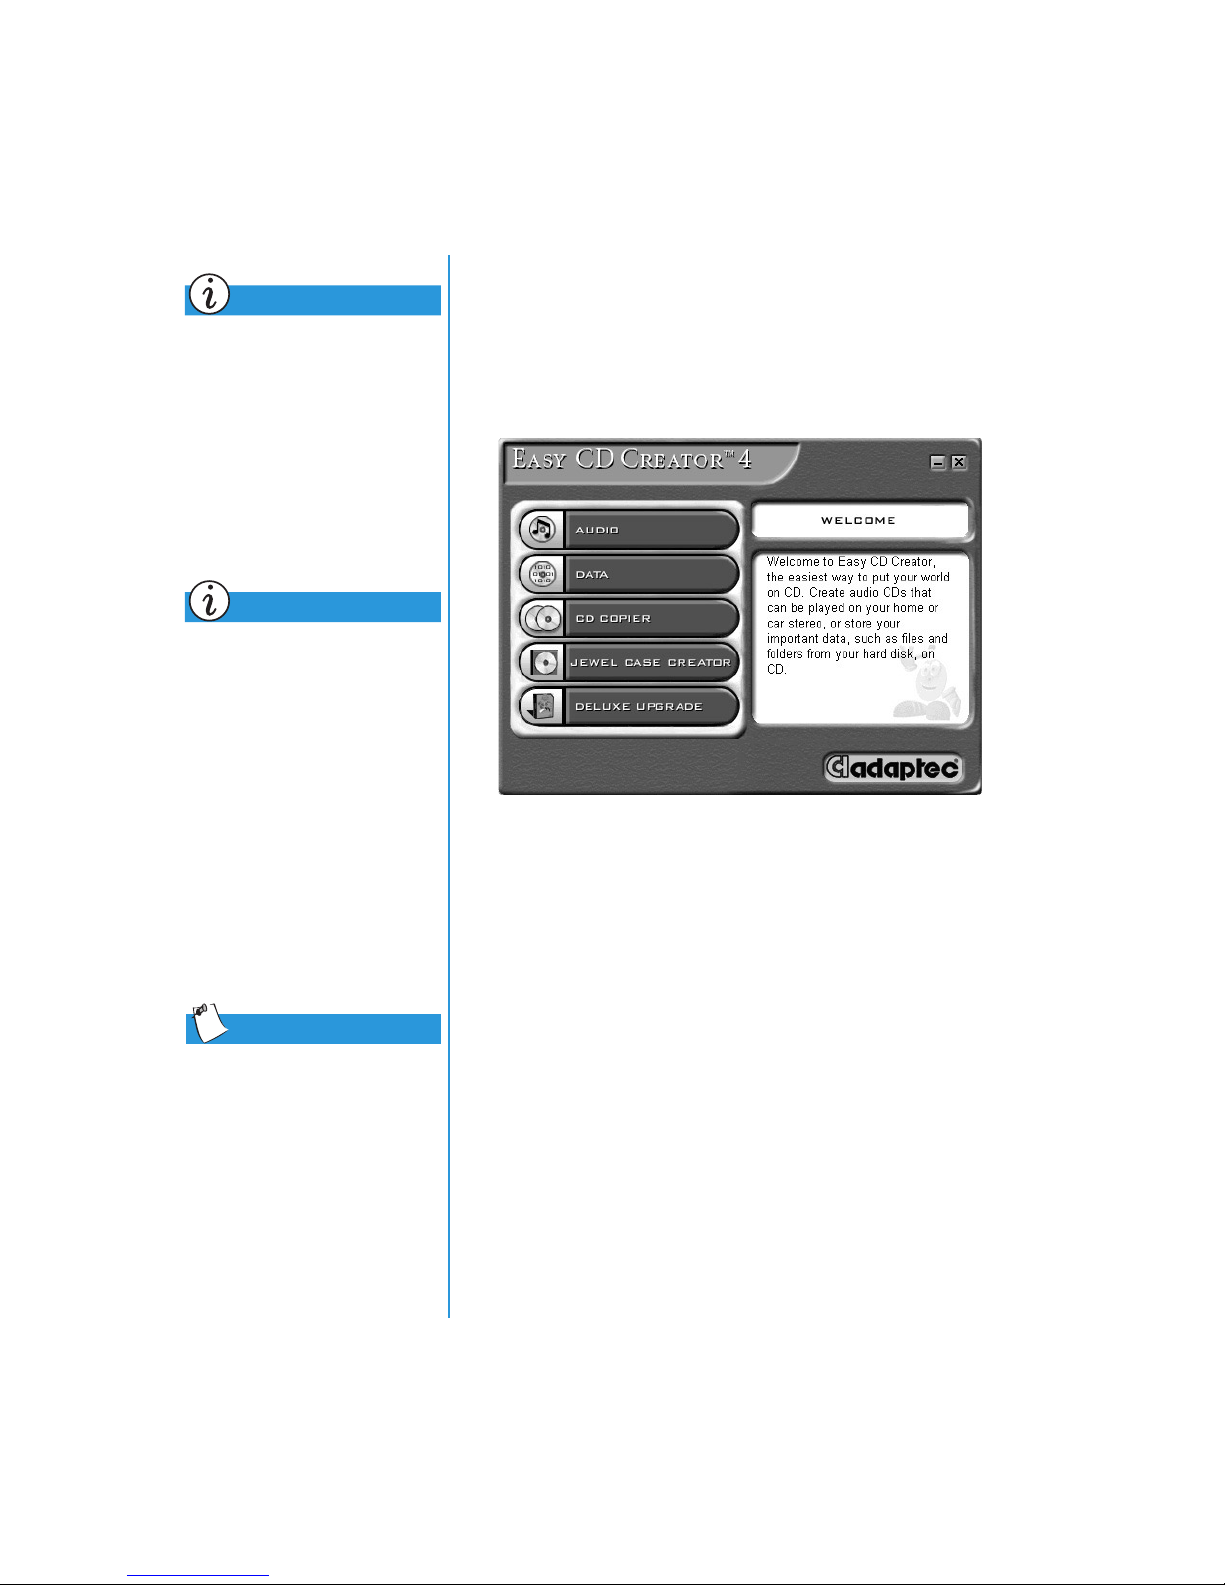
Did you know...
After installation of Adaptec
Easy CD Creator 4, you will be
prompted to restart your
Notebook. You must restart
your Notebook before you can
begin using Adaptec Easy
CD Creator 4.
Did you know...
When you start or restart
your Notebook,
CD Creator 4
with a Web-CheckUP option.
Web-CheckUP connects
to the Adaptec Web site on
the Internet and searches
for Adaptec software programs
that can be updated on
your Notebook.
Adaptec Easy
prompts you
Using Adaptec Easy CD Creator 4
To access the main menu of the Adaptec Easy CD Creator 4,
from the Windows taskbar click
Adaptec Easy CD Creator 4
to
Start
, and then click
The Adaptec main menu is displayed.
Creating Audio CDs
, point to
Programs
Create CD
, then
.
Tip
If you are using the Easy CD
Creator Standard Edition and
would like to upgrade to the
Deluxe Edition, contact your
nearest software retailer or run
We b- Ch e ck UP.
RESARIO MOBILE INTERNET
P
ERIES
1700 S
EYOND SETUP GUIDE
PC B
An audio CD is used only for playing music, not for data
storage. The
Adaptec Easy CD Creator 4
allows you to record
CDs and audio files. You can even create your own “greatest
hits” audio CD that contains tracks from multiple artists.
To create an audio CD, complete the following steps:
1. On the Windows taskbar, click
Adaptec Easy CD Creator 4
2. On the Welcome screen, click
screen is displayed, click
Audio CD
Start
, point to
, and then click
Audio
. After the Audio
. The Easy CD Creator
Programs
Create CD
,
.
window opens.
3. To open an Audio CD Layout click the small arrow next to
the
New
button on the toolbar. Click
Audio CD
from the
drop-down list and an Audio CD Layout opens.
SING THE
U
CDOR DVD D
RIVE
5-17
Page 71
Did you know...
You can record any
combination of tracks, WAV,
or MP3 files to an Audio CD.
Did you know...
4. If you are recording tracks from an existing music CD, insert
the music CD into your CD drive and continue with the next
step. To begin recording WAV or MP3 files, continue with the
next step.
5. In the left pane of the Explorer section, select the CD-ROM
drive containing the music CD; a list of the tracks on the CD
appears to the right. If you are recording WAV or MP3 files,
select the folder where your files are located.
If information about the music
CD is located on your hard
disk, the CD title, artist name,
and the name of each track are
displayed. If this information
does not appear and you have
access to the Internet, click the
™
CDDB
toolbar to download the
information from the online
CDDB Music Service.
To test the drive performance,
Compaq recommends using the
Emulate Only option (located
in the Options window) when
recording a new CD-R or using
your Notebook for the first
time. This allows you to
perform a test run before
actually recording.
Internet button on the
Did you know...
6. Select the track, WAV, or MP3 file you want to record in the
right pane of the Explorer section, and then click
Add
on the
toolbar. Repeat until the Audio CD Layout contains all of the
tracks and files that you want to record.
7. Click
Create CD
. The CD Creation Process dialog
box opens.
8. When prompted, remove your audio CD and insert a blank
CD into your CD-Recorder and click OK to start recording.
9. When the CD Creation Process is complete, click OK.
If you have tracks on other music CDs that you want to record, repeat
Note:
steps 3-5 for each music CD from which you want to record. During the
actual recording process, Easy CD Creator prompts you to reinsert the
appropriate music CD for the track being recorded.
Creating Data CDs
A data CD is ideal for backing up important files such as
personal documents and files on your hard disk. The Data CD is
designed for data storage only, and cannot be played on your
home stereo like an audio CD.
Did you know...
When you have finalized a
CD-R disc, no additional
tracks can be added to the disc.
SING THE
5-18 U
CDOR DVD D
RIVE
To create a data CD, complete the following steps:
1. On the Windows taskbar, click
Adaptec Easy Creator 4
, and then click
2. On the Welcome screen, click
3. On the Data screen, click
Data CD
, point to
Start
Create CD
. The Data screen opens.
Data
. The Easy CD Creator
window opens.
RESARIO MOBILE INTERNET
P
PC B
Programs
,
.
EYOND SETUP GUIDE
1700 S
ERIES
Page 72

4. To open a Data CD Layout, click the small arrow next to the
New
button on the toolbar. Select
Data CD
from the drop-
down list and a Data CD Layout opens.
5. Insert a blank CD into your CD-Recorder.
6. In the
Explorer
section, select the data file or folder you want
to record, and then click
Add
on the toolbar. Repeat until the
Data CD Layout contains all the files and folders you want to
record.
7. Click
8. C
Create CD
. The CD Creation Setup dialog box opens.
lick OK to start recording.
DirectCD
DirectCD allows you to write files directly onto CD-Recordable
or CD-ReWritable CDs.
To begin using DirectCD, complete the following steps:
1. On the Windows taskbar, click
Adaptec Easy CD Creator 4
2. On the Welcome screen, click
3. On the Data screen, click
Start
, and then click
Data
. The Data screen opens.
DirectCD
, point to
. The Adaptec DirectCD
Wizard! dialog box opens.
4. Follow the on-screen instructions to begin writing the CD.
Programs
Create CD
,
.
RESARIO MOBILE INTERNET
P
ERIES
1700 S
EYOND SETUP GUIDE
PC B
Jewel Case Creator
The Jewel Case Creator allows you to create custom jewel case
covers, inserts, and CD labels. To start the Jewel Case Creator,
double-click the
Creator Menu. For detailed information on how to create
customized products, refer to the Online Help Manual.
Jewel Case Creator
button on the Adaptec CD
SING THE
U
CDOR DVD D
RIVE
5-19
Page 73

Did you know...
Easy CD Creator is designed to
assist you in reproducing
material for which you own the
copyright or have obtained
permission to copy from the
copyright owner. Unless you
own the copyright or have
permission to copy from the
copyright owner, you may be
violating copyright law and be
subject to payment of damages
and other remedies. If you are
uncertain about your rights,
contact your legal advisor.
CD Copier
The CD Copier is used to back up almost any kind of CD.
To make a backup copy of a CD, complete the following steps:
1. On the Windows taskbar click
2. Point to
menu, point to
3. Click
4. Click the
5. Under
Adaptec Easy CD Creator 4
Features
CD Copier
. The CD Copier window opens.
.
Source and Destination
Copy from
, select the drive containing the
original CD.
6. Under
Record to
, select the drive containing the blank CD.
This is the CD-recordable drive.
Start
, point to
on the
tab.
Programs
Programs
.
Did you know...
In extreme cases, some errors
may render your disc unusable.
If this occurs, it may be
necessary to start over with a
new disc and then properly
dispose of the old disc.
7. Click
Copy
to begin recording a copy of your CD.
Preventing Buffer Underrun Errors
A
Buffer Underrun
to the CD-Recorder is interrupted. Once a buffer underrun
occurs, the CD creation process is halted.
The following are suggestions for preventing buffer underruns:
•
Close other programs and disable tasks or applications
running in the background such as screen savers and
virus software.
•
Ensure that the temporary files created during CD recording
are created on the local hard disk, not in a directory on a
network drive.
To change the location where the temporary files are stored, click
Note:
select
Tools,
instructions.
is an error that occurs when the flow of data
Options
from the menu, and then follow the on-screen
SING THE
5-20 U
CDOR DVD D
RIVE
RESARIO MOBILE INTERNET
P
EYOND SETUP GUIDE
PC B
1700 S
ERIES
Page 74

•
Open the Systems Properties dialog box by clicking
from the
Control Panel
ensure that
. Click the
Allow Disconnect
Device Manager
is set for both the
System
tab and
CD-Recorder and the hard disk.
•
Do not attempt to record CDs from files on a network. If the
desired files are on a network, copy them to your local hard
disk before recording the CD.
A buffer underrun error can occur on single or dual optical drive
Note:
systems (CD-ROM, CD-RW, or DVD-ROM drive).
Accessing Easy CD Creator 4
User Information
The Easy CD Creator 4 software included with your Notebook
comes with step-by-step instructions, the Quick Reference
Guide provided by Adobe Acrobat
manual called Online Help to answer any questions you might
have about the functionality of the software with your
CD-RW Drive.
®
4.0, and a complete user’s
RESARIO MOBILE INTERNET
P
ERIES
1700 S
EYOND SETUP GUIDE
PC B
To access Online Help while using the Audio or Data CD
Creator, click
Index
from the drop-down list.
To use the
of terms, click
Creator
Help
Adobe Acrobat Quick Reference Guide
Start
, then click
from the toolbar, then select
Programs
, then
, then
Quick Reference Guide
SING THE
U
Contents and
and glossary
Adaptec Easy CD
.
CDOR DVD D
RIVE
5-21
Page 75

5-22 U
SING THE
CDOR DVD D
RIVE
RESARIO MOBILE INTERNET
P
EYOND SETUP GUIDE
PC B
1700 S
ERIES
Page 76
Let’s Go
Surfing
“Surfing the Web” can be a
In This Chapter
Basic Concepts, 6-2
Browsers, 6-7
wonderful way to use and enjoy
your Notebook. Surfing offers new
opportunities daily for shopping,
education, news, entertainment,
research, and education.
Search Engines, 6-9
RESARIO MOBILE INTERNET
P
1700 S
ERIES
PC B
Possibilities abound on the Web.
This chapter helps you discover
them. When you do, you will not be
alone. It is estimated that thousands
of new users connect to the Web
every day for the first time.
EYOND SETUP GUIDE
LET’S GO S
URFING
6-1
Page 77
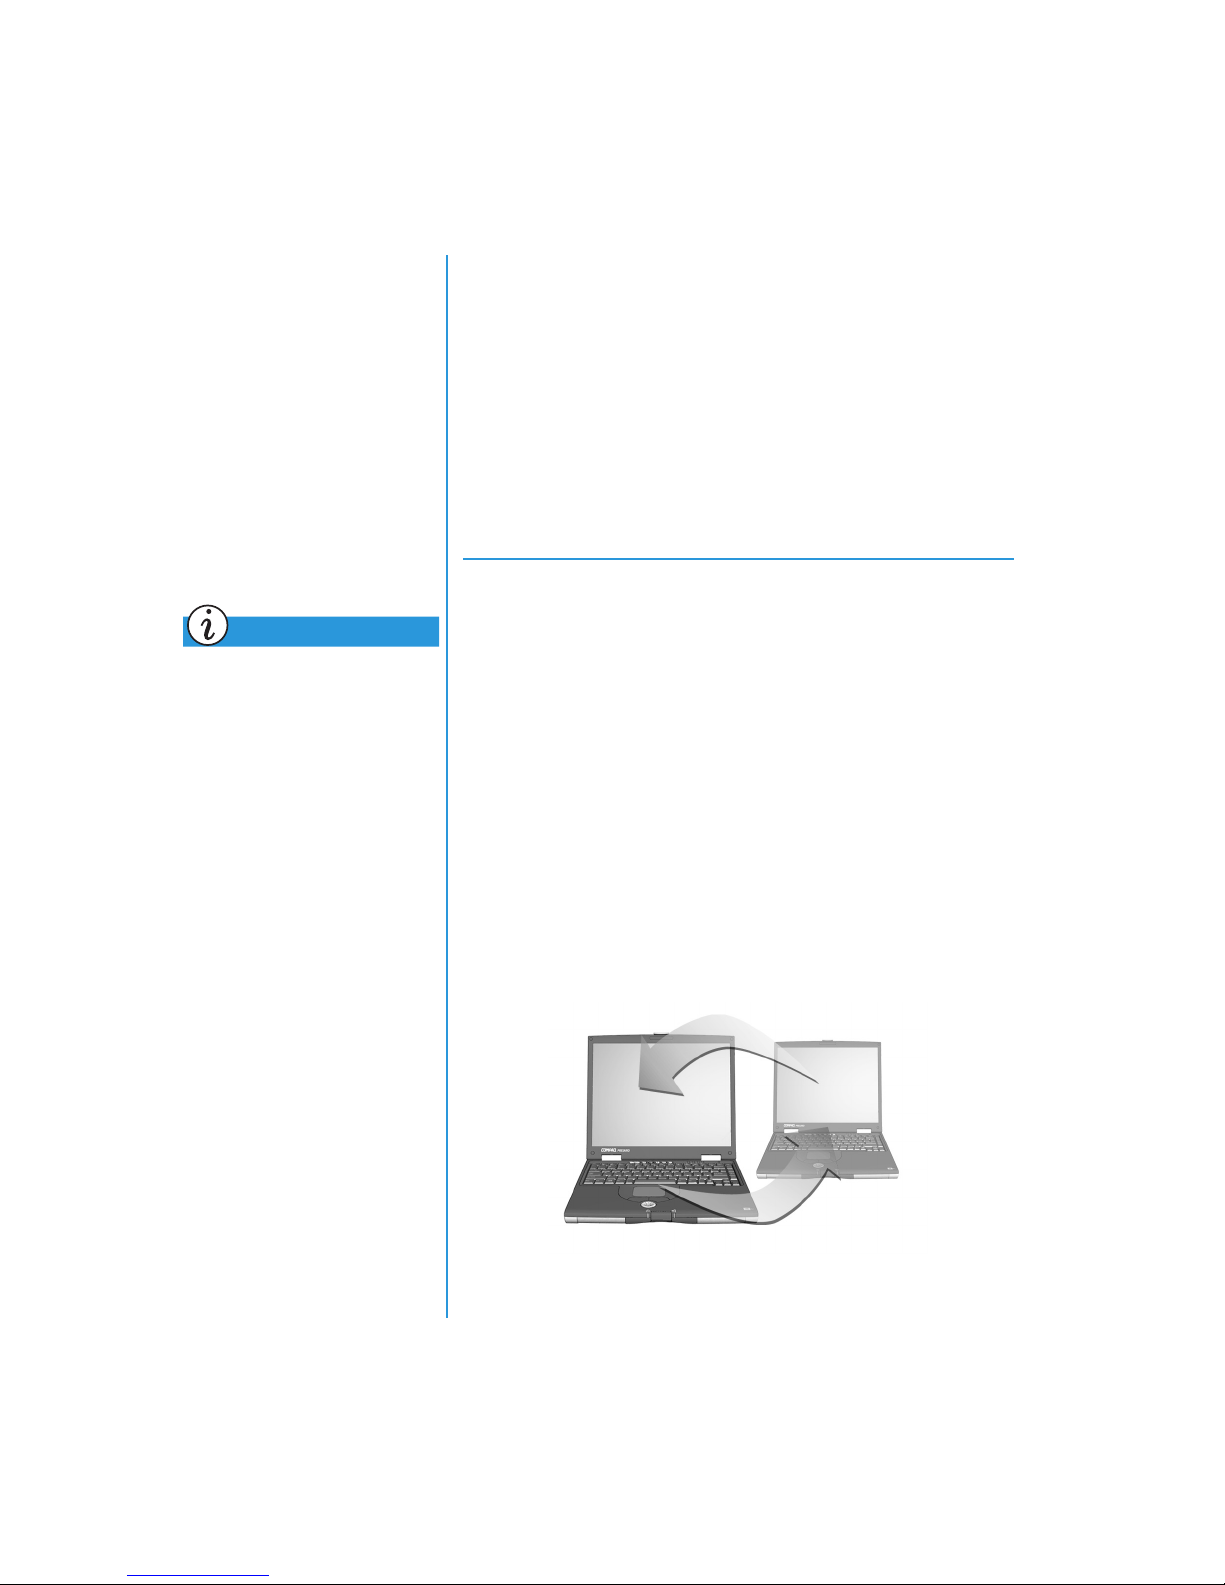
Basic Concepts
This section helps you
answer these questions:
•
What is the Internet?
•
What is the World
Wide Web?
The World Wide Web is part of the Internet. Several decades
ago, the U.S. military began developing the Internet. It wasn’t
long before academic and industrial researchers began using it to
share data.
Vast numbers of new computer users stimulated Internet growth
over the last ten years. Millions of homes and businesses now
use their computers to communicate through this system.
Welcome to the World Wide Web. Whatever other uses you have
for your computer, this one can be the most interesting.
Did you know...
The Internet is changing
communication and commerce
around the world.
What is the Internet?
Internet
The
Cables, phone lines, and radios connect huge numbers of
computers around the world. These connections allow many
simultaneous public and private communications.
The Internet does not have an owner or manager. It is a
cooperative effort between individuals, private organizations,
universities, businesses, and governments.
Let’s take a brief look at how the Internet is put together.
network
A
computers create a small network when they are linked to
each other.
is a vast communications system for computers.
is the basic building block of the Internet. Two
6-2 LET’S GO S
URFING
RESARIO MOBILE INTERNET
P
EYOND SETUP GUIDE
PC B
1700 S
ERIES
Page 78
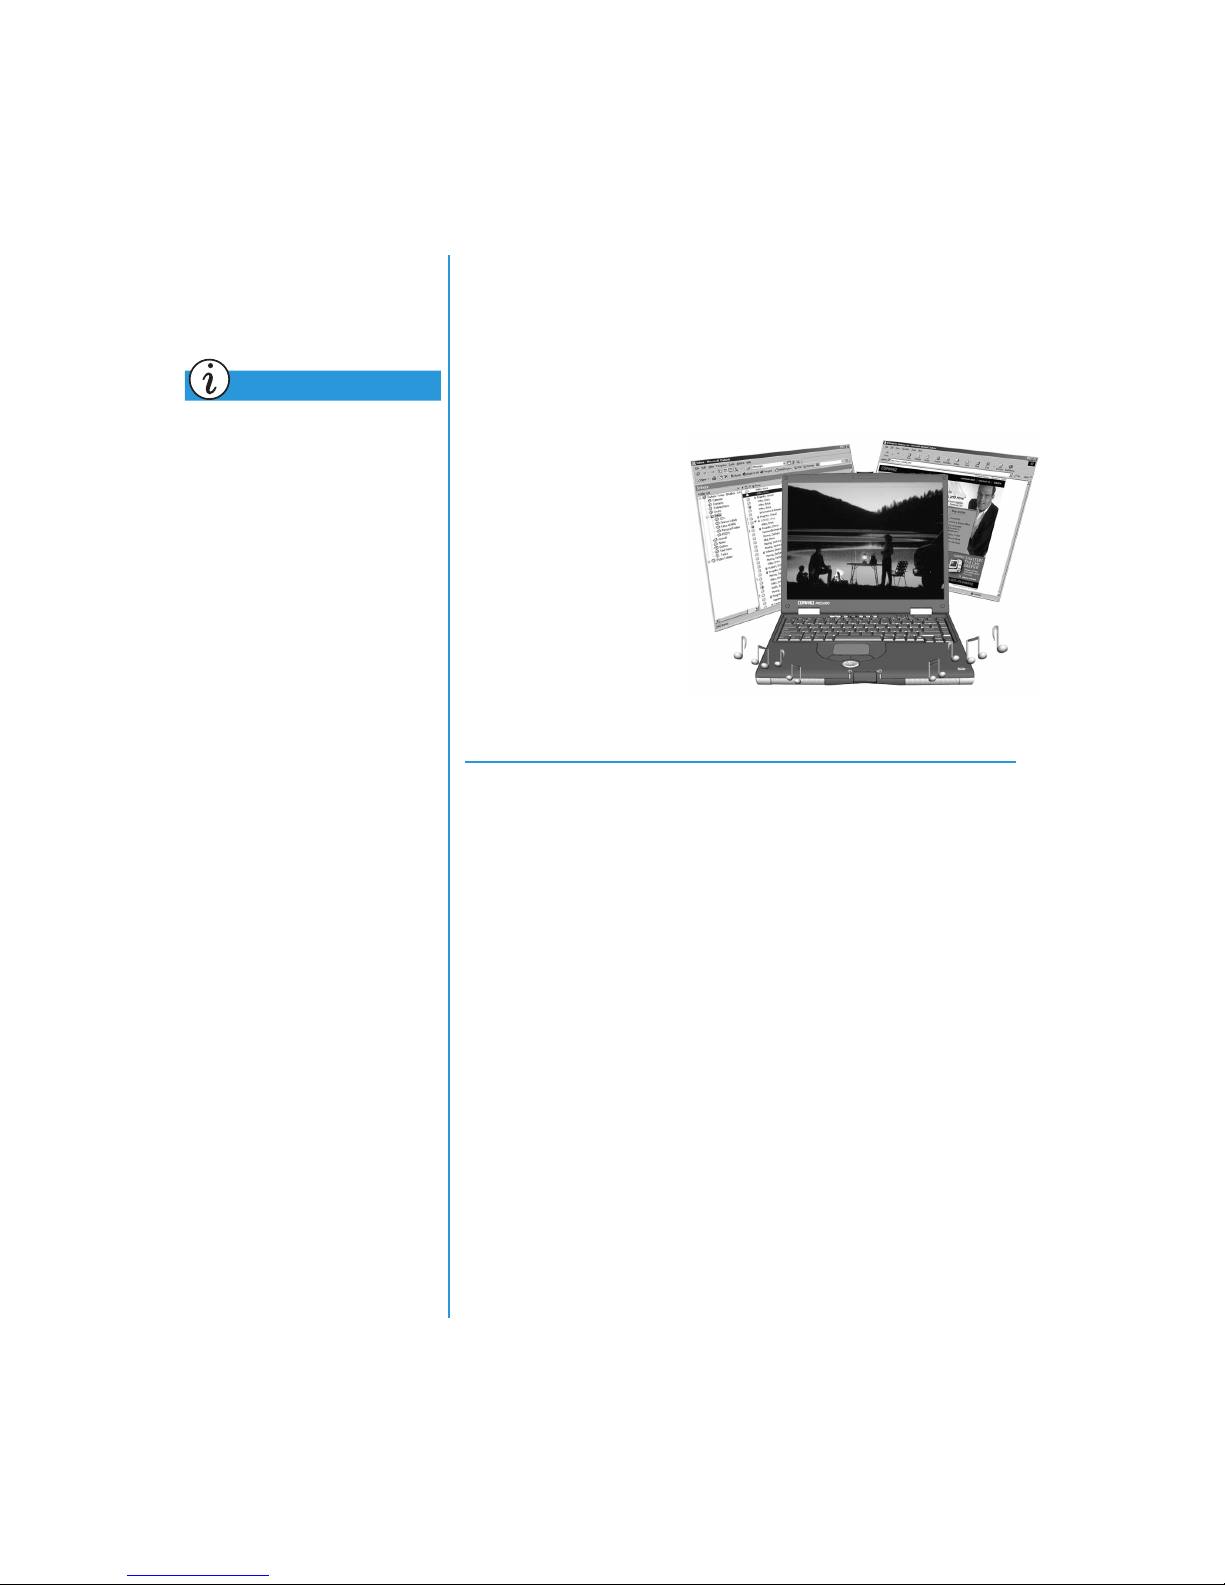
Did you know...
Computers in a network can
share information as well as
devices such as printers
and scanners.
A network can link multiple computers. For example, a large
company could link all its computers within a single network.
On a higher level, networks can link to other networks. In fact,
huge numbers of networks are linked worldwide to form the
Internet. Together they provide seemingly endless amounts of
information for topics such as:
•
Entertainment
•
Commerce
•
Research
•
Education
What is the World Wide Web?
RESARIO MOBILE INTERNET
P
ERIES
1700 S
EYOND SETUP GUIDE
PC B
Inside the Internet is the World Wide Web (www). Although
the World Wide Web is the part of the Internet that you are
most likely to be interested in, it is only one small part of the
whole system.
The complete Internet offers a number of tools, including
e-mail, the World Wide Web, and other communication services.
Here is some basic information about aspects of the Web that
will help you understand this new world.
World Wide Web
World Wide Web
The
the Internet specifically for publishing and accessing
information. It is also known as the
for World Wide Web.
is a popular system that is set up within
Web
. The letters
www
LET’S GO S
stand
URFING
6-3
Page 79
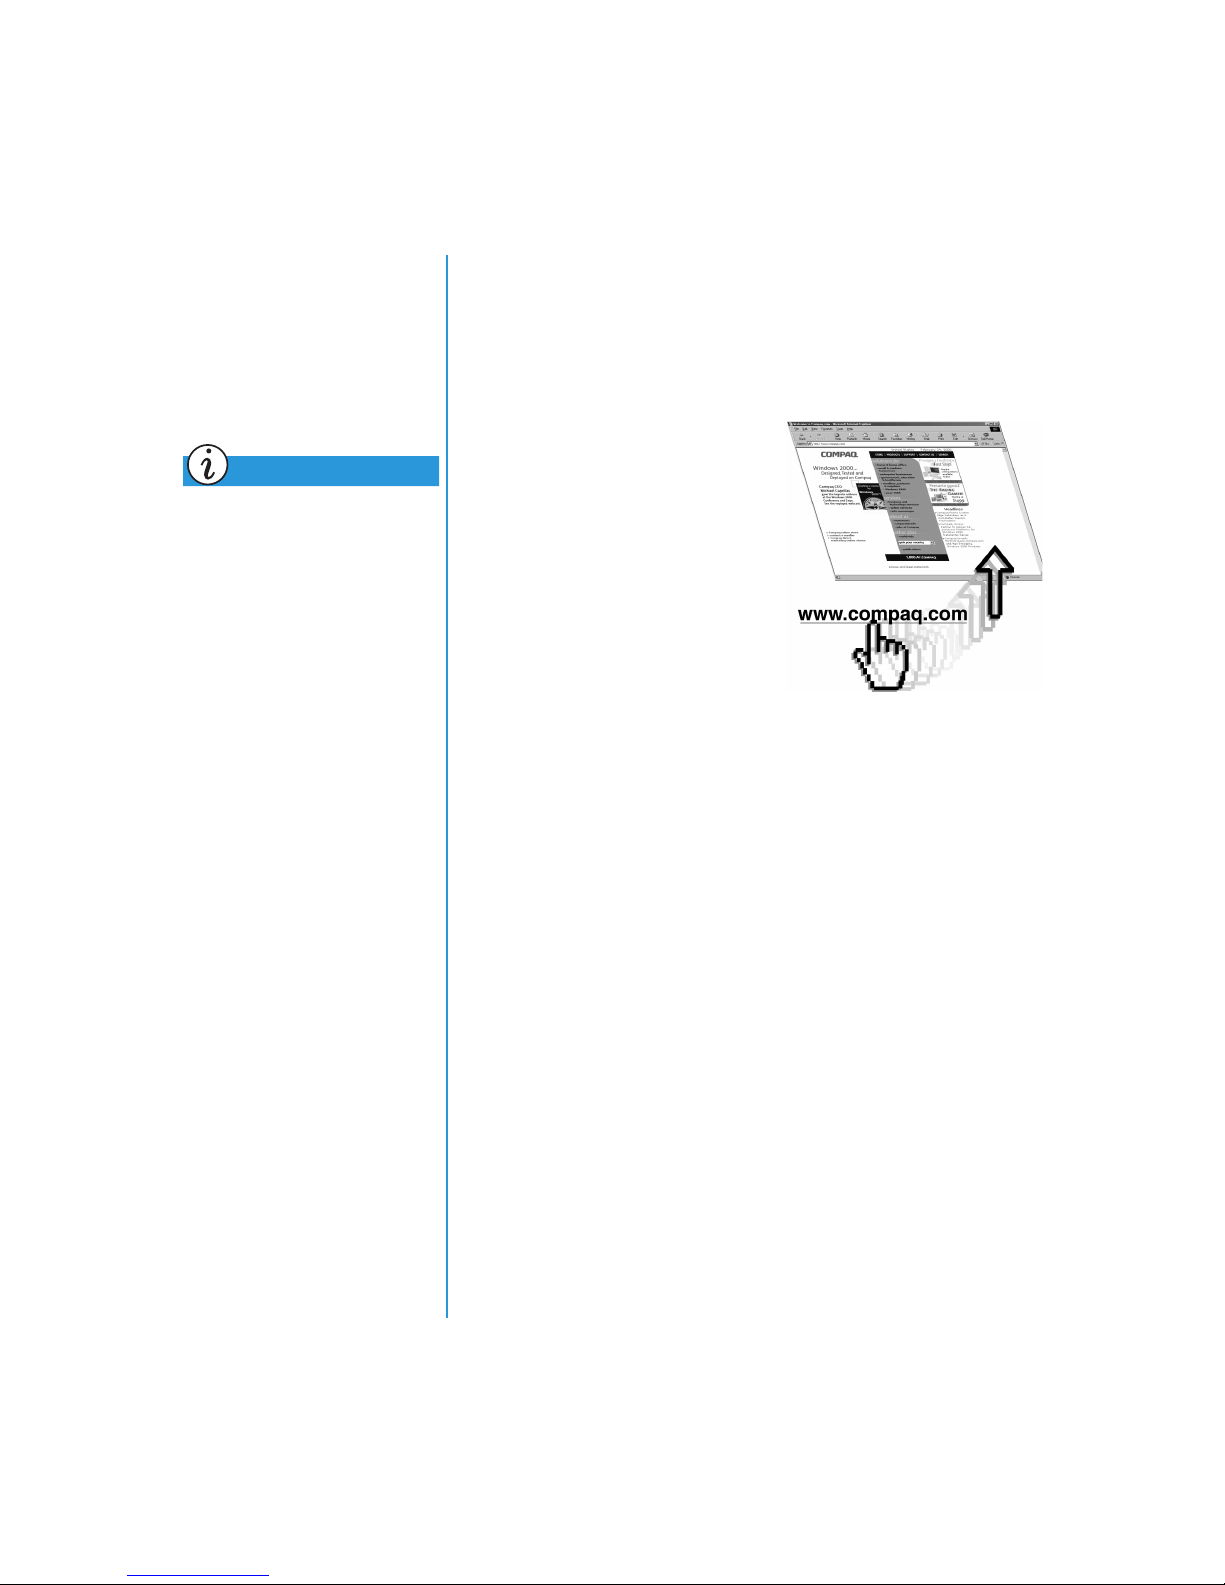
Web Sites and Web Pages
Did you know...
Hyperlinks make it easy to
jump from place to place on the
World Wide Web.
World Wide Web information is grouped in
home to one or more
Web pages
. Web pages can provide text,
Web sites
that are
graphics, animation, audio, and video to your computer.
Hyperlinks
Many Web pages include
hyperlinks
, also known as
that transport your search at the
click of a button. A link can be to
another place on the same Web
page or to another computer
halfway around the world.
Hyperlinks often appear in Web
pages as colored, underlined text. You will also find hyperlinks
hidden in buttons, pictures, and drawings on a Web page.
When you pass your cursor over a hidden hyperlink, the
normal cursor arrow turns into a hand with the thumb and
first finger extended
.
Click on a hyperlink and discover where it sends you.
links
,
6-4 LET’S GO S
URFING
These links can move you from page to page, site to site, Web
server to Web server—all over the world!
Web Servers
Information on the World Wide Web is stored on computers
called
Web servers are scattered throughout the world.
Web servers
. Web servers are like electronic libraries.
RESARIO MOBILE INTERNET
P
EYOND SETUP GUIDE
PC B
1700 S
ERIES
Page 80
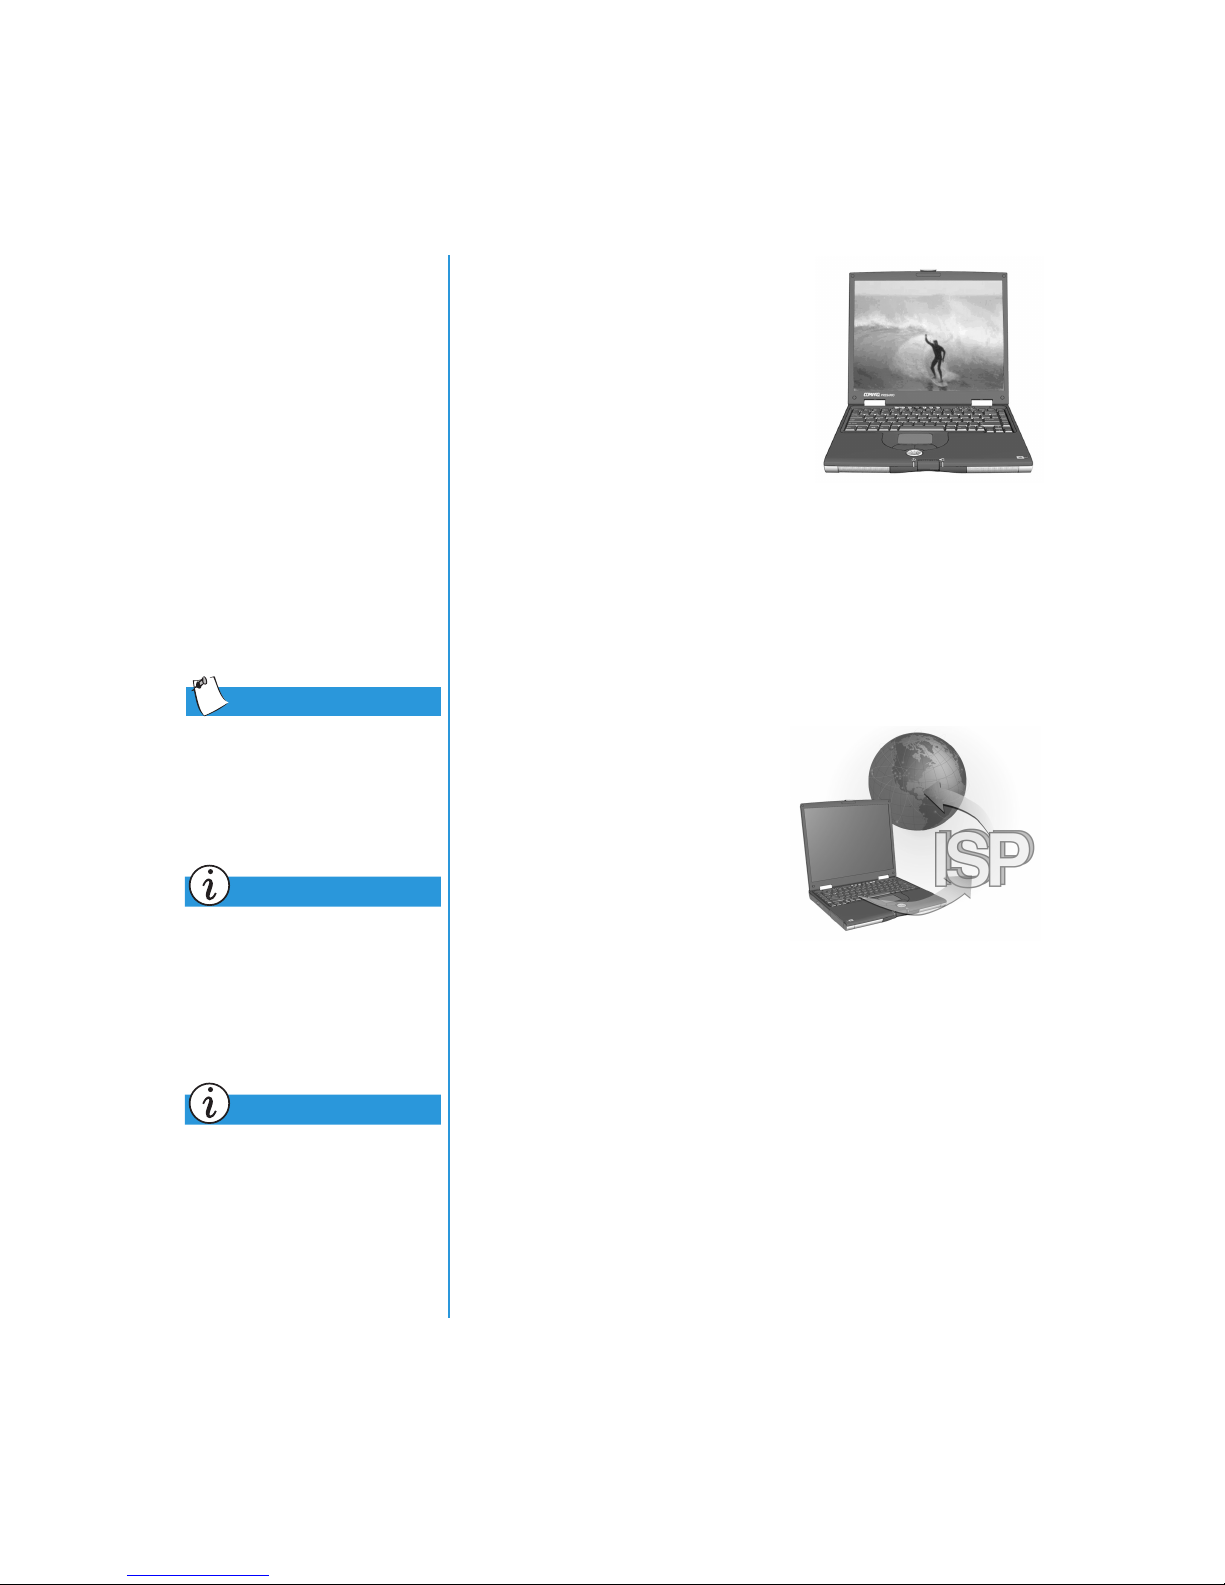
Surfing the Web
Using your computer to tour the
World Wide Web is called
the Web
. Sometimes you’ll just be
surfing
looking to see what’s there. At
other times, you’ll be looking for
something specific.
Internet Address (URL)
Tip
Your Presario Notebook
provides you with a selection
of Internet Service
Providers (ISPs).
Did you know...
High-speed Internet access
may be available in your area.
Check with your ISP or local
telephone company for
more information.
Did you know...
Your Presario Notebook has a
built-in Ethernet connection
which is the most common way
to connect to high-speed
Internet access.
A Web site has an
Internet address
to find it. An Internet address is known as a
Locator
, or
. It identifies the location of a Web site just as
URL
that tells your computer how
Uniform Resource
your home address identifies where you live.
Internet Service Provider (ISP)
A company that provides access to
the Internet is an
Provider (ISP)
Internet Service
. Your computer’s
connection to an ISP’s computer is
your entry point to the Web. You
must establish an account with the
ISP of your choice.
Modem
A computer’s physical connection to the Internet is typically
through a telephone line. Your computer contains hardware
called a
modem
standard telephone line. There are on-screen instructions you
must follow when you set up your modem.
that sends and receives information over a
RESARIO MOBILE INTERNET
P
ERIES
1700 S
EYOND SETUP GUIDE
PC B
LET’S GO S
URFING
6-5
Page 81
Search Engine
See also
The “Search Engines” section
later in this chapter for
detailed information about
searching on the Internet.
Tip
Check with your Internet
Service Provider for details
about the e-mail service
they provide.
search engine
A
is a program used on Web sites that allows you
to search the Internet for keywords you enter. The search engine
generates a list of Web pages that contain your keywords.
Once you access the Internet, you can use a search engine to
begin searching for information. You can choose from many
search engines on the Internet. To access one of these search
engines, type in a URL, such as
www.compaq.com.
URLs
take
you to the requested site.
E-mail
A form of mail delivered over the Internet is
e-mail
like a paperless letter that goes directly from one computer to
another. To get e-mail, both the sender and recipient must have
e-mail accounts. Your ISP is one possible provider of an
e-mail account.
. It is
6-6 LET’S GO S
URFING
RESARIO MOBILE INTERNET
P
EYOND SETUP GUIDE
PC B
1700 S
ERIES
Page 82
Browsers
This section covers the
following:
•
What is a Browser?
•
Using Microsoft
Internet Explorer
Tip
Learn to use the features in
your browser. It makes your
Internet experience much
more enjoyable.
What is a Browser?
Web browser
A
is a program that allows you to see Web sites on
the Internet.
Your computer’s browser performs four basic tasks. When you
provide a Web site’s URL, your browser will:
•
Contact the Web site
•
Gather information from the Web site
•
Display information from the Web site on your
computer screen
•
File, print, or dispose of information from the Web site as
you choose
Using Microsoft Internet Explorer
Your Internet PC comes with a browser called Microsoft Internet
Explorer. It is the most widely used browser in
the world.
Did you know...
Your Notebook comes
with Microsoft Internet
Explorer preinstalled.
Tip
America Online
must start AOL and log on
before starting Internet
Explorer.
RESARIO MOBILE INTERNET
P
ERIES
1700 S
®
(AOL) users
EYOND SETUP GUIDE
PC B
When you use your browser, the first page it displays is the
default home page. You can customize or change this page. You
can also customize other browser features.
Look in the browser Help files for instructions on customizing
your browser.
To use Microsoft Internet Explorer, you must have an active account
Note:
with an ISP. You must also have a physical connection, such as a phone line,
to your ISPs computer.
LET’S GO S
URFING
6-7
Page 83
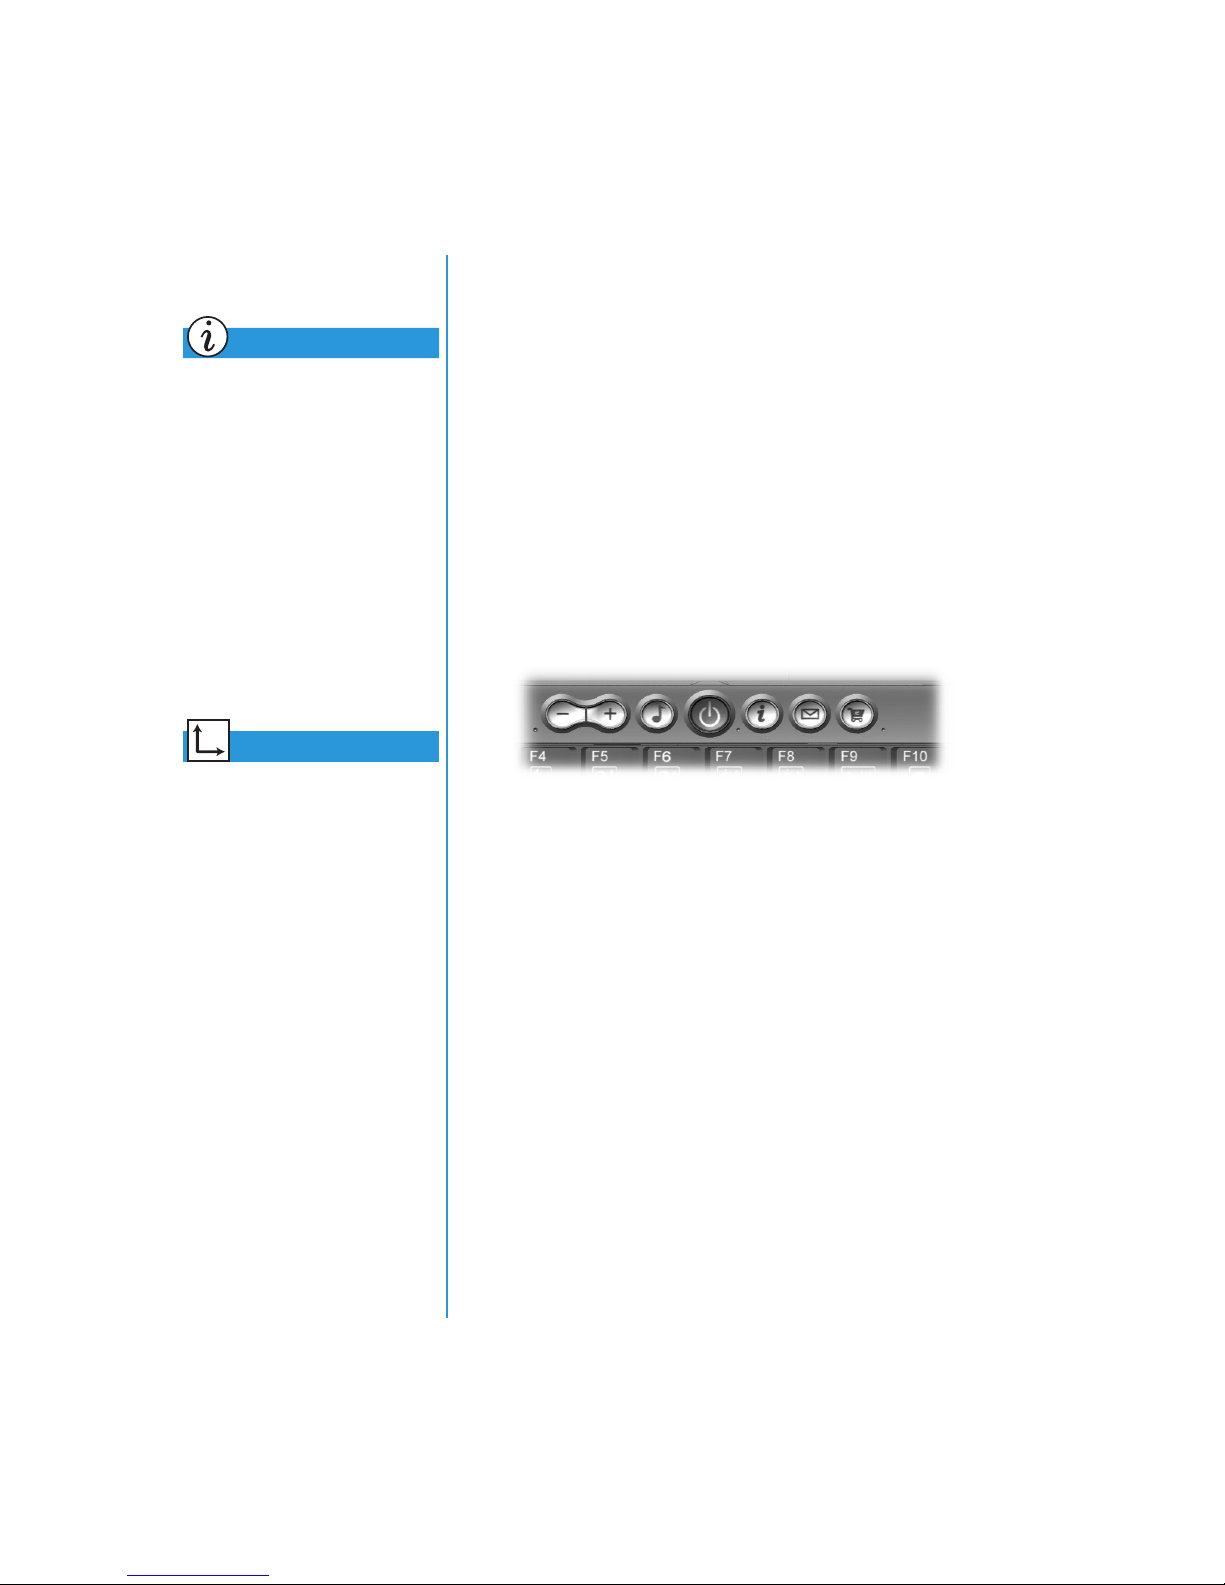
To begin surfing the Internet with Microsoft Internet Explorer,
complete either of the following:
Did you know...
Microsoft Internet Explorer has
an extensive Help section that
includes a tour of its
major features.
See also
“Internet Zone Buttons and
Lights” in Chapter 2 and
“Internet Zone Buttons” in
Chapter 3 for information
about identifying and
reprogramming the Internet
Zone buttons.
•
From the Windows desktop, double-click the
A
Explorer
•
From the Windows taskbar, click the
Programs,
An alternative method uses the
icon.
and then click the
Internet Zone
Internet Explorer
Start
Internet
button, point to
A
icon.
buttons on
your keyboard.
To connect to the Web with this procedure, simply press one of
the Internet Zone buttons.
The
Note:
shown here.
Internet Zone
buttons on your computer may differ from those
These buttons give you quick access to the most frequently used
Internet activities. They can be programmed to reflect your
personal preferences.
6-8 LET’S GO S
URFING
RESARIO MOBILE INTERNET
P
EYOND SETUP GUIDE
PC B
1700 S
ERIES
Page 84
Search Engines
Choosing a Search Engine
This section will help you
perform the following tasks:
•
Choosing a Search
Engine
•
Using a Search Engine
•
Searching on the Web
•
Accessing Files
from the Internet
Did you know...
Each search engine has a
different look and feel. Try
various search engines to see
which one you like.
Many different search engines exist
on their own Web sites. Each one
keeps a list, or
database
, of
registered Web sites. The search
engine’s master list includes a
description and Internet address for
each of its registered Web sites.
Some search engines keep generalpurpose lists while others limit their
lists to a single topic.
•
An example of a general-purpose search engine is
AltaVista
America Online
®
www.altavista.com
at
®
, provide their own general-purpose
. Some ISPs, such as
search engine.
•
An example of a specialized search engine would be one that
only lists Web sites about one specific topic.
You can locate search engines in several ways:
•
Click your browser’s
•
Ask a search engine to list other search engines.
Search
button.
RESARIO MOBILE INTERNET
P
ERIES
1700 S
EYOND SETUP GUIDE
PC B
LET’S GO S
URFING
6-9
Page 85
Tip
Choose your keywords
carefully. Your choice
determines the success
of your search.
Did you know...
URL means Uniform Resource
Locator. A URL is an address
for a resource or Web site on
the Internet.
Using a Search Engine
Most search engines ask for a keyword. A
keyword
word or simple phrase that describes your topic.
•
When entering keywords, you can enter an entire sentence to
limit the search to a more specific topic. For example, for
information about searching the Internet, enter
Internet
•
After you enter a keyword search, the search engine
, instead of
Internet
.
generates a list of hyperlinks to all Web sites that contain
your keywords. Click a link to go to a specific Web site.
For practice, search for the Compaq Web site:
1. Connect to the Internet and open your browser.
2. Enter the following URL into the
browser:
www.altavista.com.
Address
is a single
searching the
box of your Web
3. Enter Compaq in the box next to
4. Click
Search
. Your browser should display numerous links to
Find this
.
different Compaq Web sites.
To use a search engine, complete these steps:
1. Choose a keyword that describes your topic.
2. Type that keyword into the search engine.
go
3. Click the
button (or other button provided) to send
your request.
Once you have entered a keyword, the search engine will:
•
Review the descriptions of the Web sites in its records
•
Create a list of the Web sites that contain your keyword
•
Display the list on your screen
The list the search engine returns to you includes a brief
description of each Web site as well as its URL.
6-10 LET’S GO S
URFING
RESARIO MOBILE INTERNET
P
EYOND SETUP GUIDE
PC B
1700 S
ERIES
Page 86
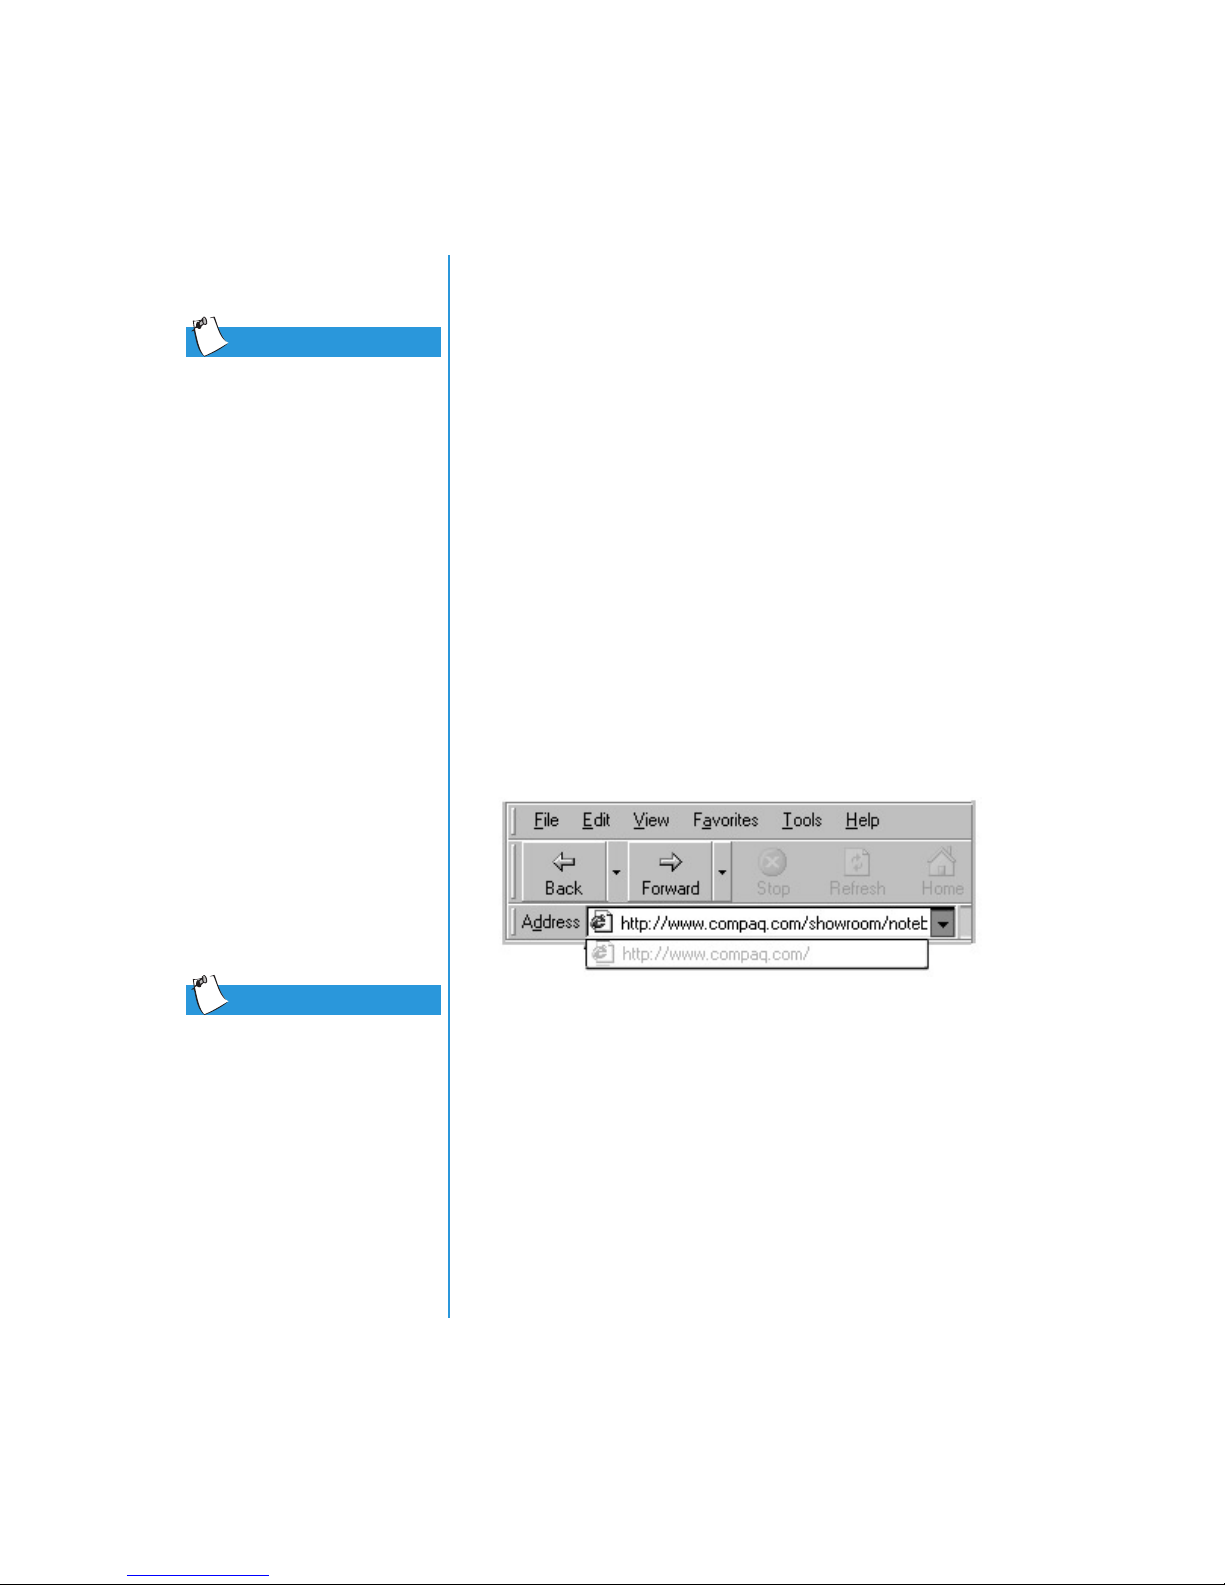
Tip
Try various keywords and
compare the results. You can
also use the same keyword in
different search engines.
Searching on the Web
You can now begin searching on the Web.
Briefly examine the list provided by the search engine. Then,
•
If you don’t like the list, change the keyword and ask the
search engine to generate a new list.
•
If you see a Web site that looks interesting, click its URL or
enter its URL in your browser.
After you have chosen and visited a Web site, you can easily
return to the search engine.
•
Use the Back arrow in your browser to return to the list.
•
Choose another Web site from the list or generate a new list.
Your browser keeps a chronological list of the Web sites you
visit. The forward arrow and back arrow let you move through
that list to revisit Web sites.
Tip
Check your browser’s Help
files for specific information on
using your Favorites folder.
RESARIO MOBILE INTERNET
P
ERIES
1700 S
EYOND SETUP GUIDE
PC B
If you know the URL of the Web site you want to visit, type it
directly into the Address box of your Web browser. For example,
you can visit the Compaq Web site by typing the following URL
into the
Address
box of your Web browser:
www.compaq.com/athome/exploration
The URL of a Web site that you want to remember can be placed
in your browser’s
Favorites
folder. Some suggested Web sites
are already in that folder. You can open your Favorites folder
and easily visit a Web site by clicking on its name.
LET’S GO S
URFING
6-11
Page 87
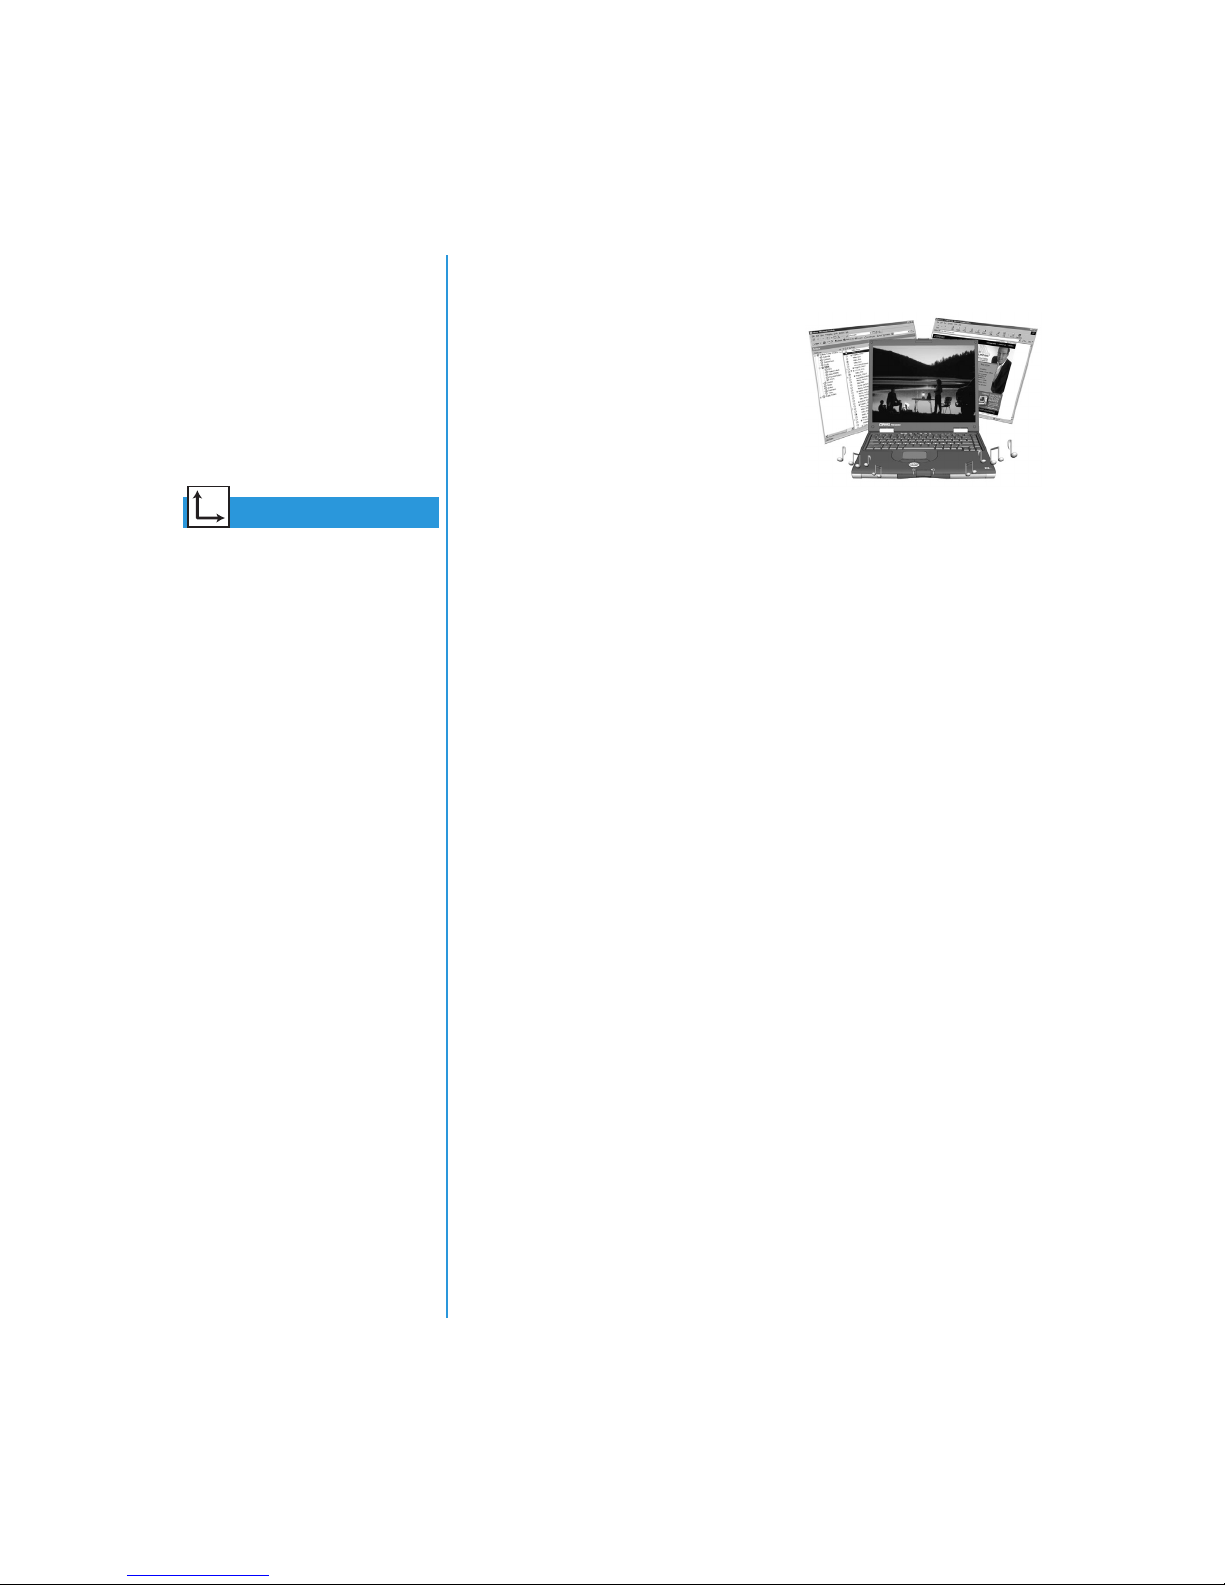
Accessing Files from the Internet
Accessing files from the Internet
can be as simple as the push of a
button. You may want to access
files such as software upgrades
and patches, videos, music, the
latest news, or up-to-date virusdetection files.
See also
The “Anti-Virus Software”
section of Chapter 4 for more
information about how to
protect your Notebook and
your files from viruses.
To access a file on the Internet,
complete the following:
1. Open your Web browser and enter a Web address or search
for the information you need.
2. Once you have located a source for the information, follow
the Web site’s directions to view or download the file.
6-12 LET’S GO S
URFING
RESARIO MOBILE INTERNET
P
EYOND SETUP GUIDE
PC B
1700 S
ERIES
Page 88
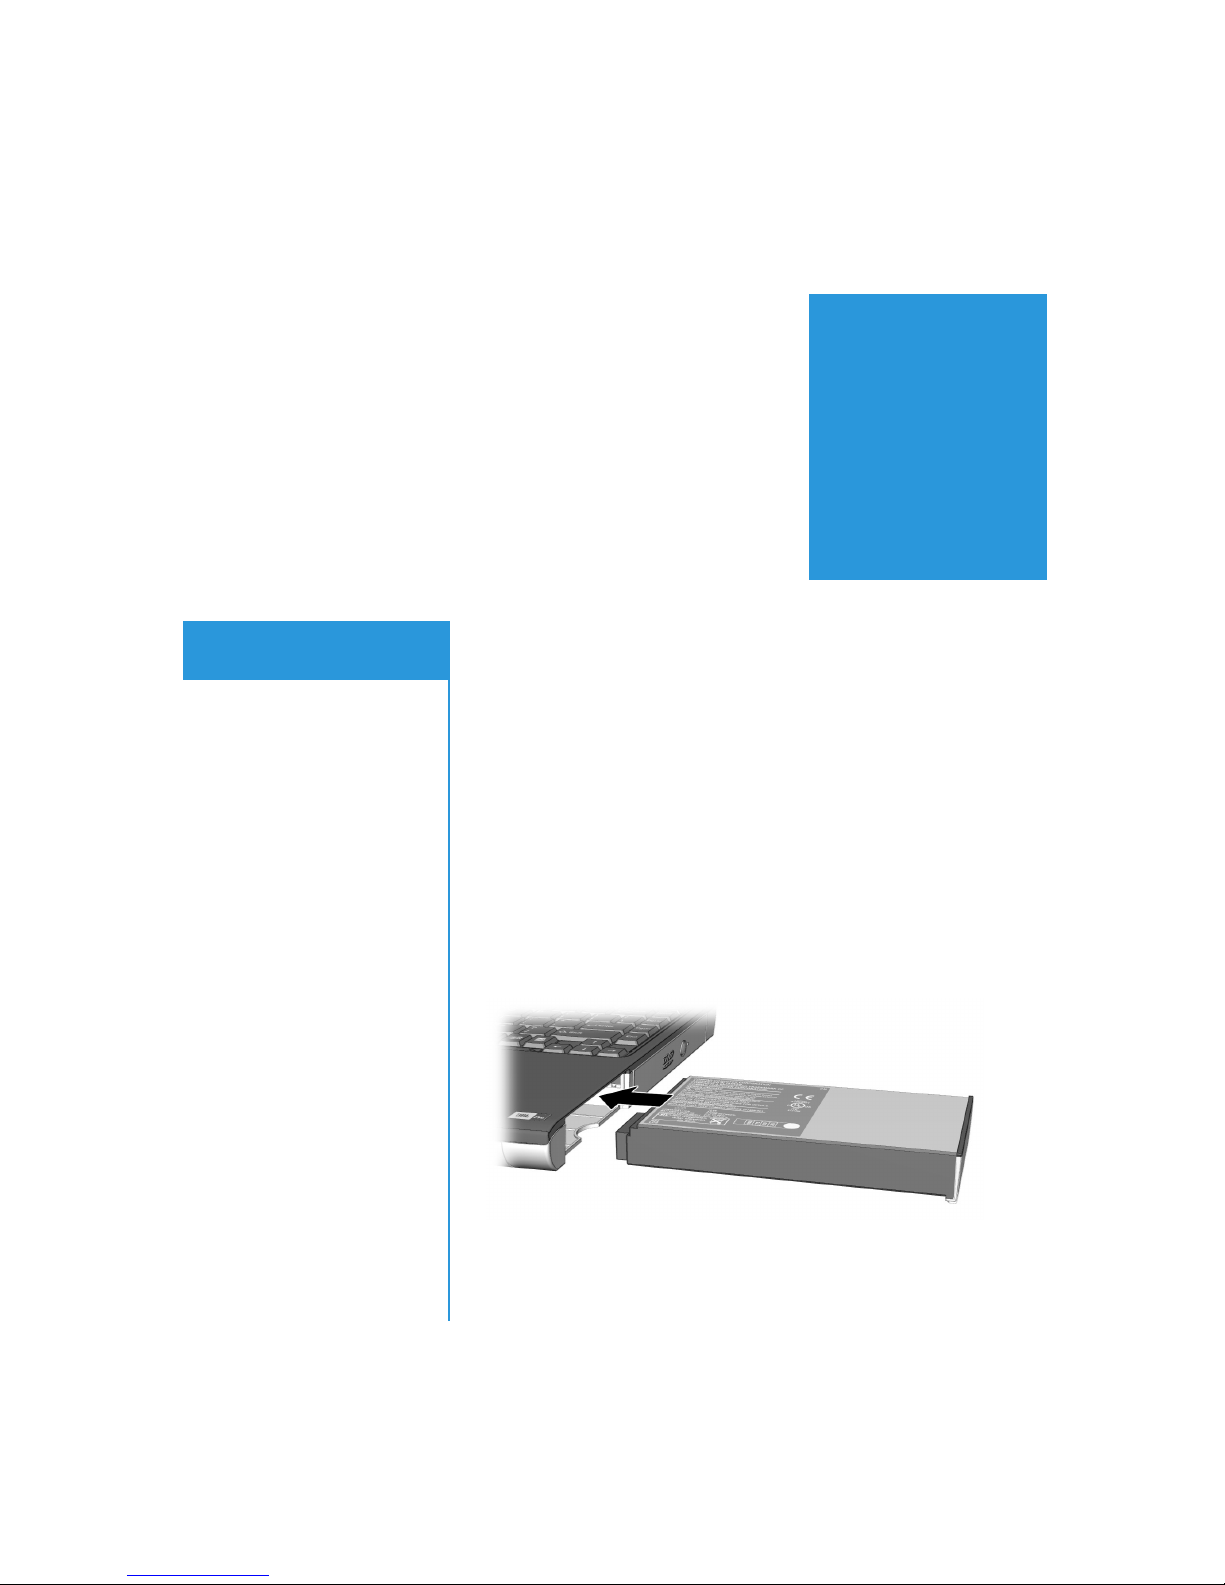
Caring for
Your Battery
When you’re on the go, AC wall outlets are not always available
In This Chapter
Battery Care, 7-2
Battery Calibration, 7-4
Power Management, 7-9
and sometimes you’ll want to use battery power. This chapter
shows you how to maintain and recharge your battery properly
so that your Presario Notebook computer has the power
necessary to continue running. After you have read this chapter,
you will be able to complete the following tasks:
•
Increase the length of battery operating time
•
Correct a low-battery condition
•
Store your battery
•
Recycle your battery
RESARIO MOBILE INTERNET
P
ERIES
1700 S
EYOND SETUP GUIDE
PC B
ARING FOR YOUR BATTERY
C
7-1
Page 89
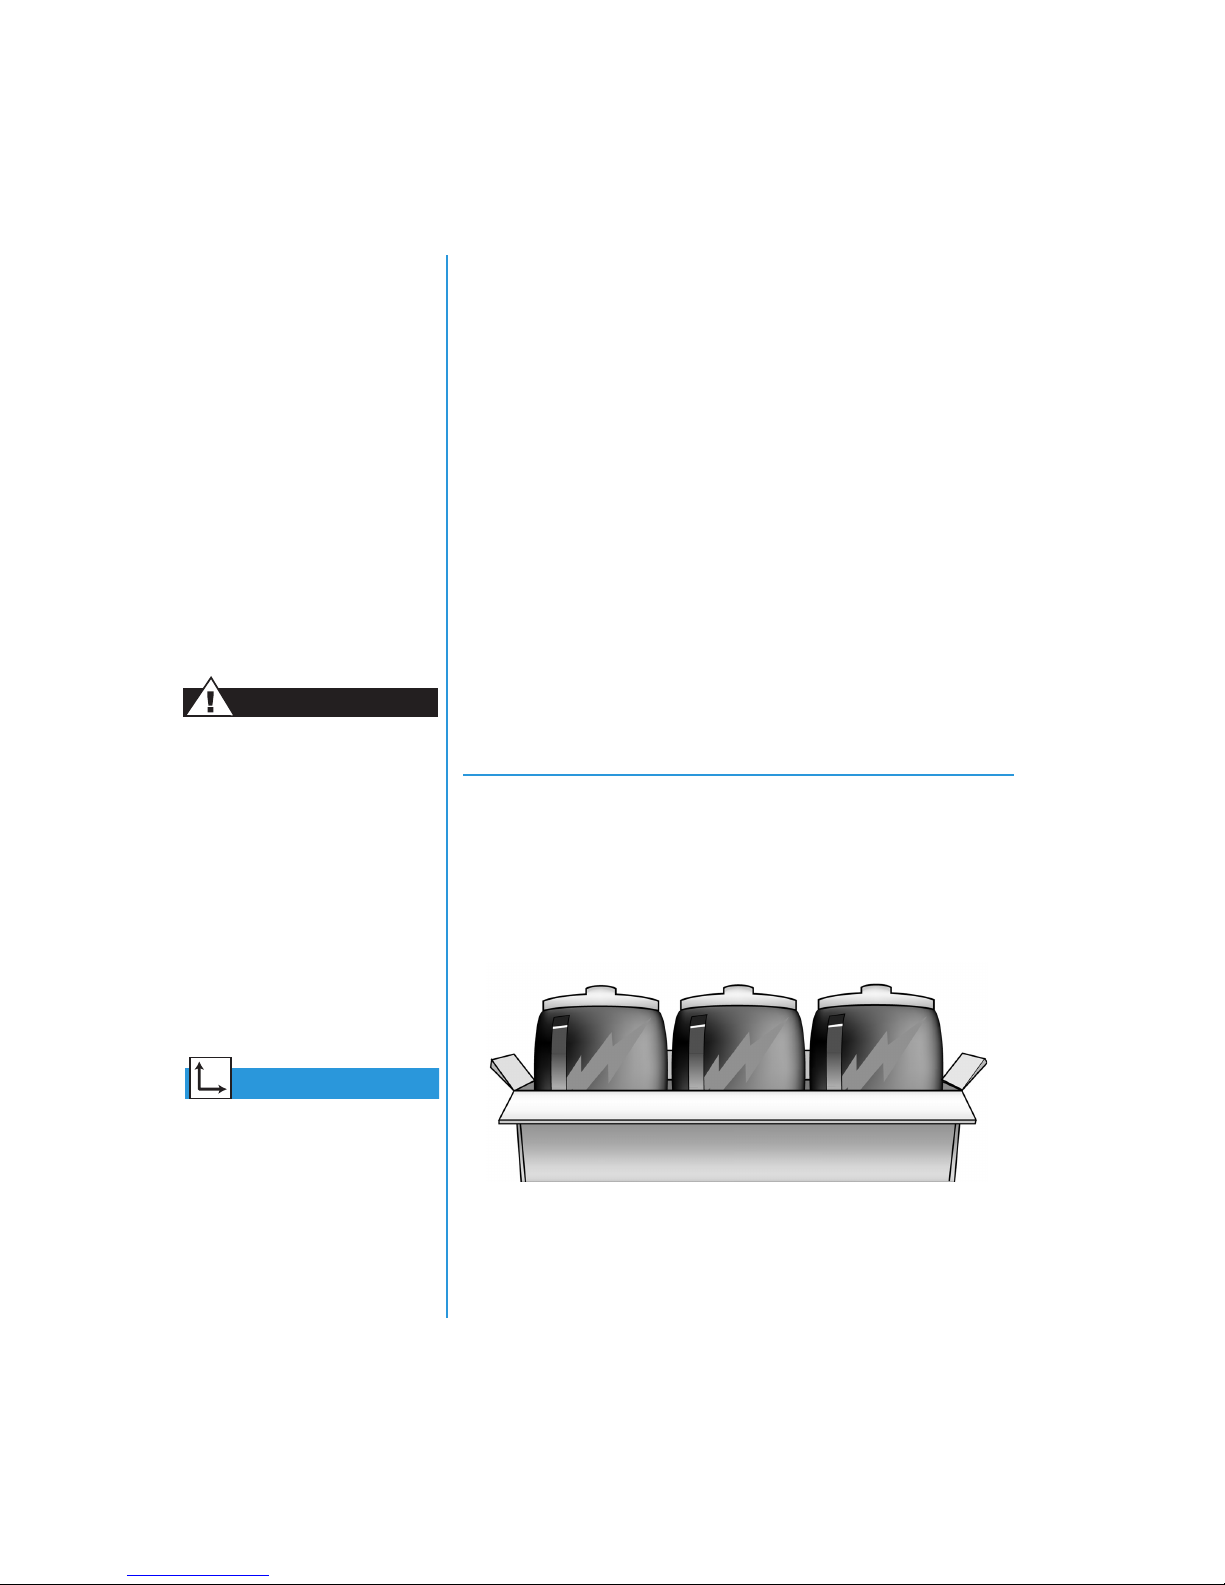
Battery Care
Using the Battery
When AC wall outlets are
not available or convenient,
the battery becomes the
“life-line” of your
Notebook. In this section
you will become familiar
with the following:
•
Using the Battery
•
Storing the Battery
•
Recycling the Battery
Warning
If your Notebook contains a
lithium battery pack, improper
handling of the battery pack
may result in fire and chemical
burns. Do not disassemble,
crush, puncture, short external
contacts, dispose of in water or
fire, or expose it to
temperatures higher than
140° F (60° C). Replace only
with the Compaq battery pack
specified for your Notebook.
Your Notebook allows you to use either AC power or battery
power. If an AC wall outlet is not available, you will want to use
battery power. This section will help you:
•
Determine the amount of remaining battery power
•
Determine what affects the length of battery operating time
Checking Battery Power
To determine the amount of remaining battery power, follow
these steps:
1. Double-click the
Battery Charge
icon or the
AC power
icon
located on the right side of the Windows taskbar.
2. Check the lights on your battery or Status panel gauge,
depending on what type of Notebook you have.
Storing the Battery
If you will not be using your Notebook for an extended period
of time, you must take precautions to ensure that your battery is
stored correctly.
See also
“Using Battery Power” earlier
in this guide for inserting,
removing, and charging your
battery.
ARING FOR YOUR BATTERY
7-2 C
RESARIO MOBILE INTERNET
P
EYOND SETUP GUIDE
PC B
1700 S
ERIES
Page 90
Tip
For safety reasons when
operating under AC Power,
Compaq recommends that
you keep a battery installed.
This ensures that you have
a charged battery when you
need it.
Tip
Temperature plays an
important role in recharging
your battery. To gain maximum
capacity, allow both the battery
and your Notebook to cool to
68°F (20° C), which is room
temperature, before recharging
the battery.
Tip
You may store your battery
within the following
temperature range:
32° F to 113° F (0°C to 45°C).
To extend its operating life,
store the battery in a cool
dry place.
See also
“Government Approvals”
section of the
Comfort Guide
information on recycling.
Safety and
for more
Refer to the following storage requirements.
NiMH Battery
- If your Notebook uses a NiMH (nickel-metalhydride) battery and you will not be using your Notebook for a
long period of time (more than two weeks):
Use your Notebook until the battery is
•
Remove the battery from your Notebook and store
•
drained completely
.
it separately.
Li-Ion Battery
- If your Notebook uses a Li-Ion (lithium-ion)
battery and you will not be using your Notebook for a long
period of time (more than two weeks):
Use your Notebook until the battery is
•
Remove the battery and store it separately.
•
drained to 50 percent
Recycling the Battery
In North America, dispose of
nickel-metal-hydride or lithium-ion
batteries by taking advantage
of the Compaq battery recycling
program. You will be provided
with a postage-paid battery pack
mailer pre-addressed to a
reclamation facility where the
metals are recycled.
Do not dispose of batteries with general household waste.
Dispose of or recycle them by using a public collection system
or returning them to Compaq, your authorized Compaq partners,
or their agents.
.
RESARIO MOBILE INTERNET
P
ERIES
1700 S
EYOND SETUP GUIDE
PC B
ARING FOR YOUR BATTERY
C
7-3
Page 91
Battery
g
p
Calibrating the Battery
Calibration
All batteries lose their
charge if they have not
been used for a lon
eriod of time. In this
section
familiar with the following:
•
•
•
you will become
Calibrating the Battery
Maximizing Battery
Operating Time
Fixing a Low-Battery
Condition
You may notice that the battery
gauge does not correctly display
the battery charge level when you
first receive your Notebook, or if
you have not used your Notebook
for a long period of time. If the
battery gauge becomes inaccurate,
you must recalibrate your battery.
Recalibrating the battery simply
means recharging the battery to its
maximum capacity and resetting
the battery gauge to display the
level of charge accurately.
To recalibrate the battery, complete the following steps:
1. Plug in the AC adapter:
a. Allow the battery to charge until the Battery Charge
icon turns off, showing that the battery is fully charged.
b. After the battery charge light or the icon turns off,
unplug the AC adapter.
7
Tip
Do not plug in the AC adapter
during the process or you will
have to start over with step 1.
ARING FOR YOUR BATTERY
7-4 C
2. Turn on or restart your Notebook.
Steps 3 through 6 prevent your Notebook from entering Sleep
mode. These steps also allow the battery to drain faster.
3. On the Windows taskbar, click
then click
4. Double-click the
Control Panel
Control Panel
.
Power Management
. The Power Management Properties dialog
Start
, point to
:
Settings
icon on the
, and
box opens.
RESARIO MOBILE INTERNET
P
EYOND SETUP GUIDE
PC B
1700 S
ERIES
Page 92
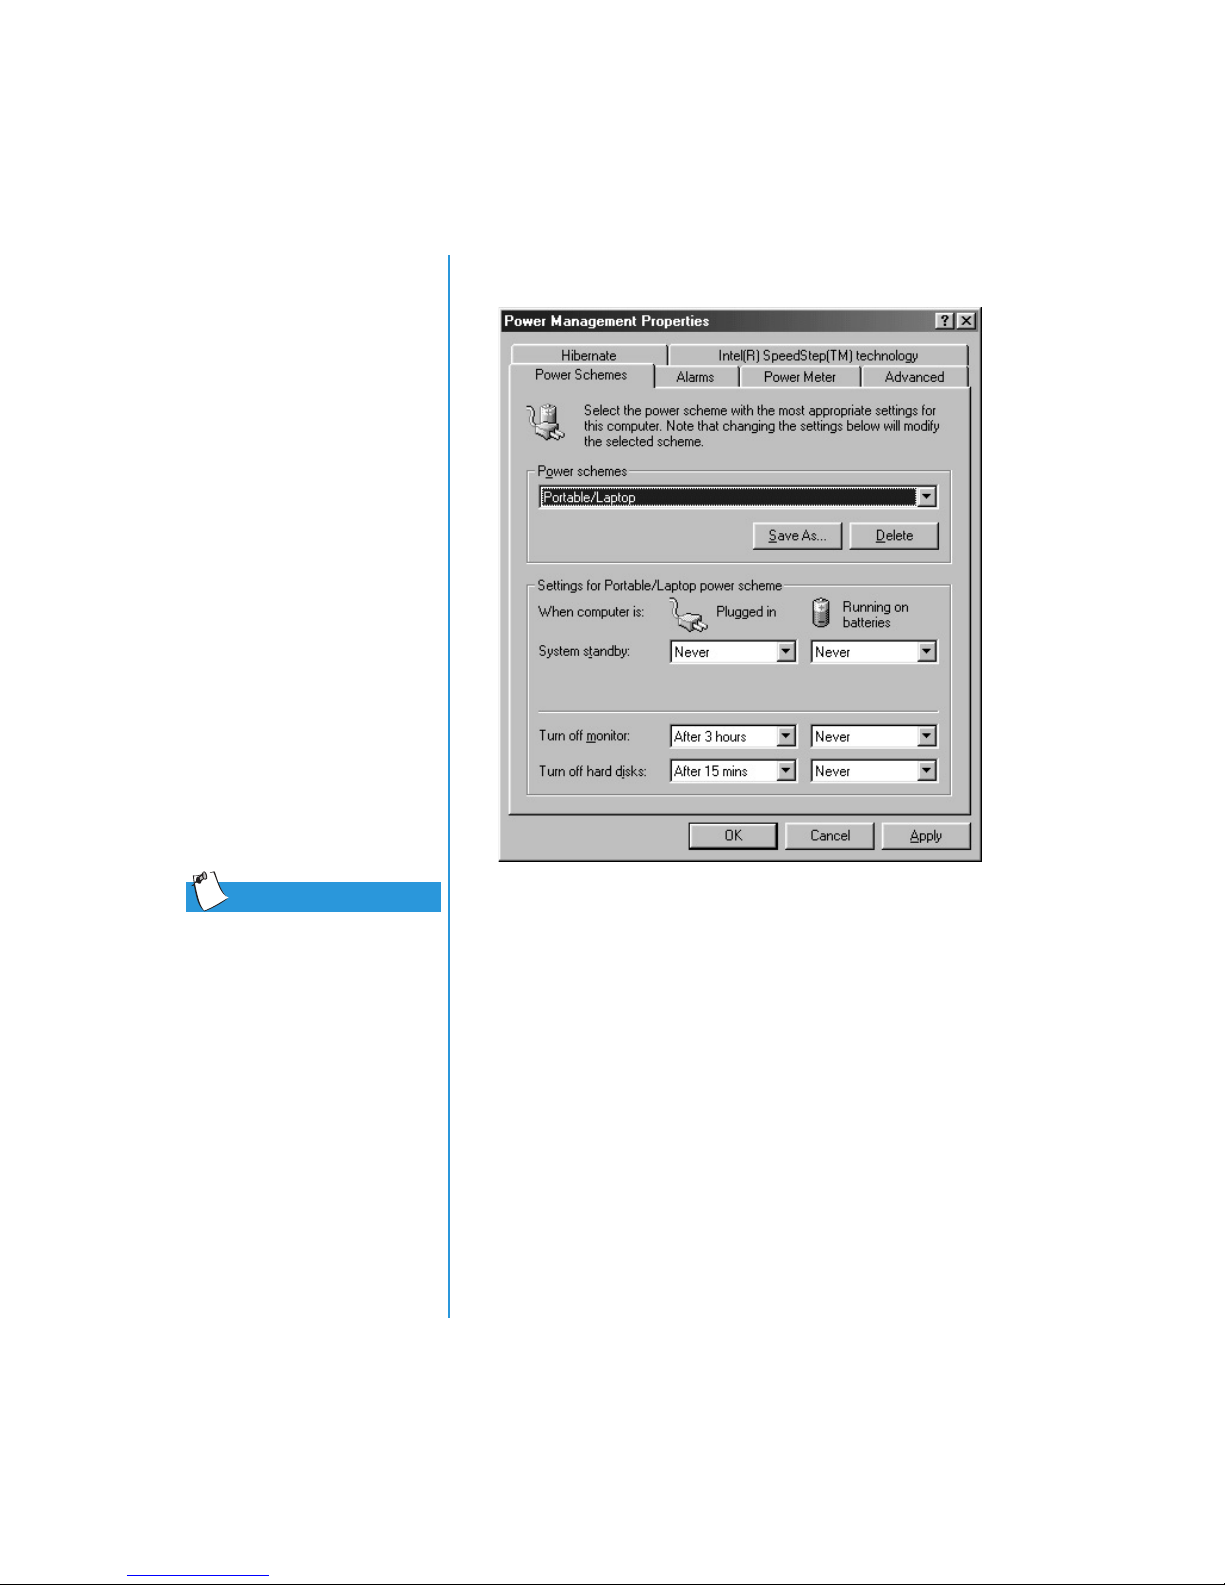
5. Click the
Power Schemes
tab.
Tip
You can use your Notebook
while the battery is draining
or charging.
RESARIO MOBILE INTERNET
P
ERIES
1700 S
EYOND SETUP GUIDE
PC B
6. From
Running on Batteries
a. In the
b. In the
c. In the
Turn off Monitor
Turn off Hard Disk
System Standby
column:
drop-down list, select
drop-down list, select
drop-down list, select
Never
Never
Never
7. Let the battery drain until your Notebook reaches
Hibernation and turns off.
8. Plug in the AC adapter. Restart your Notebook.
9. Return to the Power Management Properties dialog box
Control Panel
under
and re-enter your Power Savings
settings to the desired level.
The battery is now calibrated.
ARING FOR YOUR BATTERY
C
.
.
.
7-5
Page 93

Battery Charging Time
Battery charging time will vary based on the initial battery
charge, the type of battery, and the activity of your Notebook
while charging.
Purchasing Spare or Extra Batteries
Over time, all batteries lose the ability to operate at full capacity
and the battery will have to be replaced. To purchase a new
battery, contact your Compaq-authorized dealer or access the
Compaq Web site at:
www.compaq.com/athome
.
Maximizing Battery Operating Time
The battery operating time depends on your power management
settings. Your Notebook components, the options, and the
applications that you use also affect the operating time. This
section shows you how to increase the length of time you are
able to operate under battery power.
The display, processor, CD/DVD drive, and hard drive use the
most battery power. To maximize the battery operating time,
perform one or more of the following actions:
ARING FOR YOUR BATTERY
7-6 C
•
Reduce display brightness and select a short wait for your
screen saver.
•
Select a screen saver that does not generate a lot of graphics
or motion.
•
Reduce audio volume or use headphones.
•
Exit modem programs when you are not using them.
•
Remove PC Cards when you are not using them.
•
Remove CDs or DVDs when you are not using them.
•
Use Sleep or Hibernation mode to turn off your Notebook
when you are not using it.
RESARIO MOBILE INTERNET
P
EYOND SETUP GUIDE
PC B
1700 S
ERIES
Page 94
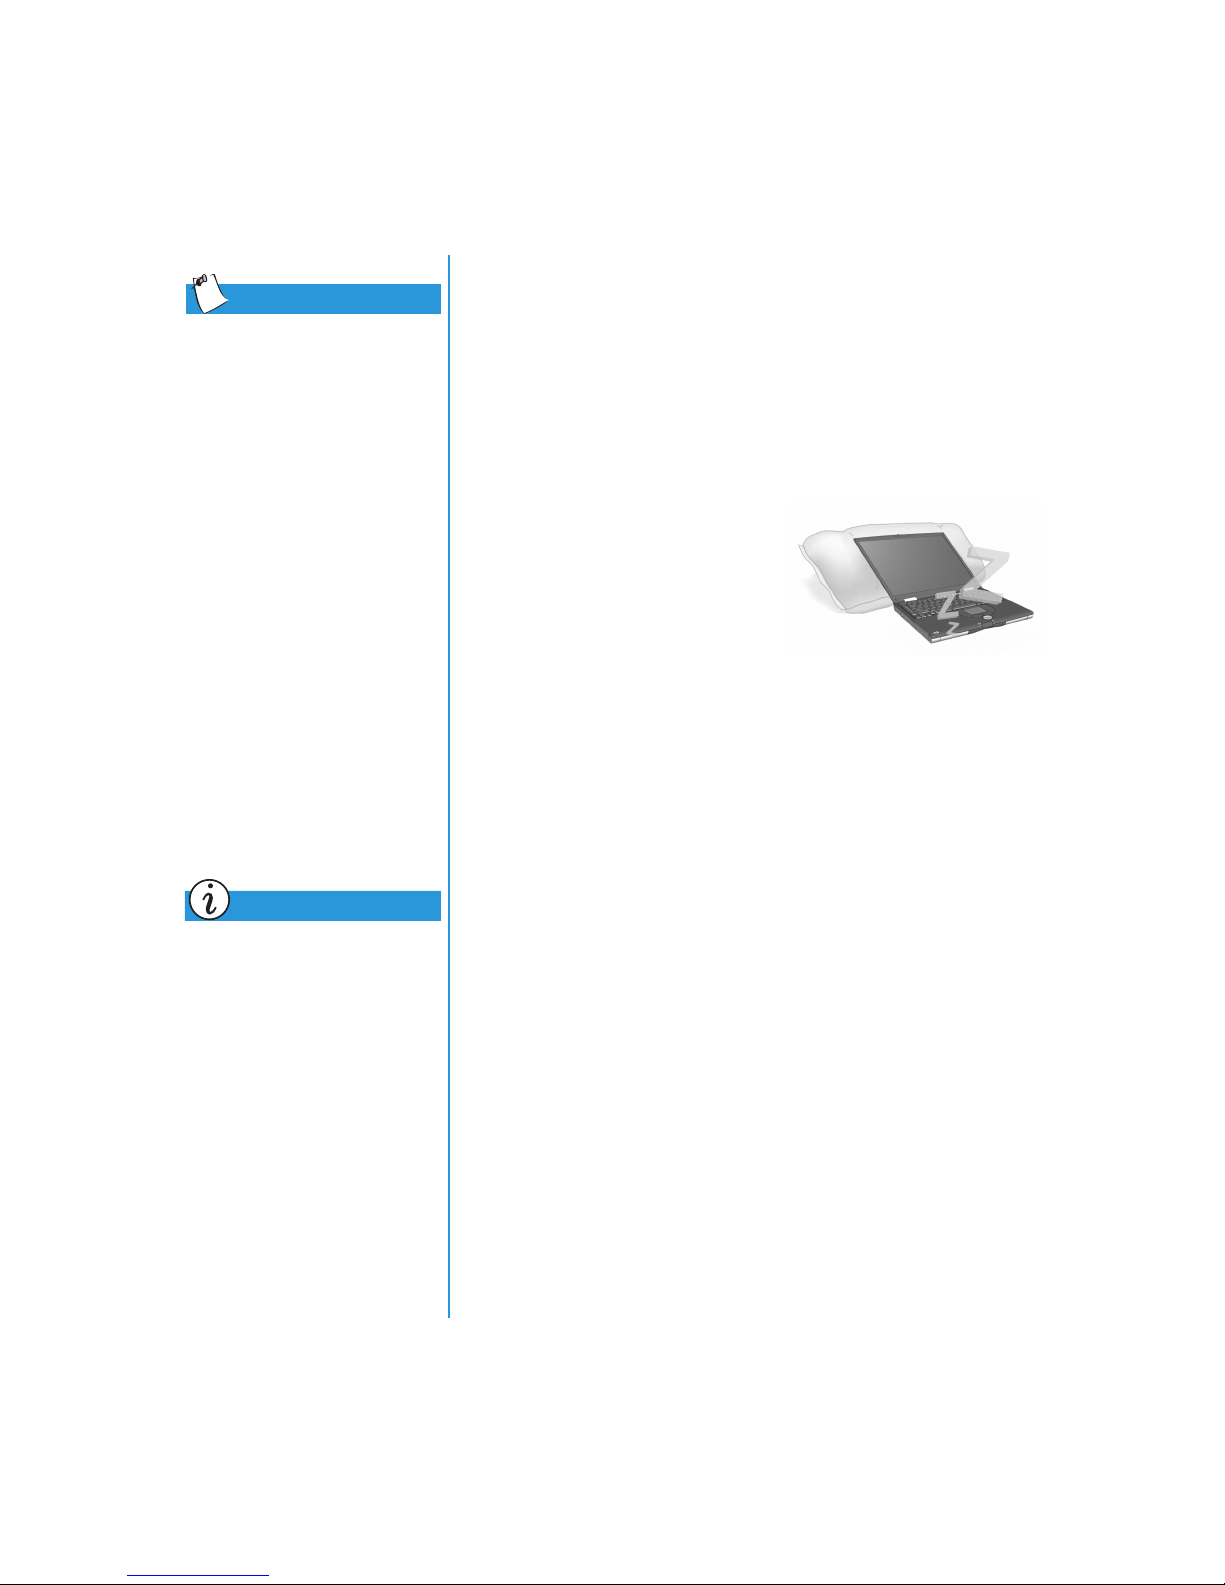
Tip
If you will not be using your
Notebook for an extended
period of time, Compaq
recommends that you unplug
the electrical cord from the
outlet and remove the
battery while your Notebook
is not in use.
Fixing a Low-Battery Condition
A low-battery condition exists when the battery has less than
10 percent of its power remaining. This section will show you
how to correct a low-battery condition and what to do if your
Notebook loses all
battery power.
When your Notebook loses all
battery power, it begins
Hibernation, a process that cannot
be interrupted. If Hibernation has
begun, you must allow your
Notebook to finish saving your
information and shut off
automatically before trying to
correct the low-battery condition.
The availability of an AC wall outlet will determine which
solution you should use to correct a low-battery condition.
Use one of the following options:
Connect the AC Adapter
Did you know...
The battery will charge
whether your Notebook is on
or off, and will continue to
charge until the battery is
fully charged or AC power
is disconnected.
RESARIO MOBILE INTERNET
P
ERIES
1700 S
EYOND SETUP GUIDE
PC B
This solution allows you to continue working without being
interrupted and simultaneously charges the drained battery. You
don’t have to turn off your Notebook before connecting the AC
adapter. Your Notebook automatically switches to AC power
once you connect the AC adapter.
ARING FOR YOUR BATTERY
C
7-7
Page 95
Did you know...
Once your Notebook has
entered Hibernation mode, it
will not turn on until it is
plugged into an AC adapter or
the drained battery is replaced
with a charged one.
Replace the Drained Battery with a Charged One
If you cannot connect the AC
adapter but you have a charged
battery, you can change to battery
power and continue working. To
replace the drained battery with a
charged one, complete the
following steps:
1. Save your work.
2. Turn off your Notebook
(or initiate Hibernation).
3. Replace the drained battery with the charged one.
4. Press the
Power
button to turn on your Notebook.
5. Resume your work.
When AC power becomes available, repeat these same steps
but insert the drained battery and charge it by plugging in the AC
adapter.
Suspend Your Work
If you cannot plug in the AC adapter and you do not have a
charged replacement battery, start Hibernation by pressing the
Power
button. When a power source (AC or battery) becomes
available, press the Power button to turn your Notebook on and
resume your work.
ARING FOR YOUR BATTERY
7-8 C
RESARIO MOBILE INTERNET
P
EYOND SETUP GUIDE
PC B
1700 S
ERIES
Page 96

Power
Saving Energy
Management
Did you know...
Presario Notebooks have
power-saving features that
protect your data and conserve
battery and monitor life.
Congratulations! You are no longer a "new user." Now you know
how to use some of the fun, basic functions of your new Presario
Notebook computer, like surfing the Web. Now, it’s time to learn
about some advanced features, such as power management,
Hibernation and Sleep modes.
What is Power Management?
This section explains the following:
•
Understanding Power Management
•
Starting and Ending Power Modes
•
Power Management Settings
•
Changing Power Management Settings
Understanding Power Management
Power management lets you reduce your Notebook power
consumption. Your Notebook has two power
management modes:
RESARIO MOBILE INTERNET
P
ERIES
1700 S
EYOND SETUP GUIDE
PC B
•
Hibernation saves information to the hard drive
and then turns off your Notebook. Your Notebook hibernates
when the
Power
button is pressed, when the battery has little
power left, or when your Notebook (operating on battery
power) is in Sleep mode for more than one hour.
•
Sleep, also called Standby, puts your Notebook in low-power
mode. It is still on, but the display appears blank.
Caution:
open files, you will lose any unsaved information if you turn off
your Notebook before you end the Sleep mode.
Although Sleep mode maintains system information and
ARING FOR YOUR BATTERY
C
7-9
Page 97
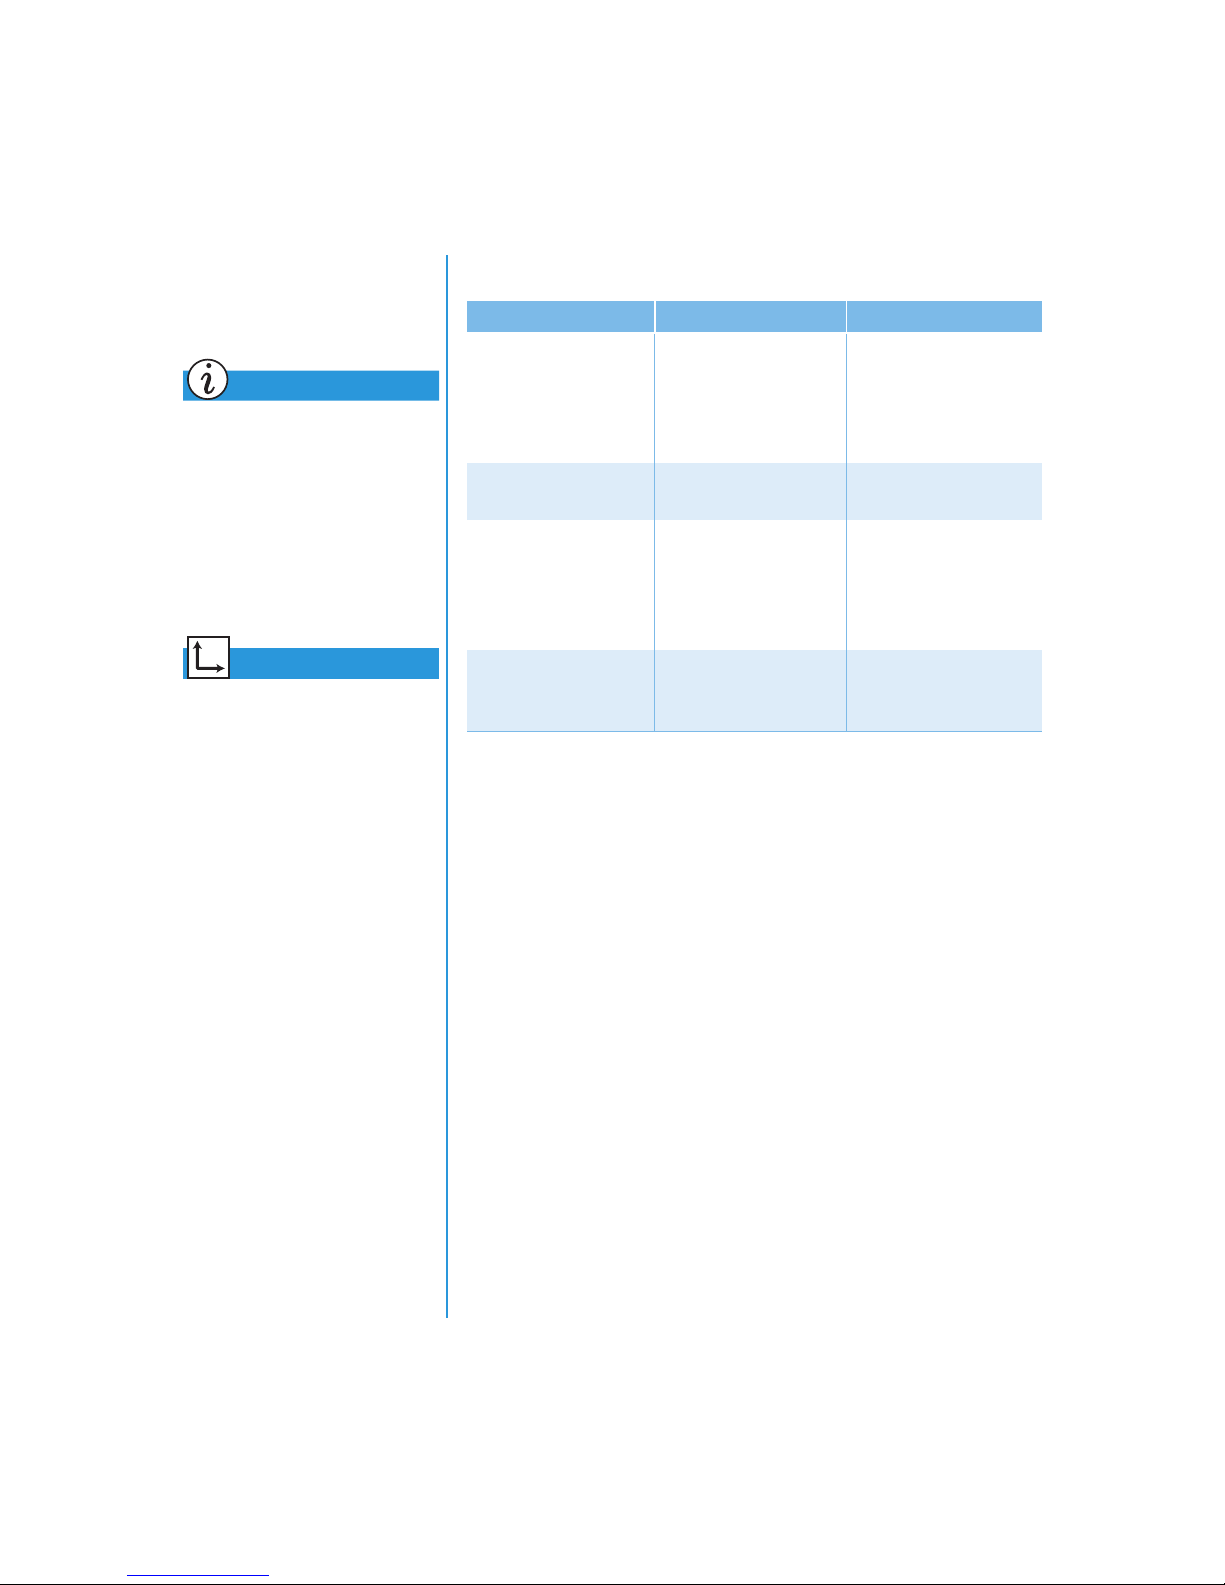
Did you know...
Your Notebook automatically
goes into Hibernation if your
battery is low or after one hour
of Sleep. When it is on AC
power, it does not go into
Hibernation.
See also
Presario Operating System
Manual for more information
on changing Power
Management settings.
Starting and Ending Power Modes
If you want to... Then... Result / Indicators
»
Put your Notebook to
sleep manually
Wake your Notebook
from Sleep manually
Put your Notebook
into Hibernation
manually
Wake your Notebook
from Hibernation
manually
Press the
Fn+F4
Or click the
Start
keys.
button on the Windows
Taskbar,
then
Shutdown
Standby
.
Press any key. Power » light stays on.
Press the
Power
»
button once. Or click
the
Shutdown
Hibernate
Press the
Start
button,
, then
.
Power
»
button once.
Power
light blinks.
,
»
Power
Power » light stays on.
light is off.
ARING FOR YOUR BATTERY
7-10 C
RESARIO MOBILE INTERNET
P
EYOND SETUP GUIDE
PC B
1700 S
ERIES
Page 98
Service
Maintaining your Notebook by keeping it clean and keeping
In This Chapter
Preventive
Maintenance, 8-2
Backup Utilities, 8-6
Hard Disk Errors, 8-7
Hard Disk Space
Management, 8-9
the vents free from dust promotes greater longevity
and higher performance. If Notebook components are not
cleaned periodically, the probability of system failure increases.
The information in this chapter provides helpful instructions
for the maintenance and care of your Notebook.
RESARIO NOTEBOOK BEYOND SETUP GUIDE
P
ERIES
1700 S
ERVICE
S
8-1
Page 99
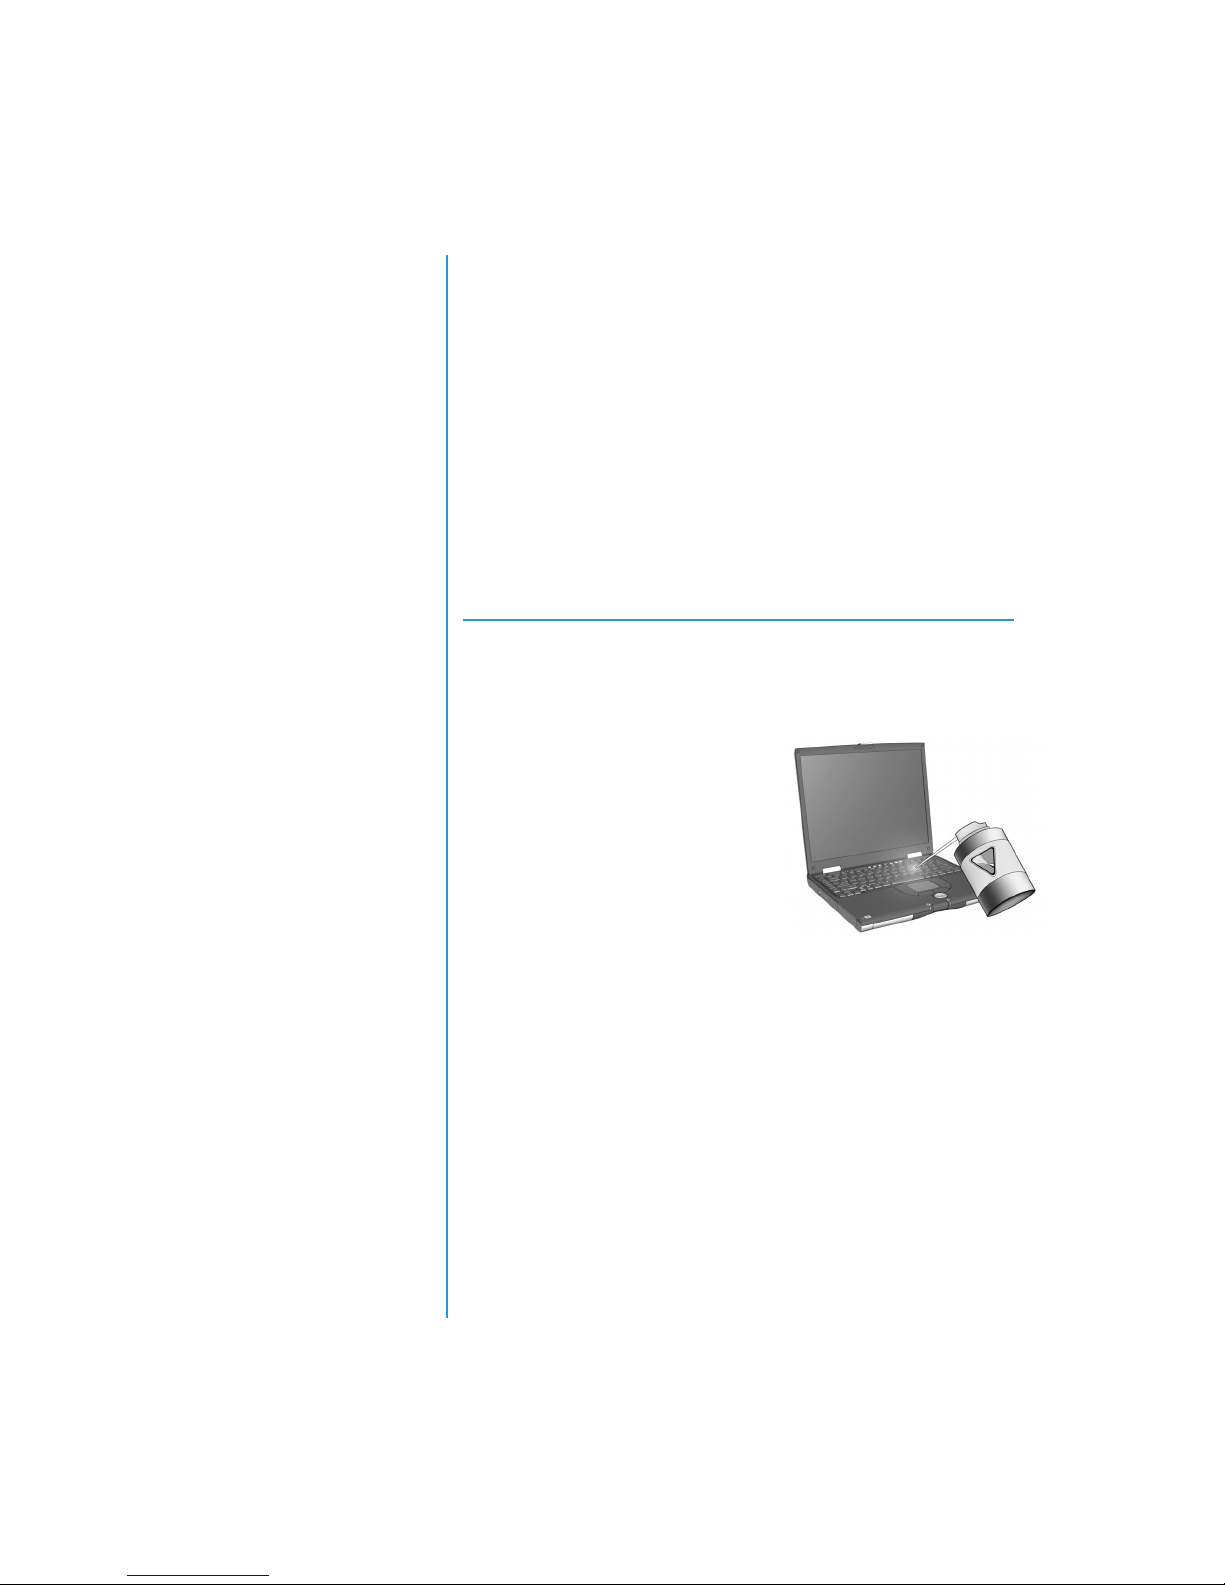
Preventive
Cleaning Your Notebook’s Exterior
Maintenance
This section covers:
•
Cleaning Your
Notebook’s Exterior
•
Cleaning the Keyboard
•
Cleaning the Display
Screen
•
Cleaning the TouchPad
•
Cleaning the External
Mouse
•
Caring for Your Presario
Notebook
Caution:
However, some electrical currents may still be flowing through the
Notebook. To completely disconnect power from the Notebook,
unplug the power and modem cables from the wall outlets and
remove the battery.
Using a damp, lint-free cloth, clean the keyboard, the
Notebook’s exterior, and other external parts on your Notebook.
Caution:
will damage the finish on your Notebook.
When you shut down your Notebook, the power turns off.
Do not use household cleaning solvents because they
Cleaning the Keyboard
You should clean the keyboard
periodically to rid it of dust, lint,
and any other foreign particles that
may become trapped beneath the
keys. Use a compressed can of air
with a straw extension attached to
blow air in and around the keys.
Cleaning the keyboard prevents
keys from sticking and jamming.
It also makes typing a more
pleasant experience.
ERVICE
8-2 S
Caution:
may permanently damage your keyboard.
Caution:
keyboard because you may deposit normal household debris on the
surfaces rather than remove it.
Do not use liquids of any kind on the keyboard, as they
Do not use a regular vacuum cleaner for cleaning the
RESARIO NOTEBOOK BEYOND SETUP GUIDE
P
1700 S
ERIES
Page 100
Tip
Foam swabs or cosmetic
applicators are preferred to
cotton swabs because cotton
can add rather than
remove lint.
Cleaning the Display Screen
The surface of your display screen may look fuzzy or
smudged. You can use a soft, damp, lint-free cloth to wipe
the screen clean.
If the display screen requires any additional cleaning, use an
antistatic screen cleaner or pre-moistened antistatic wipes.
Caution:
chemicals directly on the screen. You may permanently damage
your Notebook.
Never spray water or any other cleaning fluids or
Cleaning the TouchPad
Grease and dirt on the TouchPad
can cause your cursor to jump
around on the display screen.
To avoid this, periodically clean
the TouchPad with a damp cloth.
Remember, before using your
Notebook, always wash your
hands if they are dirty.
RESARIO NOTEBOOK BEYOND SETUP GUIDE
P
ERIES
1700 S
ERVICE
S
8-3
 Loading...