

Page 1

CPQ-311245-001.book Page 1 Thursday, March 27, 2003 10:17 PM
Contents
Display . . . . . . . . . . . . . . . . . . . . . . . . . . . . . . . . . . . . . . . 2–2
Top . . . . . . . . . . . . . . . . . . . . . . . . . . . . . . . . . . . . . . . . . . 2–3
TouchPad. . . . . . . . . . . . . . . . . . . . . . . . . . . . . . . . . . 2–3
Keys and Antenna . . . . . . . . . . . . . . . . . . . . . . . . . . . 2–4
Power Controls . . . . . . . . . . . . . . . . . . . . . . . . . . . . . 2–5
Lights. . . . . . . . . . . . . . . . . . . . . . . . . . . . . . . . . . . . . 2–6
Audio Buttons and Speakers . . . . . . . . . . . . . . . . . . . 2–7
Front Panel . . . . . . . . . . . . . . . . . . . . . . . . . . . . . . . . . . . . 2–8
Rear Panel . . . . . . . . . . . . . . . . . . . . . . . . . . . . . . . . . . . . 2–9
Connectors and Jacks. . . . . . . . . . . . . . . . . . . . . . . . . 2–9
Vent . . . . . . . . . . . . . . . . . . . . . . . . . . . . . . . . . . . . . 2–10
Left Side. . . . . . . . . . . . . . . . . . . . . . . . . . . . . . . . . . . . . 2–11
Right Side. . . . . . . . . . . . . . . . . . . . . . . . . . . . . . . . . . . . 2–12
Underside . . . . . . . . . . . . . . . . . . . . . . . . . . . . . . . . . . . . 2–13
Bays and Memory Compartment. . . . . . . . . . . . . . . 2–13
Docking Connector and Vents. . . . . . . . . . . . . . . . . 2–14
Labels. . . . . . . . . . . . . . . . . . . . . . . . . . . . . . . . . . . . 2–15
Additional Standard Components . . . . . . . . . . . . . . . . . 2–16
Cables and Cord. . . . . . . . . . . . . . . . . . . . . . . . . . . . 2–16
Adapters and Battery Pack . . . . . . . . . . . . . . . . . . . 2–17
Restoration and Documentation CDs . . . . . . . . . . . 2–18
2
Hardware
Startup and Reference Guide—Part 2 2–1
Page 2
CPQ-311245-001.book Page 2 Thursday, March 27, 2003 10:17 PM
Hardware
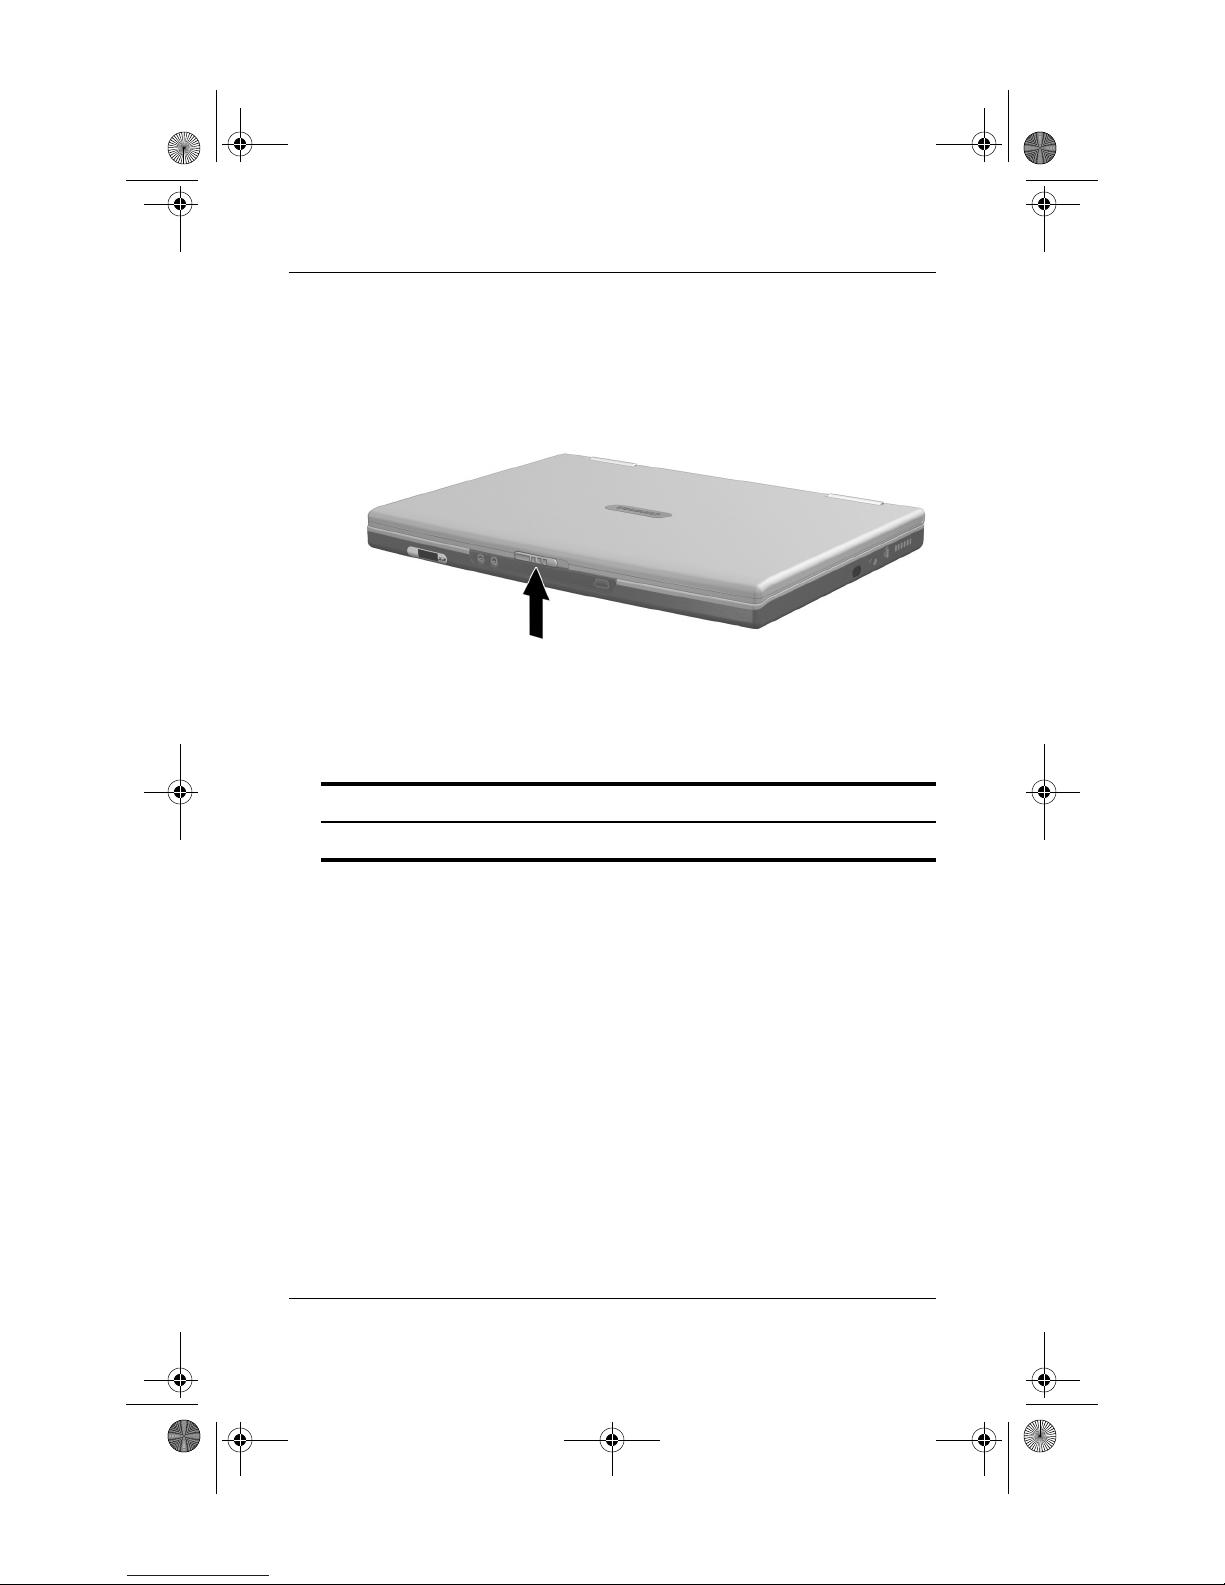
Display
Display
Display release latch Opens the notebook.
2–2 Startup and Reference Guide—Part 2
Page 3
CPQ-311245-001.book Page 3 Thursday, March 27, 2003 10:17 PM
Top
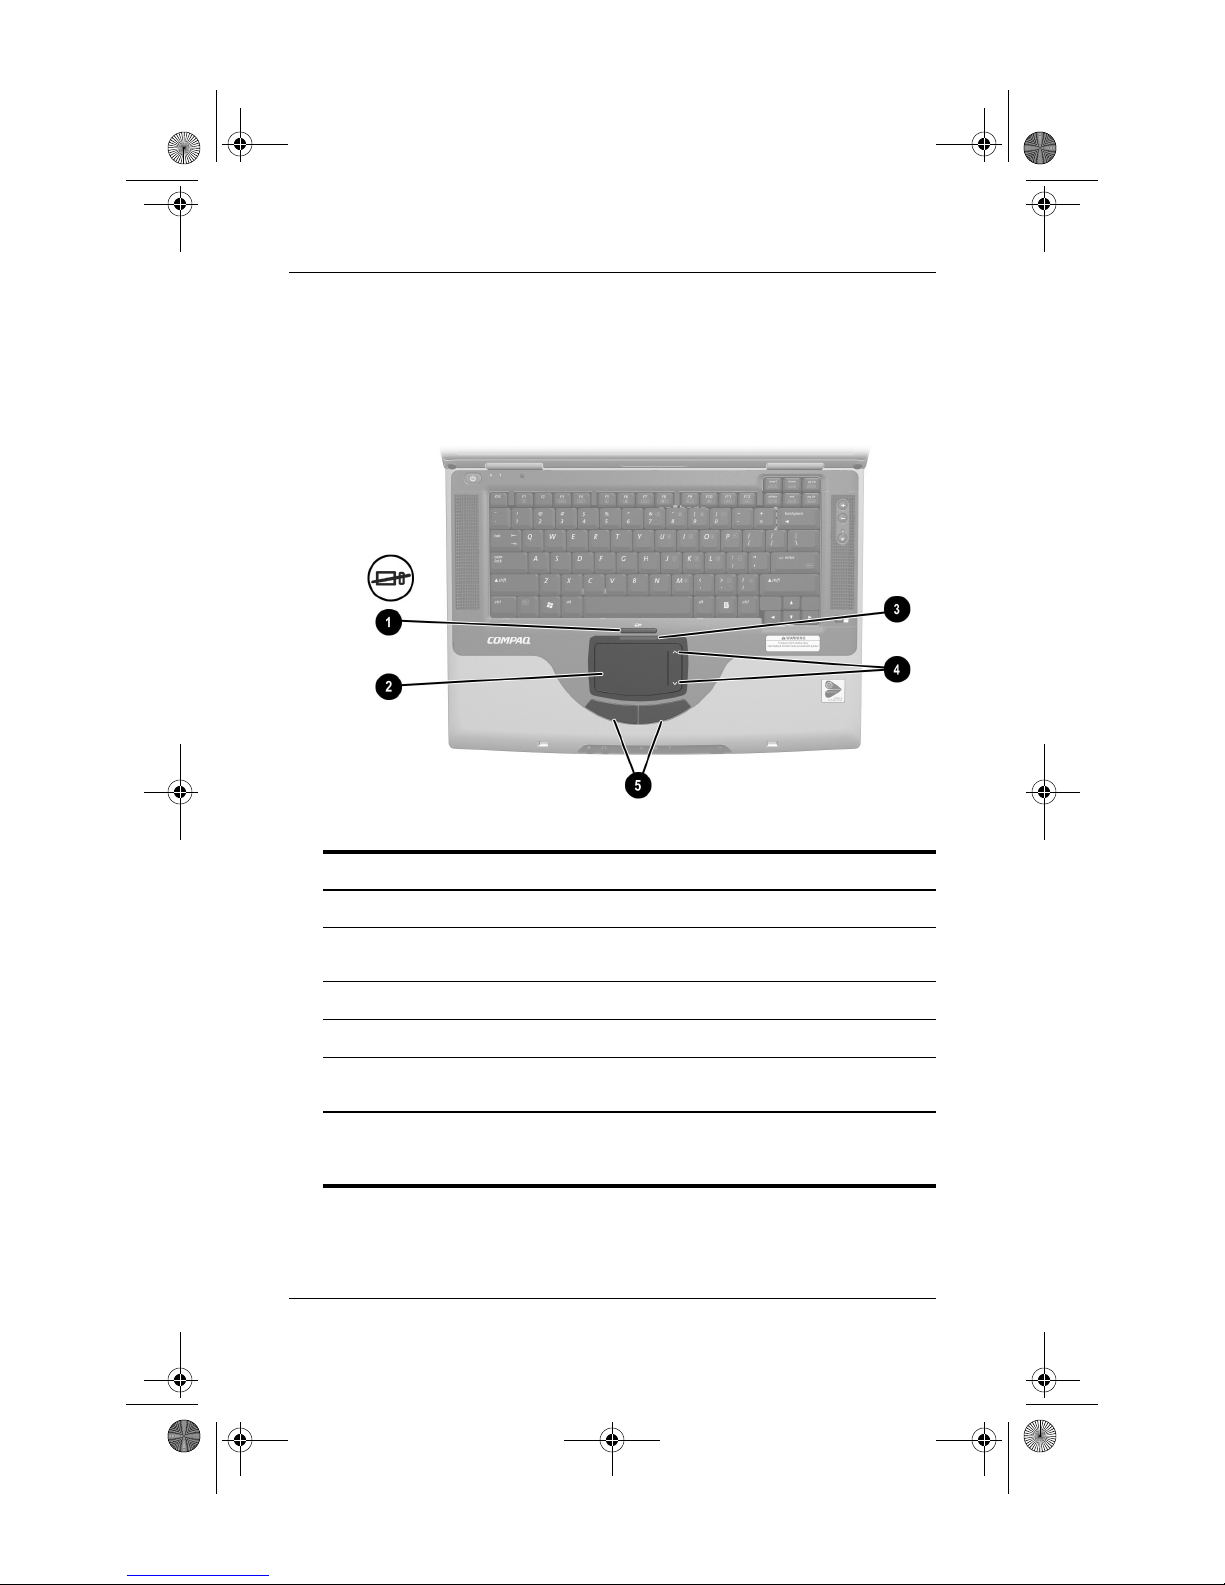
TouchPad
Hardware
Top: TouchPad
TouchPad on/off button Enables/disables the TouchPad.
1
TouchPad* Moves the pointer and selects or
2
TouchPad light On: TouchPad is enabled.
3
TouchPad scroll zones (2)* Scroll upward or downward.
4
Left and right TouchPad buttons* Function like the left and right
5
*This table describes default settings. For information about changing the
functions of TouchPad features, see “Setting TouchPad Preferences” in
Chapter 3.
Startup and Reference Guide—Part 2 2–3
activates items on the screen.
buttons on an external mouse.
Page 4
CPQ-311245-001.book Page 4 Thursday, March 27, 2003 10:17 PM
Hardware
Keys and Antenna
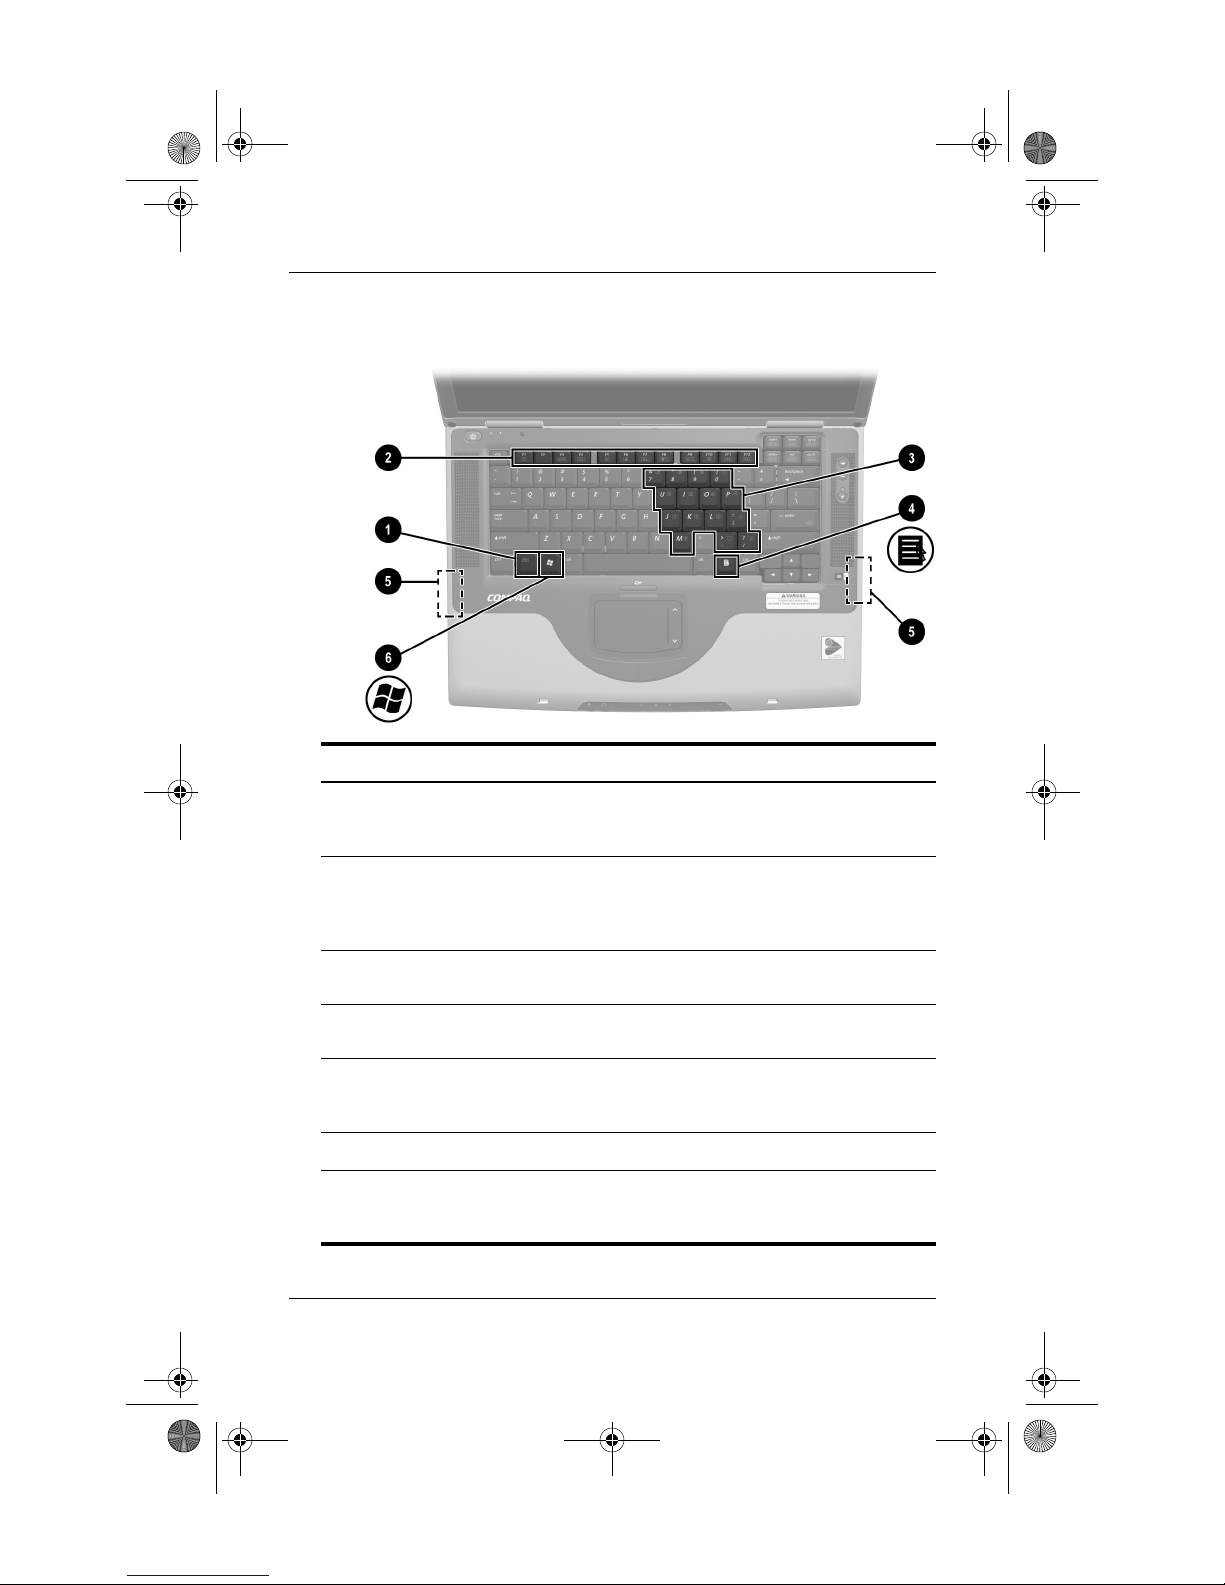
Top: Keys and Antenna
Fn key Combines with other keys to perform
1
Function keys (12) Perform system and application tasks.
2
Keypad keys (15)* Can be used like the keys on an
3
Applications key Displays a shortcut menu for items
4
Antenna (available on select
5
models and not visible from
outside the notebook)*
Microsoft logo key Displays the Windows Start menu.
6
*The notebook has 2 antennas. The second is on the right side of the
notebook. For optimal transmissions, keep the areas immediately over
the antennas free from obstructions.
2–4 Startup and Reference Guide—Part 2
system tasks. For example, pressing
Fn+F7 increases screen brightness.
When combined with the Fn key, the
function keys F1 and F3 through F12
perform additional tasks as hotkeys.
external numeric keypad.
beneath the pointer.
Sends and receives wireless device
signals.
Page 5
CPQ-311245-001.book Page 5 Thursday, March 27, 2003 10:17 PM
Power Controls
Hardware
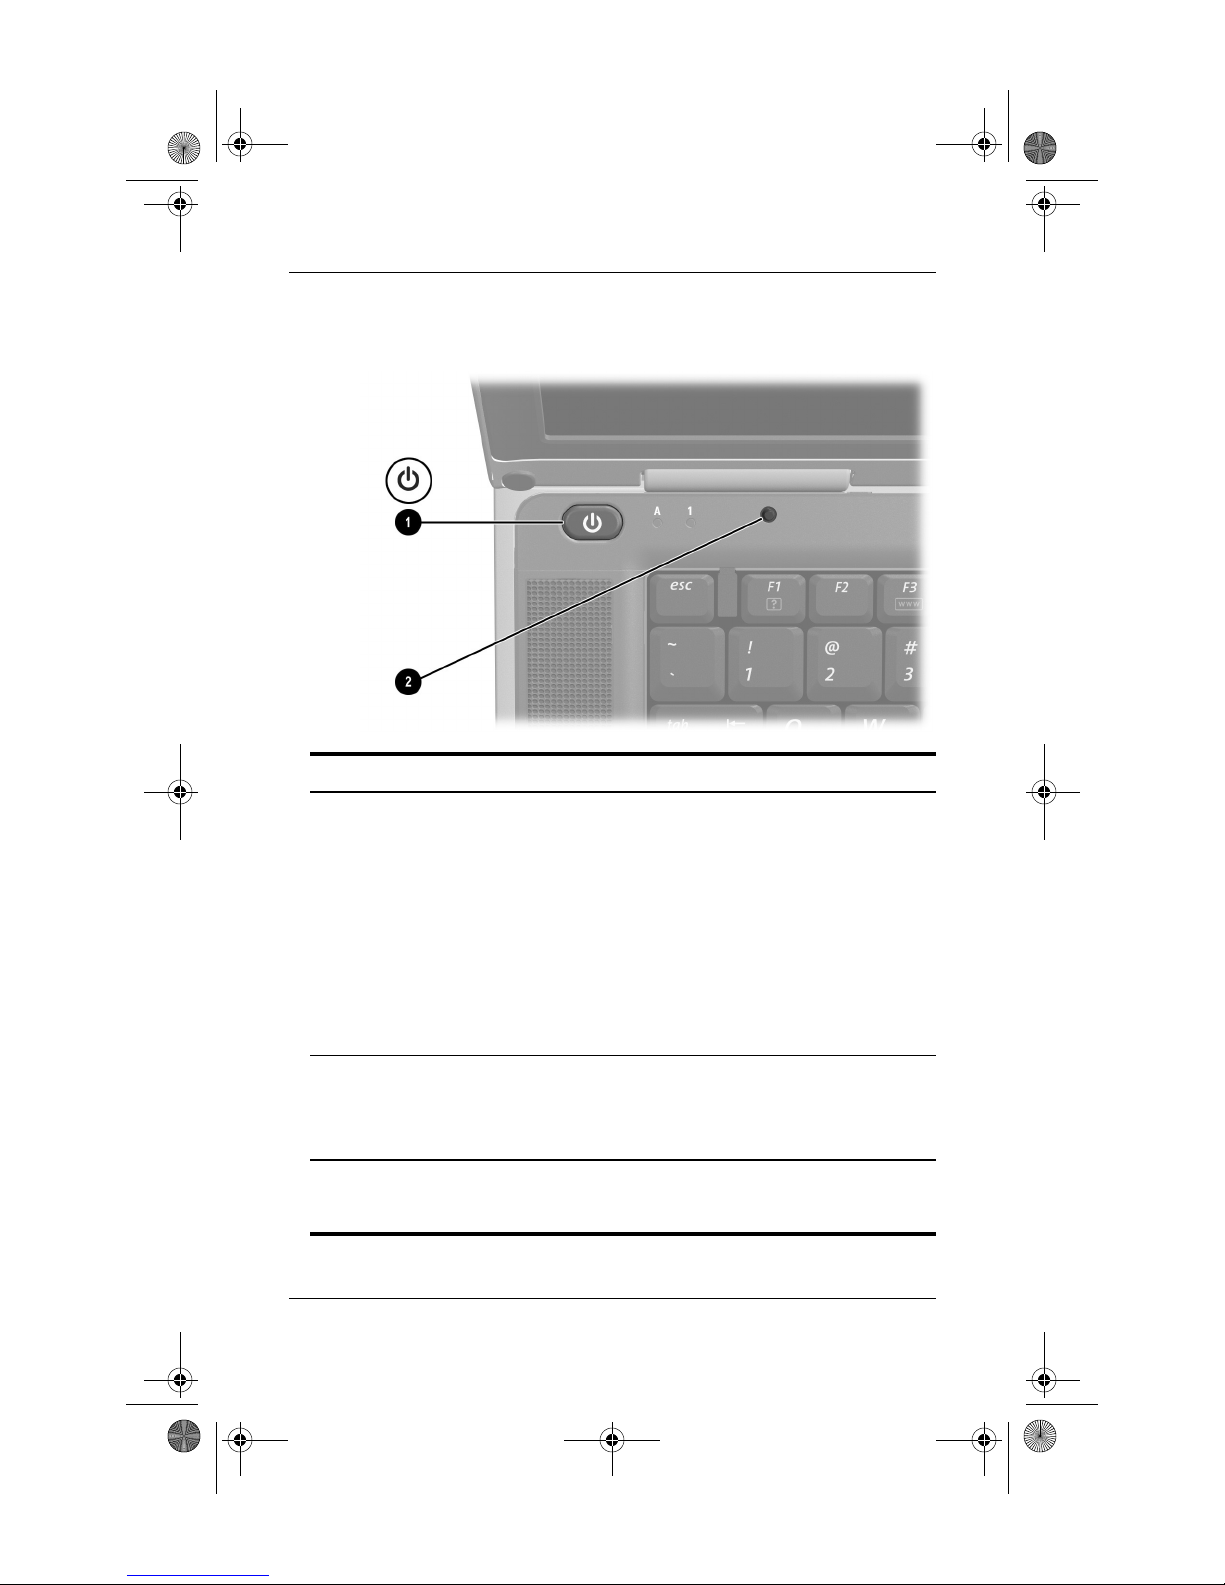
Top: Power Controls
Power button* When the notebook is:
1
■ Off, press to turn on the notebook.
■ On, briefly press to initiate Hibernation.
■ In Standby, briefly press to resume from Standby.
■ In Hibernation, briefly press to restore from
Hibernation.
If the system has stopped responding and
✎
Windows shutdown procedures cannot be
used, press and hold for at least 4 seconds
to turn off the notebook.
Display switch*
2
*This table describes default settings. For information about changing the
function of the power button or display switch, see “Setting Power Control
Preferences” in Chapter 4.
Startup and Reference Guide—Part 2 2–5
■ If the notebook is closed while on, turns off the
display.
■ If the notebook is opened while in Standby, turns
on the notebook (resumes from Standby).
Page 6
CPQ-311245-001.book Page 6 Thursday, March 27, 2003 10:17 PM
Hardware
Lights
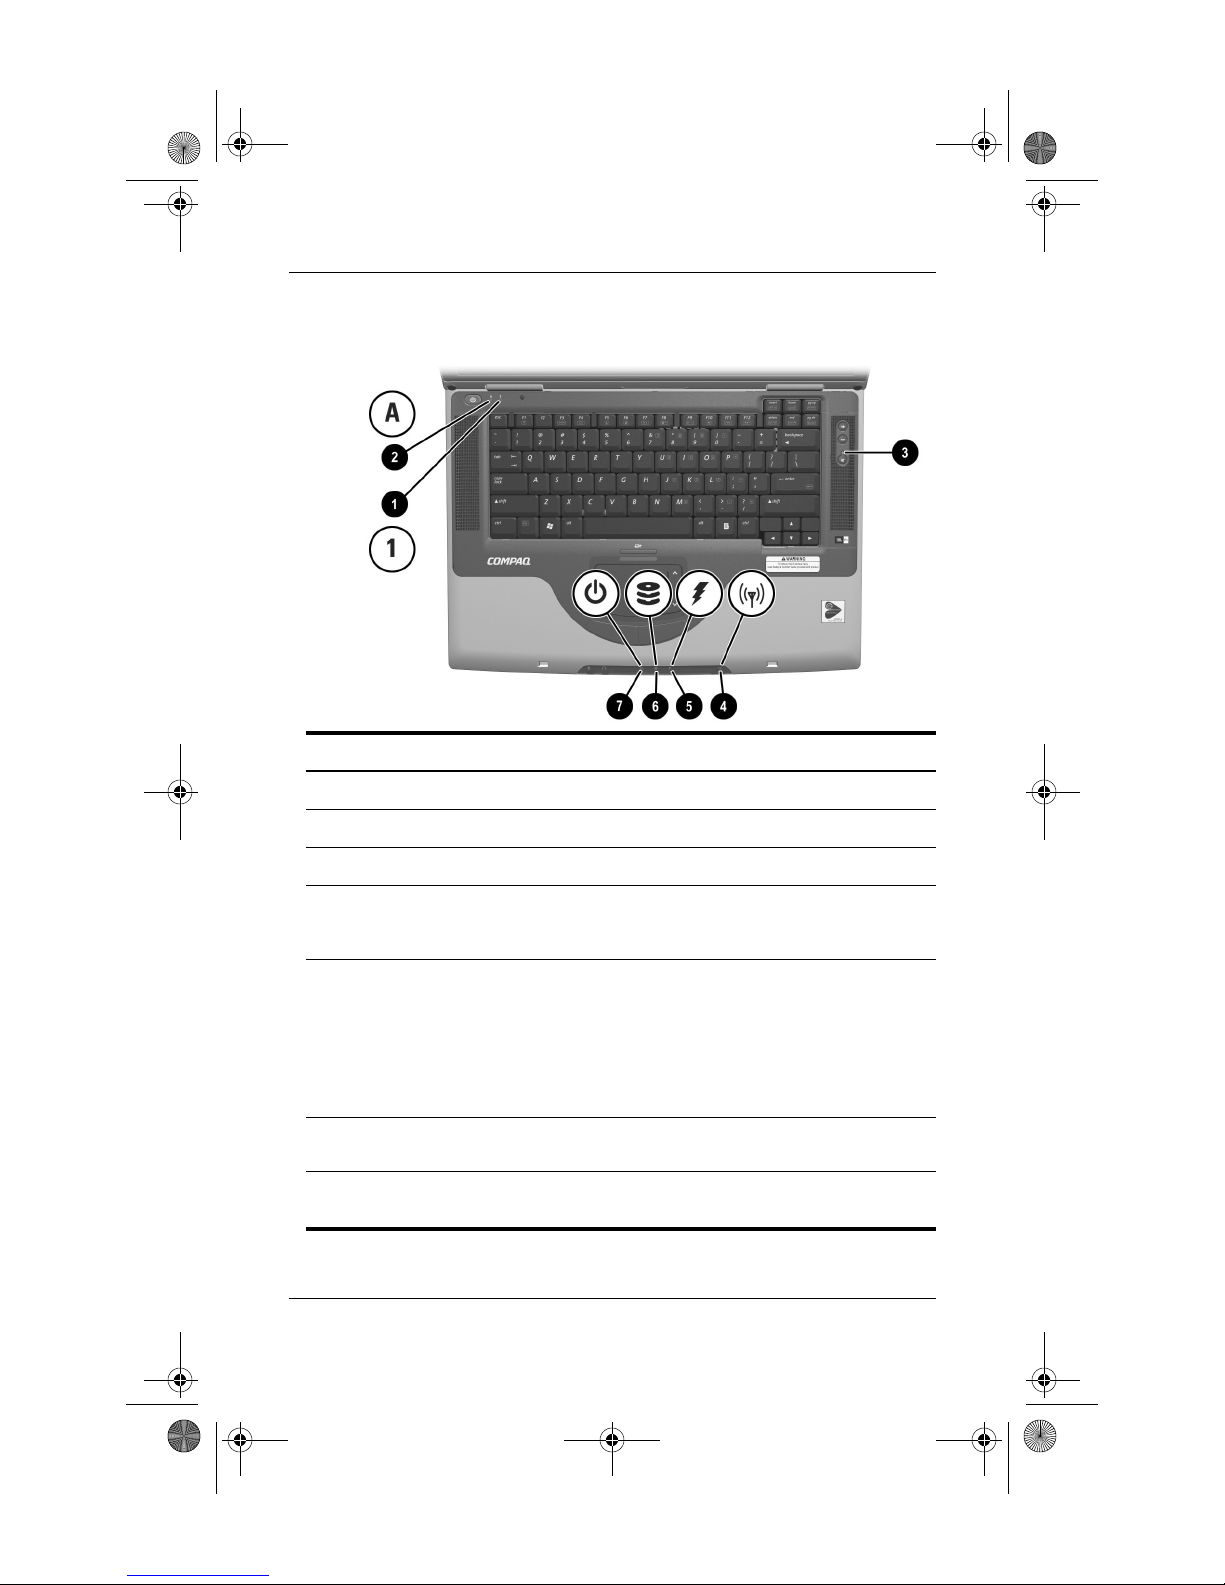
Top: Lights
Num lock light
1
Caps lock light On: Caps lock is on.
2
Mute light On: Volume is muted.
3
Wireless device light
4
(available on select
models)
Battery light On: The notebook is receiving adequate
5
IDE (Integrated Drive
6
Electronics) drive light
Power/standby light On: Notebook is turned on.
7
2–6 Startup and Reference Guide—Part 2
On: Num lock or the internal keypad is on.
On: An optional internal wireless device is
turned on.
external power.
■ On amber: A battery pack is charging.
■ On green: A battery pack is fully charged.
■ Flashing: A battery pack is malfunctioning
and may need to be replaced.
On: The internal hard drive or optical drive is
being accessed.
Flashing: Notebook is in Standby.
Page 7
CPQ-311245-001.book Page 7 Thursday, March 27, 2003 10:17 PM
Audio Buttons and Speakers
Hardware
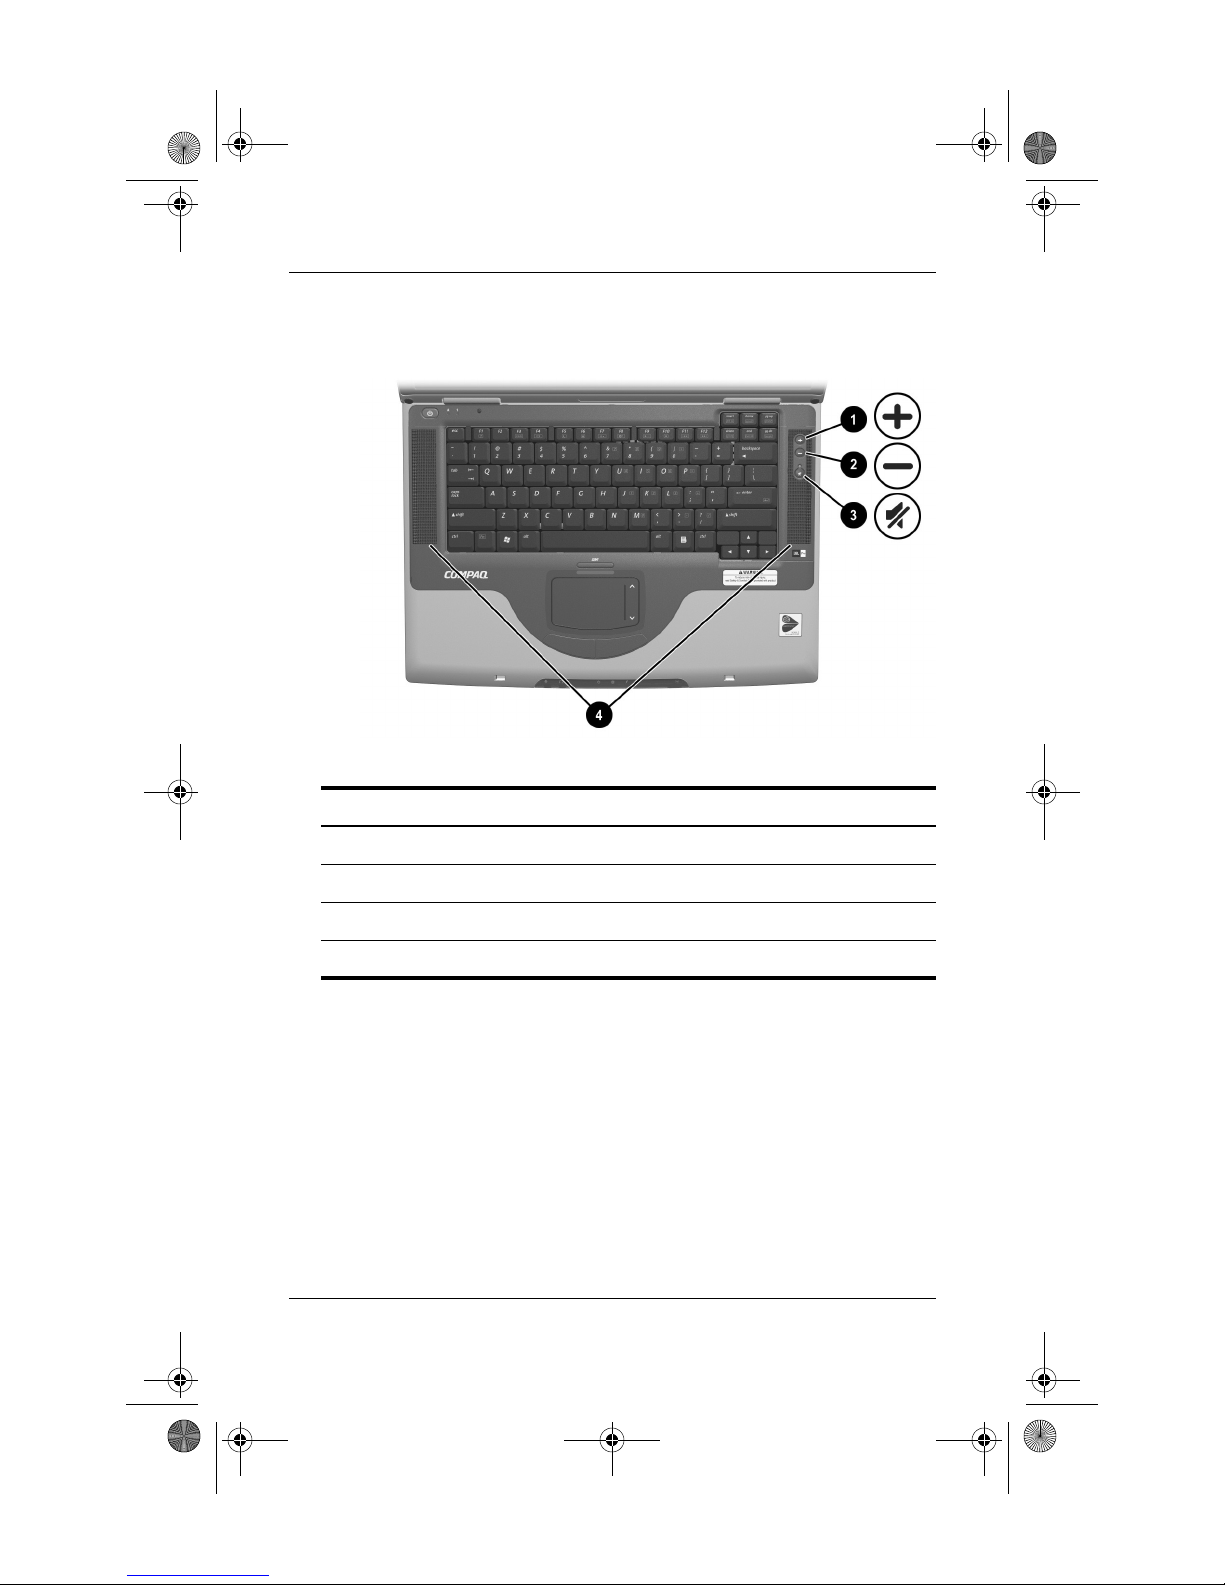
Top: Audio Buttons and Speakers
Increase volume button Increases system volume.
1
Decrease volume button Decreases system volume.
2
Mute button Mutes or restores volume.
3
Stereo speakers (2) Produce stereo sound.
4
Startup and Reference Guide—Part 2 2–7
Page 8
CPQ-311245-001.book Page 8 Thursday, March 27, 2003 10:17 PM
Hardware
Front Panel
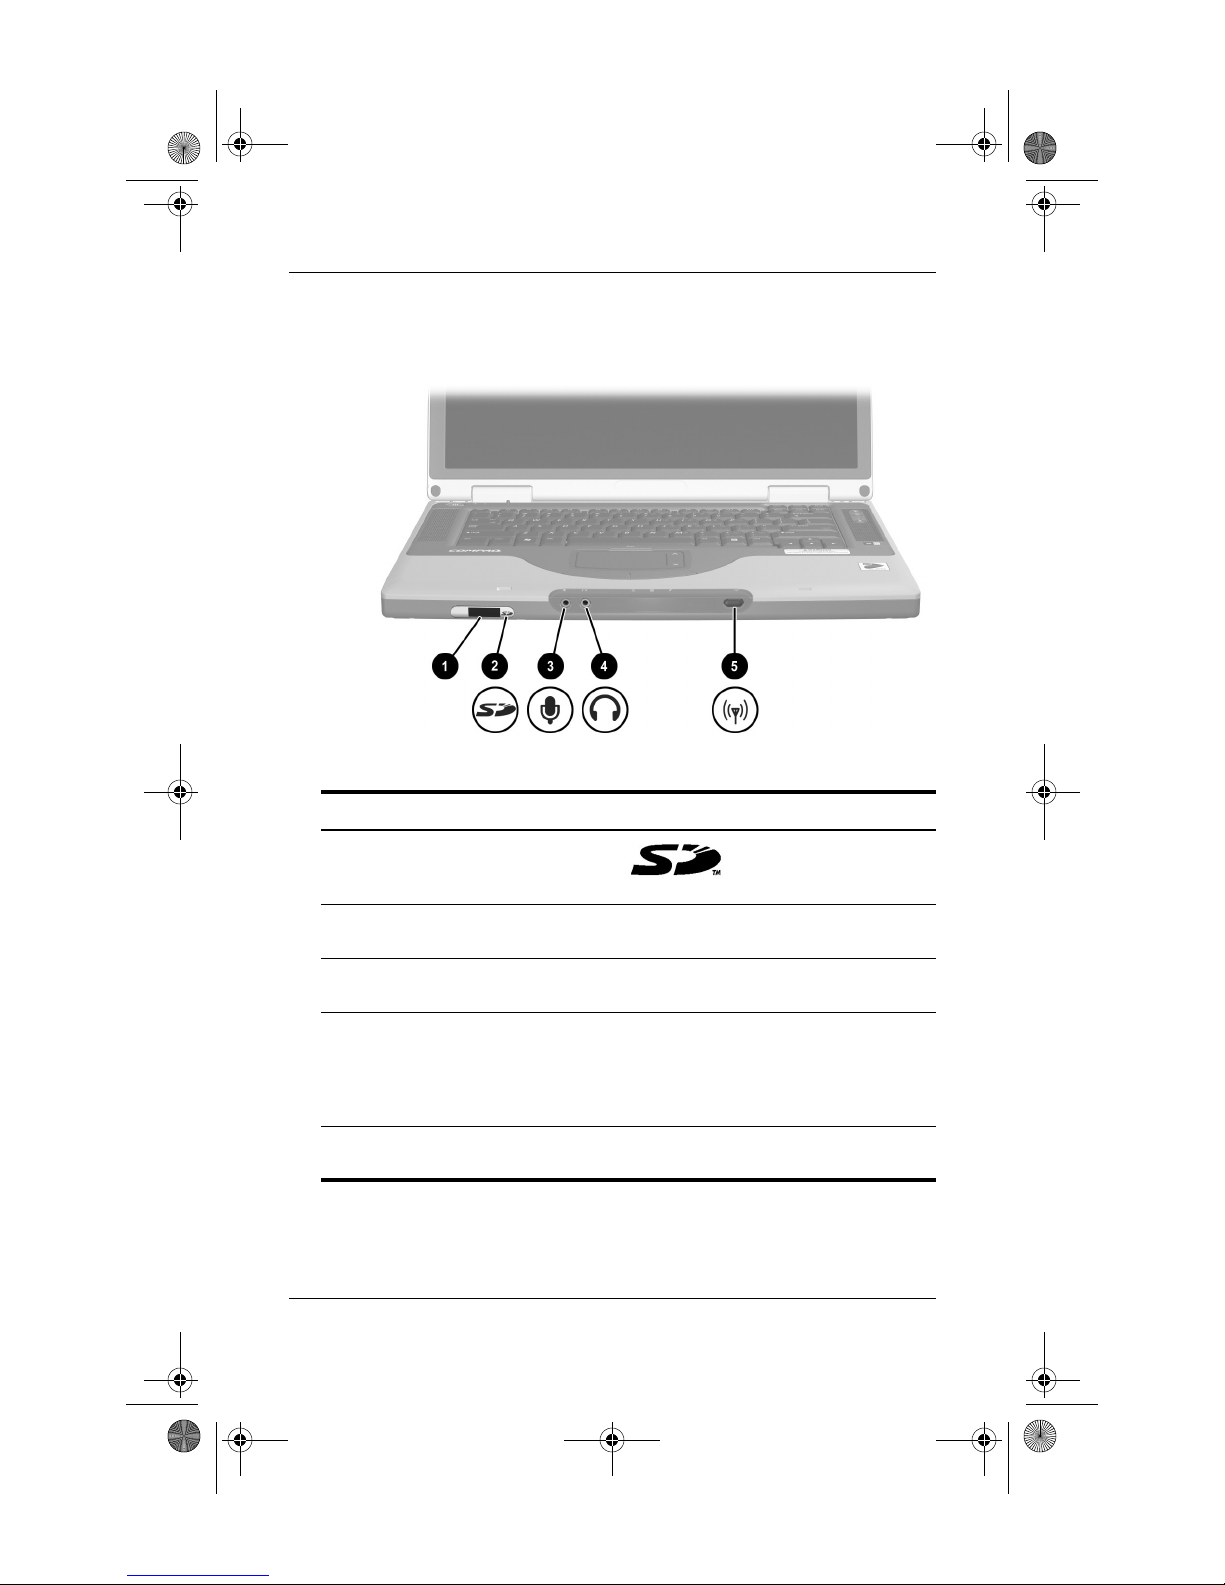
Front Panel
SD (Secure Digital) Card slot Supports SD Cards
1
SD Card light On: An SD Card or MMC is being
2
Microphone jack Connects an optional monaural or
3
Audio-out jack Connects optional headphones or
4
Wireless device button
5
(available on select models)
2–8 Startup and Reference Guide—Part 2
accessed.
stereo microphone.
powered stereo speakers. Also
connects the audio function of an
audio/video device such as a television
or VCR.
Turns an optional internal wireless
device on or off.
and MMCs (multimedia
cards).
Page 9
CPQ-311245-001.book Page 9 Thursday, March 27, 2003 10:17 PM
Rear Panel
Connectors and Jacks
Hardware
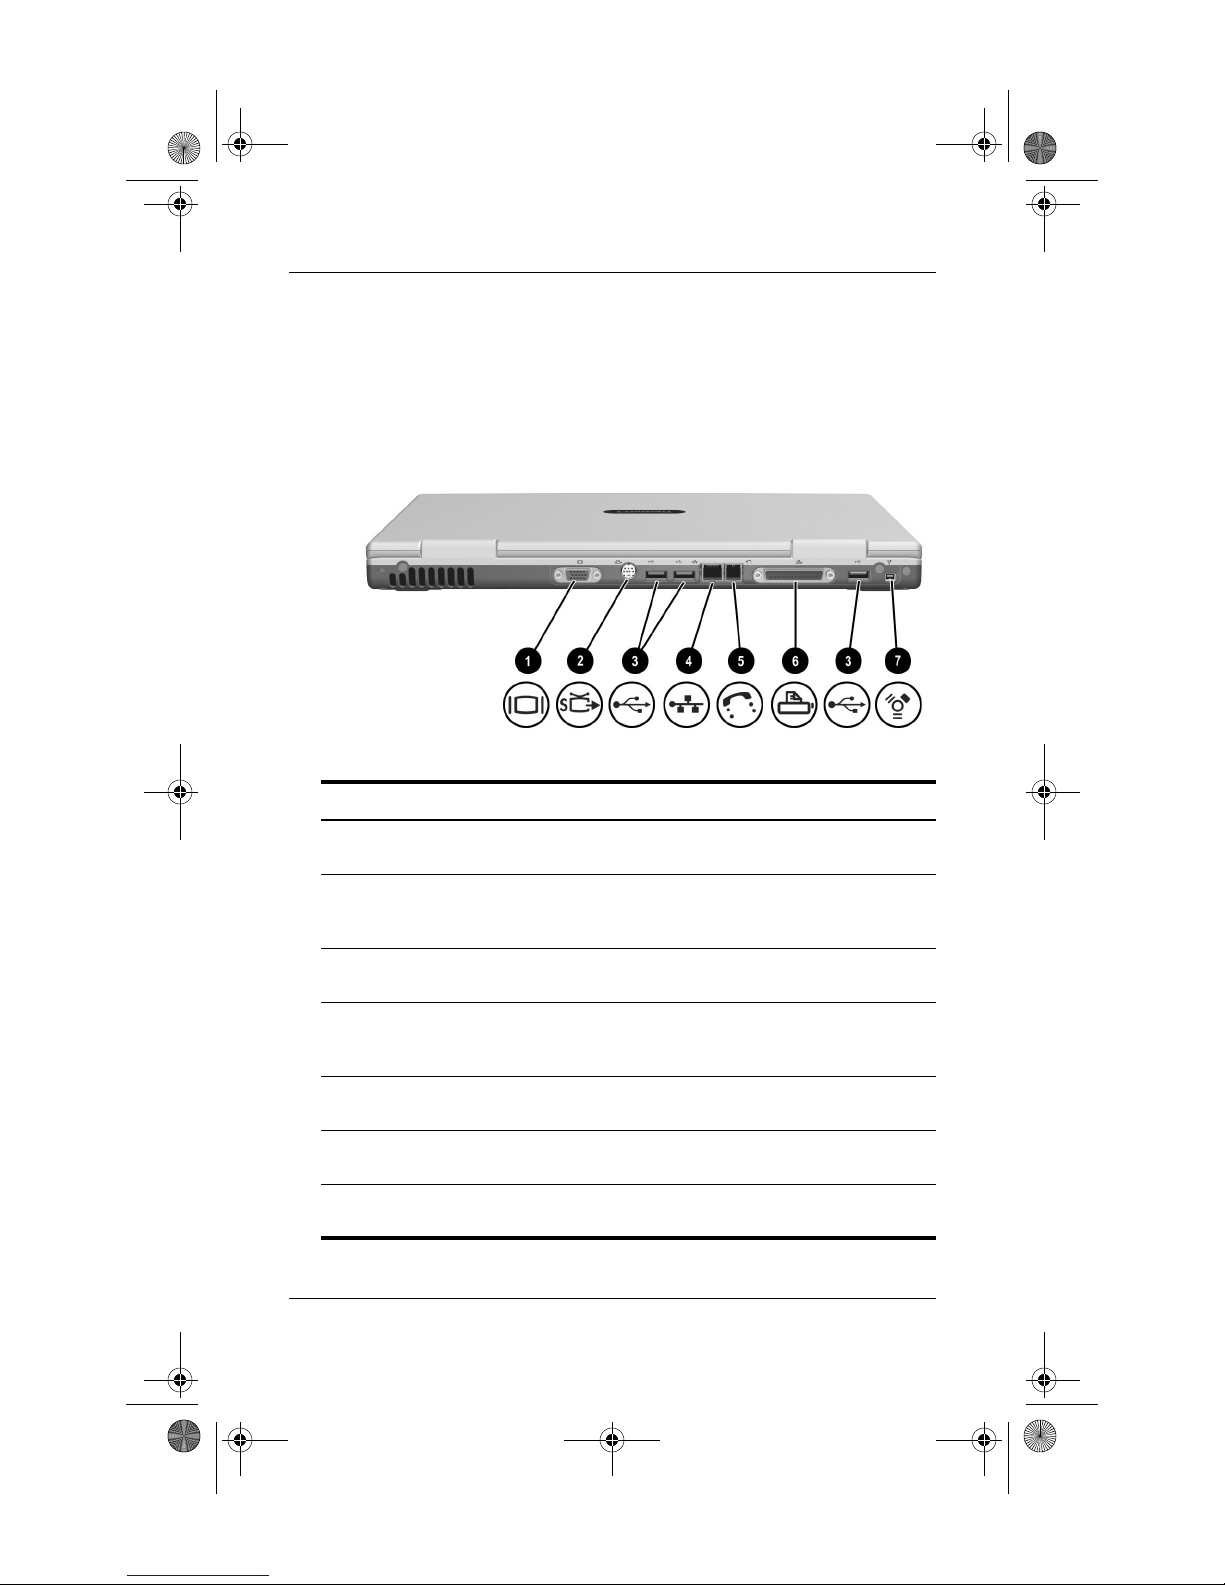
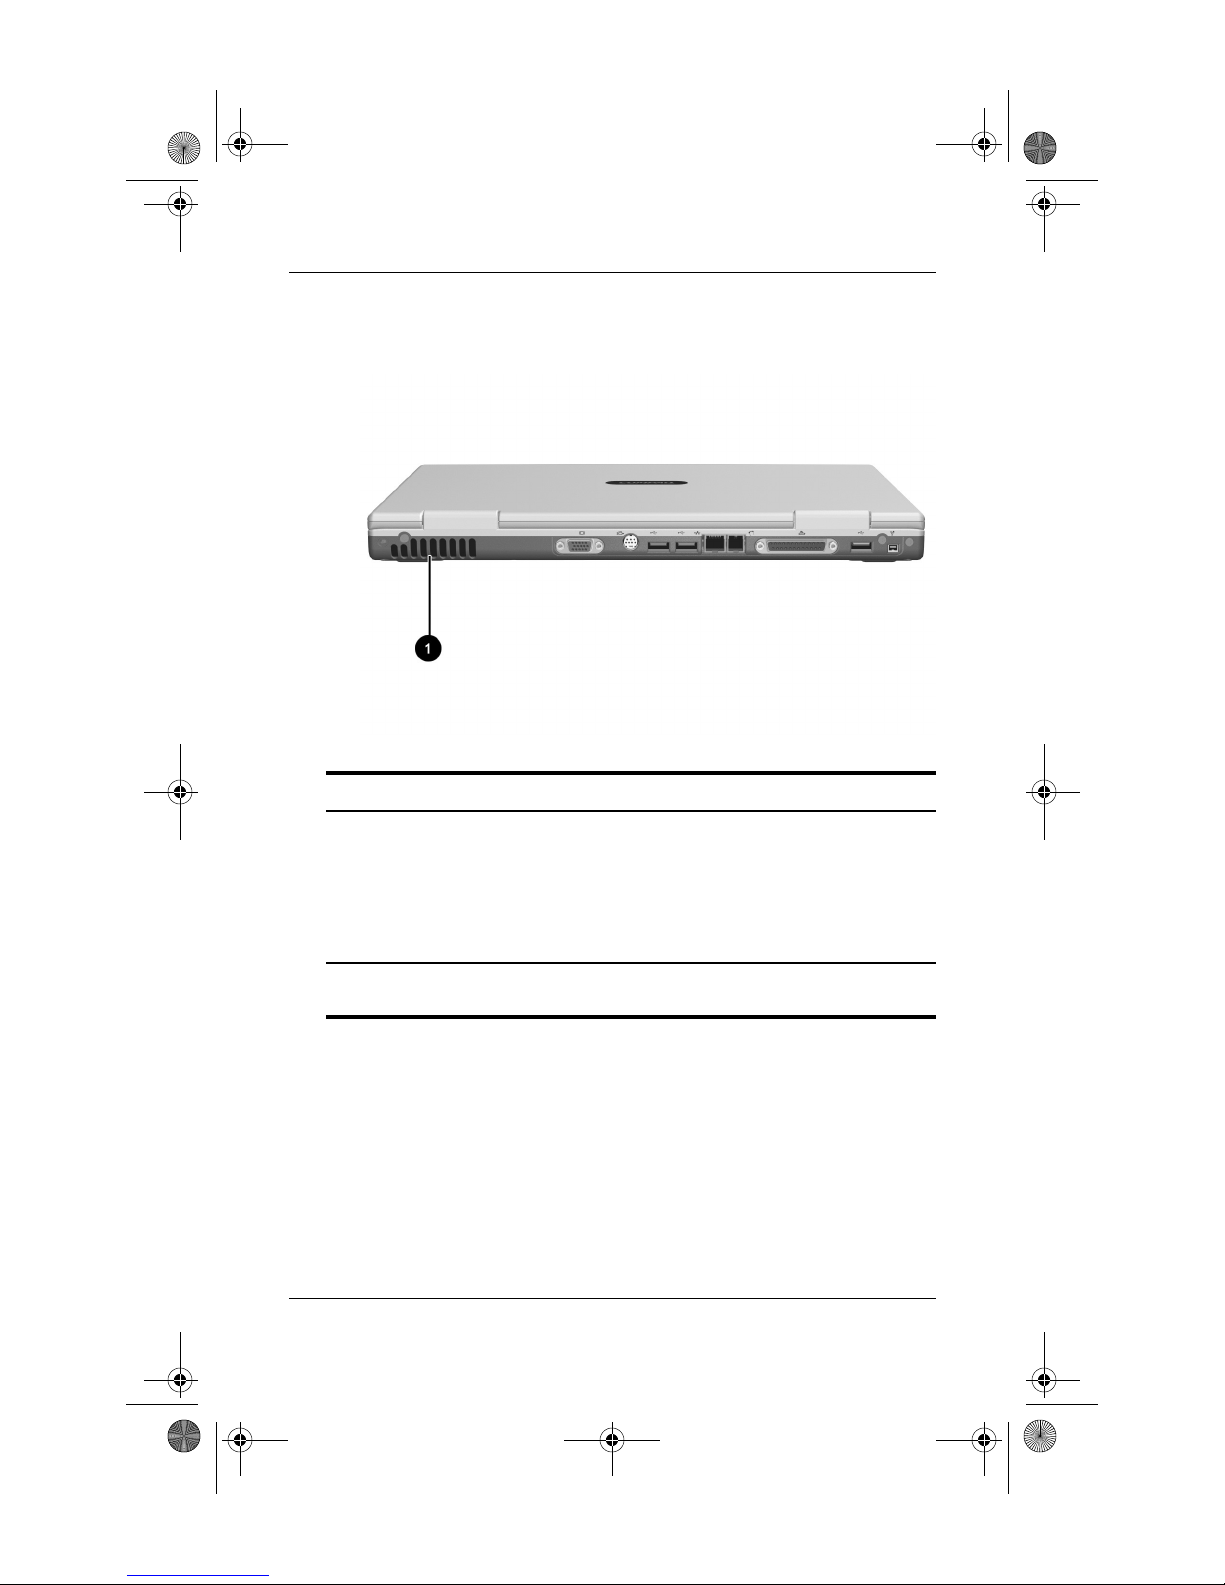
Rear Panel: Connectors and Jacks
External monitor connector Connects an optional VGA external
1
S-Video jack Connects an optional S-Video device,
2
USB connectors (3) Connect optional 2.0-compliant USB
3
RJ-45 network jack Connects an Ethernet network cable.
4
RJ-11 telephone jack Connects a modem cable. (A modem
5
Parallel connector (available
6
on select models)
1394 connector Connects an optional 1394 device
7
Startup and Reference Guide—Part 2 2–9
monitor or projector.
such as a television, VCR, camcorder,
projector, or video capture card.
devices.
(An Ethernet network cable is included
with select models.)
cable is included with select models.)
Connects an optional parallel device
such as a printer.
such as a camcorder.
Page 10
CPQ-311245-001.book Page 10 Thursday, March 27, 2003 10:17 PM
Hardware
Vent
Rear Panel: Vent
Exhaust vent* Provides airflow to cool internal components.
1
To prevent overheating, do not
Ä
obstruct vents. Do not allow a hard
surface, such as a printer, or a soft
surface, such as pillows or thick rugs
or clothing, to block airflow.
*The notebook has 3 vents. The other vents are on the underside of the
notebook.
2–10 Startup and Reference Guide—Part 2
Page 11
CPQ-311245-001.book Page 11 Thursday, March 27, 2003 10:17 PM
Left Side
Hardware
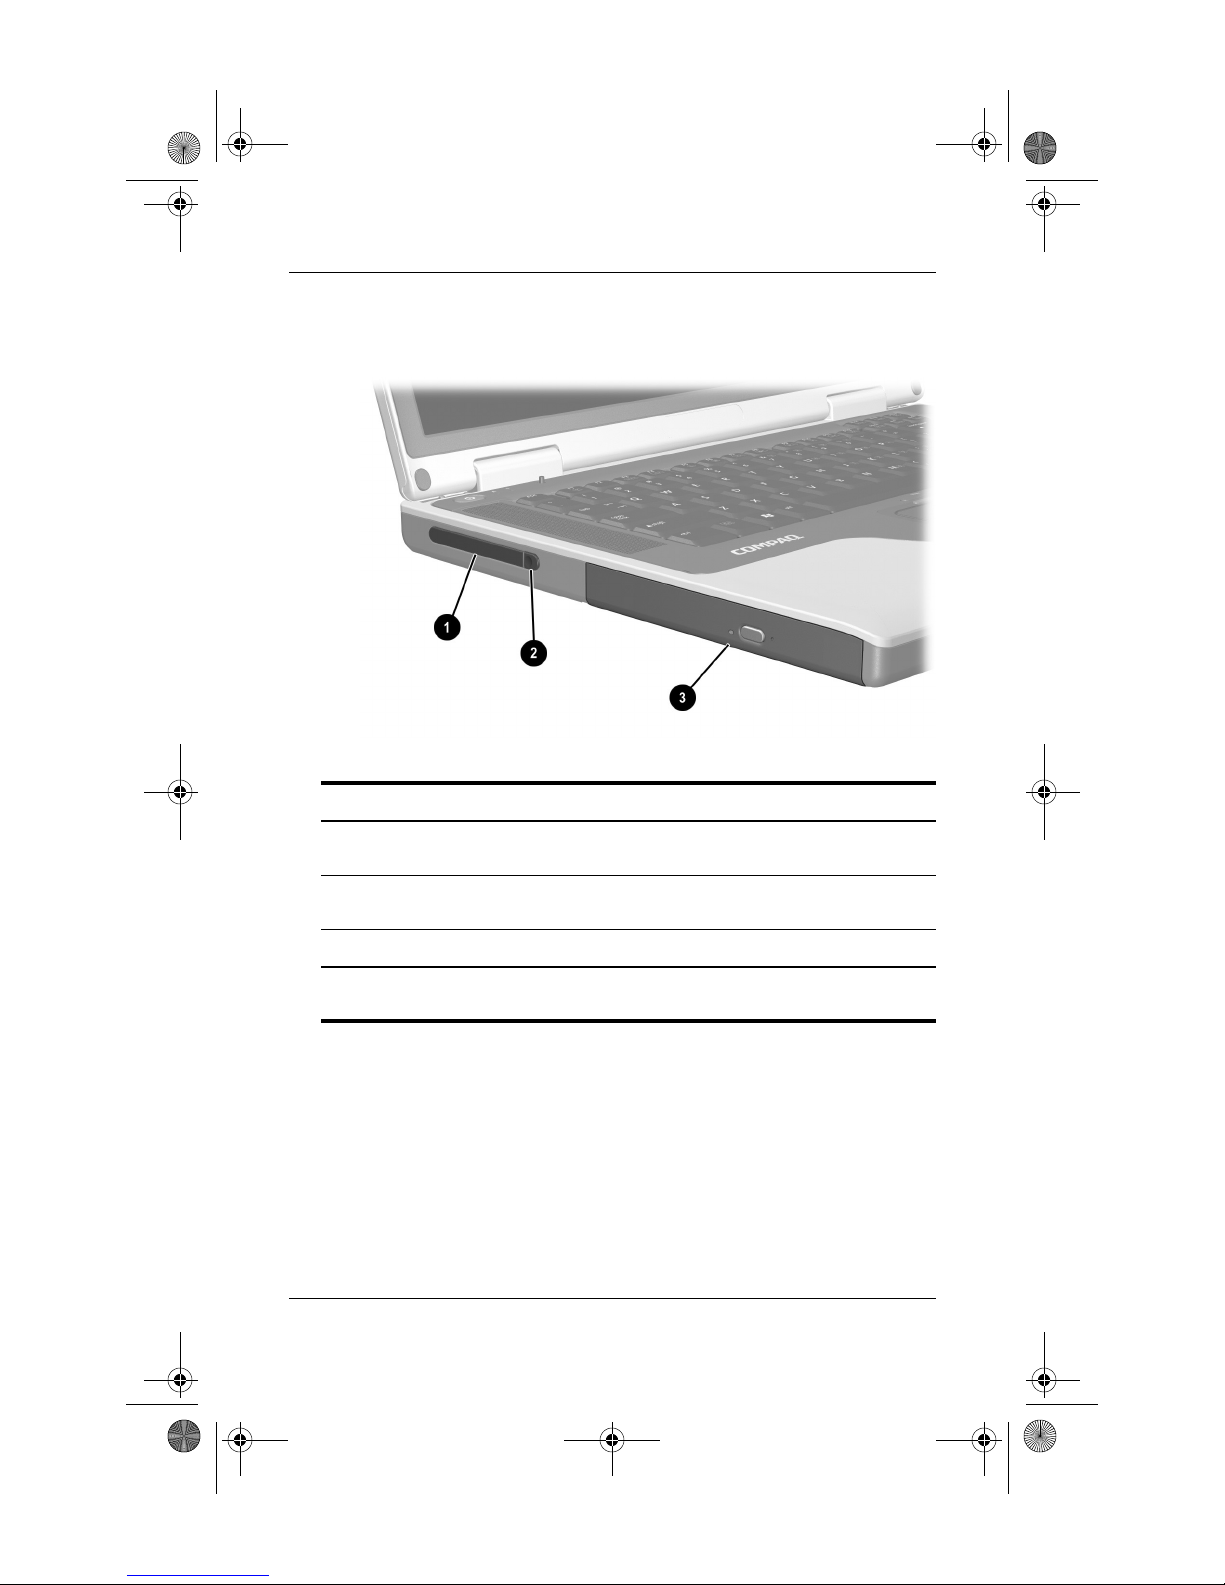
Left Side
PC Card slot Supports an optional Type I or Type II
1
PC Card eject button Ejects an optional PC Card from the
2
Optical drive* Supports an optical disc.
3
*The type of optical drive, for example a CD, DVD, or combination CD/DVD
drive, varies by model.
Startup and Reference Guide—Part 2 2–11
32-bit (CardBus) or 16-bit PC Card.
PC Card slot.
Page 12
CPQ-311245-001.book Page 12 Thursday, March 27, 2003 10:17 PM
Hardware
Right Side
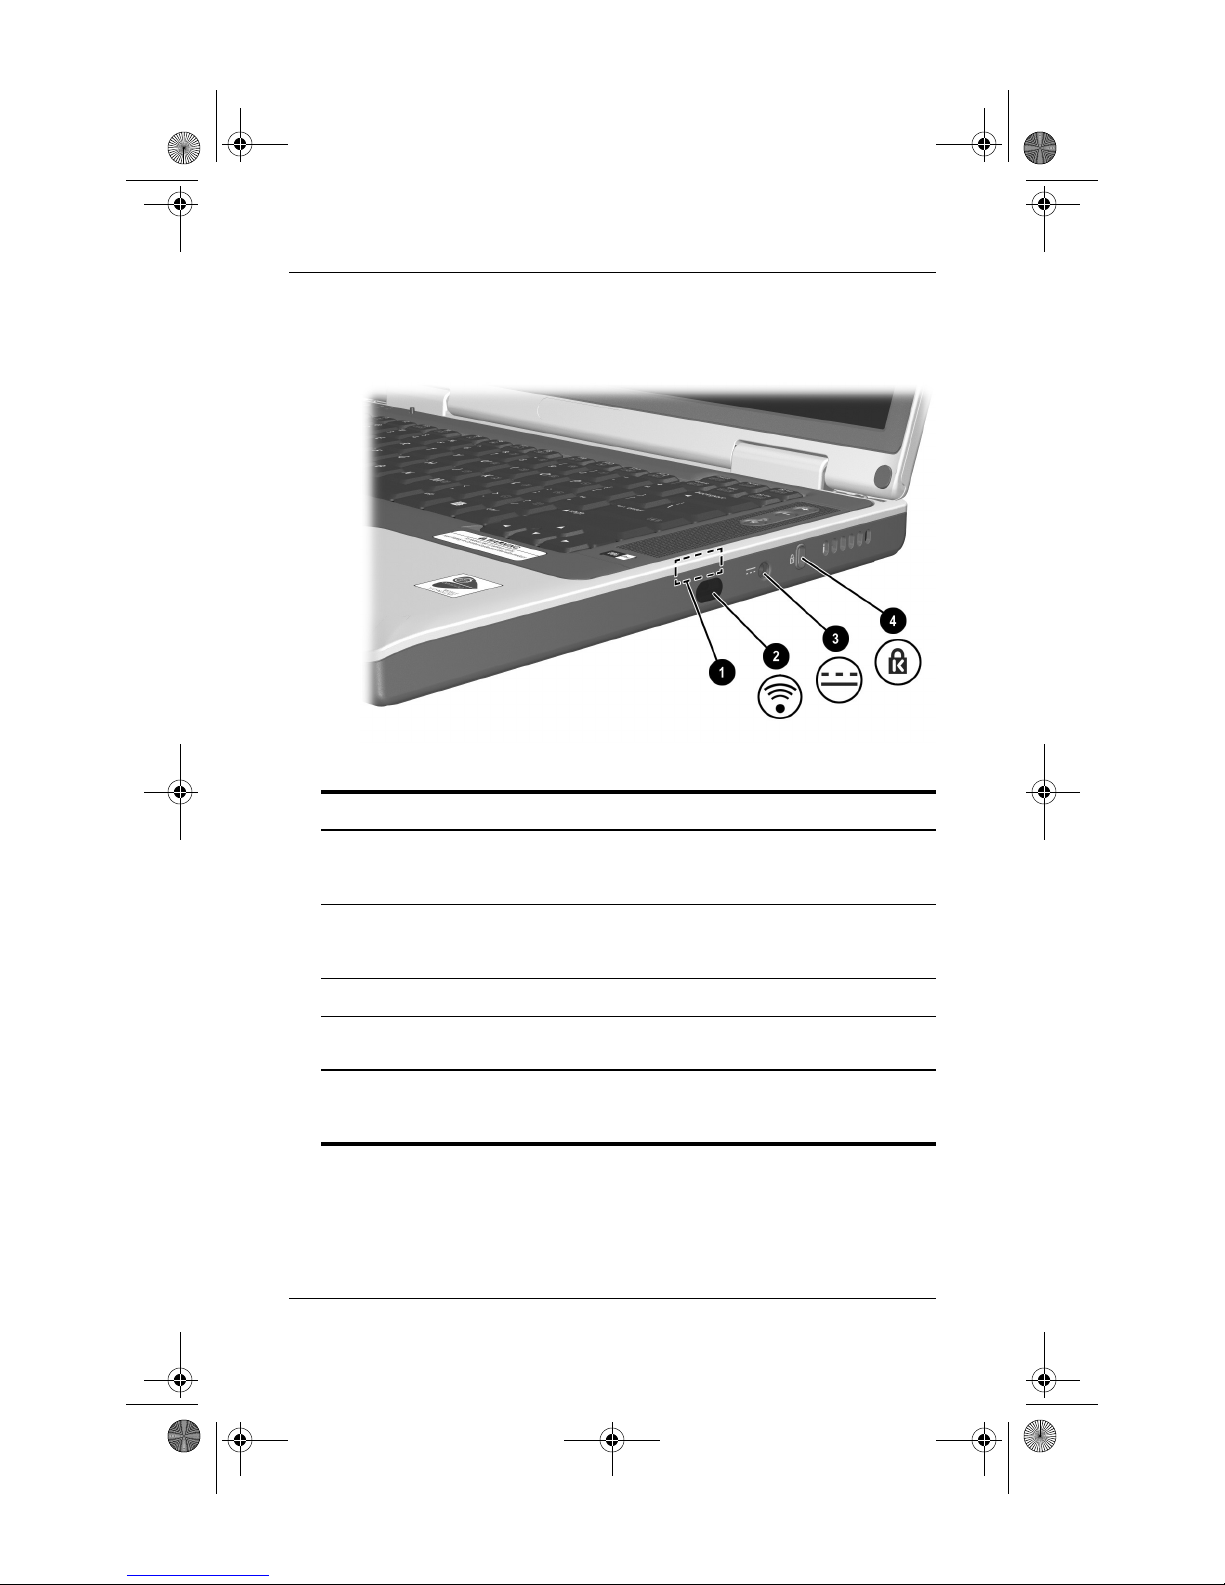
Right Side
Antenna (available on select
1
models and not visible from
outside the notebook)
Infrared port Provides wireless communication
2
Power connector Connects an AC adapter cable.
3
Security cable slot Attaches an optional security cable to
4
*The notebook has 2 antennas. The second is on the right side of the
notebook. For optimal transmissions, keep the areas immediately over the
antennas free from obstructions.
2–12 Startup and Reference Guide—Part 2
*
Sends and receives wireless device
signals.
between the notebook and an optional
IrDA-compliant device.
the notebook.
Page 13
CPQ-311245-001.book Page 13 Thursday, March 27, 2003 10:17 PM
Underside
Bays and Memory Compartment
Hardware
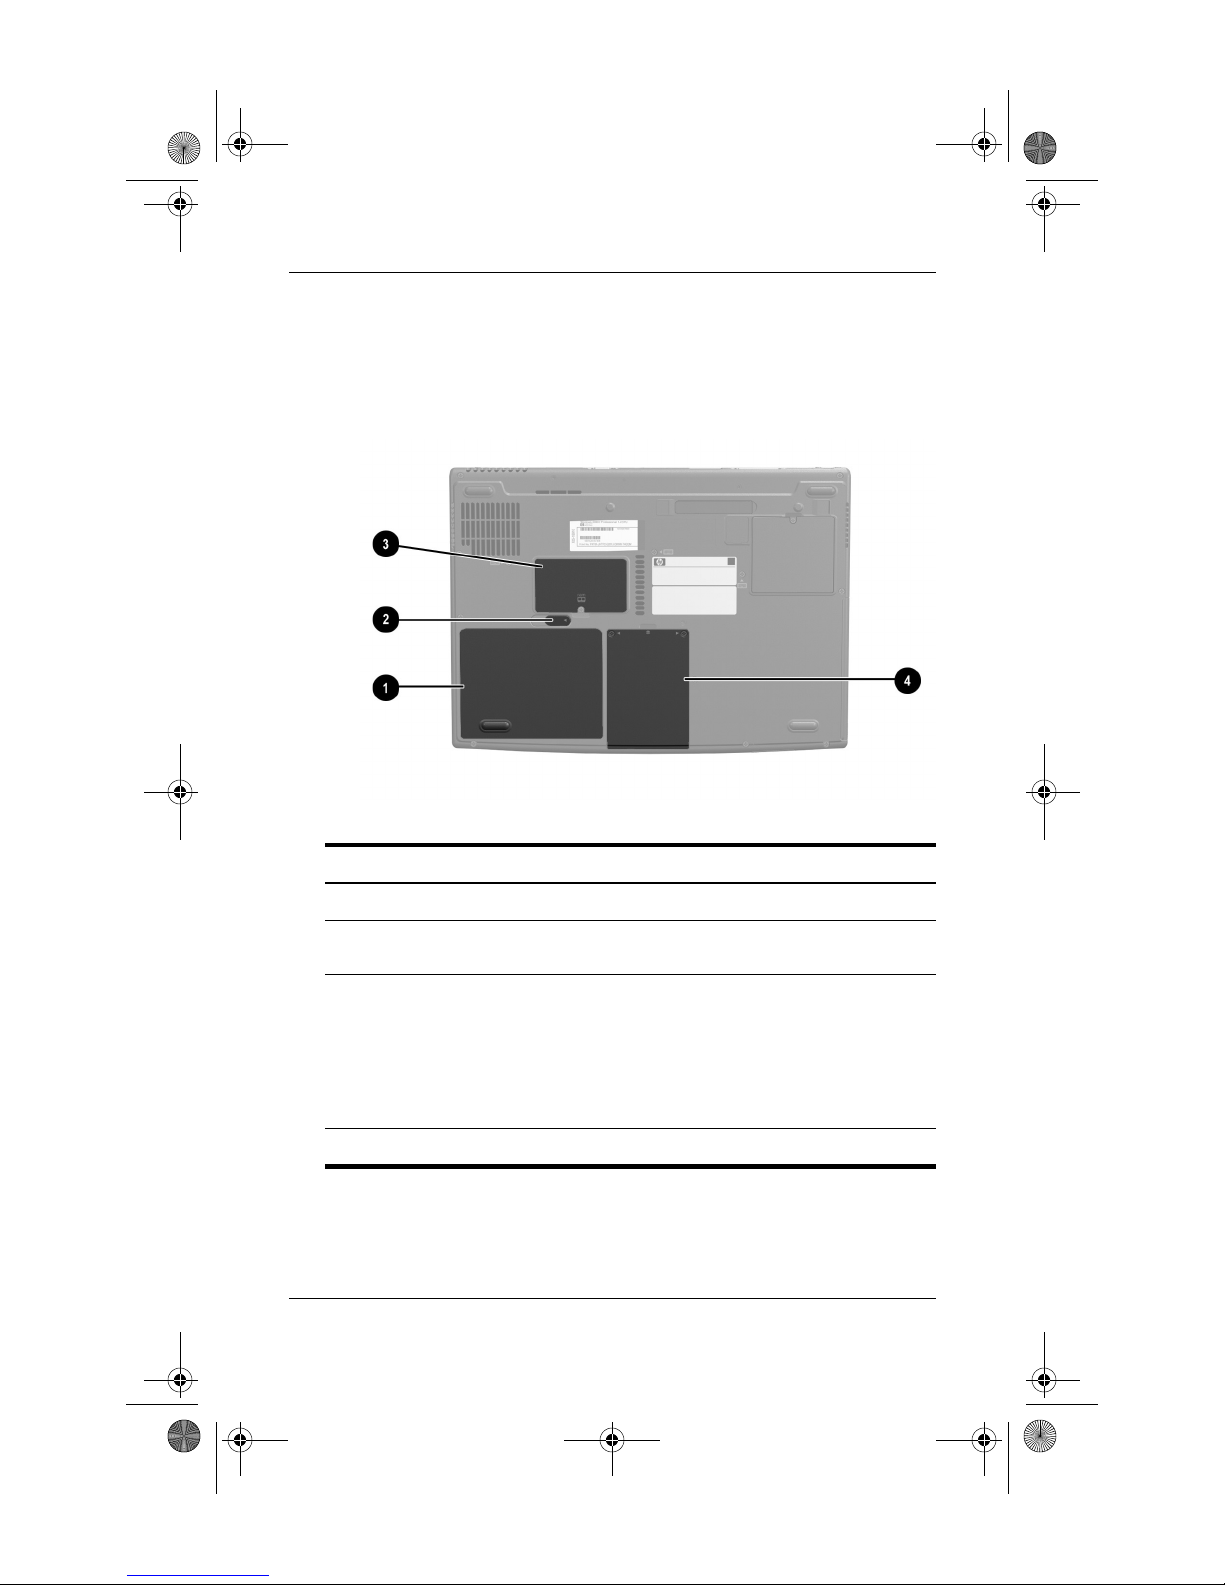
Underside: Bays and Memory Compartment
Battery bay Holds a battery pack.
1
Battery pack release latch Releases a battery pack from the
2
Memory compartment Contains 1 memory slot for an
3
Hard drive bay Holds the internal hard drive.
4
Startup and Reference Guide—Part 2 2–13
battery bay.
optional 128-MB, 256-MB, 512-MB,
or 1024-MB memory module.
The memory slot may be filled with a
replaceable memory module or
vacant, depending on the notebook
model.
Page 14
CPQ-311245-001.book Page 14 Thursday, March 27, 2003 10:17 PM
Hardware
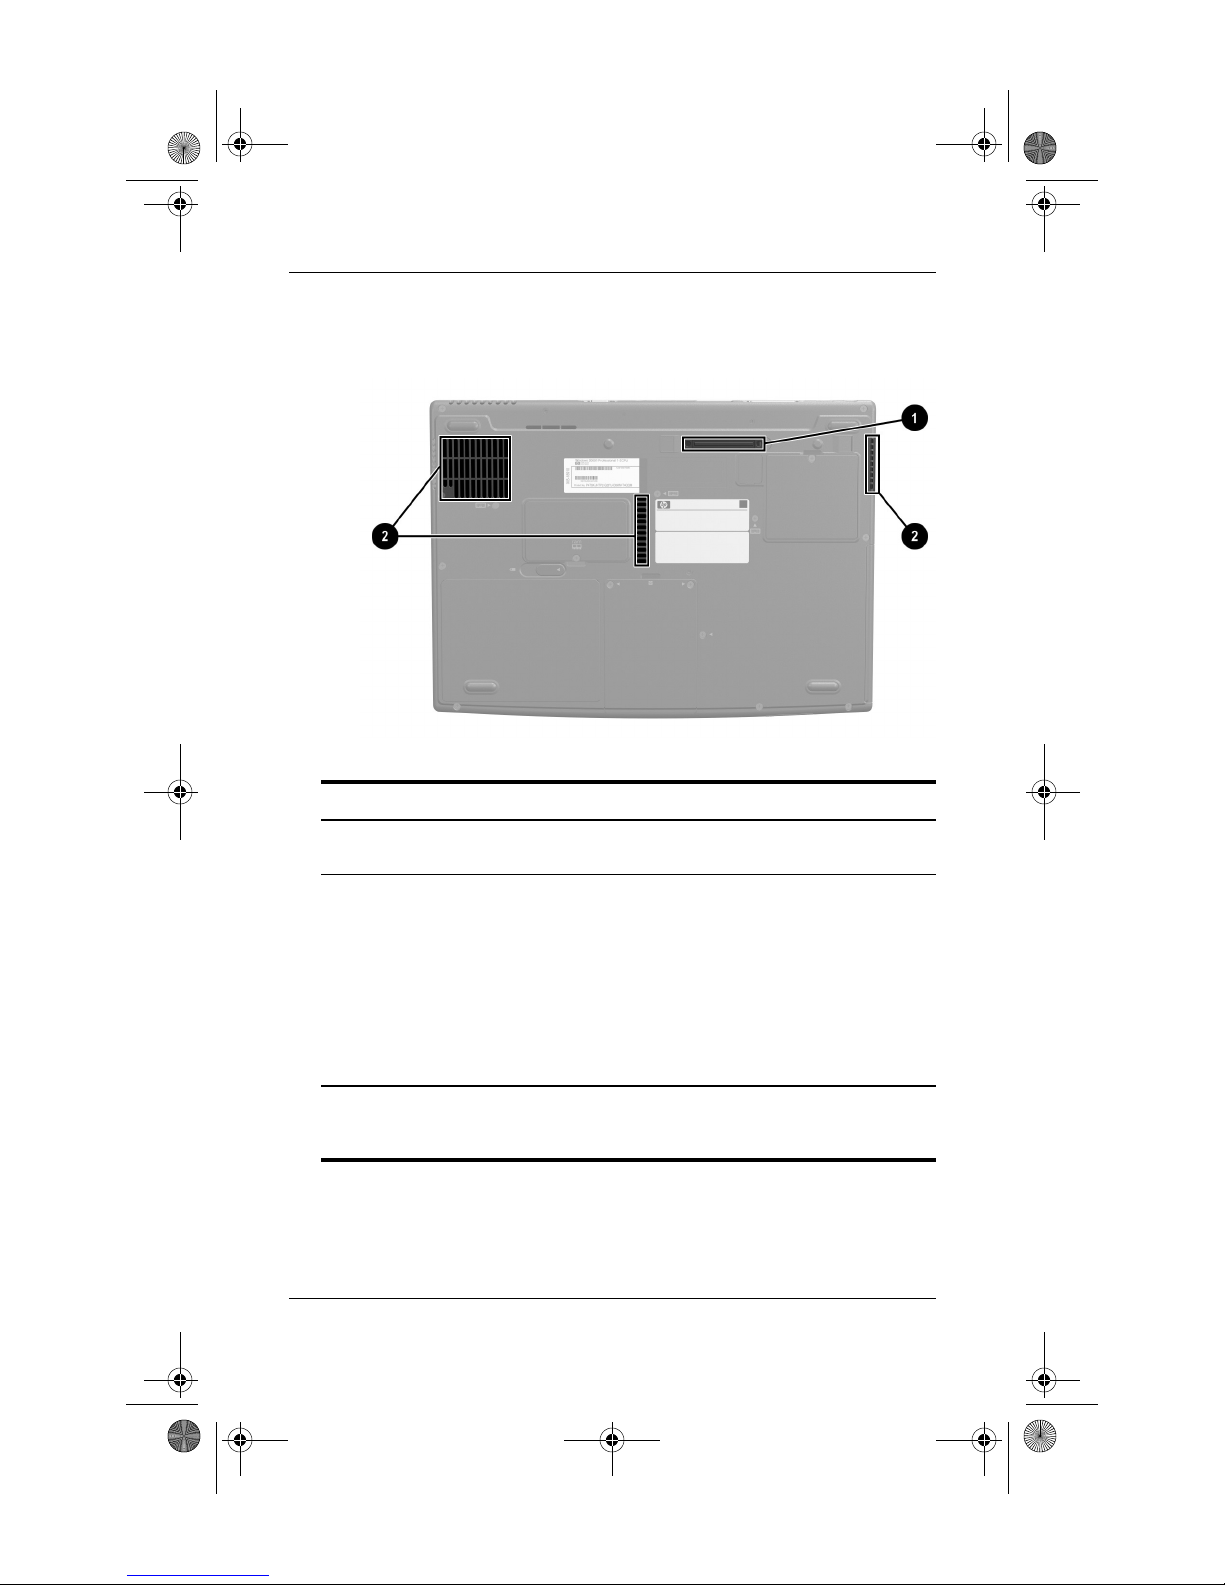
Docking Connector and Vents
Underside: Docking Connector and Vent
Docking connector* Connects the notebook to an optional
1
Vents (3) Allow airflow to cool internal
2
*As shipped, the docking connector is not visible. The docking connector is
beneath the docking connector cover, which protects the connector when
the connector is not in use.
2–14 Startup and Reference Guide—Part 2
port replicator.
components.
To prevent overheating, use
Ä
the notebook only on hard
surfaces which cannot
obstruct the vents. Do not
allow a soft surface, such as
bedding, clothing or a thick
rug, to block airflow.
Page 15

CPQ-311245-001.book Page 15 Thursday, March 27, 2003 10:17 PM
Labels
The labels affixed to the notebook and some notebook components
provide information you may need when troubleshooting system
problems or traveling internationally with the notebook.
■ The Microsoft Certificate of Authenticity label contains the
Product Key number. You may need this number to update or
troubleshoot the operating system.
■ The system label provides regulatory information about the
notebook.
■ The product identification label contains the serial number of
the notebook and a code describing the original configuration
of the notebook. You will need the notebook serial number if
you call customer support.
■ The modem approvals label, which is affixed to an optional
internal modem, provides regulatory information.
Hardware
■ Wireless certification labels, which are specific to various
types of optional wireless devices, are affixed to the notebook
and provide regulatory information.
Startup and Reference Guide—Part 2 2–15
Page 16
CPQ-311245-001.book Page 16 Thursday, March 27, 2003 10:17 PM
Hardware
Additional Standard Components
The components included with the notebook vary by region,
country, notebook model, and the optional hardware ordered. The
following sections identify the standard external accessories and
components included with most notebook models.
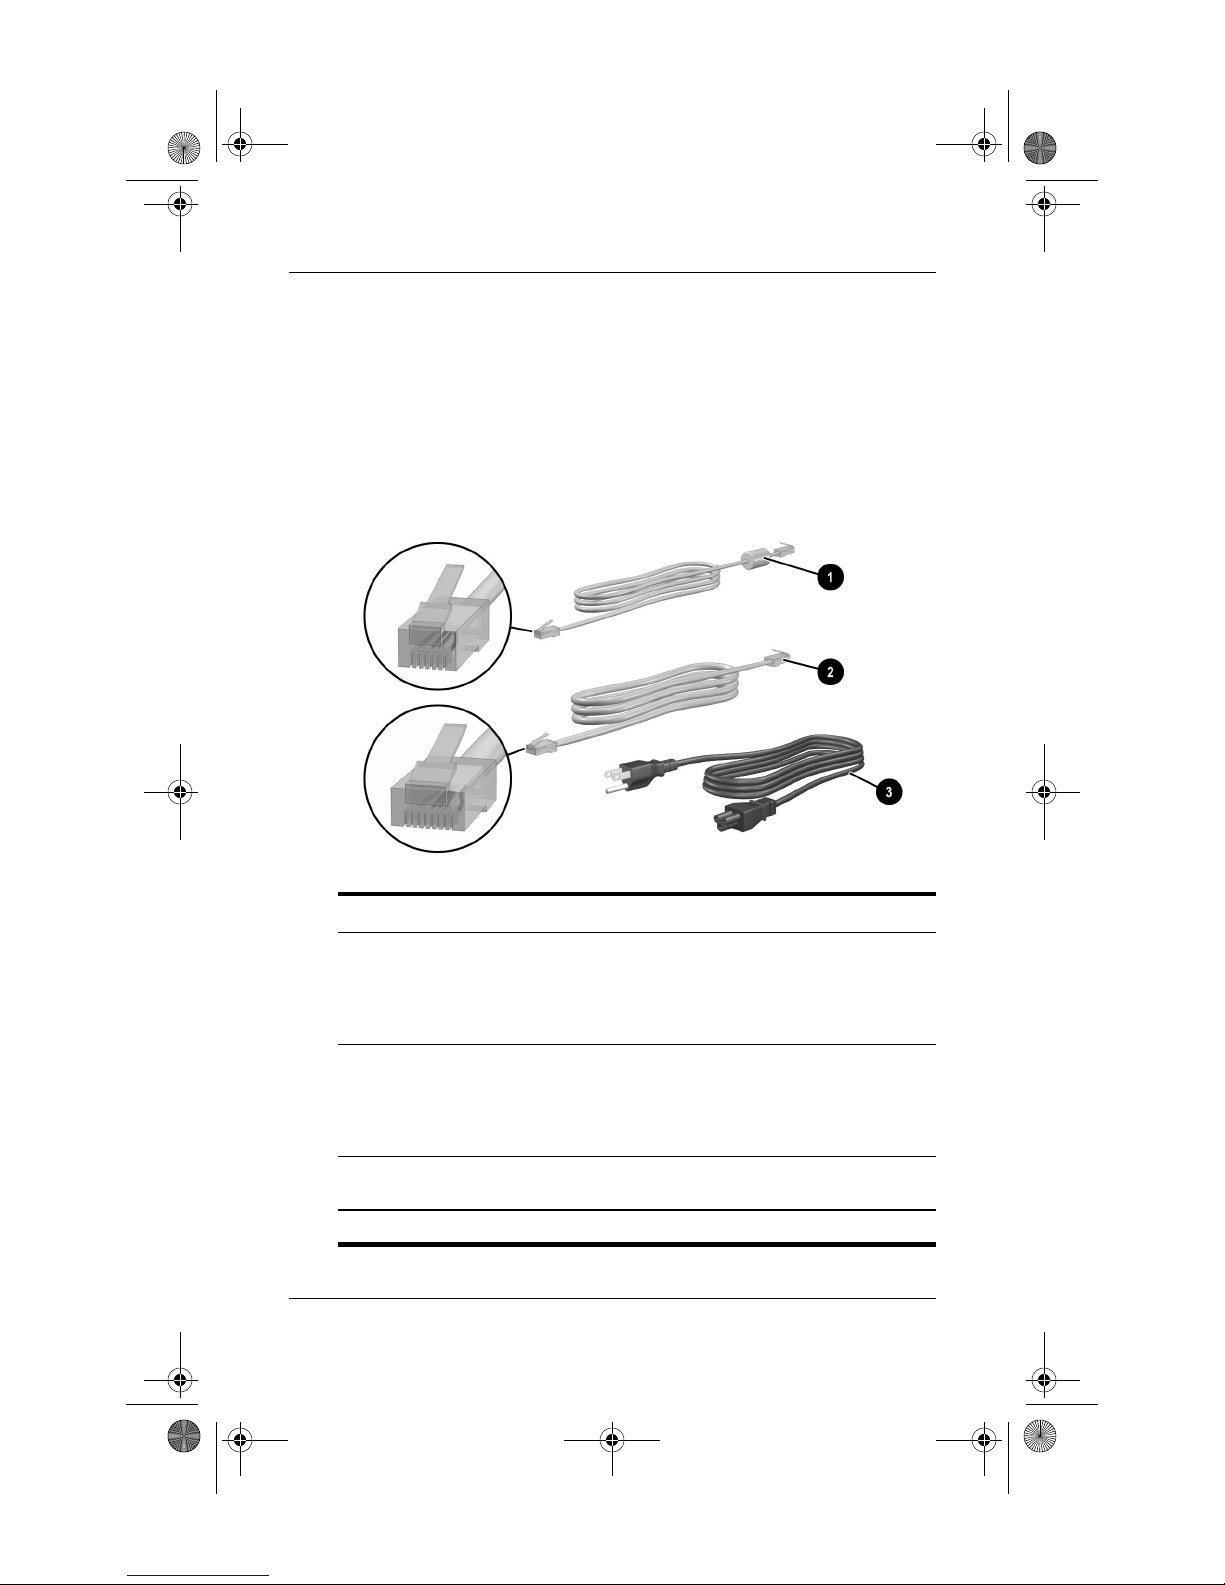
Cables and Cord
Additional Standard Components: Cables and Cord
Modem cable
1
(included with select
models)
Network cable
2
(included with select
models)
Power cord* Connects an AC adapter to an AC electrical
3
*Power cords vary in appearance by region and country.
2–16 Startup and Reference Guide—Part 2
Connects a modem to an RJ-11 telephone
jack or to a country-specific modem adapter.
A modem cable has a
✎
telephone connector at each end.
Connects the notebook to an Ethernet
network jack.
A network cable has an
✎
network connector at each end.
outlet.
6-pin
8-pin
, RJ-11
, RJ-45
Page 17
CPQ-311245-001.book Page 17 Thursday, March 27, 2003 10:17 PM
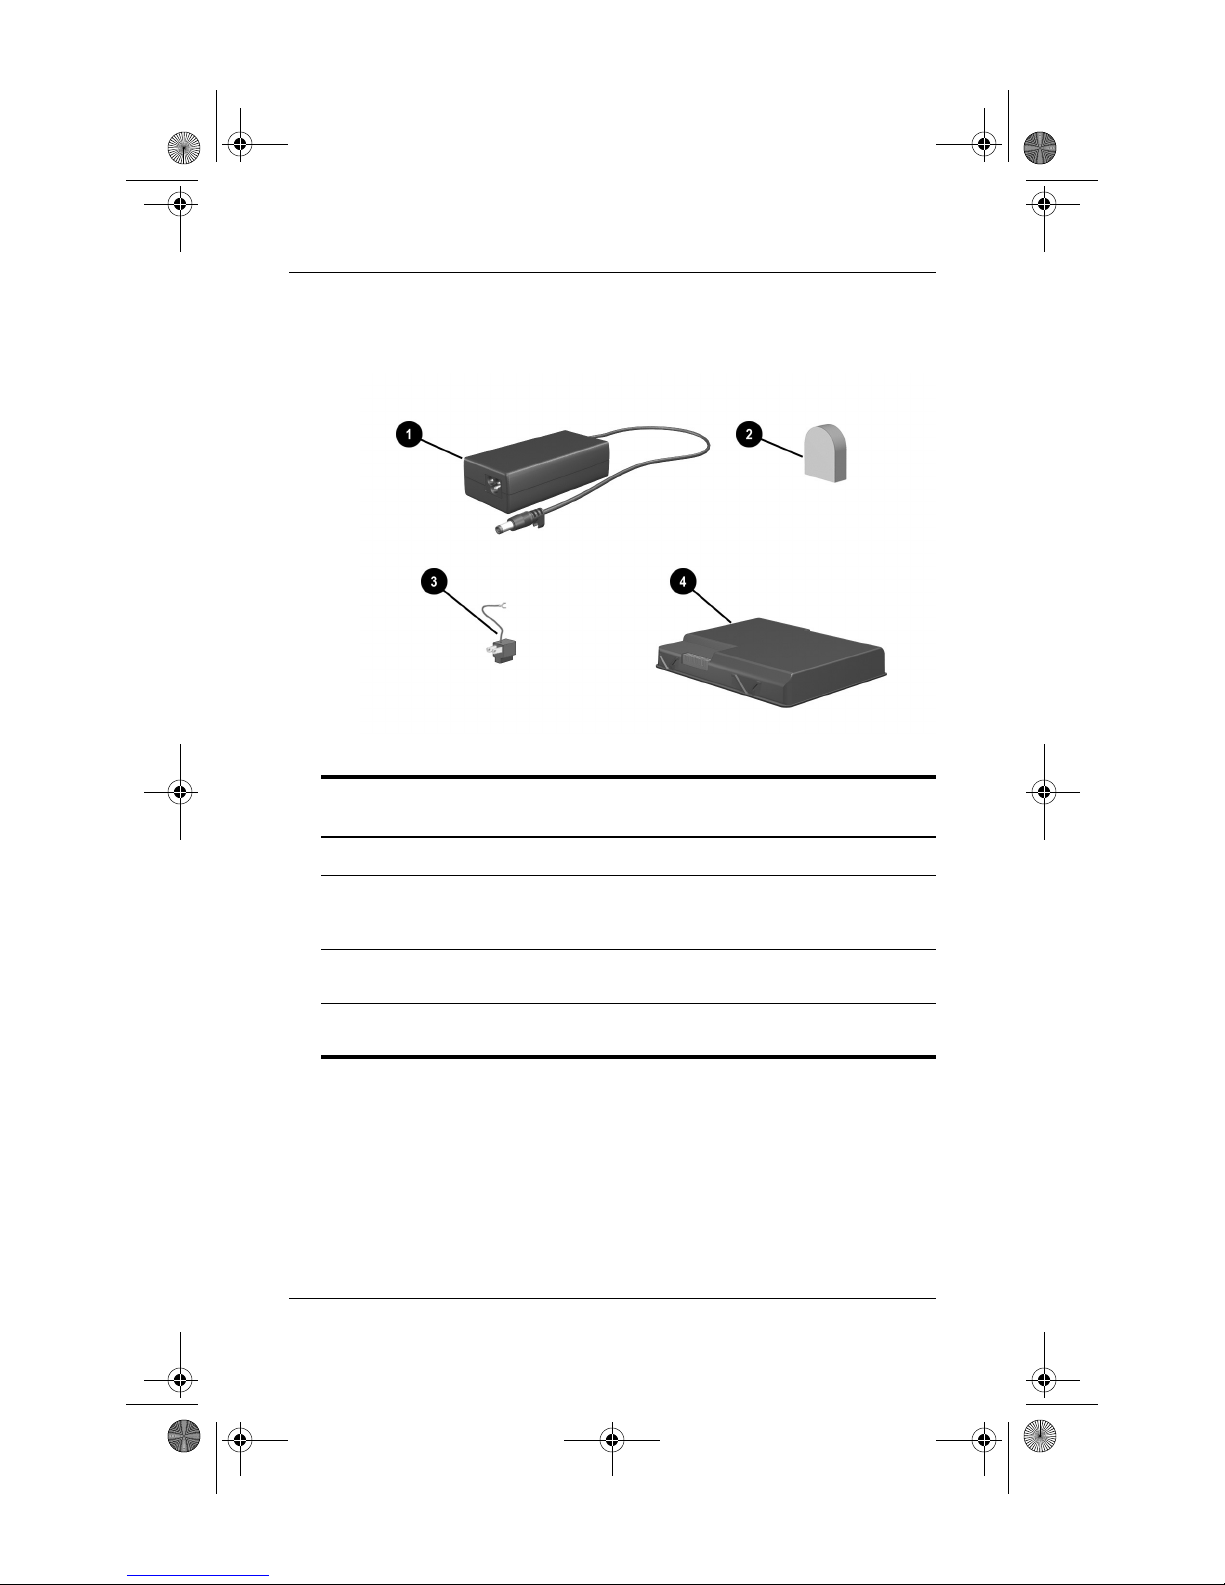
Adapters and Battery Pack
Hardware
Additional Standard Components: Adapters and
Battery Pack
AC adapter Converts AC power to DC power.
1
Country-specific modem
2
adapter (included by region
as required)
Japan-specific outlet adapter
3
(Japan only)
Battery pack Runs the notebook when the notebook
4
Startup and Reference Guide—Part 2 2–17
Adapts the modem cable to a
non-RJ-11 telephone jack.
Connects the AC adapter to a 2-prong
electrical outlet.
is not connected to external power.
Page 18

CPQ-311245-001.book Page 18 Thursday, March 27, 2003 10:17 PM
Hardware
Restoration and Documentation CDs
CDs for repairing or reinstalling software and for obtaining
supplementary information about the notebook are included with
the notebook.
■ For information about restoring, repairing, or reinstalling
software, refer to Chapter 9, “Software Updates, Restorations
and Utilities.”
■ For supplementary information about the notebook, refer to
the Documentation Library CD. The Documentation Library
CD included with all models includes the following guides.
Additional guides, for example instruction manuals for using
an optional wireless device, are included with select models.
For Information About These Topics Select This Guide
■
Caring for the notebook and drives
■ Preparing the notebook for transport
■ Traveling with the notebook
internationally
■ Solving notebook problems yourself
■ Getting help from Compaq
■ Governmental and safety information
■ Protecting the notebook from static
electricity
Ergonomic and safety information
General instructions for using modem
AT commands
AT commands supported by a Lucent/Agere
modem. (An optional internal modem
supports the Lucent/Agere command set.)
*Available in English only.
Maintenance, Shipping
and Travel
Troubleshooting
Regulatory and Safety
Notices
Safety & Comfort Guide
Modem Command
Guidelines (Advanced
Users Only)
Lucent/Agere
Command Set
(Advanced Users Only)*
2–18 Startup and Reference Guide—Part 2
Page 19

CPQ-311245-001.book Page 1 Thursday, March 27, 2003 10:17 PM
Contents
TouchPad . . . . . . . . . . . . . . . . . . . . . . . . . . . . . . . . . . . . . 3–2
Identifying TouchPad Components. . . . . . . . . . . . . . 3–2
Using the TouchPad. . . . . . . . . . . . . . . . . . . . . . . . . . 3–2
Setting TouchPad Preferences. . . . . . . . . . . . . . . . . . 3–3
Hotkeys . . . . . . . . . . . . . . . . . . . . . . . . . . . . . . . . . . . . . . 3–4
Identifying Hotkeys . . . . . . . . . . . . . . . . . . . . . . . . . . 3–4
Hotkeys Quick Reference . . . . . . . . . . . . . . . . . . . . . 3–5
Hotkeys Procedures . . . . . . . . . . . . . . . . . . . . . . . . . . 3–5
Hotkeys Commands. . . . . . . . . . . . . . . . . . . . . . . . . . 3–6
Keypad . . . . . . . . . . . . . . . . . . . . . . . . . . . . . . . . . . . . . . . 3–8
Turning the Keypad On and Off . . . . . . . . . . . . . . . . 3–9
Switching the Functions of Keypad Keys . . . . . . . . . 3–9
3
Keyboard
Startup and Reference Guide—Part 2 3–1
Page 20
CPQ-311245-001.book Page 2 Thursday, March 27, 2003 10:17 PM
Keyboard
TouchPad
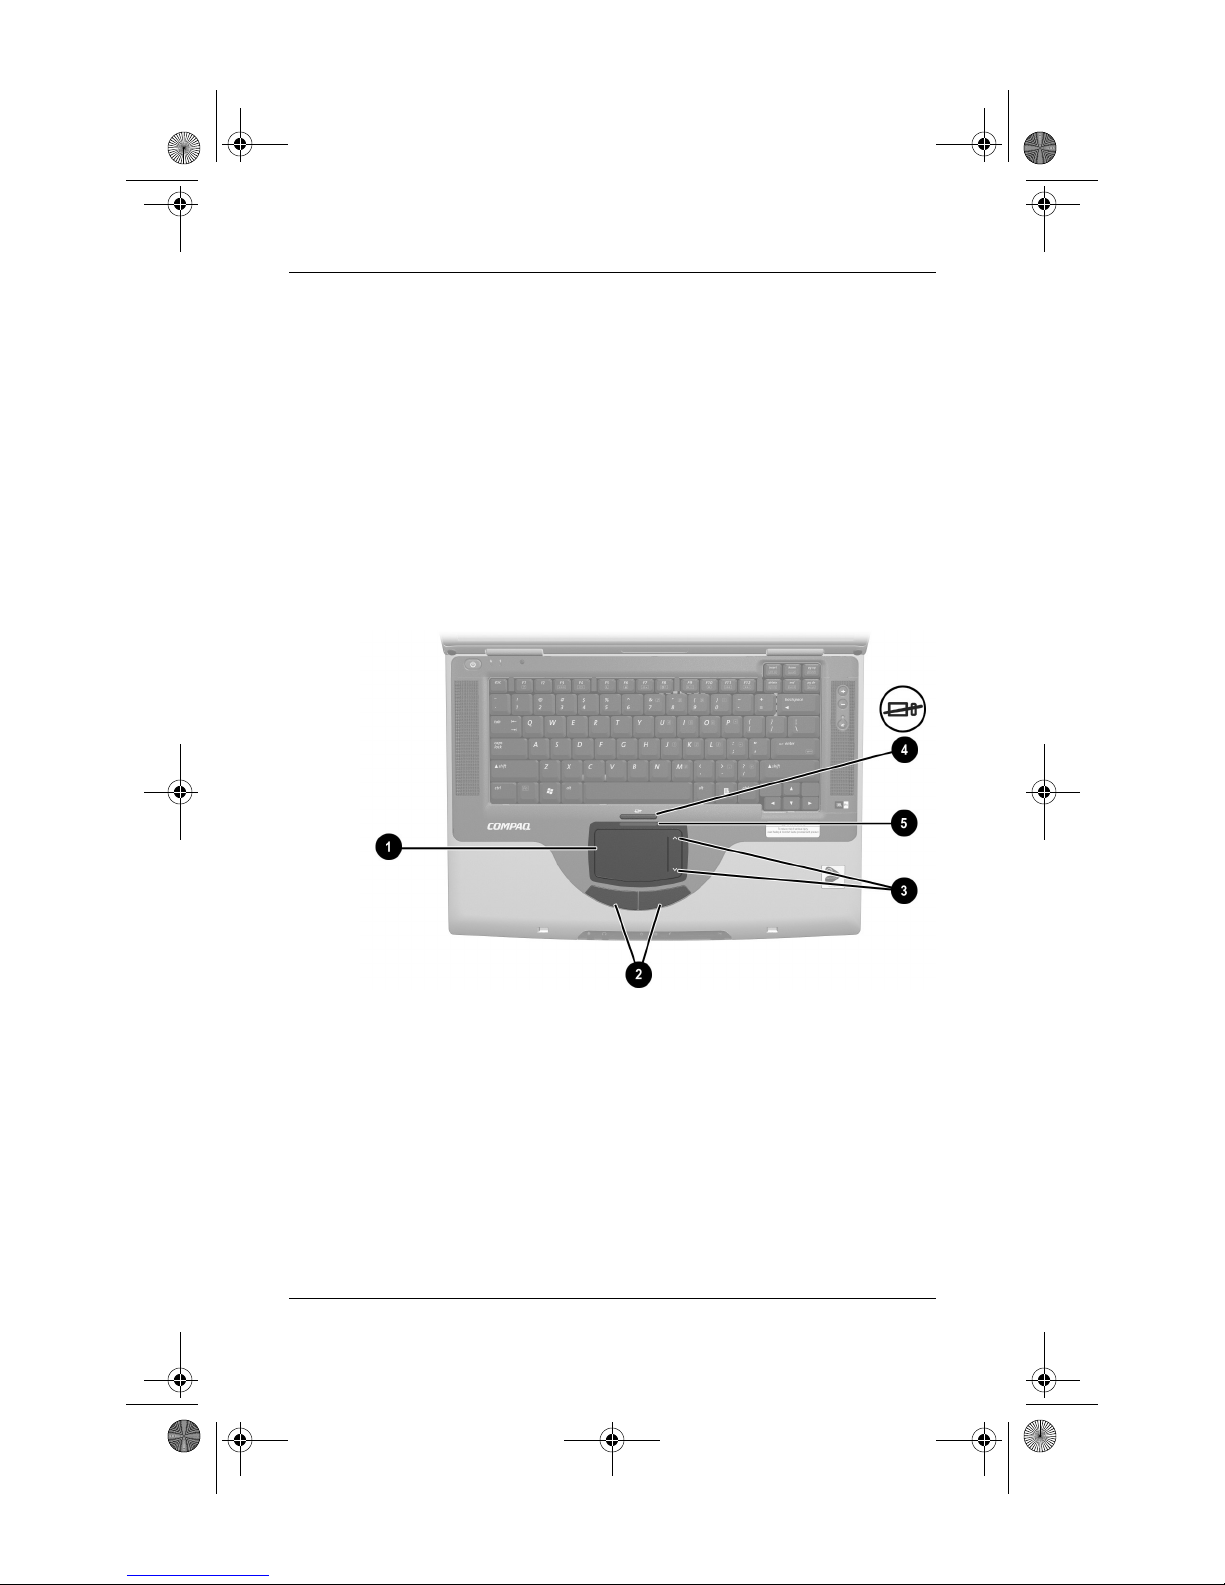
Identifying TouchPad Components
The TouchPad includes the following components:
TouchPad 4 TouchPad on/off button
1
2 Left and right TouchPad buttons 5 TouchPad light
3 TouchPad scroll zones (2)
Identifying TouchPad components
Using the TouchPad
The TouchPad provides the navigation, selection, and scroll
functions of an optional external mouse.
■ To move the pointer, slide your finger across the TouchPad
surface in the direction you want to move the pointer.
3–2 Startup and Reference Guide—Part 2
Page 21

CPQ-311245-001.book Page 3 Thursday, March 27, 2003 10:17 PM
■ If the pointer continues to move after you lift your finger
from the TouchPad surface, wait a few seconds and the
pointer will stop moving.
■ To execute the click functions of the left or right button on an
external mouse, press the left or right TouchPad button.
■ To scroll upward, press the icon in the upward scroll zone. To
scroll downward, press the icon in the downward scroll zone.
■ To enable or disable the TouchPad, press the TouchPad
button. When the TouchPad is enabled, the TouchPad light
is on.
The notebook turns on with the TouchPad enabled. Users
who work with keystrokes rather than mouse actions may
prefer to disable the TouchPad to prevent accidental
TouchPad activity.
Keyboard
Setting TouchPad Preferences
Pointer speed and shape, click speed, mouse trails, and other
pointing device preferences are set in the operating system Mouse
Properties window. To access Mouse Properties, select Start >
Control Panel > Printers and Other Hardware icon > Mouse icon.
Startup and Reference Guide—Part 2 3–3
Page 22
CPQ-311245-001.book Page 4 Thursday, March 27, 2003 10:17 PM
Keyboard
Hotkeys
Identifying Hotkeys
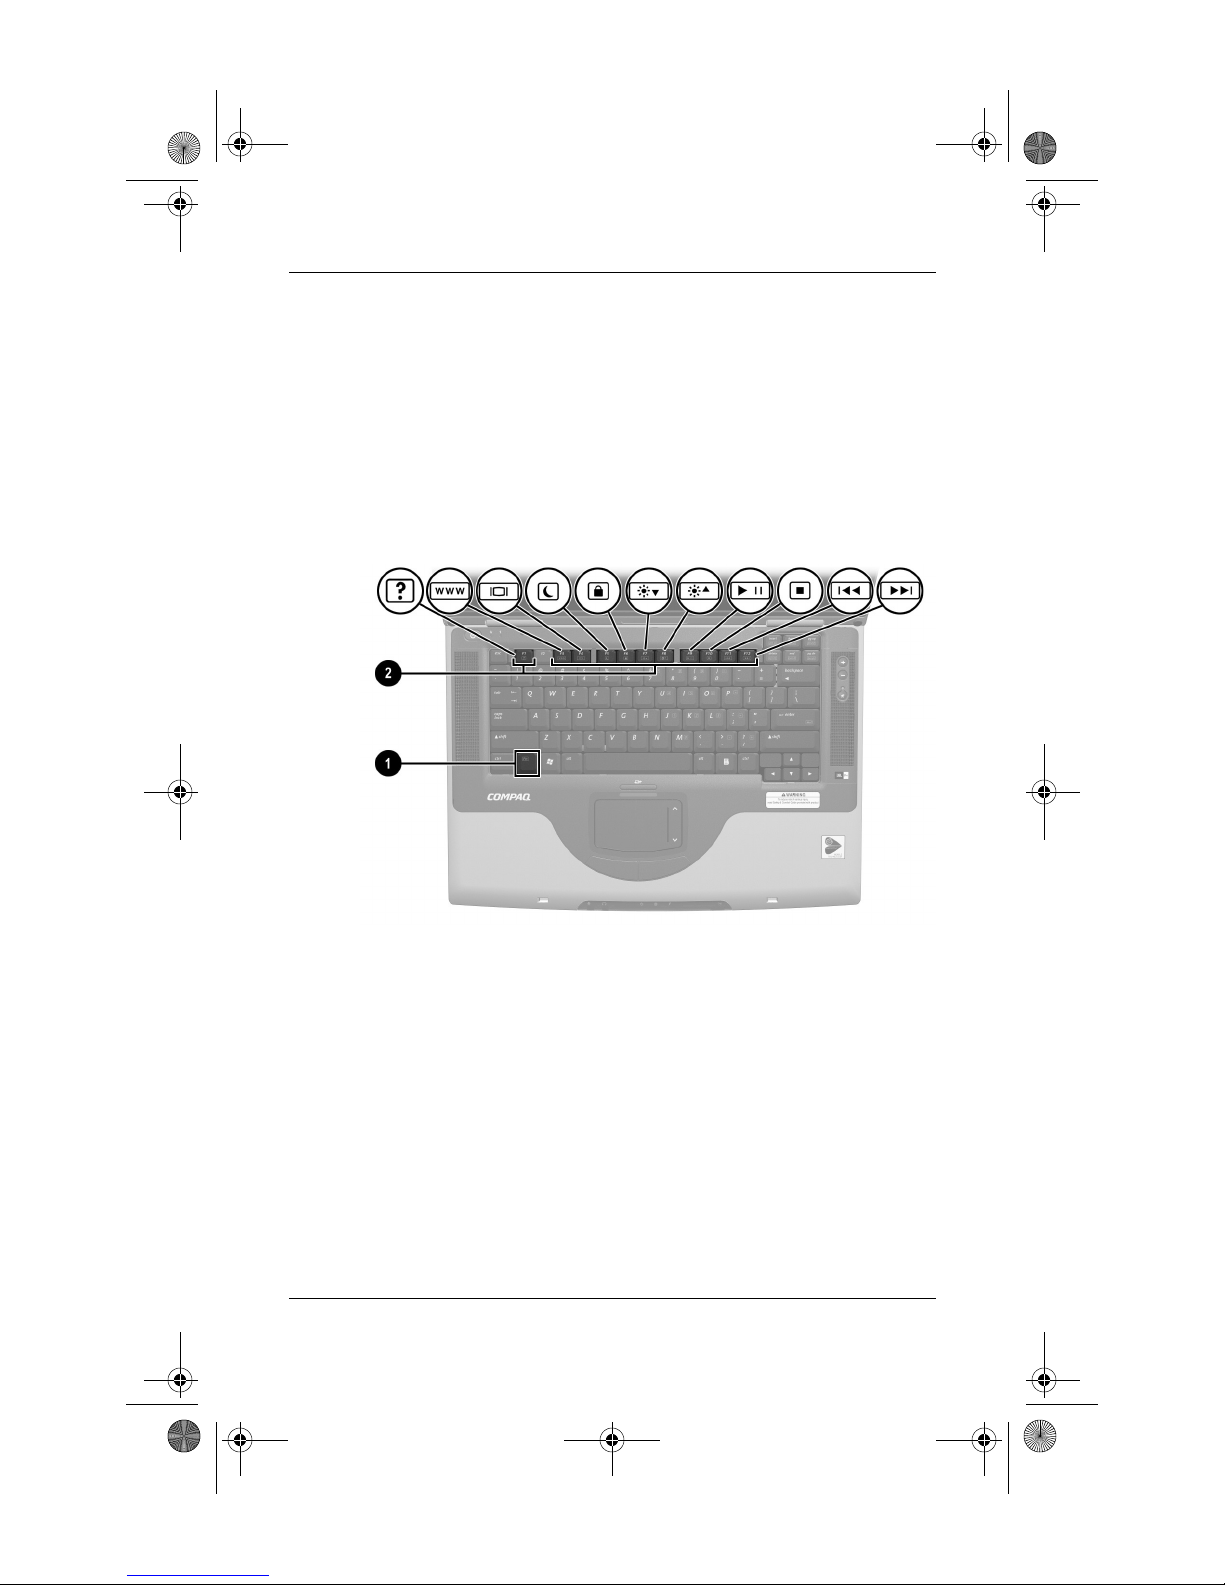
Hotkeys are preset combinations of the Fn key 1 and one of the
function keys 2.
The icons on the function keys
F1 and F3 through F12 represent the
hotkey functions available on the notebook.
Identifying hotkeys
3–4 Startup and Reference Guide—Part 2
Page 23

CPQ-311245-001.book Page 5 Thursday, March 27, 2003 10:17 PM
Hotkeys Quick Reference
The following table identifies the default hotkeys functions. For
information about changing the function of the
the “Setting Power Control Preferences” section in Chapter 4.
Default Function Hotkeys
Open Help and Support window. Fn+F1
Open Microsoft Internet Explorer. Fn+F3
Switch display and image. Fn+F4
Initiate Standby. Fn+F5
Initiate QuickLock. Fn+F6
Decrease display brightness. Fn+F7
Increase display brightness. Fn+F8
Play, pause, or resume an audio CD or DVD. Fn+F9
Keyboard
Fn+F5 hotkeys, see
Stop an audio CD or DVD. Fn+F10
Play the previous track or chapter on an audio CD
or DVD.
Play the next track on an audio CD or DVD. Fn+F12
Fn+F11
Hotkeys Procedures
To use a hotkeys command on the notebook keyboard, use either
of the following procedures:
■ Briefly press the Fn key, then briefly press the second key of
the hotkeys command.
■ Press and hold down the Fn key, briefly press the second key
of the hotkeys command, then release both keys at the
same time.
Startup and Reference Guide—Part 2 3–5
Page 24

CPQ-311245-001.book Page 6 Thursday, March 27, 2003 10:17 PM
Keyboard
Hotkeys Commands
Open Help and Support Window (Fn+F1)
The Fn+F1 hotkeys open the Help and Support window. From the
Help and Support window you can access general information
about your notebook, links to software updates and online
technical support specialists, and other support features.
For more information about the Help and Support window, see
the “Using the Help and Support Window” section in Chapter 9,
“Software Updates, Restorations and Utilities.”
Open Internet Explorer (Fn+F3)
The Fn+F3 hotkeys open Internet Explorer. After you have set up
your Internet or network services and your Internet Explorer
home page, you can use the
your home page and the Internet.
Fn+F3 hotkeys for quick access to
Switch Image (Fn+F4)
The Fn+F4 hotkeys switch the image among display devices
connected to the external monitor connector or the S-Video jack
on the notebook. For example, if an external monitor is connected
to the notebook, pressing the
Fn+F4 hotkeys switches the image
among the notebook display, the external monitor display, and a
simultaneous display on both the notebook and the monitor.
Initiate Standby (Fn+F5)
The Fn+F5 hotkeys are set by default to initiate Standby. Standby
can be initiated only while the notebook is on. If the notebook is
in Hibernation, you must restore from Hibernation before you can
initiate Standby.
3–6 Startup and Reference Guide—Part 2
Page 25

CPQ-311245-001.book Page 7 Thursday, March 27, 2003 10:17 PM
To restore from Hibernation or resume from Standby, briefly
press the power button. For more information about using
Standby and Hibernation, refer to Chapter 4, “Power.”
For information about changing the function of the
refer in Chapter 4 to the “Setting Power Control Preferences”
section.
Initiate QuickLock (Fn+F6)
The Fn+F6 hotkeys initiate the operating system QuickLock
security feature. The QuickLock feature disables the keyboard
and displays the log on screen. QuickLock does not disable the
TouchPad.
Before you can use the QuickLock feature, you must set a
Windows system password. For instructions, refer to your
operating system documentation.
After you have set a Windows system password:
Keyboard
Fn+F5 hotkeys,
■ To initiate QuickLock, press Fn+F6.
■ To exit QuickLock, enter your Windows system password.
Decrease Brightness (Fn+F7)
The Fn+F7 hotkeys decrease notebook screen brightness.
Increase Brightness (Fn+F8)
The Fn+F8 hotkeys increase notebook screen brightness.
Play, Pause, or Resume an Audio CD or DVD (Fn+F9)
The Fn+F9 hotkeys function only when an audio CD or DVD is
inserted. If the audio CD or DVD is
■ Not playing, press the Fn+F9 hotkeys to begin or resume
the play.
■ Playing, press the Fn+F9 hotkeys to pause the play.
Startup and Reference Guide—Part 2 3–7
Page 26
CPQ-311245-001.book Page 8 Thursday, March 27, 2003 10:17 PM
Keyboard
Stop an Audio CD or DVD (Fn+F10)
The Fn+F10 hotkeys stop the play of an audio CD or DVD that is
playing.
Play Previous Track of an Audio CD or DVD (Fn+F11)
The Fn+F11 hotkeys play the previously played track of an audio
CD or DVD that is playing.
Play Next Track of an Audio CD or DVD (Fn+F12)
The Fn+F12 hotkeys play the next track of an audio CD or DVD
that is playing.
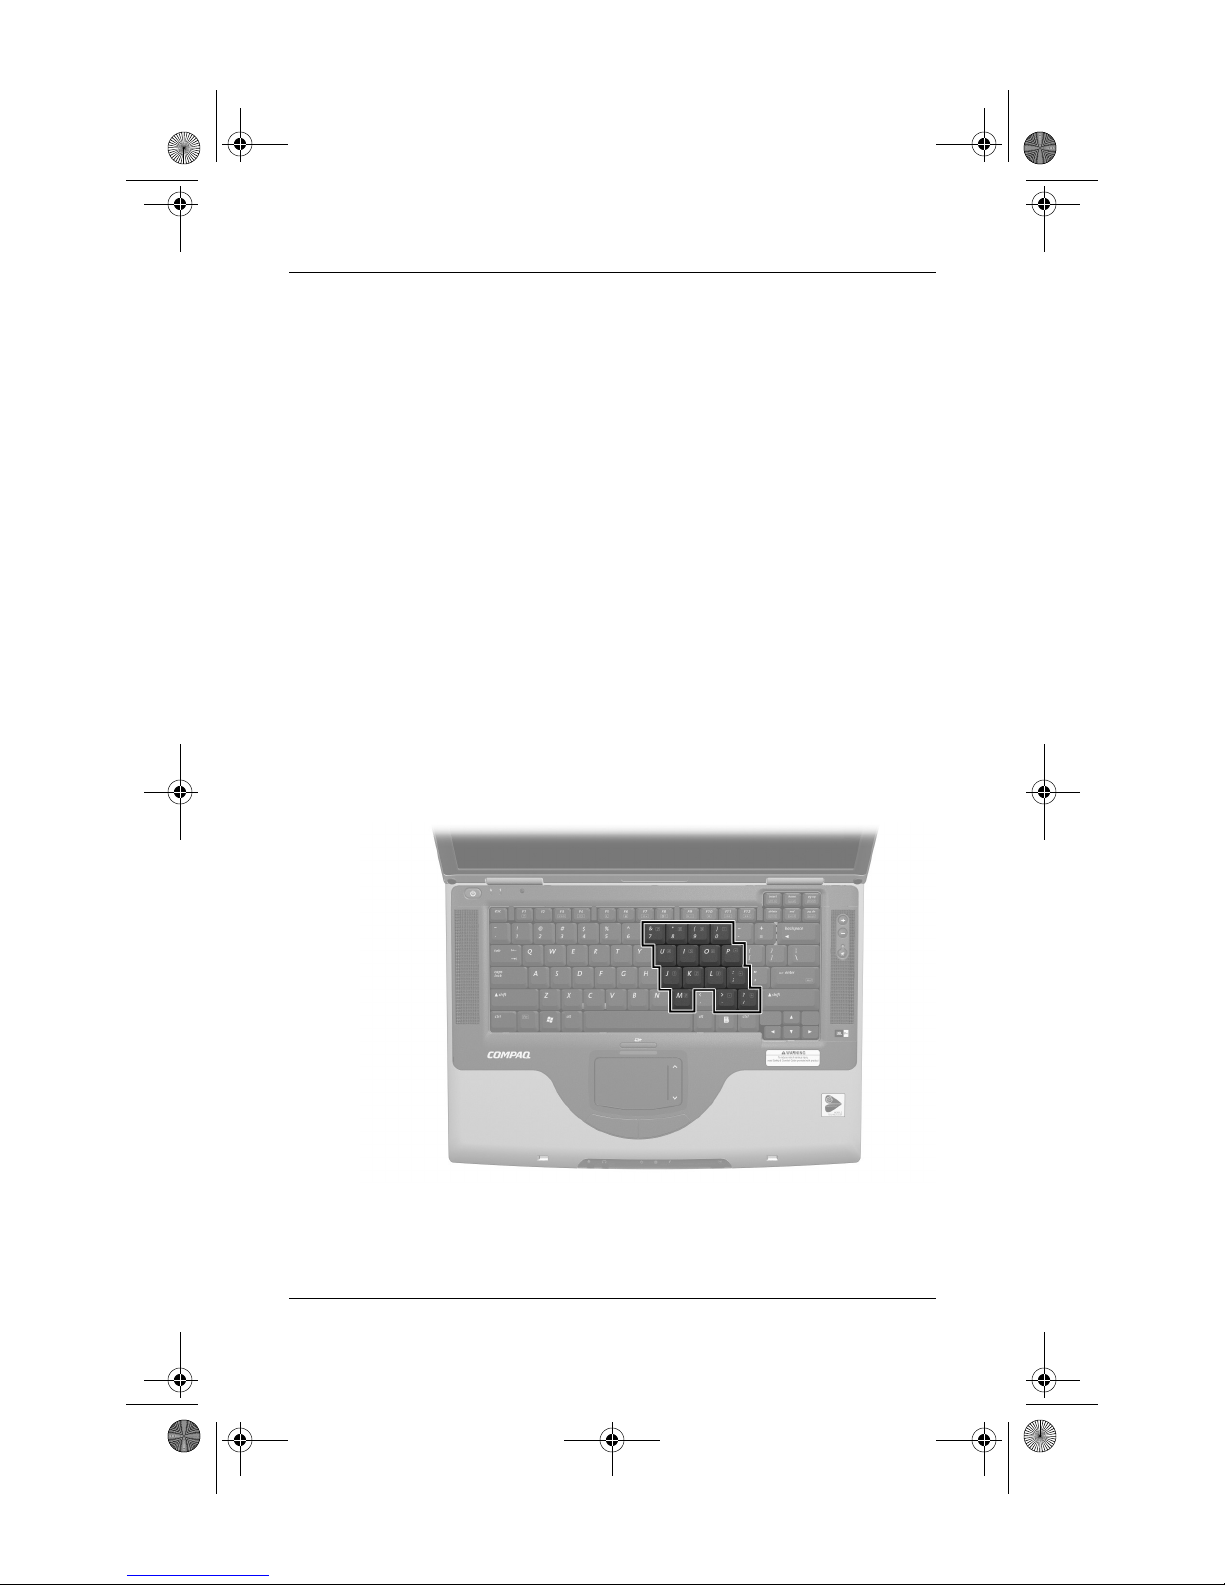
Keypad
The keypad consists of 15 keys that can be used like the keys on
an external keypad. When the keypad is turned on, each keypad
key performs the functions indicated by the icon in the upper right
corner of the key.
Identifying the keypad keys
3–8 Startup and Reference Guide—Part 2
Page 27
CPQ-311245-001.book Page 9 Thursday, March 27, 2003 10:17 PM
Turning the Keypad On and Off
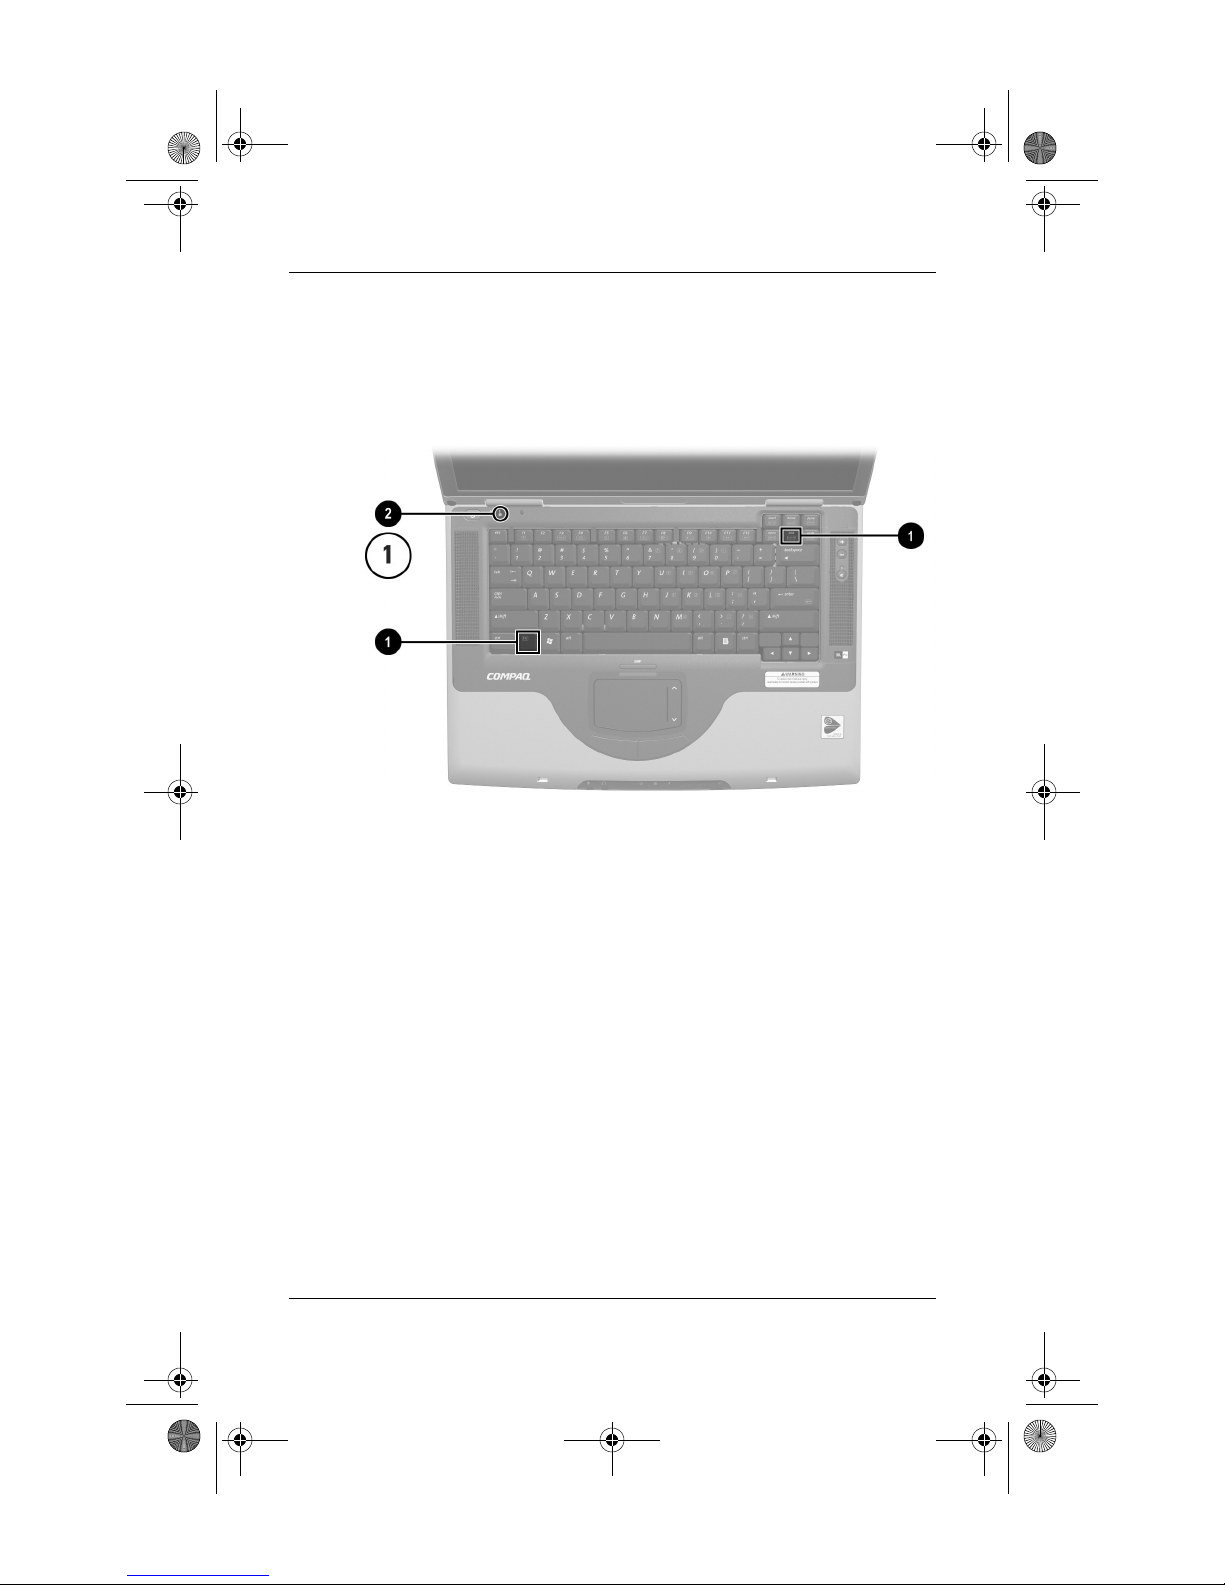
When the keypad is off, press Fn+num lk 1 to turn the keypad on.
When the keypad is on, press
num lock light 2 turns on when the keypad is on.
Fn+num lk to turn the keypad off. The
Keyboard
Identifying the Fn and num lk keys and the num lock light
Switching the Functions of Keypad Keys
You can temporarily switch the functions of a keypad key
between its standard function and its keypad function.
■ To use a key on the keypad as a keypad key while the keypad
is turned off, press and hold
■ To use a key on the keypad as a standard key while the
keypad is turned on:
❏ Press and hold Fn to type with the key in lowercase.
❏ Press and hold Fn+shift to type with the key in uppercase.
Releasing the
Fn key returns a keypad key to its set function. For
example, a keypad key returns to its keypad function if the
keypad is turned on or to its standard function if the keypad is
turned off.
Startup and Reference Guide—Part 2 3–9
Fn while pressing the key.
Page 28

CPQ-311245-001.book Page 10 Thursday, March 27, 2003 10:17 PM
Keyboard
3–10 Startup and Reference Guide—Part 2
 Loading...