

Page 1

HP StorageWorks
HP PolyServe Migration Utility for SQL Server user guide
MxMigrate 4.0.0
Part number: T5392-96058
First edition: February 2010
Page 2

Legal and notice information
© Copyright 2007, 2010 Hewlett-Packard Development Company, L.P.
Confidential computer software. Valid license from HP required for possession, use or copying. Consistent
with FAR 12.211 and 12.212, Commercial Computer Software, Computer Software Documentation, and
Technical Data for Commercial Items are licensed to the U.S. Government under vendor's standard
commercial license.
The information contained herein is subject to change without notice. The only warranties for HP products
and services are set forth in the express warranty statements accompanying such products and services.
Nothing herein should be construed as constituting an additional warranty. HP shall not be liable for
technical or editorial errors or omissions contained herein.
Microsoft, Windows, Windows XP, and Windows NT are U.S. registered trademarks of Microsoft
Corporation.
Page 3

Contents
1 Introduction ...................................................................... 4
Overview ........................................................................................................... 4
How MxMigrate works .................................................................................. 4
Migrated data .............................................................................................. 5
Prerequisites ................................................................................................. 5
Migration scenarios ............................................................................................. 6
Migrate to a new matrix, using different hostnames/IPs ...................................... 6
Migrate to a new matrix, using the same hostnames/IPs .................................... 8
Migrate to an existing matrix, using different hostnames/IPs ............................... 9
2 Using MxMigrate ............................................................ 11
Install MxMigrate .............................................................................................. 11
Perform a migration ........................................................................................... 11
Start MxMigrate ......................................................................................... 11
Source Login window .................................................................................. 12
Target Login window ................................................................................... 14
Select Databases for Transfer window ............................................................ 16
Options window ......................................................................................... 17
Validation window ...................................................................................... 18
Access check ....................................................................................... 19
Validation process ................................................................................ 19
Backup and Restore Databases window ......................................................... 21
Pre-Switch Steps window .............................................................................. 23
Backup and Restore Logs window ................................................................. 24
SSIS (SQL2005/2008 only) window ............................................................. 25
Post-Switch Steps window ............................................................................. 25
Finished window ......................................................................................... 26
HP PolyServe Migration Utility for SQL Server user guide 3
Page 4
1 Introduction
Overview
The HP PolyServe Migration Utility for SQL Server (MxMigrate) is a wizard-based
utility designed to move SQL Server databases into HP PolyServe Software for
Microsoft SQL Server. At the end of the process, the migrated SQL databases will
be highly available and manageable via HP PolyServe Software for Microsoft SQL
Server.
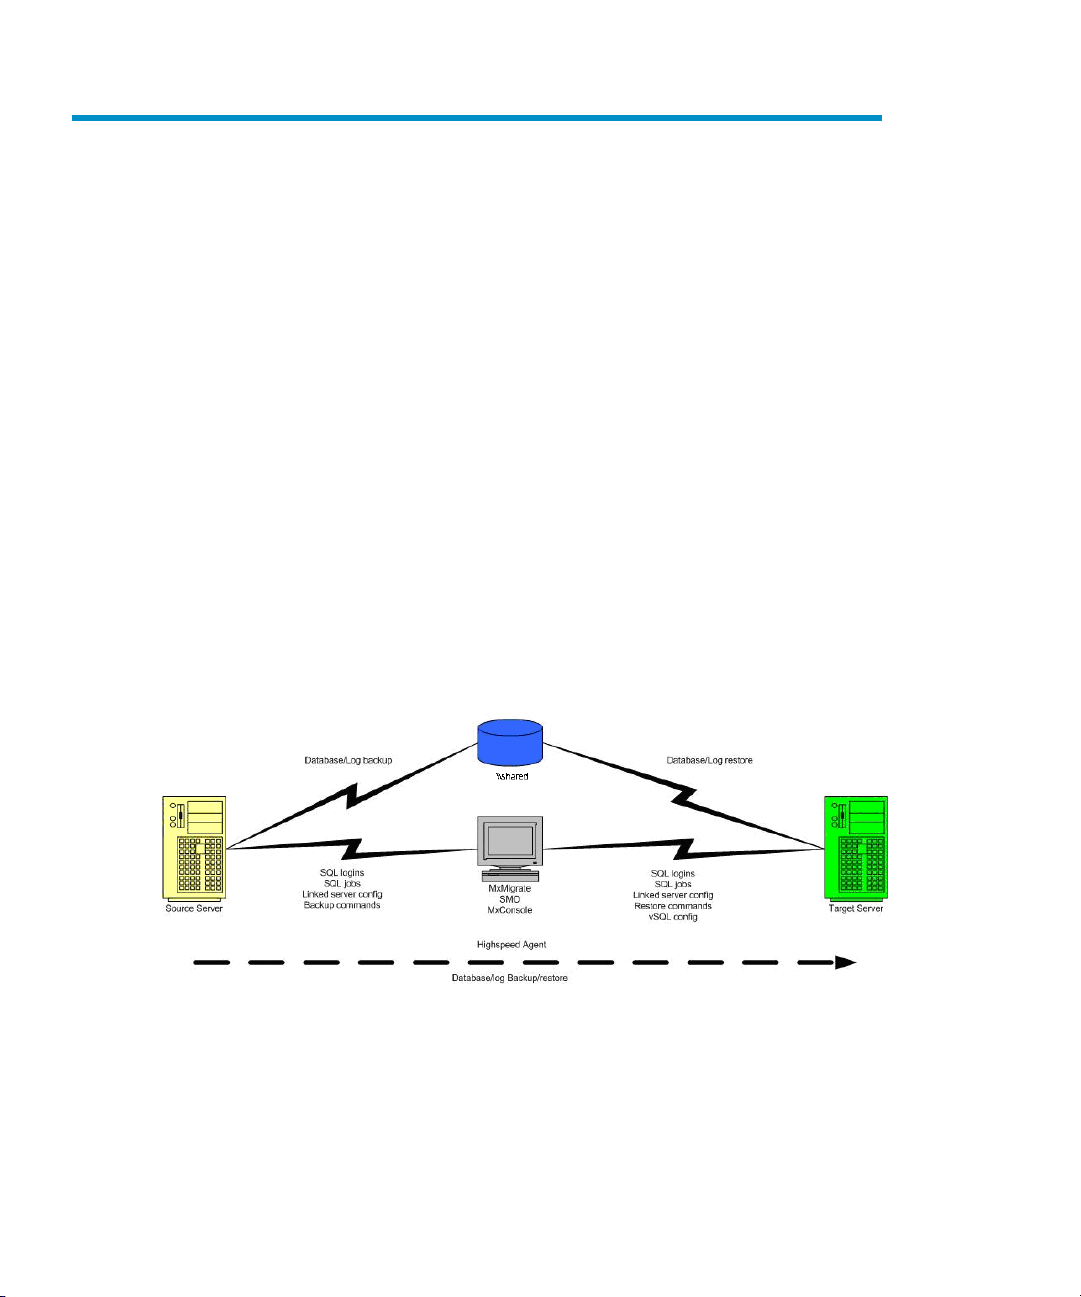
How MxMigrate works
MxMigrate is a WinForm application built on .NET 3.5 and SQL Server Management
Object (SMO). It consists of a single executable, MxMigrate.exe, that can be
launched from either a node in the Matrix Server cluster or a third system that has
network connectivity to both the source and target server. One node in the cluster is
used as the target server.
Introduction4
Page 5

Migrated data
MxMigrate migrates the following:
• User data
• SQL logins
• Linked/remote servers
• SQL jobs
• SSIS packages
MxMigrate does not migrate or handle the following:
• System databases (for example, master, msdb, tempdb)
• SSIS settings
• Replications
• Log shipping
• Database mirroring
• External dependencies
• Reporting Services
• Notification Services
• Service Broker
MxMigrate does not handle auto-close or offline databases. The databases to be
migrated must be online.
Prerequisites
The following Microsoft Software must be installed on the computer running
MxMigrate:
• Microsoft Windows 2008, or Microsoft Windows Vista or 2003 (R2, SP1, SP2),
either 32-bit or 64-bit
• Windows Installer 4.x
• .NET Framework 3.5
• Microsoft XML provider (MsXml6)
• Microsoft SQL 2008 Native Client provider (MsNCli)
• Microsoft SQL 2008 Management Objects (SMO)
• Microsoft SQL 2008 CLR Types
Following are additional requirements for the target server:
HP PolyServe Migration Utility for SQL Server user guide 5
Page 6

• Matrix Server must be installed and running on all nodes in the cluster.
• HP PolyServe Software for Microsoft SQL Server must be installed on all cluster
nodes that might host the SQL Server instance.
• The Microsoft SQL Server instance must be installed as described in the HP Poly-
Serve Software for Microsoft SQL Server Administration Guide.
Migration scenarios
The following scenarios are supported for migrating a stand-alone, non-virtualized
SQL Server instance into a Matrix Server cluster, making the instance highly available.
The scenarios assume that Matrix Server, HP PolyServe Software for Microsoft SQL
Server, and the SQL Server instance are installed on the target node. In the “New
Matrix” scenarios, the SQL Server instance is virtualized on the target node during
the migration procedure. In the “Existing Matrix” scenario, the SQL Server instance
is virtualized on the target node before starting the migration procedure.
A SQL 2000 or 2005 instance can be migrated to SQL 2005 or SQL 2008. A SQL
2008 instance can be migrated only to SQL 2008.
The supported migration scenarios are:
• Migrate to a new matrix. The SQL Server instance on the source node and the
Virtual SQL Server on the target node will use different hostnames and IP addresses.
• Migrate to a new matrix. The SQL Server instance on the source node and the
Virtual SQL Server on the target node will use the same hostname and IP address.
• Migrate to an existing matrix. The SQL Server instance on the source node and
the Virtual SQL Server on the target node will use different hostnames and IP addresses.
Migrate to a new matrix, using different hostnames/IPs
In this scenario, Matrix Server, HP PolyServe Software for Microsoft SQL Server, and
the SQL Server instance are installed on the target node. The SQL Server instance
has not yet been virtualized with HP PolyServe Software for Microsoft SQL Server.
After the target SQL Server instance is virtualized during the procedure, the source
SQL Server and the target Virtual SQL Server will have unique host names and IPs
and can be running side-by-side.
Complete the following steps:
1. Start MxMigrate.
Introduction6
Page 7

2. Validate and connect to the source SQL Server instance (Source Login window.)
3. Validate and connect to the target (physical) SQL Server instance (Target Login
window).
4. Select the databases to be migrated (Select Databases for Transfer window).
5. Specify the location for the backup files (Options window).
6. Validate your entries (Validation window).
7. Create any missing databases on the target server (Validation > New Database
window).
8. Back up the source databases (Backup and Restore Databases window).
9. Restore databases to the target server, using the Recovery feature. (Backup and
Restore Databases window).
10. Apply the SQL securities and logins, the SQL jobs, and the linked/remote server
configurations found on the source server to the target server (Pre-Switch Steps
window).
11. Apply any third-party applications, tools, and libraries to the target server so
that it will match the configuration of the source server.
12. Test applications against the target server in stand-alone mode.
13. Virtualize the SQL Server instance on the target server. (Using HP PolyServe
Software for Microsoft SQL Server, create a Virtual SQL Server and add the SQL
Server instance to it.)
14. Test applications against the Virtual SQL Server.
15. Back up the source databases (Backup and Restore Databases window).
16. Restore databases to the target server using NonRecovery (Backup and Restore
Databases window).
17. Put the source database in ReadOnly mode. Users will now be accessing the
target server for data, not the source server (Pre-Switch Steps window)
18. Back up the source transaction logs (Backup and Restore Logs window).
19. Restore the transaction logs to the target server (Backup and Restore Logs
window).
20. Migrate SSIS/DTS packages to the target server.
21. Re-sync SQL securities and logins on the target server (Post-Switch Steps window)
22. Test applications against the Virtual SQL Server.
HP PolyServe Migration Utility for SQL Server user guide 7
Page 8

Migrate to a new matrix, using the same hostnames/IPs
In this scenario, Matrix Server, HP PolyServe Software for Microsoft SQL Server, and
the SQL Server instance are installed on the target node. The SQL Server instance
has not yet been virtualized with HP PolyServe Software for Microsoft SQL Server.
After the target SQL Server instance is virtualized during the procedure, the Virtual
SQL Server will use the same host name and IP as the source SQL Server instance.
Therefore, the source SQL Server instance must be shut down before virtualizing the
target SQL Server instance.
1. Start MxMigrate.
2. Validate and connect to the source SQL Server instance (Source Login window.)
3. Validate and connect to the target (physical) SQL Server instance (Target Login
window).
4. Select the databases to be migrated (Select Databases for Transfer window).
5. Specify the location for the backup files (Options window).
6. Validate your entries (Validation window).
7. Create any missing databases on the target server (Validation > New Database
window).
8. Back up the source databases (Backup and Restore Databases window).
9. Restore databases to the target server, using the Recovery feature (Backup and
Restore Databases window).
10. Apply the SQL securities and logins, SQL jobs, and linked/remote server
configurations found on the source server to the target server (Pre-Switch Steps
window).
11. Apply any third-party applications, tools, and libraries to the target server so
that it will match the configuration of the source server.
12. Test applications against the target server in stand-alone mode.
13. Back up the source databases (Backup and Restore Databases window).
14. Restore databases to the target server using NonRecovery (Backup and Restore
Databases window).
15. Put the source database in ReadOnly mode. Users will now be accessing the
target server for data, not the source server (Pre-Switch Steps window).
16. Back up the source transaction logs (Backup and Restore Logs window).
Introduction8
Page 9

17. Restore the transaction logs to the target server (Backup and Restore Logs
window).
18. Migrate SSIS/DTS packages to the target server.
19. Re-sync SQL securities and logins on the target server (Post-Switch Steps window)
20. Shut down the source server.
21. Virtualize the SQL Server instance on the target server. (Using HP PolyServe
Software for Microsoft SQL Server, create a Virtual SQL Server with the same
IP and hostname as that of the source server and add the SQL Server instance
to it.)
22. Test applications against the Virtual SQL Server.
Migrate to an existing matrix, using different hostnames/IPs
In this scenario, Matrix Server, HP PolyServe Software for Microsoft SQL Server, and
the SQL Server instance are installed on the target node and the SQL Server instance
has already been virtualized with HP PolyServe Software for Microsoft SQL Server.
At the end of the procedure, the target Virtual SQL Server and the source SQL Server
instance will have unique host names and IPs and can be running side-by-side.
1. Start MxMigrate.
2. Validate and connect to the source SQL Server instance (Source Login window.)
3. Validate and connect to the target (physical) SQL Server instance (Target Login
window).
4. Select the databases to be migrated (Select Databases for Transfer window).
5. Specify the location for the backup files (Options window).
6. Validate your entries (Validation window).
7. Create any missing databases on the target server (Validation > New Database
window).
8. Back up the source databases (Backup and Restore Databases window).
9. Restore databases to the target server, using the Recovery feature (Backup and
Restore Databases window).
10. Apply the SQL securities and logins, SQL jobs, and linked/remote server
configurations found on the source server to the target server (Pre-Switch Steps
window).
HP PolyServe Migration Utility for SQL Server user guide 9
Page 10

11. Apply any third-party applications, tools, and libraries to the target server so
that it will match the configuration of the source server.
12. Test applications against the target server in stand-alone mode.
13. Back up the source databases (Backup and Restore Databases window)
14. Restore databases to the target server using NonRecovery (Backup and Restore
Databases window).
15. Put the source database in ReadOnly mode. Users will now be accessing the
target server for data, not the source server (Pre-Switch Steps window).
16. Back up the source transaction logs (Backup and Restore Logs window).
17. Restore transaction logs to the target server (Backup and Restore Logs window).
18. Migrate SSIS/DTS packages to the target server.
19. Re-sync SQL securities and logins on the target server (Post-Switch Steps window).
20. Test applications against the Virtual SQL Server.
Introduction10
Page 11

2 Using MxMigrate
Install MxMigrate
MxMigrate should be installed on either a node in the Matrix Server cluster or another
system that has network connectivity to both the source and target SQL Server instance.
To install MxMigrate, complete these steps:
1. Locate the MxMigrate.msi file in the directory where you downloaded the
product.
2. Double-click the MxMigrate.msi file and run the Installation Wizard. The
installation creates an MxMigrate shortcut that can be used to run the utility.
Perform a migration
The MxMigrate interface takes you through the entire migration process. User input
is validated at each step and warnings and errors are raised as necessary to ensure
that each action is performed correctly.
Start MxMigrate
Double click the MxMigrate shortcut to start the application.
The Welcome window appears after the application is launched. This window lists
the prerequisites for the product.
HP PolyServe Migration Utility for SQL Server user guide 11
Page 12

Source Login window
The Source Login window asks for the SQL login information needed to connect to
the source SQL Server instance.
Using MxMigrate12
Page 13

SQL Server Instance. Enter a valid SQL 2000, 2005, or 2008 instance such as
MySQLSource or MySQLSource\Instance1.
NOTE:
If you are unsure of the instance name, click the (…) button to open the Select SQL
Server Instance window, which lists the SQL Server instances available on the
network. Highlight the desired instance and click Select to return to the main
application. If you cannot find the correct instance, enter the instance name manually
in the textbox field.
HP PolyServe Migration Utility for SQL Server user guide 13
Page 14

Then complete the Source Login window:
Authentication Method. Select the desired authentication method to connect to the
SQL Server instance. See SQL Server Books Online for additional details regarding
Windows versus SQL authentication.
User Name. Enter the appropriate user name. (This value is needed only if SQL Server
Integrated Security is selected as the Authentication Method.)
Password. Enter the user's password, and then re-enter it in the next field. (This value
is needed only if SQL Server Integrated Security is selected as the Authentication
Method.)
When you have completed your entries, click Test Connection to verify the credentials.
This step must be completed before moving to the next step in the migration.
Target Login window
On the Target Login window, enter the SQL login information needed to connect to
the target SQL Server instance.
Using MxMigrate14
Page 15

SQL Server Instance. Enter a valid SQL instance such as MySQLTarget or
MySQLTarget\Instance1. This SQL Server instance must not be the same as the source
SQL Server instance.
If you are unsure of the instance name, click the (…) button to browse for a list of
instances available on the network.
Authentication Method. Select the desired authentication method to connect to the
SQL Server instance. See SQL Server Books Online for additional details regarding
Windows versus SQL authentication.
User Name. Enter the appropriate user name. (This value is needed only if SQL Server
Integrated Security is selected as the Authentication Method.)
Password. Enter the user's password and then re-enter it in the next field. (This value
is needed only if SQL Server Integrated Security is selected as the Authentication
Method.)
When you have completed your entries, click Test Connection to verify the credentials.
This step must be completed before moving to the next step in the migration.
HP PolyServe Migration Utility for SQL Server user guide 15
Page 16

Select Databases for Transfer window
Select the database(s) that you want to transfer to the target server. The window lists
only user databases and “model” system databases.
NOTE:
It is best practice is to migrate the model database with the RECOVERY option before
migrating the user databases. If this order is not followed, the restore of some user
databases may fail.
Click Select All to select all of the listed databases.
Click Deselect All to deselect the databases.
The “Selected” field shows the number of databases that have been selected.
Using MxMigrate16
Page 17

NOTE:
Migration of a model database is supported only from SQL Server 2005 to SQL
Server 2005, provided that the Service Pack level on the source is equal to or lesser
than Service Pack level on the target.
Options window
The Options window allows you to set options that affect how the database backup
should be carried out.
NOTE:
The following requirements apply to both the source and target server:
• Specify a UNC path for the backup and restore locations. The MxMigrate valid-
ation will fail if mapped network drives are specified for these locations.
• The user running MxMigrate and the user account under which the SQL Server
process is running must have read, write, list, create, and delete permission
within the folder.
HP PolyServe Migration Utility for SQL Server user guide 17
Page 18

Number of Parallel backups. Enter the number of threads that the system should
spawn to perform the backup in parallel. This option is useful when there is more
than one database to be backed up. The default value is 1.
Use file-based backup. This is the default method for backing up the database(s).
Backup to. Enter the path to the directory where the source SQL Server instance will
place the backup files. Use the (…) button to browse for a directory. The folder
browser dialog lists only the directories accessible in respect to the local machine
on which MxMigrate is running.
Restore from. Enter the path to the directory where the target SQL Server instance
will pick up the backup files. Use the (…) button to browse for a directory. The folder
browser dialog lists only the directories accessible in respect to the local machine
on which MxMigrate is running.
Remove backup files. Check this item if you want to remove the backup files after a
successful restore.
Validation window
The Validation window allows you to validate the Source and Target servers before
proceeding with the actual database migration.
Using MxMigrate18
Page 19

NOTE:
The Validation step verifies only that the database exists; it does not check the status
of the database. If the database is not online and accessible, the
create/backup/restore operations will fail.
Access check
To check for access to the backup directory, MxMigrate executes the following from
the source and target server:
Exec master..xp_cmdshell N'dir <backup_path or restore_path>
This step requires that xp_cmdshell execution be allowed during the migration.
To turn on xp_cmdshell on SQL 2005/2008, use the SQL Surface Area
Configuration tool or run the following script.
--enable xp_cmdshell for sql2k5
exec sp_configure 'show advance','1'
reconfigure with override
go
exec sp_configure 'xp_cmdshell','1'
reconfigure with override
go
To turn off xp_cmdshell on SQL 2005/2008, use the SQL Surface Area
Configuration tool or run this script.
--disable xp_cmdshell for sql2k5
exec sp_configure 'xp_cmdshell','0'
reconfigure with override
go
Validation process
In addition to validating access, the validation process can save the results of the
validation to a file and can create any missing databases on the target server.
HP PolyServe Migration Utility for SQL Server user guide 19
Page 20

Click Save Info to save the results of the validation to a file.
Click Start Validation to start the validation process. This process can be run as many
times as desired.
Using MxMigrate20
Page 21

If a database is missing on the target server, use the Create DB option to create the
database shell on that server using the same database size and ANSI options as the
source server. (No data is transferred.) Scroll down the validation report, select the
missing database, and then click Create DB.
You can specify the location for each of the database files on the New Database
window.
Name. The logical file name for the database.
File Group. The file group to which the database file belongs.
File Path. The physical path to the database file.
To specify an absolute path for the database file, type the path and click Set.
Click Create Database on Target to start the database creation on the target server.
Click Close to close the dialog with making any changes.
NOTE:
The minimum size for a SQL Server 2005 or 2008 database is 2 MB. If you are
creating a database shell for a SQL Server 2000 database that will be migrated to
SQL Server 2005 or 2008, the operation will fail if the SQL Server 2000 database
is less than 2 MB.
Backup and Restore Databases window
This window is used to back up the source databases and restore them on the target
server.
HP PolyServe Migration Utility for SQL Server user guide 21
Page 22
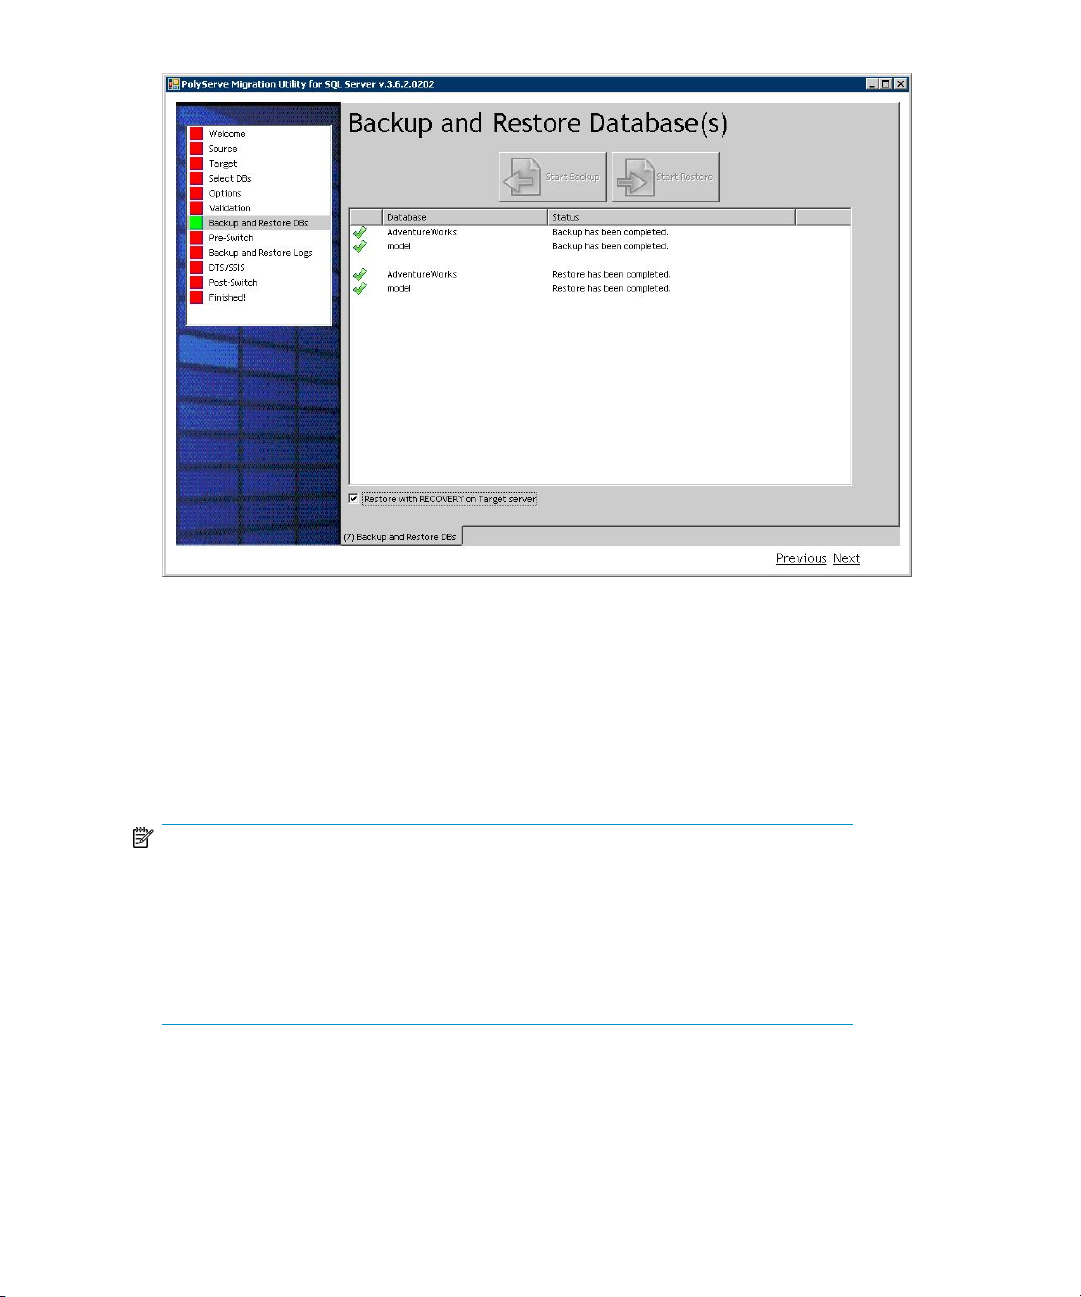
Click Start Backup to start backing up the source SQL Server database to a shared
folder.
When the backup is complete, click Start Restore to begin restoring the database to
the target server.
Restore with RECOVERY on Target server. When this box is checked, the databases
will be restored with the Recovery option on the target server. This option allows
immediate access to the databases. The default is NonRecovery, or unchecked.
NOTE:
MxMigrate does a full database backup, which can invalidate your existing SQL
2000 backup schedule. For example, you might do a full backup at 12:00am and
a differential backup every other hour. If MxMigrate does its full backup at 10:30am,
the next differential backup will be based on this 10:30am backup. On SQL
2005/2008, the COPY_ONLY flag is used to ensure that your backup strategy is
intact. See
SQL Server Books Online
for details.
Using MxMigrate22
Page 23
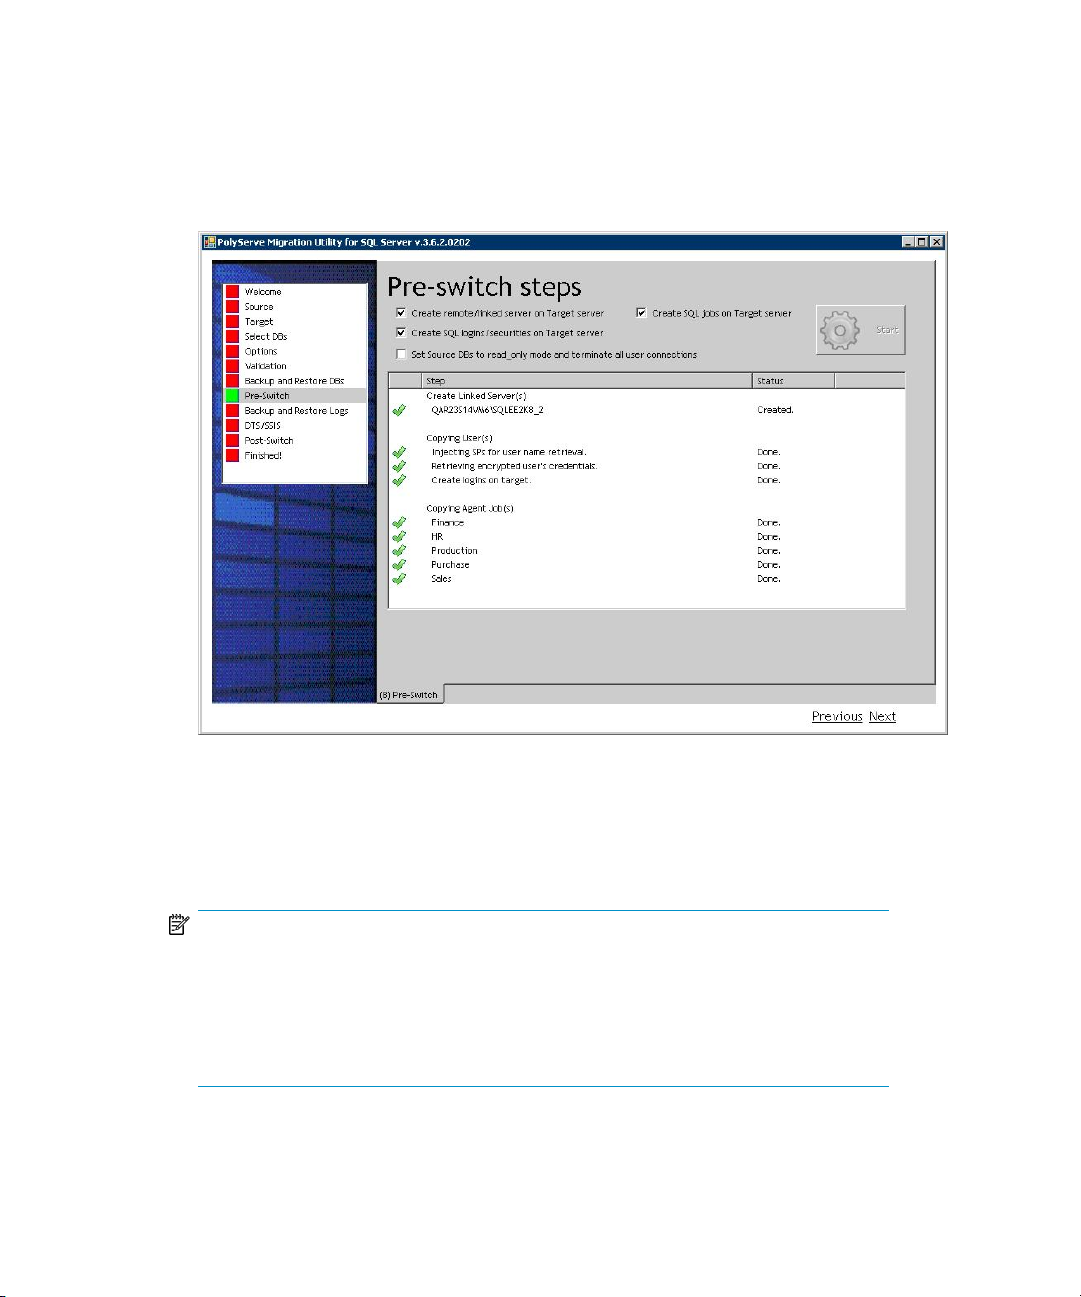
Pre-Switch Steps window
The pre-switch steps include creating linked servers on the target server, transferring
SQL logins and SQL jobs from the source server to the target server, and setting the
source database to read-only.
Check the steps that you want to perform and then click Start to begin the operation.
Create remote/linked server on Target server. This box is checked by default.
Create SQL logins/securities on Target server. This step transfers SQL logins from the
source server to the target server. This box is checked by default.
NOTE:
User credentials (login name and password) are transferred to the target server as
they exist on the source server. This may or may not meet the security policy on the
target server. You may need to re-evaluate the policy on the target server after the
credentials have been transferred and ensure that the server roles and default
database mapping are set correctly for the credentials.
HP PolyServe Migration Utility for SQL Server user guide 23
Page 24
Create SQL jobs on Target server. This option transfers SQL jobs from the source
server to the target server. This box is checked by default.
Set Source DBs to read_only mode and terminate all user connections.This option sets
the source database to read-only. Use this option only if you no longer want users
to write to the source database. This option is valid for production migration. This
box is unchecked by default.
To turn off policy checking for a login, execute the following command:
ALTER LOGIN <login_name> WITH CHECK_POLICY=OFF
GO
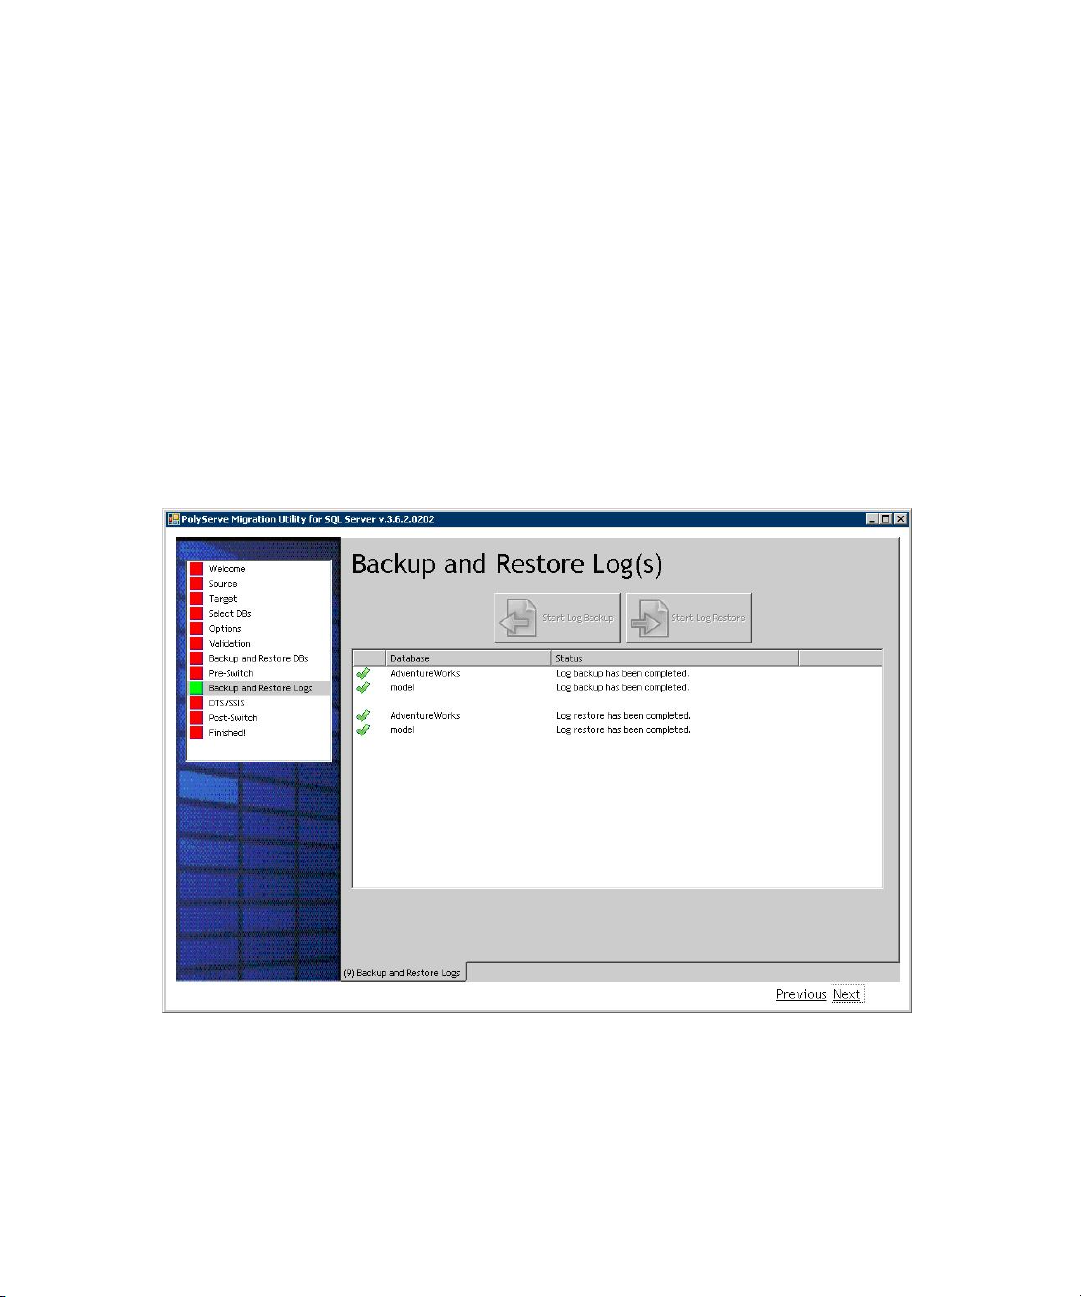
Backup and Restore Logs window
Use this window to back up the transaction log on the source server and restore it
on the target server. Only databases with Full recovery mode can have transaction
log backup. If the databases are not in Full recovery mode (i.e., simple or bulk), the
databases will be skipped during the backup and restore phase.
Click Start Log Backup to begin backing up the source server log to a shared folder.
Click Start Log Restore to begin restoring the log to the target server.
Using MxMigrate24
Page 25
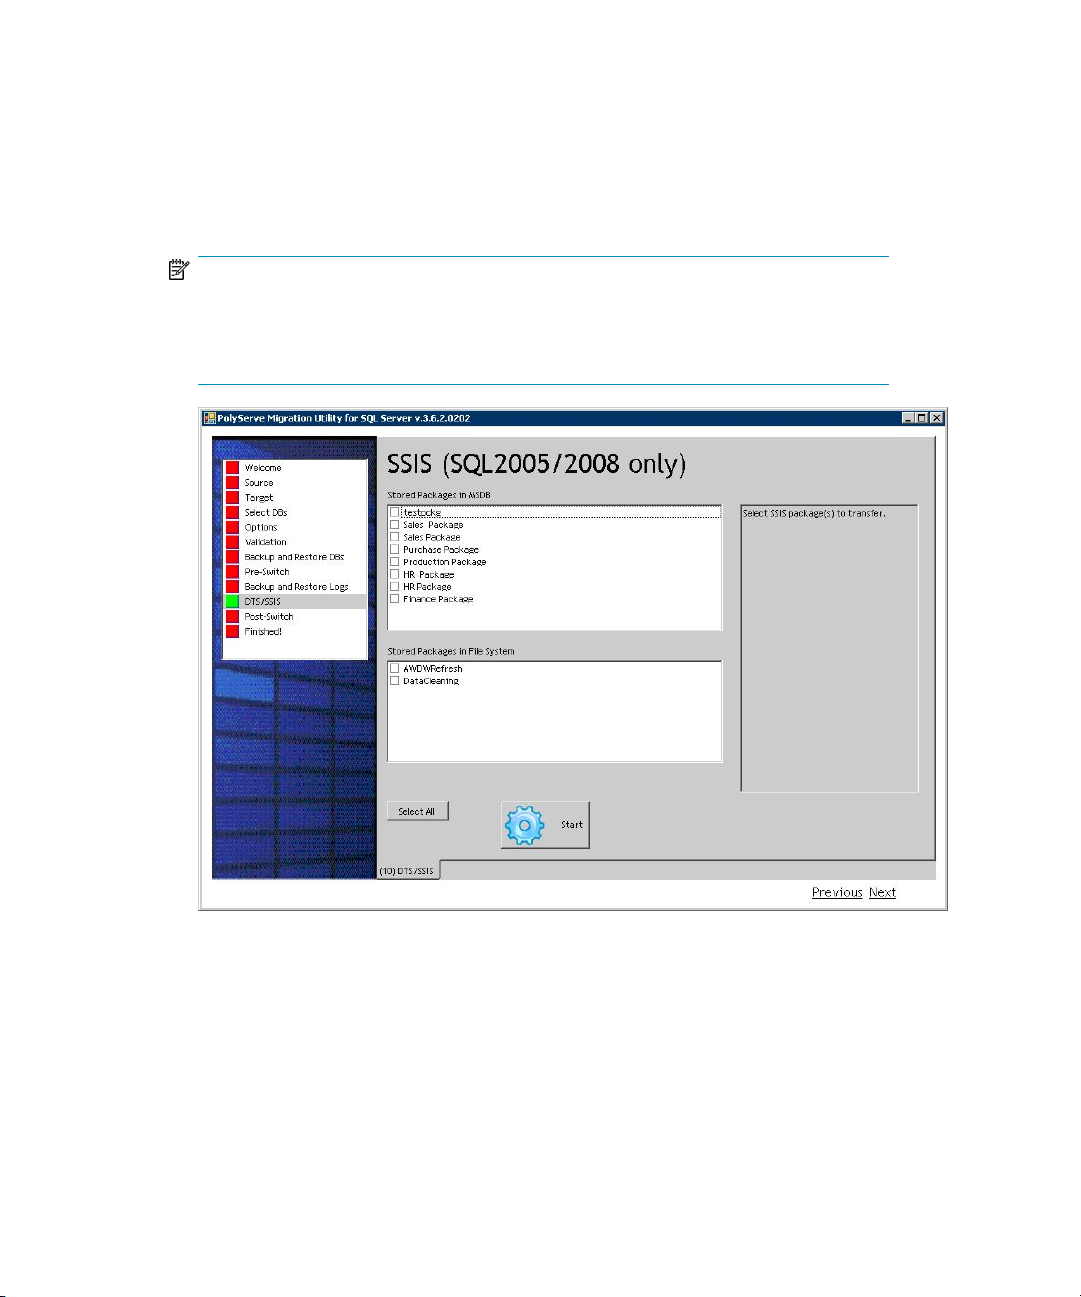
SSIS (SQL2005/2008 only) window
This window can be used to transfer SSIS packages. Check the individual packages
that you want to transfer, or click Select All to select all packages. Then click Start to
begin the operation.
NOTE:
The SSIS package transfer operation does not validate or transfer any external
objects used by the SSIS packages. You will need to transfer all external object
dependencies manually.
Post-Switch Steps window
Use this window to connect to the target SQL Server and re-sync SQL IDs for the
migrated databases. Click Start to begin the operation.
HP PolyServe Migration Utility for SQL Server user guide 25
Page 26

Finished window
This window appears when the migration is complete. It shows the migration status
log, which you can save to a file for future reference. Click Save Info to save the
status log.
Using MxMigrate26
Page 27

The MxMigrate utility also maintains a debug log called MxMigrate.log that can
be used for debugging purposes. The log is in the same directory as the
MxMigrate.exe file.
HP PolyServe Migration Utility for SQL Server user guide 27
 Loading...