

Page 1

HP 3PAR Policy Manager Software User Guide
Abstract
This guide is intended to be used as a reference when installing, configuring, and maintaining HP 3PAR Policy Manager (Policy
Manager). It contains administration-level information and some user configuration information for the Policy Manager.
HP Part Number: QL226-96117
Published: August 2011
Page 2

© Copyright 2011, 2011 Hewlett-Packard Development Company, L.P.
Confidential computer software. Valid license from HP required for possession, use or copying. Consistent with FAR 12.211 and 12.212, Commercial
Computer Software, Computer Software Documentation, and Technical Data for Commercial Items are licensed to the U.S. Government under
vendor's standard commercial license.
The information contained herein is subject to change without notice. The only warranties for HP products and services are set forth in the express
warranty statements accompanying such products and services. Nothing herein should be construed as constituting an additional warranty. HP shall
not be liable for technical or editorial errors or omissions contained herein.
Acknowledgments
Intel®, Itanium®, Pentium®, Intel Inside®, and the Intel Inside logo are trademarks or registered trademarks of Intel Corporation or its subsidiaries
in the United States and other countries.
Microsoft®, Windows®, Windows® XP, and Windows NT® are U.S. registered trademarks of Microsoft Corporation.
Adobe® and Acrobat® are trademarks of Adobe Systems Incorporated.
Java and Oracle are registered trademarks of Oracle and/or its affiliates.
UNIX® is a registered trademark of The Open Group.
Warranty
WARRANTY STATEMENT: To obtain a copy of the warranty for this product, see the warranty information website:
http://www.hp.com/go/storagewarranty
Documentation
For the latest version of this document, go to http://www.hp.com/go/3par/, navigate to your product page, click Support for your product, and
then click Manuals.
Page 3

Contents
1 Introduction...............................................................................................5
Related Documentation..............................................................................................................5
Typographical Conventions........................................................................................................5
Advisories................................................................................................................................5
2 Overview..................................................................................................6
What is the HP 3PAR Policy Manager?........................................................................................6
User Authentications.................................................................................................................6
HP 3PAR Policy Manager Connections........................................................................................6
How It All Works......................................................................................................................7
Policies...............................................................................................................................7
3 Installing the HP 3PAR Policy Manager..........................................................9
Hardware Requirements..........................................................................................................11
Software Requirements..............................................................................................................9
Installation and Setup................................................................................................................9
Reinstalling HP 3PAR Policy Manager...................................................................................10
4 Configuring Users.....................................................................................11
Overview..............................................................................................................................11
Configuring Users...................................................................................................................11
5 Starting the HP 3PAR Policy Manager.........................................................14
Starting HP 3PAR Policy Manager.............................................................................................14
Starting the Policy Manager User Interface............................................................................14
Default Login Information................................................................................................14
Stopping HP 3PAR Policy Manager...........................................................................................15
6 Understanding the User Interface................................................................16
Overview of the User Interface.................................................................................................16
Home Tab.............................................................................................................................17
Policy Tab..............................................................................................................................18
Sorting Policy Columns.......................................................................................................20
Pending Requests Tab..............................................................................................................20
Sorting Pending Requests....................................................................................................21
Audit Log Tab........................................................................................................................21
Configuration Tab...................................................................................................................22
7 Using HP 3PAR Policy Manager.................................................................24
Policy Inheritance and Hierarchy...............................................................................................24
Working in the Policy Tab........................................................................................................24
Base Installation Actions.....................................................................................................25
Viewing Policies by Group...................................................................................................26
Editing Permissions.............................................................................................................27
Adding New Parameters................................................................................................27
Removing Permission Parameters.....................................................................................29
Considerations when Creating Permissions.......................................................................29
Assigning Access Rights......................................................................................................30
Software Management Package Access Rights..................................................................30
Locking Permissions............................................................................................................31
Removing Policy Overrides..................................................................................................31
Setting Access Rights for All Policy Permissions.......................................................................32
Working in the Configuration Tab.............................................................................................32
Creating New Groups........................................................................................................32
Contents 3
Page 4

Editing Existing Group Configurations...................................................................................33
Configuring Group Notification Settings................................................................................34
Deleting Existing Groups.....................................................................................................35
Finding and Removing Missing Devices.................................................................................36
Working in the Pending Requests Tab........................................................................................37
Accepting and Denying Requests.........................................................................................38
Viewing Action Details and Specifying a Timeout...................................................................38
Container Actions..............................................................................................................38
Working in the Audit Log Tab...................................................................................................39
Viewing Audit Logs............................................................................................................40
Viewing Audit Log Entries by Group or Device..................................................................40
Audit Log Entries Online and in Log Files..............................................................................40
Audited Operations and Activity..........................................................................................40
Agent Audit Log Persistence.................................................................................................41
8 Troubleshooting and Maintenance..............................................................42
Troubleshooting......................................................................................................................42
Maintaining the Server and Database.......................................................................................42
4 Contents
Page 5
1 Introduction
Related Documentation
The following document provides information related to HP 3PAR Secure Service Architecture:
Read the…For information about…
Configuring the Secure Service Custodian
Typographical Conventions
This guide uses the following typographical conventions :
ABCDabcd
ABCDabcd
ABCDabcd
<ABCDabcd>
HP 3PAR Secure Service Custodian Configuration Utility
Reference
Used for dialog elements such as titles,
button labels, and other screen
elements.
output.
screen output.
Used for variables in filenames, paths,
and screen output.
Used for variables in user input.<ABCDabcd>
ExampleMeaningTypeface
When prompted, click Finish to
complete the installation.
Open the fileUsed for paths, filenames, and screen
\gui\windows\setup.exe
# cd \opt\3par\guiUsed to differentiate user input from
Modify the content string by adding the
-P<x> option after -jar
inform.jar
# .\java -jar inform.jar
-P<x>
Advisories
To avoid injury to people or damage to data and equipment, be sure to observe the cautions and
warnings in this guide. Always be careful when handling any electrical equipment.
WARNING! Warnings alert you to actions that can cause injury to people or irreversible damage
to data or the operating system.
CAUTION: Cautions alert you to actions that can cause damage to equipment, software, or data.
NOTE: Notes are reminders, tips, or suggestions that supplement the procedures included in this
guide.
NOTE: The InServ Storage Server has been rebranded as HP 3PAR Storage System. There are
instances in this document where menu items and command output refer to the HP 3PAR Storage
System as InServ or InServ Storage Server.
Related Documentation 5
Page 6

2 Overview
What is the HP 3PAR Policy Manager?
The HP 3PAR Policy Manager (Policy Manager) is a server-based software application that enables
customers to control and monitor communications between the HP 3PAR Secure Service Custodian
(Custodian) and the HP 3PAR Secure Service Collector Server (Collector Server). This server-based
application resides on a customer's network and sets and controls all Secure Service Architecture
permissions for the Custodians on that network. Policy Manager can be installed to enable only
authorized access and use of the managed Custodians.
The Policy Manager manages all operations the Collector Server requests to perform on Custodians,
and a subset of actions a Custodian will perform based on its own configuration. The list of managed
operations includes Custodian-specific actions, remote access connections to the Custodian, file
uploads, script and package registration and execution, and more.
Custodian policies and permissions are configured through the Policy Manager’s browser-based
user application pages. Through the application pages, authenticated users can set up and manage
Custodian-specific permissions and audit Policy Manager operations and use. Users log in to the
Policy Manager through Microsoft® Internet Explorer™, version 6.
You can host Policy Manager on Microsoft Windows NT™ (SP4), Windows 2000™ (SP3), Windows
2003™, or Windows XP™ operating systems. Hypersonic SQL provides a standalone, open
source, Java-based database to store and manage the Policy Manager configurations. Apache
Tomcat provides the Web application and file realm component for the Policy Manager.
User Authentications
Apache Tomcat provides the Web application and file realm component for the Policy Manager.
Tomcat's file realm implementation is used to manage user access to the Policy Manager. Tomcat
provides for two authentication levels or roles:
• One level of user authentication controls who can configure, manage, and administer the
Policy Manager and the Policy Manager users.
• A second level of user authentication specifies who can log in to the Policy Manager to manage
Custodian policies and permissions and view and accept pending requests.
These roles specify the Policy Manager administrators and users. A Policy Manager user has full
access to all functionality available through the Policy Manager application pages.
HP 3PAR Policy Manager Connections
Within a customer's organization, a single Policy Manager can be configured to manage some
or all Custodians, or multiple Policy Managers can be configured to handle multiple sets of
Custodians uniquely; for example, Custodians located in different departments and with separate
administration and security needs.
6 Overview
Page 7

Figure 1 HP 3PAR Policy Manager Configured to Mange Custodian Policies
How It All Works
The Secure Service Collector Server communicates with the Secure Service Custodian by posting
requests for the Custodian and receiving its responses. These can be requests to perform actions,
including uploading files, running applications, restarting, executing packages, setting data values
on the Custodians, and so forth. These requests are discovered by the Custodian Custodians upon
subsequent pings. If a Custodian is managed by the Policy Manager, the Custodian will first
reference its policy to determine whether or not it can perform the action.
Each Custodian is also configured with its own actions. These actions may be configured to execute
based on an internal schedule set in the Custodian, or based on triggering events. If Policy Manager
is in use, some of the Custodian’s own actions will be defined in the related policy.
Policies
When a Custodian connected to and managed by Policy Manager is presented with a request to
perform an action, it first refers to its policy, as defined by the Policy Manager. A policy is comprised
of a list of actions a Custodian can perform and permissions and rights to perform each action. A
Custodian’s policy determines how the Custodian will handle an action request and, based on the
defined policy, the Custodian will do one of three things:
• Accept and perform the action.
• Deny the action.
• Ask the Policy Manager for permission to perform the action.
The Custodian enforces the policy as set in the Policy Manager and reports its policy-related
activities to the Policy Manager and the Collector Server for auditing reasons.
If a Custodian requests permission to perform an action, per its policy, the Policy Manager sends
an email notification to specified Policy Manager user(s). Based on the email information, the
How It All Works 7
Page 8

recipients are informed of the requested action. They need to then accept or deny the action within
a defined timeout period.
• If the action is accepted, the Policy Manager notifies the Custodian that the action is accepted.
If applicable, the Custodian notifies the Collector Server that the action as approved, and then
it performs the action as requested.
• If the user denies the action, the Policy Manager sends the action back to the Custodian as
denied. The Custodian notifies the Collector Server that the action was denied.
All communications between the Policy Manager and its managed Custodians are initiated by the
Custodians. When a Custodian contacts the Policy Manager, either when it registers or based on
its defined ping rate, that Custodian receives any current or updated policy settings or accepted
or denied requests. At the same time, the Custodian sends the Policy Manager its action requests
and its list of supported actions.
8 Overview
Page 9

3 Installing the HP 3PAR Policy Manager
The HP 3PAR Policy Manager installation includes all necessary components needed to manage
polices on Custodians. The Policy Manager can be hosted from a computer running supported
Windows operating system and connected to Custodians via a network connection.
NOTE: The Secure Service Custodian is configured to connect to the Policy Manager at a specified
IP address or host name. If you change the network location of the Policy Manager after deployment,
the configuration of each managed Custodian will need to change in kind.
Hardware Requirements
The following are the minimum requirements for the Policy Manager, database, and Web server:
• i386
• 750 MHz processor
• 256 MB of memory
• 100 MB of disk space for the installation with additional space available for log files
NOTE: As you use the Policy Manager and audit log files are created, your disk space
requirements will grow substantially. Keep track of the disk space usage and consider archiving
log files as possible.
• 100 MB LAN connection
• Network connection between the Policy Manager and connected Custodians
Software Requirements
The following are not included, but required for installation:
• Windows NT, 2000, 2003, or XP
For Windows NT 4.0 apply Service Pack 4◦
◦ For Windows 2000 apply Service Pack 3
• HP 3PAR Policy Managerapplication pages are optimized for Microsoft Internet Explorer,
version 6.
The following are included in installation:
• HP 3PAR Policy Manager, version 1.0
• Apache Tomcat, version 5.0.18
• Hypersonic SQL version 1.7.1
• JDK 1.4.x Java VM (Virtual Machine)
Installation and Setup
To install and set up HP 3PAR Policy Manager, perform the following:
1. Insert the Policy Manager installation CD in the CD-ROM drive of the computer on which you
want to install the Policy Manager, or another networked computer to which the Custodians
can connect via LAN or WAN connections.
2. Browse to the CD in your computer's file manager or explorer application.
3. Locate and run install3PARSSPM_x_x_x_x.exe.
The Policy Manager installation program starts installing the server, Web applications, and
database, and prompts you for installation information.
Hardware Requirements 9
Page 10

4. After clicking Next at the Introduction, provide the following information when prompted:
• Installation directory for all of the installed software components.
• Port number (listening port) of the computer through which the Policy Manager
communicates with Custodians. The default port is 8080.
• Your organization’s email server and email domain name.
• The sender’s email address. The source address is 3PAR_SSPM@3par.com.
• The administrator’s email address.
• The frequency that email is to be retrieved.
• The number of days of audit log messages you wish to be made available via the View
Audit Log Entries page in the Policy Manager application user interface.
5. Review the information you entered at step 4 and click Install to begin the installation.
6. When installation is complete, click Done.
Reinstalling HP 3PAR Policy Manager
If you need to reinstall Policy Manager, perform the following:
1. Remove or uninstall the existing Policy Manager files installed on your computer from the
previous installation.
2. Reinstall Policy Manager by following the instructions described in “Installation and Setup”
(page 9).
10 Installing the HP 3PAR Policy Manager
Page 11

4 Configuring Users
Overview
After installing the server, you need to configure the users and groups with privileges for the HP
3PAR Policy Manager, and modify the Policy Manager configuration settings for your specific use
of the server.
User configuration is performed through the Apache Tomcat file realm. To manage the user
configuration, you need to start the server and then log into the Tomcat server.
NOTE: One other Policy Manager configuration file, log4j.properties, contains diagnostic
settings you may want to modify if troubleshooting server errors. This file is located in
..\Tomcat5\shared\classes. You should change the settings only if you have experience
with database and server administration and database debugging.
This chapter explains the following configuration settings available for the Policy Manager system:
• Configuring users for server administration and Policy Manager login.
• Configuring Policy Manager server properties and functionality.
Configuring Users
The Tomcat file realm controls who has access to administering the server and who can log in to
and use the Policy Manager application pages.
To configure the Tomcat file realm for HP 3PAR Policy Manager, you need to specify users for the
two user groups, APMAdmin and APMUsers, as follows:
• APMAdmin group - individuals defined in this group will be able to log into Tomcat and
configure server settings, additional APMusers, and so forth.
• APMUsers group - individuals defined in this group will be able to log into the application
pages, set permissions for all policies and groups defined in Policy Manager, view all audit
log messages, add, configure, and delete groups, and so forth.
You configure users for Tomcat and Policy Manager pages in the Tomcat Administration application.
The user information you specify in this application is saved to the tomcat-users.xml file.
To configure users:
Overview 11
Page 12
1. Start the server on your local machine.
a. Start your Web browser.
b. Enter the local host IP address/listening port in the browser’s address bar, and then
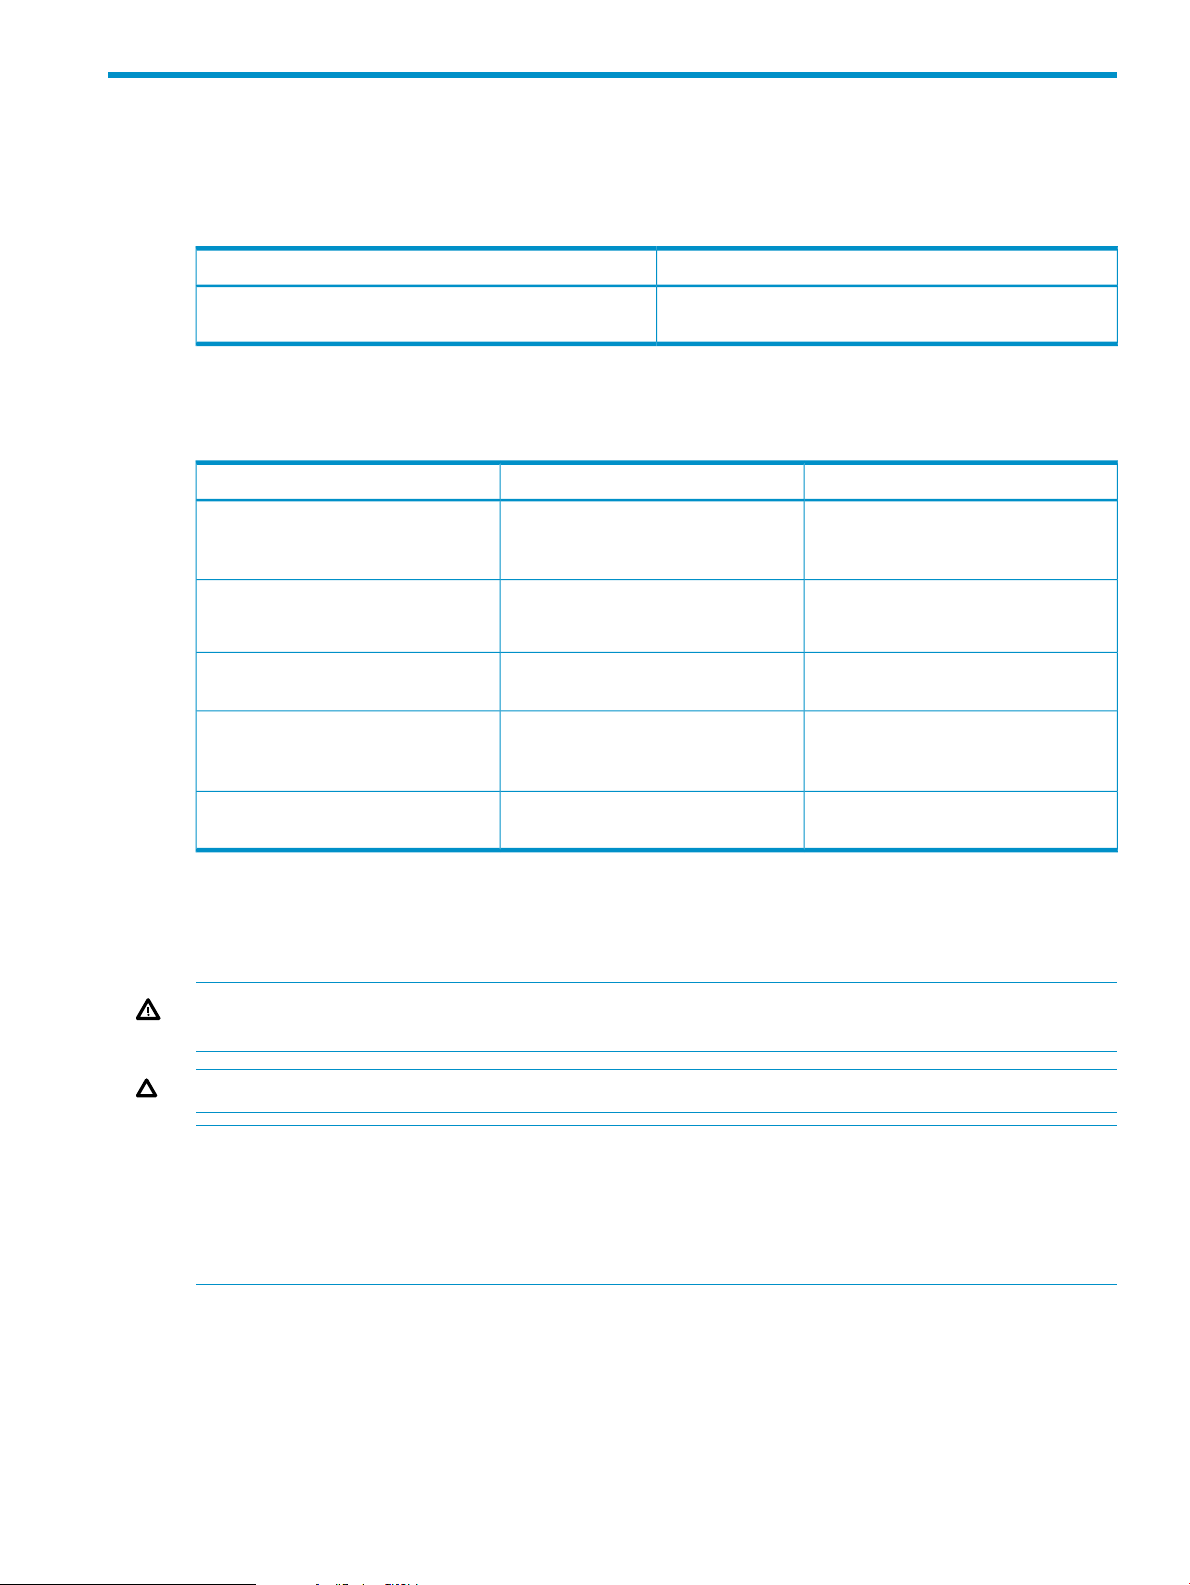
/admin (for example, 123.456.789.111/8080/admin), and press ENTER.
The HP 3PAR Tomcat Server Administration Tool appears (Figure 2 (page 12)).
Figure 2 HP 3PAR Tomcat Server Administration Tool
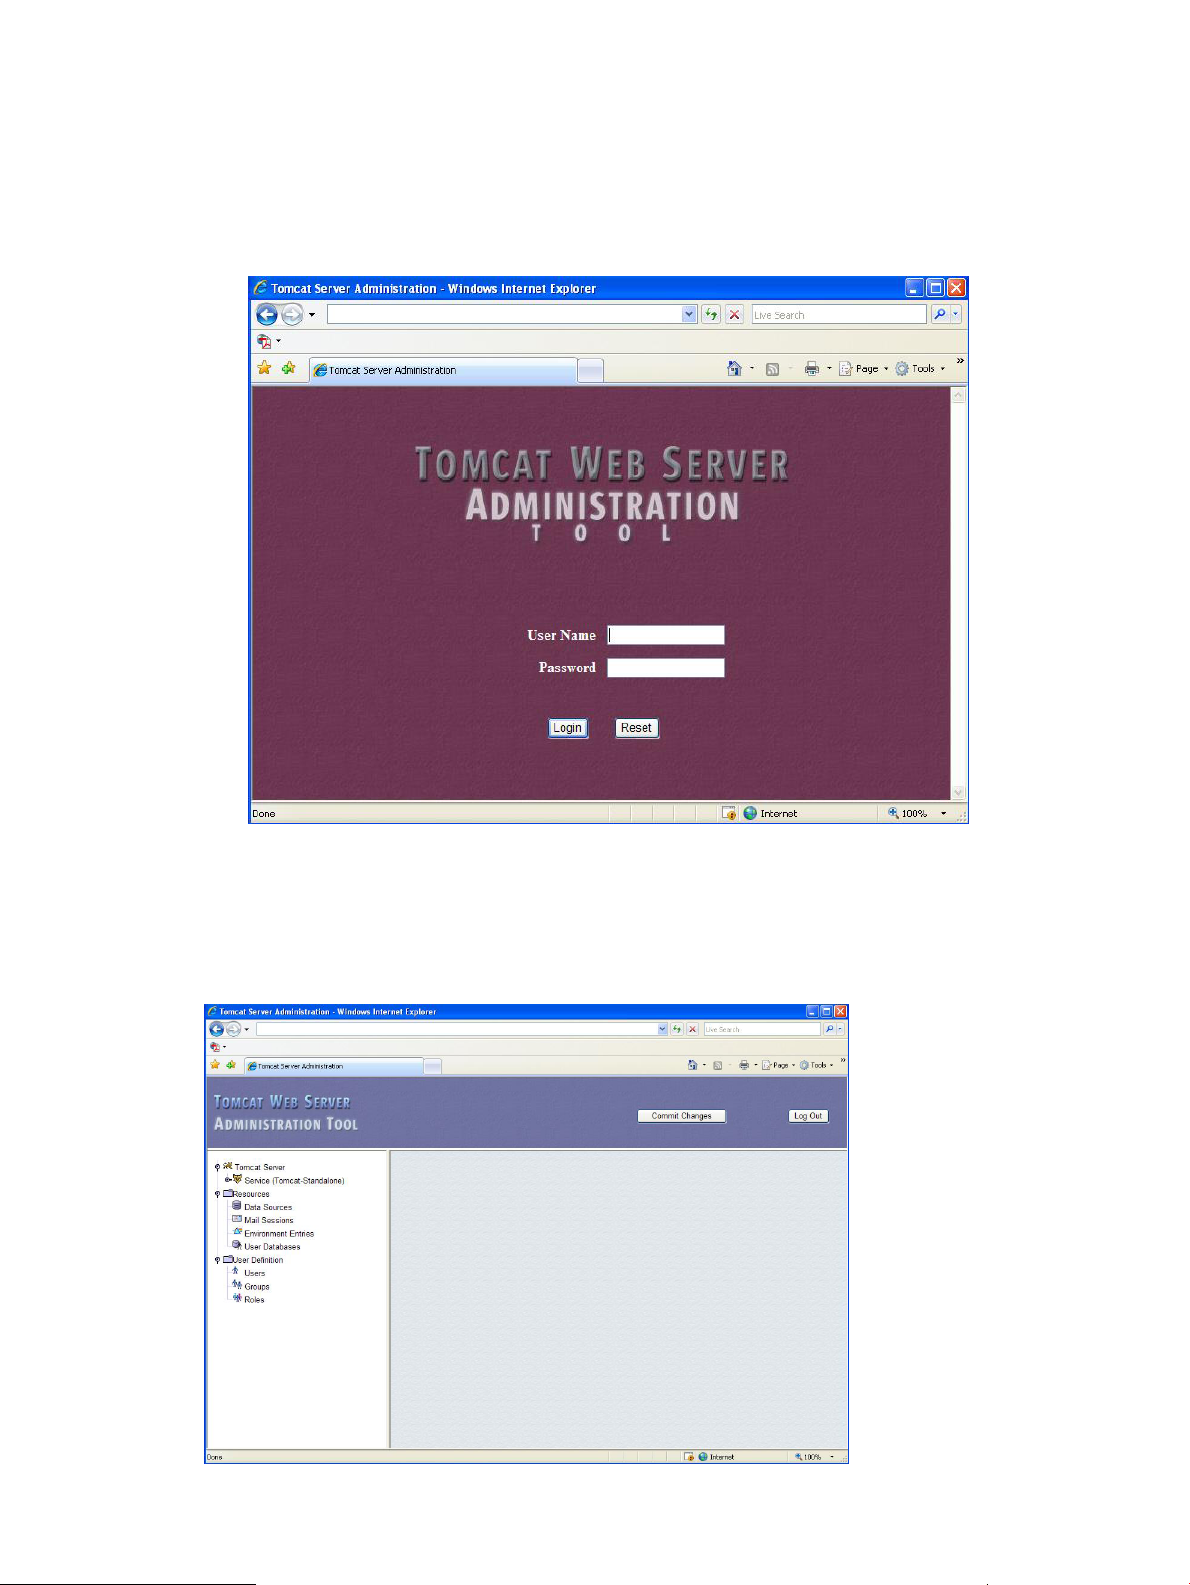
2. Type your Tomcat5 user name and password and click Login.
The Administration Tool page appears (Figure 3 (page 12)), with the following navigation
window:
Figure 3 Administration Tool Page
12 Configuring Users
Page 13
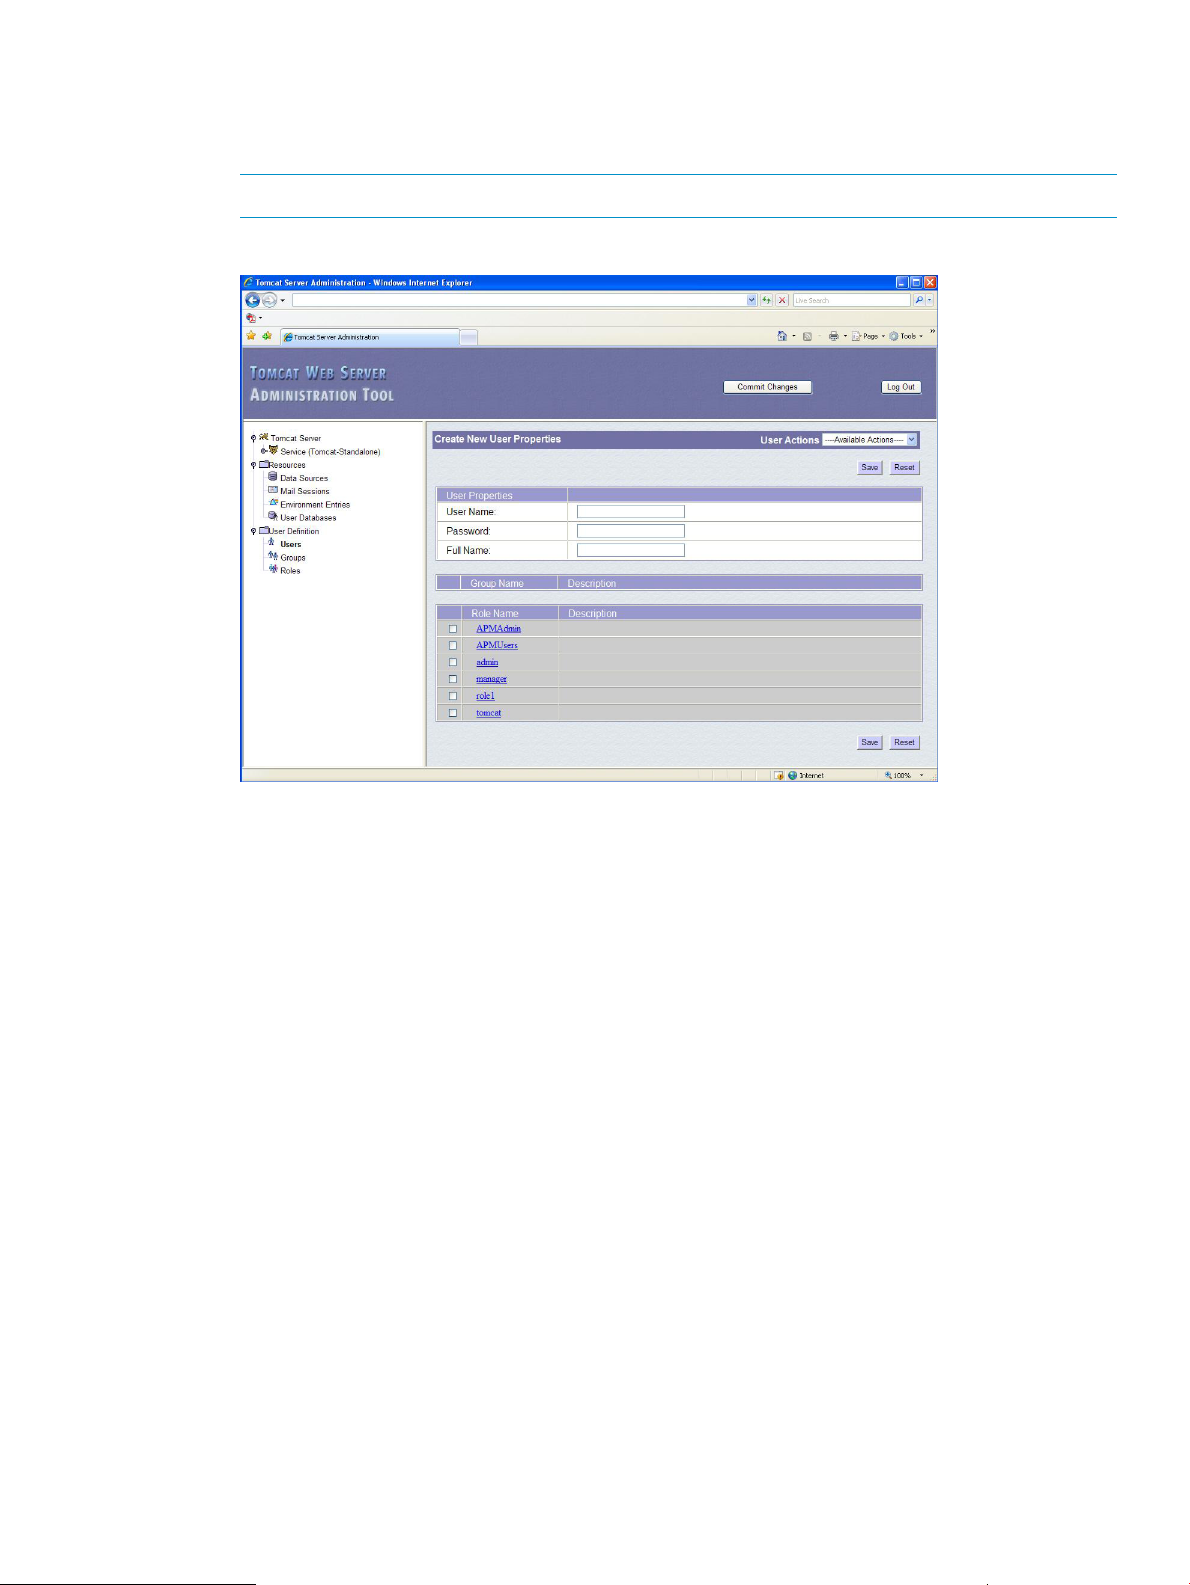
3. Under User Definition, click Users.
The Users List pane appears.
4. From the User Actions list, select Create New User.
NOTE: User names and passwords are case-sensitive.
Figure 4 Creating a User
5. Enter the user name, password, and full name of the user for logging into the application.
6. Select the groups and roles in which this user is to be defined. Each use can be defined in
multiple groups and roles. For example, you may want to add this user to two roles: one that
administers Tomcat5 and one that has access to the Policy Manager application pages.
7. Select the groups and roles in which this user is to be defined. Each use can be defined in
multiple groups and roles. For example, you may want to add this user to two roles: one that
administers Tomcat5 and one that has access to the Policy Manager application pages.
8. Click Save.
9. Repeat steps 4 through 7 to add all users you want to add to the system.
Configuring Users 13
Page 14
5 Starting the HP 3PAR Policy Manager
Starting HP 3PAR Policy Manager
By default, once HP 3PAR Policy Manager has been installed, Policy Manager is started as a
service in Windows. In order to set policies in Policy Manager, you must start Policy Manager’s
user interface.
Starting the Policy Manager User Interface
To start Policy Manager’s user interface, perform the following:
1. Open your Web browser.
2. Enter the local host IP address and/or listening port in the browser’s address bar and press
enter.
For example: 123.456.789.111 and/or 8080
The HP 3PAR Policy Manager login screen appears.
Figure 5 Policy Manager Login Screen
Default Login Information
The Apache Tomcat5 Web server is configured with one default HP 3PAR Policy Manageruser
and password as follows:
• User name = admin
• Password = admin
Use this login information to access the Policy Manager user interface.
14 Starting the HP 3PAR Policy Manager
Page 15

Figure 6 Policy Manager User Interface
WARNING! You need to modify the list of users and their passwords in Tomcat5; when doing
so, you should remove this default user name and password to ensure security is not at risk.
Stopping HP 3PAR Policy Manager
To stop HP 3PAR Policy Manager, perform the following:
1. Click Start→Control Panel→Administrative Tools→Services.
2. In the Services window, select HP 3PAR Policy Manager.
3. Click Stop the service.
Stopping HP 3PAR Policy Manager 15
Page 16

6 Understanding the User Interface
Overview of the User Interface
The HP 3PAR Policy Manager user interface allows you to set and control all permissions for the
HP 3PAR Secure Service Custodians on your network, and allows you to enable only authorized
access and use of managed Custodians. In addition to setting the policies governing the Custodian’s
permissions, the Policy Manager user interface also allows you to create and edit device groups,
configure email notifications, view any pending requests, and view Policy Manager activity logs.
For information on starting the Policy Manager user interface, see “Starting HP 3PAR Policy
Manager” (page 14).
Figure 7 (page 16) shows the Policy Manager user interface upon initial login.
Figure 7 Policy Manager User Interface Home Page
The Policy Manager user interface home page provides the following:
• Log Out link
• Help link
• Tasks organized by labeled tabs, which include the following:
Home◦
◦ Policy
◦ Pending Requests
◦ Audit Log
◦ Configuration
These tabs are discussed in detail in the following sections.
16 Understanding the User Interface
Page 17

Home Tab
The Home tab is the first viewable tab upon logging into HP 3PAR Policy Manager (Figure 8
(page 17)).
Figure 8 The Home Tab
The Home tab provides quick links to commonly performed tasks within Policy Manager. These
links are described in Table 1 (page 17).
Table 1 Home Tab Links
View All Requests
View Missing Devices
View and Change Device Policy Settings
View Groups (for policy settings)
View and Change Pending Device Requests
View Groups (for pending requests)
DescriptionLink
Displays the most recent permission requests received from
the managed devices for approval. Up to five pending
requests for all groups are displayed.
Displays up to five of the most recent devices missing from
Policy Manager (based on their set ping rates).
Displays the policies set for all devices and provides tools
for modifying the policies’ actions, parameters, permissions,
and access rights. See 6.3 Policy Tab for additional
information.
Displays all groups defined in Policy Manager. Policy
settings can be edited for the selected group.
Displays all actions forwarded from the Custodian that are
awaiting permission. Additional information about each
action can also be displayed, and you are also given the
option to accept or deny permission for each action. See
6.4 Pending Requests Tab on page 6.9 for additional
information.
Displays all groups defined in Policy Manager. After
selecting a group, any pending action requests can be
viewed, accepted, or denied.
Check the Audit Log for Recent Device and User Activity
View Groups (for the audit log)
Displays all audit messages generated by Policy Manager.
See “Pending Requests Tab” (page 20) for additional
information.
Displays all groups defined in Policy Manager. Selecting
a group allows you to view audit logs specific to that
group.
Home Tab 17
Page 18

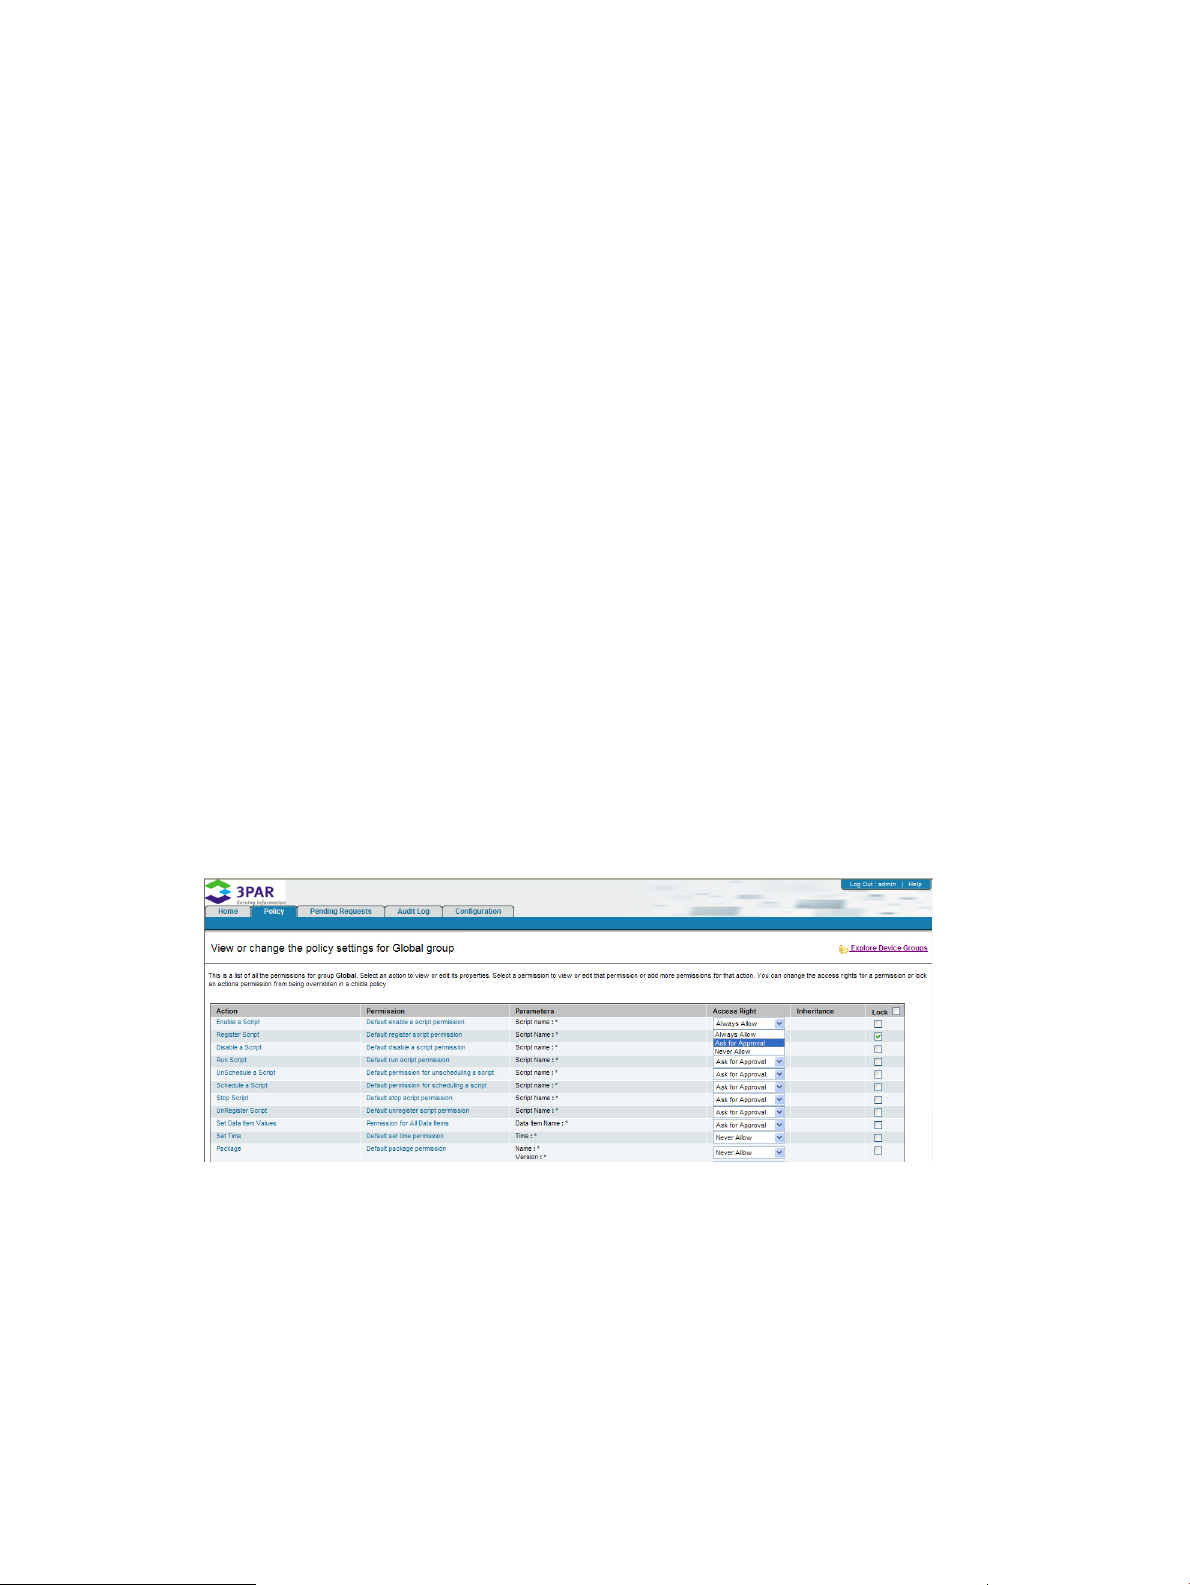
Policy Tab
The Policy tab allows you to view and modify policy settings for each HP 3PAR Policy Manager
action (Figure 9 (page 18)). For instructions on using the Policy tab, see “Working in the Policy
Tab” (page 24).
Figure 9 Policy Tab
By default, the policy settings for the parent group are displayed on the Policy tab. To display the
policy settings for a different group, click Explore Device Groups and select from the listed groups.
The Policy tab is divided into columns that display the policy’s actions and each actions associated
settings. Each column is described in Table 2 (page 18).
Table 2 Policy Tab Column Descriptions
DescriptionColumn Name
Action
Permission
Parameters
Access Right
Displays the name of the action managed by the current
policy. By default, related actions are grouped together,
such as Enable a Script, Register a Script, Disable a Script,
etc. Clicking an action in the Action column brings up the
View or change details for <name> action screen.
Displays the name of the permission set for the action in
the same row. Multiple permissions can exist for a single
action. Clicking a permission in the Permission column
allows you edit the selected permission.
Displays the parameter name(s) for the action in the same
row. Parameter names can be edited to make the name
more meaningful for your use, or for internationalization
purposes. Parameter name changes apply to the action at
all levels, regardless of inheritance.
Displays the access right for actions and their permissions.
Access rights for most actions can be set as Always Allow,
Never Allow, or Ask for Approval. However, the access
18 Understanding the User Interface
Page 19

Table 2 Policy Tab Column Descriptions (continued)
DescriptionColumn Name
right of Ask for Approval is not available for the following
actions:
• Set Time
• Alarms
• Events
• Data Item Values
• Emails
Inheritance
Lock
Identifies the group level from which permissions inherit
their access rights and settings. For example, if the
Inheritance column displays ITGroup for the permissions
of the Emails action, then the permissions settings are
inherited from the ITGroup group policy.
Displays policies that are locked in the current group’s
policy and that cannot be overridden in a lower level, or
inherited from a higher level. To lock a policy, select the
check box in the same row as the policy you wish to lock.
To lock all policies, select the check box in the Lock column
header.
Policy Tab 19
Page 20

Sorting Policy Columns
The contents of the Action, Permission, Access Right, Inheritance, and Lock columns can be sorted
to facilitate locating specific actions and their parameters.
• The Action, Permission, and Inheritance columns can be sorted alphabetically by clicking the
column headers. Once sorted, an arrow (up or down) is displayed next to the column header.
displays the Action column after clicking the header.
Figure 10 Sorting Columns Alphabetically
• Clicking the Access Right column header groups the access rights by type (Figure 11 (page 20)).
Figure 11 Sorting by Access Right
• Clicking the Lock column header sorts the column by locked policies. Policies that are locked
(indicated by check mark) are grouped either from the top to bottom, or from the bottom to
top, in the column (Figure 12 (page 20)).
Figure 12 Sorting by Locked Policy
Pending Requests Tab
The Pending Requests tab displays a list of all pending requests for HP 3PAR Policy Manager
groups (Figure 13 (page 21)). Requests are either single actions or a container of actions. For
information about requests, see “Container Actions” (page 38). By default, requests for the parent
group is displayed. For instructions on using the Pending Requests tab, see “Working in the Pending
Requests Tab” (page 37).
20 Understanding the User Interface
Page 21

Figure 13 Pending Requests Tab
The list of requests is generated in a table, which is described as follows:
DescriptionColumn Name
The name of the device (alias name) sending the request.Device
Device Description
Request Date
Name
Description
Sorting Pending Requests
Like the Policy tab, the columns displaying the pending requests on the Pending Requests tab can
be sorted to facilitate locating and organizing requests. The Device, Device Description, and Request
Date columns can be sorted by clicking the column headers.
Audit Log Tab
The Audit Log tab displays all audit messages generated by HP 3PAR Policy Manager and messages
sent from agents per selected group (Figure 14 (page 22)). By default, the audit log for the parent
group is displayed. For instructions on using the Audit Log tab, see “Working in the Audit Log Tab”
(page 39).
A user-defined definition, or default description created by
Policy Manager, of the device. The device description
includes the model name and serial number.
A time stamp of when the action was initiated on the
device.
The name of the specific permission that is pending
approval.
The user-defined description applied to the permission in
the policy.
Allows you to accept or deny the request.Accept/Deny Request
Audit Log Tab 21
Page 22

Figure 14 Audit Log Tab
Audit messages consist of any activity Policy Manager audits during operation, and can include
the following:
• All requests and commands from the HP 3PAR Secure Service Collector Server that are
processed by agents (including remote access sessions), including all successful, failed, or
denied commands. Audit messages for these activities identify whether the action was executed
successfully or if the action failed, or if the action was denied (based on policy settings on
that Agent).
• All Policy Manager user activities related to accepting and denying pending actions.
• All Policy Manager user logins and logouts.
• All policy changes.
• All action activities, including creation, modification, and deletion.
• All agent registrations.
The audit log is generated in a table, which is described as follows:
DescriptionColumn Name
The name of the group affected by this activity.Group Name
User Name
Date Message Posted
Message
The name of the applications user initiating the command
on the Custodian (for Custodian messages), or name of
the Policy Manager user (for Policy Manager activities)
The date and time when the Custodian sent the message
to Policy Manager (for agent messages) or when Policy
Manager generated the audit activity (for Policy Manager
activities).
A detailed description of the Enterprise command being
executed, or a detailed description of activity on Policy
Manager. Bold text identifies the actual information from
the agent for the action or activity, or the actual activity
performed in Policy Manager. All non-bold text is used to
help label the message’s content.
Configuration Tab
The Configuration tab displays all of the groups that have been defined in HP 3PAR Policy Manager
(Figure 15 (page 23)). For a new device connecting to Policy Manager, if there is not already a
22 Understanding the User Interface
Page 23

preexisting group, a new group is created for that device. For information on how this tab is used
in Policy Manager tasks, see “Using HP 3PAR Policy Manager” (page 24).
Figure 15 Configuration Tab
Configuration Tab 23
Page 24

7 Using HP 3PAR Policy Manager
Policy Inheritance and Hierarchy
HP 3PAR Policy Manager manages device policies and notification settings through a hierarchy
of groups and standard parent-child relationships. There is one global group, named Global by
default (this name can be changed). The Global group is a parent (or grandparent, depending
upon the child group's level in the hierarchy) group to all other groups defined in Policy Manager.
Within the Global group, there can be one or more subgroups, or child groups, and devices.
Each device that registers with Policy Manager provides its model number, which is used to create
groups in Policy Manager. Within the Policy Manager application pages, you can rename existing
groups and create new groups.
To view the Policy Manager groups, click Explore Device Groups. Each subgroup below the Global
group is considered another level in the group hierarchy as shown in “Viewing Groups” (page 24).
Figure 16 Viewing Groups
In Figure 16 (page 24), Service Processor and Gateway Processor are child groups to Global. Any
permissions set in the Global group are inherited by its child groups. Within a child group's policy
you can override a permission set in the parent group if that permission is not locked in the parent's
policy. The overridden policy is then inherited by that child group and its subgroups.
Group configuration settings also subscribe to this inheritance system with regard to notifications.
Notification settings for the Global group are inherited by the child groups of that Global group.
For each child group or device, you can override inherited permissions and notification settings
and add new permissions. Any new permissions or changed permissions affect all child groups
and related devices.
Working in the Policy Tab
When a device first registers with HP 3PAR Policy Manager, it provides the Policy Manager with
a complete list of its supported actions, as can be seen by navigating the Policy tab (Figure 17
(page 25)). Each action requires a permission. A permission is a set of parameters and an
associated access right. Some actions have parameters and some do not. Each action defined in
a device's policy may have multiple, related permissions.
Policy Manager is installed with support for all known actions contained in the released version
of the HP 3PAR Secure Service Architecture software (see “Base Installation Actions” (page 25)).
By default, all actions included in the installed Policy Manager are defined with an access right
of Ask for Approval. Until the access right is changed in the Policy Manager interface, each device
under management will ask for approval to perform any action defined in the policy. The Policy
Manager supports any new actions, such as custom actions that may be customer-specific or
device-specific, and automatically applies an access right of Ask for Approval.
24 Using HP 3PAR Policy Manager
Page 25

For example:
• The Restart Agent action controls whether or not the device will perform a requested hard
restart; there are no specific parameters for this action.
• The Package action controls whether or not a device can accept a Software Management
package from the Secure Service Collector Server. The Collector Server package actions
support the name of the package and version of the package. Each parameter can use explicit
values or wild cards. For example, the name of the package can be Package1 or * or *1,
where the latter two parameters specify any package name and any package with a name
ending in 1, respectively.
Figure 17 Policy Manager Policy Settings
Base Installation Actions
The following actions listed in are included and managed in a base installation of this version of
Policy Manager. Custom actions are not listed.
Table 3 Actions with Base Installation
Alarms
Events
Emails
DescriptionAction
Determines whether or not the Custodian can send alarms to the Collector Server, or
needs to receive approval for the permission first. Custom alarms started as the result of
a Start Custom Alarm action, configured in a logic schema, are not affected. For this
release, only one permission can be set for all alarms, meaning all alarms will be included
in the action.
Determines whether or not the Custodian can send events to the Collector Server, or
needs to receive approval for the permission first. For this release, only one permission
can be set for all events, meaning all events will be included in the action.
Determines whether or not the Custodian can send Email notifications to the Collector
Server or needs to receive approval for the permission first. Emails sent as the result of
a Send Email action, configured in a logic schema, are not affected. For this release,
only one permission can be set for all Emails, meaning all Email notifications will be
included in the action.
Working in the Policy Tab 25
Page 26

Table 3 Actions with Base Installation (continued)
DescriptionAction
Modify Ping Update Rate
File Upload
File Download
Restart Agent
Remote Application
Remote Terminal
Determines whether or not the Custodian accepts a new ping rate (frequency, in seconds,
that the Custodian contacts the Collector Server) from the Collector Server, or needs to
receive approval for the permission first rate. This action has no specific parameters.
Determines whether or not the Custodian can upload files to the Collector Server as
requested (whether a Collector Server-based request or Custodian-initiated process), or
needs to receive approval for the permission first. Permission parameters include the
fully-qualified path of the file(s) to upload to the Collector Server. The path name on the
device can be explicit or relative (which the Custodian interprets to be the root of the
Collector Server installation). File names can be explicit; for example, "error.log", or
include wildcards; for example, "*.log" or "*.*".
Determines whether or not the Custodian can accept files downloaded to it from the
Collector Server, or needs to receive approval for the permission first. Permission
parameters include the fully-qualified path of the file(s) to download to the device. The
name(s) of the file(s) and path(s) may be explicit; for example, "c:\error.log", or include
wildcards; for example, "c:\*.log" or "c:\*.*".
Determines whether or not the Custodian can restart itself as requested, or needs to
receive approval for the permission first. This action has no specific parameters.
Determines whether the Custodian can start a remote application session as requested,
or needs to receive approval for the permission first. Permission parameters include the
name of the remote application interface.
Determines whether the Custodian can start remote terminal sessions as requested, or
needs to receive approval for the permission first. Permission parameters include the
name of the remote terminal interface.
Viewing Policies by Group
To view the policies for a specific group:
1. On the View or change the policy settings for <Group Name> page in the Policy tab, click
Explore Device Groups.
The Select a group to view or change its policy settings page appears.
Figure 18 Selecting a Group
26 Using HP 3PAR Policy Manager
Page 27

2. Click a group to view that group’s policy settings.
The View or change the policy settings for <Group Name> page appears displaying the
selected group’s policy information.
Figure 19 Viewing Policies for a Selected Group
Editing Permissions
As stated earlier, each action requires a permission. By default, each action has a permission that
is made up of set of parameters and an associated access right. Permissions can be edited to
include additional parameters such as file names, script names, version numbers, and application
names. Additionally, permission parameters can also be removed.
NOTE: Depending on the group you are modifying (a parent group versus a child group), you
may need to simply enter a name and description and then click Finish to modify the permission
(child group), or you may need to provide additional information (parameters) such as a script or
file name (parent group). The following procedure describes how to add additional parameters to
a permission belonging to a parent group.
Adding New Parameters
To add a new parameter to a permission:
Working in the Policy Tab 27
Page 28

1. On the View or change the policy settings for <Group Name> page in the Policy tab, click the
permission you wish to modify.
The Edit the selected permission for <Action Name> page appears (Figure 20 (page 28)).
Figure 20 Editing Permissions
2. Enter a new name and permission description in the Name and Description fields, respectively,
and click Next.
The Edit the parameters for <Permission Name> of <Action Name> page appears (Figure 21
(page 28)).
Figure 21 Editing Parameters
28 Using HP 3PAR Policy Manager
Page 29

3. Enter the new parameter (for example, a script name or a file name) and click Finish.
NOTE: You can use partial values in conjunction with wildcards (*) to specify all applicable
values. For example, for a Run Script action you can type a script name of ACME*.pl. This
policy will apply to all Run Script actions that are defined to run Perl-based scripts with names
starting with "ACME". Other examples include *.log, which applies to all .log files on the
device, and notepad.exe which applies only to the notepad.exe application on the device.
The View or change the policy settings for <Group Name> page reappears and the new
parameter is displayed in the Parameters column for the permission you modified.
Removing Permission Parameters
To delete a parameter from a permission:
1. On the View or change the policy settings for <Group Name> page in the Policy tab, click
the permission you wish to modify.
The Edit the selected permission for <Action Name> page appears (see Figure 20 (page 28)).
2. Click Next.
The Edit the parameters for <Permission Name> of <Action Name> page appears (see Figure 21
(page 28)).
3. In the Parameters box, select the parameter(s) you wish to remove from the permission and
click Remove Checked.
Figure 22 Removing Parameters
4. Click Finish.
The View or change the policy settings for <Group Name> page reappears and the new
parameter is displayed in the Parameters column for the permission you modified.
Considerations when Creating Permissions
Make sure only actions that need an Ask for Approval access right are defined with that permission.
For example, if you specify an Ask for Approval access right for the Set Data Item Values action,
every time the server attempts to set a data item on a device, the device needs to contact the Policy
Manager to request approval from the user specified for that device. Until users grant permission
for actions that need approval, the Policy Manager queues those actions, which can lead to
degradation in the system performance.
Working in the Policy Tab 29
Page 30
Assigning Access Rights
After setting an action and its permission, you assign it an access right. An access right specifies
how you want the individual devices to handle the related permission. There are three types of
access rights:
• Always Allow - the Secure Service Custodian can execute these permissions without asking
for approval or sending the action information to Policy Manager. To see which actions of
Always Allow rights were performed on a device, refer to the device's log file.
• Ask for Approval - the Custodian forwards the action and its parameters to Policy Manager
for approval, as well as a status message to the Enterprise server. When Policy Manager
receives the action, it sends an Email to the address specified for the device's policy and then
stores the action request in the Pending Requests queue. The action request remains shown in
the Pending Request page until it is approve or denied, or it times out. If timed out, the action
is denied and needs to be re-requested, if desired, and a message is logged to the Policy
Manager audit log.
If approved or denied, the action request is removed from the Pending Requests page. A
message regarding the approval or denial is logged to the Policy Manager audit log. Policy
Manager sends its response (accept or deny) to the device. The device sends another status
message to the Collector Server to identify whether the action request was approved or denied.
If the action request was approved, the device then processes the action.
• Never Allow - the Custodian will not execute these permissions and will send information for
these requests to Policy Manager only when Never Allow actions are requested from the
Enterprise server. To see which device-initiated actions of Never Allow rights were denied on
a device, you need to refer to the device's log file.
To assign an access right to an action:
1. In the Access Right column on the View or change the policy settings for <Group Name> page,
click the access right list for the action you wish to assign an access right.
Figure 23 Selecting an Access Right
2. Select the appropriate access right.
3. Repeat step 1 and step 2 as necessary.
4. Click Done on the lower right-hand corner of the Policy tab.
5. When prompted for confirmation of the changed policy, click OK.
The View or change the policy settings for <Group Name> page refreshes and displays the
newly set access right(s).
Software Management Package Access Rights
Software management packages are NOT broken into components. This can lead to actions being
performed on a device without consent. For example, if a Run Script action has a Never Allow
30 Using HP 3PAR Policy Manager
Page 31

access right, and a Package action has an Always Allow access right, and a script is created in
a package, the package permission supersedes that script’s access right. The Custodian sees the
Package action and executes it automatically (because it has an Always Allow access right). The
Custodian and Policy Manager do not see the script in the package.
The action of accepting or denying the execution of a package on a device applies to the entire
contents of the package. If an explicit access right exists for a specific package (name and version),
the Custodian enforces the permission on that package as instructed. If an explicit access right
does not exist for a specific package, the Custodian examines the contents of the package and
processes the package based on the following rules:
• If every action in the package, including rollback actions, has an Always Allow access right,
the Custodian processes the entire package.
• If any action in the package, including rollback actions, has a Never Allow access right, the
agent denies the package and sends that as a message to the Collector Server.
• If the package contains actions with any combination of Always Allow and Ask for Approval
access rights (with a minimum of one Ask for Approval access right), the Ask for Approval
access rights are aggregated and sent to Policy Manager as one permission request. The
Policy Manager user then accepts or denies the entire package.
If a package contains actions you want to deny on one or more devices, make sure you explicitly
deny those actions or that package version as part of creating a permission for those devices'
policies. If you permit the Custodian to accept a package that contains actions you do not want
to run on a device, those actions will be run because they are in the package and the package
was permitted.
Locking Permissions
You can lock permissions from being overwritten in a child's policy. If you want to change a
permission that is locked, you must do so from within the policy in which that permission is locked.
For example, if a permission is locked in the Global policy, you need to open the Global policy
and that permission in order to change the permission's parameters or access right.
Lock permissions from the View or change the policy settings for <Group Name> page in the Policy
tab for a selected group. For each permission that you want to lock, do the following:
1. Select the Lock check box for the related permissions (Figure 24 (page 31)).
Figure 24 Locking Permissions
2. Click Done.
NOTE: The settings for permissions that are locked in a parent's policy (as shown in the
Access Right column) are not selectable in the View or change the policy settings page.
Removing Policy Overrides
If you want the policy for a child group or specific device to match that of its parent group, perform
the following:
• On the View or change the policy settings for <Group Name> page, click Reset to Parent's
Policy.
Any permission settings specific to the policy open in this page are removed. All permission settings
are replaced with those defined for the parent's policy. The next time the device contacts the server,
it receives this updated policy.
Working in the Policy Tab 31
Page 32

Setting Access Rights for All Policy Permissions
If you want to change the access rights for all permissions in a policy to a single right, perform the
following:
1. On the View or change the policy settings for <Group Name> page, select the Set All
Permissions check box.
2. Select an access right from drop-down list.
3. Click Done.
All permissions are set to a selected access right for the current policy only. This can be useful
if you need to prevent the Custodian from performing any actions for a period of time; for
example, while that device is in maintenance mode or you are troubleshooting a problem.
When the devices for that policy are ready to resume normal policy management, clear the Set
All Permissions check box for that policy and click Done.
The Access Right column displays the previously defined access rights for all permissions in that
policy. The next time the device contacts the server, it receives the updated policy.
Working in the Configuration Tab
From the Configuration tab, you can create new groups, edit existing group configurations, specify
notification settings for a group, and delete groups from HP 3PAR Policy Manager.
Creating New Groups
When a device registers with Policy Manager, it specifies its model number. Each model number
is a separate group within the Policy Manager interface.
You can create new groups based on the security needs of your devices. For example, you may
want to create a group for highly-restricted devices and another group for devices that are not as
restricted. Then, within the Policy Manager group configuration pages you can move the devices
into the related group.
To create a new group:
1. On the Configuration tab and click New→Group(Figure 25 (page 32)).
Figure 25 Creating a New Group
32 Using HP 3PAR Policy Manager
Page 33

2. In the Create new group configurations page, type or select the properties to define this group
(see Figure 26 (page 33)).
NOTE: The next time an agent connects to Policy Manager, you can change the parent
group of that device so that it inherits the policy and notification settings defined for your new
group.
Figure 26 Entering Group Information
Editing Existing Group Configurations
You can change the name of a device or group to be more meaningful to your purposes. You can
also move groups within the inheritance hierarchy. The only group you cannot move is the Global
group, which must remain as the top, parent group. Policy Manager can support any number of
nested child groups within groups.
To edit a group:
Working in the Configuration Tab 33
Page 34

1. On the Select a group to view its group configuration settings page in the Configure tab, select
the group you wish to edit.
The View and edit the settings for <Group Name> page appears (Figure 27 (page 34)).
Figure 27 Editing a Group
2. Edit the group information and hierarchy as necessary by editing the Name and Description
fields. You can also select a new parent group from the Parent Group list.
3. Click Submit to commit the changes.
Configuring Group Notification Settings
When a device sends an action request to Policy Manager for approval, the Policy Manager will
send an Email notification to specified individuals.
To configure notification information:
1. On the Select a group to view its group configuration settings page in the Configure tab, select
the group you wish to edit.
The View and edit the settings for <Group Name> page appears (see Figure 27 (page 34)).
34 Using HP 3PAR Policy Manager
Page 35

2. In the Notification Information section of the page, define the following:
• To - The recipient(s) (identified by Email address) of the Email notification.
• From - The Email address of the individual or server sending the Email notification.
• Subject - Subject line for the Email message.
• Body - Body or actual content for the Email message.
Within the subject line or body of the notification, you can include one or more supported
substitution parameters. When Policy Manager sends the Email message, it replaces the
substitution parameters with the actual information for those parameters.
Policy Manager supports the following substitution parameters in the subject line or message
body of Email notifications:
• <$A_MN> - Agent model number.
• <$A_SN> - Agent serial number.
• <$A_GN> - Agent associated group name.
• <$A_GD> - Agent associated group description.
• <$SMSG> - SOAP message .
• <$USRN> - User name.
• <$ACTN> - Action name.
• <$ACTD> - Action description.
• <$PR_N> - Permission name.
• <$PR_D> - Permission description.
• <$PRDT> - Permission details (parameter names and values).
• <$TMST> - Timestamp when action was forwarded from Agent.
For example, the following message configured using the indicated substitution parameters:
You need to either grant or deny permission for device, <$A_SN>, to perform a
<$ACTN> action (<$ACTD>). This action was initiated by <$USRN> on <$TMST>.
is sent to the defined Email recipient with actual information, such as:
You need to either grant or deny permission for device, DeviceXYZ, to perform a
Package action (controls whether or not DRM can deploy a package to a Secure
Service Proxy Agent). This action was initiated by ServiceTech1 on March 6, 2008
4:38:30 PM GMT.
Deleting Existing Groups
Deleting a group removes settings for all subgroups and devices configured in that group from the
database. If a device of the deleted group re-registers with Policy Manager, a group for that device
will be created automatically.
To delete a group:
1. On the Select a group to view its group configuration settings page in the Configure tab, select
the group you wish to delete.
The View and edit the settings for <Group Name> page appears (see Figure 27 (page 34)).
Working in the Configuration Tab 35
Page 36

2. Click Delete Group and then OK when prompted for confirmation to delete the selected group
(Figure 28 (page 36)).
Figure 28 Deleting a Group
Finding and Removing Missing Devices
If a device is not online or connected to Policy Manager, Policy Manager may be enforcing an
out-dated policy. This could mean the device is permitting actions that should be denied or denying
actions that it should be performing.
To locate and remove offline devices, perform the following:
36 Using HP 3PAR Policy Manager
Page 37

1. On Configure tab, click Search→Missing Devices.
Figure 29 Searching for Missing Devices
The View and remove missing devices page appears. Any devices shown on this page have
missed their last contact (ping) with Policy Manager and are considered offline.
Figure 30 Viewing Missing Devices
2. Select the check box next to the missing device(s) you wish to remove.
3. Click Remove Selected Missing Devices.
4. Click OK when prompted for confirmation to delete the selected device(s).
Working in the Pending Requests Tab
When a device needs to ask for approval to perform a requested action, the device does the
following:
• Sends a request for approval to Policy Manager.
• Sends a message to the Collector Server indicating that it needs to get approval from Policy
Manager (if the action is a request from the Collector Server).
• Waits for Policy Manager’s response.
When Policy Manager receives the action request, it sends an Mail notification to the user defined
for that device's policy (or device's group's policy), and then queues the action request for approval.
If the action permission is not accepted within the timeout period specified for that permission,
Policy Manager removes the action request from the Pending Requests queue and posts an entry
to its audit log. The device receives a denied request due to timeout message when it next contacts
Policy Manager.
Working in the Pending Requests Tab 37
Page 38

Pending requests are shown in the Pending Requests tab. You can view all requests pending for
the following:
• All groups
• A selected group
• A selected device.
Accepting and Denying Requests
To accept or deny a request, perform the following:
1. On the View all pending single or container requests for <Group Name> page in the Pending
Requests tab select Accept or Deny from the drop-down list (Figure 31 (page 39)).
Figure 31 Accepting and Denying Pending Requests
2. Click Submit to save your changes.
The next time the device contacts Policy Manager for pending requests approvals, Policy
Manager notifies the Custodian of all accepted or denied actions. The Custodian will then
perform the accepted actions and notify the Collector Server of any denied actions.
Viewing Action Details and Specifying a Timeout
To view more information for an action before selecting to accept or deny it, perform the following:
On the View all pending single or container requests for <Group Name> page in the Pending
Requests tab , click the name of the action under the Name column to be viewed.
The View details for the selected pending action request page appears displaying the following:
• The name of the parameter for the selected action.
• The value (data item name, a file name, etc.) specified for the selected action.
If you accept the action in this page, the Accept and set timeout for selected pending request for
selected action appears on which you can specify a time frame in which the related Custodian can
continue to accept this action for the specified permission. This can be useful if you anticipate that
the same action permission may be sent to the Custodian multiple times in the next xx minutes, and
that you want the device to continue to perform the action without requesting permission from Policy
Manager.
Container Actions
Some actions are sent to Policy Manager as single action requests, and some are sent as a group
of actions, or container, of actions. If a device sent a container of actions on a single contact (ping)
to Policy Manager, you need to view the contents of the container package in order to see the
actual actions that are pending approval. Container actions cannot be broken out into single
actions and can only be accepted or denied as a group.
To view the contents of a container action, perform the following:
On the View all pending single or container requests for <Group Name> page in the Pending
Requests tab , click the Pending Action Container under the Name column to be viewed.
38 Using HP 3PAR Policy Manager
Page 39

The View all actions in selected pending requests page appears displaying all actions packaged
in the pending action container. From this page you can view additional information for an action,
as well as accept or deny a pending action container.
Working in the Audit Log Tab
The audit log shows all activity generated by Policy Manager and activity as sent in XML messages
from the Custodian. You can view all audit log entries, entries for a selected group, or a selected
device (Figure 31 (page 39)).
Figure 32 Viewing Audit Log Entries
The audit log information sent from the Custodian and internally-generated information about Policy
Manager activity.
Information shown in audit log entries from the Custodian includes the following:
• The Policy Manager group related to the audit log entry.
• The name of the user who generated the activity that was audited (for example, the Applications
user who attempted to perform an action on a Custodian).
• The time the action was generated or initiated.
• A detailed description (Message) of the activity, which includes the message ID for the Collector
Server command sent to the Custodian.
Information shown in audit log entries generated by the Policy Manager includes the following:
• The name of the Policy Manager user.
• The time the user performed the audited activity.
• A detailed description of the action (Message).
Working in the Audit Log Tab 39
Page 40

Viewing Audit Logs
As stated earlier, you can view all audit log entries, entries for a selected group, or a selected
device. By default, audit log entries are displayed for the Global (parent) group and all of its
subgroups (children), as shown in Figure 31 (page 39).
• To view audit log entries for only the Global (parent) group, on the View audit log entries for
<Group Name> page in the Audit Log tab, click Show audit log entries for the selected group
only.
The View audit log entries for <Group Name> page appears displaying audit log entries for only
the Global (parent) group.
Viewing Audit Log Entries by Group or Device
To view audit log entries for a specific group or device:
1. On the View audit log entries for <Group Name> page in the Audit Log tab, click Explore
Device Groups.
2. Select a group or device.
The View audit log entries for <Group Name> page appears displaying audit log entries for
the selected group.
Audit Log Entries Online and in Log Files
During the installation process (for Windows), you selected how many days worth of audit log
entries Policy Manager should show in the application pages. The View audit log entries for <Group
Name> page shows only audit log entries for that number of days. All audit log entries are available
on disk if configured as such in the PolicyManager.properties file.
By default, audit log entries are stored on the computer running Policy Manager in the
\3PAR\Secure Service Policy Manager\audit directory. Each day a file is created and
all audit log messages generated by Policy Manager for that day (from 12:00 to 23:59) are saved
to the file. By default, the daily files are created with the following syntax:
SSPM_Audit_<yyyy>_<mm>_<dd>.txt
where:
• yyyy is the current four-digit year
• mm is the current month
• dd is the current day.
NOTE: There are no bounds on how large audit log files can grow or how many files will be
stored on disk. 3PAR recommends that you keep track of disk use and space, and archive the files
as needed.
Audited Operations and Activity
As discussed earlier, Policy Manager generates audit log entries for the Policy Manager and
agents.
Policy Manager entries are generated when:
• A Policy Manager user logs in to or logs out of the server.
• A Policy Manager user accepts or denies a pending action.
• An action pending approval times out before it is accepted or denied.
40 Using HP 3PAR Policy Manager
Page 41

• A Policy Manager user modifies a policy.
• A Policy Manager user creates, modifies, or deletes an action permission from a policy.
Custodian entries are generated when:
• An agent registers with Policy Manager.
• An agent forwards a message or command received from the Collector Server; for example,
messages about operations that were successful, failed, and denied.
• An agent sends a request to perform an action that has a permission access right of Ask for
Approval.
• An agent performs an action defined for a permission access right of Always Allow. The
message sent to Policy Manager audit log includes the name of the user who performed the
action, the action that was performed, and the success or failure of executing the action.
• An agent denies an action defined for a permission access right of Never Allow. The message
sent to Policy Manager audit log includes the name of the user who attempted to perform the
action, information about the action that was rejected (specific to the type of action), and the
policy permission caused the action to be rejected.
Agent Audit Log Persistence
The Custodian queues all Policy Manager related auditing messages in its audit log until the time
it sends them to the Policy Manager for processing. If Policy Manager is offline, the Agent continues
sending the messages until it can communicate them to Policy Manager. If the Custodian cannot
communicate the messages to Policy Manager before the Custodian’s own audit log has reached
its maximum size, all new audit log entries are discarded.
Working in the Audit Log Tab 41
Page 42

8 Troubleshooting and Maintenance
When Tomcat5 is operating in standalone mode, you may need to troubleshoot for the following
functionality:
Troubleshooting
SolutionProblem
Another web server or other
process is operating on port
8080, which is the default
HTTP port that Tomcat attempts
to bind to at startup.
An out of environment space
error is encountered when
running the startup or startup
scripts on Windows-based
operating systems.
The localhost machine is not
found. This can happen if your
browser computer is located
behind a proxy server.
1. Modify the server.xml file and replace port 8080 with another, unused port greater
than 1024 (because ports of 1024 or less require super user access for binding).
2. Restart Tomcat and access it using the new port; for example, http://localhost:1080
or https://localhost:1080 if SSL is enabled.
1. Open the properties for the StartupAPM.bat file or ShutdownAPM.bat file
and view the Memory tab. In the Initial environment field, enter 4096.
2. Click Apply.
Windows creates shortcuts in the directory with which you can start and stop the
container.
Ensure the proxy settings for your browser are configured such that your browser will
not go through a proxy to access the localhost machine. For Internet Explorer, these
settings are located under Tools→Internet Options→Connections→LAN Settings.
Maintaining the Server and Database
Performing maintenance work on the Policy Manager after operations have started is limited to
log file maintenance and configuration file settings.
It is important that you keep track of the number and size of the audit log files created on disk.
You should remove unnecessary files and archive those that are not of immediate need. Also, make
sure you modify the server configuration settings, especially those set in the
PolicyManager.properties file, as the needs and functionality of your server change.
42 Troubleshooting and Maintenance
 Loading...