

Page 1

HP Plasma HDTV
User’s Guide
HP PL5060N 50-Inch (127-Centimeter) Plasma High-Definition Television
HP PL4260N 42-Inch (106-Centimeter) Plasma High-Definition Television
Page 2
The only warranties for HP products and services are set forth in the
express warranty statements accompanying such products and
services. Nothing herein should be construed as constituting an
additional warranty. HP shall not be liable for technical or editorial
errors or omissions contained herein.
HP assumes no responsibility for the use or reliability of its software
on equipment that is not furnished by HP.
This document contains proprietary information that is protected by
copyright. No part of this document may be photocopied,
reproduced, or translated to another language without the prior
written consent of HP.
Hewlett-Packard Company
P.O. Box 4010
Cupertino, CA 95015-4010
USA
Copyright © 2006 Hewlett-Packard Development Company, L.P.
May be licensed in the United States by one or both of U.S. Patents
Nos. 4,930,158 and 4,930,160 until August 28, 2008.
Manufactured under license from Dolby Laboratories. Dolby, Pro
Logic, and the double-D symbol are trademarks of Dolby
Laboratories.
WOW, SRS and the symbol are trademarks of SRS Labs, Inc.
SRS WOW technology is incorporated under license from
SRS Labs, Inc.
HDMI, the HDMI logo and High-Definition Multimedia Interface are
trademarks or registered trademarks of HDMI Licensing LLC.
ENERGY STAR is a registered trademark owned by the U.S.
government.
HP supports lawful use of technology and does not endorse or
encourage the use of our products for purposes other than those
permitted by copyright law.
The information in this document is subject to change without notice.
!
Text set off in this manner indicates
important information you need.
CAUTION: Text set off in this manner
indicates that failure to follow directions
could result in damage to equipment or
loss of information.
w
WARNING: This symbol is intended to alert
the user to the presence of important
operating and maintenance (servicing)
instructions in the literature accompanying
the appliance.
n
Text set off in this manner indicates
information you need.
DANGEROUS VOLTAGE: Text set off in this
manner indicates the presence of
uninsulated voltages within the product
enclosure that may be of sufficient
magnitude to constitute a risk of electrical
shock to persons.
Page 3

Important Safeguards
WARNING: TO REDUCE THE RISK OF FIRE OR ELECTRICAL SHOCK, DO NOT EXPOSE THIS APPLIANCE
TO RAIN OR MOISTURE.
CAUTION: RISK OF ELECTRICAL SHOCK w
DO NOT OPEN
CAUTION: TO REDUCE THE RISK OF ELECTRICAL SHOCK, DO NOT REMOVE COVER (OR BACK).
NO USER-SERVICEABLE PARTS INSIDE.
REFER SERVICING TO QUALIFIED SERVICE PERSONNEL.
THIS SYMBOL IS INTENDED TO ALERT THE USER TO THE PRESENCE OF UNINSULATED
“DANGEROUS VOLTAGES” WITHIN THE PRODUCT’S ENCLOSURE THAT MAY BE OF
SUFFICIENT MAGNITUDE TO CONSTITUTE A RISK OF ELECTRICAL SHOCK TO PERSONS.
REFER SERVICING TO QUALIFIED SERVICE PERSONNEL.
w
CAUTION: DO NOT PLACE THIS PRODUCT ON AN UNSTABLE CART, STAND, TRIPOD,
THIS SYMBOL IS INTENDED TO ALERT THE USER TO THE PRESENCE OF IMPORTANT
OPERATING AND MAINTENANCE (SERVICING) INSTRUCTIONS IN THE LITERATURE
ACCOMPANYING THE APPLIANCE.
BRACKET, OR TABLE. THE PRODUCT MAY FALL CAUSING SERIOUS
PERSONAL INJURY AND SERIOUS DAMAGE TO THE PRODUCT. USE ONLY
WITH A CART, STAND, TRIPOD, BRACKET, OR TABLE RECOMMENDED BY
THE MANUFACTURER OR SOLD WITH THE PRODUCT. FOLLOW THE
MANUFACTURER’S INSTRUCTIONS WHEN INSTALLING THE PRODUCT
AND USE MOUNTING ACCESSORIES RECOMMENDED BY THE
MANUFACTURER. A PRODUCT AND CART COMBINATION SHOULD BE
MOVED WITH CARE. QUICK STOPS, EXCESSIVE FORCE, AND UNEVEN
SURFACES MAY CAUSE THE PRODUCT AND CART COMBINATION TO
OVERTURN.
iii
Page 4

INFORMATION
This equipment has been tested and found to comply with the limits for a Class B digital device, pursuant to Part 15 of
the FCC Rules. These limits are designed to provide reasonable protection against harmful interference in a residential
installation. This equipment generates, uses, and can radiate radio frequency energy and, if not installed and used in
accordance with the instructions, may cause harmful interference to radio communications. However, there is no
guarantee that interference will not occur in a particular installation. If this equipment does cause harmful interference
to radio or television reception, which can be determined by turning the equipment off and on, the user is encouraged
to try to correct the interference by one or more of the following measures:
■ Reorient or relocate the receiving antenna.
■ Increase the separation between the equipment and receiver.
■ Connect the equipment into an outlet on a circuit different from that to which the receiver is connected.
■ Consult the dealer or an experienced radio/TV technician for help.
Closed caption notice
This television receiver provides display of television closed captioning in accordance with § 15.119 of the FCC Rules.
FCC Radiation Exposure Statement
This equipment complies with FCC radiation exposure limits set forth for an uncontrolled environment. This equipment
should be installed and operated with a minimum distance of 20 cm between the radiator and your body.
Modifications
The FCC requires the user to be notified that any changes or modifications made to this device that are not expressly
approved by Hewlett-Packard Company may void the authority to operate the equipment.
Cables
Connections to this device must be made with shielded cables with metallic RFI/EMI connector hoods in order to
maintain compliance with FCC Rules and Regulations.
RESPONSIBLE PARTY
Hewlett-Packard Company
Attn: Product Regulations Manager
10955 Tantau Avenue
Building 45NL
Cupertino, CA 95014 USA
Important Safety Instructions
Electricity is used to perform many useful functions, but it can also cause personal injuries and property damage if
improperly handled. This product has been engineered and manufactured with the highest priority on safety. However,
improper use can result in electric shock and/or fire. In order to prevent potential danger, please observe the following
instructions when installing, operating, and cleaning the product. To ensure your safety and prolong the service life of
your television, please read the following precautions carefully before using the product.
iv HP Plasma HDTV User’s Guide
Page 5

1
Read these instructions.
2 Keep these instructions.
3 Heed all warnings.
4 Follow all instructions.
5 Do not use this apparatus near water.
6 Clean only with dry cloth.
7 Do not block any ventilation openings. Install in
accordance with the manufacturer’s instructions.
8 Do not install near any heat sources such as
radiators, heat registers, stoves, or other
apparatus (including amplifiers) that
produce heat.
9 Do not defeat the safety purpose of the polarized
or grounding-type plug. A polarized plug has two
blades with one wider than the other. A
grounding-type plug has two blades and a third
grounding prong. The wide blade or the third
prong are provided for your safety. If the provided
plug does not fit into your outlet, consult an
electrician for replacement of the obsolete outlet.
10 Protect the power cord from being walked on or
pinched particularly at plugs, convenience
receptacles, and the point where they exit from
the apparatus.
11 Only use attachments/accessories specified by
the manufacturer.
12 Use only with the cart, stand,
tripod, bracket, or table
specified by the manufacturer, or
sold with the apparatus. When a
cart is used, use caution when
moving the cart/apparatus
combination to avoid injury from
tip-over.
13 Unplug this apparatus during lightning storms or
when unused for long periods of time.
14 Refer all servicing to qualified service personnel.
Servicing is required when the apparatus has
been damaged in any way, the power-supply cord
or plug is damaged, liquid has been spilled or
objects have fallen into the apparatus, the
apparatus has been exposed to rain or moisture,
does not operate normally, or has been dropped.
15 Power Sources — This product should be
operated only from the type of power source
indicated on the marking label. If you are not sure
of the type of power supply to your home, consult
your product dealer or local power company. For
products intended to operate from battery power,
or other sources, refer to the operating
instructions.
16 Overloading — Do not overload wall outlets,
extension cords, or integral convenience
receptacles as this can result in a risk of fire or
electric shock.
17 Replacement Parts — When replacement parts
are required, be sure the service technician has
used replacement parts specified by the
manufacturer or have the same characteristics as
the original part. Unauthorized substitutions may
result in fire, electric shock, or other hazards.
18 Safety Check — Upon completion of any service
or repairs to this product, ask the service
technician to perform safety checks to determine
that the product is in proper operating condition.
19 The apparatus shall not be exposed to dripping or
splashing and no objects filled with liquids, such
as vases, shall be placed on the apparatus.
20 WARNING: Plug the power cord into a power
outlet where access to the power cord connector is
readily accessible in case power disconnection is
required.
21 Servicing: The user should not attempt to service
the appliance beyond that described in the
operating instructions. All other servicing should
be referred to qualified service personnel.
v
Page 6

■ Water and Moisture — Do not use this product near water; for example, near a bath tub, wash bowl, kitchen sink,
or laundry tub; in a wet basement; or near a swimming pool; and the like.
■ Stand — Do not place the product on an unstable cart, stand, tripod, or table. Placing the product on an unstable
base can cause the product to fall, resulting in serious personal injuries as well as damage to the product. Use
only a cart, stand, tripod, bracket, or table recommended by the manufacturer or sold with the product.
■ Selecting the location — Select a place with no direct sunlight and good ventilation.
■ Ventilation — The vents and other openings in the cabinet are designed for ventilation. Do not cover or block
these vents and openings since insufficient ventilation can cause overheating and/or shorten the life of the
product. Do not place the product on a bed, sofa, rug, or other similar surface, since they can block ventilation
openings. This product is not designed for built-in installation; do not place the product in an enclosed place such
as a bookcase or rack, unless proper ventilation is provided or the manufacturer’s instructions are followed.
■ The display panel used in this product is made of glass. Therefore, it can break when the product is dropped or
applied with impact. Be careful not to be injured by broken glass pieces in case the panel breaks.
■ Heat — The product should be situated away from heat sources such as fireplaces, chimneys, radiators, heat
registers, stoves, or other products (including amplifiers) that produce heat.
■ Cautions regarding use in high and low temperature environments:
When the unit is used in low-temperature space (e.g., room, office), the picture may leave trails or appear slightly
delayed. This is not a malfunction, and the unit will recover when the temperature returns to normal.
Do not leave the unit in a hot or cold location. Also, do not leave the unit in a location exposed to direct sunlight
or near a heater, as this may cause the cabinet to deform and the display panel to malfunction. Storage
temperature: –4° F to +140° F (–20° C to +60° C). Operating temperature: 32° F to 104° F (0° C to 40° C).
■ Precautions when transporting the TV — When transporting the TV, never carry it by holding onto the speaker. Be
sure to always carry the TV by two people holding it with two hands — one hand on each side of the Display.
■ Lightning — For added protection for this television equipment during a lightning storm, or when it is left
unattended and unused for long periods of time, unplug it from the wall outlet and disconnect the antenna. This
will prevent damage to the equipment due to lightning and power-line surges.
■ Power Lines — An outside antenna system should not be located in the vicinity of overhead power lines or other
electric light or power circuits, or where it can fall into such power lines or circuits. When installing an outside
antenna system, extreme care should be taken to keep from touching such power lines or circuits as contact with
them might be fatal.
vi HP Plasma HDTV User’s Guide
Page 7
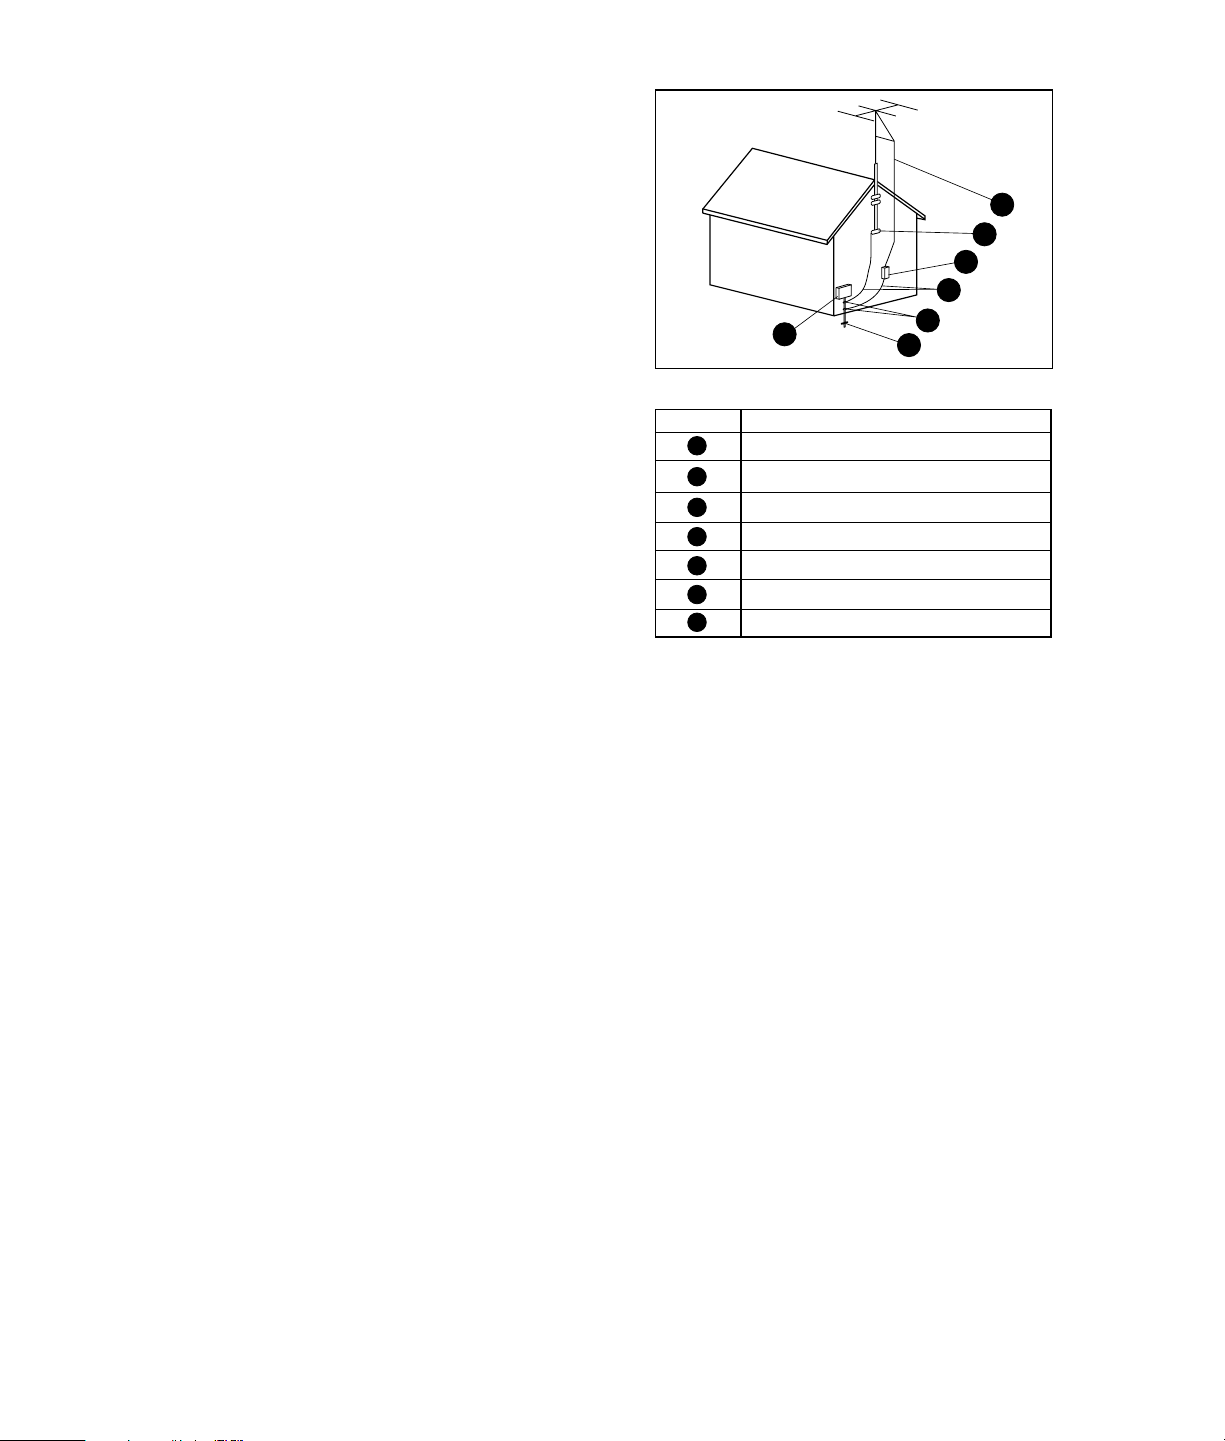
■ Outdoor Antenna Grounding — If an outside
antenna is connected to the television equipment,
be sure the antenna system is grounded so as to
provide some protection against voltage surges
and built-up static charges. Article 810 of the
National Electrical Code, ANSI/NFPA 70,
provides information with regard to proper
grounding of the mast and supporting structure,
grounding of the lead-in wire to an antenna
discharge unit, size of grounding conductors,
location of antenna-discharge unit, connection to
1
grounding electrodes, and requirements for the
grounding electrode.
■ To prevent fire, never place any type of candle or flames on the top or near the TV set.
■ To prevent fire or shock hazard, do not expose this product to dripping or splashing. No objects filled with liquids,
Antenna Grounding
Reference
1
2
3
4
5
6
7
Antenna Grounding
Grounding Component
Electric Service Equipment
Power Service Grounding Electrode System
(NEC Art 250, Part H)
Ground Clamps
Grounding Conductors (NEC Section 810-21)
Antenna Discharge Unit (NEC Section 810-20)
Ground Clamp
Antenna Lead in Wire
3
2
7
6
5
4
such as vases, should be placed on the product.
■ To prevent fire or shock hazard, do not place the AC power cord under the TV set or other heavy items.
■ Turn off the main power and unplug the AC cord from the wall outlet before handling.
■ Use a soft cloth and gently wipe the surface of the TV panel. Using a hard cloth may scratch the panel surface.
■ Use a soft damp cloth to gently wipe the panel when it is really dirty. (It may scratch the panel surface when
wiped strongly.)
■ If the panel is dusty, use an anti-static brush, which is commercially available, to clean it.
■ To protect the panel, do not use a dirty cloth, liquid cleaners, or chemical cloth to clean it; such materials may
damage the panel surface.
vii
Page 8
Important Information
The TV must be serviced by an authorized service
technician. The TV is not user-serviceable.
Changes can damage your TV and void your
warranty. Changes or modifications not expressly
approved by the manufacturer could void the user’s
authority to operate the equipment.
Recycling Information
For information about how to recycle this product
through HP, see:
http://www.hp.com/recycle
Other recycling options may also be available in your
area. If located within the U.S. and Canada, you may
also call (1) (888) 485-1849.
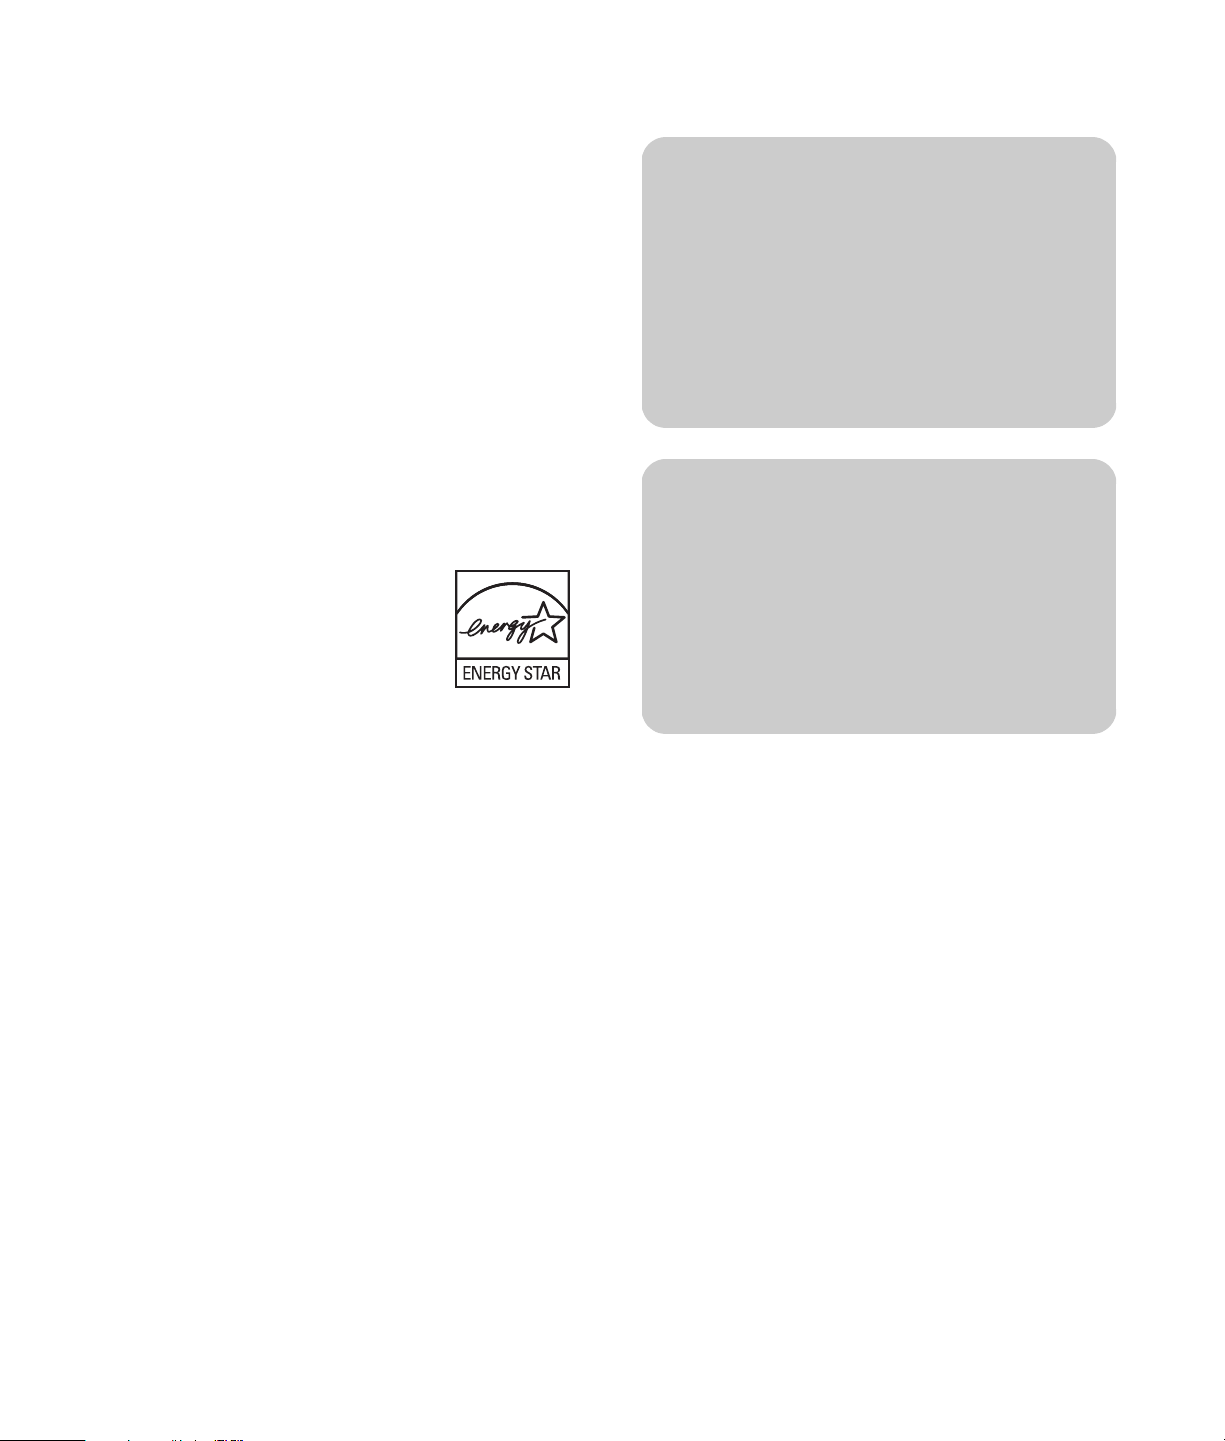
ENERGY STAR Compliance
Products marked with the ENERGY
STAR logo on the packaging box
qualify with the U.S. Environmental
Protection Agency’s ENERGY STAR
guidelines for energy efficiency.
Products with the ENERGY STAR label
are designed to use less energy, help you save money
on utility bills, and help protect the environment.
ENERGY STAR is a registered trademark owned by the
U.S. government.
n
Do not allow a picture to display for an
extended period, as this can cause a
permanent afterimage to remain on the
plasma TV.
Examples of still pictures include logos,
video games, computer images, teletext,
and images displayed in 4:3 mode.
n
Image retention protection: If still image
data displays for more than a few minutes,
the image retention prevention function
activates automatically to protect the
screen. If the image disappears, change the
image or change the input source to see an
image.
Lifting precautions
The TV is heavy; be sure to use ergonomically correct
lifting procedures when moving the TV.
Cleaning precautions
Unplug the TV before cleaning the screen.
Using solvents, such as alcohol, or abrasive material,
such as a premoistened or chemically treated towel,
may affect the TV or bezel paint.
Do not expose the product to volatile gas or fluid such
as a pesticide.
Do not put the TV in contact with vinyl or rubber
products for a long period of time. Extended contact
may result in the removal of or degradation of the
surface.
viii HP Plasma HDTV User’s Guide
Due to the size and weight of the TV, it is
recommended that a minimum of two people move it.
For transport, use the handles on the back of the TV, or
grasp the display in the area under and above the
screen.
If speakers are attached to the display, do not lift the
display by the speakers; instead, use the handles on
the back of the TV, or grasp the display in the area
under and above the screen.
Never place the display with the glass screen facing
downward, unless it is protected with pads.
Page 9

g
Table of Contents
Important Safeguards ..................................... iii
Modifications .................................................iv
Cables ..........................................................iv
Important Safety Instructions.............................iv
Important Information ....................................viii
Getting to Know Your TV................. 1
Identifying Items in the Box .................................... 2
Locating TV Buttons and Connectors........................3
Cleaning .............................................................6
Cleaning precautions ...................................... 6
Cleaning the TV.............................................. 6
Setting Up....................................... 7
Selecting a Good Location..................................... 7
Lifting the TV .................................................. 8
Attaching or removing the stand .......................8
Setting Up the TV.................................................. 9
Attaching and connecting the display
speakers........................................................ 9
Connecting the TV signal sources.................... 10
Connecting the cable TV or the air
broadcast antenna........................................ 11
Connecting cable or satellite with a
set-top box................................................... 11
Connecting a DVD player, VCR, DVR,
game console, or camcorder.......................... 12
Connecting a VCR for recording..................... 15
Connecting a PC .......................................... 15
Connecting an external sound system.............. 16
Connecting power to the TV...........................16
Turning On the TV..........................17
Turning the TV On and Off (Standby) ....................17
Using the First-Time Setup Wizard..19
Initial Setup........................................................19
Using the Remote Control ..............21
Operating the TV................................................21
Using universal remote controls.......................21
Installing or replacing remote control
batteries.......................................................21
Identifying the remote control buttons...............22
Adjusting the Volume ..........................................24
Muting the sound ..........................................24
Changing the Picture Mode..................................24
Changing Channels ............................................24
Selecting the last channel...............................24
Displaying program information......................24
Selecting the Input Source....................................25
Changing the View with the Aspect Button .............25
Turning On Captions...........................................25
Setting SAP/MTS stereo mode..............................26
Changing Audio Mode........................................26
Setting the Sleep Timer ........................................26
Adjusting TV Settings...........................................26
Opening and exiting the OSD ........................26
Table of Contents
Table of Contents ix
Page 10

Changing the TV Settings...............27
Using the OSD Menus......................................... 27
Using the Picture Menu........................................ 28
Adjusting the picture image ........................... 29
Using the Audio Menu ........................................ 30
Adjusting the audio....................................... 30
Using the Time Menu .......................................... 31
Using the Channel Menu..................................... 31
Using the Closed Caption Menu........................... 33
Using the Parental Control Menu .......................... 34
Using the Password....................................... 35
Setting Parental Controls................................ 35
How to temporarily release a blocked
program...................................................... 39
Reactivating parental controls after a
temporary release......................................... 39
Using the System Menu ....................................... 40
Starting the Setup Wizard ............................. 40
Returning to Default Settings........................... 40
Using White Wash ....................................... 40
Selecting the Standby Mode (Power Control) ... 40
Finding Answers to Questions ....... 41
Understanding TV Terms ......................................41
What are analog TV, digital TV, and
high-definition (HDTV)?..................................41
What is the difference between progressive
and interlaced signal formats for digital TVs? ...41
What is variable aspect ratio?........................41
What is HDMI?.............................................42
Identifying Cable Usage ......................................42
Specifications................................ 45
PC Compatibility Chart........................................48
Troubleshooting ............................ 49
x HP Plasma HDTV User’s Guide
Page 11

Getting to Know Your TV
Thank you for purchasing an HP Plasma High-definition
Television. HP’s array of high-definition televisions
delivers a world-class picture in a design that is sleek
and stylish.
Features:
■ Exceptional image accuracy with deep blacks and
bright, clear pictures that bring the finest details to
life, thanks to an advanced video engine that
offers dynamic contrast adjustment and
photorealistic sharpness enhancement. This HP TV
features a 2D comb-filter color enrichment system
that reproduces accurate flesh tones and vivid
colors.
■ Fantastic sound emanates from two detachable
speakers. Each speaker delivers powerful sound
through two mid-range speakers and a tweeter.
HP’s high-fidelity speaker system is complemented
by SRS WOW audio processing technology,
which enhances vocal clarity and bass
performance for an immersive sound experience.
■ A comprehensive array of digital and analog
inputs, including an integrated HDTV Tuner,
HDMI, and component video ports. Analog and
digital audio output connectors enable seamless
connectivity to external audio speakers or an
audio receiver.
■ A classic black-finish panel that blends with any
décor. The tabletop stand is sleek and stylish and
is detachable.
■ Photorealistic Sharpness Enhancement yields
crystal-clear and sharp pictures.
■ Dynamic contrast adaptation, which enables
picture quality adjustment on a scene-by-scene
basis.
■ Motion Adaptive Noise Reduction, which greatly
reduces visual noise without reducing detail.
■ Advanced scaling and film-processing technology,
which enables enjoyment of DVDs and standarddefinition TV on a big screen.
■ Integrated digital HDTV/analog tuner — for HD
shows from cable or off-the-air sources.
■ HDMI port that provides digital video and audio
through a single cable.
■ Burn-in protection technology that provides long-
lasting panel life.
■ Ultra-long-life panel provides up to 60,000 hours
of operation.
All specifications represent the typical specifications provided by
HP’s component manufacturers; actual performance may vary either
higher or lower.
The panel life is determined as the time at which luminance is 50%
compared to that of initial value at the typical lamp current on
condition of continuous operation at 25 +/– °C. 60,000 hours
equates to more than twenty-three years at seven hours a day
viewing.
Getting to Know Your TV
Getting to Know Your TV 1
Page 12
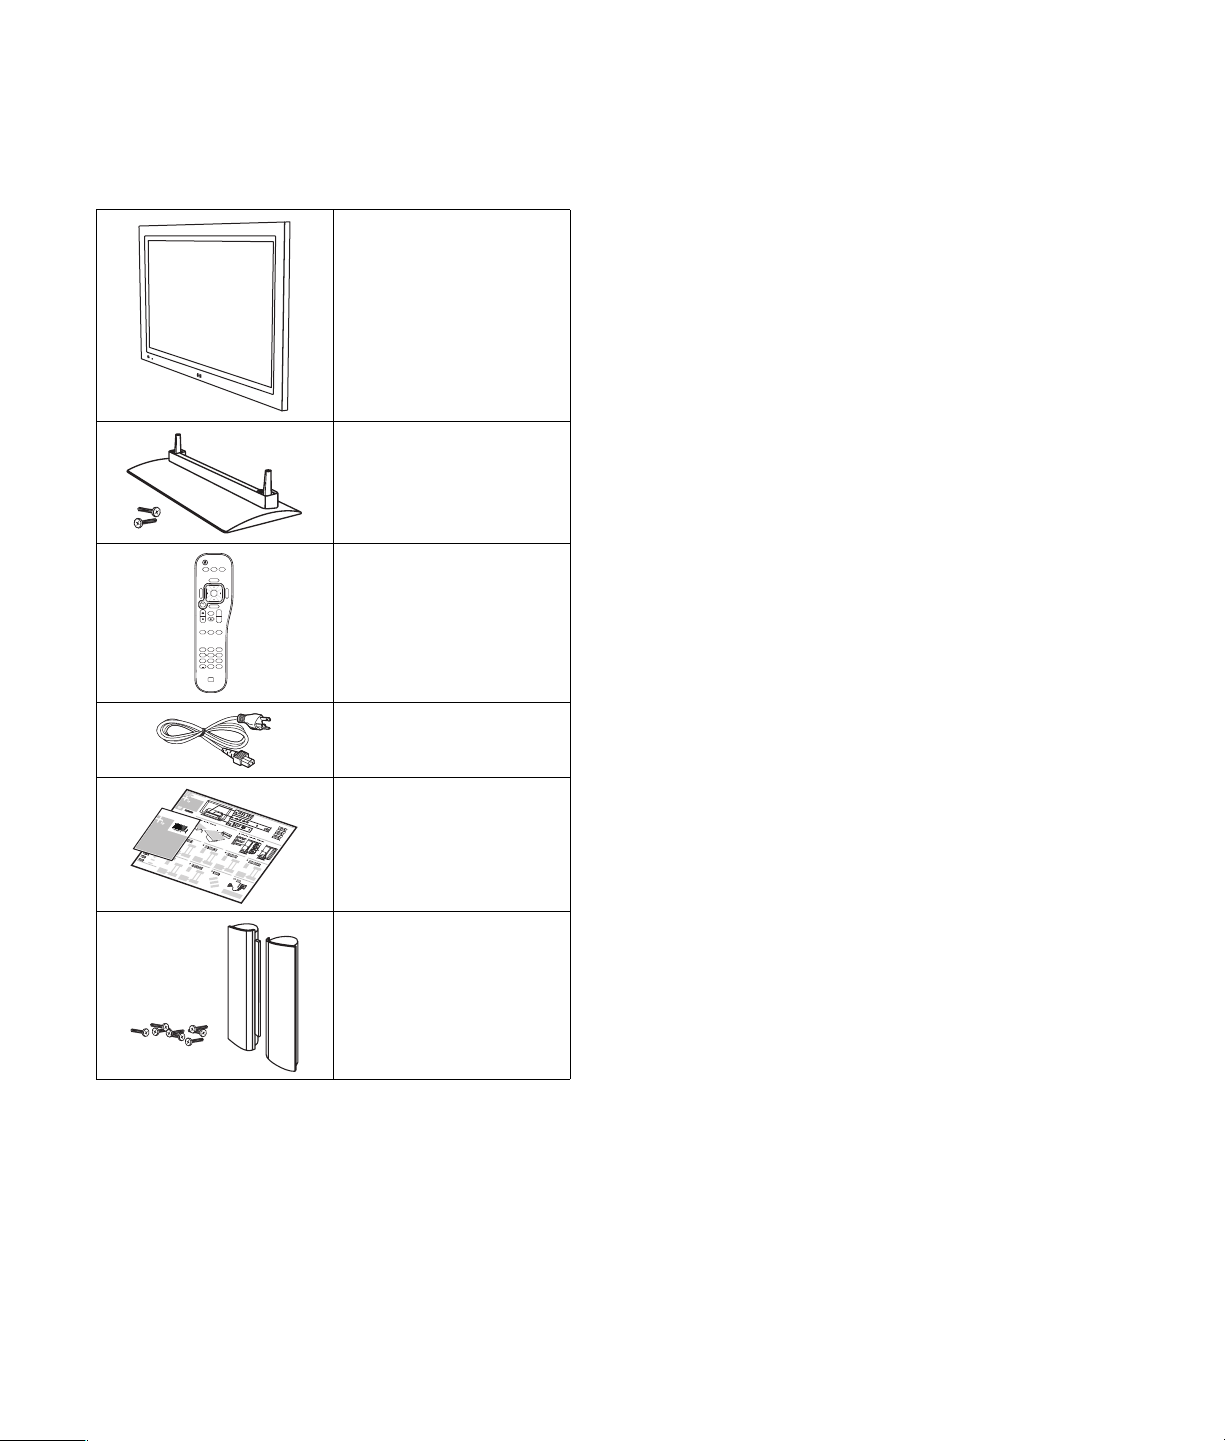
Identifying Items
in the Box
Television (panel with
stand detached)
TV stand and mounting
hardware
SAP
Sound
Menu
back
CC Sleep Ant
1
4
7
Picture
MTS
Source
OK
Aspect
Info
Ch+
Last
Ch-
3
2
6
5
89
Enter
0
Remote control unit
AC cord
Documentation
Display speakers with
mounting hardware
2 HP Plasma HDTV User’s Guide
Page 13
Locating TV Buttons and
TV Front
Connectors
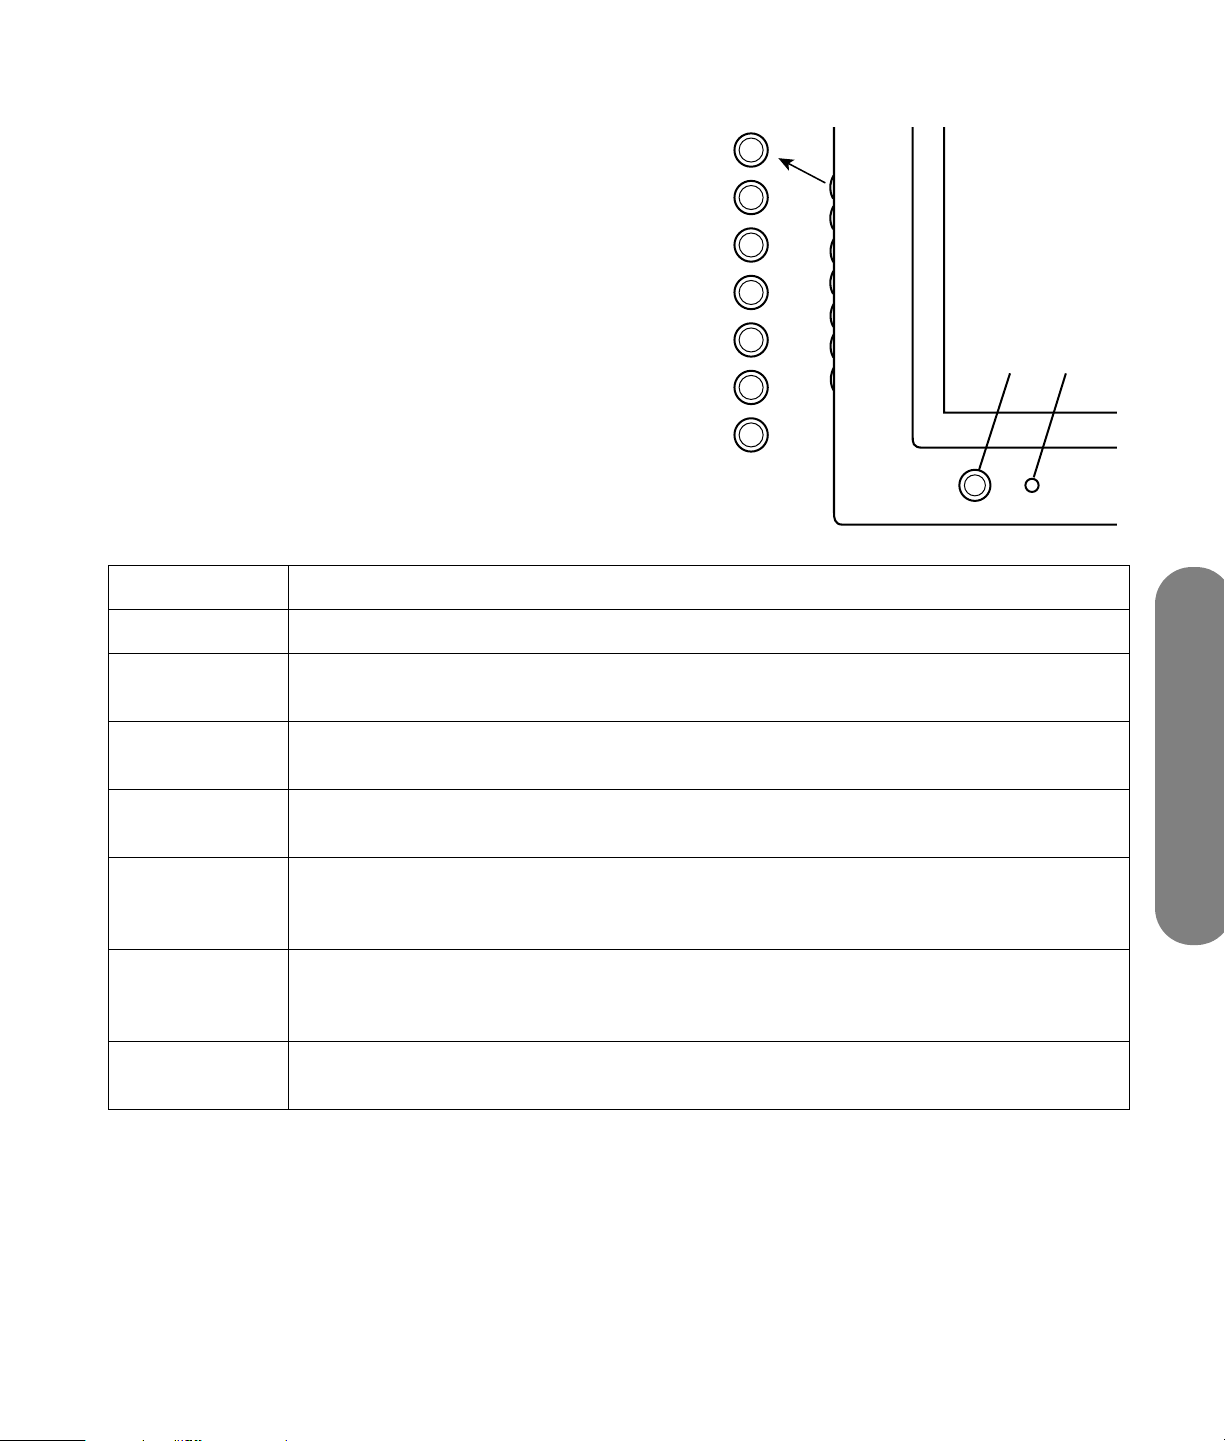
The TV contains controls, indicators, and connectors.
The TV indicators are located on the front of the TV,
and the controls are located on the left side.
TV (front) Description
MENU Menu displays the onscreen display (OSD) or functions as the Exit button to close the OSD.
OK OK starts the Auto Sync function for a connected PC signal. In an OSD menu, selects
highlighted item in the OSD.
MENU
OK
+
VOL
–
+
CH
–
SRC
A
B
+VOL
–VOL
+CH
–CH
SRC Source selects the input source. Press Source to open the list of input sources. Press Channel
A: Power button
and light
B: Remote
control sensor
Volume lowers or raises the sound level. In an OSD menu, press these buttons to move right
or left in the menu or to adjust an item.
Channel selects the next lower or higher channel. In an OSD menu, press these buttons to
move up or down in the menu.
to select the input source, and press OK. Press Source to close the list. In an OSD menu, this
button functions as the Back button, or to move up one item or menu level.
Power
on or in off/standby. The light is blue when TV is on, and is red when TV is in off/standby
mode.
Remote control sensor is the location where to point the remote control unit.
turns on the TV or places it in standby mode. The button light shows whether the TV is
Getting to Know Your TV
Getting to Know Your TV 3
Page 14
Rear TV connectors
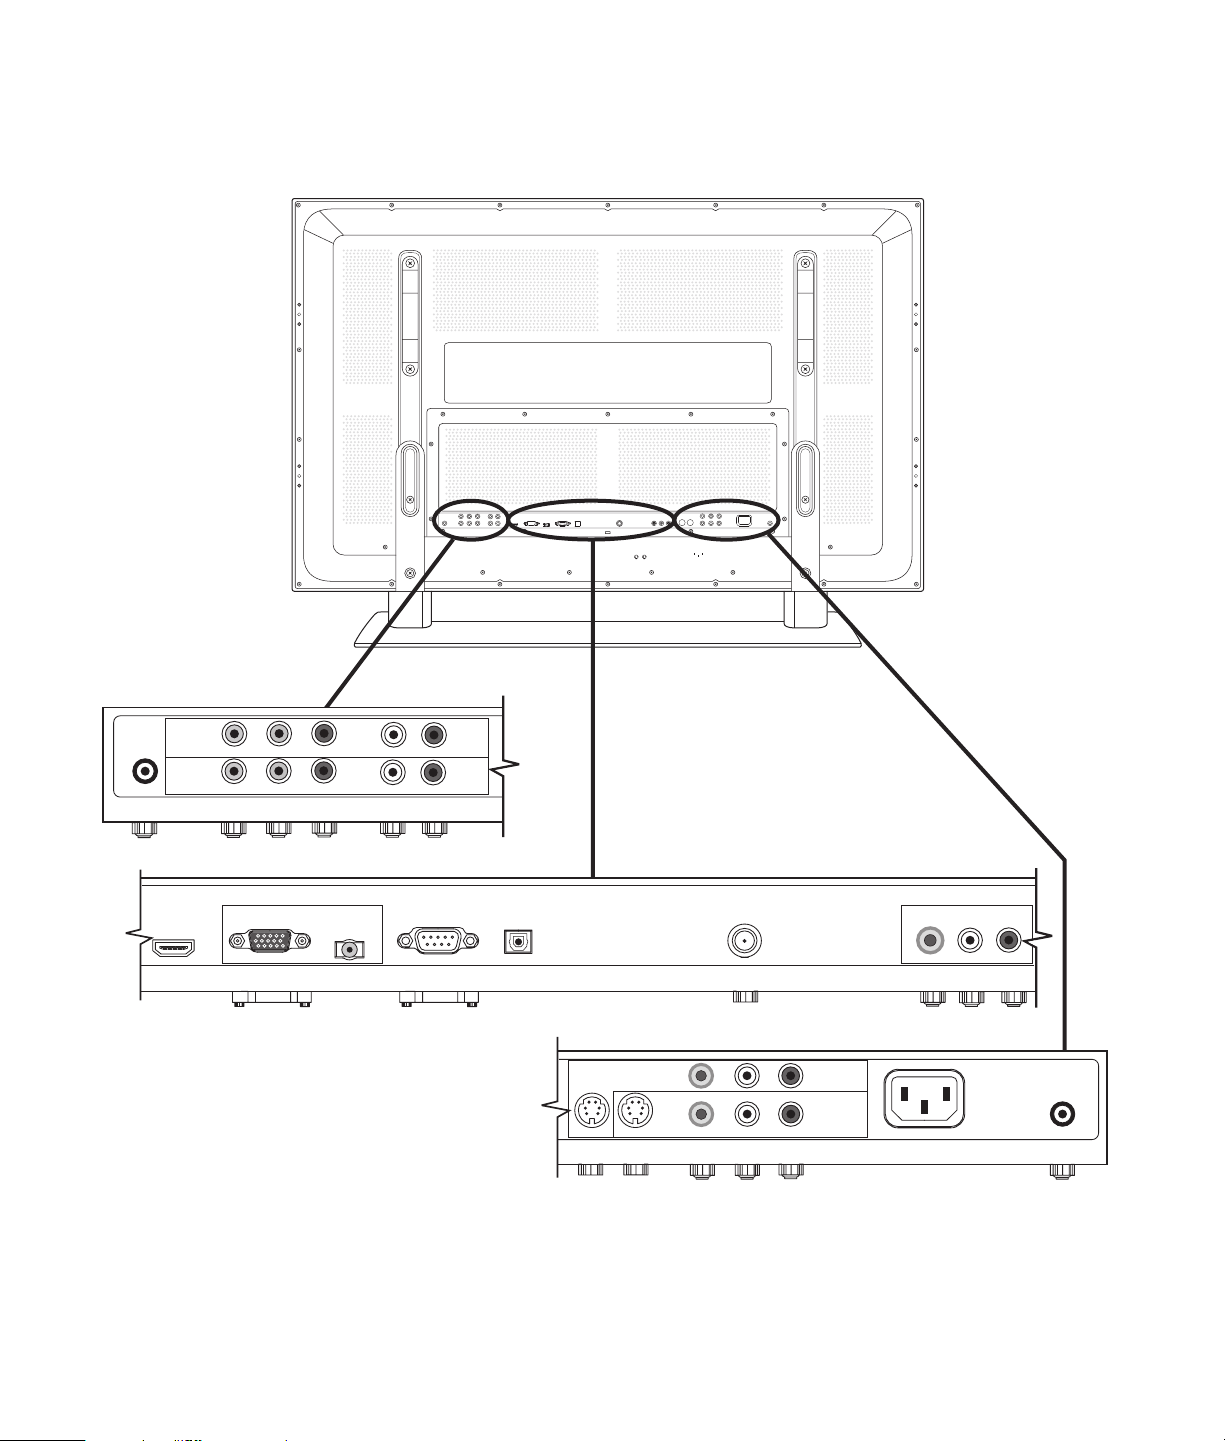
The connectors are located on the rear of the TV.
TV connectors shown below are on the left side, center, and right side of the back of the TV.
SPEAKER R
COMPONENT 1
COMPONENT 2
HDMI
Y PR/CR
PB/CB
PR/CRY
PB/CB L/MONO
PC/DVI AUDIO IN
L/MONO
COMPONENT 2
AUDIO 4 IN
Y PR/CR
PB/CB
COMPONENT 1
PR/CRY
SPEAKER R
PB/CB L/MONO
COMP 1
AUDIO IN
R
COMP 2
AUDIO IN
R
PC/DVI AUDIO IN
R
L/MONO
HDMI
AUDIO 3 IN
R
RF INPUTRS232PC
DIGITAL AUDIO OUT
VIDEO OUT
L/MONO
AUDIO OUT S-VIDEO 1 S-VIDEO 2
DIGITAL AUDIO OUT
VIDEO 1 IN
AUDIO 1 IN
R
VIDEO 1 IN
RRL
SPEAKER L
AUDIO 2 IN
AC IN
L/MONO
VIDEO 2 IN
RRF INPUTRS232PC
L/MONO
AUDIO OUT
VIDEO OUT
R
L
VIDEO 1 AUDIO IN
SPEAKER L
VIDEO 2 AUDIO IN
S-VIDEO 1 S-VIDEO 2
VIDEO 2 IN
L/MONO
R
AC IN
4 HP Plasma HDTV User’s Guide
Page 15
TV (rear) Description
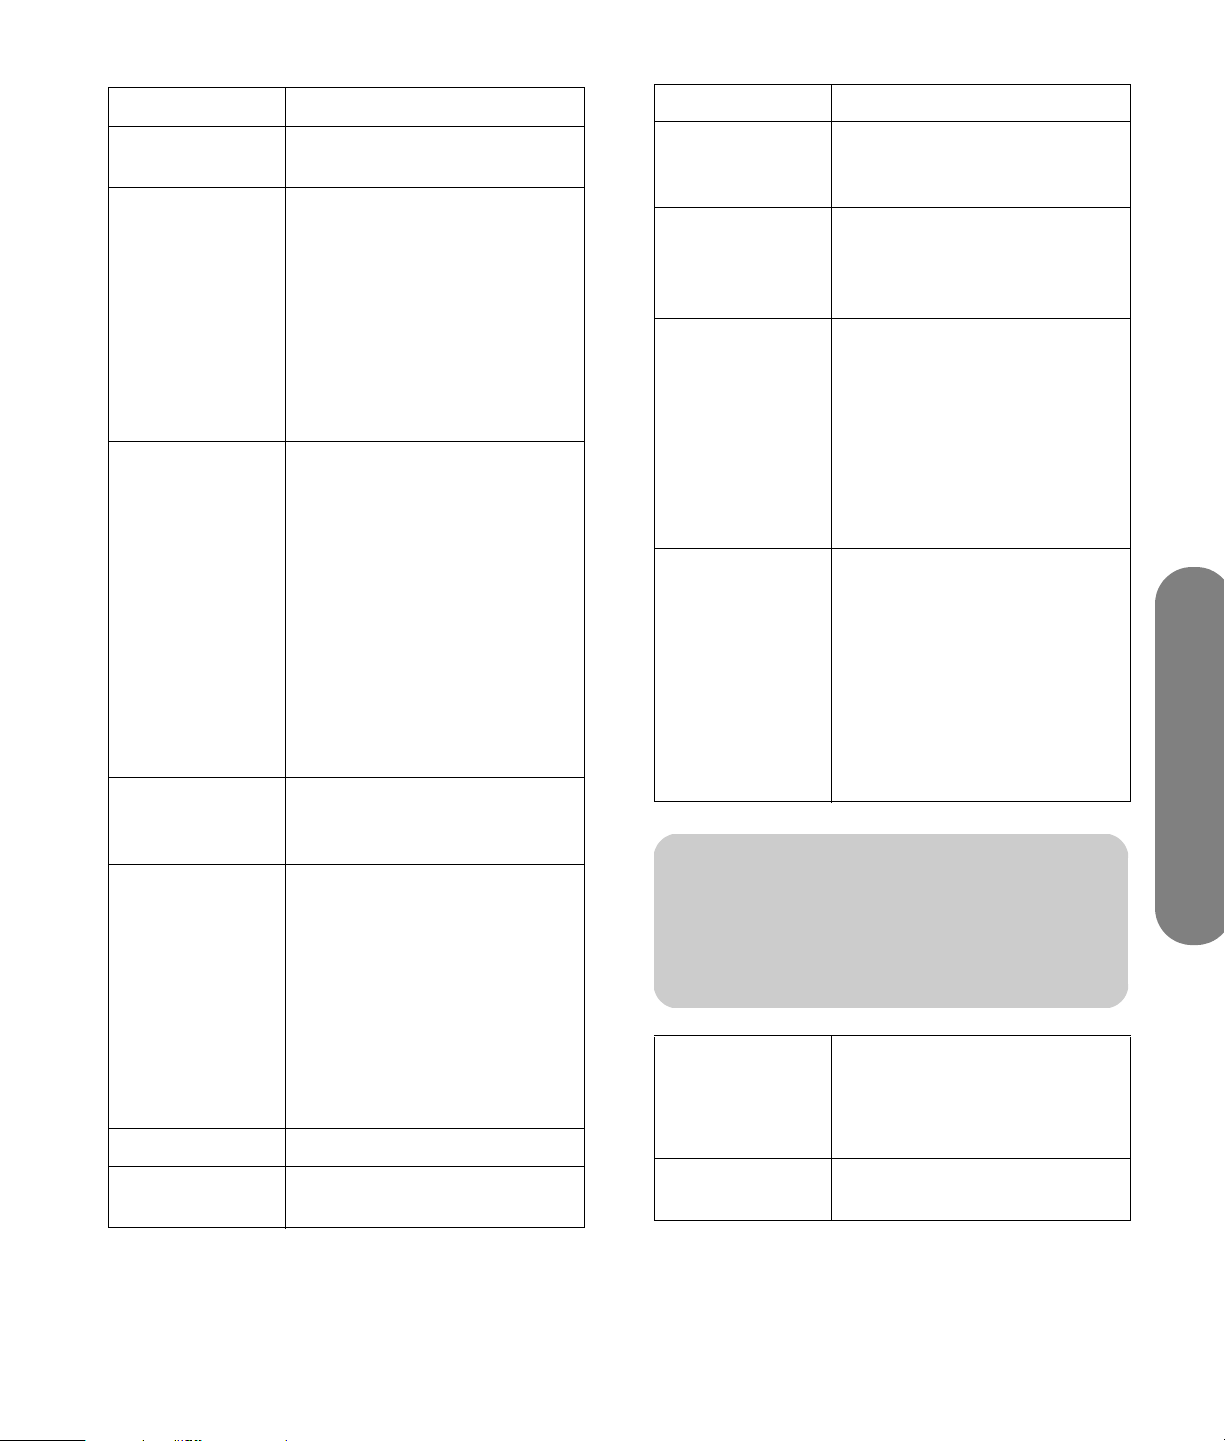
■ Speaker R
Connect wire from the right
speaker.
■ Component 1
Comp 1
Audio In
■ Component 2
Comp 2
Audio In
Connect component video
cables and left-right audio
cables from optional
equipment. Supports standard
inputs 480i, 480p, 720p, and
1080i. The TV automatically
determines what has been
connected. Some set-top boxes
must be set for a specific
resolution out.
■ HDMI ■ Connect an HDMI (High-
Definition Multimedia
Interface) cable from
optional digital, highdefinition equipment.
Or
■ Connect a DVI cable and
DVI-to-HDMI converter
cable from optional DVI
equipment; requires an
audio cable connected
from the DVI equipment to
PC/DVI Audio In.
■ PC
Connect a VGA cable from
your PC to use the TV as a
monitor.
■ PC/DVI
Audio In
■ Connect an audio cable
from the optional PC audio
out.
Or
■ Connect audio cable from
the optional DVI equipment
(connected using a DVI
cable and DVI-to-HDMI
converter cable at the
HDMI connector).
■ RS232
■ Digital Audio
Out
Used for service purposes only.
Connect an optical cable to an
external digital audio system.
TV (rear) Description (Continued)
■ RF Input
Connect a coaxial cable from
an air antenna or cable signal
source.
■ Video Out
Audio Out
Connect composite video and
left-right audio cables to
optional equipment for
monitoring or recording video.
■ S-video 1
Video 1
Audio In
■ S-video 2
Video 2
Audio In
Connect an S-video cable and
left-right audio cables from
optional equipment.
Use Video 1 Audio In for
S-video 1, and Video 2 Audio
In for S-video 2.
(Audio connectors are shared
with Video In.)
■ Video1 In
Video 1
Audio In
■ Video 2 In
Video 2
Audio In
Connect a composite video
cable and left-right audio
cables from optional
equipment.
Use Video 1 Audio In for
Video 1 In, and Video 2 Audio
In for Video 2 In.
(Audio connectors are shared
with S-video.)
!
Do not connect video cables to both the
S-video and the Video In connectors in
aset.
■ AC In
■ Speaker L
Connect the included
power cord.
NOTE: Use only the provided
power cord.
Connect wire from the left
speaker.
Getting to Know Your TV
Getting to Know Your TV 5
Page 16

Cleaning
Cleaning precautions
Unplug the TV before cleaning the screen.
A special antiglare coating is applied to the screen of
your TV. Using solvents, such as alcohol, or abrasive
material, such as a premoistened or chemically treated
towel, may affect the screen coating or bezel paint.
Do not expose the product to volatile gas or fluid such
as a pesticide.
Do not put the TV in contact with vinyl or rubber
products for a long period of time. Extended contact
may result in the removal of the coating or degradation
of the surface.
n
Do not allow a picture to display for an
extended period, as this can cause a
permanent afterimage to remain on the
plasma TV.
Cleaning the TV
Clean the screen by spraying a soft lint-free cloth with
water to lightly moisten it. Gently wipe the screen, and
avoid pressing on the screen.
To clean the outer cabinet, use the same method.
Do not use liquid or aerosol cleaners.
Examples of still pictures include logos,
video games, computer images, teletext,
and images displayed in 4:3 mode.
6 HP Plasma HDTV User’s Guide
Page 17
8
Setting Up
HP recommends professional installation from an authorized installer to ensure maximum enjoyment of your HP Plasma
HDTV. Be sure to read all the safety information and precautions before starting installation. See these topics:
■ “Important Safeguards” on page iii
■ “Important Safety Instructions” on page iv
Selecting a Good Location
Select the location for your HP Plasma HDTV. Consider
the following conditions when positioning the TV:
■ Power cord length: Choose a location with easy
access to an AC power outlet.
■ Cable lengths and distances to attached units:
Check that cables can reach the TV.
■ Do not install the TV on an unstable cart or stand;
the unit may fall over and cause injury.
■ Do not install the TV where it has a protruding
edge, such as on a small table where the display
overhangs the table surface.
■ Do not hang the TV from the ceiling; the unit may
fall and cause injury.
■ Avoid direct sunlight that may damage the display
or interfere with the operation of the remote
control.
■ Avoid areas of high humidity or damp conditions
that may cause fire or electrical shock.
■ Do not install TV near appliances, such as a
microwave, or near a heat source, such as a
fireplace or radiator.
■ Do not place the TV on a sloped or unstable
surface.
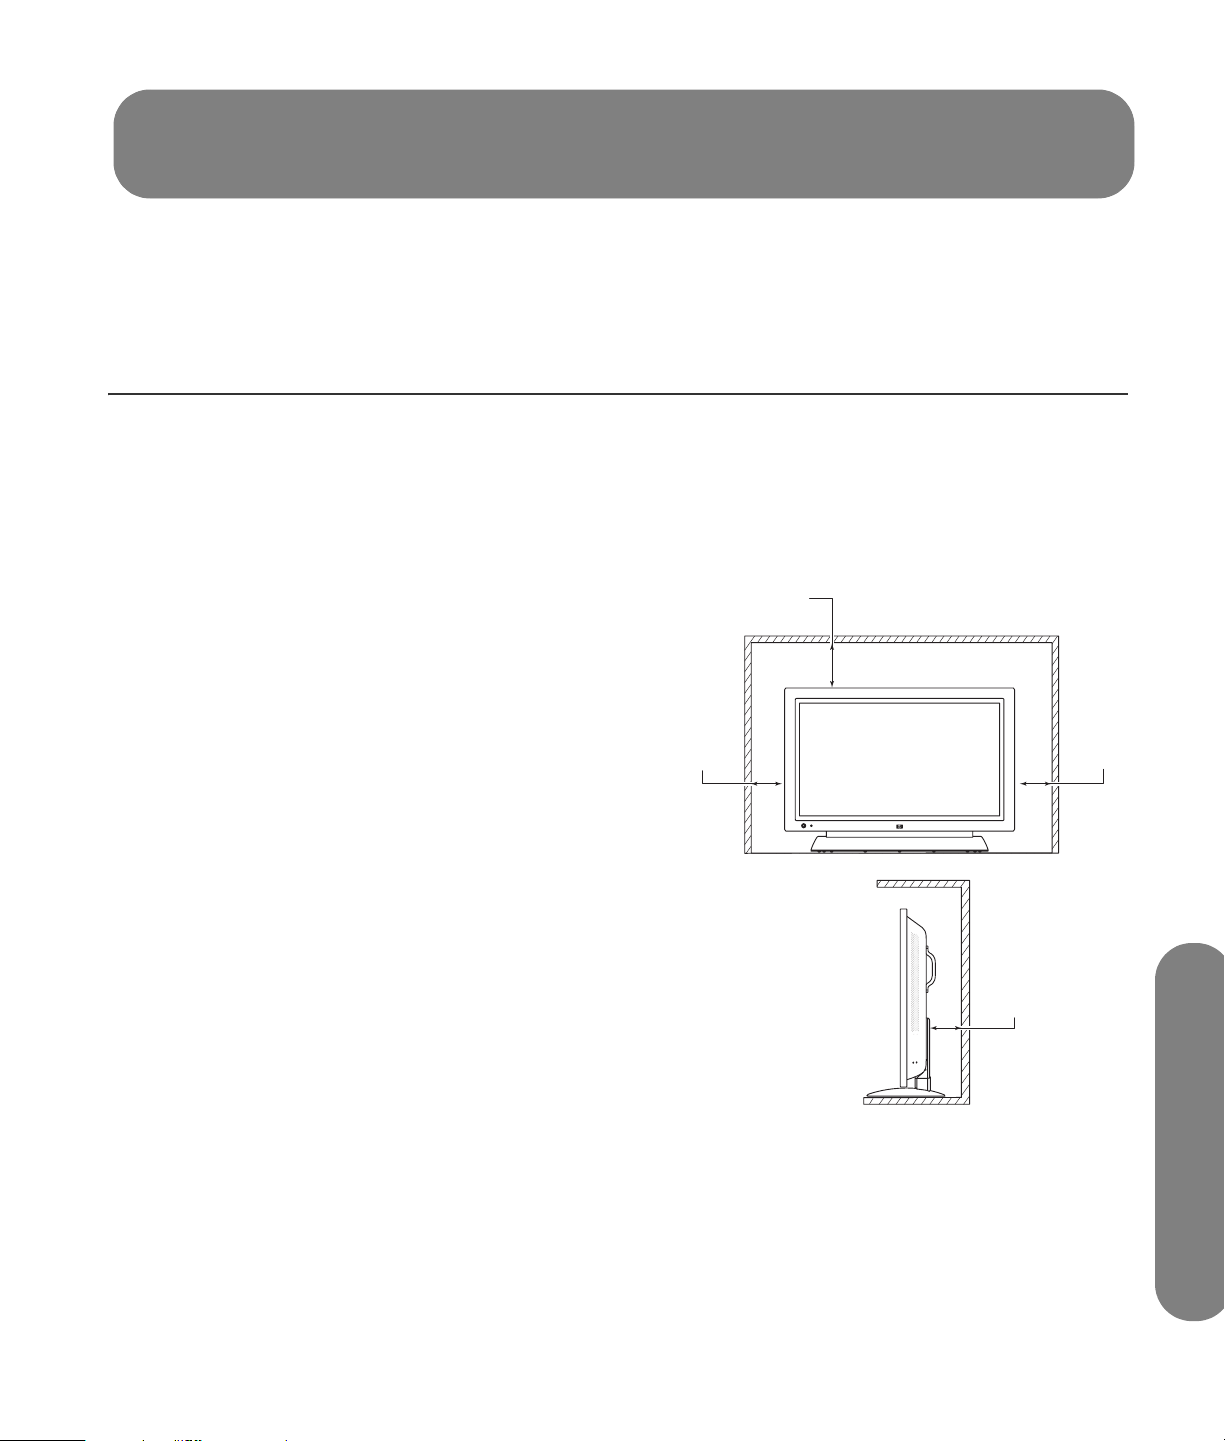
■ Provide adequate ventilation clearance around
the TV. If using the pedestal, leave a space of
3.96 inches (10 cm) or more at the top, left, and
right; 2.36 inches (6 cm) or more at the bottom;
and 2.76 inches (7 cm) or more at the rear. If
using some other method for setup, leave a space
■ “Important Information” on page viii
of 3.96 inches (10 cm) or more at the top, left,
right, and bottom; and 0.75 inches (1.9 cm) or
more at the rear.
A
B
C
A 4 in. (10 cm) minimum above TV
B 4 in. (10 cm) minimum at sides
C 2.8 in. (7 cm) minimum behind TV
Note: Speakers not shown.
B
Setting Up
Setting Up 7
Page 18
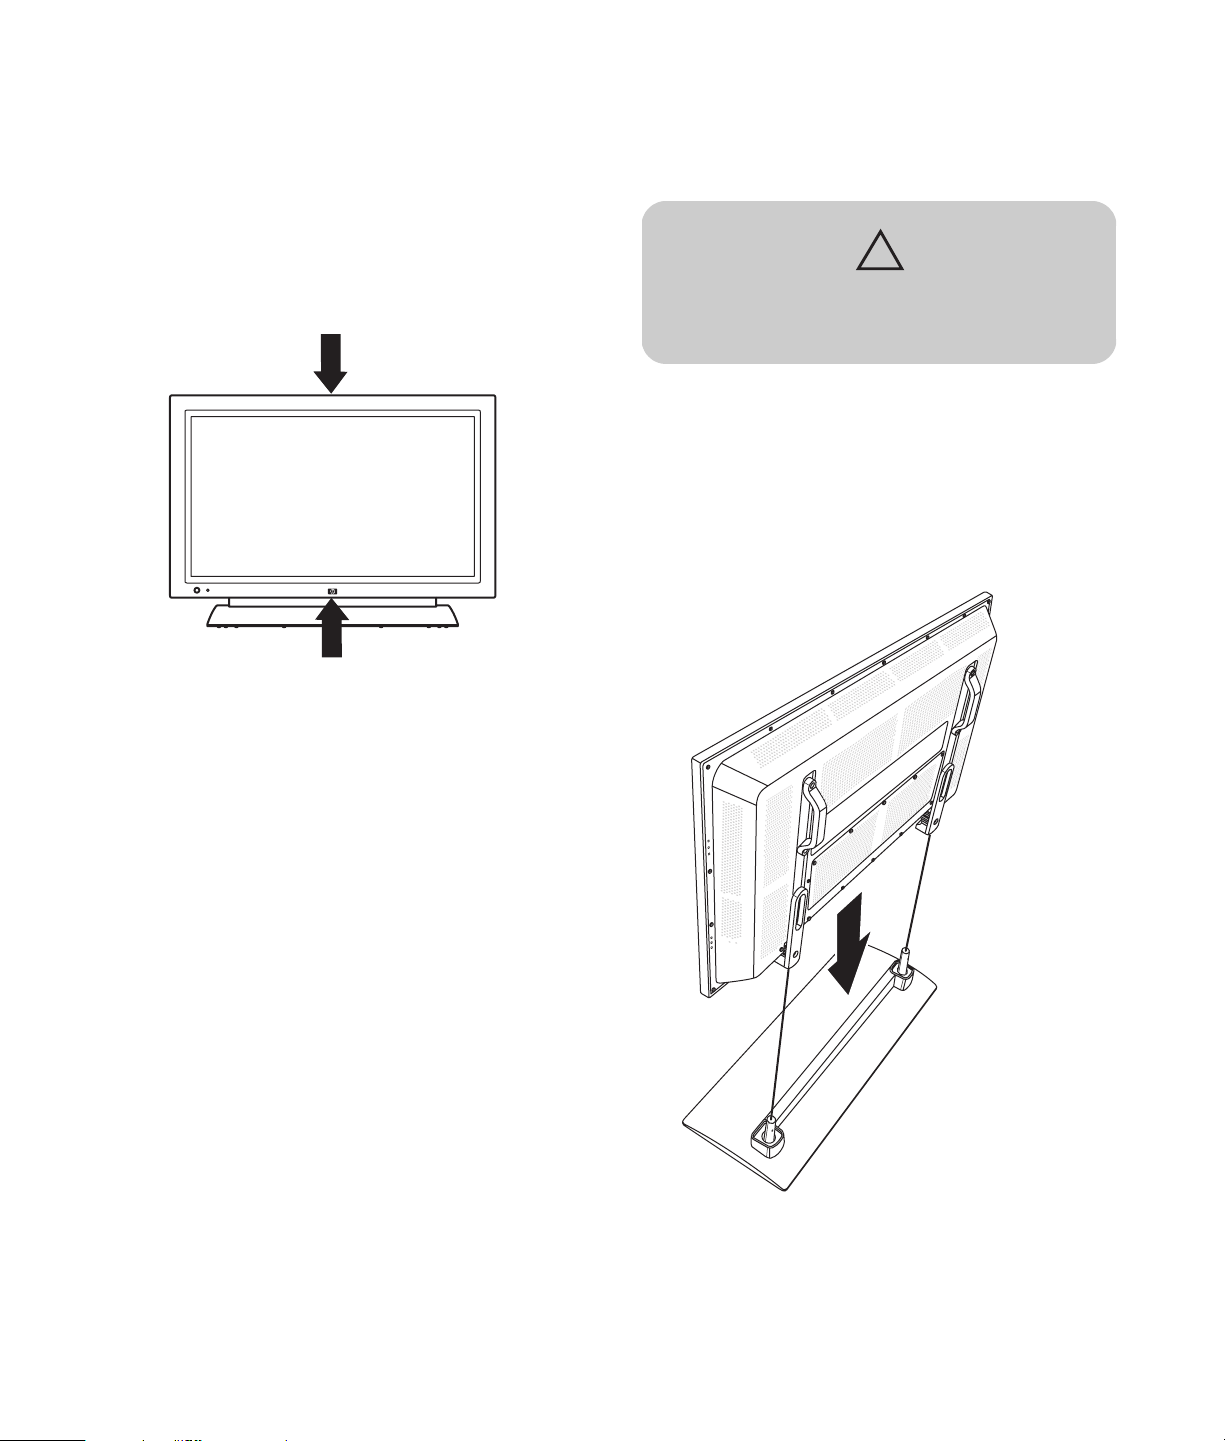
Lifting the TV
Attaching or removing the stand
The TV is heavy; be sure to use ergonomically correct
lifting procedures when moving the TV.
Due to the size and weight of the TV, it is
recommended that a minimum of two people move it.
To transport the TV, use the handles on the back of the
TV, or grasp the display in the area under and above
the screen.
If speakers are attached to the TV, do not lift the TV by
the speakers; instead, use the handles on the back of
the TV, or grasp the display in the area under and
above the screen.
Your TV comes with a stand that must be attached to
the display. Reverse these steps to remove the stand.
CAUTION: Use two people to assemble
the TV.
Before attaching the stand, unplug the AC cord from
the AC input.
1 Position the stand upright, with the back
toward you.
2 Gently lift the TV panel and lower it onto the
stand.
Move the product gently. Never place the TV with the
glass screen facing downward, unless it is protected
with pads.
8 HP Plasma HDTV User’s Guide
Page 19
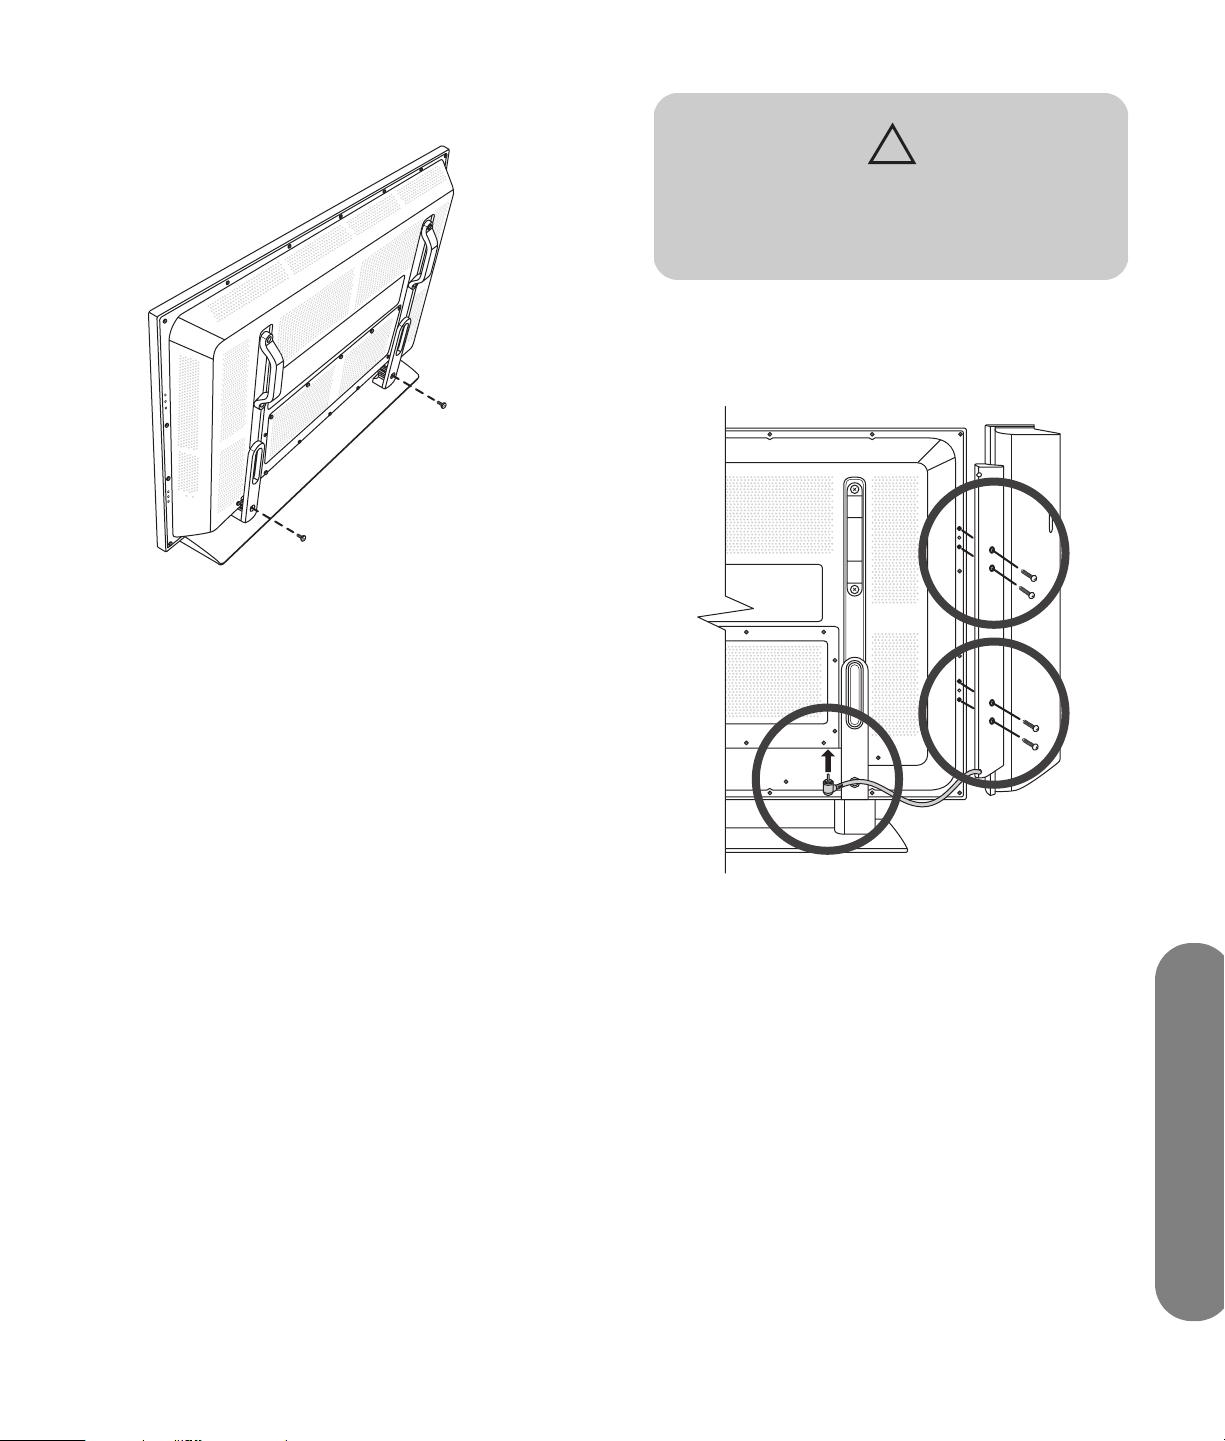
3
Insert the screws into the two holes on the back of
the TV and tighten the screws.
4 Attach speakers if you are using them. See
“Attaching and connecting the display speakers”
on page 9.
CAUTION: Unplug power for the TV and all
connected components before attaching or
connecting speakers.
1 Position the TV upright on its stand.
2 Place a speaker onto the TV, and insert the four
screws to secure it.
Setting Up the TV
Set up the TV by attaching and connecting the display
speakers, connecting cables, and connecting the
power cord.
Attaching and connecting the
display speakers
The speakers come detached from the TV. Each
speaker attaches to the side of the display and
connects individually to the TV. The right speaker is
on the right side of the display when it is viewed from
the front.
The TV has a digital audio output or analog audio
output that you can connect to a separate external
amplifier.
To use a separate external amplifier or a stereo system,
refer to “Connecting an external sound system” on
page 16.
3 Plug the speaker into the TV.
4 Repeat these steps for the other speaker.
Setting Up
Setting Up 9
Page 20

Connecting the TV signal sources
w
WARNING: Before connecting the TV to any
other electronic device, unplug the TV and
electronic device AC cords from the AC
input.
The following is an explanation of the types of
connections that are used for a coaxial cable. If your
outdoor antenna uses a 75-ohm coaxial cable with an
F-type connector, screw it onto the RF Input connector
at the rear of the TV set.
■ A 75-ohm system is generally a round cable with
an F-type connector that can easily be attached to
a connector without tools (sold separately).
■ A 300-ohm system is a flat, twin-lead cable that
can be attached to a 75-ohm connector through a
300/75-ohm adapter (sold separately).
Connect the input sources to the TV according to the
type of connection:
■ Antenna or basic cable (TV cable or satellite)
without using a set-top box: see “Connecting the
cable TV or the air broadcast antenna” on
page 11.
■ Cable or satellite with a separate set-top box: see
“Connecting cable or satellite with a set-top box”
on page 11.
n
■ To connect an external sound system, see
“Connecting an external sound system”
on page 16.
■ To connect a device that records TV, use
the Video Out and Audio Out connectors;
see “Connecting a VCR for recording” on
page 15.
n
An F-type connector should be fingertightened only. When connecting the RF
cable to the TV set, do not use tools to
tighten the F-type connector, as it may
cause damage to your TV set.
C
A
B
A 75-ohm coaxial cable, round
B 300-ohm twin-lead cable, flat
C F-type connector
About the Emergency Alert System (EAS)
■ In the case of a national emergency, natural
disaster, or other emergency situation, an EAS
message broadcasts. When this unit receives an
EAS message, if the level of emergency is
comparatively low, an alert text message displays
on screen. If the level of emergency is high, the
receiver is forced-tuned to a details channel.
■ Alert text messages display, and forced tuning
occurs, even during paid programming. Even
when forced tuning is active, the user can still
change the channel.
■ If the unit is forced-tuned to a channel that has
been blocked by Parental Control, the Parental
Control setting is given priority, and the EAS
message is not broadcast.
■ EAS messages may be broadcast not only through
digital cable, but also through analog cable or
over-the-air analog transmission.
10 HP Plasma HDTV User’s Guide
Page 21
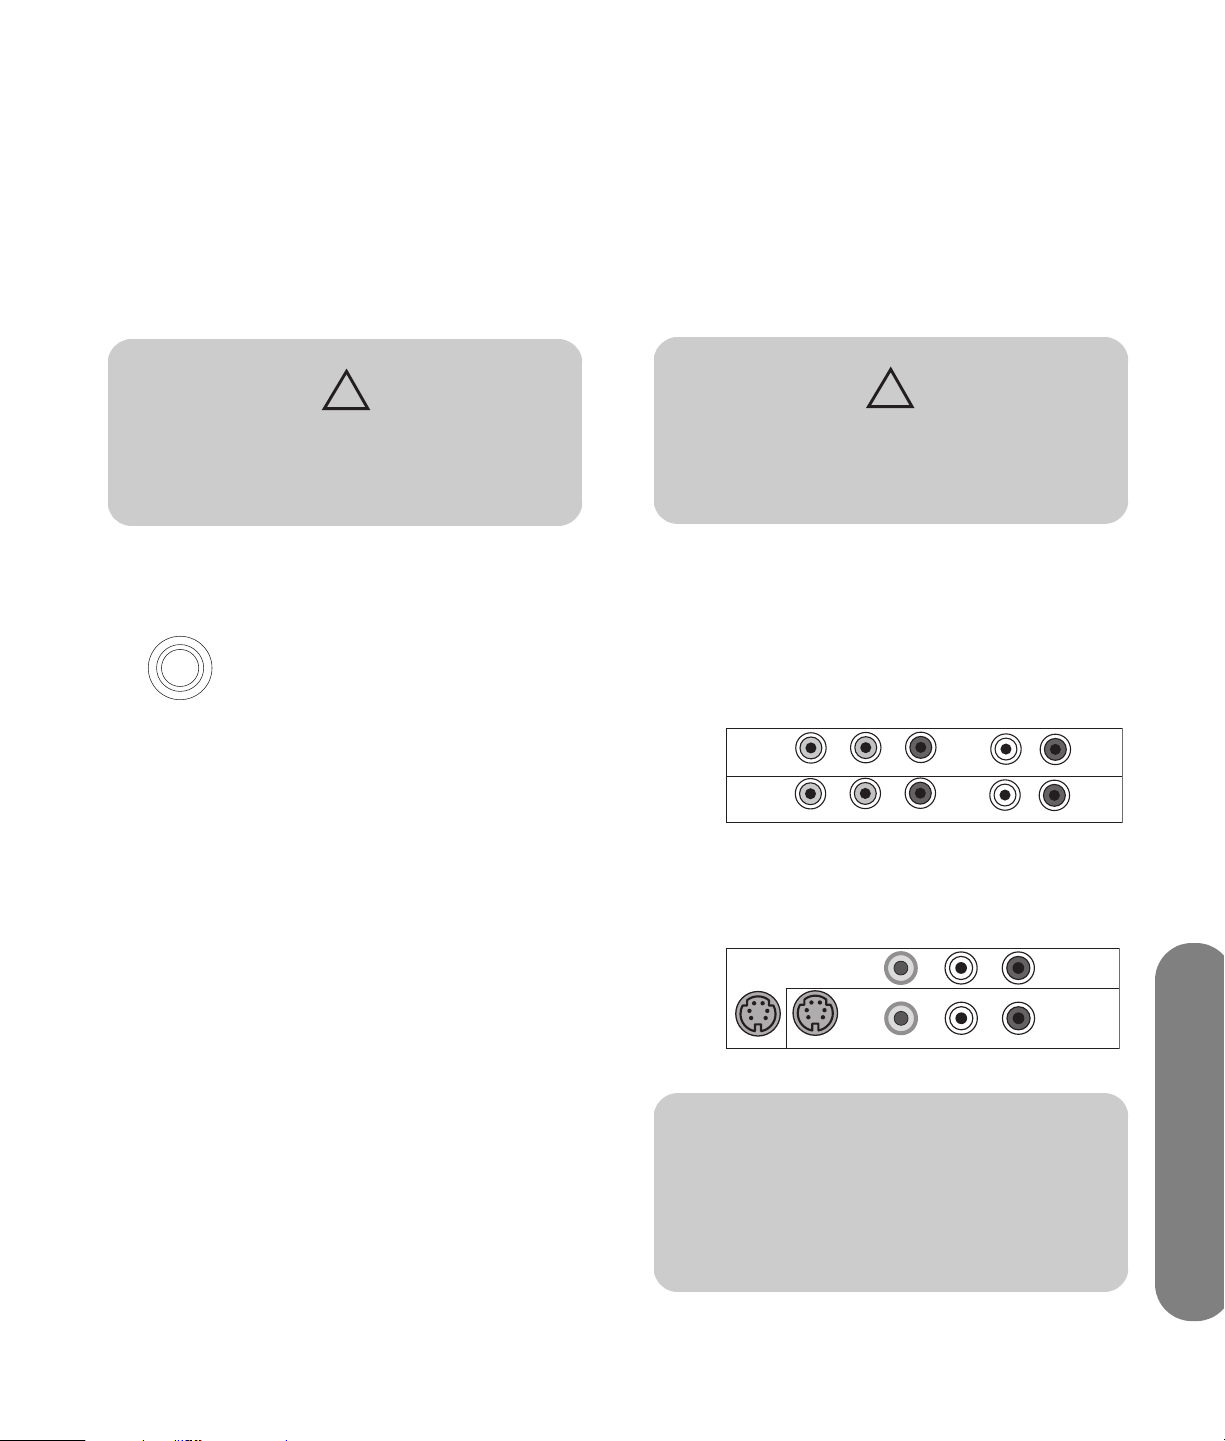
Connecting the cable TV or the
air broadcast antenna
Use standard 75-ohm coaxial cable to connect a
ground antenna or cable TV input source to the TV. Use
shielded coaxial cable to reduce radio frequency (RF)
interference.
Optional equipment, cable TV service, and all cables
are sold separately.
■ Video (composite video) and audio cables
connected to Video 1 In or Video 2 In and audio
connectors on the TV.
■ HDMI cable connected to the HDMI connector on
the TV.
■ DVI video cable with a DVI-to-HDMI converter
cable and audio cables connected to the HDMI
connector and PC/DVI Audio In connector on
the TV.
CAUTION: Unplug power for the TV and all
connected components before connecting
the antenna or cable.
1 Connect the input source coaxial cable to the
RF Input connector on the back of the TV.
RF INPUT
2 Connect power to the TV; see “Connecting power
to the TV” on page 16.
3 Turn on the TV; see “Turning the TV On and Off
(Standby)” on page 17.
Connecting cable or satellite
with a set-top box
Connecting your TV directly to the audio and video
output of your set-top box assures a more vivid picture
and enhances your viewing enjoyment.
Optional equipment and all cables are sold separately.
You can connect a digital TV set-top box (air or cable)
and other audiovisual equipment by using:
CAUTION: Unplug power for the TV and all
connected components before connecting
the set-top box.
1 Connect the set-top box input source cable(s) to
the back of the TV using one of the connector sets:
■ Component video and audio cables
connected to Component 1 and Comp 1
Audio In connectors, or Component 2 and
Comp 2 Audio In connectors on the TV.
COMPONENT 1
Y PR/CR
PB/CB
COMPONENT 2
PR/CRY
PB/CB L/MONO
■ S-video and audio cables connected to
L/MONO
S-video 1 and Video 1 Audio In connectors, or
S-video 2 and Video 2 Audio In connectors on
the TV.
S-VIDEO 1 S-VIDEO 2
VIDEO 1 IN
VIDEO 2 IN
L
L/MONO
R
R
COMP 1
AUDIO IN
R
COMP 2
AUDIO IN
R
VIDEO 1 AUDIO IN
VIDEO 2 AUDIO IN
■ Component video and audio cables connected to
Component 1 or Component 2 connectors and
audio connectors on the TV.
■ S-video and audio cables connected to S-video 1
or S-video 2 connectors and audio connectors on
the TV.
!
The S-video and Video In connectors share
the audio connectors in the set. Do not
connect video cables to both the S-video
and the Video In connectors in a set.
Setting Up 11
Setting Up
Page 22
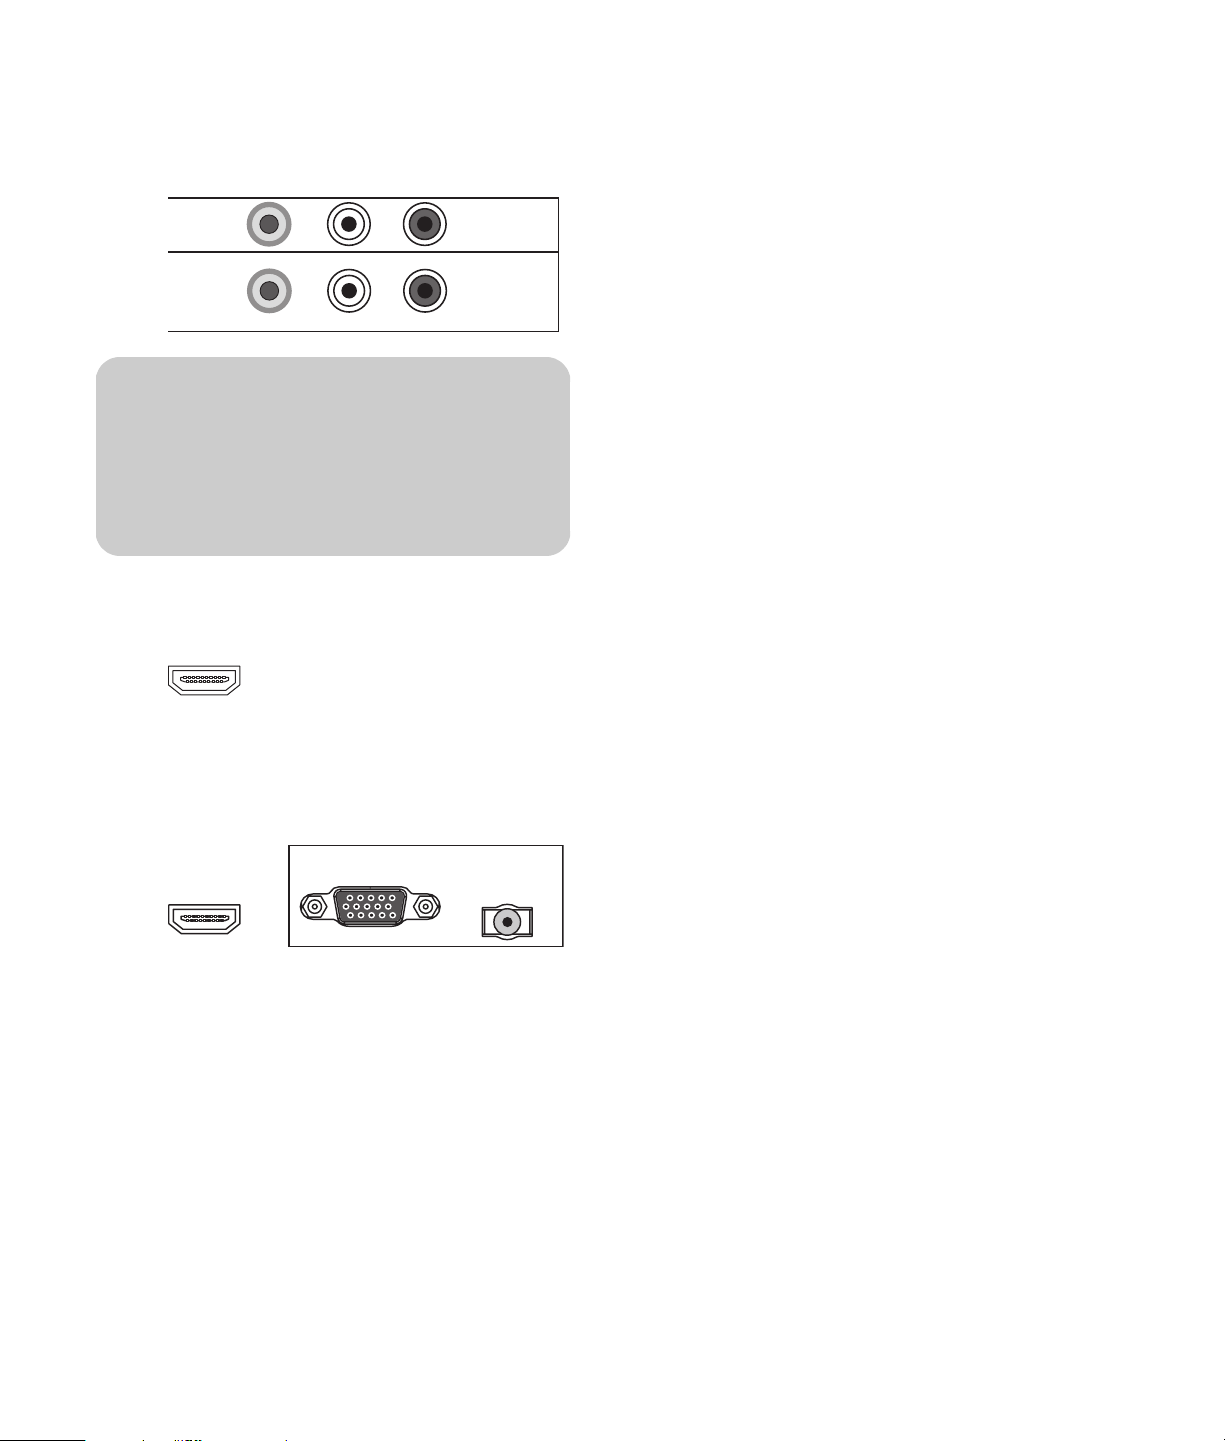
■ Video (composite video) and audio cables
connected to Video 1 In and Video 1 Audio In
connectors, or Video 2 In and Video 2 Audio
In connectors on the TV.
Connecting a DVD player, VCR,
DVR, game console, or
camcorder
VIDEO 1 IN
VIDEO 2 IN
L
L/MONO
R
VIDEO 1 AUDIO IN
VIDEO 2 AUDIO IN
R
!
The S-video and Video In connectors share
the audio connectors in the set. Do not
connect video cables to both the S-video
and the Video In connectors in a set.
■ HDMI cable connected to the HDMI connector
on the TV.
HDMI
■ DVI video cable with a DVI-to-HDMI converter
cable and an audio cable connected to the
HDMI connector and the PC/DVI Audio In
connector on the TV.
HDMI
PC
PC/DVI AUDIO IN
You can connect optional equipment (sold separately),
such as a DVD player, VCR, DVR, and so on, to the TV
by using the AV input connectors.
Optional equipment, including an external sound
system, and all cables are sold separately.
You can connect a DVD by using:
■ Component video and audio cables connected to
Component 1 or Component 2 connectors and
audio connectors on the TV.
■ S-video and audio cables connected to S-video 1
or S-video 2 connectors and audio connectors on
the TV.
■ Video (composite video) and audio cables
connected to Video 1 In or Video 2 In and audio
connectors on the TV.
■ HDMI cable connected to the HDMI connector on
the TV.
■ DVI video cable with a DVI-to-HDMI converter
cable and audio cables connected to the HDMI
connector and PC/DVI Audio In connector on
the TV.
You can connect a VCR by using either S-video or
Video (composite video) connections for playback,
and by using Video Out (composite video) connectors
for recording (input to the VCR). See “Connecting a
VCR for recording” on page 15 to use the Video Out
connectors.
2 Connect the cables to the set-top box.
3 Turn on the set-top box.
4 Connect power to the TV; see “Connecting power
to the TV” on page 16.
5 Turn on the TV; see “Turning the TV On and Off
(Standby)” on page 17.
12 HP Plasma HDTV User’s Guide
You can connect a game console, camcorder, and
some other AV equipment by using either S-video or
Video (composite video) connections.
You can connect HDMI equipment by using the HDMI
connector.
You can connect DVI equipment by using a DVI cable
with a DVI-to-HDMI converter cable and audio cables,
and the HDMI connector and the PC/DVI Audio
connector.
Page 23
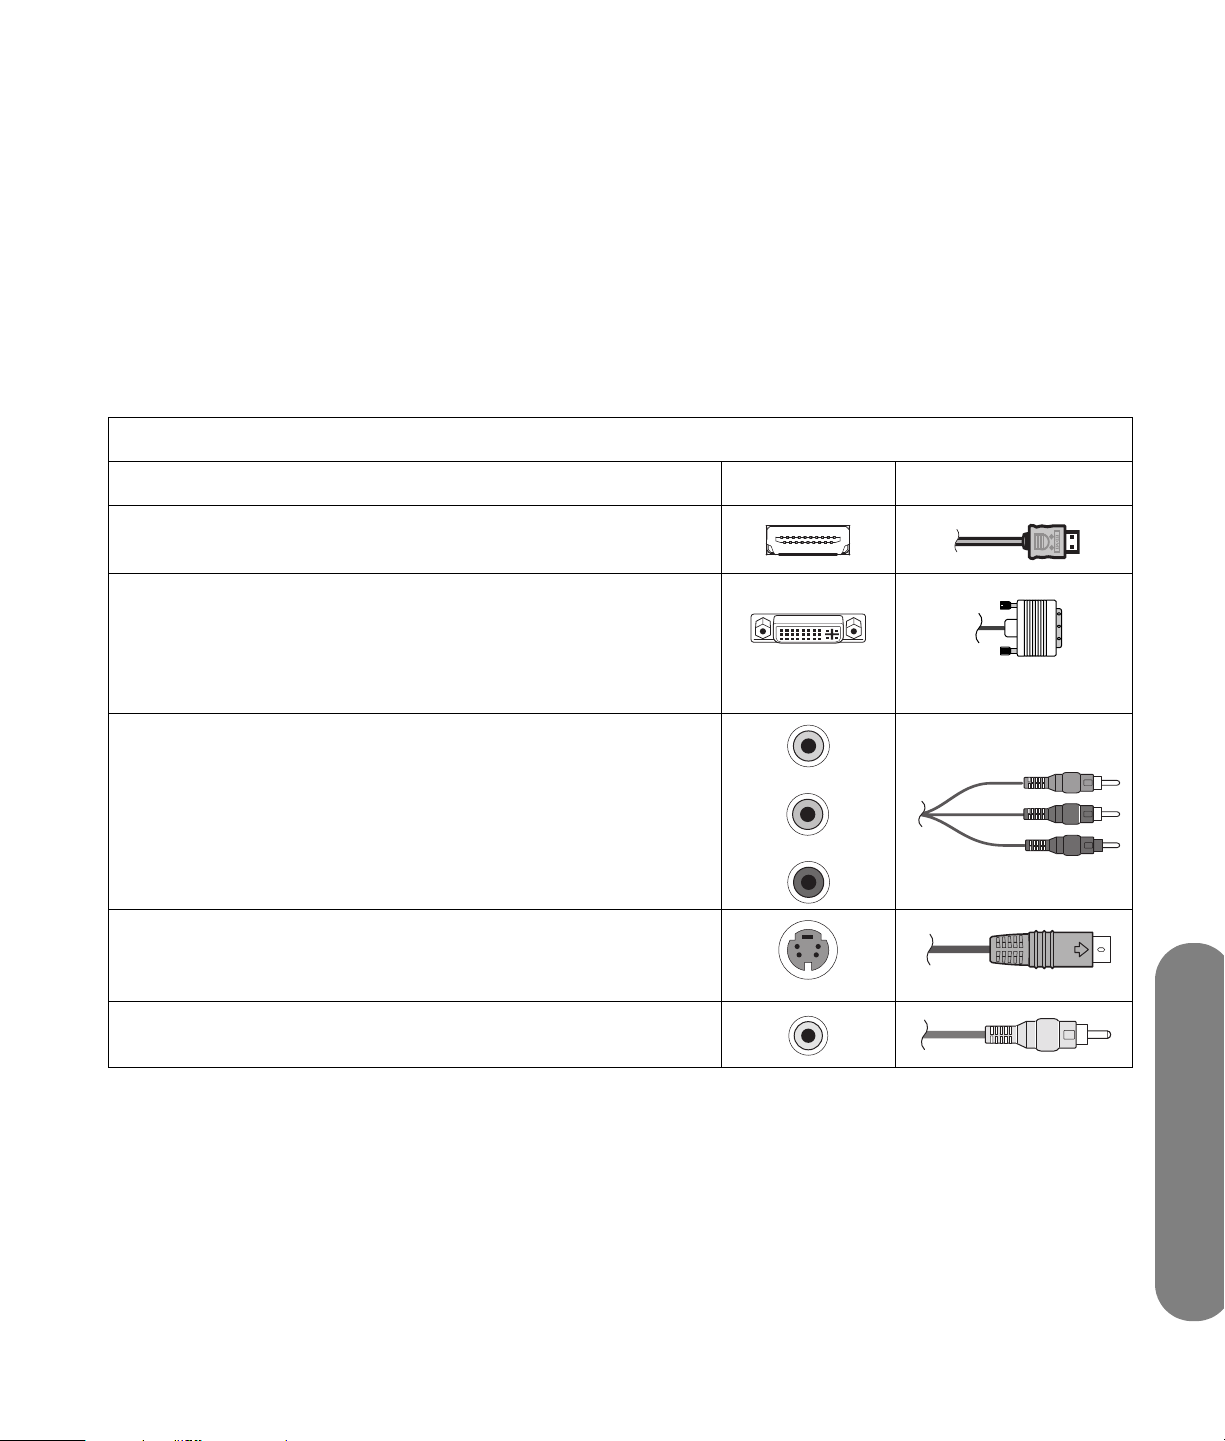
Choosing the AV connection to use
When connecting optional equipment as signal
sources, the connectors on the equipment may limit the
type of connection you can use.
When your optional equipment has more than one
type of output connector, choose the connection that
provides the best quality play-back image.
For best results, choose the best quality connection
type that is supported by your optional equipment.
The following table lists the available optional AV
equipment connections on the TV.
AV connection to use, listed from best to good video playback
Connection description TV connector Cable plug
HDMI transmits an all-digital signal and is the recommended
choice for playback from a digital DVD or DVR.
DVI transmits an all-digital video signal for playback from a digital
DVD or DVR. (For a DVI device, you must use a DVI cable with an
DVI-to-HDMI converter cable to connect video to the TV HDMI
connector, and an audio cable to connect audio to the TV PC/DVI
Audio In connector.)
Component video (Y, Pb, Pr) transmits video as separate red,
green, and blue signals. Use this connection for high-definition
video signals in 480i, 480p, 720p, or 1080i format from a DVD
or other equipment.
S-video transmits video in separate color and black-and-white
image signals and delivers a sharper image than a composite
video connection.
Video In (composite video) transmits video as a single signal.
The procedures that follow, presented in the order
listed in the table, describe connecting optional
equipment including the audio connections when
applicable.
Setting Up
Setting Up 13
Page 24
CAUTION: Unplug power for the TV and all
connected components before connecting
optional equipment. Ensure that the
optional equipment is powered off.
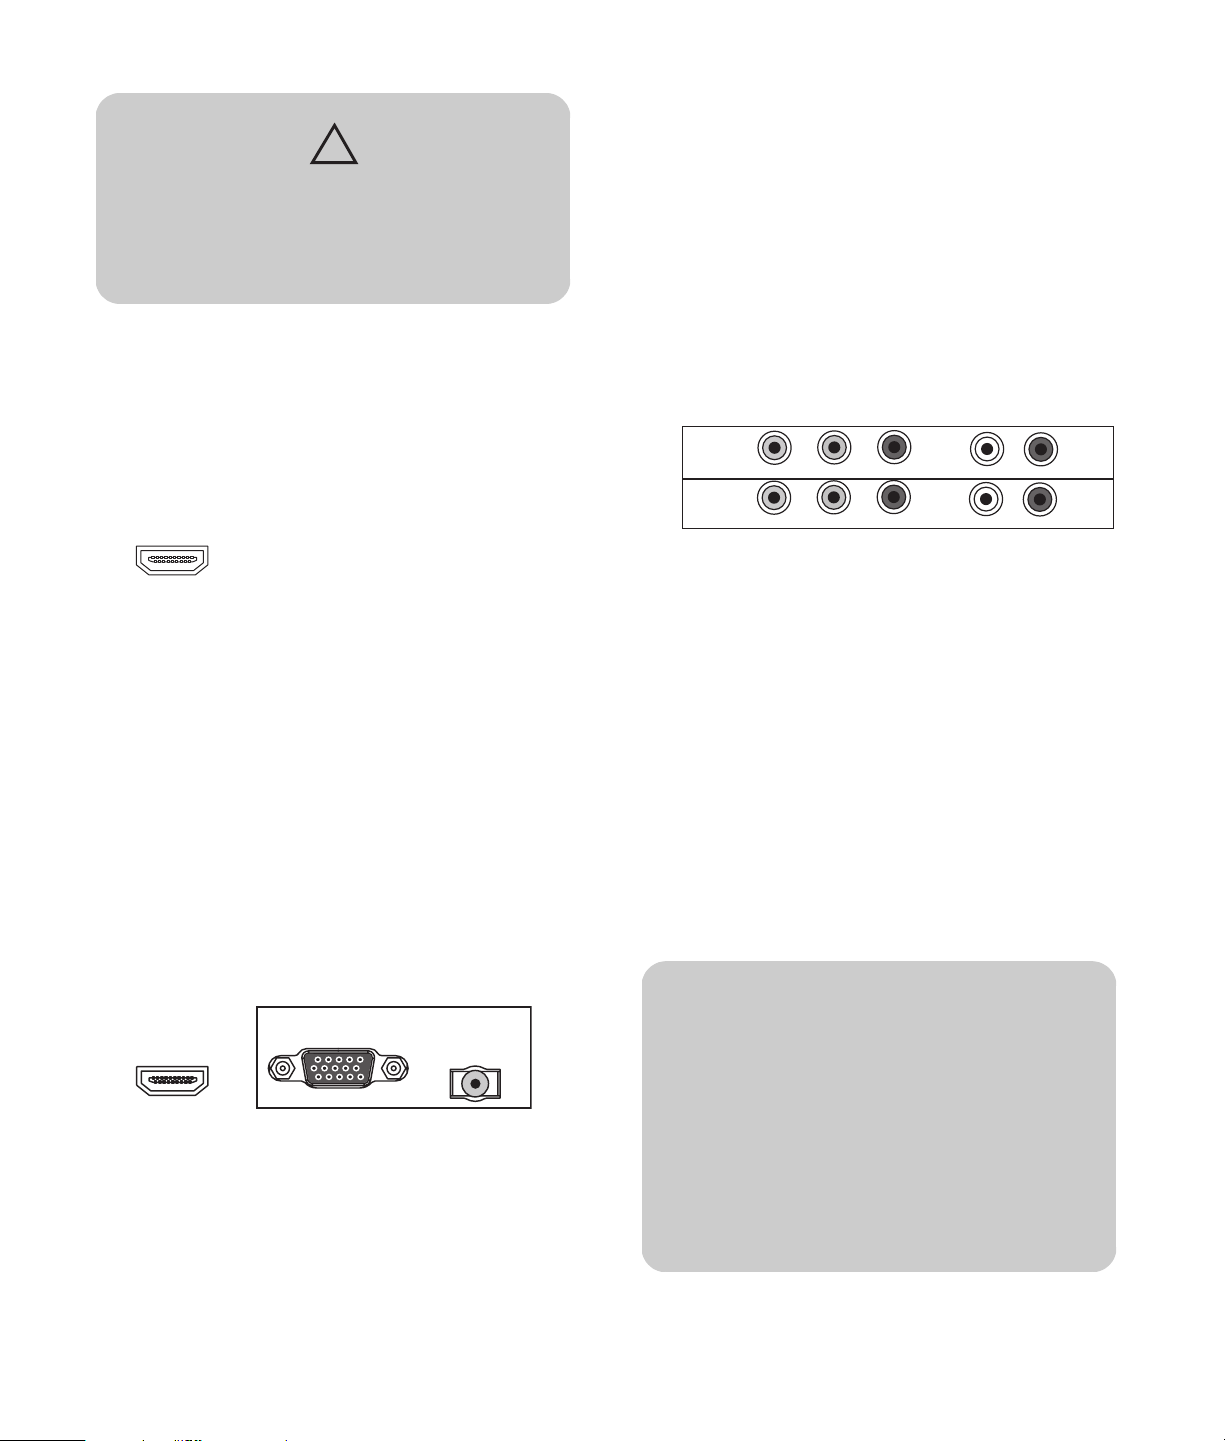
Connecting an HDMI device
This is the recommended connection for video and
audio. The HDMI cable is sold separately.
4 Connect power to the TV; see “Connecting power
to the TV” on page 16.
5 Turn on the TV; see “Turning the TV On and Off
(Standby)” on page 17.
Connecting a component device
1 Connect the component cable to the Component
In (Y, Pb, Pr) connectors. There are two sets of
component connectors you can use: Component 1
video used with Comp 1 Audio In connectors, or
Component 2 video used with Comp 2 Audio In
connectors.
1 Connect the HDMI cable to HDMI on the back
of the TV. (There are no separate audio inputs
for HDMI.)
HDMI
2 Connect the cable to the HDMI device.
3 Turn on the device, and start play.
4 Connect power to the TV; see “Connecting power
to the TV” on page 16.
5 Turn on the TV; see “Turning the TV On and Off
(Standby)” on page 17.
Connecting a DVI device
The DVI cable, DVI-to-HDMI converter cable, and the
audio cable are sold separately.
1 Connect the DVI cable and the DVI-to-HDMI
converter cable to the DVI-I device and then to the
TV HDMI connector.
HDMI
PC
PC/DVI AUDIO IN
2 Connect the audio cable to the DVI device and to
the TV PC/DVI Audio In connector.
3 Turn on the device, and start play.
COMPONENT 1
COMPONENT 2
Y PR/CR
PB/CB
PB/CB L/MONO
PR/CRY
L/MONO
COMP 1
AUDIO IN
R
COMP 2
AUDIO IN
R
2 Connect the component audio cable to the L/R
Audio In connectors on the TV.
3 Connect the cables to the device.
4 Turn on the device, and start play.
5 Connect power to the TV; see “Connecting power
to the TV” on page 16.
6 Turn on the TV; see “Turning the TV On and Off
(Standby)” on page 17.
Connecting an S-video or Video device
A VCR, game console, camcorder, or some other
audiovisual equipment can be connected using S-video
or Video (composite video) In connectors.
!
Both S-video and Video In connectors share
L/R Audio In connectors. (S-video 1 and
Video 1 In share Video 1 Audio In
connectors; S-video 2 and Video 2 In share
Video 2 Audio In connectors.)
Do not connect video cables to both the
S-video and the Video In connectors in
aset.
14 HP Plasma HDTV User’s Guide
Page 25
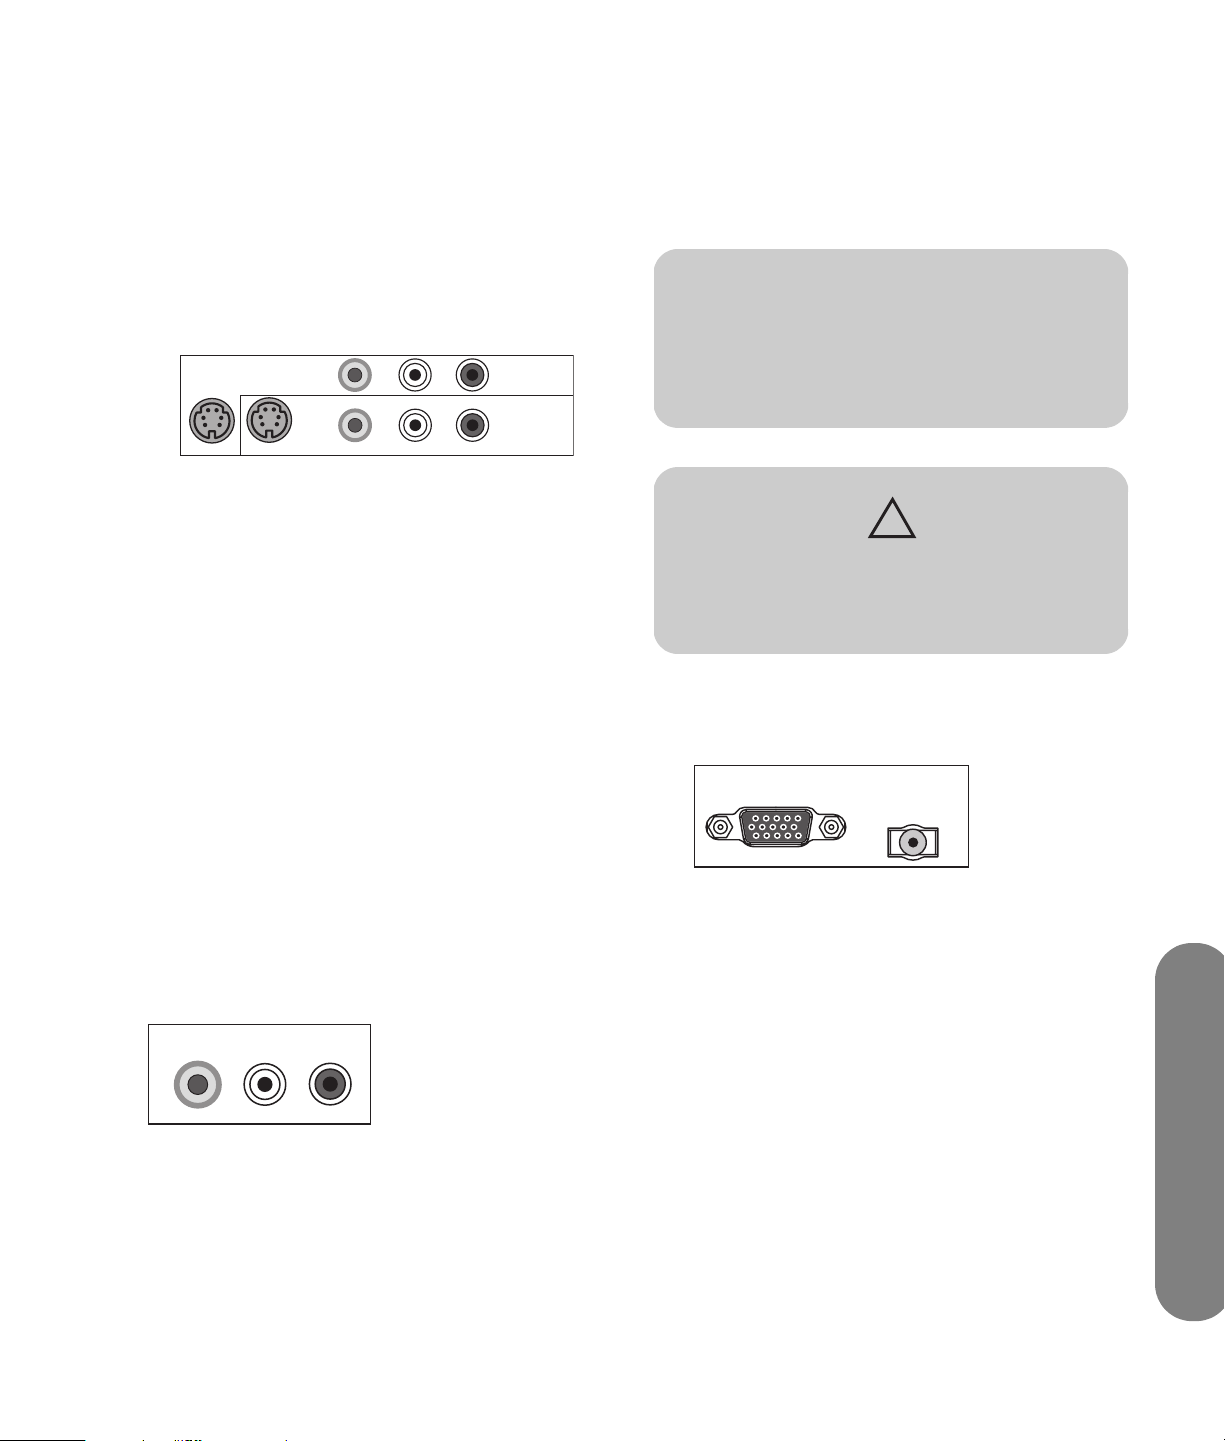
1
Connect the video equipment to the TV
connectors:
■ For a VCR, DVR, or other device that has an
S-video connector, use an S-video cable with
the S-video connector set.
Or
■ For a VCR, DVR, or other device that has a
composite connector, use a composite cable
with the Video In connector set.
S-VIDEO 1 S-VIDEO 2
VIDEO 1 IN
VIDEO 2 IN
L
L/MONO
R
VIDEO 1 AUDIO IN
VIDEO 2 AUDIO IN
R
2 Connect the audio cable connectors to the left and
right audio connectors for the connector set.
3 Connect the cables to the device.
4 Turn on the device, and start play.
5 Connect power to the TV; see “Connecting power
to the TV” on page 16.
Connecting a PC
Use these instructions when connecting a PC or other
source equipment to the TV PC (VGA) connector to
view the PC desktop as a selectable input source. VGA
cable sold separately.
n
Refer to “PC Compatibility Chart” on
page 48 for a list of PC signals compatible
with the TV.
CAUTION: Unplug power for the TV and all
connected components before connecting a
PC. Ensure that the PC is powered off.
6 Turn on the TV; see “Turning the TV On and Off
(Standby)” on page 17.
Connecting a VCR for recording
Every source signal is converted to 480i prior to output
at the Video Out connector.
1 Connect the VCR output for playback using the TV
connectors; see the previous procedures.
2 Connect the VCR for recording by connecting the
input to the VCR to the Video Out and Audio Out
connectors on the TV.
L/MONO
VIDEO OUT
AUDIO OUT
3 Connect power to the TV; see “Connecting power
to the TV” on page 16.
4 Turn on the TV; see “Turning the TV On and Off
(Standby)” on page 17.
R
1 Connect the PC or source equipment video cable
to the TV by using the PC connector (a VGA
connector).
PC
PC/DVI AUDIO IN
2 Connect the source equipment audio cable to the
TV PC/DVI Audio In connector.
3 Connect the VGA and audio cables to the PC or
source equipment.
4 Connect power to the TV; see “Connecting power
to the TV” on page 16.
Setting Up
Setting Up 15
Page 26
5 Turn on the TV; see “Turning the TV On and Off
(Standby)” on page 17.
6 Connect the power, and turn on the PC or source
equipment.
7 Adjust the picture, including Auto Sync, by using
the onscreen display Picture/Screen menu; see
“Adjusting the PC Screen image” on page 29.
You can also press the OK button on the TV to
start Auto Sync for the PC image.
Connecting an external sound
system
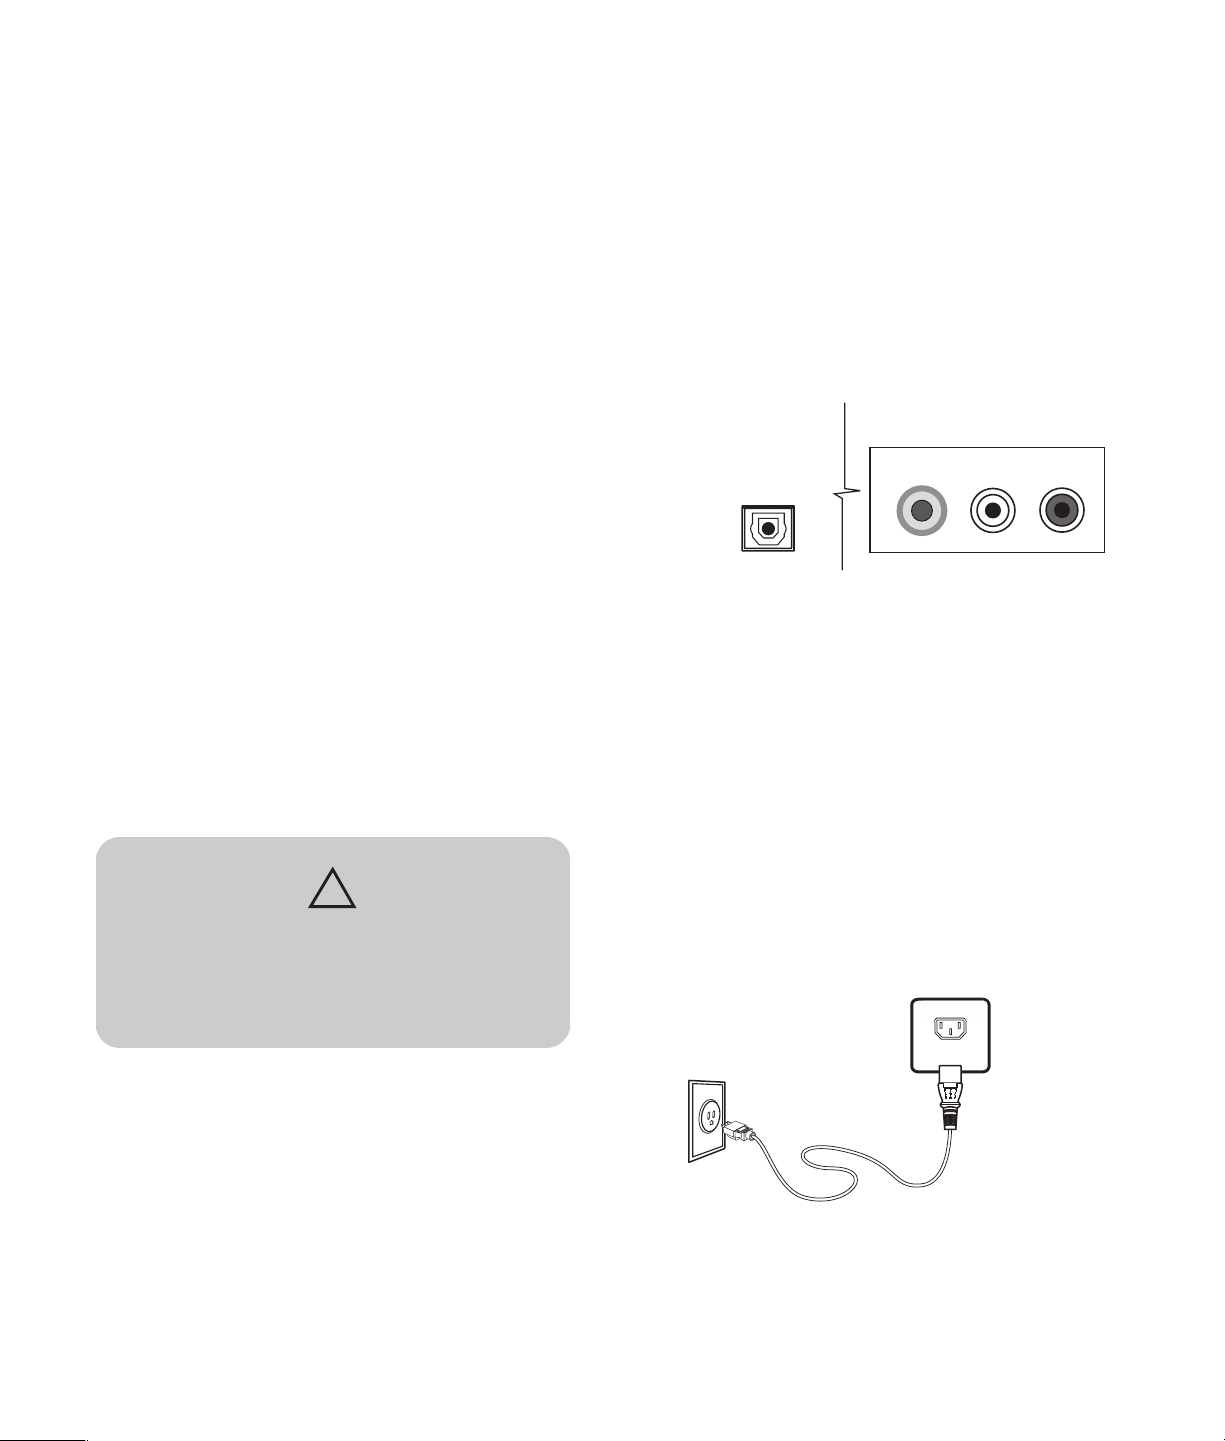
1 Connect the external sound system to the TV:
■ For digital connection, connect an optical
audio cable to the Digital Audio Output
connector on the back of the TV and to the
external sound system, such as a digital
receiver or a surround sound system.
Or
■ For analog connection, connect an audio
cable to the Audio Out connectors on the back
of the TV and to the external sound system,
such as an analog amplifier or stereo system.
You can connect an external sound system to the TV
using a digital audio or an analog audio signal:
■ Use an optical audio cable and the Digital Audio
Output connector on the back of the TV to provide
a digital audio signal to an external sound system,
such as a digital receiver or a surround sound
system. To hear analog sound from an analog
source on your digital audio system, you must
connect the Audio Out left and right connectors on
the TV to your sound system.
■ Use an audio cable and the Audio Out connectors
on the back of the TV to provide an analog audio
signal to an external sound system, such as an
analog amplifier or stereo system.
CAUTION: Unplug power for the TV and all
connected components before connecting
an external sound system. Ensure that the
external sound system is powered off.
DIGITAL AUDIO OUT
VIDEO OUT
L/MONO
AUDIO OUT
R
2 Connect power to the TV; see “Connecting power
to the TV” on page 16.
3 Turn on the TV; see “Turning the TV On and Off
(Standby)” on page 17.
4 Connect power and turn on the external sound
system.
5 Define the digital audio format in the onscreen
display Audio/Digital Audio menu; refer to
“Choosing the Digital Audio mode” on page 30.
Connecting power to the TV
1 Connect the power cord to the connector on the
back of the TV.
AC IN
100-240V~50/60Hz
16 HP Plasma HDTV User’s Guide
2 Connect the power cord to the AC power outlet.
Page 27
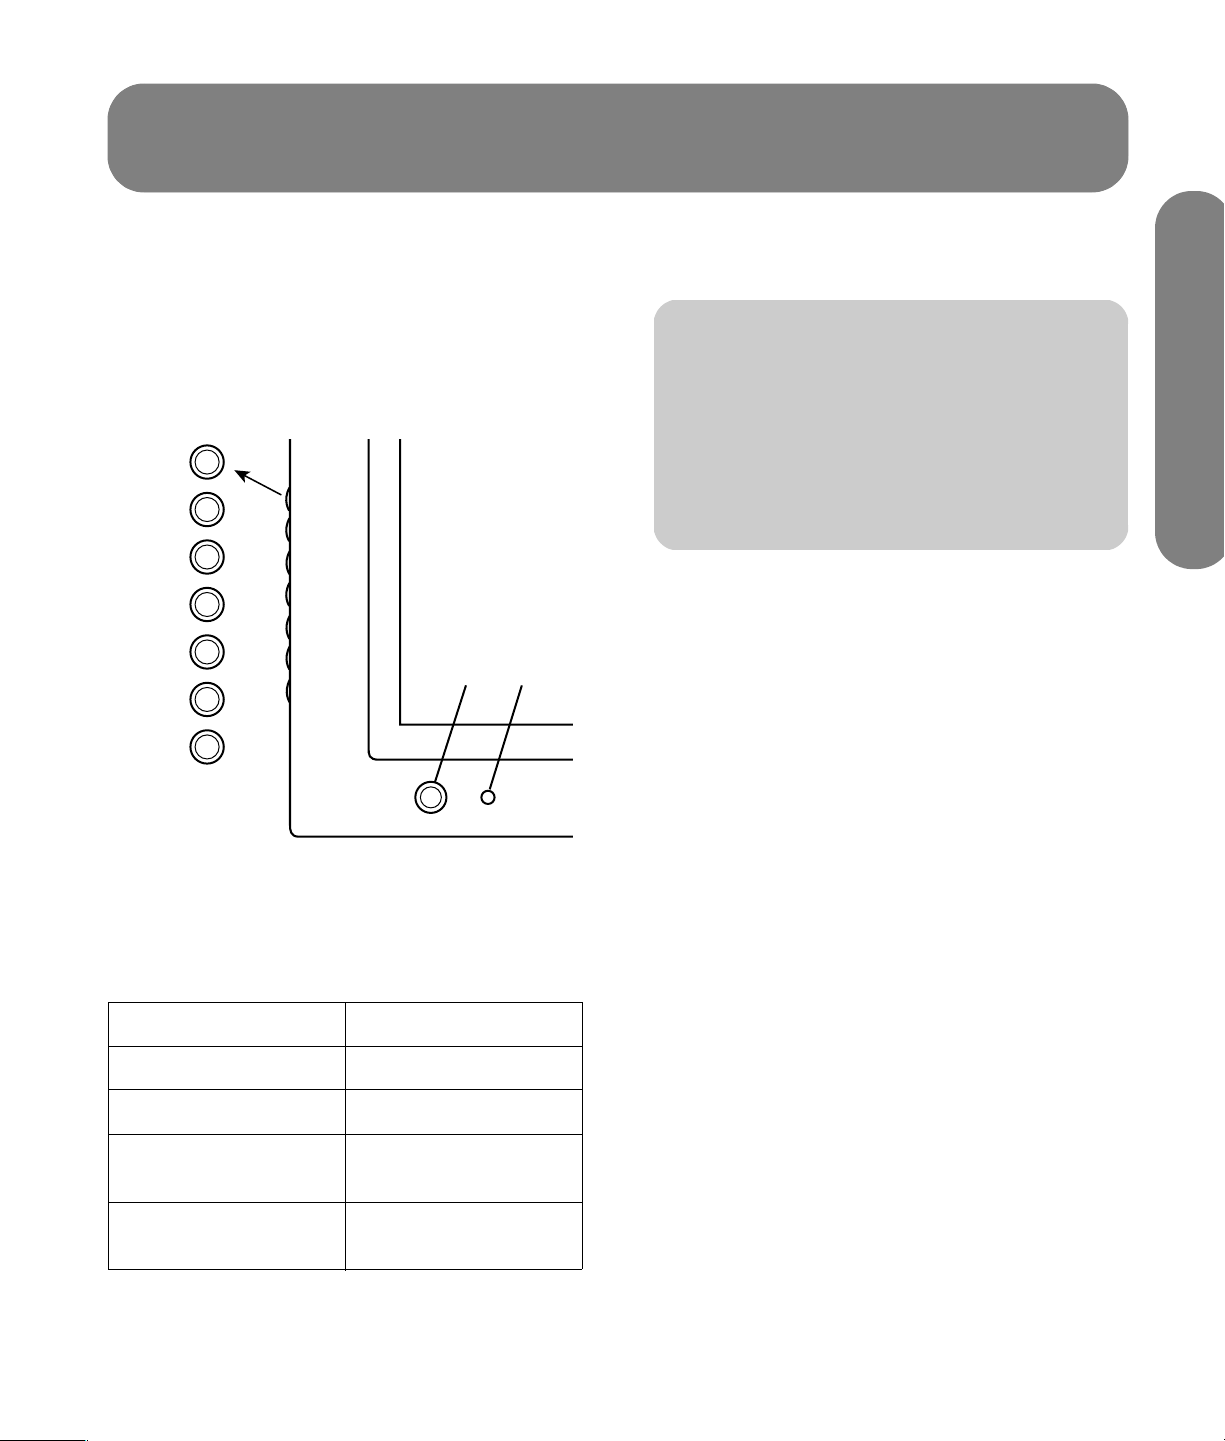
Turning On the TV
Turning the TV On and Off (Standby)
The TV has a Power button (A) on the front of the
display. You can also use the remote control Power
button to turn on the TV.
Pressing the Power button either turns the TV on or
places it into standby, which is a reduced power state.
MENU
OK
+
VOL
–
The initial setup starts when the TV powers
on for the first time. If the TV has been
turned on before, the Setup Wizard does
not start. See “Starting the Setup Wizard”
on page 40 to start the Setup Wizard from
the System menu.
After the initial setup, the power-up time from standby
depends on the Standby Mode setting:
n
Turning On the TV
+
A
CH
–
SRC
A Power button and light
B Remote control sensor
The Power button includes an indicator light, which
shows the power status of the TV.
Power indicator Power status
Lights red Standby (off)
Lights blue Ready (on)
Off AC power
disconnected
B
■ Low power, which consumes less power while in
standby, uses approximately 20 seconds of
power-up time.
■ Fast power, which consumes more power while in
standby, uses approximately 5 seconds of powerup time.
You can set the Standby Mode by using the
System menu.
If the TV is not used for an extended period of time,
press the Power button to place the TV into standby,
and then unplug the power cord.
Using the TV buttons
1 Press the Power button (A) on the front of the TV.
The TV is on or in standby.
2 Press SRC button to open the list of input sources.
Press CH+ to select the input source to view, and
press OK. Press SRC to close the list.
Flashing red or
flashing blue
Start up diagnostics or
error
Turning On the TV 17
Page 28

Using the remote control buttons
1 Point the remote control at the remote control
sensor on the display, and press the remote
control Power button.
The TV is on or in standby.
2 Press the Source button on the remote control to
open a list of the input sources. Press an arrow
button to select the input source to view, and press
OK. Press Source to close the list.
n
Image retention protection: If still image
data displays for more than a few minutes,
the image retention prevention function
activates automatically to protect the
screen. If the image disappears, change the
image or change the input source to see an
image.
18 HP Plasma HDTV User’s Guide
Page 29

Using the First-Time Setup Wizard
Initial Setup
When turning on the TV for the first time, a first-time
setup wizard walks you through the following:
■ Setting the onscreen display language.
■ Setting the date, time, and time zone.
■ Selecting a standby power mode.
■ Selecting a signal source.
■ Searching the TV signal source (antenna or cable)
and memorizing the available TV channels.
You can start the first-time setup wizard by using the
System menu in the onscreen display (OSD); see
“Starting the Setup Wizard” on page 40.
Preparing
Perform the following steps before you press TV Power
on the remote control unit.
1 Insert the batteries into the remote control unit.
2 Connect the antenna cable to the TV.
3 Plug in the AC cord to the AC outlet.
4 Turn on the TV.
Language setting
1 Select from among three languages: English,
French, and Spanish.
2 Press the up arrow and down arrow buttons on the
remote control to select the desired language
listed on the screen, and then press OK.
Date, time, and time zone setting
1 Press the up and down arrow buttons on the
remote control to highlight the date field.
2 Press the number pad buttons on the remote
control to enter a year, month, and day.
3 Press the down arrow button to highlight the
time zone.
4 Press the left and right arrow buttons to change
the time zone.
5 Press the down button to highlight the time field,
and use the number pad to enter the time.
6 Use the left and down arrow buttons to change
between AM and PM.
Standby mode setting
Select the standby mode setting.
■ Low power: Power-up time from standby is
approximately 20 seconds. However, the TV is
consuming less power while in standby.
■ Fast power: Power-up time from standby is
approximately 5 seconds. However, the TV
consumes more power while in standby.
Using the First-Time Setup Wizard
Signal source setting
1 Press the up arrow and down arrow buttons on the
remote control to select Antenna or Cable.
2 Press the OK button to start searching for
channels.
This channel search operation automatically searches
for a signal from all available channels.
Using the First-Time Setup Wizard 19
Page 30

20 HP Plasma HDTV User’s Guide
Page 31
Using the Remote Control
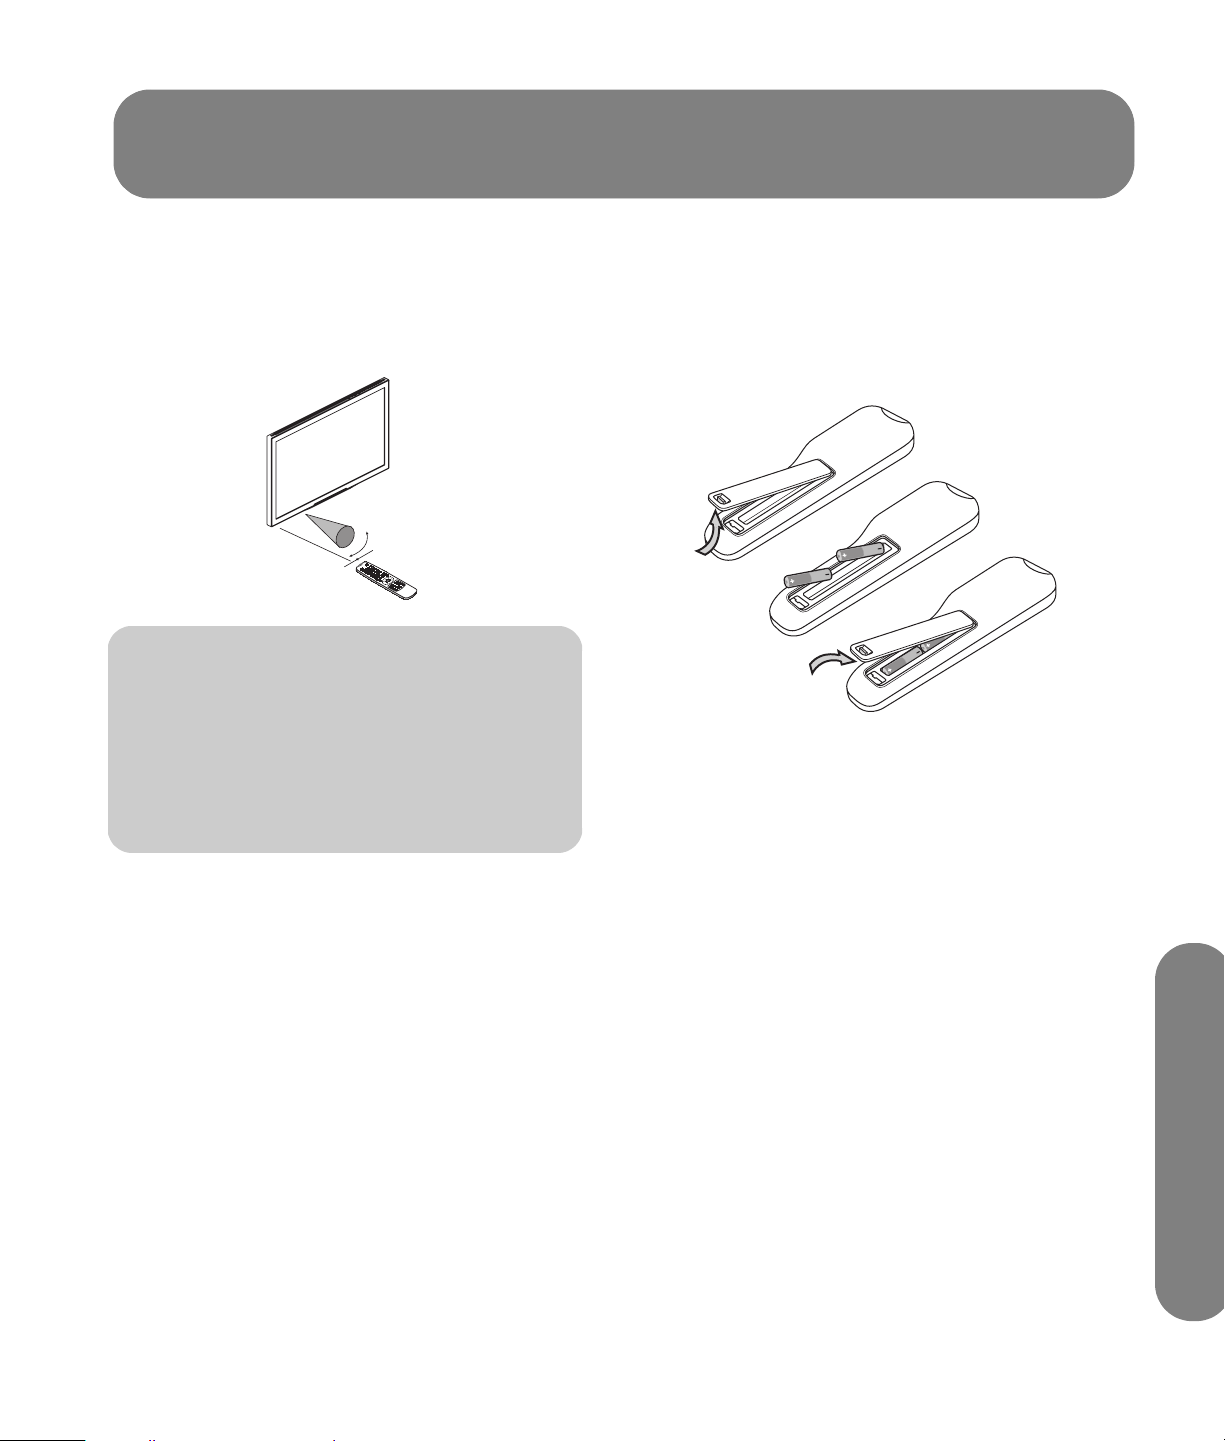
Operating the TV
The remote control operates the TV. To use the remote
control, point the remote control at the remote control
sensor on the display.
30º
E
T
U
M
V
CT
I
H
P
A
R
R
G
E
H
W
C
P
PO
M
3
O
C
P
U
6
2
ET
S
L
O
5m
V
9
5
1
E
N
D
T
I
R
W
H
C
8
4
P
A
W
SA
S
T
M
R
E
0
T
0
7
1
EN
P
I/
B
P
I
P
0
J
P
D
I
A
P
U
N
E
P
M
E
E
SL
L
A
E
E
V
Z
E
RE
E
R
J
F
E
D
C
L
A
T
I
T
P
Y
I
B
A
H
U
L
C
S
P
V
IS
Y
D
D
L
D
HO
R
E
CC
MIX
G
TT
X
E
D
N
I
R
T
I
X
E
n
Use the remote control within a distance of
16.4 feet (5 meters) from the front of the TV
remote control sensor window and at the
maximum horizontal and vertical angles of
30 degrees.
Using universal remote controls
When you want to program a universal remote control
to operate your HP TV, if HP is not listed in the
supported brand codes, use a Philips TV code. The
HP remote control transmits Philips-licensed remote
control codes.
After programming your universal remote control with
a Philips TV code, it can operate your HP TV functions
for: volume, mute, power, and input source.
Installing or replacing remote
control batteries
Insert two AAA non-rechargeable batteries into the
remote control, ensuring that you place them with the
proper polarity.
1 Press and open the cover on the back of the
remote control.
2 Insert the batteries into the remote control, and
make sure that you match polarities.
3 Close the cover.
Do not mix different types of batteries together (for
example, alkaline and carbon-zinc) or old batteries
with fresh ones.
Be sure to follow the correct polarity when installing
the batteries as indicated in the battery compartment.
Reversed batteries may cause damage to the device.
When not using the remote for a long period of time,
remove the batteries to prevent damage or injury from
possible battery leakage.
Do not try to recharge batteries that are not intended to
be recharged; they can overheat and rupture. Follow
the battery manufacturer’s directions for the batteries
you are using.
Always remove batteries as soon as they become
weak. Weak batteries can leak and severely damage
the unit. The battery life depends on how much the
remote control is used. Replace batteries when remote
control operation becomes erratic.
Do not take apart the batteries, heat them, or throw
them into a fire.
Using the Remote Control
Using the Remote Control 21
Page 32
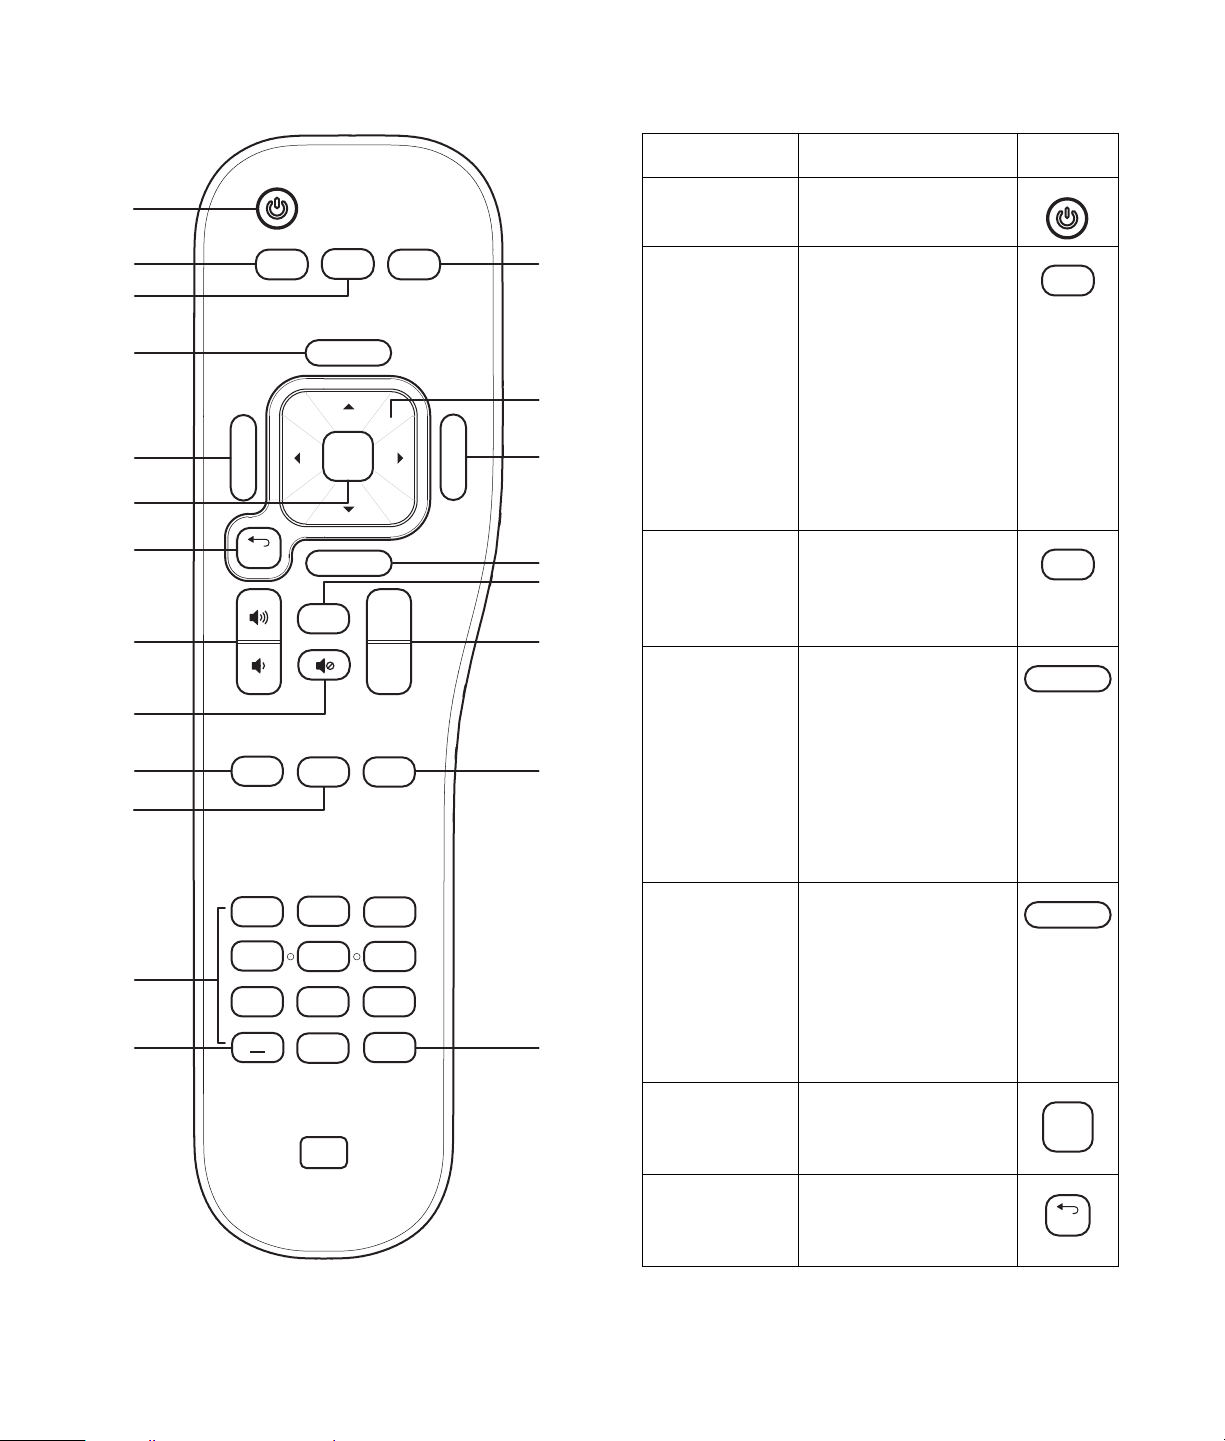
Identifying the remote control buttons
Q
Name Description Icon
A
APower
SAP
B
C
MTS
Sound
Picture
N
BSAP/MTS
Press Power to turn
the TV on or off.
Press SAP/MTS to
open a list of
available secondary
D
Source
O
audio program
options. Press a
direction arrow
button to choose
the option, then
Last
OK
Info
Aspect
Ch+
Ch-
E
F
G
H
Menu
back
P
press OK. Press
SAP/MTS to close
the list.
CSound
R
Press Sound to select
an audio mode:
Voice, Music,
Standard, User.
S
DSource
Press Source to open
a list of the input
I
JT
CC Sleep Ant
sources. Press an
arrow button to
select the input
source to view, and
K
press OK. Press
Source to close
the list.
SAP
MTS
Sound
Source
1
2
3
EMenu
Press Menu to
open the onscreen
4
L
7
MU
5
89
0
6
Enter
FOK
display (OSD).
Press Menu again to
exit the menu and
return to your TV
display.
Press OK to choose
the current menu
option.
GBack
Press Back to go
back one level when
a menu is displayed.
22 HP Plasma HDTV User’s Guide
Menu
OK
back
Page 33
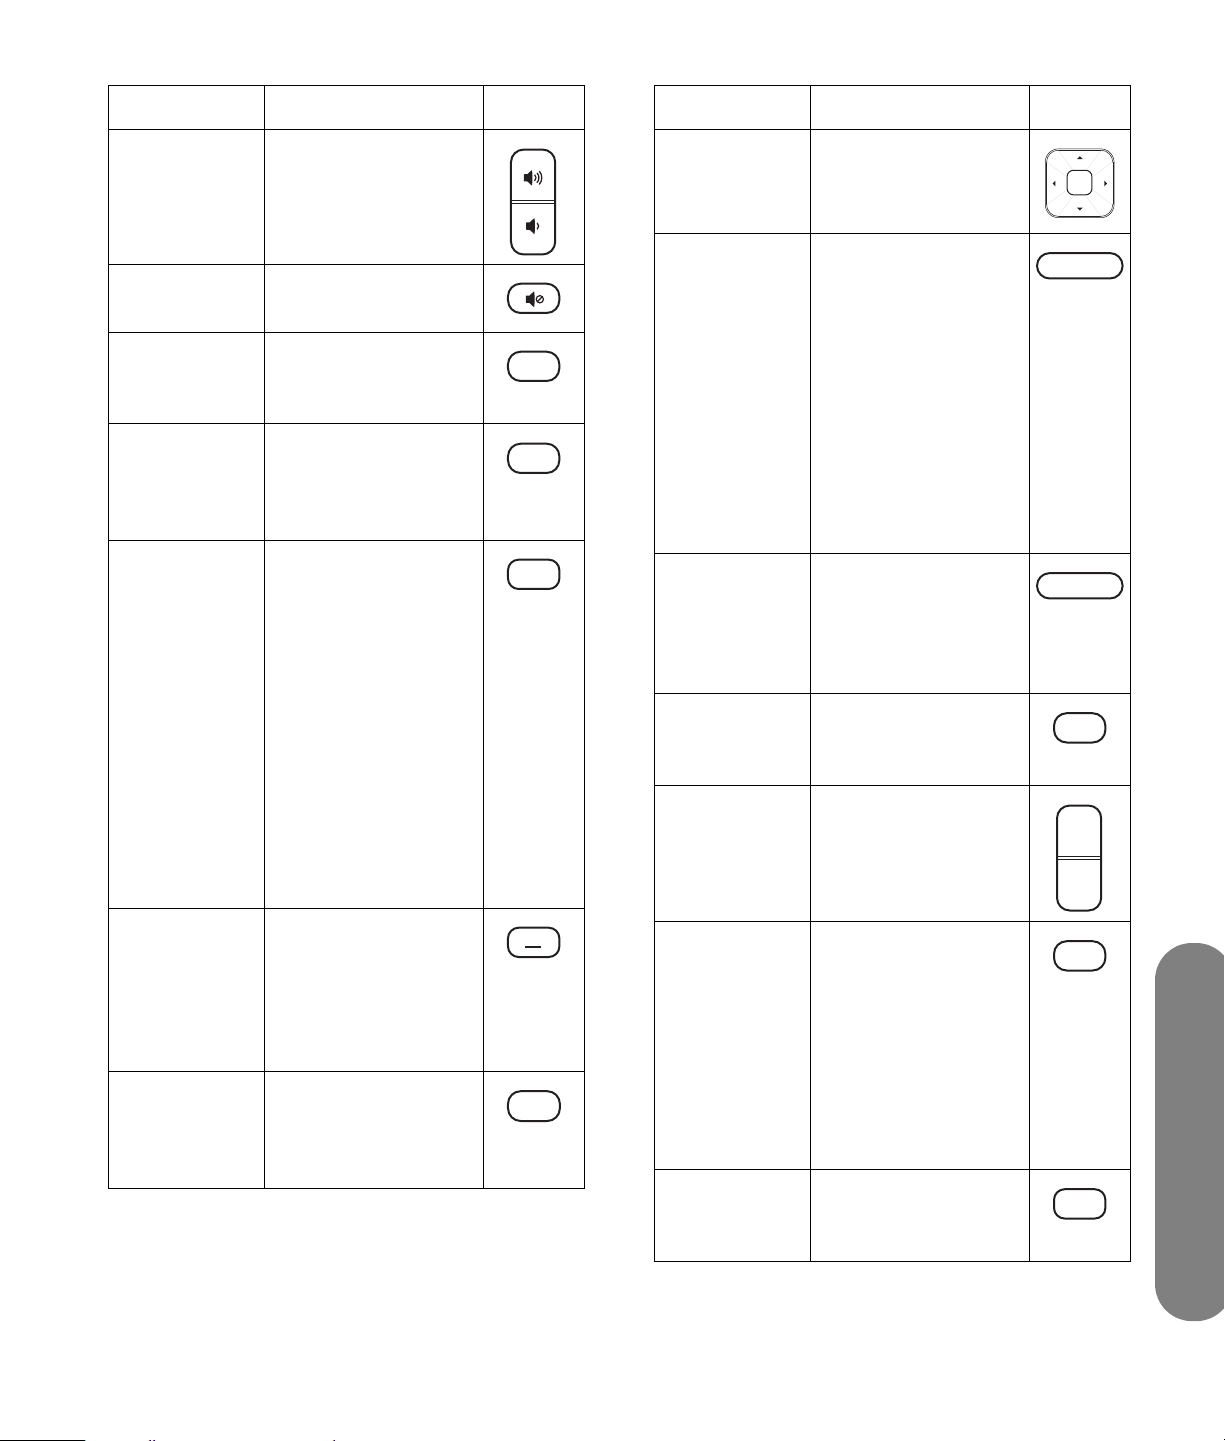
Name Description Icon
Name Description Icon
HVol
IMute
JCC
KSleep
LNumbers
Press a Volume
button to raise (or
lower) the sound.
Press Mute to turn
sound off or on.
Press CC to select
closed caption mode
options.
Press Sleep to set the
timer in this order:
15, 30, 60, 90, or
120 minutes.
Press the number
buttons (0–9) to
directly select
channels, and then
press Enter.
Use these number
buttons to edit or
enter a display name
for an analog
channel using the
Channel menu; see
“Displaying channel
information” on
page 32.
CC
Sleep
1
OUp/
down/
left/right
arrows
PAspect
QInfo
RLast
SCh+
Ch–
Press an arrow to
move the cursor in
the menu screens.
Press Aspect to open
a list of options for
the dimensions of the
TV picture image.
Press an arrow
button to select the
option, and press
OK. Press Aspect to
close the list.
The options depend
on the current input
source.
Press Info to view a
channel banner
containing
information on your
current program.
Press Last to recall
the previous channel
you were viewing.
Press Ch+ (or Ch–) to
select the next higher
(or lower) channel.
Aspect
Info
Last
Ch+
Ch-
M– (Dash)
NPicture
Press – (dash) to
enter a dash for a
subchannel number
of a digital channel.
For example,
channel 14-2.
Press Picture to select
a video mode:
Standard, Vivid,
Movie, User.
Picture
TAnt
UEnter
Press Ant to view a
channel banner
containing
information on your
current program.
Press Ant again to
view TV if currently
viewing DVD or
other source.
Press Enter after
entering a channel
number.
Using the Remote Control 23
Ant
Enter
Using the Remote Control
Page 34

Adjusting the Volume
Changing Channels
Press the volume buttons on the remote control to
increase or decrease the sound. The indicator bar on
the TV shows the increase or decrease.
Muting the sound
1 Press the Mute button to temporarily turn off the
sound.
2 Press the Mute button again to restore the sound
back to the previous level.
Changing the Picture
Mode
Pressing the Picture button displays the video mode
currently selected. Keep pressing the Picture button or
right arrow to change the video mode until you reach
a desired picture.
■ Vivid: Enhances contrast and sharpness for
viewing in a well-lit room.
■ Standard: Good for normal viewing conditions
with low room lighting.
■ Movie: Good for watching movies in a darkened
room. Provides a soft, film-like picture.
■ User: Displays the custom settings you configured
in the OSD. For more information on defining the
picture settings, see “Using the Picture Menu” on
page 28.
Press the Ch+ or Ch– buttons on the remote control to
change the channel up or down. The TV allows you to
select up to 125 channels (1 to 125). To select a
channel, enter a one-digit, two-digit, or three-digit
number, or use the channel up or down buttons.
To select a channel number (for example, channel 25),
complete the following procedure within 4 seconds:
1 Press the 2 button on the remote control.
2 Press the 5 button.
3 Press Enter.
To select a subchannel number (for example, 14-2):
1 Press the 1 button.
2 Press the 4 button.
3 Press the – (dash) button.
4 Press the 2 button.
5 Press Enter.
Selecting the last channel
Press the Last button on your remote control to view the
previous channel you were viewing.
Displaying program information
Pressing the Info button displays a banner with
information about the current program you are
viewing.
24 HP Plasma HDTV User’s Guide
n
Sometimes the name of the program is not
included in the broadcast. In that case, the
program name is not displayed.
Page 35

Selecting the Input
Changing the View with
Source
1 Press the Source button to open a list of input
sources.
2 Press the up arrow or down arrow to select the
input source to view.
3 You can also press the right arrow button to
change the label of an input source.
4 Press OK.
5 Press the Source button again to close the list of
input sources.
The list of input sources identifies a connector set on
the back of the TV. All the labels except Antenna or
Cable can be changed.
■ Antenna or Cable: This label, which cannot be
changed, selects the RF Input connector. The label
shows the scan source selection (Antenna or
Cable) of the last channel scan performed by
either the First Time Wizard or the Channel menu.
■ Composite 1
■ S-video 1
■ Composite 2
■ S-video 2
■ Component 1
■ Component 2
■ PC
■ HDMI
the Aspect Button
Press Aspect to open a list of options for the
dimensions of the TV picture image. Press an arrow
button to select the option, and press OK. Press Aspect
to close the list. The options depend on the current
input source.
■ 16:9 Mode: Shows high-definition TV in its
normal format.
■ 4:3 Mode: Shows the standard 4:3 ratio picture
image in the center of the TV with dark bars on the
left and right.
■ Zoom1: Proportionally stretches the TV picture,
but clips the top and bottom of the image to fit the
screen. Eliminates black bars.
■ Zoom2: Zooms further into the middle of the
screen and clips off more from the top and
bottom.
■ Panorama: Similar to 16:9 mode, but shows
more of the sides.
Turning On Captions
Pressing the CC button displays caption options:
■ CC on: Displays captions.
■ CC off: Turns off captions.
■ CC mute: Displays captions when the Mute
button is pressed.
To assign your preferences for captions, see “Using the
Closed Caption Menu” on page 33.
Using the Remote Control 25
Using the Remote Control
Page 36

Setting SAP/MTS
Changing Audio Mode
stereo mode
Press the SAP/MTS button to open a list of the
available Secondary Audio Programs (SAP)/Multichannel Television Sound (MTS) features. Press an
arrow button to select the option to use, and then press
OK. Press SAP/MTS to close the list.
SAP receives mono sound, stereo sound, and
Secondary Audio Programs. The MTS feature allows a
TV station to broadcast other information, such as
another language or weather information.
You can enjoy hi-fi stereo sound or SAP broadcasts
where available:
■ Stereo broadcasts: Hear programs such as
live sporting events, shows, and concerts in
dynamic stereo sound.
■ SAP broadcasts: Select to hear either Main or
SAP sound.
■ Main sound: The normal program soundtrack
(either in mono or stereo).
■ SAP sound: Listen to second language,
supplementary commentary, and other
information (SAP is mono sound).
If stereo sound is difficult to hear, obtain a
clearer sound by manually switching to fixed
mono-sound mode.
Pressing the Sound button displays the audio mode
currently selected. Keep pressing the Sound button or
right arrow to change the audio mode until you reach
a desired sound.
For more information on adjusting the User option, see
“Adjusting the audio” on page 30.
Setting the Sleep Timer
Pressing the Sleep button starts a timer for the TV to
automatically turn off. Setting the Sleep Timer to 30
means your TV automatically turns off in 30 minutes.
Minutes Description
15 Sets the timer to 15 minutes.
30 Sets the timer to 30 minutes.
60 Sets the timer to 60 minutes
90 Sets the timer to 90 minutes.
120 Sets the timer to 120 minutes.
0 Turns off the sleep timer.
n
MTS operates only while in TV mode.
26 HP Plasma HDTV User’s Guide
Adjusting TV Settings
Use the onscreen display to adjust your picture, audio,
and other settings. For more information, see “Using
the OSD Menus” on page 27.
Opening and exiting the OSD
Pressing Menu displays the OSD menu. Pressing the
Menu button again leaves the current menu and returns
you to the TV display. Pressing Back within a submenu
takes you back one menu level.
Page 37
Changing the TV Settings
Change the TV settings by using the onscreen display
(OSD) menus.
Using the OSD Menus
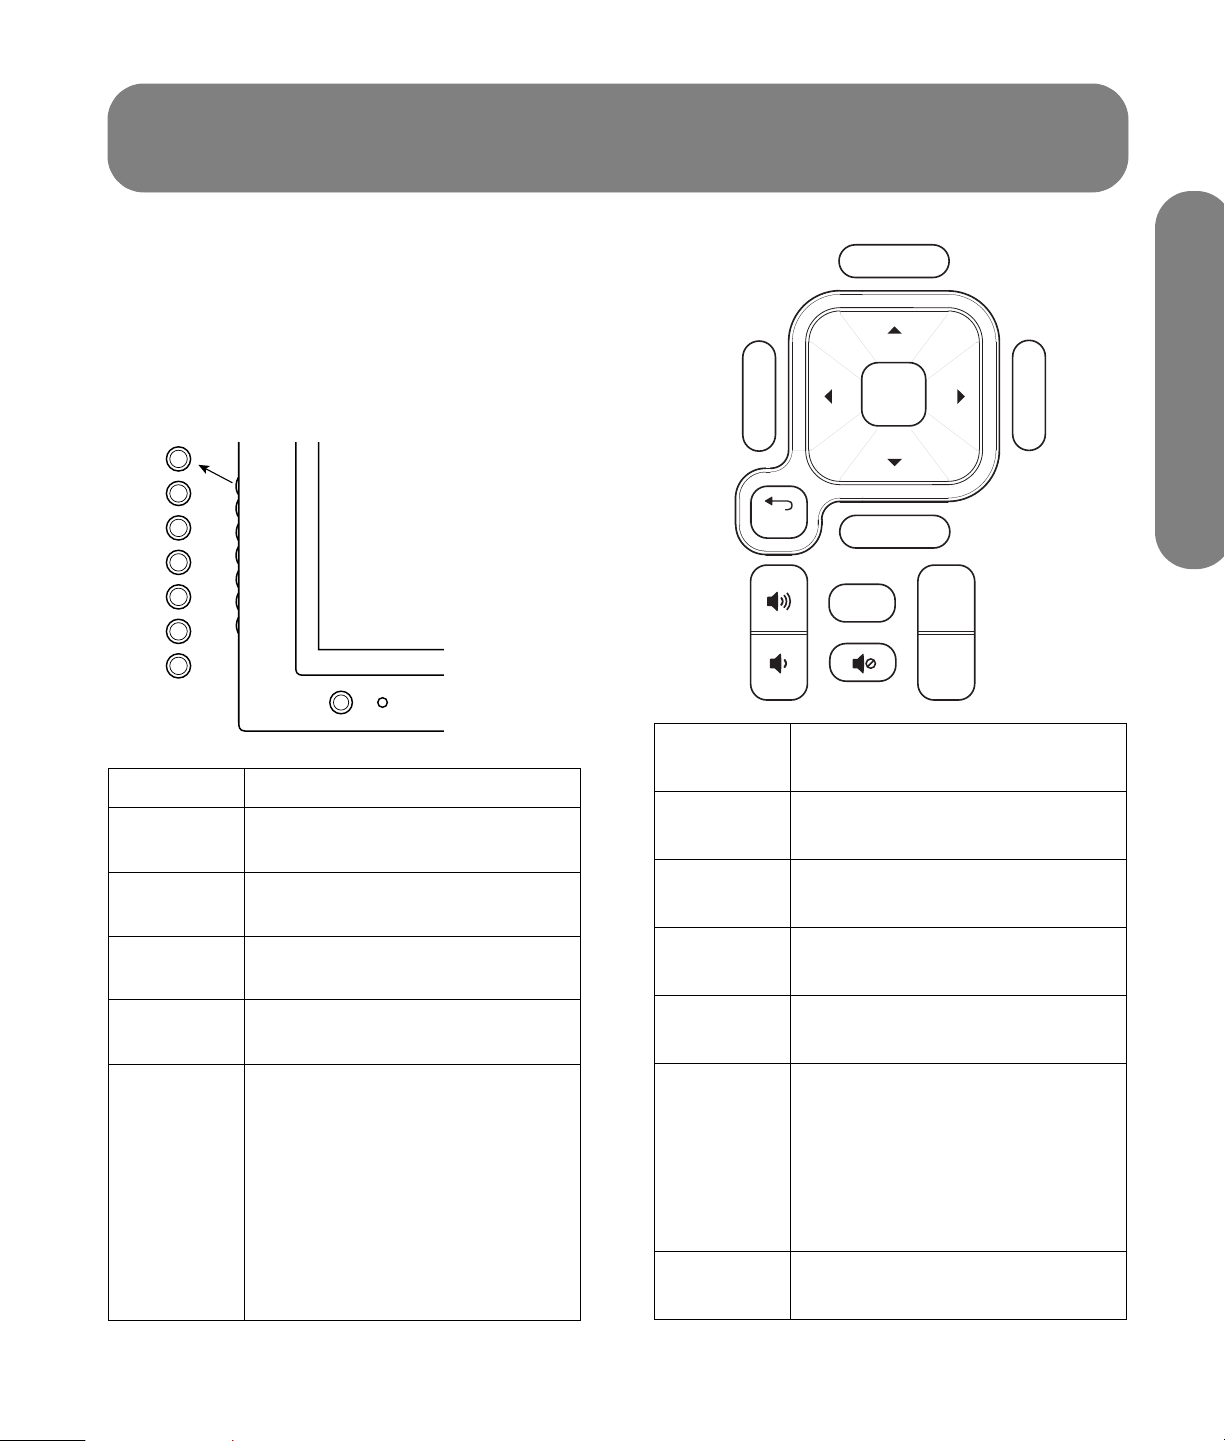
Operate the OSD menus using the buttons on the
remote control or the TV to highlight, adjust, and enter
items as described here.
MENU
OK
+
VOL
–
+
CH
–
SRC
TV (front) Description
MENU Menu (Exit) displays (or closes)
the OSD.
OK OK selects the highlighted item in
the OSD.
+VOL
–VOL
Volume moves right or left in the
menu or adjusts an item.
Source
Last
OK
Info
Aspect
Ch+
Ch-
Menu
back
Remote
control Description
MENU Menu (Exit) displays (or closes)
the OSD.
OK OK selects the highlighted item in
the OSD.
Volume Volume adjusts the sound level
or an item.
Changing the TV Settings
+CH
–CH
Channel moves up or down in
the menu.
SRC Source selects the input source.
Press SRC button to open the list of
input sources. Press CH to select
the input source to view, and press
OK. Press SRC to close the list.
Choose the input source before
opening the OSD. In an OSD
menu, this button functions as the
Back button, or to move up one
item or menu level.
Ch+
Ch–
Channel moves the channel up
or down.
Source Source selects the input source.
Press Source to open a list of the
input sources. Press an arrow
button to select the input source to
view, and press OK. Press Source
to close the list. Choose the input
source before opening the OSD.
Back Back moves up one item or
menu level.
Changing the TV Settings 27
Page 38
To operate the OSD menus:
1 Press the Source button to select the input signal
source for the TV. The OSD menus and options
you see depend on the current input source.
The following tables show the Picture menu when an
AV source is the input source (choose menu item
Settings), and when a PC source is the input source
(choose menu item Screen).
2 Open the OSD by pressing the Menu button. The
available menus appear as a list.
3 Press the direction buttons to highlight the menu
you want, and then press the OK button.
4 Press the direction buttons to move within the
menu and highlight an option, and then press the
OK button to move into the option.
5 Continue using the direction buttons to highlight
and adjust an item, and the OK button to enter the
change. You can press the Back button to move
out of an option, or to move up one menu level.
6 When you are finished, press the Menu button to
close the menu.
The OSD menus are:
■ Picture
■ Audio
■ Time
■ Channel
■ CC (Closed Caption)
■ Parental Control (Parental Ctrl)
■ System
In the following topics, a table lists each menu and the
available options.
Picture menu/
Settings Options
Mode Vivid/Standard/
Movie/User
Brightness [scale]
Contrast [scale]
Saturation [scale]
Hue [scale]
Sharpness [scale]
Blue Screen On/Off
Color Temperature Warm/Standard/Cold
Picture menu/
Screen Options
H Size [scale]
H Position [scale]
V Size [scale]
V Position [scale]
Using the Picture Menu
The Picture menu controls the look of the image on the
screen for the selected input source. For example,
when you adjust Brightness, the screen image changes
as you adjust the scale.
Because the Picture menu maintains settings for each
input, select (view) the input source, and then make
Picture menu changes.
28 HP Plasma HDTV User’s Guide
Phase Adjust [scale]
Clock adjust [scale]
Auto Sync [button]
Default [button]
Page 39

Adjusting the picture image
Adjusting the AV picture image
These options adjust the AV picture image you are
watching, so select the correct AV input source before
adjusting values.
■ Mode sets the picture adjustments to a preset
value (Vivid, Standard, Movie) or to User
for individual adjustment of Brightness, Contrast,
and so on.
■ Brightness sets the image brightness.
■ Contrast sets the image contrast.
■ Saturation sets the image color intensity.
■ Hue sets tones; decrease to make tones more red,
or increase to make tones more blue.
■ Sharpness sets the image sharpness.
■ Blue Screen turns on or off display of a blue
screen as the image when there is no video
signal.
■ Color Temperature selects different color
temperature settings: Warm, Standard,
and Cold.
Adjusting the PC Screen image
These options adjust the image from the PC connector;
the menu is not available if a PC is not connected.
■ H Size adjusts the horizontal size of the image.
■ H Position adjusts the horizontal position of the
image.
■ V Size adjusts the vertical size of the image.
■ V Position adjusts the vertical position of the
image.
■ Phase Adjust adjusts the phase of the clock
used for synchronizing the image.
■ Clock adjust adjusts the clock used for
synchronizing the image.
■ Auto Sync button starts automatic
synchronization to the image.
■ Default button resets all Screen options to default
values.
Changing the TV Settings
Changing the TV Settings 29
Page 40
Using the Audio Menu
The Audio menu sets the sound levels (Settings), the
mode for the digital audio output signal, and the mode
and values for the SRS WOW settings for the display
speakers.
Adjusting the audio
In the Audio/Settings menu, select Volume or
Balance to make adjustments. Use Sound Mode to
select preset equalizer values of Voice, Music, or
Standard, or to select User for individual adjustment
of the equalizer values.
Audio menu/Settings Options
Volume [scale]
Balance [scale]
Sound Mode: Voice/Music/
Standard/User
120 Hz [scale]
200 Hz [scale]
500 Hz [scale]
1200 Hz [scale]
3000 Hz [scale]
7500 Hz [scale]
12 KHz [scale]
Audio menu/Digital
Audio Options
Choosing the Digital Audio mode
You must be watching a digital TV channel to access
the Audio/Digital Audio menu.
In the Audio/Digital Audio menu, select the mode for
the signal provided on the digital audio output
connector: Digital Dolby or PCM. Choose the PCM
option when your external digital audio system does
not support surround sound. When the source is
analog, such as from an Analog TV channel, there is
no Digital Audio output.
Selecting surround sound
You can enjoy emulated surround sound from the
display speakers. To do so, in the Audio/SRS WOW
menu, choose the On option for Mode.
In the Audio/SRS WOW menu you can make the
following selections:
■ Focus provides clarity improvement and elevation
to the audio.
■ TruBass provides bass enhancement to the
audio.
Digital Audio Output Mode Digital Dolby/
PCM
Audio menu/SRS WOW Options
Mode Off/On
Focus [scale]
TruBass [scale]
30 HP Plasma HDTV User’s Guide
Page 41
Using the Time Menu
Using the Channel Menu
The Time menu sets the date and time, sleep timer, and
other time options.
Time menu Options
Time Zone AST/EST/CST/MST/PST/
AKST/HST/NST
Date/Time
Auto Turn-On
Auto Turn-Off
Sleep Timer
■ Mode: Manual/Auto
■ Date/Time
■ Mode: Off/Once/Daily
■ Time
■ Mode: Off/Once/Daily
■ Time
■ Mode: Off/On
■ Time
Daylight Savings On/Off
You choose the initial Date and Time for the TV during
the Setup Wizard, or in this menu by choosing
Manual mode.
Time Zone selects the time zone such as Central
Standard Time (CST) or Pacific Standard Time (PST).
Auto Turn-On and Auto Turn-Off are individual,
independent settings to automatically turn on or turn off
the TV.
Sleep Timer sets the minutes and seconds before the TV
turns off. You can also set the sleep timer using the
remote control Sleep button.
If you skipped the Setup Wizard or if the initial setup
does not find all the channels, use this menu to
automatically or manually scan and find the channels.
The scan continues until the channel is found or
confirmed as no signal.
n
Auto Scan or Manual Scan scans for all
channels. For example, a manual scan for
channel 14 would find all available
channels, such as channel 14 and sub
channels 14-2 and 14-7.
Use this menu to edit the program channel list to lock
or unlock an entire channel (for parental control) or to
skip a channel when using the Channel adjust buttons.
Use this menu to view program number and name
information, and to edit the display name of analog
channels.
Channel menu Options
Auto Scan
Manual Scan
Edit Program
■ Scan: Antenna/Cable
■ OK (button)
■ Cancel (button)
■ Channel No (number)
■ Frequency
■ OK (button)
■ Music
■ CH. No. (Channel
number)
■ Name
■ Lock
■ Skip
Changing the TV Settings
Information Shows program number
and name; the display
name of analog channels
may be edited
Changing the TV Settings 31
Page 42

Searching for channels automatically
Displaying channel information
In the Auto Search menu, start an automatic search for
channels by choosing the scan source of Antenna or
Cable, selecting the Search button on the screen,
and then pressing OK.
The scan continues until each channel is found or
confirmed as no signal. You can stop the search by
choosing the Cancel button on the screen and
pressing OK.
Searching for channels manually
In the Manual Search menu, start a manual search
for a channel: enter a channel number, press the
down arrow to select the OK button on the screen,
and press OK.
The scan continues until the channel is found or
confirmed as no signal. You can stop the search
by choosing the Cancel button on the screen and
pressing OK.
Editing the channel listing
Use Edit Program to lock or skip a channel. In the Edit
Program menu, you see a table of all the channels with
columns labeled: Music, Ch. No., Name, Lock and
Skip. Move the cursor into a column (Lock, or Skip)
and press OK to change the item for that channel. In
the Lock column, press OK to require the parental
control password to unlock and view the channel. In
the Skip column, press OK to skip the channel when
using the Channel adjust buttons.
In the Information menu, the TV shows the program
number and name. Use this menu to edit the display
name of analog channels; digital channel names are
included in the program information and cannot be
changed.
To change the display name for an analog channel:
1 In the Channel menu, select Information and
press OK. The current TV channel information
displays.
2 To change the name for the current channel, press
the down arrow to highlight the name.
To select a different channel, press the number
buttons on the remote control to select the channel,
press OK to display the channel information, and
then press the down arrow to highlight the name.
3 Use the number buttons on the remote control to
enter a name for the channel. Each button
provides different characters; refer to the table
that follows for a complete list of characters. To
edit the name, press the number button repeatedly
to scroll through the characters, stopping on the
character you want. Press the right arrow button to
move to the next character position. Press OK to
enter the name.
Number
button Characters (in sequence)
32 HP Plasma HDTV User’s Guide
2 a, b, c, @, 2
3 d, e, f, #, 3
4 g, h, i, $, 4
5 j, k, l, %, 5
6 m, n, o, ^, 6
7 p, q, r, s, 7
8 t, u, v, 8
9 w, x, y, z, 9
0 *, #, (, ), 0
Page 43

Using the Closed Caption
Menu
Use the CC (Closed Caption) menu to turn on or off
caption display and to select options. You can also use
the remote control button CC to turn caption display on
or off.
Closed
Caption menu Options
CC Mode Off/On/On When Mute
Analog Caption Services:
■ CC1/CC2/CC3/CC4
■ T1/T2/T3/T4
Digital Caption Service 1/2/3/4/5/6
Style
Your TV is equipped with an internal closed caption
decoder. It allows you to view conversations, narration
and sound effects as subtitles on your TV. Closed
Captions are available on some TV programs, and on
some VHS home video tapes, at the election of the
program provider.
Digital Closed Caption service is a caption service
available only on digital TV programs (also at the
election of the service provider). It is a more flexible
system than the original closed caption system,
because it allows a variety of caption sizes and font
styles. When the Digital Closed Caption service is in
use, it is indicated by a three-letter abbreviation that
also indicates the language of the Digital Closed
Captions: ENG (English) or SPA (Spanish) or FRA
(French), or other language codes.
■ Style
■ Size
■ Font
■ Text Colo r
■ Text Opacity
■ BG (background) Color
■ BG (background) Opacity
■ Preview
Not all programs and VHS videotapes offer closed
captioning. Look for the symbol to ensure that captions
appear.
n
When you have the signal source
equipment connected using an HDMI or a
component video connection, closed
caption information may not always be
available because the source equipment
may not pass the information to the TV
across these connectors.
In the closed caption system, there can be more than
one caption service provided. Each is identified by its
own number. CC1 through CC4 services display
subtitles of TV programs superimposed over the
program picture.
In the closed caption system, the T1 through T4
services display text that is unrelated to the program
being viewed, such as weather or news. These
services are also superimposed over the program
currently being viewed.
■ Depending on the number of caption services in
the signal being received, you will see information
such as 1/2 or 1/4 displayed. 1/2 means “the
first of two services.”
■ Example: If a program has three services (Digital
CC(ENG), CC1 and Text1), the closed caption
display toggles in sequence.
■ The CC button keeps a record of the last service
selected in its memory. If the last closed caption
mode you selected is not available for the next
program, or on another channel, the closed
caption service that is available is automatically
selected, and this service appears in parentheses.
Closed caption services that appear in
parentheses are not retained in the CC button
memory as your last selected service. Only
services that you have selected with the CC button
are retained.
Changing the TV Settings
Changing the TV Settings 33
Page 44

Using the Parental
n
When the program contains no closed
caption, “--” displays in the closed caption
information.
If the language code, such as ENG, is not
found on Digital TV programs, “--” is
shown.
All types of closed caption service (CC1, T1,
and so on) are potentially available, but a
broadcast may contain none or only some
of these services, at the election of the
program provider.
The defaults for CC may be specified by the
broadcasting station.
Using the Style option
The Style option selects the elements for displaying
closed caption text:
■ Style selects a preset or user caption style.
■ Size selects a caption size: Small, Large, Normal.
■ Font Style selects a font style.
■ Text Color selects a character color.
■ Text Opacity selects a text opacity.
■ Background (BG) Color selects a background
color.
■ Background (BG) Opacity selects a
background opacity.
■ Preview displays the a text preview of the
selected styles.
Control Menu
The Parental Control (Ctrl) menu enables and defines
parental controls for TV and movies. Use it to
password (secret number), and set the values for
parental controls by TV rating, TV content, and movie
ratings.
Parental Ctrl
menu Options
Password
MPAA (movie ratings
by Motion Picture
Association of
America)
■ Input Password
■ Confirm Password
■ Password On/Off
■ NR
■ G
■ PG
■ PG-13
■ R
■ NC-17
■ X
TV Guidelines Table of age-based
guidelines and content
values
Canadian English
■ C
■ C8+
■ G
■ PG
■ 14+
■ 18+
■ Block All (check box)
select a
34 HP Plasma HDTV User’s Guide
Canadian French
■ G
■ 8ans +
■ 13ans +
■ 16ans +
■ 18ans +
■ Block All (check box)
Page 45

Using the Password
Setting Parental Controls
The Parental Control menu allows you to use a
password to protect certain settings from being
accidentally changed.
!
IMPORTANT: These conditions must be met
to enable parental controls:
■ Password is set.
■ Rating settings have been made.
Enter the password when prompted.
Setting a password (secret number)
In the Parental Ctrl/Password menu, select Input
Password, and then enter the new 4-digit password
number by using the 0–9 buttons on the remote
control. Enter the same digits for Confirm Password,
and then press OK.
The parental controls use a V-Chip, which is an
electronic filtering device built into your TV. This tool
gives parents a great degree of control over
broadcasts accessed by their children. It allows
parents to select programs judged suitable for child
viewing while blocking ones judged not suitable. It
does so automatically once you select
set the values for parental controls.
The U.S. has two rating systems for viewing content:
TV Parental Guidelines and movie ratings.
■ The TV Parental Guidelines help parents screen
out inappropriate television shows from their
children.
■ Movie ratings are used for original movies rated
by the Motion Picture Association of America
(MPAA) as watched on cable TV and not edited
for television. Options can also be set to block
MPAA-rated movies.
a password and
Changing the TV Settings
n
As a precautionary measure, write down
your password and keep it in a familiar
place.
.
!
IMPORTANT:
password, enter the Master Password:
0532
If you lose or forget your
Changing the TV Settings 35
Page 46

Voluntary movie rating system (MPAA)
In the Parental Ctrl menu, highlight MPAA and press
OK. Adjust the item.
The setting automatically enters Block for any ratings
below your selection.
MPAA rating Description
Age NR Not rated.
G General audiences. All ages admitted.
PG Parental guidance suggested. Some material may not be suitable for children.
PG-13 Parents strongly cautioned. Some material may be inappropriate for children under 13.
R Restricted. Under 17 requires accompanying parent or adult guardian (age varies in some
jurisdictions).
NC-17 No one 17 and under admitted.
X X is an older rating that is unified with NC-17 but may be encoded in the data of older
movies.
Example:
If you select PG-13, this automatically blocks the
higher ratings R, NC-17, and X.
n
Voluntary movie rating system uses only
an age-based rating.
36 HP Plasma HDTV User’s Guide
Page 47

TV Parental Guidelines (TV Guidelines)
In the Parental Ctrl menu, highlight TV Guidelines
and press OK. Adjust the item.
The setting automatically enters Block for any ratings
below your selection.
You can set an individual content-based rating item.
Content
TV Guidelines Rating
Suggested
Age
TV-Y (All
children)
TV-Y7
(Directed to
older children)
TV-G (General
audience)
TV-PG
(Parental
guidance
suggested)
TV-14 (Parents
strongly
cautioned)
TV-MA (Mature
audience only)
FV
(Fantasy
violence)V(Violence)
Rating can
be set
Rating can
be set
Rating can
be set
Rating can
be set
S
(Sexual
situation)
Rating can
be set
Rating can
be set
Rating can
be set
L
(Adult
language)
Rating can
be set
Rating can
be set
Rating can
be set
D
(Sexually
suggestive
dialogue)
Changing the TV Settings
Rating can
be set
Rating can
be set
Changing the TV Settings 37
Page 48

Canadian Rating Systems
The TV rating systems in Canada are based on the
Canadian Radio-Television and Telecommunications
Commission (CRTC) policy on violence in television
programming.
While violence is the most important content element to
be rated, the structure developed takes into
consideration other program content like language,
nudity, sexuality, and mature themes.
When setting controls on the Canadian system you can
choose either the Canadian English ratings or the
Canadian French ratings.
Canadian English ratings
Rating Canadian English rating description
Age E Exempt: Includes news, sports, documentaries, and other information programming.
C Children: Intended for younger children under the age of 8 years. Pays careful attention to
themes that could threaten their sense of security and well-being.
C8+ Children over 8 years old: Contains no portrayal of violence as the preferred, acceptable, or
only way to resolve conflict; does not encourage children to imitate dangerous acts that they
may see on the screen.
G General: Considered acceptable for all age groups. Appropriate viewing for the entire family;
contains very little violence — physical, verbal, or emotional.
PG Parental guidance: Intended for a general audience, but may not be suitable for younger
children (under the age of 8) because it could contain controversial themes or issues.
14+ Over 14 years: Could contain themes where violence is one of the dominant elements of the
storyline, but it must be integral to the development of plot or character. Language usage could
be profane and nudity present within the context of the theme.
18+ Adults: Intended for viewers 18 years and older and might contain depictions of violence, which
while related to the development of plot, character, or themes, are intended for adult viewing.
Could contain graphic language and portrayals of sex and nudity.
38 HP Plasma HDTV User’s Guide
Page 49
Canadian French ratings
Rating Canadian French ratings description
Age E Exempt programming.
G General: All ages and children; contains minimal direct violence, but may be integrated
into the plot in a humorous or unrealistic manner.
8ans + General but inadvisable for young children: May be viewed by a wide public audience,
but could contain scenes disturbing to children under 8 who cannot distinguish between
imaginary and real situations. Recommended for viewing with parent.
13ans + Over 13 years: Could contain frequent violent scenes and therefore recommended for
viewing with parent.
16ans + Over 16 years: Could contain frequent violent scenes and intense violence.
18ans + Over 18 years: Only for adult viewing. Could contain frequent violent scenes and
extreme violence.
Changing the TV Settings
How to temporarily release a
blocked program
When the Parental Controls rating censors a program,
a message displays.
To release a blocked program:
1 Press OK, and then the password setting menu
displays.
2 Enter your 4-digit password to temporarily release
the program lock.
Reactivating parental controls
after a temporary release
You can reactivate the Parental Controls for a
temporarily released program by using either of these
actions:
■ Select the rating setting (MPAA, TV Guidelines,
Can. English Ratings, or Can. French
Ratings) from the Parental Ctrl menu.
■ Switch off the TV power.
Changing the TV Settings 39
Page 50
Using the System Menu
Use the System menu to select the language for the
OSD menus, find the software version, start the Setup
Wizard, return OSD settings to default values, select
the Standby Mode, and start White Wash to reduce
the appearance of afterimage.
Returning to Default Settings
In the Default Settings menu, return all settings,
including the channel list, to default value by selecting
Default Settings, and then pressing OK.
Using White Wash
System menu Options
OSD
Software Version Shows TV software
Setup Wizard Start the setup wizard:
Default Settings Press OK to recover all
White Wash
Standby Mode
■ Language: English/
French/Spanish
■ OSD timeout: Short/
Middle/Long
version number
Yes/No
settings to default
values.
■ Ye s/ No
■ Low power
■ Fast power
Starting the Setup Wizard
In the Setup Wizard menu, choose Yes, and press
OK. Then, turn off the TV, and turn it on again to start
the Setup Wizard.
In the White Wash menu, select Yes and press OK to
display an all-white screen for 3 minutes. This can
reduce the appearance of an afterimage resulting from
a fixed screen image.
n
Extensive use of White Wash may reduce
the lifetime of the panel.
Selecting the Standby Mode
(Power Control)
The Standby Mode menu setting can save energy. The
setting determines the power used by the TV when it is
turned off and enters standby.
■ Low power: Consumes less power while in
standby, uses approximately 20 seconds of
power-up time.
■ Fast power: Consumes more power while in
standby, uses approximately 5 seconds of powerup time.
40 HP Plasma HDTV User’s Guide
Page 51

Finding Answers to Questions
Understanding TV Terms
What are analog TV, digital TV,
and high-definition (HDTV)?
Devices such as monitors, tuners, and integrated
monitor/tuner combinations are designed to handle
any of the 18 formats officially sanctioned by the
industry-led standard setting, Advanced Television
Systems Committee (ATSC), for the digital transmission
of video signals. There are three subgroups of digital
televisions depending on their capabilities: highdefinition (HDTV), enhanced-definition (EDTV), and
standard-definition (SDTV).
In contrast, U.S. analog television has been available
for over 50 years in the single National Television
Standards Committee (NTSC) format. This is the signal
that has been broadcast over the air and through
cable systems. NTSC television offers slightly more
than 480 interlaced lines of resolution.
What is the difference between
progressive and interlaced
signal formats for digital TVs?
There are 18 standard digital TV signal formats. Each
one provides a different picture quality. Digital TV
formats are named using a number followed by either
progressive (p) or interlaced (i). The letter refers to the
way the TV uses the signals to create the picture:
■ Progressive (p) scanning presents all the
horizontal lines of the picture in one frame. This
provides a sharper picture to the eye and looks
much better than an interlaced image of the same
resolution.
■ Interlaced (i) means that the picture appears in
two segments: every other horizontal line of the
picture is displayed in one frame, and the other
half of the horizontal lines are drawn in the next
frame of the picture. This works because it
happens so fast that the eye is deceived into
believing that only one picture is being shown.
The number refers to the number of lines of resolution,
and generally the higher the number, the better the
picture. For example, with digital TV (DTV) there are
two progressive formats for broadcasters to choose
from: 480p and 720p. A 480p image is much sharper
than a regular TV broadcast, although it is only
considered a DTV signal and not a true high-definition
signal. 720p has 720 horizontal scan lines and is
considered to be true HDTV. 720p can rival a 1080i
picture, which is 1080 horizontal scan lines displayed
as an interlaced image. This is because of the sharper
and more accurate (progressive) 720p picture, even
though a 1080i picture has many more scan lines and
a much higher resolution.
What is variable aspect ratio?
The aspect ratio describes the relationship of screen
width to screen height. Standard TV signals are based
on the aspect ratio of 4:3 (four units wide by three
units high). HDTV signals are based on the aspect ratio
of 16:9, making the image 33 percent wider than a
normal TV and allowing viewing TV and movies as if
you were watching them in a theater.
In addition, many DVDs look better on the widescreen
display because most movies made in the last 50 years
were filmed in an aspect ratio of either 1.85:1 (very
close to 16:9, which is equal to 1.78:1) or 2.35:1
(even wider than 16:9).
Variable aspect ratio support enables scaling of 4:3
and anamorphic video to fill the screen.
Finding Answers to Questions
Finding Answers to Questions 41
Page 52
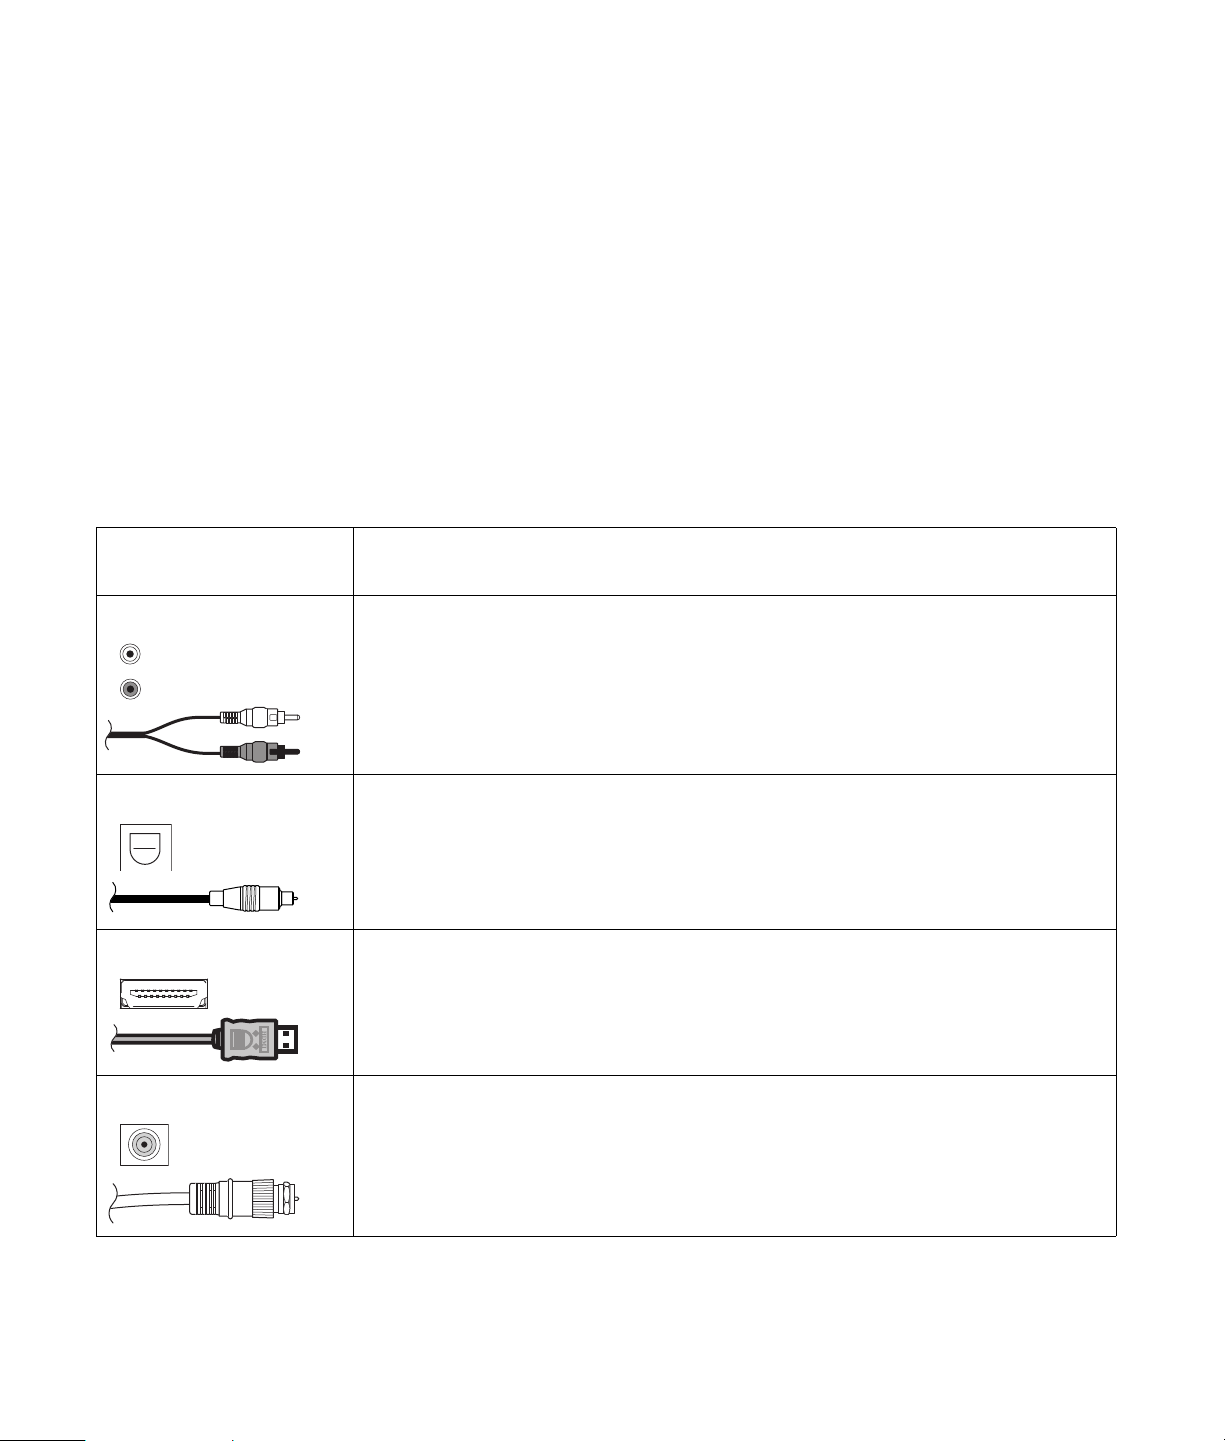
What is HDMI?
High-Definition Multimedia Interface (HDMI) is the first
industry-supported, uncompressed, all-digital audio/
video interface. HDMI components can transmit both
digital audio and video over a single cable with
improved quality over traditional analog connections
due to an all-digital transmission. Transferring digital
sources to display such as DVDs and HDTV
programming can now be done without analog
conversions that can degrade the original signal.
Identifying Cable Usage
The following section lists all of the cable types
available for the TV. It shows a side view of each with
its respective connector.
Cable type/
connection Description
RCA Red and white audio connectors connect to the red and white (L and R) audio inputs.
Digital audio High-resolution optical audio cable used for optional external audio systems, such
as 5.1 channel surround sound.
HDMI HDMI is capable of transmitting both uncompressed digital audio and digital video
signals because it has video, audio, and control signals.
Coaxial antenna RF or coaxial used mainly for antennas. Often used with cable TV, a cable or a
satellite decoder. May be used with set-top boxes if no other choice is available.
42 HP Plasma HDTV User’s Guide
Page 53
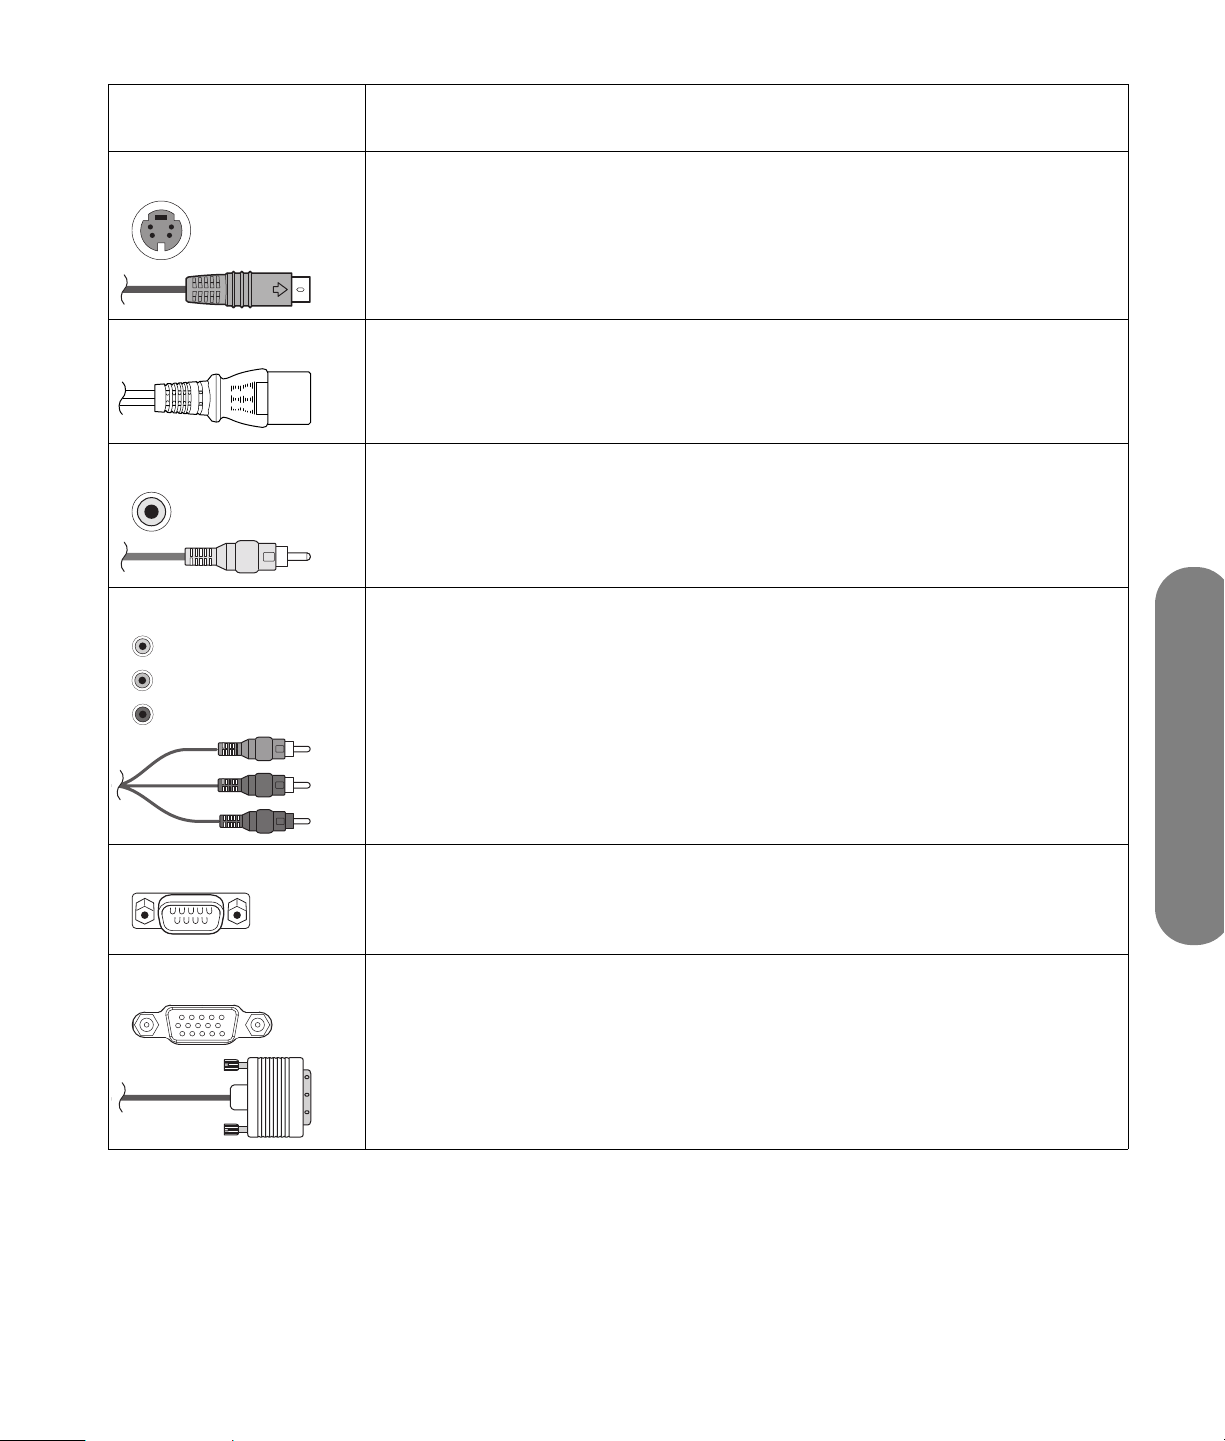
Cable type/
connection Description (Continued)
S-video Used with equipment such as DVD players, VCRs, cable or satellite tuner/decoders,
camcorders, and digital cable boxes.
Power cord Connects the TV to the power outlet.
Composite Used with equipment such as a VCR or DVD.
Component Three- or five-headed cable: One red for Pr signal, one green for Y signal, and one
blue for Pb signal. Some component cables also come with red and white audio
cables attached. Used for HDTV receivers, DVD players, and other devices
equipped with a YPbPr component output connector.
RS-232 Serial interface used for service purposes only.
VGA Interface used with PCs and monitors.
Finding Answers to Questions
Finding Answers to Questions 43
Page 54

44 HP Plasma HDTV User’s Guide
Page 55

Specifications
HP PL5060N 50-Inch (127-Centimeter) Plasma High-Definition Television
HP PL4260N 42-Inch (106-Centimeter) Plasma High-Definition Television
Display
TV panel HP PL5060N: 50 in. 16:9 color plasma display
HP PL4260N: 42 in. 16:9 color plasma display
Display area
(height x width x diagonal)
Dimensions with stand and
speakers
(h x w x d)
Dimensions without stand and
with speakers
(h x w x d)
Dimensions without stand or
speakers
(h x w x d)
Picture resolution HP PL5060N: 1366 x 768
Brightness HP PL5060N: Up to 1000 cd/m
Panel life Up to 60,000 hours
Viewing angles H: 160
HP PL5060N: 24.5 in. (62.2 cm) x 43.5 in. (110.6 cm) x 50 in. (126.9 cm)
HP PL4260N: 20.4 in. (51.8 cm) x 36.2 in. (92.0 cm) x 41.5 in. (105.5 cm)
HP PL5060N: 32.8 in. (83.2 cm) x 61.1 in. (155.2 cm) x 12.3 in. (31.3 cm)
HP PL4260N: 28.9 in. (73.3 cm) x 53.5 in. (135.8 cm) x 12.3 in. (31.3 cm)
HP PL5060N: 29.8 in. (75.8 cm) x 61.1 in. (155.2 cm) x 4.3 in. (10.8 cm)
HP PL4260N: 25.9 in. (65.8 cm) x 53.5 in. (135.8 cm) x 3.7 in. (9.3 cm)
HP PL5060N: 29.8 in. (75.8 cm) x 49.0 in. (124.4 cm) x 4.3 in. (10.8 cm)
HP PL4260N: 25.9 in. (65.8 cm) x 41.4 in. (105.2 cm) x 3.7 in. (9.3 cm)
HP PL4260N: 1024 x 768
HP PL4260N: Up to 1200 cd/m
o
V: 160
o
2
2
Audio out 8 watts per channel
OSD language English/French/Spanish
Specifications
Specifications 45
Page 56
Display (Continued)
Power requirement AC 100–240 V , 50/60 Hz
Power consumption HP PL5060N: 450 W
HP PL4260N: 340 W
Ventilation clearance
requirements
TV standard (CCIR) American TV Standard ATSC/NTSC system
Receiving channel VHF: 2–13
Audio multiplex BTSC system
4 in. (10 cm) above
4 in. (10 cm) sides
2.8 in. (7 cm) rear
TV function
UHF: 14–69
CATV: 1–125
Digital Terrestrial Broadcast (8VSB): 2–69
Digital cable (64/256 QAM): 1–135
Rear connectors
Component 1 Component Input
Component 2 Component Input
Comp 1 Audio In Audio Input (use with Component 1)
Comp 2 Audio In Audio Input (use with Component 2)
HDMI HDMI Input (Type A) with HDCP
PC VGA monitor in
PC/DVI Audio In Audio In for PC and DVI-I In with HDCP
Digital Audio Output Optical digital audio output (PCM/Digital Dolby)
RF Input 75-ohm Unbalance, F-Type for VHF/UHF/CATV in
Video Out Composite Out
46 HP Plasma HDTV User’s Guide
Page 57
Rear connectors (Continued)
Audio Out Audio Out (use with Video Out)
S-Video 1 S-video Input
S-Video 2 S-video Input
Video 1 In Composite Input
Video 2 In Composite Input
Video 1 Audio In Audio Input (use with Video 1 In or S-Video 1)
Video 2 Audio In Audio Input (use with Video 2 In or S-Video 2)
Weight
TV only HP PL5060N: 95.9 lb. (43.5 kg)
HP PL4260N: 67.2 lb. (30.5 kg)
TV with speakers (no stand) HP PL5060N: 108 lb. (49 kg)
HP PL4260N: 84.9 lb. (38.5 kg)
TV with speakers and stand HP PL5060N: 113.5 lb. (51.5 kg)
HP PL4260N: 90.4 lb. (41 kg)
Accessories
In the box Documentation, remote control unit, AC cord, and speakers
Recommended solution additions HP Digital Entertainment Center
HP Media Center PC
HP Media Center Extender
Certification and compliance UL, C-UL, FCC, BETS-7, ENERGY STAR qualified TV
Warranty 1 year, parts and labor
All specifications represent the typical specifications
provided by HP’s component manufacturers; actual
performance may vary either higher or lower.
The panel life is determined as the time at which
luminance is 50% compared to that of initial value at
the typical lamp current on condition of continuous
operation at 25 +/– °C. 60,000 hours equates to
more than twenty-three years at seven hours a day
viewing.
Specifications
Specifications 47
Page 58

PC Compatibility Chart
Pixel
Preset
1 640 x 480 31.5 – 59.9 – 25.2 VGA
2 640 x 480 37.5 – 75.0 – 31.5 VESA
3 720 x 400 31.5 – 70.1 + 28.3 VGA
4 800 x 600 37.9 + 60.3 + 40.0 VESA
5 800 x 600 46.9 + 75.0 + 49.5 VESA
6 1024 x 768 48.4 – 60.0 – 65.0 VESA
7 1024 x 768 56.5 – 70.1 – 75.0 VESA
8 1024 x 768 60.0 – 75.0 – 78.8 VESA
9 1280 x 768 47.4 + 60.0 – 68.3 VESA
10 1280 x 1024 64.0 + 60.0 + 108.0 VESA
11 1360 x 768 47.7 + 60.0 + 85.5 VESA
format
Horiz.
freq. (kHz)
Horiz.
polarity
Vert.
freq. (Hz)
Vert.
polarity
Pixel clk.
(MHz) Source
48 HP Plasma HDTV User’s Guide
Page 59

Troubleshooting
Refer to this section if you have viewing, picture, sound, remote, or startup problems with your TV.
Startup questions
Symptom Remedy
I do not hear sound at power-on,
even though there is an image.
I do not see an image at power-on.
■ Are the two speaker wires connected at the speaker and on the
TV, and:
■ Is the volume too low? Press the Volume button.
■ Is mute turned on? Press the Mute button, or the Volume button.
■ Are the connections to the input signal source component correct?
Double-check that the cables are properly inserted in the color-coded
connectors.
■ Is the input source powered on? Turn on the set-top box, DVD player,
or other component you are trying to view.
■ Is the correct input signal source selected? Press the Source button on
the remote control and confirm the source is selected.
■ Press the Menu button on the remote control or side of TV:
■ If the OSD appears, check the cables to the input source and
press the source button on the remote control or side of TV to
choose the input source.
■ If the OSD does not display, see the next symptom, “There is no
power.”
■ Did the HP logo display when you turned on the TV? (TV must be in
Standby Mode Low power to see the logo; refer to “Selecting the
Standby Mode (Power Control)” on page 40.)
■ If yes, check the cables to the input source and press the source
button on the remote control or side of TV to choose the input
source.
■ If no, see the next symptom: “There is no power.”
Troubleshooting
There is no power.
■ Press the Power button on the remote control unit.
■ If the indicator on the TV is off, press the Power button on the TV.
■ Is the AC cord disconnected? Make sure both ends of the power cord
are plugged in.
■ Is there power coming from the outlet? Plug in a functional lamp or
other electrical device into the same outlet as the TV to make sure
there is power coming from the outlet.
■ If using a power strip, make sure it is turned on.
Troubleshooting 49
Page 60

Symptom (Continued) Remedy
The unit cannot be operated.
The color is strange, faded, or
misaligned.
The power suddenly turned off.
■ External influences such as lightning and static electricity may cause
■ Adjust the picture tone.
■ Is the room too bright? The picture may look dark in a room that is
■ Check the input signal setting.
■ If watching a component device, make sure the red, blue, and green
■ Is the sleep timer set?
■ Check the power control settings.
■ The unit’s internal temperature has increased. Remove any objects
Viewing questions
Symptom Remedy
I get a poor picture with video signal
input.
Check the following: Improper control setting. Local interference. Cable
interconnections. Adjust picture control as needed. Try another location
for the TV. Be sure that all connections are secure.
improper operation. In this case, operate the unit after first turning on
the power of the TV or unplugging the AC cord and replugging it in
after 1 or 2 minutes.
too bright.
cables are fully inserted into the proper connectors on both ends.
blocking the vent, or clean the vent.
There is no picture or a blue screen,
and I have an external device
controlling the TV.
The picture, with a component input
source connected, is too red, blue, or
green, or has black that is too black
or washed out.
50 HP Plasma HDTV User’s Guide
■ Press the Source button on the remote control and confirm the source
is selected.
■ Verify that the external device or PC power is turned on.
■ Check to see whether the source component is connected.
■ Check the power management function. Is it in standby mode?
■ Connect the source to the TV. Operate the external device or PC
(move the mouse, or press a key).
■ Check to make sure each cable is plugged into the correct color-
coded connector on the TV conncectors and input source connectors.
■ Make sure the cables are plugged in all the way.
■ See “Adjusting the AV picture image” on page 29.
Page 61
Picture quality questions
Symptom Remedy
Part of my picture is cut off, or the
picture is not centered.
My picture image is too large or
too small.
Check the position adjustment settings, and adjust the screen settings
accordingly.
Press the Aspect button on the remote control to select a different picture
image size.
My picture is unstable. Verify that the external device or PC resolution setting is correct. Adjust to
the appropriate resolution.
An afterimage appears on the
screen.
A fixed picture, such as a logo, video game, or computer image, can
cause a permanent afterimage to appear on the plasma TV screen. This
product is not designed to display fixed images for extended periods of
time. Minor occurrences of afterimage may be reduced by running the
White Wash option in the OSD System Menu; see “Using White Wash”
on page 40.
Remote control questions
Symptom Remedy
The remote control does not work. Check the following, and try the proposed solution:
■ Batteries are inserted with polarity aligned.
■ Make sure the remote control batteries are fresh. If they are worn out,
replace the batteries with new batteries.
■ Make sure the remote control is within correct operating range.
■ Make sure the remote sensor window is not under too much light,
direct sunlight, or strong artificial light.
■ Make sure there are no obstacles; check that there is nothing between
the remote control and the sensor window on the display.
■ Make sure the remote control is aimed at your TV and is not farther
than 16.4 feet (5 meters) away.
Troubleshooting
The remote control does not control
other home entertainment equipment.
My universal remote control does not
find an HP TV code.
This is not a universal remote control. It only works with your HP
television.
When you want to program a universal remote control to operate your
HP TV, if HP is not listed in the supported brand codes, use a Philips TV
code. The HP remote control transmits Philips-licensed remote control
codes.
After programming your universal remote control with a Philips TV code,
it can operate your HP TV functions for: volume, mute, power, and input
source.
Troubleshooting 51
Page 62

Page 63

Téléviseur HD à plasma HP
Manuel de l'utilisateur
Téléviseur haute définition à plasma HP PL5060N 50 pouces (127 cm)
Téléviseur haute définition à plasma HP PL4260N 42 pouces (106 cm)
Page 64
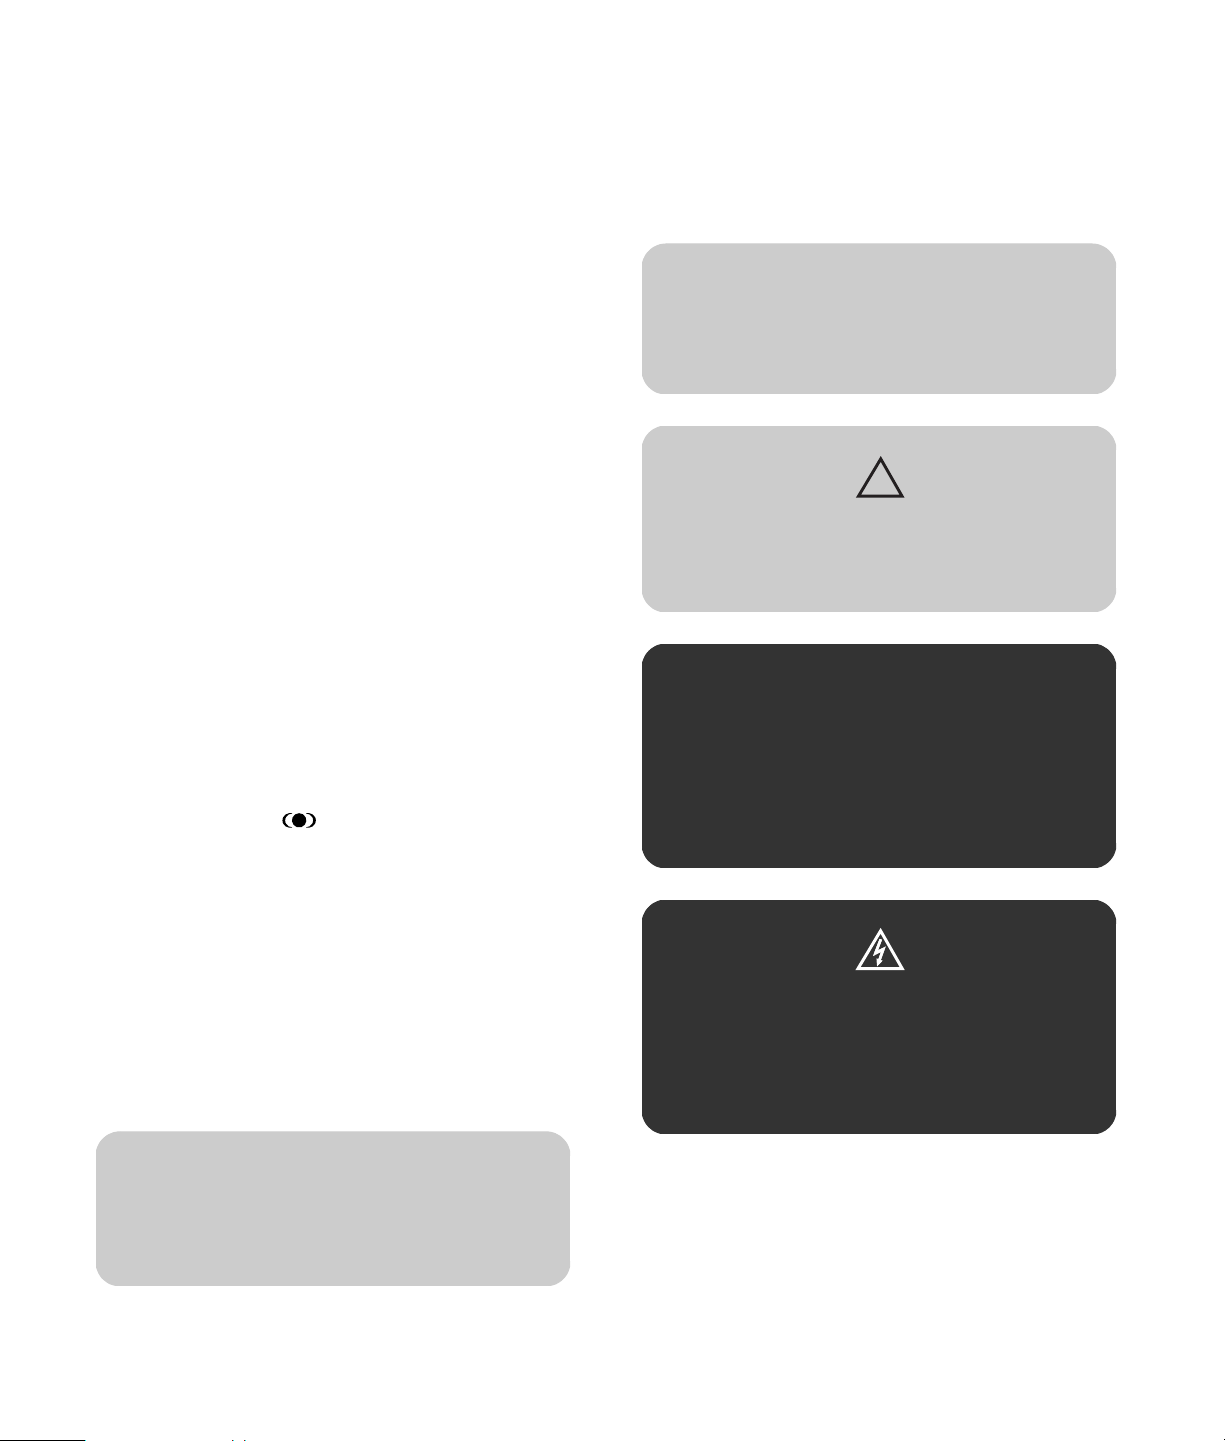
Les garanties des produits et services HP sont exclusivement
présentées dans les déclarations expresses de garantie
accompagnant ces produits et services. Aucun élément de ce
document ne peut être considéré comme une garantie
supplémentaire. La société HP ne saurait être tenue pour responsable
des erreurs ou omissions de nature technique ou rédactionnelle qui
pourraient subsister dans ce document.
La société HP n’assume aucune responsabilité quant à l’utilisation ou
à la fiabilité de ses logiciels sur un matériel qui n’est pas fourni par
HP.
Ce document contient des informations en propriété exclusive
protégées par copyright. Aucune partie de ce document ne peut être
photocopiée, reproduite ou traduite dans une autre langue sans
l'autorisation écrite préalable de HP.
Hewlett-Packard Company
P.O. Box 4010
Cupertino, CA 95015-4010
États-Unis
Copyright © 2006 Hewlett-Packard Development Company, L.P.
Le produit peut faire l’objet d’une licence aux États-Unis en vertu d’un
ou de plusieurs des brevets américains numéros 4 930 158 et
4 930 160 jusqu’au 28 août 2008.
Fabriqué sous licence de Dolby Laboratories. Dolby, Pro Logic et le
symbole du double-D sont des marques de commerce de Dolby
Laboratories.
WOW, SRS et le symbole sont des marques de commerce de
SRS Labs, Inc. La technologie SRS WOW est incorporée sous licence
de SRS Labs, Inc.
HDMI, le logo HDMI et High-Definition Multimedia Interface sont des
marques de commerce ou des marques déposées de HDMI Licensing
LLC.
ENERGY STAR est une marque déposée du gouvernement des ÉtatsUnis.
HP est en faveur d’une utilisation licite des technologies et n’appuie
pas ni n’encourage l’utilisation de produits pour d’autres fins que
celles autorisées par la loi sur les droits d’auteur.
Les informations contenues dans ce document peuvent être modifiées
sans préavis.
tt
!
Cet encadré apporte des informations
importantes qui vous sont nécessaires.
ATTENTION : le non-respect de ces
instructions présente des risques pour le
matériel et les informations qu'il contient.
w
AVERTISSEMENT : Ce symbole avertit
l’utilisateur de la présence d’instructions
d’utilisation et d’entretien (dépannage)
importantes dans la documentation
accompagnant l’appareil.
TENSION DANGEREUSE : Cet encadré
indique la présence, dans le boîtier de
l’appareil, de tensions non isolées
suffisamment élevées pour constituer un
risque d’électrocution des personnes.
n
Cet encadré apporte les informations qui
vous sont nécessaires.
Page 65

Mesures de protection importantes
AVERTISSEMENT : POUR LIMITER LES RISQUES D'INCENDIE OU DE CHOC ÉLECTRIQUE, MAINTENEZ
CET APPAREIL À L’ABRI DE LA PLUIE ET DE L'HUMIDITÉ.
ATTENTION : RISQUE DE CHOC ÉLECTRIQUE w
NE PAS OUVRIR
ATTENTION : POUR LIMITER LES RISQUES DE CHOC ÉLECTRIQUE, N’ENLEVEZ PAS LE CAPOT (NI LE
PANNEAU ARRIÈRE).
CE TÉLÉVISEUR NE CONTIENT AUCUNE PIÈCE RÉPARABLE PAR L’UTILISATEUR.
CONTACTEZ UN PERSONNEL TECHNIQUE QUALIFIÉ POUR TOUTE RÉPARATION.
CE SYMBOLE AVERTIT L’UTILISATEUR DE LA PRÉSENCE DANS LE BOÎTIER DE L’APPAREIL DE
“TENSIONS NON ISOLÉES” SUFFISAMMENT ÉLEVÉES POUR CONSTITUER UN RISQUE DE
CHOC ÉLECTRIQUE POUR LES PERSONNES.
CONTACTEZ UN PERSONNEL TECHNIQUE QUALIFIÉ POUR TOUTE RÉPARATION.
w
ATTENTION : NE PLACEZ PAS CE PRODUIT SUR UN CHARIOT, UN SUPPORT, UN
CE SYMBOLE AVERTIT L’UTILISATEUR DE LA PRÉSENCE D’INSTRUCTIONS D’UTILISATION ET
D’ENTRETIEN (DÉPANNAGE) IMPORTANTES DANS LA DOCUMENTATION
ACCOMPAGNANT L’APPAREIL.
TRÉPIED, UNE BRIDE OU UNE TABLE INSTABLE. IL POURRAIT TOMBER ET
CAUSER DES BLESSURES GRAVES ET SUBIR DES DOMMAGES
IMPORTANTS. UTILISEZ-LE UNIQUEMENT AVEC UN CHARIOT, UN
SUPPORT, UN TRÉPIED, UNE BRIDE OU UNE TABLE RECOMMANDÉS PAR
LE FABRICANT OU VENDUS AVEC L'APPAREIL. SUIVEZ LES CONSIGNES
DU FABRICANT POUR INSTALLER L’APPAREIL ET MONTER LES
ACCESSOIRES QU’IL RECOMMANDE. L’ENSEMBLE APPAREIL/SUPPORT
DOIT ÊTRE DÉPLACÉ AVEC SOIN. LES ARRÊTS INTEMPESTIFS, LA TROP
GRANDE FORCE ET LES SURFACES INÉGALES PEUVENT FAIRE BASCULER
CET ENSEMBLE.
iii
Page 66

INFORMATIONS
Cet équipement a été testé et trouvé conforme aux limites concernant les appareils numériques de classe B, selon les
dispositions de la partie 15 des règles de la FCC. Ces limites sont conçues pour offrir une protection raisonnable
contre les interférences dans une installation résidentielle. Cet équipement produit, utilise et peut émettre de l'énergie
sous forme de radiofréquences. S'il n'est pas utilisé conformément aux instructions, il peut produire des interférences
nuisibles aux communications radio. Cependant, il n'existe aucune garantie assurant qu'il n'y aura pas d'interférence
dans une installation particulière. Si l’utilisateur constate des interférences lors de la réception d'émissions de radio ou
de télévision (il suffit pour le vérifier d'allumer et d'éteindre successivement l'appareil), il devra prendre l’une ou
plusieurs des mesures suivantes pour les éliminer. À cette fin, il devra :
■ Réorienter ou déplacer l'antenne de réception.
■ Augmenter la distance entre l'équipement et le récepteur.
■ Brancher le matériel sur un circuit autre que celui du récepteur.
■ Consulter le distributeur ou demander l'aide d'un technicien de radiotélévision expérimenté.
Avis sur le sous-titrage
Ce récepteur de télévision affiche le sous-titrage conformément aux dispositions de l’alinéa 15.119 de la
réglementation FCC.
Déclaration de la FCC relative à l’Exposition aux Radiations
Cet équipement est conforme aux limitations de la FCC relatives à l’exposition aux radiations dans un environnement
non contrôlé. Cet équipement doit être installé et utilisé en observant une distance minimum de 20 cm entre l’élément
rayonnant et l’utilisateur.
Modifications
La FCC requiert que l’utilisateur soit averti que toute modification de cet équipement non approuvée expressément pas
la société Hewlett-Packard pourrait annuler le droit d'utilisation de l'équipement.
Câbles
Les câbles branchés à cet équipement doivent être blindés et comporter des capots de connecteur métalliques de type
RFI/EMI pour être conformes aux règles et réglementations de la FCC.
PARTIE RESPONSABLE
Hewlett-Packard Company
Attn : Product Regulations Manager
10955 Tantau Avenue
Building 45NL
Cupertino, CA 95014 — États-Unis
Consignes de sécurité importantes
L’électricité remplit de nombreuses fonctions utiles, mais si on l’utilise mal, elle peut occasionner des blessures et des
dégâts matériels. La conception et la fabrication de ce produit ont été prioritairement axées sur une sécurité optimale.
Toutefois, une mauvaise utilisation de l’appareil peut entraîner des risques de choc électrique ou d’incendie. Pour ne
pas courir de tels dangers, respectez les consignes ci-dessous lors de l’installation, de l’utilisation ou du nettoyage du
téléviseur. Par mesure de sécurité et pour prolonger la durée de vie de votre téléviseur, veuillez, avant de l’utiliser, lire
attentivement les consignes de sécurité suivantes :
iv Guide de l'utilisateur du téléviseur HDTV à plasma HP
Page 67

1
Lisez ces instructions.
2 Conservez ces instructions.
3 Tenez compte de tous les avertissements.
4 Suivez toutes les consignes.
5 N'utilisez pas ce téléviseur à proximité de l'eau.
6 Nettoyez uniquement avec un chiffon sec.
7 N’obstruez pas les ouvertures d’aération.
Effectuez une installation conforme aux
instructions du fabricant.
8 N'effectuez pas d'installation près de sources de
chaleur telles que radiateurs, grilles de chauffage,
poêles ou autres appareils (y compris les
amplificateurs) dégageant de la chaleur.
9 N’ignorez pas la consigne de sécurité relative à
la prise polarisée ou avec mise à la terre. Une
prise polarisée comporte deux lames dont l'une
est plus large. Une prise avec mise à la terre
comporte deux lames et une broche pour la mise
à la terre. La prise comporte une lame plus large
ou une broche de mise à la terre pour votre
sécurité. Si la prise fournie ne peut pas être
branchée sur prise de courant, consultez un
électricien afin qu'il remplace la prise inadaptée.
10 Veillez à ce que l’on ne marche pas sur le cordon
d'alimentation ou qu’on ne l’écrase pas, plus
particulièrement aux alentours des raccordements
électriques et des prises de courant et à sa sortie
de l'appareil.
11 Utilisez uniquement les fixations ou accessoires
spécifiés par le fabricant.
12 Utilisez uniquement avec le
chariot, support, trépied, bride
ou table spécifiés par le
fabricant ou vendus avec
l'appareil. Avec un chariot,
prenez toutes les précautions
nécessaires lors du déplacement
de l'ensemble chariot/téléviseur
afin d'éviter qu'il ne bascule et
que vous subissiez des blessures.
13 Débranchez le téléviseur pendant les orages
électriques ou s'il risque de ne pas être utilisé
pendant une longue période.
14 Contactez un personnel technique qualifié pour
toute réparation. Une réparation est nécessaire si
le téléviseur a subi des dommages, si le cordon
d'alimentation ou la prise a été endommagé, si un
liquide a été renversé sur le téléviseur, si des
objets sont tombés dans le téléviseur, si le
téléviseur a été exposé à la pluie ou l'humidité, s'il
ne fonctionne pas normalement ou s'il est tombé.
15 Sources d’énergie — l’alimentation en courant
électrique de cet appareil doit être du type spécifié
sur l’étiquette signalétique. Si vous n’êtes pas sûr
du type d’alimentation en courant électrique de
votre domicile, consultez le distributeur de votre
produit ou l’entreprise locale de distribution du
courant électrique. Pour les appareils alimentés par
des piles ou par d’autres sources d’alimentation,
consultez le mode d’emploi.
16 Surcharge électrique — ne surchargez pas la
capacité électrique des prises murales, des
rallonges ou des prises de courant intégrales pour
ne pas générer de risques d’incendie ou de choc
électrique.
17 Pièces de rechange — si des pièces doivent être
remplacées, assurez-vous que le technicien utilise
bien les pièces de rechange prescrites par le
fabricant ou ayant les mêmes caractéristiques que
les pièces d’origine. L’utilisation de pièces non
autorisées peut occasionner des risques
d’incendie, de choc électrique et d’autres
dangers.
18 Vérification de sécurité — après une opération de
maintenance ou de réparation du téléviseur,
demandez au technicien d’effectuer les
vérifications de sécurité nécessaires pour vous
assurer que l’appareil est en bon état de
fonctionnement.
19 L’appareil ne doit pas être exposé à des fuites ou
à des projections de liquide et aucun objet
contenant un liquide, tels les vases, ne doit être
placé sur le téléviseur.
20 AVERTISSEMENT : Branchez le cordon
d’alimentation à une prise de courant électrique
dans un endroit où le connecteur du cordon
d’alimentation est accessible facilement, dans le
cas où l’alimentation devrait être débranchée.
21 Entretien et réparation : L’utilisateur ne doit
pas tenter d’entretenir ou réparer l’appareil en
dehors des consignes du mode d’emploi.
Contactez un personnel technique qualifié pour
toute autre opération d’entretien ou de réparation.
v
Page 68

■ Eau et Humidité — Ne pas utiliser cet appareil près de l’eau, comme par exemple une baignoire, une bassine, un
évier de cuisine, un bac de buanderie, dans une cave humide, près d’une piscine, ou dans tout autre endroit de
ce type.
■ Support — ne placez pas ce produit sur un chariot, un support, un trépied, une bride ou une table instable. S’il est
placé sur une base instable, l’appareil peut tomber et provoquer des blessures graves ou s’endommager. Utilisez
uniquement un meuble roulant, un support, un trépied, une fixation ou une table recommandés par le fabricant ou
vendus avec l’appareil.
■ Sélection de l’emplacement — Sélectionnez un emplacement à l’abri de la lumière directe du soleil et bien ventilé.
■ Aération — les évents et autres ouvertures d’aération du cadre sont destinés à l’aération uniquement. Ne les
recouvrez pas et ne les obstruez pas car une aération insuffisante risquerait de provoquer une surchauffe ou
réduire la durée de vie de l’appareil. Ne placez pas l’appareil sur un lit, un canapé, un tapis ou toute autre
surface similaire qui risque d’obstruer les ouvertures d’aération. Ce produit n’est pas prévu pour être encastré. Il
ne doit pas être placé dans des endroits clos tels que des bibliothèques ou des étagères, sauf avec une ventilation
adéquate ou en cas d’instructions spécifiques du fabricant.
■ Le panneau d'affichage de cet appareil est en verre. Il risque donc de se briser s’il tombe ou s’il subit un choc.
Faites attention à ne pas vous blesser sur les éclats de verre en cas de casse du panneau d’affichage.
■ Chaleur — Cet appareil doit être placé loin de sources de chaleur telles que cheminées, radiateurs, grilles de
chauffage, poêles ou autres appareils (y compris les amplificateurs) dégageant de la chaleur.
■ Précautions d’utilisation dans des environnements de température élevée ou basse :
Lorsque l’appareil est utilisé dans un espace à température ambiante basse (par ex. une pièce, un bureau),
l’image peut laisser des traces ou apparaître légèrement différée. Il ne s’agit pas d’un fonctionnement défectueux,
l’appareil fonctionnera de nouveau normalement dès que la température redeviendra normale.
Ne laissez pas l’appareil dans un endroit chaud ou froid. De la même manière, n'exposez pas l’appareil à la
lumière directe du soleil et ne le laissez pas à proximité d’un appareil de chauffage, leur rayonnement pouvant
entraîner la déformation du cadre et un dysfonctionnement du panneau d'affichage. Température de stockage :
de –20° C à +60° C. Température de fonctionnement : de 0° C à 40° C.
■ Précautions lors du transport du téléviseur — lors du déplacement du téléviseur, ne le transportez pas en le tenant
par le haut-parleur. Assurez-vous de transporter le téléviseur à deux, utilisant vos deux mains placées de chaque
côté de l’écran.
■ Foudre — pour mieux protéger ce téléviseur pendant un orage électrique ou lorsqu’il doit rester longtemps sans
surveillance ou inutilisé, débranchez-le de la prise murale et déconnectez l’antenne. Cela protègera votre
équipement contre les dommages dus aux orages et aux pics de tension.
■ Lignes électriques — l’antenne extérieure ne doit pas être installée à proximité de lignes électriques aériennes ou
d’autres réseau d’éclairage ou de distribution électrique, ou de telle sorte qu’elle risque de tomber sur ces lignes
ou réseaux électriques. Lors de la pose d’une antenne extérieure, prendre toutes les précautions nécessaires afin
d’éviter tout contact avec les lignes à haute-tension ou divers circuits électriques, un tel contact pourrant s’avérer
fatal.
vi Guide de l'utilisateur du téléviseur HDTV à plasma HP
Page 69
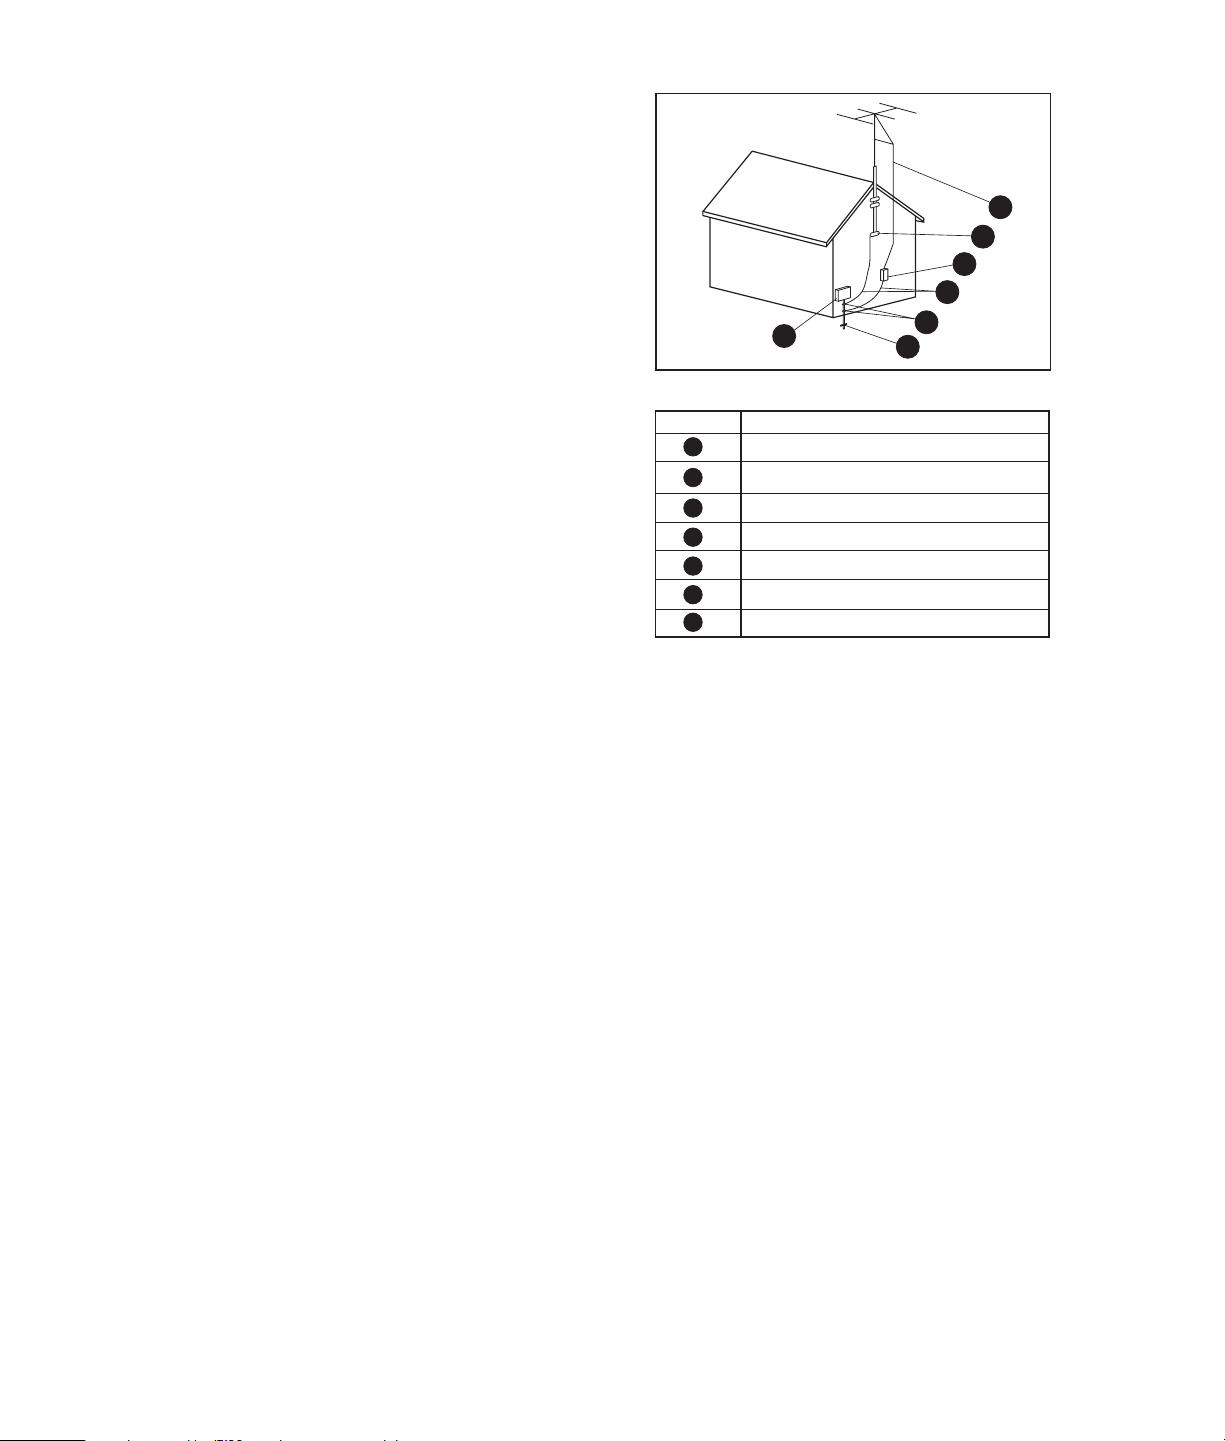
■ Mise à la terre de l’antenne extérieure — si une
antenne extérieure est connectée à cet appareil,
assurez-vous que l'antenne est électriquement mise
à la terre, de façon à vous protéger contre les
surtensions et l’accumulation de charges
d'électricité statique. L'article 810 du code
national de l’électricité (National Electrical Code)
des États-Unis, ANSI/NFPA 70, fournit des
informations sur la mise à la terre correcte du mât
d’antenne et de sa structure de base, sur la mise à
la terre de la descente d’antenne à une unité de
1
décharge d’antenne, sur la section des
conducteurs de mise à la terre, sur l'emplacement
de l’unité de décharge d’antenne, sur le
raccordement des électrodes de mise à la terre et
sur les spécifications requises de l'électrode de
mise à la terre.
■ Afin d’éviter les risques d’incendies, ne jamais placer une bougie ou tout autre type de flamme au dessus ou à
Mise à la terre de l’antenne
Mise à la terre de l’antenne
Référence
1
2
3
4
5
6
7
Matériel de mise à la terre
Boîtier de distribution électrique
Systèmes d’électrodes de mise à la terre du
réseau électrique (art. 250 du NEC, Partie H)
Pince de mise à la terre
Conducteurs de mise à la masse (Section 810-21 du NEC)
Unité de décharge d’antenne (Section 810-20 du NEC)
Pince de mise à la terre
Fil conducteur de l’antenne
3
2
7
6
5
4
proximité du téléviseur.
■ Pour éviter les risques d’incendie ou de choc électrique, veillez à ne pas exposer cet appareil à des fuites ou à
des projections de liquide. Aucun objet contenant du liquide, tel qu’un vase, ne doit être placé sur cet appareil.
■ Afin d’éviter tout risque d’incendie ou de choc électrique, ne pas placer le cordon d’alimentation sous le téléviseur
ou tout autre objet lourd.
■ Mettez l’alimentation principale hors tension et débranchez le cordon secteur de la prise murale avant toute
manipulation.
■ Utilisez un chiffon doux et essuyez délicatement la surface de l’écran du téléviseur. Un chiffon abrasif risquerait de
rayer l’écran.
■ Utilisez un chiffon doux et mouillé pour essuyer délicatement l’écran s’il est vraiment sale. (Si vous frottez fort,
vous risquez de rayer la surface de l’écran.)
■ Si l’écran est poussiéreux, utilisez, pour le nettoyer, une brosse antistatique en vente dans le commerce.
■ Pour préserver l’écran, n’utilisez pas de chiffon sale, de détergents liquides ou de chiffons abrasifs pour le
nettoyer, car de telles substances risqueraient d’endommager sa surface.
vii
Page 70

Informations importantes
Ce téléviseur ne peut être entretenu et réparé que par
un technicien de maintenance autorisé. Le téléviseur ne
peut pas être entretenu ou réparé par l’utilisateur.
Toute modification apportée à votre téléviseur est
susceptible d’annuler votre garantie. Tout changement
ou modification sans une autorisation expresse en ce
sens du fabricant pourrait annuler le droit d’utiliser
l'équipement.
Informations sur le recyclage
Pour obtenir des informations sur les conditions de
recyclage de votre téléviseur par HP, reportez-vous à la
rubrique :
http://www.hp.com/recycle
D’autres possibilités de recyclage sont disponibles
dans votre région. Si vous êtes basé aux États-Unis ou
au Canada, vous pouvez également appeler
gratuitement le (1) (888) 485-1849.
Conformité à la norme ENERGY STAR
Les produits dont l’emballage porte le
logo ENERGY STAR respectent les
directives ENERGY STAR de l’agence
américaine de protection de
l’environnement concernant le
rendement énergétique.
Les produits qui portent le logo ENERGY STAR sont
conçus pour utiliser moins d’énergie, ce qui vous
permet de réduire votre facture d’électricité et de
protéger l’environnement.
ENERGY STAR est une marque déposée du
gouvernement des États-Unis.
Précautions de nettoyage
Débranchez le téléviseur avant de nettoyer l’écran.
L’utilisation de solvants, comme l’alcool, ou de
matières abrasives comme les lingettes humidifiées ou
traitées chimiquement, peut altérer le téléviseur ou la
peinture du cache.
Ne pas exposer le produit à un gaz volatil ou à des
fluides comme les pesticides.
Le téléviseur ne doit pas être mis en contact avec des
produits en vinyle ou en caoutchouc pendant une
longue période de temps. Un contact prolongé peut
entraîner le retrait ou la dégradation de la surface.
n
Ne laissez pas d'image affichée pendant
une période prolongée sous peine de
laisser une image rémanente en
permanence sur le téléviseur à plasma.
Des exemples d'images fixes incluent entre
autres : logos, jeux vidéo, images
informatiques, télétexte et images affichés
en mode 4:3.
n
Protection contre la rémanence d’image : Si
des images fixes s’affichent pendant
plusieurs minutes, la fonction de
prévention d’images rémanentes s’active
automatiquement pour protéger l'écran. Si
l’image disparaît, modifiez l'image ou la
source d’entrée pour afficher une image.
Précautions de manipulation
Le téléviseur est très lourd ; assurez-vous d’adopter une
position ergonomique lors de sa manipulation.
En raison de sa taille et de son poids, un minimum de
deux personnes est recommandé pour déplacer le
téléviseur.
Lors d'un transport, utilisez les poignées situées à
l'arrière du téléviseur ou soulevez le poste en le
maintenant par les parties inférieure et supérieure de
l’écran.
Si les haut-parleurs sont fixés à l’écran, ne portez pas
l’écran par les haut-parleurs, mais utilisez les poignées
situées à l'arrière du téléviseur ou soulevez le poste
par ses parties inférieure et supérieure.
Ne jamais poser l’écran sur sa surface vitrée, à moins
d’utiliser des tampons pour le protéger.
viii Guide de l'utilisateur du téléviseur HDTV à plasma HP
Page 71

g
Table des matières
Mesures de protection importantes................... iii
Modifications .................................................iv
Câbles ..........................................................iv
Consignes de sécurité importantes ....................iv
Informations importantes................................ viii
Découvrir votre téléviseur ............... 1
Identification des éléments compris dans la
livraison ..............................................................2
Emplacements des boutons et des connecteurs du
téléviseur ............................................................. 3
Nettoyage ........................................................... 6
Précautions de nettoyage.................................6
Nettoyage du téléviseur...................................6
Installation ..................................... 7
Choix d’un bon emplacement ................................ 7
Manipulation du téléviseur............................... 8
Fixation ou démontage du socle ....................... 8
Installation du téléviseur ........................................ 9
Fixation et branchement des haut-parleurs du
téléviseur ....................................................... 9
Raccordement des sources de signal du
téléviseur ..................................................... 10
Raccordement de la TV câblée ou d’une antenne
hertzienne.................................................... 11
Connexion du câble ou du satellite à l’aide d’un
boîtier décodeur........................................... 11
Raccordement d’un lecteur de DVD, d'un
magnétoscope, d'une console de jeu ou d'un
caméscope .................................................. 12
Raccordement
d’un magnétoscope pour l’enregistrement........ 15
Raccordement d'un ordinateur........................ 15
Raccordement d'un système de son externe......16
Mise sous tension du téléviseur ....................... 16
Mise en marche du téléviseur ........17
Mise du téléviseur sur marche ou sur arrêt (veille) ...17
Utilisation de l'assistant de
configurationn lors du premier
démarrage ....................................19
Installation initiale...............................................19
Table des matières
Utilisation de la télécommande......21
Contrôle du téléviseur..........................................21
Utilisation d'une télécommande universelle.......21
Installation ou remplacement des piles de la
télécommande ..............................................21
Identification des touches de la
télécommande ..............................................22
Ajustement du volume..........................................24
Mise en sourdine ..........................................24
Modification du mode Image ...............................24
Changement de canal .........................................24
Sélection du dernier canal..............................24
Affichage des informations du programme .......24
Sélection de la source d’entrée.............................25
Modification de l'affichage avec la touche Aspect ..25
Activation des sous-titres ......................................25
Réglage du mode stéréo SAP/MTS .......................26
Changement de mode audio................................26
Réglage du minuteur de sommeil ..........................26
Ajustement des paramètres du téléviseur ................26
Activation et désactivation de l’affichage à l’écran
(OSD)..........................................................26
Table des matières ix
Page 72

Modification des paramètres du
téléviseur ......................................27
Utilisation des menus OSD................................... 27
Utilisation du menu Image ................................... 28
Ajustement de l’image................................... 29
Utilisation du Menu Audio ................................... 30
Ajustement audio.......................................... 30
Utilisation du Menu Heure ................................... 31
Utilisation du Menu Canal ................................... 31
Utilisation du menu Sous-titrage............................ 33
Utilisation du menu Ctrl parental .......................... 34
Utilisation du mot de passe ............................ 35
Réglage de la fonction Ctrl parental................ 35
Désactivation provisoire du blocage d'un
programme.................................................. 39
Réactivation du contrôle parental après une
désactivation temporaire ............................... 39
Utilisation du menu Système................................. 40
Lancement de l'assistant de configuration ........40
Rétablissement des paramètres par défaut ....... 40
Utilisation de White Wash.............................40
Sélection du mode Veille (Commande
d'alimentation) ............................................. 40
Réponses aux questions................ 41
Compréhension de la terminologie de la
télévision ...........................................................41
Qu’est-ce que la télévision analogique, la télévision
numérique et la télévision haute définition
(HDTV) ?......................................................41
Quelle est la différence, pour la télévision
numérique, entre le format de signaux entrelacés et
le format des signaux progressifs ?..................41
Qu’est-ce qu’un rapport de côtés variable ? .....41
Qu’est-ce que la technologie HDMI ? ..............42
Identification l’utilisation du câble .........................42
Caractéristiques techniques ........... 45
Graphique de compatibilité avec l'ordinateur.........48
Dépannage................................... 49
x Guide de l'utilisateur du téléviseur HDTV à plasma HP
Page 73

Découvrir votre téléviseur
Nous vous remercions d'avoir acheté un téléviseur
haute définition à plasma HP. La gamme HP de
téléviseurs haute définition fournit une qualité d'image
exceptionnelle dans un design élégant et stylisé.
Caractéristiques :
■ Une précision exceptionnelle de l'image avec des
noirs profonds et des images claires et lumineuses
qui animent les détails les plus fins, grâce à un
moteur vidéo avancé qui offre un ajustement
dynamique du contraste et une amélioration de la
netteté photoréaliste. Ce téléviseur HP est doté
d'un système d'optimisation des couleurs 2D à
filtre en peigne qui reproduit les tons carnés
exacts et les couleurs vives.
■ Une qualité sonore remarquable émane de deux
haut-parleurs détachables. Chaque haut-parleur
fournit un son puissant via deux haut-parleurs de
registre moyen et un d'aigus. Le système de hautparleurs haute fidélité HP est accompagné d'une
technologie de traitement audio SRS WOW, qui
améliore la clarté vocale et les performances des
graves pour une expérience sonore immersive.
■ Une gamme étendue d'entrées numériques et
analogiques, comprenant un syntoniseur HDTV
intégré, HDMI et des ports vidéo en composantes.
Des connecteurs de sortie audio analogiques et
numériques permettent une connectivité
transparente à des haut-parleurs audio externes
ou à un récepteur audio.
■ Un panneau de finition noire classique qui se
mêle à n'importe quel décor. Le support de
plateau est élégant, stylisé et détachable.
■ L'amélioration de la netteté photoréaliste produit
des images nettes et claires comme du cristal.
■ L'adaptation dynamique du contraste, qui permet
d'ajuster la qualité d'image scène par scène.
■ La réduction du bruit adaptable au mouvement,
qui réduit considérablement le bruit visuel sans
diminuer le niveau de détail.
■ La technologie avancée de redimensionnement et
de traitement de film, qui permet de regarder des
DVD et des programmes TV de définition standard
sur un grand écran.
■ Un syntoniseur analogique/HDTV numérique
intégré — pour des programmes haute définition
à partir de sources par câble ou par voie
hertzienne.
■ Un port HDMI qui permet la vidéo et l'audio
numérique par un seul câble.
■ Une technologie de protection des images
statiques qui garantit une longue durée de vie du
panneau.
■ Un panneau ultra longue durée qui garantit
jusqu'à 60 000 heures de fonctionnement.
Toutes les indications de performance représentent le niveau typique
atteint par les fabricants de composants pour HP ; les performances
constatées peuvent varier, au-dessus ou en-dessous de ce niveau.
La durée de vie du panneau est considérée comme le moment où la
luminosité est égale à 50 % de la valeur initiale du courant typique
de la lampe, dans des conditions de fonctionnement continu à +/25 °C. 60 000 heures correspondent à plus de vingt-trois années
d'utilisation à raison de sept heures par jour.
Découvrir votre téléviseur
Découvrir votre téléviseur 1
Page 74
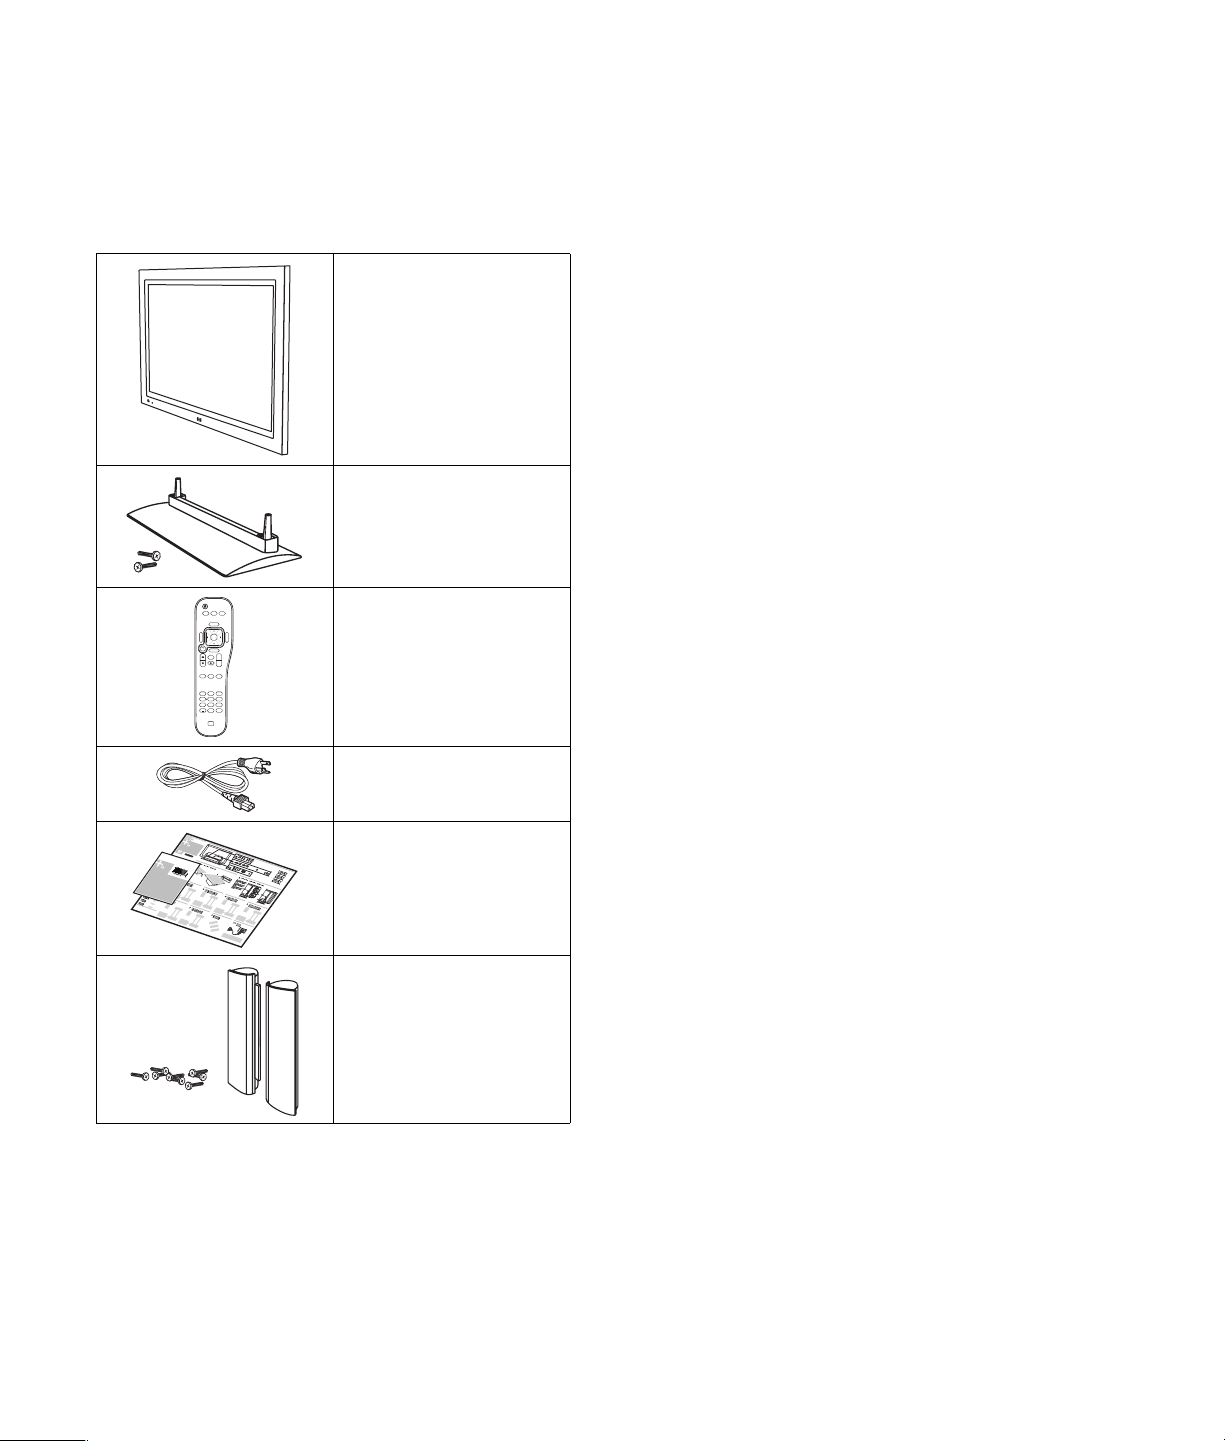
Identification des
éléments compris
dans la livraison
Téléviseur (panneau
avec socle détaché)
Socle du téléviseur et
accessoires de
montage
SAP
Sound
Menu
back
CC Sleep Ant
1
4
7
Picture
MTS
Source
OK
Aspect
Info
Ch+
Last
Ch-
3
2
6
5
89
Enter
0
Télécommande
Cordon secteur
Documentation
Haut-parleurs du
téléviseur avec leurs
accessoires de
montage
2 Guide de l'utilisateur du téléviseur HDTV à plasma HP
Page 75
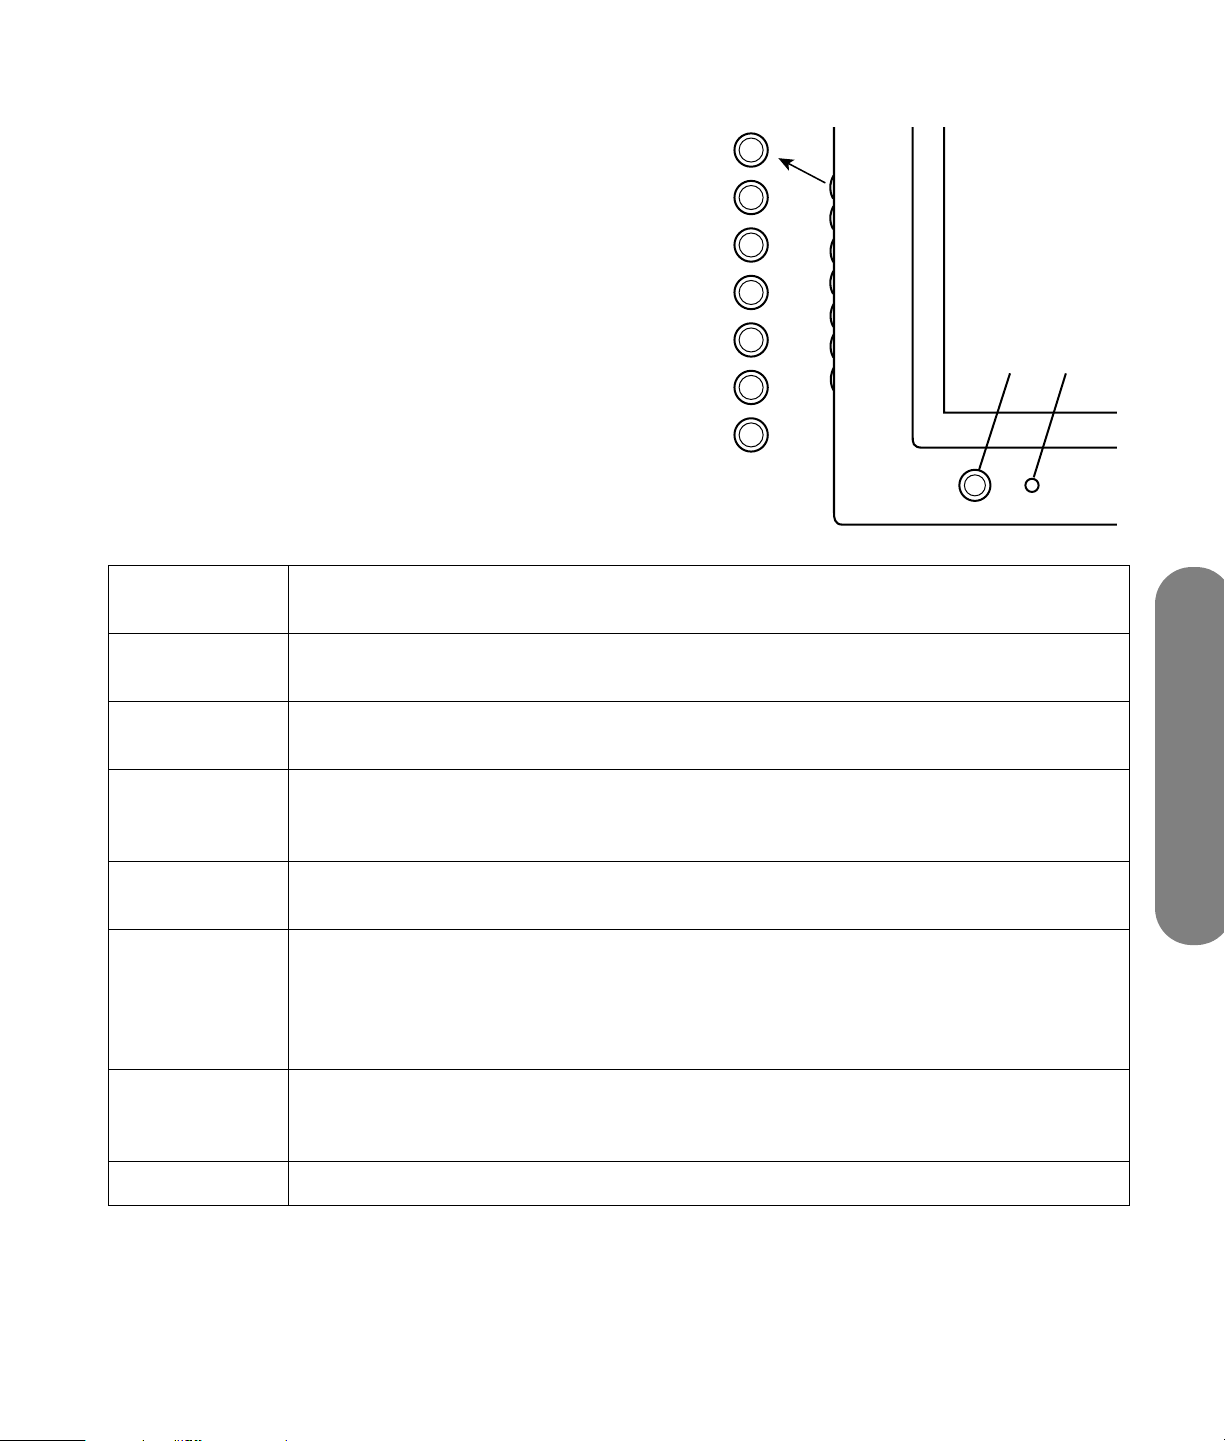
Emplacements des
Face avant du téléviseur
boutons et des
connecteurs du téléviseur
Le téléviseur est équipé de commandes, de voyants et
de connecteurs.
Les voyants se trouvent sur la face avant du téléviseur
et les commandes sur le côté gauche.
Téléviseur
(face avant) Description
MENU Menu affiche les menus d'affichage à l'écran (OSD) ou des fonctions telles que la touche
Quitter pour fermer l'OSD.
OK OK démarre la fonction Sync. Auto. pour un signal PC connecté. Dans un menu OSD, ce
bouton sélectionne l’élément mis en surbrillance sur l'affichage à l'écran.
MENU
OK
+
VOL
–
+
CH
–
SRC
A
B
+VOL
–VOL
+CH
–CH
SRC Source sélectionne la source d'entrée. Utilisez la touche Source pour ouvrir la liste des
A : Bouton et
témoin
d’alimentation
B : Télécapteur Le télécapteur est le point sur lequel la télécommande doit être dirigée.
Volume diminue ou augmente le niveau sonore. Dans un menu OSD, appuyez sur ces
boutons pour vous déplacer vers la droite ou vers la gauche dans le menu ou pour ajuster un
élément.
Canal sélectionne le canal inférieur ou supérieur suivant. Dans un menu OSD, appuyez sur
ces boutons pour vous déplacer vers le haut ou vers le bas du menu.
sources d'entrée. Utilisez la touche Canal pour sélectionner la source d'entrée, puis appuyez
sur OK. Utilisez la touche Source pour fermer la liste. Dans un menu OSD, ce bouton
fonctionne comme le bouton Précédent ou sert à passer à l'élément ou au niveau de menu
supérieur.
Marche/Arrêt
si le téléviseur est en marche ou désactivé/en veille. Le voyant est bleu lorsque le téléviseur est
en marche et rouge lorsque celui-ci est désactivé ou en mode Veille.
met le téléviseur en marche ou en mode Veille. Le voyant du bouton indique
Découvrir votre téléviseur 3
Découvrir votre téléviseur
Page 76
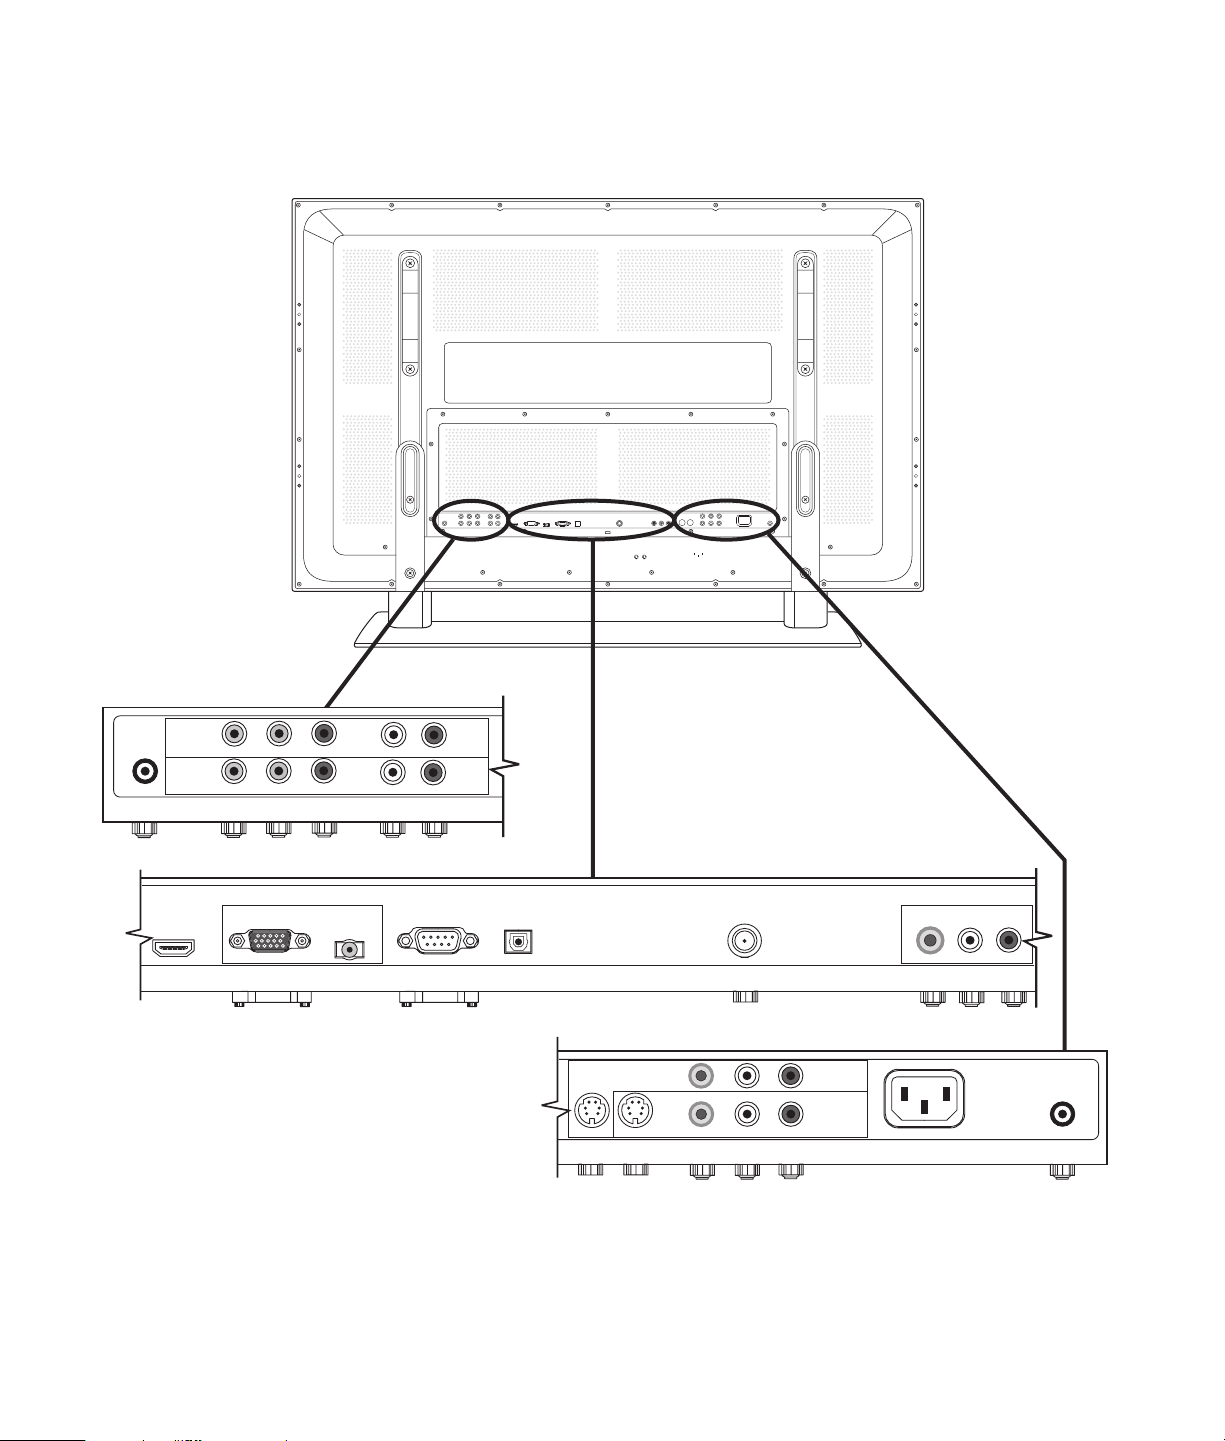
Connecteurs à l’arrière du téléviseur
Les connecteurs sont placés à l'arrière du téléviseur.
Les connecteurs indiqués ci-dessous sont situés sur le côté gauche, droite et au centre de la face arrière du téléviseur.
SPEAKER R
COMPONENT 1
COMPONENT 2
HDMI
Y PR/CR
PB/CB
PR/CRY
PB/CB L/MONO
PC/DVI AUDIO IN
L/MONO
COMPONENT 2
AUDIO 4 IN
Y PR/CR
PB/CB
COMPONENT 1
PR/CRY
SPEAKER R
PB/CB L/MONO
COMP 1
AUDIO IN
R
COMP 2
AUDIO IN
R
PC/DVI AUDIO IN
R
L/MONO
HDMI
AUDIO 3 IN
R
RF INPUTRS232PC
DIGITAL AUDIO OUT
VIDEO OUT
L/MONO
AUDIO OUT S-VIDEO 1 S-VIDEO 2
DIGITAL AUDIO OUT
VIDEO 1 IN
AUDIO 1 IN
R
VIDEO 1 IN
RRL
SPEAKER L
AUDIO 2 IN
AC IN
L/MONO
VIDEO 2 IN
RRF INPUTRS232PC
L/MONO
AUDIO OUT
VIDEO OUT
R
L
VIDEO 1 AUDIO IN
SPEAKER L
VIDEO 2 AUDIO IN
S-VIDEO 1 S-VIDEO 2
VIDEO 2 IN
L/MONO
R
AC IN
4 Guide de l'utilisateur du téléviseur HDTV à plasma HP
Page 77
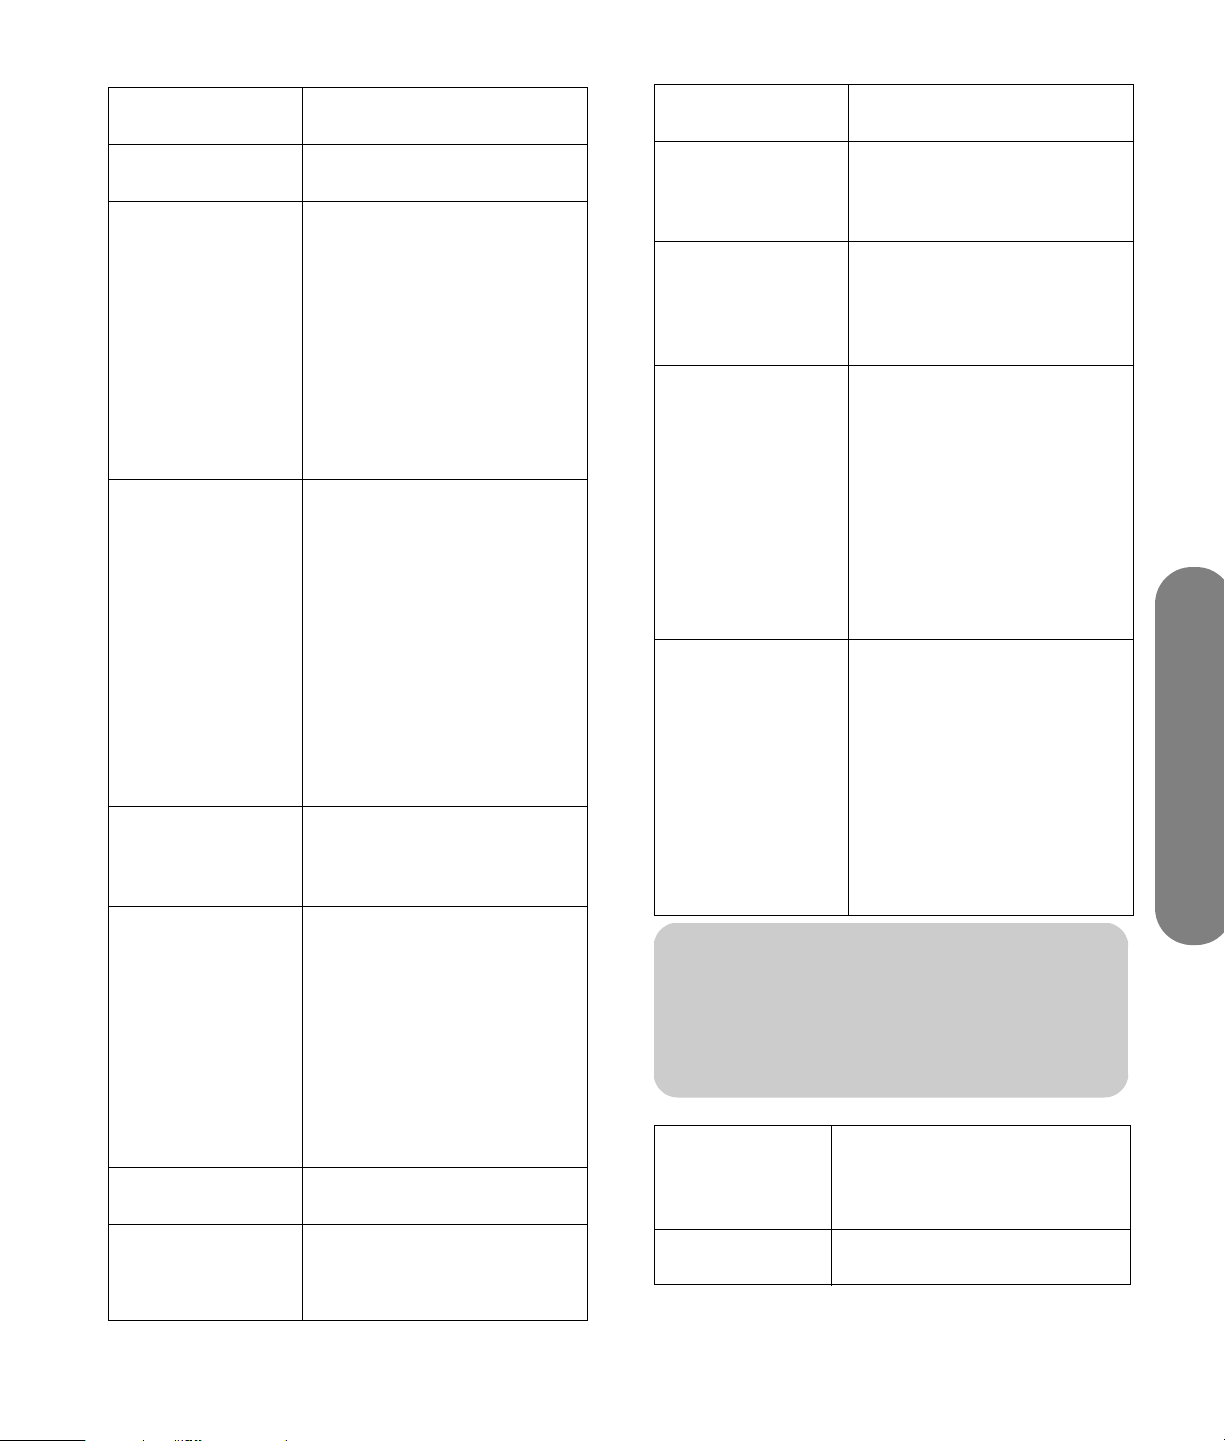
Téléviseur (face
arrière) Description
■ Speaker R
(Haut-parleur D)
■ Component 1
Comp 1 Audio
In (Entrée audio
comp. 1)
■ Component 2
Comp 2 Audio
In (Entrée audio
comp. 2)
Connectez le fil du haut-parleur
de droite.
Branchez les câbles vidéo en
composantes et les câbles
audio droite-gauche de
l’équipement en option. Prend
en charge les entrées standard
au format 480p, 720p et
1080p. Le téléviseur reconnaît
automatiquement ce qui est
branché. Certains boîtiers
décodeurs doivent être réglés
pour une sortie d'une résolution
spécifique.
■ HDMI ■ Connectez un câble HDMI
(High-Definition Multimedia
Interface) à un équipement
numérique haute définition
en option.
Ou
■ Connectez un câble DVI et
un convertisseur DVI-HDMI
à partir d'un équipement
DVI en option ; requiert la
connexion d'un câble
audio entre l'équipement
DVI et l'entrée audio PC/
DVI.
■ PC
Connectez un câble VGA à
partir de l'ordinateur pour
utiliser le téléviseur comme
moniteur.
■ PC/DVI Audio
In (Entrée audio
PC/DVI)
■ Connectez un câble audio
à partir de la sortie audio
PC en option.
Ou
■ Connectez un câble audio
à partir de l'équipement
DVI en option (connecté à
l'aide d'un câble DVI et
d'un convertisseur
DVI-HDMI au connecteur
HDMI).
■ RS232
Utilisé pour les
services uniquement.
■ Digital Audio
Out (Sortie
audio
Connectez un câble optique à
un système audio numérique
externe.
numérique)
Téléviseur (face
arrière) Description (suite)
■ RF Input (Entrée
RF)
Connectez un câble coaxial à
partir d'une antenne hertzienne
ou d'une source de signal par
câble.
■ Video Out
Audio Out
(Sortie audio)
Branchez les câbles vidéo
composite et audio droitegauche de l’équipement en
option à des fins de contrôle et
d'enregistrement vidéo.
■ S-video 1
(S-vidéo 1)
Video 1 Audio
In (Entrée audio
vidéo 1)
■ S-video 2
(S-vidéo 2)
Video 2 Audio
In (Entrée audio
vidéo 2)
Branchez un câble S-vidéo et
les câbles audio droite-gauche
de l’équipement en option.
Utilisez Video 1 Audio In
(Entrée audio vidéo 1) pour
S-video 1 (S-vidéo 1) et Video
2 Audio In (Entrée audio vidéo
2) pour S-video 2 (S-vidéo 2).
(Les connecteurs audio sont
partagés avec l'entrée vidéo
(Video In).
■ Video1 In
(Entrée vidéo 1)
Video 1 Audio
In (Entrée audio
vidéo 1)
■ Video 2 In
(Entrée vidéo 2)
Video 2 Audio
In (Entrée audio
vidéo 2)
Branchez un câble vidéo
composite et les câbles audio
droite-gauche de l’équipement
en option.
Utilisez Video 1 Audio In
(Entrée audio vidéo 1) pour
Video 1 (Vidéo 1) et Video 2
Audio In (Entrée audio vidéo 2)
pour Video 2 (Vidéo 2).
(Les connecteurs audio sont
partagés avec S-vidéo.)
!
Ne reliez pas les câbles vidéo aux deux
connecteurs S-vidéo et Video In
d'un téléviseur.
■ AC In
(Entrée courant
alternatif)
■ Speaker L
(Haut-parleur G)
Branchez le
cordon d'alimentation fourni.
REMARQUE : N’utilisez que le
cordon d'alimentation fourni.
Connectez le fil du haut-parleur
de gauche.
Découvrir votre téléviseur
Découvrir votre téléviseur 5
Page 78

Nettoyage
Précautions de nettoyage
Débranchez le téléviseur avant de nettoyer l’écran.
L’écran de votre téléviseur est traité avec un revêtement
antireflet spécial. L’utilisation de solvants, comme
l’alcool, ou de matières abrasives comme les lingettes
humidifiées ou traitées chimiquement, peut altérer le
revêtement de l’écran ou la peinture du cache.
Ne pas exposer le produit à un gaz volatil ou à des
fluides comme les pesticides.
Le téléviseur ne doit pas être mis en contact avec des
produits en vinyle ou en caoutchouc pendant une
longue période de temps. Un contact prolongé peut
entraîner la détérioration du revêtement ou la
dégradation de la surface.
n
Ne laissez pas d'image affichée pendant
une période prolongée sous peine de
laisser une image rémanente en
permanence sur le téléviseur à plasma.
Nettoyage du téléviseur
Nettoyez l’écran en passant un chiffon doux non
pelucheux, légèrement humidifié avec de l’eau.
Nettoyez l’écran avec précaution en évitant de faire
pression dessus.
Employez la même méthode pour nettoyer le cadre
extérieur.
N'utilisez pas de nettoyants liquides ou en aérosol.
Des exemples d'images fixes incluent entre
autres : logos, jeux vidéo, images
informatiques, télétexte et images affichés
en mode 4:3.
6 Guide de l'utilisateur du téléviseur HDTV à plasma HP
Page 79
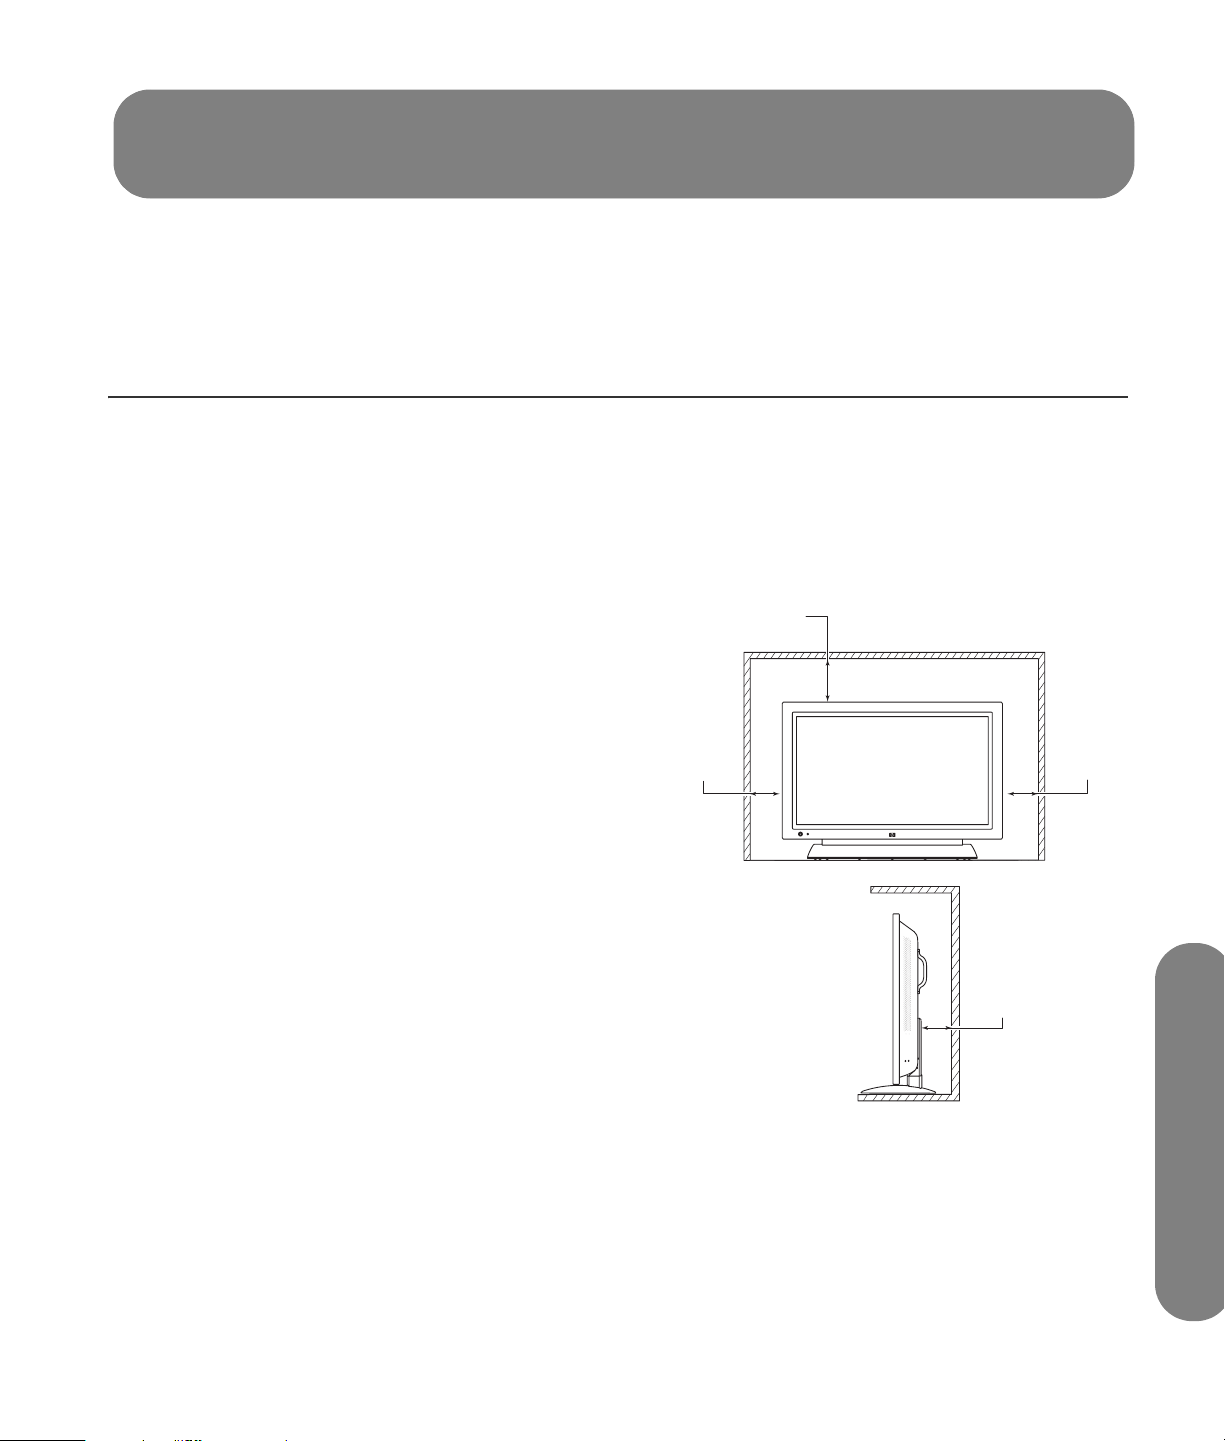
8
Installation
HP recommande une installation professionnelle par un installateur autorisé afin d’optimiser l’utilisation de votre téléviseur
HDTV à plasma HP. Veillez à bien lire toutes les informations de sécurité et les précautions d’usage avant de commencer
l’installation. Consultez les rubriques suivantes :
■ Mesures de protection importantes à la page iii
■ Consignes de sécurité importantes à la page iv
Choix d’un bon emplacement
■ Informations importantes à la page viii
Choisissez l’emplacement de votre téléviseur HDTV à
plasma HP. Tenez compte des conditions suivantes au
moment de placer le téléviseur :
■ la longueur du cordon d’alimentation ; choisissez un
emplacement avec un accès facile à la prise de
courant électrique.
■ la longueur du cordon et l’éloignement des
périphériques ; vérifiez que les câbles accèdent au
téléviseur.
■ N’installez pas votre téléviseur sur un chariot ou un
support instable ; l’appareil pourrait tomber et ainsi
entraîner des risques de blessure.
■ N’installez pas votre téléviseur sur un support trop
petit, comme une petite table où l’écran déborderait
de la surface de la table.
■ N’accrochez pas le téléviseur au plafond, l’appareil
pourrait tomber et provoquer des dommages
corporels.
■ Évitez l’exposition directe aux rayons de soleil qui
pourraient endommager l’appareil ou gêner le
fonctionnement de la télécommande.
■ Évitez les zones très humides ou dégageant de la
vapeur d’eau qui pourraient occasionner des risques
d’incendie ou de choc électrique.
■ N’installez pas le téléviseur près d’autres appareils
électriques, comme un four à micro-ondes, ni près
d’une source de chaleur, comme une cheminée ou un
radiateur.
■ Ne placez pas le téléviseur sur une surface inclinée
ou instable.
■ Prévoyez un espace d’aération suffisant autour du
téléviseur. Avec un socle, laissez un espace
de 10 cm ou plus en haut, à gauche et à droite ; un
espace de 6 cm ou plus en bas et un espace de
7 cm ou plus à l'arrière. Avec toute autre méthode,
laissez un espace de 10 cm ou plus en haut, en bas,
à gauche et à droite et un espace de 1,9 cm ou plus
à l'arrière.
A
B
B
C
A 10 cm au minimum au-dessus du
téléviseur
B 10 cm au minimum sur les côtés
C 7 cm au minimum derrière le téléviseur
Remarque : les haut-parleurs ne sont pas
représentés.
Installation
Installation 7
Page 80
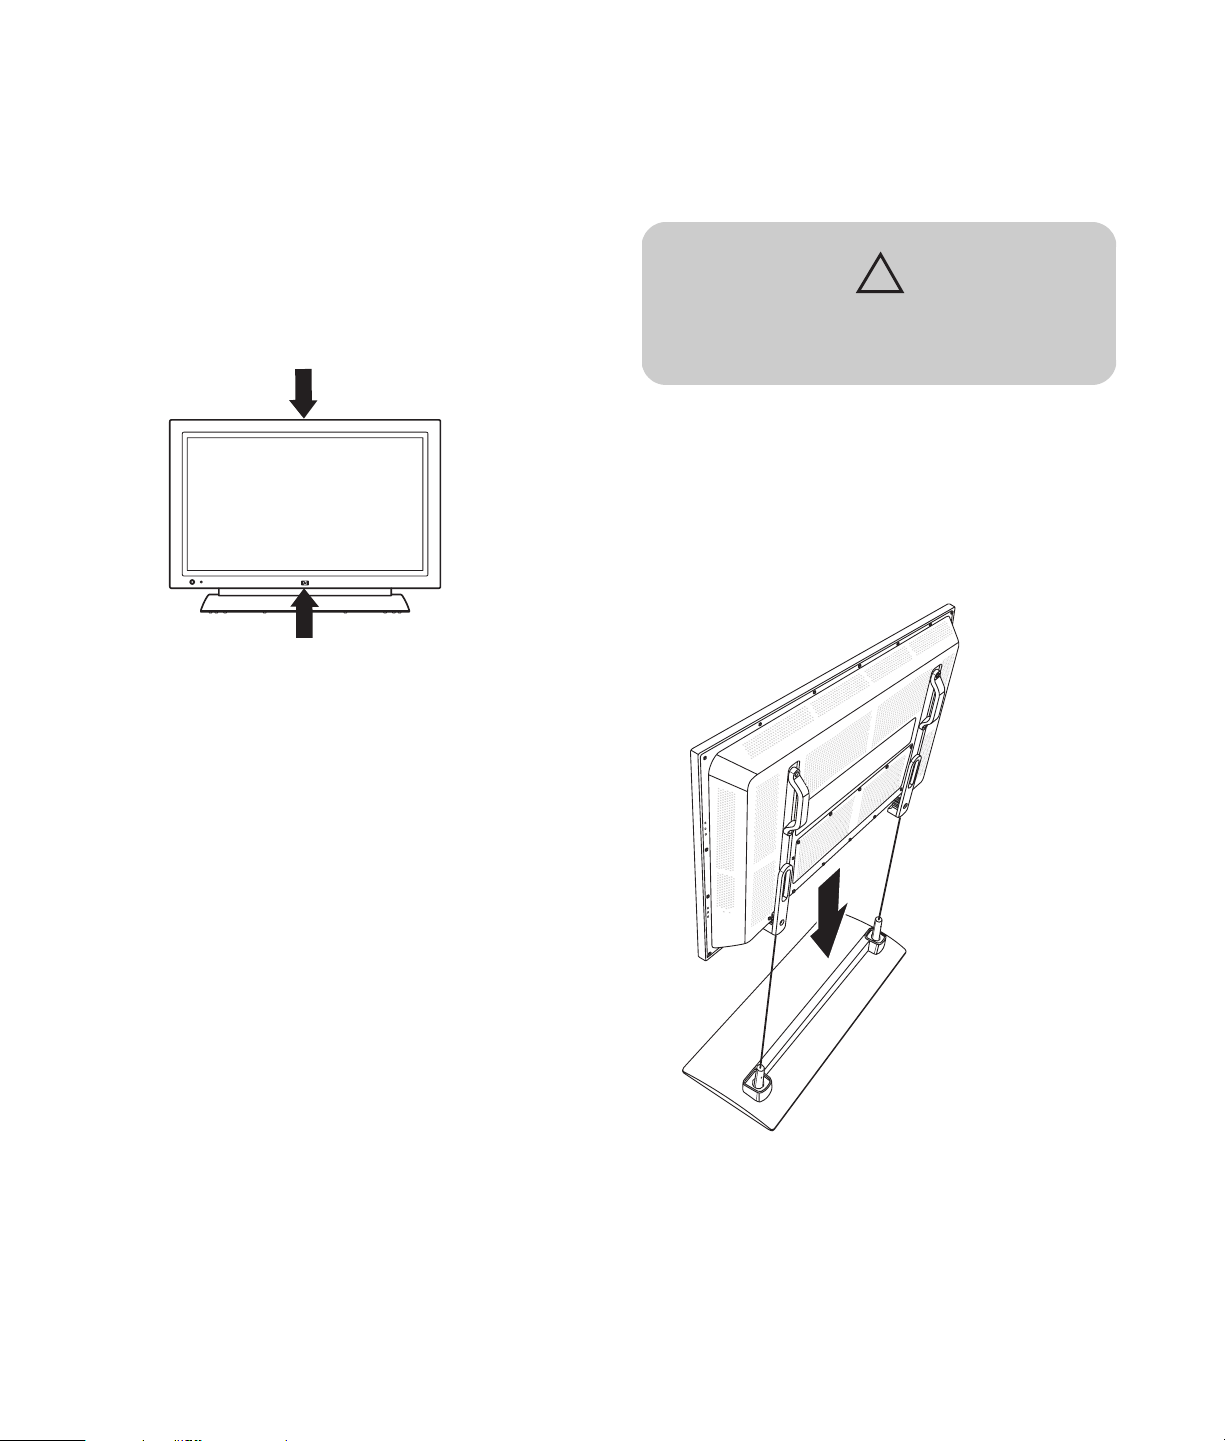
Manipulation du téléviseur
Fixation ou démontage du socle
Le téléviseur est très lourd ; assurez-vous d’adopter une
position ergonomique lors de sa manipulation.
En raison de sa taille et de son poids, un minimum de
deux personnes est recommandé pour déplacer le
téléviseur.
Pour transporter le téléviseur, utilisez les poignées situées
à l'arrière du téléviseur ou soulevez le poste en le
maintenant par les parties inférieure et supérieure de
l’écran.
Si les haut-parleurs sont fixés au téléviseur, ne portez pas
ce dernier par les haut-parleurs, mais utilisez les poignées
situées à l'arrière du téléviseur ou soulevez le poste par
ses parties inférieure et supérieure.
Déplacez l’appareil délicatement. Ne jamais poser
l’écran sur sa surface vitrée, à moins d’utiliser des
tampons pour le protéger.
Votre téléviseur est équipé d’un socle qui doit être fixé à
l’écran. Effectuez ces étapes dans l'ordre inverse pour
démonter le socle.
ATTENTION : L'assemblage du téléviseur
nécessite deux personnes.
Avant de fixer le socle, débranchez le cordon
d’alimentation de la prise de courant électrique.
1 Placez le socle en position verticale, avec l’arrière
dirigé vers vous.
2 Soulevez légèrement le panneau du téléviseur et
posez-le sur le socle.
8 Guide de l'utilisateur du téléviseur HDTV à plasma HP
Page 81
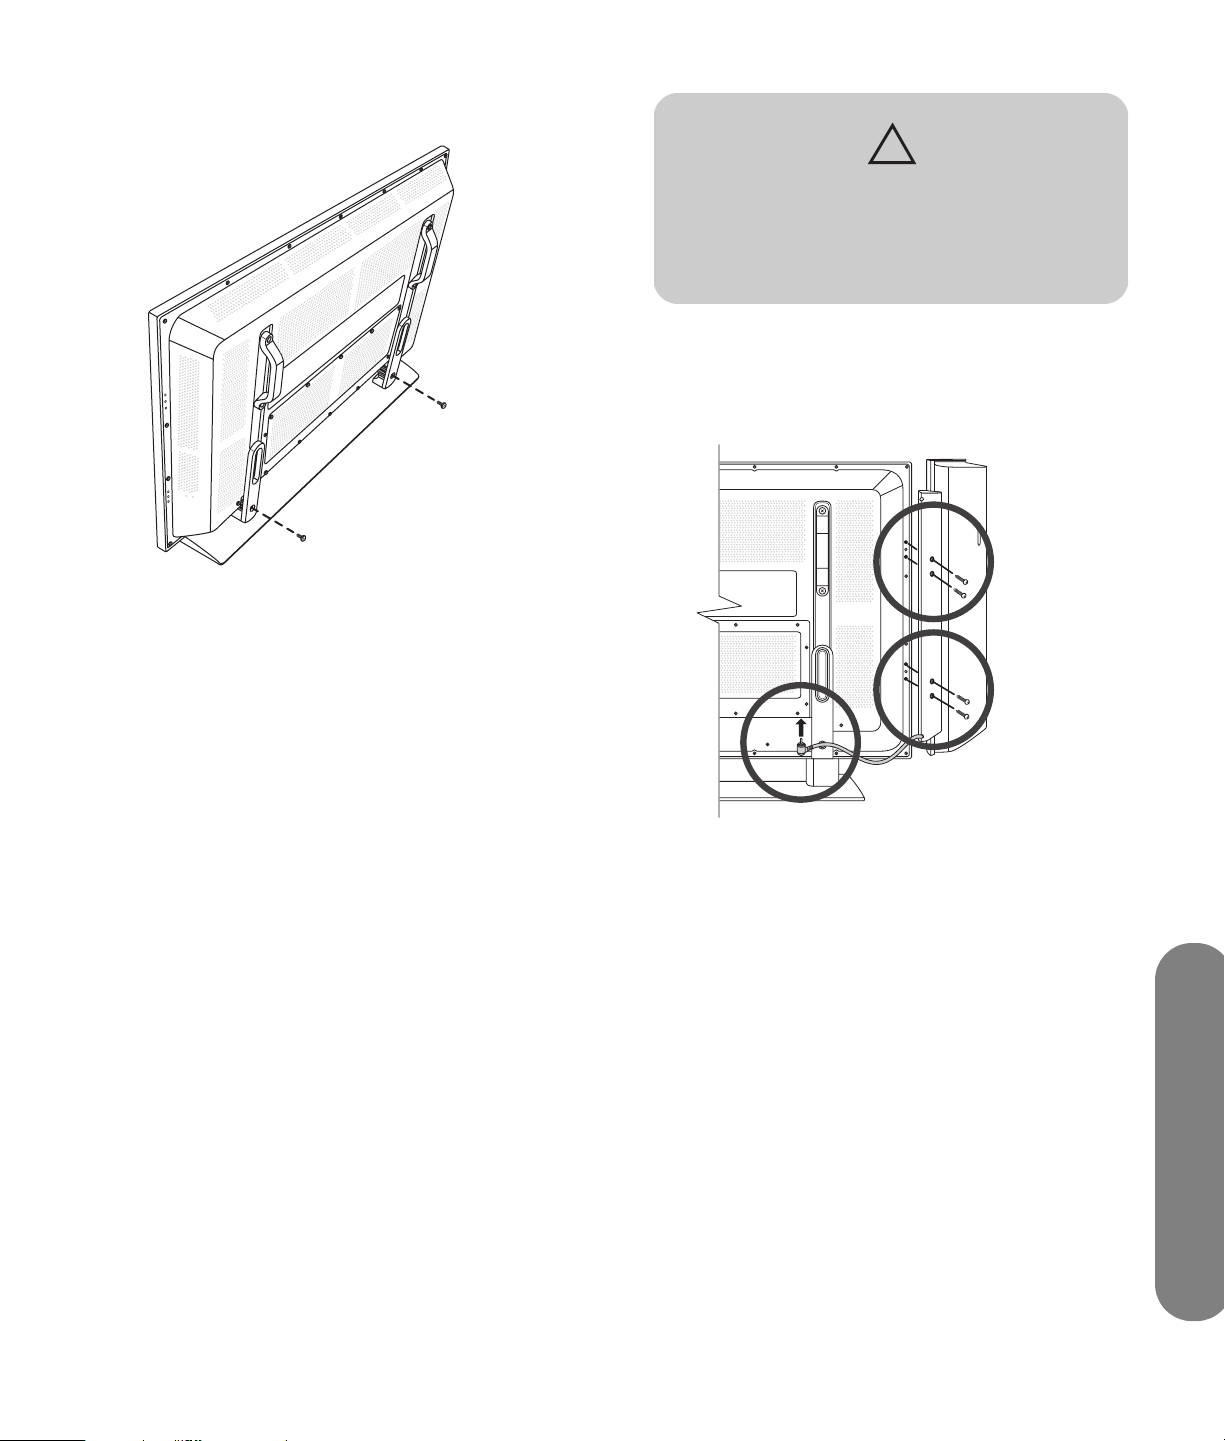
3
Insérez les vis dans les deux trous situés à l'arrière
du téléviseur et serrez-les.
4 Si nécessaire, fixez les haut-parleurs. Consultez la
rubrique Fixation et branchement des haut-parleurs
du téléviseur à la page 9.
ATTENTION : Débranchez le cordon
d’alimentation du téléviseur ainsi que tous
les autres composants raccordés avant de
fixer ou de brancher les haut-parleurs.
1 Placez le téléviseur en position verticale sur son
socle.
2 Posez un haut-parleur sur le téléviseur et insérez les
quatre vis pour le fixer.
Installation du téléviseur
Pour installer le téléviseur, fixez et branchez les hautparleurs de l’écran, raccordez les câbles et branchez le
cordon d’alimentation.
Fixation et branchement des
haut-parleurs du téléviseur
À la livraison, les haut-parleurs ne sont pas raccordés au
téléviseur. Chacun se branche sur le côté de l'écran et est
connecté de façon individuelle au téléviseur. Le hautparleur droit est sur le coté droit du téléviseur quand on le
regarde de face.
Le téléviseur possède une sortie audio numérique et une
sortie audio analogique auxquelles vous pouvez
raccorder un amplificateur externe.
Pour l’utilisation d’un amplificateur externe ou de tout
autre équipement stéréo, consultez la rubrique
Raccordement d'un système de son externe à la page 16.
3 Branchez le haut-parleur au téléviseur.
4 Répétez ces étapes pour l’autre haut-parleur.
Installation
Installation 9
Page 82

Raccordement des sources de
signal du téléviseur
w
AVERTISSEMENT : Avant de raccorder le
téléviseur à tout autre appareil
électronique, débranchez les cordons
d'alimentation de ces appareils.
Branchez les sources d’entrée au téléviseur selon le
type de connexion :
■ Antenne ou câble de base (câble ou satellite) sans
l’utilisation d’un boîtier décodeur : consultez la
rubrique Raccordement de la TV câblée ou d’une
antenne hertzienne à la page 11.
■ Câble ou satellite nécessitant l’utilisation d’un
boîtier décodeur : consultez la rubrique
Connexion du câble ou du satellite à l’aide d’un
boîtier décodeur à la page 11.
Les points suivants donnent une explication des
différents types de connexions utilisées avec un câble
coaxial. Si votre antenne extérieure nécessite un câble
coaxial de 75 ohms et un connecteur de type F,
raccordez ce câble au connecteur d'entrée RF (RF
Input) situé à l'arrière du téléviseur.
■ Le câble de 75 ohms est généralement un câble
rond accompagné d’un connecteur de type F qui
peut être facilement raccordé à un connecteur
sans nécessiter l’utilisation d'outils particuliers
(vendus séparément).
■ Le câble de 300 ohms est un câble plat, bifilaire
qui peut être raccordé à un connecteur de 75
ohms via un adaptateur de 300/75 ohms (vendu
séparément).
n
Un connecteur de type F doit être serré à la
main. Lorsque vous raccorderez le câble RF
au téléviseur, n'utilisez pas d'outil pour
serrer le connecteur de type F; cela pourrait
endommager votre téléviseur.
C
A
B
A Câble coaxial de 75 ohms, rond
B Câble bifilaire de 300 ohms, plat
C Connecteur de type F
n
■ Pour raccorder un équipement audio
externe, consultez la rubrique
Raccordement d'un système de son
externe à la page 16.
■ Pour raccorder un appareil qui enregistre
des programmes TV, utilisez les
connecteurs de sortie vidéo et audio
(Video Out et Audio Out) ; consultez la
section Raccordement d’un
magnétoscope pour l’enregistrement à la
page 15.
À propos du système EAS (Système
d’alerte d’urgence)
■ En cas d’état d’urgence nationale, de catastrophe
naturelle, ou de toute autre situation de crise, un
message EAS est diffusé. Lorsque cet appareil
reçoit un message EAS, si le niveau d’urgence est
relativement bas, seul un message texte d’alerte
s’affiché à l’écran. Si le niveau d’urgence est
élevé, le récepteur sera syntonisé de force sur un
canal affichant les détails.
■ Les messages texte d’alerte seront affichés et une
syntonisation forcée aura lieu, même pendant un
programme payant. Même si la syntonisation
forcée est active, l’utilisateur peut toujours changer
de canal.
■ Si l’appareil est syntonisé de force sur un canal qui
a été verrouillé par le contrôle parental, le réglage
du contrôle parental primera et le message EAS ne
sera pas diffusé.
■ Les messages EAS peuvent être diffusés non
seulement via le câble numérique, mais également
via le câble analogique ou la transmission
analogique OTA.
10 Guide de l'utilisateur du téléviseur HDTV à plasma HP
Page 83
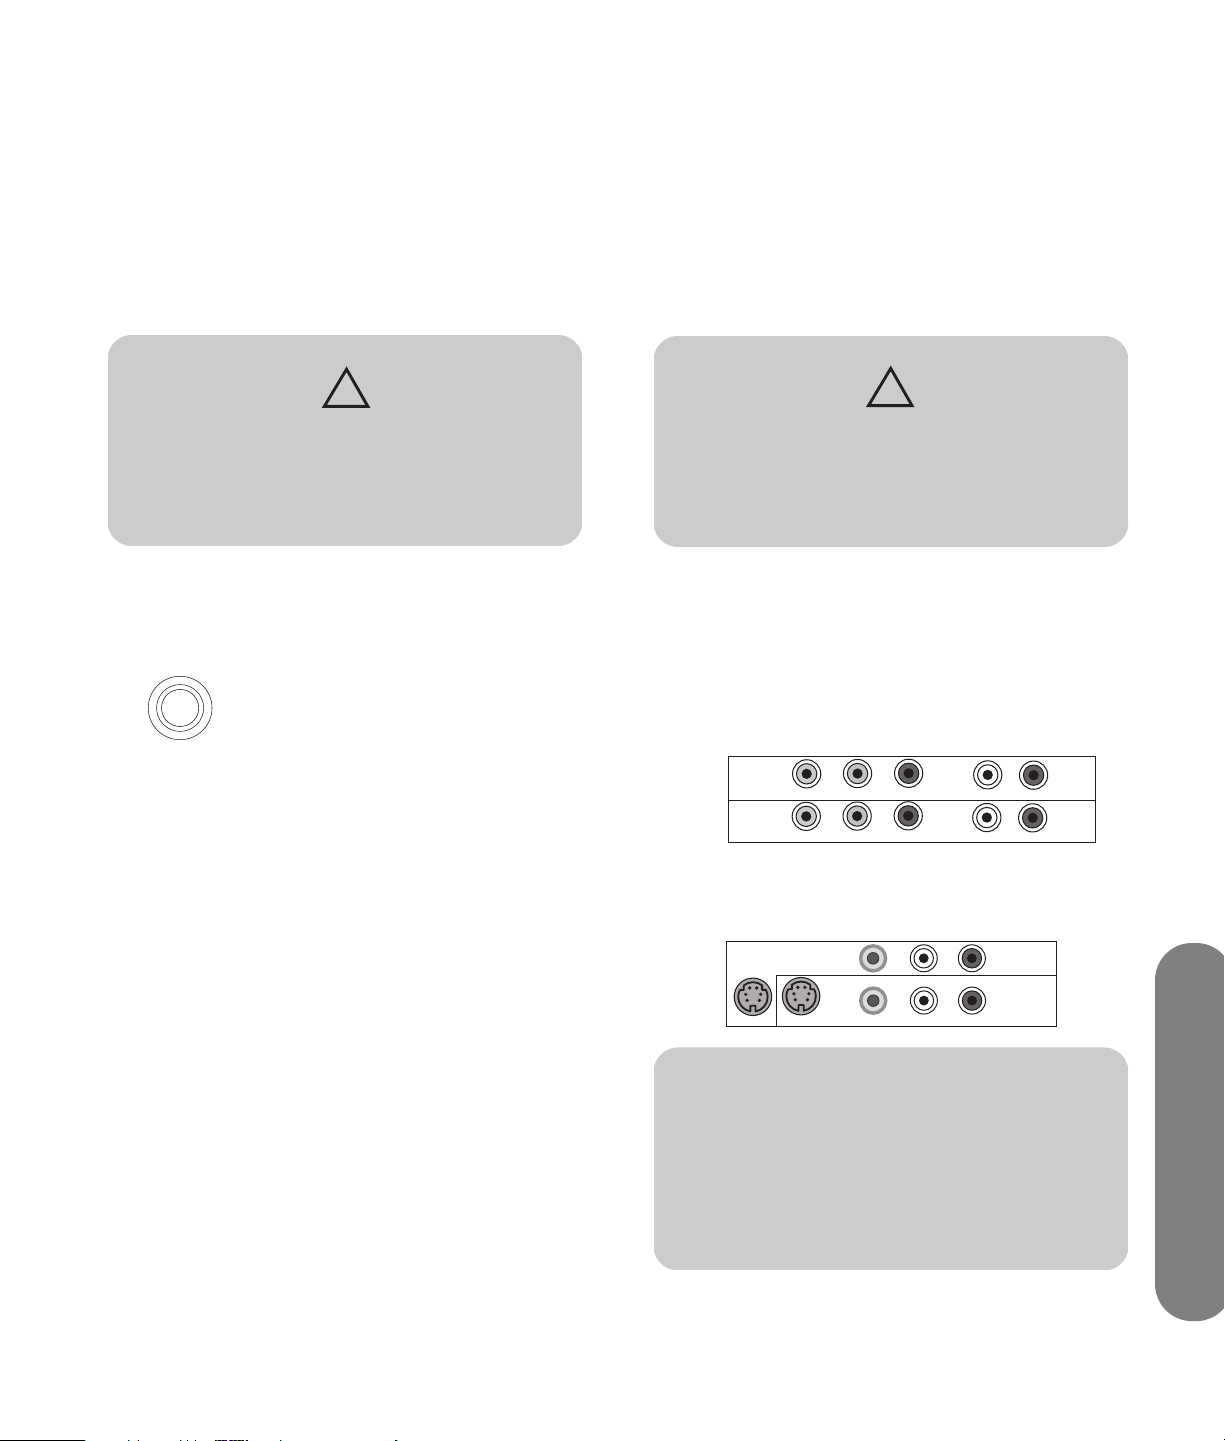
Raccordement de la TV câblée
ou d’une antenne hertzienne
Utilisez un câble coaxial standard de 75 ohms pour
raccorder la source d’entrée d’une antenne au sol ou
la TV câblée, au téléviseur. Utilisez des câbles
coaxiaux blindés afin de réduire le brouillage
radioélectrique.
L'équipement optionnel, le service de TV câblée, ainsi
que tous les câbles sont vendus séparément.
■ Des câbles S-vidéo et audio raccordés aux
connecteurs S-video 1 ou S-video 2 et aux
connecteurs audio du téléviseur.
■ Des câbles vidéo (vidéo composite) et audio
raccordés aux connecteurs Video 1 In ou Video 2 In
et aux connecteurs audio du téléviseur.
■ Un câble HDMI raccordé au connecteur HDMI du
téléviseur.
■ Un câble vidéo DVI avec un convertisseur DVI-HDMI
et des câbles audio raccordés au connecteur HDMI
et au connecteur PC/DVI Audio In du téléviseur.
ATTENTION : Mettez hors tension le
téléviseur et tous les autres composants
raccordés avant de fixer ou raccorder
l'antenne ou le câble.
1 Raccordez le câble coaxial de la source d'entrée
au connecteur RF Input situé à l'arrière du
téléviseur.
RF INPUT
2 Raccordez le cordon d'alimentation au téléviseur ;
consultez la section Mise sous tension du
téléviseur à la page 16.
3 Mettez le téléviseur en marche ; consultez la
section Mise du téléviseur sur marche ou sur arrêt
(veille) à la page 17.
Connexion du câble ou du
satellite à l’aide d’un boîtier
décodeur
ATTENTION : Mettez hors tension le
téléviseur et tous les autres composants
raccordés avant de connecter le boîtier
décodeur.
1 Raccordez le(s) câble(s) de source d’entrée du
boîtier décodeur à l’arrière du téléviseur en
utilisant l’un des jeux de connecteurs suivants :
■ Des câbles audio et vidéo en composantes
raccordés aux connecteurs Component 1 et
Comp 1 Audio In ou Component 2 et Comp 2
Audio In du téléviseur.
COMPONENT 1
Y PR/CR
PB/CB
COMPONENT 2
PR/CRY
PB/CB L/MONO
■ Des câbles S-vidéo et audio raccordés aux
L/MONO
connecteurs S-video 1 et Video 1 Audio In ou
S-video 2 et Video 2 Audio In du téléviseur.
S-VIDEO 1 S-VIDEO 2
VIDEO 1 IN
VIDEO 2 IN
L
L/MONO
R
VIDEO 1 AUDIO IN
VIDEO 2 AUDIO IN
R
COMP 1
AUDIO IN
R
COMP 2
AUDIO IN
R
La connexion directe du téléviseur à la sortie audio et
vidéo du boîtier décodeur assure une image plus vive
et améliore la qualité d'affichage.
L’équipement optionnel ainsi que tous les câbles sont
vendus séparément.
Vous pouvez connecter un boîtier décodeur TV
numérique (par câble ou voie hertzienne) ainsi que
d'autres appareils audiovisuels en utilisant :
■ Des câbles audio et vidéo en composantes raccordés
aux connecteurs Component 1 ou Component 2 et
aux connecteurs audio du téléviseur.
!
Les connecteurs S-video et Video In
partagent les connecteurs audio de
l'ensemble. Ne reliez pas les câbles vidéo
aux deux connecteurs S-vidéo et Video In
d'un téléviseur.
Installation 11
Installation
Page 84
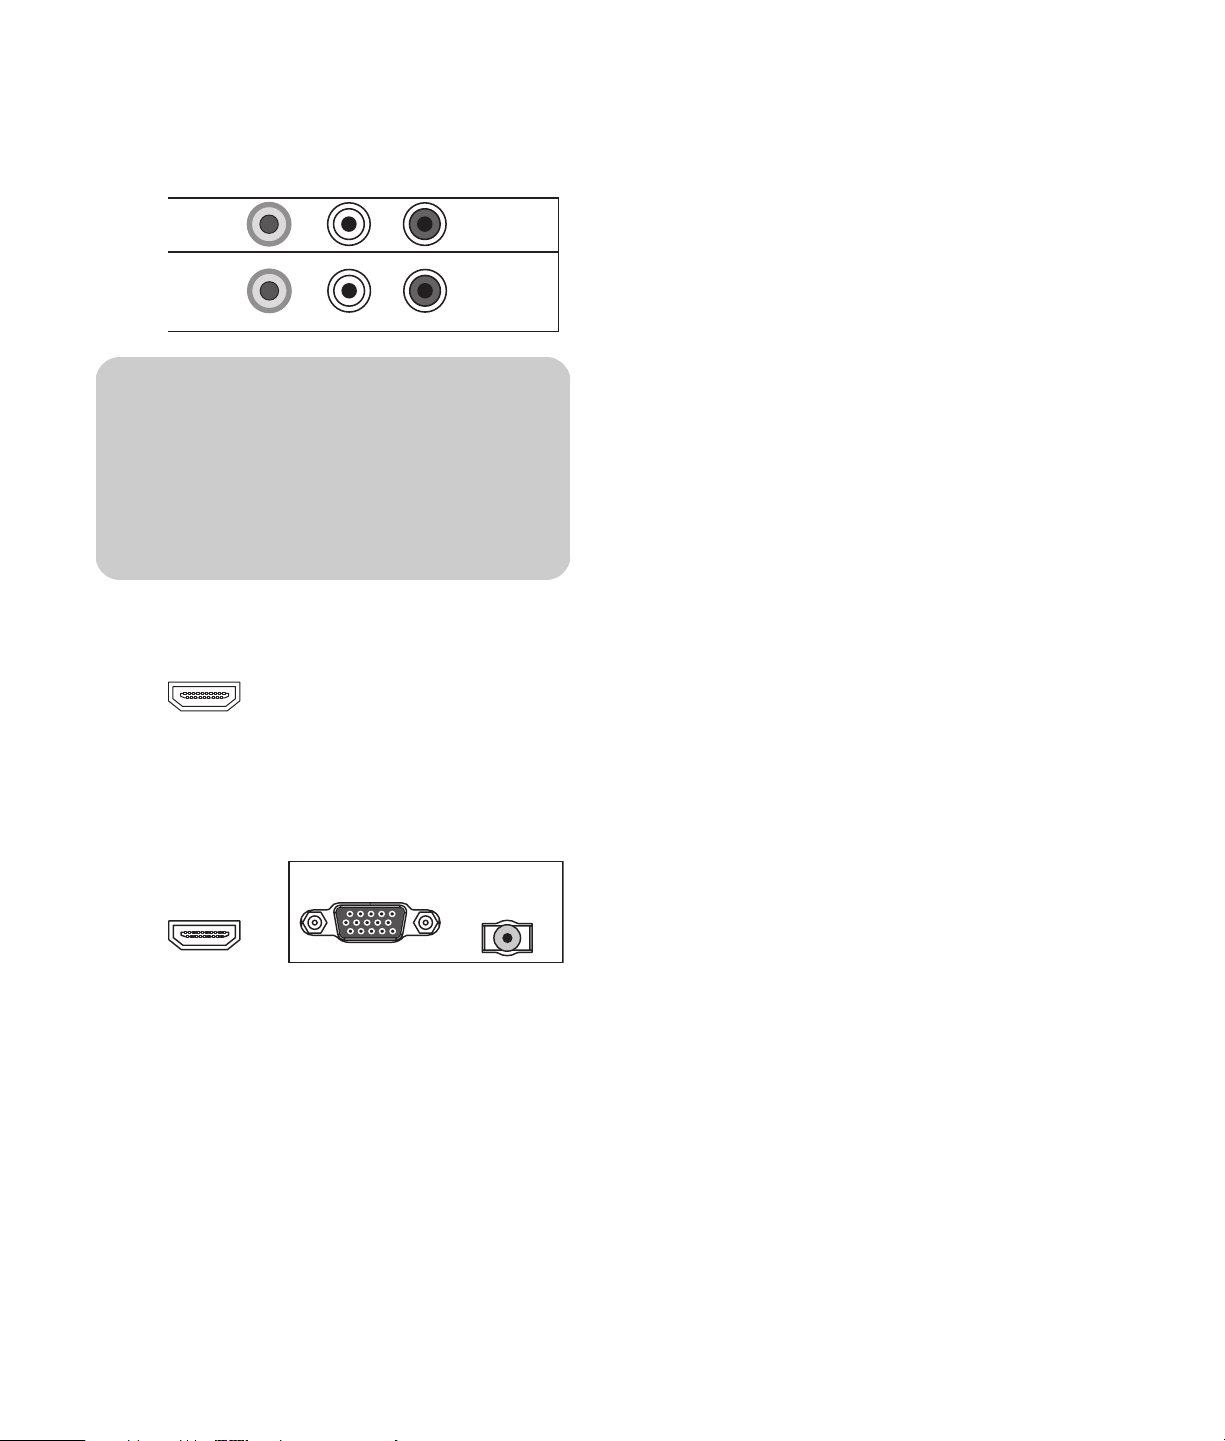
■ Des câbles vidéo (vidéo composite) et audio
raccordés aux connecteurs Video 1 In et Video
1 Audio In ou Video 2 In et Video 2 Audio In
du téléviseur.
VIDEO 1 IN
VIDEO 2 IN
L
L/MONO
R
VIDEO 1 AUDIO IN
VIDEO 2 AUDIO IN
R
!
Les connecteurs S-video et Video In
partagent les connecteurs audio de
l'ensemble. Ne reliez pas les câbles vidéo
aux deux connecteurs S-vidéo et Video In
d'un téléviseur.
■ Un câble HDMI raccordé au connecteur HDMI
du téléviseur.
HDMI
■ Un câble vidéo DVI avec un convertisseur DVI-
HDMI et un câble audio raccordés au
connecteur HDMI et au connecteur PC/DVI
Audio In du téléviseur.
HDMI
PC
2 Raccordez les câbles du boîtier décodeur.
3 Mettez le boîtier décodeur en marche.
4 Raccordez le cordon d'alimentation au téléviseur ;
consultez la section Mise sous tension du
téléviseur à la page 16.
5 Mettez le téléviseur en marche ; consultez la
section Mise du téléviseur sur marche ou sur arrêt
(veille) à la page 17.
PC/DVI AUDIO IN
Raccordement d’un lecteur de
DVD, d'un magnétoscope, d'une
console de jeu ou d'un
caméscope
Vous pouvez raccorder un équipement optionnel
(vendu séparément), comme un lecteur DVD, un
magnétoscope, un DVR, etc. au téléviseur à l’aide des
connecteurs d’entrée AV.
L’équipement optionnel, y compris le système de son
externe, ainsi que tous les câbles sont vendus
séparément.
Vous pouvez raccorder le lecteur DVD au moyen des :
■ Des câbles audio et vidéo en composantes
raccordés aux connecteurs Component 1 ou
Component 2 et aux connecteurs audio du
téléviseur.
■ Des câbles S-vidéo et audio raccordés aux
connecteurs S-video 1 ou S-video 2 et aux
connecteurs audio du téléviseur.
■ Des câbles vidéo (vidéo composite) et audio
raccordés aux connecteurs Video 1 In ou Video 2
In et aux connecteurs audio du téléviseur.
■ Un câble HDMI raccordé au connecteur HDMI du
téléviseur.
■ Un câble vidéo DVI avec un convertisseur DVI-
HDMI et des câbles audio raccordés au
connecteur HDMI et au connecteur PC/DVI Audio
In du téléviseur.
Vous pouvez raccorder un magnétoscope à l’aide des
connecteurs S-vidéo ou vidéo composite à des fins de
lecture et à l'aide des connecteurs Video Out (vidéo
composite) à des fins d'enregistrement (entrée sur le
magnétoscope). Consultez la section Raccordement
d’un magnétoscope pour l’enregistrement à la
page 15 pour utiliser les connecteurs de sortie vidéo
(Video Out).
Vous pouvez raccorder une console de jeu, un
caméscope et d’autres appareils AV en utilisant les
connecteurs S-vidéo ou vidéo composite.
Vous pouvez raccorder l'équipement HDMI en utilisant
le connecteur HDMI.
Vous pouvez raccorder un équipement DVI à l'aide
d'un câble DVI muni d'un convertisseur DVI-HDMI et
de câbles audio, ainsi que les connecteurs HDMI et
PC/DVI Audio In.
12 Guide de l'utilisateur du téléviseur HDTV à plasma HP
Page 85
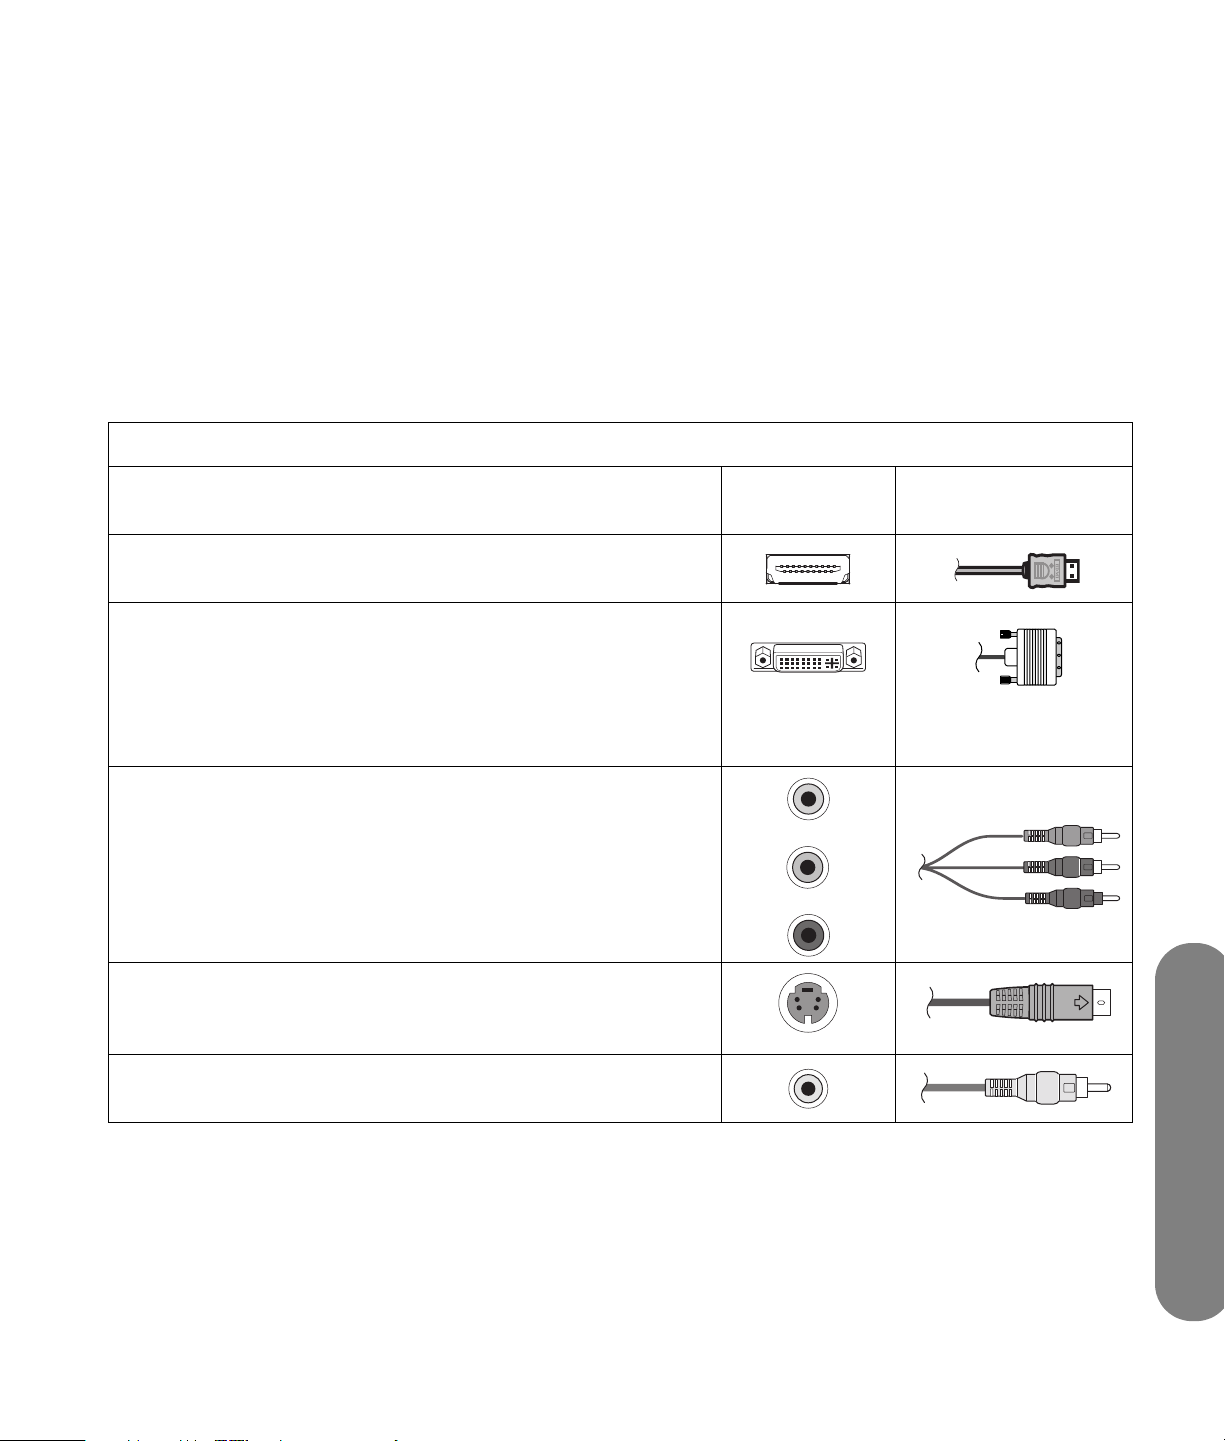
Choix de la connexion AV à utiliser
En raccordant un équipement optionnel comme source de
signal, les connecteurs de l’équipement peuvent limiter le
type de connexion utilisée.
Lorsque votre équipement comporte plusieurs types de
connecteurs de sortie, choisissez la connexion qui offre la
meilleure qualité d’image en mode de lecture.
Pour de meilleurs résultats, choisissez la meilleure qualité
de connexion que votre équipement optionnel puisse
prendre en charge.
Le tableau suivant répertorie les connexions AV
optionnelles disponibles sur le téléviseur.
Connections audio/vidéo disponibles, classées par ordre décroissant de qualité de lecture
Connecteur
Description de la connexion
HDMI transmet un signal tout numérique et représente le choix
recommandé pour la lecture de DVD numériques ou de DVR.
DVI transmet un signal tout numérique vidéo pour la lecture de
DVD numériques ou de DVR. (Pour un appareil DVI, vous devez
utiliser un câble DVI avec un convertisseur DVI-HDMI pour
raccorder la vidéo au connecteur HDMI du téléviseur et un câble
audio pour raccorder l'audio au connecteur d'entrée audio PC/
DVI (PC/DVI Audio In) du téléviseur.)
TV Prise de câble
Vidéo en composantes (Y, Pb, Pr) transmet la vidéo en différents
signaux séparés rouge, vert et bleu. Utilisez cette connexion pour
les signaux vidéo haute définition au format 480i, 480p, 720p ou
1080i émis depuis un DVD ou d’autres appareils.
S-vidéo fournit des signaux d'image couleur et noir et blanc
séparés et produit une image plus nette qu'une connexion vidéo
composite.
Entrée vidéo (vidéo composite) transmet la vidéo en signal
simple.
Les procédures qui suivent, présentées dans l'ordre du
tableau, présentent les connexions d’équipements
optionnels, y compris certaines connexions audio, le
cas échéant.
Installation
Installation 13
Page 86
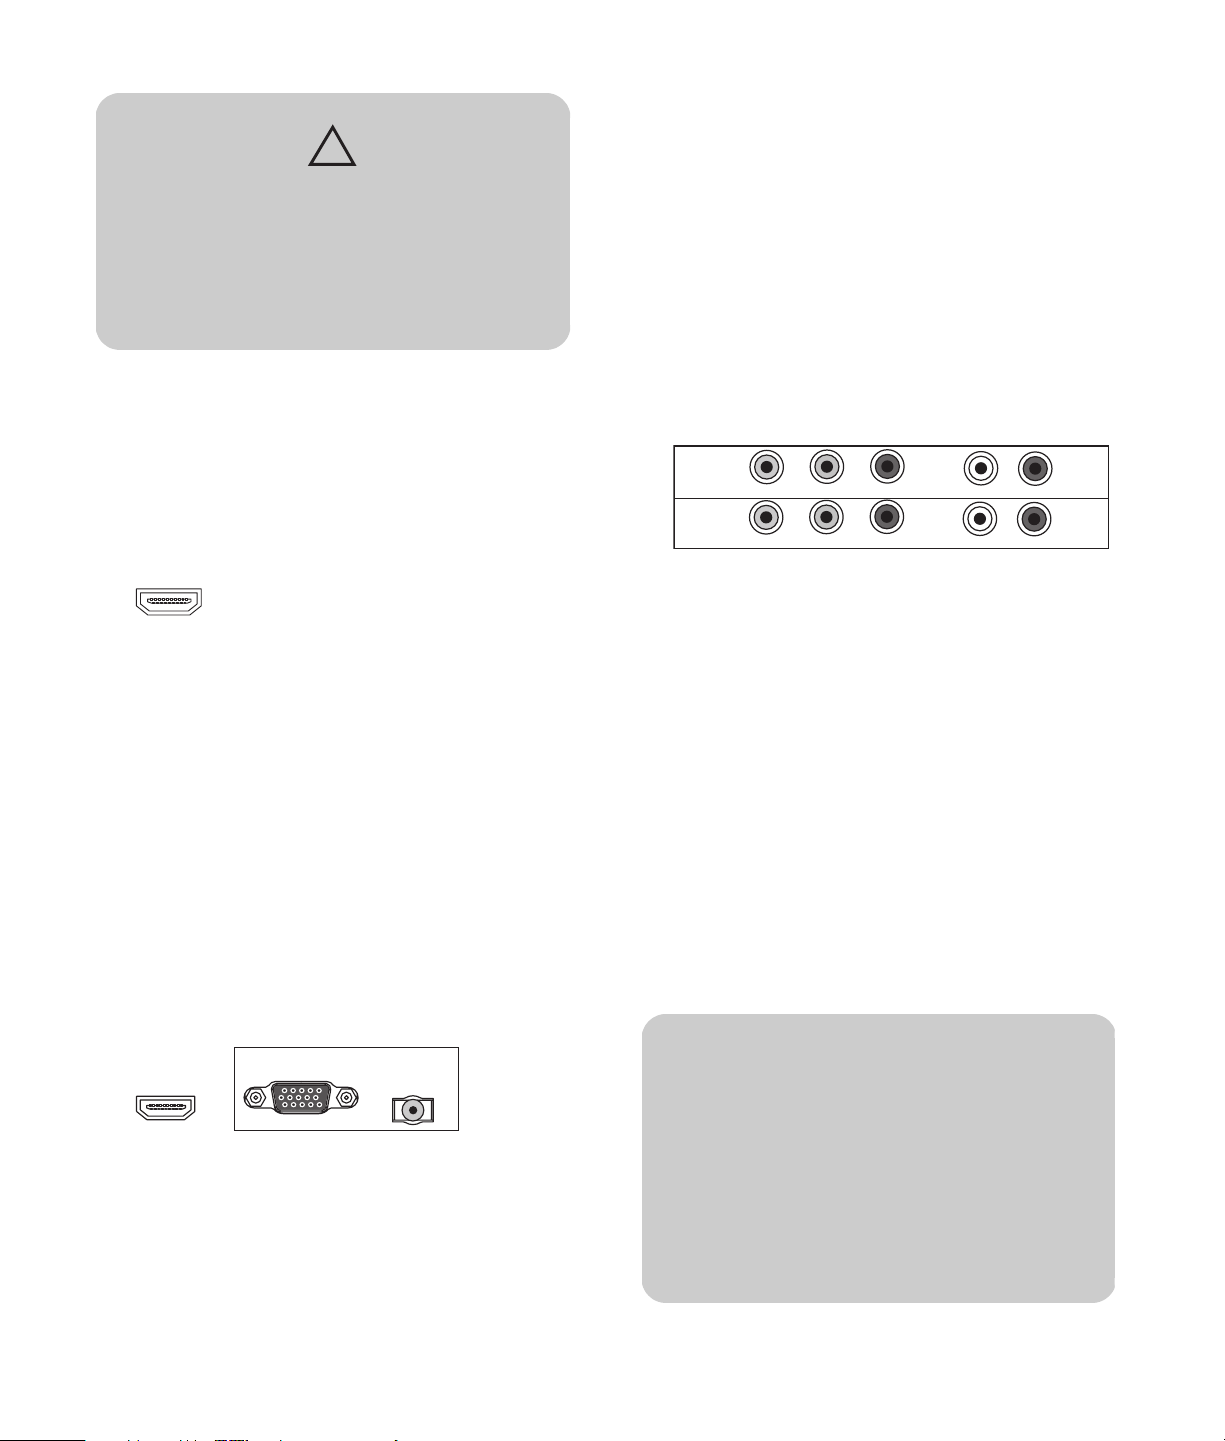
ATTENTION : Débranchez le cordon
d’alimentation du téléviseur ainsi que tous
autres composants raccordés avant de
raccorder l’équipement optionnel. Veillez à
ce que l'équipement optionnel soit mis hors
tension.
Raccordement d’un périphérique HDMI
C’est la connexion recommandée pour toute
connexion vidéo ou audio. Le câble HDMI est vendu
séparément.
1 Branchez le câble HDMI au connecteur HDMI
situé à l'arrière du téléviseur. (Il n’existe pas
d’entrée audio séparée pour HDMI.)
HDMI
2 Raccordez le câble au périphérique HDMI.
3 Mettez le périphérique en marche et commencez
la lecture.
4 Raccordez le cordon d'alimentation au téléviseur ;
consultez la section Mise sous tension du
téléviseur à la page 16.
5 Mettez le téléviseur en marche ; consultez la
section Mise du téléviseur sur marche ou sur arrêt
(veille) à la page 17.
Raccordement d’un périphérique DVI
Le câble DVI, le convertisseur DVI-HDMI et le câble audio
sont vendus séparément.
1 Branchez le câble DVI et le convertisseur DVI-HDMI
au périphérique DVI-I, puis au connecteur HDMI du
téléviseur.
4 Raccordez le cordon d'alimentation au téléviseur ;
consultez la section Mise sous tension du téléviseur à
la page 16.
5 Mettez le téléviseur en marche ; consultez la section
Mise du téléviseur sur marche ou sur arrêt (veille) à
la page 17.
Raccordement d’un périphérique
composant
1 Raccordez le câble du composant aux connecteurs
Component In (Y, Pb, Pr). Il existe deux jeux de
connecteurs de composant que vous pouvez utiliser :
les connecteurs Component 1 video utilisés avec
Comp 1 Audio In ou les connecteurs Component 2
video utilisés avec Comp 2 Audio In.
COMPONENT 1
COMPONENT 2
Y PR/CR
PB/CB
PB/CB L/MONO
PR/CRY
L/MONO
COMP 1
AUDIO IN
R
COMP 2
AUDIO IN
R
2 Raccordez le câble audio composant aux
connecteurs audio gauche et droit du téléviseur.
3 Raccordez les câbles au périphérique.
4 Mettez le périphérique en marche et commencez la
lecture.
5 Raccordez le cordon d'alimentation au téléviseur ;
consultez la section Mise sous tension du téléviseur à
la page 16.
6 Mettez le téléviseur en marche ; consultez la section
Mise du téléviseur sur marche ou sur arrêt (veille) à
la page 17.
Raccordement d'un périphérique S-vidéo
ou vidéo
Un magnétoscope, une console de jeu, un caméscope
et quelques autres équipements audiovisuels peuvent
être raccordés à l'aide des connecteurs d'entrée
S-video ou Video (vidéo composite)
.
HDMI
PC
PC/DVI AUDIO IN
2 Branchez le câble audio au périphérique DVI et au
connecteur d'entrée audio PC/DVI du téléviseur.
3 Mettez le périphérique en marche et commencez la
lecture.
14 Guide de l'utilisateur du téléviseur HDTV à plasma HP
!
Les connecteurs S-video et Video In
partagent les connecteurs d'entrée audio
gauche/droite. (S-video 1 et Video 1 In
partagent les connecteurs Video 1 Audio In ;
S-video 2 et Video 2 In partagent les
connecteurs Video 2 Audio In.)
Ne reliez pas les câbles vidéo aux deux
connecteurs S-vidéo et Video In d'un
téléviseur.
Page 87
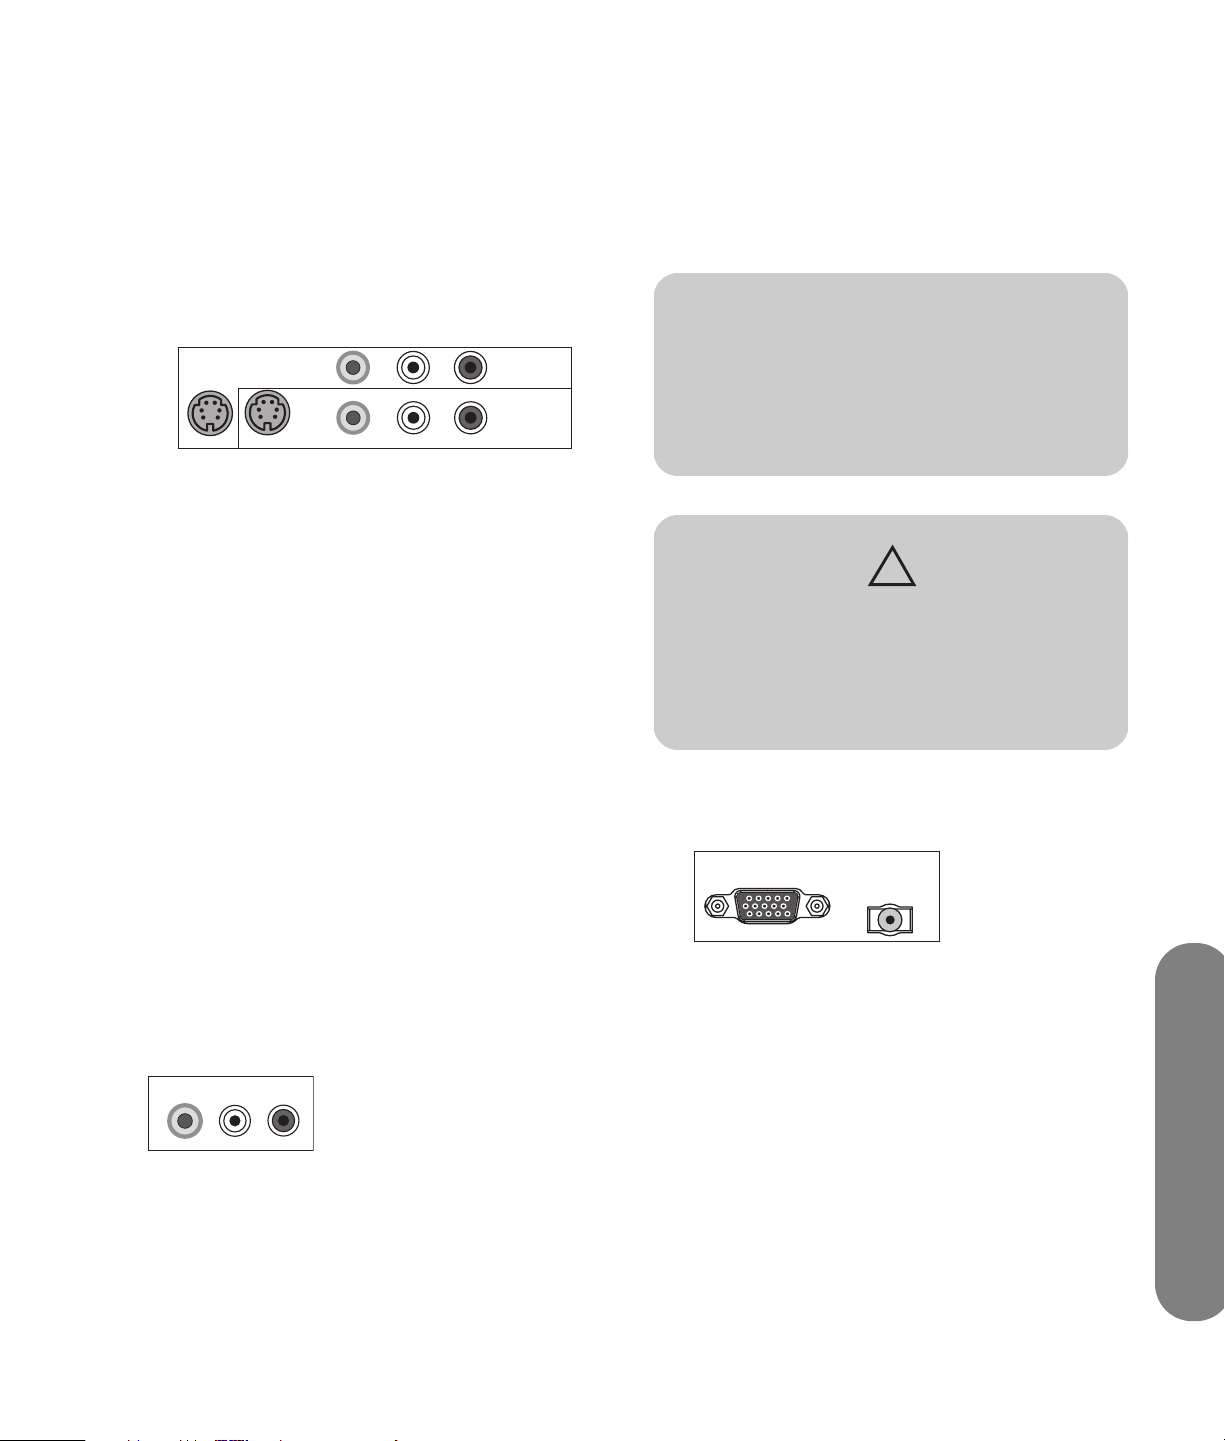
1
Raccordez l‘équipement vidéo aux connecteurs du
téléviseur :
■ Pour un magnétoscope, un DVR ou tout autre
périphérique doté d'un connecteur S-vidéo, utilisez
un câble S-vidéo avec le jeu de connecteurs S-vidéo.
Ou
■ Pour un magnétoscope, un DVR ou tout autre
périphérique doté d'un connecteur composite,
utilisez un câble composite avec le jeu de
connecteurs d'entrée vidéo (Video In).
S-VIDEO 1 S-VIDEO 2
VIDEO 1 IN
VIDEO 2 IN
L
L/MONO
R
VIDEO 1 AUDIO IN
VIDEO 2 AUDIO IN
R
2 Raccordez les connecteurs du câble audio aux
connecteurs audio gauche et droit du jeu de
connecteurs.
3 Raccordez les câbles au périphérique.
4 Mettez le périphérique en marche et commencez la
lecture.
5 Raccordez le cordon d'alimentation au téléviseur ;
consultez la section Mise sous tension du téléviseur à
la page 16.
6 Mettez le téléviseur en marche ; consultez la section
Mise du téléviseur sur marche ou sur arrêt (veille) à
la page 17.
Raccordement d'un ordinateur
Suivez ces instructions lorsque vous raccordez un
ordinateur ou tout autre source au connecteur PC
(VGA) du téléviseur pour visualiser l’ordinateur de
bureau comme source d’entrée sélectionnable. Le
câble VGA est vendu séparément.
n
Consultez la rubrique Graphique de
compatibilité avec l'ordinateur à la
page 48 pour obtenir la liste des signaux
d'ordinateur compatibles avec le téléviseur.
ATTENTION : Débranchez le cordon
d’alimentation du téléviseur ainsi que tous
autres composants raccordés avant de
raccorder un ordinateur. Veillez à ce que
l’ordinateur soit mis hors tension.
Raccordement
d’un magnétoscope pour
l’enregistrement
Chaque signal source est converti au format 480i avant
sa sortie via le connecteur de sortie vidéo (Video Out).
1 Pour la lecture, raccordez la sortie du magnétoscope
à l'aide des connecteurs du téléviseur ; consultez les
procédures précédentes.
2 Pour l'enregistrement, raccordez l'entrée du
magnétoscope aux connecteurs de sortie Video Out
et Audio Out du téléviseur.
L/MONO
VIDEO OUT
3 Raccordez le cordon d'alimentation au téléviseur ;
consultez la section Mise sous tension du
téléviseur à la page 16.
4 Mettez le téléviseur en marche ; consultez la
section Mise du téléviseur sur marche ou sur arrêt
(veille) à la page 17.
R
AUDIO OUT
1 Raccordez l'ordinateur ou le câble vidéo de
l'équipement source au téléviseur à l'aide du
connecteur PC (de type VGA).
PC
PC/DVI AUDIO IN
2 Branchez le câble audio de l'équipement source au
connecteur d'entrée audio PC/DVI du téléviseur.
3 Connectez les câbles VGA et audio au PC ou à
l'équipement source.
4 Raccordez le cordon d'alimentation au téléviseur ;
consultez la section Mise sous tension du téléviseur à
la page 16.
Installation 15
Installation
Page 88
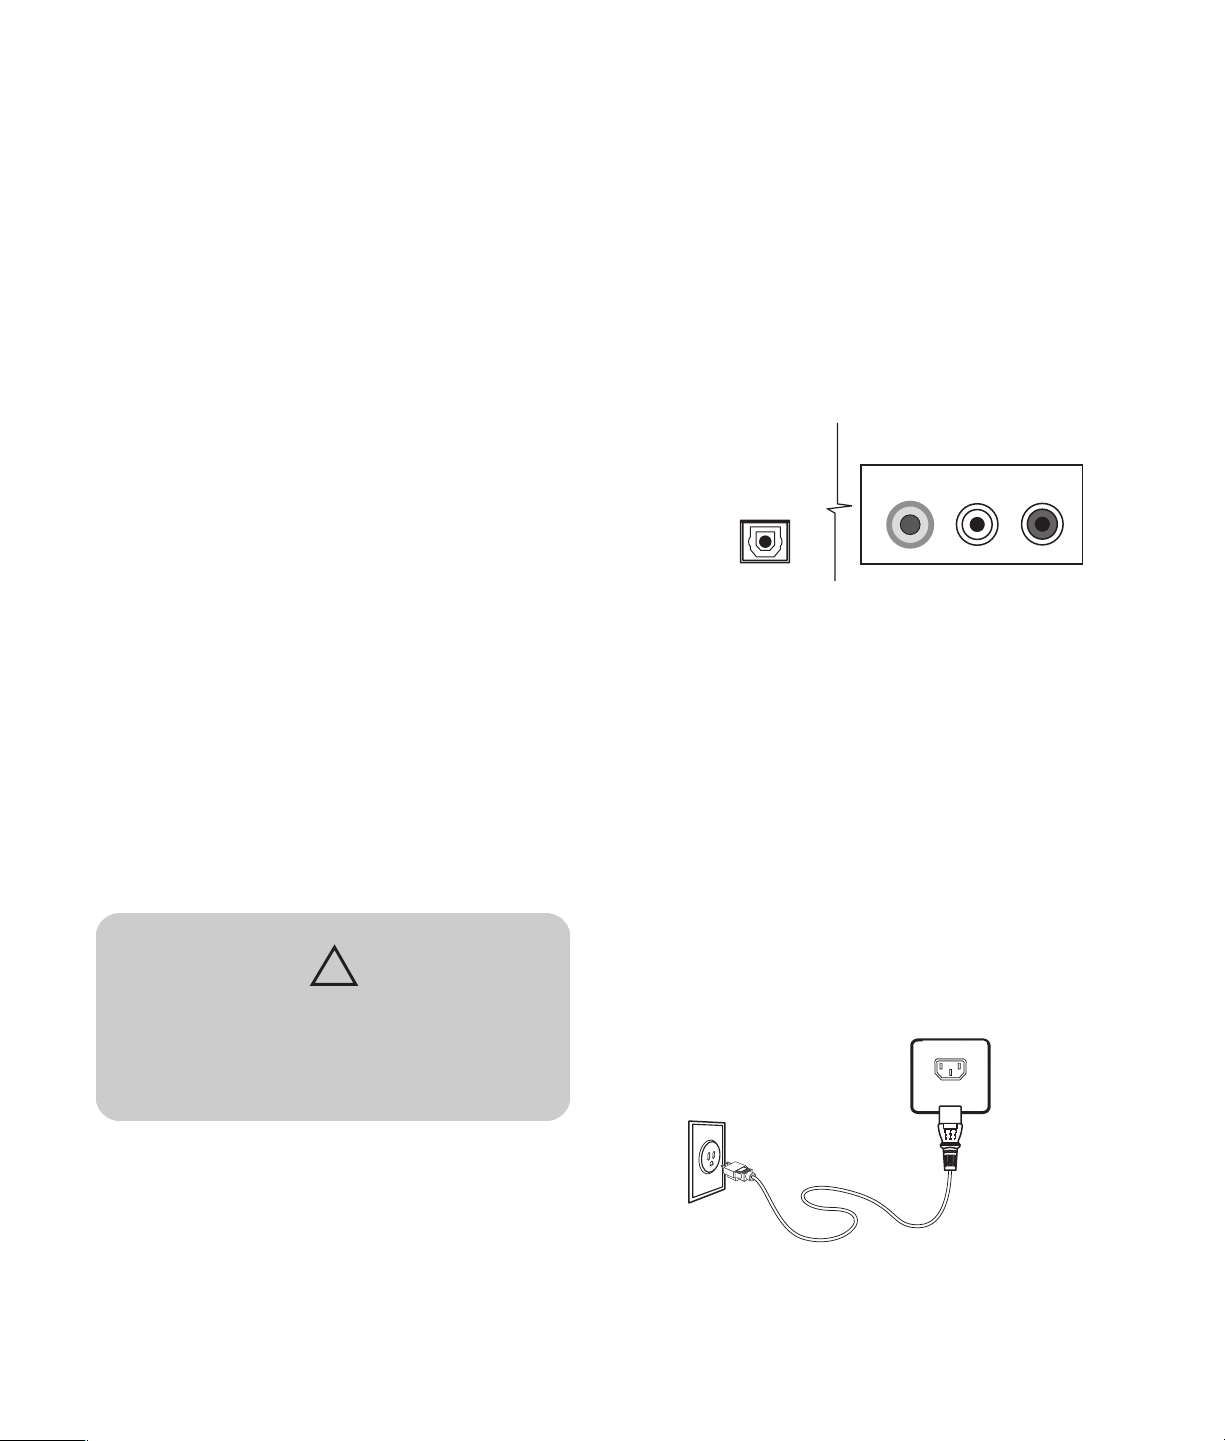
5 Mettez le téléviseur en marche ; consultez la section
Mise du téléviseur sur marche ou sur arrêt (veille) à
la page 17.
6 Branchez l’alimentation et mettez l’ordinateur ou
l’équipement source en marche.
7 Ajustez l'image, y compris la synchronisation
automatique, à l'aide du menu Image/Écran de
l'affichage à l'écran ; consultez la section Ajustement
de l’image sur un ordinateur à la page 29.
Vous pouvez également appuyer sur le bouton OK
du téléviseur pour lancer la synchronisation
automatique de l'image du PC.
Raccordement d'un système de
son externe
Vous pouvez connecter un système de son externe au
téléviseur à l'aide d'un signal audio numérique ou
analogique :
■ Utilisez un câble audio optique et le connecteur de
sortie audio numérique situé à l’arrière du téléviseur
pour fournir un signal audio numérique à un système
de son externe, par exemple un récepteur numérique
ou un système de son d’ambiance. Pour recevoir sur
votre système audio numérique un son analogique
en provenance d'une source du m
devez brancher les connecteurs gauche et droit de la
prise de sortie audio sur votre système sonore.
■ Utilisez un câble audio et les connecteurs de sortie
audio situés à l’arrière du téléviseur pour fournir un
signal audio analogique à un système de son
externe, par exemple un amplificateur analogique
■ ou un système stéréo.
ême type, vous
1 Raccordez le système de son externe au téléviseur :
■ Pour une connexion numérique, raccordez un
câble audio optique au connecteur de sortie
audio numérique situé à l’arrière du téléviseur et
au système de son externe, par exemple un
récepteur numérique ou un système de son
d’ambiance.
Ou
■ Pour une connexion analogique, raccordez un
câble audio aux connecteurs de sortie audio
situés à l’arrière du téléviseur et au système de
son externe, par exemple un amplificateur
analogique ou un système stéréo.
DIGITAL AUDIO OUT
VIDEO OUT
L/MONO
AUDIO OUT
R
2 Raccordez le cordon d'alimentation au téléviseur ;
consultez la section Mise sous tension du téléviseur à
la page 16.
3 Mettez le téléviseur en marche ; consultez la section
Mise du téléviseur sur marche ou sur arrêt (veille) à
la page 17.
4 Mettez sous tension et mettez en marche le système
de son externe.
5 Définissez le format audio numérique dans le menu
Audio/Audio numérique de l'affichage à l'écran ;
consultez la section Sélection du mode Audio
numérique à la page 30.
ATTENTION : Mettez le téléviseur et tous
autres composants raccordés hors tension
avant de raccorder un système de son
externe. Veillez à ce que le système de son
externe soit mis hors tension.
16 Guide de l'utilisateur du téléviseur HDTV à plasma HP
Mise sous tension du téléviseur
1 Branchez le cordon d'alimentation au connecteur
situé à l'arrière du téléviseur.
AC IN
100-240V~50/60Hz
2 Raccordez le cordon d’alimentation à la prise de
courant électrique.
Page 89
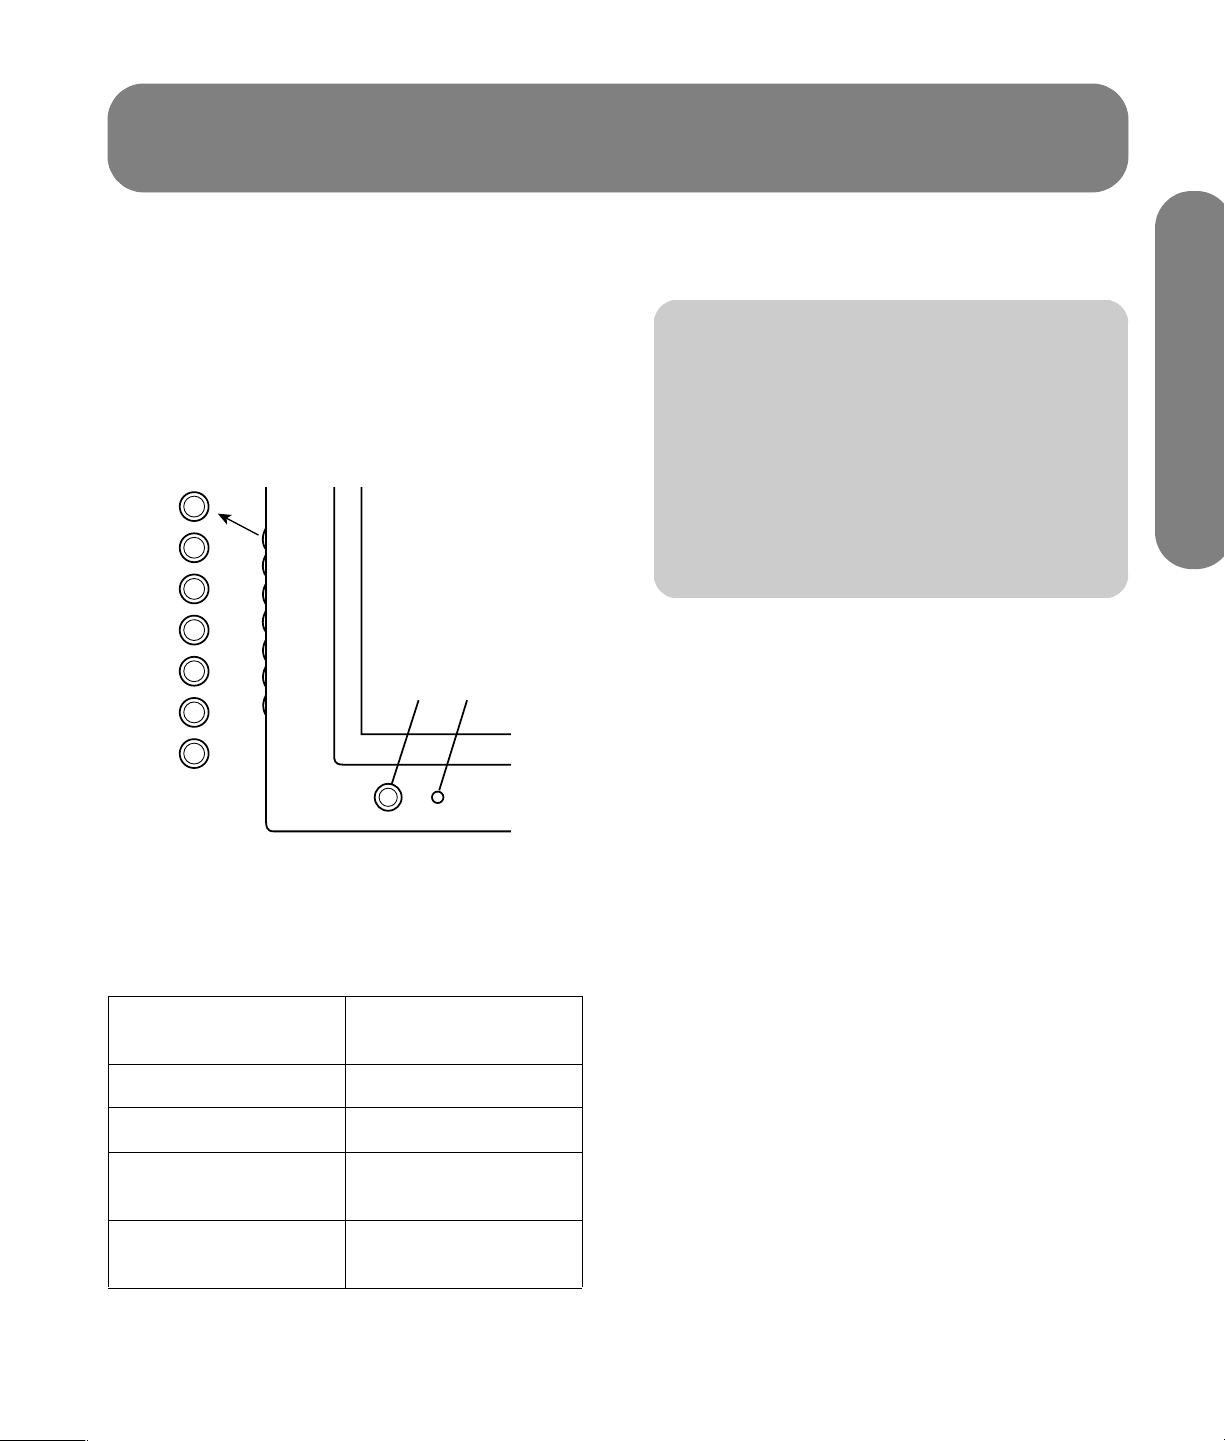
Mise en marche du téléviseur
Mise du téléviseur sur marche ou sur arrêt (veille)
Le téléviseur est doté d’un bouton Marche/Arrêt (A)
placé à l'avant de l’écran. Vous pouvez également
utiliser le bouton Marche/Arrêt de la télécommande
pour mettre en marche le téléviseur.
Si vous appuyez sur ce bouton, vous mettez le
téléviseur en marche ou en veille, mode qui
correspond à un état de consommation réduite.
MENU
OK
+
VOL
–
+
CH
–
SRC
A Bouton et témoin d’alimentation
BTélécapteur
A
B
La configuration initiale commence lorsque
le téléviseur est mis en marche la première
fois. Si le téléviseur a déjà été mis en
marche avant cette opération, l'assistant de
configuration ne démarre pas. Voir
Lancement de l'assistant de configuration à
la page 40 pour lancer l'assistant de
configuration depuis le menu Système.
Après la configuration initiale, le temps de mise en
route à partir du mode veille dépend du réglage du
mode Veille :
■ Faible alimentation, qui consomme moins
d'énergie en veille, correspond à un temps de
mise en route d'environ 20 secondes.
■ Alimentation rapide, qui consomme plus
d'énergie en veille, correspond à un temps de
mise en route d'environ 5 secondes.
Vous pouvez régler le mode Veille via le
menu Système.
n
Mise en marche du téléviseur
Le bouton d'alimentation dispose d'un témoin qui
indique le statut d'alimentation du téléviseur.
Indicateur
d’alimentation
Voyant rouge En veille (désactivé)
Voyant bleu Prêt (on)
Désactivé Alimentation CA
Rouge ou bleu
clignotant
Statut
d’alimentation
déconnectée
Diagnostic ou erreur
de démarrage
Si le téléviseur reste inutilisé pendant une période
prolongée, appuyez sur le bouton Marche/Arrêt pour
mettre le téléviseur en veille, puis débrancher le cordon
d’alimentation.
Utilisation des touches du téléviseur
1 Appuyez sur le bouton Marche/Arrêt (A) placé à
l'avant du téléviseur.
Le téléviseur est en marche ou en veille.
2 Utilisez la touche SRC pour ouvrir la liste des
sources d'entrée. Utilisez la touche CH+ pour
sélectionner la source d'entrée à afficher, puis
appuyez sur OK. Utilisez la touche SRC pour
fermer la liste.
Mise en marche du téléviseur 17
Page 90

Utilisation des touches de la
télécommande
1 Dirigez la télécommande vers le télécapteur de
l'écran avant d'appuyer sur la touche Marche/
Arrêt de celle-ci.
Le téléviseur est en marche ou en veille.
2 Utilisez la touche Source de la télécommande
pour ouvrir une liste des sources d'entrée. Utilisez
l'une des touches fléchées pour sélectionner la
source d'entrée à afficher, puis appuyez sur OK.
Utilisez la touche Source pour fermer la liste.
n
Protection contre la rémanence d’image : Si
des images fixes s’affichent pendant
plusieurs minutes, la fonction de
prévention d’images rémanentes s’active
automatiquement pour protéger l'écran. Si
l’image disparaît, modifiez l'image ou la
source d’entrée pour afficher une image.
18 Guide de l'utilisateur du téléviseur HDTV à plasma HP
Page 91

Utilisation de l'assistant de configurationn lors du
premier démarrage
Installation initiale
Lorsque le téléviseur est mis sous tension pour la
première fois, un assistant de configuration initiale
vous aide à effectuer les opérations suivantes :
■ Réglage de la langue d'affichage à l'écran.
■ Réglage de la date, de l'heure et du fuseau
horaire.
■ Sélection d'un mode veille.
■ Sélection d'une source de signal.
■ Recherche de la source de signal TV (par câble ou
antenne) et mémorisation des canaux TV
disponibles.
Vous pouvez démarrer l'assistant de configuration lors
du premier démarrage à l'aide du menu Système de
l'affichage à l'écran (OSD) ; consultez la section
Lancement de l'assistant de configuration à la
page 40.
Préparation
Procédez de la façon suivante avant d’appuyer sur la
touche Marche/Arrêt du téléviseur sur la
télécommande.
1 Introduisez les piles dans la télécommande.
2 Branchez le câble d’antenne sur le téléviseur.
3 Branchez le cordon secteur dans la prise secteur.
4 Allumez le téléviseur.
Réglage de la date, de l'heure et du
fuseau horaire
1 Appuyez sur les touches fléchées Haut et Bas de
la télécommande pour sélectionner le champ de
date.
2 Appuyez sur les touches numériques de la
télécommande pour entrer une année, un mois et
un jour.
3 Appuyez sur la touche fléchée vers le bas pour
sélectionner le fuseau horaire.
4 Appuyez sur les touches fléchées Gauche et
Droite pour modifier le fuseau horaire.
5 Appuyez sur la touche Bas pour sélectionner le
champ d'heure et utilisez les touches numériques
pour entrer l'heure.
6 Utilisez les touches fléchées Gauche et Droite pour
basculer entre AM et PM.
Réglage du mode Veille
Sélectionnez le mode Veille.
■ Faible alimentation : Le temps de mise en route à
partir du mode veille est d'environ 20 secondes.
Cependant, le téléviseur consomme moins d'énergie
lorsqu'il est en veille.
■ Alimentation rapide : Le temps de mise en route à
partir du mode veille est d'environ 5 secondes.
Cependant, le téléviseur consomme plus d'énergie
lorsqu'il est en veille.
Utilisation de l'assistant de
configurationn lors du premier
Réglage de la langue
1 Sélectionnez l’une de ces trois langues : Anglais,
Français ou Espagnol.
2 Appuyez sur les touches fléchées Haut et Bas de
la télécommande pour sélectionner la langue
désirée dans la liste à l’écran et appuyez ensuite
sur OK.
Utilisation de l'assistant de configurationn lors du premier démarrage 19
Réglage de la source de signal
1 Appuyez sur les touches fléchées Haut et Bas de
la télécommande pour sélectionner Antenne ou
Câble.
2 Appuyez sur le bouton OK pour lancer la recherche
de canaux.
L'opération de recherche des canaux permet de
rechercher automatiquement le signal de tous les
canaux disponibles.
Page 92

20 Guide de l'utilisateur du téléviseur HDTV à plasma HP
Page 93
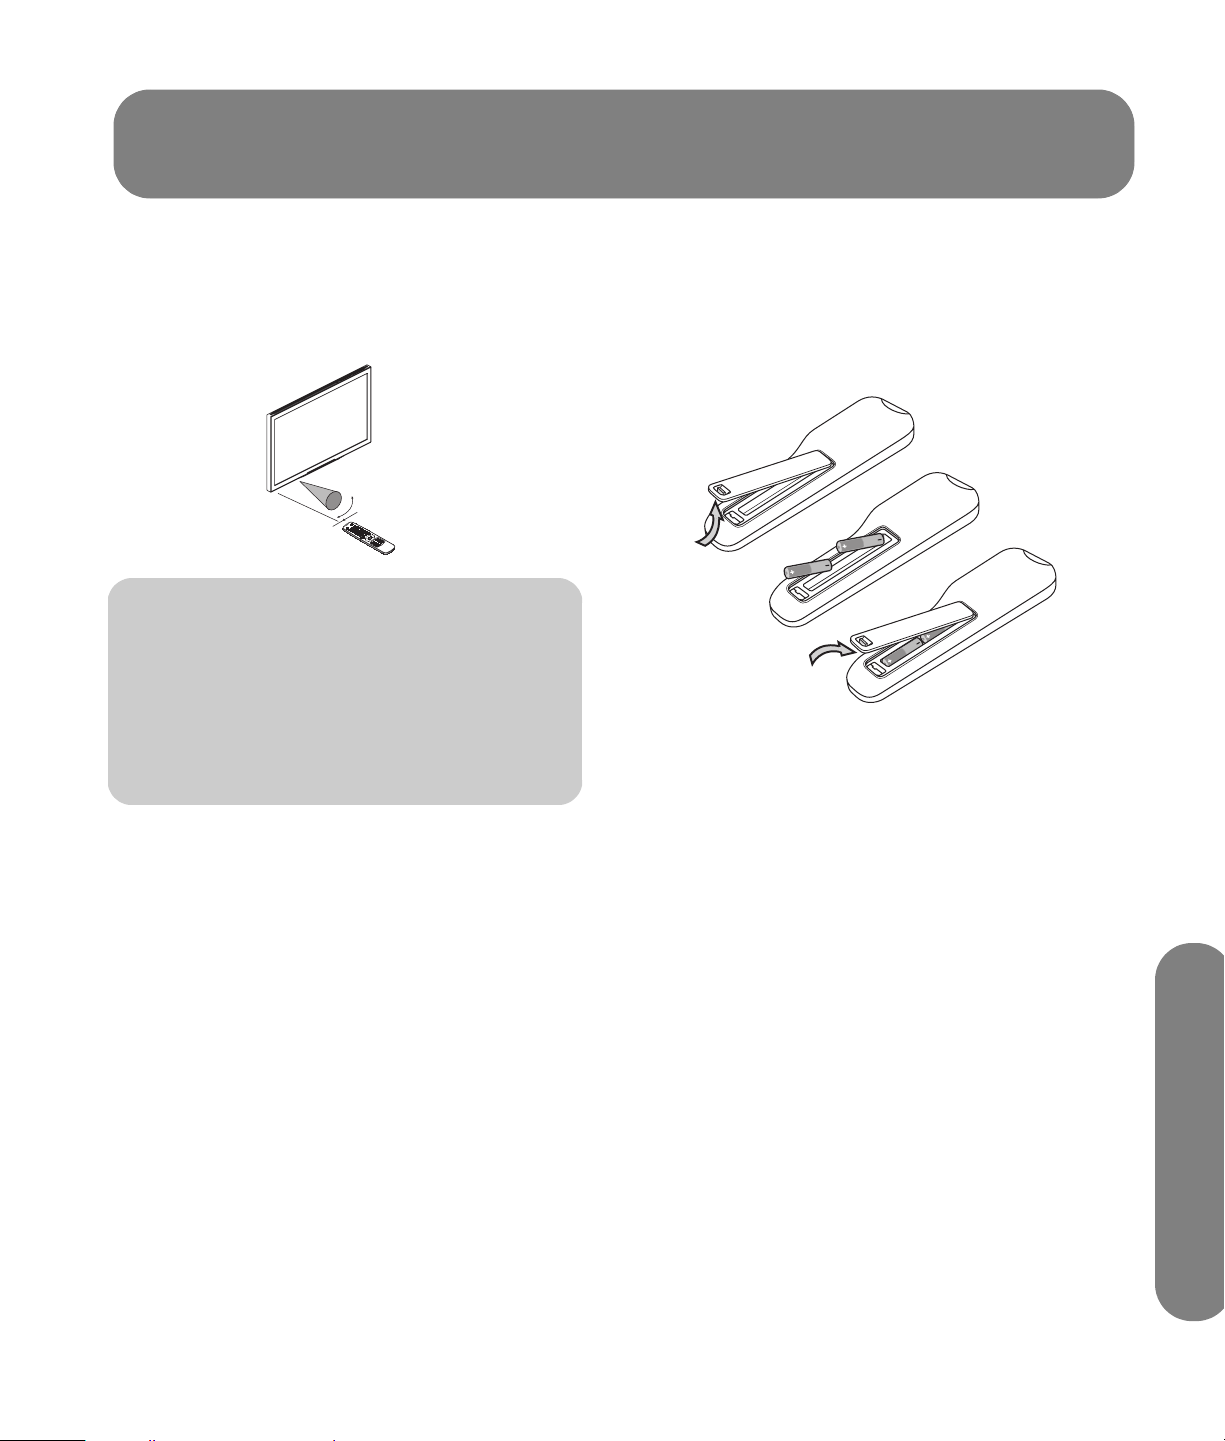
Utilisation de la télécommande
Contrôle du téléviseur
La télécommande contrôle le téléviseur. Pour utiliser la
télécommande, pointez-la vers le télécapteur placé sur
l'écran.
30º
E
T
U
M
V
CT
I
H
P
A
R
R
G
E
H
W
C
O
P
P
M
3
O
C
P
U
T
6
2
E
S
L
O
5m
V
9
5
1
E
N
D
T
I
R
W
H
C
8
4
P
A
W
SA
S
T
M
R
E
0
T
0
7
N
1
E
P
/
I
B
P
I
P
0
J
P
D
I
A
P
U
N
E
P
M
E
E
L
S
L
A
E
E
V
Z
E
E
R
E
R
J
F
E
D
C
L
A
T
I
T
P
Y
I
B
A
H
U
L
C
S
P
V
IS
Y
D
D
L
O
D
H
R
C
E
C
X
MI
G
T
T
X
E
D
N
I
R
T
I
X
E
n
Utilisez la télécommande à une distance 5
mètres, au plus, de la fenêtre du
télécapteur placé à l’avant du téléviseur et
dans des angles horizontal et vertical de
30 au maximum.
Utilisation d'une télécommande
universelle
Si vous souhaitez utiliser une télécommande universelle
pour contrôler votre téléviseur HP et que HP n'apparaît
pas dans les codes de fabricants pris en charge, utilisez
un code de téléviseur Philips. La télécommande HP
transmet les codes de télécommande Philips.
Une fois programmée avec un code de téléviseur Philips,
votre télécommande universelle peut contrôler les
fonctions de téléviseur HP suivantes : volume, mise en
sourdine, alimentation et source d'entrée.
Installation ou remplacement
des piles de la télécommande
Insérez deux piles AAA non rechargeables dans la
télécommande en veillant à les placer selon la polarité
correcte.
1 Appuyez sur le capot du compartiment à piles à
l’arrière de la télécommande pour l’ouvrir.
2 Insérez les piles dans la télécommande et assurez-
vous que la polarité est correcte.
3 Refermez le capot.
Ne mélangez pas différents types de piles (alcalines et
carbone-zinc par exemple) ou de vieilles piles avec des
piles neuves.
Assurez-vous que la polarité est correcte lorsque vous
placez les piles dans leur compartiment, comme indiqué.
Une inversion de la polarité risque d’endommager la
télécommande.
Lorsque vous n'utilisez pas la télécommande pendant une
période prolongée, enlevez les piles afin d'éviter tout
dommage ou blessure provenant d'une fuite potentielle
des piles.
N'essayez pas de recharger des piles non rechargeables,
cela peut entraîner un risque de surchauffe et de rupture :
Procédez selon les instructions du fabricant des piles.
Ôtez toujours les piles qui sont devenues trop faibles. Des
piles faibles peuvent couler et endommager gravement la
télécommande. La durée de vie des piles dépend de la
fréquence d’utilisation de la télécommande. Remplacez
les piles dès que le fonctionnement de la télécommande
devient anormal.
Ne démontez pas les piles, ne les chauffez pas et ne les
jetez pas au feu.
Utilisation de la télécommande
Utilisation de la télécommande 21
Page 94
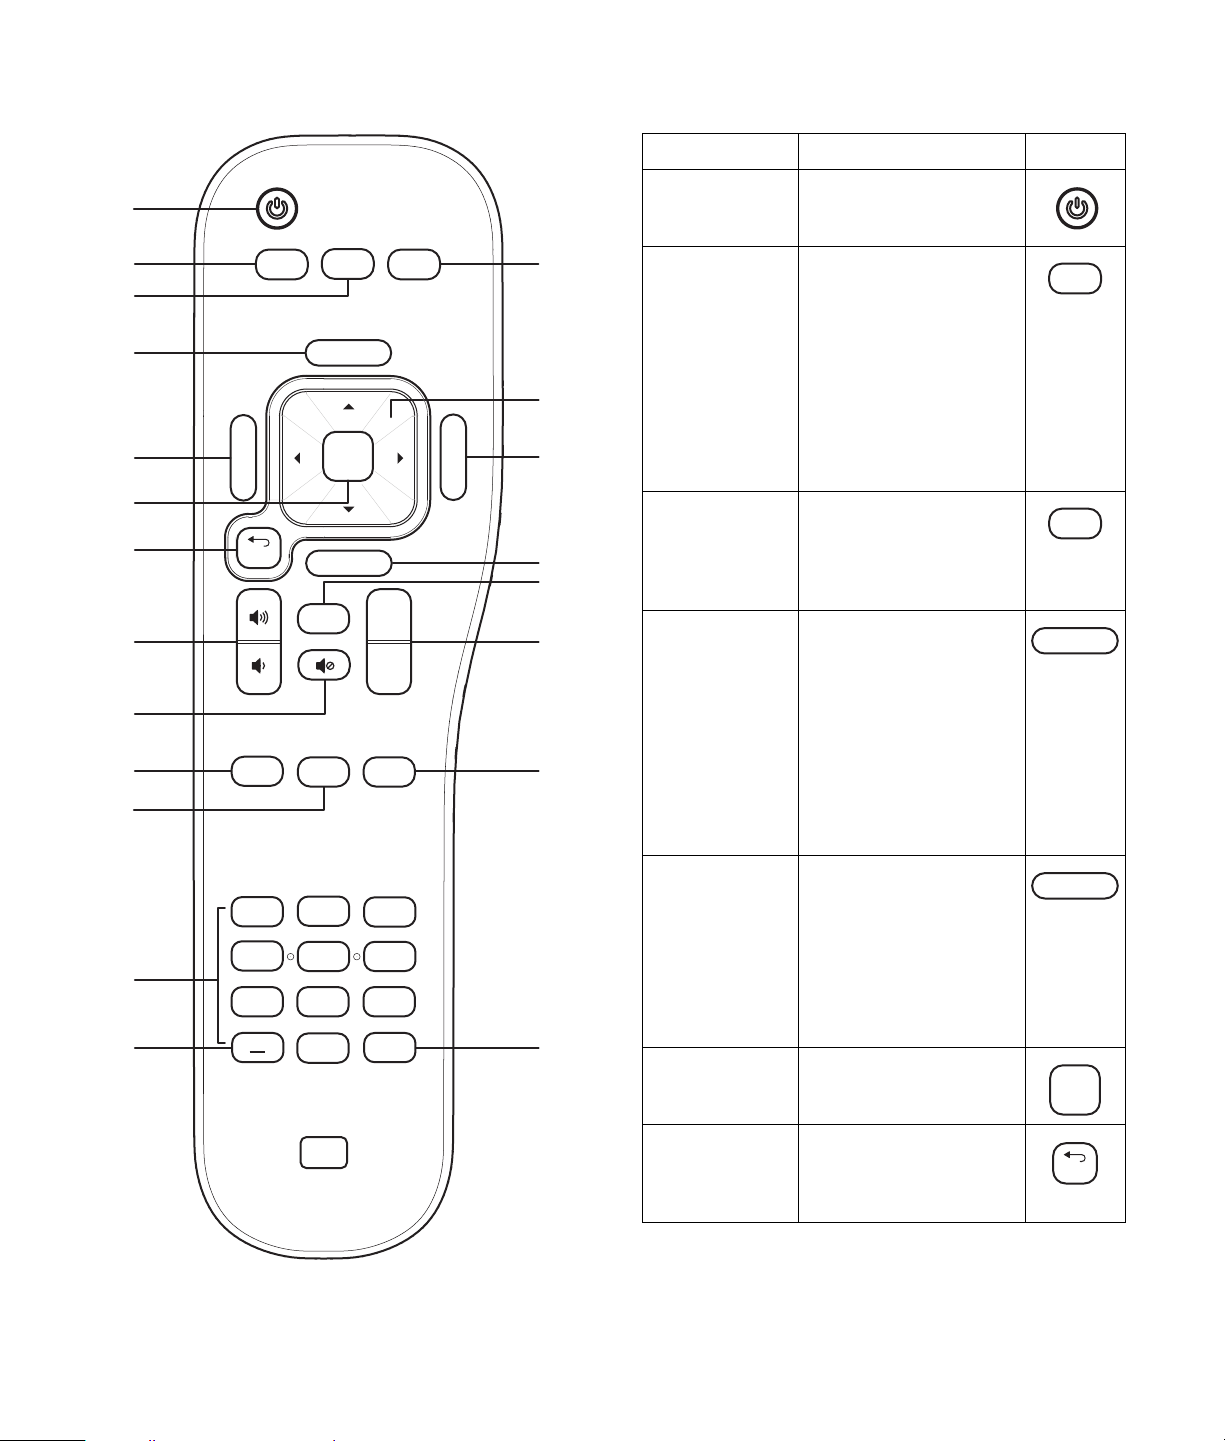
Identification des touches de la télécommande
Q
Nom Description Icône
APower
A
SAP
B
C
D
E
F
G
H
I
JT
K
Menu
back
CC Sleep Ant
MTS
Sound
Source
Last
OK
Info
Ch+
Ch-
Picture
Aspect
N
O
P
R
S
BSAP/MTS
CSound
DSource
EMenu
1
4
L
7
MU
2
5
89
0
3
6
Enter
FOK
GPréc.
Utilisez la touche Power
pour allumer ou
éteindre le téléviseur.
Appuyez sur SAP/MTS
pour ouvrir une liste des
options de programme
audio secondaire
disponibles. Utilisez une
touche fléchée
directionnelle pour
choisir une option, puis
appuyez sur OK.
Utilisez SAP/MTS pour
fermer la liste.
Utilisez la touche Sound
pour sélectionner un
mode audio : Voix,
Musique, Standard ou
Personnalisé.
Utilisez la touche
Source pour ouvrir la
liste des sources
d'entrée. Utilisez l'une
des touches fléchées
pour sélectionner la
source d'entrée à
afficher, puis appuyez
sur OK. Utilisez la
touche Source pour
fermer la liste.
Utilisez la touche Menu
pour ouvrir le menu
d’affichage à
l’écran (OSD).
Rappuyez sur la touche
Menu pour quitter le
menu et retourner à
l’écran du téléviseur.
Utilisez la touche OK
pour choisir l'option du
menu.
Utilisez la touche Back
pour revenir à
l'affichage précédent
d'un menu.
SAP
MTS
Sound
Source
Menu
OK
back
22 Guide de l'utilisateur du téléviseur HDTV à plasma HP
Page 95
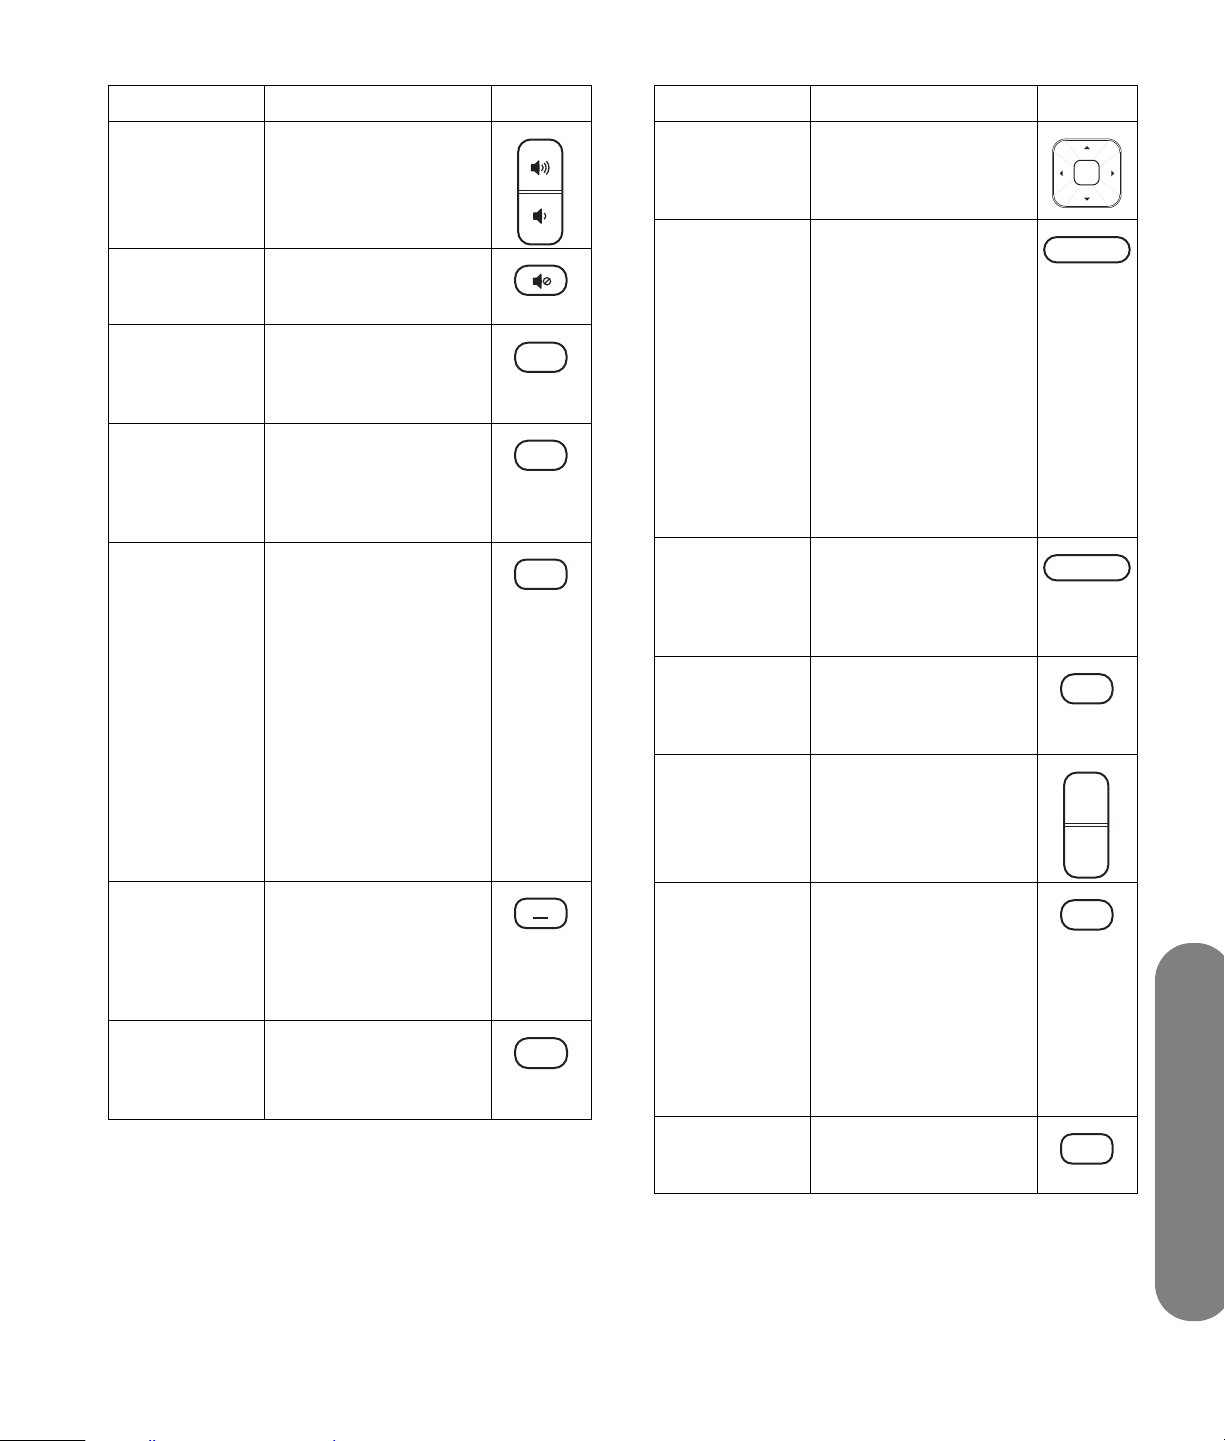
Nom Description Icône
HVol
Utilisez la touche
Volume pour augmenter
ou diminuer le son.
IMute
Utilisez la touche Mute
pour couper le son ou le
remettre en marche.
JCC
Utilisez CC pour
sélectionner les options
du mode de soustitrage.
K Sommeil
Utilisez la touche
Sommeil pour régler le
compteur dans cet
ordre : 15, 30, 60, 90
ou 120 minutes.
LTouches
numériques
Utilisez les touches
numériques (0 à 9) pour
sélectionner directement
un numéro de canal,
puis appuyez sur Entrer.
Utilisez ces touches
numériques pour éditer
ou entrer un nom
d'affichage pour un
canal analogique à
l'aide du menu Canal ;
reportez-vous à la
section Affichage des
informations sur les
canaux à la page 32.
M– (tiret)
Utilisez la touche – (tiret)
pour entrer un tiret dans
un numéro de souscanal d'un canal
numérique. Par
exemple, canal 14-2.
NImage
Utilisez la touche Picture
pour sélectionner un
mode vidéo : Standard,
Vive, Film, Personnalisé.
CC
Sleep
1
Picture
Nom Description Icône
OFlèches
Haut/Bas/
Gauche/
Droite
PAspect
Utilisez les touches
fléchées pour déplacer
le curseur sur les écrans
de menu.
Utilisez la touche Aspect
tt
pour ouvrir une liste des
options relatives aux
dimensions de l'image
du téléviseur. Utilisez
l'une des touches
fléchées pour
sélectionner l'option,
puis appuyez sur OK.
Utilisez la touche Aspect
pour fermer la liste.
Les options sont fonction
de la source d’entrée
actuelle.
QInfo
Utilisez la touche Info
pour afficher la
banderole contenant les
informations sur le
programme en cours.
RLast
Utilisez la touche Last
pour revenir au canal
que vous regardiez
précédemment.
SCh+
Ch–
Utilisez la touche Ch+
(ou Ch–) pour
sélectionner le canal
supérieur (ou inférieur)
suivant.
TAnt
Utilisez la touche Ant
pour afficher la
banderole contenant les
informations sur le
programme en cours
Rappuyez sur Ant pour
revenir à l'affichage du
téléviseur TV, lorsque
vous regardez un DVD
ou une autre source.
UEntrer
Utilisez la touche Entrer
après avoir saisi un
numéro de canal.
Aspect
Info
Last
Ch+
Ch-
Ant
Enter
Utilisation de la télécommande 23
Utilisation de la télécommande
Page 96

Ajustement du volume
Changement de canal
Utilisez les touches de volume de la télécommande
pour augmenter ou baisser le son. La barre d’état sur
le téléviseur indique l’augmentation ou la réduction du
volume.
Mise en sourdine
1 Utilisez la touche Mute pour désactiver
temporairement le son.
2 Rappuyez sur la touche Mute pour rétablir le son
à son niveau de volume précédent.
Modification du mode
Image
Utilisez la touche Picture pour afficher le mode vidéo
sélectionné. Maintenez la touche Picture ou la flèche
Droite pour sélectionner le mode vidéo et la qualité
d'image de votre choix.
■ Vive : améliore le contraste et la netteté pour une
utilisation dans une pièce bien éclairée.
■ Standard : recommandé dans des conditions de
visualisation normale avec un éclairage faible.
■ Film : recommandé pour regarder des films dans
une pièce peu éclairée. Fournit une image douce,
comme un film.
■ Personnalisé : utilise les paramètres
personnalisés que vous avez configurés dans le
menu OSD. Pour plus d'informations sur la
définition des paramètres Image, consultez la
section Utilisation du menu Image à la page 28.
Utilisez les touches Ch+ ou Ch– de la télécommande
pour faire défiler les canaux dans l’ordre croissant ou
décroissant. Le téléviseur vous permet de sélectionner
jusqu’à 125 canaux (1 à 125). Pour sélectionner une
chaîne, entrez un nombre à un, deux ou trois chiffres
ou bien utilisez les touches de défilement des canaux
Haut ou Bas.
Pour sélectionner canal précis (canal 25 par exemple),
effectuez la procédure suivante dans les 4 secondes :
1 Appuyez sur la touche 2 de la télécommande.
2 Appuyez sur la touche 5.
3 Appuyez sur Entrer.
Pour sélectionner un numéro de sous-canal (14-2 par
exemple) :
1 Appuyez sur la touche 1.
2 Appuyez sur la touche 4.
3 Appuyez sur la touche – (tiret).
4 Appuyez sur la touche 2.
5 Appuyez sur Entrer.
Sélection du dernier canal
Utilisez la touche Last de votre télécommande pour
visualiser le canal que vous regardiez précédemment.
Affichage des informations du
programme
Si vous appuyez sur la touche Info, une banderole
présentant les informations sur le programme que vous
êtes en train de regarder s'affiche.
24 Guide de l'utilisateur du téléviseur HDTV à plasma HP
n
Parfois le nom du programme n’est pas
diffusé. Dans ce cas, le nom du programme
n’est pas affiché.
Page 97

Sélection de la source
Modification de
d’entrée
1 Utilisez la touche Source pour ouvrir une liste de
sources d'entrée.
2 Appuyez sur la touche fléchée vers le haut ou vers
le bas pour sélectionner la source d’entrée à
afficher.
3 Vous pouvez également utiliser la touche fléchée
vers la droite pour modifier l'étiquette d'une
source d'entrée.
4 Appuyez sur OK.
5 Rappuyez sur la touche Source pour fermer la liste
des sources d'entrée.
La liste des sources d'entrées identifie un jeu de
connecteurs à l'arrière du téléviseur. À l'exception
d'Antenne ou câble, toutes les étiquettes peuvent être
modifiées.
■ Antenne ou câble : cette étiquette ne peut pas être
modifiée et permet de sélectionner le connecteur
d'entrée RF. L'étiquette indique la sélection de la
source de recherche (Antenne ou câble) de la
dernière recherche de canal effectuée soit par
l'Assistant première installation, soit par le menu
Canal.
■ Composite 1
■ S-video 1 (S-vidéo 1)
■ Composite 2
■ S-video 2 (S-vidéo 2)
■ Component 1
■ Component 2
■ PC
■ HDMI
l'affichage avec la touche
Aspect
Utilisez la touche Aspect pour ouvrir une liste des
options relatives aux dimensions de l'image du
téléviseur. Utilisez l'une des touches fléchées pour
sélectionner l'option, puis appuyez sur OK. Utilisez la
touche Aspect pour fermer la liste. Les options sont
fonction de la source d’entrée actuelle.
■ Mode 16/9 : affiche la télévision haute
définition dans son format normal.
■ Mode 4/3 : affiche l'image au format standard
du rapport de l'affichage 4/3 au centre du
téléviseur avec des barres sombres à gauche et à
droite.
■ Zoom1 : allonge proportionnellement l'image du
téléviseur, mais fixe le haut et le bas de l'image
pour l'adapter à l'écran. Élimine les barres noires.
■ Zoom2 : effectue un zoom sur le centre, sans
adapter le bas et le haut de l'écran.
■ Panorama : similaire au mode 16/9 mais avec
côtés plus visibles.
Activation des sous-titres
Lorsque vous appuyez sur la touche CC, les options de
sous-titres s’affichent :
■ Activé : affiche les sous-titres.
■ Désactivé : désactive les sous-titres.
■ Silencieux : affiche les sous-titres lorsque la
touche Mute est activée.
Pour configurer vos préférences de sous-titres, reportezvous à la section Utilisation du menu Sous-titrage à la
page 33.
Utilisation de la télécommande 25
Utilisation de la télécommande
Page 98

Réglage du mode
Changement de mode
stéréo SAP/MTS
Appuyez sur la touche SAP/MTS pour ouvrir une liste
des programmes audio secondaires (SAP)/sons
télévision multi-canaux (MTS) disponibles. Utilisez l'une
des touches fléchées pour sélectionner l'option à
utiliser, puis appuyez sur la touche OK. Appuyez sur
SAP/MTS pour fermer la liste.
SAP reçoit un son mono, un son stéréo et les
programmes audio secondaires. La fonction MTS
permet à une station de télévision de diffuser d’autres
informations comme des informations dans d’autres
langues ou des informations sur la météo.
Vous pouvez profiter le cas échéant du son stéréo
haute fidélité ou des émissions SAP :
■ Émissions en stéréo : vous pouvez écouter, en
direct et avec un son stéréo dynamique, des
événements sportifs, des spectacles et des
concerts.
■ Émissions SAP : vous avez le choix entre les
sons Main et SAP.
■ Son Main : bande sonore normale de
l’émission (en mono ou en stéréo).
■ Son SAP : vous pouvez écouter une deuxième
langue, des commentaires supplémentaires et
d’autres informations (SAP est un son mono).
Si le son stéréo est de mauvaise qualité, obtenez un
son plus clair en basculant manuellement sur le
mode-mono fixe.
audio
Utilisez la touche Sound pour afficher le mode audio
sélectionné. Maintenez la touche Sound ou la flèche
Droite pour sélectionner le mode audio et la qualité
sonore de votre choix.
Pour plus d'informations sur la définition des options
personnalisées, consultez la sectionAjustement audio à
la page 30.
Réglage du minuteur de
sommeil
Lorsque vous appuyez sur la touche Sommeil, vous
démarrez un compte à rebours à la fin duquel le
téléviseur s’éteindra automatiquement. Si vous réglez
le minuteur de sommeil sur 30, votre téléviseur
s’éteindra 30 minutes plus tard
Minutes Description
15 Règle la minuterie sur 15 minutes.
30 Règle la minuterie sur 30 minutes.
60 Règle la minuterie sur 60 minutes.
90 Règle la minuterie sur 90 minutes.
120 Règle la minuterie sur 120 minutes.
0 Désactive le minuteur de sommeil.
n
MTS ne fonctionne qu’en mode TV.
26 Guide de l'utilisateur du téléviseur HDTV à plasma HP
Ajustement des
paramètres du téléviseur
Utilisez l’affichage à l’écran pour ajuster notamment
les paramètres Image et Audio. Pour plus
d'informations, consultez la section Utilisation des
menus OSD à la page 27.
Activation et désactivation de
l’affichage à l’écran (OSD)
Si vous appuyez sur la touche Menu, le menu
d’affichage à l’écran (OSD) s’affiche. Si vous
rappuyez sur la touche Menu, vous quittez le menu
affiché et retournez à l’écran du téléviseur. Si vous
appuyez sur Précédent dans un sous-menu, vous
revenez au niveau de menu précédent.
Page 99
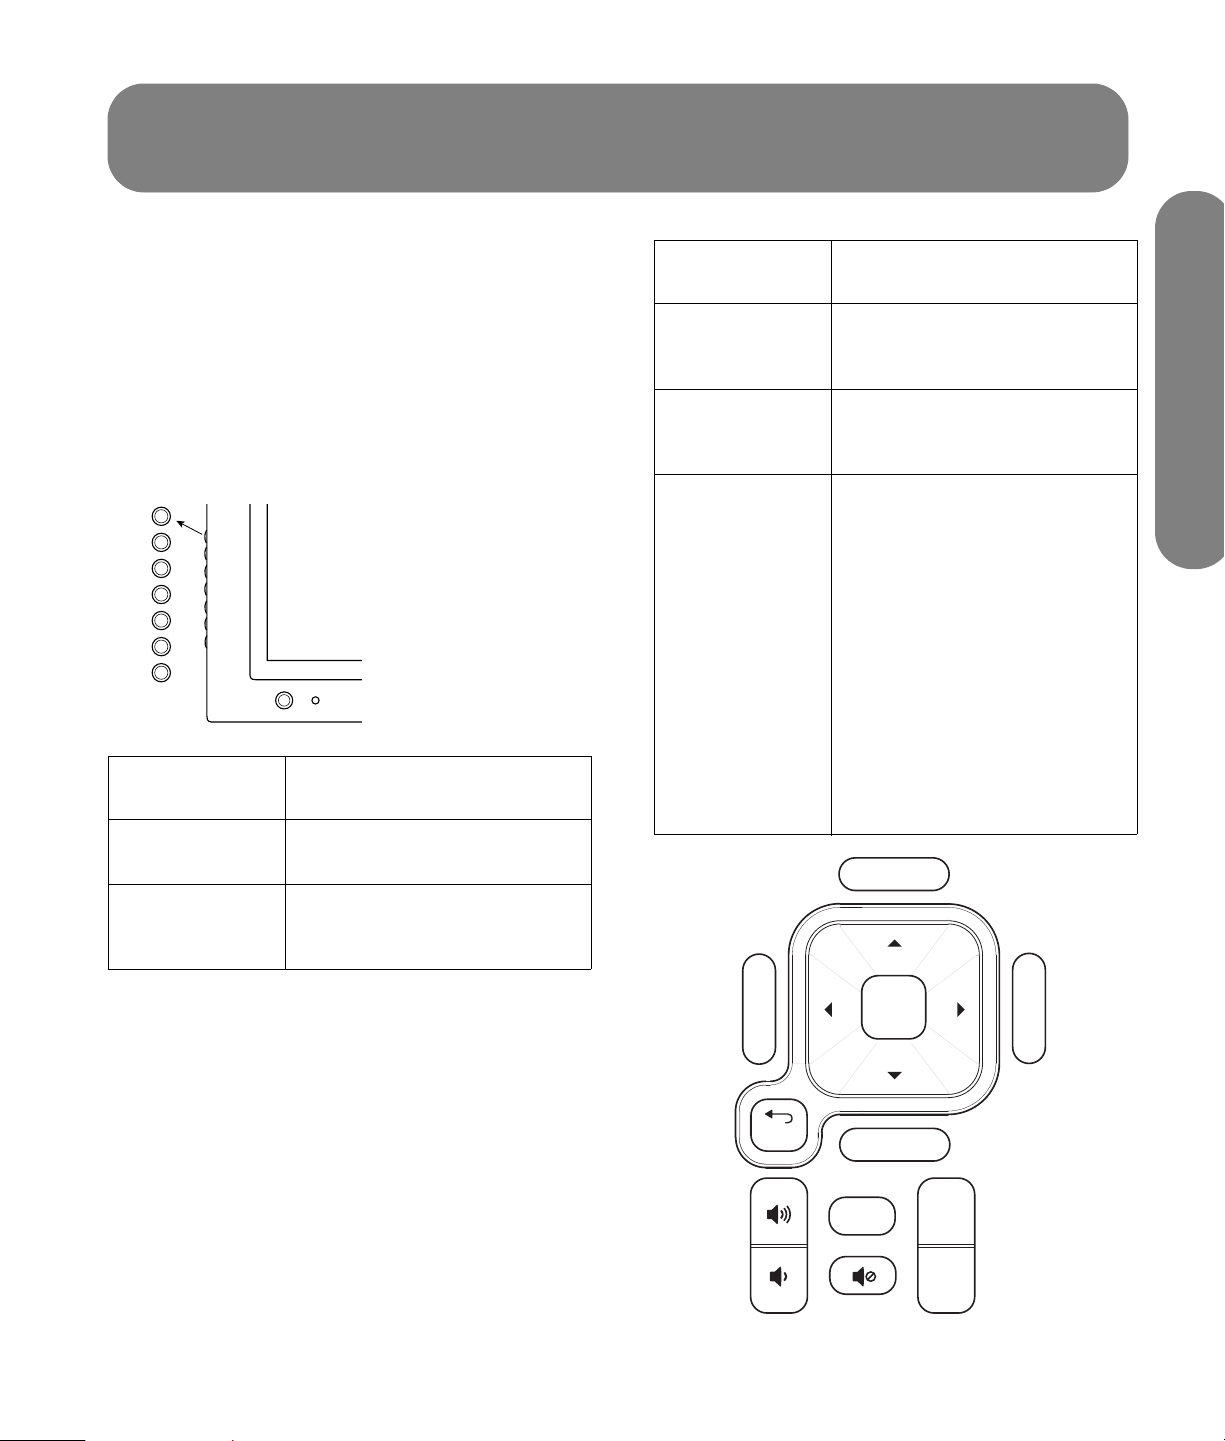
Modification des paramètres du téléviseur
Vous pouvez modifier les paramètres du téléviseur grâce
aux menus de l’affichage à l’écran (OSD).
Utilisation des menus
OSD
Vous pouvez accéder aux menus OSD en utilisant les
touches de la télécommande ou du téléviseur pour
sélectionner, ajuster et entrer les éléments spécifiés dans
ce manuel.
MENU
OK
+
VOL
–
+
CH
–
SRC
Téléviseur
(face avant) Description
MENU Menu (Quitter) affiche (ou
ferme) l’affichage à l’écran.
OK
OK sélectionne l’élément mis en
surbrillance sur l'affichage
àl'écran.
Téléviseur
(face avant) Description (suite)
+VOL
–VOL
Volume permet de se déplacer
vers la droite ou la gauche ou
d'ajuster un élément.
+CH
–CH
Canal permet de se déplacer
vers le haut ou le bas dans le
menu.
SRC
Source sélectionne la source
d'entrée. Utilisez la touche SRC
pour ouvrir la liste des sources
d'entrée. Utilisez la touche CH
pour sélectionner la source
d'entrée à afficher, puis
appuyez sur OK. Utilisez la
touche SRC pour fermer la liste.
Choisissez la source d'entrée
avant d'ouvrir l'affichage à
l'écran. Dans un menu OSD, ce
bouton fonctionne comme le
bouton Précédent ou sert à
passer à l'élément ou au niveau
de menu supérieur.
Source
téléviseur
Modification des paramètres du
Last
OK
Info
Aspect
Ch+
Ch-
Menu
back
Modification des paramètres du téléviseur 27
Page 100

Télécom
mande Description
MENU Menu (Quitter) affiche (ou ferme)
l’affichage à l’écran.
OK OK sélectionne l’élément mis en
surbrillance sur l'affichage
àl'écran.
Volume Volume permet d'ajuster le
niveau sonore ou un élément.
Ch+
Ch–
Source Source sélectionne la source
Préc. Précédent passe à l'élément ou
Canal fait défiler les canaux vers
le haut ou vers le bas.
d'entrée. Utilisez la touche Source
pour ouvrir la liste des sources
d'entrée. Utilisez l'une des touches
fléchées pour sélectionner la
source d'entrée à afficher, puis
appuyez sur OK. Utilisez la touche
Source pour fermer la liste.
Choisissez la source d'entrée
avant d'ouvrir l'affichage à
l'écran.
au niveau de menu supérieur.
5 Continuez à utiliser les touches directionnelles
pour sélectionner et ajuster un élément, et la
touche OK pour entrer la modification. Vous
pouvez appuyer sur la touche Précédent pour
sortir d’une option ou d’un niveau de menu.
6 Lorsque vous avez terminé, utilisez la touche
Menu pour fermer le menu.
Deux menus OSD disponibles sont :
■ Image
■ Audio
■ Heure
■ Canal
■ CC (sous-titrage)
■ Contrôle parental (Ctrl parental)
■ Système
Pour chacune des rubriques suivantes, un tableau
répertorie le menu et les options disponibles.
Utilisation du menu
Image
Le menu Image contrôle l’apparence, à l’écran, de
l’image de la source d’entrée sélectionnée. Par
exemple, lorsque vous ajustez la luminosité, l’image à
l’écran change en fonction du réglage de l’échelle.
Pour utiliser les menus OSD :
1 Appuyez sur la touche Source pour sélectionner la
source du signal d’entrée du téléviseur. Les menus
OSD et les options affichées dépendent de la
source d’entrée actuelle.
2 Utilisez la touche Menu pour afficher le menu
OSD. Les menus disponibles s’affichent sous forme
de liste.
3 Utilisez les touches directionnelles pour
sélectionner le menu désiré, puis appuyez sur la
touche OK.
4 Utilisez les touches directionnelles pour naviguer
dans le menu et sélectionner une option, puis
appuyez sur la touche OK pour aller dans
l’option.
28 Guide de l'utilisateur du téléviseur HDTV à plasma HP
Comme le menu Image comporte les paramètres de
chaque entrée, sélectionner (vue) de la source
d’entrée, puis effectuer les changements dans le menu
Image.
Les tableaux ci-dessous montrent le menu Image
lorsqu’une source AV est la source d'entrée
(sélectionnez l'élément de menu Paramètres) et
lorsqu’une source de l'ordinateur est la source d'entrée
(sélectionnez l'élément de menu Écran).
Menu Image/
Paramètres Options
Mode Vive/Standard/
Film/Utilisateur
Luminosité [échelle]
Contraste [échelle]
 Loading...