

Page 1
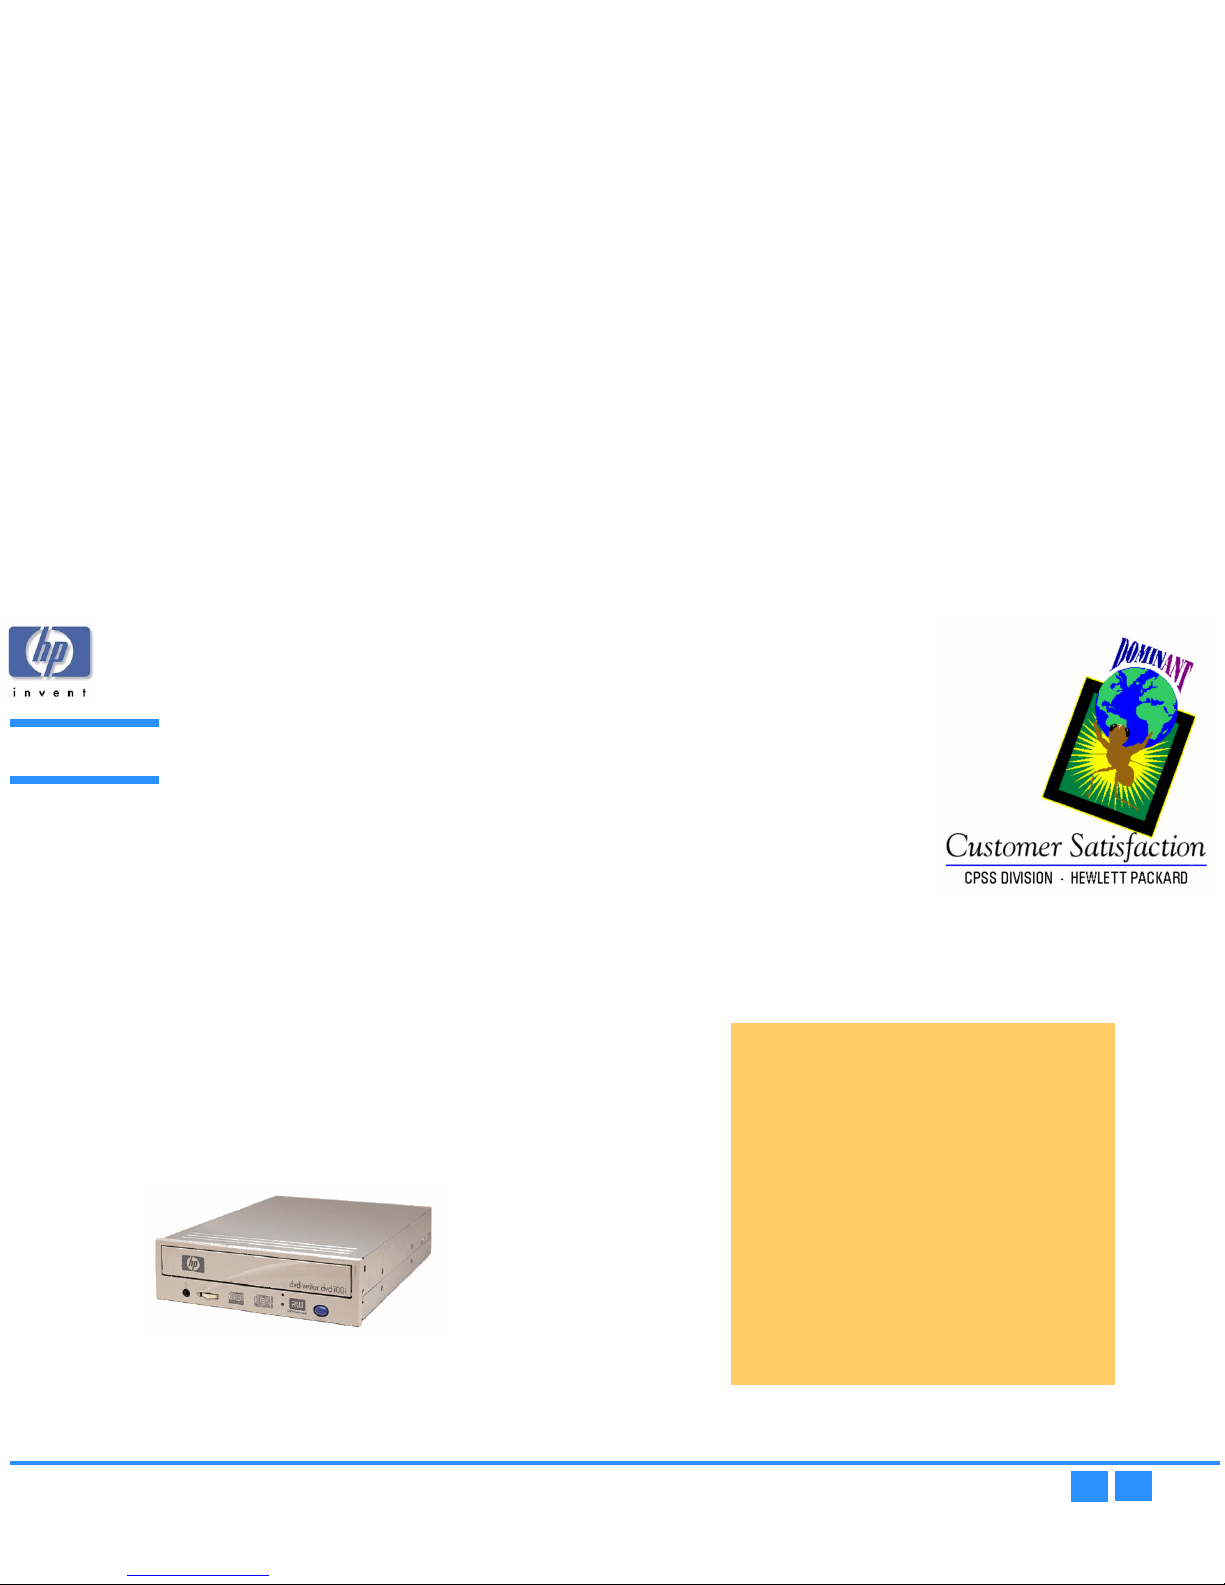
hp dvd-writer
hp dvd-writerhp dvd-writer
hp dvd-writer dvd100i
dvd100idvd100i
dvd100i
Technical Support Solutions Guide 10/25/01
1111
⇐⇐⇐⇐
⇒⇒⇒⇒
TSSG
hp dvd-writer
Technical Support Solutions Guide
for
hp dvd-writer dvd100i
10/25/01 - TSSGdvd100iFall2001.pdf
Chapters
Chapter 1 Product Information p. 11
Chapter 2 Drive Specifications p. 15
Chapter 3 Interfaces p. 31
Chapter 4 Installation and Configuration p. 34
Chapter 5 Drive Operation p. 45
Chapter 6 Tips and Techniques p. 48
Chapter 7 Software p. 52
Chapter 8 Maintenance p. 80
Chapter 9 Troubleshooting p. 81
Chapter 10 Warranty and Support p. 94
Chapter 11 Release Notes p. 96
Chapter 12 Discontinued Products p. 104
Page 2

hp dvd-writer
hp dvd-writerhp dvd-writer
hp dvd-writer dvd100i
dvd100idvd100i
dvd100i
Technical Support Solutions Guide 10/25/01
2222
⇐⇐⇐⇐
⇒⇒⇒⇒
Contents
Chapter 1
Chapter 1Chapter 1
Chapter 1
Product Information
Product History - - - - - - - - - - - - - - - - - - - - - - - - - - - - - - - - - - - - - - - - - - - - - - 11
CD Technology - - - - - - - - - - - - - - - - - - - - - - - - - - - - - - - - - - - - - - - - - - 11
DVD Technology - - - - - - - - - - - - - - - - - - - - - - - - - - - - - - - - - - - - - - - - - 11
What is MultiRead? - - - - - - - - - - - - - - - - - - - - - - - - - - - - - - - - - - - - - - - - 11
DVD Media Read/Write Compatibility - - - - - - - - - - - - - - - - - - - - - - - - - - - 12
CD-R/CD-RW Media Read/Write Compatibility - - - - - - - - - - - - - - - - - - - - - 12
Disc Storage Capacity of HP Products - - - - - - - - - - - - - - - - - - - - - - - - - - - - - - - 12
Product Positioning - - - - - - - - - - - - - - - - - - - - - - - - - - - - - - - - - - - - - - - - - - - 13
Laser Safety - - - - - - - - - - - - - - - - - - - - - - - - - - - - - - - - - - - - - - - - - - - - - - - - 13
CAUTION — Contains: Class 1 Laser Product - - - - - - - - - - - - - - - - - - - - - - 13
Parts Available for the hp dvd-writer Drive - - - - - - - - - - - - - - - - - - - - - - - - - - - - 13
Current Products - - - - - - - - - - - - - - - - - - - - - - - - - - - - - - - - - - - - - - - - - - - - 14
Chapter 2
Chapter 2Chapter 2
Chapter 2
Drive Specifications
System Requirements - - - - - - - - - - - - - - - - - - - - - - - - - - - - - - - - - - - - - - - - - - 15
Physical Specifications - - - - - - - - - - - - - - - - - - - - - - - - - - - - - - - - - - - - - - - - - 15
Mounting - - - - - - - - - - - - - - - - - - - - - - - - - - - - - - - - - - - - - - - - - - - - - - - 15
Size of the hp dvd-writer dvd100i Drive - - - - - - - - - - - - - - - - - - - - - - - - - - 17
Box Size and Weight for hp dvd-writer dvd100i Drive - - - - - - - - - - - - - - - - - 17
Bezel Front Door - - - - - - - - - - - - - - - - - - - - - - - - - - - - - - - - - - - - - - - - - - 17
Disc Loading Mechanism - - - - - - - - - - - - - - - - - - - - - - - - - - - - - - - - - - - - 17
Disc Ejection Mechanism - - - - - - - - - - - - - - - - - - - - - - - - - - - - - - - - - - - - 17
Manual Ejection - - - - - - - - - - - - - - - - - - - - - - - - - - - - - - - - - - - - - - - 18
Emergency Ejection - - - - - - - - - - - - - - - - - - - - - - - - - - - - - - - - - - - - 18
Auto Insertion - - - - - - - - - - - - - - - - - - - - - - - - - - - - - - - - - - - - - - - - 18
Ejecting Position - - - - - - - - - - - - - - - - - - - - - - - - - - - - - - - - - - - - - - 18
Tray Locking Mechanism - - - - - - - - - - - - - - - - - - - - - - - - - - - - - - - - - - - - 18
LEDs - - - - - - - - - - - - - - - - - - - - - - - - - - - - - - - - - - - - - - - - - - - - - - - 18
Connector and Jumpers on hp dvd-writer dvd100i Drive - - - - - - - - - - - - - - 19
Back of Drive - - - - - - - - - - - - - - - - - - - - - - - - - - - - - - - - - - - - - - - - - 19
Power Connector - - - - - - - - - - - - - - - - - - - - - - - - - - - - - - - - - - - - - - 19
Signal Connector - - - - - - - - - - - - - - - - - - - - - - - - - - - - - - - - - - - - - - 19
Master/Slave and Cable Select - - - - - - - - - - - - - - - - - - - - - - - - - - - 20
Analog Audio Output Connectors - - - - - - - - - - - - - - - - - - - - - - - - - - 21
Digital Audio Output Connectors - - - - - - - - - - - - - - - - - - - - - - - - - - - 21
Media - - - - - - - - - - - - - - - - - - - - - - - - - - - - - - - - - - - - - - - - - - - - - - - - - 21
Read Media Compatibility - - - - - - - - - - - - - - - - - - - - - - - - - - - - - - - - 21
Write Media Compatibility - - - - - - - - - - - - - - - - - - - - - - - - - - - - - - - - 21
Write Methods - - - - - - - - - - - - - - - - - - - - - - - - - - - - - - - - - - - - - - - - 21
Logical Recording Format - - - - - - - - - - - - - - - - - - - - - - - - - - - - - - - 22
Audio - - - - - - - - - - - - - - - - - - - - - - - - - - - - - - - - - - - - - - - - - - - - - - - - 22
RIP Speed - - - - - - - - - - - - - - - - - - - - - - - - - - - - - - - - - - - - - - - - - - 22
Reliability Specifications - - - - - - - - - - - - - - - - - - - - - - - - - - - - - - - - - - - - - - - 23
Errors - - - - - - - - - - - - - - - - - - - - - - - - - - - - - - - - - - - - - - - - - - - - - - - - 23
Error Rate - - - - - - - - - - - - - - - - - - - - - - - - - - - - - - - - - - - - - - - - - - 23
Corrected Error Rate - - - - - - - - - - - - - - - - - - - - - - - - - - - - - - - - - - - 23
Influence on Media Life - - - - - - - - - - - - - - - - - - - - - - - - - - - - - - - - - - - - 23
Reading - - - - - - - - - - - - - - - - - - - - - - - - - - - - - - - - - - - - - - - - - - - 23
Writing - - - - - - - - - - - - - - - - - - - - - - - - - - - - - - - - - - - - - - - - - - - - 23
Mean Time Between Failures (MTBF) - - - - - - - - - - - - - - - - - - - - - - - - - - - 23
Preventive Maintenance - - - - - - - - - - - - - - - - - - - - - - - - - - - - - - - - - - - - 23
Acoustic Emissions - - - - - - - - - - - - - - - - - - - - - - - - - - - - - - - - - - - - - - - - - - - 23
Acoustic Power Emissions - - - - - - - - - - - - - - - - - - - - - - - - - - - - - - - 23
Acoustic Pressure Emissions - - - - - - - - - - - - - - - - - - - - - - - - - - - - - 23
Electrical Specifications - - - - - - - - - - - - - - - - - - - - - - - - - - - - - - - - - - - - - - - 24
Power - - - - - - - - - - - - - - - - - - - - - - - - - - - - - - - - - - - - - - - - - - - - - - - - 24
Power Management - - - - - - - - - - - - - - - - - - - - - - - - - - - - - - - - - - - 24
Power Input - - - - - - - - - - - - - - - - - - - - - - - - - - - - - - - - - - - - - - - - - 24
Power Consumption - - - - - - - - - - - - - - - - - - - - - - - - - - - - - - - - - - - 24
Front Audio Output - - - - - - - - - - - - - - - - - - - - - - - - - - - - - - - - - - - - - - - 24
Ground Tab - - - - - - - - - - - - - - - - - - - - - - - - - - - - - - - - - - - - - - - - - - - - 24
Tray Locking Mechanism - - - - - - - - - - - - - - - - - - - - - - - - - - - - - - - - - - - 24
Page 3
hp dvd-writer
hp dvd-writerhp dvd-writer
hp dvd-writer dvd100i
dvd100idvd100i
dvd100i
Technical Support Solutions Guide 10/25/01
3333
⇐⇐⇐⇐
⇒⇒⇒⇒
Performance Specifications - - - - - - - - - - - - - - - - - - - - - - - - - - - - - - - - - - - - - 25
Buffer - - - - - - - - - - - - - - - - - - - - - - - - - - - - - - - - - - - - - - - - - - - - - - - - 25
Performance of the Drive - - - - - - - - - - - - - - - - - - - - - - - - - - - - - - - - - - - 25
Seek Time - - - - - - - - - - - - - - - - - - - - - - - - - - - - - - - - - - - - - - - - - - 25
Initialization Time (2x) - - - - - - - - - - - - - - - - - - - - - - - - - - - - - - - - - - 25
Disc Finalization Time (2x) - - - - - - - - - - - - - - - - - - - - - - - - - - - - - - - 25
Hours of Video Recording - - - - - - - - - - - - - - - - - - - - - - - - - - - - - - - 25
Video Formats - - - - - - - - - - - - - - - - - - - - - - - - - - - - - - - - - - - - - - - 25
Video Standards - - - - - - - - - - - - - - - - - - - - - - - - - - - - - - - - - - - - - 25
Video Capture Cards - - - - - - - - - - - - - - - - - - - - - - - - - - - - - - - - - - 25
Search Speed - - - - - - - - - - - - - - - - - - - - - - - - - - - - - - - - - - - - - - - 25
Backup Rate Native - - - - - - - - - - - - - - - - - - - - - - - - - - - - - - - - - - - 26
Backup Rate Compressed - - - - - - - - - - - - - - - - - - - - - - - - - - - - - - - 26
Burst Transfer Rate - - - - - - - - - - - - - - - - - - - - - - - - - - - - - - - - - - - - 26
Transfer Rates - - - - - - - - - - - - - - - - - - - - - - - - - - - - - - - - - - - - - - - 26
Environmental Specifications - - - - - - - - - - - - - - - - - - - - - - - - - - - - - - - - - - - - 27
Temperature - - - - - - - - - - - - - - - - - - - - - - - - - - - - - - - - - - - - - - - - - - - - 27
Non-Operating Temperature - - - - - - - - - - - - - - - - - - - - - - - - - - - - - 27
Operating Temperature - - - - - - - - - - - - - - - - - - - - - - - - - - - - - - - - 27
Humidity - - - - - - - - - - - - - - - - - - - - - - - - - - - - - - - - - - - - - - - - - - - - - - 27
Non-Operating Humidity - - - - - - - - - - - - - - - - - - - - - - - - - - - - - - - 27
Operating Humidity - - - - - - - - - - - - - - - - - - - - - - - - - - - - - - - - - - - 27
Vibration - - - - - - - - - - - - - - - - - - - - - - - - - - - - - - - - - - - - - - - - - - - - - - 27
Operating Vibration - - - - - - - - - - - - - - - - - - - - - - - - - - - - - - - - - - - 27
Shock - - - - - - - - - - - - - - - - - - - - - - - - - - - - - - - - - - - - - - - - - - - - - - - - 27
Product Safety Specifications - - - - - - - - - - - - - - - - - - - - - - - - - - - - - - - - - - - - 28
References - - - - - - - - - - - - - - - - - - - - - - - - - - - - - - - - - - - - - - - - - - - - - - - - 29
Discussion of References - - - - - - - - - - - - - - - - - - - - - - - - - - - - - - - - - - - 30
Chapter 3
Chapter 3Chapter 3
Chapter 3
Interfaces
ATA/ATAPI - - - - - - - - - - - - - - - - - - - - - - - - - - - - - - - - - - - - - - - - - - - - - - - - - 31
IDE Connectors - - - - - - - - - - - - - - - - - - - - - - - - - - - - - - - - - - - - - - - - - - - - - - 32
Chapter 4
Chapter 4Chapter 4
Chapter 4
Installation and Configuration
PC Desktop Minimum System Requirements - - - - - - - - - - - - - - - - - - - - - - - - - 34
What’s in the Box - - - - - - - - - - - - - - - - - - - - - - - - - - - - - - - - - - - - - - - - - - - - - 35
Installing the hp dvd-writer dvd100i Drive - - - - - - - - - - - - - - - - - - - - - - - - - - - 35
Inserting Disc 1 - - - - - - - - - - - - - - - - - - - - - - - - - - - - - - - - - - - - - - - - - - - 35
Viewing the Install Video - - - - - - - - - - - - - - - - - - - - - - - - - - - - - - - - - - - - 36
Starting Installation - - - - - - - - - - - - - - - - - - - - - - - - - - - - - - - - - - - - - - - 36
Accepting the Attachment Recommendation - - - - - - - - - - - - - - - - - - - - - - 36
Printing the Install Recommendation - - - - - - - - - - - - - - - - - - - - - - - - - - - 36
Installing the Hardware - - - - - - - - - - - - - - - - - - - - - - - - - - - - - - - - - - - - - 37
Restarting the Computer - - - - - - - - - - - - - - - - - - - - - - - - - - - - - - - - - - - - 42
Installing the Software - - - - - - - - - - - - - - - - - - - - - - - - - - - - - - - - - - - - - - - - - 42
Vendor Software Installation - - - - - - - - - - - - - - - - - - - - - - - - - - - - - - - - - 42
Identifying the hp dvd-writer Drive - - - - - - - - - - - - - - - - - - - - - - - - - - - - - - - - 43
Desktop Icon - - - - - - - - - - - - - - - - - - - - - - - - - - - - - - - - - - - - - - - - - - - - - - - 43
Start Menu Program Group Names - - - - - - - - - - - - - - - - - - - - - - - - - - - - - - - - 43
Additional Reference Information - - - - - - - - - - - - - - - - - - - - - - - - - - - - - - - - 44
Online User’s Guide - - - - - - - - - - - - - - - - - - - - - - - - - - - - - - - - - - - - - - 44
ReadMe Files - - - - - - - - - - - - - - - - - - - - - - - - - - - - - - - - - - - - - - - - - - - 44
Hardware/Software Compatibility - - - - - - - - - - - - - - - - - - - - - - - - - - - - - 44
Uninstalling Software - - - - - - - - - - - - - - - - - - - - - - - - - - - - - - - - - - - - - - - - 44
Product Information Drive Specifications Interfaces Installation and Configuration
Drive Operation Tips and Techniques Software Maintenance
Troubleshooting Warranty and Support Release Notes Discontinued Products
Page 4

hp dvd-writer
hp dvd-writerhp dvd-writer
hp dvd-writer dvd100i
dvd100idvd100i
dvd100i
Technical Support Solutions Guide 10/25/01
4444
⇐⇐⇐⇐
⇒⇒⇒⇒
Chapter 5
Chapter 5Chapter 5
Chapter 5
Drive Operation
Bezel - - - - - - - - - - - - - - - - - - - - - - - - - - - - - - - - - - - - - - - - - - - - - - - - - - - - 45
Disc Loading Mechanism - - - - - - - - - - - - - - - - - - - - - - - - - - - - - - - - - - - - - - 45
Disc Ejection Mechanism - - - - - - - - - - - - - - - - - - - - - - - - - - - - - - - - - - - - - - - 46
Manual Ejection - - - - - - - - - - - - - - - - - - - - - - - - - - - - - - - - - - - - - - - - - 46
Emergency Ejection - - - - - - - - - - - - - - - - - - - - - - - - - - - - - - - - - - - - - - - 46
Auto Insertion - - - - - - - - - - - - - - - - - - - - - - - - - - - - - - - - - - - - - - - - - - - 46
Ejecting Position - - - - - - - - - - - - - - - - - - - - - - - - - - - - - - - - - - - - - - - - - 46
Volume Control - - - - - - - - - - - - - - - - - - - - - - - - - - - - - - - - - - - - - - - - - - - - - 46
Starting Software - - - - - - - - - - - - - - - - - - - - - - - - - - - - - - - - - - - - - - - - - - - - 47
Chapter 6
Chapter 6Chapter 6
Chapter 6
Tips and Techniques
Frequently Asked Questions - - - - - - - - - - - - - - - - - - - - - - - - - - - - - - - - - - - - 48
Why so many different programs? - - - - - - - - - - - - - - - - - - - - - - - - - - - - - 48
What's the difference between mastering and packet-writing software? - - - - 48
How much information can I fit on one CD? - - - - - - - - - - - - - - - - - - - - - - 49
Can I do other things while my CD is recording? - - - - - - - - - - - - - - - - - - - 49
What kinds of discs can my HP drive write to? - - - - - - - - - - - - - - - - - - - - - 50
What is the best way to make a disc I can share? - - - - - - - - - - - - - - - - - - - 50
Can I erase a disc? - - - - - - - - - - - - - - - - - - - - - - - - - - - - - - - - - - - - - - - - 50
How should I take care of my discs? - - - - - - - - - - - - - - - - - - - - - - - - - - - 50
What is the best way to label a disc? - - - - - - - - - - - - - - - - - - - - - - - - - - - - 51
How do I buy more discs? - - - - - - - - - - - - - - - - - - - - - - - - - - - - - - - - - - - 51
When do I need to format a disc? - - - - - - - - - - - - - - - - - - - - - - - - - - - - - - 51
Can I copy a disc that is in my existing CD-ROM or DVD-ROM drive to a disc in
my HP drive? - - - - - - - - - - - - - - - - - - - - - - - - - - - - - - - - - - - - - - - - - 51
Can I copy a music disc that is in my CD-ROM drive to a blank disc in my HP
drive? - - - - - - - - - - - - - - - - - - - - - - - - - - - - - - - - - - - - - - - - - - - - - - 51
Chapter 7
Chapter 7Chapter 7
Chapter 7
Software
Start Menu Choices for Core Software - - - - - - - - - - - - - - - - - - - - - - - - - - - - - - 52
HP RecordNow 3.0 - - - - - - - - - - - - - - - - - - - - - - - - - - - - - - - - - - - - - - - - - - - 53
Manuals for HP RecordNow - - - - - - - - - - - - - - - - - - - - - - - - - - - - - - - - - - 53
Installing HP RecordNow - - - - - - - - - - - - - - - - - - - - - - - - - - - - - - - - - - - - 53
Files Installed for HP RecordNow 3.0 - - - - - - - - - - - - - - - - - - - - - - - - - - - 53
Using HP RecordNow - - - - - - - - - - - - - - - - - - - - - - - - - - - - - - - - - - - - - - 54
Starting HP RecordNow - - - - - - - - - - - - - - - - - - - - - - - - - - - - - - - - - 54
Making an Exact Copy of a Disc - - - - - - - - - - - - - - - - - - - - - - - - - - - 55
Making a Data Disc - - - - - - - - - - - - - - - - - - - - - - - - - - - - - - - - - - - - 56
Making a Music Disc from Audio Files - - - - - - - - - - - - - - - - - - - - - - - 56
Making a Music Disc from other CDs - - - - - - - - - - - - - - - - - - - - - - - - 57
Making a Disc for an MP3 Player - - - - - - - - - - - - - - - - - - - - - - - - - - - 57
CDDB - - - - - - - - - - - - - - - - - - - - - - - - - - - - - - - - - - - - - - - - - - - - - 58
Options - - - - - - - - - - - - - - - - - - - - - - - - - - - - - - - - - - - - - - - - - - - - 58
General Tab - - - - - - - - - - - - - - - - - - - - - - - - - - - - - - - - - - - - - - - - - 59
Advanced Tab - - - - - - - - - - - - - - - - - - - - - - - - - - - - - - - - - - - - - - - - 59
CDDB Tab - - - - - - - - - - - - - - - - - - - - - - - - - - - - - - - - - - - - - - - - - 60
Tips and Tricks - - - - - - - - - - - - - - - - - - - - - - - - - - - - - - - - - - - - - - 60
Troubleshooting - - - - - - - - - - - - - - - - - - - - - - - - - - - - - - - - - - - - - - 62
Registry Modifications for HP RecordNow - - - - - - - - - - - - - - - - - - - - - - - - 63
Location - - - - - - - - - - - - - - - - - - - - - - - - - - - - - - - - - - - - - - - - - - - - 63
Uninstalling HP RecordNow - - - - - - - - - - - - - - - - - - - - - - - - - - - - - - - - - 64
To uninstall HP RecordNow from Windows 9x: - - - - - - - - - - - - - - - - 64
To uninstall HP RecordNow from Windows Millennium Edition: - - - - - 64
To uninstall HP RecordNow from Windows NT: - - - - - - - - - - - - - - - - 64
To uninstall HP RecordNow from Windows 2000: - - - - - - - - - - - - - - 64
Support Provider for HP RecordNow - - - - - - - - - - - - - - - - - - - - - - - - - - - 64
HP DLA 2.5 - - - - - - - - - - - - - - - - - - - - - - - - - - - - - - - - - - - - - - - - - - - - - - - - - 65
Manuals for HP DLA - - - - - - - - - - - - - - - - - - - - - - - - - - - - - - - - - - - - - - - 65
Installing HP DLA - - - - - - - - - - - - - - - - - - - - - - - - - - - - - - - - - - - - - - - - - 65
Basic Installation Locations for HP DLA 2.5 - - - - - - - - - - - - - - - - - - - - - - - 65
Product Information Drive Specifications Interfaces Installation and Configuration
Drive Operation Tips and Techniques Software Maintenance
Troubleshooting Warranty and Support Release Notes Discontinued Products
Page 5

hp dvd-writer
hp dvd-writerhp dvd-writer
hp dvd-writer dvd100i
dvd100idvd100i
dvd100i
Technical Support Solutions Guide 10/25/01
5555
⇐⇐⇐⇐
⇒⇒⇒⇒
DLA Engine Installation - - - - - - - - - - - - - - - - - - - - - - - - - - - - - - - - 67
Shared Components Installation - - - - - - - - - - - - - - - - - - - - - - - - - - 67
Registry - - - - - - - - - - - - - - - - - - - - - - - - - - - - - - - - - - - - - - - - - - - 67
Using HP DLA - - - - - - - - - - - - - - - - - - - - - - - - - - - - - - - - - - - - - - - - - - - 68
Starting HP DLA - - - - - - - - - - - - - - - - - - - - - - - - - - - - - - - - - - - - - - 68
Format - - - - - - - - - - - - - - - - - - - - - - - - - - - - - - - - - - - - - - - - - - - - 68
Make Compatible - - - - - - - - - - - - - - - - - - - - - - - - - - - - - - - - - - - - - 69
Preferences - - - - - - - - - - - - - - - - - - - - - - - - - - - - - - - - - - - - - - - - - 70
Eject Button - - - - - - - - - - - - - - - - - - - - - - - - - - - - - - - - - - - - - - - - - 70
Properties Button - - - - - - - - - - - - - - - - - - - - - - - - - - - - - - - - - - - - - 70
Explore Button - - - - - - - - - - - - - - - - - - - - - - - - - - - - - - - - - - - - - - - 70
Tips - - - - - - - - - - - - - - - - - - - - - - - - - - - - - - - - - - - - - - - - - - - - - - - - - - 70
The Taskbar Icon - - - - - - - - - - - - - - - - - - - - - - - - - - - - - - - - - - - - - 70
Drag and Drop Files - - - - - - - - - - - - - - - - - - - - - - - - - - - - - - - - - - - 70
Uninstalling HP DLA - - - - - - - - - - - - - - - - - - - - - - - - - - - - - - - - - - - - - - - 71
Windows 9x - - - - - - - - - - - - - - - - - - - - - - - - - - - - - - - - - - - - - - - - - - 71
Windows NT - - - - - - - - - - - - - - - - - - - - - - - - - - - - - - - - - - - - - - - - - 71
Windows Millennium - - - - - - - - - - - - - - - - - - - - - - - - - - - - - - - - - - - 71
Windows 2000 - - - - - - - - - - - - - - - - - - - - - - - - - - - - - - - - - - - - - - - 71
Windows XP - - - - - - - - - - - - - - - - - - - - - - - - - - - - - - - - - - - - - - - - - - 71
HP MyDVD - - - - - - - - - - - - - - - - - - - - - - - - - - - - - - - - - - - - - - - - - - - - - - - - 72
System Requirements - - - - - - - - - - - - - - - - - - - - - - - - - - - - - - - - - - - - - 72
Features - - - - - - - - - - - - - - - - - - - - - - - - - - - - - - - - - - - - - - - - - - - - - - - 72
Manuals for HP MyDVD - - - - - - - - - - - - - - - - - - - - - - - - - - - - - - - - - - - - 72
Installation - - - - - - - - - - - - - - - - - - - - - - - - - - - - - - - - - - - - - - - - - - - - - 72
Using HP MyDVD - - - - - - - - - - - - - - - - - - - - - - - - - - - - - - - - - - - - - - - - 73
Starting HP MyDVD - - - - - - - - - - - - - - - - - - - - - - - - - - - - - - - - - - - 73
Support Provider - - - - - - - - - - - - - - - - - - - - - - - - - - - - - - - - - - - - - - - - - 74
Customer Support - - - - - - - - - - - - - - - - - - - - - - - - - - - - - - - - - - - - - - - - 74
Phone - - - - - - - - - - - - - - - - - - - - - - - - - - - - - - - - - - - - - - - - - - - - - 74
Web - - - - - - - - - - - - - - - - - - - - - - - - - - - - - - - - - - - - - - - - - - - - - - 74
HP Simple Backup - - - - - - - - - - - - - - - - - - - - - - - - - - - - - - - - - - - - - - - - - - - - 75
Using HP Simple Backup - - - - - - - - - - - - - - - - - - - - - - - - - - - - - - - - - - - - 75
Starting HP Simple Backup - - - - - - - - - - - - - - - - - - - - - - - - - - - - - - - 75
Full System Backup - - - - - - - - - - - - - - - - - - - - - - - - - - - - - - - - - - - - 76
Custom Backup - - - - - - - - - - - - - - - - - - - - - - - - - - - - - - - - - - - - - - 76
Complete System Restore - - - - - - - - - - - - - - - - - - - - - - - - - - - - - - - 76
Custom Restore - - - - - - - - - - - - - - - - - - - - - - - - - - - - - - - - - - - - - - 76
Automatically Excluded Files - - - - - - - - - - - - - - - - - - - - - - - - - - - - - 76
Errors and Warnings Report - - - - - - - - - - - - - - - - - - - - - - - - - - - - - - - - - - 76
Support Provider for HP Simple Backup - - - - - - - - - - - - - - - - - - - - - - - - - 77
PowerDVD - - - - - - - - - - - - - - - - - - - - - - - - - - - - - - - - - - - - - - - - - - - - - - - - - 78
System Requirements - - - - - - - - - - - - - - - - - - - - - - - - - - - - - - - - - - - - - - 78
Manuals for PowerDVD - - - - - - - - - - - - - - - - - - - - - - - - - - - - - - - - - - - - - 78
Using PowerDVD - - - - - - - - - - - - - - - - - - - - - - - - - - - - - - - - - - - - - - - - - 78
Starting PowerDVD - - - - - - - - - - - - - - - - - - - - - - - - - - - - - - - - - - - - 78
Support Provider - - - - - - - - - - - - - - - - - - - - - - - - - - - - - - - - - - - - - - - - - 79
Customer Support - - - - - - - - - - - - - - - - - - - - - - - - - - - - - - - - - - - - - - - - 79
Email - - - - - - - - - - - - - - - - - - - - - - - - - - - - - - - - - - - - - - - - - - - - - - 79
Phone - - - - - - - - - - - - - - - - - - - - - - - - - - - - - - - - - - - - - - - - - - - - - 79
Fax - - - - - - - - - - - - - - - - - - - - - - - - - - - - - - - - - - - - - - - - - - - - - - - 79
Web - - - - - - - - - - - - - - - - - - - - - - - - - - - - - - - - - - - - - - - - - - - - - - - 79
International Headquarters - - - - - - - - - - - - - - - - - - - - - - - - - - - - - - 79
Chapter 8
Chapter 8Chapter 8
Chapter 8
Maintenance
Product Care - - - - - - - - - - - - - - - - - - - - - - - - - - - - - - - - - - - - - - - - - - - - - - 80
Product Cleaning - - - - - - - - - - - - - - - - - - - - - - - - - - - - - - - - - - - - - - - - - - - 80
Drive - - - - - - - - - - - - - - - - - - - - - - - - - - - - - - - - - - - - - - - - - - - - - - - - 80
Media - - - - - - - - - - - - - - - - - - - - - - - - - - - - - - - - - - - - - - - - - - - - - - - - 80
Product Information Drive Specifications Interfaces Installation and Configuration
Drive Operation Tips and Techniques Software Maintenance
Troubleshooting Warranty and Support Release Notes Discontinued Products
Page 6
hp dvd-writer
hp dvd-writerhp dvd-writer
hp dvd-writer dvd100i
dvd100idvd100i
dvd100i
Technical Support Solutions Guide 10/25/01
6666
⇐⇐⇐⇐
⇒⇒⇒⇒
Chapter 9
Chapter 9Chapter 9
Chapter 9
Troubleshooting
Up-To-Date Troubleshooting Information - - - - - - - - - - - - - - - - - - - - - - - - - - - - 81
HP Troubleshooting Assistant - - - - - - - - - - - - - - - - - - - - - - - - - - - - - - - - - - - - 81
Improving Drive Performance and Reducing Errors - - - - - - - - - - - - - - - - - - - - - 81
Enabling Direct Memory Access to Enhance System Performance - - - - - - - - 81
Enabling DMA on HP IDE CD/DVD Drives and Windows 98/Me - - - - - 82
Enabling DMA on hard drives and Windows 98/Me - - - - - - - - - - - - - 82
Enabling DMA on HP IDE CD/DVD Drives and Windows 2000
Professional - - - - - - - - - - - - - - - - - - - - - - - - - - - - - - - - - - - - - 82
Enabling DMA on hard drives and Windows 2000 Professional - - - - - 82
DMA will not stay enabled - - - - - - - - - - - - - - - - - - - - - - - - - - - - - - - - - - 83
Reasons why DMA will not stay enabled after restarting your computer 83
Other problems occurred after enabling DMA - - - - - - - - - - - - - - - - - 83
Other performance issues - - - - - - - - - - - - - - - - - - - - - - - - - - - - - - - - - - 83
40-conductor, 40-pin vs. 80-conductor, 40-pin IDE cables - - - - - - - - 83
Software Errors - - - - - - - - - - - - - - - - - - - - - - - - - - - - - - - - - - - - - - - - - - - - - 83
HP RecordNow reported it was unable to read fast enough - - - - - - - - - - - - 83
HP RecordNow reported that there was a problem reading the disc
being copied - - - - - - - - - - - - - - - - - - - - - - - - - - - - - - - - - - - - - - - - - 83
Clean the CD - - - - - - - - - - - - - - - - - - - - - - - - - - - - - - - - - - - - - - - - 83
Try using a different source drive - - - - - - - - - - - - - - - - - - - - - - - - - - 83
Try using your HP drive as both the source and destination drive - - - - 84
If you're trying to record to an 80-minute CD - - - - - - - - - - - - - - - - - 84
HP RecordNow reported a write error - - - - - - - - - - - - - - - - - - - - - - - - - - - 84
The CD-R or CD-RW disc may be scratched, damaged, or dirty - - - - - 84
HP RecordNow reported that your HP drive is in use - - - - - - - - - - - - - - - - 84
HP RecordNow reported that the source disc cannot be copied - - - - - - - - - 84
Installation - - - - - - - - - - - - - - - - - - - - - - - - - - - - - - - - - - - - - - - - - - - - - - - - 84
Your HP drive is installed, but does not appear in Windows Explorer - - - - - 84
Your HP drive is installed and appears in Windows Explorer, but now other devices
such as CD-ROM or DVD-ROM drives do not appear in Windows
Explorer - - - - - - - - - - - - - - - - - - - - - - - - - - - - - - - - - - - - - - - - - - - - - 84
Check IDE/SCSI ribbon cables - - - - - - - - - - - - - - - - - - - - - - - - - - - 84
Check data connectors for bent pins - - - - - - - - - - - - - - - - - - - - - - - - 85
Check external SCSI cables - - - - - - - - - - - - - - - - - - - - - - - - - - - - - - 85
Change drive letter assignments - - - - - - - - - - - - - - - - - - - - - - - - - - - 85
Windows assigned the wrong drive letters to your drives - - - - - - - - - - - - - - 85
Windows 95/98/Me - - - - - - - - - - - - - - - - - - - - - - - - - - - - - - - - - - - - 85
Windows NT - - - - - - - - - - - - - - - - - - - - - - - - - - - - - - - - - - - - - - - - - 85
Windows 2000 - - - - - - - - - - - - - - - - - - - - - - - - - - - - - - - - - - - - - - - 85
The HP drive's software installation fails - - - - - - - - - - - - - - - - - - - - - - - - - 86
Uninstall the HP drive software: - - - - - - - - - - - - - - - - - - - - - - - - - - - - 86
Reinstall your HP drive's software. - - - - - - - - - - - - - - - - - - - - - - - - - - 86
Making Audio CDs - - - - - - - - - - - - - - - - - - - - - - - - - - - - - - - - - - - - - - - - - - - 86
HP RecordNow reported an error while copying an audio CD or you hear clicks
and pops when playing audio CDs - - - - - - - - - - - - - - - - - - - - - - - - - - - 86
Try using a different source drive - - - - - - - - - - - - - - - - - - - - - - - - - - 86
HP RecordNow reported an incorrect file format - - - - - - - - - - - - - - - - - - - 86
See also: - - - - - - - - - - - - - - - - - - - - - - - - - - - - - - - - - - - - - - - - - - - - - - - 86
Reading CDs - - - - - - - - - - - - - - - - - - - - - - - - - - - - - - - - - - - - - - - - - - - - - - - 86
A computer CD-ROM drive cannot read a recorded disc - - - - - - - - - - - - - - 86
The disc is scratched, damaged, or dirty - - - - - - - - - - - - - - - - - - - - - - 86
Try reading the disc in an HP drive, if available - - - - - - - - - - - - - - - - - 86
Some CD-ROM drives read discs very slowly if Read Ahead capabilities are
enabled in Windows 95/98/Me. - - - - - - - - - - - - - - - - - - - - - - - - - - - - - 87
Turn off Read Ahead
Read AheadRead Ahead
Read Ahead capabilities for the drive. - - - - - - - - - - - - - - - - - 87
If these suggestions do not solve the problem, try these possible solutions: 87
You used CD-R media - - - - - - - - - - - - - - - - - - - - - - - - - - - - - - - - - - 87
You used CD-RW media - - - - - - - - - - - - - - - - - - - - - - - - - - - - - - - - - 87
If you're trying to read an 80-minute CD - - - - - - - - - - - - - - - - - - - - - - - - 87
A home, auto, or portable stereo CD player cannot play a recorded disc - - 87
Make sure this is an audio CD, not a data CD - - - - - - - - - - - - - - - - - - 87
Use the correct media - - - - - - - - - - - - - - - - - - - - - - - - - - - - - - - - - - 87
If an error occurs while recording - - - - - - - - - - - - - - - - - - - - - - - - - - 87
You hear clicks, pops, and skips - - - - - - - - - - - - - - - - - - - - - - - - - - - 88
See Also: - - - - - - - - - - - - - - - - - - - - - - - - - - - - - - - - - - - - - - - - - - - - - - - 88
Product Information Drive Specifications Interfaces Installation and Configuration
Drive Operation Tips and Techniques Software Maintenance
Troubleshooting Warranty and Support Release Notes Discontinued Products
Page 7

hp dvd-writer
hp dvd-writerhp dvd-writer
hp dvd-writer dvd100i
dvd100idvd100i
dvd100i
Technical Support Solutions Guide 10/25/01
7777
⇐⇐⇐⇐
⇒⇒⇒⇒
A computer DVD-ROM drive cannot read a recorded disc - - - - - - - - - - - - 88
Try reading the disc in an HP drive, if available - - - - - - - - - - - - - - - - 88
Some DVD-ROM drives read discs very slowly if Read Ahead capabilities are
enabled in Windows 95/98/Me - - - - - - - - - - - - - - - - - - - - - - - - - - - - - 88
A DVD movie player cannot play a recorded disc - - - - - - - - - - - - - - - - - - 88
Make sure this is an audio CD, not a data CD. - - - - - - - - - - - - - - - - - 88
Use the correct media - - - - - - - - - - - - - - - - - - - - - - - - - - - - - - - - - - 88
See Also: - - - - - - - - - - - - - - - - - - - - - - - - - - - - - - - - - - - - - - - - - - - - - - 88
High Speed CDs - - - - - - - - - - - - - - - - - - - - - - - - - - - - - - - - - - - - - - - - - - - - 88
A high speed CD-RW disc was used in a drive that does not support
high speed - - - - - - - - - - - - - - - - - - - - - - - - - - - - - - - - - - - - - - - - - - - 88
80-Minute CDs - - - - - - - - - - - - - - - - - - - - - - - - - - - - - - - - - - - - - - - - - - - - - 88
A computer CD-ROM or HP drive cannot read an 80-minute CD - - - - - - - - 88
The CD is scratched, damaged, or dirty - - - - - - - - - - - - - - - - - - - - - - 88
Try reading the CD in a different drive - - - - - - - - - - - - - - - - - - - - - - 88
Use the drive that was used to write the CD - - - - - - - - - - - - - - - - - - - 88
An error occurred while recording - - - - - - - - - - - - - - - - - - - - - - - - - 88
Use HP media - - - - - - - - - - - - - - - - - - - - - - - - - - - - - - - - - - - - - - - 89
A home, auto, or portable stereo CD player cannot read an
80-minute CD - - - - - - - - - - - - - - - - - - - - - - - - - - - - - - - - - - - 89
You cannot write to an 80-minute CD using your HP drive - - - - - - - - - - - - 89
HP supported drives - - - - - - - - - - - - - - - - - - - - - - - - - - - - - - - - - - - 89
You are using an HP CD-R 80-minute CD - - - - - - - - - - - - - - - - - - - - 89
You are using a non-HP CD-R 80-minute CD - - - - - - - - - - - - - - - - - 89
Supported HP CD-Writer Drives for 80-Minute CDs - - - - - - - - - - - - - 89
Unable to Hear Music - - - - - - - - - - - - - - - - - - - - - - - - - - - - - - - - - - - - - - - - - 90
You're unable to hear audio through the front headphone jack - - - - - - - - - 90
Windows 2000 Professional - - - - - - - - - - - - - - - - - - - - - - - - - - - - - 90
Windows Me - - - - - - - - - - - - - - - - - - - - - - - - - - - - - - - - - - - - - - - - 90
Windows 98 - - - - - - - - - - - - - - - - - - - - - - - - - - - - - - - - - - - - - - - - - 90
Windows XP - - - - - - - - - - - - - - - - - - - - - - - - - - - - - - - - - - - - - - - - - 90
DLA 2.5 Known Problems - - - - - - - - - - - - - - - - - - - - - - - - - - - - - - - - - - - - - - 91
Chapter 10
Chapter 10Chapter 10
Chapter 10
Warranty and Support
hp dvd-writer dvd100i Warranty Information - - - - - - - - - - - - - - - - - - - - - - - - - 94
DURATION OF LIMITED WARRANTY - - - - - - - - - - - - - - - - - - - - - - - - - - - 94
Product Service and Support - - - - - - - - - - - - - - - - - - - - - - - - - - - - - - - - - - - - 95
Support Parts List - - - - - - - - - - - - - - - - - - - - - - - - - - - - - - - - - - - - - - - - - - - - 95
Chapter 11
Chapter 11Chapter 11
Chapter 11
Release Notes
HP CD-WRITER, hp dvd-writer - - - - - - - - - - - - - - - - - - - - - - - - - - - - - - - - - - - - 96
Windows NT 4.0 ATAPI Driver Issues - - - - - - - - - - - - - - - - - - - - - - - - - - - - 96
HP RecordNow, Version 3.0 - - - - - - - - - - - - - - - - - - - - - - - - - - - - - - - - - - - - - 97
How to use this document - - - - - - - - - - - - - - - - - - - - - - - - - - - - - - - - - - - 97
1. Reading Audio Discs - - - - - - - - - - - - - - - - - - - - - - - - - - - - - - - - - - - - - 97
2. Delay After Cancel - - - - - - - - - - - - - - - - - - - - - - - - - - - - - - - - - - - - - - 97
3. Copying CDs - - - - - - - - - - - - - - - - - - - - - - - - - - - - - - - - - - - - - - - - - - 97
4. Mastering Limitations - - - - - - - - - - - - - - - - - - - - - - - - - - - - - - - - - - - - 97
5. Conflicts with Adaptec Easy CD Creator 4 - - - - - - - - - - - - - - - - - - - - - - 97
6. Enable DMA to Reduce Buffer Underruns - - - - - - - - - - - - - - - - - - - - - - 97
7. Media Compatibility - - - - - - - - - - - - - - - - - - - - - - - - - - - - - - - - - - - - - 97
HP DLA, Version 2.5 - - - - - - - - - - - - - - - - - - - - - - - - - - - - - - - - - - - - - - - - - - - 98
1. Getting Started - - - - - - - - - - - - - - - - - - - - - - - - - - - - - - - - - - - - - - - - - 98
2. System Requirements - - - - - - - - - - - - - - - - - - - - - - - - - - - - - - - - - - - - 98
3. Multiple Device Support - - - - - - - - - - - - - - - - - - - - - - - - - - - - - - - - - - 98
4. Upgrading HP DLA - - - - - - - - - - - - - - - - - - - - - - - - - - - - - - - - - - - - - - 98
5. Sharing a HP DLA Drive - - - - - - - - - - - - - - - - - - - - - - - - - - - - - - - - - - - 98
6. Compressed Data - - - - - - - - - - - - - - - - - - - - - - - - - - - - - - - - - - - - - - - 99
7. Incompatibility with Direct CD - - - - - - - - - - - - - - - - - - - - - - - - - - - - - - 99
8. Incompatibility with MS Backup - - - - - - - - - - - - - - - - - - - - - - - - - - - - - 99
9. Problems with High Speed CD-RW Media - - - - - - - - - - - - - - - - - - - - - - - 99
10. Problems formatting previously formatted DVD/CD-RW media. - - - - - - 99
Product Information Drive Specifications Interfaces Installation and Configuration
Drive Operation Tips and Techniques Software Maintenance
Troubleshooting Warranty and Support Release Notes Discontinued Products
Page 8
hp dvd-writer
hp dvd-writerhp dvd-writer
hp dvd-writer dvd100i
dvd100idvd100i
dvd100i
Technical Support Solutions Guide 10/25/01
8888
⇐⇐⇐⇐
⇒⇒⇒⇒
Option 1: - - - - - - - - - - - - - - - - - - - - - - - - - - - - - - - - - - - - - - - - - - - 99
Option 2: - - - - - - - - - - - - - - - - - - - - - - - - - - - - - - - - - - - - - - - - - - - 99
11. Problems reading CD-R media - - - - - - - - - - - - - - - - - - - - - - - - - - - - - 99
12. Multiple drive incompatibilities - - - - - - - - - - - - - - - - - - - - - - - - - - - - - 99
13. Enabling/Disabling HP DLA - - - - - - - - - - - - - - - - - - - - - - - - - - - - - - - 99
14. Two identical drives - - - - - - - - - - - - - - - - - - - - - - - - - - - - - - - - - - - - - 99
15. Conflict with Nero software - - - - - - - - - - - - - - - - - - - - - - - - - - - - - - - 99
16. Issue with USB and Firewire (1394) devices - - - - - - - - - - - - - - - - - - - - - 99
HP Simple Backup - - - - - - - - - - - - - - - - - - - - - - - - - - - - - - - - - - - - - - - - - - 100
1. Multiple SCSI Device Setups - - - - - - - - - - - - - - - - - - - - - - - - - - - - - - 100
2. SCSI Controller - - - - - - - - - - - - - - - - - - - - - - - - - - - - - - - - - - - - - - - 100
3. Delay After Media Format, Media Initialize, or Canceled Backup - - - - - 100
4. CD-R Overwrite - - - - - - - - - - - - - - - - - - - - - - - - - - - - - - - - - - - - - - - 100
5. Disaster Recovery on FAT32 or DBCS Systems - - - - - - - - - - - - - - - - - - 100
6. DOS ASPI Drivers - - - - - - - - - - - - - - - - - - - - - - - - - - - - - - - - - - - - - - - 101
7. Erasing CD-RW Media - - - - - - - - - - - - - - - - - - - - - - - - - - - - - - - - - - - - 101
8. Booting from CD - - - - - - - - - - - - - - - - - - - - - - - - - - - - - - - - - - - - - - - 101
9. USB and Firewire (1394) Devices - - - - - - - - - - - - - - - - - - - - - - - - - - - - - 101
10. Disaster Recovery Configuration - - - - - - - - - - - - - - - - - - - - - - - - - - - 101
11. Sparse Files - - - - - - - - - - - - - - - - - - - - - - - - - - - - - - - - - - - - - - - - - - 101
12. HP Simple Backup and Active Desktop Applications - - - - - - - - - - - - - - 101
13. File Permissions for Backups and Restores - - - - - - - - - - - - - - - - - - - - - 101
14. Restoring Data from CD-RW Media - - - - - - - - - - - - - - - - - - - - - - - - - - 101
15. Disaster Recovery for Windows 2000 - - - - - - - - - - - - - - - - - - - - - - - - 101
16. Performing Disaster Recovery for Windows NT 4.0 Without Disaster Recovery
Diskettes - - - - - - - - - - - - - - - - - - - - - - - - - - - - - - - - - - - - - - - - - - - 102
17. Conflict With Microsoft System Restore - - - - - - - - - - - - - - - - - - - - - - 102
18. PCHealth Updates on Windows ME - - - - - - - - - - - - - - - - - - - - - - - - - 103
19. Device Issues With Windows Media Player 7.0 - - - - - - - - - - - - - - - - - - 103
20. Disaster Recovery on ATAPI Hard Disks Larger Than 8GB - - - - - - - - - 103
Chapter 12
Chapter 12Chapter 12
Chapter 12
Discontinued Products
Drives No Longer Sold - - - - - - - - - - - - - - - - - - - - - - - - - - - - - - - - - - - - - - - - 104
Product Information Drive Specifications Interfaces Installation and Configuration
Drive Operation Tips and Techniques Software Maintenance
Troubleshooting Warranty and Support Release Notes Discontinued Products
Page 9

hp dvd-writer
hp dvd-writerhp dvd-writer
hp dvd-writer dvd100i
dvd100idvd100i
dvd100i
Technical Support Solutions Guide 10/25/01
9999
⇐⇐⇐⇐
⇒⇒⇒⇒
Figures
Figure 1
Figure 1 Figure 1
Figure 1 Bottom View of the hp dvd-writer dvd100i Drive - - - - - - - - - - - - - - - - 16
Figure 2
Figure 2 Figure 2
Figure 2 Side View of the hp dvd-writer dvd100i Drive- - - - - - - - - - - - - - - - - - 16
Figure 3
Figure 3 Figure 3
Figure 3 Bezel Layout - - - - - - - - - - - - - - - - - - - - - - - - - - - - - - - - - - - - - - - - - 17
Figure 4
Figure 4 Figure 4
Figure 4 Back of Internal IDE Drive- - - - - - - - - - - - - - - - - - - - - - - - - - - - - - - 19
Figure 5
Figure 5 Figure 5
Figure 5 DC Power Connector - - - - - - - - - - - - - - - - - - - - - - - - - - - - - - - - - - 19
Figure 6
Figure 6 Figure 6
Figure 6 Interface Connector - - - - - - - - - - - - - - - - - - - - - - - - - - - - - - - - - - - 19
Figure 7
Figure 7 Figure 7
Figure 7 Drive Jumpers - - - - - - - - - - - - - - - - - - - - - - - - - - - - - - - - - - - - - - - 20
Figure 8
Figure 8 Figure 8
Figure 8 Audio Connector Output Pins - - - - - - - - - - - - - - - - - - - - - - - - - - - - - 21
Figure 9
Figure 9 Figure 9
Figure 9 Digital Audio Connector Output Pins - - - - - - - - - - - - - - - - - - - - - - - - 21
Figure 10
Figure 10 Figure 10
Figure 10 IDE Connectors - - - - - - - - - - - - - - - - - - - - - - - - - - - - - - - - - - - - - 32
Figure 11
Figure 11 Figure 11
Figure 11 40-Pin IDE Connector - - - - - - - - - - - - - - - - - - - - - - - - - - - - - - - - - 32
Figure 12
Figure 12 Figure 12
Figure 12 Align Pin 1 to the IDE Connector in the Computer - - - - - - - - - - - - - - 33
Figure 13
Figure 13 Figure 13
Figure 13 Align Pin 1 on the Drive - - - - - - - - - - - - - - - - - - - - - - - - - - - - - - - - 33
Figure 14
Figure 14 Figure 14
Figure 14 hp dvd-writer Installation Menu Screen - - - - - - - - - - - - - - - - - - - - - 35
Figure 15
Figure 15 Figure 15
Figure 15 Printing the Install Recommendation - - - - - - - - - - - - - - - - - - - - - - 36
Figure 16
Figure 16 Figure 16
Figure 16 Unplug the Computer- - - - - - - - - - - - - - - - - - - - - - - - - - - - - - - - - 37
Figure 17
Figure 17 Figure 17
Figure 17 A Free Drive Bay - - - - - - - - - - - - - - - - - - - - - - - - - - - - - - - - - - - - - 37
Figure 18
Figure 18 Figure 18
Figure 18 Setting Jumpers on the Drive - - - - - - - - - - - - - - - - - - - - - - - - - - - - 38
Figure 19
Figure 19 Figure 19
Figure 19 Rails for Mounting the Drive - - - - - - - - - - - - - - - - - - - - - - - - - - - - 38
Figure 20
Figure 20 Figure 20
Figure 20 Audio Cable Connector on Drive Back - - - - - - - - - - - - - - - - - - - - - 39
Figure 21
Figure 21 Figure 21
Figure 21 Data Cable Connector on Drive Back - - - - - - - - - - - - - - - - - - - - - - 39
Figure 22
Figure 22 Figure 22
Figure 22 An hp dvd-writer Drive Sharing the Data Cable - - - - - - - - - - - - - - - 40
Figure 23
Figure 23 Figure 23
Figure 23 An hp dvd-writer Drive Not Sharing the Data Cable - - - - - - - - - - - - 40
Figure 24
Figure 24 Figure 24
Figure 24 Power Connector on Drive Back- - - - - - - - - - - - - - - - - - - - - - - - - - 41
Figure 25
Figure 25 Figure 25
Figure 25 Securing the Drive in the Bay- - - - - - - - - - - - - - - - - - - - - - - - - - - - 41
Figure 26
Figure 26 Figure 26
Figure 26 Connect the Computer to Power - - - - - - - - - - - - - - - - - - - - - - - - - 42
Figure 27
Figure 27 Figure 27
Figure 27 HP CD-Writer Desktop Icon - - - - - - - - - - - - - - - - - - - - - - - - - - - - - 43
Figure 28
Figure 28 Figure 28
Figure 28 Bezel - - - - - - - - - - - - - - - - - - - - - - - - - - - - - - - - - - - - - - - - - - - - 45
Figure 29
Figure 29 Figure 29
Figure 29 hp dvd-writer Desktop Icon - - - - - - - - - - - - - - - - - - - - - - - - - - - - - 47
Figure 30 hp cd-dvd
Figure 30 hp cd-dvd Figure 30 hp cd-dvd
Figure 30 hp cd-dvd Screen - - - - - - - - - - - - - - - - - - - - - - - - - - - - - - - - - - - 47
Figure 31 HP DVD-Writer
Figure 31 HP DVD-WriterFigure 31 HP DVD-Writer
Figure 31 HP DVD-Writer Desktop Icon - - - - - - - - - - - - - - - - - - - - - - - - - - - 54
Figure 32 hp cd-dvd
Figure 32 hp cd-dvdFigure 32 hp cd-dvd
Figure 32 hp cd-dvd Screen - - - - - - - - - - - - - - - - - - - - - - - - - - - - - - - - - - - 54
Figure 33
Figure 33 Figure 33
Figure 33 HP RecordNow Welcome Screen - - - - - - - - - - - - - - - - - - - - - - - - - 55
Figure 34 HP DVD-Writer
Figure 34 HP DVD-WriterFigure 34 HP DVD-Writer
Figure 34 HP DVD-Writer Desktop Icon- - - - - - - - - - - - - - - - - - - - - - - - - - - 68
Figure 35 hp cd-dvd
Figure 35 hp cd-dvdFigure 35 hp cd-dvd
Figure 35 hp cd-dvd Screen - - - - - - - - - - - - - - - - - - - - - - - - - - - - - - - - - - - 68
Figure 36
Figure 36 Figure 36
Figure 36 HP DLA Welcome Screen - - - - - - - - - - - - - - - - - - - - - - - - - - - - - - 68
Figure 37 HP DVD-Writer
Figure 37 HP DVD-WriterFigure 37 HP DVD-Writer
Figure 37 HP DVD-Writer Desktop Icon - - - - - - - - - - - - - - - - - - - - - - - - - - - 73
Figure 38 MyDVD
Figure 38 MyDVDFigure 38 MyDVD
Figure 38 MyDVD Desktop Icon - - - - - - - - - - - - - - - - - - - - - - - - - - - - - - - - 73
Figure 39 hp cd-dvd
Figure 39 hp cd-dvdFigure 39 hp cd-dvd
Figure 39 hp cd-dvd Screen - - - - - - - - - - - - - - - - - - - - - - - - - - - - - - - - - - - 73
Figure 40 MyDVD Wizard
Figure 40 MyDVD Wizard Figure 40 MyDVD Wizard
Figure 40 MyDVD Wizard Screen- - - - - - - - - - - - - - - - - - - - - - - - - - - - - - - 74
Figure 41 HP DVD-Writer
Figure 41 HP DVD-WriterFigure 41 HP DVD-Writer
Figure 41 HP DVD-Writer Desktop Icon - - - - - - - - - - - - - - - - - - - - - - - - - - - 75
Figure 42 hp cd-dvd
Figure 42 hp cd-dvdFigure 42 hp cd-dvd
Figure 42 hp cd-dvd Screen - - - - - - - - - - - - - - - - - - - - - - - - - - - - - - - - - - - 75
Figure 43 HP DVD-Writer
Figure 43 HP DVD-WriterFigure 43 HP DVD-Writer
Figure 43 HP DVD-Writer Desktop Icon- - - - - - - - - - - - - - - - - - - - - - - - - - - 78
Figure 44 PowerDVD
Figure 44 PowerDVDFigure 44 PowerDVD
Figure 44 PowerDVD Desktop Icon- - - - - - - - - - - - - - - - - - - - - - - - - - - - - - 78
Figure 45 hp cd-dvd
Figure 45 hp cd-dvdFigure 45 hp cd-dvd
Figure 45 hp cd-dvd Screen - - - - - - - - - - - - - - - - - - - - - - - - - - - - - - - - - - - 78
Figure 46 PowerDVD
Figure 46 PowerDVD Figure 46 PowerDVD
Figure 46 PowerDVD Screen - - - - - - - - - - - - - - - - - - - - - - - - - - - - - - - - - - 79
Figure 47
Figure 47 Figure 47
Figure 47 hp troubleshooting screen - - - - - - - - - - - - - - - - - - - - - - - - - - - - - - 81
Page 10

hp dvd-writer
hp dvd-writerhp dvd-writer
hp dvd-writer dvd100i
dvd100idvd100i
dvd100i
Technical Support Solutions Guide 10/25/01
10
1010
10
⇐⇐⇐⇐
⇒⇒⇒⇒
Tab le s
Ta bl e 1 DVD-ROM/DVD-R/DVD-RW/DVD-RAM/DVD+RW
Read/Write Compatibility- - - - - - - - - - - - - - - - - - - - - - - - - - - - - - - - - 12
Ta bl e 2 CD-R/CD-RW Read/Write Compatibility - - - - - - - - - - - - - - - - - - - - - - - 12
Ta bl e 3 Parts for C9619A (Internal) IDE hp dvd-writer dvd100i Drive - - - - - - - - - 13
Ta bl e 4 Current HP CD-Writer Products - - - - - - - - - - - - - - - - - - - - - - - - - - - - 14
Ta bl e 5 Current hp dvd-writer Products - - - - - - - - - - - - - - - - - - - - - - - - - - - - 14
Ta bl e 6 Dimensions and Weight of the hp dvd-writer dvd100i Drive - - - - - - - - - 17
Ta bl e 7 Box Size and Weight of hp dvd-writer dvd100i Drive - - - - - - - - - - - - - - - 17
Ta bl e 8 Disc Ejection States for the hp dvd-writer dvd100i Drive - - - - - - - - - - - - 17
Ta bl e 9 Emergency Ejection Specification - - - - - - - - - - - - - - - - - - - - - - - - - - - 18
Table 10 Auto Insertion Specification - - - - - - - - - - - - - - - - - - - - - - - - - - - - - - - 18
Ta bl e 1 1 LED Protocol - - - - - - - - - - - - - - - - - - - - - - - - - - - - - - - - - - - - - - - - - 18
Ta bl e 1 2 ATA-2 Signals- - - - - - - - - - - - - - - - - - - - - - - - - - - - - - - - - - - - - - - - 20
Ta bl e 1 3 Drive Master/Slave/CSEL Jumpers- - - - - - - - - - - - - - - - - - - - - - - - - - 20
Table 14 Connectors and Jumper Block - - - - - - - - - - - - - - - - - - - - - - - - - - - - 24
Ta bl e 1 5 Write and Read Speeds of the hp dvd-writer dvd100i Drive - - - - - - - - 25
Table 16 Certification Programs - - - - - - - - - - - - - - - - - - - - - - - - - - - - - - - - - 28
Ta bl e 1 7 Icon and Program Group Names - - - - - - - - - - - - - - - - - - - - - - - - - - 43
Ta bl e 1 8 Disc Ejection States for the hp dvd-writer dvd100i Drive - - - - - - - - - - 46
Ta bl e 1 9 Emergency Ejection Specification - - - - - - - - - - - - - - - - - - - - - - - - - - 46
Ta bl e 2 0 Auto Insertion Specification- - - - - - - - - - - - - - - - - - - - - - - - - - - - - - 46
Ta bl e 2 1 Core Software Applications Accessed from the hp cd-dvd
hp cd-dvdhp cd-dvd
hp cd-dvd screen - - - 52
Table 22 Location: C:\Program Files\HP MyCD <default > - - - - - - - - - - - - - - - 53
Table 23 Location: C:\Program Files\HP MyCD\Media - - - - - - - - - - - - - - - - - - 54
Ta bl e 2 4 Location: C:\Winnt\System32\ (NT & Win2k) —
C:\Windows\System\ (Win9x) - - - - - - - - - - - - - - - - - - - - - - - - - - - - - 54
Table 25 Location: C:\Winnt\System32\Drivers\(NT4 &Win2k) —
C:\Windows\System\Iosubsys\ (Win9x) - - - - - - - - - - - - - - - - - - - - - - 54
Ta bl e 2 6 HP MyCD Registry Keys - - - - - - - - - - - - - - - - - - - - - - - - - - - - - - - - 63
Table 27 Comparison of the different types of formatting- - - - - - - - - - - - - - - - 68
Table 28 Supported HP CD-Writer Drives for 80-minute CDs - - - - - - - - - - - - - 89
Ta bl e 29 HP CD-Writer Drives No Longer Sold - - - - - - - - - - - - - - - - - - - - - - 104
Page 11

hp dvd-writer
hp dvd-writerhp dvd-writer
hp dvd-writer dvd100i
dvd100idvd100i
dvd100i
Technical Support Solutions Guide 10/25/01 Product History
11
1111
11
⇐⇐⇐⇐
⇒⇒⇒⇒
Chapter 1 Product Information
This chapter describes the hp dvd-writer dvd100i internal drive and is organized as
follows:
Product History
CD Technology
The first CD technology to be used with computers was CD-ROM, a read-only
technology. In the early 1990’s CD-R (CD-Recordable) drives became available to
consumers for storing data permanently on a disc that could be read by any
CD-ROM drive. Now Compact Disc ReWritable, or CD-RW, technology is available to
consumers. CD-RW lets users rewrite CDs up to 1,000 times. CD-RW lets users easily
store and erase data on CDs for playback on:
■
MultiRead-compatible CD-ROM drives
■
CD-R drives
■
CD-RW drives
DVD Technology
A DVD disc is the same size as a CD, but holds much more data.
A DVD disc holds 4.7 GB per layer, which equals 135
minutes of compressed video. .
The DVD logo is trademarked and owned by the DVD
Consortium.
What is MultiRead?
Hewlett-Packard Company played a principal role in the creation of MultiRead
technology that makes CD-RW media read-compatible with the spectrum of current
drives:
■
CD-ROM (Compact Disc-Read Only Memory)
■
CD-R (CD-Recordable)
■
CD-RW (CD-ReWritable)
■
DVD-ROM (Digital Versatile Disc-Read Only
Memory)
■
DVD+RW (Digital Versatile Disc-ReWritable)
The MultiRead logo on CD and DVD products indicates MultiRead compatibility.
Product History p. 11
Disc Storage Capacity of HP Products p. 12
Product Positioning p. 13
Laser Safety p. 13
Parts Available for the hp dvd-writer Drive p. 13
Current Products p. 14
Page 12
hp dvd-writer
hp dvd-writerhp dvd-writer
hp dvd-writer dvd100i
dvd100idvd100i
dvd100i
Technical Support Solutions Guide 10/25/01 Disc Storage Capacity of HP Products
12
1212
12
⇐⇐⇐⇐
⇒⇒⇒⇒
DVD Media Read/Write Compatibility
The hp dvd-writer dvd100i drive can read DVD-ROM, DVD-R, and DVD+RW discs,
usually read DVD-RW discs, and write DVD+RW discs.
Table 1
Table 1 Table 1
Table 1 DVD-ROM/DVD-R/DVD-RW/DVD-RAM/DVD+RW
Read/Write Compatibility
CD-R/CD-RW Media Read/Write Compatibility
The hp dvd-writer dvd100i drive can read CD-ROM data discs, CD-R discs, and
CD-RW discs, and write CD-R and CD-RW discs.
Table 2
Table 2 Table 2
Table 2 CD-R/CD-RW Read/Write Compatibility
* Music CDs recorded on CD-RW media can only be played on audio equipment that
is MultiRead compatible. Music CDs recorded on CD-R media can be played in most
audio CD players.
** CD-R media can only be read in DVD players with dual optical pickups. Contact the
player manufacturer to verify compatibility.
Disc Storage Capacity of HP Products
■
1 DVD-RW — Store up to 4.7 GB
■
1 CD-RW = 650 MB (530 MB formatted)
■
1 CD-R = 650 MB (up to 618 MB formatted)
DVD Players
DVD-R Drives
DVD-RW Drives
DVD-RAM Drives
DVD+RW Drives
DVD-ROM Media can be
Read in:
XXXXX
DVD-R Media can be
Read in:
UsuallyXXXX
DVD-R Media can be
Recorded by:
XOften
DVD-RW Media can be
Read in:
Usually May X May Usually
DVD-RW Media can be
Recorded by:
X
DVD-RAM Media can be
Read in:
Rarely X
DVD-RAM Media can be
Recorded by:
X
DVD+RW Media can be
Read in:
Usually Usually Usually May X
DVD+RW Media can be
Recorded by:
X
CD
Players
CD-ROM
Drives
CD-R
Drives
CD-RW
Drives
MultiRead
Compatible
Drives
DVD-ROM
Drives
DVD
Players
CD-R Media can be
Read in:
XXXXX X X**
CD-R Media can be
Recorded by:
XX
CD-RW Media can be
Read in:
X * X X
CD-RW Media can be
Recorded by:
X *
Product Information Drive Specifications Interfaces Installation and Configuration
Drive Operation Tips and Techniques Software Maintenance
Troubleshooting Warranty and Support Release Notes Discontinued Products
Page 13
hp dvd-writer
hp dvd-writerhp dvd-writer
hp dvd-writer dvd100i
dvd100idvd100i
dvd100i
Technical Support Solutions Guide 10/25/01
Product Positioning
13
1313
13
⇐⇐⇐⇐
⇒⇒⇒⇒
Product Positioning
The hp dvd-writer dvd100i drive is an internal IDE DVD+RW/CD-RW drive with the
following performances:
■
DVD-Rewritable with 2.4x re-write, 8x read
■
CD-Rewritable with 12x10x32x
The hp dvd-writer dvd100i drive is intended for:
■
camcorder users who need to share, store, and view video
■
business professionals who need to share, store, backup, and transport large
multimedia and data files
The hp dvd-writer dvd100i drive has the following applications that will be supported
by HP WW CCCs:
■
HP Install
■
HP MyDVD
■
HP DLA
■
HP RecordNow
■
PowerDVD
■
HP Simple Backup
Laser Safety
This unit employs a laser. Do not remove the cover or attempt to service this device
when connected due to the possibility of eye damage.
CAUTION — Contains: Class 1 Laser Product
Parts Available for the hp dvd-writer Drive
Table 3
Table 3 Table 3
Table 3 Parts for C9619A (Internal) IDE hp dvd-writer dvd100i Drive
!
Use of controls or adjustments or performance of procedures other than
those specified herein may result in hazardous laser radiation exposure.
Product Service Part Number Description
C9619-69901 Exchange dvd 2.4x Re-Write, 8x Read; cd
12x10x32x Internal Drive Mechanism
C4353-61100 Internal IDE Cable
8120-8740 Audio Cable
C8008-60000 One DVD-RW High Speed Media
Product Information Drive Specifications Interfaces Installation and Configuration
Drive Operation Tips and Techniques Software Maintenance
Troubleshooting Warranty and Support Release Notes Discontinued Products
Page 14
hp dvd-writer
hp dvd-writerhp dvd-writer
hp dvd-writer dvd100i
dvd100idvd100i
dvd100i
Technical Support Solutions Guide 10/25/01 Current Products
14
1414
14
⇐⇐⇐⇐
⇒⇒⇒⇒
Current Products
Table 4
Table 4 Table 4
Table 4 Current HP CD-Writer Products
Table 5
Table 5 Table 5
Table 5 Current hp dvd-writer Products
Product Type Model Number Part Number
9500 Series CD-Writer
CD-Writer
9500i (internal, commercial)
9510i (internal, retail)
C4502A
C4503A
9600 Series CD-Writer
CD-Writer
9600si (internal, commercial)
9600se (external, commercial)
C4506A
C4507A
9700 Series CD-Writer 9700i (internal, commercial)
9710i (internal, retail)
C9627A
C9628A
9900 Series CD-Writer 9900i (internal) C9629A
cd4_e Series CD-Writer cd4re (external, retail)
cd4ce (external, commercial)
cd4me (external, mass merchant)
C9634A
C9635A
C9643A
cd12_i Series CD-Writer cd12ri (internal, retail)
cd12ci (internal, commercial)
cd12mi (internal, mass merchant)
C4503B
C4502B
C9640A
cd16_i Series CD-Writer cd16ri (internal, retail)
cd16ci (internal, commercial)
cd16mi (internal, mass merchant)
C9628B
C9627B
C9641A
cd20_e Series CD-Writer cd20re (external, retail)
cd20ce (external, commercial)
C9636A
C9637A
cd24_i Series CD-Writer cd24ri (internal, retail)
cd24ci (internal, commercial)
Q2096A
Q2097A
Product Type Model Number Part Number
dvd100i Series DVD-Writer dvd100i C9619A
Product Information Drive Specifications Interfaces Installation and Configuration
Drive Operation Tips and Techniques Software Maintenance
Troubleshooting Warranty and Support Release Notes Discontinued Products
Page 15

hp dvd-writer
hp dvd-writerhp dvd-writer
hp dvd-writer dvd100i
dvd100idvd100i
dvd100i
Technical Support Solutions Guide 10/25/01 System Requirements
15
1515
15
⇐⇐⇐⇐
⇒⇒⇒⇒
Chapter 2 Drive Specifications
This chapter describes the specifications for the hp dvd-writer dvd100i drive and is
organized as follows:
System Requirements
The hp dvd-writer dvd100i drive is an internal IDE DVD+RW/CD-RW drive with an
EIDE-(ATAPI), MMC compliant interface.
The hp dvd-writer dvd100i drive functions on a desktop PC that meets the following
minimum guidelines:
■
Windows 98, Windows 2000 Professional, and Windows Me (Windows NT 4.0
Workstation with SP5 for data storage applications only) (Future – Windows XP
Personal and Professional)
■
Data applications:
●
Pentium II 450Mhz or equivalent processor
●
64 MB RAM
■
DVD video disc creation applications:
●
Pentium III 800Mhz or equivalent processor
●
128 MB RAM
●
video capture capability
■
hard disk space available
●
150 MB for included software installation
●
5 GB for DVD disc creation
■
An IDE controller with available connector
NOTE:
NOTE: NOTE:
NOTE:
Windows NT 4.0 Server, Windows 2000 Server/Advanced Server, and all
versions of Windows CE are not supported.
Physical Specifications
Mounting
■
The hp dvd-writer dvd100i drive is mountable in either horizontal or vertical
configurations.
■
Mounting screws = M3x10mm
■
The mounting screws should not extend into the drive more than 6mm.
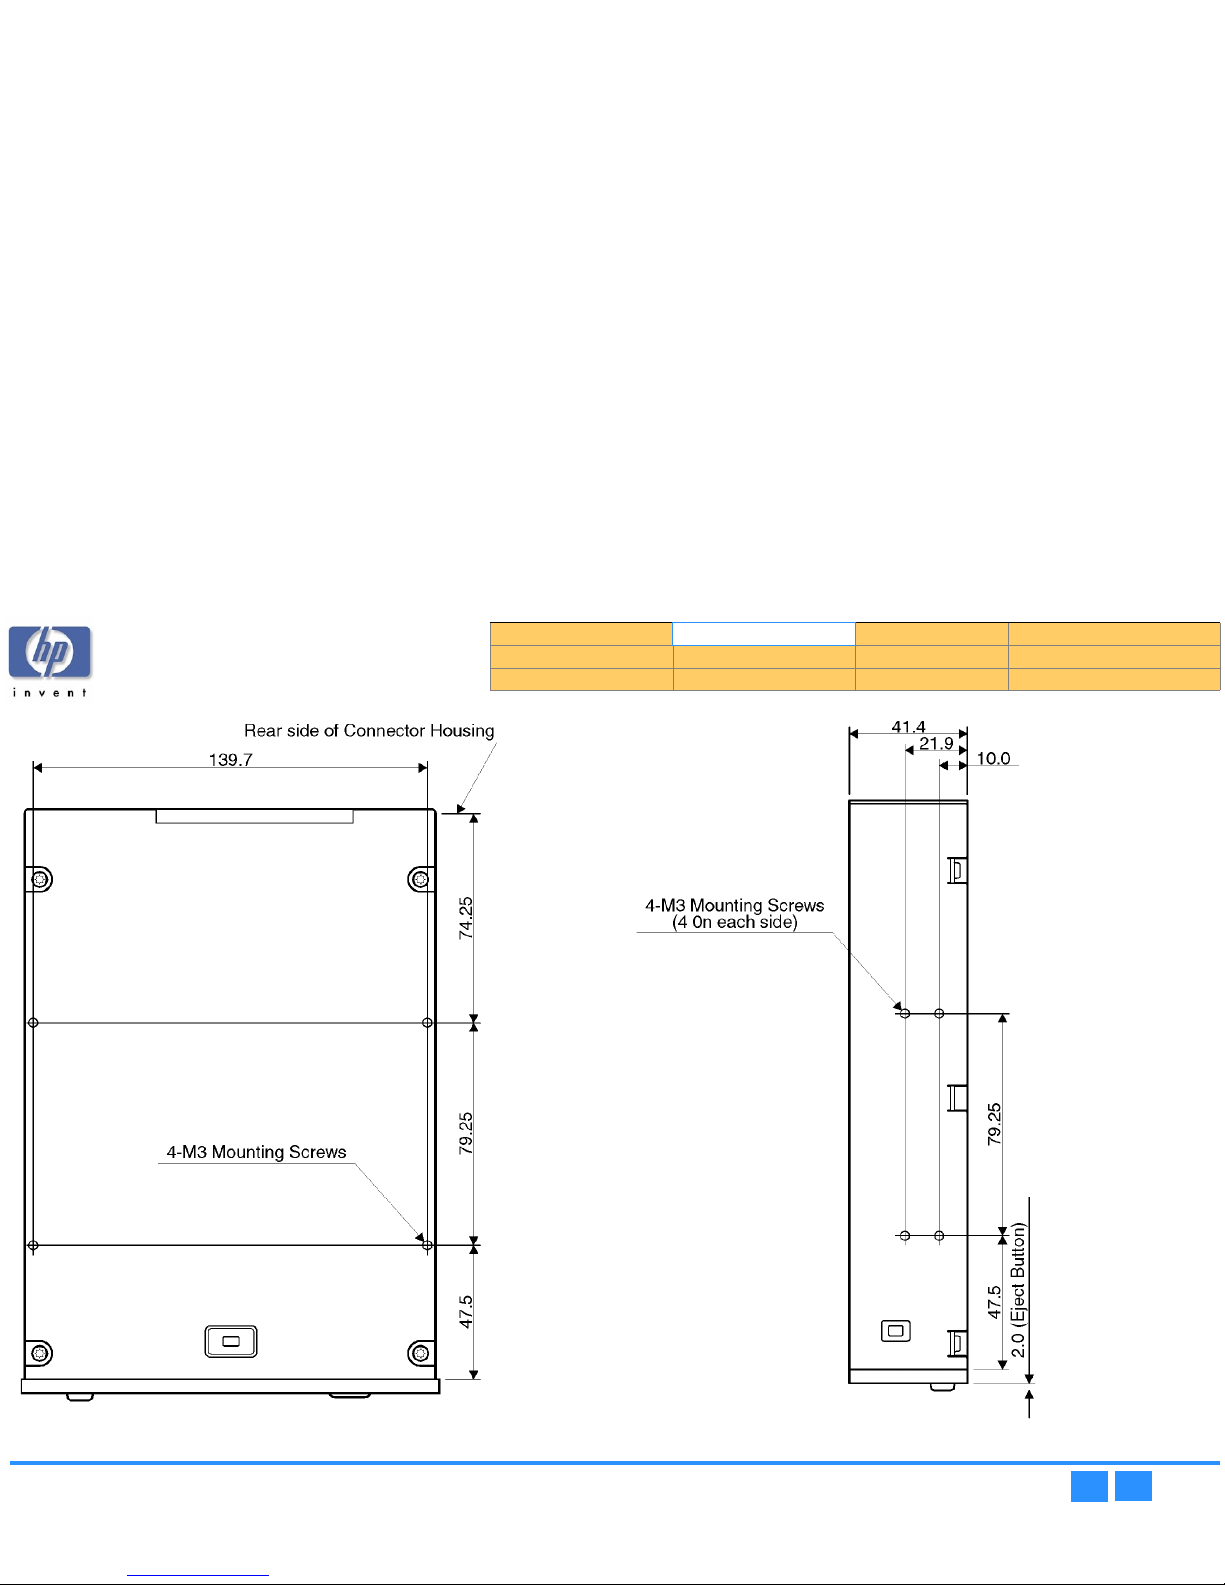
See Figure 1 and Figure 2 page 16 for the positions of the mounting screws.
System Requirements p. 15
Physical Specifications p. 15
Reliability Specifications p. 23
Acoustic Emissions p. 23
Electrical Specifications p. 24
Performance Specifications p. 25
Environmental Specifications p. 27
Product Safety Specifications p. 28
References p. 29
Page 16
hp dvd-writer
hp dvd-writerhp dvd-writer
hp dvd-writer dvd100i
dvd100idvd100i
dvd100i
Technical Support Solutions Guide 10/25/01 Physical Specifications
16
1616
16
⇐⇐⇐⇐
⇒⇒⇒⇒
Figure 1
Figure 1 Figure 1
Figure 1 Bottom View of the hp dvd-writer dvd100i Drive
Figure 2
Figure 2 Figure 2
Figure 2 Side View of the hp dvd-writer dvd100i Drive
Dimensions are
in millimeters
Dimensions are
in millimeters
Product Information Drive Specifications Interfaces Installation and Configuration
Drive Operation Tips and Techniques Software Maintenance
Troubleshooting Warranty and Support Release Notes Discontinued Products
Page 17
hp dvd-writer
hp dvd-writerhp dvd-writer
hp dvd-writer dvd100i
dvd100idvd100i
dvd100i
Technical Support Solutions Guide 10/25/01 Physical Specifications
17
1717
17
⇐⇐⇐⇐
⇒⇒⇒⇒
Size of the hp dvd-writer dvd100i Drive
The hp dvd-writer dvd100i drive is an internal IDE DVD+RW/CD-RW half height drive
that is installed in an empty drive bay.
Table 6
Table 6 Table 6
Table 6 Dimensions and Weight of the hp dvd-writer dvd100i Drive
Box Size and Weight for hp dvd-writer dvd100i Drive
Table 7
Table 7 Table 7
Table 7 Box Size and Weight of hp dvd-writer dvd100i Drive
Bezel Front Door
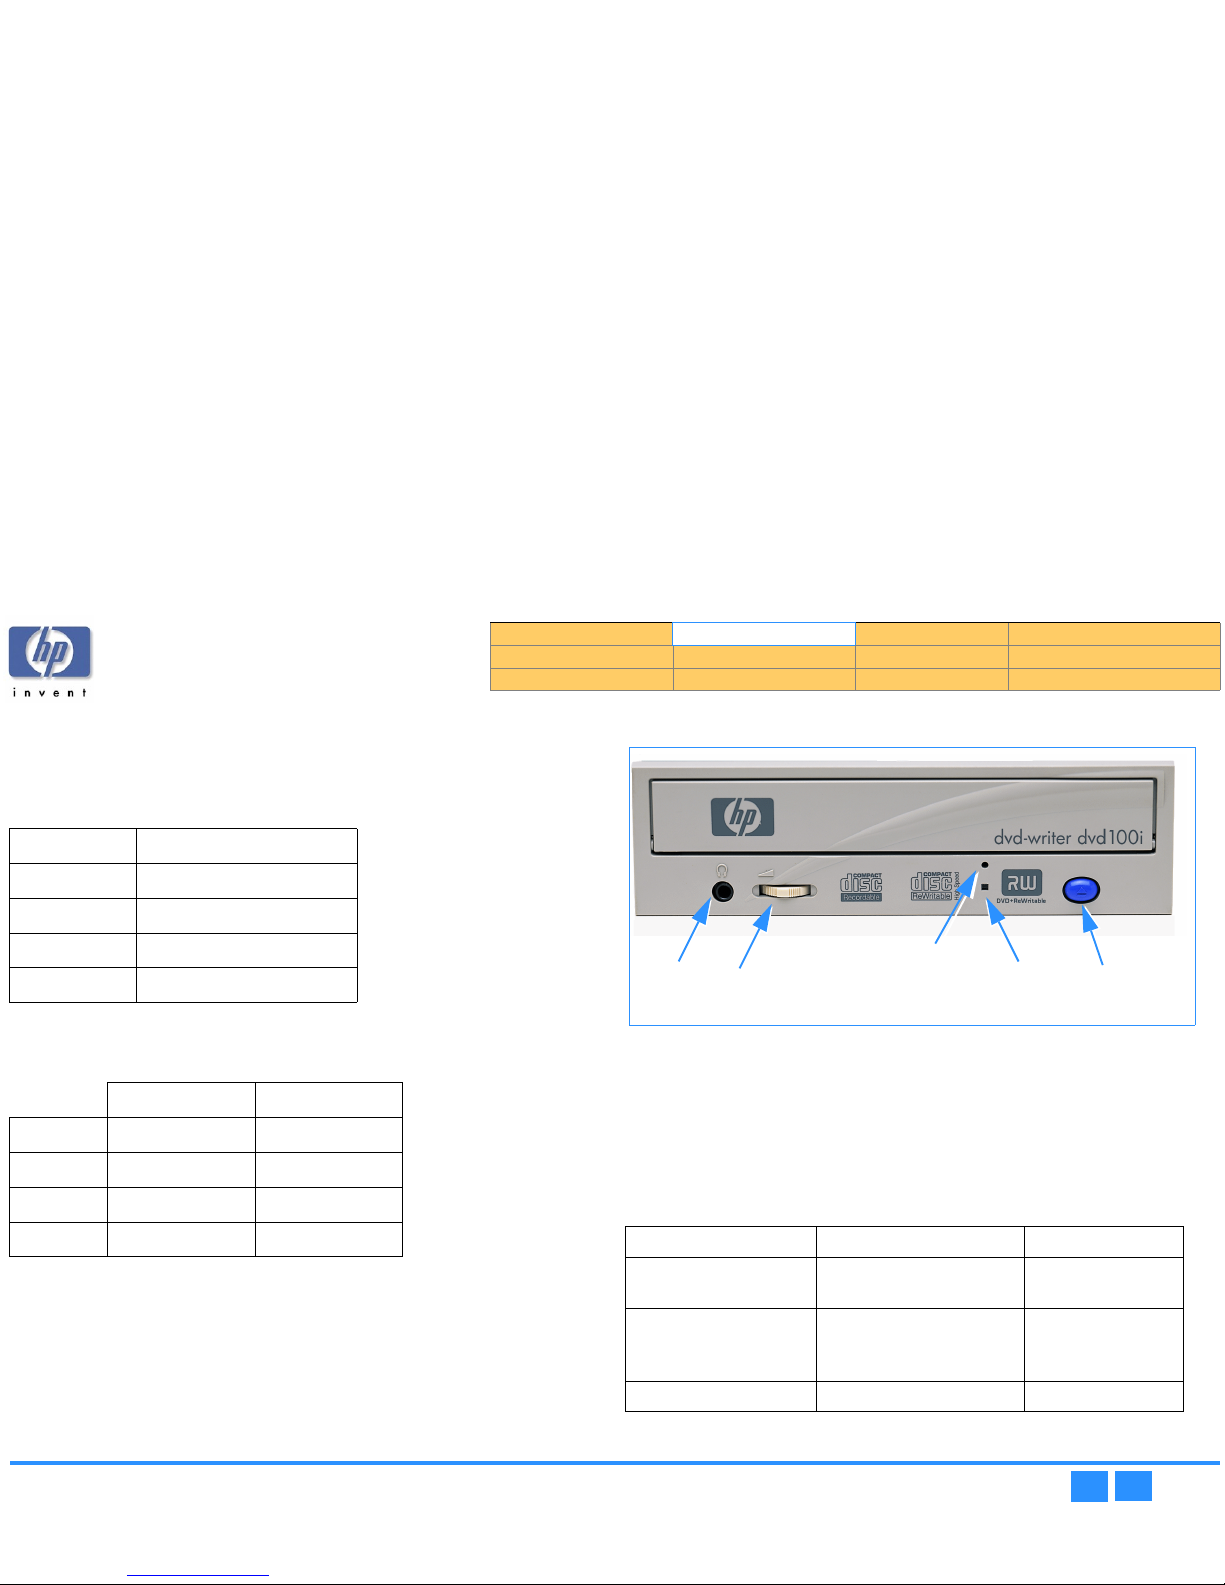
Figure 3
Figure 3 Figure 3
Figure 3 Bezel Layout
Disc Loading Mechanism
The hp dvd-writer dvd100i drive has a tray mechanism. The tray incorporates a dust
seal so that dust does not enter from the front bezel.
Disc Ejection Mechanism
Table 8
Table 8 Table 8
Table 8 Disc Ejection States for the hp dvd-writer dvd100i Drive
Form Factor 5-1/4”
Depth 196.5 mm (7.74 in.) ± 0.5mm
Width 148 mm (5.83 in.) ± 0.5mm
Height 42.3 mm (1.66 in.) ± 0.5mm
Weight (net) 0.9 kg (2 lb)
US and Asia Europe
Depth 291 mm (11.5 in.) 278 mm (11 in.)
Width 159 mm (6.3 in.) 150 mm (5.9 in.)
Height 228 mm (9 in.) 213 mm (8.4 in.)
Weight 2.2 kg (4.84 lb) 2.2 kg (4.84 lb)
Tray Position Action Response
Tray is closed and drive is
in READY state
Depress Load/Eject button Tray will open if not in
locked state.
Tray is closing or tray is
closed and drive has not
yet come READY
Depress Load/Eject button Tray will open.
Tray is open or opening Depress Load/Eject button Tray will close
Audio
Audio Audio
Audio
Volume
VolumeVolume
Volume
Jack
JackJack
Jack
Control
ControlControl
Control
Status
StatusStatus
Status
LED
LEDLED
LED
Emergency
EmergencyEmergency
Emergency
Eject Hole
Eject HoleEject Hole
Eject Hole
Load/Eject
Load/EjectLoad/Eject
Load/Eject
Button
ButtonButton
Button
Product Information Drive Specifications Interfaces Installation and Configuration
Drive Operation Tips and Techniques Software Maintenance
Troubleshooting Warranty and Support Release Notes Discontinued Products
Page 18

hp dvd-writer
hp dvd-writerhp dvd-writer
hp dvd-writer dvd100i
dvd100idvd100i
dvd100i
Technical Support Solutions Guide 10/25/01 Physical Specifications
18
1818
18
⇐⇐⇐⇐
⇒⇒⇒⇒
Manual Ejection
Manual EjectionManual Ejection
Manual Ejection
The drive has a manual ejection button on the front bezel. When pressed, it activates
the electrical signal to open and close the tray. The manual ejection facility functions
upon power-up, but it can be disabled by the host computer through the Prevent/
Prevent/Prevent/
Prevent/
Allow Medium Removal
Allow Medium RemovalAllow Medium Removal
Allow Medium Removal command.
Emergency Ejection
Emergency EjectionEmergency Ejection
Emergency Ejection
The tray is ejectable by pushing a pin or standard size paper clip into the emergency
eject pinhole on the front bezel (see Figure 3). The emergency ejection mechanism
functions even without power to the drive and with the prevent bit set.
Table 9
Table 9 Table 9
Table 9 Emergency Ejection Specification
Auto Insertion
Auto InsertionAuto Insertion
Auto Insertion
The tray automatically closes when it is pushed.
Table 10
Table 10 Table 10
Table 10 Auto Insertion Specification
The drive is designed to respond within 1 second.
Ejecting Position
Ejecting PositionEjecting Position
Ejecting Position
The tray is ejected approximately 64.5 mm from the front of the front bezel to the
center of the disc.
Tray Locking Mechanism
There is a locking mechanism on the tray such that when power is off and the tray is
closed, the tray will be locked in a closed position. This locking mechanism has a
manual override.
LEDs
LEDsLEDs
LEDs
The drive has one LED visible on the front bezel. The use of the LED is described in
Table 11 LED Protocol.
Table 11
Table 11 Table 11
Table 11 LED Protocol
Maximum force 3.5 Kgf
Stroke of pin insertion 40 mm
Recommended diameter of pin 1.2 mm
Maximum force 5.5 Kgf
Stroke 3 mm
Drive State LED
No disc inserted OFF
Disc is loading or being ejected
Disc in, drive in standby mode Solid Orange
Disc not readable Blinks Orange
Decoder Fail Blinks Orange
EEPROM Fail Blinks Orange
DRAM Fail Blinks Orange
Product Information Drive Specifications Interfaces Installation and Configuration
Drive Operation Tips and Techniques Software Maintenance
Troubleshooting Warranty and Support Release Notes Discontinued Products
Page 19
hp dvd-writer
hp dvd-writerhp dvd-writer
hp dvd-writer dvd100i
dvd100idvd100i
dvd100i
Technical Support Solutions Guide 10/25/01 Physical Specifications
19
1919
19
⇐⇐⇐⇐
⇒⇒⇒⇒
Connector and Jumpers on hp dvd-writer dvd100i Drive
Back of Drive
Back of DriveBack of Drive
Back of Drive
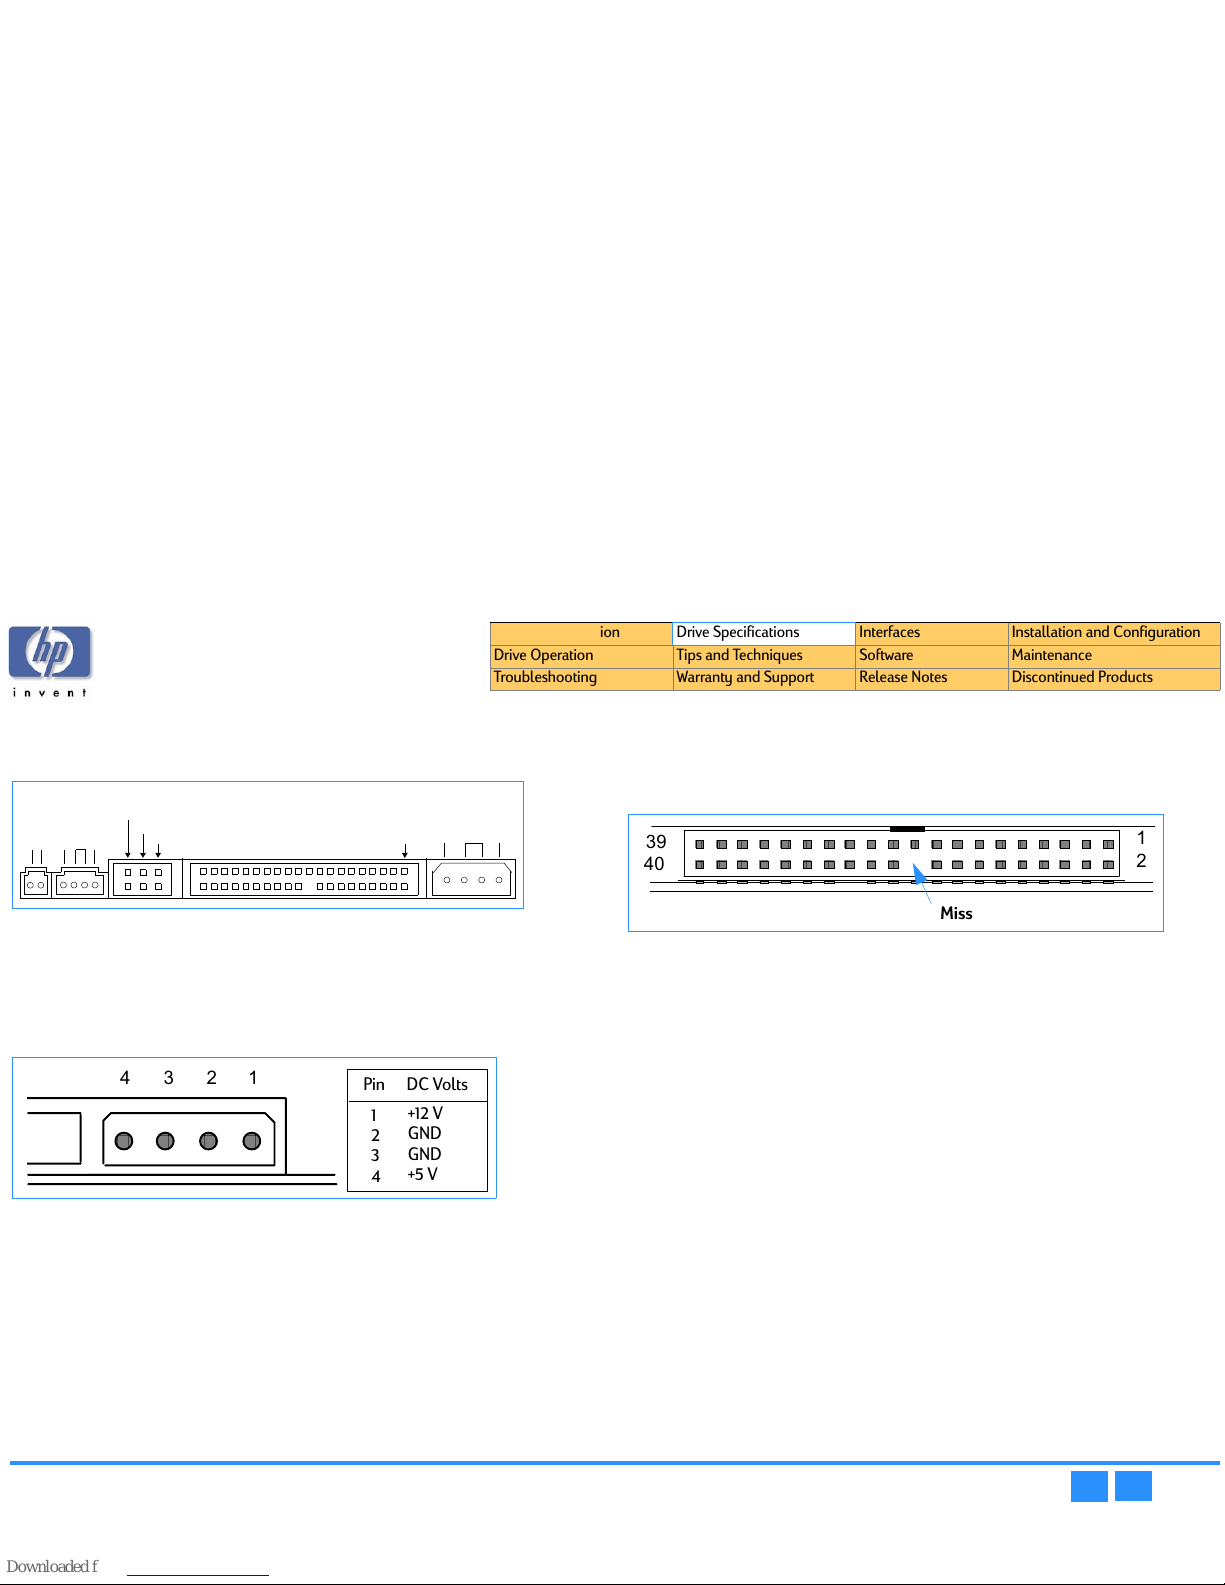
Figure 4
Figure 4 Figure 4
Figure 4 Back of Internal IDE Drive
Power Connector
Power ConnectorPower Connector
Power Connector
The hp dvd-writer dvd100i drive is an internal drive. The drive shares power from the
PC power supply. The drive has an industry standard 4-pin Amphenol or compatible
male power connector, capable of housing 18 AWG wires for each connector pin.
Figure 5
Figure 5 Figure 5
Figure 5 DC Power Connector
Signal Connector
Signal Connector Signal Connector
Signal Connector
The signal connection on the hp dvd-writer dvd100i drive is a 40-pin header
connector with a key slotted shroud. Additionally pin 20 has been removed from the
connector for keying as shown in Figure 6.
Figure 6
Figure 6 Figure 6
Figure 6 Interface Connector
The cable is a 40 conductor (stranded 28 AWG) flat ribbon cable with female header
type connectors. The maximum cable length is 18 inches. The female header type
connectors that connect to the drive has a plastic extrusion on the side of the
connector by pins 19 and 21. This allows the cable to correctly mate with the key
slotted shroud connector on the drive.
Ta bl e 12 on page 20 gives a list of the signals and connector pinout required for an
ATA-2 interface. The signals listed in Ta bl e 12 are shown as single-ended contact
assignments and not differential.
DIGITAL
AUDIO
R GND L
PIN #1
DC INPUTIDE
CONNECTOR
5V GND
12V
CABLE SEL ECT
SLAVE
MASTER
ANALOG
AUDIO
OUT
D G
OUT
Pin DC Volts
1
2
3
4
+12 V
GND
GND
+5 V
Missing Pin 20 (key pin)
Product Information Drive Specifications Interfaces Installation and Configuration
Drive Operation Tips and Techniques Software Maintenance
Troubleshooting Warranty and Support Release Notes Discontinued Products
Page 20
hp dvd-writer
hp dvd-writerhp dvd-writer
hp dvd-writer dvd100i
dvd100idvd100i
dvd100i
Technical Support Solutions Guide 10/25/01 Physical Specifications
20
2020
20
⇐⇐⇐⇐
⇒⇒⇒⇒
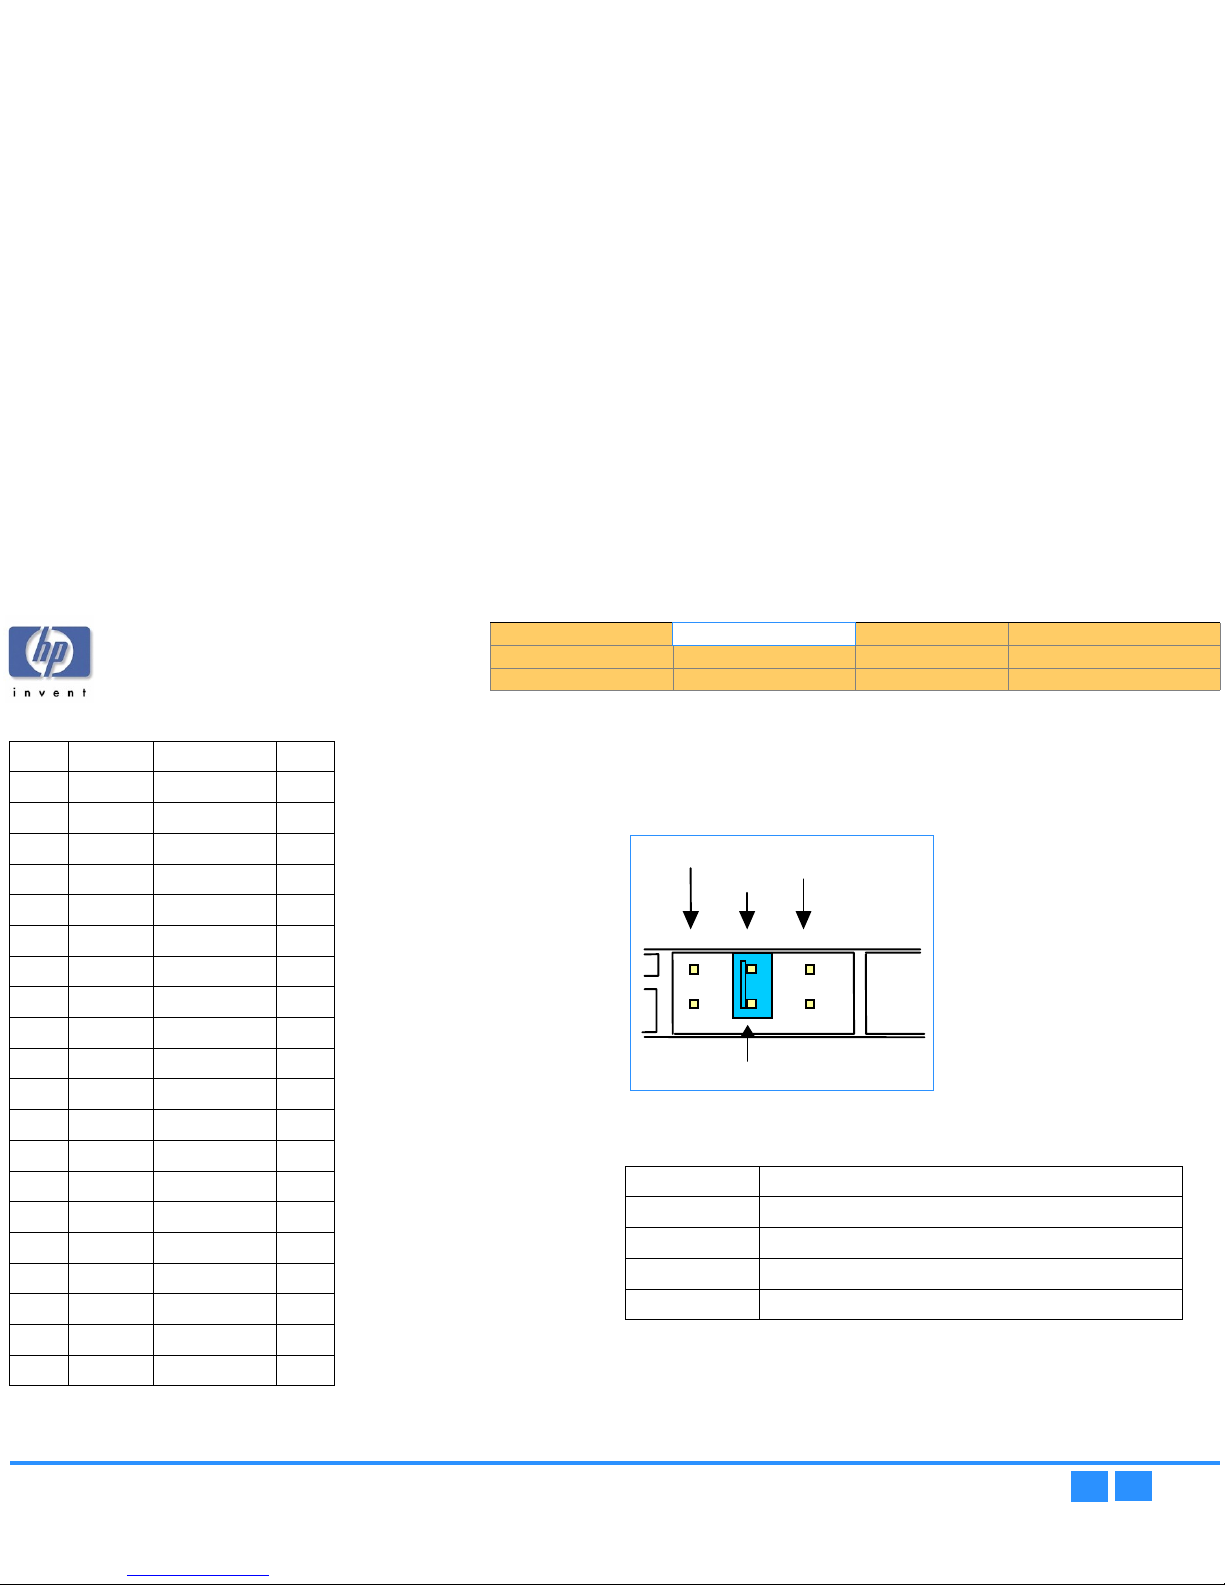
Table 12
Table 12 Table 12
Table 12 ATA-2 Signals
Master/Slave and Cable Select
Master/Slave and Cable SelectMaster/Slave and Cable Select
Master/Slave and Cable Select
Drive selection is made with jumpers on the Master, Slave, or Cable Select (CSEL)
jumper block at the back end of the drive. The drive can be configured as Master,
Slave, or Cable Select. The selection process in ANSI specification X3T10/0948D ATA2 Revision 4c is used.
Figure 7
Figure 7 Figure 7
Figure 7 Drive Jumpers
Table 13
Table 13 Table 13
Table 13 Drive Master/Slave/CSEL Jumpers
Pin # Signal Signal Pin #
1 -RESET Ground 2
3DD7 DD8 4
5DD6 DD9 6
7DD5 DD10 8
9DD4 DD11 10
11 DD3 DD12 12
13 DD2 DD13 14
15 DD1 DD14 16
17 DD0 DD15 18
19 Ground keypin 20
21 DMARQ Ground 22
23 -DIOW Ground 24
25 -DIOR Ground 26
27 IORDY SPSYNC/CSEL 28
29 -DMACK Ground 30
31 INTRQ -IOCS16 32
33 DA1 -PDIAG 34
35 DA0 DA2 36
37 -CS0 -CS1 38
39 -DASP Ground 40
Jumper Setting Meaning
M Master - Drive is set to Master
S Slave - Drive is set to Slave
CS Cable Select - Cable and drive position determines setting
None Not Allowed
MASTER
CSEL
SLAVE
JUMPER
Product Information Drive Specifications Interfaces Installation and Configuration
Drive Operation Tips and Techniques Software Maintenance
Troubleshooting Warranty and Support Release Notes Discontinued Products
Page 21
hp dvd-writer
hp dvd-writerhp dvd-writer
hp dvd-writer dvd100i
dvd100idvd100i
dvd100i
Technical Support Solutions Guide 10/25/01 Physical Specifications
21
2121
21
⇐⇐⇐⇐
⇒⇒⇒⇒
Analog Audio Output Connectors
Analog Audio Output ConnectorsAnalog Audio Output Connectors
Analog Audio Output Connectors
Rear Audio Output
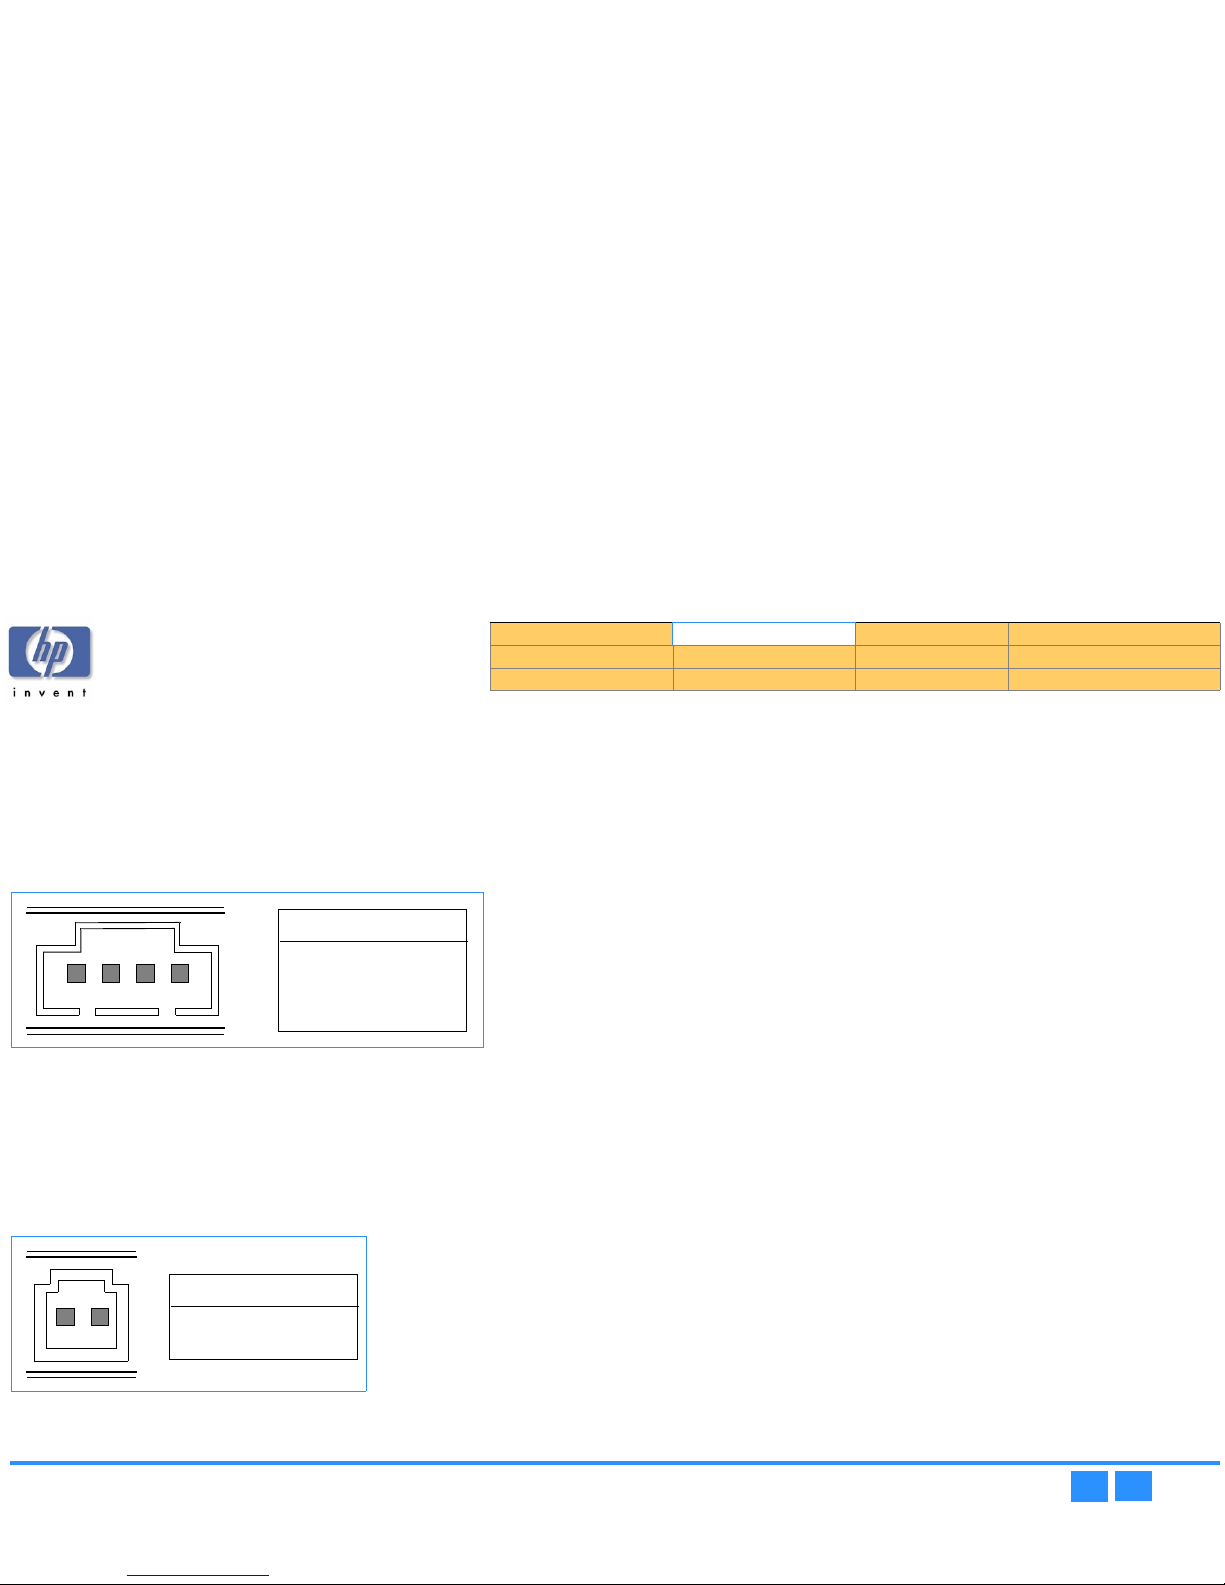
The analog audio output connector is a 4-pin male latching housed keyed
connector.
■
AUDIO Connector (4 pin)
■
Molex 70543, 70545, 70553, 70555 or equivalent
■
Mating with Molex 70066G, 70400G, 70430G, or equivalent
Figure 8
Figure 8 Figure 8
Figure 8 Audio Connector Output Pins
Front Audio Output
The front audio output is an industry standard stereo mini type.
Digital Audio Output Connectors
Digital Audio Output ConnectorsDigital Audio Output Connectors
Digital Audio Output Connectors
Rear Digital Audio Output
The digital audio output connector is a 2-pin male latching housed keyed connector.
Figure 9
Figure 9 Figure 9
Figure 9 Digital Audio Connector Output Pins
Media
Read Media Compatibility
Read Media CompatibilityRead Media Compatibility
Read Media Compatibility
The drive can read the following discs:
■
DVD+RW
■
DVD-ROM
■
DVD-Video
■
CD-Digital Audio (Red Book) and CD Extra
■
CD-ROM (Mode 1 – Yellow Book)
■
CD-ROM XA & CD-I (Mode 2/Form 1 – Green Book)
■
CD-ROM XA & CD-I (Mode 2/Form 2 – Green Book)
■
CD-Bridge & Photo-CD (single and multi-session)
■
CD – Video.
WWWWrite Media Compatibility
rite Media Compatibilityrite Media Compatibility
rite Media Compatibility
Recordable media compatible with the drive are:
■
CD-R
■
CD-RW
■
DVD+RW
Write Methods
Write MethodsWrite Methods
Write Methods
■
Create:
●
Track at once
●
Disc at once
●
Incremental packet writing (variable and fixed packets per Orange Book part II)
■
Copy:
●
Session at Once
●
Multisession
1234
Pin Audio Signal
1
2
3
4
R Signal
GND
GND
L signal
12
Pin Audio Signal
1
2
D Signal
GND
Product Information Drive Specifications Interfaces Installation and Configuration
Drive Operation Tips and Techniques Software Maintenance
Troubleshooting Warranty and Support Release Notes Discontinued Products
Page 22
hp dvd-writer
hp dvd-writerhp dvd-writer
hp dvd-writer dvd100i
dvd100idvd100i
dvd100i
Technical Support Solutions Guide 10/25/01 Physical Specifications
22
2222
22
⇐⇐⇐⇐
⇒⇒⇒⇒
Logical Recording Format
Logical Recording FormatLogical Recording Format
Logical Recording Format
Methods used to record data:
■
UDF
■
ISO 9660
■
CD-DA
Audio
The following audio features are supported:
■
CD:
●
WAV
●
MP3
■
DVD:
●
WAV
●
MPEG-1
●
Layer 2
RRRRIP Speed
IP SpeedIP Speed
IP Speed
The time it takes to transfer and store audio files from a music CD to MP3 files on
your hard drive is:
■
Extract a 4 minute audio track in less then 30 seconds, 8X minimum
Product Information Drive Specifications Interfaces Installation and Configuration
Drive Operation Tips and Techniques Software Maintenance
Troubleshooting Warranty and Support Release Notes Discontinued Products
Page 23
hp dvd-writer
hp dvd-writerhp dvd-writer
hp dvd-writer dvd100i
dvd100idvd100i
dvd100i
Technical Support Solutions Guide 10/25/01 Reliability Specifications
23
2323
23
⇐⇐⇐⇐
⇒⇒⇒⇒
Reliability Specifications
Overall, the HP CD-Writer and hp dvd-writer drives meet an estimated annualized
drive failure rate of less than 1% per year as measured at product release.
Errors
Error Rate
Error RateError Rate
Error Rate
The error rates are as follows:
■
Audio, Data Mode 2, and Mode 2 Form 2: Less than 1 uncorrectable frame in 109
bits read. [ECC Off].
■
Data Mode 1 and Mode 2 Form 1: Less than 1 uncorrectable frame in 1012 bits read.
[ECC On].
CCCCorrected Error Rate
orrected Error Rateorrected Error Rate
orrected Error Rate
The corrected error rates are as follows:
■
Audio, Data Mode 2, and Mode 2 Form 2: Less than 1 uncorrectable frame in 109
bits read.
■
Data Mode 1 and Mode 2 Form 1: Less than 1 uncorrected frame in 1012 bits read.
Influence on Media Life
Reading
ReadingReading
Reading
Reading with HP CD-Writer and hp dvd-writer drives does not degrade the media life.
Writing
WritingWriting
Writing
HP CD-Writer and hp dvd-writer drives are capable of at least 1,000 overwrites/track
on qualified HP CD-RW media.
Mean Time Between Failures (MTBF)
The MTBF for the hp dvd-writer drive is 100,000 power-on hours minimum.
Preventive Maintenance
The end user of the product does not need to perform any maintenance on the
HP CD-Writer or hp dvd-writer drives.
Acoustic Emissions
Acoustic Power Emissions
Acoustic Power EmissionsAcoustic Power Emissions
Acoustic Power Emissions
The level of sound power per ISO 9296, expressed in bels, is 7.0 B maximum.
Acoustic Pressure Emissions
Acoustic Pressure EmissionsAcoustic Pressure Emissions
Acoustic Pressure Emissions
The level of sound pressure per ISO 9614-1, expressed in decibels, is 70 dB(A)
maximum.
Product Information Drive Specifications Interfaces Installation and Configuration
Drive Operation Tips and Techniques Software Maintenance
Troubleshooting Warranty and Support Release Notes Discontinued Products
Page 24
hp dvd-writer
hp dvd-writerhp dvd-writer
hp dvd-writer dvd100i
dvd100idvd100i
dvd100i
Technical Support Solutions Guide 10/25/01 Electrical Specifications
24
2424
24
⇐⇐⇐⇐
⇒⇒⇒⇒
Electrical Specifications
Power
Table 14
Table 14 Table 14
Table 14 Connectors and Jumper Block
Power Management
Power ManagementPower Management
Power Management
The drive is Energy Star compliant.
Power Input
Power InputPower Input
Power Input
The internal PC power supply for the drive is:
■
5 VDC with +/-5% tolerance, +12 VDC with +/-10% tolerance
Power Consumption
Power ConsumptionPower Consumption
Power Consumption
The amount of power used by this drive is 25 Watts, maximum.
Front Audio Output
The front audio output is an industry-standard stereo mini type.
Ground Tab
The ground tab is an AMP FASTON terminal 61761-2 or its equivalent.
Tray Locking Mechanism
There is a locking mechanism on the tray such that when power is off and the tray is
closed, the tray will be locked in a closed position. This locking mechanism has a
manual override.
Connector Description
DC Power Inlet 4 pin Amphenol
Audio Output 4 pin per MPC-2 spec. (rear of drive)
1V typical RMS output voltage
3.5 mm Headphone Jack (front of drive)
0 to 3.5V RMS output voltage
Signal Connector 40 pin ATA-2 dual row header, shrouded & keyed
Rear Jumper Block ATAPI ID selection (Master, Slave, CSEL)
Product Information Drive Specifications Interfaces Installation and Configuration
Drive Operation Tips and Techniques Software Maintenance
Troubleshooting Warranty and Support Release Notes Discontinued Products
Page 25
hp dvd-writer
hp dvd-writerhp dvd-writer
hp dvd-writer dvd100i
dvd100idvd100i
dvd100i
Technical Support Solutions Guide 10/25/01 Performance Specifications
25
2525
25
⇐⇐⇐⇐
⇒⇒⇒⇒
Performance Specifications
The hp dvd-writer dvd100i drive:
■
is able to write CD-R, CD-RW, and High Speed CD-RW discs
■
can perform as a standard CD-ROM drive
Buffer
The amount of data buffered between source and storage medium, is 2MB minimum.
The hp dvd-writer dvd100i drive has buffer underrun prevention.
Performance of the Drive
The hp dvd-writer drive has write/read performances shown in Ta bl e 1 5 .
Tab le 15
Tab le 15 Ta ble 15
Tab le 15 Write and Read Speeds of the hp dvd-writer dvd100i Drive
The hp dvd-writer drive plays audio discs at up to 8x.
Seek Time
Seek TimeSeek Time
Seek Time
The time necessary to find data on medium is (expressed in milliseconds):
■
Average full-stroke access time of 250 ms (CD-ROM)
■
An average random access time of 125 ms (CD-ROM)
Initialization Time (2x)
Initialization Time (2x)Initialization Time (2x)
Initialization Time (2x)
The amount of time necessary for the disk to initialize is (expressed in seconds):
■
Initialization at 2x (From power off, disc in drive, spin up time, read and calibrate
disc): <20 seconds.
Disc Finalization Time (2x)
Disc Finalization Time (2x)Disc Finalization Time (2x)
Disc Finalization Time (2x)
The expected maximum disc finalization time (closing a write session) is (expressed in
minutes):
■
CD: 2 minutes typical at 2X
■
DVD: not applicable
Hours of Video Recording
Hours of Video RecordingHours of Video Recording
Hours of Video Recording
Hours of video recording at Mbits per second:
■
1 hour @ 9.8 Mbits/sec
■
2 hours @ 5.8 Mbits/sec
■
3 hours @ 3.3 Mbits/sec
NOTE:
NOTE: NOTE:
NOTE:
Bits rates include video and audio
Video Formats
Video FormatsVideo Formats
Video Formats
Formats supported by DVD authoring software:
■
MPEG-1
■
MPEG-2
■
AVI
■
QuickTime
Video Standards
Video StandardsVideo Standards
Video Standards
Supported video playback & record standards:
■
PAL
■
NTSC
Video Capture Cards
Video Capture CardsVideo Capture Cards
Video Capture Cards
Refer for the following web site:
www.hp.com/support/dvd-capture
SSSSearch Speed
earch Speedearch Speed
earch Speed
Average time required to locate a specific file on a specific piece of media, expressed
in milliseconds:
■
Average full-stroke access time of 250 ms (CD-ROM, DVD-ROM)
■
An average random access time of 125 ms (CD-ROM, DVD-ROM)
Write (CD-R) 12x
Write (CD-RW) 10x
Write (DVD+RW) 2.4x
Read (CD-RW) 20x
Read (CD-R/CD-ROM) 32x
Read (DVD+RW) 8x
Product Information Drive Specifications Interfaces Installation and Configuration
Drive Operation Tips and Techniques Software Maintenance
Troubleshooting Warranty and Support Release Notes Discontinued Products
Page 26
hp dvd-writer
hp dvd-writerhp dvd-writer
hp dvd-writer dvd100i
dvd100idvd100i
dvd100i
Technical Support Solutions Guide 10/25/01 Performance Specifications
26
2626
26
⇐⇐⇐⇐
⇒⇒⇒⇒
BBBBackup Rate Native
ackup Rate Nativeackup Rate Native
ackup Rate Native
Rate at which data can be backed up without data compression, expressed in units per
hour.
■
CD: 1.08GB/hr:
●
2x, 2.16GB/hr
●
4x, 4.32GB/hr
●
8x, 5.40GB/hr
●
10x, 6.48GB/hr - 12x
■
DVD+RW:
●
9.6GB/hr - 2.4x
BBBBackup Rate Compressed
ackup Rate Compressedackup Rate Compressed
ackup Rate Compressed
Rate at which data can be backed up with data compression, expressed in units per
hour.
■
CD:
●
Up to 2.16GB/hr - 2x
●
4.32GB/hr - 4x
●
8.64GB/hr - 8x
●
10.80GB/hr - 10x,
●
12.96GB/hr - 12x
■
DVD+RW:
●
19GB/hr - 2.4x
BBBBurst Transfer Rate
urst Transfer Rateurst Transfer Rate
urst Transfer Rate
Rate at which data can be transferred for short bursts of time, expressed in bytes per
second.
■
33 MB/s
Transfer Rates
Transfer RatesTransfer Rates
Transfer Rates
Rate at which data is normally transferred, expressed in units per second.
■
Write:
●
CD-R = 2X,4X,8X,12X
●
CD-RW = 2X,4X,10X
●
DVD+RW = 2.4X
■
Read:
●
CD-R = 2X,4X,8X,10X,14X~32X(CAV)
●
CD-RW = 2X,4X,8X~20X(CAV)
●
DVD+RW = 8X
■
1X CD = Audio: 175 KB/sec, Data Mode 2, Form 2: 171.1 KB/sec, Data (Mode 1 or
Mode 2, Form 1): 150 KB/sec.
■
1X DVD = 1353KB/sec
Product Information Drive Specifications Interfaces Installation and Configuration
Drive Operation Tips and Techniques Software Maintenance
Troubleshooting Warranty and Support Release Notes Discontinued Products
Page 27
hp dvd-writer
hp dvd-writerhp dvd-writer
hp dvd-writer dvd100i
dvd100idvd100i
dvd100i
Technical Support Solutions Guide 10/25/01 Environmental Specifications
27
2727
27
⇐⇐⇐⇐
⇒⇒⇒⇒
Environmental Specifications
Temperature
The hp dvd-writer dvd100i drive is an internal drive. The drive shares power from the
PC power supply. The drive has an industry standard 4-pin Amphenol or compatible
male power connector, capable of housing 18 AWG wires for each connector pin.
The design minimizes dust and particle deposits on CD-RW discs, since these deposits
can negatively impact write quality.
Non-Operating Temperature
Non-Operating TemperatureNon-Operating Temperature
Non-Operating Temperature
Operating Temperature
Operating TemperatureOperating Temperature
Operating Temperature
Humidity
Non-Operating Humidity
Non-Operating HumidityNon-Operating Humidity
Non-Operating Humidity
Operating Humidity
Operating HumidityOperating Humidity
Operating Humidity
Vibration
Operating Vibratio
Operating VibratioOperating Vibratio
Operating Vibrationnnn
■
Operating:
●
0.035mm p-p 10-45 Hz
●
0.025mm p-p 45-65 Hz
●
1.0G 10-150 Hz
■
Non-operating: 1.0G, power off, without disc
Shock
The amount of shock that a product can withstand:
.
Storage:
Transportation:
• -20 to +60
°
C
• -4 to +140
°
F
• -20 to +60
°
C
• -4 to +140
°
F
Operating: • +5 to +40
°
C
• +41 to +104
°
F
Storage Non-Operating Range: • 5 to 95% RH non-condensing
Operating:
a
a. Humidity specification is limited by the data disc.
• 10 - 90% RH non-condensing
Operating: operating: 2.0G, 3 ms half sine
Non-operating: non-operating: 50G, 11 ms half sine, power off, without disc
Product Information Drive Specifications Interfaces Installation and Configuration
Drive Operation Tips and Techniques Software Maintenance
Troubleshooting Warranty and Support Release Notes Discontinued Products
Page 28
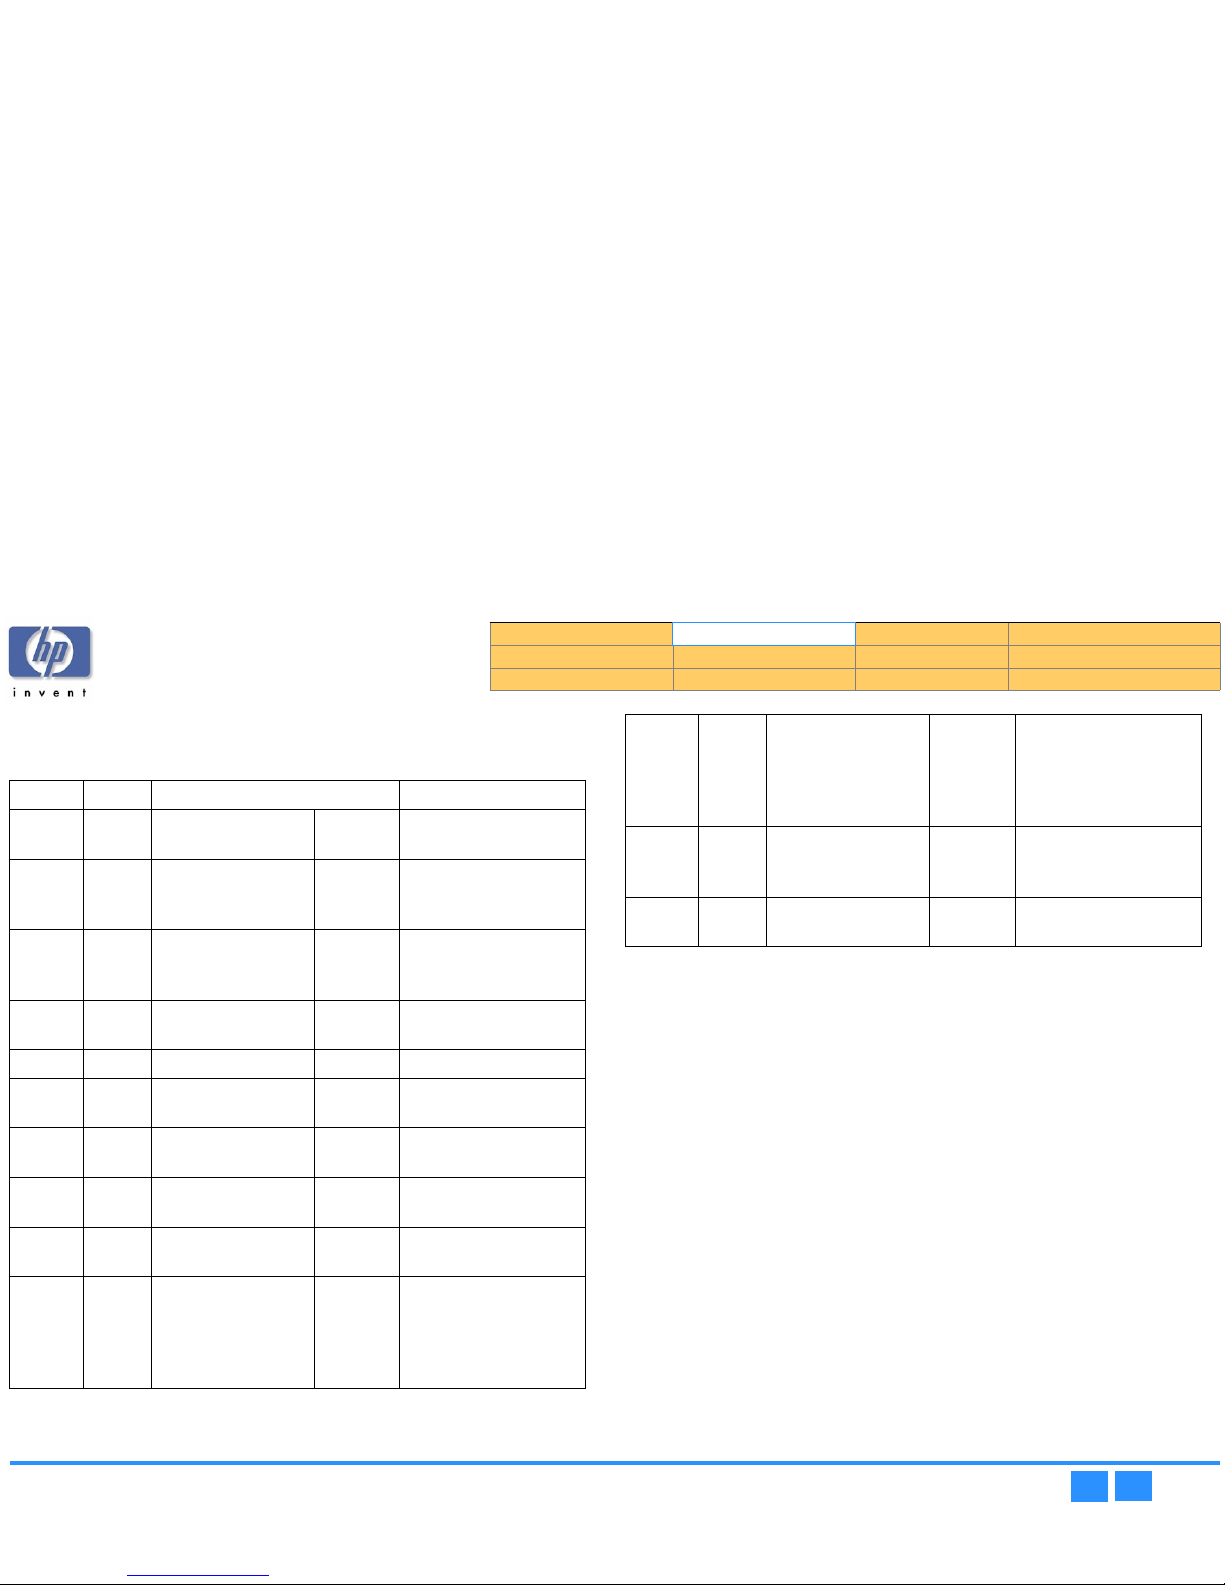
hp dvd-writer
hp dvd-writerhp dvd-writer
hp dvd-writer dvd100i
dvd100idvd100i
dvd100i
Technical Support Solutions Guide 10/25/01 Product Safety Specifications
28
2828
28
⇐⇐⇐⇐
⇒⇒⇒⇒
Product Safety Specifications
Table 16
Table 16 Table 16
Table 16 Certification Programs
Country Type Agency Country Standard
USA Safety Underwriters
Laboratories Inc
UL UL 1950 Amd 4
Laser Center for Devices and
Radiological Health
CDRH Radiation Control
Standards 21 CFR 1010
and 1020-l 0.50
EMC Federal
Communications
Commission
FCC CFR 47 Part 15 Class B
Canada Safety Canadian Standards
Association
CSA
UL
CSA C22.2 No.950-M89
or CUL
IECS-003 Class B
Europe Safety Low Voltage Directive CE 73/23/EEC (amended by
Directive 93/68/EC)
Safety TÜV Product Service TUV IEC 60950 plus
amendments
Laser EN60825 plus
amendment(s)
EMC EMC Directive CE EMCD 89/336/EEC plus
amendment
EMC National Voluntary
Accreditation Program
OR
OROR
OR American
Association of Lab
Accreditation
NVLAP
A2LA
EN 55022 (CISPR 22)
Class B (Radiated
Emissions)
EMC EN 55024
EN 61000-3-2:1995 plus
amendments
EN 61000-3-3:1995 plus
amendments
Australia
& New
Zealand
EMC EN 61000-3-2 Class D
(Harmonics)
EMC C-Tick AS/NZS 3548
AS/NZS 4252.1
Product Information Drive Specifications Interfaces Installation and Configuration
Drive Operation Tips and Techniques Software Maintenance
Troubleshooting Warranty and Support Release Notes Discontinued Products
Page 29
hp dvd-writer
hp dvd-writerhp dvd-writer
hp dvd-writer dvd100i
dvd100idvd100i
dvd100i
Technical Support Solutions Guide 10/25/01 References
29
2929
29
⇐⇐⇐⇐
⇒⇒⇒⇒
References
The following references contain the standards to which the hp dvd-writer dvd100i
drive is designed.
ANSI X3T13/1153D Information Technology - AT Attachment-4 with
Packet Interface Extension (ATA/ATAPI-4), Revision 8
or higher
ANSI X3T13/2008D Information Technology - AT Attachment-3 Interface
(ATA-3), Revision 7b [ANSI X3.298 - 1996]
ANSI X3T10/995D SCSI Primary Commands (SPC), Revision 11.0. [ANSI
X3.301 - 199x]
ANSI X3T10/996D SCSI Block Commands (SBC), Revision 8c.
ANSI X3T10/1048D SCSI Multimedia Commands (MMC), Revision 10.a or
higher.
CD-DA Compact Disc Digital Audio, specified in the System
Description Compact Disc Digital Audio (“Red Book”),
N.V. Philips and Sony Corp. Also see Compact Disc
Digital Audio System [IEC 908:1987].
CD-i Compact Disc Interactive, specified in the CD-i Full
Functional Specification (“Green Book”), N.V. Philips
and Sony Corp.
CD-i Bridge Compact Disc Interactive Bridge, specified in the CD-i
Bridge Specification, N.V. Philips and Sony Corp.
CD-ROM Compact Disc Read Only Memory, specified in the
System Description Compact Disc Read Only
Memory (“Yellow Book”), N.V. Philips and Sony Corp.
Also see Information technology - Data Interchange
on read-only 120mm optical data disks [ISO/IEC
10149:1993].
CD-ROM XA Compact Disc Read Only Memory eXtended
Architecture, specified in the System Description CDROM XA, N.V. Philips and Sony Corp.
CD-R Compact Disc Recordable System Description,
specified in Recordable Compact Disc Systems Part-II
(“Orange Book Part II”), N.V. Philips and Sony Corp.,
Revision 3.1. Also reference Revision 2.0.
CD-RW Compact Disc ReWritable System Description,
specified in the Recordable Compact Disc Systems
Part-III (“Orange Book Part III”), N.V. Philips and Sony
Corp., Revision 2.0. Also reference Revision 1.0.
ECMA-167 Volume and File Structure for Write-Once and
ReWritable Media using Non-Sequential Recording
for Information Interchange, Revision 3. (see also ISO/
IEC 13346:1997)
Enhanced Music CD Enhanced Music Compact Disc, specified in the
Enhanced Music CD Specification (“Blue Book”), N.V.
Philips, Sony Corp., and Microsoft Corp.
HP Corporate Standard Hewlett-Packard Corporate Environmental Test
Manual. The HP Corporate Environmental Test Manual
also includes information about Electrical (Shock)
and mechanical (shock and vibration) testing.
ISO 9660:1988 Information Processing - Volume and File Structure of
CD-ROM for Information Interchange.
Multisession CD Multisession for CD-ROM and Finalized CD-R discs,
Revision 1.0
OSTA MultiRead OSTA MultiRead Specifications for CD-ROM, CD-R,
CD-R/RW, and DVD-ROM Devices, Revision 1.0 or
higher.
Product Information Drive Specifications Interfaces Installation and Configuration
Drive Operation Tips and Techniques Software Maintenance
Troubleshooting Warranty and Support Release Notes Discontinued Products
Page 30
hp dvd-writer
hp dvd-writerhp dvd-writer
hp dvd-writer dvd100i
dvd100idvd100i
dvd100i
Technical Support Solutions Guide 10/25/01 References
30
3030
30
⇐⇐⇐⇐
⇒⇒⇒⇒
Discussion of References
Several of the references listed in the preceding section are still in the process of
being revised. This section provides help in understanding how the references should
be followed.
The underlying specifications for CD-R/RW devices are presented in the
specifications from N.V. Philips and Sony Corporation. These specifications are
followed in order to obtain the right to use the “Compact Disc Recordable/
ReWritable” logo. These specifications include CD-DA, CD-ROM, CD-ROM XA, CD-i,
CD-i Bridge, Multisession CD, CD-R, CD-RW, Enhanced Music CD, and Photo CD.
The drive conforms to the OSTA MultiRead specification and is certified as a
MultiRead device.
The drive will be used to support OSTA UDF file systems, and therefore implements
functionality to allow efficient UDF operation using commercial software.
ATA-2 is used as the base reference for the drive’s ATA interface. However, details from
the ATA-3 and ATA/ATAPI-4 references are incorporated to allow operation with the
higher level command set.
OSTA UDF OSTA Universal Disk Format, including support for CD-
ROM, CD-R, CD-R/RW and DVD-ROM devices,
Revision 1.5 or higher. OSTA UDF is also called UDF.
PC 2000 PC 2000 System Design Guide, Intel Corp. and
Microsoft Corp., Version 1.00 or higher
Photo CD Photo Compact Disc, specified in the System
Description Photo CD, N.V. Philips and Eastman
Kodak Company.
SFF 8020i ATA Packet Interface for CD-ROMs, Revision 2.6 or
higher. [ATAPI CD-ROM 2.6]
SFF 8080 ATA Packet Interface for CD-R/RW Devices, Revision
1.2. [ATAPI CD-R/RW 1.2]
SFF-8090v3 Command Specification for DVD Computer
Peripherals, Revision 1.0 or higher. Note: This
document is also known as Mt. Fuji-3: 1999.
Video CD Video Compact Disc, specified in the Video CD
Specification (“White Book”), N.V. Philips, Sony Corp.,
JVC, and Matsushita.
Product Information Drive Specifications Interfaces Installation and Configuration
Drive Operation Tips and Techniques Software Maintenance
Troubleshooting Warranty and Support Release Notes Discontinued Products
Page 31

hp dvd-writer
hp dvd-writerhp dvd-writer
hp dvd-writer dvd100i
dvd100idvd100i
dvd100i
Technical Support Solutions Guide 10/25/01 ATA/ATAPI
31
3131
31
⇐⇐⇐⇐
⇒⇒⇒⇒
Chapter 3 Interfaces
A brief description of how EIDE-(ATAPI) allows communication between a host
computer and a hp dvd-writer dvd100i drive is provided in this chapter.
This chapter is organized as follows:
ATA/ATAPI
Prior to the introduction of CD-ROM drives, the standard interface used inside
personal computers was the AT Attachment (ATA) interface (also referred to as the
IDE interface), which was used to communicate with hard disk drives. The ATA
standard allows two devices to exist on the same bus, with the primary device being
named Device 0 or the Master, and the secondary device being named Device 1 or
the Slave. The ATA standard defines both the low level hardware requirements such
as required device registers, electrical signal specifications, cabling and connector
specifications, and the higher level ATA command set which provides a mechanism
for a computer to communicate with a device.
When CD-ROM drives were introduced, new requirements were set which could not
be met with the existing ATA command set. Therefore an extension of the ATA
protocol was created. This new protocol was named ATA Packet Interface (ATAPI). The
ATAPI command set was based on the existing SCSI command set, and by design
allows ATAPI and ATA devices to coexist on an ATA bus. Due to wide availability and
low cost, the ATAPI interface has become the standard for CD-ROM drives used in
PCs. However, since the newer MMC specification includes the majority of the packet
commands which are in the ATAPI specification, the MMC specification is used as the
primary reference for most commands, and the ATAPI specification is used as the
primary reference for lower level communication protocol details. The hp dvd-writer
and is designed using the ATA-2 version of the ATA specification, and the ATAPI 2.6
version of the ATAPI specification.
ATA/ATAP I p. 31
IDE Connectors p. 31
Page 32
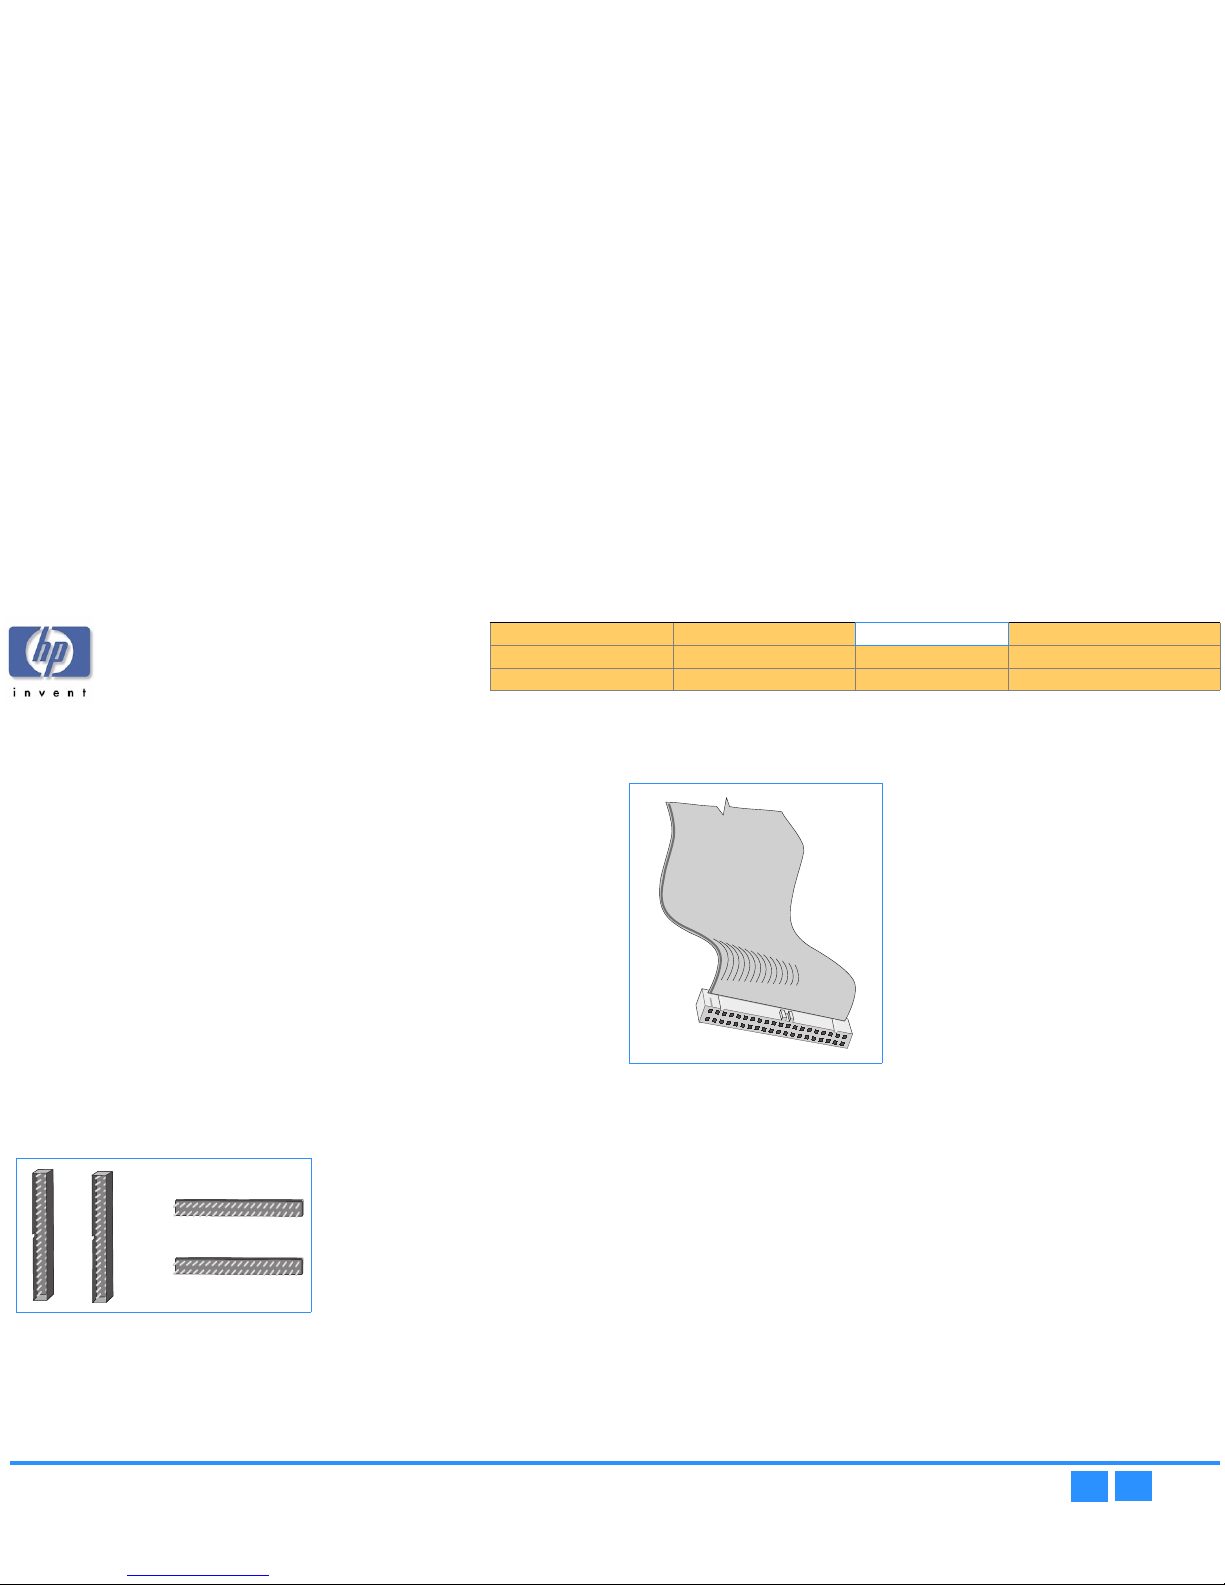
hp dvd-writer
hp dvd-writerhp dvd-writer
hp dvd-writer dvd100i
dvd100idvd100i
dvd100i
Technical Support Solutions Guide 10/25/01 IDE Connectors
32
3232
32
⇐⇐⇐⇐
⇒⇒⇒⇒
IDE Connectors
When you place Software Disc 1 in your CD-ROM and click
Install
Install Install
Install hp dvd-writer
hp dvd-writer hp dvd-writer
hp dvd-writer
the
software analyzes your computer and makes a recommendation about connecting
the hp dvd-writer hardware.
The Install Recommendation tells you whether the hp dvd-writer should be
connected to the primary or secondary controller in your computer.
NOTE:
NOTE: NOTE:
NOTE:
If the Install Recommendation states that your hp dvd-writer drive will
share the data cable with another device (such as a CD-ROM drive), follow
the cable already attached to the other device down to the circuit board in
order to locate the IDE controller that you need. If you find an extra
connector along that cable, simply attach that connector to the
hp dvd-writer drive.
Locate the recommended 40-pin IDE controller’s connector (primary or secondary)
on your computer’s motherboard.
The IDE connectors are on the motherboard, which is the largest circuit board in your
computer, taking up most of the bottom of a desktop computer or the side of a tower
computer.
IDE connectors are usually found in pairs and may look like any of the following:
Figure 10
Figure 10 Figure 10
Figure 10 IDE Connectors
You will see a variety of connectors inside your computer that look similar to the
40-pin connector, but have more or fewer pins. Find the connectors that are the
correct size to fit the cable that came in the box with your drive.
Figure 11
Figure 11 Figure 11
Figure 11 40-Pin IDE Connector
The IDE connectors may be hidden by some of the computer’s cables or may be
behind a drive.
Many computers have an IDE hard drive or CD-ROM that connects to the
motherboard through an IDE controller. The data cables on these drives have the
same width as the data cable included with your hp dvd-writer. If your computer has
an IDE hard drive or CD-ROM drive, you can follow the data cable from the back of
one of those drives to find the IDE controller.
Computer manufacturers use a wide variety of labels for IDE connectors. Look on
your computer’s circuit boards for printing identifying the primary and secondary
connectors, such as:
- PRI and SEC
- IDE-0 and IDE-1
- IDE-1 and IDE-2
- HD and CD-ROM (most common devices to be attached)
- PCI-IDE and ISA-IDE
Product Information Drive Specifications Interfaces Installation and Configuration
Drive Operation Tips and Techniques Software Maintenance
Troubleshooting Warranty and Support Release Notes Discontinued Products
Page 33
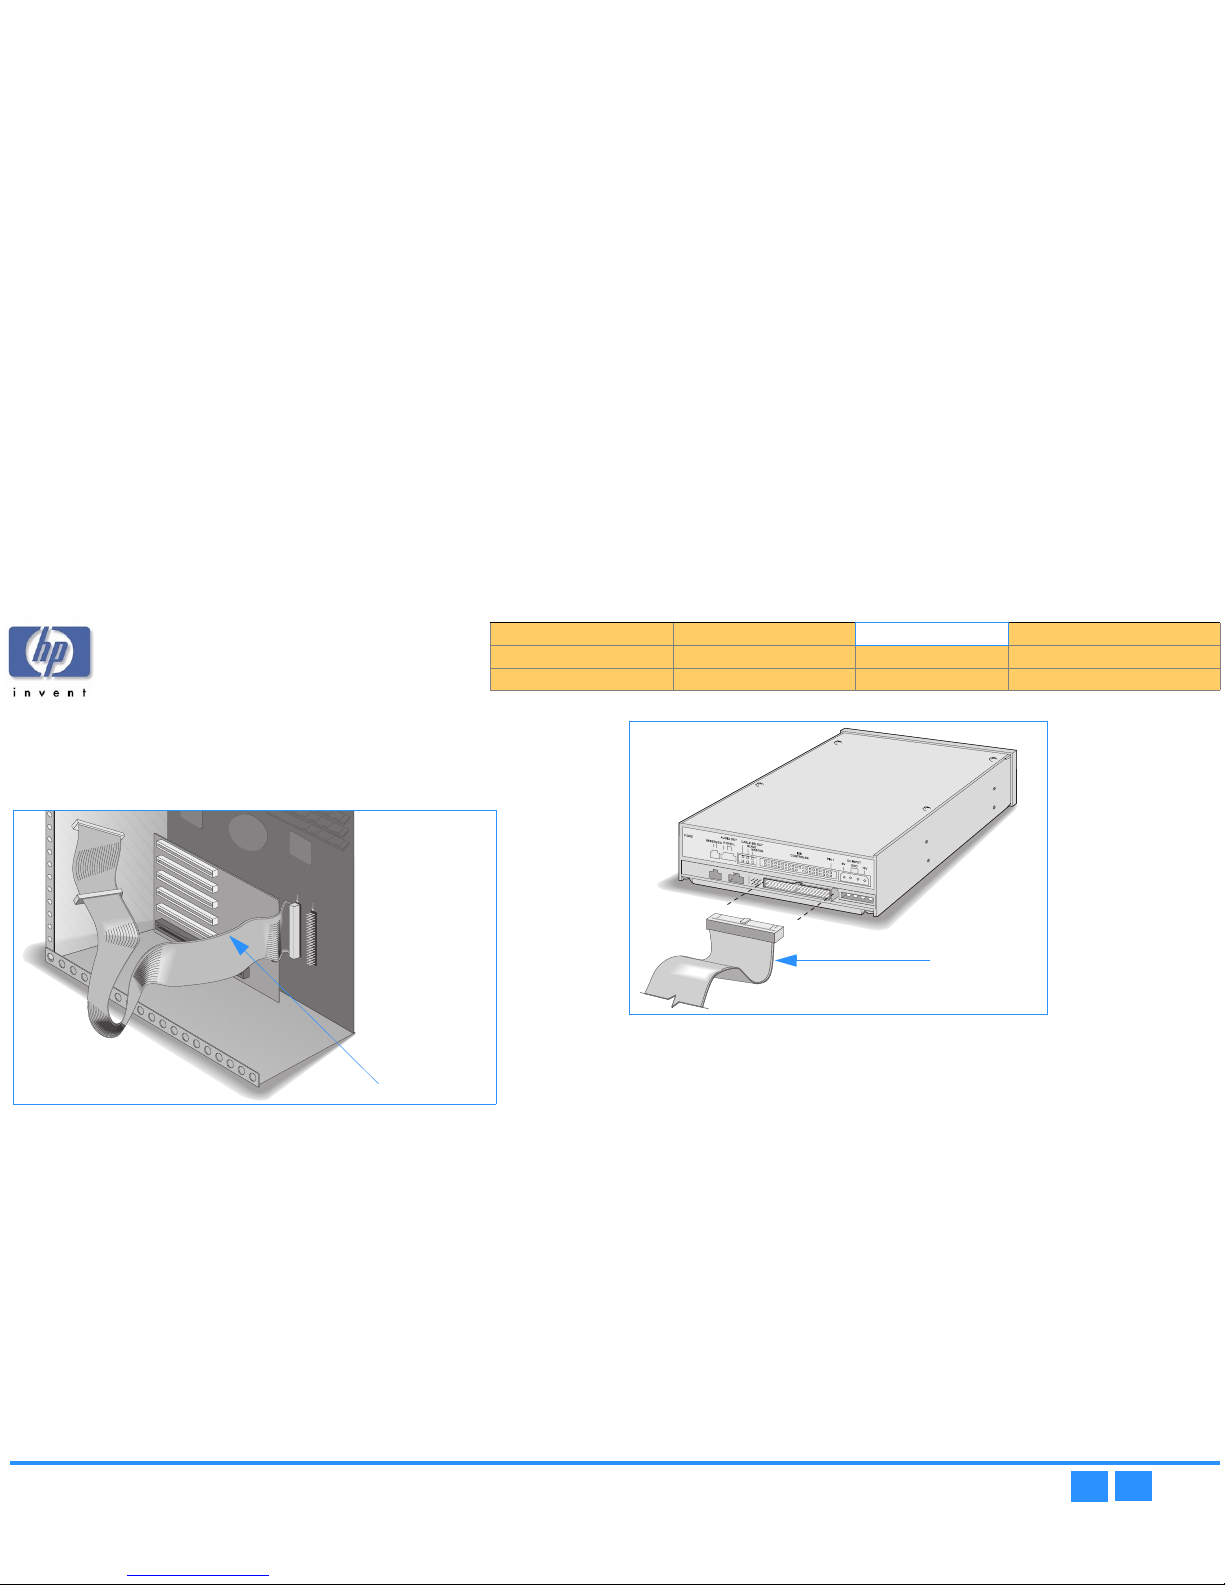
hp dvd-writer
hp dvd-writerhp dvd-writer
hp dvd-writer dvd100i
dvd100idvd100i
dvd100i
Technical Support Solutions Guide 10/25/01 IDE Connectors
33
3333
33
⇐⇐⇐⇐
⇒⇒⇒⇒
Look for a label identifying PIN-1 next to the IDE connector. The data cable’s colored
edge is aligned with PIN-1 of the IDE connector. This illustration shows a specific
computer. Yours may look different. PIN-1 could be on either side of the IDE
connector. (See Figure 12.)
Figure 12
Figure 12 Figure 12
Figure 12 Align Pin 1 to the IDE Connector in the Computer
The cable’s colored edge is aligned with PIN-1 on the hp dvd-writer drive. (Figure 13.)
Figure 13
Figure 13 Figure 13
Figure 13 Align Pin 1 on the Drive
colored stripe
on the data cable
colored stripe
on the data cable
Product Information Drive Specifications Interfaces Installation and Configuration
Drive Operation Tips and Techniques Software Maintenance
Troubleshooting Warranty and Support Release Notes Discontinued Products
Page 34

hp dvd-writer
hp dvd-writerhp dvd-writer
hp dvd-writer dvd100i
dvd100idvd100i
dvd100i
Technical Support Solutions Guide 10/25/01 PC Desktop Minimum System Requirements
34
3434
34
⇐⇐⇐⇐
⇒⇒⇒⇒
Chapter 4 Installation and Configuration
This chapter describes the installation of an hp dvd-writer dvd100i drive and is
organized as follows:
PC Desktop Minimum System Requirements
The hp dvd-writer dvd100i drive is an internal IDE DVD+RW/CD-RW drive with an
EIDE-(ATAPI), MMC compliant interface.
The hp dvd-writer dvd100i drive functions on a desktop PC that meets the following
minimum guidelines:
■
Windows 98, Windows 2000 Professional, and Windows Me (Windows NT 4.0
Workstation with SP5 for data storage applications only) (Future – Windows XP
Personal and Professional)
■
Data applications:
●
Pentium II 450Mhz or equivalent processor
●
64 MB RAM
■
DVD video disc creation applications:
●
Pentium III 800Mhz or equivalent processor
●
128 MB RAM
●
video capture capability
NOTE:
NOTE: NOTE:
NOTE:
HP MyDVD does not run on Windows NT.
■
hard disk space available
●
150 MB for included software installation
●
5 GB for DVD disc creation
■
An IDE controller with available connector
NOTE:
NOTE: NOTE:
NOTE:
Windows NT 4.0 Server, Windows 2000 Server/Advanced Server, and all
versions of Windows CE are not supported.
PC Desktop Minimum System Requirements p. 34
What’s in the Box p. 35
Installing the hp dvd-writer dvd100i Drive p. 35
Installing the Software p. 42
Identifying the hp dvd-writer Drive p. 43
Desktop Icon p. 43
Start Menu Program Group Names p. 43
Additional Reference Information p. 44
Uninstalling Software p. 44
Page 35
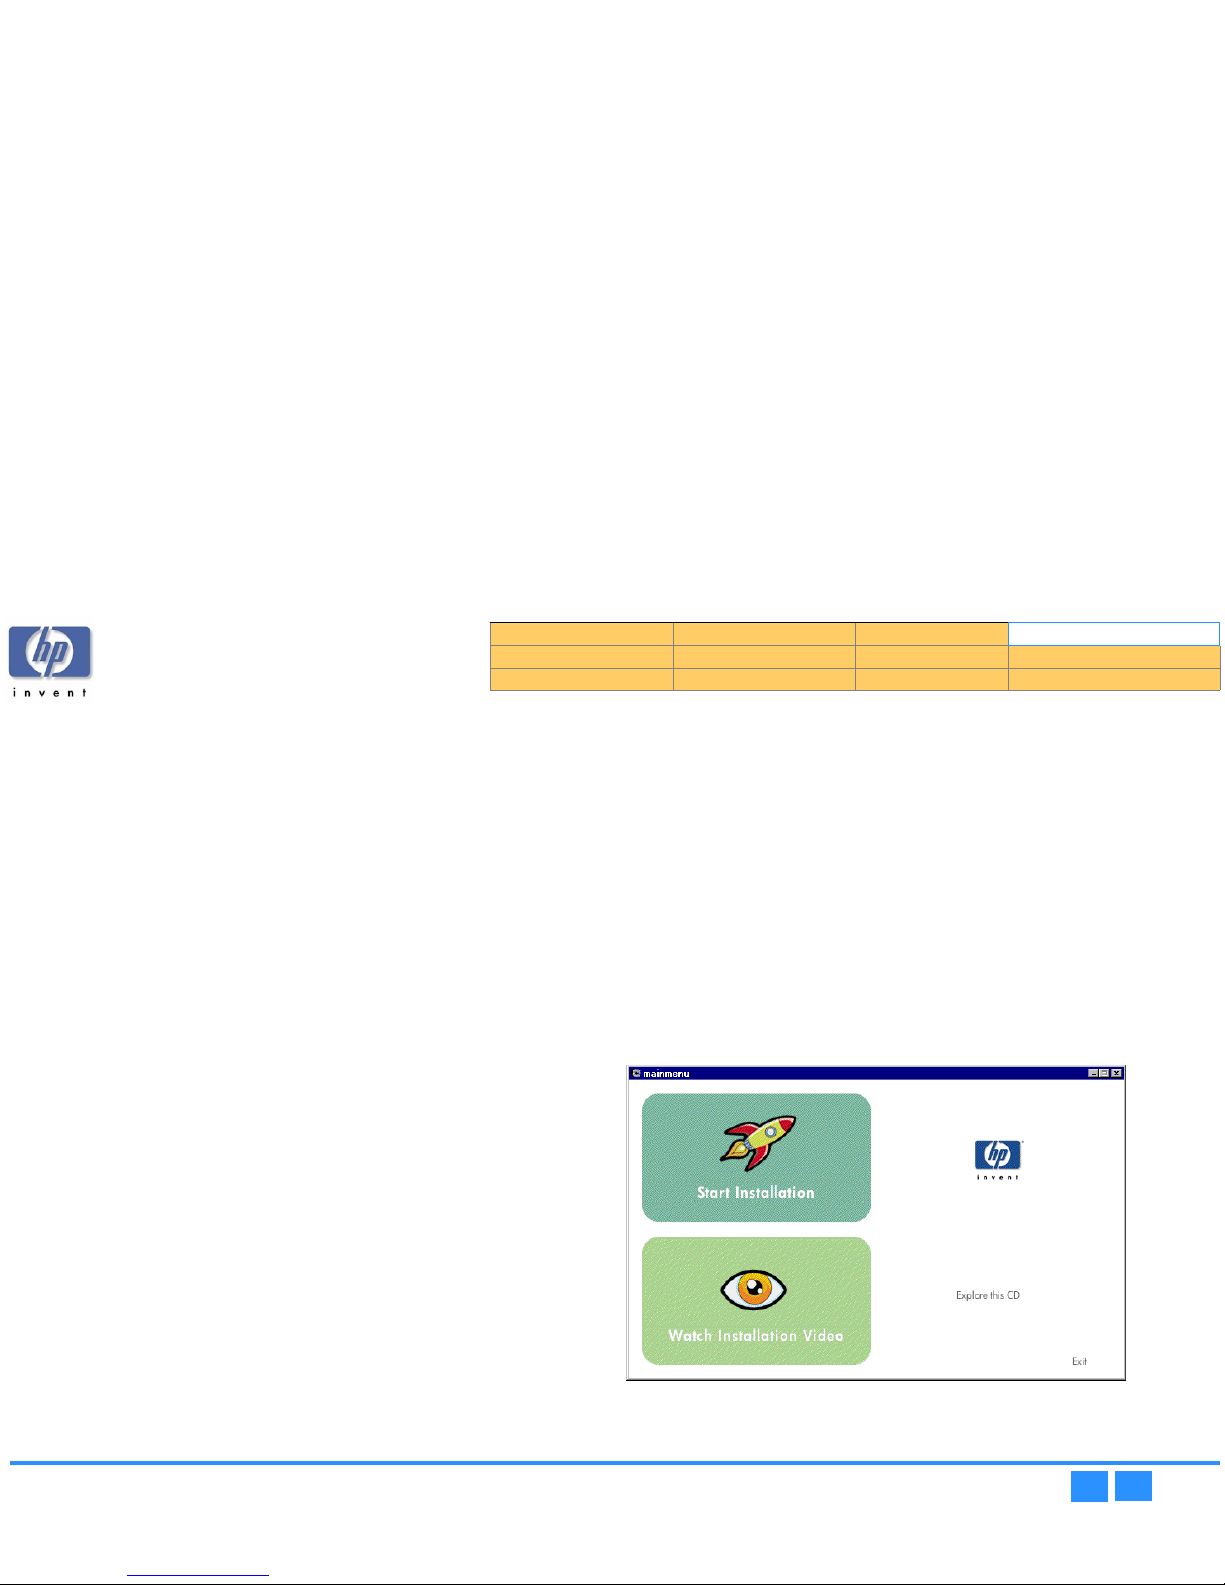
hp dvd-writer
hp dvd-writerhp dvd-writer
hp dvd-writer dvd100i
dvd100idvd100i
dvd100i
Technical Support Solutions Guide 10/25/01 What’s in the Box
35
3535
35
⇐⇐⇐⇐
⇒⇒⇒⇒
What’s in the Box
Your hp dvd-writer dvd100i package contains:
■
hp dvd-writer dvd100i drive
■
1 blank DVD+RW disc
■
Documentation
●
Quick Start Placemat
●
Install Guide
●
Support Guide
●
Integrated Install
●
Electronic User’s Guide
●
Minimum Legal Requirements
■
audio cable
■
IDE cable
■
screws
■
Software Disc #1 with:
●
HP Installation Software
●
HP MyDVD
●
HP DLA
●
HP RecordNow
●
HP Simple Backup
●
PowerDVD
Installing the hp dvd-writer dvd100i Drive
The following information is similar to the QuickStart sheet provided with the
hp dvd-writer dvd100i drive.
Inserting Disc 1
1.
1.1.
1. Turn on your printer and the computer, and start Windows.
2.
2.2.
2. Insert the CD labeled Software Disc 1 into your CD-ROM drive.
The hp dvd-writer Installation Splash screen appears briefly, then the
Installation
InstallationInstallation
Installation menu appears (see Figure 14).
NOTE:
NOTE: NOTE:
NOTE:
If Auto Insert Notification is turned on for your CD-ROM drive, the first
screen will appear automatically. If Auto Insert Notification is not turned
on, click the
Start
StartStart
Start
button on the task bar, click
Run
RunRun
Run
, type D:\SETUP (where
D: is your CD-ROM’s drive letter), then click
OK
OKOK
OK
.
Figure 14
Figure 14 Figure 14
Figure 14 hp dvd-writer Installation Menu Screen
Product Information Drive Specifications Interfaces Installation and Configuration
Drive Operation Tips and Techniques Software Maintenance
Troubleshooting Warranty and Support Release Notes Discontinued Products
Page 36
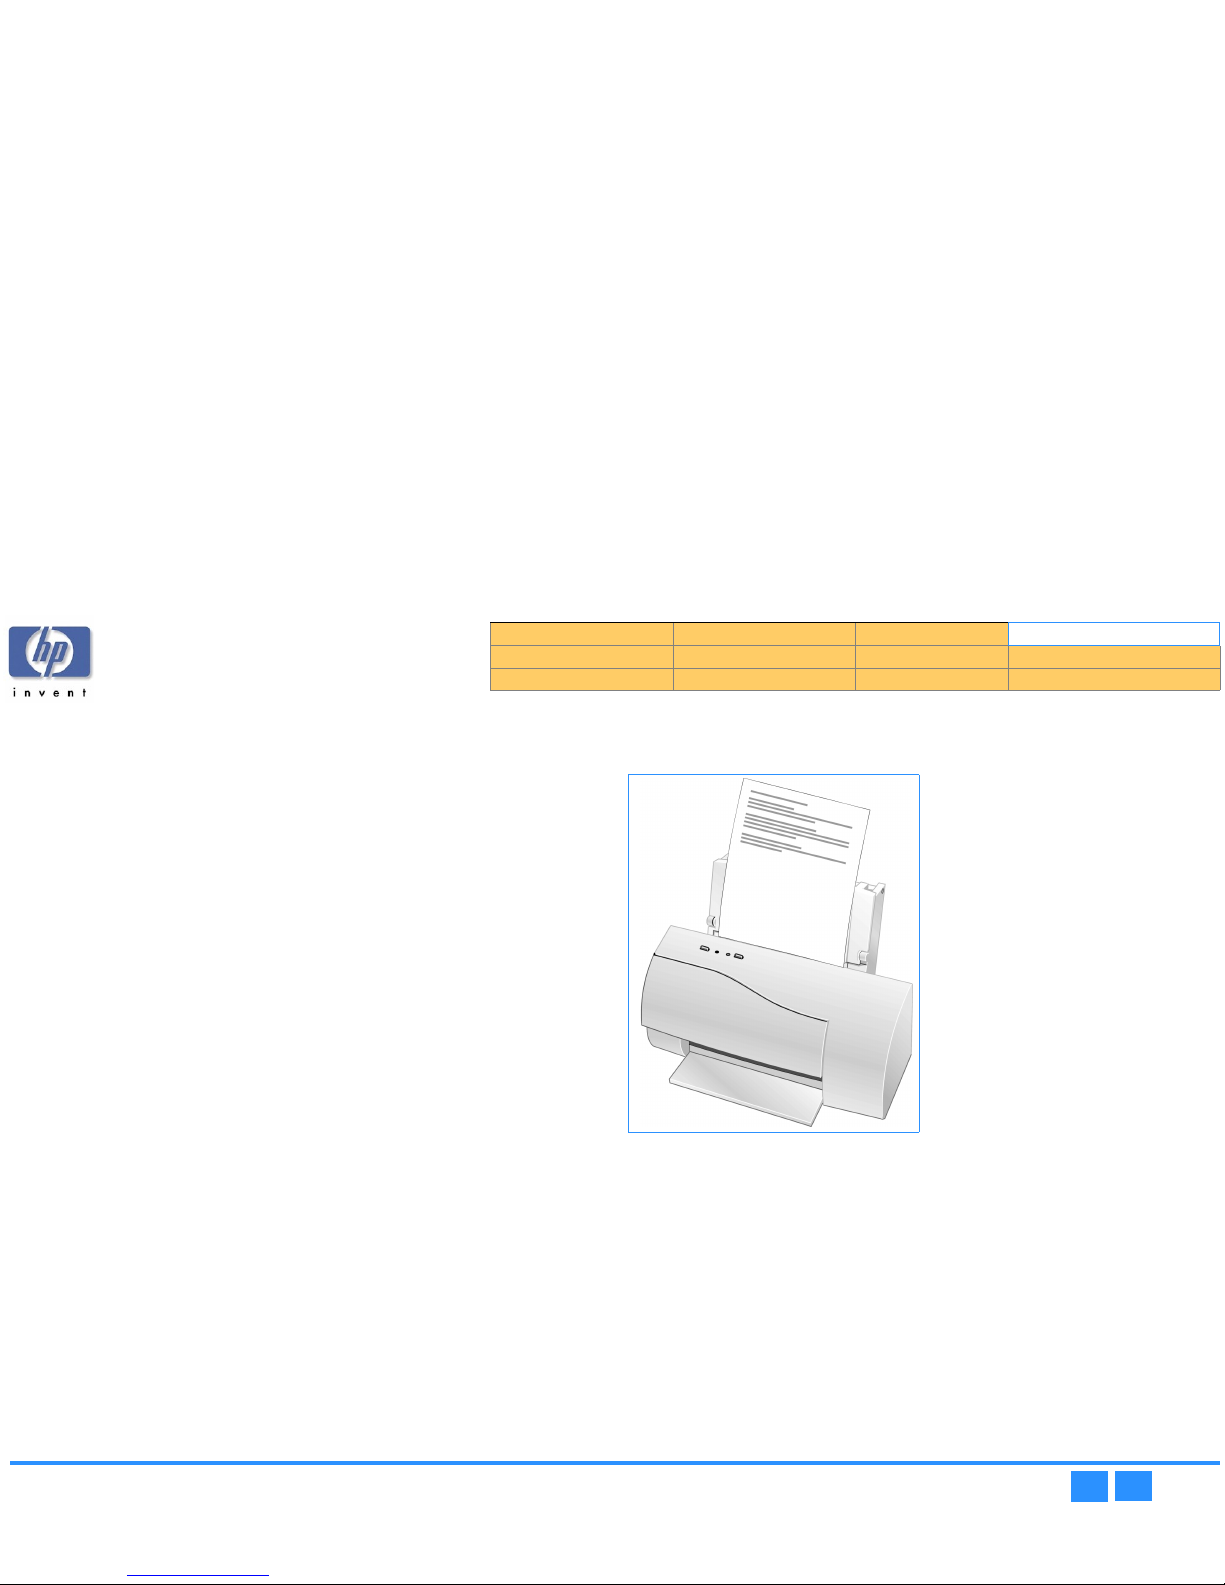
hp dvd-writer
hp dvd-writerhp dvd-writer
hp dvd-writer dvd100i
dvd100idvd100i
dvd100i
Technical Support Solutions Guide 10/25/01 Installing the hp dvd-writer dvd100i Drive
36
3636
36
⇐⇐⇐⇐
⇒⇒⇒⇒
Viewing the Install Video
■
Click Watch Installation Video
Watch Installation VideoWatch Installation Video
Watch Installation Video on the Installation
InstallationInstallation
Installation menu to watch a short video
of the installation process.
Starting Installation
1.
1.1.
1. Click Start Installation
Start Installation Start Installation
Start Installation on the Installation
InstallationInstallation
Installation menu.
2.
2.2.
2. Follow the instructions on the Welcome
WelcomeWelcome
Welcome screen, then click Next
NextNext
Next.
3.
3.3.
3. Follow the instructions on the Software License Agreement
Software License AgreementSoftware License Agreement
Software License Agreement screen, then click
Yes
YesYes
Yes.
Accepting the Attachment Recommendation
1.
1.1.
1. Follow the instructions on the hp dvd-writer CCCConnection Information
onnection Information onnection Information
onnection Information screen,
then click Next
NextNext
Next.
2.
2.2.
2. Follow the instructions on the Replace CD-ROM
Replace CD-ROM Replace CD-ROM
Replace CD-ROM screen, then click Next
NextNext
Next.
Printing the Install Recommendation
1.
1.1.
1. When the Install Recommendation
Install RecommendationInstall Recommendation
Install Recommendation screen appears, click Print
PrintPrint
Print.
Figure 15
Figure 15 Figure 15
Figure 15 Printing the Install Recommendation
The HP Drive Install Recommendation
HP Drive Install RecommendationHP Drive Install Recommendation
HP Drive Install Recommendation printout will include a recommendation for:
Jumper setting?
[ ] Master [ ] Slave
Which IDE controller?
[ ] Primary [ ] Secondary
Sharing controller & cable? If so, with: _________
Data cable instructions?
[ ] 1 device [ ] 2 devices
2.
2.2.
2. If no printer is available, copy the recommendation from the Install
Install Install
Install
Recommendation
RecommendationRecommendation
Recommendation screen.
Product Information Drive Specifications Interfaces Installation and Configuration
Drive Operation Tips and Techniques Software Maintenance
Troubleshooting Warranty and Support Release Notes Discontinued Products
Page 37
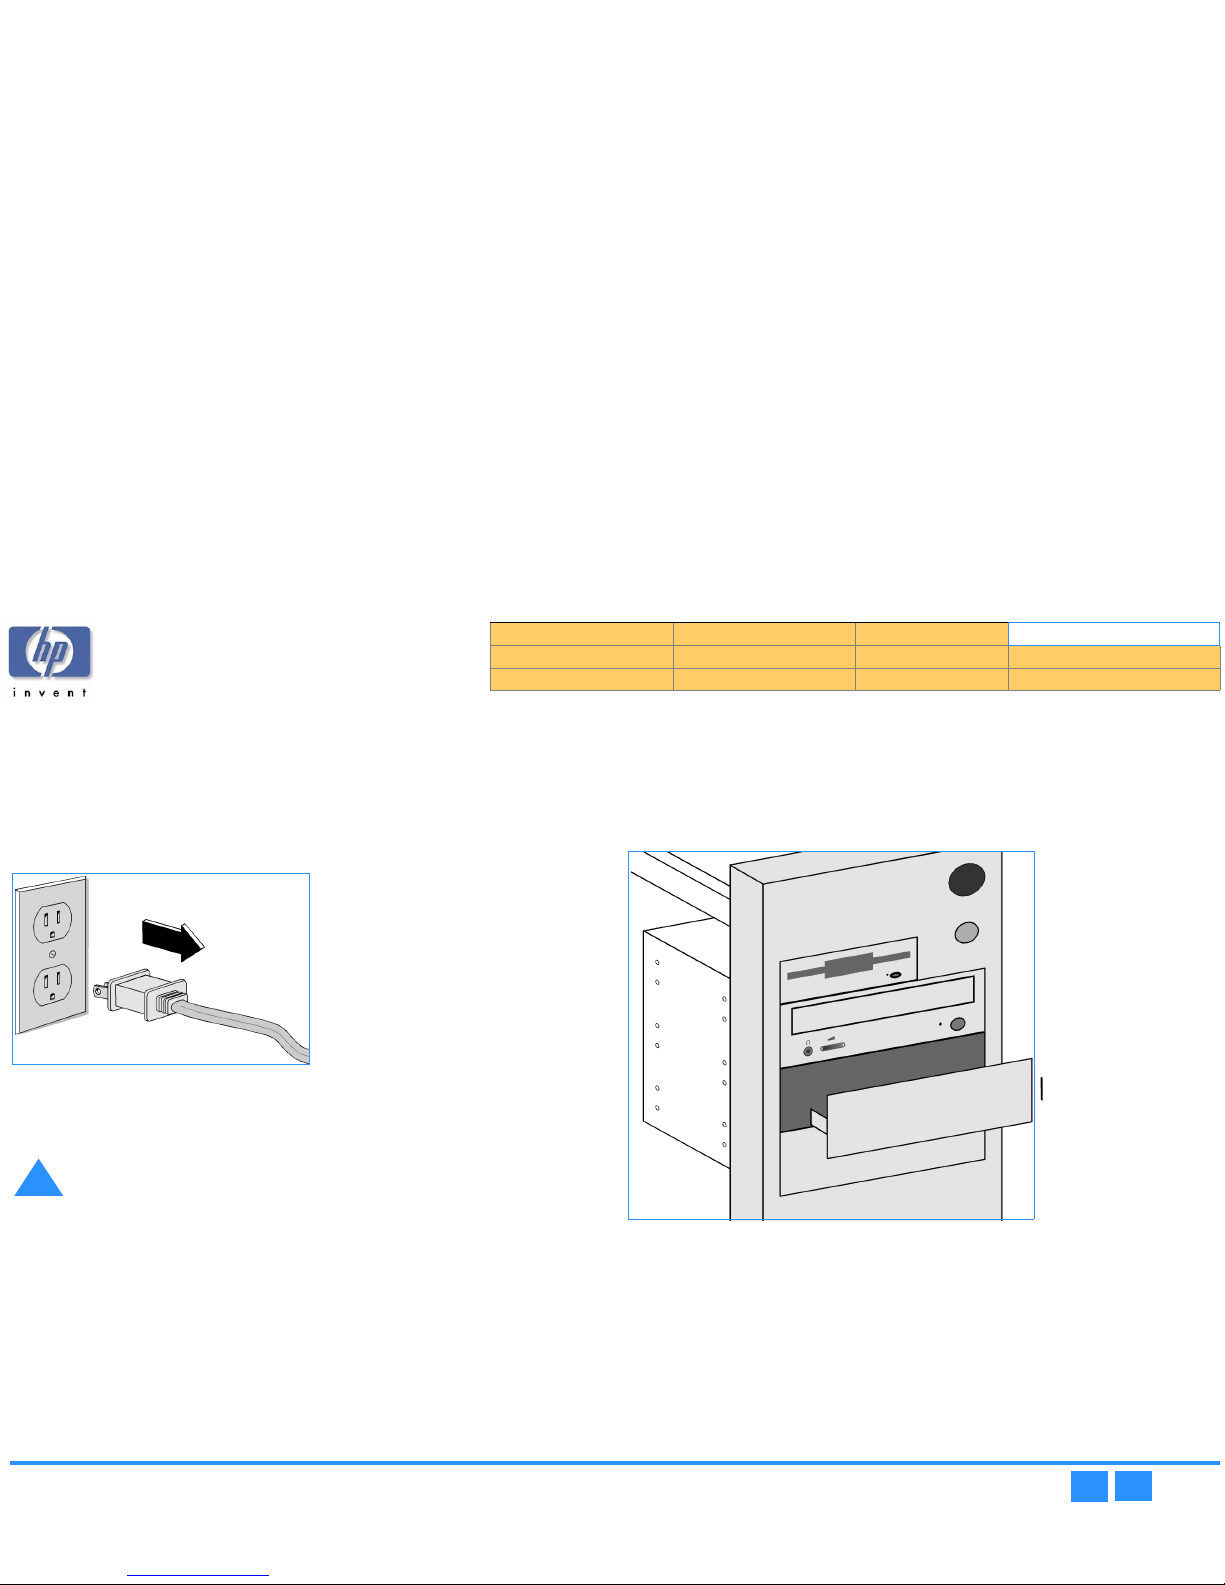
hp dvd-writer
hp dvd-writerhp dvd-writer
hp dvd-writer dvd100i
dvd100idvd100i
dvd100i
Technical Support Solutions Guide 10/25/01 Installing the hp dvd-writer dvd100i Drive
37
3737
37
⇐⇐⇐⇐
⇒⇒⇒⇒
Installing the Hardware
1.
1.1.
1. When the Shutdown for Hardware Installation
Shutdown for Hardware InstallationShutdown for Hardware Installation
Shutdown for Hardware Installation screen appears, click Shutdown
ShutdownShutdown
Shutdown
to shut down Windows.
2.
2.2.
2. Turn OFF your computer, monitor, and other devices.
3.
3.3.
3. Unplug the power cords from the wall outlet or from the power strip, if you use
one.
Figure 16
Figure 16 Figure 16
Figure 16 Unplug the Computer
4.
4.4.
4. Remove the cover from your computer.
5.
5.5.
5. Locate a free, half-height drive bay in the computer and remove its cover plate.
Half-height drive bays are about 6” wide and 1.75” tall (15 cm x 4.5 cm).
6.
6.6.
6. If you will be replacing an existing CD-ROM drive, remove that drive.
Lay aside any cables that you unplug from the CD-ROM; you will later plug them
into the hp dvd-writer drive.
Figure 17
Figure 17 Figure 17
Figure 17 A Free Drive Bay
7.
7.7.
7. Keep any mounting hardware, as it may be needed later for securing the drive in
the drive bay.
!
CAUTION: Touch something metallic (an unpainted part of the
computer’s case or a file cabinet) to discharge static electricity before
touching anything inside your computer.
■
Static electricity can damage your computer’s internal parts.
Product Information Drive Specifications Interfaces Installation and Configuration
Drive Operation Tips and Techniques Software Maintenance
Troubleshooting Warranty and Support Release Notes Discontinued Products
Page 38
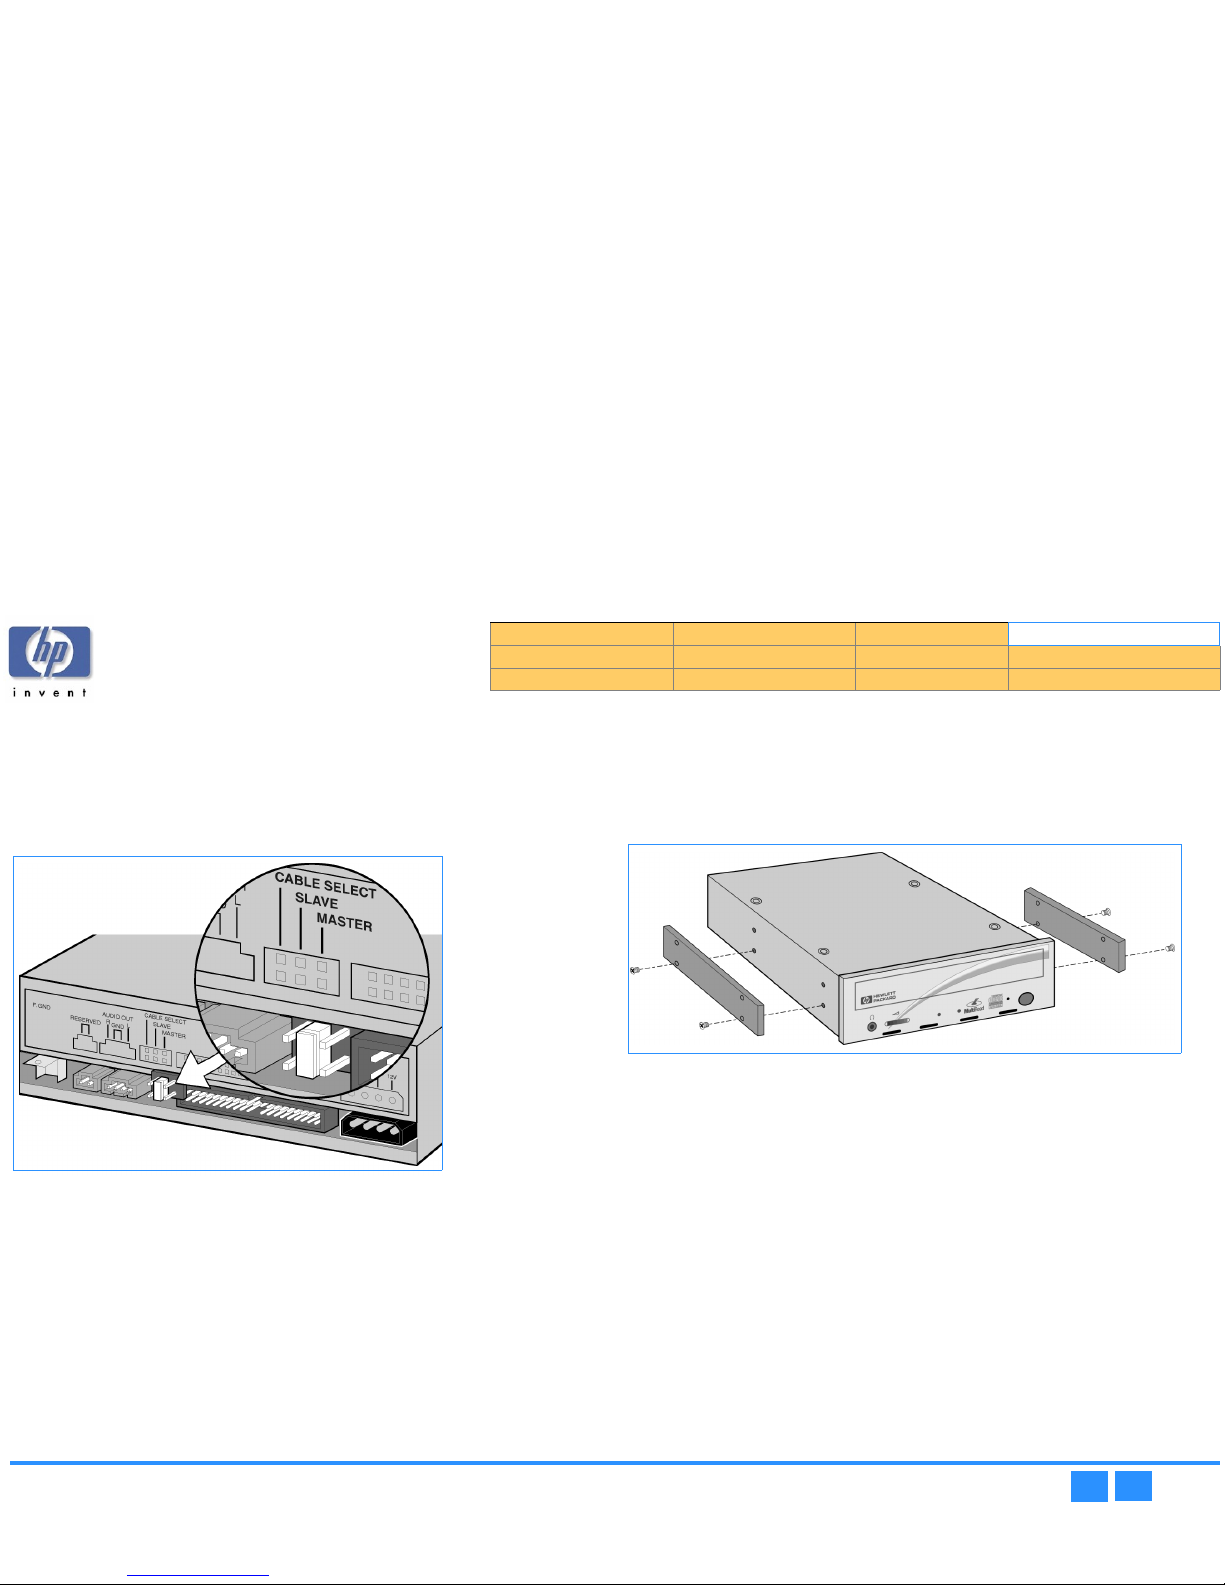
hp dvd-writer
hp dvd-writerhp dvd-writer
hp dvd-writer dvd100i
dvd100idvd100i
dvd100i
Technical Support Solutions Guide 10/25/01 Installing the hp dvd-writer dvd100i Drive
38
3838
38
⇐⇐⇐⇐
⇒⇒⇒⇒
8.
8.8.
8. Look at the Install Recommendation printout to see whether the jumper should
be set to the Master or Slave position, then set the jumper on the back of the
hp dvd-writer drive to the recommended position.
NOTE:
NOTE: NOTE:
NOTE:
Jumpers are small caps that fit over pairs of pins on the back of the
hp dvd-writer drive. Jumpers can be pulled off or replaced with needlenose pliers.
Figure 18
Figure 18 Figure 18
Figure 18 Setting Jumpers on the Drive
9.
9.9.
9. If your computer uses rails, attach the rails that came with the computer to the
sides of the hp dvd-writer dvd100i drive (see Figure 19).
Some computers use rails instead of screws to hold the drive in place.
NOTE:
NOTE: NOTE:
NOTE:
You can tell if your computer uses rails by looking at the other drives
installed in your computer.
Figure 19
Figure 19 Figure 19
Figure 19 Rails for Mounting the Drive
10.
10.10.
10. Slide the hp dvd-writer drive partially into the bay.
Product Information Drive Specifications Interfaces Installation and Configuration
Drive Operation Tips and Techniques Software Maintenance
Troubleshooting Warranty and Support Release Notes Discontinued Products
Page 39
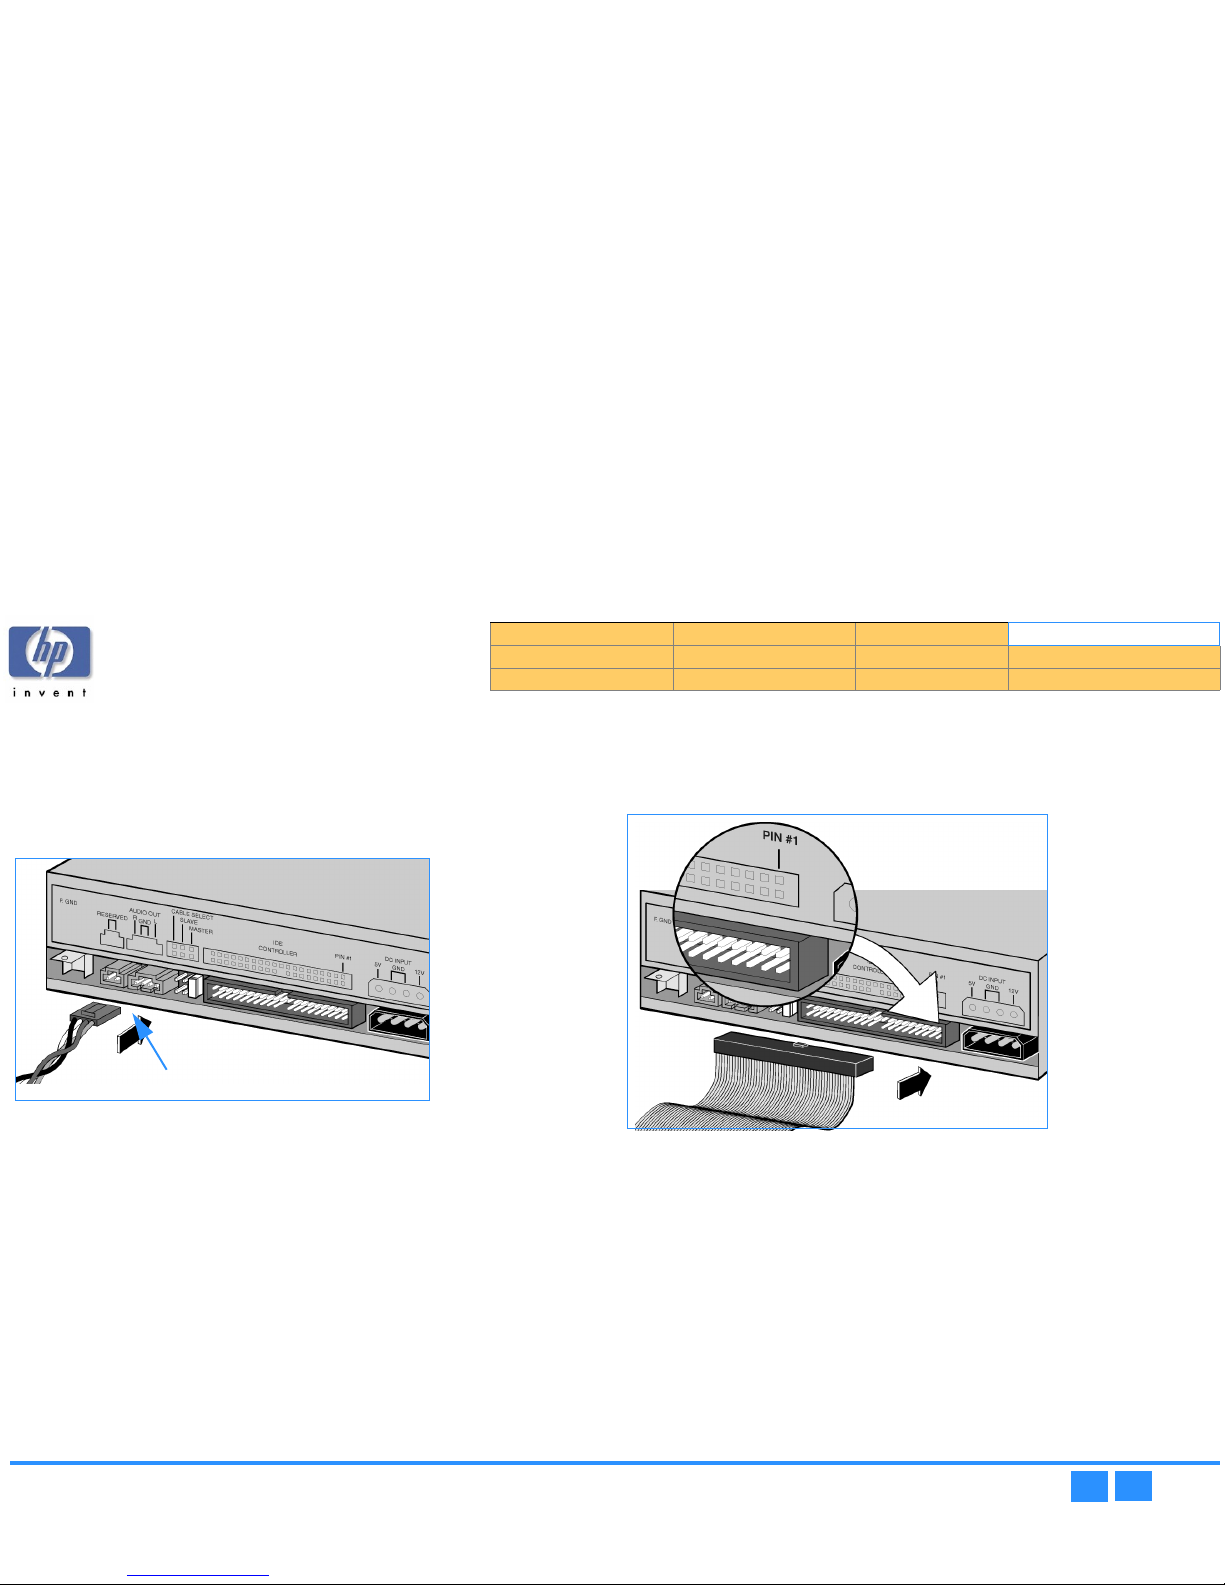
hp dvd-writer
hp dvd-writerhp dvd-writer
hp dvd-writer dvd100i
dvd100idvd100i
dvd100i
Technical Support Solutions Guide 10/25/01 Installing the hp dvd-writer dvd100i Drive
39
3939
39
⇐⇐⇐⇐
⇒⇒⇒⇒
11.
11.11.
11. To hear sound through your computer’s sound system, connect one end of the
audio cable to the back of the hp dvd-writer drive (see Figure 20) and the other
end to an audio connector on your sound card or motherboard.
NOTE:
NOTE: NOTE:
NOTE:
If you do not have a sound card, you can still hear sound through
speakers or earphones plugged into the audio connector on the front of
your hp dvd-writer drive.
Figure 20
Figure 20 Figure 20
Figure 20 Audio Cable Connector on Drive Back
12.
12.12.
12. Look at the Install Recommendation printout to see whether or not the
hp dvd-writer drive will be sharing the data cable with another device.
13.
13.13.
13. Connect the data cable to the hp dvd-writer (see Figure 21, Figure 22, and Figure
23).
Figure 21
Figure 21 Figure 21
Figure 21 Data Cable Connector on Drive Back
NOTE:
NOTE: NOTE:
NOTE:
Most IDE data cables are keyed to fit only one way. When connected
correctly, the colored stripe on the cable lines up with Pin 1 on the back of
the drive.
Audio Connector
Audio ConnectorAudio Connector
Audio Connector
Product Information Drive Specifications Interfaces Installation and Configuration
Drive Operation Tips and Techniques Software Maintenance
Troubleshooting Warranty and Support Release Notes Discontinued Products
Page 40
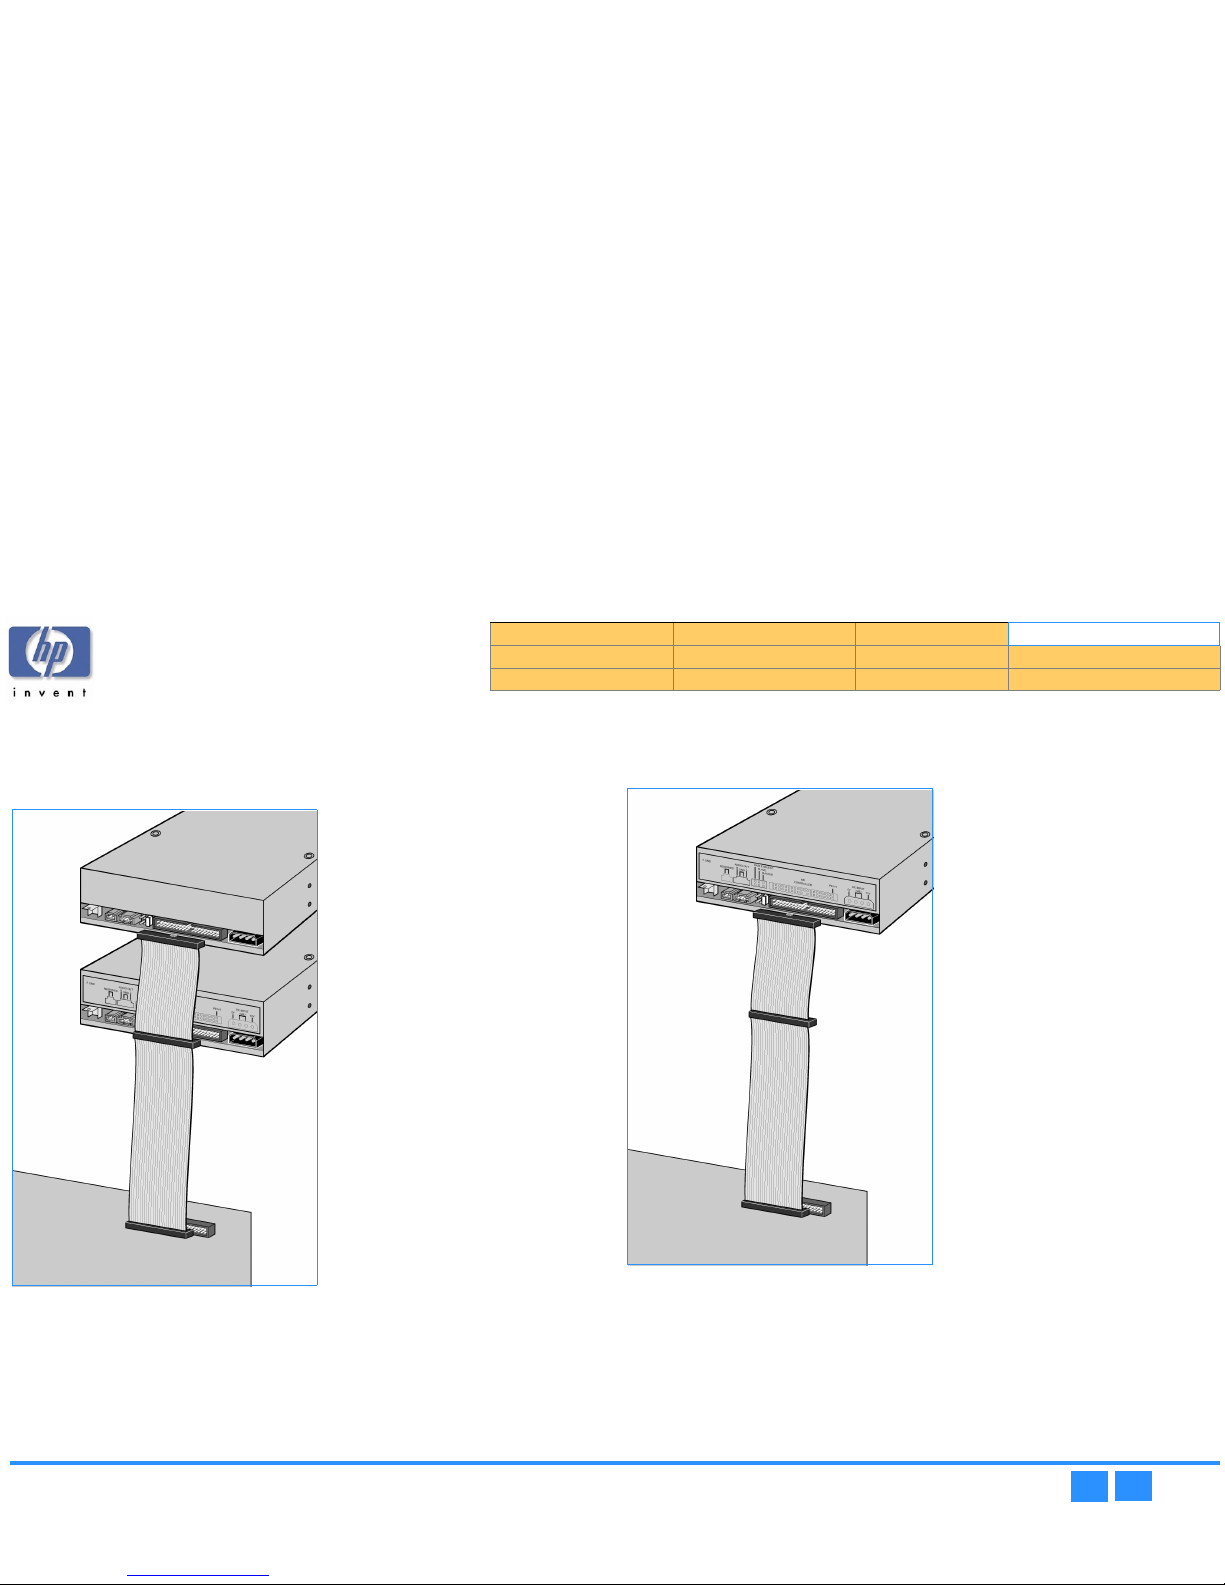
hp dvd-writer
hp dvd-writerhp dvd-writer
hp dvd-writer dvd100i
dvd100idvd100i
dvd100i
Technical Support Solutions Guide 10/25/01 Installing the hp dvd-writer dvd100i Drive
40
4040
40
⇐⇐⇐⇐
⇒⇒⇒⇒
a.
a.a.
a. For an hp dvd-writer drive sharing the data cable with another device, follow
the cable already attached to the other device. If you find an extra connector
along that cable, simply attach that connector to the hp dvd-writer drive (see
Figure 22).
Figure 22
Figure 22 Figure 22
Figure 22 An hp dvd-writer Drive Sharing the Data Cable
b.
b.b.
b. For an hp dvd-writer drive that is the only device on the data cable, locate the
IDE connector on the motherboard and use the data cable included in the
box to connect the hp dvd-writer drive to the IDE connector (see Figure 23).
Figure 23
Figure 23 Figure 23
Figure 23 An hp dvd-writer Drive Not Sharing the Data Cable
Product Information Drive Specifications Interfaces Installation and Configuration
Drive Operation Tips and Techniques Software Maintenance
Troubleshooting Warranty and Support Release Notes Discontinued Products
Page 41
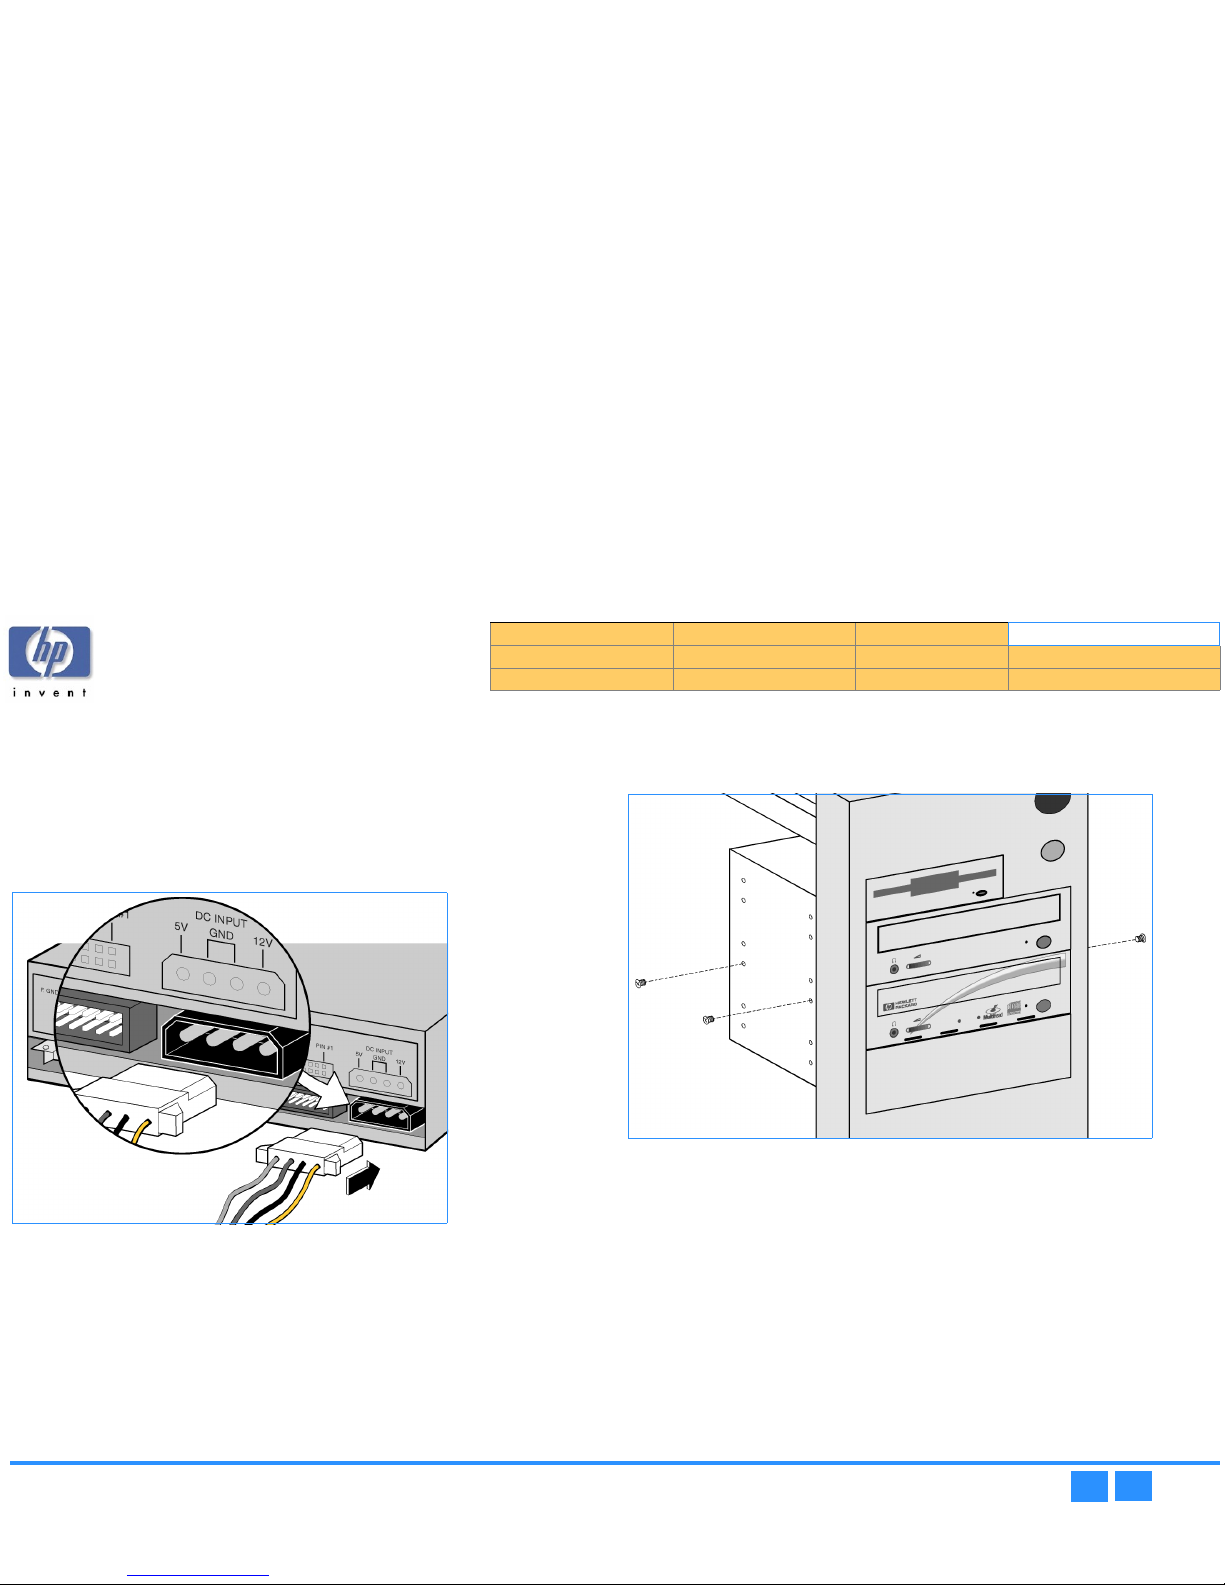
hp dvd-writer
hp dvd-writerhp dvd-writer
hp dvd-writer dvd100i
dvd100idvd100i
dvd100i
Technical Support Solutions Guide 10/25/01 Installing the hp dvd-writer dvd100i Drive
41
4141
41
⇐⇐⇐⇐
⇒⇒⇒⇒
14.
14.14.
14. Locate an available power cable connector in the computer.
Power cable connectors usually have yellow, red, and black wires. If you do not
have an available connector, you need to purchase a Y power connector from
your computer dealer.
15.
15.15.
15. Plug the power cable into the back of the HP drive. The connector only fits one
way. (See Figure 24.)
NOTE:
NOTE: NOTE:
NOTE:
Improper connection of the power cable will damage the drive.
Figure 24
Figure 24 Figure 24
Figure 24 Power Connector on Drive Back
16.
16.16.
16. Slide the HP drive completely into the drive bay.
17.
17.17.
17. Secure the HP drive into the drive bay with the screws (or rails, if your computer
uses rails). (See Figure 25.)
Figure 25
Figure 25 Figure 25
Figure 25 Securing the Drive in the Bay
Product Information Drive Specifications Interfaces Installation and Configuration
Drive Operation Tips and Techniques Software Maintenance
Troubleshooting Warranty and Support Release Notes Discontinued Products
Page 42
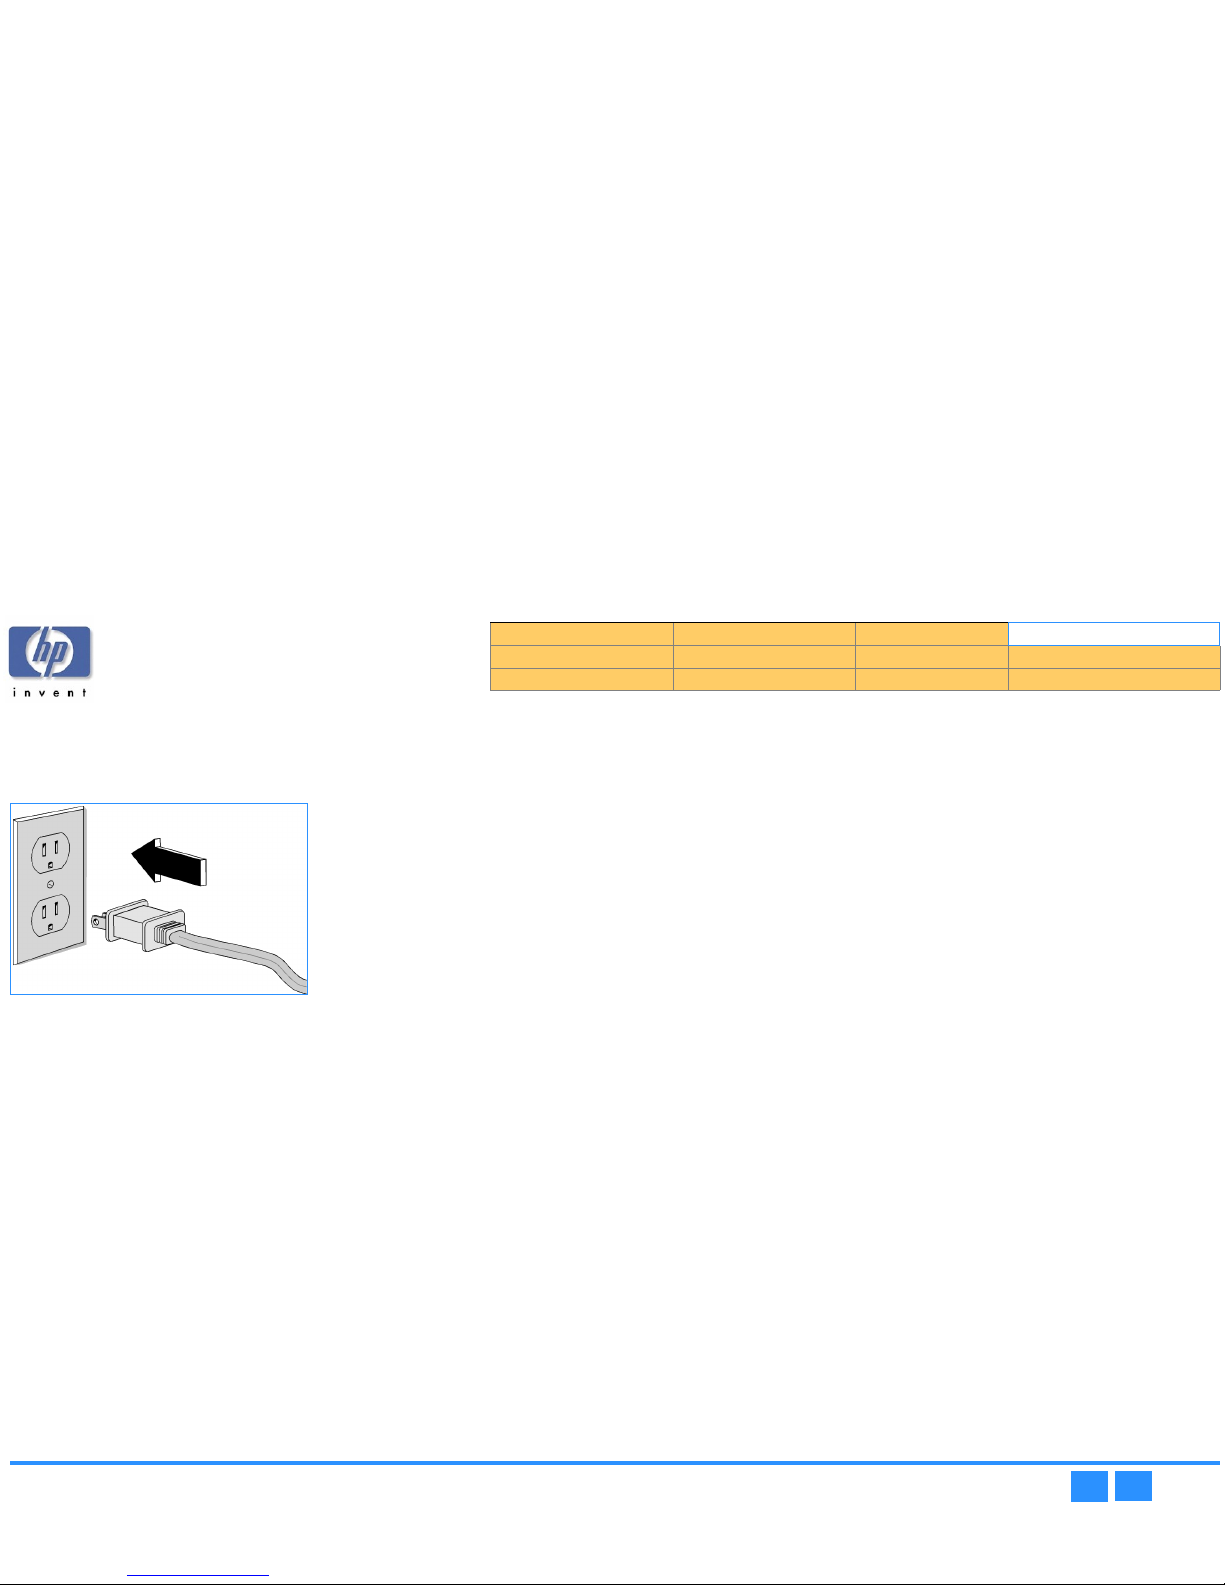
hp dvd-writer
hp dvd-writerhp dvd-writer
hp dvd-writer dvd100i
dvd100idvd100i
dvd100i
Technical Support Solutions Guide 10/25/01 Installing the Software
42
4242
42
⇐⇐⇐⇐
⇒⇒⇒⇒
Restarting the Computer
1.
1.1.
1. Replace the case on the computer.
2.
2.2.
2. Connect the computer and all attached devices to power.
Figure 26
Figure 26 Figure 26
Figure 26 Connect the Computer to Power
3.
3.3.
3. Turn on th e co mpute r.
The installation software will verify that the HP drive is correctly installed.
4.
4.4.
4. Press the Load/Eject
Load/EjectLoad/Eject
Load/Eject button to make sure the drive is receiving power by opening
and closing the tray.
Installing the Software
1.
1.1.
1. Follow the instructions on the screens to install the HP software applications.
The following applications are installed using an HP-developed custom installation
program on Software Disc 1:
■
HP MyDVD (described on page 72)
■
PowerDVD (described on page 78)
■
HP RecordNow 3.0 (described on page 53)
■
HP DLA 2.5 (described on page 65)
■
HP Simple Backup (described on page 75)
NOTE:
NOTE: NOTE:
NOTE:
No hardware drivers need to be installed. The hp dvd-writer drive uses the
operating system’s IDE drivers.
2.
2.2.
2. When the Setup Complete
Setup CompleteSetup Complete
Setup Complete screen appears, select Yes
YesYes
Yes to restart the computer,
then click Finish
FinishFinish
Finish.
3.
3.3.
3. After the computer has been restarted, the hp dvd-writer PPPProduct Registration
roduct Registrationroduct Registration
roduct Registration
screen appears .
Vendor Software Installation
After the user has finished installing the HP drive and restarted their computer, they
must insert the additional software installation CDs to invoke the vendors’ install
programs.
Product Information Drive Specifications Interfaces Installation and Configuration
Drive Operation Tips and Techniques Software Maintenance
Troubleshooting Warranty and Support Release Notes Discontinued Products
Page 43
hp dvd-writer
hp dvd-writerhp dvd-writer
hp dvd-writer dvd100i
dvd100idvd100i
dvd100i
Technical Support Solutions Guide 10/25/01 Identifying the hp dvd-writer Drive
43
4343
43
⇐⇐⇐⇐
⇒⇒⇒⇒
Identifying the hp dvd-writer Drive
Users should see the hp dvd-writer drive in Explorer or My Computer, on on the
Ta sk b ar .
If users have problems seeing the drive, refer to the online User’s Guide for
troubleshooting information.
Desktop Icon
Figure 27
Figure 27 Figure 27
Figure 27 HP CD-Writer Desktop Icon
Start Menu Program Group Names
Table 17
Table 17 Table 17
Table 17 Icon and Program Group Names
Application Program Group Name
hp dvd-writer dvd100i Hewlett-Packard>>HP DVD-Writer>>HP DVD-Writer
HP MyDVD Programs>>MyDVD
PowerDVD Programs>>CyberLink PowerDVD>>PowerDVD
HP DLA Hewlett-Packard>>HP DVD-Writer>>HP DVD-Writer
HP RecordNow Hewlett-Packard>>HP DVD-Writer>>HP DVD-Writer
HP Simple Backup Hewlett-Packard>>HP DVD-Writer>>HP DVD-Writer
User’s Guide Hewlett-Packard>>HP DVD-Writer>>HP DVD-Writer>>User’s
Guide Online
Uninstall Hewlett-Packard>>
HP DVD-Writer>>HP DVD-Writer>>Uninstall
Troubleshooting Hewlett-Packard>>
HP DVD-Writer>>HP DVD-Writer>>Troubleshooting
Electronic Registration Hewlett-Packard>>
HP DVD-Writer>>HP DVD-Writer>>Electronic Registration
Product Information Drive Specifications Interfaces Installation and Configuration
Drive Operation Tips and Techniques Software Maintenance
Troubleshooting Warranty and Support Release Notes Discontinued Products
Page 44

hp dvd-writer
hp dvd-writerhp dvd-writer
hp dvd-writer dvd100i
dvd100idvd100i
dvd100i
Technical Support Solutions Guide 10/25/01 Additional Reference Information
44
4444
44
⇐⇐⇐⇐
⇒⇒⇒⇒
Additional Reference Information
Online User’s Guide
The hp dvd-writer dvd100i Electronic User’s Guide, application Help, and application
ReadMe files should be referenced in addition to this manual if more software
information is needed when using the hp dvd-writer dvd100i drive.
ReadMe Files
ReadMe files exist for the following:
■
HP CD-WRITER, hp dvd-writer on page 96
■
HP RecordNow, Version 3.0 on page 97
■
HP DLA, Version 2.5 on page 98
■
HP Simple Backup on page 100
You can read these files in Chapter 11 Release Notes, or they can be accessed from
the program groups after installing the applications or the installation CD(s). Please
refer to these CDs for additional information not included in the release notes.
Hardware/Software Compatibility
The software shipped with the hp dvd-writer dvd100i drive is compatible with
Windows 98, Windows NT 4.0 Workstation with SP5, Windows 2000 Professional, and
Windows ME operating systems.
Compatibility with previous releases of the
HP CD-Writer (hardware, software, and
firmware) has been maintained when possible. Discs made from a previous release
are readable and usable on the hp dvd-writer dvd100i drive.
The software bundled with the hp dvd-writer dvd100i drive will not be sold as a
separate product. See the hp dvd-writer Support websites for upgrade information:
http: //www. hp. com/support/dvd-compatibility
http: //www. hp. com/support/dvd-capture
http: //www. hp. com/support/dvd-mydvd
Uninstalling Software
Users can remove all hp dvd-writer dvd100i programs or individual programs at any
time.
NOTE:
NOTE: NOTE:
NOTE:
If users want to reinstall the hp dvd-writer dvd100i drive software, they
must be sure to remove the original software first.
Removing software:
1.
1.1.
1. Click
SSSStart>>Programs>>
tart>>Programs>>tart>>Programs>>
tart>>Programs>>
Hewlett-Packard>>HP DVD-Writer>>HP DVD-Writer>>Uninstall
Hewlett-Packard>>HP DVD-Writer>>HP DVD-Writer>>UninstallHewlett-Packard>>HP DVD-Writer>>HP DVD-Writer>>Uninstall
Hewlett-Packard>>HP DVD-Writer>>HP DVD-Writer>>Uninstall
2.
2.2.
2. Select the HP CD-Writer program(s) that you wish to remove.
3.
3.3.
3. Click the Finish
FinishFinish
Finish button.
The software is removed, including all related entries in your system registry.
All files and directories should be removed if a complete uninstall is performed. To
complete an uninstall, the user must reboot the system. After rebooting the system,
verify the install directory has been removed (\Program Files\Hewlett-Packard\).
Product Information Drive Specifications Interfaces Installation and Configuration
Drive Operation Tips and Techniques Software Maintenance
Troubleshooting Warranty and Support Release Notes Discontinued Products
Page 45
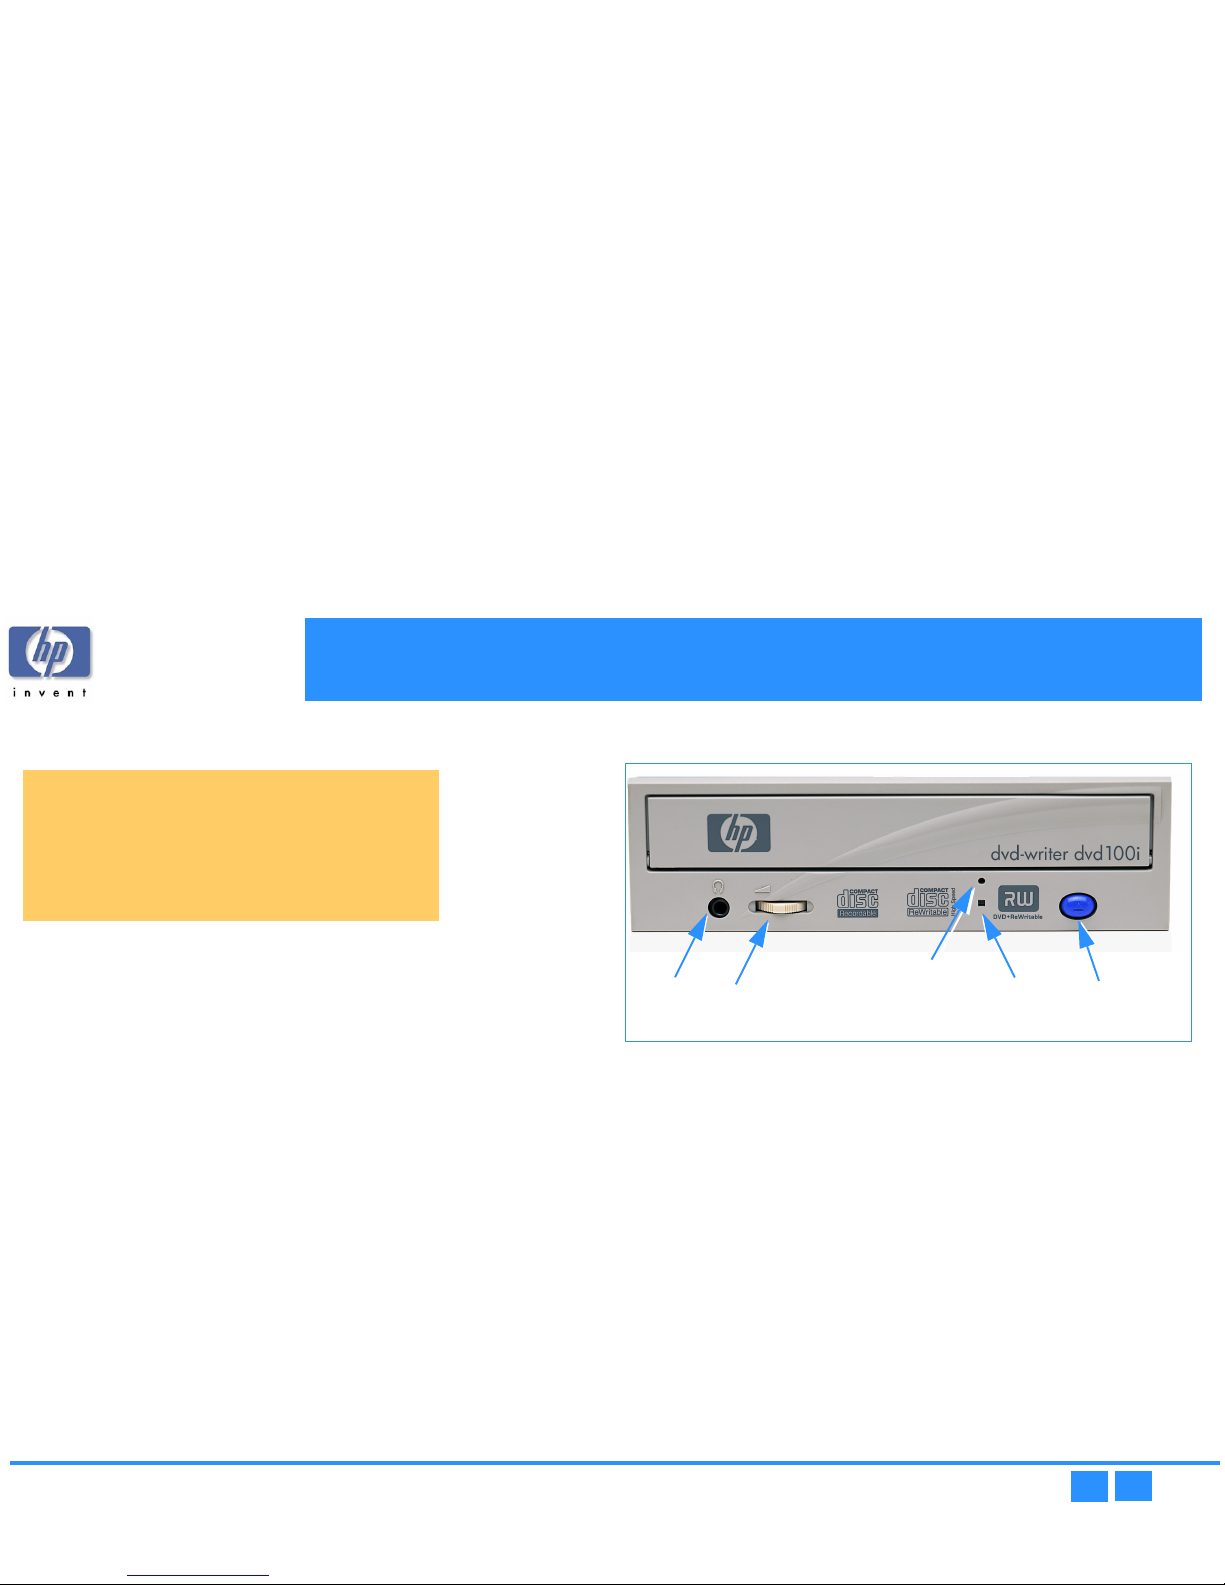
hp dvd-writer
hp dvd-writerhp dvd-writer
hp dvd-writer dvd100i
dvd100idvd100i
dvd100i
Technical Support Solutions Guide 10/25/01 Bezel
45
4545
45
⇐⇐⇐⇐
⇒⇒⇒⇒
Chapter 5 Drive Operation
This chapter offers a description of the basic operating functions of the
hp dvd-writer dvd100i drive and is organized as follows:
Bezel
Figure 28
Figure 28 Figure 28
Figure 28 Bezel
For information on the LEDs, see LEDs on page 18.
Disc Loading Mechanism
The hp dvd-writer dvd100i drive has a tray mechanism. The tray incorporates a dust
seal so that dust does not enter from the front bezel.
There is a locking mechanism on the tray such that when power is off and the tray is
closed, the tray will be locked in a closed position. However, this locking mechanism
has a manual override (see Emergency Ejection on page 46).
Bezel p. 45
Disc Loading Mechanism p. 45
Disc Ejection Mechanism p. 46
Volume Control p. 46
Starting Software p. 47
Audio
Audio Audio
Audio
Volume
VolumeVolume
Volume
Jack
JackJack
Jack
Control
ControlControl
Control
Status
StatusStatus
Status
LED
LEDLED
LED
Emergency
EmergencyEmergency
Emergency
Eject Hole
Eject HoleEject Hole
Eject Hole
Load/Eject
Load/EjectLoad/Eject
Load/Eject
Button
ButtonButton
Button
Page 46
hp dvd-writer
hp dvd-writerhp dvd-writer
hp dvd-writer dvd100i
dvd100idvd100i
dvd100i
Technical Support Solutions Guide 10/25/01 Disc Ejection Mechanism
46
4646
46
⇐⇐⇐⇐
⇒⇒⇒⇒
Disc Ejection Mechanism
Tab le 18
Tab le 18 Table 18
Tab le 18 Disc Ejection States for the hp dvd-writer dvd100i Drive
Manual Ejection
The drive has a manual ejection button on the front bezel. When pressed, it activates
the electrical signal to open and close the tray. The manual ejection facility functions
upon power-up, but it can be disabled by the host computer through the Prevent/
Prevent/Prevent/
Prevent/
Allow Medium Removal
Allow Medium RemovalAllow Medium Removal
Allow Medium Removal command, which is software controlled.
Emergency Ejection
The tray is ejectable by pushing a pin or standard size paper clip into the emergency
eject pinhole on the front bezel. The emergency ejection mechanism functions even
without power to the drive and with the prevent bit set.
Tab le 19
Tab le 19 Tabl e 1 9
Tab le 19 Emergency Ejection Specification
Auto Insertion
The tray automatically closes when it is pushed.
Table 20
Table 20 Ta ble 20
Table 20 Auto Insertion Specification
The drive is designed to respond within 1 second.
Ejecting Position
The tray is ejected approximately 64.5 mm from the front of the front bezel to the
center of the disc.
Volume Control
The Volume Control on the front of the hp dvd-writer dvd100i drive (shown in Figure
28) controls the output volume to the headphone jack.
Tray Position Action Response
Tray is closed and drive is in
READY state
Depress
Load/Eject
Load/EjectLoad/Eject
Load/Eject
button Tray will open if not in
locked state.
Tray is closing or tray is
closed and drive has not yet
come READY
Depress
Load/Eject
Load/EjectLoad/Eject
Load/Eject
button Tray will open.
Tray is open or opening Depress
Load/Eject
Load/EjectLoad/Eject
Load/Eject
button Tray will close
Maximum force 3.5 Kgf
Stroke of pin insertion 40 mm
Recommended diameter of pin 1.2 mm
Maximum force 5.5 Kgf
Stroke 3 mm
Product Information Drive Specifications Interfaces Installation and Configuration
Drive Operation
Tips and Techniques Software Maintenance
Troubleshooting Warranty and Support Release Notes Discontinued Products
Page 47
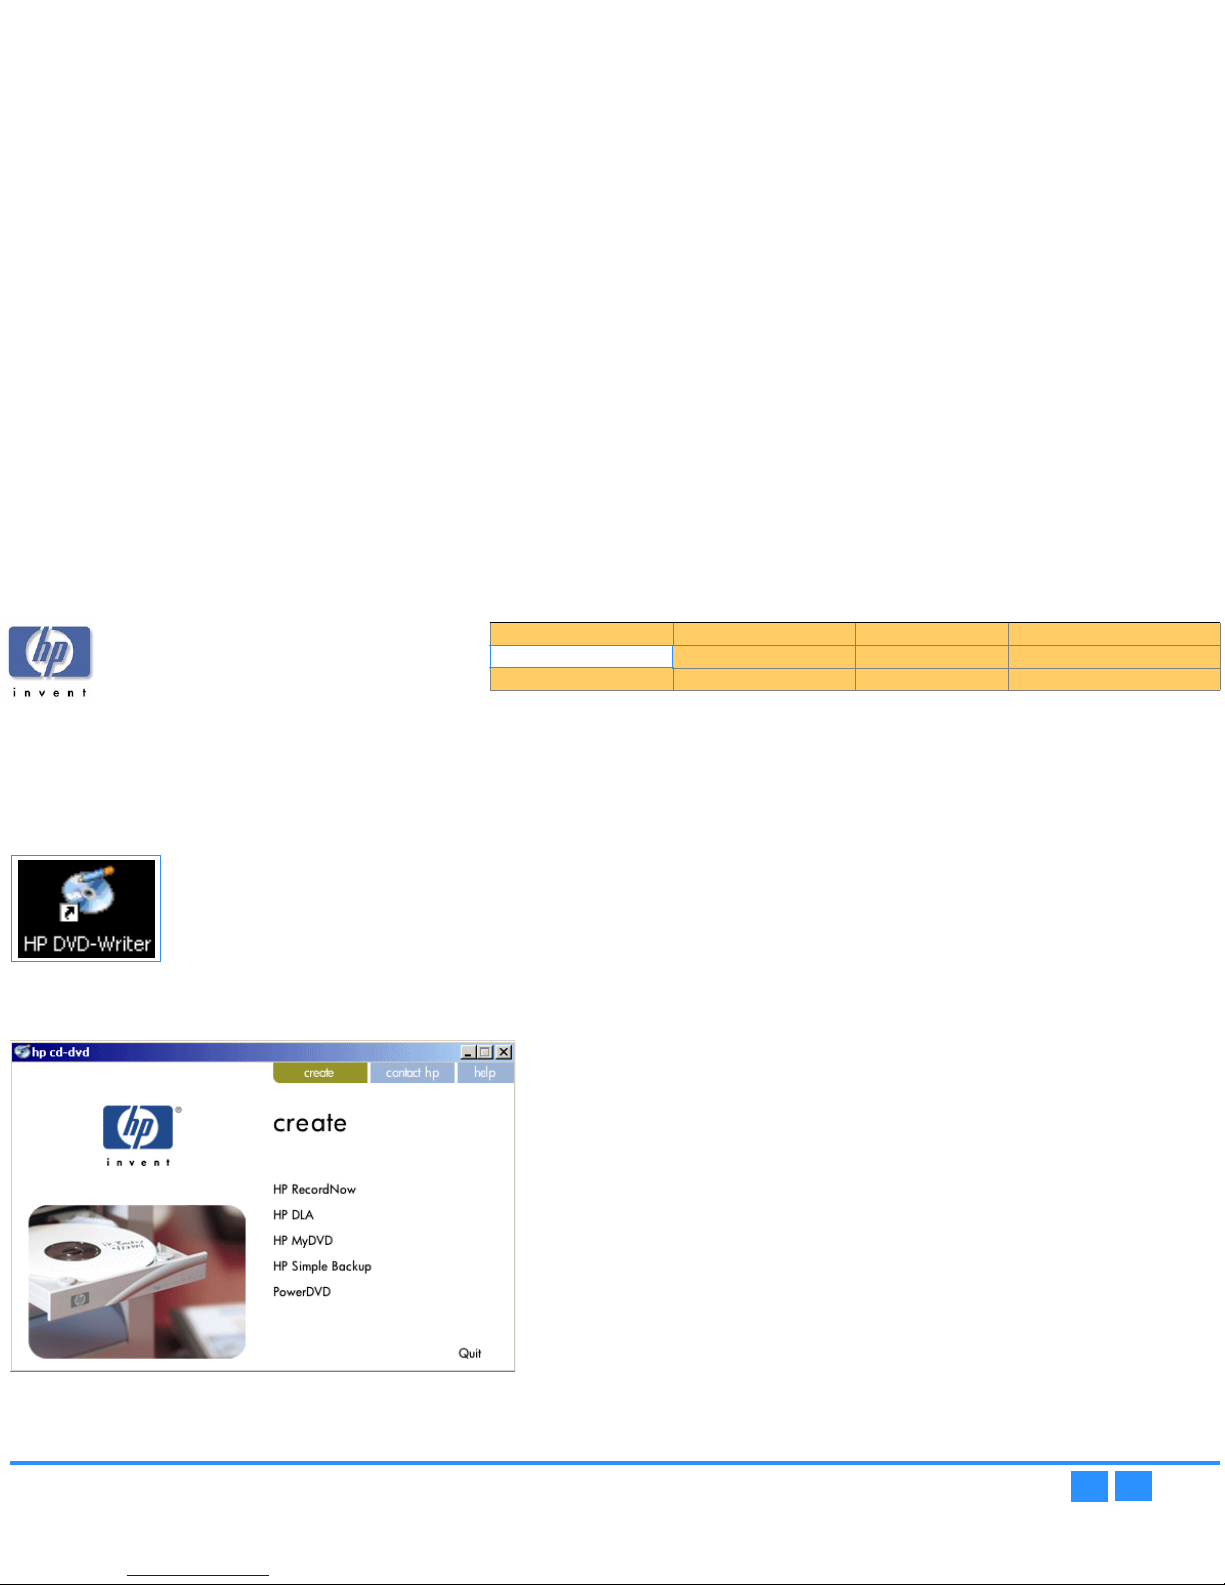
hp dvd-writer
hp dvd-writerhp dvd-writer
hp dvd-writer dvd100i
dvd100idvd100i
dvd100i
Technical Support Solutions Guide 10/25/01 Starting Software
47
4747
47
⇐⇐⇐⇐
⇒⇒⇒⇒
Starting Software
The hp cd-dvd
hp cd-dvd hp cd-dvd
hp cd-dvd screen can be opened three ways:
■
Insert a blank disc into the drive.
■
Select Start>>Programs>>
Start>>Programs>>Start>>Programs>>
Start>>Programs>>HP DVD-Writer
HP DVD-WriterHP DVD-Writer
HP DVD-Writer>>HP DVD-Writer
HP DVD-WriterHP DVD-Writer
HP DVD-Writer
■
Double-click the hp dvd-writer desktop icon
.
Figure 29
Figure 29 Figure 29
Figure 29 hp dvd-writer Desktop Icon
The hp cd-dvd
hp cd-dvd hp cd-dvd
hp cd-dvd screen appears (see Figure 30).
Figure 30
Figure 30 Figure 30
Figure 30 hp cd-dvd
hp cd-dvd hp cd-dvd
hp cd-dvd Screen
The choices in the create
create create
create tab of the hp cd-dvd
hp cd-dvd hp cd-dvd
hp cd-dvd screen are:
■
HP RecordNow
HP RecordNowHP RecordNow
HP RecordNow
Makes a music CD to play on your home or car stereo, a copy of an existing CD,
or a data CD to use on any PC.
■
HP DLA
HP DLAHP DLA
HP DLA
Makes a data CD to use on this PC.
■
HP MyDVD
HP MyDVDHP MyDVD
HP MyDVD
Lets you record video directly to DVD or CD, or assemble a DVD project using
video clips, pictures and photographs.
NOTE:
NOTE: NOTE:
NOTE:
HP MyDVD does not run on Windows NT.
■
HP Simple Backup
HP Simple BackupHP Simple Backup
HP Simple Backup
Backs up your PC to DVD or CD
■
PowerDVD
PowerDVDPowerDVD
PowerDVD
Play DVD movies on your PC
Product Information Drive Specifications Interfaces Installation and Configuration
Drive Operation
Tips and Techniques Software Maintenance
Troubleshooting Warranty and Support Release Notes Discontinued Products
Page 48

hp dvd-writer
hp dvd-writerhp dvd-writer
hp dvd-writer dvd100i
dvd100idvd100i
dvd100i
Technical Support Solutions Guide 10/25/01 Frequently Asked Questions
48
4848
48
⇐⇐⇐⇐
⇒⇒⇒⇒
Chapter 6 Tips and Techniques
This chapter provides answers to questions frequently asked about using the
hp dvd-writer dvd100i drive and is organized as follows:
Frequently Asked Questions
QQQQ
Why so many different programs?
AAAA
You can do dozens of things with your HP drive. Each program that came with the
drive helps you do something different.
Use HP RecordNow to:
●
copy non-content-protected DVDs and CDs
●
create music CDs
●
create DVD-ROM compatible data discs to share
Use HP MyDVD Video by Sonic to incorporate your video footage, photos and
music on to DVDs that you can view on most DVD-ROM and DVD players.
Use HP DLA (Drive Letter Access) to write to your HP drive from any application
you normally use such as a word processor, spreadsheet, or Windows Explorer.
Use HP Simple Backup by Veritas to protect your information from a hard drive
or computer crash by backing up your files so you can quickly and easily restore
them.
QQQQ
What's the difference between mastering and packet-writing software?
AAAA
Your HP drive comes with Two types of software: mastering software and packetwriting
Your HP drive comes with two types of software: mastering software and
packet-writing software. Mastering software is useful for writing a complete disc,
for recording music, or for ensuring that others can read your disc.
HP RecordNow is the mastering application that came with your HP drive.
Packet-writing copies a few files at a time by dragging and dropping them onto
the HP-drive icon or by saving directly from a word processor or other
application. HP-DLA is the packet-writing software that came with your HP drive.
Mastering and packet-writing applies only to CD media.
Frequently Asked Questions p. 48
Page 49
hp dvd-writer
hp dvd-writerhp dvd-writer
hp dvd-writer dvd100i
dvd100idvd100i
dvd100i
Technical Support Solutions Guide 10/25/01 Frequently Asked Questions
49
4949
49
⇐⇐⇐⇐
⇒⇒⇒⇒
QQQQ
How much information can I fit on one CD?
AAAA
The type of disc and software you use greatly affect the amount of data you can
fit on a disc.
A DVD+RW disc can hold approximately 4.7 GB of data or up to 3 hours of video
depending on the video-quality setting you choose when you record the disc.
When you use HP DLA, a DVD+RW disc can hold approximately 4.6 GB of
information.
A single session CD written with HP RecordNow can hold 650 MB of data or 74
minutes of music (an 80 minute CD will hold 700 MB or 80 minutes of music).
Most of the time you will probably be writing multisession CDs. Multisession
allows a CD to be recorded, removed, and read on a CD-ROM drive and then
have more information added later. Each time you record a session, overhead is
added to your data; about 23 MB of overhead for the first session and 14 MB of
overhead for each session after that. Therefore, the total amount of data that you
can fit on the CD varies depending on how many sessions are written and how
much data is in each session. So when planning your work, try to write as much
data in a session as you can.
When you use HP DLA with a CD-Recordable (CD-R) disc you can store up to
approximately 618 MB of data on 74-minute media or 670 MB on 80-minute
CD-R media.
When you use HP DLA with a CD-ReWritable (CD-RW) disc, the amount of data
that can fit on the CD is about 530 MB because of the additional file structure
overhead.
QQQQ
Can I do other things while my CD is recording?
AAAA
If your new drive is a cd12, cd16, cd24 or dvd100i, it has Buffer Underrun
Protection Technology that eliminates buffer underrun errors. You can use your
computer to do other tasks while you write discs. You never have to turn on your
drive's buffer underrun protection technology because it works automatically in
conjunction with your drive's mastering software.
HP MyDVD Video by Sonic does not capture video efficiently when your
computer is performing other tasks. Your DVD disc will not be ruined, however
video capture performance may be affected or there may be errors on the disc
that require you to perform the recording operation again.
If your drive does NOT have buffer underrun protection technology you can do
other things on your computer when using HP DLA; however, when using HP
RecordNow, there won't be much computing power left to run other programs.
Trying to run other programs at the same time can interrupt the recording
process and corrupt the disc because HP RecordNow and other mastering
applications need a constant stream of data to write to the disc.
So, before you start a recording session with these programs do the following:
●
Sign off from email.
●
Log off of the network.
●
Turn off any other programs that might interrupt, such as a calendar with a
reminder feature or a scheduled backup that might begin.
Product Information Drive Specifications Interfaces Installation and Configuration
Drive Operation Tips and Techniques Software Maintenance
Troubleshooting Warranty and Support Release Notes Discontinued Products
Page 50
hp dvd-writer
hp dvd-writerhp dvd-writer
hp dvd-writer dvd100i
dvd100idvd100i
dvd100i
Technical Support Solutions Guide 10/25/01 Frequently Asked Questions
50
5050
50
⇐⇐⇐⇐
⇒⇒⇒⇒
QQQQ
What kinds of discs can my HP drive write to?
AAAA
Your HP DVD-Writer can write to:
●
DVD+RW (DVD-RW or DVD-RAM are not compatible with your drive)
●
CD-R Media (74 and 80 minute)
●
CD-RW media (1x-4x)
●
CD-RW media (4x-10X)
Choose DVD+RW to store large amounts of data or your custom video that will
play in most DVD players or DVD-ROM drives.
At times, you will want to use CD media rather than DVD, such as when you are
sharing small amounts of data or creating music CDs. When choosing which kind
of CD to use, consider the following:
●
Use CD-R discs when you want assurance that a lot of other people can read
the CD. Use CD-Rs when you want to share data with others, when you will be
sending the CD to a large number of customers, or for music CDs that you can
play in any home or car CD player.
●
Choose CD-ReWritable discs as additional personal storage. For example,
when you want to archive files to free up space on your hard drive or to
transfer files between home and work where you have a drive in each location.
●
We recommend you use HP brand media. HP is only able to provide technical
assistance on issues related to the HP brand. If you experience difficulty with
non-HP media, please refer to the media manufacturer for support.
QQQQ
What is the best way to make a disc I can share?
AAAA
To create a DVD+RW data disc that is compatible with most leading DVD-ROM
players use HP RecordNow.
The DVD-video discs you create can be read in most leading DVD video players
and DVD_ROM drives. If you wish to view a DVD-video disc you created on your
PC, you must use PowerDVD software included with your drive.
If you want to be sure that anyone with a CD-ROM drive can read your CD, use a
CD-Recordable disc and HP RecordNow: for example, if you want to send a
business presentation to a large number of customers or make a music CD.
If you know that everyone reading your CD will be running Windows 95/98/Me or
Windows NT/2000 you can use a CD-Recordable disc and HP DLA.
CD-RW discs can only be read in either CD-RW drives or newer CD-ROM drives
that support the MultiRead specification. This is because CD-ReWritable discs are
a newer technology. Since not everyone can read CD-RW discs, they are good for
additional personal storage for your computer, for archiving and freeing up
space on your hard drive or for transferring files between work and home when
you have an HP drive in both places.
QQQQ
Can I erase a disc?
AAAA
DVD+RW discs can be re-written to repeatedly.
You can delete files from a CD-Recordable and CD-ReWritable disc the same way
you can delete files from a floppy or hard disk. Each location on a CD-ReWritable
disc can be erased and rewritten up to 1,000 times. However, deleting a file from a
CD-Recordable disc works differently: the space that the deleted file took up is
not made available again because each location on a CD-Recordable disc can
only be written to once. For this reason, you may not want to delete files from a
CD-Recordable disc even though it is possible to do so.
QQQQ
How should I take care of my discs?
AAAA
Recommendations:
●
Do not use a CD jewel case with your DVD+RW discs. A CD case holds the DVD
media too tightly, causing the disc to bend, which can lead to data loss.
●
Do not expose your discs to extreme heat, moisture, or light for extended
periods of time. Store in a cool, dry, dark place.
●
Scratches, dirt, and fingerprints can make a disc unreadable. Handle a disc
only by the edges and don't leave them scattered around or stacked on top of
each other. Store discs in their cases.
●
If it becomes necessary to clean a disc, use only water and a soft cloth. When
wiping a disc, wipe in a straight line from the center to the outer edge, not in a
circle. Make sure the disc is dry before you insert it into a drive.
Product Information Drive Specifications Interfaces Installation and Configuration
Drive Operation Tips and Techniques Software Maintenance
Troubleshooting Warranty and Support Release Notes Discontinued Products
Page 51
hp dvd-writer
hp dvd-writerhp dvd-writer
hp dvd-writer dvd100i
dvd100idvd100i
dvd100i
Technical Support Solutions Guide 10/25/01 Frequently Asked Questions
51
5151
51
⇐⇐⇐⇐
⇒⇒⇒⇒
QQQQ
What is the best way to label a disc?
AAAA
Recommendations
●
Adhesive labels should NOT be applied to DVD+RW discs because they can
make the DVD unreadable.
●
If you use an adhesive label on CDs, use only labels made specifically for
CDs. Once the label touches the CD, don't try to remove or reposition it
because you can pull off the recording layer.
●
Use only quick drying permanent markers to write on discs. Avoid any marker
containing non-drying ink, because the ink may eventually eat through the
disc surface and damage your data. Do not use ballpoint or other sharptipped pens because you can scratch through the protective coating and
damage your data.
QQQQ
How do I buy more discs?
AAAA
You can purchase HP CDs and DVDs from your local computer store or online at
http://www.hp.com
QQQQ
When do I need to format a disc?
AAAA
A CD only needs to be formatted if you will use HP DLA.
DVD+RW discs must always be formatted before use. Your software will take care
of formatting automatically.
QQQQ
Can I copy a disc that is in my existing CD-ROM or DVD-ROM drive to a disc in
my HP drive?
AAAA
You can use a DVD-ROM drive as a source drive; however, if the disc you want to
copy is a DVD+RW, not all DVD-ROM drives will be able to read it.
The copyright law of the United States (Title 17, United States Code) and similar
laws in other countries govern the reproduction of copyrighted works. The person
using the HP drive may be liable for its use to make unauthorized copies of
copyrighted works. Hewlett-Packard Company does not authorize or condone
the use of the HP drive for the unauthorized reproduction of copyrighted works.
Neither your HP DVD-Writer nor the software that came with it is capable of
copying content protected discs.
QQQQ
Can I copy a music disc that is in my CD-ROM drive to a blank disc in my HP
drive?
AAAA
You can use your CD-ROM drive to copy music CDs if the CD-ROM is capable of
"digital audio extraction". Although all CD-ROM drives can playback music from
a music CD, not all are capable of reading the tracks in digital format or can do it
at an acceptable speed. If a music CD that you've recorded contains clicks, pops,
or hissing, this could be the cause. Your CD-ROM is capable of digital audio
extraction if it is available in the "Device to read from" box in the HP RecordNow
software. If your CD-ROM drive does not do digital audio extraction, you can still
copy music CDs by swapping the music CD and the blank CD in and out of your
HP drive.
Product Information Drive Specifications Interfaces Installation and Configuration
Drive Operation Tips and Techniques Software Maintenance
Troubleshooting Warranty and Support Release Notes Discontinued Products
Page 52

hp dvd-writer
hp dvd-writerhp dvd-writer
hp dvd-writer dvd100i
dvd100idvd100i
dvd100i
Technical Support Solutions Guide 10/25/01 Start Menu Choices for Core Software
52
5252
52
⇐⇐⇐⇐
⇒⇒⇒⇒
Chapter 7 Software
This chapter describes software applications shipped with the hp dvd-writer dvd100i
drive and is organized as follows:
Start Menu Choices for Core Software
The core HP software choices listed in Ta bl e 2 1 appear in the hp cd-dvd
hp cd-dvdhp cd-dvd
hp cd-dvd screen when
the user selects
Start>>Programs>>Hewlett-Packard>>HP DVD-Writer>>HP DVD-Writer
Start>>Programs>>Hewlett-Packard>>HP DVD-Writer>>HP DVD-WriterStart>>Programs>>Hewlett-Packard>>HP DVD-Writer>>HP DVD-Writer
Start>>Programs>>Hewlett-Packard>>HP DVD-Writer>>HP DVD-Writer.
Table 21
Table 21 Table 21
Table 21 Core Software Applications Accessed from the hp cd-dvd
hp cd-dvdhp cd-dvd
hp cd-dvd screen
Start Menu Choices for Core Software p. 52
HP RecordNow 3.0 p. 53
HP DLA 2.5 p. 65
HP MyDVD p. 72
HP Simple Backup p. 75
PowerDVD p. 78
Application
HP RecordNow
HP DLA
HP MyDVD
HP Simple Bacup
PowerDVD
Page 53
hp dvd-writer
hp dvd-writerhp dvd-writer
hp dvd-writer dvd100i
dvd100idvd100i
dvd100i
Technical Support Solutions Guide 10/25/01 HP RecordNow 3.0
53
5353
53
⇐⇐⇐⇐
⇒⇒⇒⇒
HP RecordNow 3.0
HP RecordNow is disc mastering software that allows you to create your own music or
data discs from files on your computer, or from other disc media such as CDs or
DVDs. Music discs created with HP RecordNow will play on any CD player, whether
it’s at home, in your car, or through your computer’s CD-ROM. HP RecordNow also
makes it easy to create data discs that can be read on any appropriate CD or DVD
disc reader.
NOTE:
NOTE: NOTE:
NOTE:
Some DVD players cannot read CD-R media. Refer to the documentation
that accompanied your drive for information on supported media.
HP RecordNow guides you, step-by-step, through the recording process with simple
Wizards and an intuitive user-interface. Using HP RecordNow you can create:
■
Exact copies of existing discs
■
Discs of archived data from your hard drive
■
Music compilations from WAV or MP3 files, or from existing music discs
Manuals for HP RecordNow
Online Help is available for HP RecordNow from the Help
HelpHelp
Help menu in the HP
HP HP
HP
RecordNow
RecordNowRecordNow
RecordNow window.
A general discussion of CD formats and their limitations appears in the online
HP CD-Writer User's Guide, in the section titled Can others read the CDs that I’ve
written?.
A README file is accessible from the
Start
StartStart
Start
menu, the installation CD, and in Chapter
11 Release Notes, page 97.
Installing HP RecordNow
HP RecordNow is automatically installed by the HP CD-Writer installation program.
Otherwise, to install HP RecordNow:
1.
1.1.
1. Insert the installation CD into your drive.
2.
2.2.
2. If the installation window does not appear automatically, go to Explorer and click
on the drive containing the HP RecordNow installation CD. Double-click on
SETUP.EXE
SETUP.EXESETUP.EXE
SETUP.EXE.
3.
3.3.
3. When the installation window appears, click on HP RecordNow.
4.
4.4.
4. Follow the instructions on the screen.
Files Installed for HP RecordNow 3.0
Applicable to all supported OS platforms. (Win9x/ME, NT4 & Win2k).
Table 22
Table 22 Table 22
Table 22 Location: C:\Program Files\HP MyCD <default >
Name Description Version
Media Directory N/A
System Directory N/A
Btnenh4.ocx Active Multimedia Button, ActiveX Control 4.4.05
Cehelper.dll CEHelper Module used by MyCD.EXE 1.0.0.3
DelsL1.isu Uninstall log N/A
MainENU.dll English language library N/A
Mycd.cnt Help Table of Contents file N/A
MyCD.exe Main Application Executable 3.0
Mycd.gid Help file N/A
Mycd.hlp Help File N/A
Pconfig.dcf Encrypted Configuration File N/A
Readme.txt User information text file N/A
~cevts.che Cache file for Data CD Creation N/A
~cevts.db Data base file for Data CD Creation N/A
~cevts_001_tmp.dir Directory to hold temporary files N/A
Music.dat Cache file used by MyCD.EXE N/A
Product Information Drive Specifications Interfaces Installation and Configuration
Drive Operation Tips and Techniques Software Maintenance
Troubleshooting Warranty and Support Release Notes Discontinued Products
Page 54
hp dvd-writer
hp dvd-writerhp dvd-writer
hp dvd-writer dvd100i
dvd100idvd100i
dvd100i
Technical Support Solutions Guide 10/25/01 HP RecordNow 3.0
54
5454
54
⇐⇐⇐⇐
⇒⇒⇒⇒
Table 23
Table 23 Table 23
Table 23 Location: C:\Program Files\HP MyCD\Media
Table 24
Table 24 Table 24
Table 24 Location: C:\Winnt\System32\ (NT & Win2k) —
C:\Windows\System\ (Win9x)
Table 25
Table 25 Table 25
Table 25 Location: C:\Winnt\System32\Drivers\(NT4 &Win2k) —
C:\Windows\System\Iosubsys\ (Win9x)
Using HP RecordNow
Starting HP RecordNow
Starting HP RecordNowStarting HP RecordNow
Starting HP RecordNow
1.
1.1.
1. Use one of the following methods to start HP RecordNow:
• Insert a blank disc into the drive.
• Select
Start>>Programs>>Hewlett-Packard>>HP DVD-Writer>>HP DVD-Writer
Start>>Programs>>Hewlett-Packard>>HP DVD-Writer>>HP DVD-WriterStart>>Programs>>Hewlett-Packard>>HP DVD-Writer>>HP DVD-Writer
Start>>Programs>>Hewlett-Packard>>HP DVD-Writer>>HP DVD-Writer.
• Double-click the HP DVD-Writer
HP DVD-WriterHP DVD-Writer
HP DVD-Writer desktop icon (see Figure 31).
.
Figure 31
Figure 31 Figure 31
Figure 31 HP DVD-Writer
HP DVD-WriterHP DVD-Writer
HP DVD-Writer Desktop Icon
The hp cd-dvd
hp cd-dvd hp cd-dvd
hp cd-dvd screen appears (see Figure 32).
Figure 32
Figure 32 Figure 32
Figure 32 hp cd-dvd
hp cd-dvdhp cd-dvd
hp cd-dvd Screen
Name Description Date
About.cea UI Graphics File 05/15/01
Btn.ceb UI Graphics File 05/15/01
BtnD.ceb UI Graphics File 05/15/01
Main.ceb UI Graphics File 05/15/01
Main256.ceb UI Graphics File 05/15/01
Oem.ceb UI Graphics File 05/15/01
Oemanim.cea UI Graphics File 05/15/01
Read.cea UI Graphics File 05/15/01
Write.cea UI Graphics File 05/15/01
Name Description Date
Px.dll Main Prassi Engine 06/01/01
PxMas.dll Mastering Component 06/01/01
PxWave.dll Audio Component 06/01/01
PxSub.dll Engine Services 06/01/01
Name Description Date
PxHelper.vxd Device driver (Win9x) 06/01/01
PxHelper.sys Device driver (NT4) 06/01/01
PxHelp20.sys Device driver (Win2k) 06/01/01
Product Information Drive Specifications Interfaces Installation and Configuration
Drive Operation Tips and Techniques Software Maintenance
Troubleshooting Warranty and Support Release Notes Discontinued Products
Page 55
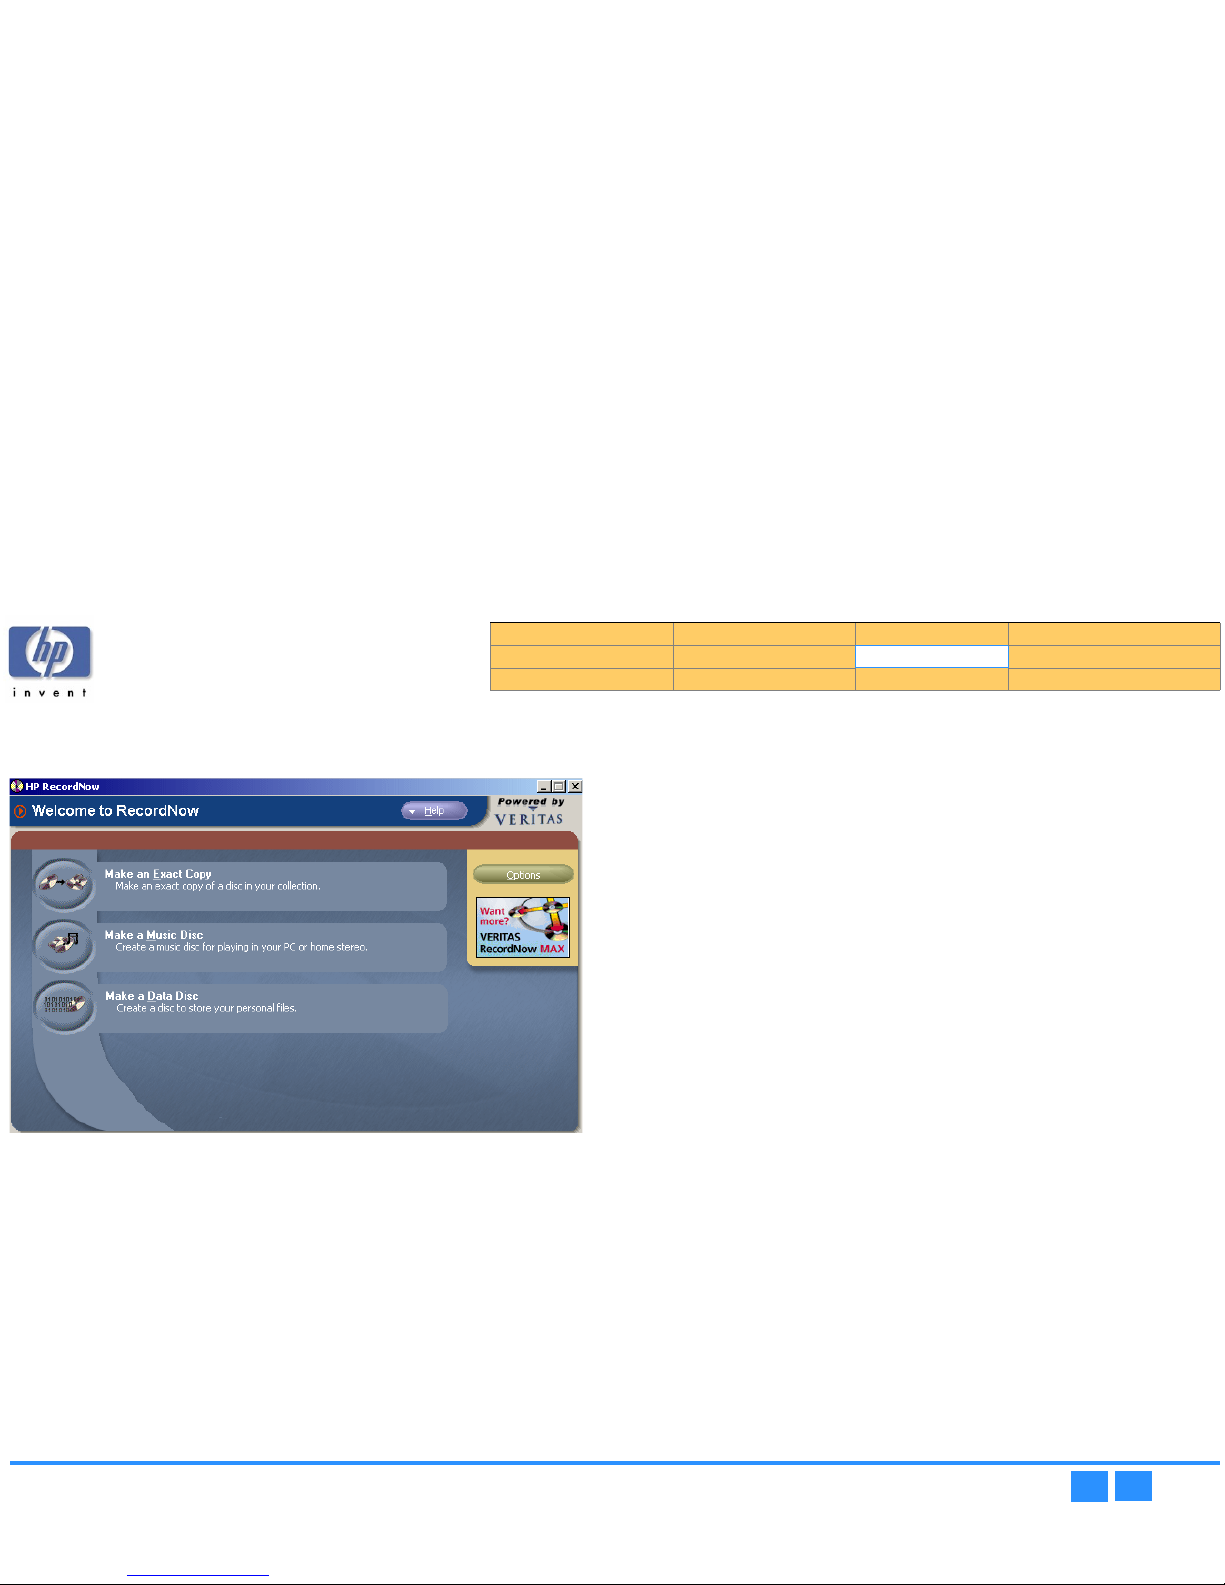
hp dvd-writer
hp dvd-writerhp dvd-writer
hp dvd-writer dvd100i
dvd100idvd100i
dvd100i
Technical Support Solutions Guide 10/25/01 HP RecordNow 3.0
55
5555
55
⇐⇐⇐⇐
⇒⇒⇒⇒
2.
2.2.
2. Click HP RecordNow
HP RecordNowHP RecordNow
HP RecordNow.
The HP Record Now Welcome
HP Record Now WelcomeHP Record Now Welcome
HP Record Now Welcome screen appears (see Figure 33).
Figure 33
Figure 33 Figure 33
Figure 33 HP RecordNow Welcome Screen
Making an Exact Copy of a Disc
Making an Exact Copy of a DiscMaking an Exact Copy of a Disc
Making an Exact Copy of a Disc
The Make an Exact Copy feature makes a duplicate of your master disc, transferring
the disc layout of the original disc to your blank disc For example, a Disc-at-Once
source disc will copy as a Disc-at-Once, retaining the track and gap layout of the
original disc.
To make an exact copy of a disc:
1.
1.1.
1. Click Make an Exact Copy
Make an Exact CopyMake an Exact Copy
Make an Exact Copy from HP RecordNow's main menu. HP RecordNow
automatically opens your CD drive.
NOTE:
NOTE: NOTE:
NOTE:
If you wish to use a different drive to read your disc, click the Change
ChangeChange
Change
button (see Changing CD Recorder drives on page 61 for more
information on this option).
2.
2.2.
2. Insert the CD you wish to make a copy of into the tray.
3.
3.3.
3. Click Next
NextNext
Next.
4.
4.4.
4. Insert a blank disc into your CD-Recorder and click Next
NextNext
Next. HP RecordNow will now
create a copy of your master disc and inform you when the process is complete.
5.
5.5.
5. If you wish to make another copy of the master disc at this time, remove the
newly recorded disc from your CD-Recorder and replace it with a blank CD-R or
CD-RW media, then click Make Another
Make AnotherMake Another
Make Another.
6.
6.6.
6. Click Done
DoneDone
Done when you are finished recording.
7.
7.7.
7. Remove the discs from your drives and store them in a safe place.
Product Information Drive Specifications Interfaces Installation and Configuration
Drive Operation Tips and Techniques Software Maintenance
Troubleshooting Warranty and Support Release Notes Discontinued Products
Page 56
hp dvd-writer
hp dvd-writerhp dvd-writer
hp dvd-writer dvd100i
dvd100idvd100i
dvd100i
Technical Support Solutions Guide 10/25/01 HP RecordNow 3.0
56
5656
56
⇐⇐⇐⇐
⇒⇒⇒⇒
Making a Data Disc
Making a Data DiscMaking a Data Disc
Making a Data Disc
Use the Data Disc recording feature to copy data from your hard drive to a CD.
To create a data disc:
1.
1.1.
1. Click the Make a Data Disc
Make a Data Disc Make a Data Disc
Make a Data Disc button. HP RecordNow automatically opens your
recorder drive.
2.
2.2.
2. Insert a blank or appendable disc into your recorder.
NOTE:
NOTE: NOTE:
NOTE:
If you wish to use a different disc drive to read your disc, click the Change
ChangeChange
Change
button (see Changing CD Recorder drives on page 61 for more
information on this option).
3.
3.3.
3. Select the files or folders you wish to copy to your disc by one of the following
methods:
• Click Add Files or Folders
Add Files or FoldersAdd Files or Folders
Add Files or Folders, highlight the files or folders you want to copy,
then click the Add
AddAdd
Add button.
• Drag and drop files and folders directly from Windows Explorer to the HP
RecordNow screen (see Dragging files from Windows Explorer to HP
RecordNow on page 61 for more information on this option).
NOTE:
NOTE: NOTE:
NOTE:
If you wish to remove any files from your list of files to record, highlight the
file(s) you wish to remove then click the Remove
RemoveRemove
Remove button. Removing files
from your copy job will not remove these files from your hard drive.
4.
4.4.
4. Once you have selected the files to record, click Next
NextNext
Next. HP RecordNow begins
recording data to your disc.
5.
5.5.
5. If you want another copy of your file list at this time, remove the newly recorded
disc, insert another blank or appendable disc into your recorder, then click Make
Make Make
Make
Another
AnotherAnother
Another.
6.
6.6.
6. Click Done
Done Done
Done when you are finished recording.
7.
7.7.
7. Remove the discs from your drives and store them in a safe place.
Making a Music Disc from Audio Files
Making a Music Disc from Audio FilesMaking a Music Disc from Audio Files
Making a Music Disc from Audio Files
HP RecordNow easily creates custom music discs from your WAV and MP3 collection
on the hard drive. Plus, the CDDB feature can automatically tag your files with such
track information as artist, album, and genre to help you sort through your
collection. See CDDB on page 58 for more information.
To make a music disc from audio files:
1.
1.1.
1. Click the Make a Music Disc
Make a Music Disc Make a Music Disc
Make a Music Disc button.
2.
2.2.
2. Click the Make a Music CD from Audio Files
Make a Music CD from Audio FilesMake a Music CD from Audio Files
Make a Music CD from Audio Files button. HP RecordNow
automatically opens your CD-Recorder drive.
NOTE:
NOTE: NOTE:
NOTE:
If you wish to use a different disc drive to read your disc, click Change
ChangeChange
Change.
(See Changing CD Recorder drives on page 61 for more information.)
3.
3.3.
3. Insert a blank disc, then click Next
NextNext
Next.
4.
4.4.
4. Click Scan for Music
Scan for Music Scan for Music
Scan for Music to have RecordNow automatically search your hard drive
for valid music files.
NOTE:
NOTE: NOTE:
NOTE:
You can control the size of audio file HP RecordNow searches for by
selecting the Hide audio files shorter than...
Hide audio files shorter than...Hide audio files shorter than...
Hide audio files shorter than... option from the Options
OptionsOptions
Options
button > General
GeneralGeneral
General tab (see Options on page 58). This feature speeds up the
search process by eliminating the short audio files such as the ones you
hear when Windows starts up or closes a program.
5.
5.5.
5. When RecordNow has located all of the valid music files on your system, you can
sort your music tracks by selecting a category from the View
ViewView
View drop-down menu in
the Music on System
Music on SystemMusic on System
Music on System section.
6.
6.6.
6. Select the tracks you want to add to your music disc using one of the following
methods:
• Select the tracks you want from the Music on System
Music on SystemMusic on System
Music on System window and click the
Add
AddAdd
Add button.
• Click the Browse...
Browse...Browse...
Browse... button, navigate to the tracks you wish to record, select
them, then click the Add
AddAdd
Add button.
• Drag-and-drop tracks from the Music on System
Music on SystemMusic on System
Music on System window on the left to the
playlist window on the right.
Product Information Drive Specifications Interfaces Installation and Configuration
Drive Operation Tips and Techniques Software Maintenance
Troubleshooting Warranty and Support Release Notes Discontinued Products
Page 57
hp dvd-writer
hp dvd-writerhp dvd-writer
hp dvd-writer dvd100i
dvd100idvd100i
dvd100i
Technical Support Solutions Guide 10/25/01 HP RecordNow 3.0
57
5757
57
⇐⇐⇐⇐
⇒⇒⇒⇒
• Drag-and-drop tracks directly from Windows Explorer onto the RecordNow
playlist window. See Dragging files from Windows Explorer to HP RecordNow
on page 61 for more information on this.
NOTE:
NOTE: NOTE:
NOTE:
Clicking Remove
RemoveRemove
Remove deletes the highlighted track from your list but does not
affect any files on your hard drive.
7.
7.7.
7. Arrange the order of the tracks in your playlist window by either:
• Selecting a track then using the green up or down arrows
or
• Selecting a track and dragging it to the new position.
NOTE:
NOTE: NOTE:
NOTE:
You can rename any track in the playlist window by selecting the track,
single clicking twice on the track name (or pressing <F2>), then typing the
new name. If your CD recorder supports CD text, your tracks will show the
new names.
8.
8.8.
8. Click Next
NextNext
Next to begin recording your tracks.
9.
9.9.
9. Once the disc has been created, if you would like to make another disc with the
same track list, replace the newly recorded CD with a blank disc then click Make
Another.
10.
10.10.
10. Click Done
DoneDone
Done when you are finished recording.
11.
11.11.
11. Remove the discs from your drives and store them in a safe place.
Making a Music Disc from other CDs
Making a Music Disc from other CDsMaking a Music Disc from other CDs
Making a Music Disc from other CDs
RecordNow can record tracks from various CDs in your collection to a single disc.
This is ideal for creating "Best Of" CDs.
To make a music disc from existing CDs:
1.
1.1.
1. Click the Make a Music Disc
Make a Music DiscMake a Music Disc
Make a Music Disc button.
2.
2.2.
2. Click the Make a Music Disc from other CDs
Make a Music Disc from other CDsMake a Music Disc from other CDs
Make a Music Disc from other CDs button. HP RecordNow
automatically opens your recorder drive.
3.
3.3.
3. Insert the CD you wish to copy songs from then click Next
NextNext
Next.
NOTE:
NOTE: NOTE:
NOTE:
If you wish to use a different disc drive to read your disc, click Change
ChangeChange
Change.
(See Changing CD Recorder drives on page 61 for more information.)
4.
4.4.
4. Add the tracks you would like to copy to the disc by selecting them from the
Music CD Tracks window on the left, then clicking Add
AddAdd
Add.
The selected tracks appear in the playlist window on the right.
5.
5.5.
5. Click Next CD
Next CDNext CD
Next CD to add tracks from other CDs. RecordNow prepares your tracks
and then prompts you to insert another CD.
6.
6.6.
6. Insert the next CD you wish to copy tracks from.
7.
7.7.
7. Repeat steps 4-6 until all the tracks you wish to copy are displayed in the playlist
window on the right.
NOTE:
NOTE: NOTE:
NOTE:
See Total time of your audio tracks on page 61 for details on how to track
the amount of time your CD has available for your audio tracks.
8.
8.8.
8. Arrange the order of the tracks in your playlist window by either:
• Selecting a track then using the green up or down arrows
or
• Selecting a track and dragging it to the new position.
NOTE:
NOTE: NOTE:
NOTE:
You can rename any track in the playlist window by selecting the track,
single clicking twice on the track name (or pressing <F2>), then typing the
new name. If your CD recorder supports CD text, your tracks will show the
new names.
9.
9.9.
9. Click the Finish
FinishFinish
Finish button. RecordNow prepares your track list and then prompts
you to insert a blank disc.
10.
10.10.
10. Insert a blank disc and click Next
NextNext
Next. RecordNow records your tracks to your blank
disc.
11.
11.11.
11. If you would like to make another CD with the same track list remove the newly
recorded CD, replace it with a blank disc, then click Make Another
Make AnotherMake Another
Make Another.
12.
12.12.
12. Click Done
DoneDone
Done when you are finished recording.
13.
13.13.
13. Remove the discs from your drives and store them in a safe place.
Making a Disc for an MP3 Player
Making a Disc for an MP3 PlayerMaking a Disc for an MP3 Player
Making a Disc for an MP3 Player
RecordNow can create a disc of your MP3 files that you can play on your MP3 player.
Product Information Drive Specifications Interfaces Installation and Configuration
Drive Operation Tips and Techniques Software Maintenance
Troubleshooting Warranty and Support Release Notes Discontinued Products
Page 58
hp dvd-writer
hp dvd-writerhp dvd-writer
hp dvd-writer dvd100i
dvd100idvd100i
dvd100i
Technical Support Solutions Guide 10/25/01 HP RecordNow 3.0
58
5858
58
⇐⇐⇐⇐
⇒⇒⇒⇒
To make a music disc for an MP3 player:
1.
1.1.
1. Click Make a Music Disc
Make a Music DiscMake a Music Disc
Make a Music Disc from the Main Menu.
2.
2.2.
2. Click Make a Disc for an MP3
Make a Disc for an MP3Make a Disc for an MP3
Make a Disc for an MP3 player. RecordNow automatically opens your
recorder drive.
NOTE:
NOTE: NOTE:
NOTE:
If you wish to use a different disc drive to read your disc, click Change
ChangeChange
Change.
(See Changing CD Recorder drives on page 61 for more information.)
3.
3.3.
3. Insert a blank disc, then click Next
NextNext
Next. Selecting Audio Files on page 62 for
information about searching your hard drive for music files.
4.
4.4.
4. Click Scan for Music to have RecordNow automatically search your hard drive for
valid music files.
NOTE:
NOTE: NOTE:
NOTE:
You can control the size of audio files RecordNow searches for by selecting
the Hide audio files shorter than
Hide audio files shorter thanHide audio files shorter than
Hide audio files shorter than option from the Options
OptionsOptions
Options button >
General
GeneralGeneral
General tab (see Options on page 58). This feature speeds up the search
process by eliminating the short audio files such as the ones you hear
when Windows starts up or closes a program.
5.
5.5.
5. When RecordNow has located all of the valid music files on your system, you can
sort your music tracks by selecting a category from the View
ViewView
View drop-down menu, in
the Music on System
Music on SystemMusic on System
Music on System section.
6.
6.6.
6. Select the tracks you want to add to your music disc using one of the following
methods:
• Select the tracks you want from the Music on System
Music on SystemMusic on System
Music on System window and click the
Add
AddAdd
Add button.
• Click the Browse...
Browse...Browse...
Browse... button, navigate to the tracks you wish to record, select
them, then click the Add
AddAdd
Add button.
• Drag-and-drop tracks from the Music on System
Music on SystemMusic on System
Music on System window on the left to the
playlist window on the right.
• Drag-and-drop tracks directly from Windows Explorer onto the RecordNow
playlist window. See Dragging files from Windows Explorer to HP RecordNow
on page 61 for more information on this.
NOTE:
NOTE: NOTE:
NOTE:
Clicking Remove
RemoveRemove
Remove deletes the highlighted track from your list but does not
affect any files on your hard drive.
7.
7.7.
7. Arrange the order of the tracks in your playlist window by either:
• Highlighting a track then using the green up or down arrows
or
• Highlighting a track and dragging it to the new position.
NOTE:
NOTE: NOTE:
NOTE:
You can rename any track in the playlist window by selecting the track,
single clicking twice on the track name (or pressing <F2>), then typing the
new name. If your CD recorder supports CD text, your tracks will show the
new names.
8.
8.8.
8. Click Next
NextNext
Next to begin recording your tracks.
9.
9.9.
9. Once the disc has been created, if you would like to make another disc with the
same track list, replace the newly recorded CD with a blank disc then click Make
Make Make
Make
Another
AnotherAnother
Another.
10.
10.10.
10. Click Done
DoneDone
Done when you are finished recording.
11.
11.11.
11. Remove the discs from your drives and store them in a safe place.
CDDB
CDDBCDDB
CDDB
HP RecordNow’s CDDB feature gathers artist, album and genre information about
your audio files. this can be helpful in sorting through your MP3 or WAV file
collection for your favorite songs or artists.
If HP RecordNow is configured to use CDDB, whenever HP RecordNow finds a new or
changed file, it will connect to CDDB via the Internet to download information
relevant to your new music file(s). HP RecordNow then uses this information to sort
your collection by artist, album, or genre.
Since this database is constantly growing, every time you access CDDB, your files are
updated with the latest information for that track.
Options
OptionsOptions
Options
The Options
OptionsOptions
Options feature allows you to customize how HP RecordNow performs your
recording operations. Click the Options
OptionsOptions
Options button to open the Options dialog box, then
choose one of the option tabs to customize your settings.
Product Information Drive Specifications Interfaces Installation and Configuration
Drive Operation Tips and Techniques Software Maintenance
Troubleshooting Warranty and Support Release Notes Discontinued Products
Page 59
hp dvd-writer
hp dvd-writerhp dvd-writer
hp dvd-writer dvd100i
dvd100idvd100i
dvd100i
Technical Support Solutions Guide 10/25/01 HP RecordNow 3.0
59
5959
59
⇐⇐⇐⇐
⇒⇒⇒⇒
General Tab
General TabGeneral Tab
General Tab
The General tab contains options controlling how RecordNow handles your
recording jobs. Use the General tab to customize the following settings.
Eject drives automatically:
A check mark in this box causes RecordNow to automatically open your recorder
drive tray when RecordNow is ready to accept a disc for recording.
Remind me to shut down my programs before a disc is created:
A check mark in this box causes RecordNow to display a reminder to close all other
applications before beginning a recording session.
If you check the "Do not show me this again" box in the reminder dialog, this
reminder will no longer appear until you re-check the Remind me to shut down my
programs before a disc is created box.
NOTE:
NOTE: NOTE:
NOTE:
For maximum performance, close all other applications before recording a
disc. This includes any screen savers or anti-virus software you may have
running.
Warn me if I can’t create a full Music Disc:
A check mark in this box causes RecordNow to display a warning if there is not
enough free space on your hard disk to stage the audio tracks when making a music
disc from other CDs.
RecordNow uses this hard disk space to make a temporary copy of your tracks from
your music CDs. If there is not enough space on your hard disk RecordNow will still
allow you to record to your disc, but depending on the amount of available space on
your hard disk, some of your tracks may not record.
Hide audio files shorter than (in seconds):
A check mark in this box causes RecordNow to only search for audio files longer than
the number of seconds you specify. This number can be anywhere between 1 and 999
seconds.
This option speeds up the search process by eliminating the short audio files, most of
which are the ones you hear when Windows starts up, or closes a program.
Warn me when appending to a data disc:
A check mark in this box causes RecordNow to display a warning when you add data
to a disc that already has information written to it.
Verify the data written to the disc after write:
A check mark in this box causes RecordNow to verify that no errors occurred during
the recording of your data disc.
Advanced Tab
Advanced TabAdvanced Tab
Advanced Tab
The Advanced
AdvancedAdvanced
Advanced tab contains options controlling the default settings for your optical
drive, and determines how RecordNow handles re-writable media. Use the Advanced
tab to customize the following settings.
Limit the maximum recorder speed to:
Specify a recording speed from the drop-down menu if you want RecordNow to
control the recorder speed.
This option is useful if your recorder speed is faster than the drive you are using to
read your source disc. If you experience errors during recording try reducing the
maximum recorder speed to a speed equal to or slower than the read speed of the
drive you are using to read your source disc.
Always do a full erase on rewritable media:
A check mark in this box causes RecordNow to automatically erase the contents of
rewritable media before beginning a recording.
Test operation before recording discs:
A check mark in this box causes RecordNow to test its reading process before
beginning to record. This feature can help catch potential problems before recording
and prevent wasting media due to a failed recording process.
!
Caution: When appending data to a disc with data already
written to it, any new files being copied will overwrite any files
already on the disc with the same name. Thi s process makes any
information in the old file inaccessible.
Product Information Drive Specifications Interfaces Installation and Configuration
Drive Operation Tips and Techniques Software Maintenance
Troubleshooting Warranty and Support Release Notes Discontinued Products
Page 60
hp dvd-writer
hp dvd-writerhp dvd-writer
hp dvd-writer dvd100i
dvd100idvd100i
dvd100i
Technical Support Solutions Guide 10/25/01 HP RecordNow 3.0
60
6060
60
⇐⇐⇐⇐
⇒⇒⇒⇒
It is recommended that you leave this option checked until you have recorded to
several CDs and are certain that no issues or problems exist with your hardware setup.
Use Burn-Proof:
A check mark in this box eliminates any buffer underrun errors you may encounter
with your drive. This option is only available for drives equipped with Burn-Proof
technology.
Use Just-Link:
A check mark in this box eliminates any buffer underrun errors you may encounter
with your drive. This option is only available for drives equipped with Just-Link
technology.
Use Lossless Linking:
A check mark in this box eliminates any buffer underrun errors you may encounter
with your drive. This option is only available for drives equipped with Lossless Linking
technology.
CDDB Tab
CDDB TabCDDB Tab
CDDB Tab
The CDDB
CDDBCDDB
CDDB tab contains options controlling how RecordNow downloads song
information from the Internet (CDDB (Compact Disc Database) Tips on page 60 for
more information on CDDB).
NOTE:
NOTE: NOTE:
NOTE:
When using the Internet to download information from CDDB, no
information from your system is uploaded to CDDB.
Use the CDDB
CDDBCDDB
CDDB tab to customize the following settings.
Prompt before downloading information:
A check mark in this box causes RecordNow to prompt you before accessing CDDB to
download song information.
Always download information:
A check mark in this box causes RecordNow to automatically access CDDB to
download song information.
Never download information:
A check mark in this box prevents RecordNow from accessing CDDB to download
song information.
Use proxy server:
Check this box if you use a proxy server to access the Internet.
• Address
AddressAddress
Address: The computer address of your proxy server.
• Port
PortPort
Port: The port connection of your proxy server.
My proxy server requires login:
Check this box if you want RecordNow to remember your login information (if any) of
your proxy server.
• Username
UsernameUsername
Username: The name you use to login to your proxy server.
• Password
PasswordPassword
Password: The password you use to login to your proxy server.
Tips and Tricks
Tips and TricksTips and Tricks
Tips and Tricks
HP RecordNow uses an easy to understand design to make recording discs as simple
as possible. This section describes some helpful tips that can make your recording
even easier.
CDDB (Compact Disc Database) Tips
RecordNow’s CDDB feature can gather artist, album and genre information about
your audio files. This can be very helpful in sorting through your MP3 file collection
for your favorite songs or artists (see CDDB for more information).
To sort your music files:
To sort your music files:To sort your music files:
To sort your music files:
1.
1.1.
1. Click Scan for Music
Scan for MusicScan for Music
Scan for Music from the Make a Music Disc from Audio Files
Make a Music Disc from Audio FilesMake a Music Disc from Audio Files
Make a Music Disc from Audio Files or Make a
Make a Make a
Make a
Disc fro an MP3 Player
Disc fro an MP3 PlayerDisc fro an MP3 Player
Disc fro an MP3 Player screens to display the music files in the Music on
Music on Music on
Music on
System
SystemSystem
System window on the left.
NOTE:
NOTE: NOTE:
NOTE:
If you use the CDDB feature to download song information for your files,
depending on the amount of files on your system, the initial download
process may take a few minutes.
2.
2.2.
2. Click the View
ViewView
View button to display a drop-down menu of the various sorting
options.
Product Information Drive Specifications Interfaces Installation and Configuration
Drive Operation Tips and Techniques Software Maintenance
Troubleshooting Warranty and Support Release Notes Discontinued Products
Page 61

hp dvd-writer
hp dvd-writerhp dvd-writer
hp dvd-writer dvd100i
dvd100idvd100i
dvd100i
Technical Support Solutions Guide 10/25/01 HP RecordNow 3.0
61
6161
61
⇐⇐⇐⇐
⇒⇒⇒⇒
3.
3.3.
3. Select a sorting option:
• All files
All filesAll files
All files: Lists all files in alphabetical order.
• By Artist
By ArtistBy Artist
By Artist: Organizes your files into folders according to the artist’s name.
• By Album
By AlbumBy Album
By Album: Organizes your files into folders according to the album name.
• By Genre
By GenreBy Genre
By Genre: Organizes your files into folders according to the genre type.
Once you have selected a sorting option, you can then either open the directory
to add individual files to the recording job, or you can drag the entire folder to
the playlist window on the right. This adds all the files within the directory to your
playlist.
Dragging files from Windows Explorer to HP RecordNow
You can drag files and folders directly from Windows Explorer to HP RecordNow.
1.
1.1.
1. Create a RecordNow recording job (See Making a Data Disc on page 56, Making
a Music Disc from Audio Files on page 56, or Making a Disc for an MP3 Player on
page 57).
2.
2.2.
2. Open Windows Explorer.
3.
3.3.
3. From Windows Explorer, select the file(s) and folder(s) you would like to copy to
your disc.
NOTE:
NOTE: NOTE:
NOTE:
You can select multiple files and folders by holding down the <Ctrl> or
<Shift> key on your keyboard, then highlighting the files you would like to
copy.
4.
4.4.
4. Position your mouse over the file(s) in Windows Explorer. Hold your mouse
button down and drag your files from Windows Explorer to RecordNow.
5.
5.5.
5. Release your mouse button and your selected files will show up in the
RecordNow window.
Using the Back button
Clicking the Back
BackBack
Back button from any screen in HP RecordNow will take you back one
screen menu. This is useful if you change your mind while setting up your recording
job.
Total time of your audio tracks
HP RecordNow displays the cumulative time of your audio tracks. This number
changes with each track that you add or remove.
HP RecordNow will not allow you to add a track if it exceeds the available space on
your media (typically 74 minutes for a compact disc). Or, you can remove one or
more tracks from your list.
Changing CD Recorder drives
HP RecordNow automatically chooses the first optical drive it finds. However, if you
have more than one drive, you can choose which recording device you wish to use.
To change your recorder drive:
To change your recorder drive: To change your recorder drive:
To change your recorder drive:
1.
1.1.
1. Set up your recording job as you normally would.
2.
2.2.
2. After HP RecordNow automatically opens your recorder drive, click the Change
ChangeChange
Change
button.
HP RecordNow will automatically switch to the next drive. If you have more than two
recorder drives, select the appropriate drive from the drop-down menu.
Adding Data to a Data CD
HP RecordNow allows you to append or add data to a disc that already contains data.
When appending data to a disc that already contains data, a prompt will appear
asking if you would like to continue with the operation.
If you are recording to a writable disc:
If you are recording to a writable disc:If you are recording to a writable disc:
If you are recording to a writable disc:
■
Click Yes
YesYes
Yes to append, or overwrite data to your disc.
Or,
■
Click No
NoNo
No if you do not wish to overwrite that data. You can then add another
blank or appendable disc and try again.
If you are recording to a rewritable disc:
If you are recording to a rewritable disc:If you are recording to a rewritable disc:
If you are recording to a rewritable disc:
■
Click Yes
YesYes
Yes to append data to your disc.
!
Caution: If you add files or folders to a disc that already
contains files or folders of the same name, the files or folders
on your disc will be overwritten and any information in the old
files will be lost.
Product Information Drive Specifications Interfaces Installation and Configuration
Drive Operation Tips and Techniques Software Maintenance
Troubleshooting Warranty and Support Release Notes Discontinued Products
Page 62
hp dvd-writer
hp dvd-writerhp dvd-writer
hp dvd-writer dvd100i
dvd100idvd100i
dvd100i
Technical Support Solutions Guide 10/25/01 HP RecordNow 3.0
62
6262
62
⇐⇐⇐⇐
⇒⇒⇒⇒
Or,
■
Click No
NoNo
No if you do not wish to overwrite that data. HP RecordNow then asks if you
want to erase all data on your disc.
• Click No
NoNo
No to insert another blank or appendable disc.
• Click Yes
YesYes
Yes to erase all the data on your media.
Selecting Audio Files
When making a music disc from audio files or making a disc for an MP3 player,
clicking the Scan for Music
Scan for MusicScan for Music
Scan for Music button causes RecordNow to automatically search your
hard disk for correctly formatted MP3 and WAV files.
Once your audio files appear in the Music on System
Music on SystemMusic on System
Music on System window on the left, sort them
by selecting a category from the View
ViewView
View drop-down menu. You can then add individual
audio files or entire folders to the playlist window on the right.
Previewing Audio Files
Highlighting a track then clicking the Preview
PreviewPreview
Preview button allows you to listen to that
track. This can be helpful when arranging a play list of songs.
Renaming Audio Tracks
To rename an audio track:
To rename an audio track:To rename an audio track:
To rename an audio track:
1.
1.1.
1. Select the track you wish to change.
2.
2.2.
2. Single click twice on the track name in the playlist window on the right (or press
<F2> on your keyboard.
3.
3.3.
3. Type the new name for the track.
NOTE:
NOTE: NOTE:
NOTE:
To have your disc display the new name, your CD recorder must support
CD text. Check the device documentation to see if your device offers this
feature.
Troubleshooting
TroubleshootingTroubleshooting
Troubleshooting
HP RecordNow makes recording CDs as simple as clicking a few buttons. However,
you may still have some questions as you make your recordings. This section tries to
answer those questions.
Recordings Fail
Disc recording is a resource-sensitive process. Having other applications running
while recording to a disc can deprive your system of required resources and cause the
recording to fail.
Most of these errors can be avoided by following these steps:
■
Enable Direct Memory Access (DMA) on your system. See your operating
system’s documentation for information on enabling DMA.
■
Close all other applications during the recording process. This includes any
screen savers and anti-virus software that may be running on your computer.
■
Reduce your maximum recorder speed. See Options for more details.
■
Use your recorder to both read your source disc and to write to your blank disc.
RecordNow will create a temporary image of the source disc on your hard drive,
which may read faster than your computer’s read-only drive.
Adding Data Files to a Music Disc
Data cannot be added to a music disc created by HP RecordNow. When
HP RecordNow creates a music disc, it creates a closed session disc, which prevents
the addition of data.
Unreadable Media
Your optical drive uses a laser beam to read the information on your disc.
Fingerprints, scratches, or any kind of dirt on your disc can cause the drive to misread
your disc.
To avoid this, be sure your disc is clean by taking a clean cloth and wiping off any dirt
or fingerprints. Also be sure to take care when handling your disc to avoid touching
the shiny surface.
Optical Drive Unavailable
There are two basic types of optical drives: a read-only drive and a recorder drive.
Though a recorder drive can be used to read read-only media, a read-only drive
cannot be used to record to media.
Check to make sure that your recording device is properly attached to your system
and that it is functional, then try your recording again.
Product Information Drive Specifications Interfaces Installation and Configuration
Drive Operation Tips and Techniques Software Maintenance
Troubleshooting Warranty and Support Release Notes Discontinued Products
Page 63
hp dvd-writer
hp dvd-writerhp dvd-writer
hp dvd-writer dvd100i
dvd100idvd100i
dvd100i
Technical Support Solutions Guide 10/25/01 HP RecordNow 3.0
63
6363
63
⇐⇐⇐⇐
⇒⇒⇒⇒
Registry Modifications for HP RecordNow
Location
LocationLocation
Location
Hkey_Local_Machine\Software\Veritas\MyCD\Current Version\All
Table 26
Table 26 Table 26
Table 26 HP MyCD Registry Keys
Key Name Default Value
Configurable
Description
AlwaysFullErase 0 Yes 0 to do quick erase on CD/RW media, 1
to always do a full erase
AudioWrite
Te st L en
60 No Number of seconds to test writing an
Audio CD from the hard drive to the
CD recorder
Bu ild Bu ild Nu mbe r N o P rod uct bui ld n umb er t hat sho ws up i n
Help->About
DataDontVerify 0 Yes 0 to verify data after write, 1 to skip
verify after write
DataWrite
Te st L en
30 No Number of seconds to test writing a
Data CD
DontEjectDrives 0 Yes 0 to eject drives before any operation,
1 to skip the eject
DontShow
Append
Warning
0 Yes 0 to warn the user they are appending
to a Data CD, 1 to skip this warning
(when they check “do not show again”)
DontShowApp
Warning
0 Yes 0 to warn the user that running other
applications can cause the CD creation
to fail, 1 to skip this warning (when they
check “do not show again”)
DontShow
AudioWarning
0 Yes 0 to warn the user if they have less
than 800MB free when creating
compilation CD’s, 1 to skip this warning
(when they check “do not show again”)
FullName E.g. VERITAS Copy
Exec
No Full product name as it appears in the
title bars and Help->About
ImageDir ~cevts_001_tmp.dir No Default name for the directory to
create to store any temporary files
ImageFilePrefix ~cevts No Prefix to any temporary name created
by the application
MaxRecord
Speed
0 Yes Set to 0 to disable, otherwise set to the
maximum record speed for ALL writers
MinAudioFile
Length
0 Yes 0 to disable, otherwise minimum
length (in seconds) of audio files that
appear when creating Audio CD’s from
files on your hard drive.
Name E.g. Copy Exec No Short application name used in dialog
messages.
OemUrl http://… No URL to navigate to when the user clicks
on the OEM Logo
PXCacheSize 256 No Passed to the PX for all engine
operations
SkipAudioErrors 1 No Skip over any audio errors when
creating Audio CD’s, so the operation
does not fail
Key Name Default Value
Configurable
Description
Product Information Drive Specifications Interfaces Installation and Configuration
Drive Operation Tips and Techniques Software Maintenance
Troubleshooting Warranty and Support Release Notes Discontinued Products
Page 64
hp dvd-writer
hp dvd-writerhp dvd-writer
hp dvd-writer dvd100i
dvd100idvd100i
dvd100i
Technical Support Solutions Guide 10/25/01 HP RecordNow 3.0
64
6464
64
⇐⇐⇐⇐
⇒⇒⇒⇒
Uninstalling HP RecordNow
To uninstall HP RecordNow from Windows 9x:
To uninstall HP RecordNow from Windows 9x:To uninstall HP RecordNow from Windows 9x:
To uninstall HP RecordNow from Windows 9x:
1.
1.1.
1. Click the Start
StartStart
Start button from your Windows taskbar.
2.
2.2.
2. Go to Settings
SettingsSettings
Settings, then select Control Panel
Control PanelControl Panel
Control Panel.
3.
3.3.
3. Select Add/Remove Programs
Add/Remove ProgramsAdd/Remove Programs
Add/Remove Programs, then click the Install/Uninstall
Install/UninstallInstall/Uninstall
Install/Uninstall tab.
4.
4.4.
4. Select HP RecordNow
HP RecordNowHP RecordNow
HP RecordNow and click Add/Remove..
Add/Remove..Add/Remove..
Add/Remove...
Windows will remove all files associated with HP RecordNow.
To uninstall HP RecordNow from Windows Millennium Edition:
To uninstall HP RecordNow from Windows Millennium Edition:To uninstall HP RecordNow from Windows Millennium Edition:
To uninstall HP RecordNow from Windows Millennium Edition:
1.
1.1.
1. Click the Start
StartStart
Start button from your Windows taskbar.
2.
2.2.
2. Go to Settings
SettingsSettings
Settings, then select Control Panel
Control PanelControl Panel
Control Panel.
3.
3.3.
3. Select Add/Remove Programs
Add/Remove ProgramsAdd/Remove Programs
Add/Remove Programs, then click the Install/Uninstall
Install/UninstallInstall/Uninstall
Install/Uninstall tab.
4.
4.4.
4. Select HP RecordNow
HP RecordNowHP RecordNow
HP RecordNow and click Add/Remove..
Add/Remove..Add/Remove..
Add/Remove...
Windows will remove all files associated with HP RecordNow.
To uninstall HP RecordNow from Windows NT:
To uninstall HP RecordNow from Windows NT:To uninstall HP RecordNow from Windows NT:
To uninstall HP RecordNow from Windows NT:
1.
1.1.
1. Click the Start
StartStart
Start button from your Windows taskbar.
2.
2.2.
2. Go to Settings
SettingsSettings
Settings, then select Control Panel
Control PanelControl Panel
Control Panel.
3.
3.3.
3. Select Add/Remove Programs
Add/Remove ProgramsAdd/Remove Programs
Add/Remove Programs, then click the Install/Uninstall
Install/UninstallInstall/Uninstall
Install/Uninstall tab.
4.
4.4.
4. Select HP RecordNow
HP RecordNowHP RecordNow
HP RecordNow and click Add/Remove..
Add/Remove..Add/Remove..
Add/Remove...
Windows will remove all files associated with HP RecordNow.
To uninstall HP RecordNow from Windows 2000:
To uninstall HP RecordNow from Windows 2000:To uninstall HP RecordNow from Windows 2000:
To uninstall HP RecordNow from Windows 2000:
1.
1.1.
1. Click the Start
StartStart
Start button from your Windows taskbar.
2.
2.2.
2. Go to Settings
SettingsSettings
Settings, then select Control Panel
Control PanelControl Panel
Control Panel.
3.
3.3.
3. Select Add/Remove Programs
Add/Remove ProgramsAdd/Remove Programs
Add/Remove Programs.
4.
4.4.
4. Select HP RecordNow
HP RecordNowHP RecordNow
HP RecordNow and click Change/Remove..
Change/Remove..Change/Remove..
Change/Remove...
Windows will remove all files associated with HP RecordNow.
Support Provider for HP RecordNow
First Tier Support is provided by Hewlett-Packard.
Second Tier Support is provided by Veritas.
UsePXVerify 1 No 1 to use the PX engine verify process, 0
if you want the UI to compare the disc
file by file to the source files during
Data CD creation
Version E.g. 1.0 No Product version that appears in the
Help->About box
Key Name Default Value
Configurable
Description
Product Information Drive Specifications Interfaces Installation and Configuration
Drive Operation Tips and Techniques Software Maintenance
Troubleshooting Warranty and Support Release Notes Discontinued Products
Page 65
hp dvd-writer
hp dvd-writerhp dvd-writer
hp dvd-writer dvd100i
dvd100idvd100i
dvd100i
Technical Support Solutions Guide 10/25/01 HP DLA 2.5
65
6565
65
⇐⇐⇐⇐
⇒⇒⇒⇒
HP DLA 2.5
Drive Letter Access (DLA) allows you to use your CD or DVD recorder just as you
would any other drive. This means you can now write files to your optical discs, delete
files from your discs, and even format them directly from Windows Explorer without
having to use any special mastering software.
HP DLA offers such helpful features as:
■
Drag and Drop files:
Drag and Drop files:Drag and Drop files:
Drag and Drop files: You can drag and drop files directly from Windows
Explorer to your optical drive.
■
Formatting discs:
Formatting discs:Formatting discs:
Formatting discs: HP DLA lets you customize how you format your CDs and
DVDs. You can perform a Quick or Full format, set what type of file system is
used, and create a label for your disc.
■
Making discs compatible with other operating systems:
Making discs compatible with other operating systems:Making discs compatible with other operating systems:
Making discs compatible with other operating systems: With HP DLA’s Make
Compatible feature, you can make CD-R discs readable by virtually any CDROM drive.
■
Viewing disc properties:
Viewing disc properties:Viewing disc properties:
Viewing disc properties: HP DLA shows you information about your media with
a click of a button.
■
Viewing disc contents:
Viewing disc contents:Viewing disc contents:
Viewing disc contents: HP DLA uses the standard Windows Explorer screen to
show you the contents of your disc.
Manuals for HP DLA
Online Help is available for HP DLA from the Help
HelpHelp
Help menu in the HP DLA
HP DLAHP DLA
HP DLA window.
A general discussion of CD formats and their limitations appears in the online
HP CD-Writer User's Guide, in the section titled Can others read the CDs that I’ve
written?.
A README file is accessible from the Start
StartStart
Start menu, the installation CD, and in Chapter
11 Release Notes, page 98.
Installing HP DLA
HP DLA is automatically installed by the HP CD-Writer installation program.
Otherwise, to install HP DLA:
1.
1.1.
1. Insert the installation CD into your drive.
2.
2.2.
2. If the installation window does not appear automatically, go to Explorer and click
on the drive containing the HP DLA installation CD. Double-click on SETUP.EXE
SETUP.EXESETUP.EXE
SETUP.EXE.
3.
3.3.
3. When the installation window appears, click on HP DLA.
4.
4.4.
4. Follow the instructions on the screen.
Basic Installation Locations for HP DLA 2.5
Applicable to all supported OS platforms. (Win9x/ME, NT4, Win2k, and Windows XP)
There is really only one installation process though there are two products (the DLA
read only file system and the DLA file system). The only difference between the file
systems should be the PCONFIG and the registry settings. During installation, we
install the basic file set and set up a few registry settings. Then we install the DLA
drivers and again change a few registry settings. Each of these should be enumerated
below. Note that a “???” in the file name indicates that this is a language specific file
where “???” will be replaced with the installed language (“ENU” for English).
There is really only one installation process though there are two products (the DLA
read only file system and the DLA file system). The only difference between the file
systems should be the PCONFIG and the registry settings. During installation, we
install the basic file set and set up a few registry settings. Then we install the DLA
drivers and again change a few registry settings. Each of these should be enumerated
below. Note that a “???” in the file name indicates that this is a language specific file
where “???” will be replaced with the installed language (“ENU” for English).
Files installed to “[Target Directory]” (“C:\Program Files\VERITAS\DLA” for
example):
●
DLAR???.DLL – The DLA user interface resource file.
●
DLATRAY.EXE – The DLA user interface executable.
●
VXDLA.CNT – A DLA file that is used for help.
●
VXDLA.HLP – A DLA file that is used for help.
Files installed to “[Target Directory]\INSTALL”:
●
DLA.EXE – A DLA executable that allows command line access to DLA.
●
DLAINST.DLL – The DLA installation helper DLL that installs and uninstalls
DLA shared driver files.
Product Information Drive Specifications Interfaces Installation and Configuration
Drive Operation Tips and Techniques Software Maintenance
Troubleshooting Warranty and Support Release Notes Discontinued Products
Page 66
hp dvd-writer
hp dvd-writerhp dvd-writer
hp dvd-writer dvd100i
dvd100idvd100i
dvd100i
Technical Support Solutions Guide 10/25/01 HP DLA 2.5
66
6666
66
⇐⇐⇐⇐
⇒⇒⇒⇒
●
SSCDBHK4.SYS – A DLA Windows NT 4.0 file that handles certain optical
hooks into the OS.
●
SSCDBHK5.SYS – A DLA Windows 2000 file that handles certain optical
hooks into the OS.
●
SSPROP.VXD – A DLA Windows 9X file that handles the property pages.
●
SSRTLN.SYS – A DLA Windows NT (4.0 and 2000) file that handles the C run
time library code.
●
SSRTLW.VXD – A DLA Windows 9X file that handles the C run time library
code.
●
TFSNBOIO.SYS – A DLA Windows NT (4.0 and 2000) driver file that handles
the block IO.
●
TFSNCOFS.SYS – A DLA Windows NT (4.0 and 2000) driver file that does the
compression filter.
●
TFSNDOFS.SYS – A DLA Windows NT (4.0 and 2000) driver file that is a pass
through file system.
●
TFSNDRCT.SYS – A DLA Windows NT (4.0 and 2000) driver file that supports
direct IO. Not documented for user. Accessable via DLA command line.
●
TFSNDRES.SYS – A DLA Windows NT (4.0 and 2000) resource file for DLA pop
up dialogs.
●
TFSNDTFS.SYS – A DLA Windows NT (4.0 and 2000) driver file that does our
tape file system.
●
TFSNIFS.SYS – A DLA Windows NT (4.0 and 2000) driver file handles the OS
file system interface.
●
TFSNOPIO.SYS – A DLA Windows NT (4.0 and 2000) driver file that handles
the optical IO requests.
●
TFSNPOOL.SYS – A DLA Windows NT (4.0 and 2000) driver file that does
memory pooling.
●
TFSNUDF.SYS – A DLA Windows NT (4.0 and 2000) driver that does the UDF
file system for CD-RW.
●
TFSNUDFA.SYS – A DLA Windows NT (4.0 and 2000) driver that does the UDF
file system for CD-R.
●
TFSWAPI.DLL – A DLA file that allows outside applications to hook into DLA
(an API).
●
TFSWBOIO.VXD – The DLA Windows 9X block IO driver.
●
TFSWCMD.EXE - A DLA executable that issues Format/Eject/Enable/Disable
commands to dla. This EXE is spawed within DLA to initiate actions.
●
TFSWCOFS.VXD – The DLA Windows 9X file system compression filter driver.
●
TFSWCTRL.EXE – A DLA executable that runs a small DLA control window for
each device.
●
TFSWCRES.DLL – The DLA resource file for all command line operations.
●
TFSWDOFS.VXD – The DLA Windows 9X file system pass through driver.
●
TFSWDRCT.VXD – The DLA Windows 9X file that ?.
●
TFSWDRES.VXD – The DLA Windows 9X resource file that handles DLA pop up
dialogs.
●
TFSWDTFS.VXD – The DLA Windows 9X tape file system driver.
●
TFSWIFS.VXD – The DLA Windows 9X driver that handles the OS file system
interface.
●
TFSWOPIO.VXD – A DLA Windows 9X driver that handles the optical IO
requests.
●
TFSWPOOL.VXD – A DLA Windows 9X driver that does memory pooling.
●
TFSWSHX.DLL – The DLA Windows shell extension driver.
●
TFSWUDF.VXD – A DLA Windows 9X driver that does the UDF file system for
CD-RW.
●
TFSWUDFA.VXD – A DLA Windows 9X driver that does the UDF file system for
CD-R.
Files installed to “[Target Directory]\SYSTEM”:
●
UNINST.DLL – A product file that helps handle the uninstallation of DLA.
Files installed to “[Windows Directory]\SYSTEM32”
(“C:\WINDOWS\SYSTEM32” for example):
●
MFC42.DLL – A shared file that contains the MFC foundation that the UI
requires.
●
MSVCIRT.DLL – A shared file required by MFC due to our UI.
Product Information Drive Specifications Interfaces Installation and Configuration
Drive Operation Tips and Techniques Software Maintenance
Troubleshooting Warranty and Support Release Notes Discontinued Products
Page 67
hp dvd-writer
hp dvd-writerhp dvd-writer
hp dvd-writer dvd100i
dvd100idvd100i
dvd100i
Technical Support Solutions Guide 10/25/01 HP DLA 2.5
67
6767
67
⇐⇐⇐⇐
⇒⇒⇒⇒
●
MSVCP60.DLL – A shared file required by MFC due to our UI.
●
MSVCRT.DLL – A shared file required by MFC for the C run time library
routines needed by the UI.
●
OLEAUT32.DLL – A shared file that is required due to some of the UI functions
we use in MFC.
●
OLEPRO32.DLL – A shared file that is required due to some of the UI functions
we use in MFC.
●
PICTUREBTN.OCX – A shared file that contains some of the buttons used in
the main user interface.
●
PNPWPROP.DLL - This is a Windows 9x Plug-n-play resource file used by PAPI
to generate the PNP dialog.
●
PNPWR???.DLL - A shared Windows 9X file that contains translated resources
for the PNP dialog
●
VXBLOCK.DLL – This is a helper DLL shared between many products that
allows us to stop running conflicting applications. It provides the support for
running MyCD and DLA simultaneously.
●
VXDMDBTN4.OCX – This is a shared file that contains some of the buttons
used in the main user interface.
Files installed to “[Windows Directory]\SYSTEM32\DRIVERS”:
●
DRVMCDB.SYS – Our shared optical device driver for Windows 2000 only.
●
DRVNCDB.SYS – Our shared optical device driver for Windows NT 4.0 only.
●
DRVNDDM.SYS – Our shared DDM driver file for Windows NT (4.0 or 2000)
only.
Files installed to “[Windows Directory]\INF”:
●
DRVMCDB.INF – A shared Windows 2000 installation file for DRVMCDB.SYS.
●
DRVNCDB.INF – A shared Windows NT 4.0 installation file for DRVNCDB.SYS.
●
DRVNDDM.INF – A shared Windows NT (4.0 and 2000) installation file for
DRVNDDM.SYS.
●
PNPWIDE.INF – A shared Windows 9X installation file for our IDE plug and
play drivers.
●
PNPWTAPE.INF – A shared Windows 9X installation file for our tape plug and
play drivers.
Files installed to “[Windows Directory]\HELP”:
●
PNPWH???.HLP – A shared Windows 9X help file for our plug and play drivers.
●
DRVMCDB.INF – A shared Windows 2000 installation file for DRVMCDB.SYS.
DLA Engine Installation
DLA Engine InstallationDLA Engine Installation
DLA Engine Installation
The DLA engine attempts to update all DLA engine drivers to be the same. These
drivers are the file system engine drivers and have nothing to do with the actual
device drivers from the shared components team. There are two complex issues with
this. The first is to be certain that all of the engine drivers are the new versions. The
second is to make certain that all of the PCONFIG data gets combined into one file.
Each installation has a PCONFIG file. This file indicates what devices are supported
for DLA. However, as a new version of DLA is installed, new devices may be supported
and this needs to be updated. As a version of DLA is uninstalled, some devices may
disappear from the support list while others remain from another installation.
All of this is handled by DLAUNIN.EXE. The normal installer calls “DLAUNIN.EXE –Q
–I –D:<INSTALL>” where –Q means quiet mode, -I means install, and –D indicates the
directory to install from where <INSTALL> is the directory. Only 1 version of DLA can
be installed on a machine. This is a new feature of the MSI installer
Shared Components Installation
Shared Components InstallationShared Components Installation
Shared Components Installation
The shared components (drivers used by all products including backup) are handled
by the basic installer. Each component is updated to make certain that only the
newest version is installed. A helper file (PNPWTAPE.EXE for Win9X or PNPNINST.EXE
for NT) handles the plug and play driver installation. This installation is the same
basic installation we use on all products.
Registry
RegistryRegistry
Registry
DLA install settings are stored in the registry in
MyComputer\HKEY_LOCAL_MACHINE\Software\VERITAS\Direct
Access\CurrentVersion\All
DLA driver settings are stored in the registry in
MyComputer\HKEY_LOCAL_MACHINE\System\CurrentControlSet\Services\* (* =
name of DLA driver e.g. tfsnifs)
NOTE:
NOTE: NOTE:
NOTE:
These settings should not be altered by the user.
Product Information Drive Specifications Interfaces Installation and Configuration
Drive Operation Tips and Techniques Software Maintenance
Troubleshooting Warranty and Support Release Notes Discontinued Products
Page 68
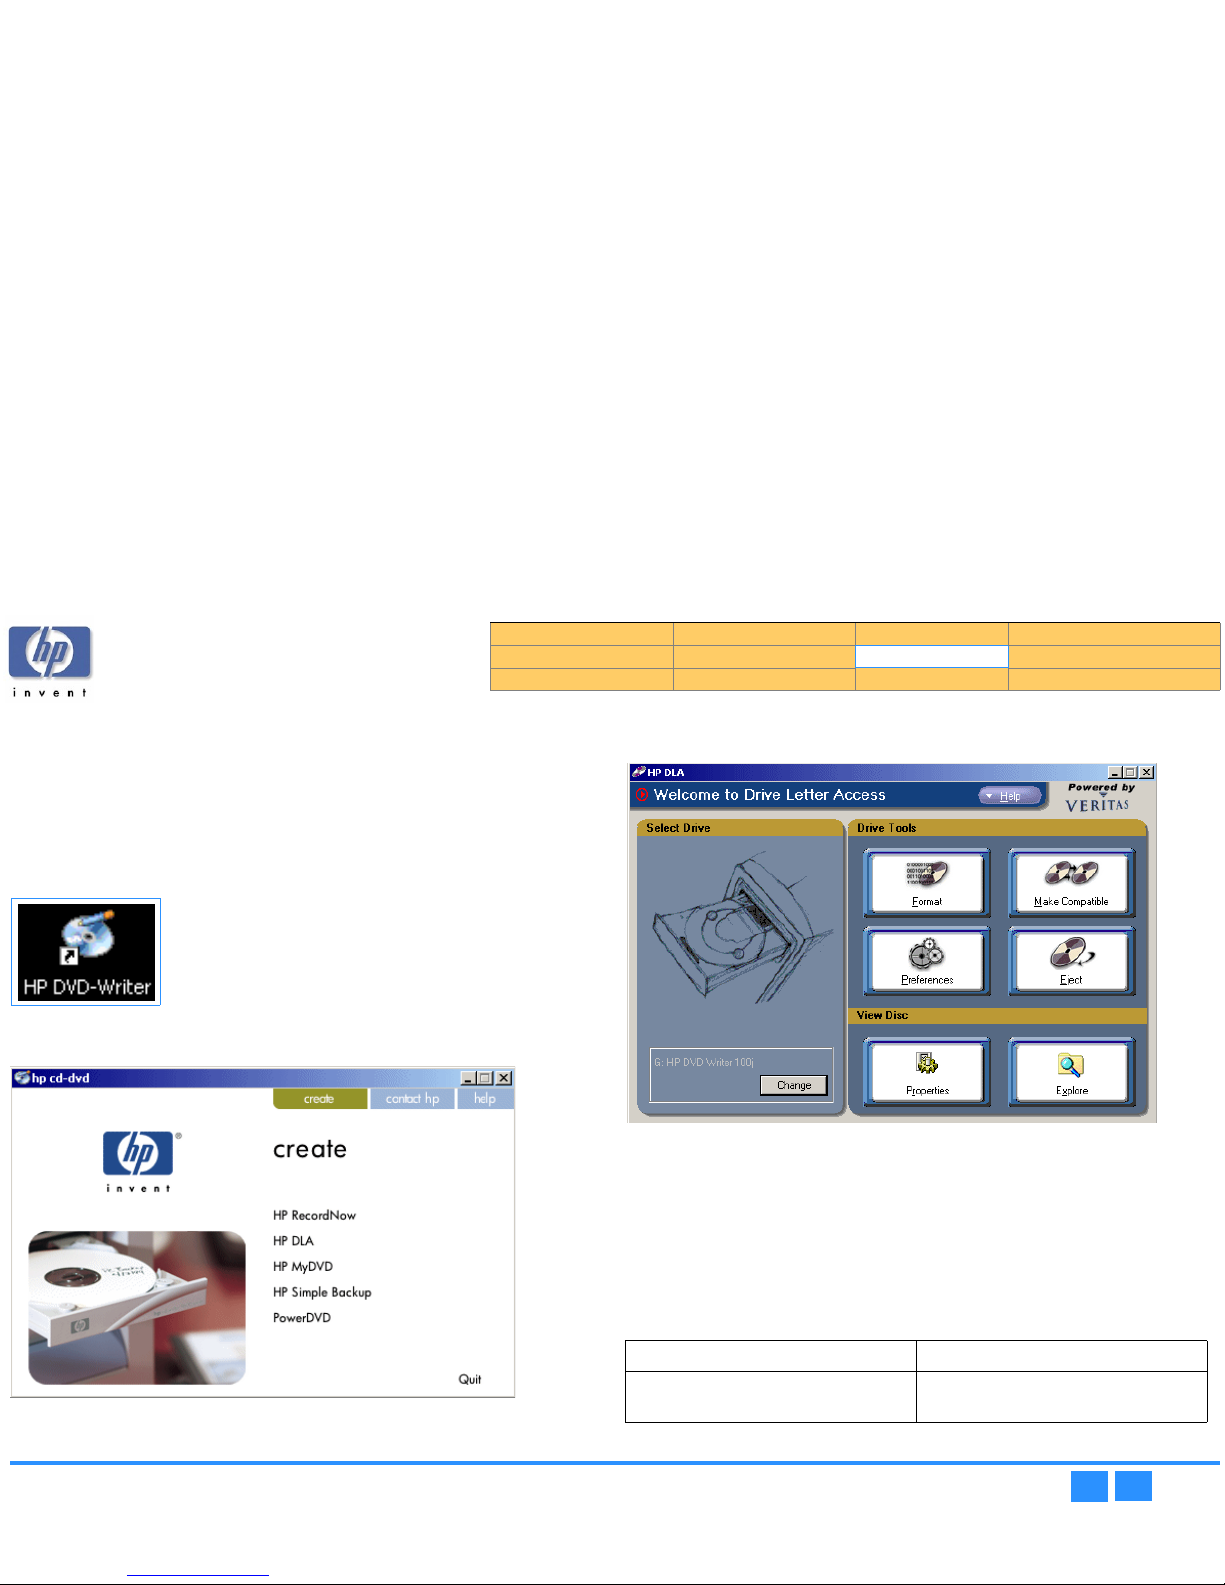
hp dvd-writer
hp dvd-writerhp dvd-writer
hp dvd-writer dvd100i
dvd100idvd100i
dvd100i
Technical Support Solutions Guide 10/25/01 HP DLA 2.5
68
6868
68
⇐⇐⇐⇐
⇒⇒⇒⇒
Using HP DLA
Starting HP DLA
Starting HP DLAStarting HP DLA
Starting HP DLA
1.
1.1.
1. Use one of the following methods to start HP DLA:
• Insert a blank disc into the drive.
• Select
Start>>Programs>>Hewlett-Packard>>HP DVD-Writer>>HP DVD-Writer
Start>>Programs>>Hewlett-Packard>>HP DVD-Writer>>HP DVD-WriterStart>>Programs>>Hewlett-Packard>>HP DVD-Writer>>HP DVD-Writer
Start>>Programs>>Hewlett-Packard>>HP DVD-Writer>>HP DVD-Writer.
• Double-click the HP DVD-Writer
HP DVD-WriterHP DVD-Writer
HP DVD-Writer desktop icon (see Figure 34).
.
Figure 34
Figure 34 Figure 34
Figure 34 HP DVD-Writer
HP DVD-WriterHP DVD-Writer
HP DVD-Writer Desktop Icon
The hp cd-dvd
hp cd-dvd hp cd-dvd
hp cd-dvd screen appears (see Figure 35).
Figure 35
Figure 35 Figure 35
Figure 35 hp cd-dvd
hp cd-dvdhp cd-dvd
hp cd-dvd Screen
2.
2.2.
2. Click HP DLA
HP DLAHP DLA
HP DLA.
The HP DLA Welcome
HP DLA WelcomeHP DLA Welcome
HP DLA Welcome screen appears (see Figure 36).
Figure 36
Figure 36 Figure 36
Figure 36 HP DLA Welcome Screen
Format
FormatFormat
Format
All discs must be initialized (or formatted) before they can store data. HP DLA’s
Format feature allows you to format your media directly from Windows Explorer just
as you would any other drive.
HP DLA can perform either a Quick or Full format of your discs. The following table
describes the fundamental differences between the two:
Table 27
Table 27 Table 27
Table 27 Comparison of the different types of formatting
Quick Format Full Format
Faster (generally taking less than 60
seconds)
Depending upon the speed of the drive,
may take up to 90 minutes
Product Information Drive Specifications Interfaces Installation and Configuration
Drive Operation Tips and Techniques Software Maintenance
Troubleshooting Warranty and Support Release Notes Discontinued Products
Page 69
hp dvd-writer
hp dvd-writerhp dvd-writer
hp dvd-writer dvd100i
dvd100idvd100i
dvd100i
Technical Support Solutions Guide 10/25/01 HP DLA 2.5
69
6969
69
⇐⇐⇐⇐
⇒⇒⇒⇒
To format a compact disc
1.
1.1.
1. Open HP DLA.
2.
2.2.
2. If your system has more than one recorder you can select the drive you wish to
use by clicking the Change
ChangeChange
Change button on the left of the screen.
3.
3.3.
3. Click the Format
FormatFormat
Format button.
4.
4.4.
4. Place your media in your optical recorder and wait for the drive to spin up.
NOTE:
NOTE: NOTE:
NOTE:
See Eject Button on page 70 for information on ejecting your recorder
tray.
5.
5.5.
5. Click the Next
NextNext
Next button.
6.
6.6.
6. Set the options:
a.
a.a.
a. Type a label for the media (optional) by placing the cursor in the Volume
label box and typing the name you wish.
b.
b.b.
b. Select the Format option (either Quick or Full).
c.
c.c.
c. If desired, select Enable Compression by clicking the option box until a check
mark appears. (This compresses data with an approximate 2:1 compression
ratio.)
7.
7.7.
7. Click Next.
NOTE:
NOTE: NOTE:
NOTE:
●
Once the Format operation is started, it cannot be cancelled.
●
Media formatted with compression can only be read by a machine with HP
DLA installed.
●
Formatting a CD-R or DVD-R uses space on the media.
●
If your CD-RW, DVD-RW or DVD-RAM disc has been used by another
application, it may take HP DLA a little longer than normal to format the disc.
●
If your drive is HP Fast Format capable (see your optical recorder’s User Guide
for more information) HP DLA will automatically use the HP Fast Format
feature when performing a Full Format of your disc. This feature allows you to
read and write to your disc during the formatting process.
Make Compatible
Make CompatibleMake Compatible
Make Compatible
The Make Compatible feature makes the uncompressed data on your CD-R media
readable by virtually any CD-ROM drive.
To make your disc compatible
1.
1.1.
1. Open HP DLA.
2.
2.2.
2. Insert your CD-R disc into the drive tray.
3.
3.3.
3. Click the Make Compatible
Make CompatibleMake Compatible
Make Compatible button.
4.
4.4.
4. Click the Start
StartStart
Start button.
NOTE:
NOTE: NOTE:
NOTE:
●
Depending on the amount of information on the disc, this process may take a
few minutes to complete and cannot be cancelled.
●
When using discs formatted by Make Compatible on computers that don’t
have HP DLA installed, long file names will be shortened and directories
nested more than 30 folders deep will not be readable.
●
Discs created with Make Compatible cannot be read by computers running in
DOS mode.
Can be performed on all CD and DVD
recordable discs
Only available for CD-RW, DVD+RW,
DVD-RW, and DVD-RAM media
Must be initially performed for all CD-R
and DVD-R media
Must be initially performed for all
CD-RW, DVD+RW, DVD-RW, and
DVD-RAM media
!
Caution Formatting a disc makes all previously recorded data
inaccessible.
Quick Format Full Format
!
Caution The Make Compatible feature closes your appendable disc
making it impossible to write further information to that disc. Do not use
this feature until you have finished copying files to your disc.
Product Information Drive Specifications Interfaces Installation and Configuration
Drive Operation Tips and Techniques Software Maintenance
Troubleshooting Warranty and Support Release Notes Discontinued Products
Page 70
hp dvd-writer
hp dvd-writerhp dvd-writer
hp dvd-writer dvd100i
dvd100idvd100i
dvd100i
Technical Support Solutions Guide 10/25/01 HP DLA 2.5
70
7070
70
⇐⇐⇐⇐
⇒⇒⇒⇒
Preferences
PreferencesPreferences
Preferences
The Preferences feature allows you to customize settings that control how HP DLA
works.
To customize your settings
1.
1.1.
1. Open HP DLA and click the Preferences
PreferencesPreferences
Preferences button.
2.
2.2.
2. Set all appropriate option boxes:
Add Media Icon to the Taskbar
●
Placing a check mark in the option box will place an icon in the Windows
taskbar when you start up your computer.
●
Removing the check mark will remove the icon from the taskbar.
Eject Button
Eject ButtonEject Button
Eject Button
Once a disc is inserted into the optical recorder, clicking the Eject
EjectEject
Eject button will open
the tray so you can remove the disc.
NOTE:
NOTE: NOTE:
NOTE:
●
The Eject
EjectEject
Eject button does not open the tray when there is no disc in the drive.
Manually open the recorder to insert the disc.
●
HP DLA is enabled for one optical recorder at a time. Use the Change
ChangeChange
Change button
to switch between drives, if you have more than one.
Properties Button
Properties ButtonProperties Button
Properties Button
The Properties
PropertiesProperties
Properties feature shows you the following information about your optical disc:
■
Label: The name given to the disc.
■
Type: The type of optical device being used to read the disc.
■
Compression: The type of compression used to create the disc (i.e., None or
Software).
■
Used Space: The amount of information stored on your disc.
■
Free Space: The amount of unused space still available on your disc.
NOTE:
NOTE: NOTE:
NOTE:
Information about Used Space and Free Space is displayed both
numerically (in KB or MB) and visually (blue shows used space, magenta
shows free space).
Explore Button
Explore ButtonExplore Button
Explore Button
Clicking the Explore
ExploreExplore
Explore button allows you to view the contents of your optical disc via
the typical Windows Explorer screen. From there you can open, move, rename, and
delete files just as you would from any other drive. HP DLA will automatically write
the new information to your disc.
NOTE:
NOTE: NOTE:
NOTE:
For users of Windows NT 4.0, 2000 Professional and XP: If you change the
drive letter of your optical disc recorder after installing HP DLA, you will
need to restart your computer before HP DLA will be able to recognize
discs in your optical drive.
Tips
The Taskbar Icon
The Taskbar IconThe Taskbar Icon
The Taskbar Icon
If you right click on the media icon displayed in the taskbar, HP DLA will display a
menu that lets you select a drive to access the following shortcuts:
Explore
ExploreExplore
Explore -- Open a Windows Explorer screen displaying the contents of the disc (see
Explore
ExploreExplore
Explore Button)
Format
FormatFormat
Format -- Format the disc (see Format on page 68)
Eject
EjectEject
Eject -- Eject the disc (see Eject Button on page 70)
Make Compatible
Make CompatibleMake Compatible
Make Compatible -- Open the Make Compatible feature (see Make Compatible on
page 69)
Properties
PropertiesProperties
Properties -- View disc Properties (see Properties Button on page 70)
Preferences
PreferencesPreferences
Preferences -- Open the Preferences feature (see Preferences on page 70)
Drag and Drop Files
Drag and Drop FilesDrag and Drop Files
Drag and Drop Files
You can drag files and folders directly from Windows Explorer to your disc.
1.
1.1.
1. Open Windows Explorer.
!
Caution Use care when writing compressed files to write-once media
such as CD-R and DVD-R. HP DLA is not able to determine in advance if a
compressed file will fit on your disc. If the disc fills up before HP DLA
finishes writing the file, you’ll have to start over with a new disc.
Product Information Drive Specifications Interfaces Installation and Configuration
Drive Operation Tips and Techniques Software Maintenance
Troubleshooting Warranty and Support Release Notes Discontinued Products
Page 71
hp dvd-writer
hp dvd-writerhp dvd-writer
hp dvd-writer dvd100i
dvd100idvd100i
dvd100i
Technical Support Solutions Guide 10/25/01 HP DLA 2.5
71
7171
71
⇐⇐⇐⇐
⇒⇒⇒⇒
2.
2.2.
2. In Windows Explorer, highlight the file(s) and folder(s) you wish to copy.
NOTE:
NOTE: NOTE:
NOTE:
You can select multiple files and folders by holding down the Ctrl or Shift
key while highlighting your files. Press the Ctrl key and use your mouse to
select non-adjacent files. Press the Shift key and use your mouse to select
sequential files (i.e., highlight a file, hold down the Shift key and highlight
another file -- all files between the two are selected).
3.
3.3.
3. Position your mouse over the file(s) in Windows Explorer. Hold your mouse
button down and drag your files to your optical drive.
4.
4.4.
4. Release your mouse button. HP DLA will copy your selected files to your disc.
Uninstalling HP DLA
Windows 9x
Windows 9xWindows 9x
Windows 9x
To remove HP DLA from a Windows 9x machine
1.
1.1.
1. Click the Windows Start
StartStart
Start button.
2.
2.2.
2. Select Settings
SettingsSettings
Settings then Control Panel
Control PanelControl Panel
Control Panel.
3.
3.3.
3. Click Add/Remove Programs
Add/Remove ProgramsAdd/Remove Programs
Add/Remove Programs then click the Install/Uninstall
Install/UninstallInstall/Uninstall
Install/Uninstall tab.
4.
4.4.
4. Select HP DLA
HP DLAHP DLA
HP DLA from the menu and click the Add/Remove...
Add/Remove...Add/Remove...
Add/Remove... button.
Windows will remove all files associated with HP DLA from your computer.
Windows NT
Windows NTWindows NT
Windows NT
To remove HP DLA from a Windows NT machine
1.
1.1.
1. Click the Windows Start
StartStart
Start button.
2.
2.2.
2. Select Settings
SettingsSettings
Settings then Control Panel
Control PanelControl Panel
Control Panel.
3.
3.3.
3. Click Add/Remove Programs
Add/Remove ProgramsAdd/Remove Programs
Add/Remove Programs then click the Install/Uninstall
Install/UninstallInstall/Uninstall
Install/Uninstall tab.
4.
4.4.
4. Select HP DLA
HP DLAHP DLA
HP DLA from the menu and click the Add/Remove...
Add/Remove...Add/Remove...
Add/Remove... button.
Windows will remove all files associated with HP DLA from your computer.
Windows Millennium
Windows MillenniumWindows Millennium
Windows Millennium
To remove HP DLA from a Windows Millennium Edition machine
1.
1.1.
1. Click the Windows Start
StartStart
Start button.
2.
2.2.
2. Select Settings
SettingsSettings
Settings then Control Panel
Control PanelControl Panel
Control Panel.
3.
3.3.
3. Click Add/Remove Programs
Add/Remove ProgramsAdd/Remove Programs
Add/Remove Programs then click the Install/Uninstall
Install/UninstallInstall/Uninstall
Install/Uninstall tab.
4.
4.4.
4. Select HP DLA
HP DLAHP DLA
HP DLA from the menu and click the Add/Remove...
Add/Remove...Add/Remove...
Add/Remove... button.
Windows will remove all files associated with HP DLA from your computer.
Windows 2000
Windows 2000Windows 2000
Windows 2000
To remove HP DLA from a Windows 2000 Professional machine
1.
1.1.
1. Click the Windows Start
StartStart
Start button.
2.
2.2.
2. Select Settings
SettingsSettings
Settings then Control Panel
Control PanelControl Panel
Control Panel.
3.
3.3.
3. Click Add/Remove Programs
Add/Remove ProgramsAdd/Remove Programs
Add/Remove Programs.
4.
4.4.
4. Select HP DLA
HP DLAHP DLA
HP DLA from the list of removable programs and click the Change/
Change/Change/
Change/
Remove
RemoveRemove
Remove button.
Windows will remove all files associated with HP DLA from your computer.
Windows XP
Windows XPWindows XP
Windows XP
To remove HP DLA from a Windows XP machine
1.
1.1.
1. Click the Windows Start
StartStart
Start button.
2.
2.2.
2. Click Control Panel
Control PanelControl Panel
Control Panel.
3.
3.3.
3. Click Add or Remove Programs
Add or Remove ProgramsAdd or Remove Programs
Add or Remove Programs.
4.
4.4.
4. Make sure the Change or Remove Programs
Change or Remove ProgramsChange or Remove Programs
Change or Remove Programs button is selected, click HP DLA
HP DLAHP DLA
HP DLA
from the list of programs, and click Change/Remove
Change/RemoveChange/Remove
Change/Remove.
Windows will remove all files associated with HP DLA from your computer.
Product Information Drive Specifications Interfaces Installation and Configuration
Drive Operation Tips and Techniques Software Maintenance
Troubleshooting Warranty and Support Release Notes Discontinued Products
Page 72
hp dvd-writer
hp dvd-writerhp dvd-writer
hp dvd-writer dvd100i
dvd100idvd100i
dvd100i
Technical Support Solutions Guide 10/25/01 HP MyDVD
72
7272
72
⇐⇐⇐⇐
⇒⇒⇒⇒
HP MyDVD
HP MyDVD - Incorporate your video footage, photos and music into DVD titles that
you can view and share on most DVD-ROM and DVD players. Easily transfer your
video footage directly from your camcorder or VCR to DVD discs. Cut unwanted
video footage, add transitions and rearrange scenes to create a more dynamic,
enjoyable viewing experience for your audience. Jump to video scenes on DVD
randomly and quickly without fast forwarding or rewinding.
NOTE:
NOTE: NOTE:
NOTE:
HP MyDVD does not run on Windows NT.
System Requirements
■
Windows 95/98/ME/2000/XP
■
800 MHz Pentium-based PC or higher
■
128 MB RAM
■
MyDVD disk space: 80MB
■
Video disk space: 5GB
■
1024 x 768 with 16-bit (or better) color display
■
DVD drive
■
Mouse
Features
■
Video import formats: MPEG-1, MPEG-2, AVI, QuickTime
■
Audio import formats: WAV, MPEG-1 Audio
■
Graphic import formats: BMP, JPG, PICT, PNG, TIF, TGA
■
Video conversion: Software transcoder to convert AVI & QuickTime to MPEG
■
Video standards: NTSC and PAL
■
DVD output devices: CD-R, hard-drive
■
DVD player: Included (can be automatically put on CD-R)
Manuals for HP MyDVD
A tutorial is available through a button on the first MyDVD Wizard
MyDVD Wizard MyDVD Wizard
MyDVD Wizard screen (Welcome
Welcome Welcome
Welcome
to My DVD!
to My DVD!to My DVD!
to My DVD!).
Available on the website mydvd.sonic.com/ are:
■
MyDVD Knowledge Base — lets you perform queries for answers to commonly
asked questions, and also submit new questions if you can't find what you need.
■
MyDVD Online Forum — a place where you can ask questions, post answers,
exchange information, and learn new ways to use MyDVD.
■
FAQs — Answers to frequently asked questions
Installation
HP MyDVD is presented as an installtion option during the integrated install, except
on Windows NT machines. The DirectX8a installer is used to install HP MyDVD on
Windows 95/98.
Product Information Drive Specifications Interfaces Installation and Configuration
Drive Operation Tips and Techniques Software Maintenance
Troubleshooting Warranty and Support Release Notes Discontinued Products
Page 73

hp dvd-writer
hp dvd-writerhp dvd-writer
hp dvd-writer dvd100i
dvd100idvd100i
dvd100i
Technical Support Solutions Guide 10/25/01 HP MyDVD
73
7373
73
⇐⇐⇐⇐
⇒⇒⇒⇒
Using HP MyDVD
NOTE:
NOTE: NOTE:
NOTE:
HP MyDVD does not run on Windows NT.
Starting HP MyDVD
Starting HP MyDVDStarting HP MyDVD
Starting HP MyDVD
1.
1.1.
1. Use one of the following methods to start HP MyDVD:
• Insert a blank disc into the drive.
• Select
Start>>Programs>>Hewlett-Packard>>HP DVD-Writer>>HP DVD-Writer
Start>>Programs>>Hewlett-Packard>>HP DVD-Writer>>HP DVD-WriterStart>>Programs>>Hewlett-Packard>>HP DVD-Writer>>HP DVD-Writer
Start>>Programs>>Hewlett-Packard>>HP DVD-Writer>>HP DVD-Writer.
• Double-click the HP DVD-Writer
HP DVD-WriterHP DVD-Writer
HP DVD-Writer desktop icon (see Figure 37) to open the
hp cd-dvd
hp cd-dvd hp cd-dvd
hp cd-dvd screen (see Figure 39), then click HP MyDVD
HP MyDVD HP MyDVD
HP MyDVD to open the MyDVD
MyDVD MyDVD
MyDVD
Wizard
Wizard Wizard
Wizard screen (see Figure 40 on page 74).
• Double-click the MyDVD
MyDVDMyDVD
MyDVD desktop icon (Figure 44).
The MyDVD Wizard
MyDVD Wizard MyDVD Wizard
MyDVD Wizard screen appears (see Figure 40 on page 74).
• Select Start>>Programs>>MyDVD>>MyDVD
Start>>Programs>>MyDVD>>MyDVDStart>>Programs>>MyDVD>>MyDVD
Start>>Programs>>MyDVD>>MyDVD
The MyDVD Wizard
MyDVD Wizard MyDVD Wizard
MyDVD Wizard screen appears (see Figure 40 on page 74).
.
Figure 37
Figure 37 Figure 37
Figure 37 HP DVD-Writer
HP DVD-WriterHP DVD-Writer
HP DVD-Writer Desktop Icon
.
Figure 38 MyDVD
Figure 38 MyDVDFigure 38 MyDVD
Figure 38 MyDVD Desktop Icon
Figure 39
Figure 39 Figure 39
Figure 39 hp cd-dvd
hp cd-dvdhp cd-dvd
hp cd-dvd Screen
2.
2.2.
2. Click HP MyDVD
HP MyDVDHP MyDVD
HP MyDVD.
The MyDVD Wizard
MyDVD Wizard MyDVD Wizard
MyDVD Wizard screen appears (see Figure 40 on page 74).
3.
3.3.
3. Use the wizard to create the DVD.
Product Information Drive Specifications Interfaces Installation and Configuration
Drive Operation Tips and Techniques Software Maintenance
Troubleshooting Warranty and Support Release Notes Discontinued Products
Page 74
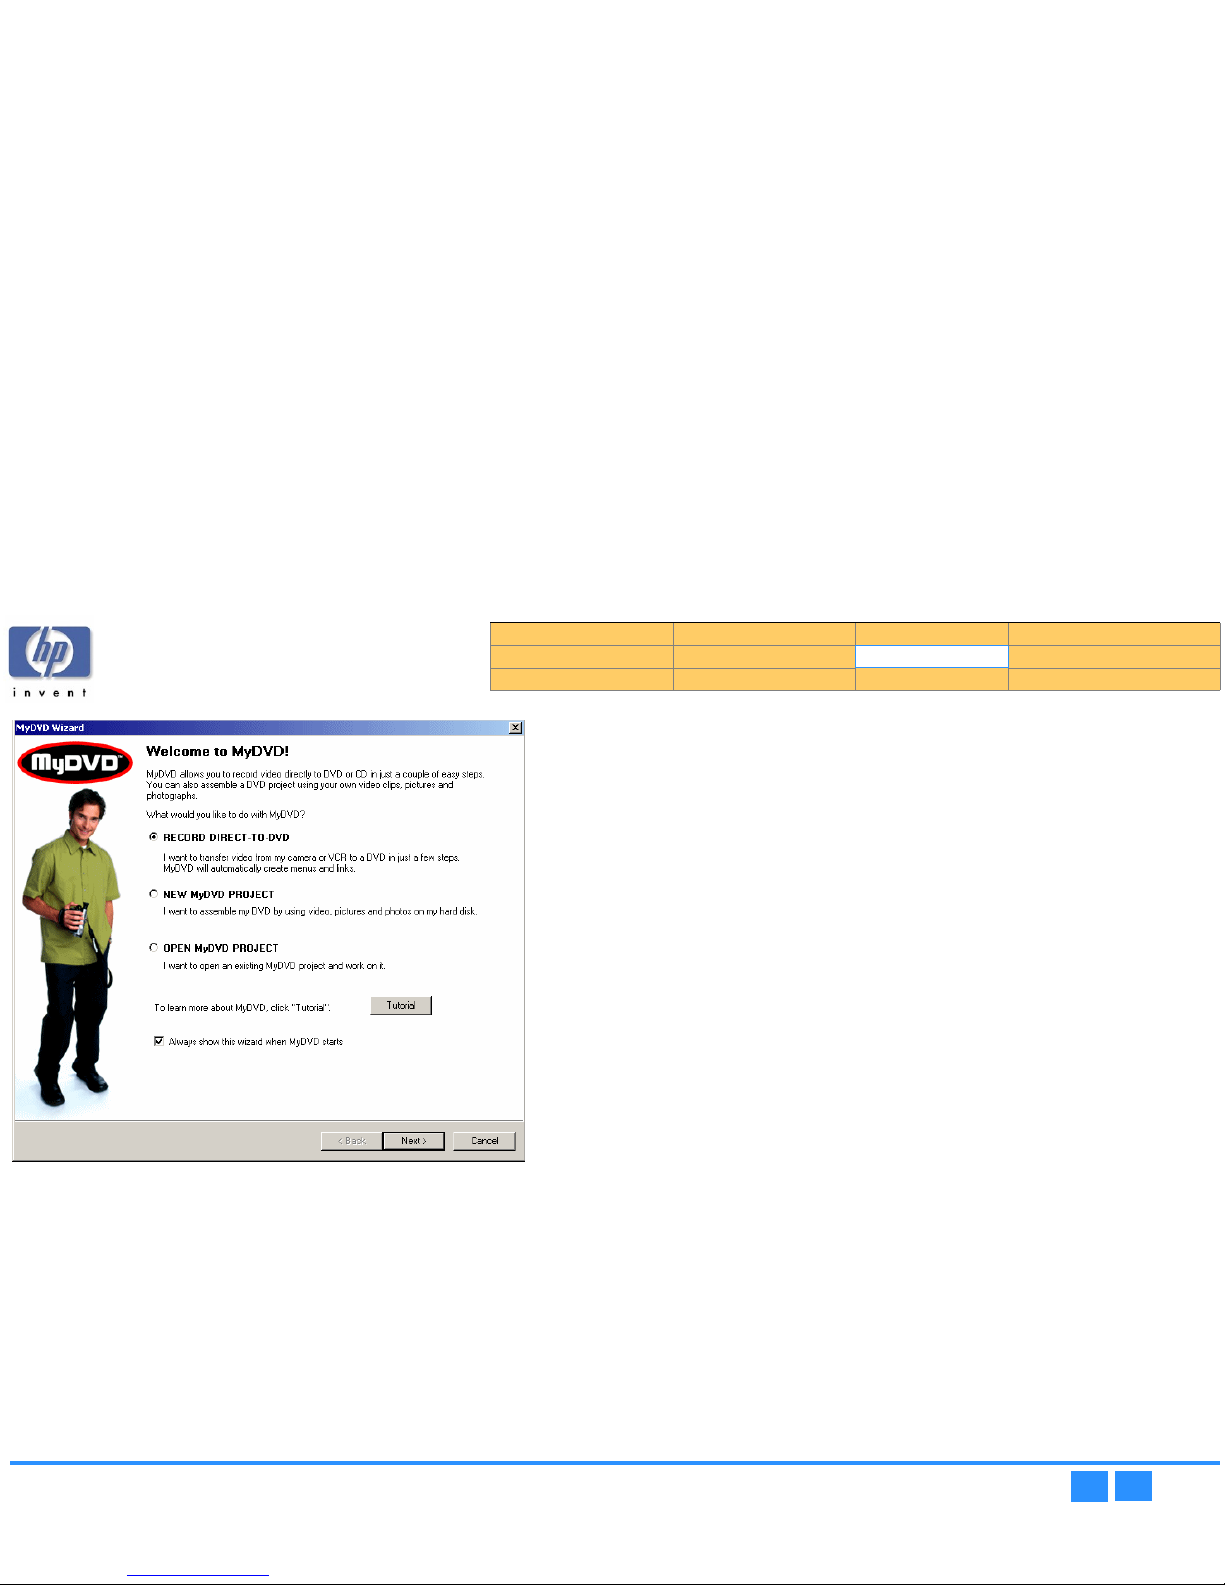
hp dvd-writer
hp dvd-writerhp dvd-writer
hp dvd-writer dvd100i
dvd100idvd100i
dvd100i
Technical Support Solutions Guide 10/25/01 HP MyDVD
74
7474
74
⇐⇐⇐⇐
⇒⇒⇒⇒
Figure 40 MyDVD Wizard
Figure 40 MyDVD Wizard Figure 40 MyDVD Wizard
Figure 40 MyDVD Wizard Screen
Support Provider
First Tier Support is provided by Hewlett-Packard
Second Tier Support is provided by Sonic
Customer Support
For more information, contact:
Phone
PhonePhone
Phone
Sonic pay-by-phone support provides access to dedicated support personnel on a
per-incident basis. A fee will be charged to your credit card and covers the support
needed to resolve an issue. Available worldwide.
USA and Canada
Pay $29.95 per incident. Call 1-877-DVD-1124
9am - 6pm Pacific Standard Time, USA (weekdays only)
Outside the USA and Canada
Pay $29.95 per incident. Call +1-415-893-7065
9am - 6pm Pacific Standard Time, USA (weekdays only)
Web
WebWeb
Web
mydvd.sonic.com
Product Information Drive Specifications Interfaces Installation and Configuration
Drive Operation Tips and Techniques Software Maintenance
Troubleshooting Warranty and Support Release Notes Discontinued Products
Page 75
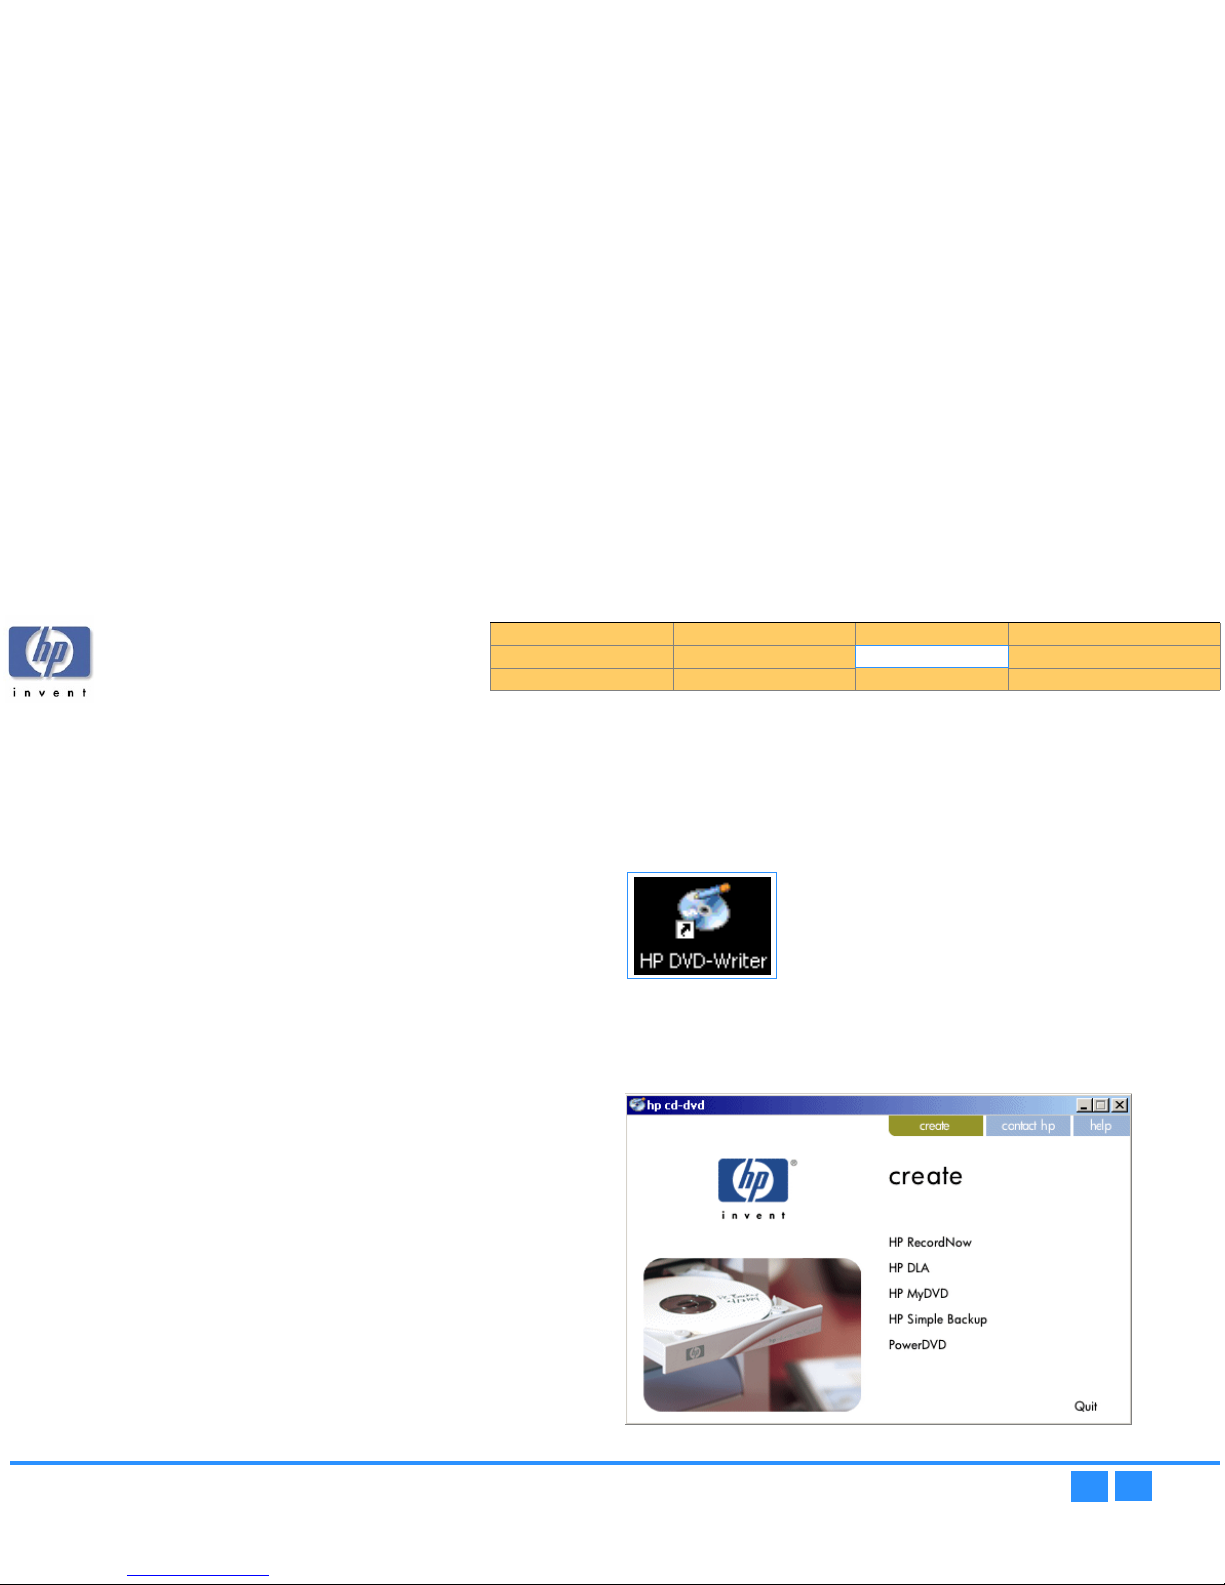
hp dvd-writer
hp dvd-writerhp dvd-writer
hp dvd-writer dvd100i
dvd100idvd100i
dvd100i
Technical Support Solutions Guide 10/25/01 HP Simple Backup
75
7575
75
⇐⇐⇐⇐
⇒⇒⇒⇒
HP Simple Backup
HP Simple Backup is a Windows based Backup software that allows you to use your
HP CD-Writer to create backups of your computer's files and then restore those files
to any computer equipped with a CD reader (yours or anyone else's).
HP Simple Backup offers four options to manage your backup needs:
■
Full System Backup
■
Custom Backup
■
Complete System Restore
■
Custom Restore.
HP Simple Backup also offers the following features to customize your backup or
restore sessions to suit your individual needs:
■
It can back up your entire drive, individual directories (with or without their
subdirectories), or individual files.
■
It can put multiple backup sessions onto one disc thus avoiding wasted media. It
will estimate how many discs you will need to complete your backup so you
won't run out of media half way through a job.
■
Its Autorun feature allows you to restore files to any computer equipped with a
CD reader (yours or anybody else's).
■
You can even customize the way that you restore your files (i.e., overwrite all files,
just the old ones, or never overwrite an existing file).
Using HP Simple Backup
Starting HP Simple Backup
Starting HP Simple BackupStarting HP Simple Backup
Starting HP Simple Backup
1.
1.1.
1. Use one of the following methods to start HP Simple Backup:
• Select
Start>>Programs>>Hewlett-Packard>>HP DVD-Writer>>HP DVD-Writer
Start>>Programs>>Hewlett-Packard>>HP DVD-Writer>>HP DVD-WriterStart>>Programs>>Hewlett-Packard>>HP DVD-Writer>>HP DVD-Writer
Start>>Programs>>Hewlett-Packard>>HP DVD-Writer>>HP DVD-Writer.
• Double-click the HP DVD-Writer
HP DVD-WriterHP DVD-Writer
HP DVD-Writer desktop icon (see Figure 41).
.
Figure 41
Figure 41 Figure 41
Figure 41 HP DVD-Writer
HP DVD-WriterHP DVD-Writer
HP DVD-Writer Desktop Icon
2.
2.2.
2. Click HP Simple Backup
HP Simple BackupHP Simple Backup
HP Simple Backup.
The hp cd-dvd
hp cd-dvd hp cd-dvd
hp cd-dvd screen appears (see Figure 42).
3.
3.3.
3. Follow the instructions in the following sections.
Figure 42 hp cd-dvd
Figure 42 hp cd-dvdFigure 42 hp cd-dvd
Figure 42 hp cd-dvd Screen
Product Information Drive Specifications Interfaces Installation and Configuration
Drive Operation Tips and Techniques Software Maintenance
Troubleshooting Warranty and Support Release Notes Discontinued Products
Page 76
hp dvd-writer
hp dvd-writerhp dvd-writer
hp dvd-writer dvd100i
dvd100idvd100i
dvd100i
Technical Support Solutions Guide 10/25/01 HP Simple Backup
76
7676
76
⇐⇐⇐⇐
⇒⇒⇒⇒
Full System Backup
Full System BackupFull System Backup
Full System Backup
Making a copy of your computer's entire hard drive is easy with HP Simple Backup.
1.
1.1.
1. Start HP Simple Backup.
2.
2.2.
2. Click on Full System Backup
Full System BackupFull System Backup
Full System Backup from the main screen.
HP Simple Backup's Wizard walks you through the rest of the necessary steps.
Custom Backup
Custom BackupCustom Backup
Custom Backup
HP Simple Backup's Custom Backup feature allows you to pick and choose which
files you want to backup. To create a Custom Backup, perform the following steps:
1.
1.1.
1. Start HP Simple Backup.
2.
2.2.
2. Click on Custom Backup
Custom BackupCustom Backup
Custom Backup from the main screen.
HP Simple Backup's Wizard walks you through the rest of the necessary steps.
Complete System Restore
Complete System RestoreComplete System Restore
Complete System Restore
HP Simple Backup's Complete System Restore option allows you to take the backup
files you created using the Full System Backup option and put those files back onto
any computer equipped with a CD reader (yours or anyone else's).
1.
1.1.
1. Insert the first CD of your backup set into your CD reader.
2.
2.2.
2. Click Complete System Restore
Complete System RestoreComplete System Restore
Complete System Restore from the automatically displayed screen.
HP Simple Backup's Wizard walks you through the rest of the necessary steps.
NOTE:
NOTE: NOTE:
NOTE:
If HP Simple Backup does not start automatically, click on the Windows
Start
StartStart
Start button and then select the Run...
Run...Run...
Run... option. Browse to your CD reader's
drive, double click the Setup.exe
Setup.exeSetup.exe
Setup.exe command and then click OK
OKOK
OK.
Custom Restore
Custom RestoreCustom Restore
Custom Restore
The Custom Restore option is much like the Complete System Restore option in that
it allows you to restore files to any computer equipped with a CD reader (yours or
anybody else's).
1.
1.1.
1. Insert the disc you created using HP Simple Backup's Custom Backup option into
your computer's CD reader.
2.
2.2.
2. Click Custom Restore
Custom RestoreCustom Restore
Custom Restore from the automatically displayed screen.
HP Simple Backup's Wizard walks you through the rest of the necessary steps.
NOTE:
NOTE: NOTE:
NOTE:
If HP Simple Backup does not start automatically, click on the Windows
Start
StartStart
Start button and then select the Run... option. Browse to your CD reader's
drive, double click the Setup.exe command and then click OK.
Automatically Excluded Files
Automatically Excluded FilesAutomatically Excluded Files
Automatically Excluded Files
Because of the constantly changing characteristics of some types of files, HP Simple
Backup automatically excludes them. Following is a list of some of these types of
files:
■
Backup application files
■
Index files for caches (internet files, history files, etc.)
■
Windows swap files
■
Drivespace or Doublespace files
■
Temporary directories (i.e., .tmp files)
Errors and Warnings Report
The following is a list of errors and warnings that may appear in the Report
ReportReport
Report file after
a backup or restore operation. Look below for a description of the error that was
reported.
Error/Warning Description
File/directory busy or in
use by another application,
it will be skipped
An application was running at the time of backup,
or a data file was in use. Close all applications, or
those running from your system tray (i.e. Antivirus, Scheduler,...), prior to backing up.
Error opening file/directory • File or directory may be corrupted. Recommend
running ScanDisk on that drive prior to backup.
• You may not have proper read access to that file
or directory (i.e. Windows NT security
permission).
Product Information Drive Specifications Interfaces Installation and Configuration
Drive Operation Tips and Techniques Software Maintenance
Troubleshooting Warranty and Support Release Notes Discontinued Products
Page 77

hp dvd-writer
hp dvd-writerhp dvd-writer
hp dvd-writer dvd100i
dvd100idvd100i
dvd100i
Technical Support Solutions Guide 10/25/01 HP Simple Backup
77
7777
77
⇐⇐⇐⇐
⇒⇒⇒⇒
Support Provider for HP Simple Backup
First Tier Support is provided by Hewlett-Packard.
Second Tier Support is provided by VERITAS.
Error reading data from file
system
• File or directory may be corrupted. Recommend
running ScanDisk on that drive prior to backup.
• You may not have proper read access to that file
or directory (i.e. Windows NT security
permission).
File/directory not found File or directory was missing during backup. The
files or directories selected for backup may have
been moved or deleted by another application. If
you would like these files backed up, locate them
and perform a Custom Backup on these files.
Error creating file/directory • File may be in use. Make sure the file you are
restoring is not open or running.
• You may not have proper write access to that file
or directory (i.e. Windows NT security
permission).
• The hard disk you are restoring to may be
corrupted. Recommend running ScanDisk on
that drive prior to restore.
File/directory missing or
corrupt during backup
These files or directories were not successfully
backed up due to one or more of the errors above.
Therefore, they are not available for restore on the
backup media. This is simply a warning. To avoid
receiving these errors in the future, follow the
instructions above.
Error/Warning Description
File/directory busy or
access denied during
backup
These files or directories were not successfully
backed up due to one or more of the errors above.
Therefore, they are not available for restore on the
backup media. This is simply a warning. To avoid
receiving these errors in the future, follow the
instructions above.
Error/Warning Description
Product Information Drive Specifications Interfaces Installation and Configuration
Drive Operation Tips and Techniques Software Maintenance
Troubleshooting Warranty and Support Release Notes Discontinued Products
Page 78
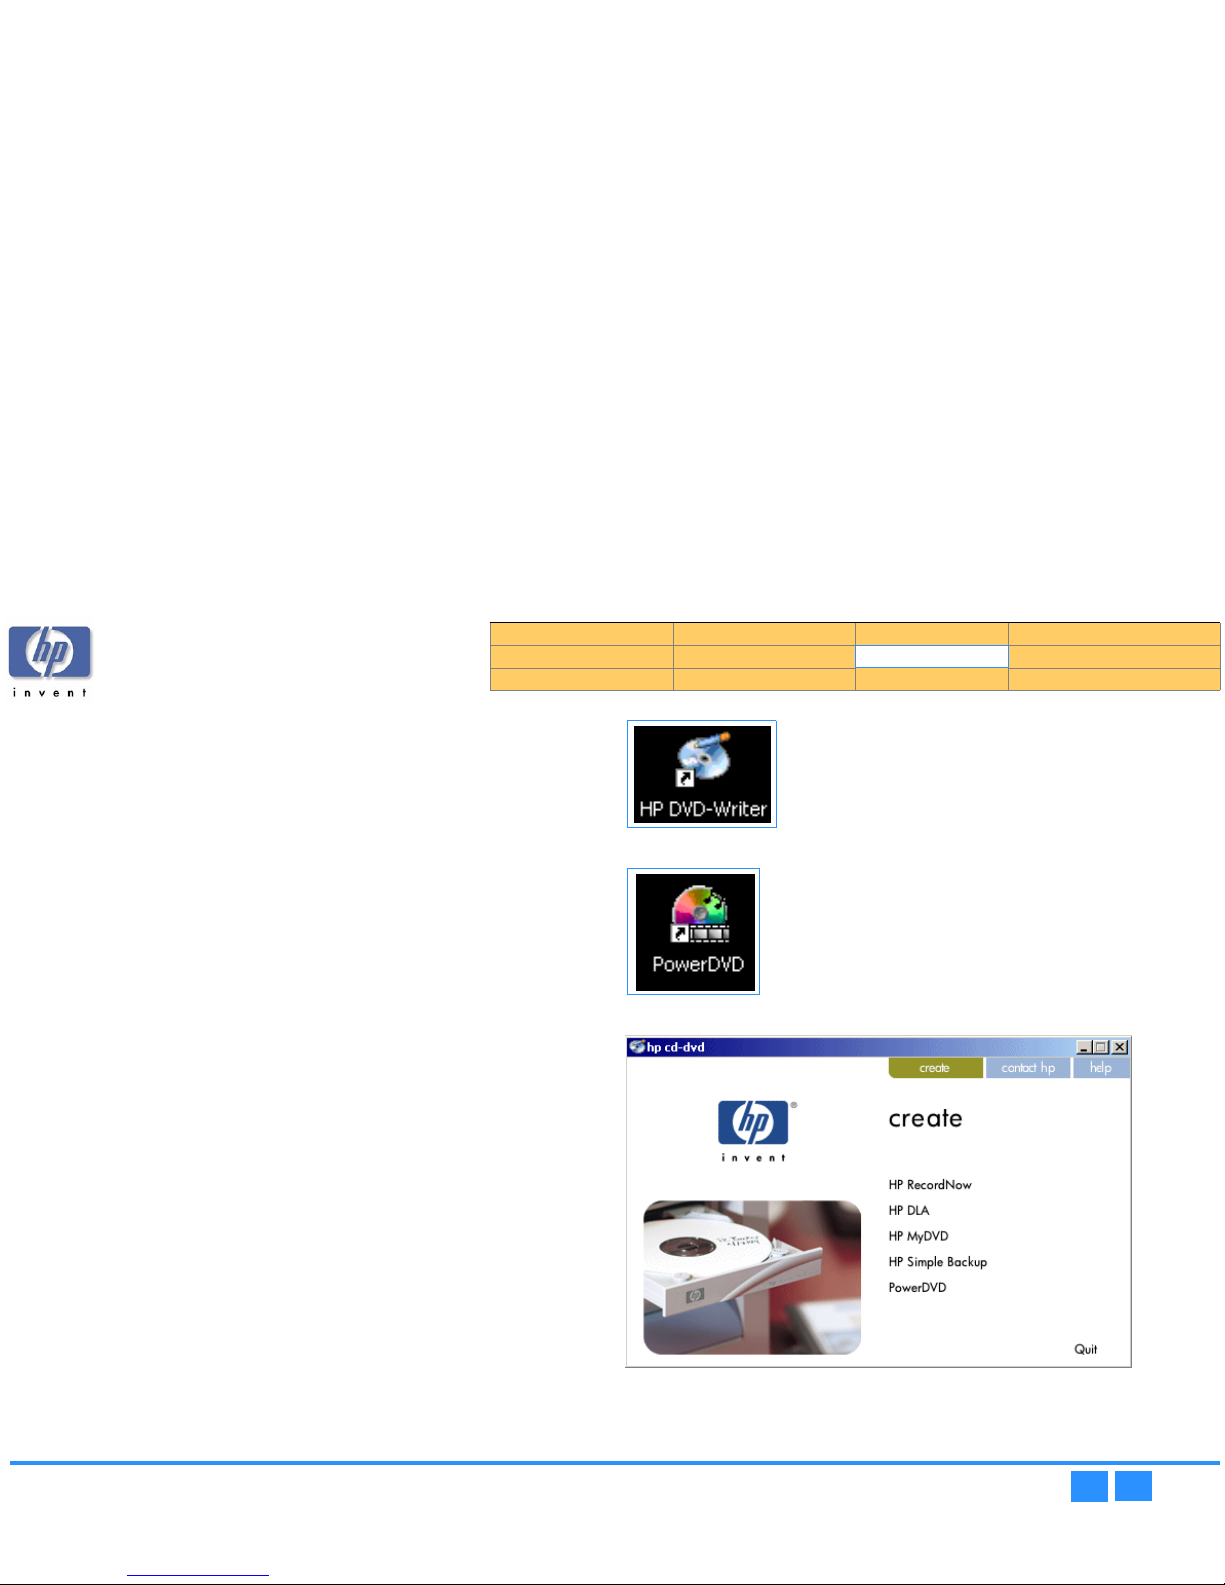
hp dvd-writer
hp dvd-writerhp dvd-writer
hp dvd-writer dvd100i
dvd100idvd100i
dvd100i
Technical Support Solutions Guide 10/25/01 PowerDVD
78
7878
78
⇐⇐⇐⇐
⇒⇒⇒⇒
PowerDVD
PowerDVD - Play DVD movies on your PC
System Requirements
■
Windows ME, 2000, 98, 95 or Windows NT4.0 SP5+ operating systems
■
Intel Pentium II 350MHz with MMX technology or above
■
DVD-ROM installed
■
Audio card supporting 44.1KHz or 48KHz sampling rate
■
32MB main memory
■
Hard disk requirement of at least 20MB
■
Display card supporting DirectDraw StandardFeatures
Manuals for PowerDVD
The user’s guide is provided in Acrobat PDF format.
Using PowerDVD
Starting PowerDVD
Starting PowerDVDStarting PowerDVD
Starting PowerDVD
1.
1.1.
1. Use one of the following methods to start PowerDVD:
• Insert a blank disc into the drive.
• Select
Start>>Programs>>Hewlett-Packard>>HP DVD-Writer>>HP DVD-Writer
Start>>Programs>>Hewlett-Packard>>HP DVD-Writer>>HP DVD-WriterStart>>Programs>>Hewlett-Packard>>HP DVD-Writer>>HP DVD-Writer
Start>>Programs>>Hewlett-Packard>>HP DVD-Writer>>HP DVD-Writer.
• Double-click the HP DVD-Writer
HP DVD-WriterHP DVD-Writer
HP DVD-Writer desktop icon (see Figure 43) to open the
hp cd-dvd
hp cd-dvd hp cd-dvd
hp cd-dvd screen (see Figure 45), then click PowerDVD
PowerDVDPowerDVD
PowerDVD to open the
PowerDVD
PowerDVD PowerDVD
PowerDVD screen (see Figure 46 on page 79).
• Double-click the PowerDVD
PowerDVDPowerDVD
PowerDVD desktop icon (Figure 44).
The PowerDVD
PowerDVD PowerDVD
PowerDVD screen appears (see Figure 46 on page 79).
• Select Start>>Programs>>CyberLink PowerDVD>>PowerDVD
Start>>Programs>>CyberLink PowerDVD>>PowerDVDStart>>Programs>>CyberLink PowerDVD>>PowerDVD
Start>>Programs>>CyberLink PowerDVD>>PowerDVD
The PowerDVD
PowerDVD PowerDVD
PowerDVD screen appears (see Figure 46 on page 79).
.
Figure 43
Figure 43 Figure 43
Figure 43 HP DVD-Writer
HP DVD-WriterHP DVD-Writer
HP DVD-Writer Desktop Icon
.
Figure 44 PowerDVD
Figure 44 PowerDVDFigure 44 PowerDVD
Figure 44 PowerDVD Desktop Icon
Figure 45
Figure 45 Figure 45
Figure 45 hp cd-dvd
hp cd-dvdhp cd-dvd
hp cd-dvd Screen
2.
2.2.
2. Use the controls in the PowerDVD
PowerDVD PowerDVD
PowerDVD screen to play the DVD.
Product Information Drive Specifications Interfaces Installation and Configuration
Drive Operation Tips and Techniques Software Maintenance
Troubleshooting Warranty and Support Release Notes Discontinued Products
Page 79
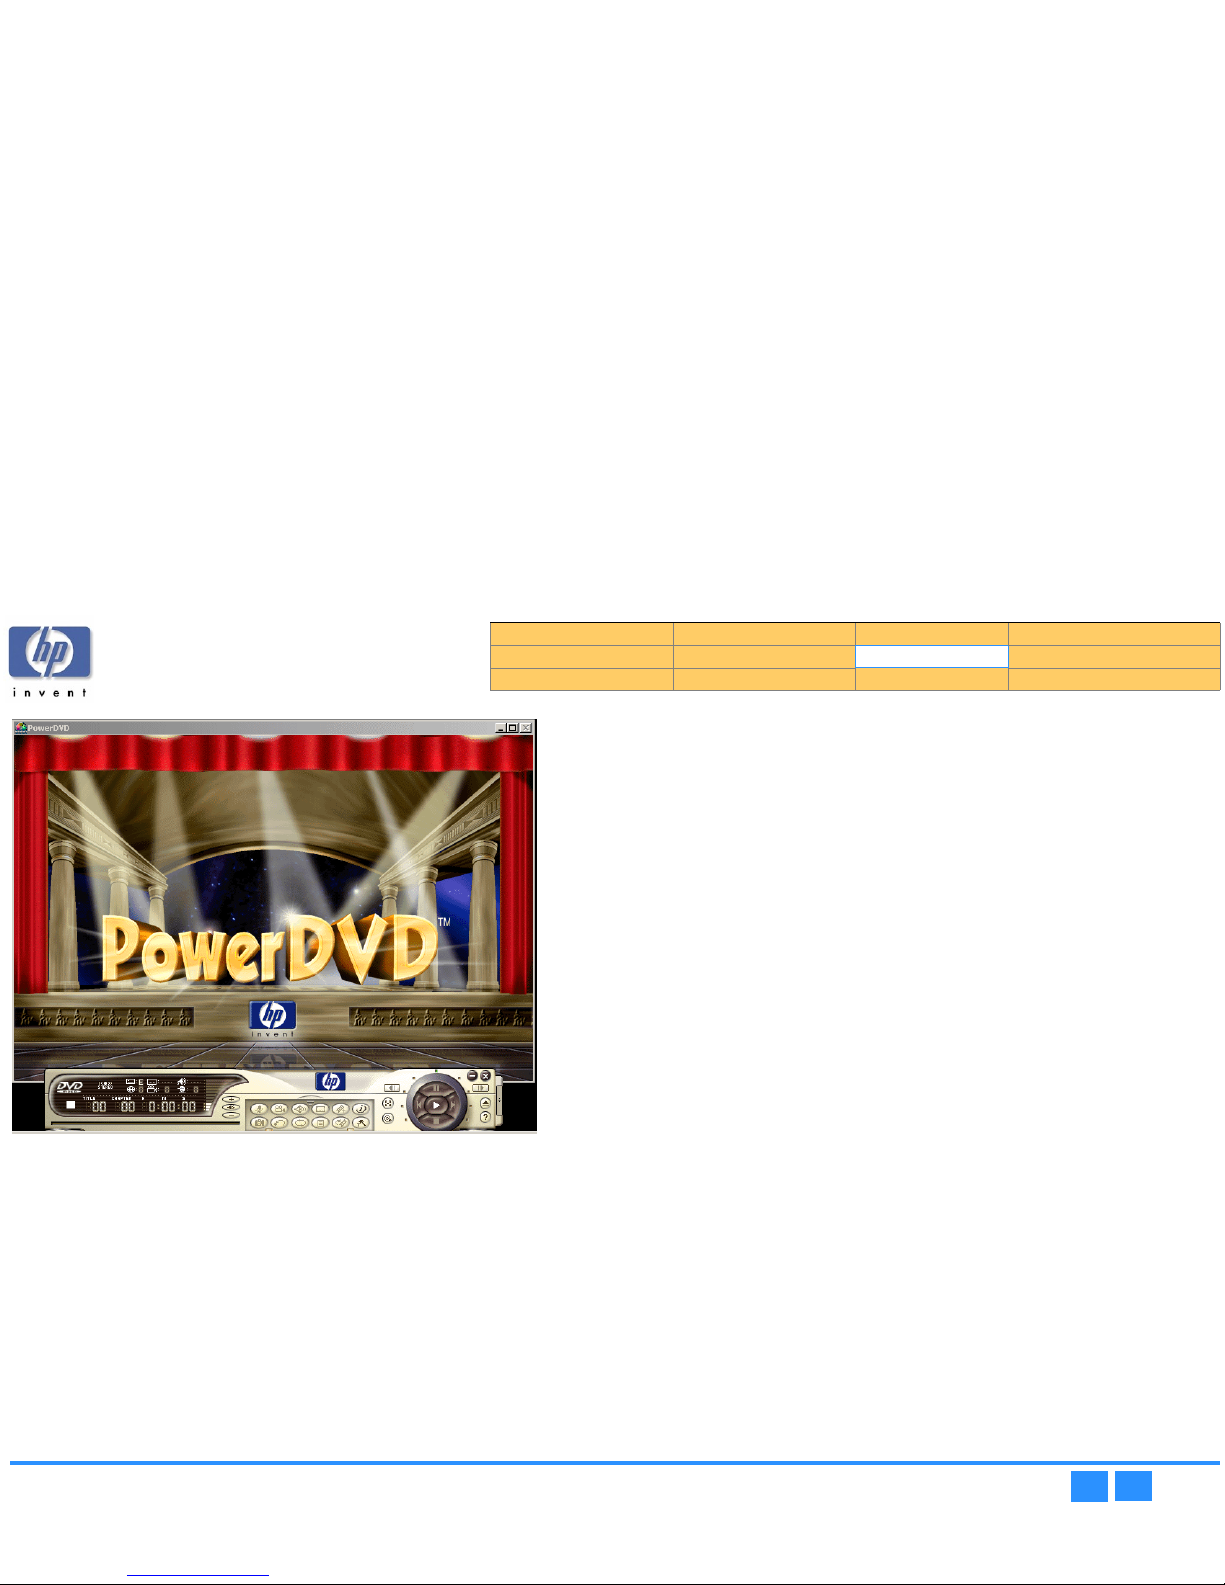
hp dvd-writer
hp dvd-writerhp dvd-writer
hp dvd-writer dvd100i
dvd100idvd100i
dvd100i
Technical Support Solutions Guide 10/25/01
PowerDVD
79
7979
79
⇐⇐⇐⇐
⇒⇒⇒⇒
Figure 46 PowerDVD
Figure 46 PowerDVD Figure 46 PowerDVD
Figure 46 PowerDVD Screen
Support Provider
First Tier Support is provided by Hewlett-Packard.
Second Tier Support is provided CyberLink.
Customer Support
For more information, contact:
Email
EmailEmail
Email
Phone
PhonePhone
Phone
886-2-8667-1298
Fax
Fax Fax
Fax
886-2-8667-1467
Web
WebWeb
Web
www.gocyberlink.com
International Headquarters
International HeadquartersInternational Headquarters
International Headquarters
CyberLink Corporation, 15F, No.100,
Product Information Drive Specifications Interfaces Installation and Configuration
Drive Operation Tips and Techniques Software Maintenance
Troubleshooting Warranty and Support Release Notes Discontinued Products
Min-Chiuan Road, Hsin-Tian City, Taipei Hsien, Taiwan
Page 80

hp dvd-writer
hp dvd-writerhp dvd-writer
hp dvd-writer dvd100i
dvd100idvd100i
dvd100i
Technical Support Solutions Guide 10/25/01 Product Care
80
8080
80
⇐⇐⇐⇐
⇒⇒⇒⇒
Chapter 8 Maintenance
This chapter is organized as follows:
Product Care
■
There are no user serviceable or maintainable parts in hp dvd-writer drives.
■
When the drive is not in use, store the lid or tray in the closed position to keep
out dust particles and other contaminants.
■
Avoid vibration and shock to the drive. Excessive vibration and shock can
misalign the laser and/or optics.
■
Never mount or operate the drive in an upside down position.
Product Cleaning
Drive
The hp dvd-writer drives do not require cleaning.
■
Never use a “CD-ROM cleaning kit” with this drive. The abrasive surface and
brushes can damage the optics for the laser of the drive.
■
If the external case becomes soiled, clean with a soft damp cloth and a mild
detergent. Never clean with alcohol, gasoline, kerosene, benzene, lacquer
thinner, or anti-static agents.
■
Never use compressed air to clean the drive! The drive has parts that have very
fine movement. Compressed air can impact these parts with dust and
contaminants, causing them to fail.
Media
With reasonable care you can expect your DVDs or CDs to last for decades. However,
to ensure performance and durability, follow these guidelines for handling your
DVDs or CDs:
■
Protect recording surfaces from scratches, fingerprints, and dirt.
■
Hold DVDs or CDs by the outer edge or by the center hole.
■
You can clean a CD with a soft, dry cloth. You can also use commercial CD
cleaner or ethyl alcohol. Wipe the CD in straight lines from the center to the
edges only.
■
Write by hand only on the “white” premarked label side using an oil-based felt
tip marker. Do not use a ball-point pen.
Do not use a ball-point pen.Do not use a ball-point pen.
Do not use a ball-point pen.
■
Do not leave a CD in direct sunlight or in hot, humid location.
Product Care p. 80
Product Cleaning p. 80
Page 81
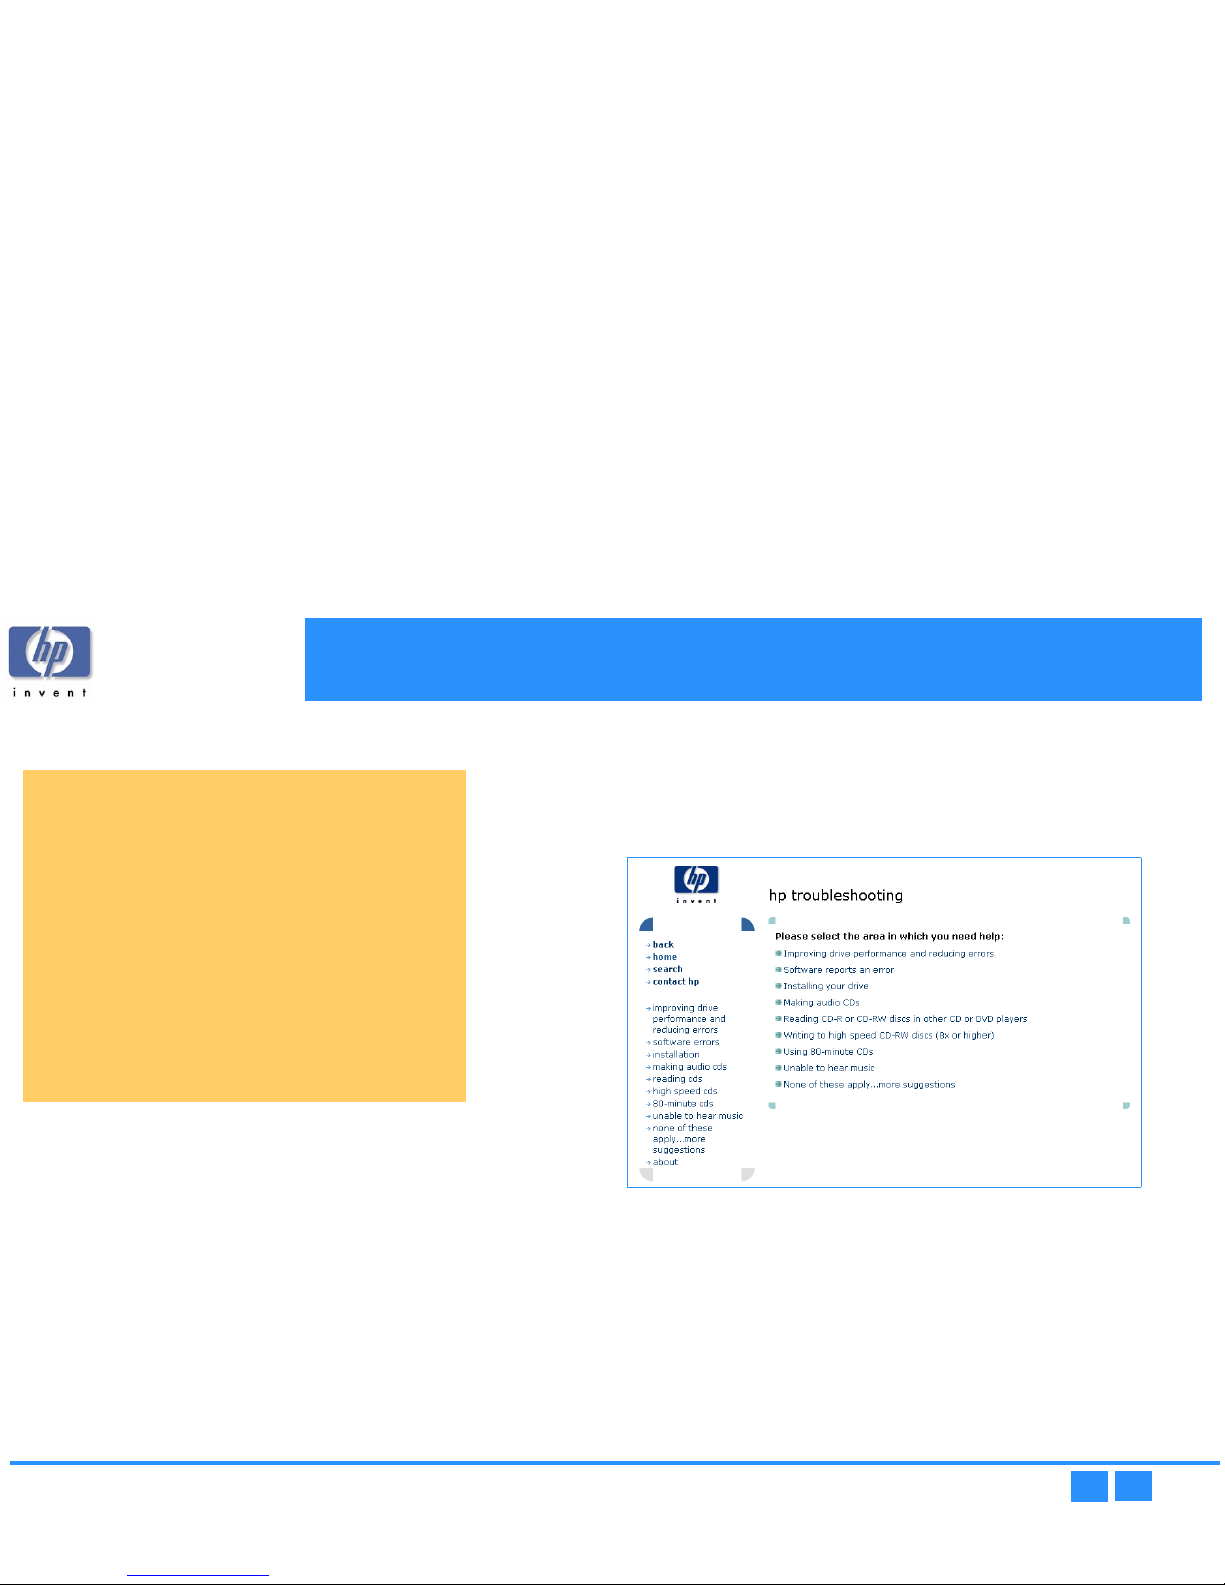
hp dvd-writer
hp dvd-writerhp dvd-writer
hp dvd-writer dvd100i
dvd100idvd100i
dvd100i
Technical Support Solutions Guide 10/25/01 Up-To-Date Troubleshooting Information
81
8181
81
⇐⇐⇐⇐
⇒⇒⇒⇒
Chapter 9 Troubleshooting
This chapter provides descriptions and solutions for some hp dvd-writer drive
hardware and software problems, and is organized as follows:
Up-To-Date Troubleshooting Information
Up-to-date troubleshooting information is available from the following web sites:
http: //www. hp. com/support/dvd-compatibility
http: //www. hp. com/support/dvd-capture
http: //www. hp. com/support/dvd-mydvd
http: //www. hp. com/support/dla
Frequently asked questions and answers are provided in Chapter 6 Tips and
Te ch n iq u es .
Release Notes for the hp dvd-writer dvd100i drives are on page 96.
HP Troubleshooting Assistant
More troubleshooting information is available in the browser-based
HP Troubleshooting Assistant, which is installed with the drive.
NOTE:
NOTE: NOTE:
NOTE:
Double-click on the hp dvd-writer icon on the desktop, then click on Help
HelpHelp
Help,
then click on Troubleshooting
TroubleshootingTroubleshooting
Troubleshooting.
Figure 47
Figure 47 Figure 47
Figure 47 hp troubleshooting screen
Improving Drive Performance and Reducing Errors
Enabling Direct Memory Access to Enhance System
Performance
Many computers and computer hardware devices come with a feature called Direct
Memory Access (DMA). When you enable DMA, you accelerate data transfer between
hardware devices because of a shortcut called the DMA channel. The DMA channel
permits data to completely bypass the computer's CPU and travel directly from main
system memory to the intended hardware device. By removing the CPU passageway,
Up-To-Date Troubleshooting Information p. 81
HP Troubleshooting Assistant p. 81
Improving Drive Performance and Reducing Errors p. 81
Software Errors p. 83
Installation p. 84
Making Audio CDs p. 86
Reading CDs p. 86
High Speed CDs p. 88
80-Minute CDs p. 88
Unable to Hear Music p. 90
DLA 2.5 Known Problems p. 91
Page 82

hp dvd-writer
hp dvd-writerhp dvd-writer
hp dvd-writer dvd100i
dvd100idvd100i
dvd100i
Technical Support Solutions Guide 10/25/01 Improving Drive Performance and Reducing Errors
82
8282
82
⇐⇐⇐⇐
⇒⇒⇒⇒
you decrease the amount of time it takes to create your CD or DVD and increase
system performance. Enabling DMA also reduces disc-writing failures.
HP recommends enabling DMA on all internal IDE CD/DVD Writers and all hard
drives. DMA is not available on external HP drives; however, you can still improve
performance when using an HP external drive by enabling DMA on your hard
drive(s).
To enable DMA on HP CD/DVD drives and your computer's hard drives, follow the
procedures for your version of Windows.
Enabling DMA on HP IDE CD/DVD Drives and Windows 98/Me
Enabling DMA on HP IDE CD/DVD Drives and Windows 98/MeEnabling DMA on HP IDE CD/DVD Drives and Windows 98/Me
Enabling DMA on HP IDE CD/DVD Drives and Windows 98/Me
1.
1.1.
1. Click the Start
StartStart
Start button, select Settings
SettingsSettings
Settings, and click Control Panel
Control PanelControl Panel
Control Panel.
2.
2.2.
2. Double-click the System
SystemSystem
System icon.
3.
3.3.
3. Click the Device Manager
Device ManagerDevice Manager
Device Manager tab.
4.
4.4.
4. Double-click the CDROM
CDROMCDROM
CDROM icon.
5.
5.5.
5. Double-click the HP CD/DVD drive listed.
6.
6.6.
6. Click the Settings
SettingsSettings
Settings tab.
7.
7.7.
7. Check the box next to DMA. If the box is already checked, then DMA is already
enabled for the HP CD/DVD drive.
NOTE:
NOTE: NOTE:
NOTE:
USB CD Writers do not have the DMA feature available
Enabling DMA on hard drives and Windows 98/Me
Enabling DMA on hard drives and Windows 98/MeEnabling DMA on hard drives and Windows 98/Me
Enabling DMA on hard drives and Windows 98/Me
1.
1.1.
1. Click the Start
StartStart
Start button, select Settings
SettingsSettings
Settings, and click Control Panel
Control PanelControl Panel
Control Panel.
2.
2.2.
2. Double-click the System
SystemSystem
System icon.
3.
3.3.
3. Click the Device Manager
Device ManagerDevice Manager
Device Manager tab.
4.
4.4.
4. Double-click Disk Drives
Disk DrivesDisk Drives
Disk Drives.
5.
5.5.
5. Double-click on the IDE hard drive listed.
6.
6.6.
6. Click the Settings
SettingsSettings
Settings tab.
7.
7.7.
7. Check the box next to DMA. If the box is already checked, then DMA is already
enabled for the HP CD/DVD drive.
Enabling DMA on HP IDE CD/DVD Drives and Windows 2000
Enabling DMA on HP IDE CD/DVD Drives and Windows 2000 Enabling DMA on HP IDE CD/DVD Drives and Windows 2000
Enabling DMA on HP IDE CD/DVD Drives and Windows 2000
Professional
ProfessionalProfessional
Professional
1.
1.1.
1. Click the Start
StartStart
Start button, select Settings
SettingsSettings
Settings, and click Control Panel
Control PanelControl Panel
Control Panel.
2.
2.2.
2. Double-click the System
SystemSystem
System icon.
3.
3.3.
3. Click the Hardware
HardwareHardware
Hardware tab.
4.
4.4.
4. Click the Device Manager
Device ManagerDevice Manager
Device Manager button.
5.
5.5.
5. In the list of devices, double-click IDE ATA/ATAPI Controllers
IDE ATA/ATAPI ControllersIDE ATA/ATAPI Controllers
IDE ATA/ATAPI Controllers.
6.
6.6.
6. Double-click the controller (normally the Secondary IDE Channel
Secondary IDE ChannelSecondary IDE Channel
Secondary IDE Channel) that
connects the HP CD/DVD drive to the motherboard.
7.
7.7.
7. Click the Advanced Settings
Advanced SettingsAdvanced Settings
Advanced Settings tab.
8.
8.8.
8. Next to Transfer Mode
Transfer ModeTransfer Mode
Transfer Mode select DMA if available
DMA if availableDMA if available
DMA if available for the correct IDE device. If
you're unsure which device to enable DMA on, try setting DMA on both master
(device 0) and slave (device 1).
9.
9.9.
9. Click OK
OKOK
OK.
Enabling DMA on hard drives and Windows 2000 Professional
Enabling DMA on hard drives and Windows 2000 ProfessionalEnabling DMA on hard drives and Windows 2000 Professional
Enabling DMA on hard drives and Windows 2000 Professional
1.
1.1.
1. Click the Start
StartStart
Start button, select Settings
SettingsSettings
Settings, and click Control Panel
Control PanelControl Panel
Control Panel.
2.
2.2.
2. Double-click the System
SystemSystem
System icon.
3.
3.3.
3. Click the Hardware
HardwareHardware
Hardware tab.
4.
4.4.
4. Click the Device Manager
Device ManagerDevice Manager
Device Manager button.
5.
5.5.
5. In the list of devices, double-click IDE ATA/ATAPI Controllers
IDE ATA/ATAPI ControllersIDE ATA/ATAPI Controllers
IDE ATA/ATAPI Controllers.
6.
6.6.
6. Double-click the controller (normally the Primary IDE Channel
Primary IDE ChannelPrimary IDE Channel
Primary IDE Channel that connects
the hard drive to the motherboard.
7.
7.7.
7. Next to Transfer Mode
Transfer ModeTransfer Mode
Transfer Mode select DMA if available
DMA if availableDMA if available
DMA if available for each hard drive.
8.
8.8.
8. Click OK
OKOK
OK.
Product Information Drive Specifications Interfaces Installation and Configuration
Drive Operation Tips and Techniques Software Maintenance
Troubleshooting
Warranty and Support Release Notes Discontinued Products
Page 83

hp dvd-writer
hp dvd-writerhp dvd-writer
hp dvd-writer dvd100i
dvd100idvd100i
dvd100i
Technical Support Solutions Guide 10/25/01 Software Errors
83
8383
83
⇐⇐⇐⇐
⇒⇒⇒⇒
DMA will not stay enabled
Reasons why DMA will not stay enabled after restarting your
Reasons why DMA will not stay enabled after restarting your Reasons why DMA will not stay enabled after restarting your
Reasons why DMA will not stay enabled after restarting your
computer
computercomputer
computer
1.
1.1.
1. The device (hard drive, HP CD drive, HP DVD drive, CD-ROM drive) does not
support DMA.
2.
2.2.
2. DMA is not available on your computer.
3.
3.3.
3. DMA has not been enabled in the computer's Basic Input/Output System (BIOS).
Refer to your computer's manufacturer for more information about using DMA on
your system.
Other problems occurred after enabling DMA
Other problems occurred after enabling DMAOther problems occurred after enabling DMA
Other problems occurred after enabling DMA
If you enabled DMA and your system locks when accessing the HP drive or you start
to have other system problems, disable DMA as a possible solution.
Other performance issues
40-conductor, 40-pin vs. 80-conductor, 40-pin IDE cables
40-conductor, 40-pin vs. 80-conductor, 40-pin IDE cables40-conductor, 40-pin vs. 80-conductor, 40-pin IDE cables
40-conductor, 40-pin vs. 80-conductor, 40-pin IDE cables
The IDE cable that came with your new HP drive is a 40-conductor, 40-pin cable.
Some computers now come with hard drives connected to faster 80-conductor,
40-pin cables, also known as ULTRA ATA66/100s.
The connectors on each of these two cables are the same, however you can note the
difference between the two configurations on the cables themselves. The
80-conductor cables have more conductors on the cable, which can increase the
performance of your hard drive.
When you installed your new HP drive, you might have replaced an 80-conductor
cable with the 40-conductor cable that came in the box with your new drive. If you
did replace an IDE cable, and your system now works slower, or you are having
performance problems with one of your hard drives or a CD-ROM or DVD-ROM
drive, examine the IDE cables. If you replaced an 80-conductor cable with a 40conductor cable, your performance issues could be related to this and you should
reinstall the 80-conductor cable. Although this isn't a recommended configuration,
your HP drive will function with an 80-conductor cable.
Software Errors
HP RecordNow reported it was unable to read fast enough
When HP RecordNow creates a CD, it does so in a single, continuous operation. This
operation requires that the computer's hardware and software transfer data from the
source device to the HP drive fast enough to keep the HP drive's laser turned on at all
times. If the HP drive becomes "starved" for data, the laser will turn off, and the
recording session will fail. There can be many different causes of this error.
This error is more likely when making second-generation copies, when using a slow or
unreliable CD-ROM as the source drive, or when using faster write speeds (10X or 12X)
especially when the blank media is not rated for higher speeds.
If you are prompted to "retry" following a failed CD recording, first, try the following:
1.
1.1.
1. Clean your source CD.
2.
2.2.
2. Use your HP drive as your source drive.
3.
3.3.
3. Test the performance of your CD-ROM and HP drive prior to recording.
4.
4.4.
4. Retry the operation.
HP RecordNow reported that there was a problem reading the
disc being copied
Clean the CD
Clean the CDClean the CD
Clean the CD
1.
1.1.
1. Use a mild, nonabrasive soapy solution on a nonabrasive cloth to clean the shiny
side of the disc.
2.
2.2.
2. Wipe from the center to the edge of the disc.
3.
3.3.
3. Dry the disc completely before reinserting it into your CD-ROM drive.
Try using a different source drive
Try using a different source driveTry using a different source drive
Try using a different source drive
To change the source drive, click the Change button in the device panel on the lowerright side of the RecordNow main window and select the desired drive from the pulldown list. Insert the CD into the selected drive.
Product Information Drive Specifications Interfaces Installation and Configuration
Drive Operation Tips and Techniques Software Maintenance
Troubleshooting
Warranty and Support Release Notes Discontinued Products
Page 84

hp dvd-writer
hp dvd-writerhp dvd-writer
hp dvd-writer dvd100i
dvd100idvd100i
dvd100i
Technical Support Solutions Guide 10/25/01 Installation
84
8484
84
⇐⇐⇐⇐
⇒⇒⇒⇒
Try using your HP drive as both the source and destination drive
Try using your HP drive as both the source and destination driveTry using your HP drive as both the source and destination drive
Try using your HP drive as both the source and destination drive
If you use your HP drive as your source drive, the entire contents of the audio CD
must be copied to your computer's hard disk. A 74-minute audio CD requires
approximately 670MB of free hard disk space. Make sure your hard disk has at least
this much free space available.
If you're trying to record to an 80-minute CD
If you're trying to record to an 80-minute CDIf you're trying to record to an 80-minute CD
If you're trying to record to an 80-minute CD
The audio layout portion of the HP RecordNow application restricts audio creation to
the 74-minute standard.
HP RecordNow reported a write error
See A high speed CD-RW disc was used in a drive that does not support high speed
on page 88.
The CD-R or CD-RW disc may be scratched, damaged, or dirty
The CD-R or CD-RW disc may be scratched, damaged, or dirtyThe CD-R or CD-RW disc may be scratched, damaged, or dirty
The CD-R or CD-RW disc may be scratched, damaged, or dirty
If the CD-R or CD-RW disc is scratched, damaged, or dirty, your HP drive may not be
able to write data or audio to it.
■
Try using a new CD-R or CD-RW disc.
■
Try using a different manufacturer's CD-R or CD-RW disc.
■
Clean the CD-R or CD-RW disc:
1.
1.1.
1. Use a mild, nonabrasive soapy solution on a nonabrasive cloth to clean the shiny
side of the disc.
2.
2.2.
2. Wipe from the center to the edge of the disc.
3.
3.3.
3. Dry the disc completely before reinserting it into your HP drive.
HP RecordNow reported that your HP drive is in use
Another application, such as DLA, is currently using your HP drive, preventing HP
RecordNow from accessing it. Before you can continue, you must eject the current
disc.
1.
1.1.
1. Press the eject button on the front of your HP drive and follow any on-screen
instructions.
2.
2.2.
2. Insert a new, unformatted disc and return to HP RecordNow.
HP RecordNow reported that the source disc cannot be copied
Two types of source discs cannot be copied because they are in an incorrect format:
■
DVD movies that use copyright protection.
■
Discs that were written using the packet writing method (such as Veritas DLA).
Installation
Your HP drive is installed, but does not appear in Windows
Explorer
■
Review your HP drive's configuration settings.
■
Turn off your computer, wait 20 seconds, then turn it on again.
■
Make sure your HP drive is receiving power. Press the eject button to open and
close your HP drive's tray. If the tray opens and closes, the drive is receiving
power.
■
If the drive is not receiving power, make sure that a power cable is plugged into
the rear of the drive. If you have an external drive, make sure the external power
supply is plugged into a working wall outlet or power strip.
■
Disconnect and then reconnect your external HP drive's power cable.
■
Disconnect and then reconnect data cable at both ends: at the back of the drive
and at the computer's connector.
■
If you have an internal HP drive, check the data connectors at both ends for bent
pins. If you find any bent pins, GENTLY and CAREFULLY straighten them with
needle-nosed pliers.
■
Check the data cable for any signs of damage. If there is damage, you may need
to replace the data cable.
Your HP drive is installed and appears in Windows Explorer,
but now other devices such as CD-ROM or DVD-ROM
drives do not appear in Windows Explorer
Check IDE/SCSI ribbon cables
Check IDE/SCSI ribbon cablesCheck IDE/SCSI ribbon cables
Check IDE/SCSI ribbon cables
You may have dislodged the IDE/SCSI ribbon cable for one of your IDE/SCSI
controllers when you installed your HP drive. Inspect all cable connections inside
Product Information Drive Specifications Interfaces Installation and Configuration
Drive Operation Tips and Techniques Software Maintenance
Troubleshooting
Warranty and Support Release Notes Discontinued Products
Page 85

hp dvd-writer
hp dvd-writerhp dvd-writer
hp dvd-writer dvd100i
dvd100idvd100i
dvd100i
Technical Support Solutions Guide 10/25/01 Installation
85
8585
85
⇐⇐⇐⇐
⇒⇒⇒⇒
your computer, disconnecting and reconnecting the cables on the devices that no
longer work.
Check data connectors for bent pins
Check data connectors for bent pinsCheck data connectors for bent pins
Check data connectors for bent pins
Check the data connectors on the drive and controller for bent pins. If you find any
bent pins, GENTLY and CAREFULLY straighten them with needle-nosed pliers.
Check external SCSI cables
Check external SCSI cablesCheck external SCSI cables
Check external SCSI cables
You may have dislodged the SCSI cable for one of your SCSI devices when you
installed your HP drive. Inspect all SCSI cable connections, disconnecting and
reconnecting the cables on the devices that no longer work.
Change drive letter assignments
Change drive letter assignmentsChange drive letter assignments
Change drive letter assignments
If you had assigned a fixed drive letter to your old device(s), Windows may now be
assigning that letter to your HP drive, making it unavailable when the fixed letter
assignment is attempted. Cancel all fixed drive letter assignments, or manually
assign new fixed letters for all devices.
Windows assigned the wrong drive letters to your drives
Unless you specify otherwise, Windows assigns drive letters based on the hardware
features of your computer and its components. This means that, in some cases,
installing a new drive shuffles the drive letters not only of your new drive, but of
those that were already installed.
If you want to assign drive letters to your CD or DVD drives manually, follow the
procedure for your version of Windows.
Windows 95/98/Me
Windows 95/98/MeWindows 95/98/Me
Windows 95/98/Me
1.
1.1.
1. Click the Start
StartStart
Start button, point to Settings
SettingsSettings
Settings, and click Control Panel
Control PanelControl Panel
Control Panel.
2.
2.2.
2. Double-click the System
SystemSystem
System icon.
3.
3.3.
3. Click the Device Manager
Device ManagerDevice Manager
Device Manager tab.
4.
4.4.
4. Click the View devices by type
View devices by typeView devices by type
View devices by type radio button.
5.
5.5.
5. Double-click the CDROM
CDROMCDROM
CDROM icon.
6.
6.6.
6. Double-click a CD-ROM drive in the list.
7.
7.7.
7. Click the Settings
SettingsSettings
Settings tab.
8.
8.8.
8. Set the Start
StartStart
Start drive letter
drive letterdrive letter
drive letter and Finish drive letter
Finish drive letterFinish drive letter
Finish drive letter settings to the desired letter.
9.
9.9.
9. Click the OK
OKOK
OK button.
10.
10.10.
10. Repeat steps 6 through 9 for each remaining drive in the list.
11.
11.11.
11. Make sure no two drives are assigned to the same letter.
Windows NT
Windows NTWindows NT
Windows NT
1.
1.1.
1. Log on with Administrator privileges.
2.
2.2.
2. Click the Start
StartStart
Start button, point to Programs
ProgramsPrograms
Programs, point to Administrative Controls
Administrative Controls Administrative Controls
Administrative Controls
(Common)
(Common)(Common)
(Common), and click Disk Administrator
Disk AdministratorDisk Administrator
Disk Administrator.
3.
3.3.
3. Click a CD-ROM or DVD-ROM device.
4.
4.4.
4. Click the Too ls
ToolsTools
Tools menu, then click Assign Drive Letter
Assign Drive LetterAssign Drive Letter
Assign Drive Letter.
5.
5.5.
5. Click the Assign Drive Letter
Assign Drive LetterAssign Drive Letter
Assign Drive Letter radio button.
6.
6.6.
6. Select the desired drive letter from the pull-down list.
7.
7.7.
7. Click the OK
OKOK
OK button.
8.
8.8.
8. Repeat steps 3 through 7 for each remaining drive.
9.
9.9.
9. Make sure no two drives are assigned to the same letter.
Windows 2000
Windows 2000Windows 2000
Windows 2000
1.
1.1.
1. Log on with Administrator privileges.
2.
2.2.
2. Click the Start
StartStart
Start button, point to Settings
SettingsSettings
Settings, then click Control Panel
Control PanelControl Panel
Control Panel.
3.
3.3.
3. Double-click Administrative Tools
Administrative ToolsAdministrative Tools
Administrative Tools.
4.
4.4.
4. Double-click Computer Management
Computer ManagementComputer Management
Computer Management.
5.
5.5.
5. Highlight the Storage
StorageStorage
Storage icon in the left pane.
6.
6.6.
6. Double-click the Disk Management
Disk ManagementDisk Management
Disk Management icon in the right pane.
7.
7.7.
7. Right-click the first drive whose drive letter you want to change.
8.
8.8.
8. Click the Assign New Drive Letter and Path
Assign New Drive Letter and PathAssign New Drive Letter and Path
Assign New Drive Letter and Path option on the popup menu.
9.
9.9.
9. Select the desired drive letter from the pull-down list.
Product Information Drive Specifications Interfaces Installation and Configuration
Drive Operation Tips and Techniques Software Maintenance
Troubleshooting
Warranty and Support Release Notes Discontinued Products
Page 86

hp dvd-writer
hp dvd-writerhp dvd-writer
hp dvd-writer dvd100i
dvd100idvd100i
dvd100i
Technical Support Solutions Guide 10/25/01 Making Audio CDs
86
8686
86
⇐⇐⇐⇐
⇒⇒⇒⇒
10.
10.10.
10. Click the OK
OKOK
OK button.
11.
11.11.
11. Repeat steps 5 through 8 for each remaining drive.
The HP drive's software installation fails
Uninstall the HP drive software:
Uninstall the HP drive software:Uninstall the HP drive software:
Uninstall the HP drive software:
1.
1.1.
1. Click the Start
StartStart
Start button, point to Settings
SettingsSettings
Settings, and click Control Panel
Control PanelControl Panel
Control Panel.
2.
2.2.
2. Double-click the Add/Remove Programs
Add/Remove ProgramsAdd/Remove Programs
Add/Remove Programs icon.
3.
3.3.
3. Scroll through the list of installed programs.
4.
4.4.
4. When you see your HP drive's entry, click it.
5.
5.5.
5. Click the OK
OKOK
OK button.
6.
6.6.
6. Follow all on-screen instructions to uninstall the software.
Reinstall your HP drive's software.
Reinstall your HP drive's software.Reinstall your HP drive's software.
Reinstall your HP drive's software.
Making Audio CDs
HP RecordNow reported an error while copying an audio CD
or you hear clicks and pops when playing audio CDs
Try using a different source drive
Try using a different source driveTry using a different source drive
Try using a different source drive
Use another CD-ROM or DVD-ROM drive, if one is available.
You can also use your HP drive as both the source and destination drive. HP
RecordNow copies the files or audio tracks from the CD to your hard disk, then back
to the CD-R or CD-RW disc. Make sure your hard disk has enough free space to hold
the entire contents of the CD you want to copy.
To change the source drive for an exact disc copy, click the Change
ChangeChange
Change button in the
device panel on the lower-right side of the RecordNow main window and select the
desired drive from the pull-down list.
When you change source drives or adjust the write speed, you should test your
record operations before making the actual recording. To have HP RecordNow test
your record operations before writing to a disc, follow these steps:
1.
1.1.
1. Click the Program Options button on the HP RecordNow main window.
2.
2.2.
2. Click the Advanced tab on the Program Options dialog box.
3.
3.3.
3. Check the Test operation before recording discs box.
HP RecordNow reported an incorrect file format
The specified file cannot be recorded to the CD because it is not in the correct format.
MP3 and WAV files must be recorded as 16-bit stereo files using a rate ranging from
22KHz to 44.1KHz.
See also:
■
HP RecordNow reported that there was a problem reading the disc being copied
on page 83.
■
HP RecordNow reported a write error on page 84.
■
HP RecordNow reported that your HP drive is in use on page 84.
Reading CDs
A computer CD-ROM drive cannot read a recorded disc
The disc is scratched, damaged, or dirty
The disc is scratched, damaged, or dirtyThe disc is scratched, damaged, or dirty
The disc is scratched, damaged, or dirty
If the disc is scratched or damaged, it may be unreadable. If the disc is dirty, gently
clean it to remove fingerprints, dust, and smudges:
1.
1.1.
1. Use a mild, nonabrasive soapy solution on a nonabrasive cloth to clean the shiny
side of the disc.
2.
2.2.
2. Wipe from the center to the edge of the disc.
3.
3.3.
3. Dry the disc completely before reinserting it into the CD-ROM drive.
Try reading the disc in an HP drive, if available
Try reading the disc in an HP drive, if availableTry reading the disc in an HP drive, if available
Try reading the disc in an HP drive, if available
Otherwise, try reading the disc in a different CD-ROM drive.
Product Information Drive Specifications Interfaces Installation and Configuration
Drive Operation Tips and Techniques Software Maintenance
Troubleshooting
Warranty and Support Release Notes Discontinued Products
Page 87

hp dvd-writer
hp dvd-writerhp dvd-writer
hp dvd-writer dvd100i
dvd100idvd100i
dvd100i
Technical Support Solutions Guide 10/25/01 Reading CDs
87
8787
87
⇐⇐⇐⇐
⇒⇒⇒⇒
Some CD-ROM drives read discs very slowly if Read Ahead
capabilities are enabled in Windows 95/98/Me.
Turn off
Turn off Turn off
Turn off
Read Ahead
Read AheadRead Ahead
Read Ahead
capabilities for the drive.
capabilities for the drive. capabilities for the drive.
capabilities for the drive.
Windows 95/98/Me only:
1.
1.1.
1. Click the Start
StartStart
Start button, select Settings
SettingsSettings
Settings, and click Control Panel
Control PanelControl Panel
Control Panel.
2.
2.2.
2. Double-click the System
SystemSystem
System icon.
3.
3.3.
3. Click the Performance
PerformancePerformance
Performance tab on the System Properties
System PropertiesSystem Properties
System Properties dialog box.
4.
4.4.
4. Click the File System
File SystemFile System
File System button in the Advanced settings
Advanced settingsAdvanced settings
Advanced settings box.
5.
5.5.
5. Click the CD-ROM
CD-ROMCD-ROM
CD-ROM tab.
6.
6.6.
6. Select No read-ahead
No read-aheadNo read-ahead
No read-ahead from the Optimize access pattern for:
Optimize access pattern for:Optimize access pattern for:
Optimize access pattern for: pull-down box.
7.
7.7.
7. Click the OK
OKOK
OK button on the File System Properties
File System PropertiesFile System Properties
File System Properties dialog box.
8.
8.8.
8. Click the OK
OKOK
OK button on the System Properties
System PropertiesSystem Properties
System Properties dialog box.
9.
9.9.
9. Windows prompts you to restart your computer so that the change can take
effect.
If these suggestions do not solve the problem, try these
possible solutions:
You used CD-R media
You used CD-R mediaYou used CD-R media
You used CD-R media
Try closing the disc with the HP DLA wizard before reading it with a CD-ROM drive
If closing the disc fails to solve the problem, the CD-ROM drive is probably not Multi-
Read compatible. To make a data disc that is compatible with non-Multi-Read CDROM drives, use HP RecordNow to write the CD.
(When you close a CD-R disc, you cannot reopen it to add more data with DLA.)
You formatted a disc and copied files to it using drive letter access (Windows Explorer,
etc.)
If the CD-ROM drive you are using to read the recorded CD-R disc can successfully
read commercially-produced CD-ROM discs, the drive is probably not capable of
reading any form of recordable CD media.
If read errors occur when you use the CD-ROM drive to read both commerciallyproduced CD-ROM discs and CD-R media, the CD-ROM drive or its controller are
faulty, the driver for the CD-ROM drive or controller is corrupted, or your Windows
installation has become corrupted.
You used CD-RW media
You used CD-RW mediaYou used CD-RW media
You used CD-RW media
If your CD-ROM drive can read formatted CD-RW discs but the drive lacks the
necessary software, you can locate the software in the ENGLISH/UDFREADER
directory on the software installation disc.
If the UDF Reader doesn't enable you to read the disc, the CD-ROM drive is probably
not Multi-Read compatible. To make a data disc that is compatible with non-MultiRead CD-ROM drives, use HP RecordNow and CD-R media.
The CD-ROM drive you are using is probably not Multi-Read compatible. Use CD-R
media when you want to read discs using this drive.
If you're trying to read an 80-minute CD
See 80-Minute CDs on page 88.
A home, auto, or portable stereo CD player cannot play a
recorded disc
Make sure this is an audio CD, not a data CD
Make sure this is an audio CD, not a data CDMake sure this is an audio CD, not a data CD
Make sure this is an audio CD, not a data CD
Home, auto, and portable stereo CD players cannot read data discs.
Use the correct media
Use the correct mediaUse the correct media
Use the correct media
Make sure you use CD-R discs for recording, not a CD-RW discs. Most stereo CD
players cannot read CD-RW discs. If you used a CD-RW disc, you can easily transfer
its contents to a CD-R disc using the "Make an exact copy" feature of the HP
RecordNow software. After you copy the CD-RW disc, you can erase and reuse it.
If an error occurs while recording
If an error occurs while recordingIf an error occurs while recording
If an error occurs while recording
If HP RecordNow reported a serious error while recording an audio disc, the final state
of the disc is uncertain. It may or may not play the audio tracks that had been
recorded before the error occurred. Record the audio disc again.
Product Information Drive Specifications Interfaces Installation and Configuration
Drive Operation Tips and Techniques Software Maintenance
Troubleshooting
Warranty and Support Release Notes Discontinued Products
Page 88
hp dvd-writer
hp dvd-writerhp dvd-writer
hp dvd-writer dvd100i
dvd100idvd100i
dvd100i
Technical Support Solutions Guide 10/25/01 High Speed CDs
88
8888
88
⇐⇐⇐⇐
⇒⇒⇒⇒
You hear clicks, pops, and skips
You hear clicks, pops, and skipsYou hear clicks, pops, and skips
You hear clicks, pops, and skips
If your audio disc plays but you hear clicks, pops, and skips, the CD was not recorded
properly. See Making Audio CDs on page 86 for more information on this problem.
See Also:
■
The disc is scratched, damaged, or dirty on page 86.
■
80-Minute CDs on page 88.
A computer DVD-ROM drive cannot read a recorded disc
Try reading the disc in an HP drive, if available
Try reading the disc in an HP drive, if availableTry reading the disc in an HP drive, if available
Try reading the disc in an HP drive, if available
Otherwise, try reading the disc in a different CD-ROM drive.
Some DVD-ROM drives read discs very slowly if Read Ahead
capabilities are enabled in Windows 95/98/Me
See Turn off Read Ahead capabilities for the drive. on page 87.
A DVD movie player cannot play a recorded disc
Make sure this is an audio CD, not a data CD.
Make sure this is an audio CD, not a data CD.Make sure this is an audio CD, not a data CD.
Make sure this is an audio CD, not a data CD.
DVD movie players cannot read data discs.
Use the correct media
Use the correct mediaUse the correct media
Use the correct media
Most DVD movie players can play audio CDs that are recorded on CD-RW media.
Most DVD movie players cannot play audio CDs recorded on CD-R media. If you
need to play recorded audio CDs in a DVD movie player, try recording on each
media type, CD-R and CD-RW. If your DVD movie player can play CD-R discs, then
always use CD-R media as these discs will also play in stereo CD players. If your DVD
movie player only plays CD-RW discs, always use that media. Note that most stereo
CD players cannot play CD-RW discs.
See Also:
■
The disc is scratched, damaged, or dirty on page 86.
■
80-Minute CDs on page 88.
High Speed CDs
A high speed CD-RW disc was used in a drive that does not
support high speed
New discs are available that support CD-RW writing speeds of 8X or higher. Older
drives that support 1X to 4X CD-RW writing speeds do not support writing to highspeed discs. In this case, you cannot use high speed CD-RW media, and must
purchase 2X or 4X certified CD-RW media.
To determine if this applies to your problem, examine the logo on
the front of the CD-RW drive. If the drive does not have the "high
speed" designation, do not attempt to use high speed CD-RW media
rated at 8X or higher.
80-Minute CDs
A computer CD-ROM or HP drive cannot read an 80-minute
CD
The CD is scratched, damaged, or dirty
The CD is scratched, damaged, or dirtyThe CD is scratched, damaged, or dirty
The CD is scratched, damaged, or dirty
■
If the CD is scratched or damaged, it may be unreadable.
■
If the CD is dirty, gently clean it to remove fingerprints, dust, and smudges. For
more information, see Reading CDs on page 86.
Try reading the CD in a different drive
Try reading the CD in a different driveTry reading the CD in a different drive
Try reading the CD in a different drive
In some cases, you can try using a different drive to read the CD.
Use the drive that was used to write the CD
Use the drive that was used to write the CDUse the drive that was used to write the CD
Use the drive that was used to write the CD
If you're using a drive different from the one used to write the data, try reading the CD
in the original drive.
An error occurred while recording
An error occurred while recordingAn error occurred while recording
An error occurred while recording
If an error occurred while writing the CD, you may not be able to read some or all of
the CD. You may not be able to accurately verify a recording error especially if you
did not record the CD.
Product Information Drive Specifications Interfaces Installation and Configuration
Drive Operation Tips and Techniques Software Maintenance
Troubleshooting
Warranty and Support Release Notes Discontinued Products
Page 89
hp dvd-writer
hp dvd-writerhp dvd-writer
hp dvd-writer dvd100i
dvd100idvd100i
dvd100i
Technical Support Solutions Guide 10/25/01 80-Minute CDs
89
8989
89
⇐⇐⇐⇐
⇒⇒⇒⇒
Use HP media
Use HP mediaUse HP media
Use HP media
HP drives can read most 80-minute CDs. However, the manufacturing process for
80-minute CDs varies and reliability problems can occur. To reduce compatibility
problems with 80-minute CDs, HP recommends that you use HP-brand 80-minute
media or use a 74-minute disc. If experiencing difficulty with non-HP media, please
contact the manufacturer for support.
A home, auto, or portable stereo CD player cannot read an 80-
A home, auto, or portable stereo CD player cannot read an 80-A home, auto, or portable stereo CD player cannot read an 80-
A home, auto, or portable stereo CD player cannot read an 80-
minute CD
minute CDminute CD
minute CD
Many home, auto, or portable CD players only read 74-minute CDs.
You cannot write to an 80-minute CD using your HP drive
HP supported drives
HP supported drivesHP supported drives
HP supported drives
All HP DVD-Writers and most HP CD-Writers can write to 80-minute media. The
following HP CD-Writer drives cannot write to 80-minute media: the 4020, 6020,
7100 and 7200 series drives. Ensure that you are using a supported HP CD-Writer
drive when recording to 80-minute media.
You are using an HP CD-R 80-minute CD
You are using an HP CD-R 80-minute CDYou are using an HP CD-R 80-minute CD
You are using an HP CD-R 80-minute CD
If you are using an HP CD-R 80-minute CD and a supported HP CD-Writer drive and
you cannot write to the disc, you may be experiencing a general write problem also
associated with 74-minute CDs. For more information regarding write errors, see
Software Errors on page 83 or Making Audio CDs on page 86.
You are using a non-HP CD-R 80-minute CD
You are using a non-HP CD-R 80-minute CDYou are using a non-HP CD-R 80-minute CD
You are using a non-HP CD-R 80-minute CD
HP drives can write to most non-HP 80-minute CDs. However, the manufacturing
process for 80-minute media varies and reliability problems can occur. If you are
using non-HP CD-R 80-minute CDs and you are experiencing write problems, HP
recommends switching to 74-minute CDs or HP-brand CD-R 80-minute CDs. You
could also contact the CD's manufacturer for support.
Supported HP CD-Writer Drives for 80-Minute CDs
Supported HP CD-Writer Drives for 80-Minute CDsSupported HP CD-Writer Drives for 80-Minute CDs
Supported HP CD-Writer Drives for 80-Minute CDs
Table 28
Table 28 Table 28
Table 28 Supported HP CD-Writer Drives for 80-minute CDs
Drive Model Hardware is Capable Software is Capable
4020i no no
6020 series no no
7100 series no no
7200 series no no
7500 series yes yes
8100i series Writes up to 78 minutes, 30
seconds on an 80-minute CD
yes
8200 series yes yes
8270e series yes no
M820e series yes yes
9100 series yes yes
9200 series yes yes
9300 series yes yes
9500 series yes yes
9600 series yes yes
9700 series yes yes
9900 series yes yes
Product Information Drive Specifications Interfaces Installation and Configuration
Drive Operation Tips and Techniques Software Maintenance
Troubleshooting
Warranty and Support Release Notes Discontinued Products
Page 90

hp dvd-writer
hp dvd-writerhp dvd-writer
hp dvd-writer dvd100i
dvd100idvd100i
dvd100i
Technical Support Solutions Guide 10/25/01 Unable to Hear Music
90
9090
90
⇐⇐⇐⇐
⇒⇒⇒⇒
Unable to Hear Music
You're unable to hear audio through the front headphone jack
If you can't hear audio through the headphone jack on the front of your HP drive, you
can follow the steps for your version of Windows to enable the headphone jack and
volume control. You will only be able to listen to an audio CD that will play in a
standard CD audio player. CDs with MP3 or Wave files cannot be heard through the
headphone jack but must be listened to through a sound card.
If you do follow these steps to enable the headphone jack, you will not be able to
hear music through your speakers unless an audio cable is connected to your HP
drive and a sound card. To enable the headphone jack on HP CD/DVD drives, follow
the procedures for your version of Windows.
Windows 2000 Professional
Windows 2000 ProfessionalWindows 2000 Professional
Windows 2000 Professional
Enabling the headphone jack in Windows 2000 Professional
1.
1.1.
1. Click the Start
StartStart
Start button, select Settings
SettingsSettings
Settings, and click Control Panel
Control PanelControl Panel
Control Panel.
2.
2.2.
2. Double-click the System
SystemSystem
System icon.
3.
3.3.
3. Click the Hardware
HardwareHardware
Hardware tab.
4.
4.4.
4. Click the Device Manager
Device ManagerDevice Manager
Device Manager button.
5.
5.5.
5. Double-click DVD/CD-ROM
DVD/CD-ROMDVD/CD-ROM
DVD/CD-ROM drives
drivesdrives
drives and double-click on the name of the drive(s)
you want to enable.
6.
6.6.
6. Click Properties
PropertiesProperties
Properties.
7.
7.7.
7. Under Digital CD Playback, uncheck the box next to Enable digital CD audio
Enable digital CD audio Enable digital CD audio
Enable digital CD audio
for this CD-ROM device
for this CD-ROM devicefor this CD-ROM device
for this CD-ROM device. (To uncheck a box, simply click on it.)
8.
8.8.
8. Click OK
OKOK
OK.
Windows Me
Windows MeWindows Me
Windows Me
Enabling the headphone jack in Windows Me
1.
1.1.
1. Click the Start
StartStart
Start button, select Settings
SettingsSettings
Settings, and click Control Panel
Control PanelControl Panel
Control Panel.
2.
2.2.
2. Double-click the System
SystemSystem
System icon.
3.
3.3.
3. Click the Device Manager
Device ManagerDevice Manager
Device Manager tab.
4.
4.4.
4. Double-click CD-ROM drives
CD-ROM drivesCD-ROM drives
CD-ROM drives and double-click on the name of the drive(s) you
want to enable.
5.
5.5.
5. Click Properties
PropertiesProperties
Properties.
6.
6.6.
6. Under Digital CD Playback, uncheck the box next to Enable digital CD audio
Enable digital CD audio Enable digital CD audio
Enable digital CD audio
for this CD-ROM device
for this CD-ROM devicefor this CD-ROM device
for this CD-ROM device. (To uncheck a box, simply click on it.)
7.
7.7.
7. Click OK
OKOK
OK.
Windows 98
Windows 98Windows 98
Windows 98
Enabling the headphone jack in Windows 98
1.
1.1.
1. Click the Start
StartStart
Start button, select Settings
SettingsSettings
Settings, and click Control Panel
Control PanelControl Panel
Control Panel.
2.
2.2.
2. Double-click the Multimedia
MultimediaMultimedia
Multimedia icon.
3.
3.3.
3. In the Multimedia Properties Windows
Multimedia Properties WindowsMultimedia Properties Windows
Multimedia Properties Windows, click the CD Music
CD MusicCD Music
CD Music tab.
4.
4.4.
4. Under Default CD-ROM drive for playing CD music
Default CD-ROM drive for playing CD musicDefault CD-ROM drive for playing CD music
Default CD-ROM drive for playing CD music, select the name of the
drive letter for your HP drive in the scroll window.
5.
5.5.
5. Uncheck the Enable digital CD audio for this CD-ROM device
Enable digital CD audio for this CD-ROM deviceEnable digital CD audio for this CD-ROM device
Enable digital CD audio for this CD-ROM device. (To uncheck a
box, simply click on it.)
6.
6.6.
6. Click OK
OKOK
OK.
Windows XP
Windows XPWindows XP
Windows XP
Enabling the headphone jack in Windows XP
1.
1.1.
1. Click the Start
StartStart
Start button, select Settings
SettingsSettings
Settings, and click Control Panel
Control PanelControl Panel
Control Panel.
2.
2.2.
2. Click the Performance and Maintenance
Performance and MaintenancePerformance and Maintenance
Performance and Maintenance icon.
3.
3.3.
3. Click the System
SystemSystem
System icon.
4.
4.4.
4. Click the Hardware
HardwareHardware
Hardware tab.
5.
5.5.
5. Click the Device Manager
Device ManagerDevice Manager
Device Manager button.
6.
6.6.
6. Double-click DVD/CD-ROM drives
DVD/CD-ROM drivesDVD/CD-ROM drives
DVD/CD-ROM drives and double-click on the name of the drive(s)
you want to enable.
7.
7.7.
7. Click Properties
PropertiesProperties
Properties.
8.
8.8.
8. Under Digital CD Playback
Digital CD PlaybackDigital CD Playback
Digital CD Playback, uncheck the box next to Enable digital CD audio
Enable digital CD audio Enable digital CD audio
Enable digital CD audio
for this CD-ROM device
for this CD-ROM devicefor this CD-ROM device
for this CD-ROM device. (To uncheck a box, simply click on it.)
9.
9.9.
9. Click OK
OKOK
OK.
Product Information Drive Specifications Interfaces Installation and Configuration
Drive Operation Tips and Techniques Software Maintenance
Troubleshooting
Warranty and Support Release Notes Discontinued Products
Page 91

hp dvd-writer
hp dvd-writerhp dvd-writer
hp dvd-writer dvd100i
dvd100idvd100i
dvd100i
Technical Support Solutions Guide 10/25/01 DLA 2.5 Known Problems
91
9191
91
⇐⇐⇐⇐
⇒⇒⇒⇒
DLA 2.5 Known Problems
DirectCD media read in DLA shows incorrect date/time
If a CD written to by DirectCD is read with DLA,
There may be a difference between the DLA date/time stamp and the date/time
stamp recorded from DirectCD.
The original date/time stamp from DirectCD is correct, with DLA’s is not.
We cannot determine if Direct CD is writing to the media correctly. DirectCD may be
the only program that can view this correctly. (PTR#5043900)
Backpack Re-Writer 4A: Not Detected by DLA.
A warning message from DLA
"No compatible CD Recordable or CD Re-Writable devices could be found on your
system." When using a Backpack Re-writer 4A.
Problem Description:
Problem Description:Problem Description:
Problem Description:
DLA appears to interfere with the driver installation for the Backpack Re-writer. If you
install the Backpack software first, restart the machine and install DLA, and restart
once more, you will not encounter any problems. However, if you install DLA first,
restart the machine and install the Backpack driver software, and restart once more,
you receive the above warning from DLA.
Despite this error message, the Backpack drive is mounted and has an assigned driveletter. You can browse the drive from My Computer and it is displayed within the
Device Manager. The drive will be recognized if you restart the computer another
time. (PTR#5043061)
Installation allowed to Network Drives
The installation path will allow choices to a network drive. The user will not be warned
of any problems. However, the user will receive an error “No compatible devices
could not be found on your system” when they try to run DLA. This is due to the
necessary driver files not available at the time of bootup.
The only solution is to have the user install all files to a local hard drive.
(PTR#5043959)
Simple Backup and DLA can’t be used simultaneously
This result is exclusive to computers with a CD-ROM and a CD-RW device or multiple
CD-RW devices installed.
When Simple Backup is in use for one optical device, it blocks access to all other
optical devices that are configured on that system.
This status is independent of device type, interface or bus configurations. Once the
Simple Backup operation is completed, access to all optical drives is restored.
The DLA product will report that the drive is in use if access is attempted during any
Simple Backup operation.
(PTR#5044123)
Very long volume label names get truncated in DLA tab and DLA properties
During the formatting of a CDR a name of 25 characters or more can be created.
However the name will be truncated at the 25th letter. (PTR#5044132)
Disabling auto-insert results in DLA not recognizing discs.
If auto-insert notification is disabled, DLA will not recognize a disc in the drive. Other
applications can see it and use the disc fine.
The user must enable auto-insert notification.
(PTR#5039302)
Incorrect error message with Win 95 and Office 97
If a user removes the media from the drive and tries to save a file through Office 97,
they will receive an error message “Floppy is not in use.” The message should be
“please insert media in drive.”
This error is limited to Windows 95 and Office 97. This may not be intuitive to the
customer. This means that the CD-RW drive does not have media inserted.
(PTR#5037772)
Two Identical drives not recognized
If there are two identical drives installed on the same system, DLA will only recognize
one drive.
This is a limitation of the CDB driver.
(PTR#5039525)
Product Information Drive Specifications Interfaces Installation and Configuration
Drive Operation Tips and Techniques Software Maintenance
Troubleshooting
Warranty and Support Release Notes Discontinued Products
Page 92

hp dvd-writer
hp dvd-writerhp dvd-writer
hp dvd-writer dvd100i
dvd100idvd100i
dvd100i
Technical Support Solutions Guide 10/25/01 DLA 2.5 Known Problems
92
9292
92
⇐⇐⇐⇐
⇒⇒⇒⇒
Win 98SE DLA causing EZ CD Creator 4 to crash
EZ CD Creator will cause a “Creatr32 caused an invalid page fault in module
Kernel32.dll” error. The error will occur with the following scenario:
1.
1.1.
1. Install DLA.
2.
2.2.
2. Install EZ CD Creator 4 and reboot.
3.
3.3.
3. Format a disk using DLA.
4.
4.4.
4. Move some files to the CD.
5.
5.5.
5. Eject the disk and close DLA.
6.
6.6.
6. Insert a new disk.
7.
7.7.
7. Start EZ CD and copy files into browser window.
8.
8.8.
8. Choose advanced and make sure it's track at once.
9.
9.9.
9. Do either create or test & create.
Error:
Creatr32 caused an invalid page fault in module Kernel32.dll
Workaround:
Installing EZCD first, then DLA fixes the problem
This error only occurs in Win 98SE.
(PTR#5038418)
Cannot change volume label in Windows ME
Cannot change the volume label on a CDRW with explorer in Win ME.
When trying to change the volume label on a CDRW in explorer, Win ME gives an
error “can't label network drive”. This is an issue with Win ME. The label command is
making an assumption that non-hard drives are network drives. Label.exe should call
into our file system via our IOCTL call with sub function 0x8 (to query if the drive is
removable)...but never does. (PTR# 5037611)
Zero length file is left at end of filled compressed media.
The last file being copied to a compressed media when the disk is filled creates the
file but is zero bytes long. DLA can not predict disc capacity when figuring in
compression.
There is no known work around. (PTR#5038660)
Network sharing is not supported with DLA
Sharing a DLA drive across a network is not supported. It can result in the host system
locking up, receiving a BSOD or rebooting.
As sharing is not a requirement for this release. (PTR#5034607)
Drive not responding to close command
DLA cannot currently close an open drive.
The user will have to manually close the drive.
(PTR#5044543)
CDR Media from Direct CD is not supported.
Media that was previously used by DirectCD cannot be used with DLA.
With an open session CDR the user will receive an error “Access is denied” when
writing data with DLA.
(PTR#5044651)
When trying to format a CDR that was formatted with Direct CD the user will receive a
“This disc is a read only disc and cannot be formatted” error (PTR#5044721)
Installer doesn't prompt to uninstall or disable built in Roxio software On
Windows XP
Windows XP comes with CD mastering software built in (Roxio). During the
installation of DLA the user will not be prompt to disable or uninstall the mastering
application.
To disable the XP mastering applet the user needs to:
1.
1.1.
1. Right click on the CD-Writer.
2.
2.2.
2. Go to Properties.
Product Information Drive Specifications Interfaces Installation and Configuration
Drive Operation Tips and Techniques Software Maintenance
Troubleshooting
Warranty and Support Release Notes Discontinued Products
Page 93

hp dvd-writer
hp dvd-writerhp dvd-writer
hp dvd-writer dvd100i
dvd100idvd100i
dvd100i
Technical Support Solutions Guide 10/25/01 DLA 2.5 Known Problems
93
9393
93
⇐⇐⇐⇐
⇒⇒⇒⇒
3.
3.3.
3. Go to Recording.
4.
4.4.
4. Remove the check from “enable CD recording on this drive”
Reboot.
(PTR#5044348)
Not formatting when drag and drop from Explorer to unformatted media
When a user attempts to use windows explorer to drag and drop a folder to an
unformatted CD-R, DLA prompts with "The disk in drive x is not formatted. Do you
want to format it now? Dialog appears: "This drive cannot be formatted". <after
pressing yes?> The media can be formatted by using the DLA toolkit or by right
clicking on the drive letter from explorer and selecting "format".
(PTR#5044715)
Product Information Drive Specifications Interfaces Installation and Configuration
Drive Operation Tips and Techniques Software Maintenance
Troubleshooting
Warranty and Support Release Notes Discontinued Products
Page 94

hp dvd-writer
hp dvd-writerhp dvd-writer
hp dvd-writer dvd100i
dvd100idvd100i
dvd100i
Technical Support Solutions Guide 10/25/01 hp dvd-writer dvd100i Warranty Information
94
9494
94
⇐⇐⇐⇐
⇒⇒⇒⇒
Chapter 10 Warranty and Support
This chapter is organized as follows:
hp dvd-writer dvd100i Warranty Information
DURATION OF LIMITED WARRANTY
Hardware - 1 Year
Software - 1 Year
The aforementioned warranty shall not apply to defects resulting from improper or
inadequate maintenance by the customer, customer-supplied software or
interfacing, unauthorized modification or misuse, operation outside of the
environmental specifications for the product, or improper site preparation and
maintenance.
In some regions, in addition to the normal local charges, fees may be charged for HP
technical support. If during your phone call, it is determined that your HP drive
requires repair, and you are within your drive's hardware-warranty period, phone
charges will be reversed.
1.
1.1.
1. HP warrants to you, the end-user customer, that HP hardware, accessories and
supplies will be free from defects in materials and workmanship after the date of
purchase, for the period specified above. If HP receives notice of such defects
during the warranty period, HP will, at its option, either repair or replace products
which prove to be defective. Replacement products may be either new or likenew.
2.
2.2.
2. 2.HP warrants to you that HP software will not fail to execute its programming
instructions after the date of purchase, for the period specified above, due to
defects in material and workmanship when properly installed and used. If HP
receives notice of such defects during the warranty period, HP will replace
software media which does not execute its programming instructions due to such
defects.
3.
3.3.
3. .HP does not warrant that the operation of HP products will be uninterrupted or
error-free. If HP is unable, within a reasonable time, to repair or replace any
product to a condition as warranted, you will be entitled to a refund of the
purchase price on a pro-rated basis upon prompt return of the product. Refunds
within the first 3 months of ownership will be refunded at 100% of purchase price.
Refunds within 3-6 months of ownership will be refunded at 85% of purchase
price. Refunds within 6-9 months of ownership will be refunded at 55% of
purchase price. Refunds within 9-12 months will be refunded at 35% of purchase
price.
4.
4.4.
4. HP products may contain remanufactured parts equivalent to new in
performance or may have been subject to incidental use.
5.
5.5.
5. Warranty does not apply to defects resulting from (a) improper or inadequate
maintenance or calibration, (b) software, interfacing, parts or supplies not
supplied by HP, (c) unauthorized modification or misuse, (d) operation outside of
the published environmental specifications for the product, or (e) improper site
preparation or maintenance.
6.
6.6.
6. HP MAKES NO OTHER EXPRESS WARRANTY OR CONDITION WHETHER
WRITTEN OR ORAL. TO THE EXTENT ALLOWED BY LOCAL LAW, ANY IMPLIED
WARRANTY OR CONDITION OF MERCHANTABILITY, SATISFACTORY QUALITY,
OR FITNESS FOR A PARTICULAR PURPOSE IS LIMITED TO THE DURATION OF
THE EXPRESS WARRANTY SET FORTH ABOVE. Some countries, states or
hp dvd-writer dvd100i Warranty Information p. 94
Product Service and Support p. 95
Support Parts List p. 95
Page 95
hp dvd-writer
hp dvd-writerhp dvd-writer
hp dvd-writer dvd100i
dvd100idvd100i
dvd100i
Technical Support Solutions Guide 10/25/01
Product Service and Support
95
9595
95
⇐⇐⇐⇐
⇒⇒⇒⇒
provinces do not allow limitations on the duration of an implied warranty, so the
above limitation or exclusion might not apply to you. This warranty gives you
specific legal rights and you might also have other rights that vary from country
to country, state to state, or province to province.
7.
7.7.
7. TO THE EXTENT ALLOWED BY LOCAL LAW, THE REMEDIES IN THIS WARRANTY
STATEMENT ARE YOUR SOLE AND EXCLUSIVE REMEDIES. EXCEPT AS
INDICATED ABOVE, IN NO EVENT WILL HP OR ITS SUPPLIERS BE LIABLE FOR
LOSS OF DATA OR FOR DIRECT, SPECIAL, INCIDENTAL, CONSEQUENTIAL
(INCLUDING LOST PROFIT OR DATA), OR OTHER DAMAGE, WHETHER BASED IN
CONTRACT, TORT, OR OTHERWISE. Some countries, States or provinces do not
allow the exclusion or limitation of incidental or consequential damages, so the
above limitation or exclusion may not apply to you.
FOR CONSUMER TRANSACTIONS IN AUSTRALIA AND NEW ZEALAND: THE
WARRANTY TERMS CONTAINED IN THIS STATEMENT, EXCEPT TO THE EXTENT
LAWFULLY PERMITTED, DO NOT EXCLUDE, RESTRICT OR MODIFY AND ARE IN
ADDITION TO THE MANDATORY STATUTORY RIGHTS APPLICABLE TO THE SALE OF
THIS PRODUCT TO YOU.
This information is subject to change without notice and is provided "as is" with no
warranty. Hewlett-Packard shall not be liable for any direct, indirect, special,
incidental, or consequential damages in connection with the use of this material.
Product Service and Support
Fee-based technical support. In some regions, in addition to the normal local
charges, fees may be charged for HP technical support. If during your phone call, it is
determined that your hp dvd-writer requires repair, and you are within your
hp dvd-writer hardware-warranty period, phone charges will be reversed.
Service and support for the hp dvd-writer drive can be accessed from the following
web sites:
http: //www. hp. com/support/dvd-compatibility
http: //www. hp. com/support/dvd-capture
http: //www. hp. com/support/dvd-mydvd
http: //www. hp. com/support/dla
At those sites you will find information on the following:
■
Electronic Services
■
E-Mail
■
FTP Site
■
Te le ph o ne
Support Parts List
The parts available for the hp dvd-writer dvd100i drive are listed in this manual in:
■
Parts for C9619A (Internal) IDE hp dvd-writer dvd100i Drive on page 13.
Product Information Drive Specifications Interfaces Installation and Configuration
Drive Operation Tips and Techniques Software Maintenance
Troubleshooting Warranty and Support Release Notes Discontinued Products
Page 96

hp dvd-writer
hp dvd-writerhp dvd-writer
hp dvd-writer dvd100i
dvd100idvd100i
dvd100i
Technical Support Solutions Guide 10/25/01 HP CD-WRITER, hp dvd-writer
96
9696
96
⇐⇐⇐⇐
⇒⇒⇒⇒
Chapter 11 Release Notes
This chapter contains the README text for applications shipped with
hp dvd-writer dvd100i drives and is organized as follows:
HP CD-WRITER, hp dvd-writer
HP CD-Writer, HP DVD-Writer
This document contains information that may not be available in other areas of the
software or the documentation.
Windows NT 4.0 ATAPI Driver Issues
Certain ATAPI drivers may cause the HP CD-Writer to perform incorrectly on some
NT 4.0 machines. Changing the installed ATAPI driver to the standard mass storage
controller driver (atapi.sys) that comes with Windows NT 4.0 should resolve the
problem.
To change to the standard mass storage driver go the Control Panel, double-click on
SCSI adapters, and select the appropriate IDE controller. Then click on the Drivers
tab, select the currently loaded driver, and click Remove. Then click the Add button,
and select the standard mass storage controller driver (atapi.sys).
The drivers for which problems have been seen include the Intel PIIX driver
(piixide.sys) versions less than 2.04, and the Iomega ZIP IDE/ATAPI driver version 1.1.
HP CD-WRITER, hp dvd-writer p. 96
HP RecordNow, Version 3.0 p. 97
HP DLA, Version 2.5 p. 98
HP Simple Backup p. 100
Page 97
hp dvd-writer
hp dvd-writerhp dvd-writer
hp dvd-writer dvd100i
dvd100idvd100i
dvd100i
Technical Support Solutions Guide 10/25/01 HP RecordNow, Version 3.0
97
9797
97
⇐⇐⇐⇐
⇒⇒⇒⇒
HP RecordNow, Version 3.0
Copyright 2001 VERITAS Software Corp. All Rights Reserved.
This README.TXT file provides late-breaking information that supplements HP
RecordNow on-line help. If information in help file conflicts with information
presented here, the information in this README.TXT file should be considered correct
and the most recent.
How to use this document
To view README.TXT on your screen in Notepad, maximize the Notepad window.
To print README.TXT, open it in Notepad, WordPad, or another word processor. Then
select the entire document and format the text in 10-point Courier font before
printing.
The following subjects are discussed:
1. Reading Audio Discs
2. Delay After Cancel
3. Copying CDs
4. Mastering Limitations
5. Conflicts with Easy CD Creator 4
6. Enable DMA to Reduce Buffer Underruns
7. Media Compatibility
1. Reading Audio Discs
If you create an Audio CD using a CD-RW disc, you will only be able to play this disc
on Multi-Read capable CD players. For best results, it is recommended that Audio
CDs be created using CD-R media.
For DVD players, please consult your DVD Owner’s Manual in order to determine
which type of media will provide the best results.
2. Delay After Cancel
A delay of a few seconds to several minutes may result after canceling an operation.
The length of delay will depend upon the drive model, type of media used, and the
point at which the operation was cancelled.
3. Copying CDs
Copying Audio CDs may take longer than copying Data CDs on some models of
drives. This will vary between models, and can be affected by the quality of the
source media.
4. Mastering Limitations
HP RecordNow can record files that contain file names up to 110 characters in length.
This maximum length is a limitation of the recording file system, and cannot be
exceeded.
5. Conflicts with Adaptec Easy CD Creator 4
If you are using HP RecordNow on a system containing Windows 2000 and Adaptec
Easy CD Creator 4, you may experience a conflict. You will not encounter this
problem if your version of Adaptec software is v4.02 or greater.
6. Enable DMA to Reduce Buffer Underruns
If you experience buffer underruns, try enabling DMA (Direct Memory Access) on
your computer. See your computer’s documentation for instructions on how to do
this.
7. Media Compatibility
Some consumer disc players cannot read CD-R or CD-RW media.
If you are experiencing problems reading certain types of media, please check your
player’s documentation to ensure that your device is capable of reading the media.
Product Information Drive Specifications Interfaces Installation and Configuration
Drive Operation Tips and Techniques Software Maintenance
Troubleshooting Warranty and Support Release Notes Discontinued Products
Page 98
hp dvd-writer
hp dvd-writerhp dvd-writer
hp dvd-writer dvd100i
dvd100idvd100i
dvd100i
Technical Support Solutions Guide 10/25/01 HP DLA, Version 2.5
98
9898
98
⇐⇐⇐⇐
⇒⇒⇒⇒
HP DLA, Version 2.5
Copyright 2001 VERITAS Software, Inc. All Rights Reserved.
This file contains important information which supplements the On-line Help. The
following subjects are discussed:
1. Getting Started
2. System Requirements
3. Multiple Device Support
4. Upgrading HP DLA
5. Sharing a HP DLA Drive
6. Compressed Data
7. Incompatibility with Direct CD
8. Incompatibility with MS Backup
9. Problems with High Speed CD-RW Media
10. Problems formatting previously formatted DVD/CD-RW media.
11. Problems reading CD-R media
12. Multiple drive incompatibilities
13. Enabling/Disabling HP DLA
14. Two identical drives
15. Conflict with Nero software
16. Issue with USB and Firewire (1394) devices
1. Getting Started
This product enables access to your optical drive from Windows. You can now use
your CDR(W) or DVD recorder for file storage and retrieval as if it were a hard drive or
floppy disk.
Discs must be formatted for HP DLA use.
Refer to the on-line help for configuration and formatting instructions.
HP DLA may not function properly if Auto Insert Notification (AutoRun) is disabled. If
you encounter difficulties with HP DLA, please ensure that the AutoRun feature of
your operating system is enabled.
2. System Requirements
The system requirements for this product include:
■
IBM or 100%-compatible Pentium 133 or higher, at least 32 Megabytes of RAM,
and 10 Megabytes of free disk space
3. Multiple Device Support
If you have more than one supported optical device attached to your system, HP DLA
will only be able to access one device at a time.
4. Upgrading HP DLA
While upgrading HP DLA to a Windows NT or Windows 2000 machine, a message
might display stating that a driver has not been installed.
This does not affect the actual installation. Continue with the installation as normal
and then reboot at the end of the installation process. The correct driver will be
installed.
5. Sharing a HP DLA Drive
If you share a HP DLA drive, you may encounter data transfer issues. Sharing of HP
DLA drives is not supported with this release, and not recommended for reliable data
transfer.
Product Information Drive Specifications Interfaces Installation and Configuration
Drive Operation Tips and Techniques Software Maintenance
Troubleshooting Warranty and Support Release Notes Discontinued Products
Page 99
hp dvd-writer
hp dvd-writerhp dvd-writer
hp dvd-writer dvd100i
dvd100idvd100i
dvd100i
Technical Support Solutions Guide 10/25/01 HP DLA, Version 2.5
99
9999
99
⇐⇐⇐⇐
⇒⇒⇒⇒
6. Compressed Data
If you format a disc with compression, the disc will only be readable on a computer
with HP DLA installed.
7. Incompatibility with Direct CD
HP DLA and Direct CD perform similar functions and are incompatible. Some
computers equipped with the Windows XP operating system will have Direct CD
preinstalled at the factory. Please uninstall Direct CD then continue installing HP
DLA.
8. Incompatibility with MS Backup
If you experience conflict with MS Backup and HP DLA, please eject all HP DLA discs
or manually disable HP DLA during the backup process.
9. Problems with High Speed CD-RW Media
If you experience problems using high speed media with a low speed drive, please
check with the manufacturer of your drive to determine what type of media is
supported.
10. Problems formatting previously formatted DVD/CD-RW
media.
Media previously formatted using another application may not format properly
using HP DLA. To correct this try one of the following procedures:
Option 1:
Option 1:Option 1:
Option 1:
Full format or blank the media with the application used to originally format the disc.
Option 2:
Option 2:Option 2:
Option 2:
From a command line prompt type the following command (where <drive letter> is the
HP DLA device):
■
DLA format /F /H <drive letter>: none
For example, if your disc writing device is drive E, type:
DLA format /F /H e: none
Then format again normally.
11. Problems reading CD-R media
For a non Multi-Read CD-ROM drive to read a CD-R disc, the media must be made
"compatible." This media must not be compressed.
12. Multiple drive incompatibilities
If you have multiple IDE devices connected to the same IDE channel, you may
experience problems using HP DLA simultaneously with other mastering software. To
remedy this connect your IDE devices to different IDE channels (see your computer’s
User Guide for more information).
13. Enabling/Disabling HP DLA
To enable or disable HP DLA, right click on the drive in Windows Explorer then choose
either Enable or Disable.
14. Two identical drives
If you have two identical optical drives installed on your computer, HP DLA will only
recognize one.
15. Conflict with Nero software
If Nero disc mastering software is installed on your computer, HP DLA will not
recognize blank discs. The work-around for this conflict is to temporarily uninstall
Nero’s software. Nero products do not affect HP DLA’s ability to read discs containing
data.
16. Issue with USB and Firewire (1394) devices
If you have a USB or other "hot-swappable" device and unplug it from your
computer, HP DLA will not recognize the drive when it’s plugged back in unless the
computer is restarted.
Product Information Drive Specifications Interfaces Installation and Configuration
Drive Operation Tips and Techniques Software Maintenance
Troubleshooting Warranty and Support Release Notes Discontinued Products
Page 100
hp dvd-writer
hp dvd-writerhp dvd-writer
hp dvd-writer dvd100i
dvd100idvd100i
dvd100i
Technical Support Solutions Guide 10/25/01 HP Simple Backup
100
100100
100
⇐⇐⇐⇐
⇒⇒⇒⇒
HP Simple Backup
Copyright 2000 VERITAS Software Corp. All Rights Reserved.
This README.TXT file provides late-breaking information that supplements the HP
Simple Backup user’s manual and on-line help. If information in the user’s manual or
help file conflicts with information presented here, the information in this
README.TXT file should be considered correct and the most recent.
The following subjects are discussed:
1. Multiple SCSI Device Setups on page 100
2. SCSI Controller on page 100
3. Delay After Media Format, Media Initialize, or Canceled Backup on page 100
4. CD-R Overwrite on page 100
5. Disaster Recovery on FAT32 or DBCS Systems on page 100
6. DOS ASPI Drivers on page 101
7. Erasing CD-RW Media on page 101
8. Booting from CD on page 101
9. USB and Firewire (1394) Devices on page 101
10. Disaster Recovery Configuration on page 101
11. Sparse Files on page 101
12. HP Simple Backup and Active Desktop Applications on page 101
13. File Permissions for Backups and Restores on page 101
14. Restoring Data from CD-RW Media on page 101
15. Disaster Recovery for Windows 2000 on page 101
16. Performing Disaster Recovery for Windows NT 4.0 Without Disaster Recovery
Diskettes on page 102
17. Conflict With Microsoft System Restore on page 102
18. PCHealth Updates on Windows ME on page 103
19. Device Issues With Windows Media Player 7.0 on page 103
20. Disaster Recovery on ATAPI Hard Disks Larger Than 8GB on page 103
1. Multiple SCSI Device Setups
If you are receiving an error indicating that the controller is not responding and you
have more than one device on your SCSI chain, make sure the Enable Disconnection
option in your SCSI controller’s BIOS setup is set to Yes (On).
If this option is off, the Windows miniport driver causes a SCSI bus reset when your
hard drive or CD-ROM is idle for more than 10 seconds. The reset causes the backup
device’s current operation to abort.
To set the Enable Disconnect option:
1. Enter your SCSI controller’s BIOS. For example, press and hold the CRTL-A keys
(for Adaptec controllers) during the computer’s boot sequence. 2. Switch ENABLE
DISCONNECTION to YES (ON). Sometimes this option displays as Disconnect/
Reconnect. Refer to your hardware manual for more information on this option.
2. SCSI Controller
If you experience sluggish performance with your SCSI controller, contact the
hardware manufacturer for the latest mini-port driver. Please make sure you have the
most recent versions of these drivers installed.
3. Delay After Media Format, Media Initialize, or Canceled
Backup
A delay of a few seconds to several minutes may result after canceling a format or
initialize operation. Delays may also occur after you cancel a backup job. Hard disk
activity will occur while information is removed from the catalog. Longer delays
occur if the medium contains a large number of files.
4. CD-R Overwrite
CD-R media (compact disc recordables) do not support the overwrite option.
5. Disaster Recovery on FAT32 or DBCS Systems
If you are running a Disaster Recovery on FAT32 (OSR2 and Win98) or DBCS systems,
you can significantly reduce the recovery time, by adding the line “SMARTDRV
4096" to the autoexec.bat. Then reboot your system.
Product Information Drive Specifications Interfaces Installation and Configuration
Drive Operation Tips and Techniques Software Maintenance
Troubleshooting Warranty and Support Release Notes Discontinued Products
 Loading...