

HP Pavilion XHD, Pavilion N5, Pavilion XH Startup Manual

HP Notebook PC
Startup Guide

Notice
This manual and any examples contained herein are provided “as is” and are subject to
change without notice. Hewlett-Packard Company makes no warranty of any kind with
regard to this manual, including, but not limited to, the implied warranties of
merchantability and fitness for a particular purpose. Hewlett-Packard Co. shall not be
liable for any errors or for incidental or consequential damages in connection with the
furnishing, performance, or use of this manual or the examples herein.
Consumer transactions in Australia and the United Kingdom: The above disclaimers and
limitations shall not apply to Consumer transactions in Australia and the United Kingdom
and shall not affect the statutory rights of Consumers.
© Copyright Hewlett-Packard Company 2000. All rights reserved. Reproduction,
adaptation, or translation of this manual is prohibited without prior written permission of
Hewlett-Packard Company, except as allowed under the copyright laws.
The programs that control this product are copyrighted and all rights are reserved.
Reproduction, adaptation, or translation of those programs without prior written
permission of Hewlett-Packard Co. is also prohibited.
Portions of the programs that control this product may also be copyrighted by Microsoft
Corporation, Phoenix Technologies, Ltd., ESS, S3 Incorporated, Accton, and Adobe
Systems Incorporated. See the individual programs for additional copyright notices.
Microsoft, MS, MS-DOS, and Windows are registered trademarks of Microsoft
Corporation. Pentium and the Intel Inside logo are U.S. registered trademarks and MMX
is a U.S. trademark of Intel Corporation. Adobe and Acrobat are trademarks of Adobe
Systems Incorporated.
Hewlett-Packard Company
HP Notebook Customer Care
1000 NE Circle Blvd., MS 425E
Corvallis, OR 97330, U.S.A.
2 Startup Guide

HP Software Product License Agreement
Your notebook PC contains factory-installed software programs. Please read the Software
License Agreement before proceeding.
Carefully read this License Agreement before proceeding to operate this equipment.
Rights in the software are offered only on the condition that the customer agrees to
all terms and conditions of the License Agreement. Proceeding to operate the
equipment indicates your acceptance of these terms and conditions. If you do not
agree with the terms of the License Agreement, you must now either remove the
software from your hard disk drive and destroy the Recovery CD, or return the
complete computer and software for a full refund.
Proceeding with configuration signifies your acceptance of the License Terms.
Unless otherwise stated below, this HP Software Product License Agreement shall
govern the use of all software that is provided to you, the customer, as part of the
HP computer product. It shall supersede any non-HP software license terms that
may be found online, or in any documentation or other materials contained in the
computer product packaging.
Note: Operating System Software by Microsoft is licensed to you under the Microsoft
End User License Agreement (EULA).
The following License Terms govern the use of the software:
Use. Customer may use the software on any one computer. Customer may not network the
software or otherwise use it on more than one computer. Customer may not reverse
assemble or decompile the software unless authorized by law.
Copies and Adaptations. Customer may make copies or adaptations of the software (a)
for archival purposes or (b) when copying or adaptation is an essential step in the use of
the software with a computer so long as the copies and adaptations are used in no other
manner.
Ownership. Customer agrees that he/she does not have any title or ownership of the
software, other than ownership of the physical media. Customer acknowledges and agrees
that the software is copyrighted and protected under the copyright laws. Customer
acknowledges and agrees that the software may have been developed by a third party
software supplier named in the copyright notices included with the software, who shall be
authorized to hold the Customer responsible for any copyright infringement or violation
of this Agreement.
Product Recovery CD-ROM. If your computer was shipped with a product recovery
CD-ROM: (i) The product recovery CD-ROM and/or support utility software may be
used only for restoring the hard disk of the HP computer with which the product recovery
CD-ROM was originally provided. (ii) The use of any operating system software by
Startup Guide 3

Microsoft contained in any such product recovery CD-ROM shall be governed by the
Microsoft End User License Agreement (EULA).
Transfer of Rights in Software. Customer may transfer rights in the software to a third
party only as part of the transfer of all rights and only if Customer obtains the prior
agreement of the third party to be bound by the terms of this License Agreement. Upon
such a transfer, Customer agrees that his/her rights in the software are terminated and that
he/she will either destroy his/her copies and adaptations or deliver them to the third party.
Sublicensing and Distribution. Customer may not lease, sublicense the software, or
distribute copies or adaptations of the software to the public in physical media or by
telecommunication without the prior written consent of Hewlett-Packard.
Termination. Hewlett-Packard may terminate this software license for failure to comply
with any of these terms provided Hewlett-Packard has requested Customer to cure the
failure and Customer has failed to do so within thirty (30) days of such notice.
Updates And Upgrades. Customer agrees that the software does not include updates and
upgrades which may be available from Hewlett-Packard under a separate support
agreement.
Export Clause. Customer agrees not to export or re-export the software or any copy or
adaptation in violation of the U.S. Export Administration regulations or other applicable
regulation.
U.S. Government Restricted Rights. Use, duplication, or disclosure by the U.S.
Government is subject to restrictions as set forth in subparagraph (c)(1)(ii) of the Rights
in Technical Data and Computer Software clause in DFARS 252.227-7013. HewlettPackard Company, 3000 Hanover Street, Palo Alto, CA 94304, U.S.A. Rights for nonDOD U.S. Government Departments and Agencies are as set forth in FAR 52.22719(c)(1,2).
Edition History
Edition 1...........................................October 2000
Edition 2
Edition 3
4 Startup Guide
............................................January 2001
..............................................May 2001
This manual is printed on recycled paper.

Contents
Introducing Your Computer............................................................................................7
Taking Inventory...........................................................................................................8
Software bundled on your computer........................................................................8
To find more information........................................................................................9
Identifying Parts of the Notebook...............................................................................10
Top and right side view.........................................................................................10
Front view..............................................................................................................11
Rear and left side view..........................................................................................12
Bottom view..........................................................................................................13
Status lights ...........................................................................................................14
Multimedia buttons................................................................................................15
Setting Up the Computer.............................................................................................16
To install the battery..............................................................................................16
To connect AC power............................................................................................17
To connect a phone line.........................................................................................18
To turn on the computer........................................................................................19
To set up Windows................................................................................................19
To register your computer..................................................................................... 20
To reset your computer..........................................................................................21
Using Your Computer ....................................................................................................23
Operating the Computer..............................................................................................24
To use the Fn hot keys...........................................................................................24
To use the touch pad..............................................................................................25
Working in Comfort with a Notebook PC...................................................................27
Traveling with Your Computer.....................................................................................29
Managing Power Consumption...................................................................................30
To use manual power management........................................................................30
Using Battery Power...................................................................................................33
To check the battery status....................................................................................33
To respond to a low-battery warning.....................................................................34
Configuring and Expanding Your Computer...............................................................35
Installing RAM modules .............................................................................................36
Removing RAM modules............................................................................................38
Expanding the hibernate partition...............................................................................39
Startup Guide 5

Service and Support........................................................................................................41
Hewlett-Packard Limited Warranty Statement............................................................42
Getting Support for Your HP Notebook PC................................................................44
To use the Reference Guide...................................................................................44
To get help from the HP notebook website...........................................................44
To call HP for Service and Support.......................................................................45
Obtaining Repair Service............................................................................................48
To receive warranty repair service ........................................................................48
To prepare your computer for shipment................................................................48
Solving Problems with Your Computer........................................................................51
Troubleshooting Techniques.......................................................................................52
Display problems................................................................................................... 52
Power and battery problems ..................................................................................53
Startup problems....................................................................................................55
Standby and resume problems...............................................................................56
Testing Hardware Operation.......................................................................................57
Recovering and Reinstalling Software........................................................................59
To recover the factory installation of your hard disk.............................................59
Removing and Reinstalling the Hard Disk Drive........................................................60
If you decide to remove the hard disk drive ..........................................................60
To install the hard disk drive again........................................................................62
Specifications and Regulatory Information..................................................................63
Hardware and Software Specifications........................................................................64
Safety Information.......................................................................................................65
Power Cords..........................................................................................................65
Battery Safety........................................................................................................66
Laser Safety ...........................................................................................................67
LED Safety............................................................................................................67
Regulatory Information...............................................................................................68
U.S.A.....................................................................................................................68
Canada...................................................................................................................69
European Union.....................................................................................................69
Japan......................................................................................................................70
Russia....................................................................................................................70
International...........................................................................................................70
Index.................................................................................................................................73
6 Startup Guide

Introducing Your Computer
Startup Guide 7

Introducing Your Computer
Taking Inventory
Taking Inventory
Your HP notebook PC is shipped with these items:
• battery
• AC adapter and power cord
• Quick Start sheet
• HP notebook PC Startup Guide
• Recovery CD (or CDs), used to restore Windows and all software included with your
computer
• Microsoft Windows manual (Windows 98, Windows Millennium Edition [ME] or
Windows 2000)
• telephone cord (if your computer has a built-in modem)
Software bundled on your computer
Your HP notebook PC comes with preinstalled software, and various models are
configured with different combinations of software. To see the list of software included
with your computer, check HP Notes in the HP Library: click Start, Programs,
HP Library, HP Notes—or double-click the HP Notes icon on the desktop.
For Windows ME, click Start, Help, Your HP Notebook, HP Notes.
8 Startup Guide

Introducing Your Computer
Taking Inventory
To find more information
Here are some sources of information about your HP notebook PC.
Source Description
Quick Start sheet
Reference Guide
HP Notes
Introductory Microsoft
manual for Windows
Windows Help
HP notebook PC website
This pictorial introduction shows you how to get the computer up and
running quickly.
The Reference Guide is a help file located on your hard drive. It provides
you with detailed information about your notebook PC (Start, Programs,
HP Library, Reference Guide).
For Windows ME: Click Start, Help, Your HP Notebook, HP Reference
Guide.
This document contains late-breaking information available after the
Reference Guide was completed (Start, Programs, HP Library,
HP Notes—or double-click the HP Notes icon on the desktop).
For Windows ME: Click Start, Help, Your HP Notebook, HP Notes.
This manual contains information about using the standard features of
Microsoft Windows (Windows 98, Windows ME or Windows 2000,
depending on which operating system your computer is shipped with).
Click Start, Help.
www.hp.com/notebooks
Startup Guide 9
Introducing Your Computer
Identifying Parts of the Notebook
Identifying Parts of the Notebook
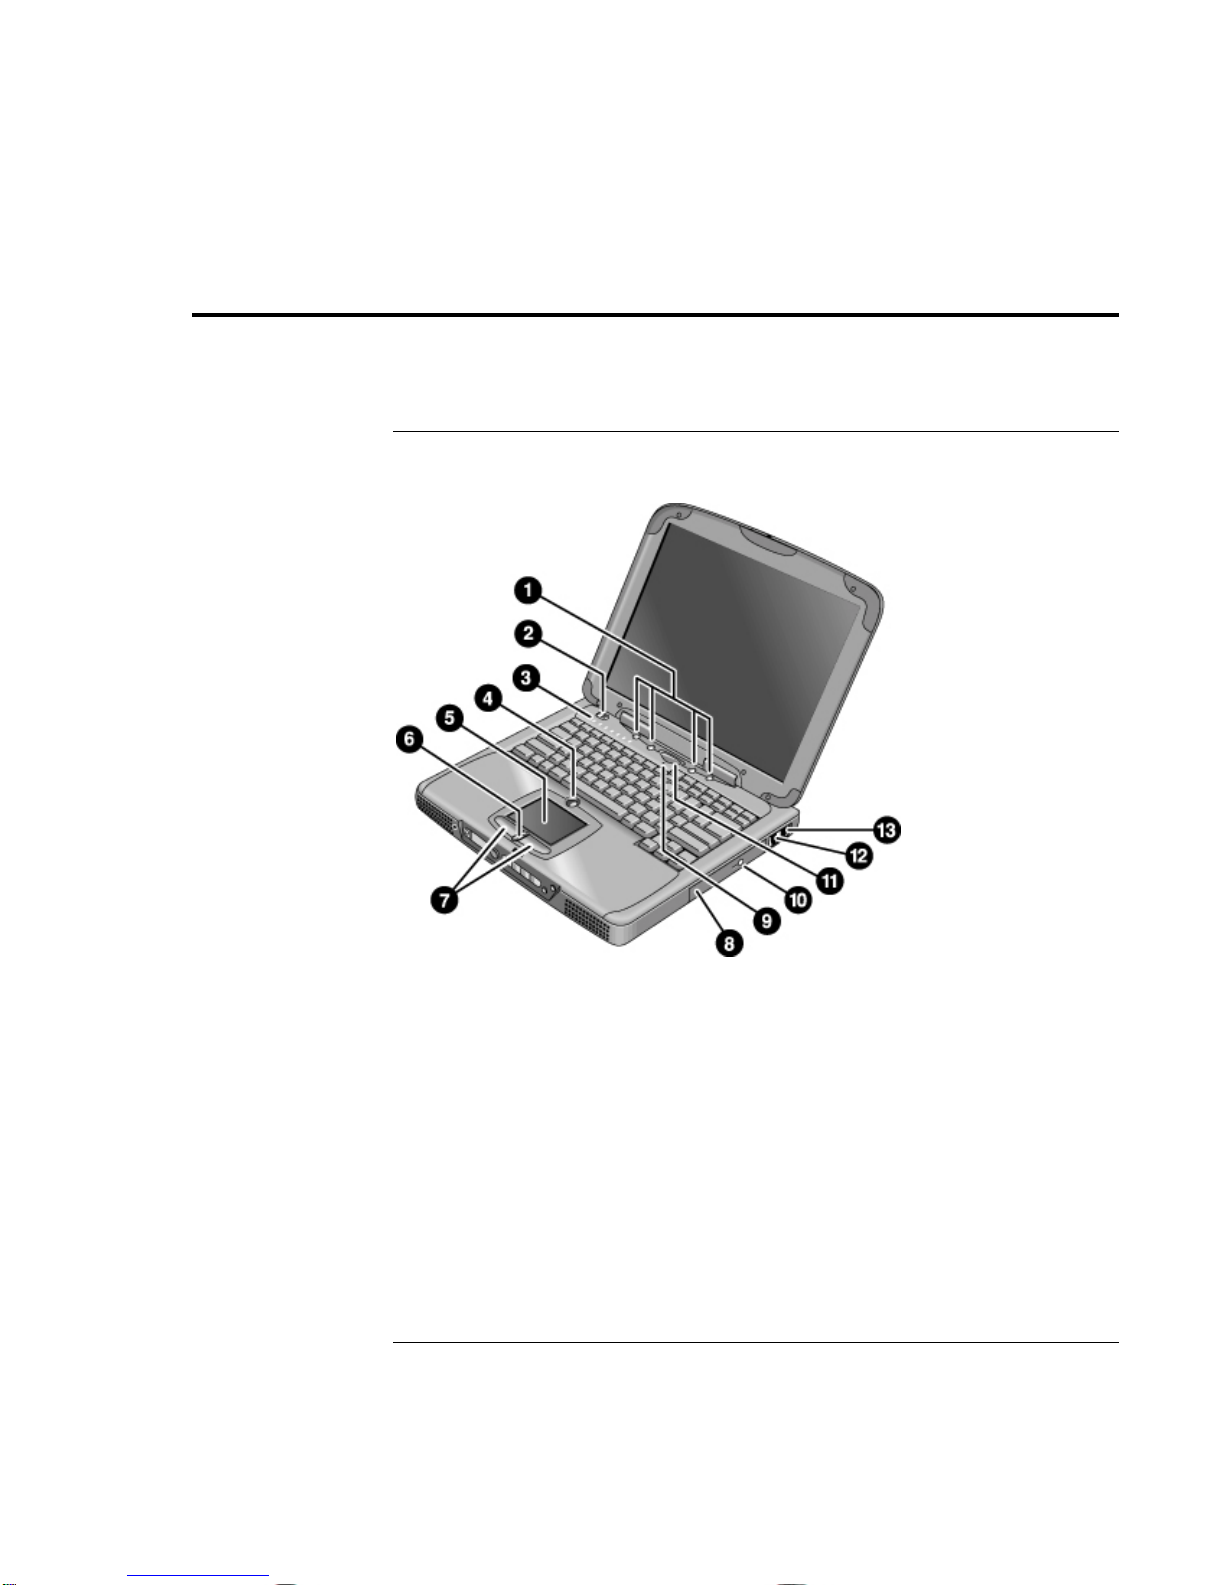
Top and right side view
1 One-Touch buttons 8 CD-ROM, CD-RW, DVD, or CD-RW/DVD
drive
2 Power switch 9 Microphone
3 Status lights (see “Status lights” on page 14) 10 CD-ROM or DVD eject button
4 Pad Lock touch pad on/off button 11 Blue standby button
5 Touch pad (pointing device) 12
6 Scroll up/down toggle 13
7 Click buttons
10 Startup Guide
Modem port (on selected models)
LAN port (on selected models)
Introducing Your Computer
Identifying Parts of the Notebook
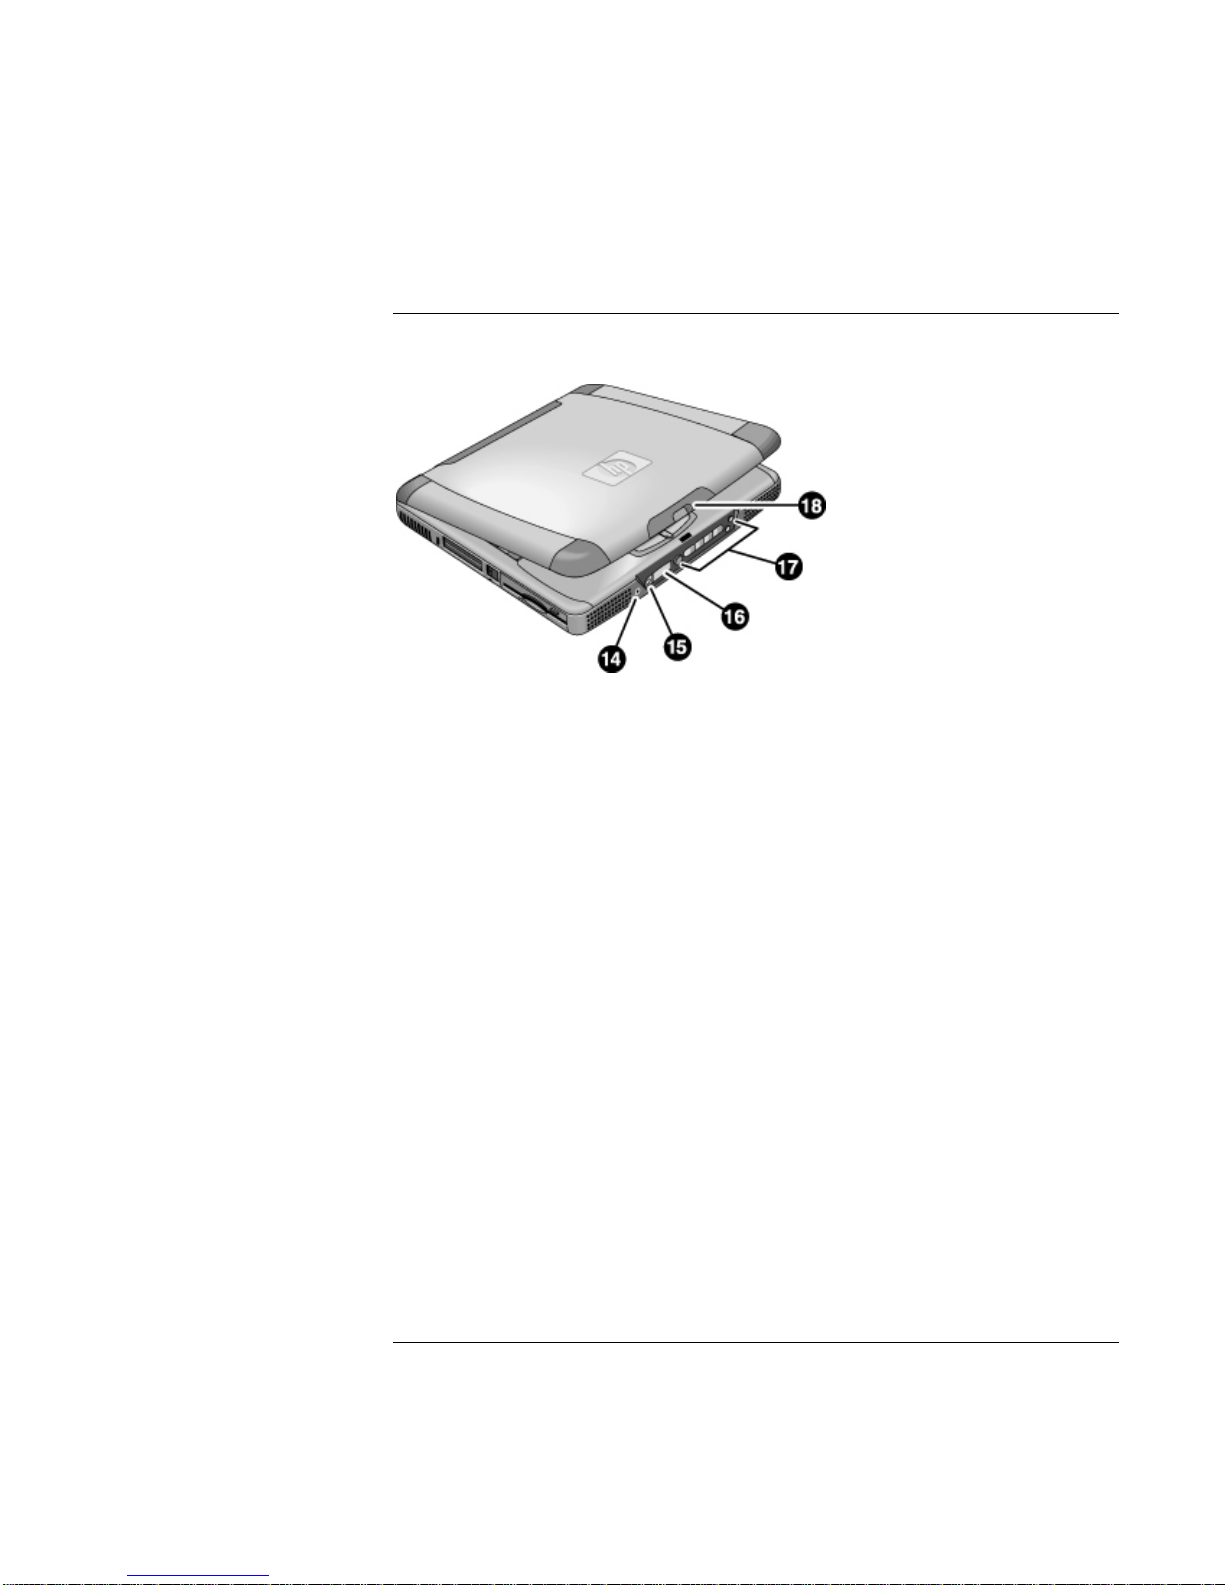
Front view
14 Headphone audio jack
15
Status panel mode select button (on selected models)
16
Status panel (on selected models)
17
Multimedia buttons (on selected models) (see
“Multimedia Buttons” in the Reference Guide)
18 Latch (to open computer)
Startup Guide 11
Introducing Your Computer
Identifying Parts of the Notebook
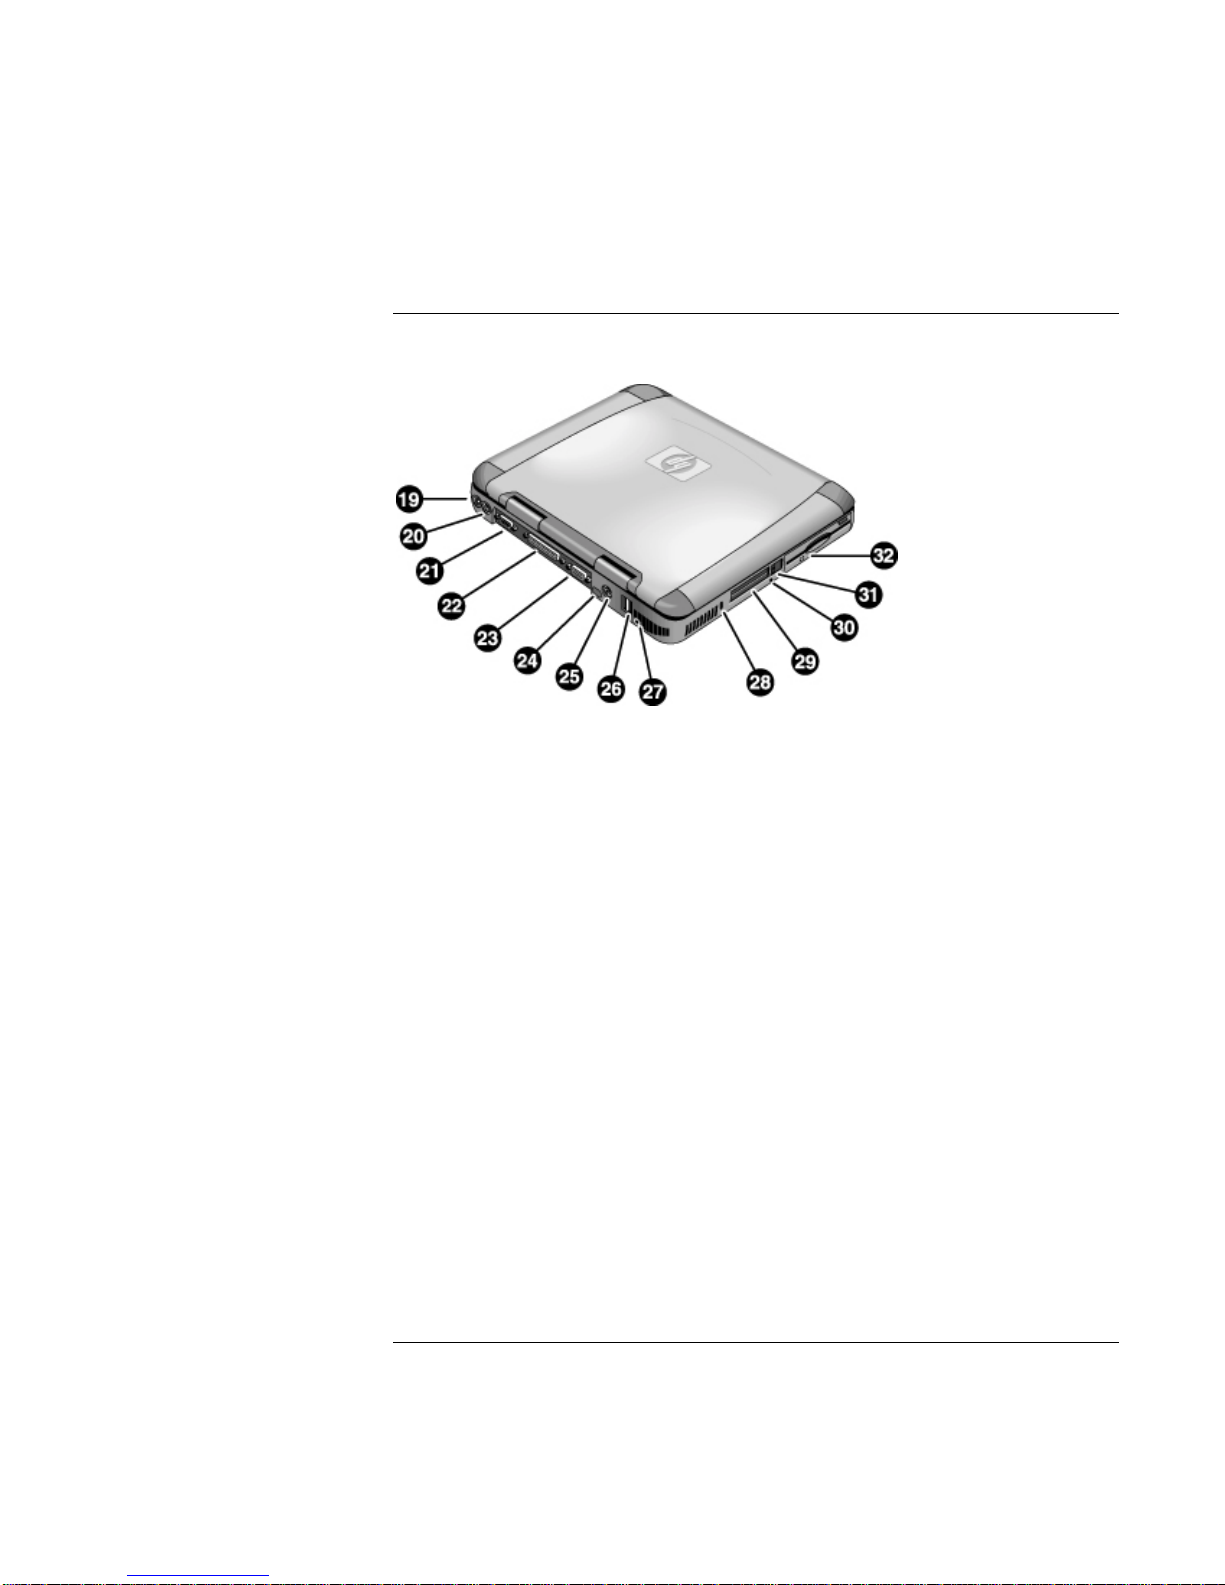
Rear and left side view
19 AC adapter (power) jack 26 USB ports
20 PS/2 port (external mouse or keyboard) 27 Microphone jack
21 Serial port 28 Kensington lock slot (security connector)
22 Parallel port 29 PC card slots
23 VGA port (external monitor) 30 System-off button (for resetting computer)
24
Infrared port (on selected models)
25 TV output port 32 Floppy disk drive
31 PC card eject buttons
12 Startup Guide
Introducing Your Computer
Identifying Parts of the Notebook
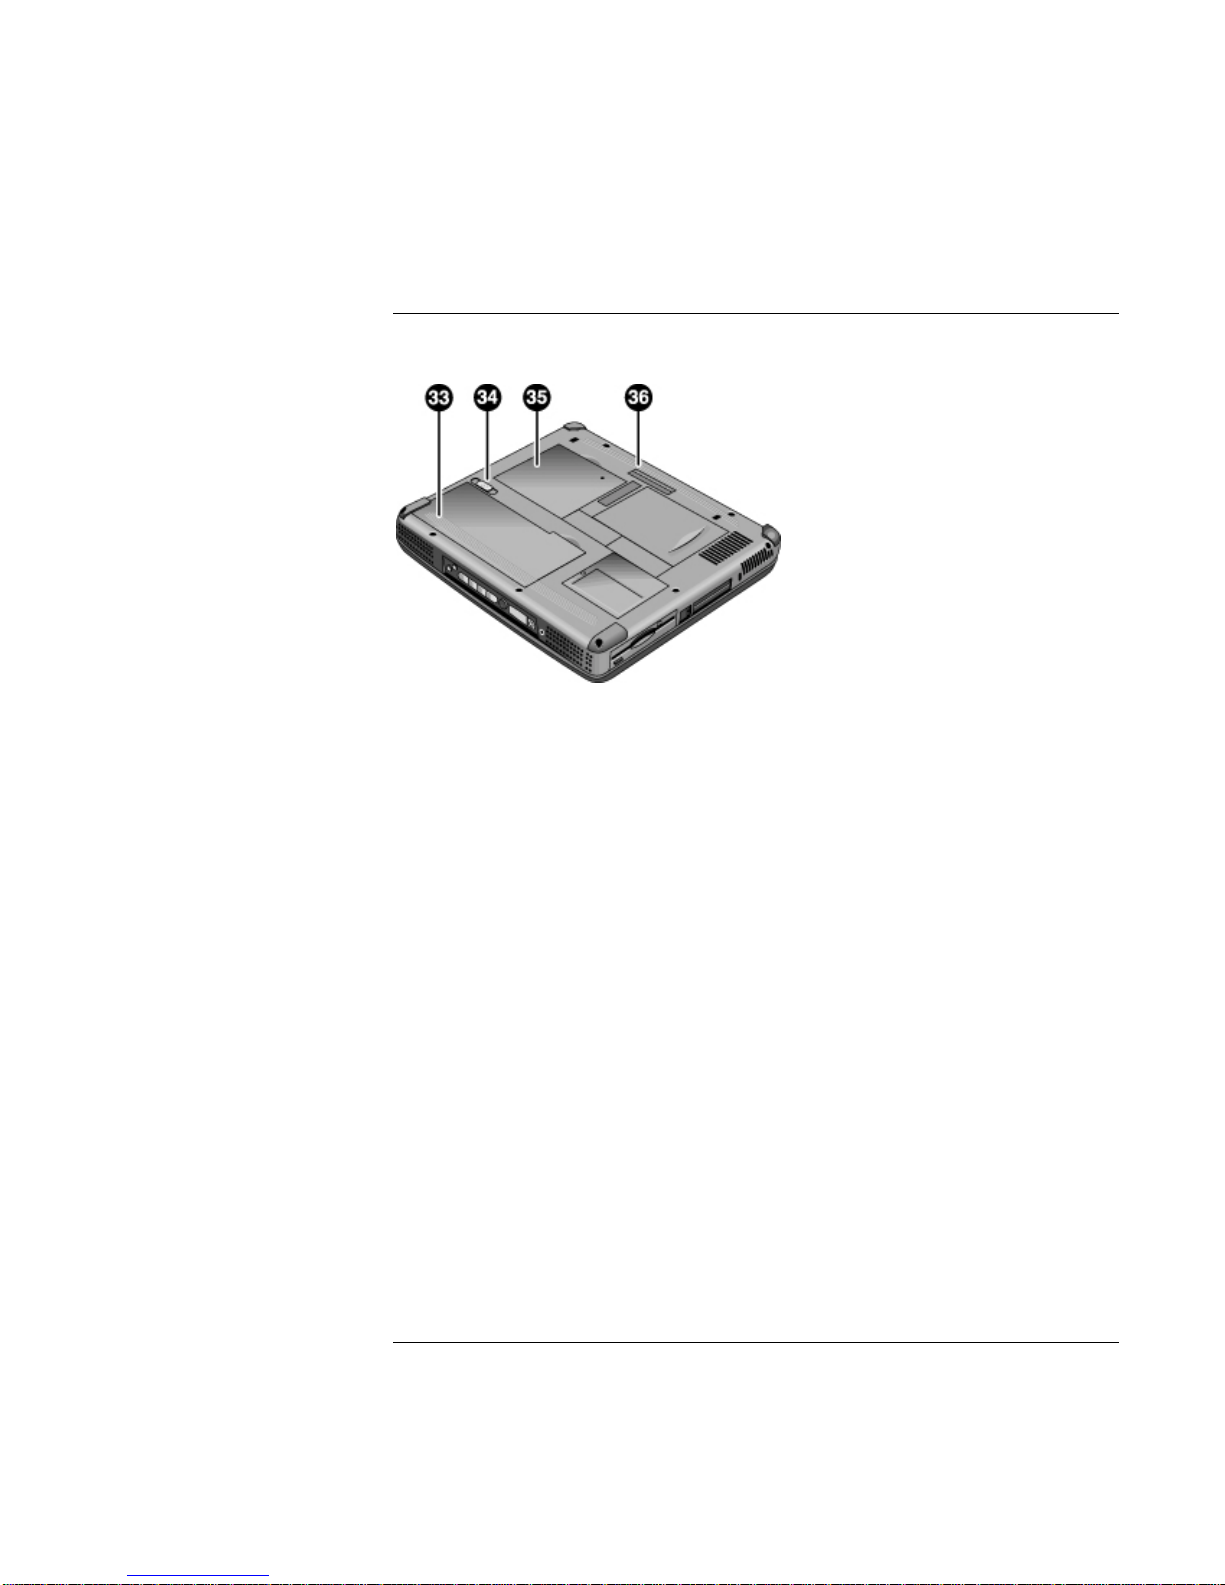
Bottom view
33 Battery
34 Battery latch
35 RAM expansion cover
36
Port replicator (docking) connector (on selected
models)
Startup Guide 13
Introducing Your Computer
Identifying Parts of the Notebook
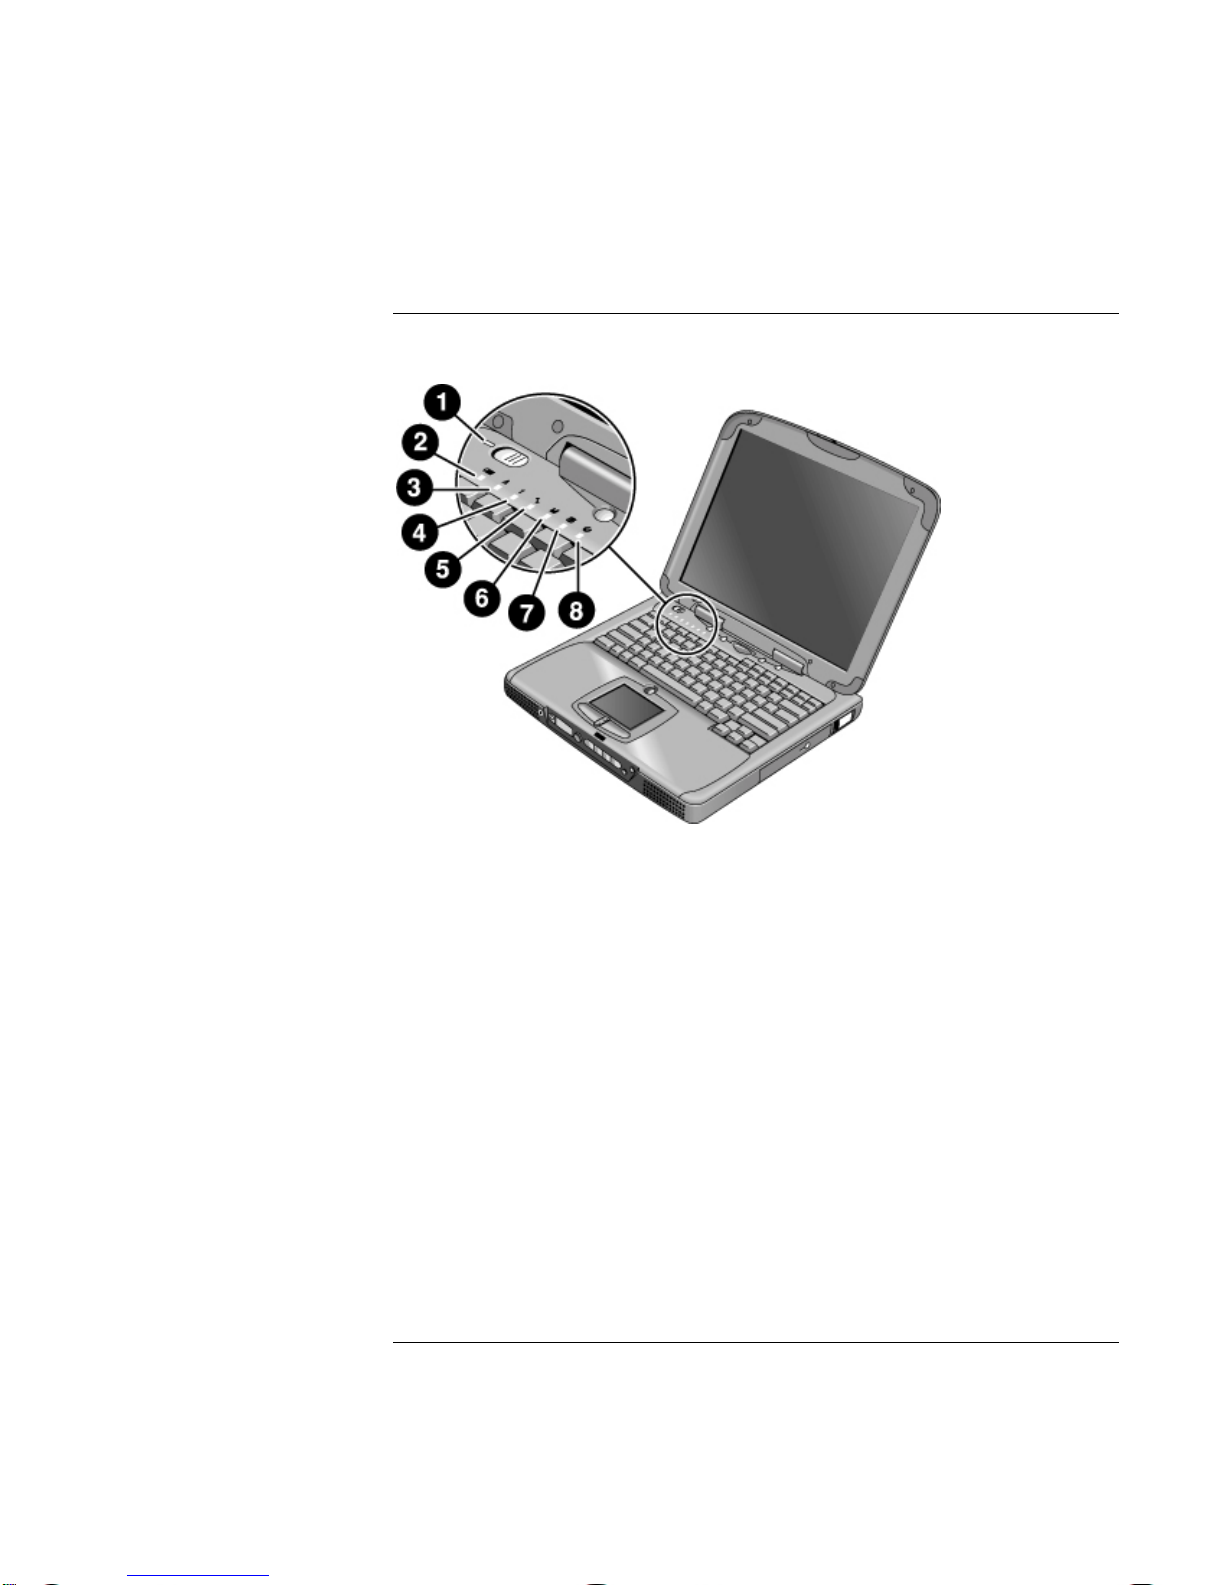
Status lights
1 Power
2 Battery
3 Caps lock (capital letters)
4 Num lock (numeric keypad)
5 Scroll lock
6 Floppy disk drive access
7 Hard disk drive access
8 CD-ROM, CD-RW, DVD, or CD-RW/DVD drive access
14 Startup Guide
Introducing Your Computer
Identifying Parts of the Notebook
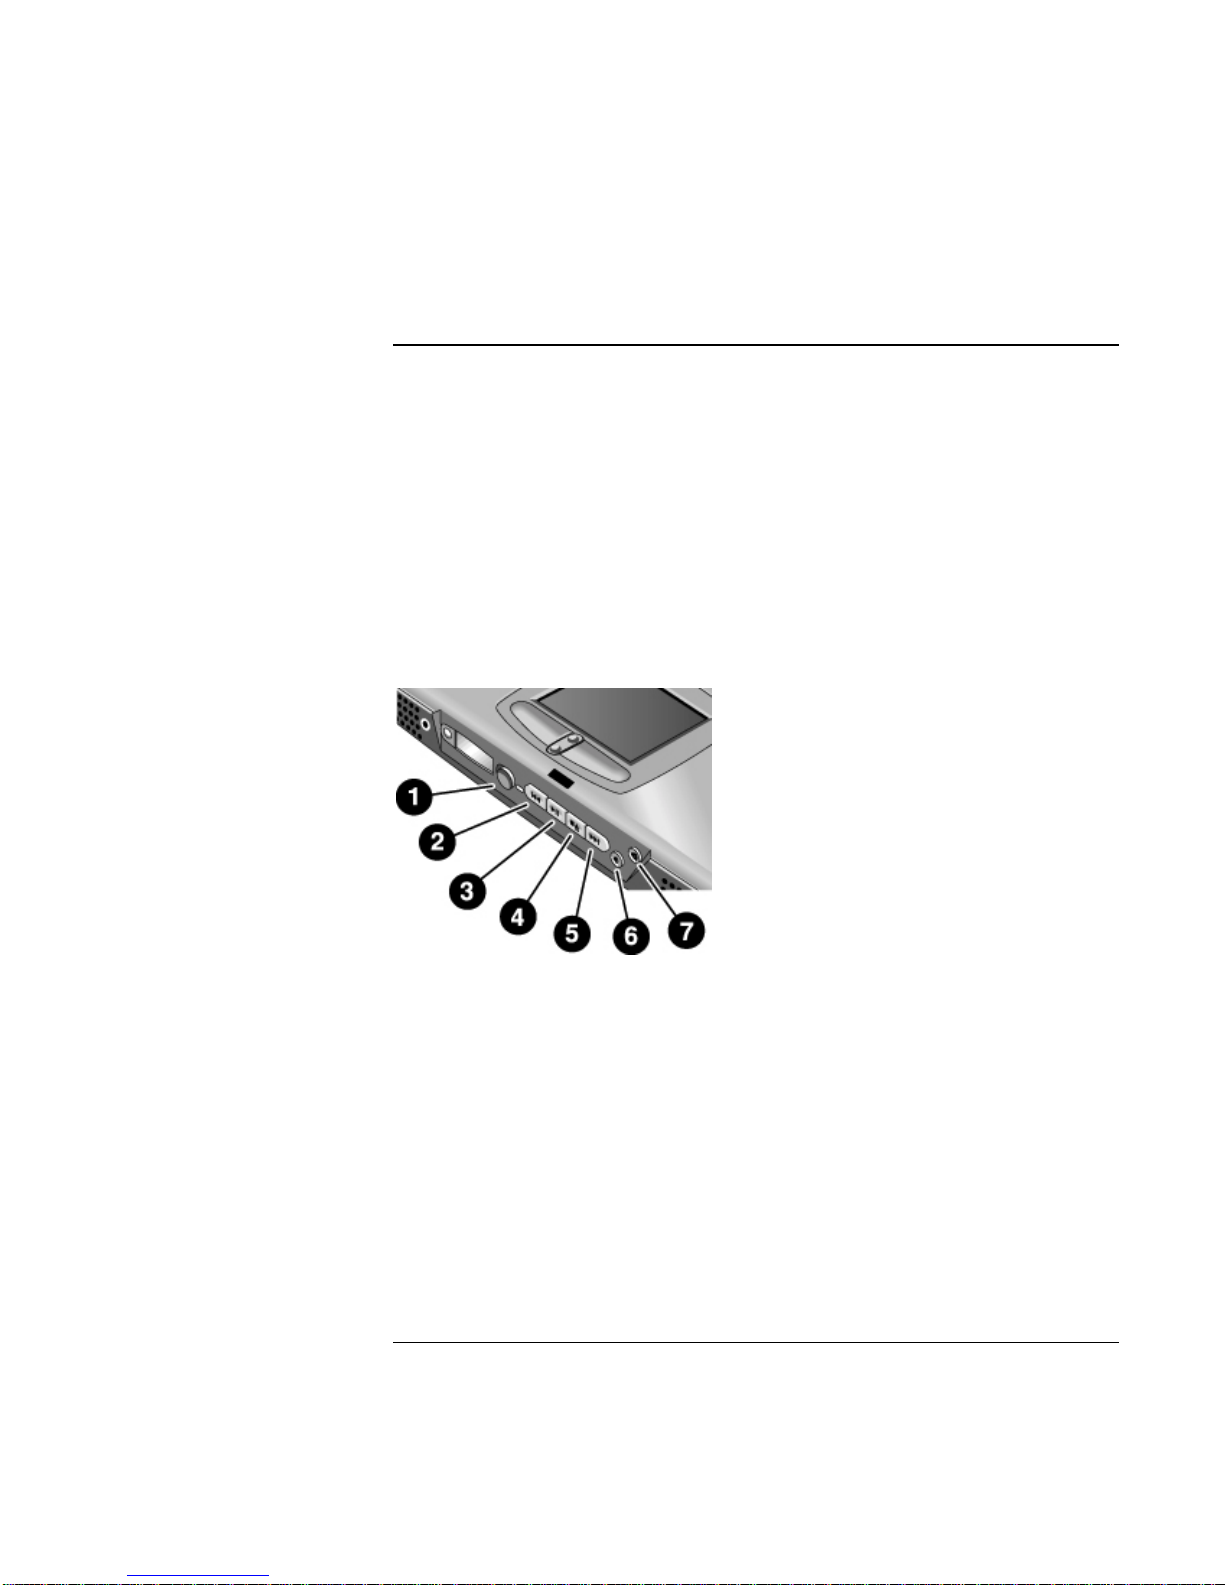
Multimedia buttons
(Provided for selected models.) The multimedia buttons are on the front of the
computer, to the right of the status display. They control the computer’s CD, DVD, or
MP3 player in the same way the controls of a standalone multimedia player control its
functions.
The buttons also work if the system is turned on, though in that case you don’t need to use
the multimedia power switch to turn on the player. When the computer is on, the volume
control buttons also govern the volume for most other audio applications.
If the system is turned off (or in standby or hibernate mode), you can still use the player
for audio CD playback. Slide the multimedia power switch to the left to activate the
player without turning on the computer.
1 Multimedia power (use only when system is turned off or
in standby or hibernate mode)
2 Previous track
3 Play/pause
4 Stop (when computer is on)*
Stop/eject (when computer is off)
5 Next track
6 Volume control down
7 Volume control up
*You can eject a CD or DVD by pressing the eject button
on the CD/DVD drive.
Startup Guide 15

Introducing Your Computer
Setting Up the Computer
Setting Up the Computer
To install the battery
Your computer is shipped with the battery installed. If the battery has been removed, you
can install it by inserting it into the battery bay on the bottom of your computer. Insert the
back edge first, as shown, then press down the front edge until the battery latch clicks
shut.
WARNING
Once you have installed the battery, connect the AC adapter to the computer and recharge
the battery while you work. You can also replace a low battery with another that is more
fully charged.
Do not mutilate, puncture, or dispose of batteries in fire. A battery can burst or
explode, releasing hazardous chemicals. A rechargeable battery must be recycled
or disposed of properly.
16 Startup Guide
Introducing Your Computer
Setting Up the Computer
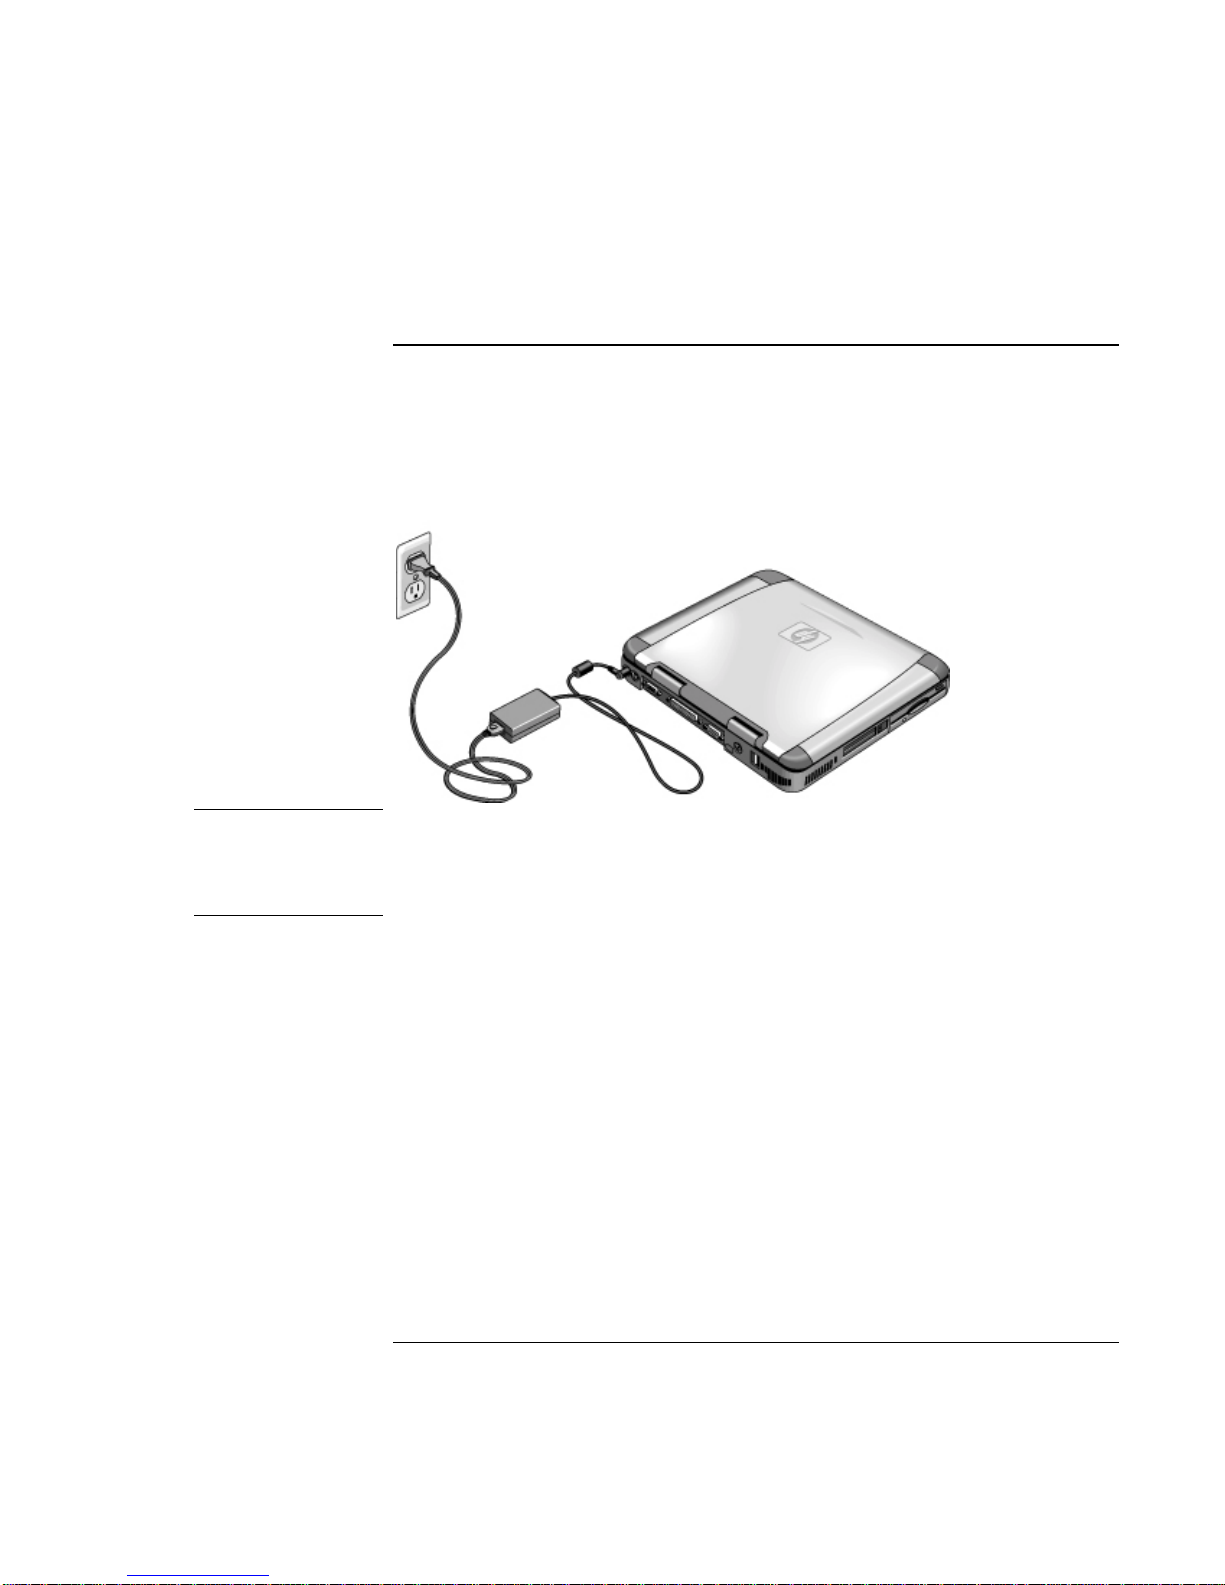
To connect AC power
Plug in the AC adapter, then connect the AC adapter to the rear of the computer. The
battery starts charging.
CAUTION
Use only an HP AC adapter intended for this product, either the adapter that came
with the computer or another authorized HP adapter. Using an unauthorized AC
adapter can damage the computer and may void your warranty. Refer to the
warranty statement for your product.
Startup Guide 17
Introducing Your Computer
Setting Up the Computer
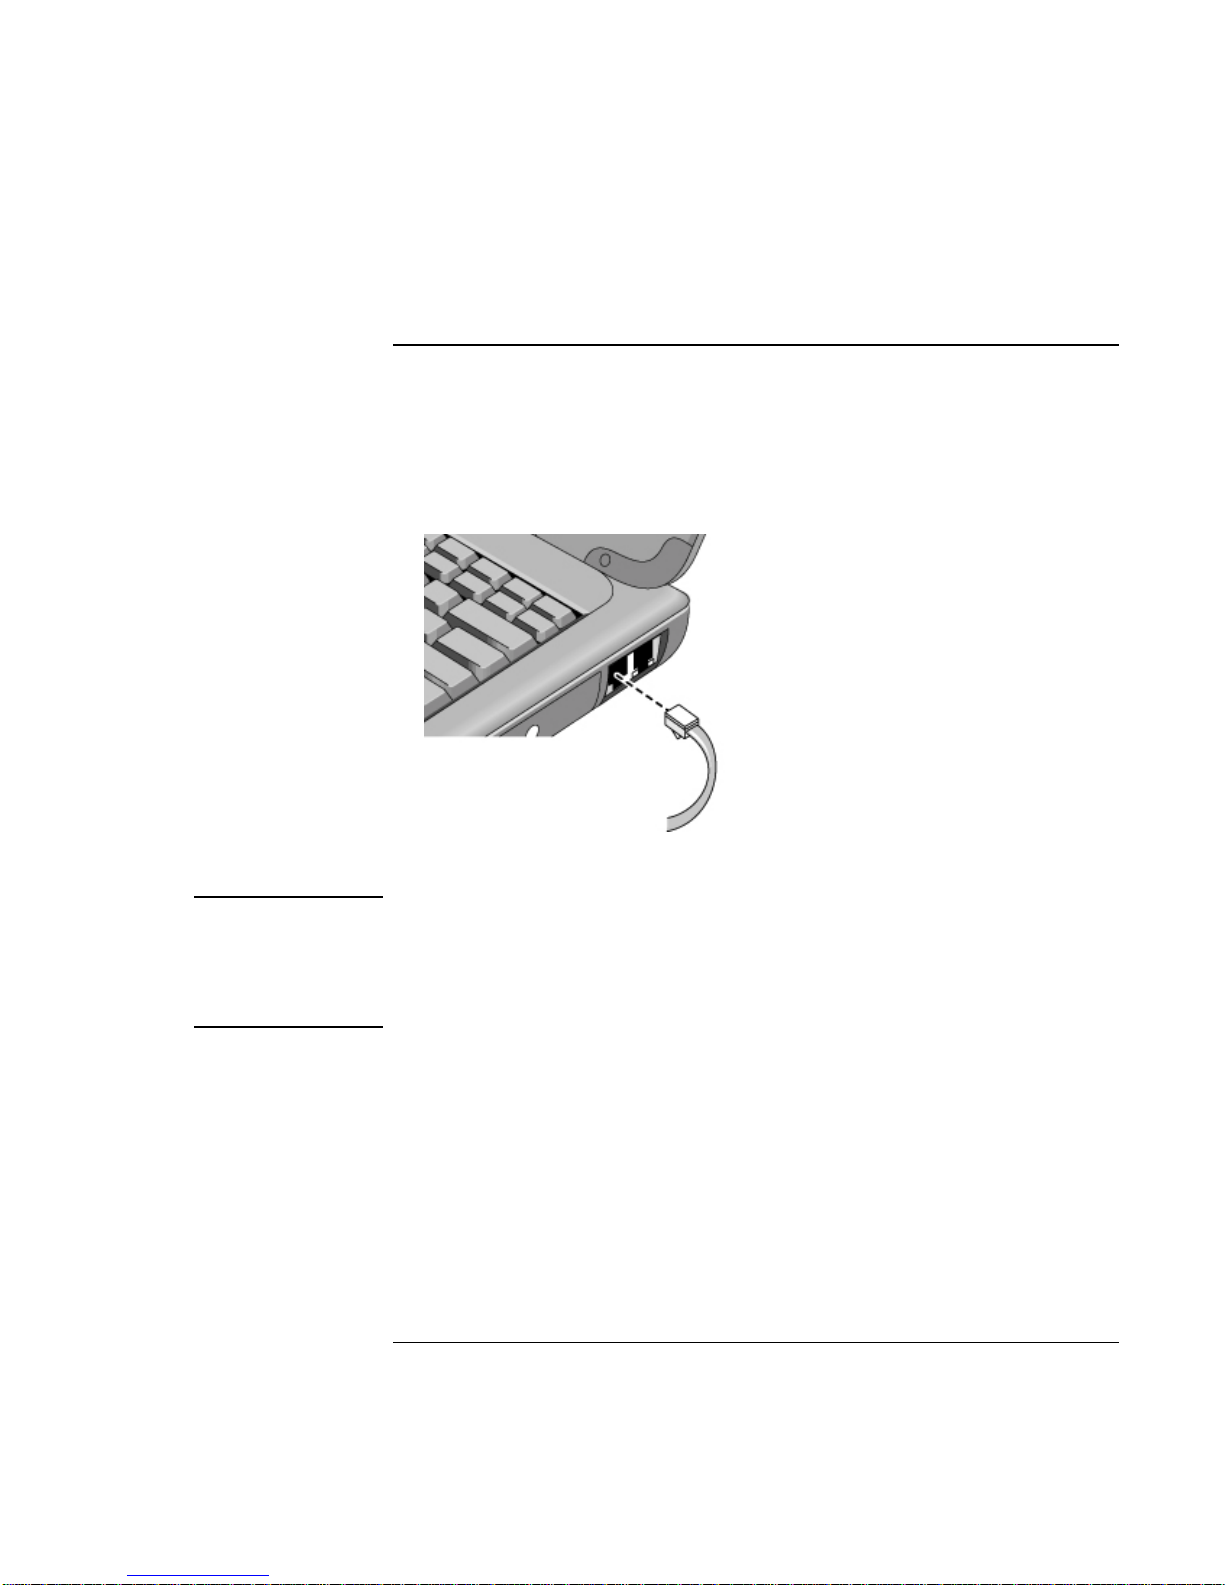
To connect a phone line
Selected models of the HP notebook PC include a built-in modem. If you prefer, you can
instead use a PC card modem or an external modem to connect a phone line.
1. Plug one end of the phone line into the modem phone jack on the computer. Be sure it
clicks into place.
CAUTION
2. Plug the other end of the phone line into a telephone jack. (If the phone line does not
fit your telephone jack, you may need to use an adapter.)
Your built-in modem may not work with multiple phone lines or a private branch
exchange (PBX). It cannot be connected t o a coin-operated telephone, and it does
not work with party lines. Some of these connections may result in excess electrical
voltage and could cause a malfunction in the internal modem. Check your
telephone line type prior to connecting your phone line.
18 Startup Guide

Hint
Introducing Your Computer
Setting Up the Computer
To turn on the computer
Slide the power switch to the left—it’s the control above the left side of the keyboard.
Windows starts automatically. If you are turning on the computer for the first time, go to
“To set up Windows” on page 19.
The power status light next to the power switch (see “Status lights” on page 14) reports
the following:
• steady green light: computer is on
• steady amber light: computer is in system standby (or suspend) mode
• no light: computer is off or in hibernate mode
See “Managing Power Consumption” on page 30 for additional information about turning
off your computer.
If your computer does not turn on when operating on battery power, the battery may be
out of power. Plug in the AC adapter and slide the power switch to the left again.
To set up Windows
Your HP notebook has Microsoft Windows—either Windows 98, Windows ME or
Windows 2000—preinstalled on the hard disk drive. The first time you turn on your
computer, a Windows Setup program will automatically run so that you can customize
your setup.
Before you begin, connect the AC adapter to your notebook, since your battery may not
be sufficiently charged to complete the Windows setup. Also, be sure to connect the
notebook to a phone line; see “To connect a phone line” on page 18.
1. Slide the power switch to the left.
2. The Windows Setup program starts automatically.
3. Follow the instructions as they appear on the screen.
During setup, you are prompted to:
• enter a user name
• accept the License Agreement
Startup Guide 19

Note
Introducing Your Computer
Setting Up the Computer
You can also register your computer at this time. Follow the instructions on the screen
during setup, or—if registration does not occur during setup—double-click the HP
Notebook Registration icon on the desktop.
You may be required to enter your Windows ID number. To locate it, look on the
Certificate of Authenticity packaged with the Microsoft Windows manual or look for a
sticker in the battery compartment.
If you have any connectio n problems with your modem, try redialing. If that doesn’t
work, you can skip registration for now.
To register your computer
Be sure to register your computer. Registering is free and fast, and it ensures you will
receive quicker, more personalized support. The information you provide during
registration will be used to provide you with better products and services.
There are three ways to register:
Note
Note
By modem
If you have Windows 98 or Windows ME, you are prompted automatically to register. To
register by modem, see that the phone is connected, then follow the onscreen instructions.
If you have Windows 2000, you are not prompted to register, but you can register by
modem if you double-click the HP Notebook Registration icon on the desktop or click the
Register link in the Windows 2000 welcome screen. See that the phone line is connected
and follow the onscreen instructions.
If you choose not to register right away, you can register by modem later by doubleclicking the Registration icon on the desktop. This icon disappears after you register.
In Windows 2000, if the registration application is launched from a reminder (e.g., from
the Microsoft Task Scheduler), it may fail to find a phone number for your country. In
this case, double-click the HP Notebook Registration icon on the desktop and the
application will succeed in finding a phone number to register successfully.
If you encounter a busy signal while attempting to register by modem, the registration
client may suspend with an hourglass icon. Click the Back button and dial-out again.
If your computer does not have a built-in modem, you can register after you set up a PC
card modem or an external modem—or you can register by phone or fax.
20 Startup Guide
Introducing Your Computer
Setting Up the Computer
By phone
You can call your HP Customer Care Center and register by phone. Check “To call HP ”
on page 45 for the phone number.
By fax
If a printer is connected to your computer, you can print a copy of your registration and
fax it to HP. You will find the fax number on the registration form.
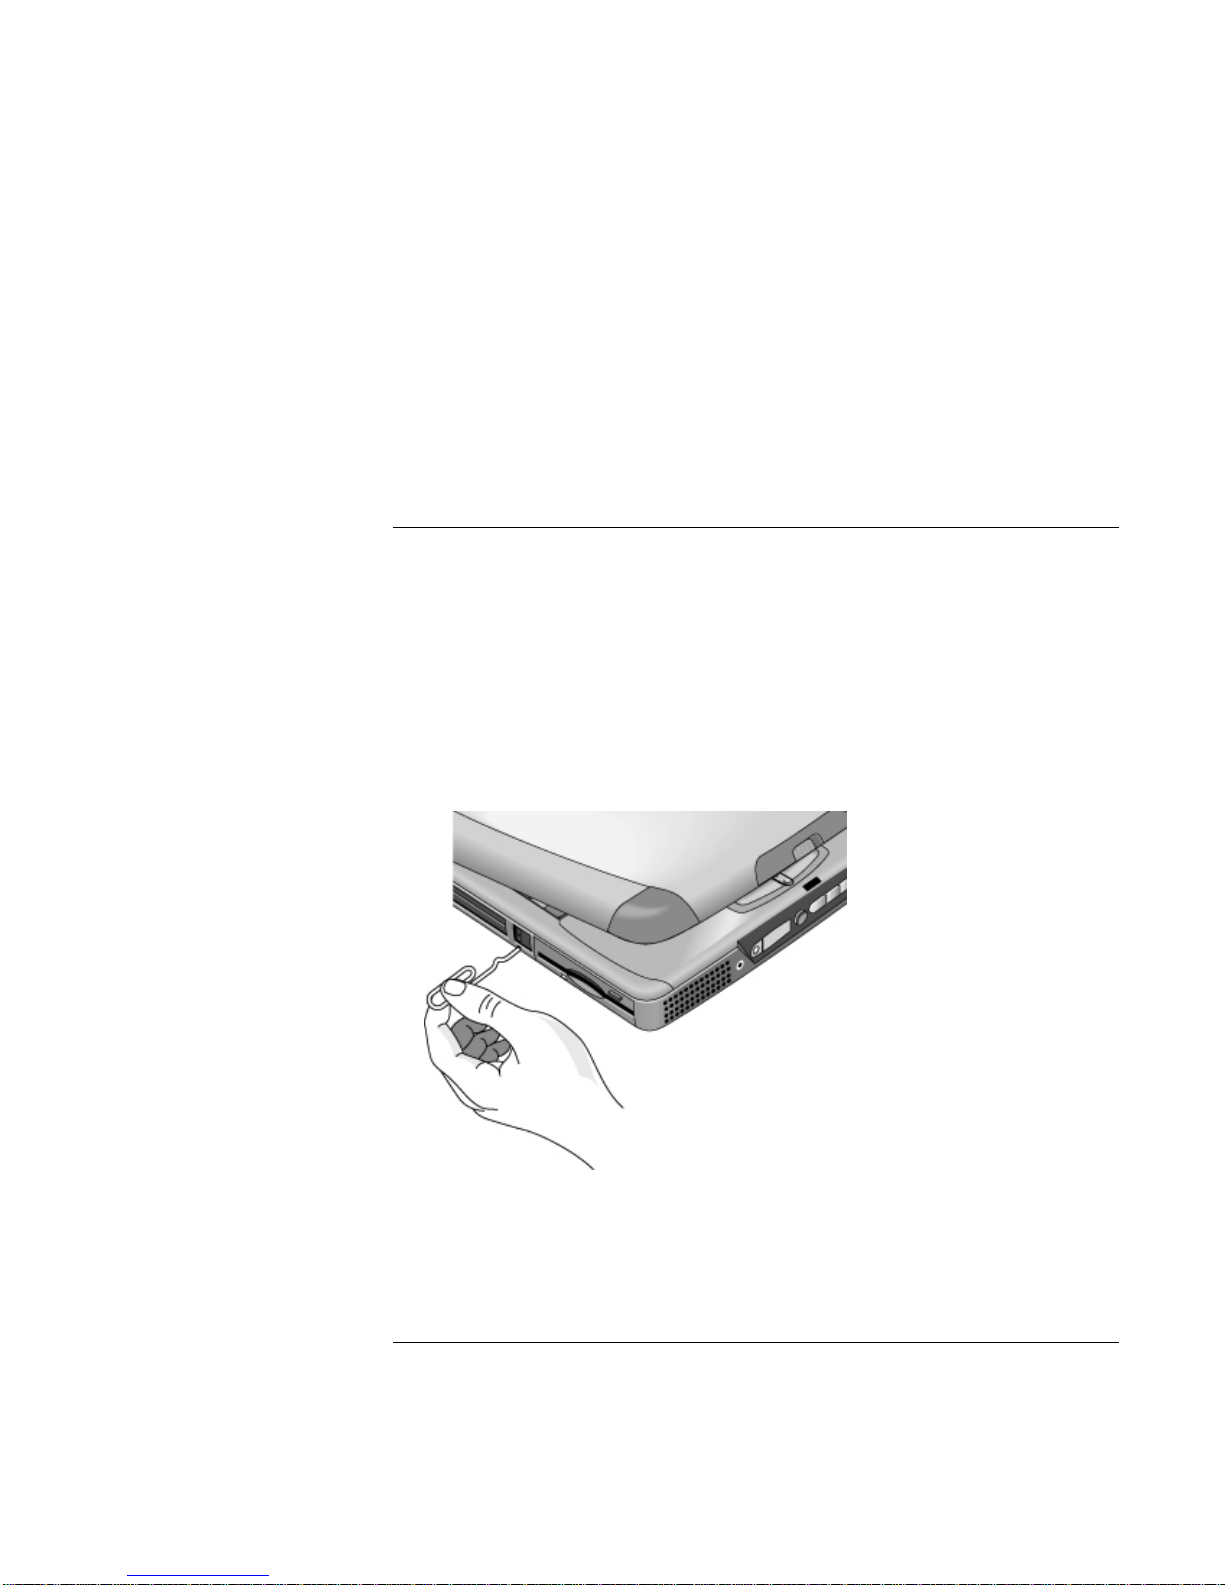
To reset your computer
If Windows or your computer stops responding, you can reset the computer and restart
Windows.
1. If possible, shut down Windows (Start, Shut Down, Shut down, OK).
2. If the computer does not shut down, slide and hold the power switch for five seconds,
then release it.
3. If the computer still does not shut down, insert a pin or straightened paper clip into the
recess on the left side of the computer, underneath the PC card eject buttons.
4. After the computer shuts down, slide the power switch and release it to turn the
Startup Guide 21
computer on again.


Using Your Computer
Startup Guide 23
 Loading...