

Page 1

hp pavilion home pc
upgrading and
servicing the pc
Page 2

The information in this document is subject to change without
notice.
Hewlett-Packard
regard to this material, including, but not limited to, the implied
warranties of merchantability and fitness for a particular purpose.
HP shall not be liable for errors contained herein or for incidental
or consequential damages in connection with the furnishing,
performance, or use of this material.
HP assumes no responsibility for the use or reliability of its software
on equipment that is not furnished by HP.
This document contains proprietary information that is protected by
copyright. All rights are reserved. No part of this document may be
photocopied, reproduced, or translated to another language
without the prior written consent of HP.
®
Company makes no warranty of any kind with
Hewlett-Packard Company
P.O. Box 4010
Cupertino, CA 95015-4010
USA
© 2003 Hewlett-Packard Company. All rights reserved.
Hewlett-Packard is a registered trademark of Hewlett-Packard
Company in the United States of America and other
countries/regions.
Other brand or product names are trademarks of their respective
holders.
Page 3

Contents
Safety Information ...............................1
AC Power Safety Warnings................................1
Welcome ..............................................2
Opening and Closing the PC..................2
Preparing the PC...............................................2
Before Opening the PC...................................... 3
After Closing the PC ..........................................3
Removing the Side Panel.................................... 4
Replacing the Side Panel ...................................5
Locating Components Inside the PC..................... 6
Removing the Front Panel ...................................7
Replacing the Front Panel...................................8
Installing the 6-In-1 Memory Card Reader or
the Diskette (Floppy) Drive................................ 15
Removing the Preinstalled Hard Drive................ 17
Replacing the Preinstalled Hard Drive................ 18
Installing a Second Hard Drive ......................... 20
Removing a Second Hard Drive........................ 23
Adding Memory .................................24
About Installing DDR DIMMs ............................ 25
Removing a Memory Module ........................... 25
Installing a Memory Module ............................ 26
Add-In Cards...................................... 27
Removing an Add-In Card................................ 28
Installing an Add-In Card .................................29
Removing and Replacing Drives............9
Removing an Optical Drive ..............................11
Installing an Optical Drive................................12
Removing the 6-In-1 Memory Card Reader or
the Diskette (Floppy) Drive................................ 13
Upgrading and Servicing the PC
Replacing the Battery ......................... 30
Index.................................................31
iii
Page 4

HP Pavilion home PC
iv
Page 5

Safety Information
Before you get started, please read this important
safety information about your HP Pavilion
home PC.
This product has not been evaluated for
connection to an “IT” power system (an AC
distribution system with no direct connection to
earth, according to IEC 60950).
AC Power Safety Warnings
The power supply is pre-set for the country/region in which
you purchased the HP Pavilion. If you move to another
country/region, please make sure you check its voltage
requirements before plugging your PC into an AC power
outlet.
Install the computer near an AC outlet. The AC power cord
is your HP Pavilion PC’s main AC disconnecting device and
must be easily accessible at all times. For your safety, the
power cord provided with your system has a grounded
plug. Always use the power cord with a properly grounded
wall outlet to avoid the risk of electrical shock.
To reduce the possibility of an electric shock from the
telephone network, always plug your computer into the AC
outlet before connecting it to the telephone line. Also,
always disconnect the telephone line before unplugging
your computer from the AC power outlet. Failure to do so
before you open the PC or do any procedures can result in
personal injury, or equipment damage.
Your system is provided with a voltage select switch for use
in a 115 or 230 VAC power system. The voltage select
switch has been pre-set to the correct voltage setting for use
in the particular country/region where it was initially sold.
Changing the voltage select switch to the incorrect position
can damage your PC and void any implied warranty.
Always disconnect the modem cord from the telephone
system before installing or removing your computer cover.
Do not operate the computer with the cover removed.
The power supply is not user-serviceable. To prevent
damage to the power supply, have a qualified person repair
or replace it. All other components are user-serviceable.
Electrostatic discharge (ESD) can damage disk drives, add-in
cards, and other components. If an ESD station is not
available, wear a wrist strap attached to a metal part of the
computer. Place cards on a conductive foam pad or inside
the card wrapper, if possible, but never on the card
wrapper.
The PC is heavy; be sure to use ergonomically correct lifting
procedures when moving the computer.
Upgrading and Servicing the PC
1
Page 6

Welcome
Opening and Closing the PC
Thank you for purchasing the HP Pavilion home
PC. The Upgrading and Servicing the PC guide
provides instructions on how to remove and
replace hardware components of your PC.
Preparing the PC
Read the following items before attempting to
upgrade or service the PC:
These procedures assume familiarity with the
general terminology associated with personal
computers and with the safety practices and
regulatory compliance required for using and
modifying electronic equipment.
Write down and save the system model and
serial numbers, all installed options, and other
information about the system. It will be easier
to consult this information than to open up and
examine the PC.
HP recommends that you use an antistatic
wrist strap and a conductive foam pad when
working on the system.
HP Pavilion home PC
2
Page 7

g
Warning:
cord from the telephone system, and then
disconnect the PC from the power source
before removing the front and side panels
of the PC. Failure to do so before you
open the PC or do any procedures can
result in personal injury or equipment
damage.
Always disconnect the modem
Before Opening the PC
To avoid injury and equipment damage, always
follow this procedure in this order before opening
the PC.
1 Remove any media from the drives.
2 Turn off the PC and all peripherals.
3 Disconnect the modem/telephone cable.
4 Disconnect the power cord and all other
attached cables (such as the keyboard,
mouse, and monitor).
Warning:
Information” in the beginning of this
document before installing and connectin
your system to the electrical power
system.
Please read “Safety
After Closing the PC
To avoid injury and equipment damage, always
follow this procedure in this order after closing
the PC.
1 Reconnect the power cord and all other
attached cables (such as the keyboard, mouse,
and monitor).
2 Reconnect the modem/telephone cable.
3 Turn on the PC and all peripherals.
4 If you installed an add-in card, install any
software drivers supplied by the card
manufacturer.
Upgrading and Servicing the PC
3
Page 8

Removing the Side Panel
1 See “Before Opening the PC” on page 3.
2 Loosen the two thumbscrews on the right side
of the back panel. The first time you loosen
these screws, you may need to use a Phillips
screwdriver. These screws do not detach; they
stay on the side panel loosely until you tighten
them again.
3 Pull the panel back toward you until it stops.
Lift the panel off the chassis and set it aside.
Note:
You do not need to remove the other side panel
to replace the hardware listed in this guide.
HP Pavilion home PC
4
Page 9

Replacing the Side Panel
1 Align the notches inside the side panel with the
holes on the chassis frame.
2 Slide the side panel forward on the frame until
it locks into place, and then tighten the
thumbscrews on the side panel.
3 See “After Closing the PC” on page 3.
Upgrading and Servicing the PC
5
Page 10

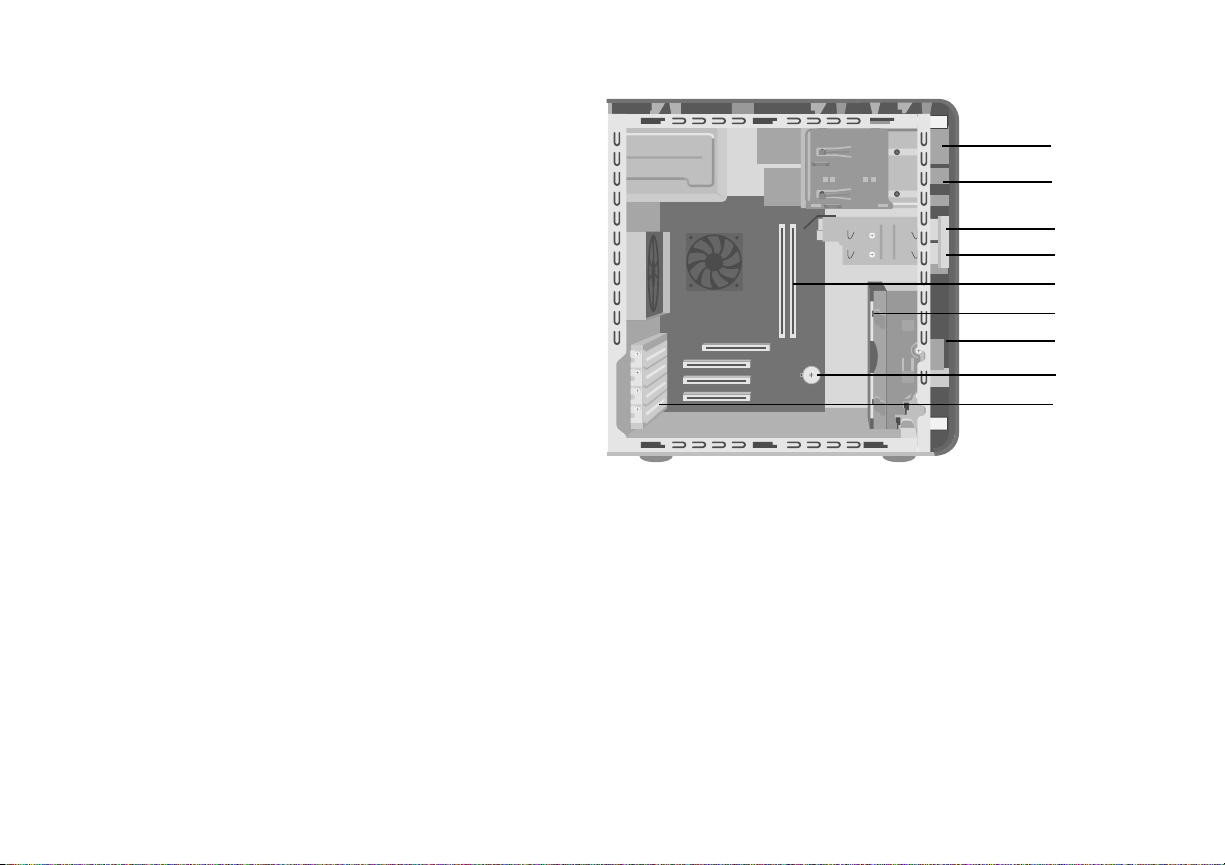
Locating Components Inside the PC
A Upper optical drive bay
B Lower optical drive bay
C Diskette (Floppy) drive
D 6-In-1 memory card reader (may not be
included with all models)
E Memory sockets
F Primary hard disk drive
G Expansion bay for second hard disk drive
H Lithium battery
I PCI/AGP Add-in card slots
A
B
C
D
E
F
G
H
I
HP Pavilion home PC
6
Page 11

Removing the Front Panel
This procedure is only necessary when removing
or replacing an optical drive, a 6-In-1 memory
card reader, or a diskette drive.
1 Remove the side panel with the thumbscrews.
See “Removing the Side Panel” on page 4.
2 Unlock or pull back the front panel release tab
(A). This tab is located at the bottom of the
front panel, near the hard drive bracket. Pull
the tab all the way back until the bottom of it
rests against the frame of the chassis. The
arrow mark on the release tab points to unlock
when it is in the unlock position.
3 Locate the three small tabs (B) attached to the
front panel on the side of the chassis. Press
each tab away from the center of the chassis.
Press the top, the middle, and the bottom tab,
and then gently remove the front panel.
B
A
Upgrading and Servicing the PC
7
Page 12

Replacing the Front Panel
1 Place the chassis upright, and then align the
bottom of the front panel with the ridge on the
bottom of the chassis.
Or
Slide the bottom of the front panel under the
bottom of the chassis, making sure the tab on
the bottom of the front panel is inserted into the
slot on the bottom of the chassis.
2 Guide the three small tabs (B) on both sides of
the front panel into the correct holes, until the
panel snaps into place.
3 Lock the front panel release tab (A) by pushing
it until it rests against the hard drive bracket.
The arrow mark on the release tab points to
lock when it is in the lock position.
B
A
HP Pavilion home PC
8
Page 13

Removing and Replacing
Drives
Your PC includes several drives that you can
replace or upgrade.
Important:
Before adding a new optical drive, make
sure that it is compatible with the Microsoft
Windows
Also, make sure you have the correct software
and drivers for the optical drive to work with the
operating system.
®
XP Home Edition operating system.
®
Your PC model may come with:
One or two optical drives (CD, DVD, CD-RW,
DVD+RW, or combo). These drives are located
in the two bays at the top of the chassis.
One diskette drive located directly under the
lower optical drive bay.
One 6-In-1 memory card reader located under
the diskette drive.
One primary hard disk drive and an
expansion bay for a second hard disk drive.
Upgrading and Servicing the PC
9
Page 14
A Upper optical drive bay
B Lower optical drive bay
C Diskette (Floppy) drive
D 6-In-1 memory card reader (may not be
included with all models)
E Memory sockets
F Primary hard disk drive
G Expansion bay for second hard disk
drive
H Lithium battery
I PCI/AGP Add-in card slots
A
B
C
D
E
F
G
H
I
HP Pavilion home PC
10
Page 15

Removing an Optical Drive
1 Remove the side panel that has thumbscrews.
See page 4.
2 Remove the front panel. See page 7.
3 Gently lay the PC on its side.
4 Pull back on the plastic tab (C) on the side
of the optical drive you want to remove. Push
the drive partway out through the front of
the PC (D).
5 Make a note of each cable and plug
orientation attached to the back of the optical
drive you want to replace before removing the
cables.
6 Disconnect the power cable and data cable
from the back of the optical drive you want to
remove, using a gentle rocking motion. Some
PC models may have a sound cable. If so,
disconnect the sound cable.
7 Pull the drive out through the front of
the PC (D).
C
D
Upgrading and Servicing the PC
11
Page 16

Installing an Optical Drive
If you are adding a drive to an empty optical
drive bay, you need to remove the drive cover.
1 Remove the side panel that has thumbscrews.
See page 4.
2 Remove the front panel. See page 7.
3 If your optical drive bay is empty, remove the
drive cover by pressing the tabs on each side
of the drive cover, and then pulling it toward
you and out of the PC.
4 Make sure the jumper on the new drive is in
the CS (Cable Select) position.
5 Slide the new optical drive through the front of
the PC. Don’t slide the drive in all the way; you
need room to attach the cables.
Note:
A jumper is a small plastic connector or wire
that electrically connects two pins in order to define
a configuration setting. Below is an example of
drive with Cable Select jumper installed
(your drive may vary).
CS SL MA
6 Connect the power cable and data cable to
the back of the optical drive. Some PC models
may have a sound cable. If so, connect the
sound cable.
HP Pavilion home PC
12
Page 17

7 Push the optical drive all the way in through
the front of the PC until it snaps into place (D).
8 Replace the front panel. See page 8.
9 Replace the side panel. See page 5.
D
Removing the 6-In-1 Memory Card
Reader or the Diskette (Floppy)
Drive
The PC has a removable drive cage that holds
the 6-In-1 memory card reader and the diskette
drive. You can remove and replace either of
these drives if they are included with your model.
To ensure that the drive fits properly into the
HP Pavilion, be sure to purchase the replacement
diskette drive from HP. Refer to the Support Guide
for the telephone number of the HP Customer
Care Center.
Upgrading and Servicing the PC
13
Page 18

To remove the 6-In-1 memory card reader drive
or the diskette drive:
1 Remove the side panel that has thumbscrews.
See page 4.
2 Gently lay the PC on its side.
3 Make a note of each cable attached to the
drive you want to replace.
4 Push down on the drive cage release tab (E).
5 Hold the release tab down as you pull the
cage toward the back of the chassis, and then
lift it out (F). Removing the drive cage provides
more space to remove the cables.
6 Remove the cables attached to the back of the
drives in the drive cage.
F
E
HP Pavilion home PC
14
Page 19

7 Remove the screw from each side of the drive
cage to remove the 6-In-1 memory card
reader.
Or
Remove the screw from each side of the drive
cage to remove the diskette drive.
8 Pull the drive out through the front of the
drive cage.
Installing the 6-In-1 Memory Card
Reader or the Diskette (Floppy)
Drive
1 See “Removing the 6-In-1 Memory Card
Reader or the Diskette (Floppy) Drive” on
page 13.
2 Slide the replacement drive into the drive cage
until the two screw holes on each side are
aligned.
Upgrading and Servicing the PC
15
Page 20

3 Attach the screw on each side of the
drive cage.
4 Pull the drive cage release tab (E) back. Align
the four holes on the top of the drive cage with
the four latches (G) on the bottom of the
optical drive bracket. Slide the latches into the
four holes on the drive cage, pushing the drive
cage forward until it snaps into place.
5 Connect the cables to the back of the drive you
installed.
6 Replace the side panel. See page 5.
G
E
HP Pavilion home PC
16
Page 21

Removing the Preinstalled Hard
Drive
You can replace the preinstalled (primary) hard
drive or install a second hard drive in the PC.
You need to remove the primary hard drive from
the chassis if you want to replace it with a highercapacity drive, or if you want to safeguard your
data when sending the PC out to be repaired.
The preinstalled hard drive is preloaded with the
system recovery partition of your PC. If you
remove this hard drive, please store in an
antistatic bag that is properly sealed.
To remove the preinstalled hard drive:
1 Remove the side panel that has thumbscrews.
See page 4.
2 Gently lay the PC on its side.
3 Make a note of each cable attached to
the hard drive before removing the cables.
Remove the cables from the back of the
hard drive.
4 Push the release tab attached to the hard drive
bracket (H) until it is unlocked. Gently push the
hard drive in the same direction and then pull
it out of the hard drive bracket (J).
H
J
Upgrading and Servicing the PC
17
Page 22

Replacing the Preinstalled
Hard Drive
1 Make sure the release tab on the hard drive
bracket is in the unlocked position before you
insert the new hard drive.
2 Align the two screws on the top and bottom of
the replacement hard drive with the screw
head tracks on the top and bottom of the hard
drive bracket. Slide the hard drive until it
snaps into place (K).
3 Push the release tab on the top of the hard
drive bracket into the locked position (L).
K
L
HP Pavilion home PC
18
Page 23

4 Attach the IDE and power supply cables to the
back of the hard drive.
Warning:
end labeled Master is connected to the
primary hard drive. If you have a second
hard drive, make sure the IDE cable
labeled Slave is connected to the second
hard drive. If the IDE cable is not
connected correctly, the PC will not be
able to locate the hard drives and data
may be lost.
Make sure the IDE cable
5 Replace the side panel. See page 5.
MASTER
SLAVE
To CPU
Upgrading and Servicing the PC
19
Page 24

Installing a Second Hard Drive
Some PC models may have an empty bay to add
a second hard drive.
1 Remove the side panel. See page 4.
2 Remove the front panel. See page 7.
3 Gently lay the PC on its side.
4 See “Removing the Preinstalled Hard Drive” on
page 17.
Note:
5 Remove the two screws on the hard drive
bracket (N).
6 Slide the bracket away from the bottom of the
chassis, and then pull it up and out of the
chassis (O).
You do not need to remove the preinstalled hard
drive from the bracket when installing a second
hard drive.
O
N
7 Align the hard drive to the screw holes (P) on
the front of the chassis and use four regular
6/32 Phillips screws (not included with your
PC) to secure the hard drive to the front of
the PC.
P
HP Pavilion home PC
20
Page 25

8 Make sure the jumper on the new drive is in
the CS (Cable Select) position. Below is a
drive with a Cable Select jumper installed.
Your drive may vary.
CS SL MA
9 Attach the power cable to the back of the
drive.
10 Make sure you attach the connector marked
Master on the IDE ribbon cable to the back of
the primary hard drive. After this primary
connection is attached, twist the remaining
part of the cable marked Slave on that same
IDE ribbon cable and connect it to the second
hard drive.
Warning:
end labeled Master is connected to the
primary hard drive. If you have a second
hard drive, make sure the IDE cable
labeled Slave is connected to the second
hard drive. If the IDE cable is not
connected correctly, the PC will not be
able to locate the hard drives and data
may be lost.
MASTER
To CPU
SLAVE
Make sure the IDE cable
Upgrading and Servicing the PC
21
Page 26

11 Connect the end of the IDE cable labeled CPU
to the motherboard.
12 Place the hard drive bracket over the new
second hard drive, align the four tabs to the
holes on the front of the chassis, and then slide
it toward the bottom of the chassis until it
snaps into place (Q).
13 Attach the two screws to the hard drive
bracket (R).
14 Replace the preinstalled hard drive. See
page 18.
15 Replace the front panel. See page 8.
16 Replace the side panel. See page 5.
R
Q
HP Pavilion home PC
22
Page 27

Removing a Second Hard Drive
1 Remove the side panel. See page 4.
2 Remove the front panel. See page 7.
3 Gently lay the PC on its side.
4 See “Removing the Preinstalled Hard Drive” on
page 17.
Note:
5 Remove the two screws on the hard drive
bracket (N).
6 Slide the bracket away from the bottom of the
chassis (O), and then pull it up and out of the
chassis.
7 Make a note of each cable attached to the
second hard drive before removing the cables.
Remove the IDE and power cables from the
back of the second hard drive.
You do not need to remove the preinstalled hard
drive from the bracket when installing a second
hard drive.
8 Remove the four screws on the front of the
chassis to release the hard drive from the front
of the chassis (P). Pull the hard drive out of the
chassis.
N
O
P
Upgrading and Servicing the PC
23
Page 28

Adding Memory
The motherboard contains sockets for
DDR DIMMs (double data rate dual in-line
memory modules).
To determine the memory capacity and speed of
the memory module your PC model uses, and for
specific memory module information and
specifications:
1 Go to the HP Web site by typing
http://www.hp.com into your Web browser
address box.
2 Press Enter on your keyboard.
3 Select your country or region from the
drop-down list.
4 Click the arrow to the right of the
drop-down list, and then click the
support & drivers link.
5 Click HP technical support.
6 Search for your PC model number, and then
search for “upgrading memory” to find out
your system configuration and memory
requirements.
The motherboard contains 184-pin DDR DIMM
sockets. The number of sockets depends on which
model you have.
DDR DIMM
Warning:
memory module could damage the
system.
Using the wrong type of
HP Pavilion home PC
24
Page 29

About Installing DDR DIMMs
DDR DIMMs must be 184-pin unbuffered DDR
SDRAM (double data rate synchronous dynamic
random access memory). The HP Pavilion ships
with one or more memory modules, but you can
replace the existing memory modules with highercapacity ones. You can install 128 MB, 256 MB,
512 MB, or 1024 MB (1GB) memory modules in
the PC.
Note:
Some memory configurations vary, depending
on your PC model. 512 MB and 1024 MB DDR
DIMM memory modules are not compatible with
all PC models.
Removing a Memory Module
1 Remove the side panel that has thumbscrews.
See page 4.
2 Gently lay the PC on its side.
3 Locate the memory sockets on the
motherboard.
4 Move any cabling out of the way, if necessary.
5 Push down the two retaining clips on the ends
of the socket until the memory module pops out
of the socket. Hold the memory module by its
edges only, as you lift it away from the socket.
Store it in its antistatic packaging.
Upgrading and Servicing the PC
25
Page 30

Installing a Memory Module
1 See “Removing a Memory Module” on
page 25.
2 Holding the new memory module by its edges
only, remove it from the antistatic packaging.
(Avoid touching the memory chips or the gold
contacts on the module.) The memory module
Warning:
module out of the socket. Use the
retaining clips to eject the module.
Do not pull the memory
has one or two small notches on the lower
edge, which fit into raised bumps in the
memory socket.
3 Hold the memory module in alignment with the
socket, aligning the notches with the bumps.
HP Pavilion home PC
26
Page 31

4 Push straight down on top of the memory
module until it is fully seated in the socket.
The retaining clips on the ends of the socket
automatically lock it into position when the
memory module is fully seated.
5 Replace any cabling that was removed.
6 Replace the side panel. See page 5.
Add-In Cards
At some point, you may want to add a PCI or an
AGP card to the PC to accommodate a new
component, such as a scanner, or to upgrade an
existing card.
Warning:
by installing add-in cards that draw
excessive current. The system is designed
to provide 2 amps (average) of +5 V
power for each board/card in the PC. The
total +5 V current draw in a fully loaded
system (one with all add-in card slots
filled) must not exceed the total number
of slots multiplied by 2 amps.
Do not overload the system
Upgrading and Servicing the PC
27
Page 32

Removing an Add-In Card
1 Remove the side panel that has thumbscrews.
See page 4.
2 Gently lay the PC on its side.
3 To prepare an empty card slot for a new card,
loosen the screw of the expansion slot cover.
Remove the cover of the empty slot.
4 If you are replacing a card, make a note of
any external or internal cables attached to
the card, and then disconnect them.
5 Loosen the screw on the bracket of the card
you are replacing.
6 Hold the bracket and the far top corner of the
card. Carefully remove the card by pulling the
card straight out of the expansion slot.
Warning:
on the expansion slot cover.
Be careful of the sharp edges
HP Pavilion home PC
28
Page 33

Installing an Add-In Card
1 Insert the new card into the slot and push
straight down. Make sure the card is properly
seated.
2 Attach the screw to secure the card you have
replaced.
3 Connect any external or internal cables
attached to the card.
4 Replace the side panel. See page 5.
Note:
If the new card or device isn’t working, read
through the card manufacturer’s installation
instructions, and recheck all connections,
including those to the card, power supply,
keyboard, and monitor. If the problem still
exists, run the BIOS setup program and load
the default settings, and then save and exit.
Upgrading and Servicing the PC
29
Page 34

Replacing the Battery
A lithium battery on the motherboard provides
backup power for the PC’s timekeeping
capability. The battery has an estimated life
expectancy of seven years.
When the battery starts to weaken, the date
and time may be incorrect. If the battery fails,
replace it with a CR2032 lithium battery (3 volt,
220mAH rating) or an equivalent battery.
Warning:
if the battery is incorrectly replaced.
Replace only with the same, or
equivalent, type of battery. Discard used
batteries according to the manufacturer’s
instructions.
To replace the battery:
1 Remove the side panel that has the
thumbscrews. See page 4.
There is danger of explosion
3 Remove any cabling, if necessary, to reach the
battery.
4 Remove any memory modules, if necessary, to
reach the battery.
5 With a flat screwdriver, press the metal latch
that holds the battery in its socket away from
the battery. The battery will pop out.
6 Install the new CR2032 battery in the socket,
with the positive (+) side facing up.
2 Gently lay the PC on its side.
HP Pavilion home PC
30
Page 35

Index
6-In-1 memory card reader
installing, 15
locating, 9
removing, 13
A
add-in cards
installing, 27, 29
removing, 28
troubleshooting, 29
AGP cards, adding, 27
B
battery
replacing, 30
type, 30
C
Cable Select jumper setting, 21
computer
disconnecting, 3
opening, 2
reconnecting, 3
removing front panel, 7
removing side panels, 4
D
disconnecting computer
procedure, 3
warning, 3
diskette drive
installing, 15
locating, 9
purchasing replacement, 13
removing, 13
E
expansion bay, locating, 9
F
floppy drive. See diskette drive
front panel
removing, 7
replacing, 8
H
hard (second) drive
installing, 20
removing, 23
hard drive
installing, 18
removing, 17
I
installing
6-In-1 memory card reader, 15
diskette drive, 15
floppy drive, 15
hard drive, 18
optical drive, 12
second hard drive, 20
L
locating
6-In-1 memory card reader, 9
drives, 9
expansion bay, 9
Upgrading and Servicing the PC
31
Page 36

M
memory module
installing, 26
removing, 25
warning, 26
memory, DDR DIMMs, 25
O
optical drive
installing, 12
locating, 9
removing, 11
P
PCI cards, adding, 27
R
reconnecting computer, 3
removing
6-In-1 memory card reader, 13
add-in cards, 28
diskette drive, 13
floppy drive, 13
front panel, 7
hard drive, 17
memory module, 25
optical drive, 11
second hard drive, 23
side panels, 4
removing and installing drives,
about, 9
replacing
drives. See installing
front panel, 8
side panels, 5
S
side panels
removing, 4
replacing, 5
T
troubleshooting add-in cards, 29
W
warnings
add-in cards, 27
operating PC with cover off, 1
power safety, 1
removing memory module, 26
removing PC cover, 2
voltage setting, 1
HP Pavilion home PC
32
 Loading...