

Page 1

HP Notebook PC
Startup Guide
Page 2

Notice
This manual and any examples contained herein are provided “as is” and are subject to
change without notice. Hewlett-Packard Company makes no warranty of any kind with
regard to this manual, including, but not limited to, the implied warranties of
merchantability and fitness for a particular purpose. Hewlett-Packard Co. shall not be
liable for any errors or for incidental or consequential damages in connection with the
furnishing, performance, or use of this manual or the examples herein.
Consumer transactions in Australia and the United Kingdom: The above disclaimers and
limitations shall not apply to Consumer transactions in Australia and the United Kingdom
and shall not affect the statutory rights of Consumers.
© Copyright Hewlett-Packard Company 2000. All rights reserved. Reproduction,
adaptation, or translation of this manual is prohibited without prior written permission of
Hewlett-Packard Company, except as allowed under the copyright laws.
The programs that control this product are copyrighted and all rights are reserved.
Reproduction, adaptation, or translation of those programs without prior written
permission of Hewlett-Packard Co. is also prohibited.
Portions of the programs that control this product may also be copyrighted by Microsoft
Corporation, SystemSoft Corp., Phoenix Technologies, Ltd., ATI Technologies Inc., and
Adobe Systems Incorporated. See the individual programs for additional copyright
notices.
Microsoft®, MS-DOS®, and Windows® are U.S. registered trademarks of Microsoft
Corporation. Pentium® and the Intel Inside logo are U.S. registered trademarks and
Celeron™ and SpeedStep™ are U.S. trademarks of Intel Corporation. TrackPoint™ is a
U.S. trademark of International Business Machines. Adobe® and Acrobat® are
trademarks of Adobe Systems Incorporated.
Hewlett-Packard Company
Mobile Computing Division
19310 Pruneridge Ave.
Cupertino, CA 95014
2 Startup Guide
Page 3

HP Software Product License Agreement
Your HP notebook PC contains factory-installed software programs. Please read the
Software License Agreement before proceeding.
Carefully read this License Agreement before proceeding to operate this equipment.
Rights in the software are offered only on the condition that the customer agrees to
all terms and conditions of the License Agreement. Proceeding to operate the
equipment indicates your acceptance of these terms and conditions. If you do not
agree with the terms of the License Agreement, you must now either remove the
software from your hard disk drive and destroy the Recovery CD, or return the
complete computer and software for a full refund.
Proceeding with configuration signifies your acceptance of the License Terms.
Unless otherwise stated below, this HP Software Product License Agreement shall
govern the use of all software that is provided to you, the customer, as part of the
HP computer product. It shall supersede any non-HP software license terms that
may be found online, or in any documentation or other materials contained in the
computer product packaging.
Note: Operating System Software by Microsoft is licensed to you under the Microsoft
End User License Agreement (EULA).
The following License Terms govern the use of the software:
Use. Customer may use the software on any one computer. Customer may not network
the software or otherwise use it on more than one computer. Customer may not reverse
assemble or decompile the software unless authorized by law.
Copies and Adaptations. Customer may make copies or adaptations of the software (a)
for archival purposes or (b) when copying or adaptation is an essential step in the use of
the software with a computer so long as the copies and adaptations are used in no other
manner.
Ownership. Customer agrees that he/she does not have any title or ownership of the
software, other than ownership of the physical media. Customer acknowledges and
agrees that the software is copyrighted and protected under the copyright laws. Customer
acknowledges and agrees that the software may have been developed by a third party
software supplier named in the copyright notices included with the software, who shall be
authorized to hold the Customer responsible for any copyright infringement or violation
of this Agreement.
Product Recovery CD-ROM. If your computer was shipped with a product Recovery
CD-ROM: (i) The product Recovery CD-ROM and/or support utility software may only
be used for restoring the hard disk of the HP computer with which the product Recovery
CD-ROM was originally provided. (ii) The use of any operating system software by
Microsoft contained in any such product Recovery CD-ROM shall be governed by the
Microsoft End User License Agreement (EULA).
Startup Guide 3
Page 4

Transfer of Rights in Software. Customer may transfer rights in the software to a third
party only as part of the transfer of all rights and only if Customer obtains the prior
agreement of the third party to be bound by the terms of this License Agreement. Upon
such a transfer, Customer agrees that his/her rights in the software are terminated and that
he/she will either destroy his/her copies and adaptations or deliver them to the third party.
Sublicensing and Distribution. Customer may not lease, sublicense the software or
distribute copies or adaptations of the software to the public in physical media or by
telecommunication without the prior written consent of Hewlett-Packard.
Termination. Hewlett-Packard may terminate this software license for failure to comply
with any of these terms provided Hewlett-Packard has requested Customer to cure the
failure and Customer has failed to do so within thirty (30) days of such notice.
Updates And Upgrades. Customer agrees that the software does not include updates and
upgrades which may be available from Hewlett-Packard under a separate support
agreement.
Export Clause. Customer agrees not to export or re-export the software or any copy or
adaptation in violation of the U.S. Export Administration regulations or other applicable
regulation.
U.S. Government Restricted Rights. Use, duplication, or disclosure by the U.S.
Government is subject to restrictions as set forth in subparagraph (c)(1)(ii) of the Rights
in Technical Data and Computer Software clause in DFARS 252.227-7013. HewlettPackard Company, 3000 Hanover Street, Palo Alto, CA 94304 U.S.A. Rights for nonDOD U.S. Government Departments and Agencies are as set forth in FAR 52.22719(c)(1,2).
Edition History
Edition 3.......................................... December 2000
This manual is printed on recycled paper.
4 Startup Guide
Page 5

Contents
Introducing the Notebook Computer .............................................................................. 7
Taking Inventory............................................................................................................ 8
What’s in the Box?................................................................................................... 8
Software bundled on your computer........................................................................9
To find more information....................................................................................... 10
Identifying Parts of the Computer ............................................................................... 11
Front View ............................................................................................................. 11
Bottom View .......................................................................................................... 12
Back View..............................................................................................................13
Status Lights........................................................................................................... 14
Setting Up Your Computer.......................................................................................... 16
Step 1 – Install the battery...................................................................................... 16
Step 2 – Connect ac power..................................................................................... 18
Step 3 – Turn on the computer............................................................................... 19
Step 4 – Set up Windows ....................................................................................... 20
Using Your Computer ..................................................................................................... 21
Operating Your Computer ........................................................................................... 22
To start and stop the computer...............................................................................22
To reset the computer............................................................................................. 23
To use the pointing devices.................................................................................... 24
To use the Fn hot keys ...........................................................................................25
Working in Comfort with a Notebook PC...................................................................26
Traveling with Your Computer...................................................................................... 29
Using Battery Power.................................................................................................... 30
To check battery status........................................................................................... 30
To respond to a low-battery warning ..................................................................... 31
Making Connections........................................................................................................ 33
Using Plug-In Modules................................................................................................ 34
To install hot-swap support.................................................................................... 34
To replace a plug-in module ..................................................................................35
Configuring and Expanding Your Computer............................................................... 37
Using the BIOS Setup Utility ......................................................................................38
To run the BIOS Setup utility ................................................................................ 38
Installing a RAM Expansion Module.......................................................................... 39
To install a RAM expansion module .....................................................................39
Startup Guide 5
Page 6

Replacing a Hard Disk Drive....................................................................................... 41
To replace the hard disk drive................................................................................ 41
Troubleshooting Your Computer .................................................................................. 43
Troubleshooting Techniques........................................................................................ 44
Display Problems ................................................................................................... 44
Hard Disk Drive Problems..................................................................................... 45
Keyboard and Pointing Device Problems.............................................................. 45
Performance Problems ........................................................................................... 46
Power and Battery Problems.................................................................................. 46
Startup Problems .................................................................................................... 47
Testing the Hardware................................................................................................... 48
To run the DiagTools diagnostic test ..................................................................... 48
Recovering and Reinstalling Software ........................................................................ 50
To recover the factory installation of your hard disk............................................. 50
Support and Service ........................................................................................................ 53
Getting Assistance for Your Computer .......................................................................54
To get help from the web ....................................................................................... 54
To contact the HP Customer Care Center.............................................................. 54
To receive repair service........................................................................................ 56
To prepare your computer for shipment ................................................................ 57
Hewlett-Packard Limited Warranty Statement............................................................ 58
Specifications and Regulatory Information .................................................................. 61
Hardware Specifications.............................................................................................. 62
Safety Information ....................................................................................................... 65
Power Cords........................................................................................................... 65
Ergonomics ............................................................................................................ 66
Battery Safety......................................................................................................... 66
Laser Safety............................................................................................................ 67
LED Safety............................................................................................................. 67
Regulatory Information................................................................................................ 68
U.S.A...................................................................................................................... 68
Canada.................................................................................................................... 69
European Union ..................................................................................................... 69
Japan....................................................................................................................... 70
Russia ..................................................................................................................... 70
International ...........................................................................................................71
Index.................................................................................................................................. 73
6 Startup Guide
Page 7

Introducing the Notebook Computer
Startup Guide 7
Page 8

Introducing the Notebook Computer
Taking Inventory
Taking Inventory
Congratulations! Your notebook computer sets a new standard in personal computing.
Although compact and easy to carry, your computer is made with the quality and
attention to detail that are the hallmark of Hewlett-Packard.
Your computer has several features that make it convenient to use:
• The display is brighter than those on previous HP notebook computers.
• Two buttons provide convenient options for starting and stopping the computer.
• Volume controls are located within easy reach on the computer’s right side, and the
audio-off button and light let you cut off all sound quickly when needed.
• All cable connectors are near the back of the computer, keeping cables away from
your working area.
This manual shows how to set up and operate your computer, as well as what to do if you
run into trouble.
What’s in the Box?
• HP notebook PC.
• Main battery (installed).
• CD-ROM or DVD drive module (installed).
• Floppy disk drive module.
• External floppy disk drive cable.
• ac adapter and power cord.
• Quick Start sheet.
• Startup Guide.
• Recovery CD, for restoring Windows and all software included with your computer.
• Microsoft Windows manual.
• Mediamatics CD (for models with a DVD drive).
8 Startup Guide
Page 9
Introducing the Notebook Computer
Taking Inventory
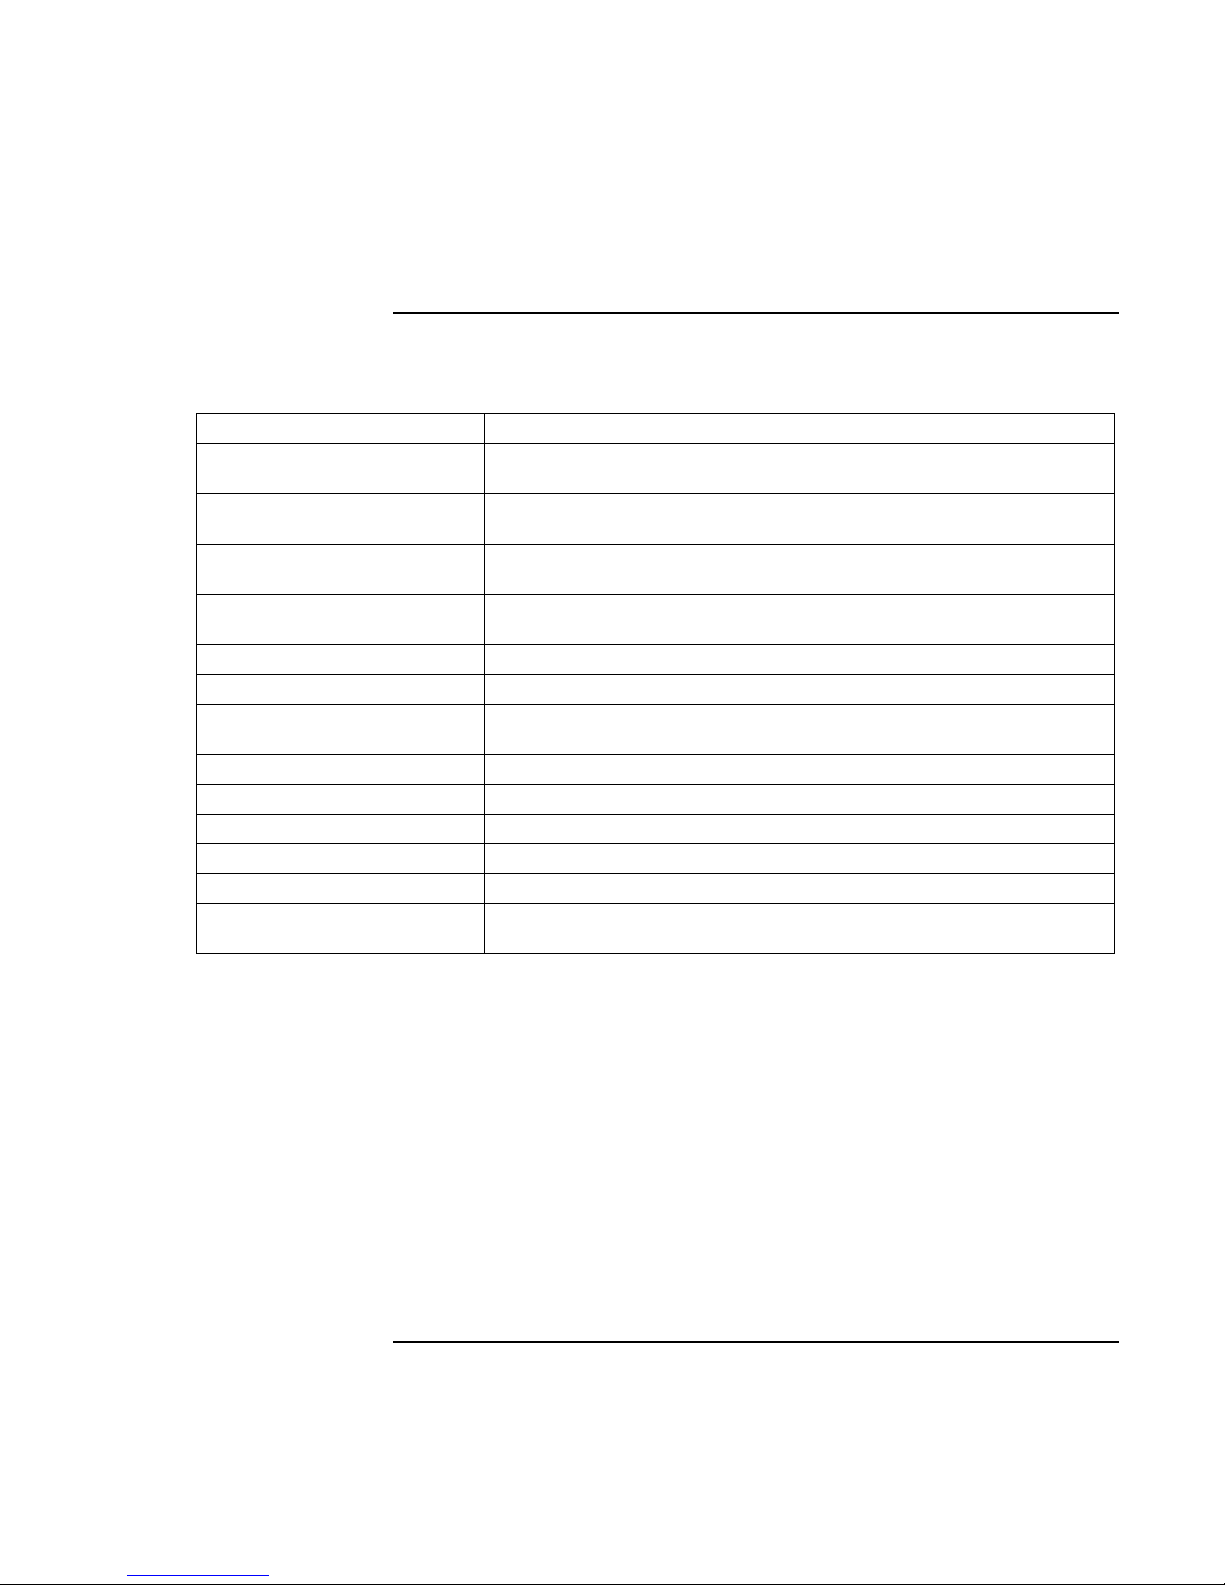
Software bundled on your computer
Your computer includes the following software.
Software Function
Softex Bay Manager Lets you swap most modules in the plug-in bay without needing to shut down and
reboot the computer (Windows ME only).
Agaté Tioman Hot-Swap Lets you swap most modules in the plug-in bay without needing to shut down and
reboot the computer (Windows 95 and 98 only).
QuickLink Permits fax transfer to fax machines and fax software, and permits data transfer
(Windows ME and 98 only).
HP e-center Provides easy access to e-pages and e-services—including backup, e-mail, and
fax transfer (North America English only).
VirusScan Protects your computer from potentially harmful files.
Adobe Acrobat Reader Allows you to read documents in Acrobat format frequently used on the Internet.
MusicMatch Jukebox Lets you download, organize, encode, and play MP3 files (Windows ME and 98
only).
Microsoft Works Provides word processor, spreadsheet, calendar, and more (Windows ME only).
Microsoft Encarta Provides an online encyclopedia (Windows ME only).
Microsoft Money Helps manage personal finances (Windows ME only).
HP DiagTools Provides hardware diagnostic tests.
DVD Express Controls DVD play (for models with a DVD drive).
HP TopTools Allows network managers and administrators to check the hardware and software
on your computer and how well they are working (not on Pavilion models).
Startup Guide 9
Page 10
Introducing the Notebook Computer
Taking Inventory
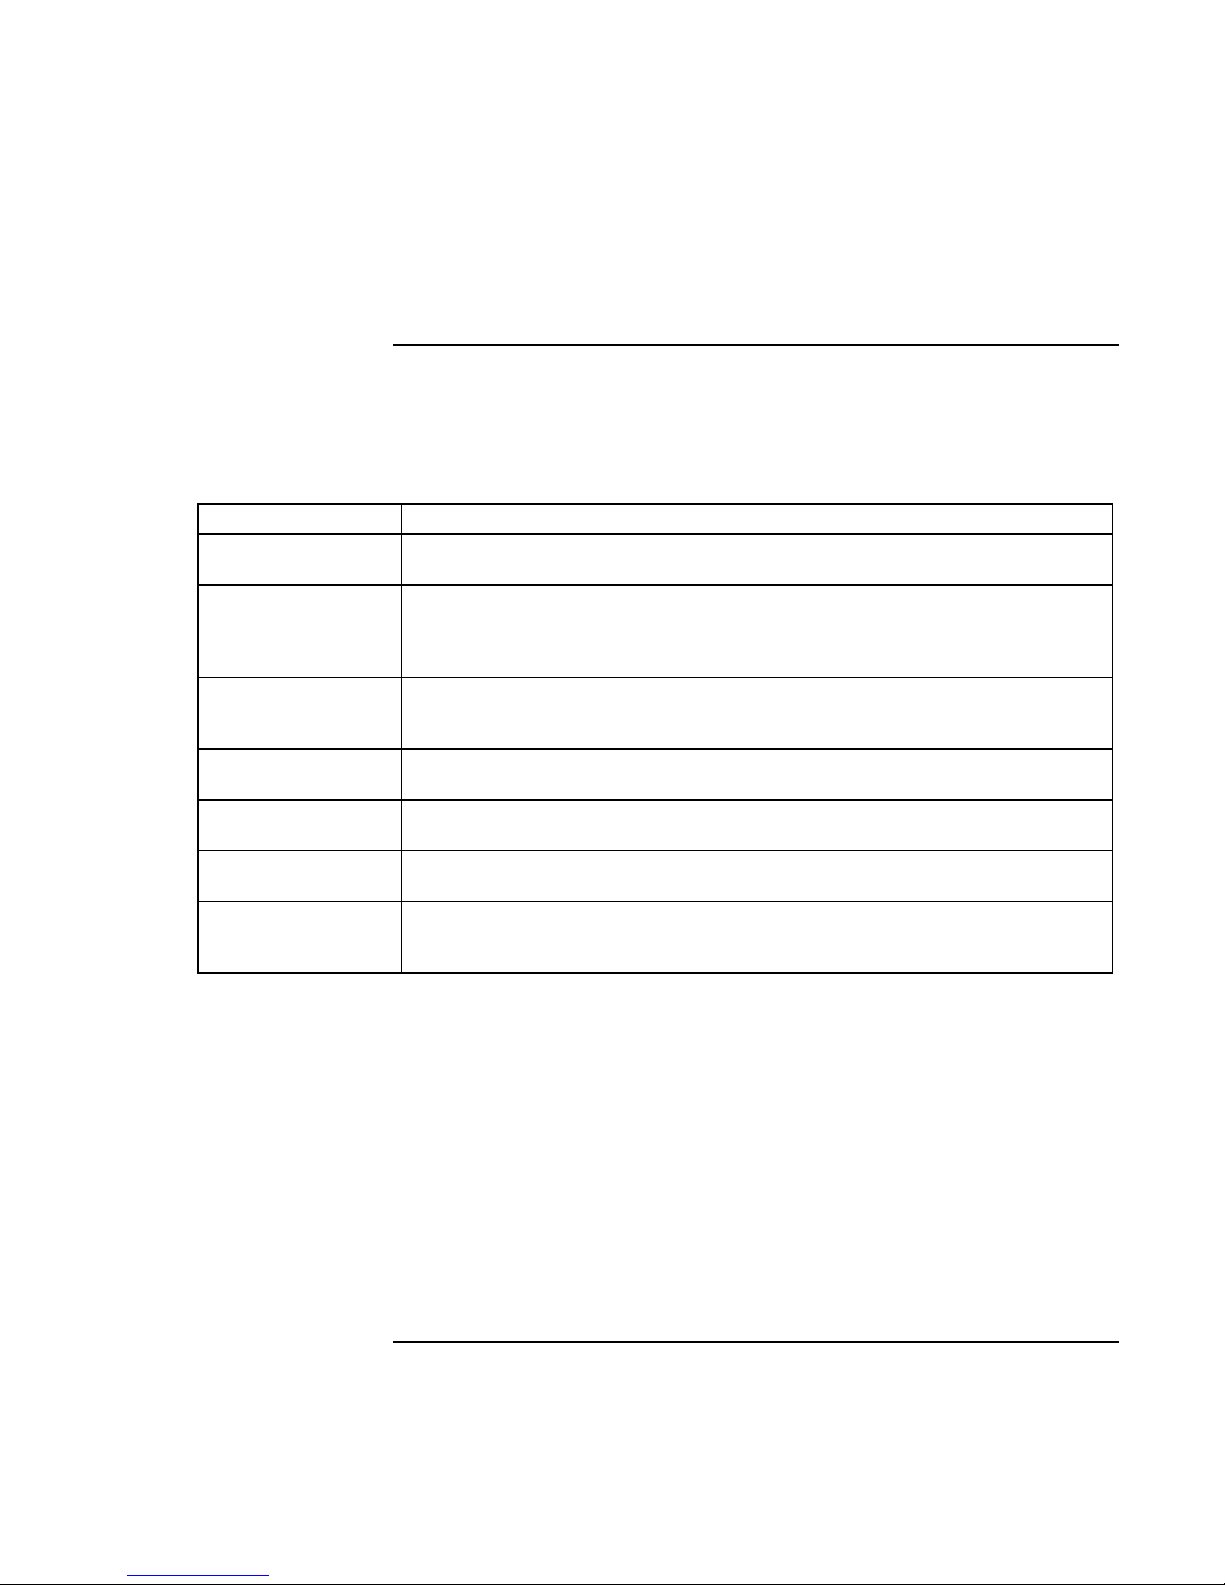
To find more information
The following table lists other sources of information about your computer and related
products.
Source Description and Location
Startup Guide This printed manual introduces your computer. It also contains setup instructions, basic
operation guidelines, troubleshooting information, and warranty information.
Online Reference
Guide
Online HP Notes For late-breaking information available after the manuals were completed, see the HP Notes
Microsoft Windows
manual
HP Notebook Web
Site
HP Customer Care
Web Site
Corporate Evaluator’s
Guide
The full Reference Guide is shipped on the computer’s hard drive, and provides a complete
source for operating and maintaining the computer. Look in the HP Library group, or on the
Recovery CD in \hp\Library. For Windows ME, click Start, Help, Your HP Notebook, HP
Reference Guide.
in the online HP Library, or on the Recovery CD in \hp\Library. For Windows ME, click
Start, Help, Your HP Notebook, HP Notes.
This is shipped with your computer and contains information about using the version of
Microsoft Windows shipped with your computer.
www.hp.com/notebooks
www.europe.hp.com/notebooks (European mirror).
www.hp.com/go/support.
This provides information about installing alternate operating systems, as well as how to
configure your notebook computer in a corporate, networked environment. Located at the HP
Notebook Web site.
10 Startup Guide
Page 11
Introducing the Notebook Computer
Identifying Parts of the Computer
Identifying Parts of the Computer
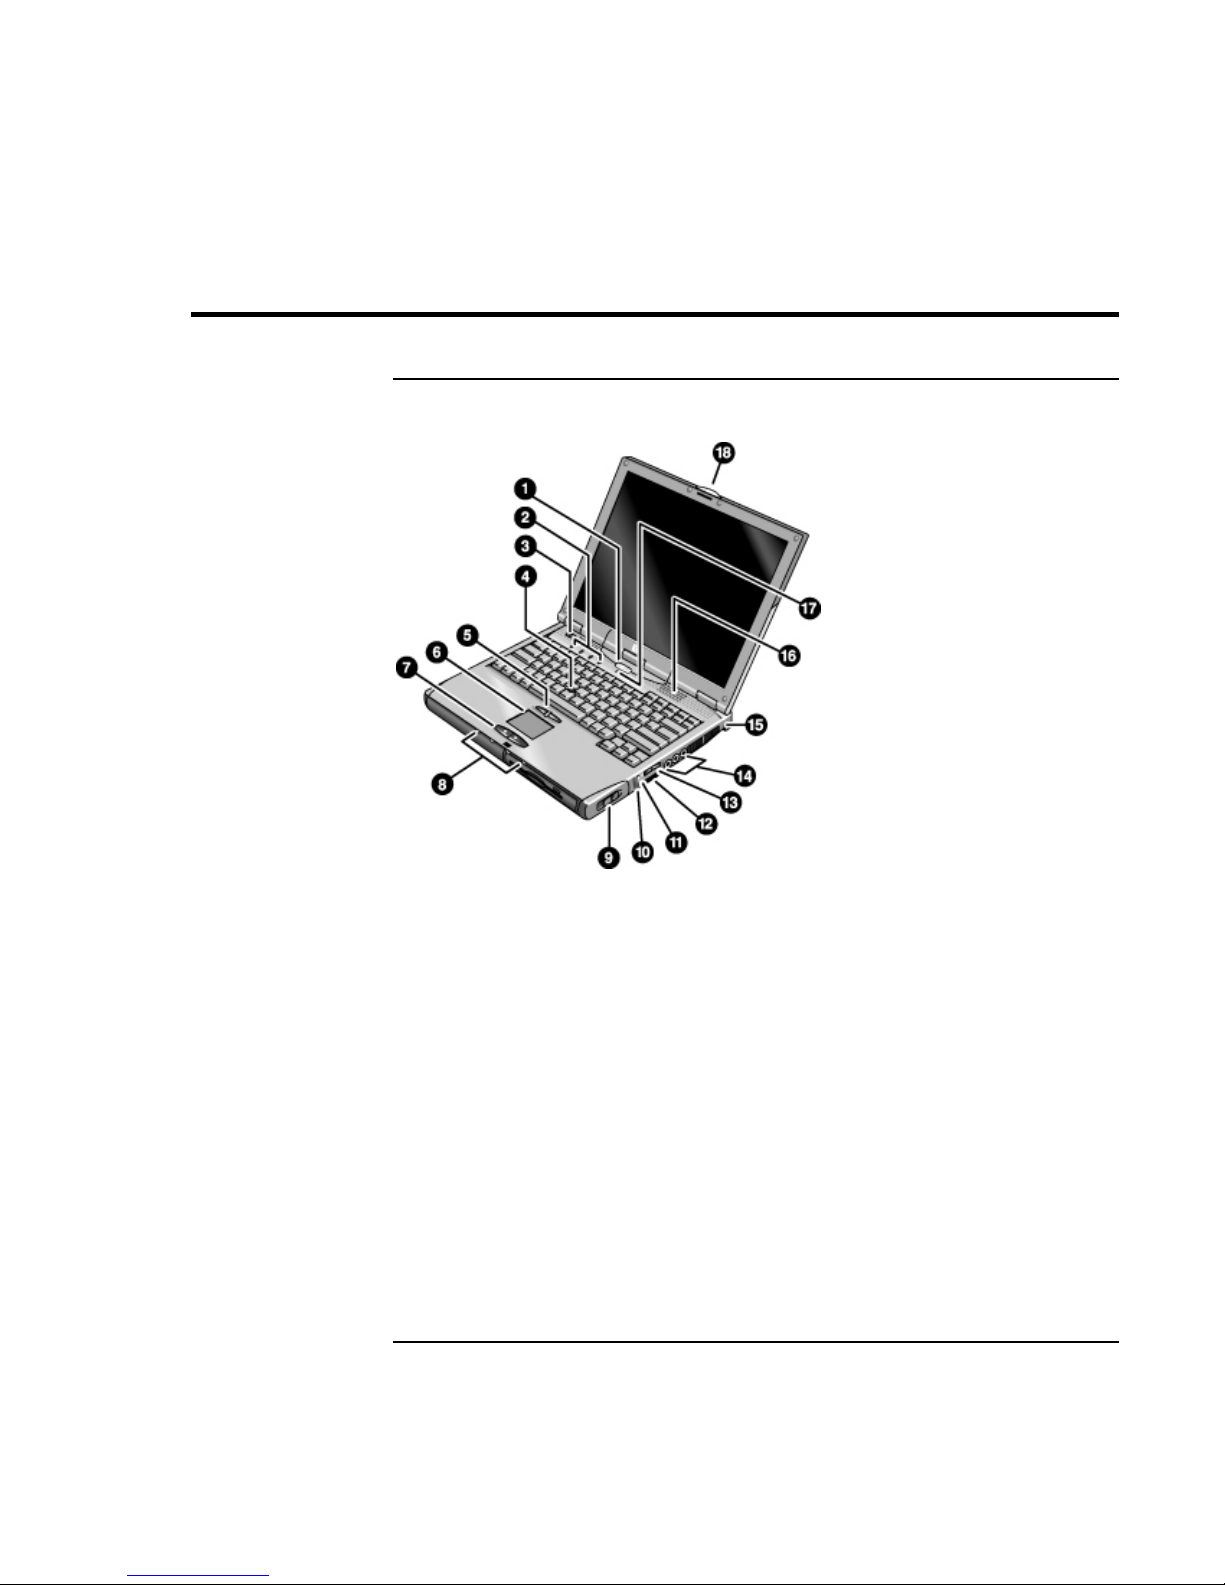
Front View
1. Sleep button. Suspends and resumes operation.
2. Keyboard status lights (left to right: Caps Lock, Num
Lock, Keypad Lock, Scroll Lock).
3. Power slide button. Turns the computer on and off.
4. Pointing stick (pointing device).
5. Click buttons and scroll button.
6. Touch pad (pointing device).
7. Click buttons.
8. Main status lights (left to right): power mode, hard disk
activity, charging status for main battery, and charging
status for secondary battery.
9. Module eject latch.
Startup Guide 11
10. System-off switch.
11. Audio-off button and audio-off light.
12. Infrared port (below the volume control).
13. Volume control.
14. Audio jacks (left to right): audio out (headphones),
external microphone, audio in.
15. Kensington lock slot (security connector).
16. Built-in speakers (one on each side).
17. Built-in microphone.
18. Latch for opening the computer.
Page 12
Introducing the Notebook Computer
Identifying Parts of the Computer
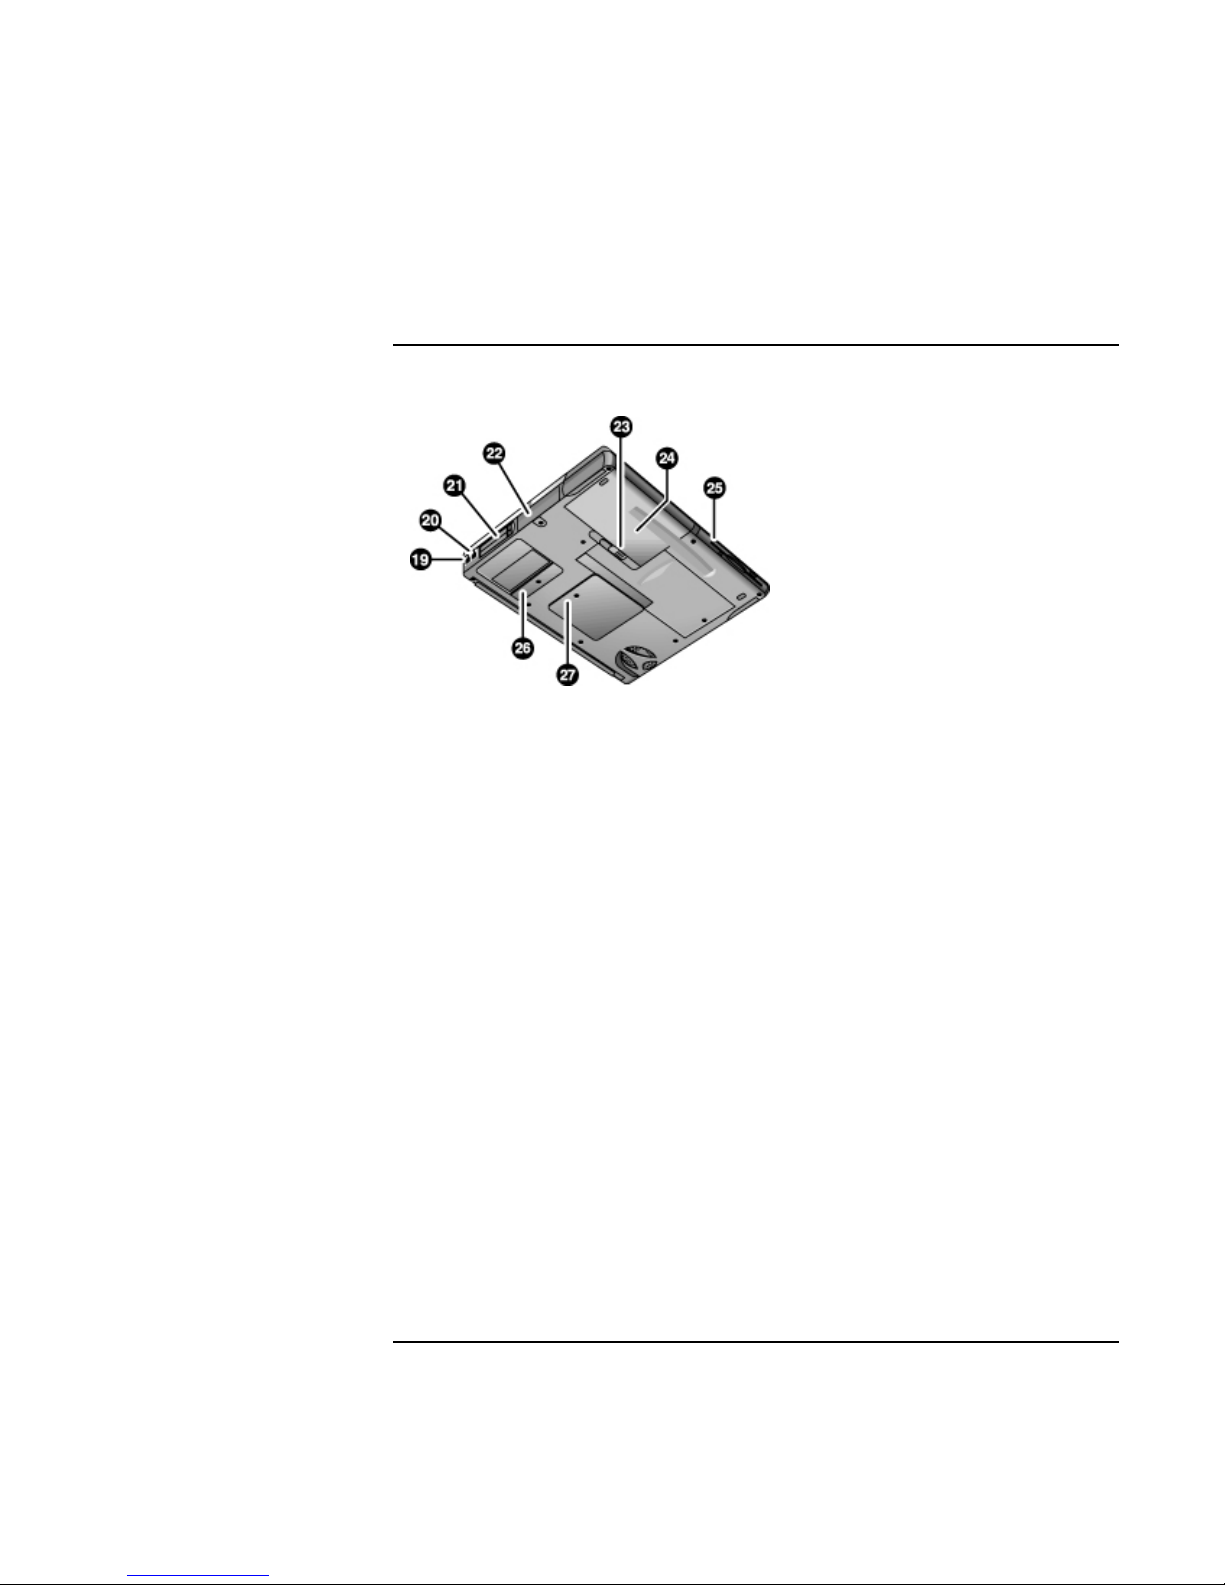
Bottom View
19. Modem port (on certain models).
20. LAN port (on certain models).
21. PC Card and CardBus slots (upper and lower).
22. Hard disk drive.
23. Main battery latch.
24. Main battery.
25. Plug-in module bay. Can contain a CD-ROM or DVD
drive, floppy disk drive, secondary battery, or other
plug-in module.
26. Mini-PCI cover (no user parts inside).
27. RAM cover.
12 Startup Guide
Page 13
Introducing the Notebook Computer
Identifying Parts of the Computer
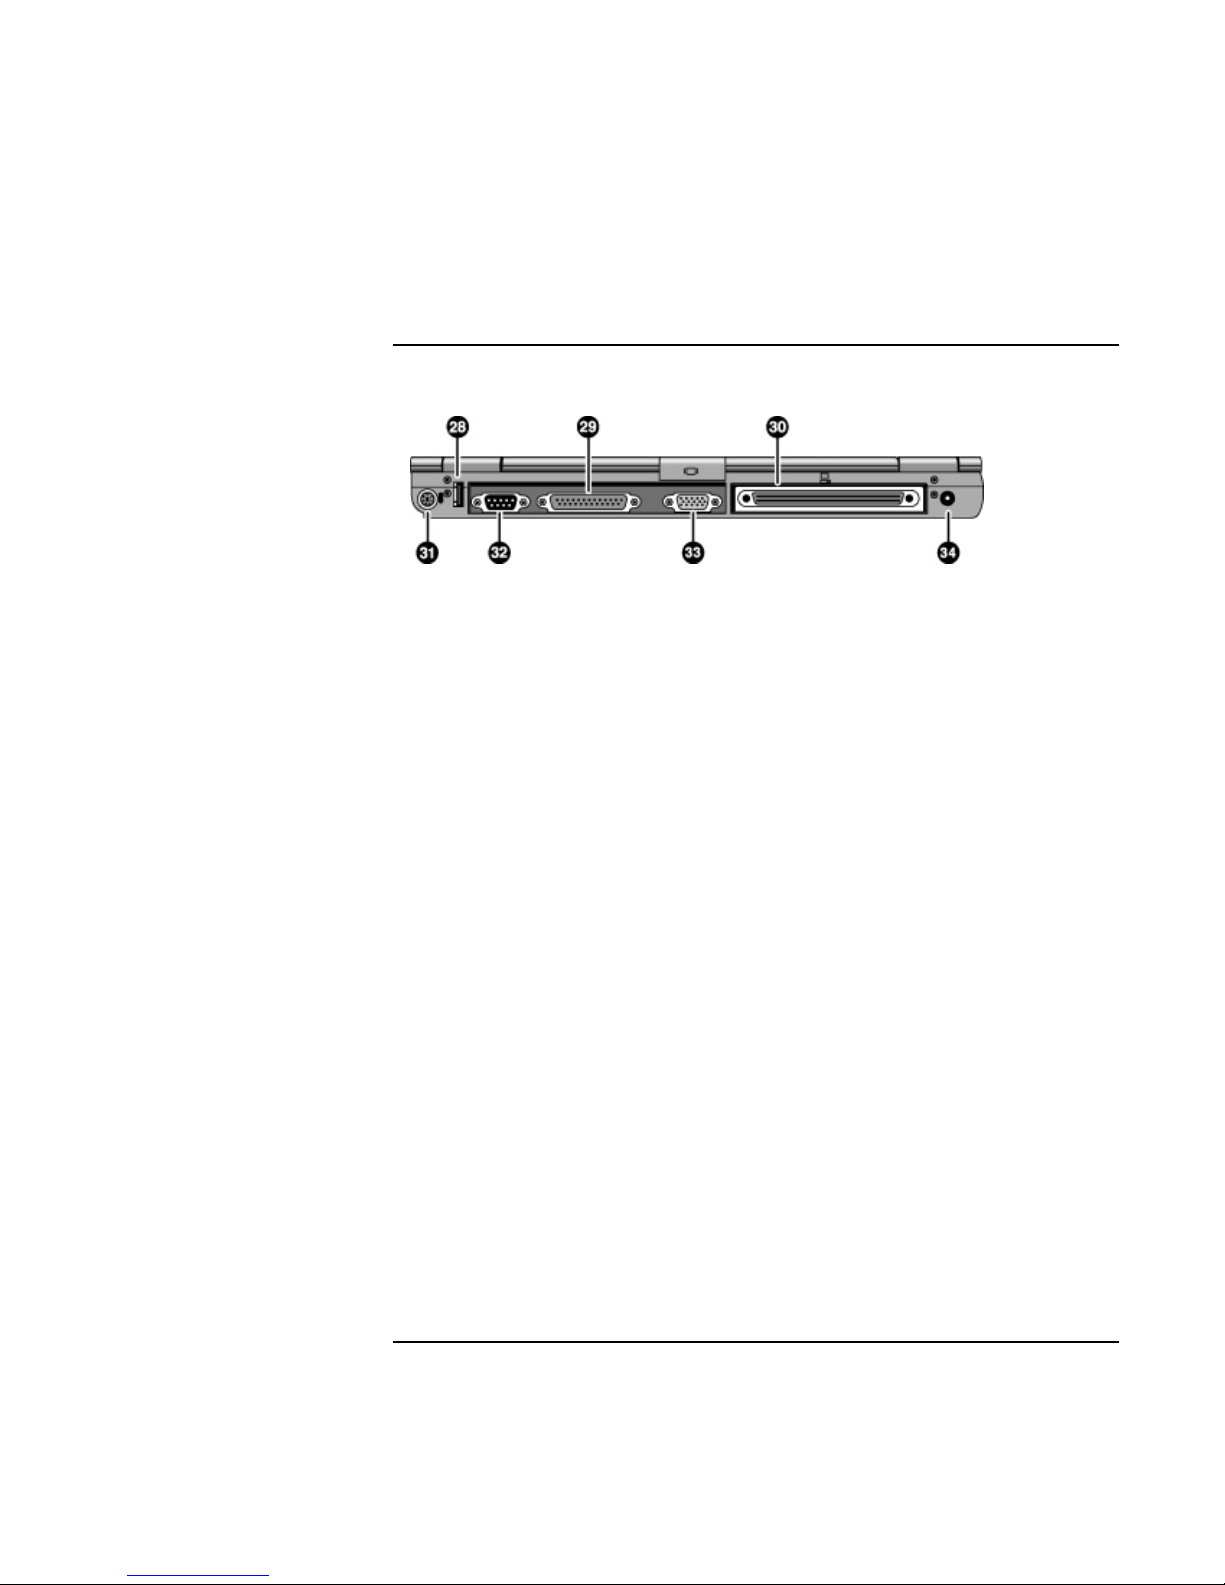
Back View
28. Universal serial bus port (USB).
29. Parallel port (LPT1). Use this port for a parallel printer
or other parallel device, or to connect the floppy disk
drive externally.
30. Docking port.
31. PS/2 keyboard or PS/2 mouse port (supports Y adapter).
32. Serial port (COM1). Use this port for a serial mouse,
modem, printer, or other serial device.
33. External monitor port.
34. ac adapter jack.
Startup Guide 13
Page 14
Introducing the Notebook Computer
Identifying Parts of the Computer
Status Lights
The computer includes a number of status lights that report power and battery status,
drive activity, and keyboard functions such as caps lock and num lock.
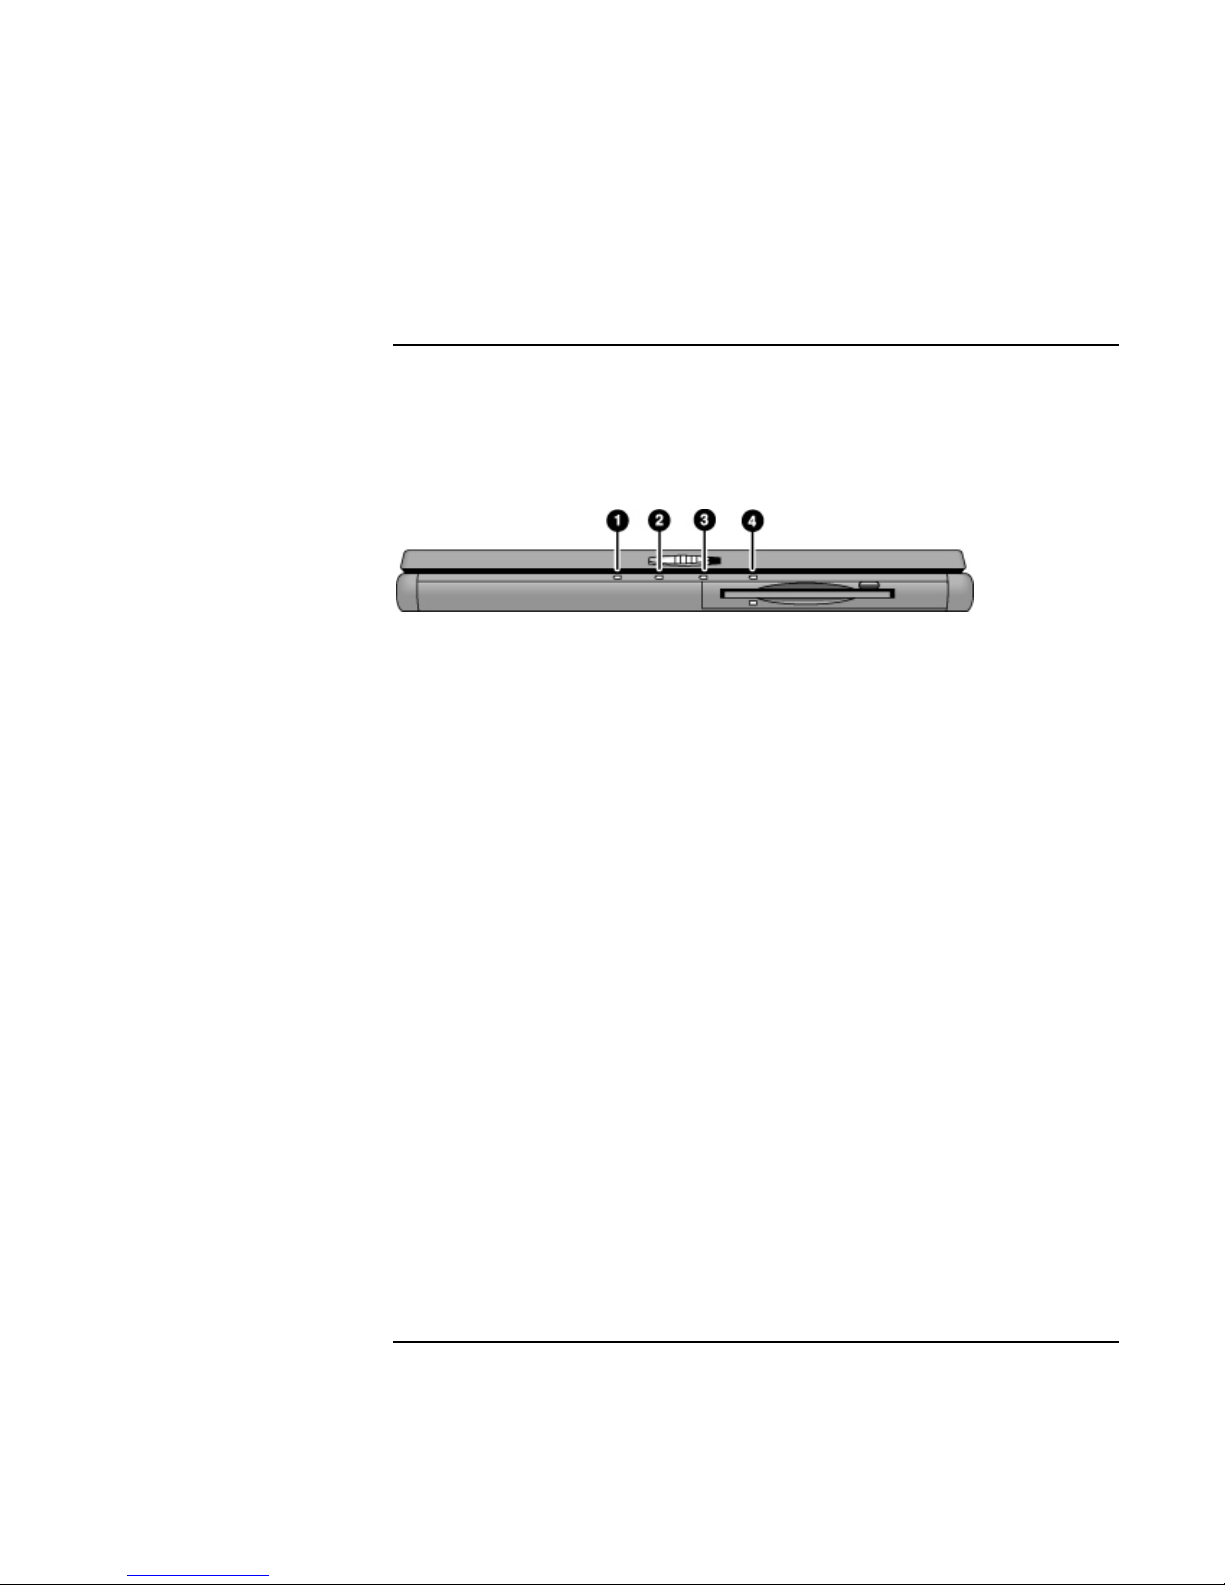
The following diagram shows the status lights on the front of the computer.
1. Power mode.
• Green: computer is on or in Display-off mode (Windows ME, 98 or 2000).
• Amber: computer is in Standby mode or Display-off mode (Windows 95).
• No light: computer is off or in Hibernate mode.
• Red light: computer failed when resuming, and must be reset.
2. Hard disk drive activity.
• Green: computer is accessing the hard disk drive.
3. Main battery status.
• Green: The ac adapter is connected and the battery is fully charged.
• Amber: The ac adapter is connected and the battery is charging.
• Red. The ac adapter is connected and the battery is missing or has a fault.
• Off: The ac adapter is not connected.
4. Secondary battery status.
• Green: The ac adapter is connected and the battery is fully charged.
• Amber: The ac adapter is connected and the battery is charging.
• Red. The battery has a fault.
• Off: The ac adapter is not connected, a secondary battery is not installed, or the
battery is not charging.
14 Startup Guide
Page 15
Introducing the Notebook Computer
Identifying Parts of the Computer
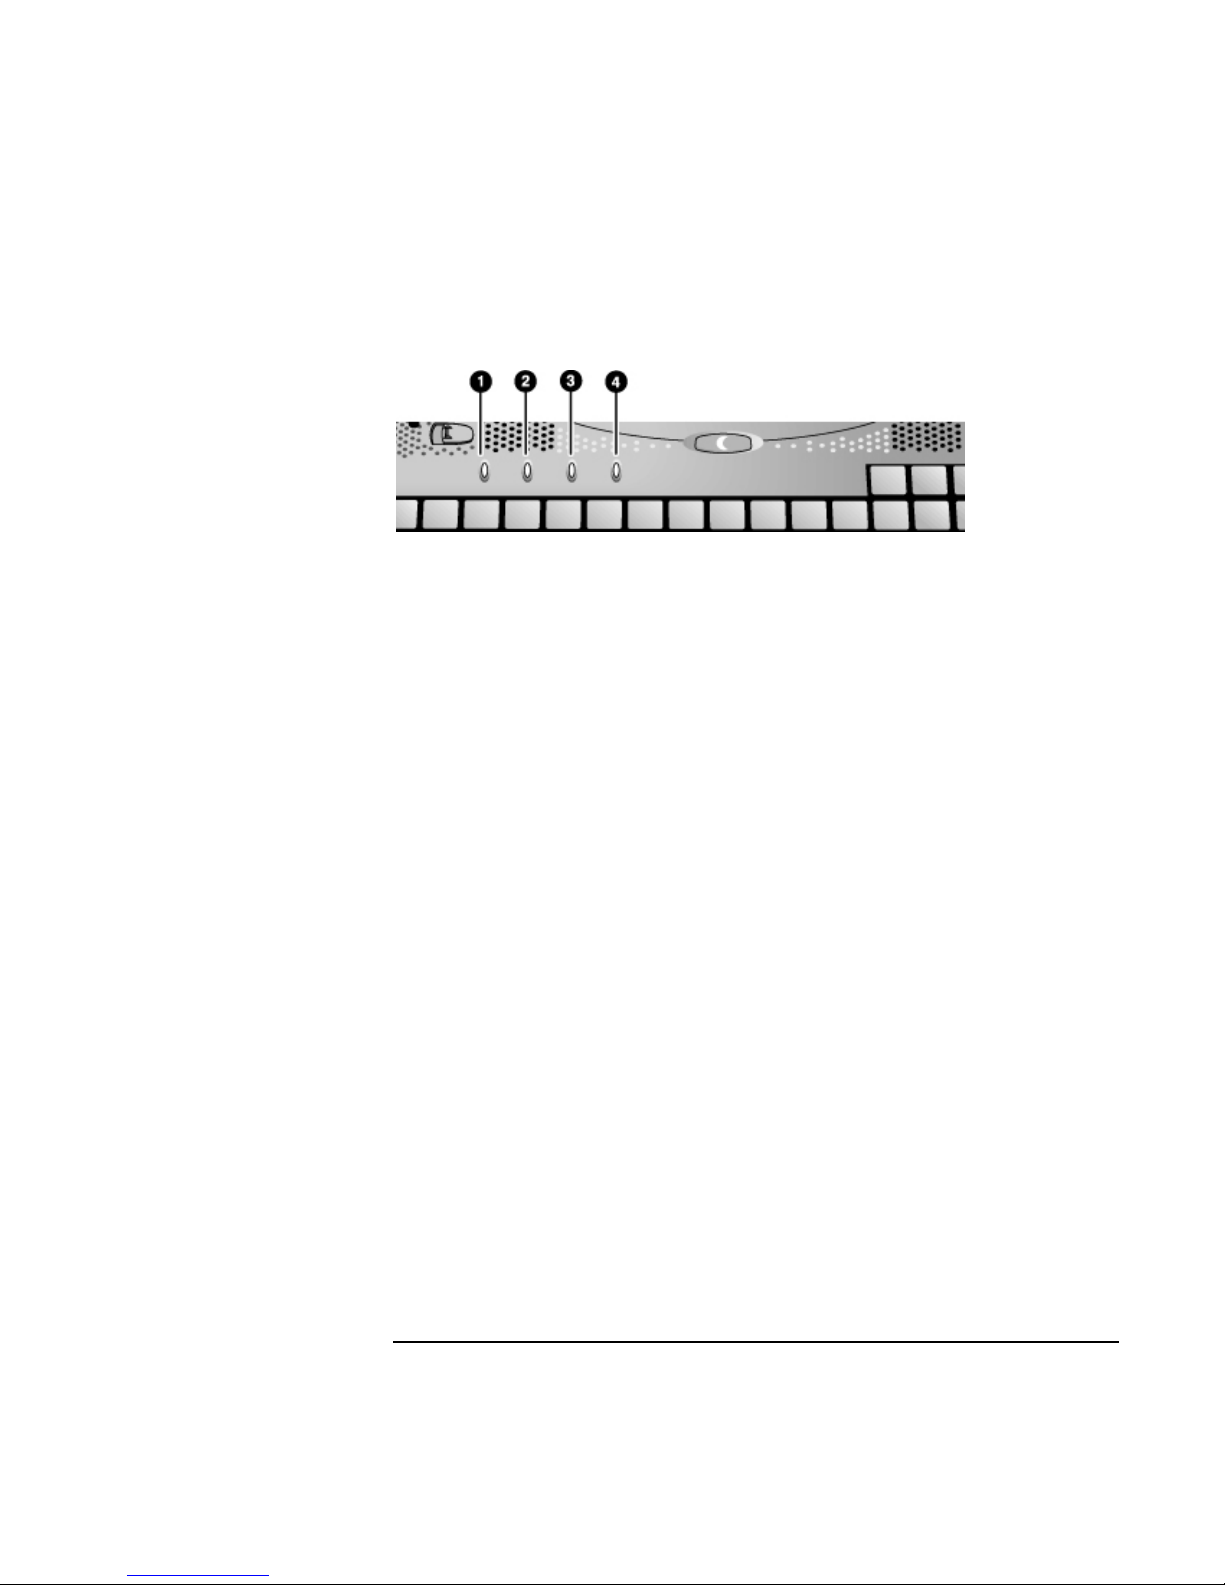
The keyboard status lights, located above the keyboard, indicate the states of the
keyboard locks.
1. Caps Lock. Caps Lock is active.
2. Num Lock. Num Lock is active. (The Keypad Lock must also be on to use the
embedded keypad.)
3. Keypad Lock. The embedded keypad is active (Fn+F8). Num Lock must also be on
for the numeric keys—otherwise, cursor control is active.
4. Scroll Lock. Scroll Lock is active.
Startup Guide 15
Page 16

Introducing the Notebook Computer
Setting Up Your Computer
Setting Up Your Computer
WARNING
WARNING
Improper use of keyboards and other input devices has been associated with
ergonomic injury. For information about reducing your risk, see Working in
Comfort in the online HP Library (for Windows ME, click Start, Help, Your HP
Notebook), or visit our ergonomics Web site, www.hp.com/ergo. For a summary
about working with a notebook computer, see “Working in Comfort with a
Notebook PC” on page 26.
If you are using your notebook computer as your primary computer, or using it for
extended periods, you should use it with a full-size keyboard, monitor, and mouse.
This can reduce the risk of ergonomic injury. See Working in Comfort in the online
HP Library (for Windows ME, click Start, Help, Your HP Notebook).
When you set up your computer for the first time, you’ll need to install and charge the
battery, connect the ac adapter, turn on the computer, and run the Windows setup
program.
Step 1 – Install the battery
Do not mutilate or puncture batteries. Do not dispose of batteries in fire, or they
can burst or explode, releasing hazardous chemicals. Rechargeable batteries must
be recycled or disposed of properly.
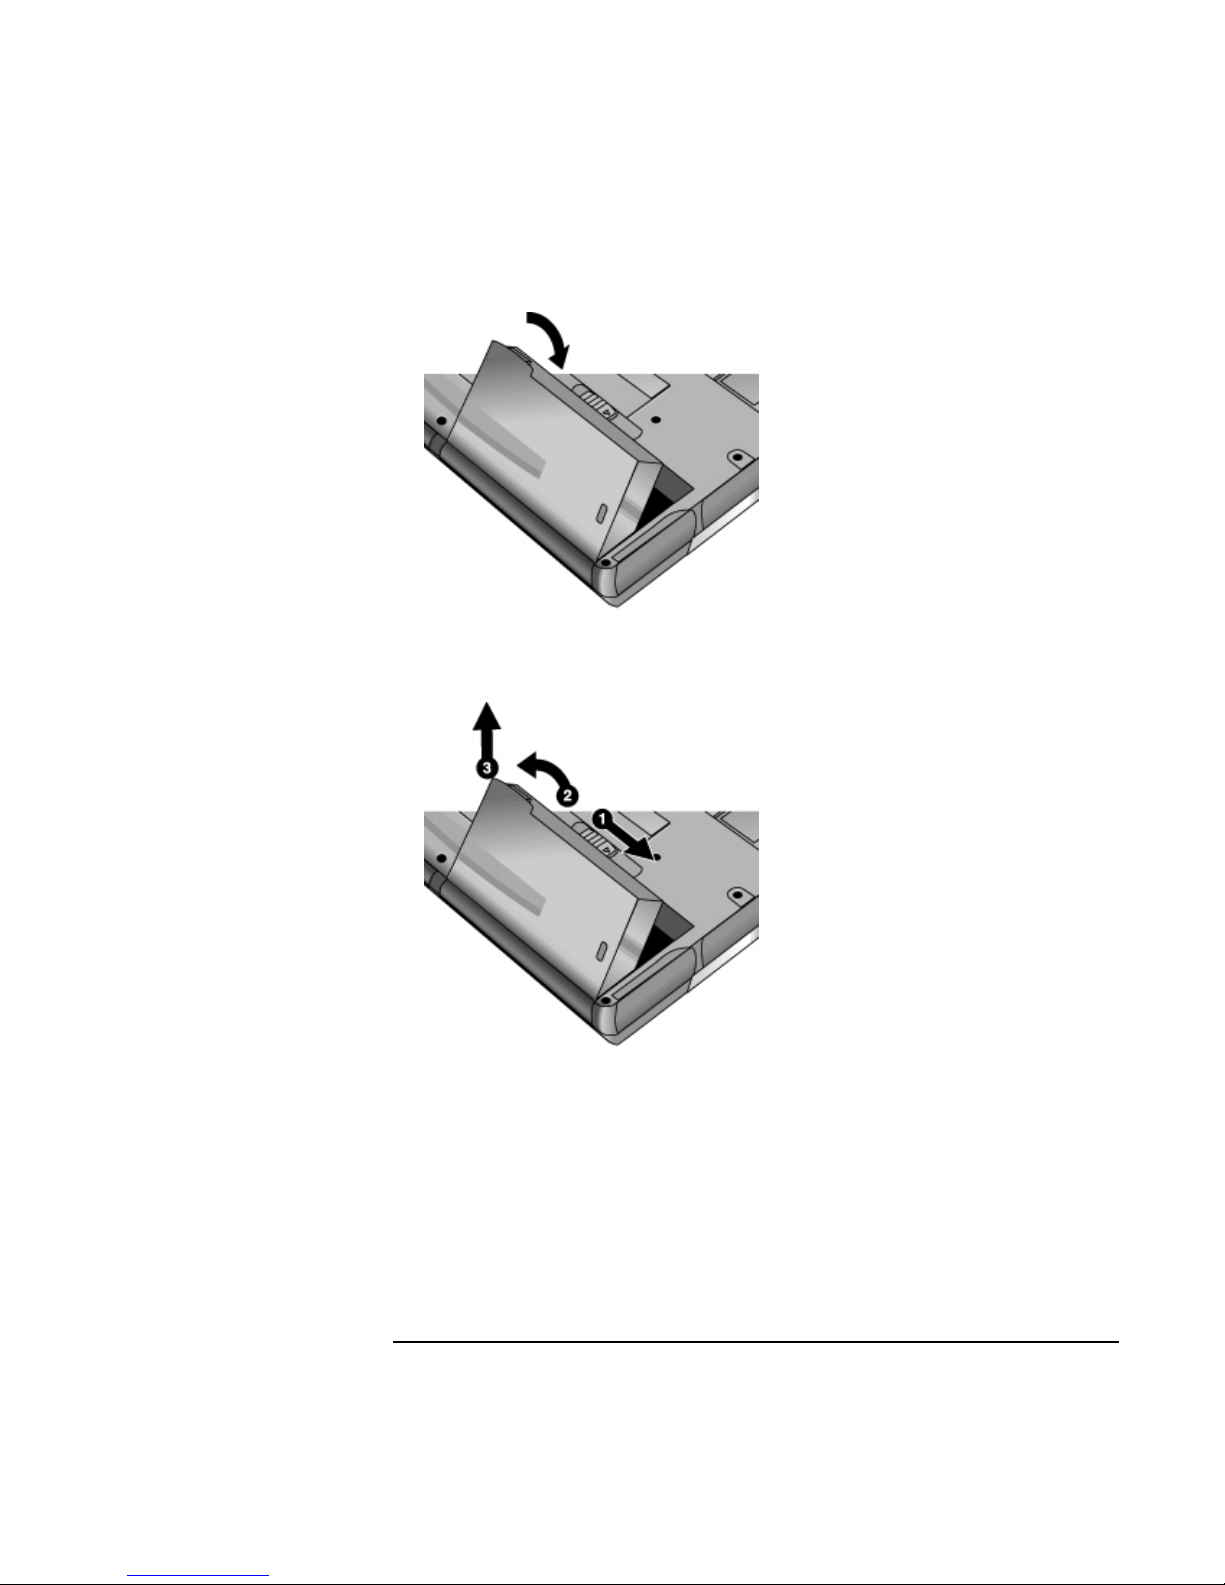
Your computer is shipped with the battery installed. If the battery has been removed, you
should install it:
1. Turn the computer upside down.
2. Insert the front (rounded) end of the battery into the battery compartment on the
16 Startup Guide
bottom of the computer, and lower the back end in until it clicks into place.
Page 17
Introducing the Notebook Computer
Setting Up Your Computer
To remove the battery
• Slide the battery’s release latch, then lift the battery out of its compartment.
Startup Guide 17
Page 18
Introducing the Notebook Computer
Setting Up Your Computer
Step 2 – Connect ac power
CAUTION
Use only the HP ac adapter included with your computer (or other approved
adapter). Using any other ac adapter could damage the computer and may void
your warranty (see the warranty statement in this manual).
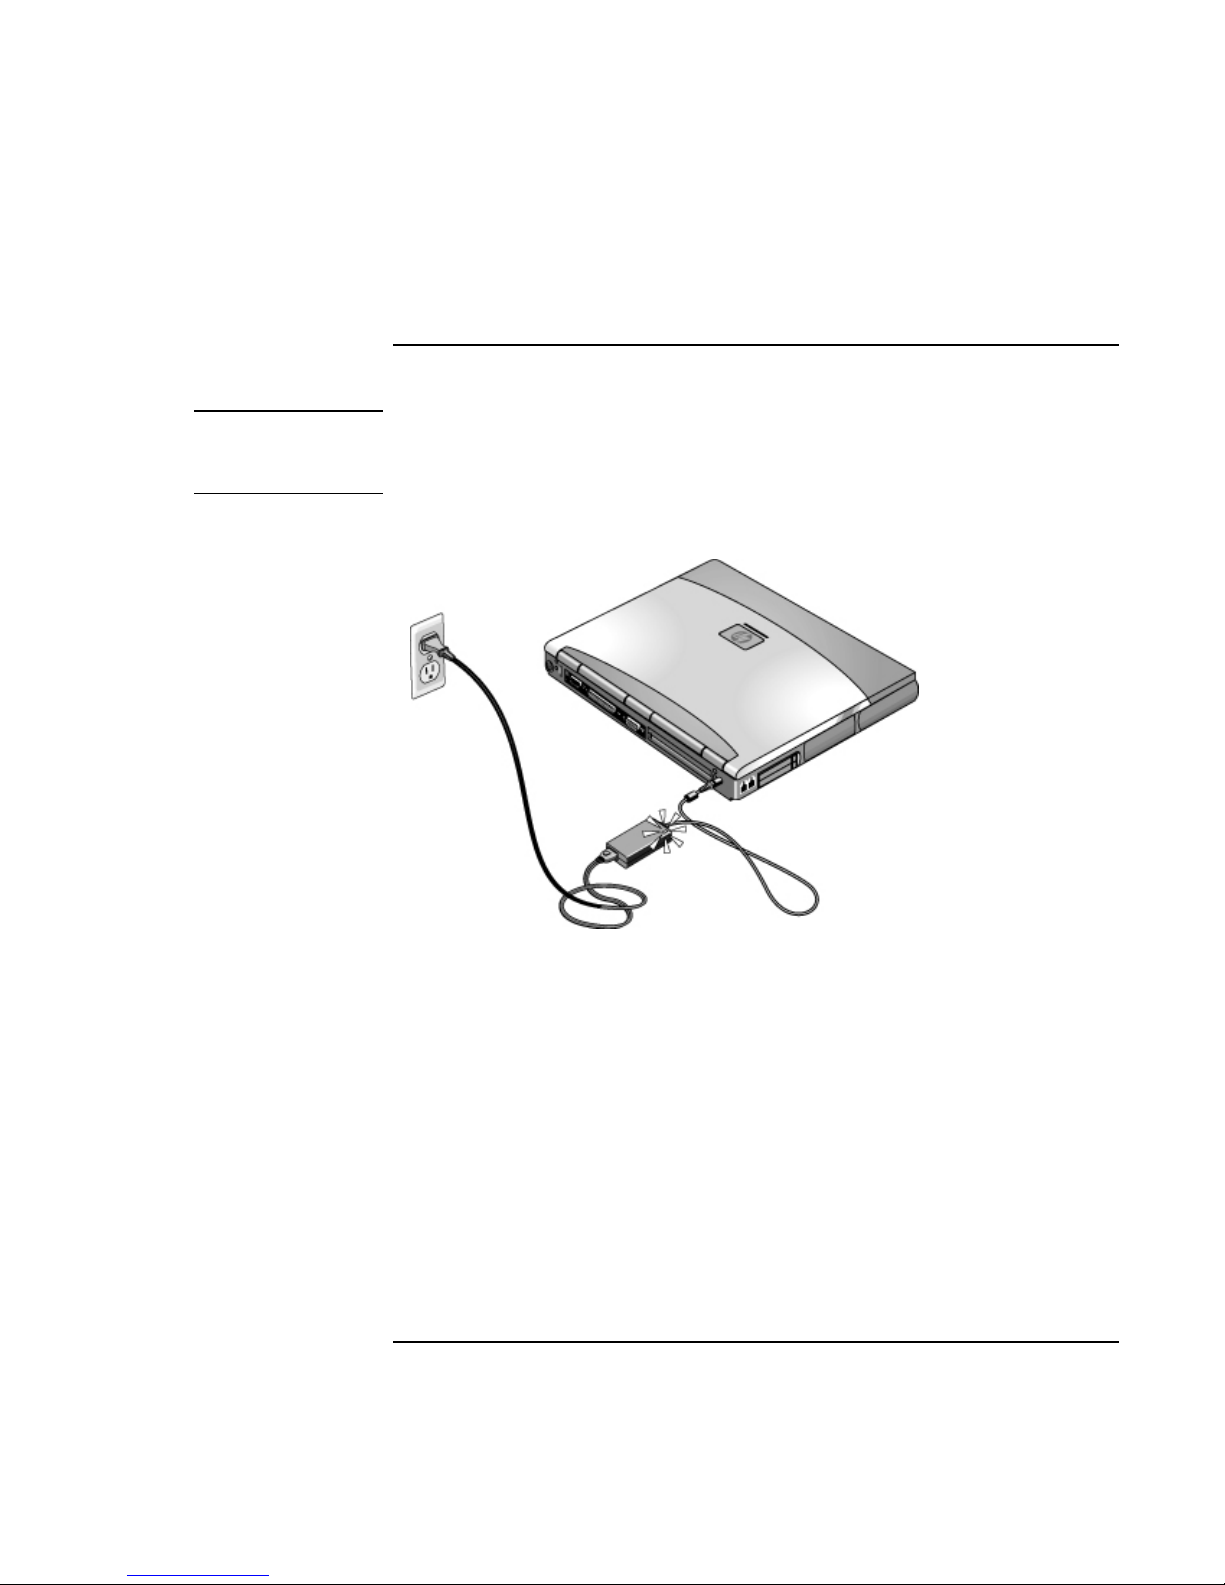
• Plug in the ac adapter, and connect it to the ac adapter jack on the back of the
computer. The computer’s battery then starts charging.
While the battery is charging, you can continue with step 3.
18 Startup Guide
Page 19
Introducing the Notebook Computer
Setting Up Your Computer
Step 3 – Turn on the computer
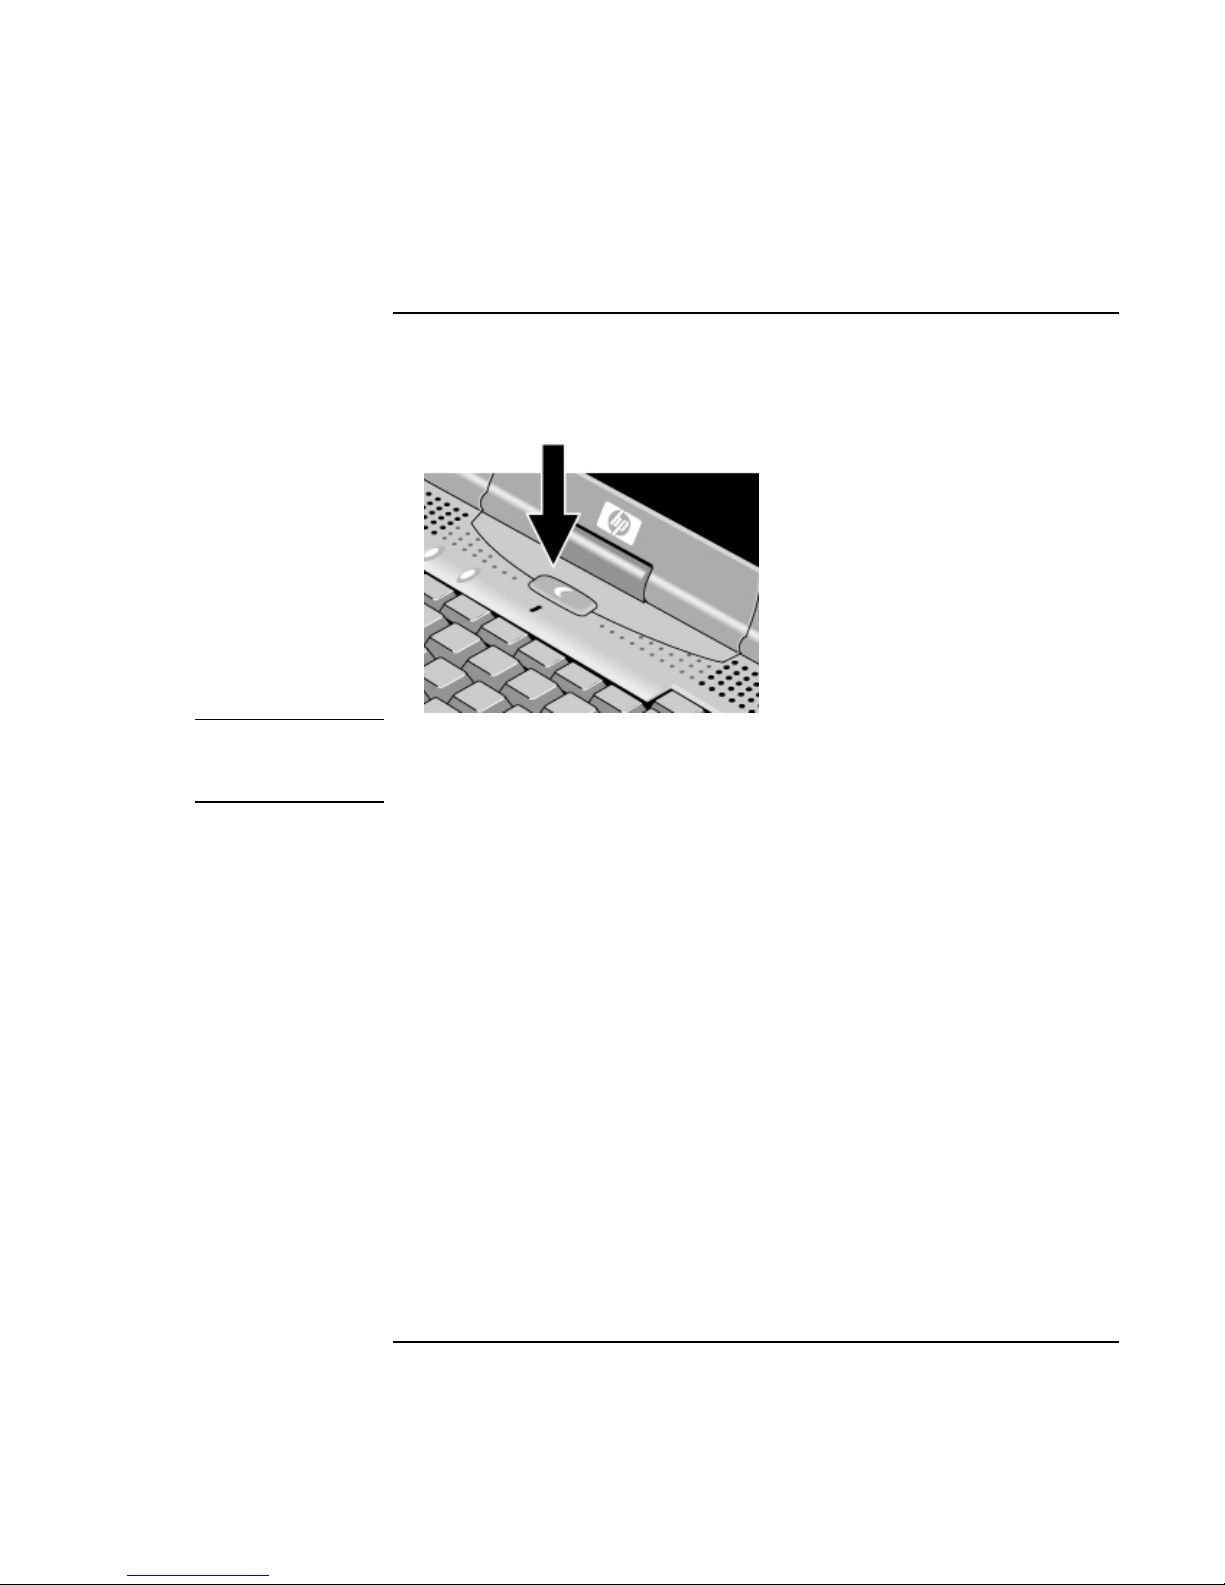
• Press the blue sleep button above the keyboard. The computer then boots up, and
Windows starts automatically.
Hint
If your computer does not turn on when operating on battery power, the battery may be
out of power. Plug in the ac adapter and press the blue sleep button again. Leave the ac
adapter plugged in for at least an hour.
Startup Guide 19
Page 20

Pavilion models
Introducing the Notebook Computer
Setting Up Your Computer
Step 4 – Set up Windows
Your notebook computer has Microsoft Windows ME, 95, 98, or 2000 preinstalled on its
hard disk drive. The first time you turn on your computer, the Windows Setup program
runs automatically so you can customize your setup.
• Follow the Setup program’s instructions as they appear on the screen. If the program
prompts you to enter the Product ID code, you will find this code on the bottom of the
computer.
When the Setup program finishes, the Windows welcome screen appears. The welcome
screen gives you the option to register your computer. Registering is free and fast, and it
ensures you will receive quicker, more personalized support from Hewlett-Packard.
To register by modem, connect a phone line to the modem port—or, if your model has
no built-in modem, to a modem you connect—then click the Register button in the
welcome screen or double-click the HP Notebook Registration icon on the desktop.
Follow the onscreen instructions. (See the online Reference Guide for details about
using the built-in modem.)
To register by phone, call your HP Customer Care Center—see “To contact the HP
Customer Care Center” on page 54 for the phone number.
20 Startup Guide
Page 21

Using Your Computer
Startup Guide 21
Page 22

Using Your Computer
Operating Your Computer
Operating Your Computer
You can start and stop your computer using its blue sleep button. However, at certain
times you may want to use other methods to start or stop the computer—depending on
power considerations, types of active connections, and start-up time.
For information on caring for and protecting your computer, see “Operating Your
Computer” in the online Reference Guide.
To start and stop the computer
Power mode To enter this mode To turn on again
Display-off mode
Saves minimal power.
Turns off the display and hard disk.
Restarts quickly.
Maintains network connections.
Standby mode
Saves significant power.
Turns off the display and other components.
Maintains current session in RAM.
Restarts quickly.
Restores network connections.
Hibernate mode
Saves maximum power.
Saves current session to disk, then shuts down.
Restores network connections.
Shut down (off)
Saves maximum power.
Turns off without saving current session.
At startup, resets everything, starts a new session, and
restores network connections.
Allow timeout. Press any key or move a
pointing device to restore
the display (“Instant-On”).
Press blue sleep button
–or–
click Start, Suspend
(Windows 95) or Start,
Shutdown, Standby
(Windows ME, 98 or 2000)
–or–
allow timeout.
Press Fn+F12
–or–
Click Start, Shut Down,
Hibernate (Windows ME or
2000)
–or–
allow timeout.
Click Start, Shut Down
(recommended)
–or–
slide the power button.
Press the blue sleep button
to display your current
session (“Instant-On”).
Press the blue sleep button
to restart and restore your
previous session.
Press the blue sleep button
to restart with a new
session.
22 Startup Guide
Page 23
Hint
Using Your Computer
Operating Your Computer
You can also customize the way these power modes work. See the chapter titled
“Traveling with Your Computer” in the online Reference Guide.
To boot from a floppy drive or CD-ROM or DVD drive, press ESC during reboot when
the HP logo and prompt appear. Then select the removable floppy drive or CDROM/DVD drive as the temporary boot device.
To reset the computer
Occasionally, you may find that Windows or the computer has stopped responding, and
will not let you turn the computer off. If this happens, try the following in the order listed.
1. If possible, shut down Windows: press CTRL+ALT+DEL, then click Shut Down.
2. Slide and hold the power button for 4 seconds, until the display shuts down, then
press the blue sleep button to restart.
–or, if this fails–
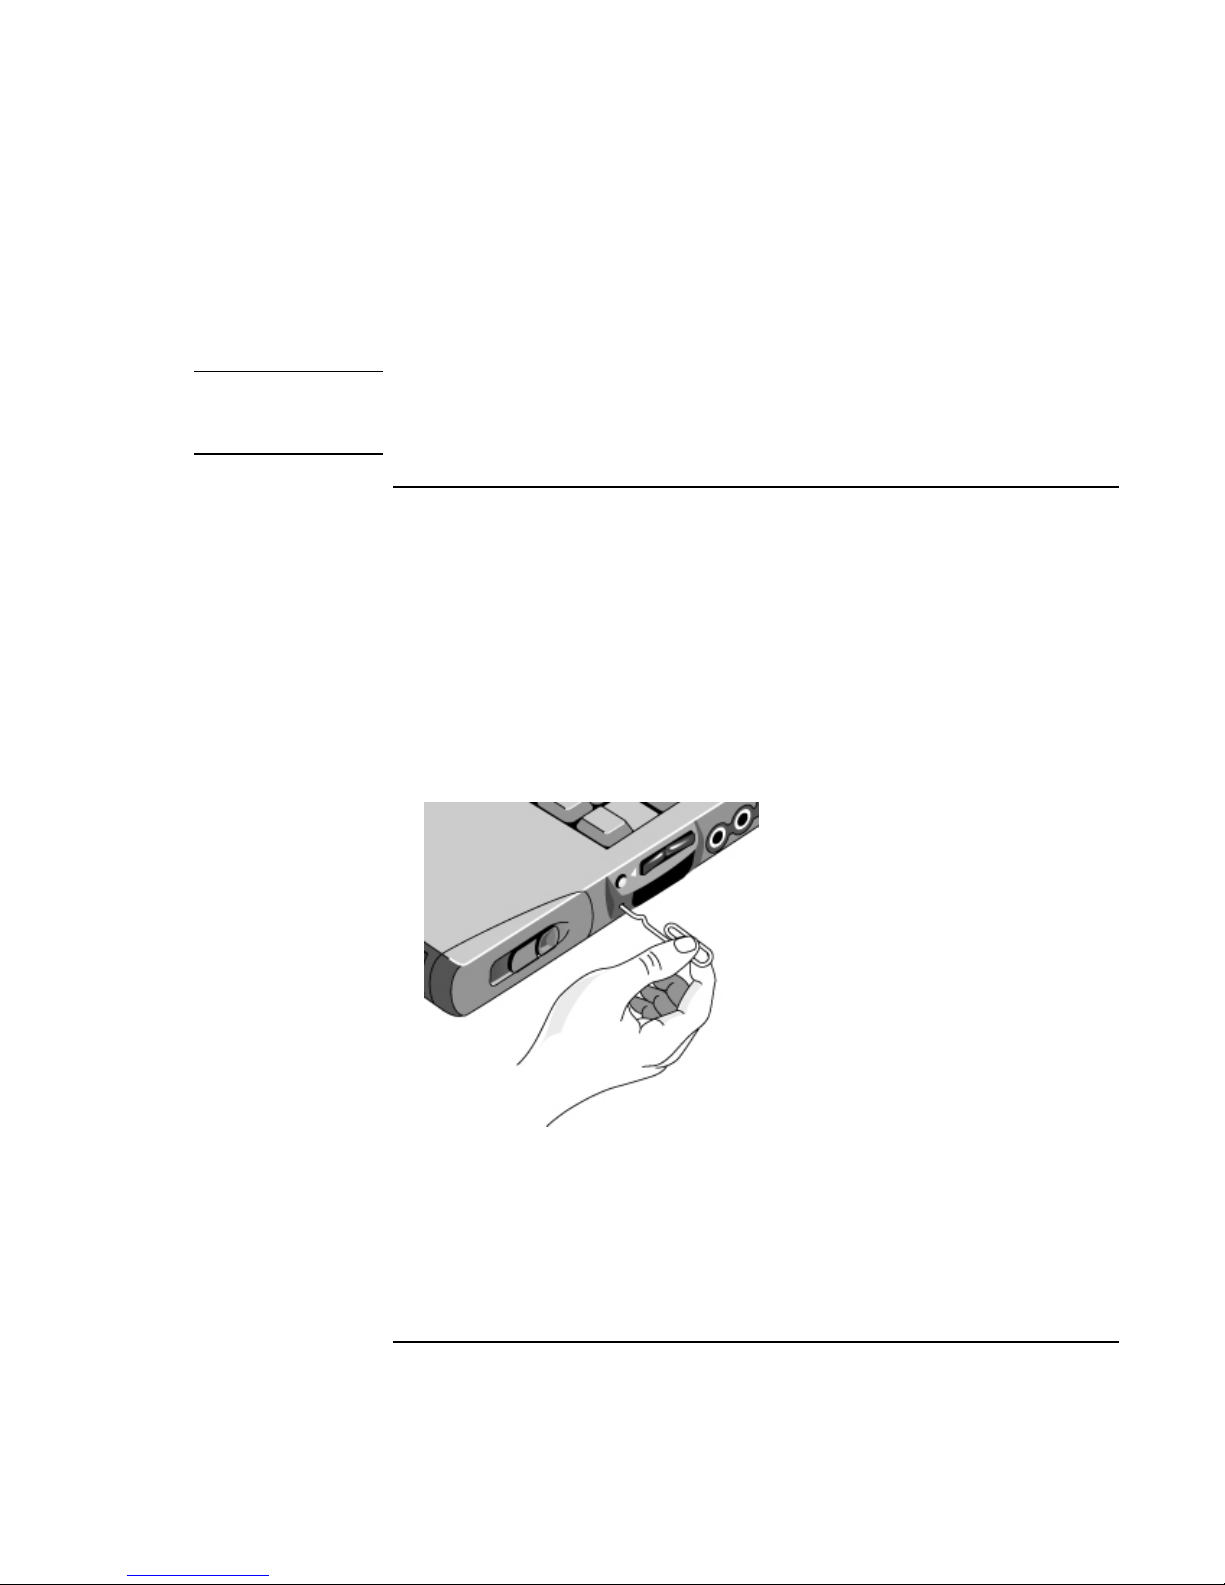
Insert a straightened paper clip into the system-off switch on the right side of the
computer, then press the blue sleep button to restart.
Startup Guide 23
Page 24
Using Your Computer
Operating Your Computer
To use the pointing devices
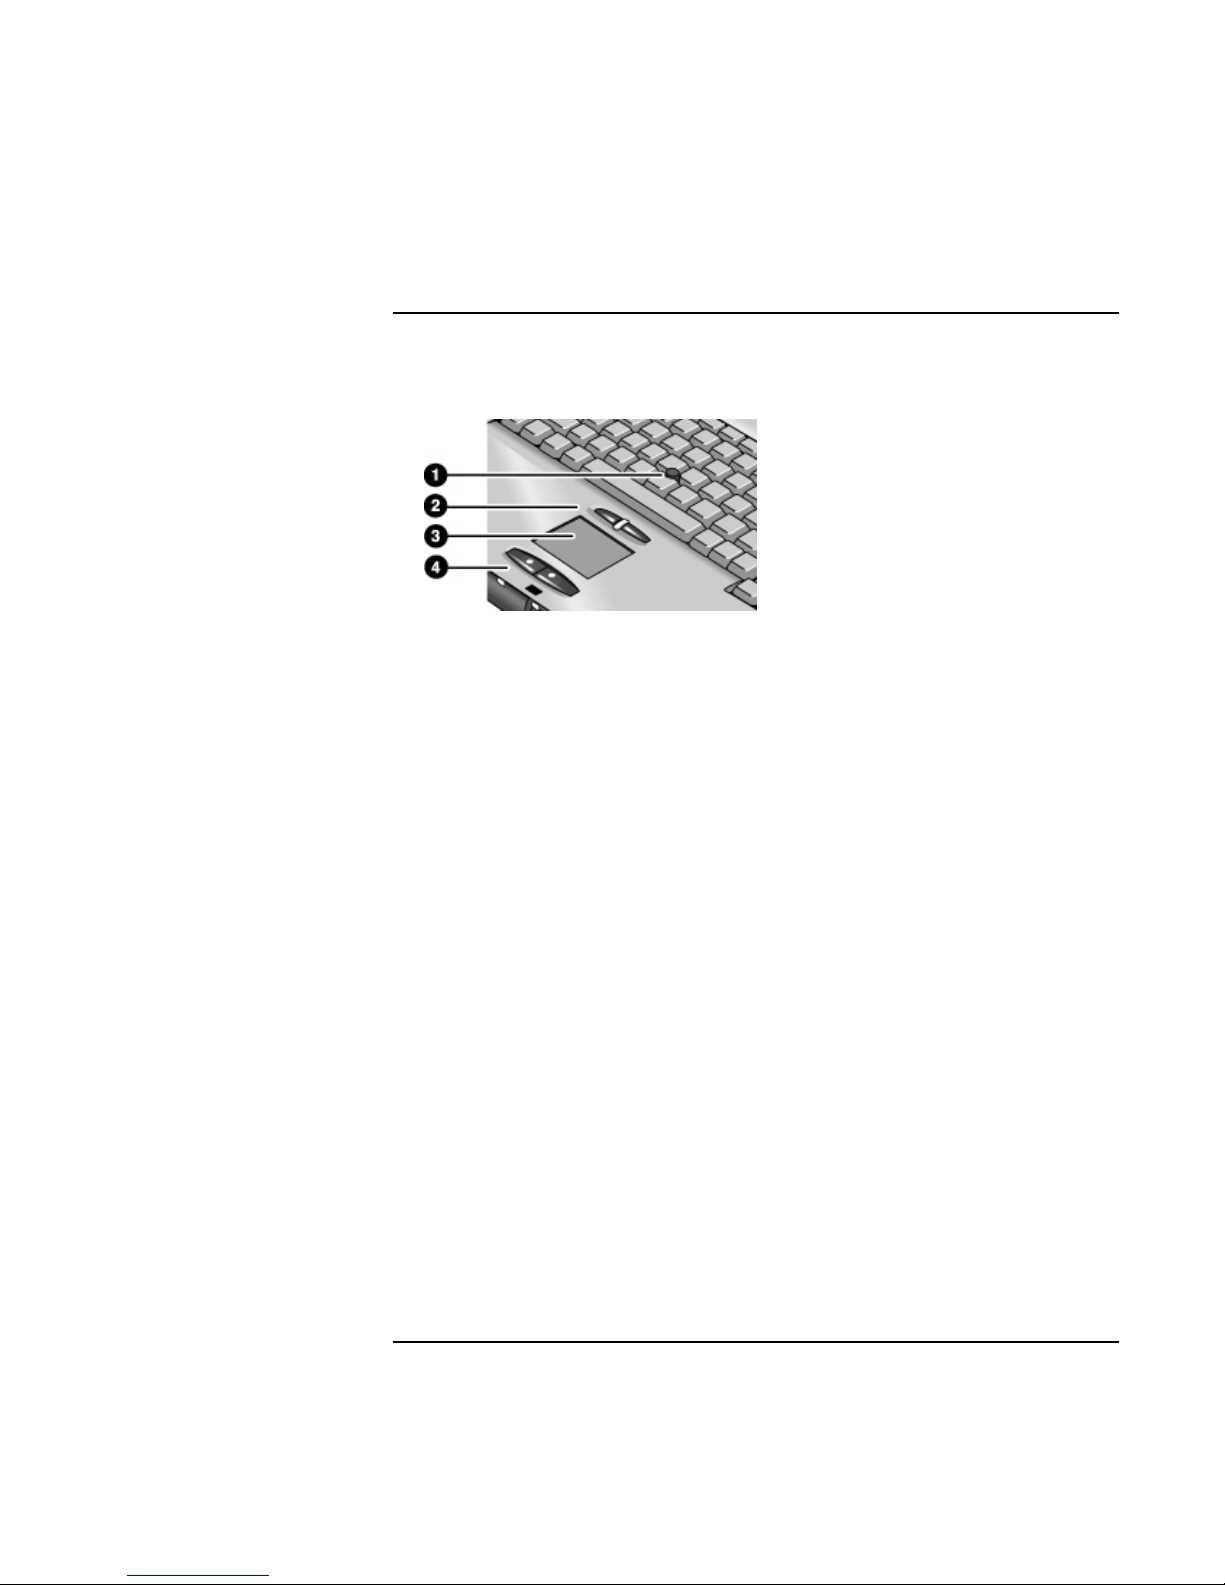
Your computer includes two built-in pointing devices: the pointing stick and touch pad.
1. Pointing stick (pressure-sensitive pointing device).
2. Click buttons and scroll button. The click buttons work like the left and right buttons
on a standard mouse. The scroll button works with the pointing stick to scroll the
contents of a window.
3. Touch pad (touch-sensitive pointing device).
4. Click buttons. These also work like the left and right buttons on a standard mouse.
Moving and selecting
1. Place your hands in a normal typing position.
2. Pointing stick. With your index finger, press the pointing stick in the direction you
want the pointer to move.
Touch pad. Move a thumb or finger across the touch pad in the direction you want
the pointer to move.
3. Use the left and right click buttons, which function like the left and right buttons on a
mouse, to make your selection:
• To open an application, move the pointer over the icon and double-click the left
button.
• To make menu selections, move the pointer to the menu item and click the left
button.
24 Startup Guide
• To open the shortcut menu for an item, move the pointer over the item and click
the right button.
• To drag an item, move the pointer over the item. Then press and hold the left
button while you move the pointer to the new location, and release the button.
Page 25

Using Your Computer
Operating Your Computer
Scrolling with the scroll button
• Hold down the scroll button and move the pointer using the pointing stick. The
contents of the window scroll in the direction you move the pointer.
To customize the operation of the touch pad or pointing stick, see “Operating Your
Computer” in the online Reference Guide.
To use the Fn hot keys
The combination of the Fn key plus another key creates a hot key—a shortcut key
sequence—for various system controls. To use a hot key, press and hold Fn, press the
appropriate second key, then release both keys.
This hot key Does this
Fn+F1 Decreases the display brightness.
Fn+F2 Increases the display brightness.
Fn+F5 Toggles among the built-in display, an external display, and simultaneous display on both.
Fn+F7 Audio mute
Fn+F8 Toggles the built-in keypad on and off. Does not affect an external keyboard. If Num Lock is on,
then the numeric functions are active; otherwise, cursor control is active.
Fn+F12 Enters Hibernate mode.
Fn+NumLock Toggles Scroll Lock on and off.
Fn+UP ARROW Increases sound volume.
Fn+DOWN ARROW Decreases sound volume.
External keyboards support only Fn+F5, Fn+F7, and Fn+F12. To use these, press and
hold left CTRL+left ALT, press the appropriate second key, then release both keys.
Startup Guide 25
Page 26

Using Your Computer
Working in Comfort with a Notebook PC
Working in Comfort with a Notebook PC
WARNING
Note
Improper use of keyboards and other input devices has been associated with
ergonomic injury. For more information about reducing your risk, visit our
ergonomics Web site at www.hp.com/ergo—or see Working in Comfort in the
online HP Library (for Windows ME, click Start, Help, Your HP Notebook).
You can use your HP notebook computer virtually anywhere, anytime. The following
recommendations should help you work more comfortably.
Note that if you are using your portable computer as your primary computer, or using it
for extended periods, you should use it with a full-size keyboard, monitor, and mouse.
This will give your portable computer the adjustability and comfort features of a
desktop unit. HP docking accessories offer quick, easy connections to these devices.
More information on how to prepare your workspace environment and set up your HP
equipment is available in Working in Comfort, which is preloaded on the hard disk in
the HP Library (for Windows ME, click Start, Help, Your HP Notebook) and available
on the Recovery CD in \hp\Library—as well as at www.hp.com/ergo.
Your Mobile Work Environment
• Use a chair that provides good support for your lower back. If an adjustable chair is
not available, you can use a pillow or rolled-up towel to provide lower back support.
• Try to keep your thighs parallel to the floor and your feet flat on the floor. In a mobile
environment, you can do this by using a phone book or briefcase to support your feet.
• Adjust the height of either your work surface or chair to keep your arms in a neutral
position. Your arms should be relaxed and loose, elbows at your sides, with the
forearms and hands parallel with the floor.
• Position your notebook computer display to minimize glare and reflection. For
26 Startup Guide
example, on an airplane, lower the window shade, or in a hotel room, draw the
curtains. You also should maintain a comfortable viewing distance–approximately 40
to 60 cm (16 to 24 inches). Adjust the angle of your display to help keep your head
angled slightly downward in a comfortable position.
Page 27

Using Your Computer
Working in Comfort with a Notebook PC
Using Your Mobile Computer
• Position the computer so your wrists and hands are in a neutral position. Your wrists
should be as straight as possible and should not have to bend sideways or more than
10 degrees up or down. If your notebook computer does not have a built-in palm rest,
you can use a rolled-up towel.
• Try to type as lightly as possible. The notebook keyboard requires little force to
activate.
• Take frequent, short rest breaks–this is especially important in a mobile computing
environment.
• Portable computers weigh between approximately 1.4 and 3.7 kilos (3 and 8 pounds).
When traveling, be sure to carry your computer properly to minimize strain on your
body. Shift the bag containing your notebook equipment frequently between your left
and right hands and shoulders.
Startup Guide 27
Page 28

Page 29

Traveling with Your Computer
Startup Guide 29
Page 30

Traveling with Your Computer
Using Battery Power
Using Battery Power
For information about how your computer regulates its power consumption, and how you
can manually reduce power consumption and extend the life of the computer’s battery,
see the chapter titled “Traveling with Your Computer” in the online Reference Guide.
To check battery status
From the battery status lights
Your computer has two battery status lights, one for the main battery and one for the
optional secondary battery in the module bay—see “Status Lights” on page 14.
From the Windows taskbar
The Windows taskbar includes a power icon that provides detailed battery status
information. The icon looks like a battery when ac is not connected.
• Place the pointer over the power icon to display the remaining battery charge. This
value is shown as either a percentage of charge remaining, or as time remaining.
• Double-click the power icon to open the Battery Meter window.
From the Windows Control Panel
• Click Start, Settings, Control Panel, then double-click Power. This provides access to
all of Windows’ power-information options.
On the battery
1. Remove the battery from the computer—see “Step 1 – Install the battery” on page 16.
2. Press the contact pad on the back of the battery. The number of lights that turn on
indicates the remaining charge (each light represents 20% of a full charge).
30 Startup Guide
Page 31

Note
Traveling with Your Computer
Using Battery Power
To respond to a low-battery warning
The computer automatically alerts you when the battery power drops to a critically low
level. The computer first emits a high-pitched beep. Then, if you do not restore power
within a short time, the computer goes into Hibernate mode.
Once the computer enters Hibernate mode, you won’t be able to turn it on again until you
restore power by doing one of the following:
• Replace the battery with a charged one. See “Step 1 – Install the battery” on page 16.
• Plug in the ac adapter. See “Step 2 – Connect ac power” on page 18.
• Install a charged secondary battery in the plug-in module bay.
If you plug in the ac adapter, you can continue to work while your battery recharges.
Startup Guide 31
Page 32

Page 33

Making Connections
Startup Guide 33
Page 34

Making Connections
Using Plug-In Modules
Using Plug-In Modules
You can use any compatible plug-in module with your computer’s module bay, such as:
• CD-ROM or DVD drive.
• LS-120 or Zip drive.
• CD read/write drive.
• Second hard drive.
• Floppy disk drive.
You can also attach the floppy disk drive to your computer’s parallel port using the
external floppy drive cable.
• Secondary battery.
CAUTION
Never remove a plug-in module without first notifying Windows—see “To replace
a plug-in module” on page 35. Otherwise, you could lose data.
For information about connecting your modem or LAN (depending on the model), or
about connecting PC Cards or external devices, see the chapter titled “Making
Connections” in the online Reference Guide. See the same online manual for modem AT
commands.
To install hot-swap support
If your computer uses Windows ME, 95 or 98, it also includes “hot-swap” software that
lets you swap most modules in the computer’s plug-in bay without needing to shut down
and reboot the computer.
If a plug-in module icon or BayManager icon is displayed in the taskbar, hot-swap
support is already installed. If the icon is not present, you can install the software as
follows:
• Windows ME: Click Start, Programs, Softex BayManager, Setup, then follow the
onscreen instructions.
• Windows 95 or 98: Click Start, Programs, Agaté Tioman for HP, Setup, then follow
the onscreen instructions.
34 Startup Guide
Page 35
CAUTION
Making Connections
Using Plug-In Modules
To replace a plug-in module
Windows ME, 95 or 98 uses hot-swap software to let you swap most plug-in modules
without shutting down the computer. Before replacing a hard drive module, however, you
must first shut down the computer.
Windows 2000 displays the Unplug or Eject Hardware icon at the right end of the taskbar
when a drive module is present.
Before disconnecting a CD-ROM drive, DVD drive, or any other type of drive, you
must either use the icon in the taskbar or shut down the computer—otherwise, you
could lose data. For Windows ME, you must also do this before you insert a drive.
Exception: for Windows ME, 95 or 98, you must shut down the computer before
connecting or disconnecting a hard disk drive.
Handle and store a module carefully when it’s out of the computer. Do not drop it
or apply excessive pressure to its surfaces—this could damage its internal
mechanisms. Do not touch the metallic pins on the computer’s connectors, module
connectors, or cable connectors. Static electricity can damage internal components.
1. Close all files that are open from the plug-in module.
2. Windows ME: If the BayManager icon is present in the taskbar, right-click the icon,
then click Remove/Swap Bay Device. When prompted, remove the module if one is
present. Don’t click OK until you’ve inserted the desired module, if any.
Windows 95 or 98: If the plug-in module icon is present in the taskbar, right-click
the icon, then click Remove Device. When prompted to remove the module, click
OK. (You don’t have to do this if the bay is empty or contains a battery.)
Windows 2000: Left-click the Unplug or Eject Hardware icon on the taskbar, and
select the module you want to remove. When prompted to remove the module, click
OK. (You don’t have to do this if the bay is empty or contains a battery.)
–or–
For any system: Click Start, Shut Down, Shut down. For Windows ME, 95 or 98, you
must do this if you are removing or inserting a hard disk drive in the module bay.
Startup Guide 35
Page 36
Making Connections
Using Plug-In Modules
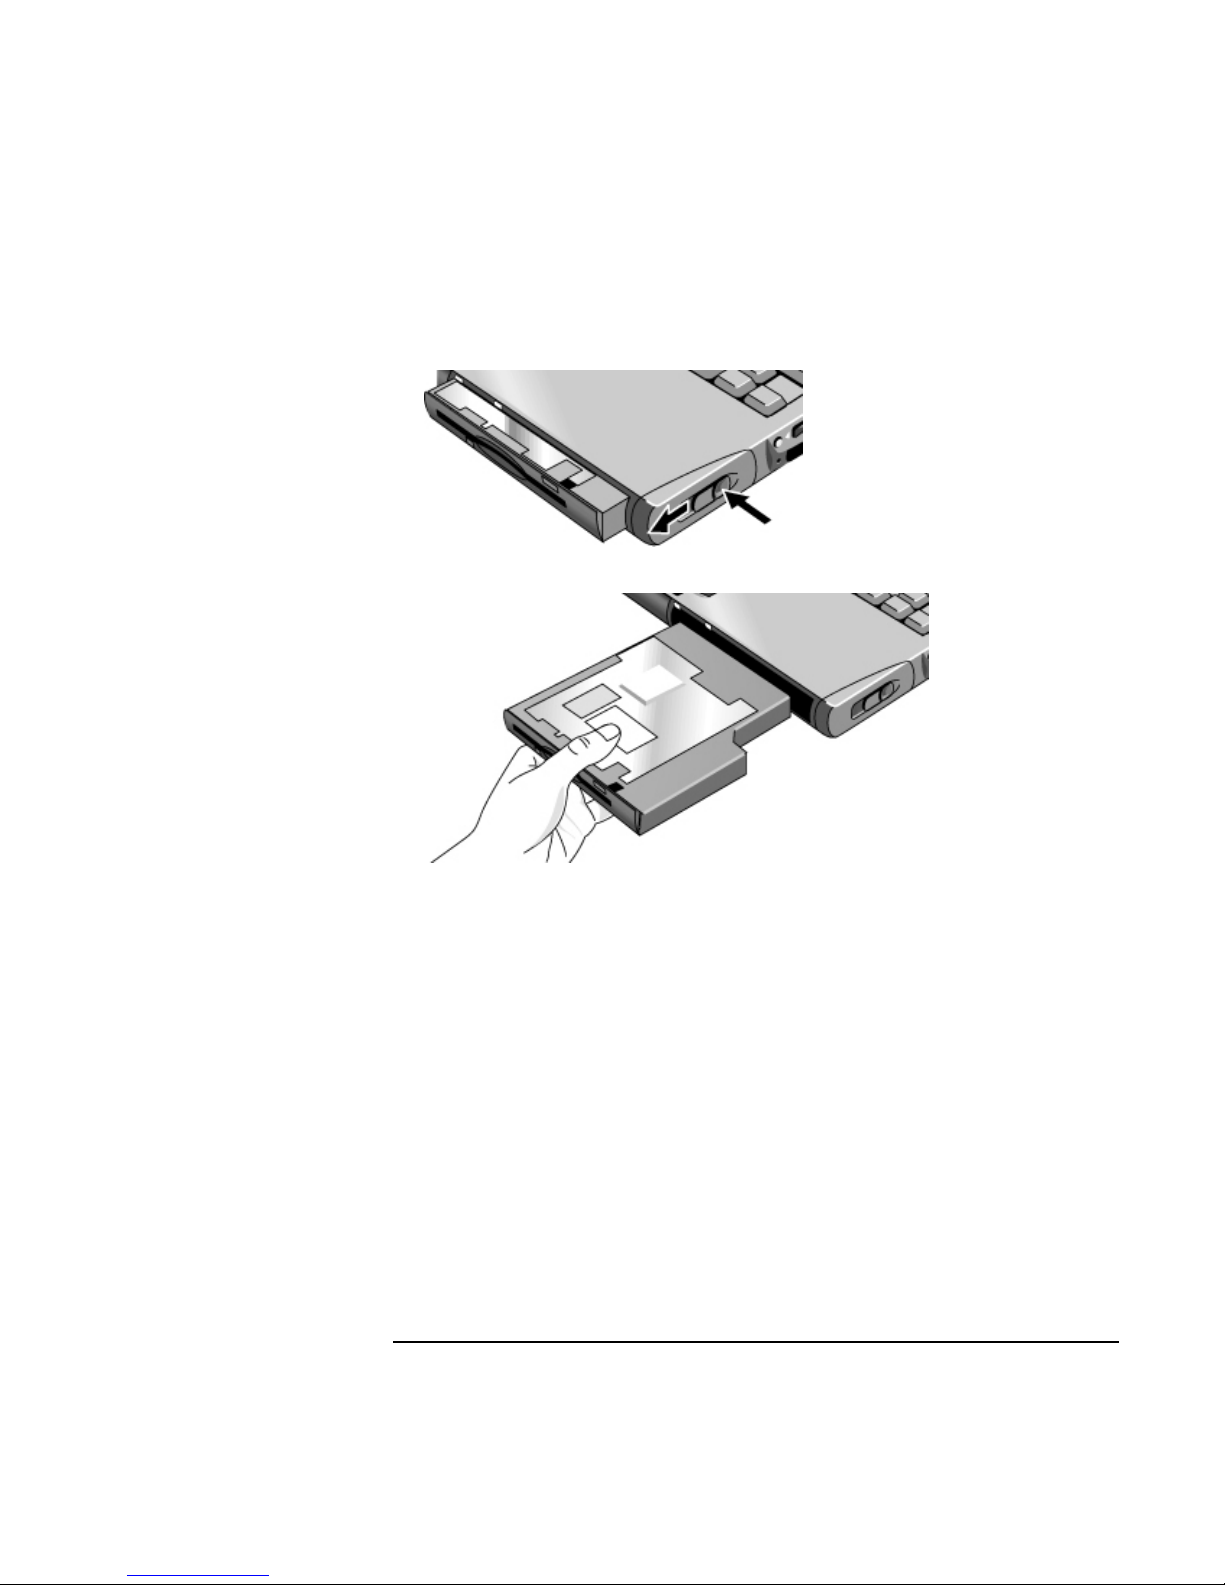
3. Press the button on the module release latch, and slide the latch toward the front of
the computer.
4. Grasp the module and pull it out.
5. Slide the new plug-in module into the computer until it clicks into place.
6. For Windows ME, click OK to close the BayManager window.
If you have a CD-ROM drive or other module in the module bay, you can connect the
floppy disk drive to the parallel port. See “Using Plug-In Modules” in the online
Reference Guide.
36 Startup Guide
Page 37

Configuring and Expanding Your Computer
Startup Guide 37
Page 38

Configuring and Expanding Your Computer
Using the BIOS Setup Utility
Using the BIOS Setup Utility
The BIOS (Basic Input and Output System) Setup utility enables you to make changes to
the computer’s system configuration, and to tailor the operation of your computer to your
individual work needs.
The settings made in BIOS Setup generally control the computer’s hardware, and so
greatly affect how the computer operates.
To run the BIOS Setup utility
1. Click Start, Shut Down, Restart.
2. When the HP logo appears, press F2 to enter BIOS Setup.
3. The pointing devices are not active in BIOS Setup, so you will need to use the
keyboard to navigate:
• Press the LEFT and RIGHT arrow keys to move among menus.
• Press the UP and DOWN arrow keys to move among parameters in a menu.
• Press F5 or F6 to move through values for the current parameter, or press ENTER
to change a setting.
4. After you select the options you want, press F10 or use the Exit menu to exit BIOS
Setup.
5. If the settings cause a conflict between devices during reboot, the system prompts you
to run BIOS Setup, and marks the conflicting settings.
For a complete list of BIOS Setup menus, settings, and options, see the online Reference
Guide.
38 Startup Guide
Page 39

Configuring and Expanding Your Computer
Installing a RAM Expansion Module
Installing a RAM Expansion Module
The computer has no memory (RAM) built in but has two slots that hold two RAM
modules. One slot contains a RAM module installed at the factory. You can use both
slots to expand your RAM.
To install a RAM expansion module
You’ll need a small Phillips screwdriver for these steps.
CAUTION
Your computer’s chips are extremely sensitive to static electricity, and can be
permanently damaged by it. Handle the RAM module only by its edges. Before
installing the memory module, discharge your body’s static electricity by touching
the metal shielding around the connectors on the rear of the computer.
1. Click Start, Shut Down, Shut down.
2. Important: Unplug the ac adapter, if present, and remove the battery. Remove the
secondary battery if one is installed.
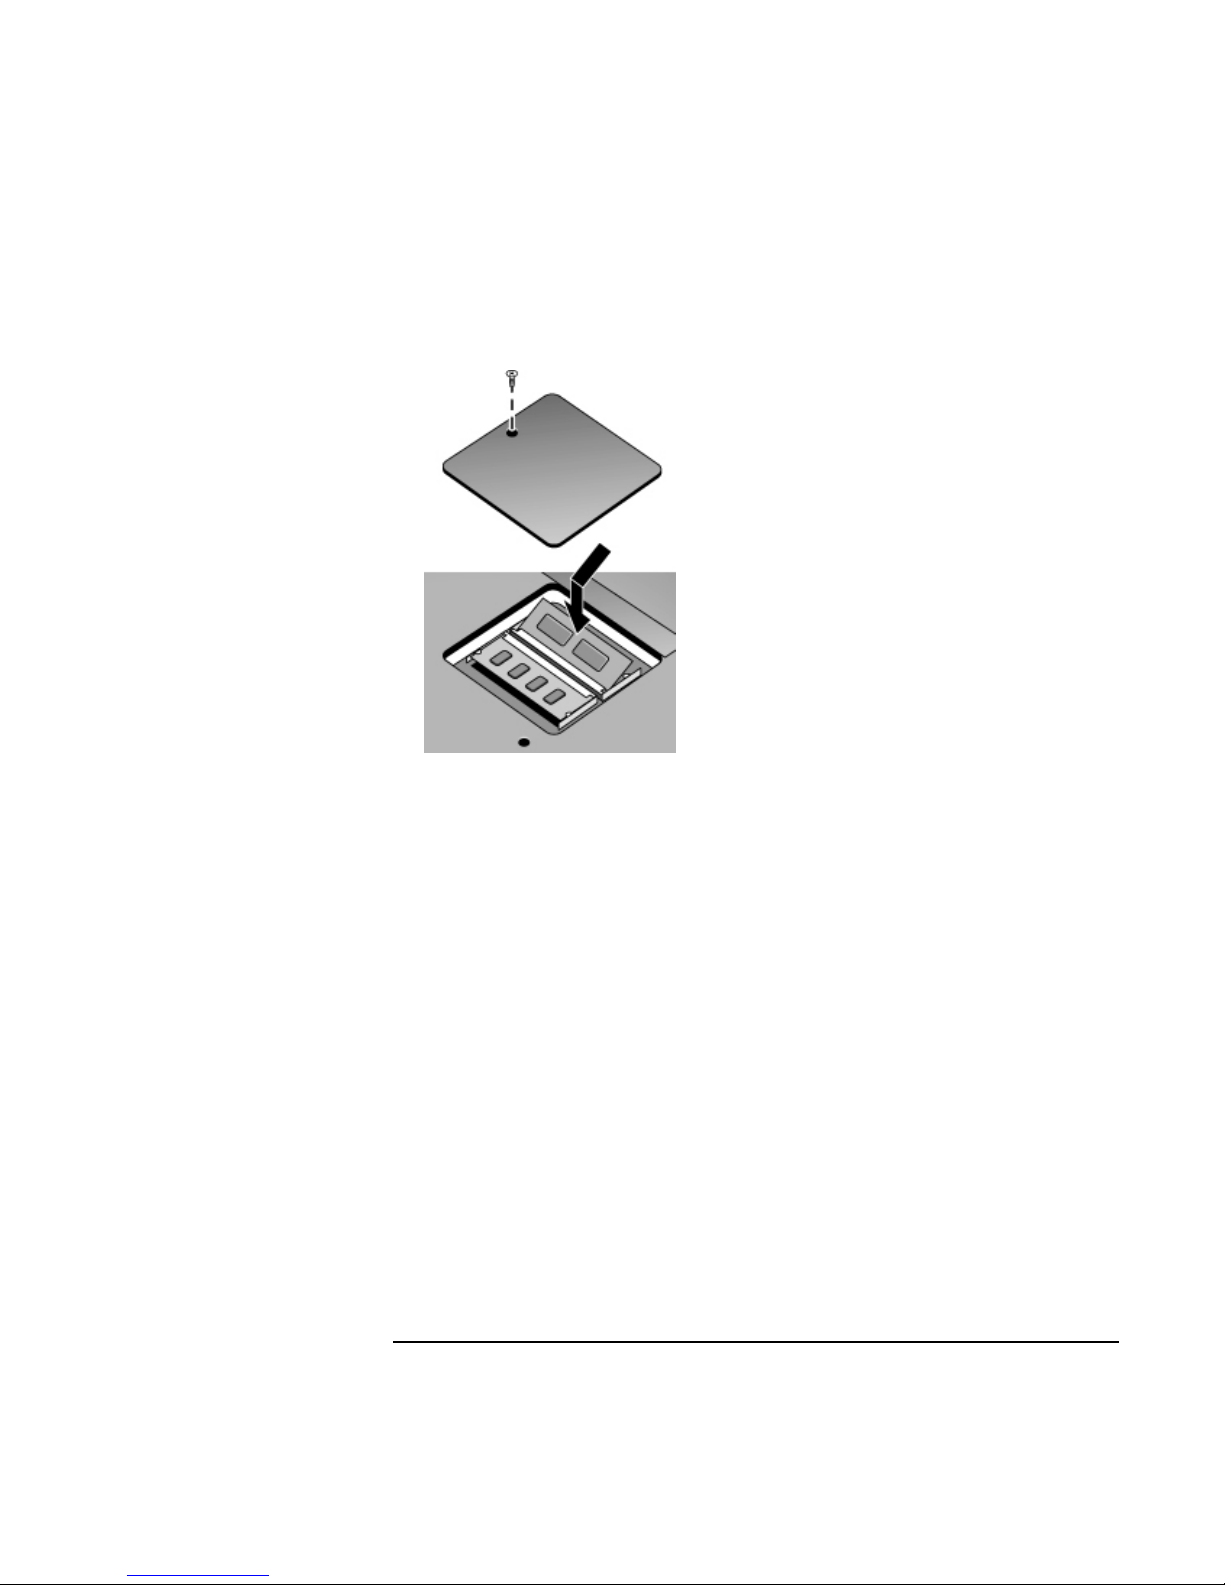
3. Turn the unit bottom-side up, remove the screw holding the RAM cover, and remove
the cover.
Startup Guide 39
Page 40
Configuring and Expanding Your Computer
Installing a RAM Expansion Module
4. Insert the RAM board into the connector at about a 30° angle until it is fully inserted.
Then press down at both sides until both latches snap closed.
5. Replace the cover.
6. Insert the battery.
To remove the RAM board, release the two latches at the sides of the board.
40 Startup Guide
Page 41
Configuring and Expanding Your Computer
Replacing a Hard Disk Drive
Replacing a Hard Disk Drive
To replace the hard disk drive
You’ll need a small Phillips screwdriver for this procedure.
1. Unplug the ac adapter if you’re using one, and remove the battery.
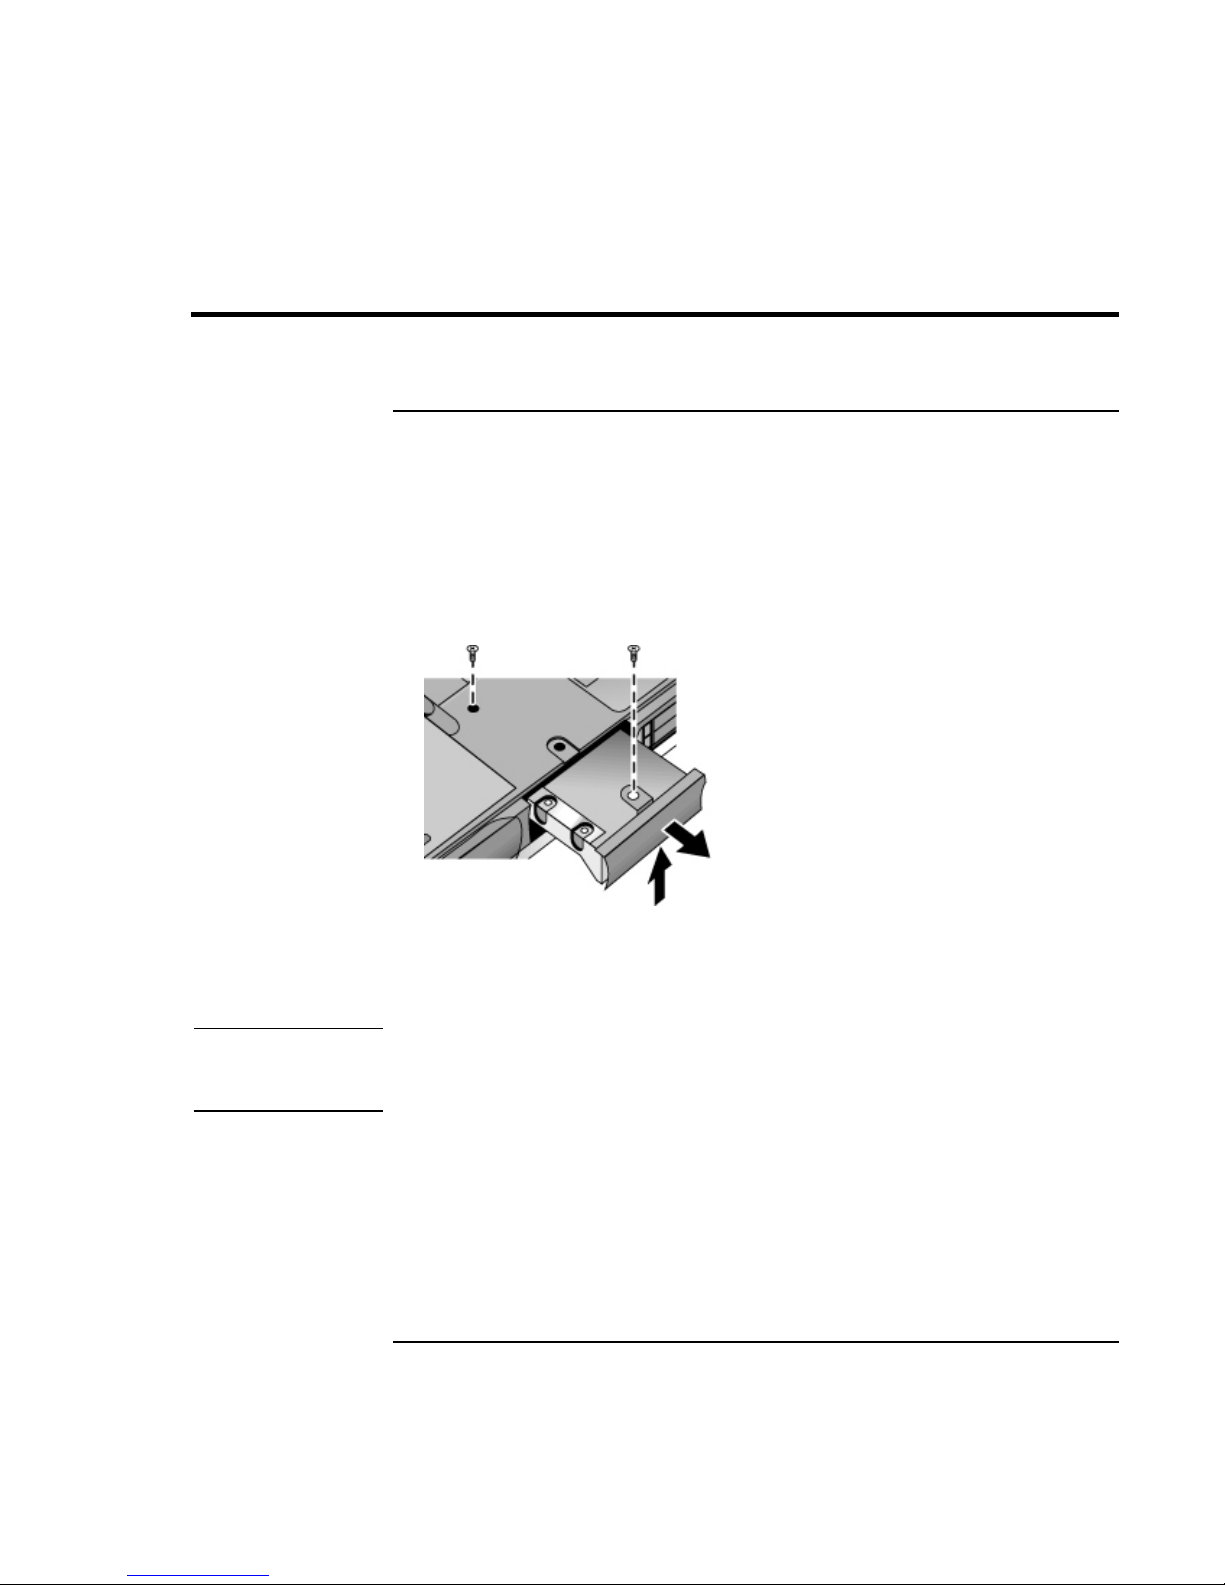
2. Turn the unit bottom side up and remove both hard drive screws.
3. Raise the cover on the end of the drive so that its retainer tab is free of the computer
casing, then gently pull the hard drive out of the computer.
Important
4. Gently slide the new drive into the hard drive compartment. Press firmly to make sure
the connector seats properly.
5. Slide the cover down into place (so the retainer tab engages the casing), and reinstall
both hard drive screws.
If you are installing a new hard disk drive, you should create a Hibernate partition on the
drive before loading any software. See “To recover the factory installation of your hard
disk” on page 50.
To install the holder on a new hard disk drive or prepare a new hard disk for use, see
“Replacing a Hard Disk Drive” in the online Reference Guide.
Startup Guide 41
Page 42

Page 43

Troubleshooting Your Computer
Startup Guide 43
Page 44

Troubleshooting Your Computer
Troubleshooting Techniques
Troubleshooting Techniques
This section contains solutions to a few basic problems you might have with your
computer. Try the solutions one at a time, in the order in which they are presented.
Here are some other sources of information for troubleshooting:
• See the troubleshooting chapter in the online Reference Guide for a more complete
list of troubleshooting suggestions.
• Click Start, Help, and use the Windows Troubleshooters.
• See the Microsoft Windows manual shipped with the computer.
• See the HP Notes in the online HP Library for updated information (for Windows
ME, click Start, Help, Your HP Notebook).
• Find technical tips and software updates for the computer at the HP Customer Care
Web site (www.hp.com/go/support).
• Test your computer by running the DiagTools test program. See “Testing the
Hardware” on page 48.
• Contact your dealer or Hewlett-Packard—see “To contact the HP Customer Care
Center” on page 54. Please have your computer with you when you call.
Display Problems
If the computer is on, but the screen is blank
• Move the mouse or pointing stick, or tap the touch pad. This will wake the display if
it is in Display-off mode.
• Press Fn+F5 in case the internal display was disabled. (Do this three times to return to
the state you started from.)
• If the computer is cold, allow it to warm up.
If the screen is difficult to read
• Try setting the display resolution to its default setting of 1024×768 or 1400 × 1050:
click Start, Settings, Control Panel, Display, Settings.
44 Startup Guide
Page 45

Troubleshooting Your Computer
Troubleshooting Techniques
Hard Disk Drive Problems
If the computer’s hard drive doesn’t spin
• Make sure the computer has power. If necessary, connect the ac adapter, and make
sure it is fully plugged into a power source and into the rear of the computer.
• Remove and reinsert the hard drive. See “Replacing a Hard Disk Drive” on page 41.
If files are corrupted
• In Windows 95 or 98, run the Scandisk surface scan to check the hard disk. From the
Start menu, click Programs, Accessories, System Tools, Scandisk.
• For Windows ME or 2000, open My Computer, select the disk you want to scan, click
File, Properties, and use the Tools tab.
• Run the VirusScan program. See the chapter titled “Using Your Computer” in the
online Reference Guide.
• Test the hard disk drive with the DiagTools diagnostics. See “Testing the Hardware”
on page 48.
• If necessary, you can format the hard disk and reinstall the original factory software.
See “To recover the factory installation of your hard disk” on page 50.
Keyboard and Pointing Device Problems
If the pointer is difficult to control
• Adjust the pointer controls: click Start, Settings, Control Panel, the double-click
Mouse.
If the touch pad or pointing stick doesn’t work
• Don’t move the pointer or touch the touch pad while the computer is rebooting or
resuming from Standby mode. If this happens, try the following:
• Press a key on the keyboard to restore normal operation.
• Suspend and resume operation using the sleep button.
• Shut down and restart Windows.
Startup Guide 45
Page 46

Troubleshooting Your Computer
Troubleshooting Techniques
• If an external mouse is connected, the built-in pointing devices are normally disabled.
You can change this setting with the BIOS Setup utility—see “Using the BIOS Setup
Utility” on page 38.
• Restart the computer: click Start, Shut Down, Restart.
Performance Problems
For best performance with Windows 2000, your computer should have at least 96 to
128 MB of memory (RAM).
If the computer stops responding
• Press CTRL+ALT+DEL to end the application that is not responding.
• Slide and hold the power button for at least four seconds to turn off and reset the
computer. Then press the blue sleep button to turn the computer back on.
• If nothing happens, insert a straightened paper clip into the system-off switch on the
right side of the computer. Then press the blue sleep button to turn the computer back
on.
Power and Battery Problems
If the computer turns off immediately after it turns on
• Battery power is probably extremely low. Plug in the ac adapter or insert a charged
battery.
If the computer keeps beeping
• The computer beeps for 15 seconds when battery power is low. Save your work, shut
down Windows immediately, and insert a charged battery or plug in the ac adapter.
If the battery doesn’t charge
• Make sure the ac adapter is fully plugged into the power source and the computer, and
that the light on the adapter is on.
• If you’re using a power strip, remove the ac adapter from the power strip and plug it
directly into a wall outlet.
• Make sure the battery is fully installed and locked in place.
46 Startup Guide
Page 47

Troubleshooting Your Computer
Troubleshooting Techniques
• Move the computer away from any nearby heat source. Unplug the ac adapter and
allow the battery to cool down. If the battery gets too hot, it will not charge properly.
• If available, try another battery and ac adapter.
Startup Problems
If the computer doesn’t respond when you turn it on
• Connect the ac adapter.
• Press the blue sleep button to try turning on the unit.
• Reset the computer by inserting a straightened paper clip into the system-off switch
on the right side of the computer. Then press the blue sleep button to turn it on.
• If the computer still doesn’t respond, remove the battery and ac adapter, remove any
PC cards, and undock the computer if docked. Then plug in the ac adapter again, and
reset the computer using the system-off switch.
If the computer won’t boot from battery power
• Make sure the battery is properly inserted and fully charged. Check the battery’s
charge by removing it and pressing the pad on the back of the battery. The lights
show the charge level.
• If you have a secondary battery, install it and try starting the computer.
• If available, try another battery.
Startup Guide 47
Page 48

Troubleshooting Your Computer
Testing the Hardware
Testing the Hardware
The DiagTools hardware diagnostic program included with your computer provides two
levels of testing:
• Automated testing using its basic hardware test.
• Advanced testing using individual hardware tests.
The tests are designed to run after the system reboots. This ensures that the computer will
be in a predictable state, so the diagnostic program can properly test the hardware
components. The tests are non-destructive and are intended to preserve the state of the
computer. The computer reboots when you exit the program so drivers can be loaded.
To run the DiagTools diagnostic test
1. Click Start, Shut Down, Restart.
Hint
2. When the HP logo appears, press F10 to start the diagnostic test.
3. Go through the first several screens.
4. When the hardware detection finishes, check the list of detected hardware.
If a device is not detected or fails its test, it might be configured incorrectly in the BIOS
Setup utility. You can confirm this by running BIOS Setup and checking the settings.
See “To run the BIOS Setup utility” on page 38.
5. Run the basic test. Press F2 to start the basic hardware test.
If the basic test fails, you can press F6 and start a Wizard that runs a set of advanced
tests for the failed component.
6. If you intend to exit without running the advanced tests, press F4 to save system and
test information in the Support Ticket log file. Then press F3 to exit.
7. Optional: Run the advanced tests. Press F2 to open the advanced test screen.
48 Startup Guide
Page 49

Troubleshooting Your Computer
Testing the Hardware
8. Select and run the appropriate tests. Tests are not listed if no such hardware is
detected. Press the following keys to run tests:
ENTER Runs the highlighted test.
F5 or
SPACE
F6 Marks or unmarks all tests in the current menu.
F7 Marks or unmarks all tests in all menus.
F10 Runs all marked tests.
Marks or unmarks the highlighted test.
9. When you are finished running tests, press ESC to exit the advanced tests.
10. Optional: Save the Support Ticket. Press F4 to save system and test information in
the Support Ticket log file.
11. Exit. Press F3 to exit and reboot.
12. Optional: Check the log. The log file contains a list of all test results and errors. Run
C:\Dmi\Hpdiags\Hpsuppt.exe to retrieve the log file to this directory and open it in
Notepad. (If Hpsuppt.exe is not on your hard disk, you can download it from the HP
Customer Care Web site, www.hp.com/go/support.)
Startup Guide 49
Page 50

Troubleshooting Your Computer
Recovering and Reinstalling Software
Recovering and Reinstalling Software
You can use the Recovery CD to recover the original software build for your computer.
The Recovery CD also provides Windows drivers specific to your computer to configure
a custom system. You can find drivers in these locations:
• On your computer’s hard drive under C:\hp\Drivers.
• On the Recovery CD under \hp\Drivers.
• On the HP Customer Care Web site (www.hp.com/go/support). This Web site
contains the latest updates of software drivers for different operating systems.
To recover the factory installation of your hard disk
Use the Recovery CD to reinstall the original factory software on your computer’s hard
disk. You use the same process to create a larger Hibernate/diagnostics partition on your
hard disk (Windows ME, 95 or 98 only) or to create a Hibernate/diagnostics partition on
a new hard disk.
CAUTION
This procedure formats the computer’s hard disk drive and erases all data on the
disk. After the hard disk is formatted, you’ll need to reinstall your applications.
Do not interrupt the following process or unplug the ac adapter until the process is
complete.
1. Important. Back up all data from your hard disk. The following steps delete all data
from the disk.
2. Plug in the ac adapter.
3. Insert the Recovery CD in the CD-ROM drive.
4. Click Start, Shut Down, Restart.
5. When you see the HP logo, press ESC.
6. Select the CD or DVD drive as the boot device.
50 Startup Guide
Page 51

Troubleshooting Your Computer
Recovering and Reinstalling Software
7. When the Recovery CD dialog box appears, follow the displayed instructions. If
prompted, accept the recommended partition size. If you install the factory software,
the recovery process can take up to 10 minutes.
If you want to create the Hibernate/diagnostics partition without installing the factory
software, click Advanced and select the option to not install the operating system.
8. When prompted to reboot the computer, press CTRL+ALT+DEL and follow any
instructions that appear onscreen.
Startup Guide 51
Page 52

Page 53

Support and Service
Startup Guide 53
Page 54

Support and Service
Getting Assistance for Your Computer
Getting Assistance for Your Computer
To get help from the web
HP has several Web sites on the Internet dedicated to providing information to HP
notebook computer users. The following sites are especially useful for helping you get
support for your computer:
• HP Customer Care Web site. Get technical information and software updates.
www.hp.com/go/support
Click Assistance for information about bulletin boards, CD-ROM subscriptions, and
service parts.
• HP Notebook Computer Web site. Get the latest information about technical
support, including e-mail and telephone support, plus information about warranty and
support programs.
www.hp.com/notebooks
To contact the HP Customer Care Center
HP Customer Care Centers will assist you free of charge during the term of the warranty
(you are responsible for the telephone charges).
During the free assistance period, HP will assist with questions about:
• Included applications and operating systems.
• HP-described operation environments and conditions.
• HP accessories, HP upgrades, and basic operation and troubleshooting.
HP will not be able to help with questions about:
• Non-HP hardware, software, operating systems, or usage not intended for or included
(by HP) with the product.
• How to repair the product yourself.
54 Startup Guide
Page 55

Support and Service
Getting Assistance for Your Computer
• Product development, custom installations.
• Consulting.
To contact the Customer Care Center by email, visit the HP Notebook Web site
(www.hp.com/notebooks) under Support.
To call the Customer Care Center, check the HP Notebook website
(www.hp.com/notebooks) under Support for the most complete and current list of phone
numbers. If your HP notebook product is not normally sold by HP in the country of use,
you must call a Customer Care Center that supports your notebook model. Currently,
service and support assistance is provided only in the following countries:
Pavilion N6000 series
United States only: (970) 635-1000
OmniBook 6000
See the following table.
Startup Guide 55
Page 56

Support and Service
Getting Assistance for Your Computer
North America
United States: (970) 635-1000
Canada: (905)-206-4663
Mexico: Mexico City 52-58-9922, outside Mexico
City 01-800-472-6684, Guadalejara 669-9500,
Monterrey 378-4240
South America
Argentina: 5411-4778-8380 or 0810-555-5520
Brazil: Sao Paulo (11) 3747-7799, other cities
0800-157751
Venezuela: 58-2-239-5664
Europe
Austria: +43-(0)7114-20-1080
Belgium (Dutch): 32-(0)2-626-8806
Belgium (French): 32-(0)2-626-8807
Czech Republic: 42-(0)2-6130-7310
Denmark: +45-39-29-4099
Finland: 358-(0)203-47-288
France: +33 (0)1-43-62-34-34
Germany: +49-(0)180-52-58-143
Greece: +30-(0)1-619-64-11
Hungary: +36-(0)1-382-1111
Ireland: +353-(0)1-662-5525
Italy: +39-02-264-10350
Netherlands: +31-(0)20-606-8751
Norway: +47-22-11-6299
Poland: +48-22-519-06-00
Portugal: +351-21-317-6333
Russia: Moscow +7-095-797-3520, St. Petersburg
+7-812-346-7997
Spain: +34-902-321-123
Sweden: +46-(0)8-619-2170
Switzerland: +41-(0)848-80-11-11
Israel: +972-(0)9-952-4848
Turkey: +90-212-221-69-69
United Kingdom: +44-(0)207-512-52-02
English (international): +44-(0)171-512-52-02
Asia and Australia
Australia: 61-3-8877-8000
China: 800-810-5959
Hong Kong: 852-800-96-7729
India: 91-11-682-6035
Indonesia: 62-21-350-3408
Japan: 81-3-3335-8333
Korea: Seoul 82-2-3270-0700, outside Seoul
080 999-0700
Malaysia: Penang 60-3-295-2566, outside Penang
03-295-2566
New Zealand: 64-9-356-6640
Philippines: 63-2-867-3551
Singapore: 65-272-5300
Taiwan: 886-2-2717-0055
Thailand: 66-2-661-4000
Vietnam: 84-8-823-4530
Africa/Middle East
Inise RSA: 086-000-1030
Outside RSA:+27-11-258-9301
To receive repair service
If the HP notebook product is not normally sold by HP in the country of use, it must be
returned for service to a country in which it is sold and supported. For example, Pavilion
notebook products are currently serviced in only the United States.
If your computer is under warranty. To receive warranty repair service, contact an HPauthorized reseller, or contact the HP Customer Care Center—see “To contact the HP
Customer Care Center” on page 54. The support technician will help qualify your unit for
warranty repair based on the warranty applicable to your unit and original purchase date,
56 Startup Guide
Page 57

Support and Service
Getting Assistance for Your Computer
and will provide you with repair processes. Warranty service may include the cost of
shipping, handling, duties, taxes, freight, or fees to or from the service location.
If your computer is no longer under warranty. Contact an HP-authorized reseller or
the HP Customer Care Center (see “To contact the HP Customer Care Center” on page
54). The support provider will let you know about repair charges and processes.
To prepare your computer for shipment
See “To receive repair service” above to determine if your computer must be sent in for
service. If so, prepare your computer for shipment as follows.
1. Important. Back up your hard disk drive. The hard disk may need to be replaced or
reformatted while your computer is being repaired.
2. Hewlett-Packard cannot guarantee the return of removable components. Please
remove the following prior to sending your computer in for service:
• PC cards.
Note
• ac adapter and power cord.
• Any removable media, such as CDs, DVDs, or floppy disks.
• Any plug-in module not involved in the problem and not requested for repair.
3. When sending your computer to Hewlett-Packard, please use the original product
packaging or other substantial packaging in order to avoid damage to the unit in
transit.
If the hard disk drive is defective, you will receive a replacement drive that is either
unformatted or loaded with software for verification. You should restore the computer’s
original software using your Recovery CD (see “To recover the factory installation of
your hard disk” on page 50) or other recovery method.
Startup Guide 57
Page 58

Support and Service
Hewlett-Packard Limited Warranty Statement
Hewlett-Packard Limited Warranty Statement
1. HP warrants to you, the end-user customer, that HP hardware, accessories and
supplies will be free from defects in materials and workmanship after the date of
purchase, for the period specified in the Warranty Duration sheet included with your
HP notebook computer. If HP receives notice of such defects during the warranty
period, HP will, at its option, either repair or replace products which prove to be
defective. Replacement products may be either new or equivalent in performance to
new.
2. HP warrants to you that HP software will not fail to execute its programming
instructions after the date of purchase, for the period specified in the Warranty
Duration sheet included with your computer, due to defects in material and
workmanship when properly installed and used. If HP receives notice of such defects
during the warranty period, HP will replace software which does not execute its
programming instructions due to such defects.
3. HP does not warrant that the operation of HP products will be uninterrupted or error
free. If HP is unable, within a reasonable time, to repair or replace any product to a
condition as warranted, you will be entitled to a refund of the purchase price upon
prompt return of the product.
4. HP's limited warranty is valid in any country or locality where HP has a support
presence for this product and where HP has marketed this product. The level of
warranty service you receive may vary according to local standards. HP will not alter
form, fit or function of the product to make it operate in a country for which it was
never intended to function for legal or regulatory reasons.
5. Warranty does not apply to defects resulting from (a) improper or inadequate
maintenance or calibration, (b) software, interfacing, parts or supplies not supplied by
HP, (c) unauthorized modification or misuse, (d) operation outside of the published
environmental specifications for the product, or (e) improper site preparation or
maintenance.
6. TO THE EXTENT ALLOWED BY LOCAL LAW, THE ABOVE WARRANTIES
ARE EXCLUSIVE AND NO OTHER WARRANTY OR CONDITION, WHETHER
WRITTEN OR ORAL, IS EXPRESSED OR IMPLIED AND HP SPECIFICALLY
DISCLAIMS ANY IMPLIED WARRANTIES OR CONDITIONS OF
MERCHANTABILITY, SATISFACTORY QUALITY, AND FITNESS FOR A
PARTICULAR PURPOSE. Some countries, states or provinces do not allow
limitations on the duration of an implied warranty, so the above limitation or
exclusion might not apply to you. This warranty gives you specific legal rights and
58 Startup Guide
Page 59

Support and Service
Hewlett-Packard Limited Warranty Statement
you might also have other rights that vary from country to country, state to state, or
province to province.
7. TO THE EXTENT ALLOWED BY LOCAL LAW, THE REMEDIES IN THIS
WARRANTY STATEMENT ARE YOUR SOLE AND EXCLUSIVE REMEDIES.
EXCEPT AS INDICATED ABOVE, IN NO EVENT WILL HP OR ITS SUPPLIERS
BE LIABLE FOR LOSS OF DATA OR FOR DIRECT, SPECIAL, INCIDENTAL,
CONSEQUENTIAL (INCLUDING LOST PROFIT OR DATA), OR OTHER
DAMAGE, WHETHER BASED IN CONTRACT, TORT, OR OTHERWISE. Some
countries, states or provinces do not allow the exclusion or limitation of incidental or
consequential damages, so the above limitation or exclusion may not apply to you.
THE WARRANTY TERMS CONTAINED IN THIS STATEMENT, EXCEPT TO
THE EXTENT LAWFULLY PERMITTED, DO NOT EXCLUDE, RESTRICT OR
MODIFY AND ARE IN ADDITION TO THE MANDATORY STATUTORY
RIGHTS APPLICABLE TO THE SALE OF THIS PRODUCT TO YOU.
Startup Guide 59
Page 60

Page 61

Specifications and Regulatory Information
Startup Guide 61
Page 62
Specifications and Regulatory Information
Hardware Specifications
Hardware Specifications
Because we are constantly improving our products, the specifications shown below are
subject to change. For the latest specifications, see the HP Notebook Web site
(www.hp.com/notebooks).
Physical Attributes Size (14-inch display): 316 × 261 × 33 mm (12.4 × 10.3 × 1.3 in).
Size (15-inch display): 325 × 261 × 35 mm (12.8 × 10.3 × 1.4 in).
Weight: 2.3–2.9 kg (5.0–6.4 lb), depending on configuration.
Magnesium display cover.
Processor and
Bus Architecture
Graphics 14.1- or 15.0-inch XGA (1024 × 768 × 16M colors) or SXGA+ (1400 × 1050 × 16M colors)
Power Rechargeable lithium-ion battery with LED charge-level gauge (11.1 or 14.8 Vdc).
Mass Storage 5- to 20-GB removable hard drive.
RAM Two slots for RAM expansion up to 512 MB.
550- to 650-MHz Celeron processor with 128-KB four-way set-associative L2 cache.
–or–
600- to 850-MHz Intel Mobile Pentium III processor with Speed Step technology with
256-KB four-way set-associative L2 cache.
1.6-V core, 2.5-V external, low-power processor.
32-KB (16-KB instruction, 16-KB data) L1 cache.
32-bit PCI bus.
active-matrix (TFT) display.
Zoomed Video support for lower PC Card slot.
3D and OpenGL graphics support.
Celeron models:
ATI Mobility M graphics accelerator with 4-MB display RAM, 2x AGP graphics capability.
Pentium III models:
ATI Mobility M1 graphics accelerator with 8-MB display RAM, 2x AGP graphics capability.
Battery life (one battery): up to 3 hours typical (varies with model and usage).
Fast battery recharge: 80% in 1.5 hour, 100% in 2 hours.
Low-battery warning.
Suspend/resume capability.
Universal 60-watt ac adapter: 100–240 Vac (50/60 Hz) input, 19 Vdc output.
Optional secondary battery available for module bay.
1.44-MB floppy drive module.
24x CD-ROM or 6x DVD drive module (or higher).
Optional drive modules available.
64 or 128 MB RAM installed in one slot.
100-MHz RAM bus.
62 Startup Guide
Page 63
Specifications and Regulatory Information
Hardware Specifications
Audio System
Keyboard and
Pointing Devices
Communications LAN/Modem Models (3Com):
Input/Output Universal serial bus (USB).
Expandability One Type III or two Type II 16-/32-bit PC Card slots (3.3- and 5-V support).
16-bit Sound Blaster Pro−compatible stereo sound.
Stereo sound via two built-in speakers (500 Hz to 10 kHz range).
3D-enhanced PCI bus audio with Zoomed Video support.
Built-in microphone.
Separate audio-off button with indicator light.
Headphone-out, microphone-in, and audio line-in.
87-key touch-type QWERTY keyboard with 101/102 key emulation.
Embedded numeric keypad.
12 function (Fn) keys.
Two pointing devices: pointing stick (TrackPoint technology licensed from IBM) and touch
pad.
LAN
- Ethernet 10Base-T (10 Mbps) and 100Base-TX (100 Mbps) support.
- Supports wake-on-LAN, remote wake-up (Windows ME or 98), fast IP, DMI, dRMON.
- MBA (Managed Boot Agent) support for PXE/BINL, BOOTP, NCP/IPX, DHCP.
Modem
- Data speed: 56 Kbps (V.90) maximum.
- Fax speed: 14.4 Kbps, Class 1 and 2.
- Modulation: V.21, V.22, V.22bis, V.23, V.32, V.32bis, V.34, V.90, X2, Bell 103,
Bell 212A.
- Synchronous transfer: V.80.
- Compression: V.42bis, MNP5.
- Error correction: V.42, MNP2-4.
- Fax: Group 3 fax, Class 1. V.17, V.27ter, V.29, V.21 channel 2.
Modem-Only Models (Ambit):
Data speed: 56 Kbps (V.90) maximum.
Fax speed: 14.4 Kbps, Class 1 and 2.
Modulation: V.21, V.22, V.22bis, V.23, V.32, V.32bis, V.34, V.90, Bell 103, Bell 212A.
Synchronous transfer: V.80.
Compression: V.42bis, MNP5.
Error correction: V.42, MNP2-4.
Fax: Group 3 fax, Class 1. V.17, V.27ter, V.29, V.21.
9-pin, 115,200-bps serial (16550 UART).
25-pin bi-directional ECP/EPP parallel.
15-pin VGA video-out with DDC support. (Resolution up to 1600 × 1200 × 64K or 16M
colors. Refresh rate up to 60 to 100 Hz, depending on resolution.)
Dual display.
PS/2 keyboard/mouse.
4-Mbps IrDA-compliant infrared port.
CardBus enabled.
Plug-in module bay for accessory modules.
Optional port replicator, mini dock, and docking system (not supported on Pavilion models).
Startup Guide 63
Page 64
Specifications and Regulatory Information
Hardware Specifications
Security Features User and administrator passwords.
System, hard drive, and docking passwords.
PC identification displayed at boot.
DMI-accessible electronic serial number.
Kensington MicroSaver lock slot.
Environmental
Limits
Major ICs
Operating temperature: 5 to 35 °C (41 to 95 °F).
Operating humidity: 20 to 90 percent RH (5 to 35 °C).
Operating altitude: up to 3000 m (10,000 ft) at 25 °C (77 °F).
Storage temperature: –20 to 50 °C (–4 to 122 °F).
CPU: Intel Mobile Pentium III or Celeron processor.
South Bridge: PIIX4M.
Display controller: ATI Mobility M or M1.
Audio controller: ESS Maestro-3E and ESS ES1921.
CardBus controller: TI PCI 1420.
Keyboard/embedded controller: National PC87570.
BIOS flash: SST28SF040.
Super I/O: National NS97338.
64 Startup Guide
Page 65
Specifications and Regulatory Information
Safety Information
Safety Information
Power Cords
The power cord supplied with the computer’s ac adapter should match the plug and
voltage requirements for your local area. Regulatory approval for the ac adapter has been
obtained using the power cord for the local area. However, if you travel to a different area
and need to connect to a different outlet or voltage, you should use one of the power
cords listed below. To purchase a power cord (including one for a country not listed
below) or a replacement ac adapter, contact your local Hewlett-Packard dealer or Sales
and Service office.
Country Rated Voltage and Current HP Part Number
Canada
Mexico
Philippines
Taiwan
United States
East and West Europe
Egypt
Saudi Arabia
Hong Kong
Singapore
United Kingdom
Australia
New Zealand
Japan 125 Vac (3 A) 8120-6316
India
South Africa
Argentina 250 Vac (2.5 A) 8120-8367
Chile 250 Vac (2.5 A) 8120-8452
People’s Republic of China 250 Vac (2.5 A) 8120-8373
125 Vac (3 A) 8120-6313
250 Vac (2.5 A) 8120-6314
250 Vac (2.5 A) 8120-8699
250 Vac (2.5 A) 8120-6312
250 Vac (2.5 A) 8120-6317
Startup Guide 65
Page 66
Specifications and Regulatory Information
Safety Information
Ergonomics
WARNING
Note
Improper use of keyboards and other input devices has been associated with
ergonomic injury. For information about reducing your risk, see Working in
Comfort in the online HP Library (for Windows ME, click Start, Help, Your HP
Notebook, Working in Comfort), or visit our ergonomics Web site,
www.hp.com/ergo.
Battery Safety
The following batteries are compatible only with HP notebook computers:
– HP F2014 and F2019
– Sanyo 3UR18650-2-QC-RT
– Panasonic CGR-B/634AE
• To avoid risk of fire, burns, or damage to your battery pack, do not allow a metal
object to touch the battery contacts.
• Do not disassemble the battery. There are no serviceable parts inside. Do not dispose
of the battery pack in fire or water.
• Handle a damaged or leaking battery with extreme care. If you come in contact with
the electrolyte, wash the exposed area with soap and water. If it contacts the eye, flush
the eye with water for 15 minutes and seek medical attention.
• Do not expose the battery pack to storage temperatures above 60 °C (140 °F).
• When the battery is not in use, store it in the battery pouch provided.
• When discarding a battery pack, contact your local waste disposal provider regarding
• To obtain a replacement battery, contact your local dealer or HP sales office.
• Do not charge the battery pack if the ambient temperature exceeds 45 °C (113 °F).
66 Startup Guide
local restrictions on the disposal or recycling of batteries.
Page 67
Specifications and Regulatory Information
Safety Information
Laser Safety
The CD-ROM and DVD drives used with the computer are certified as a Class 1 laser
devices according to the U.S. Department of Health and Human Services (DHHS)
Radiation Performance Standard and International Standards IEC 825 / IEC 825-1
(EN60825 / EN60825-1). These devices are not considered harmful, but the following
precautions are recommended:
• Ensure proper use by reading and following the instructions carefully.
• If the unit requires service, contact an authorized HP service center—see “To contact
the HP Customer Care Center” on page 54.
• Do not attempt to make any adjustment of the unit.
• Avoid direct exposure to the laser beam—do not open the unit.
CLASS 1 LASER PRODUCT
LASER KLASSE 1
LED Safety
The infrared port located on the right side of the computer is classified as a Class 1 LED
(light-emitting diode) device according to International Standard IEC 825-1 (EN60825-
1). This device is not considered harmful, but the following precautions are
recommended:
• If the unit requires service, contact an authorized HP service center— see “To contact
the HP Customer Care Center” on page 54.
• Do not attempt to make any adjustment of the unit.
• Avoid direct eye exposure to the infrared LED beam. Be aware that the beam is
invisible light and cannot be seen.
• Do not attempt to view the infrared LED beam with any type of optical device.
CLASS 1 LED PRODUCT
LEDSCHÜTZKLASSE 1 PRODUKT
Startup Guide 67
Page 68

Specifications and Regulatory Information
Regulatory Information
Regulatory Information
This section presents information that shows how your computer complies with
regulations in certain regions. Any modifications to your computer not expressly
approved by Hewlett-Packard could void the authority to operate the computer in these
regions.
U.S.A.
The computer generates and uses radio frequency energy and may interfere with radio
and television reception. The computer complies with the limits for a Class B computing
device as specified in Part 15 of FCC Rules, which provide reasonable protection against
such interference in a residential installation. In the unlikely event that there is
interference to radio or television reception (which can be determined by removing the
unit’s batteries and ac adapter), try the following:
• Reorienting or relocating the receiving antenna.
• Relocating the computer with respect to the receiver.
• Connecting the computer’s ac adapter to another power outlet.
Connections to Peripheral Devices
To maintain compliance with FCC Rules and Regulations, use properly shielded cables
with this device.
For more information, consult your dealer, an experienced radio/television technician, or
the following booklet, prepared by the Federal Communications Commission: How to
Identify and Resolve Radio-TV Interference Problems. This booklet is available from the
U.S. Government Printing Office, Washington, DC 20402, Stock Number 004-00000345-4. At the first printing of this manual, the telephone number was (202) 512-1800.
68 Startup Guide
Page 69

Specifications and Regulatory Information
Regulatory Information
Declaration of Conformity
Responsible Party: Hewlett-Packard Company
Manager of Corporate Product Regulations
3000 Hanover Street
Palo Alto, CA 94304
(415) 857-1501
declares that the product(s)
Trade name: Hewlett-Packard Company
Product name: HP OmniBook 6000 and HP Pavilion N6xxx (x is any digit 0-9)
Complies with Part 15 of the FCC Rules. Operation is subject to the following two conditions:
1. This device may not cause harmful interference, and
2. This device must accept any interference received, including interference that may cause undesired operation.
Canada
This digital apparatus does not exceed the Class B limits for radio noise emissions from
digital apparatus as set out in the radio interference regulations of the Canadian
Department of Communications.
Le présent appareil numérique n’émet pas de bruits radioélectriques dépassant les limites
applicables aux appareils numériques de Classe B prescrites dans le règlement sur le
brouillage radioélectrique édicté par le Ministère des Communications du Canada.
European Union
The equipment has been approved in accordance with Council Decision 98/482/EC for
pan-European single terminal connection to the public switched telephone network
(PSTN). However, due to differences between the individual PSTNs provided in different
countries, the approval does not, of itself, give an unconditional assurance of successful
operation on every PSTN network termination point.
In event of problems, you should contact your equipment supplier in the first instance.
Startup Guide 69
Page 70
Specifications and Regulatory Information
Regulatory Information
This equipment has been designed to work in all of the countries of the European
Economic Area (Public Switched Telephone Networks). Network compatibility is
dependent on internal software settings. Contact your equipment supplier if it is
necessary to use the equipment on a different telephone network. For further product
support, contact Hewlett-Packard—see “To contact the HP Customer Care Center” on
page 54.
Japan
Japan Telecommunications Approval
JATE approval number: A00-0143JP, A99-0700JP
Name of Equipment: T18M038.00, 3CN3AX556
Russia
Продукт сертифицирован в системе ГОСТ Р
Модем сертифицирован в системе ЭЛЕКТРОСВЯЗЬ
70 Startup Guide
Page 71
Specifications and Regulatory Information
Regulatory Information
International
Products sold internationally by Hewlett-Packard and its authorized dealers meet the
specifications listed below.
Declaration of Conformity (according to ISO/IEC Guide 22 and EN 45014)
Manufacturer’s Name: Hewlett-Packard Company
Manufacturer’s Address:
declares that the following product
Product Name: HP notebook PC
Model Numbers: HP OmniBook 6000 and HP Pavilion N6xxx (x is any digit 0-9)
Product Options: All
conforms to the following product specifications
Safety:
EMC:
Telecom: TBR 21: 1998, EG 201 121: 1998
Supplementary Information:
Corvallis, OR,
October 31, 2000
Hewlett-Packard Company
Mobile Computing Division
19310 Pruneridge Ave.
Cupertino, CA 95014, U.S.A.
IEC 950: 1991 +A1,A2,A3,A4 / EN 60950: 1992 +A1,A2,A3,A4,A11
GB4943-1995
CISPR 22: 1993 +A1,A2 / EN 55022: 1994 +A1,1995 +A2: 1997, Class B [1]
EN 61000-3-2:1995 +A1: 1998 +A2: 1998 / EN 61000-3-3:1995
GB9254-1988, FCC Title 47 CFR, Part 15 Class B/ANSI C63.4: 1992
AS/NZS 3548: 1995 Rules and Regulations of Class B
EN50082-1: 1997
EN 61000-4-2: 1995: 4kV CD, 8kV AD, EN 61000-4-3: 1995: 3V/m
EN 61000-4-4: 1995: 0.5kV Signal Lines, 1kV Power Lines
EN 61000-4-5: 1995, EN 61000-4-6: 1996, EN 61000-4-11: 1994, ENV 50204: 1995
The product herewith complies with the requirements of the Low Voltage Directive 73/23/EEC and the EMC Directive
89/336/EEC, amended by 92/31/EEC & 93/68/EEC, and the R&TTE Directive 1999/5/EC (Annex II) and carries the CE
marking accordingly.
[1] The product was tested in a typical configuration with Hewlett-Packard Personal Computer peripherals.
This device complies with Part 15 of the FCC Rules. Operation is subject to the following two conditions: (1) this device
may not cause harmful interference, and (2) this device must accept any interference received, including interference that
may cause undesired operation.
The HP F1454A and F1781A ac/dc adapter used with this product is designed to operate on all power systems, other than
IT power systems.
European Contact for regulatory topics only: Hewlett Packard GmbH, HQ-TRE, Herrenberger Straße 130, 71034 Boeblingen, Germany. Fax:
+49 7031 143143).
USA Contact: Hewlett Packard Co., Corporate Product Regulations Manager, 3000 Hanover Street, Palo Alto, CA 94304, U.S.A. Phone: +1
(415) 857-1501.
Startup Guide 71
Page 72

Specifications and Regulatory Information
Regulatory Information
72 Startup Guide
Page 73

Index
A
ac adapter
connecting, 18
jack, 11
accessories
plug-in modules, 35
adding RAM, 39
adjusting
brightness, 25
Agaté Tioman hot-swap
installing, 34
using, 35
antistatic precautions, 39
AT commands, See Reference
Guide
audio
connecting devices, See
Reference Guide
audio jacks, 11
audio-off
location, 11
B
battery
installing, 16
low power warning, 31
release latch, 11
safety, 66
saving power, See Reference
Guide
troubleshooting, 46
bay (module), 35
BayManager hot-swap
installing, 34
using, 35
BIOS Setup utility
menus, See Reference Guide
using, 38
boot device order, 23
brightness
adjusting, 25
C
Caps Lock, 11, 15
CD-ROM drive
installing, 35
clicking items, 24
COM1 port, 12, 13
computer
caring for, See Reference Guide
changing BIOS settings, 38
reinstalling Windows, 50
resetting, 23
starting and stopping, 22
testing, 48
turning on, 19
configuring
BIOS settings, 38
connecting
external devices, See Reference
Guide
LAN, See Reference Guide
modem, See Reference Guide
PC Cards, See Reference Guide
plug-in modules, 35
Corporate Evaluator's Guide, 10
cursor (pointer), 24
Customer Care Web site, 10
D
devices, See Reference Guide
temporary boot order, 23
diagnostics
running, 48
DiagTools, 48
display
brightness, 25
connecting external, See
Reference Guide
port, 12, 13
troubleshooting, 44
Display-off
mode, 22
docking, See Reference Guide
docking port, 12, 13
dragging items, 24
drives
creating Hibernate partition, 51
plug-in modules, 35
replacing hard disk, 41
DVD drive
installing, 35
E
ergonomics, 16
external devices
installing, See Reference Guide
external monitor, See Reference
Guide
F
F10 (diagnostics), 48
files
recovering, 50
floppy drive
connecting, 35. See Reference
Guide
Fn key
+ DOWN ARROW (volume), 25
+ F1 (decrease brightness), 25
+ F12 (hibernate), 25
+ F2 (increase brightness), 25
+ F5 (display), 25
+ F7 (mute), 25
+ NumLock (scroll lock), 25
+ UP ARROW (volume), 25
H
hard disk drive
creating Hibernate partition, 51
Hibernate partition, 41
replacing, 41
troubleshooting, 45
hardware specifications, 62
Hewlett-Packard support, 44
hibernate
creating partition, 51
mode, 22
Hibernate mode
status lights, 14, 15
Hibernate partition, 41
hot keys, 25
hot swapping
installing software, 34
swapping modules, 35
HP Customer Care Web site, 10
HP Library, 10
HP Notes, 10
I
infrared port
connecting, See Reference Guide
location, 12, 13
safety, 67
installing
hard disk drive, 41
Startup Guide 73
Page 74

hot-swap software, 34
plug-in modules, 35
RAM, 39
installing original software, 50
instant-on, 22
inventory, 8
K
keyboard
connecting external, See
Reference Guide
ergonomic precautions, 16
opening, 39
status lights, 11, 15
troubleshooting, 45
Keypad Lock, 11, 15
L
LAN
connecting to, See Reference
Guide
laser safety, 67
Library (HP), 10
license agreement, 3
lights (status), 11, 14, 15
LPT1 port, 12, 13
M
memory
adding, 39
microphone
location, 11
Mini-PCI, 12
modem
connecting, See Reference Guide
modes
power, 22
module bay, 35
modules (plug-in), 35
monitor
port, 12, 13
mouse
connecting, See Reference Guide
troubleshooting, 45
mute, 11
N
Notebook
Web sites, 10
Num Lock, 11, 15
O
off
button location, 11
status lights, 14, 15
turning off, 22
on
button location, 11
turning on, 22
P
parallel port
floppy connection, See Reference
Guide
location, 12, 13
PC Cards
installing, See Reference Guide
slots for, 11
plug requirements, 65
plug-in modules
swapping, 35
pointing devices
location, 11
pointing stick
configuring, See Reference Guide
location, 11
troubleshooting, 45
using, 24
port locations, 12, 13
power
connecting ac, 18
modes, 22
saving, See Reference Guide
troubleshooting, 46
power button
location, 11
resetting with, 23
turning on and off, 22
power cords, 65
R
RAM
adding, 39
rebooting
after shutdown, 22
temporary boot device, 23
recovering original software, 50
Recovery CD
using, 50
regulatory information, 68
removing
hard disk drive, 41
repair
obtaining, 57
shipment, 57
repair service, 44, 57
resetting, 23
S
safety
battery use, 66
infrared port, 67
laser, 67
power cords, 65
Scroll Lock, 11, 15
selecting items, 24
serial port
location, 12, 13
service (repair), 44
setting up, 16
sleep button
location, 11
using, 19
software, 8, 9
license, 3
speakers
location, 11
specifications
hardware, 62
Standby
mode, 22
Standby mode
status lights, 14, 15
starting computer, 22
startup
troubleshooting, 47
static electricity, 39
status lights
keyboard, 11, 15
location, 11
meanings, 14, 15
stopping computer, 22
Support Ticket, 48
swapping modules, 35
system-off switch
resetting, 23
T
temperature
limits, 64
testing the computer, 48
touch pad
configuring, See Reference Guide
location, 11
troubleshooting, 45
using, 24
troubleshooting
battery, 46
display, 44
hard disk drive, 45
keyboard, 45
74 Startup Guide
Page 75

pointing devices, 45
power, 46
startup, 47
turning off
computer, 22
turning on, 19
U
URLs, 10
USB
connecting, See Reference Guide
V
VGA output, 12, 13
voltage requirements, 65
volume control
location, 11
W
warranty
repair, 57
Web sites, 10
Windows
documentation, 10
reinstalling, 50
setting up, 20
Startup Guide 75
 Loading...