

Page 1

HP Notebook PC
Reference Guide
Page 2

Notice
This manual and any examples contained herein are provided “as is” and are subject to
change without notice. Hewlett-Packard Company makes no warranty of any kind with
regard to this manual, including, but not limited to, the implied warranties of
merchantability and fitness for a particular purpose. Hewlett-Packard Co. shall not be
liable for any errors or for incidental or consequential damages in connection with the
furnishing, performance, or use of this manual or the examples herein.
Consumer transactions in Australia and the United Kingdom: The above disclaimers and
limitations shall not apply to Consumer transactions in Australia and the United Kingdom
and shall not affect the statutory rights of Consumers.
© Copyright Hewlett-Packard Company 2000. All rights reserved. Reproduction,
adaptation, or translation of this manual is prohibited without prior written permission of
Hewlett-Packard Company, except as allowed under the copyright laws.
The programs that control this product are copyrighted and all rights are reserved.
Reproduction, adaptation, or translation of those programs without prior written
permission of Hewlett-Packard Co. is also prohibited.
Portions of the programs that control this product may also be copyrighted by Microsoft
Corporation, Phoenix Technologies, Ltd., ESS, S3 Incorporated, Accton, and Adobe
Systems Incorporated. See the individual programs for additional copyright notices.
Microsoft, MS, MS-DOS, and Windows are registered trademarks of Microsoft
Corporation. Pentium and the Intel Inside logo are U.S. registered trademarks and MMX
is a U.S. trademark of Intel Corporation. Adobe and Acrobat are trademarks of Adobe
Systems Incorporated.
Hewlett-Packard Company
Mobile Computing Division
19310 Pruneridge Ave.
Cupertino, CA 95014, U.S.A.
2 Reference Guide
Page 3

HP Software Product License Agreement
Your notebook PC contains factory-installed software programs. Please read the Software
License Agreement before proceeding.
Carefully read this License Agreement before proceeding to operate this equipment.
Rights in the software are offered only on the condition that the customer agrees to
all terms and conditions of the License Agreement. Proceeding to operate the
equipment indicates your acceptance of these terms and conditions. If you do not
agree with the terms of the License Agreement, you must now either remove the
software from your hard disk drive and destroy the Recovery CD, or return the
complete computer and software for a full refund.
Proceeding with configuration signifies your acceptance of the License Terms.
Unless otherwise stated below, this HP Software Product License Agreement shall
govern the use of all software that is provided to you, the customer, as part of the
HP computer product. It shall supersede any non-HP software license terms that
may be found online, or in any documentation or other materials contained in the
computer product packaging.
Note: Operating System Software by Microsoft is licensed to you under the Microsoft
End User License Agreement (EULA).
The following License Terms govern the use of the software:
Use. Customer may use the software on any one computer. Customer may not network the
software or otherwise use it on more than one computer. Customer may not reverse
assemble or decompile the software unless authorized by law.
Copies and Adaptations. Customer may make copies or adaptations of the software (a)
for archival purposes or (b) when copying or adaptation is an essential step in the use of
the software with a computer so long as the copies and adaptations are used in no other
manner.
Ownership. Customer agrees that he/she does not have any title or ownership of the
software, other than ownership of the physical media. Customer acknowledges and agrees
that the software is copyrighted and protected under the copyright laws. Customer
acknowledges and agrees that the software may have been developed by a third party
software supplier named in the copyright notices included with the software, who shall be
authorized to hold the Customer responsible for any copyright infringement or violation
of this Agreement.
Product Recovery CD-ROM. If your computer was shipped with a product recovery
CD-ROM: (i) The product recovery CD-ROM and/or support utility software may be
used only for restoring the hard disk of the HP computer with which the product recovery
CD-ROM was originally provided. (ii) The use of any operating system software by
Reference Guide 3
Page 4

Microsoft contained in any such product recovery CD-ROM shall be governed by the
Microsoft End User License Agreement (EULA).
Transfer of Rights in Software. Customer may transfer rights in the software to a third
party only as part of the transfer of all rights and only if Customer obtains the prior
agreement of the third party to be bound by the terms of this License Agreement. Upon
such a transfer, Customer agrees that his/her rights in the software are terminated and that
he/she will either destroy his/her copies and adaptations or deliver them to the third party.
Sublicensing and Distribution. Customer may not lease, sublicense the software, or
distribute copies or adaptations of the software to the public in physical media or by
telecommunication without the prior written consent of Hewlett-Packard.
Termination. Hewlett-Packard may terminate this software license for failure to comply
with any of these terms provided Hewlett-Packard has requested Customer to cure the
failure and Customer has failed to do so within thirty (30) days of such notice.
Updates And Upgrades. Customer agrees that the software does not include updates and
upgrades which may be available from Hewlett-Packard under a separate support
agreement.
Export Clause. Customer agrees not to export or re-export the software or any copy or
adaptation in violation of the U.S. Export Administration regulations or other applicable
regulation.
U.S. Government Restricted Rights. Use, duplication, or disclosure by the U.S.
Government is subject to restrictions as set forth in subparagraph (c)(1)(ii) of the Rights
in Technical Data and Computer Software clause in DFARS 252.227-7013. HewlettPackard Company, 3000 Hanover Street, Palo Alto, CA 94304, U.S.A. Rights for nonDOD U.S. Government Departments and Agencies are as set forth in FAR 52.22719(c)(1,2).
Edition History
Edition 2........................................... October 2000
This manual is printed on recycled paper.
4 Reference Guide
Page 5

Contents
Introducing Your Computer ............................................................................................9
Taking Inventory .........................................................................................................10
Software bundled on your computer......................................................................10
To buy accessories.................................................................................................10
To find more information ......................................................................................11
Identifying Parts of the Notebook ...............................................................................12
Top and right side view .........................................................................................12
Front view..............................................................................................................13
Rear and left side view...........................................................................................14
Bottom view ..........................................................................................................15
Status lights............................................................................................................16
Status panel............................................................................................................17
Power switch and standby button...........................................................................17
Setting Up the Computer .............................................................................................19
To install the battery ..............................................................................................19
To connect AC power............................................................................................19
To connect a phone line.........................................................................................20
To turn on the computer ........................................................................................21
To set up Windows................................................................................................21
To register your computer .....................................................................................22
To connect to an Internet Service Provider ...........................................................23
To reset your computer..........................................................................................24
Using Your Computer.....................................................................................................27
Operating the Computer ..............................................................................................28
To use the Fn hot keys ...........................................................................................28
To use the Windows and Applications keys ..........................................................29
To use the embedded keypad.................................................................................29
To use the ALT GR key.........................................................................................30
To adjust the display brightness.............................................................................30
To adjust the volume .............................................................................................31
To use the touch pad..............................................................................................32
To use the One-Touch buttons...............................................................................33
To insert or remove a CD or DVD ........................................................................35
To use your DVD drive .........................................................................................36
To use your CD-RW drive.....................................................................................36
To use your CD-RW/DVD drive ...........................................................................37
Securing the Computer ................................................................................................38
To set up password protection ...............................................................................38
To attach a security cable ......................................................................................40
To use virus-protection software ...........................................................................41
Reference Guide 5
Page 6

Working in Comfort with a Notebook PC...................................................................42
Caring for Your Computer ..........................................................................................44
To protect your hard disk drive .............................................................................44
To take care of your computer...............................................................................44
To safeguard your data ..........................................................................................45
To extend the life of the display ............................................................................45
To get the most from your batteries.......................................................................46
To clean your computer.........................................................................................46
Traveling with Your Computer .....................................................................................47
Managing Power Consumption ...................................................................................48
To use automated power management...................................................................48
To use manual power management........................................................................50
Using Battery Power....................................................................................................53
To check the battery status.....................................................................................53
To respond to a low-battery warning .....................................................................54
To optimize battery operating time........................................................................55
To control the processor speed ..............................................................................55
Making Connections .......................................................................................................57
Using the Modem ........................................................................................................58
To connect the modem...........................................................................................58
To connect to the Internet......................................................................................60
To disconnect from the Internet.............................................................................60
To dial in to a network...........................................................................................61
To change your modem settings ............................................................................61
To send and receive e-mail ....................................................................................62
To send and receive faxes (Windows 98 and Windows ME) ................................63
To send and receive faxes (Windows 2000)..........................................................64
Connecting to a LAN...................................................................................................66
Connecting PC Cards ..................................................................................................67
Connecting External Components ...............................................................................69
To identify the ports ..............................................................................................69
To connect a printer (or another parallel device)...................................................71
To connect an external keyboard or PS/2 mouse...................................................72
To connect a USB device ......................................................................................72
To connect audio devices ......................................................................................73
To use infrared devices..........................................................................................73
To use an external monitor ....................................................................................75
To use a TV set as monitor....................................................................................76
To use the port replicator.......................................................................................77
Configuring and Expanding Your Computer...............................................................81
6 Reference Guide
Using the BIOS Setup Utility ......................................................................................82
Page 7

Installing RAM modules .............................................................................................83
Removing RAM modules............................................................................................85
Expanding the hibernate partition................................................................................86
Updating Windows Drivers.........................................................................................87
To download the latest Windows drivers...............................................................87
To locate Windows drivers on your system...........................................................87
To use digitally signed drivers in Windows 98 and Windows ME........................87
Service and Support........................................................................................................89
Hewlett-Packard Limited Warranty Statement ............................................................90
Getting Support for Your HP Notebook PC................................................................92
To use the Reference Guide...................................................................................92
To get help from the HP notebook website............................................................92
To call HP for Service and Support.......................................................................93
Obtaining Repair Service ............................................................................................96
To receive warranty repair service.........................................................................96
To prepare your computer for shipment ................................................................96
Solving Problems with Your Computer ........................................................................99
Troubleshooting Techniques .....................................................................................100
Audio problems ...................................................................................................100
CD-ROM drive problems ....................................................................................100
Display problems.................................................................................................101
DVD problems.....................................................................................................102
Hard disk drive problems.....................................................................................104
Heat problems......................................................................................................105
Keyboard, touch pad, and mouse problems .........................................................105
Memory problems................................................................................................106
Modem problems.................................................................................................106
One-Touch button problems ................................................................................108
PC card problems ................................................................................................109
Performance problems.........................................................................................110
Port replicator problems ......................................................................................110
Power and battery problems ................................................................................111
Printing problems ................................................................................................112
Serial, parallel, and USB problems......................................................................113
Startup problems..................................................................................................114
Standby and resume problems .............................................................................115
Testing Hardware Operation .....................................................................................116
Recovering and Reinstalling Software.......................................................................118
To recover the factory installation of your hard disk...........................................118
To replace a damaged Recovery CD ...................................................................119
To update the HP notebook BIOS .......................................................................119
To recover an application ....................................................................................120
Removing and Reinstalling the Hard Disk Drive ......................................................121
Reference Guide 7
Page 8

If you decide to remove the hard disk drive.........................................................121
To install the hard disk drive again......................................................................123
Specifications and Regulatory Information ................................................................125
Hardware and Software Specifications......................................................................126
BIOS Setup utility options...................................................................................126
Hardware specifications.......................................................................................130
Software specifications........................................................................................133
Software system resources...................................................................................134
Modem Reference Information..................................................................................136
AT Commands (Ambit) .......................................................................................136
S-Registers (Ambit) .............................................................................................141
Selected Result Codes (Ambit)............................................................................142
Safety Information.....................................................................................................143
Power Cords ........................................................................................................143
Battery Safety ......................................................................................................144
Laser Safety .........................................................................................................145
LED Safety ..........................................................................................................145
Regulatory Information .............................................................................................146
U.S.A. ..................................................................................................................146
Canada .................................................................................................................147
European Union...................................................................................................147
Japan....................................................................................................................148
Russia ..................................................................................................................148
International.........................................................................................................148
Index...............................................................................................................................151
8 Reference Guide
Page 9

Introducing Your Computer
Reference Guide 9
Page 10

Introducing Your Computer
Taking Inventory
Taking Inventory
Your HP notebook PC is shipped with these items:
= battery
= AC adapter and power cord
= Quick Start sheet
= HP notebook PC Startup Guide
= Recovery CD (or CDs), used to restore Windows and all software included with your
computer
= Microsoft Windows manual (Windows 98, Windows Millennium Edition [ME] or
Windows 2000)
= telephone cord (if your computer has a built-in modem)
Software bundled on your computer
Your HP notebook PC comes with preinstalled software, and various models are
configured with different combinations of software. To see the list of software included
with your computer, check HP Notes in the HP Library: click Start, Programs,
HP Library, HP Notes—or double-click the HP Notes icon on the desktop.
For Windows ME, click Start, Help, Your HP Notebook, HP Notes.
To buy accessories
You can buy accessories for your computer online. For the latest accessories and options,
visit us at www.hp.com/notebooks. As new accessories become available, you'll find them
listed here.
Some of the HP notebook accessories and replacement modules offered are:
= port replicator (on selected models)
= auto/airline adapter
10 Reference Guide
Page 11

Introducing Your Computer
Taking Inventory
= AC adapter
= ultraslim AC adapter
= primary lithium ion battery
= PS/2 Y adapter for mouse and keyboard
= additional RAM—HP SDRAM:
= 64 MB
= 128 MB
To find more information
Here are some sources of information about your HP notebook PC.
Source Description
Quick Start sheet
Startup Guide
HP Notes
Introductory Microsoft
manual for Windows
Windows Help
HP notebook PC website
This pictorial introduction shows you how to get the computer up and
running quickly.
The Startup Guide is the printed HP manual that came with your
computer. It shows how to set up and operate your computer and where
to go for help if you run into trouble.
This document contains late-breaking information available after the
Reference Guide was completed (Start, Programs, HP Library,
HP Notes—or double-click the HP Notes icon on the desktop).
For Windows ME: Click Start, Help, Your HP Notebook, HP Notes.
This manual contains information about using the standard features of
Microsoft Windows (Windows 98, Windows ME or Windows 2000,
depending on which operating system your computer is shipped with).
Click Start, Help.
www.hp.com/notebooks
Reference Guide 11
Page 12
Introducing Your Computer
Identifying Parts of the Notebook
Identifying Parts of the Notebook
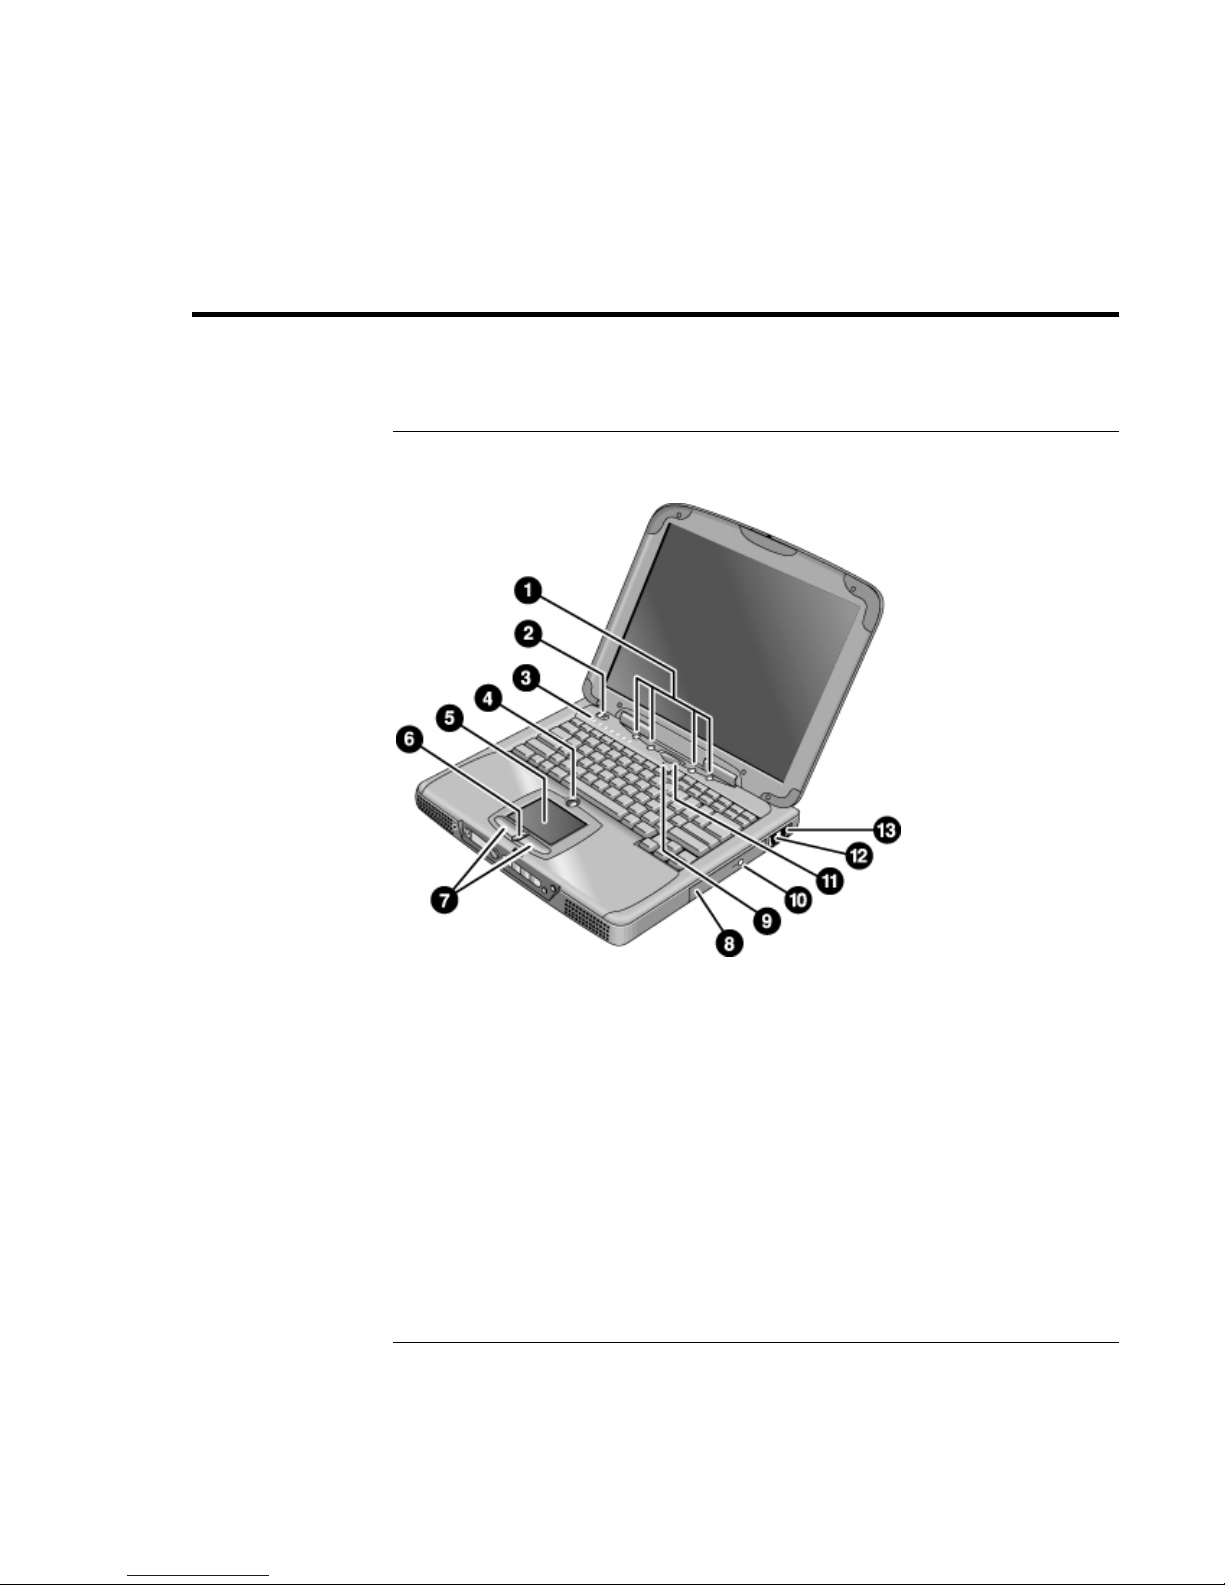
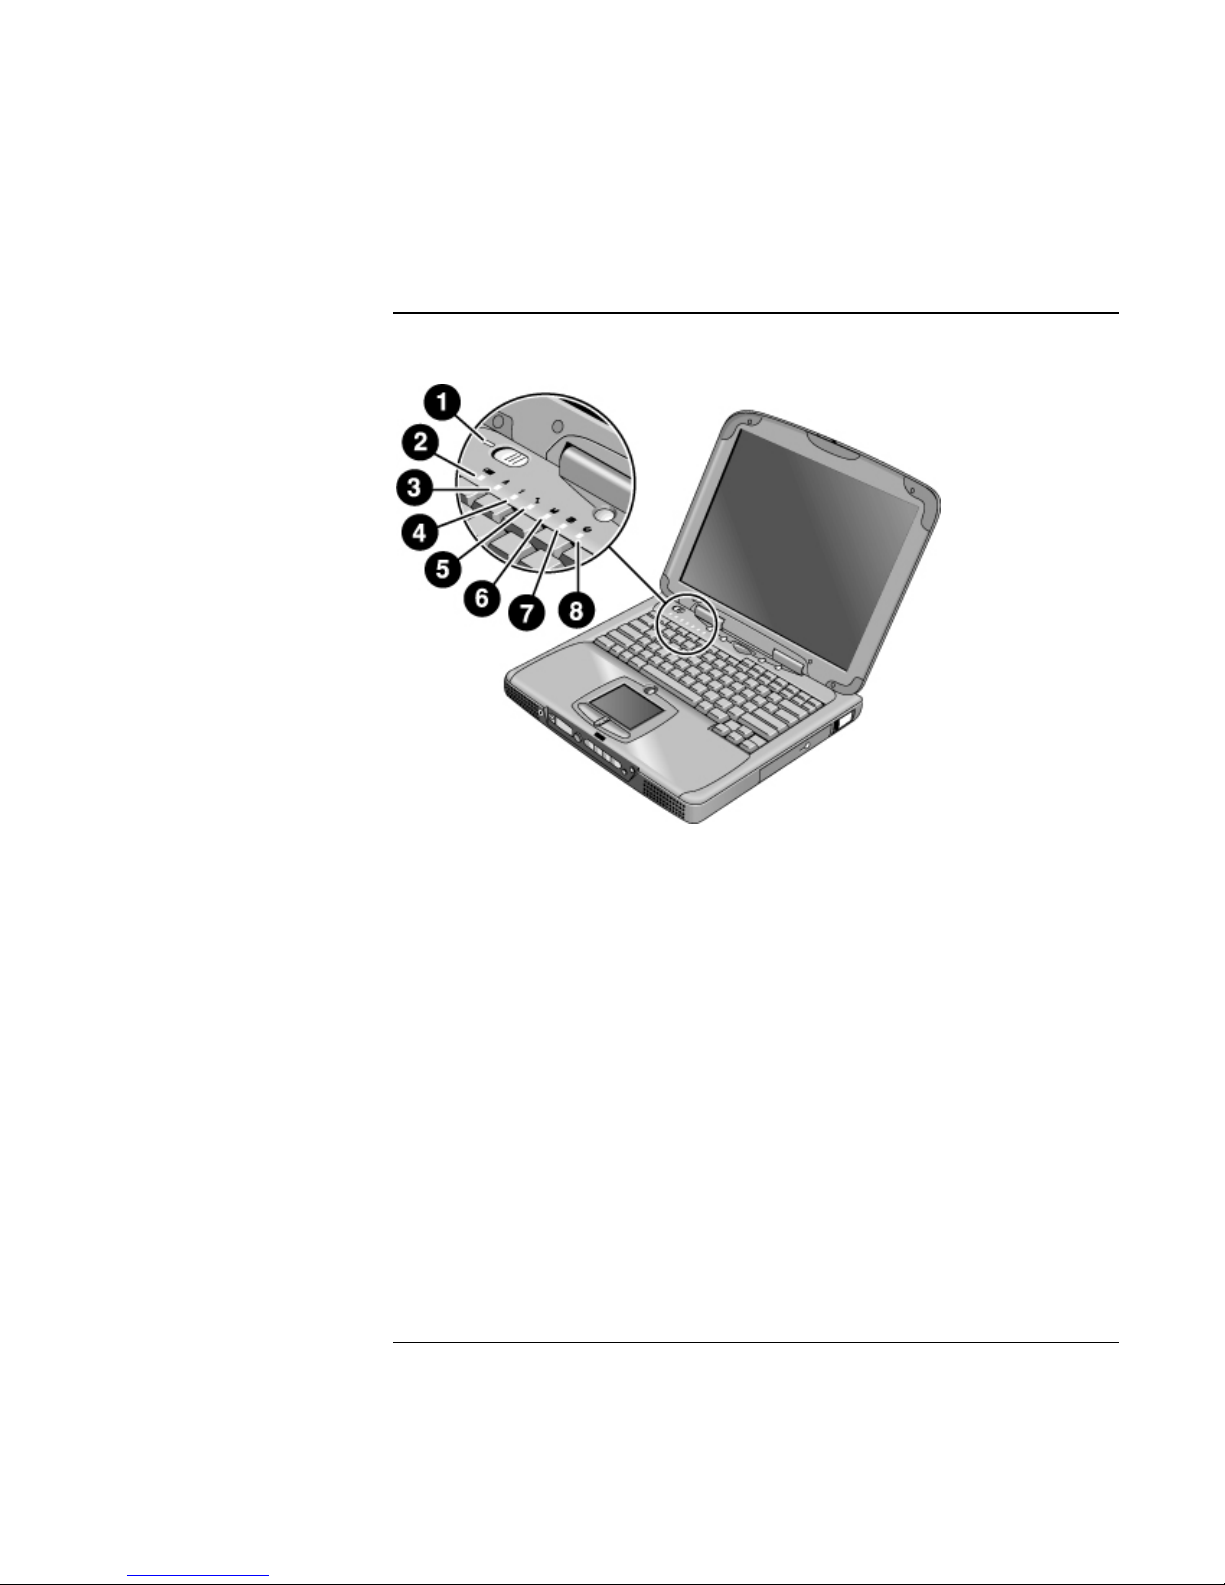
Top and right side view
1 One-Touch buttons 8 CD-ROM drive or DVD
2 Power switch 9 Microphone
3 Status lights (see “Status lights” on page 16) 10 CD-ROM or DVD eject button
4 Pad Lock touch pad on/off button 11 Blue standby button
5 Touch pad (pointing device) 12
6 Scroll up/down toggle 13
7 Click buttons
12 Reference Guide
Modem port (on selected models)
LAN port (on selected models)
Page 13
Introducing Your Computer
Identifying Parts of the Notebook
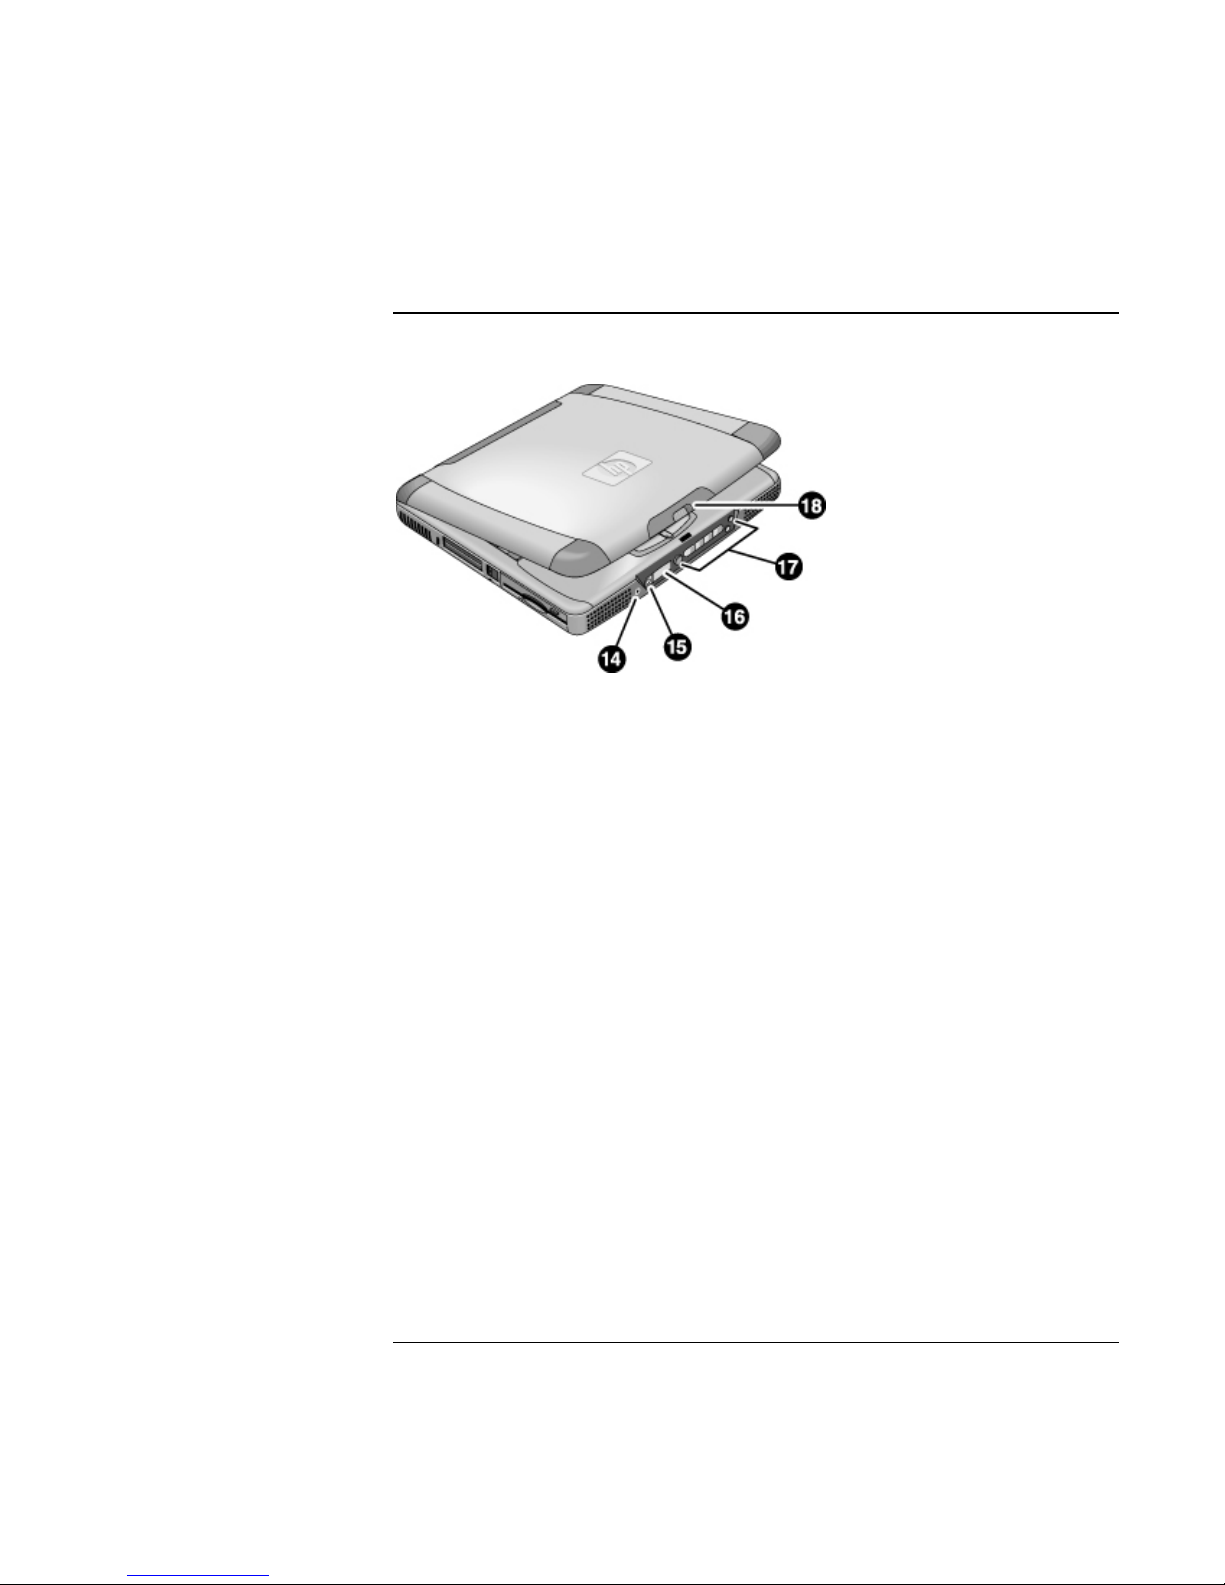
Front view
14 Headphone audio jack
15
Status panel mode select button (on selected models)
16
Status panel (on selected models)
17
Multimedia buttons (on selected models)
18 Latch (to open computer)
Reference Guide 13
Page 14
Introducing Your Computer
Identifying Parts of the Notebook
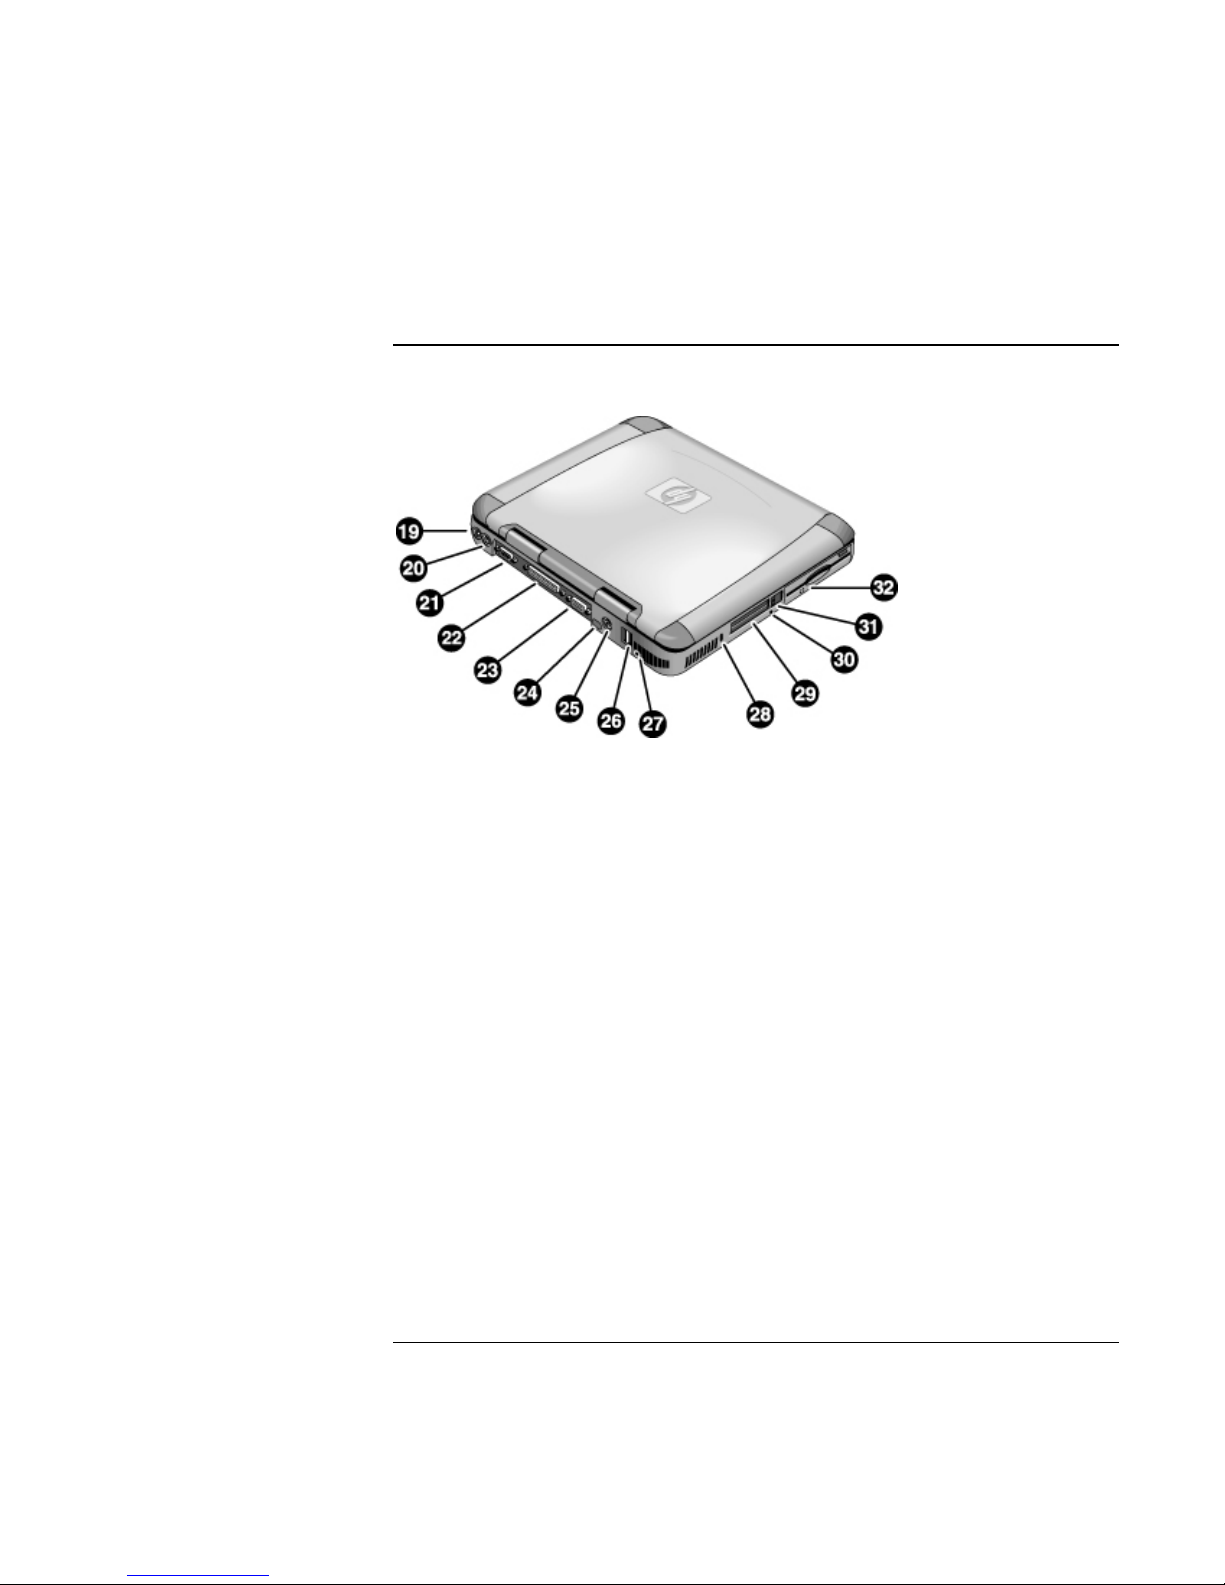
Rear and left side view
19 AC adapter (power) jack 26 USB ports
20 PS/2 port (external mouse or keyboard) 27 Microphone jack
21 Serial port 28 Kensington lock slot (security connector)
22 Parallel port 29 PC card slots
23 VGA port (external monitor) 30 System-off button (for resetting computer)
24
Infrared port (on selected models)
25 TV output port 32 Floppy disk drive
31 PC card eject buttons
14 Reference Guide
Page 15
Introducing Your Computer
Identifying Parts of the Notebook
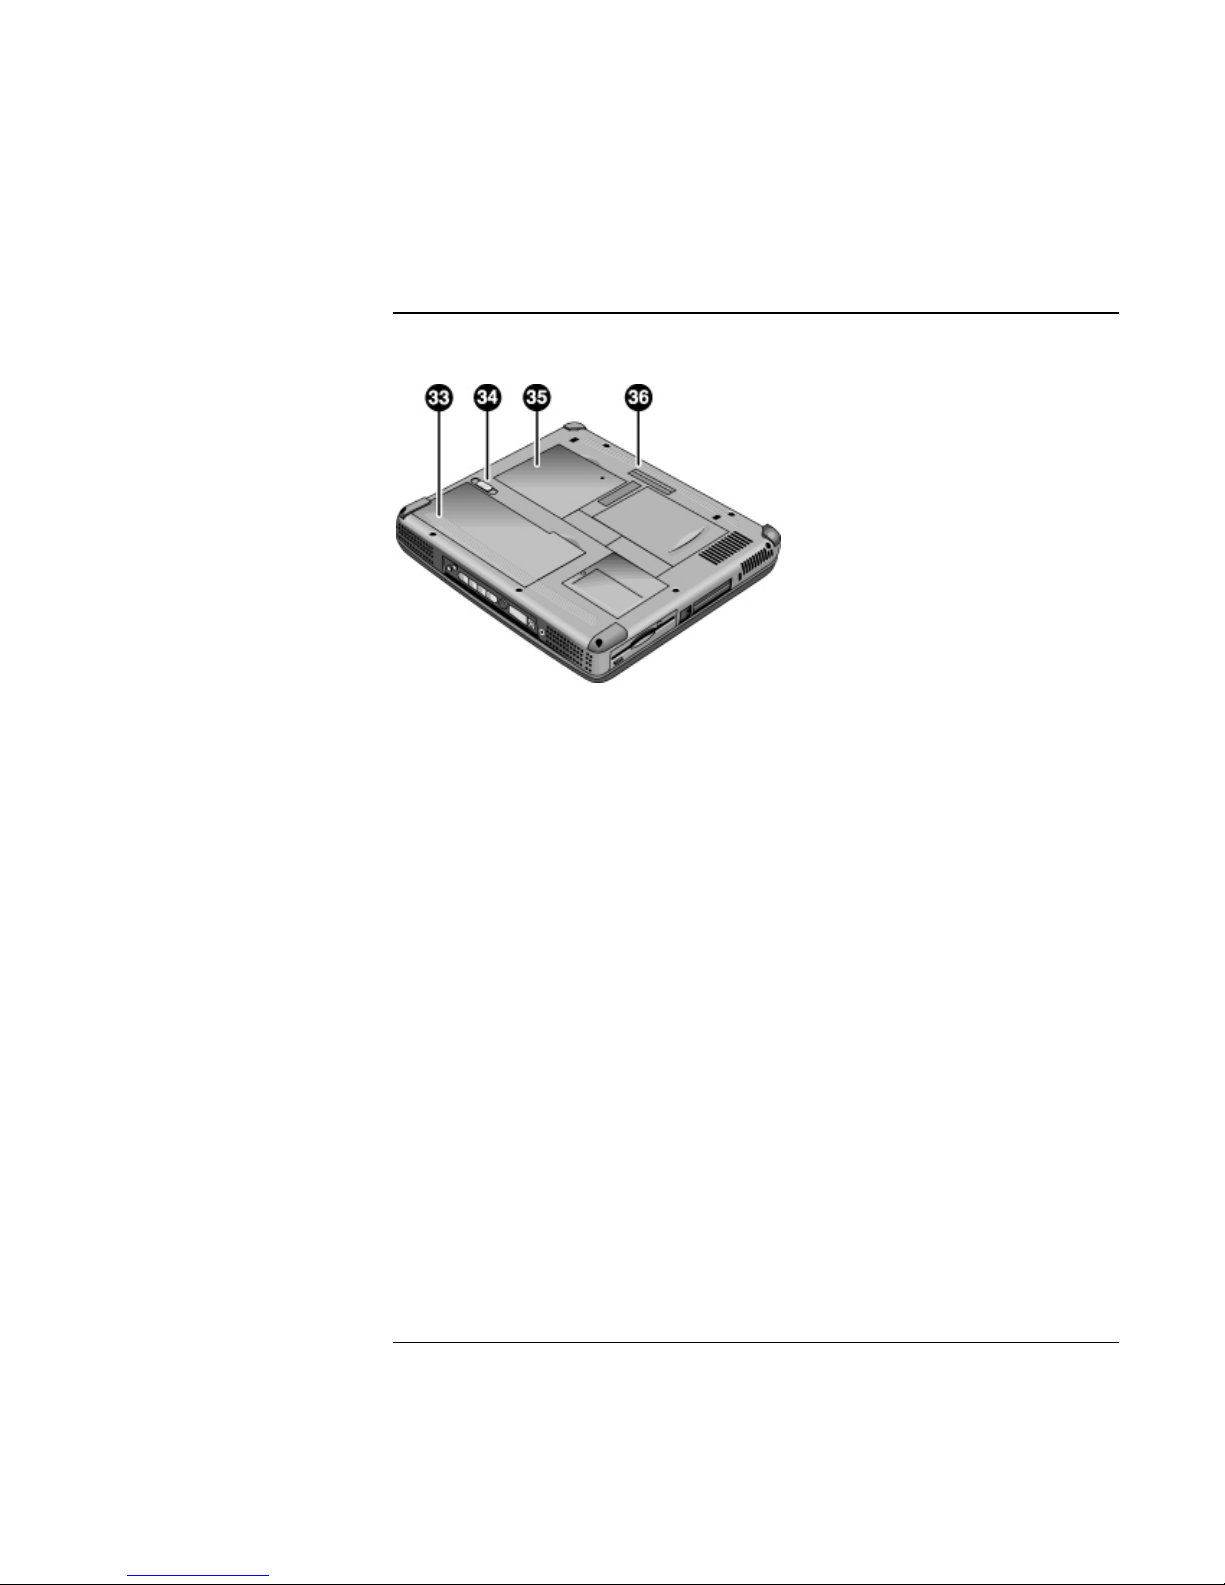
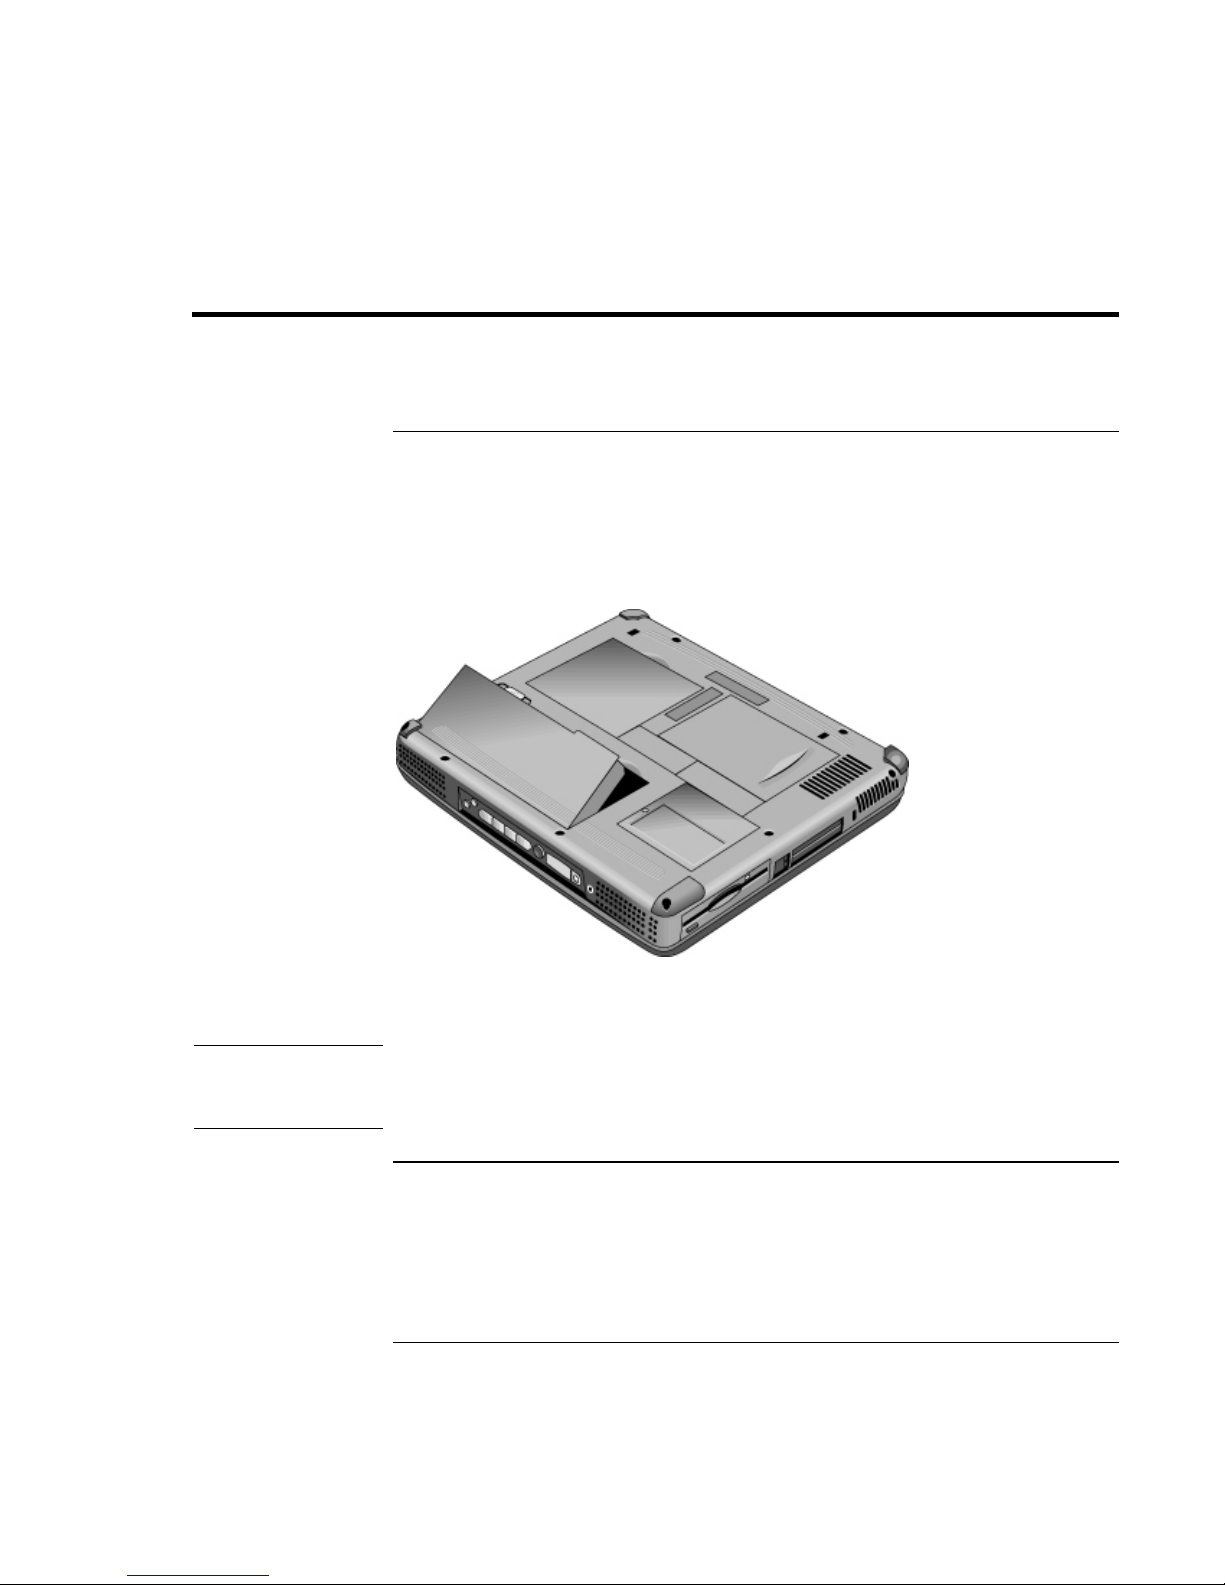
Bottom view
33 Battery
34 Battery latch
35 RAM expansion cover
36
Port replicator (docking) connector (on selected
models)
Reference Guide 15
Page 16
Introducing Your Computer
Identifying Parts of the Notebook
Status lights
1 Power
2 Battery
3 Caps lock (capital letters)
4 Num lock (numeric keypad)
5 Scroll lock
6 Floppy disk drive access
7 Hard disk drive access
8 CD-ROM drive or DVD access
16 Reference Guide
Page 17

Introducing Your Computer
Identifying Parts of the Notebook
Status panel
(Provided for selected models.) The status panel on the front of the computer provides
information about CD playback status, system power management, system date and time,
and battery status. Messages are displayed on the 8-character LCD display, and you can
switch from one kind of message to another by pressing the mode button to the left of the
display.
When the computer is on (or when the computer is off and the AC adapter is plugged in),
these modes are displayed sequentially as you press the mode button:
= power management status: on, off, standby (STBY), or hibernate (ZZZZ)
= battery charging status: percentage charged
= date
= time
When the CD player is on and the computer is off, the CD playback mode is displayed. It
shows the CD track number, the time elapsed, and an arrow when the CD is playing or
two parallel lines when it is paused—and when you press the mode button, you can also
display sequentially the four modes listed above.
When the computer is off, the CD player is off, and the AC adapter is not connected, you
can view the status panel by sliding the multimedia power switch to the left to turn it on.
Remember to turn it off when you are through checking the status panel.
If you change the Windows time or date (from Control Panel or the taskbar), the change
displays on the status panel only after you shut down and restart the computer. Click Start,
Shut Down; and after the power is off, slide the power switch to restart.
If you want to change the format displayed for date or time in the status panel, change it
in the BIOS; see “Using the BIOS Setup Utility” on page 82.
Power switch and standby button
There are two controls above the keyboard that affect power in the HP notebook PC. The
switch at the top left turns computer power on and off, and the large blue button in the top
center puts the system in standby mode—or, if it is already in standby mode, returns it to
normal operation.
Reference Guide 17
Page 18

Introducing Your Computer
Identifying Parts of the Notebook
To use the power switch
To turn on the computer when it is off, slide the power switch to the left and release it. If
the computer is plugged into AC power or contains a charged battery, the system turns on
and Windows starts automatically.
When the computer is on, you can also use the power switch to turn the system off. In
most situations, however, it is preferable to shut down Windows instead. Click Start, Shut
Down, then select Shut down and click OK. Windows will shut down, and the computer
will automatically turn off.
To use the standby button
You can use the standby button to save the current state of your computer and then to
return quickly to the same state when you are ready to resume work.
To put the computer in standby mode when it is on, press the large blue standby button,
which is found in the middle of the four smaller One-Touch buttons above the center of
the keyboard. Pressing the standby button turns off the display and the hard disk drive,
and it saves your current session to RAM. (Standby can also occur automatically when the
timeout setting in the Power Management Properties is reached.)
Hint
To return the computer to normal operation when it is in standby mode, press the standby
button again. The display and the hard disk drive will turn on, and the session you were
working on earlier will be recovered from RAM.
If your notebook does not turn on when operating on battery power, the battery may not
be sufficiently charged. Plug in the AC adapter and slide the power switch to the left and
release it. Keep the adapter plugged in until your battery is charged again.
18 Reference Guide
Page 19
Introducing Your Computer
Setting Up the Computer
Setting Up the Computer
To install the battery
Your computer is shipped with the battery installed. If the battery has been removed, you
can install it by inserting it into the battery bay on the bottom of your computer. Insert the
back edge first, as shown, then press down the front edge until the battery latch clicks
shut.
WARNING
Once you have installed the battery, connect the AC adapter to the computer and recharge
the battery while you work. You can also replace a low battery with another that is more
fully charged.
Do not mutilate, puncture, or dispose of batteries in fire. A battery can burst or
explode, releasing hazardous chemicals. A rechargeable battery must be recycled
or disposed of properly.
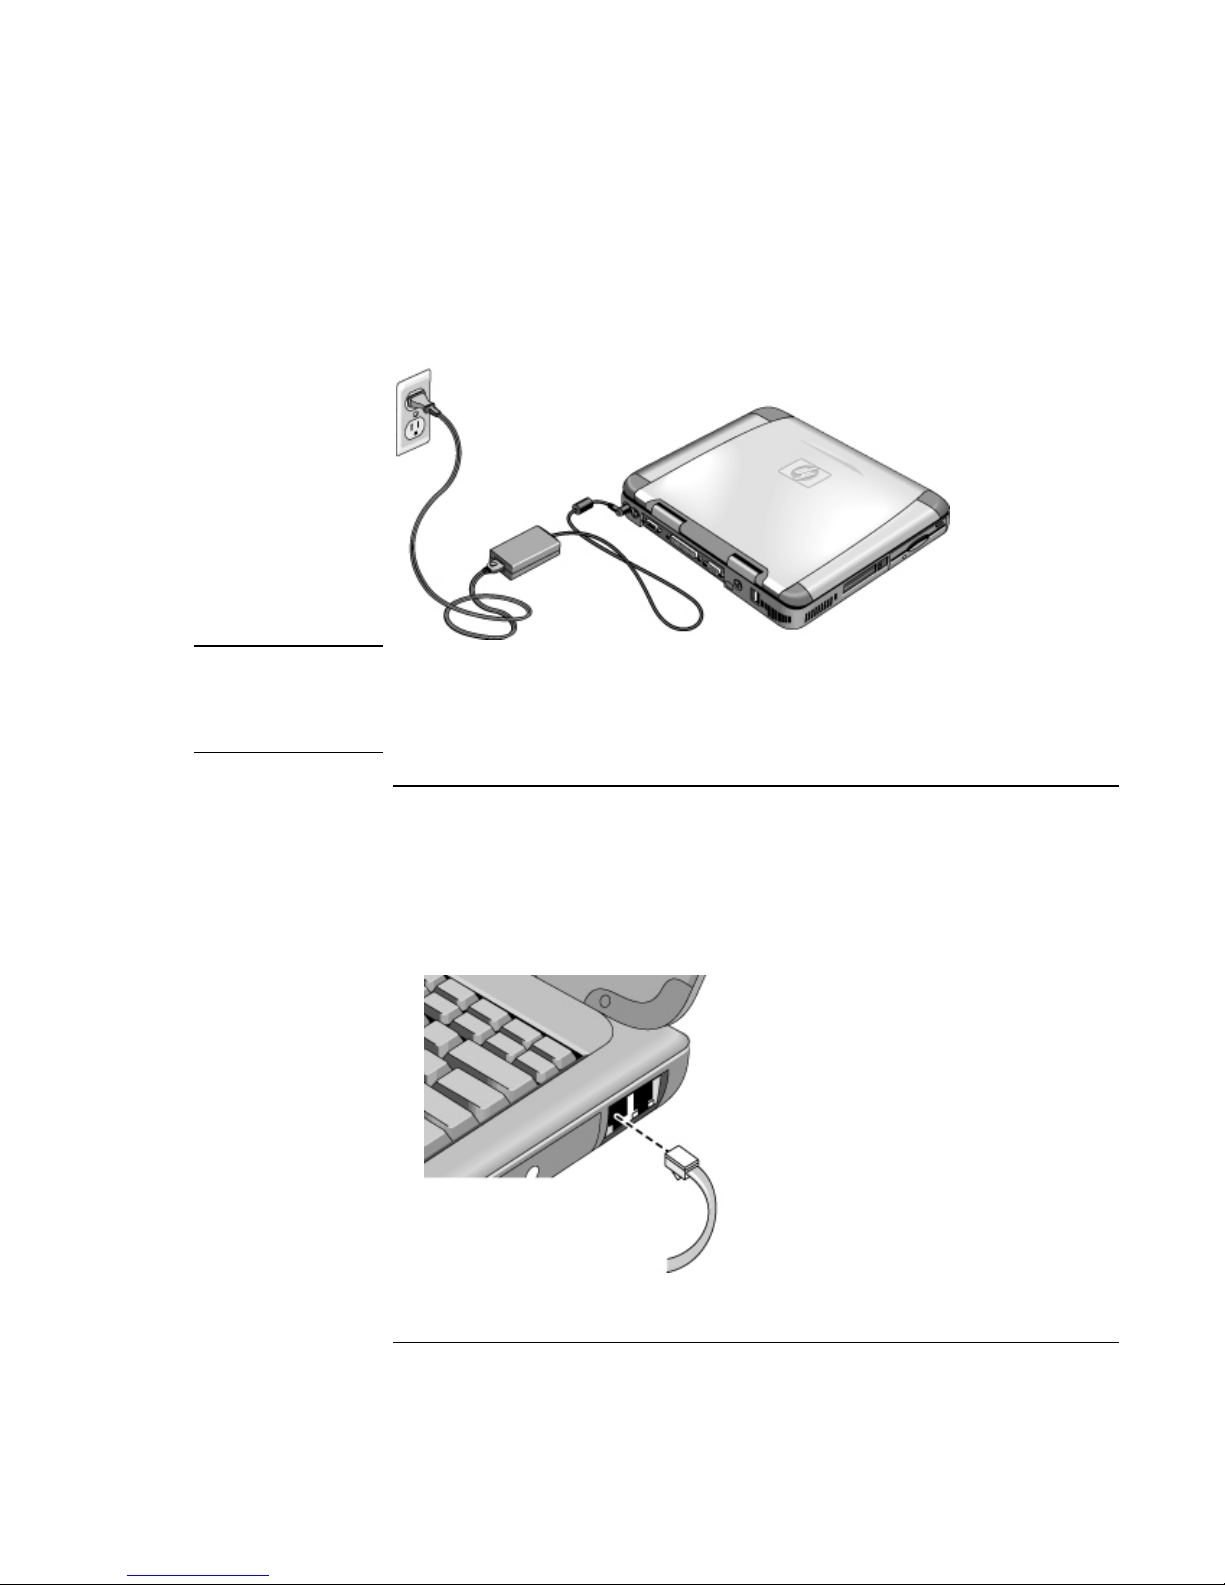
To connect AC power
Plug in the AC adapter, then connect the AC adapter to the rear of the computer. The
battery starts charging.
Reference Guide 19
Page 20
CAUTION
Introducing Your Computer
Setting Up the Computer
Use only an HP AC adapter intended for this product, either the adapter that came
with the computer or another authorized HP adapter. Using an unauthorized AC
adapter can damage the computer and may void your warranty. Refer to the
warranty statement for your product.
To connect a phone line
Selected models of the HP notebook PC include a built-in modem. If you prefer, you can
instead use a PC card modem or an external modem to connect a phone line.
1. Plug one end of the phone line into the modem phone jack on the computer. Be sure it
clicks into place.
20 Reference Guide
Page 21

CAUTION
Introducing Your Computer
Setting Up the Computer
2. Plug the other end of the phone line into a telephone jack. (If the phone line does not
fit your telephone jack, you may need to use an adapter.)
Your built-in modem may not work with multiple phone lines or a private branch
exchange (PBX), cannot be connected to a coin-operated telephone, and does not
work with party lines. Some of these connections may result in excess electrical
voltage and could cause a malfunction in the internal modem. Check your
telephone line type prior to connecting your phone line.
To turn on the computer
Slide the power switch to the left—it’s the control above the left side of the keyboard.
Windows starts automatically. If you are turning on the computer for the first time, go to
“To set up Windows” on page 21.
The power status light next to the power switch (see “Status lights” on page 16) reports
the following:
= steady green light: computer is on
Hint
= steady amber light: computer is in system standby (or suspend) mode
= no light: computer is off or in hibernate mode
See “Managing Power Consumption” on page 48 for additional information about turning
off your computer.
If your computer does not turn on when operating on battery power, the battery may be
out of power. Plug in the AC adapter and slide the power switch to the left again.
To set up Windows
Your HP notebook has Microsoft Windows—either Windows 98, Windows ME or
Windows 2000—preinstalled on the hard disk drive. The first time you turn on your
computer, a Windows Setup program will automatically run so that you can customize
your setup.
Before you begin, connect the AC adapter to your notebook, since your battery may not
be sufficiently charged to complete the Windows setup. Also, be sure to connect the
notebook to a phone line; see “To connect a phone line” on page 20.
1. Slide the power switch to the left.
Reference Guide 21
Page 22

Note
Introducing Your Computer
Setting Up the Computer
2. The Windows Setup program starts automatically.
3. Follow the instructions as they appear on the screen.
During setup, you are prompted to:
= enter a user name
= accept the License Agreement
You can also register your computer at this time. Follow the instructions on the screen
during setup, or—if registration does not occur during setup—double-click the HP
Notebook Registration icon on the desktop.
You may be required to enter your Windows ID number. To locate it, look on the
Certificate of Authenticity packaged with the Microsoft Windows manual or look for a
sticker in the battery compartment.
If you have any connection problems with your modem, try redialing. If that doesn’t
work, you can skip registration for now.
To register your computer
Be sure to register your computer. Registering is free and fast, and it ensures you will
receive quicker, more personalized support. The information you provide during
registration will be used to provide you with better products and services.
There are three ways to register:
= by modem
= by phone
= by fax
By modem
If you have Windows 98 or Windows ME, you are prompted automatically to register. To
register by modem, see that the phone is connected, then follow the onscreen instructions.
If you have Windows 2000, you are not prompted to register, but you can register by
modem if you double-click the HP Notebook Registration icon on the desktop or click the
Register link in the Windows 2000 welcome screen. See that the phone line is connected
and follow the onscreen instructions.
22 Reference Guide
Page 23

Note
Note
Introducing Your Computer
Setting Up the Computer
If you choose not to register right away, you can register by modem later by doubleclicking the Registration icon on the desktop. This icon disappears after you register.
In Windows 2000, if the registration application is launched from a reminder (e.g., from
the Microsoft Task Scheduler), it may fail to find a phone number for your country. In
this case, double-click the HP Notebook Registration icon on the desktop and the
application will succeed in finding a phone number to register successfully.
If you encounter a busy signal while attempting to register by modem, the registration
client may suspend with an hourglass icon. Click the Back button and dial-out again.
If your computer does not have a built-in modem, you can register after you set up a PC
card modem or an external modem—or you can register by phone or fax.
By phone
You can call your HP Customer Care Center and register by phone. Check “To call HP ”
on page 93 for the phone number.
By fax
If a printer is connected to your computer, you can print a copy of your registration and
fax it to HP. You will find the fax number on the registration form.
By completing registration, you will:
= Record your ownership of the computer with Hewlett-Packard and gain access to
service, support, and information.
= Record your ownership of the Windows operating system with Microsoft. If you have
Windows 2000, please contact Microsoft separately for registration of the operating
system.
To connect to an Internet Service Provider
Before you can connect to the Internet, you need to set up an account with an Internet
Service Provider (ISP). In some countries, Hewlett-Packard provides easy Internet signup
so that you can connect quickly to an ISP.
1. Connect the included telephone cord to your built-in modem. (If your computer does
not have a built-in modem, you can instead use a PC card modem or an external
modem.)
Reference Guide 23
Page 24

Introducing Your Computer
Setting Up the Computer
2. Double-click the desktop icon labeled “Connect to the Internet.” This will launch the
Internet Connection wizard, which will help you locate an ISP in your area.
OR
Click Start, Programs, Online Services and select one of the listed ISPs. This begins
the registration process for the ISP you have chosen.
OR
If available, double-click the desktop icon labeled “HP e-Center” and select “Internet
sign-up”.
OR
If available, double-click the desktop icon labeled “Easy Internet Signup”.
If AOL is your ISP, click Start, Settings, Control Panel, Internet Options and select the
Connections tab. Select either “Dial whenever network connection is not present” or
“Always dial my default connection” in order for HP e-Center to connect to AOL.
You can also make arrangements with an ISP of your choice for Internet connection.
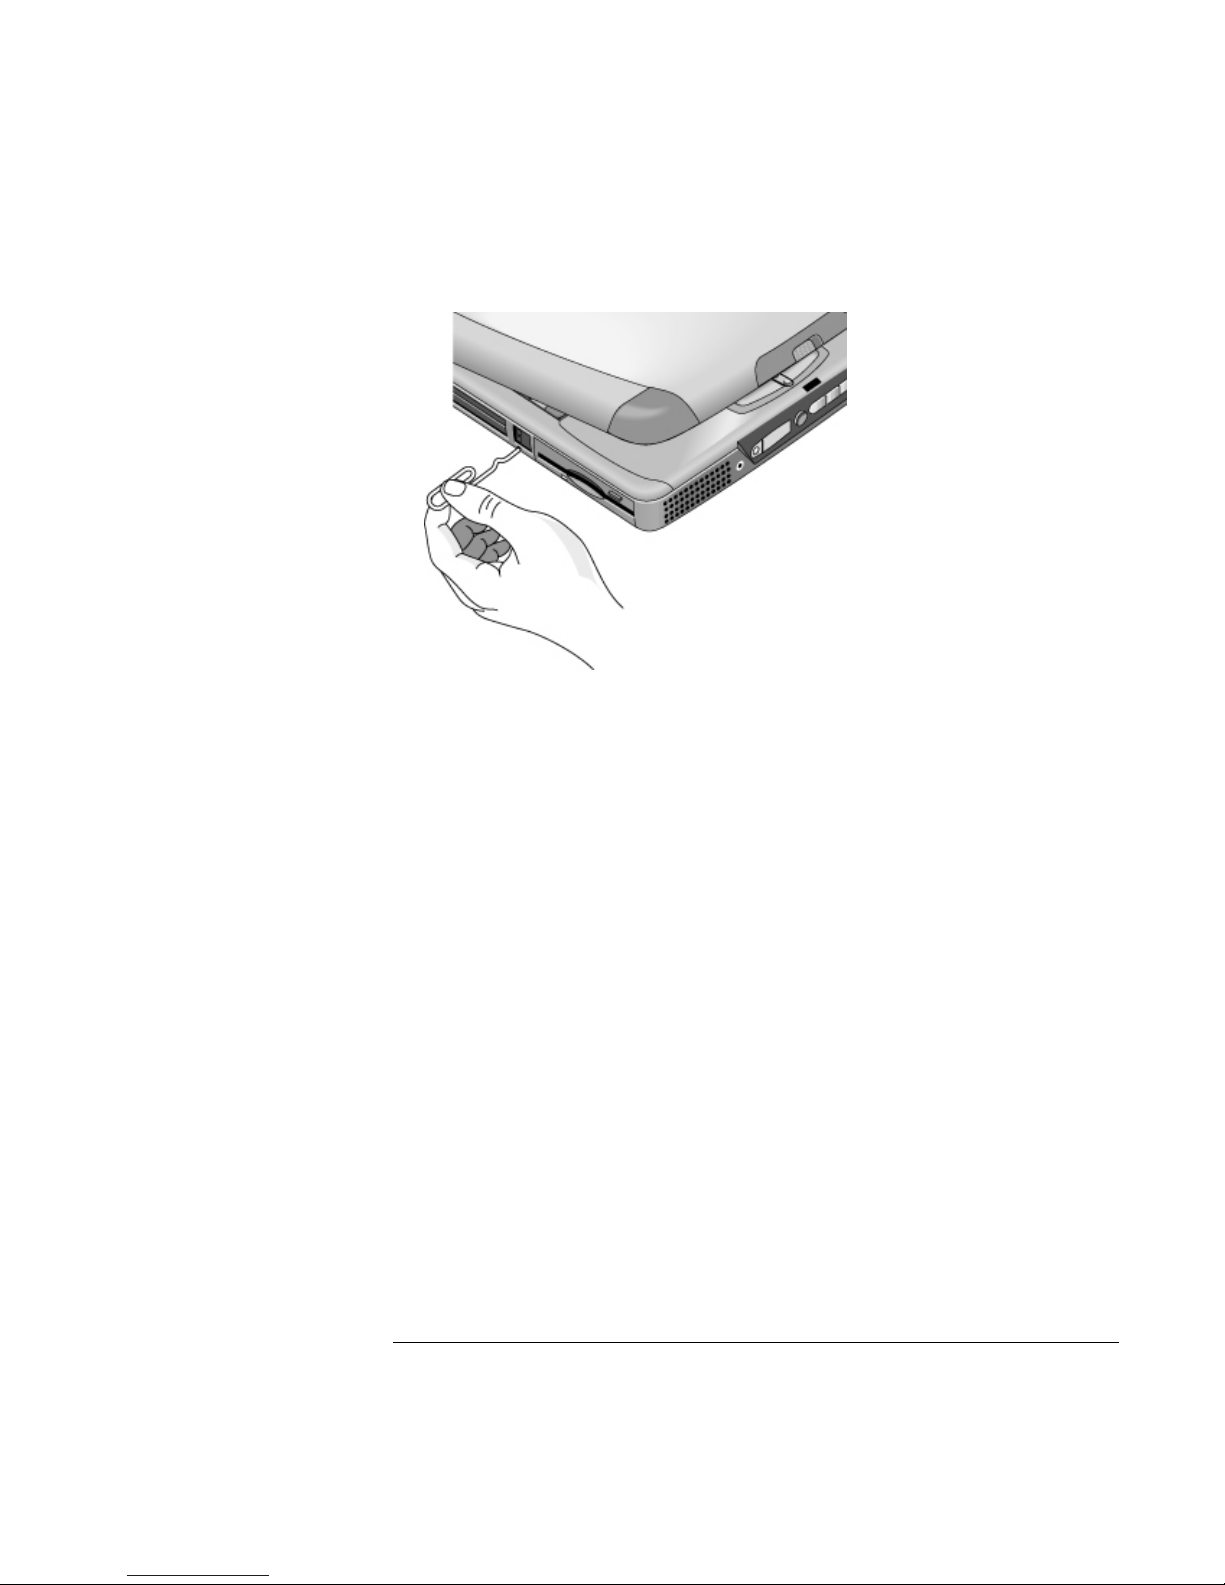
To reset your computer
If Windows or your computer stops responding, you can reset the computer and restart
Windows.
1. If possible, shut down Windows (Start, Shut Down, Shut down, OK).
2. If the computer does not shut down, slide and hold the power switch for five seconds,
then release it.
3. If the computer still does not shut down, insert a pin or straightened paper clip into the
recess on the left side of the computer, underneath the PC card eject buttons.
24 Reference Guide
Page 25
Introducing Your Computer
Setting Up the Computer
4. After the computer shuts down, slide the power switch and release it to turn the
computer on again.
Reference Guide 25
Page 26

Page 27

Using Your Computer
Reference Guide 27
Page 28

Using Your Computer
Operating the Computer
Operating the Computer
To use the Fn hot keys
The combination of the Fn key plus another key creates a hot key—a shortcut key
sequence—for various system controls. Press and hold Fn while pressing the appropriate
key. (When using an external keyboard, press and hold Ctrl+Alt with the appropriate
key—use the Ctrl and Alt keys on the left side of the keyboard.)
Hot key Does this
Fn+F1 Decreases the display’s brightness (TFT screens only)
Fn+F2 Increases the display’s brightness (TFT screens only)
Fn+F3 Decreases the display’s brightness (HPA screens only)
Fn+F4 Increases the display’s brightness (HPA screens only)
Fn+F5 Switches among the built-in display, an external display, and
simultaneous displays
Fn+F7 Toggles the sound on and off (mutes sound)
Fn+F8 Toggles the embedded numeric keypad on and off (see “To
use the embedded keypad” on page 29)
Fn+F12 Enters hibernate mode (in Windows 2000 only)
Fn+Lock key* Toggles Scroll Lock on and off (except on external keyboard)
Fn+Up arrow Increases sound volume (except on external keyboard)
Fn+Down arrow Decreases sound volume (except on external keyboard)
*The Lock key is in the top row of the keyboard:
28 Reference Guide
Page 29

Using Your Computer
Operating the Computer
To use the Windows and Applications keys
The Windows key brings up the Windows Start menu. This is the same as clicking the
Start button on the taskbar.
The Applications key brings up the shortcut menu for the current application. This is the
same menu that appears when you click the right mouse button while pointing at the
application.
Windows key combinations
Key combination Does this
Windows key+E Runs Windows Explorer
Windows key+F1 Runs Windows Help and Support
Windows key+F Runs Windows Find: Files or Folders
Windows key+M Minimizes all displayed windows
Shift+Windows key+M Returns all minimized windows to original size
Windows key+R Starts the Windows Run dialog box
To use the embedded keypad
After pressing Fn+F8 to activate the numeric keypad, you must press the Lock key
(in the top row of the keyboard) to turn number lock on or off.
When number lock is on:
= Keys change to the numeric or arithmetic designations printed on the right side of the
keys in the numeric keypad area.
= The Num Lock status indicator is lit.
= To turn off the embedded keypad, press Fn+F8 again.
Reference Guide 29
Page 30

Using Your Computer
Operating the Computer
To use the ALT GR key
Non–U.S. keyboards have an ALT GR key to the right of the spacebar. This is a shift key
providing access to certain keyboard characters.
= For a character in the lower-right corner of a key, press and hold ALT GR to type the
character.
1. Shifted.
2. Unshifted.
3. ALT GR.
To adjust the display brightness
You can adjust the brightness of your notebook’s display.
For TFT screens:
= To decrease the brightness, press Fn+F1.
= To increase the brightness, press Fn+F2.
For HPA screens:
= To decrease the brightness, press Fn+F3.
= To increase the brightness, press Fn+F4.
When you are using battery power, the display dims automatically to conserve power.
You can use the brightness controls to override this adjustment.
30 Reference Guide
Page 31

Using Your Computer
Operating the Computer
To adjust the volume
From the keyboard
= To increase the volume, press Fn+Up arrow.
= To decrease the volume, press Fn+Down arrow.
= To temporarily silence the speaker without changing the volume setting, press Fn+F7.
Press Fn+F7 again to restore the speaker output.
In Windows
1. Click the speaker symbol in the taskbar.
2. Drag the volume control bar up or down to adjust the volume.
3. To temporarily silence the speaker without changing the volume setting, click Mute.
With the multimedia buttons
If your computer has multimedia buttons (located on the front of the computer), use the
volume control buttons to adjust volume for most audio applications, including the CD
player, when the computer is on. When the computer is off, you can use these buttons to
adjust the volume for music CDs.
= To increase the volume, press the volume control up button.
= To decrease the volume, press the volume control down button.
From within an application
Many audio applications contain volume controls within the software; consult help in an
application to use such controls. In some cases, the application responds only to those
controls.
Reference Guide 31
Page 32

Using Your Computer
Operating the Computer
To use the touch pad
The touch pad, a touch-sensitive pointing device that controls the motion and speed of the
pointer on the screen, is built into your computer.
1 Pad Lock (touch pad on/off button)
2 Touch pad (pointing device)
3 Scroll up/down toggle
4 Click buttons
= Move a thumb or finger across the touch pad in the direction you want the pointer to
move.
= Use the click buttons, which function like the left and right buttons on a mouse, to
make your selection. You can also tap on the touch pad instead of clicking a button.
= To open an application, move the pointer over the icon, then press the left click button
twice rapidly (double-click). You can instead tap twice on the touch pad.
= To make a menu selection, move the pointer to the item and click the left click button
once.
= To open the shortcut menu for an item, move the pointer over the item and click the
right click button.
= To drag an item, move the pointer over the item. Press and hold the left click button
while you move the pointer to the new location. Release the button.
= To scroll up and down, press the top or bottom of the center toggle below the touch
pad.
32 Reference Guide
Page 33

Note
Using Your Computer
Operating the Computer
= To disable the touch pad, press the Pad Lock button. (The amber touch pad indicator
lights.) To reenable it, press the Pad Lock button again. You may wish to disable the
touch pad, for example, when you are entering text and do not want to move the
cursor accidentally. Avoid contact with the touch pad itself at the same time you are
pressing the Pad Lock button (to disable or to reenable); simultaneous contact will not
allow the Pad Lock button to work properly.
To customize the operation of the touch pad (and an external PS/2 or serial mouse, if
installed), double-click the Synaptics Touch Pad icon to access Mouse Properties; you
will find the icon in the taskbar, toward the lower right corner of your screen. Select the
tab corresponding to the characteristics you want to configure, including:
= button configuration for right-handed or left-handed operation (Button tab for mouse,
Button Actions tab for touch pad)
= double-click speed, pointer speed, and pointer trail
= click sensitivity
The touch pad is by default inactive when an external mouse is installed. You can enable
both touch pad and an external pointing device by changing the BIOS setting. See
“Using the BIOS Setup Utility” on page 82
To use the One-Touch buttons
The One-Touch buttons on your HP notebook allow you to start your e-mail or a Web
browser—or any other application—by pressing a single button. The buttons are
configured initially for specific applications, but you can change the configuration to start
any applications you want.
When you press a One-Touch button, the name of the application that’s starting appears
onscreen. You can modify the appearance of the name by selecting the color, size, and
style you prefer.
To configure a One-Touch button
1. Click Start, Settings, Control Panel.
2. Double-click Keyboard.
3. Select the One-Touch buttons tab.
4. Click on the button of the key you want to reconfigure.
Reference Guide 33
Page 34

Using Your Computer
Operating the Computer
5. In the Button Label field, type the name of the application you want to start with this
button. This name will appear onscreen when you press the button.
6. From the list of preinstalled applications, select the application to be associated with
the button.
OR
If the desired application is not on the list, select “Select a file on your computer” and
click the Browse button to choose any file on your notebook.
OR
If you want to attach a Web page to the button, select “Type in a Web site address”
and then select a Favorites page or type the URL of the page you want.
7. If you want the computer to start automatically (and then start this application—or
find this website), select “Enable system wake-up for this button.”
8. Click OK, then OK again to close the Keyboard properties window.
To format display of application names
When you press a One-Touch button on your HP notebook, the name of the application
that is starting appears onscreen. You can change the size, color, and font of the display,
as well as the length of time it appears. (These settings also affect the display of
multimedia messages when you play an audio CD or a movie DVD with the optional
multimedia buttons on the front of the unit.)
To format the display
1. Click Start, Settings, Control Panel.
2. Double-click Keyboard. (If you do not see the Keyboard control panel, click Show All
Control Panels.)
3. Select the One-Touch buttons tab.
4. Click Change Onscreen Display.
5. Follow the instructions below for specific formatting actions.
34 Reference Guide
Page 35

Using Your Computer
Operating the Computer
To change the font of the display
1. Select Change Font.
2. Choose the desired typeface and style.
3. Click OK, then Done, then OK.
To change the color of the display
1. Select Change Color.
2. Click on the desired color swatch.
3. Click OK, then Done, then OK.
To enable or disable Onscreen Display
1. Check Enable to enable onscreen display. (Or uncheck Enable to disable.)
2. Click Done, then OK.
To change the size of the display
1. Click the Size arrow.
CAUTION
2. Select the desired size.
3. Click Preview to see a sample message displayed in that size.
4. Click Done, then OK.
To change the length of time the display appears
1. Click a Timeout arrow repeatedly to choose a number from 1 to 10 seconds.
2. Click Preview to see a sample message displayed for that time.
3. Click Done, then OK.
To insert or remove a CD or DVD
Do not insert or remove a CD while the computer is reading it. Otherwise, the
computer could stop responding and you could lose data.
1. Press the button on the face of the CD-ROM or DVD drive. If you are using this drive
for the first time, be sure to remove any packing material that may be present.
Reference Guide 35
Page 36

Note
Using Your Computer
Operating the Computer
2. Place the CD into the drive (label facing up) and gently press down to seat it on the
spindle, making sure that the CD snaps onto the spindle.
OR
Remove the CD.
3. Slide the tray back into the module to close it.
If your computer loses power, you can manually open the drive to remove a CD by
inserting a straightened paper clip into the recessed hole on the front of the drive.
To use your DVD drive
If your computer came with a DVD drive the software needed to play DVD movies has
been preinstalled on your computer. Click Start, Programs, HP DVDExpress, HP DVD
Player.
If you need to reinstall the HP DVD player software, run
C:\HP\PROGRAMS\DVD\SETUP.EXE.
To use your CD-RW drive
If your computer came with a CD-RW drive, the software needed to read, write, and
rewrite CDs will need to be installed.
Depending on the operating system on your notebook, continue with one of the following
procedures:
= Adaptec software preloaded: Click Start, Programs, Adaptec Easy CD Creator, Setup.
You can also go to C:\HP\PROGRAMS\CDRW\SETUP.EXE to run the install
directly.
= Adaptec software on CD: Locate the Adaptec CD, insert it into the drive and setup
will run automatically. Follow the instructions on the screen.
36 Reference Guide
Page 37

Using Your Computer
Operating the Computer
To use your CD-RW/DVD drive
If your computer came with a CD-RW/DVD drive, the software needed to play DVD
movies has been preinstalled on your computer. Click Start, Programs, HP DVDExpress,
HP DVD Player. If you need to reinstall the HP DVD player, run
C:\HP\PROGRAMS\DVD\SETUP.EXE.
The software needed to read, write, and rewrite CDs will need to be installed.
Depending on the operating system on your notebook, continue with one of the following
procedures:
= Adaptec software preloaded: Click Start, Programs, Adaptec Easy CD Creator, Setup.
You can also go to C:\HP\PROGRAMS\CDRW\SETUP.EXE to run the install
directly.
= Adaptec software on CD: Locate the Adaptec CD, insert it into the drive and setup
will run automatically. Follow the instructions on the screen.
Reference Guide 37
Page 38

Using Your Computer
Securing the Computer
Securing the Computer
It is important to maintain security of the computer and of your data. You can improve
security by—among other methods—using a password, locking the computer with a
cable, or setting up virus protection.
To set up password protection
You can protect your computer from access by another user when you set up password
protection, which is available either through Windows (software) or through the BIOS
Setup utility (hardware). Both methods provide protection when the computer is rebooted:
a user must then enter the password. However, the BIOS password protection does not
ask for a password when your computer resumes after standby (suspend) or hibernate,
while Windows does provide that security.
If you want to set up hardware password protection, see “Using the BIOS Setup Utility”
on page 82.
To set up password protection in Windows 98
1. Click Start, Settings, Control Panel.
2. Double-click Passwords.
3. Select Change Passwords tab.
4. Click Change Windows Password.
5. Enter your old Windows password, if you had one; if not, leave Old Password blank.
6. Enter your new password twice.
7. Click OK, OK and Close.
To activate password protection when resuming in Windows 98
1. Check that you have set up a Windows password, as described above.
2. Click Start, Settings, Control Panel
3. Double-click Power Management.
4. Select Advanced tab.
38 Reference Guide
Page 39

Using Your Computer
Securing the Computer
5. Check "Prompt for password when computer goes off standby."
6. Click OK.
To set up password protection in Windows 2000
1. Press Ctrl+Alt+Del.
2. Click Change Password.
3. Enter your old Windows password, if you had one; if not, leave Old Password blank.
4. Enter your new password twice.
5. Click OK.
6. Click Cancel
If you want to set up hardware password protection for a non-Administrator account, see
Windows Help and Support (click Start, Help).
To activate password protection when resuming in Windows 2000
1. Check that you have set up a Windows password, as described above.
2. Click Start, Settings, Control Panel
3. Double-click Power Management
4. Select Advanced tab.
5. Check “Prompt for password when computer goes off standby”.
6. Click OK.
To set up password protection in Windows ME
1. Click Start, Settings, Control Panel.
2. Double-click Passwords. (If you do not see the Passwords control panel, click on the
View all Control Panels option.)
3. Select Change Passwords tab.
4. Click Change Windows Password.
5. Enter your old Windows password, if you had one; if not, leave Old Password blank.
6. Enter your new password twice.
7. Click OK and Close.
Reference Guide 39
Page 40

Using Your Computer
Securing the Computer
To activate password protection when resuming in Windows ME
1. Check that you have set up a Windows password, as described above.
2. Click Start, Settings, Control Panel
3. Double-click Power Options.
4. Select Advanced tab.
5. Check "Prompt for password when computer goes off standby and hibernate."
6. Click OK.
To attach a security cable
Your computer has a built-in connector that allows you to secure the computer with a
cable. The Kensington MicroSaver lock system works with this connector and is available
at many computer stores.
1. Wrap the cable around a stationary object, such as a table leg.
2. Loop the cable to create a slipknot around the stationary object—make sure it can’t
40 Reference Guide
slip off.
Page 41

Note
Using Your Computer
Securing the Computer
3. Insert the lock into the computer's security connector and release the key. Store the
key in a safe place away from the computer.
To use virus-protection software
Virus-protection software can help protect the integrity of your data. This is especially
important when you are connected to the Internet.
To access virus-protection software, click Start, Programs, VirusScan (or if you use a
different application, click Start, Programs and the name of your software). Refer to help
within the application for tips on usage.
Your notebook may ship with McAfee Virus Scan 5.02 for Windows 95 and 98.
Although HP has tested version 5.02 for use on this notebook, McAfee does not
officially support Windows ME with this version. McAfee is currently developing a
new version of Virus Scan to support Windows ME, but this version was not available
at the time this notebook was released to manufacturing. HP strongly recommends that
you update to the newer version of Virus Scan when it becomes available. You may do
so through the update features of the Virus Scan program.
Reference Guide 41
Page 42

Using Your Computer
Working in Comfort with a Notebook PC
Working in Comfort with a Notebook PC
You can use your HP notebook computer virtually anywhere, anytime. The following
recommendations should help you work more comfortably.
Note that if you are using your portable computer as your primary computer, or using it
for extended periods, you should use it with a full-size keyboard, monitor, and mouse.
This will give your portable computer the adjustability and comfort features of a desktop
unit. HP docking accessories offer quick, easy connections to these devices. More
information on how to prepare your workspace environment and set up your HP
equipment is available in Working in Comfort, which is preloaded on the hard disk in the
HP Library and available on the Recovery CD in \hp\library—as well as at
www.hp.com/ergo. (In Windows ME, you can access Working in Comfort by clicking
Start, Help, Your HP Notebook, Working in Comfort.)
WARNING
Improper use of keyboards and other input devices has been associated with
ergonomic injury. For more information about reducing your risk, visit our
ergonomics website or see Working in Comfort in the online HP Library.
Your mobile work environment
= Use a chair that provides good support for your lower back. If an adjustable chair is
not available, you can use a pillow or rolled-up towel to provide lower back support.
= Try to keep your thighs parallel to the floor and your feet flat on the floor. In a mobile
environment, you can do this by using a phone book or briefcase to support your feet.
= Adjust the height of either your work surface or chair to keep your arms in a neutral
position. Your arms should be relaxed and loose, elbows at your sides, with the
forearms and hands parallel with the floor.
= Position your notebook computer display to minimize glare and reflection. For
example, on an airplane, lower the window shade; or in a hotel room, draw the
curtains. You also should maintain a comfortable viewing distance—approximately 40
to 60 cm (16 to 24 inches). Adjust the angle of your display to help keep your head
angled slightly downward in a comfortable position.
42 Reference Guide
Page 43

Using Your Computer
Working in Comfort with a Notebook PC
Using your mobile computer
= Position the computer so your wrists and hands are in a neutral position. Your wrists
should be as straight as possible and should not have to bend sideways or more than
10 degrees up or down. Your HP notebook computer has a built-in palm rest, which is
ideal for this purpose.
= Try to type as lightly as possible. The notebook keyboard requires little force to
activate.
= Take frequent, short rest breaks—this is especially important in a mobile computing
environment.
= Portable computers weigh between approximately 1.5 and 4 kilograms (approximately
3 to 8 pounds). When traveling, be sure to carry your computer properly to minimize
strain on your body. Shift the bag containing your notebook equipment frequently
between your left and right hands and shoulders.
Reference Guide 43
Page 44

Using Your Computer
Caring for Your Computer
Caring for Your Computer
Here are some recommendations for maintaining your computer during everyday use, as
well as preventing potential physical damage or data loss.
To protect your hard disk drive
Hard disk drives, like other internal components, are not indestructible and can be
damaged by inappropriate handling and operation.
= Avoid bumps or jolts.
= Do not operate the computer while traveling over bumpy terrain.
= Standby, hibernate or shut down the computer before transporting it. This turns off the
hard drive. A drop of a few inches onto a rigid surface while the hard drive is
operating could cause loss of data or damage to the drive.
= Carry the computer in a padded case to protect against bumps and jolts.
= Set the computer down gently.
= When the computer has been in a very cold or very hot environment, do not start it
again until it has returned to a more moderate temperature.
To take care of your computer
= Provide adequate ventilation around the computer. Ensure that the notebook is sitting
on a flat surface, so that air is able to flow underneath the unit. See that there is
adequate clearance to the rear and sides of the computer, so that fan vents are not
blocked.
= Be sure to shut down, hibernate, or standby the computer before putting it in a
carrying case or other enclosed space.
= Do not pick up or carry the computer by the display.
= Do not use the computer outside in the rain or snow (or other inclement weather) or in
any extremes of temperature or humidity.
44 Reference Guide
Page 45

Using Your Computer
Caring for Your Computer
To safeguard your data
= Do not touch the touch pad or activate any other device that interrupts operation while
the system is starting or stopping.
= Back up your work regularly. Copy files to floppy disk, tape, or network drives.
= Use a virus-scanning program, such as the included application (VirusScan, for
example), to check the integrity of your files and operating system. Since new viruses
appear frequently, you will also want to update the program’s virus definitions from
time to time. Updates for VirusScan are on the Web at www.networkassociates.com;
if you are using another application, see help for updating information.
= For Windows 98 and Windows ME, check your disk using the scandisk utility (click
Start, Programs, Accessories, System Tools, ScanDisk).
= For Windows 2000, check your disk using error-checking (open My Computer, select
the disk you want to scan, click File, click Properties, select the Tools tab, and click
Check Now).
To extend the life of the display
Observe the following guidelines to extend the life of the backlight in the computer
display.
= When working at your desk, connect an external monitor and turn off the internal
display (Fn+F5).
= If you are not using an external monitor, set the Turn off monitor timeouts (for both
AC and battery operation) to the shortest comfortable interval.
= Set the brightness control to the minimum level for your comfort (Fn+F1 or Fn+F2)
(TFT only).
Reference Guide 45
Page 46

Using Your Computer
Caring for Your Computer
To get the most from your batteries
= Do not leave batteries unused for long periods of time. If you have more than one,
rotate them.
= If you normally use AC power, make a practice, at least once a week, of using the
battery as your power source.
= Unplug the AC adapter when the computer is not in use.
= To lengthen the life of a battery, be sure to charge the battery regularly.
= For long-term storage, the battery must be charged at 20–50% to minimize capacity
loss by self-discharge and to avoid deterioration of battery performance.
= For a model with a dual-speed processor, use the lower speed on battery power (see
“To control the processor speed” on page 55). The default settings conserve battery
power.
To clean your computer
You can clean the computer with a soft cloth dampened either with clean water or with
water containing a mild detergent.
= Do not use an excessively wet cloth or allow water inside the case.
= Do not use any abrasive cleaners, especially on the display. Do not apply any cleaner
directly to the display. Instead, apply the cleaner to a soft cloth and then gently wipe
the display.
= You can clean the keyboard with a vacuum cleaner to remove accumulated dust.
46 Reference Guide
Page 47

Traveling with Your Computer
Reference Guide 47
Page 48

Traveling with Your Computer
Managing Power Consumption
Managing Power Consumption
When you are not using your computer, you will want to maximize battery operating time
without compromising performance. It is not necessary to turn the computer off in order
to reduce power consumption and extend battery life.
With Windows 98, Windows ME and Windows 2000, Advanced Configuration and
Power Interface (ACPI) provides both manual and automated tools for reducing power
consumption.
= You can set power management options to occur automatically, based on timeout
values entered.
= You can also invoke power management options manually at any time by pressing the
appropriate key. See “To use manual power management” below.
To use automated power management
System hibernation, standby, monitor, and hard disk timeouts automatically occur based
on the values set in the Power Management Properties window (Windows 98) or the
Power Options Properties window (Windows ME and Windows 2000). The following
tables describe the power management timeouts you can set in Windows.
System hibernation
Action
When
Resume
Saves current session to disk, then shuts
down. Provides maximum power savings
while still allowing you to recover the
current session.
After being in suspend for the specified
interval. (Windows ME and Windows
2000 only)
-OR-
Critical low battery.
Slide the power switch to the left to
recover your current session. This may
take several minutes.
When battery power reaches a critically low level, see “To respond to a low-battery
warning” on page 54.
48 Reference Guide
Page 49

Traveling with Your Computer
Managing Power Consumption
Note
When the system hibernates as a result of a critically low battery, you will find when
resuming that all your data has been saved but that some functions may be disabled. To
resume normal operation, restore power (by connecting AC power or installing a
charged battery), perform a full shutdown, and then restart the computer.
Turn off monitor
Action
When
Resume
Turns off the display. This conserves
battery power and extends the life of the
display.
No activity of the keyboard or mouse for
the specified interval.
Press any key or move the pointer to
return to your current session.
Turn off hard disks
Action
When
Resume
Turns off only the hard disk drive. This is
usually set to occur shortly after the
monitor is turned off.
No hard disk access for the specified
interval.
Press any key or move the pointer to
return to your current session.
System standby
Action
When
Resume
Turns off the display and hard disk drive to
conserve battery power.
No activity of the keyboard or mouse, no
disk drive access, and no port (serial,
parallel, or IR) activity for the specified
interval.
Press the blue standby button to return to
your current session.
A message box appears 15 seconds before system standby takes effect. This allows you to
stop the process and save your work if you have not recently done so. (In Windows 98,
Windows ME and Windows 2000, standby and suspend are equivalent terms.)
Reference Guide 49
Page 50

Traveling with Your Computer
Managing Power Consumption
CAUTION
Make a habit of saving your work before allowing your computer to go to system
standby. If there is an interruption in power while the computer is in standby,
information that has not been saved will be lost.
You can also create power schemes that will automatically shut down the computer
components (not the computer itself) after a specified period of nonuse. Define these
schemes so that they best support the ways you use your computer.
To set power management properties
1. Click Start, Settings, Control Panel.
2. Double-click Power Management in Windows 98; double-click Power Options in
Windows 2000 and Windows ME. (For details see Windows Help and Support.)
3. Set the timeout periods you prefer. (You can choose Never, but that setting is not
recommended for hibernate mode.)
4. Click OK.
To use manual power management
You can manage your computer’s power manually whenever you need to. with any of the
following three levels of power management.
System standby
Action
When
Resume
Turns off the display and hard disk drive.
Press the blue standby button
-OR-
click Start, Shutdown, Standby
-OR-
Configure lid, power button, or sleep
button to perform the hibernation action.
Then close lid or press button (Windows
98, Windows ME, and Windows 2000).
Press the blue standby button to return to
your current session.
System standby can also occur automatically when the timeout setting in the Power
Management Properties window is reached. (In Windows 98, Windows ME and Windows
2000, standby and suspend are equivalent terms.)
50 Reference Guide
Page 51

CAUTION
Traveling with Your Computer
Managing Power Consumption
Make a habit of saving your work before allowing your computer to go to system
standby. If there is an interruption in power while the computer is in standby,
information that has not been saved will be lost.
System Hibernation
Action
When
Resume
Saves the current session to disk, then
shuts down. Provides maximum power
savings while still allowing you to recover
the current session. Restores network
connections.
Press Fn+F12 (Windows 2000 only)
-OR-
Click Start, Shut Down, Hibernate
(Windows ME and Windows 2000)
-OR-
Configure lid, power button, or sleep button
to perform the hibernation action. Then
close lid or press button (Windows 98,
Windows ME, and Windows 2000).
Slide the power switch to the left to recover
your current session. This may take
several minutes.
Hibernate mode also occurs automatically when battery power reaches a critically low
level. See “To respond to a low-battery warning” on page 54. In Windows 98, hibernate
mode occurs automatically with critical low battery power only, manual initiation of
hibernate is not available by default (except, if you wish, you can modify the default
setting for the power switch or the standby button to manually initiate hibernate mode
instead).
Reference Guide 51
Page 52

Traveling with Your Computer
Managing Power Consumption
Off
Action
When
Resume
Turning off your computer provides
maximum power savings. The current
session is not saved and unsaved data will
be lost.
Click Start, Shut Down, Shut down
(recommended)
-OR-
Slide the power button and hold for 4
seconds
-OR-
Configure a power button (same as
Hibernate mode).
Slide the power switch to the left to start a
new session. This may take several
minutes.
If the system stops responding and you are not able to turn off the computer as described
above, you can still recover. See “To reset your computer” on page 24.
To set power management properties
1. Click Start, Settings, Control Panel.
2. Double-click Power Management in Windows 98; double-click Power Options in
Windows 2000 and Windows ME. (For details see Windows Help and Support.)
3. Set the timeout periods you prefer. (You can choose Never, but that setting is not
recommended for hibernate mode.)
4. Click OK.
52 Reference Guide
Page 53

Traveling with Your Computer
Using Battery Power
Using Battery Power
You can operate the HP notebook PC on battery power for extended periods, but you
should be prepared to save your work and shut down if the battery is low. Follow the tips
in this section to maximize the length of time you can operate on battery power.
To check the battery status
From the battery status light
The battery status light reports the following information:
Green AC attached—battery full
Amber AC attached—battery charging
Red AC attached—battery will not accept charge (abnormal)
Reference Guide 53
Page 54

Traveling with Your Computer
Using Battery Power
From the Windows taskbar
The System Tray on the Windows taskbar includes a power icon that allows access to
more detailed battery status information. The icon looks like a battery when AC is not
connected.
= Place pointer over the power icon to display the percentage of charge remaining.
= Right-click the power icon to view the options for displaying power information.
= Left-click the power icon to display a menu of the available power schemes.
From the status panel
If your computer has a status panel, press the status panel mode button repeatedly until
you see the battery icon and the percentage of charge remaining.
To respond to a low-battery warning
The computer automatically alerts you when the battery power drops to a critically low
level. First you will hear a high-pitched beep. Then, if you have not taken restorative
action within a short time, the system hibernates.
Note
You won’t be able to turn the computer on again until you restore power by one of the
following actions:
= Plug in the AC adapter (see “To connect AC power” on page 19).
OR
= Replace the battery with one that is charged (see “To install the battery” on page 19).
The system must first be shut down or put into hibernate mode before changing the
battery.
If you plug in the AC adapter, you can continue to work while your battery recharges.
54 Reference Guide
Page 55

Traveling with Your Computer
Using Battery Power
To optimize battery operating time
= Plug in the AC adapter, especially while using the CD-ROM drive or DVD, the floppy
disk drive, or any external connections such as a PC card or a modem.
= If you have an I/O PC card—that is, a PC card having an external connection, such as
a network card—remove it when you’re not using it. Some I/O cards use significant
power, even while they’re inactive.
= If you work with an application that uses the serial port or an I/O PC card, exit the
application when you have finished using it.
= Turn off the CD player when you are not using it.
= For a model with a dual-speed processor, use the lower speed on battery power (see
“To control the processor speed” on page 55). The default settings conserve battery
power.
= See “Managing Power Consumption” on page 48 for other ideas about reducing
power consumption while the computer is not in use.
To control the processor speed
If your computer contains a high-speed Pentium III processor with Intel SpeedStep
Technology, you can change settings that control the processor speed. Your computer has
this feature if the taskbar contains an Intel SpeedStep Technology icon (a checkered flag).
With the default settings, the processor speed changes automatically according to the
power source (AC adapter or battery). The lower speed uses power more efficiently and is
typically in effect when the computer is running on battery power.
To use automatic speed changes
= If you reboot the computer with the AC adapter plugged in, the processor starts at
high speed. If the computer is on battery power, the processor starts at low speed.
= If you unplug the AC adapter while the computer is running or on standby, the
processor changes to low speed.
= If you plug in the AC adapter while the computer is running or on standby, the
processor changes to high speed.
Reference Guide 55
Page 56

Traveling with Your Computer
Using Battery Power
To change speed settings
= To set the speed used by the processor at boot, or to disable the dual-speed feature,
change the Intel SpeedStep Technology setting in BIOS Setup in the Power menu. For
information on how to run BIOS Setup, see “Using the BIOS Setup Utility” on page
82.
= To set the speed used by the processor while Windows is running, double-click the
Intel SpeedStep Technology icon in the taskbar or use the Control Panel Power icon.
56 Reference Guide
Page 57

Making Connections
Reference Guide 57
Page 58

Making Connections
Using the Modem
Using the Modem
By connecting your modem to a telephone line, your PC can communicate with other
networked computers. You can explore the Internet, send and receive e-mail messages,
and send and receive faxes. Your HP notebook PC contains several software programs
that work with your modem:
= Internet Explorer, for browsing the World Wide Web
= Outlook Express, for sending and receiving e-mail messages
= QuickLink III, for sending and receiving faxes (for Windows 98 and Windows ME)
= Fax, for sending and receiving faxes (for Windows 2000)
Selected models of the HP notebook PC include a built-in high-speed V.90 modem. This
modem allows you to connect to any Internet Service Provider (ISP) that has V.90
interoperable modems. Check with your ISP for a list of telephone numbers that support
V.90.
CAUTION
Note that the maximum speed for faxing is 14.4Kbps. Even though the built-in modem is
capable of downloading at 56Kbps, your ISP may not operate at this speed; please check
with your service provider for information. Transmission rates also depend on the
condition of the telephone line.
If your computer does not have a built-in modem (or if you prefer to use a different
modem), you can install a PC card modem or attach an external modem to the serial port.
To connect the modem
To reduce the risk of fire, use only No. 26 AWG or larger telecommunications line cord
to connect the modem to the telephone wall jack.
1. Check that the telephone line is an analog line, sometimes called a data line. It should
have 2, 3, or 4 wires. (You must not use a PBX or digital line.)
58 Reference Guide
Page 59

Making Connections
Using the Modem
2. Connect a telephone cord with an RJ-11 plug to the built-in modem (or connect to a
PC card or external modem). If the plug on the phone cord doesn’t fit the modem jack,
you may need to buy an adapter.
Special notes about using a modem in certain countries
= In France, if you want to access the MiniTel system, you need MiniTel emulator
software. If your computer was purchased in France, it includes the TimTel Light
software. If your computer does not include TimTel Light, you must purchase
emulator software separately.
= The pulse dialing feature may be disabled in certain countries, possibly because Loop
Disconnect is not certified there. If pulse dialing is disabled, you should use tone
dialing connections only.
= Many countries impose a blackout period after a modem repeatedly fails to connect to
a service provider. The number of failed attempts and the period of time you must
wait before trying again differ from country to country. Check with your telephone
company. For example, if you are dialing from Italy and you fail to connect to your
server or cancel the connection, you must wait one minute before dialing that same
number again. If you dial before then, you will get an error message that says “delay.”
After the fourth failed connection, you will need to wait one hour before trying the
number again. If you dial before the hour is up, you will get a message that says
“black list.”
= When using a modem in the Republic of South Africa, an external surge protector may
be necessary in order to prevent computer damage by lightning or other electrical
surges. Connect any approved surge protector to the modem cable whenever you are
using the modem.
Reference Guide 59
Page 60

Making Connections
Using the Modem
To connect to the Internet
If you have not yet signed up with an Internet Service Provider (ISP), see “To connect to
an Internet Service Provider” on page 23 for instructions.
When you have signed up with an ISP, you can connect to the Internet. Choose one of the
following:
= If you signed up with AOL, AT&T WorldNet, Compuserve 2000, Earthlink, or
Prodigy Internet, double-click the appropriate icon in the Online Services folder on
the desktop.
= If you signed up with another ISP, double-click the Internet Explorer icon on the
desktop, and then click the Connect button in the Dial-up Connection window.
When you are successfully connected to the Internet, you’ll see a connect icon (two
connected computers) next to the clock on the taskbar. You are now ready to explore the
Internet. To go to a specific website, enter the address (for example, www.hp.com) in the
browser’s Address field. To search for information on the Web, you can use the browser’s
Search tool and enter the word or phrase you are looking for.
To use AOL as your ISP
When you use AOL as your Internet Service Provider, you can access the Internet only
with AOL’s own software; you can’t use a standard browser like Internet Explorer. As a
result:
= You cannot view websites by clicking on links (such as those in the electronic
Reference Guide that link to the HP notebook website).
= You cannot go to a website by entering the address in Windows Explorer.
If you try to access the Internet without using the AOL software, the Internet Connection
wizard automatically launches, asking you to sign up for an ISP. In that case, cancel the
wizard and launch AOL.
For additional ISP information, please refer to the Microsoft Operating Manual included
in your box or Windows Help.
To disconnect from the Internet
You remain connected to the Internet until you shut down the computer, disconnect the
phone line from the computer, or give a command to hang up the connection.
60 Reference Guide
Page 61

Making Connections
Using the Modem
= To disconnect from AOL, use the Sign Off menu.
= To disconnect from other ISPs, double-click the connect icon (two connected
computers next to the clock) on the taskbar, and click Disconnect.
To dial in to a network
You can use the modem to dial in to a LAN (local area network) that supports dial-in
connections. This gives you access to network resources from a remote location.
= See Windows Help for information about setting up and using dial-in network
connections—click Start, Help.
To change your modem settings
The modem is already set up to be compatible with telephone systems and modems in
most areas. However, in some situations, you may have to change modem settings to
match local conditions. If you have questions about local requirements, contact your
telephone company.
= Control Panel. Open Modems (Windows 98 or Windows ME) or Phone And Modem
Options (Windows 2000) in Control Panel to change many modem settings.
For Windows 98 and Windows ME, on the General tab click Properties to set
connection speeds or special dialing options.
For Windows 2000, on the Modems tab click Properties to set connection speeds, or
on the Dialing Rules tab click Edit to set dialing options.
= Communications software. Many communications applications provide options for
controlling modem settings. See the help for your software.
= AT commands. You can control many aspects of modem operation using modem AT
commands. AT commands are special strings of characters sent to the modem to set
up specific conditions. Those command strings normally start with “AT” and contain
additional characters. For a list of AT commands for the built-in modem, see “Modem
Reference Information” on page 136.
For Windows 98 and Windows ME, open Modems in Control Panel. On the General
tab, click Properties, then on the Connection tab click Advanced. You can type AT
commands in the space for extra settings.
Reference Guide 61
Page 62

Making Connections
Using the Modem
For Windows 2000, open Phone And Modem Options in Control Panel. On the
Modems tab, click Properties. You can type AT commands on the Advanced tab in
the space for extra settings.
For example, to force the built-in modem to connect with V.34 modulation, you can use
the +MS command, as shown in the table of AT commands—type AT+MS=11 in the
space for extra settings.
To send and receive e-mail
The steps for sending and receiving e-mail depend on your Internet provider. If you are
using AOL, e-mail is part of your AOL service. For other ISPs, you can use Outlook
Express (included with your computer) or an e-mail system of your choice. This section
includes instructions for using Outlook Express.
To start Outlook Express
1. Double-click the Outlook Express icon on the desktop.
2. If you are not currently connected to the Internet, the Dial-up Connection window
appears. Choose Connect to connect to the Internet.
To send an e-mail message
1. Start Outlook Express.
2. Click the New Mail tool on the toolbar.
3. Fill in the information in the New Message window.
4. When you’re finished, click the Send button.
To receive e-mail messages
1. Start Outlook Express.
2. Click the Send/Recv tool on the toolbar to have Outlook deliver new messages.
3. Click the Inbox folder to view the list of messages. Unread messages appear bold on
the screen.
4. To view a message, click it once. (Or double-click to view the message in its own
window.)
62 Reference Guide
Page 63

Making Connections
Using the Modem
To send and receive faxes (Windows 98 and Windows ME)
Sending and receiving faxes requires just a telephone connection—you don’t need an
Internet connection. You can use the modem and fax software to send and receive faxes
on your computer. QuickLink III fax software is included with Windows 98 and Windows
ME on the hard disk.
To start QuickLink
With Windows 98 or Windows ME:
= Click Start, Programs, QuickLink III, QuickLink III.
The first time you start QuickLink, the Setup wizard steps you through the process of
setting options and customizing the program for your personal use. Follow the onscreen
instructions. If you’re unsure which setting to choose, accept the default choice.
To send a fax
With Windows 98 or Windows ME:
1. In QuickLink, click the QuickFax tool on the main toolbar.
2. Enter the fax number and the recipient’s name and company.
3. Type the message body in the QuickFax Note area.
4. Click Send Fax.
If instead you want to send a document as a fax, open the document in its application
window, then open the Print dialog box. Change the selected printer to QuickLink III,
then print the document.
To receive faxes
With Windows 98 and Windows ME, faxes are automatically received when QuickLink is
running in an open or minimized window. New faxes are indicated in the status box in the
QuickLink window. To receive a fax manually, follow these steps:
1. When a fax call is coming in, click Start on the menu bar.
2. Click Manual Fax Receive.
Reference Guide 63
Page 64

Making Connections
Using the Modem
To view and print a fax
With Windows 98 or Windows ME:
1. In QuickLink, click the Fax Viewer tool on the toolbar.
2. Click Yes to view the fax now.
3. Click the printer icon to print the fax.
To send and receive faxes (Windows 2000)
Sending and receiving faxes requires just a telephone connection—you don’t need an
Internet connection. You can use the modem and fax software to send and receive faxes
on your computer. Fax software is built into Windows 2000.
To set up for faxing
With Windows 2000:
1. Click Start, Settings, Control Panel, Fax. Enter your fax information.
2. On the Advanced Options tab, add a fax printer.
If you do not want to receive faxes, stop here.
3. On the Advanced Options tab, open the Fax Service Management window.
4. In the list under Fax, click Devices, then right-click the modem and click Properties.
5. On the General tab, enable the modem to receive faxes.
6. On the Received Faxes tab, select the option to save faxes in a folder.
To send a fax
With Windows 2000:
= Click Start, Programs, Accessories, Communications, Fax, Send Cover Page Fax.
Follow the instructions to create and send the fax.
If instead you want to send a document as a fax, open the document in its application
window, then open the Print dialog box. Change the selected printer to the fax printer,
then print the document.
64 Reference Guide
Page 65

Making Connections
Using the Modem
To receive, view, and print faxes
With Windows 2000, if you enabled the modem to receive faxes, they are received
automatically.
1. Click Start, Programs, Accessories, Communications, Fax, My Faxes.
2. In the Received Faxes folder, double-click the fax.
3. To print, click File, Print.
Reference Guide 65
Page 66

Making Connections
Connecting to a LAN
Connecting to a LAN
If your computer has a LAN port, you can use it to connect to a local area network
(LAN). This gives you access to network resources—such as printers and file servers on
your corporate network—and in some cases also to the Internet.
To connect to a LAN
1. Check that the existing LAN supports Ethernet 10Base-T (10 Mbps) or 100Base-TX
(100 Mbps) connections.
2. Plug the LAN cable (not supplied) into the built-in LAN port. The cable must have an
RJ-45 connector.
3. Windows 2000 automatically detects and sets up a LAN connection.
For Windows 98 or Windows ME, open Network in Control Panel to set up support
for a LAN connection on your network. For example, you can add the Microsoft
TCP/IP protocol.
See Windows Help or your Microsoft manual for information about setting up and using
LAN connections—click Start, Help.
Contact your network administrator or ISP provider for network information.
Two lights under the LAN port indicate the status of the connection (see the figure
above):
1. The yellow light indicates network activity.
2. The green light indicates that a link is established to the network.
66 Reference Guide
Page 67

Making Connections
Connecting PC Cards
Connecting PC Cards
The two PC card slots are available for storing data and expanding communication
capabilities. Your computer supports standard Type I, II, and III PC cards (PCMCIA and
CardBus). You can use one slot or both.
CAUTION
Do not remove a PC card while the computer is reading or writing data. If you do, you
could lose data, or the computer could stop responding.
To insert a PC card
1. Hold the card with its face up and its connector holes toward the card slot.
2. Slide the PC card into the upper or lower slot until it is flush with the computer.
To remove a PC card
1. Stop the PC card:
= Double-click on the PC card icon in the lower right of your screen.
= In PC Card Properties, select the PC card you want to stop.
= Click Stop.
2. Flip the eject button out, so that it sticks out from the side of the computer.
3. Press the eject button and pull out the PC card.
Reference Guide 67
Page 68

Making Connections
Connecting PC Cards
To reestablish network connection after resume
When you are using a network PC card, it is possible that you will lose network
connection after a resume operation. If this occurs:
1. Stop the network PC card:
= Double-click on the PC card icon in the lower right of your screen.
= In PC Card Properties, select the network card.
= Click Stop.
2. Flip the eject button out, so that it sticks out from the side of the computer.
3. Press the eject button and pull out the network card.
4. Insert the card again to reestablish network connection.
68 Reference Guide
Page 69

Making Connections
Connecting External Components
Connecting External Components
You can connect external components—such as a printer, mouse, monitor, or keyboard—
directly to your computer or to the optional port replicator (on models equipped with a
docking connector).
To identify the ports
Using the ports on the rear of the computer or on the port replicator, you can connect the
following external components. Table numbers refer to numbers in the figures.
Component Port location on
Notebook Port replicator (on
Audio device (input) — 10
Infrared device (on
selected models)
Microphone 5 11
Modem (serial) 2 5
Monitor 3 7
Printer (parallel) 7 6
Printer (serial) 2 5
PS/2 keyboard 6* 3
PS/2 mouse 6* 2
Speakers — 12
TV set 4 8
USB device 9 9
*You can use a Y adapter (HP F1469A) to connect both a
keyboard and mouse to your computer.
8 —
selected models)
Reference Guide 69
Page 70

Making Connections
Connecting External Components
Notebook ports
1 AC adapter jack
2 Serial port
3 VGA port (external monitor)
4 TV out
5 Microphone port
6 PS/2 port
7 Parallel port
8
Infrared port (on selected models)
9 USB ports
70 Reference Guide
Page 71

Making Connections
Connecting External Components
Port replicator ports (on selected models)
1 AC adapter jack
2 PS/2 mouse port
3 PS/2 keyboard port
4 LAN port (networking)
5 Serial port
6 Parallel port
7 VGA port (external monitor)
8 TV out
9 USB ports (2)
10 Audio in
11 Microphone port
12 Audio out (external speaker)
To connect a printer (or another parallel device)
The parallel port uses a standard 25-pin connector, most commonly used for connecting
dot-matrix, ink-jet, and laser printers. You can also use it to connect a parallel Zip drive.
= Connect the parallel printer cable or other parallel cable to the parallel port of the
Reference Guide 71
computer or the port replicator.
Page 72

Making Connections
Connecting External Components
Note
Note
If you connect a Zip drive to the parallel port, you can enhance its performance by
installing the accelerator software supplied with your Zip drive.
To connect an external keyboard or PS/2 mouse
The 6-pin PS/2 port allows you to attach an external keyboard or a PS/2-compatible
mouse to the computer. While an external PS/2 mouse is connected, the touch pad is
normally disabled. The computer provides one PS/2 port; the optional port replicator
provides two PS/2 ports.
= Plug the mouse or keyboard PS/2 cable into the PS/2 port on the computer, or plug
either or both PS/2 cables into the PS/2 ports on the port replicator.
= To connect both a mouse and keyboard to the computer, use the PS/2 Y adapter,
which is available separately.
= To connect a device that has a PC-type jack, first connect its cable to an adapter cable
with a PS/2 jack.
To use hot keys from an external keyboard, substitute Ctrl+Alt for the computer Fn key.
Use the Ctrl and Alt keys on the left side of the keyboard. For example, to access Fn+F2
(increase display brightness), press Left Ctrl+Left Alt+F2.
To connect a USB device
Note
Universal serial bus (USB) provides a bidirectional serial interface for adding peripheral
devices—such as game controllers, serial and parallel ports, and scanners—on a single
bus. The computer provides two USB ports; the optional port replicator also provides two
USB ports.
= Attach the USB cable to the USB port on the computer or to either USB port on the
port replicator. Windows automatically recognizes the USB device.
Some USB devices can be connected to the computer in series—this is called a daisychain connection.
If you have problems making this connection, contact the vendor of the peripheral
device, as well as the HP website, for the latest versions of the USB drivers.
72 Reference Guide
Page 73

Note
Making Connections
Connecting External Components
To connect audio devices
There is a built-in microphone located just below the blue standby button. You can use it
to record voice, sound, and music. You can also plug in an audio input source (such as a
CD player or an external microphone) or an audio output device (such as external
speakers or headphones).
= Attach the audio cable to the appropriate port—audio in, audio out, or microphone
port on either the computer or the optional port replicator; see “To identify the ports”.
When you plug a device into the microphone port, the built-in microphone automatically
turns off. When you plug a device into the audio out port, the built-in speakers
automatically turn off.
To use infrared devices
(Provided for selected models.) You can communicate between your HP notebook PC
and infrared (IR) devices without using cables.
Note
To enable the infrared port
In the BIOS Setup utility, INFRARED COMMUNICATION IS BY DEFAULT
DISABLED. BEFORE YOU USE YOUR INFRARED PORT TO TRANSFER FILES
OR TO PRINT TO AN INFRARED PRINTER, YOU MUST ENABLE THE
INFRARED PORT IN THE BIOS.
1. Reboot your computer.
2. When you see the HP logo, press F2.
3. Select the System Devices menu.
4. Set Infrared Port to Enabled.
5. Set Mode to FIR. When you enable IR communication, the IR mode selected by
default is FIR (Fast Infrared).
6. If DMA channel conflicts with Parallel port DMA channel, change Parallel port Mode
to EPP.
7. Save and Exit to continue reboot.
8. The IR hardware will be detected on the next boot into Windows and the appropriate
drivers will be automatically installed.
Reference Guide 73
Page 74

Making Connections
Connecting External Components
To set up the infrared connection
Your notebook provides one IR port located on the rear panel. The IR port provides
wireless, serial communication between your computer and other IR-equipped devices
such as printers and other computers.
= Line up the notebook’s IR port and the other IR port in as straight a line as possible.
The two ports should be no more than one meter apart, with no obstructions in
between. Noise from nearby equipment can cause transmission errors.
= To check the status of communications in Windows 98, go to Infrared Monitor. To
check the status of communications in Windows 2000 and Windows ME, go to
Wireless Link. You can find both under Start, Settings, Control Panel. If infrared
communication is not enabled, you can enable it here; consult help in the application.
To print to an infrared printer
With Windows 2000 or Windows ME, when you align the IR ports of the computer and
the printer, the appropriate drivers are loaded automatically. Follow the onscreen
directions, and you can proceed to print.
With Windows 98, you must install the printer driver and assign it to the notebook’s
Infrared Printing (LPT) port, which is usually assigned to LPT3. Click Start, Settings,
Printers, Add Printer, and follow the onscreen directions.
If you have already assigned a printer to the parallel port, you can assign the same printer
to the infrared port by adding another printer. Windows will keep the same printer driver,
and you can then also assign it to the infrared port.
You can print from your applications to an infrared printer in the same way as you would
to a printer connected to the parallel port. Set the infrared printer as your default printer—
or select it when you print from within the application. Be sure the computer and printer
IR ports are properly aligned.
To transfer files with an infrared connection
To transfer files through the IR port, right-click on the name or icon of the file you want
to transfer and click Send To, Infrared Recipient. In Windows 2000 and Windows ME,
“Infrared Recipient” appears only when the computer is aligned with another IR device
and detects it.
For higher-performance file transfer, you can also use the Direct Cable Connection
software built into Windows 98, or the Wireless Link software built into Windows 2000
and Windows ME.
74 Reference Guide
Page 75

Making Connections
Connecting External Components
In Windows 98, you need to install the Direct Cable Connection software first:
1. From Control Panel, click Add/Remove Programs.
2. Click Windows Setup, Communications, and select Direct Cable Connection.
See the Windows online help for instructions about how to use Direct Cable Connection
or Wireless Link.
To use an external monitor
You can connect your computer to an external monitor and then use either display—or
both displays at once.
To connect an external monitor
1. Click Start, Shut Down, Shut down, OK.
2. Connect the monitor cable from the monitor to the VGA port on the rear of the
computer or on the optional port replicator.
3. Connect the monitor to a power source and turn it on.
4. Slide the power switch to turn on the computer.
To switch the display to the external monitor
= Close the computer lid.
OR
= Press Fn+F5 (or Left Ctrl+Left Alt+F5 on an external keyboard) to cycle through the
display options: notebook display, external monitor, both.
To adjust monitor resolution
1. Click Start, Settings, Control Panel, Display.
2. On the Settings tab, adjust the Screen area.
To use dual display mode (Windows 98 and Windows ME)
You can extend the desktop by connecting an external monitor to your notebook.
Dual display mode requires that your computer display be set as shown in the table below.
Click Start, Settings, Control Panel, Display, Settings tab to adjust these settings.
Reference Guide 75
Page 76

Making Connections
Connecting External Components
Notebook screen Screen area Colors
12-inch TFT or
13-inch HPA
13-inch, 14-inch, or
15-inch
800×600 pixels 256 colors or
High Color (16 bit)
800x600 pixels or
1024×768 pixels
256 colors or
High Color (16 bit) or
True Color (24 bit)
1. Set your notebook display settings according to the table above.
2. Click the Start Button and select Shut down.
3. Connect the monitor cable from the monitor to the VGA port on the rear of the
computer or the port replicator.
4. Connect the monitor to a power source and turn it on.
5. Slide the power switch to turn on the computer. Windows will detect the second
monitor and attempt to load the proper display driver. Follow the onscreen
instructions.
6. Click Start, Settings, Control Panel, Display, Settings tab. Position the second monitor
to the right or left of your notebook display to match your monitor location.
7. Make sure that the Settings box “Extend my Windows desktop onto this monitor” is
checked.
You can change the Screen area and Colors settings for the second monitor by selecting
Display #2. These settings can be different from your notebook display settings.
To use a TV set as monitor
You can connect your computer to a television set and then use it as a display. The
computer’s LCD display continues to be active when you use a TV set.
To connect a TV set
1. Connect a TV cable from the TV set to the TV out port on the rear of the computer or
the port replicator. (You don’t need to turn the computer off.)
2. Connect the TV set to a power source and turn it on.
To activate and adjust TV display
If a monitor or display icon appears in the system tray, click it and select TV from the
options list. The computer’s display will change to 640x480.
76 Reference Guide
Page 77

Note
Making Connections
Connecting External Components
You can adjust the TV display by following these steps:
1. Click Start, Settings, Control Panel, Display.
2. Select Settings tab and click Advanced.
3. Select S3DuoVue tab and click TV. If the TV option is grayed out, reboot the system
with the TV powered on and the connector attached, then select TV in the S3DuoVue
tab again.
4. To center the display in the TV set or to adjust other settings, click Settings under the
TV graphic.
5. The TV Type for your country is automatically detected. (If it is incorrect, select the
correct type: NTSC is used in North and South America, except for Argentina and
Brazil; NTSC/Japan in Japan, South Korea, and Taiwan; and PAL in most other
countries.)
It may be necessary to change the TV settings in the BIOS Setup utility. To do this,
reboot your computer and when you see the HP logo, press F2 to start the BIOS Setup
utility. Then select the appropriate television type in the Main settings page of the BIOS
Setup.
Note
To disable TV
To return the system to normal operation, click the monitor or display icon in the system
tray and deselect the TV option.
Selecting Exit from the monitor or display icon pop-up menu removes the icon from the
system tray. If you do this, you will have to access the TV settings from the Control
Panel as described in the above steps.
To use the port replicator
(On models provided with a docking connector.) With the optional port replicator, you
can connect external components—and then avoid disconnecting and reconnecting them
each time you take the computer on the road. You can find additional information about
the port replicator in the manual that comes with it.
Reference Guide 77
Page 78

Making Connections
Connecting External Components
To connect to the port replicator
1. Plug in the AC adapter, then connect it to the rear of the port replicator. Make sure
that the AC status light is on.
2. Align the computer with the locator pins on the port replicator.
3. Press the computer down until it clicks into place. Make sure that the dock status light
is on.
4. Open the computer and slide the power switch to the left to turn it on.
After the computer is turned on, you can close the lid while it is running.
78 Reference Guide
Page 79

Making Connections
Connecting External Components
To disconnect from the port replicator
1. Press down on the release tab on the right side of the port replicator.
2. Lift the computer from the port replicator.
Reference Guide 79
Page 80

Page 81

Configuring and Expanding Your Computer
Reference Guide 81
Page 82

Configuring and Expanding Your Computer
Using the BIOS Setup Utility
Using the BIOS Setup Utility
The BIOS (Basic Input and Output System) Setup utility is a menu-driven utility that
enables you to make changes to the system configuration and tailor the operation of your
computer to your individual work needs.
The settings made in the BIOS Setup utility control the hardware and therefore have a
fundamental effect on how the computer operates.
To run the BIOS Setup utility
1. Shut down Windows and restart the computer (Click Start, Shut Down, Restart).
2. When you see the HP logo, press F2 to enter the BIOS Setup utility.
3. Select the options you want. You can find a complete list of available options in BIOS
Setup utility options on page 126.
4. After you have finished making changes, press F10 (or select Exit, Saving Changes
and Exit).
Note
5. Press Enter, then Enter again, to confirm and reboot the computer.
If the settings cause a conflict between devices during reboot, the system prompts you to
run BIOS Setup, and the conflicting settings are marked.
The pointing devices are not active in the BIOS Setup utility. Press the Right and Left
arrow keys to move from one menu to another. Press the Down and Up arrow keys to
move among parameters in a menu. Press F5 or F6 to move through values for the current
parameter or press Enter to change a setting.
To Boot from a Floppy Disk or CD-ROM
Your HP notebook is configured to boot from the hard drive first. If you want to boot
from a floppy disk or a CD-ROM, change the boot order under the Boot menu in the
BIOS Setup utility. You can also select the boot drive at startup by pressing Esc when
you see the HP logo.
82 Reference Guide
Page 83

Configuring and Expanding Your Computer
Installing RAM modules
Installing RAM modules
The notebook provides an optional memory expansion slot for installing up to two RAM
expansion modules. Use HP SDRAM modules only; EDO RAM is not supported.
Your computer’s computer chips are extremely static-sensitive. Static electricity can
permanently damage computer chips. Carefully read the following caution information.
CAUTION
Handle the RAM module only by its three nonconnector edges. Otherwise, you may
damage the module due to electrostatic discharge. Static electricity can permanently
damage computer chips. It is therefore important to discharge the static electricity
from your body before touching or installing the memory module. Discharge your
body’s electricity by touching the metal shielding around the connectors on the rear
of the computer.
You’ll need a small Phillips screwdriver to complete this procedure.
1. Click the Start Button and select Shut down.
2. Unplug the AC adapter and remove the battery.
3. Remove the RAM expansion cover located on the bottom of the computer, using a
Phillips screwdriver.
Reference Guide 83
Page 84

Configuring and Expanding Your Computer
Installing RAM modules
4. Insert the RAM expansion module into the connector at about a 30 angle until it’s
fully inserted. Then press down at both sides of the module until it latches.
5. Replace the RAM expansion module door.
6. Insert the battery.
84 Reference Guide
Page 85

Configuring and Expanding Your Computer
Removing RAM modules
Removing RAM modules
After you remove the RAM expansion cover:
1. Release the two latches at the sides of the RAM expansion module by pushing them
gently outward (away from the sides of the module). When you release the latches, the
free edge of the module pops up.
2. Pull the module out of the connector.
3. Replace the RAM expansion module door.
Reference Guide 85
Page 86

Configuring and Expanding Your Computer
Expanding the hibernate partition
Expanding the hibernate partition
You can create the hibernate partition by booting from the Recovery CD. The partitioning
and recovery process takes approximately 10 to 15 minutes. Do not interrupt the process
or unplug the AC adapter until the process is completed.
CAUTION
This procedure will format the hard disk drive and erase all data on the disk. Be sure
to back up all data from your hard disk before you begin this procedure. After the
hard disk drive is formatted, you’ll need to reinstall any applications.
1. Back up all data from your hard disk.
2. If you wish to install additional RAM, do so now.
3. Connect the AC adapter to the computer.
4. Insert the Recovery CD in the CD-ROM (or DVD) drive. (If your system came with
two Recovery CDs, insert Disc 1.)
5. Restart the computer, and when you see the HP logo, press Esc.
6. Select CD-ROM/DVD Drive as the first boot device, and press Return to continue.
7. If you want to choose a nondefault partition size. select the Advanced menu and select
a size from the Hibernate Partition Size drop-down list.
8. If you want to create a hibernate partition without recovering the operating system,
select the “Do not load operating system” checkbox and select one of the partition
options.
9. Choose Continue.
10. Click OK to begin.
If your system came with two Recovery CDs, you may be prompted to insert Disc 2
during the partitioning process.
11. When you are prompted to reboot your computer, remove the Recovery CD and press
Ctrl+Alt+Delete.
12. Follow the onscreen instructions for setting up Windows.
13. When Windows setup is complete, reinstall any applications and restore backed-up
data.
86 Reference Guide
Page 87

Configuring and Expanding Your Computer
Updating Windows Drivers
Updating Windows Drivers
To download the latest Windows drivers
Hewlett-Packard supports three operating systems (OSs) on your notebook—
Windows 98, Windows ME and Windows 2000—and your computer was shipped with
one of these OSs. If you decide to install the other OS instead, be sure to download the
latest drivers for it from the Web at www.hp.com/notebooks. You can also check this
website to find updated drivers for your original OS.
To locate Windows drivers on your system
When you install hardware or otherwise change the configuration of your computer, you
are sometimes asked to provide a location from which to copy driver files. Do not click
the Browse button to find the folder for a driver, since this may cause the system to
malfunction. Instead, type the path and filename of the location directly; for example,
c:\hp\drivers\audio.
To use digitally signed drivers in Windows 98 and Windows
ME
If you have chosen to enable driver signing in Windows 98 and Windows ME, you may
need to obtain updated drivers for your notebook PC. During installation, Windows 98
and Windows ME expect each driver file to include a digital signature file (with a .cat
extension) when driver signing is enabled. Since some files may not have been available
at the time your computer was manufactured, it is possible that you will see a message
prompting you for a digital signature file. If so, you need to obtain updated drivers, and
when available they will be posted on the Web at www.hp.com/notebooks.
Most users, however, choose to use the default Windows 98 and Windows ME
configuration, which disables driver signing. In that case, you can ignore any messages
prompting you for a digital signature file (with a .cat extension) during installation. The
drivers will function correctly without these files, so you can skip their installation.
Reference Guide 87
Page 88

Page 89

Service and Support
Reference Guide 89
Page 90

Service and Support
Hewlett-Packard Limited Warranty Statement
Hewlett-Packard Limited Warranty Statement
1. HP warrants to you, the end-user customer, that HP hardware, accessories, and
supplies will be free from defects in materials and workmanship after the date of
purchase, for the period specified in the Warranty Duration sheet included with your
HP computer. HP Pavilion and XE Series Notebooks typically come with a standard
one-year warranty. Please see your Warranty Duration sheet for more details. If HP
receives notice of such defects during the warranty period, HP will, at its option,
either repair or replace products which prove to be defective. Replacement products
may be either new or equivalent in performance to new.
2. HP warrants to you that HP software will not fail to execute its programming
instructions after the date of purchase, for the period specified in the Warranty
Duration sheet included with your HP computer, due to defects in material and
workmanship when properly installed and used. If HP receives notice of such defects
during the warranty period, HP will replace software which does not execute its
programming instructions due to such defects.
3. HP does not warrant that the operation of HP products will be uninterrupted or error
free. If HP is unable, within a reasonable time, to repair or replace any product to a
condition as warranted, you will be entitled to a refund of the purchase price upon
prompt return of the product.
4. HP’s limited warranty is valid in any country or locality where HP has a support
presence for this product and where HP has marketed this product. The level of
warranty service you receive may vary according to local standards. HP will not alter
form, fit or function of the product to make it operate in a country for which it was
never intended to function for legal or regulatory reasons.
5. Warranty does not apply to defects resulting from (a) improper or inadequate
maintenance or calibration, (b) software, interfacing, parts, or supplies not supplied by
HP, (c) unauthorized modification or misuse, (d) operation outside of the published
environmental specifications for the product, or (e) improper site preparation or
maintenance.
6.
TO THE EXTENT ALLOWED BY LOCAL LAW, THE ABOVE WARRANTIES ARE
EXCLUSIVE AND NO OTHER WARRANTY OR CONDITION, WHETHER WRITTEN OR
ORAL, IS EXPRESSED OR IMPLIED AND HP SPECIFICALLY DISCLAIMS ANY
IMPLIED WARRANTIES OR CONDITIONS OF MERCHANTABILITY, SATISFACTORY
QUALITY, AND FITNESS FOR A PARTICULAR PURPOSE.
provinces do not allow limitations on the duration of an implied warranty, so the
above limitation or exclusion might not apply to you. This warranty gives you specific
90 Reference Guide
Some countries, states or
Page 91

Service and Support
Hewlett-Packard Limited Warranty Statement
legal rights and you might also have other rights that vary from country to country,
state to state, or province to province.
7.
TO THE EXTENT ALLOWED BY LOCAL LAW, THE REMEDIES IN THIS WARRANTY
STATEMENT ARE YOUR SOLE AND EXCLUSIVE REMEDIES. EXCEPT AS
INDICATED ABOVE, IN NO EVENT WILL HP OR ITS SUPPLIERS BE LIABLE FOR
LOSS OF DATA OR FOR DIRECT, SPECIAL, INCIDENTAL, CONSEQUENTIAL
(INCLUDING LOST PROFIT OR DATA), OR OTHER DAMAGE, WHETHER BASED IN
CONTRACT, TORT, OR OTHERWISE.
Some countries, states or provinces do not allow
the exclusion or limitation of incidental or consequential damages, so the above
limitation or exclusion may not apply to you.
THE WARRANTY TERMS CONTAINED IN THIS STATEMENT, EXCEPT TO THE
EXTENT LAWFULLY PERMITTED, DO NOT EXCLUDE, RESTRICT OR MODIFY AND
ARE IN ADDITION TO THE MANDATORY STATUTORY RIGHTS APPLICABLE TO
THE SALE OF THIS PRODUCT TO YOU.
Reference Guide 91
Page 92

Service and Support
Getting Support for Your HP Notebook PC
Getting Support for Your HP Notebook PC
HP offers a number of ways that you can get technical support for your computer. If you
have questions or problems, here are the resources available to you:
= Look up information in this Reference Guide.
= Visit the HP notebook website.
= Use HP Instant Support on your notebook.
= Call HP support.
= Look up information in Microsoft Windows Help and the printed Windows manual.
To use the Reference Guide
To locate information in the guide, use the Contents, Index, and Search tabs to look for
information. The Contents tab lists the headings of all the topics in the guide. The Index
tab provides an alphabetical list of the keywords in the guide; you can locate a keyword
either by typing it in the box or by scrolling through the list. The Search tab allows you to
find specific words and phrases.
To get help from the HP notebook website
HP has a website on the Internet dedicated to HP notebook owners:
www.hp.com/notebooks. This website contains information about the various HP
notebook models, warranties, support, and special promotions.
To get help with your computer, click the Technical Support button. In the technical
support area, you will have access to:
= answers to frequently asked questions
= software, driver, and BIOS updates
= electronic manuals
= troubleshooting solutions
= self-help tools
92 Reference Guide
Page 93

Service and Support
Getting Support for Your HP Notebook PC
= the basic services included with your warranty, as well as descriptions of enhanced
and custom services
= latest support telephone numbers for HP products
To use HP Instant Support
Available at no charge, HP Instant Support is a value-added service, featuring web-based
automated diagnosis and resolution capabilities. It can be personalized to meet your
business needs, delivering the support experience that works for you and accelerating the
resolution of computing problems.
Choose either automated Self-Service, for online delivery of answers, or Smart Solutions,
which utilizes Instant Support’s “smart search” function. This intelligent tool allows you
to describe problems in everyday language, then wizards you through a variety of userfriendly support options. Find more information about Instant Support on our external
website at www.hp.com/hps/instant/index.htm.
To call HP for Service and Support
If you are unable to solve a problem with your computer, you can call the HP Customer
Care Center. The Customer Care Center will assist you at no charge during the term of the
warranty, for warranty-related questions; you are responsible only for cost of the
telephone call. During the free assistance period, HP will assist with questions about:
= applications and operating systems included with your computer
= HP-described operation environments and conditions
= HP accessories, HP upgrades, and basic operation and troubleshooting
HP will not be able to help with questions about:
= non-HP hardware, software, operating systems, or usage not intended for—or not
included by HP with—the product
= how to repair the product yourself
= product development or custom installations
= consulting
To locate the Customer Care Center in your area, check the following table. HP Customer
Care Centers will assist you for free during the term of the warranty; you are responsible
only for the cost of the telephone call. Check the HP notebook website
Reference Guide 93
Page 94

Service and Support
y
y)
A
g
(0)
(0)
A
)
)
c
g
)
(0)
(0)
y
(0)
gary
y
y
Getting Support for Your HP Notebook PC
(www.hp.com/notebooks) for the most complete and current list of phone numbers. If the
HP notebook product is not normally sold and supported by HP in the country of use, the
customer must call one of the supported HP Customer Care Centers located nearest the
region. Currently, OmniBook XE3 and Pavilion notebook service and support assistance
is only provided in the following countries:
Pavilion Series Notebooks
US & Canada Only – (970) 635-1000
OmniBook XE3 Series
North America
United States +1 (970) 635-1000
Canada +1(905) 206-4663
Latin America
Mexico Cit
Mexico (outside Mexico Cit
Asia Pacific
ustralia +61 (0)3 8877 8000
Hong Kon
Japan +81
Malaysia +60
New Zealand +64 (0)9 356 6640
People’s Republic of China +86 800 810 5959
Singapore +65 272 5300
Taiwan +886(2)2717 0055
Europe
ustria +43 (0)7114 20 1080
Belgium (Dutch
Belgium (French
Czech Republi
Denmark +45 39 29 4099
lish (from outside UK
En
Finland +358
France +33
German
Greece +30
Hun
Ireland +353 (0)1 662 5525
Ital
+39 02 264 10350
Netherlands +31 (0)20 606 8751
Norwa
Poland +48 22 519 06 00
+52 58 9922
+52 01 800 472 6684
+852 800 96 7729
3 3335 8333
3 295 2566
+32 (0)2 626 8806
+32 (0)2 626 8807
+42 (0)2 6130 7310
+44 (0)207 512 52 02
203 47 288
1 43 62 34 34
+49 (0)180 52 58 143
1 619 64 11
+36 (0)1 382 1111
+47 22 11 6299
94 Reference Guide
Page 95

Service and Support
)
g)
y
t
(0)
p
Getting Support for Your HP Notebook PC
Portugal +351 21 317 6333
Russia (Moscow
Russia (St. Petersbur
Spain +34 902 321 123
Sweden +46 (0)8 619 2170
Switzerland +41 (0)848 80 11 11
Turke
United Kingdom +44 (0)207 512 52 02
Africa/Middle Eas
Israel +972
ublic of South Africa +27 (0)86-000-1030
Re
+7 095 797 3520
+7 812 346 7997
+90 (0)212 221 69 69
9 952 4848
Reference Guide 95
Page 96

Service and Support
Obtaining Repair Service
Obtaining Repair Service
To receive warranty repair service
To receive warranty repair service for OmniBook XE3 and Pavilion Notebook Series,
contact the appropriate HP Customer Care Center. Check “To call HP for Service and
Support” on page 93 for the phone number.
Currently, HP Pavilion Notebook PC service is only provided in the United States.
The support technician will help qualify your unit for warranty repair, based on the
warranty applicable to your unit and original purchase date, and will provide you with
repair processes. If the HP notebook product is not normally sold and supported by HP in
the country of use, it must be returned to a supported country for services. Warranty
service may include the cost of shipping, handling, duties, taxes, freight, or fees to or
from the service location.
To repair your computer outside the warranty period
If your PC is no longer in the warranty period, contact the appropriate Customer Care
Center. The HP support person will let you know about repair charges and processes.
To prepare your computer for shipment
1. Important. Back up the contents of your hard disk drive to floppy disks, tape, or a
network drive.
While your computer is being repaired, the hard disk may be replaced or reformatted.
2. Hewlett-Packard cannot guarantee the return of removable components. Please
remove the following before you send your computer for service:
= PC cards
= AC adapter and power cord
= CDs in the CD player
= floppy disks in the floppy disk drive
96 Reference Guide
Page 97

Service and Support
Obtaining Repair Service
3. When shipping your computer to Hewlett-Packard, please use the original product
packaging or other substantial packaging in order to avoid damage in transit. Make
sure to wrap at least 3 inches of protection around the unit and the courier will put it
into one of their boxes.
HP recommends that you leave the hard disk drive in the computer when you send it for
repair. When the computer is returned, you can restore your data from the backup you
made. If you nevertheless want to remove the hard disk drive for this (or some other)
reason, see “Removing and Reinstalling the Hard Disk Drive” on page 121.
Reference Guide 97
Page 98

Page 99

Solving Problems with Your Computer
Reference Guide 99
Page 100

Solving Problems with Your Computer
Troubleshooting Techniques
Troubleshooting Techniques
This section contains solutions to a few common problems and troubleshooting
techniques for your HP notebook PC.
Audio problems
If sound is not audible
= Press Fn+Up arrow several times.
= Click the speaker icon on the taskbar to ensure that Mute is not checked.
= When you are operating your computer in MS-DOS mode (for example, when running
MS-DOS games), you may find that the sound does not operate properly. Use
Windows applications for full use of sound capabilities.
If sound does not record
= Check software controls for recording sound: Click Start, Programs, Accessories,
Multimedia (or Entertainment), Sound Recorder.
If the PC card detection beep(s) at startup are very loud and volume cannot be
adjusted
= Download the latest audio driver from the technical support area of the HP notebook
website www.hp.com/notebooks.
You may also want to test the audio with diagnostics. See “Testing Hardware Operation.”
CD-ROM drive problems
If you can’t boot from a CD in the CD-ROM drive
= Make sure the CD is a bootable CD, such as the Recovery CD.
= If you always want to boot from a CD when one is present, check the boot order in
BIOS Setup and change it.
1. Click Start, Shut Down, Restart.
100 Reference Guide
 Loading...