

HP Pavilion N3210, Pavilion N3270, Pavilion N3250, Pavilion N3290, Pavilion N3295 Setup Manual
...Page 1

HP Pavilion Notebook PC
Setup Guide
Page 2

Notice
This manual and any examples contained herein are provided “as is” and are subject to
change without notice. Hewlett-Packard Company makes no warranty of any kind with
regard to this manual, including, but not limited to, the implied warranties of
merchantability and fitness for a particular purpose. Hewlett-Packard Co. shall not be
liable for any errors or for incidental or consequential damages in connection with the
furnishing, performance, or use of this manual or the examples herein.
Consumer transactions in Australia and the United Kingdom: The above disclaimers and
limitations shall not apply to Consumer transactions in Australia and the United Kingdom
and shall not affect the statutory rights of Consumers.
© Copyright Hewlett-Packard Company 2000. All rights reserved. Reproduction,
adaptation, or translation of this manual is prohibited without prior written permission of
Hewlett-Packard Company, except as allowed under the copyright laws.
The programs that control this product are copyrighted and all rights are reserved.
Reproduction, adaptation, or translation of those programs without prior written
permission of Hewlett-Packard Co. is also prohibited.
Portions of the programs that control this product may also be copyrighted by Microsoft
Corporation, SystemSoft Corp., Crystal Semiconductor Corporation, Insyde Software,
Inc., Silicon Motion Corporation, ESS, and Adobe Systems Incorporated. See the
individual programs for additional copyright notices.
Microsoft, MS, MS-DOS, Windows, and Windows NT are registered trademarks of
Microsoft Corporation. Pentium and the Intel Inside logo are U.S. registered trademarks
and MMX is a U.S. trademark of Intel Corporation. TrackPoint is a U.S. registered
trademark of International Business Machines. Adobe and Acrobat are trademarks of
Adobe Systems Incorporated.
Hewlett-Packard Company
Mobile Computing Division
19310 Pruneridge Ave.
Cupertino, CA 95014
2 Setup Guide
Page 3

HP Software Product License Agreement
Your notebook PC contains factory-installed software programs. Please read the Software
License Agreement before proceeding.
Carefully read this License Agreement before proceeding to operate this equipment.
Rights in the software are offered only on the condition that the customer agrees to
all terms and conditions of the License Agreement. Proceeding to operate the
equipment indicates your acceptance of these terms and conditions. If you do not
agree with the terms of the License Agreement, you must now either remove the
software from your hard disk drive and destroy the Recovery CD, or return the
complete computer and software for a full refund.
Proceeding with configuration signifies your acceptance of the License Terms.
Unless otherwise stated below, this HP Software Product License Agreement shall
govern the use of all software that is provided to you, the customer, as part of the
HP computer product. It shall supersede any non-HP software license terms that
may be found online, or in any documentation or other materials contained in the
computer product packaging.
Operating System Software by Microsoft is licensed to you under the Microsoft
Note:
End User License Agreement (EULA).
The following License Terms govern the use of the software:
Customer may use the software on any one computer. Customer may not network
Use.
the software or otherwise use it on more than one computer. Customer may not reverse
assemble or decompile the software unless authorized by law.
Copies and Adaptations.
for archival purposes or (b) when copying or adaptation is an essential step in the use of
the software with a computer so long as the copies and adaptations are used in no other
manner.
Ownership.
software, other than ownership of the physical media. Customer acknowledges and agrees
that the software is copyrighted and protected under the copyright laws. Customer
acknowledges and agrees that the software may have been developed by a third party
software supplier named in the copyright notices included with the software, who shall be
authorized to hold the Customer responsible for any copyright infringement or violation
of this Agreement.
Product Recovery CD-ROM.
CD-ROM: (i) The product recovery CD-ROM and/or support utility software may only
be used for restoring the hard disk of the HP computer with which the product recovery
CD-ROM was originally provided. (ii) The use of any operating system software by
Microsoft contained in any such product recovery CD-ROM shall be governed by the
Microsoft End User License Agreement (EULA).
Customer agrees that he/she does not have any title or ownership of the
Customer may make copies or adaptations of the software (a)
If your computer was shipped with a product Recovery
Setup Guide 3
Page 4

Transfer of Rights in Software. Customer may transfer rights in the software to a third
party only as part of the transfer of all rights and only if Customer obtains the prior
agreement of the third party to be bound by the terms of this License Agreement. Upon
such a transfer, Customer agrees that his/her rights in the software are terminated and that
he/she will either destroy his/her copies and adaptations or deliver them to the third party.
Sublicensing and Distribution.
distribute copies or adaptations of the software to the public in physical media or by
telecommunication without the prior written consent of Hewlett-Packard.
Termination.
with any of these terms provided Hewlett-Packard has requested Customer to cure the
failure and Customer has failed to do so within thirty (30) days of such notice.
Updates And Upgrades.
upgrades which may be available from Hewlett-Packard under a separate support
agreement.
Export Clause.
adaptation in violation of the U.S. Export Administration regulations or other applicable
regulation.
U.S. Government Restricted Rights.
Government is subject to restrictions as set forth in subparagraph (c)(1)(ii) of the Rights
in Technical Data and Computer Software clause in DFARS 252.227-7013. HewlettPackard Company, 3000 Hanover Street, Palo Alto, CA 94304 U.S.A. Rights for nonDOD U.S. Government Departments and Agencies are as set forth in FAR 52.22719(c)(1,2).
Hewlett-Packard may terminate this software license for failure to comply
Customer agrees not to export or re-export the software or any copy or
Customer may not lease, sublicense the software or
Customer agrees that the software does not include updates and
Use, duplication, or disclosure by the U.S.
Edition History
Edition 1 ............................................. April 2000
This manual is printed on recycled paper.
4 Setup Guide
Page 5

Contents
Introducing Your HP Notebook PC.................................................................................9
Taking Inventory..........................................................................................................10
Software bundled on your computer ...................................................................... 10
To buy accessories..................................................................................................11
To find more information.......................................................................................12
Identifying the Parts of the Notebook..........................................................................13
Front view...............................................................................................................13
Side view ................................................................................................................14
Rear view................................................................................................................15
Bottom view............................................................................................................16
Status lights.............................................................................................................17
CD-ROM drive buttons..........................................................................................18
Setting Up the Computer..............................................................................................19
To install the battery...............................................................................................19
To connect AC power............................................................................................. 20
To connect a phone line.......................................................................................... 20
To turn on the computer ......................................................................................... 21
To set up Windows.................................................................................................22
To register your computer ...................................................................................... 23
To connect to an Internet Service Provider............................................................24
To reset your computer...........................................................................................24
To reset the screen saver.........................................................................................25
Using Your HP Notebook PC.......................................................................................... 27
Operating the Computer...............................................................................................28
To use the Fn hot keys............................................................................................28
To use the Windows and Applications keys ..........................................................29
To use the embedded keypad .................................................................................29
To use the ALT GR key .........................................................................................30
To adjust the display...............................................................................................30
To adjust the volume ..............................................................................................30
To use the touch pad...............................................................................................31
Securing the Computer.................................................................................................33
To set up password protection................................................................................33
To attach a security cable .......................................................................................34
To use the VirusScan utility ................................................................................... 34
Working in Comfort.....................................................................................................35
About Repetitive Strain Injury ...............................................................................35
Preparing Your Work Environment ....................................................................... 37
Setting Up Your HP Computing Equipment..........................................................39
Comfort and Safety Checklist ................................................................................44
Setup Guide 5
Page 6

Your HP Notebook PC...........................................................................................46
Caring for Your Computer...........................................................................................48
To protect your hard disk drive..............................................................................48
To take care of your computer................................................................................48
To safeguard your data...........................................................................................49
To extend the life of the display.............................................................................49
To get the most from your batteries .......................................................................50
To clean your computer..........................................................................................50
Traveling with Your Computer......................................................................................51
Managing Power Consumption....................................................................................52
To use automated power management...................................................................52
To use manual power management........................................................................54
Using Battery Power ....................................................................................................56
To check the battery status ..................................................................................... 56
To respond to a low-battery warning .....................................................................57
To optimize battery operating time ........................................................................57
Making Connections ........................................................................................................59
Using Your Modem......................................................................................................60
To sign up with an Internet Service Provider......................................................... 60
To connect to the Internet.......................................................................................61
To disconnect from the Internet .............................................................................62
To send and receive e-mail.....................................................................................62
To send and receive faxes.......................................................................................63
To select modem modes.........................................................................................64
To dial in France and Spain....................................................................................65
Connecting PC Cards ...................................................................................................66
Connecting External Components................................................................................68
To identify the ports ...............................................................................................68
To use the port replicator........................................................................................ 70
To connect a printer (or other parallel device).......................................................72
To connect an external keyboard or PS/2 mouse...................................................72
To connect a USB device ....................................................................................... 72
To connect audio devices .......................................................................................73
To use an external monitor.....................................................................................73
Configuring and Expanding Your Computer...............................................................75
6 Setup Guide
Using the BIOS Setup Utility.......................................................................................76
To run the BIOS Setup utility.................................................................................76
To select options from the BIOS Setup utility.......................................................76
Installing RAM modules..............................................................................................79
Removing RAM modules.............................................................................................81
Replacing a hard disk drive..........................................................................................82
Page 7

Expanding the Hibernate Partition...............................................................................83
Service and Support.........................................................................................................85
Hewlett-Packard Limited Warranty Statement............................................................86
Getting Support for Your HP Notebook PC ................................................................88
To use the User’s Guide.........................................................................................88
To get help from the HP notebook Web site..........................................................88
To get support from the HP Customer Care Web site............................................89
To call the HP Customer Care Center....................................................................89
Obtaining Repair Service .............................................................................................91
To receive warranty repair service ......................................................................... 91
To repair your computer outside the warranty period............................................91
To prepare your computer for shipment.................................................................91
Solving Problems with Your Computer.........................................................................93
Troubleshooting Techniques........................................................................................94
Audio Problems......................................................................................................94
CD-ROM Drive Problems......................................................................................94
Display Problems.................................................................................................... 95
DVD Problems........................................................................................................97
Hard Disk Drive Problems .....................................................................................98
Heat Problems.........................................................................................................99
Keyboard, Touch Pad, and Mouse Problems.........................................................99
Memory Problems ................................................................................................100
MIDI Problems.....................................................................................................100
Modem Problems..................................................................................................100
PC Card (PCMCIA) Problems .............................................................................101
Performance Problems..........................................................................................102
Port Replicator Problems...................................................................................... 103
Power and Battery Problems ................................................................................ 103
Printing Problems .................................................................................................105
Recovery CD Problems........................................................................................106
Serial, Parallel, and USB Problems......................................................................106
Startup Problems...................................................................................................107
Suspending and Resuming Problems...................................................................108
Testing Hardware Operation......................................................................................109
Recovering and Reinstalling Software.......................................................................111
To recover the factory installation of your hard disk...........................................111
To replace a damaged Recovery CD....................................................................112
To update the HP Notebook BIOS.......................................................................112
To recover an application.....................................................................................113
Specifications and Regulatory Information.................................................................115
Hardware and Software Specifications......................................................................116
Setup Guide 7
Page 8

HP Notebook PC Hardware Specifications..........................................................116
Software System Resources..................................................................................118
Safety Information...................................................................................................... 120
Power Cords..........................................................................................................120
Battery Safety .......................................................................................................121
Laser Safety ..........................................................................................................121
Regulatory Information..............................................................................................122
U.S.A. ...................................................................................................................122
Canada ..................................................................................................................123
European Union....................................................................................................124
Japan ..................................................................................................................... 124
International..........................................................................................................125
Index................................................................................................................................127
8 Setup Guide
Page 9

Introducing Your HP Notebook PC
Setup Guide 9
Page 10

Introducing Your HP Notebook PC
Taking Inventory
Taking Inventory
• HP notebook PC.
• Main battery.
• AC adapter and power cord.
• Telephone cord.
• Quick Start sheet.
• The HP notebook PC Setup Guide.
• Recovery CD (or CDs), used to restore Windows 98 and all software included with
your computer.
• Microsoft Encarta CD.
• Microsoft Works CD.
• Microsoft Money CD.
• Microsoft Windows 98 manual.
Software bundled on your computer
Your HP notebook PC comes with a selection of the software listed here. Various models
are configured with different combinations of software.
Software Function
HP e-center Provides easy access to e-pages and e-services—including Internet
registraion, backup, e-mail, and fax transfer.
Microsoft Works Offers word processing, spreadsheet, database, and calendar
applications, all contained in a single software program. (A CD is
included, in case you have to reinstall the software.)
Microsoft Encarta Provides access to a CD-based encyclopedia.
Microsoft Money Helps you manage finances at home and at the office using electronic
checkbooks, online banking, and tools for investment tracking and tax
planning. (A CD is included.)
Quicken Basic 2000 Allows you to manage and organize your finances, including
checkbook balancing, bill paying, and budget development.
10 Setup Guide
Page 11

Introducing Your HP Notebook PC
Taking Inventory
QuickLink III Permits fax transfer to fax machines and fax software—and permits
data transfer.
McAfee VirusScan Protects your computer from files that can be harmful.
My Yahoo! Provides access to Yahoo! Web site, including customizable My
Yahoo! Web site in regions where available.
Adobe Acrobat Reader Allows you to read documents in Acrobat format, which is used
frequently on the Web.
HP DiagTools Provides hardware diagnostic tests.
AudioRack 32 Controls play of audio CDs.
MusicMatch Jukebox Controls play of MP3 music files.
DVD Player For computers with a DVD drive, controls DVD play.
To buy accessories
You can buy accessories for your computer online. For the latest accessories and options,
visit us at www.hp.com/notebooks. As new accessories become available, you’ll find
them listed here.
At this time, HP offers the following accessories and replacement modules.
• Port replicator (HP F1738A).
• Auto/airline adapter (HP F1455A).
• AC adapter (HP F1454A).
• Ultraslim AC adapter (HP F1781A).
• Primary lithium ion battery (HP F1739A).
• Y adapter for mouse and keyboard (HP F1469A).
• Additional RAM—HP SDRAM:
• 32 MB (F1456B).
• 64 MB (F1457B).
• 128 MB (F1622B).
Setup Guide 11
Page 12

Introducing Your HP Notebook PC
Taking Inventory
To find more information
Congratulations! Your notebook PC sets a new standard in personal computing. It is
compact and easy to carry, and is infused with the quality and attention to detail that are
the hallmark of Hewlett-Packard.
The Quick Start sheet shows how to get your computer up and running quickly.
This table lists other sources of information about your computer.
Source Description
User’s Guide
Pavilion Notes
Introductory Microsoft
manual for Windows 98.
HP notebook Web site
HP Customer Care Web
site
The User's Guide is a help file located on your hard drive. It provides you with
detailed information about your notebook PC (Start, Programs, Pavilion
Library—or double-click the Pavilion Library icon on the desktop).
This document contains late-breaking information available after the manuals
were completed (Start, Programs, Pavilion Library—or double-click the
Pavilion Library icon on the desktop).
This manual contains information about using the standard features of
Microsoft Windows 98.
www.hp.com/notebooks
www.hp.com/cposupport
12 Setup Guide
Page 13
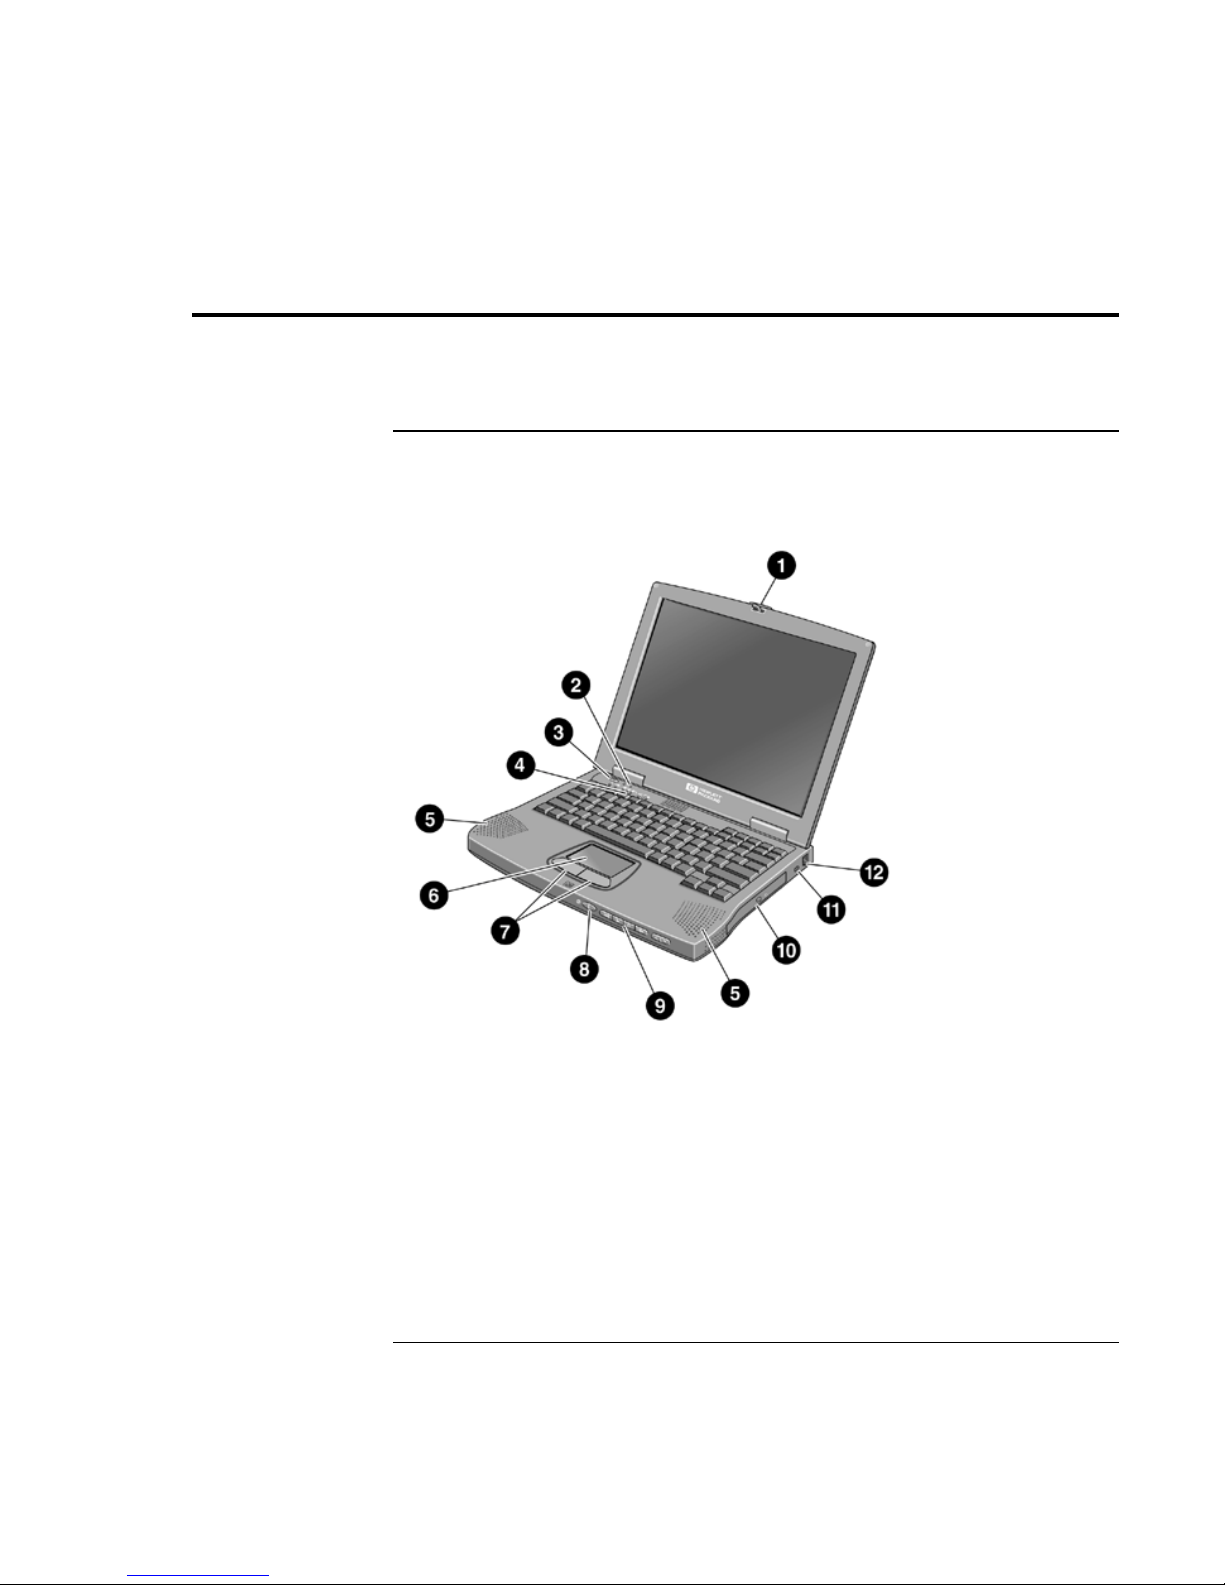
Identifying the Parts of the Notebook
Front view
Introducing Your HP Notebook PC
Identifying the Parts of the Notebook
1 Latch to open the computer
2 Built-in microphone
3 Blue power button
4 Status lights (see "Status lights" on page 17)
5 Built-in speakers
6 Touch pad (pointing device)
Setup Guide 13
Page 14
Introducing Your HP Notebook PC
Identifying the Parts of the Notebook
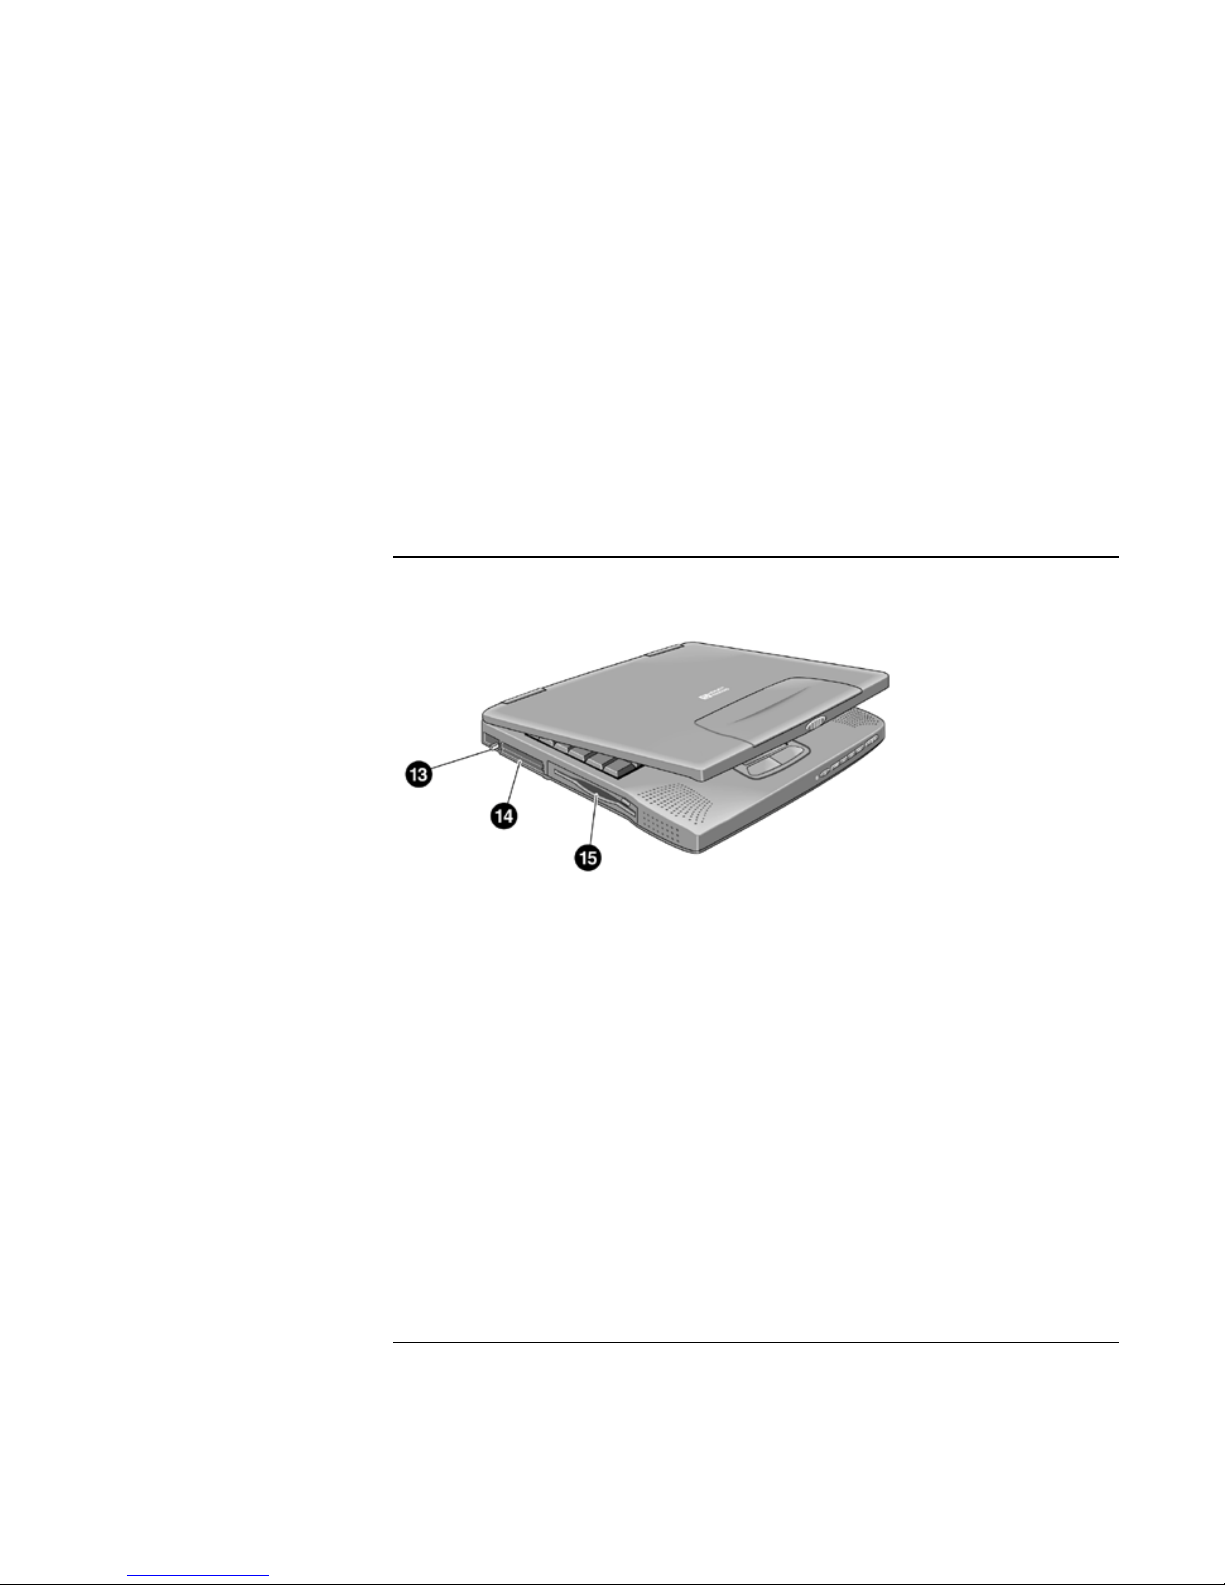
7 Click buttons
8 CD player power
9 CD player buttons
10 CD-ROM drive or DVD drive
11 Kensington lock slot (security connector)
12 Modem phone jack
Side view
13 PC Card eject button
14 PC Card and CardBus slot (lower)
15 Floppy disk drive
14 Setup Guide
Page 15
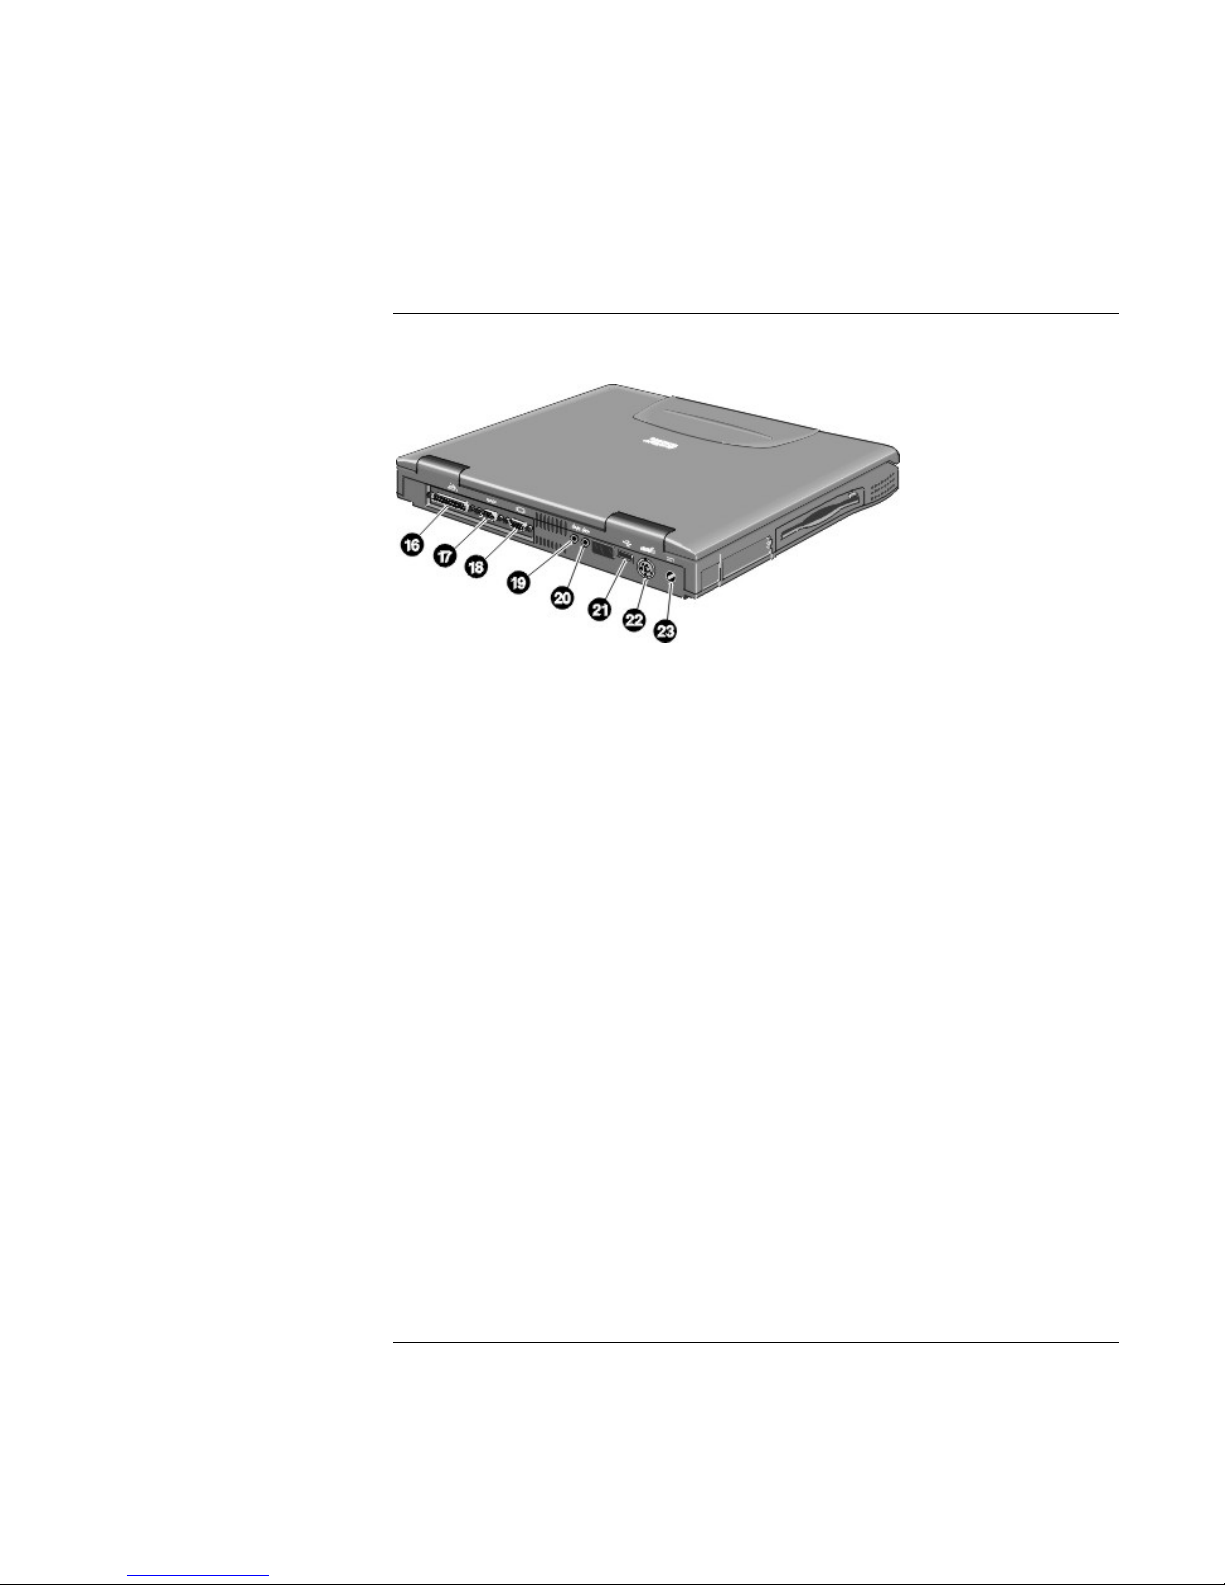
Rear view
16 Parallel port
17 Serial port
Introducing Your HP Notebook PC
Identifying the Parts of the Notebook
18 VGA port (external monitor)
19 Audio out (external speaker)
20 Microphone jack
21 USB port
22 PS/2 port
23 AC adapter jack
Setup Guide 15
Page 16
Introducing Your HP Notebook PC
Identifying the Parts of the Notebook
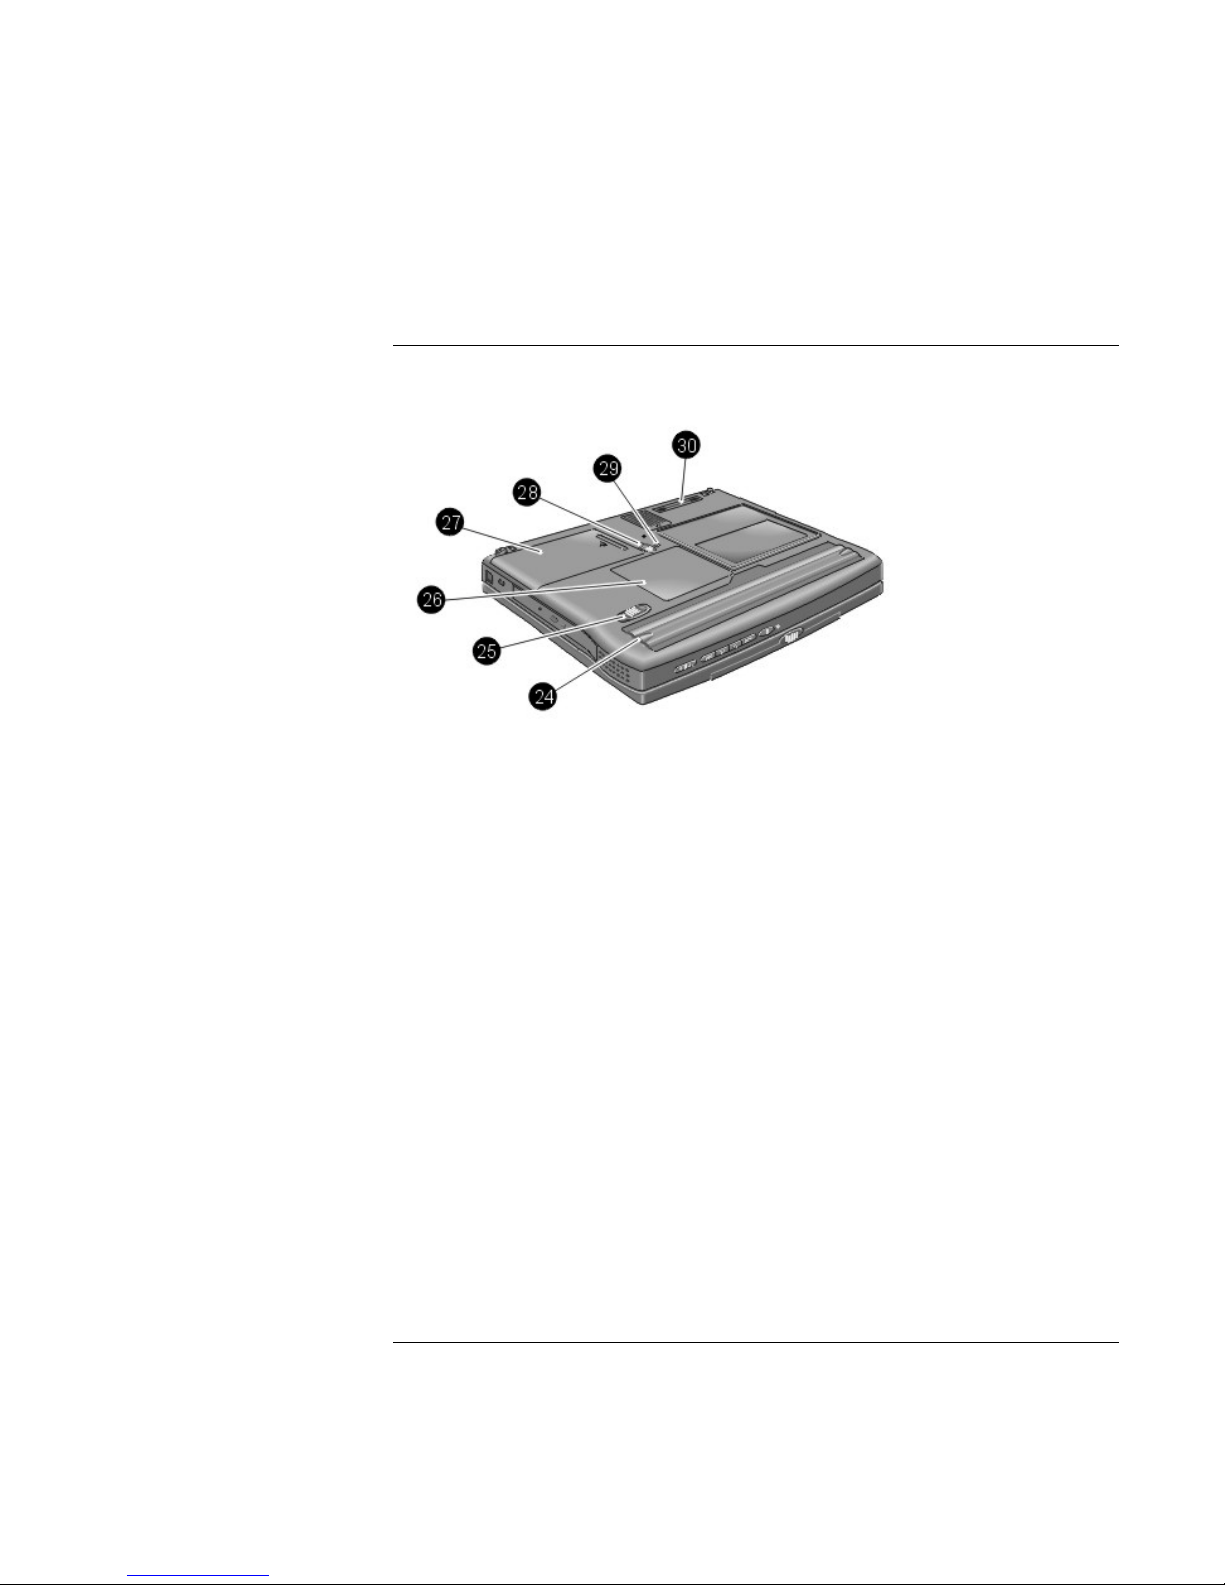
Bottom view
24 Battery
25 Battery latch
26 RAM expansion cover
27 Hard disk drive
28 Hard disk drive latch and locking screw
29 System-off button (for resetting computer)
30 Port replicator connector
16 Setup Guide
Page 17
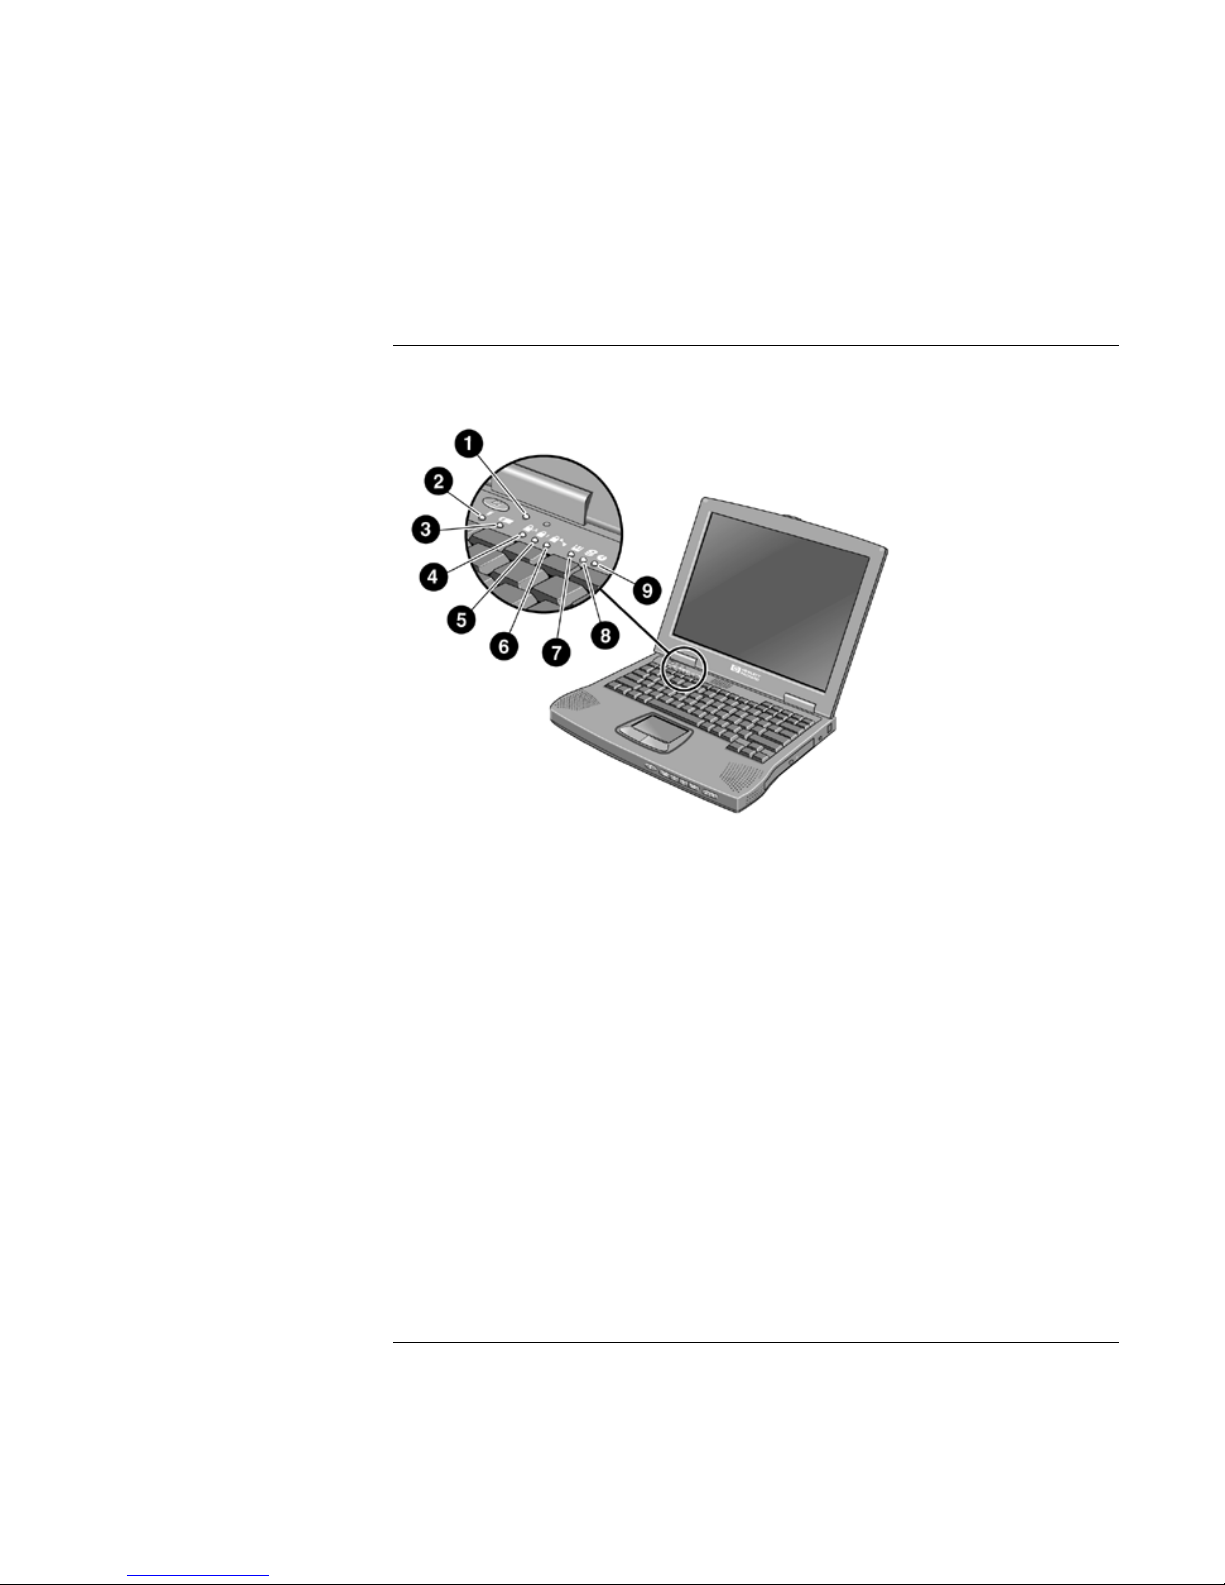
Status lights
Introducing Your HP Notebook PC
Identifying the Parts of the Notebook
1Power
2 AC connected
3 Battery
4 Caps Lock
5 Num Lock
6 Scroll Lock
7 Floppy disk drive access
8 Hard disk drive access
9 CD-ROM or DVD access
Setup Guide 17
Page 18
Introducing Your HP Notebook PC
Identifying the Parts of the Notebook
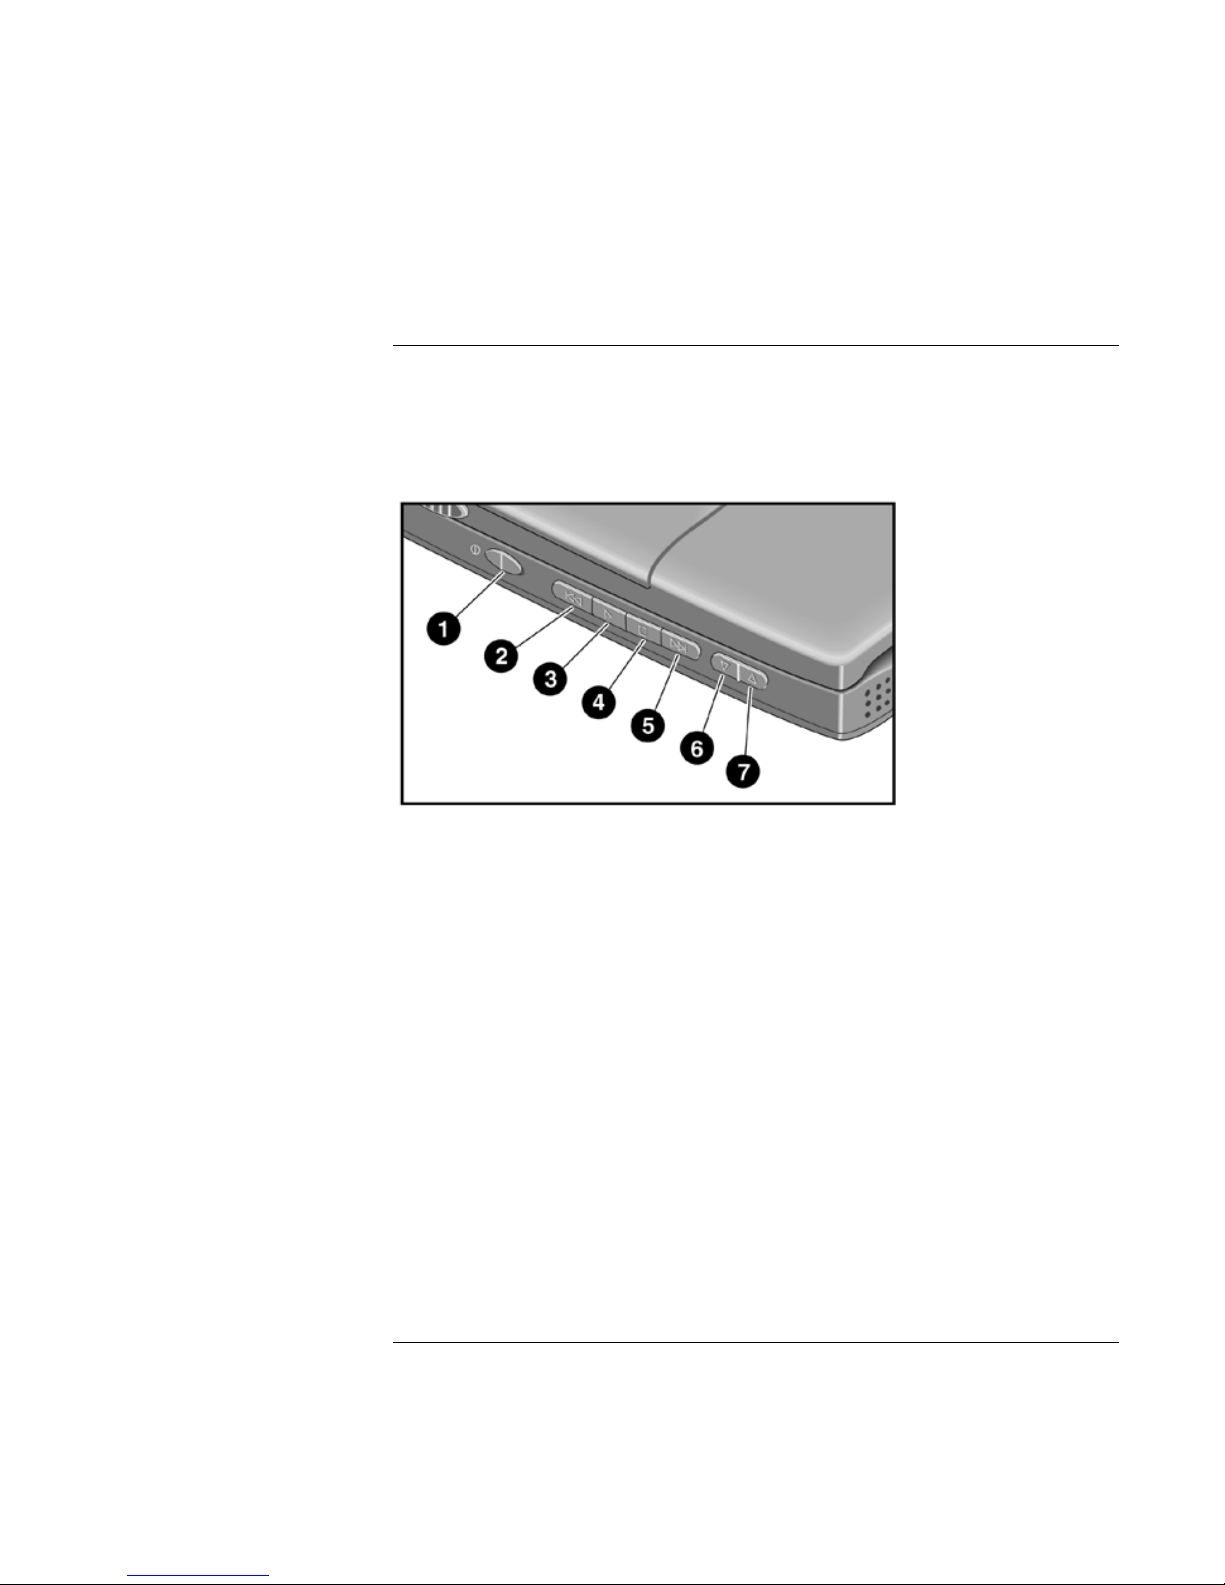
CD-ROM drive buttons
Selected models have CD-ROM buttons on the front. If you have a CD-ROM drive or a
DVD drive, you can use these buttons to play music CDs when the system is off. (When
the system is on, use the software controls in the Windows operating system.)
1 Power (slide to turn on or off)
2 Previous track
3Play
4Stop
5 Next track
6 Volume control down
7 Volume control up
18 Setup Guide
Page 19
Setting Up the Computer
To install the battery
Introducing Your HP Notebook PC
Setting Up the Computer
WARNING
Do not mutilate, puncture, or dispose of batteries in fire. A battery can burst or
explode, releasing hazardous chemicals. A rechargeable battery must be recycled
or disposed of properly.
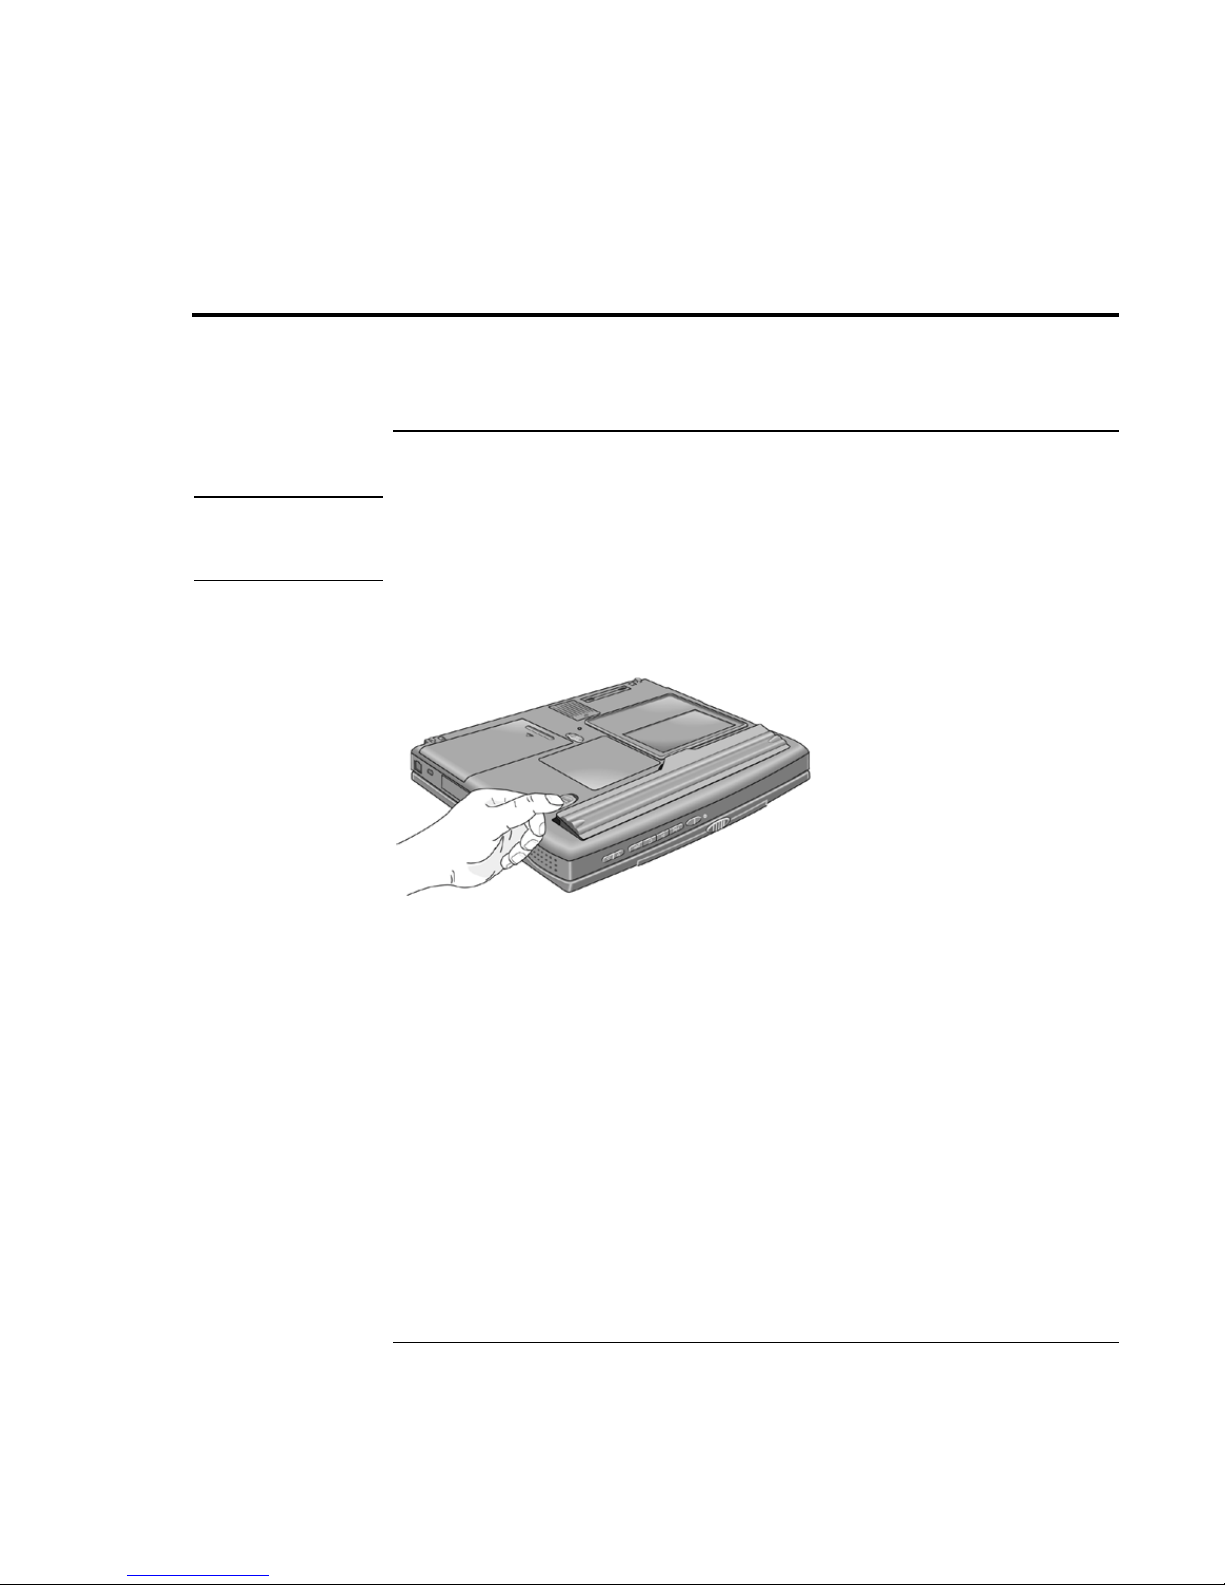
Your computer is shipped with the battery installed. If the battery has been removed, you
can install it by inserting it into the battery bay on the bottom of your computer by sliding
the battery latch, as shown.
Once you have installed the battery, connect the AC adapter to the computer and recharge
the battery while you work. You can also replace a low battery with another that is more
fully charged.
Setup Guide 19
Page 20

Introducing Your HP Notebook PC
Setting Up the Computer
To connect AC power
CAUTION
Use only the HP AC adapter intended for this product, model HP F1454A. Using
any other AC adapter can damage the computer and may void your warranty.
Refer to the warranty statement for your product.
Plug in the AC adapter, then connect the AC adapter to the rear of the computer, as
shown. The battery starts charging.
To connect a phone line
Your computer has a built-in modem. If you prefer, you can instead use a PC Card
modem or an external modem to connect to a phone line.
1. Plug one end of the phone line into the (modem) phone jack on the computer. Be sure
2. Plug the other end of the phone line into a telephone jack. (If the phone line does not
20 Setup Guide
it clicks into place.
fit your telephone jack, you may need to use an adapter.)
Page 21

Introducing Your HP Notebook PC
Setting Up the Computer
CAUTION
NOTE
Hint
Your built-in modem may not work with multiple phone lines or a private branch
exchange (PBX), cannot be connected to a coin-operated telephone, and does not
work with party lines. Some of these connections may result in excess electrical
voltage and could cause a malfunction in the internal modem. Check your
telephone line type prior to connecting your phone line.
Your computer’s modem supports the v.23 standard required for connecting to the
MiniTel system in France. To connect to the MiniTel system, use MiniTel emulation
software available in France.
To turn on the computer
Press the blue power button above the keyboard. Windows starts automatically. If you are
turning on the computer for the first time, go to “To set up Windows” on page 22.
The power status light (see “Status lights” on page 17) reports the following:
• Steady green light: computer is on.
• Slow blinking: computer is in System Standby or Suspend mode.
• No light: computer is off or in Hibernate mode.
See “Managing Power Consumption” on page 52 for additional information about turning
off your computer.
If your computer does not turn on when operating on battery power, the battery may be
out of power. Plug in the AC adapter and press the blue power button again.
Setup Guide 21
Page 22

Year 2000
Introducing Your HP Notebook PC
Setting Up the Computer
To set up Windows
Your HP notebook has Microsoft Windows 98 preinstalled on the hard disk drive. The
first time you turn on your computer, a Windows Setup program will automatically run so
that you can customize your setup.
Hewlett-Packard makes no representation or warranty about the Year 2000 readiness of
non-HP products including preinstalled operating systems or application software. You
should contact the software manufacturer directly to determine if you need to do
anything else to ensure compliance.
Microsoft has indicated that many of its operating system software products and
applications require customer installation of software patches for Year 2000 compliance
and may require additional patches in the future. The need for such patches most likely
applies to the operating system software and any Microsoft applications shipped with
this product. You are urged to contact Microsoft at http://www.microsoft.com/y2k, at
1-888-MSFTY2K (U.S. and Canada only), or at your local Microsoft office.
Before you begin, connect the AC adapter to your notebook, since your battery may not
be sufficiently charged to complete the Windows setup. Also, be sure to connect the
notebook to the phone line. For information on connecting your modem, see “To connect
a phone line” on page 20.
Note
1. Press the blue power button.
2. The Windows Setup program starts automatically.
3. Follow the instructions as they appear on the screen.
During setup, you are prompted to:
• Enter a user name.
• Accept the License Agreement.
You can also register your computer at this time. Follow the instructions on the screen
during setup, or—if registrations does not occur during setup—click Next on the desktop
wallpaper or double-click the Registration icon on the desktop.
If you experience any connection problems with your modem, you can try redialing. If
that doesn’t work, you can skip the product registration for now.
22 Setup Guide
Page 23

Introducing Your HP Notebook PC
Setting Up the Computer
To register your computer
Be sure to register your computer. Registering is free and fast, and it ensures you will
receive quicker, more personalized support. The information you provide during
registration will be used to provide you with better products and services.
There are three ways to register:
• by modem
• by phone
• by fax
By modem
Windows 98 automatically prompts you to register by modem. If you wish to do so, make
sure that you have connected the phone line, then follow the onscreen instructions.
If you choose not to register right away, you can register by modem later by doubleclicking the Registration icon on the desktop. This icon disappears after you register.
By phone
You can call your HP Customer Care Center and register by phone. The number, in the
U.S., is (970) 635-1000.
By fax
If a printer is connected to your computer, you can print a copy of your registration and
fax it to HP. You will find the fax number on the registration form.
By completing registration, you will:
• Record your ownership of the computer with Hewlett-Packard and gain access to
service, support, and information.
• Optionally, record your ownership of the Windows 98 operating system with
Microsoft.
Setup Guide 23
Page 24

Introducing Your HP Notebook PC
Setting Up the Computer
To connect to an Internet Service Provider
Before you can connect to the Internet, you need to set up an account with an Internet
Service Provider (ISP). In some countries, Hewlett-Packard provides Easy Internet
Signup so that you can connect quickly to an ISP.
1. Connect the included telephone cord to your built-in modem. If you prefer, you can
instead use a PC Card modem or an external modem to connect to an ISP.
2. If there is an Easy Internet Signup icon on the desktop, double-click it. This will
launch an Internet setup wizard, which will help you locate an ISP in your area.
−or−
Click Start, Programs, Online Services and select one of the listed ISPs. This begins
the registration process for the ISP you have chosen.
You can also make arrangements with an ISP of your choice for Internet connection.
To reset your computer
If Windows or your computer stops responding, you can reset the computer and restart
Windows.
1. If possible, shut down Windows.
2. Press and hold the blue power button until the display shuts down.
–or, if this fails–
Insert a pin or straightened paper clip into the recess on the bottom of the computer,
toward the rear. (See “Bottom view” on page 16.)
3. After the computer shuts down, press the blue power button to turn it on.
24 Setup Guide
Page 25

Introducing Your HP Notebook PC
Setting Up the Computer
To reset the screen saver
If your HP notebook PC was used as a demonstration unit in a retail store, it may have
been configured to display the screen saver demo continuously.
To reset your computer:
1. Choose a different screen saver.
• Right click on the desktop and select Properties.
• Select the Screen Saver tab, and use the pulldown menu to choose a different
screen saver.
• Click Apply and click OK.
2. Reset the power management features.
• Select Start, Settings, Control Panel, Power Management.
• Reset power management features as you prefer. (For example, you can use the
pulldown menu under Power schemes and select the Portable/Laptop power
scheme, which is appropriate for most mobile users.)
• Click Apply and click OK.
Setup Guide 25
Page 26

Page 27

Using Your HP Notebook PC
Setup Guide 27
Page 28

Using Your HP Notebook PC
Operating the Computer
Operating the Computer
To use the Fn hot keys
The combination of the Fn key plus another key creates a hot key—a shortcut key
sequence—for various system controls. Press and hold Fn while pressing the appropriate
key. (Press and hold Ctrl+Alt with the appropriate key when using an external keyboard.)
Hot key Does this
Fn + F1 Increases the display’s contrast (HP A displays only).
Fn + F2 Decreases the display’s contrast (HPA displays only).
Fn + F3 Enters Standby mode. (with Windows 98, identical to Suspend mode)
Fn + F4 Enters Suspend mode.
Fn + F5 Enters Hibernate mode.
Fn + F6 Toggles the sound on and off (mutes sound).
Fn + UP ARROW Increases sound volume (except on external keyboard).
Fn + DOWN ARROW Decreases sound volume (except on external keyboard).
Fn + F12 Switches among the built-in display, an external display, and simultaneous displays.
Fn + NumLock Toggles Scroll Lock on and off.
28 Setup Guide
Page 29

Using Your HP Notebook PC
Operating the Computer
To use the Windows and Applications keys
The Windows key brings up the Windows Start menu. This is the same as clicking the
Start button on the taskbar.
The Applications key brings up the shortcut menu for the current application. This is the
same menu that appears when you click the right mouse button while pointing at the
application.
Windows key combinations
Key combination Does this
Windows key + E Runs Windows Explorer
Windows key + F1 Runs Windows Help
Windows key + F Runs Windows Find: File or Folders… dialog box
Windows key + M Minimizes all displayed windows
Shift + Windows key + M Returns all minimized windows to original size
Windows key + R Runs the Windows Run dialog box
To use the embedded keypad
Press the Num lock key to turn number lock on or off. When Num Lock is on:
• Keys change to the numeric or arithmetic designations printed on the keys.
• The Num Lock status indicator is lit.
Setup Guide 29
Page 30

Using Your HP Notebook PC
Operating the Computer
To use the ALT GR key
Non–U.S. keyboards have an ALT GR key to the right of the spacebar. This is a shift key
providing access to certain keyboard characters.
• For a character in the lower-right corner of a key, press and hold ALT GR to type the
character.
1. Shifted.
2. Unshifted.
3. ALT GR.
To adjust the display
If your computer has an HPA display, you can adjust the display contrast.
• To increase the contrast, press Fn+F1.
• To decrease the contrast, press Fn+F2.
There is no brightness control.
If your computer has a TFT display, the contrast and brightness are preset. You cannot
adjust them.
To adjust the volume
From the keyboard
• To increase the volume, press Fn+UP ARROW.
• To decrease the volume, press Fn+DOWN ARROW.
• To temporarily silence the speaker without changing the volume setting, press Fn+F6.
Press Fn+F6 again to restore the speaker output.
30 Setup Guide
Page 31
Using Your HP Notebook PC
Operating the Computer
In Windows
1. Click the speaker symbol in the taskbar.
2. Drag the volume control bar up or down to adjust the volume.
3. To temporarily silence the speaker without changing the volume setting, click Mute.
With the CD-ROM drive buttons
Selected HP notebook models also have CD-ROM drive buttons, which you can use with
music CDs when the system is off.
• To increase the volume, press the volume control up button (to the far right of the
front edge of the computer).
• To decrease the volume, press the volume control down button (to the left of the
volume control up button).
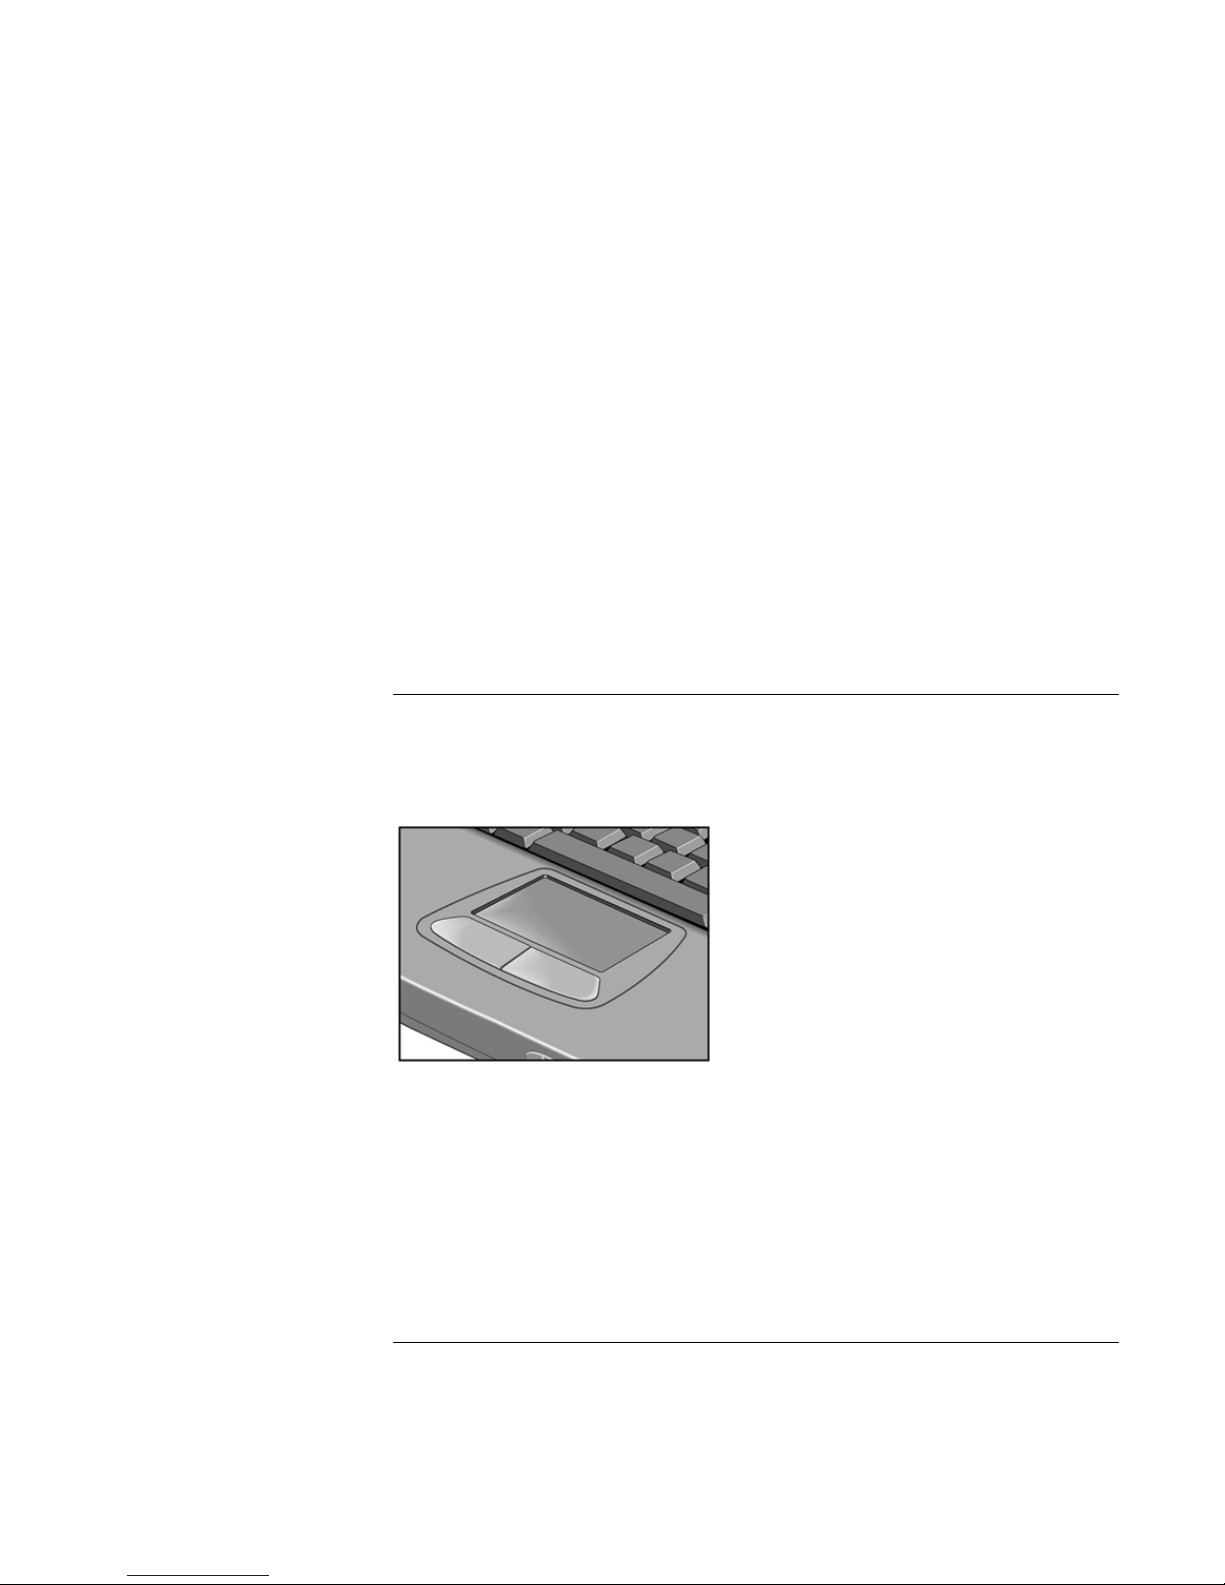
To use the touch pad
The touch pad, a touch-sensitive pointing device that controls the motion and speed of the
pointer on the screen, is built into your computer.
1. Move a thumb or finger across the touch pad in the direction you want the pointer to
move.
2. Use the click buttons, which function like the left and right buttons on a mouse, to
make your selection. You can also tap on the touch pad instead of clicking a button.
• To open an application, move the pointer over the icon, then press the left button
twice rapidly.
• To make menu selections, move the pointer to the item and press the left button once.
Setup Guide 31
Page 32

Note
Using Your HP Notebook PC
Operating the Computer
• To open the shortcut menu for an item, move the pointer over the item and click the
right button.
• To drag an item, move the pointer over the item. Press and hold the left button while
you move the pointer to the new location. Release the button.
To customize the operation of the touch pad (and an external PS/2 or serial mouse, if
installed), double-click the Synaptics Touch Pad icon to access Mouse Properties; you
will find the icon in the taskbar, toward the lower right corner of your screen. Select the
tab corresponding to the characteristics you want to configure, including:
• Button configuration for right-handed or left-handed operation (Button tab for mouse,
Button Actions tab for touch pad).
• Double-click speed, pointer speed, and pointer trail.
• Click sensitivity.
The touch pad is inactive when an external mouse is installed.
32 Setup Guide
Page 33

Securing the Computer
To set up password protection
You can protect your computer from access by another user when you set up password
protection, which is available either through Windows 98 (software) or through the BIOS
Setup utility (hardware). Both provide protection when the computer is rebooted: a user
must then enter the password. However, the BIOS password protection does not ask for a
password when your computer resumes after standby, while Windows 98 does provide
that security.
To set up password protection through Windows 98:
1. Select Start, Settings, Control Panel, Passwords.
2. Select Change Passwords tab.
Using Your HP Notebook PC
Securing the Computer
3. Click Change Windows Password.
4. Enter your old Windows 98 password, if you had one; if not, leave the first field
blank.
5. Enter your new password twice.
6. Click OK and Close.
To activate password protection when your computer resumes from standby or
hibernation:
1. Check that you have set up a Windows 98 password, as described above.
2. Select Start, Settings, Control Panel, Power Management.
3. Select Advanced tab.
4. Check "Prompt for password when com puter goes off standby."
5. Click OK.
If you also want to set up hardware password protection, see Using the BIOS Setup
Utility.
Setup Guide 33
Page 34
Using Your HP Notebook PC
Securing the Computer
To attach a security cable
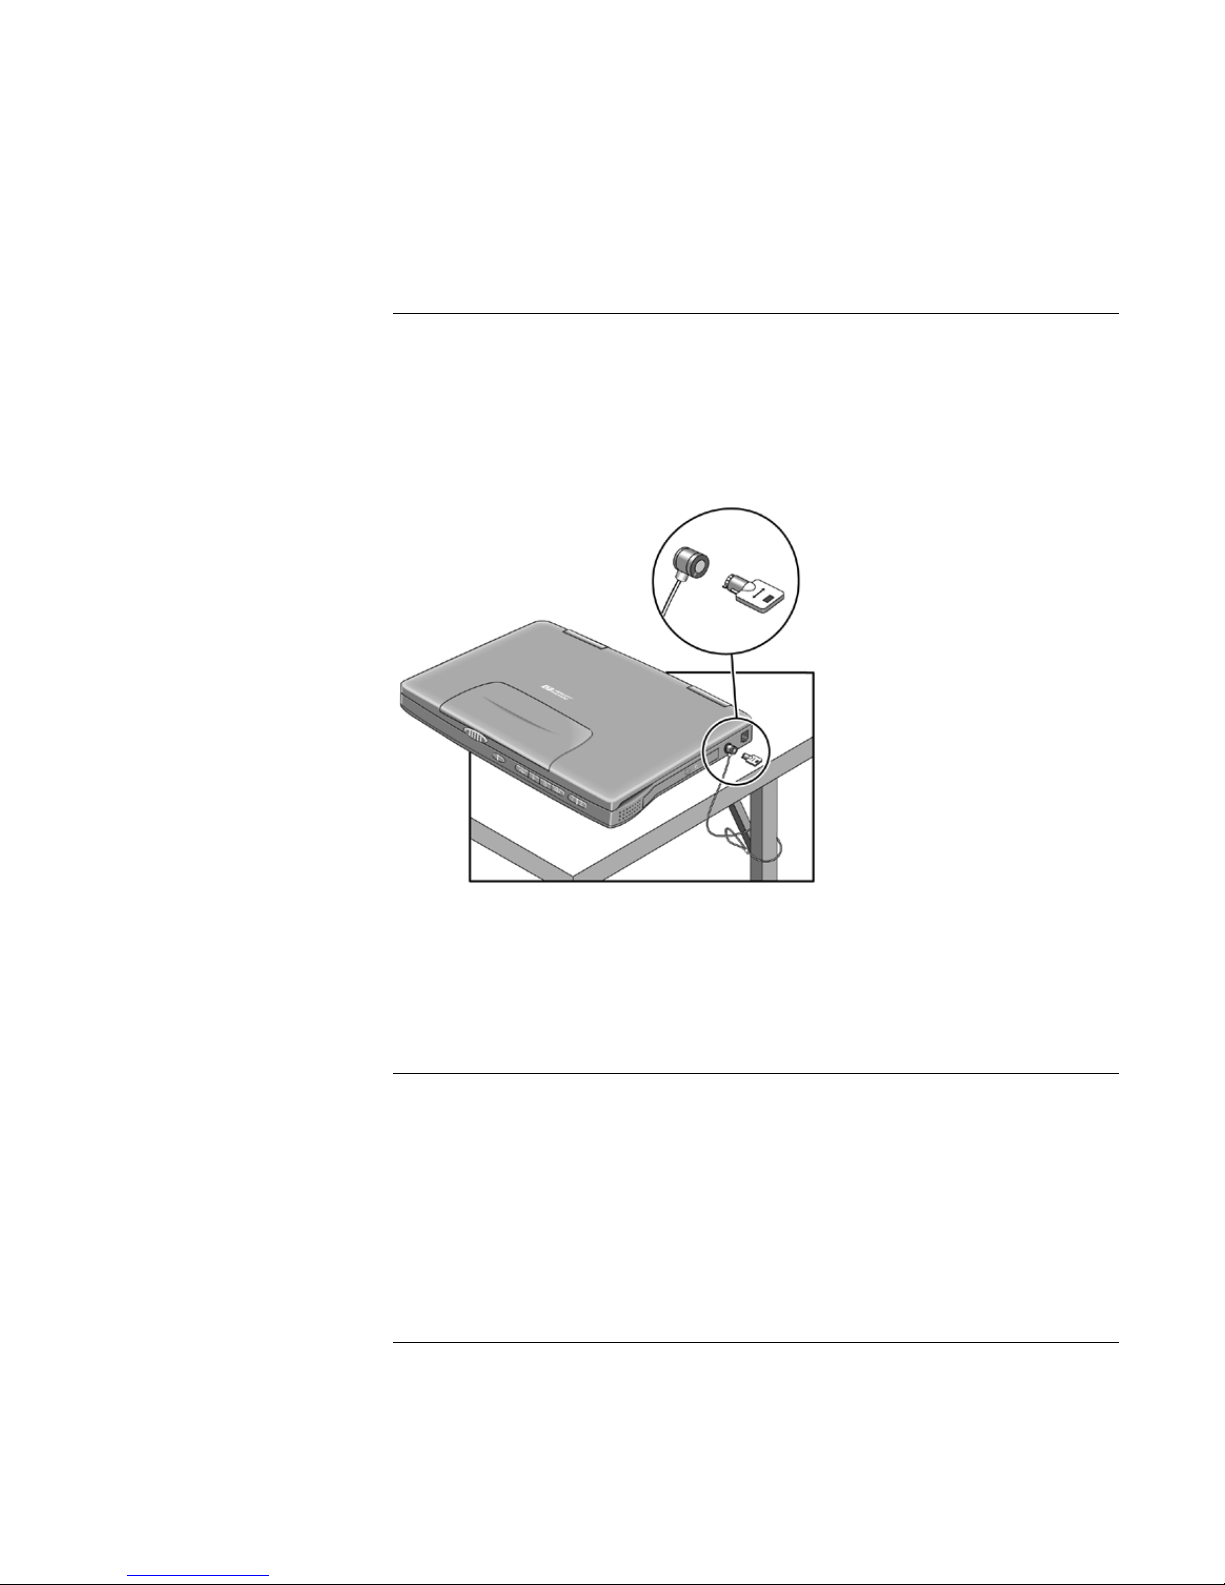
Your computer has a built-in connector that allows you to secure the computer with a
cable. The Kensington MicroSaver lock system works with this connector and is
available at many computer stores.
1. Wrap the cable around a stationary object, such as a table leg.
2. Loop the cable to create a slipknot around the stationary object—make sure it can’t
slip off.
3. Insert the lock into the computer's security connector and release the key. Store the
key in a safe place away from the computer.
To use the VirusScan utility
Virus software can help protect the integrity of your data. This is especially important
when you are connected to the Internet.
To access the VirusScan applications, click on Start, Programs, McAfee VirusScan,
McAfee VirusScan Central. Refer to help within each of the VirusScan applications for
tips on usage.
34 Setup Guide
Page 35

Working in Comfort
Using Your HP Notebook PC
Working in Comfort
WARNING
Improper use of keyboards and other input devices has been associated with
ergonomic injury. For more information about reducing your risk, visit our
ergonomics Web site at www.hp.com/ergo.
Thank you for selecting HP computing equipment. To optimize your comfort and
productivity, it is important that you set up your work area correctly and use your HP
equipment properly. With that in mind, we have developed some set-up and use
recommendations for you to follow based on established ergonomic principles.
Improper and prolonged use of keyboards and input devices are among those tasks that
have been associated with repetitive strain injury (RSI) to soft tissues in the hands and
arms. If you experience discomfort or pain while using any computing equipment,
discontinue use immediately and consult your physician as soon as possible.
In addition to the information on RSI given in this chapter, you may also consult the
online version of Working in Comfort preloaded on the hard disk of your computer
(Start, Programs, Pavilion Library, Working in Comfort), or visit HP’s Working in
Comfort Web site.
About Repetitive Strain Injury
Because your comfort and safety are our primary concern, we strongly recommend that
you use HP computing equipment in accordance with established ergonomic principles
and recommendations.
Scientific literature suggests that there may be a relationship between injury to soft
tissues—especially in the hands and arms—and prolonged, improper use of keyboards or
other equipment requiring repeated motions of the hands and forearms.
This literature also suggests that there are many other risk factors that may increase the
chance of such injury, commonly called Repetitive Strain Injury.
What is RSI?
Repetitive Strain Injury (RSI—also known as cumulative trauma disorder or repetitive
motion injury) is a type of injury where soft tissues in the body, such as muscles, nerves,
or tendons, become irritated or inflamed.
Setup Guide 35
Page 36

Using Your HP Notebook PC
Working in Comfort
RSI has been a reported problem for those who perform repetitive tasks such as assembly
line work, meatpacking, sewing, playing musical instruments, and computer work.
RSI also has been observed in those who frequently engage in activities such as
carpentry, knitting, housework, gardening, tennis, windsurfing and lifting children.
What causes RSI?
The specific causes of RSI have not been established. Nevertheless, the incidence of RSI
has been associated with a variety of risk factors, including:
• Too many uninterrupted repetitions of an activity or motion.
• Performing an activity in an awkward or unnatural posture.
• Maintaining static posture for prolonged periods.
• Failing to take frequent short breaks.
• Other environmental and psychosocial factors.
In addition, there have been reports associating the occurrence of RSI with the use of
computer keyboards, mice, and other input devices. Also, certain medical conditions,
such as rheumatoid arthritis, obesity and diabetes, may predispose some people to this
type of injury.
What can I do to avoid RSI?
Some people who use computers may experience physical discomfort during their use.
This discomfort may be a symptom of a repetitive strain injury.
Properly setting up and using computing equipment can help to minimize your chances of
experiencing this discomfort. Well-designed and properly adjusted equipment alone may
not be sufficient to eliminate all potential problems.
Maintaining good posture and positioning when working on computers also has a
significant bearing on your comfort.
What if I experience discomfort?
If you are experiencing any discomfort, seek professional medical advice immediately.
Typically, the earlier a problem is diagnosed and treated, the easier it is to resolve.
36 Setup Guide
Page 37
Using Your HP Notebook PC
Working in Comfort
Preparing Your Work Environment
When using HP computing equipment, it is important that your work environment
contribute to your comfort and productivity.
Your Chair
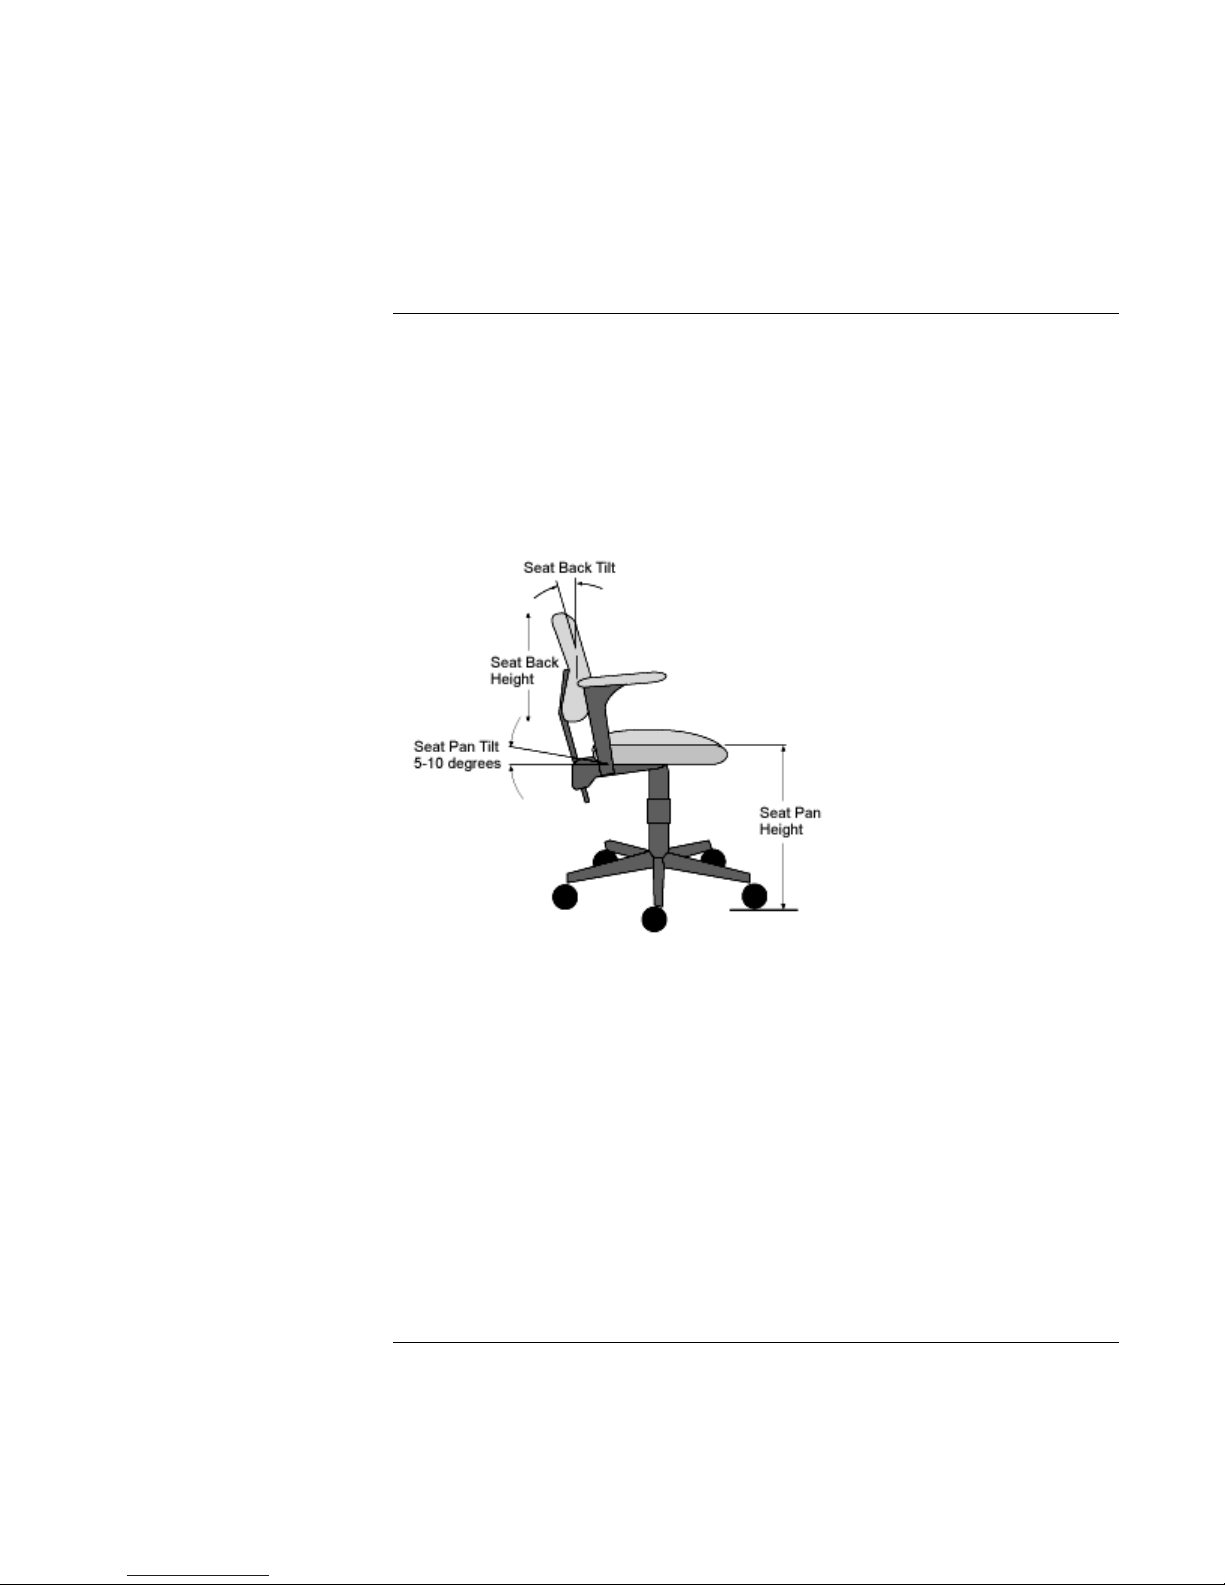
It’s very important that your chair provides a comfortable sitting position and offers the
following features:
• A stable base, such as five legs with casters. Make sure the casters are
designed for the type of floor you have in your workspace, whether it is bare or
carpeted.
• A height- and tilt-adjustment feature. It should be easy to adjust your chair
height from 40 cm to 52 cm (15.5 inches to 20.5 inches) as measured from the top of
the seat pan to the floor. If you are much taller or shorter than average, you may need
a chair that can be adjusted beyond this range. Adjust your chair so that the work
surface or keyboard tray is at elbow height and your feet are flat on the floor with
your knees slightly bent below your hips. Ideally, the seat pan should be able to tilt
both forward (minimum of 5 degrees) and backward (minimum of 10 degrees). If the
chair has an adjustable seat pan, inclining the seat slightly forward will transfer some
of the pressure from the spine to the thighs and feet. This will relieve pressure on your
back.
Setup Guide 37
Page 38
Using Your HP Notebook PC
Working in Comfort
• A curved seat edge. The front of the seat should be curved and finished in a
“waterfall” edge.
• An adjustable back support in both height and forward and backward tilt. It is
important that the backrest correctly supports the lower part, or lumbar curve, of the
back.
• A freely rotating swivel so you can move easily from side-to-side.
• Fully adjustable and padded armrests. The chair arms should not interfere with
adjusting the chair or moving it close to your work surface.
Your Work Surface
Ideally, you should be able to adjust the height of your work surface.
A simple way to ensure your work surface is at the correct height is to first adjust the
height of the seat-pan of your chair. With your chair properly adjusted and your feet
firmly on the floor, adjust the work surface height until your forearms are parallel to the
floor when you have your fingers on the keyboard or other input device.
Your Work Posture
Sitting in one position for long periods can be uncomfortable. To minimize the potential
for physical discomfort or injury, it's important that you maintain proper posture.
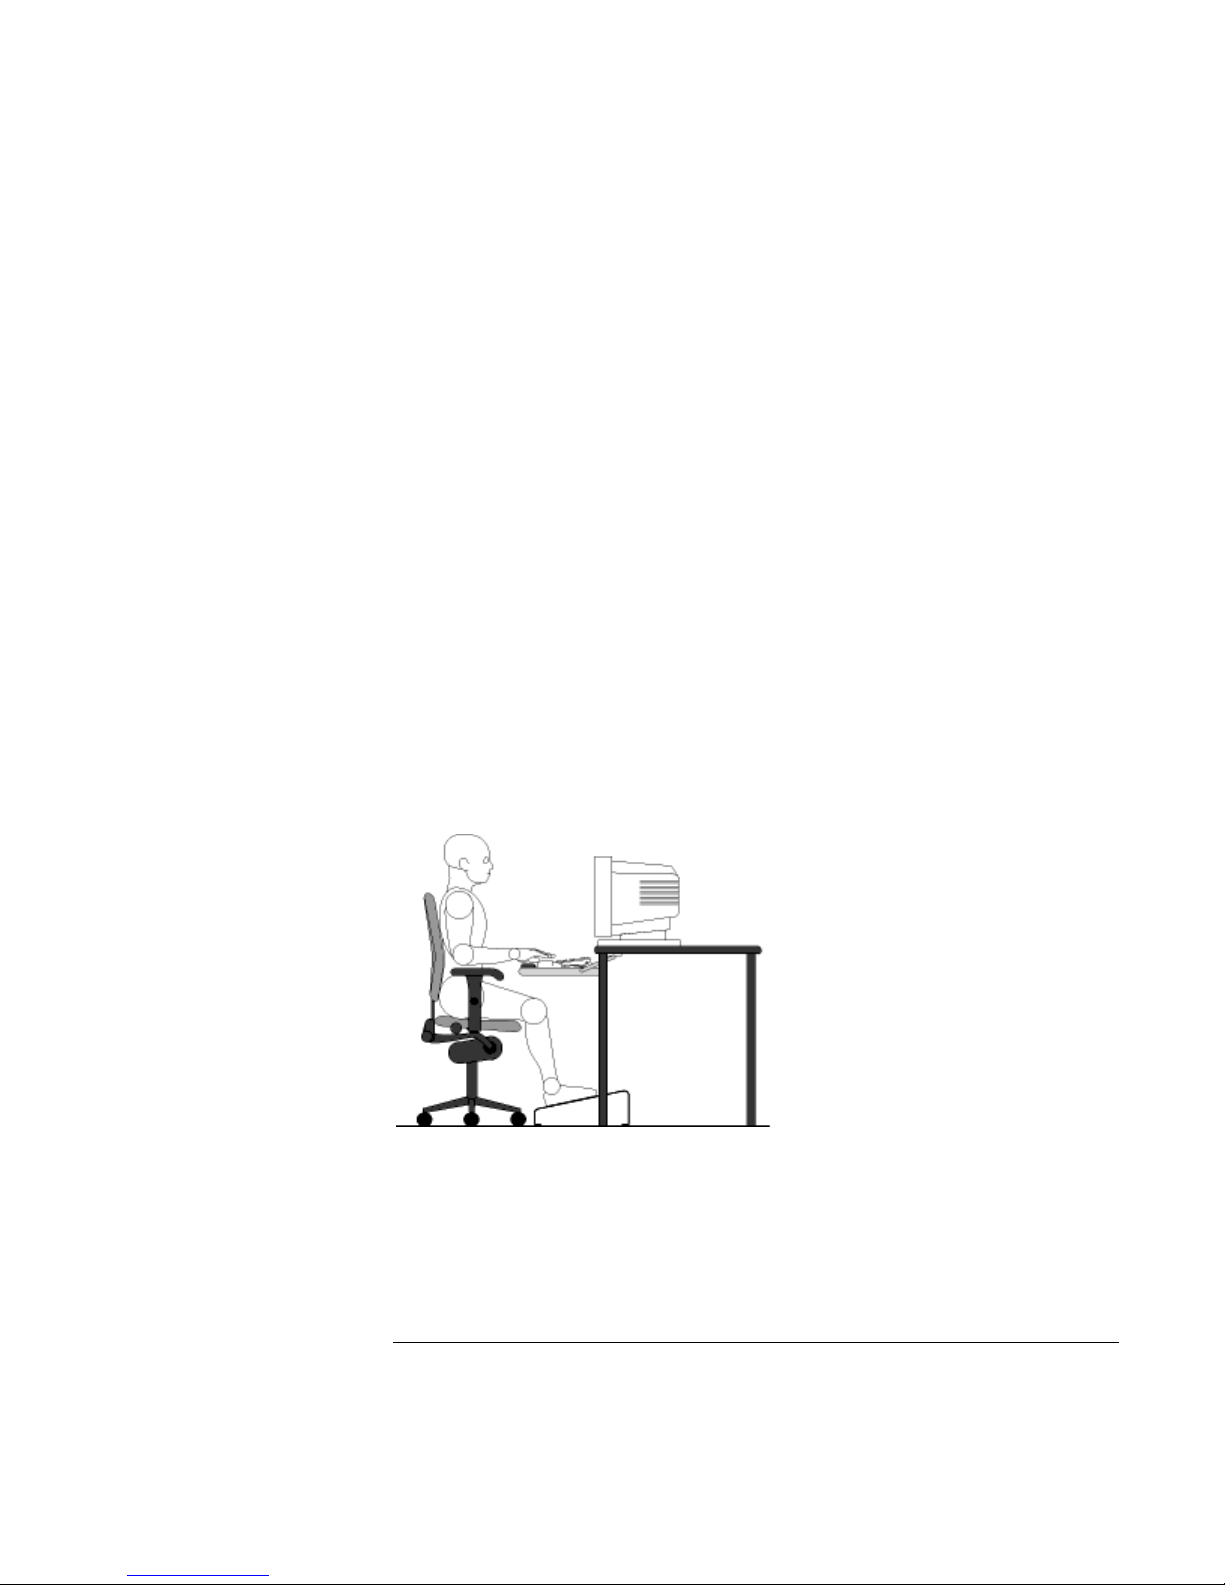
• Back: While sitting at your work surface, make sure your back is supported by the
chair's backrest in an erect position or angled slightly backwards.
• Arms: Your arms should be relaxed and loose, elbows close to your sides, with
forearms and hands approximately parallel to the floor.
38 Setup Guide
Page 39

Using Your HP Notebook PC
Working in Comfort
• Wrists: Your wrists should be as straight as possible while using the keyboard,
mouse or trackball. They should not be bent sideways, or more than 10 degrees up or
down.
• Legs: Your thighs should be horizontal or angled slightly downward. Your lower
legs should be near a right angle to your thighs. Your feet should rest flat on the floor.
If necessary, use a footrest, but double check that you have your seat height adjusted
correctly before getting a footrest.
• Head: Your head should be upright or tilted slightly forward. Avoid working with
your head or trunk twisted.
• Overall: Change your position frequently and take regular breaks to avoid fatigue.
Setting Up Your HP Computing Equipment
Make sure that all the elements of your HP computer system—monitor, document holder,
keyboard, mice and other input devices, and headphones and speakers—are optimally
arranged and adjusted to meet your personal requirements. The recommendations that
follow will help you achieve this.
Your HP Monitor
It is important that your monitor screen be clean and positioned correctly to improve
readability and help you work comfortably. Glare, high contrast, reflections, dirt and dust
will interfere with what you see on the screen. The recommendations that follow can help
you achieve a comfortable arrangement.
Setup Guide 39
Page 40
Using Your HP Notebook PC
Working in Comfort
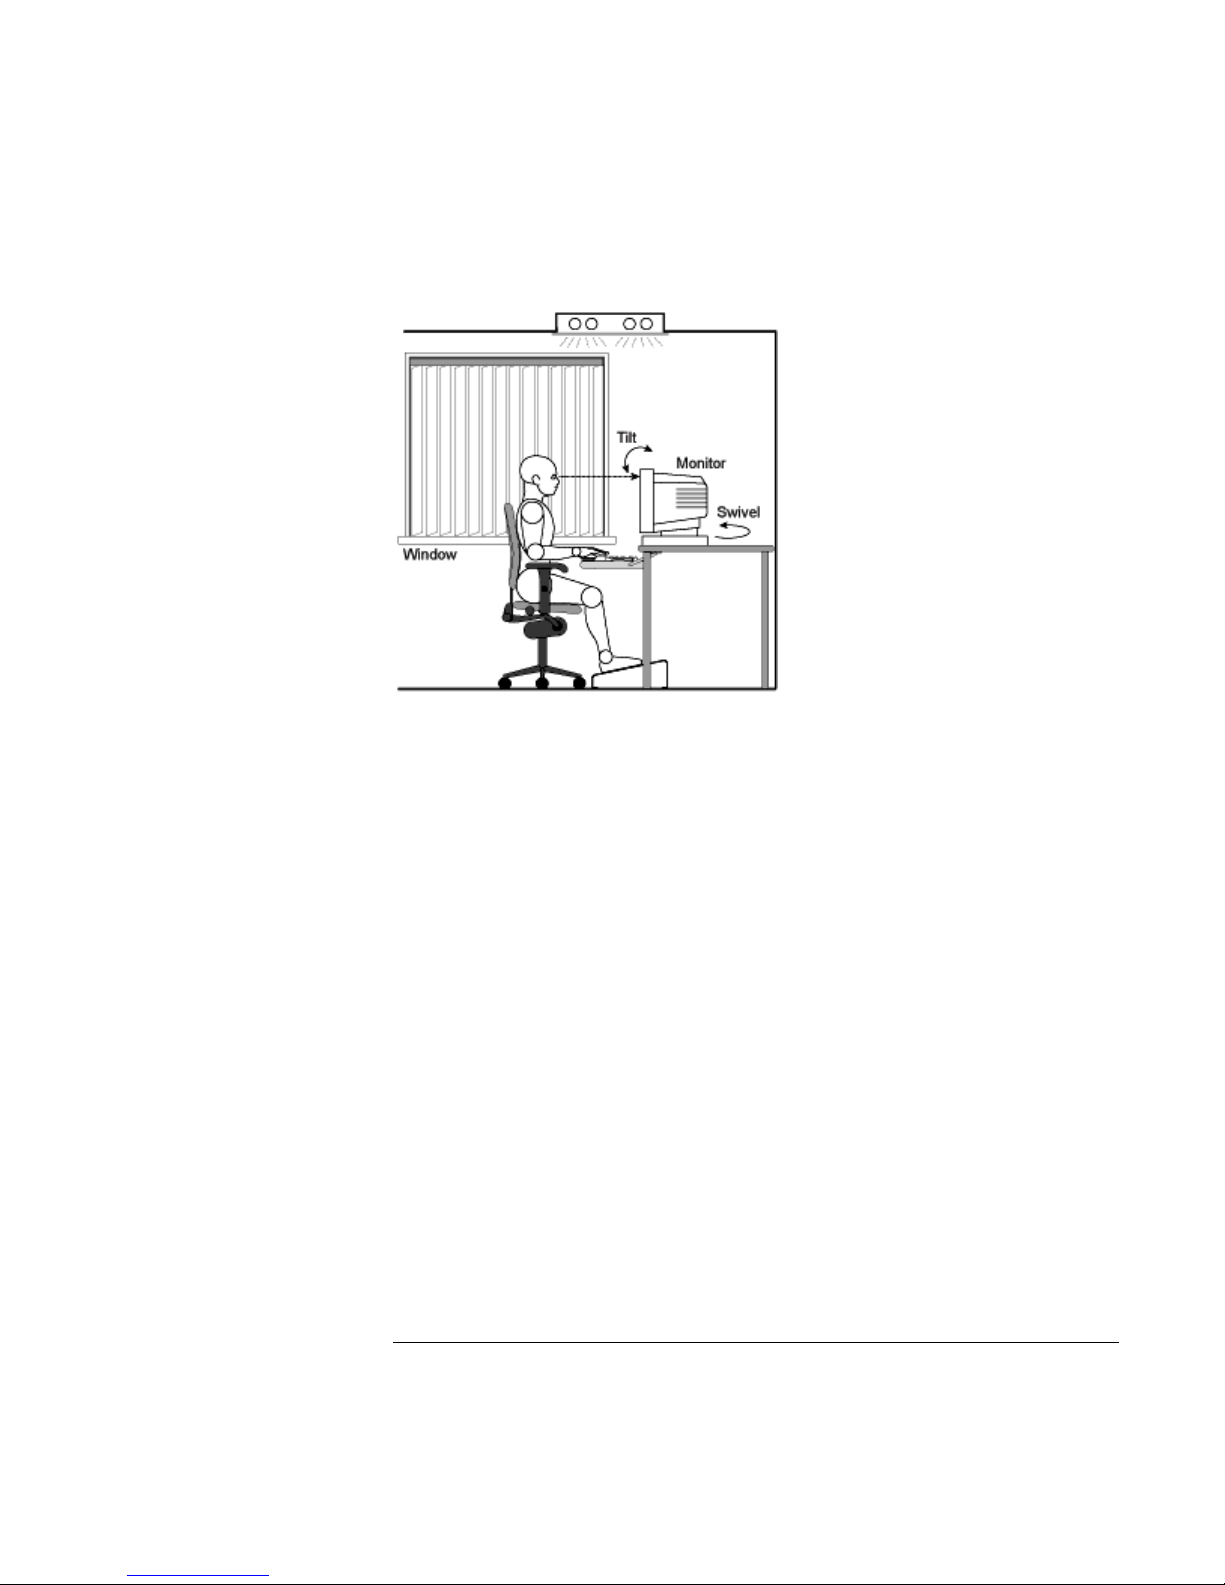
• The top of your monitor screen should be at or slightly below eye level. Most HP
monitors come with a tilt-and-swivel feature that makes it easy to adjust the screen
position.
• To avoid obscuring your view, the screen should be positioned perpendicular to your
line of sight; that is, straight on.
• To avoid glare or reflection, try to position the monitor so the screen is at a right angle
to your window rather than in front of it. If reflection or glare persists, tilting the
screen forward may help.
• Maintain a comfortable viewing distance to the screen. Most people prefer a viewing
distance of approximately 46 to 76 cm (18 to 30 inches), depending on monitor size.
Character size and the amount of space available on the work surface can affect this
distance.
• Text should be easy to read. To help ease eyestrain, adjust text attributes such as
character size, spacing, and color. In addition, you will need to use the controls
provided with your monitor to adjust the visual settings so that contrast and brightness
levels are comfortable for you. High contrast and low brightness is usually the
preferable combination.
• The monitor should be free from flicker. If the image on your screen is not stable, the
monitor may require repair or adjustment.
40 Setup Guide
Page 41

Using Your HP Notebook PC
Working in Comfort
• When possible, use a program that has a simple user interface, such as easily
identifiable icons and pull-down menus. Also, screen information should be displayed
in a structured and well-organized way.
Monitor Use Specifications
• When viewing your monitor, your head should not be tilted more than 15 degrees
forward.
• You should not have to look up more than 5 degrees above horizontal or down more
than 30 degrees below horizontal for normal work tasks, such as typing or reading.
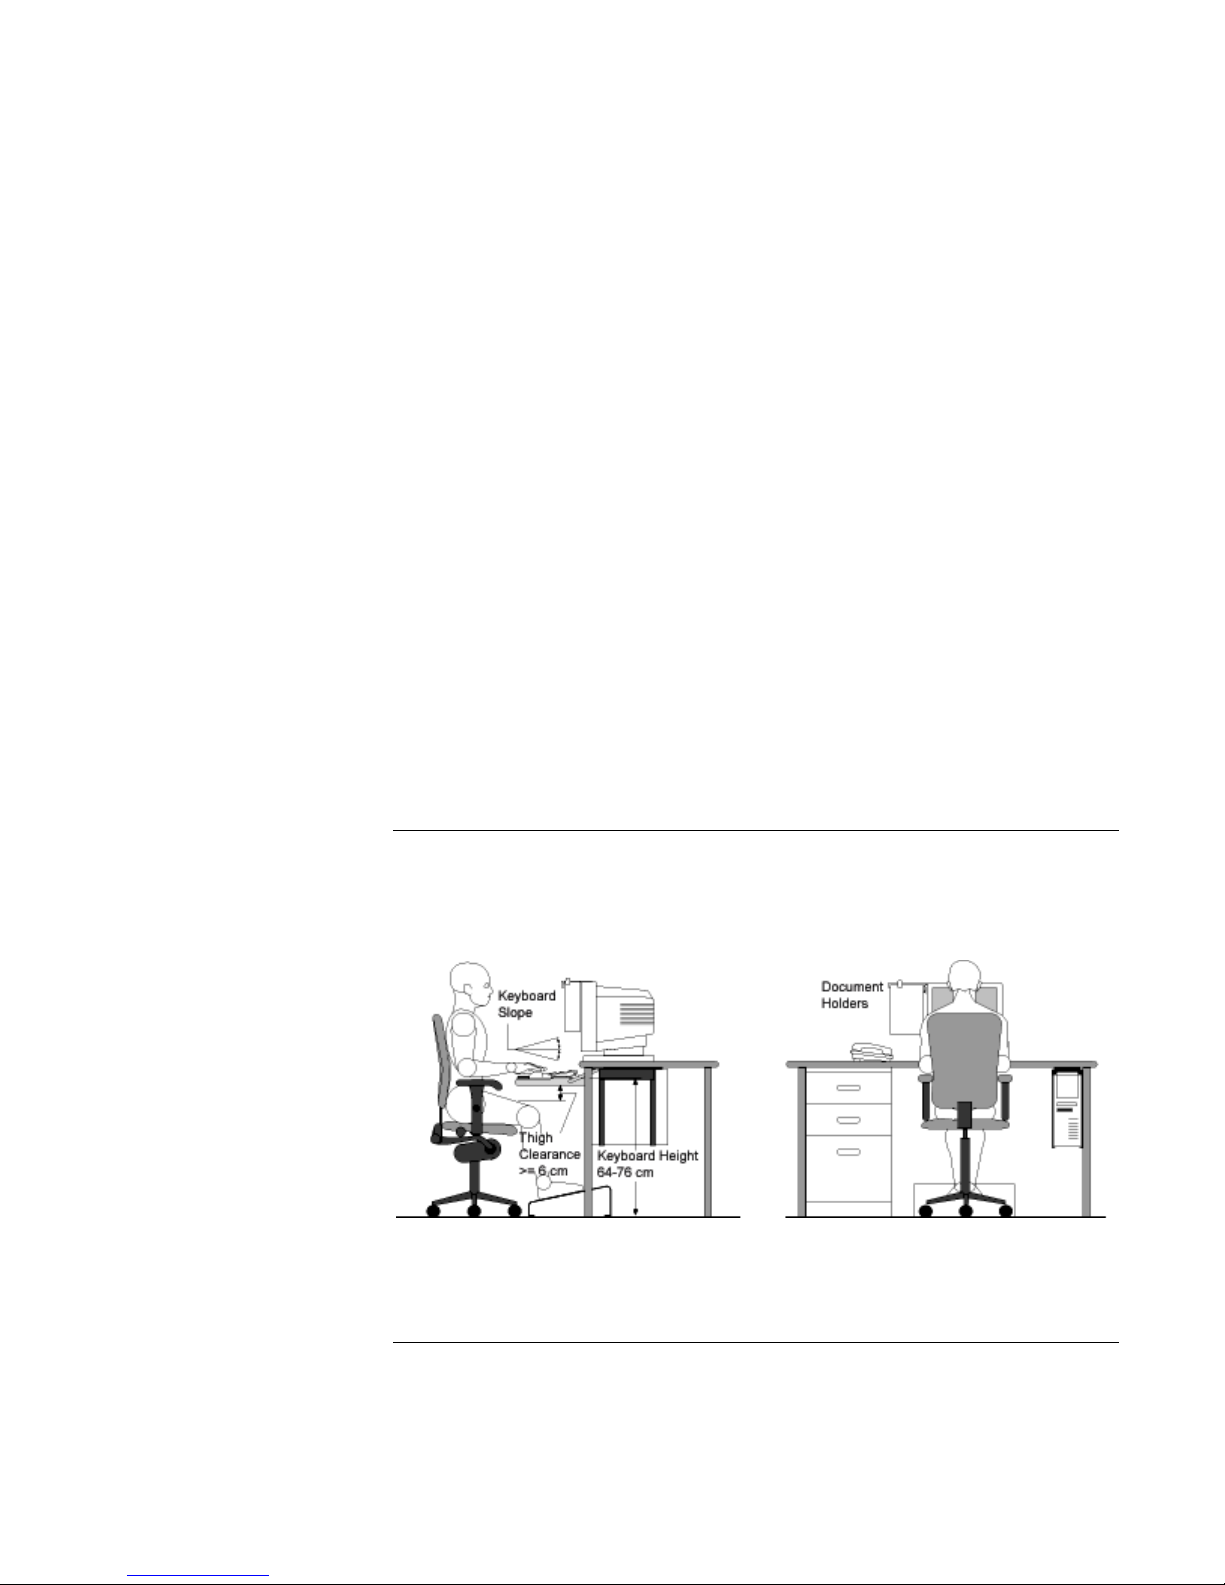
Document Holders
When keying in data from a hardcopy document, placing it in a document holder rather
than on a flat surface will make it easier to read. The following recommendations should
be observed when using a document holder:
• The document holder should be at approximately the same height and distance from
your eyes as the screen, and as close to the monitor as possible to prevent neck
twisting. Some users prefer a document holder mounted to the monitor while others
prefer the document holder positioned between the screen and keyboard.
• If the primary task is to view documents rather than using the monitor, the document
holder may be placed directly in front of the keyboard with the monitor slightly to the
side.
• To help reduce stress on your neck and prevent eye fatigue, try to minimize the
movement of your head and eyes while using a document holder.
Your HP Keyboard
The proper positioning and use of your HP keyboard is important when using HP
computing equipment. Be sure to observe the following recommendations to optimize
your comfort and safety:
Setup Guide 41
Page 42
Using Your HP Notebook PC
Working in Comfort
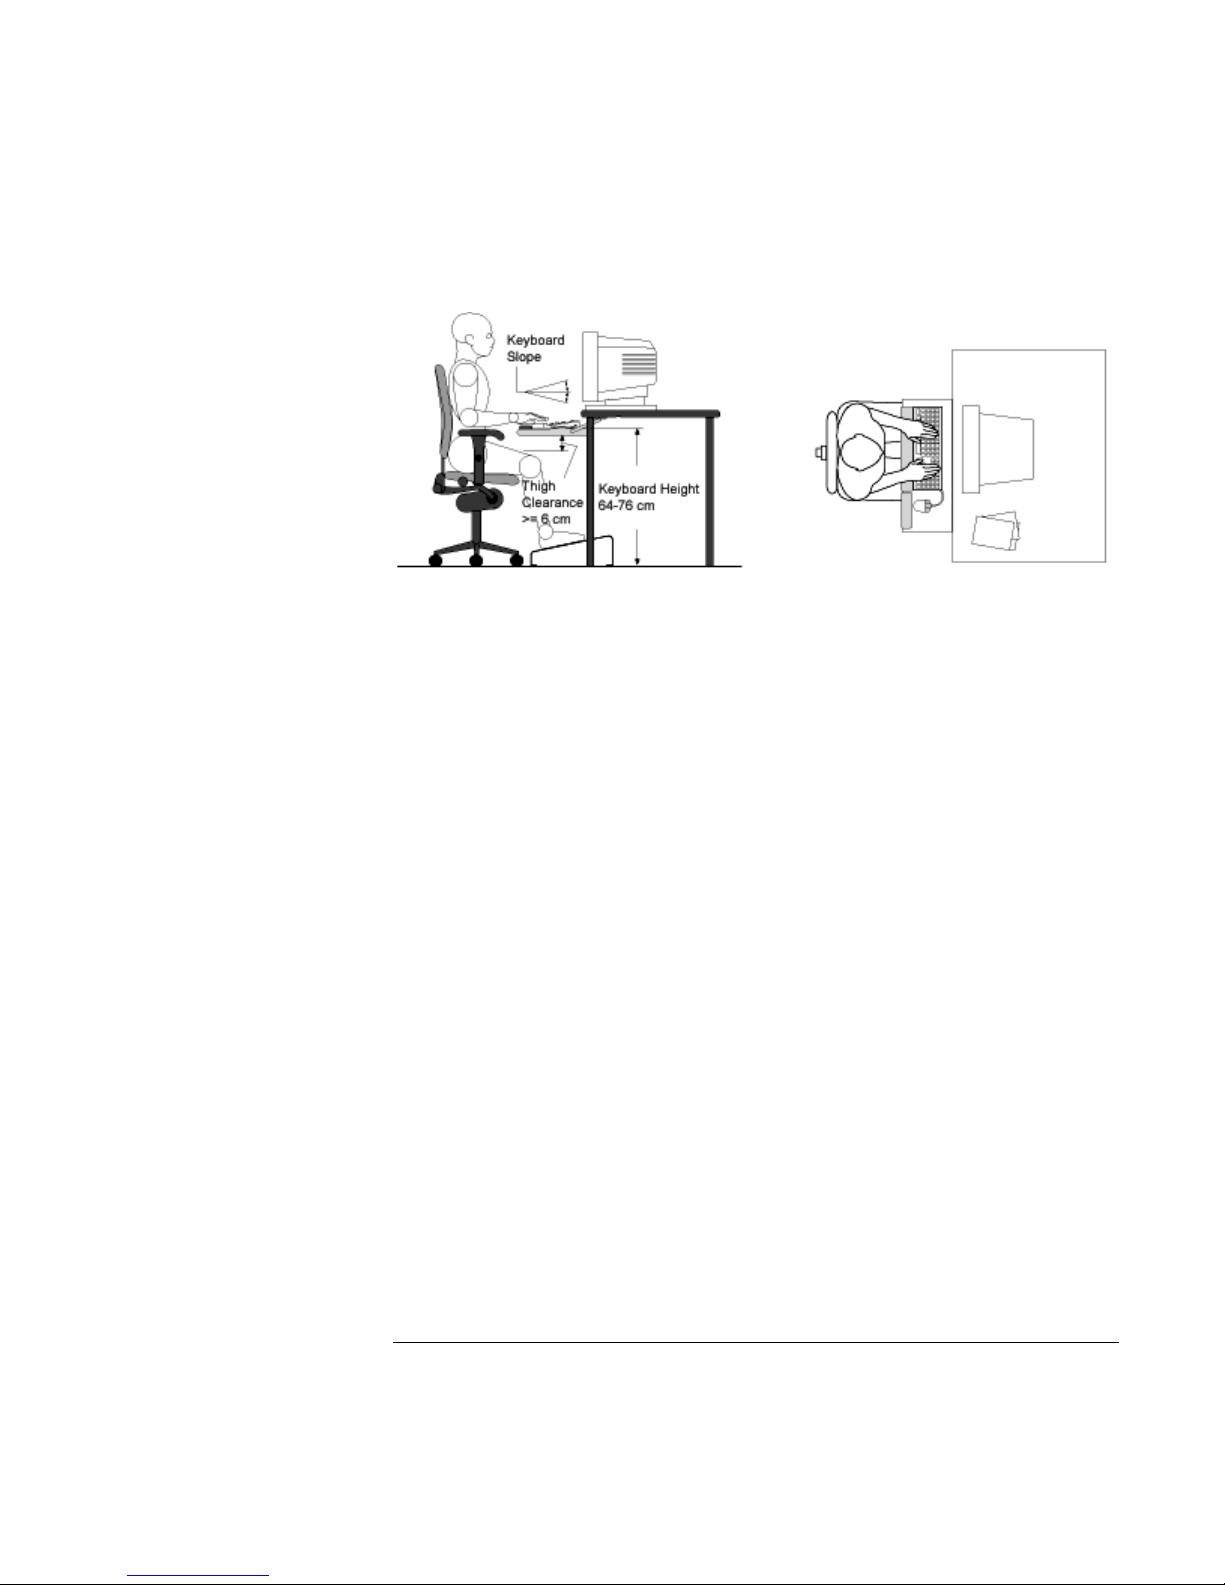
• We recommend you place your keyboard in front of the screen or document holder,
whichever is viewed the most. Your HP keyboard has long cables so you can place it
in the position that is most comfortable for you while you are using your system.
• Because HP keyboards vary in depth, you’ll want to be sure that your work surface or
keyboard tray has sufficient room to accommodate your model. The keyboard tray
should be wide enough to hold both the keyboard and mouse or trackball: 66 to 71 cm
(26 to 28 inches).
• Your HP keyboard may have a kickstand that can be opened or closed to raise or
lower the keyboard angle. If you are in the correct sitting position with your elbows at
about the same level as the work surface, you may not need to use it. However, if
your elbows are below the work surface, you may wish to use the kickstand to raise
the back of the keyboard.
• An adjustable keyboard tray may be useful if you cannot adjust your chair or work
surface to the proper height for typing. It should adjust in height from 64 to 76 cm (25
to 30 inches) above the floor and tilt forward and backward to help you find the most
comfortable position. Note that research has shown that there may be less muscle
tension in shoulders and forearms with the keyboard tilted away from you.
• When using your HP keyboard, remember it takes very little pressure or force from
your fingers to activate the keys. Improper typing style—the use of too much force—
can place unnecessary stress on the tendons and muscles in your hands, wrists, and
forearms.
• Make sure that your hands are in a neutral position when you use your keyboard. This
means that your forearms, wrists, and hands should be in a straight line.
• The keyboard has a low profile to help prevent excessive bending of your wrists while
typing. Literature suggests that you should not bend your wrists sideways or more
than 10 degrees up or down. Keep your wrists straight by moving your entire hand
and forearm over to use the function keys or numeric keypad.
42 Setup Guide
Page 43
Using Your HP Notebook PC
Working in Comfort
• You may use a palm rest to help keep your hands and wrists in a comfortable and
neutral position when you are not typing. Some HP keyboards come with an
integrated palm rest. If you use a palm rest, see that it is rounded and padded, and
flush in height with the front edge of the keyboard. Note that your palms—not your
wrists—should rest on the palm rest. If you don't have a palm rest, try not to rest your
wrists on a sharp edge, such as a work surface edge.
Mice and Other Input Devices
Various aspects of using mice and other input devices may increase your risk of
discomfort or injury. If you connect an external mouse to your computer, observing the
following recommendations may reduce that risk.
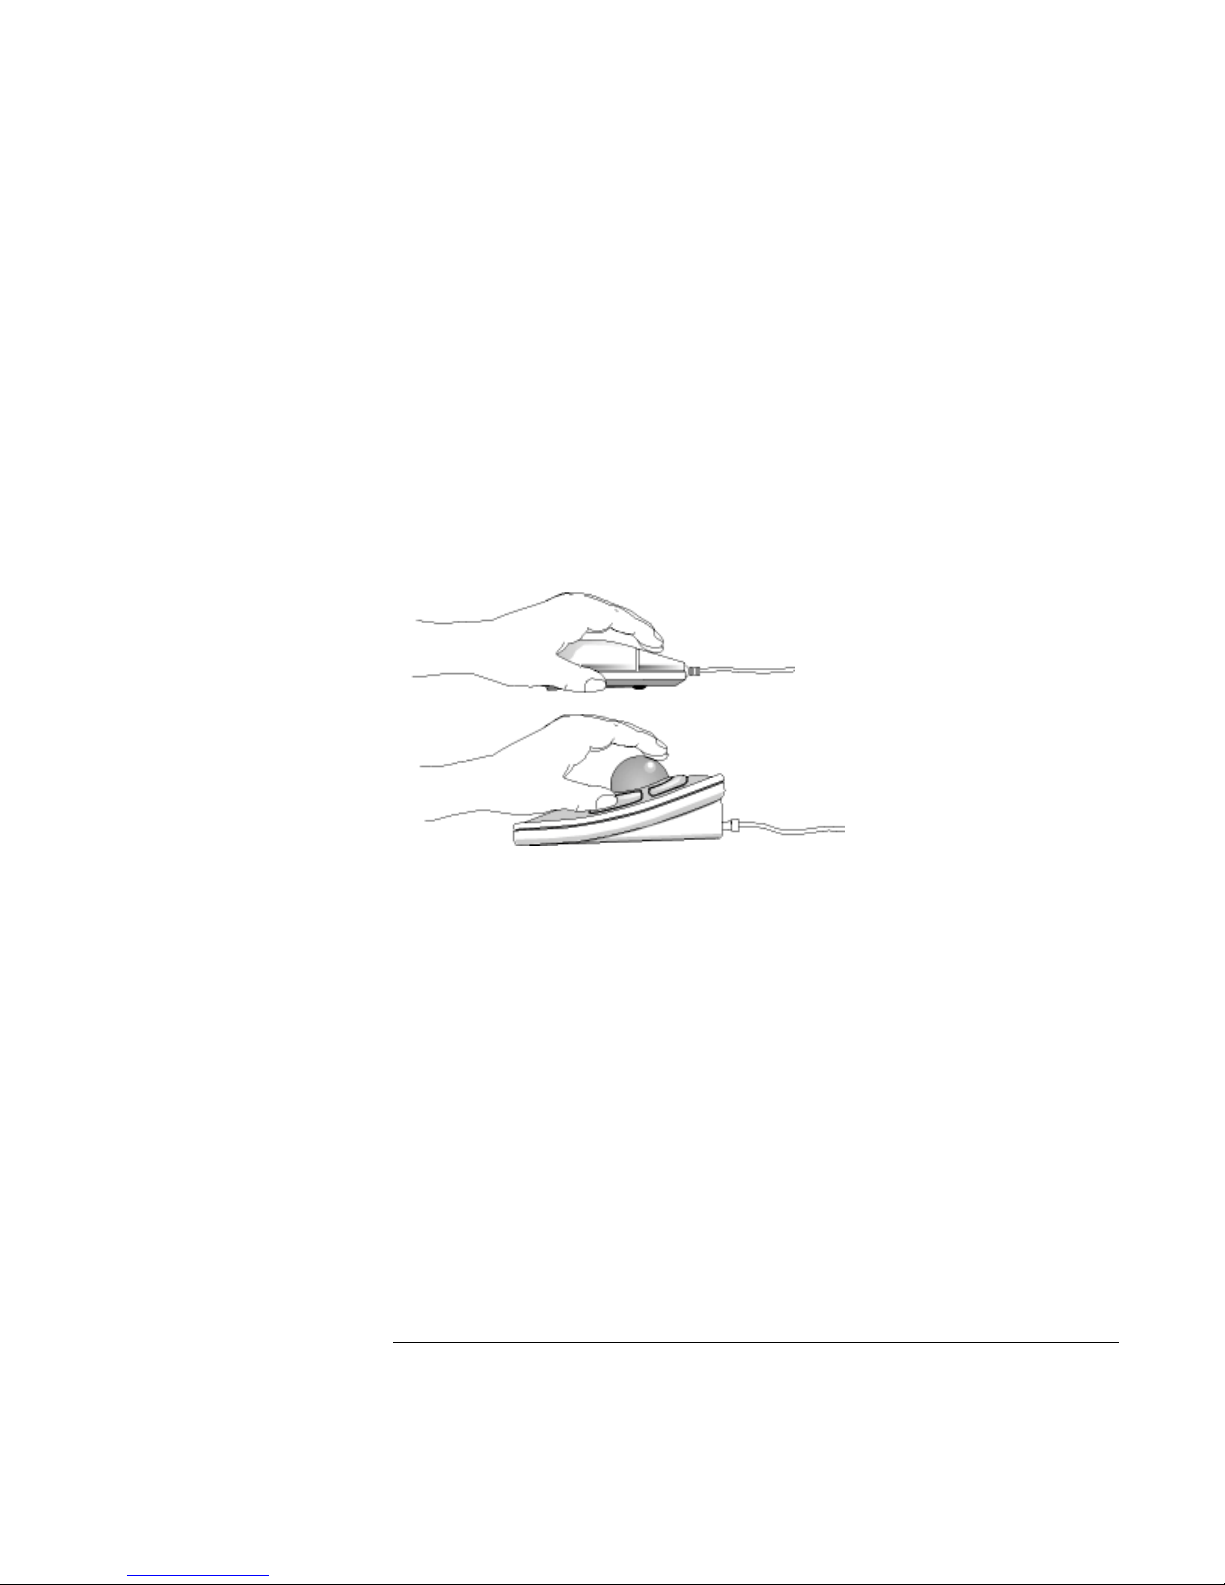
• As with the keyboard, try to keep your hand, wrist, and forearm in a neutral position
while using your mouse or other input device.
• When using a stylus or light pen with a graphics tablet, don't grip the stylus tightly.
Keep your hand and fingers relaxed and try to maintain a neutral posture in your
hand, wrist and forearm.
• If you use your thumb to rotate the ball on a trackball or spaceball, keep it in a
relaxed, natural shape, and maintain a neutral posture in your hand, wrist, and
forearm.
• Hold the mouse gently by draping your fingers over it. Keep your hand relaxed and
fingers loose. Do not grip the mouse tightly.
• It takes very little pressure or force from your fingers to activate the buttons or scroll
wheel on your mouse, scrolling mouse, trackball, or other input device. Using too
much force can place unnecessary stress on the tendons and muscles in your hands,
wrists, and forearms.
Setup Guide 43
Page 44
Using Your HP Notebook PC
Working in Comfort
• If you are using a scrolling mouse, be sure to keep your fingers and hand in a relaxed,
neutral position when activating the scroll wheel. Also, this type of mouse features
software that can minimize the number of mouse movements or button clicks.
• When using a mouse, trackball, stylus and graphics tablet, or other input device,
position it as close to the keyboard as possible, and keep it at the same level so you do
not have to stretch while using it.
• Use a good quality mouse pad to enable the mouse to work most effectively and
reduce unnecessary hand and wrist movements.
• Be sure to keep your mouse and trackball clean. Regular removal of accumulated dust
and dirt helps ensure proper tracking and reduces unnecessary hand and wrist
motions.
Headphones and Speakers
Listening to loud sounds for prolonged periods may permanently damage your hearing.
To avoid discomfort from unexpected noise, always turn down the volume before
connecting headphones or speakers to your HP equipment.
When you put on the headphones, slowly increase the volume until you find a
comfortable listening level, then leave the volume control in that position.
Comfort and Safety Checklist
These recommendations are drawn from the latest available international ergonomic
standards and recommendations, including ISO 9241 and ANSI/HFS 100-1988.
General
44 Setup Guide
Page 45

Using Your HP Notebook PC
Working in Comfort
• Work Surface Height: Adjust either your seat height, work surface, or both, to
position the work surface at approximately elbow height.
• Work Surface Arrangement: Make sure frequently used equipment is within easy
reach. For example, if you are primarily using the keyboard, place it directly in front
of you, not to the side. If you are primarily using the mouse, place it in front of your
hand or arm. If you are using both a mouse and keyboard, place them both at the same
work surface height and close together. If a palm rest is used, the height should be
flush with the front edge of the keyboard. Other items, such as your telephone or
notepad, also should be considered.
• Monitor: Place your monitor so that the top of the screen is at, or slightly below, eye
level (up to 15 degrees).
• Head: Do not tilt your head forward by more than 15 degrees, and try not to turn
your head toward the side.
• Back: While sitting at your work surface, make sure your back is supported by the
chair’s backrest in an erect position or angled slightly backwards.
• Arms: Make sure your arms and elbows are relaxed and loose, with your upper arm
perpendicular to the floor or slightly forward. Keep your forearms and hands
approximately parallel with the floor with elbows bent between 70 and 115 degrees.
Keep your elbows close to your sides (less than 20 degrees away from your body).
• Legs: Your thighs should be horizontal or angled slightly downward. Your lower
legs should be near a right angle to your thighs. Make sure there is sufficient room
under the work surface for your legs.
• Feet: If after adjusting your chair you cannot rest your feet comfortably on the floor,
use a footrest, preferably one that can be adjusted in height and angle.
Overall
• Look away from the screen from time to time to help reduce eyestrain. Focus on
distant objects briefly, and blink periodically to lubricate your eyes. You also should
have your eyes checked on a regular basis and ensure your eyeglass prescription is
suitable for working on a monitor screen.
• Remember to occasionally shift position and move your body. Keeping your body in
one position for long periods is unnatural and stressful. When prolonged work is
required, take frequent short breaks. As a rule of thumb, a five- or ten-minute break
every hour is a good idea. Short, frequent breaks are more beneficial than longer less
frequent breaks. Data show that people who work for long periods of time without a
break may be more prone to injury.
Setup Guide 45
Page 46

Using Your HP Notebook PC
Working in Comfort
• Changing tasks frequently will help prevent muscle stiffness. Examples: alternating
between keyboarding, reading, writing, filing, and moving around in your work
environment, helps you maintain a relaxed posture. Occasionally stretch the muscles
in your hands, arms, shoulders, neck, and back. You should stretch at least as often as
you take brief task breaks—at least once every hour.
• Discomfort may be alleviated by using alternative ergonomic designs and accessories
such as ergonomically personalized chairs, palm rests, keyboard trays, alternative
input devices, prescription eyeglasses, anti-glare screens, and more. Seek additional
information from the sources available to you, including your employer, doctor, local
office supply store, and the information sources listed in the online version of
Working in Comfort, which is preloaded on the hard disk of your HP computing
equipment.
Your HP Notebook PC
You can use your HP notebook virtually anywhere, anytime. The following
recommendations should help you work more comfortably.
Note that if you are using your portable computer as your primary computer, or using it
for extended periods, you should use it with a full-size keyboard, monitor, and mouse.
This will give your portable computer the adjustability and comfort features of a desktop
unit. HP port replicators offer quick, easy connections to these devices. More information
on how to prepare your workspace environment and set up your HP equipment is
available in other sections of Working in Comfort with Your HP Computing Equipment.
Preparing Your Mobile Work Environment
• Use a chair that provides good support for your lower back. If an adjustable chair is
not available, you can use a pillow or rolled-up towel to provide lower back support.
• Try to keep your thighs parallel to the floor and your feet flat on the floor. In a mobile
environment, you can do this by using a phone book or briefcase to support your feet.
• Adjust the height of either your work surface or chair to keep your arms in a neutral
position. Your arms should be relaxed and loose, elbows at your sides, with the
forearms and hands parallel with the floor.
• Position your notebook computer display to minimize glare and reflection. For
example, on an airplane, lower the window shade, or in a hotel room, draw the
curtains. You also should maintain a comfortable viewing distance, approximately 40
to 60 cm (16 to 24 inches). Adjust the angle of your display to help keep your head
angled slightly downward in a comfortable position.
46 Setup Guide
Page 47

Using Your HP Notebook PC
Working in Comfort
Using Your Mobile Computer
• Position the computer so your wrists and hands are in a neutral position. Your wrists
should be as straight as possible and should not have to bend sideways or more than
10 degrees up or down. If your notebook computer does not have a built-in palm rest,
you can use a rolled-up towel.
• Try to type as lightly as possible. The notebook keyboard requires little force to
activate.
• Take frequent, short rest breaks. This is especially important in a mobile computing
environment.
• Portable computers weigh between approximately 1.4 and 3.7 kilos (3 and 8 pounds).
When traveling, be sure to carry your computer properly to minimize strain on your
body. Shift the bag containing your notebook equipment frequently between your left
and right hands and shoulders.
Setup Guide 47
Page 48

Using Your HP Notebook PC
Caring for Your Computer
Caring for Your Computer
The following are recommendations for maintaining your computer during everyday use,
as well as preventing potential physical damage or data loss.
To protect your hard disk drive
Hard disk drives, as well as other internal components, are not indestructible and can be
damaged by inappropriate handling and operation.
• Avoid bumps or jolts.
• Do not operate the computer while traveling over bumpy terrain.
• Suspend or shut down the computer before transporting it. This turns off the hard
drive. A drop of a few inches onto a rigid surface while the hard drive is operating
could cause loss of data or damage to the drive.
• Carry the computer in a padded case to protect against bumps and jolts.
• Set down the computer gently.
To take care of your computer
• Provide adequate ventilation around the computer. Ensure that the laptop is sitting on
a flat surface, so that air is able to flow underneath the unit.
• Be sure to suspend or shut down the computer before putting it in a carrying case or
other enclosed space.
• Do not pick up or carry the computer by the display.
• Do not use the computer outside in the rain or snow (inclement weather) or in any
extremes of temperature or humidity.
48 Setup Guide
Page 49

Using Your HP Notebook PC
Caring for Your Computer
To safeguard your data
• Do not touch the touch pad or activate any other device that interrupts operation while
the system is starting or stopping.
• Back up your work regularly. Copy files to floppy, tape or network drives.
• Use a virus-scanning program, such as the included VirusScan, to check the integrity
of your files and operating system. Since new viruses appear frequently, you will also
want to update the program’s virus definitions from time to time; updates are on the
Web at www.networkassociates.com.
• Check your disk using the scandisk utility.
To extend the life of the display
Observe the following guidelines to extend the life of the backlight in the computer
display.
Note
• When working at your desk, connect an external monitor and turn off the internal
display (Fn+F12).
• If you are not using an external monitor, set the Turn off monitor timeouts (for both
AC and battery operation) to the shortest comfortable interval.
There are two types of LCD display available when you buy your notebook PC: HPA
(high-performance addressing) and TFT (thin film transistor). HPA uses a passivematrix technology that produces better contrast than conventional LCD displays. TFT,
an active-matrix technology, is somewhat more expensive; it provides a crisper,
brighter display that is visible from a greater angle.
Setup Guide 49
Page 50

Using Your HP Notebook PC
Caring for Your Computer
To get the most from your batteries
• Do not leave batteries unused for long periods of time. If you have more than one,
rotate them.
• If you normally use AC power, make a practice of at least once a week using the
battery as your power source.
• Unplug the AC adapter when the computer is not in use.
• To preserve the life of a battery, be sure to charge the battery regularly.
• For long-term storage, the battery must be charged at 20–50% to minimize capacity
loss by self-discharge and to avoid deterioration of battery performance.
To clean your computer
You can clean the computer with a soft cloth dampened either with clean water or with
water containing a mild detergent.
• Do not use an excessively wet cloth or allow water inside the case.
• Do not use any abrasive cleaners, especially on the display. Do not apply any cleaner
directly to the display. Instead, apply the cleaner to a soft cloth and then gently wipe
the display.
• You can clean the keyboard with a vacuum cleaner to remove accumulated dust.
50 Setup Guide
Page 51

Traveling with Your Computer
Setup Guide 51
Page 52

Traveling with Your Computer
Managing Power Consumption
Managing Power Consumption
When you are not using your computer, you will want to maximize battery operating time
without compromising performance. It is not necessary to turn the computer off in order
to reduce power consumption and extend battery life.
With Windows 98, Advanced Power Management (APM) provides both manual and
automated tools for reducing power consumption.
• Power management options can be set to occur automatically, based on timeout
values that you have entered.
• Power management options may be invoked manually at any time by pressing the
appropriate key. See “To use manual power management” on page 54.
To use automated power management
System standby, monitor, and hard disk timeouts automatically occur based on the values
set in the Power Management Properties window. The following tables describe the
power management timeouts you can set in Windows 98.
Turn off monitor
Action
When
Resume
Turns off the display. This not only
conserves battery power, but also
extends the life of the display.
No activity of the keyboard or mouse for
the specified interval.
Press any key or move the pointer to
return to your current session.
Turn off hard disks
Action
When
Resume
Turns off only the hard disk drive. This is
usually set to occur shortly after the
monitor is turned off.
No hard disk access for the specified
interval.
Press any key or move the pointer to
return to your current session.
52 Setup Guide
Page 53

CAUTION
Traveling with Your Computer
Managing Power Consumption
System standby
Action
When
Resume
A message box appears 15 seconds before system standby takes effect. This allows you
to stop the process and save your work if you have not recently done so. (In Windows 98,
there is no difference between Standby and Suspend.)
Make a habit of saving your work before allowing your computer to go to system
standby. If there is an interruption in power while the computer is in standby,
information that has not been saved will be lost.
You can also create power schemes which will automatically shut down the computer
components after a specified period of non-use. Define these schemes so that they best
support the ways you use your computer.
Turns off the display and hard disk drive to
conserve battery power.
No activity of the keyboard or mouse, no
disk drive access, and no port (serial,
parallel, and IR) activity for the specified
interval.
Press the blue power button to return to
your current session.
To set power management properties:
1. Click Start, Settings, Control Panel, Power Management. For details see Windows
help.
2. If you don’t want a particular timeout to occur, set the value to Never.
3. Click Apply to activate your changes without closing the window.
–or–
Click OK.
Setup Guide 53
Page 54

Traveling with Your Computer
Managing Power Consumption
To use manual power management
You can shut down your computer manually whenever you need to with any of the
following three levels of shutdown.
System standby
Action
When
Resume
System standby can also occur automatically when the timeout setting in the Power
Management Properties window is reached. (In Windows 98, there is no difference
between Standby and Suspend.)
Hibernate
Action
When
Resume
Hibernate can also occur automatically when:
Turns off the display and hard disk drive.
Fn+F3 or Fn+F4 or Start, Shut Down,
Standby.
Press the blue power button to return to
your current session.
Saves the current session to disk, then
shuts down. Provides maximum power
savings while still allowing you to recover
the current session.
Press Fn+F5.
Press the blue power button to recover
your current session. This takes several
seconds.
• Battery power reaches a critically low level (see “To respond to a low-battery
• The timeout setting in the BIOS Setup utility is reached (default is one hour after
54 Setup Guide
warning” on page 57).
System standby occurs).
Page 55

Note
Traveling with Your Computer
Managing Power Consumption
Off
Action
When
Resume
Sometimes the system stops responding and you are not able to turn off the computer as
described above. To recover, use the following in the order listed.
• If you are unable to access the Start menu, you can turn off the system by pressing
and holding the blue power button for 4 seconds.
• If holding the blue power button fails, insert a pin or straightened paper clip into the
system-off button on the bottom of the computer (see “Bottom view” on page 16).
When the system hibernates as a result of a critically low battery, you will find when
resuming that all your data has been saved but that some functions may be disabled. To
resume normal operation, restore power (by connecting AC power or installing a
charged battery), perform a full shutdown, and then restart the computer.
Turning off your computer provides
maximum power savings. The current
session is not saved and unsaved data will
be lost.
Start, Shut Down, Shut down.
Press the blue power button to start a new
session. This will take several seconds.
Setup Guide 55
Page 56
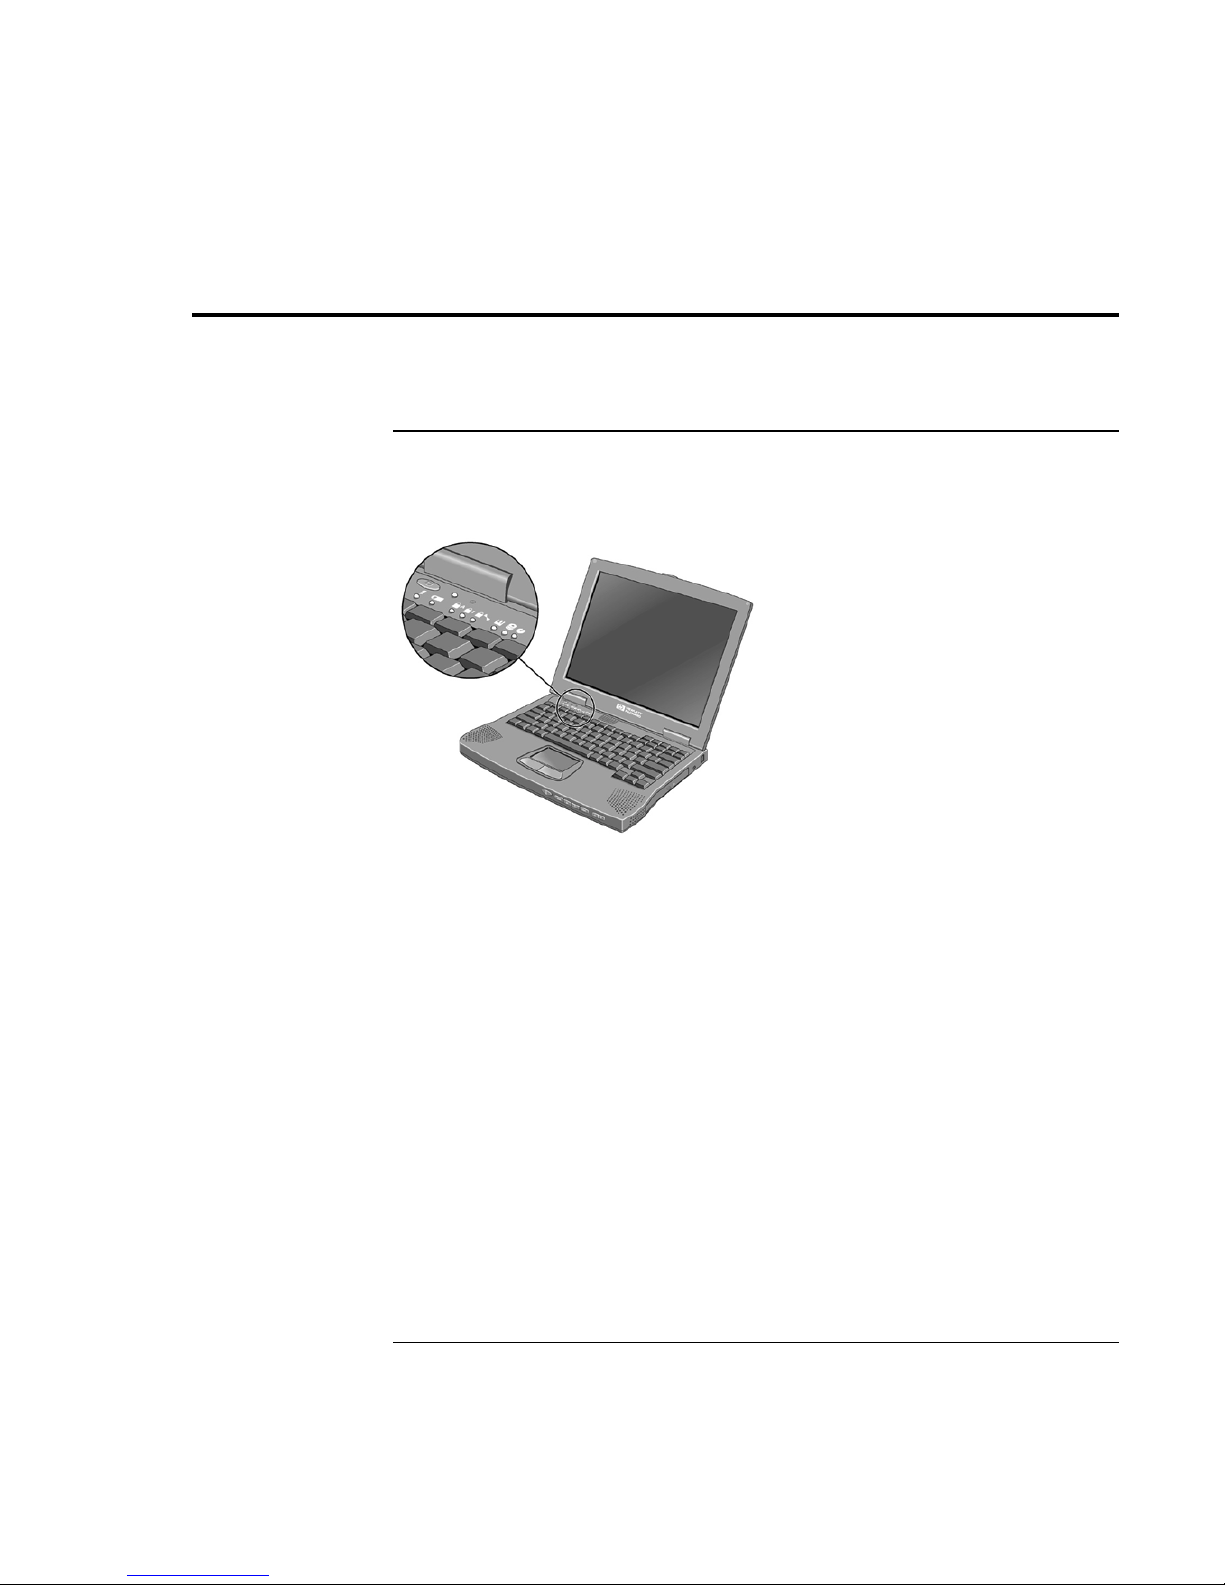
Traveling with Your Computer
Using Battery Power
Using Battery Power
To check the battery status
From the battery status light
The battery status light (second from left) reports the following information:
Green AC attached—battery full
Orange AC attached—battery charging
Red AC attached—battery will not accept charge
From the Windows taskbar
The System Tray on the Windows taskbar includes a power icon that allows access to
more detailed battery status information. The icon looks like a battery when AC is not
connected.
• Place pointer over the power icon to display a percentage of remaining time.
• Right click the power icon to view the options for displaying power information.
• Left click the power icon to display a menu of the available power schemes.
56 Setup Guide
Page 57

Note
Traveling with Your Computer
Using Battery Power
To respond to a low-battery warning
The computer automatically alerts you when the battery power drops to a critically low
level. First you will hear a high-pitched beep. Then, if you have not taken restorative
action within a short time, the system hibernates.
You won’t be able to turn the computer on again until you restore power by one of the
following actions:
• Plug in the AC adapter (see “To connect AC power” on page 20).
–or–
• Replace the battery with one that is charged (see “To install the battery” on page 19).
If you plug in the AC adapter, you can continue to work while your battery recharges.
To optimize battery operating time
• Plug in the AC adapter, especially while using the CD-ROM or DVD drive, the
floppy disk drive, or any external connections such as a PC Card or a modem.
• If you have an I/O PC Card—that is, a PC Card having an external connection, such
as a network card—remove it when you’re not using it. Some I/O cards use
significant power, even while they’re inactive.
• If you work with an application that uses the serial port or an I/O PC Card, exit the
application when you have finished using it.
• Turn off the CD player when you are not using it.
• See “Managing Power Consumption” on page 52 for other ideas about reducing
power consumption while the computer is not in use.
Setup Guide 57
Page 58

Page 59

Making Connections
Setup Guide 59
Page 60

Making Connections
Using Your Modem
Using Your Modem
By connecting your modem to a telephone line, your PC can communicate with other
computers throughout the world. You can explore the Internet, send and receive e-mail
messages, and send and receive faxes. Your HP notebook PC contains several software
programs that work with your modem:
• Internet Explorer, for browsing the World Wide Web
• Outlook Express, for sending and receiving e-mail messages
• QuickLink III, for sending and receiving faxes
• eFax, a link to a Web site that allows you to receive faxes at your existing e-mail
address
The computer comes with a high-velocity V.90 K56flex™ modem. This modem allows
you to connect to any Internet Service Provider (ISP) that has K56flex or V.90
interoperable modems. Check with your ISP for a list of telephone numbers that support
K56flex and/or V.90. In most cases, the V.90 phone number will be the same as the
K56flex number.
Note that the maximum speed for faxing is 14.4Kbps. Even though the modem is capable
of downloading at 56Kbps using K56flex technology, your ISP may not operate at this
speed or support this technology. Please check with your service provider for information
on its capabilities. Furthermore, download transmission rates depend on the condition of
the telephone line.
To sign up with an Internet Service Provider
Before you can connect to the Internet, you need to set up an account with an Internet
Service Provider (ISP). In some countries, Hewlett-Packard provides Easy Internet
Signup so that you can connect quickly to an ISP.
1. Connect the included telephone cord to your built-in modem. If you prefer, you can
instead use a PC Card modem or an external modem to connect to an ISP.
60 Setup Guide
Page 61

Making Connections
Using Your Modem
2. If there is an Easy Internet Signup icon on the desktop, double-click it. This will
launch an Internet setup wizard, which will help you locate an ISP in your area.
−or−
Click Start, Programs, Online Services and select one of the listed ISPs. This begins
the registration process for the ISP you have chosen.
You can also make arrangements with an ISP of your choice for Internet connection.
To connect to the Internet
After you have signed up with an ISP, you can connect to the Internet. Choose one of the
following:
• If you signed up with AOL, double-click the AOL icon on the desktop.
-or-
• If you signed up with another ISP, double-click the Internet Explorer icon on the
desktop, and then click the Connect button in the Dial-up Connection window.
When you are successfully connected to the Internet, you’ll see a connect icon (two
connected computers) next to the clock on the taskbar. You are now ready to explore the
Internet! To go to a specific Web site, enter the address (for example, www.hp.com) in
the browser’s Address field. To search for information on the Web, you can use the
browser’s Search tool and enter the word or phrase you are looking for.
Using AOL as your ISP
When you use AOL as your Internet Service Provider, you can access the Internet only
with AOL's own software; you can’t use a standard browser like Internet Explorer. As a
result:
• You cannot view Web sites by clicking on links (such as those in the electronic
User’s Guide that link to the HP notebook Web site).
• You cannot go to a website by entering the address in Windows Explorer.
• You cannot use the eFax icon on the desktop.
If you try to access the Internet without using the AOL software, the Easy Internet Signup
software automatically launches, asking you to sign up for an ISP. In that case, cancel the
program and launch AOL.
Setup Guide 61
Page 62

Making Connections
Using Your Modem
To disconnect from the Internet
You remain connected to the Internet until you shut down the computer, disconnect the
phone line from the computer, or give a command to hang up the connection.
• To disconnect from AOL, use the Sign Off menu.
• To disconnect from other ISPs, double-click the connect icon (two connected
computers next to the clock) on the taskbar, and click Disconnect.
To send and receive e-mail
The steps for sending and receiving e-mail depend on your Internet provider. If you are
using AOL, e-mail services are part of your AOL service. For other ISPs, you can use
Outlook Express (included with your computer) or an e-mail system of your choice. This
section includes instructions for using Outlook Express.
To start Outlook Express
1. Double-click the Outlook Express icon on the desktop.
2. If you are not currently connected to the Internet, the Dial-up Connection window
appears. Choose Connect to connect to the Internet.
To send an e-mail message
1. Start Outlook Express.
2. Click the New Mail tool on the toolbar.
3. Fill in the information in the New Message window.
4. When you’re finished, click the Send button.
To receive e-mail messages
1. Start Outlook Express.
2. Click the Send/Recv tool on the toolbar to have Outlook deliver new messages.
3. Click the Inbox folder to view the list of messages. Unread messages appear bold on
the screen.
4. To view a message, click it once. (Or double-click to view the message in its own
window.)
62 Setup Guide
Page 63

Making Connections
Using Your Modem
To send and receive faxes
The modem and QuickLink III fax software included with your notebook enable you to
use the computer to send and receive faxes.
To start QuickLink III
• Click Start, Programs, QuickLink III, QuickLink III.
The first time you start QuickLink, the Setup Wizard launches, stepping you through the
process of setting options and customizing the program for your personal use. Follow the
onscreen instructions. If you’re unsure which setting to choose, accept the default choice.
Sending a Fax
There are two ways to compose a fax. You can type a message in QuickLink III, or you
can fax a file from any program that can print.
To send a fax composed in QuickLink III
1. Start QuickLink III.
2. Click the QuickFax tool on the QuickLink III main window toolbar.
3. Enter the fax number and the recipient’s name and company.
4. Type the message body in the QuickFax Note area.
5. Click Send Fax.
To fax a file
Software programs that can print can also send faxes. To send a fax, change the selected
printer (in the Print dialog box) to QuickLink III, and then print as you normally do.
Receiving Faxes
QuickLink III also has the ability to receive, view, and print faxes. By default, faxes are
automatically received when the QuickLink III program is running in an open or
minimized window. To see if you have received any new faxes, look at the status box in
the main QuickLink III window.
To receive a fax manually
1. When a fax call is coming in, choose Start on the QuickLink III menu bar.
2. Choose Manual Fax Receive.
Setup Guide 63
Page 64

Making Connections
Using Your Modem
To view and print a fax
1. In QuickLink III, click the Fax Viewer tool on the toolbar.
2. Click Yes to view the fax now.
3. Click the printer icon to print the fax on the selected printer.
4. To see the next new fax, click the Next Fax button.
To select modem modes
If you have trouble connecting with your internal modem to other modems, you can try
forcing the internal modem to certain modulations and connect rates. To select a
modulation, use the +MS command. In addition to selecting the modulation, this
command allows you to enable or disable automode and specify the lowest and highest
connection rate. The format of the command is as follows:
+MS= <mode>,<automode>,<min_rate>,<max_rate>
The +MS command should be used as part of the modem initialization sequence in your
communications program.
The following table indicates the mode value to use for each supported modulation as
well as the possible rates that can be used for each modulation.
<mode> Modulation Possible Rate (bps)
0 v.21 300
1 v.22 1200
2 v.22bis 2400, 1200
3 v.23 1200, 300
9 v.32 9600, 4800
10 v.32bis 14400, 12000, 9600, 7200, 4800
11 v.34 33600, 31200, 28800, 26400, 24000, 21600, 19200,
16800, 14400, 12000, 9600, 7200, 4800, 2400
17 X2, v.90 57,333–33,333
64 Bell 103 300
64 Setup Guide
Page 65

Making Connections
Using Your Modem
For example, to force the internal modem to connect with the V.34 modulation:
1. Click Start, Settings, Control Panel.
2. Double-click Modem.
3. Click Properties.
4. Click the Connection tab.
5. Click Advanced.
6. In the “Extra settings” field, type AT+MS=11 and click OK.
Most Windows modem applications use the modulation command in the “Extra settings”
field as part of the modem initialization.
The following table lists the other +MS parameters along with the acceptable values for
each parameter.
Parameter Acceptable Values
<automode> 0 (Automode Disabled)
1 (Automode Enabled)
<min_rate> 300 to 33600
<max_rate> 300 to 33600
To force a maximum rate, set the minimum rate to the same value as the maximum value.
To dial in France and Spain
If you purchased your computer in Spain, the pulse dialing feature is disabled. Because
Loop Disconnect is not certified for your modem in Spain, you should use tone dialing
connections only.
In order to access the MiniTel system in France, you will need the latest modem driver
and MiniTel emulator software. The modem driver is available for download from the
technical support area on the HP notebook Web site (http://www.hp.com/notebooks).
Some HP notebooks include the TimTel Light software; if your computer does not
include TimTel Light, you must purchase the emulator software separately.
Setup Guide 65
Page 66
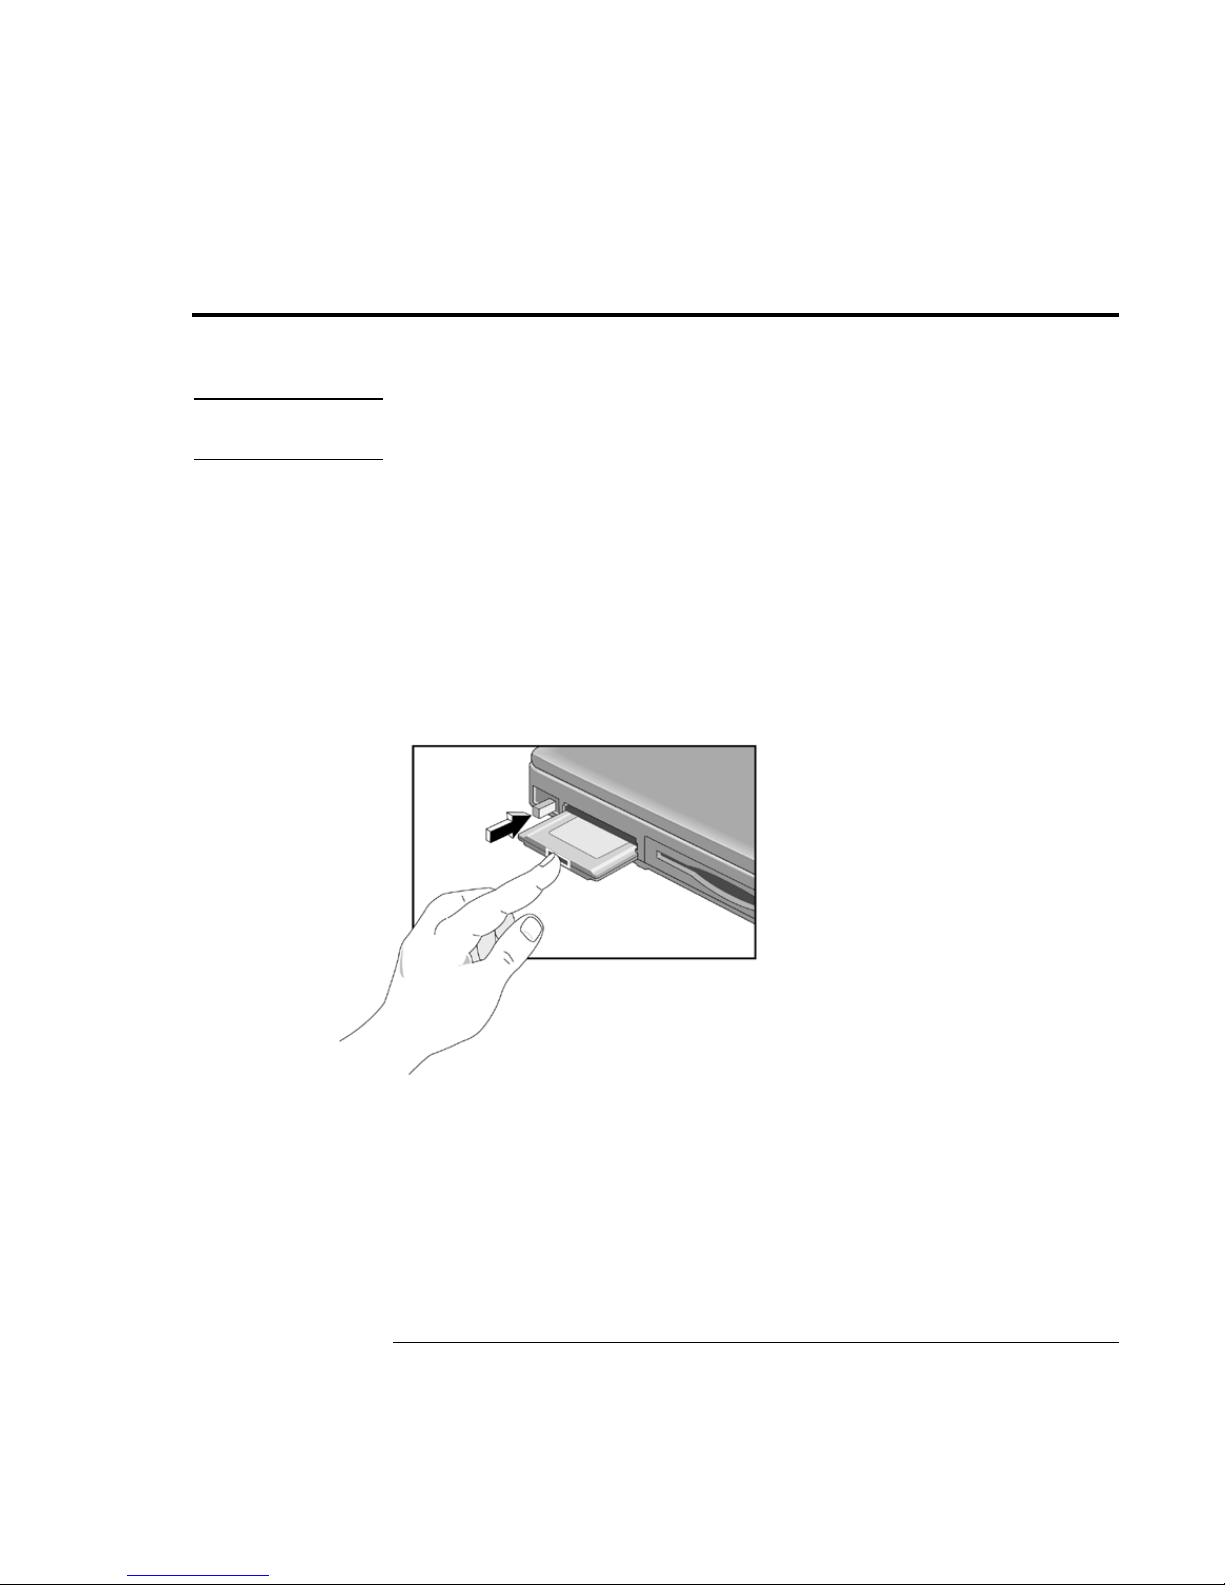
Making Connections
Connecting PC Cards
Connecting PC Cards
CAUTION
Do not remove a PC Card while the computer is reading or writing data. If you do, you
could lose data, or the computer could stop responding.
The PC Card slot is available for storing data and expanding the communication
capabilities of the computer. Your computer supports standard Type I, II, and III PC
Cards (PCMCIA and CardBus). You can use only one card at a time, since the upper slot
does not have a connection.
The PC Card slot supports Zoomed Video, which allows a zoomed video card to show
high-quality multimedia presentations.
To insert a PC Card
1. Hold the card with its face up and its connector holes toward the card slot.
2. Slide the PC Card into the lower slot until it is flush with the computer.
To remove a PC Card
1. Click the PC Card indicator in the taskbar, then click Stop. This protects your data
2. Flip the eject button out, so that it is sticks out from the side of the computer.
3. Press the eject button to eject the PC Card.
66 Setup Guide
and avoids unexpected problems. You can restart the card by removing it, then
inserting it again.
Page 67

Making Connections
Connecting PC Cards
To reestablish network connection after resume
When you are using a network PC card, it is possible that you will lose network
connection after a Resume operation. If this occurs:
1. Stop the network PC card:
• Double-click on the PC card icon in the lower right of your screen.
• In PC Card Properties, select your network card.
• Click Stop.
2. Remove the PC card.
3. Insert the PC card again to reestablish network connection.
Setup Guide 67
Page 68

Making Connections
Connecting External Components
Connecting External Components
External components such as a printer, mouse, monitor, or keyboard may be connected
directly to your computer. However, if you have purchased the optional port replicator,
you can use it to connect external components without disconnecting them each time you
wish to use the computer on the road.
To identify the ports
Using the ports on the rear of the computer or on the port replicator, the following
external components are readily connected. Table numbers refer to a callout number on
the figures.
Port location on
Component Notebook Port replicator
Printer (parallel) 1 10
Printer (serial) 2 9
Monitor 3 11
PS/2 mouse 7* 12
PS/2 keyboard 7* 12
USB device 6 13
Speakers 4 15
Microphone 5 16
Audio-in -- 14
* You can use a Y adapter (HP F1469A) to connect both a keyboard and mouse to your
computer.
68 Setup Guide
Page 69
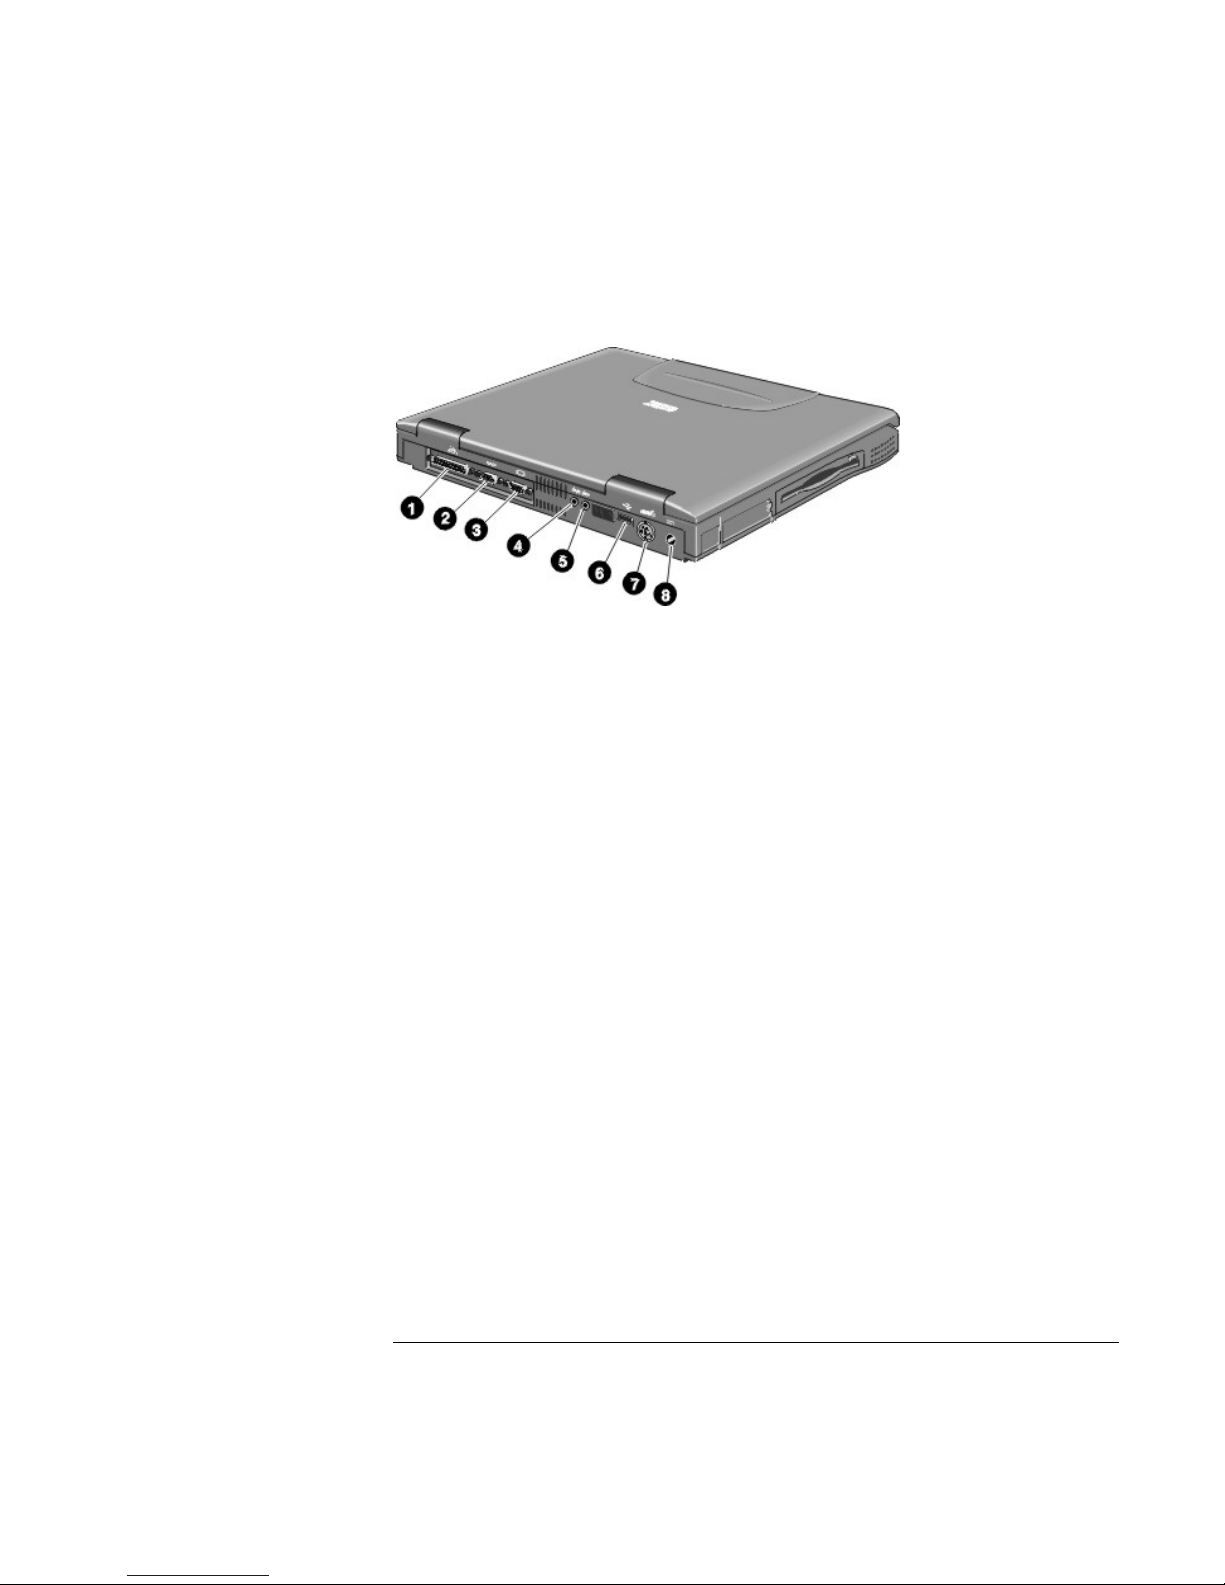
Notebook ports
1 Parallel port
2 Serial port
3 VGA port (external monitor)
4 Audio out (external speaker)
Making Connections
Connecting External Components
5 Microphone jack
6 USB port
7 PS/2 port
8 AC adapter jack
Setup Guide 69
Page 70
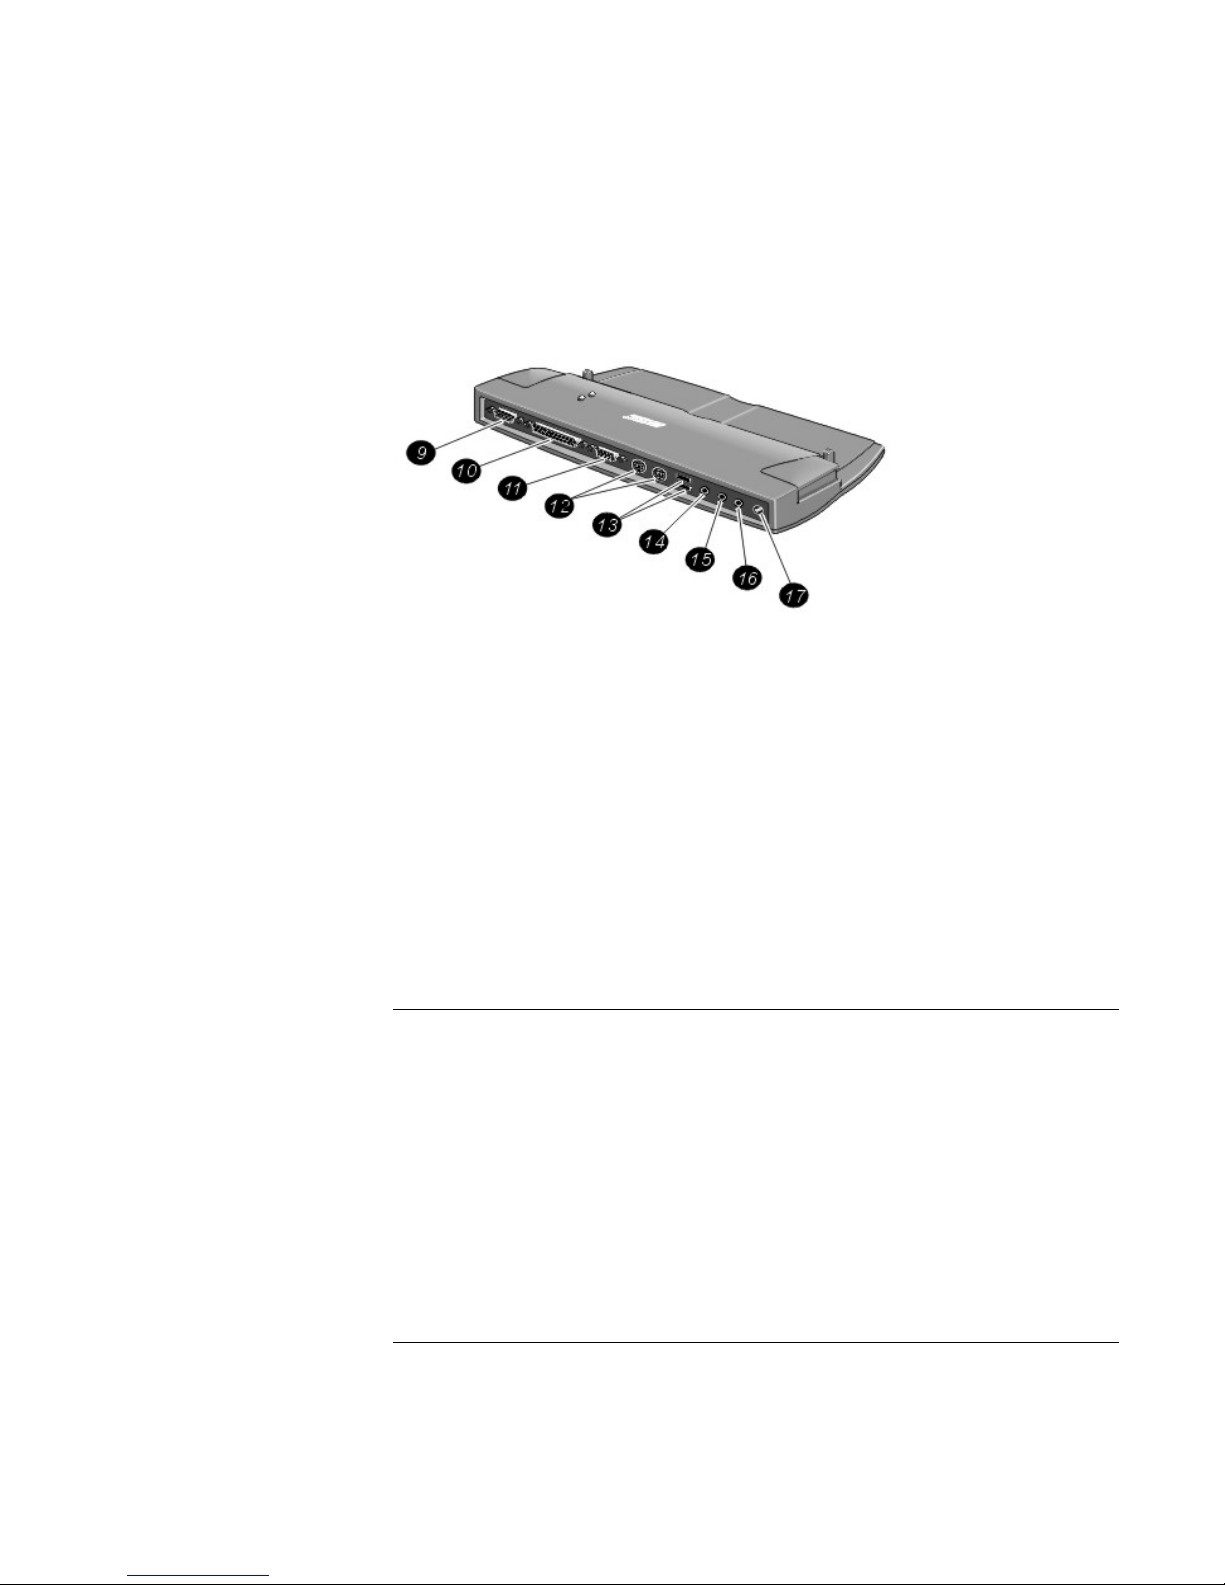
Making Connections
Connecting External Components
Port replicator ports
9 Serial port
10 Parallel port
11 VGA port (external monitor)
12 PS/2 ports (2)
13 USB ports (2)
14 Audio In
15 Audio Out (external speaker)
16 Microphone jack
17 AC adapter jack
To use the port replicator
With the optional port replicator, you can connect external components without
disconnecting them each time you wish to use the computer on the road.
To connect to the port replicator
1. Plug in the AC adapter, then connect the AC adapter to the rear of the port replicator.
Make sure that the AC status light is on.
2. Align the computer with the locator pins on the port replicator, as shown.
70 Setup Guide
Page 71
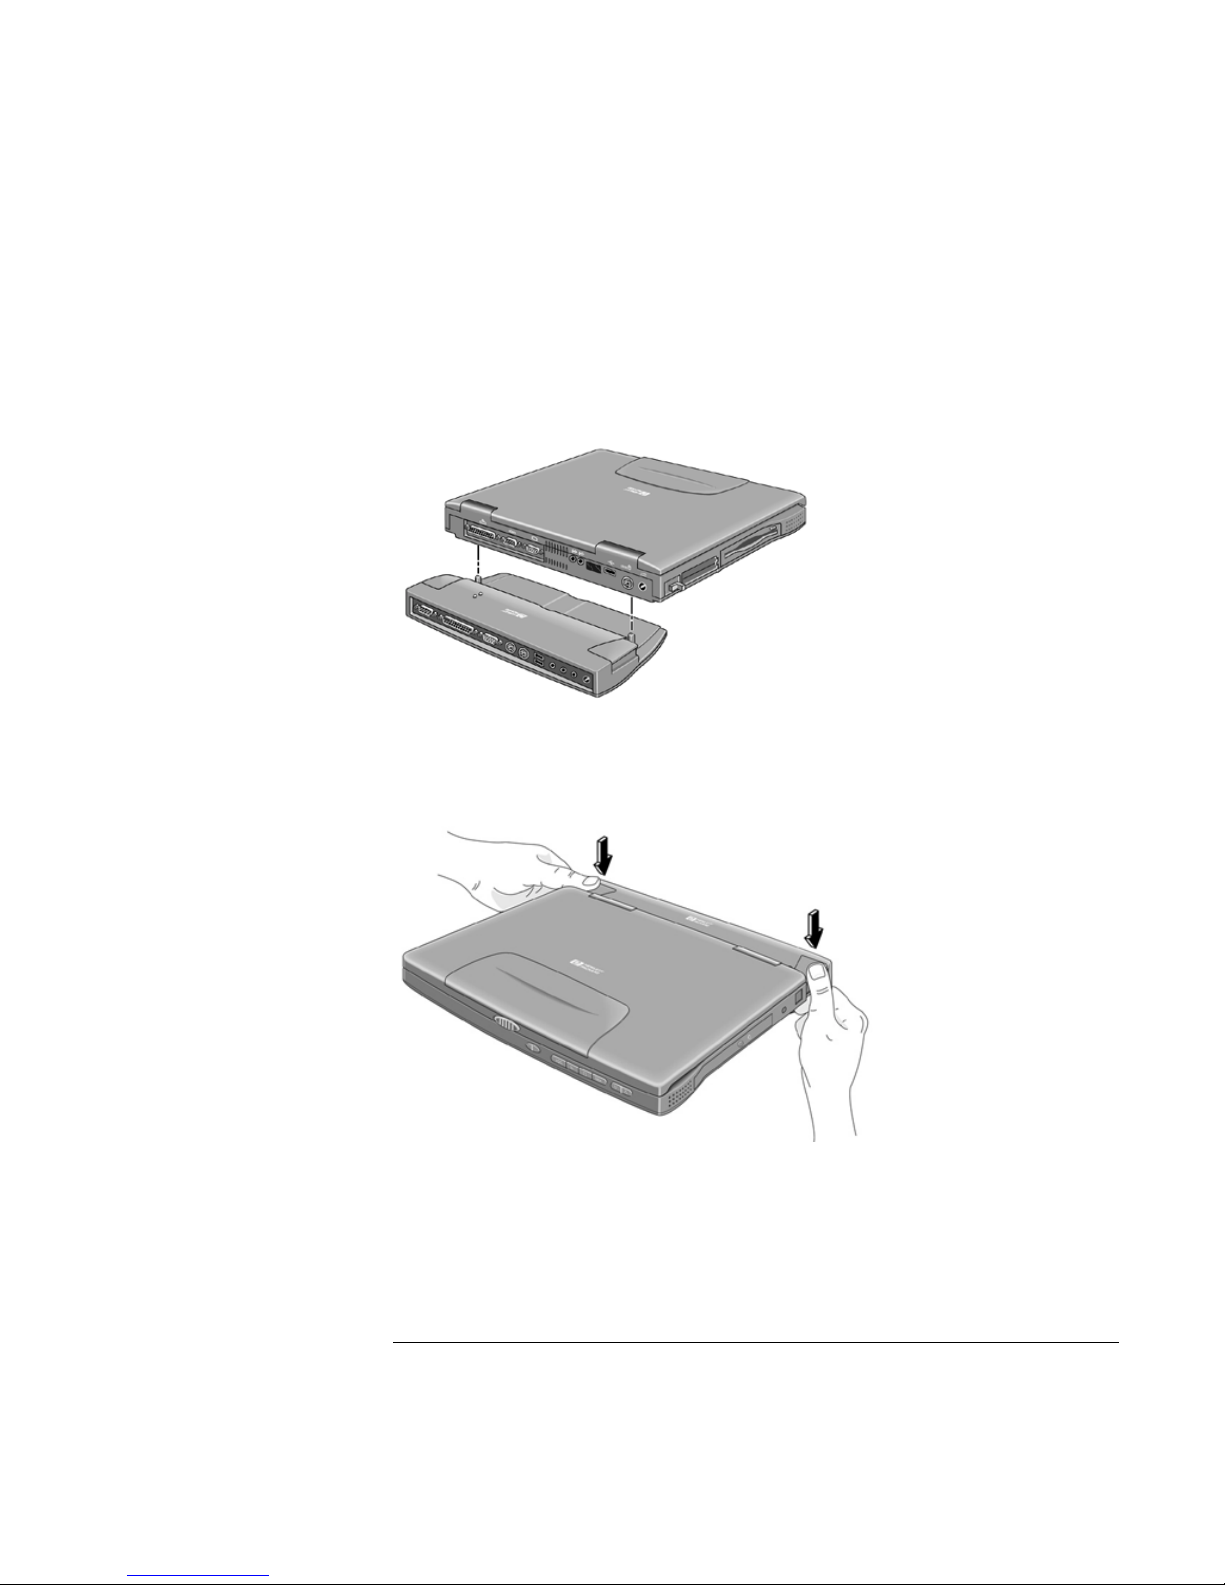
Making Connections
Connecting External Components
3. Press down until the computer clicks into place. Make sure that the dock status light is
on.
4. Open the computer and press the blue power button to turn it on.
After the computer is turned on, you can close the lid while it is running.
To disconnect from the port replicator
1. Press down on the two release tabs on the port replicator, as shown.
2. Lift the computer from the port replicator.
Setup Guide 71
Page 72

Note
Making Connections
Connecting External Components
To connect a printer (or other parallel device)
The parallel port uses a standard 25-pin connector, most commonly used for connecting
dot-matrix, ink-jet, and laser printers. You may also use it to connect a parallel Zip drive.
• Connect the parallel printer cable or other parallel cable to the parallel port.
If you connect a Zip drive to the parllel port, you can enhance its performance by
installing the accelerator that is supplied with your Zip drive.
To connect an external keyboard or PS/2 mouse
The 6-pin PS/2 port allows you to attach an external keyboard or a PS/2–compatible
mouse to the computer. While an external PS/2 mouse is connected, the touch pad is
normally disabled. The computer provides one PS/2 port; the optional port replicator
provides two PS/2 ports.
• Plug the mouse or keyboard PS/2 cable into the PS/2 port on the computer.
Note
• To connect both a mouse and keyboard, use the HP F1469A Y adapter.
• To connect a device that has a PC-type jack, first connect its cable to an adapter cable
with a PS/2 jack.
To use hot keys from an external keyboard, substitute CTRL+ALT for the computer Fn
key. For example, to access Fn+F2, press CTRL+ALT+F2.
To connect a USB device
Universal serial bus (USB) provides a bidirectional serial interface for adding peripheral
devices such as game controllers, serial and parallel ports, and scanners on a single bus.
The computer provides one USB port; the optional port replicator provides two USB
ports.
• Attach the USB cable to the USB port. Windows automatically recognizes the USB
device. Some USB devices can be connected to the computer in series—this is called
a daisy-chain connection.
72 Setup Guide
Page 73

Making Connections
Connecting External Components
Note
Note
If you have problems making this connection, contact the vendor of the peripheral
device, as well as the HP Web site, for the latest versions of the USB drivers. The USB
technology is dynamic and continues to develop.
To connect audio devices
There is a built-in microphone located just below the computer display. You can use it to
record voice, sound, and music. You can also plug in a stereo input source (such as a CD
player), an external microphone, external speakers or headphones.
• Attach the audio cable to the corresponding audio port.
When you plug a device into the microphone-in port, the built-in microphone
automatically turns off. When you plug a device into the speaker-out port, the built-in
speakers automatically turn off.
To use an external monitor
Connecting an external monitor
1. From the Start menu, shut down the computer.
2. Connect the monitor cable from the monitor to the VGA port on the rear of the
computer or on the port replicator.
3. Connect the monitor to a power source and turn it on.
4. Press the blue power button to turn on the computer.
Switching the display to the external monitor
• Close the computer lid.
–or–
• Press Fn+F12 (or CTRL+ALT+F12 on an external keyboard) to cycle through the
display options: notebook display, external monitor, both.
Adjusting monitor resolution
1. Click Start, Settings, Control Panel, Display.
2. On the Settings tab, adjust the Screen area.
Setup Guide 73
Page 74

Making Connections
Connecting External Components
Using dual display mode
You can extend the desktop by connecting an external monitor to your notebook. With
Windows 98, the dual display control panel is already installed.
Dual display mode requires that your computer display be set as shown in the table
below. Click Start, Settings, Control Panel, Display, Settings Tab to adjust these settings.
Notebook screen Screen area Colors
12.1-inch or 13-inch 800×600 pixels 256 colors or
High Color (16 bit)
14-inch 1024×768 pixels 256 colors
1. Set your notebook display settings according to the table above.
2. Click the Start Button and select Shut down.
3. Connect the monitor cable from the monitor to the VGA port on the rear of the
computer or on the port replicator.
4. Connect the monitor to a power source and turn it on.
5. Press the blue power button to turn on the computer. Windows will detect the second
monitor and attempt to load the proper display driver. Follow the onscreen
instructions.
6. Click Start, Settings, Control Panel, Display, Settings Tab. Position the second
monitor to the right or left of your notebook display to match your monitor location.
7. Make sure that the Settings box “Extend my Windows desktop onto this monitor” is
checked.
You can change the Screen area and Colors settings for the second monitor by selecting
Display #2. These settings can be different from your notebook display settings.
There are a few limitations with dual display mode:
• Settings cannot be changed on the second monitor if DirectDraw is enabled—for
example, if video is playing—since the display driver cannot reallocate the display
memory for dual display support.
• Under dual display mode, only the software cursor can be used. There is no hardware
cursor available under Virtual Refresh mode.
• Games that use the DirectDraw API cannot run in dual display mode. You will be
prompted to disable the second monitor before running the game.
74 Setup Guide
Page 75

Configuring and Expanding Your Computer
Setup Guide 75
Page 76

Configuring and Expanding Your Computer
Using the BIOS Setup Utility
Using the BIOS Setup Utility
The BIOS (Basic Input and Output System) Setup utility is a menu-driven utility that
enables you to make changes to the system configuration and tailor the operation of your
computer to your individual work needs.
The settings made in the BIOS Setup utility control the hardware and therefore have a
fundamental effect on how the computer operates.
To run the BIOS Setup utility
1. Close all applications, then shut down Windows and restart the computer.
2. When you see the HP logo, press F2 to enter the BIOS Setup utility.
3. After you select the options you want, use the Exit menu to exit the BIOS Setup
utility.
If the settings cause a conflict between devices during reboot, the system prompts you to
run BIOS Setup, and the conflicting settings are marked.
To select options from the BIOS Setup utility
You can use the touch pad (or the mouse, if you have installed one) to select menus and
options in the BIOS Setup utility. You can also use the keyboard: press ALT+RIGHT
ARROW or ALT+LEFT ARROW to move among menus. Press DOWN ARROW and
UP ARROW to move among options in a menu. Press ENTER to display a list of
choices. Within a selection window, you can tab from one item to another.
Startup Menu Default
Date and Time… Sets the date and the time using 24-hour format. Values
set take effect immediately.
Boot Logo When enabled, hides summary of power-on self-test
and messages during boot.
Boot Device… Shows the order of boot devices. Select each entry to
change the order.
76 Setup Guide
Enabled
1. Diskette A
2. Hard Disk C
3. CD-ROM/DVD
Page 77
Configuring and Expanding Your Computer
Using the BIOS Setup Utility
Display Device… Switches between Auto Sense, and LCD and CRT
(both). Auto Sense chooses the external display (CRT)
if it is attached, or the built-in display (LCD) if it is not.
Set Admin
password…
Set User password… Sets a new User Password (after Admin password is
Memory Menu Default
Video RAM Size… Configures the Video Memory to 4MB, 8MB, or Auto.
Disks Menu Default
Diskette Drives… Enables (1.44MB) or disables (None) the floppy disk
Advanced Setting Enables or disables internal hard disk controller (HDC). Enable (Internal
Components Menu Default
Serial Port… Sets the serial port assignment. COM 1, 3F8, IRQ 4
Parallel Port… Configures the parallel port.
Port Address Sets the Parallel port assignment. LPT1, Addr 378,
Port Definition Sets Standard AT, Bidirectional (PS-2), Enhanced
DMA Setting for
ECP Mode
Keyboard Numlock Starts computer with Keyboard NUM LOCK enabled or
Keyboard Repeat… Sets the auto repeat delay and repeat rate Key Repeat
Power Menu Default
Enable Power Saving Enables all power saving features Enabled
Timeout Settings… Customizes the Power Saving Settings
Video Timeout Sets the period of inactivity after which the screen is
Disk Timeout Sets the period of inactivity after which the hard disk
Sets a new Administrator Password. Clear
set). The User Password allows the user to set only the
Date and Time.
(Video memory uses part of RAM.)
drive.
Parallel (EPP), or Extended Capabilities (ECP).
Changes DMA setting when Port definition is set to
ECP.
disabled.
turned off.
stops spinning.
LCD and CRT
Clear
Auto (8MB if 64MB
memory or more)
Enable (1.44MB)
HDC)
IRQ 7
Extended
Capabilities (ECP)
DMA 3
Disabled
Rate=30cps,
Key Delay=½ sec
Never
2.0 minutes
Setup Guide 77
Page 78
Configuring and Expanding Your Computer
Using the BIOS Setup Utility
Sleep Timeout Sets the period of inactivity after which the computer
turns off LCD panel and hard disks and minimal CPU
support
Suspend Timeout Sets the period of inactivity after which the computer
enters suspend mode.
Suspend-to-disk Sets the period of disk inactivity after which the
computer enters suspend mode.
Power Button… Configures power button to power the unit on and off the
unit or to enter power-saving suspend/resume.
Lid Switch… Configures the lid switch to turn off the LCD display or
to enter power-saving suspend.
Ring Resume Sets whether the system resumes from Suspend if a
ring signal is received.
Resume Timer… Enables timer features for resuming at a specified date
and time.
Alarm Resume Sets whether the system resumes from Suspend at a
defined time of day.
Resume Time Sets the 24-hour time and date when the system
resumes from Suspend if enabled.
CPU COOLING
MODES…
Auto Turn on Dock Sets the docking mode (selected models only). When
Exit Menu
Save and Reboot… Saves Setup changes to CMOS, exits, and reboots.
Exit (No Save)… Discards Setup changes since last save, exits, and
Default Settings… Reloads default setting to CMOS.
Restore Settings… Restores current setup to original custom values.
BIOS Revision… Reports the current BIOS version number.
Sets mode for reduction of CPU temperature to
Performance (more cooling) or Silence (less cooling).
enabled, the computer turns on (or resumes)
automatically when you dock it. When disabled, it does
not.
reboots. Does not affect security, date, or time changes.
2 minutes
2 minutes
1 hour
Suspend/Resume
Turn Off LCD
Off
Disable
Performance
Disabled
78 Setup Guide
Page 79
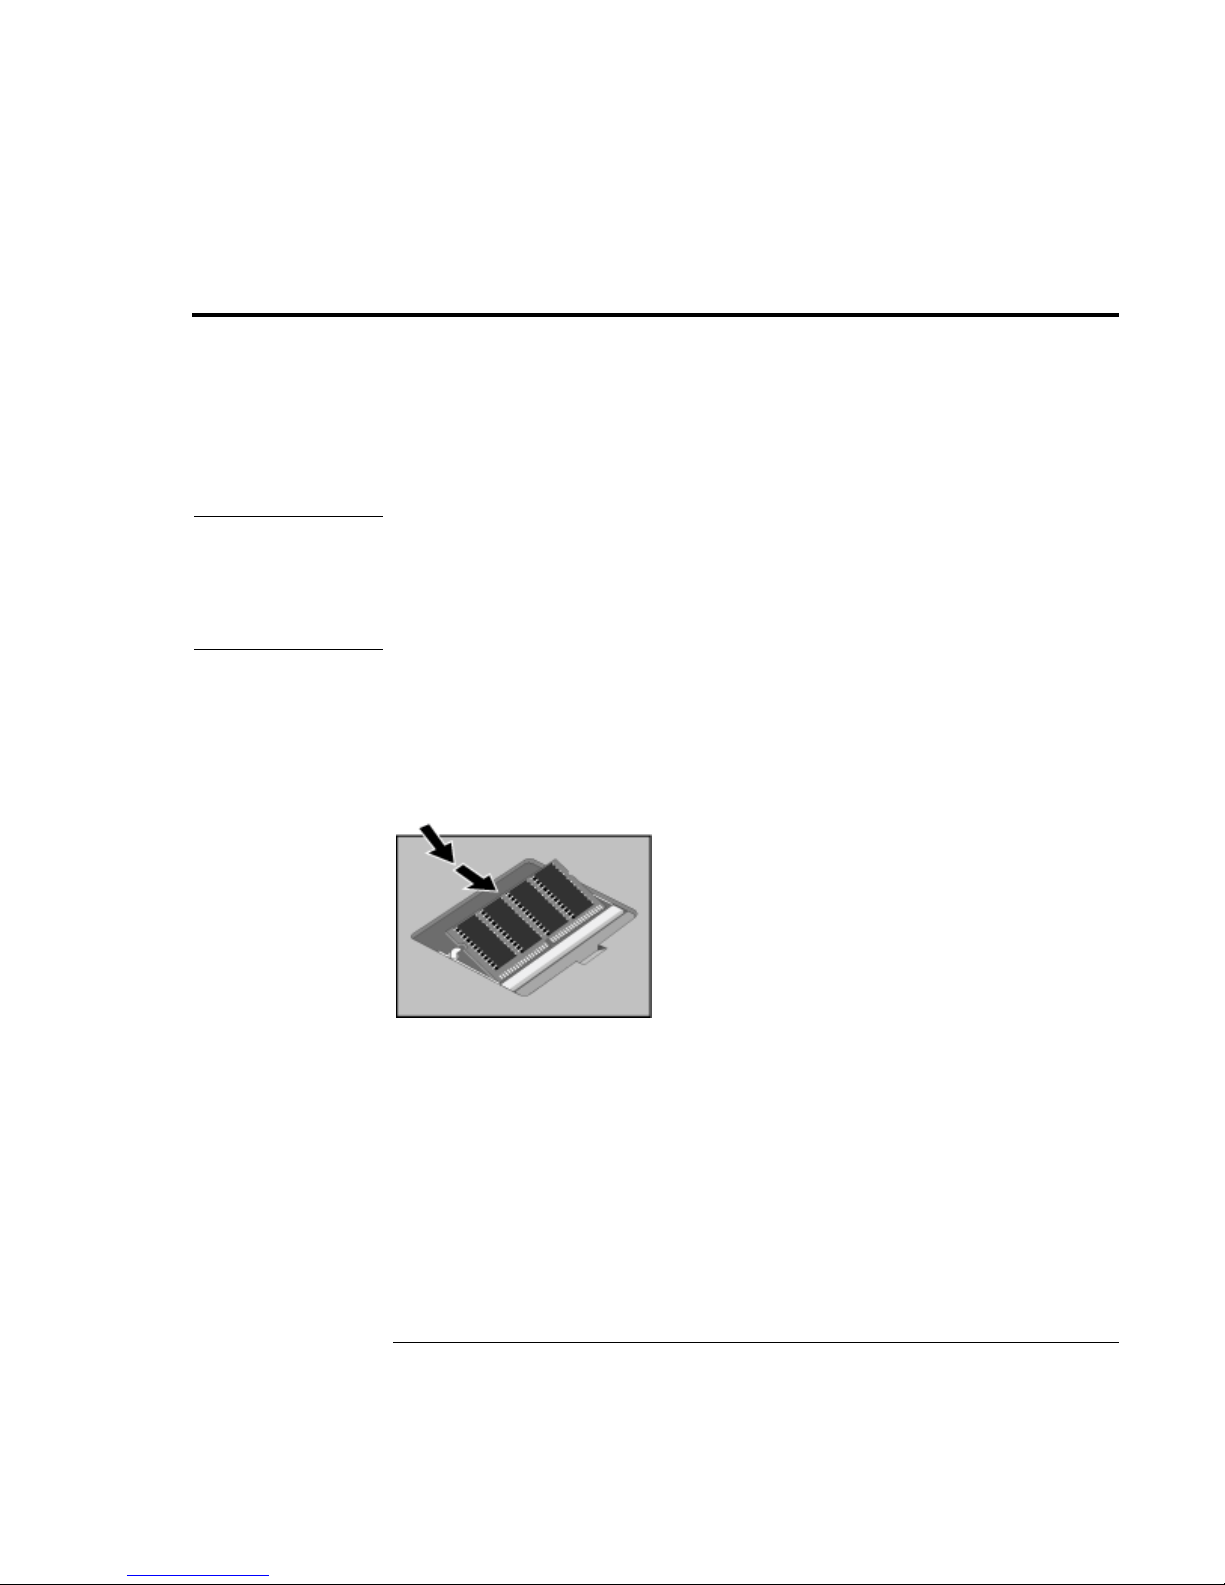
Installing RAM modules
The notebook provides an optional memory expansion slot for installing up to two RAM
expansion modules. Use HP SDRAM modules only; EDO RAM is not supported.
Your computer’s computer chips are extremely static-sensitive. Static electricity can
permanently damage computer chips. Carefully read the following caution information.
CAUTION
Handle the RAM module only by its edges. Otherwise, you may damage the module
due to electrostatic discharge. Static electricity can permanently damage computer
chips. It is therefore important to discharge the static electricity from your body
before installing the memory module. Discharge your body’s electricity by touching
the metal shielding around the connectors on the rear of the computer.
You’ll need a small Phillips screwdriver to complete this procedure.
1. Click the Start Button and select Shut down.
2. Unplug the AC adapter, if present, and remove the battery.
Configuring and Expanding Your Computer
Installing RAM modules
3. Remove the RAM expansion cover located on the bottom of the computer using a
Phillips screwdriver.
4. Insert the RAM expansion module into the connector at about a 30° angle until it’s
fully inserted. Then press down at both sides of the module until it latches.
5. Replace the RAM expansion module door.
6. Insert the battery.
Setup Guide 79
Page 80

Configuring and Expanding Your Computer
Installing RAM modules
Note
The computer comes with 32 or 64 megabytes (MB) of random access memory (RAM)
installed, and the size of the Hibernate partition is set appropriately. However, if you
add RAM so that your total RAM is greater than 256 MB, you must change the size of
the Hibernate partition. This partition is automatically used to save your current session
from RAM when battery level is low. As a result, you must provide a sufficiently large
Hibernate partition to accommodate all the information stored in RAM; otherwise, you
risk losing work in progress. See Expanding the Hibernate Partition.
80 Setup Guide
Page 81
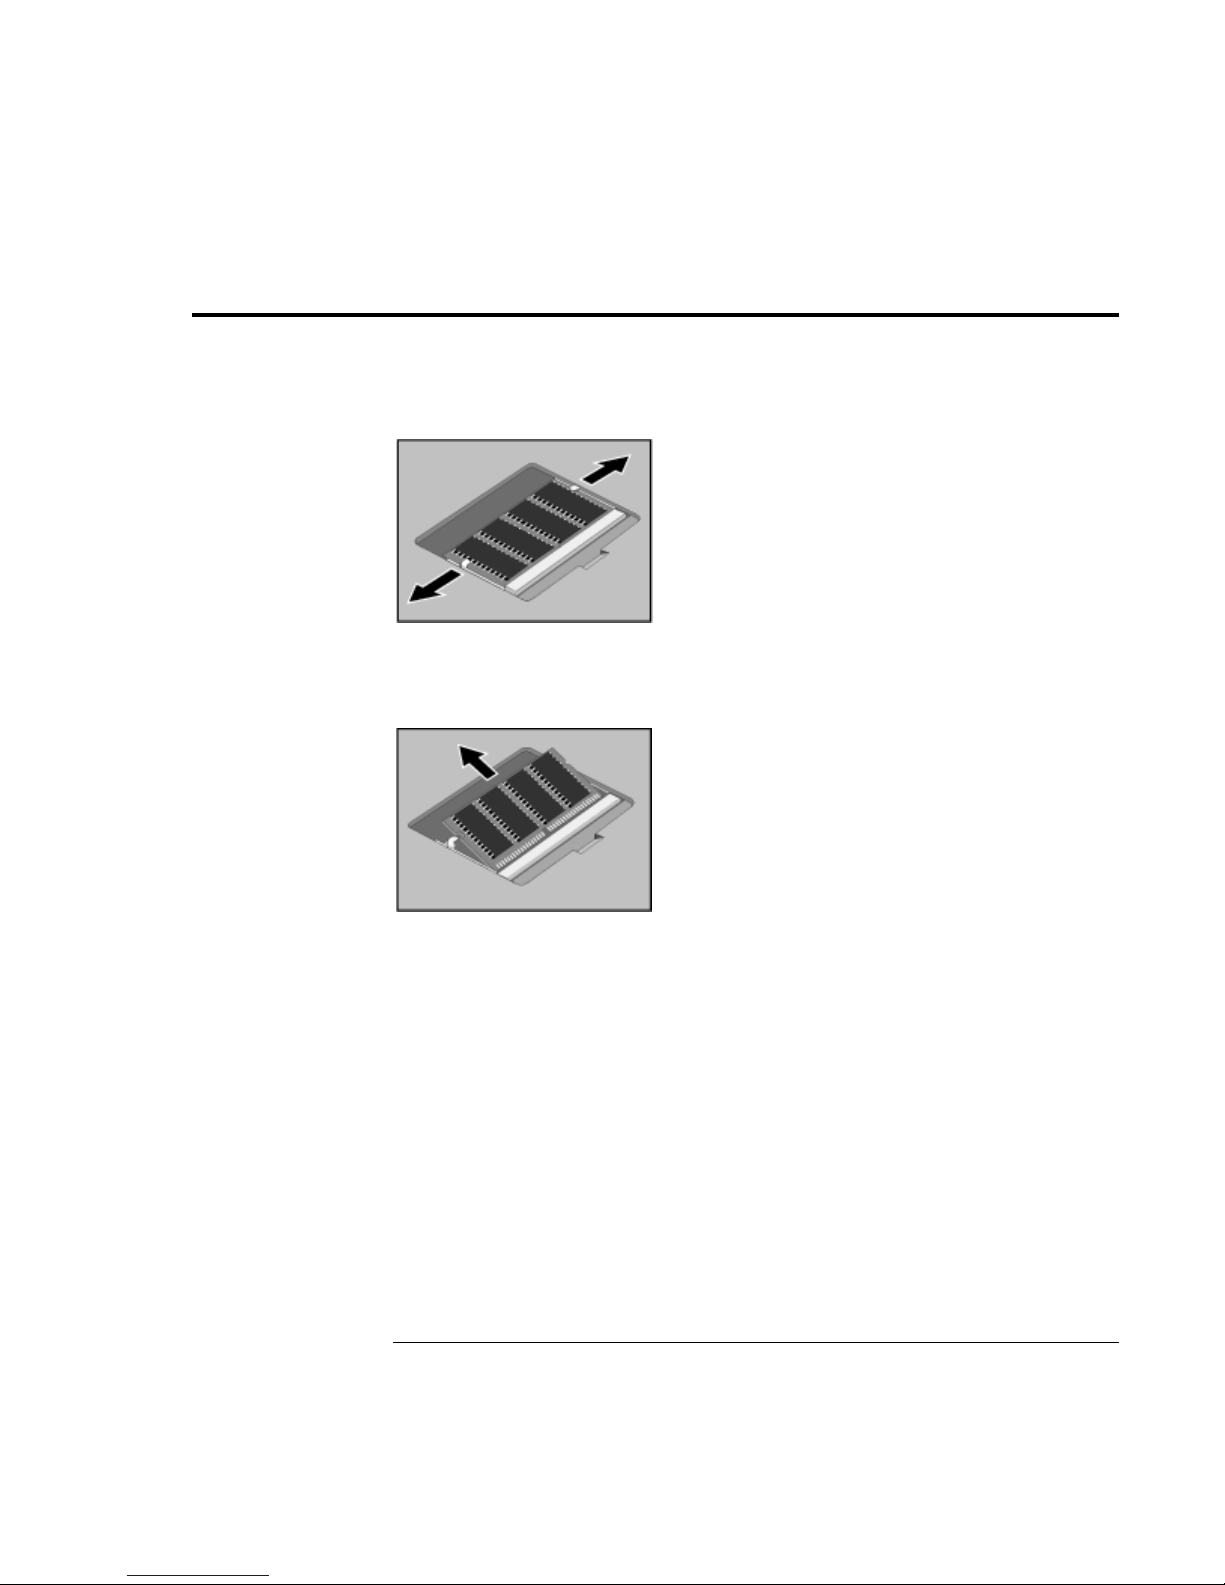
Removing RAM modules
After you remove the RAM expansion cover, do the following:
1. Release the two latches at the sides of the RAM expansion module by pushing them
gently outward (away from the sides of the module).
2. When you release the latches, the free edge of the module pops up.
Configuring and Expanding Your Computer
Removing RAM modules
3. Pull the module out of the connector.
4. Replace the RAM expansion module door.
Setup Guide 81
Page 82
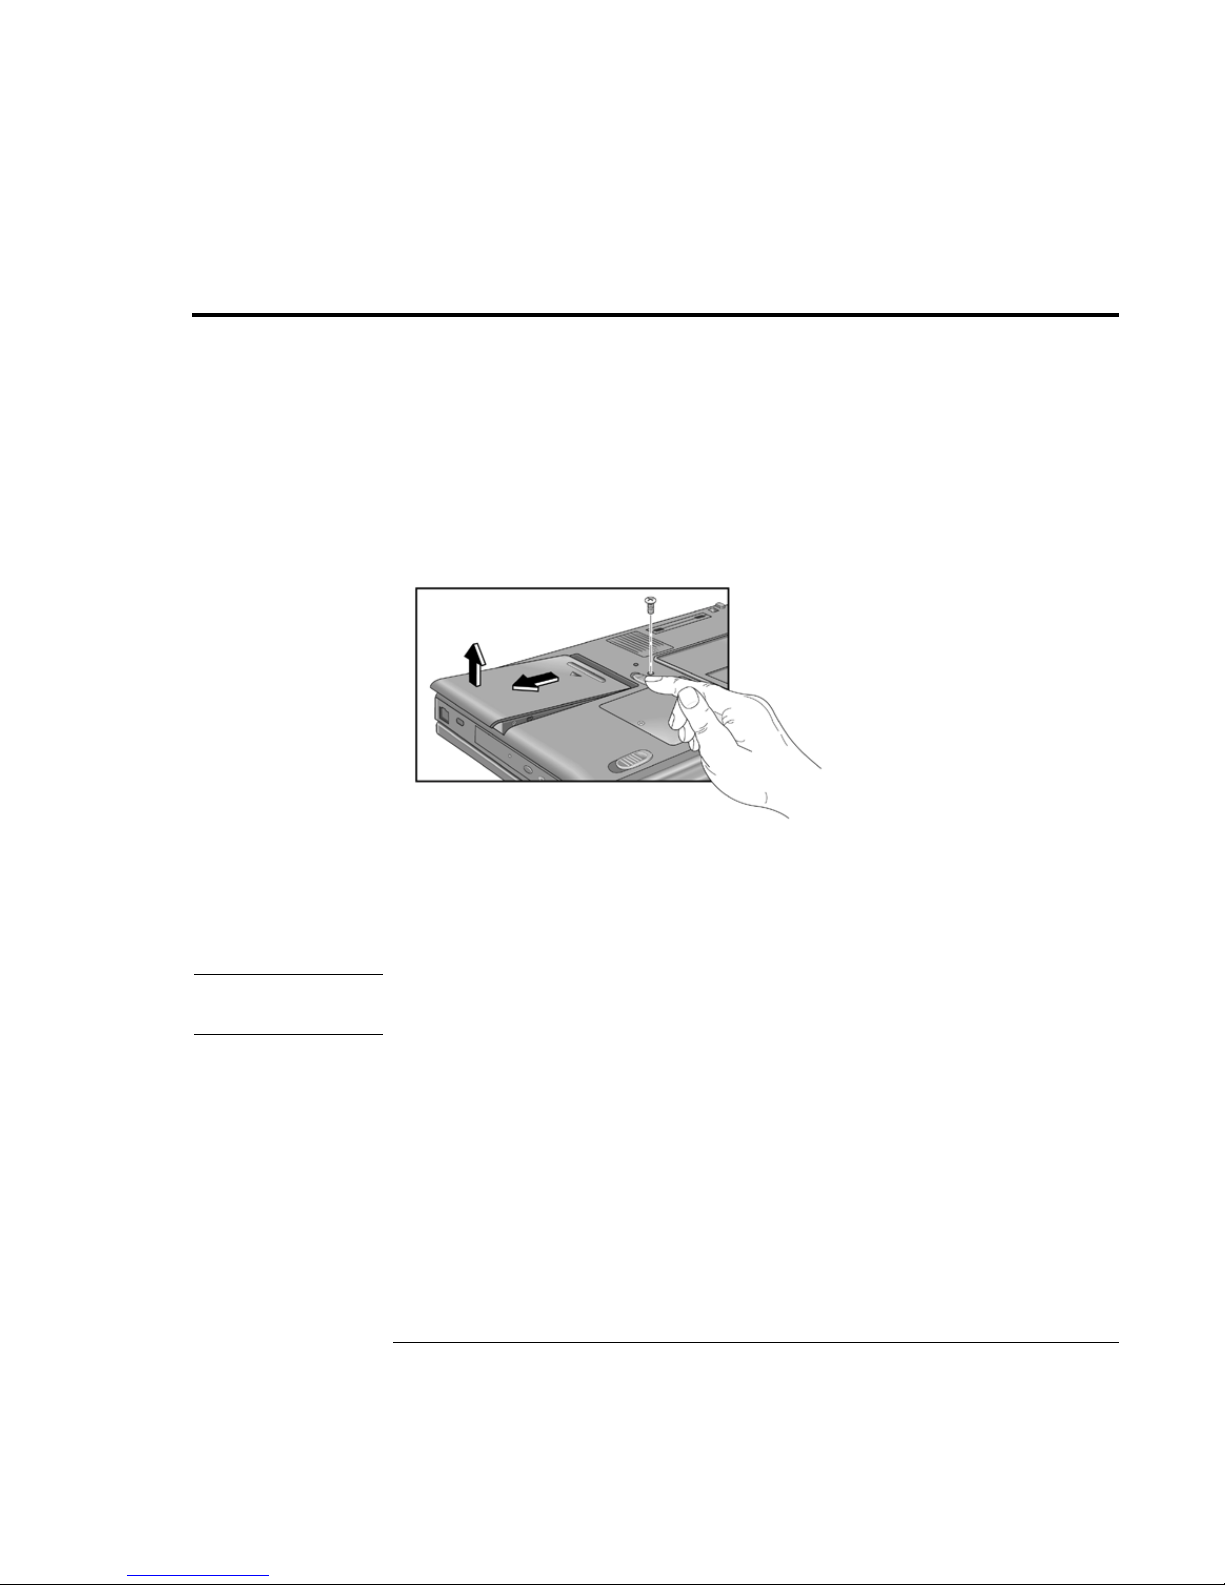
Configuring and Expanding Your Computer
Replacing a hard disk drive
Replacing a hard disk drive
You’ll need a small Phillips screwdriver to complete this procedure.
1. From the Start menu, shut down the computer.
2. Unplug the AC adapter, if present, and remove the battery.
3. Turn the unit bottom side up.
4. Use a screwdriver to remove the hard disk drive locking screw.
Note
5. Slide and hold the hard disk drive latch.
6. Slide the hard disk drive toward the edge of the computer, then lift out.
7. Insert the new hard disk drive and the locking screw.
8. Insert the battery.
If you are installing a new hard disk drive, you should create a Hibernate partition on the
drive before loading any software. See "Expanding the Hibernate Partition" on page 83.
82 Setup Guide
Page 83

Expanding the Hibernate Partition
You can create the Hibernate partition by booting from the Recovery CD. The
partitioning and recovery process takes approximately 20 minutes—do not interrupt the
process or unplug the AC adapter until the process is completed.
CAUTION
This procedure will format the hard disk drive and erase all data on the disk. Be sure
to back up all data from your hard disk before you begin this procedure. After the
hard disk drive is formatted, you’ll need to reinstall any applications.
1. Back up all data from your hard disk.
2. If you wish to install additional RAM, do so now.
3. Connect the AC adapter to the computer.
4. Insert the Recovery CD in the CD-ROM (or DVD) drive. (If your system came with
two Recovery CDs, insert Disc 1.)
5. Restart the computer, and when you see the HP logo, press Esc.
Configuring and Expanding Your Computer
Expanding the Hibernate Partition
6. Select CD-ROM/DVD as the first boot device, and press Return to continue.
7. Select a size from the Hibernate Partition Size drop-down list.
8. If you want to create a Hibernate partition without recovering the operating system,
select the “Do not load operating system” checkbox and select one of the partition
options.
9. Choose Continue.
10. Click OK to begin.
If your system came with two Recovery CDs, you may be prompted to insert the
other Recovery CD during the partitioning process.
11. When you are prompted to reboot your computer, remove the Recovery CD and press
Ctrl+Alt+Delete.
12. Follow the onscreen instructions for setting up Windows.
13. When Windows setup is complete, reinstall any applications and restore backed up
data.
Setup Guide 83
Page 84

Page 85

Service and Support
Setup Guide 85
Page 86

Service and Support
Hewlett-Packard Limited Warranty Statement
Hewlett-Packard Limited Warranty Statement
1. HP warrants to you, the end-user customer, that HP hardware, accessories and
supplies will be free from defects in materials and workmanship after the date of
purchase, for the period specified in the Warranty Duration sheet included with your
HP computer. If HP receives notice of such defects during the warranty period, HP
will, at its option, either repair or replace products which prove to be defective.
Replacement products may be either new or equivalent in performance to new.
2. HP warrants to you that HP software will not fail to execute its programming
instructions after the date of purchase, for the period specified in the Warranty
Duration sheet included with your HP computer, due to defects in material and
workmanship when properly installed and used. If HP receives notice of such defects
during the warranty period, HP will replace software which does not execute its
programming instructions due to such defects.
3. HP does not warrant that the operation of HP products will be uninterrupted or error
free. If HP is unable, within a reasonable time, to repair or replace any product to a
condition as warranted, you will be entitled to a refund of the purchase price upon
prompt return of the product.
4. HP products may contain remanufactured parts equivalent to new in performance or
may have been subject to incidental use.
5. Warranty does not apply to defects resulting from (a) improper or inadequate
maintenance or calibration, (b) software, interfacing, parts or supplies not supplied by
HP, (c) unauthorized modification or misuse, (d) operation outside of the published
environmental specifications for the product, or (e) improper site preparation or
maintenance.
6. TO THE EXTENT ALLOWED BY LOCAL LAW, THE ABOVE WARRANTIES
ARE EXCLUSIVE AND NO OTHER WARRANTY OR CONDITION, WHETHER
WRITTEN OR ORAL, IS EXPRESSED OR IMPLIED AND HP SPECIFICALLY
DISCLAIMS ANY IMPLIED WARRANTIES OR CONDITIONS OF
MERCHANTABILITY, SATISFACTORY QUALITY, AND FITNESS FOR A
PARTICULAR PURPOSE. Some countries, states or provinces do not allow
limitations on the duration of an implied warranty, so the above limitation or
exclusion might not apply to you. This warranty gives you specific legal rights and
you might also have other rights that vary from country to country, state to state, or
province to province.
7. TO THE EXTENT ALLOWED BY LOCAL LAW, THE REMEDIES IN THIS
WARRANTY STATEMENT ARE YOUR SOLE AND EXCLUSIVE REMEDIES.
86 Setup Guide
Page 87

Service and Support
Hewlett-Packard Limited Warranty Statement
EXCEPT AS INDICATED ABOVE, IN NO EVENT WILL HP OR ITS SUPPLIERS
BE LIABLE FOR LOSS OF DATA OR FOR DIRECT, SPECIAL, INCIDENTAL,
CONSEQUENTIAL (INCLUDING LOST PROFIT OR DATA), OR OTHER
DAMAGE, WHETHER BASED IN CONTRACT, TORT, OR OTHERWISE. Some
countries, states or provinces do not allow the exclusion or limitation of incidental or
consequential damages, so the above limitation or exclusion may not apply to you.
THE WARRANTY TERMS CONTAINED IN THIS STATEMENT, EXCEPT TO
THE EXTENT LAWFULLY PERMITTED, DO NOT EXCLUDE, RESTRICT OR
MODIFY AND ARE IN ADDITION TO THE MANDATORY STATUTORY
RIGHTS APPLICABLE TO THE SALE OF THIS PRODUCT TO YOU.
Setup Guide 87
Page 88

Service and Support
Getting Support for Your HP Notebook PC
Getting Support for Your HP Notebook PC
HP offers a number of ways that you can get technical support for your computer. If you
have questions or problems, here are the resources available to you:
• Look up information in this User’s Guide.
• Visit the HP notebook Web site.
• Visit the HP Customer Care Web site.
• Call HP support.
To use the User’s Guide
To locate information in the guide, use the Contents or Index tabs to search for
information. The Contents tab lists the headings of all the topics in the guide. The Index
tab provides an alphabetical list of the keywords in the guide; you can locate a keyword
either by typing it in the box or by scrolling through the list.
To get help from the HP notebook Web site
HP has a Web site on the Internet dedicated to HP notebook owners:
www.hp.com/notebooks. This Web site contains information about the various HP
notebook models, warranties, and special promotions.
To get help with your computer, click the Technical Support button. In the technical
support area, you will have access to:
• Answers to frequently asked questions
• Software, driver, and BIOS updates
• Electronic manuals
• Troubleshooting solutions
88 Setup Guide
Page 89

Service and Support
Getting Support for Your HP Notebook PC
To get support from the HP Customer Care Web site
Another Web site useful to HP notebook owners is HP Customer Care:
www.hp.com/cpso-support/guide/home.html. This Web site provides information about:
• Self-help tools, such as bulletin boards, CD-ROM subscriptions, and service parts
information
• The basic services included with your warranty, as well as descriptions of enhanced
and custom services
• Obtaining software updates
• Support telephone numbers for HP products
To call the HP Customer Care Center
If you are unable to solve a problem with your computer, you can call the HP Customer
Care Center in the U.S., at (970) 635-1000. The Customer Care Center will assist you at
no charge during the term of the warranty; you are responsible only for the telephone
charge. During the free assistance period, HP will assist with questions about:
• Applications and operating systems included with your computer
• HP-described operation environments and conditions
• HP accessories, HP upgrades, and basic operation and troubleshooting
HP will not be able to help with questions about:
• Non-HP hardware, software, operating systems, or usage not intended for—or not
included by HP with—the product
• How to repair the product yourself
• Product development or custom installations
• Consulting.
Setup Guide 89
Page 90

Service and Support
Getting Support for Your HP Notebook PC
Checking the build version
When you communicate with an HP support person, you may need to find out what
version of the software is installed on your computer. You can find information about the
build in the file version.inf, which is found in the root directory of your hard disk.
Double-click on the filename to see the information.
To see hidden files:
1. In My Computer, select View, Folder Options.
2. Click the View tab.
3. Under Hidden Files, choose “Show all files.”
4. Click OK.
90 Setup Guide
Page 91

Obtaining Repair Service
To receive warranty repair service
To receive warranty repair service, contact the HP Customer Care Center in the U.S., at
(970) 635-1000.
The support technician will help qualify your unit for warranty repair based on the
warranty applicable to your unit and original purchase date, and will provide you with
repair processes. Warranty service includes the cost of shipping, handling, duties, taxes,
freight, or fees to or from the service location. HP notebook PC service is currently
provided for the continental U.S.
To repair your computer outside the warranty period
Service and Support
Obtaining Repair Service
If your PC is no longer in the warranty period, contact the appropriate Customer Care
Center. The HP support person will let you know about repair charges and processes.
To prepare your computer for shipment
1. Important. Back up your hard disk drive.
While your computer is being repaired, the hard disk may be replaced or reformatted.
2. Hewlett-Packard cannot guarantee the return of removable components. Please
remove the following prior to sending your computer in for service:
• PC cards
• AC adapter and power cord
• CDs in the CD player
• Floppy disks in the floppy disk drive
3. When sending your computer to Hewlett-Packard, please use the original product
packaging or other substantial packaging in order to avoid damage to the unit in
transit.
Setup Guide 91
Page 92

Service and Support
Obtaining Repair Service
Note
If the hard disk drive is defective, you will receive a replacement drive with the original
HP software.
92 Setup Guide
Page 93

Solving Problems with Your Computer
Setup Guide 93
Page 94

Solving Problems with Your Computer
Troubleshooting Techniques
Troubleshooting Techniques
Audio Problems
If sound is not audible
• Press Fn+Up Arrow several times.
• Click the speaker icon on the taskbar to ensure that Mute is not checked.
• When you are operating your computer in MS-DOS mode (for example, when
running MS-DOS games), you may find that the sound does not operate properly.
Use Windows applications for full use of sound capabilities.
If sound does not record
• Check software controls for recording sound: Start, Programs, Accessories,
Multimedia (or Entertainment), Sound Recorder.
You may also want to test the audio with diagnostics. See Testing Hardware Operation.
If the PC card detection beep(s) at startup are very loud and volume cannot be
adjusted
• Download the latest audio driver from the technical support area of the HP notebook
Web site (http://www.hp.com/notebooks).
CD-ROM Drive Problems
If you can’t boot from a CD in the CD-ROM drive
• Make sure the CD is a bootable CD, such as the Recovery CD.
• If you always want to boot from a CD when one is present, check the boot order in
BIOS Setup.
1. From the Start menu, shut down, then restart the computer.
2. When you see the HP logo, press Esc to open the Boot menu. The default boot
order is (1) Diskette A, (2) Hard Drive C, and (3) CD-ROM/DVD.
94 Setup Guide
Page 95

Solving Problems with Your Computer
Troubleshooting Techniques
3. Select CD-ROM/DVD for first boot device.
4. Exit the BIOS Setup utility.
• Reboot the computer.
You may also want to test the CD-ROM drive with diagnostics. See Testing Hardware
Operation.
Display Problems
If the computer is on, but the screen is blank
• Try pressing Fn+F1 to increase the contrast or Fn+F2 to decrease the contrast. (On
TFT displays, contrast control is not necessary and therefore is not available.)
• Press Fn+F12 in case the internal display was disabled. (Do this three times to return
to the state you started from.)
• If the computer is cold, allow it to warm up.
If the screen is difficult to read
• Check whether the display resolution is set to its default setting—800×600 for 12.1"
or 13" displays or 1024×768 for larger displays. Check this in Start, Settings, Control
Panel, Display, Settings.
• If you have an HPA display, try pressing Fn+F1 to increase contrast.
If the display refreshes slowly
• Increase the amount of RAM that is allocated to video display (if your computer has
less than 64MB RAM). By default, a portion of your installed RAM is allocated to
video display: 4MB if you have less than 64MB RAM, 8MB if you have 64MB
RAM or more. (Using additional memory for video allows you to display more
colors: True Color with 8MB versus High Color with 4MB. However, using
additional memory for video results in less memory available for other computer
operations.) You can change the Auto default to either 4MB or 8MB.
1. From the Start menu, shut down, then restart the computer.
2. When you see the HP logo, press F2 to enter the BIOS Setup utility.
3. Open the Memory menu.
4. Select Video RAM Size.
Setup Guide 95
Page 96

Solving Problems with Your Computer
Troubleshooting Techniques
5. Select 4MB or 8MB.
6. Exit the BIOS Setup utility.
If part of the Windows desktop is not visible and you have to scroll down to see the
taskbar
• Your display resolution may be set to 1024×768 on a 12.1" or 13" display, instead of
800×600. You need to set the monitor type to Laptop Display Panel (800×600).
1. Click Start, Settings, Control Panel.
2. Double-click Display.
3. Click the Settings tab.
4. Click Advanced.
5. Click the Monitor tab.
6. Click Change.
7. Click Next.
8. Choose to manually select the monitor type.
9. Select Laptop Display Panel (800×600) and click Next.
10. Click Next and then Finish.
11. Click Close.
12. Reduce the resolution to 800×600 pixels and click Apply.
If an external display does not work
• Check the connections.
• Press Fn+F12 in case the external monitor was disabled. (Do this three times to return
to the state you started from.)
• The external monitor may not be detected. In the BIOS Setup utility, try setting Video
Display Device to LCD/CRT in the Main menu.
You may also want to test the display with diagnostics. See Testing Hardware Operation.
96 Setup Guide
Page 97

Solving Problems with Your Computer
Troubleshooting Techniques
DVD Problems
If you can’t boot from a CD or DVD in the DVD drive
• Make sure the CD or DVD is bootable, such as the Recovery CD.
• If you always want to boot from a CD or DVD when one is present, check the boot
order in BIOS Setup.
1. From the Start menu, shut down, then restart the computer.
2. When you see the HP logo, press Esc to open the Boot menu. The default boot
order is (1) Diskette A, (2) Hard Drive C, and (3) CD-ROM/DVD.
3. Select CD-ROM/DVD for first boot device.
4. Exit the BIOS Setup utility.
• Reboot the computer.
You may also want to test the DVD drive with diagnostics. See Testing Hardware
Operation.
If the DVD is playing erratically
• Dirt or smudges can cause a disc to skip. Clean the disc with a soft cloth. If the disc is
badly scratched, it will have to be replaced.
If a DVD movie stops playing in the middle
• The DVD may be double-sided. Open the DVD tray, and read the text near the center
hole of the disc. If it says Side A, flip the disc over, close the tray, and then press the
Play button to continue playing the movie.
• You may have accidentally paused the DVD movie. Press the Play button to resume
playing the movie.
If you get a Region Code error when playing a DVD movie
• DVDs may include regional codes that are embedded into the disc data. These codes
prevent DVD movies from being played in regions of the world that are different
from where they are sold. If you get a Region Code error, you are trying to play a
DVD that is for a different region. Make sure you play a DVD designed for your
region.
Setup Guide 97
Page 98

Solving Problems with Your Computer
Troubleshooting Techniques
If you get a “System Error: Unable to read drive” message when running a CD
program or a movie on the DVD drive
• For a single-sided CD or DVD, make sure the disc is placed into the drive with the
label facing up.
• Make sure the DVD or CD is clean.
• Wait 5 to 10 seconds after closing the DVD tray to give the computer sufficient time
to recognize the CD or DVD.
• Restart the system:
1. Remove the CD or DVD.
2. Click Start on the taskbar.
3. Choose Shut Down.
4. Choose Restart.
If the DVD movie doesn’t fill the screen
• On a double-sided DVD, each side has a different format (Standard or Widescreen).
In the widescreen format, black bands appear at the top and bottom of the screen. To
view the standard format, flip the disc over and play the other side.
Hard Disk Drive Problems
If the computer’s hard drive doesn’t spin
• Make sure the computer has power. If necessary, connect the AC adapter, making
sure it is plugged into a power source and into the rear of the computer.
If the hard disk makes a buzzing or whining noise
• Back up the drive immediately.
• Check for alternate noise sources, such as the fan or a PC Card drive.
If files are corrupted
• Run the VirusScan program.
• In Windows 98, run the ScanDisk surface scan to check the platter. From the Start
menu, click Programs, Accessories, System Tools, ScanDisk.
98 Setup Guide
Page 99

Solving Problems with Your Computer
Troubleshooting Techniques
You may also want to test the hard disk drive with diagnostics. See Testing Hardware
Operation.
Heat Problems
If the computer gets hot
• Make sure the air vents are clear.
• Note that it is normal for the computer to get warm. DOS games and other programs
that drive CPU usage toward 100% can contribute to a temperature increase.
Keyboard, Touch Pad, and Mouse Problems
If the touch pad is difficult to control
• Customize the touch pad by using the Mouse applet in Control Panel (Start, Settings,
Control Panel).
If the pointing devices don’t work
• Don’t touch the touch pad while booting or resuming.
• Reset the computer.
If a scroll mouse doesn’t work
• Suspend or shut down the computer before you attach the scroll mouse, to ensure that
the external mouse will be detected properly.
If you want to go back to using the touch pad, you must suspend or shut down the
computer before you detach the scroll mouse.
If the embedded numeric keypad doesn’t work
• Make sure Num Lock is on.
• Don’t touch the touch pad while booting or resuming.
If a special feature on the PS/2 mouse doesn’t work
• Make sure you installed any drivers included with the mouse.
• Suspend and resume the computer, so that the system will detect the PS/2 mouse.
Setup Guide 99
Page 100

Solving Problems with Your Computer
Troubleshooting Techniques
You may also want to test the keyboard and pointing devices with diagnostics. See
Testing Hardware Operation.
Memory Problems
If a message says you are out of memory
• In Windows Help, search for Memory Troubleshooter.
• If you are having memory problems running MS-DOS programs, in Windows Help
search for MS-DOS Troubleshooter.
You may also want to test memory with the diagnostics. See Testing Hardware
Operation.
MIDI Problems
If the computer is sometimes unable to play MIDI files
• Download the latest audio driver from the technical support area of the HP notebook
Web site (http://www.hp.com/notebooks).
Modem Problems
If the modem will not connect at 56K speed
• The host modem may not support a 56K (V.90) connection speed.
• The speed at which you connect depends on several factors, such as the current
condition of the telephone line. If you try connecting at another time, it’s possible
you may be able to connect at 56K.
If the modem will not connect at any speed
• Make sure the telephone line goes from the modem phone jack on the right side of the
computer to the telephone jack on the wall.
• If you have a single telephone line for voice and modem use, make sure no one else is
using the line and that the phone is not off the hook.
100 Setup Guide
 Loading...