

Page 1

HP Pavilion All-in-One PC
快速入門
Page 2

Hewlett-Packard 產品和服務的唯一擔保列於隨產品和服務所附的明示保
證聲明中。本文件的任何部分都不可構成任何額外的擔保。HP 對於本文
件在技術上或編輯上的錯誤或疏失不負擔任何責任。
HP 不承擔在非 HP 提供的設備上使用其軟體時的任何責任。
本文件包含的專屬資訊受到著作權法的保護。未經 HP 事先書面許可,不
得影印、複製本文件之任何部份,或將其翻譯成其他語言。
Hewlett-Packard Company
P.O. Box 4010
Cupertino, CA 95015-4010
USA
© Copyright 2009 Hewlett-Packard Development Company, L.P.
本產品採用受美國專利權和智慧財產權保護的版權保護技術。此版權保護
技術的使用需經 Macrovision 授權,且僅限於家庭和其他有限的觀賞使
用。未經 Macrovision 授權,不得在其他場合使用。嚴格禁止反工程或反
向組譯。
Microsoft、Windows 標誌和 Windows 是 Microsoft 集團在美國和 / 或其
他國家 / 地區的商標或註冊商標。
HP 支持您合法使用科技,但不認可或鼓勵在違反著作權法的情況下使用
我方產品。
本文件所包含之資訊可隨時更改,恕不另行通知。
Page 3

目錄
HP Pavilion All-in-One PC 安裝 .............................................................. 1
電腦簡介............................................................................................................ 1
安裝電腦............................................................................................................ 3
首次啟動電腦 .....................................................................................................4
本電腦的特殊功能 .................................................................................. 15
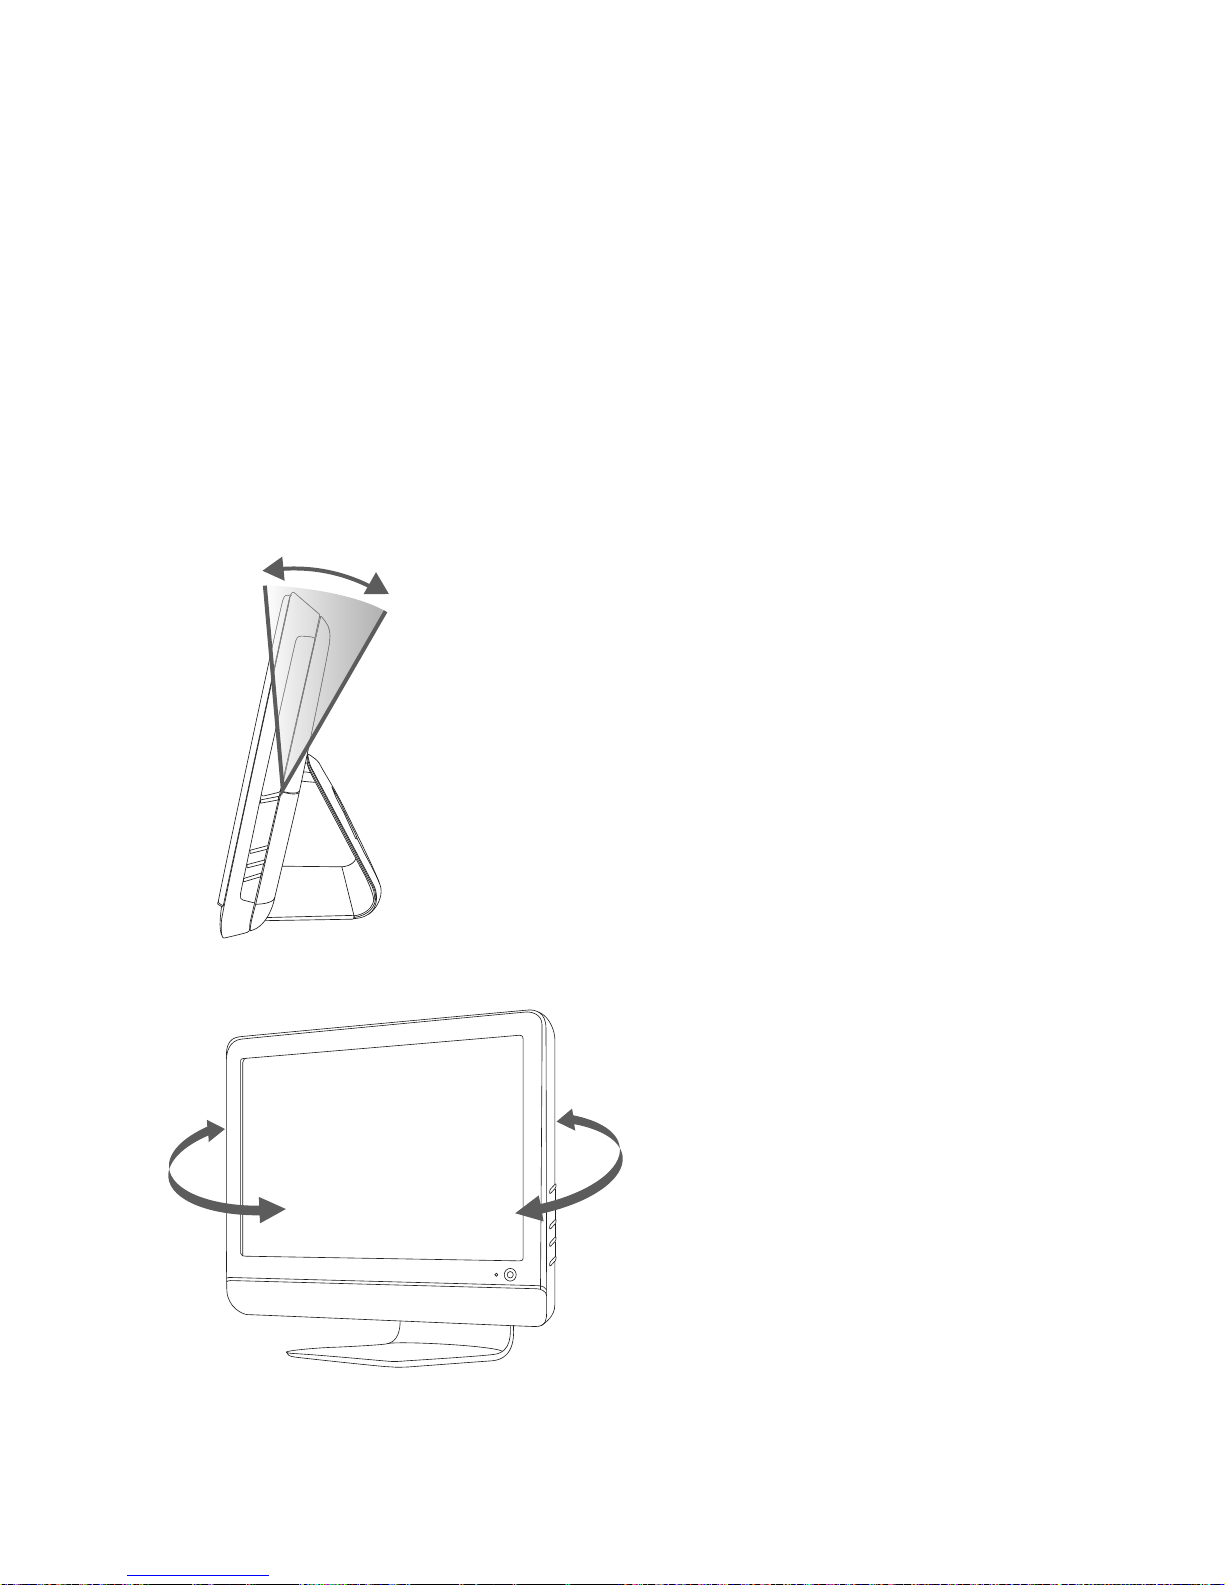
調整傾斜與旋轉角度 .........................................................................................15
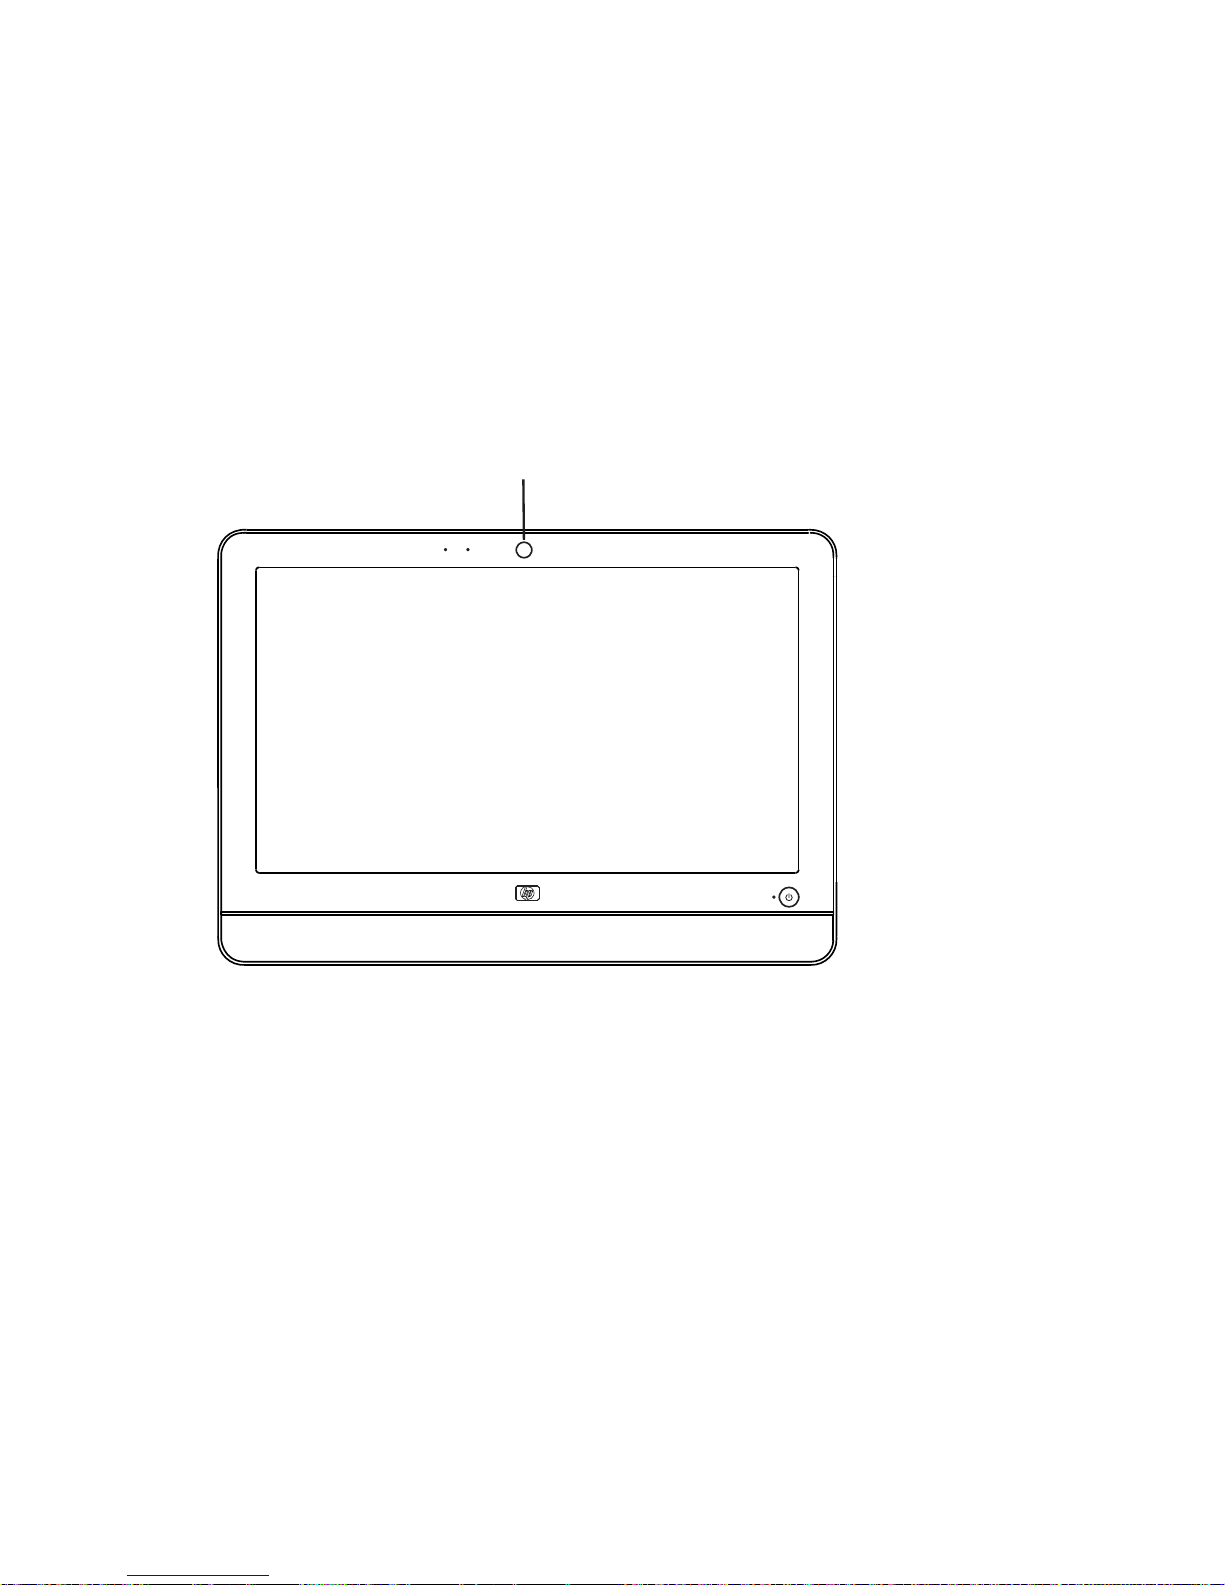
網路攝影機 ......................................................................................................16
使用讀卡機 ......................................................................................................17
使用直立式 CD/DVD 磁碟機 ..............................................................................19
調整螢幕亮度 ...................................................................................................19
使用軟體.......................................................................................................... 20
取得更多資訊 ........................................................................................ 23
使用螢幕上的說明及支援中心 ............................................................................ 23
取得網路上的支援.............................................................................................23
在網路上尋找其他手冊 ...................................................................................... 23
使用 PC 說明和工具資料夾 ................................................................................23
使用 HP Advisor 軟體 ........................................................................................ 24
安全且舒適地使用電腦 ...................................................................................... 24
升級與維修電腦 ................................................................................................24
疑難排解與維護 ..................................................................................... 25
電腦問題疑難排解.............................................................................................25
軟體疑難排解 ...................................................................................................39
維護 ................................................................................................................42
系統復原.......................................................................................................... 44
其他疑難排解 ...................................................................................................48
索引 .................................................................................................... 49
目錄 iii
Page 4

iv 快速入門 (功能依型號而異)
Page 5
HP Pavilion All-in-One PC 安裝
電腦簡介
HP Pavilion All-in-One PC
HP Pavilion All-in-One 是一部造型搶眼又時尚的電腦,配有對角長達 47 公分 (18.5 英
吋)的寬螢幕顯示器。這部時尚的 All-in-One 電腦所擁有的功能包括網路攝影機、
CD/DVD 播放器與燒錄器、USB 連接埠、儲存媒體讀卡機、無線 802.11b/g 網路功能
以及內建喇叭。
HP Pavilion All-in-One 的功能
電腦的功能與設定會因型號不同而有所差異。您的電腦可能不會完全吻合此手冊內的圖
示與說明。
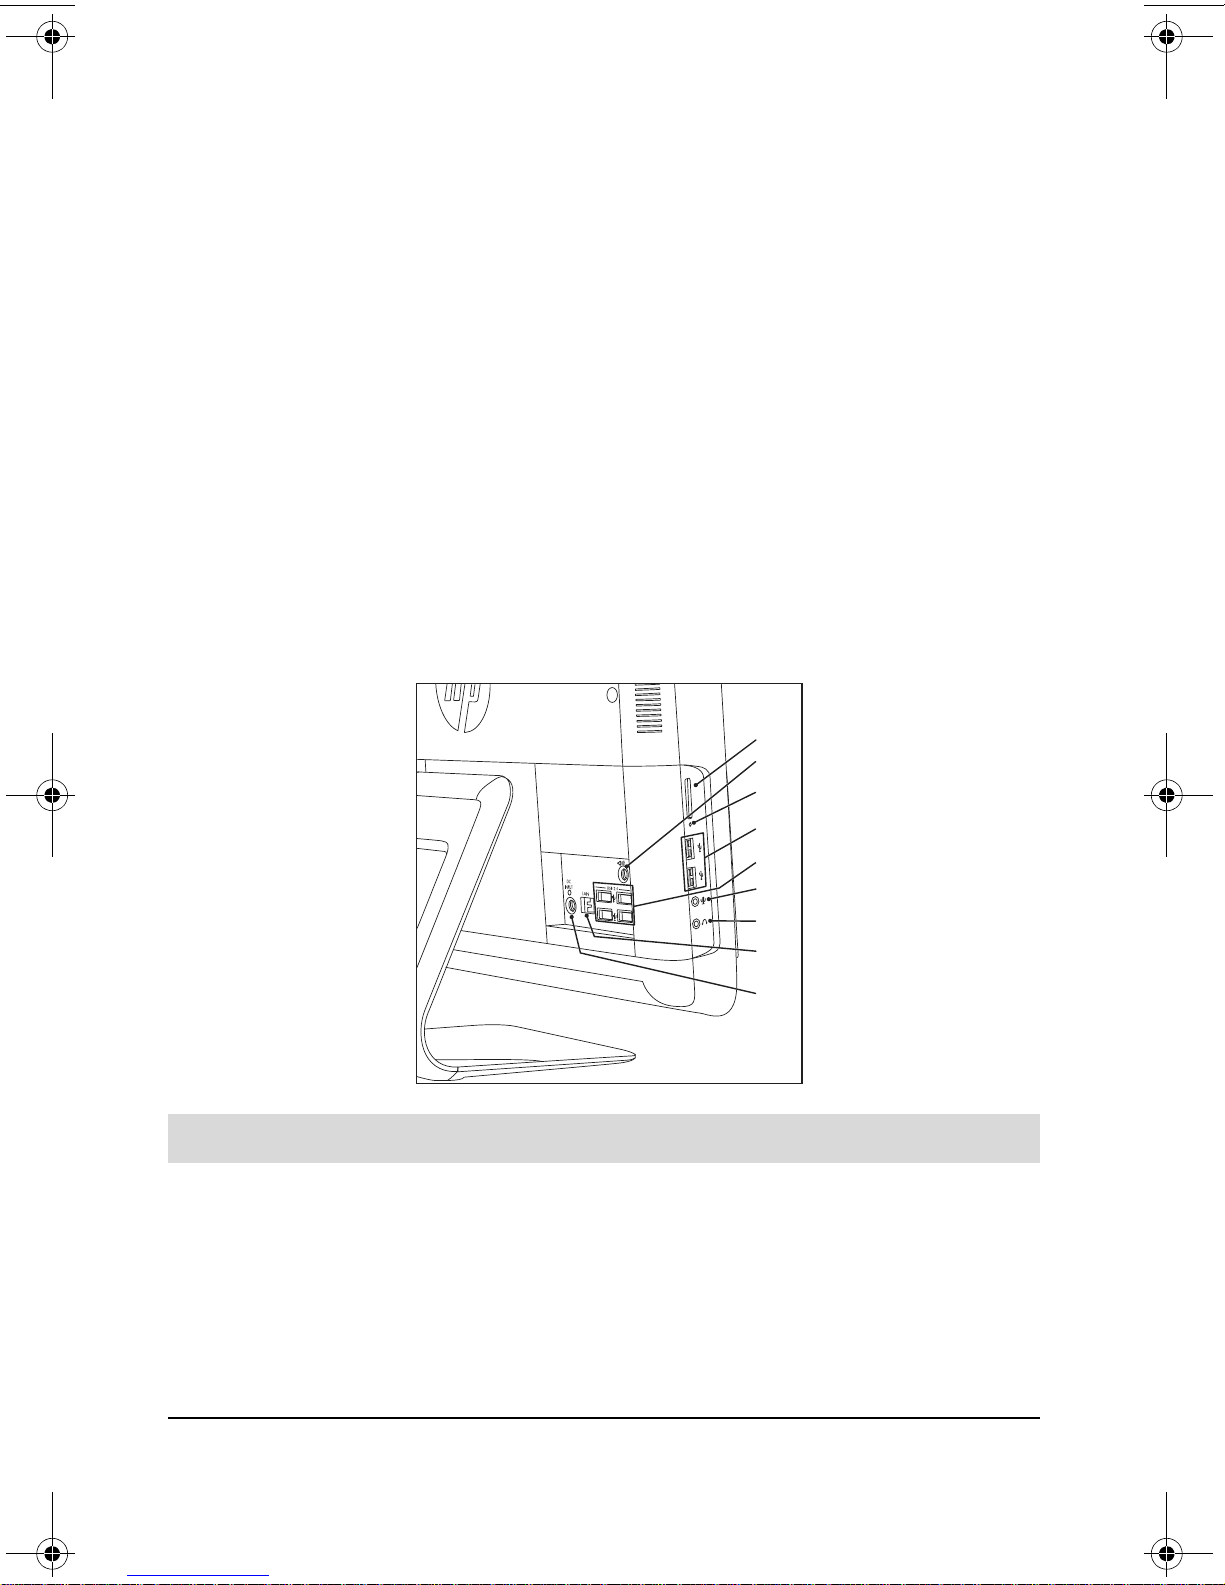
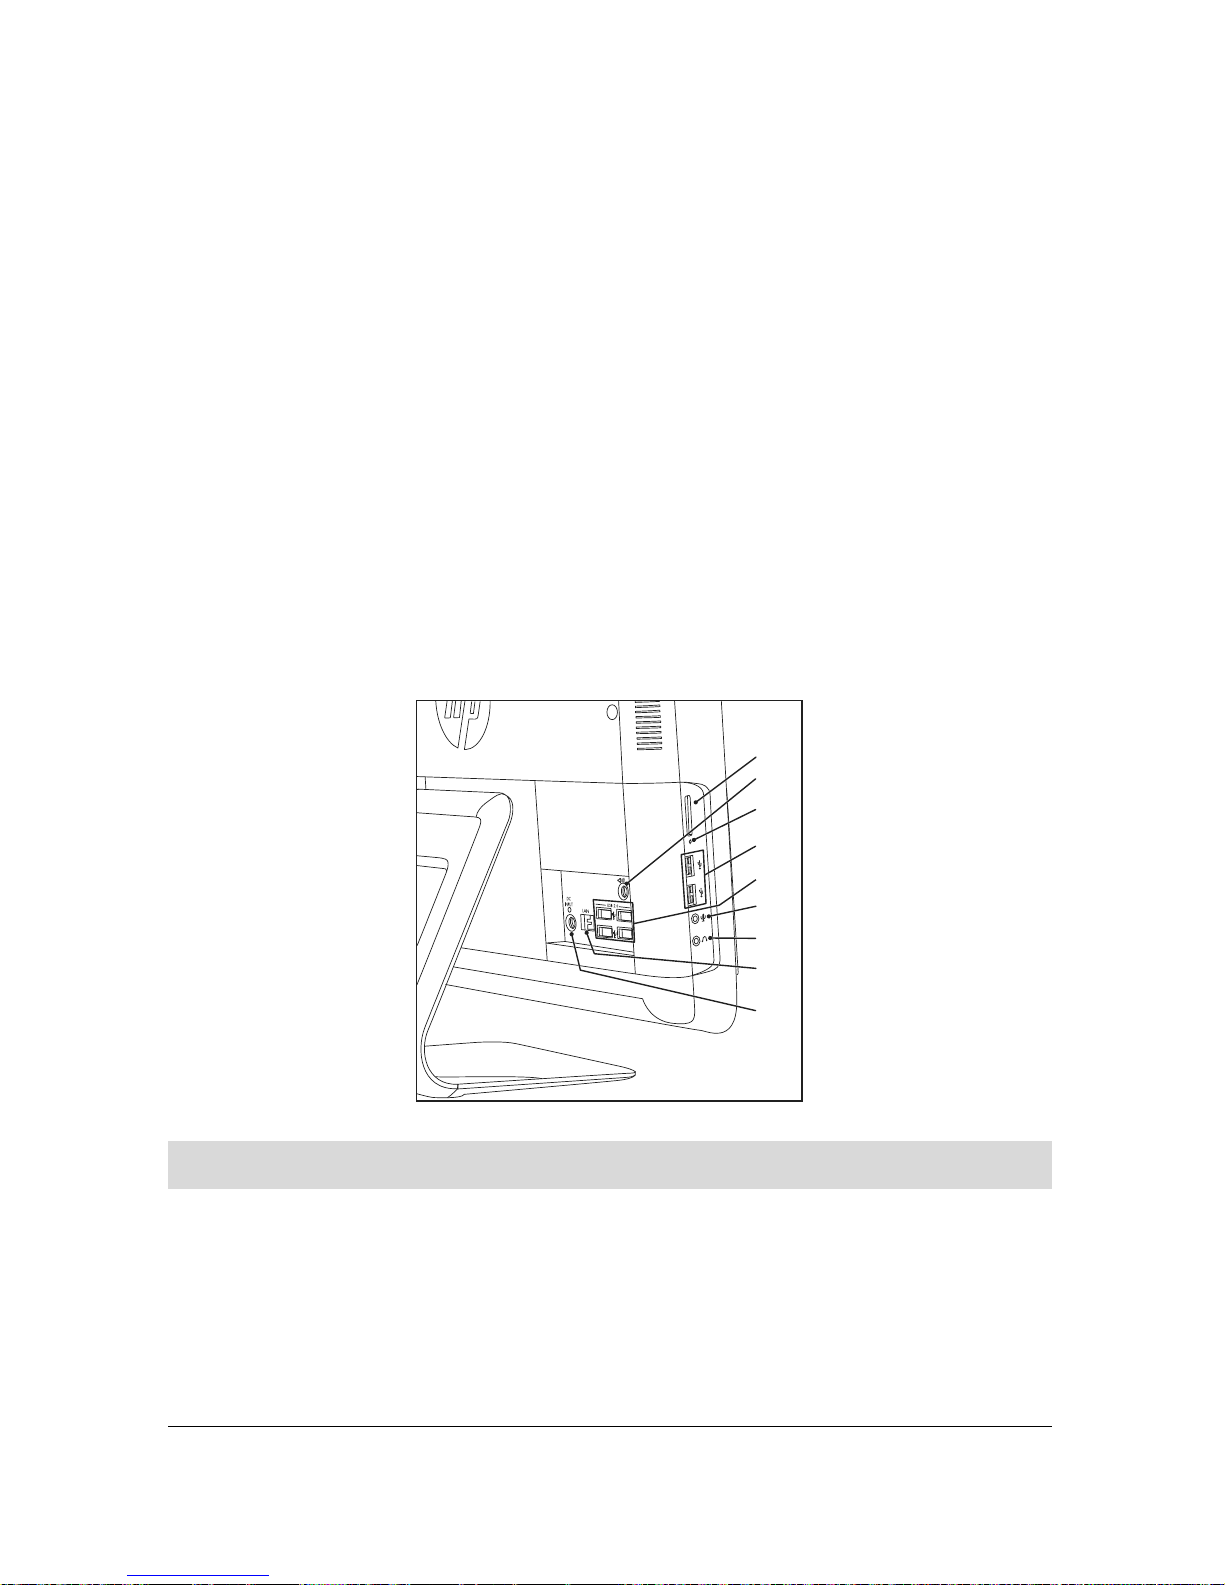
A
B
C
項目 說明
A
讀卡機 內建讀卡機可讀取記憶卡。支援的格式包括:
Extreme Digital (xD)、Secure Digital (SD)、Secure
Digital High-Capacity (SDHC)、MultiMediaCard
(MMC)、Memory Stick (MS) 以及 Memory Stick Pro
(MS Pro) 記憶卡。
使用轉接套件 (須另行選購)就可支援其他儲存媒體
卡:Mini SD、RS-MMC、Micro SD、MS-Duo 以及
MS Pro Duo。
D
E
F
G
H
I
HP Pavilion All-in-One PC 安裝 1
Page 6
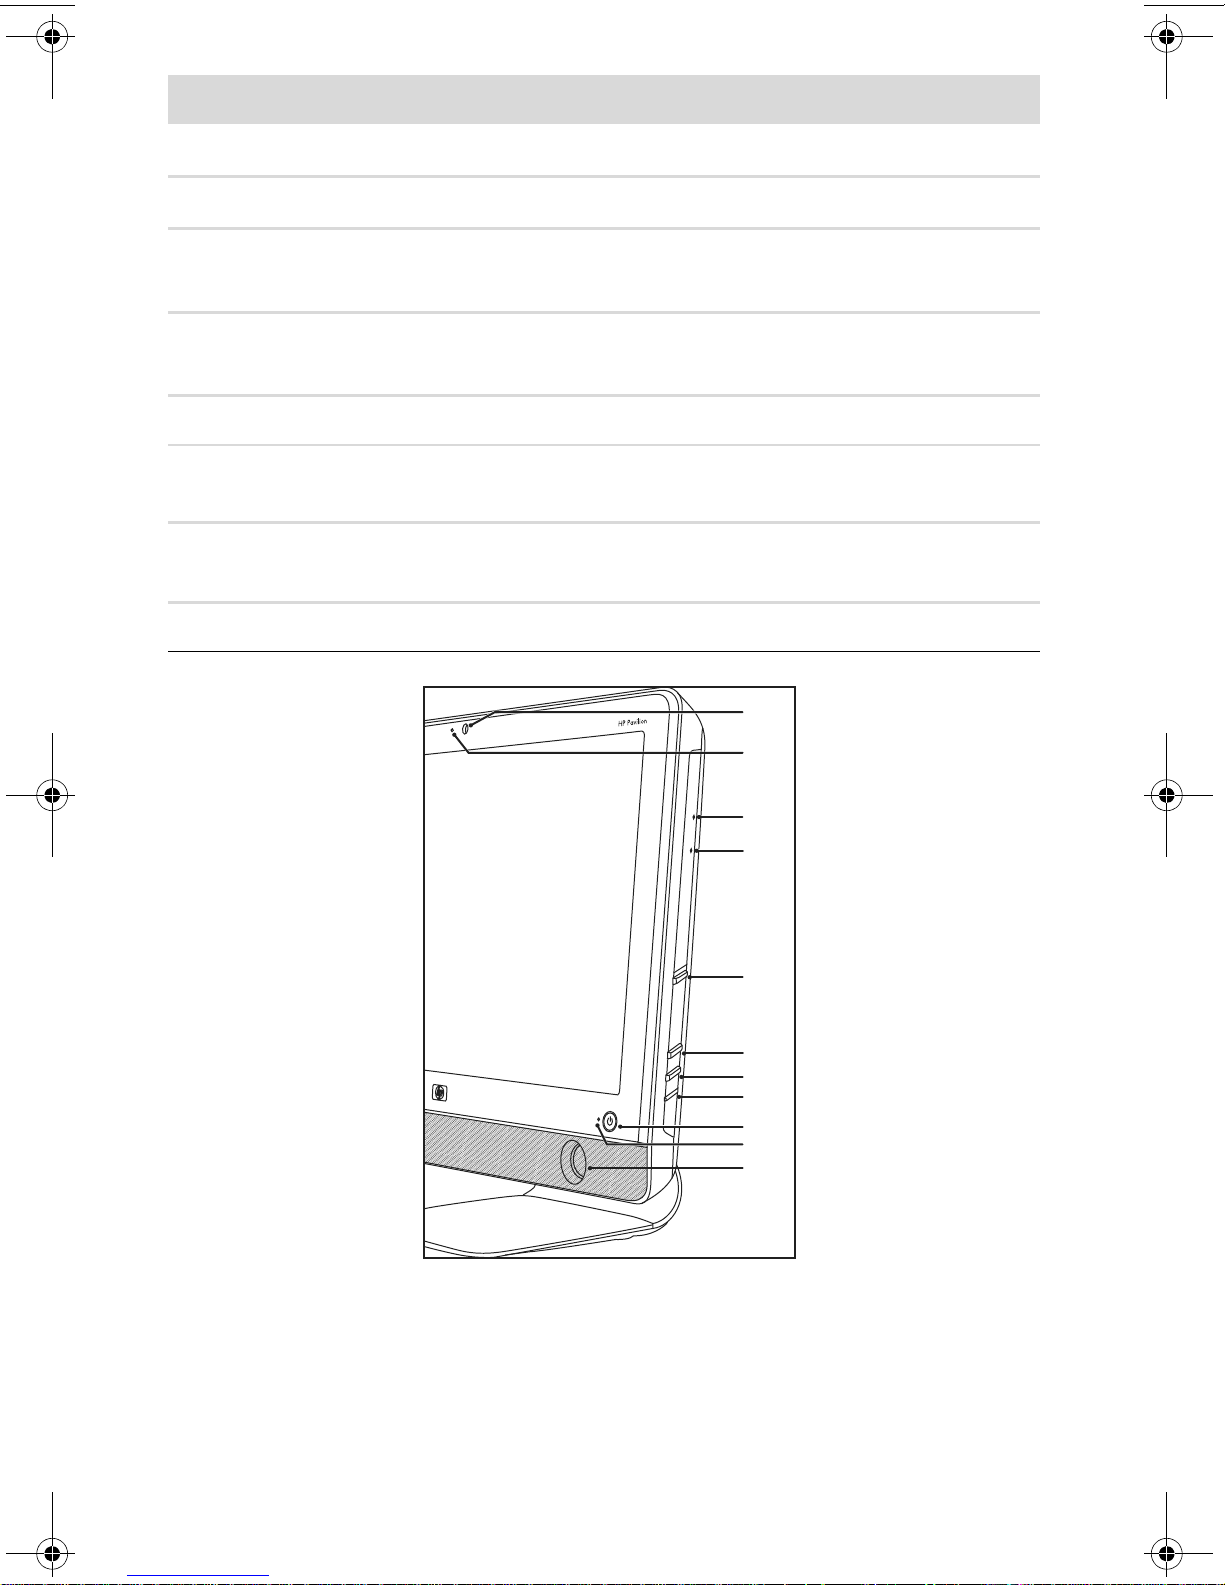
項目 說明 (續上頁)
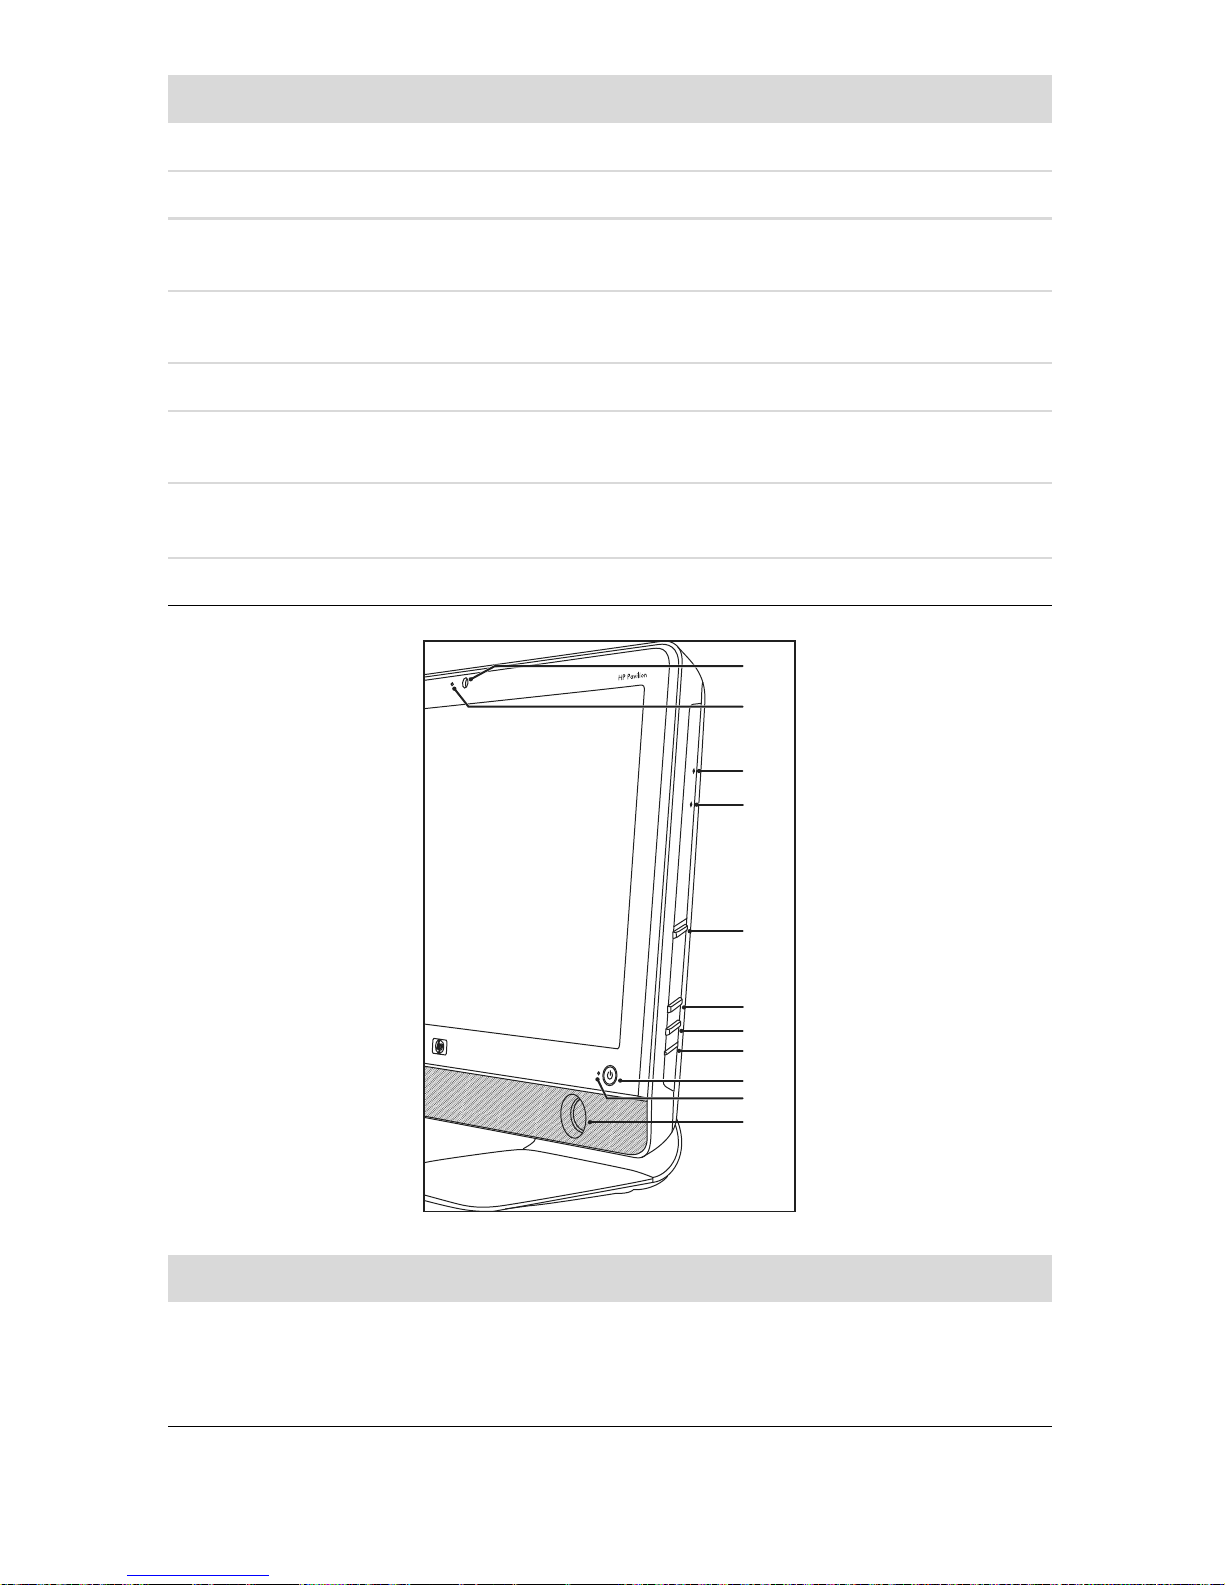
S
R
Q
P
O
N
M
L
K
J
T
B
C
音訊音源輸出 可連接至外接 2.0 與 2.1 主動式喇叭。
讀卡機 LED 說明讀卡機作業。
D USB 2.0
(2 個連接埠)
E USB 2.0
(4 個連接埠)
F
G
H
麥克風插孔 將外接麥克風連接到連接埠。
耳機插孔 將耳機連接到連接埠,盡情聆聽您的音樂也不會干擾
乙太網路 (區域網
路 [LAN])連接埠
I
電源接頭 將電源變壓器插進電腦。
可用來連接 USB 裝置 (USB 2.0),例如:印表機、外
接硬碟、數位相機以及 MP3 播放器。
可用來連接 USB 裝置 (USB 2.0),例如:印表機、外
接硬碟、數位相機以及 MP3 播放器。
到旁人。
透過有線網路連接到網際網路。
2 快速入門 (功能依型號而異)
Page 7
項目 說明 (續上頁)
J
K
L
M
N
O
P
Q
網路攝影機 建立影片與快照,供您檢視、以電子郵件傳送,並上
傳到影片分享網站。使用內建網路攝影機與麥克風進
行視訊聊天 (需有網際網路連線)。
內建麥克風 可錄製聲音,供網路攝影機影片以及線上視訊聊天
使用。
光碟緊急退出 光碟機 [Eject] 按鈕無法作用時,插進一根小針以退出
光碟。
光碟機與 LED 觀看您喜愛的 DVD 或聆聽 CD 收藏。燒錄 CD 和
DVD*。LED 可顯示光碟機中是否有光碟。
*Hewlett-Packard 支持您合法使用科技,但不認可或
鼓勵在違反著作權法的情況下使用我方產品。
光碟 [Eject] 按鈕 按下這個按鈕來開啟光碟機,以插入或取出光碟。
增加亮度 按下這個按鈕將螢幕調亮。
減少亮度 按下這個按鈕將螢幕調暗。
硬碟 LED 說明硬碟作業。
R
S
T
電源狀態 LED 電腦啟動時,指示燈為藍色;電腦處於睡眠或休眠模
式中時,指示燈則會熄滅。
內建喇叭 使用內建立體聲喇叭聆聽音樂或觀賞家庭影片與
DVD,享受震撼的影音媒體體驗。
電源 / 待命按鈕 按下按鈕以啟動電腦或讓電腦進入睡眠模式。
安裝電腦
警告:在安裝電腦以及將電腦接上電源系統之前,請先閱讀 《有限保固及
支援手冊》
警告:若要降低嚴重傷害的風險,請參閱 《安全與舒適指南》。該指南不
僅包含正確的工作站設置、姿勢以及電腦使用者的健康和工作習慣等內容,還
提供重要的電源與機械安全資訊。
請按照安裝海報上的步驟來安裝您的電腦。請參閱第 4 頁的 〈首次啟動電腦〉。
的 〈安全資訊〉一節。
HP Pavilion All-in-One PC 安裝 3
Page 8

檢查電腦安裝
將您的電腦放置在適當的位置以確認:
通風良好。
所有連接線均未阻礙行走路線。請勿將連接線放置於走道或是會被重物壓到或輾
過的地方。
為了保護您的電腦和已連接的週邊設備,請將電腦及其週邊設備的電源線連接到避雷保
護裝置。請使用具有避雷保護功能的電源延長線、不斷電系統 (UPS) 或類似的裝置。
您可以在電腦包裝箱中找到電腦的書面說明或更新訊息。
首次啟動電腦
完成安裝海報上的步驟後,即可啟動電腦。
注意事項:在您尚未首次啟動電腦並完成初始設定前,請勿連結或新增其他裝置到
電腦上。
若要啟動電腦:
1 按下 [ 電源 ] 按鈕。
2 開啟外部喇叭的電源 (如果有喇叭的話)。
®
3 按照螢幕上的指示,設定電腦與 Microsoft
若出現提示,請選取您目前所在的國家 / 地區,接著稍候片刻,等待電腦完
成準備工作。(當您選擇其他語言時,電腦的單次語言設定最多可能需要
30 分鐘。)
按照螢幕上的指示註冊、登入進行更新和上網。
也會自動開啟防毒軟體。請按照螢幕上的指示設定此工具,以保護您的電腦和
隱私。
4 當您看見 Windows 桌面時,表示已經完成初始設定。
如需開始使用電腦的說明,請參閱本章其他的說明主題。
Windows®7:
關閉電腦
為了安全起見,進行下列動作時,您將需要關閉電腦:修理電腦、安裝新硬體或插卡。
如果有很長的一段時間不會使用電腦,您可能要關閉電腦。
您可以將電腦鎖住或設定電腦進入 [ 睡眠 ] 或 [ 休眠 ] 模式 (如果有的話),而不需關
閉電腦。您可以設定電源管理計時器,使電腦自動進入 [ 睡眠 ] 或 [ 休眠 ] 模式。
4 快速入門 (功能依型號而異)
Page 9

電腦有下列幾種省電狀態:
[ 睡眠 ] 模式會儲存開啟的文件與程式,並將電腦置於省電狀態。在 [ 睡眠 ] 模式期
間,會關閉電源狀態 LED,且隨時準備快速甦醒。
[ 休眠 ] 模式 (可做為進階電源設定使用)可在硬碟上儲存系統記憶體至暫存檔,
然後關閉硬體。當您再次啟動電腦時,原本已開啟的程式、資料夾及文件會回復
到螢幕上。
重新啟動電腦
當您重新啟動電腦時,電腦會利用記憶體中的作業系統及軟體清除某些設定並重新啟
動。重新啟動電腦是解決許多電腦軟體問題最簡便且有效率的方法。
此外,您可能想要在電腦中安裝其他軟體程式或硬體裝置,安裝之後可能需要重新啟動
電腦。
若要重新啟動電腦:
®
1 按一下 [ 開始 ] 按鈕
2 按一下 [ 關機 ] 旁的箭號按鈕,然後按一下 [ 重新開機 ]。
或
快速按下電腦正面的電源按鈕。
。
聲音選項
您的電腦支援下列聲音選項:
內建類比立體聲喇叭
類比 2.0 或 2.1 主動式喇叭
耳機
注意事項:
您的電腦只支援主動式喇叭系統。主動式喇叭需要另外接上電源。
依照預設,已設定內建喇叭為開啟。
HP Pavilion All-in-One PC 安裝 5
Page 10
連接類比喇叭
(另行販售)
若要將主動式外接喇叭 (例如:簡易型左 / 右立體聲喇叭,或是兩個喇叭和一個重低
音喇叭的 2.1 系統)連接到電腦,請執行下列操作:
1 確定喇叭系統已關閉並拔下插頭。
2 如果您使用 2.0 主動式喇叭,請連接喇叭連接線到電腦後面的 「音訊音源輸出」
接頭。
或
如果您使用 2.1 主動式喇叭,請連接電腦後面的 「音訊音源輸出」接頭
到重低音喇叭,然後將左右喇叭連接到重低音喇叭。
3 開啟喇叭系統電源。如有需要,請參閱喇叭隨附的說明文件。
注意事項:連接 「音訊音源輸出」或耳機裝置時,內建喇叭會成為靜音。
連接耳機
(另行販售)
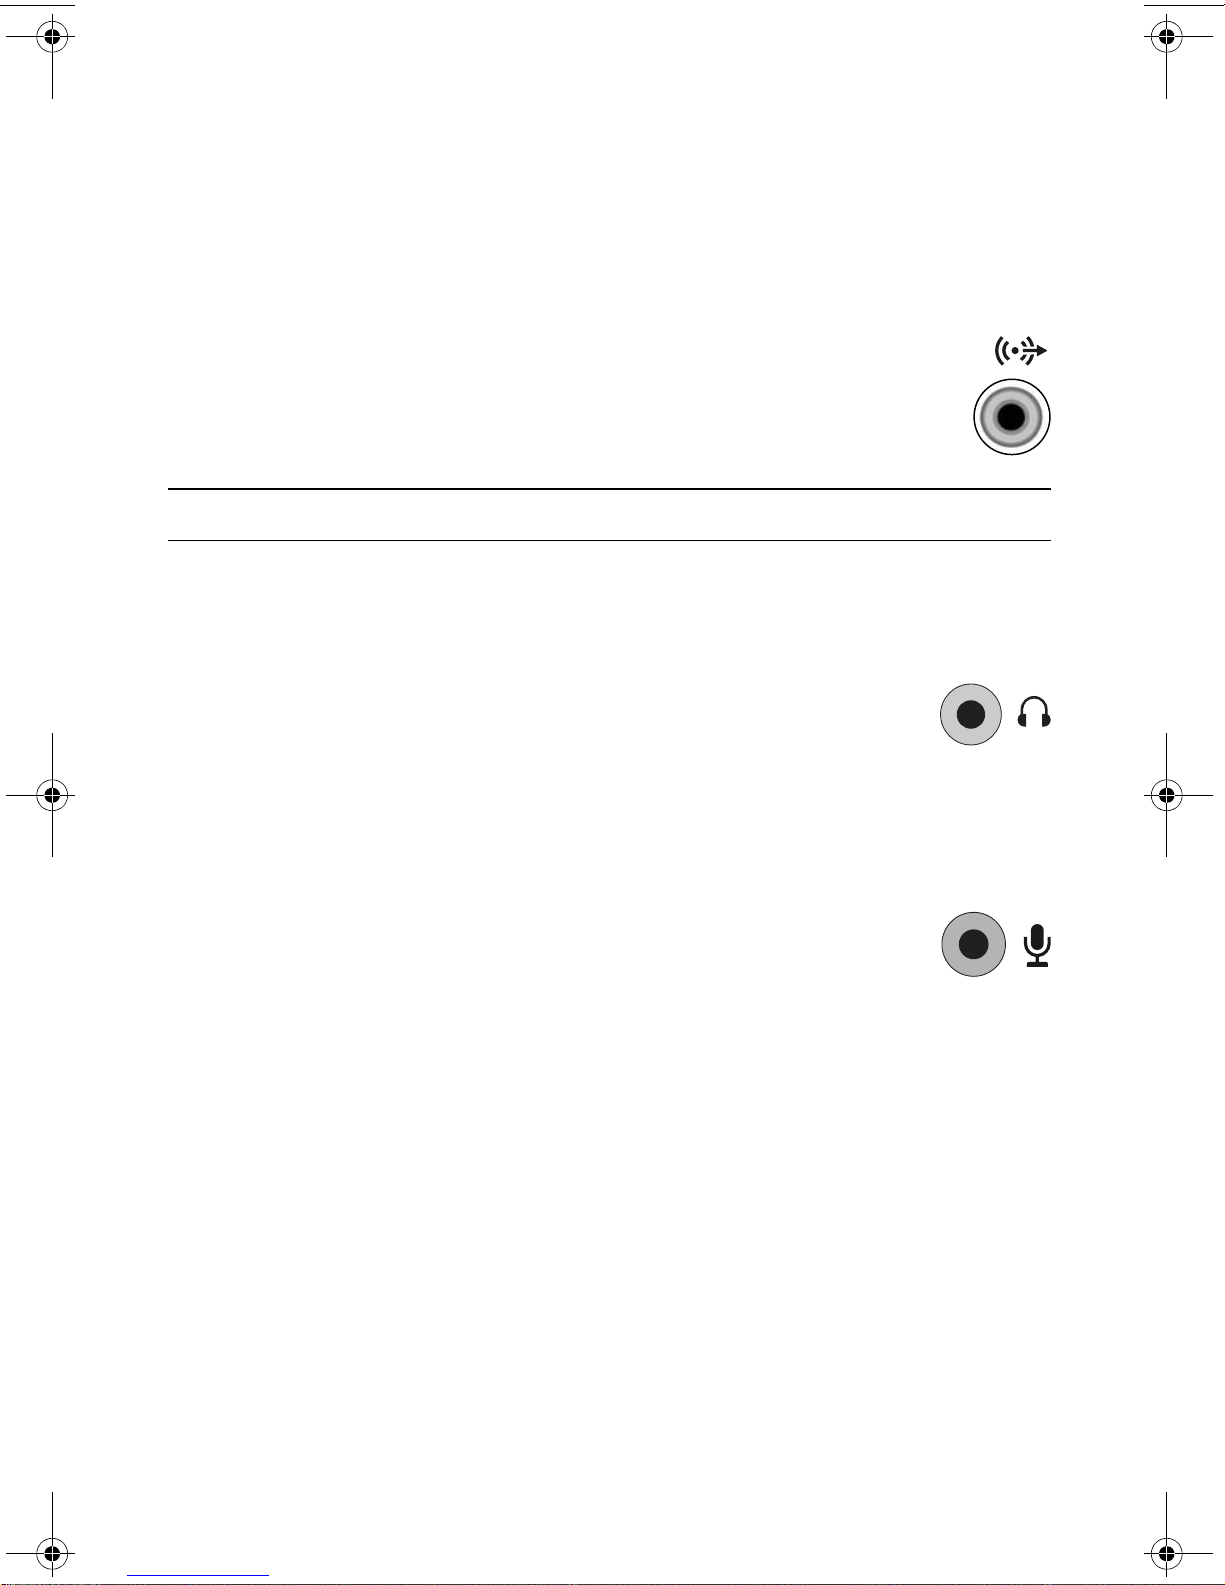
您的電腦側邊附有一個耳機接頭。
耳機接頭會有耳機圖示的標示。
插入耳機時,內建喇叭和外接喇叭 (如果已連接)的聲音會變成
靜音。
連接麥克風
(另行販售)
您的電腦有一個內建麥克風,就在電腦正面的網路攝影機旁。
電腦側邊也有一個麥克風接頭。連接外接麥克風到電腦上的麥克風
接頭。
若要選取麥克風或調整音量,請參閱第 7 頁的 〈選取麥克風〉。
6 快速入門 (功能依型號而異)
Page 11
調整喇叭音量
有數種調整音量的方法。使用 Windows 7 工具列上的 [ 音量 ] 圖示來設定喇叭音量。
然後您可以使用以下方法調整音量:
鍵盤上的 [ 音量 ] 按鈕 (僅限部分型號)。
喇叭上的 [ 音量 ] 旋鈕 (僅限部分型號)。
若要設定喇叭音量,請使用工作列上的 [ 音量 ] 圖示:
1 在工作列上的 [ 音量 ] 圖示按一下滑鼠右鍵,然後按一下 [ 開啟音量混音
程式 ]。
就會開啟 [ 音量混音程式 ] 設定視窗。
2 按一下並移動滑桿來調整音量。
3 當音量符合您的需求時,按一下右上角的 X 以關閉視窗。
如需音訊的說明,請查看第 31 頁的 〈音訊與喇叭〉中的疑難排解項目。如需詳細
資訊,請開啟 [ 說明及支援中心 ] 或參考支援網站;請參閱第 23 頁的 〈取得更多
資訊〉。
選取麥克風
電腦上的麥克風已準備好可以使用。如果您已連接多個麥克風,請選擇您要在
Windows 7 中使用的麥克風。
注意事項:將網路攝影機或音訊播放器連接到電腦時,因為是從該裝置輸入音訊,所
以 Windows 7 會將此音訊辨識為麥克風輸入。
若要選取您想在 Windows 7 中使用的麥克風,請執行下列步驟:
1 在工作列上的 [ 音量 ] 圖示按一下滑鼠右鍵,然後按一下 [ 錄音裝置 ]。接
著會開啟 [ 聲音 ] 視窗。
2 選擇您要使用的麥克風,按一下 [ 設為預設值 ],然後按一下 [ 套用 ]。
3 按一下 [ 確定 ]。
在 Windows 7 調整麥克風錄製音量
若要調整麥克風的錄製音量:
1 在工作列上的 [ 音量 ] 圖示按一下滑鼠右鍵,然後按一下 [ 錄音裝置 ]。
接著會開啟 [ 聲音 ] 視窗。
2 連按兩下您想要使用的麥克風接頭。
3 按一下 [ 等級 ] 標籤。
4 按一下並移動滑桿來調整麥克風錄製音量。
按一下 [ 確定 ],然後再按一次 [ 確定 ]。
HP Pavilion All-in-One PC 安裝 7
Page 12
連接至網路
本節說明如何透過有線或無線連線連接至網際網路。
您的電腦支援連接到其他裝置 (例如印表機)的無線或有線區域網路。
網際網路的連線通常會透過寬頻數據機 (數位式用戶迴路 (DSL) 或有線寬頻)連
接,此服務則需要另外選購。
需要另行取得無線存取點與網際網路服務,並不包含於本產品中。首次安裝無線網路,
您需要:
1 向網際網路服務供應商 (ISP) 購買高速網際網路服務。
2 購買寬頻數據機 (DSL 或有線寬頻)。ISP 可能會提供該設備。
3 如果需要的話,購買並安裝無線路由器 (另行販售)。
設定有線乙太網路網路連線
乙太網路連線也可稱為網路介面配接卡、網路介面卡或 NIC。該連線可提供乙太網路
(10BaseT) 或快速乙太網路 (100BaseT) 的高速或寬頻連線。在您連接此介面至網路
(例如:LAN)之後,您可以透過網路連線到網際網路。
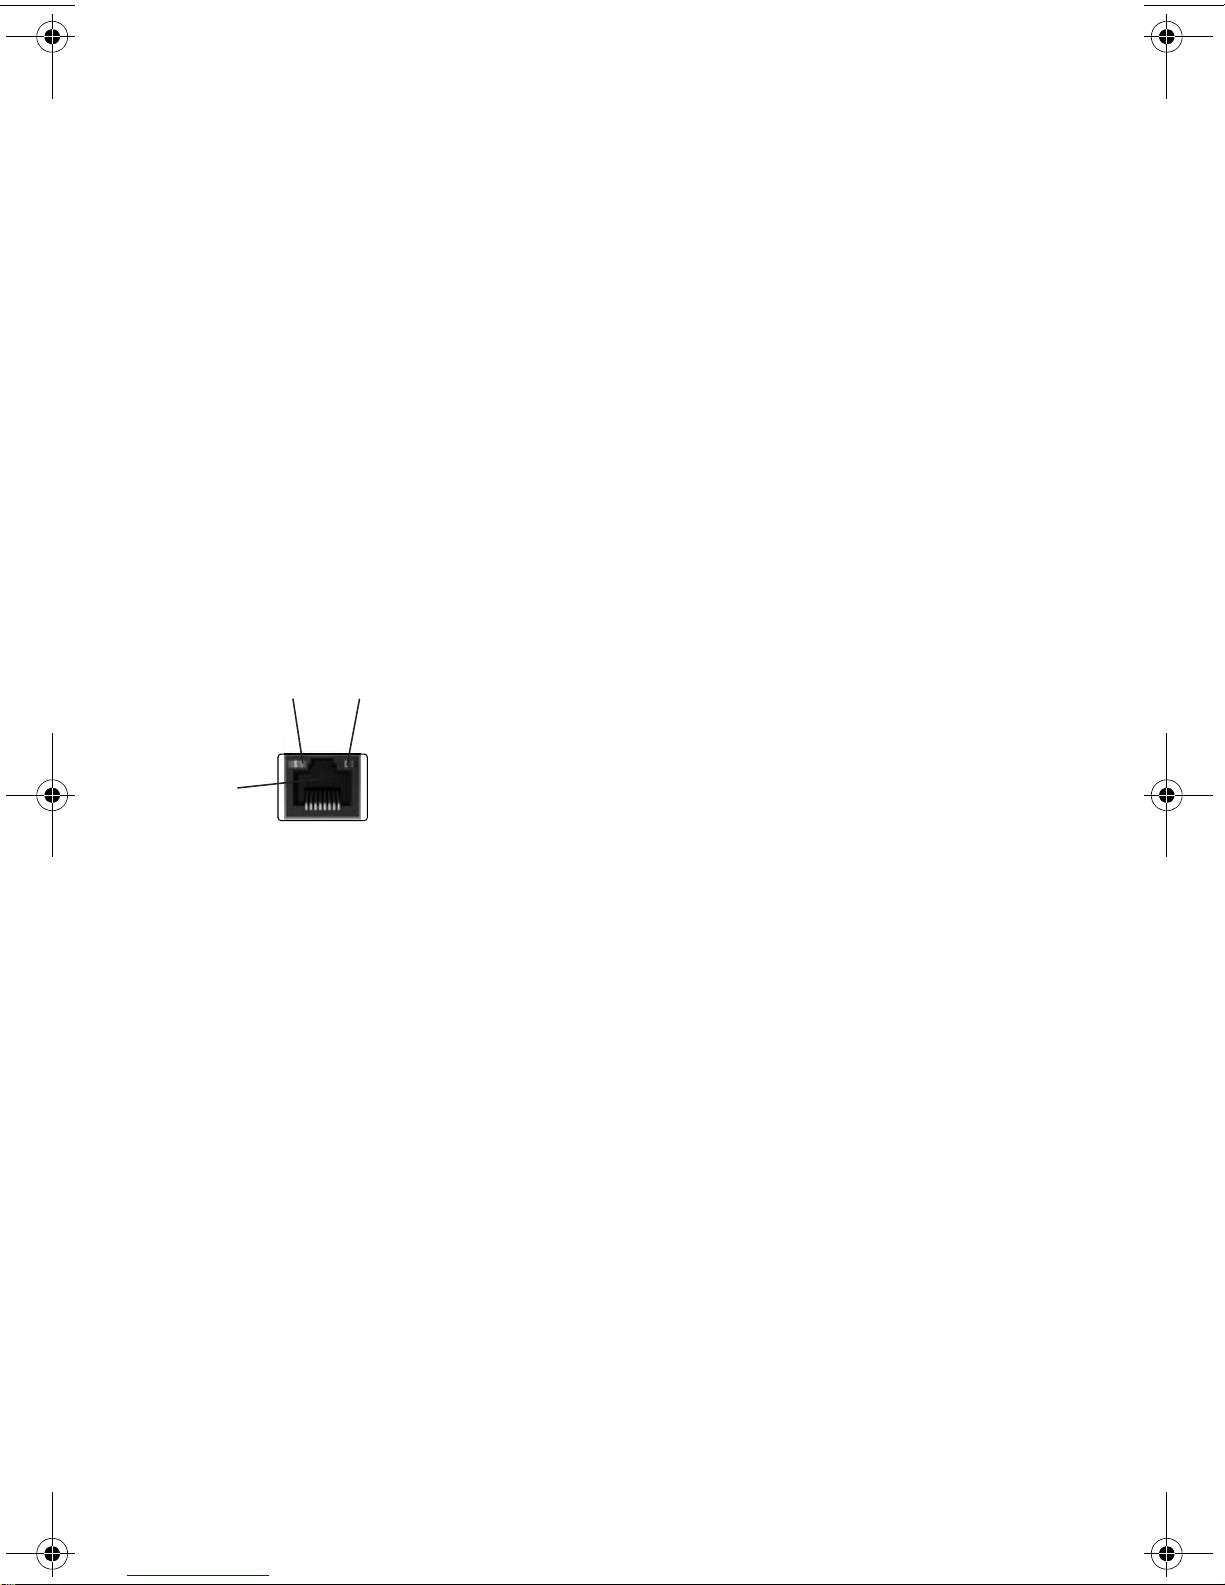
1 將乙太網路連接線連接到電腦背面的乙太網路接頭 (RJ-45) (A),然後連接到網路路
由器或區域網路裝置。
B B
LAN
A
2 電腦開機後,請檢查乙太網路接頭旁的指示燈 (B) 以得知目前的狀態:
ACTIVITY — 在網路資料傳輸作業期間亮黃燈
LINK — 網路連線正常時亮綠燈
設定無線網路連線
(僅限部分型號)
您可以將電腦連接到支援 IEEE 802.11b 或 802.11g 的無線網路。
您需要擁有網際網路連線的現有無線區域網路。請洽詢您的網際網路服務供應商
(ISP) 以取得更多資訊。
若要確認內建無線區域網路裝置已正確安裝於電腦中,請參閱第 10 頁的 〈檢查
無線區域網路裝置的安裝〉。
如需更多關於設定無線網路的資訊,按一下 [ 開始 ]、[ 說明與支援 ],然後在 [ 搜尋說
明 ] 方塊輸入設定無線網路並按下 Enter 鍵。
8 快速入門 (功能依型號而異)
Page 13

連線到網際網路
連線到網際網路,您必須:
1 向網際網路服務供應商 (ISP) 購買高速網際網路服務。
2 購買寬頻數據機 (DSL 或有線寬頻)。ISP 可能會提供該設備。
3 如果需要的話,購買並安裝無線路由器 (另行販售)。
電腦可透過區域網路 (LAN) 或數位式用戶迴路 (DSL) 連線到網際網路。也可以使用無線
連線連接到網際網路 (僅限部分型號)。請洽詢您的網際網路服務供應商 (ISP) 以取得
與連線相關的資訊。
1 請參閱第 3 頁的 〈安裝電腦〉以完成硬體連線。
2 如需建立網路連線的資訊,請參閱第 8 頁的 〈連接至網路〉。
3 若要檢查無線區域網路裝置的安裝,請參閱第 10 頁的 〈檢查無線區域網路裝置
的安裝〉。
4 若要連線到網際網路:
請向 ISP 申請註冊。如果您已有 ISP 提供的帳戶,請略過這個步驟,並按照
ISP 的指示進行。
如果您在第一次設定電腦時沒有設定網際網路服務,現在請使用 [ 線上服務 ]
進行設定:
a 按一下 [ 開始 ] 按鈕。
b 按一下 [ 所有程式 ]。
c 按一下 [ 線上服務 ],然後再按一下 [ 連接上網 ]。
d 按照螢幕上的指示選擇一個 ISP 並設定網際網路服務。
注意事項:[ 線上服務 ] 會提供 ISP 清單,不過,您可選擇另一個 ISP 或是將現有
的帳戶移轉到此電腦中。若要移轉現有帳戶,請按照 ISP 提供的指示進行。
5 連線到網際網路。您必須透過您的 ISP 才能連線。
6 開啟網頁瀏覽器並瀏覽網頁。
®
您可以使用任何網頁瀏覽器,大部份的電腦皆有 Microsoft Internet Explorer
。若
要開啟 Internet Explorer:
a 按一下 [ 開始 ] 按鈕。
b 按一下 [Internet Explorer]。
注意事項:如果您有連線到網際網路的問題,請參閱第 32 頁的 〈網際網路連線〉。
HP Pavilion All-in-One PC 安裝 9
Page 14

檢查無線區域網路裝置的安裝
您可以使用 Windows 作業系統的 [ 裝置管理員 ],確認內建無線區域網路裝置已正確
安裝於電腦上。
1 按一下 [ 開始 ] 按鈕。
2 在 [ 開始搜尋 ] 方塊輸入
裝置管理員,然後按一下 [ 裝置管理員 ] 以開啟 [ 裝置管
理員 ] 視窗。
3 按一下 [ 網路介面卡 ]。應該會在此處列出您的無線區域網路裝置。無線區域網路
裝置可能包括的詞彙有
無線、無線區域網路或 802.11。
注意事項:如果沒有列出任何無線區域網路裝置,則表示您的電腦沒有內建的無
線區域網路裝置,或者尚未正確安裝該裝置的驅動程式。
4 按一下 [ 開始 ] 按鈕。
5 在 [ 開始搜尋 ] 方塊輸入
啟 [ 網路和共用中心 ] 視窗。
6 按一下 [ 連線到網路 ],接著按照螢幕上的指示動作。
使用無線安全性功能
設定家用無線區域網路或存取現有的公共無線區域網路時,請務必啟動安全性功能以避
免他人未經授權存取該網路。最常見的安全性層級為 Wi-Fi Protected Access Personal
(WPA-Personal) 和 Wired Equivalent Privacy (WEP)。
當您設定網路時,請使用下列一項以上的安全措施:
網路和共用中心,接著按一下 [ 網路和共用中心 ] 以開
啟動路由器上的 WPA-Personal 或 WEP 安全加密。
變更預設的網路名稱 (SSID) 和密碼。
設定防火牆。
設定網頁瀏覽器上的安全性。
10 快速入門 (功能依型號而異)
Page 15
保護您的電腦
保護您的電腦、個人設定和資料免受各種類型的風險,請使用:
密碼。
防毒軟體。
防火牆軟體。
重大的安全性更新。
注意事項:安全性解決方案的設計在於防堵,但可能無法防堵軟體攻擊、錯誤處理電
腦或電腦遭竊。
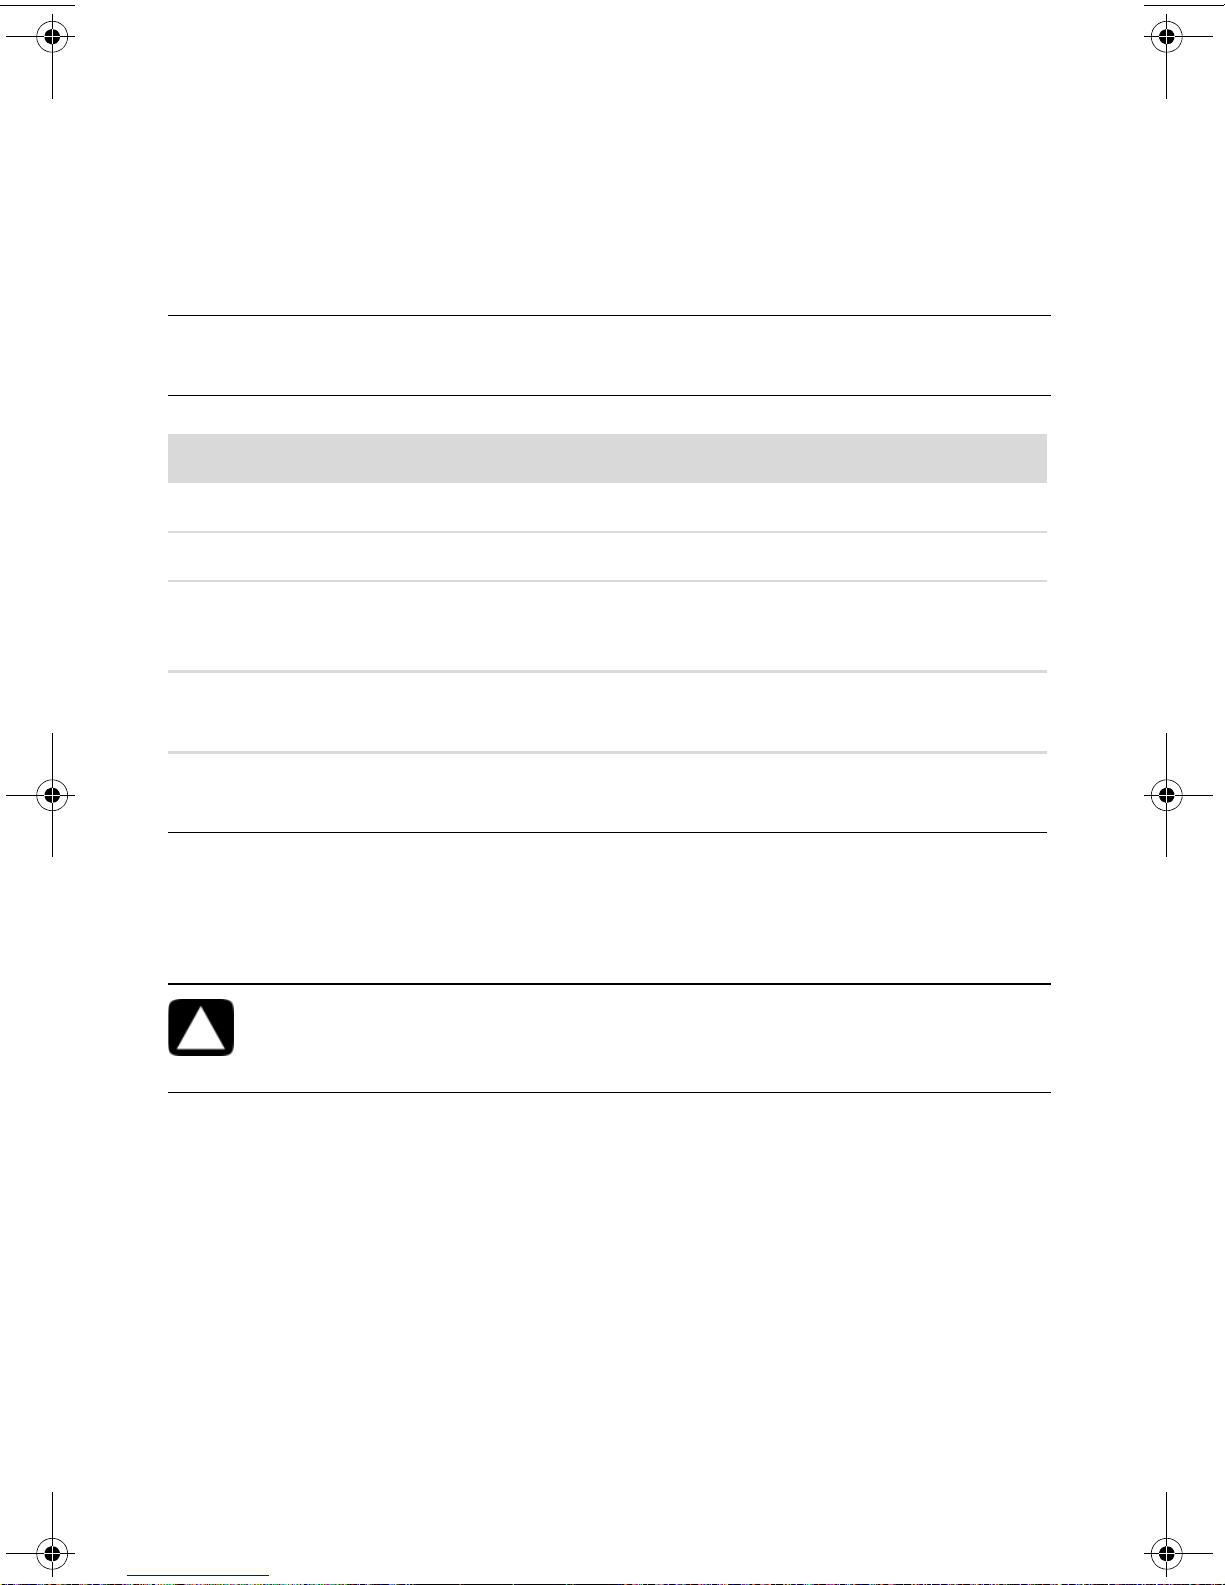
電腦遭遇的風險 電腦功能
未經授權使用電腦或使用者帳號 使用者密碼
電腦病毒 防毒程式
未經授權存取資料 防火牆程式
Windows 更新
未經授權存取 「設定公用程式」、
管理員密碼
BIOS 設定和其他系統識別資訊
電腦目前或未來的威脅 來自 Microsoft 的 Windows 重大安全性
更新
使用密碼
密碼是您選擇用來保護電腦資訊的一組字元。依照您想要控制存取資料的方式,可設
定好幾種密碼。可在電腦的 Windows 作業系統中設定密碼。
警告事項:若要避免忘記密碼而無法使用電腦的情形發生,請記錄您設定的
每個密碼。由於設定、變更或刪除密碼時均不會顯示,所以請立即記下每個密
碼並將密碼存放在安全的地方。請勿將密碼儲存在電腦檔案中。
您可在一種以上的 Windows 安全性功能中使用相同的密碼。必須在 Windows 提示時
輸入在 Windows 設定的密碼。
如需有關 Windows 密碼的資訊,請執行下列步驟:按一下 [ 開始 ] 按鈕、[ 說明及支
援 ],然後在 [ 搜尋說明 ] 方塊中輸入
〈使用螢幕上的說明及支援中心〉。
密碼,然後按下 Enter 鍵。請參閱第 23 頁的
HP Pavilion All-in-One PC 安裝 11
Page 16

使用防毒軟體
當您使用電腦存取電子郵件、網路或網際網路時,您的電腦同時也暴露在感染電腦病毒
的危險中。電腦病毒會癱瘓或損壞作業系統、軟體程式或電腦公用程式。
防毒軟體可偵測到大多數的病毒、移除病毒,並在大多數情況下修復由病毒所造成的損
壞。為提供不間斷的保護以阻擋新發現的病毒入侵,必須保持防毒軟體在最新狀態。
已預先安裝在電腦的防毒程式,包含防毒軟體和防火牆等元件。軟體包含一段免費試
用保護更新的期間。為了在試用期過後繼續保護電腦不受新病毒的入侵,請購買延長
更新服務。程式中有提供關於使用和更新防毒軟體的說明,以及購買延長更新服務期
限的資訊。
如需關於電腦病毒的更多資訊,請執行下列步驟:按一下 [ 開始 ] 按鈕、[ 說明及支
援 ],然後在 [ 搜尋說明 ] 方塊中輸入
病毒,然後按下 Enter 鍵。請參閱第 23 頁的
〈使用螢幕上的說明及支援中心〉。
使用防火牆軟體
當您使用電腦存取電子郵件、網路或網際網路時,未經授權的人士可能會存取您個人、
電腦和資料的相關資訊。為保護您的隱私,請使用防火牆軟體:
Windows 包含已預先在電腦中安裝的防火牆軟體。
已預先安裝在電腦的防毒程式,包含防火牆程式。
防火牆功能包括記錄、報告和自動警示,用來監視所有往來的通訊。
在某些情況下,防火牆可能會阻擋存取網際網路上的遊戲、干擾網路上的印表機或檔案
分享或阻擋已授權電子郵件的附件。若要暫時解決這個問題,請停用防火牆,執行您要
執行的工作,然後再次啟用防火牆。若要永久解決此問題,請重新設定防火牆。
設定電腦自動進行 Microsoft 軟體更新
Microsoft 持續地更新 Windows 作業系統。每月執行 Windows Update 以安裝這些更
新,或是使用 「自動更新」功能維持作業系統的最新狀態。
當您連線上網且可取得重要更新時,Windows Update 將透過快顯訊息或在通知區域中
的圖示自動通知您更新。若您看見 Windows Update 訊息,請允許下載更新至您的系
統。若您每週或甚至每月更新一次系統,則下載時間不會太長。
12 快速入門 (功能依型號而異)
Page 17
安裝重大安全性更新
警告事項:為了減少因安全性漏洞和電腦病毒所造成的資料損壞或遺失的風
險,一旦收到 Microsoft 警示,請立刻安裝所有重大更新。
可能在電腦出貨以後才可取得作業系統和其他軟體的更多更新。請下載所有可用的更新
並安裝到電腦。
設定使用者帳戶
當您與數人共享一台電腦時,您可以為每個電腦使用者設定一個使用者帳戶。
Windows 使用使用者帳戶內的資訊,決定電腦使用者可存取的檔案與資料夾、可變更
電腦的時機,以及個人偏好設定。每個人只可以存取自己的檔案與設定。
如需更多資訊,請按一下 [ 開始 ] 按鈕、[ 說明及支援 ],然後在 [ 搜尋說明 ] 方塊中
使用者帳戶,然後按下 Enter 鍵。請參閱第 23 頁的 〈使用螢幕上的說明及支援
輸入
中心〉。
安裝軟體和硬體裝置的準則
設定電腦並完成初始設定後,您可能想要安裝其他軟體程式或硬體裝置。請務必記得下
列重要準則:
在安裝以前,請使用 Microsoft 系統還原程式建立一個還原點。還原點是電腦設
定的快照。使用系統還原,可確保您有一組可靠的設定可供使用。
選擇與電腦相容的軟體 - 檢查新軟體所需的作業系統、記憶體和其他需求。
按照軟體製造商提供的指示來安裝新軟體。若您需要協助,請參閱廠商的說明文
件或洽詢客服資訊。
至於防毒軟體,請解除安裝現有的軟體程式,然後再重新安裝,或安裝新的防毒
程式。
注意事項:請只使用原廠授權的軟體。安裝複製的軟體可能違法,也可能導致安裝不
穩定,或是使您的電腦感染病毒。
HP Pavilion All-in-One PC 安裝 13
Page 18

從舊電腦轉移檔案和設定到新電腦
您可以使用 CD 或 DVD、可攜式記憶卡或個人儲存媒體,或是使用 「Windows 輕鬆傳
輸纜線」(另行販售),從舊電腦複製檔案至新電腦。您也可以使用 Windows 中提供
的「Windows 輕鬆傳輸」軟體,轉移檔案與複製某些設定,例如網頁瀏覽器的 [ 我的
最愛 ] 和通訊錄。
「Windows 輕鬆傳輸」軟體可指引您將檔案與設定複製到儲存裝置上,或是藉由連接
至舊電腦的 「輕鬆傳輸纜線」來複製檔案與設定。「輕鬆傳輸纜線」為 USB 連接線,
專供連接兩台電腦並搭配 「Windows 輕鬆傳輸」軟體一起使用。無法使用一般的 USB
連接線。
若要轉移檔案與設定:
1 按一下 [ 開始 ] 按鈕。
2 在 [ 開始搜尋 ] 方塊輸入 Windows
傳輸 ]。
3 遵循 [Windows 輕鬆傳輸精靈 ] 的螢幕指示,從舊的電腦將檔案轉移到新的電腦。
如需更多資訊,請按一下 [ 開始 ] 按鈕、[ 說明及支援 ],然後在 [ 搜尋說明 ] 方塊中
移動檔案,然後按下 Enter 鍵。請參閱第 23 頁的 〈使用螢幕上的說明及支援
輸入
中心〉。
輕鬆傳輸,然後按一下 [Windows 輕鬆
14 快速入門 (功能依型號而異)
Page 19
本電腦的特殊功能
30˚
-5˚
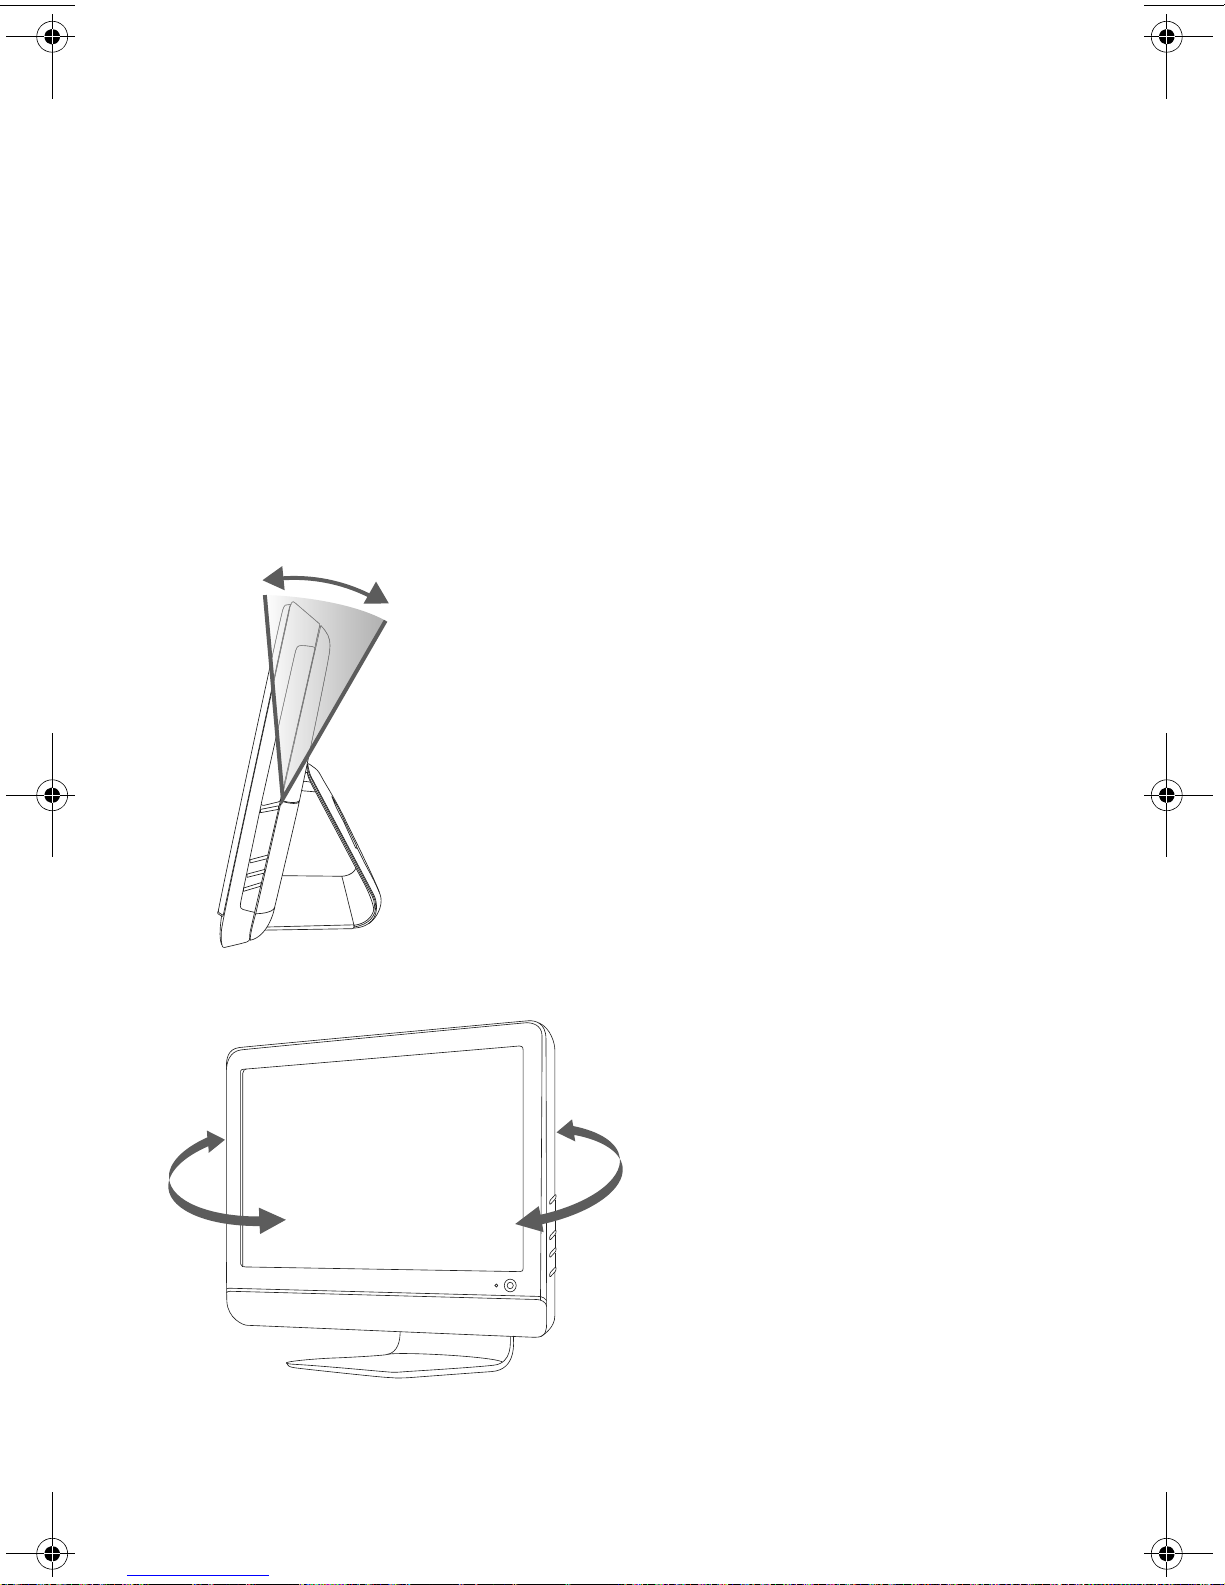
調整傾斜與旋轉角度
為取得最佳觀看角度,請根據您的個人偏好調整螢幕:
1 面對電腦的正面並握住底座,如此一來,在您調整電腦的傾斜度時才不至於翻倒
電腦。
2 移動顯示器上方邊緣來調整傾斜角度,在不碰觸螢幕的情形下將顯示器往前或往
後傾斜 (範圍為
–5 至 30 度)。
電腦的旋轉功能允許有效範圍內的調整。
本電腦的特殊功能 15
Page 20
網路攝影機
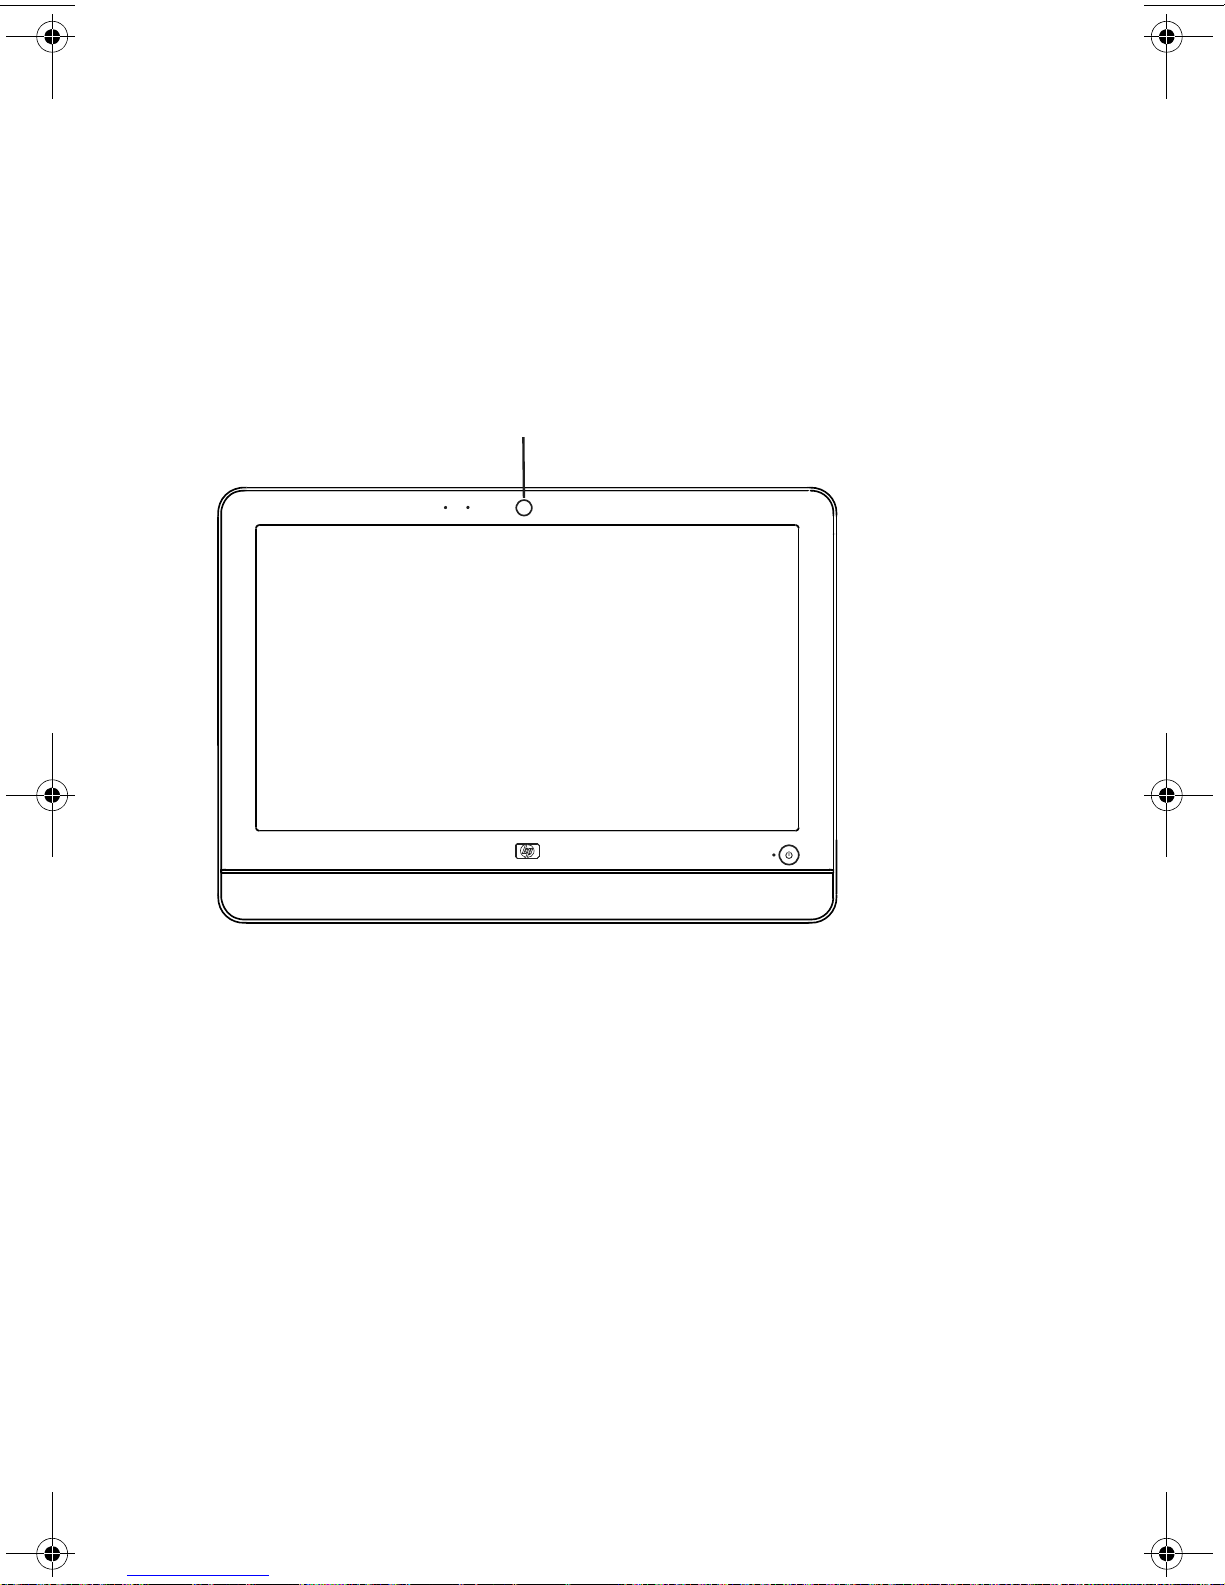
網路攝影機 (A) 位於電腦正上方。
使用網路攝影機可執行下列操作:
從您的電腦檔案建立影片。
建立快照以觀看、組織、編輯、傳送和列印。
建立影片備註,供增強版的視覺行事曆使用,並與他人分享。
可搭配 Windows Live Messenger 或其他相容的軟體程式,啟動視訊對談。
匯入即時的視訊到製作影片的程式,以儲存、傳送、在網路上播放或燒錄成光碟。
A
Power/Standby
拍攝網路攝影機影片和快照
學習如何使用 CyberLink YouCam,從網路攝影機拍攝影片與快照:
1 按一下 [ 開始 ] 按鈕。
2 按一下 [ 所有程式 ]、[CyberLink YouCam],然後再按一下 [CyberLink
YouC am] 。
3 按一下 [ 教學課程 ],觀看教學影片。
進行視訊聊天或視訊會議
若要設定視訊聊天,您必須連線到網際網路、ISP,以及可讓您透過網際網路撥打視訊
通話的軟體。使用聊天或即時訊息等類似軟體時,您可同時與一人或多人聊天。此軟體
可能需要另外申請帳號。
16 快速入門 (功能依型號而異)
Page 21

電腦正面的網路攝影機旁有內建麥克風。電腦一邊則有供外接麥克風所使用的插孔。使
用麥克風錄製聲音的最佳距離為離麥克風約 0.5 公尺 (2 英呎)遠。
設定視訊聊天前,請先執行下列操作:
1 下載網際網路即時訊息程式或視訊通話程式。確定您的對談對象擁有相容的視訊
通話軟體。
2 啟用您的網路攝影機,並將其設為預設的視訊輸入。您通常可在所使用的軟體程
式的 [ 工具 ] 功能表中的視訊設定來完成這項作業。
3 依視訊通話軟體程式的指示傳送您的視訊通話。
若要使用 CyberLink YouCam 開始視訊聊天:
1 按一下 [ 開始 ] 按鈕。
2 按一下 [ 所有程式 ]。
3 按一下 [CyberLink YouCam]、[CyberLink YouCam],然後按一下 [ 啟動視
訊通話 ]。
使用讀卡機
您的電腦內建有可讀取多重格式,具有單一插槽 (6 合 1)的讀卡機。數位相機和其
他數位影像裝置都是使用記憶卡 (或儲存媒體)來儲存數位相片檔案。讀卡機可讀取
與寫入多種類型的記憶卡。
支援的記憶卡或儲存媒體格式包括:
Extreme Digital (xD)
Secure Digital (SD)
Secure Digital High-Capacity (SDHC)
MultiMediaCard (MMC)
Memory Stick (MS)
Memory Stick Pro (MS-Pro)
使用轉接套件後,還可以支援其他的儲存媒體:
Mini Secure Digital (Mini SD)
Micro Secure Digital (Micro SD)
Reduced-size Multi Media Card (RS-MMC)
Memory Stick Duo (MS Duo)
Memory Stick Pro Duo (MS Pro Duo)
可從電腦側面直接存取讀卡機。電腦有一垂直的卡片插槽,可讀取儲存媒體。
當您插入儲存媒體,可能會出現 [ 安全地移除硬體 ] 視窗。如果出現 [ 安全地移除硬
體 ] 視窗或不小心開啟這個視窗,請按一下 [ 關閉 ]。
警告事項:選取 [USB Mass Storage Device] 時,請勿在 [ 安全地移除硬
體 ] 視窗中按下
新啟動電腦才能再偵測到讀卡機。
[ 停止 ]。這樣會使電腦作業系統無法辨識讀卡機;您必須重
本電腦的特殊功能 17
Page 22
讀卡機
A
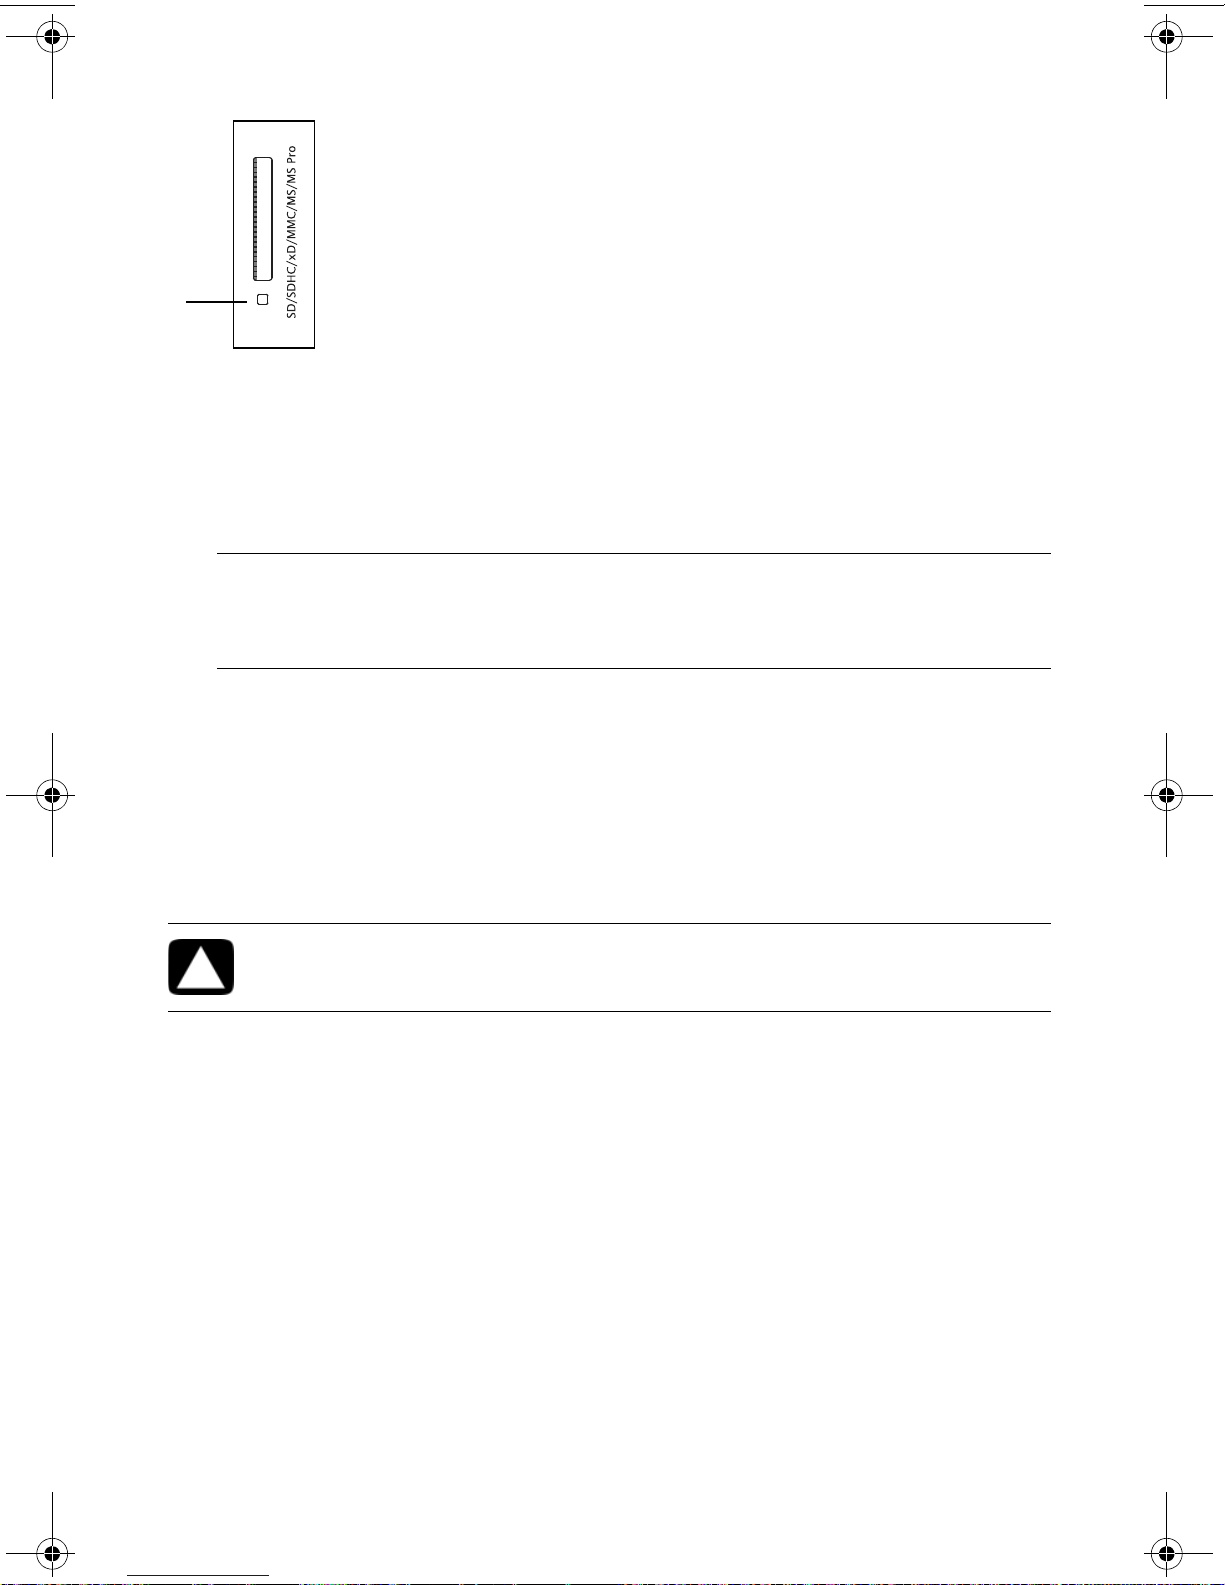
讀卡機 LED (A) 閃爍時,表示電腦正在存取記憶卡以進行讀取或寫入的動作。
若要使用讀卡機:
1 將儲存媒體插入記憶卡插槽中 (插到底)。
讀卡機上的 LED (A) 亮起時,代表電腦自動偵測到儲存媒體。
注意事項:您必須正確地插入儲存媒體。注意儲存媒體上凹角的方向。如需詳細
資訊,請開啟 [ 說明及支援中心 ] 或參考支援網站;請參閱第 23 頁的 〈取得更多
資訊〉。另外,有些記憶卡 (例如:CF Ultra/III)與電腦內建的讀卡機不相容。
2 選取要存取檔案的程式。您可以從儲存媒體複製檔案,或將檔案複製到儲存媒體。
或
如果沒有開啟 [ 自動播放 ] 視窗,請按一下 [ 開始 ] 按鈕,再按 [ 電腦 ],然後連
按兩下 [ 記憶卡 ] 圖示以顯示儲存媒體上的檔案。您可以從儲存媒體複製檔案,或
將檔案複製到儲存媒體。
3 當您結束後,在磁碟機圖示上按一下滑鼠右鍵,然後按一下 [Eject],檢查讀卡機
LED 是否仍亮著 (但沒有閃爍),然後再移除儲存媒體。
警告事項:讀卡機 LED 閃爍時,請勿移除儲存媒體。這樣可能會導致資料
遺失。
18 快速入門 (功能依型號而異)
Page 23
使用直立式 CD/DVD 磁碟機
B
A
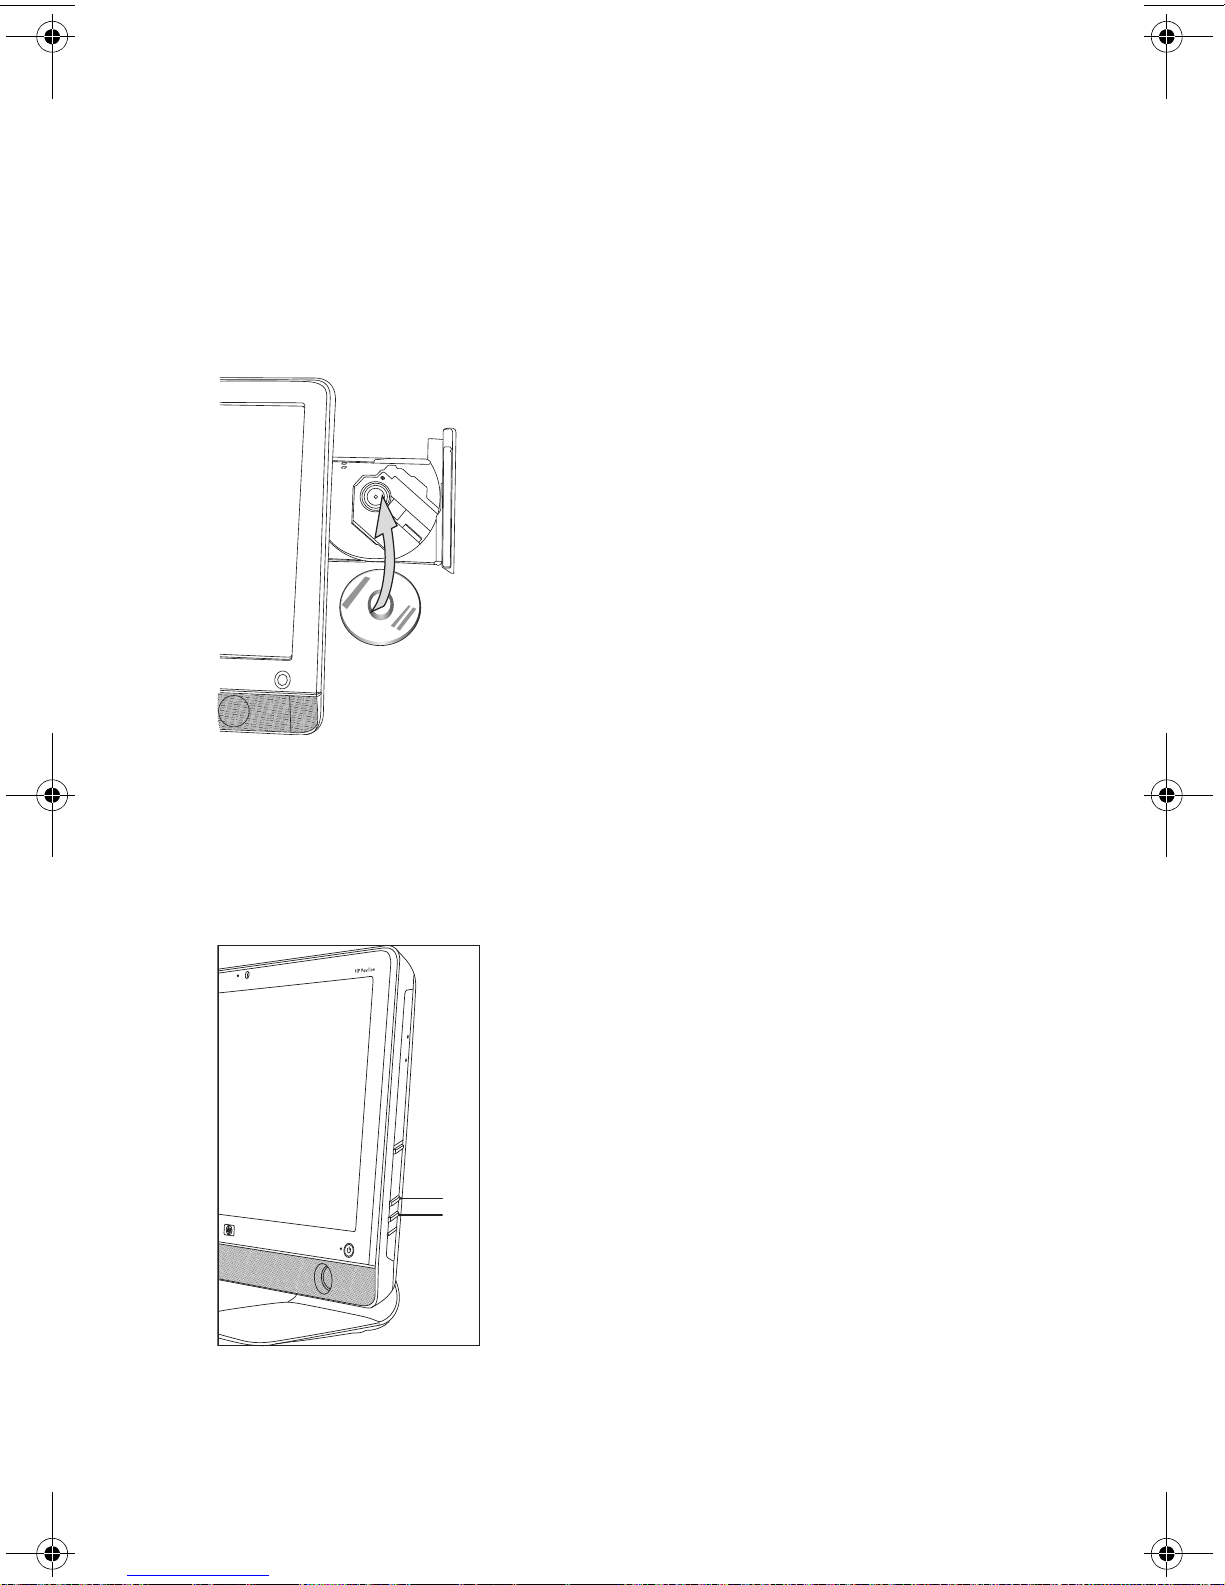
您的電腦安裝的是直立式光碟機。[Eject] 按鈕位於光碟機門蓋下方。光碟機可接受標準
大小的光碟或迷你光碟。
1 面向電腦正面。
2 按一下 [Eject] 按鈕開啟 CD/DVD 托槽。
3 將光碟的標籤面朝外放置在托槽的內圈。
4 托住托槽背面,將光碟往托槽中央位置按下,直到光碟卡至定位,然後再按下托
槽正面以關閉托槽。
調整螢幕亮度
電腦的側邊面板上有兩個按鈕,可用來調整螢幕的亮度。
1 按下上面的按鈕 (A),可以讓螢幕變亮。
2 按下下方的按鈕 (B),可以讓螢幕變暗。
若要調整螢幕解析度,按一下 [ 開始 ] 按鈕、[ 控制台 ]、[ 顯示器 ],然後按一下 [ 設
定 ] 標籤。您可以向左或向右移動調整拉桿以調整螢幕解析度。按一下 [ 確定 ]。
本電腦的特殊功能 19
Page 24
使用軟體
注意事項:您電腦可能沒有安裝某些列出的程式。此清單沒有列出所有內附軟體。
電腦內附的軟體可讓您:
燒錄和播放 CD。
燒錄資料 CD。
匯入和編輯視訊檔案。
燒錄視訊 CD 和 DVD。
整理數位儲存媒體檔案。
下表說明這些程式的特定功能,您可根據表格說明,判斷要執行工作的程式。
使用此程式: 您可以:
MediaSmart
在 MediaSmart DVD 模式中觀看 DVD 或 VCD 的電影。
播放音樂收藏的音樂、建立播放清單以及整理硬碟上的
音樂收藏。
檢視、編輯與列印 JPG 格式的圖片;建立投影片;將相
片上傳到 Snapfish 進行印刷或分享。
觀看網際網路電視,錄影與重播電視節目。
檢視電腦上的視訊檔案並上傳到 YouTube。
注意事項:並非所有國家 / 地區都可使用 You Tu be 網
站。YouTube 需要網際網路連線,且您必須設定帳號。
建立與更新音樂與影片的播放清單。
20 快速入門 (功能依型號而異)
Page 25

使用此程式: 您可以:(續上頁)
CyberLink DVD Suite
HP Advisor
燒錄資料與音樂檔案。
燒錄現有音樂或資料光碟的複本,以在電腦上使用。
從您收藏的 CD,或從 WAV、MP3 或 WMA 檔案製作
自訂的音樂 CD。這些 CD 可在家用或車用音響上播放。
複製或分享資料檔案。
從電腦儲存的檔案製作歸檔 CD 或 DVD。
檢查是否已成功建立光碟且沒有錯誤。
錄製影片檔案以製作您可在某些 DVD 播放器中播放的
VCD 和 DVD。
複製和分享視訊檔案。
擷取視訊檔案。
編輯視訊檔案。
使用 CyberLink LabelPrint 為光碟建立 LightScribe 標籤。
設定備份或印表機等電腦功能。
探索電腦,瞭解其功能。
查看電腦狀態,並且獲得警示訊息與更新。
探索 HP 與其夥伴所提供的軟體與服務。
獲得支援診斷與說明內容。
本電腦的特殊功能 21
Page 26

22 快速入門 (功能依型號而異)
Page 27

取得更多資訊
使用螢幕上的說明及支援中心
有關本電腦的資訊位於螢幕上的 [ 說明及支援中心 ]。您可從這裡找到驅動程式更新的
連結、存取技術支援選項,以及一般常見問題的相關資訊。
若要開啟 [ 說明及支援中心 ]:
按下位於鍵盤 (僅限部分型號)上的 [ 說明 ] 按鈕。
或
按一下 [ 開始 ] 按鈕,然後按一下 [ 說明及支援 ]。
取得網路上的支援
您可在網際網路上找到有關本電腦的資訊:
1 請在網頁瀏覽器中,連結至:http://www.hp.com/support。
2 選擇您的國家 / 地區和語言。
3 按一下 [ 支援及驅動程式 ]。
4 輸入您電腦的型號,然後按一下 [ 搜尋 ] 。按下其中一個項目進行檢視。
在網路上尋找其他手冊
您可以使用網際網路進入支援網站,取得電腦的手冊。
1 請使用先前所述步驟前往支援網站 (http://www.hp.com/support),搜尋您
的電腦型號。
2 按一下 [ 使用手冊 ]。
使用 PC 說明和工具資料夾
[PC 說明和工具 ] 資料夾包含為電腦使用者準備的特殊公用程式,例如:支援資訊和
程式。
若要檢視 [PC 說明和工具 ] 資料夾中的項目:
1 按一下 [ 開始 ] 按鈕、[ 所有程式 ],然後按一下 [PC 說明和工具 ]。
2 按一下 [ 硬體診斷工具 ] 以檢視或使用這些工具。
取得更多資訊 23
Page 28

使用 HP Advisor 軟體
(僅限部分型號)
HP Advisor 這套桌面工具,可讓您監視並存取電腦重要區域的系統運作狀況相關資訊。
HP Advisor 有三大主要領域:
PC Dock (電腦快捷列)— 在您的桌面上直接存取 HP 與合作夥伴軟體,並以拖
曳項目的方式自訂您的 PC Dock (電腦快捷列)。
PC Dashboard (電腦狀態檢視)— 快速查看 PC Dashboard (電腦狀態檢視)
以檢查您的電腦狀態。從 HP 和合作夥伴存取使用本電腦所需的所有項目。
PC Discovery (電腦探索中心)— 深入了解已安裝在電腦上的 HP 與合作夥伴
軟體及線上服務,並尋找與新奇軟體和服務相關的發行訊息。
若要開啟 HP Advisor Dock (HP Advisor 快捷列),請按一下工作列上的 HP 標誌。
安全且舒適地使用電腦
在使用電腦前,請先安排您的電腦及工作區域位置,讓您可以舒適的工作,以發揮最佳
產能。如需瞭解重要的人體工學相關資訊,請參閱 《安全與舒適指南》:
按一下 [ 開始 ] 按鈕、[ 所有程式 ]、[ 使用手冊 ],然後按一下 [ 安全與舒適指南 ]。
或
在您網頁瀏覽器的網址列輸入
http://www.hp.com/ergo,
然後按下鍵盤上的 Enter。
升級與維修電腦
請參閱 《升級與維護手冊》:
按一下 [ 開始 ] 按鈕、[ 所有程式 ]、[ 使用手冊 ],然後再按一下 [ 升級與維護手冊 ]。
如果沒有此手冊,請遵循第 23 頁的 〈在網路上尋找其他手冊〉中步驟,然後選
取 《升級與維護手冊》。
24 快速入門 (功能依型號而異)
Page 29

疑難排解與維護
本節包含下列項目:
第 25 頁的 〈電腦問題疑難排解〉的疑難排解表格。
第 39 頁的 〈軟體疑難排解〉中的軟體修復資訊。
第 42 頁的 〈維護〉中的維護資訊與指南。
如需詳細資訊,請參閱 [ 說明及支援中心 ] 或參閱支援網站。(請參閱第 23 頁的 〈取
得更多資訊〉。)
請參閱產品製造商所提供的說明文件,取得特定週邊裝置的資訊,例如:與印表機有關
的問題。
電腦問題疑難排解
下列表格說明您在安裝、開機或使用電腦時,可能遭遇到的部分問題徵兆。表格中也提
供您可以嘗試的可能解決方法。
疑難排解表格會以下列順序出現:
第 26 頁的 〈電腦無法開機〉
第 27 頁的 〈電源〉
第 27 頁的 〈顯示器〉
第 27 頁的 〈鍵盤與滑鼠 (有線)〉
第 29 頁的 〈無線鍵盤和滑鼠〉
第 31 頁的 〈音訊與喇叭〉
第 32 頁的 〈網際網路連線〉
第 33 頁的 〈CD 和 DVD 播放器〉
第 36 頁的 〈硬體安裝〉
第 38 頁的 〈效能〉
第 38 頁的 〈讀卡機〉
疑難排解與維護 25
Page 30

電腦無法開機
徵兆 可能的解決方法
電腦無法開機或啟動。 確認已插妥連接電腦至外部電源的連接線。
插妥連接電腦到外部電源的連接線且牆上插座也運作正常
時,電腦背面的綠色電源供應器指示燈應會亮起;如果指示
燈沒有亮起,請參閱 《有限保固及支援手冊》連絡支援
中心。
將不同的電源裝置連接到牆上插座以測試插座是否故障。
可能安裝不相容的記憶體 (RAM)。請重新安裝舊的記憶體,
讓您的電腦返回原本的狀態。如需相關說明,請參閱
級與維護手冊》
。
《升
電腦似乎被鎖定且沒有
回應。
錯誤訊息:
硬碟錯誤。 請參閱 《有限保固及支援手冊》以連絡支援中心。
使用 [Windows 工作管理員 ] 關閉任何沒有回應的程式,或
重新開機:
1 同時按下鍵盤上的 Ctrl-Alt-Delete 鍵。
2 按一下 [ 啟動工作管理員 ]。
3 選取沒有回應的程式,接著按一下 [ 結束工作 ]。
如果無法關閉程式,請重新開機:
1 同時按下鍵盤上的 Ctrl-Alt-Delete 鍵。
2 按一下紅色 [ 關機 ] 按鈕旁的箭頭,然後按一下 [ 重新
啟動 ]。
或
1 按住電源按鈕約 5 秒鐘或更長的時間以關閉電腦。
2 按電源按鈕啟動電腦。
26 快速入門 (功能依型號而異)
Page 31

電源
徵兆 可能的解決方法
錯誤訊息:
磁碟
或非系統磁碟或
無效系統
當光碟機作業停止時,請取出光碟片並按下鍵盤上的空白
鍵,即可啟動電腦。
磁碟錯誤。
按下電源按鈕時電腦
不會關機。
電腦自動關機。 電腦可能處於超高溫的環境。請讓它冷卻一下。
按住電源按鈕直到電腦關機為止。
檢查電源設定。
確定電腦通風口未受阻塞且機內風扇正常運作。請注意,
您的電腦不一定有機內風扇。
顯示器
徵兆
螢幕變黑,而且電源
燈不亮。
螢幕變黑。 按下鍵盤上的空白鍵或是移動滑鼠讓螢幕再度顯示畫面。
可能的解決方法
重新接好電腦背面和牆上插座兩端的電源插頭。
按下電腦正面的電源按鈕。
按下鍵盤上的 Esc 鍵以離開睡眠或休眠模式。
按一下電源按鈕啟動電腦。
螢幕上的影像太大、
太小或模糊不清。
在 Windows 7 調整螢幕解析度設定:
1 按一下 [ 開始 ] 按鈕,然後按一下 [ 控制台 ]。
2 在 [ 外觀及個人化 ] 下,按一下 [ 調整螢幕解析度 ]。
3 如果需要,調整解析度並按一下 [ 套用 ]。
鍵盤與滑鼠 (有線)
徵兆 可能的解決方法
電腦無法辨識鍵盤輸
入的指令及文字。
無法使用或偵測不到
有線滑鼠。
使用滑鼠關閉電腦,拔除並重新連接鍵盤到電腦背面,然
後啟動電腦。
拔除並重新連接滑鼠連接線至您的電腦。
如果仍偵測不到滑鼠,請關閉電腦、拔除並重新連接滑鼠
連接線,接著重新開機。
疑難排解與維護 27
Page 32

鍵盤與滑鼠 (有線)(續上頁)
徵兆 可能的解決方法
游標無法回應滑鼠
動作。
游標回應速度緩慢、
僅能垂直或水平移動,
或無法順暢地在螢幕
上移動。
使用鍵盤重新開機:
1 同時按下鍵盤上的 Alt 和 Tab 鍵以瀏覽開啟的應用
程式。
2 同時按下鍵盤上的 Ctrl 和 S 鍵可儲存選定程式中的變
更(Ctrl+S 是最常見的 「儲存」鍵盤快捷鍵 - 但
非
所有程式都適用)。
3 重複步驟 1 與步驟 2 以儲存所有已開啟應用程式中的
變更。
4 儲存所有已開啟程式中的變更後,請同時按下鍵盤上
的 Ctrl 和 Esc 鍵以顯示 Windows [ 開始 ] 功能表。
5 使用方向鍵選取 [ 關機 ] 旁的箭號按鈕,選取 [ 關
機 ],然後按下鍵盤上的 Enter 鍵。
6 關閉電腦後,請拔除並重新連接滑鼠連接線至電腦後
方,接著開啟電腦。
若是使用光學滑鼠:
清潔光學滑鼠:請用不含絨毛的布 (請勿用紙擦拭)
輕輕擦拭滑鼠底部的光學感應板。
將滑鼠放在滑鼠墊、白紙或其他較不反光的表面上使
用滑鼠。
並
無法使用數字鍵盤上
的方向鍵移動游標。
如需詳細的清潔資訊,請至:
http://www.hp.com/support
選擇您的國家 / 地區和語言,搜尋您的電腦型號,然後搜
尋關鍵字
按一下鍵盤上的 Num Lock 鍵來關閉 Num Lock 燈。如果您
想使用數字鍵盤上的方向鍵,Num Lock 燈不應亮起。
「清潔」。
28 快速入門 (功能依型號而異)
Page 33
無線鍵盤和滑鼠
A
徵兆 可能的解決方法
無法使用或偵測不到
無線鍵盤或滑鼠。
A 檢查下列問題:
請確定無線鍵盤或滑鼠位於接收器的範圍內,正常使
用時大約為 10 公尺 (32 英呎),初始設定或是進行
重新同步化時,則需要在 30 公分 (12 英吋)之內。
檢查滑鼠上指示電池電量的 LED。開啟滑鼠電源時:
如果 LED 是綠色,表示滑鼠的電量充足。
如果電池電量不足,LED 則為琥珀色,而且會連續
閃爍十次。
如果電池電量低於 2.0 V,LED 將不會亮起,您必
須更換電池。
更換鍵盤和滑鼠的電池;請勿使用充電電池:將裝置
反過來,關閉滑鼠電源,開啟電池蓋,將舊電池取出,
然後裝入新的鹼性電池。然後開啟滑鼠電源,並按下
[Connect] 按鈕。
滑鼠在停止使用 20 分鐘後會進入暫停模式,請確定滑
鼠不是處於暫停模式。按一下滑鼠左鍵使其重新啟動。
B 將鍵盤和滑鼠重新與接收器同步化:
圖例中所顯示的接收器、無線鍵盤與無線滑鼠皆為範
例;您的型號可能會有所不同。
重要:在這些步驟中,請將無線鍵盤與滑鼠置於與接
收器同高的平面上,距離接收器 30 公分 (12 英吋)
以內,並遠離其他裝置的干擾。
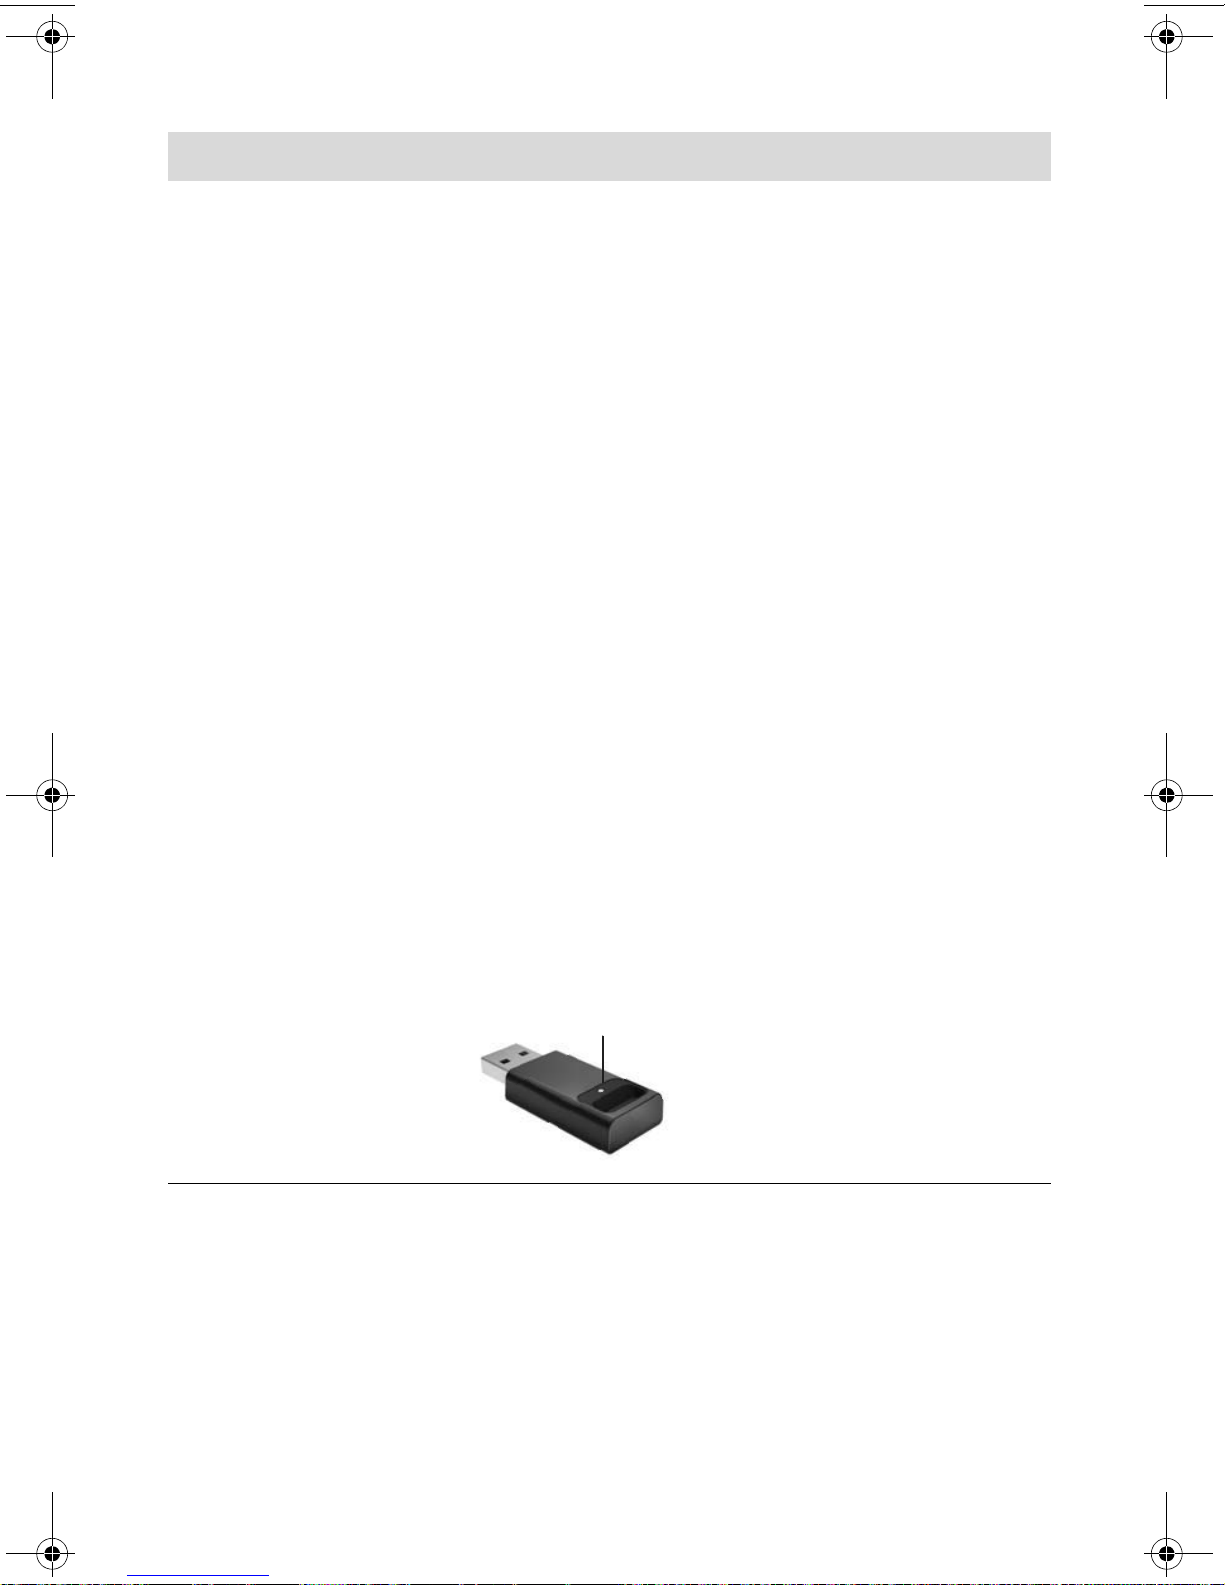
1 拔除並重新將接收器連接到電腦上的 USB 接頭。
接收器可能會有 LED 燈 (A)。
疑難排解與維護 29
Page 34
無線鍵盤和滑鼠 (續上頁)
D
徵兆 可能的解決方法
無法使用或偵測不到
無線鍵盤或滑鼠。
(續上頁)
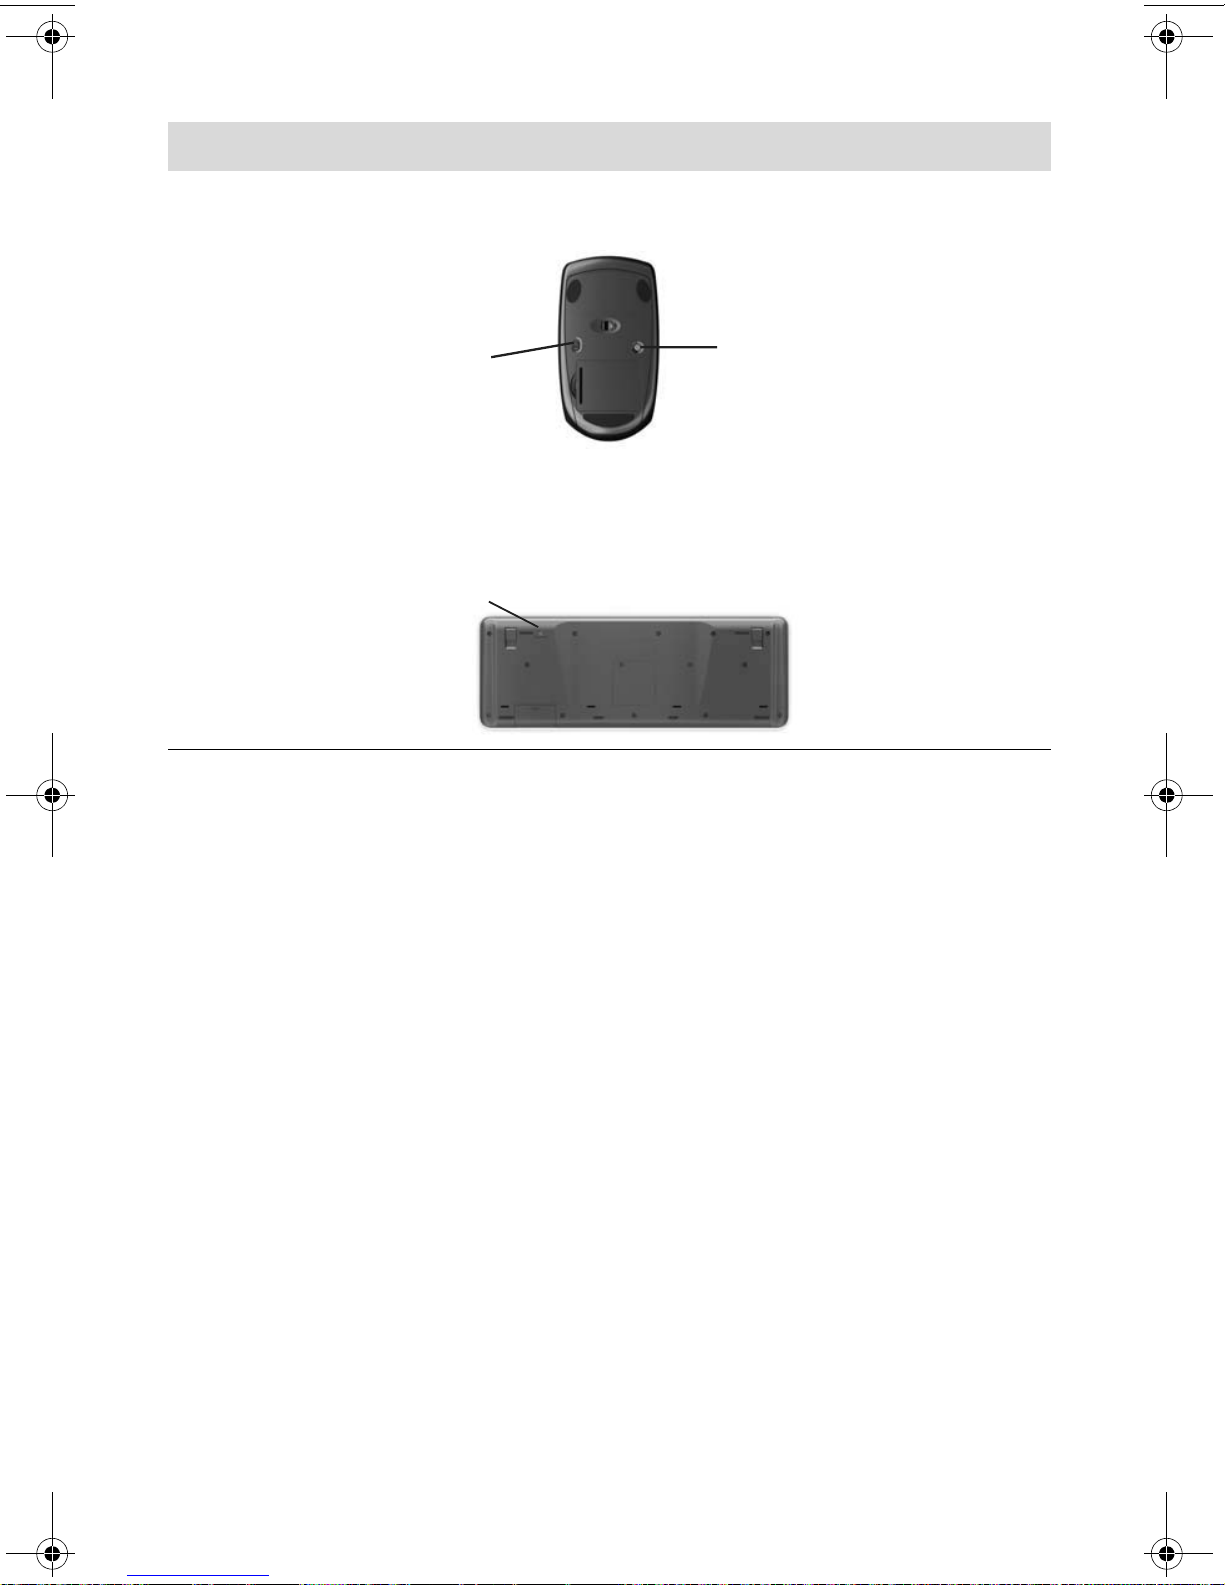
2 確定已開啟滑鼠電源 (B),然後按住滑鼠背面的
[Connect] 按鈕 (C) 5 至 10 秒。
注意事項:接收器的連
線逾時時間為 60 秒。
Off
Connect
B
On
C
3 建立滑鼠連線後,請繼續接下來的步驟,重複建立鍵
盤連線的程序。
4 按住鍵盤背面的 [Connect] 按鈕 (D) 5 至 10 秒。
若要確定已建立連線且
接收器未逾時,請移動
滑鼠以檢查螢幕上是否
有反應。
30 快速入門 (功能依型號而異)
Page 35
音訊與喇叭
徵兆 可能的解決方法
無法發出聲音。 按鍵盤上的 [ 靜音 ] 按鈕,檢查是否啟動 「靜音」功能。
或
1 在工作列上 [ 音量 ] 圖示按一下滑鼠右鍵,然
後按一下 [ 開啟音量混音程式 ]。
就會開啟 [ 音量混音程式 ] 設定視窗。
2 如果程式變成靜音,請按一下 [ 靜音 ] 按鈕解除靜音。
若要提高音量,按一下工作列上的 [ 音量 ] 圖示,或者使用
鍵盤控制鍵來提高音量。檢查軟體程式中的音量設定。
如果您使用的是外接喇叭,請確定已連接主動式喇叭,而
且已經開啟。
關閉電腦,拔除並重新連接外接喇叭。確定外接喇叭已經
連接到音源輸出接頭。
若要離開睡眠模式,按下 [Sleep] 按鈕 (僅限部分型號)或
鍵盤上的 Esc 鍵。
若有耳機連接在電腦上,請拔下耳機。
疑難排解與維護 31
Page 36

網際網路連線
徵兆 可能的解決方法
我無法連線上網。 連絡您的 ISP 以尋求協助。
請檢查您的網際網路連線類型是否使用正確的連接線。
執行無線網路安裝精靈:
1 按一下 [ 開始 ] 按鈕,然後按一下 [ 控制台 ]。
2 按一下 [ 網路和網際網路 ],然後按一下 [ 網路和共用
中心 ]。
3 在 [ 網路和共用中心 ] 視窗中,按一下 [ 設定連線或網
路 ] 以開啟精靈。
4 按照螢幕上的指示進行操作。
使用 [ 裝置管理員 ] 以確認內建無線區域網路裝置已正確安
裝於電腦中:
1 按一下 [ 開始 ] 按鈕。
2 在 [ 開始搜尋 ] 方塊輸入
[ 裝置管理員 ]。
3 按一下 [ 網路介面卡 ]。應該會在此處列出您的無線區
域網路裝置。無線區域網路裝置可能包括的詞彙有無
線
、無線區域網路或 802.11。
4 按一下 [ 開始 ] 按鈕。
5 在 [ 開始搜尋 ] 方塊輸入
一下 [ 網路和共用中心 ] 以開啟 [ 網路和共用中心 ]
視窗。
6 按一下 [ 連線到網路 ],接著按照螢幕上的指示動作。
裝置管理員,然後按一下
網路和共用中心,接著按
32 快速入門 (功能依型號而異)
Page 37
CD 和 DVD 播放器
徵兆 可能的解決方法
CD 或 DVD 光碟機無
法讀取光碟或是過了
許久仍未啟動。
我無法取出 CD 或
DVD。
請確定已放入光碟,且標籤朝外,置中放在托槽中。
至少等候 30 秒,讓光碟機辨識媒體類型。
使用多數電腦商店都有販售的光碟清潔套件來清潔光碟。
驅動程式已毀壞或過期。如需還原和更新驅動程式的詳細
資訊,請參閱第 39 頁的 〈更新驅動程式〉。
開啟電腦並按光碟機旁的 [Eject] 按鈕開啟托槽。
如果您懷疑問題出在 [Eject] 按鈕本身:
1 按一下 [ 開始 ] 按鈕,然後按一下 [ 電腦 ]。
2 在您要開啟的 CD 或 DVD 光碟機上按一下滑鼠右鍵。
3 從功能表中選取 [ 退出 ]。
4 如果光碟卡住,請插入一根針
至強制退出按鈕 (A) (位於電
腦側邊的小針孔)以退出光碟。
A
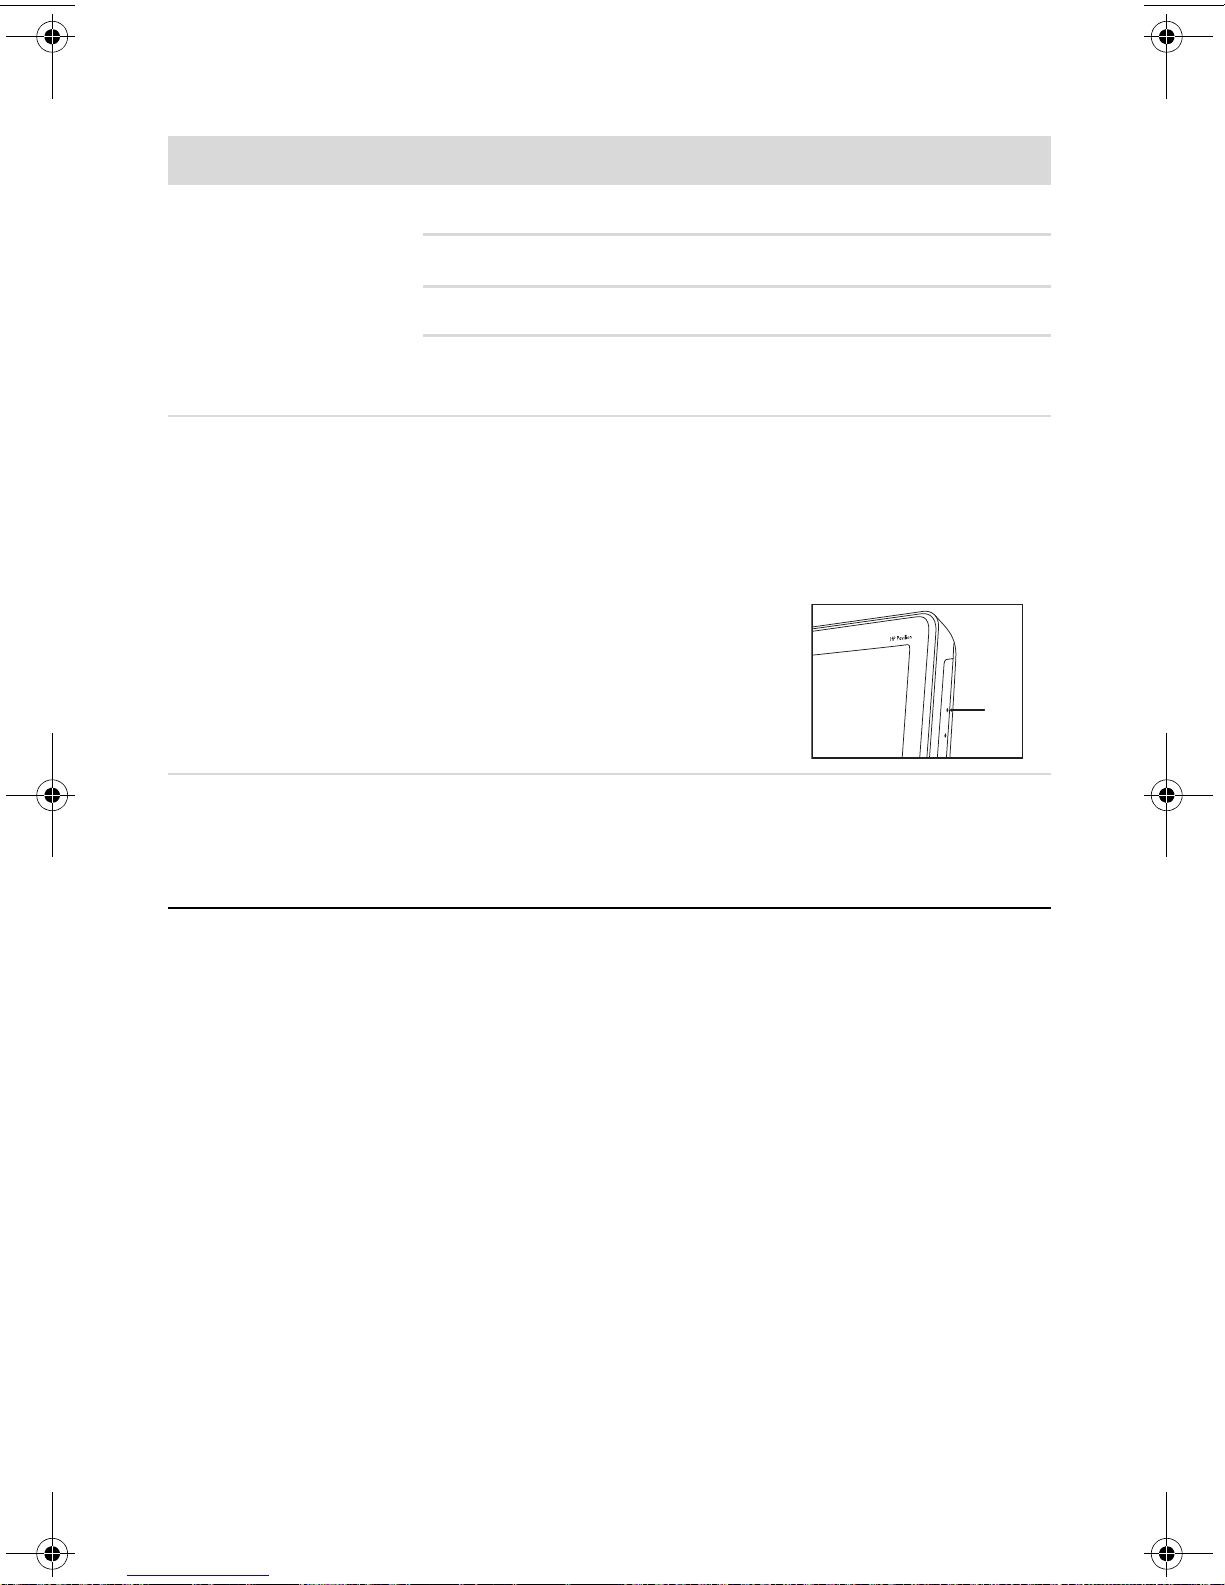
我無法在 DVD 播放器
上播放 DVD 影片。
DVD 播放器無法播放以資料檔案形式錄製到 DVD 上的視
訊檔案。若要正確地播放影片,請使用視訊錄製程式。某
些視訊檔案可在電腦上觀看,但無法以家用 DVD 播放器
播放。
疑難排解與維護 33
Page 38

CD 和 DVD 播放器 (續上頁)
徵兆 可能的解決方法
我無法建立 (錄製)
光碟。
請確定已放入光碟,且標籤朝外,置中放在托槽中。
請確認光碟機中使用的光碟類型 (媒體)是正確的。請試
用其他廠牌的光碟。
確定光碟是乾淨且未損毀的。如果在某錄製期間中停止錄
製,那麼光碟可能已經毀損,請使用另一張光碟。
根據您要錄製的檔案類型,使用正確的光碟類型。
使用 CD-R 光碟錄製音樂時,請確定它是空白的;使用
CD-R 光碟錄製資料時,請確定它是空白的或是可附加的
(有空間加入更多資料檔案)。
在製作光碟副本時,請確定您使用的是正確的光碟類型。
有些錄製程式只能錄製到與來源光碟相同的光碟類型。例
如,您只可以將 DVD 錄製到 DVD+R/-R 或 DVD+RW/-RW
光碟,而且只能將 CD 錄製到 CD-R 或 CD-RW 光碟。
為燒錄機選取較慢的寫入速度 (如果可以的話)。
如果曲目超出光碟的可用空間,錄製軟體不會允許您加入
曲目。將檔案錄製到光碟之前,您可以從清單移除一首或
多首曲目以換取可用空間。
在錄製之前,請關閉所有的軟體程式及視窗。
確定您的硬碟有足夠可用空間可儲存此內容的暫存副本。
按一下 [ 開始 ] 按鈕,然後按一下 [ 電腦 ]。在硬碟上按一
下滑鼠右鍵,然後按一下 [ 內容 ] 檢視可用空間。
如果您處於連線狀態,請先將檔案從網路磁碟機複製到硬
碟上,然後再將檔案錄製到光碟。
關閉所有程式和視窗,然後重新開機。
34 快速入門 (功能依型號而異)
Page 39

視訊
徵兆 可能的解決方法
無法播放某些視訊
檔案。
嘗試播放某些視訊檔
案時,會顯示轉碼器
錯誤訊息。
錯誤訊息:
要顯示
的視訊檔案遺失或
毀損
。
您的檔案可能已損毀,或者是不支援的格式。在視訊編輯
器中開啟視訊檔案,接著將檔案重新儲存為支援的格式。
在 Windows Media Player 中開啟檔案。請確認已將
Windows Media Player 設定為自動下載轉碼器。
若有正確的轉碼器,便可播放檔案。請注意,您必須
連線到網際網路才能下載轉碼器檔案。
若沒有正確的轉碼器,請檢查是否有 Windows Media
Player 更新。
如需更多相關資訊,請開啟 Windows Media Player 說明,
然後搜尋 「轉碼器」。
1 按一下 [ 開始 ] 按鈕。
2 在 [ 開始搜尋 ] 方塊輸入
[ 裝置管理員 ] 以開啟 [ 裝置管理員 ] 視窗。
3 按一下 [ 音效,視訊及遊戲控制器 ] 旁的加號 (+)。
4 在 [ 電視調諧器 ] 上按一下滑鼠右鍵 (僅限部分型
號),然後按一下 [ 更新驅動程式軟體 ]。
5 選取 [ 自動搜尋更新的驅動程式軟體 ]。
裝置管理員,然後按一下
6 請依照指示更新驅動程式。
7 如果系統出現提示,請重新開機。
疑難排解與維護 35
Page 40

硬體安裝
徵兆 可能的解決方法
系統無法辨識新增的
裝置。
安裝裝置隨附的驅動程式,或從該裝置的製造商網站下載
並安裝驅動程式。
您可能需要適用於 Windows 的更新版驅動程式。請直接洽
詢裝置經銷商,取得更新版驅動程式。
如果是 HP 的週邊設備,則請前往 HP 的網站:
http://www.hp.com/support
請確定已正確並穩固地連接所有連接線,且連接線或接頭
上的針腳沒有彎曲。
請關閉電腦、開啟外接裝置的電源,然後開啟電腦以整合
該裝置與電腦。
請在作業系統中停用新裝置的自動設定,並且選擇不會造
成資源衝突的基本配置。
您也可以重新設定或停用裝置,以解決資源衝突的問題。
新裝置無法運作。 若要安裝或解除安裝裝置驅動程式,您必須以有管理權限
的使用者登入。如果您必須切換使用者,按一下 [ 開始 ] 按
鈕、[ 關機 ] 旁的箭號按鈕,然後按一下 [ 切換使用者 ]。選
擇有管理權限的使用者。
36 快速入門 (功能依型號而異)
Page 41

硬體安裝 (續上頁)
徵兆 可能的解決方法
安裝新的裝置後,
裝置無法運作。
若要解決裝置衝突,您可能需要停用其中一項裝置,或解
除安裝舊的裝置驅動程式:
1 按一下 [ 開始 ] 按鈕。
2 在 [ 開始搜尋 ] 方塊輸入
[ 裝置管理員 ] 以開啟 [ 裝置管理員 ] 視窗。
3 按一下問題裝置旁的加號 (+),檢查裝置圖示旁是否有
一個以黃色圓圈為底的驚嘆號。如果有驚嘆號,表示
發生裝置衝突或是該裝置發生問題。裝置無法正常運
作時,不一定會出現驚嘆號。
4 如果您已移除硬體裝置,但 [ 裝置管理員 ] 中仍列出該
裝置驅動程式,這可能會造成裝置衝突。若要解除安
裝舊的驅動程式,讓新的裝置驅動程式可正常運作,
請在該裝置上按一下滑鼠右鍵,按一下 [ 解除安裝 ],
接著按一下 [ 確定 ]。
5 在裝置名稱上按一下滑鼠右鍵,接著選取 [ 內容 ]。
6 按一下 [ 一般 ] 標籤,查看您的裝置是否已啟用且正常
運作。如果有 [ 疑難排解 ] 按鈕,請按一下此按鈕,然
後按照裝置疑難排解精靈中的螢幕指示進行操作。
7 重新開機。按一下 [ 開始 ] 按鈕,按一下 [ 關機 ] 旁的
箭號按鈕,然後按一下 [ 重新啟動 ]。
裝置管理員,然後按一下
疑難排解與維護 37
Page 42

效能
徵兆 可能的解決方法
電腦顯示的處理器速度
不如預期。
軟體程式和檔案開啟或
回應的時間比預估長。
處理器自動以省電狀態中執行時會產生這種情況,因為執行
應用程式並不需要最大的電力來進行處理。
請確認您的系統擁有已購買的處理器。若要進行確認,按
一下 [ 開始 ] 按鈕,在 [ 電腦 ] 上按一下滑鼠右鍵、按一下
[ 內容 ],然後在 [ 一般 ] 標籤下檢查安裝在您系統上的處
理器。
如果您在電腦上建立了多個使用者帳號,請確定其他使用者
沒有登入。如果有多個使用者同時登入,那麼必須在多個使
用者之間共用系統資源。
如需有關其他工作的資訊,請參閱第 42 頁的 〈維護作業〉。
讀卡機
徵兆 可能的解決方法
讀卡機無法讀取記
憶卡。
請勿在讀卡機燈號仍閃爍時插入或移除記憶卡。這麼做可能
會導致資料遺失或讀卡機永久損壞。
某些記憶卡有 「讀 / 寫」或 「安全」開關。嘗試寫入資料
到記憶卡前,請先確定開關設定為 「啟用寫入」。
確定儲存的資料量尚未超出記憶卡的儲存限制。
確定記憶卡屬於以下其中一種支援類型:
Memory Stick (MS)、Memory Stick Pro (MS Pro)、
MultiMediaCard (MMC)、Secure Digital (SD)、
Secure Digital High-Capacity (SDHC) 或 Extreme Digital (xD)。
使用轉接套件後,還可以支援其他的儲存媒體類型:
Mini Secure Digital (Mini SD)、Micro Secure Digital
(Micro SD)、Reduced-sized MultiMediaCard (RS-MMC)、
Memory Stick Duo (MS Duo) 或
Memory Stick Pro Duo (MS Pro Duo)。
38 快速入門 (功能依型號而異)
Page 43

讀卡機 (續上頁)
徵兆 可能的解決方法
讀卡機無法讀取記
憶卡。(續上頁)
確定記憶卡已完全插入插槽,而且 LED 亮起。
檢查記憶卡的各端,是否有灰塵或有東西蓋住接孔或金屬接
點是否損壞。使用不含絨毛的布,沾少許異丙醇酒精來清潔
接點。如有需要,請更換記憶卡。
軟體疑難排解
電腦在正常作業期間會使用作業系統及安裝的軟體程式。如果您的電腦運作不正常,或
因軟體的問題而停止運作,您可能可以進行修復。
有些軟體修復就和重新啟動電腦一樣容易,而其他修復則需要從硬碟上的檔案執行
「系統復原」。
軟體修復簡介
修復軟體的最有效方法就是重新啟動電腦,或是將電腦完全關機之後再重新開機。如果
此方法無效,則在軟體發生問題時,嘗試以下可用來修復電腦的方法:
更新驅動程式 (參閱下列各節,〈更新驅動程式〉)。
Microsoft 系統復原 (請參閱第 40 頁的 〈Microsoft 系統還原〉)— 將您的電腦
設定回復到尚未發生目前軟體問題時所使用的設定。
軟體程式與硬體驅動程式重新安裝 (請參閱第 41 頁的 〈重新安裝軟體程式與
硬體驅動程式〉)— 使用 [ 復原管理員 ] 程式重新安裝原廠軟體程式或硬體驅動
程式。
系統復原 (請參閱第 44 頁的 〈系統復原〉)— 完全清除及重新格式化硬碟,同
時刪除您建立的所有資料檔案,然後重新安裝作業系統、程式與驅動程式。
更新驅動程式
驅動程式為可讓您的電腦與附接裝置 (例如:印表機、硬碟、滑鼠或鍵盤)進行通訊
的一種軟體程式。
請完成下列程序更新驅動程式;或者,若新的驅動程式無法解決您的問題,請回復舊
版的驅動程式。
1 按一下 [ 開始 ] 按鈕。
2 在 [ 開始搜尋 ] 方塊輸入
管理員 ] 視窗。
3 按一下加號 (+) 展開您要更新或回復的裝置類型。(例如,DVD/CD-ROM 光
碟機)。
裝置管理員,然後按一下 [ 裝置管理員 ] 以開啟 [ 裝置
疑難排解與維護 39
Page 44

4 連按兩下特定的項目 (例如:HP DVD Writer 640b)。
5 按一下 [ 驅動程式 ] 標籤。
6 若要更新驅動程式,請按一下 [ 更新驅動程式 ] 並按照螢幕上指示進行操作。
或
若要回復到較早的驅動程式版本,請按一下 [ 回復驅動程式 ] 並按照螢幕上指示進
行操作。
Microsoft 系統還原
Microsoft Windows 7 包含的功能可讓您將電腦設定回復到尚未發生目前軟體問題時所
使用的設定。這種功能是藉由建立可記錄特定時間及日期的電腦設定的 「還原點」所
達成。
安裝新的程式時,作業系統會在新增軟體前,自動建立還原點。您也可以手動設定還
原點。
如果遇到可能和電腦軟體有關的問題,請使用 「系統還原」將電腦還原到先前的還
原點。
注意事項:在您使用 「系統復原」程式前,請務必使用此 「系統還原」程序。
若要啟動系統還原:
1 關閉所有開啟的程式。
2 按一下 [ 開始 ] 按鈕,在 [ 電腦 ] 上按一下滑鼠右鍵,然後按一下 [ 內容 ]。
3 選擇 [ 系統保護 ]、[ 系統還原 ],然後按一下 [ 下一步 ]。
4 按照螢幕上的指示進行操作。
若要手動新增還原點:
1 關閉所有開啟的程式。
2 按一下 [ 開始 ] 按鈕,在 [ 電腦 ] 上按一下滑鼠右鍵,然後按一下 [ 內容 ]。
3 按一下 [ 系統保護 ]。
4 在 [ 保護設定 ] 下,選取您想為其建立還原點的磁碟。
5 按一下 [ 建立 ]。
6 按照螢幕上的指示進行操作。
如需關於軟體還原點的更多資訊:
1 按一下 [ 開始 ] 按鈕,然後按一下 [ 說明及支援 ]。
2 在 [ 搜尋說明 ] 方塊中輸入系統還原,然後按一下 Enter 鍵。
40 快速入門 (功能依型號而異)
Page 45

重新安裝軟體程式與硬體驅動程式
如果某個原廠安裝的軟體程式或硬體驅動程式損毀,您可以使用 「復原管理員」程式
來重新安裝程式 (僅限部分型號)。
注意事項:請勿使用 「復原管理員」程式重新安裝電腦包裝箱中隨附之 CD 或 DVD
上的軟體程式。請直接從 CD 或 DVD 上重新安裝這些程式。
解除安裝某一程式前,請確定您知道如何重新安裝該程式。確認該程式仍可從您原本進
行安裝的位置 (例如:光碟或網際網路)取得。或者確認該程式位於可由 「復原管理
員」重新安裝的程式清單中。
若要確認 「復原管理員」中可安裝程式的清單:
1 按一下 [ 開始 ] 按鈕、[ 所有程式 ]、[ 復原管理員 ],然後按一下 [ 復原管理員 ]。
若系統提示,請按一下 [ 是 ] 允許程式繼續執行。
2 在 [ 我現在就需要協助 ] 下方,按一下 [ 軟體程式重新安裝 ]。
3 在歡迎畫面按 [ 下一步 ]。
接著會開啟程式清單。確定您的程式是否出現在清單中。
若要解除安裝程式:
1 關閉所有軟體程式及資料夾。
2 解除安裝毀損的程式:
a 按一下 [ 開始 ] 按鈕,然後按一下 [ 控制台 ]。
b 在 [ 程式 ] 下,按一下 [ 移除安裝程式 ]。
c 選取您想要移除的程式,然後按一下 [ 解除安裝 ]。
d 如果您想繼續解除安裝程序,請按一下 [ 是 ]。
若要使用 「復原管理員」重新安裝程式:
1 按一下 [
2 按一下 [ 軟體程式重新安裝 ]。
3 在歡迎畫面按 [ 下一步 ]。
4 選擇您要安裝的程式,按 [ 下一步 ],然後按照螢幕上的指示進行操作。
5 當您完成重新安裝後,請重新啟動電腦。
開始 ] 按鈕、[ 所有程式 ]、[ 復原管理員 ],然後按一下 [ 復原管理員 ]。
注意事項:請勿省略最後一個步驟。您必須在復原軟體程式或硬體驅動程式後重
新開機。
疑難排解與維護 41
Page 46

維護
本節提供相關作業的資訊,協助您確保電腦運作順暢,以及未來發生問題時您可輕鬆復
原電腦上的重要資訊。
維護作業
請務必執行簡易的電腦維護作業以確保電腦擁有最佳的效能。
每週
軟體清理 使用 「清理磁碟」 或安全的協力廠商清理工具,移除累積
在系統並使系統變慢的廢棄與暫存檔案。另外,請檢查並
解除安裝您不需要使用的程式。
磁碟重組 執行 「磁碟重組工具」程式可保持磁碟的良好狀態,並改
善系統效能。經常執行此作業不會損害您的系統。
病毒掃描 每週執行完整的病毒掃描可偵測任何趁隙進入系統的病毒。
大部分的防毒產品擁有排程的功能,可自動追蹤此情形。
每月
硬體清理 徹底清理電腦的內外。
軟體更新 使用 Windows Update 可修復作業系統的錯誤並改善效能。
另外,請確定檢查硬體是否有更新版驅動程式,以及您常
用的程式是否有可用的新版本。
硬碟診斷 在某些情況下,您可以事先避免磁碟損壞,這樣可減少未
來的突發意外。
每年
系統復原 電腦使用一段時間後,按照電腦的使用頻率,系統作業速
度仍然可能會變慢。請使用 「系統復原」清理 Windows
作業系統,將其復原到首次開啟系統的原始配置狀態。請
務必先行進行備份!請參閱第 44 頁的 〈系統復原〉獲得
更多的詳細資料,再執行復原作業。
42 快速入門 (功能依型號而異)
Page 47

製作資料備份光碟
使用您電腦上安裝的 CD 或 DVD 錄製 (或燒錄)軟體來製作重要資訊的備份光碟,其
中包括個人檔案、電子郵件訊息以及網站書籤。您也可以將資料移動到外接硬碟。
將資料寫入備份光碟時,請使用包含
資料與複製到光碟中的資料,以確保備份內容正確無誤。視您使用的光碟燒錄軟體而
定,您可能需要手動啟用此功能 (請參閱軟體說明文件)。
如果在燒錄時出現問題,請嘗試使用其他媒體 (不同類型或其他廠牌的媒體)。另
外,請使用 [Windows 檔案總管 ] 工具來檢視您的檔案,並確認已完成複製內容。若
要開啟 [Windows 檔案總管 ],請在 [ 開始 ] 按鈕上按一下滑鼠右鍵,然後按一下 [ 檔
案總管 ]。
寫入驗證功能的軟體。此功能可比較您硬碟中的
建立系統復原光碟
在您的電腦運作正常時,僅需執行一次此程序。如果您的電腦之後發生問題,您可以使
用您建立的系統復原光碟,將電腦還原到原廠設定。請參閱第 45 頁的 〈建立復原光
碟〉取得更多詳細資訊。
保持電腦遠離灰塵與高溫
保持電腦遠離灰塵與高溫,可延長電腦使用壽命。灰塵、動物毛髮和其他塵埃會不斷堆
積,因而產生毛毯效應,如此一來,電腦組件會過熱,以鍵盤和滑鼠為例,將無法順利
且有效率使用。請每個月檢查系統,查看是否明顯覆蓋灰塵和堆積物,並大約每三個月
清潔一次。
清潔電腦和顯示器
1 拔下電腦的電源線。
2 使用乾淨的乾布來擦除電腦和顯示器上的灰塵。
3 使用溫水沾溼的乾淨濕布來擦拭電腦外殼。
請勿用水清潔顯示器螢幕。
注意事項:如果電腦外殼上有撕除貼紙痕跡或濺到液體,請使用異丙醇或外用酒
精和不含絨毛的布擦拭。
4 使用乾淨的布擦乾電腦外殼。
5 使用乾淨的乾布清潔顯示器,或者使用防靜電螢幕清潔劑和乾淨的布來加強清潔。
疑難排解與維護 43
Page 48

清潔電腦通風孔
通風孔可以冷卻電腦和顯示器的溫度。若要維持通風孔的效用,請使用電池式小型吸塵
器來清潔通風孔。(電池式吸塵器可減少觸電的危險性。)
1 使用吸塵器清潔電腦外殼的通風孔。
2 吸除任何堆積在電腦連接埠 (例如:乙太網路與 USB 連接埠)周圍的堆積物。
清潔鍵盤和滑鼠
清潔鍵盤時,請使用低速的電池式吸塵器,以防按鍵上蓋與彈簧脫落。
1 沿著鍵盤按鍵間的溝槽吸除灰塵。
2 使用乾淨的乾布和異丙醇酒精來清潔鍵盤按鍵上以及按鍵邊緣的堆積物。
3 使用清潔抹布或布與清潔劑來擦拭滑鼠與滑鼠連接線。
如果您使用的是滾球式滑鼠,請清潔滾球和滾輪內部:
1 將滑鼠的底部朝上。
2 以逆時針方向旋轉滾球蓋以取下外蓋和滾球。
3 使用肥皂溫水沖洗滾球。
4 使用沾異丙酮酒精的棉花棒清潔滑鼠內的滾輪。
5 滾球與滾輪完全乾燥後,裝回滾球與滾球外蓋。
系統復原
系統復原會完全清除並重新格式化硬碟,並同時刪除您建立的所有資料檔案。系統復原
會重新安裝作業系統、程式與驅動程式。不過,您必須重新安裝所有非原廠安裝的軟
體。這包含了電腦配件箱中 CD 隨附的軟體,以及在您購買電腦後所安裝的軟體程式。
您必須選擇下列其中一個方法來執行系統復原:
復原映像 - 從儲存在您硬碟的復原映像執行系統復原。復原映像是包含原廠隨
附軟體備份的檔案。若要從復原映像執行系統復原,請參閱第 46 頁的 〈從
Windows 7 [ 開始 ] 功能表啟動系統復原〉。
注意事項:復原映像會佔據部分硬碟空間而且無法儲存資料。
復原光碟 - 從一組復原光碟執行系統復原,這些光碟是您從硬碟中所儲存檔案所
建立的光碟。若要建立復原光碟,請參閱下節。
44 快速入門 (功能依型號而異)
Page 49

建立復原光碟
完成本節所述的程序,可從儲存在硬碟的復原映像建立復原光碟組。此映像包含您電腦
原廠安裝的作業系統和軟體程式檔案。
您只能為電腦建立一組復原光碟。再者,您建立的復原光碟僅能用於您的電腦。
選擇復原光碟
若要建立復原光碟,您的電腦必須具備 DVD 燒錄機。
請使用空白 DVD+R 或 DVD-R 媒體來建立您的系統復原光碟。
您無法使用 CD 或 DVD+RW、DVD-RW、DVD+RW DL、DVD-RW DL、DVD+R DL
或 DVD-R DL 光碟來建立復原光碟。
請使用高品質光碟建立復原光碟組。復原光碟建立程序的驗證標準非常高。您可能會看
到錯誤訊息,例如
如果您的光碟有問題,則會退出該光碟。系統會提示您插入新的空白光碟,重新再試一
次。可能會退出某些光碟,這個情況是正常的。
復原光碟組的光碟數量需視您電腦的型號而定 (通常為 1 至 3 片 DVD)。「恢復碟片
建立程式」會說明您需要使用空白光碟片的數量。
此程序需要一些時間來確認寫入到光碟的資訊是否正確。您可隨時離開這項處理作業。
當您下次再執行此程式時,它會從您上次結束的地方重新繼續。
「燒錄光碟時發生錯誤」或 「檢查光碟時偵測到錯誤」。
若要建立復原光碟:
1 關閉所有開啟的程式。
2 按一下 [ 開始 ] 按鈕,再按 [ 所有程式 ]、[ 復原管理員 ],然後按一下 [ 回復光碟
建立 ]。若系統提示,請按一下 [ 是 ] 允許程式繼續執行。
3 按照螢幕上的指示進行操作。請依照您製作的順序標示每片光碟 (例如:
Recovery 1、Recovery 2)。
4 將復原光碟置於安全的地方。
系統復原選項
您應該按照以下順序嘗試執行系統復原:
1 透過硬碟,從 Windows 7 [ 開始 ] 功能表執行。
2 透過硬碟,在啟動系統時按下鍵盤的 F11 鍵執行。
3 透過您建立的復原光碟。
4 透過從 HP 支援中心購買的復原光碟。若要購買復原光碟,請至
http://www.hp.com/support 進入您電腦型號的 「軟體及驅動程式下載」
頁面。
疑難排解與維護 45
Page 50

從 Windows 7 [ 開始 ] 功能表啟動系統復原
如果電腦正常運作中且 Windows 7 正常回應,請使用這些步驟來執行系統復原。
注意事項:系統復原會刪除您在購買電腦後所建立或安裝的所有資料和程式。因此,
請確定您已將所有要保留的資料備份到卸除式磁碟。
1 關閉電腦。
2 中斷電腦與所有週邊裝置的連接 (鍵盤和滑鼠除外)。
3 啟動電腦。
4 按一下 [ 開始 ] 按鈕,按一下 [ 所有程式 ],按一下 [ 復原管理員 ],然後按一下
[ 復原管理員 ]。若系統提示,請按一下 [ 是 ] 允許程式繼續執行。
5 在 [ 我現在就需要協助 ] 下方,按一下 [ 系統復原 ]。
6 選取 [ 是 ],然後按一下 [ 下一步 ]。
接著,您的電腦會重新啟動。
注意事項:如果您的系統並未偵測到復原磁碟分割,系統會提示您插入復原光
碟。請插入光碟並前往第 47 頁的 〈從使用者建立的復原光碟啟動系統復原〉一
節中的步驟 7。
7 在 [ 我現在就需要協助 ] 下方,按一下 [ 系統復原 ]。
8 如果系統提示您備份檔案且您還沒有備份檔案,請選取 [ 首先備份您的檔案 (建
議的動作) ],然後按一下 [ 下一步 ]。否則,請選取 [ 恢復但不備份您的檔案 ] 按
鈕,然後按一下 [ 下一步 ]。
接著開始進行系統復原。完成系統復原後,請按一下 [ 結束 ]
9 完成註冊程序,然後等到桌面出現為止。
10 關閉電腦、重新連接所有週邊設備,然後再重新啟動電腦。
11 執行第 48 頁的 〈執行復原後程序〉的程序。
以重新開機。
系統啟動時執行系統復原
如果 Windows 7 沒有回應,但電腦正常運作中,請使用這些步驟來執行系統復原:
注意事項:系統復原會刪除您在購買電腦後所建立或安裝的所有資料和程式。因此,
請確定您已將所有要保留的資料備份到卸除式磁碟。
1 關閉電腦。如有需要,請按住電源按鈕直到電腦關閉為止。
2 中斷電腦與所有週邊裝置的連接 (鍵盤和滑鼠除外)。
3 按一下電源按鈕啟動電腦。
46 快速入門 (功能依型號而異)
Page 51
4 當您看見初始公司標誌畫面時,請重複按鍵盤上的 F11 鍵,直到畫面上出現
「Windows 正在載入檔案 ...」訊息。
5 在 [ 我現在就需要協助 ] 下方,按一下 [ 系統復原 ]。
6 如果系統提示您備份檔案且您還沒有備份檔案,請選取 [ 首先備份您的檔案 (建
議的動作) ],然後按一下 [ 下一步 ]。否則,請選取 [ 恢復但不備份您的檔案 ] 按
鈕,然後按一下 [ 下一步 ]。
接著開始進行系統復原。完成系統復原後,請按一下 [ 結束 ] 以重新開機。
7 完成註冊程序,然後等到出現桌面為止。
8 關閉電腦、重新連接所有週邊設備,然後再重新啟動電腦。
9 執行第 48 頁的 〈執行復原後程序〉的程序。
從使用者建立的復原光碟啟動系統復原
本節包含使用您按照第 45 頁的 〈建立復原光碟〉說明所建立的復原光碟,來執行系
統復原的程序。
注意事項:系統復原會刪除您在購買電腦後所建立或安裝的所有資料和程式。因此,
請確定您已將所有要保留的資料備份到卸除式磁碟。
若要使用復原光碟執行系統復原程式:
1 如果電腦正常運作中,請建立備份 DVD,包含所有您要儲存的資料檔案。完成備
份後,請從光碟機托槽取出備份光碟。
警告事項:將會刪除硬碟上的所有資料。如果您沒有備份,將會遺失資料。
2 將復原光碟 #1 插入 DVD 光碟機托槽,然後關閉托槽。
3 如果電腦正運作中,請按一下 [ 開始 ] 按鈕、[ 關機 ] 旁的箭號按鈕,然後按一下
[ 關機 ]。
或
如果電腦沒有回應,請按住電源按鈕約 5 秒鐘或者直到電腦關機為止。
4 中斷電腦與所有週邊裝置的連接 (鍵盤和滑鼠除外)。
5 按一下電源按鈕啟動電腦。
如果系統提示您選擇從光碟或硬碟執行 「系統復原」,請選取 [ 從光碟執行程
式 ],然後按一下 [ 下一步 ]。
6 在 [ 我現在就需要協助 ] 下方,按一下 [ 原廠重設 ]。
7 如果系統提示您備份檔案且您還沒有備份檔案,請選取 [ 首先備份您的檔案 (建
議的動作) ],然後按一下 [ 下一步 ]。否則,請選取 [ 恢復但不備份您的檔案 ] 按
鈕,然後按一下 [ 下一步 ]。
8 如果電腦提示您插入下一片回復光碟,請遵照指示進行。
疑難排解與維護 47
Page 52

9 結束 「復原管理員」後,請從系統取出所有回復光碟。
10 按一下 [ 結束 ] 重新開機。
11 重新啟動電腦之後,請參閱第 3 頁的 〈安裝電腦〉。
執行復原後程序
1 在 [ 歡迎使用 Microsoft Windows] 畫面,依照螢幕上之設定指示進行操作。
2 請按照第 4 頁的 〈首次啟動電腦〉的指示進行操作。
其他疑難排解
如需其他疑難排解解決方案,請參閱下列各項:
HP Support Assistant (HP 支援助理)
HP 支援助理可協助您維護電腦效能,並可透過自動化更新、機上診斷與引導式協助,
更快解決問題。
若要開啟 HP 支援助理,按一下 [ 開始 ] 按鈕、[ 所有程式 ]、[HP],然後再按一下
[HP 支援助理 ]。
Windows 7 Troubleshooting Tools (Windows 7 疑難排解工具)
Windows 7 所提供的疑難排解工具可自動排解疑難並進行修復。若要存取 Windows 7
Troubleshooting Tools (Windows 7 疑難排解工具):
1 按一下 [ 開始 ] 按鈕,然後按一下 [ 控制台 ]。
2 按一下 [ 系統及安全性 ]。
3 在 [ 行動作業中心 ] 下方,按一下 [ 檢視電腦的狀態和解決問題 ]。
48 快速入門 (功能依型號而異)
Page 53

索引
C
CD/DVD 光碟機
安裝疑難排解 33–34
使用 19
CyberLink DVD Suite
功能 21
H
HP Advisor 21, 24
L
LAN (區域網路)
設定 8
連接
有線網路 8
無線網路 8
檢查無線區域網路裝置 10
M
MediaSmart 20
W
WEP 10
Windows Vista 更新 12
WLAN 安全性 10
WPA 10
一畫
乙太網路連線 8
四畫
支援網站 23
六畫
休眠模式 4
安全與舒適指南 24
安全警告 3
安裝電腦 3
有線網路連線 8
耳機
連接 6
七畫
更新
Windows Vista 12
系統 12
驅動程式 39
系統復原 44
系統還原 , Microsoft 40
系統復原光碟 , 製作 43, 44
防毒 , 安裝程式 13
九畫
按鈕
退出 , CD/DVD 磁碟機 19
關閉 , 請參閱關閉電腦 4
重新安裝軟體程式 41
重新啟動電腦 5
重複使力傷害 (RSI),請參閱
《安全與舒適指南》
音量 , 調整 7
十畫
修復軟體 39
效能
疑難排解 38
迷你光碟 19
退出 CD/DVD 19
十一畫
密碼 11
旋轉電腦 15
清潔 43
軟體
重新安裝 41
修復 39
軟體程式
CyberLink DVD Suite 21
HP Advisor 21
連接
有線網路 8
耳機 6
索引 49
Page 54

麥克風 6
喇叭 6
無線網路 8
麥克風
在 Windows 中選擇 7
連接 6
調整錄製音量 7
十二畫
備份 43
喇叭
連接 6
調整音量 7
復原管理員 41
無線
同步化無線鍵盤和滑鼠 29
無線區域網路連線 8
網路安全性 10
網路裝置 , 檢查安裝 10, 32
無線區域網路 8
硬體
安裝疑難排解 36–37
腕道症候群 24
舒適地操作 24
視訊
疑難排解 35
視訊聊天 16
鍵盤和滑鼠
有線 27–28
無線 29–30
讀卡機 38
顯示器 27
睡眠模式 4
網路介面配接卡 (NIC) 8
網路攝影機 16
網際網路
疑難排解 32
網際網路安全性 12
維護作業 42
說明及支援 23
十五畫
數位相片 17
十六畫
螢幕亮度 19
錄製音量 , 調整 7
十七畫
避雷保護裝置 4
還原電腦設定 40
鍵盤和滑鼠
疑難排解
有線 27–28
無線 29–30
十三畫
傾斜螢幕 15
電腦
清潔 43
設定 3
電腦開機 4
說明和工具 23
轉移檔案 14
電腦關機 4
十四畫
疑難排解
CD/DVD 光碟機 33–34
音訊 31
喇叭 31
硬體安裝 36–37
視訊 35
開機 26
電源 27
電腦效能 38
網際網路 32
十八畫
轉移資訊到您的新電腦 14
鎖定 , 電腦 26
鎖定電腦 4
十九畫
關閉電腦 4
二十一畫
驅動程式 , 更新 39
二十二畫
讀卡機
位置 1
使用 17
疑難排解 38
讀卡機 , 記憶體 17
二十三畫
顯示器
疑難排解 27
50 快速入門 (功能依型號而異)
Page 55

Page 56

Page 57

HP Pavilion All-in-One PC
Getting Started
Page 58

The only warranties for Hewlett-Packard products and services are set forth in the
express statements accompanying such products and services. Nothing herein
should be construed as constituting an additional warranty. HP shall not be liable
for technical or editorial errors or omissions contained herein.
HP assumes no responsibility for the use or reliability of its software on equipment
that is not furnished by HP.
This document contains proprietary information that is protected by copyright. No
part of this document may be photocopied, reproduced, or translated to another
language without the prior written consent of HP.
Hewlett-Packard Company
P.O. Box 4010
Cupertino, CA 95015-4010
USA
© Copyright 2009 Hewlett-Packard Development Company, L.P.
This product incorporates copyright protection technology that is protected by U.S.
patents and other intellectual property rights. Use of this copyright protection
technology must be authorized by Macrovision, and is intended for home and other
limited viewing uses only unless otherwise authorized by Macrovision. Reverse
engineering or disassembly is prohibited.
Microsoft, the Windows logo, and Windows are trademarks or registered
trademarks of the Microsoft group of companies in the United States and/or other
countries/regions.
HP supports lawful use of technology and does not endorse or encourage the use of
our products for purposes other than those permitted by copyright law.
The information in this document is subject to change without notice.
Page 59

Table of Contents
HP Pavilion All-in-One PC Setup.................................................................. 1
Computer Overview................................................................................................... 1
Setting Up Your Computer .......................................................................................... 3
Turning On Your Computer for the First Time................................................................. 4
Special Features of Your Computer ............................................................ 15
Adjusting the Tilt and Swivel ..................................................................................... 15
Webcam ................................................................................................................ 16
Using the Memory Card Reader ................................................................................ 17
Using a Vertical CD/DVD Drive................................................................................. 19
Adjusting the Screen Brightness ................................................................................. 19
Using Software........................................................................................................ 20
Getting More Information ......................................................................... 23
Using the Onscreen Help and Support Center ............................................................. 23
Accessing Support on the Web ................................................................................. 23
Finding Additional Guides on the Web ...................................................................... 23
Using the PC Help & Tools Folder .............................................................................. 23
Using HP Advisor Software ....................................................................................... 24
Using the Computer with Safety and Comfort .............................................................. 24
Upgrading and Servicing Your PC ............................................................................. 24
Troubleshooting and Maintenance............................................................. 25
Troubleshooting Computer Problems........................................................................... 25
Software Troubleshooting ......................................................................................... 39
Maintenance........................................................................................................... 42
System Recovery...................................................................................................... 44
Additional Troubleshooting ....................................................................................... 48
Index........................................................................................................ 49
Table of Conte nts iii
Page 60

iv Getting Started (features vary by model)
Page 61
HP Pavilion All-in-One PC Setup
Computer Overview
The HP Pavilion All-in-One PC
The HP Pavilion All-in-One is a sleek, stylish computer with a built-in 47-cm (18.5-in) diagonal
widescreen display. This stylish All-in-One computer comes with features like webcam, CD/
DVD player and burner, USB ports, media card reader, wireless 802.11b/g networking, and
built-in speakers.
HP Pavilion All-in-One features
Features and configurations vary by model. Your computer may not exactly match the
illustrations and descriptions in this guide.
A
B
C
Item Description
A Memory card reader
Built-in memory card reader to read a memory card.
Supported formats include: Extreme Digital (xD), Secure
Digital (SD), Secure Digital High-Capacity (SDHC),
MultiMediaCard (MMC), Memory Stick (MS), and
Memory Stick Pro (MS Pro) memory cards.
Additional media cards can be supported by using an
adapter sleeve
RS-MMC, Micro SD, MS-Duo, and MS Pro Duo.
D
E
F
G
H
I
(purchased separately): Mini SD,
HP Pavilion All-in-One PC Setup 1
Page 62
Item Description (continued)
S
R
Q
P
O
N
M
L
K
J
T
B Audio line out
C Memory card reader LED
D USB 2.0 (2 ports)
E USB 2.0 (4 ports)
F Microphone jack
G Headphones jack
H Ethernet (Local Area
Network [LAN]) port
I Power connector
Connect external 2.0 and 2.1 powered speakers.
Indicates card reader activity.
Connect USB devices (USB 2.0) such as printers, external
hard disk drives, digital cameras, and MP3 players.
Connect USB devices (USB 2.0) such as printers, external
hard disk drives, digital cameras, and MP3 players.
Connect an external microphone to the port.
Listen to music without disturbing anyone, by connecting
your headphones to the port.
Connect to the Internet through your wired network.
Plug the power adapter into your computer.
Item Description (continued)
J Webc am
2 Getting Started (features vary by model)
Create videos and snapshots that you can view, send by
e-mail, and upload to video sharing sites. Use the built-in
webcam and microphone for video chats (Internet access
required).
Page 63
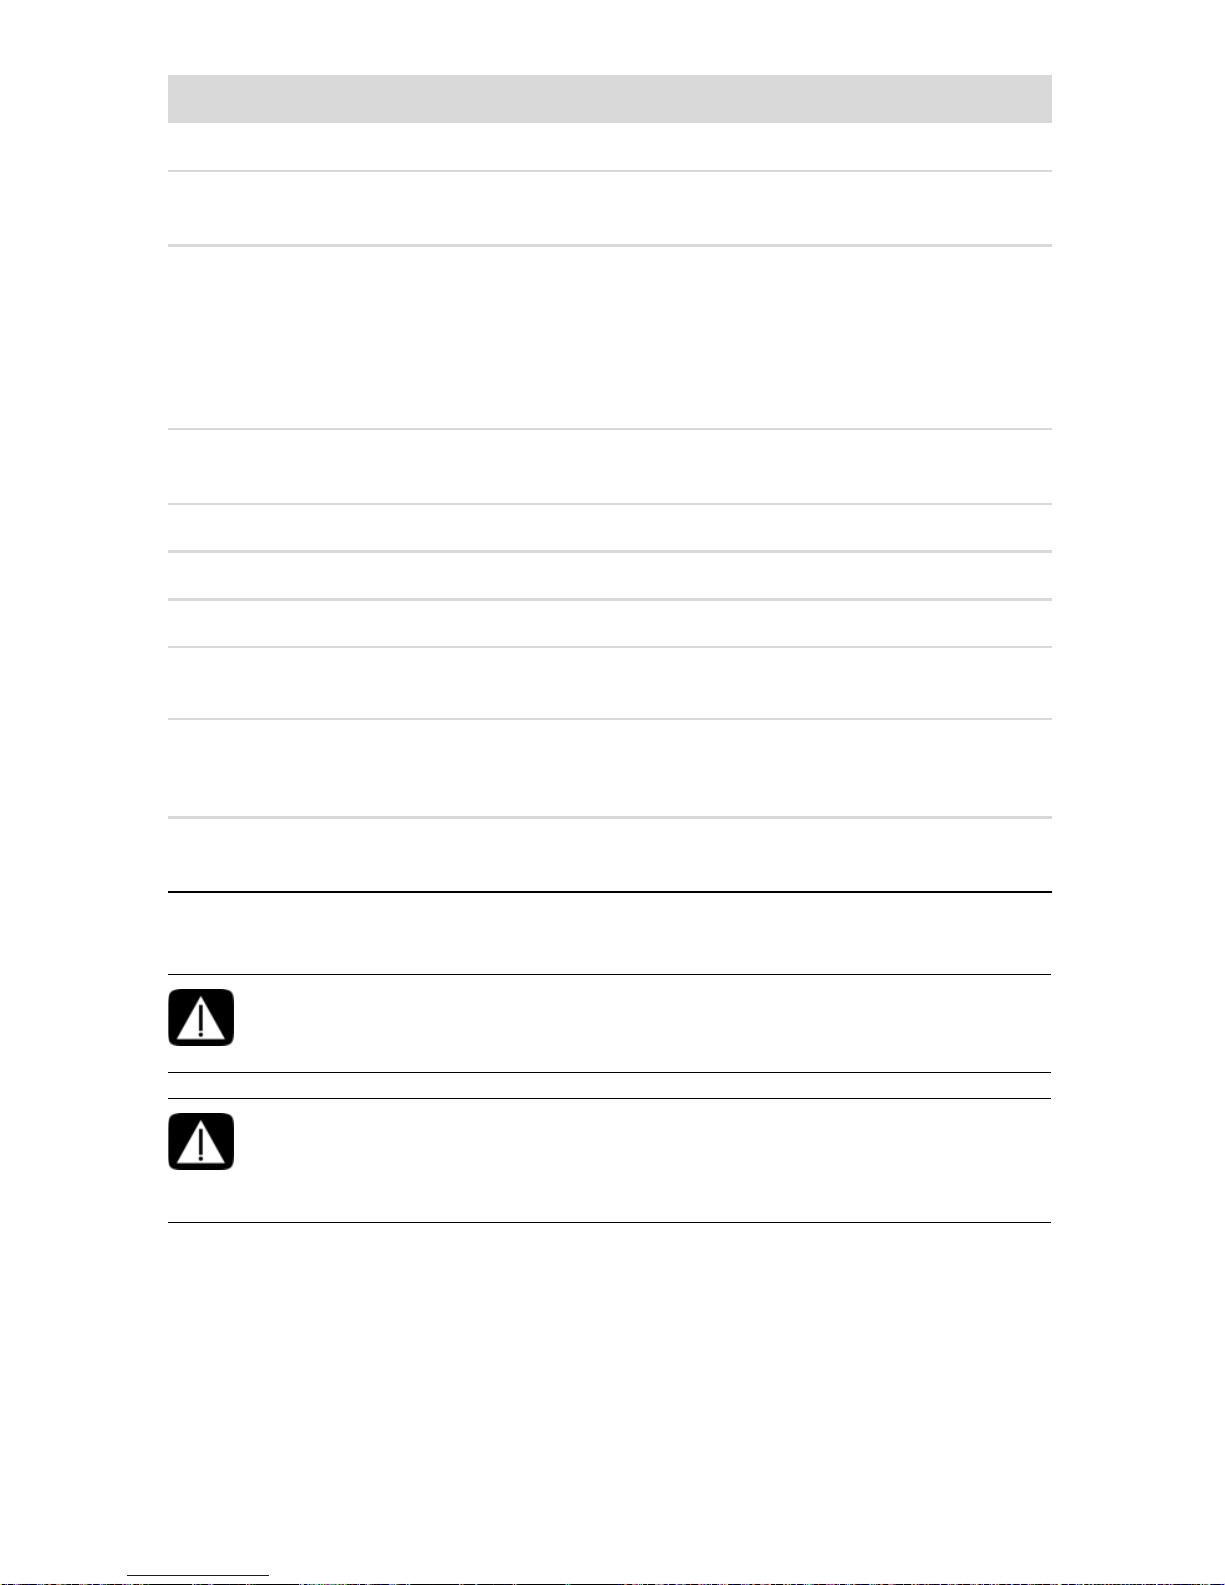
Item Description (continued)
K Built-in microphone
L Optical disc
emergency eject
M Optical disc drive
and LED
N Optical disc Eject
button
O Brightness up
P Brightness down
Q Hard disk drive LED
R Power status LED
Record sound for webcam videos and for video chats online.
Insert a small pin to eject a disc when the optical disc Eject
button does not work.
Watch your favorite DVDs, or listen to your CD collection.
Burn CDs and DVDs*. The LED indicates whether there is a
disc in the drive.
*Hewlett-Packard supports the lawful use of technology and
does not endorse or encourage the use of our products for
purposes other than those permitted by copyright law.
Press this button to open the optical disc drive to insert or
remove a disc.
Press this button for a brighter screen display.
Press this button to dim the screen display.
Indicates hard disk drive activity.
Indicator light is blue when computer is on; the light is off
when computer is in sleep or hibernate mode.
S Built-in speakers
T Power/Standby
button
Use the built-in stereo speakers for a powerful media
experience when listening to music, or when watching your
home videos and DVDs.
Press the button to turn on your computer or put it in
Sleep mode.
Setting Up Your Computer
WARNING: Please read “Safety Information” in the Limited Warranty
and Support Guide before installing and connecting the computer to the
electrical power system.
WARNING: To reduce the risk of serious injury, read the Safety & Comfort
Guide. It describes proper workstation setup, posture, and health and
work habits for computer users. It also provides important electrical and
mechanical safety information.
Follow the steps on the setup poster to set up the computer. See “Turning On Your Computer
for the First Time” on page 4.
HP Pavilion All-in-One PC Setup 3
Page 64

Checking the computer installation
Place the computer in the proper location so that:
All ventilation openings are unobstructed.
All cabling is out of the way. Do not place any cable in a walkway or where it can be
stepped on or damaged from placing heavy objects on it.
Protect the computer and connected accessories by connecting all power cords to a power
surge protection device. Use a power strip specifically labeled as having surge protection, an
uninterruptible power supply (UPS), or similar device.
Look in the computer box for printed details or updates regarding the computer.
Turning On Your Computer for the First Time
After you have completed the steps on the setup poster, you are ready to turn on the
computer.
NOTE: Do not connect or add other devices to the computer until after you turn on the
computer for the first time and complete the initial setup.
To turn on the computer:
1 Press the Power button.
2 Turn on the external speakers, if they are present.
3 Set up the computer and Microsoft
instructions:
If prompted, select the country/region in which you are physically located, and
wait while the computer makes preparations. (When you select an alternate
language, it may take up to 30 minutes for this one-time language setup on the
computer.)
Follow the onscreen instructions to register, sign up for updates, and get online.
The antivirus software may automatically open. Follow the onscreen instructions to
set up this tool, which protects the computer and your privacy.
4 When you see the Windows desktop, the initial setup is complete.
For help with getting started using your computer, see the remaining topics in this section.
®
Windows®7 by following the onscreen
Turning off the computer
You will need to turn off the computer for safety reasons: to make repairs, to install new
hardware or cards in the computer. If the computer will not be used for extended periods of
time, you may want to turn it off.
As an alternative to shutting down the computer, you can lock it or put it into either Sleep or
Hibernate mode, if it is available. You can set the power management timers to put the
computer automatically into Sleep or Hibernate mode.
4 Getting Started (features vary by model)
Page 65

The computer has these reduced power states:
Sleep mode saves your open documents and programs, and places your computer into
a reduced-power state. During Sleep mode, the power status LED turns off, and the
computer is ready to wake quickly.
Hibernate mode (available as an advanced power setting) saves the system memory
to a temporary file on the hard disk and then turns off the hardware. When you turn on
the computer again, the programs, folders, and documents that you had open are
restored to the screen.
Restarting the computer
When you restart the computer, the computer clears some settings and starts over using the
operating system and software in its memory. Restarting is the easiest and most effective way
to solve many software issues for the computer.
Also, you may want to install additional software programs or hardware devices onto the
computer, and doing so may require that you restart the computer after installation.
To restart the computer:
1 Click the Windows Start button
2 Click the Arrow button next to Shut Down
Or
Quickly press the On button on the front of the computer.
®
.
, and then click Restart.
Sound options
Your computer supports the following sound options:
Built-in analog stereo speakers
Analog 2.0 or 2.1 powered speakers
Headphones
NOTES:
Your computer supports powered speaker systems only. Powered speakers require a
separate power supply.
By default, the internal speakers are on.
HP Pavilion All-in-One PC Setup 5
Page 66
Connecting analog speakers
(Sold separately)
To connect active external speakers, such as left/right stereo speakers or a 2.1 system of two
speakers and a subwoofer, to the computer:
1 Make sure the speaker system is turned off and unplugged.
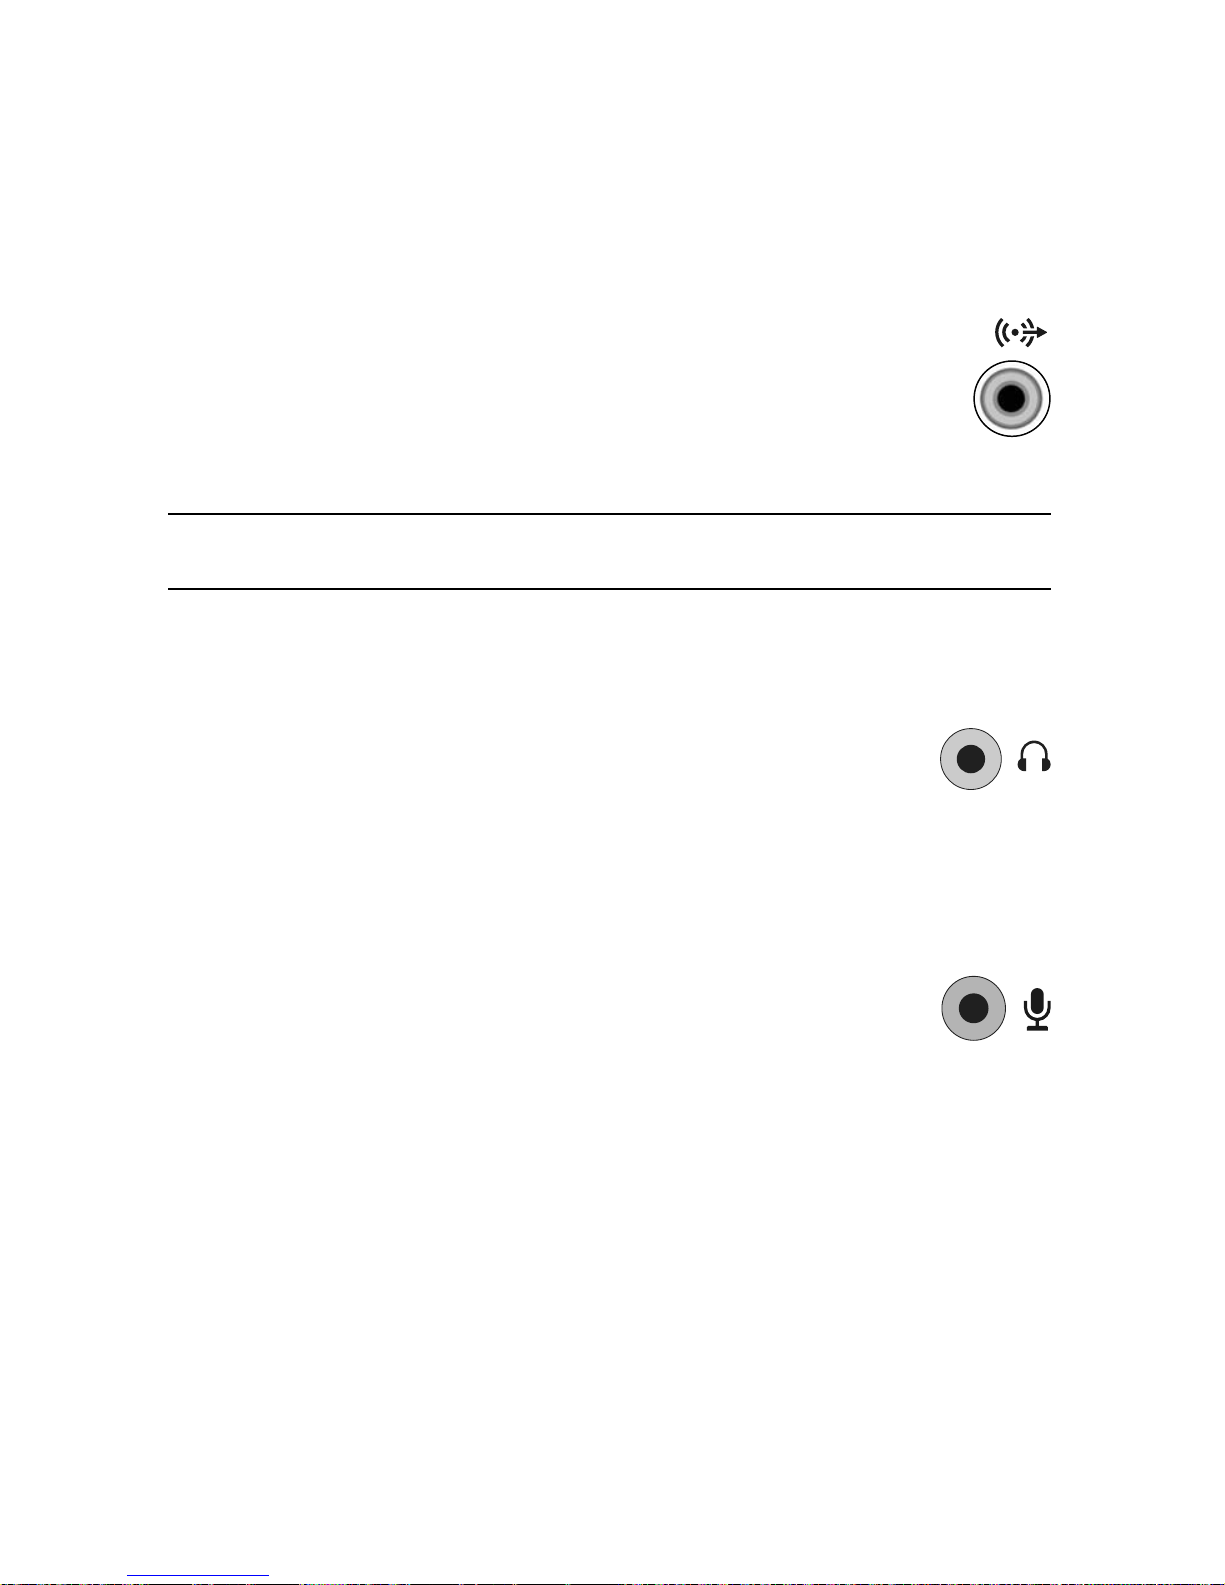
2 For 2.0 powered speakers, connect the speaker cable to the Audio Line Out connector
on the back of the computer.
Or
For 2.1 powered speakers, connect the Audio Line Out connector on the back
of the computer to the subwoofer, and then connect the left and right speakers
to the subwoofer.
3 Turn on the speaker system. If necessary, refer to the documentation that came
with your speakers.
NOTE: When an Audio Line Out or headphone device is connected, the internal speakers
are muted.
Connecting headphones
(Sold separately)
Your computer comes with a headphones connector on the side of the computer.
The headphones connector is labeled with a headphones icon.
When headphones are plugged in, the sound to the internal speakers and
the external speakers (if attached) is muted.
Connecting a microphone
(Sold separately)
Your computer comes with a built-in microphone, next to the webcam on the front of the
computer.
There is also a microphone connector on the side of the computer.
Connect an external microphone to the microphone connector on the
computer.
To select the microphone or adjust the volume, see “Selecting the microphone” on
page 7.
6 Getting Started (features vary by model)
Page 67

Adjusting the speaker volume
There are several ways to adjust volume. Use the Volume icon on the Windows 7 taskbar to
set speaker volume. Then, you can adjust the volume by using:
The Volume buttons on the keyboard (select models only).
The Volume knob on the speakers (select models only).
To set speaker volume, use the Volume icon on the taskbar:
1 Right-click the Volume icon on the taskbar, and then click Open Volume
Mixer.
The Volume Mixer settings window opens.
2 Adjust the volume by clicking the slider bar and moving it.
3 When you are satisfied with the sound level, close the window by clicking the X in the
upper-right corner.
For help with audio, check the troubleshooting items in “Audio and speakers” on page 31.
For more information, open the Help and Support Center or refer to the Support Web site;
see “Getting More Information” on page 23.
Selecting the microphone
The microphone on your computer is ready to use. If you have more than one microphone
connected, select the microphone that you would like to use in Windows 7.
NOTE: When you have a webcam or an audio player connected to the computer, because
of the audio input from the device, Windows 7 may recognize each as a microphone input.
To select the microphone that you would like to use in Windows 7:
1 Right-click the Volume icon on the taskbar, and then click Recording
Devices. The Sound window opens.
2 Select the Microphone that you want to use, click Set Default, and then
click Apply.
3 Click OK.
Adjusting microphone recording level in Windows 7
To adjust the recording level of the microphone:
1 Right-click the Volume icon on the taskbar, and then click Recording
Devices. The Sound window opens.
2 Double-click the microphone connector that you want to use.
3 Click the Levels tab.
4 Adjust the recording level for the microphone by clicking the slider bar and moving it.
Click OK, and then click OK again.
HP Pavilion All-in-One PC Setup 7
Page 68
Connecting to a network
This section describes connecting to the Internet through a wired or wireless connection.
Your computer supports a wireless or wired LAN that connects to other devices, such as
a printer.
The network connection to the Internet is usually through a broadband modem (digital
subscriber line [DSL] or cable), which requires a separate subscription.
Wireless access point and Internet service are required and are not included. First-time
wireless network installation requires that you:
1 Purchase high-speed Internet service from an Internet service provider (ISP).
2 Purchase a broadband modem (DSL or cable). This may be provided by the ISP.
3 Purchase and install a wireless router (sold separately), if one is required.
Setting up a wired Ethernet network connection
The Ethernet connection may be called a network interface adapter, network interface card,
or NIC. It provides a high-speed or broadband connection to an Ethernet (10BaseT) or Fast
Ethernet (100BaseT) network. After you connect this interface to a network, such as a LAN,
you can connect to the Internet through the network.
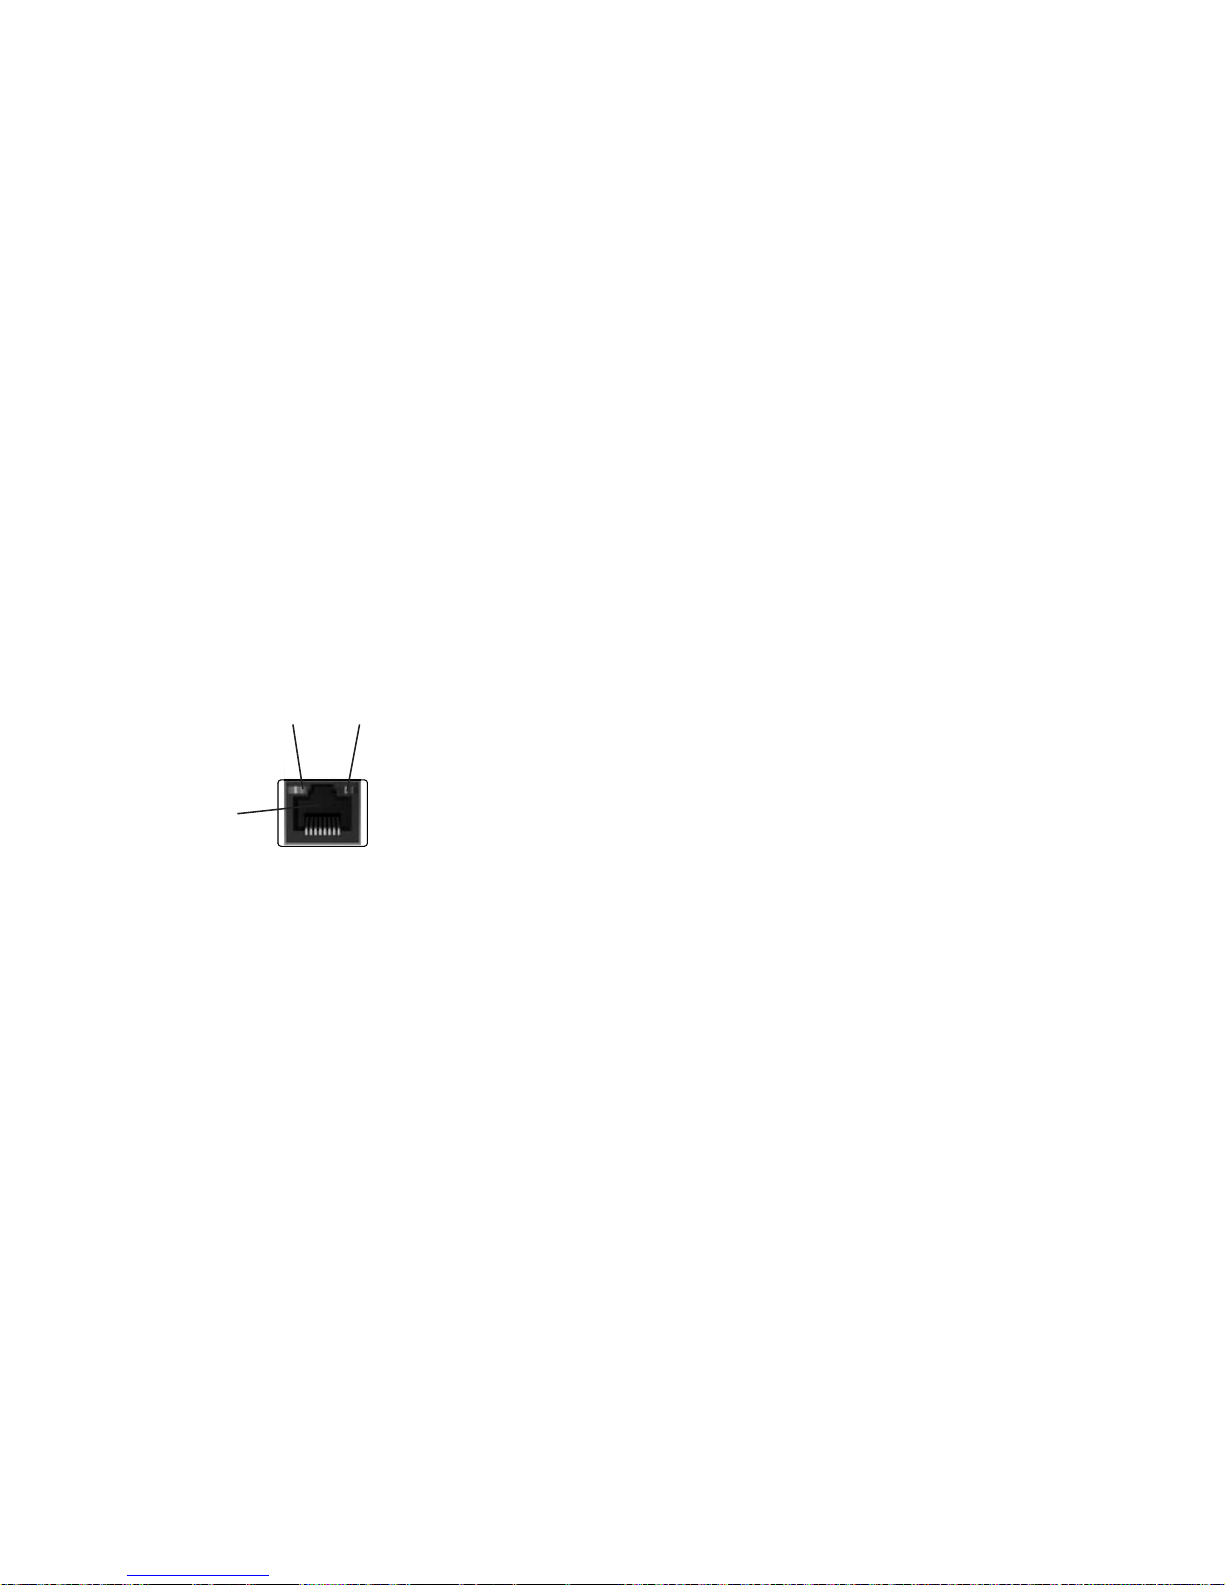
1 Connect an Ethernet cable to the Ethernet (RJ-45) connector (A) on the back of the
computer, and to the network router or LAN device.
B B
LAN
A
2 With the computer turned on, check the indicator lights (B) next to the Ethernet connector
for the status:
ACTIVITY — Lit yellow during network data transfer activity
LINK — Lit green when there is a valid network connection
Setting up a wireless network connection
(Select models only)
You can connect the computer to a wireless network supporting IEEE 802.11b or
802.11g.
You need an existing wireless LAN with an Internet connection. Consult your Internet
Service Provider (ISP) for further information.
To verify that the integrated WLAN device is installed on the computer correctly, see
“Checking the wireless LAN device installation” on page 10.
For more information about setting up a wireless network, click Start, click Help and
Support, and then type Setting up a wireless network into the Search Help box and
press Enter.
8 Getting Started (features vary by model)
Page 69

Connecting to the Internet
Connecting to the Internet requires that you:
1 Purchase high-speed Internet service from an Internet service provider (ISP).
2 Purchase a broadband modem (DSL or cable). This may be provided by the ISP.
3 Purchase and install a wireless router (sold separately), if one is required.
The computer can connect to the Internet through a LAN or digital subscriber line (DSL).
Wireless connection to the Internet may also be available (select models only). Check with
your Internet Service Provider (ISP) for specific information on the connection.
1 Refer to “Setting Up Your Computer” on page 3 to make the hardware connections.
2 For a network connection, see “Connecting to a network” on page 8.
3 To check a wireless LAN device installation, see “Checking the wireless LAN device
installation” on page 10.
4 To connect to the Internet:
Sign up with an ISP. If you already have an account with an ISP, skip this step and
follow the instructions provided by the ISP.
If you did not set up the computer for Internet service during the initial setup, do so
now by using Online Services:
a Click the Start button.
b Click All Programs.
c Click Online Services and then click Get Online.
d Follow the onscreen instructions to select an ISP and set up Internet service.
NOTE: Online Services provides a list of ISPs; however, you may choose another ISP or
transfer an existing account to this computer. To transfer existing accounts, follow the
instructions provided by the ISP.
5 Connect to the Internet. You must connect through your ISP.
6 Open your Web browser and browse the Internet.
You can use any Web browser; most computers have Microsoft Internet Explorer
®
open Internet Explorer:
a Click the Start button.
b Click Internet Explorer.
NOTE: If you have issues connecting to the Internet, see “Internet access” on page 32.
. To
HP Pavilion All-in-One PC Setup 9
Page 70

Checking the wireless LAN device installation
You can verify that the integrated WLAN device is installed on the computer correctly by
using the Windows operating system Device Manager:
1 Click the Start button.
2 Type Device Manager into the Start Search box, and then click Device Manager to
open the Device Manager window.
3 Click Network adapters. Your WLAN device should be listed here. The WLAN
device may include the term wireless, wireless LAN, or 802.11.
NOTE: If no WLAN device is listed, either the computer does not have an integrated
WLAN device, or the driver for the device is not properly installed.
4 Click the Start button.
5 Type Network and Sharing Center into the Start Search box, and then click Network
and Sharing Center to open the Network and Sharing Center window.
6 Click Connect to a network, and then follow the onscreen instructions.
Using wireless security features
When you set up a home WLAN or access an existing public WLAN, always enable security
features to protect the network from unauthorized access. The most common security levels
are Wi-Fi Protected Access Personal (WPA-Personal) and Wired Equivalent Privacy (WEP).
When setting up a network, use one or more of the following security measures:
Enable WPA-Personal or WEP security encryption on the router.
Change the default network name (SSID) and password.
Set up a firewall.
Set security on your Web browser.
10 Getting Started (features vary by model)
Page 71
Protecting your computer
Protect your computer, personal settings, and data from a variety of risks by using:
Passwords.
Antivirus software.
Firewall software.
Critical security updates.
NOTE: Security solutions are designed to act as deterrents, but they may not be able to
prevent software attacks or to prevent the computer from being mishandled or stolen.
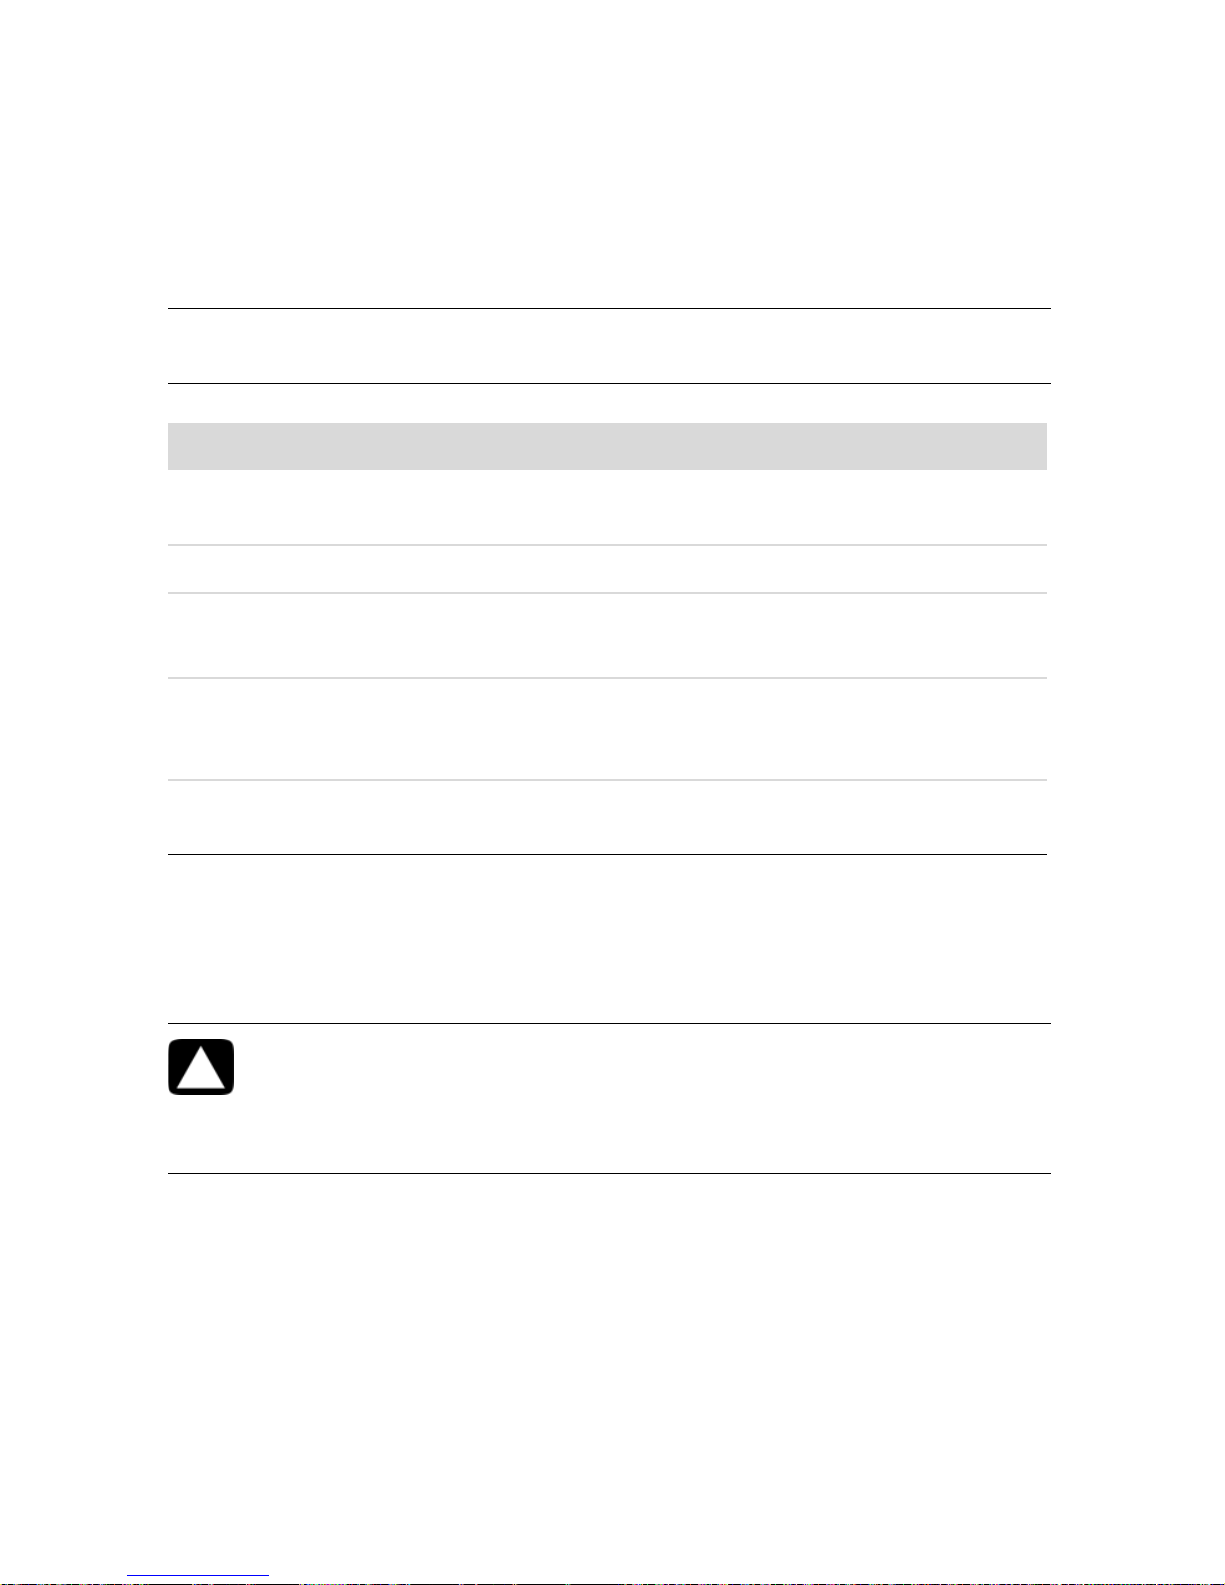
Computer risk Computer feature
Unauthorized use of the computer or user
User password
account
Computer viruses Antivirus program
Unauthorized access to data Firewall program
Windows updates
Unauthorized access to Setup Utility,
Administrator password
BIOS settings, and other system
identification information
Ongoing or future threats to the computer Windows critical security updates from
Microsoft
Using passwords
A password is a group of characters that you choose to secure the computer information.
Several types of passwords can be set, depending on how you want to control access to your
information. Passwords can be set in the Windows operating system on the computer.
CAUTION: To avoid being locked out of the computer, record each
password you set. Because passwords are not displayed as they are set,
changed, or deleted, it is essential to record each password immediately
and store it in a secure place. Do not store passwords in a file on the
computer.
You can use the same password for more than one Windows security feature. A password set
in Windows must be entered at a Windows prompt.
For information on Windows passwords: click the Start button, click Help and Support,
and then type passwords into the Search Help box and press Enter. See “Using the Onscreen
Help and Support Center” on page 23.
HP Pavilion All-in-One PC Setup 11
Page 72

Using antivirus software
When you use the computer for e-mail, network, or Internet access, you expose it to computer
viruses. Computer viruses can disable or damage the operating system, software programs,
or computer utilities.
Antivirus software can detect most viruses, remove them, and, in most cases, repair any
damage that they have caused. To provide ongoing protection against newly discovered
viruses, you must keep the antivirus software up to date.
The antivirus program, which is preinstalled on the computer, includes antivirus and firewall
components. The software includes a free trial subscription of protection updates. To protect
the computer against new viruses beyond the trial period, purchase an extended update
service. Instructions for using and updating the antivirus software, and for purchasing
extended update service, are provided within the program.
For more information about computer viruses: click the Start button, click Help and
Support, and then type viruses into the Search Help box and press Enter. See “Using the
Onscreen Help and Support Center” on page 23.
Using firewall software
When you use the computer for e-mail, network, or Internet access, unauthorized persons
may be able to gain access to information about you, your computer, and your data. To
protect your privacy, use firewall software:
Windows includes firewall software preinstalled on the computer.
The antivirus program, which is preinstalled on the computer, includes a firewall
program.
Firewall features include logging, reporting, and automatic alarms to monitor all incoming
and outgoing communications.
Under some circumstances, a firewall can block access to Internet games, interfere with
printer or file sharing on a network, or block authorized e-mail attachments. To solve the
problem temporarily, disable the firewall, perform the task that you want to perform, and then
enable the firewall again. To resolve the problem permanently, reconfigure the firewall.
Configuring the computer for automatic Microsoft
software updates
Microsoft continually updates the Windows operating system. Run Windows Update monthly
to install these updates, or keep the operating system up to date by using the Automatic
Updates feature.
When you are connected to the Internet, Windows Update automatically notifies you
(through a pop-up message or icon in the notification area) when critical updates are
available. When you see the Windows Update message, allow the updates to download to
your system. If you update the system weekly, or even monthly, the time required for
download is minimal.
12 Getting Started (features vary by model)
Page 73

Installing critical security updates
CAUTION: To reduce the risk of information damage or loss from security
breaches and computer viruses, install all critical updates from Microsoft
as soon as you receive an alert.
Additional updates to the operating system and other software may have become available
after the computer was shipped. Download all available updates and install them onto the
computer.
Setting up user accounts
When you share a computer with several people, you can set up a user account for each
computer user. Windows uses the information in the user account to determine what files and
folders the computer user can access, when they can make changes to the computer, and
their personal preferences. Each person can access only their own files and settings.
For more information, click the Start button, click Help and Support, and then type User
Accounts into the Search Help box and press Enter. See “Using the Onscreen Help and
Support Center” on page 23.
Guidelines for installing software and hardware
devices
After you set up the computer and complete the initial setup, you may want to install
additional software programs or hardware devices. Keep in mind the following important
guidelines:
Before installation, make a restore point by using the Microsoft System Restore program.
The restore point is a snapshot of the computer settings. By using System Restore, you
ensure that you have a stable set of settings to use.
Choose software that is compatible with the computer; check the operating system,
memory, and other requirements listed for the new software.
Install the new software according to the directions provided by the software
manufacturer. If you need help, check the manufacturer documentation or customer
service information.
For antivirus software, uninstall the existing software program before reinstalling it or
installing a new antivirus program.
NOTE: Use only licensed original software. Installing copied software may be illegal, may
result in an unstable installation, or may infect the computer with a virus.
HP Pavilion All-in-One PC Setup 13
Page 74

Transferring files and settings from an old computer to
your new computer
You can copy files from an old computer to your new computer by using CDs or DVDs,
memory sticks, or personal media drives, or by using the Windows Easy Transfer cable (sold
separately). To transfer files and copy certain settings, such as Web browser Favorites and
address books, use Windows Easy Transfer software, which is included with Windows.
Windows Easy Transfer software guides you to copy files and settings to a storage device or
across the Easy Transfer Cable connected to the old computer. The Easy Transfer Cable is a
USB cable designed specifically to connect two computers and work with the Windows Easy
Transfer software. A standard USB cable does not work.
To transfer your files and settings:
1 Click the Start button.
2 Type Windows Easy Transfer into the Start Search box, and then click Windows Easy
Transfer.
3 Follow the onscreen instructions in the Windows Easy Transfer Wizard to transfer your
files from an old computer to your new one.
For more information, click the Start button, click Help and Support, and then type
moving files into the Search Help box and press Enter. See “Using the Onscreen Help and
Support Center” on page 23.
14 Getting Started (features vary by model)
Page 75
Special Features of Your Computer
30˚
-5˚
Adjusting the Tilt and Swivel
For optimal viewing, adjust the screen tilt to your own preference:
1 Face the front of the computer and hold the base so that you do not topple the computer
while changing the tilt.
2 Adjust the tilt by moving the top edge of the display screen either toward or away from
you (the range is –5° to 30°), without touching the screen.
The computer allows a usable range of motion with the swivel feature.
Special Features of Your Computer 15
Page 76
Webcam
The webcam (A) is located at the top front of the computer.
Use your webcam to:
Create videos from files on your computer.
Create snapshots to view, organize, edit, send, and print.
Create video notes for an enhanced visual calendar and to share.
Initiate live video chats with Windows Live Messenger or another compatible software
program.
Import live videos into a movie-making program to save, send, stream on the Web, or
record to disc.
A
Power/Standby
Capturing webcam video and snapshots
Learn to use CyberLink YouCam to capture videos and snapshots from the webcam:
1 Click the Start button.
2 Click All Programs, CyberLink YouCam, and then click CyberLink YouCam
again.
3 Click Tut orials to view an instructional video.
Having a video chat or making conference calls
To set up a video chat, you must have a connection to the Internet, an ISP, and software that
enables you to make video calls over the Internet. As with chat or instant messenger software,
you can use this kind of software to chat with one or more people at a time. This software
may require a separate subscription.
16 Getting Started (features vary by model)
Page 77

There is a built-in microphone next to the webcam on the front of the computer. A jack for an
external microphone is on the side of the computer. The optimal distance for recording sound
with the microphone is about .5 meters (2 feet) away from the microphone.
Before you can set up a video chat:
1 Download an Internet messenger or video phone call program. Make sure the person
you are calling has compatible video-calling software.
2 Enable your webcam as the default video input. This is usually done through the video
setup in the Tools menu in the software program you are using.
3 Send your video call by following the instructions for the video-calling software
program.
To start a video chat in CyberLink YouCam:
1 Click the Start button.
2 Click All Programs.
3 Click CyberLink YouCam, CyberLink YouCam, and then click Start a
Video Call.
Using the Memory Card Reader
Your computer comes with a multi-format, single slot (6-in-1) memory card reader. Digital
cameras and other digital imaging devices use memory cards, or media, to store digital
picture files. The memory card reader can read from and write to a variety of memory cards.
Supported memory card or media formats include:
Extreme Digital (xD)
Secure Digital (SD)
Secure Digital High-Capacity (SDHC)
MultiMediaCard (MMC)
Memory Stick (MS)
Memory Stick Pro (MS Pro)
Additional media cards can be supported by use of an adapter sleeve:
Mini Secure Digital (Mini SD)
Micro Secure Digital (Micro SD)
Reduced-size Multi Media Card (RS-MMC)
Memory Stick Duo (MS Duo)
Memory Stick Pro Duo (MS Pro Duo)
The card reader is accessible directly on the side of the computer. It has one vertical card slot
that accepts the media.
Special Features of Your Computer 17
Page 78
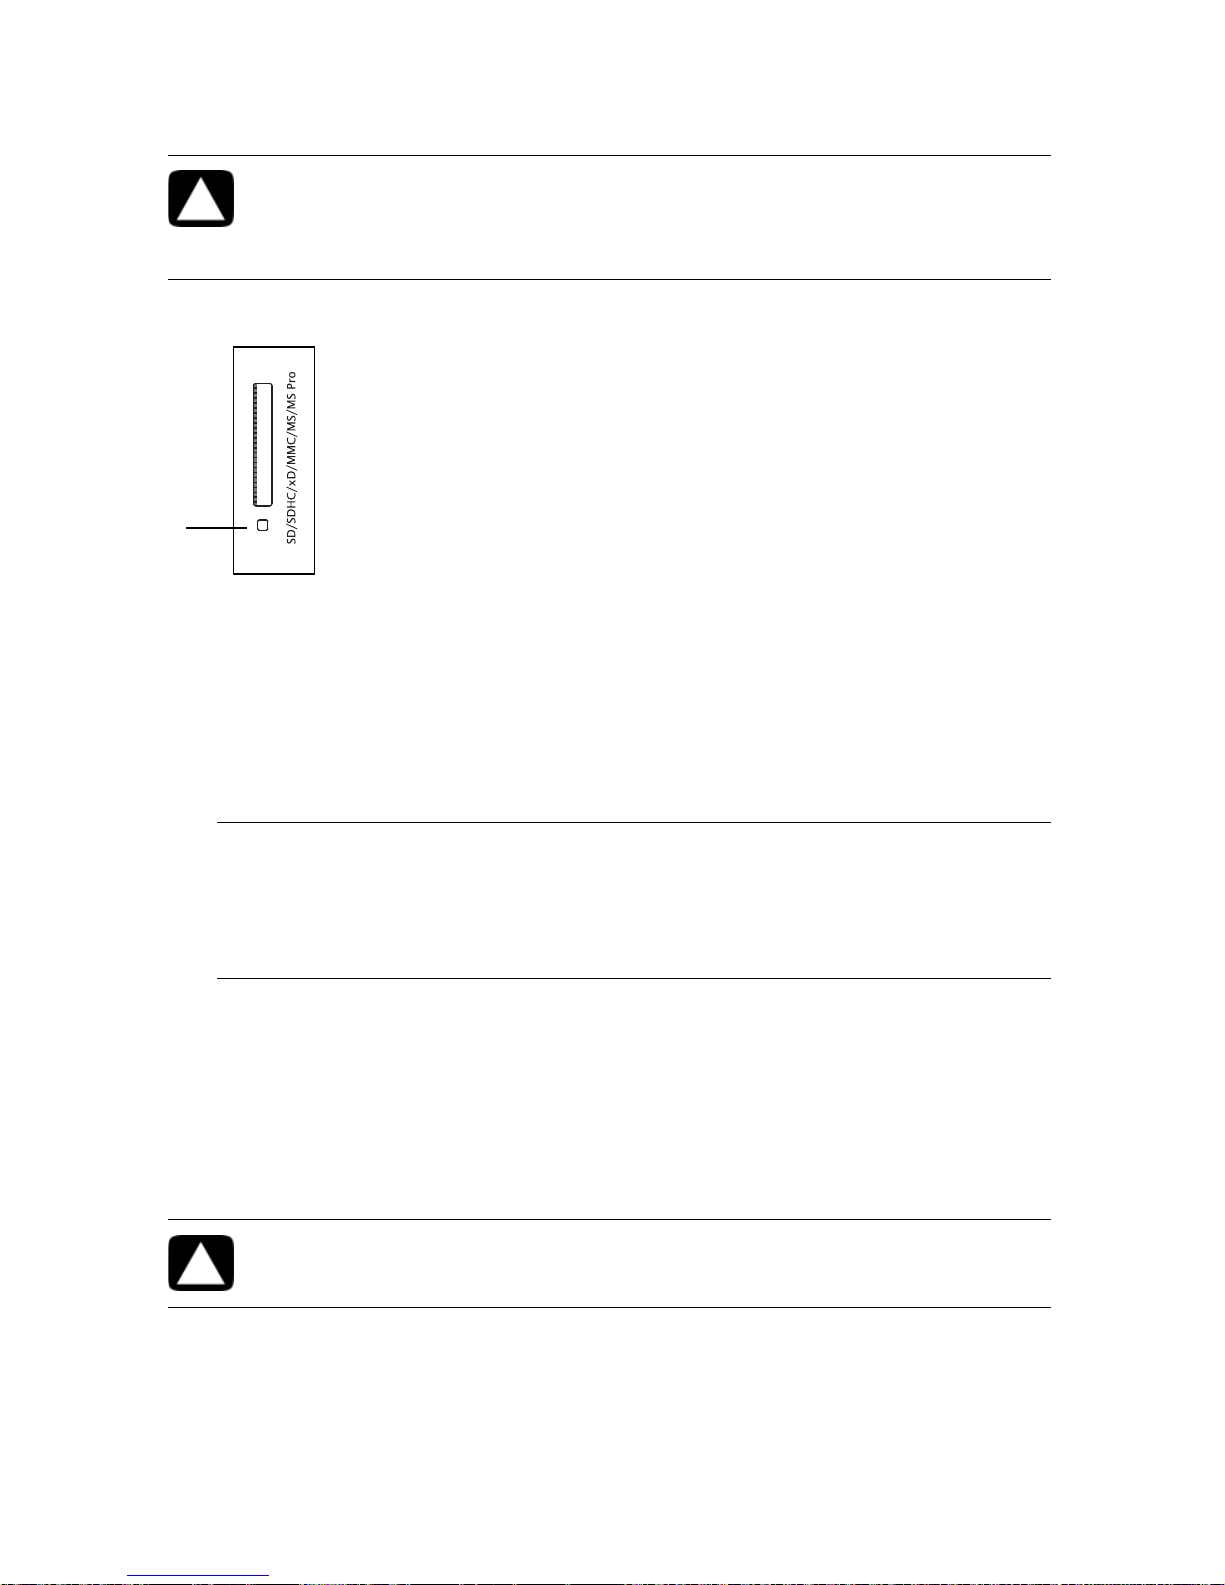
When you insert media, the Safely Remove Hardware window may appear. If it opens, or if
A
you open the Safely Remove Hardware window by mistake, click Close.
CAUTION: Do not click Stop in the Safely Remove Hardware window with
the USB Mass Storage Device selected. Doing so removes the operating
system recognition of the memory card reader from your computer, and
you must restart the computer to see the memory card reader again.
Memory card reader
The memory card reader LED (A) blinks to indicate that the computer is accessing the memory
card to read or write.
To use the memory card reader:
1 Insert the media into the card slot until it stops.
The memory card reader LED (A) on the memory card reader lights, and the computer
automatically detects the media.
NOTE: You must insert media correctly. Note the direction of the notched corner on the
media. For more information, open the Help and Support Center or refer to the
Support Web site; see “Getting More Information” on page 23. Also, some memory
cards, such as CF Ultra/III, are not compatible with the memory card reader that came
with your computer.
2 Select a program to access your files. You can copy files from or to the media.
Or
If the AutoPlay window does not open, click the Start button, click Computer, and
then double-click the Memory Card icon to display the files on the media. You can
copy files from or to the media.
3 When you are finished, right-click the drive icon, click Eject, check that the memory
card reader LED is on or off, but not blinking, and then remove the media.
CAUTION: Do not try to remove media when the memory card reader LED
is blinking. Doing so may cause loss of data.
18 Getting Started (features vary by model)
Page 79
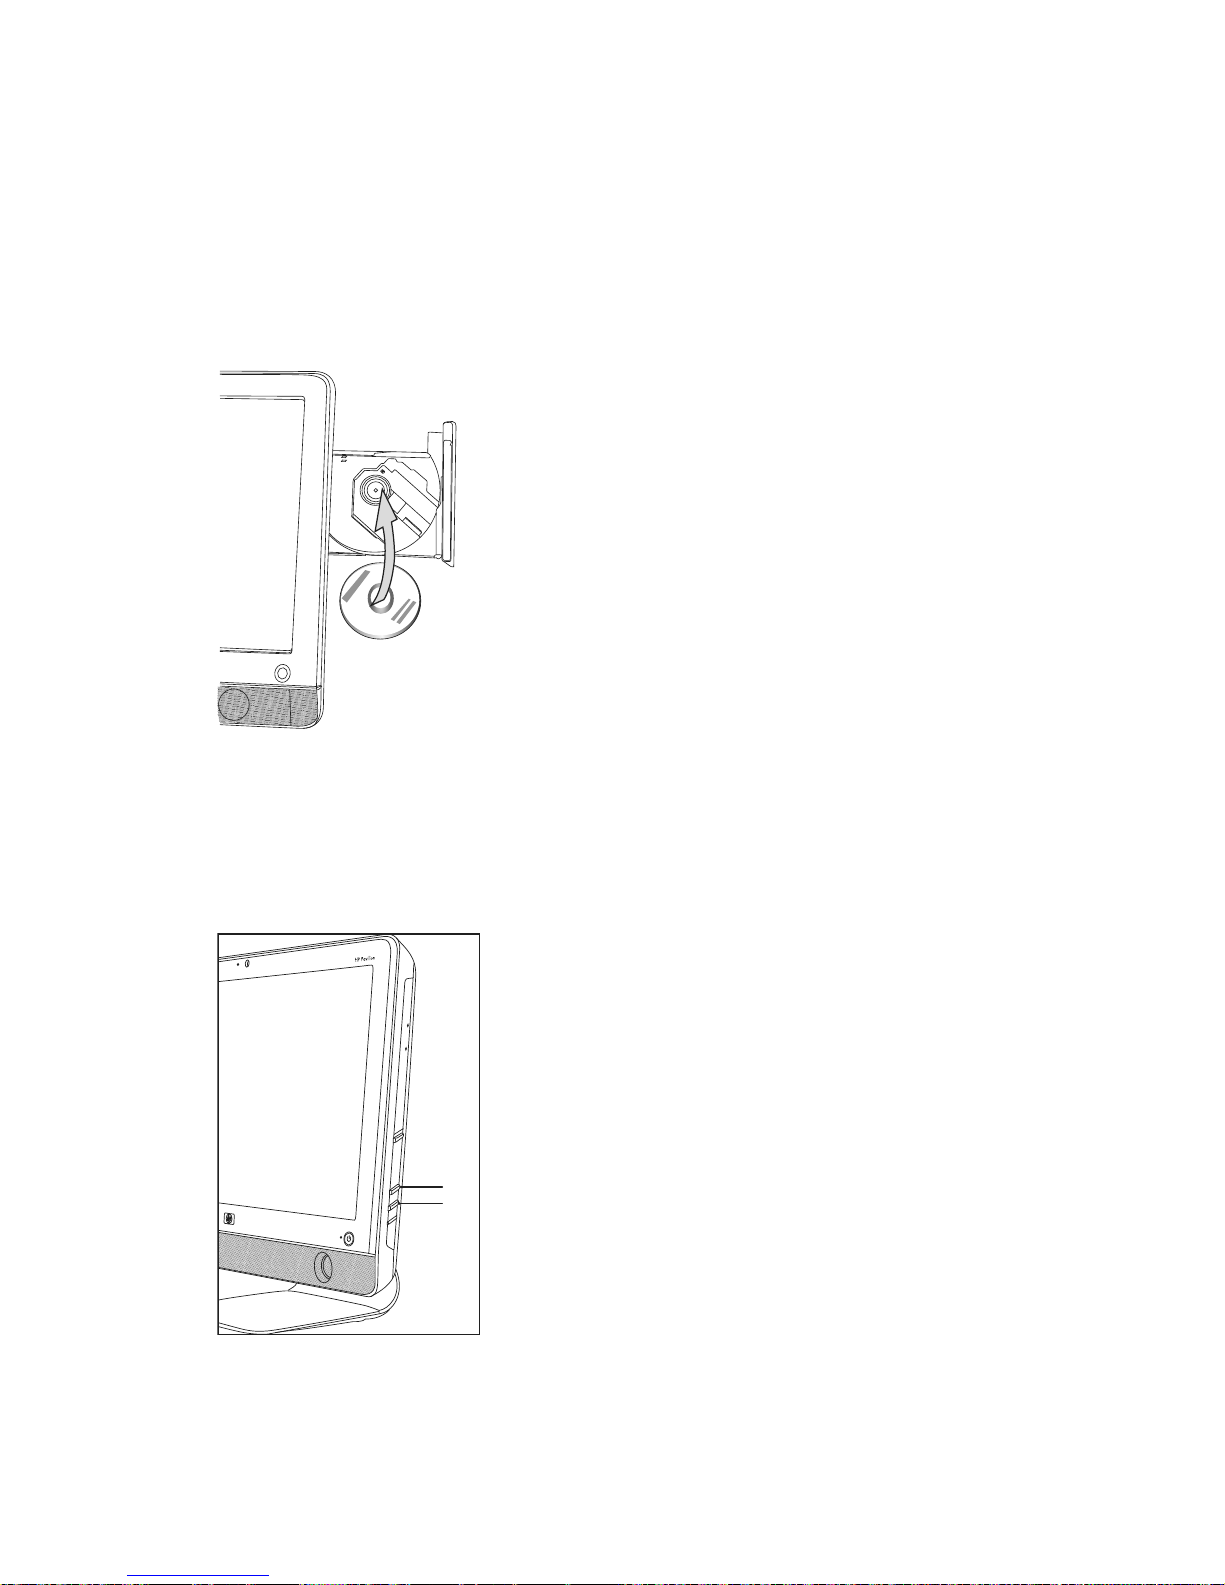
Using a Vertical CD/DVD Drive
B
A
Your computer has an optical disc drive that is installed in a vertical position. The Eject button
is just below drive door. The drive will accept either a standard-sized disc or a minidisc.
1 Face the front of the computer.
2 Press the Eject button to open the CD/DVD tray.
3 Place the disc into the inner circle inside the tray with the label facing out.
4 Holding the back of the tray, press the disc into the center, until the disc clicks into place,
and then press the front of the tray to close it.
Adjusting the Screen Brightness
Your computer has two buttons on the side panel for adjusting the brightness on the screen.
1 Press the upper button (A) to make the screen brighter.
2 Press the lower button (B) to dim the screen brightness.
To adjust screen resolution, click the Start button, click Control Panel, click Display, and
click the Settings tab. Adjust the screen resolution by moving the adjustment bar to the left or
right. Click OK.
Special Features of Your Computer 19
Page 80

Using Software
NOTE: Some of the programs that are listed may not be included with your model. This is not
a complete list of all included software.
Your computer includes software to:
Record and play CDs.
Record data CDs.
Import and edit video files.
Record video CDs and DVDs.
Organize digital media files.
The following table describes the functionality that is specific to each of these programs. Use
the table to determine which program to use to perform a task.
With this program: You c an :
MediaSmart
View movies on DVD or video CD in the MediaSmart
DVD mode.
Play music from a music collection, create playlists, and
organize music collections on the hard drive.
View, edit, and print pictures in JPG format; create
slideshows; and upload photos to Snapfish for printing or
sharing.
View Internet TV and record and play back TV shows.
View video files on the computer and upload videos to
You Tub e.
NOTE: The YouTube Web site is not available in all
countries/regions. YouTube requires an Internet connection,
and you must set up on account.
Create and update a playlist for both music and videos.
20 Getting Started (features vary by model)
Page 81

With this program: You c an : (c on tin ue d )
CyberLink DVD Suite
HP Advisor
Record data and music files.
Record a copy of an existing music or data CD to use on
the computer.
Create customized music CDs from CDs in your collection,
or from .wav, .mp3, or .wma files. These CDs can be
played in your home or car stereo.
Copy and share data files.
Create archive CDs or DVDs from files on your computer.
Verify that the disc has been created without errors.
Record movie files to create VCDs and DVDs that you can
play on some DVD players.
Copy and share video files.
Capture video files.
Edit video files.
Create LightScribe labels for discs using CyberLink
LabelPrint.
Set up computer functions such as backup or printers.
Explore capabilities to find out what your computer can do.
See status of your computer, plus get alerts and updates.
Discover software and service offers from HP and its
partners.
Access support diagnostics and Help content.
Special Features of Your Computer 21
Page 82

22 Getting Started (features vary by model)
Page 83

Getting More Information
Using the Onscreen Help and Support Center
Information about your computer is in the onscreen Help and Support Center. Here, you can
find links to driver updates, access to technical support options, and information about
commonly asked questions.
To open the Help and Support Center:
Press the Help button, located on select keyboards.
Or
Click the Start button, and then click Help and Support.
Accessing Support on the Web
You can find information for your computer on the Internet:
1 Go to http://www.hp.com/support in your Web browser.
2 Select your country/region and language.
3 Click Support and Drivers.
4 Enter the model number of your computer, and then click Search . Click an item to
view it.
Finding Additional Guides on the Web
You can find guides for your computer by using the Internet to access the Support Web site:
1 Go to the Support Web site (http://www.hp.com/support) and search for your
model number using the previous procedure.
2 Click Manuals.
Using the PC Help & Tools Folder
The PC Help & Tools folder contains special utilities for computer owners, such as support
information and programs.
To see the items in the PC Help & Tools folder:
1 Click the Start button, All Programs, and then click PC Help & Tools.
2 Click Hardware Diagnostic Tools to view or use these tools.
Getting More Information 23
Page 84

Using HP Advisor Software
(Select models only)
HP Advisor is a desktop tool you use to monitor and access system health information about
key areas of your computer. HP Advisor has three major areas:
PC Dock — Access HP and Partner software directly on your desktop and customize
your dock by dragging and dropping items.
PC Dashboard — Check your computer status at a glance with the PC Dashboard.
Access all the items you need to run your computer from HP and Partners.
PC Discovery — Explore HP and Partner software and online services that are
installed on your computer, and find offers for exciting new software and services.
To open the HP Advisor Dock, click the HP logo on the taskbar.
Using the Computer with Safety and Comfort
Before you begin using the computer, arrange the computer and your work area to maintain
your comfort and productivity. Refer to the Safety & Comfort Guide for important ergonomic
information:
Click the Start button, click All Programs, click User Guides, and then click
Safety & Comfort Guide.
Or
Type
http://www.hp.com/ergo
into the Web browser address box, and then press Enter on the keyboard.
Upgrading and Servicing Your PC
Refer to the Upgrading and Servicing Guide:
Click the Start button, click All Programs, click User Guides, and then click
Upgrading and Servicing Guide.
If not present, follow the steps in “Finding Additional Guides on the Web” on page 23,
and then select Upgrading and Servicing Guide.
24 Getting Started (features vary by model)
Page 85

Troubleshooting and Maintenance
This section contains:
Troubleshooting tables in “Troubleshooting Computer Problems” on page 25.
Software repair information in “Software Troubleshooting” on page 39.
Maintenance information and guidelines in “Maintenance” on page 42.
For more information, refer to the Help and Support Center or access the Support Web site.
(See “Getting More Information” on page 23.)
Refer to the documentation provided by the product manufacturer for information about
peripheral-specific problems, such as issues with a printer.
Troubleshooting Computer Problems
These tables present some symptoms of issues you may encounter while installing, starting up,
or using your computer. The tables also provide possible solutions you can try.
The troubleshooting tables appear in the following order:
“Computer does not start” on page 26
“Power” on page 27
“Display” on page 27
“Keyboard and mouse (with cable)” on page 27
“Wireless keyboard and mouse” on page 29
“Audio and speakers” on page 31
“Internet access” on page 32
“CD and DVD players” on page 33
“Hardware installation” on page 36
“Performance” on page 38
“Memory card reader” on page 38
Troubleshooting and Maintenance 25
Page 86

Computer does not start
Symptom Possible solution
Computer will not turn
on or start.
Computer seems to be
locked up and is not
responding.
Ensure that the cables connecting the computer to the external
power source are plugged in properly.
When the cables connecting the computer to the external
power source are plugged in properly, and the wall outlet is
functioning, the green power supply light on the back of the
computer should be on; if it is not, refer to the Limited Warranty
and Support Guide to contact Support.
Test the wall outlet by connecting a different electrical
device to it.
Incompatible memory (RAM) may have been installed. Reinstall
the old memory to return your computer to its original state. For
instructions, refer to the Upgrading and Servicing Guide.
Use the Windows Task Manager to close any programs not
responding, or restart the computer:
1 Press the Ctrl, Alt, and Delete keys on the keyboard
simultaneously.
2 Click Start Task Manager.
3 Select the program that is not responding, and then click
End Task.
Error message: Hard
disk drive error.
If closing programs does not work, restart the computer:
1 Press the Ctrl, Alt, and Delete keys on the keyboard
simultaneously.
2 Click the arrow next to the red Shut Down button, and
then click Restart.
Or
1 Press and hold the On button for 5 or more seconds to turn
off the computer.
2 Press the On button to start the computer.
Refer to the Limited Warranty and Support Guide to contact
Support.
26 Getting Started (features vary by model)
Page 87

Power
Symptom Possible solution
Error message: Invalid
system disk or
Non-System disk or
Disk error.
Computer does not turn
off when the On button
is pressed.
Computer shuts down
automatically.
When optical disc drive activity stops, remove the disc and
press the spacebar on the keyboard. The computer should
start up.
Press and hold the On button until the computer turns off.
Check power settings.
The computer may be in an exceedingly hot environment. Let it
cool down.
Ensure computer air vents are not blocked and internal fan is
running. Note that your computer may not have an internal fan.
Display
Symptom Possible solution
Screen is blank, and
power light is not lit.
Reconnect the power plug to the back of the computer and to
the wall outlet.
Press the On button on the front of the computer.
Screen is blank. Press the space bar on the keyboard or move the mouse to
make the screen display visible again.
Press the Esc key on the keyboard to resume from Sleep or
Hibernate mode.
Press the On button to turn on the computer.
Images on the screen
are too large or too
small, or the images are
fuzzy.
Adjust the monitor resolution setting in Windows 7:
1 Click the Start button, and then click Control Panel.
2 Under Appearance and Personalization, click Adjust
Screen Resolution.
3 Adjust resolution as necessary, and then click Apply.
Keyboard and mouse (with cable)
Symptom Possible solution
Keyboard commands
and typing are not
recognized by the
computer.
Turn off the computer by using the mouse, unplug and
reconnect the keyboard to the back of your computer, and then
turn on your computer.
Troubleshooting and Maintenance 27
Page 88

Keyboard and mouse (with cable) (continued)
Symptom Possible solution
Mouse (with cable)
does not work or is not
detected.
Cursor does not
respond to mouse
movement.
Unplug and reconnect the mouse cable to your computer.
If the mouse is still not detected, turn off the computer, unplug
and reconnect the mouse cable, and then restart the computer.
Restart your computer by using the keyboard:
1 Press the Alt and Tab keys on the keyboard simultaneously
to navigate to an open program.
2 Press the Ctrl and S keys on the keyboard
simultaneously to save your changes in the selected
program (Ctrl+S is the keyboard shortcut for Save on
most—not all—programs).
3 Repeat step 1 and step 2 to save changes in all open
programs.
4 After saving changes in all open programs, press the Ctrl
and Esc keys on the keyboard simultaneously to display
the Windows Start Menu.
5 Use the arrow keys to select the Arrow button next to
Shut Down, select Shut Down, and then press the Enter
key on the keyboard.
Cursor responds slowly,
moves only vertically or
horizontally, or does not
track smoothly.
I cannot move the
cursor using the arrow
keys on the number
key pad.
6 After the shutdown is complete, unplug and reconnect the
mouse connector to the back of your computer, and then
turn on your computer.
For an optical mouse:
Clean the optical mouse: Gently wipe the light sensor lens
on the bottom of the mouse with a lint-free cloth (not
paper).
Use a mouse pad, white sheet of paper, or other less
reflective surface under the mouse.
For detailed cleaning instructions, go to:
http://www.hp.com/support
Select your country/region and language, search on your
computer model number, and then search on the keyword
cleaning.
Press the Num Lock key on the keyboard to turn off the Num
Lock light. The Num Lock light should not be on if you want to
use the arrow keys on the number key pad.
28 Getting Started (features vary by model)
Page 89

Wireless keyboard and mouse
A
Symptom Possible solution
Wireless keyboard or
mouse does not work or
is not detected.
A Check for these problems:
Ensure you are using the wireless keyboard or wireless
mouse within range of the receiver, approximately
10 meters (32 feet) for normal use, and within 30 cm
(12 inches) during initial setup or for resynchronization.
Check the LED on the mouse to indicate battery power
level. When the mouse powers up:
If the LED is green, the mouse has full power.
If the battery level is low, the LED will be amber and
will fade in and out 10 times continuously.
If the battery level is below 2.0 V, the LED will not turn
on, and the battery will need to be replaced.
Replace the batteries in the keyboard and mouse; do not
use rechargeable batteries: Turn the devices over, turn the
mouse off, take off the battery cover, remove the old
batteries, and insert new alkaline batteries. Then turn on
the mouse and press the Connect button.
Ensure the mouse is not in Suspend mode, which occurs
after 20 minutes of inactivity. Click the left mouse button to
reactivate it.
B Resynchronize the keyboard and mouse to the
receiver:
The receiver, wireless keyboard, and wireless mouse
shown in the illustrations are examples; your models
may vary.
IMPORTANT: During these steps, place the wireless
keyboard and wireless mouse on the same level as the
receiver, within 30 cm (12 inches) of the receiver, and
away from interference from other devices.
1 Unplug and reconnect the receiver into a USB connector
on the computer.
The receiver may have an LED light (A).
Troubleshooting and Maintenance 29
Page 90
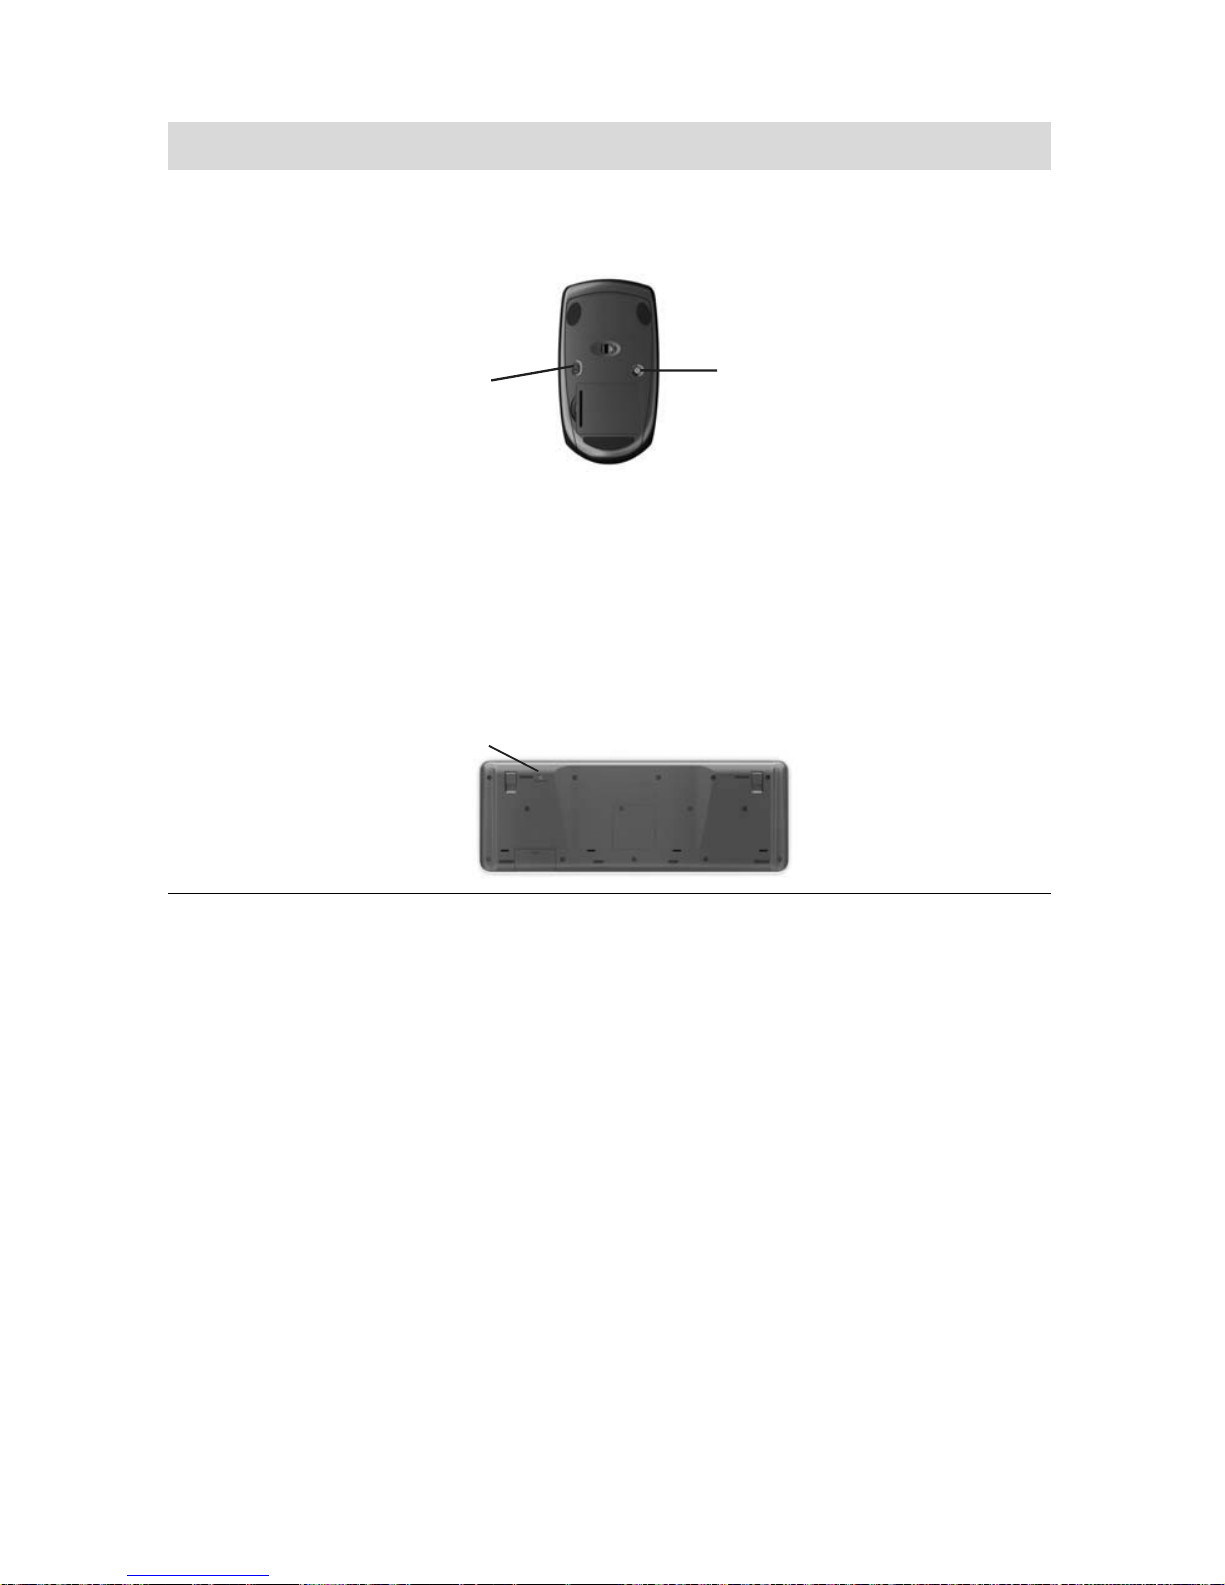
Wireless keyboard and mouse (continued)
D
Symptom Possible solution
Wireless keyboard or
mouse does not work or
is not detected.
(continued)
2 Check that the mouse is on (B), and push and hold the
Connect button (C) on the underside of the mouse for
5 to 10 seconds.
NOTE: The receiver
connection session times
out after 60 seconds. To
Off
Connect
B
On
C
ensure the connection
was established, and
that the receiver did not
time out instead, move
the mouse and check for
response on the screen.
3 After the mouse connection is established, continue with
the steps that follow to repeat the procedure for the
keyboard.
4 Push and hold the Connect button (D) on the underside of
the keyboard for 5 to 10 seconds.
30 Getting Started (features vary by model)
Page 91

Audio and speakers
Symptom Possible solution
No sound is produced. Press the Mute button on the keyboard to see whether the Mute
feature is enabled.
Or
1 Right-click the Volume icon on the taskbar, and
then click Open Volume Mixer.
The Volume Mixer settings window opens.
2 If programs are muted, click the Mute button to unmute.
To increase the volume, click the Volume icon on the task bar,
or use the keyboard controls. Check the volume setting in your
software program.
If you are using external speakers, make sure that you
connected powered (active) speakers and that they are
turned on.
Turn off your computer, and then unplug and reconnect the
external speakers. Ensure the external speakers are connected
to a Line Out connector.
To resume from Sleep mode, press the Sleep button (select
models only), or press the Esc key on the keyboard.
Unplug headphones if they are connected to your computer.
Troubleshooting and Maintenance 31
Page 92

Internet access
Symptom Possible solution
I cannot connect to the
Internet.
Contact your ISP for assistance.
Verify that you are using the proper cables for your Internet
connection type.
Run the wireless setup wizard:
1 Click the Start button, and then click Control Panel.
2 Click Network and Internet, and then click
Network and Sharing Center.
3 In the Network and Sharing Center window, click Set up
a connection or network to open the wizard.
4 Follow the onscreen instructions.
Use Device Manager to verify that the integrated WLAN device
is installed on the computer correctly:
1 Click the Start button.
2 Type Device Manager into the Start Search box, and then
click Device Manager.
3 Click Network adapters. Your WLAN device should
be listed here. The WLAN device may include the term
wireless, wireless LAN, or 802.11.
4 Click the Start button.
5 Type Network and Sharing Center into the Start Search
box, and then click Network and Sharing Center to
open the Network and Sharing Center window.
6 Click Connect to a network, and then follow the
onscreen instructions.
32 Getting Started (features vary by model)
Page 93
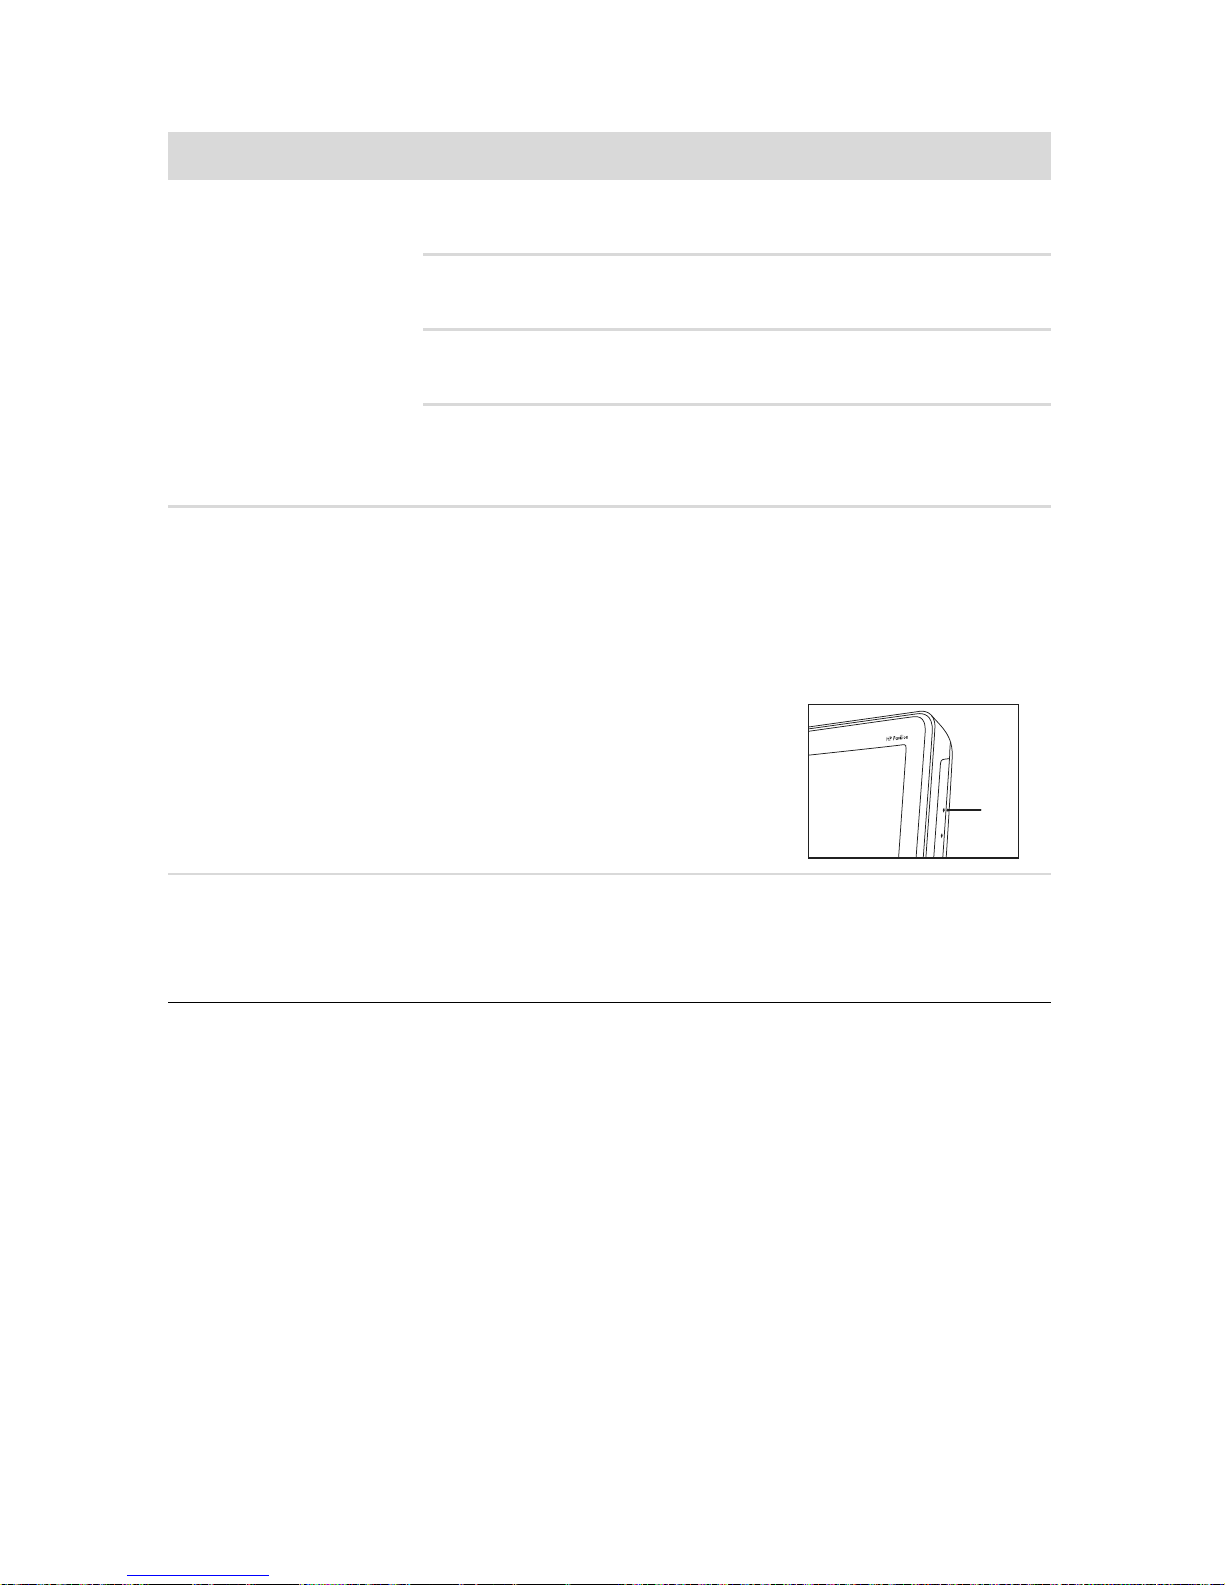
CD and DVD players
Symptom Possible solution
The CD or DVD drive
cannot read a disc, or it
takes too long to start.
I cannot remove a
CD or DVD.
Ensure the disc is inserted with the label facing out and
centered in the tray.
Wait at least 30 seconds for the drive to determine the type of
media.
Clean the disc with a disc cleaning kit, available from most
computer stores.
The driver may be corrupted or outdated. For detailed
information about restoring and updating drivers, see
“Updating drivers” on page 39.
Turn on your computer, and press the Eject button nearest the
drive to open the tray.
If you suspect a problem with the Eject button itself:
1 Click the Start button, and then click Computer.
2 Right-click the CD or DVD drive you want to open.
3 Select Eject from the menu.
4 If the disc is stuck, stick a pin in
the hard eject button (A), a small
pin hole on side of the computer,
to release it.
A
I cannot play a DVD
movie on a DVD player.
Your DVD player cannot play video files that were recorded
onto the DVD as data files. To play a movie properly, use a
video recording program. Some video files may be viewed on
a computer, but not on a home DVD video player.
Troubleshooting and Maintenance 33
Page 94

CD and DVD players (continued)
Symptom Possible solution
I cannot create (record)
adisc.
Ensure the disc is inserted with the label facing out and
centered in the tray.
Verify that you are using the correct disc type (media) for the
drive. Try a different brand of disc.
Ensure the disc is clean and undamaged. If recording stopped
during a recording session, the disc may be damaged; use a
different disc.
Use the correct type of disc for the type of files you are
recording.
When using a CD-R disc, ensure it is blank if recording music,
and that it is blank or appendable (with space to add more
data files) if recording data.
Verify that you are using the correct disc type when you make a
copy of a disc. Some recording programs can record only to
the same disc type as the source. For example, you can record
a DVD only to a DVD+R/-R or a DVD+RW/-RW disc, and you
can record a CD only to a CD-R or a CD-RW disc.
Select a slower write speed for the recording drive, if a slower
speed is available.
The recording software may not let you add a track if it exceeds
the available space on your disc. You can make space
available by removing one or more tracks from the list before
recording the files to the disc.
Close all software programs and windows before recording.
Ensure you have enough available space on your hard disk
drive to store a temporary copy of the content.
Click the Start button, and then click Computer. Right-click
the hard disk drive, and then click Properties to view the
available space.
If you are on a network, copy the files from a network drive to
your hard disk drive first, and then record them to disc.
Close all programs and windows, and then restart your
computer.
34 Getting Started (features vary by model)
Page 95

Video
Symptom Possible solution
Some video files do
not play.
Codec error messages
appear when I try to
play certain video files.
Error message: Files
Needed To Display
Video Are Missing or
Corrupt.
Your file may be corrupt or in an unsupported format. Open the
video file in a video editor, and then resave the file in a
supported format.
Open the file in Windows Media Player. Ensure Windows
Media Player is configured to automatically download codecs.
If the correct codec is available, the file will play. Note
that you must be connected to the Internet to download the
codec file.
If the correct codec is not available, check to see whether
there is an update available for Windows Media Player.
For more information, open Windows Media Player Help and
search for codec.
1 Click the Start button.
2 Type Device Manager into the Start Search box, and then
click Device Manager to open the Device Manager
window.
3 Click the plus sign (+) next to Sound, video and game
controllers.
4 Right-click TV tuner (select models only), and then click
Update Driver Software.
5 Select Search automatically for updated driver
software.
6 Follow the instructions to update the driver.
7 If you are prompted, restart the computer.
Troubleshooting and Maintenance 35
Page 96

Hardware installation
Symptom Possible solution
A new device is not
recognized as part of
the system.
A new device does
not work.
Install the device driver provided with the device, or download
and install the driver from the device manufacturer Web site.
You may need an updated driver for Windows. Contact the
device vendor directly for an update.
For HP peripheral devices, visit the HP Web site:
http://www.hp.com/support
Ensure that all cables are properly and securely connected and
that the pins in the cable or connector are not bent.
Turn off the computer, turn on the external device, and then turn
on the computer to integrate the device with the computer.
Disable the automatic settings in the operating system for the
new device, and choose a basic configuration that does not
cause a resource conflict.
You can also reconfigure or disable devices to resolve the
resource conflict.
To install or uninstall a device driver, you must be logged in
with administrative privileges. If you need to switch users, click
the Start button, click the Arrow button next to Shut Down,
and then click Switch User. Choose a user with administrative
privileges.
36 Getting Started (features vary by model)
Page 97

Hardware installation (continued)
Symptom Possible solution
A device does not work
after installing a new
device.
To resolve a device conflict, you may need to disable one of the
devices or uninstall an old device driver:
1 Click the Start button.
2 Type Device Manager into the Start Search box, and then
click Device Manager to open the Device Manager
window.
3 Click the plus sign (+) next to the problem device and
check for an exclamation point in a yellow circle near the
device icon. The exclamation point means there is a
device conflict or problem with the device. Exclamation
points do not always appear when a device is not
working properly.
4 If you have removed a hardware device, but the device
driver is still listed in the Device Manager, this may be
causing the device conflict. To uninstall the old driver so
that the new device driver works properly, right-click the
device, click Uninstall, and then click OK.
5 Right-click the name of the device, and then select
Properties.
6 Click the General tab to see whether your device is
enabled and working properly. If it is available, click the
Troubleshoot button, and follow the onscreen
instructions in the device troubleshooter wizard.
7 Restart the computer. Click the Start button, click the
Arrow button next to Shut Down, and then click Restart.
Troubleshooting and Maintenance 37
Page 98

Performance
Symptom Possible solution
Computer displays a
processor speed that is
lower than expected.
Software programs and
files take longer than
expected to open or
respond.
This happens when the processor is automatically running in a
lower power state, because the applications running do not
require the maximum processing power.
Verify that your system contains the processor you purchased.
To verify, click the Start button, right-click Computer, click
Properties, and under the General tab check the processor
installed on your system.
If you created multiple user accounts on your computer, ensure
other users are not logged in. If there are multiple users logged
in simultaneously, system resources must be shared among
them.
For information about other tasks, see “Maintenance tasks” on
page 42.
Memory card reader
Symptom Possible solution
Memory card reader
cannot read the
memory card.
Do not insert or remove memory cards when the memory card
reader LED is flashing. Doing so may cause data loss or
permanent damage to the card reader.
Some memory cards have a Read/Write or a Security switch.
Ensure the switch is set to Write Enabled before you attempt to
write data to the card.
Ensure the amount of stored data does not exceed the storage
limit of the memory card.
Ensure the memory card is one of the supported types:
Memory Stick (MS), Memory Stick Pro (MS Pro),
MultiMediaCard (MMC), Secure Digital (SD),
Secure Digital High-Capacity (SDHC), or Extreme Digital (xD).
Additional media card types can be supported by use of an
adapter sleeve: Mini Secure Digital (Mini SD),
Micro Secure Digital (Micro SD),
Reduced-sized MultiMediaCard (RS-MMC),
Memory Stick Duo (MS Duo), or
Memory Stick Pro Duo (MS Pro Duo).
38 Getting Started (features vary by model)
Page 99

Memory card reader (continued)
Symptom Possible solution
Memory card reader
cannot read the
memory card.
(continued)
Ensure the memory card is fully inserted into the slot and the
LED is on.
Inspect the ends of the memory cards for dirt or material that
closes a hole or spoils a metal contact. Clean the contacts with
a lint-free cloth and a small amount of isopropyl alcohol.
Replace the memory card if necessary.
Software Troubleshooting
Your computer uses the operating system and installed software programs during normal
operation. If your computer works improperly or stops because of the software, you may be
able to repair it.
Some software repairs are as simple as restarting your computer, and others require
performing a system recovery from files on your hard disk drive.
Software repair overview
The most efficient way to repair software problems is simply to restart the computer or turn the
computer off completely and then power it back up again. If this does not work, then explore
the following methods for fixing your computer if you are experiencing software problems:
Updating drivers (see the following section, “Updating drivers”).
Microsoft System Restore (see “Microsoft System Restore” on page 40) — Restores your
computer configuration to a configuration that was in use before the current software
problem existed.
Software program and hardware driver reinstallation (See “Software program and
hardware driver reinstallation” on page 41) — Allows reinstallation of the factoryinstalled software or hardware driver by using the Recovery Manager program.
System recovery (see “System Recovery” on page 44) — Erases and reformats the hard
disk drive, deleting all data files you have created, and then reinstalls the operating
system, programs, and drivers.
Updating drivers
A driver is a software program that enables your computer to communicate with an attached
device, such as a printer, hard disk drive, mouse, or keyboard.
Complete the following procedure to update a driver, or to revert to an earlier version of the
driver if the new one does not solve your problem:
1 Click the Start button.
2 Type Device Manager into the Start Search box, and then click Device Manager to
open the Device Manager window.
3 Click the plus sign (+) to expand the type of device you want to update or rollback. (For
example, DVD/CD-ROM drives).
Troubleshooting and Maintenance 39
Page 100

4 Double-click the specific item (for example, HP DVD Writer 640b).
5 Click the Driver tab.
6 To update a driver, click Update Driver, and then follow the onscreen instructions.
Or
To revert to an earlier version of a driver, click Rollback Driver, and then follow the
onscreen instructions.
Microsoft System Restore
Microsoft Windows 7 includes a feature that enables you to restore your computer
configuration to a configuration that was in use before the current software problem existed.
The feature does this by creating a restore point where it records the computer settings at that
time and date.
When a new program is installed, the operating system automatically creates a restore point
before it adds the new software. You can also set restore points manually.
If you experience a problem that you think may be due to software on your computer, use
System Restore to return the computer to a previous restore point.
NOTE: Always use this System Restore procedure before you use the system recovery
program.
To start a System Restore:
1 Close all open programs.
2 Click the Start button, right-click Computer, and then click Properties.
3 Choose System protection, System Restore, and then click Next.
4 Follow the onscreen instructions.
To manually add restore points:
1 Close all open programs.
2 Click the Start button, right-click Computer, and then click Properties.
3 Click System protection.
4 Under Protection Settings, select the disk for which you want to create a restore point.
5 Click Create.
6 Follow the onscreen instructions.
For more information about software restore points:
1 Click the Start button, and then click Help and Support.
2 Type system restore in the Search Help box, and then press Enter.
40 Getting Started (features vary by model)
 Loading...