

HP Pavilion MS200 Getting Started Manual

HP All-in-One PC
Getting Started

The only warranties for Hewlett-Packard products and services are set forth in the
express statements accompanying such products and services. Nothing herein
should be construed as constituting an additional warranty. HP shall not be liable
for technical or editorial errors or omissions contained herein.
HP assumes no responsibility for the use or reliability of its software on equipment
that is not furnished by HP.
This document contains proprietary information that is protected by copyright. No
part of this document may be photocopied, reproduced, or translated to another
language without the prior written consent of HP.
Hewlett-Packard Company
P.O. Box 4010
Cupertino, CA 95015-4010
USA
© Copyright 2009 Hewlett-Packard Development Company, L.P.
This product incorporates copyright protection technology that is protected by U.S.
patents and other intellectual property rights. Use of this copyright protection
technology must be authorized by Macrovision, and is intended for home and other
limited viewing uses only unless otherwise authorized by Macrovision. Reverse
engineering or disassembly is prohibited.
Microsoft, the Windows logo, and Windows are trademarks or registered
trademarks of the Microsoft group of companies in the United States and/or other
countries/regions.
HP supports lawful use of technology and does not endorse or encourage the use of
our products for purposes other than those permitted by copyright law.
The information in this document is subject to change without notice.

Table of Contents
HP All-in-One PC Setup ............................................................................... 1
Computer Overview................................................................................................... 1
Setting Up Your Computer .......................................................................................... 3
Turning On Your Computer for the First Time................................................................. 4
Special Features of Your Computer............................................................ 15
Adjusting the Tilt and Swivel ..................................................................................... 15
Webcam ................................................................................................................ 16
Using the Memory Card Reader ................................................................................ 17
Using a Vertical CD/DVD Drive................................................................................. 19
Adjusting the Screen Brightness ................................................................................. 19
Using Software........................................................................................................ 20
Getting More Information ......................................................................... 23
Using the Onscreen Help and Support Center ............................................................. 23
Accessing Support on the Web ................................................................................. 23
Finding Additional Guides on the Web ...................................................................... 23
Using the PC Help & Tools Folder .............................................................................. 23
Using HP Advisor Software ....................................................................................... 24
Using the Computer with Safety and Comfort .............................................................. 24
Upgrading and Servicing Your PC ............................................................................. 24
Troubleshooting and Maintenance............................................................. 25
Troubleshooting Computer Problems........................................................................... 25
Software Troubleshooting ......................................................................................... 39
Maintenance........................................................................................................... 42
System Recovery...................................................................................................... 44
Additional Troubleshooting ....................................................................................... 48
Index........................................................................................................ 49
Table of Contents iii

iv Getting Started (features vary by model)
HP All-in-One PC Setup
Computer Overview
The HP All-in-One PC
The HP All-in-One is a sleek, stylish computer with a built-in 47-cm (18.5-in) diagonal
widescreen display. This stylish All-in-One computer comes with features like webcam,
CD/DVD player and burner, USB ports, media card reader, wireless 802.11b/g networking,
and built-in speakers.
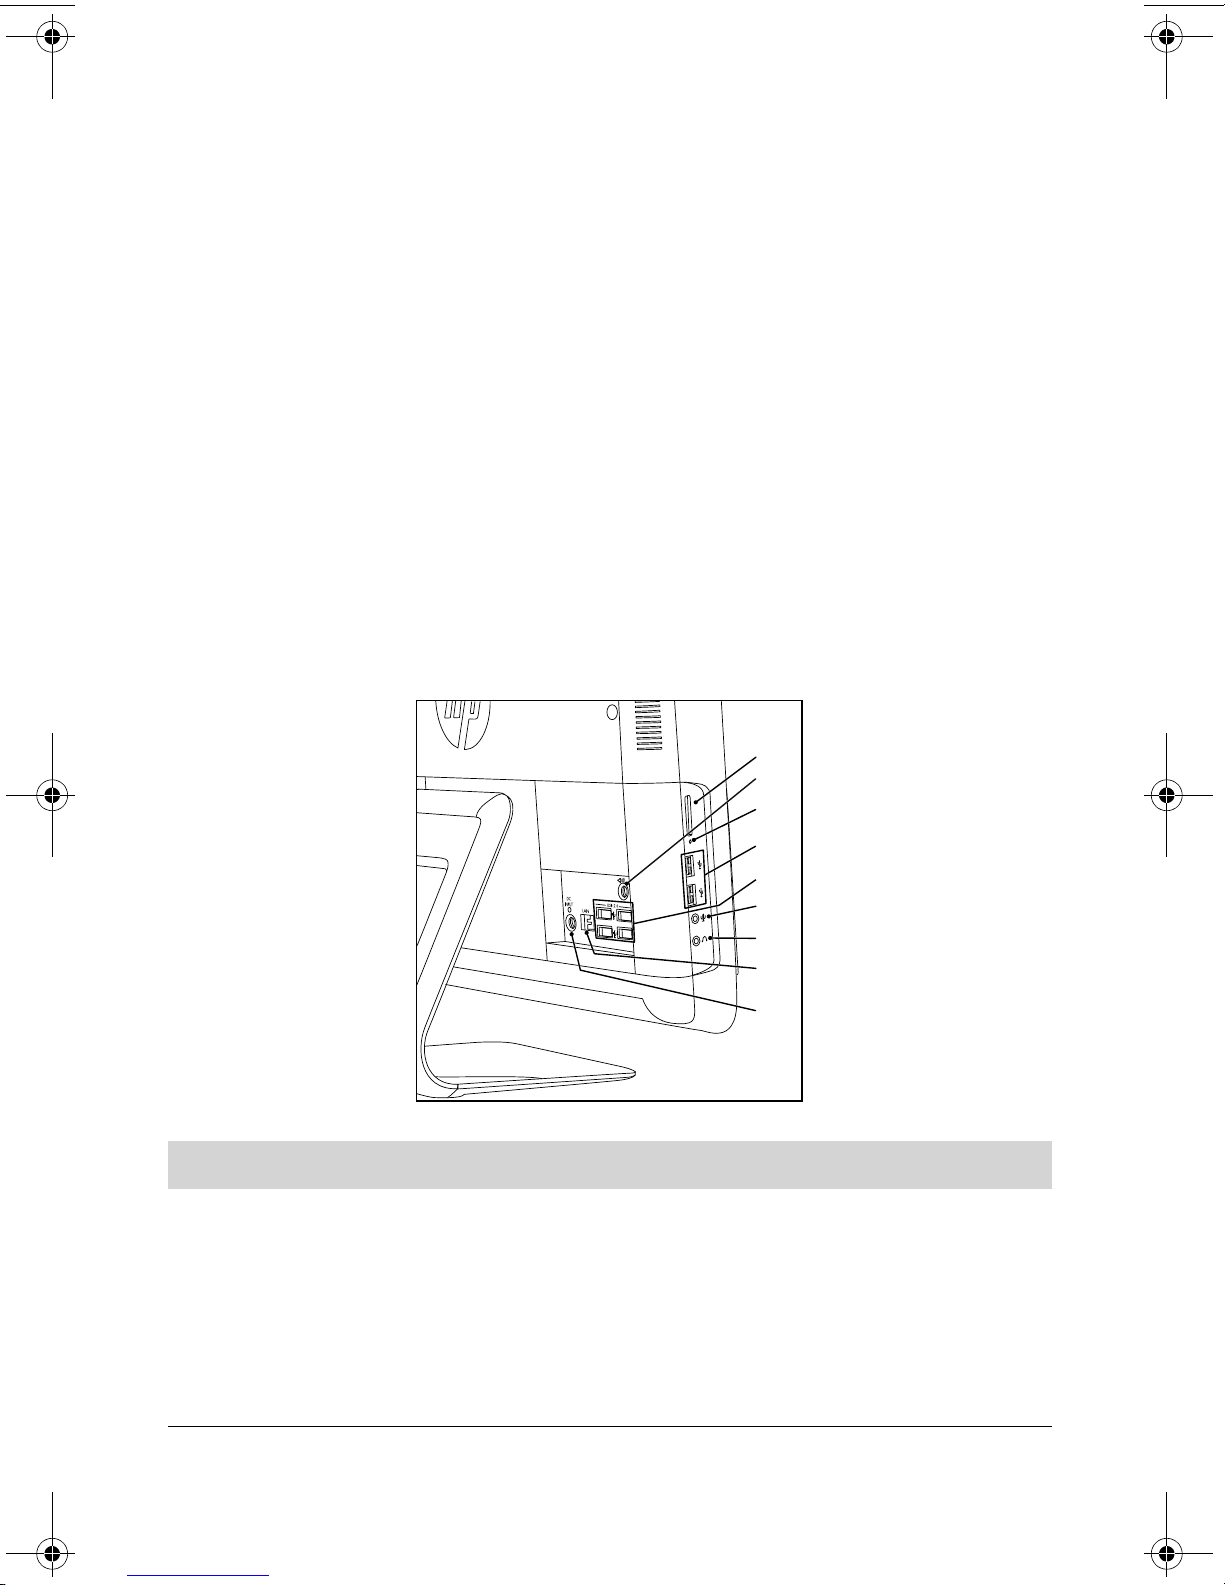
HP All-in-One features
Features and configurations vary by model. Your computer may not exactly match the
illustrations and descriptions in this guide.
A
B
C
Item Description
A Memory card reader
Built-in memory card reader to read a memory card.
Supported formats include: Extreme Digital (xD), Secure
Digital (SD), Secure Digital High-Capacity (SDHC),
MultiMediaCard (MMC), Memory Stick (MS), and
Memory Stick Pro (MS Pro) memory cards.
Additional media cards can be supported by using an
adapter sleeve
RS-MMC, Micro SD, MS-Duo, and MS Pro Duo.
D
E
F
G
H
I
(purchased separately): Mini SD,
HP All-in-One PC Setup 1
Item Description (continued)
S
R
Q
P
O
N
M
L
K
J
T
B Audio line out
C Memory card reader LED
D USB 2.0 (2 ports)
E USB 2.0 (4 ports)
F Microphone jack
G Headphones jack
H Ethernet (Local Area
Network [LAN]) port
I Power connector
Connect external 2.0 and 2.1 powered speakers.
Indicates card reader activity.
Connect USB devices (USB 2.0) such as printers, external
hard disk drives, digital cameras, and MP3 players.
Connect USB devices (USB 2.0) such as printers, external
hard disk drives, digital cameras, and MP3 players.
Connect an external microphone to the port.
Listen to music without disturbing anyone, by connecting
your headphones to the port.
Connect to the Internet through your wired network.
Plug the power adapter into your computer.
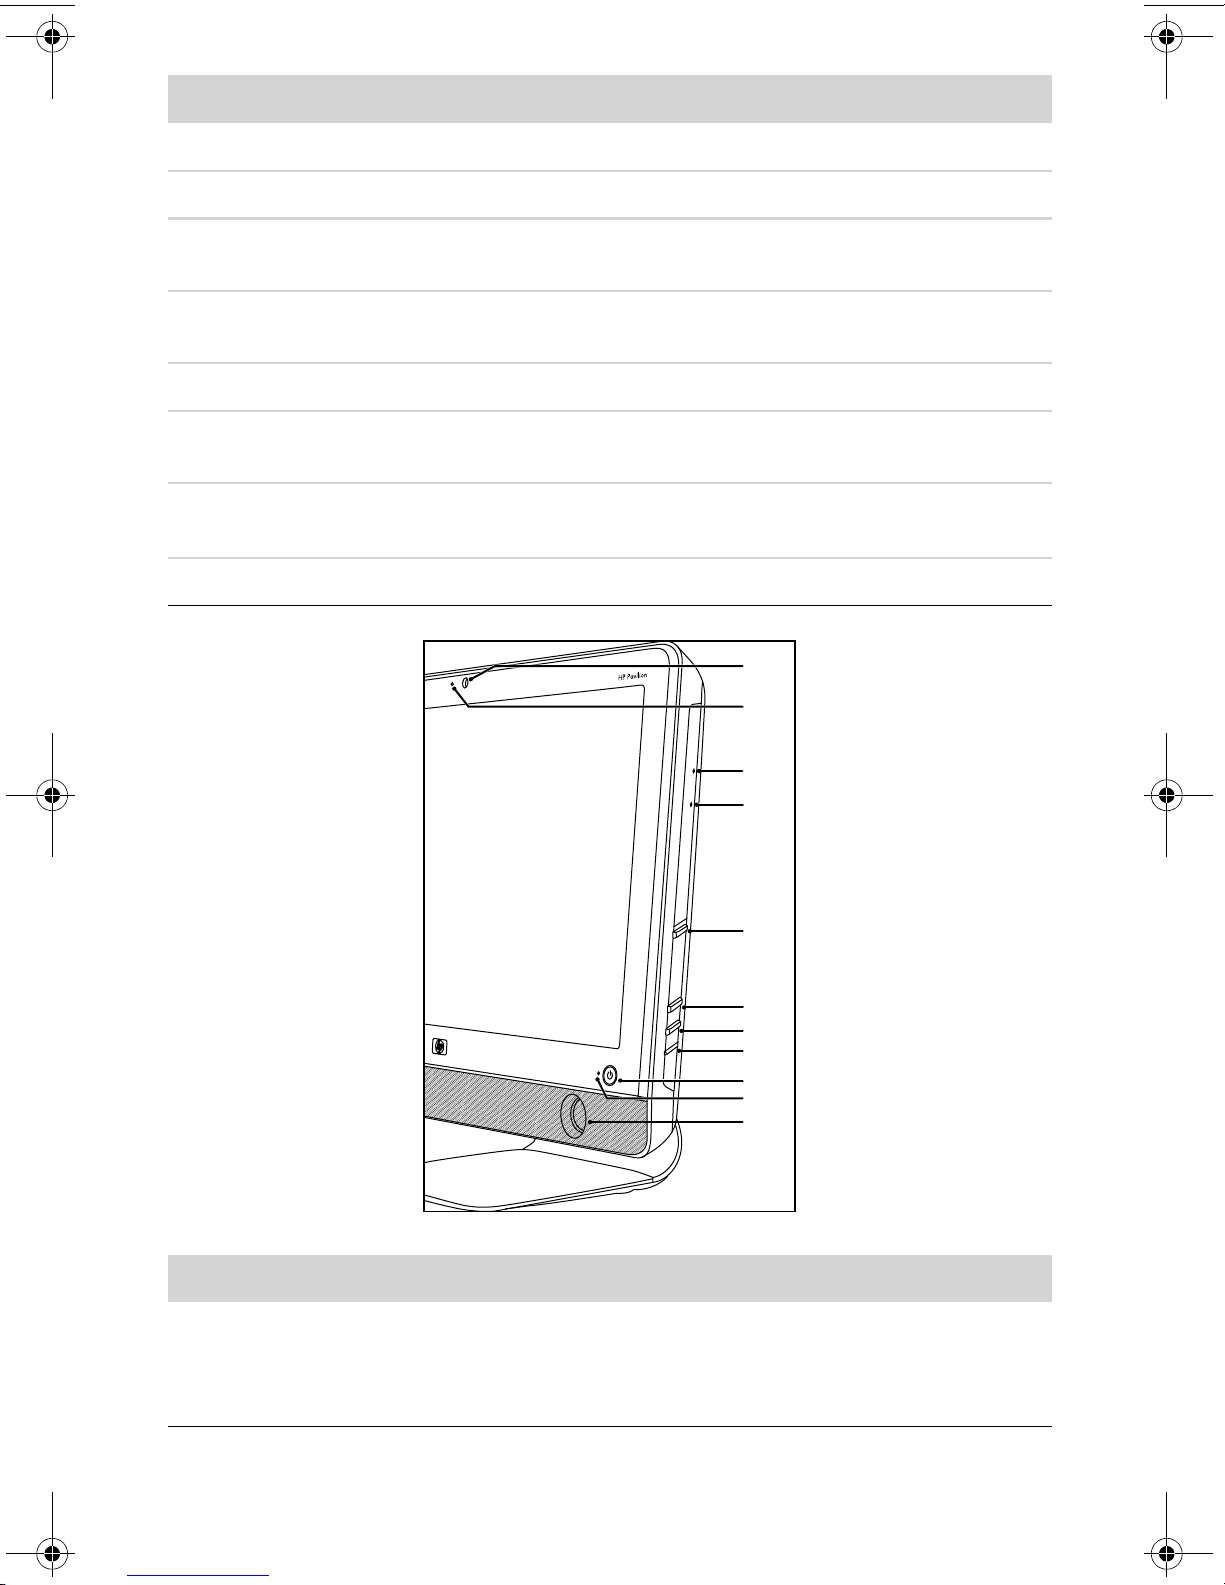
Item Description (continued)
J Webca m
2 Getting Started (features vary by model)
Create videos and snapshots that you can view, send by
e-mail, and upload to video sharing sites. Use the built-in
webcam and microphone for video chats (Internet access
required).

Item Description (continued)
K Built-in microphone
L Optical disc
emergency eject
M Optical disc drive
and LED
N Optical disc Eject
button
O Brightness up
P Brightness down
Q Hard disk drive LED
R Power status LED
Record sound for webcam videos and for video chats online.
Insert a small pin to eject a disc when the optical disc Eject
button does not work.
Watch your favorite DVDs, or listen to your CD collection.
Burn CDs and DVDs*. The LED indicates whether there is a
disc in the drive.
*Hewlett-Packard supports the lawful use of technology and
does not endorse or encourage the use of our products for
purposes other than those permitted by copyright law.
Press this button to open the optical disc drive to insert or
remove a disc.
Press this button for a brighter screen display.
Press this button to dim the screen display.
Indicates hard disk drive activity.
Indicator light is blue when computer is on; the light is off
when computer is in sleep or hibernate mode.
S Built-in speakers
T Power/Standby
button
Use the built-in stereo speakers for a powerful media
experience when listening to music, or when watching your
home videos and DVDs.
Press the button to turn on your computer or put it in
Sleep mode.
Setting Up Your Computer
WARNING: Please read “Safety Information” in the Limited Warranty
and Support Guide before installing and connecting the computer to the
electrical power system.
WARNING: To reduce the risk of serious injury, read the Safety & Comfort
Guide. It describes proper workstation setup, posture, and health and
work habits for computer users. It also provides important electrical and
mechanical safety information.
Follow the steps on the setup poster to set up the computer. See “Turning On Your Computer
for the First Time” on page 4.
HP All-in-One PC Setup 3

Checking the computer installation
Place the computer in the proper location so that:
All ventilation openings are unobstructed.
All cabling is out of the way. Do not place any cable in a walkway or where it can be
stepped on or damaged from placing heavy objects on it.
Protect the computer and connected accessories by connecting all power cords to a power
surge protection device. Use a power strip specifically labeled as having surge protection, an
uninterruptible power supply (UPS), or similar device.
Look in the computer box for printed details or updates regarding the computer.
Turning On Your Computer for the First Time
After you have completed the steps on the setup poster, you are ready to turn on the
computer.
NOTE: Do not connect or add other devices to the computer until after you turn on the
computer for the first time and complete the initial setup.
To turn on the computer:
1 Press the Power button.
2 Turn on the external speakers, if they are present.
3 Set up the computer and Microsoft
instructions:
If prompted, select the country/region in which you are physically located, and
wait while the computer makes preparations. (When you select an alternate
language, it may take up to 30 minutes for this one-time language setup on the
computer.)
Follow the onscreen instructions to register, sign up for updates, and get online.
The antivirus software may automatically open. Follow the onscreen instructions to
set up this tool, which protects the computer and your privacy.
4 When you see the Windows desktop, the initial setup is complete.
For help with getting started using your computer, see the remaining topics in this section.
®
Windows®7 by following the onscreen
Turning off the computer
You will need to turn off the computer for safety reasons: to make repairs, to install new
hardware or cards in the computer. If the computer will not be used for extended periods of
time, you may want to turn it off.
As an alternative to shutting down the computer, you can lock it or put it into either Sleep or
Hibernate mode, if it is available. You can set the power management timers to put the
computer automatically into Sleep or Hibernate mode.
4 Getting Started (features vary by model)

The computer has these reduced power states:
Sleep mode saves your open documents and programs, and places your computer into
a reduced-power state. During Sleep mode, the power status LED turns off, and the
computer is ready to wake quickly.
Hibernate mode (available as an advanced power setting) saves the system memory
to a temporary file on the hard disk and then turns off the hardware. When you turn on
the computer again, the programs, folders, and documents that you had open are
restored to the screen.
Restarting the computer
When you restart the computer, the computer clears some settings and starts over using the
operating system and software in its memory. Restarting is the easiest and most effective way
to solve many software issues for the computer.
Also, you may want to install additional software programs or hardware devices onto the
computer, and doing so may require that you restart the computer after installation.
To restart the computer:
1 Click the Windows Start button
2 Click the Arrow button next to Shut Down
Or
Quickly press the On button on the front of the computer.
®
.
, and then click Restart.
Sound options
Your computer supports the following sound options:
Built-in analog stereo speakers
Analog 2.0 or 2.1 powered speakers
Headphones
NOTES:
Your computer supports powered speaker systems only. Powered speakers require a
separate power supply.
By default, the internal speakers are on.
HP All-in-One PC Setup 5

Connecting analog speakers
(Sold separately)
To connect active external speakers, such as left/right stereo speakers or a 2.1 system of two
speakers and a subwoofer, to the computer:
1 Make sure the speaker system is turned off and unplugged.
2 For 2.0 powered speakers, connect the speaker cable to the Audio Line Out connector
on the back of the computer.
Or
For 2.1 powered speakers, connect the Audio Line Out connector on the back
of the computer to the subwoofer, and then connect the left and right speakers
to the subwoofer.
3 Turn on the speaker system. If necessary, refer to the documentation that came
with your speakers.
NOTE: When an Audio Line Out or headphone device is connected, the internal speakers
are muted.
Connecting headphones
(Sold separately)
Your computer comes with a headphones connector on the side of the computer.
The headphones connector is labeled with a headphones icon.
When headphones are plugged in, the sound to the internal speakers and
the external speakers (if attached) is muted.
Connecting a microphone
(Sold separately)
Your computer comes with a built-in microphone, next to the webcam on the front of the
computer.
There is also a microphone connector on the side of the computer.
Connect an external microphone to the microphone connector on the
computer.
To select the microphone or adjust the volume, see “Selecting the microphone” on
page 7.
6 Getting Started (features vary by model)

Adjusting the speaker volume
There are several ways to adjust volume. Use the Volume icon on the Windows 7 taskbar to
set speaker volume. Then, you can adjust the volume by using:
The Volume buttons on the keyboard (select models only).
The Volume knob on the speakers (select models only).
To set speaker volume, use the Volume icon on the taskbar:
1 Right-click the Volume icon on the taskbar, and then click Open Volume
Mixer.
The Volume Mixer settings window opens.
2 Adjust the volume by clicking the slider bar and moving it.
3 When you are satisfied with the sound level, close the window by clicking the X in the
upper-right corner.
For help with audio, check the troubleshooting items in “Audio and speakers” on page 31.
For more information, open the Help and Support Center or refer to the Support Web site;
see “Getting More Information” on page 23.
Selecting the microphone
The microphone on your computer is ready to use. If you have more than one microphone
connected, select the microphone that you would like to use in Windows 7.
NOTE: When you have a webcam or an audio player connected to the computer, because
of the audio input from the device, Windows 7 may recognize each as a microphone input.
To select the microphone that you would like to use in Windows 7:
1 Right-click the Volume icon on the taskbar, and then click Recording
Devices. The Sound window opens.
2 Select the Microphone that you want to use, click Set Default, and then
click Apply.
3 Click OK.
Adjusting microphone recording level in Windows 7
To adjust the recording level of the microphone:
1 Right-click the Volume icon on the taskbar, and then click Recording
Devices. The Sound window opens.
2 Double-click the microphone connector that you want to use.
3 Click the Levels tab.
4 Adjust the recording level for the microphone by clicking the slider bar and moving it.
Click OK, and then click OK again.
HP All-in-One PC Setup 7
Connecting to a network
This section describes connecting to the Internet through a wired or wireless connection.
Your computer supports a wireless or wired LAN that connects to other devices, such as
a printer.
The network connection to the Internet is usually through a broadband modem (digital
subscriber line [DSL] or cable), which requires a separate subscription.
Wireless access point and Internet service are required and are not included. First-time
wireless network installation requires that you:
1 Purchase high-speed Internet service from an Internet service provider (ISP).
2 Purchase a broadband modem (DSL or cable). This may be provided by the ISP.
3 Purchase and install a wireless router (sold separately), if one is required.
Setting up a wired Ethernet network connection
The Ethernet connection may be called a network interface adapter, network interface card,
or NIC. It provides a high-speed or broadband connection to an Ethernet (10BaseT) or Fast
Ethernet (100BaseT) network. After you connect this interface to a network, such as a LAN,
you can connect to the Internet through the network.
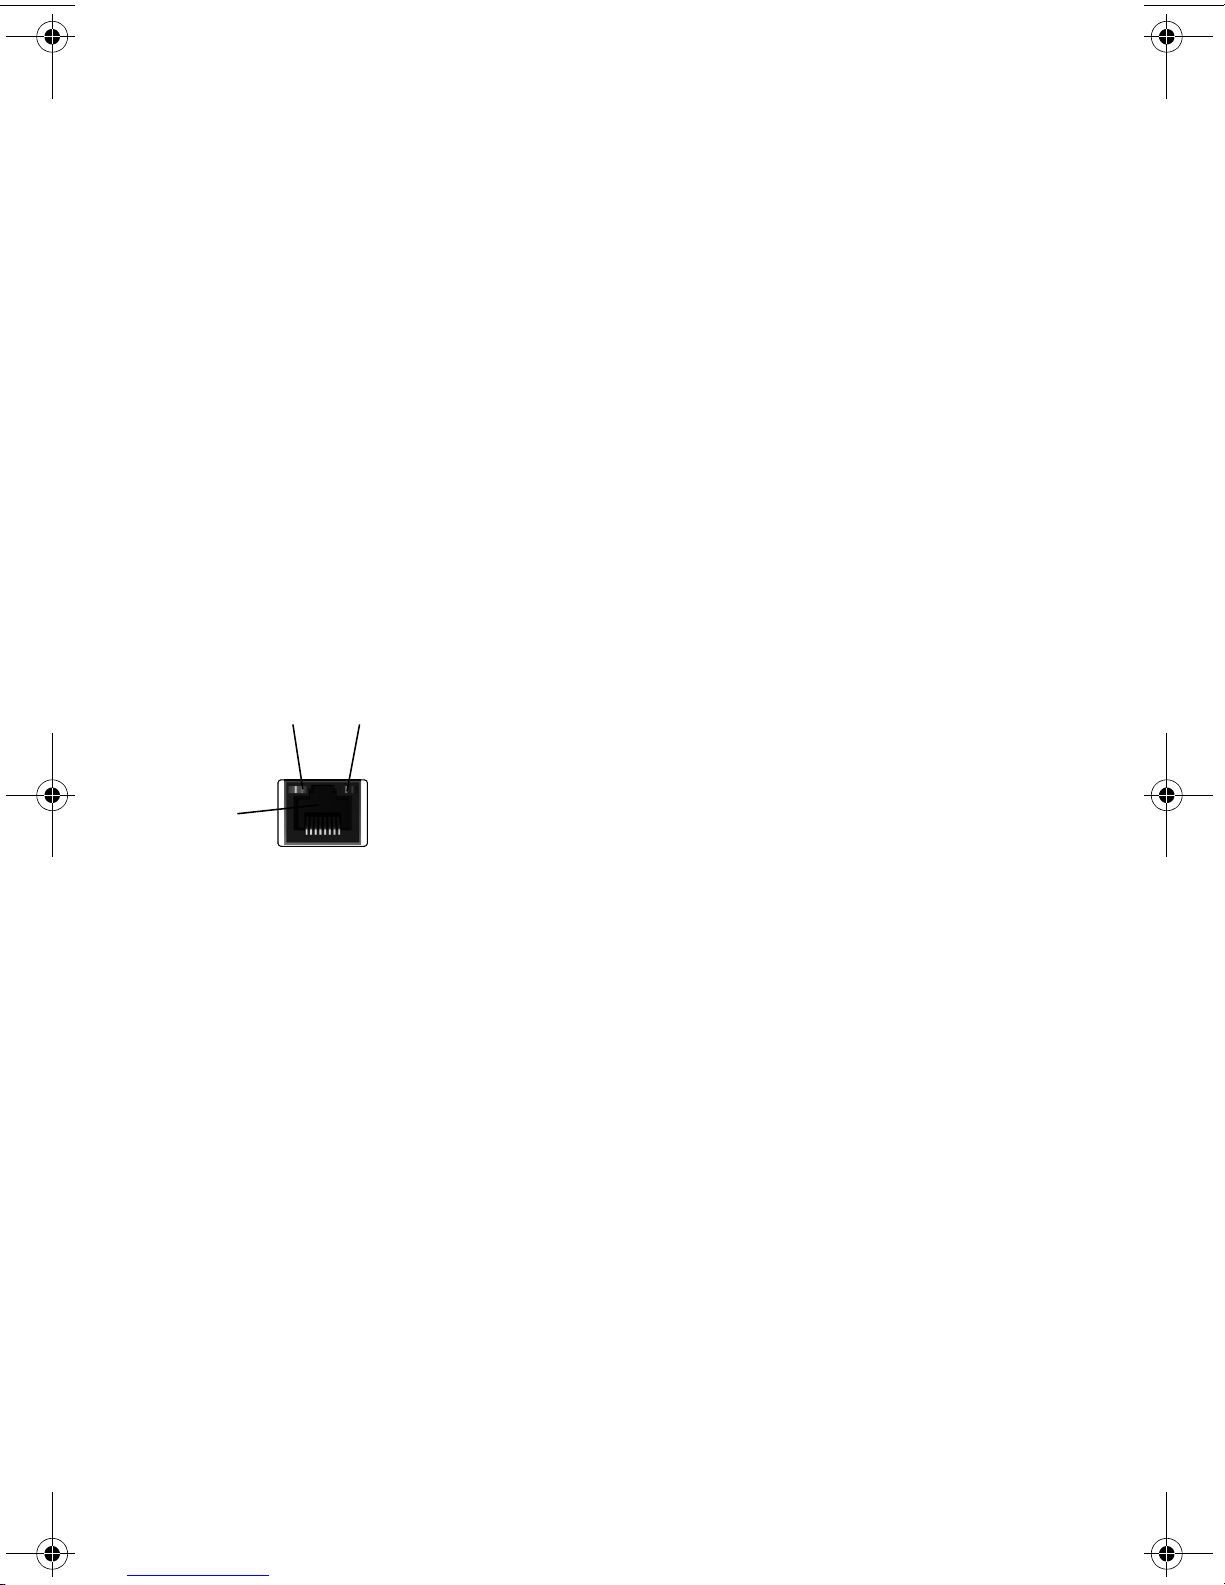
1 Connect an Ethernet cable to the Ethernet (RJ-45) connector (A) on the back of the
computer, and to the network router or LAN device.
B B
LAN
A
2 With the computer turned on, check the indicator lights (B) next to the Ethernet connector
for the status:
ACTIVITY — Lit yellow during network data transfer activity
LINK — Lit green when there is a valid network connection
Setting up a wireless network connection
(Select models only)
You can connect the computer to a wireless network supporting IEEE 802.11b or
802.11g.
You need an existing wireless LAN with an Internet connection. Consult your Internet
Service Provider (ISP) for further information.
To verify that the integrated WLAN device is installed on the computer correctly, see
“Checking the wireless LAN device installation” on page 10.
For more information about setting up a wireless network, click Start, click Help and
Support, and then type Setting up a wireless network into the Search Help box and
press Enter.
8 Getting Started (features vary by model)

Connecting to the Internet
Connecting to the Internet requires that you:
1 Purchase high-speed Internet service from an Internet service provider (ISP).
2 Purchase a broadband modem (DSL or cable). This may be provided by the ISP.
3 Purchase and install a wireless router (sold separately), if one is required.
The computer can connect to the Internet through a LAN or digital subscriber line (DSL).
Wireless connection to the Internet may also be available (select models only). Check with
your Internet Service Provider (ISP) for specific information on the connection.
1 Refer to “Setting Up Your Computer” on page 3 to make the hardware connections.
2 For a network connection, see “Connecting to a network” on page 8.
3 To check a wireless LAN device installation, see “Checking the wireless LAN device
installation” on page 10.
4 To connect to the Internet:
Sign up with an ISP. If you already have an account with an ISP, skip this step and
follow the instructions provided by the ISP.
If you did not set up the computer for Internet service during the initial setup, do so
now by using Online Services:
a Click the Start button.
b Click All Programs.
c Click Online Services and then click Get Online.
d Follow the onscreen instructions to select an ISP and set up Internet service.
NOTE: Online Services provides a list of ISPs; however, you may choose another ISP or
transfer an existing account to this computer. To transfer existing accounts, follow the
instructions provided by the ISP.
5 Connect to the Internet. You must connect through your ISP.
6 Open your Web browser and browse the Internet.
You can use any Web browser; most computers have Microsoft Internet Explorer
®
open Internet Explorer:
a Click the Start button.
b Click Internet Explorer.
NOTE: If you have issues connecting to the Internet, see “Internet access” on page 32.
. To
HP All-in-One PC Setup 9

Checking the wireless LAN device installation
You can verify that the integrated WLAN device is installed on the computer correctly by
using the Windows operating system Device Manager:
1 Click the Start button.
2 Type Device Manager into the Start Search box, and then click Device Manager to
open the Device Manager window.
3 Click Network adapters. Your WLAN device should be listed here. The WLAN
device may include the term wireless, wireless LAN, or 802.11.
NOTE: If no WLAN device is listed, either the computer does not have an integrated
WLAN device, or the driver for the device is not properly installed.
4 Click the Start button.
5 Type Network and Sharing Center into the Start Search box, and then click Network
and Sharing Center to open the Network and Sharing Center window.
6 Click Connect to a network, and then follow the onscreen instructions.
Using wireless security features
When you set up a home WLAN or access an existing public WLAN, always enable security
features to protect the network from unauthorized access. The most common security levels
are Wi-Fi Protected Access Personal (WPA-Personal) and Wired Equivalent Privacy (WEP).
When setting up a network, use one or more of the following security measures:
Enable WPA-Personal or WEP security encryption on the router.
Change the default network name (SSID) and password.
Set up a firewall.
Set security on your Web browser.
10 Getting Started (features vary by model)

Protecting your computer
Protect your computer, personal settings, and data from a variety of risks by using:
Passwords.
Antivirus software.
Firewall software.
Critical security updates.
NOTE: Security solutions are designed to act as deterrents, but they may not be able to
prevent software attacks or to prevent the computer from being mishandled or stolen.
Computer risk Computer feature
Unauthorized use of the computer or user
User password
account
Computer viruses Antivirus program
Unauthorized access to data Firewall program
Windows updates
Unauthorized access to Setup Utility,
Administrator password
BIOS settings, and other system
identification information
Ongoing or future threats to the computer Windows critical security updates from
Microsoft
Using passwords
A password is a group of characters that you choose to secure the computer information.
Several types of passwords can be set, depending on how you want to control access to your
information. Passwords can be set in the Windows operating system on the computer.
CAUTION: To avoid being locked out of the computer, record each
password you set. Because passwords are not displayed as they are set,
changed, or deleted, it is essential to record each password immediately
and store it in a secure place. Do not store passwords in a file on the
computer.
You can use the same password for more than one Windows security feature. A password set
in Windows must be entered at a Windows prompt.
For information on Windows passwords: click the Start button, click Help and Support,
and then type passwords into the Search Help box and press Enter. See “Using the Onscreen
Help and Support Center” on page 23.
HP All-in-One PC Setup 11

Using antivirus software
When you use the computer for e-mail, network, or Internet access, you expose it to computer
viruses. Computer viruses can disable or damage the operating system, software programs,
or computer utilities.
Antivirus software can detect most viruses, remove them, and, in most cases, repair any
damage that they have caused. To provide ongoing protection against newly discovered
viruses, you must keep the antivirus software up to date.
The antivirus program, which is preinstalled on the computer, includes antivirus and firewall
components. The software includes a free trial subscription of protection updates. To protect
the computer against new viruses beyond the trial period, purchase an extended update
service. Instructions for using and updating the antivirus software, and for purchasing
extended update service, are provided within the program.
For more information about computer viruses: click the Start button, click Help and
Support, and then type viruses into the Search Help box and press Enter. See “Using the
Onscreen Help and Support Center” on page 23.
Using firewall software
When you use the computer for e-mail, network, or Internet access, unauthorized persons
may be able to gain access to information about you, your computer, and your data. To
protect your privacy, use firewall software:
Windows includes firewall software preinstalled on the computer.
The antivirus program, which is preinstalled on the computer, includes a firewall
program.
Firewall features include logging, reporting, and automatic alarms to monitor all incoming
and outgoing communications.
Under some circumstances, a firewall can block access to Internet games, interfere with
printer or file sharing on a network, or block authorized e-mail attachments. To solve the
problem temporarily, disable the firewall, perform the task that you want to perform, and then
enable the firewall again. To resolve the problem permanently, reconfigure the firewall.
Configuring the computer for automatic Microsoft
software updates
Microsoft continually updates the Windows operating system. Run Windows Update monthly
to install these updates, or keep the operating system up to date by using the Automatic
Updates feature.
When you are connected to the Internet, Windows Update automatically notifies you
(through a pop-up message or icon in the notification area) when critical updates are
available. When you see the Windows Update message, allow the updates to download to
your system. If you update the system weekly, or even monthly, the time required for
download is minimal.
12 Getting Started (features vary by model)

Installing critical security updates
CAUTION: To reduce the risk of information damage or loss from security
breaches and computer viruses, install all critical updates from Microsoft
as soon as you receive an alert.
Additional updates to the operating system and other software may have become available
after the computer was shipped. Download all available updates and install them onto the
computer.
Setting up user accounts
When you share a computer with several people, you can set up a user account for each
computer user. Windows uses the information in the user account to determine what files and
folders the computer user can access, when they can make changes to the computer, and
their personal preferences. Each person can access only their own files and settings.
For more information, click the Start button, click Help and Support, and then type User
Accounts into the Search Help box and press Enter. See “Using the Onscreen Help and
Support Center” on page 23.
Guidelines for installing software and hardware
devices
After you set up the computer and complete the initial setup, you may want to install
additional software programs or hardware devices. Keep in mind the following important
guidelines:
Before installation, make a restore point by using the Microsoft System Restore program.
The restore point is a snapshot of the computer settings. By using System Restore, you
ensure that you have a stable set of settings to use.
Choose software that is compatible with the computer; check the operating system,
memory, and other requirements listed for the new software.
Install the new software according to the directions provided by the software
manufacturer. If you need help, check the manufacturer documentation or customer
service information.
For antivirus software, uninstall the existing software program before reinstalling it or
installing a new antivirus program.
NOTE: Use only licensed original software. Installing copied software may be illegal, may
result in an unstable installation, or may infect the computer with a virus.
HP All-in-One PC Setup 13
 Loading...