

HP PAVILION A6716 GETTING, PAVILION A6761 GETTING, PAVILION A6744 GETTING, PAVILION A6756 GETTING, COMPAQ PRESARIO CQ5012 User Manual
...
Getting Started

The only warranties for Hewlett-Packard products and services are set forth in the express
statements accompanying such products and services. Nothing herein should be construed as
constituting an additional warranty. HP shall not be liable for technical or editorial errors or
omissions contained herein.
HP assumes no responsibility for the use or reliability of its software on equipment that is not
furnished by HP.
This document contains proprietary information that is protected by copyright. No part of this
document may be photocopied, reproduced, or translated to another language without the prior
written consent of HP.
Hewlett-Packard Company
P.O. Box 4010
Cupertino, CA 95015-4010
USA
Copyright © 2000–2007 Hewlett-Packard Development Company, L.P.
This product incorporates copyright protection technology that is protected by U.S. patents and
other intellectual property rights. Use of this copyright protection technology must be authorized by
Macrovision, and is intended for home and other limited pay-per-view viewing uses only unless
otherwise authorized by Macrovision. Reverse engineering or disassembly is prohibited.
Microsoft and Windows Vista are U.S. registered trademarks of Microsoft Corporation.
The Windows logo and Windows Vista are trademarks or registered trademarks of Microsoft
Corporation in the United States and/or other countries/regions.
HP supports lawful use of technology and does not endorse or encourage the use of our products
for purposes other than those permitted by copyright law.
The information in this document is subject to change without notice.

Table of Contents
Setting Up the Computer ..........................................................................1
Putting the Computer Together .................................................................................1
Placing the computer in the proper location ..........................................................1
Using surge protection .......................................................................................1
Connecting to the computer ................................................................................ 2
Connecting a Digital Camera (Photo or Video)...........................................................8
Connecting Other Devices .....................................................................................10
Storing Documentation and Recovery Discs..............................................................10
Adjusting the Monitor............................................................................................11
Adjusting the screen resolution by using Vista .....................................................11
Adjusting the screen resolution by using the NVIDIA Control Panel ........................11
Setting Up a Local Area Network ........................................................................... 12
Setting Up a Wired (Ethernet) Connection ...............................................................13
Integrated Wireless Devices...................................................................................14
Connecting the Wireless LAN Device......................................................................14
Checking the wireless LAN device installation .....................................................15
Using wireless security features .........................................................................16
Connecting a Modem ...........................................................................................16
Connecting Speakers or Microphone ......................................................17
Sound Connector Types ........................................................................................17
Connecting a Microphone.....................................................................................20
Table of Contents iii

Speaker Configurations.........................................................................................21
Speaker types .................................................................................................22
Connecting 2/2.1 (Two speakers and a subwoofer) audio speakers......................22
Connecting 4.1 (Four speakers and a subwoofer) audio speakers .........................23
Connecting 5.1 (Five speakers and a subwoofer) audio speakers..........................25
Connecting 7.1 (Seven speakers and a subwoofer) audio speakers .......................26
Connecting your home stereo system (optional) ................................................... 28
2.1 home stereo installation..............................................................................29
5.1 home audio installation ..............................................................................30
5.1 home audio installation procedure...............................................................31
7.1 home audio installation ..............................................................................32
7.1 home audio installation procedure...............................................................33
Connecting digital audio ..................................................................................34
Connecting Headphones ....................................................................................... 35
Using a 2.1 speaker system with headphones..................................................... 35
Using a 5.1 to 7.1 speaker system with headphones ...........................................35
Connecting Speakers Using the Creative Sound Blaster X-Fi Sound Card..................... 36
Connecting the speakers ..................................................................................36
Connecting the FlexiJack connector.................................................................... 37
Getting Help ..........................................................................................39
Finding Onscreen Guides......................................................................................39
Finding Guides on the Web...................................................................................39
Using the Onscreen Help and Support Center.......................................................... 40
Using the PC Help & Tools Folder...........................................................................40
Using the hardware diagnostic tools .................................................................. 40
Using HP Total Care Advisor Software ....................................................................41
Turning On the Computer for the First Time ............................................43
Turning Off the Computer ...................................................................................... 44
Using Shut Down.............................................................................................44
Using Lock......................................................................................................45
Using Sleep mode ...........................................................................................45
Using Hibernate mode .....................................................................................46
Automatic Sleep, Hibernate, or Away mode .......................................................46
Restarting the Computer ........................................................................................47
Connecting to the Internet......................................................................................47
Using the Computer with Safety and Comfort...........................................................48
Setting Up User Accounts ......................................................................................49
iv Getting Started (features vary by model)

Protecting the Computer ........................................................................................50
Using passwords .............................................................................................50
Using antivirus software....................................................................................52
Using firewall software.....................................................................................52
Configuring the computer for automatic Microsoft software updates.......................53
Installing critical security updates.......................................................................54
Guidelines for Installing Software and Hardware Devices..........................................54
Transferring Files and Settings from an Old Computer to a New Computer.................. 55
Using the Keyboard...............................................................................57
Identifying Keyboard Features................................................................................57
Alphanumeric keys ..........................................................................................57
Function keys .................................................................................................. 58
Edit keys.........................................................................................................58
Arrow keys .....................................................................................................58
Numeric keys..................................................................................................59
Keyboard indicators ........................................................................................59
Special keyboard buttons .................................................................................60
Identifying Special Keyboard Buttons ......................................................................60
Customizing the keyboard buttons .....................................................................62
Keyboard Shortcuts...............................................................................................63
Wireless Mouse and Keyboard Troubleshooting.......................................................64
Synchronizing a wireless mouse and keyboard ................................................... 64
Using the Mouse ....................................................................................67
Using the Mouse Buttons .......................................................................................68
Scrolling.........................................................................................................68
Autoscrolling...................................................................................................69
Panning..........................................................................................................69
Changing Mouse Settings......................................................................................69
Switching mouse button functions.......................................................................69
Changing mouse pointer speed.........................................................................70
Changing the double-click speed.......................................................................70
Turning on the ClickLock option.........................................................................70
Changing the scroll wheel speed....................................................................... 71
Wireless Mouse and Keyboard Troubleshooting.......................................................71
Table of Contents v

Configuring Speaker and Sound Options ...............................................73
Adjusting speaker volume.................................................................................74
Selecting a microphone....................................................................................75
Configuring audio output..................................................................................75
Using the Creative Sound Blaster X-Fi or X-Fi Fatality audio card............................76
Configuring the FlexiJack connector ...................................................................77
Sound Blaster X-Fi configuration modes .............................................................. 77
Configuring speakers with Realtek HD Audio Manager ........................................78
The Realtek HD Audio Manager control screens ..................................................79
Configuring sound for recording with the Realtek HD Audio Manager....................81
Retasking front panel audio connectors ..............................................................82
Configuring multistreaming audio ......................................................................83
When to use multistreaming audio.....................................................................84
Setting up multistreaming audio......................................................................... 84
Configuring audio for Windows Media Center ...................................................85
Selecting recording devices ..............................................................................86
Resolving sound issues .....................................................................................86
Using the Windows Media Center Remote Control ..................................87
Remote Control Buttons Overview...........................................................................88
Teletext access buttons .....................................................................................90
About the Remote Control......................................................................................91
Troubleshooting the Remote Control........................................................................92
Remote sensor is not receiving a signal from the remote control.............................92
Introducing Your Computer Software .....................................................93
Learning More About Software...............................................................................93
Using the Desktop.................................................................................................93
Removing desktop icons ...................................................................................94
Retrieving desktop icons ...................................................................................94
Removing files permanently...............................................................................94
Using the Windows Start Button Menu .................................................................... 94
Using the All Programs menu ............................................................................94
Organizing the All Programs list........................................................................95
Using the Control Panel.........................................................................................95
Resizing Windows................................................................................................96
Working with Digital Images .................................................................................96
About the Internet .................................................................................................97
Using a Browser...................................................................................................98
Searching the Internet ......................................................................................98
Restricting Internet content.................................................................................99
vi Getting Started (features vary by model)

Using the Norton Internet Security Antivirus Software ..............................................100
Configuring and registering Norton Internet Security software ............................. 100
Manually running a scan ................................................................................ 100
Setting a Full System Scan time .......................................................................101
Setting up a Custom Scan time........................................................................ 101
Sending and Receiving E-Mail..............................................................................102
Using Windows Mail .....................................................................................102
Using the e-mail program provided by your ISP................................................. 102
Software Quick Reference Table...........................................................................103
Managing Files ....................................................................................107
Organizing Files with Folders...............................................................................107
Creating Folders.................................................................................................108
Moving Files ......................................................................................................108
Finding Files ......................................................................................................109
Renaming Files...................................................................................................110
Deleting Files ..................................................................................................... 110
Retrieving Files from the Recycle Bin .....................................................................110
Copying Files..................................................................................................... 111
Using a Printer ...................................................................................................111
Using CD and DVD Media Drives ..........................................................113
Using the CD and DVD Drives.............................................................................. 113
Handling CDs and DVDs ................................................................................114
Inserting and removing CDs and DVDs............................................................. 114
Compatibility Information ....................................................................................115
Disc Features and Compatibility Table ..................................................................116
Optical Drive Quick Reference Table ....................................................................117
Using Blu-ray and HD Disc Drives.........................................................................118
Using the Memory Card Reader ...........................................................119
Media Insertion Guide ........................................................................................ 120
Understanding the Activity Light ...........................................................................123
Formatting a Memory Card .................................................................................123
Troubleshooting the Memory Card Reader............................................................. 124
Using the HP Personal Media Drive and HP Pocket Media Drive ...........125
Connecting the Drive ..........................................................................................126
Inserting the Drive into an HP Drive Bay ................................................................ 127
Connecting the Drive to a Computer Without a Drive Bay .......................................128
Locating the Drive and Assigning a Drive Letter ......................................................129
Using the Drive ..................................................................................................130
Transferring files to another computer manually.................................................130
Disconnecting the Drive.......................................................................................130
Troubleshooting the HP Media Drive..................................................................... 131
Table of Contents vii

Playing CDs, DVDs, or VCDs .................................................................133
Using Music.......................................................................................................133
Using Music with Windows Media Center.............................................................134
Using the music library........................................................................................135
Adding music to the music library .................................................................... 135
Adding music files from the hard disk drive....................................................... 135
Adding music files from a CD..........................................................................136
Deleting music files from the music library.........................................................137
Using supported music file types......................................................................137
Playing Music Files in Windows Media Center.......................................................138
Changing the visualization settings ..................................................................139
Playing an album in Windows Media Center....................................................140
Playing a song in Windows Media Center .......................................................140
Creating a Queue in Windows Media Center........................................................ 141
Finding and Playing an Album in Windows Media Center ......................................141
Using album details .......................................................................................141
Using Search in Windows Media Center...............................................................142
Searching for music tracks and files .................................................................142
Creating a Playlist in Windows Media Center........................................................ 143
Copying Music Files to CD in Windows Media Center............................................ 144
Listening to Online Radio Stations......................................................................... 146
Playing Music CDs .............................................................................................146
Playing CDs with Windows Media Player..............................................................147
Playing DVDs.....................................................................................................147
Using Windows Media Center to play DVDs.....................................................148
Troubleshooting poor playback when playing DVDs ..........................................148
Using country/region codes............................................................................ 149
Playing DVD Movies in Windows Media Center ....................................................149
Changing the DVD Settings..................................................................................150
Changing the DVD movie language.................................................................150
Changing DVD remote control options .............................................................151
Changing DVD closed captioning....................................................................152
Changing DVD Audio Settings ............................................................................. 152
Playing DVDs with Windows Media Player............................................................ 153
Using DVD Play to Play DVDs, Videos, High-Definition DVDs, and Blu-ray DVDs......... 153
Playing Video CDs (VCDs)...................................................................................155
Playing video CDs (VCDs) with Windows Media Player ..................................... 155
Using Windows Media Center ..............................................................157
Setting Up Windows Media Center ...................................................................... 158
Completing the setup wizard...........................................................................158
Windows Media Center Start Menu......................................................................160
Windows Media Center Start menu items ......................................................... 160
viii Getting Started (features vary by model)

Windows Media Center Features ......................................................................... 161
The right music for the moment........................................................................ 162
Playing Internet radio ..................................................................................... 162
Sharing your digital memories.........................................................................162
Transforming your living space into a theater ....................................................163
Online media................................................................................................163
Navigating Windows Media Center..................................................................... 163
Opening Windows Media Center with a mouse................................................163
Opening Windows Media Center with the Windows Media Center
remote control............................................................................................... 164
Using the Windows Media Center menu bars ...................................................164
Selecting items in Windows Media Center........................................................165
Windows Media Center control menu..............................................................166
Changing Windows Media Center Settings ...........................................................166
Windows Media Center Settings categories...................................................... 167
Using Windows Media Center power settings...................................................168
Creating Audio and Data Discs.............................................................169
Erasing Rewritable Discs Before Recording ............................................................ 170
Working with Audio CDs ....................................................................................170
Audio CD tips ...............................................................................................171
Before you begin creating discs.......................................................................172
Creating audio CDs.......................................................................................172
Creating video discs ...................................................................................... 173
Copying a disc .............................................................................................174
Creating data discs........................................................................................175
Making a disc label using LightScribe Technology .............................................175
Making a paper disc label..............................................................................177
Working with Pictures and Videos .......................................................179
Working with Digital Images ...............................................................................179
Viewing Pictures in Windows Media Center ..........................................................180
Adding Pictures in Windows Media Center ...........................................................180
Adding picture files from the hard disk drive .....................................................180
Viewing Pictures in Windows Media Center ..........................................................181
Viewing pictures as a slide show ..................................................................... 182
Viewing a slide show with music .....................................................................182
Using supported picture file types in Windows Media Center..............................183
Editing Pictures in Windows Media Center ............................................................184
Fixing red eye or contrast ...............................................................................184
Cropping pictures in Windows Media Center ................................................... 184
Rotating pictures............................................................................................185
Printing Pictures in Windows Media Center ........................................................... 186
Copying Pictures to CDs and DVDs in Windows Media Center ................................186
Table of Contents ix

Playing Videos in Windows Media Center ............................................................187
Playing digital videos.....................................................................................187
Using supported video file types...................................................................... 188
Transferring and Recording Video Files .................................................................188
Recording analog and digital video files ..........................................................188
Creating a DVD from Video Files in Windows Media Center ...................................189
Creating Movies by Using muvee autoProducer....................................191
Basic steps for making a movie .......................................................................191
Using muvee autoProducer ..................................................................................193
Getting started ..............................................................................................193
Capturing video from a digital video camera.................................................... 195
Adding videos...............................................................................................196
Adding pictures.............................................................................................198
Adding music................................................................................................ 199
Selecting the style ..........................................................................................199
Changing the settings.....................................................................................200
Making the movie.......................................................................................... 201
Previewing the movie .....................................................................................202
Modifying the movie ......................................................................................202
Saving the movie project ................................................................................204
Recording the movie project to disc .................................................................205
Upgrading muvee autoProducer ......................................................................206
Supported muvee autoProducer output file types ................................................206
Index...................................................................................................207
x Getting Started (features vary by model)

Setting Up the Computer
WARNING: The power supply is preset for the country/region in which you
purchased your computer. If you move, please check the voltage requirements
for your new location before plugging the computer into an AC power outlet.
WARNING: Please read “Safety Information” in the Limited Warranty
and Support Guide before installing and connecting the computer to
the electrical power system.
Putting the Computer Together
Follow the steps on the setup poster to set up the computer. Read the topics in this section
to learn more about the location of components and connectors on the computer, and to
learn about some setup alternatives.
Look in the computer box for printed details or updates regarding the computer.
Placing the computer in the proper location
When setting up your new computer, place it where ventilation openings are unobstructed.
Make sure that all connections are secure and that all cabling is out of the way. Do not
place cabling in walkways or where it can be stepped on or damaged from placing
furniture on it.
Using surge protection
Help protect the monitor, computer, and accessories by connecting all power cords for the
computer and peripheral devices (such as a monitor, printer, or scanner) to a surge
protection device, such as a power strip with surge protection or an uninterruptible power
supply (UPS). Many surge protection devices have surge protection inputs and outputs for
modem or telephone lines. Telephone lines are a common path for lightning spikes to get
into the system. Some surge protection devices have surge protection for television cable
connections as well. Use those if the computer has a television tuner installed.
Setting Up the Computer 1

Not all power strips provide surge protection; the power strip must be specifically labeled
as having this capability. Use a power strip whose manufacturer offers a damage
replacement policy that replaces the equipment if surge protection fails.
Connecting to the computer
Connect the main hardware devices, such as the monitor, keyboard, and mouse, to the
back of the computer. Other peripheral devices, such as a printer, scanner, or camera,
also plug into connectors on the back of the computer. Some computers also have
connectors on the front of the computer. The following table shows some, but not all,
connectors:
NOTE:
Connector Icon/Label Description and function
The location, availability, and number of connectors on the computer may vary.
Mouse (PS/2 connector).
Keyboard (PS/2 connector).
Universal Serial Bus (USB) for mouse, keyboard,
digital cameras, or other devices with USB
connectors.
Printer (parallel).
2 Getting Started (features vary by model)
Serial
Serial port for some digital cameras or other
serial devices.

Connector Icon/Label Description and function (continued)
Audio Line Out (powered speakers).
Audio Line In.
Headphones.
Microphone.
S-Video 2
FireWire
®
(IEEE 1394) for video cameras or other
devices with very fast transfer rates.
NOTE: You must use a 6-pin FireWire (IEEE 1394)
transfer cable with this 6-pin connector.
Digital audio in and digital audio out.
Side speaker out.
Rear speaker out.
Center/Subwoofer.
Secondary S-video connector to connect a VCR,
video camera, or other analog source to the
computer.
Setting Up the Computer 3

Connector Icon/Label Description and function (continued)
Secondary Composite video connector (yellow) to
Composite
Video 2
connect to a VCR, video camera, or other analog
source to the computer.
Secondary Left audio input connector (white).
A/V In
Audio 2
L
A/V In
Audio 2
R
NOTE: This Audio In connector is connected to the
TV tuner. You must use the Audio In connector,
which is connected to the motherboard and located
on the back of the computer, to record audio only
(select models only).
Secondary Right audio input connector (red).
NOTE: This Audio In connector is connected to the
TV tuner. You must use the Audio In connector,
which is connected to the motherboard and located
on the back of the computer, to record audio only
(select models only).
Headphones Out connector (green) to connect to
headphones.
Microphone In connector (pink) to connect to a
microphone.
Universal Serial Bus (USB) 2.0 connector to connect
to a mouse, keyboard, digital camera, or another
device with a USB connector.
4 Getting Started (features vary by model)
Power connector.
Mouse connector to connect a mouse.
Keyboard connector to connect a keyboard.

Connector Icon/Label Description and function (continued)
Printer (parallel) connector to connect a parallel
printer (select models only).
Universal Serial Bus (USB) 2.0 connector to connect
a mouse, keyboard, digital camera, or another
device with a USB connector.
Ethernet LAN connector is a network interface
adapter (also called a network interface card, or
NIC) that connects to an Ethernet (10BaseT) or Fast
Ethernet (100BaseT) network hub.
ETHERNET
Connect this adapter on the computer with your
local area network (LAN) hub or any broadband
connection.
The green LED indicates a valid connection.
Microphone In (Mic) (pink) to connect to a
microphone (also functions as a center/subwoofer
Line Out when a multichannel audio configuration is
activated).
Center
Rear
Side
S-Video
Audio Line Out (green) to connect front speakers.
Audio Line In (blue) connector to connect to an
analog audio device such as a CD player for input
into computer (also functions as rear Line Out when
a multichannel audio configuration is activated).
Line C/Sub (gold) connector to connect
Center/Subwoofer speakers in a multichannel audio
configuration.
Line Rear (black) connector to connect rear speakers
in a multichannel audio configuration.
Line Side (gray) connector to connect side speakers
in an eight-speaker system (7.1).
S-video In connector to connect from a set-top box
output connector.
Setting Up the Computer 5

Connector Icon/Label Description and function (continued)
Composite
Video
A/V In
Audio 1
L
A/V In
Audio 1
R
TV/Cable Ant
ATSC
Composite Video In connector (yellow) to connect to
a TV set-top box.
Primary left audio input from set-top box
connector (white).
NOTE: Audio can be recorded by using this
Audio In connector, which is connected to the
motherboard. Some computers include this primary
left audio input connector on the front of the
computer (select models only).
Primary right audio input from set-top box
connector (red).
NOTE: Audio can be recorded by using this
Audio In connector, which is connected to the
motherboard. Some computers include this primary
right audio input connector on the front of the
computer (select models only).
TV In (TV antenna or cable input from wall outlet
with no set-top box).
TV In connector for TV cable or antenna, which
receives ATSC channels (Advanced Television
System Committee), which are over-the-air digital
transmission channels.
6 Getting Started (features vary by model)
CATV
NTSC
FM Ant
TV In connector for TV cable or antenna, which
receives CATV (Community Antenna Television) or
cable TV channels.
TV In connector for TV cable or antenna, which
receives NTSC channels (National Television System
Committee), which are over-the-air analog
transmission channels.
FM In (radio antenna input) connector, which
connects to the FM antenna cable.
Plug the FM radio antenna cable into the FM In port
on the back of the computer on the TV tuner card.
You may want to extend the ends of the cable to
improve your FM radio signal reception.

Connector Icon/Label Description and function (continued)
Modem (Line In RJ-11) (select models only).
Plug the modem cable (provided in the computer
box) into the computer modem connector on the
back of the computer. Plug the other end to the
telephone line wall jack connector.
Analog Video Out: S-video or composite video
Analog Video
connector (select models only), which connects
to a TV.
VGA/Monitor
HDMI
DVI
Digital Audio
Out
VGA/Monitor (blue) display output connector,
which connects to a VGA monitor. You may need to
use a VGA-to-DVI adapter to connect the display to
the computer.
HDMI display output connector, which connects to
an HDMI monitor or TV display. You may need to
use a HDMI-to-DVI adapter to connect the display to
the computer.
Digital video output connector, which connects to a
TV or monitor (select models only). You may need to
use a VGA-to-DVI or a HDMI-to-DVI adapter to
connect the display to the computer.
See the documentation that came with the
display device.
Digital audio input (white) connector, which
connects to a digital audio device with digital input
(such as a home audio receiver/amplifier) or digital
speakers (select models only).
Digital audio output (red) connects to a digital audio
device with digital output (select models only).
Digital Out (orange) connector, which connects to a
digital audio device with digital input (such as a
home audio receiver/amplifier) or digital speakers
(select models only).
Setting Up the Computer 7
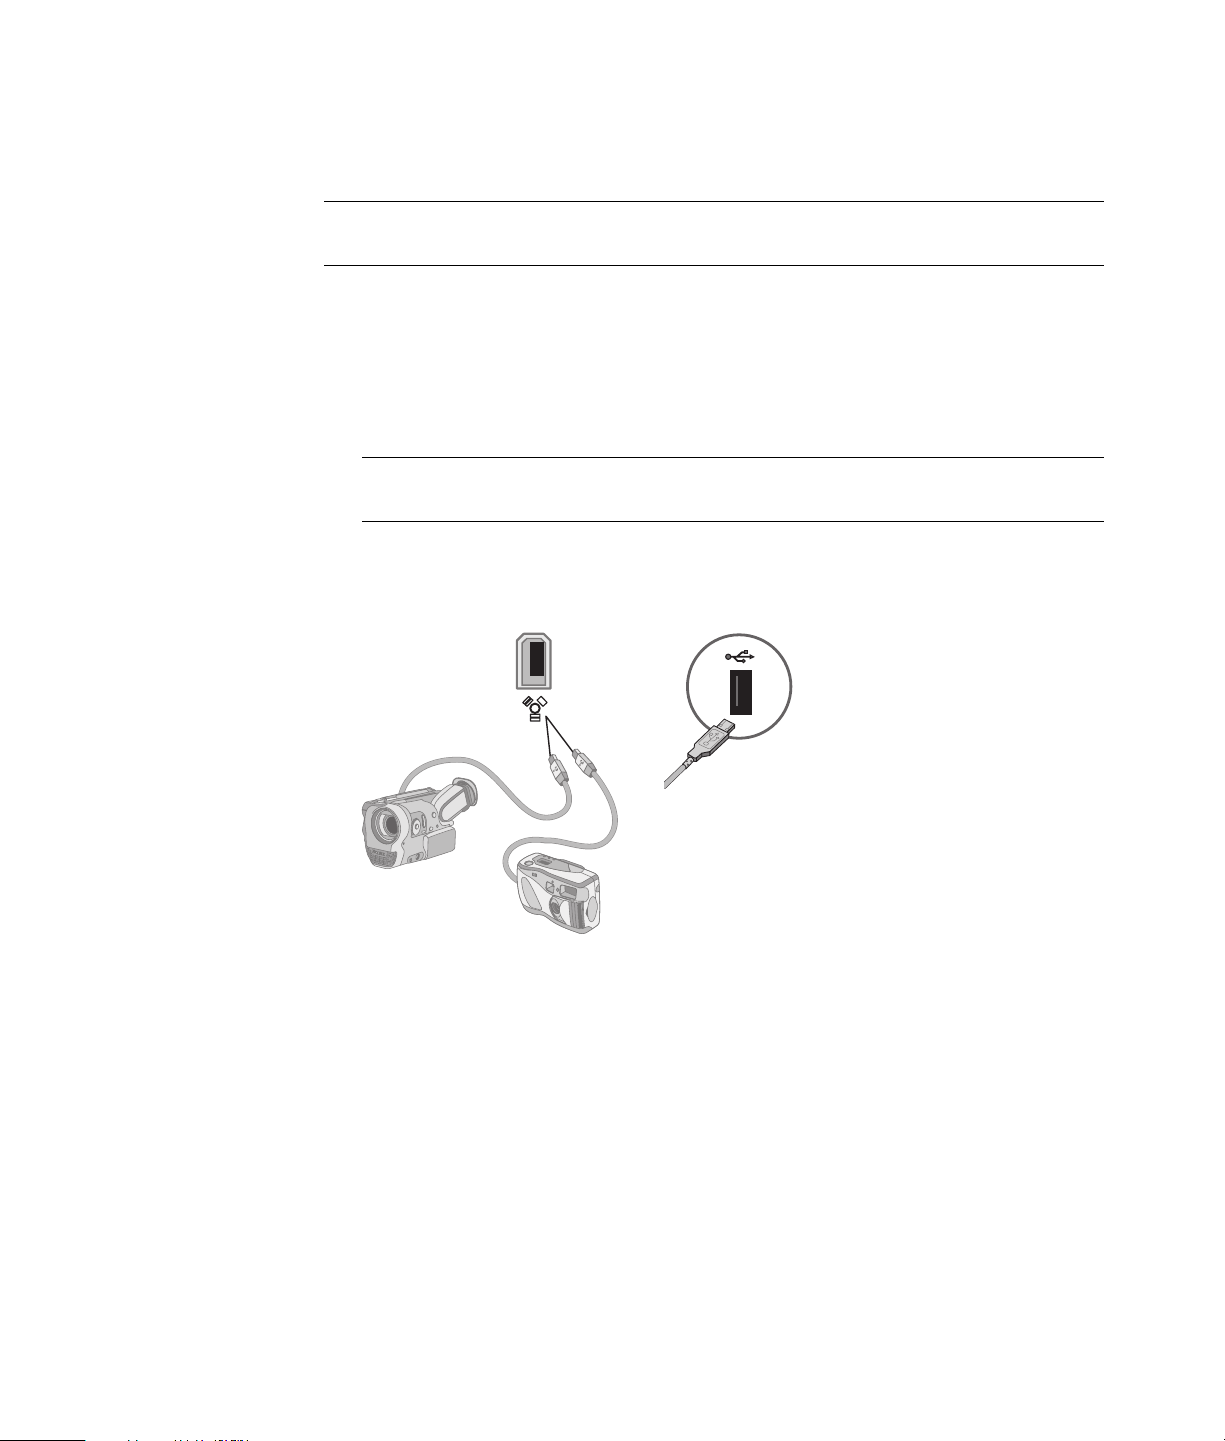
Connecting a Digital Camera (Photo or Video)
The following instructions apply only to digital photo cameras and digital video cameras.
NOTE: When connecting an analog video camera to the computer, use the Video and
Audio In connectors on the front or back of the computer.
Refer to the documentation that came with your digital photo camera or digital video
camera.
To connect a digital photo camera or a digital video camera:
®
1 Turn on the computer, and wait for the Microsoft
to start.
NOTE: If a Digital Video Device AutoPlay window appears when you connect the
camera, click Cancel.
2 Connect the 6-pin video camera transfer cable into the camera, and then into an open
port on the front or back of the computer. Most digital video cameras use either the
FireWire (IEEE 1394) port or the USB port.
Windows Vista® operating system
8 Getting Started (features vary by model)

3 A Found New Hardware message appears. Wait 2 or 3 minutes for Windows Vista to
make the necessary settings for the new device. When installation is complete, a
message appears, indicating that the camera is ready to use.
4 You may need to install driver software for your camera. If so, Windows displays a
message asking if you want to locate and install driver software. Insert the driver
software CD, click Locate and install driver software, and then follow any
onscreen instructions to install the software.
If the computer does not recognize the digital photo camera or the digital video camera:
1 Click the Windows Start Button
®
on the taskbar, and then click
Control Panel.
2 Click System and Maintenance, and then click System.
3 Click Device Manager.
4 Click the plus sign (+) next to the camera port. If the name of the camera appears, the
device is ready. If the name is not there, try the following:
Click Action, and then click Scan for hardware changes. Look in Device
Manager for a new addition under the port.
Unplug the video camera transfer cable from the computer, and plug it into a
different port. Look in Device Manager for a new addition under the port.
Setting Up the Computer 9

Connecting Other Devices
Other peripheral devices can be connected to the front or back of the computer by using
USB or FireWire (IEEE 1394) ports. These peripheral devices include printers, scanners,
video cameras, digital photo cameras, memory card readers, and PDAs (personal digital
assistants) or handheld computers. Refer to the documentation that came with your device.
NOTE: Some peripheral devices are not included with the computer.
NOTE: You must use a 6-pin (not a 4-pin) FireWire (IEEE 1394) cable with the 6-pin
FireWire (IEEE 1394) connector on the computer.
Storing Documentation and Recovery Discs
Store all computer user manuals and warranty information in an easy-to-find, safe location.
It is a good idea to store the system recovery discs with the documentation. This allows
easy access to all important computer documents and files.
10 Getting Started (features vary by model)

Adjusting the Monitor
Adjusting the screen resolution by using Vista
To change the screen resolution by using Vista:
1 Right-click an empty area of the desktop, and then click Personalize.
2 Click Display Settings.
3 If necessary, select the monitor, and then adjust the screen resolution by using the
slider under Resolution.
4 Click Apply.
5 Click Yes, if it is present.
6 Click OK.
NOTE: You can connect more than one display device (CRT monitor, flat panel monitor,
TV, and so on) to the computer at a time (select models only). You can quickly change
which device displays the computer desktop by pressing Alt+F5. Each time you press
Alt+F5, the computer desktop appears on the next device. If pressing Alt+F5 does not
work, restart the computer and try again.
Adjusting the screen resolution by using the NVIDIA Control Panel
To change the screen resolution by using the NVIDIA Control Panel:
1 Right-click an empty area of the desktop, and then click NVIDIA Control Panel.
2 Select Standard or Advanced and then click OK.
3 Under Display, click Change resolution.
4 If necessary, select the display, and then adjust the screen resolution by using the
slider under Display resolution.
5 Click Apply, and then click Yes if you want to apply that resolution.
Or
Click No, and change the resolution by using the slider under Display resolution
again, click Apply and then click Yes.
Setting Up the Computer 11

Setting Up a Local Area Network
A home local area network (LAN) may consist of either a wired or a wireless network that
you can use to connect the computer to other devices on the network, including other
computers. The network components may include a hub or a switch, which can connect
multiple devices to the network, or a router, which can connect computers or a broadband
Internet connection to the network. This network connection also enables you to share data
and printers or other devices among your computers. The network connection to the
Internet is usually through a dial-up or cable modem.
A wired network uses Ethernet cables to connect the devices on the network. For example,
the Ethernet cable plugs into the computer network interface adapter and the router.
A wireless network uses radio waves to connect the devices on the network. For example,
both the computer and the router have an antenna and adapter that use the same
Wi-Fi industry standard: 802.11n, 802.11b, 802.11g, or 802.11a.
The preceding illustration shows a home LAN. The desktop computer has a wired
connection to a wireless router. The desktop computer also has a printer that it shares with
the other computers on the network. Each notebook computer has a wireless connection to
the network router.
12 Getting Started (features vary by model)

Setting Up a Wired (Ethernet) Connection
The Ethernet connection, which may be called network interface adapter, Network
Interface Card, or NIC, provides a high-speed or broadband connection to an
Ethernet (10BaseT) or Fast Ethernet (100BaseT) network. After you connect this interface to
a network, such as a LAN, you can connect to the Internet through the network.
1 Connect an Ethernet cable to the Ethernet connector (A) on the back of the computer,
and to the network router or LAN device.
NOTE: Your computer may not come with an Ethernet connector.
A Ethernet connector (RJ-45 port)
B Ethernet indicator lights
2 With the computer turned on, check the indicator lights (B) next to the Ethernet
connector for the status:
ACTIVITY — Lit yellow during network data transfer activity
LINK — Lit green when there is a valid network connection
NOTE: Your Ethernet connector may have only one indicator light.
Setting Up the Computer 13

Integrated Wireless Devices
Wireless technology transfers data across radio waves instead of wires. Your computer
may be equipped with one or more of the following integrated wireless devices:
Wireless local area network (WLAN) devices connect the computer to
wireless local area networks (commonly referred to as wireless networks, wireless
LANs, or WLANs) in corporate offices, your home, and public areas such as airports
and restaurants. In a WLAN, each mobile wireless device communicates with a
wireless access point, which can be several meters away.
Computers with WLAN devices may support one or more of the four IEEE physical
layer industry standards: 802.11n, 802.11b, 802.11g, or 802.11a.
Bluetooth devices create a personal area network (PAN) to connect to other
Bluetooth-enabled devices such as computers, phones, printers, headsets, speakers,
and cameras. In a PAN, each device communicates directly with the other devices,
and the devices must be relatively close together—within 10 meters of each other.
Wireless wide area network (WWAN) devices provide access to information
anytime and anywhere that you have cellular (data) coverage. In a WWAN, each
mobile device communicates to a public carrier’s base station. Public carriers install
networks of base stations (similar to cell phone towers) throughout large geographic
areas, effectively providing coverage across entire states, or even entire
countries/regions.
For more information about wireless technology, go to:
http://www.hp.com/go/techcenter/wireless
Connecting the Wireless LAN Device
(Select models only)
You can connect the computer to an 802.11n (select models only), 802.11b or
802.11g wireless network by using the external antenna that was included with the
system. This device enables you to establish a wireless network using the computer as a
wireless access point, or you can use the computer as a wireless client (Station Mode) if
you already have a wireless network running.
You need an existing wireless LAN with an Internet connection (consult your Internet
Service Provider for further information). An external antenna is supplied with the system;
you must connect it to the 802.11 module to increase the range and sensitivity of
the radio.
14 Getting Started (features vary by model)

To connect the wireless LAN antenna:
1 Screw the wireless LAN antenna
cable into the wireless LAN
connector on the back of
the computer.
2 For the best wireless performance,
place the antenna on the computer
or in an elevated and open area.
NOTE: The appearance of your wireless antenna may vary.
Checking the wireless LAN device installation
To set up your wireless network, verify that the integrated WLAN device is installed on the
computer correctly:
1 Click the Windows Start Button on the taskbar.
2 Type Device Manager into the Start Search box, and then click Device Manager to
open the Device Manager window.
3 Click Network adapters. Your WLAN device should be listed here. The WLAN
device may include the term wireless, wireless LAN, or 802.11.
NOTE: If no WLAN device is listed, either the computer does not have an integrated
WLAN device, or the driver for the device is not properly installed.
4 Click the Windows Start Button on the taskbar.
5 Type Network and Sharing Center into the Start Search box, and then click Network
and Sharing Center to open the Network and Sharing Center window.
6 Click Connect to a network, and then follow onscreen instructions.
For more information about setting up a wireless network:
Click the Windows Start Button on the taskbar, click Help and Support,
and then type Setting up a wireless network into the Search Help box.
Go to: http://www.hp.com/go/techcenter/wireless (English only).
Go to: http://hp.com/support and search for wireless topics.
Setting Up the Computer 15
Using wireless security features
When you set up a home WLAN or access an existing public WLAN, always enable
security features to protect the network from unauthorized access. The most common
security levels are Wi-Fi Protected Access Personal (WPA-Personal) and Wired Equivalent
Privacy (WEP).
When setting up a network, HP recommends that you use one or more of the following
security measures:
Enable WPA-Personal or WEP security encryption on the router.
Change the default network name (SSID) and password.
Set up a firewall.
Set security on your Web browser.
For more information about setting up wireless security features, go to:
http://www.hp.com/go/techcenter/wireless
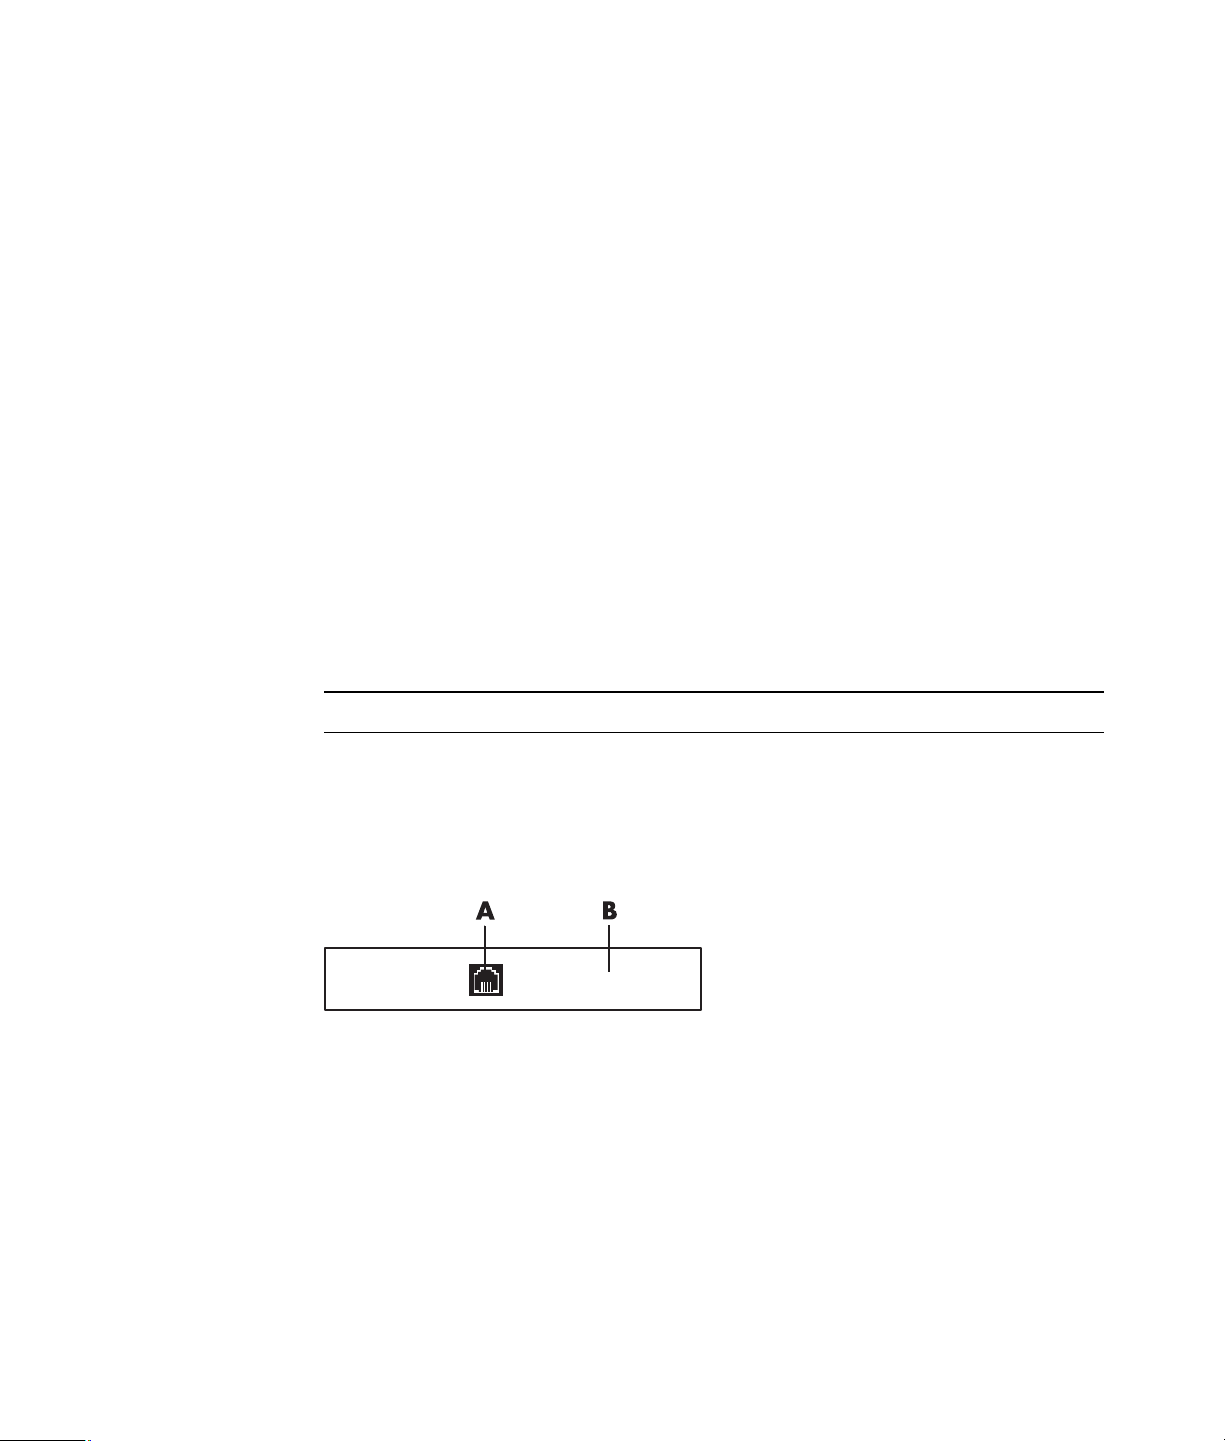
Connecting a Modem
For information on connecting to the Internet, see “Connecting to the Internet” in this guide.
The modem is used for connecting to an ISP that provides a telephone dial-up connection
to the Internet.
NOTE: Your computer may not come with a modem.
Before you can use telephone dial-up to connect to the Internet and send or receive e-mail
and faxes, you must connect your telephone service line to the modem (A), which is on the
back of the computer (B). The setup poster shows you how to plug a modem/telephone
cable into the computer modem connector and into the telephone service line wall jack
connector.
A Modem connector
B Back of computer
16 Getting Started (features vary by model)

Connecting Speakers or Microphone
Speakers are included with the monitor (select models only), or they are sold separately.
NOTE: For product information on the HP Support Web site, go to:
http://www.hp.com/support
For details about connecting stereo speakers to the computer, see the setup poster.
NOTE: Speakers may be passive (no power button or power cord) or active (power button
or power cord). Your computer supports only active (powered) speaker systems; the
speaker system must have its own power cord.
A stereo speaker set is a left-right, two-channel speaker system. A multichannel audio
speaker system is a system with more than two channels, and it may include a subwoofer.
For example, 5.1 channels, referred to as six-speaker mode, uses two front speakers
(left-right), two rear speakers (left-right), a center speaker, and a subwoofer.
If the computer has multichannel audio speaker capacity (select models only), you can
connect four channels for four-speaker output, or six channels for 5.1 speaker output.
Connect the speaker system to the computer, and then configure the audio software for
sound output.
Sound Connector Types
Your model may include one of three analog sound connector types on the back of
the computer:
Three connectors
Six connectors
Audio card
Connecting Speakers or Microphone 17

The connectors are 3.5 mm stereo mini-jacks that connect from the back of the computer to
speakers and microphones.
Your system may also have a separate Digital Out connector (select models only).
Software configuration is different for each connector type, as noted in the instructions.
NOTE:
Type 3 has three connectors.
Type 6 has six connectors.
Type S has audio card.
Sound connector Illustration Type
Three
connectors
Your computer model may include three
sound connectors. You can connect up
to a 5.1 audio system to the computer.
Six connectors Your computer model may include six
sound connectors on the back of your
computer. You can connect up to a
7.1 audio system to the computer.
Audio card
connector
Your computer may include a audio
card. You can connect up to a
5.1 audio system (7.1 audio system for
select models) or digital speakers to the
audio card on the computer.
See the following
illustrations.
3
6
S
When installing cables, use the sound connectors that match your computer model, as
shown in the installation procedure steps.
18 Getting Started (features vary by model)
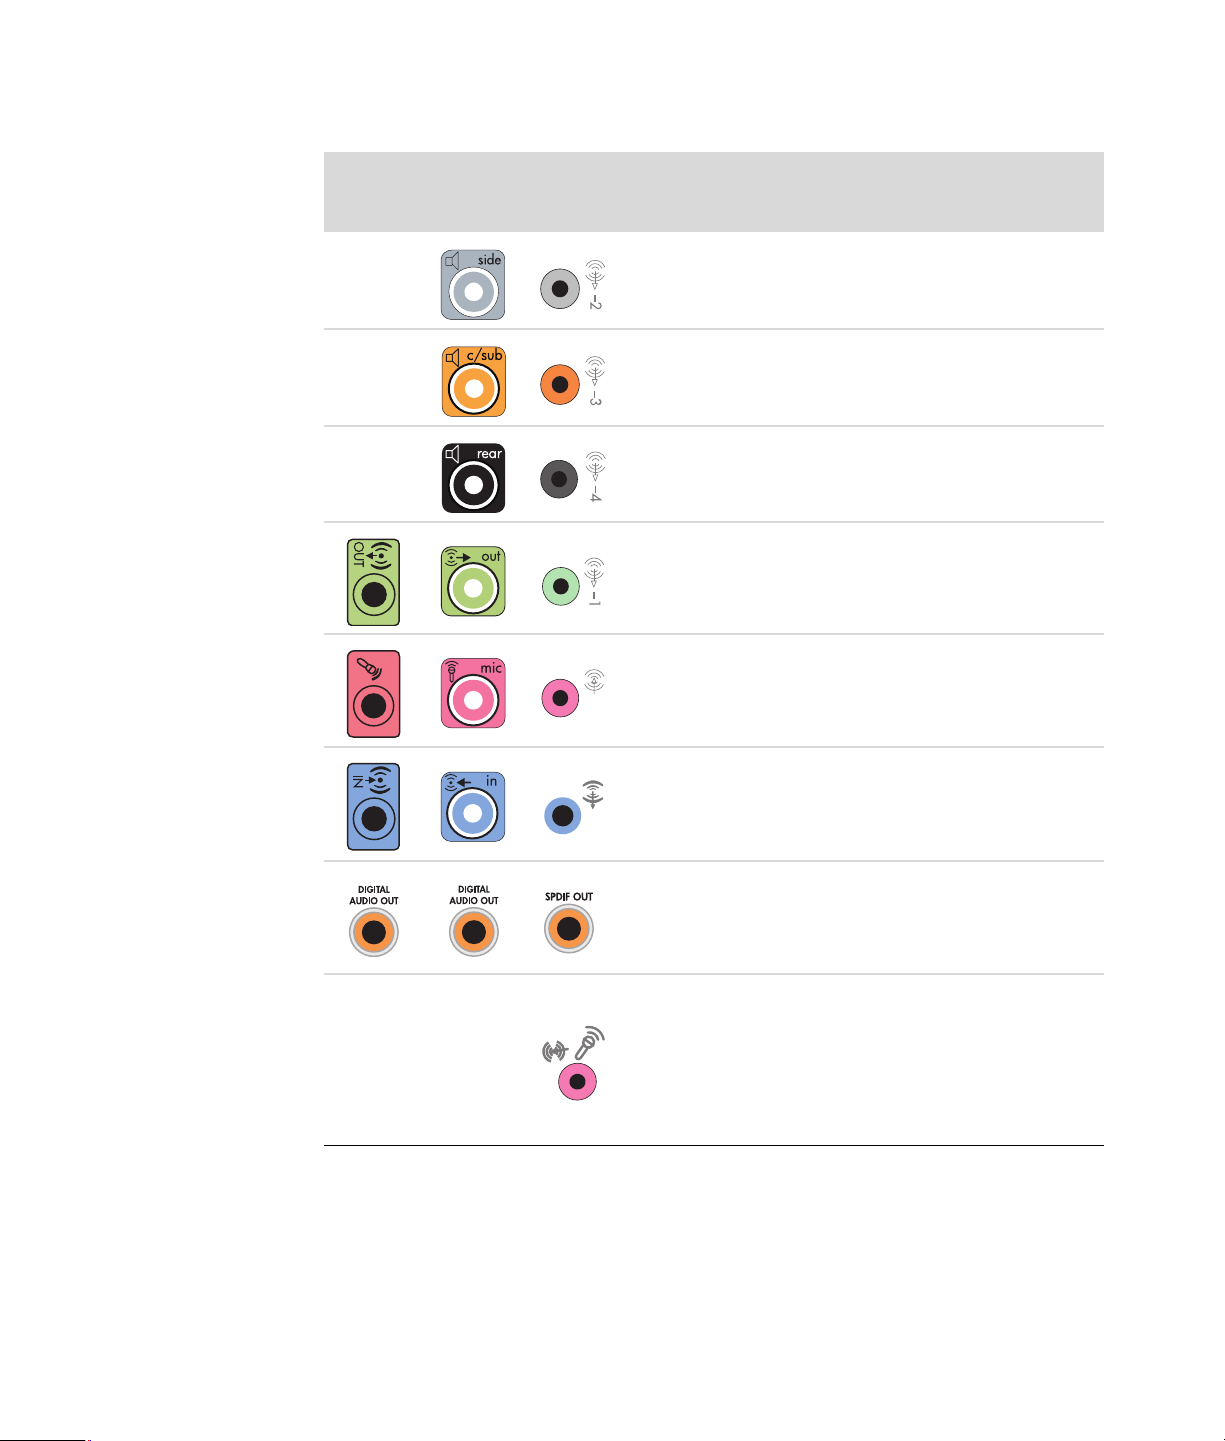
The following table shows the sound connectors on the back panel of computer systems.
Sound connector
Type 3 Type 6 Type S Description
Line Side (gray) connects to side left and right
analog speakers in an eight-speaker system (7.1).
Line C/Sub (gold) connects to front center/
subwoofer speakers in a multichannel audio
configuration.
Line Rear (black) connects to rear left and right
analog speakers in a multichannel audio
configuration.
Line Out (lime green) connects to front left and right
analog speakers.
Mic (pink) connects to a microphone.
(Type 3 also functions as center/subwoofer Line Out
when a multichannel audio configuration is enabled.)
Line In (light blue) connects to an analog audio
device such as a CD player for input into computer.
(Type 3 also functions as rear Line Out when a
multichannel audio configuration is enabled.)
Digital Audio Out or SPDIF Out (orange)
connects to a digital audio device with digital input
(such as a home audio receiver/amplifier) or to
digital speakers (select models only).
FlexiJack (pink) connects to analog Line In devices
or a microphone.
The FlexiJack supports two functions. You must select
either the microphone or the Line In function in the
Creative Console Launcher. See “Configuring the
FlexiJack connector.”
Connecting Speakers or Microphone 19

Sound connector (continued)
Type 3 Type 6 Type S Description
FlexiJack (blue) connects to analog Line In devices
or a microphone.
The FlexiJack supports two functions. You must select
either the microphone or the Line In function in the
Creative Console Launcher. See “Configuring the
FlexiJack connector.”
Optical In (optical SPDIF input) connects recording
devices such as a mini disc recorder, digital audio
tape recorder, or external hard disk recorder.
Optical Out (optical SPDIF output) connects
playback devices such as a mini disc player, digital
audio tape player, or DVD player.
NOTE:
Type 3 has three connectors.
Type 6 has six connectors.
Type S has audio card.
Connecting a Microphone
Your computer comes with one microphone connector in the back of the computer. Some
models have a second microphone connector in the front of the computer. Only one
microphone connector works at a time, and the back connector is ready to use unless you have
the multichannel audio speakers option. For computers with the multichannel audio speakers
option, the microphone connector in the front of the computer, if present, is ready to use.
To use a microphone connected to the front of your computer (select models only), select
the working microphone. See “Selecting a microphone.”
HP computers support many different audio options, sound connections, and speaker
configurations. You may set up your computer for two stereo speakers or for multichannel
audio speaker systems. Connect your speaker system to the computer, and then configure
the audio software for sound output. For more details about connecting stereo speakers to
the computer, see the setup poster.
This chapter describes the most typical options. Your system may have different
components.
Speakers are included with the monitor (select models only) or are sold separately.
NOTE: For additional information on connecting the speakers, refer to the setup poster
that came with the computer and the documentation that came with your speakers.
20 Getting Started (features vary by model)

Speaker Configurations
You may set up your computer for the following supported configurations:
Name Speaker system See
Headphones None, muted. “Connecting Headphones.”
2 (stereo) Left speaker, right speaker. “Connecting 2/2.1 (Two speakers and
a subwoofer) audio speakers.”
2.1 Left speaker, right speaker,
and a subwoofer.
4.1 Two front speakers, two
rear speakers, and a
subwoofer.
6/5.1 Two front speakers, two
rear speakers, a center
speaker, and a subwoofer.
8/7.1 Two front speakers, two
rear speakers, two side
speakers, a center
speaker, and a subwoofer
(select models only).
Home audio
system
Digital audio Digital speakers or digital
Multistreaming
audio
Home stereo or home
theater audio system with
passive speakers.
input connector on audio
system.
Two front speakers, two
rear speakers, two side
speakers, a center
speaker, and a subwoofer
(select models only).
“Connecting 2/2.1 (Two speakers and
a subwoofer) audio speakers.”
“Connecting 4.1 (Four speakers and a
subwoofer) audio speakers.”
“Connecting 5.1 (Five speakers and a
subwoofer) audio speakers.”
“Connecting 7.1 (Seven speakers and
a subwoofer) audio speakers.”
“Connecting your home stereo system
(optional).”
“Connecting digital audio.”
“Configuring multistreaming audio.”
Connecting Speakers or Microphone 21

Speaker types
Speakers may be included with the monitor (select models only) or are sold separately.
Refer to the product documentation for your speakers.
Your computer supports only an active (powered) speaker system. An active speaker
system must have its own power cord. A home audio system does not require active
speakers, because the receiver provides amplification.
A stereo speaker set is a left-right, two-channel speaker system. A multichannel audio
speaker system has a left-right front and left-right rear channel, and it may include a
subwoofer and a center speaker. Side speakers are included in more advanced systems. A
subwoofer provides enhanced bass sounds.
“.1” indicates a subwoofer. For example, 7.1 channels refers to an eight-speaker mode
and uses two front speakers (left-right), two side speakers (left-right), two rear speakers
(left-right), a center speaker, and a subwoofer.
Connecting 2/2.1 (Two speakers and a subwoofer) audio speakers
To connect simple left/right stereo active speakers or two speakers and a subwoofer for
two-channel (2.1 speaker) output:
1 Turn off the computer.
2 Connect the speaker cable to the lime green Audio Line Out connector that matches
the back of your computer.
36S
NOTE:
Type 3 is three connectors.
Type 6 is six connectors.
Type S is sound card.
3 Connect the cable to the audio system. For 2.1 speakers that were shipped with your
computer (select models only), connect the Audio Line Out connector to the subwoofer.
4 Connect the left and right speakers to the subwoofer. Refer to the speaker
documentation.
22 Getting Started (features vary by model)

5 Turn on the computer.
NOTE: Always turn on the computer before you turn on the speaker system.
6 Plug in the speaker system power.
7 Turn on the speaker system.
Step 8 is optional for a two-speaker setup.
8 After the speakers are connected to the computer, configure the audio software for
sound output for your computer model. See “Connecting Speakers or Microphone.”
Type 3: See “Configuring speakers with Realtek HD Audio Manager.”
Type 6: See “Configuring speakers with Realtek HD Audio Manager.”
Type S (audio card): See “Using the Creative Sound Blaster X-Fi or X-Fi Fatality
audio card.”
The following diagram shows a typical 2.1 audio installation:
Connecting 4.1 (Four speakers and a subwoofer) audio speakers
To connect two front speakers, two rear speakers, and a subwoofer for four-channel
(4.1 speaker) output:
1 Turn off the computer.
2 Connect the front speaker cable to the lime green Audio Line Out connector that
matches the back of your computer.
36S
NOTE:
Type 3 is three connectors.
Type 6 is six connectors.
Type S is sound card.
Connecting Speakers or Microphone 23

3 Connect the rear speaker cable to the black connector that matches the back of
your computer.
36S
For type 3-connector systems, the blue Audio Line In connector functions as a Rear Line
Out when a multichannel audio configuration is activated.
4 Connect the cables to the audio system.
5 Connect the front and rear speakers to the subwoofer. Refer to the speaker
documentation.
6 Turn on the computer.
NOTE: Always turn on the computer before you turn on the speaker system.
7 Plug in the speaker system power.
8 Turn on the speaker system.
9 After the speakers are connected to the computer, configure the audio software for
sound output for your computer model. See “Configuring Speaker and Sound
Options.”
Type 3: See “Configuring speakers with Realtek HD Audio Manager.”
Type 6: See “Configuring speakers with Realtek HD Audio Manager.”
Type S (audio card): See “Using the Creative Sound Blaster X-Fi or X-Fi Fatality
audio card.”
The following diagram shows a typical 4.1 audio installation:
24 Getting Started (features vary by model)

Connecting 5.1 (Five speakers and a subwoofer) audio speakers
To connect two front speakers, two rear speakers, a center speaker, and a subwoofer for
six-channel (5.1 speaker) output:
1 Turn off the computer.
2 Connect the front speaker cable to the lime green Audio Line Out connector that
matches the back of your computer.
36S
NOTE:
Type 3 is three connectors.
Type 6 is six connectors.
Type S is sound card.
3 Connect the rear speaker cable to the black connector that matches the back of
your computer.
36S
For type 3-connector systems, the blue Audio Line In connector functions as a Rear Line
Out when a multichannel audio configuration is activated.
4 Connect the center/subwoofer speaker cable to the gold (or pink Mic) connector that
matches the back of your computer.
36S
For type 3-connector systems, the pink Mic connector functions as a center/subwoofer
speaker Line Out when a multichannel audio configuration is activated.
5 Connect the cables to the audio system.
6 Connect the front, rear, and center speakers to the subwoofer. Refer to the speaker
documentation.
7 Turn on the computer.
NOTE: Always turn on the computer before you turn on the speaker system.
Connecting Speakers or Microphone 25

8 Plug in the speaker system power.
9 Turn on the speaker system.
10 After the speakers are connected to the computer, configure the audio software for
sound output for your computer model. See “Configuring Speaker and Sound
Options.”
Type 3: See “Configuring speakers with Realtek HD Audio Manager.”
Type 6: See “Configuring speakers with Realtek HD Audio Manager.”
Type 6 — multistreaming: See “Configuring multistreaming audio.”
Type S (audio card): See “Using the Creative Sound Blaster X-Fi or X-Fi Fatality
audio card.”
The following diagram shows a typical 5.1 audio installation:
Connecting 7.1 (Seven speakers and a subwoofer) audio speakers
(Select models only)
To connect two front speakers, two side speakers, two rear speakers, a center speaker,
and a subwoofer for eight-channel (7.1 speaker) output:
1 Turn off the computer.
2 Connect the front speaker cable to the lime green Audio Line Out connector on the
back of your computer.
3 Connect the rear speaker cable to the black Audio Line Rear connector on the back of
your computer.
26 Getting Started (features vary by model)

4 For type 6 connectors only, connect the side speaker cable to the gray Audio Line Side
connector on the back of your computer.
5 Connect the center speaker and subwoofer speaker cable to the gold Audio
Line C/Sub connector on the back of your computer.
6 Connect the cables to the audio system.
7 Connect the front, rear, side, and center speakers to the subwoofer. Refer to the
speaker documentation.
8 Turn on the computer.
NOTE: Always turn on the computer before the speaker system.
9 Connect the speaker system to the power.
10 Turn on the speaker system.
11 After the speakers are connected to the computer, configure the audio software for
sound output for your computer model.
Type 6 — multistreaming: See “Configuring multistreaming audio.”
Connecting Speakers or Microphone 27

The following diagram shows a typical 7.1 audio installation.
Color Description
1 Lime green Front audio input
2 Black Rear audio input
3 Orange Center/subwoofer audio input
4 Gray Side audio input (not shown)
Connecting your home stereo system (optional)
Most home receivers/amplifiers have RCA-type input connectors. You must connect
Y adapter cables between your computer and your receiver/amplifier. Y adapter cables
have one 3.5 mm stereo mini-jack on one end, and two RCA connectors on the other.
These cables are purchased separately.
The number of Y adapter cables that you need to connect to your home stereo system
depends on the number of speakers that you install:
2/2.1 speaker system: One Y adapter cable
4/4.1 speaker system: Two Y adapter cables
6/5.1 speaker system: Three Y adapter cables
8/7.1 speaker system: Four Y adapter cables
28 Getting Started (features vary by model)

Connecting a home stereo system to a computer requires audio cables that are long
A
enough to reach from the computer to the stereo. You also must purchase Y adapter or
mini-extension cables.
NOTE: Y adapter and mini-extension cables are purchased separately.
2.1 home stereo installation
The following diagram shows a typical two-channel (2.1 speaker) installation that uses
passive stereo speakers and plugs into a home stereo standard left and right input.
This is only a suggested configuration. Your system may be different.
B
C
ECDE
Computer to 2.1 multichannel audio system connection
A Computer back-panel connectors (type 3, type 6, or sound card)
B Y adapter cables
C Receiver/amplifier (audio input jacks)
D Subwoofer
E Front speakers (left and right)
Connecting Speakers or Microphone 29

5.1 home audio installation
The following diagram shows a typical advanced home theater audio six-channel
(6/5.1 speaker) installation that requires multichannel inputs on a receiver/amplifier.
This is only a suggested configuration. Your system may be different.
A
B
C
DEFGC
Computer to 5.1 multichannel audio system connection
A Computer back-panel connectors (type 3, type 6, or sound card)
B Y adapter cables
C Receiver/amplifier (audio input jacks)
D Subwoofer
E Center speaker
F Front speakers (left and right)
G Rear speakers (left and right)
30 Getting Started (features vary by model)

5.1 home audio installation procedure
To connect a six-channel (5.1 speaker) home audio system to the computer:
1 Turn off the computer.
2 Turn off the receiver/amplifier.
3 Connect the front stereo mini-jack end of a Y adapter cable into the lime green Audio
Line Out connector that matches the back of your computer.
36S
NOTE:
Type 3 is three connectors.
Type 6 is six connectors.
Type S is sound card.
NOTE: Receiver/amplifier input connectors may be labeled Surround, 5.1 Channel
inputs, 6 Channel inputs, CD, DVD, or DVD In.
Connect the left and right ends of the Y adapter cable into the front left (L) and right (R)
inputs on the back of the receiver/amplifier.
4 If you have rear speakers, connect the rear stereo mini-jack end of a Y adapter cable
into the Audio Line In (blue) or the Rear Speaker Out (black) connector that matches
the back of your computer.
36S
Connect the left and right ends of the Y adapter cable into the rear left (L) and
right (R) inputs on the back of the receiver/amplifier.
5 If you have a center/subwoofer speaker, connect the stereo mini-jack of a Y adapter
cable into the microphone (pink) connector or the center speaker/subwoofer (gold)
connector that matches the back of your computer.
36S
Connect the left and right ends of the Y adapter cable into the center/subwoofer
inputs on the back of the receiver/amplifier (6/5.1 or higher-channel system).
Plug the Y adapter cable into the subwoofer connector on the back of the receiver
even if a subwoofer is not used.
6 Turn on the receiver/amplifier.
Connecting Speakers or Microphone 31

7 Select the receiver/amplifier input that the Y adapter cables are plugged into.
8 Turn on the computer.
9 After the audio system is connected to the computer, configure the audio software for
sound output for your computer model. See “Connecting Speakers or Microphone.”
Type 3: See “Configuring speakers with Realtek HD Audio Manager.”
Type 6: See “Configuring speakers with Realtek HD Audio Manager.”
Type S (audio card): See “Using the Creative Sound Blaster X-Fi or X-Fi Fatality
audio card.”
7.1 home audio installation
The following diagram shows a typical advanced home theater system with an
eight-channel 8/7.1 speaker installation that requires multichannel inputs on a
receiver/amplifier.
This is only a suggested configuration. Your system may be different.
A
B
C
DEFGC
Computer to 7.1 multichannel audio system connection
A Computer back-panel connectors (type 3, type 6, or type S)
B Y adapter cables
C Receiver/amplifier (audio input jacks)
D Subwoofer
E Center speaker
F Front speakers (left and right)
G Rear speakers (left and right)
32 Getting Started (features vary by model)

7.1 home audio installation procedure
To connect an eight-channel (7.1 speaker) home audio system to the computer:
1 Turn off the computer.
2 Turn off the receiver/amplifier.
3 Connect the front stereo mini-jack end of a Y adapter cable into the lime green Audio
Line Out connector on the back of your computer.
36S
NOTE:
Type 3 has three connectors.
Type 6 has six connectors.
Type S has audio card.
NOTE: Receiver/amplifier input connectors may be labeled Surround, 7.1 Channel
inputs, 6 Channel inputs, CD, DVD, or DVD In.
Connect the left and right ends of the Y adapter cable into the front left (L) and right (R)
inputs on the back of the receiver/amplifier.
4 If you have rear speakers, connect the rear stereo mini-jack end of a Y adapter cable
into the Audio Line In (light blue) or the Rear Speaker Out (black) connector on the
back of your computer.
36 S
Connect the left and right ends of the Y adapter cable into the rear left (L) and right (R)
inputs on the back of the receiver/amplifier.
5 If you have a center/subwoofer speaker, connect the stereo mini-jack of a Y adapter
cable into the microphone (pink) connector or the center speaker/subwoofer (gold)
connector on the back of your computer.
36S
Connect the left and right ends of the Y adapter cable into the center/subwoofer
inputs on the back of the receiver/amplifier (8/7.1 or higher-channel system).
Connect the Y adapter cable to the subwoofer connector on the back of the receiver,
even if you are not using a subwoofer.
Connecting Speakers or Microphone 33

6 Turn on the receiver/amplifier.
7 Select the receiver/amplifier input to which the Y adapter cables are connected.
8 Turn on the computer.
9 After the audio system is connected to the computer, configure the audio software for
sound output for your computer model. See “Configuring Speaker and Sound
Options.”
Type 3: See “Configuring speakers with Realtek HD Audio Manager.”
Type 6: See “Configuring speakers with Realtek HD Audio Manager.”
Type S (audio card): See “Using the Creative Sound Blaster X-Fi or X-Fi Fatality
audio card.”
Connecting digital audio
(Select models only)
If you have a audio card and you are connecting your home stereo AV receiver via digital
out, connect the 3.5 mm stereo plug to the Digital Audio Out connector on the audio card.
Connect the red RCA stereo plug on the 3.5 mm Y adapter cable to the AV receiver’s
digital input connector on the AV receiver. If the red RCA stereo plug does not work, try the
white stereo plug. Only one of the connectors is needed.
To connect digital audio, your computer must include a Digital Audio Out connector on
either the audio card or the back panel. You must connect multichannel speaker outputs if
you connect the digital output.
To connect digital audio speakers:
1 Turn off the computer.
2 Connect the orange Digital Audio Out connector on the back panel of
your computer to the digital input (S/PDIF) on the digital speakers or a
digital audio system.
3 Turn on the computer.
NOTE: Always turn on the computer before the speaker system.
4 Connect the speaker system to the power.
34 Getting Started (features vary by model)

5 Turn on the speaker system.
6 After the speakers are connected to the computer, configure the audio software for
sound output for your computer model. See “Configuring Speaker and Sound
Options.”
Audio card with digital output and type 3 connectors: See “Configuring speakers
with Realtek HD Audio Manager.” Follow the instructions to enable digital audio
output.
Audio card with digital output and type 6 connectors: See “Configuring speakers
with Realtek HD Audio Manager.” By default, digital audio output is already
enabled.
Audio card: See “Using the Creative Sound Blaster X-Fi or X-Fi Fatality audio
card.” Follow the instructions to enable digital audio output.
Connecting Headphones
Your computer comes with a headphones connector (lime green) on the front of the
computer. The headphones connector is labeled with a headphones icon.
You can also connect headphones to the Line Out connector (lime green) on the
back of your computer.
Using a 2.1 speaker system with headphones
For select models with the 2.1 speaker system, look for the headphones connector on the
right side of the main speaker. When headphones are plugged in, the sound to the
speakers and the subwoofer is muted.
Using a 5.1 to 7.1 speaker system with headphones
For select models that include a 5.1 or higher speaker system, a headphones connector is
located on the right side of the control tower.
If the control tower displays HP (for headphones), the headphones are enabled; the sound
to the speakers and the subwoofer is muted.
Push and hold the On button on the control tower for several seconds to enable sound
from the speakers.
Press the On button briefly to enable the headphones.
Connecting Speakers or Microphone 35

Connecting Speakers Using the Creative Sound Blaster X-Fi Sound Card
This section provides an overview of connecting to the Creative Sound Blaster X-Fi
sound card.
NOTE: For additional information on connecting the speakers, refer to the documentation
that came with your speakers.
Connecting the speakers
Connector Description
AD-Link for AD_Link X-Fi I/O Console (the X-Fi console is sold separately)
Line Out_3 (orange or yellow)
5.1 audio setup: Front center, subwoofer
6.1 audio setup: Front center, subwoofer, and rear center
7.1 audio setup: Front center, subwoofer, and side left
Line Out_2 (black)
4.1, 5.1, 6.1 audio setup: Rear left and right
7.1 audio setup: Rear left, rear right, and side right
Line Out_1 (lime green)
2/2.1 audio setup: Front left and right
FlexiJack (white) for Line In, Microphone, Digital In/Out
The FlexiJack supports three functions. You must select the function in the
Creative Console Launcher. See “Connecting the FlexiJack connector.”
36 Getting Started (features vary by model)

To connect the X-Fi sound card to your speakers:
1 Use the audio connection table to connect your audio system to the sound card.
2 Turn on the computer.
3 Plug in and turn on the speaker system power.
After connecting the speaker system to the sound card, follow the steps in “Configuring the
FlexiJack connector” to configure the speaker settings in the Creative Sound Blaster X-Fi
software.
Connecting the FlexiJack connector
The FlexiJack connector performs three functions:
Digital Input/Output
Line In
Microphone
You must select the function in the Creative Console Launcher.
NOTE: If you are using the FlexiJack as your Digital In connection and you want to
connect digital speakers as your output device, you will need a special connector from
Creative.
Connecting Speakers or Microphone 37

38 Getting Started (features vary by model)

Finding Onscreen Guides
Onscreen guides are available in the User’s Guides folder (select models only).
1 Click the Windows Start Button on the taskbar.
2 Click All Programs.
3 Click User Guides.
4 Click an item to view it or use it.
NOTE: If there are no guide titles listed in the folder, your computer has no onscreen
guides.
Finding Guides on the Web
You can find guides and information for your computer by using the Internet to access the
Support Web site.
Getting Help
1 Go to http://www.hp.com/support in your Web browser.
2 Select your country/region and language.
3 Click Support and Drivers.
4 Enter the model number of your computer, and then click Search .
5 Click Manuals.
6 Locate the manual you want, and then do one of the following:
Click the title to display the file in Adobe Acrobat Reader (which you can
download from the Manuals page if it is not currently installed on your computer).
Right-click the title, click Save Target As, specify a location on the computer
where you want to save the file, rename the file (retaining the .pdf extension), and
then click Save.
Getting Help 39

Using the Onscreen Help and Support Center
Information about your computer is in the onscreen Help and Support Center (select
models only). Here, you can find links to driver updates, access to technical support
options, and information about commonly asked questions.
To open the Help and Support Center:
Press the Help button (select models only) on your keyboard.
Or
Click the Windows Start Button on the taskbar, and then click Help
and Support.
Using the PC Help & Tools Folder
The PC Help & Tools folder contains special utilities for computer owners, such as
support information and programs.
To see the items in the PC Help & Tools folder:
1 Click the Windows Start Button on the taskbar.
2 Click All Programs.
3 Click PC Help & Tools.
4 Click Hardware Diagnostic Tools to view or use these tools.
Using the hardware diagnostic tools
The hardware diagnostic tools help you to do the following:
View the computer system information, such as memory usage, drive capacity
and CPU usage.
Find alerts about your computer.
Show information, and run diagnostic tests on computer hardware and some
computer peripheral hardware, such as printers, monitors, speakers, and
network adapters.
Run a computer system test.
40 Getting Started (features vary by model)

Using HP Total Care Advisor Software
HP Total Care Advisor is a desktop tool you use to monitor and access system health
information about key areas of your computer. HP Total Care Advisor has four major
areas:
PC Health & Security provides a dashboard view of the status of key areas of
your computer.
PC Action Center receives messages and alerts that inform you of changes in
the status of your computer health.
PC Help provides simple access to help and support information for your
computer.
Products Showcase provides a listing of products and services available for
your computer, and presents comparison shopping information about those
items.
To ope n HP Tot al Car e Advi sor:
1 Click the Windows Start Button on the taskbar.
2 Click All Programs.
3 Click HP Total Care Advisor.
Getting Help 41

42 Getting Started (features vary by model)

Turning On the Computer for the First Time
After you have completed the steps on the setup poster, you are ready to turn on the
computer.
1 Press the Power button on the monitor.
2 Press the On button on the front of the computer.
3 Turn on the speakers, if they are present.
4 Set up the computer by following the onscreen instructions. If prompted, select the
country/region in which you are physically located, and wait while the computer
makes preparations. (When you select an alternate language, it may take up to
30 minutes for this one-time language setup on the computer.)
5 Set up Microsoft Windows Vista by following the onscreen instructions.
6 Follow the onscreen instructions to register with HP or Compaq, sign up for updates,
and get online. If you do not want to set up an Internet connection at this time, you can
do so later by manually starting Easy Internet Services. See “Connecting to the
Internet.”
7 Norton Internet Security automatically opens. Follow the onscreen instructions to set up
this tool, which protects the computer and your privacy.
NOTE: If you stop the setup procedure, when you are ready to finish, double-click the
Easy Setup icon on the desktop to run the first-time wizard.
Turning On the Computer for the First Time 43

Turning Off the Computer
For best results, when using Microsoft Windows Vista, do not shut down the computer,
except when you must turn off the power for safety reasons, such as to make repairs, install
new hardware or cards in the computer chassis, or change a battery.
As an alternative to shutting down the computer, you can lock it or put it into either Sleep
or Hibernate mode, if it is available. You can set the power management timers to put the
computer automatically into Sleep or Hibernate mode.
Sleep and Hibernate modes are power states. Sleep mode saves your work to memory, so
you can resume quickly; saves your work to the hard disk; and then goes to a
reduced-power state. During Sleep mode, the computer hardware light remains on, and
the computer is ready to wake quickly and resume your work where you left off. Hibernate
mode saves the system memory to a temporary file on the hard disk and then turns off the
hardware.
Some computers also have a reduced-power state called Away mode. Away mode turns
off the display and mutes the audio, but otherwise keeps the computer operational. During
Away mode, the computer can perform tasks such as recording a scheduled TV program
or streaming video and music files to a remote location.
Using Shut Down
For best results, when using Windows Vista, turn off the computer without pressing any
buttons on the computer chassis.
NOTE: For information on the Windows Start Button , see “Using the Windows Start
Button Menu.”
1 Close any open software programs by clicking the X at the upper-right corner of each
program window.
2 Click the Windows Start Button on the taskbar.
3 Click the Arrow button next to the Lock button.
4 Click Shut Down.
5 Turn off the monitor.
To turn on the computer after a shut down:
1 Press the power button on the monitor.
2 Press the On button on the front of the computer.
44 Getting Started (features vary by model)

Using Lock
If you lock the computer, only you or the administrator can log on to it.
1 Click the Windows Start Button on the taskbar.
2 Click the Lock button.
3 To unlock this computer, you must enter your password.
Using Sleep mode
When the computer is in Sleep mode, it goes into a reduced-power state. The monitor is
blank, as if it were turned off. By using Sleep mode:
You save time, because you do no have to wait for the computer to go through the
normal startup routine when you wake it again. The next time that you use the
computer, any programs, folders, and documents that were open before you put the
computer into Sleep mode are available.
The computer can receive faxes, if you set it to do so.
The computer can retrieve e-mail messages and download information from the
Internet automatically, if you set it to do so.
To put the computer into Sleep mode manually:
Press the Sleep button on the keyboard, if it is present.
Or
1 Click the Windows Start Button on the taskbar.
2 Click the Power button.
Or
1 Click the Windows Start Button on the taskbar.
2 Click the Arrow button next to the Lock button.
3 Click Sleep.
To wake the computer from Sleep mode:
Press the Sleep button on the keyboard.
Or
Quickly press the On button on the front of the computer.
If the computer does not work properly when you wake it from Sleep mode, restart the
computer.
1 Click the Windows Start Button on the taskbar.
2 Click the Arrow button next to the Lock button.
3 Click Restart.
Or
Quickly press the On button on the front of the computer.
Turning On the Computer for the First Time 45

Using Hibernate mode
Hibernate mode is available as an advanced power setting. When the computer is in
Hibernate mode, it saves to the hard disk drive everything that is in computer memory,
turns off the monitor and the hard disk drive, and then turns itself off. When you turn on the
computer again, your programs, folders, and documents are restored to the screen.
To put the computer into Hibernate mode manually:
1 Click the Windows Start Button on the taskbar.
2 Click the Arrow button next to the Lock button.
3 Click Hibernate, if it is present.
NOTE: If Hibernate is not present, you can set up the computer to go into Hibernate
mode automatically; see “Automatic Sleep, Hibernate, or Away mode.”
To wake the computer from Hibernate mode, press the On button on the front of the
computer.
If the computer does not work properly when you wake it from Hibernate mode, restart the
computer.
1 Click the Windows Start Button on the taskbar.
2 Click the Arrow button next to the Lock button.
3 Click Restart.
Automatic Sleep, Hibernate, or Away mode
You can set the computer to go into Sleep, Hibernate, or Away modes automatically when
it is idle for a specified number of minutes. To put the computer into a mode automatically,
modify the power management settings.
1 Click the Windows Start Button on the taskbar.
2 Click Control Panel.
3 Click System and Maintenance.
4 Click Power Options.
5 Click Change when the computer sleeps.
6 For Sleep or Away mode, select an option from the Put the computer to sleep
drop-down menu, and click Save changes.
Or
For Hibernate or Away mode:
a Click Change advanced power settings.
b Click the plus sign (+) next to Sleep.
c Click an item and make selections, and then click Apply.
d Click OK.
46 Getting Started (features vary by model)

Restarting the Computer
When you restart the computer, the computer clears some settings and starts over using the
operating system and software in its memory. Restarting is the easiest and most effective
way to solve many software issues for the computer.
Also, you may want to install additional software programs or hardware devices onto the
computer, and doing so may require that you restart the computer after installation.
1 Click the Windows Start Button on the taskbar.
2 Click the Arrow button next to the Lock button.
3 Click Restart.
Or
Quickly press the On button on the front of the computer.
Connecting to the Internet
The computer can connect to the Internet through the telephone modem. There are other
ways to connect to the Internet that do not use the telephone modem, such as a LAN (local
area network) or DSL (digital subscriber line). Check with your Internet Service Provider
(ISP) for specific information on the connection. See “About the Internet” for more
information about using the Internet.
Refer to the “Setting Up the Computer” chapter of this guide to make the hardware
connections: for a modem, see “Connecting a Modem” and for a network see “Setting Up
a Local Area Network.”
To connect to the Internet, you must have:
A computer.
A dial-up modem, a cable modem, or a DSL modem for high-speed broadband
connections. Contact your ISP for any specific software and hardware that you
may need.
Internet service with an ISP.
A Web browser.
Turning On the Computer for the First Time 47

To connect to the Internet:
1 Sign up with an ISP. If you already have an account with an ISP, skip this step and
follow the instructions provided by the ISP.
2 If you did not set up for Internet service during the initial setup of the computer, set it
up now by using Easy Internet Services.
a Click the Windows Start Button on the taskbar.
b Click All Programs.
c Click Online Services and then click Easy Internet Services.
d Follow the onscreen instructions to select an ISP and set up Internet service.
NOTE: Easy Internet Services provides a list of ISPs; however, you may choose
another ISP or transfer an existing account to this computer. To transfer existing
accounts, follow the instructions provided by the ISP.
3 Connect to the Internet. You must connect through your ISP.
Double-click the ISP-provided icon on the desktop, and log in.
4 Open your Web browser and browse the Internet.
You can use any Web browser; most computers have Microsoft Internet Explorer. To
open Internet Explorer:
a Click the Windows Start Button on the taskbar.
b Click Internet Explorer.
NOTE: If you have questions, contact your ISP directly.
Using the Computer with Safety and Comfort
WARNING: To reduce the risk of serious injury, read the Safety & Comfort
Guide. It describes proper workstation setup, posture, and health and work
habits for computer users. It also provides important electrical and mechanical
safety information.
Before you begin using the computer, arrange the computer and your work area to
maintain your comfort and productivity. Refer to the Safety & Comfort Guide for important
ergonomic information:
Click the Windows Start Button on the taskbar, click All Programs, click
User Guides, and then click Safety & Comfort Guide.
Or
Type
http://www.hp.com/ergo
into the Web browser address box, and then press Enter on the keyboard.
48 Getting Started (features vary by model)

Setting Up User Accounts
User accounts enable you to set the privileges for each user of the computer. For example,
you can set the software programs that each user is allowed to access.
Windows Vista provides three types of user accounts:
Administrator:
Is allowed to change account types for other users, change passwords, change
system-wide settings, access all files on the computer, and install software and drivers
that are compatible with Windows Vista.
Limited - Standard User:
Is not allowed to change other user settings or passwords. A Limited account may
not be able to install or run some software.
Is allowed to change the limited account picture, and to create, edit, or delete the
account password.
Guest:
Is allowed to use most software and change system settings that do not affect other
users or the security of the computer.
Is not allowed to change other user settings or passwords, or install software.
Does not have access to password-protected files, folders, and settings.
Creating multiple user accounts on the same computer has certain advantages, as well as
some drawbacks.
Advantages to multiple user accounts:
Ability to create individual user settings
Ability to limit access to software for certain users
Drawbacks to multiple user accounts:
More memory (RAM) usage
Multiple Temporary Internet Files folders to remove during Disk Cleanup
More data to back up
Longer time to complete virus scan
Turning On the Computer for the First Time 49

Protecting the Computer
Protect the computer, personal settings, and data from a variety of risks by using:
Passwords.
Antivirus software.
Firewall software.
Critical security updates.
NOTE: Security solutions are designed to act as deterrents, but they may not be able to
prevent software attacks or to prevent the computer from being mishandled or stolen.
Computer risk Security feature
Unauthorized use of the computer
User password
or user account
Computer viruses Norton Internet Security software (antivirus
program)
Unauthorized access to data Norton Internet Security software (firewall program)
updates
Unauthorized access to Setup
Windows Vista
Administrator password
Utility, BIOS settings, and other
system identification information
Ongoing or future threats to the
Critical security updates from Microsoft
computer
Using passwords
A password is a group of characters that you choose to secure the computer information.
Several types of passwords can be set, depending on how you want to control access to
your information. Passwords can be set in the Microsoft Windows
on the computer.
CAUTION: To avoid being locked out of the computer, record each password
you set. Because passwords are not displayed as they are set, changed, or
deleted, it is essential to record each password immediately and store it in a
secure place.
Vista operating system
Use the following list as a basic guide when choosing a password:
Choose a password that is easy for you to remember but difficult for others to guess.
Choose a long password (minimum of six characters).
Use a combination of uppercase and lowercase letters, numbers, and symbols.
50 Getting Started (features vary by model)

Don’t use personal information that others can easily figure out, such as your birthday,
child’s name, or phone number.
Don’t write down passwords unless you store them in a secure place away from the
computer. Do not store passwords in a file on the computer.
You can use the same password for more than one Windows Vista security feature.
A password can have any combination of up to eight letters and numbers, and it is not
case sensitive.
A password must be set and entered with the same keys. For example, if you set the
password with number keys on the keyboard, the password is not recognized if you
subsequently try to enter it with the embedded numeric keypad.
NOTE: Select models include a separate numeric keypad, which functions exactly like
the keyboard number keys, except in the case of passwords.
A password set in Windows Vista must be entered at a Windows Vista prompt.
The following table lists the Windows Vista passwords and describes their functions. For
information on how to set passwords, see “Using passwords.” For additional information
on Windows Vista passwords, such as screen saver passwords, type passwords into the
Search Help box in the Help and Support Center.
Password Function
Windows Vista Administrator
password
Protects administrator-level access to
computer contents.
Windows Vista User password Protects access to a Windows Vista user account and
the computer contents. It must be entered when you
resume from Sleep or Away mode.
CAUTION: If you forget the Administrator password, you cannot access
Setup Utility.
Turning On the Computer for the First Time 51

Using antivirus software
When you use the computer for e-mail, network, or Internet access, you expose it to
computer viruses. Computer viruses can disable the operating system, software programs,
or utilities, or cause them to function abnormally.
Antivirus software can detect most viruses, destroy them, and in most cases repair any
damage that viruses may have caused. To provide ongoing protection against newly
discovered viruses, antivirus software must be kept up to date.
The Norton Internet Security program, which is preinstalled on the computer, includes
antivirus and firewall components. The software includes a free update period. It is
strongly recommended that you protect the computer against new viruses beyond the free
period by purchasing extended update service. Instructions for using and updating Norton
Internet Security software, and for purchasing extended update service, are provided
within the program.
To open and access Norton Internet Security:
1 Click the Windows Start Button on the taskbar.
2 Click All Programs.
3 Click Norton Internet Security, and then click Norton Internet Security in
the list.
See “Using the Norton Internet Security Antivirus Software” for more information about
using the Norton antivirus software.
For more information about computer viruses, type viruses into the Search Help box in the
Help and Support Center.
Using firewall software
When you use the computer for e-mail, network, or Internet access, unauthorized persons
may be able to gain access to information about you, the computer, and your data. To
protect your privacy, use firewall software. Microsoft Windows Vista includes firewall
software preinstalled on the computer. Also, Norton Internet Security, which is preinstalled
on the computer, includes a firewall program.
Firewall features include logging, reporting, and automatic alarms to monitor all incoming
and outgoing communications.
To open and access Norton Internet Security:
1 Click the Windows Start Button on the taskbar.
2 Click All Programs.
3 Click Norton Internet Security, and then click Norton Internet Security in
the list.
Under some circumstances, a firewall can block access to Internet games, interfere with
printer or file sharing on a network, or block authorized e-mail attachments. To solve the
problem temporarily, disable the firewall, perform the task that you want to perform, and
then enable the firewall again. To resolve the problem permanently, reconfigure the
firewall.
52 Getting Started (features vary by model)

Configuring the computer for automatic Microsoft software updates
Microsoft continually updates the Windows Vista operating system. HP recommends that
you run Windows Vista Update monthly to install these updates. One way to keep the
operating system up to date is to use the Automatic Updates feature.
When you are connected to the Internet, Windows Vista Update automatically notifies you
through a pop-up message or icon in the notification area when critical updates are
available. When you see the Windows Vista Update message, allow the updates to
download to your system. If you update the system weekly, or even monthly, the time
required for download is minimal.
To configure Automatic Updates:
1 Click the Windows Start Button on the taskbar.
2 Click Control Panel.
3 Click Security.
4 Click Windows Update.
5 Click Change settings.
6 Select the desired configuration:
Install updates automatically (recommended) — This is the default
setting, and it enables you to specify a day and time to automatically download
and install recommended updates.
Download updates but let me choose whether to install them
Check for updates but let me choose whether to download and
install them
Never check for updates (not recommended) — This option makes the
computer more vulnerable to security threats and performance problems and is not
recommended.
7 Click OK.
Turning On the Computer for the First Time 53

Installing critical security updates
CAUTION: To reduce the risk of information damage or loss from security
breaches and computer viruses, install all critical updates from Microsoft as
soon as you receive an alert.
Additional updates to the operating system and other software may have become
available after the computer was shipped. Download all available updates and install
them onto the computer.
To get the latest updates for the computer:
1 Click the Windows Start Button on the taskbar.
2 Click Help and Support, and then click Software, drivers, and BIOS
updates.
3 Follow any onscreen instructions to complete downloading and installing the
latest updates.
Guidelines for Installing Software and Hardware Devices
After you set up the computer, you may want to install additional software programs or
hardware devices. Keep in mind the following important guidelines:
Before installation, make a restore point by using the Microsoft System Restore
program.
a Make sure you are logged in as an Administrator.
b Click the Windows Start Button on the taskbar.
c Click Control Panel.
d Click System and Maintenance.
e Click Backup and Restore Center.
f Click Create a restore point or change settings.
g In the System Properties window, on the System Protection tab, click Create.
Follow the onscreen instructions.
The restore point is a snapshot of the computer settings. By using System Restore, you
ensure that you have a stable set of settings to use. For information on System Restore,
go to the Microsoft Web site at: http://www.microsoft.com/worldwide
Choose software that is compatible with the computer; check the operating system,
memory, and other requirements listed for the new software.
Install the new software according to the directions provided by the software
manufacturer. If you need help, check the manufacturer’s documentation or customer
service information.
54 Getting Started (features vary by model)

If you need to restore factory settings after you install a program that is incompatible:
a Make sure you are logged in as an Administrator.
b Click the Windows Start Button on the taskbar.
c Click Help and Support.
d Click Recover factory settings.
e Choose an option, and then follow the onscreen instructions.
For antivirus software, uninstall the existing software program before reinstalling it or
installing a new antivirus program.
NOTE: Use only licensed original software. Installing copied software may be illegal, or it
may result in an unstable installation or infect the computer with a virus.
Transferring Files and Settings from an Old Computer to a New Computer
You can copy files from the old computer to a new computer by using media such as CDs
or DVDs, memory sticks, or personal media drives. You can also copy certain settings such
as Web browser Favorites and address books by using Windows Easy Transfer software,
which is included with Microsoft Windows Vista.
To transfer your files and settings:
1 Click the Windows Start Button on the taskbar.
2 Click Help and Support.
3 Type transfer files into the Search Help box.
4 Click the overview article Transfer files and settings from another computer.
This article describes a Microsoft solution for moving your files to your new computer.
5 Click Windows Easy Transfer.
6 Follow the onscreen instructions in the Windows Easy Transfer wizard to transfer your
files from an old computer to a new one.
Turning On the Computer for the First Time 55

56 Getting Started (features vary by model)

Using the Keyboard
IMPORTANT: Please see the documentation that came with the keyboard for additional
information about using the keyboard, customizing keyboard buttons, and using any
special keyboard keys. You may need to install keyboard software and drivers to access
all the special features and functions of the keyboard.
Your computer may include either a standard keyboard or a wireless keyboard. Using the
keyboard is the primary way that you enter text and commands for the computer.
A standard keyboard connects to the keyboard connector in the back of the computer.
A wireless keyboard (select models only) uses a receiver/transmitter, instead of a
connector cable, to communicate with the computer. A light on the receiver indicates
receiver activity.
Identifying Keyboard Features
The keyboard contains an arrangement of standard keys, indicator lights, and special
buttons (select models only). Your keyboard may vary from the illustrations that follow.
Alphanumeric keys
The alphanumeric keys are the main keys found on a standard typewriter.
Using the Keyboard 57

Function keys
The function keys, located above the main keys, are labeled F1 through F12. Most function
key operations vary by software program. F1 and F3 are available at all times:
Pressing F1 opens a Help window for the software program being used.
Pressing F3 opens a search window.
Edit keys
The edit keys are Insert, Home, Page Up, Delete, End, and Page Down. Use these keys to
insert and delete text, and to quickly move the cursor on the screen. The edit keys function
differently with some software programs.
Arrow keys
The arrow keys are controls for moving up, down, right, and left. You can use these keys
instead of the mouse to move the cursor for navigation on a Web page, in a document, or
in a game.
58 Getting Started (features vary by model)

Numeric keys
Press the Num Lock key to lock and unlock the numeric key functions:
When the Num Lock light on the keyboard is on, the numeric keys work in the same
way as the number keys and arithmetic functions found on a basic calculator.
When the Num Lock light on the keyboard is off, the numeric keys are directional keys
used to move the cursor or play games.
Keyboard indicators
Each keyboard indicator is a light labeled with a name or with an icon for its status:
Icon Name Description
Num Lock When lit, numeric keys are locked as number keys and
arithmetic functions.
Caps Lock When lit, alphanumeric keys are locked to uppercase.
Scroll Lock When lit, scroll function is locked.
Using the Keyboard 59

Special keyboard buttons
There are special buttons (select models only) at the top of the keyboard. These buttons
operate a CD or DVD player, control speaker volume, connect you to the Internet, or
provide quick access to specific functions. (Some keyboard models have some of these
special buttons to the left side of the main keys, some do not have the Internet buttons, and
some use a different layout on the top right.)
Identifying Special Keyboard Buttons
Your keyboard may not include some of the buttons listed.
NOTE: The number, location, and labeling of buttons vary by keyboard model.
Access buttons
Icon Feature Description
Sleep Puts computer into or out of power-saving
mode. It may take 10–30 seconds before
screen reappears.
User Switches between computer users.
Information Opens Help and Support Center.
? Or
Or
Or
Pictures
(Photos)
Music Opens music software program. Can be
Video Opens video software program. Can be
Internet Opens an Internet browser. Can be
Opens imaging software program. Can be
reconfigured.
reconfigured.
reconfigured.
reconfigured to open any Web site or
software program.
60 Getting Started (features vary by model)

Icon Feature Description (continued)
Search Opens page designed to search the Internet.
Can be reconfigured to open any Web site
or software program.
E-mail Opens e-mail program. Can be reconfigured
Or
HP Club Links to HP Web site.
to open any Web site or software program.
hp Or
Compaq Or
Or
Or
Or
Or
Or
Or
Compaq
My Presario
Shopping Goes to a shopping Web site. Can be
Sports Goes to a sports Web site. Can be
Finance Goes to a finance Web site. Can be
Connect to
Internet
Search Goes to a search engine. Can be
Chat Goes to chat Web site. Can be reconfigured
Links to Compaq Web site.
reconfigured to open a site or software
program.
reconfigured to open a site or software
program.
reconfigured to open a site or software
program.
Goes to an Internet browser page. Can be
reconfigured to open a site or software
program.
reconfigured to open a site or software
program.
to open a site or software program.
Entertainment Goes to a entertainment Web site. Can be
reconfigured to open a site or software
program.
Offers Goes to popular Web site. Can be
reconfigured to open a site or software
program.
Calculator Opens calculator. Can be reconfigured.
Using the Keyboard 61

Media control or playback buttons
Icon Label Description
Or
–+
Eject 1 and
Eject 2
Rec Starts recording to selected media.
Stop Stops media.
Play/Pause Plays or pauses media.
Prev Rewinds media.
Next Fast-forwards media.
Volume Volume knob controls speaker volume: Turn clockwise to
Mute Turns speaker sound on and off.
Opens or closes upper and lower optical drive trays.
increase speaker volume and counterclockwise to decrease
volume.
NOTE: The Volume knob can continue to be turned, even
after maximum volume has been reached.
Volume Up and Down buttons control speaker volume:
Press the Volume Up button to increase volume and the
Volume Down button to decrease volume.
Or
Customizing the keyboard buttons
You can customize some of the special buttons on the keyboard (select models only) to
open different programs or files or go to favorite Web sites.
If you cannot customize the keyboard buttons using the following procedure, see the
documentation that came with the keyboard.
1 Click the Windows Start Button on the taskbar.
2 Click Control Panel.
3 Click Hardware and Sound, if it is present.
4 Click Keyboard.
62 Getting Started (features vary by model)

5 Click the Buttons tab, and then double-click the button that you want to change.
NOTE: You can click the Speed tab to adjust the character repeat delay speed or the
cursor blink rate. You can also click the Hardware tab, and then click the
Properties button to view keyboard information.
6 For the button configuration, click the Down arrow to the right of the list and choose
the button capability, such as Complex remote page with label or Simple
local file with label.
7 Enter a display label and the address information. For a Web page, enter the URL.
8 Click OK.
9 On the Buttons tab, click Apply.
10 Repeat steps 5 through 9 for each button that you want to customize.
11 Click OK to finish.
NOTE: Click the Restore Defaults button on the Buttons tab to restore all of the buttons
to the factory settings.
Keyboard Shortcuts
Keyboard shortcuts are combinations of keys that you press simultaneously to perform
specific actions. For example, from the Windows Vista desktop, press the Alt (alternate)
key, the Ctrl (control) key, and the S key (the letter S) to display support information for the
computer (including the model number, serial number, and service ID). You see this
combination of keys represented as Alt+Ctrl+S. In Windows Vista, press Ctrl+C to copy an
item that you’ve highlighted or selected, Ctrl+V to paste a copied item, or Ctrl+Z to undo
the previous action. These shortcuts perform the same actions that you can perform
through menus, but they save you time and mouse clicks.
Using the Keyboard 63
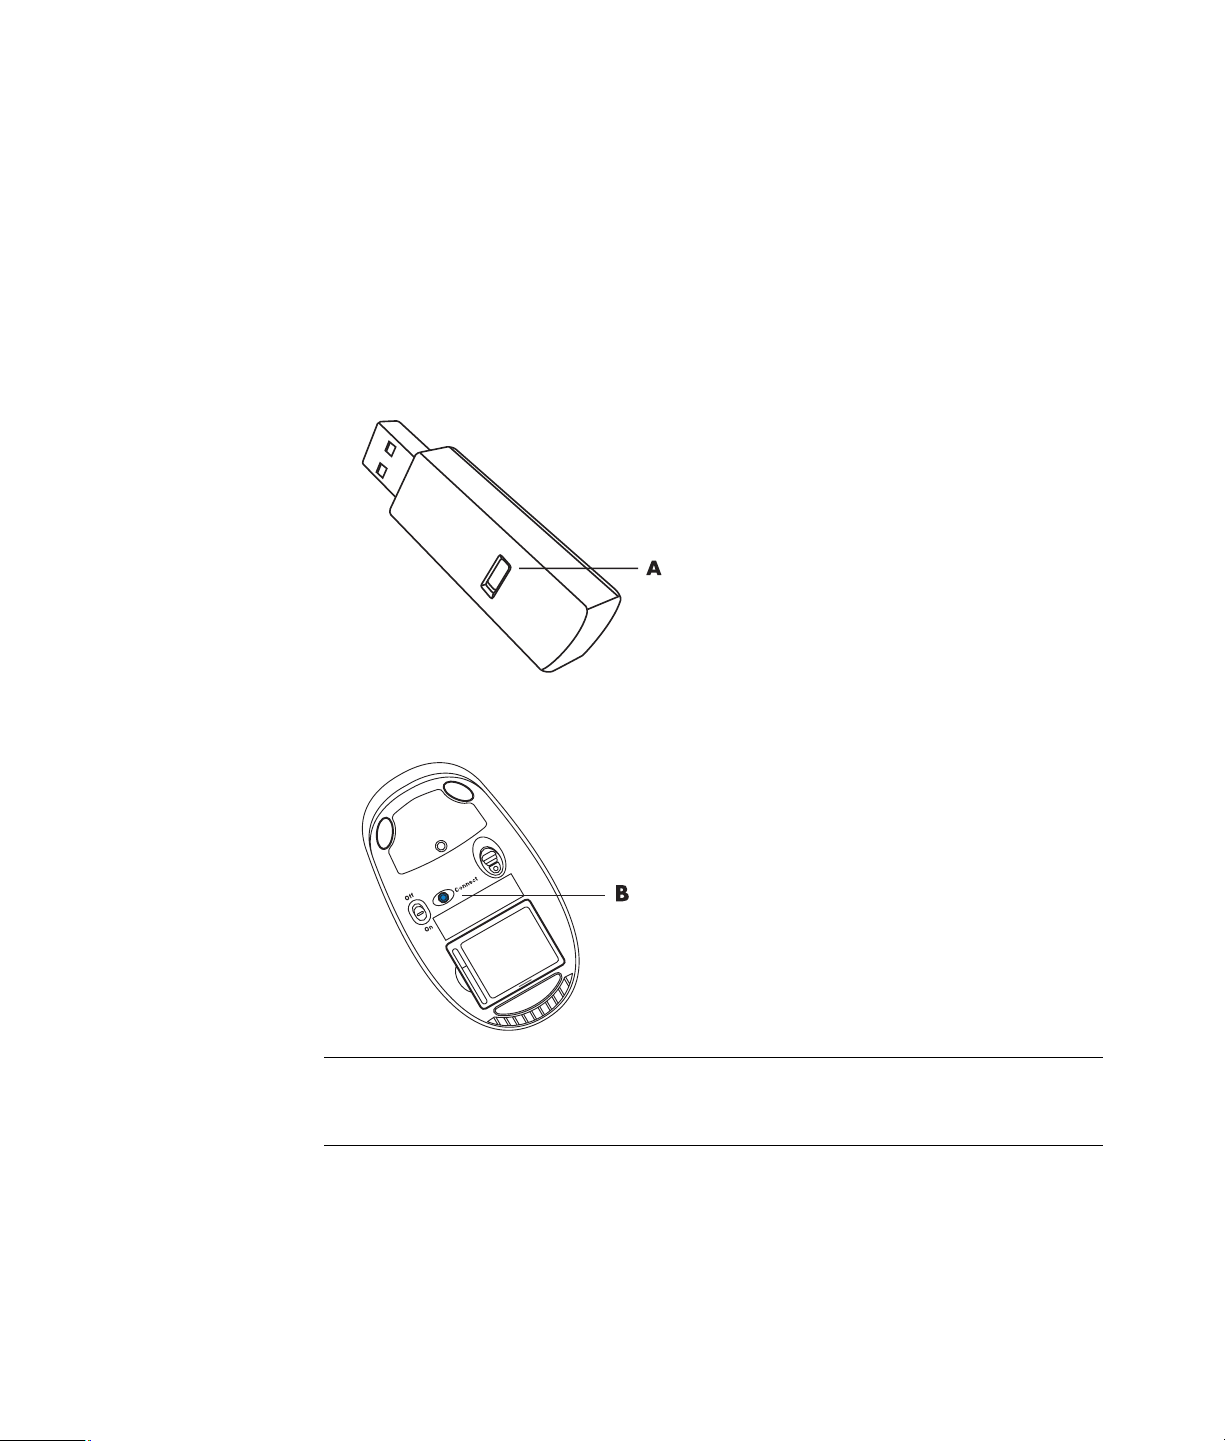
Wireless Mouse and Keyboard Troubleshooting
Synchronizing a wireless mouse and keyboard
If the wireless mouse and keyboard do not respond, use this procedure to resynchronize
the devices.
1 Plug the receiver into a USB port on the computer. If you have a choice, a USB port on
the front of the computer is best if it will be closer to the mouse and keyboard.
2 Push the Connect button (A) on the receiver, and hold it for 5 to 10 seconds until the
blue light starts to flash.
3 Push and hold the Connect button (B) on the underside of the mouse until the blue LED
on the receiver stops flashing.
NOTE: The receiver connection session times out after 60 seconds. To ensure the
connection was established instead of the receiver timing out, move the mouse and check
for response.
64 Getting Started (features vary by model)

After the mouse connection is established, repeat the procedure with the keyboard:
1 Push the Connect button on the receiver, and hold it for 5 to 10 seconds until the blue
light starts to flash.
2 Push and hold the Connect button (C) on the underside of the keyboard until the blue
LED on the receiver stops flashing.
For additional mouse and keyboard troubleshooting tips, refer to the Troubleshooting and
Maintenance Guide.
Using the Keyboard 65

66 Getting Started (features vary by model)

Using the Mouse
IMPORTANT: Please see any documentation that came with the mouse for additional
information about using the mouse, customizing mouse buttons, and using special buttons
or features that are included with the mouse. You may need to install mouse software and
drivers to access all the special features and functions of the mouse.
Your computer includes a mouse for directing the cursor (pointer) on the Windows Vista
desktop. The mouse uses a roller ball or optics (a light and sensor) to sense movement and
cause the cursor on the screen to move. Use the mouse on a flat surface.
NOTE: The optical mouse cannot work on a glass, translucent, or reflective surface.
A wireless mouse (select models only) is an optical mouse that uses a receiver/transmitter,
instead of a connector cable, to communicate with your computer. A light on the receiver
indicates receiver activity.
NOTE: The wireless mouse goes into a sleep or suspend mode after 20 minutes of
inactivity. Click a button on the mouse to wake it. (Moving the wireless mouse does not
wake it.)
Using the Mouse 67

Using the Mouse Buttons
The mouse has two or three buttons on the top:
Click the left mouse button (A) to position the cursor or select
an item.
Click the right mouse button (C) to display a menu of
commands for the item you clicked.
On select models, use the scroll wheel button (B) in the center
for scrolling and panning.
NOTE: Your mouse may look different from the one
shown here.
You see these terms for using the mouse:
Click means to press and release the left mouse button once.
Double-click means to click the left mouse button and then
quickly click it again.
Right-click means to press and release the right button once.
To select an item, click it.
To select sequential items in a list or group, click the first item in the list, and then press and
hold the Shift key on the keyboard while you click the last item.
To select non-sequential items, click the first item, and then press and hold the Ctrl key on
the keyboard while you click the additional items.
You can switch the function of the left and right buttons for left-handed use. See “Changing
Mouse Settings.”
Scrolling
Click the left mouse button to place the cursor in a document, and then:
To scroll toward the beginning of the document, roll the scroll wheel button up
(away from you).
To scroll toward the end of the document, roll the scroll wheel button down
(toward you).
68 Getting Started (features vary by model)

Autoscrolling
1 Place the cursor anywhere in the document, and then press the scroll wheel
button once. An autoscroll icon appears.
2 Move the mouse in the direction you want to scroll. The farther you move the
mouse from the starting point, the faster the document scrolls.
3 To stop autoscrolling, press the scroll wheel button again.
NOTE: Autoscrolling does not work with some software programs.
Panning
1 Place the cursor anywhere in the document, and then press and hold down the scroll
wheel button.
2 Slowly move the mouse in the direction you want to pan. The farther that you move the
mouse from the starting point, the faster the document pans.
3 To stop panning, release the scroll wheel button.
NOTE: Panning works only if the horizontal scroll bar in the window is active. Panning
does not work with some software programs.
Changing Mouse Settings
Switching mouse button functions
To switch the functions of the right and left mouse buttons for left-handed use:
1 Click the Windows Start Button on the taskbar.
2 Click Control Panel.
3 Click Hardware and Sound, if it is present.
4 Click Mouse.
5 Click the Buttons tab, and check Switch primary and secondary buttons.
6 Click Apply (using the new primary button), and then click OK.
Using the Mouse 69

Changing mouse pointer speed
To change the speed of the cursor on the screen relative to the motion of the mouse:
1 Click the Windows Start Button on the taskbar.
2 Click Control Panel.
3 Click Hardware and Sound, if it is present.
4 Click Mouse.
5 Click the Pointer Options tab.
6 In the Motion area, use the slider to adjust the pointer speed. You can select other
pointer options by placing a check in the check box next to the setting that you want.
7 Click Apply, and then click OK.
Changing the double-click speed
To change the double-click speed of the right mouse button:
1 Click the Windows Start Button on the taskbar.
2 Click Control Panel.
3 Click Hardware and Sound, if it is present.
4 Click Mouse.
5 Click the Buttons tab.
6 In the Double-click speed area, use the slider to adjust the double-click speed.
7 Click Apply, and then click OK.
Turning on the ClickLock option
ClickLock enables you to highlight or drag an object without holding down the
mouse button.
To turn on the ClickLock option:
1 Click the Windows Start Button on the taskbar.
2 Click Control Panel.
3 Click Hardware and Sound, if it is present.
4 Click Mouse.
5 Click the Buttons tab.
6 In the ClickLock area, place a check in the Turn on ClickLock check box.
7 Click Apply, and then click OK.
70 Getting Started (features vary by model)

Changing the scroll wheel speed
To change the scroll wheel speed:
1 Click the Windows Start Button on the taskbar.
2 Click Control Panel.
3 Click Hardware and Sound, if it is present.
4 Click Mouse.
5 Click the Wheel tab.
6 In the Vertical Scrolling area, adjust the number of lines per scroll by clicking the
arrow buttons.
Or
In the Horizontal Scrolling area, adjust the number of lines per scroll by clicking the
arrow buttons.
7 Click Apply, and then click OK.
Wireless Mouse and Keyboard Troubleshooting
If the wireless mouse and keyboard do not respond, see “Synchronizing a wireless mouse
and keyboard” in the “Using the Keyboard” chapter to resynchronize the devices.
Using the Mouse 71

72 Getting Started (features vary by model)

Configuring Speaker and Sound Options
Speakers are included with the monitor (select models only), or they are sold separately.
For details about connecting stereo speakers to the computer, see the setup poster. For
details about connecting multichannel speakers, see “Connecting Speakers or
Microphone.”
NOTE: Speakers may be passive (no power button or power cord) or active (power button
or power cord). Your computer supports only active (powered) speaker systems; the
speaker system must have its own power cord.
A stereo speaker set is a left-right, two-channel speaker system. A multichannel audio
speaker system is a system with more than two channels, and it may include a subwoofer.
For example, a 5.1 channel speaker system, referred to as six-speaker mode, uses two
front speakers (left-right), two rear speakers (left-right), a center speaker, and a subwoofer.
If your computer has multichannel audio speaker capacity (select models only), you can
connect four channels for four-speaker output, or six channels for 5.1 speaker output.
Your model may include one of three analog sound connector types on the back of
the computer:
Three connectors (Realtek Audio)
Six connectors (Realtek Audio)
Audio sound card (Creative Sound Blaster X-Fi and X-Fi Fatality, or Analog Devices,
Inc (ADI))
Your system may also have a separate Digital Out connector (select models only).
See “Connecting Speakers or Microphone” for more information about connecting your
speaker system, and then configure the audio software for sound output as described in
this section.
Configuring Speaker and Sound Options 73

Adjusting speaker volume
Use the Volume icon on the taskbar to set speaker volume. Then, you can adjust the volume
by using:
The Volume knob or buttons on the keyboard (select models only).
The Volume knob on the speakers (select models only).
There are two ways to use the Volume icon:
1 Click the orange Realtek HD Audio Manager Volume icon on the
taskbar.
2 Select a tab, such as Digital Output, and then adjust the volume by clicking
the slider and moving it.
3 When you are satisfied with the sound level, click outside the Volume window to
close it.
Or
1 Right-click the white Microsoft Volume icon on the taskbar, and then click
Open Volume Mixer. The Volume Mixer settings window opens.
2 Adjust the volume by clicking the slider and moving it.
3 When you are satisfied with the sound level, click the Close box (the X in the
upper-right corner) to close this window.
74 Getting Started (features vary by model)

Selecting a microphone
Your computer comes with one microphone connector on the back of the computer. Some
models have a second microphone connector on the front of the computer. Only one
microphone connector works at a time, and the back connector is ready to use unless you
have the multichannel audio speakers option. For computers with the multichannel audio
speakers option, the microphone connector on the front of the computer, if it is present, is
ready to use.
To use a microphone connected to the front of your computer (select models only), select
the working microphone:
NOTE: If you connect your microphone to the back of your computer, you do not need to
perform this procedure.
1 Right-click the white Microsoft Volume icon on the taskbar, and then click
Recording Devices. The Sound window opens.
2 Select the Recording tab.
3 Double-click Microphone, and select the General tab.
4 Click the microphone connector that you want to use, and then click Apply.
5 Click OK.
Adjusting microphone volume
To adjust the volume of the microphone:
1 Right-click the orange Realtek HD Audio Manager Volume icon on the
taskbar, and then click Audio Devices.
2 Click the Recording tab.
3 Double-click Microphone, and then click the General tab.
4 Click the microphone connector that you want to use.
5 Click the Levels tab.
6 Adjust the volume for the microphone by clicking the slider and moving it.
7 Click OK, and then click OK again.
Configuring audio output
You can configure your speaker audio output by using the following software. Use the
software that applies to your computer model:
Creative Sound Blaster X-Fi or X-Fi Fatality Speaker Settings Configuration
(audio card)
Realtek HD Audio Manager (multistreaming audio)
Windows Media Center (all systems)
Configuring Speaker and Sound Options 75

Using the Creative Sound Blaster X-Fi or X-Fi Fatality audio card
This section provides an overview of configuring and recording with the Creative Sound
Blaster X-Fi or X-Fi Fatality audio card (select models).
Configuring the audio card software
After you have installed and connected the speakers, follow these steps to configure
multichannel audio output for computers:
NOTE: Three modes are available; Entertainment Mode is selected here. For information
about the other modes, see “Sound Blaster X-Fi configuration modes.”
1 Click the Windows Start Button on the taskbar.
2 Point to All Programs.
3 Click Creative, Sound Blaster X-Fi, and then click Creative Console
Launcher.
4 The Entertainment Mode window opens. If a different mode displays, click the Mode
button, and then select Entertainment Mode.
5 Click the Windows Start Button , All Programs, Creative, and then
Creative Console Launcher.
6 Click the Speakers button.
7 Click Auto Detect. Creative automatically detects the type of speakers that
are connected to your system.
8 Click X to close the window.
Now that you have configured the audio card software, you must configure audio output
for your media software program. The procedure is different for each program. Refer to
the instructions that came with the media software program.
76 Getting Started (features vary by model)

Configuring the FlexiJack connector
Your audio device may have a FlexiJack connector that supports both microphone and Line
input. If so, you can change the FlexiJack mode, if necessary. To do this, you must select
the function in the Creative Console Launcher after you connect the audio cable to the
FlexiJack connector on the audio card.
NOTE: If you are using the FlexiJack as your Digital In connection, and you want to
connect digital speakers as your output device, you need a special connector from
Creative.
1 Connect your audio cable to the FlexiJack connector on the audio card.
2 Click the Windows Start Button , All Programs, Creative, and then
Creative Console Launcher.
3 Click the Jacks button.
4 Under FlexiJack Mode, select either Digital I/O or Mic-In/Line-In.
5 Close the window.
Sound Blaster X-Fi configuration modes
The Sound Blaster X-Fi audio card includes three modes: Audio Creation Mode,
Entertainment Mode, and Game Mode.
The main functions, such as speaker configuration, equalizer, and volume control, are
available in all three modes. However, each mode optimizes the audio card resources to
provide the best audio performance for different activities.
Using Audio Creation Mode
The Audio Creation Mode enables advanced recording functions.
Available features:
Recording from several audio sources
Applying studio-quality effects
Mixer settings
Equalizer settings
Configuring Speaker and Sound Options 77

Using Entertainment Mode
The Entertainment Mode optimizes the audio card for playing movies and music.
Available features:
Configuring speakers and headphones
Configuring surround sound, DTS, and THX
Volume, bass, and treble controls
Mixer settings
Using Game Mode
The Game Mode optimizes the audio card for playing games.
Available features:
Volume, bass, and treble controls
Mixer settings
Configuring speakers and headphones
Configuring surround sound
More information
For more information about configuring and using the audio card, go to the Creative
Sound Blaster X-Fi documentation:
1 Click the Windows Start Button on the taskbar.
2 Point to All Programs.
3 Click Creative, Sound Blaster X-Fi, and then click Documentation.
4 Click Online Manual.
Configuring speakers with Realtek HD Audio Manager
After you have installed and connected your speakers, complete the following steps if your
computer model has type 6 connectors and is capable of multistreaming audio:
1 Click the Windows Start Button on the taskbar.
2 Click Control Panel.
3 Click Hardware and Sound.
4 Click Realtek HD Audio Manager. The window opens.
NOTE: You must have your speakers connected for Realtek to display the
Speakers tab.
5 Click the Speakers tab to open that control screen.
78 Getting Started (features vary by model)

6 Click the Speaker Configuration tab.
7 Select your type of speakers from the drop-down menu.
8 Click OK.
The Realtek HD Audio Manager control screens
Digital Output: Enables you to select the Environment and Equalizer settings. You
can select an environment, such as Stone Room or Auditorium. Under Equalizer,
you can either click a preset button, such as Pop or Live, or manually adjust the
settings and then save them for easy selection later.
Speakers: Enables you to select the number of speakers, view whether the
connectors are analog or digital, and select the digital audio output and digital audio
input devices. Only speakers that are currently being used are displayed.
Configuring Speaker and Sound Options 79

Microphone: Enables fine control over the recording volume and playback volume
of the microphone. Includes buttons for noise suppression and acoustic echo
cancellation.
Line In (Digital Input): Enables control over volume, playback, mute, recording,
and multistreaming audio.
80 Getting Started (features vary by model)

HDMI Output: Enables you to select the Environment and Equalizer settings. You
can select an environment, such as Stone Room or Auditorium. Under Equalizer,
you can either click a preset button, such as Pop or Live, or manually adjust the
settings and then save them for easy selection later.
Configuring sound for recording with the Realtek HD Audio Manager
The microphone connector is ready to use for recording sound. If you want to use another
connector for recording, such as the Digital Audio In connector, complete the following
steps to select it:
1 Click the Windows Start Button on the taskbar.
2 Click Control Panel.
3 Click Hardware and Sound, and then Realtek HD Audio Manager.
4 Click the Line In tab.
5 Click Digital In tab, and then select Set Default Device.
6 Click OK to close the window.
NOTE: You can retask the front pink, blue, and green connectors to perform other audio
functions; see “Retasking front panel audio connectors.”
Configuring Speaker and Sound Options 81

Retasking front panel audio connectors
You can retask the Line In, Mic In, Headphone, and Front Speaker Out connectors on the
front of the computer, as necessary.
1 Click the Windows Start Button on the taskbar.
2 Click Control Panel.
3 Click Hardware and Sound, and then click Realtek HD Audio Manager.
4 Click a front connector icon that you want to retask.
NOTE: Only the connectors that are not dimmed are able to be retasked.
5 Place a check in the device check box that you want to select, and then click OK.
You can now use the front connectors as either input or output devices.
82 Getting Started (features vary by model)

Configuring multistreaming audio
The Realtek HD Audio Manager software enables you to listen to two different audio
sources on two different speaker sets.
For example, you can hear one audio source through a rear-panel speaker connection,
and a second source through a front-panel headphone or speaker connection. You must
configure multistreaming audio for the system if you want to hear two audio sources on
separate speakers.
Audio output overview
The front-panel audio output is the green stereo headphone connector only.
The rear-panel outputs are the speaker connectors that can be set up as multichannel out
from stereo 2.0 to 7.1 (select models only) configurations. Refer to your user
documentation for information about setting up powered speakers or your AV receiver.
Audio input overview
You can select two of the following audio sources to play through front-panel headphone
and rear-panel speaker connectors:
1 From an externally connected device source, such as:
A microphone with cable connected to Mic In (pink).
An MP3 player with cable connected to Line In (blue).
2 From an internal source inside, or directly connected to, the computer, audio files may
reside on: hard disk drives, DVDs, CDs, USB drives, HP Personal Media Drives, or
any connected device. Play internal media files through programs such as:
Microsoft Windows Media Player.
Other installed media player software.
NOTE: Digital Audio In cannot be multistreamed.
Configuring Speaker and Sound Options 83

When to use multistreaming audio
You may multistream two audio sources as described in the following typical examples:
1 For online gaming:
You hear 5.1 game sound on AV receiver or powered speakers.
You also hear gaming conversation on a headset.
See “Example 1: For online gaming.”
2 For digital home entertainment:
You hear DVD sound on a living room TV/display or AV receiver from the
rear-speaker connections.
You also hear sound on the computer or powered speakers that are connected to
the front-panel green headphone jack, from one of the following external
computer audio sources:
a Front-panel Line In
b Internal source residing on a hard disk drive, DVD, CD, USB drive, or other
external device
See “Example 2: For digital home entertainment.”
Setting up multistreaming audio
Example 1: For online gaming
To configure multistreaming audio output for online gaming with Realtek HD Audio
Manager, you must enable Voice-over-IP software (software used to converse over the
Internet). Other players hear your voice from the microphone via the Internet, and you hear
the game audio from the rear speakers.
1 Connect the audio input and output connectors as follows:
A headphone set to the front Headphone Out (green) connector
A microphone to the front Mic In (pink) connector for online conversation
A set of powered stereo 5.1 or 7.1 speakers to the rear Speaker Out connectors
for gaming sound output
2 Click the Realtek HD Audio Manager icon on the taskbar to open the
Realtek HD Audio Manager window.
3 Click the Device Advanced Settings button.
4 Select Make front and rear output devices playback two different audio
streams simultaneously.
5 Place a check in the Output Mic In/Line In to front panel check box, and
click OK.
Or
Place a check in the Output Mic In/Line In to rear panel check box, and
click OK.
84 Getting Started (features vary by model)

Example 2: For digital home entertainment
To configure multistreaming audio output for digital home entertainment with Realtek HD
Audio Manager:
1 Connect the audio output connectors as follows:
A headphone set or powered speakers to the front Headphone Out (green)
connector for stereo music playback
A set of powered stereo 5.1 or 7.1 speakers to the rear Speaker Out connectors
for DVD playback sound output
2 Click the Realtek HD Audio Manager icon on the taskbar to open the
Realtek HD Audio Manager window.
3 Click the Device Advanced Settings button.
4 Select Make front and rear output devices playback two different audio
streams simultaneously.
5 Place a check in the Output Mic In/Line In to front panel check box, and then
click OK.
Or
Place a check in the Output Mic In/Line In to rear panel check box, and then
click OK.
Configuring audio for Windows Media Center
After you have installed, connected, and configured the speakers, follow these steps to
configure multichannel audio output for Windows Media Center:
1 Click the Windows Start Button on the taskbar.
2 Click Windows Media Center.
3 Under Tasks, click settings, General, and then click Windows Media
Center Setup.
4 Click Set Up Your Speakers. The Welcome to Speaker Setup window opens.
5 Click Next.
6 Choose the speaker connection type, and then click Next.
7 Select the number of speakers, and then click Next.
8 Click Test to test the speakers.
9 Click Finish.
Configuring Speaker and Sound Options 85

Selecting recording devices
(Type 6 connectors only)
To select a sound recording device:
1 Click the Windows Start Button on the taskbar.
2 Click Control Panel.
3 Click Sounds and Audio Devices (or Sounds, Speech and Audio Devices).
The Sounds and Audio Devices window opens.
4 Click the Audio tab.
5 Under Sound Recording, select a recording device, such as Realtek HD Front
Pink Jack.
6 Click OK.
7 Close the window.
Resolving sound issues
If you do not have sound from the speakers, try the following:
Check the volume and mute settings. See “Connecting Headphones.”
Use active (powered) speakers, or speakers with an amplifier.
Check the sound cable connections.
Ensure that the software program and sound software are properly configured.
Some software programs may result in low volume, even when the Volume is turned to
the maximum value. If this is the case, click the Volu me icon on the taskbar, and
increase the system volume.
Reconfigure the sound software for surround sound.
Reinstall the audio card drivers by using application reinstallation program; refer to
the Troubleshooting and Maintenance Guide that came with the computer.
86 Getting Started (features vary by model)

Using the Windows Media Center
Remote Control
(Select models only)
NOTE: The remote control is included with select models
only. Features and location may vary.
The remote control is designed to work with Windows Media
Center. You can use the remote control with Windows Media
Center to play CDs and DVDs, view pictures, and
much more.
This remote control helps you navigate the Windows Media
Center windows on the computer just as a TV remote control
helps you navigate cable TV options or control the playback
of a movie in a VCR or DVD player.
The remote control can:
Navigate and control all Windows Media Center
windows.
Control the video display.
Place the computer in and out of sleep mode.
Shut down or restart the computer.
Log off from Windows Media Center or switch users.
Access Teletext menus while watching live TV.
The remote control cannot:
Navigate the Windows desktop or control other
computer programs outside of Windows Media Center.
Be used as a VCR, DVD player, or stereo remote control.
Turn on or off a TV that is connected to the computer
(select models only).
Turn on the computer.
Using the Windows Media Center Remote Control 87

Remote Control Buttons Overview
1 On/Off (Sleep) — Puts the computer into and out of
a power-reduced Sleep mode. It does not turn the
computer off.
2 Teletext — Turns Teletext on or off while in Live TV
mode. The Teletext page either replaces the live TV
picture or is displayed over it. TV sound is still
available.
3 Green
4Red — Opens a Teletext menu.
5Guide — Opens the Television Program Guide.
6 Recorded TV — Opens the recorded tv window
where recorded TV programs are listed.
7Arrows — Moves the cursor to navigate and select
actions within all Windows Media Center windows.
8DVD Menu — Opens the Play DVD window in
Windows Media Center or opens the main menu of a
DVD movie, if available.
9Back — Returns to the previous window within
Windows Media Center.
10 i (More information) — Displays available
information about a selected media file and displays
other menus.
11 Start — Opens the Windows Media Center
main menu.
12 Volume — Increases (+) and decreases (–)volume.
— Opens a Teletext menu.
13 Mute — Turns computer sound off. The word Mute is
displayed when Mute is turned on.
14 Record — Records a selected television program
and stores it on the hard disk drive.
15 Play — Plays the selected media.
16 Rewind — Moves the media backward at
three speeds.
17 Skip Backward — Moves media backward
7 seconds, or to the beginning of a music track or a
DVD chapter.
88 Getting Started (features vary by model)

18 0 to 9, #, * — Enters text and numbers into a Windows Media Center search or text box. Each time
you press a number button, a different character appears. Press the Enter button to select a character.
19 Clear — Deletes the last character entered.
20 LED — Activity indicator light. The LED tells you that the remote control is emitting a signal when you
press a button.
21 Print — Prints an item in Windows Media Center.
22 Yellow — Opens a Teletext menu.
23 Blue — Opens a Teletext menu.
24 Live TV — Displays the full-screen view of live TV. Moves a TV program forward to the end of the pause
buffer and resumes playing live TV.
25 OK — Selects the desired action or window option and acts as the Enter key.
26 Aspect — Changes the aspect ratio of the display. Zooms in on the picture three times then returns to
the full-screen aspect ratio.
27 Slide Show — Plays a slide show of all the pictures on the hard disk drive.
28 CH/PG up (+) and down (–) — Changes the TV channels or moves pages up and down, depending
on available options. Moves to the next DVD chapter.
29 Eject
— Ejects CD or DVD drive.
30 Pause — Pauses audio and video tracks and live or recorded TV programs.
31 Fast Forward — Moves media forward at three speeds.
32 Skip Forward — Moves media forward 30 seconds in videos and live TV, one music track, or one
DVD chapter.
33 Stop — Stops the media currently playing.
34 Enter — Selects the desired action, menu, or window option.
NOTE: The remote control requires two AA batteries. The remote control operates up to 8 meters away from the
remote sensor. Make sure there is nothing blocking the pathway between the remote control and the remote
sensor.
NOTE: Make sure you turn off the monitor and turn down or mute the volume, for example, if you have a
scheduled recording in the middle of the night and do not want to be disturbed. The computer does not
automatically go into Sleep mode if Windows Media Center is open. It is recommended that you close Windows
Media Center before you manually place the computer in sleep mode.
NOTE: If the computer model does not include a TV tuner, some remote control buttons are inactive.
Using the Windows Media Center Remote Control 89

Teletext access buttons
(Select models only)
Although Teletext is broadcast free of charge, the TV set must
be equipped with a Teletext decoder. Access to Teletext and all
of its functions is available through the TV and the Windows
Media Center remote control.
Although the following information should describe the
operation of Teletext for most TV sets, functions vary between
manufacturers and models. For specific information about
your particular TV model, see the documentation that came
with your TV.
Teletext consists of pages of free information such as news, sports, financial information,
recipes, entertainment listings, holiday advertisements, music and TV reviews, backup
information for certain TV programs, and themes for television sets capable of viewing
these pages. The Teletext buttons are also used for Integrated Services Digital Broadcasting
(ISDB) data functions.
The actual Teletext pages are broadcast in a hidden part of the television signal and
decoded by the television. Teletext pages are accessed by a three-figure number; on most
channels, the front page is on page 100.
The Teletext access buttons listed below open the main Te lete x t pag e s. Ea c h Tele t ext p age
has a unique three-digit page number. All pages can be accessed by typing in the number
using the numeric keypad on the remote control.
Use the up and down arrows to navigate through the different Teletext pages.
Button Function
Teletext
(Text)
Red Opens the red Fasttext shortcut link when display is in Teletext mode.
Green Opens the green Fasttext shortcut link when display is in Teletext mode.
Yellow Opens the yellow Fasttext shortcut link when display is in Teletext mode.
Blue Opens the blue Fasttext shortcut link when display is in Teletext mode.
Toggle button to turn Teletext on and off. This button opens page 100,
or the home page. The Teletext page completely replaces the TV or
Windows Media Center display; however, sound is still available. To
return to the TV or Windows Media Center display, press this button
again. On some displays, Teletext can be viewed over the display
picture.
90 Getting Started (features vary by model)
 Loading...