

Page 1

HP OmniBook
Getting Started
1
Page 2

Notice
This manual and any examples contained herein are provided “as is” and are
subject to change without notice. Hewlett-Packard Company makes no warranty of
any kind with regard to this manual, including, but not limited to, the implied
warranties of merchantability and fitness for a particular purpose. Hewlett-Packard
Co. shall not be liable for any errors or for incidental or consequential damages in
connection with the furnishing, performance, or use of this manual or the examples
herein.
Consumer transactions in Australia and the United Kingdom: The above disclaimers
and limitations shall not apply to Consumer transactions in Australia and the United
Kingdom and shall not affect the statutory rights of Consumers.
© Copyright Hewlett-Packard Company 1995–1996. All rights reserved.
Reproduction, adaptation, or translation of this manual is prohibited without prior
written permission of Hewlett-Packard Company, except as allowed under the
copyright laws.
The programs that control this product are copyrighted and all rights are reserved.
Reproduction, adaptation, or translation of those programs without prior written
permission of Hewlett-Packard Co. is also prohibited.
Portions of the programs that control this product may also be copyrighted by
Microsoft Corporation, Adaptec, Inc., SystemSoft Corp. See the individual programs
for additional copyright notices.
Microsoft, MS, and MS-DOS are registered trademarks and Windows is a trademark
of Microsoft Corporation (U.S. patent numbers 4955066 and 4974159). SystemSoft is
a registered trademark and CardWizard, CardView, CardSoft, and CardID are
trademarks of SystemSoft Corporation.
For warranty information, see the Support and Service booklet.
Hewlett-Packard Company
Mobile Computing Division
1000 N.E. Circle Blvd.
Corvallis, OR 97330, U.S.A.
2
Page 3

HP Software Product License Agreement
The HP Software Product License Agreement and Product Limited Warranty shall
govern all Software which is provided to you, the Customer, as part of the HP
computer product. The HP Software Product License Agreement and Product
Limited Warranty shall supersede any non-HP software license or non-HP warranty
terms which may be found in any documentation or other materials contained in
the computer product packaging.
Carefully read this License Agreement before proceeding to operate this
equipment. Rights in the software are offered only on the condition that the
Customer agrees to all terms and conditions of the License Agreement.
Proceeding to operate the equipment indicates your acceptance of these
terms and conditions. If you do not agree to the License Agreement, you must
now either remove the software from your hard disk drive and destroy the
master diskettes, or return the complete computer and software for a full
refund.
Software License Agreement
In return for payment of the applicable fee, Hewlett-Packard grants the Customer a
license in the software, subject to the following:
1. Use. Customer may use the software on any one computer. Customer may not
network the software or otherwise use it on more than one computer. Customer
may not reverse assemble or decompile the software unless authorized by law.
2. Copies and Adaptations. Customer may make copies or adaptations of the
software (a) for archival purposes or (b) when copying or adaptation is an
essential step in the use of the software with a computer so long as the copies
and adaptations are used in no other manner.
3. Ownership. Customer agrees that he/she does not have any title or ownership
of the software, other than ownership of the physical media. Customer
acknowledges and agrees that the software is copyrighted and protected under
the copyright laws. Customer acknowledges and agrees that the software may
have been developed by a third party software supplier named in the copyright
notices included with the software, who shall be authorized to hold the
Customer responsible for any copyright infringement or violation of this
Agreement.
4. Transfer of Rights in Software. Customer may transfer rights in the software
to a third party only as part of the transfer of all rights and only if Customer
obtains the prior agreement of the third party to be bound by the terms of this
License Agreement. Upon such a transfer, Customer agrees that his/her rights in
the software are terminated and that he/she will either destroy his/her copies
and adaptations or deliver them to the third party.
3
Page 4

5. Sublicensing and Distribution. Customer may not lease, sublicense the
software or distribute copies or adaptations of the software to the public in
physical media or by telecommunication without the prior written consent of
Hewlett-Packard.
6. Termination. Hewlett-Packard may terminate this software license for failure
to comply with any of these terms provided Hewlett-Packard has requested
Customer to cure the failure and Customer has failed to do so within thirty (30)
days of such notice.
7. Updates and Upgrades. Customer agrees that the software does not include
updates and upgrades which may be available from Hewlett-Packard under a
separate support agreement.
8. Export Clause. Customer agrees not to export or re-export the software or any
copy or adaptation in violation of the U.S. Export Administration regulations or
other applicable regulation.
9. U.S. Government Restricted Rights. Use, duplication, or disclosure by the
U.S. Government is subject to restrictions as set forth in subparagraph (c)(1)(ii)
of the Rights in Technical Data and Computer Software clause in DFARS
252.227-7013. Hewlett-Packard Company, 3000 Hanover Street, Palo Alto, CA
94304 U.S.A. Rights for non-DOD U.S. Government Departments and Agencies
are as set forth in FAR 52.227-19(c)(1,2).
Edition History
Edition 1 ............................................. July 1996
Edition 2 ........................................ November 1996
This manual is printed on recycled paper.
4
Page 5

Contents
1 Starting Out with Your OmniBook ......................... 7
Setting Up the OmniBook ................................ 9
To set up the OmniBook ............................... 10
To adjust the display .................................. 13
To use the pointing device.............................. 14
To turn off the Omnibook .............................. 15
To understand the status panel........................... 16
Setting up the Operating System............................ 17
To set up Windows 95 ................................. 17
To set up Windows for Workgroups ....................... 18
Restoring Files ........................................ 19
To recover Windows 95................................ 20
To set up a PCMCIA or parallel port CD-ROM drive ............. 21
To recover Windows for Workgroups ...................... 22
To make DOS 6.22 and Windows for Workgroups backup disks .... 23
To recover HP software programs......................... 24
To read the online User’s Guide .......................... 25
To install device drivers for other operating systems ............ 25
To remove the hard drive .............................. 29
To install drive C..................................... 30
Where to go from here .................................. 31
2 Troubleshooting....................................... 33
Solving Basic Problems .................................. 35
3 Specifications and Regulatory Information 39
Hardware Specifications ................................. 41
Safety Information ..................................... 42
Regulatory Information .................................. 47
U.S.A. ............................................ 47
Canada ........................................... 48
Japan ............................................ 48
Europe ........................................... 49
5
Page 6

Page 7

1
Starting Out with Your
OmniBook
7
Page 8

Starting Out with Your OmniBook
Congratulations! Your OmniBook sets a new standard in personal computing.
Although it’s compact and easy to carry, the OmniBook is infused with the quality
and attention to detail that are the hallmark of Hewlett-Packard.
This OmniBook Getting Started manual shows how to get your OmniBook up and
running quickly. It also shows what to do if you run into trouble getting it started.
For complete information about operating the OmniBook—and information about
how to remove and exchange hardware modules, consult the OmniBook User’s
Guide—an online manual.
About Your OmniBook Manuals
Your OmniBook provides these manuals—convenient, yet portable sources of
extensive information about your OmniBook and its installed software:
• The online OmniBook User's Guide introduces the OmniBook and shows you
how to operate and maintain your OmniBook. It also contains thorough
troubleshooting information. In Windows for Workgroups, look in Program
Manager in the OmniBook Library group. In Windows 95, look in Start,
Programs, OmniBook Library.
• For Windows for Workgroups, the online Windows Quick Start and MS-DOS
Quick Start manuals contain information about Windows for Workgroups and
MS-DOS. Look in Program Manager in the OmniBook Library group.
For Windows 95, the printed Introducing Microsoft Windows 95 manual contains
information about Windows 95.
8
Page 9

Starting Out with Your OmniBook
Setting Up the OmniBook
Setting Up the OmniBook
The OmniBook Getting Started guide introduces the OmniBook and shows you how
to set up the OmniBook and select an operating system. For more information
about using your OmniBook, look in the online OmniBook User’s Guide.
This manual explains how to
♦ Set up the OmniBook.
♦ Adjust the display.
♦ Use the pointing device.
♦ Turn the OmniBook off.
♦ Understand the status panel symbols.
♦ Select an operating system.
♦ Recover system files.
♦ Recover HP OmniBook applications.
♦ Remove and replace the hard disk drive.
♦ Get more information about using the OmniBook.
9
Page 10
Starting Out with Your OmniBook
CAUTION
Do not mutilate, puncture, or dispose of the battery in fire. The battery can
burst or explode, releasing hazardous chemicals. A rechargeable battery pack
must be recycled or disposed of properly.
Setting Up the OmniBook
To set up the OmniBook
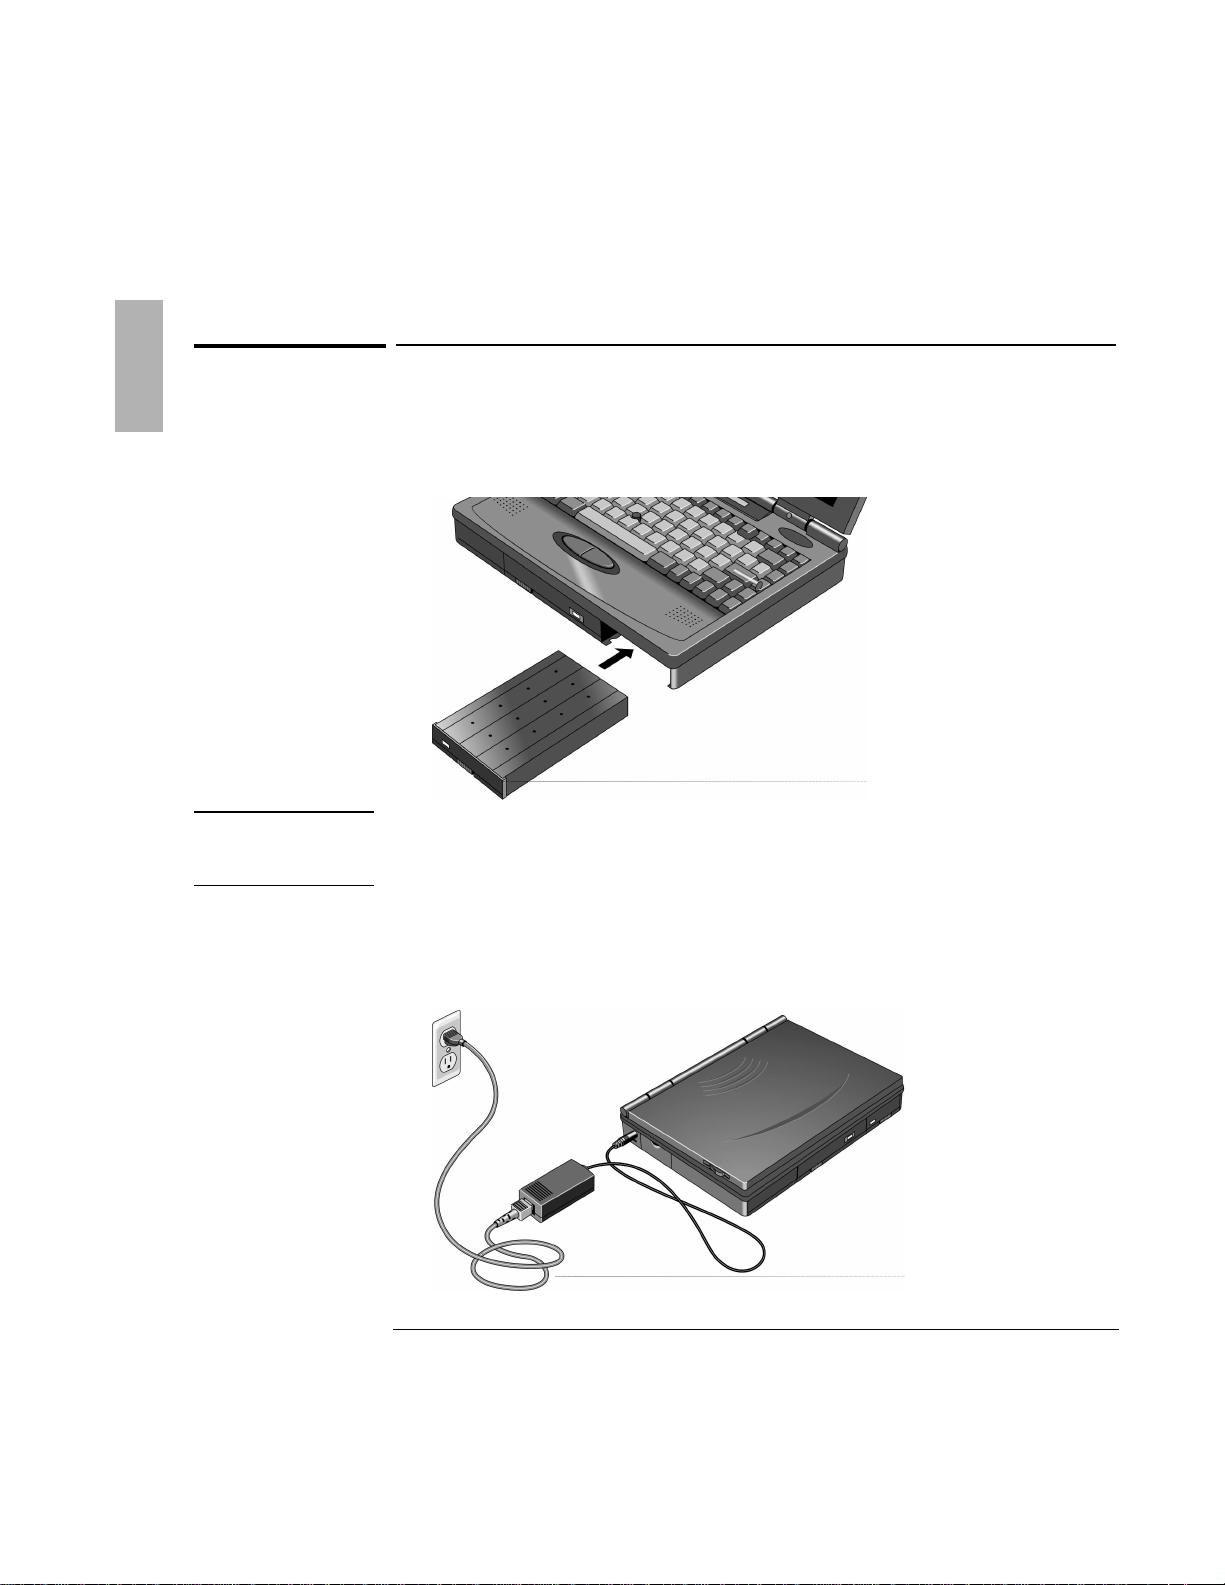
1. Remove the battery from its packaging.
2. Slide the battery all the way into the battery compartment.
3. Plug the power cord into the ac adapter, then into a grounded ac outlet. Then
plug the ac adapter into the OmniBook. When you plug in ac power, the
battery starts charging automatically.
10
Page 11
Starting Out with Your OmniBook
Reset button
Setting Up the OmniBook
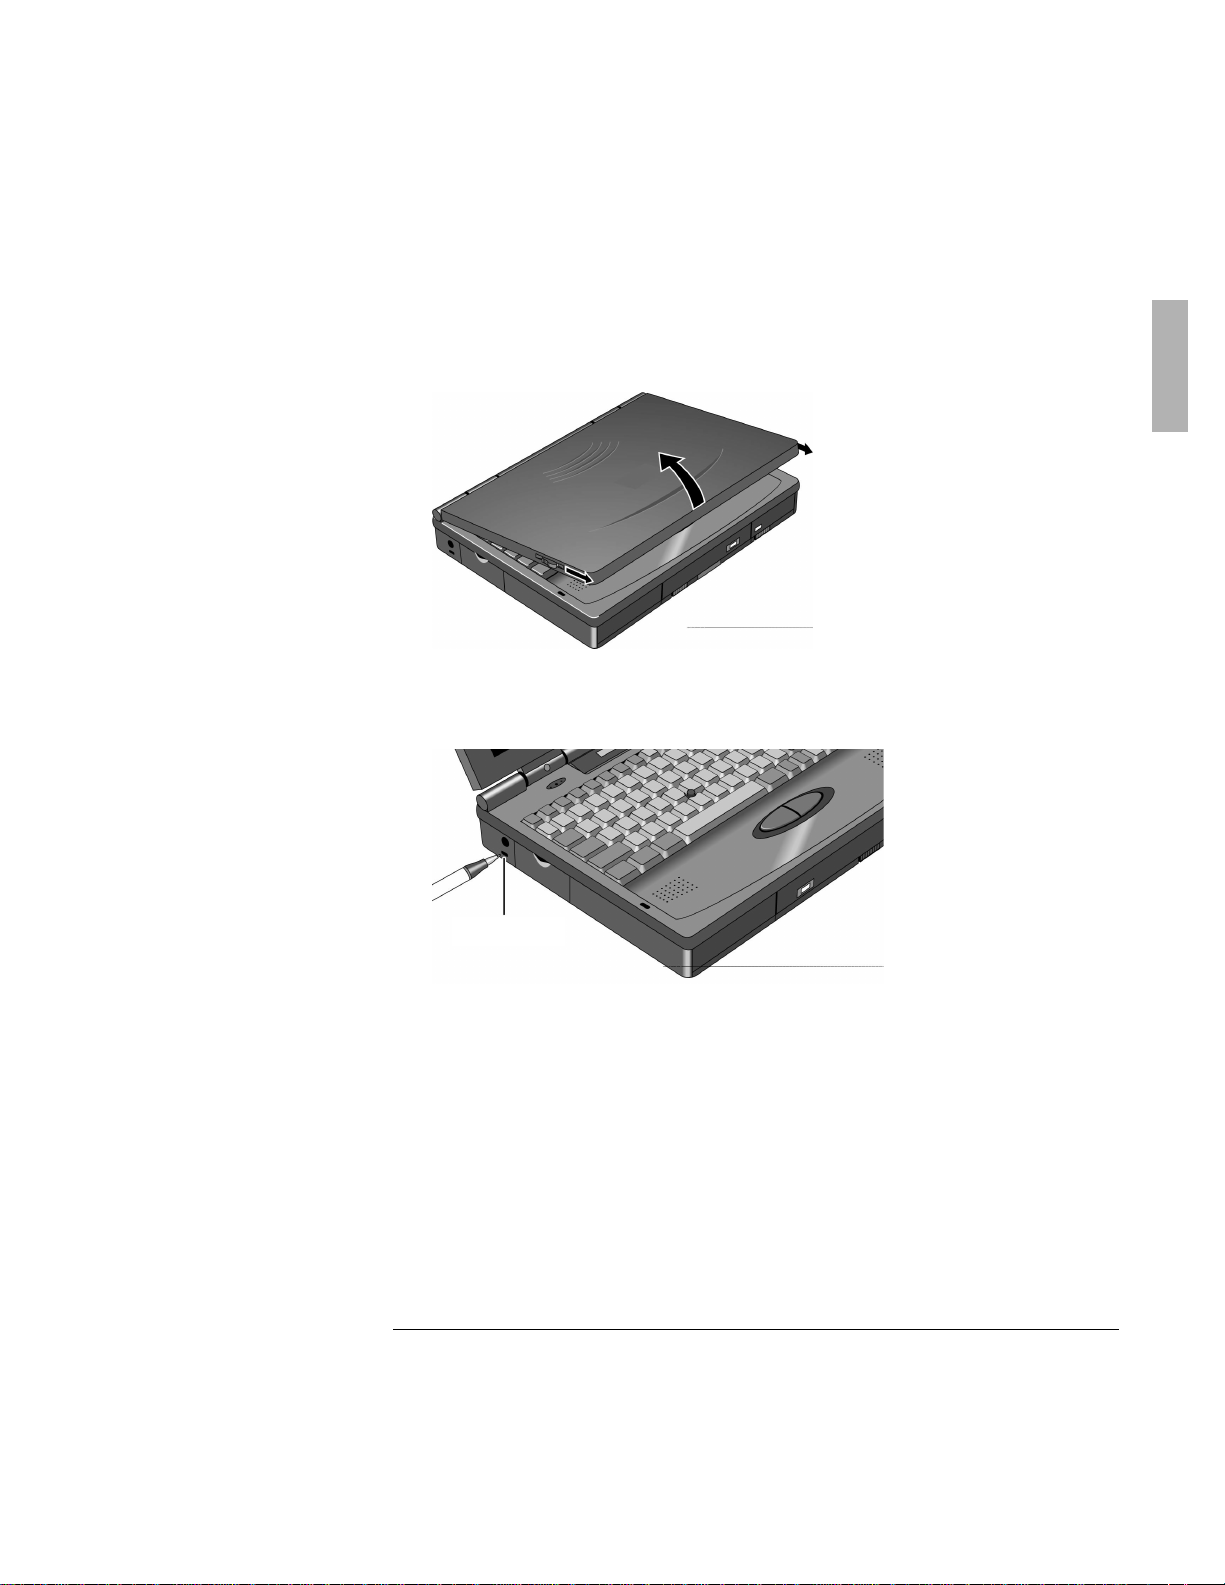
4. Open the OmniBook. Pull the two latches on the right and left sides of the
OmniBook toward you and lift the lid away from the keyboard.
5. Press the reset button. Insert a pen or pencil tip or other slender object into the
small opening below the ac adapter socket on the left side of the computer.
The OmniBook will take half a minute or more to reset and turn on.
11
Page 12
Starting Out with Your OmniBook
Setting Up the OmniBook
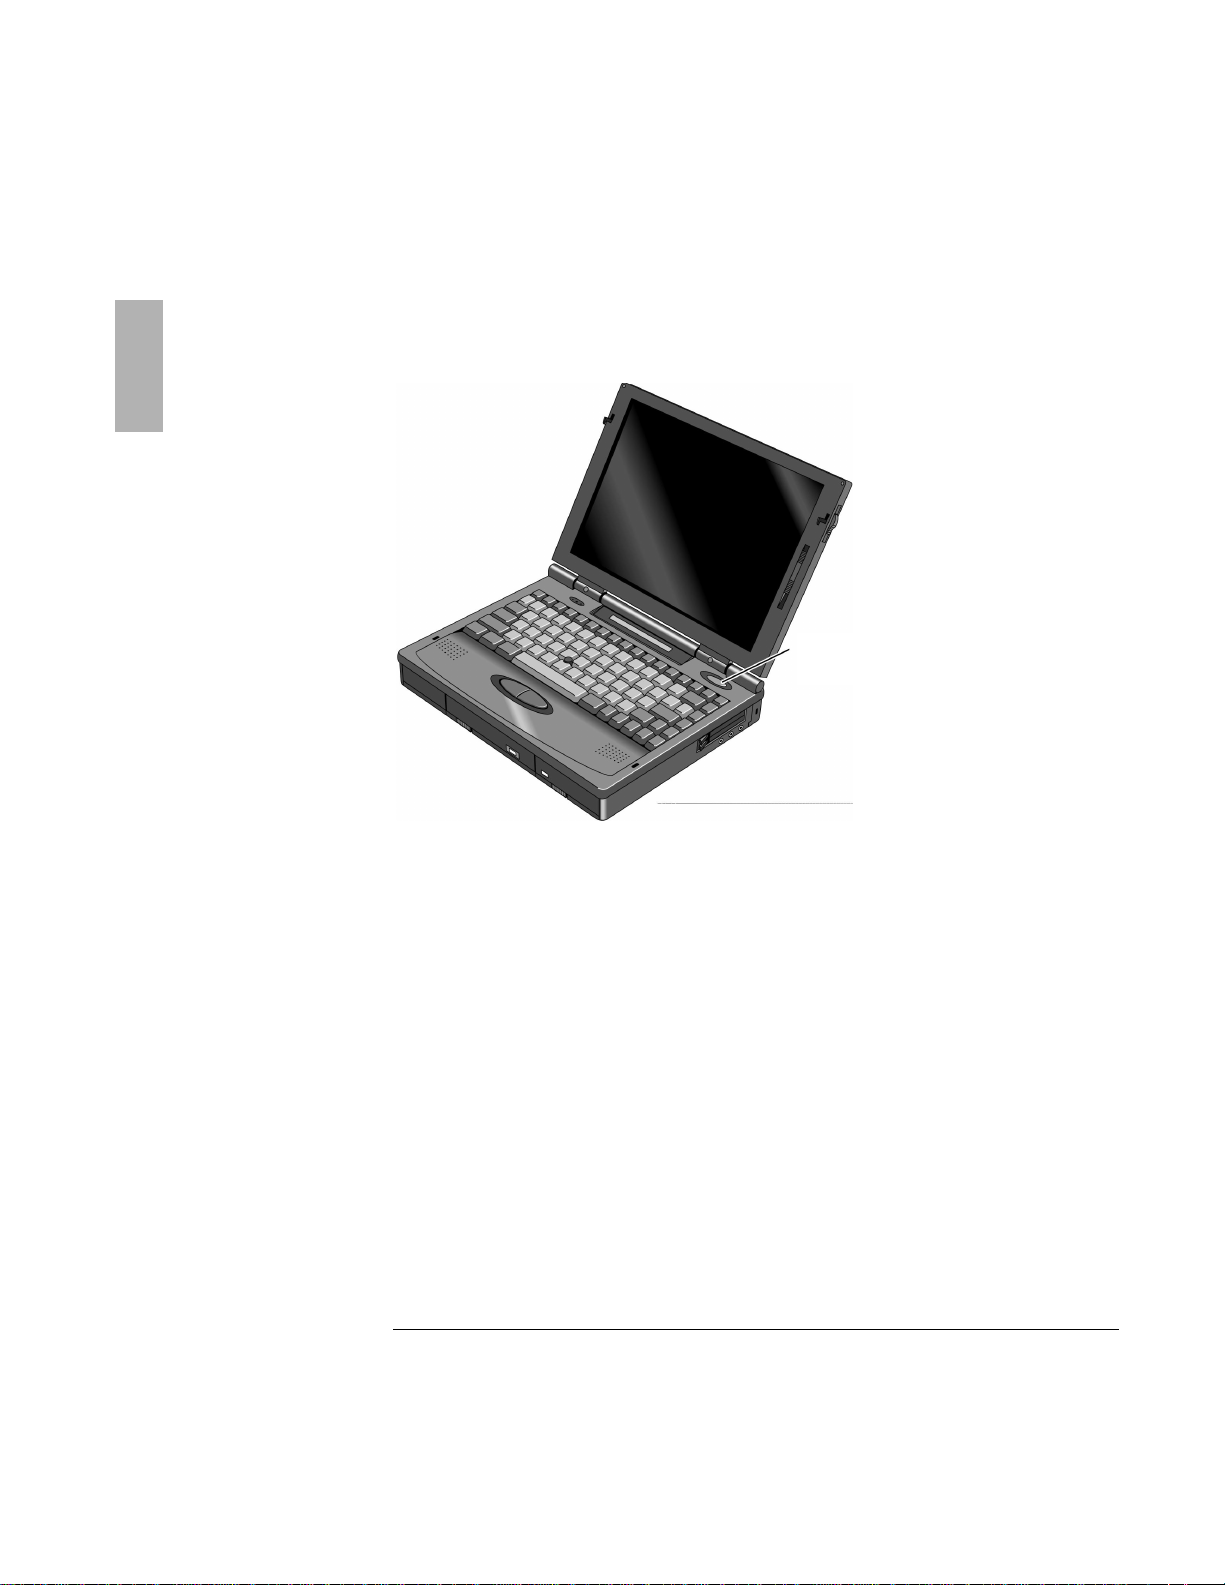
If the OmniBook does not turn on, press the blue On/Off button located on the
upper right-hand corner above the keyboard.
On/Off button
12
Page 13

Brightness
Contrast
Display controls
the screen.
Starting Out with Your OmniBook
Setting Up the OmniBook
To adjust the display
All OmniBooks are equipped with a brightness control. Some models also have a
contrast control. Your OmniBook display controls are located either to the right of
the display or under the display.
If you have two controls, the upper slider controls the brightness, and the lower
slider controls the contrast.
• Slide the control up to increase the brightness or contrast, and slide the control
down to decrease it.
• If your controls appear under the screen, slide right to increase brightness or
contrast, and slide left to decrease it.
The following illustration shows the position of the display controls.
On some OmniBook
models, the display
controls are below
13
Page 14
Starting Out with Your OmniBook
Click buttons
Pointing device
Setting Up the OmniBook
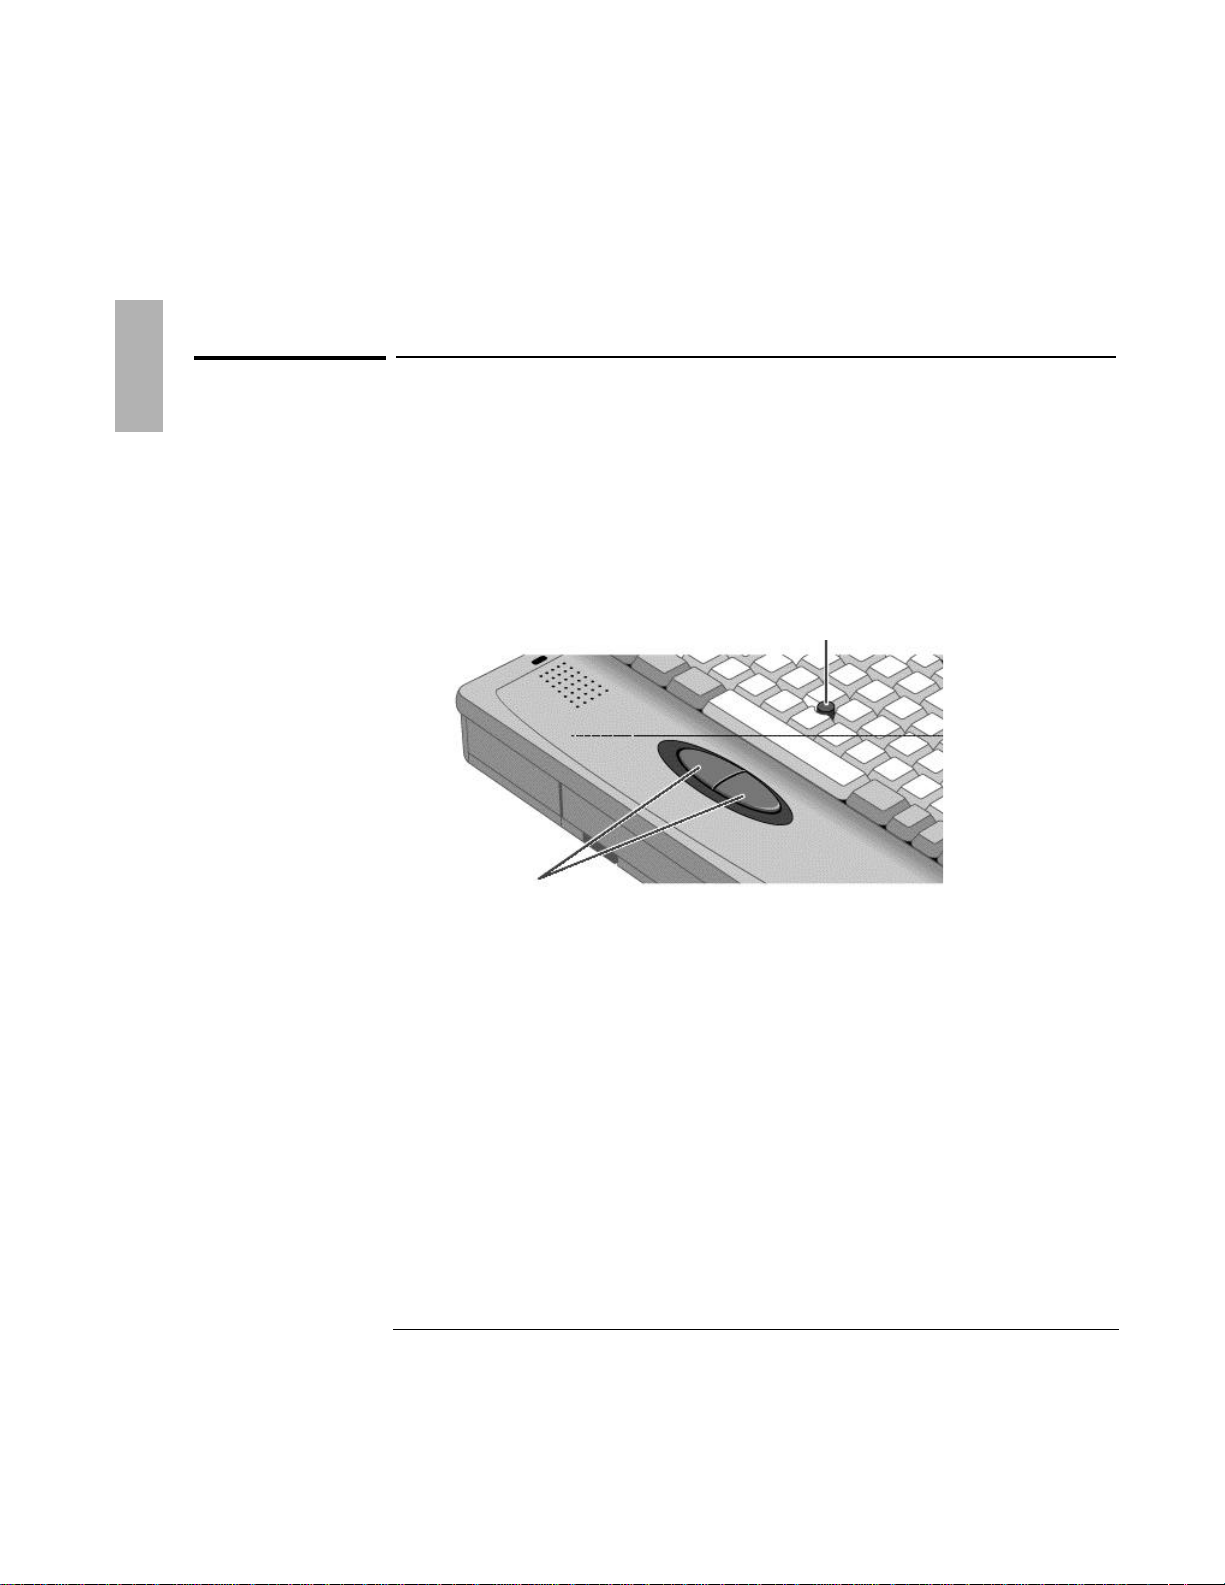
To use the pointing device
The pointing device is located in the center of the keyboard and the two click
buttons are located below the keyboard. The pointing device controls the motion of
the pointer on the screen by detecting pressure. The pointer speed corresponds to
the amount of pressure. The pointing device itself does not move. The click buttons
work like those on a standard mouse—what they do depends on the software
you’re using.
1. Place your hands in the typing position.
2. With your index finger, gently press the pointing device in the direction you
want the pointer to move.
Pressing the pointing device away from you moves the pointer up the screen
and pressing it toward you moves the pointer down the screen.
3. Click the buttons with your thumb to select and drag.
14
Page 15

Starting Out with Your OmniBook
Setting Up the OmniBook
To turn off the Omnibook
There are three ways to turn off the OmniBook depending on how long you’ll be
away from the OmniBook and how much battery life you want to save.
Instant On/Instant Off
Use Instant On mode when you're away from the OmniBook for short periods of
time—a few hours. The OmniBook’s instant on feature retains your current work
session. You don’t have to worry about losing information when you turn off the
power.
• Press the blue On/Off button located at the upper right-hand corner of the
keyboard.
The bookmark icon appears in the status panel. When you turn the OmniBook
back on again, it comes back exactly where you left it!
Save-To-Disk
Use when you're away from the OmniBook for longer periods of time—a week or
more.
1. If connected, unplug the ac adapter.
2. Press FN+F12 to save-to-disk.
When you press On/Off again, the last screen displayed appears.
Shut down
Use to completely shut down the OmniBook. It reboots when you turn it on.
1. Exit Windows.
2. Press CTRL+ALT+blue On/Off button.
15
Page 16

Starting Out with Your OmniBook
This icon appears when Caps Lock is active.
This icon appears when Num Lock is active.
This icon appears when Scroll Lock is active.
This icon appears when the OmniBook is reading from the built-in CD-
ROM drive.
This icon appears when the OmniBook is reading or writing to the floppy
disk drive.
This icon appears when the OmniBook is reading or writing to drive C.
This icon appears when you insert PC cards into the card slots. The two
cards identify when one or two of the slots are occupied.
Setting Up the OmniBook
To understand the status panel
The OmniBook status panel, located above the keyboard, contains indicators that
show the current status of the OmniBook. There are three groups of icons on the
status panel that indicate
• Keyboard status.
• Data storage status.
• Power status.
Keyboard status
The icons on the right indicate Caps Lock, Num Lock, and Scroll Lock.
Data storage status
The center icons indicate data storage areas—CD-ROM activity, floppy disk activity,
hard disk activity, and PC card status.
16
Page 17

Starting Out with Your OmniBook
This icon appears when the OmniBook is turned off; the “bookmark
icon reminds you that the state of the computer has been saved.
This icon appears when the ac adapter is plugged in.
The shading of the battery symbol shows the approximate charge level of
the battery relative to a full charge.
The lightning bolt symbol appears when the battery is charging. The
battery symbol blinks when the battery is low.
Setting up the Operating System
Power status
The left icons indicate power conditions—ac adapter use, battery status, charging
status.
”
Setting up the Operating System
This product contains two Microsoft operating systems. You must make a one-time
selection of the operating system you want to use. Once made, you may not change
your selection unless you purchase a separate license.
You must also go though the Windows 95 setup—even if you want to install
Windows for Workgroups.
To set up Windows 95
• Plug in the ac adapter, press the reset button and follow the instructions on the
screen.
When Windows 95 is installed, the OmniBook resets automatically. You’re
ready to start working.
17
Page 18

Starting Out with Your OmniBook
Setting up the Operating System
To set up Windows for Workgroups
1. Plug in the ac adapter, press the reset button and follow the instructions on the
screen.
2. When you see the following screen, select the Change button.
3. Choose the following option, then choose OK.
No, I want to install MS-DOS 6.22 and Microsoft Windows for Workgroups 3.1
18
Page 19

Restoring Files
Starting Out with Your OmniBook
Restoring Files
Your OmniBook package includes a Recovery CD ROM and a Support Utilities floppy
disk.
In this section you’ll learn how to
♦ Recover the Windows 95 operating system.
♦ Modify the Support Utility Disk to set up a PCMCIA or parallel port CD-ROM
drive.
♦ Recover the Windows for Workgroups and MS-DOS 6.22 operating systems.
♦ Make backup disks for Windows for Workgroups and MS-DOS 6.22.
♦ Recover software applications—such as the Appointment Book and the online
User’s Guide.
♦ Read the online manual from the CD.
♦ Access device drivers for various operating systems and networks.
19
Page 20

Starting Out with Your OmniBook
Restoring Files
To recover Windows 95
The following procedure describes how to restore Windows 95 and your original
OmniBook software. These steps will format the hard drive. Back up any files you
would like to save.
The entire recovery process takes approximately 1 hour. To recover your Windows
95 operating system, you’ll need a CD-ROM drive, floppy disk drive, the Recovery
CD, and the Support Utility disk.
1. If you have an internal CD-ROM drive , connect the floppy disk drive to the
OmniBook’s parallel port and install the CD-ROM drive in the OmniBook.
–or–
If you have a SCSI CD-ROM drive and a docking system , connect the SCSI
CD-ROM drive to the docking system and install the floppy disk drive in the
OmniBook.
–or–
If you have a PCMCIA or Parallel Port CD-ROM drive , connect the PCMCIA or
Parallel CD-ROM drive and install the floppy disk drive in the OmniBook. See
“To set up a PCMCIA or parallel port CD-ROM drive.”
2. Connect the ac adapter to the OmniBook.
3. Insert the Recovery CD in the CD-ROM drive.
4. Insert the Support Utility disk in the floppy disk drive.
5. Press the reset button.
The DOS 6.22 Startup menu appears.
6. Choose option 2:
Recover Windows 95 from Recovery CD
7. Choose the type of CD-ROM drive you’re using—internal OmniBook, SCSI with
docking system, or PCMCIA or parallel port.
Do not interrupt the recovery process or unplug the ac adapter until recovery is
completed.
20
Page 21

Starting Out with Your OmniBook
Hint
Both the CONFIG.SYS and AUTOEXEC.BAT files contain comments that should help
your CD-ROM manufacturer advise you in editing the files to meet the particular
requirements for your device
Restoring Files
To set up a PCMCIA or parallel port CD-ROM drive
The general steps for setting up a PCMCIA CD-ROM drive are as follows:
1. Copy the device drivers—from the installation software provided with the CDROM drive—to the Support Utility disk into the A:\TOOLS directory.
2. Add the device=driver statements to the CONFIG.SYS file on the Support
Utility disk. The device statements should immediately follow the [USERCD]
label.
3. Check the AUTOEXEC.BAT file to make sure that the CD-ROM drive is assigned
as drive G:.
Before the OmniBook can recognize the CD-ROM drive, you’ll need to edit the
CONFIG.SYS and AUTOEXEC.BAT files on the Support Utility disk. The required
device-drivers statements come from the CD-ROM manufacturer.
What you’ll need from your CD-ROM manufacturer
1. The names of the device drivers to copy to the Support Utility disk.
2. The device=drivers statements to add the CONFIG.SYS file.
3. Statements that the CD-ROM drive that may require to be added to the
AUTOEXEC.BAT file.
21
Page 22

Starting Out with Your OmniBook
Restoring Files
To recover Windows for Workgroups
The following procedure describes how to restore Windows for Workgroups and
your original OmniBook software.
The entire recovery process takes approximately 1 hour. To recover your Windows
for Workgroups operating system, you’ll need a CD-ROM drive, floppy disk drive,
your Windows for Workgroups backup disks, your MS-DOS 6.22 backup disks, the
Recovery CD, and the Support Utility disk. If you don’t have backup disks, you can
make them—see “To make DOS 6.22 and Windows for Workgroups backup.”
1. If you have an internal CD-ROM drive , connect the floppy disk drive to the
OmniBook’s parallel port and install the CD-ROM drive in the OmniBook.
–or–
If you have a SCSI CD-ROM drive and a docking system , connect the SCSI
CD-ROM drive to the docking system and install the floppy disk drive in the
OmniBook.
–or–
If you have a PCMCIA or parallel port CD-ROM drive , connect the PCMCIA or
Parallel CD-ROM drive and install the floppy disk drive in the OmniBook. See
“To set up a PCMCIA or parallel port CD-ROM drive.”
2. Connect the ac adapter to the OmniBook.
3. Insert MS-DOS disk #1 into the floppy drive.
4. Press the reset button.
5. Press F3 twice at the Welcome to Setup screen to return to the DOS prompt.
6. Type FORMAT C:/U to format drive C.
7. Press Ctrl+Alt+Del to reboot the OmniBook and continue with the MS-DOS 6.22
installation.
When prompted for installation choices, choose the defaults.
8. When the MS-DOS installation is complete, insert disk 4 of the DOS disks and
type A:. This is the MS-DOS Supplemental disk.
9. Type SETUP C:\DOS to install the MS-DOS Supplemental files.
10. Install Windows for Workgroups (from back-up installation disks or from
purchased software) to drive C as follows:
22
Page 23

Starting Out with Your OmniBook
Restoring Files
• Insert disk #1 and type A:\SETUP.
• Choose Express Setup.
• Select all defaults for this installation. Do not install any printers or networks.
Install them after the rest of this installation is complete.
11. Insert the Recovery CD in the CD-ROM drive.
12. Insert the Support Utility disk in the floppy disk drive.
13. Press the reset button.
The DOS 6.22 Startup menu appears.
14. Choose option 3:
Recover Windows for Workgroups drivers and HP Application Software
15. Choose the type of CD-ROM drive you're using: internal OmniBook, SCSI with
docking system, or PCMCIA or parallel port.
Do not interrupt the recovery process or unplug the ac adapter until recovery is
completed.
To make DOS 6.22 and Windows for Workgroups backup
disks
When you set up the Windows for Workgroups operating system, you should have
been prompted to create a set of backup disks for Windows for Workgroups and
DOS 6.22. If you did not make backup disks, you can do so now with the following
procedure.
1. From the OmniBook group, double-click Make Backup Installation Disks.
2. Follow the instructions on the screen.
23
Page 24

Starting Out with Your OmniBook
Restoring Files
To recover HP software programs
1. If you have an internal CD-ROM drive , install it in the OmniBook.
–or–
If you have a SCSI CD-ROM drive and a docking system , connect the SCSI
CD-ROM drive to the docking system.
–or–
If you have a PCMCIA or parallel port CD-ROM drive , connect the PCMCIA or
parallel port CD-ROM drive. See “To set up a PCMCIA or parallel port CD-ROM
drive.”
2. Insert the Recovery CD in the CD-ROM drive.
3. From the \OMNIBOOK\HPUTILS\DISK1 directory on the CD, double-click
SETUP.EXE. The OmniBook Application Software Setup menu appears.
4. Click the HP applications you’d like to install.
–or–
Click Select All to install all of the HP applications.
5. Click Install Now.
24
Page 25

Starting Out with Your OmniBook
Restoring Files
To read the online User’s Guide
If you want to save OmniBook disk space, you have the option of reading the online
User’s Guide directly from the Recovery CD.
1. If you have an internal CD-ROM drive , install it in the OmniBook.
–or–
If you have a SCSI CD-ROM drive and a docking system , connect the SCSI
CD-ROM drive to the docking system.
–or–
If you have a PCMCIA or parallel port CD-ROM drive , connect the PCMCIA or
parallel port CD-ROM drive. See “To set up a PCMCIA or parallel port CD-ROM
drive.”
2. Insert the Recovery CD in the CD-ROM drive.
3. To read the Windows for Workgroups manual, double-click HPBOOK.EXE from
\OMNIBOOK\MANUALS\WFW.
4. To read the Windows 95 manual, double-click HPBOOK.EXE from
\OMNIBOOK\MANUALS\WIN95.
To install device drivers for other operating systems
If you’ve installed a commercial version of Windows 95, Windows for Workgroups,
or an alternate operating system, you’ll need to manually install the required
drivers. The Recovery CD contains drivers for the following operating systems:
• Window for Workgroups.
• Windows 95.
• Windows NT.
• OS/2.
• Novell.
The drivers are located on the CD in the \OMNIBOOK\DRIVERS directory.
25
Page 26

Starting Out with Your OmniBook
bpi01114
Installing Windows for Workgroups
bpi01102
Power-management drivers
bpi01115
CD-ROM drivers
bpi01116
PC-card drivers
bpi01117
SCSI drivers
bpi01118
Sound drivers
bpi01119
Video drivers
bpi01120
Using Windows for Workgroups
Restoring Files
HP also publishes application notes that give current information about installing
operating systems and special device drivers. They are available from several
electronic support services, including the HP Mobile Computing Web site:
http://www.hp.com/go/omnibook
These same application notes are also available from these
electronic support services:
• America Online
Keyword: HP
• CompuServe Information Services
Command: GO HP
• Hewlett-Packard Bulletin Board
(208) 344-1691
(up to 14400 baud, 8, N, 1)
Window for Workgroups Driver Installation
In the Support area of the Web page, search for these OmniBook 5500 application
note identifiers:
Identifier Subject
26
Page 27

Starting Out with Your OmniBook
bpi01107
Installing Windows 95
bpi01102
Power-management drivers
bpi01108
CD-ROM drivers
bpi01109
Infrared drivers
bpi01110
PC-card drivers
bpi01111
Sound drivers
bpi01112
Using Windows 95
bpi01113
Video drivers
bpi01093
Installing Windows NT
bpi01094
PC-card drivers
bpi01095
Sound drivers
bpi01096
Using Windows NT
bpi01097
Video drivers
Restoring Files
Windows 95 Driver Installation
In the Support area of the Web page, search for these OmniBook 5500 application
note identifiers:
Identifier Subject
Window NT Driver Installation
In the Support area of the Web page, search for these OmniBook 5500 application
note identifiers:
Identifier Subject
27
Page 28

Starting Out with Your OmniBook
bpi01098
Installing OS/2
bpi01099
PC-card drivers
bpi01100
SCSI drivers
bpi01101
Using OS/2
bpi01103
Sound drivers
bpi01104
Video drivers
Restoring Files
OS/2 Driver Installation
In the Support area of the Web page, search for these OmniBook 5500 application
note identifiers:
Identifier Subject
28
Page 29

Starting Out with Your OmniBook
Restoring Files
To remove the hard drive
1. Important
Back up all the files on your current drive C. You can back up the files to a tape
drive, a network drive, a PC card, or a flexible disk.
2. Unplug the adapter.
3. Exit Windows.
• If you’re using Windows 95, use the shutdown option from the Start menu.
• If you’re using Windows for Workgroups, exit Windows, then press
CTRL+ALT+blue On/Off button simultaneously.
4. Remove all batteries from the OmniBook.
5. Close the cover and turn your computer over.
6. Remove the screw and security cover located at the back of the hard disk drive.
7. Firmly slide the drive out of the drive compartment. (This requires some force.)
29
Page 30

Starting Out with Your OmniBook
CAUTION
Handle the hard drive only by its edges to avoid damage from electrostatic
discharge.
Restoring Files
To install drive C
After following the instructions for removing drive C, use the next procedure to
install the new hard drive.
1. Gently press downwards on the hard drive while you slide it into the drive bay.
Make sure the hard disk is inserted completely in the unit. It may be necessary
to use a small pair of pliers to pull up on the PC-board tab while inserting the
hard drive.
2. Replace the screw and security cover.
3. Replace the battery or attach ac power.
4. Press the reset button.
30
Page 31

Starting Out with Your OmniBook
Where to go from here
Where to go from here
There are many ways to get information and technical support for your
OmniBook. If you have a question about your OmniBook that this manual does
not answer, you can try any of the following sources:
• The online OmniBook User’s Guide
The online manual provides complete instructions about how to operate and
maintain your OmniBook. You can view the manual online—or, print it.
• The World Wide Web
The HP web site provides a wealth of information about our mobile-computing
products. Here you can download new software and drivers, get detailed setup
instructions, or view a list of common questions and answers. You can also find
out how to get information and ask questions through CompuServe and
America Online.
The HP web site address is http://www.hp.com/go/omnibook.
• Technical Support
If you’d like to talk to a trained representative, you can call Technical Support.
If the product is under warranty, the technical assistance is normally free. Your
only charge will be the telephone call and you will speak directly to a support
specialist.
The Technical Support telephone number for your area is listed in the Support
and Service booklet that you received with your OmniBook.
• HP First (automated fax service)
You can also try the HP automated fax service. Through HP First, you can
access thousands of documents that provide help or information by fax.
The HP First telephone number is: (800) 333-1917 (inside U.S. and Canada).
(208) 344-4809 (outside U.S. and Canada).
31
Page 32

Page 33

2
Troubleshooting
33
Page 34

Troubleshooting
Hints
If you're having a problem—and Windows is running on your OmniBook—see the
online OmniBook User’s Guide. Its troubleshooting chapter contains more
troubleshooting information.
If you're having a problem within one particular application, check the manual for
that application, too.
If you run into problems getting your OmniBook started, you can use the
suggestions in this chapter for getting back on track.
If you have questions that this manual doesn't answer, you can
• See the online OmniBook User’s Guide—it’s your main source of information
about using the OmniBook. It includes extensive troubleshooting information.
• If you’re using Windows for Workgroups, check the online Windows Quick Start
and MS-DOS Quick Start manuals.
• If you’re using Windows 95, check the printed Introducing Microsoft Windows
manual.
• Look at the online Help for Windows and other applications.
• Check with your computer system administrator, if you have one.
• See other books about Windows, MS-DOS, and other applications. Check your
local library or bookstore.
• Contact your dealer, or contact Hewlett-Packard—see the OmniBook Support
and Service booklet or OmniBook Support in the online OmniBook Library.
• Get information about system resources (interrupts, addresses, and memory)—
see OmniBook Notes (in the online OmniBook Library).
Find technical information about the OmniBook on the Internet—visit the
World Wide Web support site at:
http://www.hp.com/go/omnibook
34
Page 35

Troubleshooting
Solving Basic Problems
Solving Basic Problems
If your OmniBook has a problem starting, find the symptom below that matches
your situation. Try the suggestions one at a time.
If the OmniBook turns off immediately after it turns on
• Battery power is probably extremely low. Plug in the ac adapter, or turn off the
OmniBook and insert a fresh battery pack.
If the OmniBook stops responding
• Try waiting a few moments, then try turning it off and on.
Press
• If nothing happens, insert a ball-point pen tip or other slender object into the
CTRL+ALT+DEL to reboot.
reset-button hole in the left side of the case, below the ac adapter socket. Push
in momentarily—the system should reset and reboot.
If the OmniBook doesn’t respond at turn-on
• Connect the ac adapter.
• Press On/Off to try turning on the unit.
• Insert a ball-point pen tip or other slender object into the reset-button hole in
the left side of the case, below the ac adapter socket. Push in momentarily—the
system should reset and reboot.
If you get no response, remove the battery and ac adapter and press the reset
button again—then plug in the ac adapter and try resetting again. If you still get
no response, the unit requires service.
If the OmniBook doesn’t reboot successfully, see the next symptom.
35
Page 36

Troubleshooting
Solving Basic Problems
If the OmniBook doesn’t reboot successfully
If your operating system is MS-DOS or Windows for Workgroups
• If no text is displayed, or if things stop before you see any text about MS-DOS,
the unit probably requires service.
• If you see error messages during startup, but Windows starts or you get an
MS-DOS prompt, exit Windows. Then type scandisk to fix problems with
drive C. Then press
Menu,” press
CTRL+ALT+DEL to reboot—but at the “MS-DOS Startup
F8 ENTER and step through each startup command to find where
the problem occurs. Repair or restore the necessary files as indicated.
• If you see text about MS-DOS but things stop before Windows starts or before
you get an MS-DOS prompt, insert the Support Utility disk or other boot disk in
the floppy drive, then press
CTRL+ALT+DEL to reboot from drive A—then
choose the Minimum Startup option. (If the unit doesn’t reboot from a floppy
boot disk, the unit probably requires service.)
If it reboots, type dir c: to see if drive C contains valid files. Then try the
following:
If drive C has valid files, try typing these commands:
scandisk c: (to repair any defects)
sys a: c: (to restore core MS-DOS files).
Last resort: The following commands delete all files on drive C, so you must
reinstall your files after running these commands:
fdisk (to reinitialize drive C)
format c: /u (to prepare drive C for storing data)
If it still doesn’t start, try recovering the Windows for Workgroups files on drive
C—see page 22.
36
Page 37

Troubleshooting
Solving Basic Problems
If your operating system is Windows 95
• If no text is displayed during reboot, or if things stop before you see “Starting
Windows 95...”, the unit probably requires service.
• If you see “Starting Windows 95...” during startup followed by error messages,
reboot again—but when you see “Starting Windows 95...”, press
F8 to get the
startup menu. Choose a startup option that might help you discover or fix the
problem.
Use the “safe mode” option to start Windows with a basic configuration.
Run ScanDisk (in System Tools) to fix problems with drive C. You can also
make other changes to repair your startup files.
Use the “step-by-step” option to step through each startup command to find
where problems occur, so you can repair or restore any files indicated.
• If drive C (the hard disk) isn’t working properly, insert the Support Utility floppy
disk in the floppy drive, then press
CTRL+ALT+DEL to reboot from drive A—then
choose the Minimum Startup option. At the MS-DOS prompt, type
scandisk c: to fix certain problems with drive C. You can use other
commands on drive A to try to repair drive C. Then remove the floppy disk and
try rebooting again. If it still doesn’t start, try recovering the original Windows 95
files on drive C—see page 20.
If your system password doesn’t work
• Check whether Num Lock is off. Try changing it.
• If you’ve forgotten your password, have your OmniBook at hand and call
Hewlett-Packard at the phone number in the Service and Support booklet.
If the screen is difficult to read
• Set the display resolution to its original setting—800×600 (SVGA). For Windows
for Workgroups, use Display in OmniBook Tools. For Windows 95, use Display
in HP User Tools.
• Try adjusting the brightness and contrast by sliding the controls below the
screen.
• Try changing the color scheme. For Windows for Workgroups, use Display in
OmniBook Tools. For Windows 95, use Display in HP User Tools.
37
Page 38

Page 39

3
Specifications and Regulatory
Information
39
Page 40

Specifications and Regulatory Information
Your OmniBook is designed to provide trouble-free operation. The following
suggestions can help you while working with your OmniBook:
♦ Observe the temperature limits and other specifications listed in the next
section.
♦ Check out the tips about ergonomics and work habits.
♦ If you have problems, see the problem-solving suggestions and references
listed in chapter 2.
♦ If you think your OmniBook might need repair service, see the warranty and
service information in the Support and Service booklet.
To contact Hewlett-Packard
If you have questions that the OmniBook manuals don't answer (even after looking
in the contents and index), you can contact Hewlett-Packard at the address or
phone number listed in the Support and Service booklet or in OmniBook Support in
the online OmniBook Library. Please have your OmniBook with you.
40
Page 41

Hardware Specifications
Display
Backlit liquid-crystal display (LCD).
SVGA (800 x 600 dots) up to 64K colors
Keyboard
Enhanced PC functionality with compact layout.
Embedded numeric keypad.
Tilt feet
Pointing device.
Memory
RAM: 8 MB or more (depending on the model), expandable to 64 MB maximum.
Mass Storage
Card slots: two PCMCIA slots available (two type I or type II cards or one type III card).
Hard disk drive: 1 removable 2.5-inch IDE drive.
Floppy disk drive: 1 removable 3.5-inch 1.44-MB floppy disk drive.
Interfaces
Serial: one 9-pin 115,200-baud RS-232 port (with hardware handshaking).
Parallel: one 25-pin bi-directional parallel port.
Infrared: one 4-Mbps bi-directional IrDA port.
SVGA output: one color-SVGA port with up to 256 color 1024 x 768 resolution.
Card slots: PCMCIA I/O cards (two type I or type II cards or one type III card).
MIDI: one mini D-sub 15-pin connector and adapter.
Docking port: one custom port for docking station.
NTSC/PAL composite S-video port.
Card Slots
Electrical: PCMCIA version 2.1 cards.
Mechanical: PCMCIA type I, II, and III cards.
AC Adapter
Input: 115 to 240 Vac (50 to 60 Hz).
Output: 12 Vdc, 3.3 A.
Polarity: negative (inner contact is negative).
Battery Pack
F1193A 14.4 vdc lithium ion 2.5 AH
F1194A 14.4 vdc lithium ion 3.75 AH
Temperature
Operating: 10 to 35 °C (50 to 95 °F) on TFT,
5 to 35 °C (41 to 95 °F) on DSTN.
Storage: -40 to +60 °C (-40 to 140 °F).
The unit may not operate properly below 5 °C (41 °F), but it can be stored at temperatures
down to -40 °C (-40 °F) without damaging the hardware.
Humidity
Operating: 90% relative humidity at 35 °C (95 °F) maximum.
Storage: 90% relative humidity at 60 °C (140 °F) maximum.
Audio System
Built-in 16-bit Sound Blaster-compatible stereo sound card, microphone and speakers.
Specifications and Regulatory Information
Hardware Specifications
41
Page 42

Specifications and Regulatory Information
Country
Rated Voltage and
Current
AC Plug Type
HP Part Numbers
Canada
Mexico
Philippines
Taiwan
United States
125–127 Vac (10 A)
NEMA 5-15P
8120-1348 (2.3 m)
8120-6260 (1.0 m)
United States
250 Vac (6 A)
NEMA 6-15P
8120-0698 (2.5 m)
East and West Europe
Egypt
Saudi Arabia
250 Vac (10 A)
CEE 7-VII
8120-1689 (2 m)
8120-6262 (1.0 m)
Hong Kong
Singapore
United Kingdom
250 Vac (5 A)
BS 1363A
8120-1351 (2.3 m)
8120-6261 (1.0 m)
Australia
New Zealand
People’s Republic of
China
250 Vac (7.5 A)
AS3112
8120-1369 (2 m)
8120-6346 (1.0 m)
Switzerland
250 Vac (6 A)
SEV Type 12
8120-2104 (2 m)
Denmark
250 Vac (6 A)
Danish AFSNIT 107
8120-2956 (2 m)
Japan
125 Vac (12 A)
125 Vac (7 A)
MITI 41-9682
MITI 41-7275
8120-5342 (2.5 m)
8120-6768 (0.2 m)
India
South Africa
250 Vac (10 A)
IEC 83-B1
8120-4211 (2.0 m)
Safety Information
Safety Information
Power Cord, Plug, and Voltage Requirements
The power cord supplied with the OmniBook ac adapter should match the plug
and voltage requirements for your local area. Regulatory approval for the ac
adapter has been obtained using the power cord for the local area. However, if you
travel to a different area and need to connect to a different outlet or voltage, you
should use one of the power cords listed below. To purchase a power cord
(including one for a country not listed below) or a replacement ac adapter (HP part
number F1044B), contact your local Hewlett-Packard dealer or Sales and Service
office.
Power Cords
–or–
42
–or–
–or–
–or–
Page 43

Specifications and Regulatory Information
CAUTION
Use only the ac adapter shipped with the OmniBook (HP part number
F1044B). Using any other adapter could damage the OmniBook and void your
warranty. Always plug the ac adapter into a grounded outlet. Also, the adapter
plug has negative polarity—the inner contact is negative, and the outer is
positive.
Safety Information
Battery Safety
• To avoid risk of fire, burns, or damage to your battery pack, do not allow a
metal object to touch across the battery contacts.
• The battery pack is suitable for use only with an HP OmniBook 5500 and
F1338A battery charger.
• Do not disassemble. There are no serviceable parts inside.
• Do not dispose of the battery pack in fire or water.
• Handle a damaged or leaking lithium-ion battery with extreme care. If you
come in contact with the electrolyte, wash the exposed area with soap and
water. If it contacts the eye, flush the eye with water for 15 minutes and seek
medical attention.
• Do not expose the battery pack to high storage temperatures—above 60 °C
(140 °F).
• When the battery is not in use, store it in the battery pouch provided.
• When discarding a battery pack, contact your local waste disposal provider
regarding local restrictions on the disposal or recycling of batteries.
• To obtain a replacement battery, contact your local dealer or HP sales office.
• Do not charge the battery pack if the ambient temperature exceeds
45 °C (113 °F).
• Refer to the OmniBook User’s Guide (online manual), for proper use and
installation instructions.
43
Page 44

Specifications and Regulatory Information
Safety Information
Laser Safety
The CD-ROM drive used with the OmniBook is certified a as Class 1 laser device
according to the U.S. Department of Health and Human Services (DHHS) Radiation
Performance Standard and International Standards IEC 825 / IEC 825-1 (EN60825 /
EN60825-1). This device is not considered harmful, but the following precautions
are recommended:
• Ensure proper use by reading and following the instructions carefully.
• If the unit requires service, contact an authorized HP service center—see the
OmniBook Support and Service booklet.
• Do not attempt to make any adjustment of the unit.
• Avoid direct exposure to the laser beam—do not open the unit.
CLASS 1 LASER PRODUCT
LASERSCHÜTZKLASSE 1 PRODUKT
LED Safety
The infrared port located on the back panel of the OmniBook is classified as a
Class 1 LED (light-emitting diode) device according to International Standard
IEC 825-1 (EN60825-1). This device is not considered harmful, but the following
precautions are recommended:
• If the unit requires service, contact an authorized HP service center—see the
OmniBook Support and Service booklet.
• Do not attempt to make any adjustment of the unit.
• Avoid direct eye exposure to the infrared LED beam. Be aware that the beam is
invisible light and cannot be seen.
• Do not attempt to view the infrared LED beam with any type of optical device.
CLASS 1 LED PRODUCT
LEDSCHÜTZKLASSE 1 PRODUKT
44
Page 45

Specifications and Regulatory Information
Safety Information
Working in Comfort
Ergonomics is the science that fits products to people. Its goal is to make products
easy, enjoyable, safe, and efficient to use. However, with even the best designed
equipment, how you use the product is very important.
You can use your OmniBook virtually anywhere, anytime, so following the
guidelines below can be a challenge—but your efforts will be worthwhile, and help
ensure that your OmniBook is ergonomically effective for you.
• Place your OmniBook directly in front of you, within easy reaching distance for
your hands when your arms are hanging straight down at your side (this is
about 16 inches, or 40 centimeters, in most cases).
• Whenever possible, adjust your seat height, work surface, or both to position
the surface at approximately elbow height.
• Try not to use a lot of force when typing—type as lightly as possible. The
OmniBook keyboard requires little force to activate, and excess force during
typing may increase the risk of injury to you in the long term.
• Do not rest your wrists on a sharp edge when typing. Whenever possible, find a
work surface edge that is rounded or padded, or position yourself so your
hands rest on the surface, not its edge.
• When typing, try to find positions where you can sit with your arms (shoulder
to elbow) straight down at your sides, and try not to hold your arms out away
from your body (angle less than 20 degrees).
• Position the keyboard so your wrists, hands, and fingers are in a “neutral” line
while typing. This means they do not tilt up or sideways more than 10 degrees.
• Shift positions and move your body from time to time—keeping your body
“locked” in one position for a long period of time is unnatural and stressful.
• Take short (about 2 minutes or so) breaks whenever you feel fatigued, tired, or
stiff—or at least once every hour. Use the breaks to gently stretch your hands,
fingers, arms, and shoulders.
45
Page 46

Specifications and Regulatory Information
Safety Information
16"
10° 10°
10°
20°
46
10°
Page 47

Specifications and Regulatory Information
Regulatory Information
Regulatory Information
This section presents information that shows how the OmniBook 5500 complies
with regulations in certain regions. Any modifications to the OmniBook not
expressly approved by Hewlett-Packard could void the authority to operate the
OmniBook in these regions.
U.S.A.
The OmniBook 5500 generates and uses radio frequency energy and may interfere
with radio and television reception. The OmniBook complies with the limits for a
Class B computing device as specified in Part 15 of FCC Rules, which provide
reasonable protection against such interference in a residential installation. The
“FCC ID” number for this product is listed on the bottom of the unit. In the unlikely
event that there is interference to radio or television reception (which can be
determined by removing the unit's batteries and ac adapter), try the following:
• Reorienting or relocating the receiving antenna.
• Relocating the OmniBook with respect to the receiver.
• Connecting the OmniBook ac adapter to another power outlet.
Connections to Peripheral Devices
To maintain compliance with FCC Rules and Regulations, use properly shielded
cables with this device.
For more information, consult your dealer, an experienced radio/television
technician, or the following booklet, prepared by the Federal Communications
Commission: How to Identify and Resolve Radio-TV Interference Problems. This
booklet is available from the U.S. Government Printing Office, Washington, DC
20402, Stock Number 004-000-00345-4. At the first printing of this manual, the
telephone number was (202) 512-1800.
47
Page 48

Specifications and Regulatory Information
Regulatory Information
Canada
This digital apparatus does not exceed the Class B limits for radio noise emissions
from digital apparatus as set out in the radio interference regulations of the
Canadian Department of Communications.
Le présent appareil numérique n'émet pas de bruits radioélectriques dépassant les
limites applicables aux appareils numériques de Classe B prescrites dans le
règlement sur le brouillage radioélectrique édicté par le Ministère des
Communications du Canada.
Japan
48
Page 49

Specifications and Regulatory Information
Manufacturer:
Hewlett-Packard Company
Address:
Hewlett-Packard Co.
Mobile Computing Division
1000 NE Circle Blvd.
Corvallis, OR 97330
declares that the following product
Product name:
HP OmniBook 5500, all models
Options:
conforms to the following product specifications
Safety:
IEC 950:1991+A1,A2 / EN 60950 (1992)+A1,A2
EMC:
CISPR 22:1993 / EN 55022 (1994): Class B
[1 ]
EN 55082-1:1992
IEC 801-2:1991 / prEN 55024-2 (1992): 4kV CD, 8kV AD
IEC 801-3:1984 / prEN 55024-3 (1991): 3V/m
IEC 801-4:1988 / prEN 55024-4 (1992): 0.5 kV signal lines, 1.0kV power
lines
Supplementary Information:
The product herewith complies with the requirements of the Low
Voltage Directive 73/23/EEC and the EMC Directive 89/336/EEC.
The HP F1044B ac adapter used with this product is disconnected from
the power by unplugging the power cord from the power outlet or from
the ac adapter. Therefore, the power outlet should be located close to
the product and be easily accessible.
This declaration also applies to those dedicated peripherals and
modules used with the OmniBook 5500:
HP F1195A internal/external floppy disk drive
HP F1319A quad speed CD-ROM drive
HP F1044B ac/dc adapter
[1] The product was tested in a typical configuration with Hewlett-
Packard personal computer peripherals.
Quality Department
Hewlett-Packard Company
Mobile Computing Division
Regulatory Information
Europe
Products sold in Europe by Hewlett-Packard and its authorized dealers meet the
specifications listed below.
Declaration of Conformity (according to ISO/IEC Guide 22 and EN 45014)
All
49
Page 50

 Loading...