

Page 1

HP OmniBook
Getting Started
Page 2

Notice
This manual and any examples contained herein are provided “as is” and are
subject to change without notice. Hewlett-Packard Company makes no warranty
of any kind with regard to this manual, including, but not limited to, the
implied warranties of merchantability and fitness for a particular purpose.
Hewlett-Packard Co. shall not be liable for any errors or for incidental or
consequential damages in connection with the furnishing, performance, or use of
this manual or the examples herein.
Consumer transactions in Australia and the United Kingdom: The above disclaimers
and limitations shall not apply to Consumer transactions in Australia and the United
Kingdom and shall not affect the statutory rights of Consumers.
© Copyright Hewlett-Packard Company 1995-96. All rights reserved. Reproduction,
adaptation, or translation of this manual is prohibited without prior written
permission of Hewlett-Packard Company, except as allowed under the copyright
laws.
The programs that control this product are copyrighted and all rights are reserved.
Reproduction, adaptation, or translation of those programs without prior written
permission of Hewlett-Packard Co. is also prohibited.
Portions of the programs that control this product may also be copyrighted by
Microsoft Corporation, SystemSoft Corp., and Chips and Technologies, Inc. See the
individual programs for additional copyright notices.
Microsoft, DriveSpace, MS, MS-DOS, and Windows are registered trademarks or
trademarks of Microsoft Corporation in the United States and/or other countries
(U.S. patent numbers 4955066 and 4974159). SystemSoft is a registered trademark
and CardWizard, CardLite, and CardID are trademarks of SystemSoft Corporation.
For warranty and regulatory information, see the Support and Service booklet.
Hewlett-Packard Company
Mobile Computing Division
1000 N.E. Circle Blvd.
Corvallis, OR 97330, U.S.A.
ii
Page 3

HP Software Product License Agreement
The HP Software Product License Agreement and Product Limited Warranty shall
govern all Software which is provided to you, the Customer, as part of the HP
computer product. The HP Software Product License Agreement and Product
Limited Warranty shall supersede any non-HP software license or non-HP warranty
terms which may be found in any documentation or other materials contained in
the computer product packaging.
Carefully read this License Agreement before proceeding to operate this
equipment. Rights in the software are offered only on the condition that the
Customer agrees to all terms and conditions of the License Agreement.
Proceeding to operate the equipment indicates your acceptance of these
terms and conditions. If you do not agree to the License Agreement, you must
now either remove the software from your hard disk drive and destroy the
master diskettes, or return the complete computer and software for a full
refund.
Software License Agreement
In return for payment of the applicable fee, Hewlett-Packard grants the Customer a
license in the software, subject to the following:
1. Use. Customer may use the software on any one computer. Customer may not
network the software or otherwise use it on more than one computer.
Customer may not reverse assemble or decompile the software unless
authorized by law.
2. Copies and Adaptations. Customer may make copies or adaptations of the
software (a) for archival purposes or (b) when copying or adaptation is an
essential step in the use of the software with a computer so long as the copies
and adaptations are used in no other manner.
3. Ownership. Customer agrees that he/she does not have any title or ownership
of the software, other than ownership of the physical media. Customer
acknowledges and agrees that the software is copyrighted and protected under
the copyright laws. Customer acknowledges and agrees that the software may
have been developed by a third party software supplier named in the copyright
notices included with the software, who shall be authorized to hold the
Customer responsible for any copyright infringement or violation of this
Agreement.
iii
Page 4

4. Transfer of Rights in Software. Customer may transfer rights in the software
to a third party only as part of the transfer of all rights and only if Customer
obtains the prior agreement of the third party to be bound by the terms of this
License Agreement. Upon such a transfer, Customer agrees that his/her rights in
the software are terminated and that he/she will either destroy his/her copies
and adaptations or deliver them to the third party.
5. Sublicensing and Distribution. Customer may not lease, sublicense the
software or distribute copies or adaptations of the software to the public in
physical media or by telecommunication without the prior written consent of
Hewlett-Packard.
6. Termination. Hewlett-Packard may terminate this software license for failure
to comply with any of these terms provided Hewlett-Packard has requested
Customer to cure the failure and Customer has failed to do so within thirty (30)
days of such notice.
7. Updates and Upgrades. Customer agrees that the software does not include
updates and upgrades which may be available from Hewlett-Packard under a
separate support agreement.
8. Export Clause. Customer agrees not to export or re-export the software or any
copy or adaptation in violation of the U.S. Export Administration regulations or
other applicable regulation.
9. U.S. Government Restricted Rights. Use, duplication, or disclosure by the
U.S. Government is subject to restrictions as set forth in subparagraph (c)(1)(ii)
of the Rights in Technical Data and Computer Software clause in DFARS
252.227-7013. Hewlett-Packard Company, 3000 Hanover Street, Palo Alto, CA
94304 U.S.A. Rights for non-DOD U.S. Government Departments and Agencies
are as set forth in FAR 52.227-19(c)(1,2).
Edition History
Edition 1 ........................................ September 1995
Edition 2 ........................................... March 1996
This manual is printed on recycled paper.
iv
Page 5

Contents
1 Starting Out with Your OmniBook
Start Here ........................................... 1-3
1. Insert the battery ................................... 1-3
2. Connect the ac adapter .............................. 1-4
3. Reset the OmniBook ................................ 1-5
4. Open the OmniBook ................................ 1-5
5. Turn on the OmniBook .............................. 1-6
6. Go through the setup screens .......................... 1-7
Where to go from here ................................ 1-7
2 Troubleshooting
Solving Basic Problems .................................. 2-3
3 Specifications and Regulatory Information
Hardware Specifications ................................. 3-3
Regulatory Information .................................. 3-4
U.S.A. ............................................ 3-4
Canada ........................................... 3-5
Japan ............................................ 3-5
Europe ........................................... 3-6
Contents
Page 6

Page 7

1
Starting Out with Your
OmniBook
Page 8

Starting Out with Your OmniBook
Congratulations! Your OmniBook sets a new standard in personal computing.
Although it's compact, the OmniBook is equipped with a full-size keyboard and
standard Microsoft Windows—all loaded and ready to go. What's more, your
OmniBook has been specifically designed for ease of use on the road. It features
"instant-on" power that immediately restores your last session. And the OmniBook is
infused with the quality and attention to detail that are the hallmark of HewlettPackard.
This OmniBook Getting Started manual shows how to get your OmniBook up and
running quickly. It also shows what to do if you run into trouble getting it started.
About Your OmniBook Manuals
Your OmniBook provides these manuals—convenient, yet portable sources of
extensive information about your OmniBook and its preinstalled software:
• The online Quick Start Guide gives you a fun and easy introduction to the
OmniBook. In Windows for Workgroups, look in Program Manager in the
OmniBook Library group. In Windows 95, look in Start, Programs, OmniBook
Library.
• The online OmniBook User's Guide introduces the OmniBook and shows you
how to operate and maintain your OmniBook. It also contains thorough
troubleshooting information. In Windows for Workgroups, look in Program
Manager in the OmniBook Library group. In Windows 95, look in Start,
Programs, OmniBook Library.
• For Windows for Workgroups, the online Windows Quick Start and MS-DOS
Quick Start manuals contain information about Windows for Workgroups and
MS-DOS. Look in Program Manager in the OmniBook Library group.
• For Windows 95, the printed Introducing Microsoft Windows manual and the
online Using Windows 95 manual contain information about Windows 95.
Look in Start, Programs, OmniBook Library for the online manual.
1-2
Page 9
Starting Out with Your OmniBook
Start Here
Start Here
To start using your OmniBook the first time, you have to make the following
preparations—they’re described in detail on the following pages:
1. Insert the battery, if it’s not already inserted.
2. Connect the ac adapter. (The battery isn’t charged yet.)
3. Press the reset button. (You should only have to do this the first time you start
the OmniBook.)
4. Open the OmniBook.
5. Turn on the OmniBook.
6. Go through the setup screens.
7. Begin working!
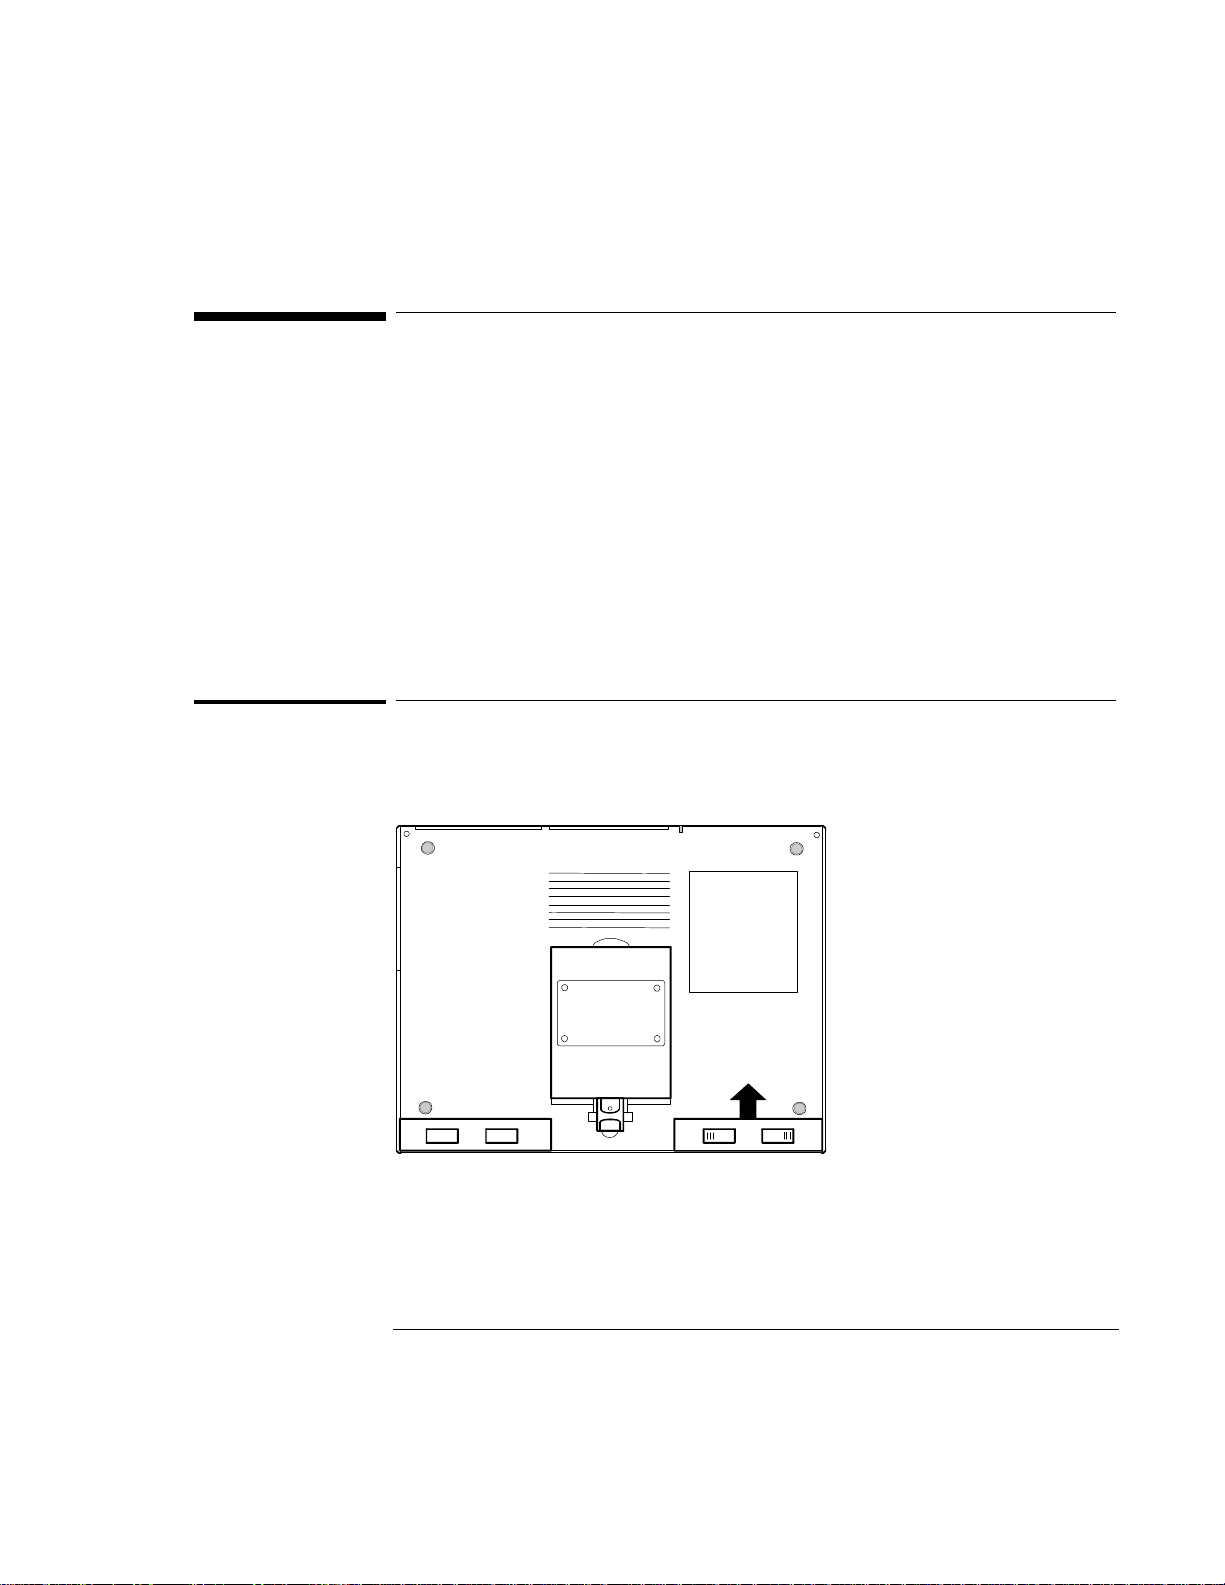
1. Insert the battery
1. For easiest access to the battery, close the display and turn your computer over.
2. Slide the battery module into the empty bay. Carefully press the battery all the
way into the compartment. You will hear a click as the locking switches move
outward and the module is locked in place.
1-3
Page 10

Starting Out with Your OmniBook
CAUTION
Do not mutilate, puncture, or dispose of the battery in fire. The battery can
burst or explode, releasing hazardous chemicals.
A rechargeable battery pack must be recycled or disposed of properly.
CAUTION
Use only an HP F1044B ac adapter (the type shipped with the OmniBook)
do
not use an ac adapter from another product. Using an improper adapter could
damage the OmniBook and will make your warranty invalid.
Start Here
2. Connect the ac adapter
—
1. Plug the power cord into the ac adapter, then into a grounded ac outlet.
2. Plug the connector from the ac adapter into the socket on the left side panel of
the OmniBook.
AC adapter
Power cord
Charging light
The charging light shows the charging status. An orange color indicates that the
adapter is charging your computer's removable battery; the light will turn green
when the battery pack is fully charged.
1-4
Page 11

Starting Out with Your OmniBook
Start Here
3. Reset the OmniBook
• Press the reset button.
Insert a pen or pencil tip or other slender object into the small opening below
the ac adapter socket on the left side of the computer.
The OmniBook may take half a minute (or more) to restart (reboot).
Pressing the reset button is similar to turning off a PC’s power, then turning it back
on again. After this first time, you should seldom have to press the reset button. (For
example, you may need to reset if the battery becomes completely exhausted.)
Make sure there’s no disk in the floppy disk drive when you reset the OmniBook. As
on a PC, if there’s a disk present, the OmniBook won’t look on the built-in disk for its
startup files, so it may not restart successfully.
4. Open the OmniBook
Pull the two latches on the right and left sides of the OmniBook toward you and lift
the lid away from the keyboard.
1-5
Page 12

Starting Out with Your OmniBook
Hint
If the display is difficult to read, try adjusting the brightness and contrast controls
they’re located just below the display. Some OmniBook models do not require a
contrast control.
Start Here
5. Turn on the OmniBook
Press the On/Off button located on the upper right-hand corner above the
keyboard.
On/Off button
1-6
—
Page 13

Starting Out with Your OmniBook
Start Here
6. Go through the setup screens
When you start up your OmniBook the first time, it takes you through a series of
setup screens to take care of routine setup tasks. When you finish, your OmniBook
is ready to use.
Where to go from here
You can probably start using your OmniBook immediately, especially if you’re
familiar with personal computers, or if you've already worked with Microsoft
Windows. Still, your OmniBook is designed as a compact, mobile computer—so it
has a few useful features that you don't normally find on a desktop PC. Take a few
minutes to explore.
Check OmniBook Notes
For late-breaking information available after the manuals were completed, see
OmniBook Notes.
• For Windows for Workgroups, look in Program Manager in the OmniBook
Library group.
• For Windows 95, look in Start, Programs, OmniBook Library.
See the Online Manuals
For detailed information about the OmniBook, see the online User's Guide. Also see
the other online information in the online OmniBook Library.
• For Windows for Workgroups, look in Program Manager in the OmniBook
Library group.
• For Windows 95, look in Start, Programs, OmniBook Library.
1-7
Page 14

Page 15

2
Troubleshooting
Page 16

Troubleshooting
Hints
If you're having a problem—and Windows is running on your OmniBook—see the
online OmniBook User’s Guide. Its troubleshooting chapter contains more extensive
troubleshooting information.
If you're having a problem within one particular application, check the manual for
that application, too.
Start Here
Troubleshooting
If you run into problems getting your OmniBook started, you can use the
suggestions in this chapter for getting back on track.
If you have questions that this manual doesn't answer, you can
• See the online OmniBook User’s Guide—it’s your main source of information
about using the OmniBook. It includes extensive troubleshooting information.
• If you’re using Windows for Workgroups, check the online Windows Quick Start
and MS-DOS Quick Start manuals.
• If you’re using Windows 95, check the printed Introducing Microsoft Windows
manual, or the online Using Windows 95 manual.
• Look at the online Help for Windows and other applications.
• Check with your computer system administrator, if you have one.
• See other books about Windows, MS-DOS, and other applications. Check your
local library or bookstore.
• Contact your dealer, or contact Hewlett-Packard—see the OmniBook Support
and Service booklet or OmniBook Support in the online OmniBook Library.
2-2
Page 17

Troubleshooting
Solving Basic Problems
Solving Basic Problems
If your OmniBook has a problem starting, find the symptom below that matches
your situation. Try the suggestions one at a time.
If the OmniBook turns off immediately after it turns on
• Battery power is probably extremely low. Plug in the ac adapter, or turn off the
OmniBook and insert a fresh battery pack.
If the OmniBook stops responding
• Try waiting a few moments, then try turning it off and on.
• Press
• If nothing happens, insert a ballpoint pen tip or other slender object into the
CTRL+ALT+DEL to reboot.
reset-button hole in the left side of the case, below the ac adapter socket. Push
in momentarily—the system should reset and reboot.
If the OmniBook doesn’t respond at turn-on
• Connect the ac adapter in case the battery is low.
• Press On/Off to try turning on the unit.
• Insert a ballpoint pen tip or other slender object into the reset-button hole in
the left side of the case, below the ac adapter socket. Push in momentarily—the
system should reset and reboot.
If you get no response, remove the battery and ac adapter and press the
reset button again—then plug in the ac adapter and try resetting again. If
you still get no response, the unit requires service.
If the OmniBook doesn’t reboot successfully, see the next symptom.
2-3
Page 18

Troubleshooting
Solving Basic Problems
If the OmniBook doesn’t reboot successfully
If your operating system is MS-DOS or Windows for Workgroups
• If no text is displayed, or if things stop before you see any text about MS-DOS,
the unit probably requires service.
• If you see error messages during startup, but Windows starts or you get an
MS-DOS prompt, exit Windows. Then type scandisk to fix problems with
drive C. Then press
Menu,” press
CTRL+ALT+DEL to reboot—but at the “MS-DOS Startup
F8 ENTER and step through each startup command to find where
the problem occurs. Repair or restore the necessary files as indicated.
• If you see text about MS-DOS but things stop before Windows starts or before
you get an MS-DOS prompt, insert the Support Utility disk or other boot disk in
the floppy drive, then press
CTRL+ALT+DEL to reboot from drive A—then
choose the Minimum Startup option. (If the unit doesn’t reboot from a floppy
boot disk, the unit probably requires service.)
If it reboots, type dir c: to see if drive C contains valid files. Then try the
following:
If drive C has valid files, try typing these commands: c:\dos\scandisk
(to repair any defects) and sys a: c: (to restore core MS-DOS files).
Try typing each of these commands to see if it fixes the problem:
fdisk /mbr (to repair only the boot sector of drive C)
c:\dos\scandisk (to repair any file defects)
Last resort: The following commands delete all files on drive C, so you must
reinstall your files after running these commands:
fdisk (to reinitialize drive C)
format c: /u (to prepare drive C for storing data)
Reinstall all of the original files on drive C—see “If you need to install all
original files on drive C” below.
2-4
Page 19

Troubleshooting
Solving Basic Problems
If your operating system is Windows 95
• If no text is displayed during reboot, or if things stop before you see “Starting
Windows 95...”, the unit probably requires service.
• If you see “Starting Windows 95...” during startup followed by error messages,
reboot again—but when you see “Starting Windows 95...”, press
F8 to get the
startup menu. Choose a startup option that might help you discover or fix the
problem.
Use the “safe mode” option to start Windows with a basic configuration.
Run ScanDisk (in System Tools) to fix problems with drive C. You can also
make other changes to repair your startup files.
Use the “step-by-step” option to step through each startup command to find
where problems occur, so you can repair or restore any files indicated.
• If drive C (the hard disk) isn’t working properly, insert the Support Utility floppy
disk in the floppy drive, then press
CTRL+ALT+DEL to reboot from drive A—then
choose the Minimum Startup option. At the MS-DOS prompt, type
scandisk c: to fix certain problems with drive C. You can use other
commands on drive A to try to repair drive C. Then remove the floppy disk and
try rebooting again. If it still doesn’t start, you could try reinstalling all of the
original files on drive C—see “If you need to reinstall all original files on drive C”
below.
If the screen is difficult to read
• Set the display resolution to its original setting: 600×480 (VGA) or 800×600
(SVGA). For Windows for Workgroups, use Display in OmniBook Tools. For
Windows 95, use Display in HP User Tools.
• Try adjusting the brightness and contrast by sliding the controls below the
screen.
• Try changing the color scheme. For Windows for Workgroups, use Display in
OmniBook Tools. For Windows 95, use Display in HP User Tools.
If your system password doesn’t work
• Check whether Num Lock is off. Try changing it.
• If you’ve forgotten your password, have your OmniBook at hand and call
Hewlett-Packard at the phone number in the Service and Support booklet.
2-5
Page 20

Troubleshooting
Solving Basic Problems
If you need to reinstall all original files on drive C
1. Connect a SCSI-type CD-ROM drive to your OmniBook.
2. Insert the Support Utility floppy disk in the floppy drive.
3. Insert the Recovery CD-ROM in the CD-ROM drive—make sure you use the
correct CD-ROM.
4. Plug in the ac adapter in case the battery is low.
5. If possible, exit Windows and restart the computer from the floppy drive. You
can press
CTRL+ALT+DEL, or press the reset button.
6. When you see a menu of startup options, select Reinstall All Original Files.
When the process finishes, your hard disk contains the original files.
2-6
Page 21

3
Specifications and Regulatory
Information
Page 22

Specifications and Regulatory Information
Solving Basic Problems
Specifications and Regulatory Information
Your OmniBook is designed to provide trouble-free operation. The following
suggestions can help you while working with your OmniBook:
♦ Observe the temperature limits and other specifications listed in the next
section.
♦ Check out the tips about ergonomics and work habits in the OmniBook User's
Guide.
♦ If you have problems, see the problem-solving suggestions and references
listed in chapter 2.
♦ If you think your OmniBook might need repair service, see the warranty and
service information in the Support and Service booklet.
To contact Hewlett-Packard
If you have questions that the OmniBook manuals don't answer (even after looking
in the contents and index), you can contact Hewlett-Packard at the address or
phone number listed in the Support and Service booklet or in OmniBook Support in
the online OmniBook Library. Please have your OmniBook with you.
3-2
Page 23

Hardware Specifications
Display
Backlit liquid-crystal display (LCD).
Color VGA (640 x 480 dots) or SVGA (800 x 600 dots).
Keyboard
Enhanced PC functionality with compact layout.
Embedded numeric keypad.
Tilt feet.
Memory
RAM: 8 MB or more (depending on the model), expandable to 64 MB maximum.
Mass Storage
Card slots: two PCMCIA slots available (two type I or type II cards or one type III card).
Hard disk drive: 1 removable 2.5-inch IDE drive.
Floppy disk drive: 1 removable 3.5-inch 1.44-MB floppy disk drive.
Interfaces
Serial: one 9-pin 115,200-baud RS-232 port (with hardware handshaking).
Parallel: one 25-pin bi-directional parallel port.
Optional SCSI: one 50-pin SCSI II port.
Infrared: one 115,200-baud bi-directional IrDA port.
SVGA output: one color-SVGA port with up to 256 color 1024 x 768 resolution.
Card slots: PCMCIA I/O cards (two type I or type II cards or one type III card).
MIDI: one mini D-sub 15-pin connector and adapter.
Docking port: one custom port for docking station.
Card Slots
Electrical: PCMCIA version 2 cards.
Mechanical: PCMCIA type I, II, and III cards.
AC Adapter
Input: 115 to 240 Vac (50 to 60 Hz).
Output: 12 Vdc, 3.3 A.
Polarity: positive (inner contact is negative).
Battery Pack
Type: removable 14.4 Vdc nickel-metal-hydride or 17.2 Vdc lithium-ion.
Recharge time: up to 3 hours (nickel-metal-hydride) or 4 hours (lithium-ion).
Operating time from full charge (varies according to usage): up to 2.5 hours (nickel-metal-
hydride) or 3.5 hours (lithium-ion).
Temperature
Operating: 10 to 35 ºC (50 to 95 °F) on TFT,
5 to 35 ºC .(41 to 95 ºF) on DSTN.
Storage: -40 to 60 °C (-40 to 140 °F).
The unit may not operate properly below 5 °C (41 °F), but it can be stored at temperatures
down to -40°C (-40°F) without damaging the hardware.
Humidity
Operating: 90% relative humidity at 35 °C (95 °F) maximum.
Storage: 90% relative humidity at 60 °C (140 °F) maximum.
Audio System
Built-in 16-bit SoundBlaster-compatible stereo sound card, microphone and speakers.
Specifications and Regulatory Information
Hardware Specifications
3-3
Page 24

Specifications and Regulatory Information
Regulatory Information
Regulatory Information
This section presents information that shows how the OmniBook 5000 complies
with regulations in certain regions. Any modifications to the OmniBook not
expressly approved by Hewlett-Packard could void the authority to operate the
OmniBook in these regions.
U.S.A.
The OmniBook 5000 generates and uses radio frequency energy and may interfere
with radio and television reception. The OmniBook complies with the limits for a
Class B computing device as specified in Part 15 of FCC Rules, which provide
reasonable protection against such interference in a residential installation. The
"FCC ID" number for this product is listed on the bottom of the unit. In the unlikely
event that there is interference to radio or television reception (which can be
determined by removing the unit's batteries and ac adapter), try the following:
• Reorienting or relocating the receiving antenna.
• Relocating the OmniBook with respect to the receiver.
• Connecting the OmniBook ac adapter to another power outlet.
Connections to Peripheral Devices
To maintain compliance with FCC Rules and Regulations, use properly shielded
cables with this device.
For more information, consult your dealer, an experienced radio/television
technician, or the following booklet, prepared by the Federal Communications
Commission: How to Identify and Resolve Radio-TV Interference Problems. This
booklet is available from the U.S. Government Printing Office, Washington, DC
20402, Stock Number 004-000-00345-4. At the first printing of this manual, the
telephone number was (202) 783-3238.
3-4
Page 25

Specifications and Regulatory Information
Regulatory Information
Canada
This digital apparatus does not exceed the Class B limits for radio noise emissions
from digital apparatus as set out in the radio interference regulations of the
Canadian Department of Communications.
Le présent appareil numérique n'émet pas de bruits radioélectriques dépassant les
limites applicables aux appareils numériques de Classe B prescrites dans le
règlement sur le brouillage radioélectrique édicté par le Ministère des
Communications du Canada.
Japan
3-5
Page 26

Specifications and Regulatory Information
Manufacturer:
Hewlett-Packard Company
Address:
Hewlett-Packard Co.
Mobile Computing Division
1000 NE Circle Blvd.
Corvallis, OR 97330
declares that the following product
Product name:
HP OmniBook 5000, all models
Options:
conforms to the following product specifications
Safety:
IEC 950:1991+A1,A2 / EN 60950 (1992)+A1,A2
EMC:
CISPR 22:1993 / EN 55022 (1994): Class B (1)]
En 50082-1:1992
IEC 801-2:1991 / prEN 55024-2 (1992): 4kV CD, 8kV AD
IEC 801-3:1984 / prEN 55024-3 (1991): 3V/m
IEC 801-4:1988 / prEN 55024-4 (1992): 0.5kV signal lines, 1.0kV power
lines
Supplementary Information:
The product herewith complies with the requirements of the Low
Voltage Directive 73/23/EEC and the EMC Directive 89/336/EEC and
carries the CE marking accordingly.
The HP F1044B ac adapter used with this product is disconnected from
the power by unplugging the power cord from the power outlet or from
the ac adapter. Therefore, the power outlet should be located close to
the product and be easily accessible.
[1] The product was tested in a typical configuration with Hewlett-
Packard personal computer peripherals.
Quality Department
Hewlett-Packard Company
Mobile Computing Division
Regulatory Information
Europe
Products sold in Europe by Hewlett-Packard and its authorized dealers meet the
specifications listed below.
Declaration of Conformity
(according to ISO/IEC Guide 22 and EN 45014)
All
3-6
Page 27

Specifications and Regulatory Information
Regulatory Information
 Loading...