

Page 1

HP NetServer
LH 6000/6000r and LT 6000r
Processor Upgrade Guide
HP Part Number 5969-5912
Printed in January 2000
Page 2

Notice
The in formation contained in this document is subject to change without noti ce.
Hewlett-Packard makes no warranty of any kind with regard to this
material, including, but not limited to, the implied warranties of
merchantability and fitness for a particular purpose. Hewlett-Packard shall not
be liable for errors contained herein or for incidental or consequential damages in
connection with the furnishing, performance, or use of this material.
Hewlett-Packard assumes no responsibility for the use or reliability of its software
on equipment that is not furnished by Hewlett-Packard.
This document con tains proprietary informati on th at is protect ed by copyrigh t. All
rights are res erved. No par t of this docum ent may be phot ocopie d, reprodu c ed, or
translated to another language without the prior written consent of
Hewlett-Packard Company.
TM
3M
is a r eg istered tr ad emark of Minn esot a Mining and Manufa cturing
Company.
Pentium
Torx
Hewlett-Packard Company
Network Server Divisi on
Technical Communications / MS 45SLE
10955 Tantau Avenue
Cupertino, CA 95014 USA
TM
is a U.S. trademark of Intel Corporation.
®
is a registered tra d emark of CamCar /Textron, Inc.
© Copyright 2000, Hewlett-Packard Company.
Audience Assumptions
This gui de is for the per son who installs, admin isters, an d t roubl e s hoots L A N
servers. Hewlett-Packard Company assumes you are qualified in the servicing of
computer equipment and trained in recognizing hazards in products with
hazardous energy levels.
ii
Page 3

Contents
About Th is Gui de............................................................................................. 1
Accessory Kit Contents.................................................................................. 1
Precautions................................................................................................... 2
1 HP NetServer LH 6000/6000r Processor Upgrade...................................... 3
Introduction ................................................................................................... 3
Tools Required.......................................................................................... 3
Upgrade Overvi ew..................................................................................... 4
Configuration Guidelines............................................................................ 4
Processor Installation .................................................................................... 5
System Preparation................................................................................... 5
Removing the Terminator or Existing Processor......................................... 7
Installing the Processor.............................................................................. 9
Installing the VRM................................................................................... 10
Setting the Processor Speed ................................................................... 11
Completing the Har dware Upgrade.......................................................... 13
Updating Firm ware ...................................................................................... 13
2 HP NetServer LT 6000r Processo r Upg rade............................................. 15
Introduction ................................................................................................. 15
Tools Required........................................................................................ 16
Upgrade Overvi ew................................................................................... 16
Configuration Guidelines.......................................................................... 16
Processor Installation .................................................................................. 17
System Preparation................................................................................. 17
Removing the Terminator or Existing Processor....................................... 19
Installing the Processor............................................................................ 22
Installing the VRM................................................................................... 23
Setting the Processor Speed ................................................................... 24
Completing the Har dware Upgrade.......................................................... 26
Updating Firm ware ...................................................................................... 26
3 BIOS Update.............................................................................................. 27
Introduction ................................................................................................. 27
Updating the BIOS....................................................................................... 27
iii
Page 4

Contents
Reinstalling the NOS................................................................................... 28
4 Warranty and Support ............................................................................... 31
Introduction ................................................................................................. 31
Hardware Accessories Limited Warranty...................................................... 31
Hewlett-Packard Hardware Accessories .................................................. 31
Third-Party Har dware Produc ts................................................................ 32
HP Repair and Telephone Suppor t .............................................................. 32
A Regulatory Information ............................................................................. 33
Index............................................................................................................... 35
iv
Page 5

About This Guide
This guide applies to the HP NetServers listed below with the following topics:
• HP NetServer LH6000/6000r processor upgrade instructions
• HP NetServer LT 6000r processor upgrade instructions
l
Updating the BIOS
• Warranty and support information
• Regulatory information
Accessory Kit Contents
CAUTION Do not remove the processor module from its sealed antistatic
bag until you are ready to install it.
As you unpack the shipping box, verify you recei v ed the following item s :
• Processor module
• Voltage reg u lator module (VR M)
• HP NetServer Navigator CD-ROM
• HP NetServer Processo r Upg ra de Guide (this guide)
1
Page 6

Precautions
Follow the procedures listed below and in this manual to ensure safe handling of
components and t o pr event harm to both you and th e HP NetServer .
WARNING Before removing a cover, always disconnect the power cord(s)
and unp lu g telephon e cables. Di s connect the p ower cords to
avoid exposure to high energy levels that may cause burns
when parts are short-circuited by metal objects, such as tools
or jewelry. Dis c onne c t telephon e c ables to avoi d expos ure to
shoc k haza rd fr om telephone ri ngin g devices . Note tha t the
power switch does not turn off the standby power. Disconnect
the power cord(s) to turn off standby power.
CAUTION This processor module is sensitive to static electricity and can
easily be damaged by improper handling. Use of a grounding
strap is recommended. Read the following information
carefully before you handle the processor:
• Leave the processor in the sealed antistatic bag until you
are ready to install it.
About This Guide
• Use an antistatic service kit, such as 3M
or equivalent.
8501/8502/8505
• Before you remove the processor from the ant istatic bag,
touch a grounded, unpainted metal surface on the system to
discharge stati c electricity.
2
Page 7
1 HP NetServer LH 6000/6000r
Processor Upgrade
Introduction
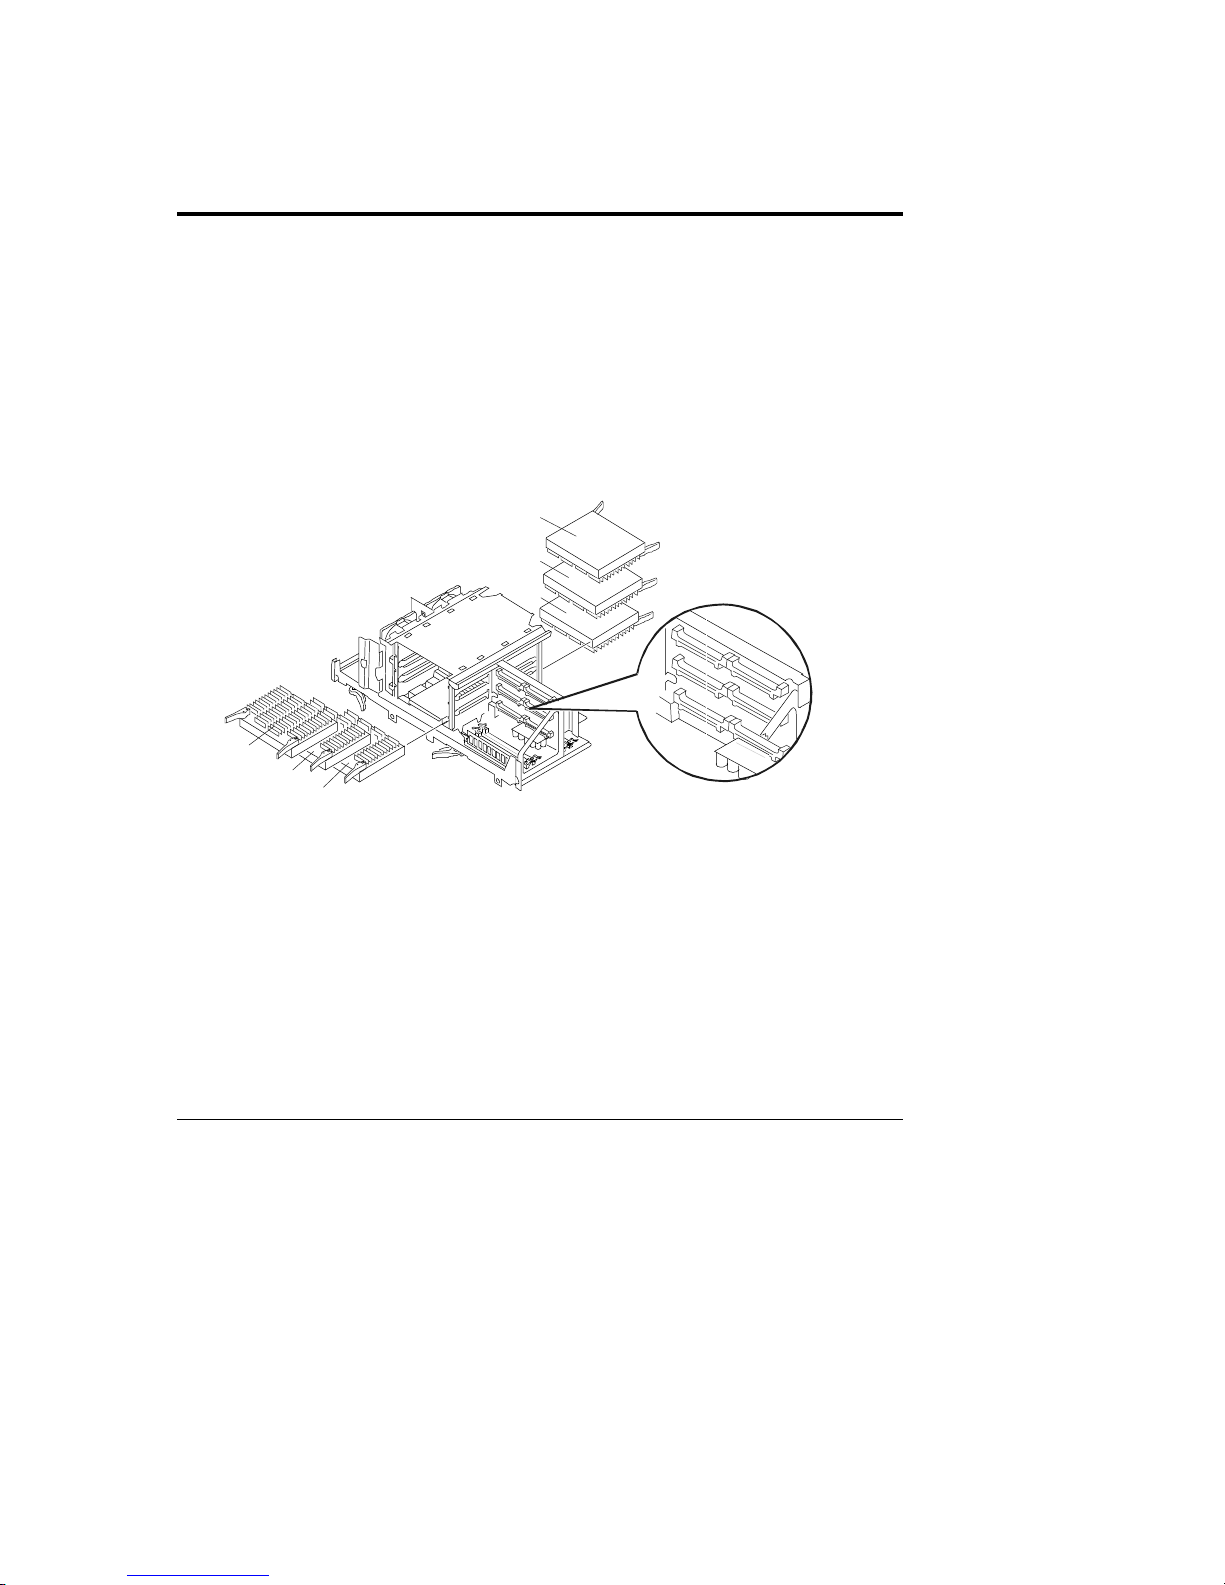
The HP NetServer LH 6000/6000r supports up to six processor modules and the
accompanying voltage regulation modules (VRMs) on the system board assembly.
Process or modul es ar e available at differen t clock speeds, bu t in a multi - processor
configu ration, all processors must operate at the s ame speed.
You can us e th is upgrade accessory to replace an ex isting processor modu le
with a higher spe e d proces sor, or t o add additional pr oce s sor modules to a
single-process or system. S ee F i gure 1-1.
6
Processor
5
4
3
2
6
5
4
3
Processor
2
1
VRM
Locations
1
Figure 1-1. Processor and VRM Locations
Tools Requ ir ed
The following tools are required to remove and replace processor modules and
there respective VRM.
• An antistati c s ervice kit ( 3 M
includes a static-dissipating work surface, a chassis clip lead, and a wrist
stra p. Use this kit t o prevent damag e to the system from static electricity.
8501/8502/8505 or equivalent). This kit
3
Page 8

Chapter 1 HP NetServer LH 6000/6000r Processor Upgrade
Upgrade Ov erv iew
To upgrade a processor, or processors in the HP NetServer LH6000/6000r, you
will follow these basic steps:
l
Shut down the NOS and the HP NetServer.
l
Remove t he required covers and ca bl es ( A C an d I/O).
• Remov e the system board and pr ocessor cage cov ers.
• Remov e the terminator (if you are addin g an additional processor).
or
Remove the existing processor module and VRM (if you are replacing a
processor).
• Install the ne w proc essor module .
• Install a VRM.
• Set the configuration switch settings, if necessary.
• Complete the hardware installation.
• Update the BIOS and if necessary reinstall your network operating system.
Configuration Gu idelines
l
Use only processor upgrade kits with the same HP product number. This
ensur es the processor type, th erm al heat sink , clock speed, and cache siz e,
and processor stepping are compatible.
l
In stall processors in con s e cutive order; that is, 1, 2, 3, 4, 5, and 6.
l
Ensur e the VRM is inst alled in the pr oper slot with the respecti ve
processor module associated with it. For example, the processor module in
slot 2 must have a VRM installed in VRM slot 2.
CAUTION Ensure the process or modul e remains sea led in the antistatic
bag until you are ready to install it.
Before you remove a processor from the antistatic bag, touch a
grounded, unpainted metal surface on the HP NetServer to
discharge stati c electricity.
4
Page 9

Chapter 1 HP NetServer LH 6000/6000r Processor Upgrade
Processor Installation
Do not set the process or speed swit ches to a different speed from the one labeled
on the proces sor, as this can re s u lt in unre liable o r i ntermitte n t perfo rm ance, and
data integrity may also be at risk.
System P reparation
The installation procedure is the same for the rack-mount and the pedestal
NetSer ver once you ga in access to the s ystem board as sembly.
1. Log off all us ers and, if necessary, backup the system.
2. Gracefully sh u t down the NOS according t o direction s in your NOS
documentation.
3. Press the power s wi t ch on the HP NetServer’s control panel when
prompted by the NOS.
4. Disconnect th e p ower cords and signal cables an d , if necessar y, label each
one to support reassembly.
CAUTION The power supplies will continue to provide standby current to
the Net Server unti l the power cabl e is disconn ected.
5. Gain access to the system board assembly for either model, rack-m ounted
or pedestal, by following the instructions in the HP NetServer LH
6000/6000r Installation Guide.
NOTE In the LH 6000r, this assembly is under the right cover, in the
LH 6000, it is under the top cover.
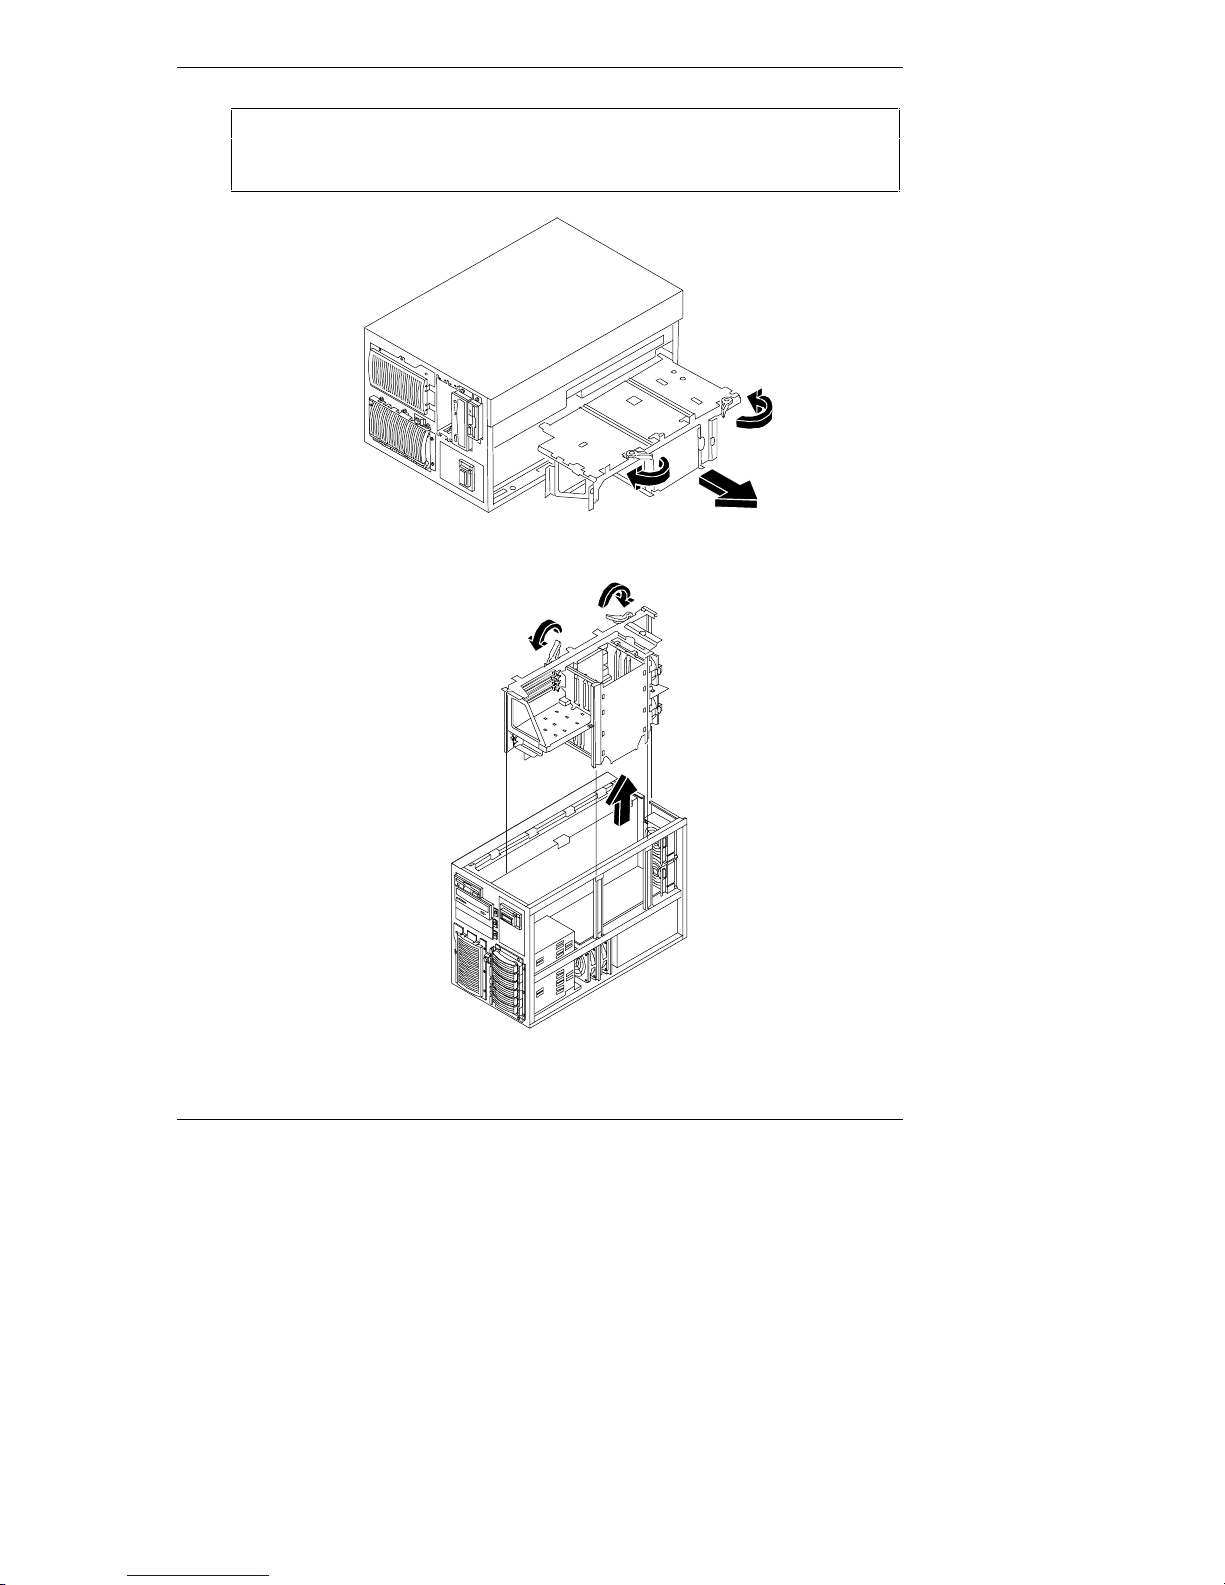
6. Remove the two screws securing the system board assembly to the chassis.
7. Loosen the two captive fasteners securing th e system board ass embly to
the chassis.
8. Unlatch the blue retaining latches to release the assembly.
9. Pu l l the assembly out until it clears the chassis guides.
CAUTION The system board assembl y weigh s appr oximat el y 30 lbs. (1 4
kgs.) and requires extra support as you remove it from the
chassis.
5
Page 10
Chapter 1 HP NetServer LH 6000/6000r Processor Upgrade
CAUTION Wear a wrist-strap and use a static-dissipating work surface
conn ected to the cha s sis when handling components. Ens ure
the metal of the wrist strap contacts your skin.
Figure 1-2. Removing the System Board (Rackmount)
Figure 1-3. Removing the System Board Assembly (Pedestal)
6
Page 11
Chapter 1 HP NetServer LH 6000/6000r Processor Upgrade
10. Refer to the next topic to decide on your next step.
Removing th e Termin ator or Existin g Pro cessor
In this topic you decide between removing the terminator(s) or an existing
processor module.
• If your s ystem has on e processor modu le and you are installing an
additional processor, remove the terminator as described in the next section
"Removing th e Ter minator. "
• If you are upgrading an existing processor or processors, remove the
exist ing processors as descr ibed in sect ion "Removin g a Processor Module
and VRM."
Removing the Terminator
If your system has at least one processor module, there are terminators installed in
all remaining slots. You must remove a terminator for each new processor before
installing an additional processor module into the next available slot.
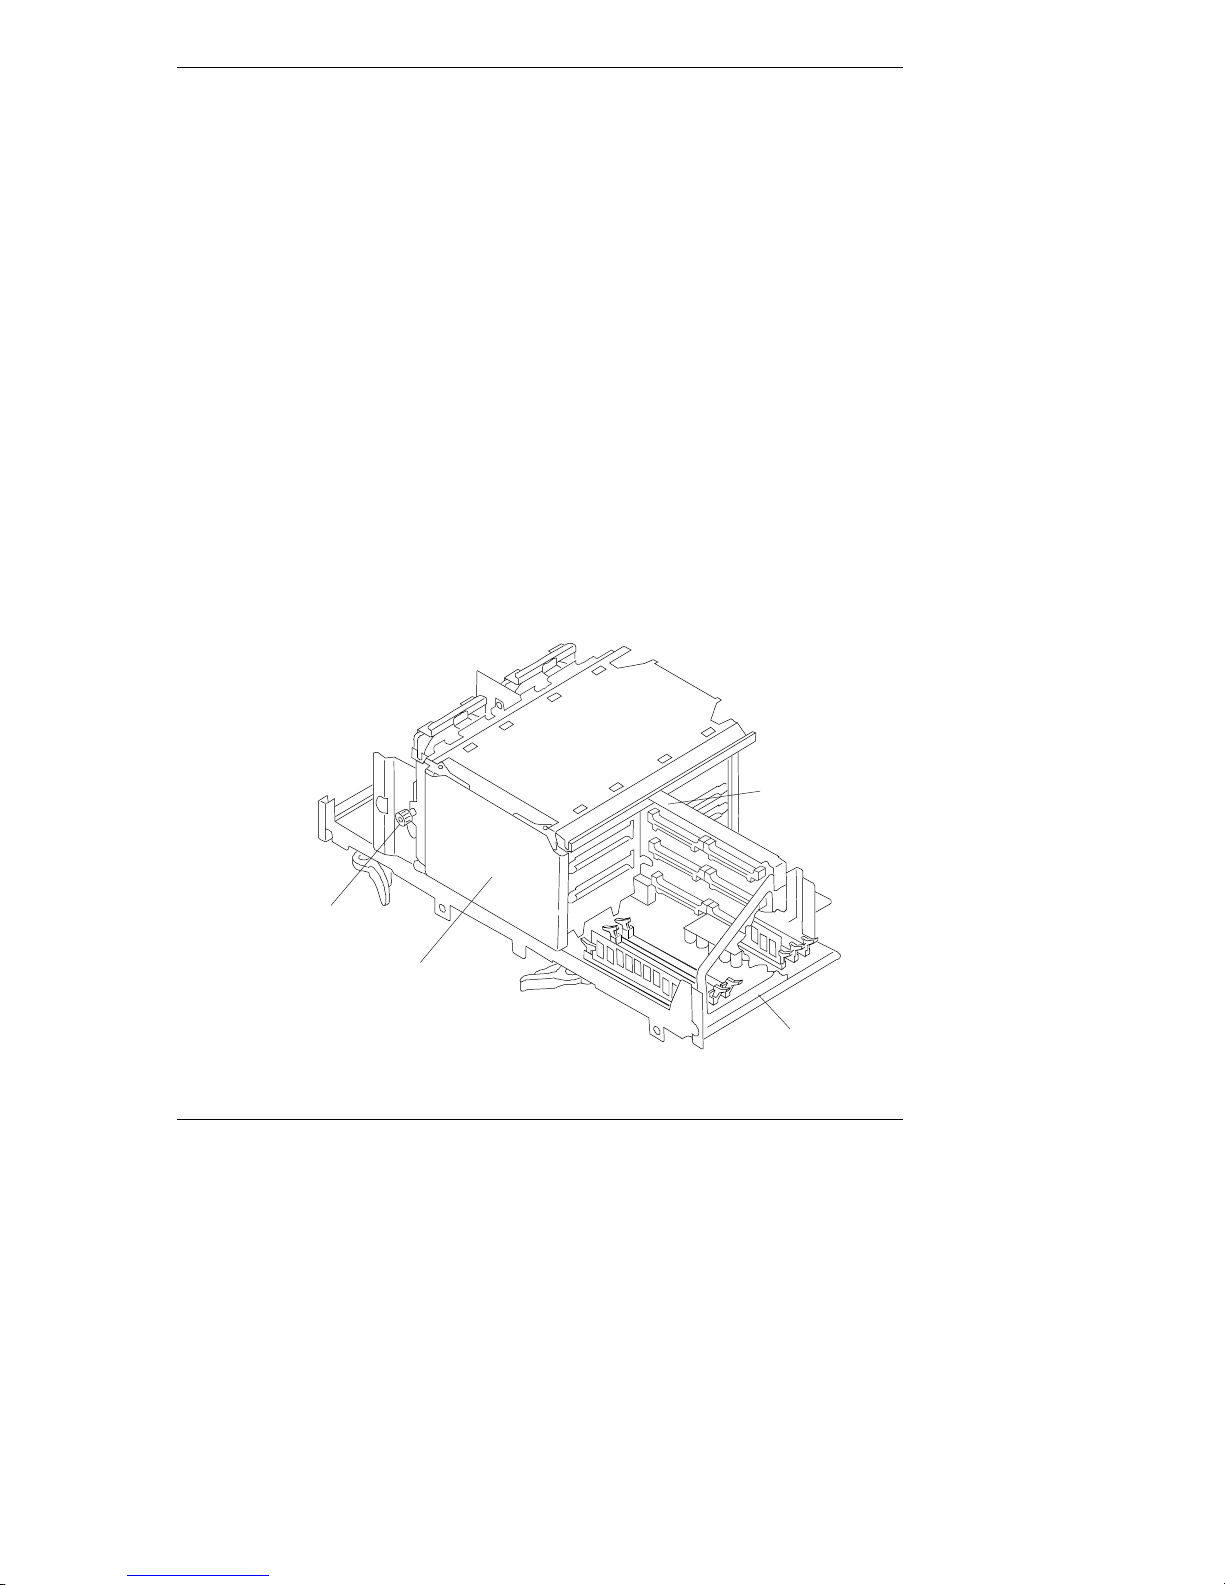
1. Loosen the th um bscrew and open the access co ver to the processor slot s.
See Figure 1-4.
Both si d es of the processor cage ha ve covers and thu mbscrews.
Thumbscrew
Access Cover
Figure 1-4. Accessing the Processor Terminator
Processor
board
System
board
7
Page 12
Chapter 1 HP NetServer LH 6000/6000r Processor Upgrade
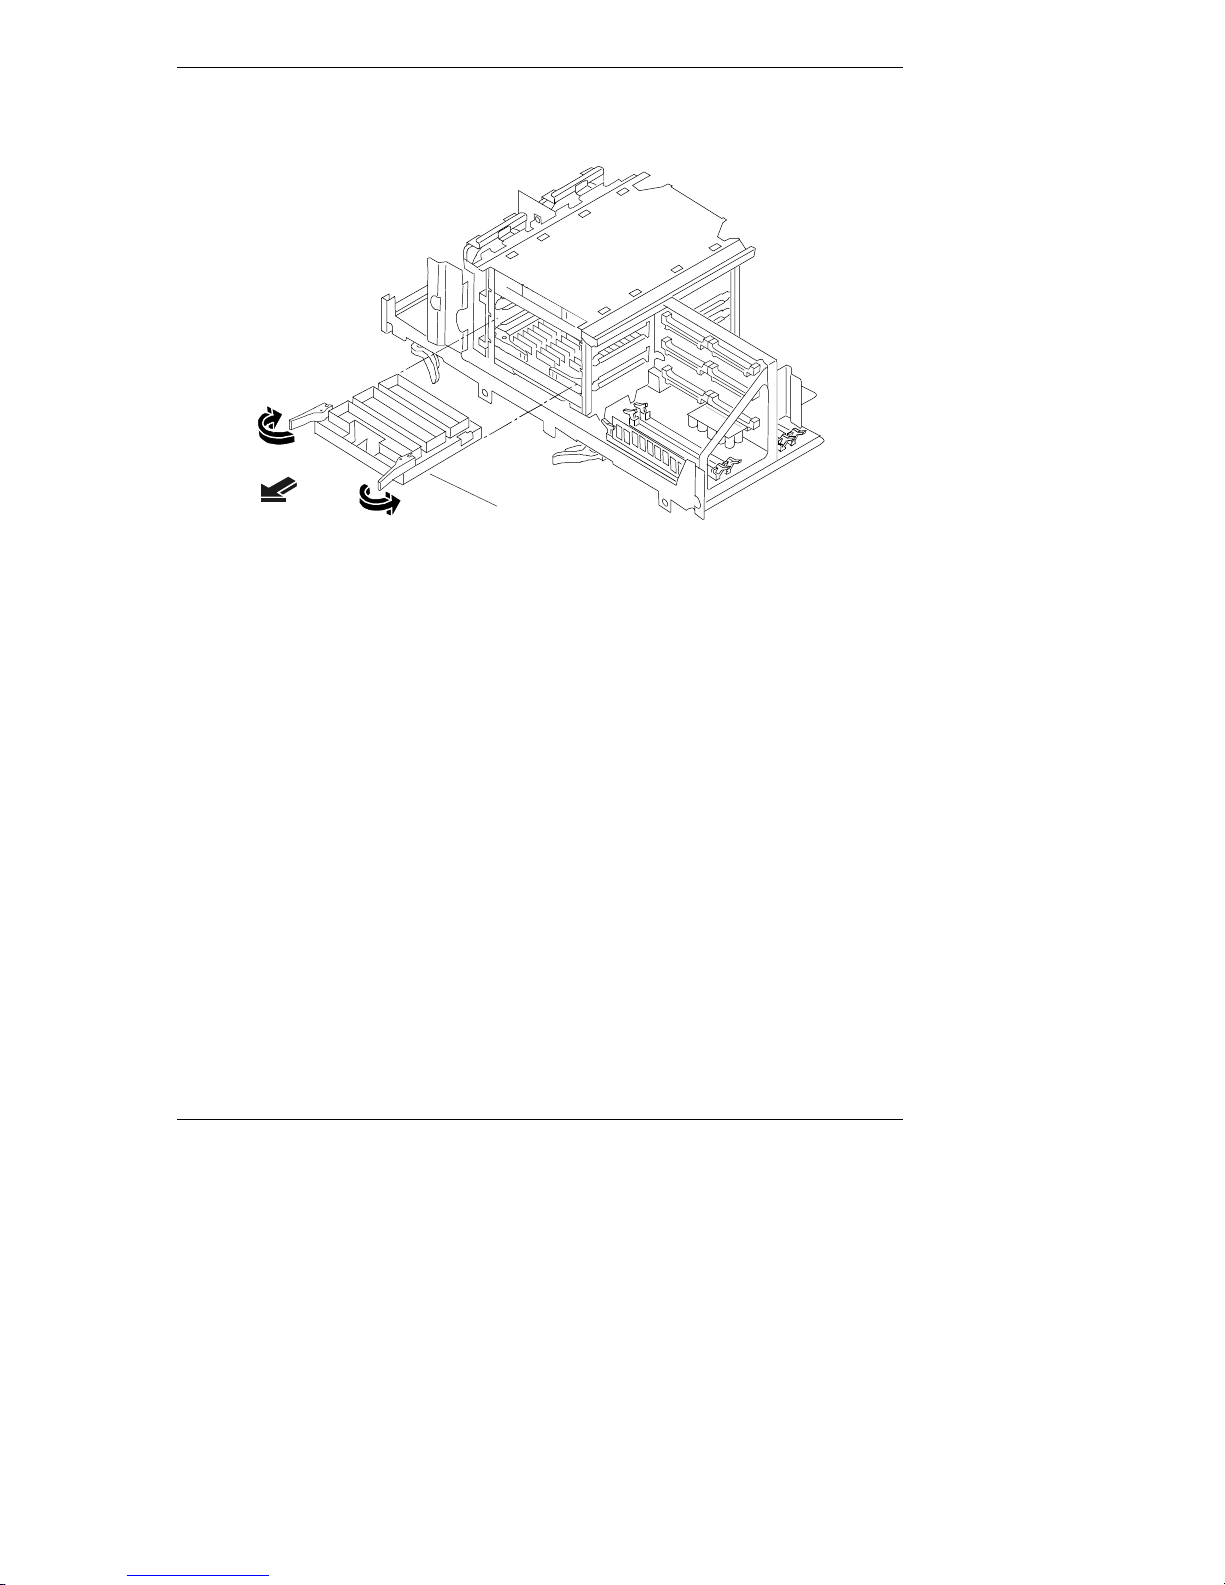
2. Open the latches and remove the terminator from the next available slot as
shown in Figure 1-5.
Processor
Terminator
Figure 1-5. Removing the Processor Terminator
3. Save all terminators for future use.
4. If adding more processor modules, repeat steps 2 and 3 for each new
processor.
Removing a Processor Module and VRM
If you are upgrading an existing processor, you must first remove the existing
processor modul e and its respective VRM.
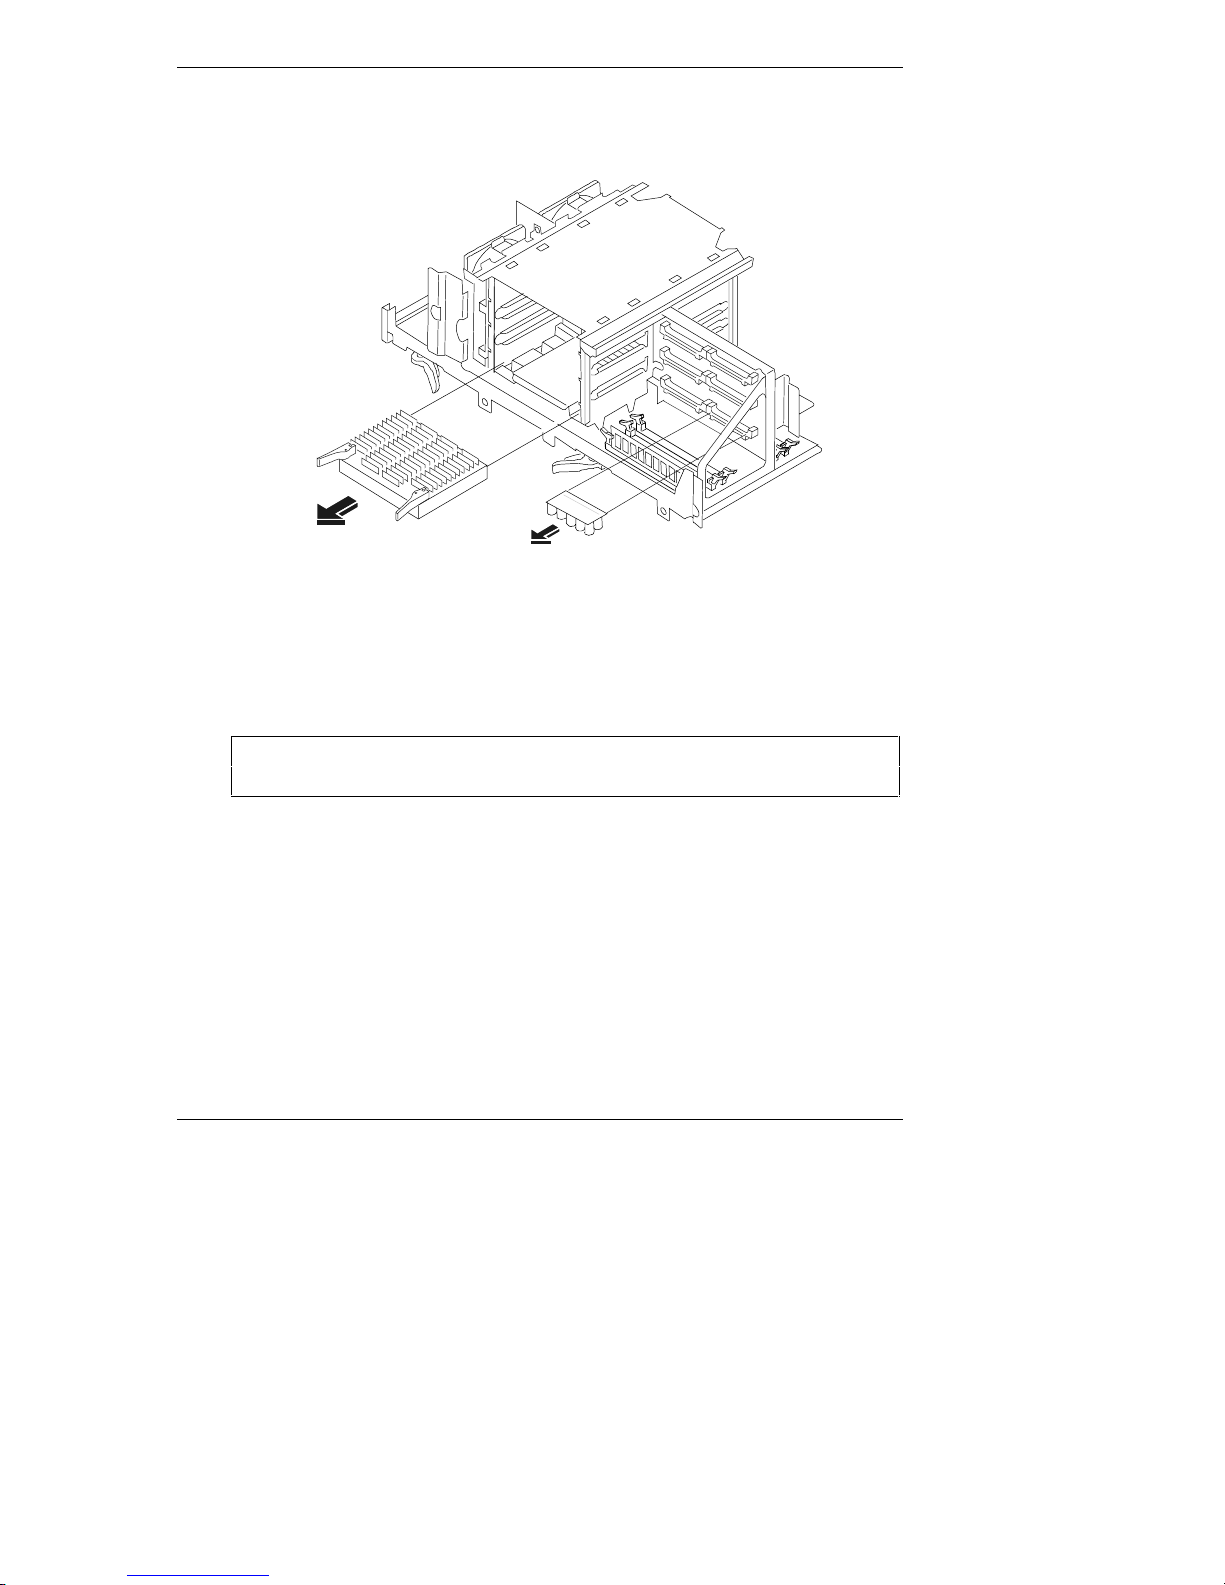
1. Rotate the retaining latches to release the processor module.
2. Remove the desired processor module from the slot and place it on
antistatic surface. See Figure 1-6.
3. Identify th e r es p ective VRM for the processor module. See Figure 1- 1.
For e xample, if you remove pr oc e s sor 1, you m ust remove the VRM 1.
4. Op en the retaining latches of the desired VRM.
5. Pu l l the VRM out of the slot. See Figure 1-6.
6. Ensure you keep the processor module with its associated VRM.
8
Page 13
Chapter 1 HP NetServer LH 6000/6000r Processor Upgrade
7. If upgrading more processor modules, repeat Steps 1–6 for each existing
processor modul e and its VRM.
Figure 1-6. Removing an Existing Processor and VRM
Installing th e Proc essor
1. Unpa ck the processor shipping box and check the contents against its
packing list.
CAUTION Ensure the process or modul e remains sea led in the antistatic
bag until you are ready to install it.
2. Remove the desir e d processor from th e s e aled bag.
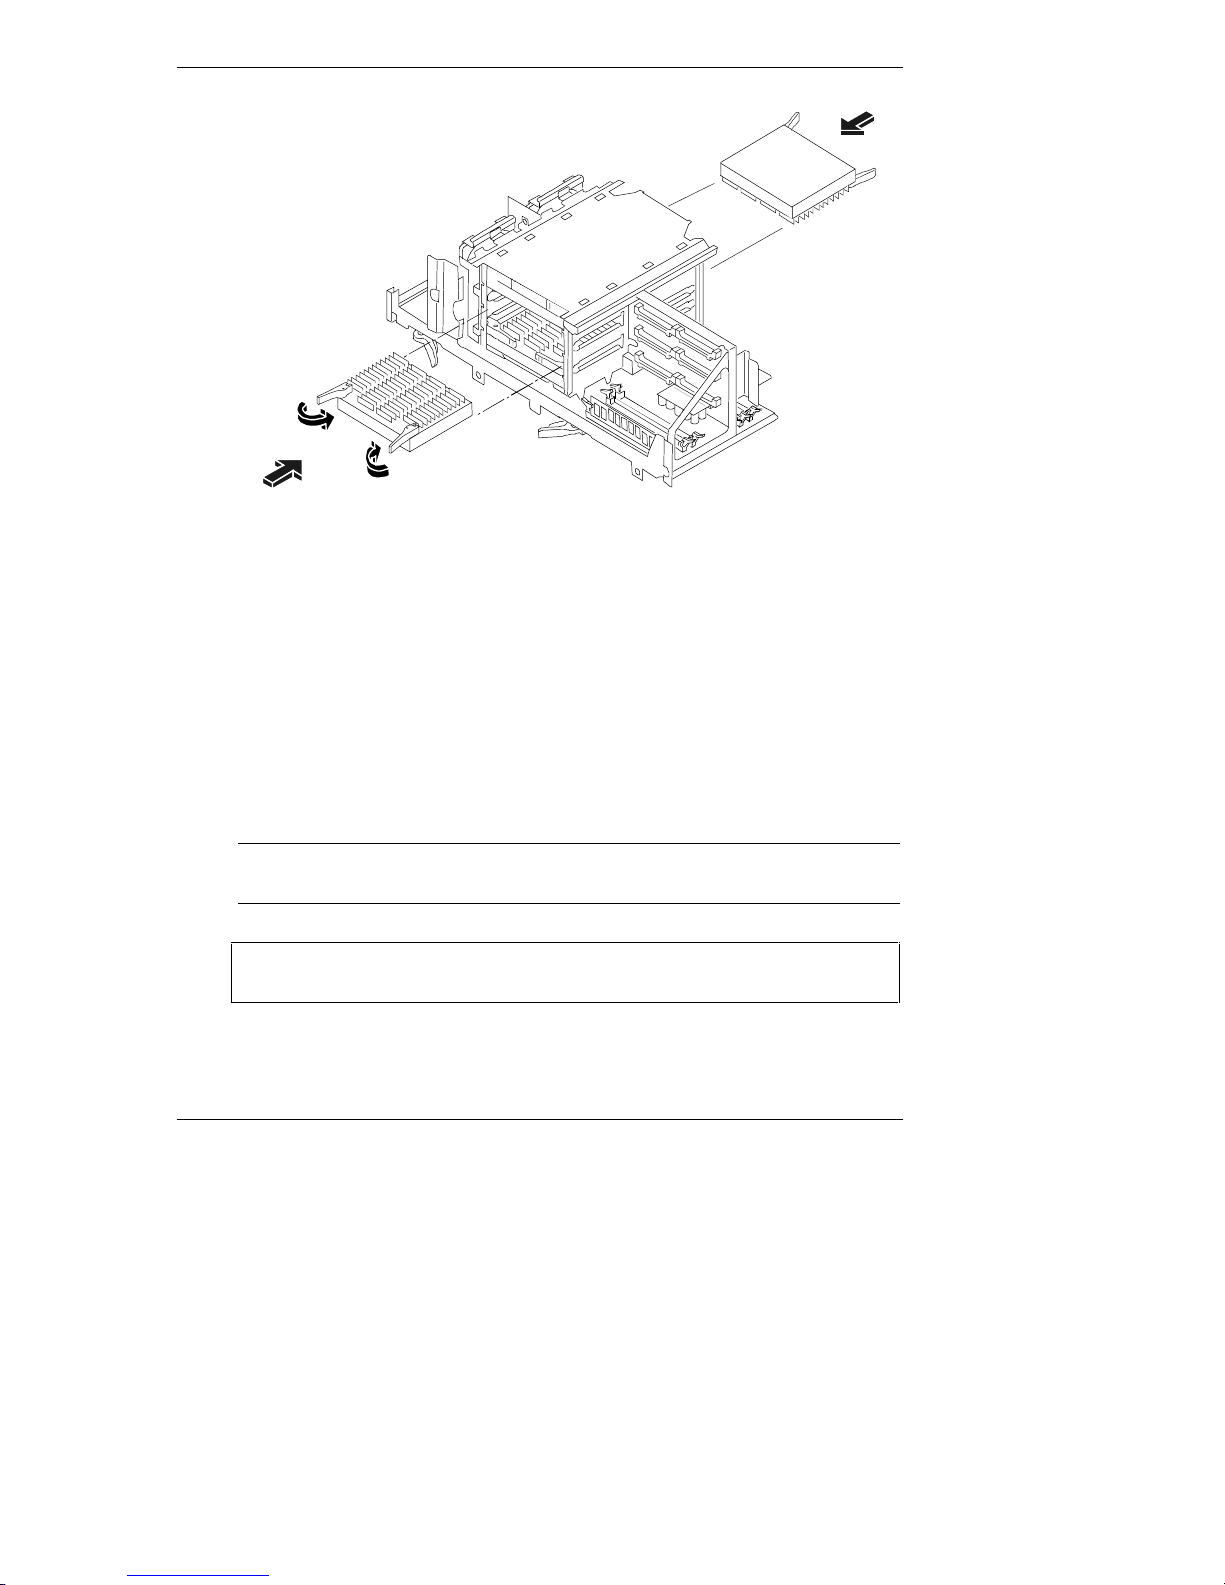
3. Open the latch es on top of the processor modu le. See Figur e 1- 7 .
4. Align the new processor in front of the next available slot.
The hea t s in k s for processors 1, 2, and 3 face a way from the system board
and th e h eat sinks for processors 4, 5, an d 6 fa ce toward the system board.
See Figure 1-7.
9
Page 14
Chapter 1 HP NetServer LH 6000/6000r Processor Upgrade
Figure 1-7. Inserting the Processor
5. Gently push down on the new processor until it is fully seated.
6. Rotate the retaining latches to seat the processor firmly into the slot.
7. If i nstall in g more processor modules, repeat St ep s 1–6 for each new
processor module.
8. Close the access c o vers to the processor sl ot s and tight en the thumbscr ews.
See Figure 1-4.
Installing th e VRM
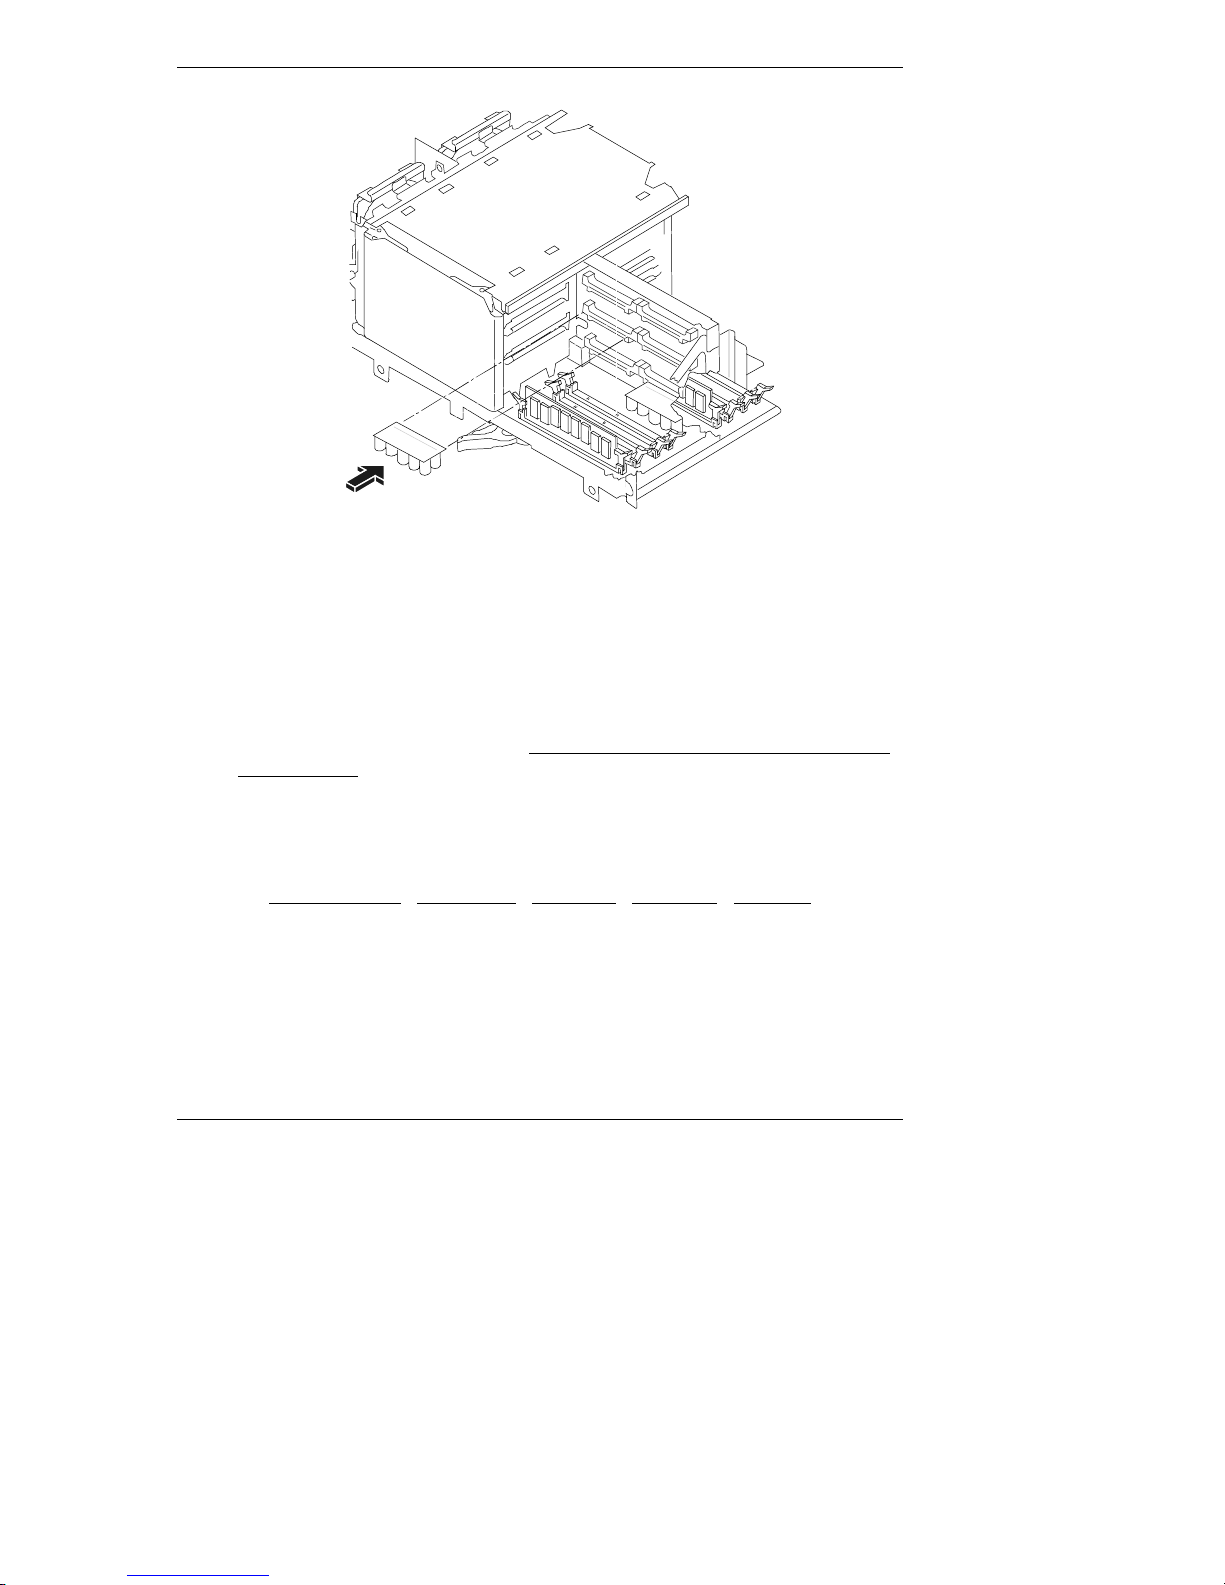
1. Select the correct slot for the VRM and ali gn it with the resp ective slot.
NOTE The comp onent side of the VRM will face d own towar d the
CAUTION Do not touch the VRM components as you push it into its slot.
2. Gently insert the VRM into the desired slot. See Figure 1-8.
10
system board.
Use th e edges of the VRM board to insert it into the sl ot .
Page 15
Chapter 1 HP NetServer LH 6000/6000r Processor Upgrade
VRM
Locations
3
2
6
5
4
1
Figure 1-8. Inserting the VRM
3. If installin g more processor modules , install a new VRM for each new
processor module, by repeating Steps 1–2.
Setting the Proce ssor Speed
If you ar e installin g processors with a faster (or s l ower) speed setting than
installed previously, you must change the switch settings of the configuration
switch located on the system board. All processors in the system must operated at
the sam e speed.
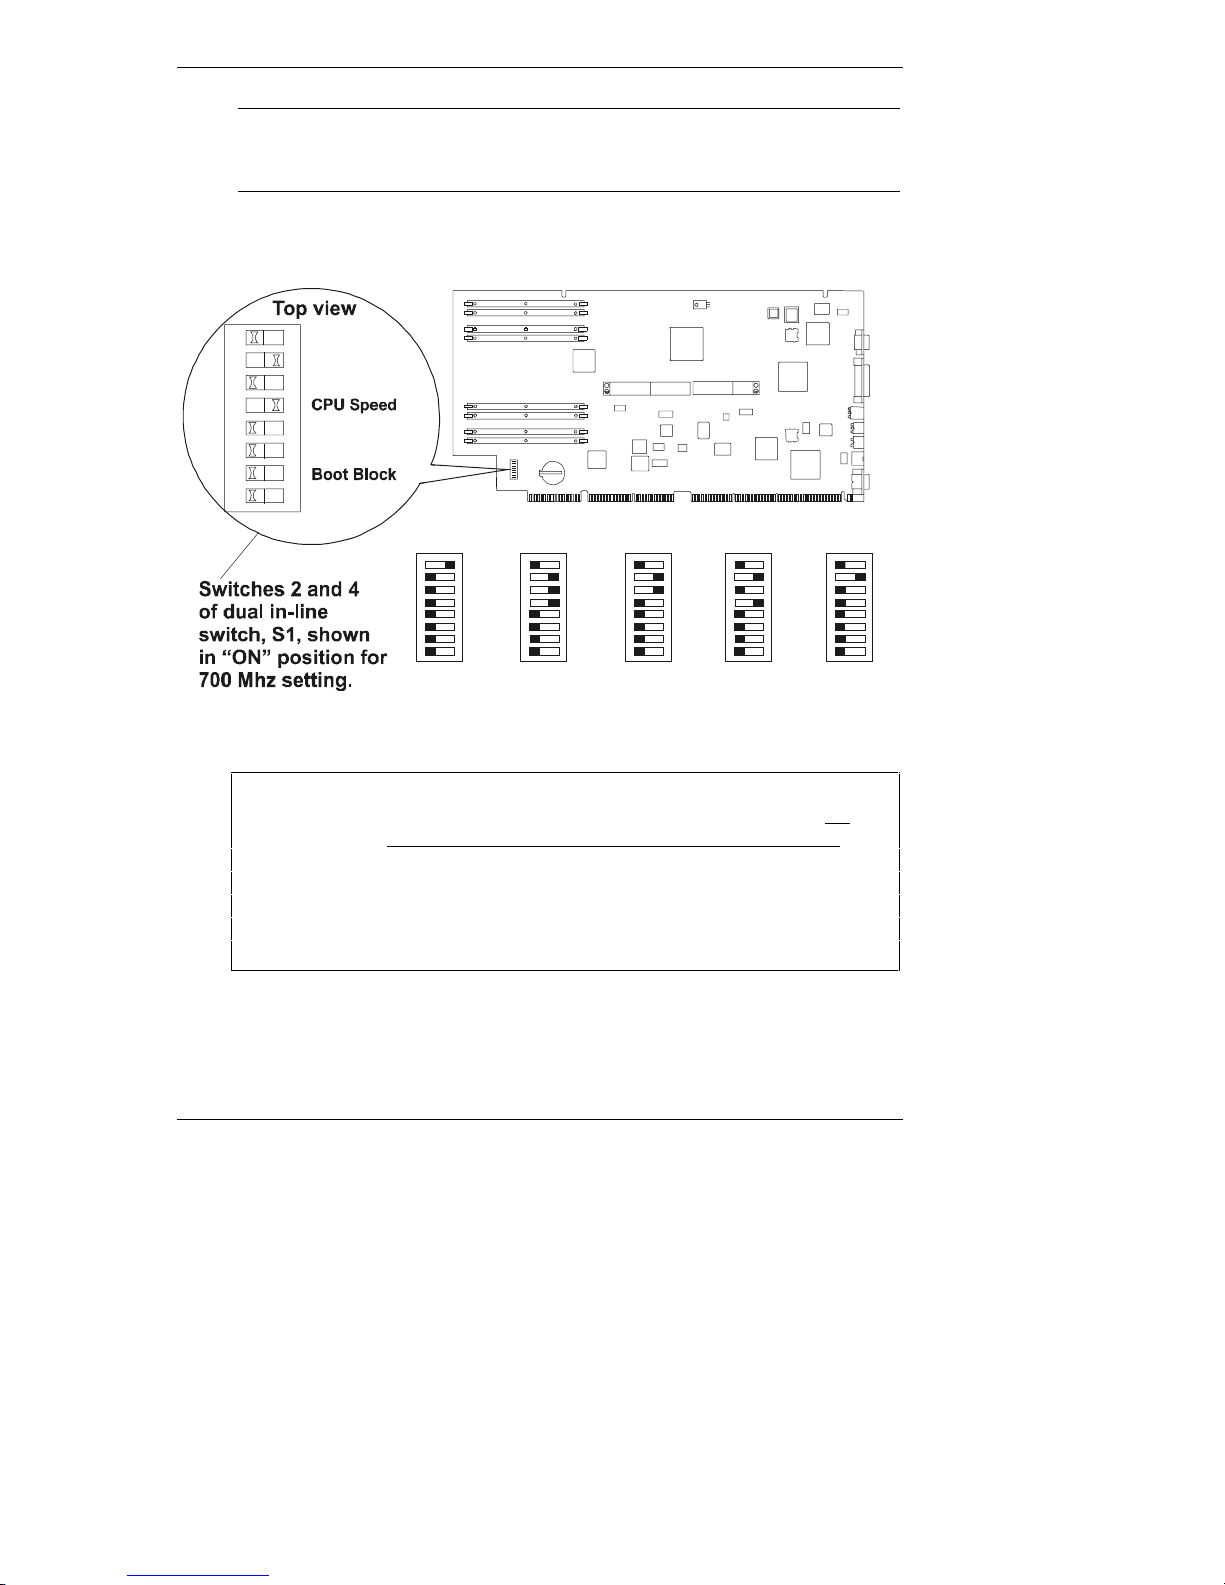
1. Determine the processor s p eed s etting fr om Table 1-1.
Table 1-1. Processor Module Speed Settings
Processor
Speeds
550 MHz ON OFF OFF OFF
600 MHz OFF ON ON ON
650 MHz OFF ON ON OFF
700 MHz OFF ON OFF ON
750 MHz OFF ON OFF OFF
SW 1 SW 2 SW 3 SW 4
11
Page 16
Chapter 1 HP NetServer LH 6000/6000r Processor Upgrade
700 Mhz
ON
ON
OFF
NOTE Some processor speeds listed in Table 1-1 and shown in Figure
1-9 may not be supported. For the latest support information,
visit the HP web site:
http:/www.hp.com/go/netserver.
2. Set the speed switches as listed in Table 1-1 and shown in Figure 1-9.
A small, flat-blade screwdriver or similar tool may be used.
12345678
ON
CPU Speed
CPU Speed
CPU Speed
Clear Config
Clear Password
Reserved
ONOFF
1
2
3
4
550 Mhz 600 Mhz 650 Mhz
ONOFF
OFF
1
2
3
4
1
2
3
4
1
2
3
4
1
2
3
4
750 Mhz
Figure 1-9. Processor Switch Location (System Board)
CAUTION Do not set the configuration switches to a different (faster)
speed, than the sta ted speed of the processor ’s design. All
processors in the system mus t oper ate at the sa m e s p eed.
Setting the processor speed to another speed may resul t in
unreliable or intermittent performance. Data integrity may
also be pl aced at risk if processors are operat ed at speeds other
than the one specifi ed on the process or modul e.
ONOFF
12
Page 17

Chapter 1 HP NetServer LH 6000/6000r Processor Upgrade
Completing the Hardware Upgrade
Complete the hardware installation as follows:
1. Reinstall the system board assembly into the chassis. See Figures 1-2
and 1-3.
2. Reconnect cabl es and power cords to the NetServer.
3. Follow the instructions for closing up the NetS er ver in the HP NetServer
LH 6000/6000r Installation Guide.
4. Restore power to the HP NetServer.
CAUTION Operating the system without all covers in place r ed u ces
critical cooling airflow over some components, such as hard
disk drives and processor modules. Continuous operation of
the system without all covers in place will increase
temperatures and may reduce the reliability of some
components.
5. Check the boot mes s ages to see if the system detects th e ad di tional
processors.
6. If boot messages indicate the additional processor(s) has/have not been
found, verify:
a. The processor retest function in the Setup Utility is set to Enabled.
b. All proces s ors use th e same speed an d ca che size.
c. The processor(s) and th e V RM( s) are insta lled in the correct slots an d
seated properly.
d. Check the System Event log for debug information.
7. If boot messages still fail to report the new processor(s), you must reinstall
the NOS.
8. Go to Cha pter 3, "Updating the BIOS," in this guide to reinstall the NOS.
Updating Firmware
Refer to the instructions in Chapter 3 in this guide to update your BIOS and
if necessary, reinstall your network operating system (NOS).
13
Page 18

Page 19
2 HP NetServer LT 6000r Processor
Slot 4
Slot 5
VRM
Locations
5
1
Upgrade
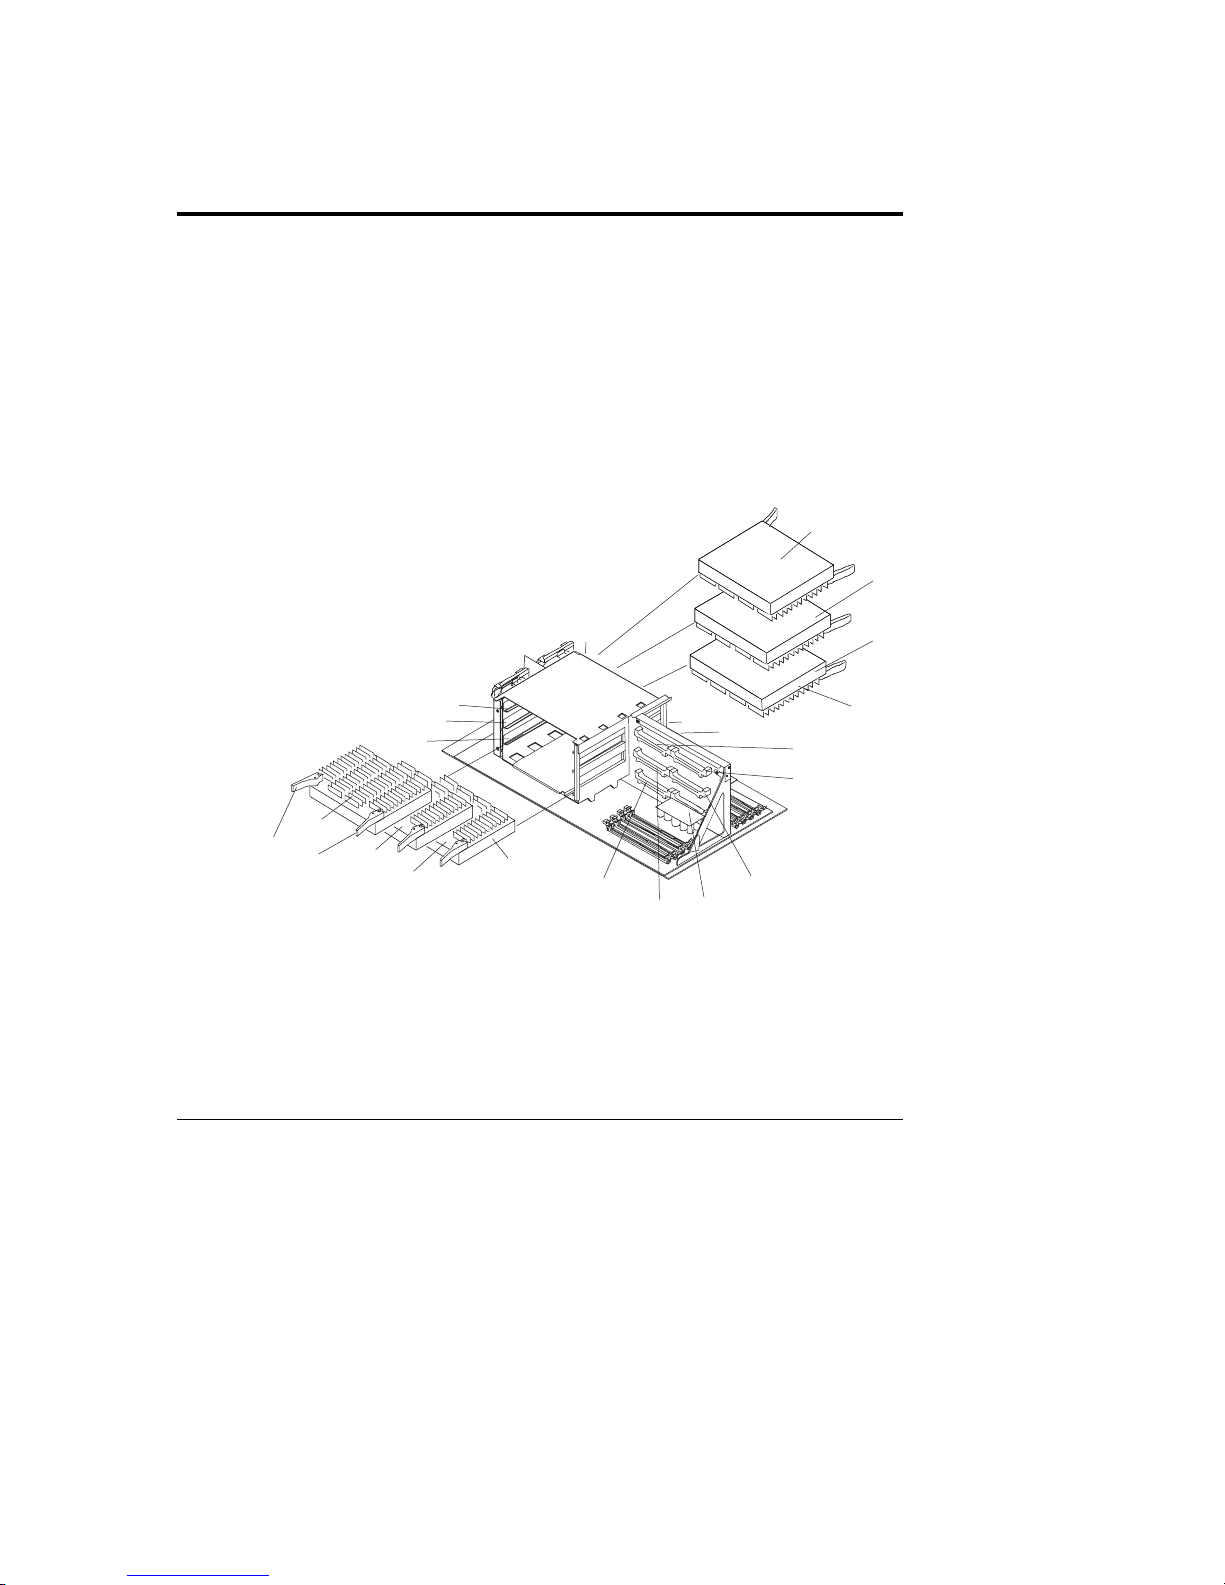
Introduction
The HP NetServer supports LT 6000r up to six processor modules and the
accompanying voltage regulation modules (VRMs) on the system board assembly.
Process or modul es ar e available at differen t clock speeds, bu t in a multi - processor
configu ration, all processors must operate at the s ame speed.
You can use this upgrade guide to replace an existing processor module
with a higher spe e d proces sor, or t o add additional pr oce s sor modules to a
single-process or system.
6
5
Latches
Open
Slot 6
Slot 3
Slot 2
Slot 1
3
2
1
Figure 2-1. Processor Slot and VRM Socket Locations
Processors
4
2
4
Processors
3
6
15
Page 20

Chapter 2 HP NetServer LT 6000r Processor Up g ra d e
Tools Requ ir ed
The following tools are required to remove and replace processor modules and
there respective VRM.
• An antistati c s ervice kit ( 3 M
includes a static-dissipating work surface, a chassis clip lead, and a wrist
stra p. Use this kit t o prevent damag e to the system from static electricity.
8501/8502/8503 or equivalent). This kit
• T-15 Torx driver may only be needed the first time the HP NetServer is
opened.
Upgrade Ov erv iew
To upgrade a processor, or processors in the HP NetServer LT 6000r, you will
follo w these basic s teps:
l
Shut down the NOS and the HP NetServer.
l
Remove t he required covers and ca bl es ( A C an d I/O).
• Extend the NetServer from the rack.
l
Open th e N etServer for access to the system board.
• Remov e the system board and pr ocessor cage cov ers.
• Remov e the terminator (if you are addin g an additional processor).
or
Remove the existing processor module and VRM (if you are upgrading
processor modules).
• Install t he ne w proc essor module.
• Install a VRM.
• Set the configuration switch settings, if necessary.
• Complete the hardware installation.
• Update the BIOS and, if necessar y, r ein sta ll the NOS.
Configuration Gu idelines
Use the following guidelines when installing additional processor modules in the
LT 6000r:
16
Page 21

Chapter 2 HP NetServer LT 6000r Processor Up g ra d e
• Use only processor module upgrade kits with the same HP product
number. This ensures the processor type, thermal h eat s ink, clock sp eed ,
and ca che size will ma tch, and all pr ocessor modu le clock speeds are
compatible.
l
In stall processors in con s e cutive order, tha t is, 1, 2, 3, 4, 5, and 6.
• En s ure the VRM is installed in the proper slot with the respective
processor module associated with it. For example, the processor module in
slot 2 must have a VRM installed in VRM slot 2.
CAUTION Do not remove the processor module from its sealed antistatic
bag until you are ready to install it. Ensure the bags remains
sealed unt il the pro per time.
Before r e moving a proce s sor m odule from its antistatic bag ,
touch a grounded, unpainted metal surface on the NetServer to
discharge elect rostati c energy.
Processor Installation
Do not set the process or speed swit ches to a different speed from the one labeled
on the proces sor, as this can re s u lt in unre liable o r i ntermitte n t perfo rm ance, and
data integrity may also be at risk.
System P reparation
1. Log off all us ers and, if necessary, back up data.
2. Shutdown the NetServer accordin g to your NOS in stru ctions and power off
the Net Server.
3. Disconnect th e p ower cord and signal cables from the Net Ser ver’s rear
panel.
4. If necessary, l abel each cord and cable for r eassembl y.
CAUTION The power supplies will continue to provide standby current to
5. Open the system boa rd access panel accord ing to the in str uction s in the
HP NetServer LT 6000r Installation Guide.
the Net Server unti l the power cabl e is disconn ected.
17
Page 22
Chapter 2 HP NetServer LT 6000r Processor Up g ra d e
NOTE If the NetServer is in a rack, pull out the rack’s anti-tip foot
before sliding it out from the rack. The access panel will be
easy to open, even i f there are not s er vers instal led above it.
CAUTION The system board assembly weights approximately 20 lbs. (9
kgs.) an d requires suppor t as you r e move it from the cha s sis.
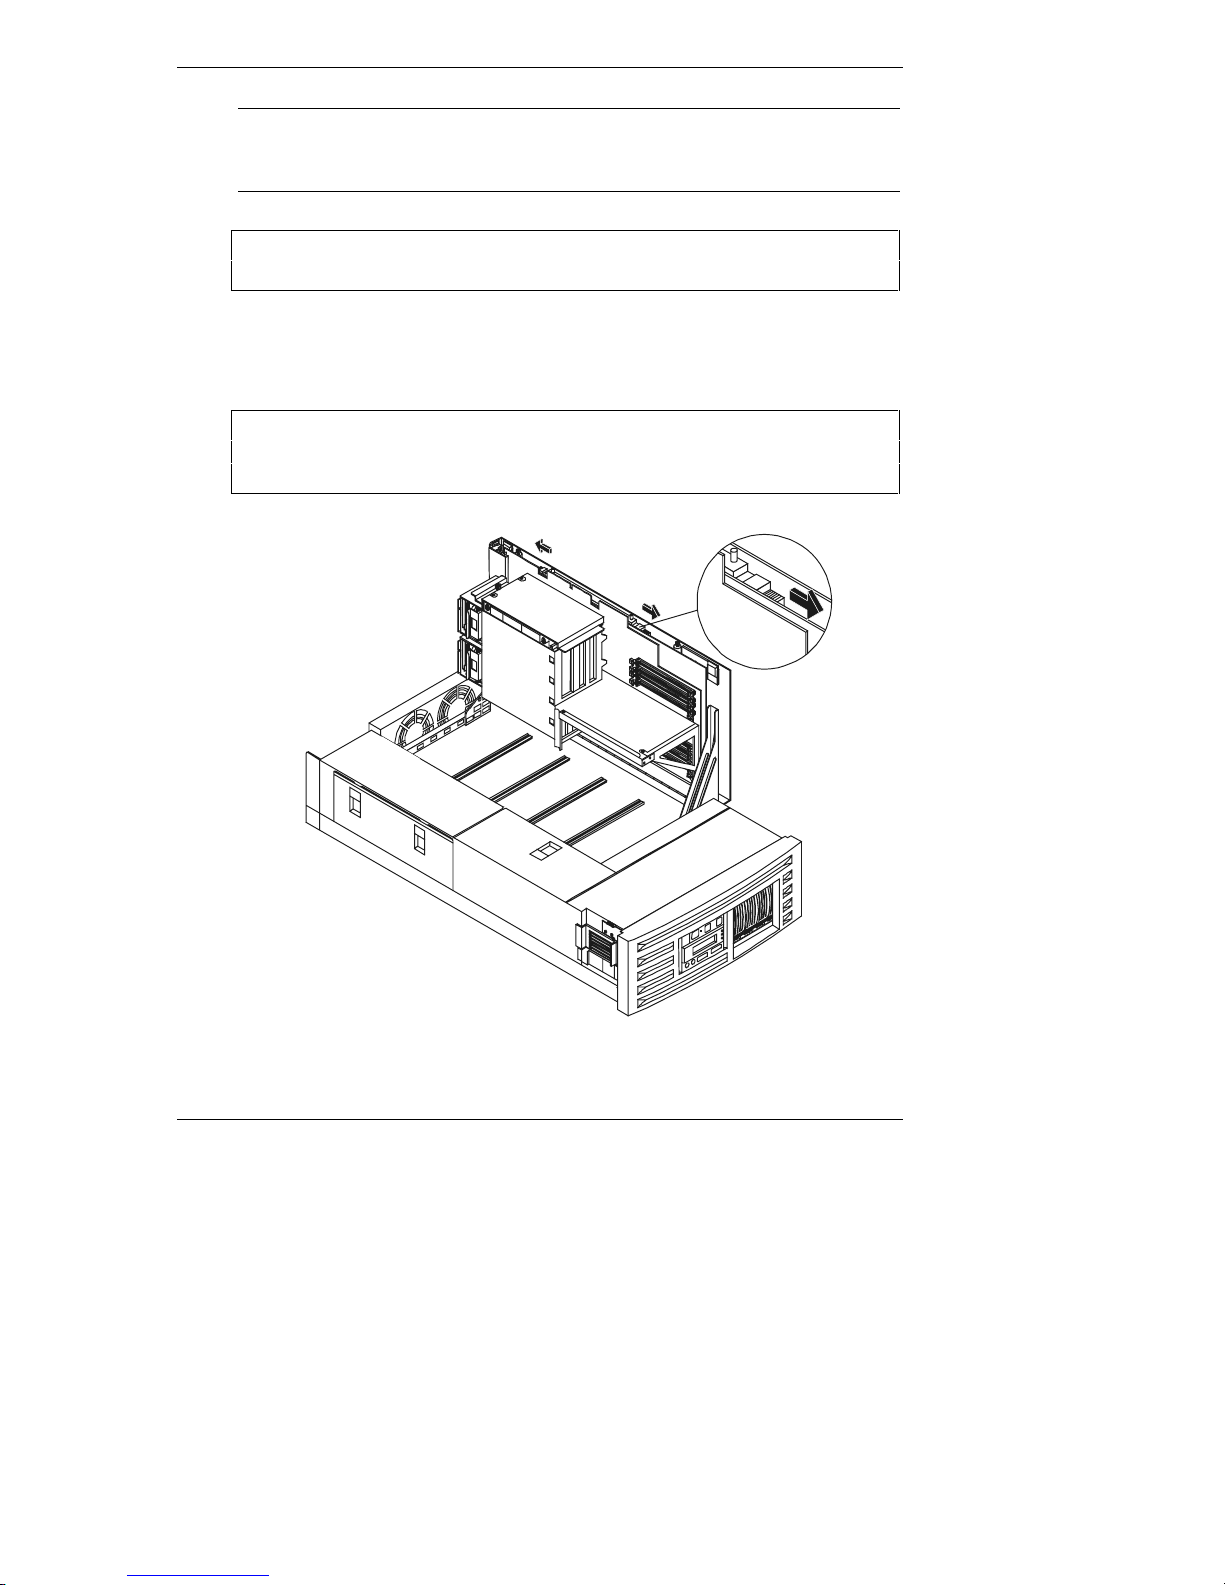
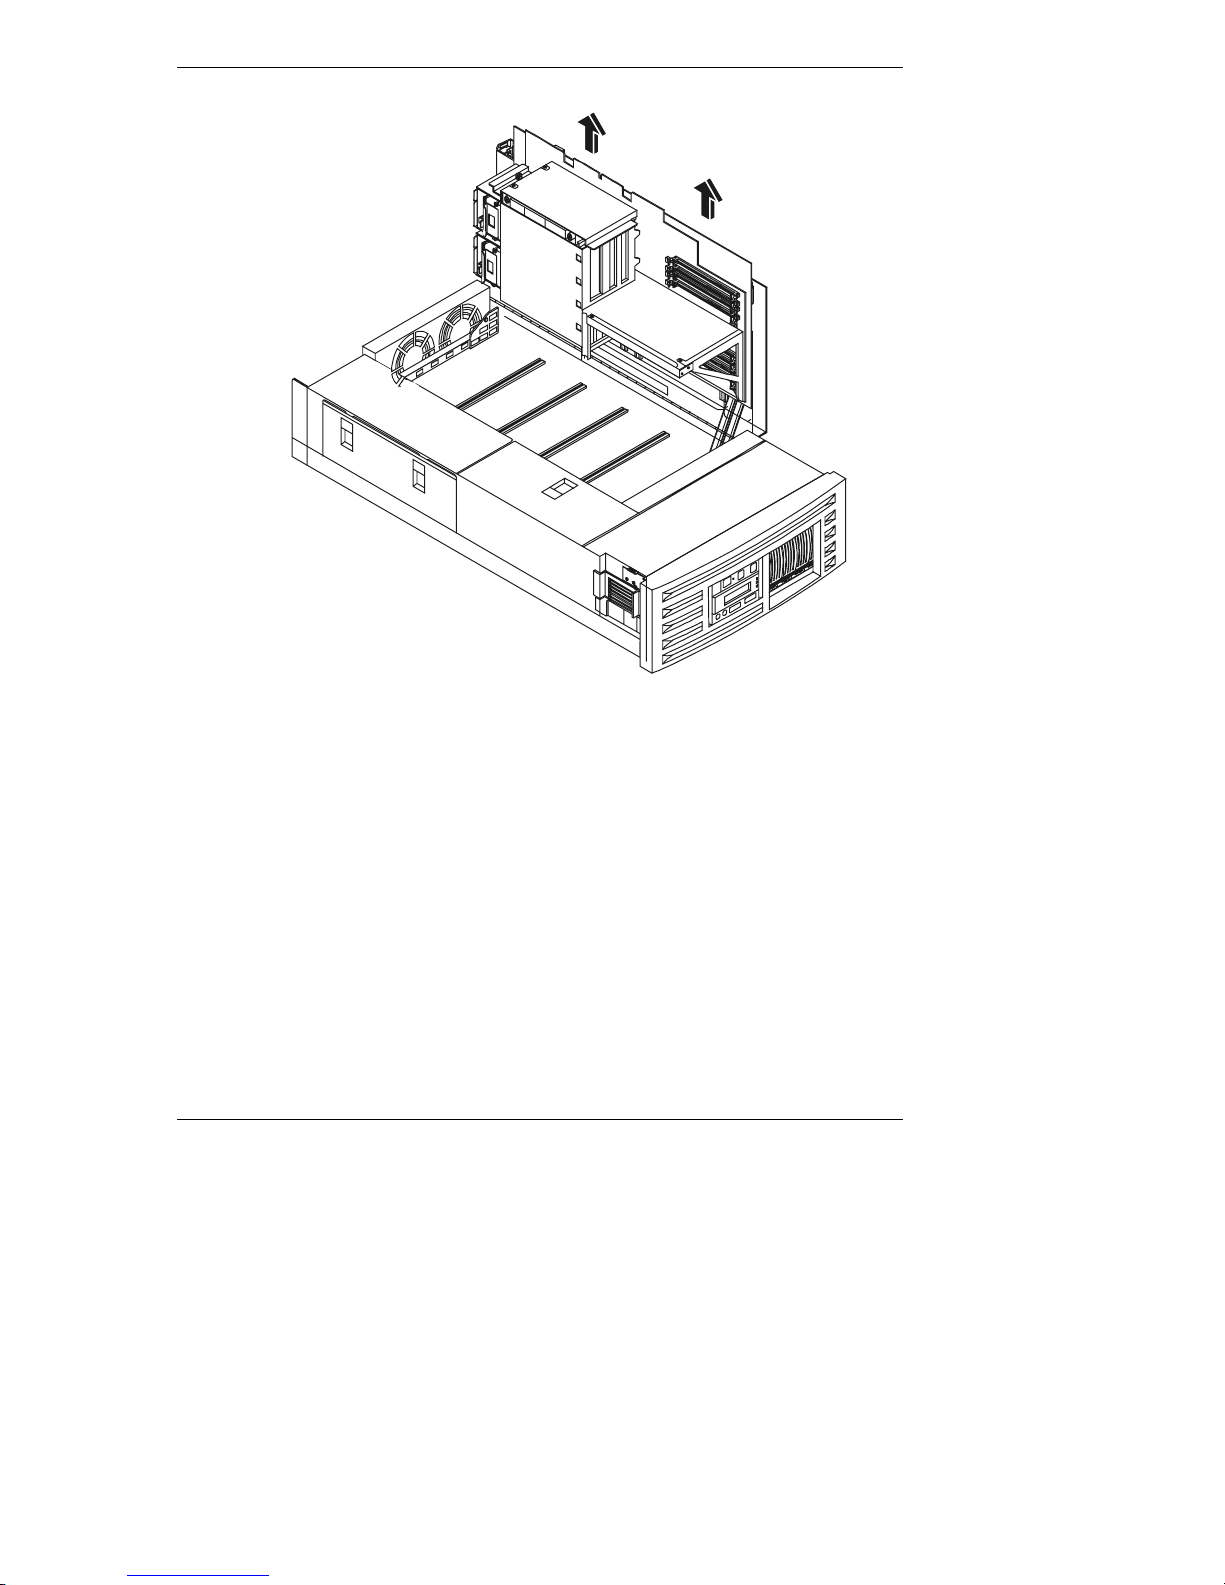
7. Remove the system board assembly by moving the release latches out
away from each oth er a t th e top of the assembly, and th en p ulling the
assembly out from the access panel. See Figures 2-2 and 2-3.
CAUTION Wear a wrist-strap and use a static-dissipating work surface
conn ected to the cha s sis when handling components. Ens ure
the metal portion of the wrist strap contacts your skin.
18
Figure 2-2. Release Latch Locations
Page 23
Chapter 2 HP NetServer LT 6000r Processor Up g ra d e
Figure 2-3. Removing the System Board Assembly from the Access Panel
7. Place the assembly on an antistatic pad.
8. Refer to the next topic to decide on your next step.
Removing th e Termin ator or Existin g Pro cessor
In this topic you decide between removing the terminator(s) or an existing
processor module.
• If your s ystem has on e processor modu le and you are installing an
additional processor, remove the terminator as described in the next section
"Removing th e Ter minator. "
• If you are upgrading an existing processor or processors, remove the
exist ing processors as descr ibed in sect ion "Removin g a Processor Module
and VRM."
19
Page 24
Chapter 2 HP NetServer LT 6000r Processor Up g ra d e
Removing the Terminator
If your system has at least one processor modul e, there ar e ter minators
installed in all remaining slots. You must remove a terminator for each
new processor before installing an additional processor module into the
next available slot.
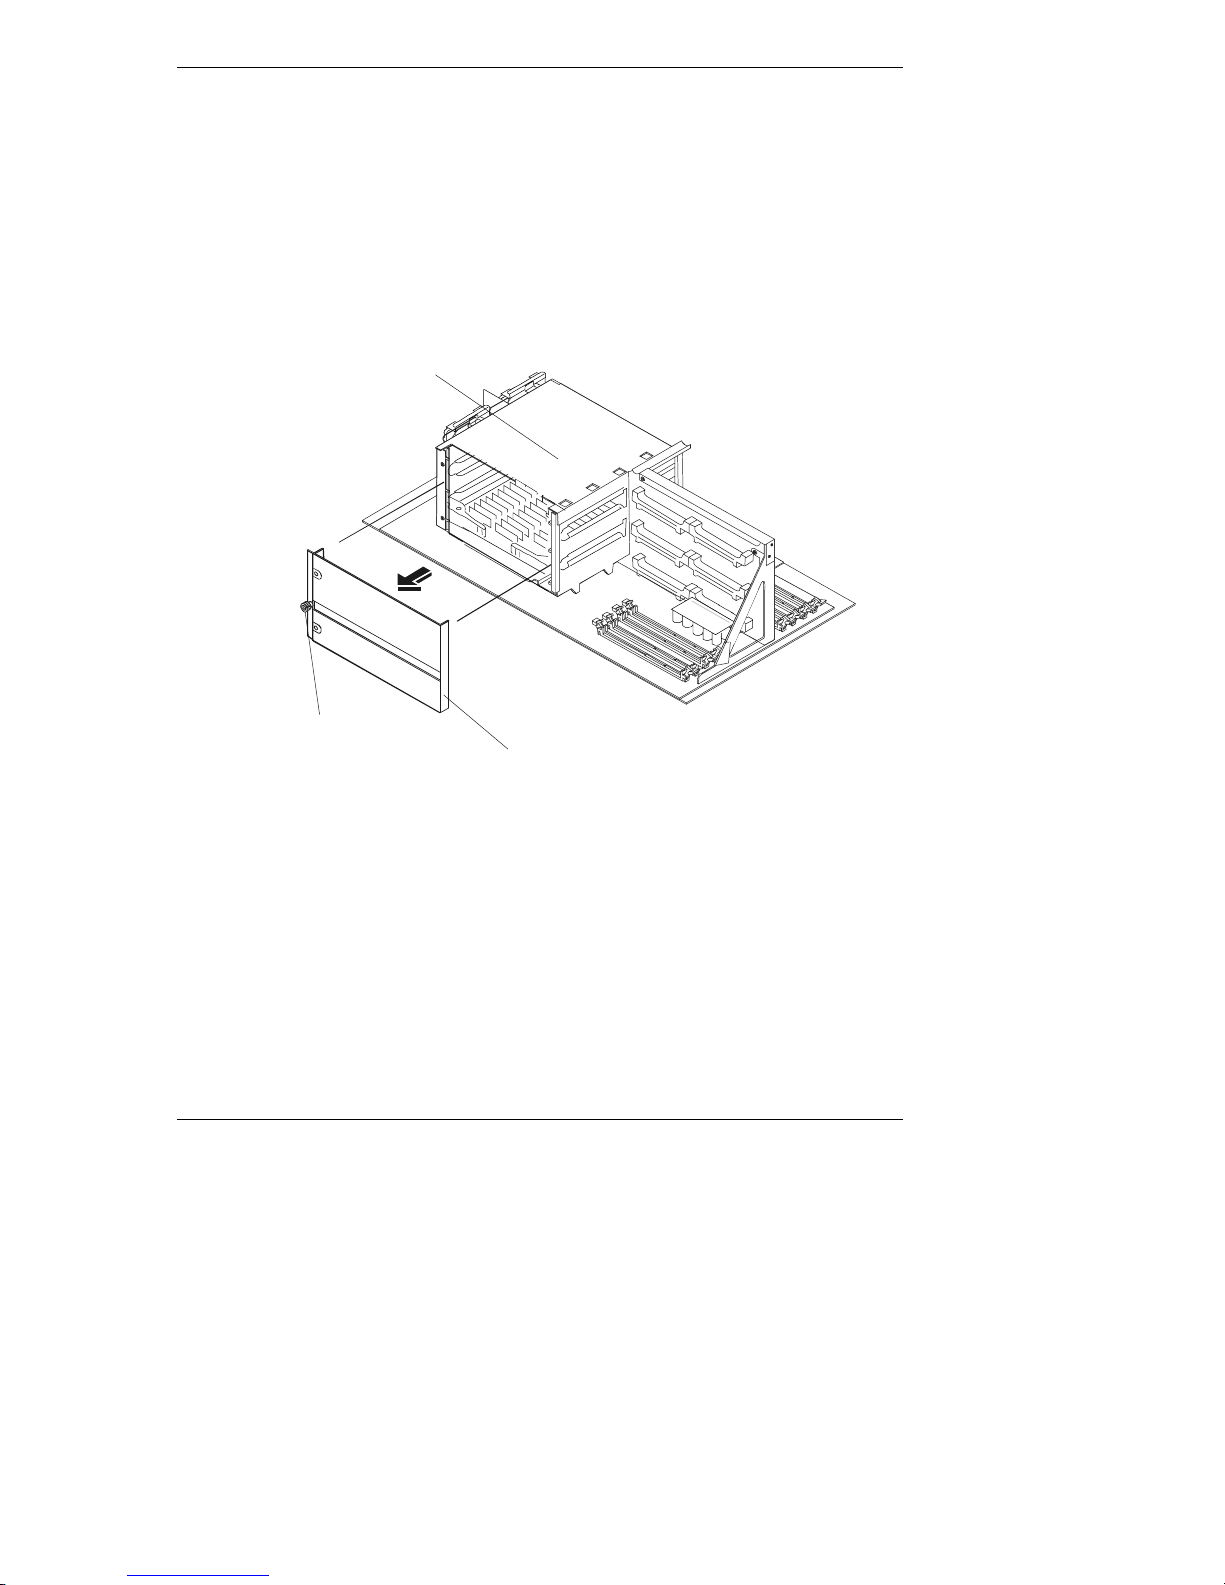
1. Loosen the th um bscrew and open the access co ver to the processor slot s.
See Figure 2-4.
Both si d es of the processor cage ha ve covers and thu mbscrews.
Processor Cage
20
Thumbscrew
Access Cover
Figure 2-4. Removing the Access Cover
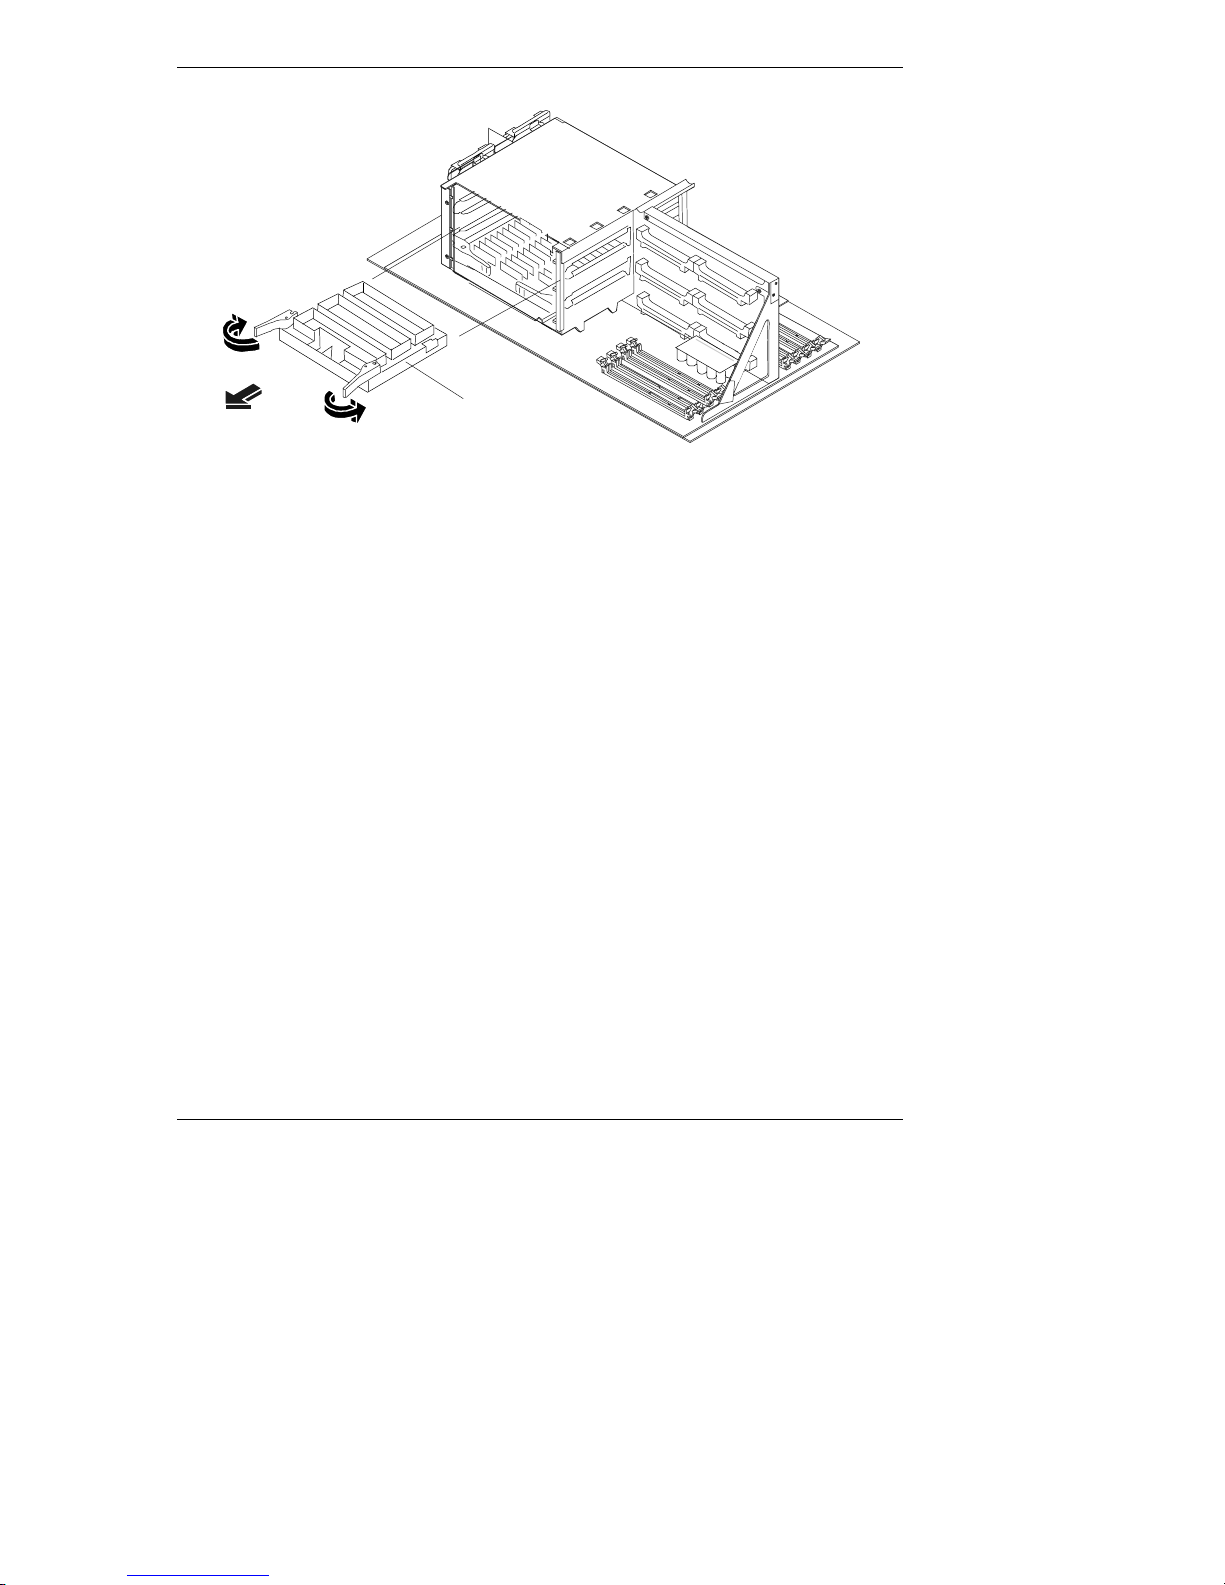
2. Open the latches and remove the terminator from the next available slot as
shown in Figure 2-5.
Page 25
Chapter 2 HP NetServer LT 6000r Processor Up g ra d e
Terminator
Figure 2-5. Removing the Processor Terminator
3. Save all terminators for future use.
4. If adding more processor modules, repeat Steps 2 and 3 for each new
processor.
Removing a Processor Module and VRM
If you are upgrading an existing processor, you must first remove the existing
processor modul e and its respective VRM.
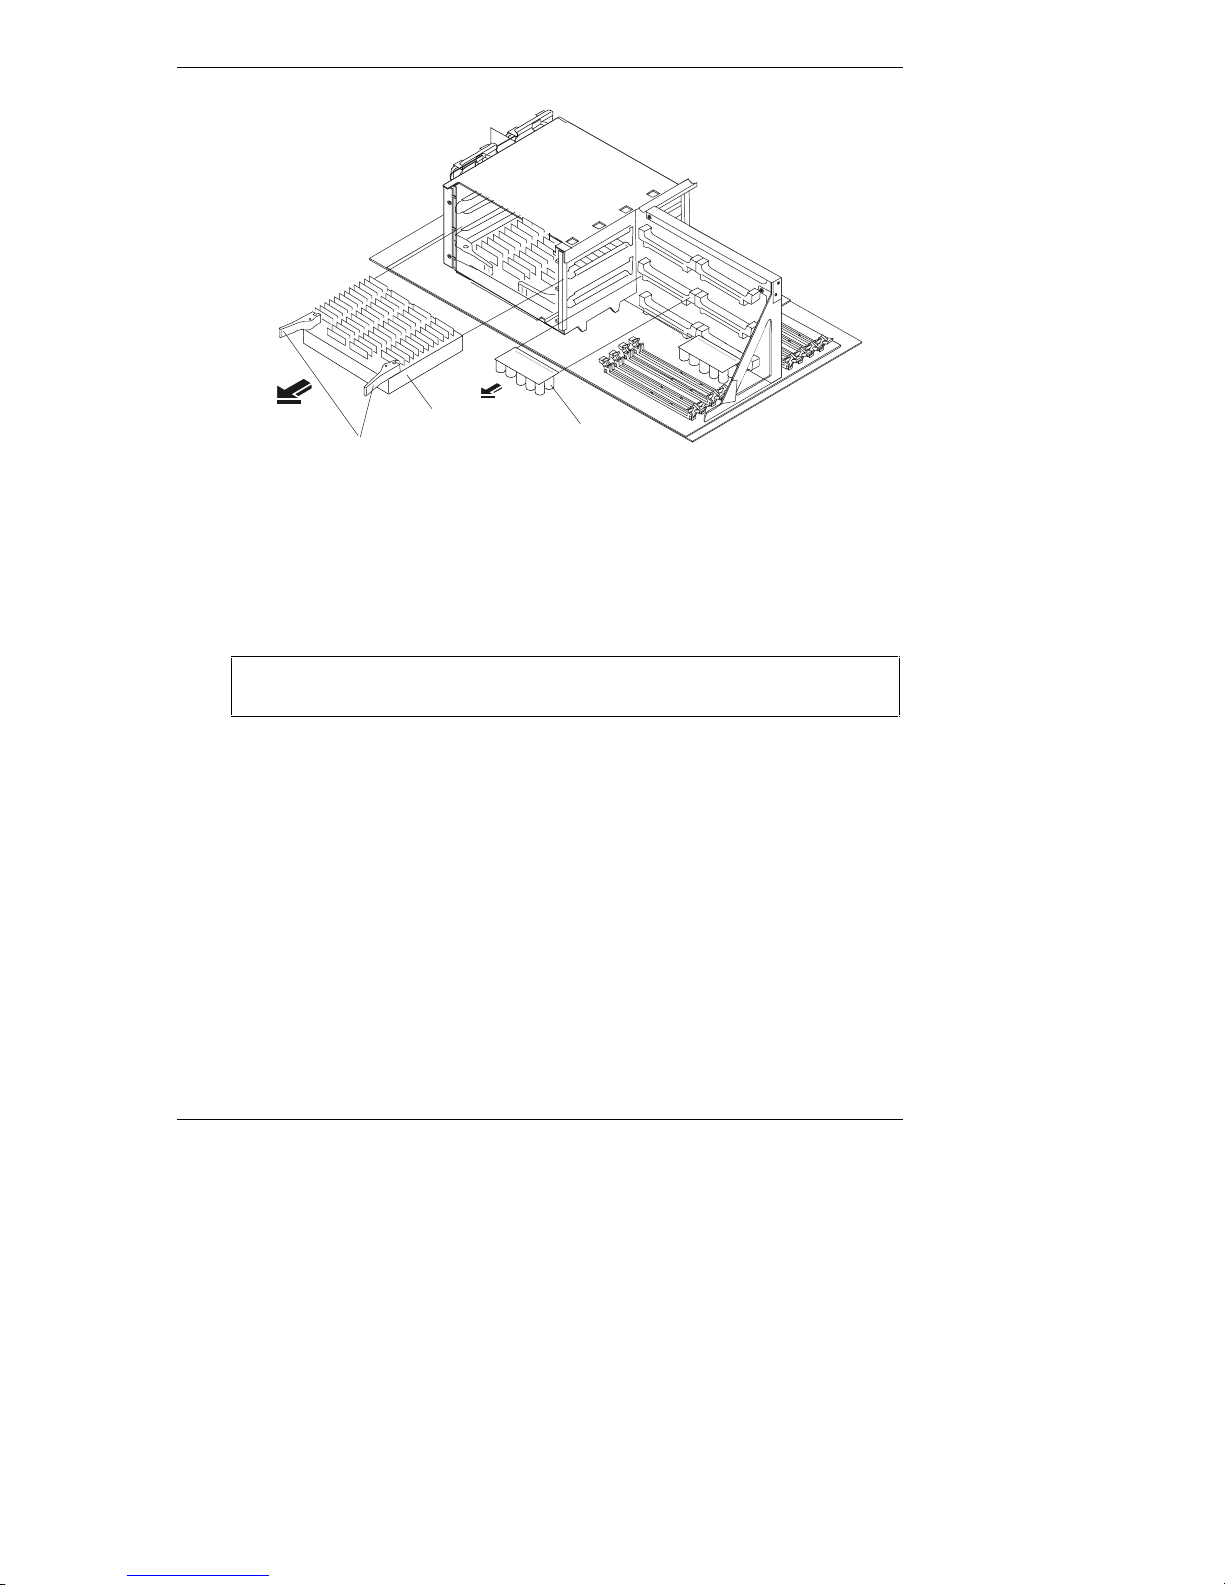
1. Rotate the retaining latches to release the processor module.
2. Remove the desired processor module from the slot and place it on
antistatic surface. See Figure 2-6.
3. Identify th e V RM for the respecti ve p rocessor m od u le. See Figure 2-1.
For e xample, if you remove pr oc e s sor 1, you m ust remove VRM 1.
4. Op en the retaining latches of the desired VRM.
5. Lift the VRM out of the slot. See Figure 2-6.
6. Ensure you keep the processor module with its associated VRM.
7. If upgrading more processor modules, repeat Steps 1–6 for each existing
processor modul e and its VRM.
21
Page 26
Chapter 2 HP NetServer LT 6000r Processor Up g ra d e
Latches Open
Figure 2-6. Removing an Existing Processor and VRM
Installing th e Proc essor
1. Unpa ck the processor shipping box and check the contents against its
packing list.
CAUTION Ensure the process or modul e remains sea led in the antistatic
bag until you are ready to install it.
2. Remove the desir e d processor from th e s e aled bag.
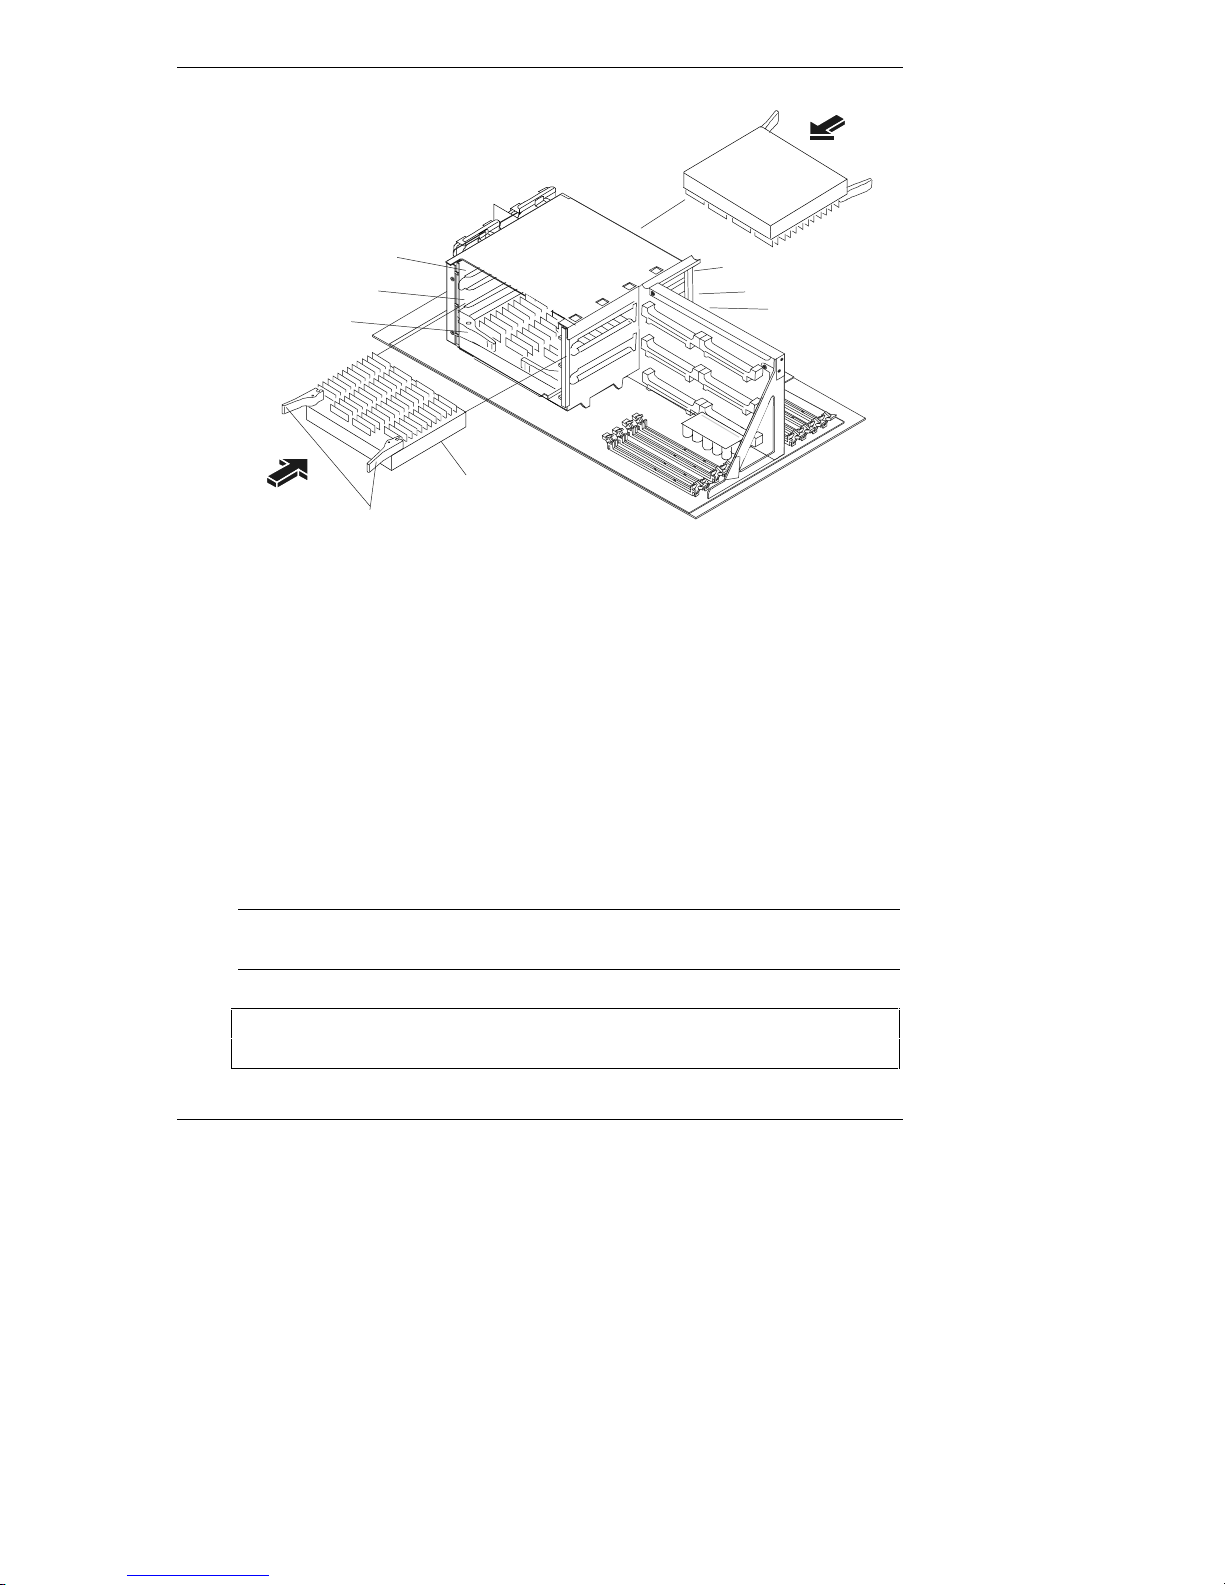
3. Open the latch es on top of the processor modu le. See Figur e 2- 7 .
4. Align the new processor in front of the next available slot.
The hea t s in k s for processors 1, 2, and 3 face a way from the system board
and th e h eat sinks for processors 4, 5, an d 6 fa ce toward the system board.
See Figure 2-7.
Processor
VRM
22
Page 27
Chapter 2 HP NetServer LT 6000r Processor Up g ra d e
Slot 3
Slot 2
Slot 1
Latches open
5. Gently push down on the new processor until it is fully seated.
See Figure 2-7.
6. Rotate the retaining latches to seat the processor firmly into the slot.
7. If i nstall in g more processor modules, repeat St ep s 1–6 for each new
processor module.
8. Close the access c o vers to the processor sl ot s and tight en the thumbscr ews.
See Figure 2-4.
Installing th e VRM
Slot 6
Slot 5
Slot 4
Processor
Figure 2-7. Inserting the Processor
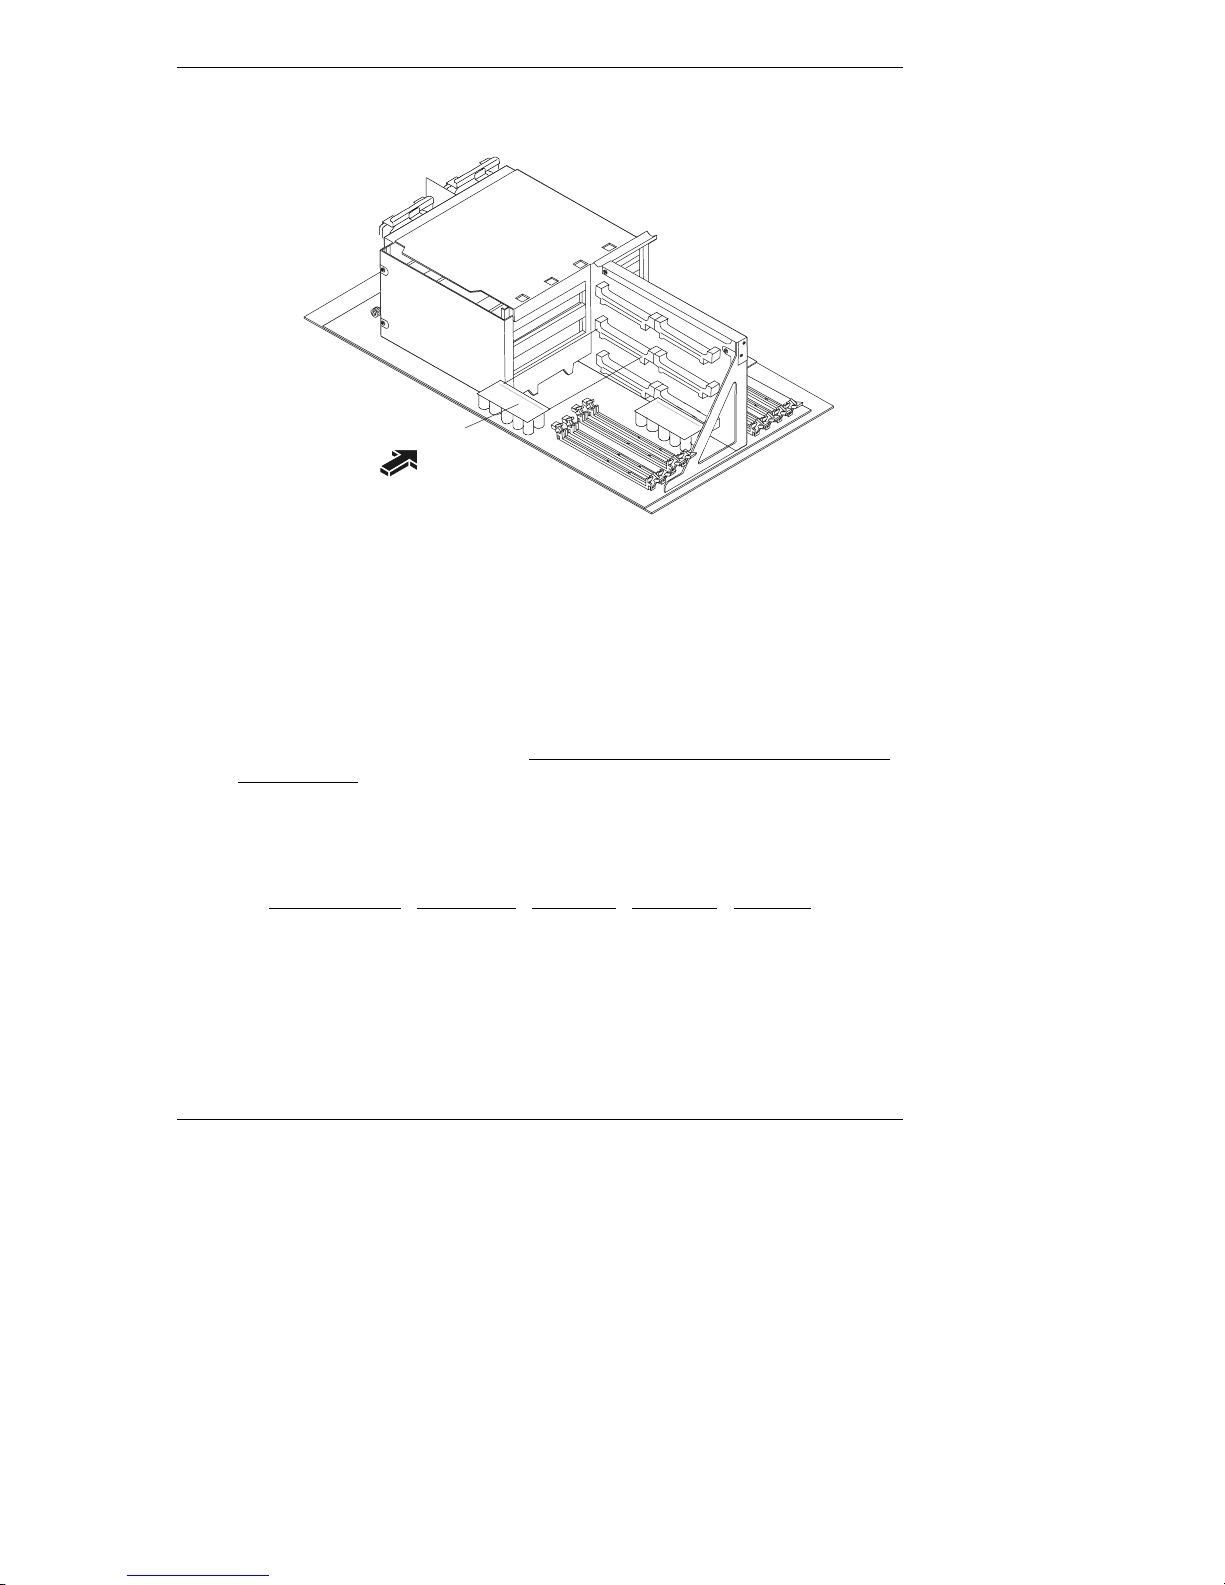
1. Select the correct slot for the VRM and ali gn it with the resp ective slot.
NOTE The comp onent side of the VRM will face d own towar d the
system board.
CAUTION Do not touch the VRM components as you push it into its slot.
Use th e edges of the VRM board to insert it into the sl ot .
23
Page 28
Chapter 2 HP NetServer LT 6000r Processor Up g ra d e
2. Gently insert the VRM into the desired slot. See Figure 2-8.
VRM
Locatio ns
3
2
4
6
5
1
VRM
Figure 2-8. In stalling a V RM
3. If installin g more processor modules , install a new VRM for each new
processor module, by repeating Steps 1–2.
Setting the Proce ssor Speed
If you ar e installin g processors with a faster (or s l ower) speed setting than
installed previously, you must change the switch settings of the configuration
switch located on the system board. All processors in the system must operated at
the sam e speed.
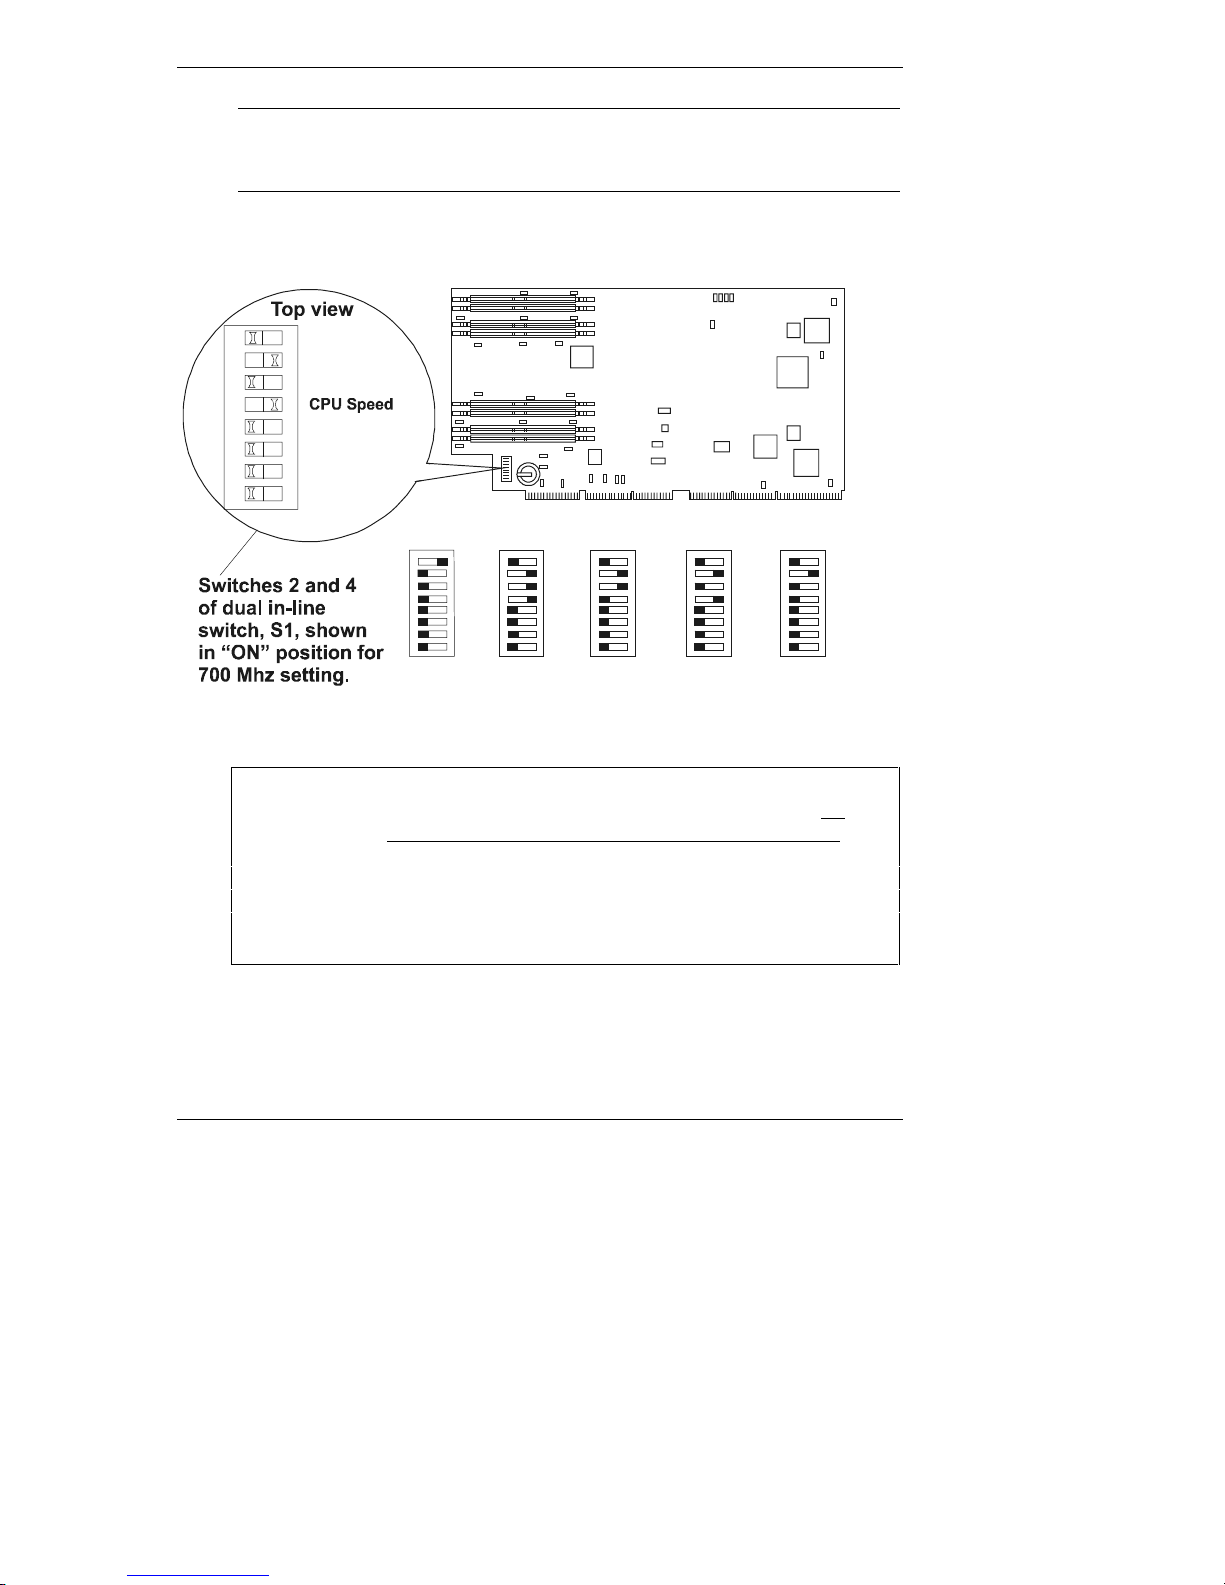
1. Determine the processor s p eed s etting fr om Table 2-1.
Table 2-1. Processor Module Speed Settings
Processor
Speeds
SW 1 SW 2 SW 3 SW 4
24
550 MHz ON OFF OFF OFF
600 MHz OFF ON ON ON
650 MHz OFF ON ON OFF
700 MHz OFF ON OFF ON
750 MHz OFF ON OFF OFF
Page 29
Chapter 2 HP NetServer LT 6000r Processor Up g ra d e
NOTE Some processor speeds listed in Table 2-1 and shown in Figure
2-9, may not be supported. For the latest support information,
visit the HP web site:
http:/ ww w. hp .com/go/netser ver.
2. Set the speed switches as listed in Table 2-1 and shown in Figure 2-9.
A small, flat-blade screwdriver or similar tool may be used.
12345678
ON
CPU Speed
CPU Speed
CPU Speed
Clear Config
Clear Password
Recovery Boot
Reserved
ON
OFF
1
2
3
4
550 Mhz
ON
OFF
1
2
3
4
600 Mhz
ON
OFF
1
2
3
4
650 Mhz
ON
OFF
1
2
3
4
700 Mhz
ON
OFF
1
2
3
4
750 Mhz
Figure 2-9. Processor Switch Location (System Board)
CAUTION Do not set the configuration switches to a different (faster)
speed th an the stat ed sp eed of t he processor’s design. All
processors in the system mus t oper ate at the sa m e s p eed.
Setting the processor speed to another speed may resul t in
unreliable or intermittent performance. Data integrity may
also be pl aced at risk if processors are operat ed at speeds other
than the one specifi ed on the process or modul e.
25
Page 30

Chapter 2 HP NetServer LT 6000r Processor Up g ra d e
Completing the Hardware Upgrade
Complete the hardware upgrade as follows:
1. Reinstall the system board assembly into the chassis. See Figures 2-2
and 2-3.
2. Reconnect cabl es and power cords to the HP Net Server.
3. Follow the instructions for closing up the NetS er ver in the HP NetServer
LT 6000r Installation Guide.
4. Restore power to the HP NetServer.
CAUTION Operating the system without all covers in place r ed u ces
critical cooling airflow over some components, such as hard
disk drives and processor modules. Continuous operation of
the system without all covers in place will increase
temperatures and may reduce the reliability of some
components.
5. Check the boot mes s ages to see if the system detects th e ad di tional
processors.
6. If the boot messages indicate the additional processor(s) has/have not been
found, verify:
a. The processor retest function in the Setup Utility is set to Enabled.
b. All proces s ors modul es u s ed h ave the same sp eed and cache si z e.
c. The processor(s) and th e V RM( s) are insta lled in the correct slots an d
seated properly.
d. Check the System Event log for debug information.
7. If the boot messages s till fail to report the new processor(s), you must
reinstall the NOS.
8. Go to Cha pter 3, "Updating the BIOS," in this guide to reinstall the NOS.
Updating Firmware
Refer to the instructions in Chapter 3 in this guide to update your BIOS and
if necessary, reinstall your network operating system (NOS).
26
Page 31

3 BIOS Update
Introduction
This section applies to all HP NetServers described in this guide. After upgrading
the pr ocessor modu le(s) or add in g a processor module to a NetServer, the BI OS
may require updating.
Updating the B IOS
After installin g the new processor modul e( s ) , restart the NetServer from the
HP NetServer Navigator CD-ROM provided with the new processor module.
NOTE You are not required to use the HP NetServer Navigator
CD-ROM to reconfigure your system after installing the new
processor. Th e NetServer sh ould detect the new or additional
processors automatically. However, HP recommends using the
HP NetServer Navigator CD-ROM provided with the proc essor
upgrade kit to ensure you have the latest drivers and
information.
CAUTION Versions of the HP NetServer Navigator CD-ROM other than
the one provided with the upgrade kit may not contain the
appr opr iate BIOS for these new pr ocessor modu les. Therefore,
use only the H P Net Serv er Navigator CD-ROM provided with
the upgrade kit, or a later version for the HP NetServers
described in this guide.
Perform the following instructions to ensure the BIOS is up-to-date.
1. Restart the Net S er ver with the HP NetServer Navigator CD-ROM provided
with the processor upgrade kit inserted in the CD-ROM drive.
When you restart the HP Ne tS erver Navigator CD-ROM , you may see a
message similar to the one listed below:
27
Page 32

Chapter 3 BIOS Updat e
"Note: The version of BIOS on the NetServer Navigator CD-ROM is
newer than the BIOS detected on your NetServer. It is recommended
that you run Configuration Assistant t o update your se r ver’s BIOS
and system configuration."
◊ If you see this message when you restart the HP NetServer Navigator
CD-ROM, you must update the BIOS.
Continue with this procedure.
◊ If the HP NetServer Navigator CD-ROM starts and goes directly to the
NetServer Navigator main menu without the above message appearing,
your BIOS contains the proper BIOS for the processors installed, and
does not need updating for this purpose.
You may skip the remainder of this procedure.
2. From the Navigator main menu, se lect NetServer Utilities.
3. Select More NetServer Utilities option.
4. Select the BIOS Update utility.
5. Select the Execute option.
The BIOS update is preformed automatically.
6. When the BIOS update is complete, remove the HP NetServer Navigator
CD-ROM from the CD-ROM drive and restart the NetServer.
This completes the BIOS update process.
Reinstalling the NOS
You may have to reinstall the NOS for eith er of the following reasons:
l
If th e system did not r ecognize th e new processor, when you booted the
NetServer.
l
If you went from a single-processor to a multi-processor configuration and
the syst em did not recognize all the new processors.
Check your NOS documentation, or th e Network Operating System Installation
Instructions and the README First file and Configuration Advisor utilit i es on th e
HP NetServer Navigator CD-ROM.
28
Page 33

Chapter 3 BIOS Updat e
NOTE The Net Server sh ould detect the n ew or addition al processors
automatically. If this is not the case you may have to reinstall
the NOS to detect the new processors.
1. I f n ecessary reinstall your NOS and then reboot the system.
2. If the new processors are detected, then this completes the installation of
the processor upgrade.
29
Page 34

Page 35

4 Warranty and Support
Introduction
The har d ware warran ty below appl ies to components purch a s ed as accessories . If
your component was factory installed as part of an HP NetServer model, refer to
the warranty statement provided with your system documentation.
Hardware A ccessories L i mited Warranty
Hewlett-Pa ckard H ardware A cce ssorie s
An HP NetServer Har d ware Accessor y is an interna l HP h ardwar e prod u ct
that is specifically designated for use with HP NetServers; is added on or
integrated into an HP NetServer in order to provide hi gher perfor mance, capa city,
or increased capability; and is listed as a product in HP’s Corporate Price List.
Upon installati on insid e an HP Net Server, th e HP NetServer Hardware Access ory
carries a System-Matching Warranty. This warranty includes a one-year
Return-to-HP warranty or the remainder of the warranty period for the original
HP NetServer in which it is installed, whichever is longer.
This a ccessory ma y be serviced through exped ited part shipment. In th is event, HP
will prepay shipping charges, duty, and taxes; provide telephone assistance on
repla cement of the com p onent; and pay shipping charges, duty, and ta x es for any
part that HP asks to be returned.
HP warrants this HP Net S erver Hard ware Accessory again st defects in ma terial
and workmanship, under normal use, for the period specified in the section titled
HP NetServer Limited Warranty Coverage. The warranty commences on receipt
of thi s product by Cust om er from HP or Resel ler. If HP or Reseller r eceives not ice
of such defects during the warranty period, HP or Reseller will either, at its
option, repair or replace products that prove to be defective.
Should HP or Reseller be unable to re pair or replace the hardware accessory
within a reasonable amount of time, Customer’s alternate remedy shall be a refund
of th e pur chase price u p on return of the hardware accessory product.
HP products extern al to the system processor unit, such as ex ternal storage
subsystems, printers, or other peripherals, are covered by the applicable warranty
for those product s. HP SureStore drives ar e considered ex ternal accessories an d
carr y th eir own warran ty.
31
Page 36

Chapter 4 Warranty and Support
The customer may be required to run HP-supplied configuration and diagnostic
programs before a replacement will be dispatched or an on site visit is authorized.
Third-Party Hardware Products
HP does not warrant third-party hardware products. Third-party hardware
products may be warranted in acco rdance w ith the third-pa rty warranty
statement accompanying the product. On site visits caused by third-party
hard ware products — whether internal to the HP NetServer system processor
unit (such as non-HP DIMMs) or externa l to th e system processor unit (such as
LAN cabling)—are subject to standard per-incident travel and labor charges.
HP Repair and Te lephone Sup port
Refer to the HP NetServer Warranty and Service/Support Booklet supplied with
your HP NetServer system documentation for instructions on how to obtain
HP repair and telephone support.
32
Page 37

A Regulatory Information
For reg u latory infor mation per taining to th is HP accessory, please refer to th e
regulatory section of the Installation Guide for the NetServer in which this
accessory is ins talled.
33
Page 38

Page 39

Index
A
accessory kit, contents, 1
B
BIOS
updating, 27
C
CAUTION
BIOS versions, 27
cover requirements, 13, 26
processor antistatic, 4
processor module speed, 12, 25
processor switch settings, 5, 17
static electricity, 2
weight of system board assy., 5
G
getting help, 31
H
Hardware accessories lim ited warranty,
31
hardw are repa ir
warranty information, 31
help, 31
HP NetServer Navigator CD-ROM, 27
N
NOS, re-installing, 28
O
overview of steps
LH 6000, 4
LT 6000r, 16
P
precautions, 2
processor module
removing from LH 6000, 8
removing from LT 6000r , 21
R
regulatory information, 33
re-instal l ing the NOS, 28
replacing covers
LH 6000, 13
LT 6000r, 26
S
Support
repair and phon e , 32
T
terminator
removing from LH 6000, 7
tools required
LH 6000, 3
V
VRM
inst allation , 1 0, 23
removing from LH 6000, 8
removing from LT 6000r , 21
W
Warning
shock haza rd, 2
Warranty
hard ware accessories limi ted, 31
warranty information
hardware, 31
35
 Loading...