

Page 1

User Guide
LaserJet Pro M501
www.hp.com/support/ljM501
M501n
M501dn
Page 2

Page 3

HP LaserJet Pro M501
User Guide
Page 4

Copyright and License
Trademark Credits
© Copyright 2017 HP Development Company,
L.P.
Reproduction, adaptation, or translation without
prior written permission is prohibited, except as
allowed under the copyright laws.
The information contained herein is subject to
change without notice.
The only warranties for HP products and
services are set forth in the express warranty
statements accompanying such products and
services. Nothing herein should be construed as
constituting an additional warranty. HP shall not
be liable for technical or editorial errors or
omissions contained herein.
Edition 3, 1/2019
Adobe®, Adobe Photoshop®, Acrobat®, and
Pos
tScript® are trademarks of Adobe Systems
Incor
porated.
Apple and the Apple logo are trademarks of
Apple Computer, Inc., registered in the U.S. and
other countries. iPod is a trademark of Apple
Computer, Inc. iPod is for legal or rightholderauthorized copying only. Don't steal music.
Microsoft®, Windows®, Windows® XP, and
Windows Vista® are U.S. registered trademarks
of Microsoft Corporation.
UNIX® is a registered trademark of The Open
Gro
up.
Page 5

Table of contents
1 Printer overview ........................................................................................................................................................................................ 1
Printer views .............................................................................................................................................................................. 2
Printer front view ................................................................................................................................................. 2
Printer back view .................................................................................................................................................. 3
Interface ports ...................................................................................................................................................... 4
Control panel view ............................................................................................................................................... 4
Printer specications ............................................................................................................................................................... 6
Technical specications ...................................................................................................................................... 6
Supported operating systems ........................................................................................................................... 6
Mobile printing solutions .................................................................................................................................... 8
Printer dimensions .............................................................................................................................................. 9
Power consumption, electrical specications, and acoustic emissions ................................................... 10
Operating-environment range ........................................................................................................................ 10
Printer hardware setup and software installation ............................................................................................................ 11
2 Paper trays .............................................................................................................................................................................................. 13
Load paper to Tray 1 (multipurpose tray) .......................................................................................................................... 14
Introduction ........................................................................................................................................................ 14
Tray 1 paper orientation ................................................................................................................................... 15
Load paper to Trays 2 and 3 ................................................................................................................................................ 16
Introduction ........................................................................................................................................................ 16
Tray 2 and the 550-sheet tray paper orientation ........................................................................................ 17
Load and print envelopes ..................................................................................................................................................... 19
Introduction ........................................................................................................................................................ 19
Print envelopes .................................................................................................................................................. 19
Envelope orientation ......................................................................................................................................... 19
3 Supplies, accessories, and parts .......................................................................................................................................................... 21
Order supplies, accessories, and parts ............................................................................................................................... 22
Ordering .............................................................................................................................................................. 22
Supplies and accessories ................................................................................................................................. 22
ENWW iii
Page 6

Customer self-repair parts ............................................................................................................................... 22
Replace the toner cartridge .................................................................................................................................................. 23
Introduction ........................................................................................................................................................ 23
Toner-cartridge information ............................................................................................................................ 23
Remove and replace the cartridge ................................................................................................................. 24
4 Print .......................................................................................................................................................................................................... 29
Print tasks (Windows) ............................................................................................................................................................ 30
How to print (Windows) .................................................................................................................................... 30
Automatically print on both sides (Windows) ............................................................................................... 31
Manually print on both sides (Windows) ........................................................................................................ 31
Print multiple pages per sheet (Windows) .................................................................................................... 32
Select the paper type (Windows) .................................................................................................................... 32
Additional print tasks ........................................................................................................................................ 33
Print tasks (OS X) .................................................................................................................................................................... 34
How to print (OS X) ............................................................................................................................................ 34
Automatically print on both sides (OS X) ....................................................................................................... 34
Manually print on both sides (OS X) ................................................................................................................ 34
Print multiple pages per sheet (OS X) ............................................................................................................ 35
Select the paper type (OS X) ............................................................................................................................ 35
Additional print tasks ........................................................................................................................................ 36
Store print jobs on a USB ash drive to print later ........................................................................................................... 37
Introduction ........................................................................................................................................................ 37
Before you begin ............................................................................................................................................... 37
Set up the printer for job storage ................................................................................................................... 37
Step one: Install the USB ash drive .......................................................................................... 37
Step two: Update the print driver ............................................................................................... 38
Create a stored job (Windows) ........................................................................................................................ 38
Print a stored job ............................................................................................................................................... 40
Delete a stored job ............................................................................................................................................ 41
Information sent to printer for Job Accounting purposes ........................................................................... 41
Mobile printing ........................................................................................................................................................................ 42
Introduction ........................................................................................................................................................ 42
HP ePrint via email ............................................................................................................................................ 42
HP ePrint software ............................................................................................................................................ 43
AirPrint ................................................................................................................................................................. 43
Google Cloud Print ............................................................................................................................................. 43
Android embedded printing ............................................................................................................................. 43
5 Manage the printer ................................................................................................................................................................................. 45
Use HP Web Services applications ...................................................................................................................................... 46
iv ENWW
Page 7

Change the printer connection type (Windows) ................................................................................................................ 47
Advanced conguration with HP Embedded Web Server (EWS) and HP Device Toolbox (Windows) ....................... 48
Advanced conguration with HP Utility for OS X ............................................................................................................... 51
Open HP Utility ................................................................................................................................................... 51
HP Utility features ............................................................................................................................................. 51
Congure IP network settings .............................................................................................................................................. 53
Introduction ........................................................................................................................................................ 53
Printer sharing disclaimer ................................................................................................................................ 53
View or change network settings ................................................................................................................... 53
Rename the printer on a network .................................................................................................................. 53
Manually congure IPv4 TCP/IP parameters from the control panel ........................................................ 54
Link speed and duplex settings ...................................................................................................................... 54
Printer security features ....................................................................................................................................................... 56
Introduction ........................................................................................................................................................ 56
Assign or change the system password using the HP Embedded Web Server ...................................... 56
Lock the formatter ............................................................................................................................................ 56
Energy-conservation settings .............................................................................................................................................. 57
Introduction ........................................................................................................................................................ 57
Print with EconoMode ....................................................................................................................................... 57
Set the Auto Power Down delay and congure the printer to use 1 watt or less of power .................. 57
Set the Delay Shut Down setting .................................................................................................................... 58
HP Web Jetadmin ................................................................................................................................................................... 59
Update the rmware ............................................................................................................................................................. 60
Method one: Update the rmware using the control panel ....................................................................... 60
Method two: Update the rmware using the Firmware Update Utility ..................................................... 60
6 Solve problems ....................................................................................................................................................................................... 63
Customer support .................................................................................................................................................................. 64
Restore the factory-set defaults ......................................................................................................................................... 65
A “Cartridge is low” or “Cartridge is very low” message displays on the printer control panel ................................. 66
Change the “Very Low” settings ...................................................................................................................... 66
Order supplies .................................................................................................................................................... 66
Printer does not pick up paper or misfeeds ....................................................................................................................... 68
Introduction ........................................................................................................................................................ 68
The printer does not pick up paper ................................................................................................................ 68
The printer picks up multiple sheets of paper .............................................................................................. 70
Clear paper jams .................................................................................................................................................................... 74
Introduction ........................................................................................................................................................ 74
Jam locations ..................................................................................................................................................... 74
Experiencing frequent or recurring paper jams? .......................................................................................... 75
Clear paper jams in Tray 1 ............................................................................................................................... 76
ENWW v
Page 8

Clear paper jams in Tray 2 and the 550-sheet tray ..................................................................................... 79
Clear paper jams in the toner-cartridge area ................................................................................................ 83
Clear paper jams in the rear door and the fuser area (M501n models) ................................................... 85
Clear paper jams in the output bin ................................................................................................................. 87
Clear paper jams in the duplexer (M501dn models) ................................................................................... 87
Improve print quality ............................................................................................................................................................. 92
Introduction ........................................................................................................................................................ 92
Print from a dierent software program ....................................................................................................... 92
Check the paper-type setting for the print job ............................................................................................. 92
Check the paper type setting (Windows) .................................................................................. 92
Check the paper type setting (OS X) .......................................................................................... 92
Check the toner-cartridge status .................................................................................................................... 93
Clean the printer ................................................................................................................................................ 94
Print a cleaning page .................................................................................................................... 94
Visually inspect the toner cartridge ................................................................................................................ 94
Check paper and the printing environment ................................................................................................... 94
Step one: Use paper that meets HP specications ................................................................. 94
Step two: Check the environment .............................................................................................. 95
Step three: Set the individual tray alignment ........................................................................... 95
Check the EconoMode settings ....................................................................................................................... 96
Try a dierent print driver ................................................................................................................................ 96
Solve wired network problems ............................................................................................................................................ 98
Introduction ........................................................................................................................................................ 98
Poor physical connection ................................................................................................................................. 98
The computer is using the incorrect IP address for the printer ................................................................. 98
The computer is unable to communicate with the printer ......................................................................... 98
The printer is using incorrect link and duplex settings for the network ................................................... 99
New software programs might be causing compatibility problems ......................................................... 99
The computer or workstation might be set up incorrectly ......................................................................... 99
The printer is disabled, or other network settings are incorrect ............................................................... 99
Index ........................................................................................................................................................................................................... 101
vi ENWW
Page 9

1 Printer overview
●
Printer views
●
Printer specications
●
Printer hardware setup and software installation
For more information:
The following information is correct at the time of publication. For current information, see www.hp.com/
support/ljM501.
HP's all-inclusive help for the printer includes the following information:
●
Install and congure
●
Learn and use
●
Solve problems
●
Download software and rmware updates
●
Join support forums
●
Find warranty and regulatory information
ENWW 1
Page 10

Printer views
1
2
3
5
6
4
7 8
●
Printer front view
●
Printer back view
●
Interface ports
●
Control panel view
Printer front view
1 2-line control panel with keypad
2 Optional 1 x 550-sheet paper feeder, Tray 3
3 Tray 2
4 Model name
5 Tray 1
6 Top cover (access to the toner cartridge)
7 Standard output bin
8 On/o button
2 Chapter 1 Printer overview ENWW
Page 11

Printer back view
1
3
2
4
6
5
1 Top-cover-release button
2 Dust cover for Tray 2 (ips up when legal-size paper is loaded)
3 Power connection
4 Interface ports
5 Serial number and product model label
6 Rear door
ENWW Printer views 3
Page 12

Interface ports
1
2
3
4
1
2
3
4
5
6
7
8
9
10
1 Slot for a cable-type security lock
2 Local area network (LAN) Ethernet (RJ-45) network port
3 Hi-Speed USB 2.0 printing port
4 Host USB port for job storage feature (requires a 16 GB or larger USB ash drive)
Control panel view
1 Control panel display This screen shows status information, menus, help information, and error messages.
2 Numeric keypad Use these buttons to enter numeric values.
3
Cancel button
Press this button to cancel a print job or to exit the control panel menus.
4 Chapter 1 Printer overview ENWW
Page 13

4
Back arrow button
5 Down arrow button Use this button to navigate through the menus or to decrease a value that appears on the
6 OK button Press the OK button for the following actions:
Use this button for the following actions:
●
Exit the control-panel menus.
●
Scroll back to a previous menu in a submenu list.
●
Scroll back to a previous menu item in a submenu list (without saving changes to the
menu item).
display.
●
Open the control-panel menus.
●
Open a submenu displayed on the control-panel display.
●
Select a menu item.
●
Clear some errors.
●
Begin a print job in response to a control-panel prompt (for example, when the
message Press [OK] to continue appears on the control-panel display).
7
Setup button
8 Up arrow button Use this button to navigate through the menus or to increase a value that appears on the
9 Ready light (green) This light is on when the printer is ready to print. It blinks when the printer is receiving print
10 Attention light (red) This light blinks when the printer requires user attention.
Use this button to open the Setup menu.
display.
data.
ENWW Printer views 5
Page 14

Printer specications
IMPORTANT: The following specications are correct at the time of publication, but they are subject to change.
For current information, see www.hp.com/support/ljM501.
●
Technical specications
●
Supported operating systems
●
Mobile printing solutions
●
Printer dimensions
●
Power consumption, electrical specications, and acoustic emissions
●
Operating-environment range
Technical specications
Model name
Product number
Paper handling Tray 1 (100-sheet capacity)
Tray 2 (550-sheet capacity)
1 x 550-sheet paper feeder Optional Optional
Automatic duplex printing Not supported
Connectivity 10/100/1000 Ethernet LAN connection with IPv4
and IPv6
Hi-Speed USB 2.0
Memory 256 MB DDR3 memory
Control-panel display and input 2-line graphical display with 10-key keypad
Print Prints 45 pages per minute (ppm) on letter and 43
ppm on A4-size paper
Job storage/PIN-protected printing
(Requires a 16 GB or greater USB ash drive.)
M501n
J8H60A
M501dn
J8H61A
Supported operating systems
The following information applies to the printer-specic Windows PCL 6 and OS X print drivers.
Windows: The HP Software Installer installs the HP PCL.6, HP PCL-6, or HP PCL 6 driver depending on the
Windows operating system along with optional software when using the full software installer. See the software
installation notes for more information.
OS X: Mac computers are supported with this printer. Download HP Easy Start either from 123.hp.com or from
the Print Support page, and then use HP Easy Start to install the HP print driver and utility. HP Easy Start is not
included in the in-box CD.
6 Chapter 1 Printer overview ENWW
Page 15

1. Go to 123.hp.com.
2. Follow the steps provided to download the printer software.
Linux: For information and print drivers for Linux, go to hplipopensource.com/hplip-web/index.html.
UNIX: For information and print drivers for UNIX®, go to www.hp.com/go/unixmodelscripts.
Operating system Print driver installed Notes
Windows® XP SP3 or later, 32-bit The HP PCL.6 printer-specic print
driver is installed for this operating
system as part of the basic software
installation. The basic installer installs
the driver only.
Windows Vista®, 32-bit The HP PCL.6 printer-specic print
driver is installed for this operating
system as part of the basic software
installation. The basic installer installs
the driver only.
Windows Server 2003 SP2 or
later, 32-bit
Windows 7 SP1 or later, 32-bit
and 64-bit
Windows 8, 32-bit and 64-bit The HP PCL-6 printer-specic print
The HP PCL.6 printer-specic print
driver is installed for this operating
system as part of the basic software
installation. The basic installer installs
the driver only.
The HP PCL 6 printer-specic print
driver is installed for this operating
system as part of the full software
installation.
driver is installed for this operating
system as part of the basic software
installation.
The full software installation is not supported for this
operating system.
Microsoft retired mainstream support for Windows XP in April
2009. HP will continue to provide best-eort support for the
discontinued XP operating system.
The full software installation is not supported for this
operating system.
The full software installation is not supported for this
operating system.
Use UPD drivers for 64-bit operating systems.
Microsoft retired mainstream support for Windows Server
2003 in July 2010. HP will continue to provide best-eort
support for the discontinued Server 2003 operating system.
Windows 8 RT support is provided through Microsoft IN OS
Version 4, 32-bit driver.
Windows 8.1, 32-bit and 64-bit The HP PCL-6 printer-specic print
driver is installed for this operating
system as part of the basic software
installation.
Windows 10, 32-bit and 64-bit The HP PCL-6 printer-specic print
driver is installed for this operating
system as part of the basic software
installation.
Windows Server 2008 SP2, 32bit
Windows Server 2008 SP2, 64bit
Windows Server 2008 R2, SP 1,
64-bit
The HP PCL.6 printer-specic print
driver is installed for this operating
system as part of the basic software
installation.
The HP PCL 6 printer-specic print
driver is installed for this operating
system as part of the basic software
installation.
The HP PCL 6 printer-specic print
driver is installed for this operating
system as part of the basic software
installation.
Windows 8.1 RT support is provided through Microsoft IN OS
Version 4, 32-bit driver.
ENWW Printer specications 7
Page 16

Operating system Print driver installed Notes
Windows Server 2012, 64-bit The software installer does not
Windows Server 2012 R2, 64 bit The software installer does not
OS X 10.9 Mavericks, OS X 10.10
Yosemite, and OS X 10.11 El
Capitan
NOTE: For a current list of supported operating systems, go to www.hp.com/support/ljM501 for HP's all-
inclusive help for the printer.
NOTE: For details on client and server operating systems and for HP UPD PCL6, UPD PCL 5, and UPD PS driver
support for this printer, go to www.hp.com/go/upd and click the Specications tab.
Mobile printing solutions
support Windows Server 2012 but
the HP PCL 6 and HP PCL-6 printer-
specic print drivers do support it.
support Windows Server 2012 but
the HP PCL 6 and HP PCL-6 printer-
specic print drivers do support it.
The OS X print driver and print utility
are available for download from
123.hp.com. The HP installer
software for OS X is not included in
the in-box CD.
Download the HP PCL 6 or PCL-6 driver from the HP Web site
www.hp.com/support/ljM501, and use the Windows Add
Printer tool to install it.
Download the HP PCL 6 or PCL-6 driver from the HP Web site
www.hp.com/support/ljM501, and use the Windows Add
Printer tool to install it.
Download HP Easy Start either from 123.hp.com or from the
Print Support page, and then use HP Easy Start to install the
HP print driver and utility.
1. Go to 123.hp.com.
2. Follow the steps provided to download the printer
software.
The printer supports the following software for mobile printing:
●
HP ePrint software
NOTE: The HP ePrint Software supports the following operating systems: Windows 7 SP 1 (32-bit and 64-
bit); Windows 8 (32-bit and 64-bit); Windows 8.1 (32-bit and 64-bit); Windows 10 (32-bit and 64-bit); and
OS X versions 10.9 Mavericks, 10.10 Yosemite, and 10.11 El Capitan.
●
HP ePrint via email (Requires HP Web Services to be enabled and the printer to be registered with HP
Connected)
●
HP ePrint app (Available for Android, iOS, and Blackberry)
●
HP All-in-One Remote app for iOS and Android devices
●
Google Cloud Print
●
AirPrint
●
Android Printing
8 Chapter 1 Printer overview ENWW
Page 17

Printer dimensions
1
2
2
3
3
1
1
1
2
2
3
3
Figure 1-1 Dimensions for the base printer
Printer fully closed Printer fully opened
1. Height 289 mm (11.4 in) 289 mm (11.4 in)
2. Depth Tray 2 dust cover closed: 376 mm (14.8 in)
Tray 2 dust cover open: 444 mm (17.5 in)
3. Width 410 mm (16.1 in) 410 mm (16.1 in)
Weight 11.6 kg (25.6 lb)
Figure 1-2 Dimensions for the printer with the 1 x 550-sheet paper feeder
569 mm (22.4 in)
Printer and accessories fully closed Printer and accessories fully opened
1. Height 419 mm (16.5 in) 419 mm (16.5 in)
2. Depth Tray 2 dust cover closed: 376 mm (14.8 in)
ENWW Printer specications 9
Tray 2 dust cover open: 444 mm (17.5 in)
569 mm (22.4 in)
Page 18
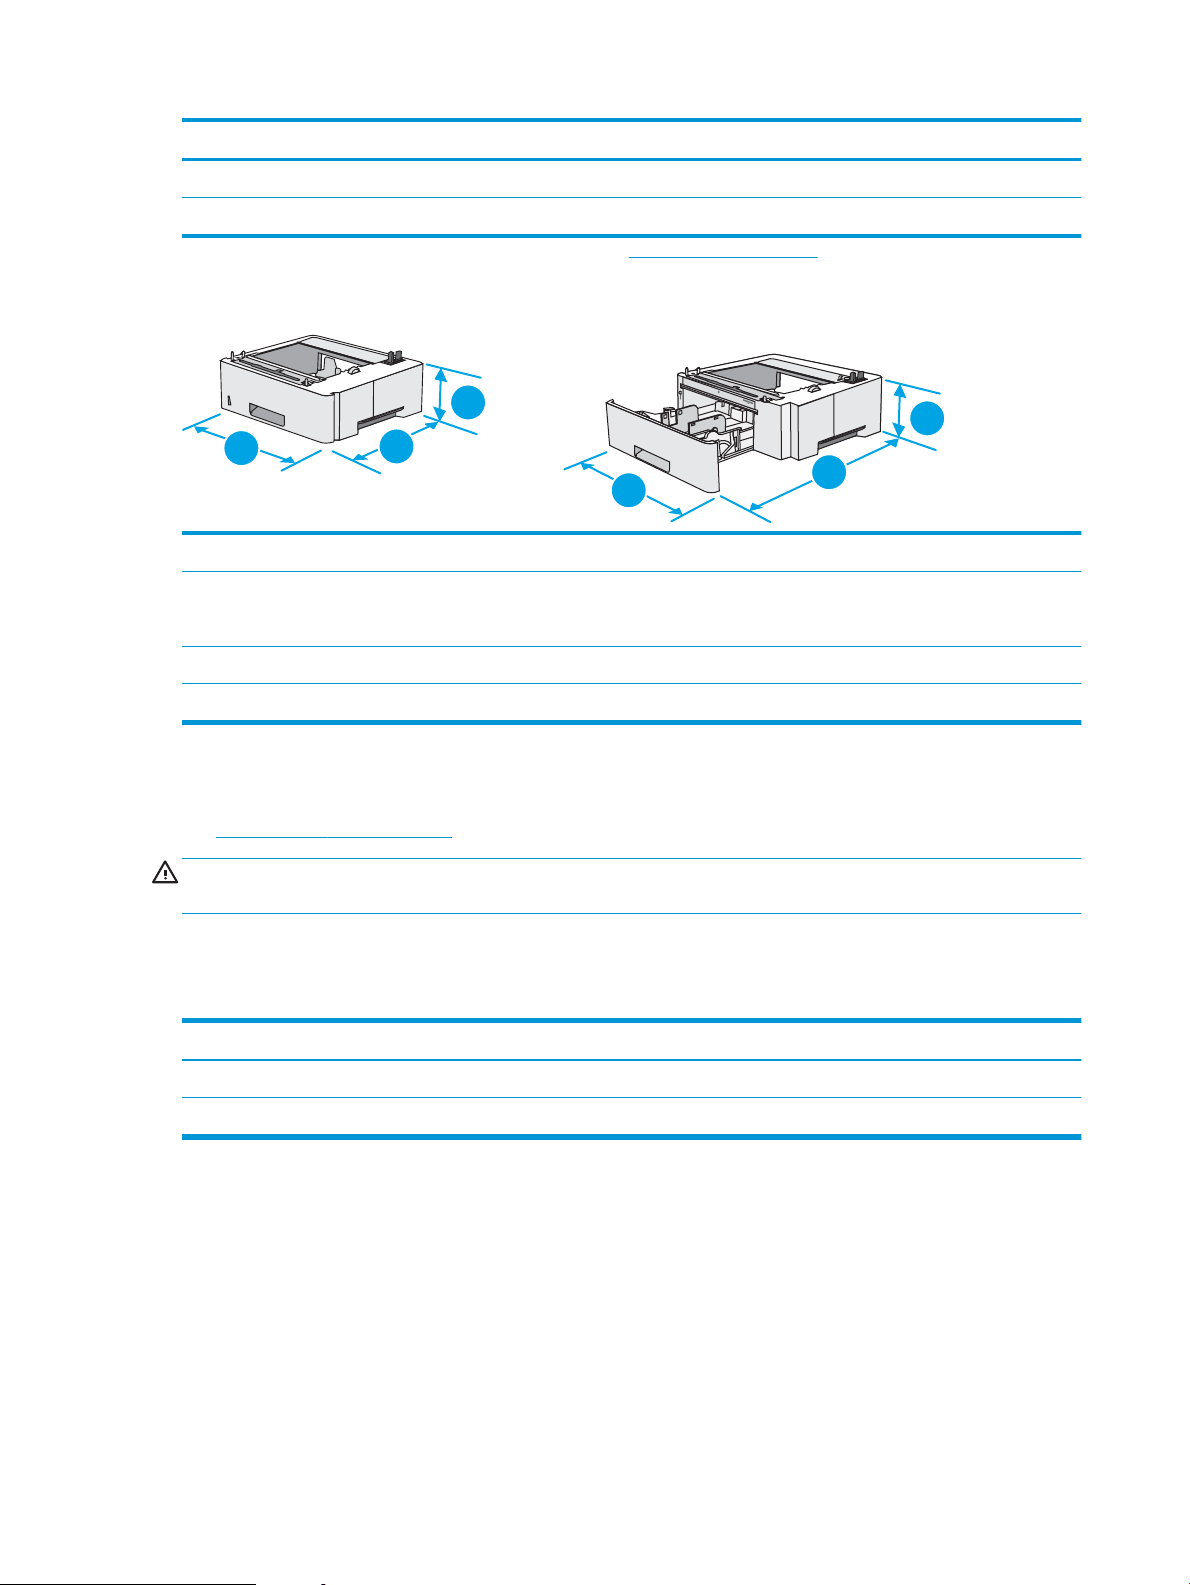
Printer and accessories fully closed Printer and accessories fully opened
1
2
2
3
3
1
3. Width 410 mm (16.1 in) 410 mm (16.1 in)
Weight 15.4 kg (34 lb)
1
These values are subject to change. For current information, go to www.hp.com/support/ljM501.
Figure 1-3 Dimensions for the 1 x 550-sheet paper feeder
1. Height 130 mm (5.1 in)
2. Depth Tray closed: 376 mm (14.8 in)
Tray opened: 569 mm (22.4 in)
3. Width 410 mm (16.1 in)
Weight 3.8 kg (8.4 lb)
Power consumption, electrical specications, and acoustic emissions
See www.hp.com/support/ljM501 for current information.
CAUTION: Power requirements are based on the country/region where the printer is sold. Do not convert
operating voltages. This will damage the printer and void the printer warranty.
Operating-environment range
Table 1-1 Operating-environment specications
Environment Recommended Allowed
Temperature 17° to 25°C (62.6° to 77°F) 15° to 32.5°C (59° to 90.5°F)
Relative humidity 30% to 70% relative humidity (RH) 10% to 80% RH
10 Chapter 1 Printer overview ENWW
Page 19

Printer hardware setup and software installation
For basic setup instructions, see the Setup Poster and Getting Started Guide that came with the printer. For
additional instructions, go to HP support on the Web.
Go to www.hp.com/support/ljM501 for HP's all-inclusive help for the printer. Find the following support:
●
Install and congure
●
Learn and use
●
Solve problems
●
Download software and rmware updates
●
Join support forums
●
Find warranty and regulatory information
ENWW Printer hardware setup and software installation 11
Page 20

12 Chapter 1 Printer overview ENWW
Page 21

2 Paper trays
●
Load paper to Tray 1 (multipurpose tray)
●
Load paper to Trays 2 and 3
●
Load and print envelopes
For more information:
The following information is correct at the time of publication. For current information, see www.hp.com/
support/ljM501.
HP's all-inclusive help for the printer includes the following information:
●
Install and congure
●
Learn and use
●
Solve problems
●
Download software and rmware updates
●
Join support forums
●
Find warranty and regulatory information
ENWW 13
Page 22
Load paper to Tray 1 (multipurpose tray)
Introduction
The following information describes how to load paper in Tray 1. This tray holds up to 100 sheets of 75 g/m2 (20
lb) paper.
NOTE: Select the correct paper type in the print driver before printing.
CAUTION: To avoid jams, never add or remove paper from Tray 1 during printing.
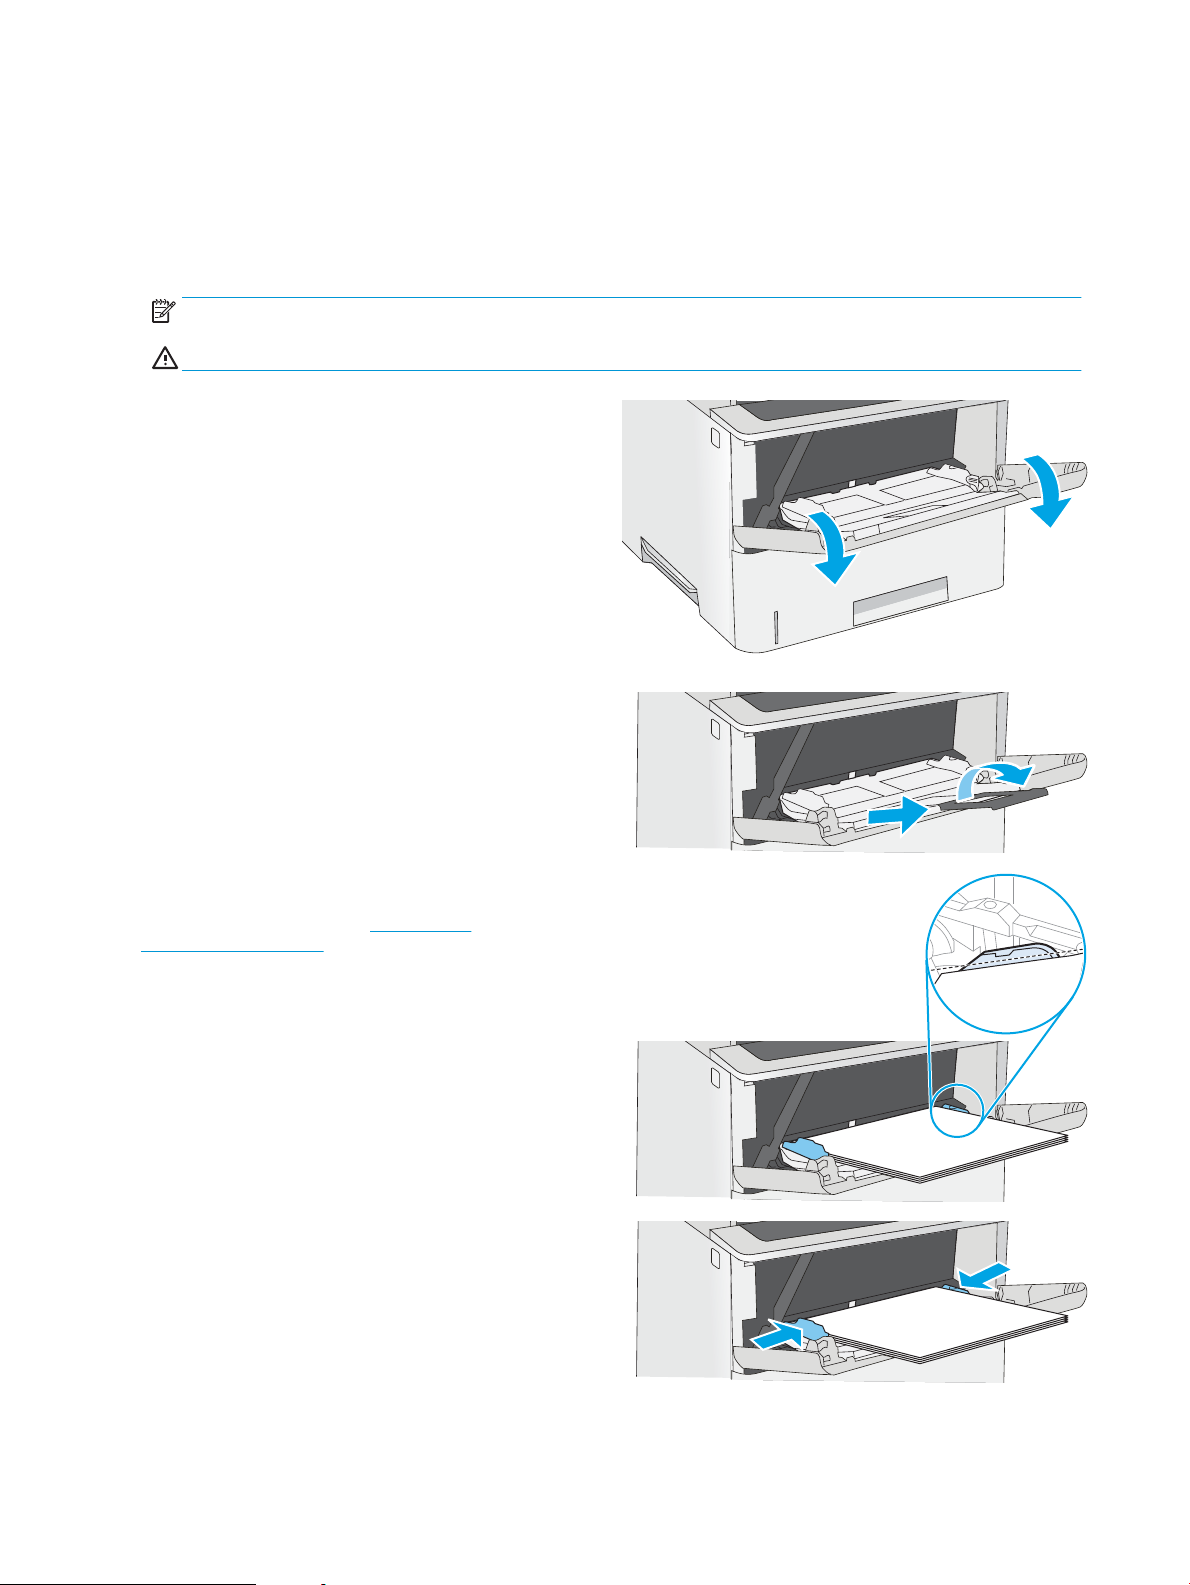
1. Grasp the handle on either side of Tray 1, and pull
it forward to open it.
2. Pull out the tray extension to support the paper.
3. Spread the paper guides to the correct size, and
then load paper in the tray. For information about
how to orient the paper, see Tray 1 paper
orientation on page 15.
Make sure that the paper ts under the ll line on
the paper guides.
NOTE: The maximum stack height is 10 mm (0.4
in), or approximately 100 sheets of 75g paper.
4. Adjust the side guides so that they lightly touch the
paper stack, but do not bend it.
14 Chapter 2 Paper trays ENWW
Page 23
Tray 1 paper orientation
When using paper that requires a specic orientation, load it according to the information in the following table.
Paper type Single-sided printing Duplex printing
Letterhead, preprinted, or prepunched Face-up
Top edge leading into the printer
Face-down
Bottom edge leading into the printer
ENWW Load paper to Tray 1 (multipurpose tray) 15
Page 24

Load paper to Trays 2 and 3
B6
11
14
Introduction
The following information describes how to load paper in Tray 2 and the optional 550-sheet Tray 3 (part number
F2A72A). The optional tray holds up to 550 sheets of 75 g/m2 (20 lb) paper.
NOTE: The procedure to load paper for the 550-sheet Tray 3 is the same as for Tray 2. Only Tray 2 is shown
here.
CAUTION: Do not extend more than one paper tray at a time.
1. Open the tray.
NOTE: Do not open this tray while it is in use.
2. Before loading paper, adjust the paper-width
guides by squeezing the adjustment latches and
sliding the guides to the size of the paper being
used.
3. Adjust the paper-length guide by squeezing the
adjustment latch and sliding the guide to the size
of the paper being used.
NOTE: When the tray is extended, the paper size
indicator changes from "A4" to "14".
16 Chapter 2 Paper trays ENWW
Page 25
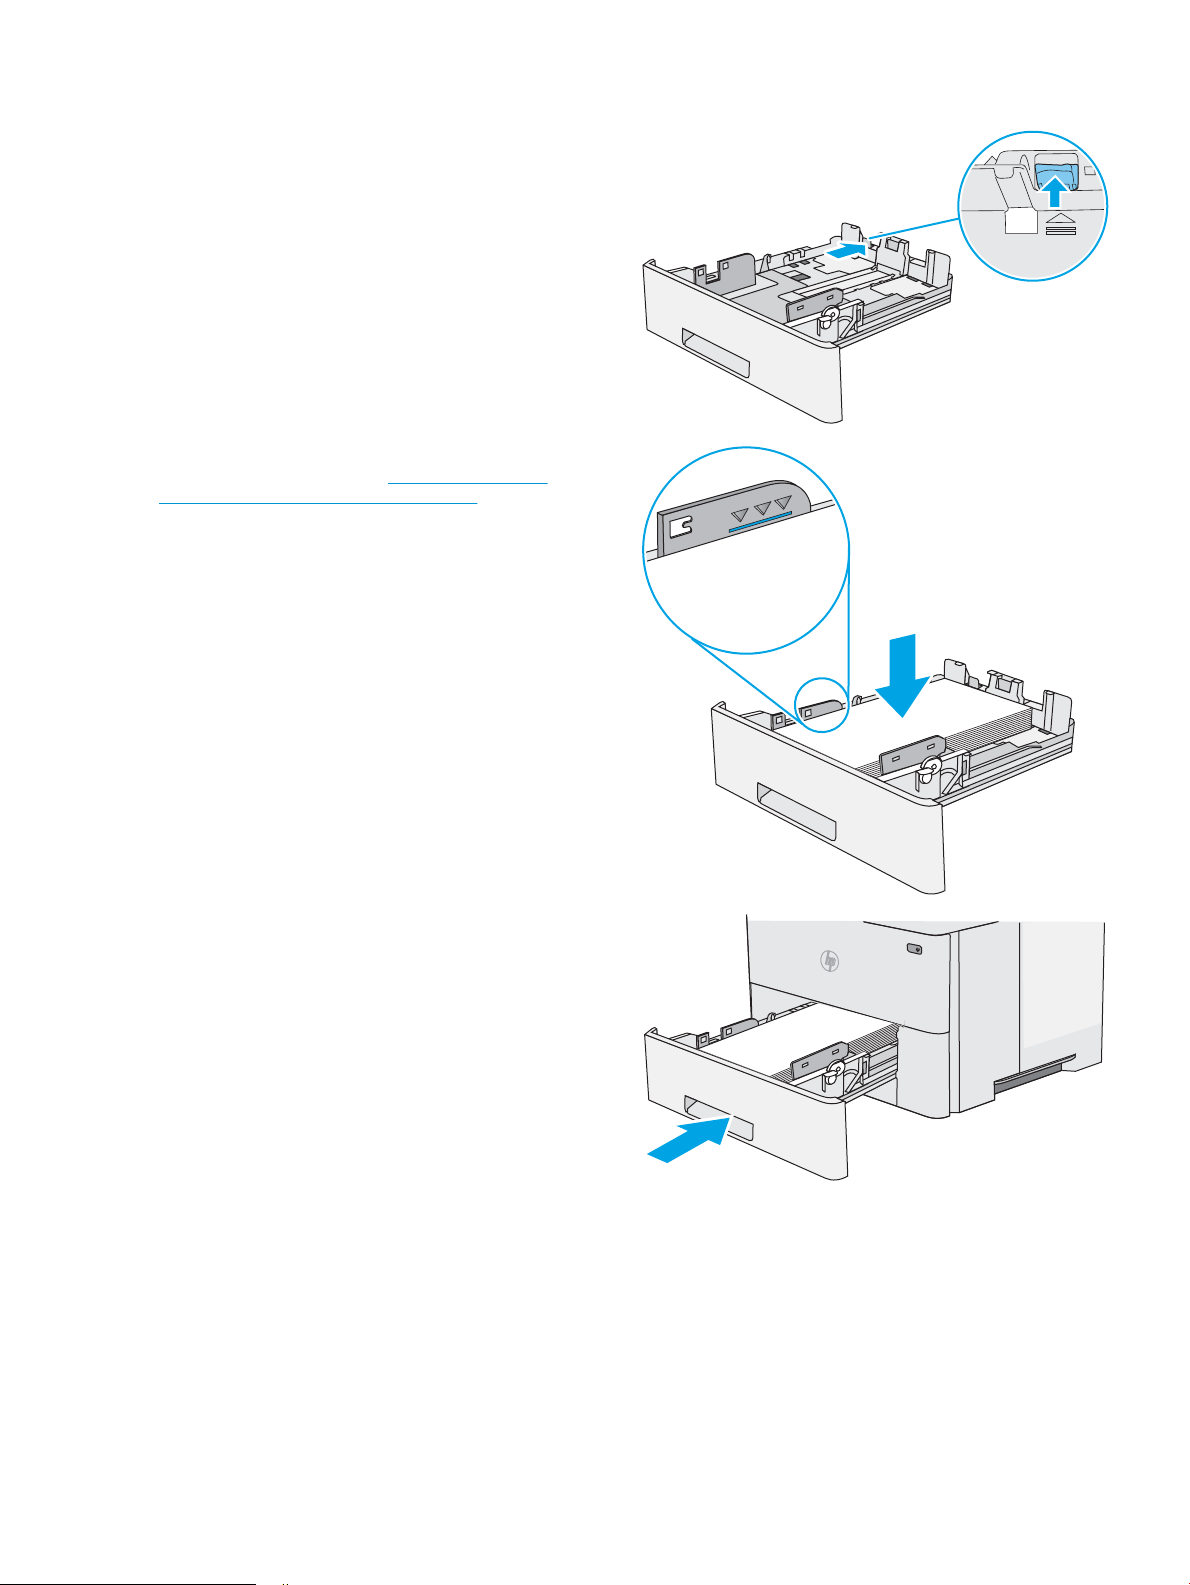
4. To load legal-size paper into the tray, squeeze the
14
lever on the back of the tray that is to the left of
center, and then extend the tray back to the
correct paper size.
NOTE: This step does not apply to other paper
sizes.
5. Load paper into the tray. For information about
how to orient the paper, see Tray 2 and the 550-
sheet tray paper orientation on page 17.
NOTE: Do not adjust the paper guides tightly
against the paper stack. Adjust them to the
indentations or markings in the tray.
NOTE: To prevent jams, adjust the paper guides
to the correct size and do not overll the tray. Be
sure that the top of the stack is below the tray full
indicator, as shown in the enlargement in the
illustration.
6. Close the tray.
Tray 2 and the 550-sheet tray paper orientation
When using paper that requires a specic orientation, load it according to the information in the following table.
ENWW Load paper to Trays 2 and 3 17
Page 26

Paper type Single-sided printing Duplex printing
123
123
Letterhead, preprinted, or prepunched Face-down
Top edge at the front of the tray
Face-up
Bottom edge at the front of the tray
18 Chapter 2 Paper trays ENWW
Page 27

Load and print envelopes
Introduction
The following information describes how to print and load envelopes. Use only Tray 1 to print on envelopes. Tray
1 holds up to 10 envelopes.
To print envelopes using the manual feed option, follow these steps to select the correct settings in the print
driver, and then load the envelopes into the tray after sending the print job to the printer.
Print envelopes
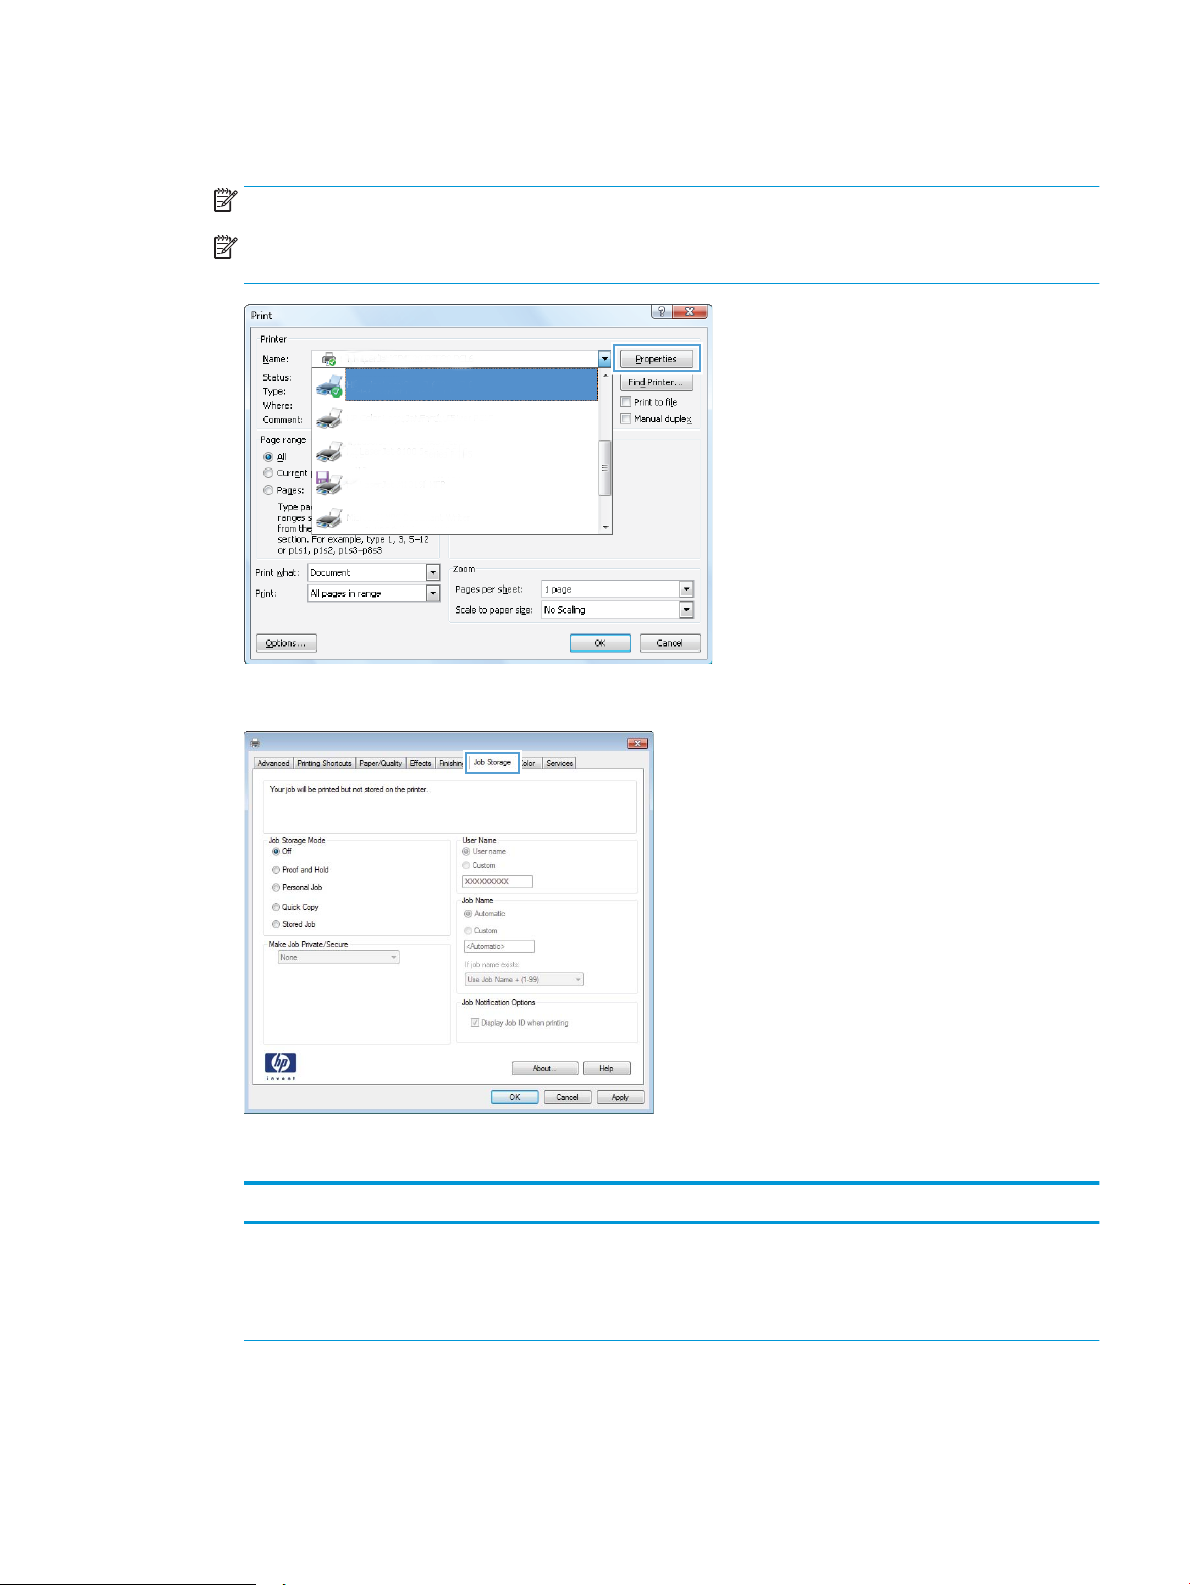
1. From the software program, select the Print option.
2. Select the printer from the list of printers, and then click or tap the Properties or Preferences button to
open the print driver.
NOTE: The name of the button varies for dierent software programs.
NOTE: To access these features from a Windows 8 or 8.1 Start screen, select Devices, select Print, and
then select the printer.
3. Click or tap the Paper/Quality tab.
4. In the Paper size drop-down list, select the correct size for the envelopes.
5. In the Paper type drop-down list, select Envelope.
6. In the Paper source drop-down list, select Manual feed.
7. Click the OK button to close the Document Properties dialog box.
8. In the Print dialog box, click the OK button to print the job.
Envelope orientation
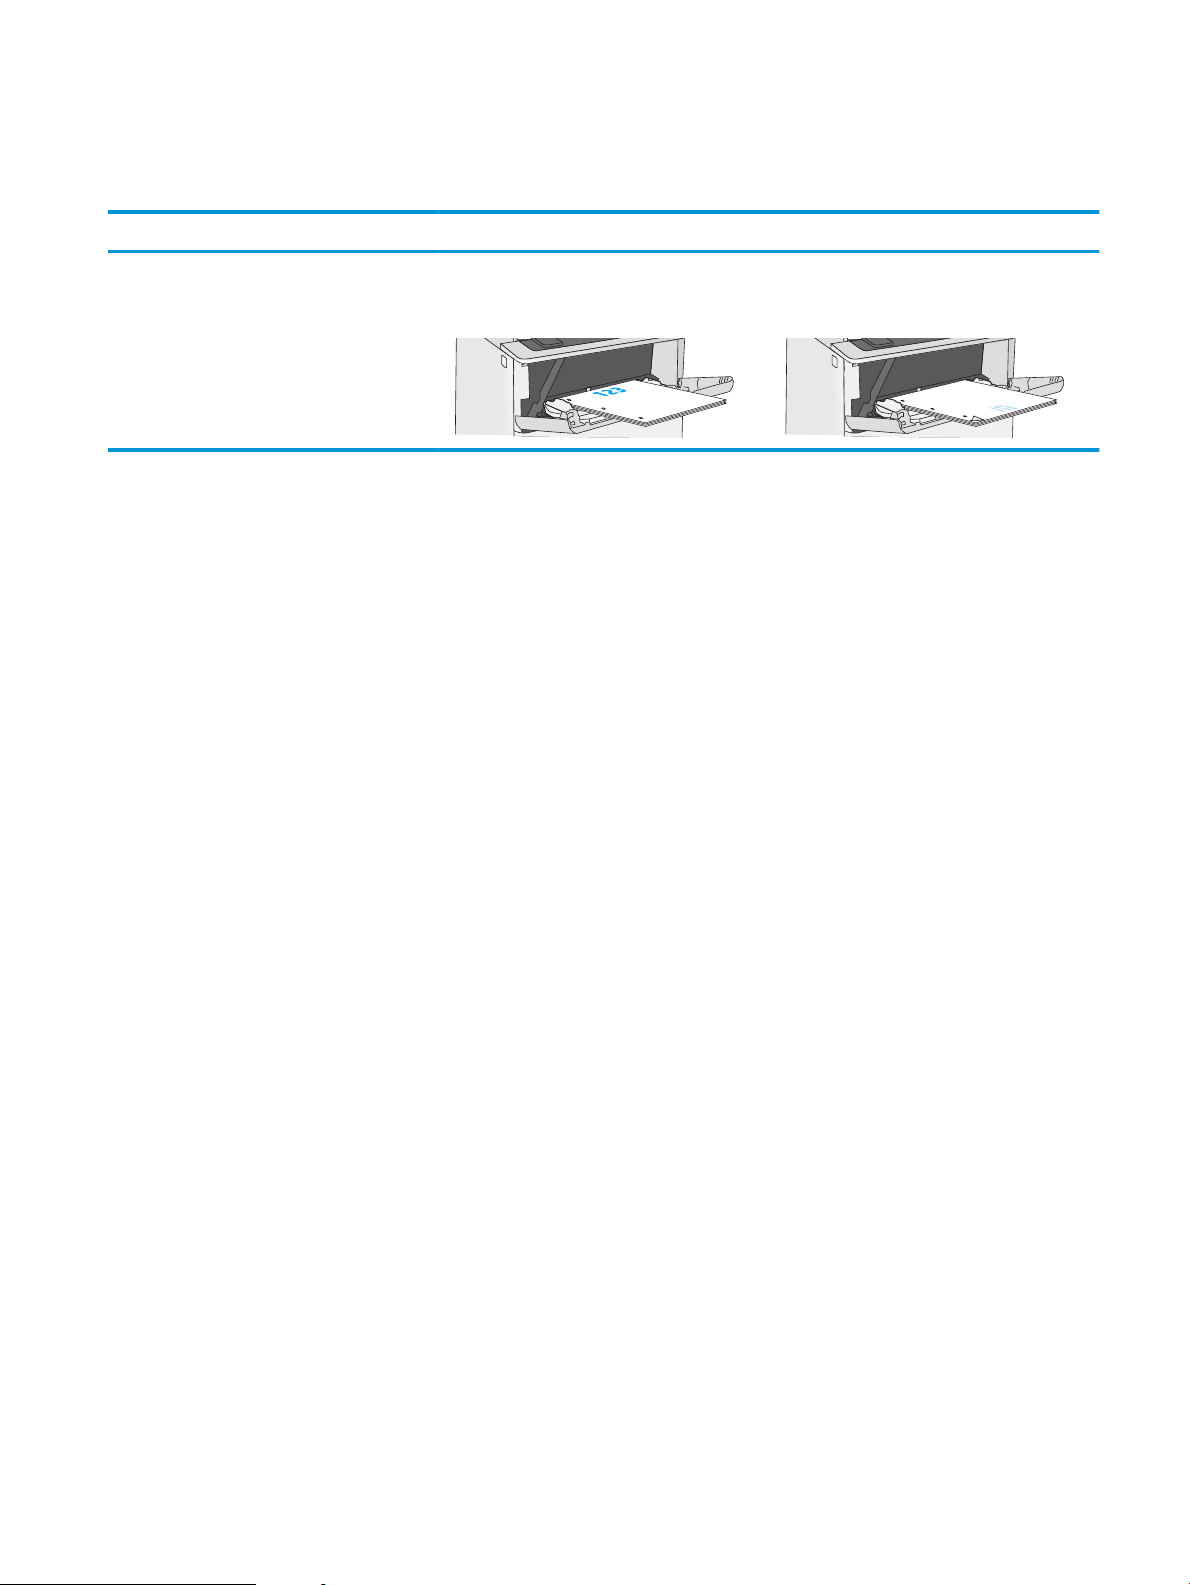
Load envelopes in Tray 1 face up, with the short, postage end
leading into the printer.
ENWW Load and print envelopes 19
Page 28

20 Chapter 2 Paper trays ENWW
Page 29

3 Supplies, accessories, and parts
●
Order supplies, accessories, and parts
●
Replace the toner cartridge
For more information:
The following information is correct at the time of publication. For current information, see www.hp.com/
support/ljM501.
HP's all-inclusive help for the printer includes the following information:
●
Install and congure
●
Learn and use
●
Solve problems
●
Download software and rmware updates
●
Join support forums
●
Find warranty and regulatory information
ENWW 21
Page 30

Order supplies, accessories, and parts
Ordering
Order supplies and paper www.hp.com/go/suresupply
Order genuine HP parts or accessories www.hp.com/buy/parts
Order through service or support providers Contact an HP-authorized service or support provider.
Order using the HP Embedded Web Server (EWS) To access, in a supported Web browser on your computer, enter the
printer IP address or host name in the address/URL eld. The EWS
contains a link to the HP SureSupply Web site, which provides
options for purchasing Original HP supplies.
Supplies and accessories
Item Description Cartridge number Part number
Supplies
HP 87A Black Original LaserJet Toner
Cartridge
HP 87X High Yield Black Original
LaserJet Toner Cartridge
Accessories
1 x 550-sheet paper feeder Optional 550-sheet paper feeder Not applicable F2A72A
Standard-capacity replacement black
toner cartridge
High-capacity replacement black toner
cartridge
87A CF287A
87X CF287X
Customer self-repair parts
Customer Self-Repair (CSR) parts are available for many HP LaserJet printers to reduce repair time. More
information about the CSR program and benets can be found at www.hp.com/go/csr-support and
www.hp.com/go/csr-faq.
Genuine HP replacement parts can be ordered at www.hp.com/buy/parts or by contacting an HP-authorized
service or support provider. When ordering, one of the following will be needed: part number, serial number
(found on back of printer), product number, or printer name.
●
Parts listed as Mandatory self-replacement are to be installed by customers, unless you are willing to pay
HP service personnel to perform the repair. For these parts, on-site or return-to-depot support is not
provided under the HP printer warranty.
●
Parts listed as Optional self-replacement can be installed by HP service personnel at your request for no
additional charge during the printer warranty period.
Item
Transfer Roller Service Kit Replacement transfer roller Mandatory F2A68-67910
Tray 1 Pick Up and Separation Roller Kit Replacement rollers for Tray 1 Mandatory F2A68-67914
Tray 2-3 Roller Kit Replacement rollers for Tray 2 and 3 Mandatory F2A68-67913
1x550-sheet paper feeder Replacement paper feeder Mandatory F2A72-67901
Description Self-replacement options Part number
22 Chapter 3 Supplies, accessories, and parts ENWW
Page 31

Replace the toner cartridge
Introduction
The following information provides details about the toner cartridge for the printer, and it includes instructions to
replace it.
●
Toner-cartridge information
●
Remove and replace the cartridge
Toner-cartridge information
This printer indicates when the toner cartridge level is low and very low. The actual toner cartridge life remaining
can vary. Consider having a replacement cartridge available to install when print quality is no longer acceptable.
Continue printing with the current cartridge until redistributing the toner no longer yields acceptable print
quality. To redistribute the toner, remove the toner cartridge from the printer and gently rock the cartridge back
and forth about its horizontal axis. For graphical representation, see cartridge replacement instructions. Reinsert
the toner cartridge into the printer and close the cover.
To purchase cartridges or check cartridge compatibility for the printer, go to HP SureSupply at www.hp.com/go/
suresupply. Scroll to the bottom of the page and verify that the country/region is correct.
Item Description Cartridge number Part number
HP 87A Black Original LaserJet
Toner Cartridge
HP 87X High Yield Black Original
LaserJet Toner Cartridge
Standard-capacity replacement
black toner cartridge
High-capacity replacement
black toner cartridge
87A CF287A
87X CF287X
NOTE: High-yield toner cartridges contain more toner than standard cartridges for increased page yield. For
more information, go to www.hp.com/go/learnaboutsupplies.
Do not remove the toner cartridge from its package until it is time to replace it.
CAUTION: To prevent damage to the toner cartridge, do not expose it to light for more than a few minutes.
Cover the green imaging drum if the toner cartridge must be removed from the printer for an extended period of
time.
The following illustration shows the toner-cartridge components.
ENWW Replace the toner cartridge 23
Page 32

1 2
1 Memory chip
2 Imaging drum
CAUTION: Do not touch the imaging drum. Fingerprints can cause print-quality problems.
CAUTION: If toner gets on clothing, wipe it o by using a dry cloth and wash the clothes in cold water. Hot water
sets toner into fabric.
NOTE: Information about recycling used toner cartridges is in the toner-cartridge box.
Remove and replace the cartridge
1. Press the top-cover-release button on the left side
of the printer.
24 Chapter 3 Supplies, accessories, and parts ENWW
Page 33

2. Open the front door.
1
3
2
3. Grasp the handle of the used toner cartridge and
pull out to remove it.
4. Remove the new toner cartridge from its
protective shell by tearing o the plastic strip and
opening the package. Save all packaging for
recycling the used toner cartridge.
ENWW Replace the toner cartridge 25
Page 34

5. Hold both ends of the toner cartridge and rock it
5-6 times.
6. Align the toner cartridge with its slot, and then
insert the toner cartridge into the printer.
26 Chapter 3 Supplies, accessories, and parts ENWW
Page 35

7. Close the front door.
2
1
8. Pack the used toner cartridge into the box that the
new cartridge came in. See the enclosed recycling
guide for information about recycling.
In the U.S., a pre-paid shipping label is included in
the box. In other countries/regions, go to
www.hp.com/recycle to print a pre-paid shipping
label.
Adhere the pre-paid shipping label to the box, and
return the used cartridge to HP for recycling.
ENWW Replace the toner cartridge 27
Page 36

28 Chapter 3 Supplies, accessories, and parts ENWW
Page 37

4 Print
●
Print tasks (Windows)
●
Print tasks (OS X)
●
Store print jobs on a USB ash drive to print later
●
Mobile printing
For more information:
The following information is correct at the time of publication. For current information, see www.hp.com/
support/ljM501.
HP's all-inclusive help for the printer includes the following information:
●
Install and congure
●
Learn and use
●
Solve problems
●
Download software and rmware updates
●
Join support forums
●
Find warranty and regulatory information
ENWW 29
Page 38

Print tasks (Windows)
How to print (Windows)
The following procedure describes the basic printing process for Windows.
1. From the software program, select the Print option.
2. Select the printer from the list of printers. To change settings, click or tap the Properties or Preferences
button to open the print driver.
NOTE: The name of the button varies for dierent software programs.
NOTE: To access these features from a Windows 8 or 8.1 Start screen app, select Devices, select Print,
and then select the printer.
NOTE: For more information, click the Help (?) button in the print driver.
NOTE: The print driver might look dierent than what is shown here, but the steps are the same.
30 Chapter 4 Print ENWW
Page 39

3. Click or tap the tabs in the print driver to congure the available options. For example, set the paper
orientation on the Finishing tab, and set the paper source, paper type, paper size, and quality settings on
the Paper/Quality tab.
4. Click or tap the OK button to return to the Print dialog box. Select the number of copies to print from this
screen.
5. Click or tap the OK button to print the job.
Automatically print on both sides (Windows)
Use this procedure for printers that have an automatic duplexer installed. If the printer does not have an
automatic duplexer installed, or to print on paper types that the duplexer does not support, print on both sides
manually.
1. From the software program, select the Print option.
2. Select the printer from the list of printers, and then click or tap the Properties or Preferences button to
open the print driver.
NOTE: The name of the button varies for dierent software programs.
NOTE: To access these features from a Windows 8 or 8.1 Start screen app, select Devices, select Print,
and then select the printer.
3. Click or tap the Finishing tab.
4. Select the Print on both sides check box. Click the OK button to close the Document Properties dialog box.
5. In the Print dialog box, click the OK button to print the job.
Manually print on both sides (Windows)
Use this procedure for printers that do not have an automatic duplexer installed or to print on paper that the
duplexer does not support.
ENWW Print tasks (Windows) 31
Page 40

1. From the software program, select the Print option.
2. Select the printer from the list of printers, and then click or tap the Properties or Preferences button to
open the print driver.
NOTE: The name of the button varies for dierent software programs.
NOTE: To access these features from a Windows 8 or 8.1 Start screen app, select Devices, select Print,
and then select the printer.
3. Click or tap the Finishing tab.
4. Select the Print on both sides (manually) check box. Click the OK button to print the rst side of the job.
5. Retrieve the printed stack from the output bin, and place it in Tray 1.
6. If prompted, touch the appropriate control panel button to continue.
Print multiple pages per sheet (Windows)
1. From the software program, select the Print option.
2. Select the printer from the list of printers, and then click or tap the Properties or Preferences button to
open the print driver.
NOTE: The name of the button varies for dierent software programs.
NOTE: To access these features from a Windows 8 or 8.1 Start screen app, select Devices, select Print,
and then select the printer.
3. Click or tap the Finishing tab.
4. Select the number of pages per sheet from the Pages per sheet drop-down list.
5. Select the correct Print page borders, Page order, and Orientation options. Click the OK button to close the
Document Properties dialog box.
6. In the Print dialog box, click the OK button to print the job.
Select the paper type (Windows)
1. From the software program, select the Print option.
2. Select the printer from the list of printers, and then click or tap the Properties or Preferences button to
open the print driver.
NOTE: The name of the button varies for dierent software programs.
NOTE: To access these features from a Windows 8 or 8.1 Start screen app, select Devices, select Print,
and then select the printer.
3. Click or tap the Paper/Quality tab.
4. From the Paper type drop-down list, select the option for the type of paper you are using, and then click
the OK button.
5. Click the OK button to close the Document Properties dialog box. In the Print dialog box, click the OK button
to print the job.
32 Chapter 4 Print ENWW
Page 41

Additional print tasks
Go to www.hp.com/support/ljM501.
Instructions are available for performing specic print tasks, such as the following:
●
Create and use printing shortcuts or presets
●
Select the paper size, or use a custom paper size
●
Select the page orientation
●
Create a booklet
●
Scale a document to t a specic paper size
●
Print the rst or last pages of the document on dierent paper
●
Print watermarks on a document
ENWW Print tasks (Windows) 33
Page 42

Print tasks (OS X)
How to print (OS X)
The following procedure describes the basic printing process for OS X.
1. Click the File menu, and then click the Print option.
2. Select the printer.
3. Click Show Details or Copies & Pages, and then select other menus to adjust the print settings.
NOTE: The name of the item varies for dierent software programs.
4. Click the Print button.
Automatically print on both sides (OS X)
NOTE: This information applies to printers that include an automatic duplexer.
NOTE: This feature is available if you install the HP print driver. It might not be available if you are using AirPrint.
1. Click the File menu, and then click the Print option.
2. Select the printer.
3. Click Show Details or Copies & Pages, and then click the Layout menu.
NOTE: The name of the item varies for dierent software programs.
4. Select a binding option from the Two-Sided drop-down list.
5. Click the Print button.
Manually print on both sides (OS X)
NOTE: This feature is available if you install the HP print driver. It might not be available if you are using AirPrint.
1. Click the File menu, and then click the Print option.
2. Select the printer.
3. Click Show Details or Copies & Pages, and then click the Manual Duplex menu.
NOTE: The name of the item varies for dierent software programs.
4. Click the Manual Duplex box, and select a binding option.
5. Click the Print button.
6. Go to the printer, and remove any blank paper that is in Tray 1.
7. Retrieve the printed stack from the output bin and place it with the printed-side facing down in the input
tray.
8. If prompted, touch the appropriate control panel button to continue.
34 Chapter 4 Print ENWW
Page 43

Print multiple pages per sheet (OS X)
1. Click the File menu, and then click the Print option.
2. Select the printer.
3. Click Show Details or Copies & Pages, and then click the Layout menu.
NOTE: The name of the item varies for dierent software programs.
4. From the Pages per Sheet drop-down list, select the number of pages that you want to print on each sheet.
5. In the Layout Direction area, select the order and placement of the pages on the sheet.
6. From the Borders menu, select the type of border to print around each page on the sheet.
7. Click the Print button.
Select the paper type (OS X)
1. Click the File menu, and then click the Print option.
2. Select the printer.
3. Click Show Details or Copies & Pages, and then click the Media & Quality menu or the Paper/Quality menu.
NOTE: The name of the item varies for dierent software programs.
4. Select from the Media & Quality or Paper/Quality options.
NOTE: This list contains the master set of options available. Some options are not available on all
printers.
●
Media Type: Select the option for the type of paper for the print job.
●
Print Quality: Select the resolution level for the print job.
●
Edge-To-Edge Printing: Select this option to print close to the paper edges.
●
EconoMode: Select this option to conserve toner when printing drafts of documents.
5. Click the Print button.
ENWW Print tasks (OS X) 35
Page 44

Additional print tasks
Go to www.hp.com/support/ljM501.
Instructions are available for performing specic print tasks, such as the following:
●
Create and use printing shortcuts or presets
●
Select the paper size, or use a custom paper size
●
Select the page orientation
●
Create a booklet
●
Scale a document to t a specic paper size
●
Print the rst or last pages of the document on dierent paper
●
Print watermarks on a document
36 Chapter 4 Print ENWW
Page 45

Store print jobs on a USB ash drive to print later
●
Introduction
●
Before you begin
●
Set up the printer for job storage
●
Create a stored job (Windows)
●
Print a stored job
●
Delete a stored job
●
Information sent to printer for Job Accounting purposes
Introduction
This section provides procedures for creating and printing documents that are stored on the USB ash drive.
These jobs can be printed at a later time.
Before you begin
The job storage feature has the following requirements:
●
A dedicated USB 2.0 ash drive with at least 16 GB free space must be installed in the rear host USB port.
This USB ash drive holds the job storage jobs sent to the printer. Removing this USB ash drive from the
printer disables the job storage feature.
●
If you are using an HP Universal Print Driver (UPD), you must use UPD version 5.9.0 or above.
Set up the printer for job storage
Complete the following processes to enable the printer job storage feature.
Step one: Install the USB ash drive
1. Locate the rear host USB port.
NOTE: On some models, the rear host USB port is covered. Remove the rear host USB port cover before
proceeding.
ENWW Store print jobs on a USB ash drive to print later 37
Page 46

2. Install the USB ash drive into the rear host USB port.
The control panel displays a To format USB drive for Job Storage press OK message.
3. Press the OK button, and then follow the instructions on the control panel to complete the procedure
Step two: Update the print driver
Update the print driver in Windows
1. Click the Start button, and then click Devices and Printers.
2. Right-click on the name of the HP printer, and then select Printer properties.
3. In the Properties dialog, select the Device Settings tab.
4. Select Update Now, and then click OK. The print driver updates.
The updated print driver will include the Job Storage tab.
Create a stored job (Windows)
Store jobs on the USB ash drive for private or delayed printing.
NOTE: The print driver might look dierent than what is shown here, but the steps are the same.
1. From the software program, select the Print option.
38 Chapter 4 Print ENWW
Page 47
2. Select the printer from the list of printers, and then select Properties or Preferences (the name varies for
dierent software programs).
NOTE: The name of the button varies for dierent software programs.
NOTE: To access these features from a Windows 8 or 8.1 Start screen app, select Devices, select Print,
and then select the printer.
3. Click the Job Storage tab.
4. Select a Job Storage Mode option.
Mode Description PIN protected Job deletion
Proof and Hold Print the rst page of a
document to verify print
quality, and then print the rest
of the document from the
printer control panel
No Automatically after the job is
printed or when job retention
limit is reached.
ENWW Store print jobs on a USB ash drive to print later 39
Page 48

Mode Description PIN protected Job deletion
Personal Job The job does not print until
you request it at the printer
control panel.
For this job-storage mode, you
can select one of the Make Job
Private/Secure options:
●
If you assign a personal
identication number
(PIN) to the job, you must
provide the required PIN
at the control panel.
●
If you encrypt the job,
you must provide the
required password at the
control panel.
The print job is deleted from
memory after it prints and is
lost if the printer loses power.
Quick Copy Print the requested number of
copies of a job and store a
copy of the job in the printer
memory so you can print it
again later.
Stored Job Store a job on a USB ash
drive and allow other users to
print the job at any time.
Yes (optional) Automatically after the job is
printed or when job retention
limit is reached.
No Manually
Yes (optional) Manually
5. To use a custom user name or job name, click the Custom button, and then enter the user name or the job
name.
Select which option to use if another stored job already has that name:
●
●
6. Click the OK button to close the Document Properties dialog box. In the Print dialog box, click the OK button
to print the job.
Print a stored job
Use the following procedure to print a job that is stored in the USB ash drive.
1. On the printer control panel, press the OK button.
2. Scroll to and select Stored Jobs.
3. From the Job Folders list, select a user name. A list of jobs stored under that user name displays.
4. Select the name of the job. If the job is private or secure, enter the PIN when prompted.
5. Use the arrow keys to select Copies, and then press the OK button.
Use Job Name + (1-99): Append a unique number to the end of the job name.
Replace Existing File: Overwrite the existing stored job with the new one.
40 Chapter 4 Print ENWW
Page 49

6. Enter the number of copies, and then press the OK button.
7. Use the arrow keys to select Print, and then press the OK button.
Delete a stored job
When you send a stored job to the USB ash drive, the printer overwrites any previous jobs with the same user
and job name. If the USB ash drive is full, the printer control panel displays a No more memory message and
existing stored jobs must be deleted before additional print jobs can be stored.
Use this procedure to delete a job that is stored in the USB ash drive.
1. On the printer control panel, press the OK button.
2. Scroll to and select Stored Jobs.
3. From the Job Folders list, select a user name. A list of jobs stored under that user name displays.
4. Select the name of the job. If the job is private or secure, enter the PIN when prompted.
5. Use the arrow keys to select Delete, and then press the OK button. Press the OK button again to delete the
job.
Information sent to printer for Job Accounting purposes
Printing jobs sent from drivers on the client (e.g., PC) may send personally identiable information to HP’s
Printing and Imaging devices. This information may include, but is not limited to, user name and client name
from which the job originated that may be used for job accounting purposes, as determined by the Administrator
of the printing device. This same information may also be stored with the job on the mass storage device (e.g.,
disk drive) of the printing device when using the job storage feature.
ENWW Store print jobs on a USB ash drive to print later 41
Page 50

Mobile printing
Introduction
HP oers multiple mobile and ePrint solutions to enable easy printing to an HP printer from a laptop, tablet,
smartphone, or other mobile device. To see the full list and to determine the best choice, go to www.hp.com/go/
LaserJetMobilePrinting.
●
HP ePrint via email
●
HP ePrint software
●
AirPrint
●
Google Cloud Print
●
Android embedded printing
HP ePrint via email
Use HP ePrint to print documents by sending them as an email attachment to the printer's email address from
any email enabled device.
NOTE: The printer might require a rmware update to use this feature.
To use HP ePrint, the printer must meet these requirements:
●
The printer must be connected to a wired or wireless network and have Internet access.
●
HP Web Services must be enabled on the printer, and the printer must be registered with HP Connected.
Follow this procedure to enable HP Web Services and register with HP Connected:
1. On the printer control panel, press the OK button. Open the Network Setup menu, and then select
Show IP Address to display the IP address or host name.
2. Open a Web browser, and in the address line, type the IP address or host name exactly as it displays
on the printer control panel. Press the Enter key on the computer keyboard. The EWS opens.
NOTE: If the Web browser displays a message indicating that accessing the Web site might not be
safe, select the option to continue to the Web site. Accessing this Web site will not harm the
computer.
3. Click the HP Web Services tab, and then click Enable. The printer enables Web Services, and then
prints an information page.
The information page contains the printer code necessary to register the HP product at HP
Connected.
4. Go to www.hpconnected.com to create an HP ePrint account and complete the setup process.
42 Chapter 4 Print ENWW
Page 51

HP ePrint software
The HP ePrint software makes it easy to print from a Windows or Mac desktop or laptop computer to any HP
ePrint-capable printer. This software makes it easy to nd HP ePrint-enabled printers that are registered to your
HP Connected account. The target HP printer can be located in the oce or at locations across the globe.
●
Windows: After installing the software, open the Print option from within your application, and then select
HP ePrint from the installed printers list. Click the Properties button to congure print options.
●
OS X: After installing the software, select File, Print, and then select the arrow next to PDF (in the bottom
left of the driver screen). Select HP ePrint.
For Windows, the HP ePrint software supports TCP/IP printing to local printers on the network (LAN or WAN) and
that support UPD PostScript®.
Windows and OS X both support IPP printing to LAN or WAN network-connected printers that support ePCL.
Windows and Mac also both support printing PDF documents to public print locations and printing using HP
ePrint via email through the cloud.
Go to www.hp.com/go/eprintsoftware for drivers and information.
NOTE: The HP ePrint software is a PDF workow utility for Mac, and is not technically a print driver.
NOTE: HP ePrint Software does not support USB printing.
AirPrint
Direct printing using Apple’s AirPrint is supported for iOS 4.2 or later and from Mac computers running OS X 10.7
Lion and newer. Use AirPrint to print directly to the printer from an iPad, iPhone (3GS or later), or iPod touch (third
generation or later) in the following mobile applications:
●
Mail
●
Photos
●
Safari
●
iBooks
●
Select third-party applications
NOTE: Before using AirPrint with a USB connection, verify the version number. AirPrint versions 1.3 and earlier
do not support USB connections.
Google Cloud Print
Google Cloud Print is a mobile printing solution available to Gmail account users that allows you to print over the
web from anywhere, including your phone or tablet, to any printer.
For more information, go to www.google.com/cloudprint/learn/printers.html, and then select the HP link.
Android embedded printing
HP's print solution for Android and Kindle enables mobile devices to automatically nd and print to HP printers
that are on a network.
The printer must be connected to the same network (sub-net) as the Android device.
ENWW Mobile printing 43
Page 52

HP print solutions are embedded in some Android and Kindle devices and available for others at:
play.google.com.
For more information on how to use Android embedded printing and which Android devices are supported, go to
www.hp.com/go/LaserJetMobilePrinting.
44 Chapter 4 Print ENWW
Page 53

5 Manage the printer
●
Use HP Web Services applications
●
Change the printer connection type (Windows)
●
Advanced conguration with HP Embedded Web Server (EWS) and HP Device Toolbox (Windows)
●
Advanced conguration with HP Utility for OS X
●
Congure IP network settings
●
Printer security features
●
Energy-conservation settings
●
HP Web Jetadmin
●
Update the rmware
For more information:
The following information is correct at the time of publication. For current information, see www.hp.com/
support/ljM501.
HP's all-inclusive help for the printer includes the following information:
●
Install and congure
●
Learn and use
●
Solve problems
●
Download software and rmware updates
●
Join support forums
●
Find warranty and regulatory information
ENWW 45
Page 54

Use HP Web Services applications
HP Web Services applications provide useful content that can be automatically downloaded from the Internet to
the printer. Choose from a variety of applications including news, calendars, forms, and cloud-based document
storage.
To activate these applications and schedule the downloads, go to the HP Connected Web site at
www.hpconnected.com
NOTE: To use this feature, the printer must be connected to a network and have internet access. HP Web
Services must be enabled on the printer.
Enable Web Services
1. On the printer control panel, press the OK button.
2. Select the HP Web Services menu, and then press the OK button.
3. Select the Enable Web Services item, and then press the OK button.
46 Chapter 5 Manage the printer ENWW
Page 55

Change the printer connection type (Windows)
If you are already using the printer and you wish to change the way it is connected, use the Recongure your HP
Device shortcut on your computer desktop to change the connection. For example, you can recongure the
printer to use a dierent wireless address, to connect to a wired or wireless network, or change from a network
connection to a USB connection. You can change the conguration without inserting the printer CD. After you
select the type of connection you wish to make, the program goes directly to the portion of the printer setup
procedure that needs to change.
ENWW Change the printer connection type (Windows) 47
Page 56

Advanced conguration with HP Embedded Web Server (EWS) and
HP Device Toolbox (Windows)
Use the HP Embedded Web Server to manage printing functions from a computer instead of the printer control
panel.
●
View printer status information
●
Determine the remaining life for all supplies and order new ones
●
View and change tray congurations
●
View and change the printer control-panel menu conguration
●
View and print internal pages
●
Receive notication of printer and supplies events
●
View and change network conguration
The HP Embedded Web Server works when the printer is connected to an IP-based network. The HP Embedded
Web Server does not support IPX-based printer connections. Internet access is not needed to open and use the
HP Embedded Web Server.
When the printer is connected to the network, the HP Embedded Web Server is automatically available.
NOTE: HP Device Toolbox is software used to connect to the HP Embedded Web Server when the printer is
connected to a computer via USB. It is available only if a full installation was performed when the printer was
installed on a computer. Depending on how the printer is connected, some features might not be available.
NOTE: The HP Embedded Web Server is not accessible beyond the network rewall.
Method one: Open the HP Embedded Web Server (EWS) from the Start menu
1. Click the Start button, and then click the Programs item.
2. Click your HP printer group, and then click the HP Device Toolbox item.
Method two: Open the HP Embedded Web Server (EWS) from a Web browser
1. On the printer control panel, press the OK button. Open the Network Setup menu, and then select Show IP
Address to display the IP address or host name.
2. Open a Web browser, and in the address line, type the IP address or host name exactly as it displays on the
printer control panel. Press the Enter key on the computer keyboard. The EWS opens.
NOTE: If the Web browser displays a message indicating that accessing the Web site might not be safe,
select the option to continue to the Web site. Accessing this Web site will not harm the computer.
48 Chapter 5 Manage the printer ENWW
Page 57

Tab or section Description
Home tab
Provides printer, status, and
conguration information.
System tab
Provides the ability to congure the
printer from your computer.
●
Device Status: Shows the printer status and shows the approximate percent life remaining
of HP supplies.
●
Supplies Status: Shows the approximate percent life remaining of HP supplies. Actual
supply life remaining can vary. Consider having a replacement supply available to install
when print quality is no longer acceptable. The supply does not need to be replaced unless
the print quality is no longer acceptable.
●
Device Conguration: Shows the information found on the printer conguration page.
●
Network Summary: Shows the information found on the printer network conguration
page.
●
Reports: Print the conguration and supplies status pages that the printer generates.
●
Job Storage Log: Shows a summary of all jobs stored in the USB ash drive.
●
Color Usage Log: Shows a summary of color jobs that the printer has produced.
(Color printers only)
●
Event Log: Shows a list of all printer events and errors.
●
Device Information: Provides basic printer and company information.
●
Paper Setup: Change the default paper-handling settings for the printer.
●
Print Quality: Change the default print-quality settings for the printer.
●
Energy Settings: Change the default times for entering Sleep/Auto O mode or automatic
shutdown.
Print tab
Provides the ability to change default
print settings from your computer.
●
Job Storage Setup: Congure the job storage settings for the printer.
●
Print Density: Change the print density of contrasts, highlights, midtones, and shadows
●
Paper Types: Congure print modes that correspond to the paper types that the printer
accepts.
●
System Setup: Change the system defaults for the printer.
●
Supply Settings: Change the settings for Cartridge is low alerts and other supplies
information.
●
Service: Perform the cleaning procedure on the printer.
●
Save and Restore: Save the current settings for the printer to a le on the computer. Use
this le to load the same settings onto another printer or to restore these settings to this
printer at a later time.
●
Administration: Set or change the printer password. Enable or disable printer features.
NOTE: The System tab can be password-protected. If this printer is on a network, always
consult with the administrator before changing settings on this tab.
●
Printing: Change the default printer print settings, such as number of copies and paper
orientation. These are the same options that are available on the control panel.
●
PCL5c: View and change the PCL5c settings.
●
PostScript: Turn o or on the Print PS Errors feature.
ENWW Advanced conguration with HP Embedded Web Server (EWS) and HP Device Toolbox (Windows) 49
Page 58

Tab or section Description
Fax tab
(Fax printers only)
Scan tab
(MFP printers only)
Networking tab
(Network-connected printers only)
●
Receive Options: Congure how the printer handles incoming faxes.
●
Phone Book: Add or delete entries in the fax phone book.
●
Junk Fax List: Set fax numbers to block from sending faxes to the printer.
●
Fax Activity Log: Review recent fax activity for the printer.
Congure the Scan to Network Folder and Scan to E-mail features.
●
Network Folder Setup: Congure folders on the network to which the printer can save a
scanned le.
●
Scan to E-mail Setup: Begin the process to set up the Scan to E-mail feature.
●
Outgoing E-mail Proles: Set an email address that will appear as the “from” address for all
emails sent from the printer.
●
Default SMTP Conguration: Congure the SMTP Server information.
●
E-mail Address Book: Add or delete entries in the email address book.
●
Network Contacts Setup: Congure the printer to connect to a network address book.
●
E-mail Options: Congure a default subject line and body text. Congure default scan
settings for emails.
Network administrators can use this tab to control network-related settings for the printer when
it is connected to an IP-based network. It also allows the network administrator to set up Wi-Fi
Direct functionality. This tab does not appear if the printer is directly connected to a computer.
Provides the ability to change network
settings from your computer.
HP Web Services tab Use this tab to set up and use various Web tools with the printer.
50 Chapter 5 Manage the printer ENWW
Page 59

Advanced conguration with HP Utility for OS X
Use the HP Utility to check printer status or to view or change printer settings from your computer.
You can use the HP Utility when the printer is connected with a USB cable or is connected to a TCP/IP-based
network.
Open HP Utility
1. At the computer, open the System Preferences menu, and then click Print & Fax, Print & Scan, or Printers &
Scanners
2. Select the printer in the list.
3. Click the Options & Supplies button.
4. Click the Utility tab.
5. Click the Open Printer Utility button.
HP Utility features
The HP Utility toolbar includes these items:
●
Devices: Click this button to show or hide Mac products found by the HP Utility.
.
●
All Settings: Click this button to return to the HP Utility main view.
●
HP Support: Click this button to open a browser and go to the HP support Web site.
●
Supplies: Click this button to open the HP SureSupply Web site.
●
Registration: Click this button to open the HP registration Web site.
●
Recycling: Click this button to open the HP Planet Partners Recycling Program Web site.
HP Utility consists of pages that you open by clicking in the All Settings list. The following table describes the
tasks that you can perform with HP Utility.
Item Description
Supplies Status Show the printer supplies status and provides links for ordering supplies online.
Device Information Show information about the currently selected printer, including the printer Service ID (if
assigned), the rmware version (FW Version), the Serial Number, and the IP address.
Commands Send special characters or print commands to the printer after the print job.
NOTE: This option is available only after you open the View menu and select the Show
Advanced Options item.
Color Usage
(Color printers only)
Show information about color jobs that the printer has produced.
ENWW Advanced conguration with HP Utility for OS X 51
Page 60

Item Description
File Upload Transfer les from the computer to the printer. You can upload the following types of les:
○
HP LaserJet printer command language (.PRN)
○
Portable document format (.PDF)
○
Postscript (.PS)
○
Text (.TXT)
Power Management Congure the printer economy settings.
Update Firmware Transfer a rmware update le to the printer.
NOTE: This option is available only after you open the View menu and select the Show
Advanced Options item.
HP Connected Access the HP Connected Web site.
Upload Fonts Upload fonts from the computer to the printer.
Message Center Display error events that have occurred with the printer.
Duplex Mode Turn on the automatic two-sided printing mode.
Network Settings
(Network-connected printers only)
Supplies Management Congure how the printer should behave when supplies are nearing the end of their
Trays Conguration Change paper size and type for each of the trays.
Additional Settings Open the HP Embedded Web Server (EWS) for the printer.
Proxy Server Settings Congure a proxy server for the printer.
Basic Fax Settings
(MFP fax models only)
Fax Forwarding
(MFP fax models only)
Fax Logs
(MFP fax models only)
Fax Speed Dials
(MFP fax models only)
Congure the network settings, such as the IPv4 settings, IPv6 settings, Bonjour settings,
and other settings.
estimated life.
NOTE: USB connections are not supported.
Set up the elds in the fax header and congure how the printer answers incoming calls.
Set up the printer to send the incoming faxes to a dierent number.
View the logs of all faxes.
Add fax numbers to the speed dial list.
Junk Fax Blocking
(MFP fax models only)
Scan to E-mail
(MFP printers only)
Scan to Network Folder
(MFP printers only)
Store the fax numbers you want to block.
Open the HP Embedded Web Server (EWS) page for conguring settings for scanning to
email.
Open the HP Embedded Web Server (EWS) page for conguring settings for scanning to a
network folder.
52 Chapter 5 Manage the printer ENWW
Page 61

Congure IP network settings
●
Introduction
●
Printer sharing disclaimer
●
View or change network settings
●
Rename the printer on a network
●
Manually congure IPv4 TCP/IP parameters from the control panel
●
Link speed and duplex settings
Introduction
Use the following sections to congure the printer network settings.
Printer sharing disclaimer
HP does not support peer-to-peer networking, as the feature is a function of Microsoft operating systems and
not of the HP printer drivers. Go to Microsoft at www.microsoft.com.
View or change network settings
Use the HP Embedded Web Server to view or change IP conguration settings.
1. Open the HP Embedded Web Server (EWS):
a. On the printer control panel, press the OK button. Open the Network Setup menu, and then select
Show IP Address to display the IP address or host name.
b. Open a Web browser, and in the address line, type the IP address or host name exactly as it displays
on the printer control panel. Press the Enter key on the computer keyboard. The EWS opens.
NOTE: If the Web browser displays a message indicating that accessing the Web site might not be
safe, select the option to continue to the Web site. Accessing this Web site will not harm the
computer.
2. Click the Networking tab to obtain network information. Change settings as needed.
Rename the printer on a network
To rename the printer on a network so that it can be uniquely identied, use the HP Embedded Web Server.
1. Open the HP Embedded Web Server (EWS):
a. On the printer control panel, press the OK button. Open the Network Setup menu, and then select
Show IP Address to display the IP address or host name.
ENWW Congure IP network settings 53
Page 62

b. Open a Web browser, and in the address line, type the IP address or host name exactly as it displays
on the printer control panel. Press the Enter key on the computer keyboard. The EWS opens.
NOTE: If the Web browser displays a message indicating that accessing the Web site might not be
safe, select the option to continue to the Web site. Accessing this Web site will not harm the
computer.
2. Open the System tab.
3. On the Device Information page, the default printer name is in the Device Description eld. You can change
this name to uniquely identify this printer.
NOTE: Completing the other elds on this page is optional.
4. Click the Apply button to save the changes.
Manually congure IPv4 TCP/IP parameters from the control panel
Use the control-panel menus to manually set an IPv4 address, subnet mask, and default gateway.
1. On the printer control panel, press the OK button.
2. Open the following menus:
●
Network Setup
●
IPv4 Cong Method
●
Manual
3. Use the arrow keys and the OK button to enter the IP address, subnet mask, and default gateway, and then
touch the OK button to save the changes.
Link speed and duplex settings
NOTE: This information applies only to Ethernet networks. It does not apply to wireless networks.
The link speed and communication mode of the print server must match the network hub. For most situations,
leave the printer in automatic mode. Incorrect changes to the link speed and duplex settings might prevent the
printer from communicating with other network devices. To make changes, use the printer control panel.
NOTE: The printer setting must match the setting for the network device (a network hub, switch, gateway,
router, or computer).
NOTE: Making changes to these settings causes the printer to turn o and then on. Make changes only when
the printer is idle.
1. On the printer control panel, press the OK button.
2. Open the following menus:
●
Network Setup
●
Link Speed
3. Select one of the following options:
54 Chapter 5 Manage the printer ENWW
Page 63

●
Automatic: The print server automatically congures itself for the highest link speed and
communication mode allowed on the network.
●
10T Full: 10 megabytes per second (Mbps), full-duplex operation
●
10T Half: 10 Mbps, half-duplex operation
●
100TX Full: 100 Mbps, full-duplex operation
●
100TX Half: 100 Mbps, half-duplex operation
●
1000T Full: 1000 Mbps, full-duplex operation
4. Press the OK button. The printer turns o and then on.
ENWW Congure IP network settings 55
Page 64

Printer security features
Introduction
The printer includes several security features to restrict who has access to conguration settings, to secure data,
and to prevent access to valuable hardware components.
●
Assign or change the system password using the HP Embedded Web Server
●
Lock the formatter
Assign or change the system password using the HP Embedded Web Server
Assign an administrator password for access to the printer and the HP Embedded Web Server so that
unauthorized users cannot change the printer settings.
1. Open the HP Embedded Web Server (EWS):
a. On the printer control panel, press the OK button. Open the Network Setup menu, and then select
Show IP Address to display the IP address or host name.
b. Open a Web browser, and in the address line, type the IP address or host name exactly as it displays
on the printer control panel. Press the Enter key on the computer keyboard. The EWS opens.
NOTE: If the Web browser displays a message indicating that accessing the Web site might not be
safe, select the option to continue to the Web site. Accessing this Web site will not harm the
computer.
2. On the System tab, click the Administration link in the left navigation pane.
3. In the area labeled Product Security, enter the password in the Password eld.
4. Re-enter the password in the Conrm Password eld.
5. Click the Apply button.
NOTE: Make note of the password and store it in a safe place.
Lock the formatter
The formatter has a slot that you can use to attach a security cable. Locking the formatter prevents someone
from removing valuable components from it.
56 Chapter 5 Manage the printer ENWW
Page 65

Energy-conservation settings
●
Introduction
●
Print with EconoMode
●
Set the Auto Power Down delay and congure the printer to use 1 watt or less of power
●
Set the Delay Shut Down setting
Introduction
The printer includes several economy features to conserve energy and supplies.
Print with EconoMode
This printer has an EconoMode option for printing drafts of documents. Using EconoMode can use less toner.
However, using EconoMode can also reduce print quality.
HP does not recommend the full-time use of EconoMode. If EconoMode is used full-time, the toner supply might
outlast the mechanical parts in the toner cartridge. If print quality begins to degrade and is no longer acceptable,
consider replacing the toner cartridge.
NOTE: If this option is not available in your print driver, you can set it using the HP Embedded Web Server.
1. From the software program, select the Print option.
2. Select the printer, and then click the Properties or Preferences button.
3. Click the Paper/Quality tab.
4. Click the EconoMode check box.
Set the Auto Power Down delay and congure the printer to use 1 watt or less of power
Use the control panel menus to set the amount of time before the printer shuts down.
NOTE: After the printer shuts down, the power consumption is 1 watt or less.
Complete the following procedure to change the Shut Down After Delay setting:
1. On the printer control panel, press the OK button.
2. Open the following menus:
●
System Setup
●
Energy Settings
●
Shut Down After
3. Select the time for the Shut Down After delay.
NOTE: The default value is 4 hours.
ENWW Energy-conservation settings 57
Page 66

Set the Delay Shut Down setting
Use the control panel menus to select whether or not the printer delays shutting down after the power button is
pressed.
Complete the following procedure to change the Delay Shut Down setting:
1. On the printer control panel, touch the OK button.
2. Open the following menus:
●
System Setup
●
Energy Settings
●
Delay Shut Down
3. Select one of the delay options:
●
No Delay: The printer shuts down after a period of inactivity determined by the Shut Down After
setting.
●
When Ports Are Active: When this option is selected the printer will not shut down unless all ports are
inactive. An active network link or fax connection will prevent the printer from shutting down.
58 Chapter 5 Manage the printer ENWW
Page 67

HP Web Jetadmin
HP Web Jetadmin is an award-winning, industry-leading tool for eciently managing a wide variety of
networked HP products, including printers, multifunction printers, and digital senders. This single solution allows
you to remotely install, monitor, maintain, troubleshoot, and secure your printing and imaging environment —
ultimately increasing business productivity by helping you save time, control costs, and protect your investment.
HP Web Jetadmin upgrades are periodically made available to provide support for specic product features. Go
to www.hp.com/go/webjetadmin for more information.
ENWW HP Web Jetadmin 59
Page 68

Update the rmware
HP oers periodic printer updates, new Web Services apps, and new features to existing Web Services apps.
Follow these steps to update the printer rmware for a single printer. When you update the rmware, Web
Service apps will update automatically.
There are two supported methods to perform a rmware update on this printer. Use only one of the following
methods to update the printer rmware.
Method one: Update the rmware using the control panel
Use these steps to load the rmware from the control panel (for network-connected printers only), and/or set
the printer to automatically load future rmware updates. For USB-connected printers, skip to method two.
1. Make sure the printer is connected to a wired (Ethernet) or wireless network with an active Internet
connection.
NOTE: The printer must be connected to the internet to update the rmware via a network connection.
2. On the printer control panel, press the OK button to open the Setup menu.
3. Scroll to and open the Service menu, and then open the LaserJet Update menu.
NOTE: If the LaserJet Update option is not listed, use method two.
4. Select Check for Update to check for updates.
NOTE: The printer automatically checks for an update, and if a newer version is detected, the update
process automatically starts.
5. Set the printer to automatically update the rmware when updates become available.
On the printer control panel, press the OK button to open the Setup menu.
Scroll to and open the Service menu, open the LaserJet Update menu, and then select the Manage Updates
menu.
Set the Allow Updates option to YES, and then set the Automatic Check option to ON.
Method two: Update the rmware using the Firmware Update Utility
Use these steps to manually download and install the Firmware Update Utility from HP.com.
NOTE: This method is the only rmware update option available for printers connected to the computer via a
USB cable. It also works for printers connected to a network.
NOTE: You must have a print driver installed in order to use this method.
1. Go to www.hp.com/go/support, click the Drivers & Software link, type the printer name in the search eld,
press the ENTER button, and then select the printer from the list of search results.
2. Select the operating system.
3. Under the Firmware section, locate the Firmware Update Utility.
4. Click Download, click Run, and then click Run again.
5. When the utility launches, select the printer from the drop-down list, and then click Send Firmware.
60 Chapter 5 Manage the printer ENWW
Page 69

NOTE: To print a conguration page to verify the installed rmware version before or after the update
process, click Print Cong.
6. Follow the on-screen instructions to complete the installation, and then click the Exit button to close the
utility.
ENWW Update the rmware 61
Page 70

62 Chapter 5 Manage the printer ENWW
Page 71

6 Solve problems
●
Customer support
●
Restore the factory-set defaults
●
A “Cartridge is low” or “Cartridge is very low” message displays on the printer control panel
●
Printer does not pick up paper or misfeeds
●
Clear paper jams
●
Improve print quality
●
Solve wired network problems
For more information:
The following information is correct at the time of publication. For current information, see www.hp.com/
support/ljM501.
HP's all-inclusive help for the printer includes the following information:
●
Install and congure
●
Learn and use
●
Solve problems
●
Download software and rmware updates
●
Join support forums
●
Find warranty and regulatory information
ENWW 63
Page 72

Customer support
Get telephone support for your country/region
Have the printer name, serial number, date of purchase, and
problem description ready
Get 24-hour Internet support, and download software utilities and
drivers
Order additional HP service or maintenance agreements www.hp.com/go/carepack
Register the printer www.register.hp.com
Country/region phone numbers are on the yer that was in the box
with the printer or at www.hp.com/support/.
www.hp.com/support/ljM501
64 Chapter 6 Solve problems ENWW
Page 73

Restore the factory-set defaults
Restoring the factory-set defaults returns all of the printer and network settings to the factory defaults. It will
not reset the page count, or tray size. To restore the printer to the factory-default settings, follow these steps.
CAUTION: Restoring the factory-set defaults returns all of the settings to the factory defaults, and it also
deletes any pages that are stored in the memory.
1. On the printer control panel, press the OK button.
2. Select Service.
3. Select the Restore Defaults option, and then press the OK button.
The printer automatically restarts.
ENWW Restore the factory-set defaults 65
Page 74

A “Cartridge is low” or “Cartridge is very low” message displays on the printer control panel
Cartridge is low: The printer indicates when a toner cartridge level is low. Actual toner cartridge life remaining
may vary. Consider having a replacement available to install when print quality is no longer acceptable. The toner
cartridge does not need to be replaced now.
Continue printing with the current cartridge until redistributing the toner no longer yields acceptable print
quality. To redistribute the toner, remove the toner cartridge from the printer and gently rock the cartridge back
and forth about its horizontal axis. For graphical representation, see cartridge replacement instructions. Reinsert
the toner cartridge into the printer and close the cover.
Cartridge is very low: The printer indicates when the toner cartridge level is very low. Actual toner cartridge life
remaining may vary. Consider having a replacement available to install when print quality is no longer
acceptable. The toner cartridge does not need to be replaced now unless the print quality is no longer
acceptable.
Once an HP toner cartridge has reached Very Low, HP’s Premium Protection Warranty on that toner cartridge has
ended.
Change the “Very Low” settings
You can change the way the printer reacts when supplies reach the Very Low state. You do not have to reestablish these settings when you install a new toner cartridge.
1. On the printer control panel, press the OK button.
2. Open the following menus:
●
●
●
●
3. Select one of the following options:
●
●
●
Order supplies
System Setup
Supply Settings
Black Cartridge or Color Cartridges
Very Low Setting
Select the Continue option to set the printer to alert you that the toner cartridge is very low, but to
continue printing.
Select the Stop option to set the printer to stop printing until you replace the toner cartridge.
Select the Prompt option to set the printer to stop printing and prompt you to replace the toner
cartridge. You can acknowledge the prompt and continue printing. A customer congurable option on
this printer is "Prompt to Remind Me in 100 pages, 200 pages, 300 pages, 400 pages, or never." This
option is provided as a customer convenience and is not an indication these pages will have
acceptable print quality.
Order supplies and paper
66 Chapter 6 Solve problems ENWW
www.hp.com/go/suresupply
Page 75

Order through service or support providers Contact an HP-authorized service or support provider.
Order using the HP Embedded Web Server (EWS) To access, in a supported Web browser on your computer, enter the
printer IP address or host name in the address/URL eld. The EWS
contains a link to the HP SureSupply Web site, which provides
options for purchasing Original HP supplies.
ENWW A “Cartridge is low” or “Cartridge is very low” message displays on the printer control panel 67
Page 76

Printer does not pick up paper or misfeeds
Introduction
The following solutions can help solve problems if the printer is not picking up paper from the tray or is picking
up multiple sheets of paper at one time. Either of these situations can result in paper jams.
●
The printer does not pick up paper
●
The printer picks up multiple sheets of paper
The printer does not pick up paper
If the printer does not pick up paper from the tray, try these solutions.
1. Open the printer and remove any jammed sheets of paper. Verify that no torn remnants of paper remain
inside the printer.
2. Load the tray with the correct size of paper for the job.
3. Make sure the paper size and type are set correctly on the printer control panel.
68 Chapter 6 Solve problems ENWW
Page 77

4. Make sure the paper guides in the tray are adjusted correctly for the size of paper. Adjust the guides to the
appropriate indentation in the tray. The arrow on the tray guide should line up exactly with the marking on
the tray.
NOTE: Do not adjust the paper guides tightly against the paper stack. Adjust them to the indentations or
markings in the tray.
The following images show examples of the paper-size indentations in the trays for various printers. Most
HP printers have markings similar to these.
Figure 6-1 Size markings for Tray 1 or the multipurpose tray
Figure 6-2 Size markings for cassette trays
ENWW Printer does not pick up paper or misfeeds 69
Page 78

5. Verify that the humidity in the room is within specications for this printer and that paper is being stored in
1
2
unopened packages. Most reams of paper are sold in moisture-proof wrapping to keep paper dry.
In high-humidity environments, paper at the top of the stack in the tray can absorb moisture, and it might
have a wavy or uneven appearance. If this happens, remove the top 5 to 10 sheets of paper from the stack.
In low-humidity environments, excess static electricity can cause sheets of paper to stick together. If this
happens, remove the paper from the tray, and ex the stack by holding it at each end and bringing the
ends up to form a U shape. Then, rotate the ends down to reverse the U shape. Next, hold each side of the
stack of paper, and repeat this process. This process releases individual sheets without introducing static
electricity. Straighten the paper stack against a table before returning it to the tray.
Figure 6-3 Technique for exing the paper stack
6. Check the printer control panel to see if it is displaying a prompt to feed the paper manually. Load paper,
and continue.
7. The rollers above the tray might be contaminated. Clean the rollers with a lint-free cloth dampened with
warm water. Use distilled water, if it is available.
CAUTION: Do not spray water directly on to the printer. Instead, spray water on the cloth or dab the cloth
in water and wring it out before cleaning the rollers.
The following image shows examples of the roller location for various printers.
Figure 6-4 Roller locations for Tray 1 or the multipurpose tray
The printer picks up multiple sheets of paper
If the printer picks up multiple sheets of paper from the tray, try these solutions.
1. Remove the stack of paper from the tray and ex it, rotate it 180 degrees, and ip it over. Do not fan the
paper. Return the stack of paper to the tray.
70 Chapter 6 Solve problems ENWW
Page 79

NOTE: Fanning the paper introduces static electricity. Instead of fanning the paper, ex the stack by
1
2
holding it at each end and bringing the ends up to form a U shape. Then, rotate the ends down to reverse
the U shape. Next, hold each side of the stack of paper, and repeat this process. This process releases
individual sheets without introducing static electricity. Straighten the paper stack against a table before
returning it to the tray.
Figure 6-5 Technique for exing the paper stack
2. Use only paper that meets HP specications for this printer.
3. Verify that the humidity in the room is within specications for this printer, and that paper is being stored in
unopened packages. Most reams of paper are sold in moisture-proof wrapping to keep paper dry.
In high-humidity environments, paper at the top of the stack in the tray can absorb moisture, and it might
have a wavy or uneven appearance. If this happens, remove the top 5 to 10 sheets of paper from the stack.
In low-humidity environments, excess static electricity can cause sheets of paper to stick together. If this
happens, remove the paper from the tray, and ex the stack as described above.
4. Use paper that is not wrinkled, folded, or damaged. If necessary, use paper from a dierent package.
ENWW Printer does not pick up paper or misfeeds 71
Page 80

5. Make sure the tray is not overlled by checking the stack-height markings inside the tray. If it is overlled,
remove the entire stack of paper from the tray, straighten the stack, and then return some of the paper to
the tray.
The following images show examples of the stack-height markings in the trays for various printers. Most
HP printers have markings similar to these. Also make sure that all sheets of paper are below the tabs near
the stack-height marks. These tabs help hold the paper in the correct position as it enters the printer.
Figure 6-6 Stack-height markings
Figure 6-7 Tab for the paper stack
72 Chapter 6 Solve problems ENWW
Page 81

6. Make sure the paper guides in the tray are adjusted correctly for the size of paper. Adjust the guides to the
appropriate indentation in the tray. The arrow on the tray guide should line up exactly with the marking on
the tray.
NOTE: Do not adjust the paper guides tightly against the paper stack. Adjust them to the indentations or
markings in the tray.
The following images show examples of the paper-size indentations in the trays for various printers. Most
HP printers have markings similar to these.
Figure 6-8 Size markings for Tray 1 or the multipurpose tray
Figure 6-9 Size markings for cassette trays
7. Make sure the printing environment is within recommended specications.
ENWW Printer does not pick up paper or misfeeds 73
Page 82

Clear paper jams
1
2
3
4
Introduction
The following information includes instructions for clearing paper jams from the printer.
●
Jam locations
●
Experiencing frequent or recurring paper jams?
●
Clear paper jams in Tray 1
●
Clear paper jams in Tray 2 and the 550-sheet tray
●
Clear paper jams in the toner-cartridge area
●
Clear paper jams in the rear door and the fuser area (M501n models)
●
Clear paper jams in the output bin
●
Clear paper jams in the duplexer (M501dn models)
Jam locations
1 Output bin
2 Top cover and toner-cartridge area
3 Tray 1
4 Tray 2 and the optional 1 x 550-sheet feeder
NOTE: M501dn models: Remove Tray 2 to access jams in the duplexer.
74 Chapter 6 Solve problems ENWW
Page 83

Experiencing frequent or recurring paper jams?
Follow these steps to solve problems with frequent paper jams. If the rst step does not resolve the problem
continue with the next step until you have resolved the problem.
1. If paper has jammed in the printer, clear the jam and then print a conguration page to test the printer.
2. Check that the tray is congured for the correct paper size and type on the printer control panel. Adjust
paper settings if necessary.
a. On the printer control panel, press the OK button.
b. Open the following menus:
●
System Setup
●
Paper Setup
c. Select the tray from the list.
d. Select Paper Type and then select the type of paper that is in the tray.
e. Select Paper Size and then select the size of paper that is in the tray.
3. Turn the printer o, wait 30 seconds, and then turn it on again.
4. Print a cleaning page to remove excess toner from inside the printer.
a. On the printer control panel, press the OK button.
b. Open the following menus:
●
Service
●
Cleaning Page
c. Load plain letter or A4 paper when you are prompted, and then press the OK button.
A Cleaning message displays on the printer control panel. Wait until the process is complete. Discard
the page that prints.
5. Print a conguration page to test the printer.
a. On the printer control panel, press the OK button.
b. Open the Reports menu.
c. Select Conguration Report.
If none of these steps resolves the problem, the printer might need service. Contact HP customer support.
ENWW Clear paper jams 75
Page 84
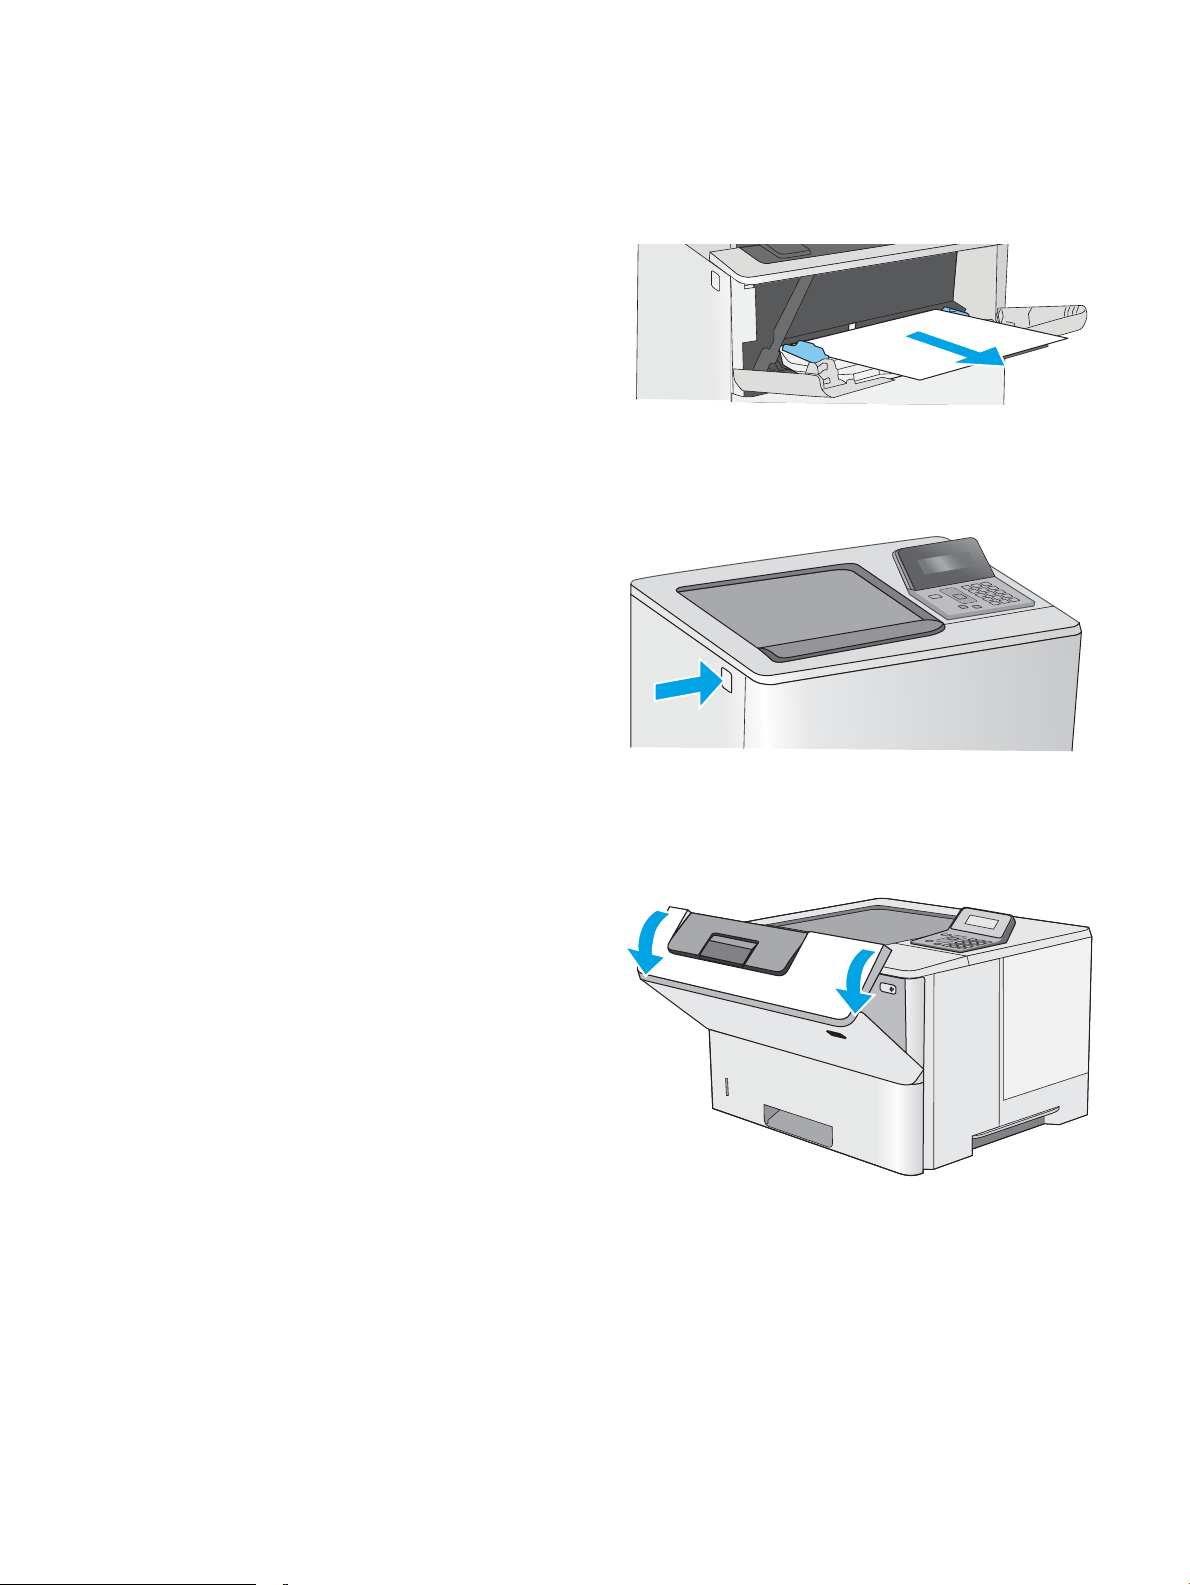
Clear paper jams in Tray 1
Use the following procedure to clear paper jams in Tray 1. When a jam occurs, the control panel displays an error
message that assists in clearing the jam.
1. If most of the sheet of paper is visible in the tray,
slowly pull the jammed paper out of the printer.
Make sure that the entire sheet is removed. If it
tears, continue with the following steps to nd the
remnants.
If most of the sheet of paper has been pulled
inside the printer, continue with the following
steps.
2. Press the top-cover-release button on the left side
of the printer.
3. Open the front door.
76 Chapter 6 Solve problems ENWW
Page 85

4. Remove the toner cartridge.
5. Lift the jam-access cover and slowly remove any
jammed paper. Be careful not to tear the paper.
ENWW Clear paper jams 77
Page 86

6. Reinsert the toner cartridge.
7. Close the front door.
78 Chapter 6 Solve problems ENWW
Page 87

Clear paper jams in Tray 2 and the 550-sheet tray
B6
11
14
Use the following procedure to check for paper in all possible jam locations related to Tray 2 and the 550-sheet
tray. When a jam occurs, the control panel displays an error message that assists in clearing the jam.
1. Remove the tray from the printer.
2. Remove the paper from the tray, and discard any
damaged paper.
3. Verify that the rear paper guide is adjusted to the
indentation for the correct paper size. If necessary,
pinch the release and move the rear paper guide to
the correct position. It should click into place.
NOTE: When the tray is extended, the paper size
indicator changes from "A4" to "14".
ENWW Clear paper jams 79
Page 88

4. Load the paper into the tray. Make sure that the
stack is at at all four corners and that the top of
the stack is below the maximum-height indicators.
5. Reinsert and close the tray.
6. Press the top-cover-release button on the left side
of the printer.
80 Chapter 6 Solve problems ENWW
Page 89

7. Open the front door.
8. Remove the toner cartridge.
9. Lift the jam-access cover and slowly remove any
jammed paper. Be careful not to tear the paper.
ENWW Clear paper jams 81
Page 90

10. Reinsert the toner cartridge.
11. Close the front door.
82 Chapter 6 Solve problems ENWW
Page 91

Clear paper jams in the toner-cartridge area
Use the following procedure to check for paper in all possible jam locations in the toner-cartridge area. When a
jam occurs, the control panel displays an error message that assists in clearing the jam.
1. Press the top-cover-release button on the left side
of the printer.
2. Open the front door.
3. Remove the toner cartridge.
ENWW Clear paper jams 83
Page 92

4. Lift the jam-access cover and slowly remove any
jammed paper. Be careful not to tear the paper.
5. Reinsert the toner cartridge.
6. Close the front door.
84 Chapter 6 Solve problems ENWW
Page 93

Clear paper jams in the rear door and the fuser area (M501n models)
Use the following procedure to clear paper jams in the rear door and fuser area. When a jam occurs, the control
panel displays an error message that assists in clearing the jam.
NOTE: The fuser is hot while the printer is in use. Wait for the fuser to cool before clearing jams.
1. Open the rear door.
ENWW Clear paper jams 85
Page 94

2. Remove any jammed paper.
3. Close the rear door.
86 Chapter 6 Solve problems ENWW
Page 95

Clear paper jams in the output bin
Use the following procedure to check for paper in all possible jam locations in the output bin. When a jam occurs,
the control panel displays an error message that assists in clearing the jam.
1. If paper is visible in the output bin, grasp the
leading edge and remove it.
Clear paper jams in the duplexer (M501dn models)
Use the following procedure to check for paper in all possible jam locations in the automatic duplexer. When a
jam occurs, the control panel displays an error message that assists in clearing the jam.
1. Remove Tray 2 from the printer.
2. Pull forward on the green tab inside the tray area
to release the duplex pan.
ENWW Clear paper jams 87
Page 96

3. Remove any jammed paper.
4. Close the duplex pan.
5. Reinsert and close the tray.
88 Chapter 6 Solve problems ENWW
Page 97

6. Open the rear door.
7. Remove any jammed paper.
8. Close the rear door.
ENWW Clear paper jams 89
Page 98

9. Press the top-cover-release button on the left side
of the printer.
10. Open the front door.
11. Remove the toner cartridge.
90 Chapter 6 Solve problems ENWW
Page 99

12. Lift the jam-access cover and slowly remove any
jammed paper. Be careful not to tear the paper.
13. Reinsert the toner cartridge.
14. Close the front door.
ENWW Clear paper jams 91
Page 100

Improve print quality
Introduction
●
Print from a dierent software program
●
Check the paper-type setting for the print job
●
Check the toner-cartridge status
●
Clean the printer
●
Visually inspect the toner cartridge
●
Check paper and the printing environment
●
Check the EconoMode settings
●
Try a dierent print driver
If the printer is having print-quality problems, try the following solutions in the order presented to resolve the
issue.
Print from a dierent software program
Try printing from a dierent software program. If the page prints correctly, the problem is with the software
program from which you were printing.
Check the paper-type setting for the print job
Check the paper type setting when printing from a software program and the printed pages have smears, fuzzy
or dark print, curled paper, scattered dots of toner, loose toner, or small areas of missing toner.
Check the paper type setting (Windows)
1. From the software program, select the Print option.
2. Select the printer, and then click the Properties or Preferences button.
3. Click the Paper/Quality tab.
4. From the Paper Type drop-down list, click the More... option.
5. Expand the list of Type is: options.
6. Expand the category of paper types that best describes your paper.
7. Select the option for the type of paper you are using, and click the OK button.
8. Click the OK button to close the Document Properties dialog box. In the Print dialog box, click the OK button
to print the job.
Check the paper type setting (OS X)
1. Click the File menu, and then click the Print option.
2. In the Printer menu, select the printer.
92 Chapter 6 Solve problems ENWW
 Loading...