

Page 1

User Guide
HP LaserJet MFP M232-M237 series
Page 2

HP company notices
THE INFORMATION CONTAINED HEREIN IS SUBJECT TO CHANGE WITHOUT NOTICE.
ALL RIGHTS RESERVED. REPRODUCTION, ADAPTATION, OR TRANSLATION OF THIS MATERIAL IS PROHIBITED WITHOUT PRIOR WRITTEN PERMISSION OF
HP, EXCEPT AS ALLOWED UNDER THE COPYRIGHT LAWS. THE ONLY WARRANTIES FOR HP PRODUCTS AND SERVICES ARE SET FORTH IN THE EXPRESS
WARRANTY STATEMENTS ACCOMPANYING SUCH PRODUCTS AND SERVICES. NOTHING HEREIN SHOULD BE CONSTRUED AS CONSTITUTING AN ADDITIONAL
WARRANTY. HP SHALL NOT BE LIABLE FOR TECHNICAL OR EDITORIAL ERRORS OR OMISSIONS CONTAINED HEREIN.
© Copyright 2020 HP Development Company, L.P.
Microsoft and Windows are either registered trademarks or trademarks of Microsoft Corporation in the United States and/or other countries.
Mac, OS X, macOS, and AirPrint are trademarks of Apple Inc., registered in the U.S. and other countries.
ENERGY STAR and the ENERGY STAR mark are registered trademarks owned by the U.S. Environmental Protection Agency.
Android is a trademark of Google LLC.
iOS is a trademark or registered trademark of Cisco in the U.S. and other countries and is used under license.
Safety information
Always follow basic safety precautions when using this product to reduce risk of injury from re or electric shock.
- Read and understand all instructions in the documentation that comes with the printer.
- Observe all warnings and instructions marked on the product.
- Unplug this product from wall outlets before cleaning.
- Do not install or use this product near water, or when you are wet.
- Install the product securely on a stable surface.
- Install the product in a protected location where no one can step on or trip over the line cord, and the line cord cannot be damaged.
- If the product does not operate normally, see Solve problems.
- There are no user-serviceable parts inside. Refer servicing to qualied service personnel.
Page 3

Table of contents
1 Get started .................................................................................................................................................... 1
Printer views .......................................................................................................................................................... 2
Control panel features ........................................................................................................................................... 5
Use the HP Smart app to print, scan, and manage ............................................................................................. 11
2 Connect your printer .................................................................................................................................... 12
Connect your printer to a Wi-Fi network using HP Smart ................................................................................... 13
Connect your printer to a Wi-Fi network using Wi-Fi Protected Setup (WPS) .................................................... 14
Connect your printer to an Ethernet network ..................................................................................................... 15
Connect your printer using a USB cable .............................................................................................................. 16
Change wireless settings ..................................................................................................................................... 17
Change the connection type ................................................................................................................................ 19
3 Load media ................................................................................................................................................. 20
Load paper ........................................................................................................................................................... 21
Load envelopes .................................................................................................................................................... 23
Load labels ........................................................................................................................................................... 24
Load an original on the scanner glass ................................................................................................................. 25
Load an original in the document feeder (some models only) ........................................................................... 27
4 Print ........................................................................................................................................................... 28
Print from a Windows computer .......................................................................................................................... 29
Print from a Mac computer .................................................................................................................................. 30
Print with mobile devices .................................................................................................................................... 31
5 Copy and scan .............................................................................................................................................. 32
Make a copy .......................................................................................................................................................... 33
Copy an identication (ID) card ............................................................................................................................ 34
Scan using HP Smart (iOS/Android, Windows 10, and macOS) ........................................................................... 36
Scan using the HP Scan software (Windows 7) ................................................................................................... 37
ENWW iii
Page 4

6 Congure your printer .................................................................................................................................. 38
Use Web Services ................................................................................................................................................. 39
Update the printer ............................................................................................................................................... 40
Congure the printer using the Embedded Web Server (EWS) ........................................................................... 41
7 Supplies, accessories, and parts ................................................................................................................... 45
Order supplies, accessories, and parts ................................................................................................................ 46
Congure the HP toner-cartridge-protection supply settings ........................................................................... 48
Enable or disable the Cartridge Policy feature .................................................................................................... 49
Replace the toner cartridge ................................................................................................................................. 50
8 Solve problems ............................................................................................................................................ 52
HP support ........................................................................................................................................................... 53
Interpret control-panel light patterns ................................................................................................................. 54
Interpret printer display codes ............................................................................................................................ 58
Print printer reports ............................................................................................................................................. 61
Restore original factory defaults and settings ................................................................................................... 62
Cartridge low ........................................................................................................................................................ 63
Printer does not pick up paper or misfeeds ........................................................................................................ 64
Clear paper jams .................................................................................................................................................. 67
Improve print quality ........................................................................................................................................... 78
Resolving print quality problems ........................................................................................................................ 82
Improve copy and scan image quality ................................................................................................................. 89
Solve wireless network problems ....................................................................................................................... 91
Solve Ethernet connection problems .................................................................................................................. 95
Appendix A Printer specications .................................................................................................................... 96
Technical specications ....................................................................................................................................... 96
System requirements .......................................................................................................................................... 96
Printer dimensions .............................................................................................................................................. 97
Power consumption, electrical specications, and acoustic emissions ............................................................. 98
Operating-environment range ............................................................................................................................ 98
Warning icons ....................................................................................................................................................... 99
Laser Warning .................................................................................................................................................... 100
Appendix B Service and support ..................................................................................................................... 101
HP limited warranty statement ......................................................................................................................... 102
HP's Premium Protection Warranty: LaserJet toner cartridge limited warranty statement ........................... 115
HP policy on non-Original HP supplies .............................................................................................................. 116
HP anticounterfeit Web site .............................................................................................................................. 117
iv ENWW
Page 5

Data stored on the toner cartridge ................................................................................................................... 118
End User License Agreement ............................................................................................................................. 119
Customer self-repair warranty service ............................................................................................................. 124
Customer support .............................................................................................................................................. 125
Appendix C Environmental product stewardship program ................................................................................ 126
Protecting the environment .............................................................................................................................. 127
Ozone production .............................................................................................................................................. 127
Power consumption ........................................................................................................................................... 127
Toner consumption ............................................................................................................................................ 127
Paper use ........................................................................................................................................................... 128
Plastics ............................................................................................................................................................... 128
HP LaserJet print supplies ................................................................................................................................. 128
Paper .................................................................................................................................................................. 128
Material restrictions .......................................................................................................................................... 128
Disposal of waste equipment by users (EU and India) ...................................................................................... 129
Electronic hardware recycling ........................................................................................................................... 129
Hardware recycling information (Brazil) ........................................................................................................... 130
Chemical substances ......................................................................................................................................... 130
Product Power Data per European Union Commission Regulation 1275/2008 ............................................... 130
SEPA Ecolabel User Information (China) ........................................................................................................... 131
The regulation of the implementation on China energy label for printer, and copier ..................................... 131
Restriction of Hazardous Substances statement (India) .................................................................................. 131
WEEE (Turkey) .................................................................................................................................................... 131
The Table of Hazardous Substances/Elements and their Content (China) ....................................................... 132
Material Safety Data Sheet (MSDS) ................................................................................................................... 132
EPEAT ................................................................................................................................................................. 133
Declaration of the Presence Condition of the Restricted Substances Marking (Taiwan) ................................. 134
For more information ........................................................................................................................................ 135
Appendix D Regulatory information ............................................................................................................... 136
Regulatory statements ..................................................................................................................................... 137
Wireless statements .......................................................................................................................................... 143
Index ........................................................................................................................................................... 147
ENWW v
Page 6

vi ENWW
Page 7

1 Get started
●
Printer views
●
Control panel features
●
Use the HP Smart app to print, scan, and manage
ENWW 1
Page 8

Printer views
●
Printer front view (d/dw model)
●
Printer front view (sdn/sdw model)
●
Printer back view
Printer front view (d/dw model)
Feature Description
1 Scanner lid
2 Scanner glass
3 Control panel
4 Output tray/cartridge access door
5 Status light (some models only). For more information, see Light patterns.
White Idle, sleep, or working
Amber Needs attention because an error has occurred
Blue Wireless network connection status
Green Starting up, processing, or updating
Purple Wireless setup mode
6 Tray cover
7 Input tray
2 Chapter 1 Get started ENWW
Page 9

Printer front view (sdn/sdw model)
Feature Description
1 Document feeder door
2 Document feeder
3 Tray cover
4 Input tray
5 Scanner lid
6 Scanner glass
7 Output tray/cartridge access door
8 Control panel
ENWW Printer views 3
Page 10

Printer back view
Feature Description
1 Rear USB port
2 Ethernet port (some models only)
3 Power input
4 Rear access door
5 Security slot
4 Chapter 1 Get started ENWW
Page 11

Control panel features
●
Control panel view (d/dw model)
●
Control panel view (sdn/sdw model)
●
Control panel display
Control panel view (d/dw model)
Feature Description
1 Control panel lights
Wireless button
(some models
only)
Paper light The Paper light blinks when the input tray is out of paper, or when there is a paper
Attention light
(USB model
only)
Press (the Wireless button) to turn wireless capability on or o. For more
information, see
Press and hold (the Wireless button) to set up wireless using WPS.
error.
The Attention light is on or blinks when the printer requires user attention. For more
information, see Interpret control-panel light patterns.
Wireless status of the printer.
ENWW Control panel features 5
Page 12

Cartridge light When the Cartridge light is on, it indicates that the cartridge is low on toner. If the
Cartridge light blinks, you can continue printing until the Attention light blinks or the
status light shows amber.
If the Cartridge light blinks and the Attention light is on or the status bar shows
amber, a problem with the cartridge has occurred. Reinstall or replace the cartridge to
continue printing. See Remove and replace the toner cartridge.
Open Lid light This light ashes during the ID Card Copy mode. Open the lid and turn the original
over to copy the second side.
2 Control panel
display
3 Copy Options
4 Copy button/
5 ID Card copy
6 Information
For a list of printer display codes, see Interpret printer display codes.
light
button
button/light
Use (the Menu button) and (the Minus button) and (the Plus
button) as follows:
1. Press (the Plus/Minus button) to adjust the number of copies to print.
2. Press (the Menu button) to move to the next option, (the Contrast
setting icon).
3.
Press (the Plus/Minus button) to adjust the contrast.
Press this button to start a copy job.
Press this button to start the process of copying a two-sided identication card or
similar document. See Copy an identication (ID) card.
Press (the Information button) to print a summary of printer settings and
status. If a printer error occurs,
(the Information button) lights up or blinks.
Press the button, check and follow the instructions on the printed page to resolve the
error.
If (the Information button) blinks while setting up wireless, press this button
to complete authorization.
7 Resume button/
light
8 Cancel button/
light
9 Power button
10 Status light
(some models
only)
If the Resume light is on, the printer needs attention. Press (the Resume
button) to acknowledge and resume printing.
Press (the Cancel button) to cancel a job.
Press (the Power button) to turn the printer on or o.
When the Status light is on, the printer is ready to print. When the light is blinking, the
printer is starting up, receiving print data, or canceling a job. When the light dims, the
printer is in Sleep Mode (a low-power state).
6 Chapter 1 Get started ENWW
Page 13

Control panel view (sdn/sdw model)
Feature Description
1 Power button
2 Status light When the Status light is on, the printer is ready to print. When the light is
3 Control panel lights
Paper light The Paper light blinks when the input tray is out of paper, or when there is a
Attention light The Attention light is on or blinks when the printer requires user attention. For
Cartridge light When the Cartridge light is on, it indicates that the cartridge is low on toner. If
Open Lid light This light ashes during the ID Copy mode. Open the lid and turn the original
4 Control panel
display
For a list of printer display codes, see Interpret printer display codes.
Press (the Power button) to turn the printer on or o.
blinking, the printer is starting up, receiving print data, or canceling a job. When
the light dims, the printer is in Sleep Mode (a low-power state).
paper error.
more information, see Interpret control-panel light patterns..
the Cartridge light blinks, you can continue printing until the Attention light
blinks or the status light shows amber.
If the Cartridge light blinks and the Attention light is on or the status bar shows
amber, a problem with the cartridge has occurred. Reinstall or replace the
cartridge to continue printing. See Remove and replace the toner cartridge.
over to copy the second side.
ENWW Control panel features 7
Page 14

5 Copy Options
6 Copy button Press this button to start a copy job.
Use (the Menu button) and (the Minus button) and (the
Plus button) as follows:
1. Press (the Plus/Minus button) to adjust the number of copies to
print.
2. Press (the Menu button) to move to the next option, (the
Contrast setting icon).
3. Press (the Plus/Minus button) to adjust the contrast.
4. Press (the Menu button) to move to the next option, (the
Reduce/Enlarge setting icon).
5. Press (the Plus/Minus button) to adjust the size.
7 ID Card copy
button
8 Information
button/light
9 Wireless
button (some
models only)
10 Resume
button/light
11 Cancel button/
light
Press this button to start the process of copying a two-sided identication card
or similar document. See Copy an identication (ID) card.
Press (the Information button) to print a summary of printer settings and
status. If a printer error occurs,
blinks. Press the button, check and follow the instructions on the printed page to
resolve the error.
If (the Information button) blinks while setting up wireless, press this
button to complete authorization.
Press (the Wireless button) to turn wireless capability on or o. For more
information, see
Press and hold (the Wireless button) to set up wireless using WPS.
If the Resume light is on, the printer needs attention. Press (the Resume
button) to acknowledge and resume printing.
Press (the Cancel button) to cancel a job.
Wireless status of the printer.
(the Information button) lights up or
8 Chapter 1 Get started ENWW
Page 15

Control panel display
Control panel elements
The printer has the following control panel elements.
Feature Description
1 Wireless icon (some models only) If the wireless icon is lit, then there is a stable wireless connection. If an
exclamation icon appears beside the wireless icon, see Wireless status
of the printer.
2 Ethernet icon This indicates the printer is connected through a wired (Ethernet)
connection.
3 Wi-Fi Direct icon (wireless model
only)
4 Character display Depending on the current mode, the characters display the following:
5 Reduce/Enlarge (scale) icon When displayed, the character display shows the current scaling factor
6 Lighter/Darker (contrast) icon When displayed, the character display shows the contrast setting (as a
7 Number of Copies icon When displayed, the character display shows the number of copies
The Wi-Fi Direct icon indicates that Wi-Fi Direct is on.
● Number of copies being printed
● Copy settings (contrast and the reduce/enlarge setting)
● Animation to show that the device is busy
● Error and status codes. For a list of printer display codes, see
Interpret printer display codes.
(in percent).
bar graphic).
currently selected for printing.
ENWW Control panel features 9
Page 16

Control panel modes
The appearance of the control panel display changes depending on the mode that the printer is in. Three
common display modes are shown below.
Copy mode
The display shows (the Number of Copies icon), and the number of copies
currently selected.
Contrast mode
The display shows (the Lighter/Darker icon), and the current setting.
Scale mode (some models only)
The display shows (the Reduce/Enlarge icon), and the current scale (as a
percentage of the original size).
10 Chapter 1 Get started ENWW
Page 17

Use the HP Smart app to print, scan, and manage
The HP Smart app can help you perform many dierent printer tasks, including the following:
● Set up and connect your printer.
● Print and scan documents and photos.
● Share documents through email and other applications.
● Manage printer settings, check printer status, print reports, and order supplies.
HP Smart is supported on mobile devices and computers running on iOS, Android, Windows 10, and macOS
10.13 and later.
NOTE: At this time, the HP Smart app might not be available in all languages. Some features are available
only on specic printers or models. HP Smart does not support all le formats. See Get more information
about HP Smart.
To install HP Smart and open the app
Complete the following steps to install and open HP Smart, connect your printer, and begin using the app.
1. Visit 123.hp.com to download and install HP Smart on your device.
NOTE:
● iOS, Android, Windows 10, and macOS devices: You can also download HP Smart from the
respective app stores for the device.
● Windows 7: You can download the HP printer software from 123.hp.com , install the software, and
connect the printer wirelessly using the software.
2. Open HP Smart after installation.
● iOS/Android: From the mobile device desktop or app menu, tap HP Smart.
● Windows 10: From the computer desktop, click Start, and then select HP Smart from the app list.
● macOS: From the Launchpad, select HP Smart.
3. Connect your printer wirelessly using HP Smart. See Connect your printer to a Wi-Fi network using HP
Smart.
4. When prompted, create an HP account and register the printer.
Get more information about HP Smart
To learn how to connect, print, and scan using HP Smart, visit the website for your device:
● iOS/Android: www.hp.com/go/hpsmart-help
● Windows 10: www.hp.com/go/hpsmartwin-help
● macOS: www.hp.com/go/hpsmartmac-help
ENWW Use the HP Smart app to print, scan, and manage 11
Page 18

2 Connect your printer
●
Connect your printer to a Wi-Fi network using HP Smart
●
Connect your printer to a Wi-Fi network using Wi-Fi Protected Setup (WPS)
●
Connect your printer to an Ethernet network
●
Connect your printer using a USB cable
●
Change wireless settings
●
Change the connection type
12 Chapter 2 Connect your printer ENWW
Page 19

Connect your printer to a Wi-Fi network using HP Smart
NOTE: This section is applicable to wireless printers only.
Install the HP Smart app on your computer or mobile device and use the app to set up or connect the printer
to your Wi-Fi network.
For information about HP Smart including where to download the app, see Use the HP Smart app to print,
scan, and manage.
1. Make sure your computer or mobile device is connected to your Wi-Fi network. On your mobile device,
turn on Bluetooth and location services.
NOTE: HP Smart uses Bluetooth for printer setup. It does not support Print using Bluetooth.
2. If your printer Wi-Fi was previously turned o, make sure to turn it on. For more information about
wireless status, see To turn on or o the wireless capabilities of the printer.
3. If the printer is no longer in wireless setup mode, restore the printer network settings. See To restore
network settings to default settings.
NOTE: For some printers or models, the purple light will start pulsing in the Status light bar or the
Wireless light will blink when the printer is in wireless setup mode.
4. Open the HP Smart app on your computer or mobile device. See Use the HP Smart app to print, scan, and
manage.
5. From HP Smart, click or tap (the Plus icon) or Add Printer, and then choose the option to select or
add a printer. If prompted, allow Bluetooth and location permissions.
Follow the instructions to add the printer to your network.
6. When prompted, create an HP account and register the printer.
NOTE: When the printer is connected successfully, the Wireless light stops blinking and remains lit (for all
Wireless models). See Printer views.
ENWW Connect your printer to a Wi-Fi network using HP Smart 13
Page 20

Connect your printer to a Wi-Fi network using Wi-Fi Protected Setup (WPS)
This wireless setup method can be used if your router has a WPS button. If the router does not have this
button, it is recommended that you connect the printer using the HP Smart app. See Connect your printer to a
Wi-Fi network using HP Smart.
1. Make sure your router and printer are not too far from each other.
2.
From the printer control panel, press and hold (the Wireless button) for at least 3 seconds to start
WPS.
The Wireless light blinks.
3. Press the WPS button on your router.
NOTE:
● Be sure to press the WPS button on the router within 2 minutes.
● When the printer is connected successfully, the Wireless light stops blinking and remains lit (for all
Wireless models). See Printer views.
4. Open the HP Smart app on your computer or mobile device. See Use the HP Smart app to print, scan, and
manage.
5. From HP Smart, click or tap (the Plus icon) or Add Printer, and then choose the option to select or
add a printer.
Follow the instructions to add the printer to your network.
6. When prompted, create an HP account and register the printer.
14 Chapter 2 Connect your printer ENWW
Page 21

Connect your printer to an Ethernet network
If your Ethernet network does not have an Internet connection, connect the printer wirelessly to the HP Smart
app. See Connect your printer to a Wi-Fi network using HP Smart.
1. Make sure your computer is connected to the router.
2. Connect your printer and router using an Ethernet cable. (Ethernet cable sold separately.)
NOTE:
● The Wi-Fi connection is automatically disabled when you connect the Ethernet cable.
● To connect the printer wirelessly, disconnect the Ethernet cable and connect the printer to your
wireless network using HP Smart. See Connect your printer to a Wi-Fi network using HP Smart.
3. Open the HP Smart app on your computer or mobile device. See Use the HP Smart app to print, scan, and
manage.
4. From HP Smart, click or tap (the Plus icon) or Add Printer, and then choose the option to select or
add a printer.
Follow the instructions to add the printer to your network.
5. When prompted, create an HP account and register the printer.
ENWW Connect your printer to an Ethernet network 15
Page 22

Connect your printer using a USB cable
1. Connect the printer and computer using a USB cable.
2. Open the HP Smart app on your computer. See Use the HP Smart app to print, scan, and manage.
3.
From HP Smart, click or tap (the Plus icon) or Add Printer, and then choose the option to select or
add a printer.
Follow the instructions to add the printer.
4. When prompted, create an HP account and register the printer.
16 Chapter 2 Connect your printer ENWW
Page 23

Change wireless settings
You can set up and manage the wireless connection for your printer. This includes printing information about
network settings, turning the wireless function on or o, and restoring wireless settings.
Wireless status of the printer
Wireless button
Wireless icon
O O Solid white light on the bar. The printer is not connected to the network.
On
(sdn/sdw model) Status light (d/dw model) Wi-Fi Status
On Solid light blue light on the bar. The printer is connected to the network.
Blinks The bar pulses light blue. The printer is trying to connect to a wireless
To turn on wireless, press (the
Wireless button).
To connect the printer to a Wi-Fi network, see
Connect your printer to a Wi-Fi network using
HP Smart or Connect your printer to a Wi-Fi
network using Wi-Fi Protected Setup (WPS).
network.
On (signal bar cycles)
On (signal bar cycles)
On (signal bar cycles)
Blinks Solid blue light pulses and then ashes
amber.
Blinks Purple light pulses on the bar. The printer is in wireless setup mode.
The printer is unable to connect to a wireless
network.
If the printer is unable to connect to a
wireless network,
blinks and Er/61 appears on the control
panel. Press
continue and then try connecting the printer
to the wireless network again. See Connect
your printer to a Wi-Fi network using Wi-Fi
Protected Setup (WPS).
If problem persists, try connecting using the
HP Smart app. See Connect your printer to a
Wi-Fi network using HP Smart.
(the Wireless icon)
(the Cancel button) to
ENWW Change wireless settings 17
Page 24

To turn on or o the wireless capabilities of the printer
Press (the Wireless button) to turn on or o the printer wireless capabilities.
To restore network settings to default settings
1.
Press and hold (the Information button) for 3 seconds, and then release the button. All control
panel buttons will light up.
Press and hold (the Wireless button) and (the Cancel button). The printer restarts and,
2.
depending on your printer model, the Status light pulses purple or
blinking blue. This indicates that the printer is in wireless setup mode. You can now set up a wireless
connection between the printer and your device.
NOTE: Use the HP Smart app to connect the printer wirelessly.
(the Wireless button) starts
18 Chapter 2 Connect your printer ENWW
Page 25

Change the connection type
USB to a wireless connection
Windows 10/macOS
1. Unplug the USB cable from the printer.
2. Make sure your computer or mobile device is connected to your Wi-Fi network. On your mobile device,
turn on Bluetooth and location services.
3. If your printer Wi-Fi was previously turned o, make sure to turn it on. For more information about
wireless status, see To turn on or o the wireless capabilities of the printer.
4. If the printer is no longer in wireless setup mode, restore the printer network settings. See To restore
network settings to default settings.
5. Open the HP Smart app on your computer or mobile device. See Use the HP Smart app to print, scan, and
manage.
6. When prompted, create an HP account and register the printer.
7. Follow the on-screen instructions to connect the printer to your Wi-Fi network.
Windows 7
1. Open the HP printer software.
If you have not installed the HP printer software on your computer, visit 123.hp.com to download and
install the printer software.
2. In the printer software, click Tools, and then click Device Setup & Software.
3. Select Convert a USB connected device to wireless. Follow the on-screen instructions.
Wireless to a USB connection
Windows/macOS
1. Connect the printer and computer using a USB cable.
2. Open the HP Smart app on your computer. See Use the HP Smart app to print, scan, and manage.
3. From HP Smart, click or tap (the Plus icon) or Add Printer, and then choose the option to select or
add a printer. Follow the instructions to add the printer.
4. When prompted, create an HP account and register the printer.
ENWW Change the connection type 19
Page 26

3 Load media
●
Load paper
●
Load envelopes
●
Load labels
●
Load an original on the scanner glass
●
Load an original in the document feeder (some models only)
20 Chapter 3 Load media ENWW
Page 27

Load paper
The following information describes how to load paper into the input tray.
NOTE: To avoid paper jams:
● Never add or remove paper from the input tray during printing.
● Before loading the input tray, remove all of the paper from the input tray and straighten the stack.
● Use paper that is not wrinkled, folded, or damaged.
● Always use 1 size paper. For example, do not place A5 paper over A4 size paper.
● Always push the paper guides to ensure paper does not slant/skew while picking up by printer.
To load paper
1. Remove paper from the input tray, if any.
TIP: To load Legal-size paper, lift the printer cover and, if necessary, leave it open. Depending on your
printer model, you might also need to lower the tray door.
2. Slide the paper guides to the edges of the input tray.
ENWW Load paper 21
Page 28

3. Insert the stack of paper into the input tray with the top forward and the side to be printed on facing up.
4. Slide the paper guides until they touch the edges of the media.
5. Lower the tray cover and extend the output tray.
22 Chapter 3 Load media ENWW
Page 29

Load envelopes
The following information describes how to load paper into the input tray.
For a list of supported sizes and tray capacity, visit www.hp.com/support/ljM232MFP . Click Product
information, and then click the product specications for your printer.
To load envelopes
1. Remove all paper from the input tray.
2. Insert the envelope into the middle of the input tray, with the short, postage end toward the back of the
tray. The side to be printed on should face up.
3. Slide the paper guides until they touch the edges of the media.
4. Lower the tray cover and extend the output tray.
ENWW Load envelopes 23
Page 30

Load labels
The following information describes how to load paper into the input tray.
For a list of supported sizes and tray capacity, visit www.hp.com/support/ljM232MFP . Click Product
information, and then click the product specications for your printer.
To load labels
1. Remove all paper from the input tray.
2. Insert the sheet of labels into the middle of the input tray, with the top edge of the sheet toward the
back of the tray. The side to be printed on should face up.
3. Slide the paper guides until they touch the edges of the media.
4. Lower the tray cover and extend the output tray.
24 Chapter 3 Load media ENWW
Page 31

Load an original on the scanner glass
You can copy or scan originals by loading them on the scanner glass.
NOTE:
● The scanner might not work correctly if the scanner glass and lid backing are not clean.
● Remove all originals from the document feeder tray before lifting the lid on the printer.
To load an original on the scanner glass
1. Lift the scanner lid.
ENWW Load an original on the scanner glass 25
Page 32

2. Load your original print-side down and align it with the marking on the rear left corner of the glass.
TIP: For more help on loading an original, refer to the engraved guides along the edge of the scanner
glass.
3. Close the lid.
26 Chapter 3 Load media ENWW
Page 33

Load an original in the document feeder (some models only)
You can copy or scan a document by placing it in the document feeder.
CAUTION: Do not load photos in the document feeder, this might cause damage to your photos. Use only
paper that is supported by the document feeder.
NOTE: Some features, such as the Fit to Page copy feature, do not work when you load your originals in the
document feeder. For those features to work, load your originals on the scanner glass.
To load an original in the document feeder
1. Load your original print-side up into the document feeder.
a. If you are loading an original printed in portrait orientation, place the pages so that the top edge of
the document goes in rst. If you are loading an original printed in landscape orientation, place the
pages so that the left edge of the document goes in rst.
b. Slide the paper into the document feeder until you hear a tone.
TIP: For more help on loading originals in the document feeder, refer to the diagram on the document
feeder tray.
2. Slide the paper-width guides inward until they stop at the left and right edges of the paper.
ENWW Load an original in the document feeder (some models only) 27
Page 34

4 Print
●
Print from a Windows computer
●
Print from a Mac computer
●
Print with mobile devices
NOTE: Depending on your printer, the Status light blinks or a solid green light appears on the bar when the
printer is initializing, cooling down, performing automatic cleaning routines, or shutting down.
To provide productive printing, this printer may automatically enter cool-down mode under certain
environmental conditions. This process might take several minutes. When the printer is cooling down, print
jobs might pause, but these jobs will continue when the engine is ready.
28 Chapter 4 Print ENWW
Page 35

Print from a Windows computer
1. Make sure you have installed the HP Smart app. See Use the HP Smart app to print, scan, and manage.
2. Open the document you wish to print.
3. From the File menu in your software program, select the Print option.
4. Click the button that opens the Properties dialog box.
Depending on your software application, this button might be called Properties, Options, Setup, or
Preferences.
5. Make sure your printer is selected.
6. Change any print settings, and Click OK.
7. Click Print or the OK button to print the job.
ENWW Print from a Windows computer 29
Page 36

Print from a Mac computer
1. Make sure you have installed the HP Smart app. See Use the HP Smart app to print, scan, and manage.
2. From the computer, open System Preference, and select Printers and Scanners.
3. Click + (the Add button/icon), select the printer from the printer list, and then click Add.
4. Once connected, open the document you wish to print and use the Print command.
5. Make sure the desired printer is selected.
6. Change any print settings.
7. Click Print to print the document.
30 Chapter 4 Print ENWW
Page 37

Print with mobile devices
You can use the HP Smart app to print documents and photos from your mobile device, social media account,
or cloud storage. See Use the HP Smart app to print, scan, and manage.
You can also print directly from your mobile devices using AirPrint (iOS) or HP Print Service Plugin (Android):
● iOS: Devices running iOS 4.2 or later have AirPrint pre-installed.
● Android: Download the HP Print Service Plugin from the Google Play Store or your favorite app store,
and then enable it on your device.
NOTE: You can print using HP Smart or AirPrint/HP Print Service Plugin when the mobile device is on the
same network as the printer or a dierent network (using Wi-Fi Direct).
Print while connected to same Wi-Fi network
You can print documents and photos from your mobile device when the device is on the same Wi-Fi network
as the printer.
Visit www.hp.com/go/mobileprinting for more information on mobile printing.
NOTE: Make sure your mobile device and printer are connected to the same Wi-Fi network. See Connect your
printer to a Wi-Fi network using HP Smart.
Print without connecting to same Wi-Fi network (Wi-Fi Direct)
With Wi-Fi Direct, you can directly connect your computer or mobile device to the printer and print wirelessly
—without connecting your computer or mobile device to an existing wireless network.
Visit www.hp.com/go/widirectprinting for more information on Wi-Fi Direct.
NOTE:
● Make sure Wi-Fi Direct on your printer is turned on. If Wi-Fi Direct is turned on, (the Wi-Fi Direct
icon) appears on the control panel display.
● Up to 5 computers and mobile devices can connect to the printer using Wi-Fi Direct connection.
To turn Wi-Fi Direct on or o from the control panel:
1. Press and hold (the Information button) for three seconds and then release the button.
All control panel buttons will light up.
2. Press (the Resume button) and (the Wireless button) at the same time.
TIP: Press (the Information button) to print a report to check Wi-Fi Direct status and password.
ENWW Print with mobile devices 31
Page 38

5 Copy and scan
●
Make a copy
●
Copy an identication (ID) card
●
Scan using HP Smart (iOS/Android, Windows 10, and macOS)
●
Scan using the HP Scan software (Windows 7)
32 Chapter 5 Copy and scan ENWW
Page 39

Make a copy
Follow these steps to make a copy from the scanner glass:
1. Load the document on the scanner glass according to the indicators on the printer.
2.
Press (the Menu button) to choose any of the following copy settings.
● Use (the Minus button) and (the Plus button) to adjust the number of copies to print.
● Select (the Lighter/Darker) setting, and then use (the Minus button) and (the
Press (the Copy button) to start copying.
3.
TIP: If your device has a camera, you can use the HP Smart app to scan a printed document or photo
with the device camera. You can then use HP Smart to edit, save, print, or share the image.
Plus button) to adjust the darkness setting for the current copy job.
ENWW Make a copy 33
Page 40

Copy an identication (ID) card
Use the ID Copy feature to copy both sides of identication card, or other small-size documents, onto the
same side of one sheet of paper. The printer prints both images at the same time.
1. Open the scanner lid and place the ID card on the top half of the scanner glass as shown.
2. Close the scanner lid and press (the ID Copy button) to start copying.
When the copying is done, (the Open Lid light) is lit and "P2" appears on the display.
34 Chapter 5 Copy and scan ENWW
Page 41

3. Open the scanner lid, ip over the ID card and place on the same section of the scanner glass.
4. Close the scanner lid and press (the Resume button) to start scanning the second side and print.
ENWW Copy an identication (ID) card 35
Page 42

Scan using HP Smart (iOS/Android, Windows 10, and macOS)
You can use the HP Smart app to scan documents or photos from the printer's scanner, and you can also scan
using your device camera. HP Smart includes editing tools that allow you to adjust the scanned image before
saving or sharing. You can print, save your scans locally or in cloud storage, and share them via email, SMS,
Facebook, Instagram, etc. To scan with HP Smart, follow the instructions provided in the appropriate section
below, depending on the type of device you are using.
● iOS/Android: www.hp.com/go/hpsmart-help
● Windows 10: www.hp.com/go/hpsmartwin-help
● macOS: www.hp.com/go/hpsmartmac-help
36 Chapter 5 Copy and scan ENWW
Page 43

Scan using the HP Scan software (Windows 7)
Use the HP Scan software to initiate scanning from software on your computer. You can save the scanned
image as a le or send it to another software application.
1. Load the document on the scanner glass according to the indicators on the printer.
2. Open the HP Printer software. From the computer desktop, click Start, select All Programs, click HP,
click the folder for the printer, and then select the printer name.
3. Select Scan, and then select Scan a Document or Photo.
4. Adjust the settings if necessary.
5. Click Scan.
ENWW Scan using the HP Scan software (Windows 7) 37
Page 44

6 Congure your printer
●
Use Web Services
●
Update the printer
●
Congure the printer using the Embedded Web Server (EWS)
38 Chapter 6 Congure your printer ENWW
Page 45

Use Web Services
The printer oers innovative, cloud-based solutions, such as print anywhere, scan-and-save to cloud, and
other services (including supplies auto replenishment). For more information, visit the HP Smart website
(www.hpsmart.com).
NOTE: To use these cloud-based solutions, the printer must be connected to the Internet. Unless otherwise
agreed, HP can modify or cancel these cloud-based solution oerings at its discretion.
Set up Web Services
1. Before you set up Web Services, make sure your printer is connected to the Internet.
2. Open the printer home page (the embedded web server or EWS). See To access and use the Embedded
Web Server (EWS).
3. Click the HP Web Services tab.
4. In Web Services Settings, click Enable, and follow the on-screen instructions to accept the terms of use.
5. If prompted, choose to allow the printer to check for and install printer updates.
NOTE:
● If prompted for a password, enter the PIN from the label on your printer. See Things to note when
accessing EWS.
● If prompted for proxy settings and if your network uses proxy settings, follow the on-screen
instructions to set up a proxy server. If you do not have the details, contact your network
administrator or the person who set up the network.
● If a printer update is available, the printer downloads and installs the update and then restarts
automatically. Repeat the instructions above to set up HP Web Services.
6. After the printer is connected to the HP server, the printer prints an information sheet. Follow the
instructions on the information sheet to nish setting up Web Services.
Remove Web Services
1. Open the printer home page (the embedded web server or EWS). See To access and use the Embedded
Web Server (EWS).
2. Click the HP Web Services tab.
3. In Web Services Settings, click Disable Web Services.
ENWW Use Web Services 39
Page 46

Update the printer
HP oers periodic printer updates to improve printer performance, x issues, or protect your printer against
potential security threats.
If your printer is connected to a Wi-Fi or Ethernet network with Internet access, the printer automatically
updates the printer when new updates are available. By default, the printer automatically checks for updates.
TIP: You can check to see if an update is available for the printer at any time. Learn more about checking for
printer updates.
40 Chapter 6 Congure your printer ENWW
Page 47

Congure the printer using the Embedded Web Server (EWS)
Use the Embedded Web Server (EWS) to manage printing functions from your computer.
● View printer status information
● Check the information and status of the printing supplies
● Receive notication of printer and supplies events
● View and change the network and the printer settings
To access and use the Embedded Web Server (EWS)
You can open EWS using one of the following:
● HP Smart app
● HP printer software
● Web browser using IP address
● Web browser using Wi-Fi Direct connection
Things to note when accessing EWS
● If the web browser displays a message indicating that the website is unsafe, select the option to
continue. Accessing the website will not harm your device.
● If prompted, enter the default user name and password of the printer.
– User Name: admin
– Password: Open the cartridge access door, and see the label inside the printer.
● Depending on how the printer is connected, some features in EWS might not be available.
● EWS is not accessible beyond the network rewall.
ENWW Congure the printer using the Embedded Web Server (EWS) 41
Page 48

To open EWS using HP Smart (iOS, Android, and Windows 10)
1. Open the HP Smart app on your computer or mobile device. See Use the HP Smart app to print, scan, and
manage.
2. From HP Smart, select your printer, and then click or tap Advanced Settings.
To open EWS using an IP address (Wi-Fi or Ethernet connection)
1.
Find out the IP address. Press (the Information button) on the printer to print an information page.
2. Open a web browser, type the IP address or hostname in the address bar, and then click or tap Enter.
To open EWS using an IP address (Wi-Fi Direct connection)
1. Make sure your device and the printer are connected using Wi-Fi Direct. See Print without connecting to
same Wi-Fi network (Wi-Fi Direct).
2. Open a web browser, type the following IP address or hostname of the printer in the address bar, and
then click or tap Enter.
IP Address: 192.168.223.1
To open EWS using HP Printer software (Windows 7)
1. From the computer desktop, click Start, select All Programs, click HP, click the folder for the printer,
select the icon with the printer's name, and then open HP Printer Assistant.
2. In the HP Printer Assistant, select Print tab.
3. Select Printer Home Page (EWS).
42 Chapter 6 Congure your printer ENWW
Page 49

Congure IP network settings
Use the following sections to congure the printer network settings.
View or change network settings
Use the Embedded Web Server to view or change IP conguration settings.
1. Open EWS. See To access and use the Embedded Web Server (EWS).
2. Click the Networking tab to obtain network information. Change settings as needed.
Rename the printer on a network
To rename the printer on a network so that it can be uniquely identied, use the Embedded Web Server.
1. Open EWS. See To access and use the Embedded Web Server (EWS).
2. Open the System tab.
3. On the Device Information page, the default printer name is in the Device Description eld. You can
change this name to uniquely identify this printer.
NOTE: Completing the other elds on this page is optional.
4. Click the Apply button to save the changes.
Manually congure IPv4 TCP/IP parameters
Use the EWS to manually set an IPv4 address, subnet mask, and default gateway.
1. Open EWS. See To access and use the Embedded Web Server (EWS).
2. On the Networking tab, click IPv4 Conguration in the left navigation pane.
3. From the IP Preferred Address Method drop-down, select Manual, and then edit the IPv4 conguration
settings.
4. Click the Apply button.
Assign or change the system password using the Embedded Web Server
Assign an administrator password for access to the printer and the HP Embedded Web Server so that
unauthorized users cannot change the printer settings.
1. Open EWS. See To access and use the Embedded Web Server (EWS).
2. On the System tab, click the Administration link in the left navigation pane.
3. In the area labeled Product Security, enter the password in the Password eld.
4. Re-enter the password in the Conrm Password eld.
5. Click the Apply button.
NOTE: Make note of the password and store it in a safe place.
ENWW Congure the printer using the Embedded Web Server (EWS) 43
Page 50

Change energy-conservation settings
The printer includes several economy features to conserve energy and supplies.
Set the Sleep/Auto O After Inactivity setting
Use the EWS to set the amount of idle time before the printer enters sleep mode.
Complete the following procedure to change the Sleep/Auto O After Inactivity setting:
1. Open EWS. See To access and use the Embedded Web Server (EWS).
2. Click the System tab, and then select Energy Settings.
3. From the Sleep/Auto O After Inactivity drop-down, select the time for the delay.
4. Click the Apply button.
Set the Shut Down After Inactivity delay and congure the printer to use 1 watt or less of power
Use the EWS to set the amount of time before the printer shuts down.
NOTE: After the printer shuts down, the power consumption is 1 watt or less.
Complete the following procedure to change the Shut Down After Inactivity setting:
1. Open EWS. See To access and use the Embedded Web Server (EWS).
2. Click the System tab, and then select Energy Settings.
3. From the Shut Down After Inactivity drop-down, select the time for the delay.
NOTE: The default value is 4 hours.
4. Click the Apply button.
Set the Delay Shut Down setting
Use the EWS to select whether or not the printer delays shutting down after (the Power button) is
pressed.
Complete the following procedure to change the Delay Shut Down setting:
1. Open EWS. See To access and use the Embedded Web Server (EWS).
2. Click the System tab, and then select Energy Settings.
3. Select or clear the Delay when ports are active option.
NOTE: When this option is selected the printer will not shut down unless all ports are inactive. An
active network link will prevent the printer from shutting down.
44 Chapter 6 Congure your printer ENWW
Page 51

7 Supplies, accessories, and parts
●
Order supplies, accessories, and parts
●
Congure the HP toner-cartridge-protection supply settings
●
Enable or disable the Cartridge Policy feature
●
Replace the toner cartridge
ENWW 45
Page 52

Order supplies, accessories, and parts
Order
Order supplies and paper www.hp.com/go/suresupply
Order genuine HP parts or accessories www.hp.com/buy/parts
Order through service or support providers Contact an HP-authorized service or support provider.
Order using the HP Embedded Web Server (EWS) To access, in a supported Web browser on the computer, enter the
printer IP address in the address/URL eld. The EWS provides
options for purchasing Original HP supplies.
NOTE: You can also order using the HP Smart app. For information about this app, see Use the HP Smart app
to print, scan, and manage.
46 Chapter 7 Supplies, accessories, and parts ENWW
Page 53

Supplies and accessories
Item Description Cartridge number Part number
Supplies
For use in North America, Australia, and New Zealand only
HP 134A Black Original LaserJet Toner
Cartridge
HP 134X High Yield Black Original
LaserJet Toner Cartridge
For use in the European Economic Area, Switzerland, UK, and Israel only*
HP 135A Black Original LaserJet Toner
Cartridge
HP 135X High Yield Black Original
LaserJet Toner Cartridge
For use in Africa, Latin America, Middle East, CIS, non-EU Balkan countries/regions, and Asia Pacic (except China, India, Australia, and New
Zealand) only
HP 136A Black Original LaserJet Toner
Cartridge
HP 136X High Yield Black Original
LaserJet Toner Cartridge
For use in China and India only
HP 137A Black Original LaserJet Toner
Cartridge
HP 137X High Yield Black Original
LaserJet Toner Cartridge
Standard-capacity replacement black toner
cartridge
High-capacity replacement black toner
cartridge
Standard-capacity replacement black toner
cartridge
High-capacity replacement black toner
cartridge
Standard-capacity replacement black toner
cartridge
High-capacity replacement black toner
cartridge
Standard-capacity replacement black toner
cartridge
High-capacity replacement black toner
cartridge
134A W1340A
134X W1340X
135A W1350A
135X W1350X
136A W1360A
136X W1360X
137A W1370A
137X W1370X
*The product is regionalized for the regions and countries listed above. However, nothing herein must be
deemed as an authorization from HP to import products into the European Economic Area, Switzerland, and
the UK from any country outside that region.
ENWW Order supplies, accessories, and parts 47
Page 54

Congure the HP toner-cartridge-protection supply settings
Use HP Cartridge Policy and Cartridge Protection to control which cartridges are installed in the printer and
protect the cartridges that are installed from theft.
● Cartridge Policy: This feature protects the printer from counterfeit toner cartridges by allowing only
genuine HP cartridges to be used with the printer. Using genuine HP cartridges ensures the best possible
print quality. When someone installs a cartridge that is not a genuine HP cartridge, the printer control
panel displays a message that the cartridge is unauthorized and it provides information explaining how
to proceed.
● Cartridge Protection: This feature permanently associates toner cartridges with a specic printer, or
eet of printers, so they cannot be used in other printers. Protecting cartridges protects your
investment. When this feature is enabled, if someone attempts to transfer a protected cartridge from
the original printer into an unauthorized printer, that printer will not print with the protected cartridge.
The printer control panel displays a message that the cartridge is protected, and it provides information
explaining how to proceed.
CAUTION: After enabling cartridge protection for the printer, all subsequent toner cartridges installed
in the printer are automatically and permanently protected. To avoid protecting a new cartridge, disable
the feature before installing the new cartridge.
Turning the feature o does not turn o protection for cartridges that are currently installed.
Both features are o by default. Follow these procedures to enable or disable them.
48 Chapter 7 Supplies, accessories, and parts ENWW
Page 55

Enable or disable the Cartridge Policy feature
The Cartridge Policy feature can be enabled or disabled using the embedded web server (EWS).
NOTE: Enabling or disabling this feature might require entering an administrator password.
1. Open EWS. See To access and use the Embedded Web Server (EWS).
2. Click the System tab, and then select Supply Settings.
3. From the Cartridge Policy drop-down menu, select o or Authorized HP.
4. Click the Apply button.
ENWW Enable or disable the Cartridge Policy feature 49
Page 56

Replace the toner cartridge
Cartridge information
Continue printing with the current cartridge until redistributing the toner no longer yields acceptable print
quality. To redistribute the toner, remove the toner cartridge from the printer and gently rock the cartridge
back and forth about its horizontal axis. For graphical representation, see cartridge replacement instructions.
Reinsert the toner cartridge into the printer and close the cover.
Remove and replace the toner cartridge
When a print cartridge approaches the end of useful life, you can continue printing with the current cartridge
until redistributing the toner no longer yields acceptable print quality.
1. Open the cartridge access door, and then remove the old print cartridge.
2. Remove the new print cartridge from the packaging. Place the used print cartridge in the bag and box
for recycling.
CAUTION: To prevent damage to the print cartridge, hold the print cartridge at each end. Do not touch
the protective cover or roller surface.
3. Grasp both sides of the print cartridge and gently rock the print cartridge to distribute the toner evenly
inside the cartridge.
50 Chapter 7 Supplies, accessories, and parts ENWW
Page 57

4. Remove the cover from the print cartridge.
5. Insert the print cartridge in the product, and then close the cartridge access door.
CAUTION: If toner gets on your clothing, wipe it o with a dry cloth and wash the clothing in cold
water. Hot water sets toner into the fabric.
ENWW Replace the toner cartridge 51
Page 58

8 Solve problems
●
HP support
●
Interpret control-panel light patterns
●
Interpret printer display codes
●
Print printer reports
●
Restore original factory defaults and settings
●
Cartridge low
●
Printer does not pick up paper or misfeeds
●
Clear paper jams
●
Improve print quality
●
Resolving print quality problems
●
Improve copy and scan image quality
●
Solve wireless network problems
●
Solve Ethernet connection problems
52 Chapter 8 Solve problems ENWW
Page 59

HP support
For the latest product updates and support information, visit the product support website at www.hp.com/
support/ljM232MFP . HP online support provides a variety of options for help with your printer:
Contact HP
If you need help from an HP technical support representative to solve a problem, visit the
www.support.hp.com. The following contact options are available at no cost for in-warranty customers (HP
agent-assisted support for out-of warranty customers may require a fee):
Get software and drivers: Download software, drivers, and rmware you need for the printer.
Ask the community: Join the community forums to nd solutions, ask questions, and share tips.
HP Diagnostic Tools: Use HP online tools to detect your printer and nd recommended solutions.
Chat with an HP support agent or the HP Virtual Agent online.
Call an HP support agent.
When contacting HP support, be prepared to provide the following information:
● Product name (located on the printer)
● Product number (located on a label inside the printer)
● Serial number (located on a label inside the printer)
Register printer
By taking just a few minutes to register, you can enjoy quicker service, more eicient support, and product
support alerts. If you did not register your printer while installing the software, you can register now at
www.register.hp.com
Additional warranty options
Extended service plans are available for the printer at additional costs. Go to www.hp.com/support/
ljM232MFP , select your country/region and language, then explore the service plan options available for your
printer.
ENWW HP support 53
Page 60

Interpret control-panel light patterns
●
USB model
●
Wireless model
USB model
The Status light on the printer blinks
The printer is processing a job or is initializing, restarting, cooling, or cleaning. No action is required.
NOTICE: If the Status light blinks quickly, turn o the printer and then turn it on again. If problem persists,
Contact HP.
The Attention light is on
Attention light on, Paper
light blinks.
If (the Paper light) blinks, the printer might be out of paper (see Load paper) or paper might be
Attention light on,
Cartridge light blinks.
For a list of printer display codes, see Interpret printer display codes.
The Attention light blinks
Attention light blinks. Verify that the printer cartridge access door or the rear access is correctly closed.
For a list of printer display codes, see Interpret printer display codes.
The Attention light is o
Attention light o,
Cartridge light on.
jammed (see
Resume button) to continue.
If (the Cartridge light) blinks, the cartridge might be very low or there is a cartridge error (such as
incompatible, unauthorized, protected). Replace the toner cartridge.
NOTE: There will be no Attention state if the printer is congured to continue printing when the toner
cartridge is very low.
If (the Cartridge light) is on, the printer cartridge level is low. See Cartridge low.
Clear paper jams). If you are sending a manual feed job, load paper, and press (the
For a list of printer display codes, see Interpret printer display codes.
54 Chapter 8 Solve problems ENWW
Page 61

Wireless model
●
Overview
●
Light patterns
Overview
Status light overview Description
Light patterns
Table 8-2 White
Light behavior Description
White Idle, sleep, or working
Amber Needs attention because an error has occurred
Blue Wireless network connection status
Green Starting up, processing, or updating
Purple Wireless setup mode
Solid white light on the bar. The printer is idle and not connected to a wireless network.
To connect the printer to your wireless network, see Connect your
printer to a Wi-Fi network using HP Smart.
If (the Cartridge light) is on, the printer cartridge level is
low, see
Cartridge is low.
If (the Cartridge light) blinks, the printer cartridge level is
very low, see
For a list of printer display codes, see Interpret printer display
codes.
White light ashes on the bar. The printer is processing and printing a print job.
White light in the center of the bar. The printer is in the sleep mode.
Cartridge is very low.
Table 8-3 Amber
Light behavior Description
Solid amber light on the bar. The printer door might not be closed properly. Make sure the
cartridge access and rear access doors are closed properly.
For a list of printer display codes, see Interpret printer display
codes.
ENWW Interpret control-panel light patterns 55
Page 62

Table 8-3 Amber (continued)
Light behavior Description
If (the Paper light) blinks, the printer might be out of
paper or not loaded properly (see
press (the Resume button) to continue.
Or there could be a paper jam. Clear jam (see Clear paper jams),
and press (the Resume button) to continue.
If (the Cartridge light) blinks, the cartridge might be very
low or there is a cartridge error (such as incompatible,
unauthorized, or protected). Replace the toner cartridge.
NOTE: No notication is provided if the printer has been
congured to continue printing when the toner cartridge is very
low.
Solid amber light ashes fast on the bar. The printer has encountered some problem. Turn o the printer,
and then turn it on again after 30 seconds. If problem persists,
visit www.hp.com/support/ljM232MFP
For a list of printer display codes, see Interpret printer display
codes.
Load paper). Load paper, and
Table 8-4 Blue
Light behavior Description
Solid light blue light on the bar. The printer is idle and connected to a wireless network. A
computer or mobile device is directly connected to the printer
using Wi-Fi Direct.
If (the Cartridge light) is on, the printer cartridge level is
low, see
Cartridge is low.
If (the Cartridge light) blinks, the printer cartridge level is
very low, see
For a list of printer display codes, see Interpret printer display
codes.
The bar pulses light blue. The printer is trying to connect to a wireless network.
Solid blue light pulses and then ashes amber. The printer is unable to connect to a wireless network.
To resolve wireless connection, see Solve wireless network
problems.
Cartridge is very low.
56 Chapter 8 Solve problems ENWW
Page 63

Table 8-5 Green
Light behavior Description
Solid green light on the bar. The printer is initializing, waiting for conrmation, performing
Green light pulses on the bar. The printer is performing routine maintenance.
automatic cleaning routines, downloading and installing a printer
update, or cooling down. (To provide productive printing, the
printer may automatically enter the cool-down mode under
certain environmental conditions.)
For a list of printer display codes, see Interpret printer display
codes.
NOTICE: The printer must be turned on during the updating
process. Do not turn o the printer or disconnect the power
before the update is complete.
NOTE:
● If a problem occurs while installing the printer update, the
printer will restart and try to update automatically (with an
active Internet connection).
● When the printer is cooling down, print jobs might pause.
Print jobs will continue when the engine is ready. This might
take several minutes.
Table 8-6 Purple
Light behavior Description
Purple light pulses on the bar. The printer is in wireless setup mode.
If the (the Information button) blinks, press it to connect.
Solid purple light blinks fast and then ashes amber. Time is running out for the Wi-Fi Protected Setup (WPS) mode.
Press
information, see
Wi-Fi Protected Setup (WPS).
(the Cancel button) to clear the error. For more
Connect your printer to a Wi-Fi network using
ENWW Interpret control-panel light patterns 57
Page 64

Interpret printer display codes
Table 8-7 Control-panel light patterns
Code on display State of the printer Action
Go/01 The printer is in manual-feed mode. Load the correct paper type and size for the print job in the input
Go/02 The printer is processing a manual duplex
job.
Go/03 The paper type or size loaded in the input
tray is dierent from the paper type or size
specied in the print job settings.
Go/06
(Wireless only)
P2 An ID Copy job has been started.
The printer has received a request to
connect to this printer using Wi-Fi Direct.
tray, and then press
press
Load the pages into the input tray to print their second sides, and
then press
Load the paper type and size that matches the print job settings
into the input tray, or press
continue with the currently loaded paper. Alternatively, you can
press
Press (the Resume button) to connect or press (the
Cancel button) to stop.
When (the Open Lid light) blinks, open the lid and turn over
the identication card, close the lid, and then press (the
(the Cancel button) to cancel the current job.
(the Resume button) to continue or press
(the Cancel button) to cancel the current job.
(the Cancel button) to cancel the current job.
(the Resume button) to continue or
(the Resume button) to
Resume button) to continue or press (the Cancel button) to
cancel the current job.
Er/01 The input tray is empty.
Er/02 The cartridge access door is open. Verify that the top cover is fully closed.
Er/03 The printer failed to pick a sheet of paper to
print.
Er/04 Paper jam in the input tray/printer base. Clear jam in the input tray area or at the base of the printer. After
Er/05 Paper jam in the toner cartridge area. Clear jam in the toner cartridge area. Close the door and your print
Er/06 Paper jam in the output tray area. Clear jam in the output tray area. After clearing the paper, press
Load the input tray or press (the Cancel button) to cancel
the current job.
Press (the Resume button) to retry or reload the paper and
print again.
clearing the paper, press
See
Clear paper jams.
job should resume automatically. See Clear paper jams.
(the Resume button) to continue. See Clear paper jams.
(the Resume button) to continue.
58 Chapter 8 Solve problems ENWW
Page 65

Table 8-7 Control-panel light patterns (continued)
Code on display State of the printer Action
Er/07 The toner cartridge is missing or incorrectly
installed.
Er/08 The toner level is too low for printing. The cartridge needs to be replaced, or the cartridge setting needs
Er/11 There is a problem with the toner cartridge. Make sure the shipping material has been removed from the
Er/14 The toner cartridge has been protected and
is not allowed to be used in this printer.
Er/17 An unauthorized toner cartridge is installed. Replace with the correct toner cartridge.
Er/20 Cartridge sensor error. Turn o the printer. Wait for 30 seconds and turn on the printer. If
Er/23 The printer is running low on memory (Print,
Copy, or Scan).
Er/26 The printer has experienced a general
engine error.
Install or reinstall the toner cartridge.
to be changed to Continue in the EWS (see To open EWS using HP
Smart (iOS, Android, and Windows 10)). Under System tab, click
Supply Settings—if the Very Low Setting is congured to
Continue, then the Supply Light will blink without an error code.
cartridge and that the cartridge is compatible and not damaged.
Replace with the correct toner cartridge.
the problem persists, contact www.hp.com/support/ljM232MFP
Press (the Cancel button) to cancel current job. Break the
job into smaller jobs that contain fewer pages and resend. Avoid
doing multiple tasks at a time such as scanning while printing.
Press (the Resume button) to continue. If error repeats,
turn
o the printer. Wait for 30 seconds and turn on the printer. If
the problem persists, contact www.hp.com/support/ljM232MFP
Er/30 There is an issue with the scanner. Ensure that the protective sheet is removed from the scan glass.
Turn o the device, wait 30 seconds and then turn it on. If the
problem persists, contact www.hp.com/support/ljM232MFP
Er/41 Paper jam in the document feeder. Clear jam in the document feeder. After clearing the paper, copy or
scan the job again. See Clear jams in the document feeder (some
models only).
Er/42 Paper jam in the rear duplexer. Clear jam in the rear duplexer. After clearing the paper, press
(the Resume button) to continue. See Clear jams in the rear
duplexer.
Er/50
Er/51
Er/52
Er/54
Er/55
Er/58
Er/59
There is an issue with the print engine. Turn o the printer. Wait for 30 seconds and turn on the printer. If
the problem persists, contact www.hp.com/support/ljM232MFP
ENWW Interpret printer display codes 59
Page 66

Table 8-7 Control-panel light patterns (continued)
Code on display State of the printer Action
Er/61 An error occurred when attempting a
wireless WPS connection.
Er/66 The wireless hardware is not detected.
Er/77 Secure device failure. Turn o the printer. Wait for 30 seconds and turn on the printer. If
Press the (the Cancel button) to continue and then try
connecting the printer to the wireless network again. See
your printer to a Wi-Fi network using Wi-Fi Protected Setup (WPS).
If problem persists, try connecting using the HP Smart app. See
Connect your printer to a Wi-Fi network using HP Smart.
Press (the Resume button) to continue without the wireless
hardware. Else, turn
on the printer. If the problem persists, contact www.hp.com/
support/ljM232MFP
the problem persists, contact www.hp.com/support/ljM232MFP
o the printer. Wait for 30 seconds and turn
Connect
60 Chapter 8 Solve problems ENWW
Page 67

Print printer reports
NOTE: This section is applicable to wireless printers only.
For USB model, press and hold (the Resume button) for 3 seconds to print a conguration report.
Printer report How to print Description
Information
Report
Conguration
Report
Wireless
Network Test
Report
Web Service
information
page
Press (the Information button).
Press and hold (the Information button) for 3
seconds until all the buttons are lit. Press
Resume button) to print a conguration report.
Press and hold (the Information button) for 3
seconds until all the buttons are lit. Press
Information button) and (the Resume button) at
the same time.
Alternatively, open EWS. SeeTo access and use the
Embedded Web Server (EWS), click Networking tab, and
click Wireless Conguration, and then click Print Test
Report.
Open EWS. See To access and use the Embedded Web
Server (EWS), click HP Web Services tab, and click Web
Services Settings and then click Print Information
Sheet.
(the
(the
Printer Information Report provides a summary of the
printer information and its current status.
Conguration report shows the printer usage log (pages
printed, images scanned), event logs, copy/energy
settings, network status and more.
Wireless Network Test Report shows the diagnostics
results for the status of the wireless network, wireless
signal strength, detected networks, and more.
Depending on the Web Services status, Web Services
Reports provide dierent instructions to help you turn
on Web Services, set up Web Services, x connection
issues, and more.
If you have not enabled the Web Services, click Enable
to Print Information Sheet.
Adjust
Alignment Test
Page
Open EWS. See To access and use the Embedded Web
Server (EWS), click System tab, and click Service, follow
the on-screen instructions in Adjust Alignment to
position the image on desired location on the paper.
The printer prints an alignment page.
ENWW Print printer reports 61
Page 68

Restore original factory defaults and settings
If you disable some functions or change some settings and want to change them back, you can restore the
printer to the original factory settings or network settings.
1. Open EWS. See To access and use the Embedded Web Server (EWS).
2. On the System tab, click Service.
3. In the Restore Defaults area, click the Restore defaults button.
The printer automatically restarts.
62 Chapter 8 Solve problems ENWW
Page 69

Cartridge low
Cartridge is low
Actual cartridge life remaining may vary. Consider having a replacement available to install when print quality
is no longer acceptable. The cartridge does not need to be replaced now.
Continue printing with the current cartridge until redistributing the toner no longer yields acceptable print
quality. To redistribute the toner, remove the toner cartridge from the printer and gently rock the cartridge
back and forth about its horizontal axis. For graphical representation, see cartridge replacement instructions.
Reinsert the toner cartridge into the printer and close the cover.
Cartridge is very low
Actual cartridge life remaining may vary. Consider having a replacement available to install when print quality
is no longer acceptable. The cartridge does not need to be replaced now unless the print quality is no longer
acceptable.
Once an HP toner cartridge has reached Very Low, HP’s Premium Protection Warranty on that toner cartridge
has ended.
Change the “Very Low” settings
You can change the way the printer reacts when supplies reach the Very Low state. You do not have to reestablish these settings when you install a new toner cartridge.
1. Open EWS. See To access and use the Embedded Web Server (EWS).
2. Select the System tab, and then select Supply Settings.
3. Select one of the following options from the Very Low Setting (Black Cartridge): drop-down list:
● Select the Stop option to set the printer to stop printing until you replace the cartridge.
● Select the Continue option to set the printer to alert you that the cartridge is very low, but to
Order supplies
Order supplies and paper www.hp.com/go/suresupply
Order through service or support providers Contact an HP-authorized service or support provider.
Order using the HP Embedded Web Server (EWS) To access, in a supported Web browser on your computer, enter
continue printing.
the printer IP address in the address/URL eld. The EWS provides
options for purchasing Original HP supplies.
ENWW Cartridge low 63
Page 70

Printer does not pick up paper or misfeeds
Introduction
The following solutions can help solve problems if the printer is not picking up paper from the input tray or is
picking up multiple sheets of paper at one time. Either of these situations can result in paper jams.
●
The product does not pick up paper
●
Clean the pickup roller
●
The product picks up multiple sheets of paper
The product does not pick up paper
If the product does not pick up paper from the input tray, try these solutions.
1. Open the product and remove any jammed sheets of paper.
2. Load the tray with the correct size of paper for your job.
3. Make sure the paper size and type are set correctly.
4. Make sure the paper guides in the tray are adjusted correctly for the size of paper. Adjust the guides to
the appropriate indentation in the tray.
5. Clean the pickup roller.
NOTE: If the problem persists, visit the support site for this printer at www.hp.com/support/ljM232MFP to
learn more about solving paper problems.
Clean the pickup roller
1. Turn o the printer.
2. Unplug the power cord from the back of the printer.
3. Remove the stack of paper from the input tray.
4. Flip the printer on its side, as shown.
64 Chapter 8 Solve problems ENWW
Page 71

5. Release and hold on to the blue latch, and then remove the panel.
6. Dampen a soft, lint-free cloth with alcohol or water, and then wipe each roller.
NOTE: Apply a moderate amount of pressure to each roller to ensure that they are completely cleaned.
7. Wait approximately 10 minutes to allow the pickup roller to dry completely.
8. While holding onto the blue latch, align and insert the panel as shown. Release the blue latch to lock the
panel in the place.
ENWW Printer does not pick up paper or misfeeds 65
Page 72

9. Flip the printer back to the original, upright position.
10. Reload the stack of paper into the input tray.
11. Plug the power cord back into the printer, and then turn on the printer.
The product picks up multiple sheets of paper
If the product picks up multiple sheets of paper from the input tray, try these solutions.
1. Remove the stack of paper from the input tray and rotate it 180 degrees, and ip it over. Return the
stack of paper to the input tray.
2. Use only paper that meets HP specications for this product.
3. Use paper that is not wrinkled, folded, or damaged. If necessary, use paper from a dierent package.
4. Make sure the input tray is not overlled. If it is, remove the entire stack of paper from the tray,
straighten the stack, and then return some of the paper to the input tray.
5. Make sure the paper guides in the tray are adjusted correctly for the size of paper. Adjust the guides to
the appropriate indentation in the tray.
6. Make sure the printing environment is within recommended specications.
66 Chapter 8 Solve problems ENWW
Page 73

Clear paper jams
Introduction
The following information includes instructions for clearing paper jams from the printer.
●
Jam locations
●
Frequent or recurring paper jams?
●
Clear jams from the input tray
●
Clear jams in the printer base
●
Clear jams from the print cartridge area
●
Clear jams from the output areas
●
Clear jams in the document feeder (some models only)
●
Clear jams in the rear duplexer
Jam locations
Jams can occur at the following locations in the product.
Location Error code
Input tray/printer base Er/04
Print cartridge area Er/05
Output tray Er/06
Document feeder Er/41
Rear duplexer Er/42
NOTE: Jams can occur in more than one location.
ENWW Clear paper jams 67
Page 74

Frequent or recurring paper jams?
Follow these steps to solve problems with frequent paper jams. If the rst step does not resolve the problem
continue with the next step until you have resolved the problem.
1. If paper has jammed in the printer, clear the jam and then print a test page to test the printer.
2. Check that the tray is congured for the correct paper size and type.
a. Open EWS. See To access and use the Embedded Web Server (EWS).
b. Click the System tab, and then click the Paper Setup page.
c. Select the type of paper that is in the tray.
3. Turn the printer o, wait 30 seconds, and then turn it on again.
4. Print a cleaning page to remove excess toner from inside the printer.
5. Print a test page to test the printer.
If none of these steps resolves the problem, the printer might need service. Contact support.
68 Chapter 8 Solve problems ENWW
Page 75

Clear jams from the input tray
Error code: Er/04
CAUTION: Do not use sharp objects, such as tweezers or needle-nose pliers, to remove jams. Damage
caused by sharp objects will not be covered by the warranty.
When removing jammed media, pull the jammed media straight away from the product. Pulling jammed
media out of the product at an angle can damage the product.
NOTE: Depending on where the jam is located, some of the following steps might not be necessary.
1. Open the cartridge access door, and then remove the print cartridge.
2. Remove the media stack from the input tray.
ENWW Clear paper jams 69
Page 76

3. With both hands, grasp the side of the jammed media that is most visible (this includes the middle), and
carefully pull it free from the printer.
4. Reinstall the print cartridge, and then close the cartridge access door.
70 Chapter 8 Solve problems ENWW
Page 77
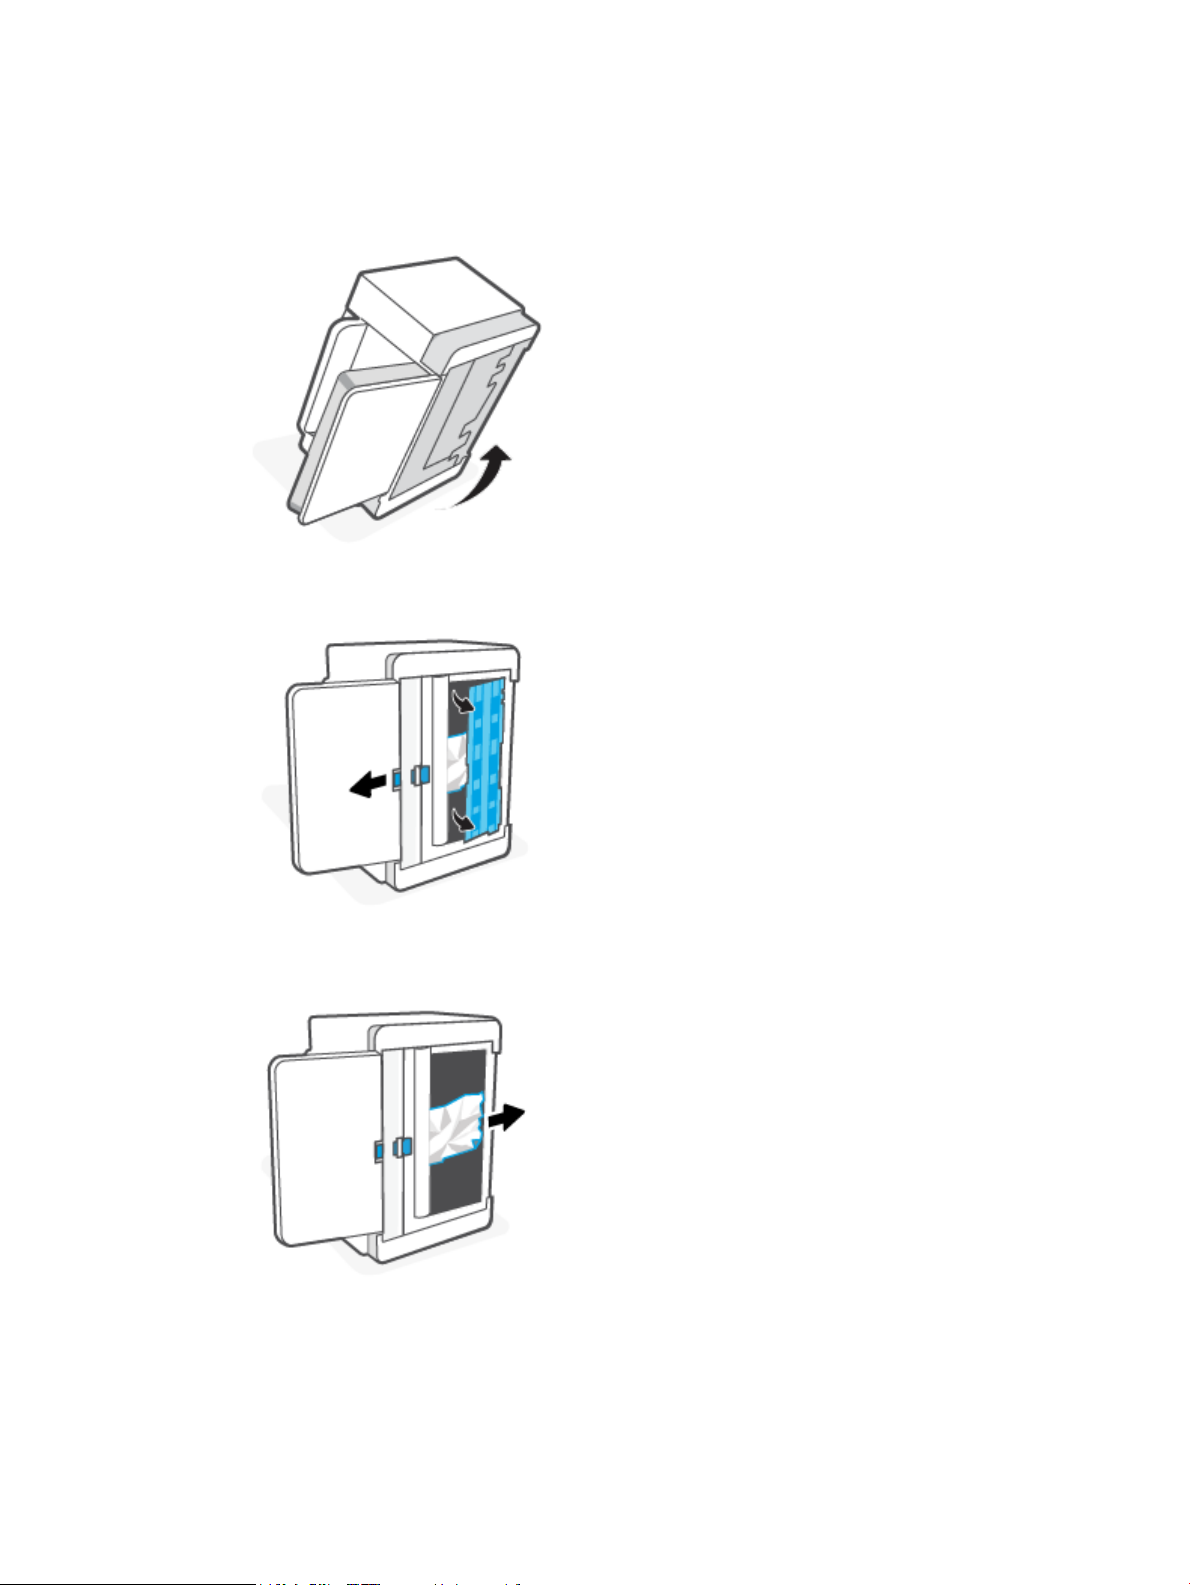
Clear jams in the printer base
Error code: Er/04
1. Flip the printer on its side, as shown.
2. Release and hold on to the blue latch, and then remove the panel.
3. Remove the jammed media.
ENWW Clear paper jams 71
Page 78

4. While holding onto the blue latch, align and insert the panel as shown. Release the blue latch to lock the
panel in the place.
5. Flip the printer back to the original, upright position.
72 Chapter 8 Solve problems ENWW
Page 79

Clear jams from the print cartridge area
Error code: Er/05
1. Open the cartridge access door, and then remove the print cartridge.
2. If you can see the jammed paper, carefully grasp the jammed paper, and slowly pull it out of the printer.
ENWW Clear paper jams 73
Page 80

3. Reinstall the print cartridge, and then close the cartridge access door.
74 Chapter 8 Solve problems ENWW
Page 81

Clear jams from the output areas
Error code: Er/06
CAUTION: Do not use sharp objects, such as tweezers or needle-nose pliers, to remove jams. Damage
caused by sharp objects is not covered by the warranty.
When a jam occurs,
light appears on the bar (depending on the printer).
Remove any visible jammed paper from the output tray area. Use both hands to remove jammed paper to
avoid tearing the paper.
(the Paper light) blinks, and either (the Attention light) blinks or a solid amber
Clear jams in the document feeder (some models only)
Error code: Er/41
When a jam occurs, a jam message displays on the printer control panel.
1. Remove any loose paper from the input tray of the document feeder.
ENWW Clear paper jams 75
Page 82

2. Remove any jammed paper visible in the input tray area. Use both hands to remove jammed paper to
avoid tearing the paper.
3. Lift the jam-access cover in the document feeder.
4. Remove any jammed paper.
5. Close the jam-access cover.
Clear jams in the rear duplexer
Error code: Er/42
Use the following procedure to check for paper in all possible jam locations in the rear duplexer.
1. Open the rear access door.
76 Chapter 8 Solve problems ENWW
Page 83

2. If you can see the jammed paper, carefully grasp the jammed paper, and then slowly pull it out of the
printer.
3. Close the rear access door.
ENWW Clear paper jams 77
Page 84

Improve print quality
●
Introduction
●
Print from a dierent software program
●
Check the paper-type setting for the print job
●
Check toner-cartridge status
●
Clean the cartridge
●
Print a cleaning page
●
Visually inspect the toner cartridge
●
Check paper and the printing environment
●
Adjust Print Density
Introduction
The following information provides troubleshooting steps to resolve print-quality problems, including the
following problems:
● Smears
● Fuzzy print
● Dark print
● Light print
● Streaks
● Missing toner
● Scattered dots of toner
● Loose toner
● Skewed images
To resolve these or other print-quality problems, try the following solutions in the order presented.
For information about resolving specic image defects, see Resolving print quality problems.
Print from a dierent software program
Try printing from a dierent software program. If the page prints correctly, the problem is with the software
program from which you were printing.
If the page does not print correctly, try updating the printer and print again. See Update the printer.
Check the paper-type setting for the print job
Check the paper type setting when printing from a software program and the printed pages have smears,
fuzzy or dark print, curled paper, scattered dots of toner, loose toner, or small areas of missing toner.
78 Chapter 8 Solve problems ENWW
Page 85

Check the paper type setting on the printer
Verify that the tray is loaded with the correct type of paper.
Check the paper type setting (Windows)
1. From the software program, select the Print option.
2. Select the printer, and then click the Properties or Preferences button.
3. Check the paper settings.
Check the paper type setting (OS X)
1. Click the File menu, and then click the Print option.
2. In the Printer menu, select the printer.
3. By default, the print driver displays the Copies & Pages menu. Open the menus drop-down list, and then
click the Finishing menu.
4. Select a type from the Media Type drop-down list.
Check toner-cartridge status
Follow these steps to check the estimated life remaining in the toner cartridges and if applicable, the status
of other replaceable maintenance parts.
Step one: Find supplies information
From the printer control panel, press (the Information button) to print an information report.
Step two: Check supplies status
1. Open EWS (see To access and use the Embedded Web Server (EWS)) to look at the supplies status report
of the toner cartridges and if applicable, the status of other replaceable maintenance parts.
Print quality problems can occur when using a toner cartridge that is at its estimated end of life. The
conguration report indicates when a supply level is very low.
Once an HP toner cartridge has reached Very Low, HP’s Premium Protection Warranty on that toner
cartridge has ended.
The toner cartridge does not need to be replaced now unless the print quality is no longer acceptable.
Consider having a replacement available to install when print quality is no longer acceptable.
If you determine that you need to replace a toner cartridge or other replaceable maintenance parts, the
conguration report lists the genuine HP part numbers.
2. Check to see if you are using a genuine HP cartridge.
A genuine HP toner cartridge has “HP” on it, or has the HP logo on it. For more information on identifying
HP cartridges go to www.hp.com/go/learnaboutsupplies
ENWW Improve print quality 79
Page 86

Clean the cartridge
During the printing process, cartridges might be contaminated by paper dust and cause print quality issues
such as background issues, vertical dark bands, or repetitive horizontal banding.
Follow these steps to improve the above mentioned print quality issues:
1. Open EWS. See To access and use the Embedded Web Server (EWS).
2. Click the System tab, and then click Service.
3. In the Cartridge Cleaning Mode area, click Start to begin the cleaning process.
Print a cleaning page
During the printing process paper, toner, and dust particles can accumulate inside the printer and can cause
print-quality issues such as toner specks or spatter, smears, streaks, lines, or repeating marks.
Use the following procedure to print a cleaning page.
1. Open EWS. See To access and use the Embedded Web Server (EWS).
2. On the System tab, click Service.
3. In the Fuser Cleaning mode area, click Start to begin the cleaning process.
Visually inspect the toner cartridge
Follow these steps to inspect the toner cartridge.
1. Remove the toner cartridges from the printer, and verify that the sealing tape has been removed.
2. Check the memory chip for damage.
3. If you see any damage on the toner cartridge, replace the toner cartridge.
4. Reinstall the toner cartridge, and print a few pages to see if the problem has resolved.
Check paper and the printing environment
Step one: Use paper that meets HP specications
Some print-quality problems arise from using paper that does not meet HP specications.
● Always use a paper type and weight that this printer supports.
● Use paper that is of good quality and free of cuts, nicks, tears, spots, loose particles, dust, wrinkles,
voids, staples, and curled or bent edges.
● Use paper that has not been previously printed on.
● Use paper that does not contain metallic material, such as glitter.
● Use paper that is designed for use in laser printers. Do not use paper that is designed only for use in
Inkjet printers.
● Use paper that is not too rough. Using smoother paper generally results in better print quality.
80 Chapter 8 Solve problems ENWW
Page 87

Step two: Check the environment
The environment can directly aect print quality and is a common cause for print-quality or paper-feeding
issues. Try the following solutions:
● Move the printer away from drafty locations, such as open windows or doors, or air-conditioning vents.
● Make sure the printer is not exposed to temperatures or humidity outside of printer specications.
● Do not place the printer in a conned space, such as a cabinet.
● Place the printer on a sturdy, level surface.
● Remove anything that is blocking the vents on the printer. The printer requires good air ow on all sides,
including the top.
● Protect the printer from airborne debris, dust, steam, grease, or other elements that can leave residue
inside the printer.
Adjust Print Density
Complete the following steps to adjust the print density.
1. Open EWS. See To access and use the Embedded Web Server (EWS).
2. Click the System tab, and then select System Setup from the left navigation pane.
3. Select the correct density settings.
4. Click Apply to save the changes.
ENWW Improve print quality 81
Page 88

Resolving print quality problems
●
Introduction
●
Troubleshoot print quality problems
Introduction
The following information provides troubleshooting steps for solving image defect issues, including the
following defects:
● Light print
● Gray background or dark print
● Blank pages
● Black pages
● Dark or light bands
● Dark or light streaks
● Missing toner
● Skewed images
● Colors that do not align
● Curled paper
Troubleshoot print quality problems
Table
8-8 Image defects table quick reference
Table 8-9 Light print Table 8-10 Gray background or dark print Table 8-11 Blank page — No print
82 Chapter 8 Solve problems ENWW
Page 89

Table 8-8 Image defects table quick reference (continued)
Table 8-12 Black page Table 8-13 Banding defects Table 8-14 Streak defects
Table 8-15 Fixing/fuser defects Table 8-16 Image placement defects Table 8-17 Output defects
Image defects, no matter the cause, can often be resolved using the same steps. Use the following steps as a
starting point for solving image defect issues.
1. Reprint the document. Print quality defects can be intermittent in nature or can go away completely
with continued printing.
2. Check the condition of the cartridge. If a cartridge is in a Very Low state (it has passed the rated life),
replace the cartridge.
3. Make sure that the driver and tray print mode settings match the media that is loaded in the tray. Try
using a dierent ream of media or a dierent tray. Try using a dierent print mode.
4. Make sure that the printer is within the supported operating temperature/humidity range.
5. Make sure that the paper type, size, and weight are supported by the printer. See the printer support
page at www.hp.com/support/ljM232MFP for a list of the supported paper sizes and types for the
printer.
NOTE: The term “fusing” refers to the part of the printing process where toner is aixed to paper.
The following examples depict letter-size paper that has passed through the printer short-edge rst.
ENWW Resolving print quality problems 83
Page 90

Table 8-9 Light print
Description Sample Possible solutions
Light print:
The printed content on the entire page is
light or faded.
1. Reprint the document.
2. Remove the cartridge, and then
shake it to redistribute the toner.
3. Make sure that the cartridge is
installed correctly.
4. Print a conguration report and check
for life and usage of the cartridge
(Press and hold the
Information button) for 3 seconds
until all the buttons are lit, then press
the
print a conguration report).
5. Replace the toner cartridge.
6. If the problem persists, go to
www.hp.com/support/ljM232MFP
Table 8-10 Gray background or dark print
Description Sample Possible solutions
(the
(the Resume button) to
Gray background or dark print:
The image or text is darker than expected.
1. Make sure that the paper in the trays
has not already been run through the
printer.
2. Use a dierent paper type.
3. Reprint the document.
4. Mono models only: From the printer
EWS, go to the Adjust Toner Density
menu, and then adjust the toner
density to a lower level.
5. Make sure that the printer is in within
the supported operating temperature
and humidity range.
6. Replace the toner cartridge.
7. If the problem persists, go to
www.hp.com/support/ljM232MFP
84 Chapter 8 Solve problems ENWW
Page 91

Table 8-11 Blank page — No print
Description Sample Possible solutions
Blank page — No print:
The page is completely blank and contains
no printed content.
1. Make sure that the cartridge is
genuine HP cartridges.
2. Make sure that the cartridge is
installed correctly.
3. Print with a dierent cartridge.
4. Check the paper type in the paper
tray and adjust the printer settings to
match. If necessary, select a lighter
paper type.
5. If the problem persists, go to
www.hp.com/support/ljM232MFP
Table 8-12 Black page
Description Sample Possible solutions
Black page:
The entire printed page is black.
1. Visually inspect the toner cartridge to
check for damage.
2. Make sure that the cartridge is
installed correctly.
3. Replace the toner cartridge.
4. If the problem persists, go to
www.hp.com/support/ljM232MFP
Table 8-13 Banding defects
Description Sample Possible solutions
Repetitive wide-pitch banding and
Impulse bands:
Dark or light lines which repeat down the
length of the page. They might be sharp or
soft in nature. The defect displays only in
areas of ll, not in text or sections with no
printed content.
1. Reprint the document.
2. Replace the toner cartridge.
3. Use a dierent paper type.
4. If the problem persists, go to
www.hp.com/support/ljM232MFP
ENWW Resolving print quality problems 85
Page 92

Table 8-14 Streak defects
Description Sample Possible solutions
Light vertical streaks:
Light streaks that usually span the length
of the page. The defect displays only in
areas of ll, not in text or sections with no
printed content.
Dark vertical streaks and ITB cleaning
streaks (color models only):
Dark lines which occur down the length of
the page. The defect might occur anywhere
on the page, in areas of ll or in sections
with no printed content.
1. Reprint the document.
2. Remove the cartridge, and then
shake it to redistribute the toner.
3. If the problem persists, go to
www.hp.com/support/ljM232MFP
NOTE: Both light and dark vertical
streaks can occur when the printing
environment is outside the specied range
for temperature or humidity. Refer to your
printer's environmental specications for
allowable temperature and humidity
levels.
1. Reprint the document.
2. Remove the cartridge, and then
shake it to redistribute the toner.
3. Print a cleaning page.
4. Check the toner level in the cartridge.
See To open EWS using HP Smart
(iOS, Android, and Windows 10).
5. If the problem persists, go to
www.hp.com/support/ljM232MFP
86 Chapter 8 Solve problems ENWW
Page 93

Table 8-15 Fixing/fuser defects
Description Fixing/fuser Possible solutions
Hot fuser oset (shadow):
Slight shadows, or osets, of the image
repeated down the page. The repeated
image might fade with each recurrence.
Poor fusing:
Toner rubs o along either edge of page.
This defect is more common at the edges
of high-coverage jobs and on light media
types but can occur anywhere on the page.
1. Reprint the document.
2. Check the paper type in the paper
tray and adjust the printer settings to
match. If necessary, select a lighter
paper type.
3. If the problem persists, go to
www.hp.com/support/ljM232MFP
1. Reprint the document.
2. Check the paper type in the paper
tray and adjust the printer settings to
match. If necessary, select a heavier
paper type.
3. If the problem persists, go to
www.hp.com/support/ljM232MFP
Table 8-16 Image placement defects
Description Sample Possible solutions
Margins and skew:
The image is not centered, or is skewed on
the page. The defect occurs when the
paper is not positioned properly as it is
pulled from the tray and moves through
the paper path.
1. Reprint the document.
2. Remove the paper and then reload
the tray. Make sure that all the paper
edges are even on all sides.
3. Make sure that the top of the paper
stack is below the tray full indicator.
Do not overll the tray.
4. Make sure that the paper guides are
adjusted to the correct size for the
paper. Do not adjust the paper guides
tightly against the paper stack.
Adjust them to the indentations or
markings in the tray.
5. If the problem persists, go to
www.hp.com/support/ljM232MFP
ENWW Resolving print quality problems 87
Page 94

Table 8-17 Output defects
Description Sample Possible solutions
Output curl:
Printed paper has curled edges. The curled
edge can be along the short or long side of
the paper. Two types of curl are possible:
● Positive curl: The paper curls toward
the printed side. The defect occurs in
dry environments or when printing
high coverage pages.
● Negative curl: The paper curls away
from the printed side. The defect
occurs in high-humidity
environments or when printing low
coverage pages.
Output stacking:
The paper does not stack well in the output
tray. The stack might be uneven, skewed,
or the pages might be pushed out of the
tray and onto the oor. Any of the
following conditions can cause this defect:
● Extreme paper curl
● The paper in the tray is wrinkled or
deformed
1. Reprint the document.
2. Positive curl: From the printer EWS,
select a heavier paper type. The
heavier paper type creates a higher
temperature for printing.
Negative curl: From the printer EWS,
select a lighter paper type. The
lighter paper type creates a lower
temperature for printing. Try storing
the paper in a dry environment prior
or use freshly opened paper.
3. Print in duplex mode.
4. If the problem persists, go to
www.hp.com/support/ljM232MFP
1. Reprint the document.
2. Extend the output bin extension.
3. If the defect is caused by extreme
paper curl, complete the
troubleshooting steps for Output
curl.
4. Use a dierent paper type.
5. Use freshly opened paper.
● The paper is a non-standard paper
type, such as envelopes
● The output tray is too full
6. Remove the paper from the output
tray before the tray gets too full.
7. If the problem persists, go to
www.hp.com/support/ljM232MFP
88 Chapter 8 Solve problems ENWW
Page 95

Improve copy and scan image quality
Introduction
If the printer is having image quality problems, rst make sure you are using high-quality originals. If the
problem still exists, try the following solutions in the order presented to resolve the issue.
●
Check the scanner glass for dirt and smudges
●
Check the paper settings
●
Optimize for text or pictures
●
Edge-to-edge copying
If the issue is not resolved, see Improve print quality for further solutions.
Check the scanner glass for dirt and smudges
Over time, specks of debris might collect on the scanner glass and white plastic backing, which can aect
performance. Use the following procedure to clean the scanner.
1. Press (the Power button) to turn the printer o, and then disconnect the power cable from the
electrical outlet.
2. Open the scanner lid.
3. Clean the scanner glass and the white plastic backing underneath the scanner lid with a soft cloth or
sponge that has been moistened with nonabrasive glass cleaner.
CAUTION: Do not use abrasives, acetone, benzene, ammonia, ethyl alcohol, or carbon tetrachloride on
any part of the printer; these can damage the printer. Do not place liquids directly on the glass or platen.
They might seep and damage the printer.
4. Dry the glass and white plastic parts with a chamois or a cellulose sponge to prevent spotting.
5. Connect the power cable to an outlet, and then press (the Power button) to turn the printer on.
Check the paper settings
1. Open EWS. See To access and use the Embedded Web Server (EWS).
2. On the Systems tab, click Paper Setup.
3. Change the necessary settings, and then click Apply.
Optimize for text or pictures
1. Open EWS. See To access and use the Embedded Web Server (EWS).
2. On the Copy tab, select the Optimize drop-down list.
3. Select the setting you want to use.
ENWW Improve copy and scan image quality 89
Page 96

● Mixed: Use this setting for documents that contain a mixture of text and graphics.
● Text: Use this setting for documents that contain mostly text.
● Picture: Use this setting for documents that contain mostly graphics.
4. Change the necessary settings, and then click Apply.
Edge-to-edge copying
The printer cannot print fully edge-to-edge. There is a 4 mm (1/6 in) unprintable border around the page.
Considerations for printing or scanning documents with cropped edges:
● When the original is smaller than the output size, move the original 4 mm (1/6 in) away from the corner
indicated by the icon on the scanner. Recopy or scan in this position.
● When the original is the size of the printed output that you want, use the Reduce/Enlarge feature to
reduce the image so the copy is not cropped.
90 Chapter 8 Solve problems ENWW
Page 97

Solve wireless network problems
●
Introduction
●
Wireless connectivity checklist
●
The printer does not print after the wireless conguration completes
●
The printer does not print, and the computer has a third-party rewall installed
●
The wireless connection does not work after moving the wireless router or printer
●
Cannot connect more devices to the wireless printer (Wi-Fi Direct)
●
The wireless printer loses communication when connected to a VPN
●
The network does not appear in the wireless networks list
●
The wireless network is not functioning
●
Perform a wireless network diagnostic test
●
Reduce interference on a wireless network
Introduction
Use the troubleshooting information to help resolve issues.
NOTE: To determine if Wi-Fi Direct printing is enabled on your printer, print an information report from the
printer control panel
Wireless connectivity checklist
● Verify that the printer and the wireless router are turned on and have power. Also make sure that the
wireless radio in the printer is turned on.
● Verify that the service set identier (SSID) is correct. Print an information report to determine the SSID.
On the printer control panel, press (the Information button).
If you are not sure the SSID is correct, run the wireless setup again.
● With secured networks, verify that the security information is correct. If the security information is
incorrect, run the wireless setup again.
● If the wireless network is working correctly, try accessing other computers on the wireless network. If
the network has Internet access, try connecting to the Internet over a wireless connection.
● Verify that the encryption method (AES or TKIP) is the same for the printer as it is for the wireless access
point (on networks using WPA security).
● Verify that the printer is within the range of the wireless network. For most networks, the printer must
be within 30 m (100 ft) of the wireless access point (wireless router).
● Verify that obstacles do not block the wireless signal. Remove any large metal objects between the
access point and the printer. Make sure poles, walls, or support columns containing metal or concrete do
not separate the printer and wireless access point.
ENWW Solve wireless network problems 91
Page 98

● Verify that the printer is located away from electronic devices that might interfere with the wireless
signal. Many devices can interfere with the wireless signal including motors, cordless phones, security
system cameras, other wireless networks, and some Bluetooth devices.
● Verify that the print driver is installed on the computer.
● Verify that you have selected the correct printer port.
● Verify that the computer and printer connect to the same wireless network.
● For OS X, verify that the wireless router supports Bonjour.
The printer does not print after the wireless conguration completes
1. Make sure that the printer is turned on and in the ready state.
2. Turn o any third-party rewalls on your computer.
3. Make sure that the wireless network is working correctly.
4. Make sure that your computer is working correctly. If necessary, restart the computer.
5. Verify that you can open the printer EWS from a computer on the network.
The printer does not print, and the computer has a third-party rewall installed
1. Update the rewall with the most recent update available from the manufacturer.
2. If programs request rewall access when you install the printer or try to print, make sure you allow the
programs to run.
3. Temporarily turn o the rewall, and then install the wireless printer on the computer. Enable the
rewall when you have completed the wireless installation.
The wireless connection does not work after moving the wireless router or printer
1. Make sure that the router or printer connects to the same network that your computer connects to.
2. Print a information report.
3. Compare the service set identier (SSID) on the information report to the SSID in the printer
conguration for the computer.
4. If the numbers are not the same, the devices are not connecting to the same network. Recongure the
wireless setup for the printer.
Cannot connect more devices to the wireless printer (Wi-Fi Direct)
1. Make sure that the other computers are within the wireless range and that no obstacles block the signal.
For most networks, the wireless range is within 30 m (100 ft) of the wireless access point.
2. Make sure that the printer is turned on and in the ready state.
3. Make sure there are not more than 5 concurrent Wi-Fi Direct users.
4. Turn o any third-party rewalls on your computer.
92 Chapter 8 Solve problems ENWW
Page 99

5. Make sure that the wireless network is working correctly.
6. Make sure that your computer is working correctly. If necessary, restart the computer.
The wireless printer loses communication when connected to a VPN
● Typically, you cannot connect to a VPN and other networks at the same time.
The network does not appear in the wireless networks list
● Make sure the wireless router is turned on and has power.
● The network might be hidden.
● Make sure that the printer is within wireless range of the wireless router, and that there are no obstacles
blocking the signal.
● The printer operates on the 2.4 GHz and 5 GHz wireless bands.
● Refresh the wireless networks list.
● Try restarting the printer.
The wireless network is not functioning
1. To verify if the network has lost communication, try connecting other devices to the network.
2. Test network communication by pinging the network.
a. Open a command-line prompt on your computer.
● For Windows, click Start, click Run, type cmd, and then press Enter.
● For OS X, go to Applications, then Utilities, and open Terminal.
b. Type ping followed by the router IP address.
c. If the window displays round-trip times, the network is working.
3. Make sure that the router or printer connects to the same network that the computer connects to.
a. On the printer control panel, press (the Information button) to print an information report.
b. Compare the service set identier (SSID) on the information report to the SSID in the printer
information for the computer.
c. If the numbers are not the same, the devices are not connecting to the same network. Recongure
the wireless setup for the printer.
Perform a wireless network diagnostic test
A wireless network diagnostic test can be performed using the printer control panel or the Embedded Web
Server (EWS). The wireless network diagnostic test provides information about the wireless network settings.
ENWW Solve wireless network problems 93
Page 100

Method one: Perform a wireless network diagnostic test using the printer control panel
● From the printer control panel, press and hold (the Information button) for 3 seconds, and then
press (the Information button) (the Resume button) at the same time.
Method two: Perform wireless network diagnostic test using the EWS
1. Open EWS. See To access and use the Embedded Web Server (EWS).
2. Select the Networking tab.
3. On the Wireless Conguration page, verify that the On option is selected.
4. Click the Print Test Report button to print a test page that shows test results.
Reduce interference on a wireless network
The following tips can reduce interference in a wireless network:
● Keep the wireless devices away from large metal objects, such as ling cabinets, and other
electromagnetic devices, such as microwaves and cordless telephones. These objects can disrupt radio
signals.
● Keep the wireless devices away from large masonry structures and other building structures. These
objects can absorb radio waves and lower signal strength.
● Position the wireless router in a central location in line of sight with the wireless printers on the
network.
94 Chapter 8 Solve problems ENWW
 Loading...