

Page 1
The HP M210 is a Wi-Fi Alliance authorized Wi-Fi CERTIFIED
802.11a/b/g and 802.11n product. The Wi-Fi CERTIFIED logo
is a certification mark of the Wi-Fi Alliance.
HP M210 802.11n Access Point Quickstart
This Quickstart shows you how to install and get started using the HP M210 Access Point (JL023A AM, JL024A WW).
See also the M210 Configuration and Administration Guide and other M210 documentation available from www.hp.com/support/manuals. The M210 Access
Point is an IEEE 802.11n, dual-band, high-speed access point that provides simplified wireless LAN administration with clustering technology.
Hardware overview
Package contents
M210 Access Point (AP), power supply, documentation.
Ethernet port
The M210 is equipped with an auto-sensing 10/100/1000 BaseT Ethernet port with RJ-45
connector. This port is IEEE 802.3af-compliant enabling the M210
to be powered by
Power
over Ethernet (PoE).
Radio and antennas
The M210 features an IEEE 802.11a/b/g/n-compliant radio with internal dual-band omnidirectional MIMO antennas.
Reset button
Press and quickly release the Reset button to restart the M210. To reset the M210 to factory
defaults, press the button until the status lights blink three times, then release.
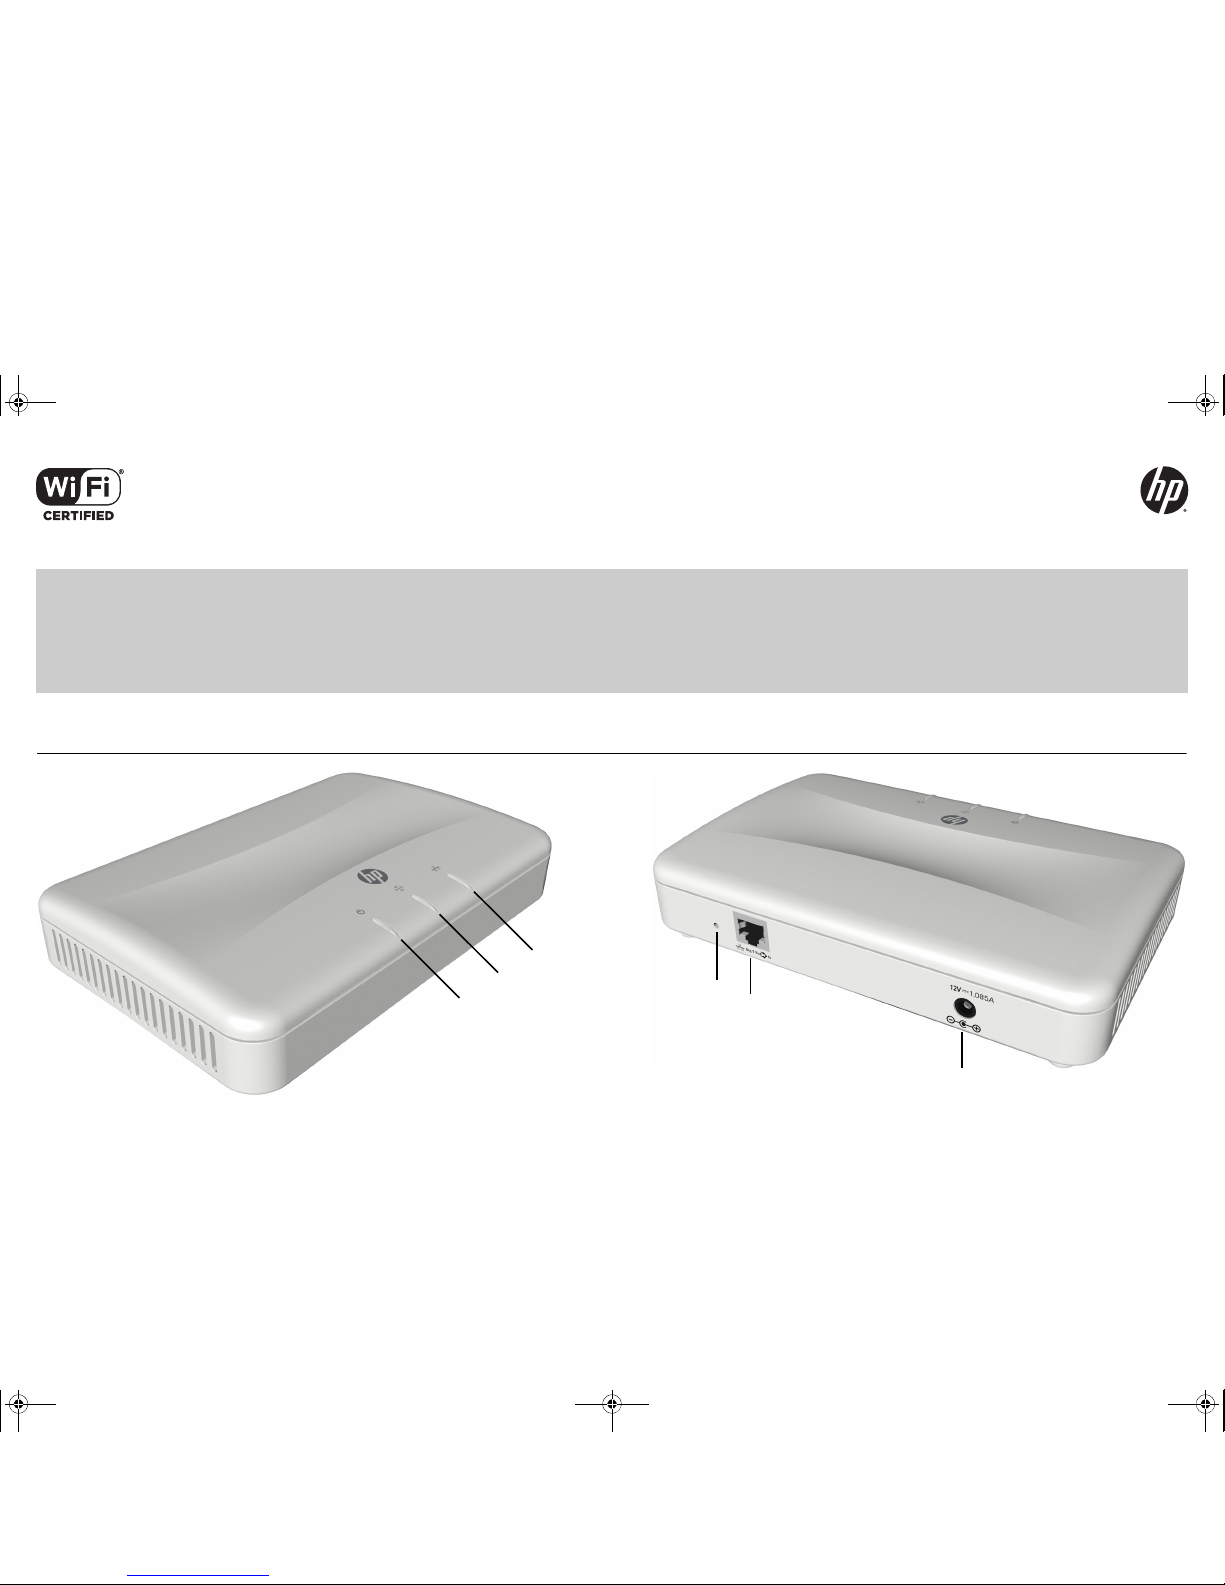
1 Power LED
2 WLAN LED
3 Ethernet LED
4
6
5
4 Reset button
5 Ethernet connector
6 Power connector
1
2
3
5998-5757_QS_M210.fm Page 1 Tuesday, April 15, 2014 1:29 PM
Page 2

HP M210 802.11n Access Point Quickstart 2 Important information to read before installing
Status LEDs
The status LEDs (left to right) indicate the following:
Important information to read before installing
Caution: Prior to installing or using the M210, make sure that the installation plans are
in compliance with RF and other regulations, such as building and wiring codes, safety,
channel, indoor/outdoor restrictions, and license requirements for the intended country
of use. It is the responsibility of the end user to ensure that installation and use comply
with local safety and radio regulations.
Other documentation: Become fully familiar with the Safety and Regulatory information
provided with the M210 and available online.
Surge protection and grounding: Make sure that proper surge protection and grounding
precautions are taken according to local electrical code. Failure to do so may result in
personal injury, fire, equipment damage, or a voided warranty. The HP hardware warranty
provides no protection against damage caused by static discharge or power surge.
Cabling: You must use the appropriate cables and where applicable, surge protection for
your region. Use Cat 5e or better Ethernet cabling.
Country of use: In some regions, you are prompted to select the country of use during setup.
Once the country has been set, the M210 will automatically limit the available wireless
channels, ensuring compliant operation in the selected country. Entering the incorrect
country can result in illegal operation and can cause harmful interference to other systems.
Safety: Take note of the following safety information during installation:
• If your network covers an area served by more than one power distribution system, be
sure all safety grounds are securely interconnected.
• Network cables may occasionally be subject to hazardous transient voltages (caused by
lightning or disturbances in the electrical power grid).
• Handle exposed metal components of the network with caution.
• The M210 is powered-on when the Ethernet port is plugged into a PoE power source or
when an external power supply is connected.
• The M210 and all interconnected equipment must be installed indoors within the same
building, including all PoE-powered network connections, as described by Environment
A of the IEEE 802.3af standard.
The M210 can be powered by:
• The provided external power supply.
• A 10/100 or 10/100/1000 PoE-enabled switch. Various PoE-enabled switches are
available from HP Networking.
• An HP Networking 1-Port Power Injector (J9407B).
Installation
The M210 can be placed on a desktop or be mounted on a wall.
Mounting the M210 on a wall
Screw holes on the back of the
M210 enable it to be mounted in
one horizontal orientation
(pictured) or two vertical
orientations. HP recommends
that you experiment with the
mounting orientation to achieve
the best reception for your
wireless clients.
Select mounting screws with a
pan head (non-counter-sunk
head) approximately 6 mm (.25
inches) in diameter so that the
screw head fits into the mounting holes on the back of the M210. The screws should have an
approximate length of 25 mm to 30 mm (1 to 1.25 inches) and a diameter of 3.5 mm (.14
inches) (#6 in North America). For drywall, HP recommends that wall anchors be used with
the screws. In North America, a #6 screw with matching wall anchor works well.
LED State Description
Power
Off The M210 has no power.
Flashing
(1 second
interval)
The M210 is starting up. If the Power LED continues to flash
after several minutes, it indicates that the software failed to
load. Reset or turn the M210 power off then on. If this condition
persists, contact support (www.hp.com/networking/support).
On The M210 is fully operational.
WLAN Flashing Radio is transmitting or receiving data.
Ethernet
Off The port is not connected or there is no activity.
Flashing The port is transmitting or receiving data.
5998-5757_QS_M210.fm Page 2 Tuesday, April 15, 2014 1:29 PM
Page 3

HP M210 802.11n Access Point Quickstart 3 Configure a simple wireless network
Mount the M210 as follows:
1. The M210 has two mounting screw holes (1 in illustration) on the center of the back of
the unit. Use the two embossed arrows (2 in illustration) at one end of the M210 to mark
the two screw hole positions 83 mm (3.25 inches) apart.
2. Drill two holes of
appropriate diameter
for the screws or wall
anchors. Insert the wall
anchors if applicable.
3. Tighten both screws
until they protrude 6
mm (.25 inches).
4. Position the two
mounting holes on the
back of the M210
against the two screws.
5. Gently push the M210
against the two screws
so that they fit into the
mounting holes and
then slide the M210
slightly down until it is
sufficiently anchored.
Configure a simple wireless network
This procedure describes how to configure a simple wireless network that enables you to
establish a wireless connection to the Internet through the M210. Other wireless network
configurations are possible. See the M210 Configuration and Administration Guide. The
topology of this simple wireless network is as follows:
A. Connect and power on the M210
1. Configure your computer to use a static IP address in the range 192.168.1.2 to
192.168.1.254 and a subnet mask of 255.255.255.0. Set the default gateway to
192.168.1.1 and DNS server to 192.168.1.1.
2. Disable any wireless connection on your computer.
3. Disconnect the M210 power source (power adapter, PoE switch, or PoE injector).
4. Connect the Ethernet cables.
• If using a power supply, connect your computer LAN port to the M210 Ethernet port.
• If using a PoE switch, connect your computer and the M210 to the PoE switch.
• If using a PoE injector, connect your computer LAN port to the PoE injector data in
port and connect the PoE injector data and power out port to the M210.
5. Power on the M210.
• If using a power supply, plug it into the wall and connect it to the M210.
• If using a PoE switch or injector, power it on.
The M210 power LED flashes once per second as it starts up. Wait for the power LED to
remain on before proceeding to the next step.
B. Log in
A factory-default M210 is assumed.
Note: The M210 is managed via its web-based management tool using Microsoft Internet
Explorer 8 or later, Google Chrome v29 or later, or Mozilla Firefox v24 or later.
Note: You can access the M210
management tool using either http or https. Using https
is more secure, but you will see a security warning until you purchase and install
your own certificate. With https, it is acceptable to choose the option that allows
you to proceed through the security warning.
1. In a web browser, specify either: http://192.168.1.1 or https://192.168.1.1.
2. On the Welcome page, specify admin for both Username and Password, and then
select Login.
3. On the HP end user license agreement page, read the agreement, and then select Accept
HP End User License Agreement.
4. In some regions, a Country prompt appears. Select the country in which the M210 will
operate and then select Save. See Country of use on page 2.
C. Perform a Quick Setup
The first time you log in to the management tool (and after a factory default reset), the
Quickly set up the M210 page is automatically presented. The default selection Recommend
wireless network settings based upon your network environment enables you to you
choose a typical network environment.
12
Router
(DHCP)
HP M210
(
802.11a/b/g/n)
P
O
W
E
R
R
A
D
I
O
E
T
H
E
R
N
E
T
Internet
5998-5757_QS_M210.fm Page 3 Tuesday, April 15, 2014 1:29 PM
Page 4

HP M210 802.11n Access Point Quickstart 4 Configure a simple wireless network
Select the environment that resembles your network, and then make the appropriate settings.
This procedure uses the first option, Basic wireless network as an example.
Select Basic wireless network, and then OK. The Quick setup - Basic wireless network page
is divided into three sections: Step 1, Step 2, and Step 3.
Step 1: Specify access point settings
Configure the radio: Wireless mode
Select the desired Wireless mode. Supported modes and channels are determined by the
regulatory domain.
Available modes in most regulatory domains are as follows:
• IEEE 802.11a: Up to 54 Mbps in the 5 GHz band.
• IEEE 802.11b/g: Up to 11 (802.11b) and 54 Mbps (802.11g) in the 2.4 GHz band.
• IEEE 802.11a/n: Up to 300 Mbps for 802.11n and 54 Mbps for 802.11a in the 5 GHz
band.
• IEEE 802.11b/g/n: Up to 300 Mbps for 802.11n, 54 Mbps for 802.11g, and 11 Mbps for
802.11b in the 2.4 GHz band.
• 5 GHz IEEE 802.11n: (Pure 802.11n) Up to 300 Mbps in the 802.11n 5 GHz band.
• 2.4 GHz IEEE 802.11n: (Pure 802.11n) Up to 300 Mbps in the 802.11n 2.4 GHz band.
Note:
In
5 GHz IEEE 802.11n
and
2.4 GHz IEEE 802.11n
modes, the M210 does not
permit non-802.11n clients to associate. Also in these modes, the M210 does not
use protection mechanisms (RTS/CTS or CTS-to-self) to enable legacy APs to
operate on the same frequency. This can potentially cause problems with legacy
(a/b/g) APs operating on the same channel, but provides the best M210 throughput.
Note:
In
IEEE 802.11a/n
and
IEEE 802.11b/g/n
modes, the M210 permits both 802.11n
and legacy clients (a/b/g) to associate. The M210 uses protection mechanisms
(RTS/CTS or CTS-to-self) when sending 802.11n data to prevent disruption to
legacy (a/b/g) clients associated on the same channel.
Get an IP address
IPv4 and IPv6 addressing are both available on the M210. Click the + symbol to the left of
IPv4 or IPv6 to expand their respective settings. Only IPv4 supports DHCP.
Note: For IPv6, consult the M210 Configuration and Administration Guide.
IPv4: IP configuration set to DHCP
For this sample procedure, DHCP is assumed. With IP configuration set to DHCP, the M210
will operate as a DHCP client, automatically obtaining an IP address from a DHCP server. If
no DHCP server is found, the default IP address 192.168.1.1 is used.
With DHCP you can preconfigure the address or find the assigned address as follows:
• Preconfigure the DHCP server to assign a specific IP address to the M210. To do this
you need to specify the M210 Ethernet MAC address as a reserved IP address on the
DHCP server. The M210 Ethernet MAC address is printed on the M210 product label and
it is also listed on the management tool Home > System summary page.
• Let the DHCP server automatically assign an IP address. By default, the DHCP server
will assign an IP address after the M210 connects to the network. When the DHCP
server has assigned the M210 an IP address, you can then find the M210
IP address by
looking for the M210
MAC address in the DHCP server log.
5998-5757_QS_M210.fm Page 4 Tuesday, April 15, 2014 1:29 PM
Page 5

HP M210 802.11n Access Point Quickstart 5 Configure a simple wireless network
IPv4: IP configuration set to Static IP
• IP address: Specify the desired address that is on the same subnet as the network to
which the M210 will connect after installation. Respect any DHCP server-mandated
static address ranges.
• Subnet mask: Specify the appropriate mask.
• Default gateway: Specify the address of the device on the wired network that provides
access to the Internet.
Change administrator login credentials
To safeguard the M210 management tool, HP strongly recommends that you change its
password. For Current password enter admin. For New password and Confirm password
specify the same new password. Passwords must be from 1 to 32 alphanumeric characters
without special characters or spaces. Passwords are case sensitive. HP recommends that
new passwords be at least six characters long.
Note: If you leave the password fields blank, no change is made.
Step 2: Specify access point cluster settings
Up to four M210 APs can be grouped into a cluster to simplify configuration of multiple APs
and to provide basic channel management within the cluster. For full clustering information,
see the M210
Configuration and Administration Guide
.
To set up this
M210
as the first AP in a cluster, set
Clustering
to
Enabled
, specify a
Cluster
name
(user defined but the identical name must be used for all members of the cluster),
specify a
Cluster location with whatever description you like, and set Cluster IP version to
either IPv4 or IPv6.
Then on each additional M210 to be added to this cluster, at initial power on select the
Quickly
set up the
M210 option:
Add to wireless network with existing AP cluster
, and specify the
matching
Cluster name
and
Cluster IP version
.
Step 3: Specify wireless network settings
Identify the wireless network
Network name (SSID)
Specify a name to uniquely identify the wireless network. This name is broadcast, enabling
users to select it from the network list presented on their device. The name is case-sensitive.
Secure the wireless network
Security method
Choose the method that will be used to protect wireless transmissions. Because this sample
procedure is for Basic wireless network, only WPA/WPA2 Personal is available. Although
included, Disabled is NOT recommended.
WPA versions
• WPA2 (AES): This WPA version is the most secure. It must be used for the pure
802.11n wireless modes 5 GHz IEEE 802.11n and 2.4 GHz IEEE 802.11n.
• WPA (TKIP): This version of WPA security is compatible with all wireless modes except
the two pure 802.11n modes.
Key, Confirm key
Define the key
that wireless users must provide to connect to the wireless network.
Specify a
key that is from 8 to 63 alphanumeric characters in length. HP recommends that the key be
at least 20 characters long and contain a mix of letters and numbers.
Completing Quick Setup
When all settings for Steps 1 through 3 are complete, select Save. When prompted to
confirm the update, select OK.
Note: If you configured a static IP address, you will now lose communication with the
management tool until you change the IP address in your Web browser. If the IP
address is on a subnet different than your computer (192.168.1.x), you must also
configure your computer to use the new subnet.
5998-5757_QS_M210.fm Page 5 Tuesday, April 15, 2014 1:29 PM
Page 6

HP M210 802.11n Access Point Quickstart 6 Specifications
D. Test the wireless network
For the purpose of this example, the network to which you connect the M210 must have a
DHCP server and an Internet connection. Furthermore, the Network name (SSID) is
assumed to be the default HP, and the Security method is WPA2 (AES).
1. Disconnect your computer from the PoE switch or injector or the M210.
2. Power off the M210.
• If using a power supply, disconnect it from the M210.
• If using a PoE switch or injector, remove power and disconnect the Ethernet cable
from the M210.
3. Connect the switch or the data in port of the injector to the network.
4. Reconnect and power on the M210.
• If using a power supply, connect the M210 to the network and reconnect the M210
power supply.
• If using a PoE switch or injector, reconnect the M210 to the PoE switch or the data
and power out port of the injector and then power on the switch or injector.
5. Wait until the M210
Power LED stops blinking.
6. Enable the Wi-Fi wireless network interface of your computer or mobile device and
verify that it is set to obtain an IP address automatically.
7. Connect your computer or mobile device to the new wireless network named HP,
providing the WPA2 key you defined earlier when prompted.
8. Confirm that you can browse the Internet through the M210.
E. Perform additional configuration
The M210 management tool is now available wirelessly or wired at: https://<IP address>. For
additional configuration information, see the online help and the M210 Configuration and
Administration Guide.
HP websites
www.hp.com/networking/support
www.hp.com/networking
www.hp.com/support/manuals
www.hp.com
Specifications
Specification Description
Product model number RSVLC-1103
Frequency range 2412–2262 MHz, 5180–5240 MHz, 5745–5825 MHz
Actual operating frequencies depend on regulatory approval for the country of
use.
Dimensions 19.35(w)x12.7(d)x3.81(h) cm, 7.62(w)x5(d)x1.5(h) inch
Weight 0.34 kg (0.75 lb)
Voltage 100–240 VAC
Current 0.44 A
Maximum power rating 5.28 W
Antenna Internal 2.4/5 GHz MIMO omni-directional (2)
Operating temperature 0°C to 40°C
Non-operating/storage
temperature
-40°C to 70°C
Operating/non-operating
relative humidity
5% to 95% @40°C, noncondensing/
5% to 95% @65°C, noncondensing
Altitude Up to 4600 m (15,000 ft)
© Copyright 2014 Hewlett-Packard Development Company, L.P.
The information contained herein is subject to change without notice.
March 2014
Printed in China
Document part # 5998-5757
*5998-5757*
5998-5757_QS_M210.fm Page 6 Tuesday, April 15, 2014 1:29 PM
 Loading...