

Page 1

M208
WORKGROUP
HUB/PRINT SERVER
Installation and Configuration Manual
Manual Version 5.5
Firmware Version 5.5
Microplex Systems Ltd.
8525 Commerce Court
Burnaby, BC V5A 4N3
P/N 79-208-100
Page 2

Copyright 1991, 1992, 1993, 1994, 1995 Wyndham Technologies Inc.
All rights reserved.
No part of this manual shall be reproduced, photocopied, recorded, stor ed in a r etrieval system, translated to
another language, or transmitted by any means electronic, mechanical, or otherwise, without written
permission from Wyndham Technologies Inc.
No patent liability is assumed with respect to the use of the information contained herein. While every
precaution has been taken in the preparation of this manual, Microplex Systems Ltd. assumes no liability for
errors contained herein or for incidental or consequential damages in connection with the performance or use
of this material.
PostScript and TranScript are trademarks of Adobe Systems, Inc. DEC and Ultrix are trademarks of Digital
Equipment Corporation. Hewlett-Packard, HP/UX, LaserJet, and DeskJet are registered trademarks of
Hewlett-Packard Company. IBM is a registered trademark of International Business Machines. SCO and the
SCO logo are registered trademarks of The Santa Cruz Operation, Inc. Sun Microsystems, and Sun
Workstation are registered trademarks, and OpenWindows, NeWSprint, NFS, Sun-2, Sun-3, Sun-4, Sun386i,
and SPARCstation, are trademarks of Sun Microsystems, Inc. Novell and NetWare ar e trademarks of Novell,
Inc., AppleTalk is a registered trademark of Apple, Inc., NetBIOS is a trademark of International Business
Systems Corp., Windows NT, Windows for Workgroups, and Windows 95 are registered trademarks of
Microsoft Corporation.
This manual was written, illustrated, and produced using FrameMaker workstation publishing software.
Manual Version: 5.5
Firmware Version: 5.5
Rev: 11/95
Printed in Canada
Page 3

TABLE OF CONTENTS
TABLE OF CONTENTS ................................................................i
LIST OF FIGURES ......................................................................iv
LIST OF TABLES .........................................................................v
PREFACE .....................................................................................1
Who Should Use This Manual.................................................................. 1
Organization of This Manual.................................................................... 1
General Conventions ................................................................................ 2
Computer Entry and Display Conventions............................................... 3
GETTING TO KNOW THE M208 .................................................5
Overview................................................................................................... 5
M208 Features.......................................................................................... 5
Overview of the Hub Architecture ........................................................... 8
Overview of Print Server Architecture..................................................... 9
Overview of Print Server Installation..................................................... 11
INSTALLING THE M208 ON THE NETWORK ..........................15
Overview................................................................................................. 15
Preparing for Installation........................................................................ 15
Connecting the M208 to the Network .................................................... 17
Connecting Peripherals........................................................................... 17
USING THE HUB ........................................................................19
Overview................................................................................................. 19
M208 Hub Features ................................................................................ 19
Hub Installation ...................................................................................... 20
Hub Configuration.................................................................................. 21
Monitoring the Hub ................................................................................ 24
SNMP Management Features................................................................. 28
Troubleshooting the Hub........................................................................ 28
CONFIGURING THE M208 FOR TCP/IP ...................................31
Overview................................................................................................. 31
Host Software ......................................................................................... 31
M208 Configuration ............................................................................... 35
Host Configuration ................................................................................. 42
TABLE OF CONTENTS i
Page 4

CONFIGURING THE M208 FOR NOVELL ................................63
Overview................................................................................................. 63
Host Software ......................................................................................... 63
M208 Configuration ............................................................................... 64
Host Configuration ................................................................................. 65
CONFIGURING THE M208 FOR APPLETALK .........................75
Overview................................................................................................. 75
M208 Configuration ............................................................................... 75
Host Configuration ................................................................................. 75
Additional Configuration Options.......................................................... 76
CONFIGURING THE M208 FOR WINDOWS ............................79
Overview................................................................................................. 79
TCP/IP Setup.......................................................................................... 80
M208 Configuration ............................................................................... 83
Host Configuration ................................................................................. 84
M208 INTERNAL ARCHITECTURE .......................................... 89
Overview................................................................................................. 89
Destinations ............................................................................................ 89
Models .................................................................................................... 90
Variables................................................................................................. 91
Logpaths ................................................................................................. 92
I/O Ports.................................................................................................. 92
USING THE M208’S COMMAND SET .......................................93
Overview................................................................................................. 93
npsh Overview........................................................................................ 93
npsh Prompt............................................................................................ 94
User Accounts and Permissions.............................................................. 94
Redirecting Output from Commands...................................................... 94
npsh Basic Commands............................................................................ 95
npsh Command Set ................................................................................ 95
USING NPWIN ..........................................................................127
Overview............................................................................................... 127
System Requirements ........................................................................... 127
Installation ............................................................................................ 127
Print Server/Hub Configuration............................................................ 128
ii TABLE OF CONTENTS
Page 5

Starting a NPWin Session With An Unconfigured Unit ...................... 128
USING THE M208’S ADDITIONAL OPTIONS .........................131
Overview............................................................................................... 131
General Options.................................................................................... 131
TCP/IP Options..................................................................................... 135
Novell Options...................................................................................... 140
Managing With SNMP......................................................................... 141
FTP Daemon......................................................................................... 146
Serial Line IP........................................................................................ 154
IP Routing............................................................................................. 157
TROUBLESHOOTING THE M208 ...........................................159
Overview............................................................................................... 159
Common Problems ............................................................................... 159
TCP/IP Problems.................................................................................. 159
Novell Problems ................................................................................... 163
AppleTalk Problems............................................................................. 167
Windows Problems............................................................................... 167
GETTING HELP WITH THE M208 ...........................................171
Overview............................................................................................... 171
Help Methods Available....................................................................... 171
Technical Support................................................................................. 172
Upgrade Procedure ............................................................................... 173
Warranty............................................................................................... 174
M208 SPECIFICATIONS ..........................................................177
Variable Definitions.............................................................................. 177
Hardware Specifications....................................................................... 179
Software Specifications........................................................................ 192
GLOSSARY ..............................................................................195
APPENDIX A ............................................................................203
Planning Your Print Setup.................................................................... 203
APPENDIX B ............................................................................207
Repeater Specifications ........................................................................ 207
INDEX .......................................................................................209
TABLE OF CONTENTS iii
Page 6

LIST OF FIGURES
Figure 1: Print Server Operating Logic ...........................................10
Figure 2: M208 Diagram .................................................................16
Figure 3: Twisted-Pair Cable Pinouts ..............................................21
Figure 4: npd Overview ...................................................................54
Figure 5: M208 Jumper Settings ...................................................137
Figure 6: Sample Commercial Invoice ..........................................176
Figure 7: Parallel Port Timing .......................................................181
iv LIST OF FIGURES
Page 7

LIST OF TABLES
Table 1: npconfig/ezsetup Main Menu ..........................................33
Table 2: npconfig Detailed Configuration Options Sub-Menu.......33
Table 3: Model Types ....................................................................90
Table 4: UTP (RJ45) Connector Pinout .......................................179
Table 5: THICK (Transceiver) Connector Pinouts ......................180
Table 6: Parallel Port Timing .......................................................182
Table 7 PRN Pinout ....................................................................183
Table 8: 9-Pin COM1/COM2 Pinout ...........................................184
Table 9: 5-Pin Serial Device Pinout .............................................185
Table 10: LED Patterns ..................................................................188
Table 11: Run and Auto-Reset Mode Description .........................189
Table 12: TCP/IP Port Numbers ....................................................192
Table 13: Configuration Considerations ........................................203
Table 14: Data and Collision Propagation Delays .........................207
Table 15: AUI Interface (IEEE 802.3 Compliant) .........................208
Table 16: UTP Interface (IEEE 802.2 10Base-T Compliant) ........208
LIST OF TABLES v
Page 8

vi LIST OF TABLES
Page 9
PREFACE
Who Should Use This Manual
A system administrator or someone with a good understanding of the protocol
involved should perform the installation and configuration procedures in this manual.
Organization of This Manual
This manual covers each aspect of the M208 and contains these chapters:
PREFACE on page 1
Contents, organization, and conventions used in this manual.
GETTING TO KNOW THE M208
Description of the M208’s features and an introduction to its architecture and
installation
INSTALLING THE M208 ON THE NETWORK on page 15
Description of the M208’s network connectors and I/O ports, along with steps to connect the unit to the network.
USING THE HUB on page 19
Overview and details on installing, configuring, and troubleshooting the hub
component of the M208.
CONFIGURING THE M208 FOR TCP/IP on page 31
Overview of TCP/IP host software and in-depth details on M208 configuration and
various TCP/IP host setups.
CONFIGURING THE M208 FOR NOVELL on page 63
Full introduction to Novell host software and to the various print configurations
available with all versions of NetWare.
CONFIGURING THE M208 FOR APPLETALK on page 75
Description of a full AppleTalk setup.
CONFIGURING THE M208 FOR WINDOWS on page 79
Explanation of print setups in a Windows NT, Windows 95, and WfW environment.
.
on page 5
PREFACE: Who Should Use This Manual 1
Page 10
?
unit
host
M208 INTERNAL ARCHITECTURE on page 89
Explanation of the M208’s internal operating architecture and logic.
USING THE M208’S COMMAND SET on page 93
Full reference section based on the M208’s command set.
USING NPWIN on page 127
Explanation of using NPWin to configure and manage the M208.
USING THE M208’S ADDITIONAL OPTIONS on page 131
Introduction to some of the print enhancements provided by the M208.
TROUBLESHOOTING THE M208 on page 159
Helpful hints and steps to consider when you run into problems in any print setup.
GETTING HELP WITH THE M208 on page 171
Information on Microplex’s service and support procedures including Technical Support, upgrading, and warranty.
M208 SPECIFICATIONS on page 177
Full details about the M208’s hardware and software specifications.
A
B
GLOSSARY on page 195
C
Definitions of words, abbreviations, and acronyms used in this manual.
APPENDIX A on page 203
Useful information on setting up your printing environment.
APPENDIX B on page 207
Repeater specifications.
General Conventions
These are some of the conventions followed in this manual:
• At the bottom of each page is the name of the chapter, the section, and the page
number.
• The header contains an icon to represent which chapter you are currently reading.
• Names of other publications and references to other sections in this manual are in
italics.
2 PREFACE: General Conventions
Page 11

Caution
Cautions are indicated to warn of any undesirable effects an action may cause.
Note
Notes are added to make you aware of certain steps or considerations, and sometimes
to provide tips or suggestions.
Computer Entry and Display Conventions
Command syntax and examples are formatted as follows:
• The Courier font in boldface indicates command entries.
$ ping ftp.microplex.com
• Regular Courier font indicates displayed results.
ftp.microplex.com is alive
• Arguments separated by the or symbol ( | ) mean that a choice must be made.
list default com1|com2
• Square brackets [ ] around something indicates that it is optional.
set sysinfo name [
• Command names, entries, and example references are bold along with directories
and file names. Boldface is also used if emphasis is needed.
Enter npwrite when you see...
namestring
]
sends data to the M208 named spike...
• Variable values are shown in italics both in command syntax, output, and in text.
ping
ipname
ipname
is alive
Please enter the ipname at the prompt.
• Italics are also used for emphasis.
PREFACE: Computer Entry and Display Conventions 3
Page 12

4 PREFACE: Computer Entry and Display Conventions
Page 13

GETTING TO KNOW THE M208
Overview
The purpose of this chapter is to get you acquainted with the M208. It contains an
overview of the M208’s features, an overview of the Hub’s architecture, an overview
of the Print Server’ s architecture, and an ov erview of basic Print Serv er installations in
each of the supported environments.
M208 Features
With the Microplex M208 Workgroup Hub/Print Server, you can easily expand your
network and locate laser printers, dot matrix printers, plotters, and other peripherals
anywhere on the LAN rather than attaching them directly to a host system. Installation
is also quick and simple in any of the supported environments.
Hub/Remote Access Features
• auto-discovery/auto-senses when a device is connected to a port,
• automatically detects network collisions,
• automatically segments a port when the port experiences excessi ve collisions or
other undesirble Ethernet activity,
• duplicate address protection: if two units have the same address, both ports are
automatically segmented,
• any port can be used as the network connection or to cascade M208s,
• automatic reverse receive parity to correct miswiring,
• extensive monitoring and status reports via the npsh command set,
• SNMP management via MIB II and custom MIBs,
• SLIP support on the serial ports for dial-up or leased line remote access to the
local network
• NPWin for Windows-based configuration and management,
GETTING TO KNOW THE M208: Overview 5
Page 14

Print Server Features
General Features
• one high-speed, IEEE 1284-I compliant parallel port,
• four-speed parallel port to support any peripheral, slow or fast,
• two serial ports,
• multi-level configuration security through passwords and permission levels,
• SNMP support through MIB II, custom MIBs, and custom traps to aid in
network management,
• multiple printer destinations for printing flexibility,
• load-balancing so a job can be redirected to an idle printer instead of waiting for
a particular one to free up,
• the choice to disable selected Print Server services,
• extra printing functionality such as carriage return insertion to remove some of
the processing burden from the host,
• banner/trailer page generation,
• autosensing of job/file format for ASCII to PostScript conversion or for
automatic switching of the printer’s emulation mode,
• header and trailer strings to instruct printers in tray selection, font, pitch,
simplex/duplex, and other options,
• logging to keep track of job, user, page count, checksum, and printer error
information,
• TCP/IP syslog and SMTP (email) support for additional logging functionality,
• backchanneling for printers to send various PostScript messages about: print-job
status, paper out, paper jam, busy, toner out, etc. back through a serial port,
• queuing of all print jobs on LANs or WANs, while supporting up to four printers
simultaneously ,
TCP/IP Features
• further configuration security through TCP access lists,
• scrambled print job data to protect the job as it passes over the network,
6 GETTING TO KNOW THE M208: M208 Features
Page 15

• ability to telnet and ping to another host on the network from the M208 allowing
for terminal server capabilities,
• up to 256 simultaneous TCP connections,
• GOSIP RFC-1042 support,
• IP Routing support for communications over separate networks,
• FTP daemon support for printing, unit monitoring, and configuration,
• SLIP support for serial port network communications,
• IP packet fragmentation support,
Novell Features
• support for all versions of NetWare, including NetWare 4,
• simultaneous support of multiple Novell frame types,
• encrypted password support,
• queueing on up to 32 queues over 16 file servers,
• ability to add a preferred Novell file server list,
• automatic frame type sensing of all Novell frame types,
AppleTalk Features
• quick printer setup through the Chooser,
• ability to disable certain print destinations on the M208 so they don’t all appear
in the Chooser,
• configurable AppleTalk zones,
NetBIOS Features
• NetBIOS over TCP/IP support for Windows NT, Windows 95, and Windows
for Workgroups (WfW),
• simple printer setup,
GETTING TO KNOW THE M208: M208 Features 7
Page 16

Printer Support
The M208 is compatible with PC’s, UNIX systems, Macintosh computers, minis, and
mainframes as long as at least one of the following is present:
TCP/IP
• an LPR client to interact with our Line Printer Daemon on the unit,
• an RSH client (i.e. rsh, remsh, rcmd) to interact with our RSH Daemon,
• the ability to print directly to a TCP port number on our unit; we have a TCP port
number mapped to each I/O port on the unit by default (i.e. com1 is 4000),
Other
• NetWare support,
• AppleTalk over EtherTalk support,
• NetBIOS over TCP/IP support,
For a listing of the printing standards supported, please see Standards Supported on
page 193.
Overview of the Hub Architecture
The M208 includes a fully managable eight port Ethernet hub. Hubs are stable network devices that perform signal regeneration (including amplification, symmetry,
and retiming), packet forwarding, and routing. When a hub is presented with a data
signal, it automatically regenerates and transmits the data signal to all the other hub
ports without any modification to the signal.
The M208 has a total of nine Ethernet ports, eight 10Base-T (RJ45) and one AUI port.
Any port on the M208 can serve as the network connection for the unit.
Very little configuration is required for the hub as it becomes fully operational as soon
the the unit is powered up. To install the hub, simply attach it to the network and connect other Data Terminal Devices (DTEs) to it.
For more information on hub installation and configuration please see USING THE
HUB on page 19.
8 GETTING TO KNOW THE M208: Overview of the Hub Architecture
Page 17

Overview of Print Server Architecture
This section will provide an overview of how the M208’s Print Server component
works. To better understand this, it is important to understand I/O ports, destinations
and models.
I/O Ports
The M208 has three I/O ports; one parallel and two serial ports. Printers can be
attached to any or all of the three I/O ports. Each I/O port has an internal queuing
mechanism that automatically queues print jobs on a first-come, first-serve basis even
if the print jobs come from different network environments (e.g. Novell and TCP/IP).
Destinations
When you send a print job to the Print Server, the print job doesn’t go directly to an
I/O port but first goes to a destination. A destination can be thought of as logical place
on the M208 to send print jobs. Each destination has an I/O port and a model (see
below) associated with it. The purpose of our destinations is to allow you the ability to
configure a number of different print setups on the Print Server.
There are six pre-defined destinations on the M208 and each of them, by default, is
associated to one of the three I/O ports on the unit (two destinations per I/O port). By
default, the destinations have names such as d1prn, d2com1, d3com2, etc. If you like,
any of these destination names can be changed to be something more meaningful.
Models
Each destination on the unit also has a model associated with it. The six models (one
per destination) can be thought of as a series of mini-filter that can do special processing to the print job data. For example, a model can be set up to do such things as
ASCII to PostScript conversion (a2ps) or carriage return insertion (onlcr).
By default, all six models on the M208 are initially set up to be raw. When raw, they
simply pass data through to the I/O port untouched. By default, the models are named
m1 through to m6 but can be changed to be something more meaningful.
Models only need to be reconfigured when you want to do special processing to all the
print jobs that are sent to a particular destination.
GETTING TO KNOW THE M208: Overview of Print Server Architecture 9
Page 18
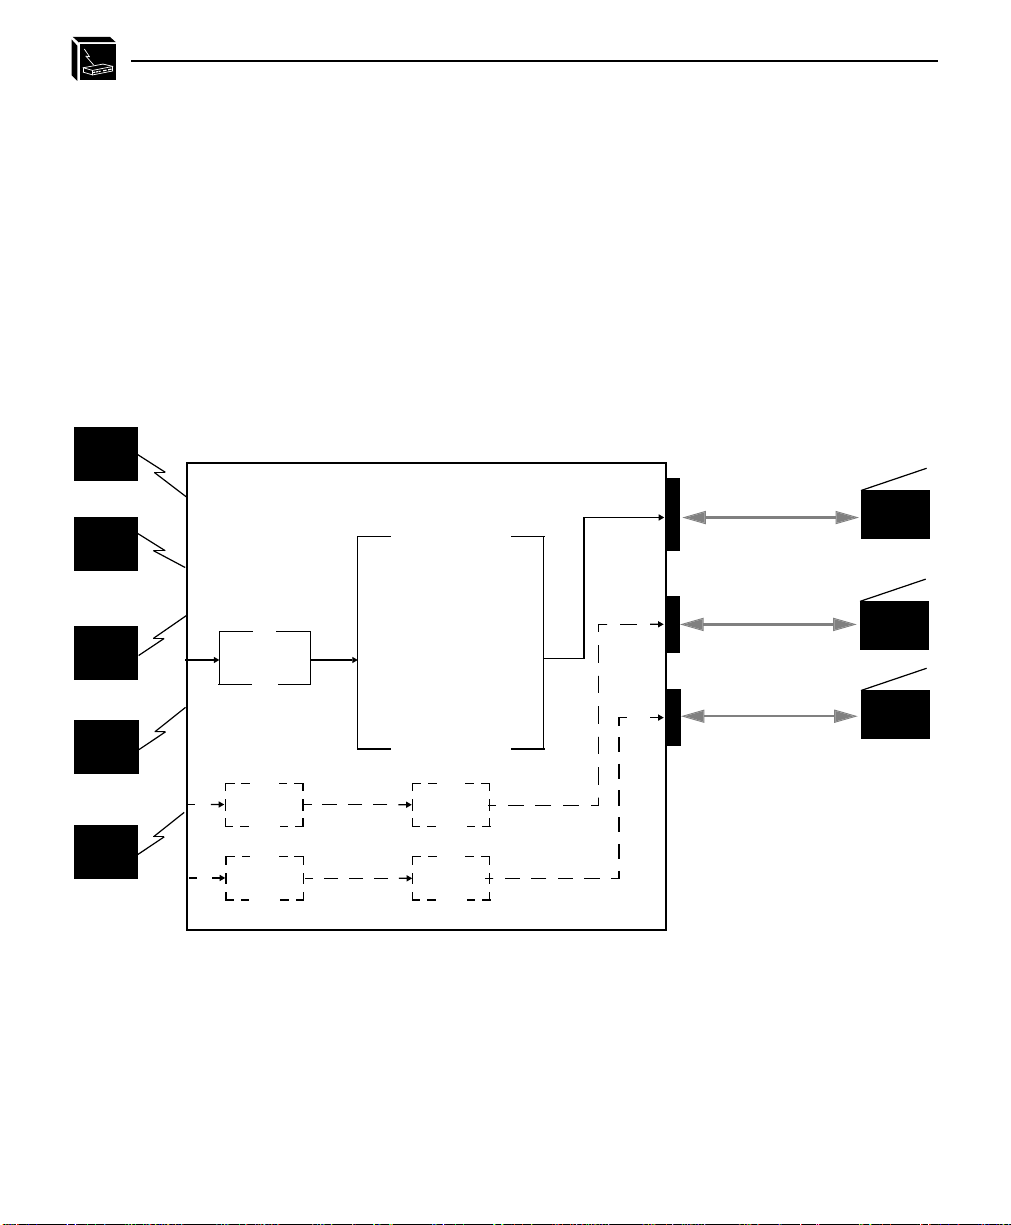
Summary
When you are doing a print setup, you must direct print jobs to a particular destination
which is mapped to an I/O port to which the printer(s) is attached. The destination’s
associated model is then used for any extra processing of the data, if required. Each
I/O port has an internal queuing mechanism that automatically queues print jobs on a
first-come, first-serve basis.
For more information on I/O ports, destinations, and models, please see M208 INTER-
NAL ARCHITECTURE on page 89.
Figure 1: Print Server Operating Logic
TCP/IP
host
Novell
host
Mac
host
NT
host
WfW
host
M208 Workgroup Print Server
Model
m1
banner/trailer page
header string
Destination
d1prn
d2com1
.
.
.
d6com2
This example follows a print job sent to destination
d1prn
is associated with modelm1 and the I/O port
When the data is passed through the associated model, any job
processing specified by the model is performed on the data.
If no additional processing is specified, the data is passed
through to the I/O port untouched.
trailer string
CR insertion (onlcr)
tab expansion (xtab)
ASCII to PostScript
descrambling
printer switching
m2
.
.
.
m6
d1prn.
prn
.
PRN I/O port
COM1 I/O port
COM2 I/O port
printer
printer
printer
10 GETTING TO KNOW THE M208: Overview of Print Server Architecture
Page 19

Overview of Print Server Installation
Not
This section will provide an overvie w of the basic steps required to install the M208 in
the various supported environments: Unix, Novell (PSERVER and RPRINTER), NetBIOS over TCP/IP, and AppleTalk.
e
Before installing the M208, it may be useful to look at Appendix A, Planning Your
Print Setup on page 203 for advantages/disadvantages of various configuration
options.
Basic Unix Configuration
The following outlines the basic steps required to add a M208 to a Unix
network.
Once the unit is physically attached to the network, you need to:
1 Assign an IP address, netmask, and possibly a default router to the M208. This
can be done in several ways:
• automatically with ezsetup or npconfig (Option 1 from the Main Menu).
Please see page 36.
• manually through the network using ARP. Please see page 37.
• manually through the network using RARP. Please see page 38.
• manually through the network using BOOTP. Please see page 39.
• manually through the COM port. Please see page 40.
2 Configure the print setup on the host to print to this unit. This can be done in sev-
eral ways depending on your host system.
• automatically with ezsetup or npconfig (Option 2 from the Main Menu)
Please see page 36.
• manually for a BSD Unix environment. Please see page 47.
• manually for a System V Unix environment. Please see page 51.
• manually for a AIX Unix environment. Please see page 59.
GETTING TO KNOW THE M208: Overview of Print Server Installation 11
Page 20

Basic Novell Configuration
PSERVER Setup
The following outlines the basic steps required to add a M208 to a Novell network
using a PSERVER setup and applies to any Netware version. The M208 replaces a
dedicated workstation running PSERVER.EXE or PSERVER.NLM so these are no
longer needed.
Once the unit is physically attached to the network, you need to:
1 Enter into a PCONSOLE session. PCONSOLE is used for the entire print setup.
2 Create a new queue.
3 Create a new print server. The name will be is M_xxxxxx where xxxxxx is the last
six digits of the Ethernet address as found on the bottom of the unit.
4 Add a new printer and type in the name of one of the eight default destinations on
the unit. (e.g. d1prn, d2com1,etc.) At the prompt for the type field, select
DEFINED ELSEWHERE. If this is not available, choose PARALLEL.
5 Associate this printer with the queue defined in Step 2.
6 Reboot the M208 and wait about a minute for it to connect to the file server.
RPRINTER Setup
The following outlines the basic steps required to add a M208 to a Novell network
using a RPRINTER setup and applies to any Netware version. The M208 interacts
with an existing PSERVER running PSERVER.EXE or PSERVER.NLM.
Once the unit is physically attached to the network, you need to:
1 Enter into a PCONSOLE session.
2 Create a new queue.
3 Select an existing PSERVER and define a new remote printer. The printer name
can be anything but the type must be REMOTE OTHER/UNKNOWN.
4 Associate this printer with the queue created in step 2.
5 Exit PCONSOLE.
6 Restart PSERVER. (e.g. PSERVER.NLM)
7 Go to SYS:\LOGIN and create a directory named M_xxxxxx where xxxxxx is the
12 GETTING TO KNOW THE M208: Overview of Print Server Installation
Page 21

last six digits of the Ethernet address as found on the bottom of the unit.
8 Inside this directory, create a file called CONFIG.
9 Enter the line:
name
where pservername is the existing PSERVER’s name, printernumber is the
defined number for this printer in that PSERVER, and destname is a M208 destination (e.g. d1prn, d3com2, etc.).
10 Reboot the Print Server and wait about a minute for it to connect to the file server.
For more information on Novell PSERVER or RPRINTER configuration, please see
CONFIGURING THE M208 FOR NOVELL on page 63.
Basic Windows Configuration
The following outlines the basic steps required to add a M208 to a Windows NT Version 3.5 network using the LPR print method.
Once the unit is physically attached to the network, you need to:
1 Ensure that the appropriate network software is installed on your host system. In
the Network Settings dialogue box, make sure you see these in the Installed Net-
work Software scroll box:
• MS TCP/IP Printing
• TCP/IP Protocol
• Simple TCP/IP Service
2 Make sure your workstation has an IP address and netmask.
set rprinter add
pservername printernumber dest-
3 Assign an IP address and netmask to the M208. Use a PC or terminal connected to
the Print Server’ s serial port to do this. Please seeManual Configuration Through
the COM Port on page 40 for information on completing this step.
4 On your NT workstation, select the Print Manager.
5 Select Create a Printer from the Printer menu.
6 Define the printer name and driver. In the Print to field, select Other...
7 Choose LPR port from the displayed list and select OK.
8 Enter in the name or IP address of the Print Server.
9 Fill in the destination on the Print Server and select OK. The destination will be
GETTING TO KNOW THE M208: Overview of Print Server Installation 13
Page 22

the name of one of the eight default destinations on the unit. (e.g. d1prn, d3com2,
etc.)
For more information on NetBIOS over TCP/IP configurations, please see CONFIG-
URING THE M208 FOR WINDOWS on page 79.
Basic AppleTalk Configuration
The following outlines the basic steps required to add a M208 to an AppleTalk network.
Note
Example
An AppleTalk setup does not require any Print Server configuration; the network
parameters are automatically configured for you once the M208 is booted on the network.
Once the unit is physically attached to the network, you need to:
1 Select Chooser from the Apple Menu.
2 Select the Laserwriter icon.
A list of available printers will appear. By default, the format of each name is
M208name_papname
where M208name is the name of the M208 and papname is
an M208 I/O port. Both names are configurable.
M_000BF5_prn
is the printer associated with the M208 named M_000BF5 using the parallel port.
3 From the list of printers, select one to print to.
For more information on AppleTalk configurations, please see CONFIGURING THE
M208 FOR APPLETALK on page 75.
14 GETTING TO KNOW THE M208: Overview of Print Server Installation
Page 23

INSTALLING THE M208 ON THE NETWORK
Overview
The first step of your M208 setup is to attach it to the network. This section tells you
how to do that and also covers the M208’s network interfaces.
Preparing for Installation
Before unpacking and installing the hardware, read the FCC Warning.
FCC Warning
This equipment generates, uses and can radiate radio frequency energy.
If it is not installed and used as directed in this manual, interference to
radio communications may result. The equipment has been tested and
found to comply with the limits for a Class A computing device
pursuant to Subpart B of Part 15 of FCC rules, which are designed to
provide reasonable protection against such interference when operated
in a commercial environment. Operation of this equipment in a
residential area is likely to cause interference. In such a case the user
will be required to correct the interference at the expense of the user.
Unpacking the M208
Before unpacking the M208, check the package for any obvious damage resulting
from mishandling. If the outside box is damaged, open it and check for any damage to
the contents. Immediately report any damage to the shipping company.
Unpack the M208 and check the contents and serial numbers against the packing slip.
Immediately report any errors or shortages to your vendor. If everything is in acceptable order, fill out the Warranty Registration/Customer Survey card and mail it in.
INSTALLING THE M208 ON THE NETWORK: Overview 15
Page 24
Site Requirements
Environment
Prepare to install the M208 in a clean, well-ventilated environment protected from
extremes of temperature, humidity, mechanical shock, or vibration. Provide enough
space at the front and back of the unit for cable connections.
Location
Prepare to install the M208:
• within four meters (13 feet) of a grounded 115 or 230 VAC outlet,
• within five meters (15 feet) of any device connected to the parallel port (PRN)
• within 15 meters (50 feet) of any device connected to the serial ports (COM1 or
COM2).
Grounding, Power, and Connection
Ensure that the electrical outlet is properly grounded.
Power is supplied to the M208 from an external transformer through a two-meter (six-
foot) output cord to a 6 position mini din. The external transformer connects through a
two-meter (six-foot) line cord to a 3-prong 115 or 230 VAC outlet.
Figure 2: M208 Diagram
M208 Front View
M208 WORKGROUP HUB / PRINT SERVER
COLACTNETERRSTATPOWER
M208 Rear View
POWER
16 INSTALLING THE M208 ON THE NETWORK: Preparing for Installation
86543217
TRANSCEIVER
Page 25

Connecting the M208 to the Network
To connect the M208 to the network:
1 Connect Data Terminal Equipment (DTE) and other hubs/backbone to the appro-
priate ports (10Base-T or AUI port). Please see Hub Installation on page 20 for
further details.
1 Connect peripherals to the appropriate I/O ports. Please see Connecting Peripher-
als on page 17 for details on each of the M208’s I/O ports.
2 Unpack and plug in the power supply. The connector plugs into the back of the
M208. Watch the lights on the from panel of the M208 as they cycle through the
power-on self test. When the test is complete, the PO WER light is on and STAT is
flashing.
Connecting Peripherals
A maximum of three devices can be attached to an M208’s I/O ports at the same time;
one on the parallel port and two on the serial ports.
Parallel Port Connections (PRN)
One 25-pin female DB-25S connector with an IBM PC compatible pinout are provided on the rear panel for connection to a printer using a parallel port. This port can
be configured with various parameters depending on the attached printer. These
parameters include:
• ackmode for printers (usually non-laser printers) that use the
trigger of next data transfer rather than the BUSY signal,
• autofeed for printers (usually non-laser printers) that require the
be asserted,
• bbmode for simulating an attached printer,
• fastmode for high performance parallel interfaces that can handle an increased
transfer rate,
• slowmode for slower parallel interfaces which require slower transfer rates.
•vslowmode for printers that require ever slower data transfer rates.
INSTALLING THE M208 ON THE NETWORK: Connecting the M208 to the Network 17
ACK signal for the
AUT OFD line to
Page 26

Please see list prn on page 100, set prn on page 112, and PRN Pinout on page 183.
Serial Port Connections (COM1, COM2)
Two 9-pin male DE-9P connectors with IBM PC AT compatible pinouts are provided
for connection to printers using serial ports. Each of these ports have various parameters which control such things as:
• parity selection, generation, and detection,
• hardware flow control,
• software flow control,
• character description.
For more information, please see list com1|com2 on page 98, set com1|com2 on page
105, and 9-Pin COM1/COM2 Pinout on page 184.
Note
For best performance, connect RXD lines (Pin 2) to ground on cables connected to
equipment that do not drive the transmit data signal (i.e. some printers). This will prevent induced noise from being processed as data.
You have now completed the basic installation of the M208 onto the network and now
it must be configured for use. Please continue with the appropriate chapters for information pertaining to the hub component of the unit and for information pertaining to
configuring the M208 for your particular environment:
• USING THE HUB on page 19,
• CONFIGURING THE M208 FOR TCP/IP on page 31,
• CONFIGURING THE M208 FOR NOVELL on page 63,
• CONFIGURING THE M208 FOR APPLETALK on page 75,
• CONFIGURING THE M208 FOR WINDOWS on page 79.
18 INSTALLING THE M208 ON THE NETWORK: Connecting Peripherals
Page 27

USING THE HUB
Overview
The M208 Workgroup Hub/Print Server includes a fully managable and intelligent
eight port Ethernet hub. Hubs (or multi-port repeaters) are stable network de vices that
perform signal regeneration (including amplification, symmetry , and retiming), packet
forwarding, and routing. When a hub is presented with a data signal, it automatically
regenerates and transmits the data signal to all the other hub ports without any modification to the signal.
Very little configuration is required for the hub as it becomes fully operational as soon
the unit is powered up.
M208 Hub Features
The following is a list of features for the hub component of the M208:
• auto discovery/auto-sensing: the M208 automatically senses when a device is
connected to a port and begins transmitting data signals to that port,
• auto-port segmentation: the hub will automatically segment a port when the port
experiences excessive collisions or sends extremely long (illegal) Ethernet
packets,
• intelligent segmentation recovery: if a port becomes segmented due to undesirable
Ethernet activity, the port will automatically return to normal operation when the
undesirable activity disappears,
• collision detection: when two nodes try to transmit data at the same time, the
M208 will transmit a jam signal telling the nodes that a collision has occurred.
Once the collision condition is removed, the M208 terminates the jam signal and
resumes normal operation,
• cascading hubs: any port can be used to cascade M208s,
• automatic reverse recei ve parity to correct miswiring: the M208 can automatically
reverses the polarity of the receive pair if it senses the parity to be incorrect,
• configuration and management in a Windows environment using NPWin,
USING THE HUB: Overview 19
Page 28

• full hub monitoring capabilities using the npsh command set,
Not
• remote network management via private MIBs: the M208’s private MIB file
contains all the variables and traps required to manage the hub using an SNMP
manager,
Hub Installation
You can use any of the network ports to connect the M208 to computers, to other
hubs/backbone, or to other Data Terminal Equipment (DTE).
Connectors
The M208 has 9 network connectors: eight 10Base-T (RJ45) connectors, and one A UI
connector.
Cable Requirements for Connecting to the Backbone or to Other Hubs
To connect the M208 to the backbone or to another hub, a crossed-over cable is
required unless port #1 is used, then a straight through cable can be used as long as the
switch next to the port is set accordingly. By default, the switch is set to accept a
straight-through cable.
Cabling Requirements for Connecting to DTE’s
To connect other DTE’s to the M208, a straight-through cable is required unless port
#1 is used, then a crossed-over cable can be used as long as the switch next to the port
is set accordingly.
For the pinouts of the twisted-pair cable, please see Twisted-Pair Cable Pinouts on
page 21. For the pinouts of the A UI cable, please see THICK (Transceiver) Connector
Pinouts on page 180.
e
Port #1 is the only port that can be set (using the external switch) to accept either a
crossed-over or straight-through cable. Ports #2-8 are internally crossed-over.
20 USING THE HUB: Hub Installation
Page 29

Figure 3: Twisted-Pair Cable Pinouts
Not
Twisted-Pair Straight-Through Cable
M208 End DTE End
Signal Pins SignalPins
Receive + 1 1 Transmit +
Receive - 2 2 Transmit Transmit + 3 3 Receive +
Transmit - 6 6 Receive -
Twisted-Pair Crossover Cable
M208 End
Signal Pins SignalPins
Receive + 1 6 Transmit Receive - 2 3 Transmit +
Transmit + 3 2 Receive Transmit - 6 1 Receive +
Hub Configuration
The hub component of the M208 becomes fully operationable as soon as the unit is
powered up and thus very little configuration is required. However, to facilitate communications with the M208 and to utilize the M208’s print server capabilities, it is
necessary to configure the unit with an IP address.
Other hub configuration options as well as the npsh commands to perform the configuration are detailed below. All hub configuration can also be performed using the
included NPWin software utility included with the M208.
e
In order to use the print server functions of the M208, an IP address must be config-
Backbone/Hub End
USING THE HUB: Hub Configuration 21
Page 30

ured on the unit.
NoteNot
Configuring the M208 with an IP address
There are a number of ways to configure the M208 with an IP address, either automatically with a shell script or manually.
Please see Computer-aided Configuration with ezsetup or npconfig on page 36, Man-
ual Configuration Through the Network with ARP on page 37, Manual Configuration
Through the Network with RARP on page 38, Manual Configuration Through the Network with BOOTP on page 39, or Manual Configuration Through the COM Port on
page 40, or USING NPWIN on page 127 for step-by-step instructions.
Enabling/Disabling a Port
This feature allows you to manually enable or disable a particular port. By default, all
ports are enabled and the M208 will auto-sense when a device is connected to the port
and will start sending data signals to the port.
A port that has been manually disabled will not auto-sense when a device is attached
to it. You must manually enable any port that has been manually disabled before autosensing will work.
To disable a particular port, please follow the steps below:
1 Login to the M208 as a root user.
2 At the npsh prompt, type the following command:
config hub [
portnum
] [-]enable
where portnum is the number between 1 and 9 of the port that you want to disable.
e
The config hub command stores the configuration setting to EEPROM and automatically resets the unit.
Enabling/Disabling Link Integrity on a 10Base-T Port
This feature allows you to stop a port from generating a link integrity signal. This signal informs a hub of the presence of a device connect to it over a twisted-pair cable
and of the integrity of that link. By default, link integrity is enabled on all ports.
If you have a non-10Base-T product connected to the hub, you may need to disable the
link integrity on that particular port or else the port will experience excessive collisions and auto-partion itself.
22 USING THE HUB: Hub Configuration
Page 31

To disable link integrity on a specific port, please follow the steps below:
NoteNoteNoteNot
1 Login to the M208 as a root user.
2 At the npsh prompt, type the following command:
config hub [
portnum
] [-]li
where portnum is the number between 1 and 8 of the port that you want to disable
link integrity.
This command is not applicable to port 9 which is the AUI port.
If the port LED stays lit even when no device is attached, this indicates that link
integrity has been turned off for that particular port.
Enabling/Disabling Reversing Receive Polarity on a Port
This feature allows you to turn off the automatic re v erse receive polarity on a port. By
default, reverse receive polarity is enabled.
If you disable this feature on a port, you must ensure that you are using the correct
wiring for the port. Please see Twisted-Pair Cable Pinouts on page 21 for details.
To disable reverse receive polarity of a specific port, please follow the steps below:
1 Login to the M208 as a root user.
2 At the npsh prompt, type the following command:
config hub [
portnum
] [-]revxpol
where portnum is the number between 1 and 8 of the port that you want to disable
reverse receive polarity.
e
Enabling/Disabling SQE Test on the AUI port
This command is not applicable to port 9 which is the AUI port.
The SQE Test is a signal that tests the signal detection electronics in the transceiver
and lets the hub know that the collision detection circuits and signal paths are working
correctly. The SQE Test is only applicable to the AUI port and by default, the SQE
Test is disabled.
If you are using the AUI port via a external transceiver, the SQE Test signal could be
interpreted by the transceiver as a collision and may cause a collision signal to be generated to the rest of the network. Generally , when you are using an external transcei v er
on the AUI port, ensure that the SQE Test is disabled.
USING THE HUB: Hub Configuration 23
Page 32

If you are using the AUI port without an external transceiver, the SQE Test can be
Not
used to verify the integrity of the connection.
To enable the SQE Test on port 9, please follow the steps below:
1 Login to the M208 as a root user.
2 At the npsh prompt, type the following command:
config hub 9 sqe
Monitoring the Hub
Monitoring the hub can be done on two levels, by observing the LED lights on the
both the front and back panels of the unit and by using the hub monitoring features
included in the npsh command set.
Hub Monitoring Using the LEDs
The M208’s hub component has ten LEDs associated with it: two LEDs on the front
panel indicating collisions and general hub activity and eight LEDs on the back indicating port activity.
The collision LED (COL) on the front panel will flash when the hub is experiencing
transmission collisions. The rate of flash corresponds to the amount of collisions that
the hub is experiencing.
The activity LED (ACT) on the front panel will flash when the hub is experiencing
network activity. The rate of flash corresponds to the amount of network activity the
hub is experiencing.
The port activity LEDs on the back panel will flash when the port is receiving data
from the network. The rate of flash corresponds to the amount of data being sent or
received by the port.
e
When a port has been auto-segmented, the port activity LED will flash slowly until the
hub terminates the auto-segment condition.
24 USING THE HUB: Monitoring the Hub
Page 33

Hub Monitoring Using npsh
The command set npsh provides extensive information regarding the operation of the
hub including both the general operational status of the hub as well as information
specific to each port. This information is valuable for monitoring the operation of the
hub and for troubleshooting your network.
To monitor the operations of the hub as a whole, please follow the steps below:
1 Login to the M208 as a root or guest user.
2 At the npsh prompt, type the following command:
list hub
A screen showing the general operational status of the hub, various counters, and the
configuration of each port is displayed.
To monitor the configuration and operational status of a particular port, please follow the steps below:
1 Login to the M208 as a root or guest user.
2 At the npsh prompt, type the following command:
list hub [
portnum
]
where portnum is the number between 1 and 9 of the port that you want to monitor.
A screen showing information specific to the configuration and operation of the
desired port is displayed.
Definitions of Ethernet Terms in List Hub Output
The following defines the Ethernet terms used in the output of the List Hub command.
Alignment Errors Displays the number of frames detected with an
Frame Check Sequence (FCS) error and a framing
error.
Auto Partitioned Displays whether the port has been auto-partitioned
because of undesirable Ethernet activity.
Auto Partitions Displays the number of instances where the M208
has auto-partitioned this port.
USING THE HUB: Monitoring the Hub 25
Page 34

Collisions Displays the number of occurrences where the port
has activity on both its receive and transmit pairs.
This is a normal event within a CSMA/CD network.
Excessive collisions, however, may indicate an overloaded network or a wiring error.
Data Rate Mismatches Displays the number of occurrences where the fre-
quency or data rate of the incoming signal is different
from the local transmit frequency.
Enabled Displays whether the port is enabled. If enabled, data
received on another port is transmitted on the transmit pair. If disabled, the transmit pair is inactive
while the receive pair is active.
FCS Errors Displays the number of frames detected on a port
with an invalid Frame Check Sequence (FCS).
Frame Too Longs Displays the number of frames that exceed the maxi-
mum valid packet length of 1518 bytes.
Last Scr Address Displays the value of the Ethernet source address
field of the last valid frame it received.
Late Events Displays the number of instances where a collision is
detected after the LateEvent Threshold in the frame.
This attribute will be counted by both the Late Events
attribute as well as the Collisions attribute.
Link Integrity Test Displays whether the port has the link integrity test
enabled.
Link Status Displays whether the port passed the link status test.
Loop Back Test Displays whether the AUI port passed the loop back
test.
MJLP Error Displays whether the M208 has a MAU Jabber
Lockup Protection (MJLP) error. A MJLP error is
where the port transmits for a period longer than the
maximum packet length.
Operating Status Displays the operation status of the M208, either
operational or failure.
26 USING THE HUB: Monitoring the Hub
Page 35

Readable Frames Displays the number of valid frames received by the
port.
Readable Octets Displays the number of valid octets received by the
port.
Rx Polarity Reversed Displays whether the receive polarity has been auto-
matically reversed on the port. This occurs when the
receive pair is miswired.
Runts Displays the number of instances where activity is
detected with a duration greater than the ShortEventMaxTime but less than the minimum valid frame
time.
Short Events Displays the number of instances where activity is
detected with a duration less than ShortEventMaxTime. This is a normal event in a CSMA/CD network.
Source Address Displays the number of Ethernet source address
changes on the received packets.
SQE Test Displays whether the AUI port has the SQE Test
enabled.
Src Address Match Displays a confirmation that the Ethernet address on
the last frame received matches that of the previous
frame. This indicates that either the DTE has been
changed or the port is connected to another hub.
Total Errors Displays the total number of errors detected by the
M208.
Total Frames Displays the total number of valid frames receiv ed on
all the ports of the M208.
Total Octets Displays the total number of octets received on all the
ports of the M208.
Transmit Collisions Displays the number of transmit collisions detected
by the M208 on all of the ports.
Very Long Events Displays the number of times the transmitter is active
in excess of the MAU jabber lockup protection timer.
USING THE HUB: Monitoring the Hub 27
Page 36

SNMP Management Features
The M208 includes a private Management Information Base (MIB) file that contains a
number of variables and traps that can be used to configure, monitor and manage all
aspects of the unit. The M208 supports both MIB II and private MIBs, allowing it to
be a fully managed agent using a SNMP manager such as HP’s OpenView, Sun’s Sun-
Net Manager, and Castle Rock’s, SNMPc.
The MIB is included in a file called mplxmib.txt that can found on the host software
disk. This file can also be downloaded from the Microplex FTP site
(ftp.microplex.com: support/m208/misc/mplxmib.txt) or can be accessed via the
Microplex Web site (http://www.microplex.com/).
For a complete description of SNMP, the MIB file, and how to set up an SNMP user,
please see Managing With SNMP on page 141.
Troubleshooting the Hub
This section covers some basic troubleshooting tips regarding the operation of the hub
component of the M208. For information on troubleshooting the print server component of the M208, please see TROUBLESHOOTING THE M208 on page 159.
Basic Troubleshooting Tips
• Ensure that the connections are secure and the hub is powered-up,
• If a transceiver is connected to the AUI port, make sure the SQE test is turned off.
If you connect a transceiver to the AUI port and the SQU test is turned on,
excessive collisions, short events, or dropped packets between the M208 and the
device connected to the AUI port can occur,
• Ensure that you have a valid network topology and that you are complying with
standard Ethernet practices regarding length of cable runs, number of hops, etc.
Additional Troubleshooting Tips
• If you plug a device into one of the RJ45 ports (Hub to DTE) and the LED does
not turn on, try plugging it into port one and setting the selector switch to the
crossed-over position (X). If this works, either use port one or change to a
straight-through cable.
28 USING THE HUB: SNMP Management Features
Page 37

• If you plug another hub into one of the RJ45 ports (Hub to Hub) and the LED does
not turn on, try plugging it into port one and setting the selector switch to the
straight-through position (||). If this works, either use port one or change to a
crossed-over cable.
• If you plug a device into one the RJ45 ports (DTE to Hub) and the LED turns on
but does not flicker when you know the device should be receiving data from
another active device, make sure that reverse receive polarity is enabled for the
port or correct the receive pair.
USING THE HUB: Troubleshooting the Hub 29
Page 38

30 USING THE HUB: Troubleshooting the Hub
Page 39

CONFIGURING THE M208 FOR TCP/IP
Not
Overview
If you are setting the M208 in a TCP/IP environment, this chapter will help you with
all aspects of the setup process. The provided host software is introduced and then
steps are given for configuring the M208 for communications ov er the network and for
printing. Since TCP/IP encompasses a wide variety of system types, the common ones
are covered in detail to help you get printing in a TCP/IP environment.
Host Software
The TCP/IP software provided includes two setup programs, source code, interface
files, and various printing-related programs such as:
• a2ps for ASCII to PostScript conversion,
• onlcr for carriage return insertion,
• banner for banner page generation,
• chr for echoing ASCII characters and strings to standard output,
• npscramble for print job scrambling,
• npd for bi-directional communications when printing,
• npwrite for direct socket printing.
chr is the only mandatory binary when using one of the interface scripts for printing.
The extra processing binaries (a2ps, onlcr, banner) can be configured for the host to
perform or they can each be set on the M208 alleviating the host of these extra tasks.
e
CONFIGURING THE M208 FOR TCP/IP: Overview 31
To be utilized on a host, they must be used in conjunction with an interface file. Otherwise, please see USING THE M208’S COMMAND SET on page 93 for information on
the commands necessary to set these features on the M208. By setting these features
on the M208, the compilation of chr may be the only one required.
Page 40

Compiling Host Software
Some compilation may be needed before adding print setups to your host unless you
have SunOS 4.1.x, Solaris 2.x, or SCO Unix. Pre-compiled binaries are provided for
these. npconfig can be used to do the compilation or you can try and compile each
program independently. For the npconfig method, please:
1 Select Detailed Configuration Options . . . from the npconfig Main Menu.
2 Select Manage Host Software . . . from the Options Sub-Menu.
3 Select Compile Host Software and answer the prompts until compiled.
For more information on all of this provided host software, please see the next subsections.
ezsetup and npconfig
ezsetup and npconfig are the two installation programs provided; one is for a very
quick, simple setup and the latter is for a more detailed configuration or for maintaining and troubleshooting the M208. Both programs help you configure your M208 and
direct print jobs to it.
ezsetup provides two choices only; these are the same as the first two choices of
npconfig’s Main Menu. Within minutes, you will have configured the M208 so it can
be recognized on the network and your host will be able to send print jobs successfully
to it.
If you want to spend more time manipulating the extra capabilities of the M208 and
your host’s configuration, use npconfig. It can be used to configure a print destination
on your host and it can also be used as a M208 management utility allowing you to
monitor, change, and troubleshoot the unit.
Both setup scripts create individual log files, /tmp/ezsetup.log and /tmp/npcon-
fig.log, which simultaneously log a copy of all of the commands executed as you run
through each of these scripts.
Please refer to Table 1: npconfig/ezsetup Main Menu, and Table 2: npconfig Detailed
Configuration Options Sub-Menu for an explanation of the menus.
32 CONFIGURING THE M208 FOR TCP/IP: Host Software
Page 41

Table 1: npconfig/ezsetup Main Menu
Option Description
Configure New Unit Add a M208 to your network. This option provides for: IP
name, IP address, hardware address, netmask, and for root
and guest passwords. (ezsetup as well)
Configure Host Setup Configure a print destination on the host including com-
munication mechanism and processing options. (ezsetup
as well)
Detailed Configuration Options . . See Table 2: npconfig Detailed Configuration Options
Sub-Menu.
Check Current Print Server Status Display current status of a M208 and associated I/O ports.
Cancel a Print Job in the Print
Server
Table 2: npconfig Detailed Configuration Options Sub-Menu
Option Description
Display current status of a M208, current print jobs within
it, and a prompt for a print job to be cancelled.
Select Print Server Select the M208 you want to configure.
Configure Print Server’s Des-
tinations. . .
Configure M208 destination settings: name, I/O port, backchannel, model, logpath, state, alternate destination, and service(s).
Configure Print Server’s
Models . . .
Configure M208 model settings: name, type, banner page, carriage return insertion (onlcr), tab expansion (xtab), descrambling, ASCII to PostScript conversion (a2ps), and header and
trailer strings.
Configure Print Server’s I/O
Ports . . .
Configure M208 I/O port settings: state, timeout, handshaking,
parity, and speed.
CONFIGURING THE M208 FOR TCP/IP: Host Software 33
Page 42

Table 2: npconfig Detailed Configuration Options Sub-Menu
Option Description
Configure Print Server’s Log-
Configure M208 logpath settings: name, type, and port.
paths . . .
Configure Print Server’s
Add and remove users. Change user passwords and user types.
Users . . .
Configure Print Server’s Nov-
ell Options . . .
Configure and list the M208 Novell settings: name, frame type,
and PSERVER password. List M208 PSERVER and
RPRINTER configuration.
Configure Print Server’s Network Options . . .
Configure M208 IP address, netmask, routing entries, frame
type, and RARP and BOOTP settings. Restore unit to default
settings. List all network-related settings.
Manage Print Server’s System Information . . .
Display and modify system information of a M208: M208
name, contact name, location string, log details, descramble
key, license key, and module(s).
Configure Print Server’s Permanent Settings . . .
For Print Server settings, query current status and store
changes to/from EEPROM and factory defaults.
Debug Print Server . . . Use M208 debug commands. Begin and start I/O port tests.
Manage Host Software . . . Install manual pages, compile source code, and install binaries
and scripts provided on the host software media.
Remote Host Security . . . Specify TCP hosts/networks that can communicate with the
M208.
34 CONFIGURING THE M208 FOR TCP/IP: Host Software
Page 43

M208 Configuration
When the M208 is first installed on a TCP/IP network, you are unable to communicate
with it since its network parameters are not initialized. During configuration, the following parameters are initialized and saved in EEPROM:
• IP address (mandatory),
• netmask or sub-netmask(mandatory),
• root user password (recommended for security),
• guest user password (recommended for security).
Initializing these parameters permits configuration of all remaining settings through
any of these five ways:
1 computer-aided configuration with ezsetup or npconfig,
2 manual configuration with a terminal connected to COM1,
3 manual configuration through the network with RARP,
4 manual configuration through the network with BOOTP,
5 manual configuration through the network with ARP.
Once you have completed any one of these methods, you will notice the STAT LED
flashing on once per second. This means the M208 is configured and recognizable on
the network. At this point, you can then configure a host for printing by continuing
with Host Configuration on page 42. This will complete your entire print setup unless
you want to enhance it.
If you want to continue with any of the following procedures, please find them as indicated in other sections of this manual:
• Add to or change configuration of your M208. Please see USING THE M208’S
COMMAND SET on page 93.
• Utilize more advanced features of the Print Server. Please see USING THE
M208’S ADDITIONAL OPTIONS on page 131.
CONFIGURING THE M208 FOR TCP/IP: M208 Configuration 35
Page 44

Computer-aided Configuration with ezsetup or npconfig
NoteNot
If you choose computer-aided configuration, you must log on to your system as root
or superuser and use the host software diskette or tape supplied with your M208. If
the software is not provided, or you need a different medium, contact your vendor.
To configure the M208 with the aid of a script, you must:
1 Insert the host software medium into the drive.
2 Login as root user.
3 cd to a directory with at least three megabytes of free space.
4 Transfer the compressed tar file from the media onto the host:
tar xvf /dev/
devicename
devicename is usually fd0 for a diskette.
5 Uncompress this file. Enter:
uncompress npdist.tar.1.Z
6 Untar this file. Enter:
tar xvf npdist.tar.1
A list of files displays and scrolls up on the screen as tar executes and se v eral files
and sub-directories are created.
7 Assign an IP address and IP name to the M208 in your host table (/etc/hosts,
hosts nis map, or DNS name tables).
8 Run ezsetup or npconfig. Enter:
./ezsetup or ./npconfig
e
If running the host software on an HP/UX system, you need to explicitly set the
Korne shell by adding “
ksh” before “./ezsetup” or “./npconfig”.
9 Enter the number for Configure New Unit from the Main Menu.
10 Follow the prompts.
For more information, please see ezsetup and npconfig on page 32.
36 CONFIGURING THE M208 FOR TCP/IP: M208 Configuration
Page 45

Manual Configuration Through the Network with ARP
Not
Not
To manually configure the M208 using the network, go to a host terminal and do the
following:
1 Log on to your system as root user.
2 Assign an IP address and IP name to the M208 in your host table (/etc/hosts,
hosts nis map, or DNS name tables).
3 Find the Ethernet address for the M208 on the bottom of the unit. It must be
entered as part of this procedure.
4 Use the arp command to add an entry in the host's arp able. This is the most com-
mon syntax for this command:
Syntax
e
e
arp -s
ipname ethernetaddress
where ipname is the M208’s IP name or IP address and ethernetaddress is that of
the M208.
If this syntax doesn’t apply, look in your host’s reference manual to find the
proper syntax for the arp command.
5 telnet to the M208. This will bring up a login screen.
telnet
ipname
6 Log into the Print Server as root.
7 At the password prompt, press <Enter>. No password is required at this point as
the M208 is still unconfigured.
This WARNING message is normal at this point so you can ignore it:
STORED AND CURRENT VALUES DIFFER
You should now see a prompt displayed that has the M208 IP address followed by
a colon, then root.
ipaddress
:root>
8 Store the new IP address and netmask in EEPROM so that the M208 can remem-
ber its configuration after reboots. Enter:
store tcpip
ifnum
addr
ipaddress
store tcpip
CONFIGURING THE M208 FOR TCP/IP: M208 Configuration 37
ifnum
mask
netmask
Page 46

Not
e
ifnum is the index to a particular Network Interface. ifnum will always be 1 for
the M208 since there is only one network interface, Ethernet.
9 [Optional, but recommended] Configure root and guest user passwords with the
following commands.
set user passwd root
set user passwd guest
newrootpasswd
newguestpasswd
10 Save these configurations to EEPROM. Enter:
save
11 Verify the IP address and netmask. Enter:
list stored tcpip
These are now stored in EEPROM.
12 Logout of the Telnet session with quit. Then reboot the M208 by powering the
unit off, then on.
13 Test the equipment and configuration after installation is complete. Enter at the
shell prompt on your UNIX machine:
ping
ipname
Manual Configuration Through the Network with RARP
The RARP daemon provides a mechanism for dynamic IP address assignment. When
a RARP-configured TCP/IP host boots, it broadcasts a RARP request for an IP
address. Your network must have this daemon running on some host. If you do not
know whether your network has one, please ask your system administrator or configure the M208 with one of the other methods in this section.
To configure the M208 with RARP, you need to:
1 Make an entry in the /etc/ethers file for the new M208.
Example
00:80:72:00:AB:CD spike
entry for the M208 named spike which has this Ethernet address.
2 Start the RARP daemon if it isn’t running. Send a HUP signal to it with the kill
command:
kill -HUP pid
38 CONFIGURING THE M208 FOR TCP/IP: M208 Configuration
Page 47

3 Reboot the M208. After the ST AT LED flashes regularly, wait another ten seconds
to allow the RARP process to complete.
4 Test the new IP address by trying a ping with the new IP name:
ping
ipname
5 [Optional, but recommended] At this point, set up the user passwords. Please see
set user on page 117.
If no response is given by the M208, the RARP process probably failed. Reboot the
unit and try one of the other methods mentioned in this section.
Manual Configuration Through the Network with BOOTP
BOOTP is a protocol for configuring the M208 as it boots. During the boot sequence,
the M208 can broadcast a BOOTP request and if a BOOTP server is running on the
network configured to respond to the requesting device, it will provide the M208 with
its IP address, netmask, default router, and a time server from which to query the current time (GMT) and the timezone in which the M208 is located.
By default, the M208 will broadcast a BOOTP request when it boots. The following
command can be used to control this request:
store tcpip
ifnum
opts [[-]rarp] [[-]bootp]
On the BOOTP server, there must be an entry in /etc/bootptab similar to this:
M208:\
:sm=
netmask
:\
:hd=/usr/boot:\
:bf=null:\
:gw=
default router
:\
:ht=ethernet:\
:ha=
network address
:ip=
ipaddress
:ts=
time server
:to=
timezone
CONFIGURING THE M208 FOR TCP/IP: M208 Configuration 39
:\
: (in seconds from GMT)
:\ (e.g. 0080720000DC)
:\
Page 48

Manual Configuration Through the COM Port
NoteNot
A terminal, PC, or laptop can be connected to one of the M208’s COM ports for configuration purposes. A straight-through serial cable is normally needed unless a PC is
attached; in this case, a null modem cable can be used. Please see Serial Cable
Schematic on page 186 for more details.
To configure the M208 through the serial ports, you need to:
1 Configure your terminal settings according to the following specifications, unless
the COM port’s parameters have been modified on the M208:
Baud rate: 9600 Data bits: 8
Stop bits: 1 Parity: NONE
Receive handshake: XON/XOFF Transmit handshake: XON/XOFF
2 Turn on the M208 power. Wait until the STAT LED flashes regularly and then
press the <Break> key on your terminal once.
If you see garbage characters on the screen, check the baud rate and parity settings
of the terminal. If you aren’t getting anything, it may be your cable.
3 Press <Enter> for the local host (i.e. the M208) when the prompt appears asking
for an Internet address to login to.
4 Login as root when asked for a login name.
5 Press <Enter> at the password prompt. No password is required at this point, as
the M208 is still unconfigured.
6 Store the new IP address and netmask in EEPROM so that the M208 can remem-
ber its configuration after reboot. Enter:
store tcpip
store tcpip
e
ifnum is the index to a particular Network Interface. ifnum will always be 1 for
ifnum
ifnum
addr
mask
ipaddress
netmask
the M208 since there is only one network interface, Ethernet.
7 [Optional, but recommended] Configure root and guest user passwords with the
following commands:
set user passwd root
set user passwd guest
40 CONFIGURING THE M208 FOR TCP/IP: M208 Configuration
newrootpasswd
newguestpasswd
Page 49

8 Save these configurations to EEPROM. Enter:
save
9 Verify the IP address and netmask. Enter:
list stored tcpip
These are now stored in EEPROM.
10 After configuration, turn the M208 off, then on. This reboots the M208 and auto-
matically logs you out of the terminal session.
11 Test the equipment and configuration after installation is complete. Enter at the
shell prompt on your UNIX machine:
ping
ipname
Restoring to Factory Defaults
If at any time you’d like to restore the M208’s network settings to their original state,
you can do so with an npsh command or by utilizing jumpers within the M208 itself.
Please see Restoring To Factory Defaults on page 135 for more details on this process.
CONFIGURING THE M208 FOR TCP/IP: M208 Configuration 41
Page 50

Host Configuration
When setting up a print destination on a Unix host, you have the option to utilize a
computer-aided script such as ezsetup or npconfig or to do all of the appropriate steps
manually .
If you decide to go with one of the provided installation scripts, select Configure
Host Setup from the Main Menu of either program to configure a print setup on your
host. It will step you through some questions and then perform all of the necessary
setup commands for you. Please see ezsetup and npconfig on page 32 for more information on these scripts.
The rest of this section introduces you to different printing methods, with the spooler
and without, and discusses each of the manual steps for these environments:
• BSD,
• System V,
• Sun NeWSprint and Adobe TranScript,
• AIX,
• PC.
Direct Printing Without the Spooler
Before configuring the spooling system, test that basic communications are working
with the M208 and attached printers. Perform tests by sending print jobs directly to
the M208 and bypassing the spooler altogether. You can send print jobs directly to the
M208 with either npwrite or rsh/rcmd/remsh.
The rsh/rcmd/remsh program provides the same functions as the npwrite program
except that the rsh/rcmd/remsh program exits with an error code when the network
connection is down. npwrite continually tries until the job is completed. Remember
this behavior when you are manually modifying your interface script because some
spooler systems simply send a message about the error but the job gets flushed. The
npr.if interface script gives you examples of how this behavior should be handled.
npwrite
The data transfer program npwrite is provided with the host software shipped with the
M208. It sends data to the unit over a TCP connection. Data is read from a file or , if no
42 CONFIGURING THE M208 FOR TCP/IP: Host Configuration
Page 51

file is specified, from standard input. The format of the data is not altered by this program so make sure it is in printer-ready format.
The syntax for npwrite is:
Syntax
npwrite
where:
ipname M208 IP name or IP address.
portname I/O port on the M208 (i.e. prn, com1, com2).
filenames [optional]. Filename(s) to be printed. If no filename is specified, data
Example
npwrite 192.75.11.32 prn testfile.txt
npwrite spike com2 testfile.txt
cat testfile.txt | npwrite 192.75.11.32 prn
where spike and 192.75.11.32 are the M208’s IP name and IP address.
For more information on npwrite, please refer to the online manual pages. If the
npwrite binary is not available for your UNIX machine, use rsh/rcmd/remsh instead.
rsh/rcmd/remsh
The rsh/rcmd/remsh programs are remote command ex ecution clients that talk to the
rshd server in the M208. rsh, rcmd, and remsh are actually the same programs but
have different names on different UNIX systems; some systems may even have
another name for remote command. Enter man rshd to display the online manual
pages for information on the remote shell server for your version of UNIX.
ipname portname [filenames
is read from standard input.
]
The Print Server provides lp, lpstat, and cancel programs for print services through
the rshd server. The lp command reads data from standard input and sends it to the
specified port as follows:
• on SCO UNIX, either of the following:
Example
CONFIGURING THE M208 FOR TCP/IP: Host Configuration 43
rcmd spike lp -d d1prn < testfile.txt
cat testfile.txt | rcmd spike lp -d d1prn
Page 52

• on Sun UNIX, either of the following:
Not
Example
rsh spike lp -d d1prn < testfile.txt
cat testfile.txt | rsh spike lp -d d1prn
where spike is the M208’s IP name and d1prn is the destination.
Printing Via the Spooler
Once you know your communications are correct and you can successfully print
directly to the Print Server, you can integrate the spooler.
Interface scripts play important roles in BSD spooling environments and especially
with System V print spoolers. BSD systems also provide a remote printing method
that utilizes the spooler but needs no script or host software at all.
The following sections elaborate on different spooling environments and provide the
manual steps for full host configuration in various en vironments. ezsetup or npconfig,
in most cases, can be used instead to simplify the setup process. Please see ezsetup
and npconfig on page 32 for further details.
npr.if Interface Script
The npr.if interface script provided works in most environments, but it can be
replaced by a custom interface script if you have other requirements. It is usually a
UNIX script which reads parameters from the command line, processes the job
according to the parameters, and sends it to the destination.
Two interface scripts, nprbsd.if and nprsysv.if, are shipped in raw state. These inter-
face scripts can be named anything you would like. Load the appropriate one for your
system spooler type and use it in this state if the M208 can do sufficient processing.
The M208 itself contains enough processing options, when they are turned on, to handle most processing needs without the need for host software. Some of these options
include ASCII to PostScript conversion (a2ps) and carriage return insertion (onlcr).
Therefore, host software may be unnecessary and you can turn off all processing
options on the host. Please see Host Software on page 31 to find out more about these
options.
e
If you require high-speed printing, use one of the interface scripts with host processing turned on. This removes processing load from the Print Server and increases print-
44 CONFIGURING THE M208 FOR TCP/IP: Host Configuration
Page 53

ing throughput.
Both ezsetup and npconfig utilize the appropriate interface script by renaming it to
nprprintername.if, where printername is the name of the printer on the host. To
install one of these scripts manually, please refer to the section that applies to your
host: the BSD UNIX section starting on page 47 or the System V UNIX section starting
on page 51.
Custom Interface Scripts
If an interface script is to be used for your print setup, you have three choices:
1 Use npr.if provided in the host software.
2 Use a pre-defined script for your particular printer.
3 Use a script you have created yourself.
The npr.if method is explained throughout this section. However, if you have a pre-
defined printer script or a script of your own, there are certain modifications you must
make in order for it to work with the M208.
The important part of an interface script is where it sends the print job. With the
M208, the data must be captured and sent over the network for printing, since your
printer is no longer locally attached. There are two possible ways to make this happen
with your current script:
1 Encapsulate your script’s code with brackets ( ) and after the closing bracket, add
a command to send the data to the M208 for printing.
2 Use npd as the print method.
Both of these methods are explained on the next page.
Modifying Your Script
If you choose to simply edit the script, you need to understand how an interface file
works. The structure of any standard interface file should be as follows:
process options
(
generate printer setup characters
generate banner page data for each file
CONFIGURING THE M208 FOR TCP/IP: Host Configuration 45
Page 54

translate data to printer format
) |
communication program
where communication program is the command executing rsh/rcmd/remsh or
npwrite so the print job is redirected over the network to the M208.
Example
(
FILE=$6
#the spool file is found in the sixth parameter on System V
cat $FILE | onlcr
#filter the job
) | rcmd spike lp -d d3com1
where spike is the name of the M208 and the print jobs are being sent to its destination d3com1 by remotely executing the M208’s lp print command.
Please see npwrite on page 42, rsh/rcmd/remsh on page 43, and lp on page 102 for
more details on each command’s syntax.
Note
Even if you have a very simplistic script, it’s important that you enclose your script
with brackets and then add in a communication program at the end.
Using npd and Your Own Script
If npd is the print method you would like to use with your interface script, you need to
start the npd daemon on your host and then incorporate it into your print setup. Please
see npd Pseudo-device Interface on page 54 to find out more about npd and how to
get it started.
Once you have this daemon running, you can go ahead and work it into your printer
configuration. For BSD systems, this requires an lp= field in your printcap entry along
with the standard if= field for the name of your interface script. The lp= field is filled
in with the name of the npd devicefile used in npd’s startup command. If you have a
System V setup, the -v option in the lpadmin command will equal the npd devicefile.
46 CONFIGURING THE M208 FOR TCP/IP: Host Configuration
Page 55

BSD UNIX
BSD systems allow you to print remotely or to print with an interface file for a locally
attached printer. This is configured within the /etc/printcap database.
lpd Remote Printing
The lpd daemon spools files locally, then sends them to an M208 acting as a remote
printer. As interf ace scripts cannot be used with this spooling method, processing must
be done by the Print Server.
This method should be used in the following conditions:
• your UNIX host supports BSD 4.3 LPD protocol,
• no bi-directional communication is required between the printer and printing
application,
• you want to avoid using special host software.
In BSD printing, two files are sent to the Print Server, a data file and a control file. The
control file contains information about originating user and host. However, since the
control file may not arrive before the data file in the current LPD standards, fully
detailed banner pages cannot be guaranteed.
Setting up lpd Remote
To manually add an M208 printer as a remote printer entry on your BSD UNIX host,
you need to add an entry to the /etc/printcap file and then create its associated files
and directories.
Here is an example of what the printcap entry should look like followed by a description of the commands necessary to create these entries:
Example
ps|PostScript printer on spike’s com2 port:\
:lp=:\
:rp=d3com2:\
:rm=spike:\
:sd=/usr/spool/lpd/spike/ps:\
:lf=/usr/spool/lpd/spike/ps/log:\
:af=/usr/spool/lpd/spike/ps/acct:
where ps is the printer name sending jobs to the destination d3com2 on the M208
named spike.
CONFIGURING THE M208 FOR TCP/IP: Host Configuration 47
Page 56

To create the necessary entries for this example, these commands are needed:
cd /usr/spool/lpd
mkdir spike
mkdir spike/ps
touch spike/ps/log spike/ps/acct
chown -R daemon.daemon spike
chmod -R g+rwX,o+rX spike
Once this is done, you can then start this printer.
lpc start ps
To send a print job, use this syntax:
Syntax
BSD Interface Script Printing
lpr -P
printername filename
If you decide not to go with a remote printer setup, you can use an interface file
instead. This interface script is specified in /etc/printcap with the if= entry instead of
the rm= and rp= entries. The script is called by the lpd daemon with the following
syntax:
Syntax
nprbsd.if -w
where:
nprbsd.if Name of the interface script.
width Width of page in characters.
length Length of page in lines.
indent Number of characters of indent from left margin.
login Login name of person originating the print request.
host Name of host where the print job originates.
acct_file File where accounting data is stored.
Setting up an Interface Script
width
-l
length
-i
indent
-n
login
-h
host acct_file
To manually set up your host with an interface file, you need to add an entry to the
/etc/printcap file and then create and edit its associated files and directories.
Here is an example of what the printcap entry should look like followed by a descrip-
48 CONFIGURING THE M208 FOR TCP/IP: Host Configuration
Page 57

tion of the commands necessary to create these entries:
Example
hp:\
:sh:pw#80:mx#0\
:lp=/dev/spike.com2:\
:sd=/usr/spool/lpd/spike/com2:\
:lf=/usr/spool/lpd/spike/com2/log:\
:af=/usr/spool/lpd/spike/com2/acct:\
:if=/usr/spool/lpd/spike/com2/npr.if:
where hp is the printer name sending jobs to the M208 named spike through the interface file npr.if.
To create these entries, please do the following:
1 Create the printer’s spooling directory and associated files.
cd /usr/spool/lpd
mkdir spike
mkdir spike/com2
touch spike/com2/log spike/com2/acct
chown -R daemon.daemon spike
chmod -R g+rwX,o+rX spike
2 Copy the nprbsd.if file from the host software medium to the spooling directory.
Copy the file as npr.if or name it something more meaningful.
cp nprbsd.if /usr/spool/lpd/spike/com2/npr.if
cd /usr/spool/lpd/spike/com2
chown daemon.daemon npr.if
chmod g+rwX,o+rX npr.if
3 Edit the npr.if variables to suit your system environment. Look for the comment
section beginning with “EDIT THESE VARIABLES” and at the end of this large
comment block, you will find these:
Note
When defining these variables, remember that each is case sensitive. Please define
them as seen in these descriptions. In addition, a further description of these variables is included in the large comment block before them.
NPDIR_PATH (mandatory) Define the directory location of chr, banner,
onlcr, a2ps, and npscramble binaries. Usually
/usr/local/bin.
Note
CONFIGURING THE M208 FOR TCP/IP: Host Configuration 49
These binaries must be copied over from the host software medium. Please see
Page 58

Host Software on page 31 for more details.
COMM_PROG (mandatory) Specify a communication program to transfer
data to the M208 (i.e. npwrite, rsh). If the program is
npwrite, define the UNIT_PORT variable. Otherwise,
define the LP_DEST variable.
PRINTER_TYPE (mandatory) Specify printer type (i.e. raw, ascii, ps, hp, pcl-
ps, gen7170).
UNIT_NAME (mandatory) Define the M208 IP name.
UNIT_PORT (conditional) Specify the M208 port name (i.e. prn, com1,
com2). Use only when COMM_PROG is defined as
npwrite.
LP_DEST (conditional) Specify M208 destination name. Use only when
COMM_PROG is defined as rsh.
Example
Note
#END_MARK_1
NPDIR_PATH=/usr/local/bin
COMM_PROG=rsh
UNIT_NAME=spike
LP_DEST=d3com2
PRINTER_TYPE=hp
BANNERPAGE=1
#START_MARK_1
Additional variables can also be defined within this variable section as indicated
by BANNERPAGE=1. Some other options are ASCII to PostScript conversion,
carriage return insertion, and scrambling. By setting a particular variable to a 1,
this option is then turned on and a 0 turns it off. These too are described further in
the beginning of npr.if.
4 Create the lp= device that is used as a locking mechanism for contending print
jobs.
touch /dev/spike.com2
chmod go+rw /dev/spike.com2
5 Start the print spooler.
lpc start hp
50 CONFIGURING THE M208 FOR TCP/IP: Host Configuration
Page 59

6 Try printing with the following syntax:
Syntax
System V UNIX
Printing in a System V environment requires the use of an interface file. It also consists of:
• the lp printer interface program,
• the lpsched printing scheduler,
• a set of programs that act as interfaces between scheduler and printing device.
The scheduler copies the file into a spooling directory and calls the interface program
when the job is ready to go to the M208. It processes the job according to the script’s
settings and then sends it over to the M208 for printing.
The interface script is usually kept in /usr/spool/lp/admins/lp/interfaces and carries
the same name as the associated printer. It is copied there from the original interface
file in /usr/spool/lp/model when the lpadmin command is executed.
The interface script is called with the following syntax:
Syntax
ps203
where:
lpr -P
printername filename
reqid username title copies options file1
...
ps203 Name of the interface script which is also the printer name on the host.
reqid Print job identification.
username ID of the user requesting the job.
title Title of the print job if desired.
copies Number of copies of each file to be printed.
options Additional switches for extra job processing options.
file1 Spool file.
... Indicates additional spool files.
CONFIGURING THE M208 FOR TCP/IP: Host Configuration 51
Page 60

Setting up an Interface Script
The following steps are the manual instructions for setting up your host with npr.if:
Note
Note
Note
The example commands provided represent a print setup involving a printer named
hp, an M208 named spike, and a printer attached to the M208’s com2 port.
1 Copy the nprsysv.if file from the host software medium to the model directory.
Copy the file as npr.if or name it something more meaningful.
cp nprsysv.if /usr/spool/lp/model/npr.if
2 Edit the npr.if variables to match your system requirements. Look for the com-
ment section beginning with “EDIT THESE VARIABLES” and at the end of this
large comment block, you will find these:
When defining these variables, remember that each is case sensitive. Please define
them as seen in these descriptions. In addition, a further description of these variables is included in the large comment block before them.
NPDIR_PATH (mandatory) Define the directory location of chr, banner,
onlcr, a2ps, and npscramble binaries. Usually
/usr/local/bin.
These binaries must be copied over from the host software medium. Please see
Host Software on page 31 for more details.
COMM_PROG (mandatory) Specify a communication program to transfer
data to the M208 (i.e. npwrite, rsh, rcmd, remsh). If the
program is npwrite, define the UNIT_PORT variable. Oth-
erwise define the LP_DEST variable.
PRINTER_TYPE (mandatory) Specify printer type (i.e. raw, ascii, ps, hp, pcl-
ps, gen7170).
UNIT_NAME (mandatory) Define the M208 IP name.
UNIT_PORT (conditional) Specify the M208 port name (i.e. prn, com1,
com2). Use only when COMM_PROG is defined as
npwrite.
LP_DEST (conditional) Specify M208 destination name.
Use only when COMM_PROG is defined as rsh, rcmd, or
remsh.
52 CONFIGURING THE M208 FOR TCP/IP: Host Configuration
Page 61

Example
#END_MARK_1
NPDIR_PATH=/usr/local/bin
COMM_PROG=rcmd
UNIT_NAME=spike
LP_DEST=d4com2
PRINTER_TYPE=hp
BANNERPAGE=1
#START_MARK_1
Note
Syntax
Additional variables can also be defined within this variable section as indicated
by BANNERPAGE=1. Some other options are ASCII to PostScript conversion,
carriage return insertion, and scrambling. By setting a particular variable to a 1,
this option is then turned on and a 0 turns it off. These too are described further in
the beginning of npr.if.
3 Create the dummy output device file used as a locking mechanism between con-
tending print jobs.
touch /dev/spike.com2
chmod go+rw /dev/spike.com2
4 Install a new printer specifying printer name, interface script name, and dummy
device created in Step 3.
/usr/lib/lpadmin -php -mnpr.if -v/dev/spike.com2
5 Start the scheduler.
lpsched
6 Enable the printer and allow it to accept requests.
enable hp
accept hp
7 Try printing a file with the following syntax:
lp -d
printername filename
CONFIGURING THE M208 FOR TCP/IP: Host Configuration 53
Page 62

npd Pseudo-device Interface
The npd pseudo-tty daemon is used when bi-directional communications is required
between the printer and printing application, and when changes to the printer’s interface script are undesirable.
Some applications like Sun NeWSprint and Adobe TranScript work best with a bidirectional communications channel to the printer because they can provide more
details on the printer status. For example, PostScript printers can send error messages
back to the application as they occur. npd is used in this case making use of the TCP
protocol and pseudo-tty device drivers.
Figure 4: npd Overview
TCP/IP Host
The spooler
processes the job
and passes it to the
printer device.
/dev/m208.prn
54 CONFIGURING THE M208 FOR TCP/IP: Host Configuration
npd watches over this device
and sends any print jobs over
to the M208.
M208
printer
Page 63

Starting npd
Syntax
Starting the npd daemon is all that is needed to utilize npd. Integrating any special
applications can then be done anytime thereafter.
Use the following syntax to start npd:
npd
devicefile ipname portname
where:
devicefile Name for a pseudo-tty pair’s slave device acquired by npd.
ipname M208 IP name or IP address.
portname M208 I/O port name (i.e. prn, com1, com2).
Note
Example
Example
Example
npd locks
The devicefile cannot exist prior to starting npd and this particular npd daemon cannot be running already. It is possible to have more than one daemon running on the
same host, however, as long as they are not using the same devicefile.
npd /dev/spike.com2 spike com2
starts an npd daemon utilizing /dev/spike.com2 to send print jobs to the printer
attached to com2 on the M208 named spike.
By default, npd looks in the /dev directory to find a free pseudo-tty pair
(/dev/pty?? and /dev/tty?? files). However, if your UNIX system has these files in a
different directory, you can specify the directory pathname with a -p option.
npd -p /dev/pty /dev/spike.com2 spike com2
where /dev/pty is the directory to be searched for a free pseudo-tty pair.
Some systems such as HPUX place the master and slave devices in separate directo-
ries (e.g. /dev/ptym and /dev/pty). Specify where each of the pairs reside with the pm and -ps options.
npd -pm /dev/ptym -ps /dev/pty /dev/spike.com2 spike com2
where /dev/ptym is the directory searched to find a free pseudo-tty pair’s master
device and /dev/pty is the directory used for locating the pseudo-tty pair slave device.
As npd acquires an exclusive lock on the M208 port, it is possible to lock out other
daemons that may reside on other UNIX hosts. Therefore, npd is designed to timeout
and release the lock if the pseudo-tty pair is idle for a specified time (30 seconds is the
CONFIGURING THE M208 FOR TCP/IP: Host Configuration 55
Page 64

default). You can modify this value with the -t option.
Example
npd -t 60 /dev/spike.com2 spike com2
for the timeout to occur in 60 seconds.
Testing npd
Once npd has been started, it’s a good idea to test and see if npd is working before
trying to print through the spooler. This is one test method.
Example
cat test.txt > /dev/spike.com2
redirects the cat output of test.txt to the npd device /dev/spike.com2 which is then
sent to the M208 named spike.
Modifying a Host to Use npd
If you want the npd daemon to start every time you reboot your UNIX machine, edit
your .rc file to include the appropriate npd startup command line (from the previous
section). After npd starts, integrate the print spooler into this pseudo-tty setup.
In BSD print spooler systems, modify the lp= field in the appropriate printer entry in
the /etc/printcap file. Set lp= to the devicefile argument of the npd program.
On System V systems, the -v option in the lpadmin command will equal the device-
file.
Stopping npd
Whenever an npd daemon starts, it makes a log entry in the /usr/adm/npdlog file.
The contents of this file have the following naming information:
pid ipname port masterfile slavefile devicefile
where:
pid Process ID of npd daemon.
ipname M208 IP address or IP name serviced by npd.
port M208 I/O port used by npd (i.e. prn, com1, com2).
masterfile Master device used by npd.
slavefile Slave device used by npd.
56 CONFIGURING THE M208 FOR TCP/IP: Host Configuration
Page 65

devicefile Name linked to the slavefile by npd.
Example
153 spike com2 /dev/ptyq1 /dev/ttyq1 /dev/spike.com2
is the log entry for the npd daemon using process ID 153.
You can acquire the process ID of the npd daemon that needs to be stopped and then
execute the following kill command for that process:
Syntax
kill -TERM
Applications Using npd
Sun NeWSprint
Sun NeWSprint page accounting works with PostScript printers. It utilizes the bidirectionality of the M208’s serial ports to get this status back to the host.
If the printer is attached to one of the parallel ports, no page information comes back
from the printer. This causes Sun NeWSprint to assume a communication problem
and disable the queue. To avoid this, remove the af= field in the /etc/printcap entry
and set the HANDLER_INTERFACE variable to PARALLEL in the .param file
located in the printer’s spooling directory.
Add a new Sun NeWSprint printer entry with the add_np_printer program. The
pseudo-tty device is a serial interface. Therefore, when this program prompts you for a
device interface, select Serial and device suffix a for any port on the unit.
pid
After NeWSprint creates the necessary spooling directory and entry in the /etc/printcap file, set the lp= field in the new entry to the devicefile argument of the npd pro-
gram.
Example
The modified /etc/printcap entry looks like this for a PostScript printer named ps
attached to com2 on the M208 named spike:
# entry for a PostScript printer on a serial port
ps|PostScript|PostScript on spike’s com2 port:\
:lp=/dev/spike.com2:\
:sd=/b/newsprint/lpd/spike/com2:\
:lf=/b/newsprint/lpd/spike/com2/log:\
:af=/b/newsprint/lpd/spike/com2/acct:\
:if=/b/newsprint/lpd/if:\
:gf=/b/newsprint/lpd/gf:\
:nf=/b/newsprint/lpd/nf:\
CONFIGURING THE M208 FOR TCP/IP: Host Configuration 57
Page 66

:tf=/b/newsprint/lpd/tf:\
:rf=/b/newsprint/lpd/rf:\
:vf=/b/newsprint/lpd/vf:\
:cf=/b/newsprint/lpd/cf:\
:df=/b/newsprint/lpd/df:\
:of=/b/newsprint/lpd/of:\
:mx#0:\
:sf:\
:sb:\
:br#19200:\
:xc#0177777:\
:ms=-parity,ixon,-opost,-ixany:
Note
If you are using a PostScript printer, remember to include :sh:\ in this entry to suppress the standard LPD header.
Adobe TranScript
Adobe TranScript page accounting works with PostScript printers. It utilizes the bidirectionality of the unit’s serial ports to get this status back to the host.
If the printer is attached to one of the parallel ports, no page information comes back
from the printer. This causes Adobe TranScript’s pscomm to assume a communication problem and disable the queue. To avoid this, replace the pscomm program with
Microplex’s equivalent npcomm.sh program in the .options file which redirects the
data to the M208. npcomm.sh is found in the host software.
Create and edit this .options file in the printer’s spooling directory with global read
permissions. This setup uses rsh/rcmd/remsh or npwrite to talk to the unit.
Add the following variable definitions in this .options file:
NPDIR_PATH Define the directory location of npcomm.sh program. Usually
PSCOMM Redefine the communication program used by psint.sh to use
RCMD Specify the name of the remote shell command to use for trans-
/usr/local/bin.
npcomm.sh instead of pscomm.
ferring data to the M208 (i.e. rsh).
UNIT_NAME Define the M208 IP name or IP address.
LP_DEST Specify the M208 destination name.
Use the mkprinter.sh program to add a new Adobe TranScript printer entry. For now,
58 CONFIGURING THE M208 FOR TCP/IP: Host Configuration
Page 67

use /dev/ttypa as the device interface for any port on the M208. When the program
creates the spooling directory and entry in /etc/printcap file, set the lp= field to the
devicefile argument from npd.
Example
Note
AIX
For a PostScript printer named ps attached to com1 on the M208 named spike:
ps|PostScript|PostScript on spike’s com1 port:\
:lp=/dev/spike.com1:\
:sd=/usr/spool/lpd/spike/com1:\
:lf=/usr/adm/printers/ps-log:\
:af=/usr/adm/printers/ps-acct:\
:br#19200:rw:fc#0000374:fs#0000003:\
:xc#0:xs#0040040:mx#0:sf:sb:\
:if=/usr/local/lib/ts/psif:\
:of=/usr/local/lib/ts/psof:\
:gf=/usr/local/lib/ts/psgf:\
:nf=/usr/local/lib/ts/psnf:\
:tf=/usr/local/lib/ts/pstf:\
:rf=/usr/local/lib/ts/psrf:\
:vf=/usr/local/lib/ts/psvf:\
:cf=/usr/local/lib/ts/pscf:\
:df=/usr/local/lib/ts/psdf:
Using :sh:\ in this entry will suppress headers and also prevent TranScript from printing out banner pages if they are set in the .options file.
IBM has a unique print spooler system that uses the qdaemon program. Use the following steps to interface with the M208 using rsh:
Note
These steps and associated examples refer to a setup with a queue named queue2, a
queue device named lp0, printing to the destination d1prn on the M208 named spike.
1 Create a device. Enter:
smit pdp
2 Select Printer/Plotter and then Add a Printer/Plotter. Follow the prompts until
SMIT executes the “mkdev” command to create this device.
Note
Select “parallel” as the interface even if you ha v e a printer attached to the M208’s
serial port.
CONFIGURING THE M208 FOR TCP/IP: Host Configuration 59
Page 68

Select p as the port number.
Select ppa0 as the adapter.
Select a printer type that best matches what you are using.
Select a device lp0. If this device is not available, go back and select “Remove a
Printer/Plotter” and remove lp0 making it available for your next run through.
AIX has a limit of four physical devices. If you run out, IBM suggests deleting the
device after completing a print setup thus making it available for future setups.
3 Create a new queue. Enter:
mkque -q queue2
4 Create a queue device to do the one-to-one mapping with the printer and specify
the backend program for the qdaemon to send print jobs to. Enter:
mkquedev -d lp0 -q queue2 -a ‘backend = /usr/lib/lpd/
piobe’
Note
Note
Note
Note
Sometimes /usr/lpd/piobe is the location of this backend program.
5 Create a virtual printer. This associates the queue, queue device, printer/plotter
name, data type, and printer/plotter type. Enter:
mkvirprt -q queue2 -d lp0 -n lp0 -s pcl -t hplj3
-s is usually pcl but can also be ps (Postscript) or asc (ASCII). This does not
seem to affect the output on the printer so it may be best to use pcl.
6 Change the pio-file for your queue. This will be located in /usr/lib/lpd/pio/cus-
tom and will be called queue2:lp0 after the queue and queue device names.
Change the line beginning with 307 mo::. Enter:
307 mo::rsh spike lp -d d1prn
This file is only created after the mkvirprt command has been executed in Step 5.
This step redirects the print job over the network to the M208.
For destinations other than d1prn, please see Destinations on page 89.
7 Run chvirprt since the print setup has been altered and needs updating. Enter:
chvirprt -q queue2 -d lp0
If you need to delete an entire print setup, use the rmvirprt command.
60 CONFIGURING THE M208 FOR TCP/IP: Host Configuration
Page 69

This is the /etc/qconfig entry created for this particular setup:
Example
queue2: queue stanza
device = lp0 by mkquedev (queue device)
up = TRUE printer’s ready to go
lp0: queue device stanza
backend = /usr/lib/lpd/piobe for local printing
For further information on these commands, please see your AIX system documentation.
Other TCP/IP Print Methods
NCSA
NCSA is a freeware package available on the Internet at
zaphod.ncsa.uiuc.edu in the directory /PC/Telnet/msdos/contributions. The file is
tel23bin.zip. It contains an lpr client for DOS that is compatible with the Print Server.
You can send jobs to the M208 with the following command syntax:
Syntax
lpr -S
ipname
-P
where ipname is the M208 IP name or IP address and destname is the name of a
M208 destination.
Example
lpr -Sspike -Pd4com2
destname
sends a print job to d4com2 on the M208 named spike.
FTP’s PC/TCP
FTP Software markets a package called PC/TCP which provides an lpr client for
DOS that is compatible with the M208.
Jobs can be sent to the M208 directly with the following command syntax after an
entry has been made for the Print Server in the host table:
Syntax
lpr -S
ipname
-P
destname
where ipname is the M208’s IP name or IP address and destname is the name of an
M208 destination.
Example
lpr -Sspike -Pd4com2
sends a print job to d4com2 on the M208 named spike.
CONFIGURING THE M208 FOR TCP/IP: Host Configuration 61
Page 70

Note
FTP’s package also provides Windows printing along with several other software
packages on the market. These are just two possible applications that will work with
the M208. Please see the user manuals of the appropriate applications for more information.
Direct Socket Printing
The M208 provides a socket interface for custom printing applications. Programs can
open a TCP connection to a TCP port on the Print Server. The specified port number
corresponds to a destination on the M208, and data is processed according to the
model associated with this destination. Please see list pserver on page 100, list dest on
page 99, and list model on page 100 for more details.
npwrite is a sample program that performs this way . It is included in the host software
shipped with your M208. For examples, please refer to Direct Printing Without the
Spooler on page 42.
FTP Daemon
The FTP Daemon provides an additional method to submit print jobs to the M208. For
a complete discussion of printing and other M208 functions using the FTP Daemon,
please see FTP Daemon on page 146.
Now that your TCP/IP host is configured for printing, please look to the following for
further configuration options:
• Add to or change configuration of your M208. Please see USING THE M208’S
COMMAND SET on page 93 and USING NPWIN on page 127.
• Utilize more advanced features of the M208. Please see USING THE M208’S
ADDITIONAL OPTIONS on page 131.
62 CONFIGURING THE M208 FOR TCP/IP: Host Configuration
Page 71

CONFIGURING THE M208 FOR NOVELL
Overview
This chapter introduces the M208’s configuration possibilities along with the various
methods of printing available within a Nov ell environment. The M208 works with different NetWare versions, including version 4, and we provide setup steps for each.
Host Software
NetWare’ s PCONSOLE is generally used to change passwords, add print servers, add
remote printers, and add queues to be serviced. It can be used for both a PSER VER or
RPRINTER setup. To install a M208 in a Novell environment, PCONSOLE is used
for the entire installation. The following pages give step-by-step examples of installing the M208 in various Novell environments.
Even though the entire print set-up is done through PCONSOLE, you may want to
communicate directly with the M208 in order to modify settings, monitor the unit, etc.
To communicate with the M208, the optional host software, npsh.exe is included.
npsh.exe is a DOS executable program that can be run from a DOS prompt on a NetWare workstation.
npsh.exe, does these things:
npsh nvplist Lists all of the M208’s on the network; each name is
in the format M_xxxxxx (where xxxxxx equals the
last six digits of the unit’s Ethernet address) by
default regardless of whether it is configured as a
PSERVER or an RPRINTER. This name is configurable.
npsh
npsh
CONFIGURING THE M208 FOR NOVELL: Overview 63
unitname
unitname command
Starts a Telnet-like session with the named Print
Server allowing you to configure, monitor, and troubleshoot the unit with its built-in command set.
Initiates a single command with guest access only to
the unit instead of entering into a complete session.
Page 72

To communicate with the unit using npsh.exe, you need to:
Not
1 From a DOS prompt on a Novell workstation, begin annpsh session with the unit.
npsh
unitname
Starts a Telnet-like session with the named M208 with guest access only.
2 To obtain root access to the unit, type:
supervisor
A standard login screen is displayed prompting you for the login name and password.
3 Login to the unit as a root user.
root
e
Root users require the use of a password as configured in the unit’s user list.
4 Enter the password. If this password is not yet set, press enter at the password
prompt. Otherwise, enter the password that is already stored on the unit.
password
You are now logged in to the unit as a root user and can access any npsh command on
the unit.
Note
Because npsh.exe makes use of broadcasts, you may have problems communicating
across a router.
Please see User Accounts and Permissions on page 94, USING THE M208’S COM-
MAND SET on page 93 and USING NPWIN on page 127 for further details.
M208 Configuration
The M208 configuration in a Novell en vironment is much simpler than that required in
a TCP/IP one. No addresses, masks, or router entries are necessary and in most cases,
the M208 can simply be connected to the network, turned on, and then configured for
printing from a Novell station through PCONSOLE. The only parameters that you
may want to set is a PSERVER password or possibly the frame type. Please see store
pserver on page 120. This type of configuration is done using npsh.exe as detailed in
the previous section.
64 CONFIGURING THE M208 FOR NOVELL: M208 Configuration
Page 73

Host Configuration
The M208 can act as either a PSERVER or as a RPRINTER in a Novell environment.
It supports encrypted passwords and it is capable of servicing up to 16 file servers and
32 queues as a PSERVER. One M208 can handle eight RPRINTER setups.
PSERVER Bootup
When booting as a PSERVER, the M208 gets a server list from the first file server it
contacts. The unit then contacts those servers on that list to see if there is a queue that
needs servicing. The queues are then be polled every 5 seconds (by default) by the
Print Server to see if there are any jobs queued.
RPRINTER Bootup
When booting as a RPRINTER, the M208 again gets a server list from the first file
server it contacts. For each server found on that list, it then looks for a file called
SYS:\LOGIN\M_xxxxxx\CONFIG where xxxxxx is the last six hexadecimal digits
in the Ethernet address found on the bottom of the unit. This file contains one set
rprinter command for each RPRINTER serviced by the M208 since the RPRINTER
settings do not hold their effect through a power cycle.
Note
If the M208 loses a connection to a file server (as a PSERVER) or to a PSERVER (as
a RPRINTER), it will automatically reconnect when that server becomes available
again.
Following is the configuration steps for a PSERVER setup, a RPRINTER setup, as
well as the options available for NetWare 4 environments.
PSERVER Setup (Pre-NetWare 4)
This procedure configures the Novell file server to use an M208 as a PSERVER in a
non-NetWare 4 environment. Please see NetWare 4 Options on page 71 for more on a
NetWare 4 setup.
Note
The M208 replaces a dedicated workstation running PSERVER.EXE or
PSERVER.NLM on the file server, so these are no longer needed.
To set up the unit as a PSERVER in a non-NetWare 4 environment, you need to:
CONFIGURING THE M208 FOR NOVELL: Host Configuration 65
Page 74

Step Action Result of Action
1 Log in to Novell as supervisor. Gives you supervisor rights.
2 Enter PCONSOLE. PCONSOLE’s Main Menu displays.
3 Select PRINT QUEUE INFORMA-
List of currently-defined queues comes up.
TION.
4 Press <Insert> to add a queue. Asks for new queue’s name.
5 Type in this new name in any format
New queue is added to list.
you like and press <Enter>.
6 Press <Escape>. Returns to PCONSOLE’s Main Menu.
7 Select PRINT SERVER INFORMA-
A list of existing print servers displays.
TION.
8 Press <Insert> to add a server. Prompts for the server’s name.
9 Type the name of the M208. By
This new server is added to the list.
default, it isM_xxxxxx where xxxxxx
equals the last six digits of the unit’s
Ethernet address. (e.g. M_000BF5)
10 Select it and press <Enter>. PRINT SERVER INFORMATION menu
comes up.
11 Select PRINT SERVER CONFIGU-
This menu displays.
RATION.
12 Select PRINTER CONFIGURA-
A list of configured printers is displayed.
TION.
13 Select the first item listed as NOT
INSTALLED and press <Enter>.
The PRINTER N CONFIGURATION window comes up where N equals the selected
printer.
66 CONFIGURING THE M208 FOR NOVELL: Host Configuration
Page 75

Step Action Result of Action
14 Type in the name of one of the eight
default destinations on the unit for the
Cursor sits at the Type field with a printer
name now assigned.
Name field (e.g. d1prn, d3com2, etc.)
and go to the Type field.
15 Press <Enter> at this field and then
select DEFINED ELSEWHERE.
16 Press <Escape> and select Yes to
save changes.
Comes back to the PRINTER N CONFIGURATION window.
Gives you the option to define more printers.
17 Press <Escape> again. Returns to PRINT SERVER CONFIGU-
RATION menu.
18 Select QUEUES SERVICED BY
A list of defined printers displays.
PRINTER.
19 Select one of these printers. A list of queues comes up. It will be empty
the first time you use it.
20 Press <Insert>. Displays a list of available queues.
21 Select the queue created earlier to ser-
Asks for a priority.
vice this printer and press <Enter>.
22 Press <Enter> to select the default.
Comes back to queue list.
This is fine for most cases.
23 Press <Escape> back to Main Menu Main Menu displays.
24 Reboot the M208 by unplugging and
plugging it back in.
Unit will boot up and see the new queue
that it has to service. This may take a
minute.
25 Check CURRENTLY ATTACHED
SERVERS once you have gone into
You should see the M208’s name displayed
(e.g. M_000BF5).
view the appropriate queue.
26 Press <Escape> until you have exited
The configuration is complete.
PCONSOLE.
RPRINTER Setup (Pre-NetWare 4)
CONFIGURING THE M208 FOR NOVELL: Host Configuration 67
Page 76

This procedure associates an existing PSERVER with a remote M208 acting as a
RPRINTER in a pre-NetWare 4 environment. It is the PSERVER’s responsibility to
get jobs from the queue and to pass them off to the M208 acting as the remote printer .
Unlike a PSERVER set-up, the M208 does not deal directly with the queues.
Note
As a RPRINTER, the M208 does not use a login ID. In addition, a non-M208
PSERVER (e.g. PSERVER.NLM) must be running for RPRINTER to operate.
A RPRINTER set up requires the use of a configuration file. This file is required to tell
the M208 to act as a RPRINTER upon boot up since RPRINTER settings do not hold
their effect through a power cycle. Once the unit boots up, the Print Server contacts
file servers it knows about and on each one, looks for the file
SYS:\LOGIN\M_xxxxxx\CONFIG where xxxxxx is the last six digits (in hexadecimal) of the Ethernet address as found on the bottom of the unit. If it finds this file, it
reads in each entry as if it were an npsh command entered right on the unit.
Note
To ensure that the M208 contacts the file server that contains the CONFIG file, set up
the appropriate file server as a preferred file server. Please see Setting Preferred File
Servers on page 140 for more information.
Caution
If you are using a configuration file and you have changed the name of the M208, you
must change the name of the directory containing this file.
To set up the unit as a RPRINTER in a pre-Netware 4 environment, you need to:
Step Action Result of Action
1 Log in to Novell as supervisor. Gives you supervisor rights.
2 Enter PCONSOLE. PCONSOLE’s Main Menu displays.
3 Select PRINT QUEUE INFORMA-
List of currently-defined queues comes up.
TION.
4 Press <Insert> to add a queue. Asks for new queue’s name.
5 Type in this new name in any format
New queue is added to list.
you like and press <Enter>.
68 CONFIGURING THE M208 FOR NOVELL: Host Configuration
Page 77

Step Action Result of Action
6 Press <Escape>. Returns to PCONSOLE’s Main Menu.
7 Select PRINT SERVER INFORMA-
TION.
8 Select one of the print servers and
press <Enter>.
9 Select PRINT SERVER CONFIGU-
RATION.
10 Select PRINTER CONFIGURA-
TION.
11 Select or create a printer name which
you want to install as a remote printer
and press <Enter>.
12 Put the cursor on the Type field and
press <Enter>.
13 Select REMOTE
OTHER/UNKNOWN.
14 Ignore the other fields and press
<Escape> to save these changes.
15 Press <Escape> until you are at the
PRINT SER VER CONFIGURA TION
menu again.
A list of existing print servers displays.
Display’s PRINT SERVER INFORMATION menu.
Brings up this menu.
Displays a list of printers associated with
the print server.
PRINTER N CONFIGURATION window
displays where N equals the selected
printer.
A list of options comes up.
This displays in the Type field.
Takes you back to the list of printers.
Displays this menu.
16 Select QUEUES SERVICED BY
PRINTER.
17 Select the printer you previously
A list of defined printers for this print server
is shown.
An empty queue list comes up.
defined and press <Enter>.
18 Press <Insert>. A list of available queues displays.
19 Select the queue you want this printer
Prompts you for a priority.
to service and press <Enter>.
CONFIGURING THE M208 FOR NOVELL: Host Configuration 69
Page 78

Step Action Result of Action
20 Press <Enter> to use the default.
Returns you to the queue list.
Usually this is fine.
21 Press <Escape> until you have exited
You’re now at the command prompt.
PCONSOLE.
22 Start PSERVER. Starts the PSERVER so the M208 can ser-
vice it as an RPRINTER.
23 In SYS VOLUME on the file server,
You will be at this prompt.
change to the \LOGIN directory.
24 Create a directory named after the
This directory is created.
M208. By default, this will be
M_xxxxxx where xxxxxx is the last
six digits of the unit’s Ethernet
address. (e.g. M_000BF5)
25 Within this directory, create a file
A blank file displays.
called CONFIG and open it for editing.
26 Enter the line:
pservername printernumber
destname
where pservername
set rprinter add
One entry is written in the file. One entry is
required for each RPRINTER serviced by
the M208.
equals the existing PSER VER’ s name,
printernumber equals the defined
number for this printer in that
PSERVER, and destname equals an
M208 destination (e.g. d1prn,
d3com2, etc.).
27 Reboot the M208 to enable these
changes.
The M208 will boot up and read this entry
from the CONFIG file and set itself to act
as an RPRINTER.
70 CONFIGURING THE M208 FOR NOVELL: Host Configuration
Page 79

NetWare 4 Options
NetWare 4 introduces NDS and some new frame types. The M208 can be used in a
NetWare 4 environment with either of these options:
• Set the M208 up as a PSERVER replacing a dedicated workstation running
PSERVER.EXE or PSERVER.NLM on the file server. The M208 replaces these
loadable PSERVER’s so they are no longer needed.
• Set the M208 up as a RPRINTER interacting with an existing PSERVER.
Note
If following a PSERVER setup, bindery emulation is required.
Included in this sub-section are the steps for a PSERVER setup since the steps have
changed now that bindery emulation is required. A RPRINTER setup is not included
since the only changes from a pre-NetWare 4 RPRINTER setup are some name
changes in PCONSOLE.
To configure the unit as a PSERVER in a NetWare 4 environment, you need to:
Step Action Result of Action
1 Log in to Novell as supervisor. Gives you supervisor rights.
2 Enter PCONSOLE. PCONSOLE’s Main Menu displays.
3 Press F4. Puts you into bindery emulation mode and
displays Main Menu.
4 Select PRINT QUEUES. List of currently-defined queues comes up.
5 Press <Insert> to add a queue. Asks for new queue’s name.
6 Type in this new name and press
New queue is added to list.
<Enter>.
7 Press <Escape>. Returns to PCONSOLE’s Main Menu.
8 Select PRINT SERVERS. A list of existing print servers displays.
9 Press <Insert> to add a new print
server.
CONFIGURING THE M208 FOR NOVELL: Host Configuration 71
Prompts you for the name of the print
server.
Page 80

Step Action Result of Action
10 Type the name of the M208. By
This new server is added to the list.
default, it isM_xxxxxx where xxxxxx
equals the last six digits of the unit’s
Ethernet address. (e.g. M_000BF5)
11 Select this new print server and press
<Enter>.
PRINT SERVER INFORMATION menu
displays.
12 Select PRINTERS. A list of defined printers comes up.
13 Press <Insert> to add a printer to the
list.
14 Type in the name of one of the eight
Prompts you for the printer name, type, and
some additional fields.
Cursor moves to this field.
default destinations on the unit for the
Name field (e.g. d1prn, d3com2, etc.)
and go to the Type field.
15 Press <Enter> at this field and then
Brings you back to the printer’s window.
select DEFINED ELSEWHERE. If
DEFINED ELSEWHERE is not
available, choose PARALLEL.
16 Press <Enter> on the Print Queues
List of available queues is displayed.
Assigned field.
17 Press <Insert> to display all queues;
You are prompted for a priority
select the one you defined earlier and
press <Enter>.
18 Select a priority and press <Enter>.
Priority 1 should be fine.
19 Press <Escape> until you are back to
Printer’s window displays with fields now
filled in.
Main Menu is displayed.
Main Menu.
20 Reboot the Print Server by unplug-
ging and then plugging it back in.
Unit resets and realizes its new configura-
tion. It then attaches to the queue after 30
seconds or so.
72 CONFIGURING THE M208 FOR NOVELL: Host Configuration
Page 81

Step Action Result of Action
21 Check the CURRENTLY
ATTACHED SERVERS once you
have gone into view the appropriate
queue.
22 Press <Escape> until you are out of
PCONSOLE.
If you want to continue with any of the following procedures, please find them as indicated in other sections of this manual:
• Add to or change configuration of your M208. Please see USING THE M208’S
COMMAND SET on page 93 and USING NPWIN on page 127.
• Utilize more advanced features of the M208. Please see USING THE M208’S
ADDITIONAL OPTIONS on page 131.
• Troubleshoot Novell installation and printing problems. Please see Novell
Problems on page 163.
You should see the M208’s name displayed
(e.g. M_000BF5).
You will be back at the command line and
the M208 is now configured.
CONFIGURING THE M208 FOR NOVELL: Host Configuration 73
Page 82

74 CONFIGURING THE M208 FOR NOVELL: Host Configuration
Page 83

CONFIGURING THE M208 FOR APPLETALK
Overview
This chapter will cover the few steps required to get your print jobs printing to an
M208 in an AppleTalk over EtherTalk environment.
Note
The M208 does not support LocalTalk.
M208 Configuration
An AppleTalk setup does not require any Print Server configuration; the network
parameters are automatically configured for you once the M208 is booted on the network. If you wish to modify some of the M208’s default settings, you can use the
built-in npsh command set. Please see USING THE M208’S COMMAND SET on
page 93 for more on the available commands.
Note
There is no host software provided for the Macintosh. To do any configuration on the
unit, you must rely on:
• npsh commands available through a telnet session. These commands could be
issued from a Macintosh workstation if you a running program like NCSA Telnet
and MacTCP is installed on your system.
• a Novell workstation running the host software npsh.exe.
• a Windows workstation running the NPWin software utility,
• a terminal, PC, or laptop connected to one of the serial ports on the M208.
Host Configuration
Once you have physically attached the M208 to the network, the following steps will
get your Apple host printing to the M208:
1 Select Chooser from the Apple Menu.
2 Select the appropriate print driver icon (e.g. Laserwriter icon).
A list of available printers will appear. By default, the format of each name is
CONFIGURING THE M208 FOR APPLETALK: Overview 75
Page 84

M208name_papname
where M208name is the name of the M208 and papname is
an M208 I/O port. Both names are configurable.
Example
M_000BF5_prn
is the printer associated with the M208 named M_000BF5 using the parallel port.
Note
The Print Server’s default name is M_xxxxxx where xxxxxx equals the last six
digits of the unit’s Ethernet address found on the bottom of the unit.
3 From the list of printers, select one to print to.
You have now configured your AppleTalk system to print to the M208.
Additional Configuration Options
AppleTalk Zones
If the M208 does not come up in the correct AppleTalk zone, you can configure a particular zone name on the unit. To do this, start an npsh session with the unit and enter
the following command:
store pserver apple zone [
reset
where zonename is the zone where you want the M208 to appear.
To clear the AppleTalk zone, type the command without entering a zonename and
press <Enter>.
zonename
]
Changing M208 Name
By default, the M208’s name is
M208name_papname
where M208name is the name
of the M208 and papname is an M208 I/O port. The npsh command, list pserver, will
give you a listing showing both the M208 name and the papname.
The following example details the steps necessary to change the name that appears in
the Chooser from M_000BF5_prn to Sales_laser.
1 Start an npsh session with the unit.
2 Enter the name that you would like to appear for the M208 (e.g. Sales). This will
make up the first part of the name in the Chooser.
76 CONFIGURING THE M208 FOR APPLETALK: Additional Configuration Options
Page 85

store pserver name Sales
Note
This new name will also affect Unix, Novell and NetBIOS setups.
3 Enter the name that you would like to appear for the papname (e.g. laser). This
will make up the second part of the name in the Chooser.
store pserver applepap prn name laser
4 Reset the unit so the changes take effect.
reset
Removing Excess Printers from the Chooser
When you first install an M208 in an AppleT alk en vironment, you will notice that four
printers show up in your Chooser; one printer for each destination on the M208 that
has AppleTalk services enabled.
If you want to limit the number of printers showing up in the Chooser , you need to disable the AppleTalk service from the related destination’s list of services. To do this,
start an npsh session with the unit and follow the steps below:
1 Display a listing of the M208’s characteristics across all protocols.
list pserver
2 Look at the Apple Pap section of the listing to learn the destination name that
corresponds with the unnecessary printer’s papname.
3 For each printer that you do not want to appear in the Chooser, disable the Apple-
Talk service from the corresponding destination’s list of services. Type the following command:
Note
set dest
You can also turn off any other services that are not required by this destination
destname
service -appletalk
bin the same way.
4 Repeat the previous step until you have remo v ed the AppleTalk service from each
of destinations that correspond to the papname of the unnecessary printers.
5 Save the changes to EEPROM.
save
CONFIGURING THE M208 FOR APPLETALK: Additional Configuration Options 77
Page 86

Disabling the AppleTalk Module
If you have several Microplex M208s in your network and only some of them are servicing AppleTalk networks, it is a good idea to turn off the entire AppleTalk module
from the particular M208. This will not only save on M208 resources but will ensure
that only appropriate M208s show up in the Chooser.
To disable the AppleTalk module, start an npsh session with the unit and follow the
steps below:
1 Remove AppleTalk from the available protocols.
set sysinfo module -appletalk
2 Save the changes to EEPROM.
save
If you want to continue with any of the following procedures, please find them as indicated in other sections of this manual:
• Add to or change configuration of your M208. Please see USING THE M208’S
COMMAND SET on page 93 and USING NPWIN on page 127.
• Utilize more advanced features of the M208. Please see USING THE M208’S
ADDITIONAL OPTIONS on page 131.
78 CONFIGURING THE M208 FOR APPLETALK: Additional Configuration Options
Page 87

CONFIGURING THE M208 FOR WINDOWS
Overview
This chapter discusses the M208’s support for Windows. The M208 provides support
for Windows NT, Windows for Workgroups (WfW), and Windows 95. Examples are
provided for each of these environments.
In a Windows environment, TCP/IP is the data transfer protocol used for printing.
This means that IP addresses and netmasks are required in your Windows stations
along with the appropriate TCP/IP software. This chapter will also discuss how you
set this up in your environment.
Print Methods Overview
A Central Host
The recommended print method for a Windows environment is to have a central host
act as a spooler for jobs before they are sent to the Print Server/printer. The reason for
this is that the central workstation has the ability to store the spooled jobs while they
are waiting to go to the Print Server/printer . The W indo ws Print Manager would rather
see the data get spooled centrally rather than having to hold on to the data until the
Print Server/printer can accept it.
An example of this setup would be an Windows NT host which allows WfW stations
to spool to it. The NT host would have the only print setup going to the Print
Server/printer directly and it would be shared across the network. In this way, the
WfW station could send jobs to this shared printer on the NT host. All WfW jobs
would first spool to the NT host before being sent to the Print Server/printer for printing.
Print Setup Possibilities
There are two print methods available with the M208 in a Windows environment:
LPR - Berkeley’s Line Printer Protocol which uses TCP/IP to transfer data to the
Print Server’s built-in Line Printer Daemon.
NetBIOS -NetBIOS over TCP/IP used to transfer data to the Print Server.
CONFIGURING THE M208 FOR WINDOWS: Overview 79
Page 88

NetBIOS is further broken down into these two setup procedures:
“net use” - Microsoft’s shared resource feature.
Print Manager - Microsoft’s management tool for printing.
Choosing one of these methods depends entirely on what’s available with your particular Windows software. The following is a list of what is supported in each:
Windows NT and NT/AS - LPR and NetBIOS (“net use” and Print Manager)
Windows for Workgroups - NetBIOS (“net use” and Print Manager)
Windows 95 - NetBIOS (Print Manager)
Note
Basic Setup Steps
Regardless of which method you choose, TCP/IP will always be used in some way.
In each of these environments, the basic setup steps required to get you printing from
one of these hosts are to:
1 Ensure that you have the appropriate network software installed on your W indo ws
host.
2 Configure the Windows host with an IP address and netmask.
3 Configure the M208 with an IP address and netmask.
4 Create a printer and select a method of printing to the M208 (e.g. LPR).
TCP/IP Setup
Setting Up TCP/IP Services on Your Windows Stations
The following section gives step-by-step directions on how to install the necessary
network software in the supported environments.
Windows NT LPR Network Software Installation
1 Go to the Main program group.
2 Double click on Control Panel.
3 Double click on Network.
80 CONFIGURING THE M208 FOR WINDOWS: TCP/IP Setup
Page 89

4 A dialogue box will appear showing your current network settings. Under
Installed Network Software, check to see if MS TCP/IP Printing shows. If it
doesn’t, you’ll need to perform the following steps.
5 Select Add New Software.
6 Select TCP/IP Protocol and Components.
7 Click on Continue.
8 Select TCP/IP Printing Support from the TCP/IP components list that displays.
You may also want to select Connectivity Utilities.
9 Click on Continue.
Windows NT NetBIOS Network Software Installation
1 Go to the Main program group.
2 Double click on Control Panel.
3 Double click on Network.
4 A dialogue box will appear showing your current network setting. Under
Installed Network Software, check to see if NetBIOS TCPIP->Streams Environment appears. If not, you’ll need to add this new software by clicking on the
Add New Software Button.
Windows For Workgroups NetBIOS Network Software Installation
1 Make sure that you have the Microsoft TCP/IP-32 group in your Program Man-
ager. If you do not have the file, wfwt32.exe, you can download it from:
• Compuserve in “MS Software Library”
• Microsoft’s FTP site, ftp.microsoft.com, under “Softlib/MSLFILES”
• Microplex’s FTP site, ftp.microplex.com, under “support/misc”
2 Once this is placed in a directory on you WfW station, you will need to double
click on the Network Setup icon in the Network Group.
3 Click on Drivers.
4 Since the TCP/IP services will not yet be listed here, click on Add Protocols.
5 Select Unlisted.
6 Specify the directory where the file exists. A new TCP/IP-32 program group will
CONFIGURING THE M208 FOR WINDOWS: TCP/IP Setup 81
Page 90

then be created which will include FTP, Telnet, etc.
Note
At this point, you will be prompted with a dialogue box asking for the TCP/IP network settings (i.e. IP address and netmask) for this WfW station. Fill these in at this
time.
Windows 95 NetBIOS Network Software Installation
1 Make sure that File and Printer Sharing for Microsoft Networks is installed in
your Network setup. If not, you’ll need to perform the following steps.
2 Open Settings:Control Panel folder.
3 Double click on the Network icon.
4 Select Add.
5 Select Service.
6 Select File and Printer Sharing for Microsoft Networks from the list.
7 Click OK.
8 Click OK again since this service will now show in the list to the left.
Configuring TCP/IP On Your Windows Workstations
Since TCP/IP is used as the data transfer protocol, IP addresses and netmasks must be
assigned to your Windows workstation(s) if you haven’t already done so.
If you are not familiar with IP addresses and are sure that this network will not go
onto the Internet, the following are some sample settings to use:
IP Address Netmask
Host 1 192.1.1.1 255.255.255.0
M208 192.1.1.2 255.255.255.0
Host 2 192.1.1.3 255.255.255.0
and so on...
The following sections will detail how you configure TCP/IP settings on the different
Windows platforms.
82 CONFIGURING THE M208 FOR WINDOWS: TCP/IP Setup
Page 91

Windows NT IP Address and Netmask Configuration
1 Go to the Main program group.
2 Double click on Control Panel.
3 Double click on Network.
4 Select TCP/IP Protocol from Installed Network Software list.
5 Click on the Configure button.
6 A dialogue box will come up asking for network settings. Fill in the IP address
and netmask for this workstation and then click OK.
Windows for Workgroups IP Address and Netmask Configuration
Configuring an IP address and netmask for the WfW workstation is part of the procedure involved in installing NetBIOS Network Software. Please see Windows For
Workgroups NetBIOS Network Software Installation on page 81 for more details.
Windows 95 IP Address and Netmask Configuration
1 Open the Settings:Control Panel folder.
2 Double click on the Network icon.
3 Under the Installed Network Software list, select the entry dealing with the
TCP/IP Protocol.
4 Click on Configure.
5 A dialogue box will come up asking for network settings. Fill in the IP address
and netmask for this workstation and then click OK.
M208 Configuration
Since TCP/IP is being utilized, the M208’s configuration involves storing an IP
address and a netmask. This is normally handled with the arp command but in the
case of Windo ws NT and WfW, this does not work reliably . Therefore, the best way to
store an IP address and a netmask is to connect a terminal, PC, or laptop to one of the
M208’s serial ports. This will log you into the unit where you can store the IP address
and netmask.
To configure a M208 with its network settings, please see Manual Configuration
CONFIGURING THE M208 FOR WINDOWS: M208 Configuration 83
Page 92

Through the COM Port on page 40 for detailed instructions.
Once you have configured the unit, you will notice the STAT LED flashing on once
per second. This means the M208 is configured and recognizable on the network. At
this point, you can now configure your host.
Host Configuration
Now that your workstation(s) and the M208 have IP addresses and netmasks, you can
now configure a print setup. There are several methods available depending on what
Windows package you are using. If you experience Windows-related printing problems after completing these setups, please see TROUBLESHOOTING THE M208 on
page 159 for more information.
Windows NT Version 3.5x
LPR Method
1 Create a print path and printer; select Main.
2 Select Control Panel.
3 Select Printers which loads up the Print Manager.
4 Select Create a Printer from the Printer menu.
5 Define the printer name and driver; in the Print to field, select Other....
6 Choose LPR port from the list that comes up and select OK.
7 Fill in the host name or IP address of the M208.
8 Fill in the destination or queue on the M208 (e.g. d1prn) and select OK.
where:
destination Is a pre-defined destination or queue on the M208 that is automat-
ically mapped by default to an I/O port. For example, destination
d1prn is automatically mapped to the PRN port. Please see Des-
tinations on page 89 for a more detailed description. Please note
that destinations are case sensitive and are lowercase by default.
This printer is now available for printing and will interact with the M208’s built-in
84 CONFIGURING THE M208 FOR WINDOWS: Host Configuration
Page 93

Line Printer Daemon using TCP/IP.
NetBIOS Using Print Manager Method
Note
Note
In order to use this method, you must first configure the M208 with a Microsoft Networks Workgroup name. This can be done by telneting to the M208, starting an npsh
session with the unit, and issuing the following command:
store pserver smb workgrp
workgroupname
where workgroupname is the name of the Microsoft Networks Workgroup that you
want the M208 to be included in (e.g. Engineering).
You must reset the M208 for this command to take affect.
1 Ensure that the network connection is functioning properly between the Windo ws
NT workstation and the M208. Try to ping or telnet to the unit.
2 Open Print Manager.
3 Select Connect Network Printer from the Printer menu or click on the appro-
priate toolbar item.
4 A list of network services will appear. Double click on the Microsoft Windows
Network.
5 A list of known workgroups will appear. Double click on the workgroup name
that you previously configured the M208 under (e.g. Engineering).
6 Double click on the M208 once the list of registered devices in this workgroup
appears.
7 A list of destinations (e.g. d1prn) with NetBIOS service enabled will appear.
These are read directly from the M208. Select one of them.
8 Print Manager will then ask to install a local printer driver. Click on OK.
9 A dialogue box appears providing a list of possible printer drivers. Once you
select one, click on OK.
This printer is now available for printing using NetBIOS over TCP/IP.
CONFIGURING THE M208 FOR WINDOWS: Host Configuration 85
Page 94

Windows for Workgroups (WfW)
NetBIOS Using Print Manager Method
Note
Note
In order to use this method, you must first configure the M208 with a Microsoft Networks Workgroup name. This can be done by telneting to the M208, starting an npsh
session with the unit, and issuing the following command:
store pserver smb workgrp
workgroupname
where workgroupname is the name of the Microsoft Networks Workgroup that you
want the M208 to be included in (e.g. Engineering).
You must reset the M208 for this command to take affect.
1 Ensure that the network connection is functioning properly between the Windo ws
workstation and the M208. Try to ping or telnet to the unit.
2 Open Print Manager.
3 Select Connect Network Printer from the Printer menu or click on the appro-
priate toolbar item.
4 A list of known workgroups will appear. Double click on the workgroup name
that you previously configured the M208 under (e.g. Engineering).
5 Double click on the M208 once the list of registered devices in this workgroup
appears.
6 A list of destinations (e.g. d1prn) with NetBIOS service enabled will appear.
These are read directly from the M208. Select one of them.
7 Click OK.
This printer is now available for printing using NetBIOS over TCP/IP.
Windows 95
NetBIOS Using Print Manager Method
Note
This setup assumes that you have already created a local printer using the Add a New
Printer icon in the Settings:Printer folder. You can use any port here such as LPT1
or LPT2 when creating this printer.
Note
86 CONFIGURING THE M208 FOR WINDOWS: Host Configuration
In order to use this method, you must first configure the M208 with a Microsoft Net-
Page 95

works Workgroup name. This can be done by telneting to the M208, starting an npsh
session with the unit, and issuing the following command:
Note
store pserver smb workgrp
workgroupname
where workgroupname is the name of the Microsoft Networks Workgroup that you
want the M208 to be included in (e.g. Engineering).
You must reset the M208 for this command to take affect.
1 Ensure that the network connection is functioning properly between the Windo ws
workstation and the M208. Try to ping or telnet to the unit.
2 Open the Settings:Printer folder.
3 Double click on the target printer that you created earlier.
4 Select Properties from the Printer menu.
5 Select the Details tab and click on the Add Port... button.
6 Select the Browse button.
7 A list of network services will appear. Double click on the Entire Network.
8 A list of known workgroups will appear. Double click on the workgroup name
that you previously configured the M208 under (e.g. Engineering).
9 Double click on the M208 once the list of registered devices in this workgroup
appears.
10 A list of destinations (e.g. d1prn) with NetBIOS service enabled will appear.
These are read directly from the M208. Select one of them.
11 Click on OK to exit the Browse for Printer dialogue box.
12 Click on OK to exit the Properties dialogue box.
This printer is now available for printing using NetBIOS over TCP/IP.
If you want to continue with any of the following procedures, please find them as indi-
cated in other sections of this manual:
• For problems related to Windows printing, please see TROUBLESHOOTING
THE M208 on page 159.
• Add to or change configuration of your M208. Please see USING THE M208’S
COMMAND SET on page 93 and USING NPWIN on page 127.
CONFIGURING THE M208 FOR WINDOWS: Host Configuration 87
Page 96

• Utilize more advanced features of the M208. Please see USING THE M208’S
ADDITIONAL OPTIONS on page 131.
88 CONFIGURING THE M208 FOR WINDOWS: Host Configuration
Page 97

unit
M208 INTERNAL ARCHITECTURE
host
Overview
This chapter will provide a more detailed description of the internal operating architecture of the M208 including: destinations, models, variables, logpaths, and I/O
ports.
Destinations
The M208 provides six printer destinations that are used by all hosts. A destination
can be thought of as logical place on the M208 to which hosts send their print jobs.
Destinations allow you the ability to configure a number of different print setups on
the M208.
Destinations map a name, with a nine-character maximum, to the I/O ports and by
default, each I/O port comes with two destinations mapped to it. The default
destination names are:
unit
host
d1prn d2com1 d3com2
d4prn d5com1 d6com2
Any of the six destinations can be matched to any of the three I/O ports, and each destination uses one of the defined models for processing. The destination list is limited
to a maximum of six entries, and is configured through the npsh interface on the Print
Server. Default destination names can also be changed to something more meaningful.
An alternate destination can also be configured so that a print job goes to another
printer if the defined printer is busy, in error, or off-line.
Destination definitions include: name, I/O port, backchannel, model used, logpath,
state, service(s) supported, and alternate destination.
See also: list dest on page 99, set dest on page 107, Making An Alternate Print Desti-
nation on page 133, Manipulating the M208’s Services on page 133, and USING
NPWIN on page 127.
M208 INTERNAL ARCHITECTURE: Overview 89
Page 98

unit
host
Models
Each destination on the M208 also has a model associated with it. The six models (one
per destination) can be thought of as a series of mini-filter that can do special processing to the print job data. These processing options include:
• banner page generation,
• header string insertion,
• trailer string insertion,
• tab expansion (xtab),
• carriage return insertion (onlcr),
• ASCII to PostScript conversion (a2ps),
• print job descrambling.
The default model names are m1 to m6 and each comes mapped to a particular destination. By default, the model settings are raw, that is,they simply pass data through to
the I/O port untouched. This provides a clean slate to begin your configuration. Model
names can be changed to be something more meaningful.
Note
The models are not capable of multiple copies and throughput may decrease if onlcr
or a2ps is enabled.
Each model definition includes: name, type, and some of these processing parameters, if any.
See also: list model on page 100, set model on page 110, Setting Up Special Job Pro-
cessing on page 132, and USING NPWIN on page 127.
Table 3: Model Types
Setting Inclusions
raw No content sensing. Jobs are assumed to match the printer
type, or else the printer does the autosensing and switching.
90 M208 INTERNAL ARCHITECTURE: Models
Page 99

Variables
Table 3: Model Types
Setting Inclusions
pcl-ps For printers that cannot autosense the print job format and
switch modes by themselves. Precedes each job with a string
to switch from PostScript to PCL, or vice versa, depending
on job content. These strings must be specified in the setup
command.
a2ps Convert ASCII jobs to PostScript or pass PostScript jobs
directly to PostScript printers.
Variables are actually utilized within the M208’s models and are useful for defining
lengthy header or trailer strings. This might be necessary for certain printer switch
strings, for example. Each variable consists of a combination of escape codes and text
for this printer control.
Variables are used to make efficient use of the limited space in these header and trailer
strings. Only nine elements can be included in these strings. Each element can be one
of the following:
unit
host
letter
a
code 0x40
variable $FF
Therefore, you could make up a series of variables and specify each of these (up to
nine) in the header or trailer string. Each variable could then contain up to 14 elements
of its own.
Please see Variable Definitions on page 177 for a description of all pre-defined variables. You can also create your own variables to add to this list.
See also: list var on page 102, set var on page 117, list model on page 100, set model
on page 110, and USING NPWIN on page 127.
M208 INTERNAL ARCHITECTURE: Variables 91
Page 100

unit
host
Logpaths
The term logpath comes from the UNIX syslog logging system. With the M208, each
destination can report statistics on: user, page count, job name, and printer errors. In
addition, a checksum calculation can be obtained to confirm data integrity when a job
is sent to the printer.
Logging occurs either through a printer or terminal connected to an I/O port, or
through a Telnet session to a particular TCP port. A logpath can also be configured to
report statistics via email to a particular user. This can then be sa ved to a file if desired.
In addition, messages can be logged to SYSLOGD on a particular TCP/IP host.
Each logpath is associated with a particular destination and the six default logpath
names range from l1 to l6. Logpath names can be changed to be something more
meaningful.
Logpath definitions include: name, log port, and log type.
See also: list logpath on page 100, set logpath on page 108, Capturing Printer Feed-
back on page 134, and USING NPWIN on page 127.
I/O Ports
The M208 comes with three I/O ports: one IEEE 1284-I compliant parallel port and
two serial ports. These ports have several parameters such as flow control and baud
rate, that can be manipulated to best suit your attached peripherals. These parameters
are configured using the set commands while list commands display each port’s settings. Please refer to the following commands for the indicated information:
• To learn more about the I/O port parameters, please see:
Connecting Peripherals on page 17.
• To look at current I/O port settings, please see:
list com1|com2 on page 98 and list prn on page 100.
• To change I/O port settings, please see:
set com1|com2 on page 105 and set prn on page 112.
92 M208 INTERNAL ARCHITECTURE: Logpaths
 Loading...