

Page 1
User Guide
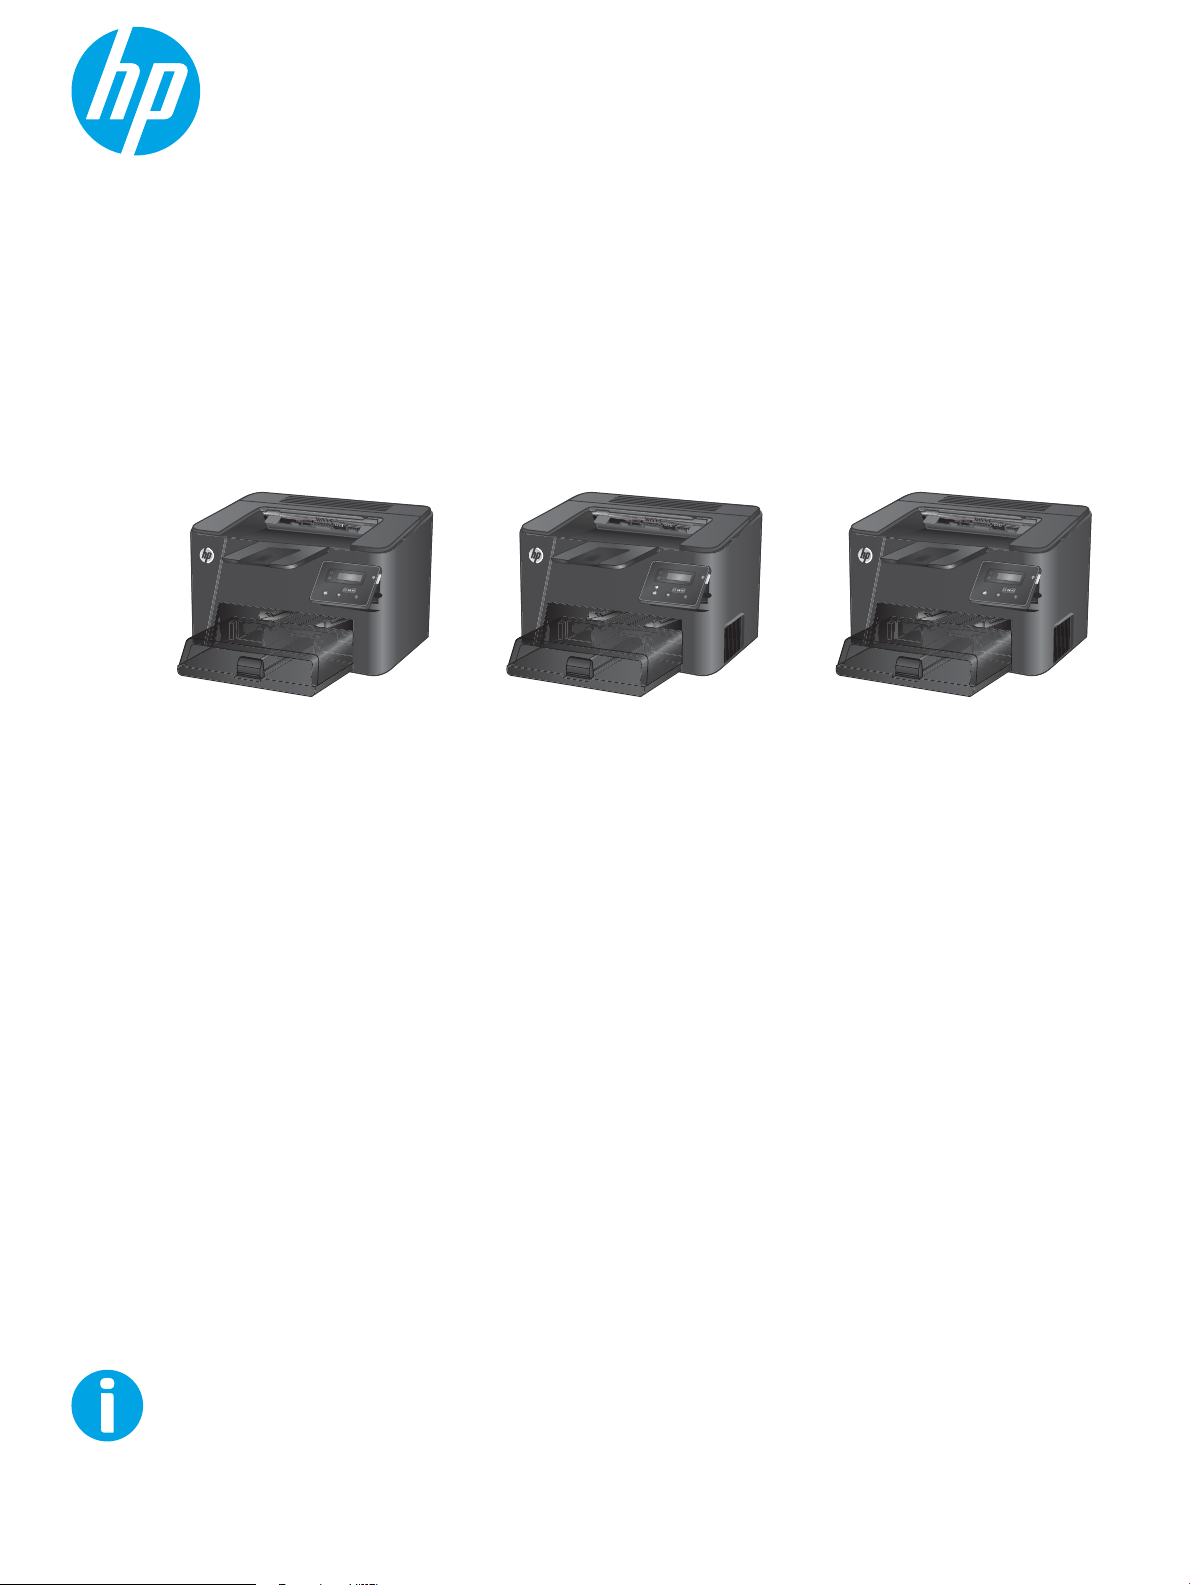
LaserJet Pro M201, M202
www.hp.com/support/ljM201
www.hp.com/support/ljM202
M201dw
M202dw
M201n
M202n
M201d
M202d
Page 2

Page 3

HP LaserJet Pro M201, M202
User Guide
Page 4

Copyright and License
Trademark Credits
© Copyright 2015 HP Development Company,
L.P.
Reproduction, adaptation, or translation
without prior written permission is prohibited,
except as allowed under the copyright laws.
The information contained herein is subject to
change without notice.
The only warranties for HP products and
services are set forth in the express warranty
statements accompanying such products and
services. Nothing herein should be construed
as constituting an additional warranty. HP shall
not be liable for technical or editorial errors or
omissions contained herein.
Edition 1, 11/2015
Adobe®, Adobe Photoshop®, Acrobat®, and
PostScript
®
are trademarks of Adobe Systems
Incorporated.
Apple and the Apple logo are trademarks of
Apple Computer, Inc., registered in the U.S. and
other countries. iPod is a trademark of Apple
Computer, Inc. iPod is for legal or rightholderauthorized copying only. Don't steal music.
Microsoft®, Windows®, Windows® XP, and
Windows Vista® are U.S. registered trademarks
of Microsoft Corporation.
UNIX® is a registered trademark of The Open
Group.
Page 5

Table of contents
1 Product introduction ..................................................................................................................................... 1
Product comparison ............................................................................................................................................... 2
Power consumption, electrical specications, and acoustic emissions ............................................. 4
Operating-environment specications ............................................................................................... 4
Product views ......................................................................................................................................................... 5
Product front view ............................................................................................................................... 5
Product back view ............................................................................................................................... 6
Control-panel view .............................................................................................................................. 7
Product hardware setup and software installation .............................................................................................. 8
2 Paper trays ................................................................................................................................................... 9
Supported paper sizes and types ........................................................................................................................ 10
Supported paper sizes ...................................................................................................................... 10
Supported paper types ..................................................................................................................... 12
Load the priority input tray (Tray 1) .................................................................................................................... 13
Load the main input tray (Tray 2) ........................................................................................................................ 15
3 Parts, supplies, and accessories .................................................................................................................... 19
Order parts, accessories, and supplies ................................................................................................................ 20
Ordering ............................................................................................................................................. 20
Supplies and accessories .................................................................................................................. 20
Replace the toner cartridge ................................................................................................................................. 21
4 Print ........................................................................................................................................................... 25
Print tasks (Windows) .......................................................................................................................................... 26
How to print (Windows) ..................................................................................................................... 26
Automatically print on both sides (Windows) ................................................................................... 28
Manually print on both sides (Windows) ........................................................................................... 29
Print multiple pages per sheet (Windows) ........................................................................................ 30
Select the paper type (Windows) ...................................................................................................... 31
Additional print tasks ........................................................................................................................ 31
ENWW iii
Page 6

Print tasks (Mac OS X) .......................................................................................................................................... 32
How to print (OS X) ............................................................................................................................ 32
Automatically print on both sides (OS X) .......................................................................................... 32
Manually print on both sides (OS X) .................................................................................................. 32
Print multiple pages per sheet (OS X) ............................................................................................... 33
Select the paper type (OS X) ............................................................................................................. 33
Additional print tasks ........................................................................................................................ 33
Set up HP Wireless Direct Printing (network and wireless models only) ............................................................ 34
Mobile printing (network and wireless models only) .......................................................................................... 35
HP ePrint via email ............................................................................................................................ 35
HP ePrint software ............................................................................................................................ 35
AirPrint ............................................................................................................................................... 36
5 Manage the product ..................................................................................................................................... 37
Change the product connection type (Windows) ................................................................................................ 38
Advanced conguration with HP Embedded Web Server (EWS) and HP Device Toolbox (Windows) ................. 39
Advanced conguration with HP Utility for Mac OS X ......................................................................................... 41
Open HP Utility .................................................................................................................................. 41
HP Utility features ............................................................................................................................. 41
Congure IP network settings ............................................................................................................................. 43
Printer sharing disclaimer ................................................................................................................. 43
View or change network settings ..................................................................................................... 43
Rename the product on a network ................................................................................................... 43
Manually congure IPv4 TCP/IP parameters from the control panel ............................................... 44
HP Web Jetadmin ................................................................................................................................................. 45
Product security features .................................................................................................................................... 46
Set or change the product password using the HP Embedded Web Server ..................................... 46
Economy settings ................................................................................................................................................ 47
Print with EconoMode ....................................................................................................................... 47
Set the Sleep Delay ........................................................................................................................... 47
Set the Auto Power Down delay ........................................................................................................ 47
Update the rmware ............................................................................................................................................ 49
Method one: Update the rmware using the control panel ............................................................. 49
Method two: Update the rmware using the Firmware Update Utility ............................................ 49
6 Solve problems ............................................................................................................................................ 51
Customer support ................................................................................................................................................ 52
Restore the factory-set defaults ......................................................................................................................... 53
A “Cartridge is low” or “Cartridge is very low” message displays on the product control panel ....................... 54
Change the “Very Low” settings ....................................................................................................... 54
Order supplies ................................................................................................................................... 54
iv ENWW
Page 7

Product does not pick up paper or misfeeds ....................................................................................................... 55
The product does not pick up paper ................................................................................................. 55
The product picks up multiple sheets of paper ................................................................................ 55
Clear jams ............................................................................................................................................................ 56
Jam locations ..................................................................................................................................... 56
Experiencing frequent or recurring paper jams? .............................................................................. 57
Clear jams in the toner-cartridge area .............................................................................................. 58
Clear jams in the output bin .............................................................................................................. 60
Clear jams in the duplexer (duplex models only) .............................................................................. 62
Improve print quality ........................................................................................................................................... 63
Print from a dierent software program .......................................................................................... 63
Check the paper-type setting for the print job ................................................................................. 63
Check the paper type setting (Windows) ........................................................................ 63
Check the paper type setting (OS X) ............................................................................... 63
Check the toner-cartridge status ...................................................................................................... 64
Print a cleaning page ......................................................................................................................... 64
Visually inspect the toner cartridge for damage .............................................................................. 65
Check paper and the printing environment ...................................................................................... 65
Step one: Use paper that meets HP specications ........................................................ 65
Step two: Check the environment .................................................................................. 65
Check other print job settings ........................................................................................................... 66
Check the EconoMode settings ....................................................................................... 66
Try a dierent print driver ................................................................................................................. 67
Solve wired network problems ............................................................................................................................ 68
Poor physical connection .................................................................................................................. 68
The computer is using the incorrect IP address for the product ...................................................... 68
The computer is unable to communicate with the product ............................................................. 68
The product is using incorrect link and duplex settings for the network ........................................ 69
New software programs might be causing compatibility problems ................................................ 69
The computer or workstation might be set up incorrectly ............................................................... 69
The product is disabled, or other network settings are incorrect .................................................... 69
Solve wireless network problems ....................................................................................................................... 70
Wireless connectivity checklist ......................................................................................................... 70
The product does not print after the wireless conguration completes ......................................... 71
The product does not print, and the computer has a third-party rewall installed ........................ 71
The wireless connection does not work after moving the wireless router or product .................... 71
Cannot connect more computers to the wireless product ............................................................... 71
The wireless product loses communication when connected to a VPN ........................................... 71
The network does not appear in the wireless networks list ............................................................ 71
The wireless network is not functioning ........................................................................................... 72
Perform a wireless network diagnostic test ..................................................................................... 72
ENWW v
Page 8

Reduce interference on a wireless network ...................................................................................... 72
Index ............................................................................................................................................................. 73
vi ENWW
Page 9

1 Product introduction
●
Product comparison
●
Product views
●
Product hardware setup and software installation
For more information:
Go to www.hp.com/support/ljM201, www.hp.com/support/ljM202.
HP's all-inclusive help for the product includes the following information:
●
Install and congure
●
Learn and use
●
Solve problems
●
Download software updates
●
Join support forums
●
Find warranty and regulatory information
ENWW 1
Page 10

Product comparison
Model name
Product number
Product dimensions Height 251 mm
Depth 251 mm
Width 379 mm
Weight, with toner
Paper handling Priority input tray (Tray
Main input tray (Tray 2,
Standard output bin
Automatic duplex
Supported operating
systems
M201n
CF455A
(9.9 in)
(9.9 in)
(14.9 in)
5.9 kg
cartridge
1, 10-sheet capacity)
250-sheet capacity)
(150-sheet capacity)
printing
Windows XP, 32-bit, SP2
and greater
(13 lb)
M202n
C6N20A
251 mm
(9.9 in)
242 mm
(9.5 in)
379 mm
(14.9 in)
5.9 kg
(13 lb)
M201dw
CF456A
251 mm
(9.9 in)
281 mm
(11.1 in)
384 mm
(15.1 in)
6.6 kg
(14.5 lb)
M202dw
C6N21A
251 mm
(9.9 in)
281 mm
(11.1 in)
384 mm
(15.1 in)
6.6 kg
(14.5 lb)
M201d
CF466A
251 mm
(9.9 in)
281 mm
(11.1 in)
384 mm
(15.1 in)
6.6 kg
(14.5 lb)
M202d
CF467A
251 mm
(9.9 in)
281 mm
(11.1 in)
384 mm
(15.1 in)
6.6 kg
(14.5 lb)
Windows XP, 64-bit, SP2
and greater, print-driver
only
Windows Vista, 32-bit
and 64-bit
Windows 7, 32-bit and
64-bit
Windows 8, 32-bit and
64-bit
Windows 8.1, 32-bit and
64-bit
Windows 2003 Server
32-bit, SP1 and higher,
print driver only
Windows 2003 Server
64-bit, SP1 and higher,
print driver only
Windows 2003 Server,
Standard Edition and
Enterprise Edition, print
driver only
Windows 2003 R2 Server
32-bit, Standard and
Enterprise editions, print
driver only
2 Chapter 1 Product introduction ENWW
Page 11
Model name
M201n
M202n
M201dw
M202dw
M201d
M202d
Product number
Windows 2003 R2 Server
64-bit, Standard and
Enterprise editions, print
driver only
Windows 2008 Server ,
32-bit and 64-bit, (SP1
and higher) print driver
only
Windows 2008 R2 Server
64-bit, SP1, print driver
only
Windows 2008 R2 Server
64-bit, Standard and
Enterprise editions, print
driver only
Windows 2012 Server,
print driver only
Windows 2012 R2 Server
64-bit, print driver only
Windows 2012 Server
64-bit, print driver only
Mac OS X v10.7 – v10.9
CF455A
C6N20A
CF456A
C6N21A
CF466A
CF467A
Supported print drivers HP PCL6 discrete print
driver
This driver is included on
the in-box CD as the
default print driver.
HP UPD PCL5c print
driver
Available for download
HP UPD PCL6 print driver
Available for download
HP UPD PS print driver
Available for download
Connectivity Hi-Speed USB 2.0
10/100 Ethernet LAN
connection
Wireless network
connection
Memory 128 MB RAM
ENWW Product comparison 3
Page 12

Model name
M201n
M202n
M201dw
M202dw
M201d
M202d
Product number
Control-panel display 2-line LCD
Print Prints 25 pages per
minute (ppm) on A4-size
paper and 26 ppm on
Letter-size paper
CF455A
C6N20A
CF456A
C6N21A
CF466A
Power consumption, electrical specications, and acoustic emissions
See www.hp.com/support/ljM201, www.hp.com/support/ljM202 for current information.
CAUTION: Power requirements are based on the country/region where the product is sold. Do not convert
operating voltages. This will damage the product and void the product warranty.
Operating-environment specications
Environment Recommended Allowed
Temperature 17° to 25°C (62.6° to 77°F) 15° to 30°C (59° to 86°F)
Relative humidity 30% to 70% relative humidity (RH) 10% to 80% RH
Altitude Not applicable 0 to 3048 m (0 to 10,000 ft)
CF467A
4 Chapter 1 Product introduction ENWW
Page 13
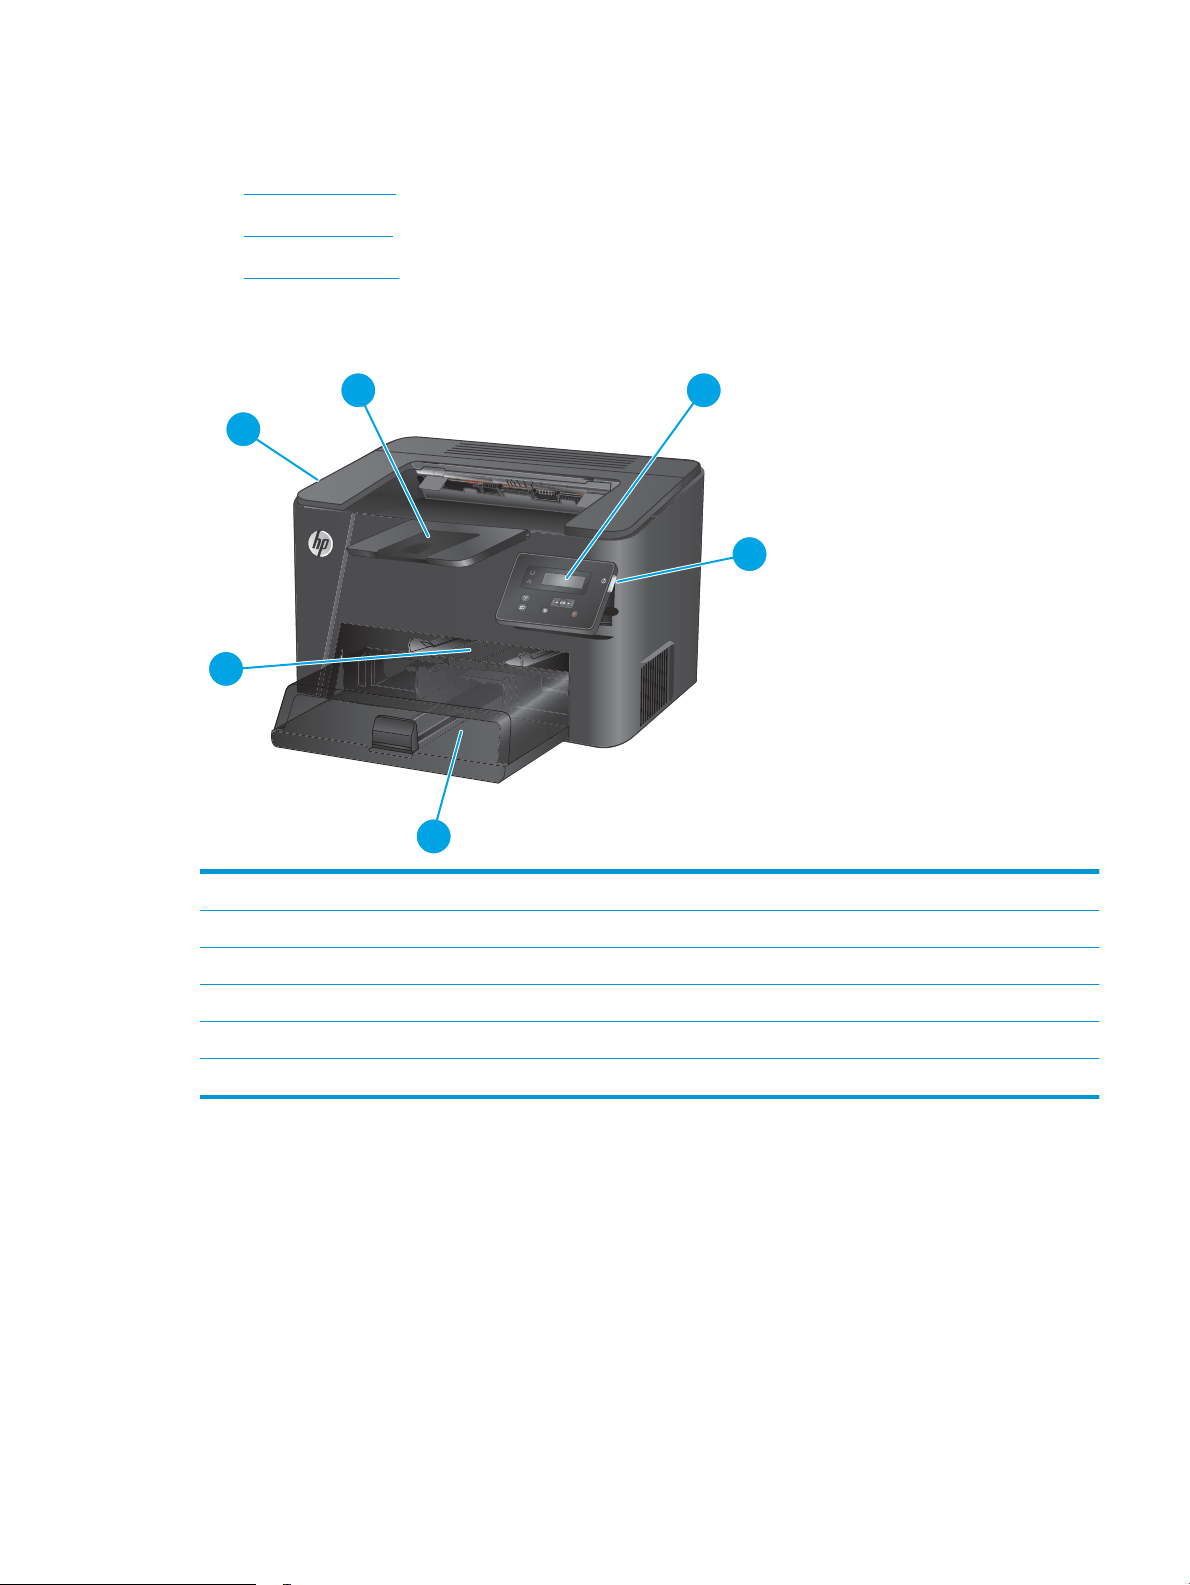
Product views
1
6
3
2
4
5
●
Product front view
●
Product back view
●
Control-panel view
Product front view
1 Output bin
2 Control panel (tilts up for easier viewing)
3 Power on/o button
4 Main input tray (Tray 2)
5 Priority input tray (Tray 1)
6 Handle for opening the top cover (access to the toner cartridge and for clearing jams)
ENWW Product views 5
Page 14
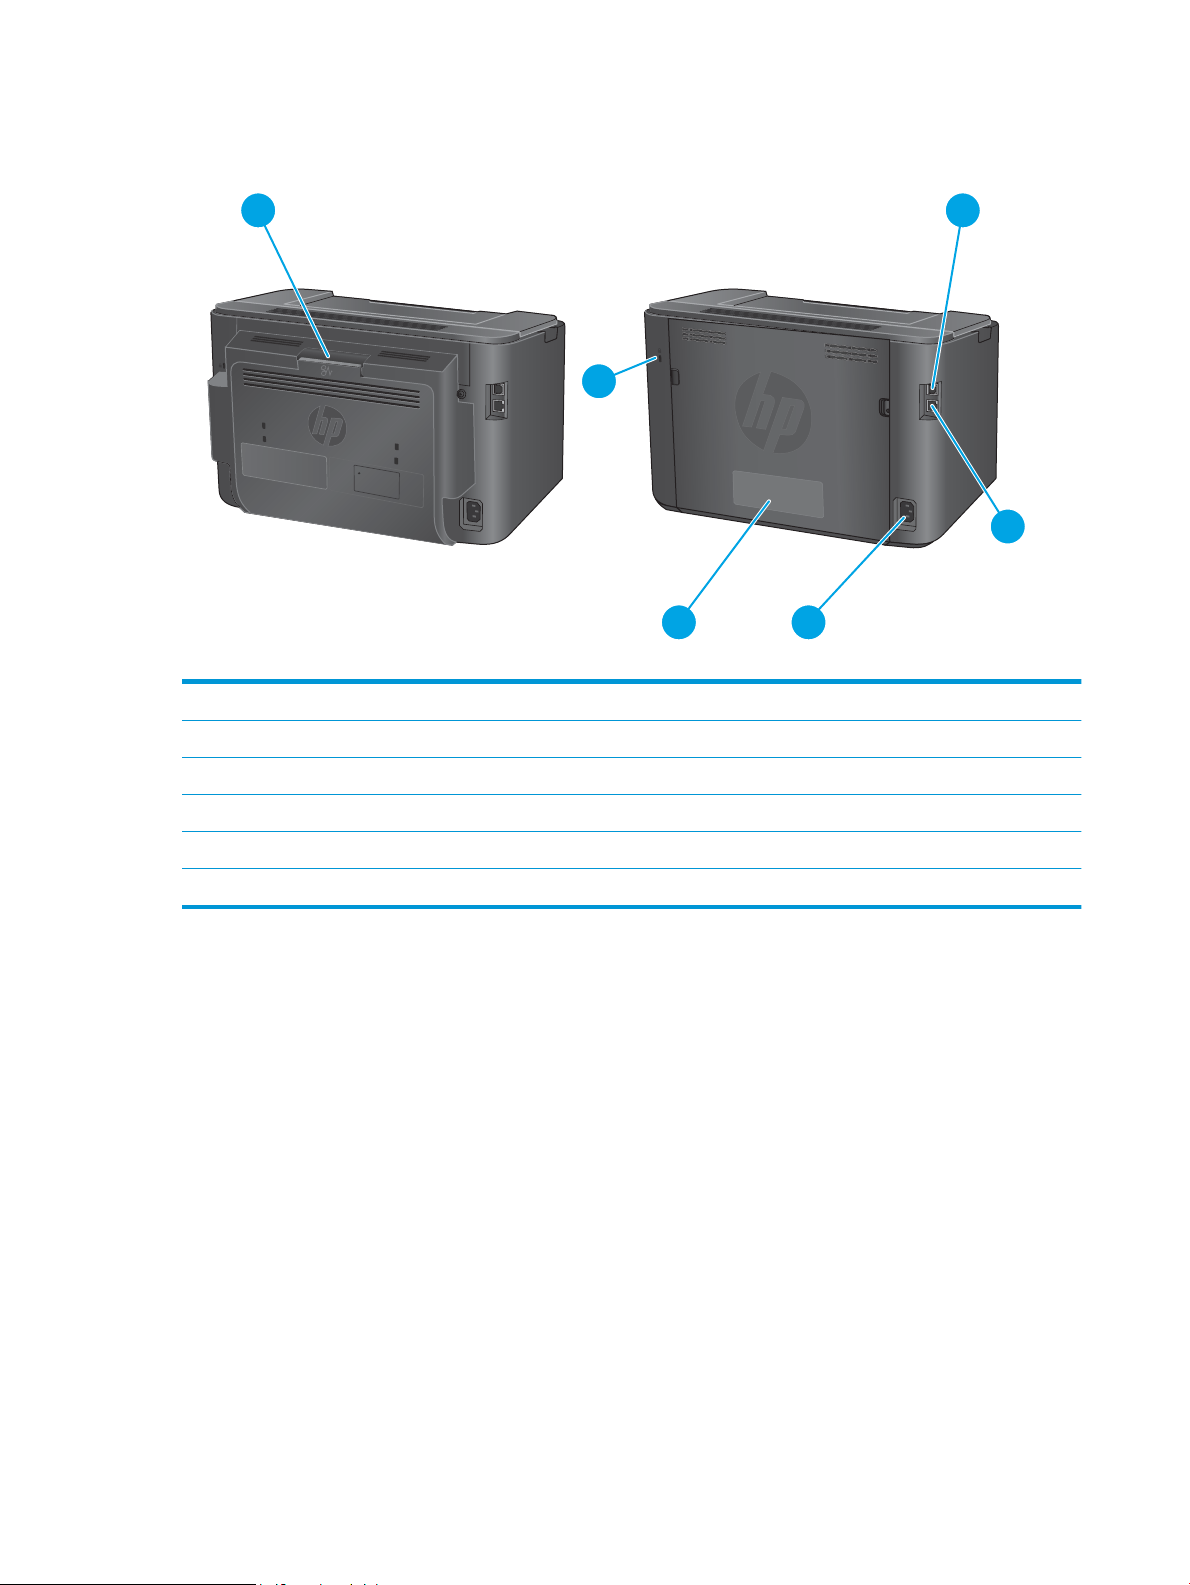
Product back view
1
2
4
3
6
5
M201d, M201dw
M202d, M202dw
M201n
M202n
1 Rear door (access for clearing jams, duplex models only)
2 Hi-Speed USB 2.0
3 Ethernet port (network and wireless models only)
4 Power connection
5 Product number and serial number label
6 Slot for cable-type security lock
6 Chapter 1 Product introduction ENWW
Page 15
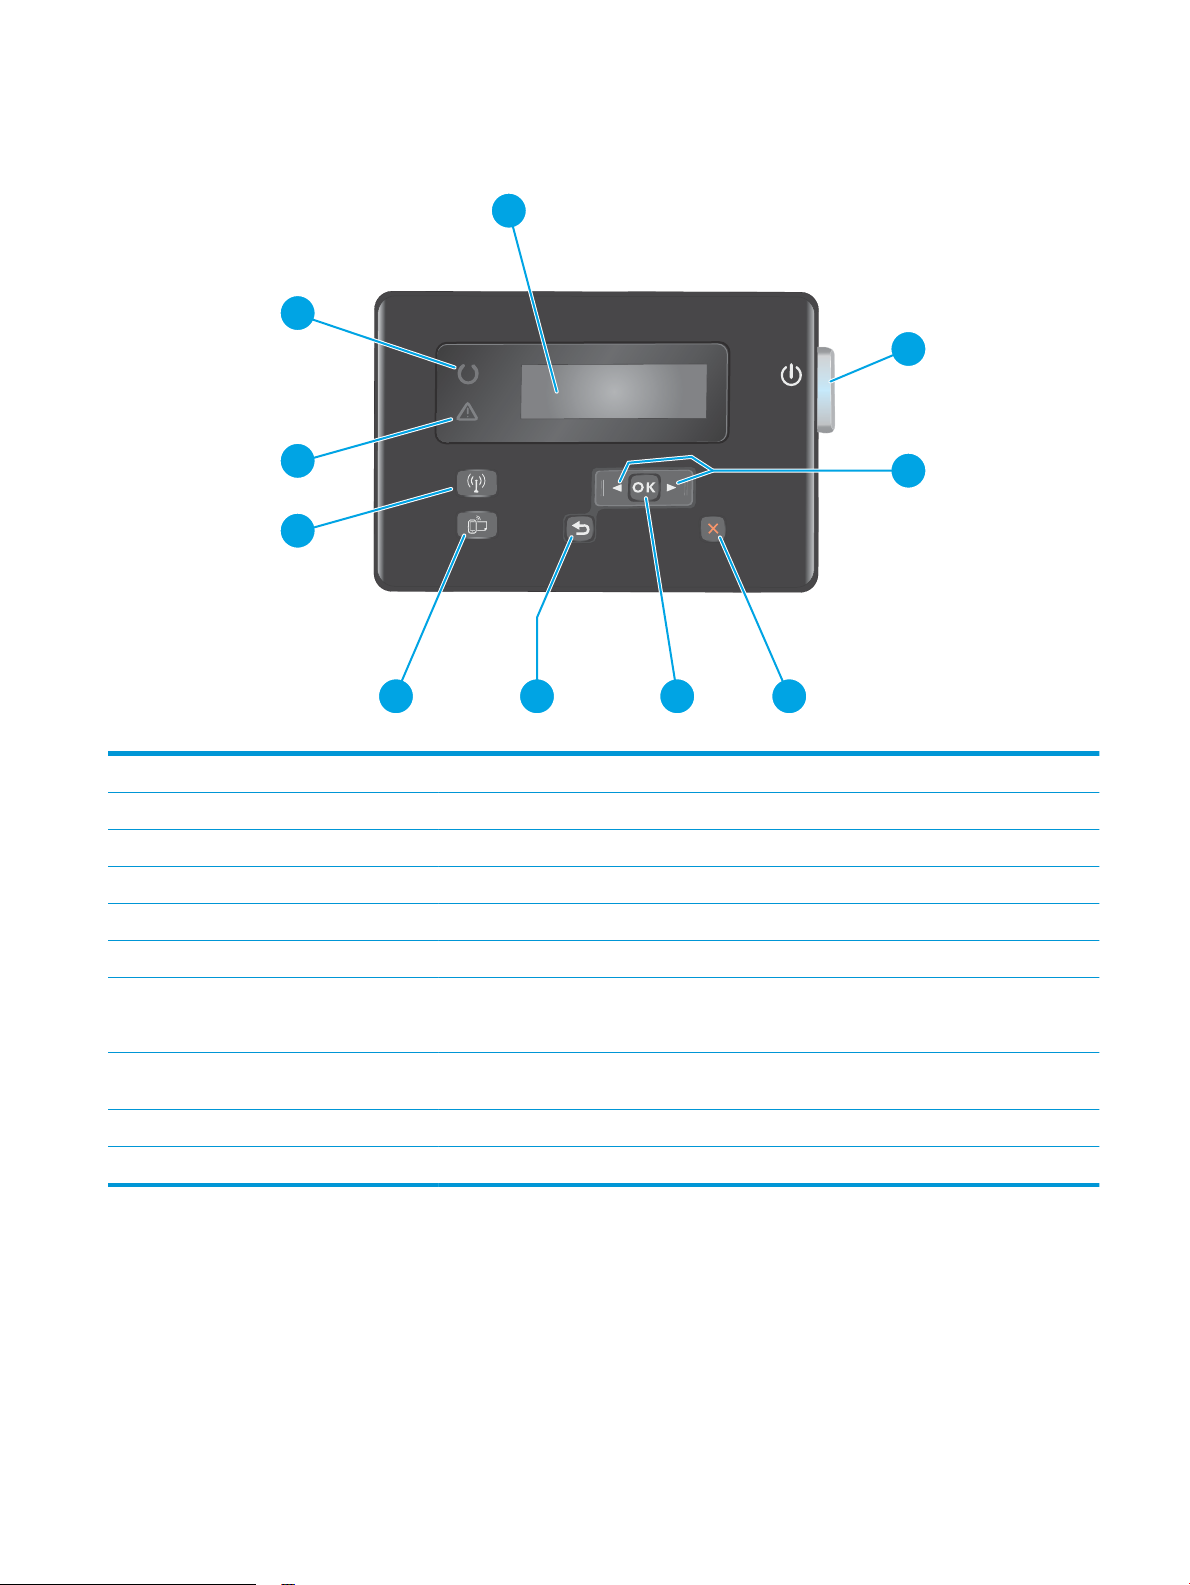
Control-panel view
4
3
2
5
6
10
9
8
7
1
1 LCD display Provides textual information, such as product status and conguration menus
2 Power on/o button Turns the product on or o. The button illuminates when the product is on.
3 Left and right arrow buttons Moves the cursor or scrolls through menu options
4 Cancel button Clears settings, cancels the current job, or exits the current menu
5 OK button Conrms a setting or an action to proceed
6 Back button Returns to the previous screen
7 ePrint button Opens the Web Services menu (network and wireless models only)
NOTE: The ePrint button is non-functional on M201d and M202d models.
8 Wireless button and light, dw
models only
9 Attention light Indicates the product has an error, a tray is empty, or other condition requiring attention
10 Ready light Indicates the product is ready
Provides access to the Wireless menu and wireless status information. When the product is
connected to a wireless network, this button illuminates.
ENWW Product views 7
Page 16

Product hardware setup and software installation
For basic setup instructions, see the Hardware Installation Guide that came with the product. For additional
instructions, go to HP support on the Web.
Go to www.hp.com/support/ljM201, www.hp.com/support/ljM202 for HP's all-inclusive help for the product.
Find the following support:
●
Install and congure
●
Learn and use
●
Solve problems
●
Download software updates
●
Join support forums
●
Find warranty and regulatory information
8 Chapter 1 Product introduction ENWW
Page 17

2 Paper trays
●
Supported paper sizes and types
●
Load the priority input tray (Tray 1)
●
Load the main input tray (Tray 2)
For more information:
Go to www.hp.com/support/ljM201, www.hp.com/support/ljM202.
HP's all-inclusive help for the product includes the following information:
●
Install and congure
●
Learn and use
●
Solve problems
●
Download software updates
●
Join support forums
●
Find warranty and regulatory information
ENWW 9
Page 18
Supported paper sizes and types
●
Supported paper sizes
●
Supported paper types
Supported paper sizes
NOTE: To obtain the best results, select the correct paper size and type in the print driver before printing.
Size Dimensions Priority input tray
(Tray 1)
Letter 216 x 279 mm (8.5 x 11 in)
Legal 216 x 356 mm (8.5 x 14 in)
Executive 184 x 267 mm (7.3 x 10.5 in)
Ocio 8.5 x 13 216 x 330 mm (8.5 x 13 in)
4 x 6 102 x 152 mm (4 x 6 in)
5 x 8 127 x 203 mm (5 x 8 in)
A4 210 x 297 mm (8.3 x 11.7 in)
A5 148 x 210 mm (5.8 x 8.3 in)
A6 105 x 148 mm (4.1 x 5.8 in)
B5 (JIS) 182 x 257 mm (7.2 x 10.1 in)
B6 (JIS) 129 x 182 mm (5.1 x 7.2 in)
Main input tray (Tray 2)Auto duplex
10 x 15cm 100 x 150 mm (3.9 x 5.9 in)
Ocio 216 x 340 mm 216 x 340 mm (8.5 x 13.4 in)
16K 195 x 270 mm (7.7 x 10.6 in)
16K 184 x 260 mm (7.2 x 10.3 in)
16K 197 x 273 mm (7.8 x 10.8 in)
Japanese Postcard
Postcard (JIS)
Double Japan Postcard
Rotated
Double Postcard (JIS)
Envelope #10 105 x 241 mm (4.1 x 9.5 in)
100 x 148 mm (3.9 x 5.8 in)
200 x 148 mm (7.9 x 5.8 in)
10 Chapter 2 Paper trays ENWW
Page 19

Size Dimensions Priority input tray
(Tray 1)
Envelope Monarch 98 x 191 mm (3.9 x 7.5 in)
Envelope B5 176 x 250 mm (6.9 x 9.8 in)
Envelope C5 162 x 229 mm (6.4 x 9 in)
Envelope DL 110 x 220 mm (4.3 x 8.7 in)
Main input tray (Tray 2)Auto duplex
Custom 76 x 127 mm to 216 x 356 mm (3 x 5 in to
8.5 x 14 in)
ENWW Supported paper sizes and types 11
Page 20
Supported paper types
NOTE: To obtain the best results, select the correct paper size and type in the print driver before printing.
Type Single-sided or manual duplex Auto duplex
Plain
HP EcoSMART Lite
Light 60–74g
Intermediate 85–95g
Midweight 96–110g
Heavy 111–130g
Extra Heavy 131–175g
Transparency
Labels
Letterhead
Envelope
Preprinted
Prepunched
Colored
Bond
Recycled
Rough
Vellum
12 Chapter 2 Paper trays ENWW
Page 21
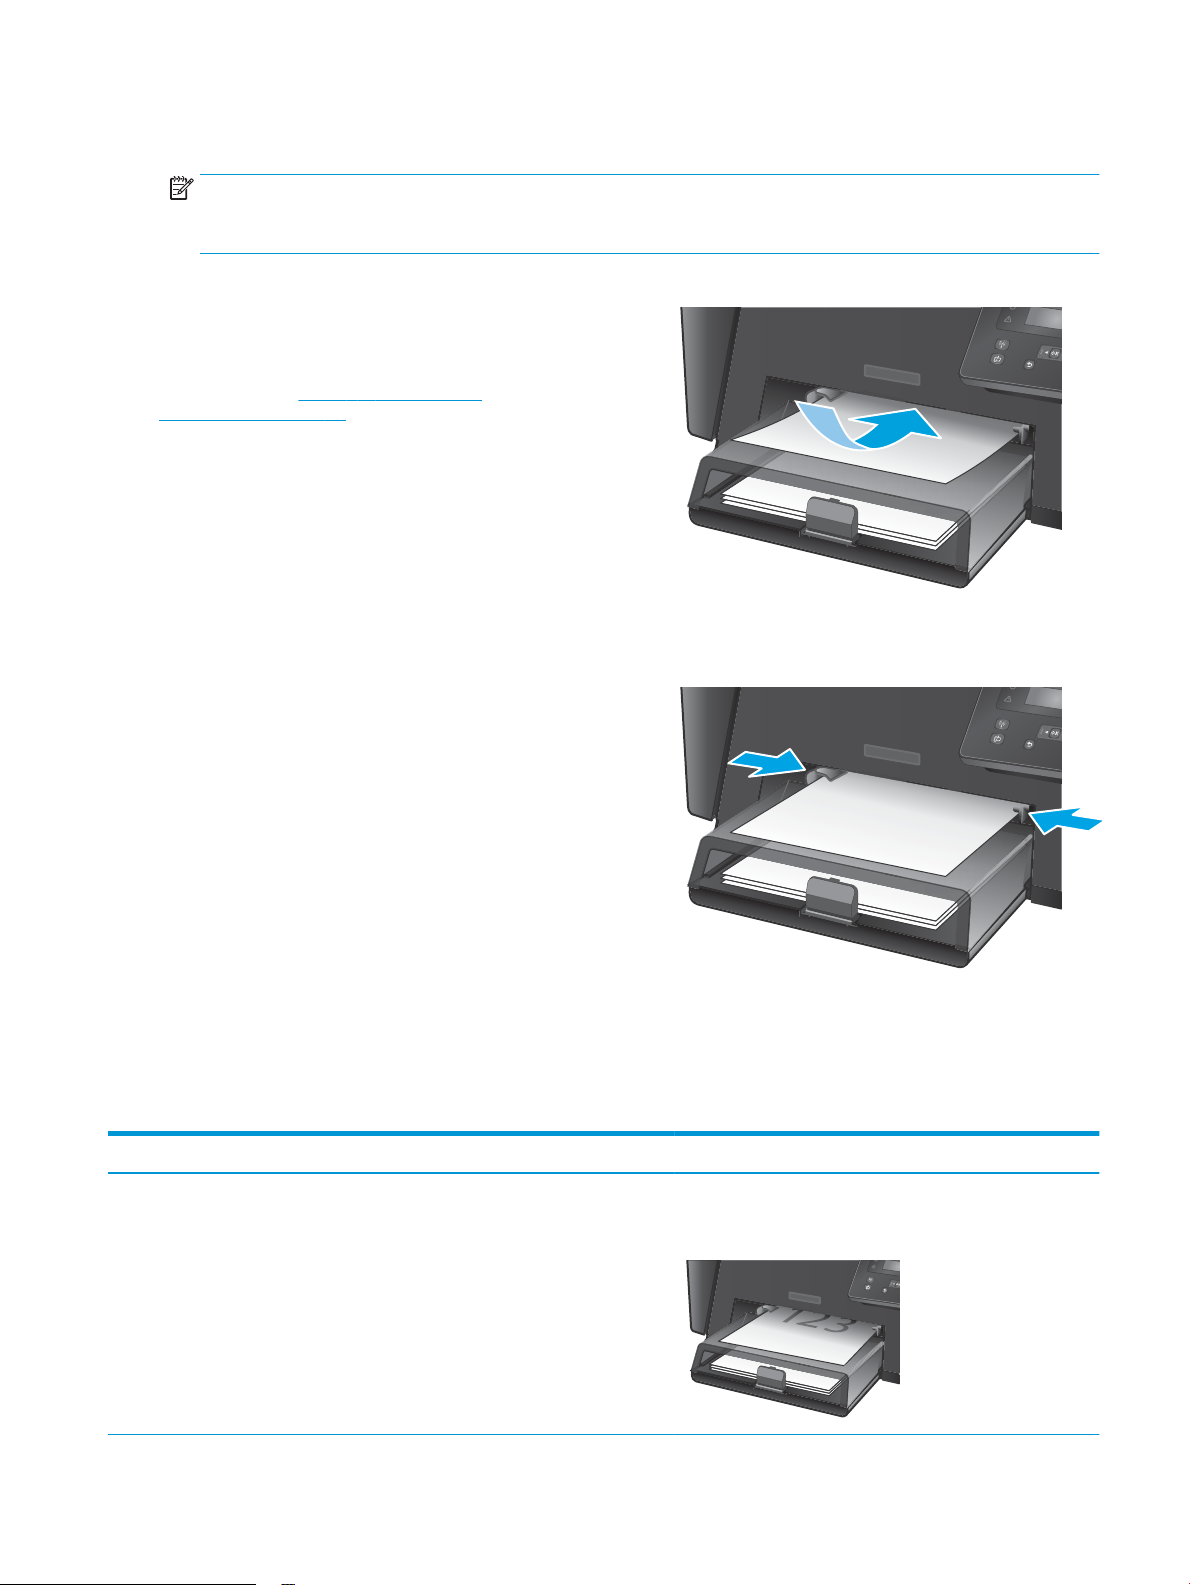
Load the priority input tray (Tray 1)
NOTE: When adding new paper, make sure to remove all of the paper from the input tray and straighten the
stack. Do not fan the paper. This reduces jams by preventing multiple sheets of paper from feeding through
the product at one time. Use paper that is not wrinkled, folded, or damaged.
1. Load the paper face-up with the top forward in
the input tray.
The orientation of the paper in the tray varies
depending on the type of print job. For additional
information, see Table 2-1 Tray 1 paper
orientation on page 13.
2. Adjust the paper guides until they are snug
against the paper.
Table 2-1 Tray 1 paper orientation
Paper type Duplex mode How to load paper
Preprinted or letterhead 1-sided printing or manual 2-sided
printing
Face-up
Top edge leading into the product
ENWW Load the priority input tray (Tray 1) 13
Page 22
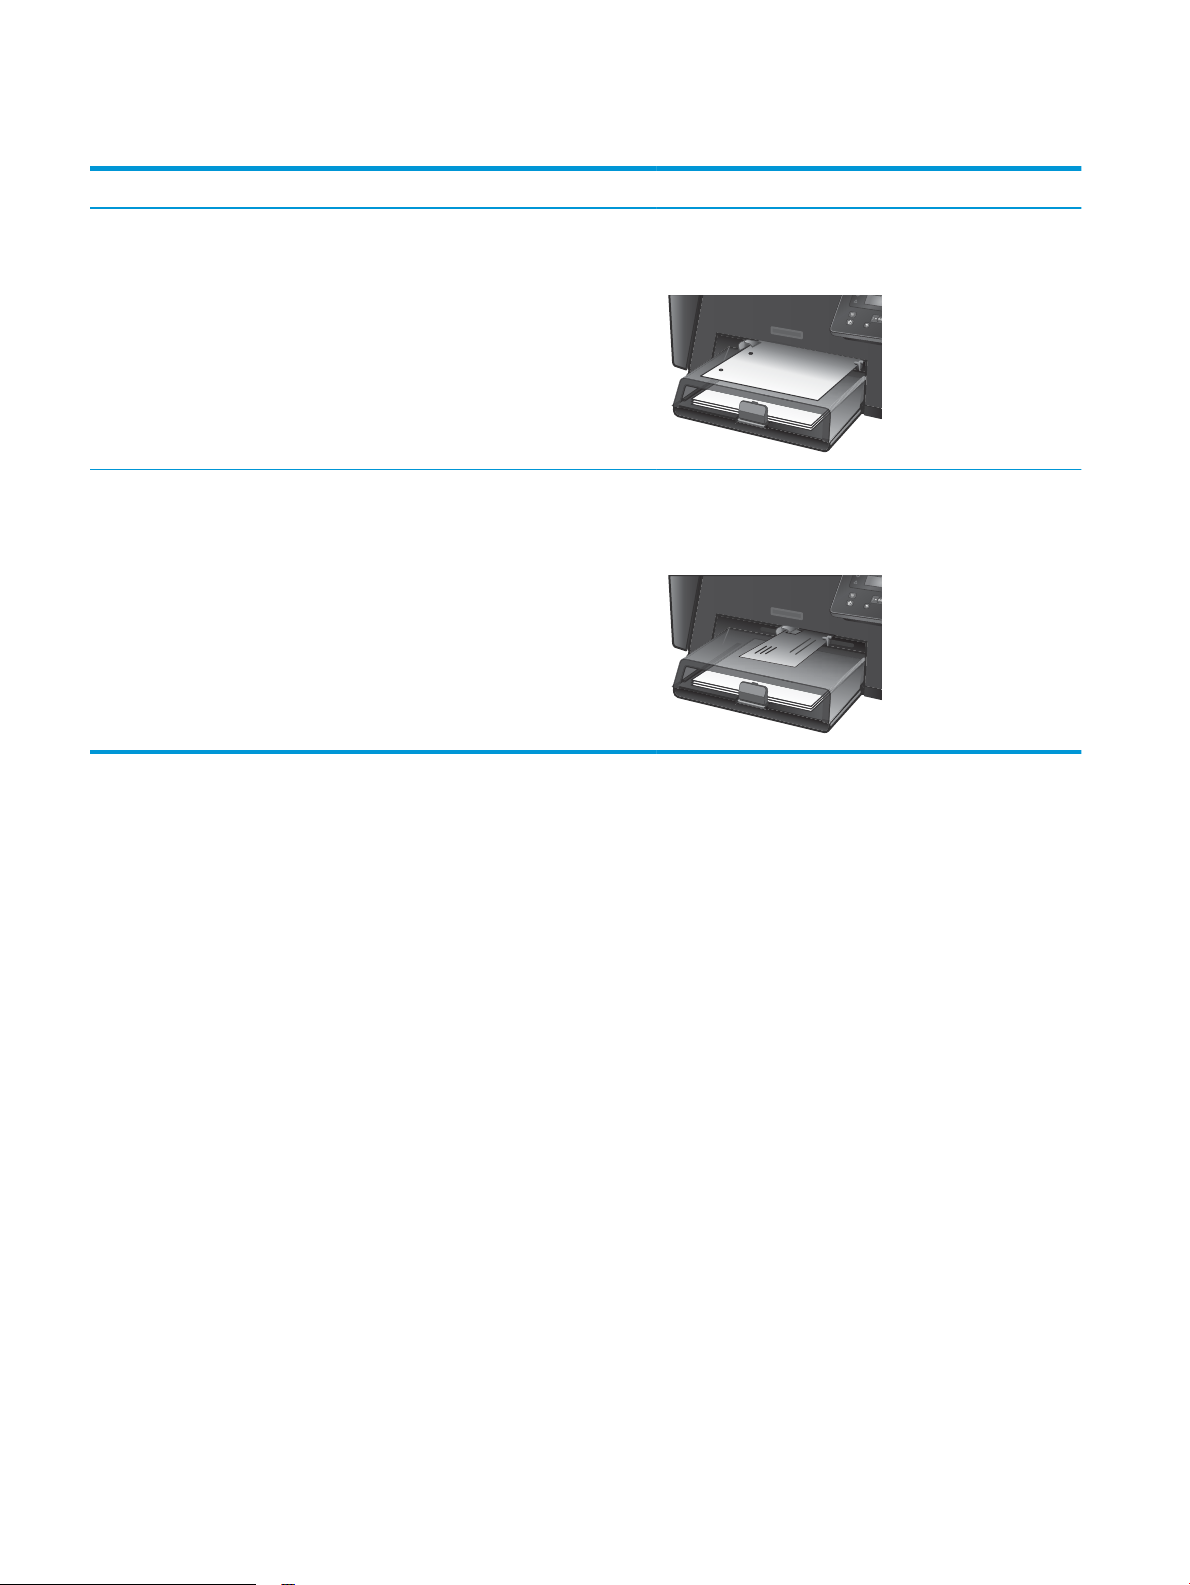
Table 2-1 Tray 1 paper orientation (continued)
Paper type Duplex mode How to load paper
Prepunched 1-sided printing or manual 2-sided
printing
Envelopes 1-sided printing Face-up
Face-up
Holes toward the left side of the product
Top edge toward the right of the tray, postage end entering
the product last
14 Chapter 2 Paper trays ENWW
Page 23
Load the main input tray (Tray 2)
NOTE: When adding new paper, make sure to remove all of the paper from the input tray and straighten the
stack. Do not fan the paper. This reduces jams by preventing multiple sheets of paper from feeding through
the product at one time. Use paper that is not wrinkled, folded, or damaged.
1. Open the dust cover.
2. Load the paper into the tray. Make sure that the
paper ts under the tabs and below the
maximum-height indicators.
The orientation of the paper in the tray varies
depending on the type of print job. For additional
information, see Table 2-2 Tray 2 paper
orientation on page 17.
ENWW Load the main input tray (Tray 2) 15
Page 24
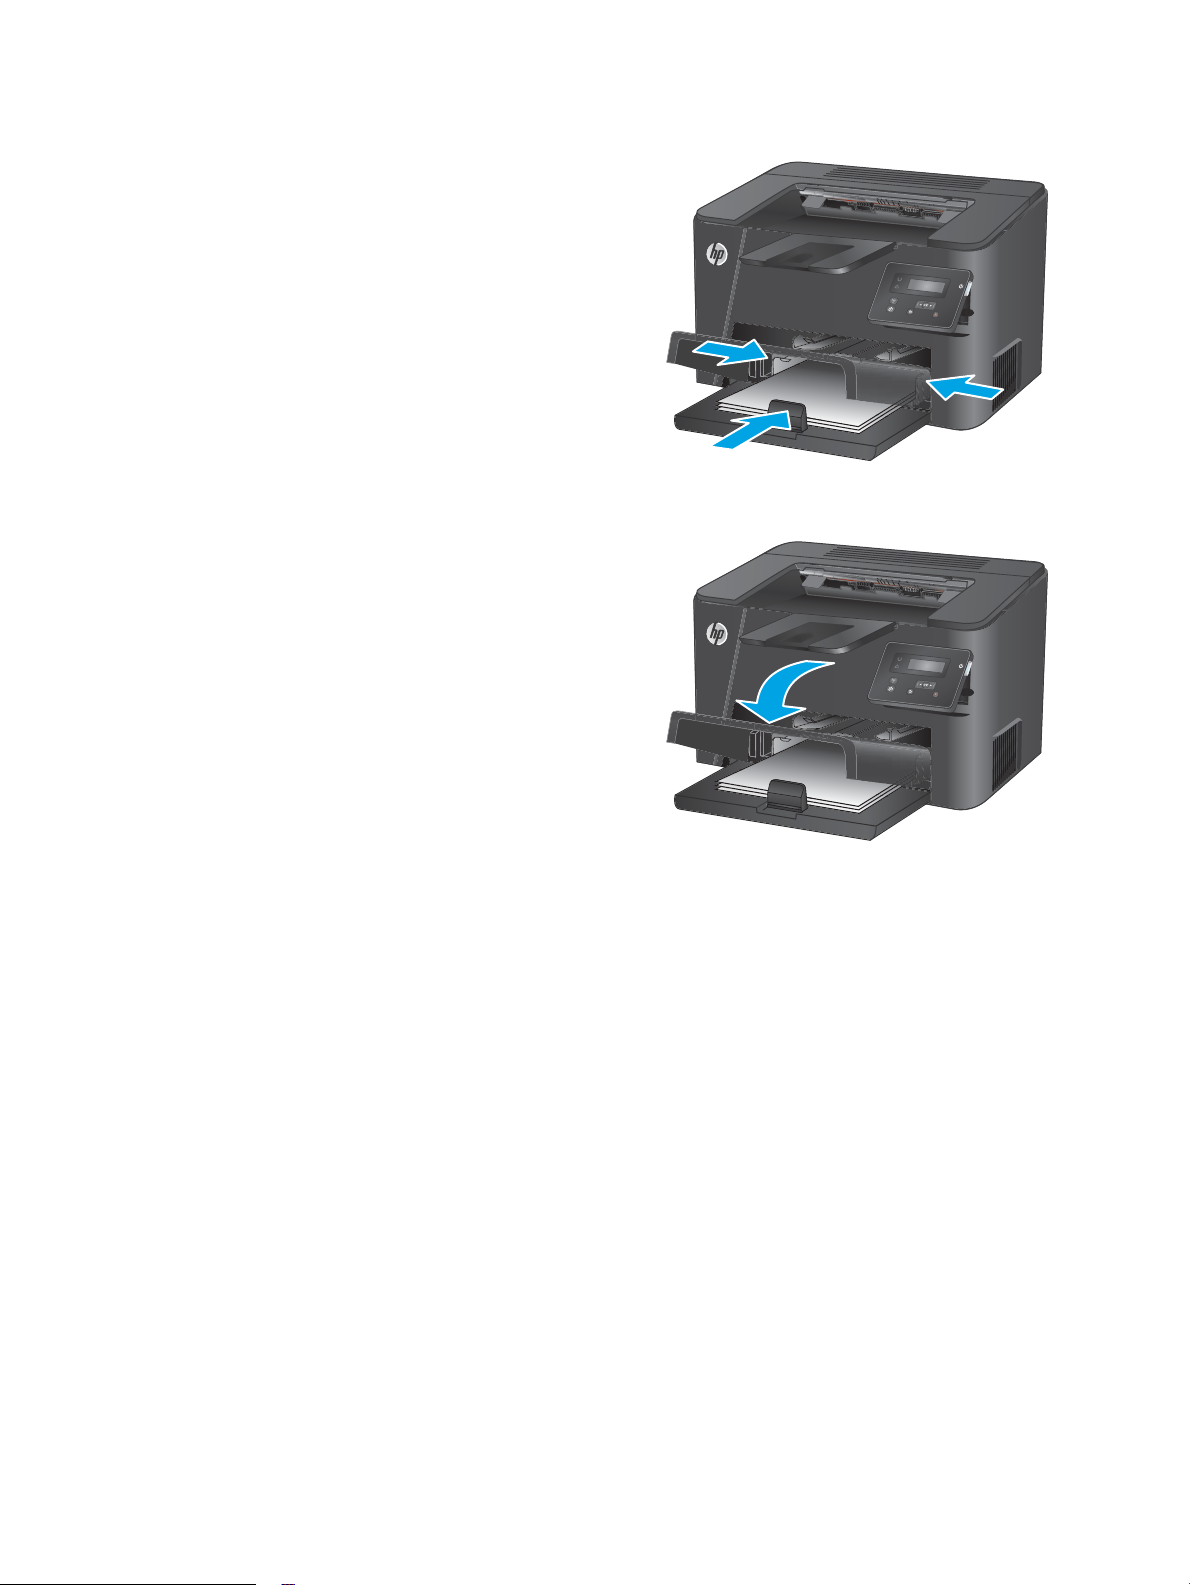
3. Adjust the paper guides until they are snug
against the paper.
4. Close the dust cover.
16 Chapter 2 Paper trays ENWW
Page 25
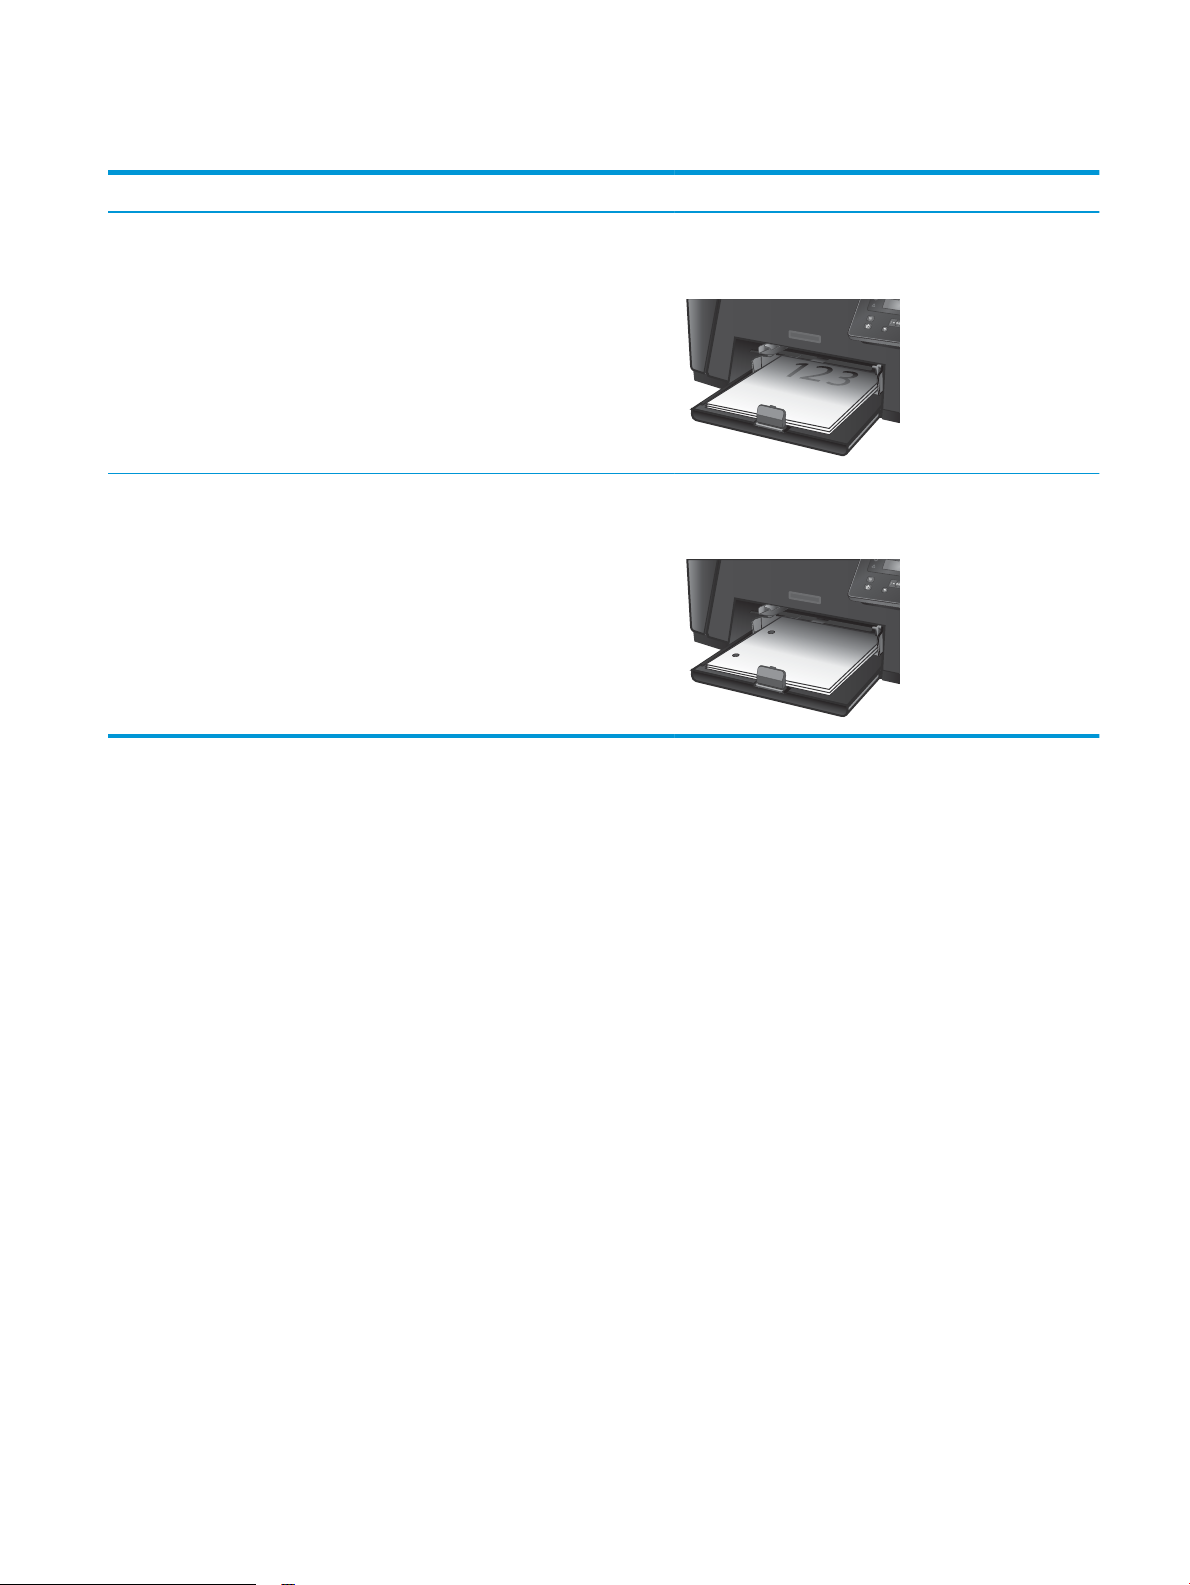
Table 2-2 Tray 2 paper orientation
Paper type Duplex mode How to load paper
Preprinted or letterhead 1-sided printing or 2-sided printing Face-up
Top edge leading into the product
Prepunched 1-sided printing or 2-sided printing Face-up
Holes toward the left side of the product
ENWW Load the main input tray (Tray 2) 17
Page 26

18 Chapter 2 Paper trays ENWW
Page 27

3 Parts, supplies, and accessories
●
Order parts, accessories, and supplies
●
Replace the toner cartridge
For more information:
Go to www.hp.com/support/ljM201, www.hp.com/support/ljM202.
HP's all-inclusive help for the product includes the following information:
●
Install and congure
●
Learn and use
●
Solve problems
●
Download software updates
●
Join support forums
●
Find warranty and regulatory information
ENWW 19
Page 28

Order parts, accessories, and supplies
Ordering
Order supplies and paper www.hp.com/go/suresupply
Order genuine HP parts or accessories www.hp.com/buy/parts
Order through service or support providers Contact an HP-authorized service or support provider.
Order using the HP Embedded Web Server (EWS) To access, in a supported Web browser on your computer, enter
the product IP address or host name in the address/URL eld. The
EWS contains a link to the HP SureSupply Web site, which provides
options for purchasing Original HP supplies.
Supplies and accessories
Item Description Part number
HP 83A Toner Cartridge Replacement toner cartridge CF283A
HP 83X Toner Cartridge High-capacity replacement toner cartridge CF283X
HP 88A Toner Cartridge Replacement toner cartridge for China and India
only
USB cable 2-meter standard USB-compatible device
connector
CC388A
C6518A
20 Chapter 3 Parts, supplies, and accessories ENWW
Page 29

Replace the toner cartridge
When a toner cartridge approaches the end of useful life, the product displays a prompt to order a
replacement. Printing can continue with the current cartridge until redistributing the toner no longer yields
acceptable print quality.
A second message displays on the control panel when the toner cartridge reaches the “very low” state.
1. Open the top cover.
2. Remove the toner cartridge.
ENWW Replace the toner cartridge 21
Page 30

3. Remove the new toner cartridge from the bag.
Place the used toner cartridge in the bag for
recycling.
4. Grasp both sides of the toner cartridge and
distribute the toner by gently rocking the
cartridge.
CAUTION: Do not touch the shutter or the
surface of the roller.
5. Bend the tab on the left side of the cartridge until
the tab breaks loose. Pull the tab until all the
tape is removed from the cartridge. Place the tab
and tape in the toner cartridge box to return for
recycling.
22 Chapter 3 Parts, supplies, and accessories ENWW
Page 31

6. Align the toner cartridge with the tracks inside
the product, and then insert the toner cartridge
until it is rmly seated.
7. Close the top cover.
ENWW Replace the toner cartridge 23
Page 32

24 Chapter 3 Parts, supplies, and accessories ENWW
Page 33

4 Print
●
Print tasks (Windows)
●
Print tasks (Mac OS X)
●
Set up HP Wireless Direct Printing (network and wireless models only)
●
Mobile printing (network and wireless models only)
For more information:
Go to www.hp.com/support/ljM201, www.hp.com/support/ljM202.
HP's all-inclusive help for the product includes the following information:
●
Install and congure
●
Learn and use
●
Solve problems
●
Download software updates
●
Join support forums
●
Find warranty and regulatory information
ENWW 25
Page 34

Print tasks (Windows)
●
How to print (Windows)
●
Automatically print on both sides (Windows)
●
Manually print on both sides (Windows)
●
Print multiple pages per sheet (Windows)
●
Select the paper type (Windows)
●
Additional print tasks
How to print (Windows)
The following procedure describes the basic printing process for Windows.
1. From the software program, select the Print option.
2. Select the product from the list of printers. To change settings, click or tap the Properties or
Preferences button to open the print driver.
NOTE: The name of the button varies for dierent software programs.
26 Chapter 4 Print ENWW
Page 35

3. Click or tap the tabs in the print driver to congure the available options. For example, set the paper
orientation on the Finishing tab, and set the paper source, paper type, paper size, and quality settings
on the Paper/Quality tab.
4. Click or tap the OK button to return to the Print dialog box. Select the number of copies to print from
this screen.
5. Click or tap the OK button to print the job.
ENWW Print tasks (Windows) 27
Page 36

Automatically print on both sides (Windows)
Use this procedure for products that have an automatic duplexer installed. If the product does not have an
automatic duplexer installed, or to print on paper types that the duplexer does not support, you can print on
both sides manually.
1. From the software program, select the Print option.
2. Select the product from the list of printers, and then click or tap the Properties or Preferences button to
open the print driver.
NOTE: The name of the button varies for dierent software programs.
3. Click or tap the Finishing tab.
4. Select the Print on both sides check box. Click the OK button to close the Document Properties dialog
box.
5. In the Print dialog box, click the OK button to print the job.
28 Chapter 4 Print ENWW
Page 37

Manually print on both sides (Windows)
Use this procedure for products that do not have an automatic duplexer installed or to print on paper that the
duplexer does not support.
1. From the software program, select the Print option.
2. Select the product from the list of printers, and then click or tap the Properties or Preferences button to
open the print driver.
NOTE: The name of the button varies for dierent software programs.
3. Click or tap the Finishing tab.
4. Select the Print on both sides (manually) check box. Click the OK button to print the rst side of the job.
5. Retrieve the printed stack from the output bin, and place it in Tray 1.
6. If prompted, touch the appropriate control panel button to continue.
ENWW Print tasks (Windows) 29
Page 38

Print multiple pages per sheet (Windows)
1. From the software program, select the Print option.
2. Select the product from the list of printers, and then click or tap the Properties or Preferences button to
open the print driver.
NOTE: The name of the button varies for dierent software programs.
3. Click or tap the Finishing tab.
4. Select the number of pages per sheet from the Pages per sheet drop-down list.
5. Select the correct Print page borders, Page order, and Orientation options. Click the OK button to close
the Document Properties dialog box.
6. In the Print dialog box, click the OK button to print the job.
30 Chapter 4 Print ENWW
Page 39

Select the paper type (Windows)
1. From the software program, select the Print option.
2. Select the product from the list of printers, and then click or tap the Properties or Preferences button to
open the print driver.
NOTE: The name of the button varies for dierent software programs.
3. Click or tap the Paper/Quality tab.
4. From the Paper type drop-down list, click the More... option.
5. Expand the list of Type is: options.
6. Expand the category of paper types that best describes your paper.
7. Select the option for the type of paper you are using, and then click the OK button.
8. Click the OK button to close the Document Properties dialog box. In the Print dialog box, click the OK
button to print the job.
Additional print tasks
Go to www.hp.com/support/ljM201, www.hp.com/support/ljM202.
Instructions are available for performing specic print tasks, such as the following:
●
Create and use printing shortcuts or presets
●
Select the paper size, or use a custom paper size
●
Select the page orientation
●
Create a booklet
●
Scale a document to t a specic paper size
●
Print the rst or last pages of the document on dierent paper
●
Print watermarks on a document
ENWW Print tasks (Windows) 31
Page 40

Print tasks (Mac OS X)
●
How to print (OS X)
●
Automatically print on both sides (OS X)
●
Manually print on both sides (OS X)
●
Print multiple pages per sheet (OS X)
●
Select the paper type (OS X)
●
Additional print tasks
How to print (OS X)
The following procedure describes the basic printing process for OS X.
1. Click the File menu, and then click the Print option.
2. Select the product.
3. Click Show Details, and then select other menus to adjust the print settings.
4. Click the Print button.
Automatically print on both sides (OS X)
NOTE: This information applies to products that include an automatic duplexer.
NOTE: This feature is available if you install the HP print driver. It might not be available if you are using
AirPrint.
1. Click the File menu, and then click the Print option.
2. Select the product.
3. Click Show Details, and then click the Layout menu.
4. Select a binding option from the Two-Sided drop-down list.
5. Click the Print button.
Manually print on both sides (OS X)
NOTE: This feature is available if you install the HP print driver. It might not be available if you are using
AirPrint.
1. Click the File menu, and then click the Print option.
2. Select the product.
3. Click Show Details, and then click the Manual Duplex menu.
4. Click the Manual Duplex box, and select a binding option.
5. Click the Print button.
6. Go to the product, and remove any blank paper that is in Tray 1.
32 Chapter 4 Print ENWW
Page 41

7. Retrieve the printed stack from the output bin and place it with the printed-side facing down in the input
tray.
8. If prompted, touch the appropriate control panel button to continue.
Print multiple pages per sheet (OS X)
1. Click the File menu, and then click the Print option.
2. Select the product.
3. Click Show Details, and then click the Layout menu.
4. From the Pages per Sheet drop-down list, select the number of pages that you want to print on each
sheet.
5. In the Layout Direction area, select the order and placement of the pages on the sheet.
6. From the Borders menu, select the type of border to print around each page on the sheet.
7. Click the Print button.
Select the paper type (OS X)
1. Click the File menu, and then click the Print option.
2. Select the product.
3. Click Show Details, and then click the Media & Quality menu or the Paper/Quality menu.
4. Select a type from the Media-type drop-down list.
5. Click the Print button.
Additional print tasks
Go to www.hp.com/support/ljM201, www.hp.com/support/ljM202.
Instructions are available for performing specic print tasks, such as the following:
●
Create and use printing shortcuts or presets
●
Select the paper size, or use a custom paper size
●
Select the page orientation
●
Create a booklet
●
Scale a document to t a specic paper size
●
Print the rst or last pages of the document on dierent paper
●
Print watermarks on a document
ENWW Print tasks (Mac OS X) 33
Page 42

Set up HP Wireless Direct Printing (network and wireless models only)
NOTE: This feature is available with wireless models only and the product might require a rmware update
to use this feature.
The HP Wireless Direct Printing feature lets you print from your wireless mobile device directly to an
HP Wireless Direct-enabled product without requiring connection to an established network or the Internet.
Use HP Wireless Direct to print wirelessly from the following devices:
●
iPhone, iPad, or iTouch using Apple AirPrint or the HP ePrint mobile app
●
Mobile devices that run Android or Symbian using the HP ePrint Home & Biz application
●
Any Wi-Fi capable computer with any operating system.
For more information on HP Wireless Direct, go to www.hp.com/go/wirelessprinting, and then click HP
Wireless Direct.
To set up HP Wireless Direct from the control panel, complete the following steps:
1. At the product control panel, press the OK button to open the menus.
2. Use the arrow buttons to open the following menus:
●
Network Setup
●
Wireless Menu
●
Wireless Direct
3. Select the On option, and then press the OK button. The product saves the setting and then returns the
control panel to the Wireless Direct menu.
34 Chapter 4 Print ENWW
Page 43

Mobile printing (network and wireless models only)
HP oers multiple Mobile and ePrint solutions to enable wireless printing to an HP printer from a laptop,
tablet, smartphone, or other mobile device. To determine the best choice, go to www.hp.com/go/
LaserJetMobilePrinting (English only).
●
HP ePrint via email
●
HP ePrint software
●
AirPrint
HP ePrint via email
Use HP ePrint to print documents by sending them as an email attachment to the product's email address
from any email enabled device.
To use HP ePrint, the product must meet these requirements:
●
The product must be connected to a wired network and have Internet access.
●
HP Web Services must be enabled on the product, and the product must be registered with
HP Connected.
1. On the product control panel, press the OK button.
2. Scroll to the HP Web Services menu, and press the OK button.
3. Scroll to the Print Information Sheet option, and press the OK button.
The information page contains the printer code that you use to register your HP product at
HP Connected.
4. Go to www.hpconnected.com to create an HP ePrint account and complete the setup process.
For more information, go to www.hp.com/support to review additional support information for your product.
HP ePrint software
The HP ePrint software makes it easy to print from a Windows or Mac desktop or laptop computer to any HP
ePrint-capable product. This software makes it easy to nd HP ePrint-enabled products that are registered to
your HP Connected account. The target HP printer can be located in the oice or at locations across the globe.
●
Windows: After installing the software, open the Print option from within your application, and then
select HP ePrint from the installed printers list. Click the Properties button to congure print options.
●
Mac: After installing the software, select File, Print, and then select the arrow next to PDF (in the
bottom left of the driver screen). Select HP ePrint.
For Windows, the HP ePrint software supports TCP/IP printing to local network printers on the network (LAN
or WAN) to products that support UPD PostScript®.
Windows and Mac both support IPP printing to LAN or WAN network-connected products that support ePCL.
Windows and Mac also both support printing PDF documents to public print locations and printing using HP
ePrint via email through the cloud.
Go to www.hp.com/go/eprintsoftware for drivers and information.
ENWW Mobile printing (network and wireless models only) 35
Page 44

AirPrint
NOTE: The HP ePrint software is a PDF workow utility for Mac, and is not technically a print driver.
NOTE: HP ePrint Software does not support USB printing.
Direct printing using Apple’s AirPrint is supported for iOS 4.2 or later. Use AirPrint to print directly to the
product from an iPad, iPhone (3GS or later), or iPod touch (third generation or later) in the following
applications:
●
Mail
●
Photos
●
Safari
●
iBooks
●
Select third-party applications
To use AirPrint, the product must be connected to the same wireless network as the Apple device. For more
information about using AirPrint and about which HP products are compatible with AirPrint, go to the support
Web site for this product:
www.hp.com/support/ljM201, www.hp.com/support/ljM202
NOTE: AirPrint does not support USB connections.
36 Chapter 4 Print ENWW
Page 45

5 Manage the product
●
Change the product connection type (Windows)
●
Advanced conguration with HP Embedded Web Server (EWS) and HP Device Toolbox (Windows)
●
Advanced conguration with HP Utility for Mac OS X
●
Congure IP network settings
●
HP Web Jetadmin
●
Product security features
●
Economy settings
●
Update the rmware
For more information:
Go to www.hp.com/support/ljM201, www.hp.com/support/ljM202.
HP's all-inclusive help for the product includes the following information:
●
Install and congure
●
Learn and use
●
Solve problems
●
Download software updates
●
Join support forums
●
Find warranty and regulatory information
ENWW 37
Page 46

Change the product connection type (Windows)
If you are already using the product and you wish to change the way it is connected, use the Recongure your
HP Device shortcut on your computer desktop to change the connection. For example, you can recongure
the product to use a dierent wireless address, to connect to a wired or wireless network, or change from a
network connection to a USB connection. You can change the conguration without inserting the product CD.
After you select the type of connection you wish to make, the program goes directly to the portion of the
product setup procedure that needs to change.
38 Chapter 5 Manage the product ENWW
Page 47

Advanced conguration with HP Embedded Web Server (EWS)
and HP Device Toolbox (Windows)
Use the HP Embedded Web Server to manage printing functions from your computer instead of the product
control panel.
●
View product status information
●
Determine the remaining life for all supplies and order new ones
●
View and change tray congurations
●
View and change the product control-panel menu conguration
●
View and print internal pages
●
Receive notication of product and supplies events
●
View and change network conguration
The HP Embedded Web Server works when the product is connected to an IP-based network. The HP
Embedded Web Server does not support IPX-based product connections. You do not have to have Internet
access to open and use the HP Embedded Web Server.
When the product is connected to the network, the HP Embedded Web Server is automatically available.
NOTE: HP Device Toolbox is available only if you performed a full installation when you installed the
product. Depending on how the product is connected, some features might not be available.
NOTE: The HP Embedded Web Server is not accessible beyond the network rewall.
Open the HP Embedded Web Server (EWS) from the Start menu
1. Click the Start button, and then click the Programs item.
2. Click your HP product group, and then click the HP Device Toolbox item.
Open the HP Embedded Web Server (EWS) from a Web browser
1. Print a conguration page, and locate the IP address.
a. On the control panel, press the OK button.
b. Scroll to the Reports menu, and then press the OK button.
c. Scroll to the Conguration Report, and then press the OK button to print the report.
2. Open a Web browser, and in the address line, type the IP address as it displays on the product control
panel. Press the Enter key on the computer keyboard. The EWS opens.
ENWW Advanced conguration with HP Embedded Web Server (EWS) and HP Device Toolbox (Windows) 39
Page 48

Tab or section Description
Home tab
Provides product, status, and
conguration information.
System tab
Provides the ability to congure the
product from your computer.
●
Device Status: Shows the product status and shows the approximate percent life
remaining of HP supplies.
●
Supplies Status: Shows the approximate percent life remaining of HP supplies. Actual
supply life remaining can vary. Consider having a replacement supply available to install
when print quality is no longer acceptable. The supply does not need to be replaced
unless the print quality is no longer acceptable.
●
Device Conguration: Shows the information found on the product conguration page.
●
Network Summary: Shows the information found on the product network conguration
page.
●
Reports: Print the conguration and supplies status pages that the product generates.
●
Event Log: Shows a list of all product events and errors.
●
Device Information: Provides basic product and company information.
●
Paper Setup: Change the default paper-handling settings for the product.
●
Print Quality: Change the default print-quality settings for the product.
●
EcoSMART Console: Change the default times for entering Sleep mode or Auto Power
Down mode. Congure which events cause the product to wake.
●
Paper Types: Congure print modes that correspond to the paper types that the product
accepts.
●
System Setup: Change the system defaults for the product.
●
Service: Perform the cleaning procedure on the product.
●
Save and Restore: Save the current settings for the product to a le on the computer. Use
this le to load the same settings onto another product or to restore these settings to
this product at a later time.
●
Administration: Set or change the product password. Enable or disable product features.
NOTE: The System tab can be password-protected. If this product is on a network, always
consult with the administrator before changing settings on this tab.
Print tab
Provides the ability to change default
print settings from your computer.
Networking tab
(Network-connected products only)
Provides the ability to change
network settings from your
computer.
HP Web Services tab Use this tab to set up and use various Web tools with the product.
●
Printing: Change the default product print settings, such as number of copies and paper
orientation. These are the same options that are available on the control panel.
●
PCL5c: View and change the PCL5c settings.
●
PostScript: Turn o or on the Print PS Errors feature.
Network administrators can use this tab to control network-related settings for the product
when it is connected to an IP-based network. It also allows the network administrator to set up
Wireless Direct functionality. This tab does not appear if the product is directly connected to a
computer.
40 Chapter 5 Manage the product ENWW
Page 49

Advanced conguration with HP Utility for Mac OS X
Use the HP Utility to check product status or to view or change product settings from your computer.
You can use the HP Utility when the product is connected with a USB cable or is connected to a TCP/IP-based
network.
Open HP Utility
1. At the computer, open the System Preferences menu, and then click Print & Fax, Print & Scan, or
Printers & Scanners.
2. Select the product in the list.
3. Click the Options & Supplies button.
4. Click the Utility tab.
5. Click the Open Printer Utility button.
HP Utility features
The HP Utility toolbar includes these items:
●
Devices: Click this button to show or hide Mac products found by the HP Utility.
●
All Settings: Click this button to return to the HP Utility main view.
●
HP Support: Click this button to open a browser and go to the HP support Web site.
●
Supplies: Click this button to open the HP SureSupply Web site.
●
Registration: Click this button to open the HP registration Web site.
●
Recycling: Click this button to open the HP Planet Partners Recycling Program Web site.
HP Utility consists of pages that you open by clicking in the All Settings list. The following table describes the
tasks that you can perform with HP Utility.
Menu Description
Information And Support
●
Supplies Status: Show the product supplies status and provides links for ordering
supplies online.
●
Device Information: Show information about the currently selected product,
including the product Service ID (if assigned), the rmware version (FW Version),
the Serial Number, and the IP address.
●
File Upload: Transfer les from the computer to the product. You can upload the
following types of les:
◦
HP LaserJet printer command language (.PRN)
◦
Portable document format (.PDF)
ENWW Advanced conguration with HP Utility for Mac OS X 41
Page 50

Menu Description
◦
◦
●
HP Connected: Access the HP Connected Web site.
●
Upload Fonts: Upload fonts from your computer to the product.
Postscript (.PS)
Text (.TXT)
Printer Settings
Information Message Center: Display error events that have occurred with the product.
Fax Settings
(MFP fax models only)
Scan Settings
(MFP touchscreen models only)
●
Auto-o: Congure the product to automatically turn o after a period of
inactivity. You can adjust the number of minutes after which the product turns o.
●
Network Settings: Congure the network settings, such as the IPv4 settings, IPv6
settings, Bonjour settings, and other settings.
●
Supplies Management: Congure how the product should behave when supplies
are nearing the end of their estimated life.
●
Trays Conguration: Change paper size and type for each of the trays.
●
Additional Settings: Open the HP Embedded Web Server (EWS) for the product.
NOTE: USB connections are not supported.
●
Basic Fax Settings: Set up the elds in the fax header and congure how the
product answers incoming calls.
●
Junk Fax Blocking: Store the fax numbers you want to block.
●
Fax Forwarding: Set up the product to send the incoming faxes to a dierent
number.
●
Fax Logs: View the logs of all faxes.
●
Fax Speed Dials: Add fax numbers to the speed dial list.
●
Scan to E-mail: Open the HP Embedded Web Server (EWS) page for conguring
settings for scanning to email.
●
Scan to Network Folder: Open the HP Embedded Web Server (EWS) page for
conguring settings for scanning to a network folder.
NOTE: USB connections are not supported.
42 Chapter 5 Manage the product ENWW
Page 51

Congure IP network settings
●
Printer sharing disclaimer
●
View or change network settings
●
Rename the product on a network
●
Manually congure IPv4 TCP/IP parameters from the control panel
Printer sharing disclaimer
HP does not support peer-to-peer networking, as the feature is a function of Microsoft operating systems and
not of the HP printer drivers. Go to Microsoft at www.microsoft.com.
View or change network settings
Use the HP Embedded Web Server to view or change IP conguration settings.
1. Print a conguration page, and locate the IP address.
a. On the control panel, press the OK button.
b. Scroll to the Reports menu, and then press the OK button.
c. Scroll to the Conguration Report option, and then press the OK button to print the report.
2. Open a Web browser, and in the address line, type the IP address exactly as it displays on the product
control panel. Press the Enter key on the computer keyboard. The EWS opens.
3. Click the Networking tab to obtain network information. Change settings as needed.
Rename the product on a network
If you want to rename the product on a network so that it can be uniquely identied, use the HP Embedded
Web Server.
1. Print a conguration page, and locate the IP address.
a. On the control panel, press the OK button.
b. Scroll to the Reports menu, and then press the OK button.
c. Scroll to the Conguration Report option, and then press the OK button to print the report.
2. Open a Web browser, and in the address line, type the IP address as it displays on the product control
panel. Press the Enter key on the computer keyboard. The EWS opens.
3. Open the System tab.
4. On the Device Information page, the default product name is in the Device Status eld. You can change
this name to uniquely identify this product.
ENWW Congure IP network settings 43
Page 52

NOTE: Completing the other elds on this page is optional.
5. Click the Apply button to save the changes.
Manually congure IPv4 TCP/IP parameters from the control panel
Use the control-panel menus to manually set an IPv4 address, subnet mask, and default gateway.
1. On the product control panel, press the OK button.
2. Open the following menus:
●
Network Setup
●
IPV4 Cong Method
●
Manual
3. Use the arrow keys to enter the IP address, and press the OK button. Press the OK button again to
conrm.
4. Use the arrow keys to enter the subnet mask, and press the OK button. Press the OK button again to
conrm.
5. Use the arrow keys to enter the default gateway, and press the OK button. Press the OK button again to
conrm.
44 Chapter 5 Manage the product ENWW
Page 53

HP Web Jetadmin
HP Web Jetadmin is an award-winning, industry-leading tool for eiciently managing a wide variety of
networked HP products, including printers, multifunction products, and digital senders. This single solution
allows you to remotely install, monitor, maintain, troubleshoot, and secure your printing and imaging
environment — ultimately increasing business productivity by helping you save time, control costs, and
protect your investment.
HP Web Jetadmin upgrades are periodically made available to provide support for specic product features.
Go to www.hp.com/go/webjetadmin and click the Self Help and Documentation link to learn more about
upgrades.
ENWW HP Web Jetadmin 45
Page 54

Product security features
The product supports security standards and recommended protocols that help you keep the product secure,
protect critical information on your network, and simplify the way you monitor and maintain the product.
For in-depth information about HP's secure imaging and printing solutions, visit www.hp.com/go/
secureprinting. The site provides links to white papers and FAQ documents about security features.
Set or change the product password using the HP Embedded Web Server
Use the HP Embedded Web Server to set a password or change an existing password for a product on a
network.
1. Print a conguration page, and locate the IP address.
a. On the control panel, press the OK button.
b. Scroll to the Reports menu, and then press the OK button.
c. Scroll to the Conguration Report, and then press the OK button to print the report.
2. Open a Web browser, and in the address line, type the IP address exactly as it displays on the product
control panel. Press the Enter key on the computer keyboard. The EWS opens.
3. Click the System tab, and click either the Product Security or the Administration link.
NOTE: If a password has previously been set, you are prompted to provide the password. Enter the
password, and then click the Apply button.
4. Enter the new password in the Password box and in the Conrm Password box.
5. At the bottom of the window, click the Apply button to save the password.
NOTE: For products connected with a USB cable to a Windows computer, use the HP Device Toolbox to
change the product password:
1. Click the Start button, and then click the Programs item.
2. Click your HP product group, and then click the HP Device Toolbox item.
3. Click the System tab.
4. Click Administration, and locate the area to change the password.
46 Chapter 5 Manage the product ENWW
Page 55

Economy settings
●
Print with EconoMode
●
Set the Sleep Delay
●
Set the Auto Power Down delay
Print with EconoMode
This product has an EconoMode option for printing drafts of documents. Using EconoMode can use less toner.
However, using EconoMode can also reduce print quality.
HP does not recommend the full-time use of EconoMode. If EconoMode is used full-time, the toner supply
might outlast the mechanical parts in the toner cartridge. If print quality begins to degrade and is no longer
acceptable, consider replacing the toner cartridge.
NOTE: If this option is not available in your print driver, you can set it using the HP Embedded Web Server.
1. From the software program, select the Print option.
2. Select the product, and then click the Properties or Preferences button.
3. Click the Paper/Quality tab.
4. Click the EconoMode check box.
Set the Sleep Delay
1. On the product control panel, press the OK button.
2. Open the following menus:
●
System Setup
●
Energy Settings
●
Sleep/Auto o
●
Sleep/Auto o After
3. Select the time for the sleep delay, and then press the OK button.
NOTE: The default value is 15 Minutes.
Set the Auto Power Down delay
NOTE: This setting is not available on all products.
1. On the product control panel, touch the OK button.
2. Open the following menus:
●
System Setup
●
Energy Settings
●
Shut down After
ENWW Economy settings 47
Page 56

3. Select the time for the power-down delay.
NOTE: The default value is Never.
4. The product automatically wakes when it receives jobs or when you press a button on the product
control panel. You can change which events cause the product to wake. Open the following menus:
●
System Setup
●
Energy Settings
●
Sleep/Auto O
●
Wake Events
To turn o a wake event, select the event, and then select the No option.
48 Chapter 5 Manage the product ENWW
Page 57

Update the rmware
HP oers periodic product updates, new Web Services apps, and new features to existing Web Services apps.
Follow these steps to update the product rmware for a single product. When you update the rmware, Web
Service apps will update automatically.
There are two supported methods to perform a rmware update on this product. Use only one of the
following methods to update the product rmware.
Method one: Update the rmware using the control panel
Use these steps to load the rmware from the control panel (for network-connected products only), and/or
set the product to automatically load future rmware updates. For USB-connected products, skip to method
two.
1. Make sure the product is connected to a wired (Ethernet) network with an active Internet connection.
NOTE: The product must be connected to the Internet to update the rmware via a network
connection.
2. On the product control panel, press the OK button.
3. Open the following menus:
●
Service
●
LaserJet Update
4. Scroll to the Check for Updates Now option, and press the OK button.
NOTE: The product automatically checks for an update, and if a newer version is detected, the update
process automatically starts.
5. Set the product to automatically update the rmware when updates become available.
a. On the product control panel, press the OK button.
b. Open the following menus:
●
Service
●
LaserJet Update
●
Manage Updates
c. Set the Allow Updates option to YES, and then set the Automatic Check option to ON. Press the OK
button.
Method two: Update the rmware using the Firmware Update Utility
Use these steps to manually download and install the Firmware Update Utility from HP.com.
NOTE: This method is the only rmware update option available for products connected to the computer via
a USB cable. It also works for products connected to a network.
ENWW Update the rmware 49
Page 58

1. Go to www.hp.com/go/support, click the Drivers & Software link, type the product name in the search
eld, press the ENTER button, and then select the product from the list of search results.
2. Select the operating system.
3. Under the Firmware section, locate the Firmware Update Utility.
4. Click Download, click Run, and then click Run again.
5. When the utility launches, select the product from the drop-down list, and then click Send Firmware.
NOTE: To print a conguration page to verify the installed rmware version before or after the update
process, click Print Cong.
6. Follow the on-screen instructions to complete the installation, and then click the Exit button to close
the utility.
50 Chapter 5 Manage the product ENWW
Page 59

6 Solve problems
●
Customer support
●
Restore the factory-set defaults
●
A “Cartridge is low” or “Cartridge is very low” message displays on the product control panel
●
Product does not pick up paper or misfeeds
●
Clear jams
●
Improve print quality
●
Solve wired network problems
●
Solve wireless network problems
For more information:
Go to www.hp.com/support/ljM201, www.hp.com/support/ljM202.
HP's all-inclusive help for the product includes the following information:
●
Install and congure
●
Learn and use
●
Solve problems
●
Download software updates
●
Join support forums
●
Find warranty and regulatory information
ENWW 51
Page 60

Customer support
Get telephone support for your country/region
Have the product name, serial number, date of purchase, and
problem description ready.
Get 24-hour Internet support www.hp.com/support/ljM201, www.hp.com/support/ljM202
Download software utilities, drivers, and electronic information www.hp.com/support/ljM201, www.hp.com/support/ljM202
Order additional HP service or maintenance agreements www.hp.com/go/carepack
Register your product www.register.hp.com
Country/region phone numbers are on the yer that was in the
box with your product or at www.hp.com/support/.
52 Chapter 6 Solve problems ENWW
Page 61

Restore the factory-set defaults
Restoring the factory-set defaults returns all of the product and network settings to the factory defaults. It
will not reset the page count, tray size, or language. To restore the product to the factory-default settings,
follow these steps.
CAUTION: Restoring the factory-set defaults returns all of the settings to the factory defaults, and it also
deletes any pages that are stored in the memory. The procedure then automatically restarts the product.
1. On the product control panel, press the OK button to open the menus.
2. Open the following menus:
●
Service
●
Restore Defaults
The product automatically restarts.
ENWW Restore the factory-set defaults 53
Page 62

A “Cartridge is low” or “Cartridge is very low” message displays on the product control panel
Cartridge is low: The product indicates when a toner cartridge level is low. Actual toner cartridge life
remaining may vary. Consider having a replacement available to install when print quality is no longer
acceptable. The toner cartridge does not need to be replaced now.
Cartridge is very low: The product indicates when the toner cartridge level is very low. Actual toner cartridge
life remaining may vary. Consider having a replacement available to install when print quality is no longer
acceptable. The toner cartridge does not need to be replaced now unless the print quality is no longer
acceptable.
Once an HP toner cartridge has reached Very Low, HP’s Premium Protection Warranty on that toner cartridge
has ended.
Change the “Very Low” settings
Use the product control panel to change the way the product reacts when supplies reach the Very Low state. It
is not necessary to re-establish these settings after installing a new toner cartridge.
1. On the product control panel, press the OK button.
2. Open the following menus:
●
System Setup
●
●
●
3. Select one of the following options:
●
●
●
Order supplies
Order supplies and paper www.hp.com/go/suresupply
Order through service or support providers Contact an HP-authorized service or support provider.
Order using the HP Embedded Web Server (EWS) To access, in a supported Web browser on your computer, enter
Supply Settings
Black Cartridge
Very Low Setting
Select the Stop option to set the product to stop printing when the cartridge reaches the Very Low
threshold.
Select the Prompt option to set the product to stop printing when the cartridge reaches the Very
Low threshold. Acknowledge the prompt or replace the cartridge to resume printing.
Select the Continue option to set the product to display an alert that the cartridge is very low, and
to continue printing beyond the Very Low setting without interaction. This can result in
unsatisfactory print quality.
the product IP address or host name in the address/URL eld. The
EWS contains a link to the HP SureSupply Web site, which provides
options for purchasing Original HP supplies.
54 Chapter 6 Solve problems ENWW
Page 63

Product does not pick up paper or misfeeds
●
The product does not pick up paper
●
The product picks up multiple sheets of paper
The product does not pick up paper
If the product does not pick up paper from the tray, try these solutions.
1. Open the product and remove any jammed sheets of paper.
2. Load the tray with the correct size of paper for your job.
3. Make sure the paper size and type are set correctly on the product control panel.
4. Make sure the paper guides in the tray are adjusted correctly for the size of paper. Adjust the guides to
the appropriate indentation in the tray.
5. Check the product control panel to see if the product is waiting for you to acknowledge a prompt to feed
the paper manually. Load paper, and continue.
6. The rollers above the tray might be contaminated. Clean the rollers with a lint-free cloth dampened with
warm water.
The product picks up multiple sheets of paper
If the product picks up multiple sheets of paper from the tray, try these solutions.
1. Remove the stack of paper from the tray and ex it, rotate it 180 degrees, and ip it over. Do not fan the
paper. Return the stack of paper to the tray.
2. Use only paper that meets HP specications for this product.
3. Use paper that is not wrinkled, folded, or damaged. If necessary, use paper from a dierent package.
4. Make sure the tray is not overlled. If it is, remove the entire stack of paper from the tray, straighten the
stack, and then return some of the paper to the tray.
5. Make sure the paper guides in the tray are adjusted correctly for the size of paper. Adjust the guides to
the appropriate indentation in the tray.
6. Make sure the printing environment is within recommended specications.
ENWW Product does not pick up paper or misfeeds 55
Page 64

Clear jams
1
2
●
Jam locations
●
Experiencing frequent or recurring paper jams?
●
Clear jams in the toner-cartridge area
●
Clear jams in the output bin
●
Clear jams in the duplexer (duplex models only)
Jam locations
1 Toner-cartridge area and output bin See Clear jams in the toner-cartridge area on page 58 and
Clear jams in the output bin on page 60.
2 Duplex area (duplex models only) See Clear jams in the duplexer (duplex models only)
on page 62.
56 Chapter 6 Solve problems ENWW
Page 65

Experiencing frequent or recurring paper jams?
To reduce the number of paper jams, try these solutions.
1. Use only paper that meets HP specications for this product.
2. Use paper that is not wrinkled, folded, or damaged. If necessary, use paper from a dierent package.
3. Use paper that has not previously been printed or copied on.
4. Make sure the tray is not overlled. If it is, remove the entire stack of paper from the tray, straighten the
stack, and then return some of the paper to the tray.
5. Make sure the paper guides in the tray are adjusted correctly for the size of paper. Adjust the guides so
they are touching the paper stack without bending it.
6. Make sure that the tray is fully inserted in the product.
7. If you are printing on heavy, embossed, or perforated paper, use the manual feed feature and feed
sheets one at a time.
8. Verify that the tray is congured correctly for the paper type and size.
a. On the product control panel, press the OK button.
b. Open the following menus:
●
System Setup
●
Paper Setup
c. Verify the tray is congured for the paper type and size.
9. Make sure the printing environment is within recommended specications.
ENWW Clear jams 57
Page 66

Clear jams in the toner-cartridge area
A Jam in cartridge area message displays on the product control panel.
1. Open the top cover.
2. Remove the toner cartridge.
3. Remove any jammed paper from the toner-
cartridge area. Use both hands to remove
jammed paper to avoid tearing the paper.
58 Chapter 6 Solve problems ENWW
Page 67

4. Reinsert the toner cartridge.
5. Close the top cover.
6. If the error message still displays on the control
panel, press OK to clear it.
ENWW Clear jams 59
Page 68

Clear jams in the output bin
A Jam in output bin message displays on the product control panel.
1. Open the top cover.
2. Pull out the green tab to release the jam-access
cover.
3. Remove any jammed paper.
60 Chapter 6 Solve problems ENWW
Page 69

4. Close the jam-access cover.
5. Close the top cover.
6. If the error message still displays on the control
panel, press OK to clear it.
ENWW Clear jams 61
Page 70

Clear jams in the duplexer (duplex models only)
A Jam in duplex area message displays on the product control panel.
1. Open the rear door.
2. Remove any jammed paper from the duplex area.
Use both hands to remove jammed paper to avoid
tearing the paper.
3. Close the rear door.
4. If the error message still displays on the control
panel, press OK to clear it.
62 Chapter 6 Solve problems ENWW
Page 71

Improve print quality
If the product is having print-quality problems, try the following solutions in the order presented to resolve
the issue.
●
Print from a dierent software program
●
Check the paper-type setting for the print job
●
Check the toner-cartridge status
●
Print a cleaning page
●
Visually inspect the toner cartridge for damage
●
Check paper and the printing environment
●
Check other print job settings
●
Try a dierent print driver
Print from a dierent software program
Try printing from a dierent software program. If the page prints correctly, the problem is with the software
program from which the page was printed.
Check the paper-type setting for the print job
Check the paper type setting when printing from a software program and the printed pages have smears,
fuzzy or dark print, curled paper, scattered dots of toner, loose toner, or small areas of missing toner.
Check the paper type setting (Windows)
1. From the software program, select the Print option.
2. Select the product, and then click the Properties or Preferences button.
3. Click the Paper/Quality tab.
4. From the Paper Type drop-down list, click the More... option.
5. Expand the list of Type is: options.
6. Expand the category of paper types that best describes your paper.
7. Select the option for the type of paper being used, and click the OK button.
8. Click the OK button to close the Document Properties dialog box. In the Print dialog box, click the OK
button to print the job.
Check the paper type setting (OS X)
1. Click the File menu, and then click the Print option.
2. Select the product.
3. Click Show Details, and then click the Media & Quality menu or the Paper/Quality menu.
ENWW Improve print quality 63
Page 72

4. Select a type from the Media-type drop-down list.
5. Click the Print button.
Check the toner-cartridge status
Check the supplies status page for the following information:
●
Estimated percentage of cartridge life remaining
●
Approximate pages remaining
●
Part numbers for HP toner cartridges
●
Number of pages printed
Use the following procedure to print the supplies status page:
1. On the product control panel, press the OK button.
2. Scroll to the Reports menu, and press the OK button.
3. Scroll to the Supplies Status option, and then press the OK button to print a report of the status of all
supply items.
4. Check the percent of life remaining for the toner cartridge and if applicable, the status of other
replaceable maintenance parts.
Print quality problems can occur when using a toner cartridge that is at its estimated end of life. The
supplies status page indicates when a supply level is very low. After an HP supply has reached the very
low threshold, HP’s premium protection warranty on that supply has ended.
The toner cartridge does not need to be replaced now unless the print quality is no longer acceptable.
Consider having a replacement available to install when print quality is no longer acceptable.
If a toner cartridge or other replaceable maintenance part needs to be replaced, the supplies status
page lists the genuine HP part numbers.
5. Check to see if a genuine HP cartridge is installed.
A genuine HP toner cartridge has the words “HP” on it, or has the HP logo on it. For more information on
identifying HP cartridges go to www.hp.com/go/learnaboutsupplies.
HP cannot recommend the use of non-HP supplies, either new or remanufactured. Because they are not
HP products, HP cannot inuence their design or control their quality. If you are using a relled or
remanufactured toner cartridge and are not satised with the print quality, replace the toner cartridge
with a genuine HP toner cartridge.
Print a cleaning page
During the printing process paper, toner, and dust particles can accumulate inside the product and can cause
print-quality issues such as toner specks or spatter, smears, streaks, lines, or repeating marks.
Follow these steps to clean the product's paper path.
64 Chapter 6 Solve problems ENWW
Page 73

1. On the product control panel, press the OK button.
2. Scroll to the Service menu, and press the OK button.
3. Scroll to the Cleaning Page option, and press the OK button.
A Cleaning message displays on the product control panel. The cleaning process takes a few minutes to
complete. Do not turn the product o until the cleaning process has nished. When it is nished, discard
the printed page.
Visually inspect the toner cartridge for damage
1. Remove the toner cartridge from the product, and verify that the sealing tape has been removed.
2. Check the memory chip for damage.
3. Examine the surface of the imaging drum on the toner cartridge.
CAUTION: Do not touch the roller (imaging drum) on the cartridge. Fingerprints on the imaging drum
can cause print-quality problems.
4. If there are any scratches, ngerprints, or other damage on the imaging drum, replace the toner
cartridge.
5. If the imaging drum does not appear to be damaged, rock the toner cartridge gently several times and
reinstall it. Print a few pages to see if the problem has resolved.
Check paper and the printing environment
Step one: Use paper that meets HP specications
Some print-quality problems arise from using paper that does not meet HP specications.
●
Always use a paper type and weight that this product supports.
●
Use paper that is of good quality and free of cuts, nicks, tears, spots, loose particles, dust, wrinkles,
voids, staples, and curled or bent edges.
●
Use paper that has not been previously printed on.
●
Use paper that does not contain metallic material, such as glitter.
●
Use paper that is designed for use in laser printers. Do not use paper that is designed only for use in
Inkjet printers.
●
Use paper that is not too rough. Using smoother paper generally results in better print quality.
Step two: Check the environment
The environment can directly aect print quality and is a common cause for print-quality or paper-feeding
issues. Try the following solutions:
●
Move the product away from drafty locations, such as open windows or doors, or air-conditioning vents.
●
Make sure the product is not exposed to temperatures or humidity outside of product specications.
●
Do not place the product in a conned space, such as a cabinet.
ENWW Improve print quality 65
Page 74

●
Place the product on a sturdy, level surface.
●
Remove anything that is blocking the vents on the product. The product requires good air ow on all
sides, including the top.
●
Protect the product from airborne debris, dust, steam, grease, or other elements that can leave residue
inside the product.
Check other print job settings
When printing from a software program, follow these steps to try to resolve the issue by adjusting other
print-driver settings.
Check the EconoMode settings
HP does not recommend the full-time use of EconoMode. If EconoMode is used full-time, the toner supply
might outlast the mechanical parts in the toner cartridge. If print quality begins to degrade and is no longer
acceptable, consider replacing the toner cartridge.
NOTE: This feature is available with the PCL 6 print driver for Windows. If you are not using that driver,
enable the feature by using the HP Embedded Web Server.
Follow these steps if the entire page is too dark or too light.
1. From the software program, select the Print option.
2. Select the product, and then click the Properties or Preferences button.
3. Click the Paper/Quality tab, and locate the Print Quality area.
4. If the entire page is too dark, use these settings:
●
Select the 600 dpi option.
●
Select the EconoMode check box to enable it.
If the entire page is too light, use these settings:
●
Select the FastRes 1200 option.
●
Clear the EconoMode check box to disable it.
5. Click the OK button to close the Document Properties dialog box. In the Print dialog, click the OK button
to print the job.
66 Chapter 6 Solve problems ENWW
Page 75

Try a dierent print driver
Try a dierent print driver when printing from a software program and the printed pages have unexpected
lines in graphics, missing text, missing graphics, incorrect formatting, or substituted fonts.
Download any of the following drivers from the HP Web site: www.hp.com/support/ljM201, www.hp.com/
support/ljM202.
HP PCL 6 driver
HP UPD PS driver
HP UPD PCL 5
●
Provided as the default driver on the product CD. This driver is automatically
installed unless a dierent one is selected.
●
Recommended for all Windows environments
●
Provides the overall best speed, print quality, and product-feature support for most
users
●
Developed to align with the Windows Graphic Device Interface (GDI) for the best
speed in Windows environments
●
Might not be fully compatible with third-party and custom software programs that
are based on PCL 5
●
Recommended for printing with Adobe® software programs or with other highly
graphics-intensive software programs
●
Provides support for printing from postscript emulation needs, or for postscript
ash font support
●
Recommended for general oice printing in Windows environments
●
Compatible with previous PCL versions and older HP LaserJet products
●
The best choice for printing from third-party or custom software programs
●
The best choice when operating with mixed environments, which require the
product to be set to PCL 5 (UNIX, Linux, mainframe)
●
Designed for use in corporate Windows environments to provide a single driver for
use with multiple product models
●
Preferred when printing to multiple product models from a mobile Windows
computer
HP UPD PCL 6
●
Recommended for printing in all Windows environments
●
Provides the overall best speed, print quality, and printer feature support for most
users
●
Developed to align with Windows Graphic Device Interface (GDI) for best speed in
Windows environments
●
Might not be fully compatible with third-party and custom software programs that
are based on PCL 5
ENWW Improve print quality 67
Page 76

Solve wired network problems
Check the following items to verify that the product is communicating with the network. Before beginning,
print a conguration page from the product control panel and locate the product IP address that is listed on
this page.
●
Poor physical connection
●
The computer is using the incorrect IP address for the product
●
The computer is unable to communicate with the product
●
The product is using incorrect link and duplex settings for the network
●
New software programs might be causing compatibility problems
●
The computer or workstation might be set up incorrectly
●
The product is disabled, or other network settings are incorrect
NOTE: HP does not support peer-to-peer networking, as the feature is a function of Microsoft operating
systems and not of the HP print drivers. For more information, go to Microsoft at www.microsoft.com.
Poor physical connection
1. Verify that the product is attached to the correct network port using a cable of the correct length.
2. Verify that cable connections are secure.
3. Look at the network port connection on the back of the product, and verify that the amber activity light
and the green link-status light are lit.
4. If the problem continues, try a dierent cable or port on the hub.
The computer is using the incorrect IP address for the product
1. Open the printer properties and click the Ports tab. Verify that the current IP address for the product is
selected. The product IP address is listed on the product conguration page.
2. If you installed the product using the HP standard TCP/IP port, select the box labeled Always print to
this printer, even if its IP address changes.
3. If you installed the product using a Microsoft standard TCP/IP port, use the hostname instead of the IP
address.
4. If the IP address is correct, delete the product and then add it again.
The computer is unable to communicate with the product
1. Test network communication by pinging the network.
a. Open a command-line prompt on your computer.
68 Chapter 6 Solve problems ENWW
Page 77

●
For Windows, click Start, click Run, type cmd, and then press Enter.
●
For OS X, go to Applications, then Utilities, and open Terminal.
b. Type ping followed by the IP address for your product.
c. If the window displays round-trip times, the network is working.
2. If the ping command failed, verify that the network hubs are on, and then verify that the network
settings, the product, and the computer are all congured for the same network.
The product is using incorrect link and duplex settings for the network
HP recommends leaving these settings in automatic mode (the default setting). If you change these settings,
you must also change them for your network.
New software programs might be causing compatibility problems
Verify that any new software programs are correctly installed and that they use the correct print driver.
The computer or workstation might be set up incorrectly
1. Check the network drivers, print drivers, and the network redirection settings.
2. Verify that the operating system is congured correctly.
The product is disabled, or other network settings are incorrect
1. Review the conguration page to check the status of the network protocol. Enable it if necessary.
2. Recongure the network settings if necessary.
ENWW Solve wired network problems 69
Page 78

Solve wireless network problems
●
Wireless connectivity checklist
●
The product does not print after the wireless conguration completes
●
The product does not print, and the computer has a third-party rewall installed
●
The wireless connection does not work after moving the wireless router or product
●
Cannot connect more computers to the wireless product
●
The wireless product loses communication when connected to a VPN
●
The network does not appear in the wireless networks list
●
The wireless network is not functioning
●
Perform a wireless network diagnostic test
●
Reduce interference on a wireless network
Wireless connectivity checklist
●
Verify that the network cable is not connected.
●
Verify that the product and the wireless router are turned on and have power. Also make sure that the
wireless radio in the product is turned on.
●
Verify that the service set identier (SSID) is correct. Print a conguration page to determine the SSID. If
you are not sure the SSID is correct, run the wireless setup again.
●
With secured networks, verify that the security information is correct. If the security information is
incorrect, run the wireless setup again.
●
If the wireless network is working correctly, try accessing other computers on the wireless network. If
the network has Internet access, try connecting to the Internet over a wireless connection.
●
Verify that the encryption method (AES or TKIP) is the same for the product as it is for the wireless
access point (on networks using WPA security).
●
Verify that the product is within the range of the wireless network. For most networks, the product must
be within 30 m (100 ft) of the wireless access point (wireless router).
●
Verify that obstacles do not block the wireless signal. Remove any large metal objects between the
access point and the product. Make sure poles, walls, or support columns containing metal or concrete
do not separate the product and wireless access point.
●
Verify that the product is located away from electronic devices that might interfere with the wireless
signal. Many devices can interfere with the wireless signal including motors, cordless phones, security
system cameras, other wireless networks, and some Bluetooth devices.
●
Verify that the print driver is installed on the computer.
●
Verify that you have selected the correct printer port.
●
Verify that the computer and product connect to the same wireless network.
●
For OS X, verify that the wireless router supports Bonjour.
70 Chapter 6 Solve problems ENWW
Page 79

The product does not print after the wireless conguration completes
1. Make sure that the product is turned on and in the ready state.
2. Turn o any third-party rewalls on your computer.
3. Make sure that the wireless network is working correctly.
4. Make sure that your computer is working correctly. If necessary, restart the computer.
5. Verify that you can open the product HP Embedded Web Server from a computer on the network.
The product does not print, and the computer has a third-party rewall installed
1. Update the rewall with the most recent update available from the manufacturer.
2. If programs request rewall access when you install the product or try to print, make sure you allow the
programs to run.
3. Temporarily turn o the rewall, and then install the wireless product on the computer. Enable the
rewall when you have completed the wireless installation.
The wireless connection does not work after moving the wireless router or product
1. Make sure that the router or product connects to the same network that your computer connects to.
2. Print a conguration page.
3. Compare the service set identier (SSID) on the conguration page to the SSID in the printer
conguration for the computer.
4. If the numbers are not the same, the devices are not connecting to the same network. Recongure the
wireless setup for the product.
Cannot connect more computers to the wireless product
1. Make sure that the other computers are within the wireless range and that no obstacles block the signal.
For most networks, the wireless range is within 30 m (100 ft) of the wireless access point.
2. Make sure that the product is turned on and in the ready state.
3. Turn o any third-party rewalls on your computer.
4. Make sure that the wireless network is working correctly.
5. Make sure that your computer is working correctly. If necessary, restart the computer.
The wireless product loses communication when connected to a VPN
●
Typically, you cannot connect to a VPN and other networks at the same time.
The network does not appear in the wireless networks list
●
Make sure the wireless router is turned on and has power.
●
The network might be hidden. However, you can still connect to a hidden network.
ENWW Solve wireless network problems 71
Page 80

The wireless network is not functioning
1. Make sure that the network cable is not connected.
2. To verify if the network has lost communication, try connecting other devices to the network.
3. Test network communication by pinging the network.
a. Open a command-line prompt on your computer.
●
For Windows, click Start, click Run, type cmd, and then press Enter.
●
For OS X, go to Applications, then Utilities, and open Terminal.
b. Type ping followed by the router IP address.
c. If the window displays round-trip times, the network is working.
4. Make sure that the router or product connects to the same network that the computer connects to.
a. Print a conguration page.
b. Compare the service set identier (SSID) on the conguration report to the SSID in the printer
conguration for the computer.
c. If the numbers are not the same, the devices are not connecting to the same network. Recongure
the wireless setup for the product.
Perform a wireless network diagnostic test
From the product control panel, you can run a diagnostic test that provides information about the wireless
network settings.
1. On the product control panel, press the OK button.
2. Open the Self Diagnostics menu.
3. Select Run Wireless Test to start the test. The product prints a test page that shows test results.
Reduce interference on a wireless network
The following tips can reduce interference in a wireless network:
●
Keep the wireless devices away from large metal objects, such as ling cabinets, and other
electromagnetic devices, such as microwaves and cordless telephones. These objects can disrupt radio
signals.
●
Keep the wireless devices away from large masonry structures and other building structures. These
objects can absorb radio waves and lower signal strength.
●
Position the wireless router in a central location in line of sight with the wireless products on the
network.
72 Chapter 6 Solve problems ENWW
Page 81

Index
A
accessories
ordering 20
part numbers 20
acoustic specications 4
AirPrint 36
B
bins, output
locating 5
browser requirements
HP embedded Web Server 39
C
cartridge
replacing 21
checklist
wireless connectivity 70
cleaning
paper path 64
control panel
locating 5
control panel buttons
locating 7
covers, locating 5
customer support
online 52
D
defaults, restoring 53
dimensions, product 2
double-sided printing
Mac 32
Windows 29
drivers
paper types 12
duplex printing
Mac 32
duplex printing (double-sided)
settings (Windows) 28
Windows 29
duplexing
manually (Mac) 32
manually (Windows) 29
E
EconoMode setting 47, 66
economy settings 47
electrical specications 4
Embedded Web Server
changing password 46
opening 46
Embedded Web Server (EWS)
features 39
Explorer, versions supported
HP Embedded Web Server 39
F
factory-set defaults, restoring 53
H
HP Customer Care 52
HP Device Toolbox, using 39
HP Embedded Web Server
changing password 46
opening 46
HP Embedded Web Server (EWS)
features 39
HP ePrint 35
HP ePrint software 35
HP EWS, using 39
HP Utility 41
HP Utility for Mac
Bonjour 41
features 41
HP Utility, Mac 41
HP Web Jetadmin 45
HP Wireless Direct Printing 34
I
interface ports
locating 6
Internet Explorer, versions supported
HP Embedded Web Server 39
J
jams
causes of 57
locating 56
Jetadmin, HP Web 45
L
labels
printing (Windows) 31
M
Macintosh
HP Utility 41
manual duplex
Mac 32
Windows 29
media
supported sizes 10
multiple pages per sheet
printing (Mac) 33
printing (Windows) 30
N
Netscape Navigator, versions
supported
HP embedded Web Server 39
network
password, changing 46
password, setting 46
network installation 38
network port
locating 6
ENWW Index 73
Page 82

networks
HP Web Jetadmin 45
installing the product 38
O
on/o button, locating 5
online support 52
ordering
supplies and accessories 20
output bin
locating 5
P
pages per minute 2
pages per sheet
selecting (Mac) 33
selecting (Windows) 30
paper
jams 57
ordering 20
selecting 65
supported sizes 10
supported types 12
paper pickup problems
solving 55
paper type
selecting (Windows) 31
paper types
selecting (Mac) 33
part numbers
supplies 20
power
consumption 4
power connection
locating 6
power switch, locating 5
power-down delay
setting 47
print on both sides
Mac 32
manually, Windows 29
Windows 29
printing on both sides
settings (Windows) 28
product and serial number label
locating 6
R
replacing toner cartridge 21
restoring factory-set defaults 53
S
security lock slot
locating 6
serial number label
locating 6
settings
factory-set defaults, restoring
53
sleep delay
disabling 47
enabling 47
software
HP Utility 41
special paper
printing (Windows) 31
specications
electrical and acoustic 4
status
HP Utility, Mac 41
supplies
low threshold settings 54
ordering 20
part numbers 20
replacing toner cartridge 21
status, viewing with HP Utility for
Mac 41
using when low 54
supplies status
checking 64
supplies status page
printing 64
support
online 52
supported media 10
supported operating systems 2
system requirements
HP Embedded Web Server 39
T
technical support
online 52
toner
amount remaining 64
toner cartridge
checking for damage 65
low threshold settings 54
replacing 21
using when low 54
transparencies
printing (Windows) 31
Tray 1
loading 13
orientation 13
Tray 2
loading 15
orientation 17
trays
included 2
locating 5
troubleshooting
jams 57
network problems 68
wired network 68
wireless network 70
two-sided printing
settings (Windows) 28
U
USB port
locating 6
W
Web browser requirements
HP Embedded Web Server 39
Web sites
customer support 52
HP Web Jetadmin, downloading
45
weight, product 2
wireless network
troubleshooting 70
wireless network interference 72
74 Index ENWW
 Loading...