

Page 1

HP P JJornada
420 0 PPalm-size e PPC
Users s GGuide
Part number F1255-90002
Printed in Singapore
Edition 1
Page 2

ii Hewlett-Packard Jornada 420 Palm-size PC
Copyright t nnotice
This manual and any examples contained herein are provided “as
is” and are subject to change without notice. Hewlett-Packard
Company makes no warranty of any kind with regard to this
manual, including, but not limited to, the implied warranties of
merchantability and fitness for a particular purpose. HewlettPackard Co. shall not be liable for any errors or for incidental or
consequential damages in connection with the furnishing,
performance, or use of this manual or the examples herein.
The above disclaimers and limitations shall not apply to
consumer transactions in Australia and the United Kingdom and
shall not affect the statutory rights of consumers.
© Hewlett-Packard Co. 1999. All rights reserved. Reproduction,
adaptation, or translation of this manual is prohibited without
prior written permission of Hewlett-Packard Company, except as
allowed under the copyright laws.
The programs that control this product are copyrighted and all
rights are reserved. Reproduction, adaptation, or translation of
those programs without prior written permission of HewlettPackard Co. is also prohibited.
Microsoft, MS, ActiveSync, Active Desktop, Outlook, Windows,
Windows NT, and the Windows logo are either registered
trademarks or trademarks of Microsoft Corporation in the United
States and/or other countries. Microsoft products are licensed to
OEMs by Microsoft Licensing, Inc., a wholly owned subsidiary of
Microsoft Corporation.
CIC and Jot are registered trademarks or trademarks of
Communication Intelligence Corporation.
BSQUARE and bTask are either registered trademarks or
trademarks of BSQUARE Corporation. OmniSolve is copyright
1998-99 LandWare Inc. with all rights reserved. LandWare is a
trademark of LandWare, Inc.
EZOS, EZOS EzExplorer, EzExplorer are either registered
trademarks or trademarks of EZOS S.A. in Belgium and/or other
countries.
Hewlett-Packard Singapore (Pte) Ltd.
Asia Pacific Personal Computer Division
452 Alexandra Road
Singapore 119961
Page 3
Table e oof f CContents
..........
...........
............
.....
.............
........
........
.....
Table of Contents |
iii
Chapter
Chapter
Chapter 2 | Setting up
Chapter 2 | Setting up
Chapter 3 | Learning the basics
Chapter 3 | Learning the basics
Chapter 4 | Connecting to a desktop PC
Chapter 4 | Connecting to a desktop PC
Chapter 5 | Sending and receiving e-mail
Chapter 5 | Sending and receiving e-mail
1 | Welcome
1 | Welcome
Taking inventory ............................................................1
Using the manual ...........................................................2
Using HP Jornada’s built-in programs..........................3
Finding more information ..............................................5
Registering the HP Jornada ................................
Understanding conventions ...........................................6
Identifying the hardware features ................................8
Setting up for the first time .........................................11
Managing battery power ..............................................16
Caring for the HP Jornada................................
Turning the HP Jornada 420 on and off .....................21
Locking the hardware buttons................................
Using the hard icons.....................................................22
Using the Active Desktop................................
Using the Start Menu and taskbar..............................24
Using the command bar ...............................................25
Typing, writing, and drawing on the HP Jornada......25
Finding files and documents................................
Finding information .....................................................29
Viewing information.....................................................29
Adjusting settings.........................................................30
Using HP settings.........................................................31
Learning the shortcuts.................................................36
Connecting for the first time................................
Connecting and disconnecting ................................
Connecting by infrared.................................................47
Connecting to another PC............................................48
Browsing the HP Jornada desktop ..............................49
Synchronizing data.......................................................50
Using channels..............................................................52
Transferring files..........................................................54
Printing .........................................................................54
Synchronizing messages ..............................................55
Using Windows CE Inbox Transfer.............................56
...........................................................
.........................................................
................................
................................
..............................
1
6
7
20
21
22
23
28
39
39
46
55
Page 4
iv Hewlett-Packard Jornada 420 Palm-size PC
............
.....................
.......................
.......
..........................
....
.......
...............
.......
.......
........
................
....
..........
................................
Sending and receiving messages using a dial-up
connection .....................................................................57
Setting up an Ethernet connection..............................60
Using Inbox...................................................................61
Sending and receiving CompuServe e-mail ................65
Chapter 6 | Staying Organized
Chapter 6 | Staying Organized
Scheduling meetings and appointments
Tracking friends and colleagues ..................................70
Keeping a to-do list................................
Recording voice memos ................................................72
Chapter 7 | Getting down to business
Chapter 7 | Getting down to business
Creating notes and drawings................................
Using bTask ..................................................................82
Using OmniSolve ................................
Backing up and restoring data ................................
Customizing the HP Jornada................................
Chapter 8 | Troubleshooting
Chapter 8 | Troubleshooting
Troubleshooting basic problems ..................................95
Troubleshooting remote connections...........................97
Troubleshooting viewing problems..............................98
Resetting ................................................................
Chapter 9 | Warranty, support, and service
Chapter 9 | Warranty, support, and service
Appendix A | Jot Character Recognizer
Appendix A | Jot Character Recognizer
Areas of the Input Panel ............................................110
Symbols ................................................................
Help Writing Characters............................................112
Options ................................................................
Natural Character Set................................
Simplified Uppercase Character Set .........................119
Appendix
Appendix
PC devices
PC devices
Index
Index
HP software product license agreement
HP software product license agreement
B | Migrating data from nonWindows CE HP handheld
B | Migrating data from nonWindows CE HP handheld
................................................................
Translating appointment data...................................129
Translating Phone Book data ....................................130
................................................................
Use
Copies and adaptations ..............................................139
Ownership...................................................................140
Transfer of rights in software ....................................140
HP shrink-wrap license terms ...................................141
................................
....................................
................................
............................
................................
...............................
...............................................139
67
68
71
77
77
83
83
86
95
99
103
109
111
112
112
129
133
139
Page 5

Chapter 1 | Welcome | 1
1 1 | | WWelcome
The Hewlett-Packard Jornada 420 Palm-size PC (P/PC) is a
mobile computer running the Microsoft® Windows® CE
operating system. It allows you to store your business and
personal information, manage your appointments and contacts,
and check e-mail while on the road. It then allows you to upload
updated information to your desktop or notebook PC after
returning to the office.
In addition to Microsoft Windows products, the HP Jornada has
built-in programs from Hewlett-Packard, BSQUARE™, and
LandWare that help you manage the system, manage tasks, and
perform financial calculations. It also allows you to load
programs from the HP Jornada compact disk.
This chapter includes the following:
·
An inventory list of the HP Jornada package
·
A description of the contents of this User’s Guide
·
An overview of built-in programs
Taking g iinventory
The HP Jornada package includes the following items:
·
HP Jornada 420 and stylus
·
HP Jornada battery
·
AC adapter, DC cable, and power cable
·
Sync cable
·
Cradle
·
HP Jornada Quick Start Card—A guide to getting started
quickly with the HP Jornada
Page 6

2 Hewlett-Packard Jornada 420 Palm-siz e PC
·
Desktop Software for Microsoft Windows CE compact disk—
Contains Microsoft Windows CE Services, plus software and
system updates for both the HP Jornada and desktop PC
·
HP Jornada compact disk—Programs that can be loaded onto
the HP Jornada
·
Documentation pack—This User’s Guide and the Regulatory
Information Leaflet
·
HP Jornada Accessory Guide—Information on accessories and
products that can help you get the most from the HP Jornada
Using g tthe e mmanual
This User’s Guide is designed to help you use your HP Jornada
quickly and easily. Although great care has been taken to ensure
the accuracy of procedures and screen art, some actual screens
may be different than the ones that appear in this User’s Guide.
This guide includes the following chapters:
·
Chapter 1, Welcome—Contains an overview of the HP
Jornada’s built-in applications, where to find more
information, and conventions used in this guide.
·
Chapter 2, Setting up—Explains the hardware features, how
to set up and care for the HP Jornada, and how to manage the
battery power.
·
Chapter 3, Learning the basics—Describes how to turn the HP
Jornada on and off, reconfigure the hard icons, work with the
Start menu and taskbar, and adjust settings. Also includes
tips and shortcuts to help you work faster.
·
Chapter 4, Connecting to a desktop PC —Explains how to
install Windows CE Services on your desktop or notebook PC,
how to transfer files, how to synchronize data, e-mail
messages, and channels, and how to print.
·
Chapter 5, Sending and receiving e-mail—Describes how to
use Inbox.
·
Chapter 6, Staying organized—Explains how to use the HP
Jornada to manage your calendar and address book and
describes to-do lists, alarms, and reminders.
·
Chapter 7, Getting down to business—Describes
Microsoft Note Taker ®, bTask from BSQUARE, and
Page 7

Chapter 1 | Welcome | 3
OmniSolve from LandWare. Also explains how to back up and
restore data, and how to customize the HP Jornada.
·
Chapter 8, Troubleshooting—Contains tips and procedures to
follow when things do not work quite as you expected, and
explains how to reset the HP Jornada.
·
Chapter 9, Warranty, support, and service—Explains the
warranty and how to get service.
·
Appendix A, Jot Character Recognizer—Describes how to use
the Jot character recognizer, and shows how and where to
draw characters on the screen for each of the two character
sets: the Natural Character Set and the Simplified Uppercase
Character Set.
·
Appendix B, Migrating data from non–Windows CE HP
handheld PC devices—Describes how to use the HP PIM
Translation Utility to transfer PIM data from a non–Windows
CE HP organizer or Palmtop PC to the HP Jornada.
Using g HHP P JJornadas s bbuilt-in n pprograms
This section lists the HP Jornada’s built-in programs. These
programs are installed in ROM and cannot be erased or removed.
·
Calendar—Keeps track of important dates and events, and
helps manage your schedule.
·
Tasks—Keeps track of to-do lists. Allows you to set an alarm
or a reminder.
·
Contacts—Stores names, addresses, and telephone numbers.
When you update your contacts list, you can synchronize it
with your desktop PC, so that contacts are always up to date.
·
Inbox—Sends and receives e-mail messages. Also
synchronizes with Microsoft Outlook or Microsoft Exchange on
your desktop PC.
·
EZOS EzExplorer—Finds files and documents on the P/PC.
·
bTask from BSQUARE—Allows you to switch between
applications or view the ones currently running. It also allows
you to close applications with a single step.
·
Note Taker—Allows you to jot quick notes or to create
sketches while in a meeting.
Page 8

4 Hewlett-Packard Jornada 420 Palm-siz e PC
·
Voice Recorder—Records reminders or vital information when
there is no time to type. The dedicated Record button allows
you to record messages with one hand.
·
Channels—Downloads Web information to the HP Jornada so
that it can be viewed offline.
·
Connections—Sets up connections for communications with
other computers or the Internet.
·
ActiveSync™—Synchronizes the HP Jornada with your
desktop or notebook PC over a network or dial-up connection
from a remote location.
·
PC Link—Establishes the connection between the HP Jornada
and desktop PC partner.
·
Calculator—Performs simple calculations in an on-screen
calculator. Allows you to copy the results to any open
document.
·
OmniSolve from LandWare—Performs complex mathematical
and business calculations.
·
HP settings—Adjusts and stores up to three settings for the
display, sets a password, and displays memory usage.
·
HP backup—Backs up Contacts, Calendar, and Tasks data or
your entire P/PC to a CompactFlash Memory Card.
·
Find—Searches for appointments, channel items, contacts,
mail messages, Note Taker notes, tasks, or voice recordings.
·
Help—Gives you access to online help.
·
Solitaire—Passes the time at the airport, on the train, or
during a not-so-interesting meeting or lecture.
·
Settings—Adjusts settings for buttons, communications, the
stylus, and more.
Page 9

Chapter 1 | Welcome | 5
Finding g mmore e iinformation
The following table is a guide to the different types of
information available to help you use the HP Jornada. Although
this book introduces the programs on your P/PC, it does not
describe them completely. For more information, see the
comprehensive online Help for each program.
Information Source
Programs This User’s Guide.
–or–
Synchronizing and
exchanging files
with a desktop PC
(including
information on
connecting while
traveling)
Toolbar buttons and
dialog box items
Troubleshooting
information on
connections
Online Help on your P/PC. Tap
and then
This User’s Guide.
–or–
Online Help on your P/PC. Tap
and then
–or–
Windows CE Services online Help on
your desktop PC. In the Mobile
Devices window, click
click
Windows CE Services Help
Topics
Tap and hold on a toolbar button or
dialog box item to see its name or a
short description. Drag off the toolbar
button or item before lifting to avoid
activating it.
Windows CE Services online Help on
your desktop computer. In the Mobile
Devices window, click
Windows CE Services Help
Topics
.
.
Help
Help
.
.
Help
Help
Start
Start
, and then
, then
Up-to-date
information on
Windows CE–based
devices
http://www.microsoft.com/windowsce.
Page 10

6 Hewlett-Packard Jornada 420 Palm-siz e PC
Information on this
release of Windows
CE
The complete text of this User’s Guide is also available on the
Hewlett-Packard Web site at www.hp.com/jornada. You can
download the User’s Guide to your desktop PC and view it using
the Adobe™ Acrobat Reader, available from the Adobe Web site
at www.adobe.com.
The Release Notes on your desktop
computer. Click
Programs, Microsoft Windows CE
Services
Notes
, and then click
.
Start
, point to
Release
Registering g tthe e HHP P JJornada
To register the HP Jornada, go to www.hp.com/jornada.
Understanding g cconventions
This User’s Guide includes visual cues to help you find tips and
warnings.
A shortcut, another way to do
something, or expanded
information about the topic.
Caution or warning information
about the topic. This is important
information that should be
observed to prevent loss of data or
damage to the HP Jornada.
Page 11

2 2 | | SSetting g uup
This chapter includes instructions to help you:
·
identify hardware features
·
set up the HP Jornada for the first time
·
manage battery power
·
care for the HP Jornada
Chapter 2 | Setting up | 7
Page 12
8 Hewlett-Packard Jornada 420 Palm-siz e PC
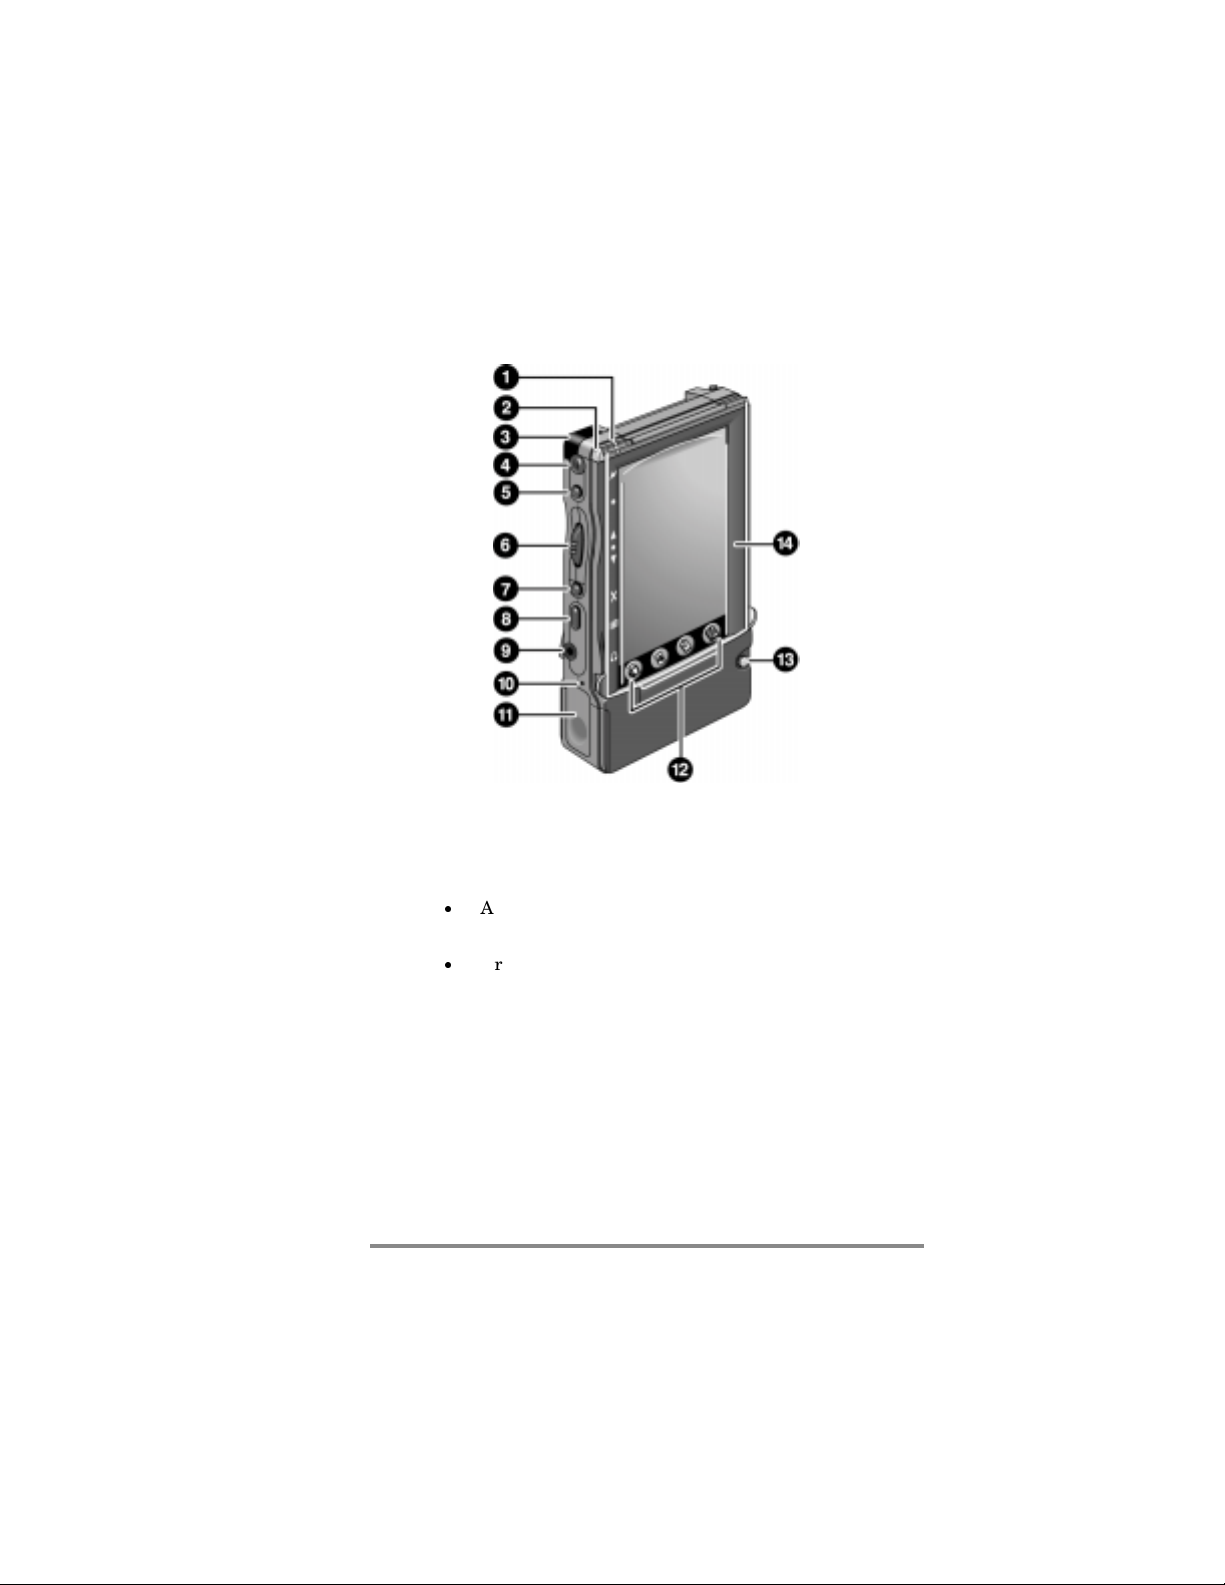
Identifying g tthe e hhardware e ffeatures
The views below introduce you to the connectors, ports, and other
features of the HP Jornada.
Front view of the HP Jornada
1. AC Charging LED—When connected to AC power, this
LED glows with one of two colors:
·
Amber—Indicates that the battery is charging
(connected to AC power).
·
Green—Indicates that the battery is fully charged.
2. Notification LED—Blinks red when you have an
appointment. Glows red when you are recording.
3. Infrared port (IrDA–compliant transceiver)— Enables
you to send and receive files by infrared beam between
P/PCs, between the P/PC and a Handheld PC (H/PC), or
between the P/PC and a desktop PC. (For more
information, see “Connecting by infrared” on page 47.)
4. Microphone—Allows you to record voice memos.
Page 13

Chapter 2 | Setting up | 9
5. Record button—Starts the Voice Recorder. When held,
turns on the P/PC when it is off, and records until the
button is released.
6. Action button—Pressing this button selects the
highlighted item. Rocking this button allows you to
scroll (also referred to as Up/Down control).
7. Exit button—Exits dialog windows and menus.
8. Start button—Displays the
menu. Also turns on
Start
the P/PC when it is off, and, if held, brings up
HP settings.
9. Earphone jack—Accepts a plug for standard earphones.
10. Battery door release—When pressed with the stylus,
releases the battery door.
11. Battery door—Slides down when the battery door
release is pressed. Open only when replacing the
battery.
12. Hard icon panel—Allows one-touch access to four
applications. By default, the applications are Contacts,
Calendar, Tasks, and OmniSolve, but these can be
reconfigured. To do this, tap
menu, tap
Buttons
, tap the
Settings
Program
from the
Start
tab, and then
follow the directions on the control panel.
13. Power on/off button—Press to power on and off.
14. Display cover—Open the display cover when you want to
tap the screen.
Page 14
10 Hewlett-Packard Jornada 420 Palm-size PC
Back view of the HP Jornada
15. CompactFlash Type I and II Card slot—Enables you to
add memory or use accessories on CompactFlash Cards.
(For a list of recommended accessory cards, go to the
Hewlett-Packard Web site at www.hp.com/jornada.)
16. Stylus—Use the stylus as a mouse substitute. For
example, tap to select a button or menu item, double-tap
to open an application, drag the stylus across words or
items to select them.
17. Reset button—Restarts the HP Jornada. For more
information about soft and full resets, see “Resetting” on
page 99.
18. Audio speaker—Lets you listen to system sounds or
voice memos.
19. P/PC connector —Connects the P/PC to the cradle.
Page 15

Chapter 2 | Setting up | 11
Setting g uup p ffor r tthe e ffirst tt time
As part of the setup process, you:
·
install the battery
·
connect the AC adapter
·
start the HP Jornada
·
complete the Windows CE Welcome Wizard
Follow the steps described below in the order they are
presented.
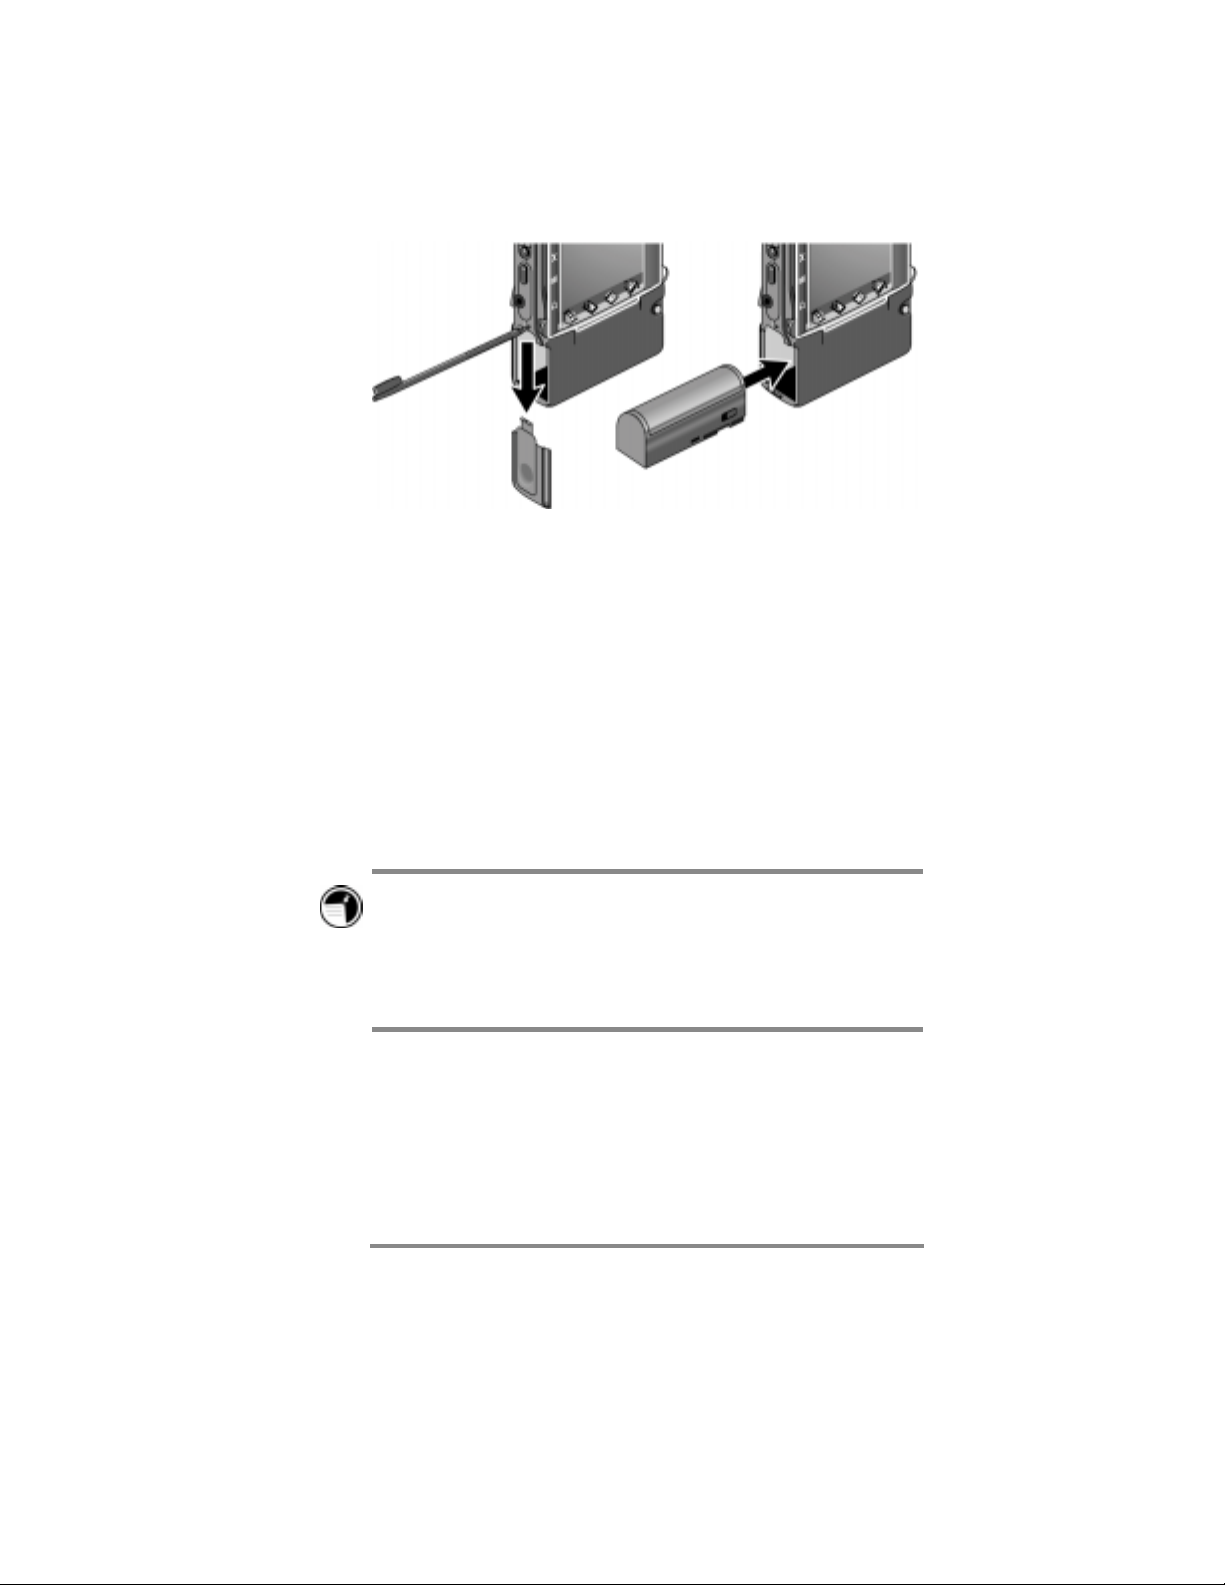
Installing the battery
The battery powers the HP Jornada when it is not connected to
AC power. The battery fits into a compartment on the bottom of
the HP Jornada, as shown in the diagram. The switch on the
battery does not have any electrical function.
When the battery is drained, you can flip the switch so that
the red dot shows to indicate this battery needs to be
recharged. This can be convenient if you have more batteries.
Page 16
12 Hewlett-Packard Jornada 420 Palm-size PC
This view of the left side of the HP Jornada shows how to
insert the battery.
To install the battery
1. Release the battery door by pushing the stylus into the
small hole above the door. Then, slide the door down and
off.
2. Slide the battery into the battery slot. If the battery does
not slide in easily, check the battery orientation and try
again. If you are putting the battery in correctly, you do
not need to force it.
3. Replace the battery door, and slide it up until it snaps
shut.
After you install the battery, the HP Jornada turns on
automatically. Before using your P/PC on battery power,
though, you should charge the battery by connecting the AC
adapter. You can use the P/PC while charging. Charging the
battery takes approximately 3 to 4 hours. For information on
connecting the AC adapter, read the next sections.
Page 17
Chapter 2 | Setting up | 13
The rechargeable backup battery is a permanent part of the
HP Jornada, so you do not need to install or replace it.
The backup battery is charged automatically when the P/PC is
connected to AC power.
Make sure you connect to AC power to charge as soon as you
see a backup battery low warning.
Do NOT replace your main battery when the backup battery is
low.
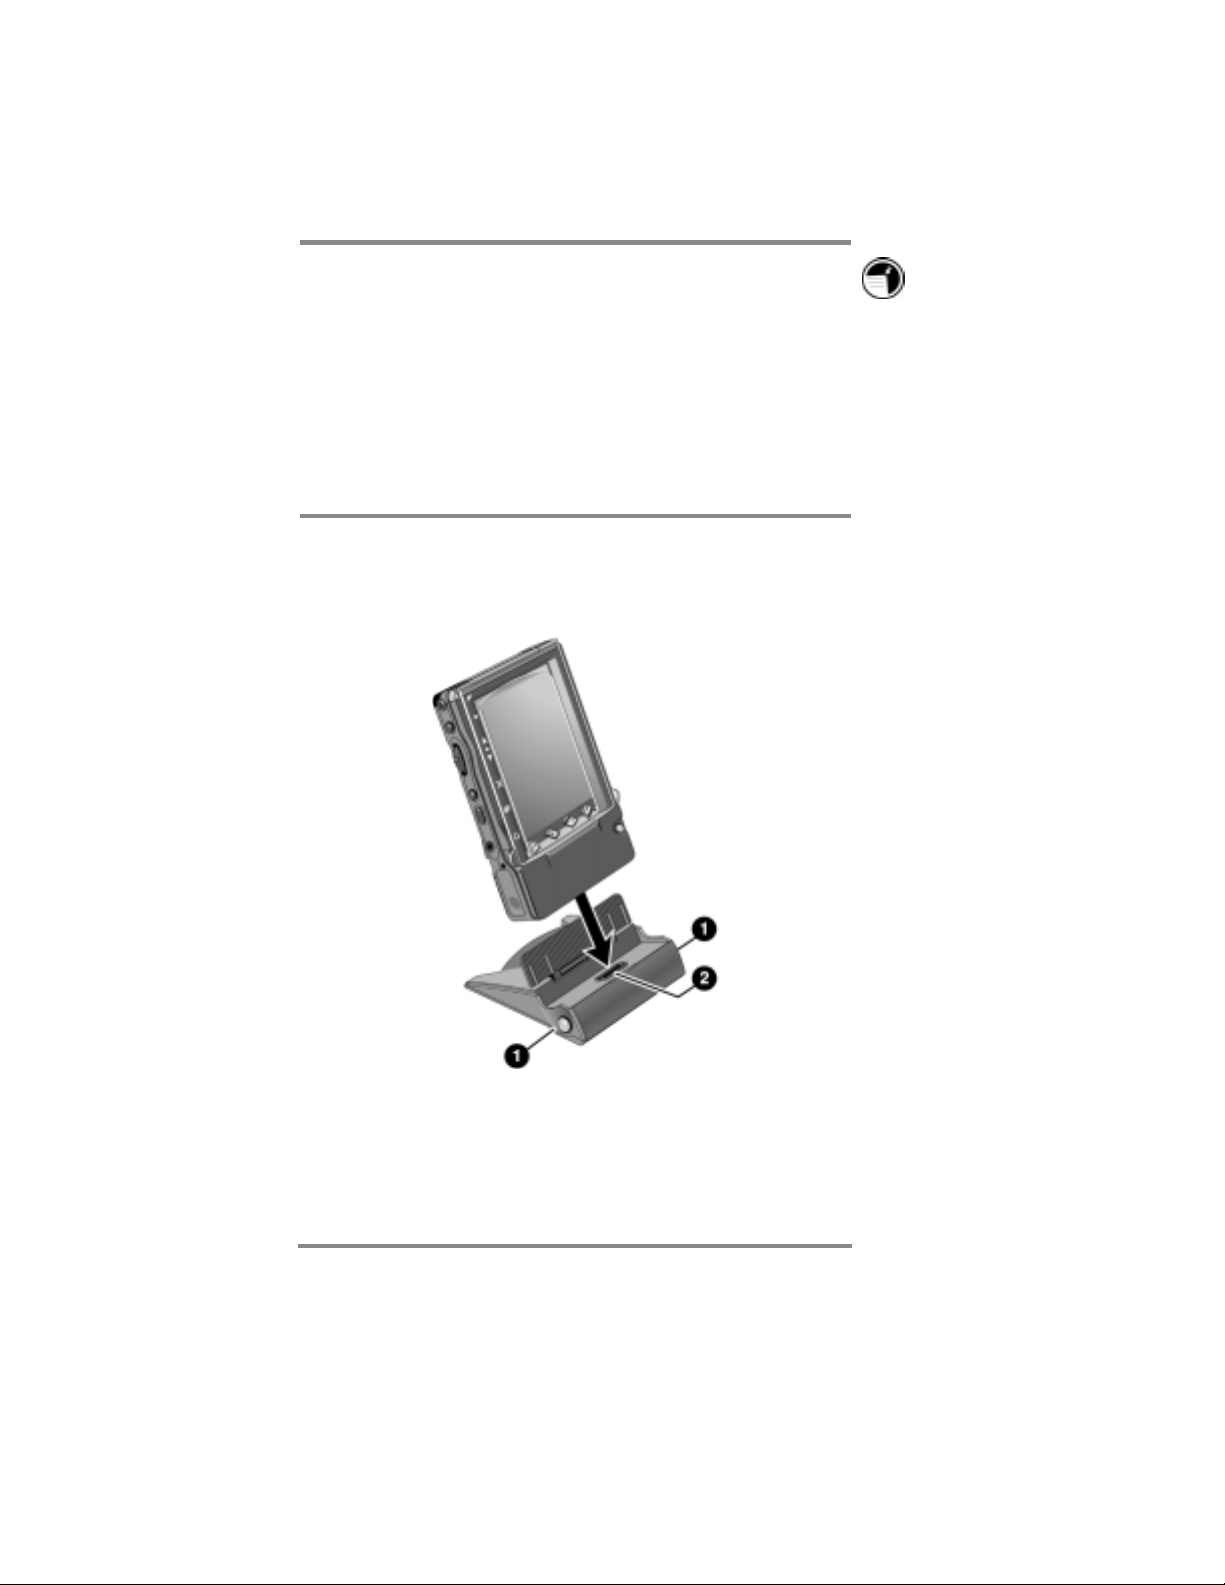
Using the cradle
The views below show the features of the cradle and how the
P/PC docks with it.
1. Release buttons—To release the HP Jornada from the cradle,
press the buttons on both sides of the cradle.
2. Connector to the P/PC—Connects the cradle to the P/PC.
Page 18
14 Hewlett-Packard Jornada 420 Palm-size PC
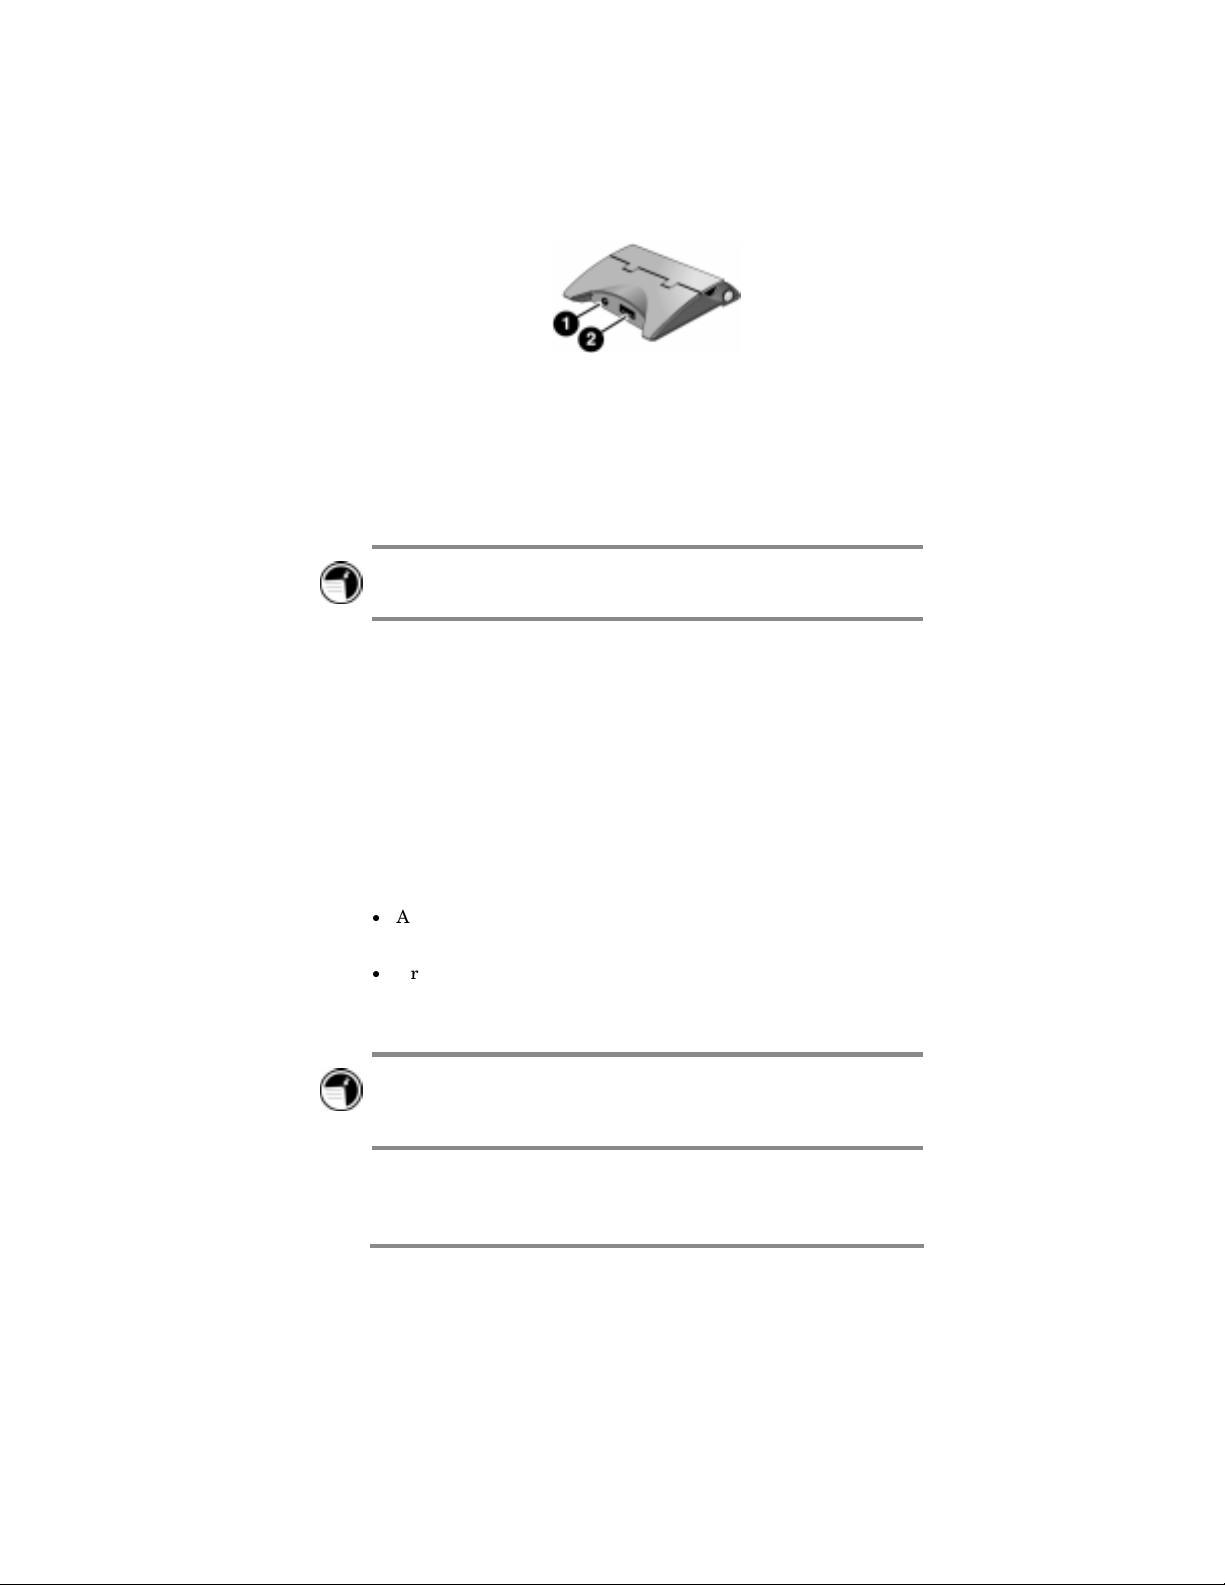
Back view of the cradle.
1. DC jack—Connects the P/PC to AC power, which also charges
both the main and backup batteries.
2. Serial port (RS-232C)—Connects the HP Jornada to your
desktop PC to transfer files or to synchronize data. (For more
information, see “Connecting for the first time” on page 39.)
The HP Jornada must be in its cradle in order to connect to an
AC adapter or to a PC.
Connecting the AC adapter
You can operate the HP Jornada on AC power using the AC
adapter and cradle. The AC adapter accepts voltages from 100 V
to 240 V, so you can use it anywhere in the world. However, you
may need a plug adapter to accommodate different electrical
outlets.
When the HP Jornada is connected to AC power, the main
battery and backup battery are charged automatically. The
AC Charging LED indicates the charging status of the main
battery:
·
Amber—Indicates that the battery is charging (connected to
AC power).
·
Green—Indicates that the battery is fully charged.
The AC Charging LED is illuminated only if the P/PC is
connected to AC power.
A dialog box pops up when the backup battery power is low.
Connect to AC power immediately to recharge the backup
battery.
Page 19
Chapter 2 | Setting up | 15
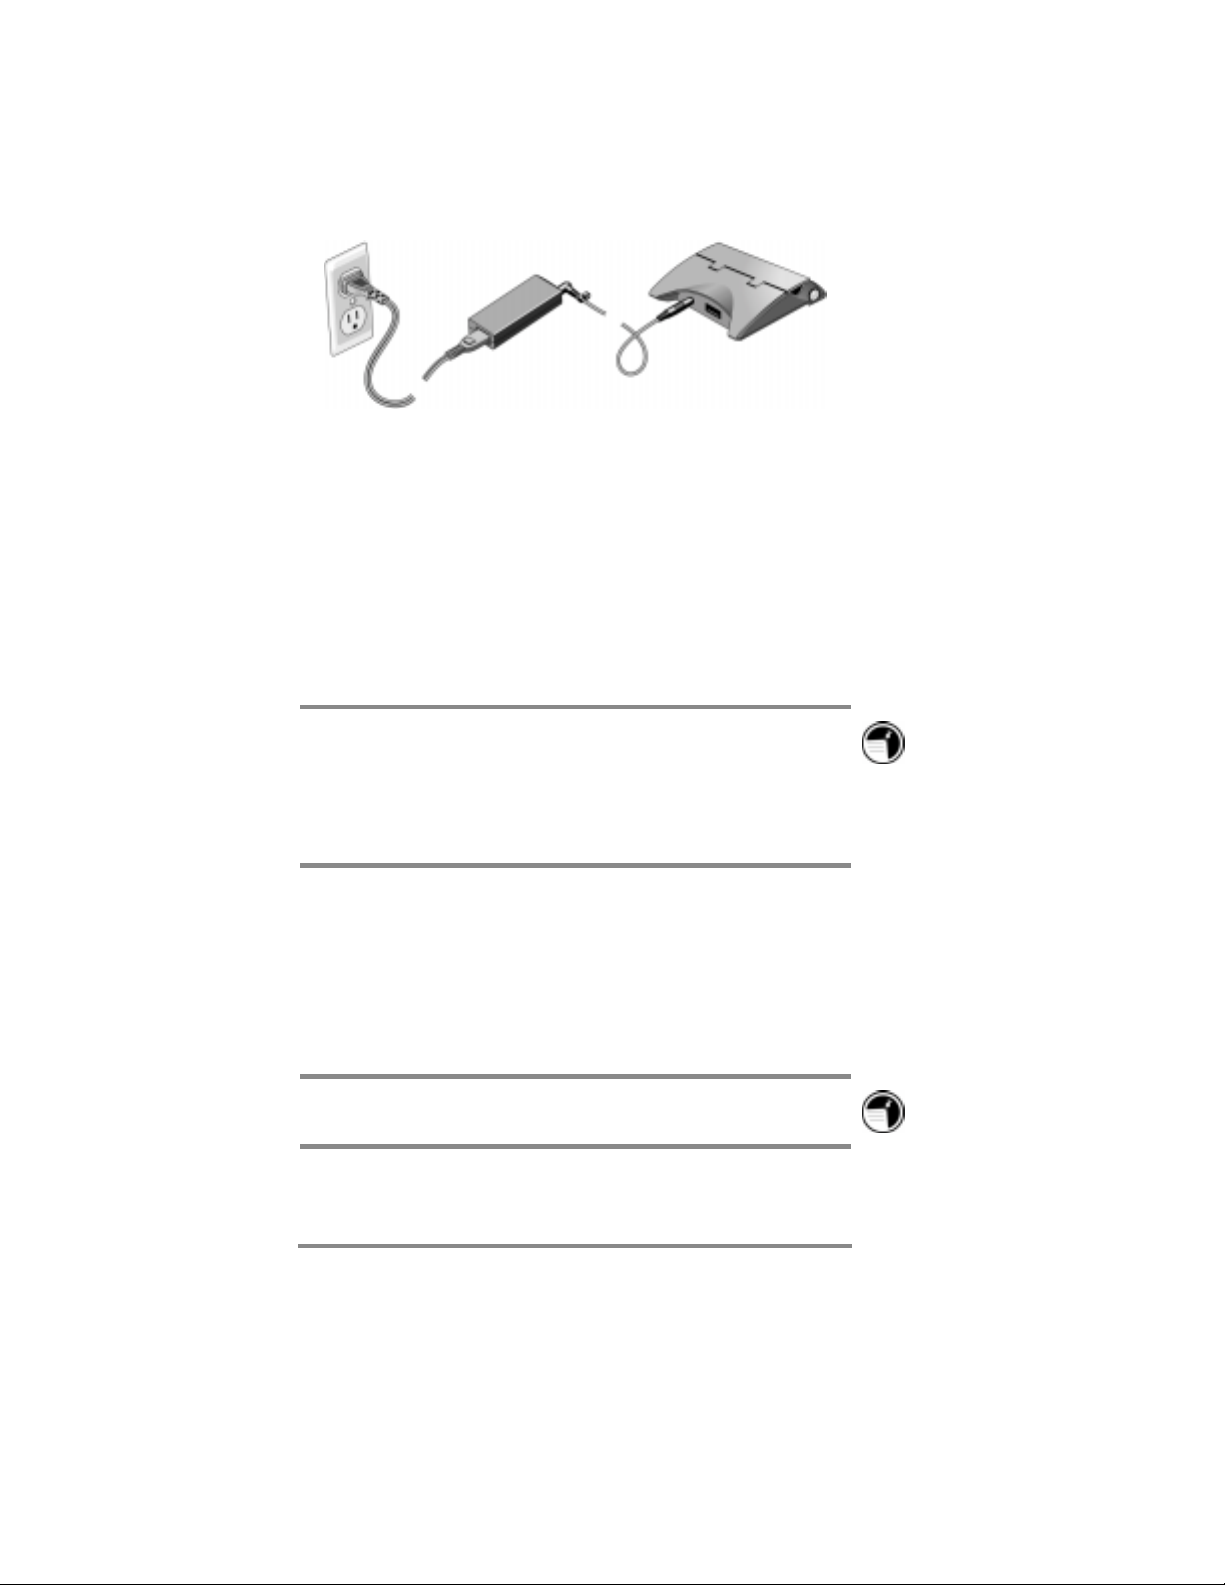
The AC adapter includes three parts: the power cable, the
adapter, and the DC cable.
To connect to AC power
1. Plug the DC cable into the back of the cradle.
2. Connect the DC cable to the AC adapter.
3. Connect the power cable to the AC adapter.
4. Plug the power cable into an AC power outlet.
5. Put the HP Jornada into its cradle.
Use the AC adapter to plug the HP Jornada into external
power whenever possible, especially when connecting to a
desktop PC or other peripheral, or when letting the LED
indicator flash for extended time periods. For more
information, see “Managing battery power” later in this
chapter.
Running the Welcome Wizard
After you install the battery, the HP Jornada turns on
automatically. At startup, the Hewlett-Packard welcome screen
appears. Then, after a few moments, the Windows CE Welcome
Wizard begins. The Welcome Wizard leads you through
calibrating the stylus, setting your home city, and then setting
the World Clock.
The display cover must be open when you tap the screen.
Page 20

16 Hewlett-Packard Jornada 420 Palm-size PC
Managing g bbattery y ppower
Because the data and files you save on the HP Jornada are
stored in RAM, it is extremely important that you maintain a
continuous power supply to the HP Jornada at all times. If the
HP Jornada runs out of power, all information you have entered
is lost. Although the Windows CE operating system and
programs are stored in ROM and cannot be erased, any custom
settings and programs you have added are lost.
When taking out the battery, keep in mind that when the
P/PC is without power, data retention is guaranteed for only 1
minute. You do not need to take out the main battery except to
replace it with a spare battery (F1287A).
The HP Jornada uses a rechargeable lithium-ion battery, which
supplies power whenever the P/PC is not connected to AC power.
Under normal operating conditions, the battery should last for up
to 6 hours of continuous use without recharging. Battery life
varies, however, depending on how you use the P/PC.
You should respond immediately when a message warning of
low battery power is displayed. When the battery power is low,
simply connect the HP Jornada to AC power to recharge.
Using the Power control panel
The Power control panel displays information about the current
state of your battery and allows you to control options that can
conserve battery power.
To open the Power control panel
1. Tap the
Power
menu, read “Using the Start Menu and taskbar” on page
24.
–or–
If the power plug icon is on the taskbar, double-tap it.
2. Tap the
button, tap
Start
. If you are not familiar with using the Start
Status, Power
Settings
, or
Dimming
, and then tap
tab.
Page 21
Chapter 2 | Setting up | 17
3. Select your preferences. For more information, read the
following paragraphs, or tap the
Help
button.
4. Tap OK to save the changes and exit, or tap the
button (X in the upper right corner) to abandon the
changes.
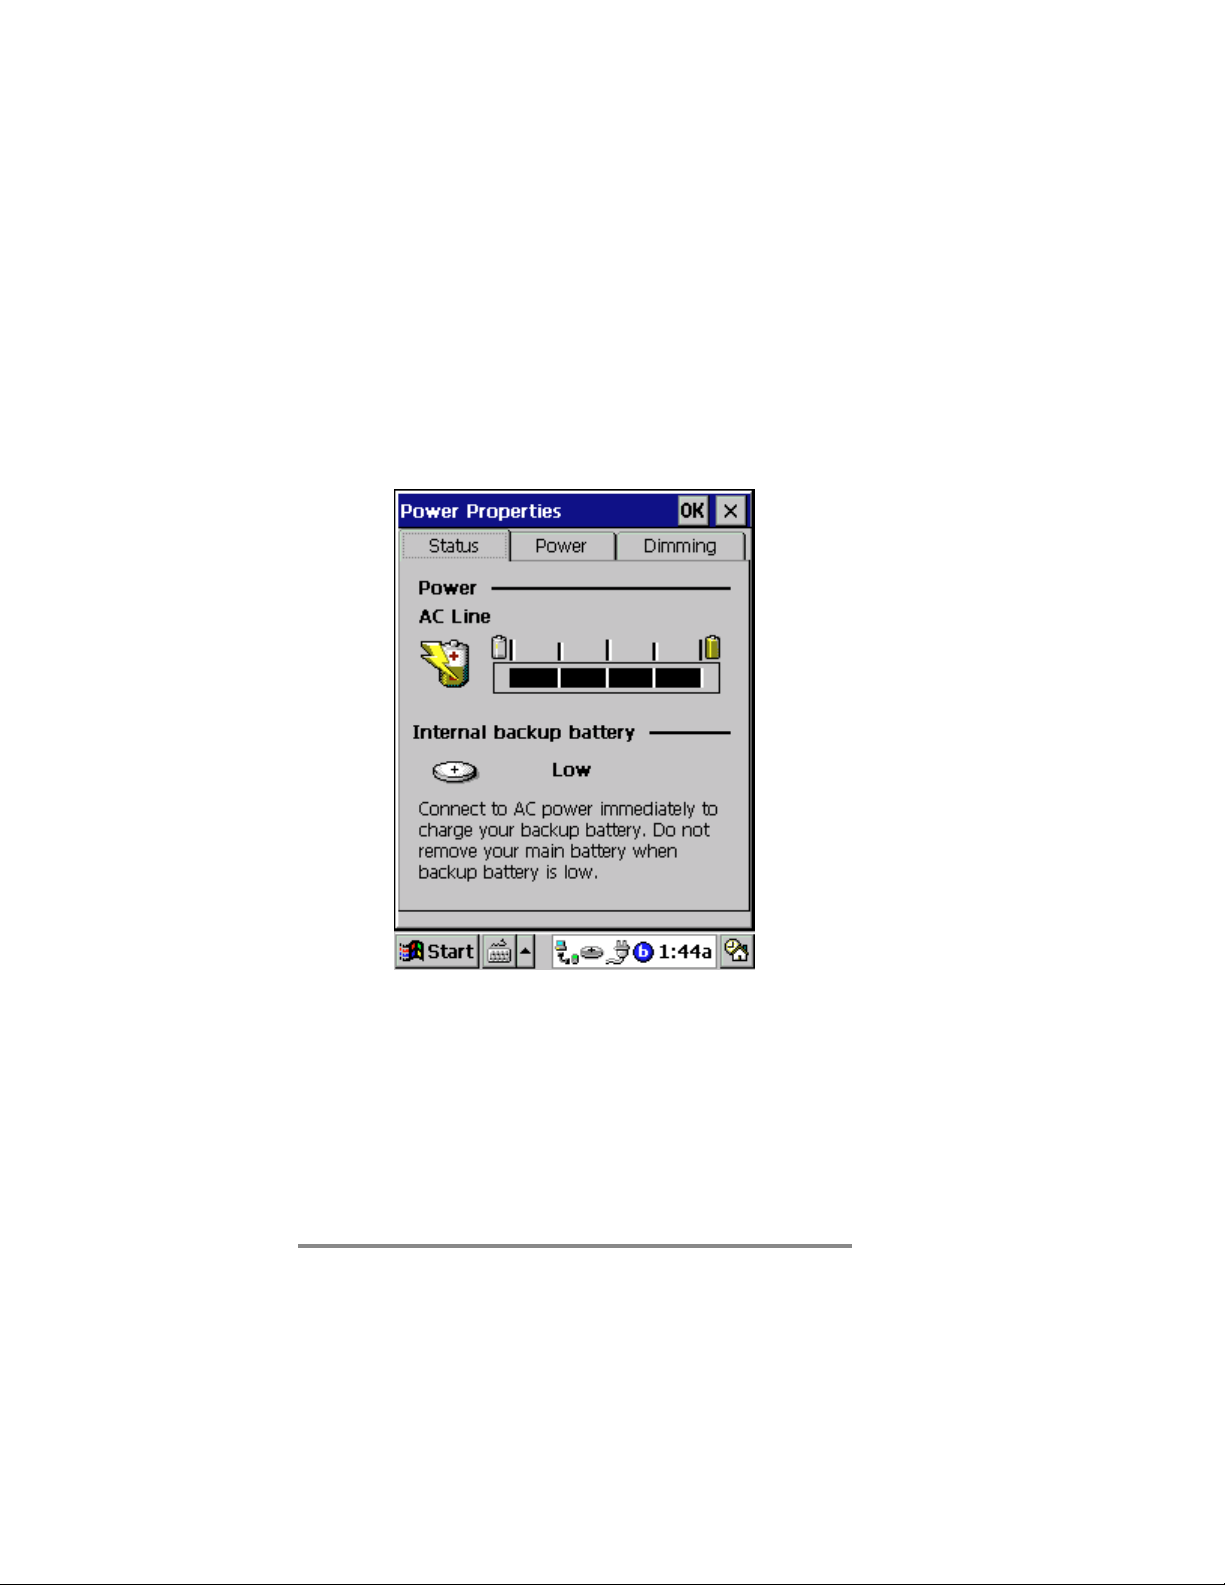
Status tab
The
Status
batteries.
tab displays the status of the main and backup
Close
Status tab
Page 22
18 Hewlett-Packard Jornada 420 Palm-size PC
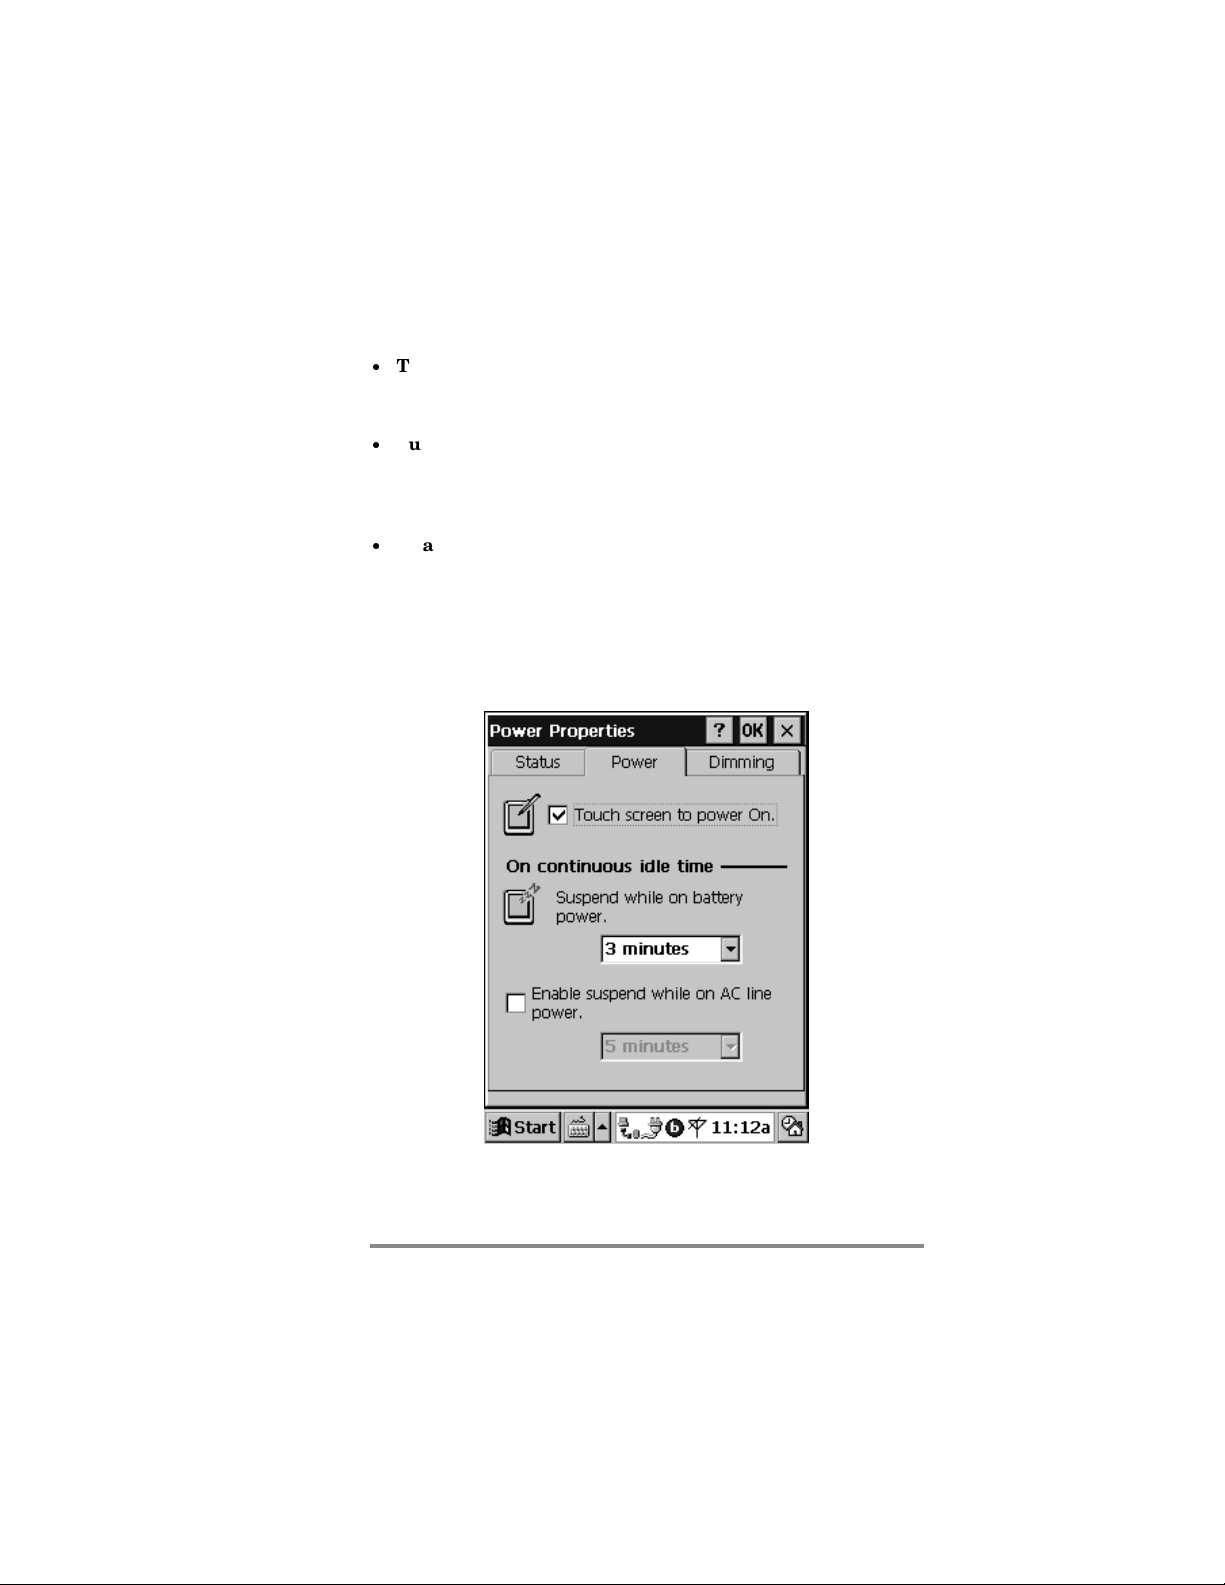
Power tab
The
Power
suspends operation to help maximize battery life:
tab lets you customize how and when your P/PC
·
Touch screen to power On
P/PC to awake from suspend mode when you tap the screen or
hard icon panel.
·
Suspend while on battery power
power, your P/PC automatically suspends operation after a
period of continuous idle time while running on battery power.
Select the amount of idle time from the dropdown list.
·
Enable suspend while on AC line power
option to automatically suspend operation after a period of
continuous idle time while running on AC power. Select the
amount of idle time from the dropdown list.
The
Touch screen to power On
When you uncheck this option, you are no longer able to use the
hard icon panel to power on the P/PC.
—Select this option to allow your
—To conserve battery
—Select this
option is checked by default.
Power tab
Page 23
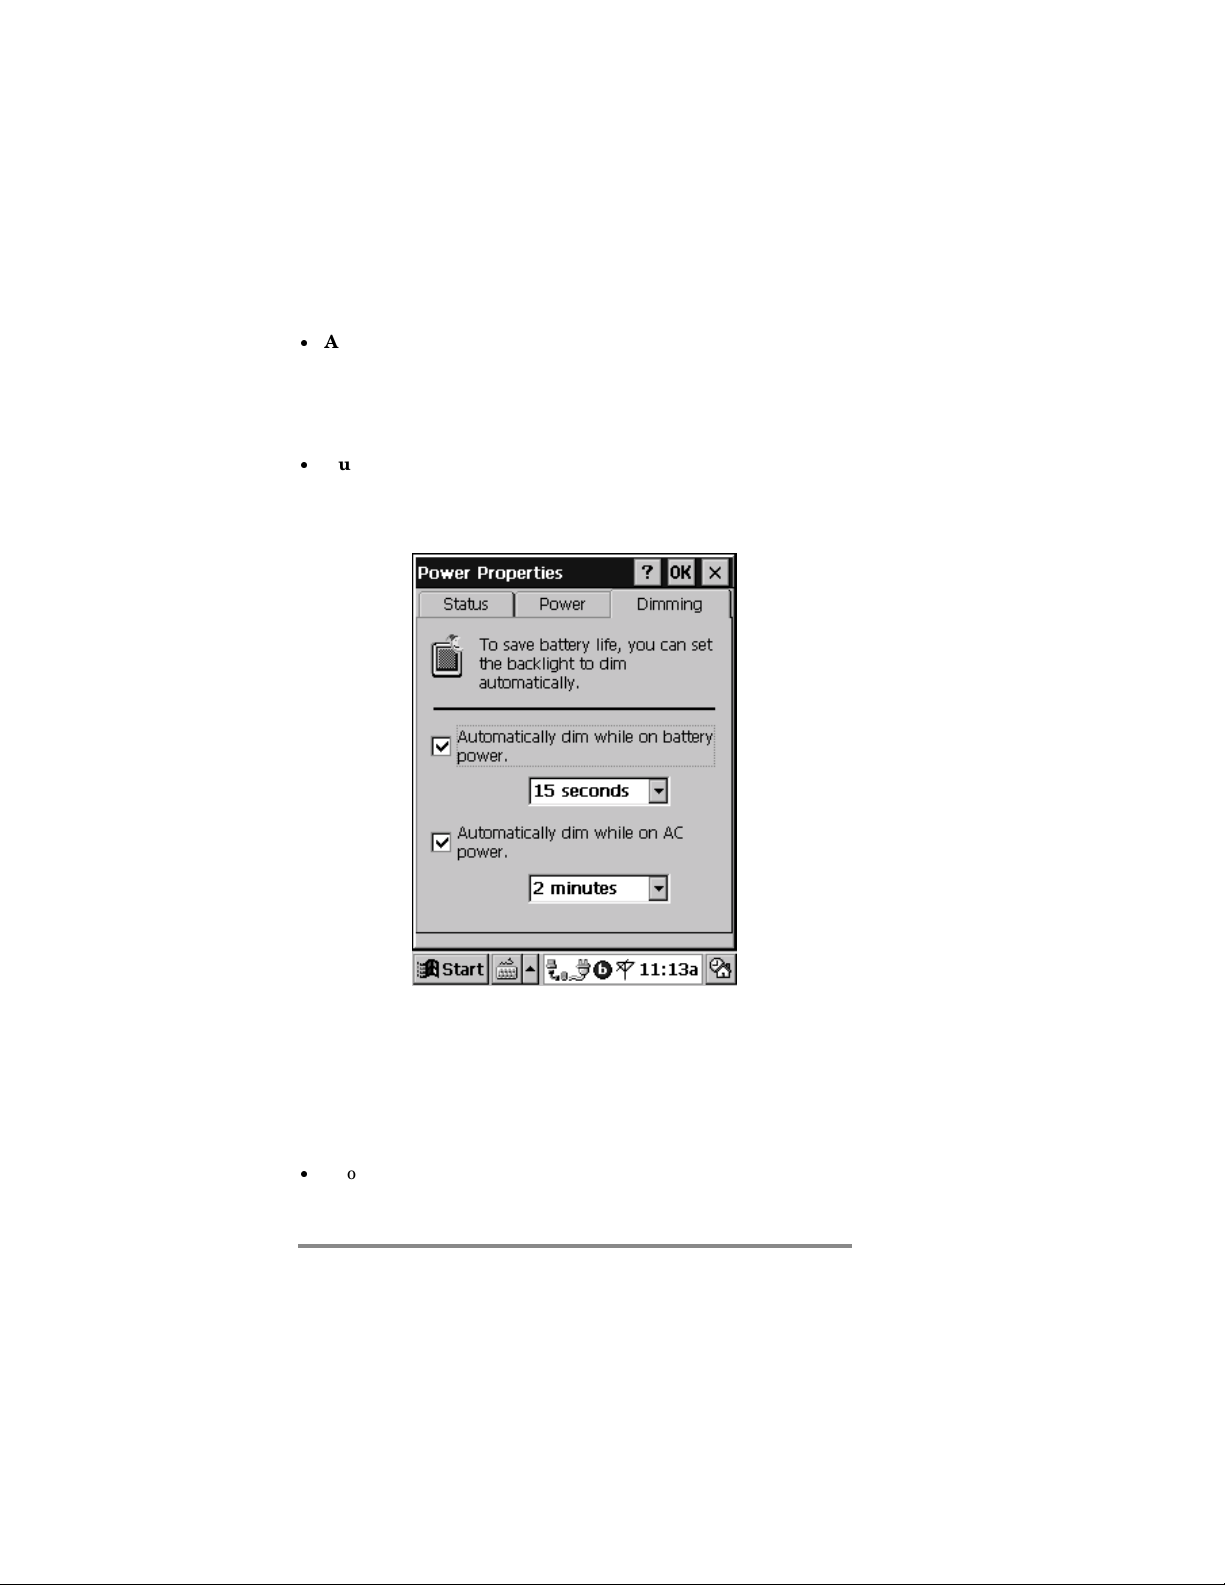
Dimming tab
The
Dimming
conserve battery power:
tab lets you control backlight dimming to help
Chapter 2 | Setting up | 19
·
Automatically dim while on Battery Power
battery power, select this option to automatically dim the
backlight after a period of continuous idle time while running
on battery power. Select the amount of idle time from the
dropdown list.
·
Automatically dim while on AC Power
to automatically dim the backlight after a period of continuous
idle time while running on AC power. Select the amount of
idle time from the dropdown list.
—To conserve
—Select this option
Dimming tab
Conserving battery power
The following tips can conserve battery power, ensuring the
longest use of your P/PC between charges:
·
Shorten auto-suspend time. To set auto-suspend time: from
the
Power
Start
tab.
menu, tap
Settings
, tap
Power
, and then tap the
Page 24

20 Hewlett-Packard Jornada 420 Palm-size PC
·
Set the display to dim automatically after a short time. To set
dimming: from the
and then tap the
·
Minimize brightness and use contrast to increase readability.
To set brightness and contrast: from the
HP settings
“Using HP settings” on page 31.
·
Turn off sounds you do not need or mute the system speaker.
To mute sounds: from the
more information about HP settings, see “Using HP settings”
on page 31.
·
Connect to AC power when connected to any peripherals
requiring power.
·
Connect to AC power when connected to your desktop PC.
Start
Dimming
. For more information about HP settings, see
Caring ffor r tthe e HHP P JJornada
Follow these suggestions for long and trouble-free use.
·
To clean the screen, wipe it with a damp, lint-free cloth.
·
Do not drop the HP Jornada. Accidental damage is not covered
under the Hewlett-Packard express warranty.
menu, tap
tab.
menu, tap
Start
Settings
Start
HP settings
, tap
Power
menu, tap
,
. For
·
Radiated interference from other electronic equipment may
affect the appearance of the display. To return the display to
normal, remove the P/PC from the source of the interference.
·
The HP Jornada is designed to operate at temperatures
between 0 to 40 ºC (32 to 104 ºF). It is designed to maintain
data at temperatures between 0 to 55 ºC (32 to 131 ºF).
Subjecting the P/PC to temperatures outside those ranges
may damage the P/PC or result in loss of data. Be especially
careful not to leave the HP Jornada in direct sunlight or in a
car where temperatures can rise to harmful levels.
Page 25

Chapter 3 | Learning the basics | 21
3 3 | | LLearning g tthe e bbasics
This chapter describes the following:
·
turning the HP Jornada on and off
·
using and reconfiguring the hard icons
·
working with the Start menu, taskbar, command bar, and
online help
·
adjusting settings, such as volume and the world clock
·
using shortcuts to help you work faster
Turning g tthe e HHP P JJornada a 4420 0 oon n aand od off
The HP Jornada does not need to be started up or shut down; you
can start working immediately by pressing the On/Off button at
the lower right corner of the P/PC. When you are finished, turn
off the HP Jornada by pressing the On/Off button. Turning off
the HP Jornada simply suspends operation. When you turn it on
again, you can start working where you left off.
You can also turn on the HP Jornada in the following ways:
·
by pressing the
·
by pressing the
·
by holding the stylus down on one of the hard icons
·
by tapping the screen.
To conserve battery power, you can set the HP Jornada to autosuspend after a preset period of continuous idle time. By default,
the P/PC auto-suspends after 3 minutes while running on battery
power. (For more information on auto-suspend and tips for
conserving battery power, see “Managing battery power” on page
16.)
button
Start
Record
button
Page 26
22 Hewlett-Packard Jornada 420 Palm-size PC
Locking g tthe e hhardware e bbuttons
Pressing the
P/PC. To avoid powering on the P/PC accidentally (which would
drain the battery), you can lock the hardware buttons that are on
the left side of the P/PC.
Record
To lock the buttons
button or the
button powers on the
Start
1. Press and hold the
When the volume is not muted, a sound indicates that
Button Lock is enabled, and the lock icon
in the taskbar.
On/Off
button to lock the buttons.
appears
To unlock the buttons
1. When the buttons are locked, press and hold the
button to unlock the buttons. When the volume is not
muted, a sound indicates that Button Lock is disabled,
and the lock icon
When Button Lock is enabled, all hardware buttons are disabled,
except for the
On/Off
button.
disappears from the taskbar.
On/Off
Using g tthe e hhard d iicons
To launch Contacts, Calendar, Tasks, or OmniSolve, tap the
appropriate icon at the bottom of the display. If you double-tap
the icon, the Edit windows for Contacts, Calendar, and Tasks are
displayed.
To reconfigure the hard icons
1. Tap
2. Tap
3. Tap the
4. Tap the name of the hard icon (under
Settings
Buttons
that you want to reconfigure.
from the
.
Program
tab.
Start
menu.
Program
button)
Page 27
Chapter 3 | Learning the basics | 23
5. Tap the name of the program (under
assignment) that you want to associate with the hard
icon.
6. Tap OK.
Button
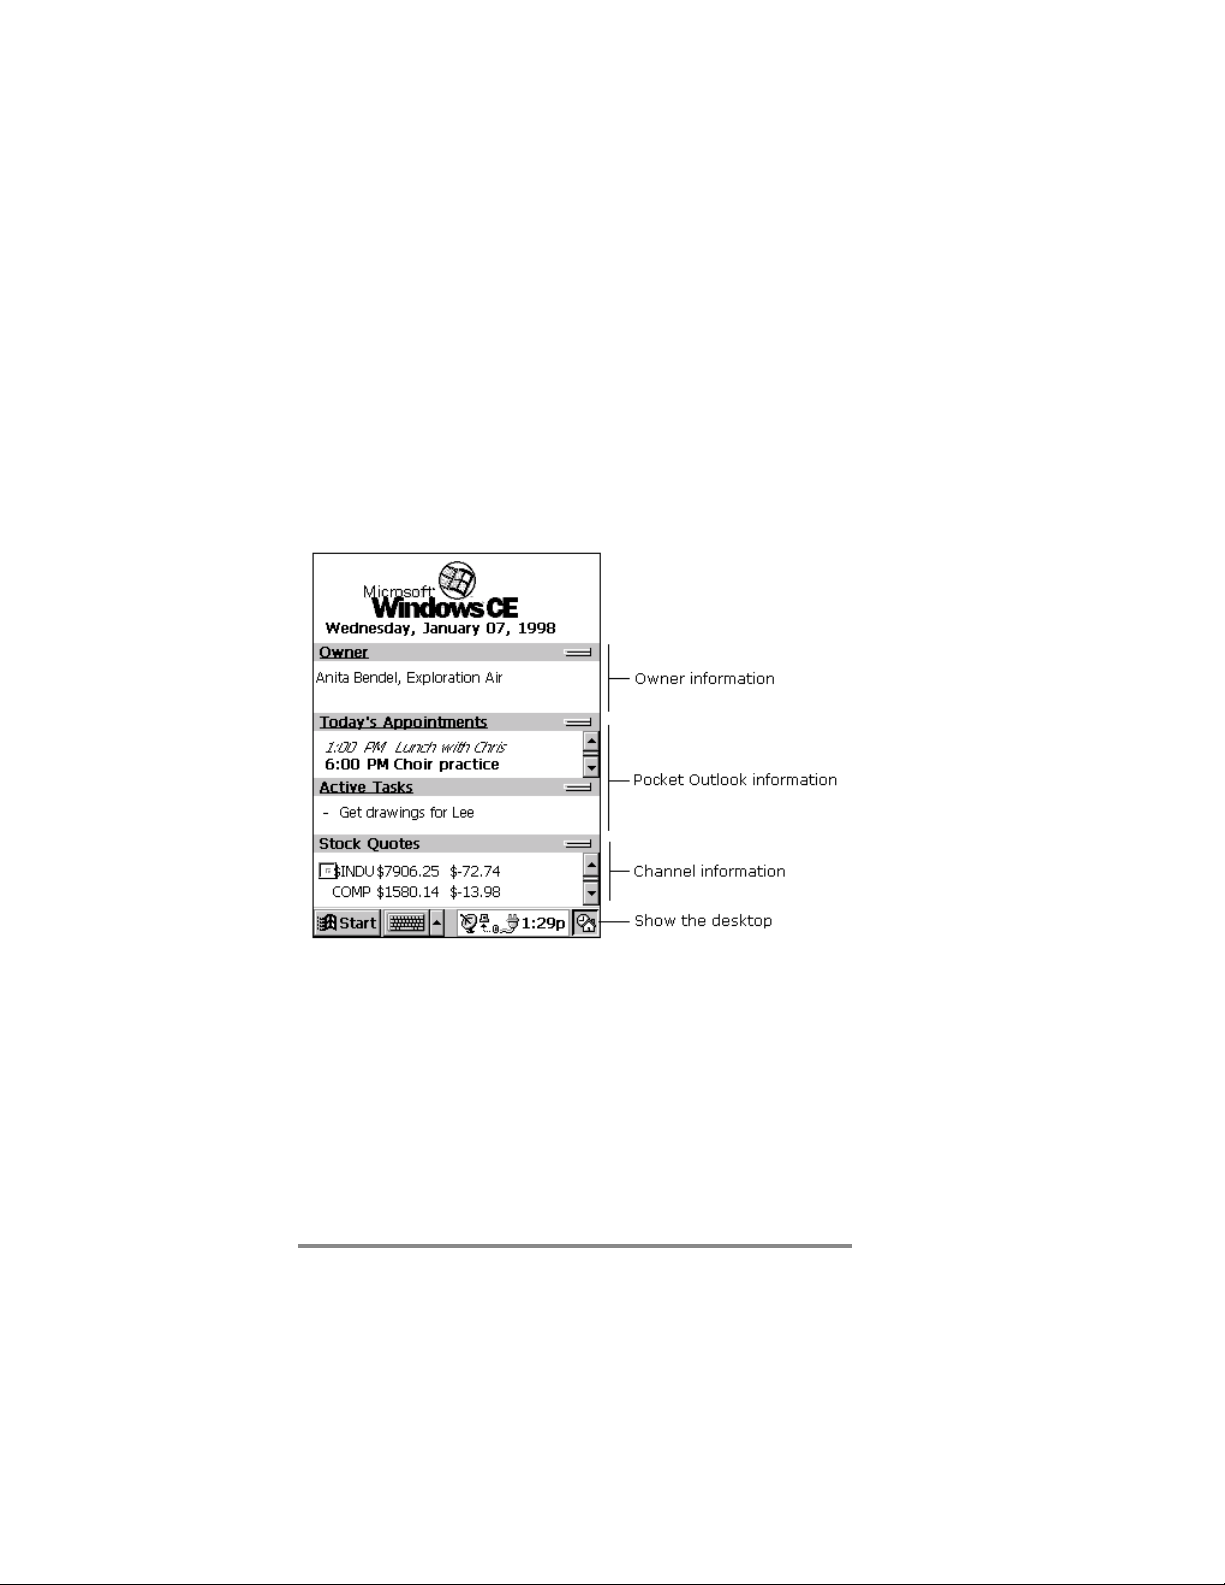
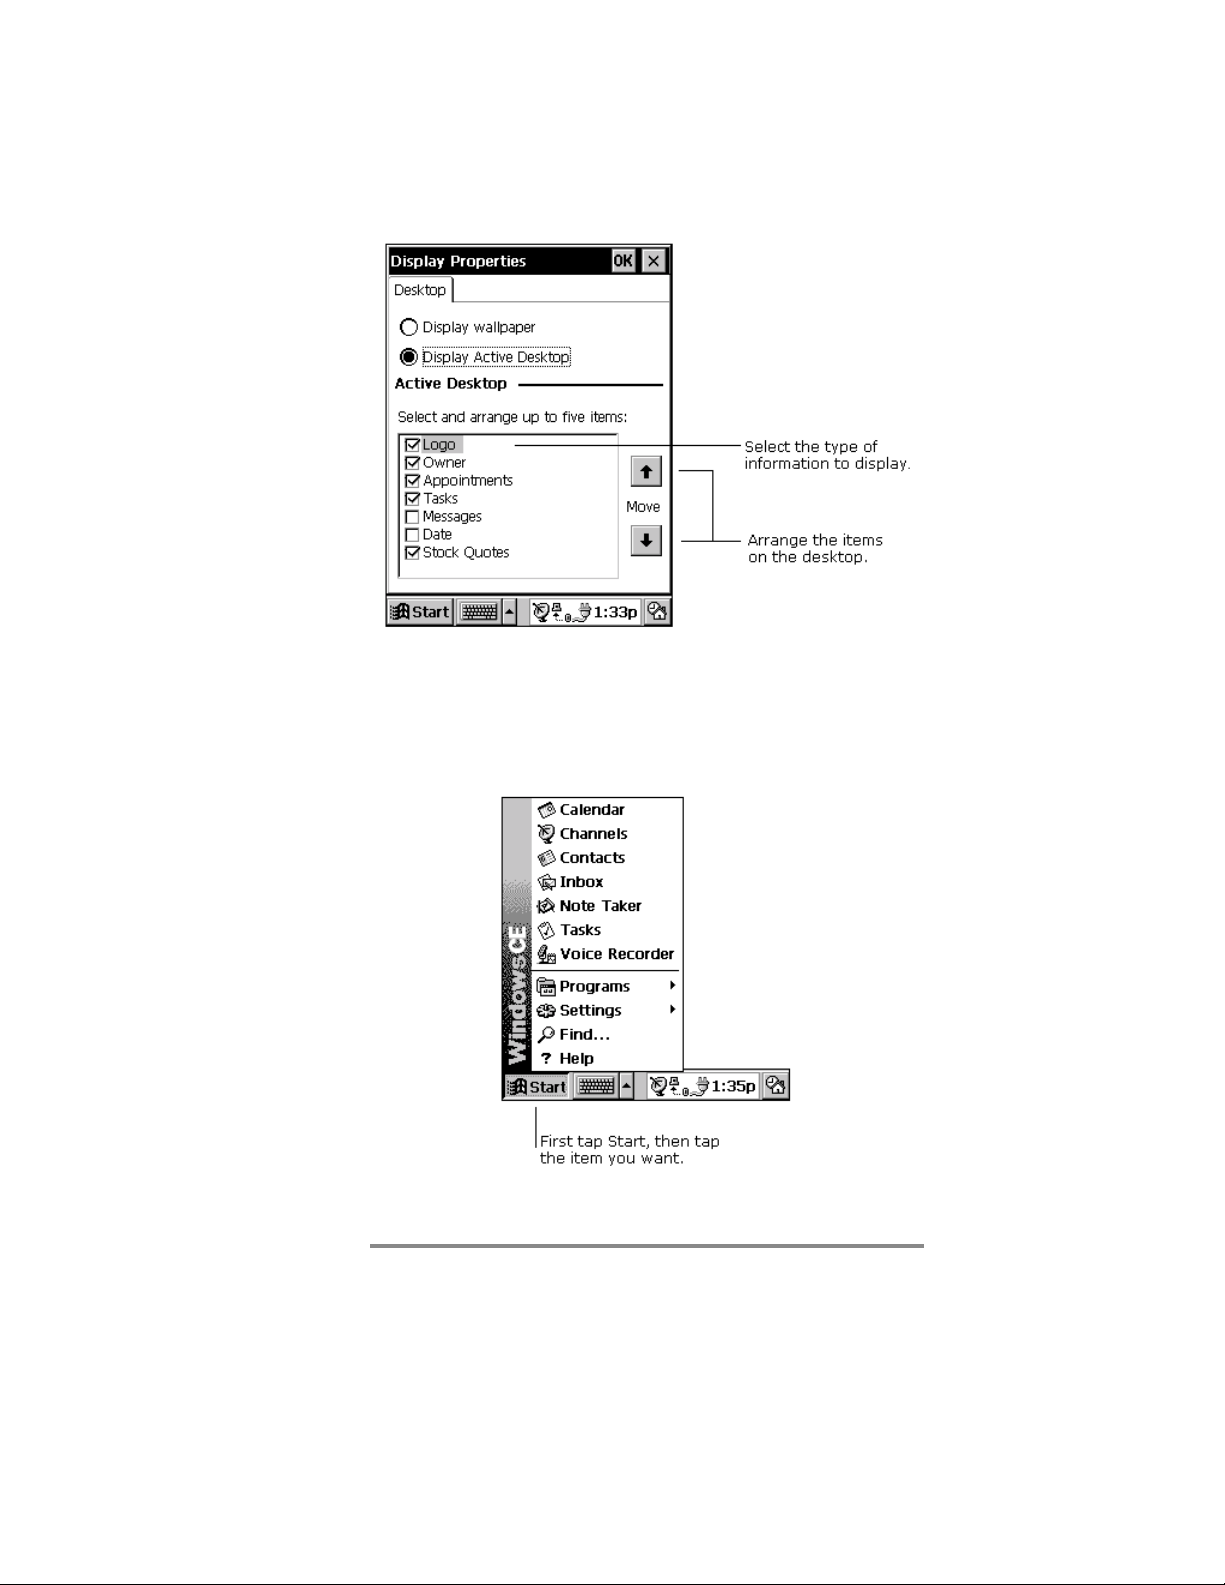
Using g tthe e AActive e DDesktop
You can use the Active Desktop™ to display important
information, such as today’s appointments and tasks. You can
also display channel information, such as stock quotes. For more
information, see “Displaying mobile desktop components” on
page 54.
To select the type of information you want to display on the
desktop, tap
Active Desktop
Start, Settings, Display
.
, and then
Display
Page 28
24 Hewlett-Packard Jornada 420 Palm-size PC
Using g tthe e SStart t MMenu u aand d ttaskbar
Use the
settings, find information, and view Help for the current
program.
menu on the taskbar to switch programs, display
Start
Page 29
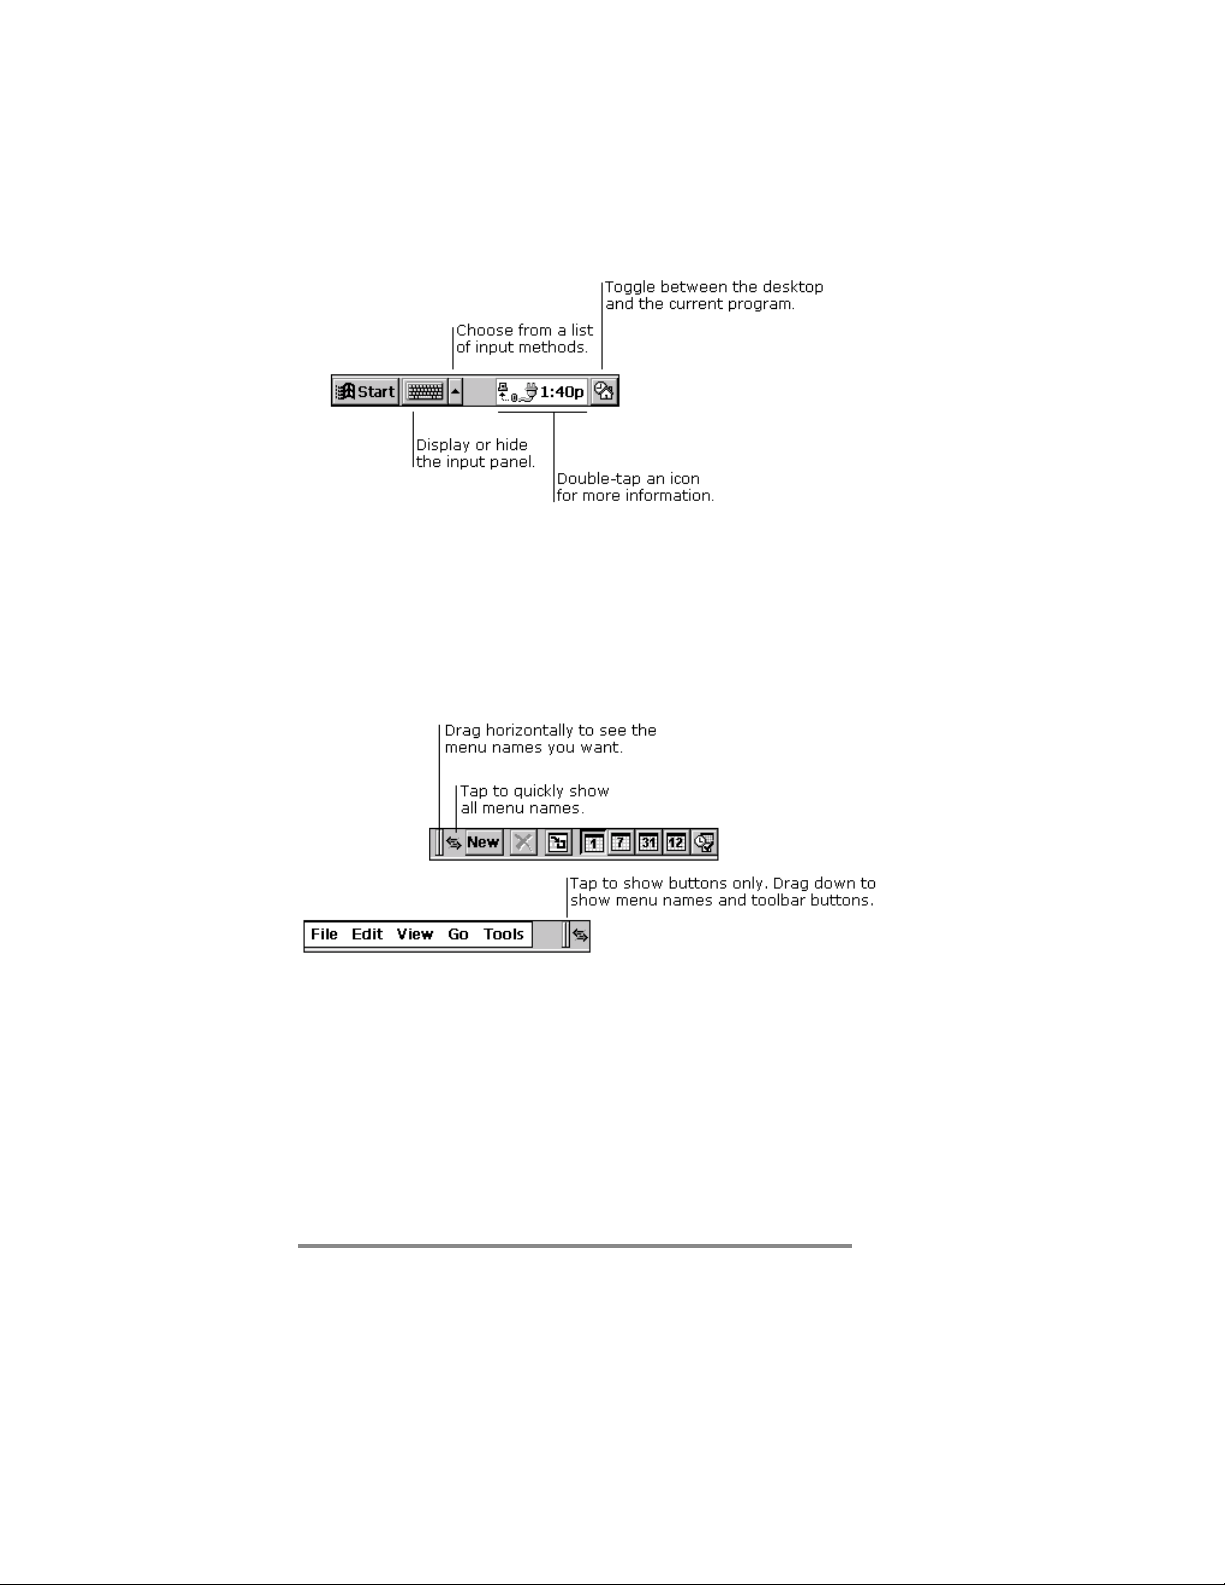
On the taskbar, you can also do the following.
Chapter 3 | Learning the basics | 25
You can change what you see on the
tapping
Start, Settings,
and then
Taskbar
menu and taskbar by
Start
.
Using g tthe e ccommand d bbar
The command bar at the top of the P/PC screen includes both
menu names and toolbar buttons. You can decide which you want
to display.
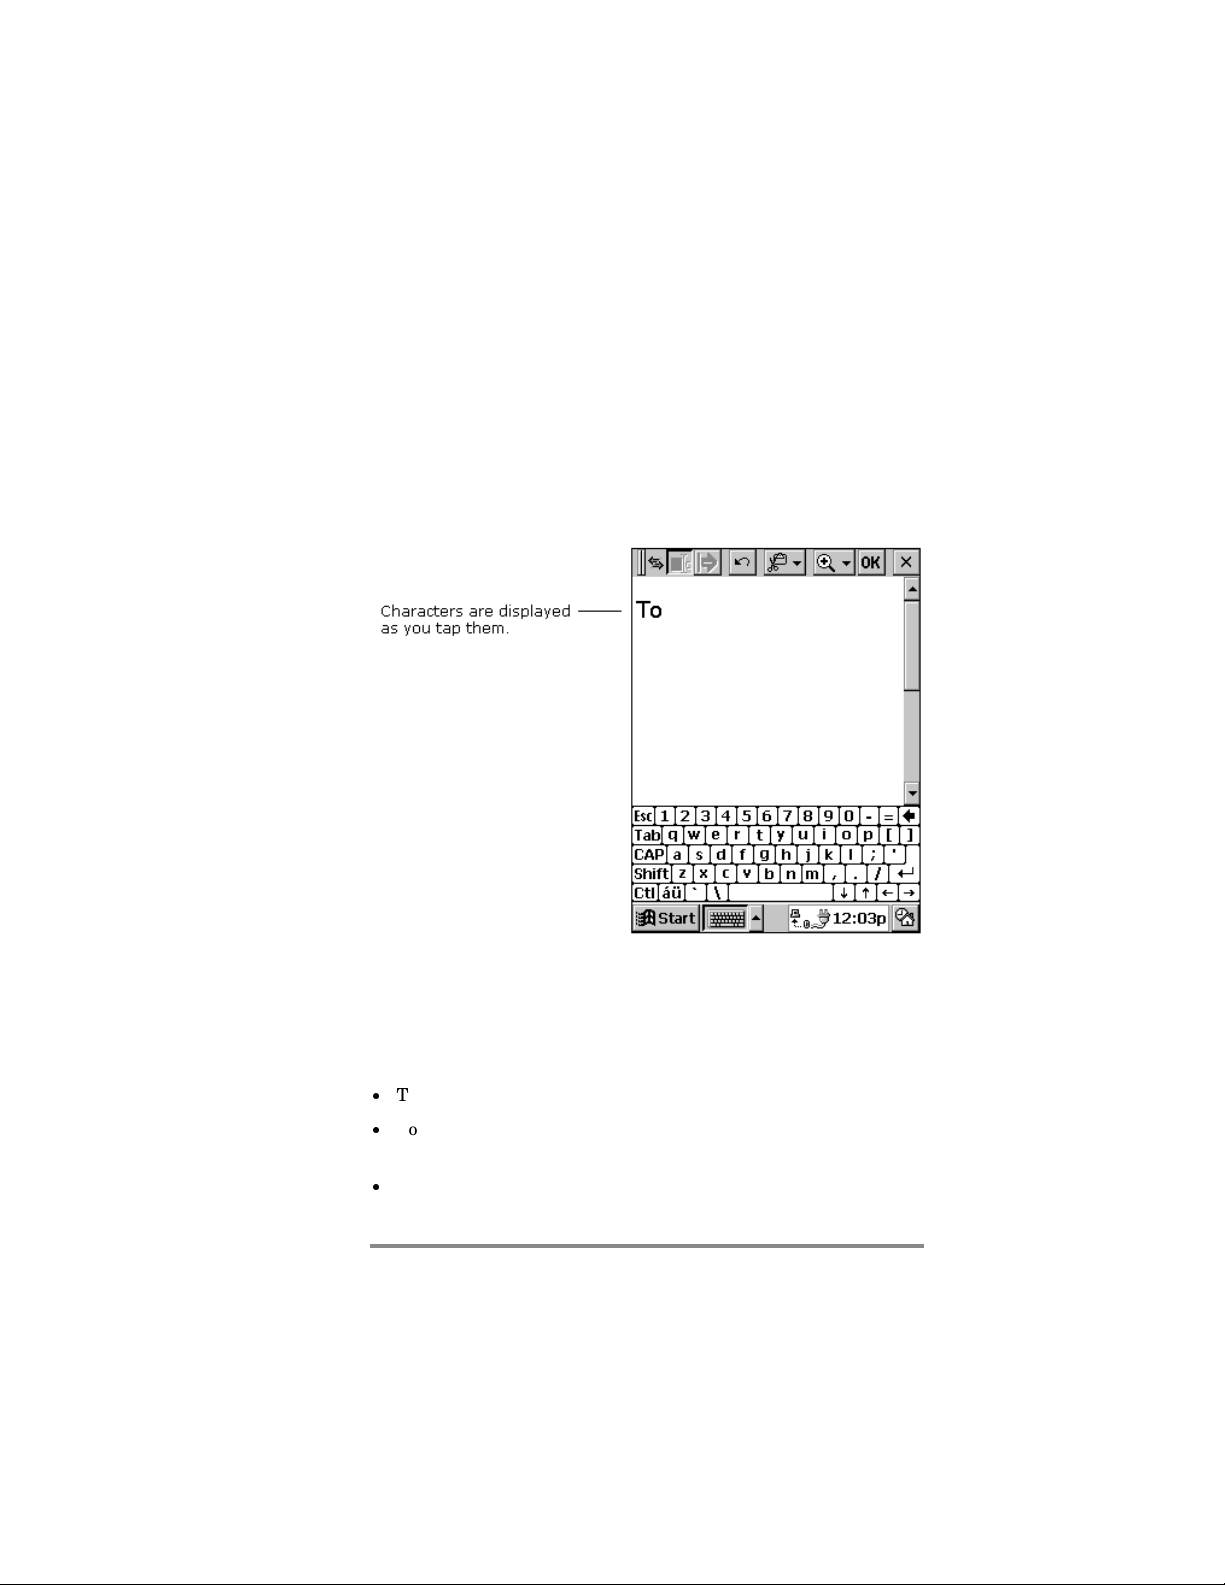
Typing, , wwriting, , aand dd drawing g oon n tthe
HP P JJornada
With your P/PC, you can quickly type, write, and draw in the way
that is most convenient for you. You can type with the soft
keyboard, write using character recognition, or write and draw
directly on the screen using your stylus.
In Note Taker, and in notes that you attach to entries in
Calendar, Contacts, and Tasks, you can use your stylus to write
Page 30
26 Hewlett-Packard Jornada 420 Palm-size PC
on the screen. For more information, see “Creating notes and
drawings“ on page 77.
You can enter information in any program on your P/PC by
typing with the soft keyboard or writing using character
recognition. First select the input method you want to use in your
P/PC’s input panel. Tap the
choices.
Typing with the keyboard
To type, tap the
Then tap the keys with your stylus.
Input Method
Input Method
arrow and select
arrow to see your
Keyboard
.
You can adjust keyboard settings to suit the way you work. Tap
Start, Settings
input method, and then tap
Enable swipe shortcuts (gestures) on your keyboard so that you
can do the following:
·
To insert a space, swipe across the keyboard from left to right.
·
To delete a character, swipe across the keyboard from right to
left.
·
To enter a carriage return, swipe the keyboard from top to
bottom.
, and then
Input Panel
Options
.
. Select
Keyboard
as the
Page 31

Chapter 3 | Learning the basics | 27
·
To enter the character in uppercase, starting on a key, swipe
up.
Using character recognition
You can use the character recognition software, CIC® Jot™, to
write. Tap the
Recognizer
handwritten character is converted to typed text that appears on
the screen.
Input Method
. When you write a letter in the box, your
arrow and select
Jot Character
Some letters must be written in a particular way to be
recognized. To see how to write letters, tap the
an online demonstration or see Appendix A.
Help
button for
Page 32

28 Hewlett-Packard Jornada 420 Palm-size PC
Drag your stylus across the panel horizontally from right to
left to delete a character. Drag from left to right to type a
space.
As you type or write, your P/PC anticipates the word you are
writing and displays it above the input panel. When you tap the
displayed word, it is inserted into your text at the insertion point.
The more you use your P/PC, the more words it learns to
anticipate.
To customize the suggested words, tap
, and then the
Panel
Word Completion
Start, Settings, Input
tab.
Finding g ffiles s aand dod documents
EzExplorer is your gateway to all the applications, documents,
and other files on your P/PC. It displays information using
familiar folder and file names. In EzExplorer, you can browse,
copy, move, delete, and rename the files and folders in your
system, and you can create shortcuts to frequently used items.
To start EzExplorer
1. From the
EzExplorer
Start
.
menu, tap
Programs
, and then tap
Page 33

Chapter 3 | Learning the basics | 29
For detailed procedures about using EzExplorer, refer to online
Help.
Finding g iinformation
The Find feature on your P/PC helps you quickly locate
information. Tap
to find, select a data type, and then tap OK to start the search.
Start
and then
. Enter the text you want
Find
Viewing g iinformation
Most programs provide a list view, showing the items or files you
have already created in that program. You can display the list in
the manner that is most helpful for you.
You can sort the list on a particular column by tapping the
column heading.
In Calendar, Contacts, and Tasks, you can assign entries to
particular categories and then filter the list to show a specific
category.
In Note Taker, Voice Recorder, and Inbox, you can place files or
messages in folders, and then filter the list to show only the files
or messages in a specific folder.
Page 34

30 Hewlett-Packard Jornada 420 Palm-size PC
Adjusting g ssettings
You can adjust P/PC settings to suit the way you work. Select
and then
Start
P/PC.
You might want to adjust the following:
Settings
to see the settings available on your
·
Buttons
and to adjust the Up/Down control.
·
Owner
misplaced.
·
Power
·
System
and program memory.
·
Password
·
Volume & Sounds
·
World Clock
second location.
For information on a particular setting, you can do either of the
following:
·
Open the setting, tap
·
Open the setting, and then tap and hold on the label of the
item you want more information about, as shown in the figure
on the next page.
, to associate program buttons with specific programs
, to enter contact information in case your P/PC is
, to maximize battery life.
, to adjust memory allocation between storage memory
, to limit access to your P/PC.
, to customize or turn off sounds.
, to set the date and time for your location and a
, and then tap
Start
Help
.
Page 35

Chapter 3 | Learning the basics | 31
Using g HHP P ssettings
Use HP settings to adjust screen brightness and contrast,
speaker volume, your password, and password protection. You
can also display system information such as memory status and
remaining battery power.
Setting brightness, contrast, and volume
You can adjust the screen brightness and contrast, adjust the
speaker volume to suit your work environment, and check the
remaining battery power and memory status. You can also mute
the speaker by selecting the speaker mute checkbox.
To set brightness, contrast, and volume
1. Tap the
–or–
Hold the
2. Adjust the contrast, brightness, and volume sliders on
the
Settings
check box to mute or restore the system volume.
button, and then tap
Start
button for 1 second.
Start
tab, and then select or deselect the
HP settings
.
Mute
Page 36

32 Hewlett-Packard Jornada 420 Palm-size PC
HP settings
volume by using the
open
HP settings
profiles and to select the preferred one.
allows you to adjust brightness, contrast, and
Action
, and use the
button. Hold the
Action
button to
Start
button to cycle the
Settings tab
The HP Jornada has four preset HP settings profiles. You can
launch any profile by selecting the radio button associated with
it. You can also adjust any of the settings in any profile to suit
your preference.
Page 37

Chapter 3 | Learning the basics | 33
To change profiles
1. Select the radio button of the profile you want to change.
2. Adjust sound, brightness, and contrast sliders to your
preference.
3. Tap OK to save the new settings. Tapping the
button exits this window and abandons all changes.
You can switch to the
tapping the Speaker button.
Volume & Sounds
control panel by
Close
Viewing battery status
The
Settings
status bar at the bottom of the window. You can also view power
status on the
To switch to the Power control panel
1. Tap the
tab displays the remaining battery capacity on a
Power
control panel.
Battery
button next to the battery status bar.
Page 38

34 Hewlett-Packard Jornada 420 Palm-size PC
Viewing memory status
The
Memory
Program memory.
tab displays total and available (free) Storage and
Memory tab
To adjust how memory is allocated between
storage and programs
1. Switch to the
Windows
2. Tap the
3. Move the slider to the left or right.
System
button next to the memory status display.
Memory
control panel by tapping the
tab.
Page 39

Chapter 3 | Learning the basics | 35
4. Press the
and save all changes.
–or–
Press the
this window and abandon all changes.
Action
Exit
button or tap the OK button to exit
button or tap the
Close
button to exit
Setting a password and delay timer
You can protect the HP Jornada by setting a password. You can
also choose to be prompted to enter the password each time you
turn on the P/PC.
Password tab
To set your password and an optional password
delay timer
1. Tap the
–or–
Hold the
2. Tap the
button, and then tap
Start
button for 1 second.
Start
Password
tab.
HP settings
.
Page 40

36 Hewlett-Packard Jornada 420 Palm-size PC
3. Tap
4. Enter a password by tapping characters on the
5. If you want, tap the
6. Press the
7. If you enabled password protection at power–on, the
8. If you want, choose the
9. Press the
Set Password
keyboard, and then enter the same password in the
Confirm
power–on
and save all changes.
–or–
Press the
this window and abandon all changes.
Activate password protection
active. The default is to activate immediately after
suspend.
button, and then select one of the preset delay times
from the list. The delay allows you to turn your P/PC
back on within the allotted time without having to enter
your password.
and save all changes.
password text box.
checkbox.
Action
Exit
Action
.
Enable password protection at
button or tap the OK button to exit
button or tap the
After suspending for
button or tap the OK button to exit
button to exit
Close
radio buttons become
radio
–or–
Press the
this window and abandon all changes.
button or tap the
Exit
button to exit
Close
Learning g tthe e sshortcuts
The following tips and shortcuts help you work faster.
·
Turn on the HP Jornada by pressing the
pressing the
holding the stylus down on one of the hard icons, or by tapping
the screen.
·
Press the
·
Hold down the
Start
button, by pressing the
Start
button to bring up the
button to bring up
Start
On/Off
Start
HP settings
button, by
Record
menu.
button, by
.
Page 41

Chapter 3 | Learning the basics | 37
·
Hold down the
Record
button to start recording. Recording
stops when you release the button.
To play all of your recordings one after another, press the
Action
·
Press the
button twice. A short beep sounds between recordings.
Action
button to execute a highlighted item. Rock
this button to scroll up and down through dropdown lists.
·
Press the
·
Reconfigure the hard icons so that they start the applications
that you use most often. To do this, tap
menu, tap
Start
button to exit dialog windows.
Exit
Buttons
, tap the
Settings
Program
from the
tab, and then
follow the directions on the control panel.
·
Use the AC adapter to plug the HP Jornada into external
power whenever possible, especially when connecting to a
desktop PC or other peripheral, or when letting the LED
indicator flash for extended time periods. For more
information, see “Managing battery power” on page 16.
·
In Calendar, to choose the way you prefer to be notified, on
the
then tap
·
If you have lost the HP Jornada or replaced it with another
menu, tap
Tools
Reminder Options
Options
, tap the
.
Alarm
button, and
HP Jornada, you can set up the new P/PC with the same data
and settings as the old one, if you previously performed a full
backup using Windows CE Services or HP backup.
If you used Windows CE Services to back up your data, then
when you connect the new P/PC to your desktop PC for the
first time, choose Restore rather than Synchronize or Browse.
If you backed up the P/PC using HP backup, then restore the
information as described in “Using HP backup” on page 84.
·
Speed up the synchronization process by synchronizing
regularly. If you use Microsoft Outlook, Windows CE Services
synchronizes only 2 weeks of calendar data by default.
·
To open the
World Clock
control panel quickly, double-tap
the clock in the status area of the taskbar.
·
'To close applications use bTask, or from the
Settings
, tap
System
, tap
Task Manager
application you want to close, and then tap
menu, tap
Start
, select the
End Task
.
Page 42

38 Hewlett-Packard Jornada 420 Palm-size PC
Page 43

Chapter 4 | Connecting to a desktop PC | 39
4 4 | | CConnecting g tto o aa
desktop p PPC
This chapter describes how to:
·
install Windows CE Services
·
establish a partnership between the HP Jornada and your
desktop PC
·
use Windows CE Services to browse the contents of the HP
Jornada
·
synchronize data, e-mail messages, and channels
·
transfer files between the HP Jornada and desktop PC
Connecting g ffor r tthe e ffirst tt time
You can connect to a desktop PC using the HP Jornada serial
port, or you can connect to an infrared-equipped desktop or
notebook PC using the infrared port. Before you connect, you
must install Windows CE Services on the desktop PC. Then, you
can connect the HP Jornada to your desktop PC with the sync
cable or the infrared port, and establish a partnership.
Understanding Windows CE Services
Microsoft Windows CE Services with ActiveSync enables you to
synchronize the information on your desktop computer with the
information on your P/PC. Synchronization is the process of
comparing the data on your P/PC with your desktop computer
and updating both computers with the most recent information.
For example:
·
Keep Contacts, Calendar, and Tasks data up-to-date by
synchronizing your mobile device with your choice of Microsoft
Outlook (Inbox synchronization with Outlook Express is not
Page 44

40 Hewlett-Packard Jornada 420 Palm-size PC
currently supported), Microsoft Schedule+, or Microsoft
Exchange on your desktop computer.
·
Synchronize Voice Recorder and Note Taker documents
between your P/PC and desktop computer. Your files are
automatically converted to the correct format.
With Windows CE Services, you can also:
·
back up and restore your P/PC data
·
add and remove programs on your P/PC
·
copy (rather than synchronize) files between your P/PC and
your desktop computer
Windows CE Services includes several components. The
Windows CE Services Setup Wizard detects which software
components are needed and prompts you to set up only the
necessary components. For instance,
·
If you do not already have Outlook or Schedule+ installed, the
Setup Wizard attempts to install Schedule+ version 7.0a.
·
The Setup Wizard can add Inbox extensions to enable you to
transfer messages to your desktop mail client—Exchange or
Outlook.
You may need to restart your PC after installing each
component.
Contents of the Desktop Software for Microsoft Windows CE
compact disk
The Desktop Software for Microsoft Windows CE compact disk
includes the following software options for your desktop PC.
·
Windows CE Services—Allows you to connect the HP Jornada
to a desktop or notebook PC running Windows 95 or Windows
NT.
·
Microsoft Exchange Update—Adds an option to the Tools
menu in Microsoft Exchange, allowing you to synchronize the
HP Jornada Inbox with your Windows Inbox.
·
Microsoft Schedule+ 7.0a—A schedule management program
for Windows 95 or NT.
·
Ethernet Components—Network drivers for your Windows
CE.
Page 45

Chapter 4 | Connecting to a desktop PC | 41
·
Microsoft Pocket Streets—A maps-and-navigation program for
Windows CE.
·
Windows 95 infrared drivers version 2.0—Allow you to install
an infrared port on a desktop PC.
·
Windows 95 Dial-Up Networking version 1.2 upgrade—
Allows you to establish a remote connection to your desktop
PC by modem.
·
Microsoft Internet Explorer version 4.01—The most recent
version of the Internet browser for Windows 95 or Windows
NT.
·
Windows NT Service Pack 3—System updates for Windows
NT.
Many Windows CE programs are available, including freeware
and shareware. Go to www.microsoft.com/windowsce, or try
searching the Web on the keyword “Windows CE” to find
additional programs for your P/PC.
Minimum PC requirements for Windows CE Services
The minimum PC requirements for running Windows CE
Services are as follows:
·
Microsoft Windows NT Workstation 4.0 or Windows 95 (or
later)
·
Desktop PC with a 486/33DX or higher processor (Pentium®
P90 recommended)
·
8 MB of memory (12 MB recommended) for Windows 95 (or
later), and 16 MB of memory (32MB recommended) for
Windows NT Workstation
·
Hard disk drive with 10 to 50 MB of available hard disk space
(actual requirements vary, based on selection of features and
current system configuration)
·
Available 9-pin serial communications port
·
CD-ROM drive
·
VGA or higher resolution graphics card (SVGA 256-color
recommended)
Page 46

42 Hewlett-Packard Jornada 420 Palm-size PC
To install Windows CE Services
1. If you want to upgrade to Microsoft Outlook 98, install it
first.
2. Insert the Desktop Software for Microsoft Windows CE
compact disk into the CD-ROM drive on your desktop
PC.
3. The Windows CE Services Setup Wizard should start
automatically. If it does not start, click
menu, and then type d:\setup, where d is the
Start
letter assigned to your CD-ROM drive.
4. Follow the instructions that appear on your screen to set
up Windows CE Services.
5. The Windows CE Services Get Connected dialog box
appears and prompts you to connect the HP Jornada.
·
If you connect using the sync cable, connect your
P/PC as described in “Connecting by sync cable” on
page 42, and then click
·
If you connect by infrared, click
“Connecting by infrared” on page 47.
Start
.
Cancel
on the
Run
, and skip to
If you chose
tap
Programs
Manual
synchronization, you need to tap
, tap
Communication
, and then tap
Start
PC Link
,
Connecting by sync cable
The HP Jornada uses a serial connection to communicate with a
desktop PC. The serial connection is established with the sync
cable (included with the HP Jornada) and a 9-pin serial
communications port on your desktop PC.
The HP Jornada 420 connects to the sync cable via the cradle.
If you do not have a 9-pin serial port on your desktop PC, or if
the port is in use by another device, such as a printer or modem,
you may need to obtain an adapter from your computer
manufacturer.
.
Page 47

Chapter 4 | Connecting to a desktop PC | 43
To connect the HP Jornada to your desktop PC
1. Insert the 9-pin end of the sync cable into a serial port
on your desktop PC.
2. Fully insert the flat end of the sync cable, arrow side up,
into the serial port on the cradle.
3. Insert AC adapter into the DC jack on the cradle.
4. Mount the HP Jornada in the cradle.
Fully insert the flat end of the sync cable, arrow side up,
into the serial port on the cradle.
Establishing a partnership
After you set up Windows CE Services on your desktop PC and
connect your HP Jornada with the serial cable to the desktop PC,
you are prompted to establish a partnership between your
desktop PC and the HP Jornada. The partnership enables your
desktop PC to recognize the HP Jornada when transferring files
or synchronizing data.
You can establish partnerships between the HP Jornada and up
to two desktop PCs (for example, your home PC and your office
PC). A single desktop PC can partner with any number of H/PCs
or P/PCs. This is useful if you have more than one computer
running Windows CE, or if several people share a single desktop
PC.
Page 48

44 Hewlett-Packard Jornada 420 Palm-size PC
Following the New Partnership Wizard
The New Partnership Wizard helps you create a partnership and
gives you options for synchronizing data, e-mail messages, and
files between the HP Jornada and desktop PC. When the New
Mobile Device Detected dialog box appears on your desktop PC,
click Synchronize, and then follow the instructions on the screen
of your desktop PC to complete the New Partnership Wizard.
The Wizard prompts you to type a name and a description for the
P/PC. The name can be anything you choose (up to 15
alphanumeric characters, no spaces) and should make it easy for
you to identify the HP Jornada. The description could be the
make and model (for example, HP Jornada 420) or a property
control number.
You can later change the device name and description using
the
Communication
menu, tap
Start
tap
Connections
The Wizard also prompts you to choose settings for
synchronization:
choose
Continuous
changes for as long as the computers are connected.
control panel on the HP Jornada. On the
Programs
.
Manual, On Connect
, information is synchronized whenever it
, tap
Communication
, or
, and then
Continuous
. If you
The P/PC icon appears in the Mobile Devices window after the
new partnership is created, which can take a minute or two.
To change the type of items that are synchronized after you
have completed the wizard, select the P/PC icon in the Mobile
Devices folder and then click
menu.
Tools
Also, regardless of the options you choose while completing the
Wizard, you can also synchronize at any moment by choosing
the
Synchronize Now
Mobile Devices window. Or, right-click the connection icon in
the taskbar of the desktop PC, and then click
. For more information, see “Synchronizing data” on page
Now
50.
ActiveSync Options
command from the
Tools
on the
menu of the
Synchronize
Page 49

Chapter 4 | Connecting to a desktop PC | 45
Troubleshooting partnerships
If you are unable to establish a connection between the HP
Jornada and your desktop PC, try the following:
·
Confirm that both the desktop PC and the HP Jornada are
communicating at the same baud rate.
To check the baud rate on your desktop PC
1. Click
Communications
Devices window.
on the
menu of the Mobile
File
To check and change the baud rate on the
HP Jornada
1. On the
Communications
tab.
Start
menu, tap
, and then tap the
Settings
, tap
PC Connection
Communications Properties, PC Connection tab
2. To change the baud rate setting, tap
Connection
·
Verify that the sync cable from the HP Jornada is connected to
the port listed on the
.
Communications
Change
tab of the Windows
Page 50

46 Hewlett-Packard Jornada 420 Palm-size PC
CE Services Properties dialog box (this is the port you selected
when setting up Windows CE Services).
If these steps fail to correct the problem, use the Windows CE
Services Communications Troubleshooter. The Communications
Troubleshooter provides detailed diagnostic steps to identify and
correct common problems.
To start the Communications Troubleshooter
1. On the
Microsoft Windows CE Services, and click Mobile
Devices.
2. On the
Communications Troubleshooter.
menu of your desktop PC, point to
Start
menu in the Mobile Devices window, click
Help
Connecting g aand dd disconnecting
After you have established a partnership, you can set Windows
CE Services to automatically detect the HP Jornada and
establish a connection whenever you connect the sync cable.
Using the COM port on your desktop PC is the easiest way for
you to connect, unless you use that port for other peripherals.
To enable automatic connection
1. On the
Microsoft Windows CE Services, and click Mobile
Devices.
2. On the
Communications
3. Under Device Connections via Serial Port, click
Auto Connect
If you use the COM port of your desktop PC for other devices, or
if you have disconnected the HP Jornada and need to reestablish
the connection, you can establish a manual connection using the
PC Link program on the HP Jornada.
menu of your desktop PC, point to
Start
menu in the Mobile Devices window, click
File
.
.
Enable
To connect manually
1. On the HP Jornada
Communications
Connection Status
, and then tap
menu, tap
Start
dialog box appears. After a few
Programs
PC Link
, tap
. The
Page 51

Chapter 4 | Connecting to a desktop PC | 47
moments a sound indicates that the connection is being
established.
The HP Jornada icon in the Mobile Devices window is grayed
out until the connection is established, which can take a
minute or two.
To close the connection
1. On the HP Jornada, double-tap the connection icon in
the status area of the taskbar.
2. In the
Connection Status
dialog box, tap
Disconnect
Connecting g bby y iinfrared
You can use the infrared port on the HP Jornada to connect to a
desktop or notebook PC that is running Windows 95 (or later).
Once connected, you can transfer files and synchronize data and
e-mail messages just as if you had connected using the sync
cable.
Line up the IR ports on the two devices so that they are within
20 centimeters (8 inches) of one another.
Before you can connect by infrared, you must set up and
configure an infrared port on your desktop or notebook PC. Many
notebook PCs have a built-in infrared port; however, you may
need to install a third-party infrared transceiver on your desktop
PC. For more information about installing and configuring that
device for use with your desktop PC, refer to the instructions that
came with your infrared port.
The Desktop Software for Microsoft Windows CE compact disk
also includes infrared device drivers for Windows 95.
To configure Windows CE Services for infrared
connection
.
1. Insert the Desktop Software for Microsoft Windows CE
compact disk into the CD-ROM drive on your desktop
PC, and then run Setup.exe.
2. Click
Optional Components
Windows 95 Communications Driver setup program.
, and then select the
Page 52

48 Hewlett-Packard Jornada 420 Palm-size PC
3. When the setup program prompts you to specify a
communications port, select a virtual port (typically
COM3).
4. When setup is complete, restart your desktop PC, and
then open the Mobile Devices window.
5. In the Mobile Devices window, click
on the
6. Under
you set up the infrared device.
–or–
Click
you may need to reinstall Windows CE Services.)
menu.
File
, select the infrared port you installed when
Port
to install the port. (If you install a new port,
New
Communications
To configure the HP Jornada for infrared
connection
1. On the HP Jornada
Communications
2. Tap the
not show Connect using Infrared Port, tap
Connection
list of available connections.
PC Connection
, and then select
menu, tap
Start
.
tab. If the control panel does
Infrared Port
Settings
, then tap
Change
from the
To establish an infrared connection
1. Line up the infrared port on the HP Jornada with the
infrared device on your notebook or desktop PC.
2. On the HP Jornada
Communications
menu, tap
Start
, and then tap
Programs
PC Link
, tap
.
Connecting g tto o aanother r PPC
In some cases, you may need to connect the HP Jornada to a
desktop PC other than your partner. Or, there may be times
when your desktop PC does not recognize the HP Jornada as its
partner. This occurs if you have logged on to the desktop PC with
a different user name or if you performed a full reset of the HP
Jornada by removing all power or allowing the batteries to die.
In these cases, when you connect the HP Jornada to a PC, the
New Mobile Device Detected dialog box appears, offering you the
Page 53

Chapter 4 | Connecting to a desktop PC | 49
option to Synchronize, Browse, or to Restore data from an
existing backup file.
If you choose Synchronize, the New Partnership Wizard begins,
and the HP Jornada is designated as a partner of the desktop
PC.
If you choose Browse, the HP Jornada is connected as a “guest.”
As a guest, you can view files and folders on the HP Jornada,
transfer files and folders, and manually back up or restore.
However, you cannot synchronize data or automatically back up
and restore data.
If you choose Restore, you are given the option to restore data
from an existing backup file on the desktop PC. Restoring data in
this way replaces all existing data on the HP Jornada with the
data in the backup file on your PC.
If you have lost the HP Jornada or replaced it with another HP
Jornada, you can set up the new P/PC with the same data and
settings as the old one, if you previously performed a full
backup using Windows CE Services or HP backup.
If you used Windows CE Services to back up your data, then
when you connect the new P/PC to your desktop PC for the
first time, choose Restore rather than Synchronize or Browse.
If you backed up the P/PC using HP backup, then restore the
information as described in “Using HP backup” on page 84.
Browsing g tthe e HHP P JJornada a ddesktop
While the HP Jornada is connected to a desktop PC, you can use
Windows CE Services to browse the contents of the HP Jornada
from your desktop.
To browse the HP Jornada desktop
1. Double-click the HP Jornada icon in the Mobile Devices
window on your desktop PC. The contents are displayed
as any other folder on your desktop PC.
You can cut, paste, and copy files between folders on the P/PC, or
transfer files between the P/PC and your desktop PC, simply by
dragging the file icons between the appropriate folders.
Page 54

50 Hewlett-Packard Jornada 420 Palm-size PC
For more information about transferring files, see
“Transferring files” on page 54.
You cannot open files or start programs stored on the P/PC by
double-clicking their icons in the Mobile Devices window. When
you double-click the icon for a file or program that is stored on
the P/PC, Windows CE Services displays the properties for that
file or program, as if you had clicked
menu.
Synchronizing g ddata
Windows CE Services with ActiveSync enables you to
synchronize data between the HP Jornada and desktop PC, so
the names you add to your Contacts database and the
appointments you add to your Calendar while traveling can be
automatically updated on your desktop PC when you return. You
can also synchronize messages in the HP Jornada Inbox with
Microsoft Outlook or Microsoft Exchange on your desktop PC,
and download channels.
You can set ActiveSync either to synchronize automatically each
time you connect the HP Jornada to your desktop PC, or to
synchronize continuously whenever the synchronized
information changes, for as long as the computers are connected.
You can also synchronize at any moment by choosing
Synchronize Now
window.
from the
Properties
menu in the Mobile Devices
Tools
on the
File
Synchronizing selected data
You can choose some or all of the following items to be
synchronized:
·
Calendar, Contacts, or Tasks information—Exchange and
update information on the HP Jornada with information
stored in Outlook or Schedule+ on your desktop PC.
·
E-mail messages—Share messages between selected folders in
the HP Jornada Inbox and Exchange or Outlook on your
desktop PC. For information on Inbox, see “Using Inbox” on
page 61.
Page 55

Chapter 4 | Connecting to a desktop PC | 51
·
Channels—Download Internet, intranet, or other Webformatted content to the P/PC. For information on channels,
see “Using channels” on page 52.
All files you create on your P/PC, such as Voice Recorder and
Note Taker files, are stored in a My Documents folder. You can
see these files by double-clicking your P/PC icon in the Mobile
Devices window on your desktop computer.
When Note Taker files are copied to the desktop computer, they
are converted to .doc files and can be opened in Microsoft Word.
When Microsoft Word (.doc) files are copied to the P/PC, they
must be converted manually to Note Taker (.pwi) files in order to
be opened in Note Taker.
To convert .doc files to .pwi files
1. In the Mobile Devices window on your desktop PC, go to
the
menu, and then select
Tools
File Conversion
.
2. Select the
Microsoft Word Document
3. Click
of the type
format.
4. Click OK to exit. For more information, see Windows CE
Services Help.
Voice Recorder files remain .wav files on both your P/PC and
desktop computer. Synchronization gives you a handy way to
move your Voice Recorder files to your desktop computer. A
special playback codec, provided with the Windows CE Services
installation, is needed to play P/PC .wav files recorded in Mobile
Voice format on your desktop computer. PCM files can be played
on any desktop PC.
Desktop to Device
, and in the
Edit
drop-down list, select the Note Taker (*.pwi)
Convert to mobile device file
tab, and select
from the list.
To specify data to synchronize
1. On your desktop PC, open the Mobile Devices window,
and then select the P/PC icon.
2. On the
3. On the
box, select the check boxes beside the services you want
to synchronize.
menu, click
Tools
General
tab of the
ActiveSync Options
ActiveSync Options
.
dialog
Page 56

52 Hewlett-Packard Jornada 420 Palm-size PC
4. To set specific options (for example, to indicate how
many weeks of Calendar data to synchronize, or to
synchronize only active tasks), select the appropriate
service, and then click
Speed up the synchronization process by synchronizing
regularly. If you use Microsoft Outlook, Windows CE Services
synchronizes only 2 weeks of calendar data by default.
Resolving synchronization conflicts
If the same item (for example, an appointment or a task) has
been modified on both the desktop PC and on the HP Jornada,
ActiveSync indicates that a synchronization conflict has occurred.
When the Resolve Conflicts dialog box appears, you can either
resolve the conflict by selecting one of the items to replace or you
can ignore the conflict.
You can resolve each conflict manually, at the time of
synchronization, or you can resolve conflicts automatically by
setting a default option for conflict resolution.
To set a default option for conflict resolution
Options
.
1. Open the Mobile Devices window, and then select the
P/PC icon.
2. On the
3. On the
box, click
4. Select the option you prefer to resolve conflicts.
menu, click
Tools
General
Advanced
tab of the
.
ActiveSync Options
ActiveSync Options
.
dialog
Using g cchannels
A channel is a Web site or other Web-formatted content that is
available for offline viewing on your P/PC. Channels allows
Internet, intranet, or other Web-formatted content to be
automatically downloaded to your P/PC from your desktop
computer via synchronization.
Content can be updated on a regular basis, such as updates from
a news channel, or on a one-time basis, such as movie listings
from an entertainment channel.
Page 57

Chapter 4 | Connecting to a desktop PC | 53
Channels and automatic updates to them are managed on the
desktop computer by Internet Explorer 4.0. Use Internet
Explorer 4.0 on your desktop computer to subscribe to Mobile
Channels.
A special Web site has been set up to help you get started using
Channels. For information on getting started with Channels on
your P/PC, go to http://www.microsoft.com/windowsce/channels/.
Personalizing channels
Some channels are divided into content areas. You can choose
which content areas you want to download to your P/PC. In
Channels, tap
content areas you want.
You can specify the amount of channel information that is
transferred to your P/PC. Tap
information is stored on your P/PC, and new content replaces
older content.
File
, then
Channels
View
, and select the channels and
, then
Options
. Channel
To remove a channel and all of its content, tap
Channels
, and clear the channel that you want to remove.
File
, then
Synchronizing channel information
Channel information can be synchronized as part of the general
synchronization process described above. In the Mobile Devices
window of Windows CE Services, click
Options
During synchronization, channel information is copied to your
P/PC. It can be viewed either from Channels or on your Active
Desktop as a mobile desktop component, depending on the
channel format you have subscribed to. See “Mobile desktop
components” later in this chapter for more information.
, then select
Channel Item
Tools, ActiveSync
.
Viewing channel content
Whenever new content is available for one of your channels, you
see the Channel icon in the status area of the taskbar. Doubletap the icon to switch to Channels, or tap
Start
, then
Channels
.
Page 58

54 Hewlett-Packard Jornada 420 Palm-size PC
To view channel content, tap an icon on the Channel bar, or tap
the
Explore Channel
to a specific page within a channel.
button to quickly navigate to a channel or
Displaying mobile desktop components
The P/PC also includes an Active Desktop feature that can
display specialized channel content for quick reference. Similar
to Channels, content for mobile desktop components is
synchronized with the desktop computer. For example, a content
provider might create a mobile desktop component that updates
and displays key financial market indices during the day.
To display mobile desktop components on the Active Desktop, tap
Start, Settings, Display
want to display.
, and then select the components you
Transferring g ffiles
You can copy files between the HP Jornada and desktop PC by
dragging icons to or from the P/PC icon in the Mobile Devices
window on your desktop PC or by using the
commands on the
Paste
Edit
menu.
Cut, Copy
, and
Printing
If you want hard copies of files on your P/PC, you must transfer
them to your desktop PC for printing. You cannot print files
directly from the P/PC.
Page 59

Chapter 5 | Sending and receiving e-mail | 55
5 5 | | SSending g aand
receiving g ee-mail
With Inbox, you can keep in touch with your office, home, and
clients by sending and receiving e-mail messages in any of these
ways:
·
synchronize messages with Microsoft Exchange or Microsoft
Outlook on your desktop computer
·
transfer individual messages using Windows CE Inbox
Transfer
·
send and receive messages using a dial-up connection to an
ISP or an Ethernet connection to your Corporate Network
Synchronizing g mmessages
E-mail messages can be synchronized as part of the general
synchronization process described in “Synchronizing data” on
page 50. During synchronization:
·
Messages are copied from the Inbox folder of Exchange or
Outlook on your desktop computer to the Inbox folder on your
P/PC. The messages on the two computers are linked, so when
you delete a message on your P/PC, it is deleted from your
desktop computer as well the next time you synchronize.
·
Messages in the Outbox folder on your P/PC are transferred to
Exchange or Outlook, and then sent from those programs.
Features available on your desktop computer, such as scheduling
meetings and selective downloading of file attachments, are also
available on your P/PC.
By default, e-mail synchronization is disabled. To enable e-mail
synchronization, in the Mobile Devices window on your desktop
computer, click
and then click OK.
Tools, ActiveSync Options
, select
Message
,
Page 60

56 Hewlett-Packard Jornada 420 Palm-size PC
After you have enabled message synchronization, you can set
message synchronization options by closing the dialog box and
then reopening it. Select
Message
and then click
Options
.
Using g WWindows s CCE E IInbox x TTransfer
You can use Windows CE Inbox Transfer to copy or move specific
messages between Exchange or Outlook and your P/PC, and you
can move them into folders other than the Inbox. The messages
on the two computers are not linked. You can modify or delete
messages from one location without affecting the other.
You can also use this method to move messages to your desktop
computer that you have received on your P/PC from other
services, such as paging and faxing services.
To transfer messages, connect the P/PC to the desktop computer.
In either Exchange or Outlook, click
Inbox Transfer
, and then indicate what you want to do.
Tools
, then
Windows CE
Page 61

Chapter 5 | Sending and receiving e-mail | 57
Sending g aand d rreceiving g mmessages s uusing g a a ddial-
up p cconnection
If you want e-mail service, you need:
·
a modem
·
a PPP (Point-to-Point Protocol) or SLIP (Serial Line Internet
Protocol) account to an Internet service provider (ISP)
·
a dial-up connection set up on the HP Jornada
·
access to a phone line
Page 62

58 Hewlett-Packard Jornada 420 Palm-size PC
The following figure depicts how the connection is made.
Connecting to the Internet
Installing and configuring a modem
The HP Jornada 420 supports CompactFlash Card modems.
Follow the manufacturer’s instructions included with the
CompactFlash Card modem to install and configure it for use
with the HP Jornada.
Getting an account with an Internet service provider
To send and receive e-mail, you need to contact an ISP to set up a
PPP account. SLIP accounts are offered by some ISPs instead of
PPP accounts. The HP Jornada supports the use of SLIP as well
as PPP.
Your ISP gives you the configuration information you need to
connect the HP Jornada to e-mail service:
·
your account user name
·
your account password
·
phone number of your ISP’s modem
·
IP and DNS addresses, if necessary
·
your e-mail user name or ID (this may be the same as the user
name for your ISP account)
·
your e-mail password (this may be the same as the password
for your ISP account)
Page 63

Chapter 5 | Sending and receiving e-mail | 59
·
the POP3 host name of your ISP
·
the SMTP host name of your ISP (if required by your ISP)
Setting up a dial-up connection to your ISP
After you have established an account with an ISP, you can set
up a connection on the HP Jornada and send and receive e-mail
whenever you want.
To set up a dial-up connection
1. On the
Communication
2. In the
Connection
3. In the
Up Connection
4. Select the down-arrow button next to the
modem
If you do not see your modem listed in the drop-down
list, your modem may not be properly connected to your
P/PC. Make sure that the modem is connected to your
P/PC properly, based on the installation instructions
that came with the modem.
5. Tap
Next
Tap
Finish
specified in the
also appears on the
submenu.
menu, tap
Start
Connections
, and type a name for the connection.
Make New Connection
, and then tap
box, and highlight the name of your modem.
and fill in the phone number you wish to dial.
. A new icon appears with the name you
Connections
Programs
, and then tap
folder, double-tap
menu in the
Start
, tap
Connections
dialog box, select
.
Next
folder. This connection
Connections
.
Make New
Select a
Dial-
Connecting to your ISP
After you have configured your connection to your ISP, you are
ready to connect your phone line to your modem, and then dial
in. Make sure you connect to the phone line supported by your
modem, follow the instructions provided by the manufacturer.
Most CompactFlash Card modems use analog phone lines.
Page 64

60 Hewlett-Packard Jornada 420 Palm-size PC
To connect to your ISP
1. Plug your modem’s phone cord into a standard phone
jack.
2. To use your new connection, double-tap the new icon in
the
Connection
Start/Programs/Communication
3. Fill in the requested information before you dial.
After you are connected to your ISP, use the Inbox program to
send and receive e-mail, as explained in “Using Inbox” on page
61.
If you are unable to find an analog phone line, use the line
dedicated to a fax machine. Fax machines use only analog
lines.
folder (or select the new icon from the
Setting g uup p aan n EEthernet t cconnection
The HP Jornada can also connect to networks via Ethernet cards
(CompactFlash Type II cards). Check the manufacturer’s
installation instructions for information on how to set up the
connection.
menu).
Page 65

Chapter 5 | Sending and receiving e-mail | 61
Using g IInbox
In Inbox on your P/PC, tap
tab, and then the
the steps.
Add
To download your messages from the server
Compose, Options
button. A setup wizard walks you through
, the
Services
1. Tap
2. Tap
The mail that you receive using a dial-up connection appears in
the Inbox folder on your P/PC, together with the mail you
synchronize with your desktop computer. Messages that you
receive remotely are linked to your mail server rather than your
desktop computer.
You can work online, which means that you read and respond to
messages while connected to the server. Messages are sent as
soon as you tap
You can also work offline. Once you have downloaded new
message headers or partial messages, you can disconnect from
the server and then decide which messages to download
completely. The next time you connect, Inbox downloads the
complete messages you have marked for retrieval and sends the
messages you have composed (see “Receiving messages” for
details).
Service
Connect
, and select the connection you want to use.
to start downloading.
, which saves space on your P/PC.
Send
Page 66

62 Hewlett-Packard Jornada 420 Palm-size PC
Receiving messages
When you receive a message, double-tap it to open it.
When you connect to your Internet mail service, by default Inbox
downloads only the first 100 lines of each new message to the
Inbox folder. No mail attachments are downloaded. When you
synchronize with your desktop computer, only the first 50 lines of
each new message are downloaded. The original messages
remain on the mail server or your desktop computer.
You can mark the messages that you want to retrieve in their
entirety the next time you synchronize or connect to your mail
service. Select the message, tap
Full Copy
indications of message status.
. The icons in the Inbox message list give you visual
Service
, and then tap
Retrieve
Page 67

Chapter 5 | Sending and receiving e-mail | 63
You specify your downloading preferences when you set up the
service or select your synchronization options. You can change
them at any time.
To change Inbox delivery options for mail synchronization, in the
Mobile Devices window on your desktop computer, select your
P/PC icon, click
Select
Message
and then click
Tools,
and then click
ActiveSync Options
Options
. (For the
.
Options
button to be available, you must have previously enabled
message synchronization.)
To change Inbox delivery options for remote mail, in Inbox on
your P/PC, tap
Service
again and tap
Service
and then tap the service name. Then tap
Properties
.
You need to download a full message before you can view its
attachments.
Microsoft Exchange users can use Inbox to schedule meetings
remotely. Your network administrator must enable Microsoft
rich text support for any accounts that are accessed by mobile
device users.
To process meeting requests, you need to download the complete
message, either by marking specific messages for downloading or
by choosing to download all messages completely during the
service setup. In addition, make sure to enable the
requests
option during the service setup.
Meeting
Page 68

64 Hewlett-Packard Jornada 420 Palm-size PC
Sending messages
To compose a new message, tap the
toolbar. You can enter an e-mail address in the To box, or you
can select a name from the Address Book. All e-mail addresses
entered in the e-mail fields in Contacts appear in the Address
Book.
New Message
button on the
To send your message, tap
placed in your Outbox folder on your P/PC and are delivered to
their destination in one of two ways.
They are transferred to the Outbox folder in Exchange or Outlook
on your desktop computer the next time you synchronize.
They are transmitted to your mail server the next time you
connect remotely. In Inbox, make sure the appropriate service is
selected on the
Service
menu. Then tap
File
and then
. Messages are
Send
Connect
.
Page 69

Chapter 5 | Sending and receiving e-mail | 65
Sending g aand d rreceiving g CCompuServe ee e-mail
If you are a member of CompuServe, you can use Inbox to receive
your CompuServe e-mail on the HP Jornada. To do this, you need
to
·
Use the Web browser and Internet account on your desktop
PC (partner) to go to the CompuServe Web site at
www.csi.com/communications.
·
Follow the instructions that are provided at that site for
creating a POP3 mailbox. Be sure to choose a mailbox
password that the HP Jornada can support (that is, clear
text).
·
Create a connection on the HP Jornada, as described in
“Setting up a dial-up connection to your ISP” on page 59. You
have all the account information you need when you finish
creating your POP3 mailbox at the CompuServe site.
·
Set up (and name) the Inbox mail service connection. See
“Using Inbox” on page 61.
After you have completed these initial setup procedures, you are
able to send and receive your CompuServe e-mail just as you
would with any other Internet e-mail account.
Page 70

66 Hewlett-Packard Jornada 420 Palm-size PC
Page 71

Chapter 6 | Staying Organized | 67
6 6 | | SStaying g OOrganized
The Hewlett-Packard Jornada 420 comes with programs
designed to help you stay organized. You can manage your
contacts, tasks, and calendar while you are away from your
office. When you return, you can synchronize the HP Jornada
with your desktop or notebook PC to ensure that the databases
on the HP Jornada are always up to date with the Microsoft
Outlook or Schedule+ data on your desktop.
You can also set alarms and reminders so you never forget an
appointment or meeting, and you can record voice memos to
yourself with Microsoft Voice Recorder. This chapter contains
information about and basic procedures for:
·
Calendar
·
Contacts
·
Tasks
·
Voice Recorder
Calendar, Contacts, and Tasks have a card view and a list view.
Card view allows you to enter or view the details for each entry.
List view allows you to view all entries.
You can switch to these programs at any time by tapping them
on the
More information on the procedures described in this chapter,
as well as information on additional procedures, can be found
in online Help on the P/PC. Tap
item you want information on.
Start
menu.
Start, Help,
and then the
Page 72

68 Hewlett-Packard Jornada 420 Palm-size PC
Scheduling g mmeetings s aand d aappointments
Use Calendar to schedule appointments, meetings, and other
events. Check your appointments in one of several views (Day,
Week, Month, Year, and Agenda). Switch among the views by
tapping the corresponding command bar button.
You can display today’s appointments on your Active Desktop.
Tap
Start, Settings, Display, Display Active Desktop
then select
Appointments
, and
.
Enter the details for an appointment on the appointment card.
You can quickly display a new appointment card by doubletapping the Calendar hard icon.
Page 73

Chapter 6 | Staying Organized | 69
If you need to schedule a meeting with people who use Outlook,
Pocket Outlook, or Schedule+, you can use Calendar to schedule
the meeting. When attendees receive a meeting request, they can
accept or decline the meeting. If they accept, the meeting is
automatically added to their schedule. In addition, their response
is automatically sent back to you, and your calendar is updated.
Before you can send a meeting request, you need to enter e-mail
addresses in Contacts and set up Inbox to send and receive
messages. For information on using Contacts and Inbox, see
“Tracking friends and colleagues” on page 70, and “Using Inbox”
on page 61.
To create a meeting request
1. Tap
2. Tap
3. Enter the meeting information.
4. Select the contacts you want to invite.
5. Select other desired options and then OK.
Tools, Options
you send and receive messages using synchronization,
select
Windows CE Inbox Services
an ISP or network, select the service you set up in Inbox.
and then
File
, and then select a mail transport. If
. If you connect to
Make Meeting
.
Page 74

70 Hewlett-Packard Jornada 420 Palm-size PC
Inbox automatically creates a meeting request and sends it to the
attendees the next time you connect to your mail server or
synchronize with your desktop computer.
Your P/PC reminds you about your appointments and
meetings by sounding an alarm, flashing the notification light,
or displaying a message on the screen. To change how your are
notified, tap
and then
Reminder Options
Tools
and then
Tracking g ffriends s aand d ccolleagues
Contacts maintains a list of your friends and colleagues so that
you can easily find the information you are looking for, whether
at home or on the road. Using the P/PC IR port, you can also
quickly share Contacts information with other Windows CEbased mobile device users.
You can quickly create a contact card by double-tapping the
Contacts hard icon.
Options
.
. Tap the
Alarm
button
Enter the details for a contact on the contact card. You can enter
both business and personal information.
To change the type of information that appears in your list,
tap
Tools
and then
Customize Columns
.
Page 75

Chapter 6 | Staying Organized | 71
Keeping g a a tto-do do llist
Use Tasks to keep track of what you have to do. Overdue tasks
are displayed in red.
Enter the details for a task on the task card. You can assign a
task to a category, and if you associate a date with a task, you
can set a reminder for it.
Page 76

72 Hewlett-Packard Jornada 420 Palm-size PC
All active tasks (tasks that have a start date before the current
date and are not marked completed) are displayed in the Active
Tasks box in the Agenda view of Calendar.
Display your active tasks on the Active Desktop. For more
information, see “Using the Active Desktop” on page 23.
Recording g vvoice e mmemos
Quickly capture thoughts and reminders, ideas, and phone
numbers with Voice Recorder. Use it in the way that is most
convenient for you: using the hardware buttons on your P/PC or
using the buttons on your screen.
You can use the buttons on your P/PC to record and play
recordings one-handed.
Making a recording
To Do this
Record Press and hold the Record button.
You hear one beep when it is ready
to record.
Stop recording Release the Record button. You
hear two beeps when recording
stops.
Page 77

Chapter 6 | Staying Organized | 73
Playing a recording
To Do this
Play Press the Action button.
Pause/resume Press the Action button.
Stop Press the Exit button (returns to
the beginning of the recording).
Play all Press the Action button twice
(plays all messages in the list).
Navigating
To Do this
Fast-forward, while
playing
Rewind, while playing Press and hold the Action button in
Scroll through the list
of recordings
Press and hold the Action button in
the down position.
the up position.
Press the Action button up or down
and then quickly release.
Using the screen buttons
Instead of using the P/PC buttons, you can tap the buttons on
your screen to record and play your recordings. A progress bar
and a status bar provide visual indications of the process.
Page 78

74 Hewlett-Packard Jornada 420 Palm-size PC
To skip part of a recording, move the slider to any place in the
recording before you play it.
Adjusting memory
If your P/PC runs out of memory while recording, you hear
several beeps and see an out-of-memory message on your screen.
You can adjust the allocation of memory on your P/PC by tapping
Start, Settings, System
If you run out of memory frequently, use a CompactFlash
Memory Card for storing files that you rarely need. For more
information on CompactFlash Memory Cards, see “Inserting and
Removing CompactFlash Cards” on page 92. To save a recording
to a CompactFlash card, tap the
Options
check box, and then tap OK.
. On the
General
, and then the
Tools
tab, tap the
Memory
menu, and then tap
Save to storage card
tab.
Page 79

Chapter 6 | Staying Organized | 75
Voice Recorder uses approximately 300 bytes per second for
recording, using the Mobile Voice format. For example, a 10second note uses approximately 3K.
Choosing a recording format
Voice Recorder uses a codec called Mobile Voice to compress files,
making them 25 times smaller than the original size. This
enables you to store more recordings, although the sound quality
is less than optimal. For the best sound quality, use the PCM
format. These files are larger than those stored in Mobile Voice
format. To switch formats, tap
Format
Your recordings are saved as .wav files, which you can transfer to
your desktop computer for playback, editing, and archiving. You
need desktop software that can play .wav files, and you need the
same codec used to make the recording. You can get the Mobile
Voice codec by installing Windows CE Services (see
“Understanding Windows CE Services” on page 39) or go to the
following Web site: http://www.microsoft.com/windowsce/info/.
.
If you want to email your recording from your P/PC, use the
PCM file format.
Tools
and then
Recording
Organizing recordings
Your recordings are saved automatically and given the names
Recording1, Recording2
recordings are listed in the Voice Recorder window.
To quickly rename a recording
1. Tap the recording to select it.
2. Tap it again, and then enter the new name.
You can organize your recordings by renaming them and placing
them in folders. For example, you can create a folder called My
Novel and place all relevant recordings in that folder.
If you display recordings for a particular folder in the Voice
Recorder window, any new recordings you make while that folder
is selected are placed in that folder. They are given the folder
, and so on, by default. These
Page 80

76 Hewlett-Packard Jornada 420 Palm-size PC
name and an incremental number (My Novel1, My Novel2, and
so on).
Page 81

Chapter 7 | Getting down to business | 77
7 7 | | GGetting g dodown n tto
business
The Hewlett-Packard Jornada 420 can help you stay productive
and be efficient, even when you are away from your desktop or
notebook PC. You have access to pre-installed programs to help
you calculate expenses and conduct searches.
This chapter contains information about:
·
Microsoft Note Taker
·
bTASK from BSQUARE
·
OmniSolve from LandWare
·
HP backup
·
Customizing the HP Jornada
Creating g nnotes s aand dd drawings
Note Taker with Rich Ink technology makes it easy to write,
draw, and make lists quickly, the way you are used to writing on
paper¾but even better, because you can edit and format what
you have written or drawn.
To use Note Taker, tap
You can create a new note by tapping the
tap the
which the formatting and structure are already in place.
arrow and tap a template to start with a note in
New
Start
, then
Note Taker
New
.
button, or you can
Page 82

78 Hewlett-Packard Jornada 420 Palm-size PC
Entering information
With Note Taker, you can enter information in the way that is
easiest for you. You can use the input panel to type using the
keyboard, or you can write using the character recognizer. You
can also write and draw directly on the screen.
When you display the input panel, you see the insertion point,
indicating where the text is placed.
Page 83

Chapter 7 | Getting down to business | 79
When you hide the input panel, the insertion point disappears,
and you can write or draw anywhere on the screen.
Writing and drawing
You can use your stylus to write and draw directly on the screen.
To create a drawing, on your first stroke, cross three ruled lines.
A drawing box appears. Subsequent strokes in or outside the
border of the drawing box become part of the drawing.
You might want to switch to full-screen display so that you can
see as much as possible on the screen. Tap
Screen
. Tap
Restore
to see the command bar again.
View
, then
Full
Editing and formatting a note
You can edit text you have entered using a keyboard or character
recognizer. You can also edit handwritten notes and drawings. To
select the text or picture you want to edit, hide the input panel,
tap the
drawing.
button, and drag your stylus over the text or
Select
Page 84

80 Hewlett-Packard Jornada 420 Palm-size PC
Instead of tapping the
the
Action
Tap the
button as you drag the stylus.
button to see your editing options. The options
Edit
button, you can press and hold
Select
available depend on what you have selected: text, handwriting,
or a drawing.
You can apply formatting to a selection, or you can set default
formatting that is applied to everything you then type, write, or
draw.
You can also use the
button to increase or decrease the
Space
space between elements on your screen.
Page 85

Chapter 7 | Getting down to business | 81
Instead of tapping the
remove space by pressing and holding the Exit button as you
drag the stylus.
button, you can insert and
Space
Saving your notes
When you have finished a note, tap OK to save it and return to
your list of notes. Note Taker automatically names your note as
follows.
The first 21 characters of the first line of typed text are used as
the note name.
If no text is included in the note, but the note has been assigned
to a folder, the notes are given the folder name and an
incremental number (Tradeshow1, Tradeshow2, and so on).
If no text is included and no folder is assigned, the notes are
named
To name a note yourself, to place it in a folder, or to change the
file format, tap
Note1, Note2
File
, etc.
and then
Save As
.
Each note in Note Taker is a file. Note Taker files are saved in
Note Taker (.pwi) format, which synchronizes with Microsoft
Word files, as described in Chapter 6. You have two additional
choices for file formats:
To import the file into a program that supports rich text, save the
note in
drawings are lost.
To import the file into a program that does not support rich text,
save the note as a
drawings, and all formatting, are lost.
Rich text format
Text only note
(.rtf). Handwritten words and
(.txt). Handwritten words and
Page 86

82 Hewlett-Packard Jornada 420 Palm-size PC
Organizing your notes
You can keep track of your notes by renaming them and placing
them in folders. For example, you can create a folder called My
Novel and place all relevant notes in that folder. All the notes in
the selected folder appear in the list view.
Using g bbTask
Use bTask to switch between applications, view the applications
currently running, or close applications with a single step.
Tasks are closed automatically when memory is running low.
To start bTask
1. From the
. The
bTask
Start
bTask
menu, tap
icon is added to the taskbar.
Programs
, and then tap
To switch between open applications
1. Tap the
2. Tap the application to which you want to switch.
icon on the taskbar.
bTask
To close the active application or all open
applications
1. Tap the
2. Tap
Close Active
icon on the taskbar.
bTask
or
Close All
.
Page 87

To close bTask
Chapter 7 | Getting down to business | 83
1. Tap the
2. Tap
Exit
icon on the taskbar.
bTask
.
Using g OOmniSolve
OmniSolve is a financial application designed specifically for real
estate, retail, and business professionals who use P/PCs to make
financial decisions quickly and accurately. OmniSolve employs a
“form filling” metaphor to give you a problem-solving
environment that is easy, powerful, and flexible.
To start OmniSolve
1. From the
OmniSolve
For detailed procedures about using OmniSolve, refer to online
Help.
Start
.
menu, tap
Programs
, and then tap
Backing g uup p aand d rrestoring g ddata
To prevent loss of data, you should back up the HP Jornada data
frequently. You can back up the HP Jornada two convenient
ways:
·
Use Windows CE Services to back up all data to your desktop
PC.
·
Use the HP backup application to back up all data or only
Calendar, Task, and Contact (PIM) databases to internal
memory or a CompactFlash Card.
Using Windows CE Services Backup at your PC
The Windows CE Services Backup feature creates a complete
duplicate of all data stored on the HP Jornada. If you routinely
connect to your desktop PC, this is the best method of data
backup. The backup file is saved on the hard disk of your desktop
PC.
When you restore data from a backup file created by
Windows CE Services, all data on the HP Jornada is replaced by
Page 88

84 Hewlett-Packard Jornada 420 Palm-size PC
the data in the backup file, including files you have created,
programs you have installed, and any system settings and
options you have set.
To access the Windows CE Services Backup feature, click
Backup/Restore
window.
on the
Tools
Using HP backup
HP backup provides a convenient way to back up data while you
are traveling or while you are away from your desktop PC. You
can back up the information to a CompactFlash Card for secure
storage. You can also back up data to a folder on the HP Jornada.
However, this does not preserve the information if you lose power
or need to perform a full reset.
The backup file (.dbe or .dbb) is always placed in the My
Documents directory. When saving to a CompactFlash Card, a
My Documents directory is automatically created.
To back up data
menu in the Mobile Devices
1. On the
Start
menu, tap
Settings
, and tap
HP backup
.
Page 89

Chapter 7 | Getting down to business | 85
2. Tap
·
·
Backup
Select
stored in RAM, including files you have created,
programs you have installed, and any system
settings and options you have set.
Select
your Contacts, Tasks, and Calendar databases.
, and then choose one of the backup options:
Backup all data
Backup PIM databases
to back up all information
to back up only
3. Follow the instructions on your screen to complete the
backup process.
To restore from a backup file
1. On the
2. Tap
3. Tap either
4. Select the backup file you want to restore, and then tap
Restore
databases
.
OK
menu, tap
Start
.
Restore all data
.
Settings
or
, and tap
Restore PIM
HP backup
.
Page 90

86 Hewlett-Packard Jornada 420 Palm-size PC
The HP Jornada must have the same regional settings when
you restore as you had when you completed the backup.
Otherwise, you cannot restore the files. To change regional
settings, on the
Regional Settings
Start
.
menu, tap
Settings
, and then tap
Customizing g tthe e HHP P JJornada
This section describes ways you can add software and accessories
to the HP Jornada.
Finding third-party software
You can add more capabilities to the HP Jornada by installing
third-party software. A variety of commercial software is
available for Windows CE, including custom business
applications, system utilities, and games.
Page 91

Chapter 7 | Getting down to business | 87
You can get these programs from:
·
the HP Jornada compact disk and the Desktop Software for
Microsoft Windows CE compact disk included with the
HP Jornada
·
software distributors and their web sites, including the HP
web site at www.hp.com/jornada/solutions/solution.html
You cannot run programs designed for Windows 95 or
Windows NT on the HP Jornada. The programs that run on
the P/PC must be designed specifically for Windows CE Palmsize PCs.
Contents of the HP Jornada compact disk
The HP Jornada compact disk includes the following programs:
·
Outside In from Inso—View Microsoft Word files (with
graphics) from your P/PC.
·
Quicken ExpensAble from On-The-Go Software—Create
expense reports while on the road.
·
PhoneManager 2.0 from Trio—Send and receive SMS
messages via GSM phone, and manage the handphone
directory from P/PC.
·
PIM Translation Utility from Hewlett-Packard—Translate
Appointments and Phone Book data from older HP electronic
organizers for use in your HP Jornada.
Explore the HP Jornada compact disk to enjoy these free
programs. For more information about a particular program, go
to the program manufacturer’s website.
Minimum PC requirements for HP Jornada compact disk
The minimum PC requirements for the HP Jornada compact disk
are as follows:
·
Microsoft Windows 95, Windows 98, or Windows NT 4.0
·
486 66MHz or faster processor
·
2x or faster CD-ROM drive
Page 92

88 Hewlett-Packard Jornada 420 Palm-size PC
·
VGA (640 x 480) 256-color monitor
·
Web browser: Netscape Navigator 2.0 or higher, or Microsoft
Internet Explorer 2.0 or higher.
To install a program
1. Download the software program or installer from the
Web to your desktop PC.
–or–
Insert the floppy disk or compact disk into the
appropriate drive on your desktop PC.
2. Connect the HP Jornada to your desktop PC.
3. If the program includes an installer program (typically
named Setup.exe or Install.exe), double-tap the installer
program on the desktop PC. The installer program
copies the necessary files to the HP Jornada.
–or–
If the program does not have an associated installer or
setup program, drag the program file (typically an *.exe
file type) to the HP Jornada icon in the Mobile Devices
window. If the
appears, tap OK to copy the file without conversion.
No Converter Selected
dialog box
Install software by dragging the program file to the Mobile
Devices window only if no installer program is available.
Software installed in this way may not appear on the
Programs
manually if you wish to remove it from the HP Jornada.
list, and you may have to delete the program
Remove
To add programs with Application Manager
1. Connect the HP Jornada to your desktop PC, and then
open the Mobile Devices window.
2. On the
Application Manager
3. In the list of programs, select the program you wish to
install, and then click
menu in the Mobile Devices window, click
Tools
.
.
Add
Page 93

Chapter 7 | Getting down to business | 89
Removing programs
After you have installed a program on the HP Jornada, you can
use the Windows CE Application Manager to remove the
program or to reinstall the program after it has been removed. If
you do not have enough storage memory on the HP Jornada, you
may want to use the Application Manager to temporarily remove
programs you no longer use or programs that you use
infrequently.
You can use either the Application Manager (on your desktop
PC) or the
HP Jornada) to remove programs.
Remove Programs
To remove programs with Application Manager
1. Connect the HP Jornada to your desktop PC, and then
open the Mobile Devices window.
control panel (on the
2. On the
Application Manager
3. In the list of programs, select the program you want to
delete, and then click
menu in the Mobile Devices window, click
Tools
.
Remove
.
To remove programs from the HP Jornada with
the Remove Programs control panel
1. On the
Remove Programs
2. From the
remove.
3. Tap
Programs stored in ROM cannot be removed. (For a list of
these programs see “Using HP Jornada’s built-in programs” on
page 3.)
Remove
menu, tap
Start
Programs
.
Settings
.
list, select the program you want to
, and then tap
Page 94

90 Hewlett-Packard Jornada 420 Palm-size PC
Adding sounds
The HP Jornada plays sounds (.wav files). You can copy a new
sound file from your desktop PC to the HP Jornada without
converting the file.
To add sounds
1. Connect the HP Jornada to a desktop PC and start
Windows CE Services.
2. Double-click the HP Jornada icon.
3. Drag the .wav file you want to copy from its location on
your desktop PC to the Windows folder in the Mobile
Devices window.
To use the new sound
1. On the HP Jornada
tap
Volume & Sounds
2. Tap the
3. Choose an event name from the first dropdown list.
4. Choose the new sound from the second dropdown list.
5. Tap OK.
Sounds
tab.
Start
.
menu, tap
Settings
, and then
Adding desktop wallpaper
The HP Jornada can display Windows CE bitmaps (.2bp files).
You can copy Windows CE bitmap images from your desktop PC
to the HP Jornada without converting the files, and you can use
these images as desktop wallpaper on your Windows CE desktop.
To add desktop wallpaper
1. Connect the HP Jornada to a desktop PC and start
Windows CE Services.
2. Double-click the HP Jornada icon.
3. Drag the bitmap image you want to copy from its
location on your desktop PC to the Windows folder in the
Mobile Devices window.
Page 95

To use the new wallpaper
Chapter 7 | Getting down to business | 91
1. On the HP Jornada
tap
Display
2. Choose the
3. Choose the new bitmap image from the
image
on the right side of the dialog box.
4. If desired, tap the
5. Tap OK.
.
Display wallpaper
dropdown list, and examine the preview image
Tile
Start
checkbox.
menu, tap
radio button.
Settings
Wallpaper
Adding accessories
You can purchase the following optional accessories.
·
CompactFlash Card and adapter (4MB) (F1231A)—Adds
storage memory.
·
CompactFlash Card and adapter (10MB) (F1233A)—Adds
storage memory.
·
Sync Cable (F1258A)
·
External keyboard (F1275A)
·
Battery Pack (F1287A)
·
Pens (F1288A)
, and then
·
Cradle (F1289A)
·
AC Adapter (F1290A)
·
External charger (F1293A)
Go to the Hewlett-Packard website at www.hp.com/jornada to
check for new accessories.
Page 96

92 Hewlett-Packard Jornada 420 Palm-size PC
Inserting and Removing CompactFlash Cards
CompactFlash Type I and II Cards give the HP Jornada
additional capabilities, such as additional memory, removable
storage, cellular modems, and Ethernet cards. Many cards have
been tested specifically for compatibility with the HP Jornada.
For a list of recommended compatible devices, go to the HewlettPackard Web site at www.hp.com/jornada.
You may also need to install a software driver for a particular
card. The software drivers for Windows CE should be included
with the card or be available from the card manufacturer.
To insert the CF card
1. Turn off the P/PC, and close the display cover.
2. Remove the CF card slot door by pressing onto the
fingernail recess and pulling the door off.
3. Connect the P/PC to AC power by mounting it into the
cradle.
4. Push the card, connector-side first, into the slot until it
stops. The P/PC turns back on.
5. Replace the card slot door by positioning the two tabs in
the slot groove and pressing onto the fingernail recess to
push the door locked.
View showing how to insert a CF card
Page 97

Chapter 7 | Getting down to business | 93
To remove the CF card
1. Close all applications on the P/PC that have open files
on the CF card.
2. Turn off the P/PC, and close the display cover.
3. Remove the CF card slot door by pressing onto the
fingernail recess and pulling the door off.
4. Use the end of the stylus to lever the CF card out.
5. Replace the card slot door by positioning the two tabs in
the slot groove and pressing onto the fingernail recess to
push the door locked.
Page 98

94 Hewlett-Packard Jornada 420 Palm-size PC
Page 99

Chapter 8 | Troubleshooting | 95
8 8 | | TTroubleshooting
If you encounter difficulties while using your HP Jornada 420,
this chapter helps you find answers. If you need information
about troubleshooting Microsoft® Windows® CE Services, click
Windows CE Services Help Topics on the Help menu in the
Mobile Devices window on your desktop PC.
The information in this chapter helps you:
·
Troubleshoot basic problems
·
Troubleshoot problems with remote connections
·
Troubleshoot problems with the display
·
Troubleshoot problems connecting by infrared
Troubleshooting g bbasic c pproblems
If you have a specific problem, review the information below to
see if you can find the answer quickly. Or, go to the HP Jornada
Web site at www.hp.com/jornada for current information about
common difficulties.
Problem Diagnosis / Remedy
HP Jornada does not
turn on when not
connected to AC power.
Battery runs out of
power quickly.
Battery power is too low to run the
P/PC. Connect to AC power, and
then turn on your HP Jornada.
(Charge the battery regularly to
avoid running out of battery
power.)
You are using your HP Jornada in
ways that drain the batteries
quickly. See “Managing battery
power” on page 16.
Page 100

96 Hewlett-Packard Jornada 420 Palm-size PC
HP Jornada does not
auto-suspend when
connected to a desktop
PC or when using the
modem.
HP Jornada
automatically shuts
down.
HP Jornada does not
turn on when connected
to AC power.
HP Jornada locks up
when running
applications.
The HP Jornada is designed to stay
on while connected to a computer.
This is the correct behavior. No
action is needed.
Batteries are too low to run the
P/PC. When a critically low
battery-power condition is
encountered, the HP Jornada
initiates a safety shutdown.
Connect to AC power and charge
the battery.
HP Jornada is locked up. Connect
the HP Jornada to external power,
and perform a soft reset. (See
“Resetting” on page 99.) (Caution:
You may lose any unsaved data
when performing a soft reset.)
HP Jornada is locked up. Connect
to AC power, and perform a soft
reset. (See “Resetting” on page 99.)
Note: Check battery power
regularly to ensure that the battery
is not running low on power.
HP Jornada does not
turn on or display
appears to be off, even
though power is on.
Backup file created
with the HP backup
application on another
HP handheld device
cannot be restored to
the HP Jornada 420.
The display contrast is too light.
(For more information, see “Using
HP settings” on page 31.)
File format is not compatible, or file
cannot be found.
Only a PIM database backup file
(.dbb) can be restored from another
HP handheld device to the
HP Jornada 420. Make sure that
you save the backup file (.dbb) in
the My Documents directory on the
other handheld device, and that the
My Documents directory is copied
to the CompactFlash Card used for
the restore action.
 Loading...