

Page 1

H P D e s k J e t 6 9 0 C S e r i e s P r i n t e r s M S W i n d o w s P r i n t i n g
MS Windows Printing
The HP DeskJet 690C series printer drivers are compatible with MS
Windows 3.x, and MS Windows 95.
Note
Access to the printer driver to change specific settings is available from
within each software application program. This is recommended since
settings made in the software application can override settings made in
the Printers control panel.
Steps to access the printer driver vary depending upon the software
application. Generally, the printer driver is accessed from the “File, Print”
or “File, Print Setup” in the software program.
You can also access the printer driver through the MS Windows’ Printers
control panel to change default settings. The Printers control panel allows
you to:
Only a printer driver containing the designation “690C”
should be used with HP DeskJet 690C series printers. Other
HP DeskJet or DeskWriter printer drivers should not be used.
Select the default printer from the list of available printer drivers.
Add printer drivers.
Remove unneeded printer drivers.
Set various printer options (which may be superseded by the
printer settings selected in the software application program).
Confirm the port which the printer is using.
Although the printer driver provides access to various printer settings, like
paper type and page orientation, these settings may be overridden by
settings made from the software program. The Printers control panel
settings are used when a software program does not specify certain
defaults.
Note
Drivers are available for DOS printing, and DOS printing can
be accommodated through MS Windows (see “DOS Printer
Drivers” which follows.)
Page 2

H P D e s k J e t 6 9 0 C S e r i e s P r i n t e r s M S W i n d o w s P r i n t i n g
Opening the Printers Control Panel in MS Windows 3.x:
1. Double-click Main in the Program Manager.
2. Double-click Control Panel.
3. Double-click Printers.
The default printer is listed in the text box at the top of the dialog box. To
select a different default printer, double-click a printer from the list of
installed printers.
Opening the HP Printer Properties Dialog Box in MS Windows
95:
1. From the Start button on the task bar, select Settings.
2. Select Printers.
3. Double-click the HP DeskJet 690C Series Printer icon as shown:
4. Select Printer from the HP DeskJet 690C Series Printer dialog box:
5. Selecting Properties reveals the control panel shown below.
Page 3

H P D e s k J e t 6 9 0 C S e r i e s P r i n t e r s M S W i n d o w s P r i n t i n g
Printer Properties Dialog Box (MS Windows 95)
Because you can connect your printer to any LPT: (parallel) port, it is
important to make sure the proper port is selected. The steps below
describe how to select or change a printer port from the control panels, MS
Windows 3.x, or MS Windows 95.
To select a port:
1. Open the Printers control panel.
2. Click Connect and select the port from the list.
The default printer name is followed by the port to which it is connected.
To select a printer port in MS Windows 95:
1. From the Start button on the task bar, select Settings.
2. Select Printers and double-click the HP DeskJet 690C Series
printer.
3. Select Printer, then select Properties
4. Select Details
From the list under Print to the Following Port: select the appropriate
printer port.
Page 4

H P D e s k J e t 6 9 0 C S e r i e s P r i n t e r s M S W i n d o w s P r i n t e r S o f t w a r e
MS Windows Printer Software
The HP DeskJet 690C printer software for MS Windows
includes:
HP DeskJet 690C series printer driver
HP DeskJet 690C Toolbox
How do I? (on-screen procedures to help user’s use and
maintain their printers)
Troubleshooting
Printer Services (Maintenance and Status)
TrueType Fonts
Release Notes
The HP DeskJet 690C Toolbox allows you to:
View step-by-step tutorials for common printer tasks
Diagnose and solve common printer problems
Monitor a current print job
Monitor the printer’s status at any time
Align the print cartridges (through Properties/Services)
Clean the print cartridges (through Properties/Services)
Print a self-test page (through Properties/General and Services)
Test printer communication (through Properties/Services)
Page 5

H P D e s k J e t 6 9 0 C S e r i e s P r i n t e r s I n s t a l l i n g t h e P r i n t e r D r i v e r
Installing the Printer Driver
The minimum system requirements to run the HP Printing System for MS
Windows are:
MS Windows 3.x
An 80386 processor
2 MB of RAM to print in black or 4 MB of RAM to print in color
10 MB free hard disk space
Before installing printer software:
1. Unpack the printer set it up with the procedures described in “User
Documentation/Setup Guide.”
2. Make sure the computer and the printer are both turned on and
connected with the proper cable.
3. Close any screen savers or other software running in the
background on your computer.
Installing the HP Printing System for MS Windows
1. Insert Installation Disk 1 into the computer’s disk drive.
2. Click File in the menu bar of the Program Manager window.
3. Choose Run in the File menu to open the Run dialog box.
4. Type A:\SETUP or B:\SETUP (depending on the computer’s
configuration) in the text box and click OK.
5. Follow the on-screen instructions during the installation process
and provide appropriate computer system information.
6. Restart MS Windows to activate the HP DeskJet 690C series
printer driver.
Installing the printer software in MS Windows 95:
1. Insert Installation Disk 1 into your computer’s disk drive.
2. From the Start button on the task bar, select Settings.
3. Select Printers.
4. When the Printers dialog box opens, double-click on the Add
Printer icon.
5. Follow the instructions when the Add Printer Wizard opens.
Page 6

H P D e s k J e t 6 9 0 C S e r i e s P r i n t e r s A l i g n i n g t h e P r i n t C a r t r i d g e s
Aligning the Print Cartridges
After installing the software, the print cartridges need to be aligned before
beginning any print jobs. You will also need to perform this procedure
whenever you install a new print cartridge.
Note
To align the print cartridges:
Double click the Desktop icon (MS Windows 95 version shown
above) and proceed from step 6 below, or:
1. Select Start from the task bar
2. Select Programs
3. Select HP DeskJet Utilities
4. Select HP DeskJet 690C Toolbox
5. Double-click the HP DeskJet 690C Toolbox icon
You may skip the next procedure if you have already
performed the print cartridge alignment as part of the
installation routine.
6. Select Printer Services
7. Select Align the Print Cartridges and follow the instructions.
Page 7

H P D e s k J e t 6 9 0 C S e r i e s P r i n t e r s A b o u t t h e P r i n t e r D r i v e r
About the Printer Driver
HP DeskJet 690C series printer drivers provide access to all the
capabilities of the HP DeskJet 690C printer. The following options are
available from the printer driver:
Automatic or Manual printing
Grayscale printing
Best, Normal, or EconoFast print quality
Paper Type (including HP’s special papers)
Paper Size
Two-sided printing
Number of Copies
Ordered printing
Portrait or Landscape print orientation
Banner and cut-sheet printing
Print iron-on transfers or flip a document
Print a photograph
For detailed help, click the Help button in the HP DeskJet print settings
dialog box.
Page 8

H P D e s k J e t 6 9 0 C S e r i e s P r i n t e r s U s i n g t h e P r i n t e r D r i v e r
Using the Printer Driver
Accessing HP’s print settings dialog box from MS Windows 3.x
or MS Windows 95 applications (recommended):
1. Choose “File, Print” or “File, Print Setup.” This varies with the
software program you are using. (For example: MS Word uses “File,
Print, Printer, Options”, and FrameMaker uses “File, Print Setup,
Options” to access the menu )
2. Click the Setup button.
Accessing HP’s print settings dialog box from the MS Windows
control panel:
From MS Windows 3.x:
1. Double-click Main in the Program Manager window.
2. Double-click Control Panel.
3. Double-click Printers.
4. Select the HP DeskJet 690C printer in the Installed Printers list and
click the Setup button.
From MS Windows 95:
1. From Start, select Settings.
2. Select Printers.
3. Double-click the HP DeskJet 690C Series Printer icon to reveal
the dialog box shown below.
MS Windows Printer Status Dialog Box
Page 9

H P D e s k J e t 6 9 0 C S e r i e s P r i n t e r s U s i n g t h e P r i n t e r D r i v e r
4. Select Printer, then select Properties to reveal the HP DeskJet 690C
Printer Properties dialog box.
The dialog box has five tabs; General, Details, Setup, Paper, and Services
which are described below. The General and Details tabs are provided by
MS Windows, the Setup, Paper and Services tabs are provided by the HP
DeskJet 690C series printer driver.
Page 10

H P D e s k J e t 6 9 0 C S e r i e s P r i n t e r s U s i n g t h e P r i n t e r D r i v e r
General Property Page (MS Windows)
General Property Page Options (MS Windows)
Option Description
Comment Allows you to include special printing instructions, etc. Next time you
print the document, these instructions will be found in this box.
Separator page Allows you to insert a separator page file between print jobs. Browse
allows you to locate and specify the separator page to be printed.
Print Test Page Prints a test page.
OK Accepts changes.
Cancel Cancel changes.
Apply Applies the current settings.
Page 11

H P D e s k J e t 6 9 0 C S e r i e s P r i n t e r s U s i n g t h e P r i n t e r D r i v e r
Details Property Page (MS Windows)
Details Property Page Options (MS Windows)
Option Description
Print to the
following port:
Print using the
following driver:
Capture Printer Port
and End Capture
Timeout Settings Not Selected: sets the time Windows waits before sending an error
Spool Settings... Allows you to spool documents or print directly to the printer. Also allows
Port Settings... Allows spooling of MS-DOS print jobs. You may also elect to have the
OK Accepts changes.
Cancel Cancel changes.
Apply Applies the current settings.
Provides options to add or delete printer ports. This selection also
allows you to print to fax or file.
Allows you to change printer drivers or install updated ones. (To install
an updated driver, for example, click the New Driver button, then click
Have Disk and follow the directions presented there.)
Permits you to capture, or terminate the capture of, a network printer. A
selection allows you to reconnect to a network printer each time at logon.
message that your printer is off or off line after you send a print job.
Transmission Retry: sets the time Windows waits for your printer if your
printer is on line but engaged. (If your printer is setup on a busy network,
and/or if you send large graphics files, your printer might display an error
message before your files have had a chance to print. To prevent this,
increase this setting somewhat.)
you to disable bi-directional support.
driver check the port state before printing.
Page 12

H P D e s k J e t 6 9 0 C S e r i e s P r i n t e r s U s i n g t h e P r i n t e r D r i v e r
Setup Property Page
Setup Property Page Options
Option Description
ColorSmart (see
ColorSmart:
Automatic vs.
Manual Printing
below)
Print In Grayscale
(see Grayscale
Printing which
follows)
Print Quality Best (presentation quality), Normal (letter quality), or EconoFast (draft
ICM (Independant
Color Matching)
Default Saves the current settings as the default settings for the printer.
Help Opens the online help.
OK Accepts changes.
Cancel Cancel changes.
Apply Applies the settings only to document to be printed. Does not change the
Permits selection of Automatic or Manual screen-to-printer color
mapping. Automatic (recommended) selects the best Halftoning,
Intensity and Color Control settings for all areas of your document.
Selecting Manual permits opening the Options dialog box which provides
adjustments for Intensity and Halftoning, and allows selection of two
types of Color Control.
Prints different colors as shades of gray. Has both Automatic
(recommended) and Manual modes. Selecting Manual permits opening
the Options dialog box which provides adjustments for Intensity and
Halftoning. The Grayscale mode may be used to produce photocopying
documents or to save the color cartridge when printing draft copies.
quality).
Improves consistency between the printer and other color devices
connected to your system.
default settings.
Page 13

H P D e s k J e t 6 9 0 C S e r i e s P r i n t e r s U s i n g t h e P r i n t e r D r i v e r
ColorSmart: Automatic vs. Manual Printing
In most cases the best print output is obtained by choosing Automatic
ColorSmart printing. In automatic mode, the printer driver analyzes each
element in a document to provide the best color output.
If the color output obtained using the Automatic ColorSmart option is not
satisfactory, use the Manual option.
The Manual ColorSmart Options dialog box provides control over
Intensity, Color Control, and Halftoning.
The Intensity slider bar adjusts the amount of ink applied to the paper—
Darker means more ink, Lighter means less ink.
Color Control offers two options: Vivid (Color) and Match (Screen). To print
the document so it looks like it looks on the computer screen, choose
Match. To make the colors of the printed output brighter and more vivid
than they appear on the screen, choose Vivid.
Halftoning describes how the driver places individual drops of ink on the
page to reproduce different shades of the same color. Scatter halftoning,
the default setting, usually gives the best results. Pattern halftoning applies
different patterns of dots for different shades of a color.
ColorSmart Options Dialog Box
Page 14

H P D e s k J e t 6 9 0 C S e r i e s P r i n t e r s U s i n g t h e P r i n t e r D r i v e r
Grayscale Printing
ColorSmart also allows printing color documents in monochrome with
discernible shades of gray. Pages with grayscale images can be
photocopied or faxed on a monochrome device and retain their full
meaning and impact.
Grayscale printing is also faster than color printing and is ideal for printing
draft copies.
To print in grayscale, select Automatic and the Print in Grayscale
option in the ColorSmart dialog box.
Setup Dialog Box with “Automatic” and “Print in Grayscale”
Selected
Selecting Manual with Print in Grayscale selected, allows access to
the Option dialog box which provides control over intensity and
halftoning.
Page 15

H P D e s k J e t 6 9 0 C S e r i e s P r i n t e r s U s i n g t h e P r i n t e r D r i v e r
Manual Grayscale Options Dialog Box
Page 16
H P D e s k J e t 6 9 0 C S e r i e s P r i n t e r s U s i n g t h e P r i n t e r D r i v e r
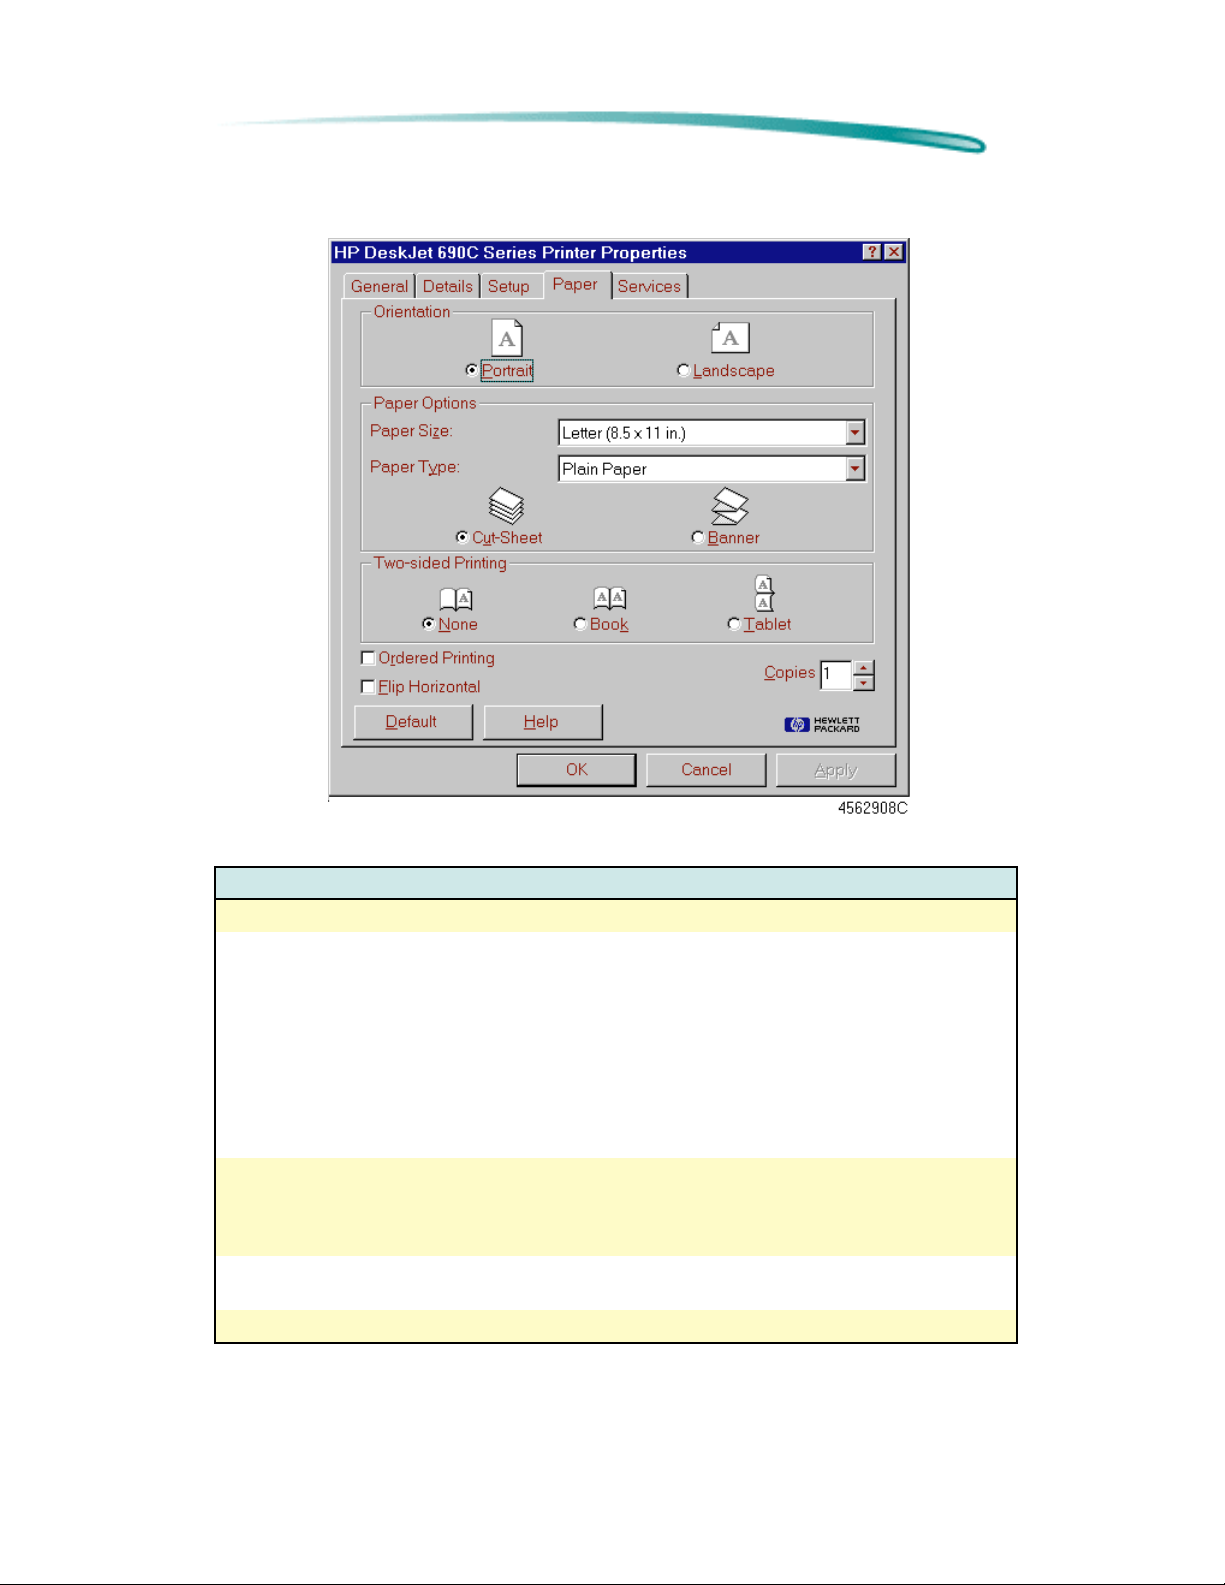
Paper Property Page
Paper Property Page Options
Option Description
Orientation Choose portrait or landscape.
Paper Options Paper Size: Allows selection of numerious paper sizes. To use a paper
size not listed, select Custom.
Paper Type: Allows you to t
ell the printer the type of paper upon which you are about to print. (Lets
the printer decide which settings to use to give you the best results.)
Cut-Sheet: Allows the use of cut-sheet paper, or,
Banner: Allows the use of continuous-feed (Z-fold) banner paper. See
description of banner printing below.
Two-Sided (Manual
Duplex) Printing
Ordered Printing Prints in reverse order (last page first). Collates pages when printing
Flip Horizontal Allows you to reverse the printout horizontally.
Table continued on next page
Allows you to manually print both sides of plain paper to economize and
help conserve resources. Allows you to select the two-sided mode you
prefer: Book or Tablet. For more information about two-sided printing,
see below.
multiple copies.
Page 17

H P D e s k J e t 6 9 0 C S e r i e s P r i n t e r s U s i n g t h e P r i n t e r D r i v e r
Paper Property Page Options (Cont.)
Option Description
Copies Allows selection of multiple copies. (Do not change this setting unless
you want multiple copies all the time. Generally, specify the number of
copies required from within your application.)
Default Saves the current settings as the default settings for the printer.
Help Opens the online HP DeskJet 820 Help.
OK Accepts changes.
Cancel Cancel changes.
Apply Applies the settings only to document to be printed. Does not change the
default settings.
Page 18

H P D e s k J e t 6 9 0 C S e r i e s P r i n t e r s U s i n g t h e P r i n t e r D r i v e r
Banner Printing
HP DeskJet 690C series printers can be set to print both cut-sheet and
banner paper. Banner printing is supported for up to 20 sheets of lettersized or A4 Z-fold paper.
Banner Printing Procedure:
1. From the Paper Size menu, select Letter or A4 depending upon
the size of your banner paper.
2. Select Banner, then click OK.
3. Slide your printer’s banner lever to the right until it clicks. (The
banner lever is located below the IN/OUT tray.)
4. Flip-up the banner support guide in the OUT tray.
5. Remove all cut-sheet paper from the IN tray.
6. If using HP Banner Paper: Count-out one more sheet of
banner paper than required by your banner and tear it off.
7. If using tractor-fed Z-fold paper: Count-out one more sheet
of paper than required by your banner and tear it off. Tear off the
edge perforations from both sides, then unfold and refold the
pages to separate them.
8. Turn the banner paper so that the torn edge of the top sheet faces
into the printer and place the stack in the IN tray.
9. Verify that the width and length adjusters are positioned against
the edges of the paper stack.
10. Print your banner.
11. After your banner has printed, tear off the excess paper in the IN
tray. Press the Form Feed button as necessary to fully eject the
remainder of the paper.
12. When you have finished printing your banner, select Cut-Sheet
from the Paper tab in the Properties dialog box
13. Return the banner lever to the left to begin printing cut-sheet
paper, envelopes, transparencies, labels, etc.
Page 19

H P D e s k J e t 6 9 0 C S e r i e s P r i n t e r s U s i n g t h e P r i n t e r D r i v e r
Two-Sided Printing (Manual Duplex)
The printer driver can be set to print both sides of plain paper to
economize and help conserve resources.
Note
Two-Sided Printing Procedure:
1. Select Two-sided printing.
2. Start printing your document. Observe that the odd-numbered
3. After the printer finishes printing the odd-numbered pages,
4. Carefully remove the newly printed pages from the OUT tray and,
5. Restart the printer by clicking the Continue button on the
Two-sided printing is available for all sizes of paper.
However, you cannot use two-sided printing on envelopes,
transparencies, labels, glossy paper, or premium paper.
pages print first.
instructions for printing the other side appear on your computer’s
screen.
leaving them face-up, turn the pages around (NOT OVER) and reinsert the pages in the IN tray. Verify that the tops of the pages
feed into the printer first. (You should be able to read the pages
from in front of the printer when the pages are correctly placed in
the IN tray.)
computer message. Observe that the even-numbered pages
begin printing on the back of the previously printed odd-numbered
pages.
Note
Do not click the Continue button until you have positioned
the odd-numbered pages in the IN tray.
Page 20

H P D e s k J e t 6 9 0 C S e r i e s P r i n t e r s U s i n g t h e P r i n t e r D r i v e r
Services Page
Services Page Options
Option Description
Align the print
cartridges
Clean the print
cartridges
Print a self-test
page
Test printer
communication
Default Saves the current settings as the default for the printer.
Help Opens the online help.
OK Accepts changes.
Cancel Cancel changes.
Apply Applies the settings only to document to be printed. Does not change
Initializes the routine that aligns the print cartridges. Follow the onscreen instructions.
Initializes the routine that cleans the print cartridges. Use only if print
cartridges are not functioning correctly. This routine uses a great deal of
ink. Follow the on-screen instructions.
Initializes the routine that prints a test page. Use this function to verify
the connection between your computer and the printer.
This procedure test the communication between the computer and the
printer. This test takes up to 3 minutes. An on-screen message appears
giving status information. No printout is involved.
the default settings.
Page 21

H P D e s k J e t 6 9 0 C S e r i e s P r i n t e r s O p t i m i z i n g P e r f o r m a n c e
Optimizing Performance
The print speed and overall performance of HP DeskJet 690C series
printers can be affected by several things:
The amount of RAM can determine how fast documents are sent to
the printer. Increasing RAM can speed up this process as well as
make the computer work more efficiently at other things beside
printing.
The size and complexity of the documents printed can make a
difference in the printer's performance. Graphics are usually more
complex - especially color graphics - and print more slowly than
text.
The processing speed of the computer will determine how fast a
document is sent to the printer. For example, a computer with a
486 processor runs faster than a computer with a 386 processor.
Running numerous software programs at one time slows down
printing; each open program uses RAM. Therefore, limit the
number of programs or documents open at one time.
Screen fonts are stored in RAM, which means they use up memory
that the printer may need in order to print. Delete screen fonts or
printer fonts that are not needed.
Using On-line Help
On-line help provides information about the printer’s software and status.
Printer Software Help
Type of help: Provides: How to access/where to find:
HP DeskJet Toolbox Tutorials and
troubleshooting for common
print tasks and problems
Error Message Help Comprehensive context
sensitive information
designed for error recovery.
Print Settings Help Information to help you make
print settings choices.
Release Notes Up-to-date information for
specific conflicts.
Click on the icon on the desktop, or in
the Program group.
Button available on most popup error
messages.
Click the help button for any tab in the
HP print settings dialog box.
From the Program Utilities: select HP
DeskJet 690C Release Notes.
Page 22

H P D e s k J e t 6 9 0 C S e r i e s P r i n t e r s O p t i m i z i n g P e r f o r m a n c e
Cleaning and Aligning Print Cartridges
These functions are available from the Services Page (see above) and
from within the HP DeskJet 690C Toolbox.
Page 23

H P D e s k J e t 6 9 0 C S e r i e s P r i n t e r s D O S P r i n t i n g
DOS Printing
Since DOS applications are developed independently under different
standards, each DOS application requires its own printer driver. If there is
no driver available for the HP DeskJet 690C series printer, use a driver for
a different HP DeskJet printer. In some cases, the substitute driver will not
provide access to all of the DeskJet 690C’s capabilities.
The following table outlines usable drivers and their capabilities when
used with an HP DeskJet 690C series printer.
Substituting Printer Drivers
Printer Driver Supported Features
HP DeskJet 660C Color Printing
HP DeskJet 560C Color Printing
HP DeskJet 540 Color Printing
HP DeskJet 500C Color Printing
HP DeskJet 320 Color Printing
HP DeskJet 310 Color Printing
HP DeskJet 520 Monochrome Printing Only
HP DeskJet 510 Monochrome Printing Only
HP DeskJet 500 Monochrome Printing Only
HP DeskJet PLUS Monochrome Printing Only
HP DeskJet Monochrome Printing Only
The table below shows software drivers available from individual software
manufacturers for some HP DeskJet printers.
DOS Programs and Recommended Printer Drivers
DOS Software Program Version Recommended Printer Driver
WordPerfect 5.1, 5.1+, 6.x HP DeskJet 600, 660C, or 850C
Harvard Graphics 3.0 HP DeskJet 540
Lotus 1-2-3 2.x, 3.x, 4.0 HP DeskJet 540
MS Word 5.5, 6.0 HP DeskJet 560C
Information on installing a DOS printer driver for a particular DOS
application is supplied by the software manufacturer.
Page 24

H P D e s k J e t 6 9 0 C S e r i e s P r i n t e r s D O S P r i n t i n g
HP DeskJet Control Panel for DOS
The DeskJet Control Panel for DOS is software that replaces the front
panel switches found on older printers. The HP Control Panel for DOS
does not replace printer drivers; it must be used along with DOS software
printer drivers. When there is no specific HP DeskJet 690C series printer
driver available for an application, the HP Control Panel gives the user
access to print settings and features not available through the DOS
application. If settings are available in the DOS application printer driver
and the DOS Control Panel, the settings made in the DOS application
override those made in the HP Control Panel for DOS.
The HP Control Panel for DOS also lets the user monitor the printer’s
status, and clean and align the print cartridges.
Minimum System Requirements
DOS version 3.3 (or newer)
An 80286 (or better) processor
2 MB of RAM to print in black or 4 MB of RAM to print in color
Installation
Before you install the DOS control panel:
1. Unpack the printer and set it up.
2. Make sure the computer and the printer are both turned on and
connected with the proper cable.
To install the HP control panel for DOS:
1. Insert the disk containing the HP Control Panel for DOS in the disk
drive.
2. At the DOS prompt, type A:\Install (or B:\Install depending on
the floppy drive configuration) and press Enter.
3. Follow the on-screen instructions.
Page 25

H P D e s k J e t 6 9 0 C S e r i e s P r i n t e r s D O S P r i n t i n g
To align the print cartridges from the Control Panel for DOS:
1. Type DJCP at the DOS prompt to open the stand-alone DOS
Control Panel.
2. Select Align Print Cartridges and follow the on-screen instructions.
Two Ways to Use the HP DeskJet Control Panel for DOS
The DOS Control Panel can run either as a stand-alone application or as
a memory resident application. To run the DOS Control Panel as a standalone application: type DJCP at the DOS prompt.
HP DeskJet 690C Control Panel for DOS
The DOS Control Panel must be loaded into memory at start-up to work as
a memory resident application.
Page 26

H P D e s k J e t 6 9 0 C S e r i e s P r i n t e r s D O S P r i n t i n g
To set up the Control Panel for DOS as a memory resident
application:
1. Type DJCP at the DOS prompt to open the stand-alone DOS
Control Panel.
2. Select More Settings.
3. Select Memory Resident Functions.
4. Select Make Memory Resident.
5. Select Done and reboot the computer.
The memory resident DOS Control Panel is a subset of the stand-alone
application due to memory considerations.
Whether stand-alone or memory resident, the Control Panel for DOS
allows the user to control or view the following:
Print Cartridge Services (clean and align the pens)
Print Quality
Page Orientation
Font Width (normal or compressed)
Status Reports (limited in the resident DOS Control Panel)
Context-Sensitive Help
In addition to these, the stand-alone Control Panel for DOS provides
access to:
Paper Size
Media Type (paper or transparencies)
Character Set
Lines per Page
Line Termination
Reset All Settings
Memory Resident Controls
Page 27

H P D e s k J e t 6 9 0 C S e r i e s P r i n t e r s O S / 2
OS/2
Although no OS/2 specific printer driver is available for the HP DeskJet
690C series printers, the MS Windows printer driver can be accessed
through OS/2 by using MS Windows in OS/2.
 Loading...