

Page 1
Page 2

Page 3

User’s Guide
HP SureStore CD/DVD-ROM Server
Page 4

© Copyright 1999
Hewlett-Packard Company.
All rights reserved. Reproduction, adaptation or
translation without prior written permission is
prohibited, except as allowed under the copyright
laws.
Publication number
5967-9962
User’s Guide, First Edition,
March 1999
Applicable Products:
J3278B, J4150A, J4152A
Trademark Credits
Microsoft
®
, MS-DOS®, Windows®,
Microsoft Windows NT
®
are U.S. registered
trademarks of Microsoft Corporation. UNIX
®
is a
registered trademark of The Open Group.
Netscape Navigator is a U.S. trademark of
Netscape Communications Corporation.
Warranty
The information contained in this document is
subject to change without notice.
HEWLETT-PACKARD COMPANY MAKES NO
WARRANTY OF ANY KIND WITH REGARD TO
THIS MATERIAL, INCLUDING, BUT NOT
LIMITED TO, THE IMPLIED WARRANTIES
OF MERCHANTABILITY AND FITNESS FOR
A PARTICULAR PURPOSE.
Hewlett-Packard shall not be liable for errors
contained herein or for incidental or
consequential damages in connection with the
furnishing, performance or use of this material.
A copy of the specific warranty terms applicable
to your HP product and replacement parts can be
obtained from your HP Sales and Service Office
or Authorized dealer.
For warranty service information, see appendix B
in this guide.
Hewlett-Packard Company
8000 Foothills Boulevard
Roseville, California
95747-6588
Safety Considerations
Prior to the installation and use of this product,
review all safety markings and instructions.
Do not proceed beyond a
WARNING
or
CAUTION
notice until you have understood the hazard and
have taken appropriate precautions.
Use of control, adjustments, or performance
procedures other than those specified herein may
result in hazardous radiation exposure.
To prevent direct exposure to a laser beam, do
not try to disassemble the CD-ROM and
DVD-ROM drives.
Grounding. This product provides a protective
earthing terminal. There must be an
uninterruptible safety earth ground from the
main power source to the product’s input wiring
terminals, power cord, or supplied power cord set.
Whenever it is likely that the protection has been
impaired, disconnect the power cord until the
ground has been restored.
If your LAN covers an area served by more than
one power distribution system, be sure their
safety grounds are securely interconnected.
LAN cables may occasionally be subject to
hazardous transient voltages (such as lightning
or disturbances in the electrical utilities power
grid). Handle exposed metal components of the
network with caution.
For more safety information, see the
“Safety Statements” section starting on page D-4.
Servicing. There are no user-serviceable parts
inside the user-replaceable modules comprising
the product. Any servicing, adjustment,
maintenance, or repair must be performed only
by service-trained personnel.
Instruction Manual Symbol.
If the product is marked with
this symbol, refer to product
manuals to protect the product
from damage.
WARNING
Denotes a hazard that can
cause injury
CAUTION
Denotes a hazard that can
damage equipment or data.
!
Page 5

Preface 3
Preface
About This Guide
This
User’s Guide
aids in installation and use of the HP SureStore
CD/DVD-ROM servers. These are HP product numbers J3278B,
J4150A, and J4152A, with firmware version 5.xx and later.
This guide consists of the following chapters:
1. Introduction. A brief description of HP CD/DVD-ROM servers —
how they work, where to use them, and their benefits.
2. Installing Your Server. A description of the server towers and the
steps to install and connect them to your network. How to use the
CD-ROM and DVD-ROM drives and the discs.
Each of the following four chapters details the procedures for
setting up the server for your network, including getting access,
controlling access, and configuring. Use each of the chapters
relevant to the type of networking on your servers and clients in the
following order. (For example, for TCP/IP with Microsoft Windows,
follow chapters 3 and 4 and skip chapters 5 and 6.)
3. Setup for Internet Protocol (IP, HTTP) networks.
4. Setup for Microsoft and OS/2 networks (SMB).
5. Setup for Novell networks.
6. Setup for UNIX networks (NFS).
The remaining chapters are useful for all network types:
7. Configuration Reference for All Networks.
Reference information useful for configuration and management
on all network types. Chapters 3–6 have some references to
information in this chapter.
8. Caching and Archiving Using the Hard Disk (J4150A only).
9. Upgrading the Firmware.
10. Troubleshooting. Solving problems with the servers.
The appendices provide supplemental reference information—
technical and regulatory specifications
,
and support and warranty
services.
Quick Reference
Accompanying this
User’s Guide
is the
Quick Installation Guide,
a
simpler reference for initial installation in most environments.
Page 6

4 Preface
Page 7

Table of Contents 5
Table of Contents
Preface
Table of Contents
1. Introduction
How They Work . . . . . . . . . . . . . . . . . . . . . . . . . . . . . . . . . . . . . . . . . . . . . . . . . . 1-1
Where to Use Them . . . . . . . . . . . . . . . . . . . . . . . . . . . . . . . . . . . . . . . . . . . . . . . 1-2
Features and Benefits . . . . . . . . . . . . . . . . . . . . . . . . . . . . . . . . . . . . . . . . . . . . . 1-3
2. Installing Your Server Tower
The Products . . . . . . . . . . . . . . . . . . . . . . . . . . . . . . . . . . . . . . . . . . . . . . . . . . . . 2-1
Unpacking Components . . . . . . . . . . . . . . . . . . . . . . . . . . . . . . . . . . . . . . . . . . . 2-2
Expanding the Tower . . . . . . . . . . . . . . . . . . . . . . . . . . . . . . . . . . . . . . . . . . . . . 2-3
Steps to Connect the Towers . . . . . . . . . . . . . . . . . . . . . . . . . . . . . . . . . . . . . . . . 2-3
How to Use HP SureStore CD-ROM Drive . . . . . . . . . . . . . . . . . . . . . . . . . . . . 2-6
How to Use HP DVD-ROM Drive . . . . . . . . . . . . . . . . . . . . . . . . . . . . . . . . . . . . 2-7
Care of CD/DVD-ROM Discs . . . . . . . . . . . . . . . . . . . . . . . . . . . . . . . . . . . . . . . 2-8
3. Setup for IP Networks and HTTP
Set the IP Address for the Server . . . . . . . . . . . . . . . . . . . . . . . . . . . . . . . . . . . . 3-1
Client Access to Discs . . . . . . . . . . . . . . . . . . . . . . . . . . . . . . . . . . . . . . . . . . . . . 3-9
Configuring the Server . . . . . . . . . . . . . . . . . . . . . . . . . . . . . . . . . . . . . . . . . . . 3-11
4. Setup for Microsoft Networks (SMB)
Client Access to Discs . . . . . . . . . . . . . . . . . . . . . . . . . . . . . . . . . . . . . . . . . . . . . 4-2
Configuring the Server . . . . . . . . . . . . . . . . . . . . . . . . . . . . . . . . . . . . . . . . . . . 4-11
5. Setup for Novell Networks
Client Access to Discs . . . . . . . . . . . . . . . . . . . . . . . . . . . . . . . . . . . . . . . . . . . . . 5-2
Configuring the Server . . . . . . . . . . . . . . . . . . . . . . . . . . . . . . . . . . . . . . . . . . . . 5-9
6. Setup for UNIX Networks (NFS)
Client Access to Discs . . . . . . . . . . . . . . . . . . . . . . . . . . . . . . . . . . . . . . . . . . . . . 6-1
Configuring the Server . . . . . . . . . . . . . . . . . . . . . . . . . . . . . . . . . . . . . . . . . . . . 6-3
7. Setup Reference for All Networks
Configuration Methods . . . . . . . . . . . . . . . . . . . . . . . . . . . . . . . . . . . . . . . . . . . . 7-6
Remote Network Management Tools . . . . . . . . . . . . . . . . . . . . . . . . . . . . . . . . 7-10
Page 8

6 Table of Contents
8. Caching and Archiving Using the Hard Disk
Caching . . . . . . . . . . . . . . . . . . . . . . . . . . . . . . . . . . . . . . . . . . . . . . . . . . . . . . . . .8-1
Archiving and Replacing Discs . . . . . . . . . . . . . . . . . . . . . . . . . . . . . . . . . . . . . . 8-3
Disk Space for Caching and Archiving . . . . . . . . . . . . . . . . . . . . . . . . . . . . . . . .8-6
9. Upgrading the Firmware
10. Troubleshooting
Restart Server . . . . . . . . . . . . . . . . . . . . . . . . . . . . . . . . . . . . . . . . . . . . . . . . . . 10-1
Check Front-Panel Indicators . . . . . . . . . . . . . . . . . . . . . . . . . . . . . . . . . . . . . .10-2
Look Up Your Problem . . . . . . . . . . . . . . . . . . . . . . . . . . . . . . . . . . . . . . . . . . .10-5
Procedures for Resolution and Repair . . . . . . . . . . . . . . . . . . . . . . . . . . . . . . 10-14
A. Getting Support
HP Customer Care Centers Phone Numbers . . . . . . . . . . . . . . . . . . . . . . . . . . A-1
Electronic Support Services . . . . . . . . . . . . . . . . . . . . . . . . . . . . . . . . . . . . . . . . A-2
B. Warranty
Obtaining Warranty Service . . . . . . . . . . . . . . . . . . . . . . . . . . . . . . . . . . . . . . . B-1
Your Warranty . . . . . . . . . . . . . . . . . . . . . . . . . . . . . . . . . . . . . . . . . . . . . . . . . . B-2
For Specific Regions . . . . . . . . . . . . . . . . . . . . . . . . . . . . . . . . . . . . . . . . . . . . . . B-2
C. Technical Specifications
Server . . . . . . . . . . . . . . . . . . . . . . . . . . . . . . . . . . . . . . . . . . . . . . . . . . . . . . . . . C-1
Interface Connectors . . . . . . . . . . . . . . . . . . . . . . . . . . . . . . . . . . . . . . . . . . . . . C-1
HP SureStore CD/DVD-ROM Drives . . . . . . . . . . . . . . . . . . . . . . . . . . . . . . . . C-2
Hard Drive for HP J4150A . . . . . . . . . . . . . . . . . . . . . . . . . . . . . . . . . . . . . . . . C-2
Electrical and Environmental . . . . . . . . . . . . . . . . . . . . . . . . . . . . . . . . . . . . . . C-3
Supported Network Systems . . . . . . . . . . . . . . . . . . . . . . . . . . . . . . . . . . . . . . . C-4
Supported Network Protocols/Standards . . . . . . . . . . . . . . . . . . . . . . . . . . . . . C-4
Security Features . . . . . . . . . . . . . . . . . . . . . . . . . . . . . . . . . . . . . . . . . . . . . . . . C-4
D. Regulatory and Safety Information
Regulatory Statements . . . . . . . . . . . . . . . . . . . . . . . . . . . . . . . . . . . . . . . . . . . D-1
Safety Statements . . . . . . . . . . . . . . . . . . . . . . . . . . . . . . . . . . . . . . . . . . . . . . . D-4
Index
Page 9
Introduction 1-1
1
Introduction
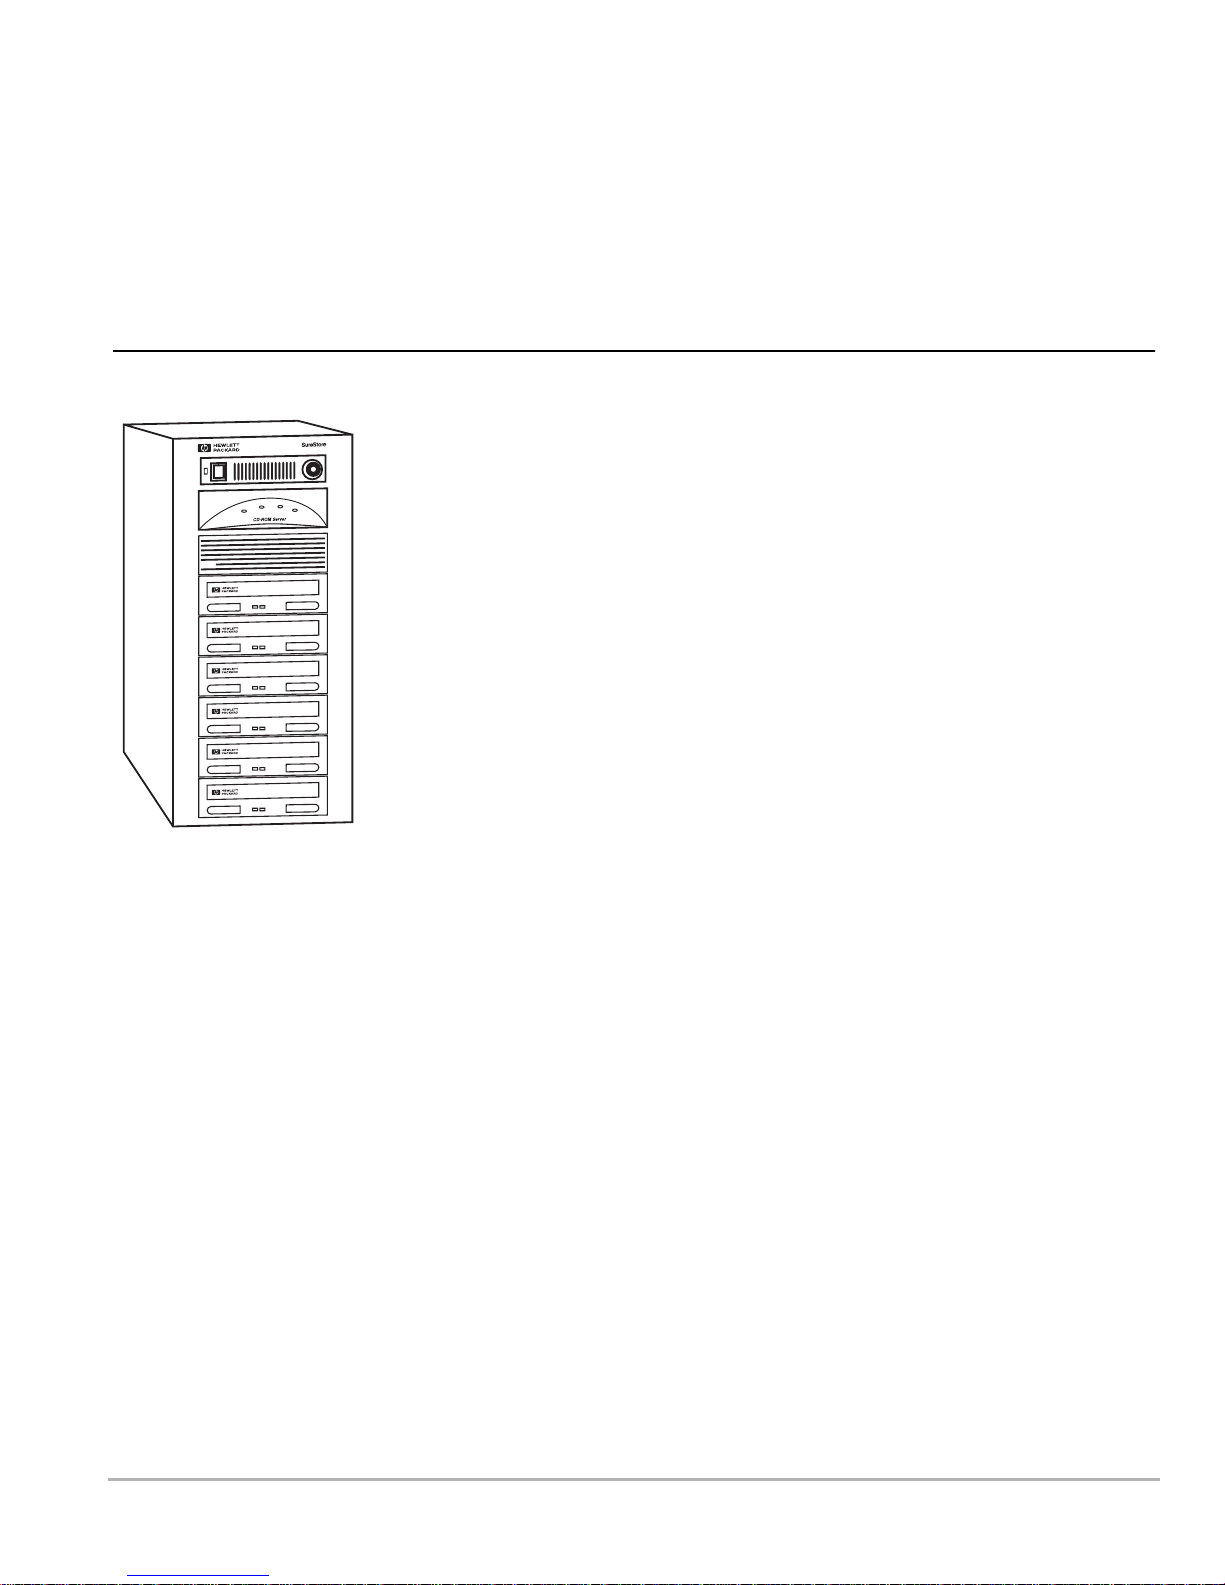
HP SureStore CD-ROM Server
HP SureStore CD-ROM Server Plus
HP SureStore CD/DVD-ROM Server
The HP SureStore servers connect CD-ROM and DVD-ROM drives
to twisted-pair networks—either IEEE 802.3i 10-Base-T Ethernet
or IEEE 802.3u 100Base-TX Fast Ethernet. All users on the
network can share the information on any CD or DVD in the tower.
The server module located in the top bay of the 8-bay server tower
is internally connected to the other 7 bays containing DVD-ROM or
CD-ROM drives.
The SureStore CD-ROM Server Plus uses one of the drive bays for a
hard disk drive, which adds a cache and archive repository to serve
34 full-capacity CDs simultaneously.
The SCSI bus used on these servers is extendable to another SCSI
accessory tower, the seven-bay HP J4148A SureStore CD
Expansion Tower. The two towers together serve up to 14 drives
(41 CDs when used with the Server Plus).
How They Work
HP SureStore CD- and DVD-ROM servers directly connect as nodes
on an Ethernet network. The product acts as a network file server,
so that a network client communicates directly with it. This results
in high performance and reliability. Since each of the three products
acts as a server, this guide will use the term “server” to refer to any
of these tower products on the network.
Installation and configuration is simple. In most environments, the
network connection is the only installation required prior to using
the server. There is no software that must be installed on clients or
file servers. Your computer will see the server simply as another
network file server, and you access it using standard network
operating system commands.
Page 10

1-2 Introduction
The server also supports the HTTP protocol. Therefore, you can
access and manage it using a standard web browser, such as
Netscape Navigator or Microsoft Internet Explorer.
You can also remotely manage the server as a node in your network
using popular network management applications.
Where to Use Them
HP SureStore CD/DVD-ROM servers can be used in networks
supporting one or more of the following basic messaging and
network protocols:
•
Novell NCP (NetWare Control Protocol) over IPX/SPX
•
Novell NCP over NetWare/IP
•
Microsoft networking—SMB (Server Message Block)
over NetBEUI (NetBIOS Extended User Interface)
•
Microsoft networking—SMB (Server Message Block)
over NetBIOS/TCP/IP
•
NFS (Network File System) over UDP/IP
•
HTTP (HyperText Transfer Protocol) over TCP/IP (Internet
Protocol) for access from a web browser
Network clients that use these networking protocols can
simultaneously
access the server. Refer to appendix C for more
information.
Novell NetWare
Networks
The server can emulate Novell file servers running NetWare 3, 4,
and 5. No NLM is required.
Microsoft and IBM
Networks
The server is easily shared using the SMB (Server Message Block)
protocol, the default protocol in popular PC systems (such as
Microsoft Windows 95, 98, NT 3.51, NT 4.0, and OS/2 Warp
systems).
UNIX Networks The server can be mounted using NFS (Network File System).
Internet/Intranet
Networks
The server is accessible from a web browser in environments that
can use HTTP over TCP/IP (Internet Protocol).
Apple Macintosh
Networks
The Macintosh requires the NFS protocol (Network File System).
Note ❏
Contact your NOS vendor to verify your Year 2000 readiness.
Page 11

Introduction 1-3
Features and Benefits
Complete Solution
for the Task
The HP CD/DVD-ROM server towers can be installed on the
network in minutes, versus hours for other solutions (such as
towers attached to file servers).
File Server
Independence
The server is pre-installed with all the network functionality
required. It does not rely on intermediate communications with a
file server.
Ease of Use These servers are designed to be easy to install and use.
Software from disks is not needed to install the server. The server
uses standard networking protocols (HTTP, NCP, SMB, and NFS),
so there is no need to learn any special software to access it.
Users find their data by mapping individual disc drives or the
entire server (with a subdirectory for each disc) to be a logical
network drive, or by using their browser to access the built-in
web server.
Location Flexibility As a network node, the server tower can be located anywhere on the
network, such as in the workgroup where users can update new CD
content as it arrives. It can be rack mounted in HP racks.
Up-to-Date Data Since all users share a common set of discs, they are assured of
using the correct set of data.
Broad Compatibility
and Flexibility
Now and Later
As a multi-protocol device, the server simultaneously supports
various network operating environments, including
Novell NetWare, Microsoft and IBM network operating systems
(Windows 95/98, Windows NT, OS/2), UNIX, and
Internet/intranets. Or it can function with only one protocol
enabled. New firmware can be downloaded to Flash memory to
support new features and future network operating systems.
The HP SureStore CD-ROM Server and HP SureStore CD-ROM
Server Plus read CD-ROMs. The HP SureStore CD/DVD-ROM
Server with its DVD-ROM drives is ready for the future. These
drives read DVD-ROM, CD-ROM, CD-R, and CD-RW media.
The server can be extended to up to 14 drives when needed, using
the HP SureStore CD Expansion Tower with your server tower.
Either a 10Base-T or a 100Base-TX network can be connected.
Web Server
Functionality
Users can access discs using a web browser, such as
Netscape Navigator or Microsoft Internet Explorer, and
network managers can configure and manage the server using
a web browser.
Page 12

1-4 Introduction
Security Disc access can be restricted by setting up password protection.
The number of simultaneous users of any disc can be limited to
comply with license agreements. Or, user access can be
administered using the network operating system’s authentication
provisions, such as Novell’s NDS (NetWare Directory Services) and
Microsoft’s Windows NT 4.0 domains.
Speed These servers take advantage of 100-Mbit/s networks. The 32-bit
processor and cache memory allow ample throughput for
demanding CD- and DVD-ROM applications. The HP Multi-Disc
Cache on the Server Plus provides file caching for reading CDs at
hard-disk speeds. HP’s drives seek data quickly. See appendix C for
drive speed specifications.
Scaling HP Multi-Disc Cache on the Server Plus provides an archive
repository that automatically uploads CDs. Then you can use
those drives to load more CDs. You can remove and replace CDs
in the repository. (Adding the Expansion Tower can provide
41 full-capacity CDs for simultaneous access.)
Upgradability New firmware can be easily downloaded to the server’s Flash
memory over the network.
URL:
http://www.hp.com/go/cdrom_server
(You can also find technical support information at that World Wide
Web site. Check with an HP-authorized dealer for additional
assistance).
Remote Management
with Web JetAdmin
and Others
Hewlett-Packard’s Web JetAdmin automatically locates and
monitors multiple CD/DVD-ROM servers from a single console.
Other leading management applications that support the Simple
Network Management Protocol, SNMP, can also manage the
servers.
Page 13

Installing Your Server Tower 2-1
2
Installing Your Server Tower
The Products
HP J3278B SureStore
CD-ROM Server
This tower has a server module in the top bay, and high-speed
HP SureStore CD-ROM drives pre-installed in the other
seven bays.
HP J4150A SureStore
CD-ROM Server Plus
This tower has a server module in the top bay. A large internal hard
drive is installed in the second bay, providing HP Multi-Disc Cache
for storing copies of CDs and providing increased performance for
all CDs. High-speed HP SureStore CD-ROM drives are
pre-installed in the other six bays.
HP J4152A SureStore
CD/DVD-ROM Server
This tower has a server module in the top bay, and high-speed
HP DVD-ROM drives pre-installed in the other seven bays. These
drives read both CD and DVD-ROM discs.
SCSI Features
All the towers have an expansion SCSI connector for attaching a
second tower with seven more drives, such as the HP J4148A
SureStore CD Expansion Tower with its seven CD-ROM drives.
See “HP J4148A SureStore CD Expansion Tower” on page 2-3 for
attaching the tower.
The SCSI bus is terminated at one end by the server module and at
the other end by an internal active terminator on the backplane.
The SCSI IDs are set automatically based on the position of the
HP drives in the tower. The topmost drive in the tower (CD or DVD
or hard disk) is assigned ID 0 (zero), the second drive (CD or DVD)
is assigned ID 1, and so on, and the lowest drive is assigned ID 6.
Page 14

2-2 Installing Your Server Tower
Unpacking Components
Unpack and inspect all parts for damage. Contact your dealer if
anything is missing.
•
Server tower. Installed modules vary; see page 2-1.
•
User’s Guide,
this manual (HP part no. 5967-9962)
•
Quick Installation Guide
(HP part no. 5967-9968)
•
2 front-cover keys (HP replacement part no. 5183-7741)
•
Emergency Ejection Pin (HP part no. 5064-7172)
(Only for HP J4152A SureStore CD/DVD-ROM Server)
•
Power cord for your country, one of the following:
CAUTION!
❏
If your installation requires a different power cord than the one
supplied with the server, be sure to use a power cord displaying
the mark of the safety agency that defines the regulations for
power cords in your country. The mark is your assurance that
the power cord can be used safely with the server.
Region or Country Part Number
USA, Canada, Brazil, Mexico 8120-6805
Argentina 8120-6871
Chile 8120-6979
Europe 8120-6802
Denmark 8120-6806
Switzerland 8120-6807
United Kingdom 8120-8709
South Africa, India 8120-6808
Australia, New Zealand 8120-6803
Israel 8120-6799
China 8120-8376
Page 15

Installing Your Server Tower 2-3
Optional: Expanding the Tower
HP J4148A
SureStore CD
Expansion Tower
This expansion tower provides the additional bays for expanding
beyond the drives in the server tower. It includes a SCSI cable to
connect the two towers and an external active HP SCSI terminator
to be installed on a rear SCSI connector. SCSI IDs are set
automatically on HP CD-ROM drives based on their position in the
tower. The topmost position on this accessory tower is ID 0 on the
second SCSI bus “B”, and the lowest position is ID 6 on the second
SCSI bus “B”. All 14 drives are read by the server module located in
the server tower.
Consult the
User’s Guide
accompanying the expansion tower for its
specific installation instructions. Complete the SCSI cable
connection to the server tower, the SCSI termination connection,
and the power cord connection as directed in that guide. The “Steps
to Connect the Towers” (below) include the steps needed to start up
both towers.
Note ❏
To install the expansion tower after the server tower has been
installed, you must
switch off power
to the server tower before
installing the expansion tower. After installing the expansion
tower, follow the “Steps to Connect the Towers” to restart the
server tower.
Steps to Connect the Towers
Before You Begin •
Verify with your network administrator that a 10Base-T
(Ethernet) or 100Base-TX (Fast Ethernet) network connection
is ready for the server tower. Locate the twisted-pair network
cable (with an RJ-45 connector).
•
Verify that the tower’s power is
off
.
CAUTION!
•
Verify that the power supply input voltage is set according to
the power standards in the country of use; set the voltage
switch on the rear of the tower (see the illustration on the next
page) to 115 volts or 230 volts. Also verify that the power cord is
appropriate for the country of use (see page 2-2).
CAUTION!
The SCSI
bus may be damaged if
you connect or
disconnect any units
when the power is on.
•
If you are expanding the server tower (using its rear SCSI
connector illustrated below), you must complete all cable and
termination connections on both towers
before
you apply power.
Apply power to the expansion tower
before
you apply power to
the server tower. See also page 2-3.
Page 16

2-4 Installing Your Server Tower
Optional:
Rack Mounting
•
You can use the HP C2982A CD-ROM Tower Rackmount Kit to
mount the tower in one of the following 19” racks:
• HP J1464A Rack System/U25
• HP J1466A Rack System/U33
• HP J1500A Rack System/E41
• HP J1501A Rack System/E33
• HP J1502A Rack System/E25
Steps
1. Attach the power cord to the rear of the tower and to the power
line source.
Do not switch on
power yet.
Note ❏
If you are also installing the HP J4148A SureStore CD
Expansion Tower, now install its power cord and switch on
its power.
2. Attach the network cable to the RJ-45 connector on the rear of
the tower.
Input voltage switch
Power cord connector
RJ-45 network connector
SCSI connector
!
Page 17
Installing Your Server Tower 2-5
3. On the front of the tower, switch on power. Verify that:
• The
ON/BUSY
or
BUSY
indicators on the HP CD-ROM or
DVD-ROM drives go on.
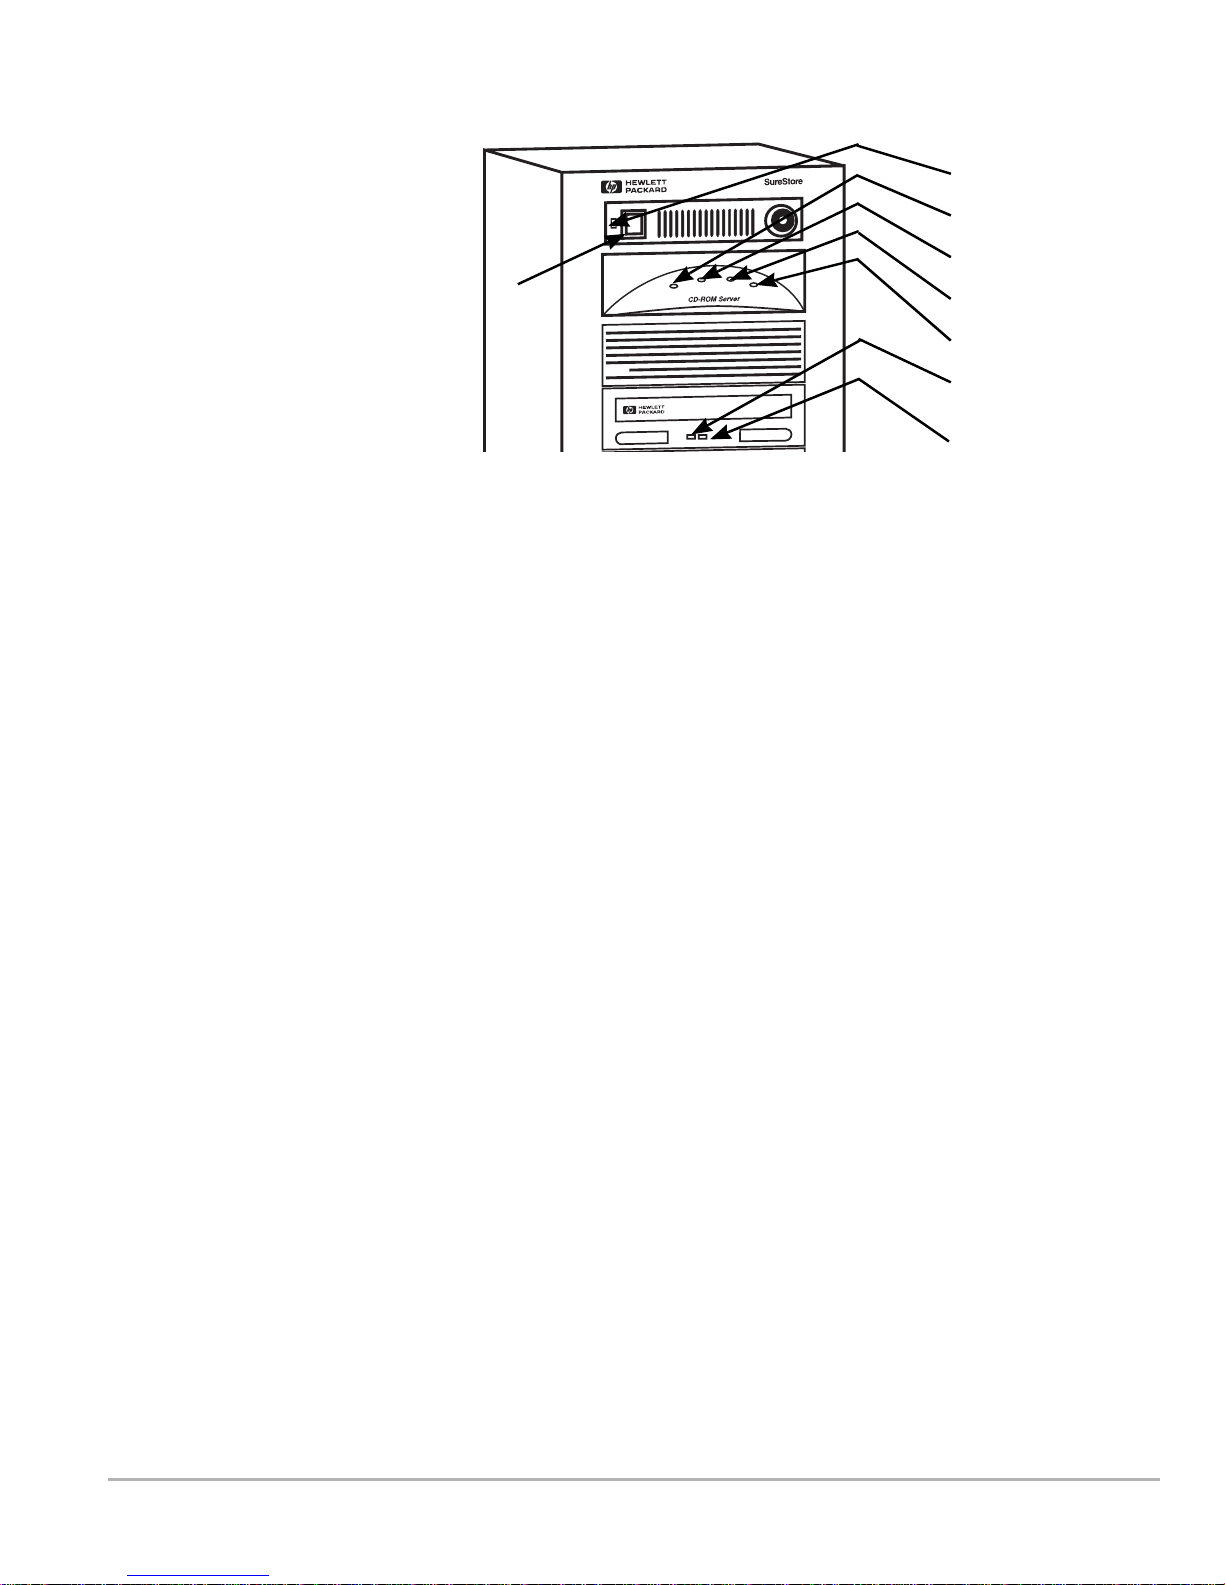
• The 4 indicator lights on the server module (illustrated
above) go on at the beginning of the power-on self-test.
When the
Status
indicator remains
green
and the
SCSI
indicator is
off
, the server is ready for use. Depending on the
number of drives in use, this may take a few seconds to
five minutes.
The server auto-negotiates the link speed—10 or 100 megabits
per second—with other devices on the network.
4. Load a compact disc into the tray of a CD-ROM or DVD-ROM drive
(see page 2-6 or page 2-7). Verify that:
•
A CD-ROM drive’s ON/BUSY
indicator
blinks
and then
turns
off
shortly, and its
DISC
indicator goes on. If either
one
flashes
continuously, then either the disc is not
standard or there is a problem with the drive; refer to
chapter 10, “Troubleshooting”.
•
A DVD-ROM drive’s BUSY
indicator
blinks
. If it remains
on
continuously, then either the disc is not standard or
there is a problem with the drive; refer to chapter 10,
“Troubleshooting”.
• The server’s
SCSI
indicator
blinks
during access. If it does
not, then verify your connections and cycle power (switch
power
off
and wait 10 seconds and then switch power on
again) to the server tower. If
SCSI
still does not
blink
, refer
to chapter 10, “Troubleshooting”.
Repeat step 4 for all CD/DVD-ROM drives (including those in an
expansion tower).
Status indicator
SCSI indicator
Network indicator
Power indicator
DISC indicator
(not on J4152A)
ON/BUSY indicator
Power indicator
Power
switch
Page 18
2-6 Installing Your Server Tower
How to Use HP SureStore CD-ROM Drive
Example Drive
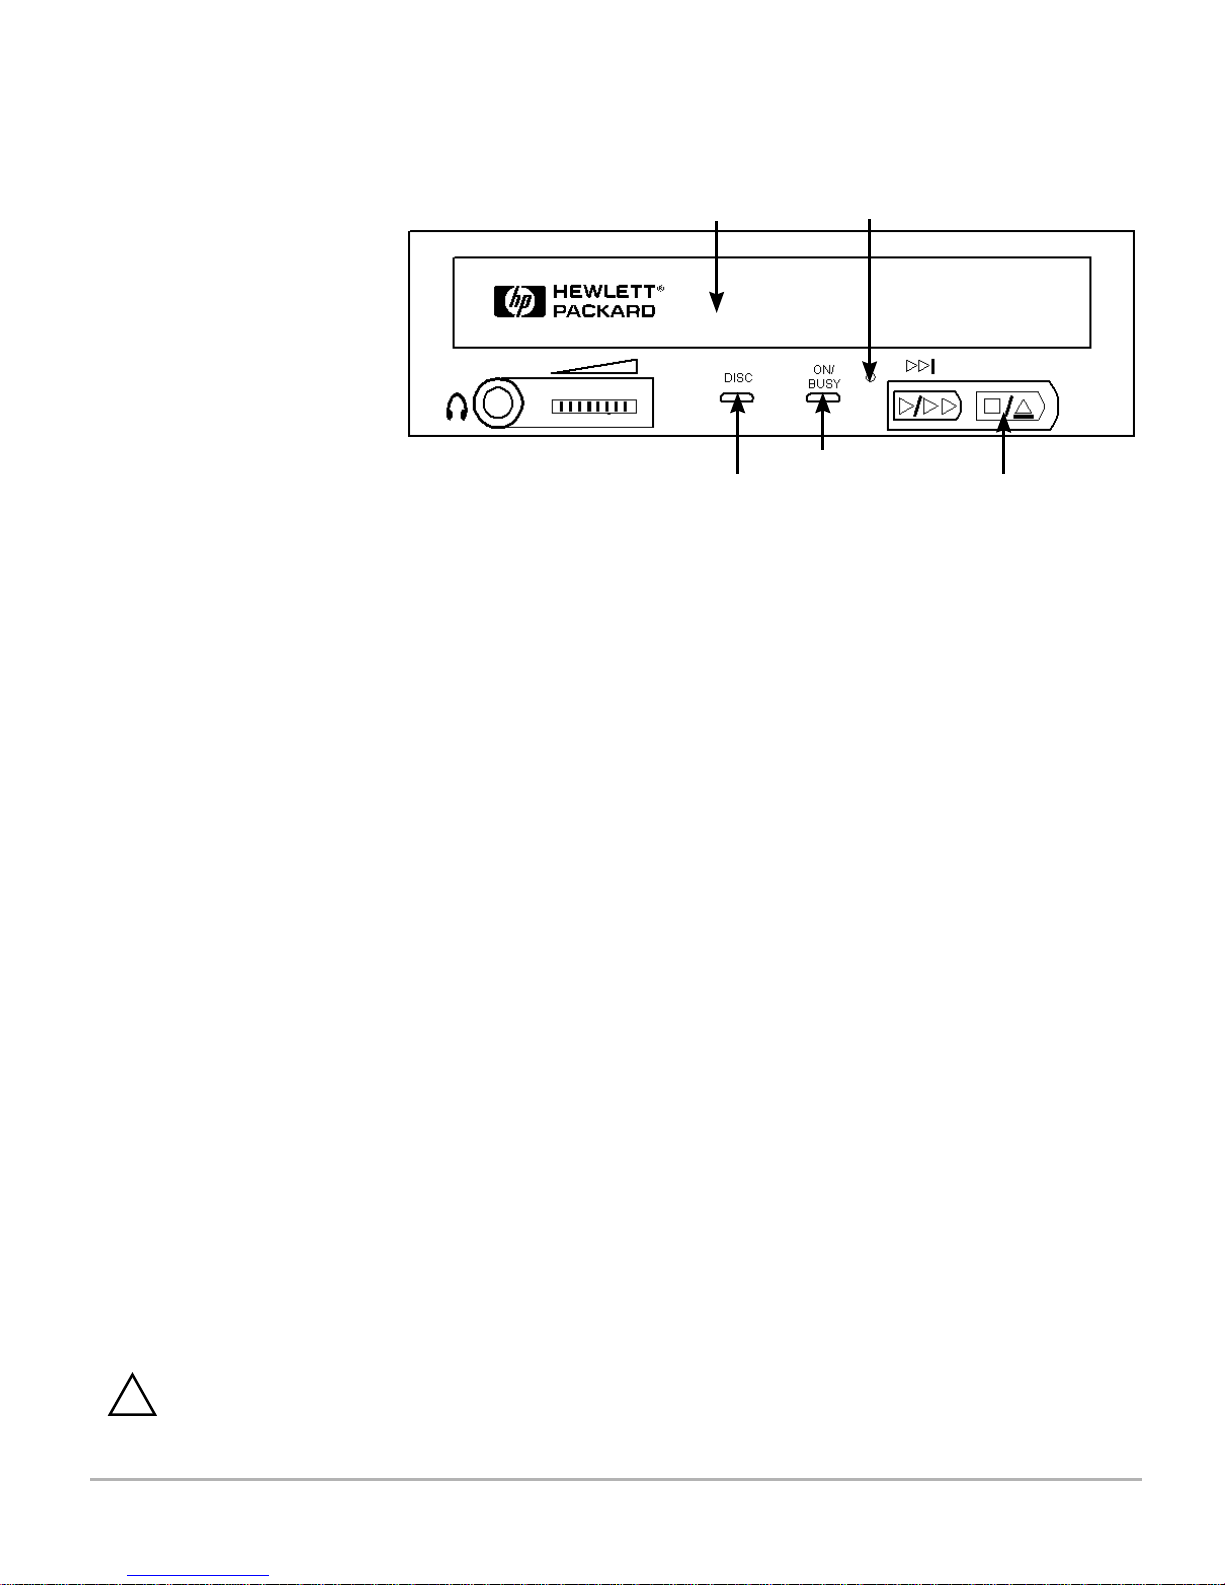
•
Tray door: Press Stop/Eject button to open door. Insert CD into
drawer. Press Stop/Eject button to close door.
•
Stop/Eject button: Push to eject CD. This will not work if the
power is off or if ejection has been disabled by configuration.
If you have eliminated these possibilities and still have
difficulty ejecting a disc, see “Emergency Eject” below.
•
Emergency Eject button (recessed): If the automatic Stop/Eject
button does not work although power is on and ejection is
enabled in the configuration, you may have to use this method
of disc ejection as an last resort. Switch off power. Insert a
paper clip or other thin rigid object in this hole to press the
recessed button to eject the CD.
•
ON/BUSY
indicator: On (yellow) when power is switched on.
Blinking
continuously when CD is inserted and being
accessed.
Off
when CD is inserted and not being accessed.
•
DISC
indicator: On (green) when power is on and CD is
inserted.
Off
if no CD is inserted.
Loading and
Operation
1. While the drive is powered up, push the Stop/Eject button.
The tray drawer will slide out in 2-3 seconds.
2. Lay the bare CD into the depression in the tray, label side up.
For rack-mounted servers, the label side faces the server module;
secure the CD in place by sliding the three clips over it.
3. Press the Stop/Eject button again, and the tray will slide shut
within 2-3 seconds.
Note ❏
We recommend you use the Stop/Eject button to close the tray
in a smooth and secure manner. Closing the tray by pressing
the front of the drawer by hand is not recommended.
Tray door Emergency Eject button
ON/BUSY indicator
DISC indicator Stop/Eject button
!
Page 19
Installing Your Server Tower 2-7
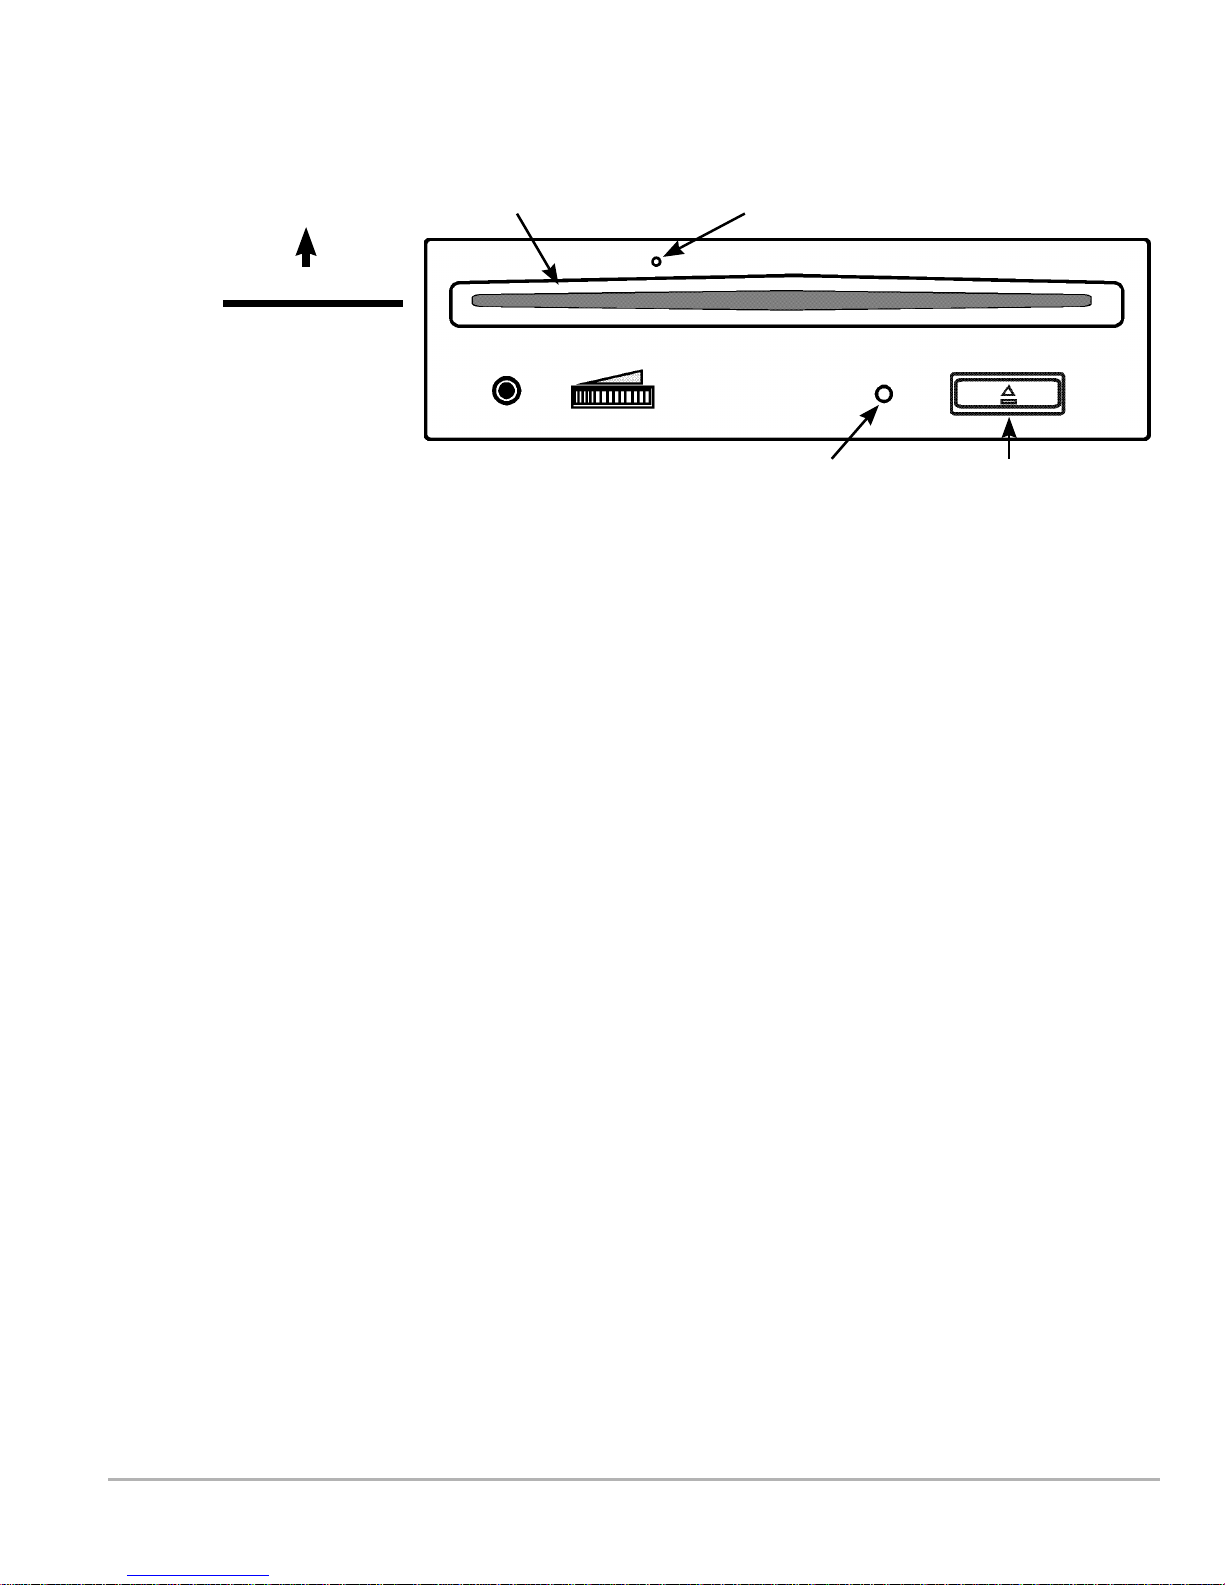
How to Use HP DVD-ROM Drive
Example Drive
•
Disc loading slot: Insert a CD or DVD disc into this slot with the
label side up (or for rack-mounted servers, with the label side
facing the server module).
•
Eject button: Push to eject the disc. This will not work if the
power is off or if ejection has been disabled by configuration.
If you have eliminated these possibilities and still have
difficulty ejecting a disc, see “Emergency Eject” below.
•
Emergency Eject button (recessed): If the automatic Eject
button does not work although power is on and ejection is
enabled in the configuration, you may have to use this method
of disc ejection as an last resort.
CAUTION!
❏
Switch off power to the tower and wait 10 seconds before doing
this procedure.
Insert the emergency ejection pin (supplied in the product
package) into the access hole until the disc ejects. (If the pin is
lost, you may substitute a
1
/16" hex key (Allen wrench.) Do
not
use a paper clip; it is not rigid enough and may damage the
drive! Then restart the server tower.
•
BUSY
indicator: On (green) when power is switched on.
Blinking
when an inserted disc is being accessed.
Off
when no
disc is inserted or the disc is not being accessed, or there is a
problem (see page 10-3).
Loading and
Operation
Press the Eject button to eject any disc currently in the slot. Insert
the CD or DVD disc into the slot with the label side up (or for
rack-mounted servers, with the label side facing the server module).
The
BUSY
LED goes on while the disc initializes; it goes off when
the disc is ready for access.
DIsc loading slot Emergency Eject button
BUSY indicator Eject button
Label Side
Page 20

2-8 Installing Your Server Tower
Care of CD/DVD-ROM Discs
Always store a disc in its protective case or sleeve when not
installed in a CD or DVD drive. Store it at temperatures between
+10° and +60° C (+14° F to +140° F). Allow the disc to stabilize after
moving it from one temperature extreme to another, before using it.
Check each DVD and CD periodically to determine if it needs
cleaning. If the disc is dusty, you can use a commercially available
dust removal spray to blow off dust particles. After removing the
dust particles, you can wipe the disc using a clean, soft cotton cloth.
Use a straight-line motion, wiping from the center to the outside
edge in a non-circular motion.
Correct Procedure for Cleaning a Disc
If a disc becomes dirty or soiled with grease or other contaminants
not removable by wiping, you can clean it with a CD disc cleaner
available at most computer dealers. Follow the directions packaged
with the cleaner. Do not use other cleaning solutions.
CAUTION!
Do Not:
❏
Touch the surface of a disc with your fingers.
❏
Scratch the reflective top or bottom surface of the disc.
❏
Drop the disc.
❏
Expose the disc to dirt, moisture, or high humidity.
!
Page 21

Setup for IP Networks and HTTP 3-1
3
Setup for IP Networks and HTTP
If you are running TCP/IP on your network, this chapter describes
the basic procedures for getting access to the discs from the client
workstations, for both required and optional configuration for
IP network, and for access control related to IP. In addition, any
workstations running HTTP (HyperText Transfer Protocol) over
TCP/IP can use a web browser to most easily access discs and to do
any configuration you need for the HP CD/DVD-ROM server.
Many workstations are running other client and transport protocols
in addition to TCP/IP, such as Microsoft networking (covered in
chapter 4), Novell NetWare products (covered in chapter 5), and
NFS (covered in chapter 6). We recommend that you perform the
additional protocol-specific procedures, such as mapping drives
(mounting) for easy client usage of CD-ROM and DVD-ROM
information. This chapter includes some references to those
procedures in the other chapters.
Novell NetWare/IP, whether used in combination with IPX or under
TCP/IP alone, requires you to follow the configuration instructions
in “Novell NetWare/IP” on page 5-17 also.
Set the IP Address for the Server
Required
Procedure
Before you can configure and use the server in the TCP/IP
environment, you must cause an available Internet Protocol (IP)
address to be assigned to the server. On some systems, you also
may need a unique host name to associate with the IP address.
This section provides these procedures.
Page 22

3-2 Setup for IP Networks and HTTP
Before You Begin
•
Confirm with the network administrator that you may proceed
with network configuration.
•
Obtain an unused IP address from the network administrator.
Note ❏
Do not use the factory-default IP address (192.0.0.192) when
installing the server. Do not assign an IP address before
consulting the network administrator.
•
If Using DNS or WINS Host Names:
Obtain the unique host name from the network administrator.
Then associate it with the HP CD/DVD-ROM server’s IP
address on your DNS server, using the appropriate procedures
for your server. Consult your network administrator or your
system manuals.
Note ❏
If you intend to use WINS, you must enable WINS when you
configure your server later. (See “Methods for Configuration” on
page 3-11 and access the IP configuration.)
•
Note the LAN hardware address (MAC address) printed on the
LAN Address label attached to the server or (top of) the tower.
The address is in the form of twelve hexadecimal digits, such as
0060B0
hhhhhh
(where h is a hexadecimal digit).
•
Verify that the server is powered up and connected to the
network.
•
To use a UNIX system to do one of the procedures in this
section, obtain
root
privileges.
•
To use Windows NT or UNIX to do a DHCP or BOOTP
procedure in this section, obtain
administrator
privileges.
Methods for
Assigning the
IP Address
In this section the methods are summarized, and then each specific
procedure is given. The methods available to you for assigning the
IP address to the server depend on your network operating system.
Descriptions of each method state which operating systems can use
the method.
Page 23

Setup for IP Networks and HTTP 3-3
Choice of Manual Methods
1.
ARP
(Address Resolution Protocol) is the easiest method to use
on supported systems—Windows NT and UNIX. Details are
found on page 3-4 to page 3-5
.
It requires that the IP address is
sent to each new device individually. ARP is not routable; the
workstation from which the configuration is made must be
located on the same network segment as the server.
2. Editing and saving the
config.ini
file for the server is a method
usable in any Microsoft Windows or Novell NetWare
environment. It requires precision in editing the text of the file,
however. See page 3-6 for the details.
Choice of Automated Methods
1.
RARP
(Reverse Address Resolution Protocol) downloads the IP
address to each device automatically. It requires a
rarp
daemon
on your system. RARP operates within a single network
segment only. RARP can be implemented by using UNIX; see
the details on page 3-6.
2.
BOOTP
(Bootstrap Protocol) is similar to RARP, but operates on
the entire network. It requires a
bootp
daemon on your system.
BOOTP can be implemented by using UNIX or Windows NT’s
DHCP server; see the details on page 3-7 or page 3-8.
3.
DHCP
(Dynamic Host Configuration Protocol) allows for the
automatic but temporary assignment of IP addresses from a
predefined pool of addresses. Note that this address may change
and disrupt users. In the absence of either an active
rarp
or
bootp
daemon running on the host, DHCP when enabled will cause the
selected host to automatically allocate and download a free
IP address, a default gateway (router) address, and a subnet
mask to the requesting HP CD/DVD-ROM server. It also sets how
long the IP addresses will remain valid. DHCP can be
implemented by using UNIX or Windows NT.
Note ❏
Only one of the RARP, BOOTP, or DHCP methods should be
enabled on a network at the same time. If both a BOOTP and a
DHCP server on the network provide an IP address, then the
BOOTP address is used. If both a RARP and a BOOTP or DHCP
server provides an IP address at the same time, the results are
undefined.
Page 24

3-4 Setup for IP Networks and HTTP
Windows 95/98/NT:
Using ARP
To assign the IP address in Windows 95, 98, or NT by using the
arp
command, first access the DOS prompt window.
Note:
Windows95
Only
❏
Due to a Windows95 TCP/IP issue, a Windows95 workstation
needs an existing entry in its ARP cache table. You can check to
see if there are any entries by executing a
ping
command to a
valid address on your network, such as your default gateway.
Then perform the
arp
and
ping
commands shown below.
Note ❏
The
<LAN-address>
can be found on the LAN Address label on
the tower (top) or server; each pair of digits must be separated
by a hyphen.
Example:
The host returns “
Request Timed Out
” messages and “
Reply
from 192.124.138.80
…”, indicating that the address has been
set and that communication with the server is established.
Notes ❏
When you execute the
ping
command for the first time, the
response time may be longer than usual. The
ping
command
enables the server to assign itself the address.
❏
You may set (and change) the IP address using this method only
in the approximately one-half hour immediately following
startup in the factory-default state. This inhibits accidental or
unauthorized IP address changes after this period.
Restart the server (cycle its power).
arp -s
<IP-address> <LAN-address>
ping
<IP-address>
arp -s 192.124.138.80 00-60-b0-11-00-86
ping 192.124.138.80
Page 25

Setup for IP Networks and HTTP 3-5
UNIX:
Using ARP
To assign the IP address in UNIX by using the
arp
command,
perform the commands shown below.
Note ❏
The
<LAN-address>
can be found on the LAN Address label on
the server or (top of) the tower; each pair of digits must be
separated by a colon.
Example:
The host will return a message similar to “
192.124.138.80 is
alive
”, indicating that the address has been set and that
communication with the server is established.
Note ❏
The
arp -s
command may vary between different systems.
Some BSD-type systems expect the IP address (or host name)
and LAN address in reverse order. IBM AIX systems require
the additional argument
ether
for Ethernet networks, for
example:
❏
When you execute the
ping
command for the first time, the
response time may be longer than usual. The
ping
command
enables the server to assign itself the address.
❏
You may set (and change) the IP address using this method only
in the approximately one half hour immediately following
startup in the factory-default state. This inhibits accidental or
unauthorized IP address changes after this period.
Restart the server (cycle its power).
arp -s
<IP-address> <LAN-address>
temp
ping
<IP-address>
arp -s 192.124.138.80 00:60:b0:11:00:86 temp
ping 192.124.138.80
arp -s ether salesdept 00:60:b0:11:00:86 temp
Page 26

3-6 Setup for IP Networks and HTTP
Windows and
NetWare:
Editing the
config.ini File
To assign the IP address by editing the
config.ini
file, you must
first set up access to the server from a workstation on the network,
using the instructions for “Client Access to Discs” in chapter 4 or 5,
for your client networking protocol.
Use a text editor to open the
config.ini
file in the
ServerProperties
folder in the
System
folder on the server.
Edit the
InternetAddress
parameter in the IP section.
CAUTION!
❏
Make sure there is a space between the equal sign and the
parameter value. All other spaces between names of parameters
or values are ignored. Do not remove the
[END]
marker from
the file.
❏
You must save the file and restart the server to activate the
new settings. You can do this by setting the
Restart
parameter
in the
config.ini
file to
yes
and saving the file. Instead of
setting
Restart
in the file, you can save the file first and then
switch the server’s power
off
, wait 10 seconds, and switch
power on.
The new settings are ready for use when the server completes
its restart. See page 2-5.
UNIX:
Using RARP
To assign the IP address in UNIX by using RARP:
1. Append the following entry to your LAN (MAC) address table,
typically:
/etc/ethers
. The
<LAN-address>
can be found on
the LAN Address label on the server or (top of) the tower; each
pair of digits must be separated by a colon.
Example:
2. Make sure the host table and alias name databases are updated
as required by your systems.
3. Start the
rarp
daemon (if not already running), typically by using
the command:
rarpd -a
4. Restart the server (cycle its power).
<LAN-address> <host-name>
00:60:b0:11:00:86 cdserv
Page 27

Setup for IP Networks and HTTP 3-7
UNIX:
Using BOOTP
To assign the IP address in UNIX by using BOOTP:
1. Obtain
administrator
privileges.
2. Append the following entry to your boot table, typically
/etc/bootptab
).
Example:
Notes ❏ hostname
is the DNS host name.
❏
The ht and vm fields must be entered exactly as in the example.
For Ethernet,
ht=ether
.
❏
In the ha field, for
<LAN-address>
use the address found on
the server or (top of) the tower. As in the example, use no
separators between its digits.
❏
In the ip field, for
<IP-address>
use the IP address assigned
by the network administrator.
❏
The sm field
(subnet mask)
determines when the traffic should
be sent through a router. For example, the normal class C mask
is 255.255.255.0. The mask 0.0.0.0 indicates that automatic
router sensing is used.
❏
The gw field
(default gateway or router address)
identifies the
router which is sent all traffic directed outside the local network
(according to the subnet mask).
3. Make sure the host table and alias name data bases are updated
as described in “If Using DNS or WINS Host Names:” on page 3-2.
4. Start the
bootp
daemon (if not already running), typically by using
the command:
bootpd -a
5. Restart the server (cycle its power) to download the IP address,
default gateway address, and subnet mask.
<hostname>
:ht=
<hardwaretype>
:vm=
<vendormagic>
:\
:ha=
<LAN-address>
:ip=
<IP-address>
:\
:sm=
<subnetmask>
:gw=
<gatewayfield>
cdserv:ht=ether:vm=rfc1048:\
:ha=0060b0110086:ip=192.124.138.80:\
:sm=255.255.255.0:gw=192.124.138.254
Page 28

3-8 Setup for IP Networks and HTTP
UNIX:
Using DHCP
To assign the IP address in UNIX by using DHCP:
1. Obtain
administrator
privileges.
2. Edit or create a scope in the DHCP manager of the
dhcp
daemon.
The entries made in this scope should include:
• Subnet mask
• Default router Internet address
• NetBIOS over TCP/IP name server Internet address(es)
• NetBIOS over TCP/IP node type
Node type: The server can act either as a B Node (WINS
disabled), or as an H Node (WINS enabled).
• NetBIOS over TCP/IP scope ID
• Lease duration
3. Activate the scope.
4. DHCP must be left configured to the default of enabled.
Windows NT:
Using DHCP
To assign the IP address in Windows NT by using DHCP:
1. Obtain
administrator
privileges.
2. Install the DHCP service on an NT server.
3. Open the DHCP Manager (in Administrative Tools).
4. In the Server menu, use Add DHCP Server to Server List to enter
the IP address of each DHCP server on the network.
5. In the Scope menu for a specific server, select Create. Enter:
• Range of IP addresses in a subnet that can be leased
• Subnet mask for the address range
• IP addresses to be excluded from the scope
• Lease duration (can be defaulted)
• Scope name
6. Using the DHCP Options, configure the Default Gateway if the
default 0.0.0.0 is not appropriate.
7. Select Activate in the Scope menu.
Page 29
Setup for IP Networks and HTTP 3-9
Client Access to Discs
Methods for
Providing Access
For TCP/IP networks, two methods for client workstations to access
the server and its discs are possible.
•
A web browser can be used for access once an IP address is
assigned (see the section starting on page 3-1).
•
Clients can map drives to the server, a CD/DVD-ROM drive, or
a particular disc on a drive.
HTTP:
Using a Web
Browser
The HP CD/DVD-ROM server supports HTTP over TCP/IP. This
means that the server works as a web server. To access the server’s
web page, you must first configure the server with an IP address as
described in the section starting on page 3-1.
Note ❏
After you set up web access to the server according to the
procedure in that section, “Web (HTTP)” can be disabled and
enabled in the server’s configuration; the default is enabled. See
“Disabling Access for Other Protocols” on page 3-13.
The server can be accessed using any standard web browser, such
as Netscape Navigator or Microsoft Internet Explorer. The example
here uses Internet Explorer.
1. Start Internet Explorer.
2. In the Address field, enter the URL of the server as:
As an alternative to the IP address, you can use a host name
associated with the IP address and assigned to the server.
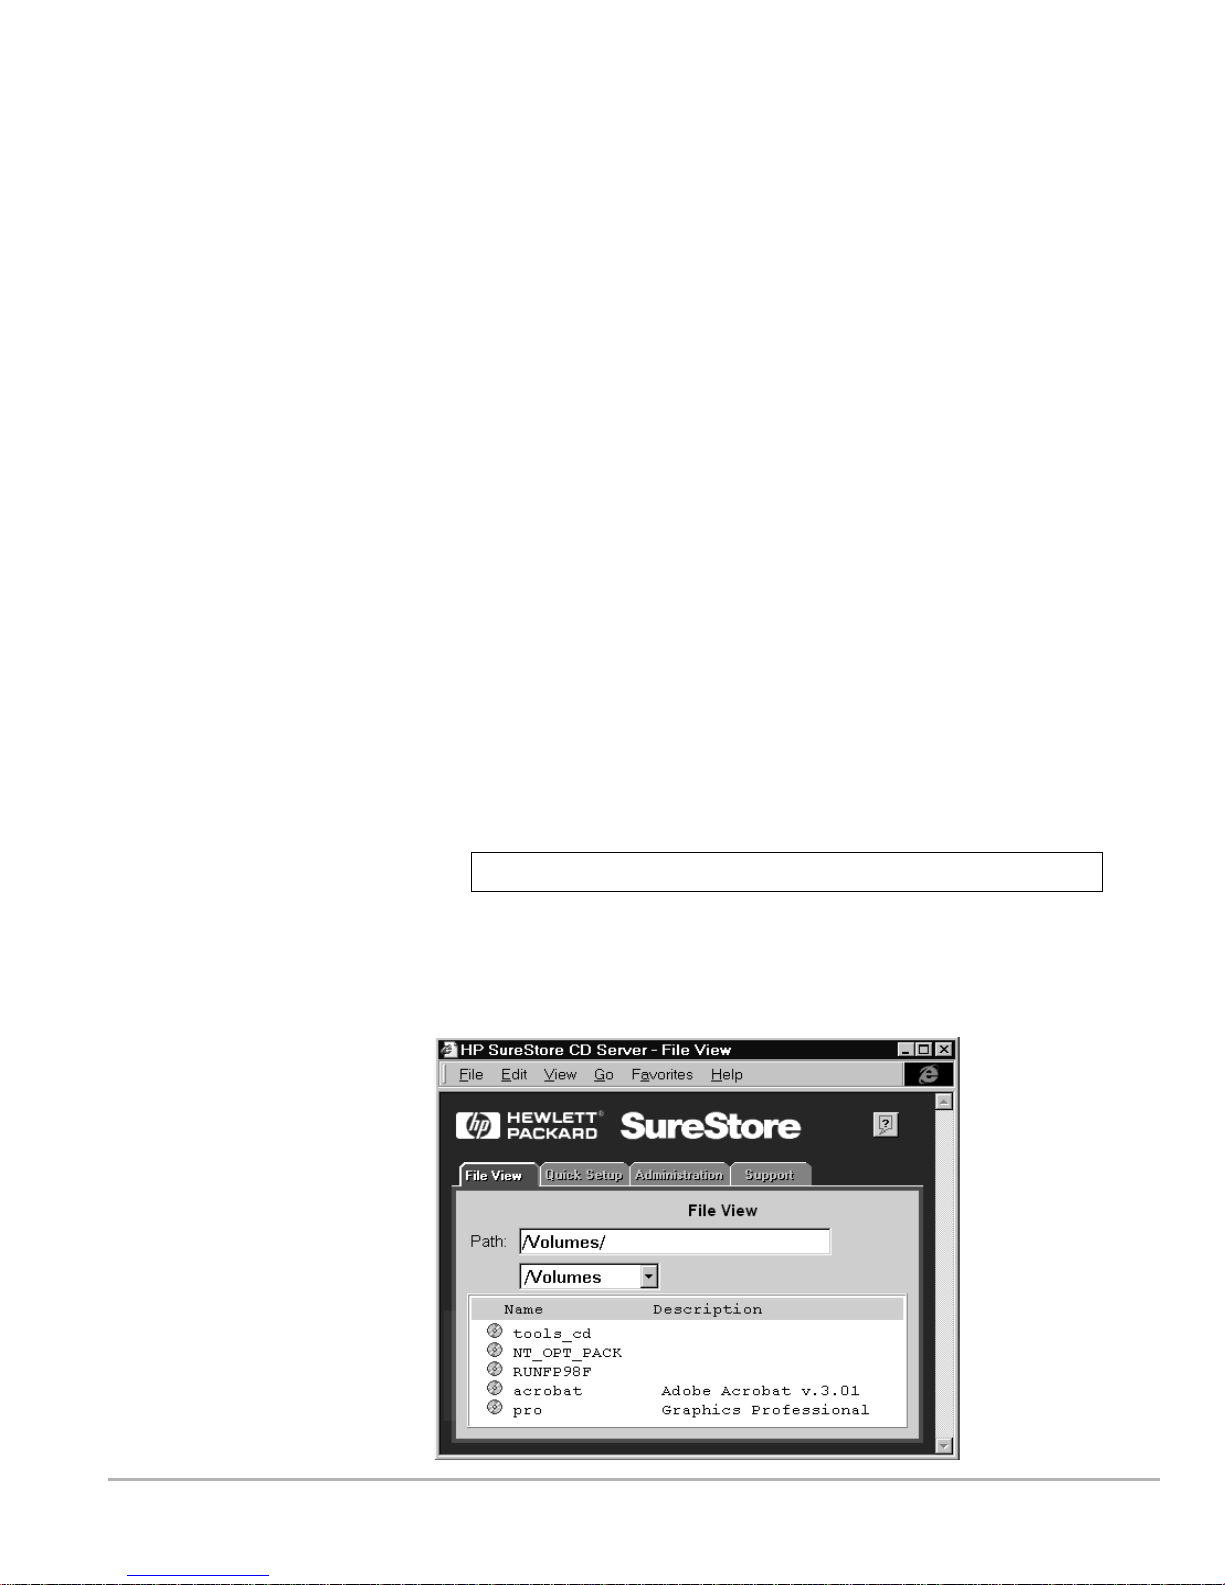
3. The main web page for the server is displayed, as shown below.
http://
<IP-
address>
Page 30

3-10 Setup for IP Networks and HTTP
Click on a disc to view a list of its contents. All users have
access to this page under the File View tab. They can browse
and access the discs listed according to access permissions set
up by the administrator. You can disallow web access to the
discs by disabling the Enable access to volumes via Web
browser (HTTP) setting (see page 3-13).
Some discs contain an
index.htm
or
index.html
file that
provides access to the disc contents on a web page you can use
with the browser. If you click on such a disc, that web page will
appear in place of the simple list. However, you can see the
simple list rather than the index page by adding /. after the
location address.
For easy access to your server resources, web pages can be saved in
your web browser.
•
Netscape Navigator: Bookmarks, Add Bookmark
•
Microsoft Internet Explorer: Favorites, Add Favorite
Note ❏
Web browsers may save pages in local cache memory. In this
case, if a disc in a drive is changed; returning to the File View
will not show the changed disc. You must reload the web page.
Mapping Drives
An additional way to make the discs available to workstations on
the network (clients) is the same as used with file servers:
“mapping” the server to a drive letter on PC systems, or “mounting”
on UNIX systems. After the server is mapped or mounted, the client
accesses the server, with its discs (and optionally its configuration
parameters), just like any other attached disk drive or networked
file server.
The mapping or mounting procedure depends on the network
operating environment and client system. Use the procedures in
subsequent chapters as follows:
•
Microsoft & IBM Networks (SMB) . . . . . . . . . . . . . chapter 4
(Clients: Windows 95/98, Windows NT,
Windows for Workgroups, OS/2, and DOS)
•
Novell NetWare (NCP) . . . . . . . . . . . . . . . . . . . . . . chapter 5
(Clients: Windows 95/98, Windows NT,
Windows for Workgroups, and DOS)
•
UNIX (NFS) . . . . . . . . . . . . . . . . . . . . . . . . . . . . . . . chapter 6
Page 31

Setup for IP Networks and HTTP 3-11
Configuring the Server
By making configuration changes, you can customize server
operation and can set access rights for security.
Configuration
Tips
Some IP configuration changes you might need are listed below.
Some of these items are detailed in this section.
•
Set an IP address, as described in this chapter (page 3-1).
•
Set up or change the server name for NetWare or for Microsoft
networking clients (SMB), or change the domain or workgroup
name for SMB. (See page 4-12.)
•
Set up a password or other access rights restrictions, some of
which are specific to other networking and client protocols.
(See chapters 4, 5, and 6 for other protocols.)
•
Disable server protocols, such as SMB on NetBIOS/NetBEUI,
SMB on NetBIOS/TCP/IP, NetWare, and NFS, to prevent
blanket access for protocols for which you have not restricted
access.
•
Disable disc access through web browsers.
•
Set up Internet and SNMP parameters.
•
Set the server’s time synchronization.
Methods for
Configuration
This chapter provides information for some of the configuration
options, if they are general needs or relate specifically to TCP/IP
networks. Configuration options specific to Microsoft networking,
Novell NetWare, or UNIX/NFS are addressed in chapters 4, 5,
and 6, respectively.
HP recommends the web method of configuration if a web browser
and IP and HTTP are available. Text editing is an alternative
method (see page 3-6).
Page 32
3-12 Setup for IP Networks and HTTP
Web Browser
Configuration
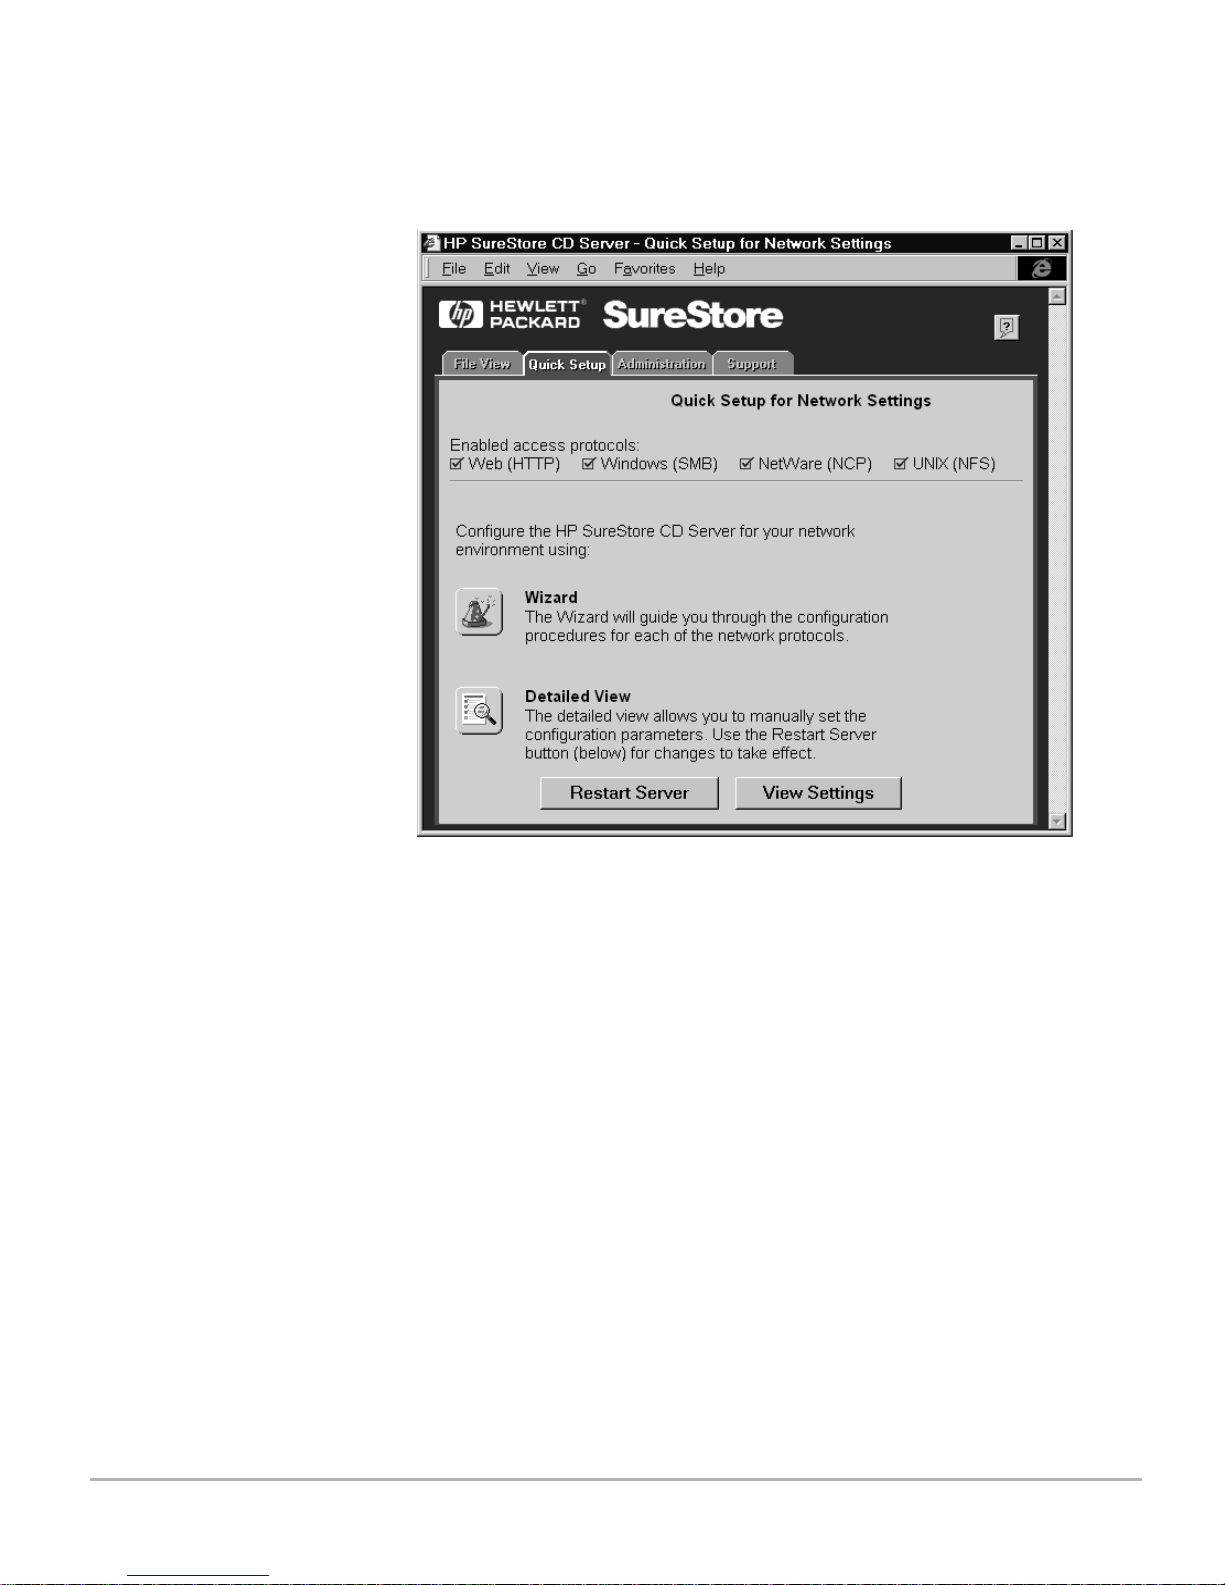
Following step 3 above (page 3-9), select the Quick Setup tab for
most configuration needs. The first time during a session, you will
be prompted to enter the username (default is
root
) and password
(default is
pass
).
You have the choice of a configuration wizard—click on the
Wizard icon—or detailed configuration settings—click on the
Detailed View. The wizard leads you through the most basic
settings, and then restarts the server when you click the Finish
button at the end. The detailed configuration includes all the
settings, and when finished you must click the Restart Server
button to effect most settings that change how the server
appears on the network.
If you need help, click the ? button to display the on-line help.
You can display a table of all configuration settings. Click the
View Settings button on this Quick Setup page.
Some general settings for the server are done under the
Administration tab instead. (Some of the settings below are
examples.) When those settings are saved, they do not require
restarting the server to take effect. The View Settings button is
also available under the Administration tab.
You are prompted to
supply:
username = root
password =
pass
(factory defaults)
Page 33

Setup for IP Networks and HTTP 3-13
Disabling Access
for Other
Protocols
In the Detailed View (from the Quick Setup page), you can switch
off all access to the server through other protocols for which you do
not set up access restrictions.
Disable Microsoft Windows access by using the Windows (SMB) tab
and disabling the NetBIOS Protocol Bindings for both NetBEUI
and TCP/IP. Disable UNIX by using the UNIX tab and the Enable
NFS setting. Disable NetWare by using the NetWare tab and the
Enable NetWare setting.
Note ❏
Do
not
disable Web (HTTP) access. Maintain administrative
access to the server through this web interface.
You must restart the server to effect Detailed View settings.
TCP/IP and Web
(HTTP) Settings
The wizard for TCP/IP (from the Quick Setup page) allows you to
set the correct subnet mask and default router to accompany the
IP address. Clicking the wizard’s Finish button causes the server to
restart for the settings to take effect.
You can enable WINS on the Detailed View setup page for TCP/IP,
or in the wizard for TCP/IP.
The Detailed View setup page for Web (HTTP) allows you to disable
all access to the volumes through this web interface—the File View
(see page 3-10).
Server Password
To protect the system files, it is important that you change the
server password. For example, users are prompted for the server
password when trying to access the Administration and Quick
Setup web pages for the first time during a session. Under the
Administration tab, click the This Server button and with the
server module highlighted, click the Settings button. On the
resulting page, select the General tab. Change and confirm the
password. Click Save. This new password takes effect without
restarting the server.
Automatic Time
Synchronization
Setting up the Network Time Protocol
For automatic time synchronization you can use the Network Time
Protocol (NTP, as defined by RFC 1769). Under the Administration
tab, click the This Server button and with the server module
highlighted, click the Settings button. On the resulting page, select
the Date & Time tab. Select Automatically and network Time
Protocol. Then for NTP Server, specify the IP address or Internet
domain name of the time server.
Or you can use NetWare NDS Time Synchronization if your
network runs NetWare (see page 5-18).
Page 34

3-14 Setup for IP Networks and HTTP
Access Rights:
Web Security
The HP CD/DVD-ROM server can be configured to restrict user
access to CD/DVD-ROM drives, to individual discs, and to the
server configuration. You can limit the number of users
simultaneously accessing any disc to comply with user-license
restrictions.
By Networking Protocols
Access restrictions can be set individually for each protocol
(NetWare NCP, Windows SMB, UNIX NFS, and Web HTTP).
The default settings in some protocols provide full access rights to
all users, so we recommend that you implement at least two access
restrictions:
•
Disable all protocols not being used. If unused protocols are not
disabled, a user accessing the server through such a protocol
may be given full access rights, regardless of the security
configurations in other protocols. See “Disabling Access for
Other Protocols” on page 3-13.
•
Restrict access to the root and
System
folders (see below).
By Discs or Drives
Access restrictions can be set individually for each CD/DVD-ROM
drive, for each disc inserted into the drives, and for the server
configuration files (in the
System
folder within the root), and for
the volumes as a group (using the
Volumes
folder). Refer to the
“File System Description” starting on page 7-3 for information on
these folders.
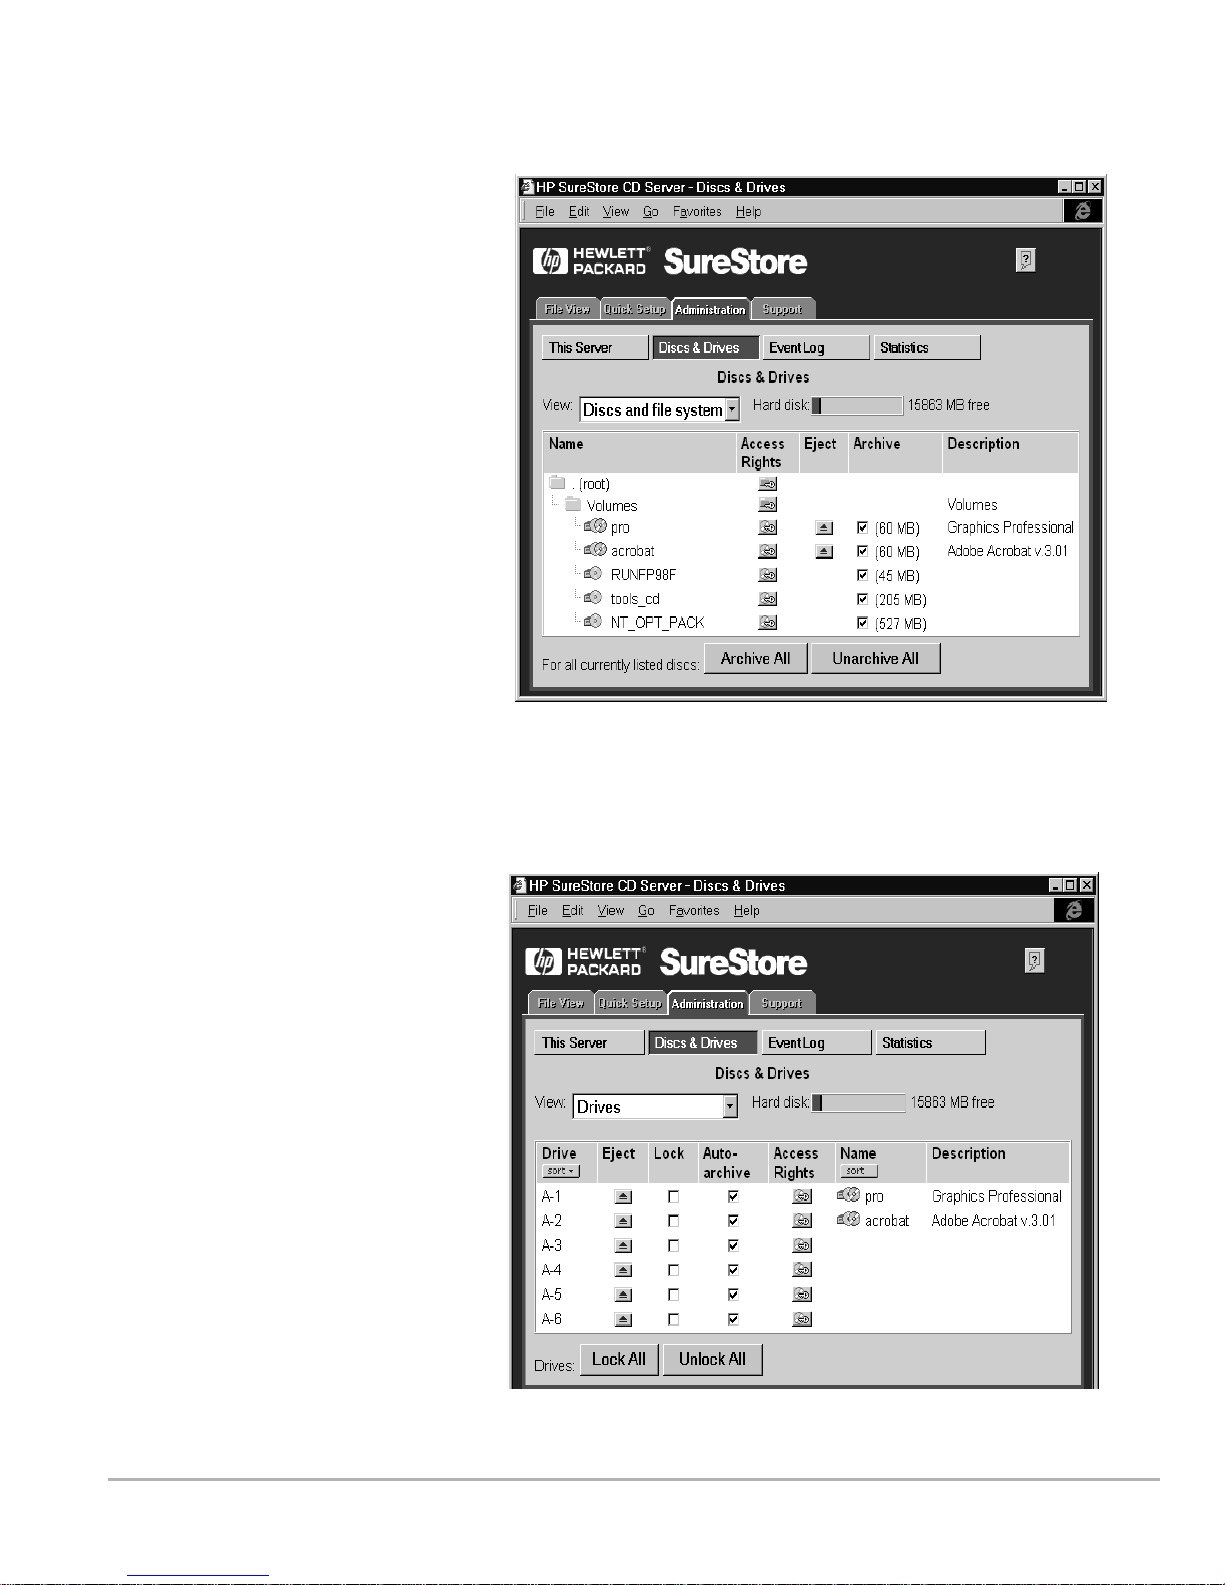
Set these access rights using the web browser, under the
Administration tab. Select the Discs and Drives button. In the
Discs and file system view, you will see an icon in the Access Rights
column for each of the discs and for the root and for the
volumes
folder. In the Drives view, you will see an icon in the Access Rights
column for each CD/DVD-ROM drive. See the display on the
next page.
Page 35
Setup for IP Networks and HTTP 3-15
Click on the Access Rights icon to display the Access Rights
properties page for that access point.
By Drive.
To associate the access sharing and access rights with
the drive, for whatever disc is in the drive, rather than the specific
disc, click Drive for Use the access rights and properties of the
Drive.
Page 36

3-16 Setup for IP Networks and HTTP
Then the disc’s volume name (see page 3-16) will be changed to
the default SCSI name, such as CD-id2lun0. You can change
this name using the Name field on this property page. As a
result, the icon in the Access Rights column will illustrate the
key on top of a drive rather than a disc. (For HP J4150A: If this
disc is then archived, the share name will revert to the disc’s
volume name.)
Volume Name and User Limit.
Under the General tab, you can
set the disc’s volume name and the limit for the number of users
simultaneously accessing the volume (for user-license restrictions).
The volume has by default the name held on the disc itself. You can
override the default name using the Name setting on this page.
Note ❏
Spaces in a volume name will be replaced by underscores.
If the volume name duplicates another volume name, an
underscore and capital-A (then underscore and capital-B, etc.)
will be appended to the duplicate.
Password.
Under the Web security tab, you can protect the volume
using either the administrator’s Server Password (see page 3-13) or
a separate password for the volume. These changes take effect as
soon as you OK each page.
Security by Network.
If you use Windows NT domains or
NetWare NDS, you also can set up access restrictions for those
environments. For the details, see page 4-14 or page 5-10,
respectively.
Page 37

Setup for Microsoft Networks (SMB) 4-1
4
Setup for Microsoft Networks (SMB)
This chapter describes the setup for Microsoft and IBM networks
running SMB (Server Message Block). SMB is a protocol that
makes use of NetBIOS. NetBIOS can be transported over different
network protocols. The HP SureStore CD/DVD-ROM server
supports the following transport methods automatically:
•
SMB over NetBIOS/NetBEUI
(NetBIOS Extended User Interface)
•
SMB over NetBIOS/TCP/IP
(also called NBT)
Clients using SMB could be running Windows 95 or 98,
Windows NT, Windows for Workgroups, OS/2, UNIX, or DOS.
This chapter includes examples of procedures for such client
systems. You may need to refer to your network operating system
manuals for assistance with specific procedures.
If you are running TCP/IP on your network as well as SMB, refer to
chapter 3 to assign the IP address to the server (the “Set the
IP Address for the Server” section from page 3-1 to page 3-8) before
granting access to clients.
Following that section of chapter 3 are instructions for setting
up access to the discs and configuring the server (starting on
page 3-9). For IP and HTTP installations, we recommend use of
those instructions for client access and configuration in addition
to the methods following in this chapter.
Page 38

4-2 Setup for Microsoft Networks (SMB)
Client Access to Discs
The procedures for accessing your HP CD/DVD-ROM server are
similar to accessing any other workstation or file server. Users at
workstations (clients) on the network use the same procedures to
access both types of servers, For easy access to the discs from
applications, the server should be made available to each client
system—“mapped” to a drive letter on PC systems. After the server
is mapped, the client accesses the server with its discs (and
optionally its configuration parameters) just like any other attached
disk drive or networked file server.
The mapping described in this section can be done on
one
workstation by one administrator or installer first. Then any
configuration tasks for the server setup can be done (described later
in “Configuring the Server” on page 4-11), before setting up
all
the
network clients according to the procedures in this section.
1. Select Access
Point
Different workstations need different points of access to the server.
The network administrator or installer, for example, needs access to
configure and monitor the server. Then, the administrator may
want to set up all the clients with access to the discs, without access
to the configuration files stored on the server. Choices for the latter
setup include mapping all the discs in the server and mapping each
drive or disc volume separately.
The procedures for mapping drives require you to select an access
point. We recommend consulting the description of access points
and the server’s file system, in the reference chapter starting on
page 7-1, before proceeding.
2. Map Drives
This section gives you examples of how to set up access to the server
from clients for Windows 95/98, Windows NT, Windows for
Workgroups, OS/2, and DOS.
Note ❏
The examples below assume that you have not changed the
server name for SMB:
HP
hhhhhh
, where
hhhhhh
are the last
six digits of the server’s LAN hardware (MAC) address. If you
have changed the server name (see page 4-12), that assigned
name appears instead.
Page 39
Setup for Microsoft Networks (SMB) 4-3
Windows 95, 98,
Windows NT 4.0
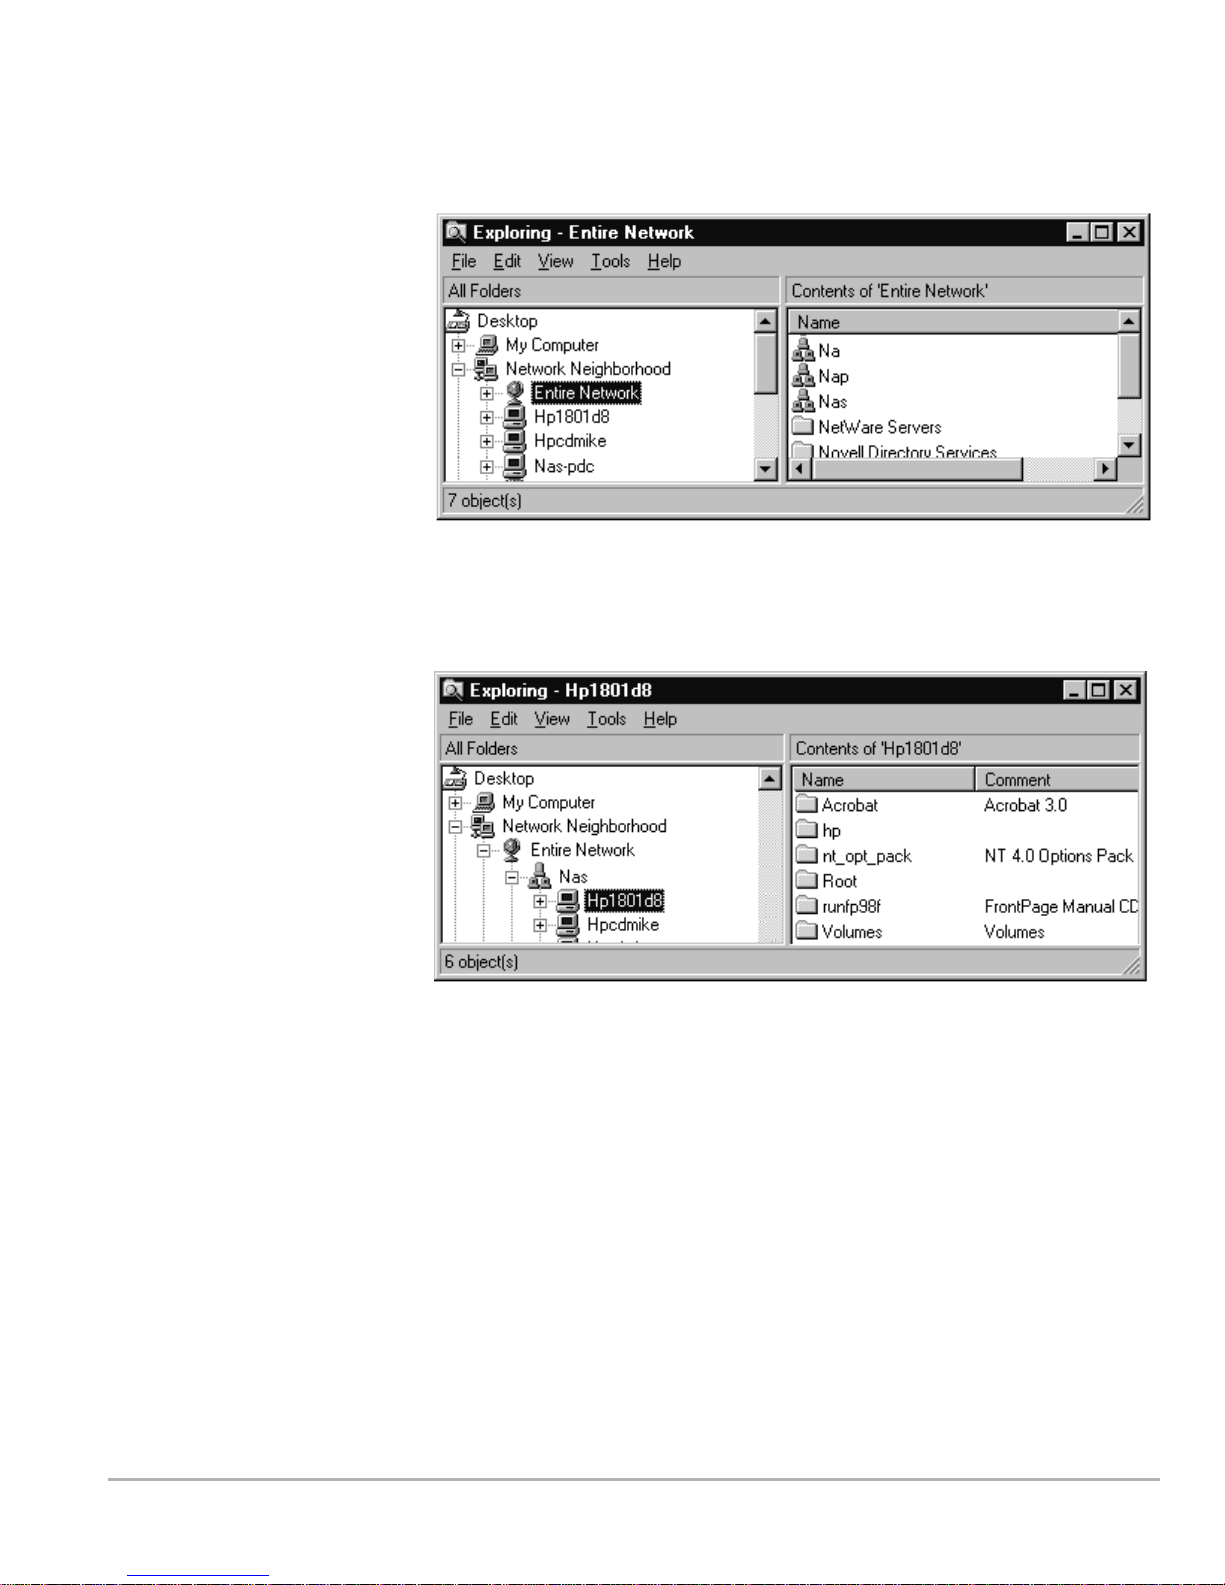
1. Start the Windows Explorer from the Start Programs Menu.
2. Expand the Network Neighborhood icon. The available resources
are displayed.
3. Expand the Entire Network icon to list the workgroups. The
server will appear in the (alphabetically) first workgroup on your
local segment.
Skip ahead to step 11 if you see the server. However, if you
cannot find a workgroup containing the server name in
Network Neighborhood, then continue here with step 4:
4. Start the Windows Explorer from the Start menu.
5. Select Map Network Drive... from the Tools menu.
6. Select a drive letter.
Page 40

4-4 Setup for Microsoft Networks (SMB)
7. In the path box, type
\\HP
hhhhhh
\root
, where
hhhhhh
are the
last six digits of the server’s LAN hardware (MAC) address.
8. This maps the administrative root access to the server. If you wish
to use this root access for the same drive letter the next time you
start your computer, check Reconnect at Logon. (If you wish to
select a level of mapping more appropriate for a user, see step 10
below.)
9. Click the OK button. The server is now ready for use.
10.
Optional:
If you have other SMB domains or workgroup names
defined and the server did not appear within them, you can use
this client to change the setting for the Workgroup Name to the
name of your existing domain or workgroup. (See page 4-12.)c
If you wish to map the server to a different level than root
level (as described in step 12 below), you can then return to
step 1 of the procedure above to redo the mapping as
desired.
11. Double-click the entry for your new server. The default entry
name is
HP
hhhhhh
, where
hhhhhh
are the last six digits of the
server’s LAN hardware (MAC) address.
Note ❏
The individual discs are shown as well as the
Volumes
folder
that contains them. This is not the normal hierarchical
appearance, but it is done this way to give you the choice of
mapping either individual discs or all of them together.
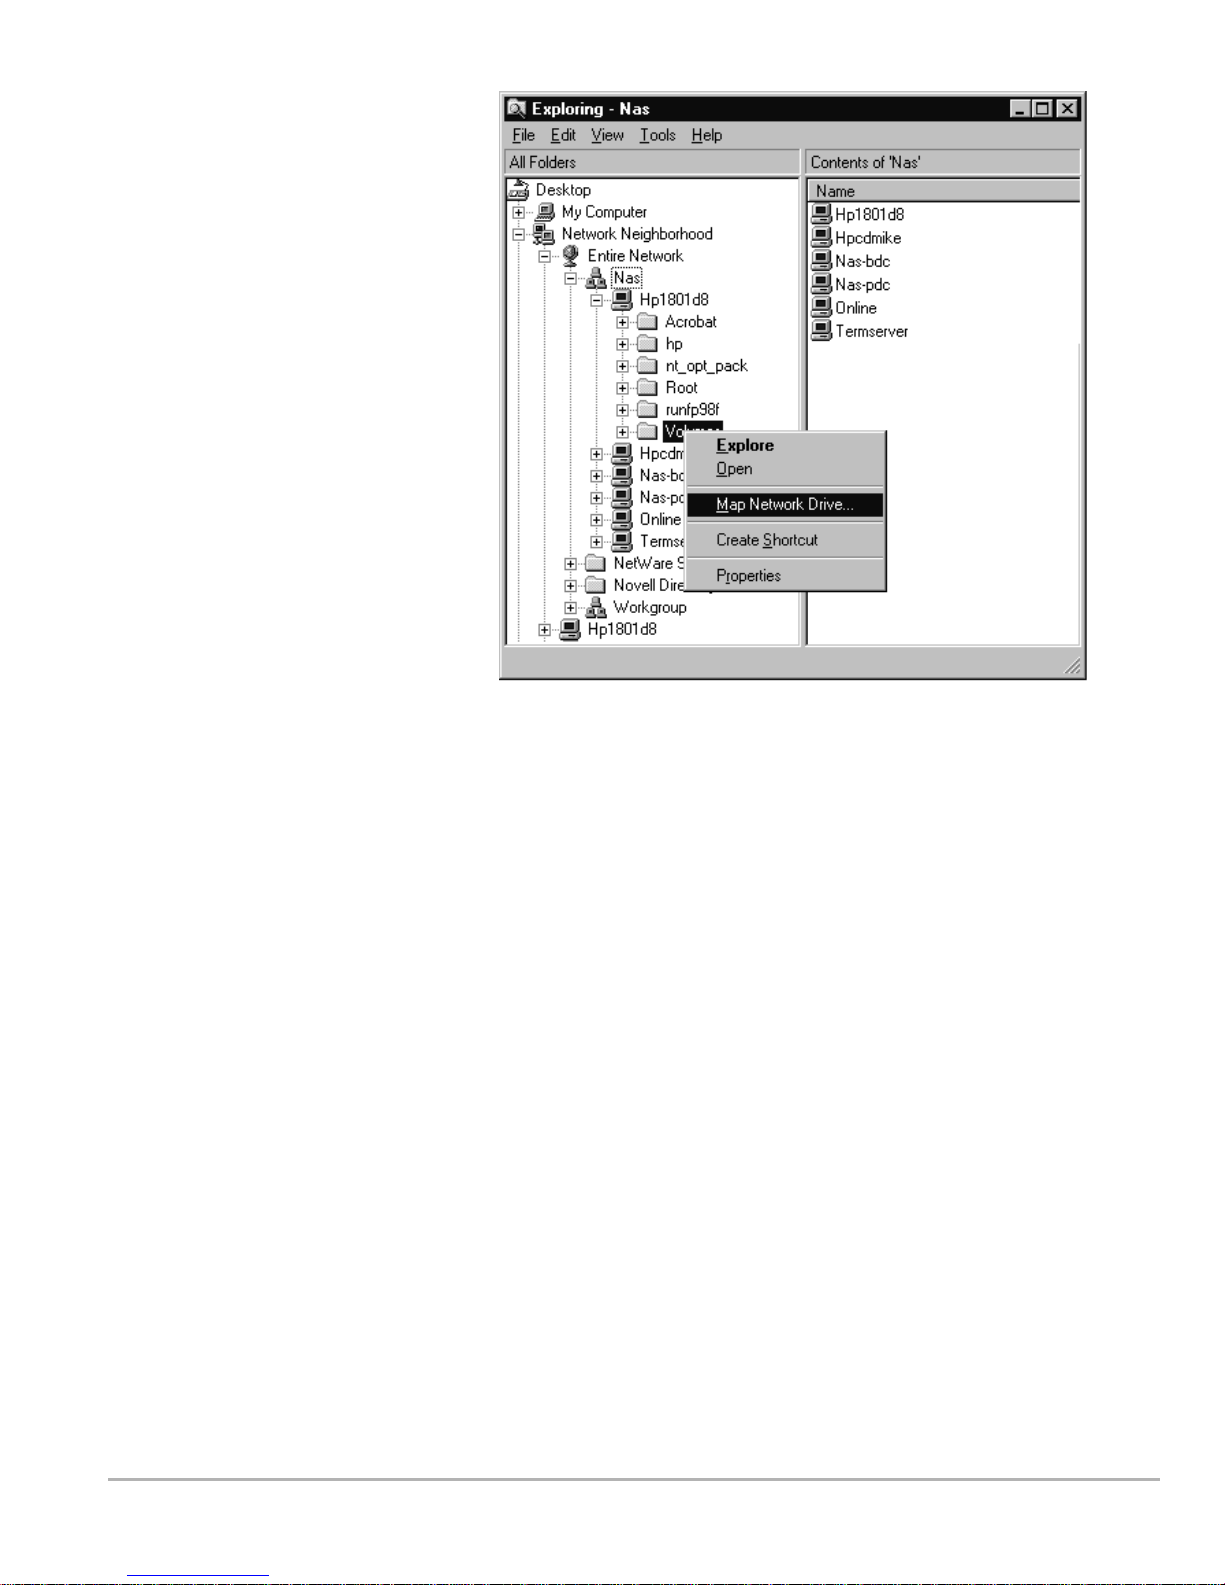
12. To map a resource to a drive letter, right-click one of the following
server resources:
• For root access to everything, right-click
Root
.
• For access to all discs with one drive letter, right-click the
Volumes
folder.
• For individual disc access, right-click the specific disc
folder name.
13. From the pop-up menu, select Map Network Drive.
Page 41
Setup for Microsoft Networks (SMB) 4-5
14. Select a drive letter for your server or use the default drive letter.
15. Check Reconnect at Logon if you wish to use the server resource
as the same drive letter the next time you start your computer.
16. Click the OK button. The server is ready for use.
Note ❏
In the Microsoft network environment, network resources are
accessed by specifying a server and a resource on that server
using the Universal Name Convention (UNC) as:
\\server\resource
The resource is
not
a file path. You may not replace the resource
name with the path to a file or folder on your disc. Therefore, if
using the file system as outlined in the “File System
Description” on page 7-3, only
Volumes
folder access would be
possible (see “Access Points” on page 7-1). However, the server
also allows you to map the following resources on SMB clients:
• Root, which includes the complete file system of the server.
Map a network drive to
Root
for root-level access.
• A folder for each disc (or for each CD/DVD-ROM
drive
if you
have set the drive to “Use the access rights and properties of
the Drive” rather than “Disc” as described on page 3-14).
Map a network drive letter to the volume name (or to the
drive name).
Page 42
4-6 Setup for Microsoft Networks (SMB)
Windows for
Workgroups
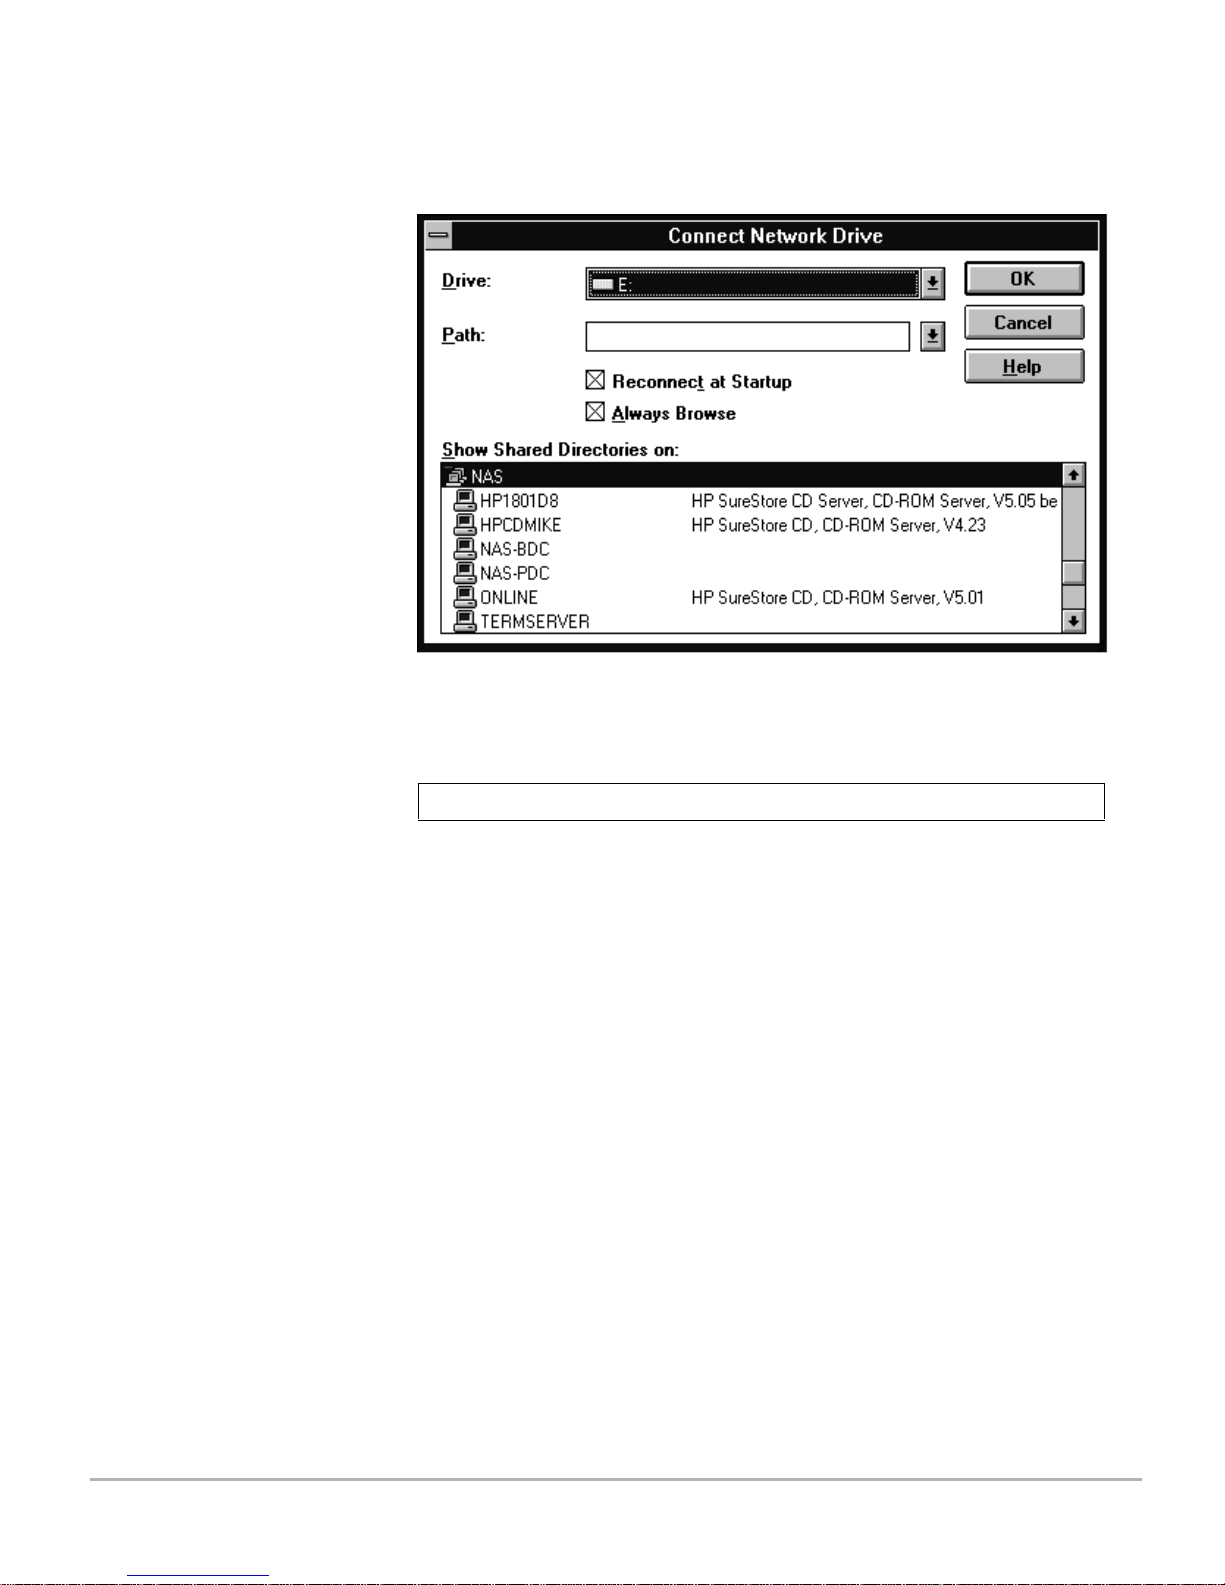
1. Start File Manager.
2. From the Disk menu, select Connect Network Drive. The
following dialog is displayed.
3. Select a drive letter or accept the default.
4. In the Path field, type an entry for your server:
hhhhhh
are the last six digits of your server’s LAN hardware
(MAC) address.
<path>
is the path of the resource that provides your selected
access point on the server.
• For root access to everything, type
root
• For access to all discs with one drive letter, type
volumes
• For individual disc access, type the specific volume name,
for example,
50202MAY
5. Check Reconnect at Startup if you wish to use the same mapping
the next time you start your computer.
6. Click the OK button. The server is ready for use.
The server
appears in the (alphabetically) first workgroup on your local
segment. Or, you can use this client to change the setting for
the Workgroup Name to the name of your existing domain or
workgrou
p. (See page 4-12.)
\\HP
hhhhhh\<path>
Page 43
Setup for Microsoft Networks (SMB) 4-7
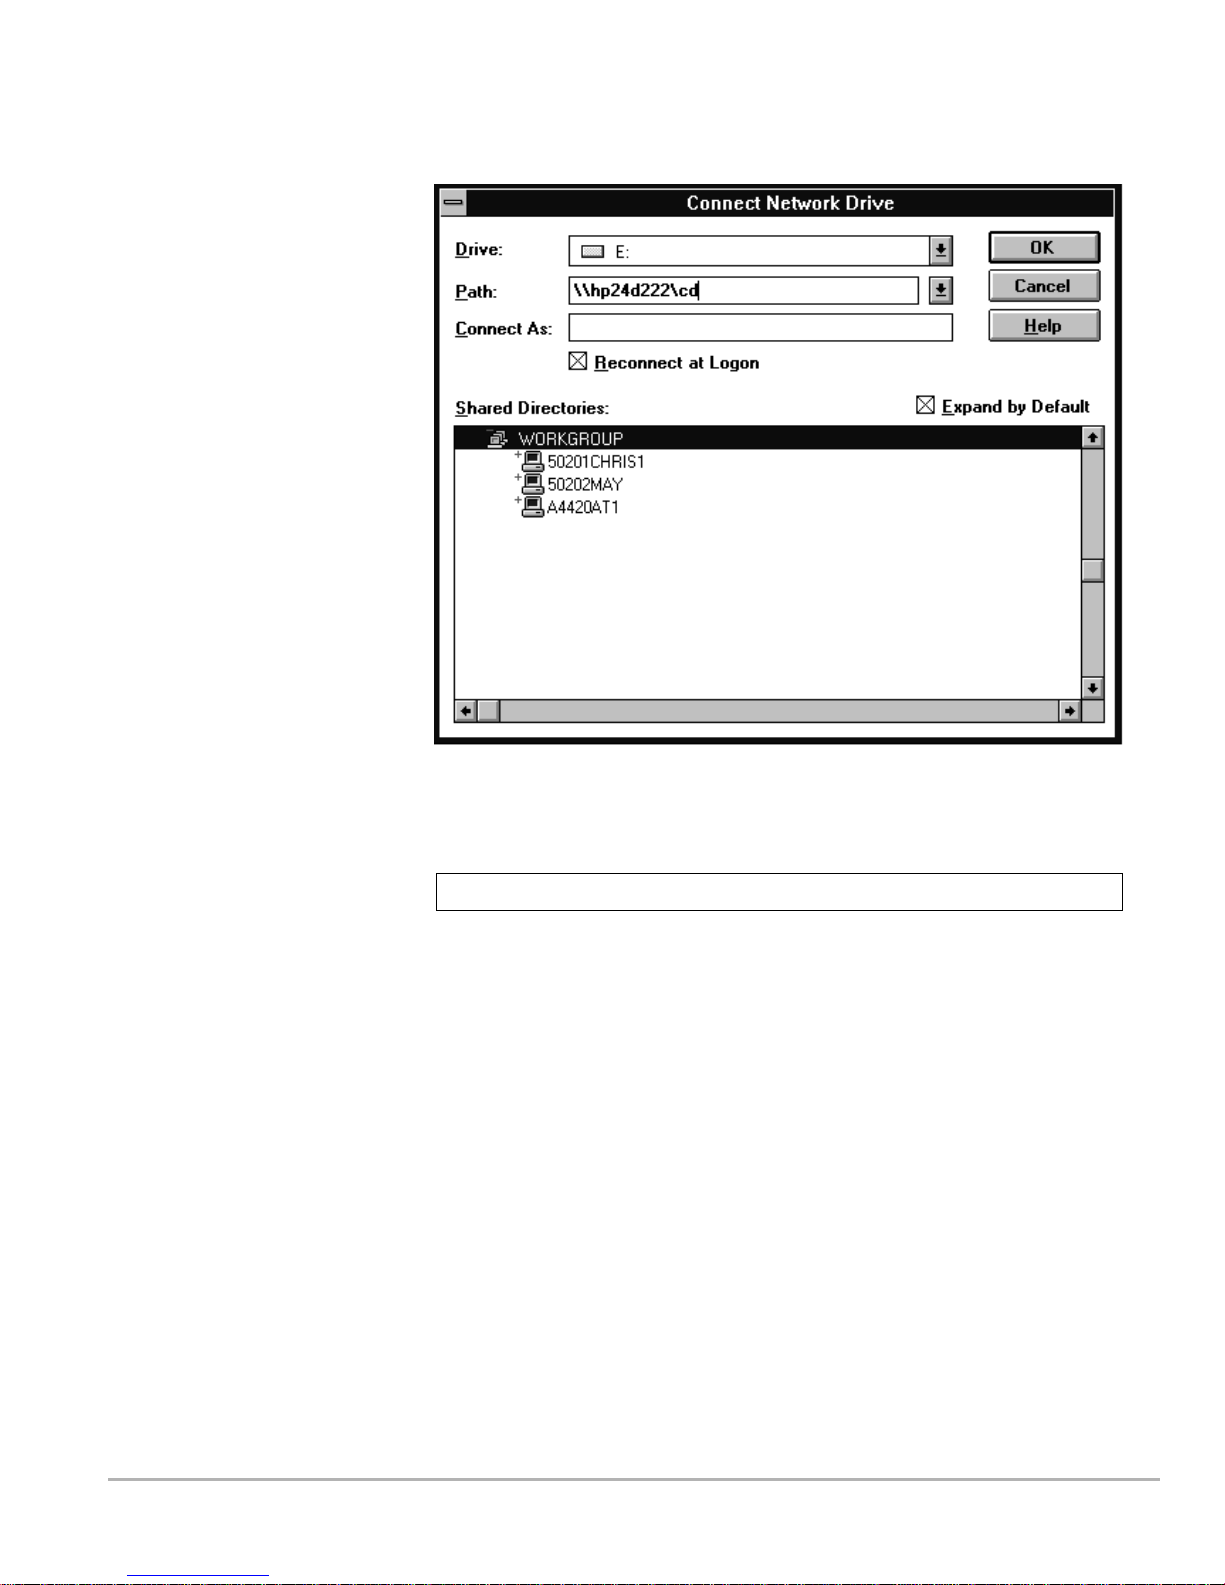
Windows NT 3.51 1. Start the File Manager.
2. From the Disk menu, select Connect Network Drive.
3. Select a drive letter or accept the default.
4. In the Path field, type an entry for your server:
hhhhhh
are the last six digits of your server’s LAN hardware
(MAC) address.
<path>
is the path of the resource that provides your selected
access point on the server.
• For root access to everything, type
root
• For access to all discs with one drive letter, type
volumes
• For individual disc access, type the specific volume name,
for example,
50202MAY
5. Check Reconnect at Startup if you wish to use the same mapping
the next time you start your computer.
6. Click the OK button. The server is ready for use.
\\HP
hhhhhh\<path>
Page 44
4-8 Setup for Microsoft Networks (SMB)
IBM Peer for OS/2 Make sure you have the peer for OS/2 installed on the workstation.
If not, do the procedure on page 4-9 instead of the procedure on
this page.
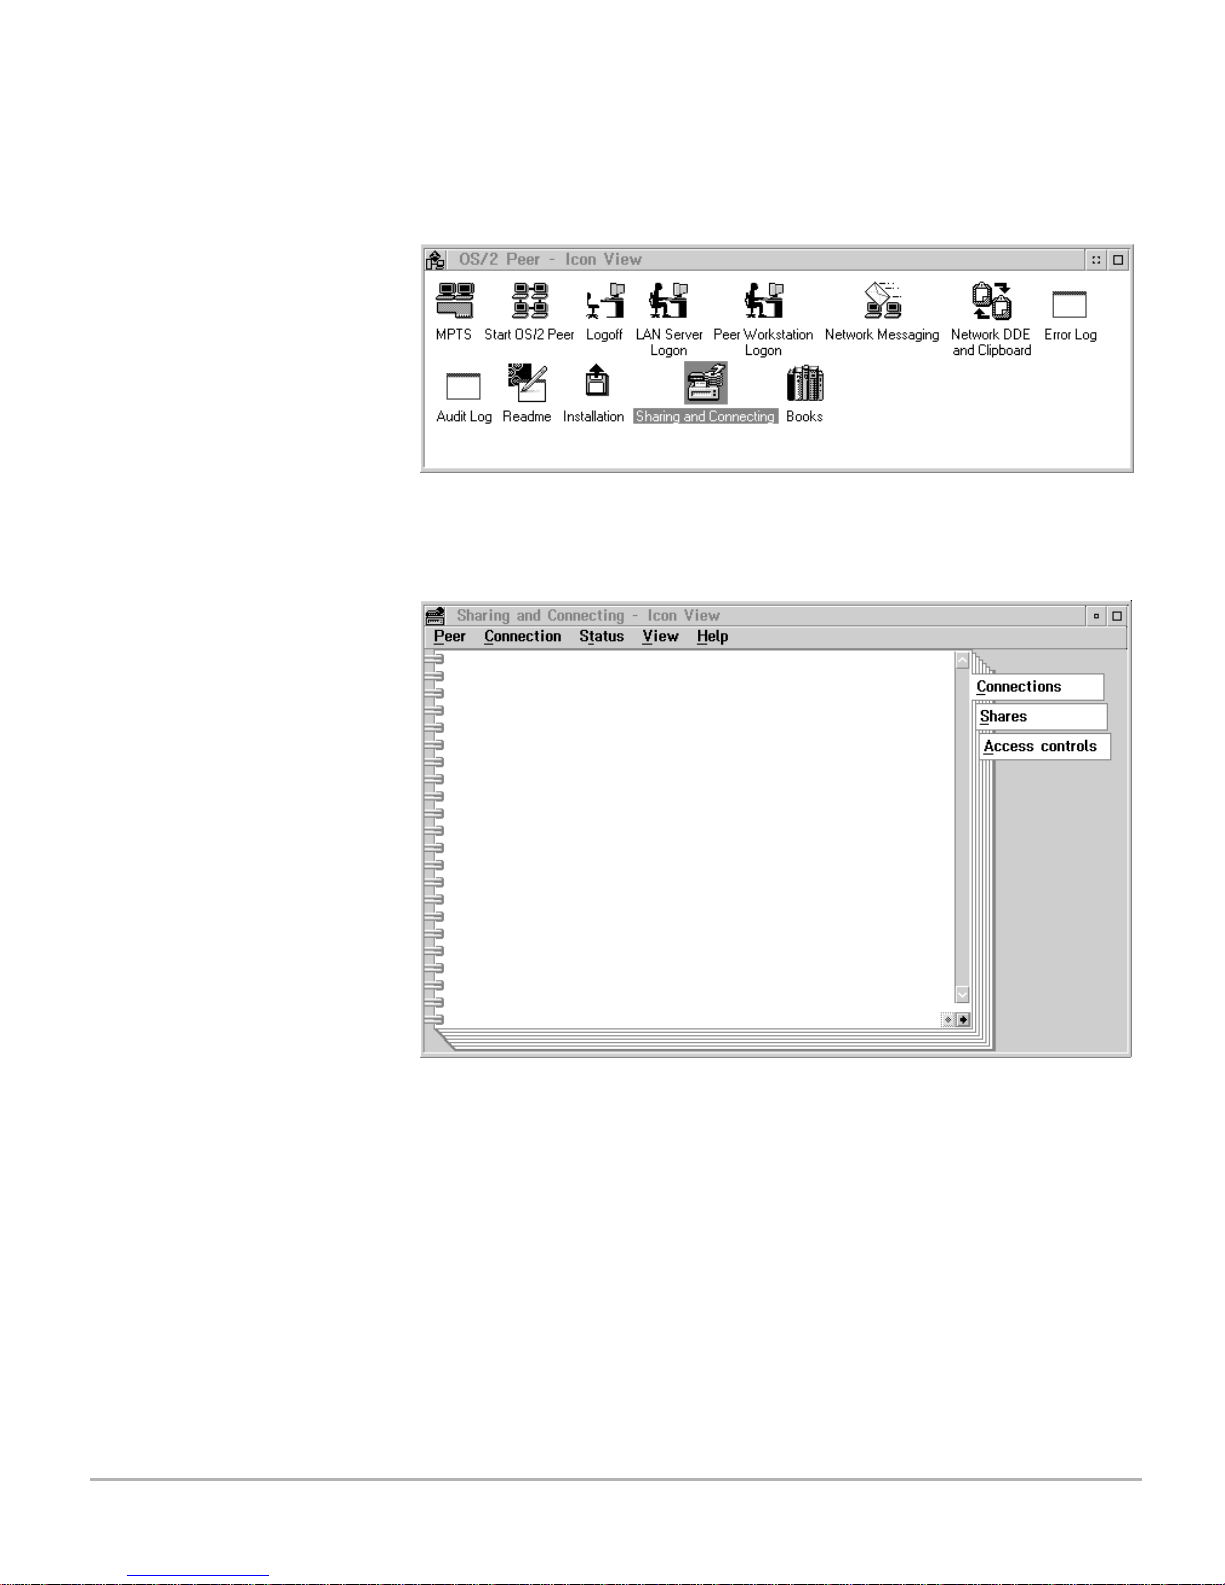
1. Double-click the OS/2 Peer icon. The Peer window opens:
2. Double-click the Sharing and Connecting icon to open the
following window:
Active connections will be listed in the window.
Page 45
Setup for Microsoft Networks (SMB) 4-9
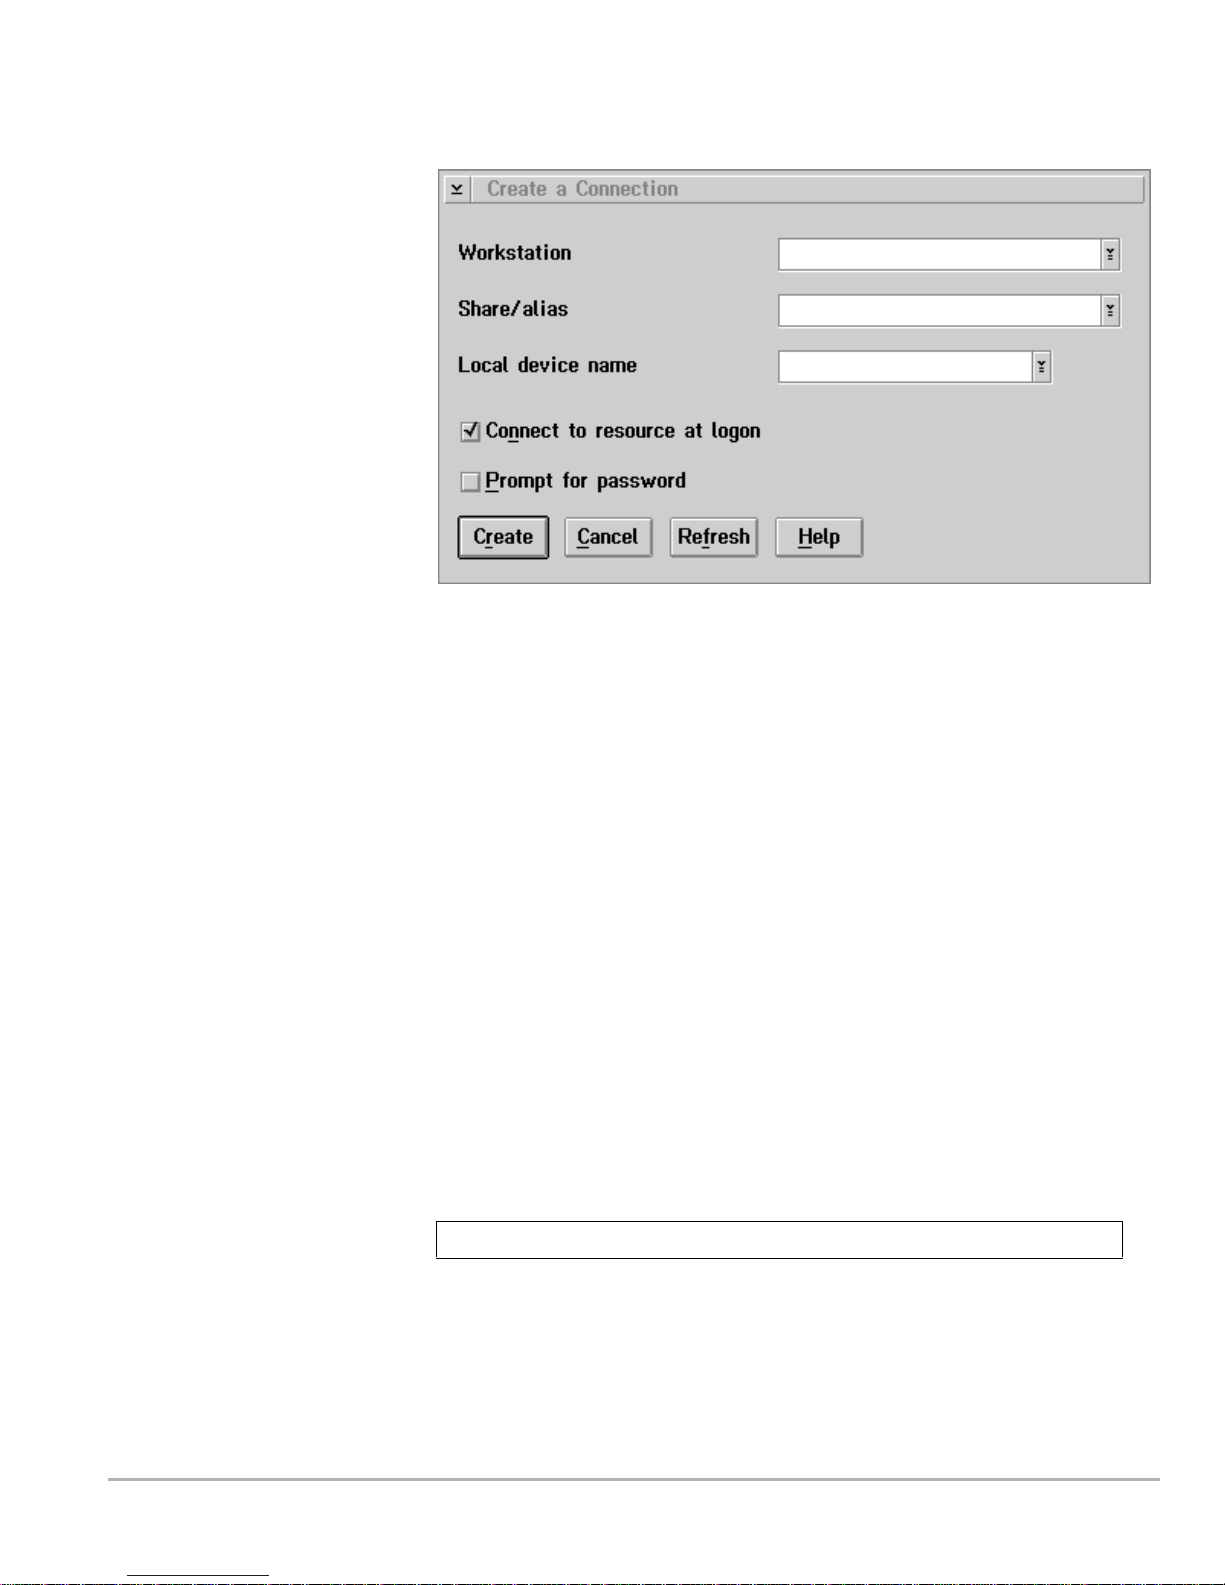
3. From the Connection menu, select Create. The following dialog
is shown:
4. In the Workstation field, enter
HP
hhhhhh
, where
hhhhhh
are the
last six digits of the server’s LAN hardware address.
5. In the Share/alias field, enter the name of the server folder or an
individual disc:
• For root access to everything, type
root
• For access to all discs with one drive letter, type
volumes
• For individual disc access, type the specific volume name,
for example,
cd_12345
6. In the Local device name field, select a drive letter to map.
7. Click Create. The server is ready for use.
If you do not have IBM Peer for OS/2
The server can be mapped to a drive letter using the
net use
command, as follows:
1. Open an OS/2 window.
2. At the OS/2 prompt, enter:
hhhhhh
are the last six digits of your server’s LAN hardware
(MAC) address.
<path>
is any server folder.
3. To make the connections active each time you boot up, create or
edit the
startup.cmd
file to include the
net use
command.
net use
<drive-letter>
: \\HP
hhhhhh\<path>
Page 46

4-10 Setup for Microsoft Networks (SMB)
DOS The server is mounted using the
net use
command, provided that
the appropriate network support is installed.
1. At the DOS prompt, enter the following:
hhhhhh
are the last six digits of the server’s LAN hardware
(MAC) address. In the examples below, the example full LAN
hardware address used is 0060B0CD000B.
<path>
is the path of the folder that provides your selected
access point on the server.
Example of root access:
Example of
volumes
folder access:
Example of disc access:
2. To make the connection permanent, edit your
autoexec.bat
file
to include your
net use
command.
Notes ❏
If you are using DOS within Windows 95/98 or Windows NT 4.0,
and you wish to access file or directory names longer than
8 characters, you will need to precede these long names with a
quote mark (
"
).
An example of changing to the directory named Product
Information:
❏
If you are using DOS within Windows NT, you may use the
*
wildcard.
An example of quickly changing to that directory:
net use
<drive-letter>
: \\HP
hhhhhh\<path>
net use E: \\HP cd000b\root
net use F: \\HP cd000b\volumes
net use G: \\HP cd000b\cd_12345
G:\HP cd000b\CD\>cd "PRODUCT INFORMATION
G:\HP cd000b\CD\>cd "PRODUCT*
Page 47

Setup for Microsoft Networks (SMB) 4-11
Configuring the Server
By making configuration changes, you can customize server
operation and can set access rights for security.
Configuration
Tips
Some server configuration changes you might need:
•
Set up a password for the server.
•
Set up the server name.
•
Disable access to the server using protocols other than SMB.
•
Set up disc access rights using share-level security, or using
user-level security with NT domain authentication.
Methods for
Configuration
This chapter provides information for some of the configuration
options, if they are general needs or relate specifically to SMB
networks. If you are also using TCP/IP on your network, see
chapter 3 for additional features. If you are also using
Novell NetWare, see chapter 5.
HP recommends the web method of configuration.
A browser
and the server’s web pages can be used for configuration, as long as
HTTP is available. This is an easy way to make changes to the
configuration and access files stored on the server. See “Web
Browser Configuration” on page 3-12 for an introduction.
Text Editing is an alternative method.
If you don’t have IP,
HTTP, and a web browser, you can use a text editor to directly edit
and save the configuration file stored on the server. Precision in
editing the files is required. See page 3-6 for details.
Disabling Access
for Other
Protocols
In the Detailed View (from the Quick Setup page), you can switch
off all access to the server through other protocols for which you do
not set up access restrictions.
You can disable NetWare access under the NetWare tab by using
the Enable NetWare setting. You can disable UNIX access under
the UNIX tab using the Enable NFS setting.
Note ❏
To continue administering the server using the web browser,
do
not disable
HTTP access under the Web (HTTP) tab.
If you should ever need to disable Microsoft Windows SMB access,
disable the NetBIOS Protocol Bindings for both NetBEUI and
TCP/IP under the Windows (SMB) tab.
You must restart the server to effect these Detailed View settings.
Page 48

4-12 Setup for Microsoft Networks (SMB)
How and Where
Server Appears
On the Quick Setup web page, you can select the wizard for
Windows (SMB) to configure the following. (Clicking the wizard’s
Finish button causes the server to restart for the settings to take
effect.)
To change the server name to text that is easy for your clients to
identify, set the SMB Server Name for the Windows (SMB) network
environment. The default is
HP
hhhhhh
, where
hhhhhh
are the last
6 digits of the server’s LAN hardware (MAC) address. Characters
that Microsoft does not allow in the name are:
SPACE , : ; ? " * \ | [ ] < > ^ + =
So that the server will appear in your existing SMB domains or
workgroups, change the Workgroup name. Characters that
Microsoft does not allow in the name are the same as above.
Access Rights:
Windows
Security
By default, all users have access to all the discs on all the drives on
the server, and the system files are protected by the server
password. You can restrict user access to drives, to individual discs,
and to the server configuration. Specific passwords can be
configured for SMB user-level or share-level access control. You can
limit the number of users simultaneously accessing any disc to
comply with user-license restrictions. And we recommend that you
restrict access to the root and
System
folders on the server.
Access restrictions are set individually for each protocol. If you use
other network protocols in addition to SMB, consult the other
chapters for setup of those protocols. The default settings in some
protocols provide full access rights to all users, so we recommend
that you disable all protocols not being used. If you do not, a user
accessing the server through such a protocol may be given full
access rights, regardless of the security configurations in other
protocols.) See “Disabling Access for Other Protocols” on page 4-11.
Server Password
If HTTP (providing web access) remains enabled, it is important
that you change the server password to protect the system files.
For example, users are prompted for the server password when
trying to access the Administration and Quick Setup web pages for
the first time during a session. Under the Administration tab, click
the This Server button and with the server module highlighted,
click the Settings button. On the resulting page, select the General
tab. Change and confirm the password. Click Save. This new
password takes effect without restarting the server.
Page 49

Setup for Microsoft Networks (SMB) 4-13
User Limits
Use the Administration tab. Select the Discs and Drives button.
Select the Discs and file system view. For each of the discs and for
the root and for the
volumes
folder, you will see an icon in the
Access Rights column. Click on that icon. An Access Rights
properties page will be displayed.
Under the General tab, you can set the disc’s volume name and the
limit for the number of users simultaneously accessing the volume
(for user-license restrictions). The volume has by default the name
held on the disc itself. You can override the default name using the
Name setting on this page.
Note ❏
Spaces in a volume name will be replaced by underscores.
If the volume name duplicates another volume name, an
underscore and capital-A (then underscore and capital-B, etc.)
will be appended to the duplicate.
Share-Level Access Control
A password can be assigned to any server folder or any disc inserted
in a connected drive. The user will automatically be prompted for
the password when trying to access the shared folder. Access will
then be granted to the folder and all its subfolders. To set this
security mode, use the Quick Setup tab and select either the Wizard
or the Detailed View for Windows (SMB). Select Share level.
Setting the Passwords.
Then using the Administration tab,
select the Discs and Drives button. Select the Discs and file system
view. For each of the discs and for the root and for the
volumes
folder, you will see an icon in the Access Rights column. Click on
that icon to display an Access Rights properties page. Select the
Windows Sharing tab. The Windows share name for the volume can
be specified on this page, and it becomes the volume name (same as
Name under the General tab. Set the share level and passwords for
access here.
Controlling Access by Drive.
On the Access Rights property
page, you can opt to associate the access rights by drive, for
whatever disc in is the drive. Click “Drive” for “Use the access
rights and properties of”. Then the disc’s volume name (see
page 4-13) will be changed to the default SCSI name, such as
CD-id2lun0. You can change this name using the Name field on this
property page. As a result, the icon in the Access Rights column will
illustrate the key on top of a drive rather than a disc. (For
HP J4150A: If this disc is then archived, the share name reverts
to the disc’s volume name.)
Page 50

4-14 Setup for Microsoft Networks (SMB)
User-Level Access Control
You can implement user-level security authenticated by an NT
domain controller. A user logging in to the server must provide her
identity (name and domain) and password. The server uses this
information to validate the user identity against the primary
domain controller (PDC). It actually logs in to the PDC, reads the
user's group membership, and then logs out. If its login is
successful, the user is allowed access to the server.
For SMB, the server maintains an administrator account that is
never authenticated against the primary domain controller,
because some method of access must be maintained in case the PDC
becomes unavailable.
To set this access control mode, use the Quick Setup tab and select
either the Wizard or the Detailed View for Windows (SMB). On the
properties page, select User level. Then specify the Authentication
Domain containing the controller.
Setting the Passwords.
Then using the Administration tab,
select the Discs and Drives button. Select the Discs and file system
view. For each of the discs and for the root and for the
volumes
folder, you will see an icon in the Access Rights column. Click on
that icon to display an Access Rights properties page. Select the
Windows Sharing tab. The Windows share name for the volume can
be specified on this page, and it becomes the volume name (same as
Name under the General tab. Set the rights and passwords for
access here.
Controlling Access by Drive.
On the Access Rights property
page, you can opt to associate the access rights by drive, for
whatever disc in is the drive. Click “Drive” for “Use the access
rights and properties of”. Then the disc’s volume name (see
page 4-13)
will be changed to the default SCSI name, such as
CD-id2lun0. You can change this name using the Name field on this
property page. As a result, the icon in the Access Rights column will
illustrate the key on top of a drive rather than a disc. (For
HP J4150A: If this disc is then archived, the share name reverts to
the disc’s volume name.)
Page 51

Setup for Novell Networks 5-1
5
Setup for Novell Networks
This chapter describes the setup for Novell networks running NCP
(NetWare Control Protocol). The Novell network products could be
NetWare 3.x, 4.x, or 5.
Note:
NetWare 5
with IP
❏
The HP SureStore CD/DVD-ROM server supports NCP
transported over IPX and/or NetWare/IP. However, the server
does not
support NetWare 5’s pure IP implementation; it
supports NetWare/IP from NetWare 4.11. This is used by
NetWare 5 in compatibility mode.
Clients using NCP could be running Windows 95 or 98,
Windows NT, Windows for Workgroups, OS/2, or DOS. This chapter
includes examples of procedures for many such installations. You
may need to refer to your network operating system manuals for
assistance with specific procedures for some client systems.
If you are running TCP/IP on your network as well as Novell
products, refer to chapter 3 to assign the IP address to the server
(the “Set the IP Address for the Server” section from page 3-1 to
page 3-8) before granting access to clients.
Following that section of chapter 3 are instructions for
accessing the discs and configuring the server by using a web
browser. For IP and HTTP installations, we recommend use of
those instructions for client access and configuration in addition
to the methods following in this chapter.
Page 52

5-2 Setup for Novell Networks
Client Access to Discs
The procedures for accessing your HP CD/DVD-ROM server are
similar to accessing any other NetWare file server. Users at
workstations (clients) on the network use the same procedures to
access both types of servers, For easy access to the discs from
applications, the server should be made available to each client
system—“mapped” to a drive letter on PC systems. After the server
is mapped, the client accesses the server, with its discs (and
optionally its configuration parameters) just like any other attached
disk drive or networked file server.
The mapping described in this section can be done on
one
workstation by one administrator or installer first. Then any
configuration tasks for the server setup can be done (described later
in “Configuring the Server” on page 5-9), before setting up
all
the
network clients according to the procedures in this section.
1. Select Access
Point
Different workstations need different points of access to the server.
The network administrator or installer, for example, needs access to
configure and monitor the server. Then, the administrator may
want to set up all the clients with access to the discs, bypassing the
configuration files stored on the server. Choices for the latter setup
include mapping all the discs in the server and mapping each drive
or disc volume separately.
The procedures for mapping drives require you to select an access
point. We recommend using the description of access points and the
server’s file system, in the reference chapter starting on page 7-1,
before proceeding.
2. Map Drives
The examples in this section are for Microsoft client software on
Windows 95/98, Windows NT, Windows for Workgroups, and DOS.
For use of Client 32, you may need to make substitutions in these
procedures.
Note ❏
The examples below assume that you have not changed the
server name for NetWare:
HP
hhhhhh
_NW
, where
hhhhhh
are
the last six digits of the server’s LAN hardware (MAC) address.
Your server name will be different if you have changed the
server name (see page 5-10) or if you are using NetWare/IP.
Page 53
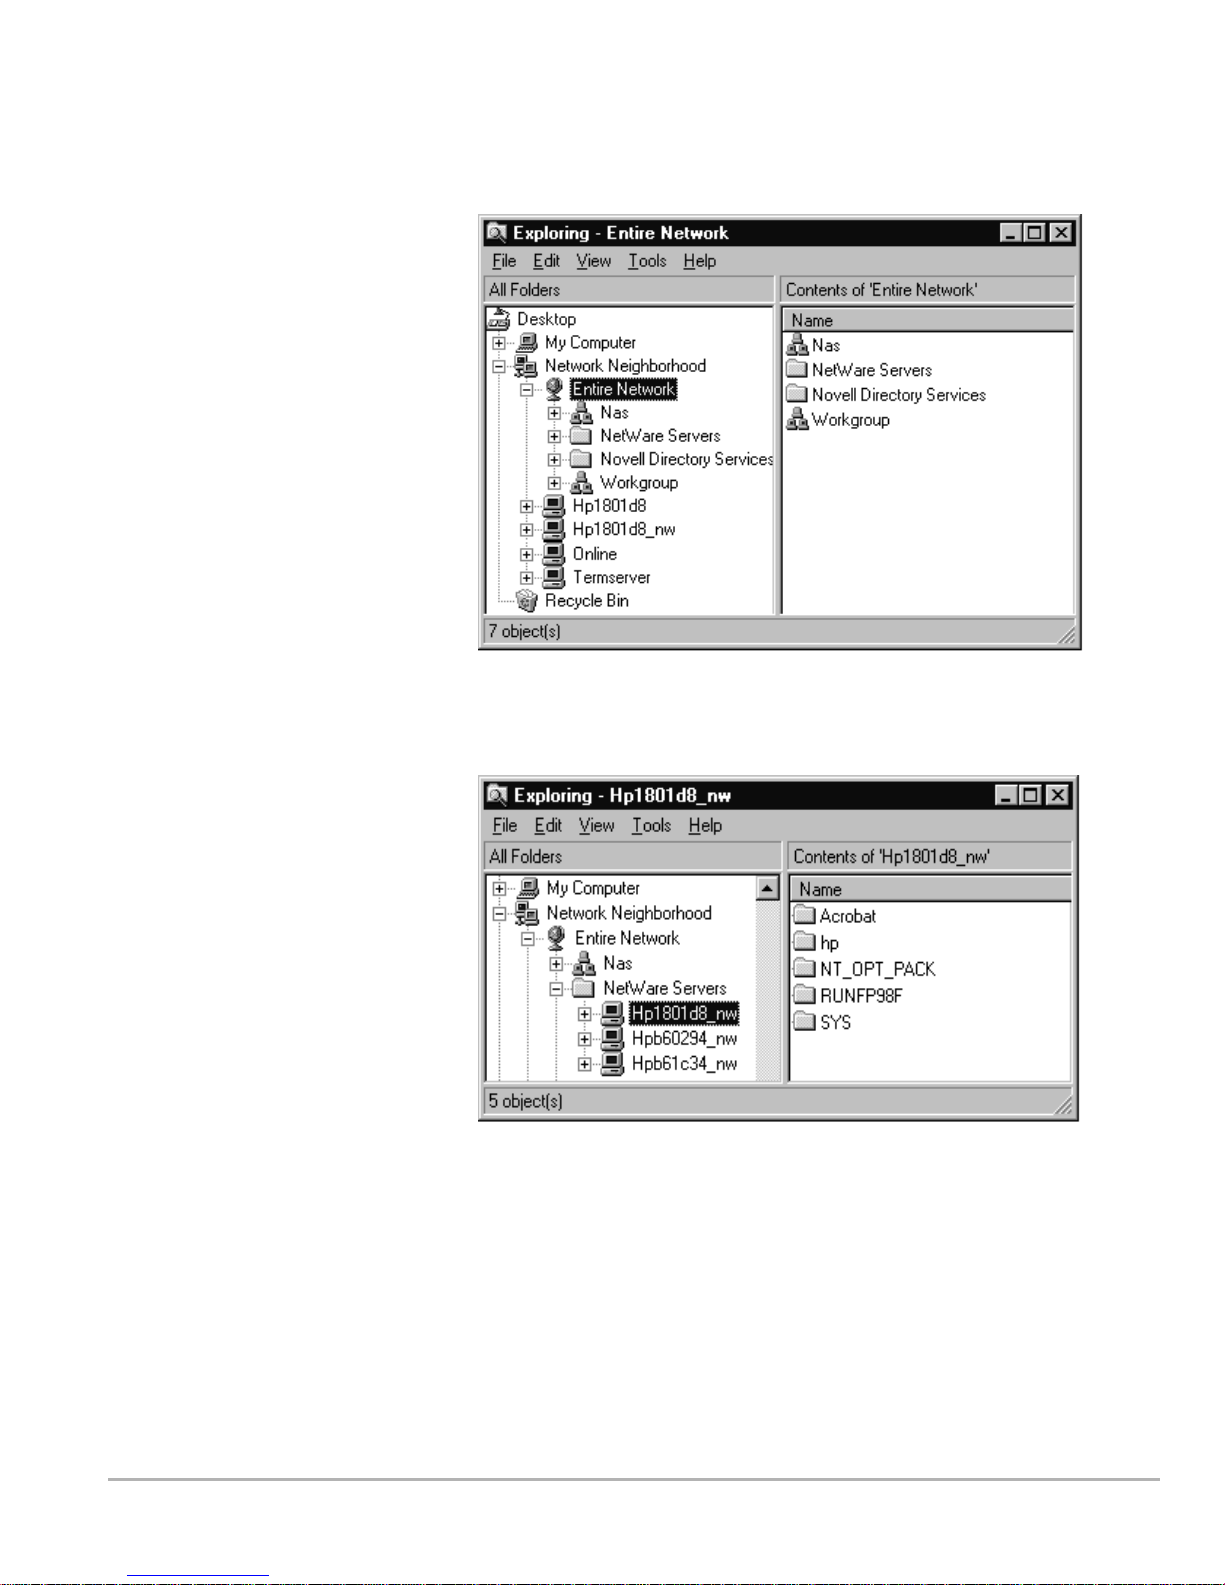
Setup for Novell Networks 5-3
Windows 95/98 and
Windows NT 4.0
1. Start the Windows Explorer from the Start Programs Menu.
2. Expand the Network Neighborhood icon. The available resources
are displayed.
3. Expand the Entire Network icon and open the NetWare
networking folder.
Skip ahead to step 10 if you see the server. However, if you
cannot find the server name in NetWare, then continue here
with step 4:
4. Start the Windows Explorer from the Start menu.
5. Select Map Network Drive... from the Tools menu.
6. Select a drive letter.
Page 54
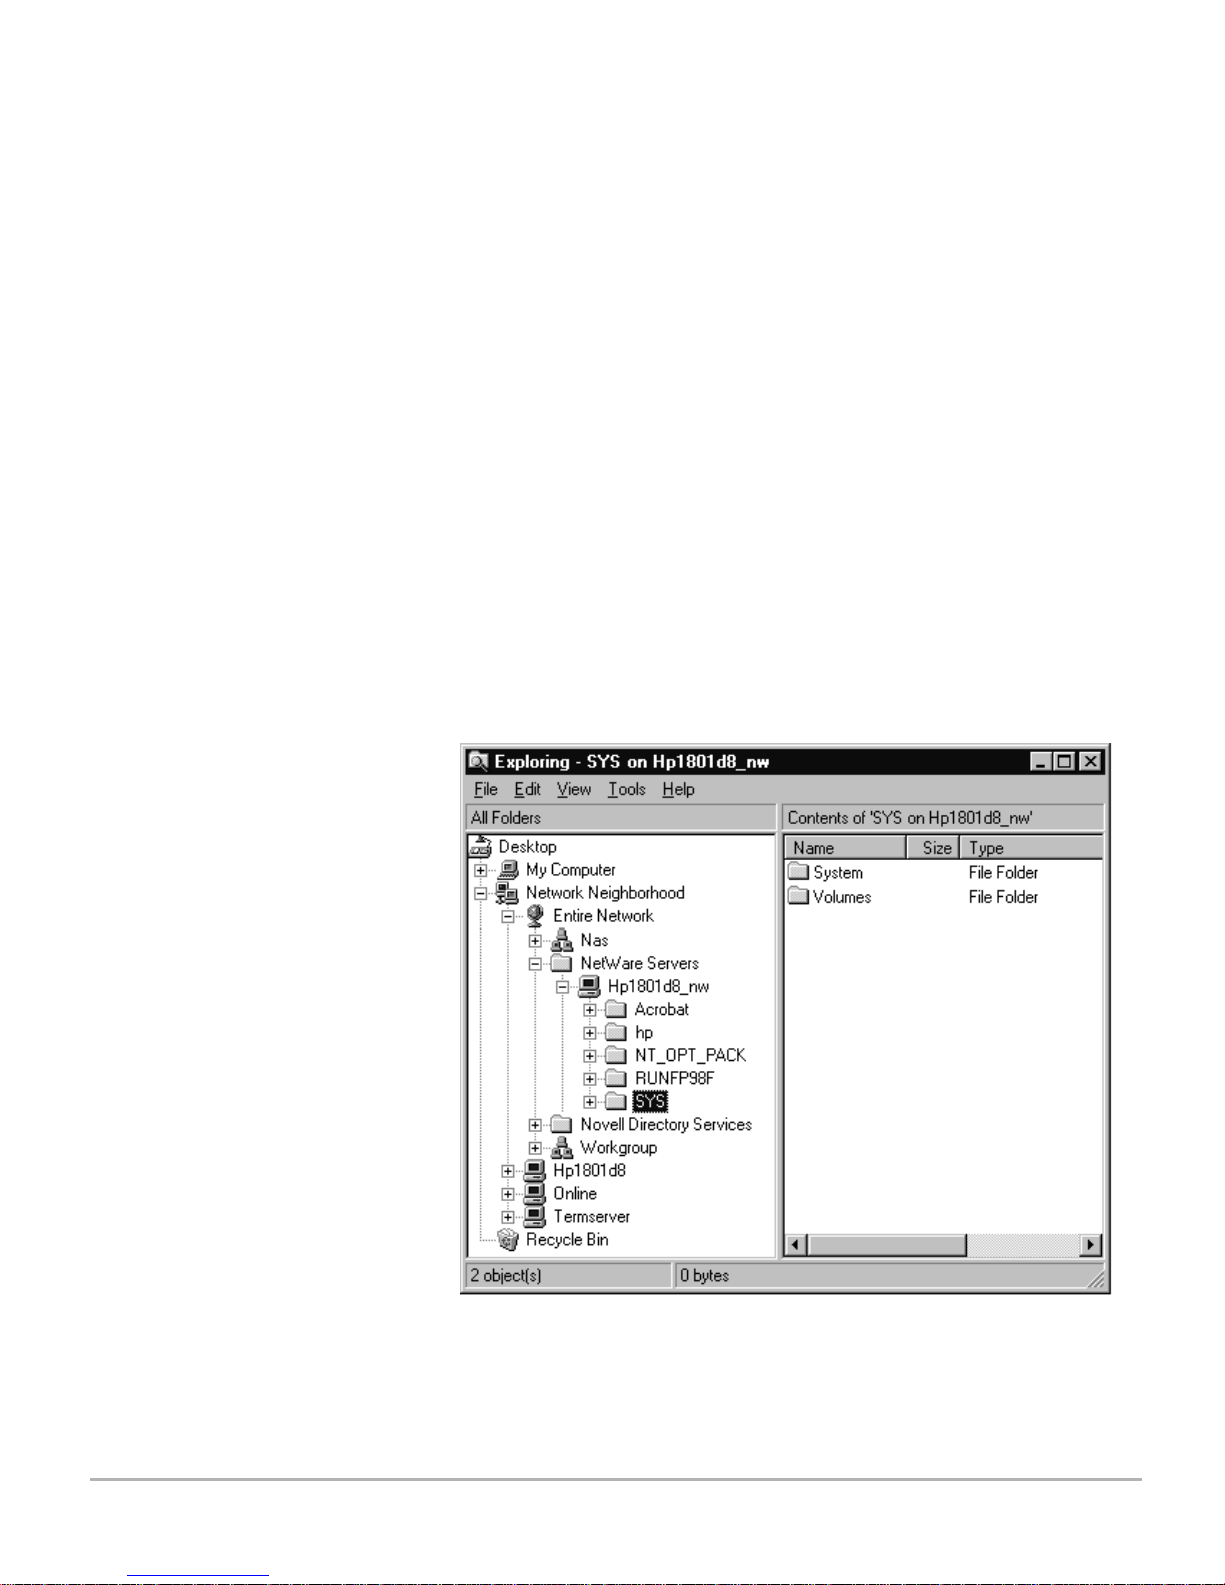
5-4 Setup for Novell Networks
7. In the path box, type
\\HP
hhhhhh_
NW\SYS
, where
hhhhhh
are
the last six digits of the server’s LAN hardware (MAC) address.
8. This maps the administrative root access to the server. If you wish
to use this root access for the same drive letter the next time you
start your computer, check Reconnect at Logon. (If you wish to
select another level of mapping, see step 12 below.)
9. Click the OK button. The server is now ready for use.
10. Double-click the entry for your new server. The default entry
name is
HP
hhhhhh_
NW
, where
hhhhhh
are the last six digits of
the server’s LAN hardware (MAC) address. The name can be
changed later during configuration.
Note ❏
On some clients, if you have set Bindery Authentication, you
will be prompted to enter your user name and password, unless
you are already logged in. (Before the server has been set up, all
users have full access to it.)
11. Once you are logged in to the server, you should see the available
discs by their volume names, as well as the
sys
folder. Expand
sys
to see the
volumes
folder (which also contains all the
volumes).
Page 55
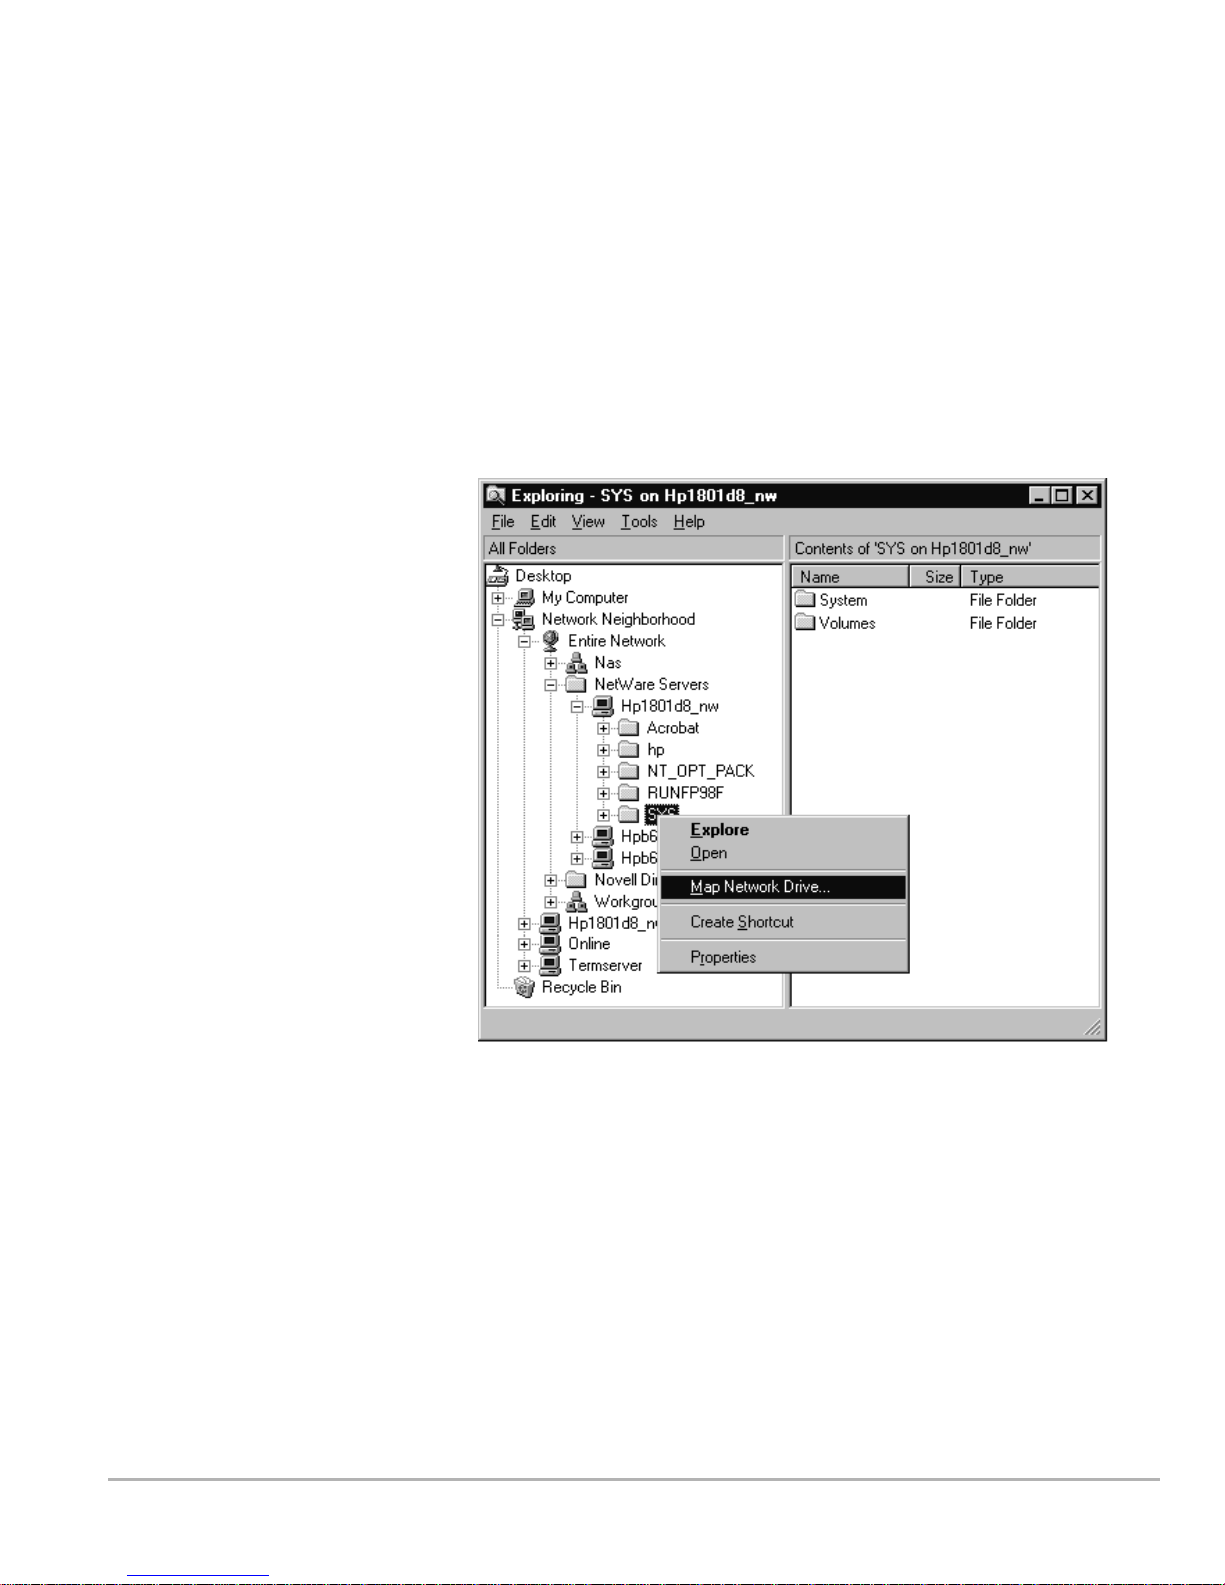
Setup for Novell Networks 5-5
12. To map the server to a drive letter, right-click one of the following
server resources:
• For root access to everything, right-click the
sys
folder.
• For access to all discs with one drive letter, right-click the
volumes
folder.
• For individual disc access, right-click the specific disc
volume folder.
If you do not wish to map the server to a drive letter, just
continue to explore the server until the file you need is found.
13. From the pop-up menu, select Map Network Drive...
14. Select a drive letter for your server.
15. Check Reconnect at Logon if you wish to use the server resource
as the same drive letter the next time you start your computer.
16. Click the OK button. The server is ready for use.
Page 56
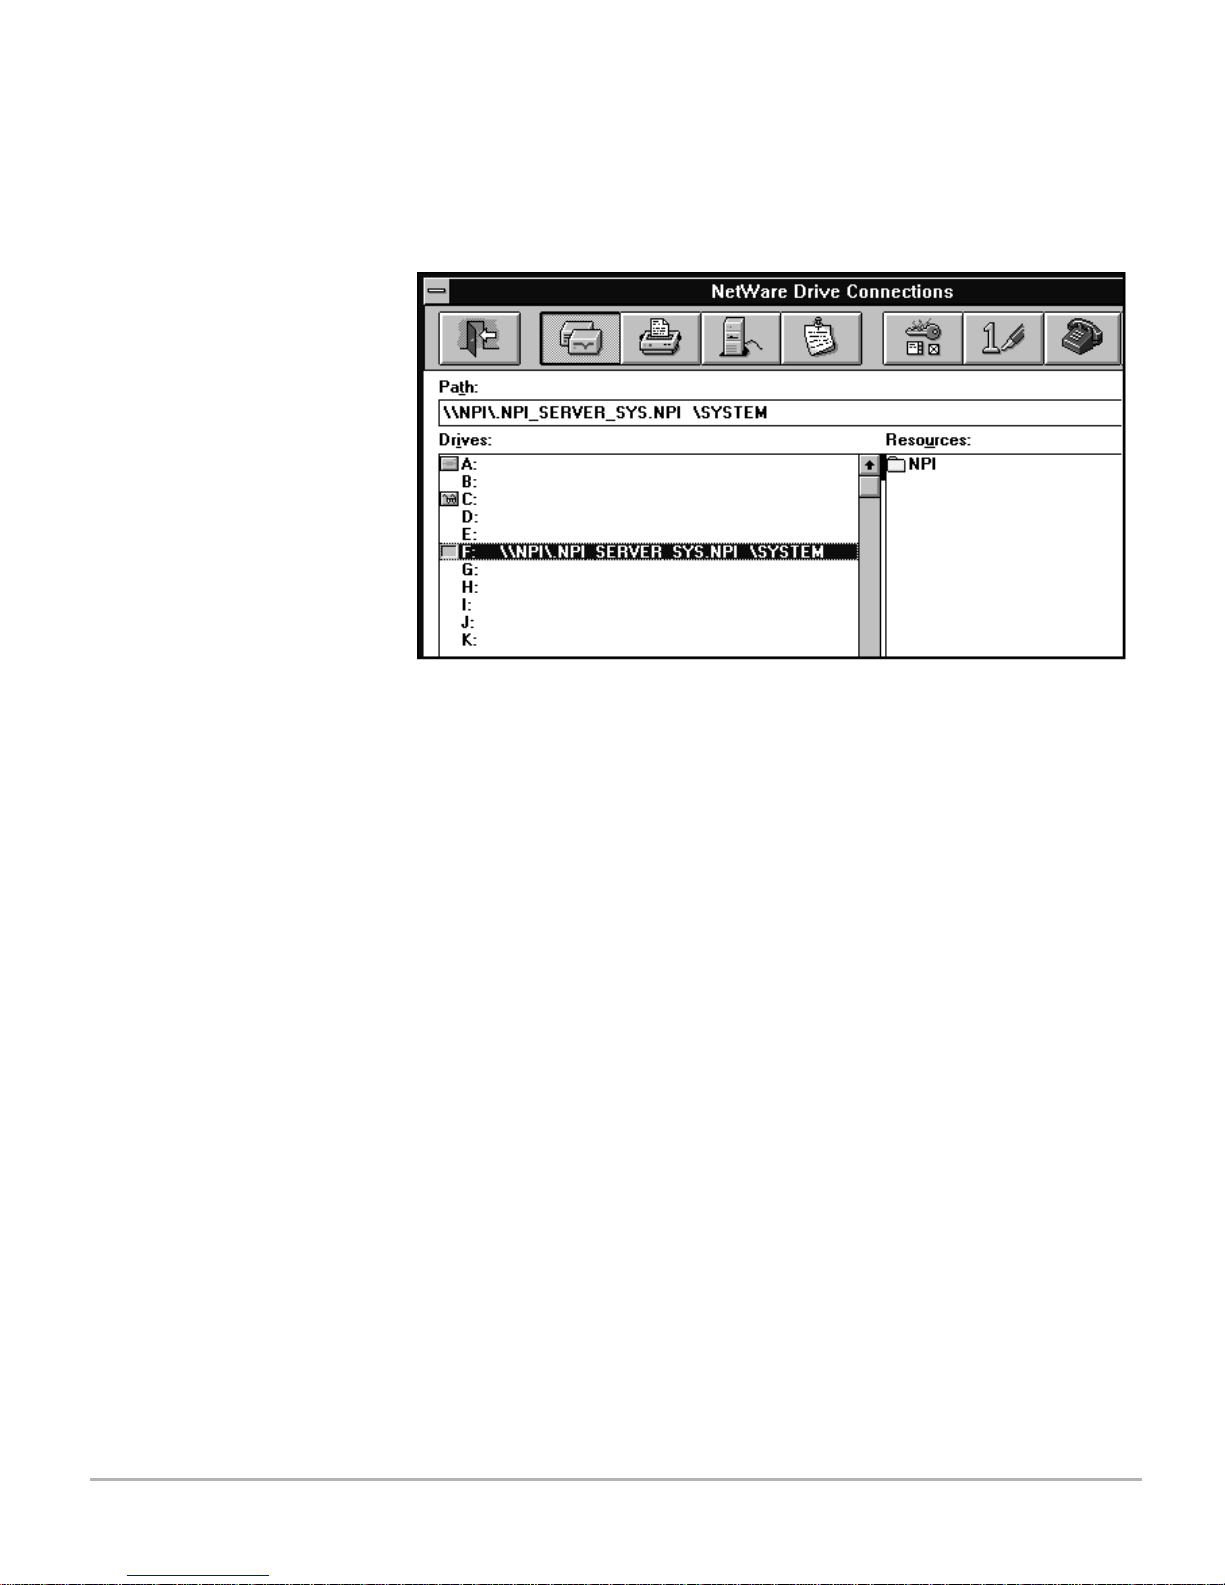
5-6 Setup for Novell Networks
Windows for
Workgroups
1. Start File Manager.
2. From the Disk menu, select Connect Network Drive…
The following dialog is displayed. If you also have Microsoft
Network installed, you may have to click the NetWare button to
display the dialog.
3. Click the Select NetWare Connection button on the toolbar.
4. Select the entry for your new server. The default entry name is
HP
hhhhhh
_NW
, where
hhhhhh
are the last six digits of the
server’s LAN hardware (MAC) address. The name can be changed
later during configuration.
5. Click the Login button.
Note ❏
On some clients, if you have set Bindery Authentication, you
will be prompted to enter your user name and password, unless
you are already logged in. (Before the server has been set up, all
users have full access to it.)
Page 57
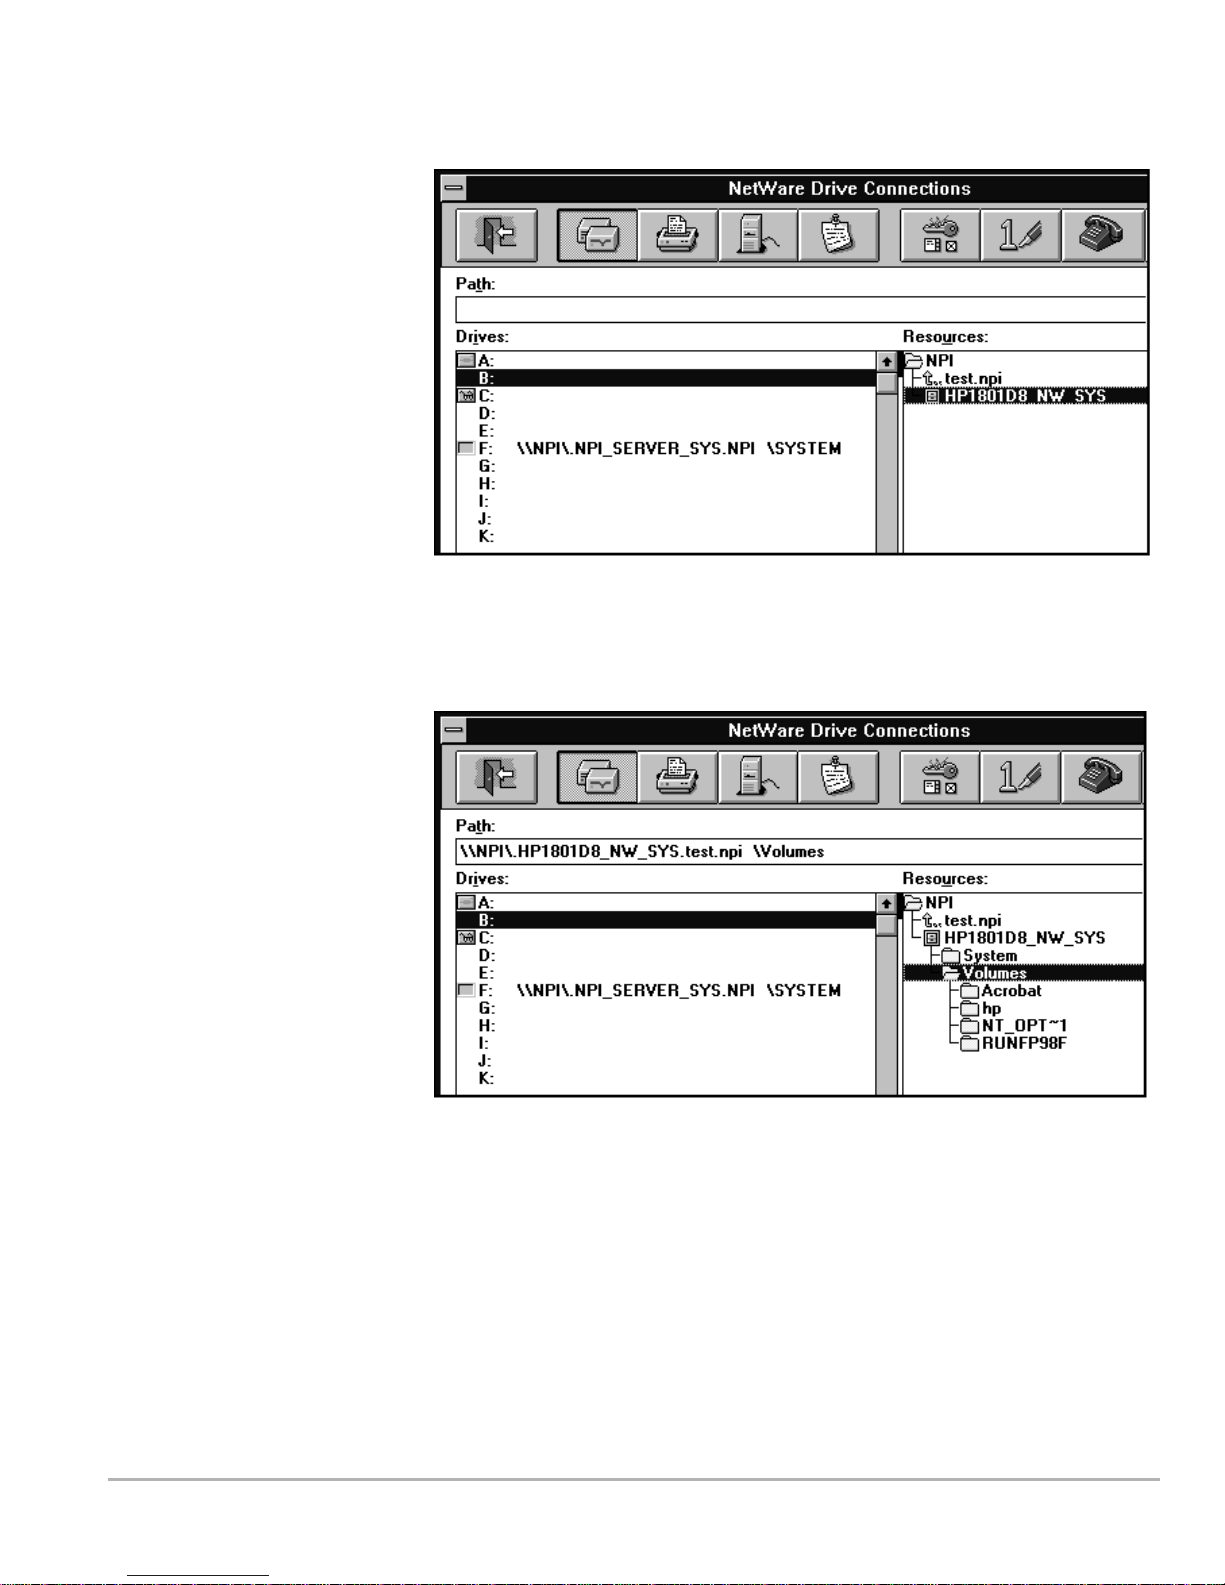
Setup for Novell Networks 5-7
6. Once you are logged in to the server, click the Drive Connections
button on the toolbar. The following dialog is displayed.
7. Double-click the volume name (
HP 1801D8_NW_SYS
in this case).
Then double-click the
Volumes
folder to display the following
dialog.
Page 58

5-8 Setup for Novell Networks
8. Select a drive letter in the Drives listing and then:
• For root access to everything, select
HP
hhhhhh
_NW_SYS
in
the Resources list.
• For access to all discs with one drive letter, select the
VOLUMES
folder in the Resources list.
• For individual disc access, select the specific disc folder
name (inside the
volumes
folder) in the Resources list.
If you are using bindery mode, the discs will appear at the
same level as the
SYS
volume.
9. Click Map to map the server to the selected drive letter.
10. Click Permanent if you wish to use the server as the same drive
letter the next time you start your computer.
11. Click the Exit button on the toolbar. The server is ready for use.
DOS The server is mounted using the
map
command.
1. On a NetWare file server, at the DOS prompt enter the
following:
hhhhhh
are the last six digits of your server’s LAN hardware
(MAC) address. In the examples below, the full LAN hardware
address assumed is 0060B0CD000B.
<path>
is the path of the folder that provides your selected
access point on the server.
Example of root access:
Example of
VOLUMES
folder access:
Example of disc volume access:
2. To make the connection permanent, edit your
autoexec.bat
file
to include your
map
command.
map root <
drive-letter>
:=HP
hhhhhh
_NW/
<path>
map root E:=HP cd000b_NW/SYS:
map root F:=HP cd000b_NW/SYS:/VOLUMES
map root G:=HP cd000b_NW/SYS:/VOLUMES/cd_18881
Page 59

Setup for Novell Networks 5-9
Login Scripts
Alternative
As an alternative to setting up clients individually as described
above, login scripts can be used to automate and distribute access to
the discs. To map the networked discs, the
attach/map
(in
NetWare 3.x) or
login/map
(in NetWare 4.x) commands are
normally used.
Configuring the Server
By making configuration changes, you can customize server
operation and set access rights for security.
Configuration
Tips
The following Novell environments require some configuration of
the server itself before setting up the client access. The
configuration is included in this section.
•
Novell NetWare 4.x and 5 NDS (Novell Directory) Server
•
Novell NetWare/IP in NetWare 4.x, and in NetWare 5 only in
compatibility mode.
Note ❏
You cannot use this server with NetWare 5 in its pure
IP implementation.
The following Novell environment allows some access configuration
options to be configured either before or after giving access to all the
clients.
•
NetWare 3.x bindery server networks
Other server configuration changes that Novell network may need:
•
Disable access using protocols other than NetWare.
•
Set up or change the server name for Novell clients.
•
Set up a password to be used with the bindery server.
•
Set the server’s time synchronization.
•
Show all volumes.
Methods for
Configuration
This chapter provides information for some of the configuration
options, if they are general needs or relate specifically to Novell
networks. If you are also using TCP/IP on your network, see
chapter 3 for additional features.
HP recommends the web method of configuration if a web browser
and IP and HTTP are available. Text editing is an alternative
method (see page 3-6).
Page 60

5-10 Setup for Novell Networks
Disabling Access
for Other
Protocols
In the Detailed View (from the Quick Setup page), you can switch
off all access to the server through other protocols for which you do
not set up access restrictions.
You can disable Microsoft networking (SMB) access by using the
Windows (SMB) tab and disabling the NetBIOS Protocol Bindings
for both NetBEUI and TCP/IP. You can disable UNIX access under
the UNIX tab using the Enable NFS setting.
Note ❏
Do
not
disable Web (HTTP) access. Maintain administrative
access to the server using this web interface.
If you should ever need to disable NetWare access to the server, use
the NetWare tab and the Enable NetWare setting.
You must restart the server to effect Detailed View settings.
Server Name
On the Quick Setup web page, you can select the wizard for
NetWare (NCP) to change the NetWare Server Name. The default
is
HP
hhhhhh
_NW
, where
hhhhhh
are the last six digits of the
server’s LAN hardware (MAC) address. (Clicking the wizard’s
Finish button causes the server to restart for the settings to
take effect.)
NDS Server
If the server is used as an NDS-compatible server, you may store
the access rights in the NDS tree, or you may store the access rights
in a file on a Novell file server. HP recommends the first option,
storing them in the tree.
If this is the first HP SureStore CD-ROM or CD/DVD-ROM server
being installed in your NDS tree, the server will try to extend the
NDS Schema with a new attribute to the “NCP server” class. This
new attribute will not affect the operation of your NetWare servers.
This schema extension has been approved by Novell.
For this first server, you must use the account of the Admin object
that has supervisor rights to the
root
object of the NDS tree. This
means that the account specified in the NDS setup (see page 5-11)
must have supervisor access rights to that root object.
Once this first server has been successfully installed, the schema is
extended. In future installations of other HP CD-ROM or
CD/DVD-ROM servers into this tree, as well as any re-installation
of this server, you can use the account of the Admin object for the
tree in which the server will reside.
Page 61

Setup for Novell Networks 5-11
After you set up your own access to the server from a workstation
on the network using the instructions in the previous section,
“Client Access to Discs” starting on page 5-2, you can configure the
server.
Use the Wizard on the Quick Setup page. Select NetWare (NCP).
Select NDS. Settings you will need are:
•
NDS Tree name. Example:
NPSD
•
Account with Supervisor rights. Use the Browse button to select
the account—as the relative distinguished name of a user or
administrator (with Supervisor rights to the root for the first
installation and later with Supervisor or Create rights in the
NDS tree context. Example:
ADMIN.OU.NPSD.HP
•
Password for the account set (see previous item).
•
NDS Tree Context. Example:
OU.NPSD.HP
Clicking the wizard’s Finish button causes the server to restart for
the settings to take effect. Several minutes afterward, the server
should be installed in the NDS tree, and users will be able to access
the server using NDS mode.
Next, use NetWare Administrator (
NWADMIN)
to set up the access
right on the
sys
volume of the server.
You must log out and then log in again to have all the necessary
rights on the server object and the associated volume.
Verify proper installation by running NetWare Administrator
(
NWADMIN)
. The server should appear as a NetWare NDS File
server. Examine the properties in
NWADMIN
. The server status
should be “UP”.
If the server does not appear in the NDS tree, or if it appears
but the status is down or unknown, check for error messages in
the server’s log file. Refer to “NetWare NDS Installation Errors”
on page 10-13 for corrective action for each error message.
We recommend that you disable bindery mode (using the Bindery
selection that immediately precedes the NDS selection on the
second page of the NetWare wizard), after you have successfully
installed the server in NDS, and allow users to log on in NDS
mode only.
Note ❏
If NDS mode is not functioning, you can always access the
server in bindery mode by logging in as supervisor using the
password on the server, even if bindery mode is disabled.
Page 62

5-12 Setup for Novell Networks
Store NDS Rights in File
First identify or create a directory on an existing Novell file server
to contain the NDS access rights file.
After you set up your own access to the server from a workstation
on the network using the instructions in the previous section,
“Client Access to Discs” starting on page 5-2, you can configure the
server.
Use the Detailed View on the Quick Setup page. Select NetWare
(NCP). For “Store NDS Rights in”, select File. Specify the file on the
NetWare file server to store the NDS access rights. The directory
must exist; the HP CD/DVD-ROM server will create the file when
rights are first changed on the server’s
sys
volume. You must
restart the server for these settings to take effect.
Then assign the server NDS object (newly created by the above
procedure) as a trustee to the directory for the access rights file.
The rights to assign are Read, Write, Create, Erase, Modify, and
FileScan.
Then you may change any rights on the server’s
sys
volume, using
NetWare Administrator (
NWADMIN)
. If you do so, the server will
create the access rights file you defined on the other Novell file
server.
You must log out and then log in again to have all the necessary
rights on the server object and the associated volume.
Verify proper installation by running
NWADMIN
. The server
should appear as a NetWare NDS File server. Examine the
properties in
NWADMIN
. The server status should be “UP”.
If the server does not appear in the NDS tree, or if it appears
but the status is down or unknown, check for error messages in
the server’s log file. Refer to “NetWare NDS Installation Errors”
on page 10-13 for corrective action for each error message.
We recommend that you disable bindery mode (using the Bindery
selection that immediately precedes the NDS selection on the
second page of the NetWare wizard), after you have successfully
installed the server in NDS, and allow users to log on in NDS
mode only.
Note ❏
If NDS mode is not functioning, you can always access the
server in bindery mode by logging in as supervisor using the
password on the server, even if bindery mode is disabled.
Page 63

Setup for Novell Networks 5-13
Default Settings in NetWare NDS
After installing the server as an NDS server, the default security
rights will protect all the configuration files. The
System
folder will
be empty for users. The user rights to the server and its files and
directories are set up as follows:
• Supervisor rights to the
sys
volume are inherited from the
Supervisor rights to the NDS server object.
• Read and File Scan rights are inherited from the Browse rights
to the NDS server object.
• By default, the
System
directory is set up with an
inherited-rights filter that filters all rights except the
Supervisor right. This protects all the configuration files.
Because the server appears as a normal NDS file server, its NDS
security rights can be set using standard procedures.
The server’s file system security rights are set up by the NetWare
Administrator, as detailed below:
1. Login as Admin, and start the NetWare Administrator.
2. Browse the
sys
volume by double-clicking it. You will see all the
directories available in the server.
3. Select the directory or file for which you wish to set the access
rights to, and
right-click
it.
4. Choose Details, and make the required changes.
The NetWare NDS access rights for the server can be set using
Security Equivalence, Group, Container, Organization role, and
User Objects as with any other NDS file server. There is no
difference between how you use
NWADMIN
to set these access
rights for the HP CD/DVD-ROM server, and how you would set the
access rights on an NDS file server.
Page 64

5-14 Setup for Novell Networks
Bindery Server
The HP SureStore CD/DVD-ROM Server acts as a normal NetWare
file server; you use the standard tools such as
NWADMIN,
SYSCON,
and
Filer
for handling security. Two bindery modes are
described below—with user authentication and without user
authentication.
With Authentication
If user access control is desired, you must specify an authentication
server to the CD/DVD-ROM server. The server must log into the
authentication server briefly to authenticate the user and identify
the groups the user belongs to. In this case, the authentication
server must have a standby license for the server, but several
servers can share this license. If a license is not available, the user
may still be authenticated but group information cannot be read.
Note ❏
All user accounts must allow two concurrent logins, not the
Novell default of one login.
Authorized users have configurable rights to the volumes of the
HP CD/DVD-ROM server. Authorization of users is done using an
existing NetWare server, here referred to as the authentication
server.
Use the Quick Setup web page and either the wizard or the Detailed
View. Set Bindery mode and specify the authentication server for
Bind Authentication.
The authentication process reduces Network Administrator
overhead. The Administrator does not have to maintain a separate
user database for HP CD/DVD-ROM servers. If the user is defined
in the file server that the HP CD/DVD-ROM server uses for
authentication, the Administrator will not have to do anything to
give the user access to the HP CD/DVD-ROM server.
Authentication to a NetWare 3.x Server.
For access to the
HP CD/DVD-ROM server connected to a NetWare 3.x Server,
authentication is validated through a user list in the bindery of the
NetWare server:
•
If the user is on the list, the user’s password will be verified and
the user will be granted access.
•
If the password is incorrect, login will fail.
•
If the user is not on the list, the user will not be granted access
to the HP CD/DVD-ROM server. However, the user could log in
as “guest” and get access to volumes that are not protected.
Page 65

Setup for Novell Networks 5-15
Default Access Rights.
The default access rights in NetWare
bindery mode are set up by the following trustee assignments:
•
The root of the
sys
volume has
[EVERYONE]
as trustee, with
File Scan, Read, Write, Create, Modify, and Erase rights.
•
The
System
folder has all rights, except Supervisor, filtered.
Thus all system files are effectively protected from normal user
access.
Changing Access Rights.
You can set the rights using standard
tools, such as Filer.
•
To make all volumes accessible to some users only, do the
following:
a. Log into your NetWare bindery file server as Supervisor.
b. Attach to the HP SureStore CD/DVD-ROM server using its
NetWare name (such as
HP
hhhhhh
_NW
, the user name
supervisor
, and the password specified as the Server
Password. The factory-default password is
pass
.
(In order for Filer to access the CD/DVD-ROM server, the
client must have an active connection.)
c. Start Filer on your NetWare bindery file server.
d. Change the current directory to:
<HP -netware-name>
/sys:
where
<HP -netware-name>
is the HP SureStore
CD/DVD-ROM server’s NetWare name (by default
HP
hhhhhh
_NW
, where
hhhhhh
are the last six digits of
your server’s LAN hardware address).
e. Remove the
[EVERYONE]
trustee from the root.
f. Add a new trustee assignment to the root.
•
To restrict access to a particular disc, do the following:
a. Log into your NetWare bindery file server as Supervisor.
b. Attach to the HP SureStore CD/DVD-ROM server using its
NetWare name (such as
HP
hhhhhh
_NW)
, and log into it
using the user name
supervisor
and the password specified
as the Server Password. The factory-default password is
pass
.
(In order for Filer to access the CD/DVD-ROM server, the
client must have an active connection.)
Page 66

5-16 Setup for Novell Networks
c. Start Filer on your NetWare bindery file server.
d. Change the current directory to:
<HP -netware-name>
/sys:
where
<HP -netware-name>
is the HP SureStore
CD/DVD-ROM server’s NetWare name (by default
HP
hhhhhh
_NW
, where
hhhhhh
are the last six digits of
your server’s LAN hardware address).
e. On the resource you want to protect, set an inherited rights
filter to filter
all
rights.
f. Add the new trustee assignment to the resource. This makes
it available only to the users in the trustee list.
Notes ❏
The NetWare bindery access rights for the HP SureStore
CD/DVD-ROM server can be set using Group and User Objects,
as with any other file server.
❏
You can always access the HP SureStore CD/DVD-ROM server
using the username
supervisor
and the password specified as
the Server Password (by default
pass
).
With No Authentication
If user authentication is not required, you do not have to specify
the an authentication server (Bind Authentication on the
HP CD/DVD-ROM server). The Supervisor can log in using the
Server Password. Other users can log in without password and will
be considered to belong to the
EVERYONE
group.
An extra NetWare server license is not required because the server
does not log into the file server.
Changing Access Rights.
You can set the rights using standard
tools, such as Filer, if you need to limit
System
file access to the
Supervisor. Unauthorized users will still have guest access to the
volumes.
Page 67

Setup for Novell Networks 5-17
Novell
NetWare/IP
You can use the server in a NetWare environment that uses only
the TCP/IP protocol with NetWare 4.11 (NetWare/IP). You
can not
use the server with NetWare 5 in its pure IP implementation. You
can use it with NetWare 5 in compatibility (4.11) mode.
To use the IP protocol in NetWare, use Novell’s documentation to
make sure that the NetWare TCP/IP environment is fully
implemented first.
Assign an IP address to the server; refer to “Set the IP Address for
the Server” on page 3-1.
Configure the server for IP. Set the following to correspond with the
IP address:
•
Subnet Mask
•
Default Router (gateway)
•
Primary DNS Server
•
Secondary DNS Server
Configure the server for NetWare. Set the following:
•
Enable NetWare IP
•
DSS Server
After the server is restarted and a delay of about 5 minutes, clients
that support the NetWare/IP protocol will connect directly to the
server peer-to-peer. Clients without NetWare/IP support will be
routed through a Novell server with an IPX/IP gateway.
To Use NetWare/IP Only:
You can disable the IPX protocol on the server:
1. Enable NetWare.
2. Restart the server.
3. Set the Internal Net Address and the Server Name.
4. Restart the server again, and wait 5 minutes.
The server will then be accessible to the clients that support the
NetWare/IP protocol.
Note ❏
If the clients cannot then access the server, then do the
following:
a. Switch off the power to the server.
b. Wait 20 minutes for the SAP table to be flushed.
c. Switch on power to the server.
d. Wait 5 minutes for the server to be visible. All NetWare/IP
clients should now be able to access the server.
Page 68

5-18 Setup for Novell Networks
Automatic Time
Synchronization
Setting Up NDS Time Synchronization
If you are using NetWare NDS, you can set automatic time
synchronization from a NetWare Time Server. On the Date and
Time page, make sure the Time Zone is correctly set. Select
Automatically and Novell Directory Services.
•
NDS time synchronization is normally obtained using the SAP
method.
•
Alternatively, if you have a Time Provider Group on your
system you can provide a list of servers for the server to contact
to obtain its time synchronization. The list can also contain
Secondary Time Servers. For this alternative, on the NetWare
configuration page (select Quick Setup and Detailed View),
select List of Servers under Time Source, and list the server
names (separated by commas) to be contacted for time
synchronization.
As an alternative to NDS Time Synchronization, you can use the
Network Time Protocol (NTP, as defined by RFC 1769) if TCP/IP is
running. (See page 3-13.)
Server Password
If HTTP (providing web access) remains enabled, it is important
that you change the server password to protect the system files.
Under the Administration tab, click the This Server button and
with the server module highlighted, click the Settings button. On
the resulting page, select the General tab. Change and confirm the
password. Click Save. This new password takes effect without
restarting the server.
Page 69

Setup for UNIX Networks (NFS) 6-1
6
Setup for UNIX Networks (NFS)
This chapter describes the setup for UNIX systems on networks
using NFS (Network File System) transported over UDP/IP.
Examples of procedures for UNIX systems are included. You may
need to refer to your system manuals for assistance with specific
procedures.
Use the instructions in chapter 3 to assign an IP address to the
server (the “Set the IP Address for the Server” section from page 3-1
to page 3-8) before doing any of the procedures in this chapter.
Following that section of chapter 3 are instructions for accessing
the discs and configuring the server by using a web browser
(starting on page 3-9). For installations with IP and HTTP, we
recommend use of those instructions for client access and
configuration in addition to the methods following in this chapter 6.
Client Access to Discs
The procedures for accessing your HP SureStore CD/DVD-ROM
server are similar to accessing any other workstation or file server.
Users at workstations on the network use the same procedures to
access both types of servers, For easy access to the discs from
applications, the server should be “mounted” for each client system.
After the server is mounted, the client accesses the server, with its
discs (and optionally its configuration) just like any other attached
disk drive or networked file server.
The mapping described in this section can be done on one
workstation by one administrator or installer first. Then any
configuration tasks for the server setup can be done (described later
in “Configuring the Server” on page 6-3, before setting up all the
network clients according to the procedures in this section.
Page 70

6-2 Setup for UNIX Networks (NFS)
Reference on
Server File
System
Different workstations need different points of access to the server.
The network administrator or installer, for example, needs access to
configure and monitor the server and to configure access rights.
Then, the administrator may want to set up all the clients with
access to the discs, bypassing the configuration files stored on the
server. Please refer to the description of access points and the file
system used on the server, in the reference chapter, starting on
page 7-1.
Mount Drives
On UNIX systems, the server is accessed using NFS. Mount the
server by using the following procedure:
Note ❏
You will need
root
privileges to mount the server.
1. Create a directory for the server:
Example:
2. Mount the server:
<IP-address-or-hostname>
is the IP address or host
name assigned to the server for TCP/IP configuration; see
“Set the IP Address for the Server” on page 3-1.
Example:
NFS for PC or
Apple Macintosh
The server can also be accessed through third-party NFS software
for PC or Apple Macintosh computers. If you run a TCP/IP network,
this provides an alternative to Microsoft networking (SMB). Please
see the NFS software documentation for instructions on how to
mount the server.
mkdir
<directory>
mkdir /HP cd
mount
<IP-address-or-hostname>
:/
<directory>
mount cdserv:/ /HP cd
Page 71

Setup for UNIX Networks (NFS) 6-3
Configuring the Server
By making configuration changes, you can customize server
operation and can set access rights for security.
Configuration
Tips
Some server configuration changes you might need:
•
Disable workstation access to the server using protocols other
than NFS.
•
Restrict user access.
Methods for
Configuration
This chapter provides information for some of the configuration
options, if they are general needs or relate specifically to UNIX
networks. If you are also using TCP/IP on your network, see
chapter 3 for additional features.
HP recommends the web method of configuration if a web browser
and IP and HTTP are available. See “Web Browser Configuration”
on page 3-12 for an introduction. Text editing is an alternative
method.
Disabling Access
for Other
Protocols
In the Detailed View (from the Quick Setup page), you can switch
off all access to the server through other protocols for which you do
not set up access restrictions.
You can disable Microsoft networking (SMB) access by using the
Windows (SMB) tab and disabling the NetBIOS Protocol Bindings
for both NetBEUI and TCP/IP. You can disable NetWare access
under the NetWare tab by using the Enable NetWare setting.
Note ❏
Do
not
disable Web (HTTP) access. Maintain administrative
access to the server using this web interface.
If you should ever need to disable UNIX access to the server, use
the UNIX tab and the Enable NFS setting.
You must restart the server to effect these Detailed View settings.
Access Rights
Access restrictions can be set individually for each protocol. If you
use other network protocols in addition to NFS, consult the other
chapters for setup of those protocols. (The default settings in some
protocols provide full access rights to all users, so we recommend
that you disable all protocols not being used, as described in the
previous section. If you do not, a user accessing the server through
such a protocol may be given full access rights, regardless of the
security configurations in other protocols.)
Page 72

6-4 Setup for UNIX Networks (NFS)
UNIX/NFS-Specific Access Controls
You may restrict access by means of NFS to users with a certain
Group IDs and User IDs (UID). You use standard UNIX commands
or your platform-specific tools to set the rights for the mounted files.
Example
using standard UNIX commands:
Using the example in step 2 of the mounting procedure on
page 6-2, the local mount point is the
HP cd
directory.
Result:
Now
root
(UID 0) and members of the group
adm
have full
rights to the server’s
System
folder, but no others.
Only the owner and the superuser can change these rights.
Differences from standard NFS servers.
In the server’s root file
system (containing everything except the discs), you can set all
rights and IDs for both directories and files. Uniquely, if a right is
not set for a file or directory, the file or directory inherits the rights
from the parent directory. Since no files can be created and there
are no executable files, the data files will not inherit the executable
bit of the directories. In the example above, all directories in the
subtree
/HP cd/System/
have the rights
drwxrwx---
and all files
will get the rights
-rw-rw----
.
For non-writable volumes such as inserted (and archived) discs,
only the IDs and rights for the volume’s root is changeable. All files
and directories on that volume will get the same IDs and rights.
Example
using standard UNIX commands:
Result:
All directories and files on the disc
MyDisc
have
cdowner
as
owner and
users
as group. In this example, all directories and
files have the rights
rwxrwx---
.
chown root /HP cd/System
chgrp adm /HP cd/System
chmod 770 /HP cd/System
chown cdowner /HP cd/Volumes/MyDisc
chgrp users /HP cd/Volumes/MyDisc
chmod 770 /HP cd/Volumes/MyDisc
Page 73

Setup for UNIX Networks (NFS) 6-5
Authentication of a PC in an NFS Environment.
PC
workstations on a UNIX network can also be authenticated. This
requires an authentication server and a Default User ID to be
specified on the UNIX (NFS) configuration page under Quick Setup.
The two settings are combined in 4 different ways, to obtain the
following behavior.
Server Password
To protect the system files, it is important that you change the
server password for web access. For example, users are prompted
for the server password when trying to access the Administration
and Quick Setup web page for the first time during a session. Under
the Administration tab, click the This Server button and then the
Settings button. On the resulting properties page, select the
General tab. Change and confirm the password. Click Save. This
new password takes effect without restarting the server.
Default
User ID
PCNFSD Authentication Server
Result for PCNFSD clients
Example:
-2
0.0.0.0
Clients with user ID and group ID = -2
can be authenticated, but there is no
authentication server.
Example:-2Example:
192.124.138.99
Clients authenticated by the server get
their real user ID and group ID. Clients
not authenticated default to the Default
User ID.
0
Example:
192.124.138.99
Clients authenticated by the server get
their real user ID and group ID. Clients
not authenticated will fail.
0 0.0.0.0 All clients will fail.
Page 74

6-6 Setup for UNIX Networks (NFS)
Access by Discs or Drives
Access restrictions can be set individually for each CD/DVD-ROM
drive, for each disc inserted into the drives, and for the server
configuration files (in the
System
folder within the root), and for
the volumes as a group (using the
Volumes
folder). Refer to the
“File System Description” starting on page 7-3 for information on
these folders.
Set these access rights using the web browser, under the
Administration tab. Select the Discs and Drives button. In the Discs
and file system view, you will see an icon in the Access Rights
column for each of the discs and for the root and for the
volumes
folder. In the Drives view, you will see an icon in the Access Rights
column for each CD/DVD-ROM drive.
Click on the Access Rights icon to display the Access Rights
properties page for that access point.
By Drive.
To associate the access sharing and access rights with
the drive, for whatever disc is in the drive, rather than the specific
disc, click Drive for Use the access rights and properties of the
Drive.
Then the disc’s volume name will be changed to the default
SCSI name, such as CD-id2lun0. You can change this name
using the Name field on this property page. As a result, the icon
in the Access Rights column will illustrate the key on top of a
drive rather than a disc. (For HP J4150A: If this disc is then
archived, the share name will revert to the disc’s volume name.)
You must configure the UNIX Export List.
Under the Unix
Security tab, set up the export list for each folder or volume. To
mount an individual disc, or drive, or the root, you must add an
entry to the Add list for it.
These changes take effect as soon as you OK each page.
Page 75

Setup Reference for All Networks 7-1
7
Setup Reference for All Networks
This chapter is a collection of reference information helpful for
setting up the HP SureStore CD/DVD-ROM server. Information
needed for specific network operating systems is contained in
chapters 3, 4, 5, and 6. Hardware installation procedures are in
chapter 2. Topics in this chapter include:
•
Understanding the server’s file system . . . . . . . . . . . page 7-3
Consult this section, especially when you first use an
HP SureStore CD/DVD server, for an explanation of its
file system for discs and drives, as well as for determining
the server configuration and access controls.
•
Selecting an access point for server clients . . . . . . . . page 7-1
When accessing the server and its discs, and when mapping or
mounting drives, you have a choice of access points within the
server’s file system. Also, different access points are intended
for administrator/installers and for the clients using the discs.
•
Using a web browser and server web page . . . . . . . . page 7-6
This is the easiest configuration method and is supported
by on-line help. However, it requires that you configure the
server with an Internet (IP) address on a TCP/IP network.
•
Using a text editor to edit the server’s files . . . . . . . page 7-10
You can use your favorite text editor but must be precise in
your editing.
•
HP Web JetAdmin and remote management . . . . . page 7-10
File System and Access Points
Access Points
Consult the “File System Description” on page 7-3.
Page 76

7-2 Setup Reference for All Networks
Administrative: Root Folder Access
Using the
Roo
t folder (which is named
sys
or / in some operating
systems) at the top level of the server directory structure as the
access point allows access to all files, folders, discs, and system files.
Network administrators, who configure and monitor the server,
normally use this access.
All Discs in Server: Volumes Folder Access
Using the
Volumes
folder as the access point allows access to all
CDs and DVDs inserted into the drives in the server. On PCs, this
makes it possible to use only one drive letter to access all drives
connected to the server. This is the normal access for most users
and is a major benefit of the HP SureStore server solution.
Each Volume: Disc or Drive Access
Two alternatives:
•
Specific Disc
An inserted CD- or DVD-ROM disc can be used as the access
point. On PCs, this makes it possible to map a drive letter to a
single disc. This may be necessary to run CD software that
expects to find its data at the root level.
•
Specific Drive
A connected CD-ROM or DVD-ROM
drive
(and any disc in the
drive) can be used as the client’s access point, if the
administrator sets the drive instead of the disc to be used for
access rights and properties. Then only the files of discs in that
drive can be accessed. This means that access restrictions can
be defined only once, and users do not have to re-map each time
a new disc is inserted into the drive. This is useful for
administering periodically updated discs. Also, the disc’s
volume name will be changed to the default SCSI name, such
CD-id2lun0 (you can change this name).
Page 77
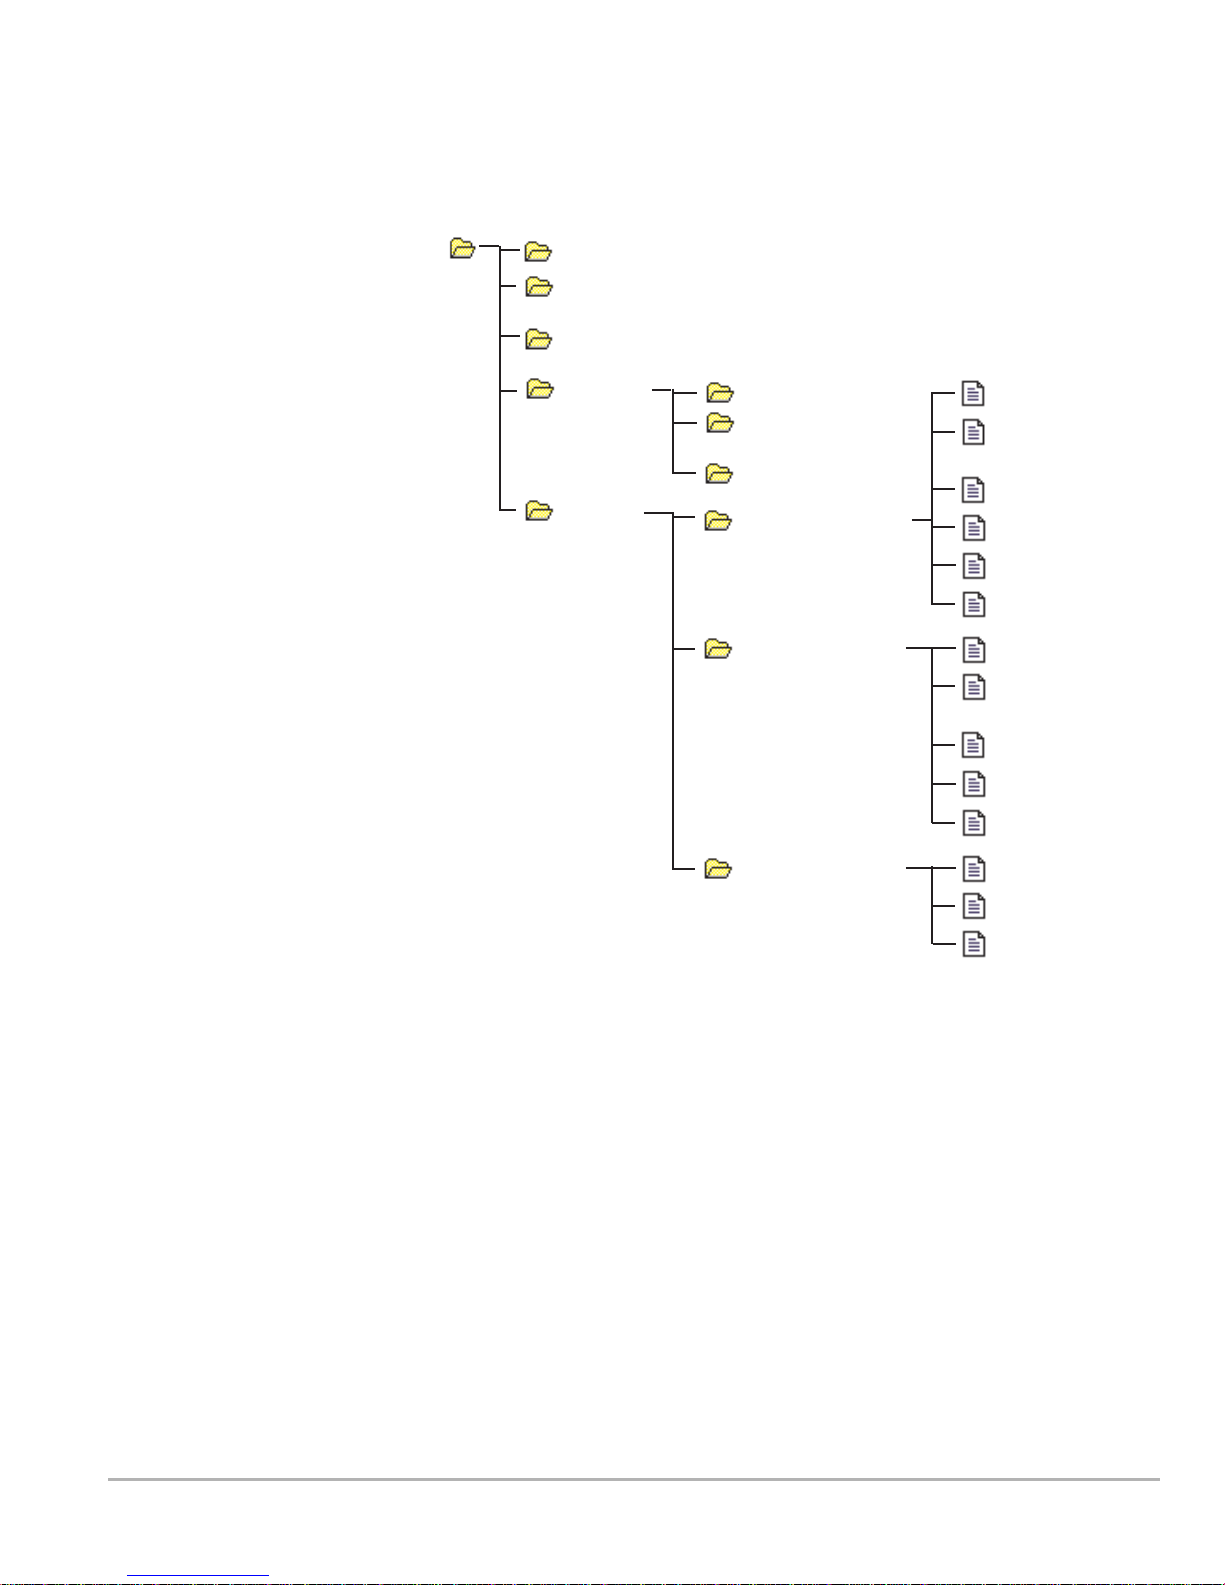
Setup Reference for All Networks 7-3
File System
Description
The server appears to each system as a file server. Like any other
file server, it has a directory structure in which files are stored. The
server directory structure is outlined below. The purpose of each
folder is more fully explained below.
Root
(Generic) Folder
This folder (which is named
sys
or / in some operating systems)
includes everything—the
Volumes
folder (with all of the discs
beneath) and the
System
folder. Use this folder as the access point
for the administrator.
Root
sys
/
or
or
Volumes
<disc1>
<disc2>
<disc6>
.
.
.
VolumeProperties
DeviceProperties
ServerProperties
.
.
.
<disc1>
<disc2>
<disc6>
System
.
.
.
.
.
.
disc1.txt
default.txt
HD-id0lun0.txt
disc2.txt
123archive.txt
CD-id2lun0.txt
root.txt
default.txt
disc6.txt
CD-id6lun0.txt
CD-id1lun0.txt
logfile.txt
statistics.txt
config.ini
Page 78

7-4 Setup Reference for All Networks
Disc Folder
There is a folder for each individual disc available in the server. It
contains the contents of the disc. Its name will comply with the
following rules:
•
The volume name held on the disc (here to be called the “disc
name”) is used if another volume name has not been set
specifically by an administrator (see below).
•
If the disc name contains spaces, each space will be changed to
an underscore.
•
If the disc name duplicates another disc/volume name on the
server, an underscore and capital-A (then underscore and
capital-B, etc.) will be appended to the duplicate.
•
If an administrator has set a volume name, it will be used
instead of the disc name. Since the disc name may not be an
easily recognizable representation of the disc contents,
assigning your own volume name is a convenient way of setting
a more significant or recognizable name.
Note ❏
If you run an application from a disc, or look for an application’s
associated files on the disc, the application may not recognize it
by the volume name you have set. In that case, you will not be
able to set a name but must use the disc name instead.
•
If an administrator has set access rights by drive rather than
disc, then the name of the drive—either the SCSI name, such as
CD-id2lun0, or another name configured—it will be used in
place of any of the above names. This name is useful for the
following reasons:
• Any disc inserted into the drive will be seen as having this
name. Thus you could use the same drive for a series of
discs, such as a monthly issue, and you will not have to
enter a new name each time you change the disc.
• When a drive name is set, the volume rights for any disc
inserted in the drive are determined by the drive access
rights. This is convenient because the access rights need
setting only once, while the disc can be changed.
Note:
For J4150A only
❏
However, if this disc is then archived, the name will revert to
the disc’s volume name.
Page 79

Setup Reference for All Networks 7-5
Volumes Folder
Use this folder as the access point for all discs in the server.
When a disc is inserted into a drive, a folder for it is created in the
server’s
Volumes
folder. All the files on that disc can be accessed
through this folder. Use this folder, subordinate to the
Volumes
folder, as the access point for the individual disc.
System Folder
The
System
folder contains the following server files:
DeviceProperties Folder.
This contains files for each CD-ROM
drive, DVD-ROM drive, and hard disk drive in the server. The files
contain the settings for each drive.
CD-id1lun0.txt
File. Properties for the CD/DVD-ROM in the
second bay, with SCSI ID 1. There will be a file for each
CD/DVD-ROM drive in the server.
HD-id0lun0.txt
File. Properties for the hard disk drive in
the first bay, with SCSI ID 0.
default.txt
File. Default properties for newly inserted
drives.
VolumeProperties Folder.
This contains files for each CD-ROM,
DVD-ROM, and archived volume in the server. The files contain the
settings for each of these volumes. The first two items in the
following list are examples of the volumes to be found in a server.
NETWARE5.txt
File (for example). Properties for the CD-ROM
with the volume name “NETWARE5”.
2F05-509A (removed volume)
File. Default properties for
the available disc that has been archived and then physically
removed. (For J4152A only)
Root.txt
File. Properties for the server’s root.
default.txt
File. Default properties for all new discs.
ServerProperties Folder.
This contains files storing the
configuration settings, the log file, and the statistics for the server.
config.ini
File. Server configuration settings
logfile.txt
File. Server log file
statistics.txt
File. Server statistics
Page 80
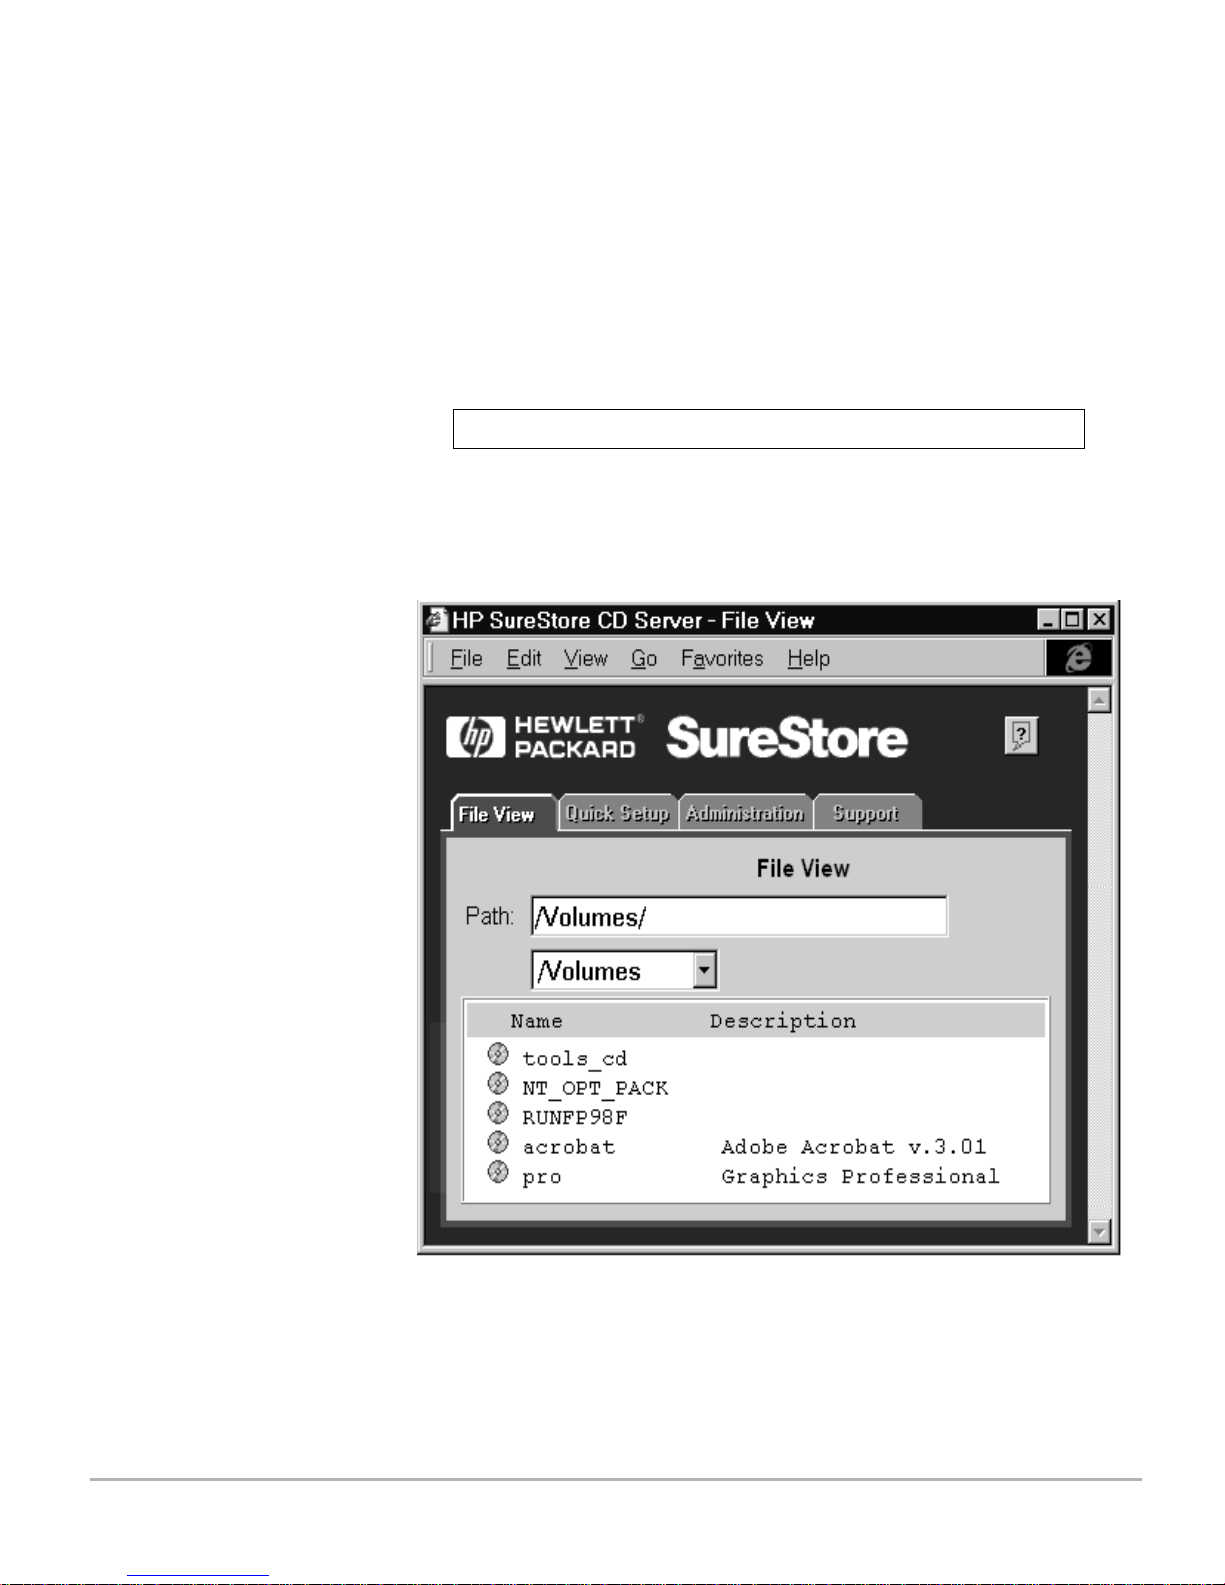
7-6 Setup Reference for All Networks
Configuration Methods
Using a Web
Browser and the
Server Web Page
To access the server’s web page, you must first configure the server
with an IP address as described in the section starting on page 3-1.
The Enable HTTP setting must be left enabled. You can use any
standard web browser, such as Netscape Navigator or Microsoft
Internet Explorer. The example here uses Internet Explorer.
1. Start Internet Explorer.
2. In the Address field, enter the URL of the server as:
As an alternative to the IP address, you can use a host name
associated with the IP address and assigned to the server.
3. The main web page for the server is displayed, as shown below.
http://
<IP-
address>
Page 81
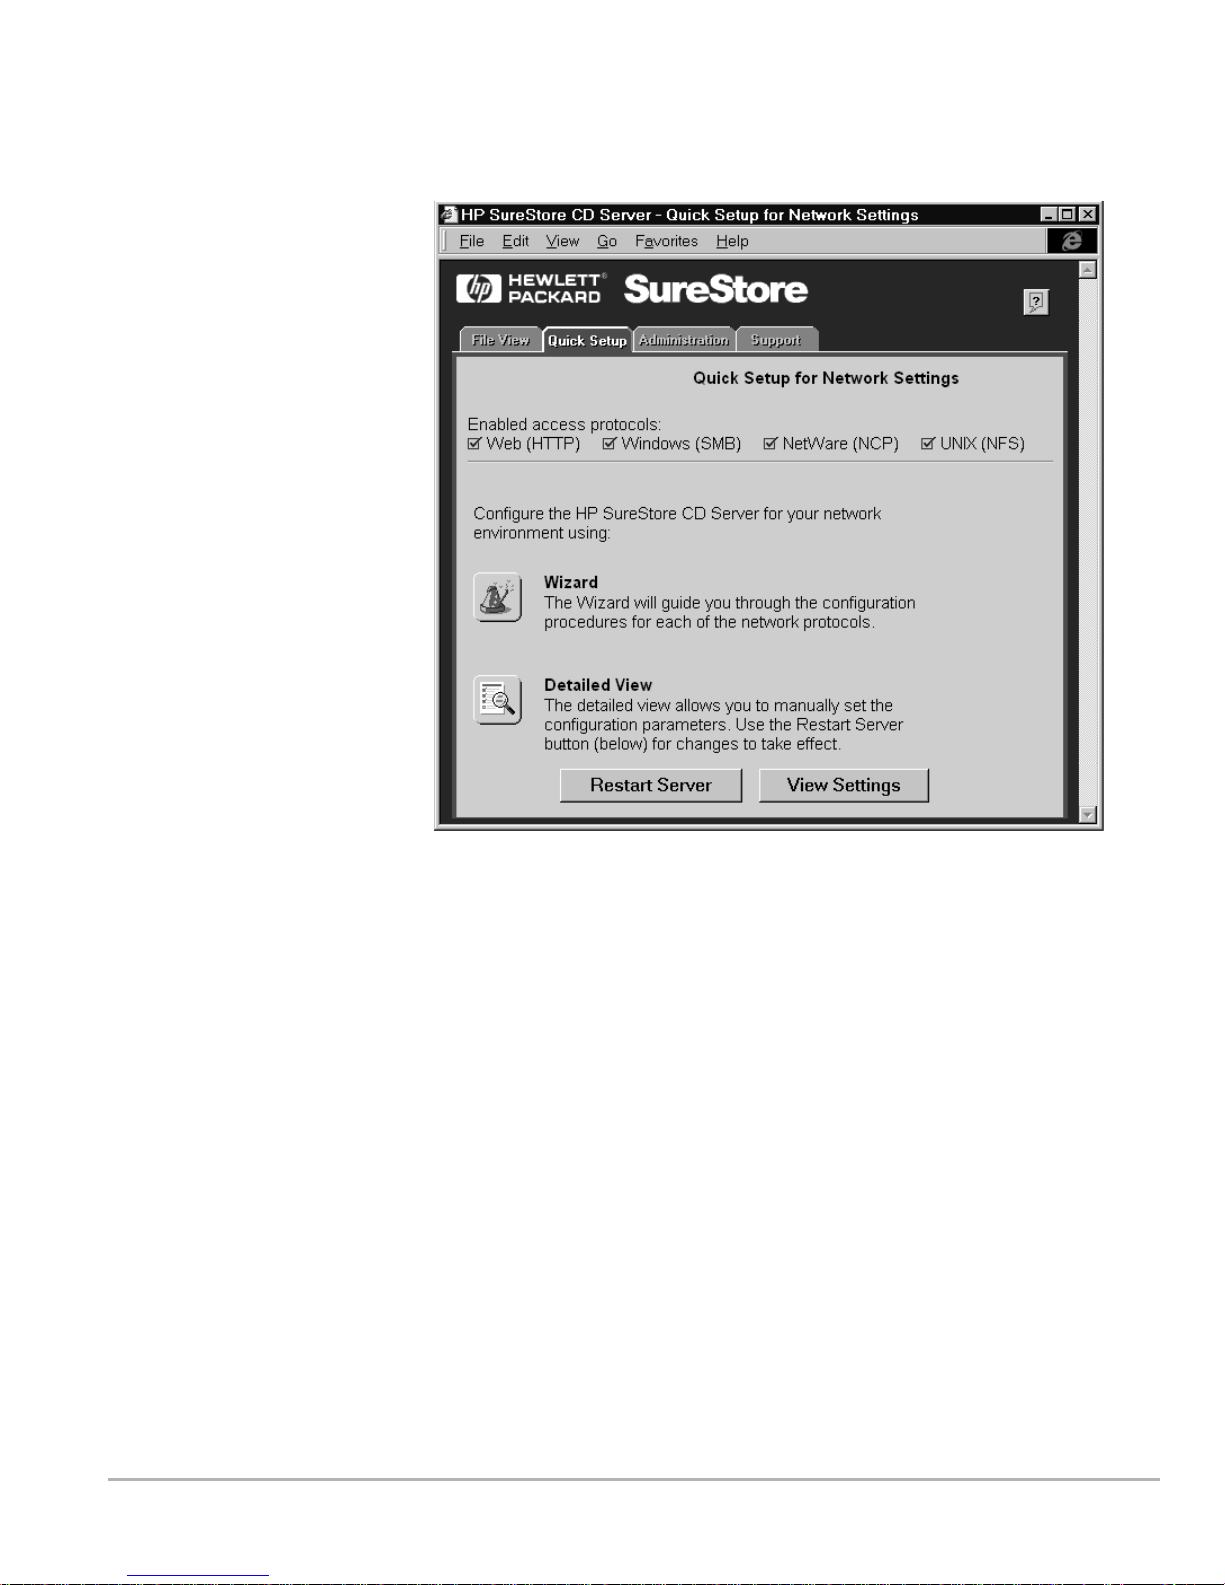
Setup Reference for All Networks 7-7
4. Select the Quick Setup tab for most network configuration needs.
The first time during a session, you will be prompted to enter the
username (default is
root
) and password (default is
pass
).
You have the choice of a configuration wizard—click on the
Wizard icon—or detailed configuration settings—click on the
Detailed View. The wizard leads you through the most basic
settings, and then restarts the server when you click the Finish
button at the end. The detailed configuration includes most of
the details of configuration settings, and when finished you
must click the Restart Server button to effect most settings that
change how the server appears on the network.
If you need help, click the ? button to display the on-line help.
You can display a table of all configuration settings. Click the
View Settings button on this Quick Setup page.
You are prompted to
supply:
username = root
password =
pass
(factory defaults)
Page 82
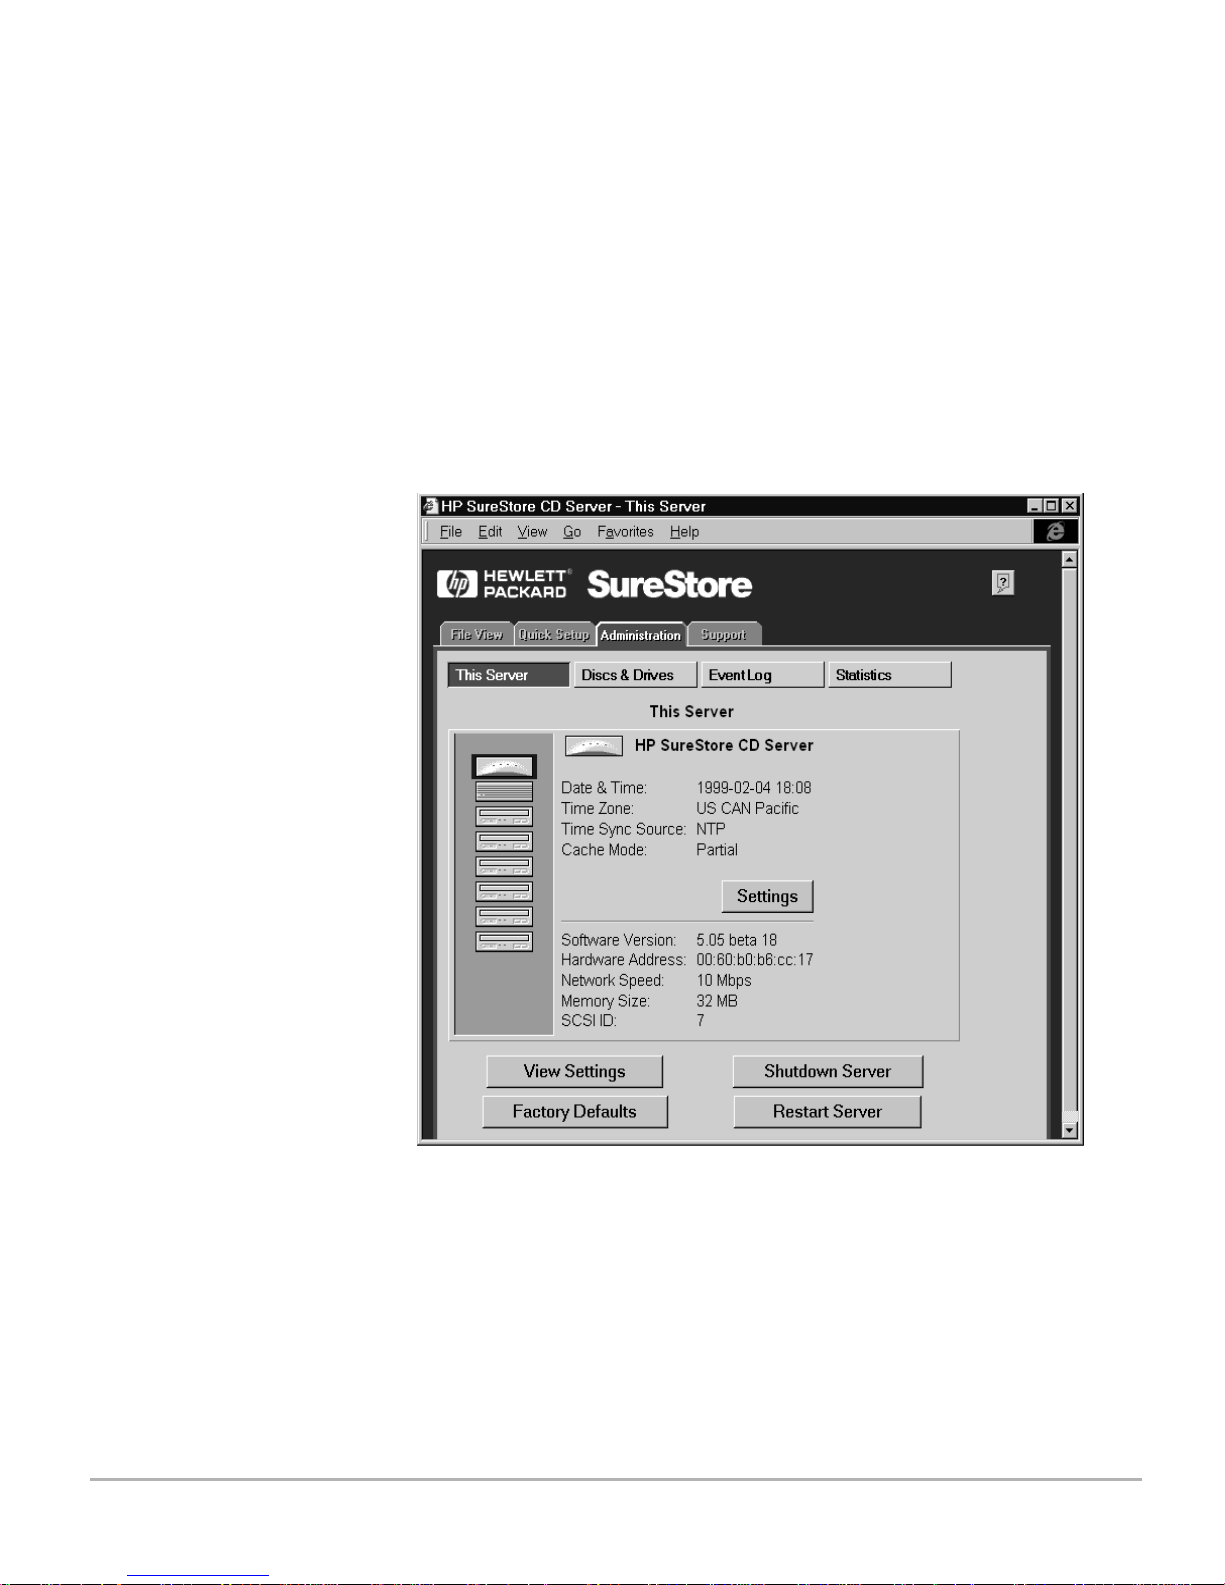
7-8 Setup Reference for All Networks
5. Some general settings for the server (such as its administrative
password) are done under the Administration tab instead of the
Quick Setup tab. If you had not supplied the name and password
already this session you will be prompted to enter the username
(default is
root
) and password (default is
pass
).
Click the This Server button, and with the server module
highlighted, click the Settings button to display the server
settings page. When these settings are saved, they do not
require restarting the server to take effect.
If you need help, click the ? button to display the on-line help.
You can display a table of all configuration settings. Click the
View Settings button on this Administration page.
Page 83
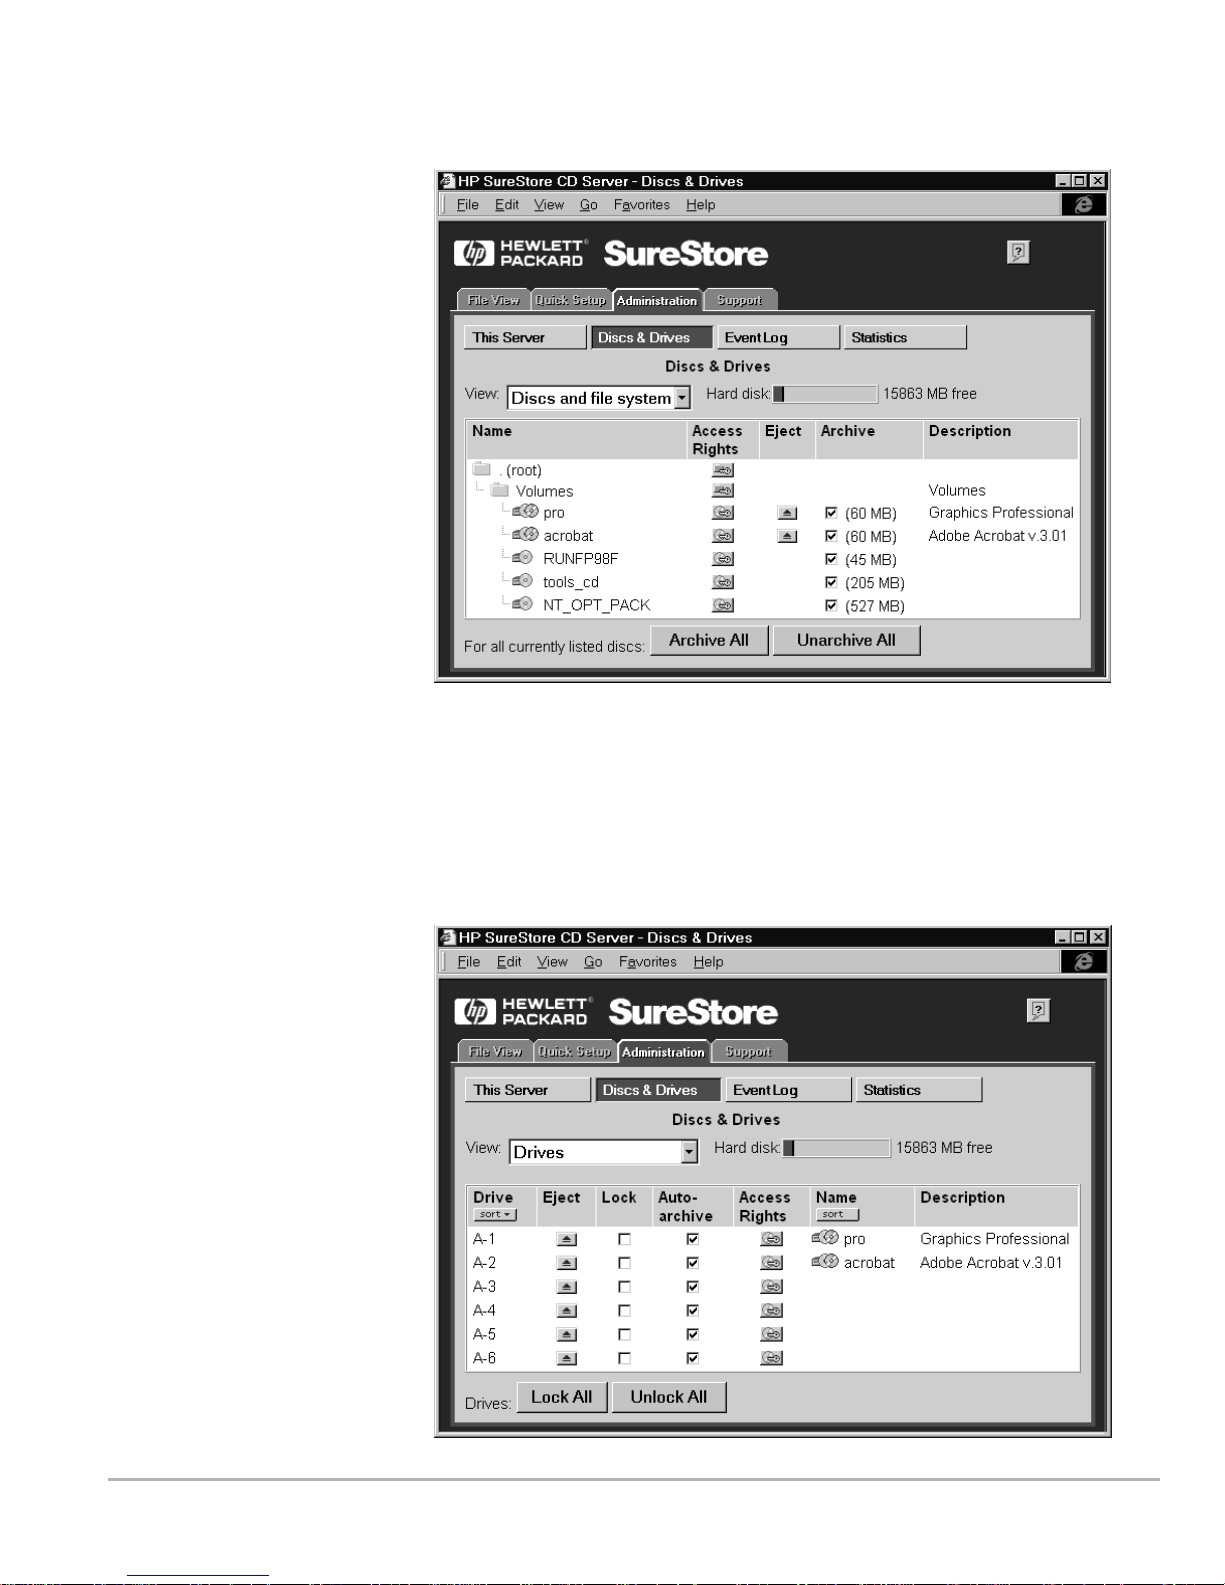
Setup Reference for All Networks 7-9
6. To set access rights for the volumes on the server, use the
Administration tab and click on the Discs and Drives button.
One view is for Discs and File System. For each of the discs and
access points on the server, you will see an icon in the Access
Rights column. Click on that icon to display the Access Rights
page. These changes take effect as soon as you OK each page.
Another view is for Drives. You can associate the access rights
by drive, for whatever disc in is the drive.
Page 84

7-10 Setup Reference for All Networks
Note ❏
Some settings that affect access rights for a particular network
type are not found under Discs and Drives. They appear in
Quick Setup configuration.
Using a Text
Editor to Edit
Server’s Files
Use a text editor to open the
config.ini
file in the
ServerProperties
folder in the
System
folder on the server.
Edit the parameters and values.
CAUTION!
❏
Make sure there is a space between the equal sign and the
parameter value. All other spaces between names of parameters
or values are ignored. Do not remove the
[END]
marker from
the file.
You must save the file and restart the server to activate the new
settings. You can do this by setting the
Restart
parameter in the
config.ini
file to
yes
and saving the file. Instead of setting
Restart
in the file, you can save the file first and then switch the
server’s power
off
, wait 10 seconds, and switch power on.
The new settings are ready for use when the server completes
its restart. See page 2-5.
Remote Network Management Tools
SNMP
The server includes SNMP broadcast support. Using remote
network management tools, you can autodiscover the
HP CD/DVD-ROM servers on your network. You can use
HP Web JetAdmin to see all installed HP CD/DVD-ROM servers
and print servers. This can help you, for example, to check of the
health of the networked peripherals or to assign IP addresses.
HP Web
JetAdmin
HP Web JetAdmin is available from Hewlett-Packard for
downloading from URL:
www.hp.com/go/webjetadmin
Page 85

Caching and Archiving Using the Hard Disk 8-1
8
Caching and Archiving Using the Hard Disk
Only for
HP J4150A
SureStore
CD-ROM
Server Plus
The hard disk drive included with the HP J4150A SureStore
CD-ROM Server Plus is operated automatically for caching and
archiving CDs. Disc data that is
cached
on the hard drive will be
used automatically to speed up user access when the disc in a
physical CD-ROM drive is accessed. A disc that is
archived
on the
hard drive can be accessed without the disc being present in a
physical CD-ROM drive.
The location of the disc data on the hard drive rather than on a
CD-ROM drive is transparent to the users.
Caching
What is
Caching?
Caching uses the hard drive to automatically copy disc data, to
increase access performance (speed) when a user accesses the disc.
(Caching aids in disc and file access; it does not affect data
throughput or network performance.)
When the disc is removed from the CD-ROM drive, the disc is no
longer accessible from the cache. As long as there is space available,
however, the cached data remains and will be used if the disc is
again inserted. The cached data is aged and deleted when the space
is needed for more frequently accessed files and for archives.
See also the section “Disk Space for Caching and Archiving” on
page 8-6.
Page 86

8-2 Caching and Archiving Using the Hard Disk
Types of
Caching
Cache Modes
•
Partial
The directory structure on the discs is cached. This speeds up
browsing directories and finding files. By default, this mode
also includes caching of the frequently accessed files on the
discs. The disk space allocated for file caching can be reduced to
zero to suspend file caching; then only directory caching is done.
•
Mirror
The full image of all disc data is cached. Mirroring speeds up
frequent access and access by multiple users. The image is
available only as long as the disc is in the CD-ROM drive.
•
None
No caching is performed. Archiving can still be performed,
however (see “Archiving and Replacing Discs” on page 8-3).
The cache mode has no impact on archiving (see “Archiving and
Replacing Discs” on page 8-3 and “Disk Space for Caching and
Archiving” on page 8-6).
Changing
Cache Settings
The factory-default cache mode is partial caching with file caching
of 500 megabytes.
You can change the default cache mode for the server by using the
Administration web page. Under the Administration tab, click the
This Server button and with the server module highlighted, click
the Settings button. Then select the Caching and Archiving tab.
Your choices are listed below. The caching will be started as a
background activity as soon as a disc is inserted into a drive.
•
For no caching, change the Cache Mode to None. Then,
directories and files on the discs will not be cached.
•
For directory caching only, set Cache Mode to Partial and Disk
space for file caching to 0 (zero). Then only the directory
structure and not the files will be cached.
•
For file and directory caching, set Cache Mode to Partial and set
the amount of space for file caching. Then the directories and
frequently accessed files will be cached.
•
For full mirroring of all discs, set Cache mode to Mirror. All disc
data will be cached.
For managing disk space usage, see “Disk Space for Caching and
Archiving” on page 8-6.
Page 87

Caching and Archiving Using the Hard Disk 8-3
Archiving and Replacing Discs
What is
Archiving?
Archiving allows you to store more discs for user access than those
fitting into the tower’s drives at one time. Archiving uses the hard
drive to store a persistent copy of a disc, a full “mirror” copy of all
disc data that persists after you remove the actual disc.
If the data is already mirrored (see “Caching” on page 8-1),
archiving will make the copy persistent. Archiving is performed
independent of the setting of the cache mode (see “Cache Modes” on
page 8-2).
Archiving a disc can take up to five minutes (or a few seconds if a
mirror of the disc has already been cached), but the disc is
meanwhile accessible from the CD-ROM drive. When the archive is
complete, an information event is added to the log file (and sent as
e-mail if Errors, Warnings, & Info are configured with an e-mail
address). In addition, by default the disc will be ejected
automatically after archiving, to indicate that you can insert
another disc into that CD-ROM drive.
A warning event will be logged if not enough hard drive space is
available for an archive.
Auto-archiving
causes every disc you insert into a CD-ROM drive to
be automatically archived, as long as hard drive space is available.
By default, the server auto-archives every disc you insert.
Page 88
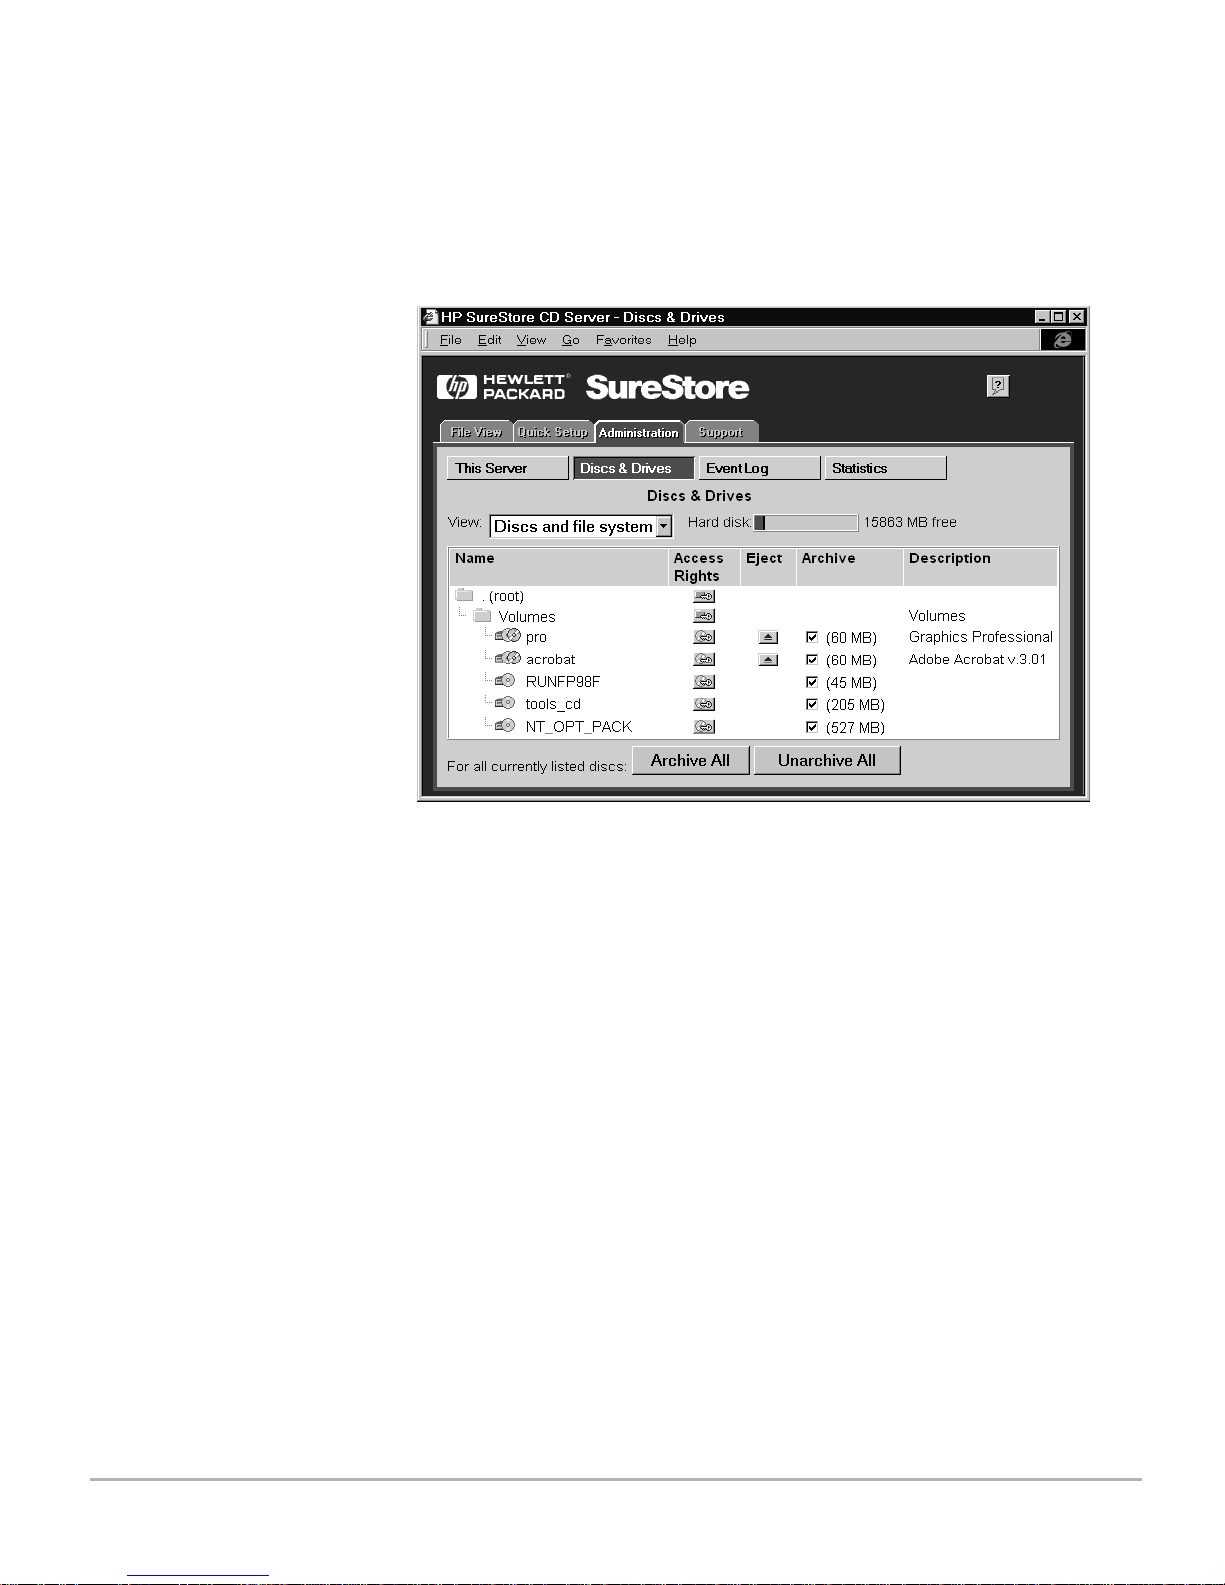
8-4 Caching and Archiving Using the Hard Disk
Removing an
Archive
An archived disc remains user-accessible until you remove the
archive. Three methods are the following:
•
On the Administration web page, click Discs and Drives, select
the “Discs and file system” view, and under Archive click the
checkmark off for an individual disc. This removes the archive
copy of the corresponding disc.
•
On the Administration web page, click Discs and Drives, select
the “Discs and file system” view, and click the Unarchive All
button. This removes the archive copies of all the discs listed on
the server.
•
On the Administration web page, click the This Server button
and with the server module highlighted, click the Settings
button. Then select the Caching and Archiving tab. Click the
“Clear Disk” button to do a “quick format” of the hard disk to
remove all cache and archive copies. Automatic caching and
archiving of the discs currently installed on the server will be
restarted, according to the current configuration.
Changing
Archive Settings
Auto-archiving for every drive and automatic ejection after
archiving are factory defaults, except that by default discs larger
than 650 Megabytes will not be automatically archived or mirrored.
The cache mode has no impact on archiving (see “Cache Modes” on
page 8-2 and “Disk Space for Caching and Archiving” on page 8-6).
Page 89
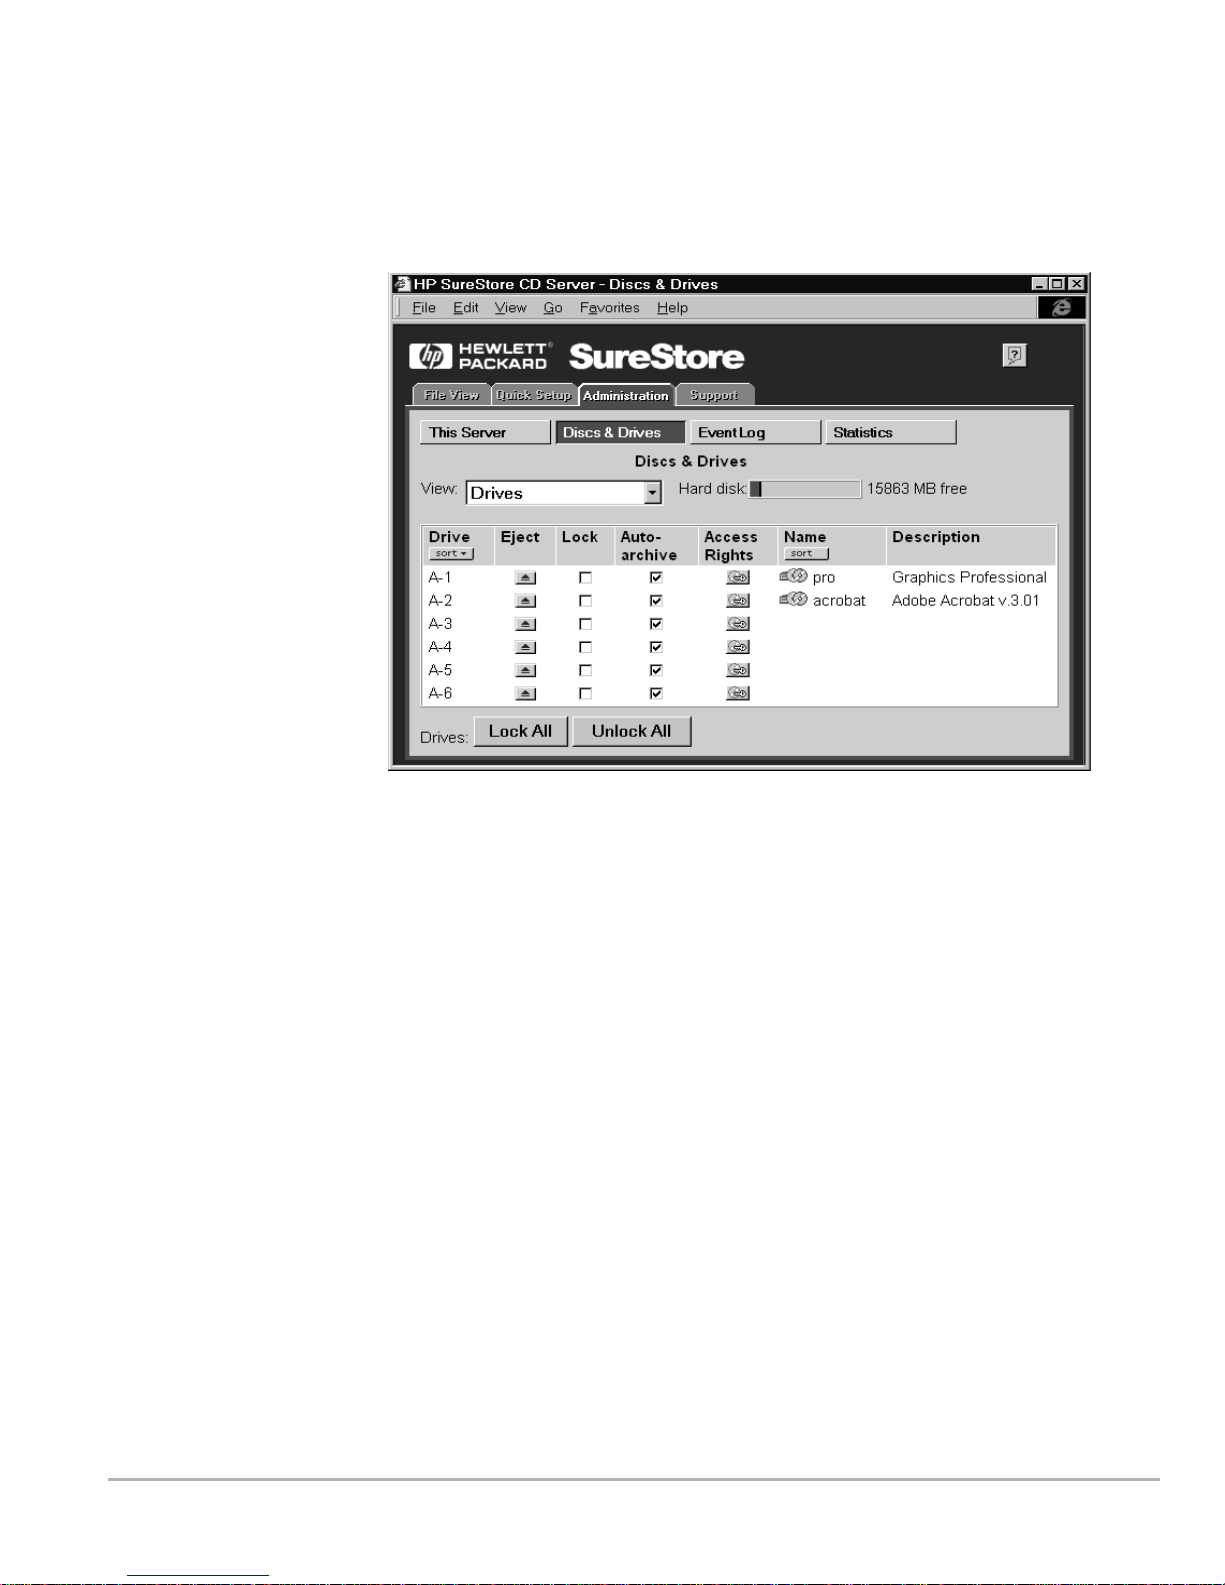
Caching and Archiving Using the Hard Disk 8-5
Switching Off Auto-Archiving and Making Specific Archives
You can switch off auto-archiving for specific CD-ROM drives on the
Administration web page for Discs and Drives, in the “Drives” view.
Then you can set individual drives for auto-archiving, and any disc
subsequently inserted into the drive will be archived automatically.
You can initiate a specific archive of a disc on the Administration
web page for Discs and Drives, in the “Discs and file system” view,
by checking its Archive box. Clicking the Archive All button
specifically archives all the discs in the drives. (See the illustration
on page 8-4.)
Switching Off Automatic Ejection
You can switch off automatic ejection following auto-archiving for
all drives. On the Administration web page, click the This Server
button and with the server module highlighted, click the Settings
button. Then select the Caching and Archiving tab and click the
Eject checkmark. After archiving, you can eject the disc manually at
the tower or by pressing the Eject button on the Administration web
page for Discs and Drives, in either view.
This page also allows you to change the following archive settings:
•
Maximum size of disc to automatically archive or mirror.
•
Minimum size of disc to trigger warnings that not enough hard
disk space is left.
Page 90

8-6 Caching and Archiving Using the Hard Disk
Disk Space for Caching and Archiving
Archiving has precedence over mirror caching. Mirroring uses some
of the disk space unused by archives. When more space is needed
for archiving or mirroring, then the least recently accessed mirrored
data will be removed. The number of discs that can be mirrored or
archived depends on the amount of data copied, not on an arbitrary
disc capacity such as 650 megabytes.
If you run out of space for archiving, you may obtain space for
another archive by switching the caching mode to Partial or None or
by reducing the space allocated for file caching with Partial mode.
Removing a physical disc that has been mirrored or removing an
archive copy also will reallocate the disk space.
You can view the usage of hard disk space for caching, and the
amount of free space on the Administration web page for Discs and
Drives, in either view, and on the Statistics page. The blue band
indicates the space currently being used by cached and archived
data.
Page 91

Upgrading the Firmware 9-1
9
Upgrading the Firmware
The firmware stored in
Flash memory
on the server can easily be
updated over the network. All firmware updates supporting
CD-ROM and DVD-ROM are free of charge.
Note ❏ Flash Memory:
The program (firmware) that runs your
server
is stored in Flash memory.
This is a memory chip that, like
ordinary RAM memory, keeps its contents even when the power
is turned off. However, you can erase its contents and write new
data to it. When firmware updates with new features are
available for your
server, you can download them to the flash
memory without having to replace any parts.
Checking if an
Update is
Available
Contact your HP-authorized dealer for the most recent releases of
firmware. Your existing firmware version is identified on the
Administration web page for This Server, when the server is
highlighted (and in the
config.ini
file in the
ServerProperties
folder in the
System
folder).
You can also use the HP Web site or contact your nearest
HP Customer Care Center. Refer to appendix A for information.
Updating the
Server’s Flash
Memory
You can implement an update to your Flash memory over the
network using FTP on a TCP/IP network. To upgrade over the
network you need the following:
•
The file with the new server firmware. The file name is
hpcd_
<version>
(for example,
hpcd_411.bin
for the
firmware release 4.11). Obtain the updated file from the
HP Web site or your HP-authorized dealer.
•
A computer on the network with TCP/IP and FTP. On
Windows NT computers, you can issue the
ftp
command at the
DOS prompt.
•
The server must also be installed on the network with TCP/IP
configuration as described in chapter 3.
Page 92

9-2 Upgrading the Firmware
Follow the steps below to install new server firmware:
1. Obtain a copy of the firmware update file from your
HP-authorized dealer or from HP’s Electronic Support services.
2. Login to the server using the command:
where
<IP-address/host-name>
is either the IP address or
the host name assigned to the server.
3. You will be prompted for user ID and password. Use the user ID
root
, which has the default password
pass
. (
root
is the user ID
with the highest priority.)
4. Issue the command
bin
to change to binary transfer mode.
5. Issue the command:
where
<filename>
is the name of the new server firmware (for
example,
hpcd_411.bin)
.
CAUTION!
❏
Be careful not to interrupt the file transfer. If the transfer is
interrupted, the server may become inoperative and must be
returned to HP.
6. Wait for the transfer to complete. This normally takes 1 to
4 minutes. The server will then automatically restart with the
new server firmware.
7. Log out using the command
quit, bye
, or
exit
, depending on
your FTP version.
8. Cycle power to the server.
With the new firmware operating, your password for
root
reverts to the original setting
pass
.
Instructions on how to install your server firmware are also
supplied with the firmware update.
ftp
<IP-address/host-name>
put
<filename>
flash
Page 93

Troubleshooting 10-1
10
Troubleshooting
This chapter will help you to diagnose and resolve problems with
the server product. The chapter has these sections:
•
Check Front-Panel Indicators. . . . . . . . . . . . . . . . . .page 10-2
•
Look Up Your Problem.. . . . . . . . . . . . . . . . . . . . . . .page 10-5
•
Procedures for Resolution or Repair. . . . . . . . . . . .page 10-14
If you have identified a problem with hardware or software, you can
look for the problem in the second section, “Look Up Your Problem”.
If the symptoms are unclear or you do not find your problem listed,
then check all the indicators in the first section, “Check Front-Panel
Indicators” In both sections, you will be referred to documentation
on specific actions you should take.
For more help in solving problems, consult the subsequent
appendix A, “Getting Support”. It includes the location of HP’s Web
site for CD servers, where you can find more problem-solving tips in
the “Electronic Support Services” section. It also lists telephone
numbers for HP support.
Restart Server
One general method of restarting the server is to switch power off,
wait 10 seconds, and switch power on again (power cycle).
Page 94
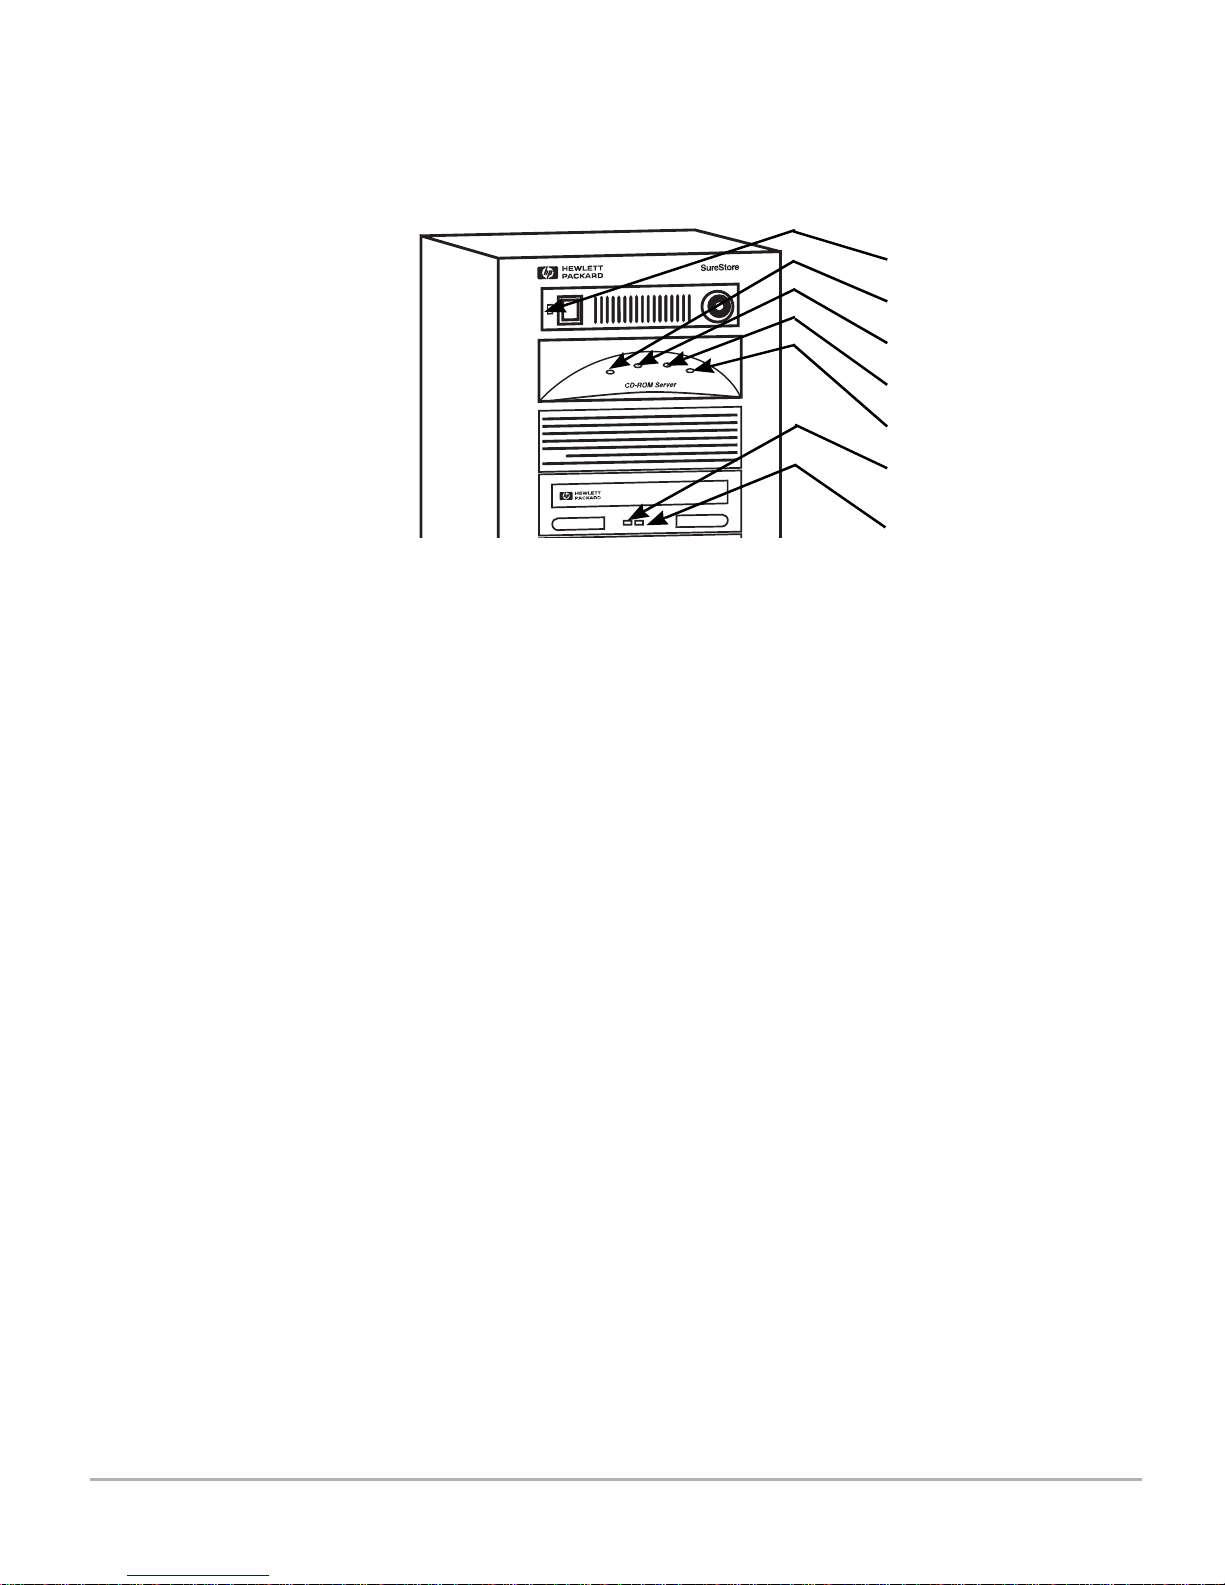
10-2 Troubleshooting
Check Front-Panel Indicators
The indicator lights (LEDs) on the front of the tower show the
status of the tower, server, and CD/DVD-ROM drives.
On the tower nearest the top (when floor mounted):
•
Power
is
green (on)
when power is connected to the tower and
the power switch is on.
On the server module, from left to right:
•
Status
is
green
or
off
during start-up. When the server is ready
for use,
Status
remains
green (on)
(see page 10-3). For an error
condition, it is
red
or
flashing yellow
(see page 10-4).
•
SCSI
is
green
or
yellow
during start-up. When the server is
ready for use
SCSI
is
off
, or
blinking green
when a disc is
being read, or
blinking green
when writing to HP J4150A’s
hard disk (see page 10-3). For an error condition, it is
red
(see
page 10-4).
•
Network
is
blinking green
whenever a packet is received on an
100-Mbit/s network, and
blinking yellow
on a 10-Mbit/s
network. If the link is lost, it is
red
.
•
Power
is on when power is connected from tower to server.
On the HP disc drives, from left to right:
•
(Only on J3278B and J4150A CD-ROM drives) DISC
is
on
(green) when power is connected from the tower to the
drive and a CD is inserted. It is
off
when no CD is inserted.
•
(Only on J3278B and J4150A CD-ROM drives) ON/BUSY
or
(Only on J4152A DVD-ROM drives) BUSY
is
on
when power is connected from the tower to the drive.
It
blinks
in synchrony with access to an inserted disc. It is
off
when an inserted disc is not being accessed.
Status indicator
SCSI indicator
Network indicator
Power indicator
DISC indicator
(not on J4152A)
ON/BUSY indicator
Power indicator
Page 95

Troubleshooting 10-3
Normal
Conditions
The
Power
LEDs on the tower and server module are controlled by
hardware and are always on when power is connected. The
following tables describe the state of the other LEDs.
On the Server Module
On the CD-ROM or DVD-ROM Drive
Event Status SCSI Network
Initial power to unit Solid Green Solid Green Solid Green
During power-up and
self-test (approx. 30
seconds to 5 minutes)
1. Solid Green;
2. Off
1. Off;
2. Blink Yellow
Off
After power-up and
self-test
Solid Green Off
Blink Green
for each
100-Mb/s
packet;
Blink Yellow
for each
10-Mb/s
packet
Disc accessed Solid Green
Blink Green for read;
Blink Yellow for write
(on hard drive);
Off for no activity
No disc, and
No hard drive archive
Solid Green Off
Flash loading Fast Flash Yellow Off Off
Event
Disc,
on
J3278B,
J4150A
ON/BUSY
, on
J3278B,
J4150A
BUSY
, on
J4152A
Initial power to unit Solid Green
Solid Yellow,
with no CD
Off
During power-up and
self-test (approx. 30
seconds to 5 minutes)
Solid Green
Solid Yellow,
with no CD
Blink Green
when drive
accessed for
testing
After power-up and
self-test
Off, with no CD
Solid Yellow,
with no CD
Off
Disc accessed Solid Green
Blink Yellow
for read;
Off for no
activity
Blink Green
for read;
Off for no
activity
No disc, and
No hard drive archive
Off Solid Yellow Off
Page 96

10-4 Troubleshooting
Error Conditions
The following tables show how the front-panel LEDs display
various problems. Look up the problem in the next section to find
the procedure to resolve it.
On the Server Module
On the CD-ROM or DVD-ROM Drive
Status SCSI Network Problem to Look Up
Off — Solid Red Network connection failure.
Off Solid Red Off No access. SCSI problem.
Off Flash Red Off One or components failed; SCSI problem.
Slow Flash
Yellow
Off Off
Try restarting server. If indicator persists,
server module failed.
Flash Y ellow
and Red
Off Off
Startup memory error.
Server module
failed.
Flash Red Off Off
Flash load failed or DRAM error.
Server
module failed.
Solid Red Off Off Flash BIOS failure.
Server module failed.
Disc, on
J3278B,
J4150A
ON/BUSY , on
J3278B,
J4150A
BUSY, on
J4152A
Problem to Look Up
Off with
CD in
Off with
CD in
Off with
disc in
If disc inaccessible: power disconnected, defective drive, or SCSI
disconnection
Off
Flash Yellow
in series of 5
Solid green for
about a minute,
then Off
Disc read problem, unsupported
disc format, or drive problem
—
Continuously
On
—
If disc inaccessible: possible SCSI
ID conflict
Page 97

Troubleshooting 10-5
Look Up Your Problem
Power LED is Off
If the tower’s
Power
LED is not on, check the following causes and
corresponding solutions.
Disc Drive
Problem
s
If you hear excessive noise on a CD- or DVD-ROM drive, or hear the
disc “jump”, or if the LEDs on the drives do not operate as expected
(see page 10-2 to page 10-4), you could have a defective or
unreadable disc in the drive.
Possible Causes Resolution
Pow er switch is
off
Make sure the power switch is on.
Power cable
not connected
Make sure the power cable is connected.
Be sure the power cable is appropriate for your country.
Input voltage
is set incorrectly
Switch the power switch
off
. Check the input power setting—the switch on the back of the tower. Modify the setting only if you are sure the current setting is wrong.
CAUTION
: Your HP-authorized dealer has normally set
the input voltage as required for the country of usage. A
lower setting will destroy the power supply. A higher setting will cause a malfunction at a load above four drives,
but will not cause any damage.
Wait 10 seconds, and switch power
on
again (power
cycle).
Power loss
Your facility may be undergoing a blackout or brownout.
Make sure the power source for the tower is active.
Switch power
off
, wait 10 seconds, and switch power on
again (power cycle).
Power supply
malfunction
Call HP support for help, as described in appendices A
and B.
Page 98

10-6 Troubleshooting
Defective Disc
HP CD-ROM drives in the tower are designed to automatically
switch down to lower speeds when they encounter a defect or a
scratch on the disc, and then to continue to read data at the slower
speed until a new read command is transmitted to the drive.
However, fingerprints, contaminants, or deep scratches on the disc
surface may prevent the drive from successfully reading data.
Perform the disc cleaning procedure on page 2-8.
If the problem persists, test a different disc in the same drive;
if that disc works properly, the previous disc may be defective.
If no disc works properly in the drive, then switch off the server,
wait 10 seconds, then switch it on again (power cycle), and wait
for the self-test to complete and
Status
to be
solid green
.
Also verify that the disc is in a supported format (described on
page 10-7). If the problem persists, the drive may be faulty; see
“Isolate Faulty Hardware Component” on page 10-16.
Ejected Disc
HP CD-ROM drives in the HP server are designed to automatically
eject any unreadable disc. HP DVD-ROM drives in the HP server
will eject a disc that is blank or has no table of contents. If a disc is
ejected, verify that the disc is in the tray with the label side towards
the top of the tower (as floor mounted). Or the disc may be blank,
incorrectly written, or damaged. Also verify that the disc is in a
supported format (described on page 10-7).
Test a different disc in the same drive; if that disc works
properly, the previous disc may be defective. If no disc works
properly in the drive, then switch off the server, wait 10
seconds, then switch it on again (power cycle), and wait for the
self-test to complete and
Status
to be
solid green
. If problem
persists, the drive may be faulty; see “Isolate Faulty Hardware
Component” on page 10-16.
Page 99

Troubleshooting 10-7
Disc and Drive
Access Problems
CD-ROM or DVD-ROM Read or Drive Problem
If you cannot see or access the CD in a CD-ROM drive, and you see
the
ON/BUSY
indicator
flashing
5 times in a series, then open and
close the CD tray door using the Stop/Eject button. Wait to see if the
Disc
goes on and
ON/BUSY
goes
off
; you should then have access.
On both CD- and DVD-ROM drives, try switching off the server,
wait 10 seconds, then switch it on again (power cycle), and wait
for the self-test to complete and
Status
to be
solid green
.
If a problem persists, refer to the problems “Defective Disc” on
page 10-6 and “Errors when Accessing Server or Discs” on
page 10-9. If none of those conditions apply, the drive may be
faulty; see “Isolate Faulty Hardware Component” on
page 10-16.
Drive Access Problem
If you cannot see a drive on the network, but you can see the server
on the network, then use the procedure for “SCSI Problems” on
page 10-10.
Disc Defective or Unreadable
If a LED error condition indicates this possibility, then start at
“Disc Drive Problems” on page 10-5.
Disc Format Unsupported
If the LEDs on a CD-ROM drive indicate a possible problem with
disc format, check that the disc is in a supported format. Formats
are listed in the server specifications for “Supported CD & DVD File
Systems” on page C-1.
Test a different disc in the same drive; if that disc works
properly, the previous disc may be defective. If no disc works
properly in the drive, then switch off the server, wait 10
seconds, then switch it on again (power cycle), and wait for the
self-test to complete and
Status
to be
solid green
. If problem
persists, the drive may be faulty; see “Isolate Faulty Hardware
Component” on page 10-16.
Page 100

10-8 Troubleshooting
Server Access
Failure
Cannot Locate Server
If you are having trouble locating your server on your network, note
the following:
•
The server may not immediately appear because your system
and network protocols may require significant time to locate the
server. You should wait at least 5 minutes and then try again.
•
In Windows networks, a “master browser” function performed
by one of the systems on your network may be required.
“Browse master” services are commonly performed by file
servers, but on peer-to-peer networks, the service may be
missing. Refer to your Windows system documentation for
information on adding file-server services.
•
Check if the server is talking on the network at all—whether
you can ping it in an IP network or whether it appears in the
Network Neighborhood in a Windows network. See also
“Difficulty Locating the Server in NetWare” on page 10-11.
•
If the server will not appear on the network, or you suspect that
your configuration changes have serious errors, then you can
reset the server to the factory-default condition, and cycle its
power again, to see if you can reconfigure it for the network.
Refer to the procedure to “Restore Factory-Default Settings” on
page 10-14.
If you cannot install the server to the network, call HP support for
help in isolating the failure, or go to HP’s Web site containing more
problem-solving tips, as described in appendix A, “Getting Support”.
If your server has failed according to indicator error conditions on
page 10-4, then the server module may be faulty; go to “Isolate
Faulty Hardware Component” from page 10-16 to page 10-19.
 Loading...