


HP P7-1269c, P7-1240, P7-1205, P7-1298c, HPEH81220 User Manual
...
VGA |
DISPLAY |
DVI


 HDMI-DVI
HDMI


 VGA-DVI

www.hp.com/support

Copyright and License
© Copyright 2011 Hewlett-Packard Development Company, L.P. The information contained herein is subject to change without notice.
The only warranties for Hewlett-Packard products and services are set forth in the express statements accompanying such products and services. Nothing herein should be construed as constituting an additional warranty. HP shall not be liable for technical or editorial errors or omissions contained herein.
HP assumes no responsibility for the use or reliability of its software on equipment that is not furnished by HP.
This document contains proprietary information that is protected by copyright. No part of this document may be photocopied, reproduced, or translated to another language without the prior written consent of HP.
Hewlett-Packard Company P.O. Box 4010
Cupertino, CA 95015-4010 USA
This product incorporates copyright protection technology that is protected by U.S. patents and other intellectual property rights. Use of this copyright protection technology must be authorized by Macrovision, and is intended for home and other limited viewing uses only unless otherwise authorized by Macrovision. Reverse engineering or disassembly is prohibited.
Microsoft and Windows are trademarks of Microsoft Corporation in the U.S. and other countries.
HP supports lawful use of technology and does not endorse or encourage the use of our products for purposes other than those permitted by copyright law.
The information in this document is subject to change without notice.
Warranty Print on Demand Statement
You can find the expressly provided HP Limited Warranty applicable to your product in the start menu on your PC and/or in the CD/DVD provided in the box. For some countries/regions, a printed HP Limited Warranty is provided in the box. In countries/regions where the warranty is not provided in printed format, you may request a printed copy from hp.com/go/orderdocuments or write to HP at: Hewlett-Packard, MS POD, 11311 Chinden Blvd., Boise, ID 83714, U.S.A.; Hewlett Packard, POD, P.O. Box 200, Alexandra Post Office, Singapore 911507. Please include your product name, warranty period, name, and postal address.


1 Getting information
Type of information |
Where to find |
|
|
|
|
● |
Set up your computer. |
Quick Setup (this Guide) |
|
|
|
● |
Use the computer. |
Quick Setup (this Guide) |
●Connect to the Internet.
●Recover factory settings. Troubleshooting and Maintenance Guide on your computer. At the bottom
of your screen, click on Start, then click HP Help and Support and HP User Manuals.
● |
See how-to videos about using |
Visit http://www.hp.com/supportvideos (English only) |
|
|
the features of your computer. |
|
|
|
|
|
|
● |
Learn how to use the Microsoft |
Help and Support |
|
|
Windows 7 operating system. |
Click Start, and then click Help and Support or visit |
|
|
|
||
● |
Find Windows 7 password |
http://www.hp.com/go/win7. |
|
|
information. |
|
|
|
Windows 7 troubleshooting tools |
||
● Find links to driver updates. |
|||
1. Click Start, click Control Panel, and then click System and |
|||
● |
Read frequently asked |
||
Security. |
|||
|
questions. |
||
|
|
||
2.Under Action Center, click Find and fix problems (troubleshooting).
●Troubleshoot the most common Troubleshooting and Maintenance Guide on your computer. At the bottom
computer hardware and |
of your screen, click on Start, then click HP Help and Support and HP |
software issues. |
User Manuals. |
|
|
● Find electronic user guides |
HP Support website: http://www.hp.com/support |
and specifications for your |
|
computer model. |
|
● Order parts and find |
|
additional troubleshooting |
|
help. |
|
|
|
● Upgrade or replace |
Upgrading and Servicing Guide |
components of your computer. |
HP Support website: http://www.hp.com/support |
|
|
|
|
ENWW |
1 |

Type of information |
Where to find |
●Find computer warranty information.
●Get technical support.
Limited Warranty and Support Guide or the Warranty and Support Information included with your computer.
Or
Click Start, click All Programs, and then click HP User Manuals.
● Get up-to-date information and |
http://www.hp.com/support/consumer-forum |
|
|
help from the Windows |
|
|
community. |
|
|
|
|
● Connect to a TV. |
Watching and Recording TV |
|
|
|
Click Start, click All Programs, and then click HP User Manuals. |
|
|
|
|
|
If the guide is not available there, visit http://www.hp.com/support |
|
|
|
● Get special utilities for |
PC Help & Tools folder |
|
|
computer owners. |
Click Start, click All Programs, and then click PC Help & Tools. |
|
|
|
|
|
|
● |
Maintain your computer. |
HP Support Assistant — Maintains your computer performance and resolve |
|
|
problems faster by using automated updates, on-board diagnostics, and |
|
|
guided assistance. |
|
|
Click Start, click All Programs, click HP, and then click HP Support |
|
|
Assistant. |
|
|
Troubleshooting and Maintenance Guide |
|
|
Click Start, click HP Help and Support, and then click HP User |
|
|
Manuals. |
|
|
Maintaining Your Computer (this Guide) |
|
|
|
● Find safety and regulatory |
Safety & Regulatory Information |
|
|
notices. |
Click Start, click HP Help and Support, and then click HP User |
|
|
|
|
|
Manuals or visit http://www.hp.com/support. |
|
|
|
● |
Find ergonomic information. |
Safety & Comfort Guide |
|
|
Click Start, click HP Help and Support, and then click HP User |
|
|
Manuals or visit http://www.hp.com/ergo. |
|
|
|
2 |
Chapter 1 Getting information |
ENWW |

2 Setting up your computer
WARNING! To reduce the risk of electrical shock or damage to your equipment:
•Place the computer in a location away from water, dust, moisture, and soot. These can increase the inside temperature, or can cause fire or electrocution.
•Do not disable the power cord grounding plug. The grounding plug is an important safety feature.
•Plug the power cord in a grounded (earthed) outlet that is easily accessible at all times.
•Disconnect power from the equipment by unplugging the power cord from the electrical outlet. To prevent direct exposure to laser beam, do not try to open the enclosure of the CD or DVD drives.
•The power supply is preset for the country/region in which you purchased your computer. If you move, check the voltage requirements for your new location before plugging the computer into an AC power outlet.
The computer may be heavy; be sure to use ergonomically correct lifting procedures when moving the computer.
To reduce the risk of serious injury read the Safety & Comfort Guide. The guide is located on the web at http://www.hp.com/ergo.
1.Place the computer so that all ventilation openings are unobstructed and cabling is not in a walkway or where it can be stepped on or damaged by placing furniture on it.
2.Connect all power cords from the monitor, computer, and accessories to a power surge protection device that is specifically labeled as having surge protection, an uninterruptible power supply (UPS), or a similar device. If the computer has a television tuner, or a modem or telephone connection, protect the computer by using surge protection with these signal inputs as well. Connect the television cable or the telephone line cord to the surge protection device, and then connect the device to the computer.
3.Download and install operating system updates.
a.Find out what operating system and version your computer is currently running.
(Click Start > Control Panel and double-click System. The operating system and version are shown under Windows edition.)
b.Open your internet browser and go to http://www.hp.com/support.
c.Select your country and language, if necessary, and click Support & Drivers.
ENWW |
3 |

d.Select Download drivers and software (and firmware), type your computer model name and number in the product field, and press Enter.
e.If necessary, select your computer model from Product search results.
f.Select your computer operating system.
g.Click Download next to each update you wish to download.
h.Follow the on-screen instructions to install each downloaded update.
4.Look in the computer box for additional printed details or updates.
5.Read the Safety and Regulatory Information document in the HP User Manuals folder.
6.Read the Safety & Comfort Guide for proper workstation setup, posture, health and work habits, and electrical and mechanical safety information. Click Start, click All Programs, and then click HP User Manuals or visit http://www.hp.com/ergo.
After you complete the initial computer setup, you might want to install additional software programs or hardware devices. Check the operating system, memory, and other requirements listed before purchasing new software or hardware for your computer. Follow the software manufacturer's directions to install the new software.


 NOTE: Use only licensed original software. Installing copied software could result in an unstable installation, infect the computer with a virus, or be illegal.
Security solutions can deter theft, mishandling, and software attacks, but cannot prevent them.
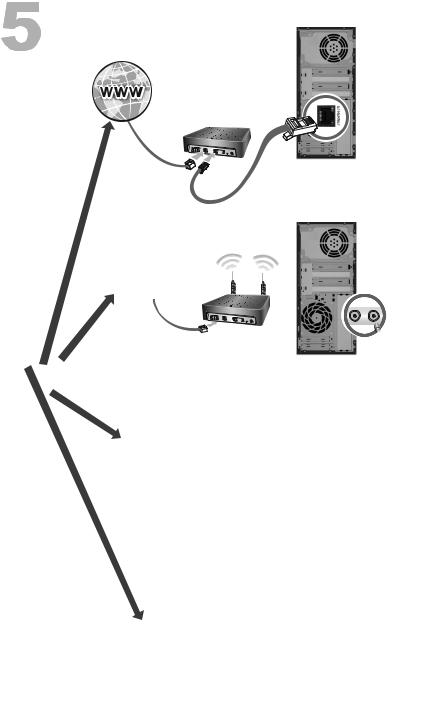
Connecting to the Internet
Steps to connect to the Internet:
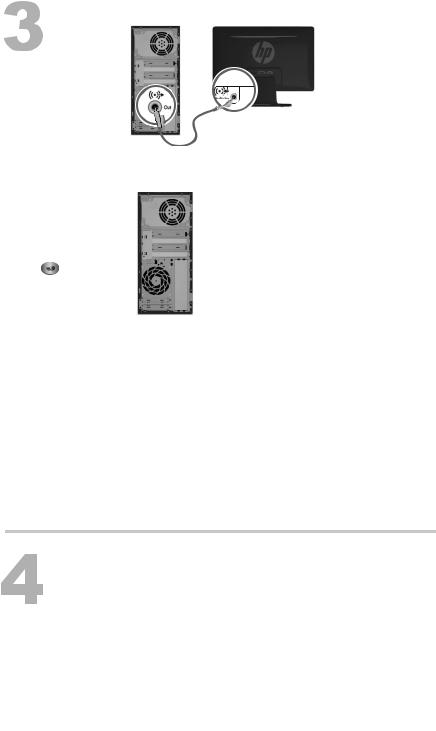
1.Connect the hardware as shown on the setup view.
2.Get Internet service.
●Sign up with an Internet Service Provider (ISP). If you already have an account with an ISP, skip this step and follow the instructions provided by the ISP.
●If you did not set up the computer for Internet service during the initial setup, do so now by using Online Services:
a.Click Start, click All Programs, click Online Services, and then click Get Online.
b.Follow the on-screen instructions to select an ISP and set up Internet service.
4 |
Chapter 2 Setting up your computer |
ENWW |


 NOTE: Online Services provides a list of ISPs; however, you
 might choose another ISP or transfer an existing account to this computer. To transfer existing accounts, follow the instructions provided by the ISP.
3.Using your Internet connection through your ISP, open a web browser and browse the Internet.


 NOTE: If you have issues connecting to the Internet, see Internet access on page 16.
ENWW |
Connecting to the Internet |
5 |

3 Setting up additional features
HP TouchSmart Magic Canvas
The HP TouchSmart PC is a touch-enabled high-performance computer built into a high-definition widescreen display. The slim computer offers select features, that vary by model, such as an adjustable webcam, a CD/DVD and Blu-ray player and burner, Bluetooth capability, USB ports, a media card reader, Wireless 802.11n networking, full support for Beats Audio™ devices (sold separately), and high quality speakers.
HP TouchSmart 5.0 provides a unique, touch-based computer experience. Magic Canvas provides an interactive desktop that expands to the left and right, allowing you to spread out your applications and documents. Use the Carousel to place shortcuts to all of your favorite applications, folders, files, and Web pages. To
launch the software, tap the HP TouchSmart icon |
on the desktop, or tap the |
Start button and then tap HP TouchSmart. |
|
●The Magic Canvas
The Magic Canvas is an interactive background that grows as you scroll to the left and right. You are no longer confined to one background screen, but can have notes, programs and files spread across the canvas, expanding to the left and right of the screen.
◦Access a submenu, by tapping on the Magic Canvas, to change the background, write a note on the Magic Canvas and leave it there, and filter the media types that appear on your screen.
◦Customize the appearance of your Magic Canvas with stationary and moving objects.
◦Place playlists, slide shows, music, graffiti, videos, and photos on your Magic Canvas.
◦A carousel, of available applications and your favorite website shortcuts, appears at the bottom of the screen. Make a left and right sliding motion with your finger over the carousel to scroll continuously through the applications and website shortcuts.
●Creating Magnets
Magnets are content that you can place on the Magic Canvas. You can create magnets from some TouchSmart applications.
◦Drag content from an application (photos, music, playlists, notes, calendars) onto the Magic Canvas.
◦Create shortcuts to content.
6 |
Chapter 3 Setting up additional features |
ENWW |

◦Interact with magnets without having to open the application.
◦Pin magnets to the Magic Canvas to prevent them from scrolling off.
●Interaction with Applications
◦All active applications are highlighted in the carousel.
◦Applications can be scrolled on or off the screen.
◦Bring an application into view by touching it in the carousel.
◦View all applications and website shortcuts by tapping the Quick Launch button.
◦Size application views to full screen, partial screen, or icon.
●Website Tiles
Add shortcut tiles to your favorite websites into the carousel.
For additional information about HP TouchSmart 5.0, tap the Start button, tap
Help and Support, and then tap HP TouchSmart, or tap the Help and Support icon on the Carousel and then tap HP TouchSmart.
Using Beats Audio™ (select models only)
Your HP TouchSmart PC features audio connectors (headphone and Audio Out ) that are optimized for Beats Audio™ headphones and external audio systems (purchased separately). Select HP TouchSmart PC models also include four Beatsoptimized internal speakers and a Beats toggle button  on the keyboard.
Your computer comes ready for you to experience music with Beats enabled. To disable Beats, press the Beats toggle button; the Beats-off icon appears on the screen. To turn Beats on, press the Beats toggle button again. If your keyboard does not contain the Beats toggle button, press Fn+B to enable and disable Beats. Tap the Beats icon on the system tray to view the Beats user interface.
All you need to do is plug the Beats Audio headphones into the side headphone connector to experience crisp and clear sound separation. To experience the full capability of BEATS audio using the internal speakers, HP recommends connecting a matching HP subwoofer to the Sub connector on the back panel. If you are using an external audio system, plug it into the Audio Out connector on the back panel.
HP My Display TouchSmart Edition
HP My Display TouchSmart Edition allows you to adjust the screen display using the touch feature.
●You can adjust sound, brightness, and contrast.
●Viewing mode can be set to the factory default, or optimized for movie, text, or gaming.
●Status indicators let you know if the onscreen keyboard scroll lock, number lock, or caps lock are set.
ENWW |
Using Beats Audio™ (select models only) |
7 |
●A settings screen lets you adjust color with the touch of a button.
●An options screen lets you set display options, set transparency, and check for updates.
HP My Display TouchSmart Edition can be accessed from the task tray, or by rightclicking on the desktop, or from the Start Menu, tap All Programs, tap HP, and then tap HP My Display TouchSmart Edition. Online help for HP My Display TouchSmart Edition is available by tapping the ? button in the upper right hand corner of the application screen.
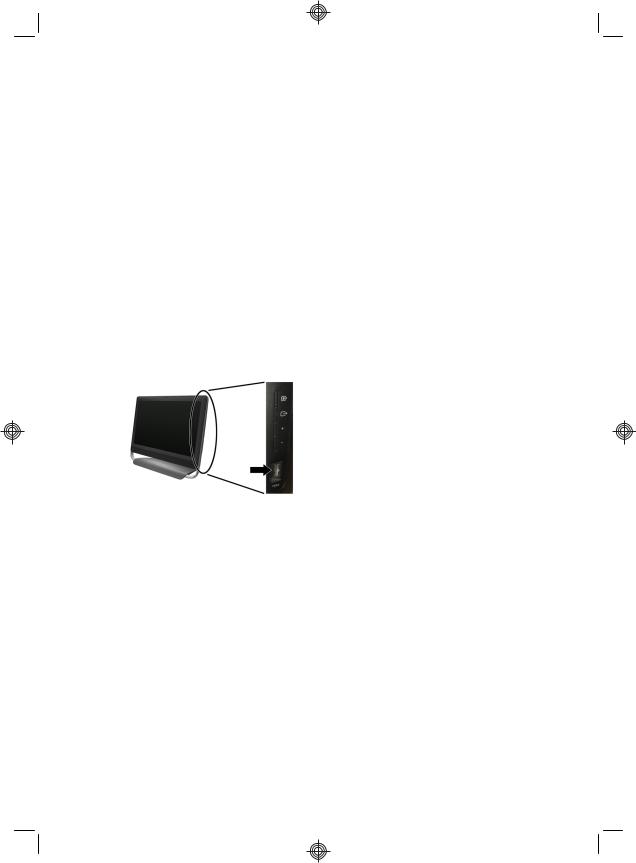
Using the HDMI port controls (select models only)
The right side of your computer may contain an HDMI port and volume control buttons. Unless a device is plugged into the HDMI port, the volume controls have no functionality. The HDMI controls are only intended to control the settings of the device plugged into that port, and do not control any other media devices on the system.
To use the HDMI port controls, plug a device into the HDMI port. Press the menu button (the top button displayed). A new on-screen menu displays. Using the +/- buttons, select brightness, volume, contrast, or color balance.
When a device is plugged into the HDMI port, the volume on the computer is muted. Pressing the +/- buttons on the side panel does not change the volume of the computer.
8 |
Chapter 3 Setting up additional features |
ENWW |

4 Maintaining your computer
Cleaning procedures
Keeping your computer system free of dust, dirt, and heat will prolong its life.
●Dust, pet hair, and other particles can build up, creating a blanket effect; as a result, components can overheat or, in the case of the keyboard and mouse, not work smoothly and effectively.
●Check your system once a month for visible signs of dust and debris, and clean it about once every three months.
●Visit www.hp.com/support for additional cleaning instructions.
Cleaning the computer |
Air vents keep the computer cool. Keep these vents clean by using a small, battery- |
|
vents |
powered vacuum cleaner. (A battery-powered vacuum cleaner eliminates the risk of |
|
|
electric shock.) |
|
|
1. |
Vacuum the vents on the computer case. |
|
2. |
Remove any debris that has accumulated in and around the computer |
|
|
connectors (for example, the Ethernet and USB connectors). |
|
|
|
ENWW |
Cleaning procedures |
9 |

Cleaning the keyboard and |
When cleaning the keyboard keys, use a low setting on a battery-powered vacuum |
|
mouse |
cleaner, to avoid removing key caps and springs. |
|
|
1. |
Vacuum between the keys of the keyboard and along the grooves. |
|
2. |
Use a clean, dry cloth and isopropyl (rubbing) alcohol to clean buildup on the |
|
|
keyboard keys and along its edges. |
|
3. |
Wipe the body of the mouse and the mouse cord by using cleaning wipes. |
If you have a roller-ball mouse, clean the ball and rollers inside:
1.Turn the mouse upside down, and rotate the ball-cover ring counterclockwise to remove the ring and release the roller ball.
2.Rinse the roller ball with soap and warm water.
3.Clean the rollers inside the mouse with a cotton swab dampened with isopropyl (rubbing) alcohol.
4.After the roller ball and rollers are completely dry, replace the ball and ballcover ring.
Cleaning the touch screen (AiO models only)
Follow these steps to clean the touch screen:
1.Turn off the computer. Tap the Start button, and then tap Shut Down.
2.Disconnect the power cord from the wall.
3.Spray a small amount of mild glass cleaner on a soft cloth to clean the touch screen.
4.Wipe the surface and left and right side of the touch screen to remove any dirt, fingerprints, or other debris that could hinder the touch recognition of the screen.
CAUTION: Do not spray or place the cleaner directly on the screen; spray the cleaner into the cloth, and then wipe the sides and surface of the touch screen.
Do not use an abrasive cleaner or cloth when cleaning the sides or the surface of the screen, because this could cause damage to the touch screen.
10 |
Chapter 4 Maintaining your computer |
ENWW |

5 Troubleshooting
Refer to the documentation provided by the product manufacturer for information about peripheral-specific problems, such as issues with a monitor or a printer. The following tables present some issues you might encounter while installing, starting up, or using your computer and possible solutions.
For more information or for additional troubleshooting options, see Getting information on page 1.
Computer does not start
Symptom |
Possible solution |
Error message: Hard disk drive error.
Restart the computer.
1.Press the Ctrl+Alt+Delete keys on the keyboard simultaneously.
2.Click the Arrow button next to the red Shut Down button, and then click Restart.
Or, press and hold the Power button on the computer for 5 or more seconds to turn off the computer, and then press the Power button to restart the computer.
3.If Windows opens, immediately back up all important data to a backup hard disk drive.
4.Contact Support, whether it was possible or not to start up Windows. Either the hard disk drive or the system board may need to be replaced.
Computer will |
Ensure that the cables connecting the computer to the external power source are plugged in |
not turn on or |
properly. When the cables connecting the computer to the external power source are plugged |
start. |
in properly, and the wall outlet is functioning, the green power supply light on the back of the |
|
computer should be on; if it is not, contact Support. |
|
|
|
Test the wall outlet by connecting a different electrical device to it. |
|
|
ENWW |
Computer does not start |
11 |
 Loading...