

Page 1

HP External Hard Disk Drive
Backup Solution by Seagate
User Guide
November 2004 (First Edition)
Part Number 373652-001
Page 2

© Copyright 2004 Hewlett-Packard Development Company, L.P.
The information contained herein is subject to change without notice. The only warranties for HP products and
services are set forth in the express warranty statements accompanying such products and services. Nothing herein
should be construed as constituting an additional warranty. HP shall not be liable for technical or editorial errors
or omissions contained herein.
Microsoft and Windows are U.S. registered trademarks of Microsoft Corporation.
HP External Hard Disk Drive Backup Solution by Seagate User Guide
November 2004 (First Edition)
Part Number 373652-001
Page 3

Contents
About This Guide
Audience Assumptions..................................................................................................................................v
Where to Go for Additional Help..................................................................................................................v
Telephone Numbers................................................................................................................................v
Chapter 1
Introduction
BounceBack Express Software.................................................................................................................. 1-1
Features of BounceBack Express........................................................................................................ 1-1
Hardware Requirements...................................................................................................................... 1-2
Operating System Requirements......................................................................................................... 1-2
Chapter 2
Installation Procedures
Connecting the External HDD to the Server ............................................................................................. 2-1
Installing the BounceBack Software ......................................................................................................... 2-1
Running Your First Backup................................................................................................................ 2-3
Running Additional Backups.............................................................................................................. 2-4
Disconnecting the External HDD.............................................................................................................. 2-4
Uninstalling BounceBack Express ............................................................................................................ 2-5
Upgrading to BounceBack ........................................................................................................................ 2-6
Chapter 3
Configuring the Software
BounceBack Express Software.................................................................................................................. 3-1
Configuring BounceBack Express ............................................................................................................ 3-1
BounceBack Express Launcher .......................................................................................................... 3-1
Accessing the BounceBack Express Components.............................................................................. 3-2
Running Customized Backups .................................................................................................................. 3-3
Adding Items to the Backup ............................................................................................................... 3-3
Changing the List of Items for a Backup............................................................................................ 3-6
Removing Backup Sets....................................................................................................................... 3-6
Disabling a Backup Set....................................................................................................................... 3-6
Scheduling a Backup in BounceBack Express ................................................................................... 3-7
Launch a Backup from the BounceBack Express Settings Program .................................................. 3-9
Setting BounceBack Express Options ..............................................................................................3-10
Viewing the Log File............................................................................................................................... 3-11
HP External Hard Disk Drive Backup Solution by Seagate User Guide iii
Page 4

Contents
Chapter 4
Data Recovery
Recovering Data.........................................................................................................................................4-1
Restoring Files Using Windows Explorer...........................................................................................4-1
Restoring Files Using the Compare List .............................................................................................4-1
Preparing for a Disk Crash.........................................................................................................................4-2
Checklist..............................................................................................................................................4-2
Recovering from a Disk Crash...................................................................................................................4-2
Using the External HDD with a New Server.......................................................................................4-2
Chapter 5
Managing the HP External Hard Disk Drive Backup Solution by Seagate
Changing the External HDD Letter ...........................................................................................................5-1
Information Tab...................................................................................................................................5-1
Removing Deleted Files from the External HDD......................................................................................5-2
Excluding Data from the Backup Process..................................................................................................5-3
Removing an Item from the Backup Exclusions.................................................................................5-4
Chapter 6
Advanced Backup Options
Creating Backup Sets.................................................................................................................................6-1
Scheduling Backups...................................................................................................................................6-3
Using the Automatic Backup Scheduler..............................................................................................6-3
Using the Backup with Compare List........................................................................................................6-5
File Menu ............................................................................................................................................6-6
Edit Menu............................................................................................................................................6-6
View Menu..........................................................................................................................................6-6
BounceBack Comparison Button Functions .......................................................................................6-6
Index
iv HP External Hard Disk Drive Backup Solution by Seagate User Guide
Page 5

This user guide can be used for reference for installing the HP External Hard Disk Drive
Backup Solution by Seagate. The HP External Hard Disk Drive Backup Solution by Seagate
includes:
• 160 Gigabyte external HDD
• BounceBack Express automatic backup software
Audience Assumptions
To install the BounceBack Express software and the external HDD, it is assumed you have
knowledge of:
• Basic Windows file management and administration, such as manipulating files and
folders in Windows Explorer
• HP ProLiant servers
About This Guide
Where to Go for Additional Help
In addition to this guide, the following information sources are available:
• HP ProLiant ML110 Server User Guide
• HP ProLiant ML150 G2 Server User Guide
These documents can be found on the documentation CD provided with your server.
Telephone Numbers
For the name of the nearest HP authorized reseller:
• In the United States, call 1-800-345-1518.
• In Canada, call 1-800-263-5868.
For HP technical support:
• In the United States and Canada, call 1-800-HP-INVENT (1-800-474-6836).
• Outside the United States and Canada, refer to
HP External Hard Disk Drive Backup Solution by Seagate User Guide v
http://www.hp.com.
Page 6

Introduction
The HP External Hard Disk Drive Backup Solution by Seagate and BounceBack Express
software enable you to create regular backups of your server data and store the data on the
Seagate external HDD. The data stored on external HDD is fully recoverable and can be
loaded onto the server in a recovery situation.
This guide provides the following information:
• Connecting the external HDD to the HP ProLiant ML110 or HP ProLiant ML150
G2 servers
• Installing the BounceBack Express automatic backup software
• Performing regular and scheduled backups using the Bounceback Express automatic
backup software
• Restoring backup data from the external HDD to your HP ProLiant servers
• Upgrading the backup software from BounceBack Express to BounceBack (optional)
1
BounceBack Express Software
Use the BounceBack Express software to back up and recover server data. The first time that
you connect the external HDD to your computer, the software automatically launches a
backup of the server data.
BounceBack Express is designed to support the HP External Hard Disk Drive Backup
Solution by Seagate.
You can upgrade your backup software from BounceBack Express to BounceBack. The full
version of BounceBack software includes a full disaster-recovery option enabling recovery
from a server hard drive failure, as well as accidental deletion or corruption of files. It also
includes an advanced restore program, file versioning, file synchronization between multiple
servers, and a background backup feature.
Features of BounceBack Express
BounceBack Express has the following key features:
• Automatically begins a full backup of the external HDD after the BounceBack Express
software installation is complete.
HP External Hard Disk Drive Backup Solution by Seagate 1-1
Page 7

Introduction
• Creates backup data files in “native file format”—no special software is needed to view
files or data.
• Enables you to select specific data for backup by drive, folder, file, or file type.
• Completes backups based on a customizable schedule. Backups can be scheduled at a
specific time and can be performed daily, weekly, or monthly.
• Automatically launches subsequent backups whenever an external HDD is attached.
• Supports external storage system data management.
Hardware Requirements
The HP External Hard Disk Drive Backup Solution by Seagate, BounceBack, and
BounceBack Express software are compatible with the following HP servers:
• HP ProLiant ML110 server
• HP ProLiant ML150 G2 server
Operating System Requirements
The HP External Hard Disk Drive Backup Solution by Seagate, BounceBack, and
BounceBack Express software are compatible with the following operating systems:
• Microsoft® Windows® 2003
• Windows 2003 SBS
1-2 HP External Hard Disk Drive Backup Solution by Seagate
Page 8

Installation Procedures
Connecting the External HDD to the Server
To connect the external HDD to the server:
1. Connect AC power to the power supply and appropriate wall socket.
2. Power on the power supply.
3. Power on the external HDD and verify the power light is on.
4. Connect the USB cable between the external HDD and the server.
Installing the BounceBack Software
IMPORTANT: When you connect the external HDD to the server, HP recommends that you choose
“Default Backup.” For BounceBack users, this is the best and preferred method to create a complete
(full) backup of your server hard drive.
2
To install the BounceBack Express software:
1. Insert the BounceBack CD into the CD-ROM drive and close the drive.
2. The BounceBack menu will open automatically. Click Install from the
BounceBack menu.
HP External Hard Disk Drive Backup Solution by Seagate User Guide 2-1
Page 9
Installation Procedures
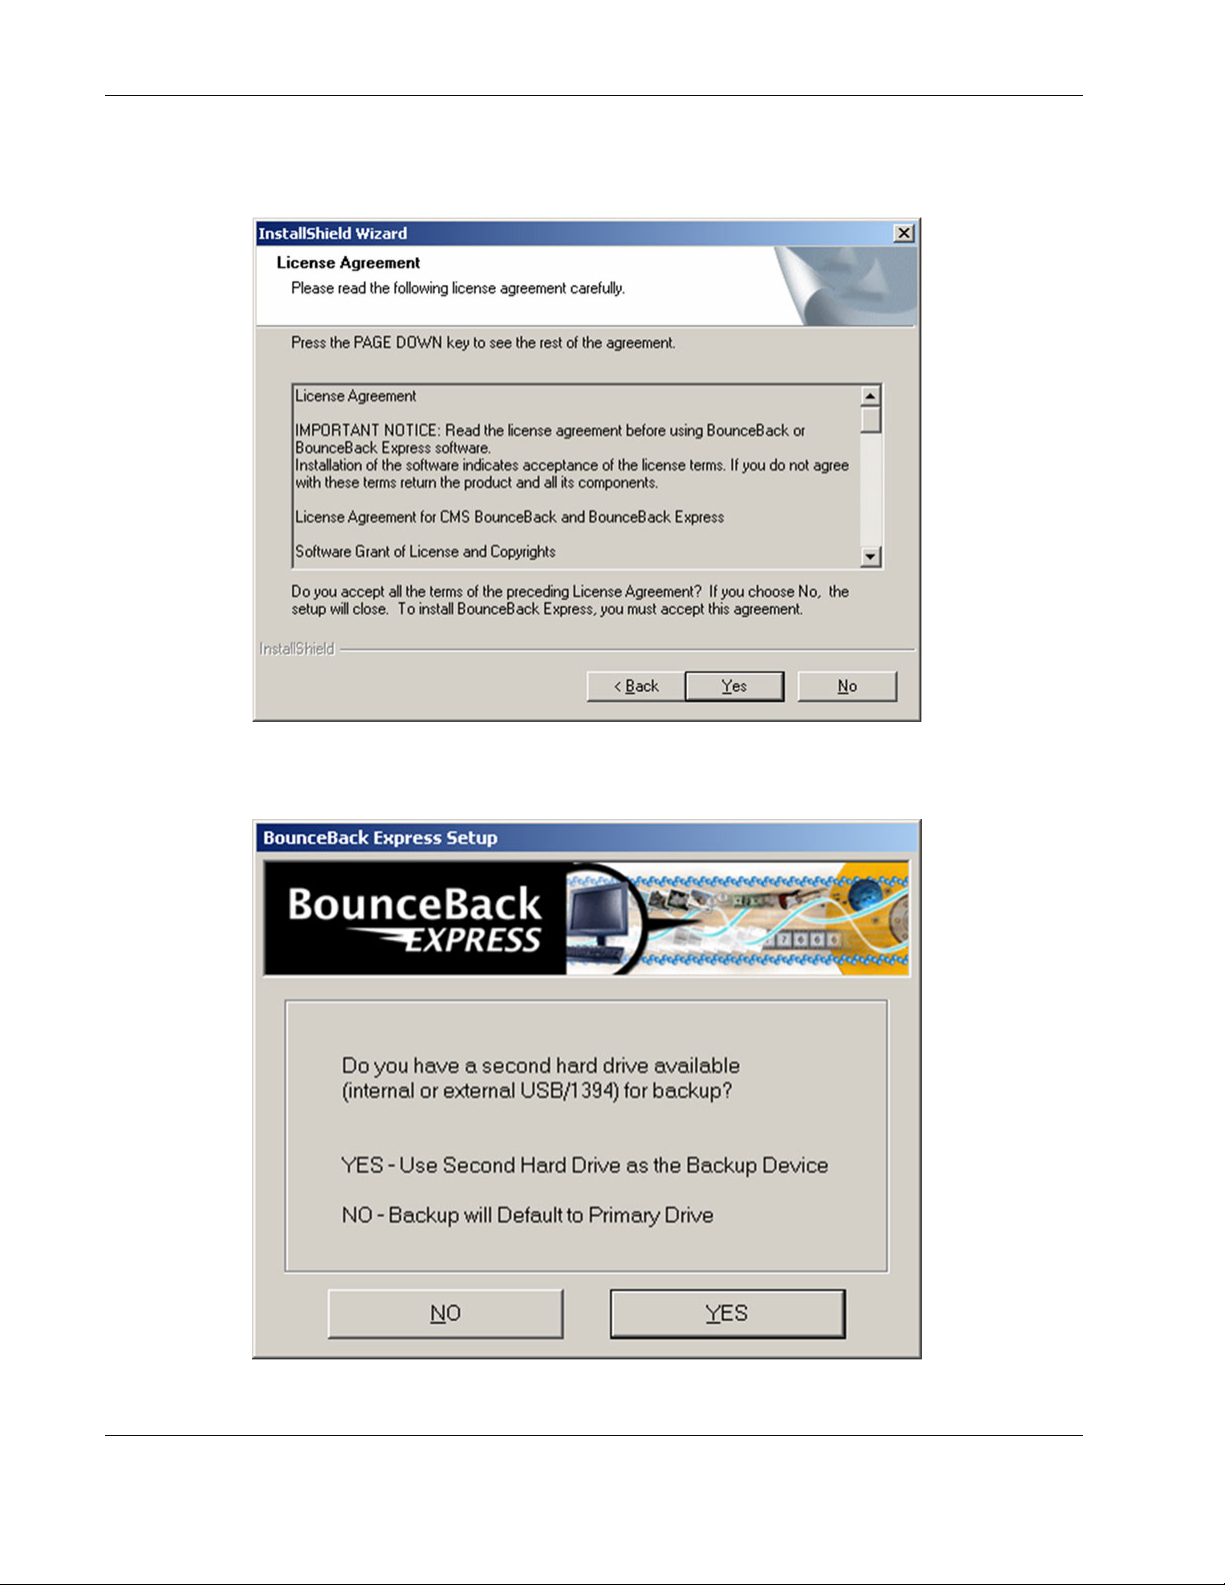
3. Read the License Agreement window and select Yes to agree to the terms of the
agreement. The BounceBack Express software installation will begin.
4. Select Yes to indicate the presence of the external HDD.
2-2 HP External Hard Disk Drive Backup Solution by Seagate User Guide
Page 10
Installation Procedures
NOTE: If the external HDD is not detected, the software will prompt you to connect the drive.
After the external HDD has been selected, the software continues to scan the source drive for
how much data is being backed up. This number is used to determine how long the first
backup will take.
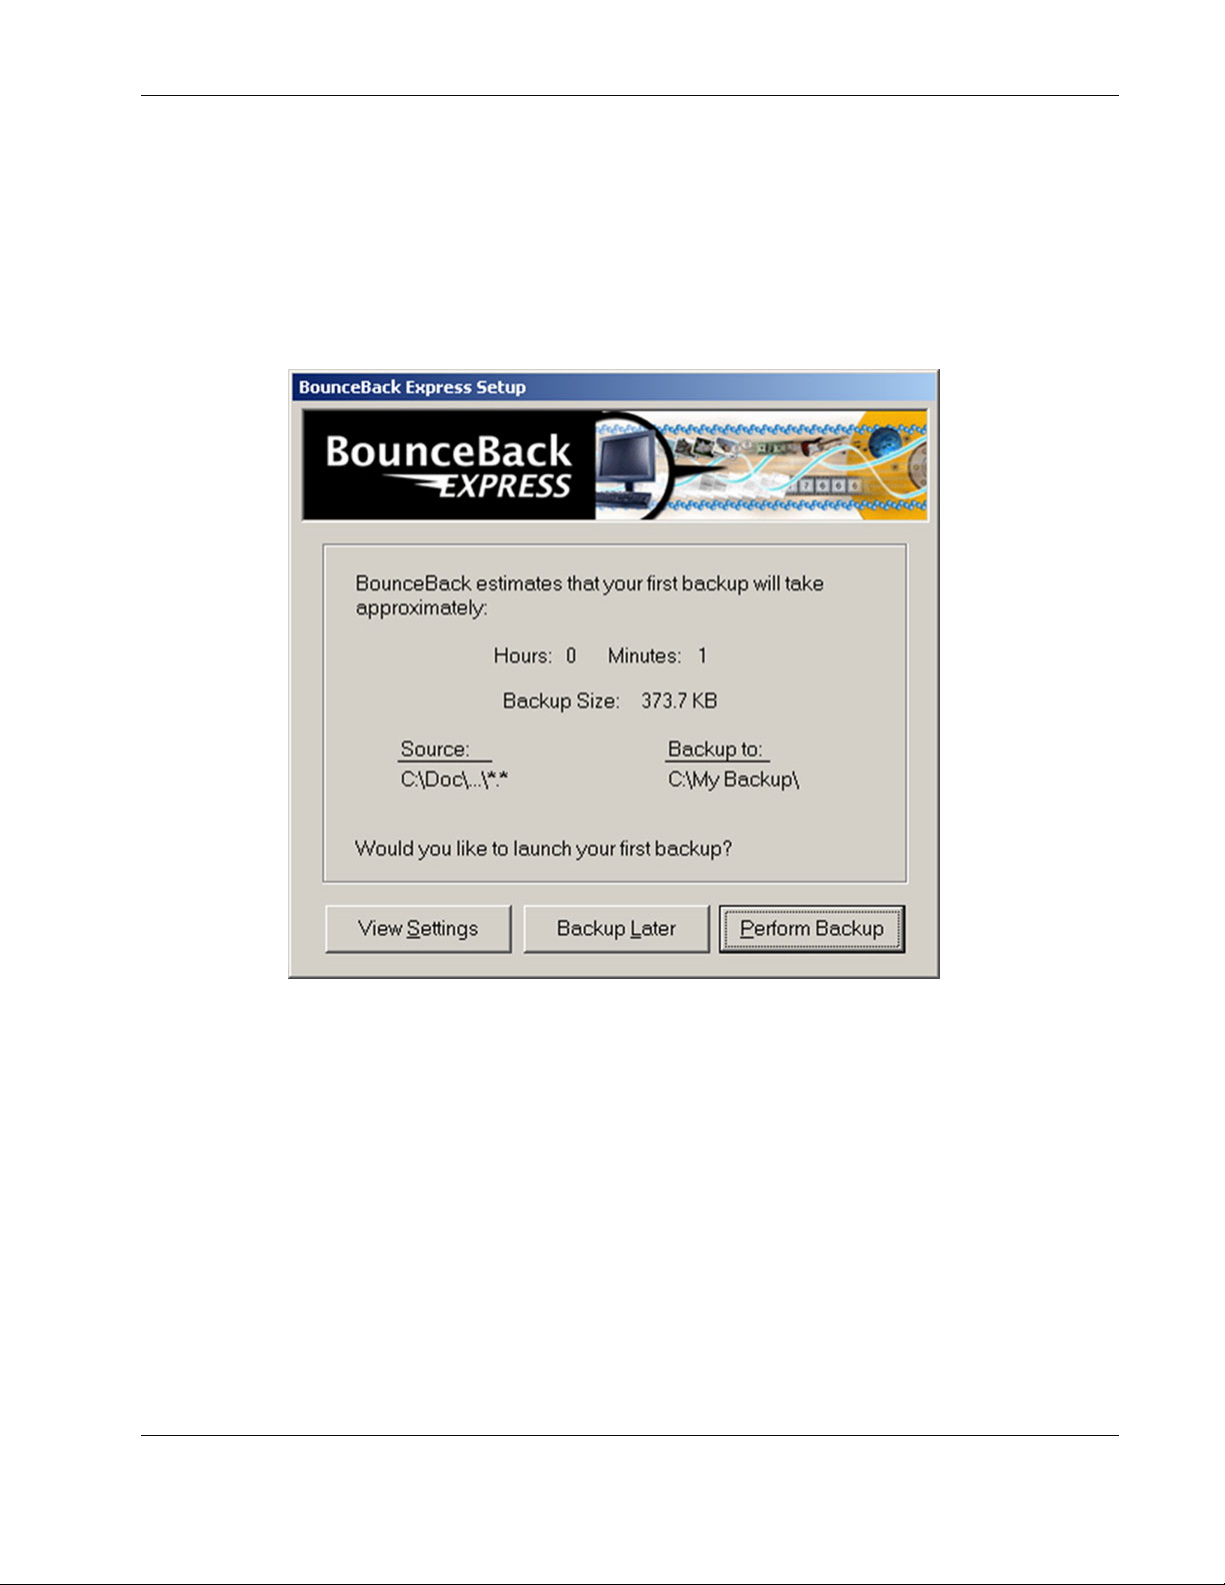
After the size of the backup has been determined, the estimated file size and completion time
will display.
Running Your First Backup
You can now decide to run your first backup immediately, delay until a more suitable time, or
change the backup settings.
• View Settings—Launches the BounceBack setting program and will display the default
backup settings. For information on how to change the default backup settings, refer to
“Configuring BounceBack Express.” If a change is made, the software will resize and
display new timing information.
• Backup Later—Immediately concludes the installation process.
• Perform Backup—Launches an immediate backup and will run to completion. This will
conclude the installation.
HP External Hard Disk Drive Backup Solution by Seagate User Guide 2-3
Page 11
Installation Procedures
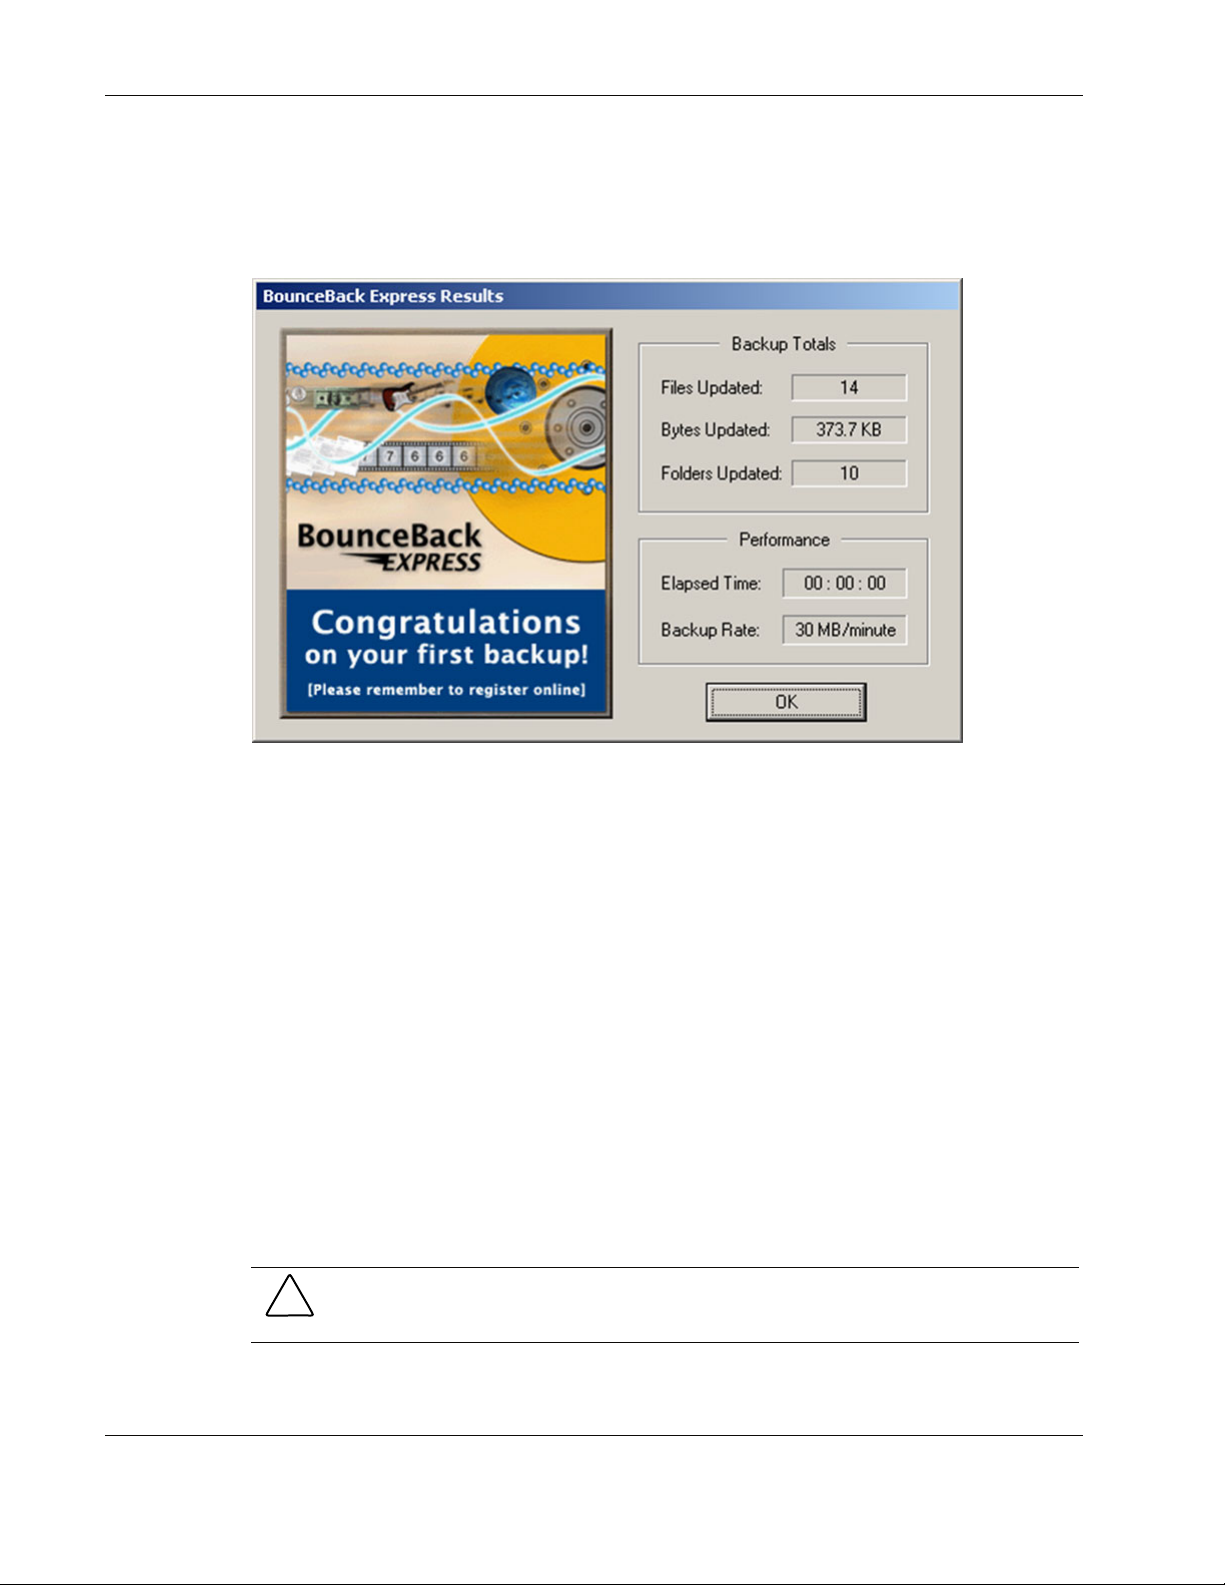
To run your first backup:
1. Select Perform Backup. BounceBack Express will start a complete backup of your
server’s data. When the backup is complete, you will see a window similar to the
following.
2. Select OK.
Running Additional Backups
The external HDD should remain connected to the server at all times. If the server and
external HDD are disconnected, the BounceBack Express software will automatically scan
the server for any new files or modified ones upon reconnection, and automatically back up
new or modified files to the external HDD. The following backup options are also available:
• To manually run a backup using the default settings, click the BounceBack icon in the
taskbar and select Launch BounceBack Backup.
• To turn off the Auto Launch feature, click the BounceBack icon in the taskbar, and select
Disable BounceBack Launcher.
• To create customized backups, refer to “Customized Backups.”
• To create scheduled backups, refer to “Scheduling Backups.”
Disconnecting the External HDD
CAUTION: Do not disconnect your drive while it is backing up your files—data loss and
corruption will result.
It is important to stop the device before physically disconnecting it from the server.
2-4 HP External Hard Disk Drive Backup Solution by Seagate User Guide
Page 12
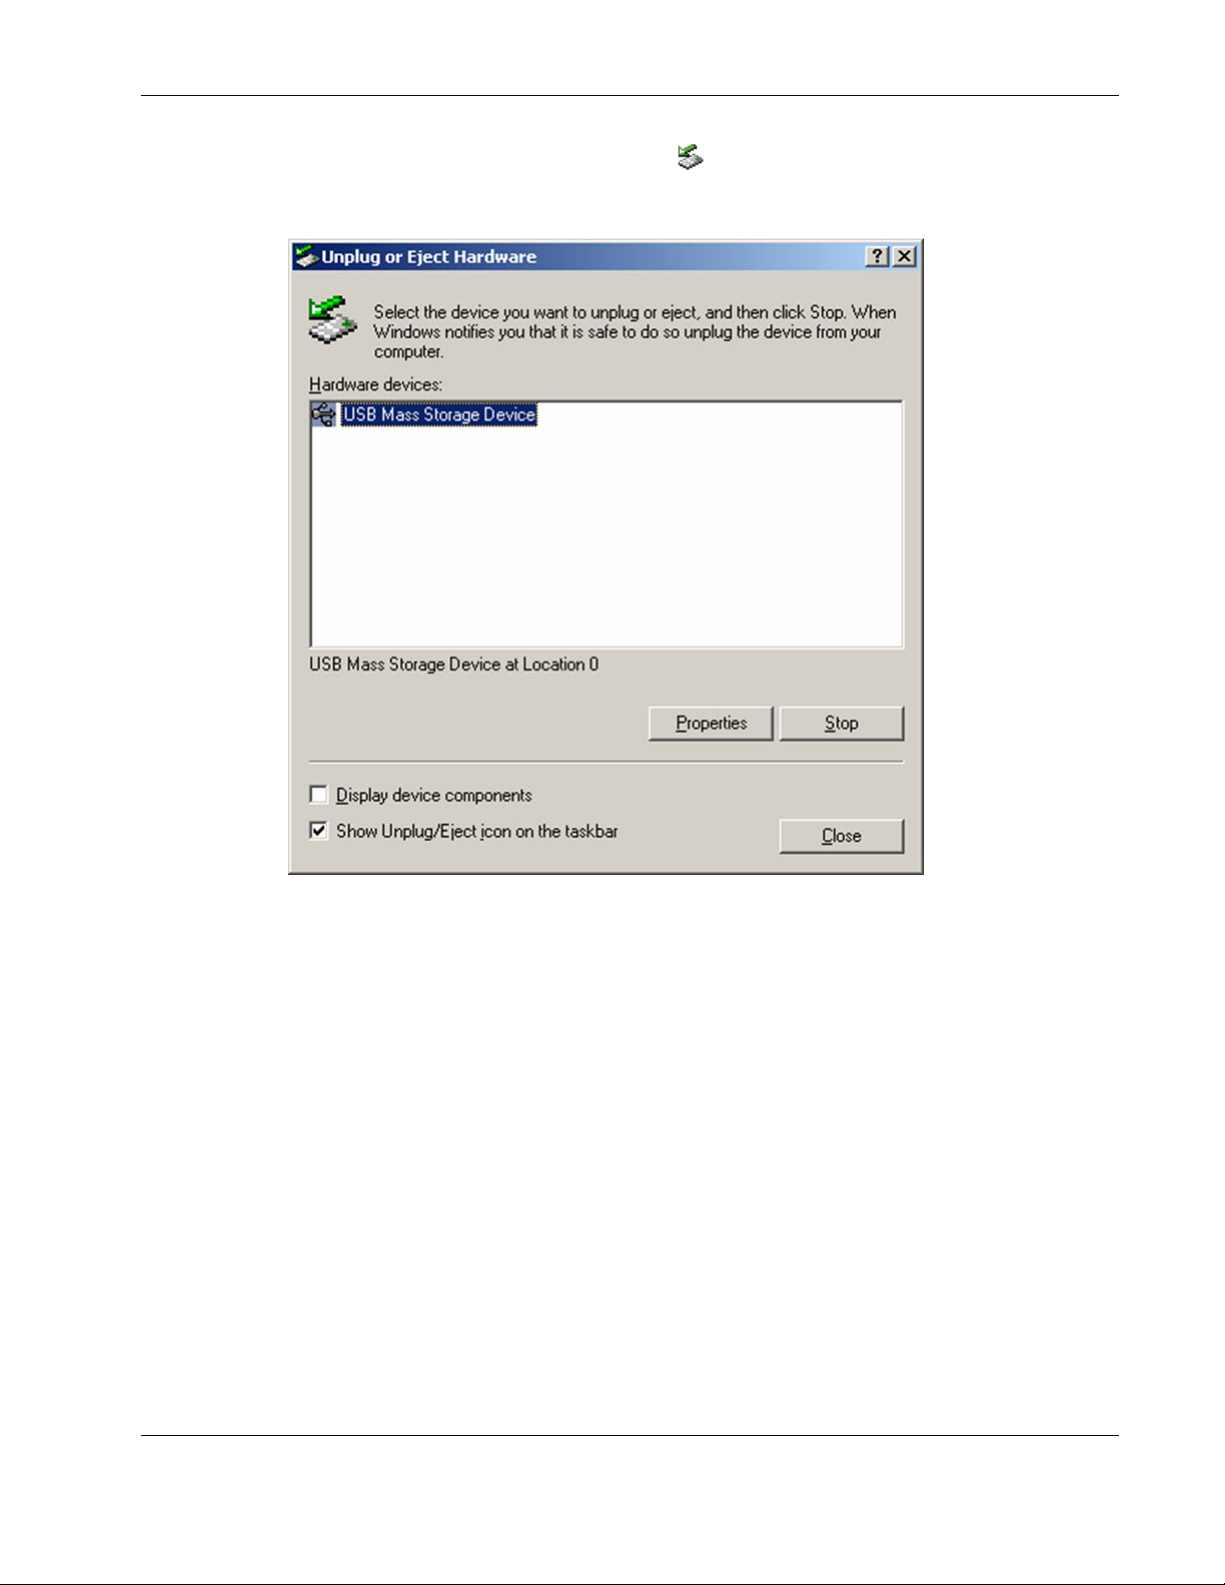
1. Double-click the removable media icon in the Windows taskbar.
2. Select Stop.
Installation Procedures
3. When you see the “You may safely remove this device” message, you can disconnect the
USB cable connecting the external HDD to the server.
Uninstalling BounceBack Express
To completely remove the BounceBack Express software from your system:
1. Click Start>Settings>Control Panel.
2. Select Add/Remove Programs.
3. Highlight BounceBack Express and click Add/Remove.
4. Follow the on-screen instructions to completely remove the software and components
from your system.
HP External Hard Disk Drive Backup Solution by Seagate User Guide 2-5
Page 13
Installation Procedures
Upgrading to BounceBack
To upgrade your copy of BounceBack Express to BounceBack, access the CMS Peripherals,
Inc., website at http://www.cmsproducts.com/seagate/upgrade to purchase and download
BounceBack. Follow the instructions in “Installing the BounceBack Software” to complete
the upgrade.
The BounceBack software will retain all backup settings previously configured using
BounceBack Express.
CAUTION: If you have previously used BounceBack Express to back up data from the
server, do not select the option to reformat the external HDD during the upgrade to
BounceBack. You will lose all previously backed up data on the external HDD.
2-6 HP External Hard Disk Drive Backup Solution by Seagate User Guide
Page 14

The BounceBack Express software can be configured to create custom backup data sets.
BounceBack Express Software
The BounceBack Express software gives you complete control over the data you choose to
back up. Use BounceBack Express to:
• Select files and directories to back up, or exclude them from a backup.
• Change the drive letters for the external HDD.
• Set backup reminders and view a backup log.
• Create backup sets (files, directories, or folders) for scheduled backups.
• Restore lost or altered files easily to their original or alternate locations.
3
Configuring the Software
After the initial installation and complete backup, each time you connect your backup drive,
BounceBack Express scans your system disk for any new files or modified ones, and
automatically backs them up to the external HDD.
Configuring BounceBack Express
BounceBack Express Launcher
Each time you connect the external HDD to the server, the BounceBack Express Launcher
automatically starts a backup. The BounceBack Express Launcher will also:
• Detect the external HDD when you connect it to your system and automatically back up
any modified or new data.
• Enable or disable the automatic backup feature upon power up of your system.
• Start a backup manually.
• Start a backup with the compare feature, which displays for you the changed or altered
files before backing them up.
Launch programs included with the BounceBack Express software (BounceBack Express
Settings, and so on).
HP External Hard Disk Drive Backup Solution by Seagate User Guide 3-1
Page 15

Configuring the Software
1. Click the BounceBack icon to view the BounceBack Launcher menu. You can right-click
or click the icon.
2. Use the commands in the BounceBack Launcher menu for the following tasks:
• Launch BounceBack Express—Starts a backup immediately.
• Launch BounceBack Express/Compare—Starts a backup immediately and displays all
changed or altered files for your review before backing up.
• BounceBack Express Settings—Enables you to configure various backup settings.
• Enable/Disable BounceBack Launcher—Toggles between enabling and disabling the
launching of an automatic backup each time you connect the external HDD to
your system.
• Close—Exits the BounceBack Launcher software and removes the icon from the taskbar.
To restart BounceBack Launcher, you must select Start>Programs>BounceBack
Express>BounceBack Launcher.
Accessing the BounceBack Express Components
To access the BounceBack components, select Start>Programs>BounceBack
Express>BounceBack Backup.
Use the software components in the BounceBack Backup menu for the following tasks:
• BounceBack Backup—Starts a backup immediately.
• BounceBack Launcher—Starts the BounceBack Launcher.
• BounceBack Reminder—Informs when you last performed a backup.
• BounceBack Settings—Opens the BounceBack Backup Settings program, where you can
configure and customize your backups.
• BounceBack TechRepair—Opens the BounceBack Backup TroubleShooter program.
This program enables technical support to assist you with problematic computers or
installations. It also provides access to the backup log files.
3-2 HP External Hard Disk Drive Backup Solution by Seagate User Guide
Page 16

Running Customized Backups
The BounceBack Express Settings program is used to fully customize a backup set. There are
two ways to access BounceBack Express Settings:
• Right-click the BounceBack Launcher icon in the taskbar and select BounceBack
Express Settings.
• Select Start>Programs>BounceBack Express>BounceBack Express Settings.
Configuring the Software
The following tabs are available in BounceBack Express Settings:
• Backup—Create, organize, and schedule data sets for automatic backup.
• Exclusions—Exclude drives, folders, or files from a backup or a backup set (refer to
“Excluding Data from the Backup Process”).
• Information—View information about your external HDD and change the drive letter
(refer to “Information Tab”).
Adding Items to the Backup
Complete the following steps to add a drive, folder, or individual files to the backup:
HP External Hard Disk Drive Backup Solution by Seagate User Guide 3-3
Page 17

Configuring the Software
1. From the Backup tab, select Edit.
2. Select Add Item to display the Select Source Data window. You can navigate to your
drives, folders, and files in this window just as you would in Windows Explorer.
3-4 HP External Hard Disk Drive Backup Solution by Seagate User Guide
Page 18

Configuring the Software
3. Select the drive or folder you want to back up and click OK. You can selectively back up
files of certain types by entering a file extension into the File Type field. For example,
*.doc. You can also add new file folders by selecting the appropriate drive icon and
entering a folder name into the New Folder field.
4. The Select Backup Path window opens, where you can select the destination for your
data to be backed up. The drive letter assigned to the external HDD will be pre-selected.
5. Change the backup drive selected, if necessary, and click OK. After you add new items,
BounceBack Express Settings displays the source files and destination locations for the
backup as shown in the following image.
NOTE: You can double-click the drive icon and enter a folder name into the New Folder text box. This
step can help you organize your data by backing it up into folders on the external HDD.
HP External Hard Disk Drive Backup Solution by Seagate User Guide 3-5
Page 19

Configuring the Software
Changing the List of Items for a Backup
After selecting drives, folders, or files for backup, you might want to make changes to the
list:
1. From BounceBack Express Settings, click Backup.
2. Select the item you want to change and click Edit.
3. Click Edit Item from the Backup Set window.
4. Select the drives, folders, or files you want to back up and click OK.
5. In the Select Backup Path window, navigate to the desired location on the external HDD
for the backup to be created, and click OK.
6. Select the Backup Set Options and set a Backup Schedule, as needed.
Removing Backup Sets
Use the Remove Item button to delete items from a backup:
1. From BounceBack Express Settings, select the Backup tab.
2. Select the item you want to delete from a backup and click Remove Item.
Disabling a Backup Set
To disable a backup set without deleting it:
3-6 HP External Hard Disk Drive Backup Solution by Seagate User Guide
Page 20

Configuring the Software
1. From BounceBack Express Settings, select the Backup tab.
2. Select the item you want to delete from a backup.
3. Click Disable—the button to the left of the Set Name will change to red. The Disable
button will now change to Enable when the disabled set is highlighted.
Scheduling a Backup in BounceBack Express
Scheduling has been reduced to a few keystrokes and the only prerequisite is to have a data
set to schedule. The method to schedule is as follows:
1. In the BounceBack Express Settings program, select the Backup tab.
2. Select the backup Set Name you want to schedule.
HP External Hard Disk Drive Backup Solution by Seagate User Guide 3-7
Page 21

Configuring the Software
3. Click Schedule to display the following dialog box.
4. Select a backup schedule option from the Backup Set Schedule window. The following
options are available:
— Not Scheduled—Default selection
— Once—Schedule a single backup by date and time
— Daily—Schedule a daily backup by date and time
— Monthly—Schedule a monthly backup by date and time
5. In the following example, the backup is scheduled for 6:00 pm Monday through Friday.
After you have set your scheduling requirements, click OK to save the schedule.
3-8 HP External Hard Disk Drive Backup Solution by Seagate User Guide
Page 22

Configuring the Software
6. After you have set the backup schedule, the schedule details will display under
“Scheduled For” in the Backup tab. Schedules can be changed at any time. If a scheduled
event is missed because the system is powered off, you will be informed of the missed
backup when the system is powered on. You will be prompted to start one immediately or
wait until a more convenient time.
Launch a Backup from the BounceBack Express Settings Program
In the main window of BounceBack Express Settings, there is a backup option. This option
enables you to highlight any backup Set Name, regardless of the enable/disable setting, and
launch only that data set backup. To launch the backup:
1. From BounceBack Express Settings, select the Backup tab.
2. Select the backup Set Name you want to schedule.
3. Click Backup to display the following dialog box.
4. Click Yes to continue the backup or No to cancel the backup.
HP External Hard Disk Drive Backup Solution by Seagate User Guide 3-9
Page 23

Configuring the Software
Setting BounceBack Express Options
BounceBack Express is initially installed with many default options. To review and change
options for each data set:
1. In the BounceBack Express Settings program, select the Backup tab.
2. Select the backup Set Name you want to schedule and click Edit.
3. The options available to all data sets are:
— Add Item—Enables you to add drives, folders, files, or file types to the backup set.
— Edit Item—Enables you to change the highlighted data from an existing path to
another.
— Remove Item—Deletes the complete highlighted data path.
— Schedule—Launches the schedule setup dialog. Schedules can be set monthly,
weekly, daily, or as single events. Schedules that have been set are displayed in the
Backup Set Information area of the window.
— Set Name—Each backup set should have a unique name. BounceBack Express
automatically creates the data set with the name “Default Backup.” Additional data
sets are named “Set 2,” “Set 3,” and so on. Backup Set Names are displayed in the
Backup Set Information area of the display. By moving the mouse cursor over this
text box, you can enter any name for your backup set.
— Backup Set Options—These options are set individually for each backup set:
3-10 HP External Hard Disk Drive Backup Solution by Seagate User Guide
Page 24

— Verify—This option will display a progress bar during the backup. Each file will
be verified after it has been backed up against the source file. Verifies take a
slightly shorter time than backup operations because no writing to the hard drive
is required.
— Unattended Backup—Select this option if you want BounceBack Express to run
without any user interaction. This option is not utilized if the Launch
BounceBack Express Compare feature is selected.
— Shutdown Computer on Completion of Backup—Select this option of you want
BounceBack to shut down your computer after it performs a backup. It will not
prompt you before it shuts down your system.
Viewing the Log File
The BounceBack TechRepair feature is used to facilitate many technical support functions for
multiple versions of BounceBack software. The two items that apply to all BounceBack
versions are Backup Logging and Log Info.
To launch BounceBack TechRepair, select Start>Programs>BounceBack
Express>BounceBack TechRepair.
Configuring the Software
• Backup Logging has one option, Detailed logging. When this option is selected, every
file backed up will be listed in the log file. This option is not recommended for normal
use.
HP External Hard Disk Drive Backup Solution by Seagate User Guide 3-11
Page 25

Configuring the Software
• The Log Info group displays the size and last date BounceBack Express was accessed.
The log file is appended each time BounceBack Express backs up your data. It also
shows its size and the date of your last backup.
— View Log—Displays the log file summarizing the statistics of every completed
— Purge Log—Deletes the log file.
backup.
3-12 HP External Hard Disk Drive Backup Solution by Seagate User Guide
Page 26

Recovering Data
The BounceBack Express software enables you to quickly recover lost data. There are two
ways to recover data:
• By dragging and dropping the files in Windows Explorer.
• By using the Compare List from the Launch BounceBack Express/Compare command in
the BounceBack Launcher task bar menu.
Restoring Files Using Windows Explorer
You can use Windows Explorer to drag and drop files from the external HDD to your system
drive. You must know which files you want to recover to use this method.
1. Select Start>Programs>Accessories>Windows Explorer.
4
Data Recovery
2. Double-click the appropriate external HDD.
3. Select the folders or files on the external HDD that you want to recover.
4. Save the folders or files you want to recover by dragging your selections to the
appropriate server drive.
NOTE: The “My Computer” program of Windows can also be used to restore files using the same dragand-drop method described previously.
Restoring Files Using the Compare List
When you start a backup by selecting Launch BounceBack Express/Compare from the
BounceBack Launcher, the BounceBack software compares the files on your system disk
with the ones stored on the external HDD, and enables you to view the files that were deleted
from your server.
1. Select Launch BounceBack Express/Compare from the BounceBack Launcher icon
menu.
2. Allow the backup scan to complete. This might take a few minutes.
3. Click View Changes.
HP External Hard Disk Drive Backup Solution by Seagate User Guide 4-1
Page 27

Data Recovery
4. In the Backup Comparison Results window, select Deleted Files from the View menu.
This displays all files and folders that are deleted from your server, but found on the
external HDD. Selecting Changed Files will display files existing on both the server and
external HDD, but are different.
5. To recover all deleted files, click Restore. To recover specific files, select the ones you
want to recover and then click Restore.
Preparing for a Disk Crash
The HP External Hard Disk Drive Backup Solution by Seagate provides a “hands-off”
backup solution. However, if you disable the automatic backup, and do not complete manual
backups on a regular basis, you will not be able to recover data that you have added to your
system since the first full backup.
Several different backup strategies can be implemented:
• Set a reminder to back up your system daily, weekly, or monthly.
• Configure BounceBack Express to back up your system every time you connect the
external HDD to the server.
• Configure BounceBack Express to complete regularly scheduled backups.
Checklist
To prepare for a complete disk crash, verify the following guidelines:
• BounceBack Express completed a full backup of the system when the software was
installed.
• Backups were completed on a regular basis.
• You are familiar with the documentation shipped with the external HDD.
If you follow these guidelines, you can recover from a complete disk crash.
Recovering from a Disk Crash
If you followed the guidelines in the “Checklist” section, you will be able to recover from a
complete system disk failure.
Using the External HDD with a New Server
You can connect your external HDD to any supported server with a compatible operating
system to recover and access data previously backed up on another server.
1. Connect the external HDD to the server.
2. If necessary, reinstall the BounceBack Express software. Be sure to check the Disable
Disaster Recovery box and do not perform a backup when the installation is complete.
4-2 HP External Hard Disk Drive Backup Solution by Seagate User Guide
Page 28

Data Recovery
CAUTION: Be sure to select Disable Disaster Recovery as you need to preserve the data
already on the external HDD. After your recover the data you lost, then you can start a full
backup.
3. Right-click on the BounceBack Express icon in the taskbar and select Launch
BounceBack Express/Compare.
4. Click Restore in the BounceBack Comparison Results window.
5. Repeat step 4 until no “Deleted” files display.
NOTE: You can also use Windows Explorer to recover data by dragging files from the external
HDD to the server drive.
HP External Hard Disk Drive Backup Solution by Seagate User Guide 4-3
Page 29

Managing the HP External Hard Disk Drive Backup
This section contains information regarding maintenance and tasks frequently required to
ensure proper operation of the HP External Hard Disk Drive Backup Solution by Seagate.
Changing the External HDD Letter
Information Tab
From the Information tab in the BounceBack Express Settings Program, you can change the
external HDD letters, or view information about the external HDD.
5
Solution by Seagate
By default, BounceBack Express assigns the next available drive letter to the external HDD.
You can change the drive letter for the external HDD to another letter with the
Change Drive Letter button:
HP External Hard Disk Drive Backup Solution by Seagate User Guide 5-1
Page 30

Managing the HP External Hard Disk Drive Backup Solution by Seagate
1. Select the drive letter in the list that you want to change.
2. Click Change Drive Letter. BounceBack Express only displays drive letters that are not
already used on the system.
3. Select the new drive letter and click OK.
NOTE: Click Refresh List in the Backup Device Drive Letters section if the partition information
does not update automatically.
Removing Deleted Files from the External HDD
When you start a backup by selecting the Launch BounceBack Express/Compare option
from the BounceBack Launcher menu, BounceBack Express compares the files on your
system disk with the ones stored on the external HDD and gives you an opportunity to view
the files that are deleted from your system drive.
1. Select Launch BounceBack Express/Compare from the BounceBack Launcher
icon menu.
2. Wait a few minutes for the scan to complete.
5-2 HP External Hard Disk Drive Backup Solution by Seagate User Guide
Page 31

Managing the HP External Hard Disk Drive Backup Solution by Seagate
3. Click View Changes in the BounceBack Express window.
4. In the Backup Comparison Results window, select Deleted Files from the View menu.
This displays all files and folders that have been deleted from your system disk, but still
exist on the external HDD.
5. Click Purge to delete those files and file folders that have already been deleted from your
hard drive, or select the ones you want to delete and then click Purge.
Excluding Data from the Backup Process
Use the Exclusions tab in BounceBack Express Settings to selectively exclude drives,
folders, or files from a backup. You might want to exclude excessively large files or folders
to speed up the backup process.
To exclude data from a backup:
HP External Hard Disk Drive Backup Solution by Seagate User Guide 5-3
Page 32

Managing the HP External Hard Disk Drive Backup Solution by Seagate
1. Select Add Exclusion, or select an existing item in the Exclusions tab and click Edit
Exclusion.
2. Select a drive letter to exclude or double-click the drive letter to find the folders or files
you want to exclude from the backup. Multiple items can be highlighted for selection.
3. Select OK. Your excluded items are added to the list on the Exclusions tab, and will not
be included in the backup.
NOTE: When you add an item to the excluded list after the initial backup, that item will still exist on
the external HDD. Subsequent backups done after the full backup are only incremental backups
and will only back up the files that have changed since the previous backup.
Removing an Item from the Backup Exclusions
To enable BounceBack Express to back up an excluded item, you must remove the item from
the Exclusions list.
1. Select the item you want to remove from the Exclusions list.
2. Select Remove Exclusions.
3. The selected items are removed from the list and included in future backups.
5-4 HP External Hard Disk Drive Backup Solution by Seagate User Guide
Page 33

Creating Backup Sets
A Backup Set can contain one or more drives, folders, or files of a specific type in a folder.
You can also combine a folder on one drive (for example, C:\My Documents) with another
folder on a different drive, or the entire drive (for example, D:\) into the same backup set.
To create a backup set:
1. Start the BounceBack Express Settings program.
6
Advanced Backup Options
HP External Hard Disk Drive Backup Solution by Seagate User Guide 6-1
Page 34

Advanced Backup Options
2. Click Add to open the Backup Set window.
NOTE: When you create Backup Sets, the software automatically increments the name for each
Backup Set as “Set 2,” “Set 3,” and so on. You can change these names to names with more meaning,
or names that remind you of what is included in the Backup Set.
3. In the Backup Set Items window, enter a name that describes the Backup Set in the Set
Name text box.
4. Select the Backup Set Types you would like for this set:
— None
— Background Backup
NOTE: The Backup Set window displays a Source column and a Backup to column. The Source
column represents the data on the hard disks of your server. The backup to column represents the
data on the external HDD.
5. Select the Backup Set Options you would like for this set:
— Verify
— Unattended
— Shutdown
6. Click Add Item to access the Select Source Data window.
6-2 HP External Hard Disk Drive Backup Solution by Seagate User Guide
Page 35

7. In the Select Source Data window, select the drives, folders, or files you want to add to
the Backup Set and click OK.
8. In the Select Backup Path window, select the external HDD and click OK.
NOTE: When selecting a source to back up, multiple items can be highlighted and selected at the
same time. When selecting a backup path, only one item can be highlighted for selection.
9. If desired, select a backup schedule (refer to “Scheduling Backups” for more
information).
10. The Backup Set items window displays the drive and folder (for example, C:\My
Documents) under the Source column. The Backup to column displays the drive letter for
the external HDD. There is no limit to the number of Backup Items a Backup Set can
contain.
Changing a Backup Set
You can add or remove drives, folders, or files from a Backup Set at any time, or change the
schedule. To change the contents or schedule of a Backup Set:
1. Select the Backup tab in BounceBack Express Settings.
Advanced Backup Options
2. Select the name of the Backup Set you wish to change.
3. Click Edit Set.
4. Make the changes in the Backup Set Items window.
Removing a Backup Set
To remove a Backup Set from the BounceBack Backup Settings program, simply highlight
the Backup Set name and click Remove Set.
Disabling a Backup Set
You can temporarily disable a Backup Set. Highlight the name of the Backup Set in the
BounceBack Backup Settings program and click Disable. Disabled Backup Sets appear with
a red icon next to the “Set Name.”
Scheduling Backups
Using the Automatic Backup Scheduler
BounceBack Express has a scheduling feature to further automate your data backups. You
can group drives, folders, or even files of a certain type into a Backup Set. You can determine
if you want the Backup Set to always be backed up when you connect the external HDD, or
on a weekly or monthly basis.
HP External Hard Disk Drive Backup Solution by Seagate User Guide 6-3
Page 36

Advanced Backup Options
For example, you might have files and folders that change daily, so you want this data to be
backed up each time you connect the external HDD to your system. Program files and data
that you rarely access can be backed up on a monthly or weekly basis. This added power
gives you more control over which drives and directories are backed up and when.
Scheduling a Backup to Launch When the External HDD is Connected
The external HDD should always remain connected to the server. If the external HDD is
disconnected, the BounceBack Express software is configured to automatically launch a
backup when the external HDD is reconnected to the server. To change this default setting:
1. Select the Backup Set in the Backup Set tab of the BounceBack Express Settings
program.
2. Click Schedule and select a scheduling option:
— Always—When selected, BounceBack will automatically launch a backup each time
the storage device is connected to the server.
— Daily—When selected, BounceBack will automatically launch a backup when the
storage device is connected to the server. This option requires you to select a day of
the week (multiple days can be selected).
— Monthly—When selected, BounceBack will automatically launch a backup monthly
when the external HDD is connected to the server. This option requires you to select
a specific day of the month.
NOTE: Changing the default option will configure your external HDD to automatically only on this
day of the month. This will enable you to connect your external HDD to your computer without auto
launching a backup, except on the date that you scheduled.
3. Click OK to save the settings.
4. Click OK to return to BounceBack Express Settings. The new schedule you selected will
now be displayed in the “Scheduled For” column next to the backup set.
Scheduling a Backup if the External HDD is Always Connected
The external HDD should always remain connected to the server.
1. Start BounceBack Express Settings and click Options.
2. Click Advanced Options.
3. Select External HDD is Always Present for Scheduled Backups and click OK.
4. Click Apply.
5. Select the Backup Sets tab and select the set you want to schedule.
6-4 HP External Hard Disk Drive Backup Solution by Seagate User Guide
Page 37

Advanced Backup Options
6. Click Edit Set and then click Schedule.
7. Choose Once, Daily, or Monthly and set the appropriate time and days.
8. Click OK.
Your backup will now launch on the specified days at the specified times.
Using the Backup with Compare List
Some users might wish to view all folders and files, after an initial backup, before they are
backed up to the backup drive. The View Comparison List Before Backup option creates a
list of the files that differ between the data stored on the external HDD and the hard drive in
your computer.
Each of the menu items at the top of the BounceBack Comparison window are utilized as
follows:
HP External Hard Disk Drive Backup Solution by Seagate User Guide 6-5
Page 38

Advanced Backup Options
File Menu
The file menu has the following commands:
• Backup—Select this command to back up the files you select in the external HDD
Comparison Results window. This command performs the same function as the Backup
button.
• Restore—Select this command to recover or restore the files you select. This command
performs the same function as the Restore button.
• Exit—Exits the Compare List and cancels the backup.
Edit Menu
The Edit menu has the following commands:
• Select All—Selects all of the files and folders in the Compare List
• Invert Selection—Changes the selection to include the files you did not originally select
and exclude the ones you did originally select.
View Menu
Use the View menu to selectively view the types of files in the Compare List.
• Missing—Displays only the files that have never been backed up to the external HDD.
• Changed—Displays on the files that exist on both drives, but are different.
• Deleted—Displays on the files that exist on the external HDD but are no longer on your
computer.
• All—Displays all files.
BounceBack Comparison Button Functions
Backup Button
The Backup button is enabled only for Missing and Changed files in the Compare List and
works in the following manner:
• Missing—This will back up files to the external HDD which exist on the source drive but
are not currently on the external HDD.
• Changed—This will back up the version of each file selected as it exists on the external
HDD to the source drive. This operation will overwrite the current copy of each file that
exists on the source, even if the file is newer.
• Deleted—This will restore all the deleted files you select for restore back to the source
drive. This is a good way to recover files you mistakenly deleted from your source drive
but still exist on the external HDD.
6-6 HP External Hard Disk Drive Backup Solution by Seagate User Guide
Page 39

Purge Button
Advanced Backup Options
The Purge button is enabled only for Deleted files in the Compare list and works in the
following manner:
• Deleted—This will remove all the files you select from the external HDD which no
longer exist on the source drive.
NOTE: It is good practice to frequently purge from the external HDD those files and folders that
have been deleted from the source drive. For more information, refer to “Removing Deleted Files
from the External HDD.”
HP External Hard Disk Drive Backup Solution by Seagate User Guide 6-7
Page 40

A
advanced options 6-1
automatic backups 3-7, 6-3
B
backup
auto launch 6-4
customized 3-3
deleting files 5-2
excluding files 5-3
initial 2-3
launching 3-9
removing exclusions 5-4
scheduling 3-7, 6-3, 6-4
unattended 3-11
Verify utility 3-11
backup log 3-11
backup set 6-1
adding 3-3
creating 6-1
deleting 3-6, 6-3
disabling 3-6, 6-3
editing 3-6, 6-3
enabling 3-7
naming 3-10
options 3-10
BounceBack
Launcher utility 3-1, 3-2
Reminder utility 3-2
settings 3-2
software upgrade 1-1, 2-6
TechRepair utility 3-2, 3-11
BounceBack Express
Compare utility 4-1, 5-2, 6-5
components 3-2
configuring 3-1
features 1-1
installing 2-1
options 3-10
Settings utility 3-2
BounceBack Express Compare utility 3-2, 6-5
BounceBack Express components 3-2
Index
BounceBack Express Settings
Backup tab 3-3
Exclusions tab 3-3, 5-3
Information tab 3-3
Information Tab 5-1
BounceBack Express Settings utility 3-2
BounceBack Launcher utility 3-1, 3-2
disable 2-4, 3-2
enable 3-2
BounceBack Reminder utility 3-2
BounceBack TechRepair utility 3-2
log 3-11
C
change drive letter 5-1
compare list
restore 4-1
view 6-5
configuring BounceBack Express 3-1
customized backups 3-3
D
data recovery 4-1, 4-2
checklist 4-2
data restore 4-1
deleting files 5-2
drive letter 5-1
H
hardware requirements 1-2
help resources v
HP authorized reseller v
I
initial backup 2-3
installing
BounceBack Express Software 2-1
server 4-2
storage system 2-1
HP External Hard Disk Drive Backup Solution by Seagate User Guide Index-1
Page 41

Index
L
launch backup 3-9
log file 3-11
delete 3-12
view 3-12
O
operating system 1-2
operating system requirements 1-2
options
advanced 6-1
backup set 3-10
BounceBack Express 3-10
R
recovering data 4-1
removing backup exclusions 5-4
requirements
hardware 1-2
operating system 1-2
software 1-2
restore 4-1
compare list 4-1
drag-and-drop 4-1
Windows Explorer 4-1
S
scheduling
backups 6-3, 6-4
scheduling backups 3-7, 6-3
servers
installing new 4-2
supported 1-2
settings 3-2
software
features 1-1
uninstalling 2-5
upgrade 2-6
software upgrade 1-1
storage system
about 5-1
disconnecting 2-4
installing 2-1
supported servers 1-2
T
telephone numbers v
U
unattended backup 3-11
upgrade software 1-1, 2-6
V
verify backup 3-11
Index-2 HP External Hard Disk Drive Backup Solution by Seagate User Guide
 Loading...