

Page 1

8505 8mm Cartridge Tape Drive
User’s Guide
Order Number: EK-STWCT-UG. E01
Page 2

Fifth Edition,December 1994
The information in this document is subject to change without notice and should not be construed as a
commitment by Digital Equipment Corporation. Digital Equipment Corporation assumes no
responsibility for any errors that may appear in this document.
Restricted Rights: Use, duplication, or disclosure by the U.S. Government is subject to restrictions as set
forth in subparagraph (c) (1) (ii) of the Rights in Technical Data and Computer Software clause at
DFARS 252.227-7013.
Digital Equipment Corporation does not give a warranty of any kind regarding the fitness or applicability
of the information content for a particular purpose. The user assumes all responsibility for understanding
the interrelationships of this enclosed information with other affected software or system products.
The disclosure of this information does not grant to the user a license under any patents, pending patents,
trademarks, or copyrights or other rights of Digital Equipment Corporation, or of any third party.
FCC Notice: This equipment generates, uses, and may emit radio frequency energy. The equipment has
been type tested and found to comply with the limits for a Class A computing device pursuant to Subpart
J of Part 15 of FCC Rules, which are designed to provide reasonable protection against such radio
frequency interference when operated in a commercial environment. Any changes or modifications made
to this equipment may void the user's authority to operate the equipment. Operation of this equipment in
a residential area may cause interference, in which case the user, at his own expense, may be required to
take measures to correct the interference.
Copyright © Digital Equipment Corporation 1994
All Rights Reserved
Printed in U. S. A
The following are trademarks of Digital Equipment Corporation:
StorageWorks, and the Digital Logo.
All other trademarks and registered trademarks are the property of their respective owners.
Page 3

Contents
Revision Record ..........................................................................................................v
About This Guide ..................................................................................................... vii
1 Introduction
1.1 Product Overview ...............................................................................................1–1
1.2 StorageWorks Packaging Options for the Cartridge Tape Drive...........................1–1
1.3 Support for Four Data Formats............................................................................1–4
1.4 Support for Partitioned Tapes..............................................................................1–5
1.5 Enhanced Performance........................................................................................1–5
1.6 Intelligent Data Compression..............................................................................1–5
1.7 Sophisticated Error Correction Procedures ..........................................................1–5
1.8 Additional Features.............................................................................................1–5
2 Installation and Initial Power On
2.1 Unpacking the StorageWorks 8505 8mm Cartridge Tape Drive...........................2–1
2.2 Installation Documents........................................................................................2–1
2.3 Performing the Initial Power On..........................................................................2–2
3 Operating the Cartridge Tape Drive
3.1 Location of Controls and Indicators.....................................................................3–1
3.1.1 Unload Button ..............................................................................................3–2
3.1.2 LEDs............................................................................................................3–2
3.2 Recommended Data Cartridge.............................................................................3–3
3.3 Setting the Write-Protect Switch .........................................................................3–3
3.4 Loading a Data Cartridge ....................................................................................3–4
3.5 Load Time ..........................................................................................................3–5
3.6 Unload Cartridge Procedure................................................................................3–5
3.7 Error During Unload Procedure...........................................................................3–5
4 Cleaning the Cartridge Tape Drive
4.1 Determining When the Tape Drive Needs Cleaning.............................................4–1
4.2 Using the 8mm Cleaning Cartridge.....................................................................4–2
4.3 Exercising the Cartridge Tape Drive....................................................................4–3
Order Number: EK–STWCT–UG. E01 iii
Page 4

StorageWorks 8505 8mm Cartridge Tape Drive
Appendix A Product Specifications
Appendix B Product Notes for Novell™ and MS-DOS
™
Appendix C Product Notes for Sun™
Appendix D Product Notes for IBM™ RS/6000
Appendix E Product Notes for Hewlett-Packard
Reader Comment Form ........................................................................... Inside Back Cover
Figures
1–1 StorageWorks 8505 8mm Cartridge Tape Drive..................................................1–1
1–2 Option SWXTE-AA: One Tape Drive in a Device Carrier ..................................1–2
1–3 Option SWXTE-AB: Two Tape Drives in a Device Carrier ................................1–3
1–4 Option SWXTE-AC: For Installation in Desktop Expansion Unit.......................1–3
3–1 Front Panel Controls and Indicators....................................................................3–1
3–2 Front Panel LEDs...............................................................................................3–2
3–3 Write-Protect Switch on 8mm Data Cartridge.....................................................3–4
4–1 Cleaning the Cartridge Tape Drive......................................................................4–3
Tables
1–1 Read/Write Compatibility of 8mm Tape Drives and Data Formats......................1–4
1-2 Read/Write Compatibility Comparisons..............................................................1–3
3–1 States Indicated by LEDs....................................................................................3–3
iv Order Number: EK–STWCT–UG. E01
Page 5

Revision Record
This Revision Record provides a concise publication history of this guide. It lists the manual revision levels,
release dates, and reasons for the revisions. It also describes how the changes to affected pages are
marked in the guide.
The following revision history lists all revisions of this publication and their effective dates. The
publication part number is included in the Revision Level column, with the last entry denoting the
latest revision.
Revision Level Date Summary of Changes
EK-STWCT-UG. A01 December 1993 Original release
EK-STWCT-UG. B01 March 1994 Cleaning cartridge and
Appendix B added
EK-STWCT-UG. C01 August 1994 Appendix C added
EK-STWCT-UG. D01 October 1994 Appendix D added
EK-STWCT-UG. E01 December 1994 Appendix E added
Order Number: EK–STWCT–UG. E01 v
Page 6

About This Guide
This section identifies the users of this guide and describes the contents and structure. In addition, it
includes a list of conventions used in this guide.
StorageWorks 8505 8mm Cartridge Tape Drive User's Guide
This guide provides operational and maintenance information for the StorageWorks 8505
8mm Cartridge Tape Drive.
Intended Audience
This guide is intended for any user who is responsible for operating or maintaining the
cartridge tape drive.
Document Structure
This guide contains the following chapters:
Chapter 1: Introduction
Introduction gives an overview of the StorageWorks 8505 8mm Cartridge Tape Drive
and describes the three packaging options for the drive: SWXTE-AA, SWXTE-AB, and
SWXTE-AC. It also describes the formats the drive can read and write.
Chapter 2: Installation and Initial Power On
Installation and Initial Power On refers you to the appropriate installation information
and provides information about the initial power on of the cartridge tape drive.
Chapter 3 Operating the Cartridge Tape Drive
Operating the Cartridge Tape Drive describes how to use the drive’s controls and
indicators; it also describes how to load and unload tapes.
Chapter 4 Cleaning the Cartridge Tape Drive
Cleaning the Cartridge Tape Drive describes how to clean the drive.
Appendix A: Product Specifications
Product Specifications provides physical and operating specifications.
Order Number: EK–STWCT–UG. E01 vii
Page 7

StorageWorks 8505 8mm Cartridge Tape Drive
Appendix B: Product Notes for Novell™ and MS-DOS
™
Product Notes for Novell and MS-DOS provides information for the system
administrator. It must be read before installing and using the cartridge tape drive SBB
with a host system operating with the Novell and MS-DOS, or MS-DOS/WINDOWS
operating systems.
Appendix C: Product Notes for
Sun™
Product Notes for Sun provides information for the system administrator. It must be read
before installing and using the cartridge tape drive SBB with a host system operating
with the Sun and Solaris operating systems.
Appendix D: Product Notes for
Product Notes for
IBM provides information for the system administrator. It must be
IBM
™
RS/6000
read before installing and using the cartridge tape drive SBB with a host system
operating with the AIX 3.2.5 (or later) operating system.
Appendix E: Product Notes for
HP™ 9000 Series 800
Product Notes for HP provides information for the system administrator. It must be read
before installing and using the cartridge tape drive SBB with a host system operating
with the HP-UX 9.04 (or later) operating system.
Conventions
This guide uses the following conventions:
Documentation Conventions
Style Meaning
boldface type For emphasis
italic type For emphasis and manual titles
Ordering Data and Cleaning Cartridges
You can order data and cleaning cartridges from the following sources:
• The 8mm data cartridge, Digital part number TKZ8x, is recommended for use with
the StorageWorks 8505 8mm Cartridge Tape Drive. You can order the data cartridge
from authorized Digital VARs and distributors, or by calling DECdirect at 800DIGITAL or 800-344-4825. In Canada, you can call DECdirect at 613-592-5111.
• Approved cleaning cartridges can be ordered from EXABYTE. These cleaning
cartridges are the only cleaning device or material recommended for use with the
StorageWorks 8505 8mm Cartridge Tape Drive. Both cleaning cartridges and data
cartridges can be ordered from EXABYTE Corporation at 1685 38th Street, Boulder,
Colorado, 80301. EXABYTE Direct Marketing is at 800-392-8273. The
EXABYTE part numbers are:
Data cartridge . . . . . . . . . . . . . . . . . . . . . . . . 180093
viii Order Number: EK–STWCT–UG. E01
Page 8

Cleaning cartridge, 3 cleaning passes . . . . . 727113
Cleaning cartridge, 12 cleaning passes . . . . 727386
About This Manual
Order Number: xxx-xxx-xxx iii
Page 9
1
Introduction
This chapter provides a product overview of the StorageWorks 8505 8mm Cartridge Tape Drive, outlines
its features, and describes the formats it can read and write.
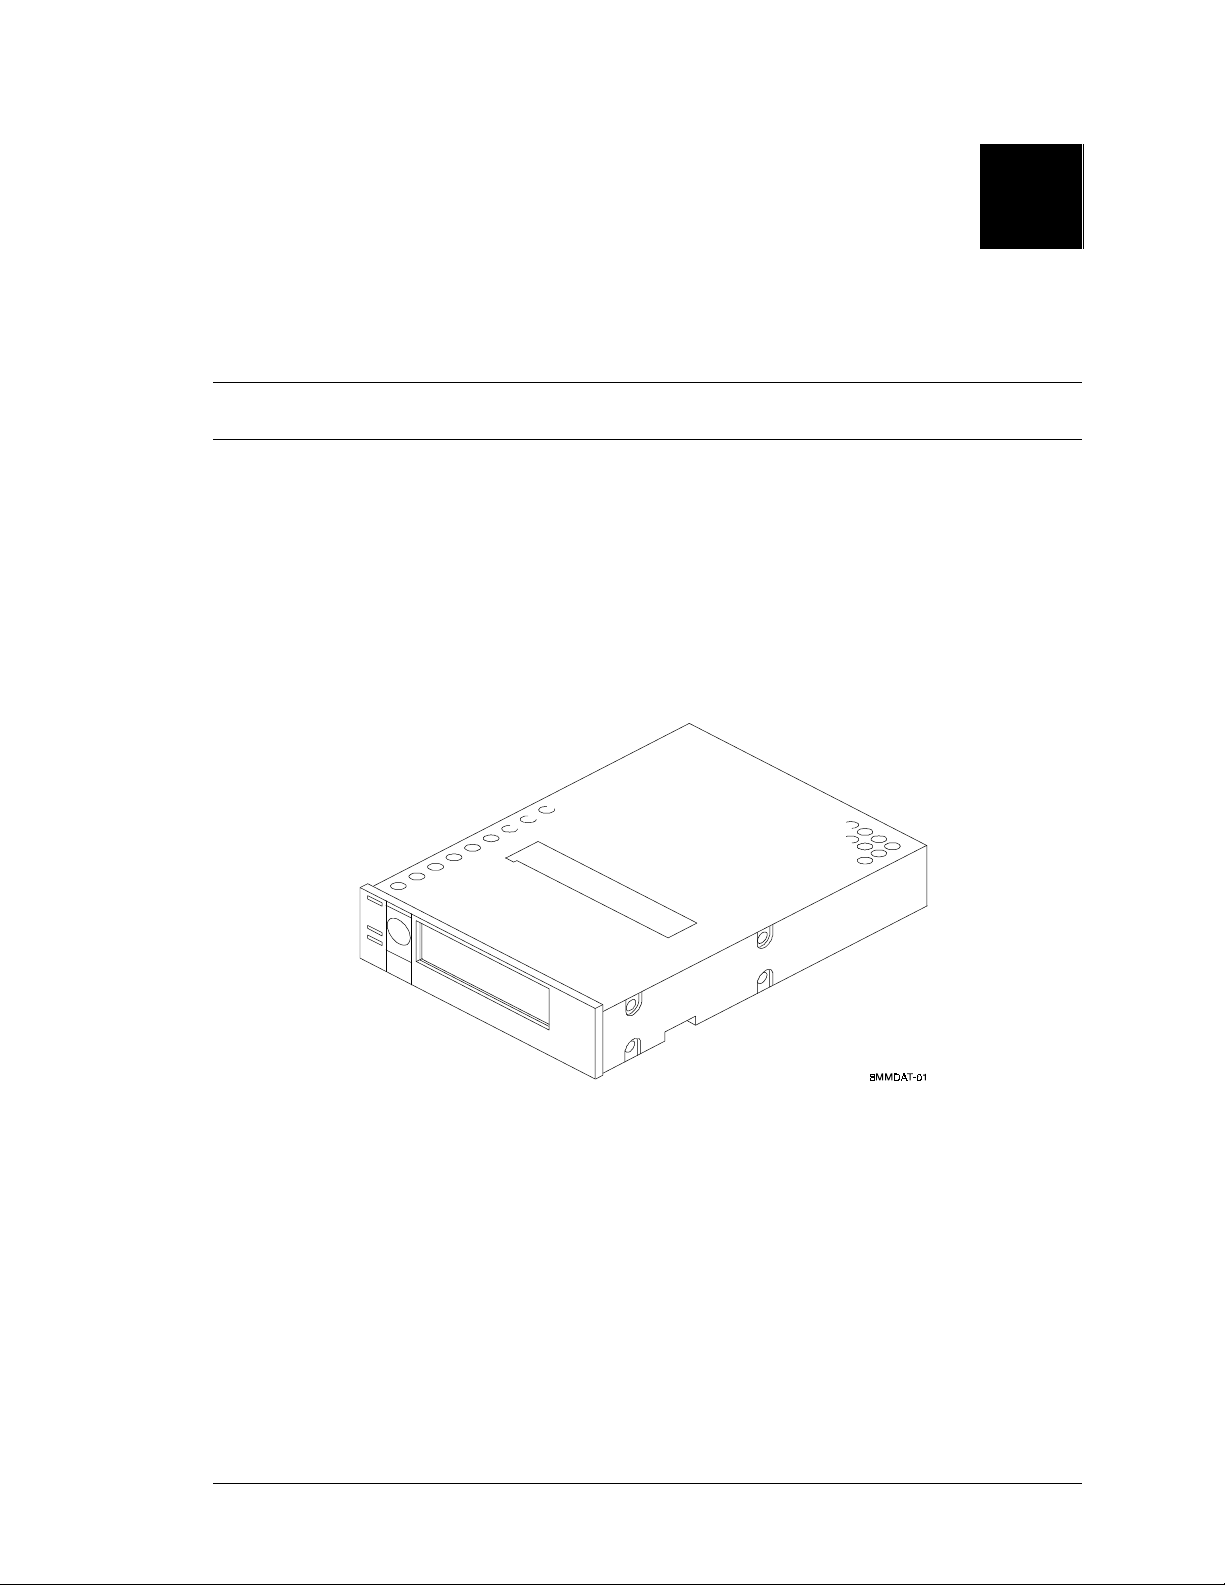
1.1 Product Overview
The StorageWorks 8505 8mm Cartridge Tape Drive (Figure 1–1) is an enhanced 8mm
digital helical-scan cartridge tape drive, which is packaged in an industry standard
5.25-inch half-height form factor. The half-height size allows for ease of integration
across a multitude of platforms.
Figure 1-1 StorageWorks 8505 8mm Cartridge Tape Drive
1.2 StorageWorks Packaging Options for the Cartridge Tape Drive
The. StorageWorks 8505 8mm Cartridge Tape Drive is available as three packaging
options as follows:
• SWXTE-AA (Figure 1–1)
• SWXTE-AB (Figure 1–2)
• SWXTE-AC (Figure1–3)
Figures 1–1, 1–3, and 1–4 show the packaging options. (Chapter 2 provides information
about installing and configuring the options.)
Order Number: EK–STWCT–UG. E01 1–1
Page 10
StorageWorks 8505 8mm Cartridge Tape Drive
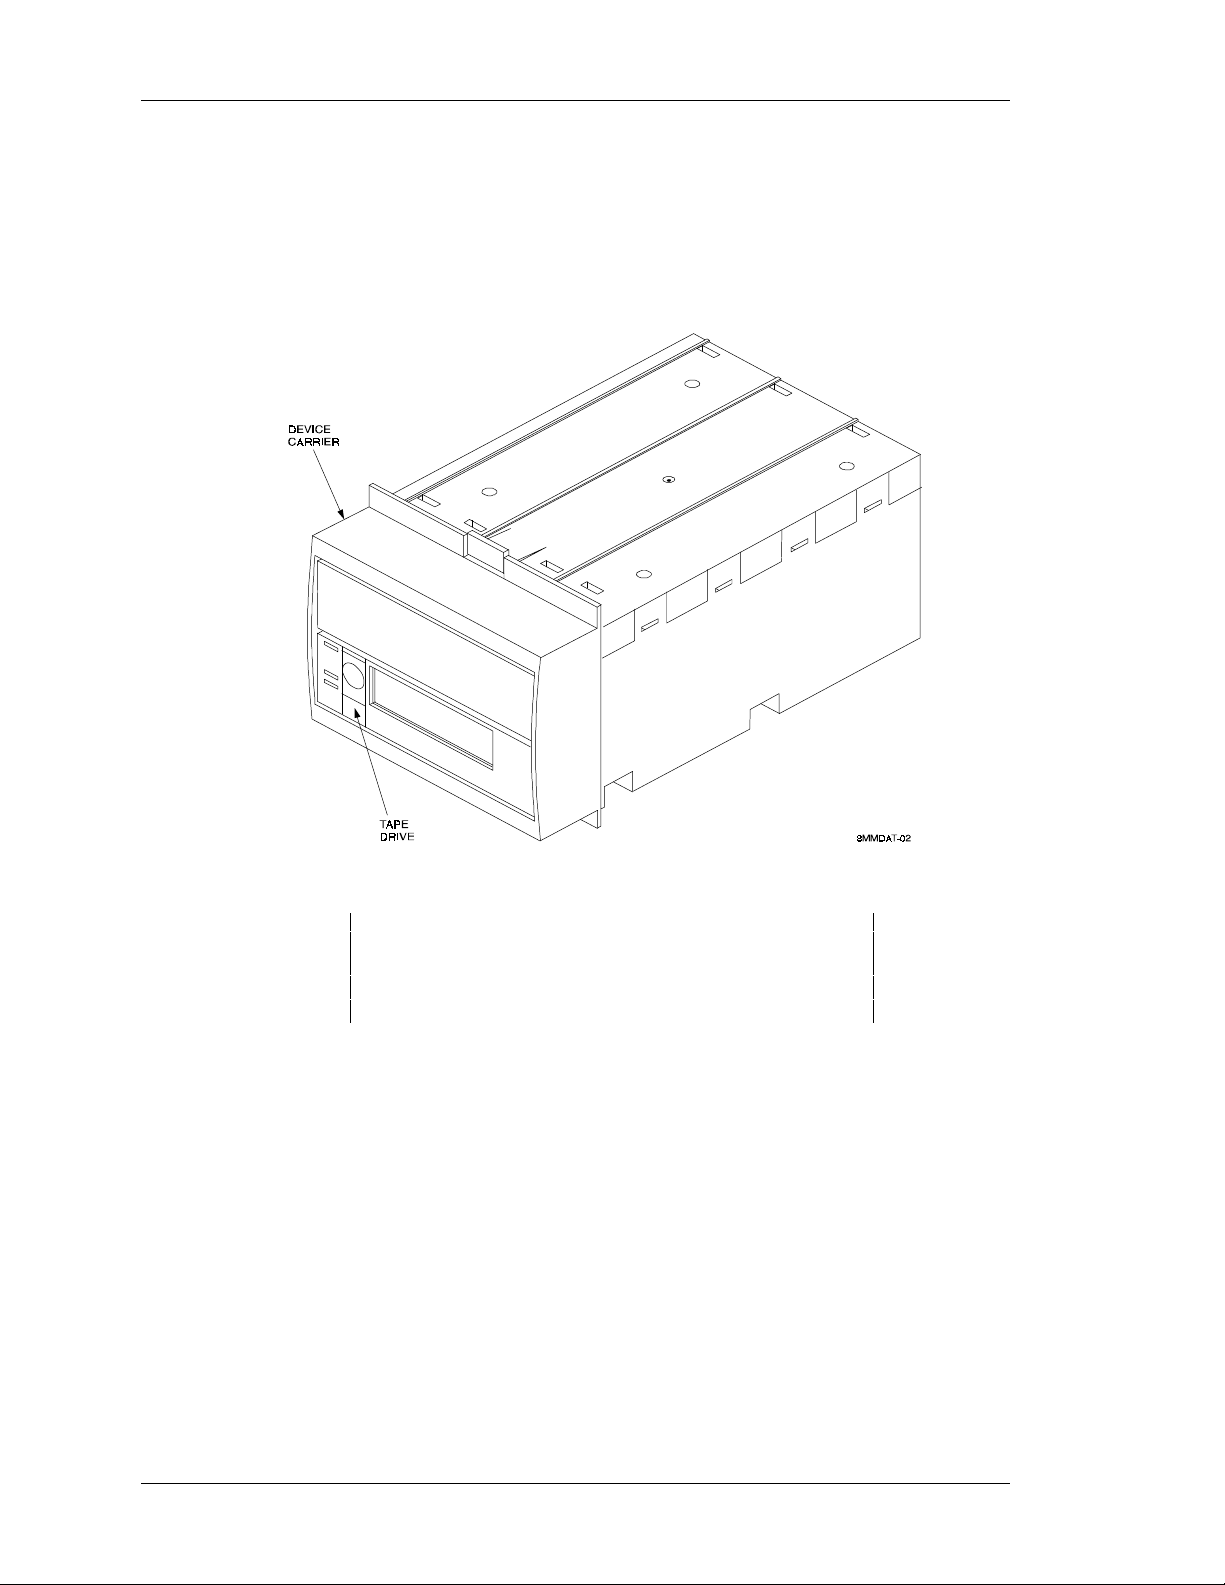
Option SWXTE-AA is a configuration in which one or two 8mm tape drives is installed
in a device carrier, and the device is subsequently placed in a StorageWorks drive
expansion unit. Figure 1–2 shows one tape drive installed in a device carrier.
Figure 1–2 Option SWXTE-AA: One Tape Drive in a Device Carrier
NOTE
The expression
in StorageWorks documentation to refer to a device, such as
tape or disk drive, that is installed in a device carrier.
StorageWorks Building Block, or SBB
, is used
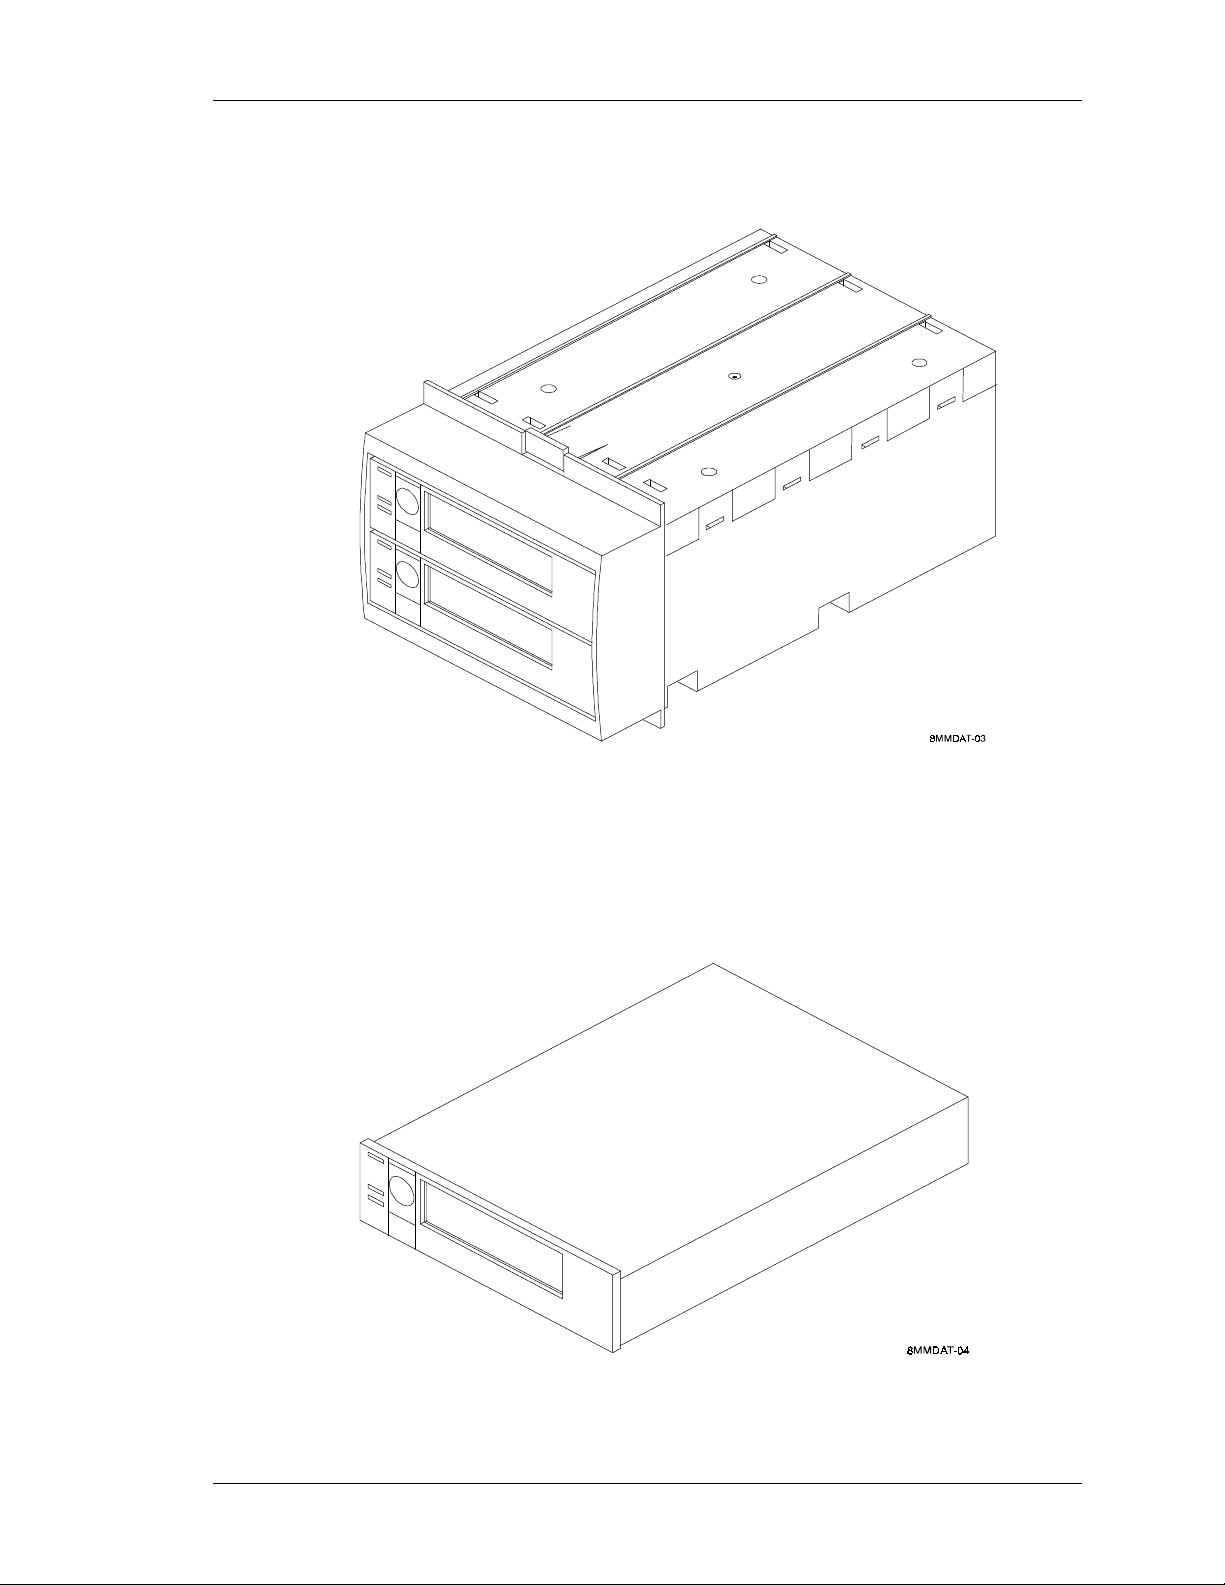
Option SWXTE-AB is a configuration in which a second 8mm tape drive is installed in a
device carrier. Note that the device carrier is shipped to you with both drives already
installed if options SWXTE-AA and SWXTE-AB are ordered at the same time. If option
SWXTE-AB is ordered after you already have option SWXTE-AA, the second drive is
installed in the top half of the device carrier as shown in Figure 1–3.
1–2 Order Number: EK–STWCT–UG. E01
Page 11
Chapter 1 Introduction
Figure 1–3 Option SWXTE-AB: Two Tape Drives in a Device Carrier
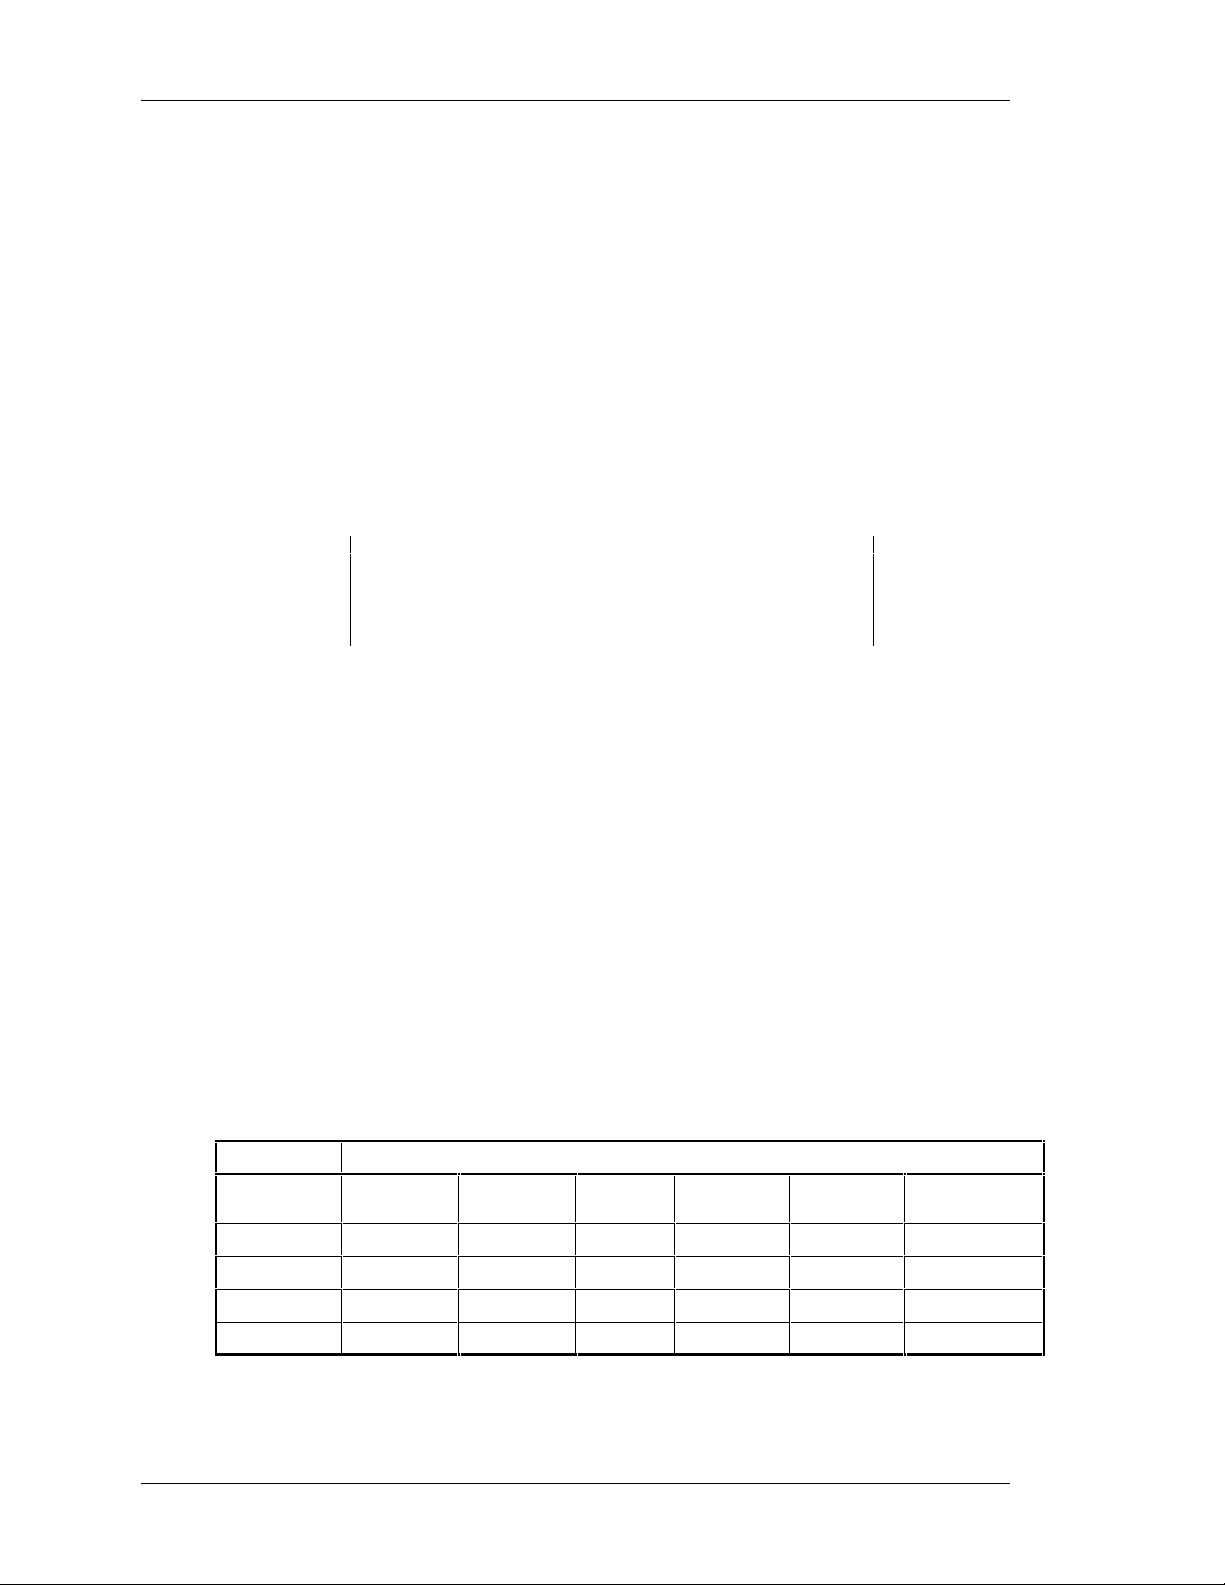
Option SWXTE-AC is a configuration in which an 8mm tape drive is installed in a
desktop expansion unit. Figure 1–4 shows the tape drive as it is shipped to you.
Figure 1–4 Option SWXTE-AC: For Installation in Desktop Expansion Unit
Order Number: EK–STWCT–UG. E01 1–3
Page 12
StorageWorks 8505 8mm Cartridge Tape Drive
TKZ09 and
EXB-8500
Yes
Yes
1.3 Support for Four Data Formats
The StorageWorks 8505 8mm Cartridge Tape Drive can read and write data in four
formats:
• EXB-8500c (compressed) format
• EXB-8500 format
• EXB-8200c (compressed) format
• EXB-8200 format
When writing in its default EXB-8500c (compressed) format, the 8mm tape drive
implements a powerful algorithm that enables it to compress user data at ratios of 2:1 or
greater. Assuming an average compression efficiency of 2:1, the tape can store up to
10 GBytes of data on a single 8mm data cartridge.
The actual compression ratio achieved depends on the type of
data to be compressed. This guide assumes an average
compression efficiency of 2:1.
NOTE
When writing in the non-compressed EXB-8500 format, the tape drive can store up to
5.0 GBytes of data on a single 8mm data cartridge.
When writing in the EXB-8200c (compressed) format, the tape drive can store up to
5.0 GBytes of data on a single 8mm data cartridge, assuming an average compression
efficiency of 2:1
When writing in the non-compressed EXB-8200 format, the tape drive can store up to
2.5 GBytes of data on a single 8mm data cartridge. Refer to Appendix B and C of this
guide for detailed data format information for your specific operating environment.
Table 1–1 lists the read and write compatibilty of several data formats with several 8mm
tape drives. Note that devices with names beginning "EXB" are produced by EXABYTE
Corporation; devices with names beginning "TKZ" are produced by Digital Equipment
Corporation. In the table, SWXTE represents all three packaging options of the
StorageWorks 8mm Cartridge Tape Drive.
Table 1–1 Read/Write Compatibility of 8mm Tape Drives and Data Formats
Tape format Can be written and read by an . . .
TKZ08 and
EXB-8200
EXB-8500c –
EXB-8500
EXB-8200c
EXB-8200 Yes Yes Yes
–––
––
EXB-8200SX EXB-8205
–––
Yes
–
EXB-8500c SWXTE and
EXB-8505
Yes Yes
Yes Yes
Yes Yes
Yes Yes
1–4 Order Number: EK–STWCT–UG. E01
Page 13

1.4 Support for Partitioned Tapes
Some operating systems provide support for tape partitions. With these systems, the tape
drive can read and write tapes containing either one or two partitions. Partitions provide
an efficient way to maintain a directory on a tape without the risk of overwriting data
when updating the directory. For additional information, refer to the operating manuals
that support your system.
1.5 Enhanced Performance
Assuming an average 2:1 compression ratio, the tape drive can achieve a sustained
transfer rate of approximately 1 MByte per second when writing in EXB-8500c format.
The maximum SCSI data transfer rate is up to 5.0 MBytes/second for a synchronous
burst and up to 2.5 MBytes/second for an asynchronous burst. (Achievement of these
performance numbers is dependent on the system configuration into which this tape drive
is installed).
Data interchange is maintained through full read and write compatibility with the
EXB-8500c, EXB-8500, EXB-8205, EXB-8200, and EXB-8200SX 8mm Cartridge Tape
Drives.
Chapter 1 Introduction
1.6 Intelligent Data Compression
When writing in its default EXB-8500c format, the tape drive uses the established
Improved Data Recording Capability (IDRC) algorithm. Licensed from IBM, this
algorithm is a de facto standard in mainframe environments. It uses the EXABYTE
Compression Integrity Check™ feature to ensure that data is accurately compressed and
decompressed into the original form sent by the host computer.
The compression algorithm is completely contained in an EXABYTE proprietary
integrated circuit. When data compression is enabled by the user, the tape drive invokes
the compression algorithm intelligently, constantly monitoring the compression ratio to
determine whether compressing the data will actually decrease the size of the data set.
When compression is turned on, the tape drive sends compressed data to tape only when
it benefits the user's storage capacity and throughput.
1.7 Sophisticated Error Correction Procedures
The tape drive performs on-board error correction code (ECC) and error-recovery
procedures, along with full read-after-write verification to ensure data integrity. The
drive also contains a logical-block-CRC (cyclic redundancy check) feature. By adding
two bytes of CRC data to every logical block on a compressed format tape, the drive can
check that user data is compressed and decompressed accurately.
1.8 Additional Features
The tape drive contains a single-ended SCSI controller. Additional features include
SCSI-2 compatibility, synchronous data transfer, an integrated 1-MByte speed-matching
buffer, full disconnect/reconnect arbitration support, and logical block packing. The tape
drive is an easily integrated solution to your journalizing, archiving, data interchange,
software distribution, imaging, data acquisition, and backup/restore needs.
Order Number: EK–STWCT–UG. E01 1–5
Page 14

2
Installation and Initial Power ON
This chapter refers you to the installation document you need. It also provides the steps you should follow
for the initial power on of the StorageWorks 8505 8mm Cartridge Tape Drive.
2.1 Unpacking the StorageWorks 8505 8mm Cartridge Tape Drive
CAUTION
If the current environment differs from the storage
environment by 15° or more, allow the Cartridge Tape Drive to
acclimate to the current environment for at least 12 hours.
The cartridge tape drive's packaging is designed to protect the drive from potentially
damaging condensation. If the drive has not acclimated in its packaging for at least 12
hours, serious damage to the device can occur.
Unpack and inspect the contents of your shipment. In addition to this guide, it should
contain the following items:
• One SWXTA-AA 10 GB, 8mm helical-scan cassette tape drive
• One 8mm cassette tape
• One head-cleaning cassette
• StorageWorks SBB user's guide
Also, check the contents for damaged components. Notify your vendor immediately if
any items are damaged. Keep all boxes and packing material for reshipment.
2.2 Installation Documents
The 8mm Cartridge Tape Drive is available as three different options. The following list
shows the option numbers and gives the title of the documents that describe installation
or configuration for that option.
• SWXTE-AA: This option number identifies a configuration in which one or two
cartridge tape drives is installed in a device carrier, and the device carrier is
subsequently placed in a StorageWorks deskside (or larger) storage expansion unit.
For instructions on installing or replacing the drive in the device carrier, refer to the
document titled StorageWorks Building Blocks User's Guide. For instructions on
placing the device carrier in a deskside storage expansion unit, refer to the document
titled StorageWorks Expansion Storage Pedestal User's Guide.
Order Number: EK–STWCT–UG. E01 2–1
Page 15

StorageWorks 8505 8mm Cartridge Tape Drive
• SWXTE-AB: This option number identifies a configuration in which a second
cartridge tape drive is installed in a device carrier. For installation instructions, refer
to the same documents listed in the preceding bullet. In addition, this option is
always shipped with the document StorageWorks Family 5.25-inch SBB
Half-Height Device Installation Guide, which provides instructions on installing the
second cartridge tape drive in a device carrier.
• SWXTE-AC: This option number identifies a configuration in which a cartridge
tape drive is installed in a desktop expansion unit. For installation instructions, refer
to the document titled StorageWorks Desktop Expansion Unit User's Guide.
2.3 Performing the Initial Power On
After you have installed the cartridge tape drive, you can perform the initial power on
procedure. Power on is accomplished by installing the tape drive into its desktop
expansion unit or expansion storage pedestal cabinet, and then applying power to the
cabinet.
When you apply power, the drive performs its power-on initialization and self-test
(POST). Assuming that no data cartridge is loaded and that the tape drive is connected
correctly, POST takes about 30 seconds as follows:
• During the first part of POST, all three LEDs will be lit.
• During the second part of POST, the top amber LED will be lit and the middle and
bottom LEDs may flash depending on whether the tape drive is connected to the
SCSI bus and a data cartridge is loaded.
NOTES
Do not insert a data cartridge into the tape drive while POST
is in progress because the drive will automatically eject it.
If the top amber LED does not go out after POST, an error
has occurred. Contact your vendor.
When POST completes (top amber LED off), the tape drive is ready for normal
operation. After POST completes, you should refer to Table 3–1 in Chapter 3 if the state
of the LEDs differs from the state described in this procedure. The table shows how to
determine the drive’s operating state by the behavior of the LEDs.
2–2 Order Number: EK–STWCT–UG. E01
Page 16

3
Operating the Cartridge Tape Drive
This chapter describes how to operate the 8505 8mm Cartridge Tape Drive. It also includes information
about using a data cartridge.
This chapter includes information about the following topics:
• How to use the tape drive operator controls and indicators, including a table showing
how the LEDs represent the drive’s operating states
• How to set the write-protect switch on the data cartridge
• How to load and unload data cartridges
3.1 Location of Controls and Indicators
Figure 3–1 shows the controls and indicators on the front panel of the StorageWorks
8505 8mm Cartridge Tape Drive.
Figure 3–1 Front Panel Controls and Indicators
Order Number: EK–STWCT–UG. E01 3–1
Page 17

StorageWorks 8505 8mm Cartridge Tape Drive
3.1.1 Unload Button
The unload button is the only operator control on the cartridge tape drive.
The
unload
button can be used to clear hardware errors. If a
hardware error occurs, press the
tape drive. If necessary, wait a few seconds and press the
button again to eject the tape.
3.1.2 LEDs
The cartridge tape drive uses three LEDs to indicate its various operating states. The
location of these LEDs is shown in Figure 3–2 . Table 3–1 shows the combinations of
LEDs that may occur during tape drive operation. You can use these LED combinations
to determine the drive’s operating state as follows:
• When the top (amber) LED is on or flashing, the drive has an error or needs to be
cleaned
NOTE
unload
button to reset the
• When the middle LED is on or flashing, SCSI bus activity is occurring. The middle
LED can be green or amber as follows:
Amber – When the LED is amber, the tape loaded in the drive is in compressed
format (EXB-8500c or EXB-8200c).
Green – When the LED is green, the tape loaded in the drive is in uncompressed
format (EXB-8500 or EXB-8200).
• When the bottom (green) LED is on, a data cartridge is loaded in the drive. When
this LED is flashing, tape motion is occurring.
Figure 3–2 Front Panel LEDs
3–2 Order Number: EK–STWCT–UG. E01
Page 18

Chapter 3 Operating the Cartridge Tape Drive
Table 3–1 States Indicated by LEDs
Drive State Top LED (errors) Middle LED (SCSI)* Bottom LED (motion)
POST (1st part) On On green On
POST (to completion) On Flash irregular** Off***
Failed POST Flash fast Flash irregular Off
Ready (no tape loaded) Off Flash irregular Off
Ready (tape loaded) Off Flash irregular On
Normal tape motion Off Flash irregular Flash slow
High-speed tape motion Off Flash irregular Flash fast
SCSI bus reset On Flash irregular On
Error Flash slow Flash irregular Off
Time to clean Flash fast Flash irregular Flash fast
Cleaning tape loaded Off Flash irregular Flash slow
* Green indicates EXB-8500 or EXB-8200 uncompressed format.
Amber indicates EXB-8500c or EXB-8200c compressed format.
** The LED flash rates are defined as follows:
flash slow = 1 flash/second
flash fast = 4 flashes/second
irregular = Rate of flash varies depending on SCSI bus activity. If the 8mm tape drive is
not connected to the SCSI bus, the LED will be off.
*** If a tape is loaded, the bottom LED will flash slow and then fast during the second part of
the power-on self-test (POST)
You may occasionally observe LED combinations and
sequences not described in Table 3–1. These other
combinations represent special or unusual conditions that are
beyond the scope of this table.
3.2 Recommended Data Cartridge
The 8mm cartridge tape drive uses 8mm data cartridges, Digital part number TKZ8x.
This data cartridge provides approximately 10 GBytes of EXB-8500c formatted data
capacity, assuming an average compression ratio of 2:1.
Additional data cartridges can be ordered. For details, see page
Guide" section of this document.
3.3 Setting the Write-Protect Switch
The tape drive uses 8mm data cartridges, part number TKZ8X. These data cartridges are
equipped with a write-protect switch to prevent the tape from being unintentionally
written to.
NOTE
viii in the "About This
Order Number: EK–STWCT–UG. E01 3–3
Page 19

StorageWorks 8505 8mm Cartridge Tape Drive
Before loading a data cartridge into the drive, ensure that the write-protect switch is set
correctly for the desired operation. You can use a ball-point pen or similar instrument to
set the write-protect switch.
• To write protect the data cartridge, move the write-protect switch away from the
edge of the data cartridge, as shown in Figure 3–3. If the red tab is visible, the
cartridge is write-protected and cannot be written to or erased.
• To write enable the data cartridge, move the write-protect switch toward the edge of
the data cartridge, as shown in Figure 3–3. If only the edge of the red tab i s visible,
the data cartridge is write-enabled and can be written to or erased.
Figure 3–3 Write-Protect Switch on 8mm Data Cartridge
3.4 Loading a Data Cartridge
To load a data cartridge into the tape drive, follow these steps:
1. Ensure that the write protect switch has been set correctly for the desired operation
(see Section 3.3 above).
2. If you have just powered on the drive, be sure that the bottom green LED and the top
amber LED on the front panel are off, indicating that the drive has passed its power
on self-test and is ready to load the data cartridge.
3. Insert the data cartridge into the drive with the label side up and the write-protect
switch facing you.
4. The drive automatically loads the data cartridge. All three LEDs are off for the first 8
seconds of the load operation. Then, the bottom LED flashes to indicate tape motion.
When the bottom LED is on continuously, the drive is ready.
3–4 Order Number: EK–STWCT–UG. E01
Page 20

3.5 Load Time
Once a data cartridge has been inserted, the drive requires approximately 35 seconds to
load the data cartridge and position the tape (assuming that the data cartridge has been
rewound). During this 35-second load time, the drive determines the following:
• The tape format (blank, EXB-8500c, EXB-8500, EXB-8200c, EXB-8200, or other
format).
• The adaptive tape-reading parameters. This process enables the drive to read tapes
produced by different manufacturers, tapes that are aged or worn, and tapes written
by other 8mm cartridge tape drives.
3.6 Unload Cartridge Procedure
The following actions occur when you press the unload button. (These steps assume that
a data cartridge is loaded and that the drive is ready.)
Approximately 10 seconds will elapse after you press the
unload
button before the bottom LED begins to flash.
Chapter 3 Operating the Cartridge Tape Drive
NOTE
1. Any command or operation currently in progress is completed.
2. Any buffered information is written to tape, and an EOD mark is written t o indicate
the end of data (EXB-8500c, and EXB-8500, and EXB-8200c format tapes only).
3. The tape is rewound to the physical beginning of tape (PBOT).
4. The tape is unloaded from the tape path.
5. The data cartridge is ejected.
3.7 Error During Unload Procedure
If an error exists before or during the unload procedure, the unload sequence will be
suspended and the top amber LED will flash. If the unload button is pressed again, the
unload sequence will be re-attempted; however, unwritten data in the buffer will not be
written to tape. The buffer and errors will be cleared.
Order Number: EK–STWCT–UG. E01 3–5
Page 21

4
Cleaning the Cartridge Tape Drive
This chapter describes how to use the cleaning cartridge to clean the tape heads and tape path of the
StorageWorks 8505 8mm Cartridge Tape Drive .
The heads and tape path of the StorageWorks 8505 8mm Cartridge Tape Drive should be
cleaned on a regular basis. The only cleaning material recommended for use with the
tape drive is an approved 8mm cleaning cartridge. (Additional cleaning cartridges can be
ordered as described on page
Except for cleaning, as described in Section 4.1 and 4.2, the tape drive needs no
preventive maintenance or user serviceable adjustments. If an excessive number of errors
begin occurring, however, you may find the procedure described in Section 4.3 useful.
Using cloth swabs, cotton swabs, cleaning agents, or cleaning
cartridges is not recommended and will void the warranty on
the tape drive.
viii, in the "About This Guide" section of this document.)
CAUTION
4.1 Determining When the Tape Drive Needs Cleaning
You should clean the tape drive’s heads and tape path after every 30 hours of tape
motion. This cleaning frequency does not depend on the format in which you write and
read data. However, if you are using the tape drive in a particularly dirty environment, or
if you operate it infrequently, you may want to clean the tape drive more often than every
30 hours of tape motion. Cleaning the tape drive helps ensure that it will perform
according to its specifications.
The tape drive keeps track of tape motion hours internally. When 30 hours of tape
motion have elapsed, the top and bottom LEDs will flash rapidly and the middle LED
will flash irregularly, depending on SCSI bus activity. For best results, clean the tape
drive as soon as possible after the LEDs begin flashing.
Order Number: EK–STWCT–UG. E01 4–1
Page 22

StorageWorks 8505 8mm Cartridge Tape Drive
4.2 Using the 8mm Cleaning Cartridge
To prevent contamination of the tape drive and damage to the
heads, do not use the cleaning cartridge for more than the
number of cleaning cycles specified on the cartridge label.
Discard the cleaning cartridge after you have used it for the
specified number of cleaning cycles. Do not attempt t o rewind
the material in the cleaning cartridge and re-use it.
To use the 8mm cleaning cartridge, proceed as follows:
1. Ensure the tape drive is powered on. Remove any tape cartridge from the drive.
2. Check the usage record on the label of the cleaning cartridge t o make sure there is at
least one cleaning cycle remaining (see Figure 4–1). If there are no cleaning cycles
remaining, discard the cleaning cartridge and use a new one.
3. Insert the cleaning cartridge in the tape drive. The remainder of the cleaning cycle is
performed automatically by the tape drive. When the cleaning cycle is complete, the
cartridge is unloaded and ejected from the tape drive. The cleaning cycle may range
from 2 to 3 minutes.
CAUTION
4. To confirm that a cleaning was done, look at the LEDs on the front panel. If the
cleaning cycle was successful, the top and bottom LEDs will be off. If the cleaning
cycle was not performed, the LEDs will continue to flash.
5. If the cleaning cycle was successful, record the date the cleaning was performed on
the cleaning cartridge label, as shown in Figure 4–1. Store the cleaning cartridge for
future use if it still has cycles remaining.
NOTE
If there are no more cleaning cycles remaining for the
cleaning cartridge, it will be ejected when you load it.
4–2 Order Number: EK–STWCT–UG. E01
Page 23

Figure 4–1 Cleaning Cartridge
Chapter 4 Cleaning the Cartridge Tape Drive
4.3 Exercising the Cartridge Tape Drive
You might find it useful to perform the procedure described in this section if either of the
following two situations exists:
• Application software is reporting abnormal data errors when reading or writing to the
cartridge tape drive with a known good tape cartridge.
• The cartridge tape drive has been stored for six months or more, and you get a large
number of data errors when you begin using the drive.
This procedure thoroughly exercises the tape drive and thus ensures that the drive’s
internal lubrication is properly distributed:
1. Apply power to the tape drive. This is accomplished by applying power to the
storage subsystem that houses the drive (i.e., drive expansion pedestal or desktop
expansion unit). The drive performs its power-on initialization and self-test (POST).
Assuming that no data cartridge is loaded and that the tape drive is connected
correctly, POST takes about 30 seconds as follows:
• During the first part of POST, all three LEDs will be lit.
• During the second part of POST, the top amber LED will be lit and the middle and
bottom LEDs may flash, depending on whether the drive is connected to the SCSI
bus and a data cartridge is loaded.
NOTES
Do not insert a data cartridge into the tape drive while POST
is occurring because the drive will automatically eject it.
If the top amber LED does not go out after the power-on
initialization and self-test are complete, an error has occurred.
Contact your vendor.
Order Number: EK–STWCT–UG. E01 4–3
Page 24

StorageWorks 8505 8mm Cartridge Tape Drive
2. Locate a data cartridge and ensure that its write-protect switch has been set correctly
for the desired operation.
3. Insert the data cartridge into the tape drive with the label side up and the
write-protect switch facing you.
4. Wait while the drive loads the tape and positions it at LBOT (Logical Beginning of
Tape). This takes about 35 seconds.
NOTE
All three LEDs will be
bottom LED will
When the bottom LED is on continuously, the drive is ready.
off
for the first 8 seconds. Then, the
flash
to indicate that the tape is being loaded.
5. Perform a write operation to write approximately 500 MBytes of data to the tape.
You can perform the write operation with a system command or utility, or with your
back-up software. If you use your back-up software, be sure you write to a hard drive
scratch area.
6. Rewind the tape and then read the data written on the tape in step 5.
7. Repeat steps 5 and 6 at least two times or for two hours, whichever is greater.
NOTE
If the tape has been stored for a long period, errors may occur
during the break-in period. If an error occurs, reset the drive
and repeat steps 5 and 6 as appropriate.
When you have completed step 7, the tape drive is ready for normal operation. If errors
persist, please contact your vendor.
4–4 Order Number: EK–STWCT–UG. E01
Page 25

Product Specifications
This appendix lists the product specifications for the StorageWorks 8505 8mm Cartridge Tape Drive.
Read & Write Format
Recording Format — 8mm Helical-Scan Digital Computer Tape
Head Configuration — Read-after-write head pairs with separate full-width erase head
Linear Density
8500 mode — 45434 bpi
8200 mode — 43271 bpi
Track Density
8500 mode — 1638 tracks per inch
8200 mode — 819 tracks per inch
A
Area Density
8500 mode — 74 million bits/sq. inch
8200 mode — 35 million bits/sq. inch
Formatted Capacity with a TKZ8x (112 meter tape)
5000 MBytes (native)
10,000 MBytes (compressed)
Controller Features
Integrated SCSI Controller and Formatter
Standard SCSI Interface Connection (single-ended)
Onboard Error Correction Code (ECC) — (ECC: Reed-Solomon Product Code)
Error Recovery Procedures (ERP)
Transfer rate (peak):
5.0 MBytes/sec. synchronous
2.5 MBytes/sec. asynchronous
1
1
Compression capacity and throughput ratios will vary dependent upon type of data.
Order Number: EK–STWCT–UG. E01 A–
1
Page 26

StorageWorks 8505 8mm Cartridge Tape Drive
Transfer rate (sustained):
500 KBytes/sec. (native)
1 MBytes/sec. (compressed)
1
Power on diagnostics: approximately 30 seconds
Buffer size: 1 MByte
Max. search speed:
realized
1
7.5 MBytes/sec. (native): a search speed increase of up to 5x may be
Reliability
Non-recoverable error rate: Less than one in 10
MTBF: 80,000 hours
MTTR: < 30 minutes
Tape Motion
Tape speed: 0.436 ips
Effective head-to-tape speed: 150 ips
Max. rewind speed: 75 times nominal
17
bits read
Media
8mm data cartridge (Digital part number TKZ8x)
ANSI/ISO/IEC 11319-1992 and ECMA-145
8mm wide magnetic tape cartridge for information exchange
Cleaning Cartridge
Exabyte-approved 8mm cleaning cartridge
SCSI Command Set
Test Unit Ready
Rewind
Request Sense
Read Block Limits
Read
Write
Write Filemarks
Inquiry
Space
Recover Buffered Data
Mode Select
Reserve Unit
Release Unit
Erase
A–2 Order Number: EK–STWCT–UG. E01
Page 27

SCSI Command Set (Cont'd)
Mode Sense
Load/Unload
Receive Diagnostic Results
Send Diagnostics
Prevent/Allow Medium Removal
Verify
Locate
Read Position
Log Sense/Log Select
Environment
Operating temperature: +5°C to +40°C (+41°F to 104°F)
Non-operating temperature: -40°C to +60°C (-40°F to +140°F)
Relative humidity (noncondensing): 20% to 80%
Appendix A Product Specifications
SCSI Characteristics
SCSI-2 Specification — ANSI X3.131-1990
Sequential Access Device
SCSI Bus Parity — Configurable
Full Disconnect, Arbitration, Reconnect
Asynchronous and Synchronous Data Transfer Supported
Connector Type — Standard StorageWorks Connector
Termination — None
Single-Ended
Physical Dimensions (Tape Device)
Standard 5.25-inch half-high form factor
Height: 1.625 inch
Width: 5.750 inch
Depth: 8.0 inch
Weight: 2.57 pounds
Power (For One Tape Device)
+5/ +12 volts plus or minus 5%
15 watts
Order Number: EK–STWCT–UG. E01 A–3
Page 28

B
Product Notes for Novell,™ MS-DOS,™and Windows NT
™
This appendix provides information for the system administrator. It should be read before installing and using the
SWXTE tape drive SBB with a host system operating under the Novell, MS-DOS, MS-DOS/Windows or
Windows NT operating systems.
The StorageWorks 8505 8mm Cartridge Tape Drive is available as three packaging options:
SWXTE–AA, SWXTE–AB, and SWXTE–AC. These options are referred to collectively in this
appendix by the name SWXTE. (Section 1.2 of this guide summarizes these packaging options
and defines SBB.)
The SWXTE tape drive SBB utilizes the standard SCSI-2 command set to interface to the PCbased host system. Thus, the host system must be equipped with a SCSI adapter to properly
interface the tape drive with the host. For example, the host SCSI adapter might interface the
computer’s EISA bus to the SCSI-2 port of the SBB.
A host PC SCSI adapter is normally supplied with a compatible software driver for use with its
operating system. When operating under the Novell and MS-DOS or MS-DOS/Windows
operating systems, the software driver must be pre-loaded according to the SCSI adapter
manufacturer’s installation procedure to ensure a proper interface between the tape drive S BB
and the host. In addition, a user-level tape read/write software program may be required to
implement tape support under the Novell, MS-DOS, MS-DOS/Windows, or Windows NT
environments. There are many commercial software products available that provide host or
network-based data backup and restore, archiving, data logging, etc. functionality for these
operating systems.
Before purchasing a user-level software product, ensure that the tape drive SBB is supported by
that product (see note below). Commercial software vendors usually publish a supported
hardware list, or have telephone technical support personnel that will answer questions regarding
compatibility of a particular tape drive or other storage devices. When choosing a software
product suitable for your application, follow the software vendor’s installation procedure to
implement support for your tape drive SBB.
This product is supported under Windows NT, versions 3.1 and 3.5, by adding the "Exabyte
8500 series (SCSI-2)" tape device option. Follow the Windows NT "Add/Remove Tape Devices"
procedure to add this support.
Finally, if your host is operating under Novell Netware, Novell, Inc. provides a software product
called “Server Backup” with some of its operating system products. This program has been found
to work well with the SWXTE tape drive SBB.
NOTE
The SWXTE–AA, SWXTE–AB, and SWXTE–AC tape drive packaging
options are functionally equivalent to the EXABYTE model 8505 10 GB
8mm tape drive. Commercial software products that support the 8505
will usually work with the SWXTE.
Order Number: EK–STWCT–UG. E01 B–1
Page 29

C
Product Notes for Sun
This appendix describes how to include cartridge tape drive SWXTE in a SUN SPARC system running
Solaris 2.3 (or later) and SunOS 4.1.x. The information covers the installation of the SWXTE tape drive
hardware and configuring the system to communicate with the drive.
™
C.1 Modifications Required for SunOS 4.1.x
C.1.1 Installation Procedure
NOTES
1. The SWXTE designation in the following procedure is the
StorageWorks product name for "Exabyte EXB-8505".
2. In order to support the addition of this device, drive
information must be supplied in the
/sys/scsi/targets/st_conf.c file. For additional
information, read the man pages for "st".
Perform the following steps to modify the system to communicate with the SWXTE
tape drive:
• From the command line, type:
cd /sys/scsi/targets
• Edit the "st_conf.c" file and carefully add the following structure before the
entry for "/* Exabyte 8mm 5GB cartridge */":
/* DEC EXB-8505 8mm /w Compression Cartridge tape drive */
{
"DEC EXB-8505 8mm Helical Scan /w Compression", 16 , "EXABYTE EXB-8505",
ST_TYPE_EXB8500, 1024,
(ST_BSF | ST_VARIABLE | ST_BSR | ST_LONG_ERASE),
5000, 5000,
{ 0x14, 0x90, 0x15, 0x8C },
{ 0, 0, 0, 0 }
},
• Verify that the above entry is added to the st_conf.c file correctly.
where:
Order Number: EK–STWCT–UG. E01 C–1
Page 30

StorageWorks 8505 8mm Cartridge Tape Drive
– the first string (DEC EXB-8505 8mm Helical Scan /w Compression) is the
name given to the drive.
– the second string (
16) is the length of the vendor ID provided by the SCSI "inquiry"
command.
– the third string (
– the fourth string (
– the fifth string ((
– the sixth string (
– the seventh string (
– the eighth string (
ST_TYPE_EXB8500) is the drive type for the driver.
1024) is the block size in bytes.
ST_BSF . . .) is drive options.
5000) is the maximum read retries.
5000) is the maximum write retries.
0x14, 0x90, 0x15, 0x8C) is the density codes (low
à
hi) as
defined below:
- 0x14 is the vendor-unique density code for the EXB-8200 in the uncompressed mode.
- 0x90 is the vendor-unique density code for EXB-8200c in the compressed mode.
- 0x15 is the vendor-unique density code for the EXB-8500 in the uncompressed mode.
- 0x8C is the density code for the EXB-8500c in the compressed mode.
– the ninth string (0,0 . . .) is the speed code (not used).
After you have edited the "st_conf.c" file and added the above entry, rebuild the
kernel using the standard procedure (for further help, refer to the man pages of
config).
Install the tape SBB into the StorageWorks enclosure and power on the system. We
recommend that the SWXTE SCSI device address be set to ID 4 or 5.
NOTE
If your SCSI host adapter is supported by the “probe-scsi”
command, then it may be used to verify at the boot prompt
that the connected device is correctly attached to the system.
Reboot the system using the following command at the boot prompt:
>boot
The system reboots with the newly compiled kernel and creates special files in /dev so
that it can communicate with the SWXTE. Verify that “DEC EXB-8505 8mm
Helical Scan /w Compression” is displayed as a target when the system is
booting.
C–2 Order Number: EK–STWCT–UG. E01
Page 31

Appendix C Product Notes for Sun
At this time the tape is configured in the /dev directory with "rst" (rewind on close) and
"nrst" (no rewind on close) format. For example, if the target SCSI ID for the SWXTE
is 4, then "rst" will be "rst4, rst12, rst20, rst28"; nrst will be "nrst4, nrst12,
nrst20, and nrst28".
• rst4 and nrst4 correspond to the 0x14 density mode (8200, uncompressed format)
• rst12 and nrst12 correspond to the 0x90 density mode (8200c, compressed format)
• rst20 and nrst20 correspond to the 0x15 density mode (8500, uncompressed format)
• rst28 and nrst28 correspond to the 0x8C density mode (8500c, compressed format)
To test the SWXTE drive, back-up the file “passwd” file to tape using the “tar”
command as follows:
tar cvf /dev/rst4 /etc/passwd
The system responds with:
a /etc/passwd 1 blocks
Note that depending on the size of the file, a different number of blocks may be reported.
™
Verify that the “passwd” file was saved to tape using the following command:
tar tvf /dev/rst4
The system responds with:
/etc/passwd
The installation and verification procedure is now complete.
C.2.2 Information
C.2.2.1 Operation with SPARC Server 4/470 and 4/490
The tape drive will operate normally on SPARCserver™ 4/470 and 4/490 running
SunOS 4.1.2 with the following limitations:
• There is no way to mode-select the drive to write in low-density (2.0 GB format)
mode.
• The tape drive will automatically write in high-density (5.0 format) mode from any
position on new media or media previously written in low-density mode.
• The tape drive will automatically write in low-density mode from anywhere other
than the beginning of tape or media that has been previously written in low-density
mode.
Order Number: EK–STWCT–UG. E01 C–3
Page 32

StorageWorks 8505 8mm Cartridge Tape Drive
C.2.2.2 Dump Parameters for the Tape Drive
The parameters that should be used when running the dump utility with the SWXTE tape
drive are:
density = 54000 (BPI)
size = 6000 (112 meter tape) in 8200 mode
size = 13000 (112 meter tape) in 8500 or 8500c mode
blocking factor = 126
Example 1
The following example shows backing-up the entire disk partition onto the SWXTE tape
drive:
dump 0dsbf 54000 13000 126 /dev/rst20 /dev/sd0g
Example 2
The following example shows backing-up the "/usr" partition on disk sd2g onto the
SWXTE tape drive assigned as "rst4", in the low-density mode. The following would
be useful if you want to read the tape in an EXB-8200 drive which uses the size (s) of
6000.
dump 0dsbf 54000 6000 126 /dev/rst4 /dev/sd2g
For further help, refer to the man pages of dump.
C–4 Order Number: EK–STWCT–UG. E01
Page 33

Appendix C Product Notes for Sun
C.2 Modifications Required for Solaris™ 2.3 (or later)
C.2.1 Installation Procedure
NOTES
1. The “SWXTE” designation in the following procedure is the
StorageWorks product name for Exabyte EXB-8505.
2. In order to support the addition of this device, drive
information must be supplied in the
global properties that apply to each of the targets, or as
properties that are applicable to one target only. The "st
driver" looks for the property called "tape-config-list". For
additional information, read the man page “st”. We
recommend here the use of the global properties approach.
Perform the following steps to modify the system to communicate with the SWXTE
tape drive:
/kernel/drv/st.conf
™
file as
• From the command line, type:
cd /kernel/drv
• Edit the “st.conf” file by adding the following before the first occurrence of
“name=":
# entry for 8505 tape drive
tape-config-list = "EXABYTE EXB-8505", "DEC EXB-8505 8mm Helical Scan /w Compression”,
“swxte-data”;
swxte-data = 1,0x35,1024,0x1639,4,0x14,0x90,0x15,0x8C,3;
where:
In the “tape-config-list” string:
– The first string (
EXABYTE EXB-8505) is the string returned by the SWXTE on a
SCSI inquiry command.
– The second string (
DEC EXB-8505 8mm Helical Scan /w compression) is
the nick name for the SWXTE drive. This string will be displayed on the console
during boot.
– The third string is defined as follows:
In the “swxte-data” string:
– The first parameter (
1) is the revision level of the software and is set to 1
(limitation on Sun operating systems).
– The second parameter (
This is defined
Order Number: EK–STWCT–UG. E01 C–5
in /usr/include/sys/mtio.h.
0x35) is the tape type, specifying 8mm tape drive.
Page 34

StorageWorks 8505 8mm Cartridge Tape Drive
– The third parameter (1024) is the block size in bytes.
– The fourth parameter (
following options:
ST_VARIABLE = 0x0001
ST_BSF = 0x0008
ST_BSR = 0x0010
ST_LONG_ERASE = 0x0020
ST_KNOWS_EOD = 0x0200
ST_UNLOADABLE = 0x0400
ST_LONG TIMEOUTS = 0x1000
These options are equal to the fourth parameter, 0x1639.
– The fifth parameter (
number of densities is 4 (limitation on Sun operating systems).
– The sixth parameter (
uncompressed mode.
– The seventh parameter (
in the compressed mode.
– The eight parameter (
(uncompressed mode).
– The ninth parameter (
compressed mode.
0x1639) defines the options selected. 0x1639 represents the
4) defines the number of densities. The maximum definable
0x14) is the vendor-unique density code for EXB-8200 in the
0x90) is the vendor-unique density code for EXB-8200c
0x15) is the vendor-unique density code for the EXB-8500
0x8C) is the default density code for the EXB-8500c in the
– The last parameter in the swxte-data string is the default density 3, EXB-8500c in
the compressed mode.
After you have edited the “st.conf” file, shut down the system as follows:
cd /
shutdown -i0 -g0 -y0
Install the tape SBB into the StorageWorks enclosure and power on the system. We
recommend that the SWXTE SCSI device address be set to ID 4 or 5.
NOTE
If your SCSI host adapter is supported by the “probe-scsi”
command, then it may be used to verify that the connected
device is correctly attached to the system.
Reboot the system using the following command at the boot prompt:
>boot -rv
Note that the switch "r" forces the kernel to be re-configured, and switch "v" enables a
display of the system configuration at boot time.
C–6 Order Number: EK–STWCT–UG. E01
Page 35

Appendix C Product Notes for Sun
The system compiles the kernel and creates special files in /dev so that it can
communicate with the SWXTE. Since you booted the system using the verbose switch,
the system displays all of its SCSI targets. Verify that “DEC EXB-8505 8mm
Helical Scan /w Compression” is displayed as a target when the system is
booting.
At this time, the tape drive is configured in the /dev directory in two ways: rmt format,
and rst format.
“rmt” format
In this format, the drive is configured with various options. For further explanations, see
the man pages on “st” (the modes are x, xl, xm, xh, xc, and xu, where x is the rmt
number).
• Options x, xu, and xc, correspond to the 0x8C, (EXB-8500c, compressed) density
mode.
• Option xl, corresponds to the 0x14 (EXB 8200, uncompressed) density mode.
• Option xm corresponds to 0x90 (EXB-8200c, compressed) density mode.
• Option xh corresponds to 0x15 (EXB-8500, uncompressed) density mode.
™
• Option b associates with the BSD behavior and is for backward compatibility on all
of the above options. For further information, refer to the man pages of “mtio”.
• The n option provides access t o the device with no rewind, similar to nrst (below),
and is also applicable to all of the above options.
“rst” format
Special files “rst” (rewind on close) and “nrst” (no rewind on close) are also built and
reside in the /dev directory. For example, if the SCSI target ID for the SWXTE is 4, then
“rst” will be “rst4, rst12, rst20, and rst28,”; nrst will be “nrst4, nrst12, nrst20, and
nrst28”.
• rst4 and nrst4 correspond to the 0x14 density mode (EXB-8200, uncompressed
format)
• rst12 and nrst12 correspond to the 0x90 density mode (EXB-8200c, compressed
format)
• rst20 and nrst20 correspond to the 0x15 density mode (EXB-8500, uncompressed
format)
• rst28 and nrst28 correspond to the 0x8C density mode (EXB-8500c, compressed
format)
To test the SWXTE drive, back-up the file “passwd” to tape using the “tar”
command as follows:
tar cvf /dev/rst4 /etc/passwd
The system responds with:
a /etc/passwd 1 blocks
Note that depending on the size of the file, a different number of blocks may be reported.
Order Number: EK–STWCT–UG. E01 C–7
Page 36

StorageWorks 8505 8mm Cartridge Tape Drive
Verify that the “passwd” file was saved to tape using the following command:
tar tvf /dev/rst4
The system responds with
/etc/passwd
The installation and verification procedure is now complete.
C.2.2 Running SUN Diagnostics (Optional)
The diagnostic exerciser provided by the Sun operating system (“sundiag”) does not
support the generic 8mm tape device configuration. In order to run “sundiag”, you must
modify the st.conf file in the /kernel/drv directory. Change the “tape type” in
the swxte-data string from 0x35 (generic 8mm tape drive) to 0x29 (Exabyte 8500
8mm cartridge) and re-boot the system with the “boot -r” option. You can now run
“sundiag” when the system is up and running.
Remember to change the “tape type” back to 0x35 and
re-boot the system with the “boot -r” option after running
“sundiag”.
CAUTION
C.2.3 Dump Parameters for the Tape Drive
The parameters that should be used when running the "ufsdump" utility with the
SWXTE tape drive are as follows:
density (d) = 54000 (BPI)
size (s) = 13000 (112 m tape)
Example,
The following string is an example of how to back-up the entire disk partition onto the
SWXTE tape drive:
ufsdump 0dsf 54000 13000 /dev/rst20 /dev/sd0g
C–8 Order Number: EK–STWCT–UG. E01
Page 37

D
Product Notes for IBM™ RS/6000
This appendix provides information for the system administrator. It should be read before installing and using the
SWXTE tape drive SBB with a host system with the AIX 3.2.5 (or later) operating system.
D.1 Modifications Required to Operate the SWXTE with AIX 3.2.5 (or later)
After the SWXTE tape drive has been properly attached to the SCSI bus, install the device using
"smit" or by executing specific commands while logged into the root account. Section D.1.1
below describes how to install the tape drive using the fast-path command (smit dev).
Section D.1.2 describes how to install the device using the command-line interface.
D.1.1 Installing the SWXTE Using the SMIT Command
From the command line, type:
# smit dev
Select menu entry "Configure the devices you have added after the IPL".
Select menu entry "Change/show the characteristics".
a) Select the entry that matches the controller and target ID of your installation.
Example: rmt1 available 00–03–00–50 other SCSI tape drive
where 3 is the SCSI controller number and 5 is the SCSI target ID
b) On the menu, change the settings of the "BLOCK size", "DENSITY setting #1", and
"DENSITY setting #2". Density codes are listed in Section D.1.2 below. For IBM
compatibility, set the block size to "1024".
c) Accept the changes.
D.1.2 Installing the SWXTE Using Command-Line Interface
From the command line, type:
# cfgmgr
To determine which rmt has been added, type:
# lsdev –Cc tape
Order Number: EK–STWCT–UG. E01 D–1
Page 38

StorageWorks 8505 8mm Cartridge Tape Drive
Example:
# lsdev –Cc tape
Name Status Location Description
rmt0 Available 00–03–00–50 Other SCSI Tape Drive
Next, type:
# chdev –l <rmt*> –a density_set_1=<DENSITY_1> –a density_set_2=<DENSITY_2>
Example:
# chdev –l rmt0 –a density_set_1=140 –a density_set_2=20
rmt0 changed
Finally, type the following:
# chdev –l <rmt*> –a block_size=<SIZE>
Example:
# chdev –l rmt0 –a block_size=1024
rmt0 changed
where,
<rmt*> is the tape drive added as shown by the lsdev command.
<SIZE> is the fixed block size (0 = variable, 1024 is suggested).
<DENSITY_1> (140 suggested) and DENSITY_2 (20 suggested).
Code Density Code Meanings
0 for EXB-8500, compression on, suppress density error checking.
20 for EXB-8200, density error checking enabled.
21 for EXB-8500, density error checking enabled.
127 for current density, suppress density error checking.
140 for EXB-8500, compression on, density error checking enabled.
144 for EXB-8200, compression on, density error checking enabled.
The files that are created are:
Tape Drive Special File Characteristics
Special File Name Rewind-on-Close Retention-on Open Bytes-per-Inch
/dev/rmt*
/dev/rmt*.1
/dev/rmt*.2
/dev/rmt*.3
/dev/rmt*.4
/dev/rmt*.5
/dev/rmt*.6
/dev/rmt*.7
Yes No Density Setting # 1
No No Density Setting # 1
Yes Yes Density Setting # 1
No Yes Density Setting # 1
Yes No Density Setting # 2
No No Density Setting # 2
Yes Yes Density Setting # 2
No Yes Density Setting # 2
D–2 Order Nu
Page 39

Appendix D. Product Notes for IBM
RS/6000
NOTES
1. The values of density setting # 1 and # 2 are derived from tape
drive attributes that can be set using SMIT. Typically, density
setting # 1 is set to the highest possible density for the tape drive,
while density setting # 2 is set to a lower density. However, density
settings are not required to follow this pattern.
2. The
3. Most tape drives use 512-byte block size. The 8mm tape drive uses
density value
that does not support multiple densities. For tape drives that
support multiple densities, the
writing to the tape. When reading a tape, the drive defaults to the
density at which the tape is written.
a minimum block size of 1024 bytes. Using SMIT to lower the block
size will waste space.
is ignored when using a magnetic tape device
density value
only applies when
D.1.3 Using the SWXTE 8mm Tape Drive to Install AIX
Perform the installation procedure as described in AIX, version 3.2, Installation Guide
(SC23–2341), Chapter 1, ending after completing step F.5.c of the procedure.
If the tape device is displayed as "defined" instead of "available", then enter the following:
# mkdev –l <rmt*>
Example:
# mkdev –l rmt0
rmt0 Available
Continue with step F.5.d until the installation is completed.
NOTE
Always use an approved 8mm EXABYTE cleaning cartridge to clean
the tape heads and tape path of the SWXTE tape drive. An IBM
cleaning cartridge will not function properly with the SWXTE. Refer to
page
viii
of the "About This Guide" section of this document for
EXABYTE 8mm cleaning cartridge ordering information.
Order Number: EK–STWCT–UG. E01 D–3
Page 40

E
Product Notes for Hewlett-Packard
This appendix describes how to include the tape drive SBB in an HP 9000 Series 700 system running HP-UX
9.05 (or later) and Series 800 system running HP-UX 9.04 (or later). The information covers configuration of
the host system to communicate with the tape drive.
E.1 General Information
If the necessary drivers are not already built into your existing kernel, you will need to
rebuild your kernel.
When using the dump utility under HP-UX, you must supply the correct density code and
tape length size for dump to use in its calculations. Refer to Section E.2.2 for details. We
recommend a value of 126 for the blocking factor parameter.
Compression can be enabled/disabled at any time by selecting the appropriate device file
name. See Section E.2.1.3 and E.2.1.4 for device names.
E.2 Modifications Required for HP-UX 9.05 on Series 700 Systems and HP-UX 9.04
on Series 800 Systems
E.2.1 Installation Procedure
NOTES
The "EXB-85058SQANXR1" designation returned in response to
SCSI inquiry during performance of the following procedure is the
StorageWorks internal name for the tape drive, as incorporated in
and used by the firmware.
E.2.1.1 Installation of Tape Drive
After ensuring that the address of the tape drive does not conflict with the address of any
other device on that SCSI bus, install the tape drive into the StorageWorks enclosure and
power-on the workstation.
E.2.1.2 System Modification
Enter the System Administration Manager (SAM) as superuser. From the first-level menu,
choose Peripheral Devices. From the second-level menu, choose Tape Drives. The
system’s hardware will be scanned, and the available tape drives window will identify the
tape drive SBB as a SCSI tape drive with the appropriate hardware path. Highlight that
selection and then pull down the Actions menu and select the Add function. The program at
Order Number: EK–STWCT–UG. E01 E–1
Page 41

StorageWorks 8505 8mm Cartridge Tape Drive SBB
this time will check the kernel to determine if the necessary drivers are built in, displaying
the results.
If necessary, the program will rebuild the kernel. If this occurs, you will have to reboot the
system in order to use the tape drive.
For further information on adding tape devices, refer to Hewlett-Packard’s Installing
Peripherals manual, P/N B2355-40041.
E.2.1.3 Device Files (Series 700)
The System Administration Manager program automatically creates the appropriate device
files and places them in the /dev/rmt directory.
The following naming convention is used on Series 700 computers for the EXB-8505
Cartridge Tape System SBB, as shown in the examples listed below:
/dev/rmt/c#d#[hlmc][n][b]
where:
c# specifies the controller designation, which may contain either two or
three characters, specifies the following:
where # is sc[f], in accordance with the following:
s is the system bus module:
2 = core I/O (the default)
4 = EISA
c is the slot number:
0 for core I/O
4 for EISA
f is the function number. This value identifies the location on the core I/O
bus. For the single-ended SCSI interface, the value is 1. If you are using
the EISA bus, omit the f value.
d# designates the SCSI address of the tape drive, where # here identifies a
number value.
h/l/m/c indicates density, with h meaning high density (EXB8200c format), l
meaning low density (EXB8200 format), m meaning standard DDS
format (EXB8500 format), and c meaning data compression (EXB8500c
format.
n indicates no rewind.
b specifies Berkeley behavior.
E–2 Order Number: EK–STWCT–UG. E01
Page 42

Appendix D. Product Notes for Hewlett-Packard
Example:
If you were to install a tape drive SBB on the main (core) SCSI bus and in slot location 4 of
the StorageWorks SWXSE-02 expansion enclosure, the following device files would be
produced in /dev/rmt for a Series 700 computer:
c201d4c c201d4l c201d4cb c201d4lb
c201d4cn c201d4ln c201d4cnb c201d4lnb
c201d4h c201d4m c201d4hb c201d4mb
c201d4hn c201d4mn c201d4hnb c201d4mnb
E.2.1.4 Device Files (Series 800)
The System Administration Manager program automatically creates the appropriate device
files and places them in the /dev/rmt directory.
The following naming convention is used on Series 800 computers for the EXB-8505
Cartridge Tape Subsystem SBB, as shown in the examples listed below:
/dev/rmt/lu#_8mm{8200/8500}[n][c][b]
where:
lu# specifies the logical unit number of the tape drive as reported from the
ioscan-f command
n indicates no rewind
c indicates compressed data
b specifies Berkeley behavior
Example
If you were to install a tape drive SBB on the main (core) SCSI bus and in slot location 4 of
the StorageWorks SWXSE-02 expansion enclosure, the following device files would be
produced in /dev/rmt, assuming a logical unit number of 8:
8_8mm8200 8_8mm8200n 8_8mm8500 8_8mm8500n
8_8mm8200b 8_8mm8200nb 8_8mm8500b 8_8mm8500nb
8_8mm8200c 8_8mm8200nc 8_8mm8500c 8_8mm8500nc
8_8mm8200cb 8_8mm8200ncb 8_8mm8500cb 8_8mm8500ncb
E.2.1.5 Testing the Tape Drive
To test the tape drive, back up the “passwd” file to tape using the “tar” command, as follows
(assuming that you installed the drive in accordance with the preceding example):
tar cvf /dev/rmt/c201d4h /etc/passwd
or
tar cvf /dev/rmt/8_8mm8500c /etc/passwd
The system responds with something similar to the following:
a /etc/passwd 2 blocks
Note that depending on the size of the file, a different number of blocks may be reported.
Order Number: EK–STWCT–UG. E01 E–3
Page 43

StorageWorks 8505 8mm Cartridge Tape Drive SBB
E.2.1.6 Verification
Use the following command to verify that the “passwd” file was written to tape:
tar tvf /dev/rmt/c201d4h
or
tar tvf /dev/rmt/8_8mm8500c
The system responds with something similar to the following:
rw-r--r-- 0/10 535 Jan 14 16:31 1995 /etc/passwd
The installation and verification procedure is now complete.
E.2.2 Dump Parameters for the Tape Drive
The parameters that should be used when running the dump utility with the tape drive are:
density = 54000
size = choose from table
8200(c) 804 2893 6000
8500(c) 1741 6268 13000
15 m 54 m 112 m
blocking factor = 126 (recommended)
Example
The following example shows the command for backing up an entire disk partition onto the
tape drive, using a 112-meter tape:
dump 0dsbf 54000 13000 126 /dev/rmt/c201d4h /dev/dsk/c201d5s0
or
dump 0dsbf 54000 13000 126 /dev/rmt/8_8mm8500c /dev/vg00/rlvol5
For further help, refer to man pages of the dump command.
E–4 Order Number: EK–STWCT–UG. E01
Page 44

Page 45

Reader’s Comments
Manual Order Number:
EK-STWCT-UG. E01
8505 8mm Cartridge Tape Drive User's Guide
Digital is committed to providing the best possible products and services. Since our manuals are important
components of our products, we value your comments, corrections, and suggestions for improvements. Please take a
few minutes to fill out and return this form, attaching additional sheets, if needed. Thank you.
Manual Rating Excellent Good Fair Poor
Accuracy (correct presentation of facts) [ ] [ ] [ ] [ ]
Completeness (adequate information) [ ] [ ] [ ] [ ]
Clarity (easy to understand) [ ] [ ] [ ] [ ]
Organization (logical sequence of information) [ ] [ ] [ ] [ ]
Layout (easy to follow subject matter) [ ] [ ] [ ] [ ]
Indexing (easy to locate desired information) [ ] [ ] [ ] [ ]
Errors Noted (please include page, paragraph, table or figure number)
Most-Liked Features
Least-Liked Features
Suggestions for Improvement
Return Address:
Customer Research
Response Center
Attn: Nan Andrews Amish
Digital Equipment Corporation
334 South Street, SHR3-2/S27
Shrewsbury, MA 01545
Name Phone
Title
Company
Street Address
Mail Stop
City State ZIP
Country (if other than USA)
 Loading...