

Page 1

HP MediaSmart Server User's Guide
Page 2

Page 3

Table of Contents
Welcome to the HP MediaSmart Server 1
Chapter 1. Set up and Installation 3
What's in the Box?...........................................................................................3
The Server at a Glance ...................................................................................3
What You'll Need to Set up the Server............................................................4
Finding a Home for Your Server......................................................................5
Turning on the Server......................................................................................7
Installing the Software.....................................................................................9
HP Software Updates....................................................................................43
Chapter 2. Start Using Your Server 57
Guided Tour...................................................................................................57
First Steps......................................................................................................71
Getting Help for Using Your Server...............................................................90
Chapter 3. HP Photo Publisher 93
HP Photo Publisher Home Page...................................................................93
HP Photo Publisher Log on Page..................................................................94
Upload Photos or Create an Album...............................................................97
Select Photos.................................................................................................98
Server Continues Uploading........................................................................100
Snapfish.......................................................................................................100
Flickr............................................................................................................101
Facebook.....................................................................................................104
Picasa..........................................................................................................105
Chapter 4. HP Photo Viewer 107
HP MediaSmart Photo Viewer Home Page.................................................107
HP Photo Viewer Slideshow........................................................................108
Upload Photos or Create an Album.............................................................113
Select Photos...............................................................................................113
HP MediaSmart Photo Viewer Album Missing Photos................................115
Chapter 5. Features for Mac 117
Installing and Uninstalling Software on the Mac..........................................117
Updating and Rolling Back Mac Clients......................................................121
Connecting Your Mac to the Server............................................................123
HP MediaSmart Server Control Center for Mac..........................................129
Mac Backup and Restore............................................................................131
Chapter 6. Online Backup 137
Server Online Backup Features..................................................................137
Before Using Server Online Backup............................................................137
Server Online Backup Dashboard...............................................................137
Button Bar....................................................................................................139
Windows Home Server Settings..................................................................143
Chapter 7. About Streaming Media 147
Streaming Media .........................................................................................147
Streaming Media Requirements..................................................................147
Streaming Media Types...............................................................................147
iii
Page 4

HP MediaSmart Server User's Guide
Putting Media on the HP MediaSmart Server .............................................147
Streaming to your Television, Stereo, and Home PC..................................147
Streaming to a Remote Computer...............................................................148
Streaming to iTunes ....................................................................................148
Chapter 8. Server for iTunes 149
Settings for iTunes.......................................................................................149
Chapter 9. TwonkyMedia 151
Streaming Media Servers............................................................................151
TwonkyMedia Features...............................................................................152
TwonkyMedia Default Settings....................................................................154
UPnP A/V and DLNA...................................................................................155
TwonkyMedia and Remote Streaming........................................................155
Configure TwonkyMedia for Streaming Media............................................155
Chapter 10. Media Collector 157
About HP Media Collector...........................................................................157
Configuring Media Collector........................................................................159
Media Collection Status...............................................................................168
Chapter 11. HP Video Converter 177
About HP Video Converter..........................................................................177
Video Conversion Use Case Scenarios......................................................178
Automating Video Conversion.....................................................................179
Giving Users Access to the Converted Videos Folder................................181
Enabling Converted Videos for TwonkyMedia............................................182
Converting Non-Copy Protected DVDs.......................................................184
Supported Video Formats............................................................................185
Video Conversion Fails................................................................................186
Chapter 12. Media Streamer 189
About Media Streamer.................................................................................189
Media Streamer Pages................................................................................189
Music Page..................................................................................................190
Music Page—Album View...........................................................................190
Music Page—Artists View...........................................................................191
Music Page—Folders View.........................................................................192
Music Page—Playlists View........................................................................193
Music Page—Media Player.........................................................................193
Music Page—Tracks Panel.........................................................................194
No Music To Stream....................................................................................195
No music on your Server.............................................................................195
Photos Page................................................................................................195
Photos Page—Date View............................................................................195
Photos Page—Folder View .........................................................................196
Photos Page—Playlist View........................................................................197
Photos Page—Full Screen View.................................................................198
Videos Page ................................................................................................199
Videos Page – All View ...............................................................................199
Videos Page – Folders View .......................................................................200
Videos Page – Playlists View......................................................................201
Video Quality Filter......................................................................................202
Status link....................................................................................................203
Videos Page – Videos Panel.......................................................................203
Videos Page – Player..................................................................................204
iv
Page 5

Table of Contents
Chapter 13. Troubleshooting & FAQs 205
Errors & Lights.............................................................................................205
Network & Firewall.......................................................................................214
Power Management ....................................................................................226
Server Recovery and Factory Reset...........................................................226
Server Storage ............................................................................................235
Streaming Media .........................................................................................248
Chapter 14. Product Information 263
Product Specifications.................................................................................263
Regulatory Statements................................................................................267
WM-DRM 10 Licensed Technology.............................................................270
Limited Warranty and Technical Support Statement...................................271
HP MediaSmart Server 2.5 Update Read me.............................................275
Chapter 15. Licenses, Copyrights and Notices for Open Source
Components 277
FlickrJ: .........................................................................................................277
Software License Agreement (BSD License)..............................................277
Facebook Java API: The MIT License ........................................................277
Gdata Java Client: Apache License............................................................278
JCIFS : GNU LESSER GENERAL PUBLIC LICENSE ...............................281
Firefly: GPL License....................................................................................288
ImageMagick: Compatible with GPL...........................................................292
TaskScheduler: The Code Project Open License (CPOL) 1.02.................296
MiscUtil.dll: MiscUtil....................................................................................299
Facebook Development Platform Java Client.............................................300
Facebook API License.................................................................................301
Software License Agreement (BSD License)..............................................301
PacketVideo.................................................................................................302
Glossary 317
Index 321
v
Page 6

Page 7

Welcome to the HP MediaSmart Server
The HP MediaSmart Server protects and shares a household's digital content—giving connected
families an-easy-to-use, central repository for their digital photos, music, videos, and documents.
The HP MediaSmart Server supports computers running Microsoft® Windows® and Apple®
Mac® OS X, giving families that are "living the digital lifestyle" a more protected and reliable
way of managing their media and files.
The HP MediaSmart Server Provides:
• Mac and Windows Supported Operating Systems
Support for households that have a mix of Microsoft Windows and Mac OS X 10.5 or later
computers.
• HP Photo Viewer and HP Photo Publisher
A simple photo management and sharing tool that lets users share their photos directly from the
HP MediaSmart Server or through popular photo sharing web sites like Snapfish, Facebook,
Flickr™, and Picassa™ Web Albums.
Photo web site services are subject to change without notice and some services may not be
available at the time of product purchase. The available service providers may vary in your
country/region.
• Media Collector
Media Collector automatically collects photos, music, and video files from computers on the home
network and organizes them on the server. Available on PCs only.
• Media Streaming and Remote Media Streaming
Photos, videos, and music can be streamed to PCs or TVs in the house. Furthermore, you can
enjoy your photos, music, and videos—at home or at work—with remote media streaming to any
Internet-connected computer.
• PC Backup and Mac Backup
An automatic backup process for Windows PCs and Apple Macs on your home network.
Automatic backup of computers running Microsoft Windows® Vista (32 & 64 bit), XP Home
(SP2), XP Professional (SP2), Media Center Edition 2004 (SP2) or later, and Macs running Time
Machine.
• Remote Computer Access
Remote access to media and files with an easy-to-use, browser-based interface. With proper
authorization, a remote user can log into their home system and perform functions as if they were
sitting at their computer.
• iTunes Music Server
1
Page 8

HP MediaSmart Server User's Guide
Any computer system on the network that runs iTunes can access music on the HP MediaSmart
Server as an iTunes shared library.
• Disk Duplication and Storage Expansion
A way to transparently duplicate selected folders on separate disk drives to help protect against a
hard disk failure. Plus, it's easy to add storage as needs grow.
Requires at least two hard disks.
2
Page 9
Chapter 1. Set up and Installation
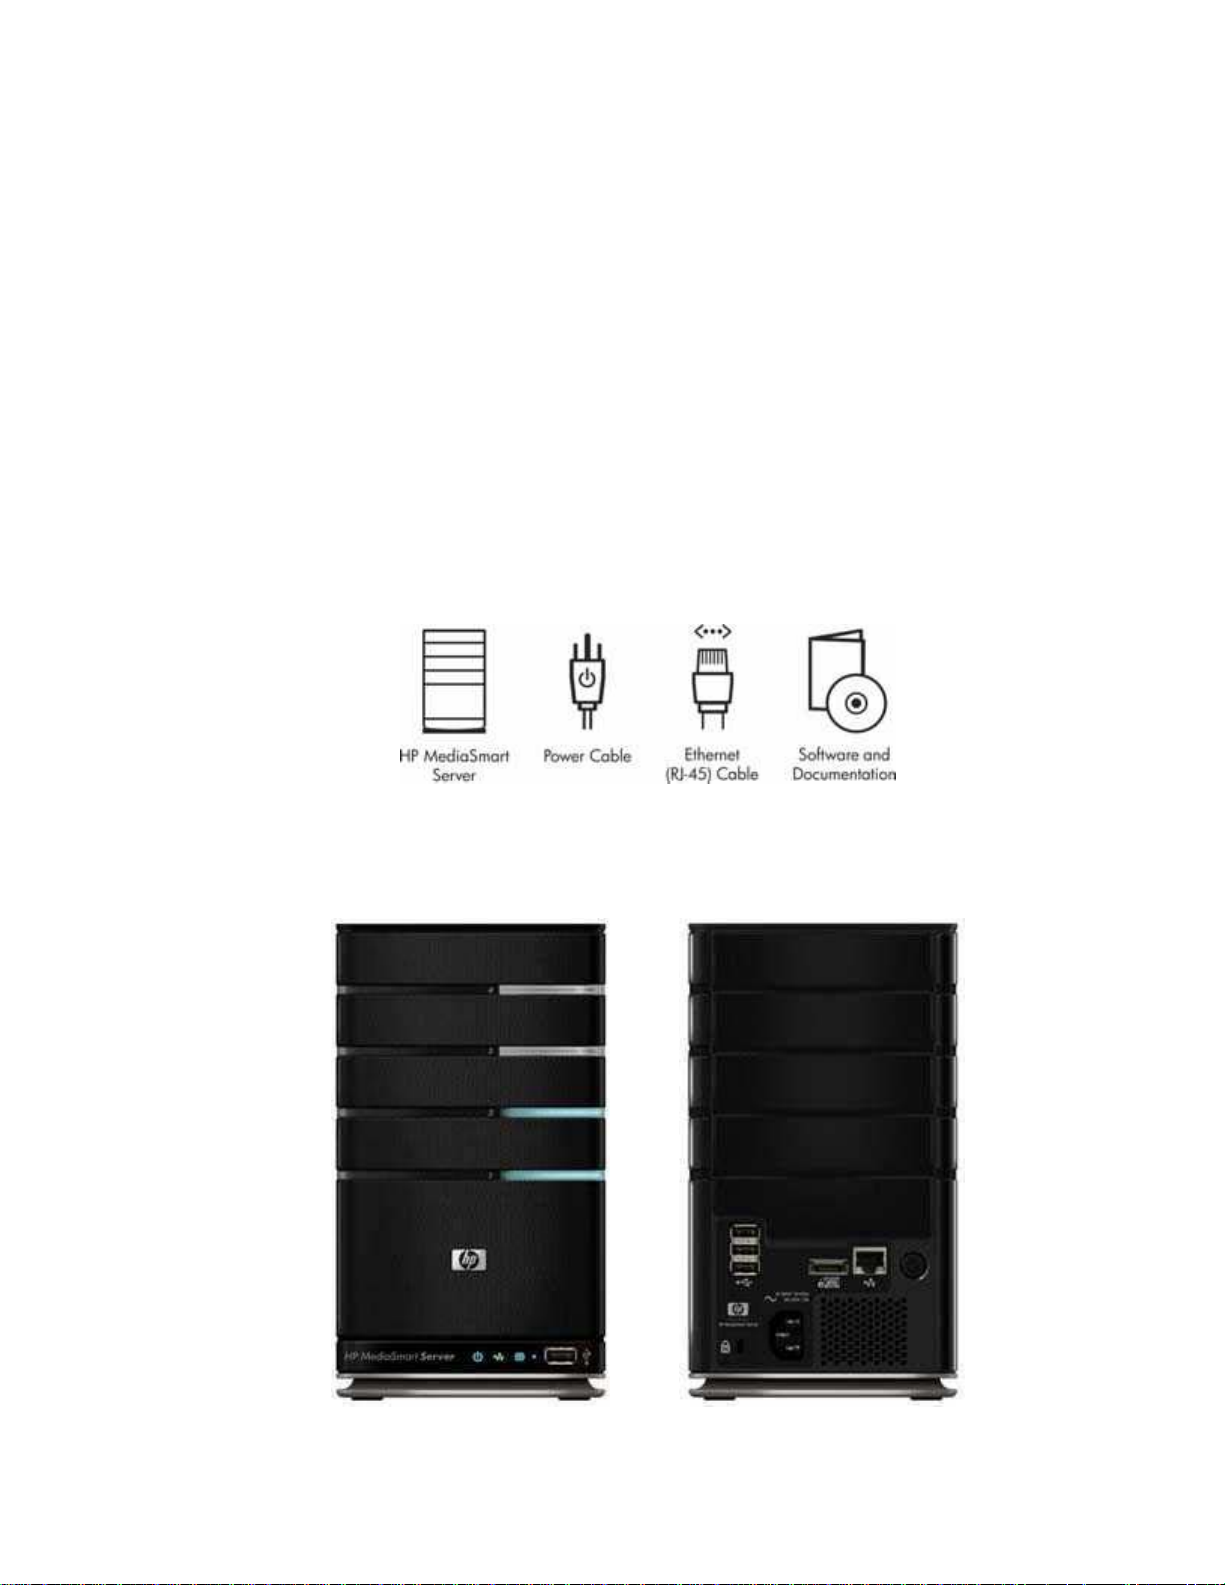
WHAT'S IN THE BOX?
In the box you will find:
• HP MediaSmart Server
• Power cord
• Ethernet (RJ-45) cable
• Software and Documentation
THE SERVER AT A GLANCE
The following lights and symbols are found on the front and back of the HP MediaSmart Server.
3
Page 10
HP MediaSmart Server User's Guide
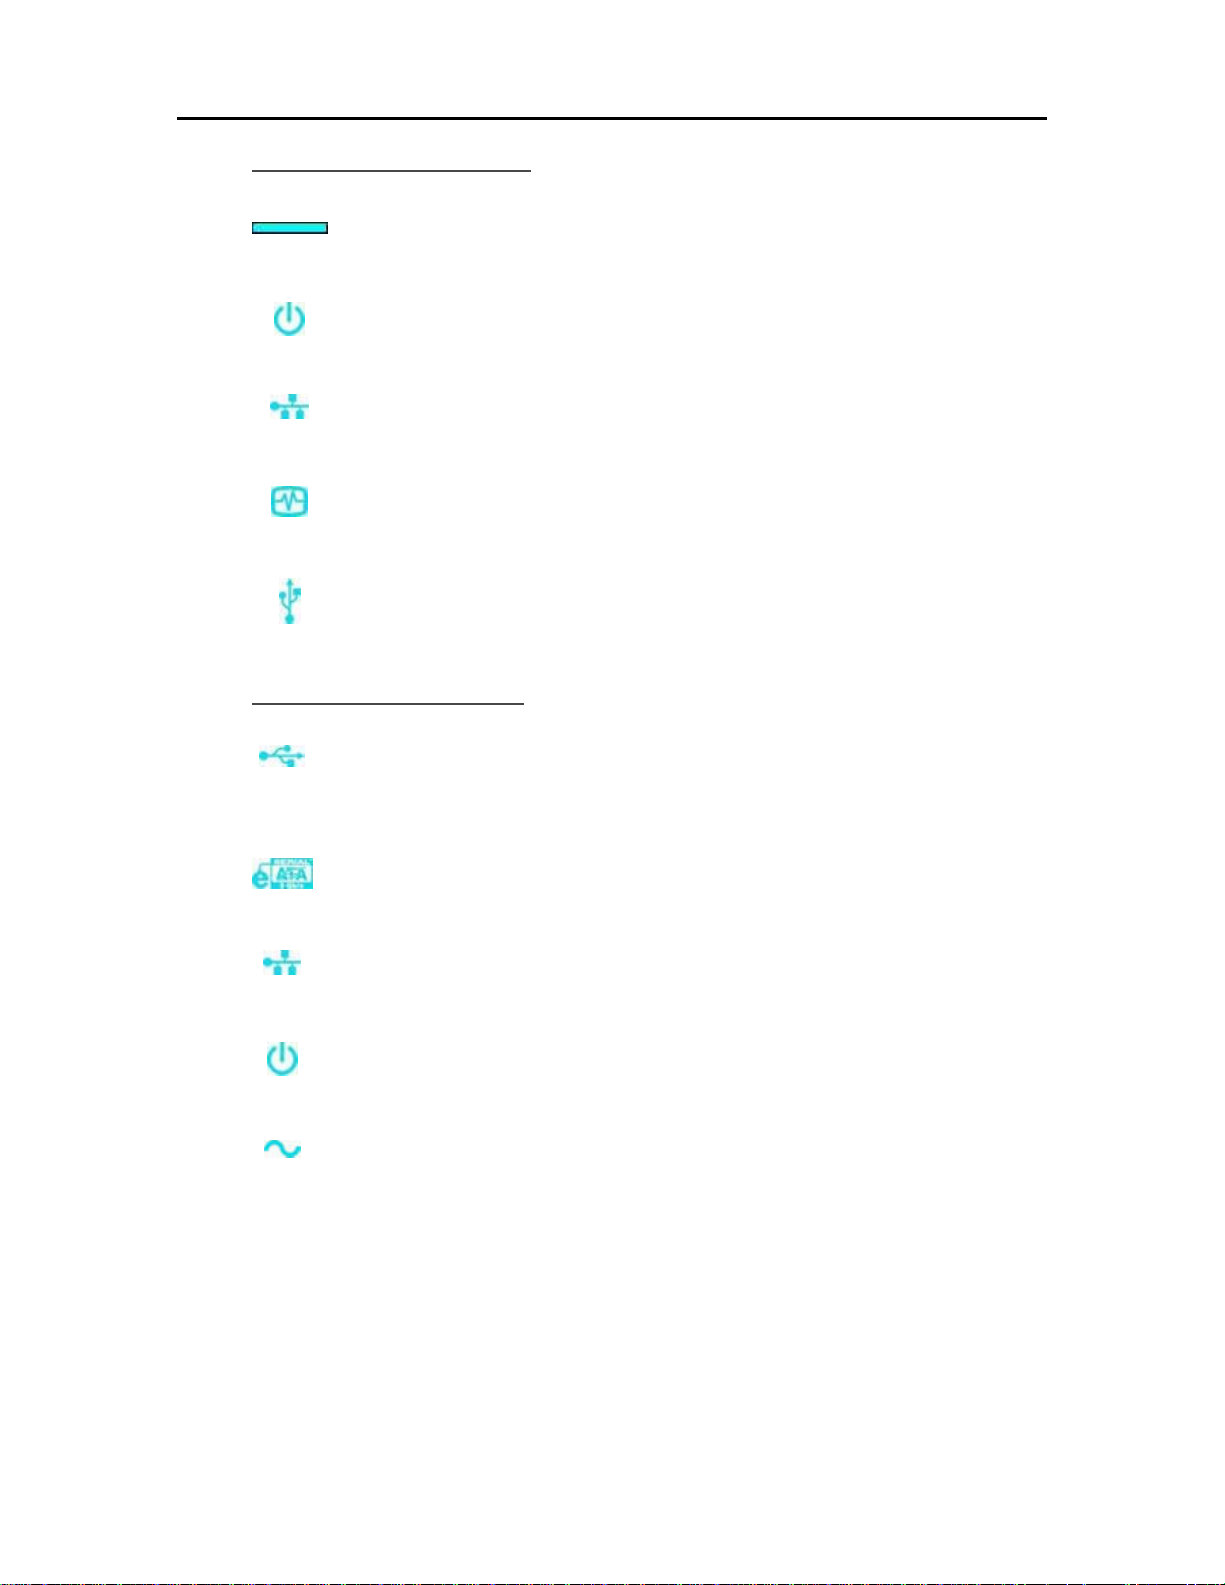
The Front of the Server
Light Bar. There is one light bar for each internal SATA disk in the HP
MediaSmart Server. The server can hold up to four disks.
Power Light. The power light is solid aqua white when the server is
turned on.
Network Connection Light. The network connection light is solid aqua
white when the server is connected to the network via a router or switch.
Health Light. The health light is solid aqua white when the server is
operating correctly.
USB Port. Plug up to four USB 2.0 or later disk drives into the USB
ports to expand your storage space. There is one USB port on the front
and three on the back of the server.
The Back of the Server
USB Port. Plug up to four USB 2.0 or later disk drives into the USB ports
to expand your storage space. There is one USB port on the front and
three on the back of the server.
eSATA Port. Plug an eSATA (external SATA) hard drive into the eSATA
port to expand your storage space.
Ethernet Port. Connect the HP MediaSmart Server to your network using
an Ethernet cable.
Power Switch. Press to turn the HP MediaSmart Server on.
Power Port. Plug the included AC power cord into the HP MediaSmart
Server.
WHAT YOU'LL NEED TO SET UP THE SERVER
One or more open ports on a router connected to your network. The HP MediaSmart Server must
be wired to the router. The network connection must support 100 Mbps to 1000 Mbps (Gigabit
Ethernet).
The router must have DHCP enabled to provide an automatic IP address to the server. See your
router's documentation for additi onal i nf ormation.
4
Page 11

Set up and Installation
• One or more computers running Windows XP, Windows Media Center Edition, or Windows Vista
for the first software installation. Optionally, an Apple Mac OS X 10.5 (Leopard) or later for
additional software installations.
• An Internet browser is required to run the HP MediaSmart Server software. Choose one from the
following options.
• Download Internet Explorer from http://www.microsoft.com/downloads
• Download Firefox from http://www.firefoxdownload.com/
• Download Safari from http://www.apple.com/safari/download/
• A broadband connection, such as DSL or cable, is required for remote access functionality.
• iTunes 7.1 or later is required for combining household music libraries and streaming music with
iTunes. Download iTunes from http://www.apple.com/itunes/download
.
.
.
.
FINDING A HOME FOR YOUR SERVER
Server Location
Find a suitable place to locate your HP MediaSmart Server before you install the software on your
computers. The location you choose must have either an available wired network connection to
your broadband router or a switch connected to your broadband router.
The server also requires adequate ventilation to ensure it does not get too hot:
• Do not locate the server in an unventilated space.
• Make sure that the server’s front and back panels are not blocked.
• Check that the location of the server is not too hot. Maximum environmental temperature for
operating the server is 35 °C (95 °F).
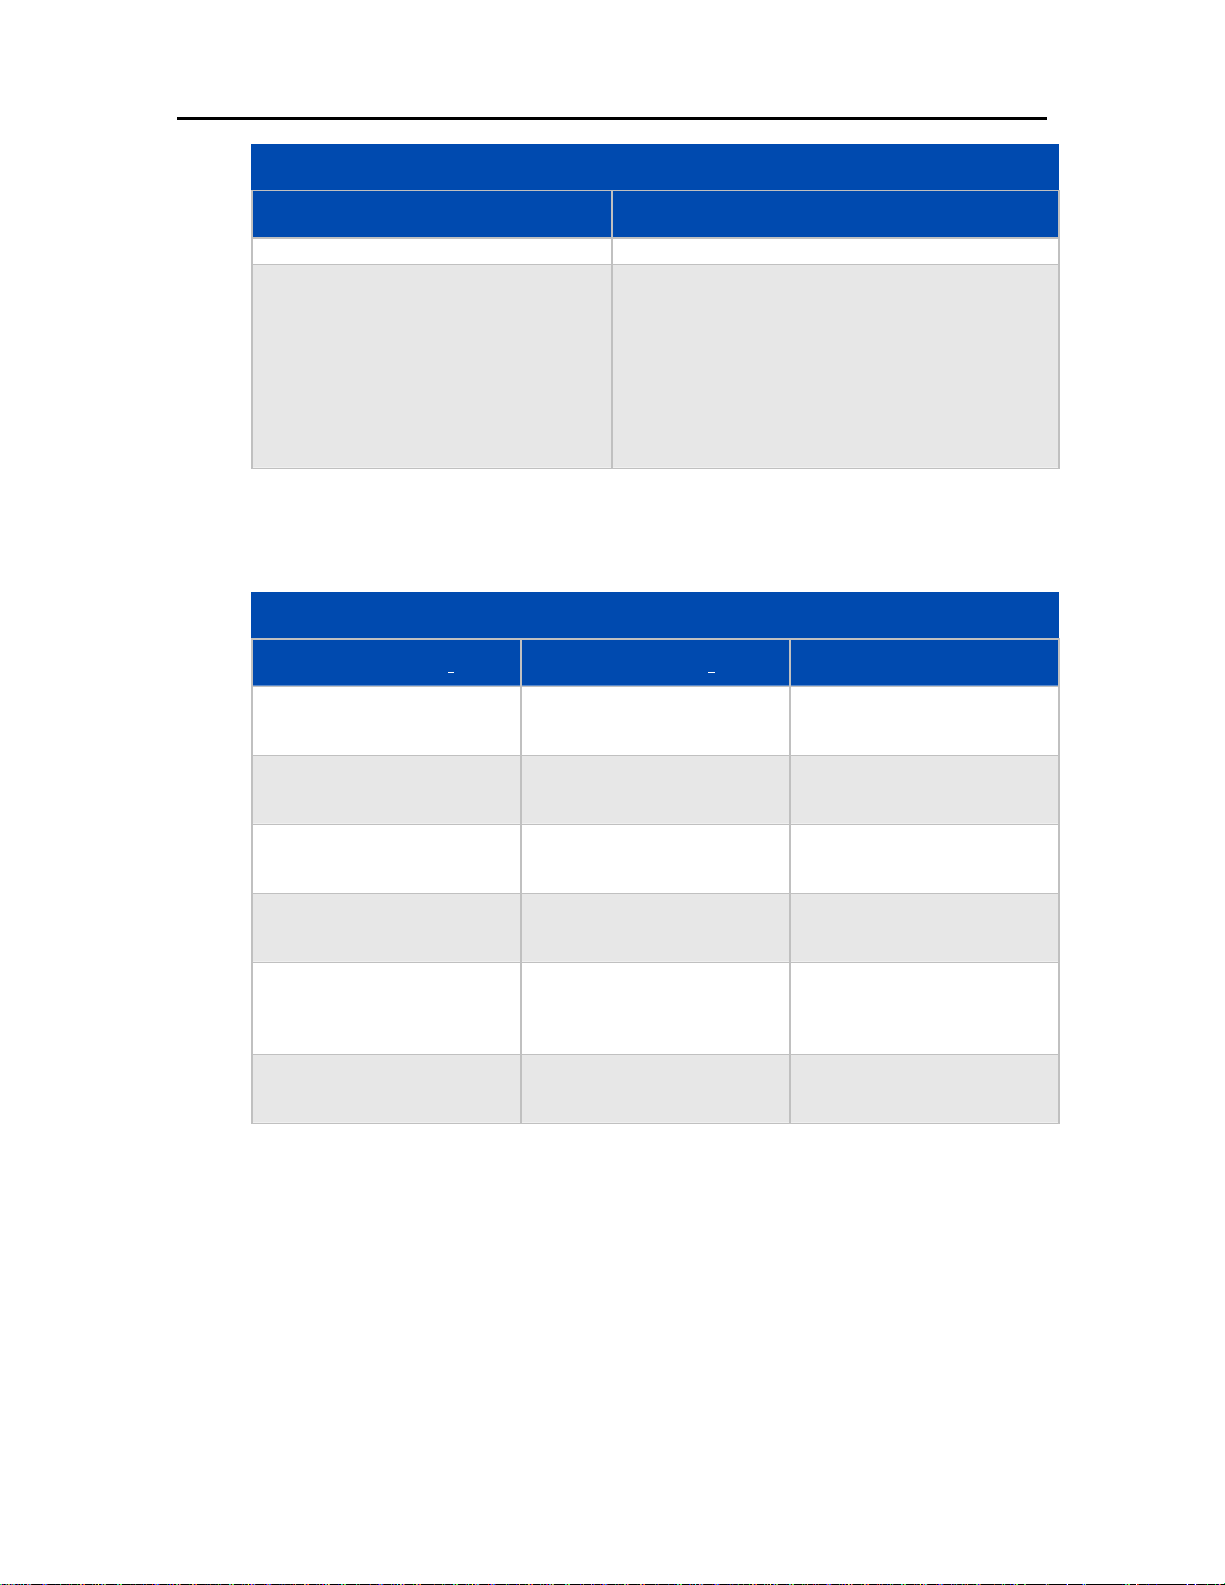
Network Requirements
To successfully use the HP MediaSmart Server, your network must meet the following
requirements:
Network Requirements
Requirement Recommended
Server connection 100 Mbps to 1000 Mbps (Gigabit Ethernet) wired
connection
Home computers One or more computers running a supported
operating system with a wired or wireless network
connection. For a list of supported operating
systems, see Supported Operating Systems.
Internet connection Broadband connection, such as DSL or cable,
5
Page 12
HP MediaSmart Server User's Guide
Requirement Recommended
Router An external Internet broadband rout er wi t h 1 00
Supported Operating Systems
The following operating systems are supported to work with the HP MediaSmart Server:
Windows Vistaa Windows XPb Mac OS X
Network Requirements
required for remote access functionality.
Mbps (or faster) Ethernet connection to the server
for remote access functionality and wired or
wireless connections to the computers on the
network.
Additionally, your router must have DHCP enabled
to provide an automatic IP address to the server.
Supported Operating Systems
Windows Vista Home Basic Windows XP Home with
Service Pack 2 (SP2)
Windows Vista Home Basic
64-bit
Windows Vista Home
Premium
Windows Vista Home
Premium 64-bit
Windows Vista Ultimate Windows XP Media Center
Windows Vista Ultimate 64bit
a. Remote access to network computers is not supported by Windows Vista Home (all versions);
the Business, Enterprise, and Ultimate versions of Windows Vista support remote access. For
more information, see Why can't I connect to some computers? in the Windows Home Server
Console Help.
b. Windows XP Professional and Windows XP Media Center Editions support remote access.
Windows XP Home does not support remote access.
Windows XP Professional
with SP2
Windows XP Home with SP3
Windows XP Professional
with SP3
Edition 2005 with SP2 and
Rollup 2
Windows XP Media Center
Edition 2004 with SP2
Mac OS X 10.5 or later
6
Page 13
Set up and Installation
Wireless Support
You must connect the HP MediaSmart Server to your router (or switch) with an Ethernet cable.
The server does not support wireless connection to your router. However, computers connected
wirelessly to a wireless access point or router are supported.
TURNING ON THE SERVER
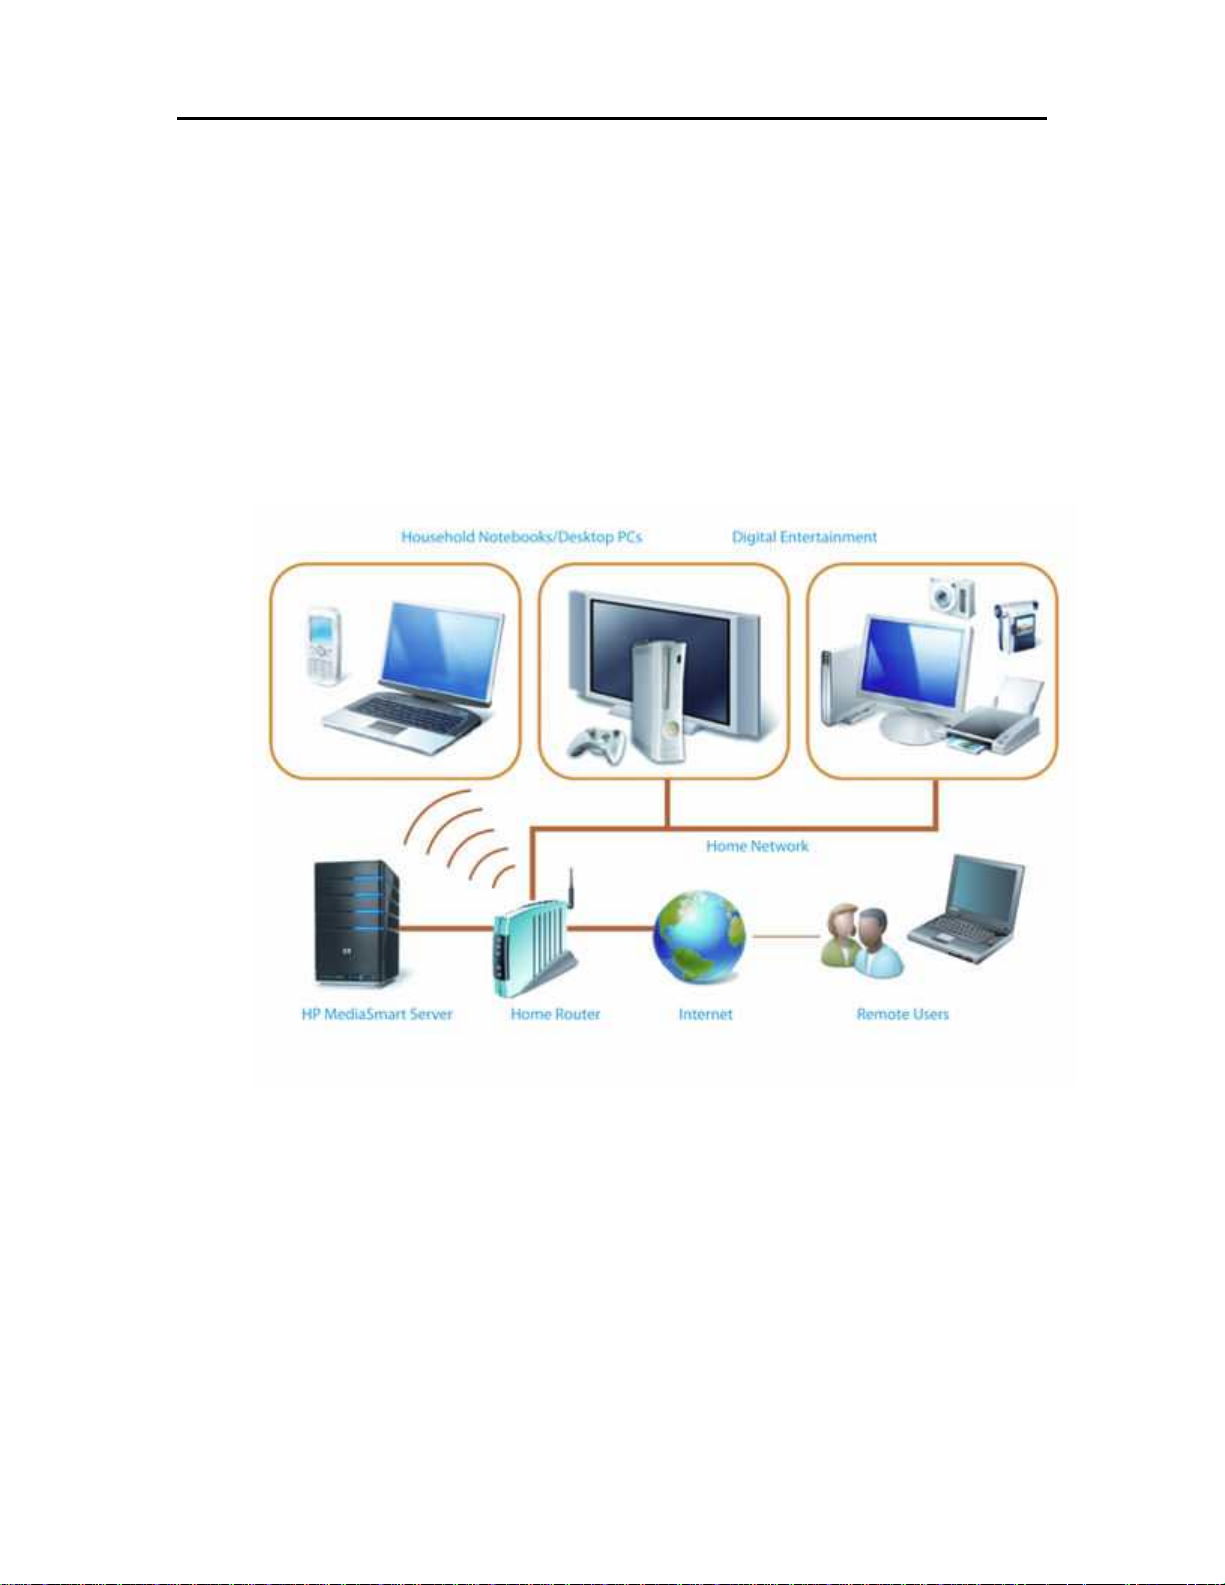
Connecting the Server
How you connect the HP MediaSmart Server to your network depends on the network
configuration.
This example shows a broadband router connecting the follo wing:
• HP MediaSmart Server (Requires wired connection to a router, and remote features require a
broadband Internet connection.)
• Desktop computer
• Laptop with a wireless adapter
TV connected to a network-enabled media streaming Media streaming sends media—music,
photos and video files—from the HP MediaSmart Server to other devices that can play the media.
The HP MediaSmart Server includes functionality that allows media to stream to a Digital Media
Adapter (DMA).
7
Page 14
HP MediaSmart Server User's Guide
• Remote users connecting to the HP MediaSmart Server and home network through an Internet
browser
The server requires a DHCP-enabled router to get its IP address. By default, most routers include a
DHCP server. For more information, check your router documentation.
Caution
If you have wireless functionality on your network, be sure to enable your router’s security
settings, such as WPA or WEP, to protect your network. See the documentation that came with
your router.
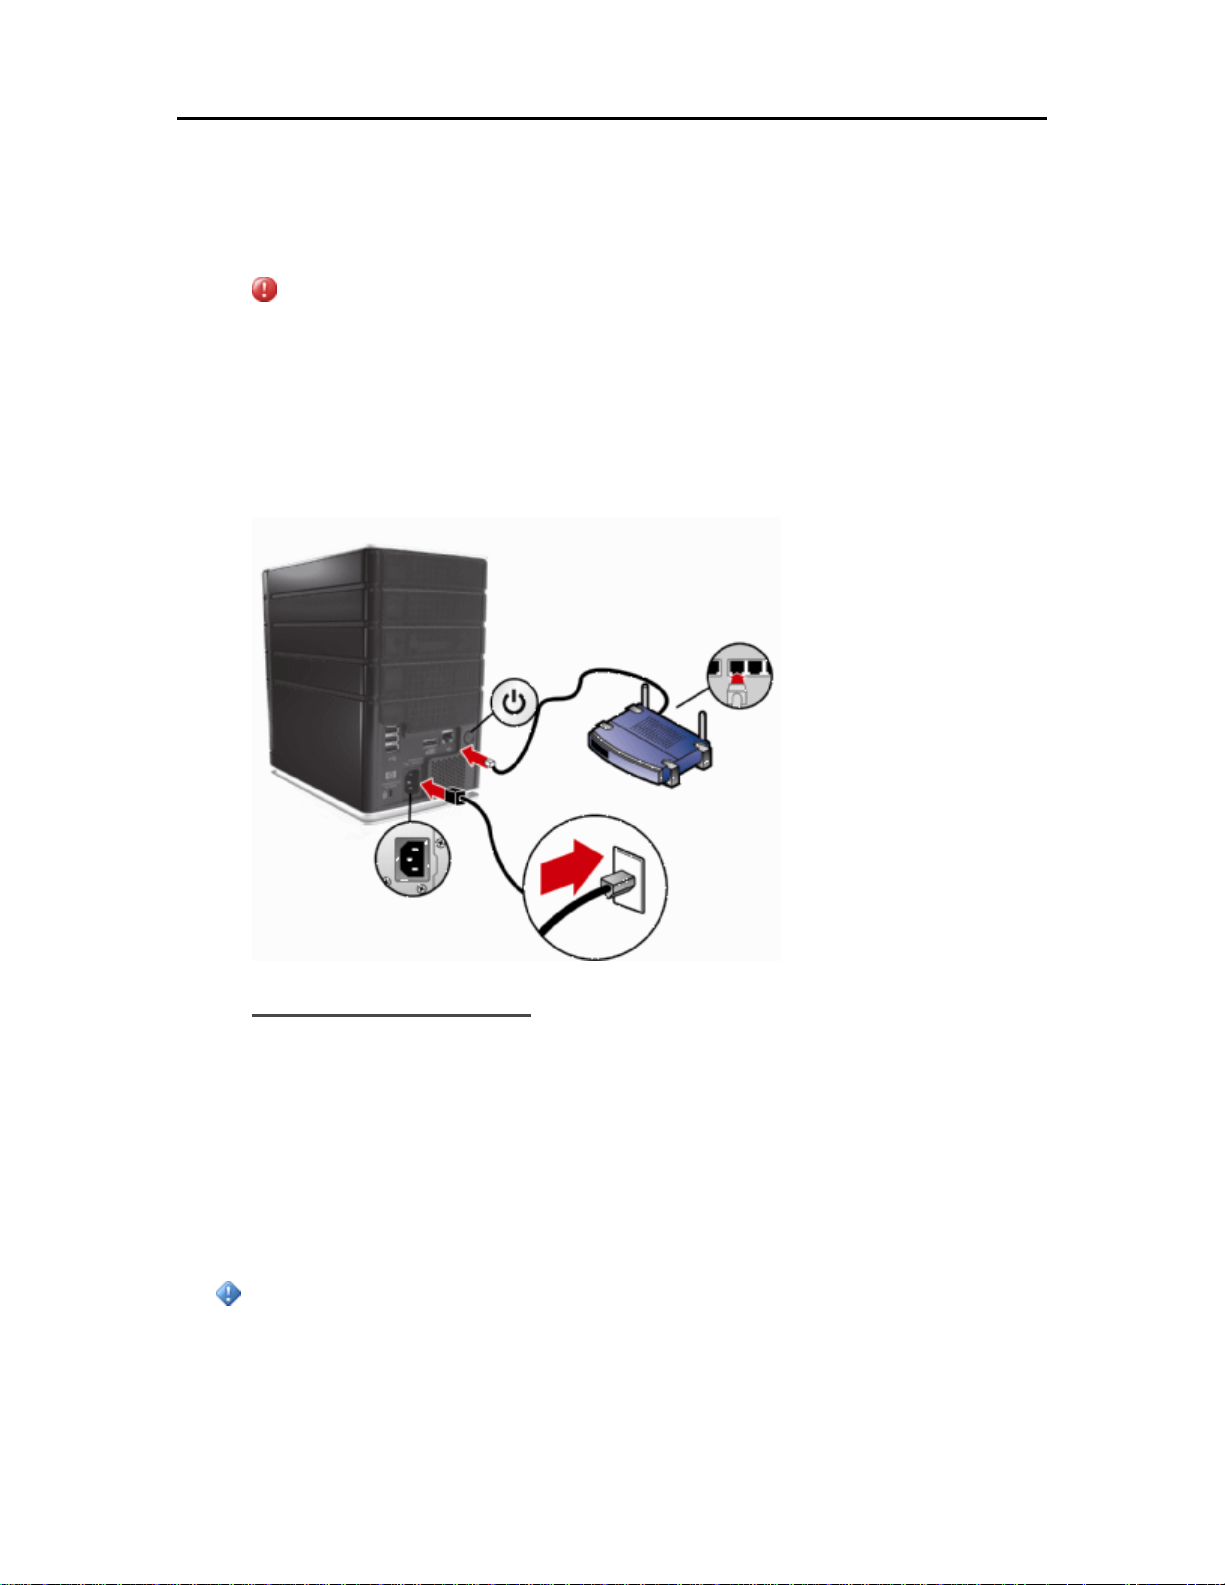
Connecting the Server
Connect the HP MediaSmart Server to a power source and to a router.
To power on the server
1. Plug in. Plug one end of the power cord into the server’s power receptacle and the other end into
an electrical outlet.
2. Connect. Connect one end of the Ethernet cable to the server and the other end to an available
Ethernet port on your router or to a switch that is connected to your router .
3. Power on. Press the Power button on the back of the server.
The server takes approximately 60 seconds to start up. The indicator lights blink and change color
throughout the startup process. Wait for all of the server lights to be pulsing before proceeding
with the software installation.
Important
Do not attach USB devices to the HP MediaSmart Server during initial setup. For additional
information, see Adding and Removing an External USB Drive, eSATA Drive.
8
Page 15
Set up and Installation
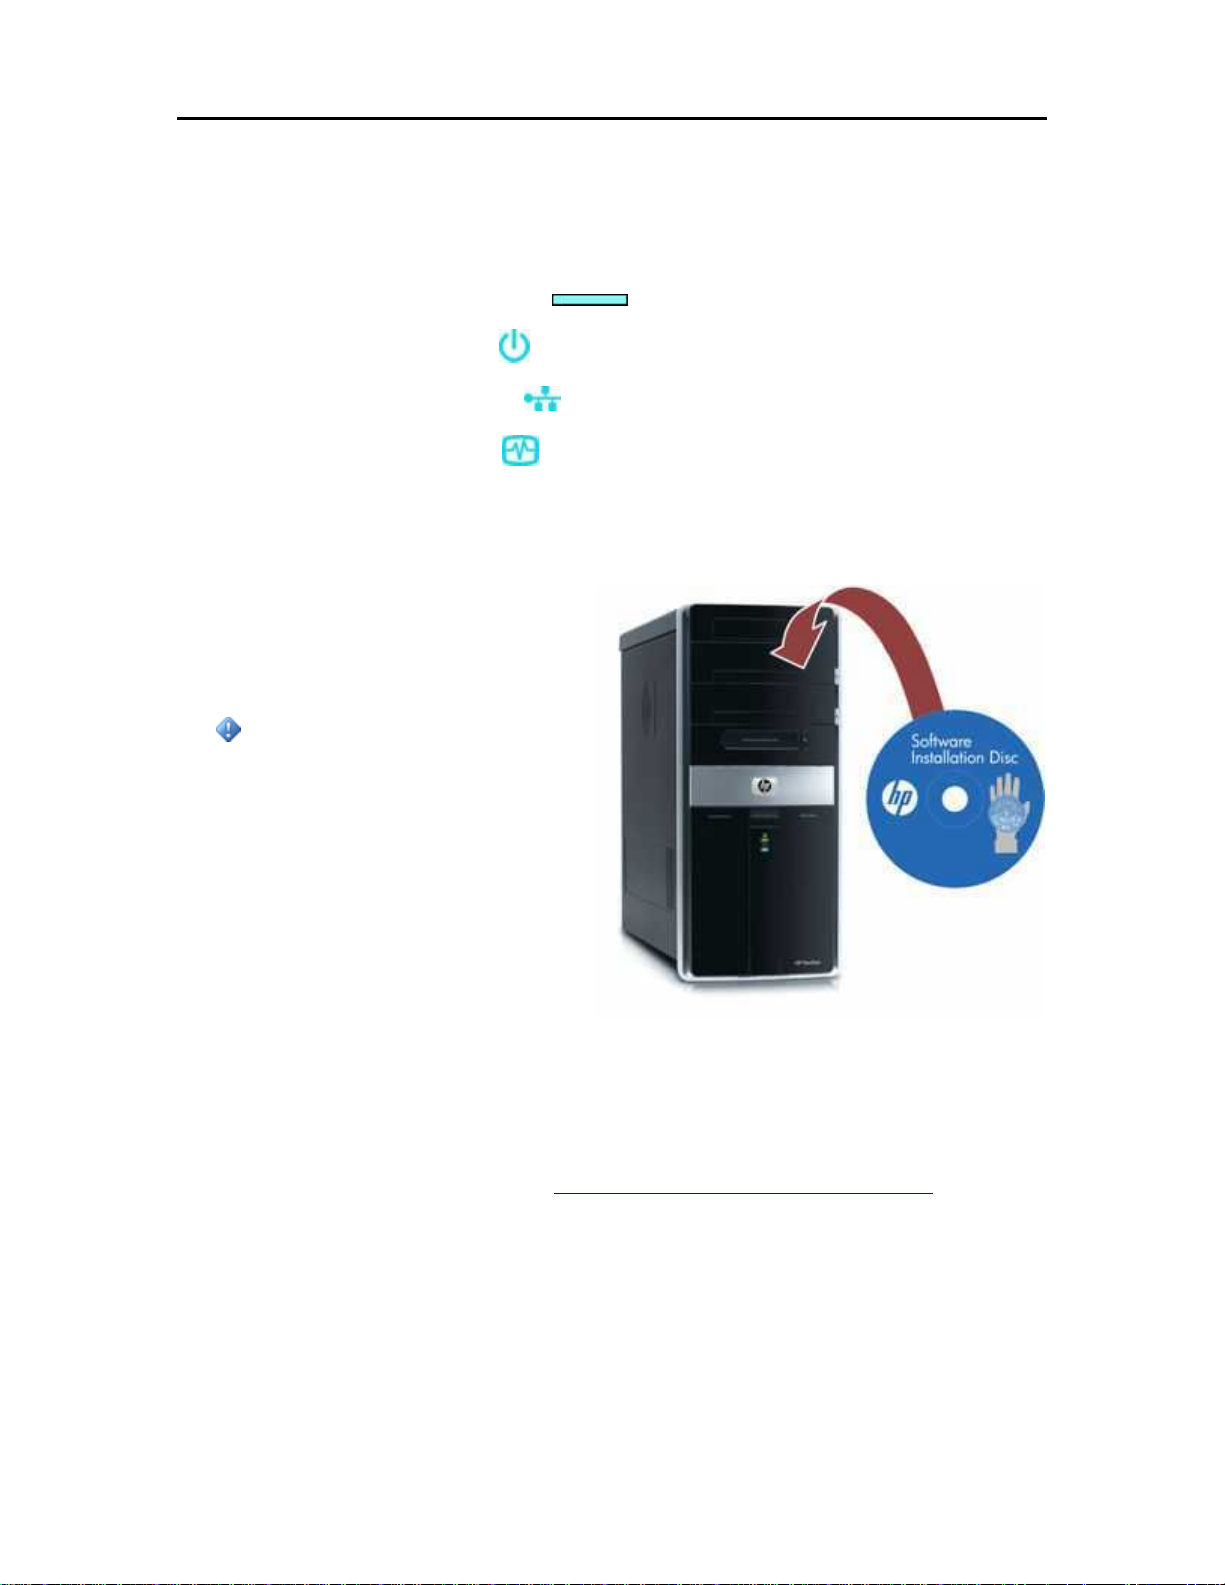
Checking the Server Lights
The lights on the front of the HP MediaSmart Server indicate the status of the server. After the HP
MediaSmart Server startup completes but prior to the first software installation, the indicator lights
show:
• Hard drives—breathing aqua white
• Power—breathing aqua white
• Network—breathing aqua white
• Health—breathing aqua white
After you complete the software installation, all lights should be solid aqua white.
INSTALLING THE SOFTWARE
Overview of the Software Installation
Important
The first installation must be on a
Windows computer. Subsequent
installations can be on a Windows or Mac
home computer.
This section of the User's Guide provides
detailed instructions for installing the HP
MediaSmart Server software. If you are
familiar with installing software, it may
not be necessary for you to read this entire
section. However, HP recommends that
you take a look at these important points.
Click a bullet to show or hide detailed information.
• Firewall and Anti-Virus Settings
Software firewalls installed on your computer can prevent the computer from locating the HP
MediaSmart Server on your network. Open your firewall and anti-virus software and make sure it
is set to "Learn" new programs. See, Updating Your Firewall's Trusted Program List
information.
• Administrator Privileges
You must have administrative privileges on the computer where you are installing the software.
Do the following to check for administrator privileges prior to running the software installation
disc,
• On Windows Vista, click Start, Control Panel, and then User Accounts and Family
Safety.
for more
9
Page 16

HP MediaSmart Server User's Guide
• On Windows XP, click Start, Control Panel, and then double-click User Accounts.
• On Mac OS X 10.5 or Later, click System Preferences, Accounts, and check Allow user to
administer this computer.
• Server Name
During the software installation, you will be asked to name the server. HP recommends that you
keep the default name, HPSERVER. During the installation is the only time you can name your
server. It cannot be changed later. Write down your server name.
• Server Password
You will also create a password for the server during the installation. Create a strong password. A
strong password must be at least 7 characters long and must fulfill three of the following
requirements:
• Uppercase characters
• Lowercase characters
• Numbers
• Symbols (such as !, @, and #)
• Client Update
At the time this documentation was written, the HP MediaSmart Server 2.5 update was available
for download. If you are a new customer running the Software Installation Disc for the first time,
the installation should find and install the 2.5 server software update. If the installation does not
find the update, you can install it from the Windows Home Server Console. See Updating and
Rolling Back the Server.
Updates must be run on the server and the client to maintain compatible software versions.
Installing the update during installation or through the Windows Home Server Console only
updates the server. To complete the process, you still need to update the client software. See
Updating and Rolling Back Client PCs
or Updating and Rolling Back Mac Clients.
Updating Your Firewall's Trusted Program List
The HP MediaSmart Server Software Installation Disc installs several programs that enable your
computer to communicate with the HP MediaSmart Server over your network. Software firewalls
installed on your computer can block this communication and prevent the computer from locating
the HP MediaSmart Server on your network.
Set Your Firewall or Anti-Virus Programs to Automatically
"Learn" New Programs
It is recommended that you set your firewall and anti-virus programs to "Learn" new programs
before installing the HP MediaSmart Server software. After the HP MediaSmart Server software is
installed, the firewall should prompt you to allow the installed programs to communicate with the
server.
10
Page 17

Set up and Installation
Allow the following HP MediaSmart Server programs to communicate through your f irewall or
anti-virus program:
1. C:\Program Files\Hewlett-Packard\HP MediaSmart Server
This directory will hold the following program that needs to be added:
• MediaManager.exe
2. C:\Program Files\Windows Home Server
This directory will hold the following program that needs to be added:
• MountBackup.exe
• RestoreOffProc.exe
• WHSTrayApp.exe
• WHSConsoleClient.exe
• WHSConnector.exe
Manually Add Programs to Your Firewall or Anti-Virus Programs
Trusted List
Some firewall or anti-virus programs may not automatically update their trusted programs list.
Instructions for manually updating several common firewall and anti-virus programs are listed
below. If your firewall or anti-virus program is not listed, please contact the vendor to find out
how to manually add programs to the trusted programs list. Additionally, see the documentation
that came with your firewall or anti-virus program for the latest information.
Click the vendor to expand and view the instructions on updatin g their trusted programs list. Click
again to hide the instructions.
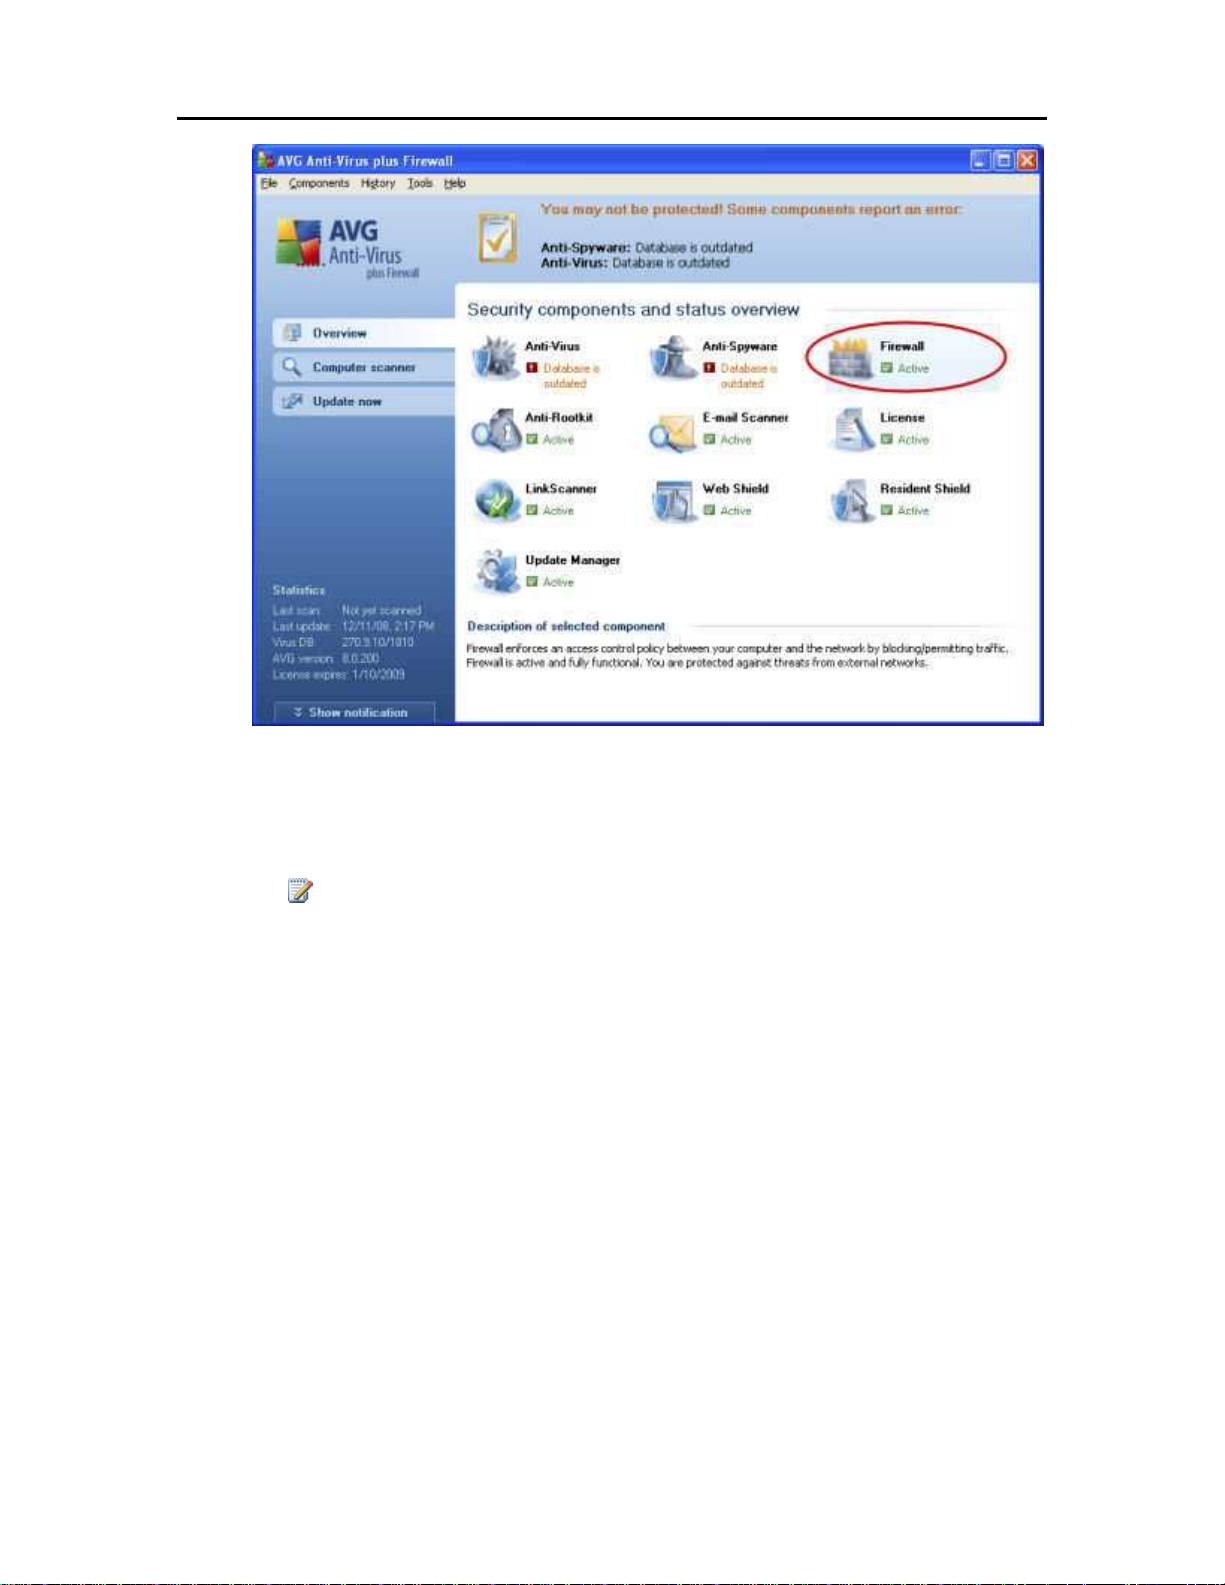
• AVG
Open the AVG Anti-Virus plus Firewall. Double-click the Firewall button to configure the
Firewall. Add the programs listed at the top of this page.
11
Page 18
HP MediaSmart Server User's Guide
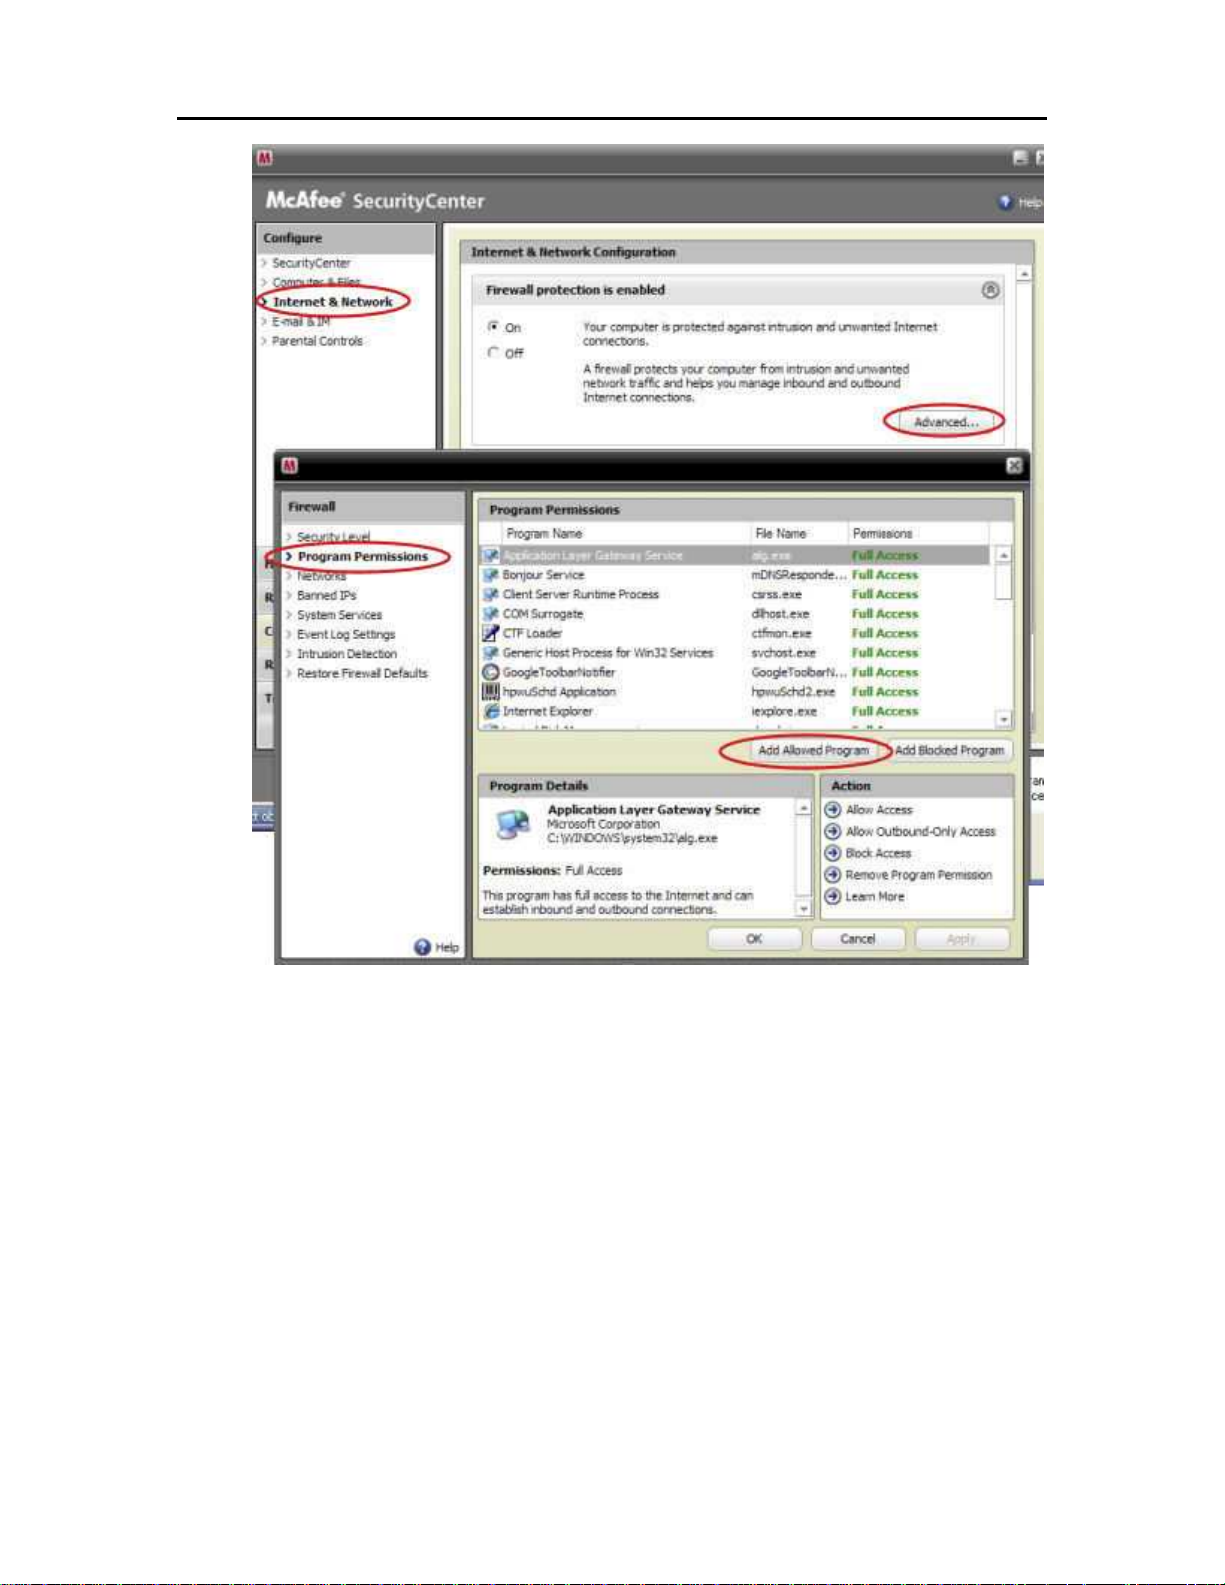
• McAfee
Open your McAfee Security Center, click Internet and Netw ork , and then click the Advanced
button in the firewall section. Click Program Permissions, then click Add Allowed Program.
Add the programs listed at the top of this page.
Note
McAfee's firewall automatically disables Windows Firewall and sets itself as your default
firewall.
12
Page 19
Set up and Installation
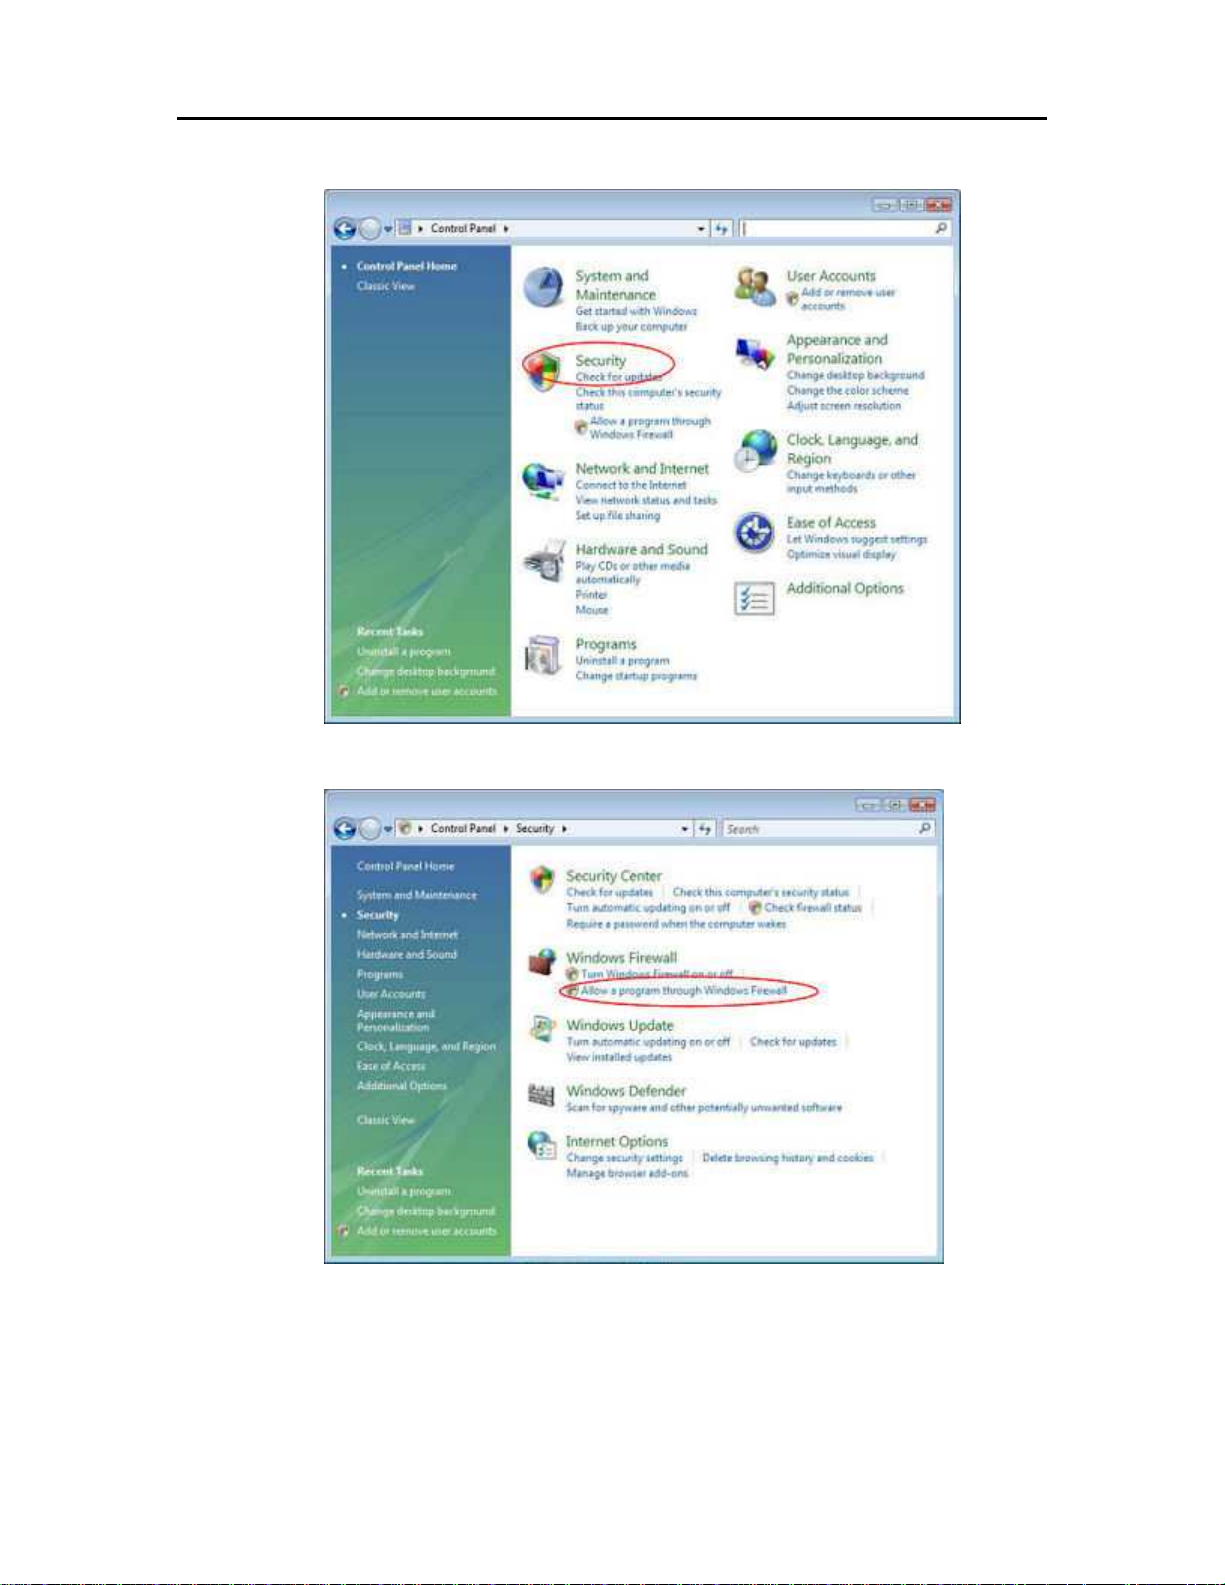
• Microsoft Windows Vista
To add exceptions to your firewall using Windows Vista, preform the following steps:
13
Page 20
HP MediaSmart Server User's Guide
1. Click Start, Control Panel, and then Security Center.
2. Click Allow a program through Windows Firewall.
14
Page 21
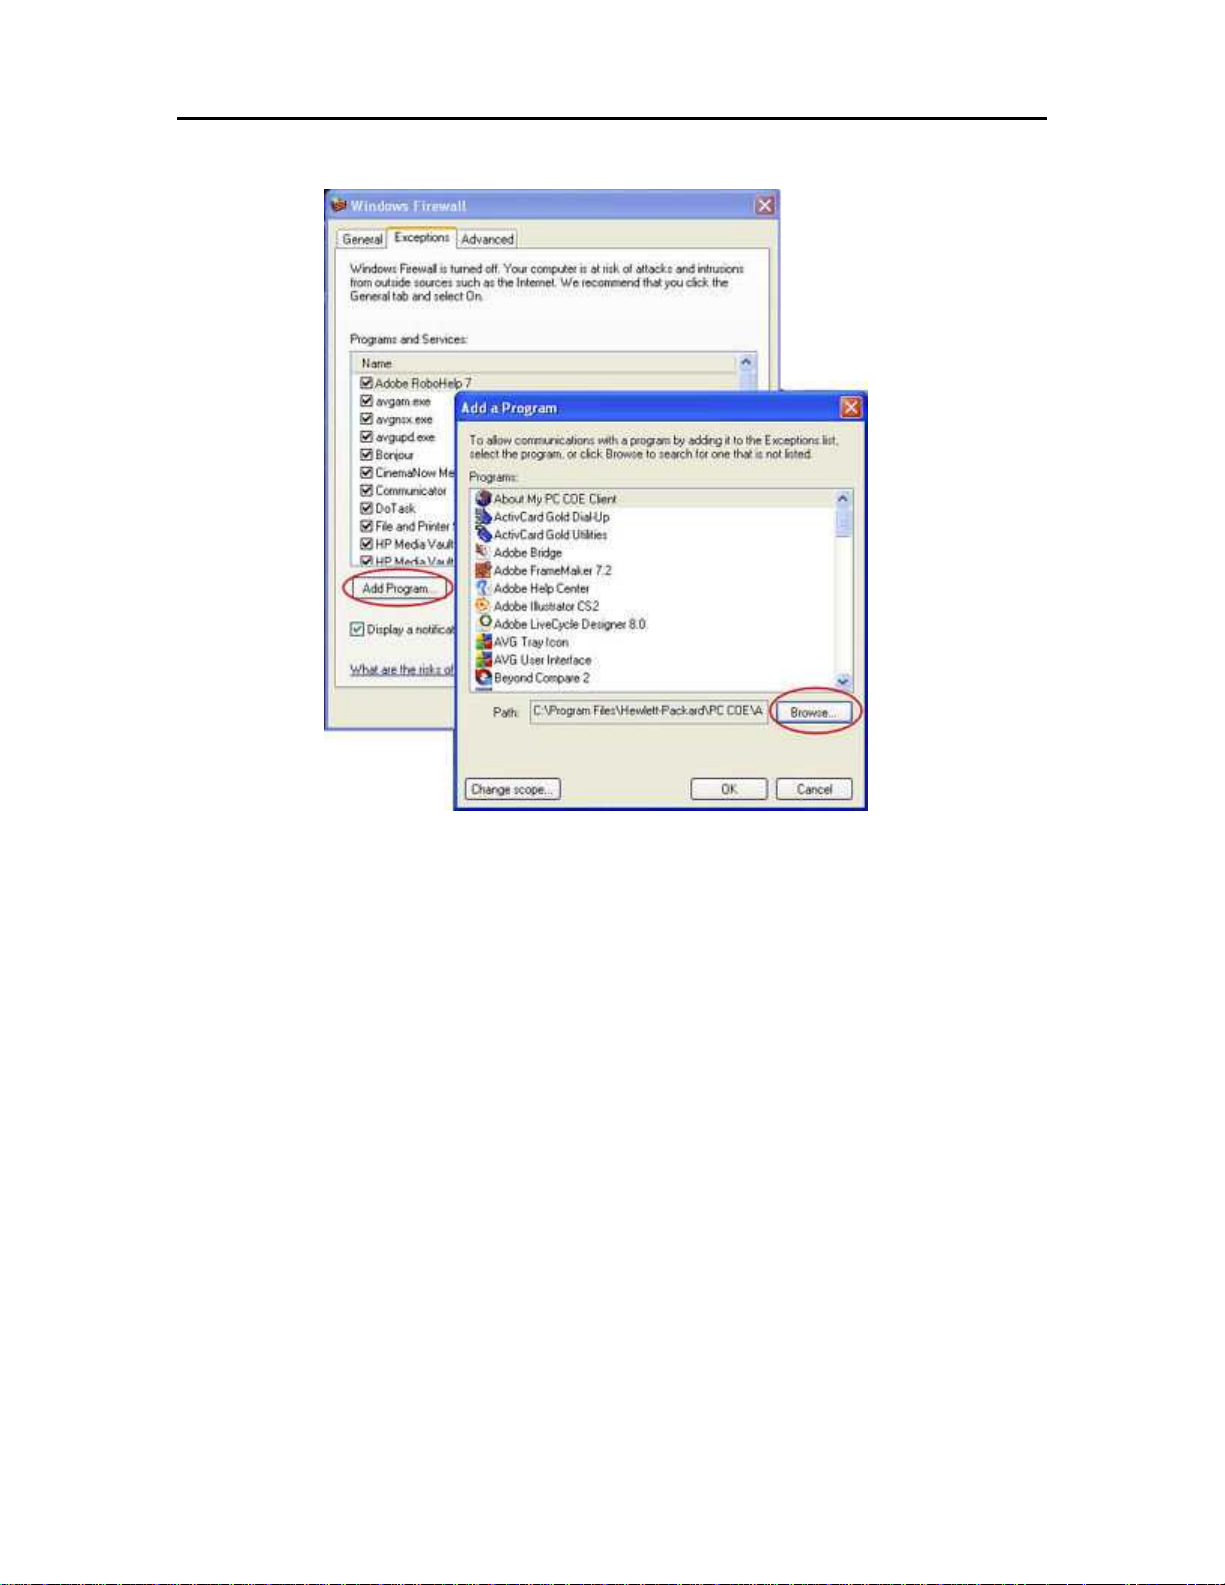
3. Select the Exceptions tab and then click Add Program.
Set up and Installation
4. In the Add a Program dialog box, click Browse. Add the programs listed at the top of
this page.
5. Click OK.
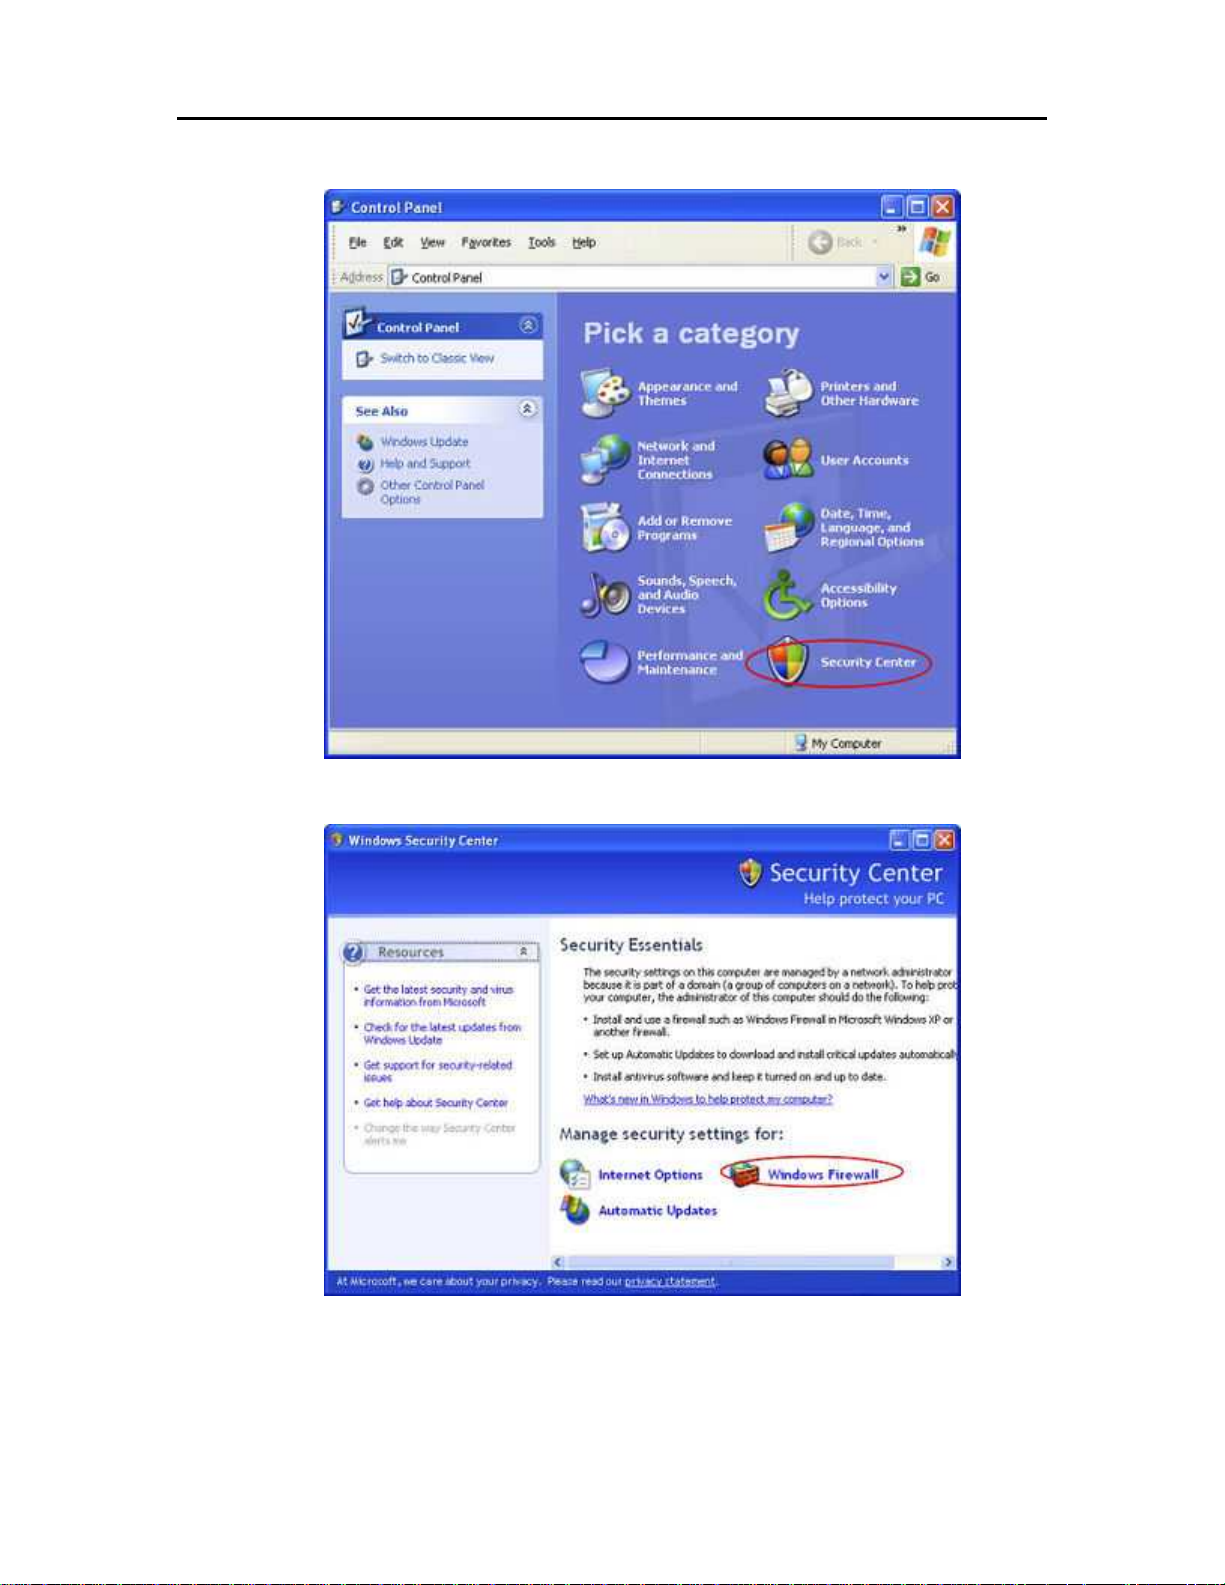
• Microsoft Windows XP
To add exceptions to your firewall using Windows XP, preform the following steps:
15
Page 22
HP MediaSmart Server User's Guide
1. Click Start, Control Panel, and then Security Center.
2. Click Windows Firewall.
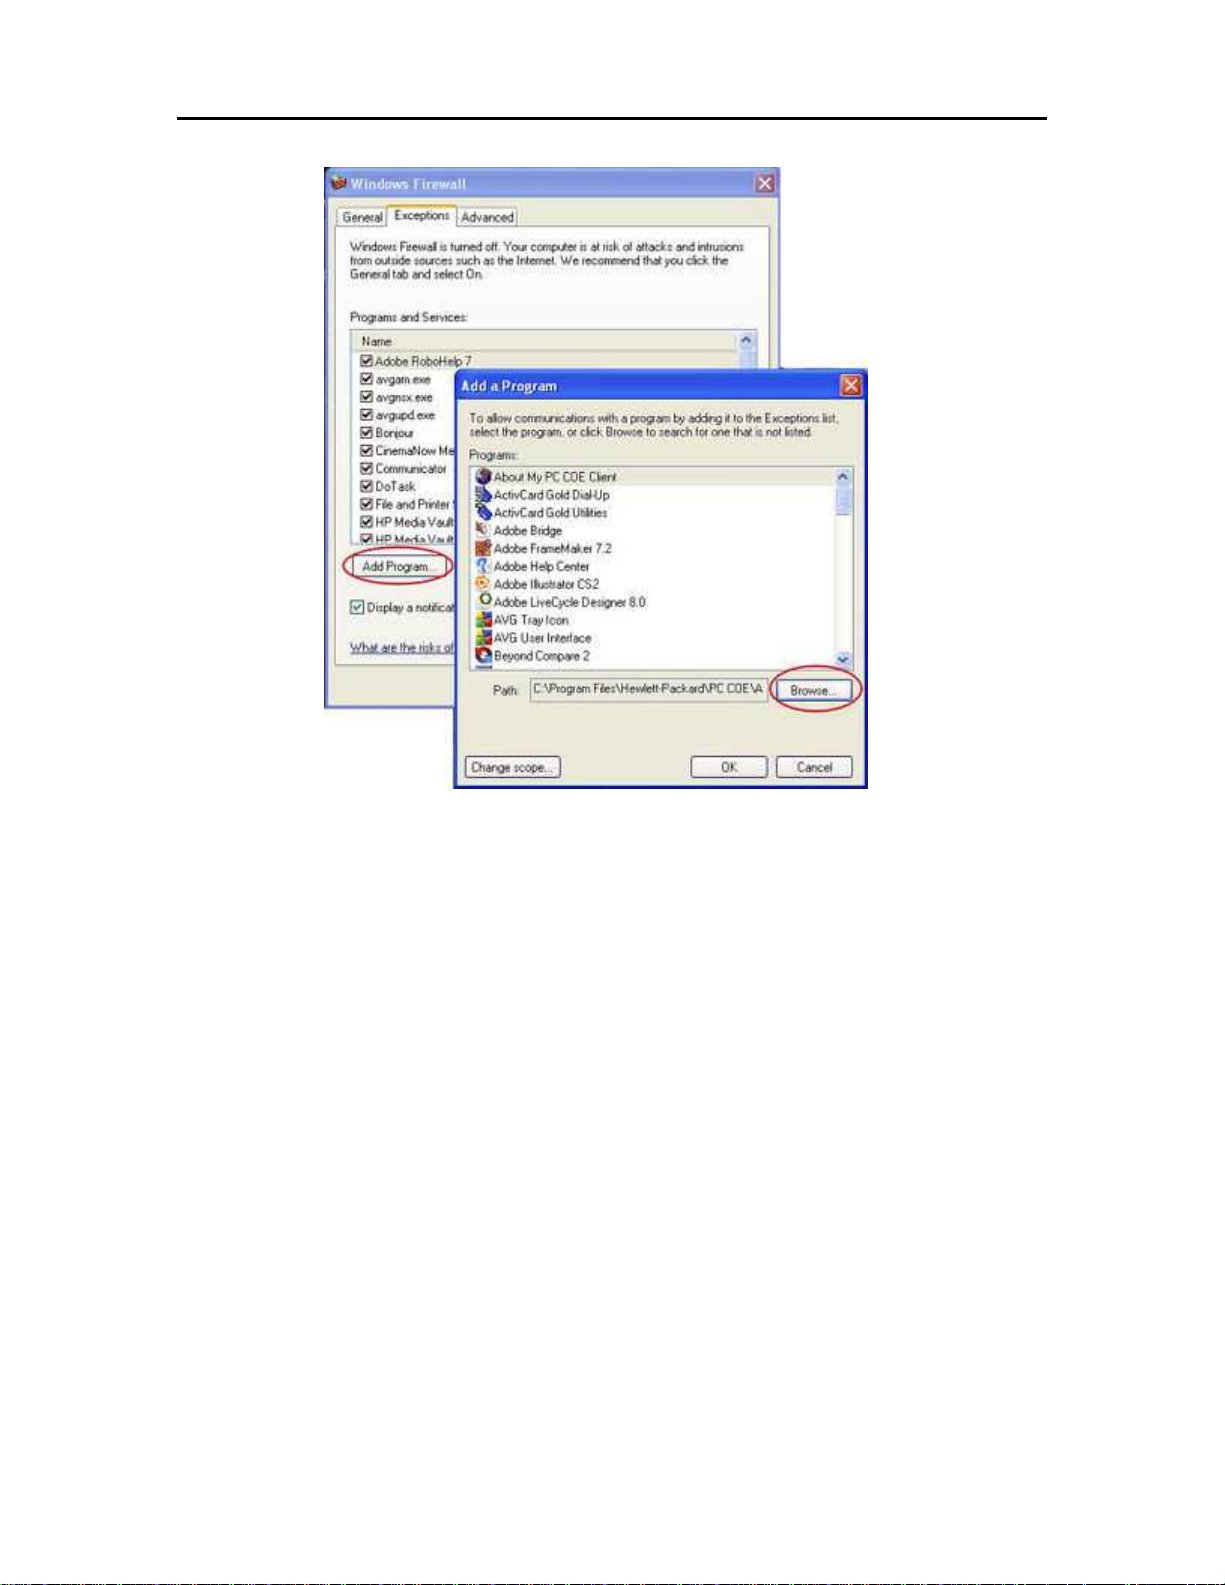
3. Select the Exceptions tab and then click Add Program.
4. In the Add a Program dialog box, click Browse. Add the programs listed at the top of
this page.
16
Page 23
Set up and Installation
5. Click OK.
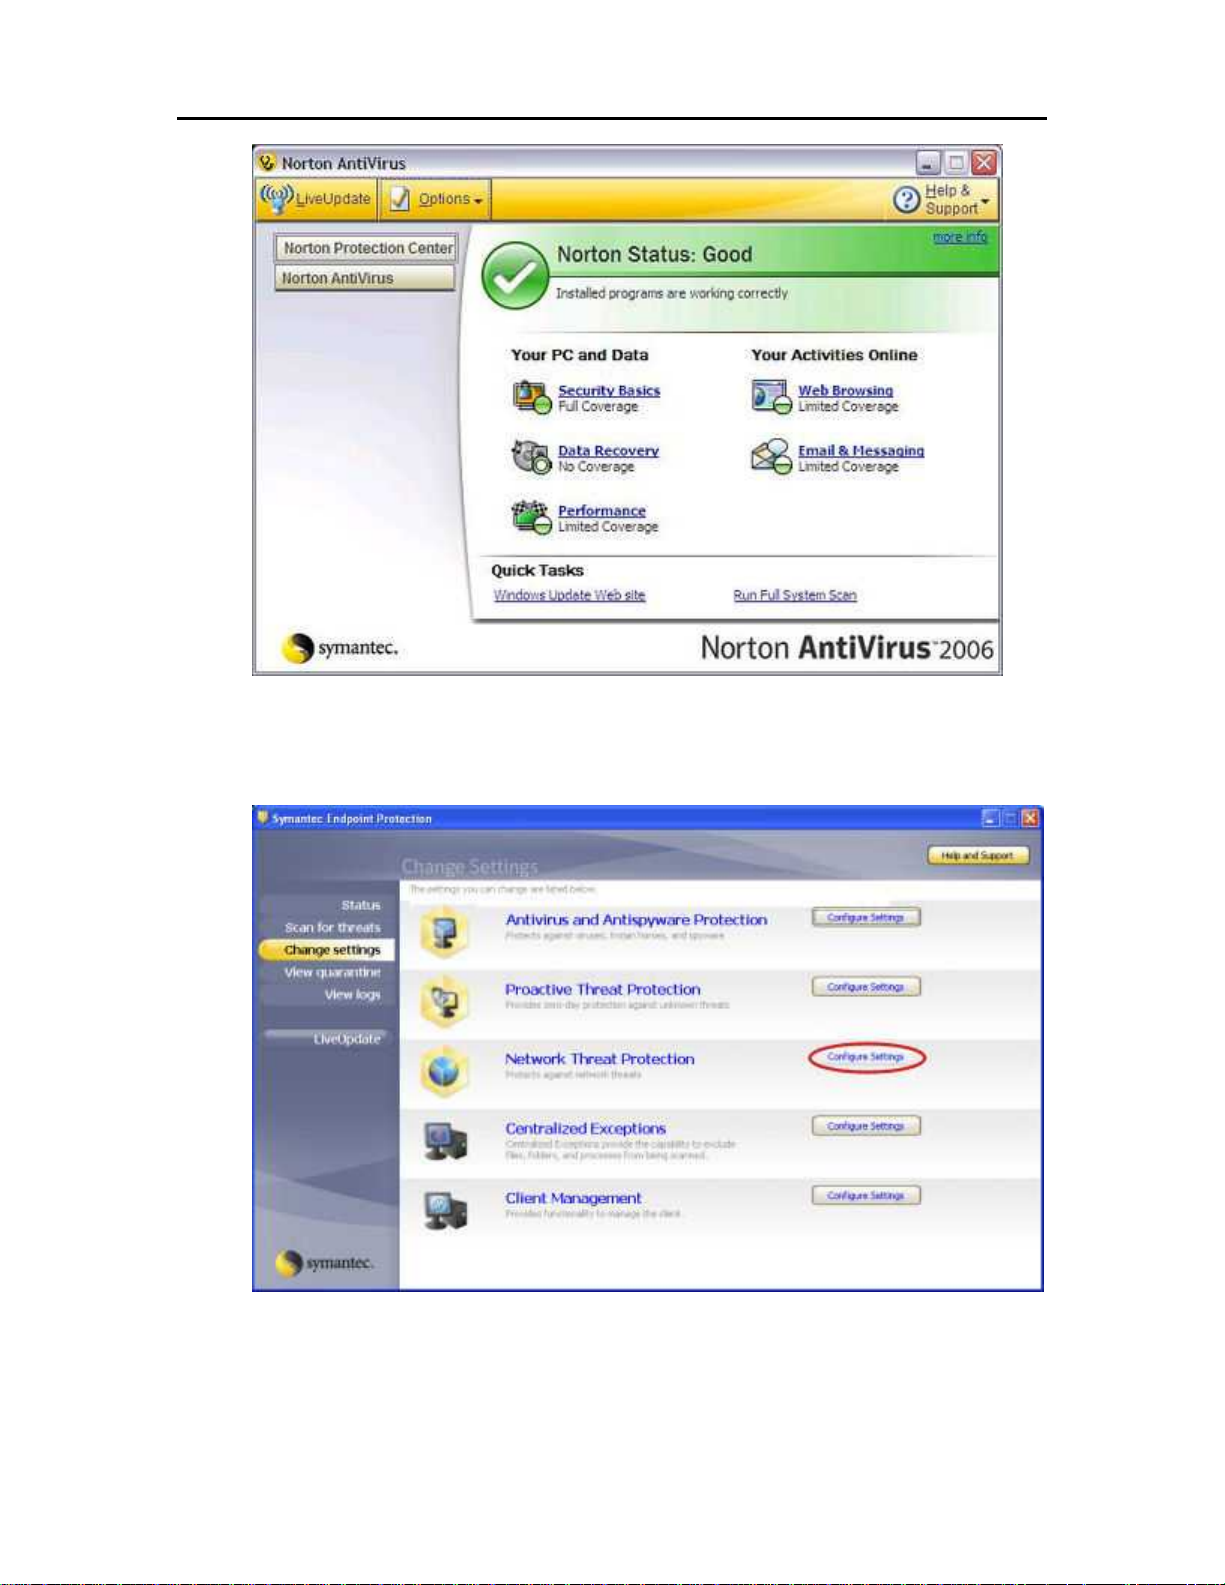
• Norton
Click Options in Norton to change the firewall settings. Add the programs listed at the top of this
page.
17
Page 24
HP MediaSmart Server User's Guide
• Symantec
Open Symantec Endpoint Protection, Click Change Settings, and then click Configure Settings
for Network Threat Protection. Add the programs listed at the top of this page.
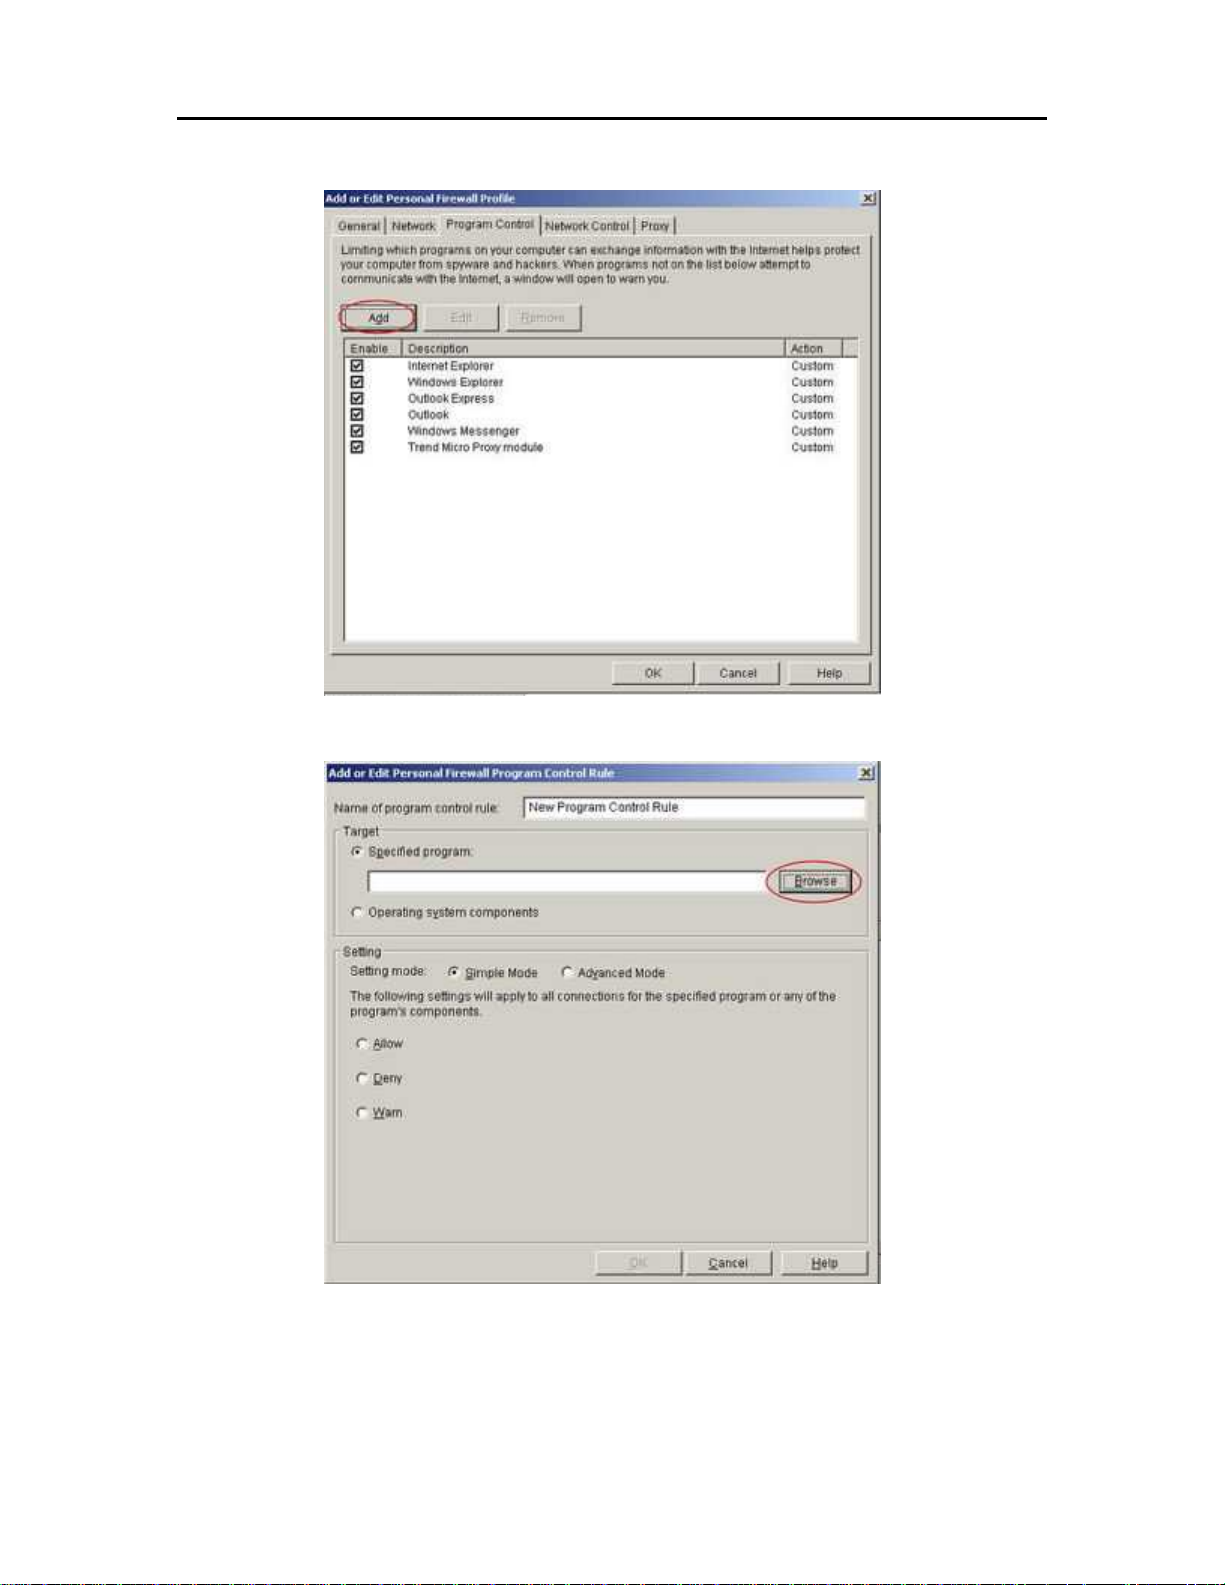
• Trend Micro
1. Open the Trend Micro Main Console, select the Personal Network and Fi rew all
Controls tab, and then click Settings.
18
Page 25

Set up and Installation
2. On the Personal Firewall page, click Add.
19
Page 26
HP MediaSmart Server User's Guide
3. Select the Program Control tab and then click Add.
4. Click Browse and add the programs listed at the top of this page.
5. Click OK.
• ZoneAlarm
20
Page 27
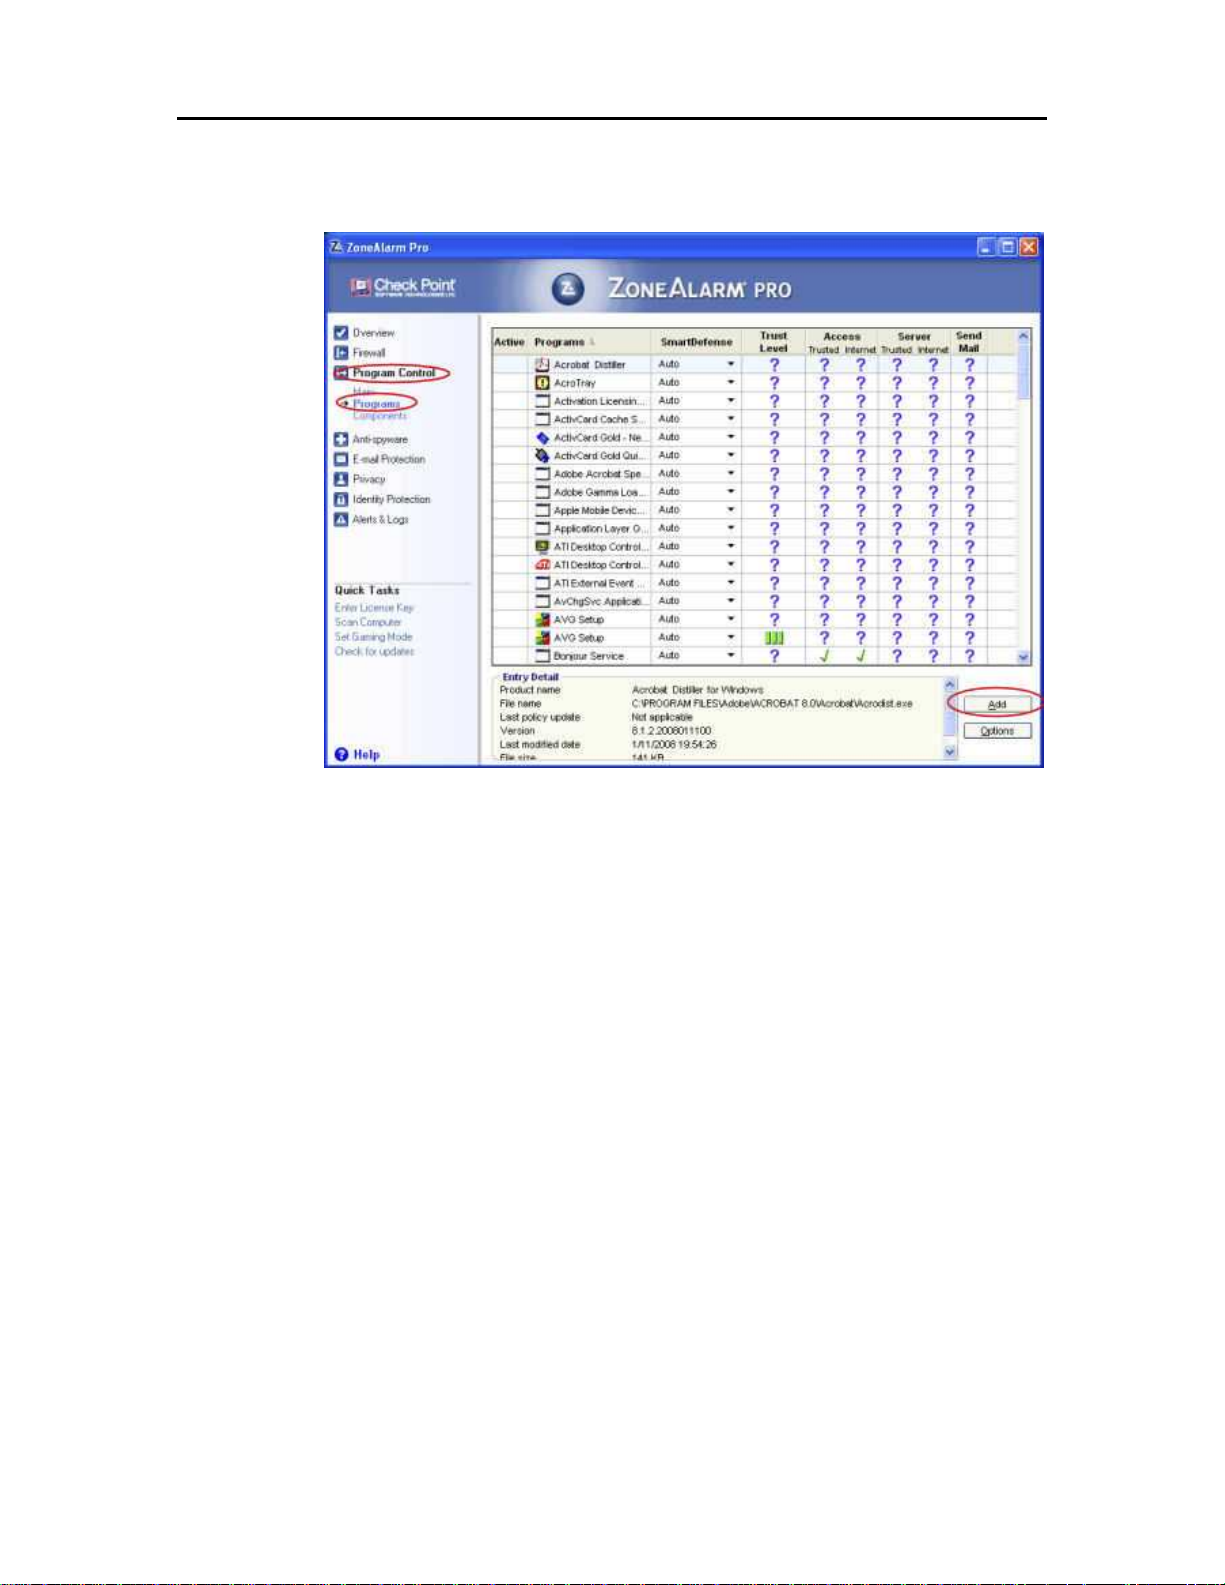
1. Open ZoneAlarm Security.
2. Click Program Control, Programs, and then Add.
Set up and Installation
3. Add the programs listed at the top of this page.
21
Page 28

Installing Software on the First PC
This help topic provides detailed instructions for installing the HP MediaSmart Server software. If you are familiar with installing software, it may not
be necessary for you to read this entire document. Instead, you may want to just look at the Overview of the Software Installation
.
1. Check for Administrator Privileges
You must have administrative privileges on your home computer to install
the software. Complete the following steps to view or change user account
settings.
• On Windows Vista,
Click Start, Control Panel, and then User Accounts and Family Safety
• On Windows XP,
Click Start, Control Panel, and then double-click User Accounts
• On Mac OS X 10.5 or Later,
Click System Preferences, Accounts, and check Allow user to
administer this computer
22
Page 29

Set up and Installation
2. Insert the Software Installation Disc
The Software Installation Disc first installs the HP MediaSmart Server
software and then the Microsoft Home Server Connector software on your
computer.
o Insert the Software Installation Disc into a computer connected to your
network. The installation starts.
o Follow the instructions on each installation page.
Note
Computers running Windows Vista may display User Account Control
messages, such as “A program needs your permission to Continue.” Click
Continue.
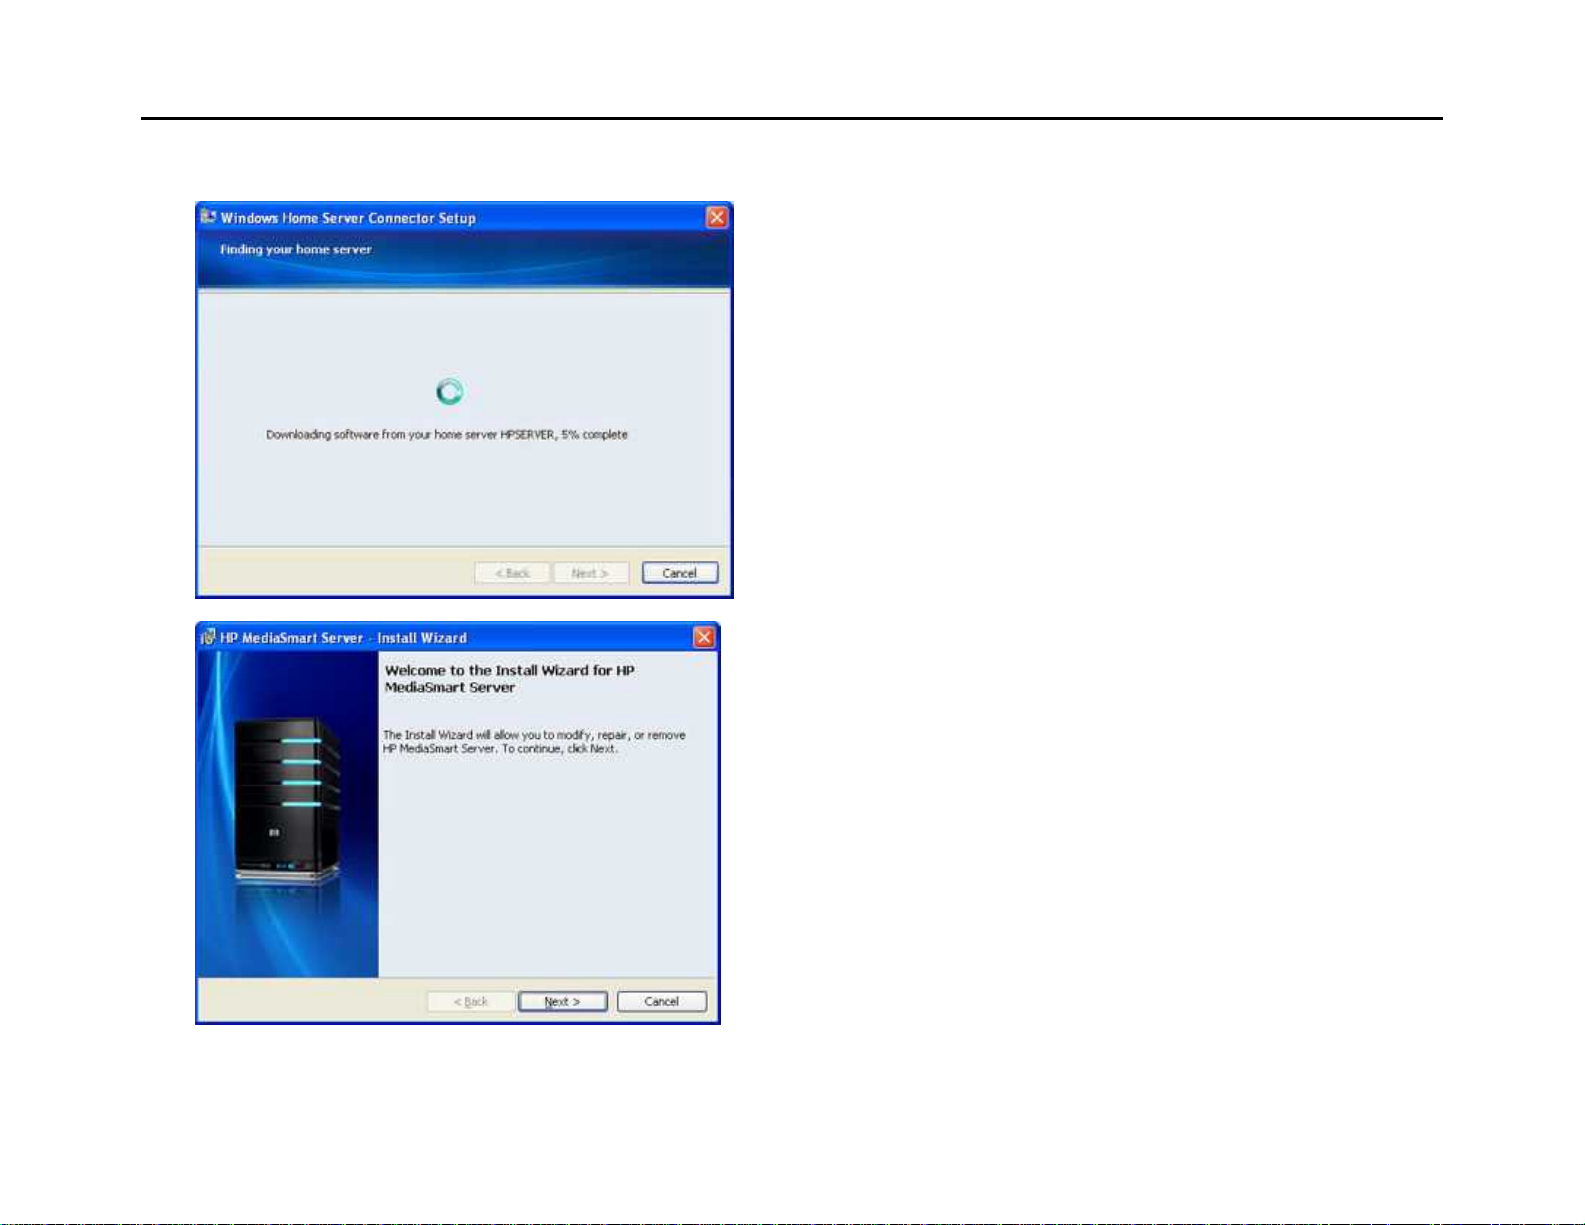
3. Find the Server
The installation looks for and connects to your HP MediaSmart Server.
Click Next once the server is found.
23
Page 30
HP MediaSmart Server User's Guide
4. Download Software from the Server
Please wait while the installation downloads software from your server.
5. Welcome to the HP MediaSmart Server Software Installation
The HP MediaSmart Server software installs first. This software is used to
24
• Provide a single point of access for all of the server's features,
• Share photos and videos easily over the Internet using HP Photo Publisher
and HP Photo Viewer
• Centralize your photo, video, and music libraries using HP Media Collector
Page 31

Set up and Installation
6. Accept the License Agreement
Accept the end user license agreement and click Next.
7. Install the HP MediaSmart Server Software
Please wait while the HP MediaSmart Server software installs. This may
take several minutes.
25
Page 32

HP MediaSmart Server User's Guide
8. Welcome to the Windows Home Server Connector Software
Installation
The Windows Home Server Connector:
• Connects your computer to the server
• Automatically backs up your computer every night
• Monitors the health of the network and computers runn ing Windows Vista
• Enables configuration of the server from your computer
The Windows Home Server software installation runs only once—on the
first computer where you run the Software Installation Disc.
9. Install the Windows Home Server Connector Software
Please wait while the Windows Home Server Connector software installs.
This may take several minutes.
26
Page 33

Set up and Installation
10. Automatically Download and Install Windows Home Server
Connector Updates
HP recommends that you select to automatically download and install
updates.
11. Wake up this Computer to Perform Scheduled Backups
Select to wake up this computer if it is in sleep or hibernate mode to run a
scheduled backup.
27
Page 34

HP MediaSmart Server User's Guide
12. Customize your Home Server
Click Next to begin customizing your home server.
13. Start Windows Home Server
Click Welcome to initialize the Windows Home Server and configure basic
options.
28
Page 35

Set up and Installation
14. Initialize Windows Home Server
The Windows Home Server initialization begins and can take several hours
depending on your hardware. Please wait while Windows Home Server:
• Configures your hardware
• Recovers your data
• Starts Windows Home Server
15. Name the HP MediaSmart Server
Type a name for your server. Server names can be:
• 15 characters maximum with no spaces
• Letters (at least one), numbers and hyphens
Important
This is the only time you can name your server. It cannot be changed later.
Write down your server name. The default name is HPSERVER.
29
Page 36

HP MediaSmart Server User's Guide
16. Set the Server Password
Create a strong password. A strong password must be at least 7 characters
long and must fulfill three of the following requirements:
• Uppercase characters
• Lowercase characters
• Numbers
• Symbols (such as !, @, and #)
Note
The password hint can be seen by anyone who clicks the Password hint
button on the Windows Home Server Connector logon window.
Important
The server password is not the same as a user password. User accounts and
passwords are setup in the Windows Home Server Console.
30
Page 37

Set up and Installation
17. Help Protect Windows Home Server Automatically
Windows Home Server automatically downloads and installs relevant
important updates from Windows Update to help make your home server
more secure.
Choose if you want Windows Home Server to continue to automatically
downloading updates after the software installation.
Note
It is recommended that you turn on Automatic Windows Updates.
18. Join the Customer Experience Improvement Program
Join the Customer Experience Improvement Program (CEIP) and help
make Windows Home Server even better. CEIP collects information about
your hardware and home server usage without interrupting you. None of the
information that is collected is used to identify or contact you.
Choose if you want to participate in this program and click the next arrow.
31
Page 38

HP MediaSmart Server User's Guide
19. Select Windows Error Reporting
To help understand the problems you may encounter with Windows Home
Server, Windows Error Reporting automatically reports error s to Microsoft.
Any personal information inadvertently collected in the reports will not be
used.
Choose if you want to participate in this program and click the next arrow.
20. Check for Windows Home Server Updates
The Windows Home Server installation checks for any relevant important
updates. This may take some time to complete, but does not require
additional information from you.
32
Important
Do not restart or turn off your home server during the update process.
Page 39

Set up and Installation
21. Install Updates on your Home Server
Please wait while Windows Home Server updates install. This may take
several minutes.
22. Log on to Windows Home Server
Type the password you created earlier in the installation.
33
Page 40

HP MediaSmart Server User's Guide
23. Check for HP MediaSmart Server Updates
The HP MediaSmart Server installation checks for any updates. Installing
updates ensures that you experience the full functionality and optimal
performance of the HP MediaSmart Server.
Note
This check only occurs the first time you run the Software Installation Disc.
If you want to check for updates at a later time, see Updating and Rolling
Back the Server.
24. Connect to HP MediaSmart Server Web
Please wait while HP Update connects to the Web and looks for updates for
the HP MediaSmart Server.
34
Page 41

Set up and Installation
25. Install Server Updates
Select the update and complete the instructions on the screen to install it.
At the time this document was written, the 2.5 update was available for
download. If you are a new customer running the Software Installation
Disc for the first time, the installation may find and install the 2.5 server
software update depending on options you selected earlier in the install. If
the installation does not find the update, you can install it from the
Windows Home Server Console after the installation completes. See
Updating and Rolling Back the Server
.
Important
Do not restart or turn off your home server during the update process.
26. The Windows Home Server Console opens
The Windows Home Server console opens. Use the console to set up user
accounts and configure HP MediaSmart Server features. Click Help in the
upper right corner of the Console to get additional assistance.
35
Page 42

HP MediaSmart Server User's Guide
27. Update the Client Software
Updating the server and the client are separate processes. If you chose to
update the server software in Step 25 or by running HP Update in the
Windows Home Server Console, you must also update the client software.
Updates must be run on the server and the client to maintain compatible
software versions.
To complete the process and update the client software, see Updating and
Rolling Back Client PCs or Updating and Rolling Back Mac Clients.
36
Page 43

Updating Client PCs
Note
Update the server software prior to updating the client software. If your server does not have the
correct software version, you will get an error message when you try to install the client software.
See Updating and Rolling Back the Server
After installing the server update, you are ready to update the client software on each PC in your
home that accesses the server. For Mac instructions, see Updating and Rolling Back a Mac Client
1. At the computer, click Start, and then Run.
for more information.
.
Type or copy/paste the following (UNC) network address into the Run dialog.
\\HPSERVER\Software\Home Server Connector Software\ set up .exe
If you renamed your server during the initial software installation, the path will be \\<server
name>\Software\Home Server Connector Software\setup.exe.
2. Follow the instructions on your computer for installing the update.
There are other methods for installing the update. For more details, see Updating and Rolling
Back Client PCs.
Installing Software on Additional PCs
You can install the server through a web browser or you can use the Software Installation Disc to
install the HP MediaSmart Server and Windows Home Server Connector software on the other
computers on the home network. Install the software on one computer at time.
If you misplaced or damaged your Software Installation Disc, you can also install the software for
your computer directly from the server. For more information, see To install from the server using
Windows XP or Windows Vista.
To install from the Software Installation Disc
1. Insert the Software Installation Disc into a computer connected to the home network.
You must have administrative privileges to install. For additional information, see Installing the
Software on the First Computer.
37
Page 44

HP MediaSmart Server User's Guide
2. Follow the instructions on the installation wizards.
The installation process is identical to installing on the first computer except for the following:
• The Windows Home Server Setup does not run.
• Your server password is required to install, as shown in the following figure:
To install the from the server using Windows XP or Windows
Vista
Note
If you are installing on a Windows Vista 64-bit operating system, you must have Windows Home
Server with Power Pack 1 installed. To check your version of Windows Home Server, double-
click the Windows Home Server icon
Resources in the sidebar of the Windows Home Server Settings dialog box.
1. At the computer, click Start, and then Run.
Type the following (UNC) network address:
\\HPSERVER\Software\Home Server Connector Software\ set up .exe
The network address will be different if you renamed your server. In this case type,
\\<server name>\Software\Home Server Connector Software\setup.exe
2. Click OK.
in the system tray. Click Settings, and then click
Setting up Additional Computers
After installing the software on the Software Installation Disc, there are a few setup options for
you to consider.
• The home computer is automatically set up to be backed up each night. If you want to customize
back up settings for this computer, see Computer Backups
• If you created individual user accounts in Windows Home Server for one or more family members
that use this computer, you also need to set up computer user accounts for them if you want them
38
.
Page 45

Set up and Installation
to be able to access features on the server without logging on. For additional information, see User
Accounts in the Windows Home Server help.
• If there is an iTunes library on this computer that you want to include in an aggregated iTunes
library on the server, set up this computer to copy its iTunes library to the server. For additional
information, see Set up iTunes
.
Installing and Uninstalling Software on the Mac
• To Install the Mac Software
• To Uninstall the Mac Software
To Install the Mac Software
The Server has to be configured first using a Windows Client. Once the Windows Home Server
Connector has been installed you can install the Features for the Mac.
Note
You must have administrative privileges on your computer to install the software. Click System
Preferences, Accounts, and check Allow user to administer this computer.
1. Once Windows Home Server has been installed on a Windows home computer, insert the
installation CD and a screen will appear with 2 icons, one for install and one for uninstall.
2. Double click the Install HP MediaSmart Server Software.pkg to begin the install process.
3. On the Welcome to the HP MediaSmart Server Software click Continue to install.
39
Page 46

HP MediaSmart Server User's Guide
4. The End User license Agreement will pop up, click Continue to agree.
5. A standard install screen will appear, this screen will report how much room is available for the
install on the default location. You do have a button to press to change location if you desire.
Otherwise click Install.
6. Once the install is completed a confirmation screen will appear followed by a settings or a
preferences screen.
40
Page 47

Set up and Installation
7. The confirmation screen can be closed or left open. It will not effect the rest of this process. Click
Close, to close the summary screen.
8. On the settings screen you will need to enter the server name and the server’s administrator
password so that the Mac software can access your Server. The authentication process begins
when you stop typing the password.
9. Once your credentials have been authenticated, click Apply to save the server name and password.
Note
Server Name and Password have to be authenticated prior to using the control center, or entering
preferences for BackUp.
10. After clicking Apply, you can click BackUp to set your BackUp Preferences. Or you can click
Show All to go to the Control Center.
41
Page 48

HP MediaSmart Server User's Guide
To Uninstall the Mac Software
After the Mac software has been installed, should you decide to un-install the Mac software, insert
the Software Installation Disc and a screen opens with two icons, one for install and one for
uninstall.
1. Double click the Uninstall HP MediaSmart Server Software to begin the process.
2. Follow the on screen instructions to complete the uninstall process, click Continue, and then click
Close on the Summary screen.
HP MediaSmart Server 2.5 Update Read me
As always, the HP MediaSmart Server helps you centralize, organize, and share your digital
content. The 2.5 update improves on existing HP MediaSmart Server features, making them even
more robust. Additionally, new features were added to make your music, photos, and videos more
mobile than ever before. With the HP MediaSmart Server, your media is where you
are…wherever you are. Read on to discover what's new!
HP Video Converter
The HP MediaSmart Server automatically converts your video library (including unprotected
DVDs) into a format that will play in the home and remotely on PCs, Macs, XBox 360s,
PlayStation 3s, and other popular media st reaming devices. The video converter transcodes many
popular video formats into an MPEG-4 video file using an H.264 video codec and AAC stereo
audio codec with both original and mobile resolutions. The original vid eo resolution streams to
most devices attached to your home network including PCs, Macs, and gaming systems. The
mobile video resolution streams remotely to your PC or Mac using a secure remote log on to your
server and can be copied to popular mobile devices.
42
Page 49

Set up and Installation
HP Media Streamer for Videos
The HP Media Streamer always supported music and photos. Now it supports videos!
Whether you are at home, on campus, at work, or visiting friends and family, you can use a web
browser and your HP MediaSmart Server personal web address to securely log on to your server
and use Media Streamer to stream music, photos, and videos to wherever you are. No additional
player is required. Media Streamer does it all—it streams your media and offers several playback
options.
MediaSmart Server iPhone Application
The MediaSmart Server iPhone application is a free download that allows you to securely stream
photo, music, and video libraries from your home server to your iPhone or iPod Touch. And since
your MediaSmart Server is designed to stay on 24/7, all of your media files are now just a
fingertip away. Wireless or 3G connection is recommended for best performance. The iPhone
application is only supported on EX 487 and EX 485 HP MediaSmart Servers.
Defect Fixes and Enhancements
The following defect fixes and enhancements are included in this update.
1. Public and private capabilities were added to HP Photo Viewer albums.
2. Made a number of improvements to the Mac Backup feature, including the ability to resize the
backup disk.
3. Fixed a number of TwonkyMedia server issues, including the case where songs would not play all
the way through.
4. Improved the HP Media Streamer interface, including adding support for streaming video files,
column sort functionality, and new album art views. See HP_Media_Streamer_for_Videos
5. Added streaming support for iPhone. See MediaSmart_Server_iPhone_Application
6. Added the HP Video Converter which transcodes common video formats to an H.264 video codec
and AAC stereo audio code. See HP_Video_Converter
7. Improved Media Collector by displaying progress details, status information, and client
connectivity to shared folders.
8. Improved The HP MediaSmart Server dashb oar d fu nct i o nality.
9. The User's Guide was updated to match HP MediaSmart Server software changes.
above.
above.
above.
HP SOFTWARE UPDATES
HP MediaSmart Server Software Update
Use the HP MediaSmart software update to keep your server and home computers current with th e
latest HP software, online help, and new features.
43
Page 50

HP MediaSmart Server User's Guide
HP MediaSmart software update does not update the Microsoft Windows Home Server operating
system. For information about updating Windows Home Server, see Configuring Windows
Update in the Windows Home Server Console Help.
To Configure HP MediaSmart Software Update
1. At the computer, double-click the Windows Home Server icon in the system tray and log on.
2. Click Settings in the upper right of the Console.
3. Select HP MediaSmart Server in the left menu and click the HP Update tab.
4. In the Configure section you have choices to
Configure HP Software Update Options
Option Additional information
Automatically download and install updates
(recommended)
Download updates and let me choose when to
install
44
Requires no user action.
Downloads and installs updates on the server in
the background. If necessary the server will
automatically reboot.
Requires user action.
Your computer notifies you that an update has
been downloaded and is ready to install on the
Page 51

Set up and Installation
Configure HP Software Update Options
Option Additional information
server. Additionally, the Install link turns blue
under HP MediaSmart software updates.
To update the server after an update is
downloaded, click Install under HP MediaSmart
software updates in the Windows Home Server
Console
Turn off automatic updates
5. The following information and options are in the Version section of the HP Update dialog
• The server software version number and date are shown.
• Click Check for updates to immediately check for available software updates, regardless
of the configuration settings you selected above.
• The Install link becomes active when an update has been downloaded, but not installed.
Click Install to run the server update.
• The Rollback link becomes active when a software update has been installed. Use this
link to uninstall the update on the server and revert to the previous server software
version.
Important
Clicking Install or Rollback only makes changes to the server software. Each home computer
still needs to be updated or rolled back so that the server and client computers are running the
same version of software. See Updating and Rolling Back Client PCs
Back Mac Clients for more information.
Not recommended.
To get updates with this choice you will have to
click Check for updates located in the Version
section.
or Updating and Rolling
Updating and Rolling Back the Server
Use the HP MediaSmart software update to keep your server and home computers current with th e
latest HP software, online help, and new features.
Important
The server must be updated before client PCs and Macs are updated. The server and the client
computers must be running the same version of the HP MediaSmart Server software.
To update the server
The method you use to update the server depends on how you configured HP Update.
• To automatically check for updates
45
Page 52

HP MediaSmart Server User's Guide
If you selected Automatically download and install updates when you configured HP Update,
then you do not need to take further action. The server will install updates in the background as
they are available.
• To manually check for updates
Note
If you have never restarted you HP MediaSmart Server, you may need to turn it off and
back on before you check for updates.
1. At the computer, double-click the Windows Home Server icon
in the system tray and
log on.
2. Click Settings in the upper right of the Console.
3. Select HP MediaSmart Server in the left menu and click the HP Update tab.
4. Click the Check for updates link.
5. If an update is found it will be listed as below. Click Next to start the install process;
follow default choices to complete the software install.
46
Page 53

• To manually install an update copied to the server
Set up and Installation
1. If you downloaded a software update from the www.hp.com site, you can manually
install it by copying the software update package to your server. Once the update is on
the server, complete the following steps.
2. At the computer, double-click the Windows Home Server icon
log on.
3. Click Settings in the upper right of the Console.
4. Select HP MediaSmart Server in the left menu andclick the HP Update tab.
5. Click the Check for updates link. After the install wizard checks for pending u pdat es on
your server, you will see the select package page where you can select the Search button.
in the system tray and
47
Page 54

HP MediaSmart Server User's Guide
6. Click Select file.
7. Type the full path to the file that you copied to the server or select the Browse button
navigate to the file and select OK.
8. Click Finish to start the install process and follow the default choices to complete the
server software install.
48
Page 55

Set up and Installation
To roll back the server
If you want to uninstall a server update click Rollback and then click Yes in the confirmation
screen. If you updated the client software, it must also be uninstalled so that the server and the
client are running the same version of the HP MediaSmart Server software.
Note
HP MediaSmart software update does not update the Microsoft Windows Home Server operating
system. For information about updating Windows Home Server, see Configuring Windows
Update in the Windows Home Server Console Help.
Updating and Rolling Back Client PCs
Note
Update the server software prior to updating the client software. If your server does not have the
correct software version, you will get an error message when you try to install the client software.
See Updating and Rolling Back the Server
Updating Client PCs
There are multiple ways of updating your client PCs. Once the server is updated, the client PC
update is on the server and can be run from the software folder. The client PC update can also be
for more information.
49
Page 56

HP MediaSmart Server User's Guide
downloaded and run from HP Update. The followi ng sectio ns describe various methods for
installing the client PC update. Click an option to expand and view the instructions for updating
your client. Click again to hide the instructions.
• To Update Client PCs Using Run Programs
1. At the computer, click Start, and then Run.
Type the following (UNC) network address.
\\HPSERVER\Software\Home Server Connector Software\ set up .exe
If you renamed your server during the initial software installation the path will be \\<server
name>\Software\Home Server Connector Software\setup.exe.
2. Follow the instructions on your computer for installing the update.
• To Update Client PCs Using HP Update
1. Click the Start menu, HP, and HP Update.
2. Click Settings to configure HP Update.
50
Page 57

Set up and Installation
3. Click Next to immediately check for a client PC update.
4. Follow the instructions on your computer for installing the update.
• To Update Client PCs Using the Software Installation Disc
The Software Installation Disc runs an executable file that is on your server. When the server
software is updated, the new client executable file is placed on the server but not installed. As
long as you run the Software Installation Disc after you update the server, the CD will find the
new client executable file on the server and install it.
• To Update Client PCs Using a Browser
1. Open a Web Browser and type the following address http://hpserver:55000.
If you renamed your server during the initial installation the URL will be http://<server
name>:55000.
The Windows Home Server Connector Setup window opens.
2. Click Download Now.
Rolling Back Client PCs
Important
You must roll back your server prior to rolling back the client PC. See Updating and Rolling Back
the Server.
1. Click the Start menu, Control Panel, and Add or Remove Programs.
2. Select HP MediaSmart Server and click Remove.
3. Select Windows Home Server Connector and click Remove.
4. Close Add or Remove Programs.
5. At the computer, click Start, and then Run.
6. Type the following (UNC) network address.
\\HPSERVER\Software\Home Server Connector Software\ set up .exe
The network address will be different if you renamed your server. In this case type,
\\<server name>\Software\Home Server Connector Software\setup.exe
7. Click OK.
Install the software on one computer at a time.
Checking the Client PC Version Number
It is important for the Server software and the Mac client software to be on the same version in
order for them to work together properly. Complete the following steps to confirm that the server
and the client are on the same version.
1. To check the PC client software version number, click the Start menu and click HP MediaSmart
Server.
2. In the task bar at the bottom of your screen, right-click HP MediaSmart Server and select About
HP Control Center from the pop-up menu.
51
Page 58

HP MediaSmart Server User's Guide
The About dialog opens.
3. To check the server software version number, double-click the Windows Home Server icon
the system tray and log on.
4. Click Settings in the upper right of the Console.
5. Select HP MediaSmart Server in the left menu and click the HP Update tab.
The version number is at the bottom of the HP Update tab.
in
52
Page 59

Set up and Installation
The server and client software should have compatible version numbers. The following table lists
the version numbers that work together.
Compatible Software Version Numbers
Server Version PC Client Version Mac Client Version
1.3.6.21622 1.2.1.18999, 1.3.6.21622 N/A
1.3.8.25155 1.2.1.18999, 1.3.6. 21 6 22,
1.3.8.25155
2.1.7.24261 2.1.7.24261 1.0.0b20
2.5 2.5 2.5
N/A
Updating and Rolling Back Mac Clients
Updating Mac Clients
Important
Update the server software prior to updating the client software. The server update and the Mac
client update are downloaded at the same time through the HP Update mechanism in the Windows
Home Server Console. Updating the server ensures that the most recent copy of the HP MSS
53
Page 60

HP MediaSmart Server User's Guide
Client.dmg is on your server and ready to install. See Updating and Rolling Back the Server
more information.
1. Insert the Software Installation Disc and run it, or
Select the server name in the left side of the Finder and connect to the server.
The name of the server is HPSERVER, unless you renamed it during the original installation.
Choose Software > Mac, and then run HP MSS Client.dmg.
for
2. When the software window opens, click Uninstall HP MediaSmart Server Software.
Moving the application to the trash can will not uninstall it properly.
3. After the uninstall is complete, click Install HP MediaSmart Server Software.pkg to install the
update.
Rolling Back Mac Clients
Important
Roll back the server software prior to rolling back the Mac client software. When the server is
rolled back using the HP Update mechanism in the Windows Home Server Console, it also rolls
back the HP MSS Client.dmg file that is located on the server. See Updating and Rolling Back the
Server for more information.
1. Go to Finder > Applications, and then drag and drop HP MediaSmart Server Control Center
to the Trash.
2. Select the server name in the left side of the Finder and connect to the server.
The name of the server is HPSERVER, unless you renamed it during the original installation.
3. Choose Software > Mac, and then run HP MSS Client.dmg.
54
Page 61

Set up and Installation
4. When the software window opens, click Install HP MediaSmart Server Software.pkg to install
the update.
Checking the Mac Client Version Number
It is important for the Server software and the Mac client software to be on the same version in
order for them to work together properly. Complete the following steps to confirm that the server
and the client are on the same version.
1. To check the Mac client software version number, go to Finder > Applications, and open the HP
MediaSmart Control Center on the Mac.
2. At the top of the screen select HP MediaSmart Server Control Center > About HP
MediaSmart Control Center.
The Mac client version number is displayed in the About dialog.
3. To check the server software version number go to a PC and double-click the Windows Home
Server icon
4. Click Settings in the upper right of the Console.
5. Select HP MediaSmart Server in the left menu and click the HP Update tab.
The version number is at the bottom of the HP Update tab.
Note
Server version 2.1.7.24261 and Mac client v ersi o n 1.0.0b20 work together. Starting with version
2.5, the server and the client version numbers will have the same first two numbers.
in the system tray and log on.
55
Page 62

HP MediaSmart Server User's Guide
The server and client software should have compatible version numbers. The following table lists
the version numbers that work together.
Compatible Software Version Numbers
Server Version PC Client Version Mac Client Version
1.3.6.21622 1.2.1.18999, 1.3.6.21622 N/A
1.3.8.25155 1.2.1.18999, 1.3.6. 21 6 22,
N/A
1.3.8.25155
2.1.7.24261 2.1.7.24261 1.0.0b20
2.5 2.5 2.5
56
Page 63

Chapter 2. Start Using Your Server
GUIDED TOUR
HP MediaSmart Server Control Center for PC
The Control Center is the starting point for accessing the features of the HP MediaSmart Server.
The Control Center has three sections:
Browse—Access your shared folders .
• Tools—Tools and settings for configuring your server.
• Help & Support—Learn to use the HP MediaSmart Server and connect to online support.
Opening the Control Center on a PC
The Control Center can be accessed from the following:
Windows Start menu—at the computer, click Start, All Programs, and then
select HP MediaSmart Server.
Desktop icon—at the computer, double-click the HP MediaSmart Server icon on
the desktop.
57
Page 64

HP MediaSmart Server User's Guide
About the HP MediaSmart Server Control Center for PC
The Browse Section
Shared folders are places to help you get started saving and organizing your files so that you can
share them with other people on your network.
Server—opens a folder that displays a list of all your shared folders.
Photos—opens a folder that displays a list of photos and photo subfolders.
Music—opens a folder that displays a list of music and music subfolders.
Video—opens a folder that displays a list of videos and video subfolders.
If the logon name for the user account on your server does not match the logon name for your
computer, you must enter a user name and password. For information about creating matching
user accounts, see Why should logons names match? in the Windows Home Server Console
Help.
58
Page 65

Start Using Your Server
The Tools Section
Use the tools and settings on this tab to configure your HP MediaSmart Server.
HP Photo Publisher—Publish photos from your Server to your favorite photosharing site. Friends and family can see your photos on the Internet.
Home Server Console—opens the Windows Home Server Console, where you
manage and configure the server. For more information, see Windows Home
Server Console in the Windwows Home Server Console help.
Backup now—immediately backs up your computer. All files not backed up
since the last nightly backup are backed up. For more information, see Backup
Now in the Windows Home Server Console Help.
Media Streamer—opens a web application for streaming music, videos, and
photos in your home. For more information, see About Media Streamer
Media Collector Status—opens a client tool for viewing media collection
information and connectivity. For more information, see About Media
Collector.
Wake Server—Click Wakeup Server if you want to use the HP MediaSmart
Server during sleep hours. All of the lights on the Server will be off when it is
in sleep mode. For more information, see Power
.
.
The Help & Support Section
Get information about using, configuring, and getting accessories for your HP MediaSmart Server.
User’s Guide—contains installation information, setup instructions, how to use
the server, tutorials, and other important information.
Online support—go to the HP Support web site, where you can get more
information about the HP MediaSmart Server.
Registration—Click to go to https://register.hp.com
MediaSmart Server. Registering your Server ensures that your information is
on file with HP if you should need technical support services.
Need accessories?—get accessories for your server and shop HP Home &
Home Office.
and register your HP
HP MediaSmart Server Control Center for Mac
The Control Center is the starting point for accessing the features of the HP MediaSmart Server.
The Control Center has three sections:
Browse—Access your shared folders .
• Tools—Tools and settings for configuring your server.
• Help & Support—Learn to use the HP MediaSmart Server and connect to online support.
59
Page 66

HP MediaSmart Server User's Guide
Opening the Control Center for Mac
The Control Center can be accessed from the following:
Using the Finder—at the computer, click Finder, Applications, and then
select HP MediaSmart Server Control Center.
On the Dock—at the computer, double-click the HP MediaSmart Server
icon on the Dock.
Desktop icon—at the computer, double-click the HP MediaSmart Server
Control Center icon on the desktop.
The Control Center desktop icon and system tray icon are available only
if you selected to create them during installation.
About the HP MediaSmart Server Control Center for Mac
The Browse Section
Shared folders are places to help you get started saving and organizing your files so that you can
share them with other people on your network.
Server—opens a folder that displays a list of all your shared folders.
Photos—opens a folder that displays a list of photos and photo subfolders.
Music—opens a folder that displays a list of music and music subfolders.
Video—opens a folder that displays a list of videos and video subfolders.
60
Page 67

Start Using Your Server
If the logon name for the user account on your server does not match the logon name for your
computer, you must enter a user name and password. For information about creating matching
user accounts, see Why should logons names match? in the Windows Home Server Console
Help.
The Tools Section
Use the tools and settings on this tab to configure your HP MediaSmart Server.
HP Photo Publisher—Publish photos from your Server to your favorite photosharing site. Friends and family can see your photos on the Internet.
Preferences—Click to enter your Server name and password, also to set
backup preferences.
Media Streamer—opens a web application for streaming music, videos, and
photos in your home. For more information, see About Media Streamer
Wake Server—Click Wakeup Server if you want to use the HP MediaSmart
Server during sleep hours. All of the lights on the Server will be off when it is
in sleep mode. For more information, see Power
.
.
The Help & Support Section
Get information about using, configuring, and getting accessories for your HP MediaSmart Server.
User’s Guide—contains installation information, setup instructions, how to use
the server, tutorials, and other important information.
Online support—go to the HP Support web site, where you can get more
information about the HP MediaSmart Server.
Registration—Click to go to https://register.hp.com
MediaSmart Server. Registering your Server ensures that your information is
on file with HP if you should need technical support services.
Need accessories?—get accessories for your server and shop HP Home &
Home Office.
and register your HP
Windows Home Server Console
O
PENING THE WINDOWS HOME SERVER CONSOLE
The Windows Home Server Console is where you manage and configure the HP MediaSmart
Server. You can access the Windows Home Server Console in the following ways:
• To open the WHS Console from the Start menu
• To open the WHS Console from the HP MediaSmart Server desktop icon
• To open the WHS Console from the system tray
61
Page 68

HP MediaSmart Server User's Guide
To open the WHS Console from the Start menu
1. At the computer, click Start, All Programs, and then select Windows Home Server Console.
2. Log on to the Windows Home Server Console.
To open the WHS Console from the HP MediaSmart Server
desktop icon
1. From the computer desktop, double-click HP MediaSmart Server icon.
2. In the Control Center, click the Tools tab.
3. Click Home Server Console.
4. Log on to the Windows Home Server Console.
To open the WHS Console from the system tray
1. At the computer, double-click the Windows Home Server icon in the system tray.
2. Log on to the Windows Home Server Console.
WELCOME TO THE WINDOWS HOME SERVER CONSOLE
Opening the Windows Home Server Console brings you to the following screen. This document
explains or links to documents that will help you use the Windows Home Server console.
62
Page 69

Start Using Your Server
The Top Banner
From the top banner you can click on a tab to open management windows, or click the Settings
link to open the MediaSmart Server Settings. Clicking the Help link will open a help screen that
deals the location you are at.
Click on any of the links below to open a help page for that document:
• MediaSmart Server
• Computers and Backup
• User Accounts
• Shared Folders
• Server Storage
• Network
• Settings
• Help
63
Page 70

HP MediaSmart Server User's Guide
The Settings Link will open up a page that allows you to
configure settings:
You can configure the various settings by clicking on the title in the left panel.
Help
Clicking the help button will open up the help file for the server.
You can search help by clicking the Content, Index, or Search tab.
64
Page 71

Start Using Your Server
Windows Home Server Console Left Panel
Clicking the selections on the left panel will allow you to configure your server. Links below the
graphic will give you more information for that selection
Click the links below to learn more about the panes listed above:
• Welcome
65
Page 72

HP MediaSmart Server User's Guide
• Server Summary
• Remote Access
• HP Photo Publisher
• Features for Mac
• Server Online Backup
• Server for iTunes
• HP Media Collector
• HP Video Converter
• TwonkyMedia
You can rearrange the position of the panes by:
• Hover over the pane, hold the left mouse button down and move the pane to the position you want
to place it.
or
• Hover over the pane until the up/down arrows appear. This will move pane to the top or bottom
position.
Each pane has 3 conditions:
Informational
Configured/OK
Warning/Not Configured
Main Panel
The Main Panel will display whatever you have chosen from the left panel.
66
Page 73

Start Using Your Server
THE MEDIASMART SERVER TAB
The MediaSmart tab contains the tools and settings for managing the HP features.
Welcome
This is the Home Server Console, you can set up and manage all of the HP MediaSmart Server
features from here. The following items are already set up for you:
• Automatic PC backups Learn more
• Streaming Media (TwonkyMedia, Server for iTunes, and Web Streamer) Learn more
• McAfee Antivirus Learn more
For the next steps, we recommend that you set up these features:
• User Accounts for each person in your home
• Remote Access so that you can access your server when you're away from home
• Server Online Backup
67
Page 74

HP MediaSmart Server User's Guide
• HP Media Collector
You can find these items on the left buttons of this screen.
Note
You can rearrange the buttons by dragging and dropping or with the top and bottom arrows.
Remote Access settings
Enjoy your digital experiences when and where you want. Remote Access gives you and your
family access to:
• Files and supported computers from any location
• Remote Management of your server
Remote Media Streaming
• HP Photo Viewer
• HP Photo Publisher
HP Photo Publisher
Publish photos from your Server to your favorite photo-sharing site. Friends and family can see
your photos on the Internet. Uploading your photos is a simple 4-step process:
1. Log on to the HP Photo Publisher
2. Log on to the photo-sharing site
3. Select the photos you want to share
4. Upload your photos
Media Collector
Media Collector copies media files from the computers in your network and organizes them on the
server. Media Collector continuously copies files. You can enable collection for any or all the PCs
in your home.
You choose the organization structure:
• Photos - by date or existing structure
• Music - by artist/album or existing structure
• Videos - move or copy to the server
Mac Features
Your HP MediaSmart Server works with Mac OS X 10.5 and later. You can:
• Use Time Machine to back up your Mac to the HP MediaSmart Server.
Get easy access to shared folders on the server using your Control Center.
68
Page 75

Start Using Your Server
Settings for iTunes
Your HP MediaSmart Server includes a Server for iTunes. This server allows you to stream your
music and playlists to computers that are running iTunes, or compatible devices.
Server Summary
Review important information about your Server at a glan ce.
Media Smart Server Online Backup
Online Backup uses an Amazon S3™ account to save your important files to a remote location on
the Internet. You can also browse and restore your online files back to your Server . This feature is
an Add-in that you can uninstall at any time.
THE WINDOWS HOME SERVER TABS
The Windows Home Server enables you to share, store, access, and automatically protect your
pictures, videos, music, and files. It contains the following tabs:
• Computers & Backups—view and customize backups. Also, view the status of your home
computers. For more information, see Computers & Backup in the Windows Home Server
Console Help.
• User Accounts—add, remove, and modify user accounts. For more information, see User
Accounts in the Windows Home Server Console Help.
Shared Folders—add, open, remove, and view the properties of the shared folders on your server.
For more information, see Shared Folders in the Windows Home Server Console Help.
• Server Storage—view, add, repair, and remove hard drives from server storage. For more
information, see Server Storage in the Windows Home Server Console Help.
• Network—displays health notifications from your server and your home computers. For more
information, see Network Health in the Windows Home Server Console Help.
• Settings—configure general settings, such as date and time, backups, passwords, media sharing,
remote access, add-ins, resources, and more. For more information, see Server Settings in the
Windows Home Server Console Help.
• Help—access the Windows Home Server Console Help.
ABOUT HP ADD-INS FOR WINDOWS HOME SERVER
HP add-ins are software programs that extend the functionality of Windows Home Server. HP is
working with PacketVideo to provide enhanced media streaming using the TwonkyMedia add-in.
The McAfee add-in delivers server side anti-virus protection.
PacketVideo TwonkyMedia
The TwonkyMedia enhanced media streaming software add-in for the HP MediaSmart Server
enables you to view photo thumbnails, available music album art, and stream content from any
shared folder using a digital media player or a digital media receiver.
69
Page 76

HP MediaSmart Server User's Guide
Note
It is suggested that you use one media streaming program, either Windows Media Connect or
TwonkyMedia described above. Windows Media Connect is part of Windows Home Server and is
already installed on the HP MediaSmart Server. Conversely, Hewlett-Packard partnered with
PacketVideo to provide the TwonkyMedia add-in. For a comparison of these programs, see
Windows Media Connect 2.0 and TwonkyMedia Comparison
.
McAfee Anti-virus Protection
To receive McAfee Anti-virus protection, you must activate the service. The McAfee anti-virus
add-in with Total Protection Service is a comprehensive security management solution that:
• Checks for viruses, spyware, unwanted programs, and other potential threats. Every time a file is
accessed on your Windows Home Server, Total Protection Service scans the file to make sure it is
free of viruses and spyware.
• Sends security status information for your server to an administrative web site that is unique to
your account, known as the McAfee SecurityCenter. You can visit the SecurityCenter to check
detection reports or to set up security rules, known as policies, to define the types of programs that
do not pose a security threat.
• Updates itself automatically at regular intervals with the latest versions of components and
detection definition (dat) files. This ensures that Total Protection Service is always able to protect
you against the latest threats.
Total Protection Service typically operates in the background without an y interaction on your part.
To learn more about the McAfee anti-virus add-in, see their online documentation in one of the
following languages:
• English—http://us.mcafee.com/root/campaign.asp?cid=39906&l=enu&action=whshelp
• French—http://us.mcafee.com/root/campaign.asp?cid=39906&l=fra&action=whshelp
• German—http://us.mcafee.com/root/campaign.asp?cid=39906&l=deu&action=whshelp
• Spanish—http://us.mcafee.com/root/campaign.asp?cid=39906&l=esp&action=whshelp
After you activate McAfee antivirus protection, you receive a seven month trial period. Internet
access is required to receive updates. Subscription is required for updates after seven months.
Installing Add-ins
1. At the computer, double-click the Windows Home Server icon in the system tray and log on.
2. Click Settings in the upper right corner of the Console.
3. Click Add-ins in the left menu.
4. Click the Available tab.
5. Click Install to install an add-in.
6. Click OK on the Installation succeeded dialog box to restart the console.
For additional information, see Add-ins in the Windows Home Server help.
70
Page 77

Start Using Your Server
FIRST STEPS
Customize Computer Backups
After running the Software Installation Disc on your first home computer it is automatically added
to the list of computers that are backed up by the HP MediaSmart Server each night. Run the
Software Installation Disc on additional home computers to enable them to communicate with the
server and to add them to nightly backups.
To customize the hard-drive volumes to back up, or to exclude folders from the backup
1. At the computer, double-click the Windows Home Server icon
2. Log on to the Windows Home Server Console.
3. Click the Computers & Backups tab.
For assistance backing up or restoring a computer, see the following in the Windows Home Server
Console Help:
• Computers & Backup
• How does backup work?
• Managing and Configuring Backups
• Restoring Computer Backups
• Removing a Computer
• Troubleshooting Computers & Backup
in the system tray.
Copy Files to Shared Folders
Shared folders are places for you to organize and store files on your home server so that you can
share them with other people on your network. Start copying digital assets from your computer to
shared folders on the HP MediaSmart Server.
Note
Do not delete the shared folders that come with the HP MediaSmart Server—Music, Photos,
Public, Software, or Videos. Likewise, do not delete the Mac shared folder if you intend to use
Mac features.
1. At the computer, double-click the HP MediaSmart Server desktop icon.
Or you can click the Shared Folders icon.
2. Copy Photos, Music, or Videos to the appropriate shared folder or click Server to create shared
folders for other digital content.
71
Page 78

HP MediaSmart Server User's Guide
Note
From the Media Sharing page on the Windows Home Server Settings tab, you can turn on digital
media streaming for the Photos, Music, or Videos shared folders. Click On for each folder that
you want to stream from.
Windows Home Server Console Help for Shared Folders
For assistance using shared folders, see the following in the Windows Home Server Console Help:
• Shared Folder
• Adding a shared folder
• Viewing shared folder properties
• Opening a shared folder
• Removing a shared folder
• Viewing shared folder history
What is Folder Duplication?
Accessing Shared Folders from your Computer
For convenience, the HP MediaSmart Server provides several ways to access shared folders:
• At the computer, click Start and Run. Type \\hpserver or the name of your server and click OK.
• To access shared folders from the Control Center
• To access shared folders from the desktop shortcut
• To access shared folders from the system tray
• To access shared folders from My Network Places in Windows XP
• To access shared folders from Network in Windows Vista
To access shared folders from the Control Center
1. At the computer, click Start, All Programs, and then select HP MediaSmart Server.
2. Click one of the following:
• Server—opens a folder that contains all your shared folders.
• Photos—opens a folder for sharing photos.
• Music—opens a folder for sharing music.
• Videos—opens a folder for sharing videos.
72
Page 79

Start Using Your Server
To access shared folders from the desktop shortcut
1. At the computer, go to the desktop, and then double-click the Shared Folders on Server shortcut
.
2. Double-click the shared folder you want to open.
To access shared folders from the system tray
1. Right-click the Windows Home Server
2. Click Shared Folders.
3. Double-click the shared folder you want to open.
To access shared folders from My Network Places in Windows XP
1. At the computer, click Start, and then click My Network Places.
2. Double-click the shared folder you want to open.
3. If the shared folders are not in My Network places, you can add them manually.
To access shared folders from Network in Windows Vista
1. At the computer, click Start, and then Network.
2. In Network, double-click the computer icon next to SERVER
If you changed the default name of the server, that name appears next to the computer icon
instead.
3. Double-click the shared folder you want to open.
icon.
.
Enable Guest Account and Set up User Accounts
Enabling the Guest Account
If you want everyone to use the same logon account to access the HP MediaSmart Server, enable
the guest account. If the Guest account is enabled with no password, family members are not
required to logon when they use home computers. Additionally, all family members can have Full
access to all shared folders through the Guest account.
Important
If you enable the Guest account, everyone that connects to your home network has the same
privileges. That may mean that they all have full access to shared folders and other resources on
your server. To protect your home network from unwanted connections , see Securing your server
from intruders.
73
Page 80

HP MediaSmart Server User's Guide
Notes
o We strongly recommend that you enable the Guest account and give the Guest account full
permission on all your photos, music, and videos shared folders; this ensures that Media Collector
always has access to all shares.
o The Guest account cannot be used to access the server from outside of the home using remote
access.
To enable the guest account
1. At the computer, double-click the Windows Home Server icon
2. Log on to the Windows Home Server Console.
3. Click the User Accounts tab at the top of the page, the User Accounts Setup dialog displays.
4. Click Enable Guest.
Notes
If you have already asked the Enable Guest checkbox not to show again, double-c lick Guest
account and click Enable.
in the system tray.
Creating Individual User Accounts
If family members want to access information on your home network from an Internet café, coffee
shop, or other location outside of your home, they need individu al user accounts with strong
passwords on their computer or laptop and on the server.
Important
When you create user accounts on the server, use logon names and passwords that match the logon
names and passwords of existing user accounts on yo ur h o me computers. Creating matching user
accounts enables family members to automatically log on to the server when they log on to their
home computer.
If the user accounts and passwords do not match, you will be prompted to type a user name and
password when you open the server’s shared folders.
If your computer does not have a password or if the computer uses a factory default user name, you
can change these parameters to eliminate the need to ente r y ou r user nam e and pass wo r d whe n y ou
access a shared folder.
To create a user account for a home computer running Windows XP
1. At the computer, click Start, Control Panel, and then User Accounts.
2. Click Add to create a user account.
-orClick Change an Account to change a logon name or password for an existing account.
A strong password is suggested to ensure security and is required to use remote access. A strong
password must be at least 7 characters long and must fulfill three of the following four character
criteria:
• Uppercase characters
74
Page 81

Start Using Your Server
• Lowercase characters
• Numbers
• Symbols (such as !, @, #, and so on.)
A password hint helps you remember your password. The password hint can be seen by anybody
who clicks the link to display it.
To create a user account for a home computer running Windows Vista
1. At the computer, click Start and then Control Panel.
2. Under User Accounts and Family Safety, select Add or remove user accounts.
3. Add user accounts or make changes to existing user accounts.
A strong password is suggested to ensure security and is required to use remote access. A strong
password must be at least 7 characters long and must fulfill three of the following four character
criteria:
• Uppercase characters
• Lowercase characters
• Numbers
• Symbols (such as !, @, #, and so on.)
A password hint helps you remember your password. The password hint can be seen by anybody
who clicks the link to display it.
To create user accounts on the server
1. At the computer, double-click the Windows Home Server icon
in the system tray.
2. Log on to the Windows Home Server Console.
3. Click the User Accounts tab at the top of the page. If the User Accounts Setup dialog displays
click OK.
4. Click Add, this will open the Add User Account screen. enter user information. Check the
Enable Remote Access for this user check box. Make an appropriate choice concerning allowing
access to computer and folders.
5. Click Next.
6. Enter and confirm a strong password. A strong password is suggested to ensure security and is
required to use remote access. A strong password must be at least 7 characters long and must
fulfill three of the following four character criteria:
• Uppercase characters
• Lowercase characters
• Numbers
75
Page 82

HP MediaSmart Server User's Guide
• Symbols (such as !, @, #, and so on.)
7. Click Next.
8. Select access to shared folders
9. Click Finish.
10. Click Done.
Repeat for each user account that you want to add.
Add a user account for a home computer running Mac
1. Click System Preferences, Accounts.|
2. If the accounts page is locked, click the lock and enter you credentials to unlock the page.
76
Page 83

3. Click the + to open the new account page.
Start Using Your Server
Enter the user information.
A strong password is suggested to ensure security and is required to use remote access. A strong
password should be at least 7 characters long and fulfill three of the following four character
criteria:
• Uppercase characters
• Lowercase characters
• Numbers
• Symbols (such as !, @, #, and so on.)
A password hint helps you remember your password.
77
Page 84

HP MediaSmart Server User's Guide
5. Click Create Account.
Secure your Server from Intruders
The HP MediaSmart Server is designed as a device that is always on, which comes in handy for
accessing files any time your network users need or want them. Additionally, remote access can
allow visitors to view, add, and delete photos and videos. If not properly secured, these features
present security risks, so you’ll want to ensure that unauthorized users can’t access your server and
the files stored on it.
The following security measures help protect your network and computers:
• Firewall protection
• Wireless security
Anti-virus software
• User name and password protection
• Remote Access security
Firewall protection
A firewall is a hardware device or software program that protects your network from unauthorized
access. It protects your system from hackers running programs, sending email, and gaining access
to your private information. The following types of firewalls protect your network and computers:
Broadband router firewall
• Windows Home Server firewall
• Personal firewall
78
Page 85

Start Using Your Server
Broadband router firewall
The HP MediaSmart Server requires a broadband router. Broadband routers allow multiple
computers and devices to share an internet connection using NAT (Network Address Translation)
technology. NAT allows all the computers and devices on your network to use a single internet
connection (IP address). NAT acts as a firewall by masking the real IP addresses of your network
components—including the HP MediaSmart Server—which keeps them from being seen outside
the home.
Some broadband routers implement Stateful Packet Inspection (SPI), which adds enhanced
security by examining each packet of information before allowing it into the network. SPI can
prevent advanced forms of incursions like Denial of Service attacks.
Windows Home Server firewall
Windows Home Server includes Windows Firewall, which protects communications between the
server and the computers on your home network . This firewall is configured to allow remote
access. It is not configurable by the user.
Personal firewall
A personal firewall is a software application that protects an individual computer. Because a
personal firewall is behind the broadband firewall, it will protect the computer on which it is
installed from attacks from other computers within the network.
Firewall ports
The following table lists the ports used by the server.
Ports used by the server
Type Port numbers Description
TCP 80, 443 Standard Web site
TCP 55000, 56000 internal (subnet only) Web site for
Windows Home Server Web services
TCP 1138 Transport
TCP 8912 Backup and beacon
UDP 8912 Backup and beacon
TCP 2869 UPnP (Universal Plug and Play)
UDP 1900 UPnP
TCP 3389 Remote desktop
TCP 4125 Remote access (when enabled)
TCP 139, 445 File and print sharing
UDP 137, 138 File and print sharing
79
Page 86

HP MediaSmart Server User's Guide
Type Port numbers Description
Ports used by the server
UDP 10284, 10283, 10282,
10281, 10280, 10243
The following topics in the Windows Home Server Console Help discuss how to configure your
router for port forwarding:
• Configuring your broadband router
• Why can't I connect to some computers?
• Learn more about router port forwarding
Media connection
Wireless security
If your router comes with wireless capability, it has a piece of equipment called a Wireless Access
Point (WAP). A WAP can come within an all-in-one-gateway, router, or as a standalone unit. In
many cases, WAP’s security settings are toggled off by default and you must manually turn on the
security settings. If the security settings are toggled off, anyone can access your network and may
be able to get into the server and any computer or other device on your network. Firewalls and
anti-virus software do not keep intruders out of wireless networks.
Most wireless networking equipment supports two forms of data encryption as security features:
Wired Equivalent Privacy (WEP)
Wi-Fi Protected Access (WPA)
For more information on how to configure the security for your wireless network, see the user’s
guide that came with your networking equipment.
Anti-virus software
You should install anti-virus software on all the computers on your ne twork, and configure the
software from one of the computers to scan all the shared folders on the server. You might be
required to assign (map) drive letters to all your shared folders to enable the anti-virus software to
scan the server.
Important
Remember to keep your anti-virus definitions up-to-date.
User name and password protection
User names and passwords help secure the server by requiring authentication for managing the
server, accessing shared files, and using remote access.
Server password - during the first install of the HP MediaSmart Server, you are asked to create a
strong password to allow access for managing your server from the Windows Home Server
console. This password will protect the server from unwanted changes.
80
Page 87

Start Using Your Server
• User account passwords - each person who uses your network must have a user account so they
can access shared folders on the server or, if configured, use remote access. For more information,
see User Accounts and Setting User Accounts Password Policy in the Windows Home Server
Console Help.
• Computer passwords - by using the same user name and password for logging onto a computer
as for the server user account, you can avoid having to enter the user name and password when
accessing a shared folder. Requiring logon to each computer on your network adds a level of
security. For more information, see Why should logon names match? in the Windows Home
Server Console Help.
Remote Access security
By default Remote Access is turned off.
Using a computer to remotely access the files on your server is protected in several ways:
• Security certificate
HTTPS (encrypted Secure Sockets Layer (SSL) protocol)
• User account with strong password
Security certificate
When you install the HP MediaSmart Server software on your home computers, the Windows
Home Server Connector software adds the Windows Home Server security certificate to the
computer’s trusted certificate list. This security certificate helps secure the information that is
exchanged between the server and your computer’s Web browser. The best way to access the files
on the server while away from home is from a computer that has a browser and Internet access.
Using remote access to access your server from public or other untrusted computers is not
recommended. Doing so can potentially expose your server to malicious software and viruses.
HTTPS
Remote Access is secure because the connection between the remote computer and the server is
done over HTTPS. HTTPS uses the encrypted Secure Sockets Layer (SSL) protocol, the same
protocol used for banking transactions and retail commerce.
User Account with strong password
Remote access does not allow logging on from the Guest or Administrator account. Moreover, the
user account must be enabled for remote access, which requires a strong password to ensure that
authentication is as secure as possible.
HP MediaSmart Photo Viewer
If you have configured a Domain name to your Server, any photos that are placed into photo
viewer are viewab le by any one that finds your domain. The Photos that are found and seen on
this manner can not be deleted, nor can they be modified. Deleting photos can only be done by
users that have successfully logged into the Server.
81
Page 88

HP MediaSmart Server User's Guide
Add Shared Folders to Network Places
How to add shared folders to network places in Windows XP and Windows Vista.
• To add shared folders to My Network Places in Windows XP
• To add a network place in Windows Vista
To add shared folders to My Network Places in Windows XP
1. At the computer, click Start, and then click My Computer.
Note
If you use the classic start menu, click My Computer on the desktop.
2. Under Other Places, click My Network Places.
3. Under Network Tasks, click Add a network place.
4. In the Add Network Place Wizard, click Next.
5. Highlight Choose another network location, and then click Next.
6. To add the network place, you have two options:
In the Internet or network address box, enter the path to the shared folder you want to map, and
then click Next.
For example, enter \\HPSERVER\Music
Where HPSERVER is the default name. If you changed the name of the server, use that name.
Music is the shared folder’s name.
• Click the Browse button and then use Windows Explorer to locate the network place.
The path is usually: Entire Network, Microsoft Windows Network, Workg roup, <Name
of Server>.
7. After locating the shared folder, click to highlight it, and then click OK.
The location will appear in the Folder box.
8. Specify whether you want to reconnect every time that you log on to your computer, and then
click Finish.
Once you create a network place for one of the shared folders, the other shared folders on the
server will be available on My Network Places.
To add a network place in Windows Vista
Note
Network discovery must be turned on to add a shared folder to Network places in Windows Vista.
1. At the computer, click Start, and then click Network.
2. Under Network Tasks, click Add a network place.
3. In the Network Place Wizard, click Next.
4. Highlight Choose another network location, and then click Next.
5. To add the network place, you have two options:
82
Page 89

Start Using Your Server
• In the Internet or network address box, enter the path to the shared folder you want to
map, and then click Next.
For example, enter \\HPSERVER\Software
Where HPSERVER is the default name. If you changed the name of the server, use that
name. Software is shared folder’s name.
• Click the Browse button and then use Windows Explorer to locate the network place.
The path is usually: Entire Network, Microsoft Windows Network, Workg roup, <Name
of Server>.
After locating the shared folder, click to highlight it, and then click OK. The location will
appear in the Internet or network address box.
6. To create a name for the network place, enter a name in the Type a name for this network place
box, and then click Next.
7. Specify whether you want to reconnect every time that you log on to your computer, and then
click Finish.
About HP Add-ins for Windows Home Server
HP add-ins are software programs that extend the functionality of Windows Home Server. HP is
working with PacketVideo to provide enhanced media streaming using the TwonkyMedia add-in.
The McAfee add-in delivers server side anti-virus protection.
PacketVideo TwonkyMedia
The TwonkyMedia enhanced media streaming software add-in for the HP MediaSmart Server
enables you to view photo thumbnails, available music album art, and stream content from any
shared folder using a digital media player or a digital media receiver.
Note
It is suggested that you use one media streaming program, either Windows Media Connect or
TwonkyMedia described above. Windows Media Connect is part of Windows Home Server and is
already installed on the HP MediaSmart Server. Conversely, Hewlett-Packard partnered with
PacketVideo to provide the TwonkyMedia add-in. For a comparison of these programs, see
Windows Media Connect 2.0 and TwonkyMedia Comparison
.
McAfee Anti-virus Protection
To receive McAfee Anti-virus protection, you must activate the service. The McAfee anti-virus
add-in with Total Protection Service is a comprehensive security management solution that:
• Checks for viruses, spyware, unwanted programs, and other potential threats. Every time a file is
accessed on your Windows Home Server, Total Protection Service scans the file to make sure it is
free of viruses and spyware.
• Sends security status information for your server to an administrative web site that is unique to
your account, known as the McAfee SecurityCenter. You can visit the SecurityCenter to check
detection reports or to set up security rules, known as policies, to define the types of programs that
do not pose a security threat.
• Updates itself automatically at regular intervals with the latest versions of components and
detection definition (dat) files. This ensures that Total Protection Service is always able to protect
you against the latest threats.
83
Page 90

HP MediaSmart Server User's Guide
Total Protection Service typically operates in the background without an y interaction on your part.
To learn more about the McAfee anti-virus add-in, see their online documentation in one of the
following languages:
• English—http://us.mcafee.com/root/campaign.asp?cid=39906&l=enu&action=whshelp
• French—http://us.mcafee.com/root/campaign.asp?cid=39906&l=fra&action=whshelp
• German—http://us.mcafee.com/root/campaign.asp?cid=39906&l=deu&action=whshelp
• Spanish—http://us.mcafee.com/root/campaign.asp?cid=39906&l=esp&action=whshelp
After you activate McAfee antivirus protection, you receive a seven month trial period. Internet
access is required to receive updates. Subscription is required for updates after seven months.
Installing Add-ins
1. At the computer, double-click the Windows Home Server icon in the system tray and log on.
2. Click Settings in the upper right corner of the Console.
3. Click Add-ins in the left menu.
4. Click the Available tab.
5. Click Install to install an add-in.
6. Click OK on the Installation succeeded dialog box to restart the console.
For additional information, see Add-ins in the Windows Home Server help.
Configure HP MediaSmart Server Settings
OWER
P
The Power Management screen allows you to put the Server into a sleep mode to save power.
The Enable Daily Sleep Time checkbox allows the Server to be put into a sleep mode and wake
up based on times entered into the Sleep time and Wake time fields.
Note
The server will wake up for a scheduled backup.
Clicking the Sleep Now button puts the Server into sleep mode. The server will wake up for a
backup, input from the Control Center, or pre ssi ng the p owe r but t o n o n the Ser ver.
84
Page 91

Start Using Your Server
HP MEDIASMART SERVER SOFTWARE UPDATE
Use the HP MediaSmart software update to keep your server and home computers current with th e
latest HP software, online help, and new features.
HP MediaSmart software update does not update the Microsoft Windows Home Server operating
system. For information about updating Windows Home Server, see Configuring Windows
Update in the Windows Home Server Console Help.
To Configure HP MediaSmart Software Update
1. At the computer, double-click the Windows Home Server icon in the system tray and log on.
2. Click Settings in the upper right of the Console.
85
Page 92

HP MediaSmart Server User's Guide
3. Select HP MediaSmart Server in the left menu and click the HP Update tab.
4. In the Configure section you have choices to
Configure HP Software Update Options
Option Additional information
Automatically download and install updates
(recommended)
Download updates and let me choose when to
install
Requires no user action.
Downloads and installs updates on the server in the
background. If necessary the server will automatically
reboot.
Requires user action.
Your computer notifies you that an update has been
downloaded and is ready to install on the server.
Additionally, the Install link turns blue under HP
MediaSmart software updates.
To update the server after an update is downloaded,
click Install under HP MediaSmart software updates
in the Windows Home Server Console
Turn off automatic updates
86
Not recommended.
To get updates with this choice you will have to click
Check for updates located in the Version section.
Page 93

Start Using Your Server
5. The following information and options are in the Version section of the HP Update dialog
• The server software version number and date are shown.
• Click Check for updates to immediately check for available software updates, regardless
of the configuration settings you selected above.
• The Install link becomes active when an update has been downloaded, but not installed.
Click Install to run the server update.
• The Rollback link becomes active when a software update has been installed. Use this
link to uninstall the update on the server and revert to the previous server software
version.
Important
Clicking Install or Rollback only makes changes to the server software. Each home computer
still needs to be updated or rolled back so that the server and client computers are running the
same version of software. See Updating and Rolling Back Client PCs
Back Mac Clients for more information.
or Updating and Rolling
NOTIFICATIONS
The Notifications screen gives you control of which notifications will show up as messages in
your system tray.
The example below has all notifications turned on.
87
Page 94

HP MediaSmart Server User's Guide
An example of a new server add-in is also displayed.
LED
The LED screen gives you control of two different LED behaviors.
The LED brightness control allows you to adjust the brightness of all LEDs on the front panel of
the Server. Grab the slider and move for a brighter or dimmer LED.
The Health LED Behavior checkbox allows for the Server’s health LED to show red you for any
Critical Windows Home Server health notifications.
HP MEDIASMART SERVER SETTINGS, HARDWARE TAB
Information presented on this screen is gathered from various sensors within the Server Solution:
88
Page 95

Start Using Your Server
HP MEDIASMART SERVER SETTINGS, SUPPORT TAB
The Support tab shows:
• The HP Software Version
The BIOS Version
• The Serial Number of the Server
• Links for Online Support and More information
• Access to the Server event logs
89
Page 96

HP MediaSmart Server User's Guide
GETTING HELP FOR USING YOUR SERVER
The HP MediaSmart Server is a home server for families with multiple computers on a home
network who want to enjoy their digital experiences when and where they want. The HP
MediaSmart Server includes remote access to files, automatic computer backups, virtually
unlimited storage expandability, and media streaming to the entertainment center.
Help is available from most windows on the HP MediaSmart Server.
HP MediaSmart Server Help
HP Help includes the types of help shown in the following table. Additionally, the online User’s
Guide provides links to topics in the Windows Home Server Help.
User’s Guide—Contains online help, installation instructions, guidance for set
up, using the product, tutorials, recovery information, and other important
information.
Online Help—A Help button is available on most pages.
HP Support Web site—Additional support and informational articles are
available at http://www.hp.com/support
.
90
Page 97

Start Using Your Server
Windows Home Server Console Help
Some tasks, such as creating users and using s hared folders, are done through the Windows Home
Server Console.
1. At the computer, double-click the Windows Home Server icon
2. Log on to the Windows Home Server Console.
3. Click Help in the upper right corner, indicated by a
boxes.
Windows Home Server Console Help
Main Topics Description
Welcome to the Windows Home Server
Console
Computers & Backup Explains how backups work and how to configure,
User Accounts How to add users to your server.
Shared Folders Adding, opening, removing, viewin g t he
Learn what the Windows Home Server tray icon
colors mean. This topic also provides an overview
of adding user accounts, organizing files,
configuring backups, and customizing server
settings.
restore, and troubleshoot backups.
icon, or click help buttons on dialog
history of shared folders, and using folder
duplication.
in the system tray.
Server Storage View, add, repair, and remove hard drives from
total storage.
Network Health What health notifications mean and what to do
about them.
Windows Home Server Settings How to configure backups, passwords, media
sharing, remote access, add-ins, resources, and
more.
Remote Access How to set up the server to easily access your files
away from home.
91
Page 98

Page 99

Chapter 3. HP Photo Publisher
HP PHOTO PUBLISHER HOME PAGE
To access the HP Photo Publisher Home Page, log onto the Windows Home Server Console. At
the HP MediaSmart Server tab, click the HP Photo Publisher button in the left pane to open the
Photo Publisher home page.
Photo Publisher allows you to post photos from your Server to the photo sharing and social
networking sites shown above.
File Compatibility
The table below tells what file types are accepted at the various photo sharing and social
networking sites:
93
Page 100

HP MediaSmart Server User's Guide
Picasa X X X X
Snapfish X
facebook X X X X
flickr X X
MediaSmart
Photo Viewer
Some limitations, by site, for the free account:
• At time of writing; flickr only allows for 3 photo sets, and a limit of 100MB worth of photo
uploads each calendar month.
• At time of writing; facebook allows only 60 photos for album, but you can have an unlimited
number of albums
• At time of writing; Picasa has a storage limit of 250mb
• At time of writing; Snapfish does not have any restriction to number of photos uploaded.
*.jpg, *.jpeg *.gif *.png *.bmp
X X X
HP PHOTO PUBLISHER LOG ON PAGE
To login to HP Photo Publisher:
94
 Loading...