

Page 1

GETTING STARTED
Page 2

HP ENVY15 Getting Started
Page 3

© Copyright 2011 Hewlett-Packard
Development Company, L.P.
AMD and AMD Catalyst are trademarks of
Advanced Micro Devices, Inc. Microsoft and
Windows are U.S. registered trademarks of
Microsoft Corporation. Bluetooth is a
trademark owned by its proprietor and used
by Hewlett-Packard Company under
license. Intel is a trademark of Intel
Corporation in the U.S. and other countries.
SD Logo is a trademark of its proprietor.
The information contained herein is subject
to change without notice. The only
warranties for HP products and services are
set forth in the express warranty statements
accompanying such products and services.
Nothing herein should be construed as
constituting an additional warranty. HP shall
not be liable for technical or editorial errors
or omissions contained herein.
Second Edition: November 2011
First Edition: November 2011
Document Part Number: 658370-002
Product notice
This guide describes features that are
common to most models. Some features
may not be available on your computer.
Software terms
By installing, copying, downloading, or
otherwise using any software product
preinstalled on this computer, you agree to
be bound by the terms of the HP End User
License Agreement (EULA). If you do not
accept these license terms, your sole
remedy is to return the entire unused
product (hardware and software) within 14
days for a refund subject to the refund
policy of your place of purchase.
For any further information or for requesting
a full refund of the computer, please
contact your local point of sale (the seller).
Page 4

User Guides
HP is committed to reducing the
environmental impact of our products. As
part of this effort, we provide user guides
and learning centers on your computer hard
drive in Help and Support. Additional
support and updates to the user guides are
available on the web.
Page 5

Page 6

Safety warning notice
WARNING! To reduce the possibility of heat-related injuries or of overheating the computer, do not
place the computer directly on your lap or obstruct the computer air vents. Use the computer only on
a hard, flat surface. Do not allow another hard surface, such as an adjoining optional printer, or a soft
surface, such as pillows or rugs or clothing, to block airflow. Also, do not allow the AC adapter to
contact the skin or a soft surface, such as pillows or rugs or clothing, during operation. The computer
and the AC adapter comply with the user-accessible surface temperature limits defined by the
International Standard for Safety of Information Technology Equipment (IEC 60950).
v
Page 7

vi Safety warning notice
Page 8

Table of contents
1 Welcome .......................................................................................................................................................... 1
What's new ........................................................................................................................................... 2
Audio .................................................................................................................................... 2
Volume dial ......................................................................................................... 2
Beats Audio ......................................................................................................... 3
Accessing Beats Audio Control Panel ................................................ 3
Enabling and Disabling Beats Audio .................................................. 4
HP Wireless Audio .............................................................................................. 5
HP Wireless Audio Manager .............................................................. 5
Refreshing your software content (select models only) ....................................................... 6
Radiance backlight keyboard and proximity sensor ............................................................ 6
HP CoolSense ..................................................................................................................... 7
Intel Wireless Display (select models only) ......................................................................... 7
AMD Eyefinity Multi-Display technology .............................................................................. 7
Example display configuration for SLS ............................................................... 8
Switching the screen image ................................................................................ 8
Using AMD Catalyst Control Center .................................................................... 8
Finding information ............................................................................................................................... 9
2 Getting to know your computer ................................................................................................................... 11
Top ..................................................................................................................................................... 11
Imagepad ........................................................................................................................... 11
Lights ................................................................................................................................. 12
Buttons and speakers ........................................................................................................ 13
Keys ................................................................................................................................... 14
Front ................................................................................................................................................... 15
Right side ........................................................................................................................................... 16
Left side .............................................................................................................................................. 18
Display ................................................................................................................................................ 19
Bottom ................................................................................................................................................ 20
vii
Page 9

3 Networking .................................................................................................................................................... 21
Using an Internet service provider (ISP) ............................................................................................ 22
Connecting to a wireless network ....................................................................................................... 22
Connecting to an existing WLAN ....................................................................................... 22
Setting up a new WLAN network ....................................................................................... 23
Configuring a wireless router ............................................................................ 24
Protecting your WLAN ....................................................................................... 24
4 Keyboard and pointing devices ................................................................................................................... 25
Using the keyboard ............................................................................................................................ 25
Using the action keys ......................................................................................................... 25
Using pointing devices ....................................................................................................................... 27
Setting pointing device preferences ................................................................................... 27
Using the Imagepad ........................................................................................................... 28
Turning the Imagepad off or on ......................................................................... 28
Navigating ......................................................................................................... 29
Selecting ........................................................................................................... 29
Using Imagepad gestures ................................................................................. 29
Scrolling ............................................................................................ 30
Pinching/Zooming ............................................................................. 30
Rotating ............................................................................................ 31
Flicking ............................................................................................. 31
5 Maintenance .................................................................................................................................................. 32
Using a factory-sealed battery ............................................................................................................ 32
Replacing or upgrading the hard drive ............................................................................................... 33
Removing the hard drive .................................................................................................... 33
Installing the hard drive ...................................................................................................... 36
Adding or replacing memory modules ................................................................................................ 38
6 Backup and recovery .................................................................................................................................... 43
Restore ............................................................................................................................................... 44
Creating recovery media .................................................................................................................... 45
Performing a system restore .............................................................................................................. 45
Restoring using the dedicated recovery partition (select models only) .............................. 46
Restoring using the recovery media .................................................................................. 46
Changing the computer boot order .................................................................................... 47
Backing up and recovering your information ...................................................................................... 47
Using Windows Backup and Restore ................................................................................ 48
Using Windows system restore points ............................................................................... 48
viii
Page 10

When to create restore points ........................................................................... 48
Create a system restore point ........................................................................... 49
Restore to a previous date and time ................................................................. 49
7 Customer support ......................................................................................................................................... 50
Contacting customer support ............................................................................................................. 50
Labels ................................................................................................................................................. 51
8 Specifications ................................................................................................................................................ 52
Input power ......................................................................................................................................... 53
DC plug of external HP power supply ................................................................................ 53
Operating environment ....................................................................................................................... 54
Index ................................................................................................................................................................... 55
ix
Page 11

x
Page 12

1Welcome
The following sections are included in this chapter:
●
What's new
●
Finding information
Before you set up and register your computer, plug the AC adapter into the computer and connect to
external power. With external power connected, press the power button to begin charging the battery,
and then follow the on-screen instructions.
After you set up and register the computer, it is important to take the following steps:
1. Set up your wired or wireless network. For more information, see
Networking on page 21.
2. Create recovery discs or a recovery flash drive. For instructions, see
Backup and recovery
on page 43.
3. Get to know your computer. See
Getting to know your computer on page 11 and Keyboard
and pointing devices on page 25.
4. Discover the software that is already loaded on the computer by selecting Start > All Programs.
1
Page 13
What's new
Audio
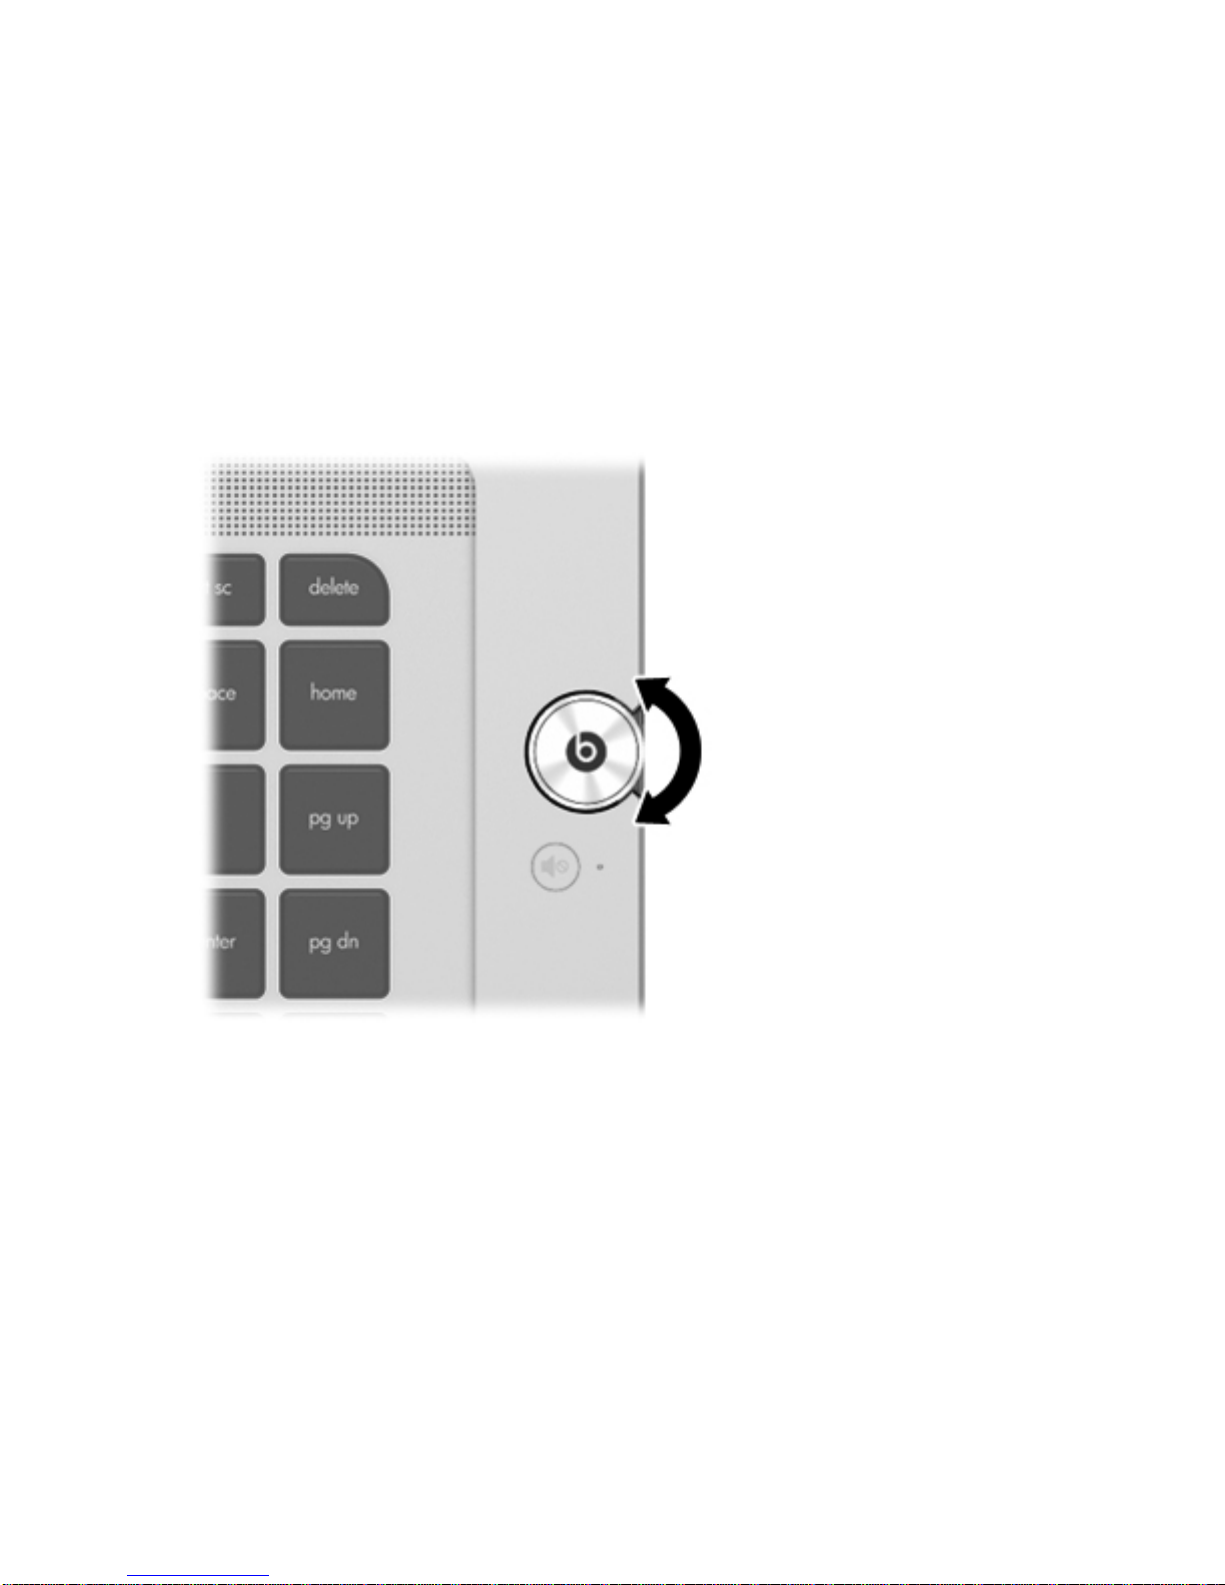
Volume dial
Like the dial on a stereo, the integrated volume dial controls speaker volume on the computer.
▲
To increase speaker volume, rotate the dial clockwise.
–or–
▲
To decrease speaker volume, rotate the dial counter-clockwise.
2 Chapter 1 Welcome
Page 14

Beats Audio
Beats Audio is an enhanced audio feature that provides a deep, controlled bass while maintaining a
clear sound.
Accessing Beats Audio Control Panel
Beats Audio Control Panel allows you to view and manually control audio and bass settings.
To open Beats Audio Control Panel, do one of the following:
▲
Press the Beats Audio button
located in the center of the volume dial.
–or–
▲
Select Start > Control Panel > Hardware and Sound > Beats Audio Control Panel.
What's new 3
Page 15
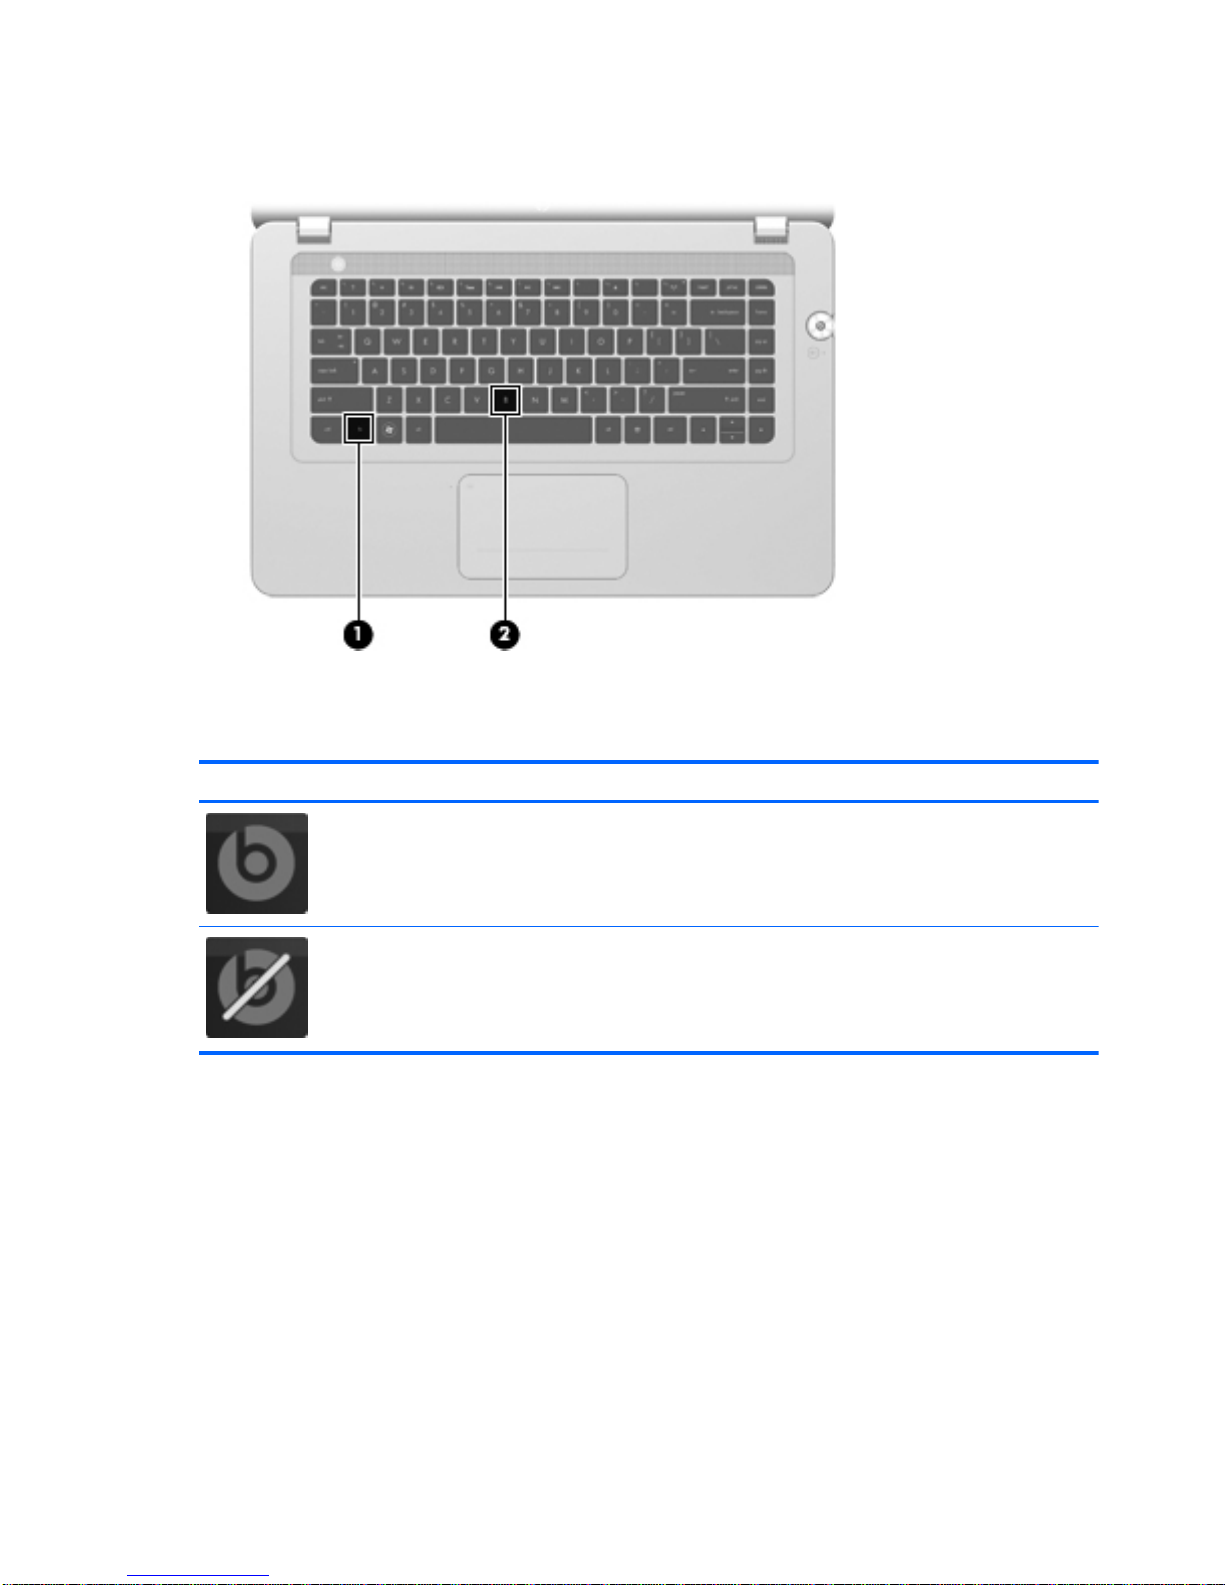
Enabling and Disabling Beats Audio
▲ To enable or disable Beats Audio, press the fn key (1) and the b key (2).
The following table explains the meaning of the Beats Audio icons that appear on the screen, when
you press the Beats Audio hot key (fn+b).
Icon Meaning
Beats Audio is enabled.
Beats Audio is disabled.
4 Chapter 1 Welcome
Page 16
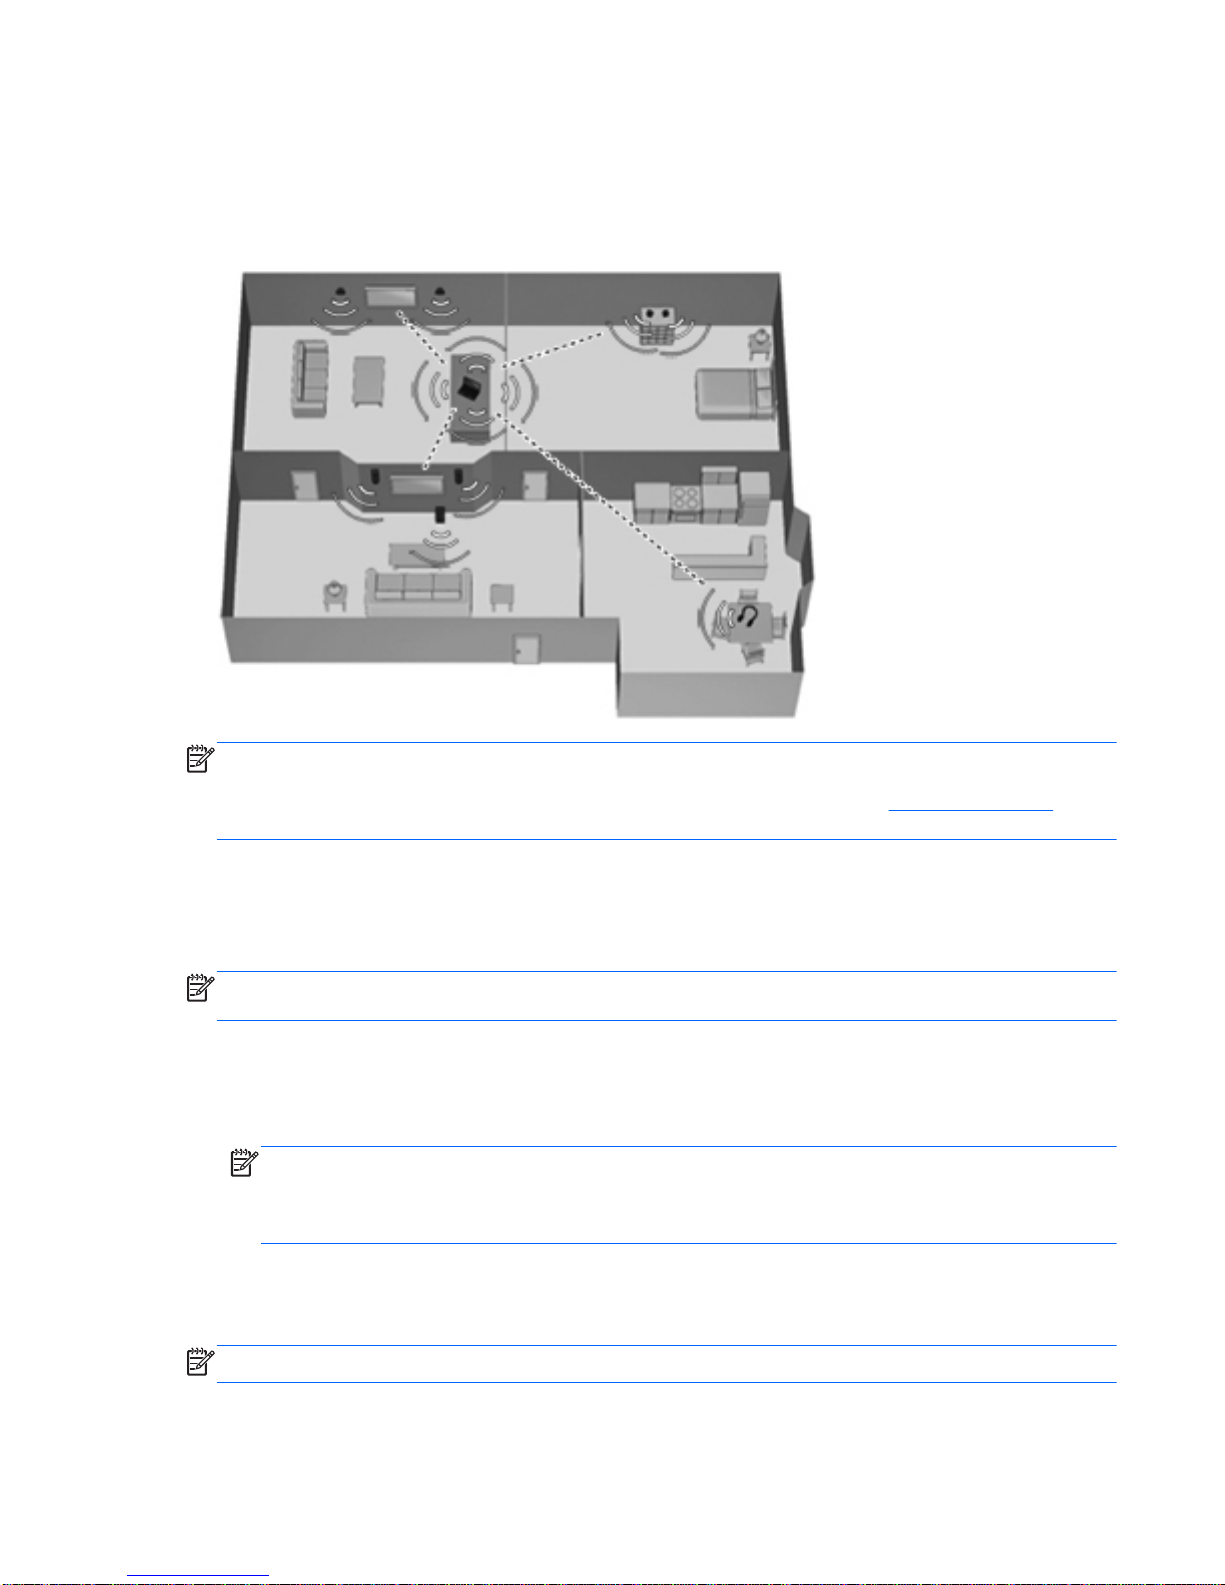
HP Wireless Audio
HP Wireless Audio helps you set up a wireless sound system in your home that streams audio from
your computer to a compatible set of wireless-enabled speakers or other audio devices. To add
compatible wireless audio devices to your home sound system, use HP Wireless Audio.
NOTE: HP Wireless Audio uses KleerNet technology, and is not compatible with other wireless
technologies. Your wireless audio devices must also be compatible with HP Wireless Audio and
KleerNet technology. To purchase compatible wireless audio devices, go to
http://www.hp.com or a
retailer near you.
HP Wireless Audio Manager
With HP Wireless Audio Manager, you can add, remove, name, and group wireless-enabled devices
in your home audio system.
NOTE: Before you start HP Wireless Audio Manager, be sure that the wireless device is turned on
(the wireless light on the f12 key is white).
To access HP Wireless Audio Manager, do one of the following:
▲
Right-click the HP Wireless Audio icon in the notification area, at the far right of the taskbar,
and then click Launch Manager.
NOTE: If you are concerned about battery life, disable HP Wireless Audio when you are not
using it. Right-click the icon in the notification area and select Disable HP Wireless Audio. To
re-enable the software, right-click the icon in the notification area and select Enable HP
Wireless Audio.
–or–
▲
Select Start > Control Panel > Hardware and Sound > HP Wireless Audio.
NOTE: For more information about HP Wireless Audio, see the software Help.
What's new 5
Page 17
Refreshing your software content (select models only)
When the computer is in the Sleep state, Intel® Smart Connect Technology periodically causes the
computer to exit Sleep. Smart Connect then updates the content for certain open applications and
reinitiates Sleep. As a result, your work is immediately available to you as soon as you exit Sleep.
You do not have to wait while updates are downloaded.
▲ To open Intel Smart Connect to enable this feature or manually adjust the settings, select Start
> All Programs > Intel > Intel Smart Connect Technology.
For additional information and a list of supported applications, see the software Help.
Radiance backlight keyboard and proximity sensor
The radiance backlight keyboard feature, turned on at the factory, uses proximity sensor technology
to automatically light up the keyboard when the sensor detects your presence in front of the
computer. The proximity sensor, also turned on at the factory, automatically turns the radiance
backlight keyboard feature on or off based on your location.
▲
To turn the radiance backlight keyboard feature off or on, press the keyboard backlight action
key (f5).
▲
To switch between low, medium, or high brightness levels, press and hold the keyboard
backlight action key (f5) in combination with either the up or down arrow key.
▲
To change the proximity sensor settings, select Start > All Programs > HP > HP Proximity
Sensor.
6 Chapter 1 Welcome
Page 18

HP CoolSense
HP CoolSense automatically detects when the computer is not in a stationary position and
adjusts performance and fan settings to keep the surface temperature of your computer at the
optimum level of comfort.
When HP CoolSense is off, the position of the computer is not detected and the performance and fan
options remain at the factory setting. As a result, the surface temperature of the computer may be
higher than it would be with HP CoolSense on.
To turn CoolSense off or on, follow these steps:
1. Select Start > Control Panel > Hardware and Sound > HP CoolSense.
2. Select On or Off.
Intel Wireless Display (select models only)
Intel Wireless Display allows you to view your computer content wirelessly on your TV using, a
wireless third-party TV adapter (purchased separately). For details about using the wireless adapter,
see the device manufacturer's instructions.
NOTE: The computer wireless feature must be enabled and the computer graphics must be set to
power-saving mode before you can use the wireless display.
AMD Eyefinity Multi-Display technology
Your computer supports the new AMDTM Eyefinity technology, which provides the following features:
●
You can connect up to 2 external displays by using the HDMI port and the DisplayPort on the
computer.
●
You can span the screen image across as many as 2 external displays into a massive single
large surface (SLS).
What's new 7
Page 19
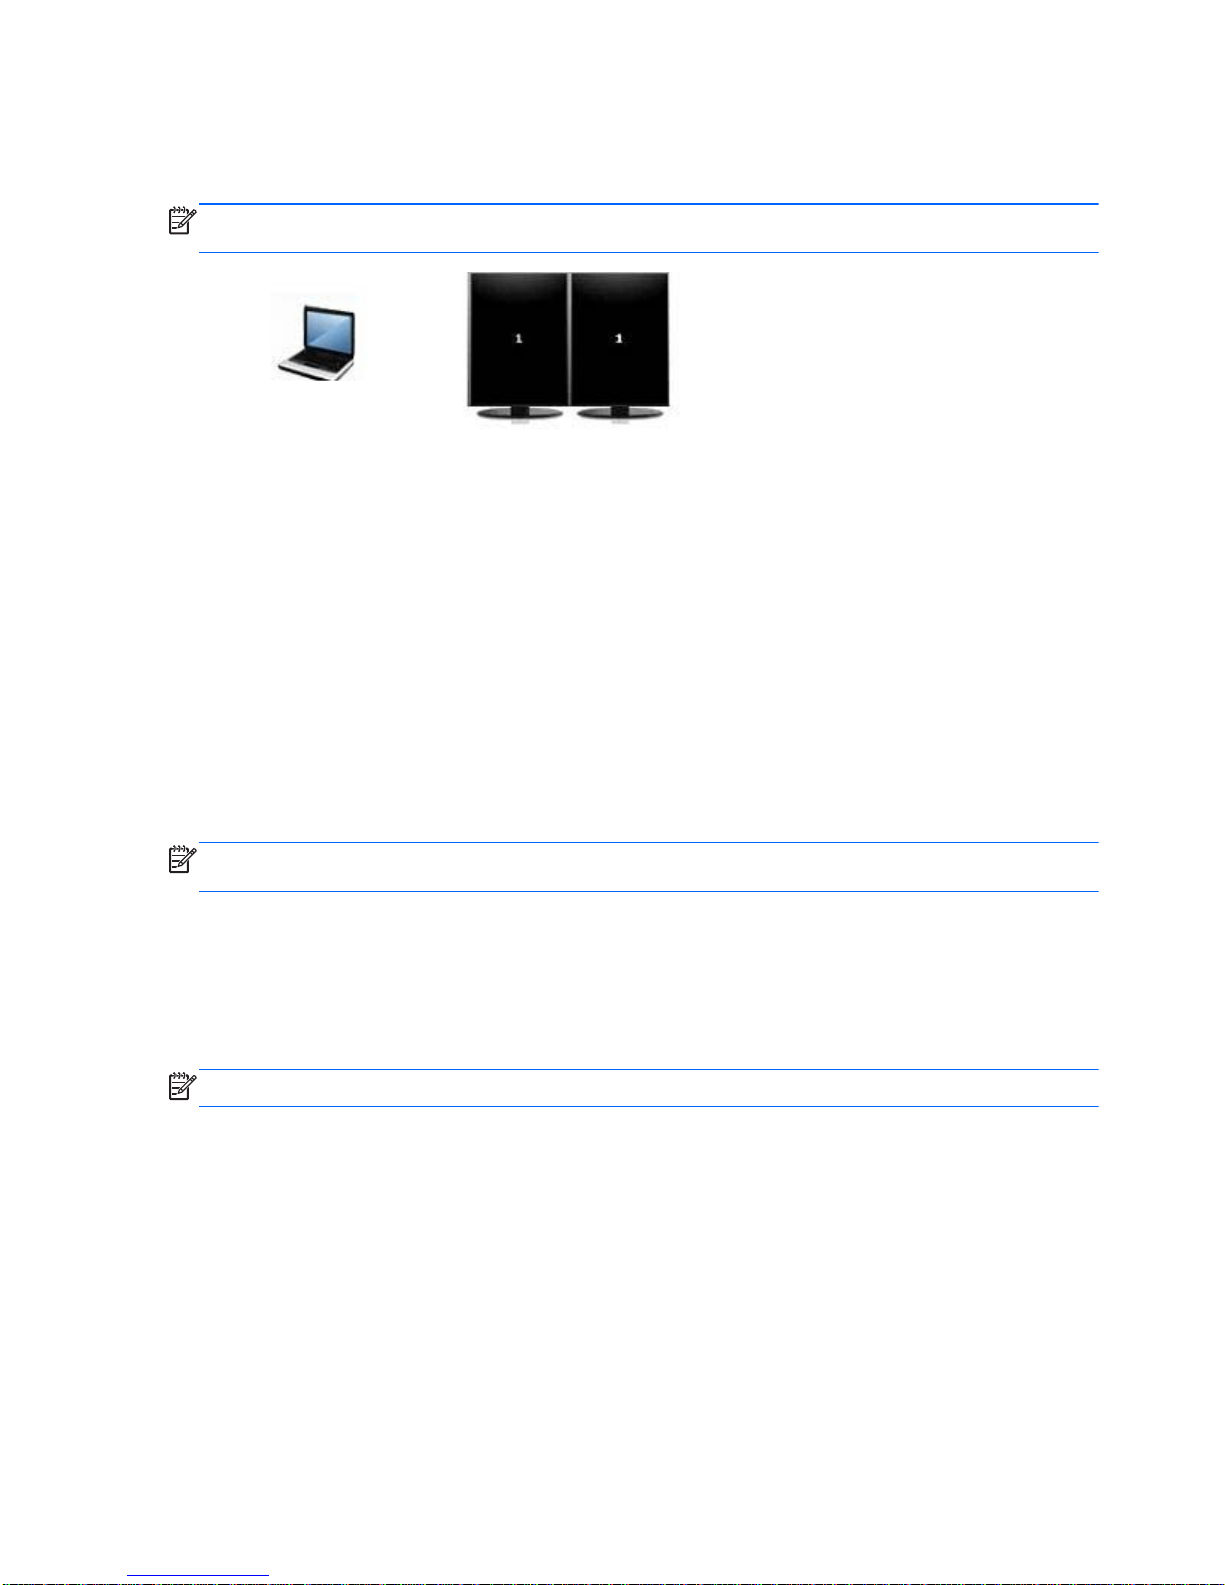
Example display configuration for SLS
In this example, 2 external displays are connected to the computer.
NOTE: External displays in an SLS must have identical resolution settings. Change the settings as
needed to comply with this requirement.
Switching the screen image
Press the switch screen image action key (f4) to open a dialog box that allows you to select one of 4
configuration choices.
●
Computer only—Turns off any external displays and shows the image only on the computer
display.
●
Duplicate—Clones the image on the computer display onto an external display that is connected
to the computer.
●
Extend—Extends the screen image across the computer display and all connected external
displays.
●
Projector only—Turns off the computer display and extends the screen image across all
connected external displays.
NOTE: To manage the video output devices and default output devices, use AMD Catalyst™
Control Center.
Using AMD Catalyst Control Center
To configure the display output and to manage AMD Eyefinity technology, use AMD Catalyst Control
Center.
▲
To open AMD Catalyst Control Center, right-click the desktop and click Graphics Properties.
NOTE: For additional information about using AMD Catalyst Control Center, see the software Help.
8 Chapter 1 Welcome
Page 20

Finding information
The computer comes with several resources to help you perform various tasks.
Resources For information about
Instructions for setting up the computer
●
New computer features
● Help to identify computer components
Getting Started
To access this guide:
Select Start > All Programs > HP > HP
Documentation.
–or–
Select Start > Help and Support > User guides.
●
Computer features
● Instructions for the following:
◦ Connecting to a wireless network
◦ Using the keyboard and pointing devices
◦
Replacing or upgrading the hard drive and memory
modules
◦
Performing a backup and a recovery
◦
Contacting customer support
●
Computer specifications
HP Notebook Reference Guide
To access this guide:
Select Start > All Programs > HP > HP
Documentation.
–or–
Select Start > Help and Support > User guides.
●
Power management features
● Instructions for the following:
◦
Maximizing battery life
◦
Using the multimedia features of the computer
◦ Protecting the computer
◦
Caring for the computer
◦
Updating the software
Help and Support
To access Help and Support, select Start > Help and
Support.
NOTE: For country- or region-specific support, go to
http://www.hp.com/support, select your country or
region, and follow the on-screen instructions.
●
Operating system information
● Software, driver, and BIOS updates
● Troubleshooting tools
● Instructions for contacting customer support
Regulatory, Safety and Environmental Notices
To access this guide:
Select Start > All Programs > HP > HP
Documentation.
–or–
Select Start > Help and Support > User guides.
●
Regulatory and safety information
● Battery disposal information
Finding information 9
Page 21

Resources For information about
Safety & Comfort Guide
To access this guide:
Select Start > All Programs > HP > HP
Documentation.
–or–
Select Start > Help and Support > User guides.
–or–
Go to
http://www.hp.com/ergo.
●
Proper workstation setup
● Guidelines for posture and work habits that maximize your
comfort and decrease your risk of injury
●
Electrical and mechanical safety information
Worldwide Telephone Numbers booklet
This booklet is provided with your computer.
HP customer support telephone numbers
HP Web site
To access this Web site, go to
http://www.hp.com/
support.
●
Customer support information
● Ordering parts and finding additional help
●
Software, driver, and BIOS updates
●
Information about accessories for the computer
Limited Warranty*
To access the warranty:
Select Start > All Programs > HP > HP
Documentation > View Warranty Information.
–or–
Select Start > Help and Support > User guides.
–or–
Go to
http://www.hp.com/go/orderdocuments.
Warranty information
*You can find the expressly provided HP Limited Warranty applicable to your product located with the user guides on your
computer and/or on the CD/DVD provided in the box. In some countries/regions, HP may provide a printed HP Limited
Warranty in the box. For some countries/regions where the warranty is not provided in printed format, you may request a
printed copy from
http://www.hp.com/go/orderdocuments or write to:
●
North America: Hewlett-Packard, MS POD, 11311 Chinden Blvd, Boise, ID 83714, USA
● Europe, Middle East, Africa: Hewlett-Packard, POD, Via G. Di Vittorio, 9, 20063, Cernusco s/Naviglio (MI), Italy
●
Asia Pacific: Hewlett-Packard, POD, P.O. Box 200, Alexandra Post Office, Singapore 911507
When you request a printed copy of your warranty, please include your product number, warranty period (found on your
serial number label), name, and postal address.
IMPORTANT: Do NOT return your HP product to the addresses above. For product support, see your product home page
at
http://www.hp.com/go/contactHP.
10 Chapter 1 Welcome
Page 22

2 Getting to know your computer
The following sections are included in this chapter:
●
Top
●
Front
●
Right side
●
Left side
●
Display
●
Bottom
Top
Imagepad
Component Description
(1) Imagepad light
●
Amber: The Imagepad is off.
● Off: The Imagepad is on.
(2) Imagepad on/off button Quickly double-tap this button to turn the Imagepad off or on.
Top 11
Page 23

Component Description
(3) Left Imagepad button The bottom left corner of the Imagepad functions like the left
button on an external mouse.
(4) Imagepad zone Moves the pointer and selects or activates items on the
screen.
(5) Right Imagepad button The bottom right corner of the Imagepad functions like the
right button on an external mouse.
Lights
Component Description
(1) Imagepad light ● Amber: The Imagepad is off.
●
Off: The Imagepad is on.
(2) Caps lock light ● White: Caps lock is on.
●
Off: Caps lock is off.
(3)
Power light ● White: The computer is on.
●
Blinking white: The computer is in the Sleep state.
●
Off: The computer is off or in Hibernation.
(4)
Wireless light
●
White: An integrated wireless device, such as a
wireless local area network (WLAN) device, is enabled.
NOTE: Wireless devices are enabled at the factory.
●
Amber: All wireless devices are disabled.
(5)
Mute light ● Amber: Speaker sound is off.
●
Off: Speaker sound is on.
12 Chapter 2 Getting to know your computer
Page 24

Buttons and speakers
Component Description
(1)
Power button
●
When the computer is off, press the button to turn on the computer.
● When the computer is on, press the button briefly to initiate Sleep.
●
When the computer is in the Sleep state, press the button briefly to exit
Sleep.
● When the computer is in Hibernation, press the button briefly to exit
Hibernation.
If the computer has stopped responding and Windows shutdown procedures
are ineffective, press and hold the power button for at least 5 seconds to
turn off the computer.
To learn more about your power settings, select Start > Control Panel >
System and Security > Power Options, or see the HP Notebook
Reference Guide.
(2) Stereo speakers (2) Produce sound with Beats Audio speakers.
(3)
Mute button Mutes or restores speaker sound.
(4)
Beats Audio button Opens Beats Audio Control Panel, which allows you to view and control the
audio and bass settings.
Beats Audio is an enhanced audio feature that provides a deep, controlled
bass while maintaining a clear sound.
NOTE: You can also open the Beats Audio Control Panel by selecting
Start > Control Panel > Hardware and Sound > Beats Audio Control
Panel.
Top 13
Page 25

Keys
Component Description
(1) esc key Displays system information when pressed in combination with the
fn key.
(2) fn key Executes the following functions:
●
When the key is pressed in combination with the esc key,
system information is displayed.
●
When the key is pressed in combination with the b key, Beats
Audio is enabled or disabled.
(3)
Windows logo key Displays the Windows Start menu.
(4) b key Enables or disables Beats Audio when pressed in combination with
the fn key.
(5) Action keys Execute frequently used system functions.
(6)
Windows applications key Displays a shortcut menu for items beneath the pointer.
14 Chapter 2 Getting to know your computer
Page 26

Front
Component Description
Stereo speakers (4) Produce sound with Beats Audio speakers.
Front 15
Page 27

Right side
Component Description
(1)
Hard drive light
●
Blinking white: The hard drive is being accessed.
● Amber: HP ProtectSmart Hard Drive Protection has
temporarily parked the hard drive.
NOTE: For information about HP ProtectSmart Hard Drive
Protection, see the HP Notebook Reference Guide.
(2)
Power light
●
White: The computer is on.
● Blinking white: The computer is in the Sleep state.
●
Off: The computer is off or in Hibernation.
(3) Digital Media Slot Supports the following digital card formats:
●
MultiMediaCard
●
Secure Digital (SD) Memory Card
● Secure Digital High Capacity Memory Card
(4)
Security cable slot Attaches an optional security cable to the computer.
NOTE: The security cable is designed to act as a deterrent, but
it may not prevent the computer from being mishandled or stolen.
(5)
USB 2.0 port Connects an optional USB device.
(6)
DisplayPort Connects an optional digital display device, such as a high-
performance monitor or projector.
(7)
HDMI port Connects an optional video or audio device, such as a high-
definition television, any compatible digital or audio component, or
a high-speed HDMI 1.4 device.
(8) Volume dial Adjusts the speaker volume.
Rotate the dial clockwise to increase the volume or rotate the dial
counter-clockwise to decrease the volume.
(9)
RJ-45 (network) jack Connects a network cable.
16 Chapter 2 Getting to know your computer
Page 28

Component Description
(10) AC adapter light
●
White: The computer is connected to external power, and the
battery is fully charged.
●
Amber: The computer is connected to external power, and
the battery is charging.
● Blinking amber: The computer is connected to external
power and there is a battery error or the battery has reached
a low or critical battery level.
● Off: The computer is running on battery power.
(11)
Power connector Connects an AC adapter.
Right side 17
Page 29

Left side
Component Description
(1) Optical drive Reads and writes to an optical disc.
CAUTION: To reduce the risk of damaging the computer, do
not insert smaller (8 cm diameter) optical discs into the drive.
(2)
USB 3.0 charging port Connects an optional USB 3.0 device and provides enhanced
USB power performance. The USB 3.0 charging port can also
charge select models of cell phones and MP3 players, even
when the computer is off.
(3)
USB 3.0 ports (2) Connect optional USB 3.0 devices and provides enhanced
USB power performance.
NOTE: The USB 3.0 port is also compatible with USB 1.0
and 2.0 devices.
(4)
Audio-in (microphone) jack Connects an optional computer headset microphone, stereo
array microphone, or monaural microphone.
(5)
Audio-out (headphone) jacks (2) Produce sound when external audio devices are connected to
either of these ports. Both stereo headphone jacks are
connected to a signal amplifier to provide improved audio
reproduction with external speakers, headphones, and other
optional accessories.
WARNING! To reduce the risk of personal injury, adjust the
volume before putting on headphones, earbuds, or a headset.
For additional safety information, see the Regulatory, Safety,
and Environmental Notices.
NOTE: When a device is connected to either jack, the
computer speakers are disabled.
18 Chapter 2 Getting to know your computer
Page 30

Display
Component Description
(1) Internal display switch Turns off the display and initiates Sleep if the display is closed while the
power is on.
NOTE: The internal display switch is not visible from the outside of the
computer.
(2) Proximity sensor Detects your presence in front of the computer and turns the radiance
keyboard feature off or on based on your proximity to the computer.
(3) WLAN antennas (2)* Send and receive networking signals using up to three integrated antennas
to a local wireless router or hub.
(4) Internal microphones (2) Records audio using the integrated microphones by specific applications.
The microphones will automatically improve the audio to reduce ambient
noise and provide echo cancellation
(5) Webcam light On: The webcam is active.
(6) HP TrueVision HD Webcam Records video and captures still photographs.
To access the webcam, select Start > All Programs > CyberLink >
CyberLink YouCam.
*The antennas and IR emitters are not visible from the outside of the computer. For optimal transmission, keep the areas
immediately around the antennas and IR emitters free from obstructions. To see wireless regulatory notices, see the section
of the Regulatory, Safety, and Environmental Notices that applies to your country or region. These notices are located in
Help and Support.
Display 19
Page 31

Bottom
Component Description
(1) Hard drive cover Provides access to the hard drive.
(2) Vents (7) Enable airflow to cool internal components.
NOTE: The computer fan starts up automatically to cool internal
components and prevent overheating. It is normal for the internal fan
to cycle on and off during routine operation.
(3) Release latch Releases the hard drive cover.
(4) Service access door Provides access to the memory module slots.
(5) HP Triple Bass Reflex Subwoofer Provides superior bass sound.
20 Chapter 2 Getting to know your computer
Page 32

3Networking
● Using an Internet service provider (ISP)
●
Connecting to a wireless network
NOTE: Internet hardware and software features vary depending on computer model and your
location.
Your computer may support one or both of the following types of Internet access:
●
Wireless—For mobile Internet access, you can use a wireless connection. See
Connecting to an
existing WLAN on page 22 or Setting up a new WLAN network on page 23.
●
Wired—You can access the Internet by connecting to a wired network. For information about
connecting to a wired network, see the HP Notebook Reference Guide.
21
Page 33

Using an Internet service provider (ISP)
Before you can connect to the Internet, you must establish an ISP account. Contact a local ISP to
purchase Internet service and a modem. The ISP helps to set up the modem, install a network cable
to connect your wireless computer to the modem, and test the Internet service.
NOTE: Your ISP will give you a user ID and password to access the Internet. Record this
information and store it in a safe place.
The following features help you set up a new Internet account or configure the computer to use an
existing account:
●
ISP-provided icons (available in some locations)—These icons may be displayed individually
on the Windows desktop. To set up a new Internet account or configure the computer to use an
existing account, double-click an icon, and then follow the on-screen instructions.
●
Windows Connect to the Internet Wizard—You can use the Windows Connect to the Internet
Wizard to connect to the Internet in any of the following situations:
◦
You already have an account with an ISP.
◦
You do not have an Internet account and want to select an ISP from the list provided within
the wizard. (The list of ISP providers is not available in all regions.)
◦
You have selected an unlisted ISP, and the ISP has provided you with information such as
a specific IP address and POP3 and SMTP settings.
To access the Windows Connect to the Internet Wizard and instructions for using it, select
Start > Control Panel > Network and Internet > Network and Sharing Center > Set up a
new connection or network.
NOTE: If you are prompted within the wizard to choose between enabling or disabling
Windows Firewall, choose to enable the firewall.
Connecting to a wireless network
Wireless technology transfers data across radio waves instead of wires. Your computer may be
equipped with one or more of the following wireless devices:
● Wireless local area network (WLAN) device
● HP Mobile Broadband Module, a wireless wide area network (WWAN) device
●
Bluetooth® device
For more information about wireless technology and connecting to a wireless network, see the
HP Notebook Reference Guide and information and Web site links provided in Help and Support.
Connecting to an existing WLAN
1. Turn on the computer.
2. Be sure that the WLAN device is on.
3. Click the network icon in the notification area, at the far right of the taskbar.
4. Select a network to connect to.
22 Chapter 3 Networking
Page 34

5. Click Connect.
6. If required, enter the security key.
Setting up a new WLAN network
Required equipment:
● A broadband modem (either DSL or cable) (1) and high-speed Internet service purchased from
an Internet service provider (ISP)
●
A wireless router (purchased separately) (2)
● Your new wireless computer (3)
NOTE: Some modems have a built-in wireless router. Check with your ISP to determine what type
of modem you have.
The illustration shows an example of a completed WLAN network installation that is connected to the
Internet. As your network grows, additional wireless and wired computers can be connected to the
network to access the Internet.
Connecting to a wireless network 23
Page 35

Configuring a wireless router
For help in setting up a WLAN, see the information provided by your router manufacturer or your ISP.
The Windows operating system also provides tools to help you set up a new wireless network. To use
the Windows tools to set up your network, select Start > Control Panel > Network and Internet >
Network and Sharing Center > Set up a new connection or network > Set up a new network.
Then follow the on-screen instructions.
NOTE: It is recommended that you initially connect your new wireless computer to the router by
using the network cable provided with the router. When the computer successfully connects to the
Internet, you can disconnect the cable, and then access the Internet through your wireless network.
Protecting your WLAN
When you set up a WLAN or access an existing WLAN, always turn on security features to protect
your network from unauthorized access.
For information about protecting your WLAN, see the HP Notebook Reference Guide.
24 Chapter 3 Networking
Page 36

4 Keyboard and pointing devices
The following sections are included in this chapter:
●
Using the keyboard
●
Using pointing devices
Using the keyboard
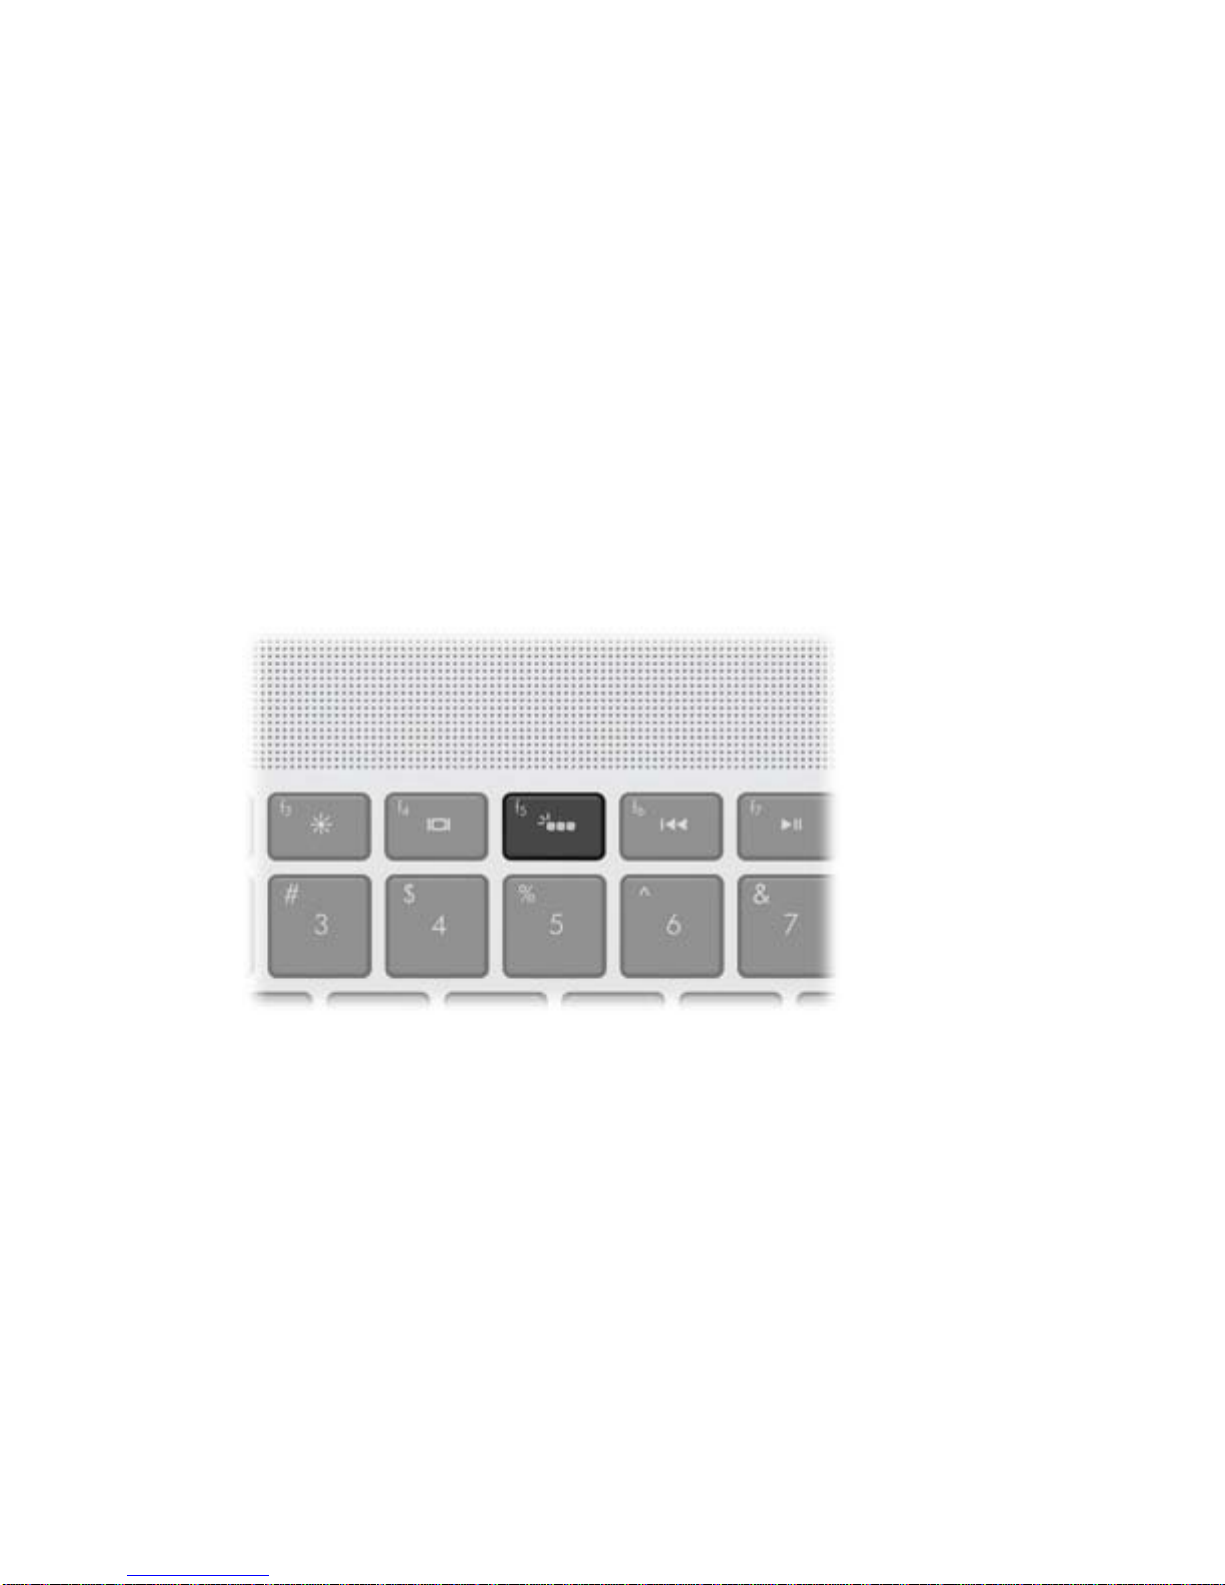
Using the action keys
Action keys are used for performing customized actions that are assigned to specific keys at the top
of the keyboard.
The icons on the f1 through f8, f10, and f12 keys represent the action key functions. To activate a
function, press and hold the key.
You can disable the action key feature and revert back to standard settings. Using standard settings,
you press the fn key and one of the function keys to activate the assigned function. For instructions
on disabling the action key feature, see the “Setup Utility (BIOS) and System Diagnostics” chapter in
the HP Notebook Reference Guide.
CAUTION: Use extreme care when making changes. Errors can prevent the computer from
operating properly.
Icon Key Description
f1 Opens Help and Support, which provides information about your Windows operating system and
computer, answers to questions and tutorials, and updates to your computer.
Help and Support also provides automated troubleshooting and links to support specialists.
f2 Decreases the screen brightness level.
f3 Increases the screen brightness level.
Using the keyboard 25
Page 37

Icon Key Description
f4 Presents the following choices to switch the screen image among display devices connected to the
computer:
●
Computer only—Turns off any external displays and shows the image only on the computer
display.
● Duplicate—Clones the image on the computer display onto an external display that is connected
to the computer.
●
Extend—Extends the screen image across the computer display and all connected external
displays.
●
Projector only—Turns off the computer display and extends the screen image across all
connected external displays.
f5 Turns the radiance backlight keyboard feature off or on.
NOTE: To conserve battery power, turn off this feature. To switch between low, medium, or high
brightness levels, press and hold the keyboard backlight action key (f5) in combination with either the
up or down arrow key.
f6 Plays the previous track of an audio CD or the previous section of a DVD or a BD.
f7 Plays, pauses, or resumes an audio CD, a DVD, or a BD.
f8 Plays the next track of an audio CD or the next section of a DVD or a BD.
f10 Ejects a disc from the optical drive.
f12 Turns off or on all wireless features, including wireless networking, wireless display, and wireless
audio.
NOTE: This key does not establish a wireless connection. To establish a wireless connection, a
wireless network must be set up.
26 Chapter 4 Keyboard and pointing devices
Page 38

Using pointing devices
NOTE: In addition to the pointing devices included with your computer, you can use an external
USB mouse (purchased separately) by connecting it to one of the USB ports on the computer.
Setting pointing device preferences
Use Mouse Properties in Windows to customize settings for pointing devices, such as button
configuration, click speed, and pointer options.
To access Mouse Properties, select Start > Devices and Printers. Then right-click the device
representing your computer, and select Mouse settings.
Using pointing devices 27
Page 39

Using the Imagepad
The advanced Imagepad replaces the traditional TouchPad to create a high-precision gesture-friendly
mouse alternative. To move the pointer, slide one finger across the Imagepad in the direction you
want the pointer to go. Use the left and right Imagepad buttons like the corresponding buttons on an
external mouse.
Turning the Imagepad off or on
To turn the Imagepad off or on, quickly double-tap the Imagepad on/off button.
NOTE: The Imagepad light is off when the Imagepad is on.
The Imagepad light and on-screen display icons indicate the Imagepad status.
Imagepad light Icon Description
Amber
Indicates that the Imagepad is off.
Off
Indicates that the Imagepad is on.
28 Chapter 4 Keyboard and pointing devices
Page 40

Navigating
To move the pointer, slide one finger across the Imagepad in the direction you want the pointer to go.
Selecting
Use the left and right Imagepad buttons like the corresponding buttons on an external mouse.
Using Imagepad gestures
The Imagepad supports a variety of gestures. To use Imagepad gestures, place two fingers on the
Imagepad at the same time.
NOTE: Imagepad gestures are not supported in all computer programs.
To view the demonstration of a gesture:
1. Select Start > Control Panel > Hardware and Sound > Synaptics ClickPad.
2. Click a gesture to activate the demonstration.
Using pointing devices 29
Page 41

To turn the gestures on or off:
1. Select Start > Control Panel > Hardware and Sound > Synaptics ClickPad.
2. To turn a gesture on, select the check box next to the gesture. To turn a gesture off, clear the
check box next to the gesture.
3. Click Apply, and then click OK.
Scrolling
Scrolling is useful for moving up, down, or sideways on a page or image. To scroll, place two fingers
slightly apart on the Imagepad, and then drag them across the Imagepad in an up, down, left, or right
motion.
NOTE: Scrolling speed is controlled by finger speed.
NOTE: Scrolling is enabled at the factory.
Pinching/Zooming
Pinching allows you to zoom in or out on images or text.
●
Zoom in by placing two fingers together on the Imagepad, and then moving them apart.
●
Zoom out by placing two fingers apart on the Imagepad, and then moving them together.
NOTE: Pinching/zooming is enabled at the factory.
30 Chapter 4 Keyboard and pointing devices
Page 42

Rotating
Rotating allows you to rotate items such as photos. Place two separated fingers on the Imagepad,
and then rotate your fingers in an arc while maintaining uniform finger separation. An arcing motion to
the left rotates the object to the left; an arcing motion to the right rotates the object to the right.
NOTE: Rotating is enabled at the factory.
Flicking
Flicking allows you to quickly perform the following functions:
●
Browse the Internet.
●
Scroll through photos in a photo viewer.
●
Navigate through screens.
●
Scroll through documents.
●
Enter or exit the slide show mode in your photo viewer.
To flick, use three fingers to touch the Imagepad in a light, quick flicking motion up, down, left, or
right.
NOTE: Three-finger flicking is enabled at the factory.
Using pointing devices 31
Page 43

5 Maintenance
The following sections are included in this chapter:
●
Using a factory-sealed battery
●
Replacing or upgrading the hard drive
●
Adding or replacing memory modules
Using a factory-sealed battery
IMPORTANT: Do not attempt to replace your computer battery, which is installed and sealed at the
factory. A broken battery seal voids your warranty.
Your computer has an internal rechargeable battery that can be replaced only by an authorized
service provider. For information about keeping your battery in good condition, see “Using Battery
Power” in the HP Notebook Reference Guide. To access this guide, select Start > All Programs >
HP > HP Documentation. To monitor the status of your battery, or if the battery is no longer holding
a charge, run Battery Check in Help and Support. If Battery Check indicates that your battery should
be replaced, contact customer support.
32 Chapter 5 Maintenance
Page 44

Replacing or upgrading the hard drive
CAUTION: To reduce the risk of information loss or an unresponsive system:
Shut down the computer before removing a hard drive from the hard drive bay.
If you are not sure whether the computer is off, in the Sleep state, or in Hibernation, press the power
button, and then shut down the computer through the operating system.
NOTE: To determine the type of drive installed in your computer, click Start, right-click Computer,
click Manage, and then click Disk Management.
NOTE: When replacing a hard drive, make sure that you save the hard drive bracket and cover.
You may need to reinstall these parts along with the new hard drive.
Removing the hard drive
1. Save your work and shut down the computer.
2. Disconnect all external devices connected to the computer.
3. Remove external power from the computer.
4. Slide the release latch (1), and then remove the hard drive cover (2).
Replacing or upgrading the hard drive 33
Page 45

5. Disconnect the hard drive cable (1) from the computer, and then remove the 4 hard drive screws
(2).
34 Chapter 5 Maintenance
Page 46

6. Pull back the plastic cover (1), and then lift the hard drive (2) out of the hard drive bay.
Replacing or upgrading the hard drive 35
Page 47

Installing the hard drive
1. Insert the hard drive (1) into the hard drive bay, and then replace the plastic cover (2).
36 Chapter 5 Maintenance
Page 48

2. Replace the 4 hard drive screws (1), and then connect the hard drive cable (2) to the computer.
3. Align the tabs on the hard drive cover with the notches on the computer, and then slide the cover
into the notches. The release latch automatically locks the cover into place.
4. Reconnect external power and external devices.
5. Turn on the computer.
Replacing or upgrading the hard drive 37
Page 49

Adding or replacing memory modules
The computer has two memory module slots. They are located under the service access door on the
bottom of the computer. The memory capacity of the computer can be upgraded by adding a memory
module or replacing a memory module in one of the memory module slots.
WARNING! To reduce the risk of electric shock and damage to the equipment, unplug the power
cord before installing a memory module.
CAUTION: Electrostatic discharge (ESD) can damage electronic components. Before beginning
any procedure, ensure that you are discharged of static electricity by touching a grounded metal
object.
NOTE: To use a dual-channel configuration when adding a second memory module, be sure that
both memory modules are identical.
To add or replace a memory module:
CAUTION: To reduce the risk of information loss or an unresponsive system:
Shut down the computer before removing a memory module from the computer. Do not remove a
memory module while the computer is on, in the Sleep state, or in Hibernation.
If you are not sure whether the computer is off, in the Sleep state, or in Hibernation, press the power
button, and then shut down the computer through the operating system.
1. Save your work and shut down the computer.
2. Disconnect all external devices connected to the computer.
3. Remove external power from the computer.
4. Slide the release latch (1), and then remove the hard drive cover (2).
38 Chapter 5 Maintenance
Page 50

5. Remove the 6 service access door screws (1), and then remove the door (2).
6. If you are replacing a memory module, remove the existing memory module.
a. Pull away the retention clips (1) on each side of the memory module.
The memory module tilts up.
Adding or replacing memory modules 39
Page 51

b. Grasp the edge of the memory module (2), and then gently pull the module out of the
memory module slot.
CAUTION: To reduce the risk of damage to the memory module, hold the memory
module by the edges only. Do not touch the components on the memory module. To
protect a memory module after removal, place it in an electrostatic-safe container.
7. Insert a new memory module.
CAUTION: To reduce the risk of damage to the memory module, hold the memory module by
the edges only. Do not touch the components on the memory module, and do not bend the
memory module.
a. Align the notched edge (1) of the memory module with the tab in the memory module slot.
b. Position the memory module at a 45-degree angle from the surface of the memory module
compartment, and then press the module (2) into the slot until the memory module is
seated.
40 Chapter 5 Maintenance
Page 52

c. Gently press the memory module (3) down, applying pressure to both the left and right
edges of the memory module, until the retention clips snap into place.
8. Align the screw holes in the service access door with the holes in the computer, and then lower
the door (1) onto the computer.
9. Replace the 6 service access door screws (2).
Adding or replacing memory modules 41
Page 53

10. Align the tabs on the hard drive cover with the notches on the computer, and then slide the cover
into the notches. The release latch automatically locks the cover into place.
11. Reconnect external power and external devices.
12. Turn on the computer.
42 Chapter 5 Maintenance
Page 54

6 Backup and recovery
● Restore
●
Creating recovery media
●
Performing a system restore
●
Backing up and recovering your information
Your computer includes tools provided by the operating system and HP to help you safeguard your
information and restore it if necessary.
This chapter provides information about the following topics:
●
Creating a set of recovery discs or a recovery flash drive (HP Recovery Manager software
feature)
●
Performing a system restore (from the partition, recovery discs, or a recovery flash drive)
●
Backing up your information
●
Recovering a program or driver
43
Page 55

Restore
In the event of hard drive failure, to restore your system to its factory image you must use a set of
recovery discs or a recovery flash drive that you have created using HP Recovery Manager. HP
recommends that you use HP Recovery Manager immediately after software setup to create either a
set of recovery discs or a recovery flash drive.
If you need to restore your system for some other reason than hard drive failure, you can use the HP
Recovery partition (select models only), without the need for recovery discs or a recovery flash drive.
To check for the presence of a recovery partition, click Start, right-click Computer, click Manage,
and then click Disk Management. If the recovery partition is present, a Recovery drive is listed in the
window.
CAUTION: HP Recovery Manager (partition or discs/flash drive) restores only the software that was
installed at the factory. Software not provided with this computer must be reinstalled manually.
NOTE: Recovery discs have been included if your computer does not have a recovery partition.
44 Chapter 6 Backup and recovery
Page 56

Creating recovery media
HP recommends that you create either a set of recovery discs or a recovery flash drive to be sure that
you can restore your computer to its original factory state if the hard drive fails, or if for any reason
you cannot restore using the recovery partition tools. Create these discs or the flash drive after setting
up the computer for the first time.
NOTE: HP Recovery Manager allows the creation of only one set of recovery discs or one recovery
flash drive. Handle these discs or the flash drive carefully and keep them in a safe place.
NOTE: If your computer does not include an integrated optical drive, you can use an optional
external optical drive (purchased separately) to create recovery discs, or you can purchase recovery
discs for your computer from the HP Web site. If you use an external optical drive, it must be
connected directly to a USB port on the computer, not to a USB port on an external device, such as a
USB hub.
Guidelines:
●
Purchase high-quality DVD-R, DVD+R, DVD-R DL, or DVD+R DL discs.
NOTE: Read-write discs, such as CD-RW, DVD±RW, double-layer DVD±RW, and BD-RE
(rewritable Blu-ray) discs, are not compatible with the HP Recovery Manager software.
●
The computer must be connected to AC power during this process.
●
Only one set of recovery discs or one recovery flash drive can be created per computer.
NOTE: If you are creating recovery discs, number each disc before inserting it into the optical
drive.
●
If necessary, you can exit the program before you have finished creating the recovery discs or
recovery flash drive. The next time you open HP Recovery Manager, you will be prompted to
continue the backup creation process.
To create a set of recovery discs or a recovery flash drive:
1. Select Start > All Programs > HP > HP Recovery Manager > HP Recovery Media Creation.
2. Follow the on-screen instructions.
Performing a system restore
HP Recovery Manager software allows you to repair or restore the computer to its original factory
state. HP Recovery Manager works from recovery discs or a recovery flash drive, or from a dedicated
recovery partition (select models only) on the hard drive.
NOTE: A system restore must be performed if the computer hard drive has failed or if all attempts to
correct any functional computer issues fail. A system restore should be used as a final attempt to
correct computer issues.
Creating recovery media 45
Page 57

Note the following when performing a system restore:
●
You can restore only the system that you have previously backed up. HP recommends that you
use HP Recovery Manager to create either a set of recovery discs or a recovery flash drive as
soon as you set up the computer.
●
Windows has its own built-in repair features, such as System Restore. If you have not already
tried these features, try them before using HP Recovery Manager.
●
HP Recovery Manager restores only software that was installed at the factory. Software not
provided with this computer must be downloaded from the manufacturer's Web site or reinstalled
from the disc provided by the manufacturer.
Restoring using the dedicated recovery partition (select models only)
When using the dedicated recovery partition, there is an option to back up pictures, music and other
audio, videos and movies, recorded TV shows, documents, spreadsheets and presentations, e-mails,
and Internet favorites and settings during this process.
To restore the computer from the recovery partition, follow these steps:
1. Access HP Recovery Manager in either of the following ways:
●
Select Start > All Programs > HP > HP Recovery Manager > HP Recovery Manager.
– or –
●
Turn on or restart the computer, and then press esc while the “Press the ESC key for
Startup Menu” message is displayed at the bottom of the screen. Then, press f11 while the
“F11 (System Recovery)” message is displayed on the screen.
2. Click System Recovery in the HP Recovery Manager window.
3. Follow the on-screen instructions.
Restoring using the recovery media
1. If possible, back up all personal files.
2. Insert the first recovery disc into the optical drive on your computer or an optional external
optical drive, and then restart the computer.
– or –
Insert the recovery flash drive into a USB port on your computer, and then restart the computer.
NOTE: If the computer does not automatically restart in HP Recovery Manager, the computer
boot order must be changed. For details, see
Changing the computer boot order on page 47
3. Press f9 at system bootup.
4. Select the optical drive or the flash drive.
5. Follow the on-screen instructions.
46 Chapter 6 Backup and recovery
Page 58

Changing the computer boot order
To change the boot order for recovery discs:
1. Restart the computer.
2. Press esc while the computer is restarting, and then press f9 for boot options.
3. Select Internal CD/DVD ROM Drive from the boot options window.
To change the boot order for a recovery flash drive:
1. Insert the flash drive into a USB port.
2. Restart the computer.
3. Press esc while the computer is restarting, and then press f9 for boot options.
4. Select the flash drive from the boot options window.
Backing up and recovering your information
It is very important to back up your files and keep any new software in a safe place. As you add new
software and data files, continue to create backups on a regular basis.
How completely you are able to recover your system depends on how recent your backup is.
NOTE: A recovery from your most recent backup should be performed if the computer is attacked
by a virus or if any major system components fail. In order to correct computer issues, attempt a
recovery before you attempt a system restore.
You can back up your information to an optional external hard drive, a network drive, or discs. Back
up your system at the following times:
●
At regularly scheduled times
TIP: Set reminders to back up your information periodically.
●
Before the computer is repaired or restored
●
Before you add or modify hardware or software
Guidelines:
●
Create system restore points using the Windows® System Restore feature, and periodically
copy them to an optical disc or an external hard drive. For more information about using system
restore points, see
Using Windows system restore points on page 48.
●
Store personal files in the Documents library and back up this folder periodically.
●
Save customized settings in a window, toolbar, or menu bar by taking a screen shot of your
settings. The screen shot can be a time-saver if you have to re-enter your preferences.
Backing up and recovering your information 47
Page 59

To create a screen shot:
1. Display the screen you want to save.
2. Copy the screen image.
To copy only the active window, press alt+prt sc.
To copy the entire screen, press prt sc.
3. Open a word-processing document, and then select Edit > Paste. The screen image is added to
the document.
4. Save and print the document.
Using Windows Backup and Restore
Guidelines:
●
Be sure that the computer is connected to AC power before you start the backup process.
●
Allow enough time to complete the backup process. Depending on file sizes, it may take over an
hour.
To create a backup:
1. Select Start > Control Panel > System and Security > Backup and Restore.
2. Follow the on-screen instructions to schedule and create a backup.
NOTE: Windows® includes the User Account Control feature to improve the security of the
computer. You may be prompted for your permission or password for tasks such as installing
software, running utilities, or changing Windows settings. For more information, see Help and
Support.
Using Windows system restore points
A system restore point allows you to save and name a snapshot of your hard drive at a specific point
in time. You can then recover back to that point if you want to reverse subsequent changes.
NOTE: Recovering to an earlier restore point does not affect data files saved or e-mails created
since the last restore point.
You also can create additional restore points to provide increased protection for your files and
settings.
When to create restore points
●
Before you add or modify software or hardware
●
Periodically, whenever the computer is functioning optimally
48 Chapter 6 Backup and recovery
Page 60

Create a system restore point
1. Select Start > Control Panel > System and Security > System.
2. In the left pane, click System protection.
3. Click the System Protection tab.
4. Click Create.
5. Follow the on-screen instructions.
Restore to a previous date and time
To revert to a restore point (created at a previous date and time), when the computer was functioning
optimally, follow these steps:
1. Select Start > Control Panel > System and Security > System.
2. In the left pane, click System protection.
3. Click the System Protection tab.
4. Click System Restore.
5. Follow the on-screen instructions.
NOTE: If you revert to a restore point and then change your mind, you can reverse the restoration.
Backing up and recovering your information 49
Page 61

7 Customer support
The following sections are included in this chapter:
●
Contacting customer support
●
Labels
Contacting customer support
If the information provided in this user guide, in the HP Notebook Reference Guide, or in Help and
Support does not address your questions, you can contact HP Customer Support at:
http://www.hp.com/go/contactHP
NOTE: For worldwide support, click Contact HP worldwide on the left side of the page, or go to
http://welcome.hp.com/country/us/en/wwcontact_us.html.
Here you can:
●
Chat online with an HP technician.
NOTE: When technical support chat is not available in a particular language, it is available in
English.
●
E-mail HP Customer Support.
●
Find HP Customer Support worldwide telephone numbers.
●
Locate an HP service center.
50 Chapter 7 Customer support
Page 62

Labels
The labels affixed to the computer provide information you may need when you troubleshoot system
problems or travel internationally with the computer.
●
Serial number label—Provides important information, including the following:
Component
(1) Product name
(2) Serial number (s/n)
(3) Part number/Product number (p/n)
(4) Warranty period
(5) Model description
Have this information available when you contact technical support. The serial number label is
affixed inside the hard drive bay.
●
Microsoft® Certificate of Authenticity—Contains the Windows Product Key. You may need the
Product Key to update or troubleshoot the operating system. The Microsoft Certificate of
Authenticity is located on the bottom of the computer.
●
Regulatory label—Provides regulatory information about the computer. The regulatory label is
affixed inside the hard drive bay.
●
Wireless certification label or labels (select models only)—Provide information about optional
wireless devices and the approval markings of some of the countries or regions in which the
devices have been approved for use. If your computer model includes one or more wireless
devices, one or more certification labels are included with your computer. You may need this
information when traveling internationally. Wireless certification labels are affixed inside the hard
drive bay.
Labels 51
Page 63

8 Specifications
● Input power
●
Operating environment
52 Chapter 8 Specifications
Page 64

Input power
The power information in this section may be helpful if you plan to travel internationally with the
computer.
The computer operates on DC power, which can be supplied by an AC or a DC power source. The
AC power source must be rated at 100–240 V, 50–60 Hz. Although the computer can be powered
from a standalone DC power source, it should be powered only with an AC adapter or a DC power
source supplied and approved by HP for use with this computer.
The computer can operate on DC power within the following specifications.
Input power Rating
Operating voltage and current 19.5 V dc @ 6.15 A - 120 W
19.5 V dc @ 4.62 A - 90 W
DC plug of external HP power supply
NOTE: This product is designed for IT power systems in Norway with phase-to-phase voltage not
exceeding 240 V rms.
NOTE: The computer operating voltage and current can be found on the regulatory label.
Input power 53
Page 65

Operating environment
Factor Metric U.S.
Temperature
Operating 5°C to 35°C 41°F to 95°F
Nonoperating -20°C to 60°C -4°F to 140°F
Relative humidity (noncondensing)
Operating 10% to 90% 10% to 90%
Nonoperating 5% to 95% 5% to 95%
Maximum altitude (unpressurized)
Operating -15 m to 3,048 m -50 ft to 10,000 ft
Nonoperating -15 m to 12,192 m -50 ft to 40,000 ft
54 Chapter 8 Specifications
Page 66

Index
A
AC adapter light 17
action keys
Help and Support 25
identifying 14
optical drive eject 26
radiance backlight keyboard
26
screen brightness 25
switching screen image 26
using 25
wireless 26
AMD Catalyst Control Center 8
AMD Eyefinity 7
audio-in (microphone) jack 18
audio-out (headpone) jack 18
B
backing up
customized window, toolbar,
and menu bar settings 47
personal files 47
battery, replacing 32
bays, hard drive 20, 51
Beats Audio 3, 13
Beats Audio button 3
Beats Audio Control Panel 3
Beats Audio hot key 4
Bluetooth label 51
buttons 13
Beats Audio 13
Imagepad on/off 11
left Imagepad 12
mute 13
right Imagepad 12
C
caps lock light, identifying 12
Certificate of Authenticity label 51
components
bottom 20
display 19
front 15
left-side 18
right-side 16
top 11
connector, power 17
CoolSense 7
D
DC plug of external HP power
supply 53
dial, volume 16
Digital Media Slot, identifying 16
display image, switching 26
DisplayPort, identifying 16
drives, hard 33, 36
E
esc key, identifying 14
Eyefinity 7
F
f11 46
flicking Imagepad gesture 31
fn key, identifying 14
H
hard drive
identifying 33
installing 36
removing 33
hard drive bay 51
hard drive cover, identifying 20
hard drive light 16
HDMI port, identifying 16
headphone jack 18
Help and Support key 25
HP Recovery Manager 45
HP Wireless Audio Manager 5
I
Imagepad
buttons 12
identifying 11
navigating 29
selecting 29
using 28
Imagepad gestures
flicking 31
pinching 30
rotating 31
scrolling 30
zooming 30
Imagepad light 11, 12
Imagepad on/off button 11
Imagepad zone, identifying 12
input power 53
integrated webcam light,
identifying 19
Intel Smart Connect Technology
6
Intel Wireless Display 7
internal display switch,
identifying 19
internal microphones, identifying
19
Internet connection setup 23
ISP, using 22
J
jacks
headphone 18
microphone 18
RJ-45 (network) 16
Index 55
Page 67

K
keyboard backlight action key 26
keys
action 14
esc 14
fn 14
Windows applications 14
Windows logo 14
L
labels
Bluetooth 51
Microsoft Certificate of
Authenticity 51
regulatory 51
serial number 51
wireless certification 51
WLAN 51
latch, release 20
lights
AC adapter 17
caps lock 12
hard drive 16
Imagepad 11, 12
mute 12
power 12, 16
webcam 19
wireless 12
M
memory module
inserting 40
removing 39
replacing 38
memory module compartment,
identifying 20
microphone jack 18
Microsoft Certificate of Authenticity
label 51
mouse, external
setting preferences 27
mute button, identifying 13
mute light, identifying 12
N
network jack, identifying 16
O
operating environment 54
operating system
Microsoft Certificate of
Authenticity label 51
Product Key 51
optical drive eject key,
identifying 26
optical drive, identifying 18
P
pinching Imagepad gesture 30
pointing devices, setting
preferences 27
ports
HDMI 16
USB 2.0 16
USB 3.0 18
USB 3.0 charging 18
power button, identifying 13
power connector, identifying 17
power lights, identifying 12, 16
Product Key 51
product name and number,
computer 51
proximity sensor 6, 19
R
radiance backlight keyboard 6
recovering using the dedicated
recovery partition 46
recovering using the recovery
discs 46
recovery discs 45
recovery, system
performing 45
using recovery discs 46
using the dedicated recovery
partition 46
regulatory information
regulatory label 51
wireless certification labels 51
release latch 20
restore points 48
RJ-45 (network) jack, identifying
16
rotating Imagepad gesture 31
S
screen brightness keys 25
screen image, switching 26
scrolling Imagepad gesture 30
security cable slot, identifying 16
serial number label 51
serial number, computer 51
service access door
identifying 20
removing 39
setup of WLAN 23
single large surface 8
slots
Digital Media Slot 16
security cable 16
speaker, top, identifying 13
speakers, front, identifying 15
subwoofer, identifying 20
supported discs 45
system recovery
performing 45
using recovery discs 46
using the dedicated recovery
partition 46
system restore points 48
T
traveling with the computer 51
U
USB 2.0 ports, identifying 16
USB 3.0 charging port,
identifying 18
USB 3.0 port, identifying 18
using system restore 48
V
vents, identifying 20
volume dial, identifying 2, 16
W
webcam light, identifying 19
webcam, identifying 19
Windows applications key,
identifying 14
Windows logo key, identifying 14
Wireless Audio 5
wireless certification label 51
wireless key, identifying 26
wireless light 12
wireless network (WLAN)
connecting 22
equipment needed 23
protecting 24
wireless network, connecting 22
wireless router, configuring 24
56 Index
Page 68

wireless setup 23
WLAN
connecting 22
equipment needed 23
protecting 24
WLAN antennas, identifying 19
WLAN device 51
WLAN label 51
Z
zooming Imagepad gesture 30
Index 57
Page 69

 Loading...