

Page 1

D8000 Best Practices
Abstract
The HPE D8000 Disk Enclosure is a high-capacity expansion enclosure with a rack height of 4
EAI units (7 in). The disk enclosure fits a 1.2 m rack. The integral cable management arm allows
the enclosure to be withdrawn from the rack for servicing while remaining connected and powered
on. This document highlights best practices for deploying and optimizing the HPE D8000 Disk
Enclosure and is intended for D8000 administrators.
Part Number: P12500-001
Published: April 2019
Edition: 1
Page 2

©
Copyright 2019 Hewlett Packard Enterprise Development LP
Notices
The information contained herein is subject to change without notice. The only warranties for Hewlett Packard
Enterprise products and services are set forth in the express warranty statements accompanying such
products and services. Nothing herein should be construed as constituting an additional warranty. Hewlett
Packard Enterprise shall not be liable for technical or editorial errors or omissions contained herein.
Confidential computer software. Valid license from Hewlett Packard Enterprise required for possession, use,
or copying. Consistent with FAR 12.211 and 12.212, Commercial Computer Software, Computer Software
Documentation, and Technical Data for Commercial Items are licensed to the U.S. Government under
vendor's standard commercial license.
Links to third-party websites take you outside the Hewlett Packard Enterprise website. Hewlett Packard
Enterprise has no control over and is not responsible for information outside the Hewlett Packard Enterprise
website.
Acknowledgments
Intel®, Itanium®, Pentium®, Xeon®, Intel Inside®, and the Intel Inside logo are trademarks of Intel Corporation
in the U.S. and other countries.
Microsoft® and Windows® are either registered trademarks or trademarks of Microsoft Corporation in the
United States and/or other countries.
Adobe® and Acrobat® are trademarks of Adobe Systems Incorporated.
Java® and Oracle® are registered trademarks of Oracle and/or its affiliates.
UNIX® is a registered trademark of The Open Group.
Page 3

Contents
General best practices................................................................................ 4
Best practices for rack installation............................................................ 5
Mechanical best practices........................................................................ 14
Best practices for installing drives for the D8000 Disk Enclosure....... 17
Supported Racks and Space Considerations......................................................................................5
Installing the Physical Enclosure Rack Rail.........................................................................................5
Installing the Physical Enclosure.........................................................................................................8
Installing the cable management arm..................................................................................................9
Rack PDU recommendations............................................................................................................ 11
Lifting the physical enclosure with lifting straps.................................................................................14
Lifting the physical enclosure with lift handles...................................................................................14
Installing/Removing the Access Panel.............................................................................................. 15
Recommendations for populating drive bays.................................................................................... 17
Best practices for Smart Array connectivity...........................................19
Single-domain cabling....................................................................................................................... 19
Dual-domain cabling..........................................................................................................................19
Daisy-chaining...................................................................................................................................20
Best practices for staying current on firmware...................................... 22
Websites..................................................................................................... 23
Support and other resources................................................................... 24
Accessing Hewlett Packard Enterprise Support................................................................................24
Accessing updates............................................................................................................................ 24
Customer self repair.......................................................................................................................... 25
Remote support.................................................................................................................................25
Warranty information......................................................................................................................... 25
Regulatory information...................................................................................................................... 25
Documentation feedback...................................................................................................................26
3
Page 4

General best practices
Become familiar with the HPE D8000 Disk Enclosure by reading the following manuals:
• HPE D8000 Disk Enclosure QuickSpecs
https://www.hpe.com/support/D8000-quickspecs
• HPE D8000 Disk Enclosure Quick Setup Instructions
• HPE D8000 Disk Enclosure EAC Getting Started Guide
• HPE D8000 Disk Enclosure Installation and Maintenance Guide
https://www.hpe.com/support/D8000-IM
See the HPE Storage Information Library:
http://www.hpe.com/info/EIL
Stay current on firmware
Use the latest disk, controller, and enclosure firmware to enhance the performance and functionality of the
D8000 Disk Enclosure.
More information
Best practices for staying current on firmware
4 General best practices
Page 5

Best practices for rack installation
To reduce the risk of personal injury or damage to equipment, be sure that:
• If the installation location does not allow for the concrete anchor option, the rack is bolted to the floor using
the concrete anchor kit. The rack stabilizer option kit can be used as an alternative.
• The rack leveling feet are extended to the floor.
• The full weight of the rack rests on the leveling feet.
• The racks are coupled together in multiple rack installations.
Always plan the rack installation so that the heaviest item is installed at the bottom of the rack. Install the
heaviest item first and continue to populate the rack from the bottom to the top. Failure to follow this
procedure could result in the rack tipping when a fully loaded physical enclosure is extended for service.
Do not use the lifting straps and removable handles to install the physical enclosure into the rack. Because of
the enclosure's size and weight, use a pneumatic lift to install the physical enclosure.
More information
Supported Racks and Space Considerations
Supported Racks and Space Considerations
The physical enclosure and support rails are engineered for mounting into 19 in wide front panel, four-post
cabinets and racks that have been designed according to the EIA-310-D standard. Due to the length of the
physical enclosure, 1200 mm racks must be used for racking the physical enclosure.
Hewlett Packard Enterprise recommends using the HPE G2 Enterprise Series Racks (1200 mm) or HPE G2
Advanced Series Racks (1200 mm) for racking the physical enclosure.
For CTO configurations, Hewlett Packard Enterprise requires the HPE G2 Enterprise Series Racks
(1200mm).
The HPE G2 Enterprise Series Racks (1200 mm) and HPE G2 Advanced Series Racks (1200 mm) are
capable of supporting 2800 lbs of static load. Given a fully loaded physical enclosure weights 325 lbs, a
maximum of eight fully loaded physical enclosures can be installed in a single rack. Cables, PDUs, and other
rack hardware should also be considered when configuring the rack.
Hewlett Packard Enterprise rails are not compatible with tapped holes. The rails are adjustable to
accommodate 25 in to 35 in Retma rail spacing.
To ensure that there is adequate space to install the physical enclosure and to ensure adequate airflow,
observe the following spatial requirements when installing a Hewlett Packard Enterprise-branded or thirdparty rack:
• Leave a minimum clearance of 47 in in front of the rack.
• Leave a minimum clearance of 30 in in back of the rack.
• Leave a minimum clearance of 48 in from the back of the rack to the rear of another rack or row of racks.
Installing the Physical Enclosure Rack Rail
The D8000 rack rails are adjustable to fit racks with Retma rack rail spacings of 25in - 35in. The D8000 rack
rails are shipped configured for a Retma rack rail spacing of 35in.
Best practices for rack installation 5
Page 6

Procedure
1. Adjust the rack rails:
a. Extend the middle slide fully. This will expose the four adjustment screws.
b. Remove the four adjustment screws and slide the rear mounting bracket until the holes in the rear
mounting bracket align with the holes for a 29 in Retma spacing, if using an HPE rack. If using a thirdparty rack, the distance between the front and rear Retma rails needs to be measured and the rack
rails adjusted accordingly.
c. Assemble the four adjustment screws into the rear mounting bracket as shown in the following
illustration.
2. Install the cable management bracket onto the right rack rail. The cable management bracket must be
installed onto the right rack rail prior to installing the rack rail into the rack. It cannot be installed onto the
right rack rail once it is installed in the rack. The cable management bracket is installed using four screws
as shown in the following illustration.
6 Best practices for rack installation
Page 7
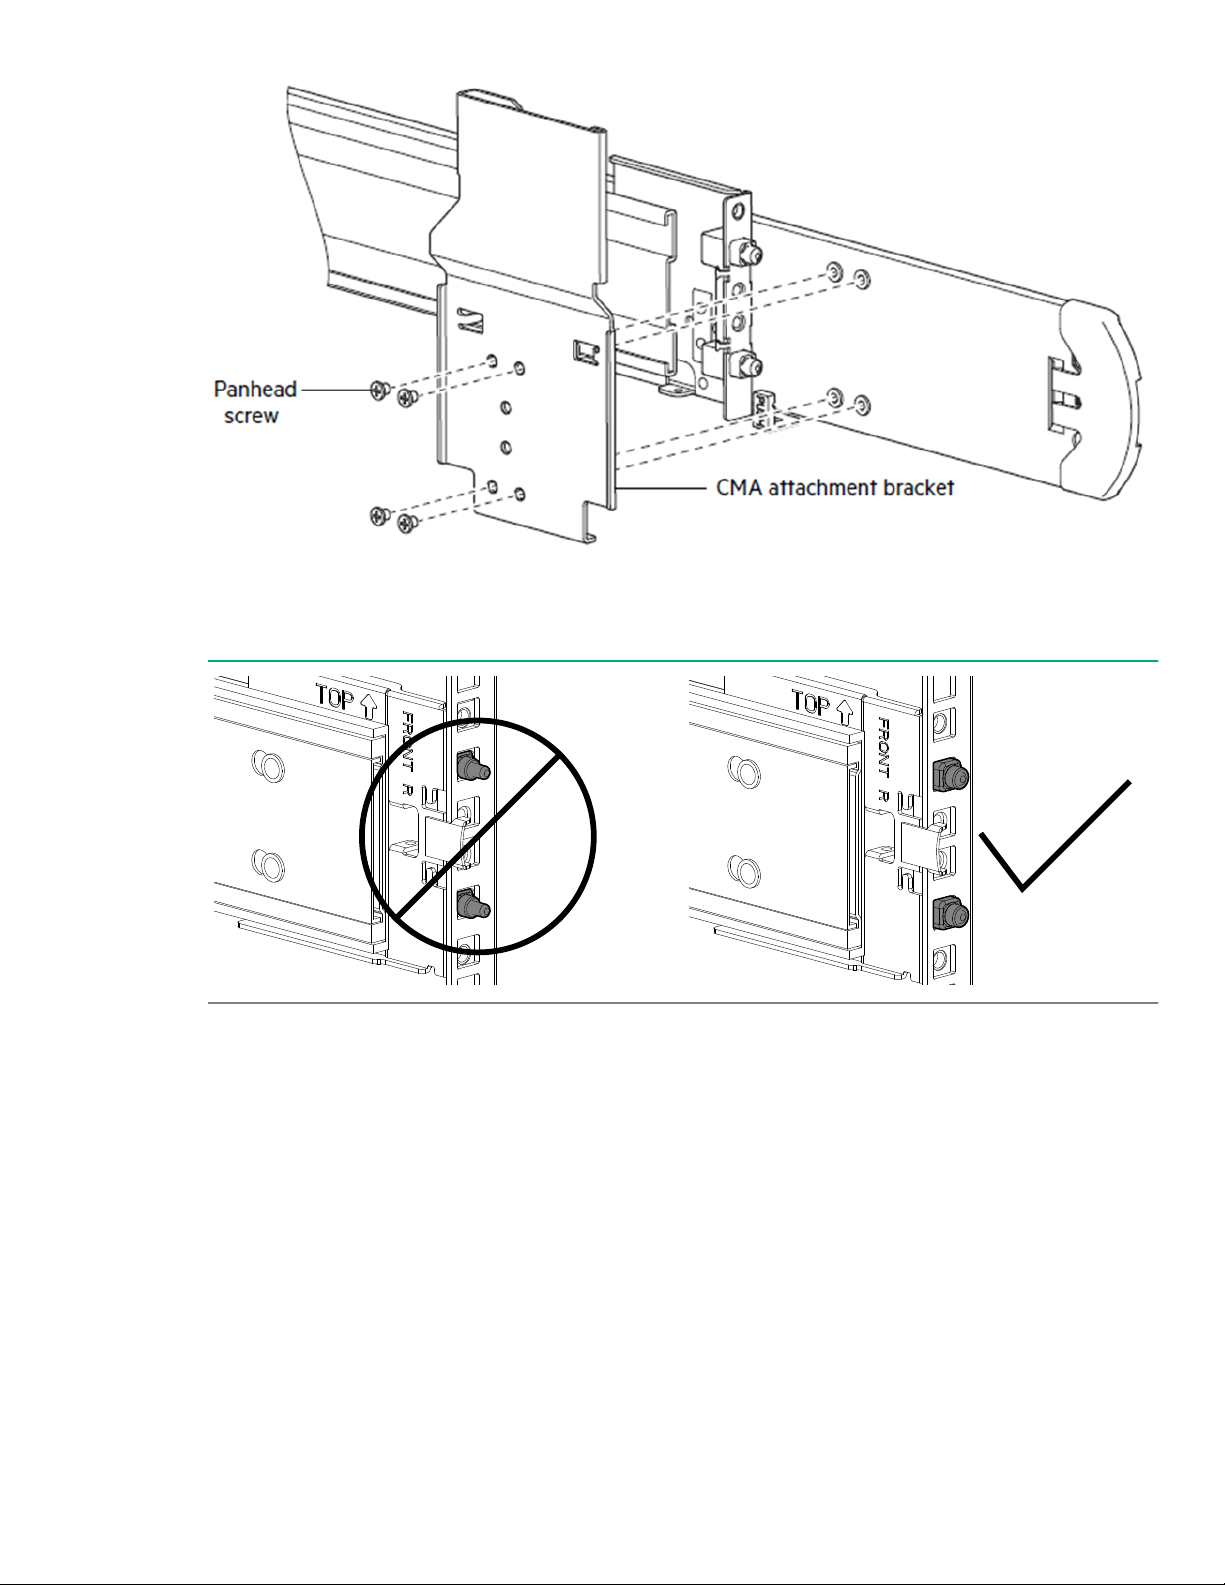
3. After installing the rack rails according to the Installation and Maintenance Guide, verify that the rack rails
are completely installed. The following illustrations show proper and improper installation of the rack rails.
The front and back of the rails should be inspected.
4. To avoid personal injury or damage to equipment, the rack rails should be secured to the rack with the
provided hardware.
a. Using 2 M5 screws and the rack bracket, secure the front of the rack rail to the rack. Complete for both
the left and right rack rails.
Best practices for rack installation 7
Page 8
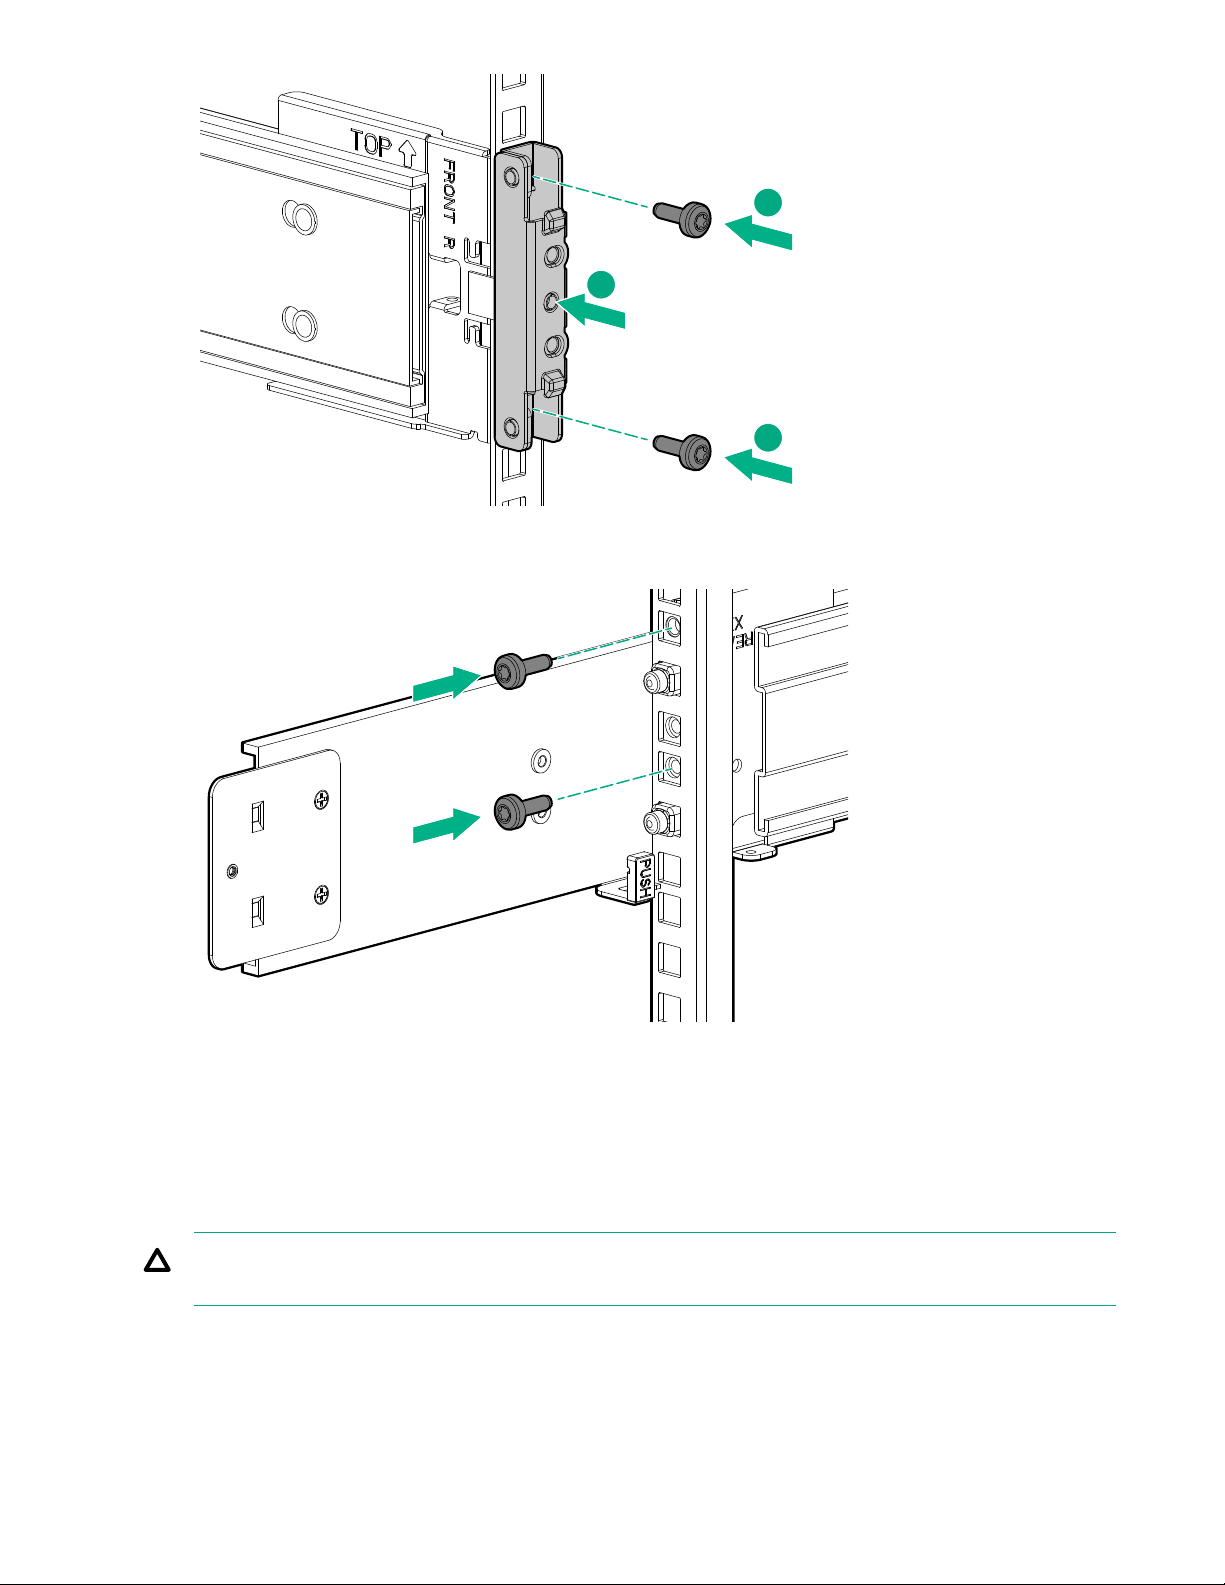
1
2
2
b. Using 2 M5 screws, secure the rear of the rack rail to the rack. Complete for both the left and right rack
rails.
Installing the Physical Enclosure
Do not use the lifting straps and removable handles to install the physical enclosure into the rack. Due to the
physical enclosure's size and weight, use a pneumatic lift to install the enclosure. Using a pneumatic lift
allows for more stable alignment of the physical enclosure to the rack rails, preventing damage to the inner
rack rail member on the physical enclosure.
CAUTION: The D8000 rack rail must be properly secured in the rack. Improper installation may result in
damage to the equipment or personal injury.
To install the physical enclosure in the rack:
8 Best practices for rack installation
Page 9

Procedure
1. Position the physical enclosure so that the inner rails on the physical enclosure align with the middle rails
of the rack rails. Both inner rails should be the same distance from the rack face.
2. Keeping the physical enclosure stationary, pull the middle rails forward onto the inner rails. The middle
rails should slide smoothly onto the inner rails. Difficult middle rail movement is an indication of
misalignment. Slide the middle rails onto the inner rails until they “click” into position.
3. Lower the pneumatic lift 2 or 3 inches. Do not remove the pneumatic lift until the physical enclosure is fully
installed in the rack. This is a safety measure in case the rack rails are not seated properly or any
mechanical/integration failure occurs.
4. Depress the inner slide lock springs on the left and right rack rails. With the springs depressed, push the
physical enclosure toward the rack. The inner slide lock springs can be released once they have entered
the middle sides.
5. Push the physical enclosure all the way into the rack. When fully seated, there will be an audible “click”.
Installing the cable management arm
To install the cable management arm:
Prerequisites
Before you install the physical enclosure into the rack, attach the cable management arm (CMA) physical
enclosure attachment bracket to the physical enclosure using two pan head screws. You can install the CMA
physical enclosure attachment bracket after the physical enclosure is in the rack, but it is easier with the
physical enclosure removed from the rack.
Best practices for rack installation 9
Page 10

Procedure
1. Ensure that the CMA is oriented properly. The arrow next to the “B” mark on the CMA should be pointed
upward.
2. Slide the CMA “B” bracket into the right rack rail CMA attachment bracket until it “clicks” into place.
3. Slide the CMA “A” bracket into the cable management arm physical enclosure attachment bracket unit it
“clicks” into place.
4. Install the crossbar using the two blue captive thumbscrews to stabilize the two rack rails at the rear of the
enclosure as shown in the following illustration.
10 Best practices for rack installation
Page 11

Rack PDU recommendations
HPE PDUs are designed for use with HPE Standard, Advanced, and Enterprise racks, but are compatible
with most third-party data center racks. The PDU models vary in form factor with several mounting
configurations available, including the following:
• HPE Basic PDU—Provides basic power distribution. No network connectivity.
• HPE Metered PDU—Provides real-time local and remote power monitoring at each load segment enabling
users to obtain power usage and available circuit capacity.
• HPE Switched PDU—Offers the same features as Metered PDUs and provides controlled on/off switching
of individual outlets, groups of outlets, power sequencing delays to minimize inrush currents, and
unauthorized equipment provisioning.
• HPE Metered & Switched PDU—Offers the same features as Switched PDUs but provides individual
outlet metering in place of load segment metering.
NOTE: Take into account the length of the unit when selecting PDU, as the length of the unit may make the
servicing of certain PDUs challenging.
Best practices for rack installation 11
Page 12

Table 1: Rack Mounting Options
Form Factor Details
0U (Vertical) Vertical PDUs come in Half, Mid, & Full-height versions and install vertically in the 0U
space in the back of the rack. There are also Half and Full-height high-density models
that install vertically in the 0U space in the back of the rack. The high-density model
mounts on its side with outlets facing the back of the rack.
• Half-height PDU—Designed to fit in a 22U and taller rack.
• Mid-height PDU—Designed to fit in a 36U and taller rack.
• Full-height PDU—Designed to fit in a 42U and taller rack.
1U 1U PDU can be installed in a U position in the rack, or in the true 0U space on the side
of the rack between the RETMA rails.
2U 2U PDUs can be installed in a U position in the rack.
For more detailed information regarding PDUs, see the following guides:
Table 2: Documentation List
Document Available at:
QuickSpecs
HPE Basic Power Distribution Units
QuickSpecs
HPE G2 Metered Power Distribution
Units QuickSpecs
HPE G2 Switched Power Distribution
Units QuickSpecs
HPE G2 Metered and Switched Power
Distribution Units QuickSpecs
Install/User Guides
HPE G2 Series Basic Power Distribution
Unit User Guide
HPE G2 Series Metered, Switched, and
Metered & Switched Power Distribution
Unit User Guide
Support Matrices / Technical Data Sheets
https://psnow.ext.hpe.com/doc/PSN1009694917WWEN.pdf
https://h20195.www2.hpe.com/v2/GetDocument.aspx?
docname=a00002908enw
https://h20195.www2.hpe.com/v2/getdocument.aspx?
docname=a00002909enw
https://h20195.www2.hpe.com/v2/GetDocument.aspx?
docname=a00002910enw
http://h20628.www2.hp.com/km-ext/kmcsdirect/emr_nac05333389-2.pdf
https://support.hpe.com/hpsc/doc/public/display?
sp4ts.oid=1010309528&docLocale=en_US&docId=emr_naa00006907en_us&withFrame
HPE G2 Basic Power Distribution Units
(PDU)
12 Best practices for rack installation
https://h20195.www2.hpe.com/V2/GetDocument.aspx?
docname=4AA6-8687ENW
Table Continued
Page 13

Document Available at:
HPE G2 Metered Power Distribution
Units (PDU)
HPE G2 Switched Power Distribution
Units (PDU)
HPE G2 Metered and Switched Power
Distribution Units (PDU)
https://h20195.www2.hpe.com/v2/Getdocument.aspx?
docname=a00004232enw
https://h20195.www2.hpe.com/v2/Getdocument.aspx?
docname=a00004231enw
https://h20195.www2.hpe.com/v2/Getdocument.aspx?
docname=a00004230enw
Best practices for rack installation 13
Page 14

Mechanical best practices
Lifting the physical enclosure with lifting straps
The lifting straps were not designed to lift a fully loaded physical enclosure. When using the lifting straps to
move the physical enclosure, no hard drives should be installed in the physical enclosure.
Procedure
1. Ensure that the lifting straps are securely buckled. The lifting straps are not buckled in the packaging and
must be manually buckled.
2. Lifting the physical enclosure requires three people capable of lifting 40 lbs.
3. Two people should be positioned at the rear corners of the physical enclosure and one person should be
positioned at the front of the physical enclosure.
4. To lift, grip the straps securely by the loops and lift the enclosure using appropriate lifting technique.
Lifting the physical enclosure with lift handles
The lift handles are not universal. There is a left side handle and a right side handle. Ensure that the correct
lift handle is being installed on the correct side of the physical enclosure.
The lift handles were not designed to lift a fully loaded physical enclosure. When using the lift handles to
move the physical enclosure, no hard drives should be installed in the physical enclosure.
Procedure
1. Install the lift handle:
a. Pull out the push-pull pin on the lift handle.
b. Move the lift handle to the side of the physical enclosure close to the lift handle mounting features.
c. Slide the lift handle up so that the retaining features on the lift handle engage the lift handle mounting
features on the side of the physical enclosure.
d. Release the push-pull pin to lock the lift handle in place.
14 Mechanical best practices
Page 15

1
1
2
2
2. Verify that each of the four lift handles is securely fastened to the physical enclosure before performing the
lift. Personal injury or damage to the equipment could result if the physical enclosure is lifted with the lift
handles not securely fastened.
3. With two persons positioned one on each side of the physical enclosure, grip the lift handles securely and
lift the physical enclosure using appropriate lifting technique.
Installing/Removing the Access Panel
IMPORTANT: A minimum of three people are required to lift the physical enclosure with the removable
handles, with at least one person on each side of the enclosure.
Procedure
• To remove the access panel:
1. Open the latch in front of the access panel by rotating it towards the bottom of the physical enclosure.
2. Depress the expose access panel tab.
3. With the access panel tab depressed, rotate the access panel up by lifting the lift tab labeled “LIFT
HERE.” Grasp the access panel and gently lift it off the physical enclosure.
4. The procedure is the same for both access panels.
Mechanical best practices 15
Page 16

• To install the access panel:
1. Ensure that the access panel latch is in the open position.
2. While facing the front of the physical enclosure, carefully align the mounting features at the rear of the
access panel with the mounting pins at the rear of the enclosure.
3. With the access panel mounting features engaging the physical enclosure mounting pins/slots, slowly
rotate the access panel down into place onto the physical enclosure.
4. Gently but firmly press the top of the access panel to ensure that the access panel tab locks into place.
5. Close the access panel latch by rotating it up until it “clicks” into place.
16 Mechanical best practices
Page 17

Best practices for installing drives for the D8000 Disk Enclosure
NOTE: The D8000 enclosure weighs 250 pounds empty, and the drive drawer pulls out of the rack to support
top-loading drives. Review all safety information regarding the enclosure, and the risks of tipping if improperly
mounted, before attempting to install new hard drives.
Drives are installed in the enclosure in the bays contained in the drive drawer. To install new hard drives in the
enclosure, open the drive drawer and lift the cover. Secure the drive cover to prevent it from falling while
installing drives. Each drive is then installed into a drive bay, connector first, and locked into position using the
drive carrier latching mechanism.
Use the drive bay map, and installation sequence, described in the next section to populate the drawer with
drives.
Recommendations for populating drive bays
• To prevent improper cooling and thermal damage, the first row of drive bays, as well as the column of drive
bays closest to the drive expander module (the gray-colored disk slots in the following figure), must be
populated with either a hard drive or a drive blank.
• Populate the remaining disk slots from enclosure front to back—filling an entire lateral bay (disks 13–23)—
before populating the next bay (disks 25–35), and so on.
• When rack-mounting a D8000 enclosure, install the disks after the enclosure is installed in the rack.
• Populate disk slots 97–106 at any time during the sequence, as they are cooled separately within the
enclosure.
• Place disk drives with higher power dissipation capacity towards the front of the enclosure.
• For installation access, ensure that at least 89 cm (35 in) of open space is available.
• Hard drives are sensitive to excess vibration. Use care when sliding the disk enclosure in and out of the
rack.
• A RAID 1 mirror requires an even number of hard drives.
Best practices for installing drives for the D8000 Disk Enclosure 17
Page 18

• To provide the greatest storage space efficiency, drives that will be configured within an array should be
the same capacity.
• Install drives from front to rear.
• Never leave the access panel open for more than 9 minutes.
• Avoid overheating.
18 Best practices for installing drives for the D8000 Disk Enclosure
Page 19

Best practices for Smart Array connectivity
NOTE: When cabling the HPE D8000 Storage Enclosure to SAS initiators, the only restriction is that two IO
Modules are required in the enclosure to support dual-domain connectivity. Also, storage environment
designers should consider that SAS hard drives offer dual-port connectivity, while SATA hard drives are
limited to single-port connectivity.
• Use dual-domain connectivity to the HPE D8000 enclosure only when both IO Modules are installed AND
the enclosure contains only SAS hard drives.
• Use single-domain connectivity when only one IO Module is installed (the base configuration of the
Storage Enclosure) OR only SATA hard drives are installed.
There are other limitations to consider for multi-initiator and daisy chaining configuration requirements, but—
other than the limitations previously described—these limitations are a function of the initiators used, not the
Storage Enclosure. The cabling diagrams and best practices described in the remainder of this document are
specific to storage solutions using the HPE P408e-p or P208e-p SAS initiators.
Single-domain cabling
Single domain storage solutions using the HPE D8000 will have only one active path between the initiator and
the storage enclosure. This requires only one IO Module to be installed and will work with both SAS and SATA
HDDs. Cabling should be done as illustrated in the following diagram:
Dual-domain cabling
Dual-domain storage solutions using the HPE D8000 will have two active paths between the initiator and the
storage enclosure. This requires two IO Modules to be installed, and SAS HDDs. Cabling for this
configuration is illustrated in the following diagram:
Best practices for Smart Array connectivity 19
Page 20

Daisy-chaining
Daisy-chaining the D8000 Storage Enclosure offers the benefits of both single and dual-domain storage
configurations, up to the limit of physical HDDs supported by the initiators. For all current Smart Array SAS
initiators, that limit is 211 hard drives. Up to two D8000 Storage enclosures (each of which provide 106
physical HDD slots) can be connected together to provide the highest density storage for Smart Array in only
8U of rack space.
The following diagram illustrates the proper method for connecting two single IO Module D8000 Storage
Enclosures to one Smart Array initiator to achieve single-domain connectivity.
20 Best practices for Smart Array connectivity
Page 21

The following diagram illustrates the proper method for connecting two dual IO Module D8000 Storage
Enclosures to one Smart Array initiator to achieve dual-domain connectivity.
Best practices for Smart Array connectivity 21
Page 22

Best practices for staying current on firmware
The HPE D8000 Storage Enclosure will periodically require firmware updates to add features or fix issues.
Official firmware updates are provided to customers in the following formats:
• As a Smart Component
• On the HPE website
• In the most current Support Pack for ProLiant (SPP) .iso file
To provide the best performance from the entire solution, all D8000 customers are encouraged to regularly
download and use the most current SPP to update:
• The D8000
• Any hard drives in the enclosure
• The Smart Array initiators attached to the enclosure
• Other ProLiant device drivers or firmware
Firmware for the HPE D8000 enclosure can also be installed on the enclosure without running the SPP by
downloading and installing the latest D8000 Firmware Smart Component directly. Firmware Smart
Components for D8000 can be found on the HPE website at:
https://www.hpe.com/storage/DiskEnclosureFirmware
22 Best practices for staying current on firmware
Page 23

Websites
General websites
Hewlett Packard Enterprise Information Library
www.hpe.com/info/EIL
Single Point of Connectivity Knowledge (SPOCK) Storage compatibility matrix
www.hpe.com/storage/spock
Storage white papers and analyst reports
www.hpe.com/storage/whitepapers
For additional websites, see Support and other resources.
D8000 documentation websites
D8000 documentation (Storage Information Library)
www.hpe.com/info/EIL
D8000 Disk Enclosure Quickspecs
https://www.hpe.com/support/D8000-quickspecs
D8000 Disk Enclosure Installation and Maintenance Guide
www.hpe.com/support/D8000-IM
Websites 23
Page 24

Support and other resources
Accessing Hewlett Packard Enterprise Support
• For live assistance, go to the Contact Hewlett Packard Enterprise Worldwide website:
http://www.hpe.com/assistance
• To access documentation and support services, go to the Hewlett Packard Enterprise Support Center
website:
http://www.hpe.com/support/hpesc
Information to collect
• Technical support registration number (if applicable)
• Product name, model or version, and serial number
• Operating system name and version
• Firmware version
• Error messages
• Product-specific reports and logs
• Add-on products or components
• Third-party products or components
Accessing updates
• Some software products provide a mechanism for accessing software updates through the product
interface. Review your product documentation to identify the recommended software update method.
• To download product updates:
Hewlett Packard Enterprise Support Center
www.hpe.com/support/hpesc
Hewlett Packard Enterprise Support Center: Software downloads
www.hpe.com/support/downloads
Software Depot
www.hpe.com/support/softwaredepot
• To subscribe to eNewsletters and alerts:
www.hpe.com/support/e-updates
• To view and update your entitlements, and to link your contracts and warranties with your profile, go to the
Hewlett Packard Enterprise Support Center More Information on Access to Support Materials page:
www.hpe.com/support/AccessToSupportMaterials
IMPORTANT: Access to some updates might require product entitlement when accessed through the
Hewlett Packard Enterprise Support Center. You must have an HPE Passport set up with relevant
entitlements.
24 Support and other resources
Page 25

Customer self repair
Hewlett Packard Enterprise customer self repair (CSR) programs allow you to repair your product. If a CSR
part needs to be replaced, it will be shipped directly to you so that you can install it at your convenience.
Some parts do not qualify for CSR. Your Hewlett Packard Enterprise authorized service provider will
determine whether a repair can be accomplished by CSR.
For more information about CSR, contact your local service provider or go to the CSR website:
http://www.hpe.com/support/selfrepair
Remote support
Remote support is available with supported devices as part of your warranty or contractual support
agreement. It provides intelligent event diagnosis, and automatic, secure submission of hardware event
notifications to Hewlett Packard Enterprise, which will initiate a fast and accurate resolution based on your
product's service level. Hewlett Packard Enterprise strongly recommends that you register your device for
remote support.
If your product includes additional remote support details, use search to locate that information.
Remote support and Proactive Care information
HPE Get Connected
www.hpe.com/services/getconnected
HPE Proactive Care services
www.hpe.com/services/proactivecare
HPE Proactive Care service: Supported products list
www.hpe.com/services/proactivecaresupportedproducts
HPE Proactive Care advanced service: Supported products list
www.hpe.com/services/proactivecareadvancedsupportedproducts
Proactive Care customer information
Proactive Care central
www.hpe.com/services/proactivecarecentral
Proactive Care service activation
www.hpe.com/services/proactivecarecentralgetstarted
Warranty information
To view the warranty information for your product, see the links provided below:
HPE ProLiant and IA-32 Servers and Options
www.hpe.com/support/ProLiantServers-Warranties
HPE Enterprise and Cloudline Servers
www.hpe.com/support/EnterpriseServers-Warranties
HPE Storage Products
www.hpe.com/support/Storage-Warranties
HPE Networking Products
www.hpe.com/support/Networking-Warranties
Regulatory information
To view the regulatory information for your product, view the Safety and Compliance Information for Server,
Storage, Power, Networking, and Rack Products, available at the Hewlett Packard Enterprise Support Center:
Support and other resources 25
Page 26

www.hpe.com/support/Safety-Compliance-EnterpriseProducts
Additional regulatory information
Hewlett Packard Enterprise is committed to providing our customers with information about the chemical
substances in our products as needed to comply with legal requirements such as REACH (Regulation EC No
1907/2006 of the European Parliament and the Council). A chemical information report for this product can be
found at:
www.hpe.com/info/reach
For Hewlett Packard Enterprise product environmental and safety information and compliance data, including
RoHS and REACH, see:
www.hpe.com/info/ecodata
For Hewlett Packard Enterprise environmental information, including company programs, product recycling,
and energy efficiency, see:
www.hpe.com/info/environment
Documentation feedback
Hewlett Packard Enterprise is committed to providing documentation that meets your needs. To help us
improve the documentation, send any errors, suggestions, or comments to Documentation Feedback
(docsfeedback@hpe.com). When submitting your feedback, include the document title, part number, edition,
and publication date located on the front cover of the document. For online help content, include the product
name, product version, help edition, and publication date located on the legal notices page.
26 Support and other resources
 Loading...