

Page 1
HP
®
COLOR LJ PRO M452/MFP 477
TONER CARTRIDGE REMANUFACTURING INSTRUCTIONS
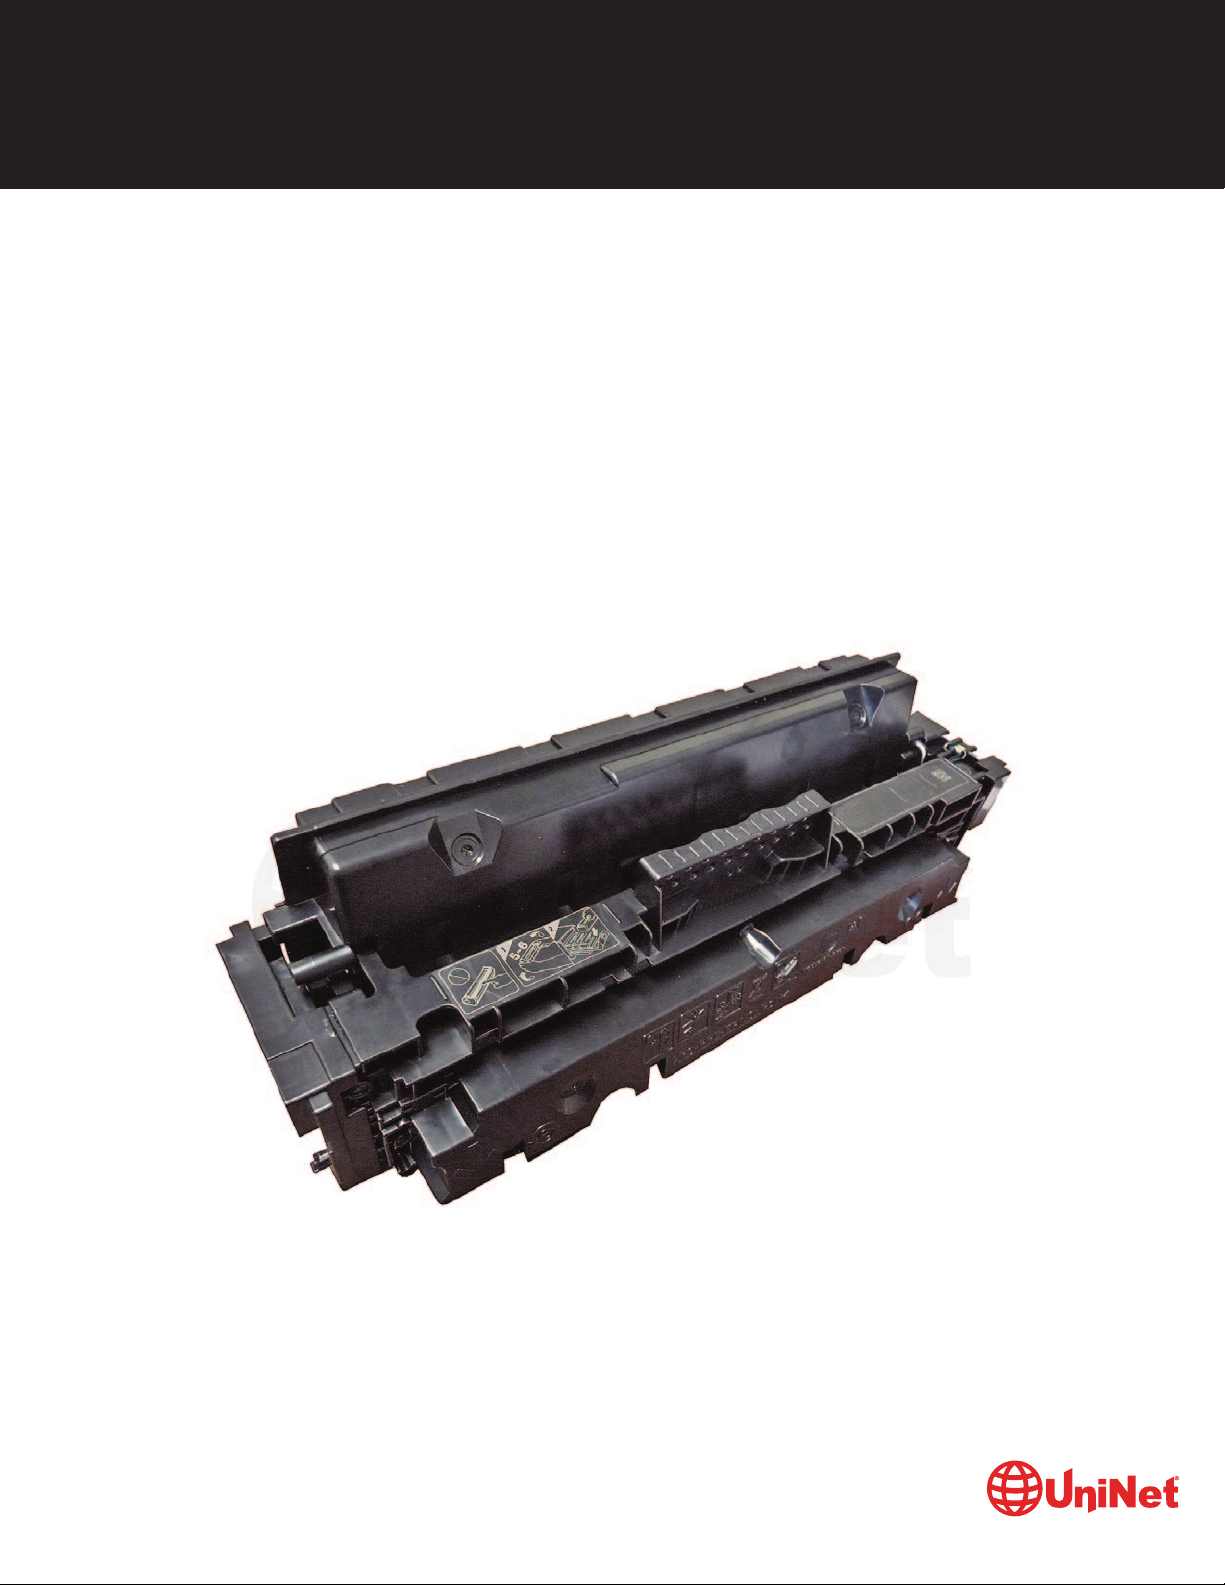
HP CF410/11/12/13 A/X-HP 410 SERIES TONER CARTRIDGE
© 2017 UniNet Imaging Inc. All trademark names and artwork are property of their respective owners. Product brand names mentioned are intended to show compatibility only.
UniNet Imaging does not warrant downloaded information. Unauthorized sale, reproduction or distribution of this article is prohibited. For additional support, please contact techsupport@uninetimaging.com
www.uninetimaging.com
Page 2
HP PRO M452 / MFP 477 (CF410/11/12/13 A/X-HP 410 SERIES) TONER CARTRIDGE REMANUFACTURING INSTRUCTIONS
REMANUFACTURING THE HP COLOR LJ PRO M452, MFP 477
(CF410//11/12/13 A/X-HP 410 SERIES) TONER CARTRIDGES
By Mike Josiah and the Technical Staff at UniNet
© 2017 UniNet Imaging Inc. All trademark names and artwork are property of their respective owners. Product brand names mentioned are intended to show compatibility only.
UniNet Imaging does not warrant downloaded information. Unauthorized sale, reproduction or distribution of this article is prohibited. For additional support, please contact techsupport@uninetimaging.com
www.uninetimaging.com
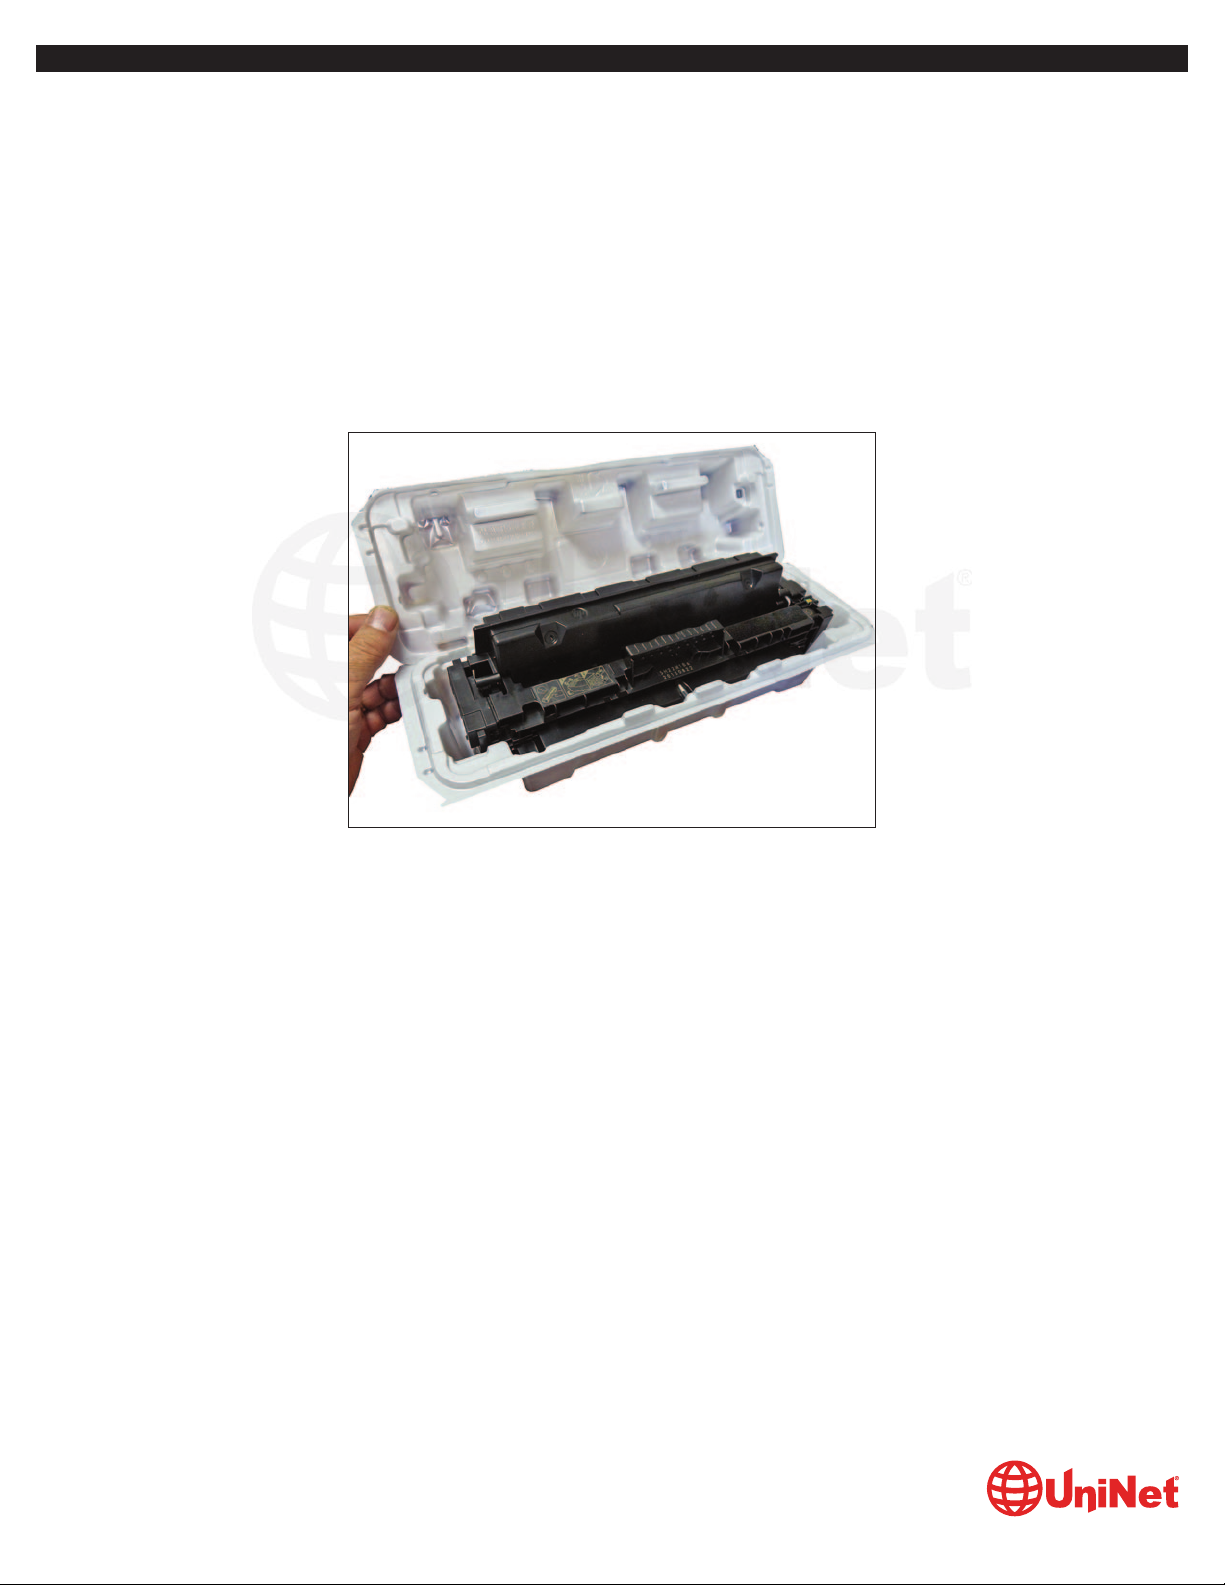
New cartridges do not come with a drum cover. They use a new type of box insert to protect the cartridge. It’s a good idea to have
your customers save these inserts.
The end caps are plastic-welded, and the doctor blade has a left-hand threaded screw, but once past the welds are not that difficult
to do.
PRINTERS CURRENTLY BASED ON THE M452 ENGINE
HP LaserJet Pro M452dn
HP LaserJet Pro M452dw
HP LaserJet Pro M452nw
HP LaserJet Pro MFP M477fnw
CARTRIDGES USED IN THESE MACHINES (HP 410A/X SERIES)
CF410A (Black) 2,300 pages USD$84.99 list*
CF411A (Cyan) 2,300 pages USD$109.99 list*
CF412A (Magenta) 2,300 pages USD$109.99 list*
CF413A (Yellow) 2,300 pages USD$109.99 list*
CF410X (Black High Yield) 6,500 pages USD$141.99 list*
CF411X (Cyan High Yield) 5,000 pages USD$189.99 list*
CF412X (Magenta High Yield) 5,000 pages USD$189.99 list*
CF413X (Yellow High Yield) 5,000 pages USD$189.99 list*
*Pricing current in U.S. American Dollars, as of July 2016. With the new machines shipping with 1,200 page black and color starter
cartridges, there is sure to be a fast growing demand for remanufactured cartridges!
First released in March 2016, the Pro M452/477 series of color laser printers are based on a 28ppm black & color, 600 DPI
engine. (38,400 x 600 DPI enhanced DPI).
The first page out is stated at under 9.0 seconds. Standard installed memory is 256MB NAND Flash with 128MB DRAM, up to
256MB NAND Flash with 256MB Dram depending on the model.
Page 3
REQUIRED TOOLS
1. Toner approved vacuum
2. A small screwdriver (common style)
3. A Phillips head screwdriver
4. Needle nose pliers
5. Flat blade (common) screwdriver
REQUIRED SUPPLIES
1. Color toner for use in the HP M452/477 series cartridges (check for standard or high yield)
2. New replacement chip (check color, standard or high yield)
3. New long life drum
4. New wiper blade
5. New developer roller (optional)
6. New PCR (optional)
7. New doctor blade (optional)
8. Good quality double-sided tape 1/8” wide. (3M Brand preferred)
9. Lint free cloths
10. Conductive grease
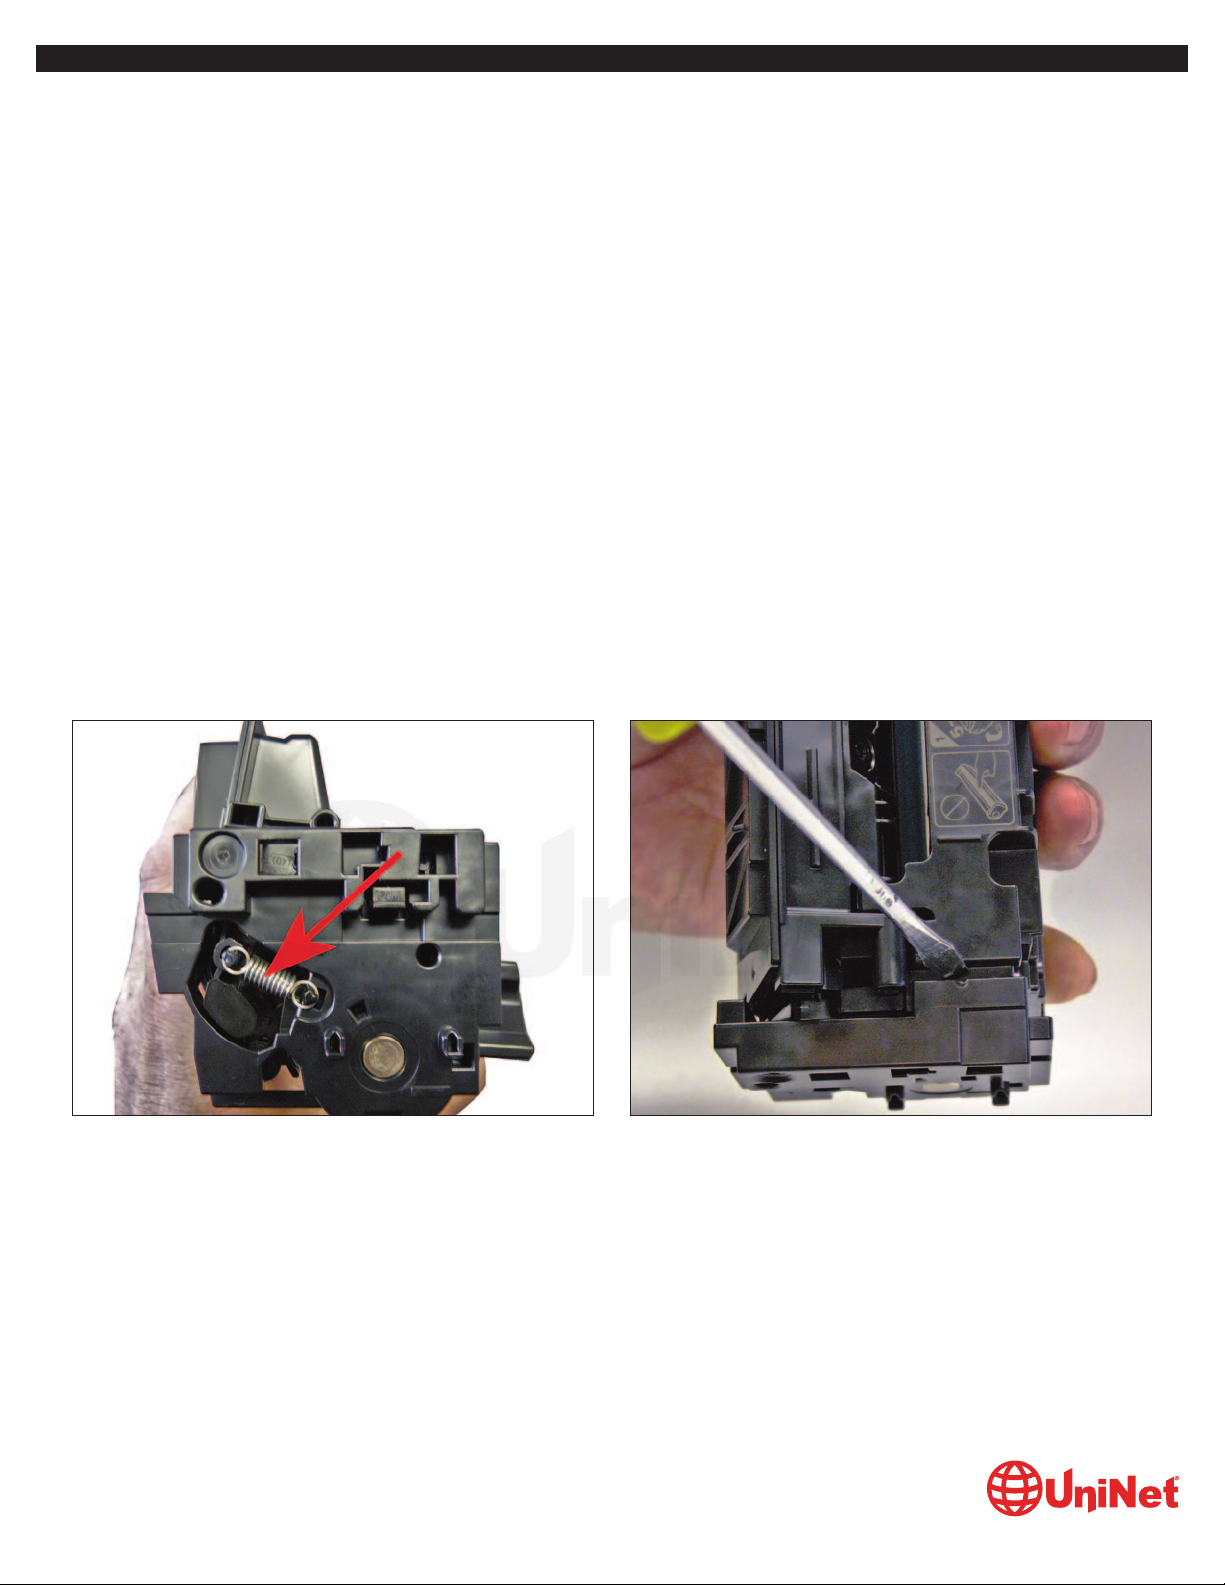
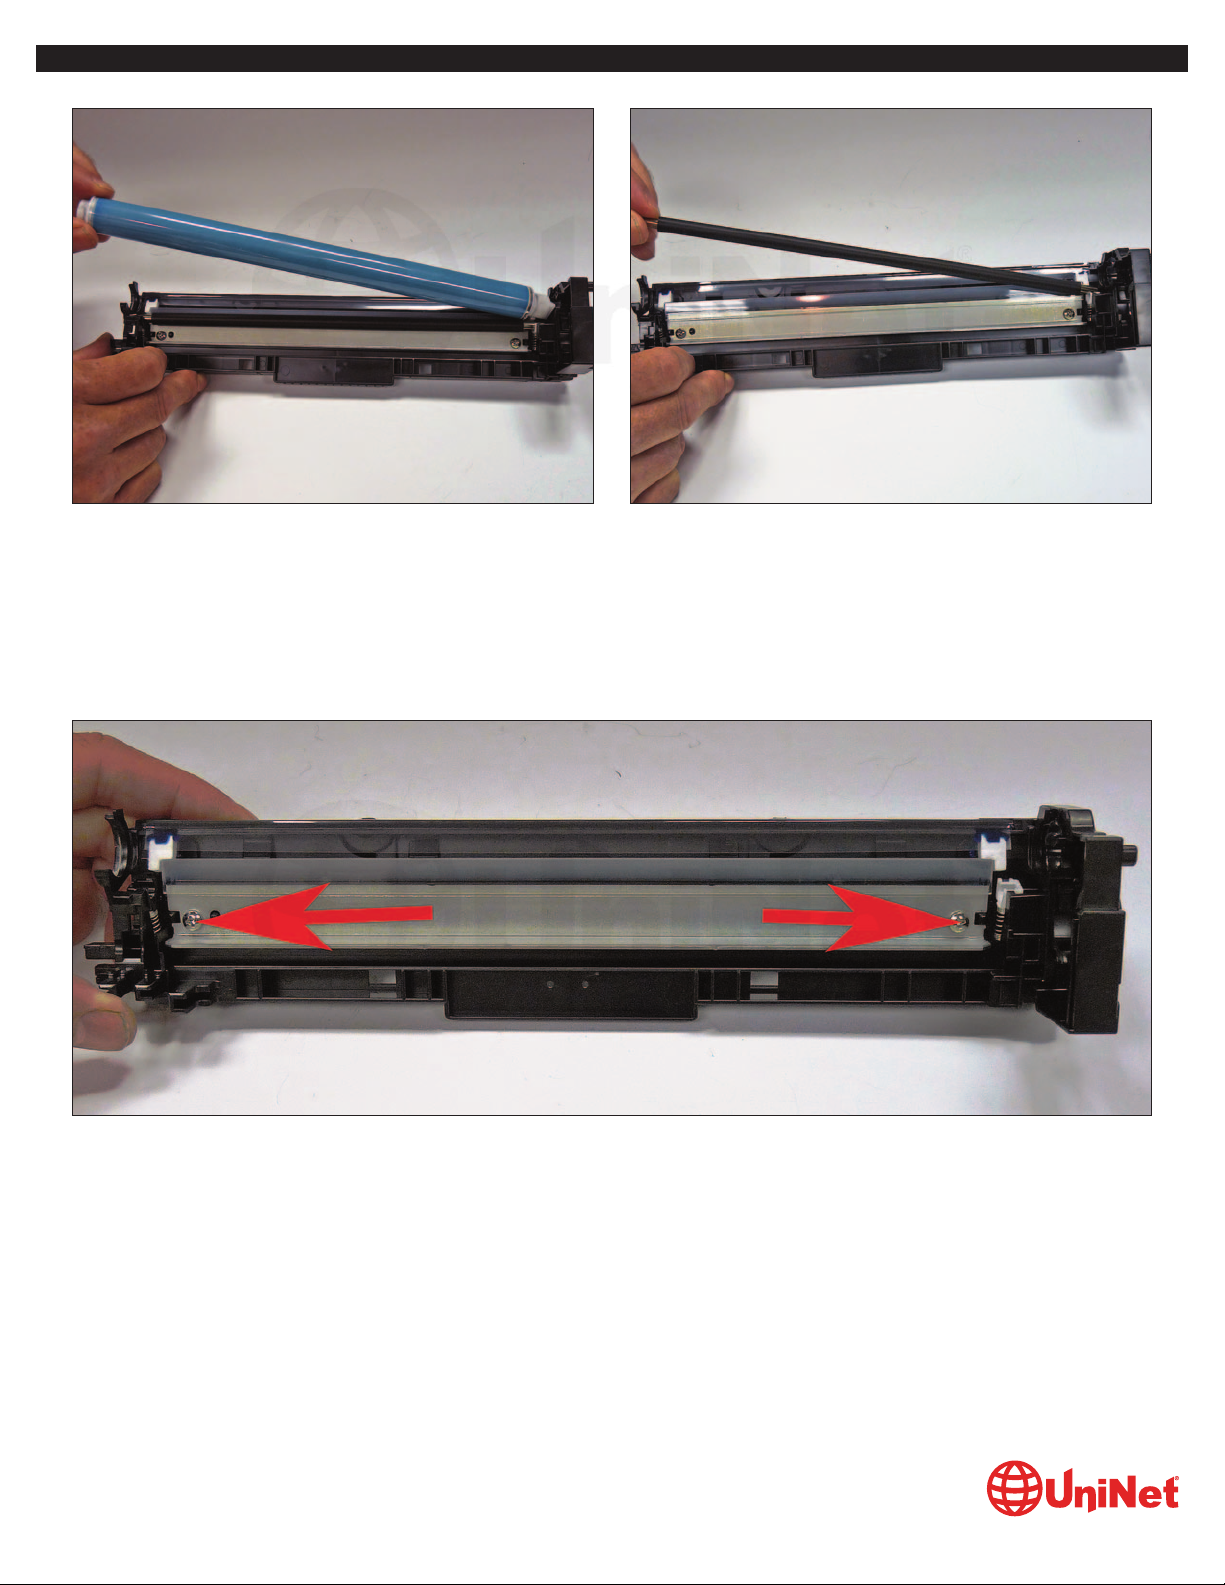
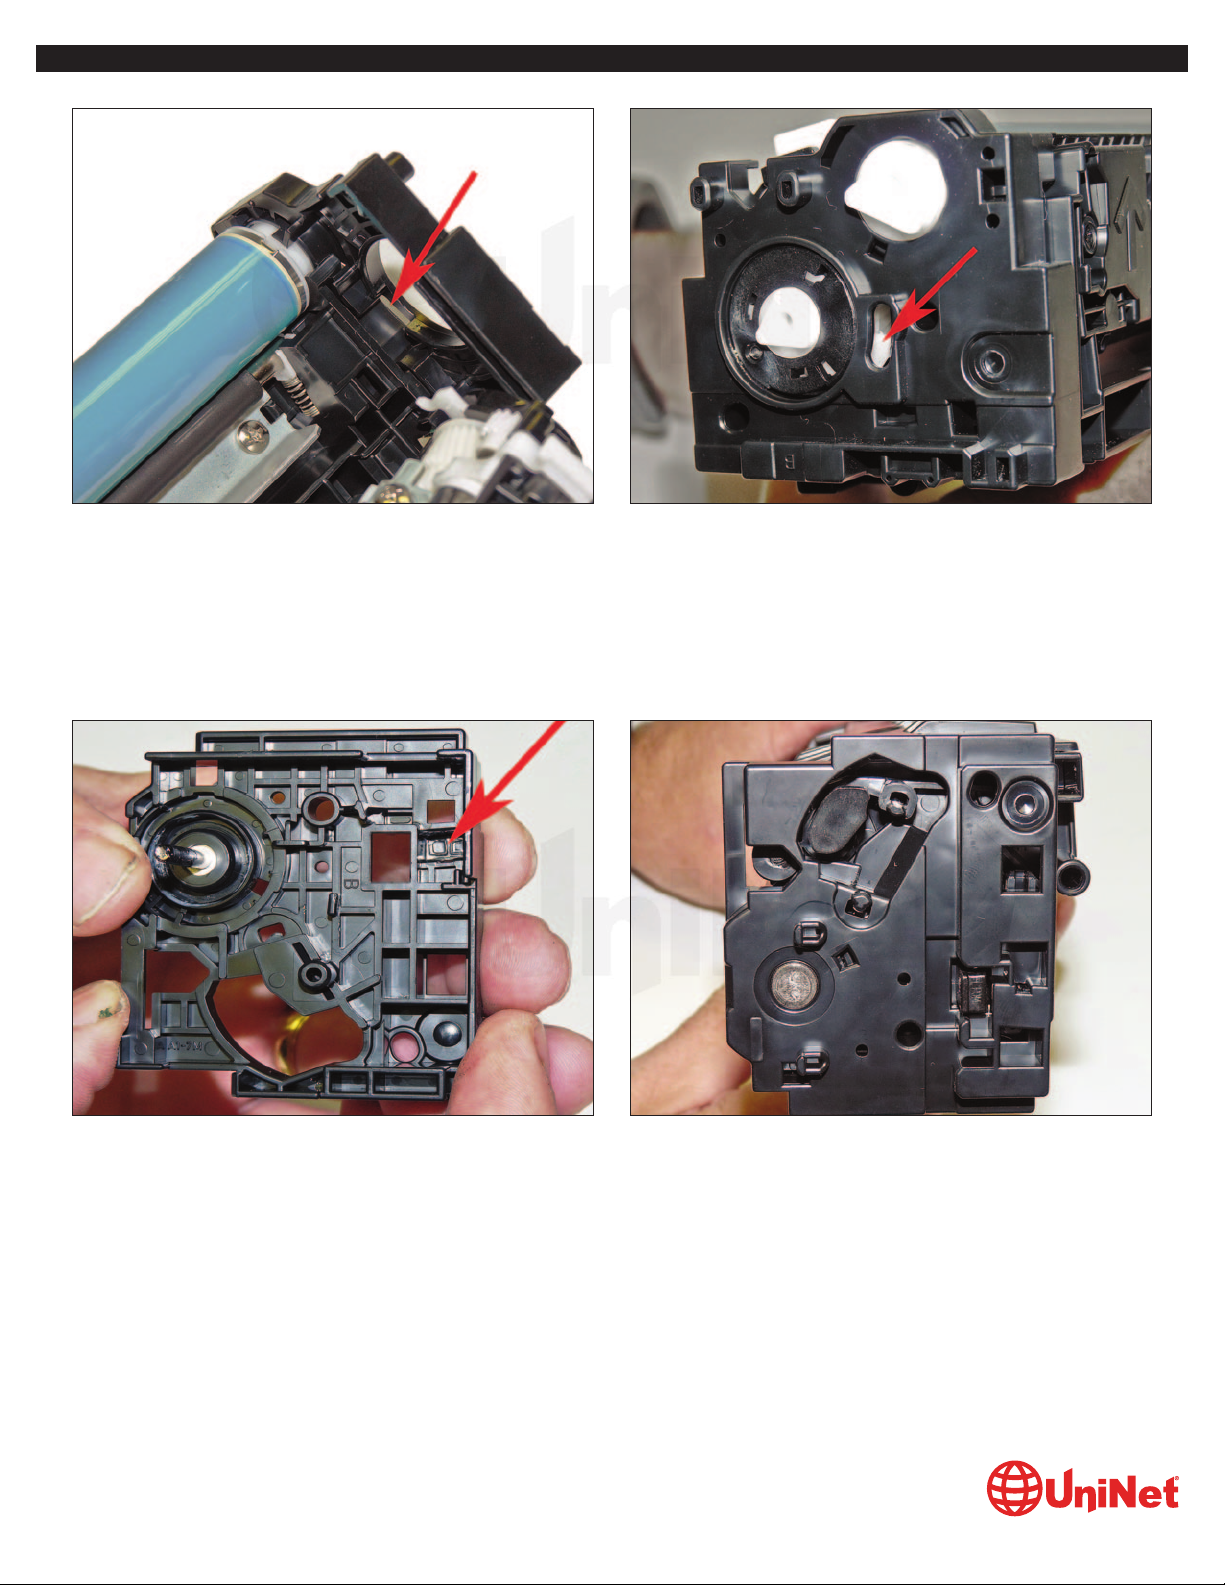
1. With the HP top label facing you, remove the spring from the
left side of the cartridge.
2. On the same side, using a flat blade screwdriver, pry out the
top of the end cap until you feel the weld give way.
HP PRO M452 / MFP 477 (CF410/11/12/13 A/X-HP 410 SERIES) TONER CARTRIDGE REMANUFACTUIRNG INSTRUCTIONS
© 2017 UniNet Imaging Inc. All trademark names and artwork are property of their respective owners. Product brand names mentioned are intended to show compatibility only.
UniNet Imaging does not warrant downloaded information. Unauthorized sale, reproduction or distribution of this article is prohibited. For additional support, please contact techsupport@uninetimaging.com
www.uninetimaging.com
Page 4
3. Slide the screwdriver inside the end cap to the place as
indicated and gently pry again until the end cap comes free.
4. Remove the end cap.
HP PRO M452 / MFP 477 (CF410/11/12/13 A/X-HP 410 SERIES) TONER CARTRIDGE REMANUFACTUIRNG INSTRUCTIONS
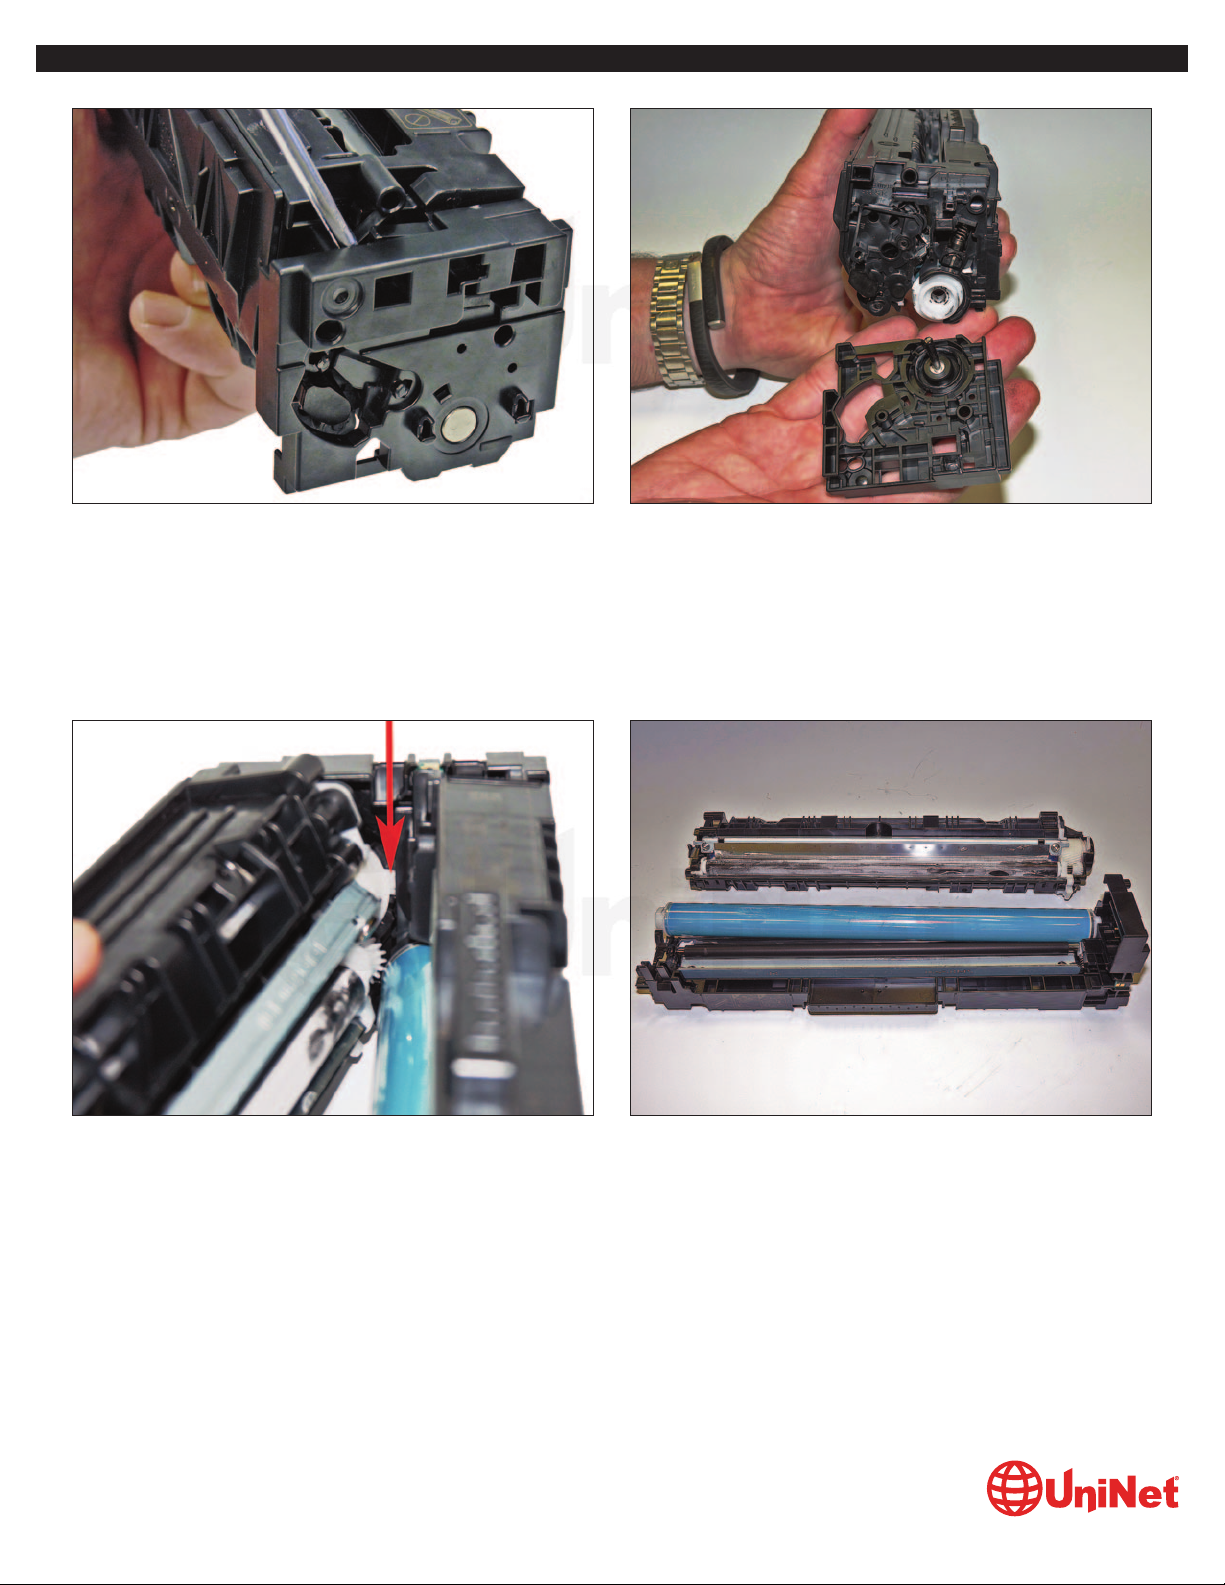
5. Start to separate the two halves.
You will see a small white plastic tab on the drum gear assembly, that blocks you from removing the waste chamber.
Lift up on that tab while pulling the end cap out to separate the two halves.
© 2017 UniNet Imaging Inc. All trademark names and artwork are property of their respective owners. Product brand names mentioned are intended to show compatibility only.
UniNet Imaging does not warrant downloaded information. Unauthorized sale, reproduction or distribution of this article is prohibited. For additional support, please contact techsupport@uninetimaging.com
www.uninetimaging.com
Page 5
6. Remove the drum from the waste chamber. 7. Remove the PCR. Clean with your preferred PCR cleaner and
place aside in a clean area.
HP PRO M452 / MFP 477 (CF410/11/12/13 A/X-HP 410 SERIES) TONER CARTRIDGE REMANUFACTUIRNG INSTRUCTIONS
© 2017 UniNet Imaging Inc. All trademark names and artwork are property of their respective owners. Product brand names mentioned are intended to show compatibility only.
UniNet Imaging does not warrant downloaded information. Unauthorized sale, reproduction or distribution of this article is prohibited. For additional support, please contact techsupport@uninetimaging.com
www.uninetimaging.com
8. Remove the two wiper blade screws and the wiper blade.
Page 6
10. Coat the new wiper blade with your preferred lubricant and install.
Install the two screws.
HP PRO M452 / MFP 477 (CF410/11/12/13 A/X-HP 410 SERIES) TONER CARTRIDGE REMANUFACTUIRNG INSTRUCTIONS
© 2017 UniNet Imaging Inc. All trademark names and artwork are property of their respective owners. Product brand names mentioned are intended to show compatibility only.
UniNet Imaging does not warrant downloaded information. Unauthorized sale, reproduction or distribution of this article is prohibited. For additional support, please contact techsupport@uninetimaging.com
www.uninetimaging.com
9. Clean out all the waste toner from the chamber.
Make sure all the wiper blade seals are clean.
Page 7

Make sure to place a small amount of conductive grease on the black PCR holder.
HP PRO M452 / MFP 477 (CF410/11/12/13 A/X-HP 410 SERIES) TONER CARTRIDGE REMANUFACTUIRNG INSTRUCTIONS
© 2017 UniNet Imaging Inc. All trademark names and artwork are property of their respective owners. Product brand names mentioned are intended to show compatibility only.
UniNet Imaging does not warrant downloaded information. Unauthorized sale, reproduction or distribution of this article is prohibited. For additional support, please contact techsupport@uninetimaging.com
www.uninetimaging.com
11. Install the cleaned PCR.
Page 8

HP PRO M452 / MFP 477 (CF410/11/12/13 A/X-HP 410 SERIES) TONER CARTRIDGE REMANUFACTUIRNG INSTRUCTIONS
© 2017 UniNet Imaging Inc. All trademark names and artwork are property of their respective owners. Product brand names mentioned are intended to show compatibility only.
UniNet Imaging does not warrant downloaded information. Unauthorized sale, reproduction or distribution of this article is prohibited. For additional support, please contact techsupport@uninetimaging.com
www.uninetimaging.com
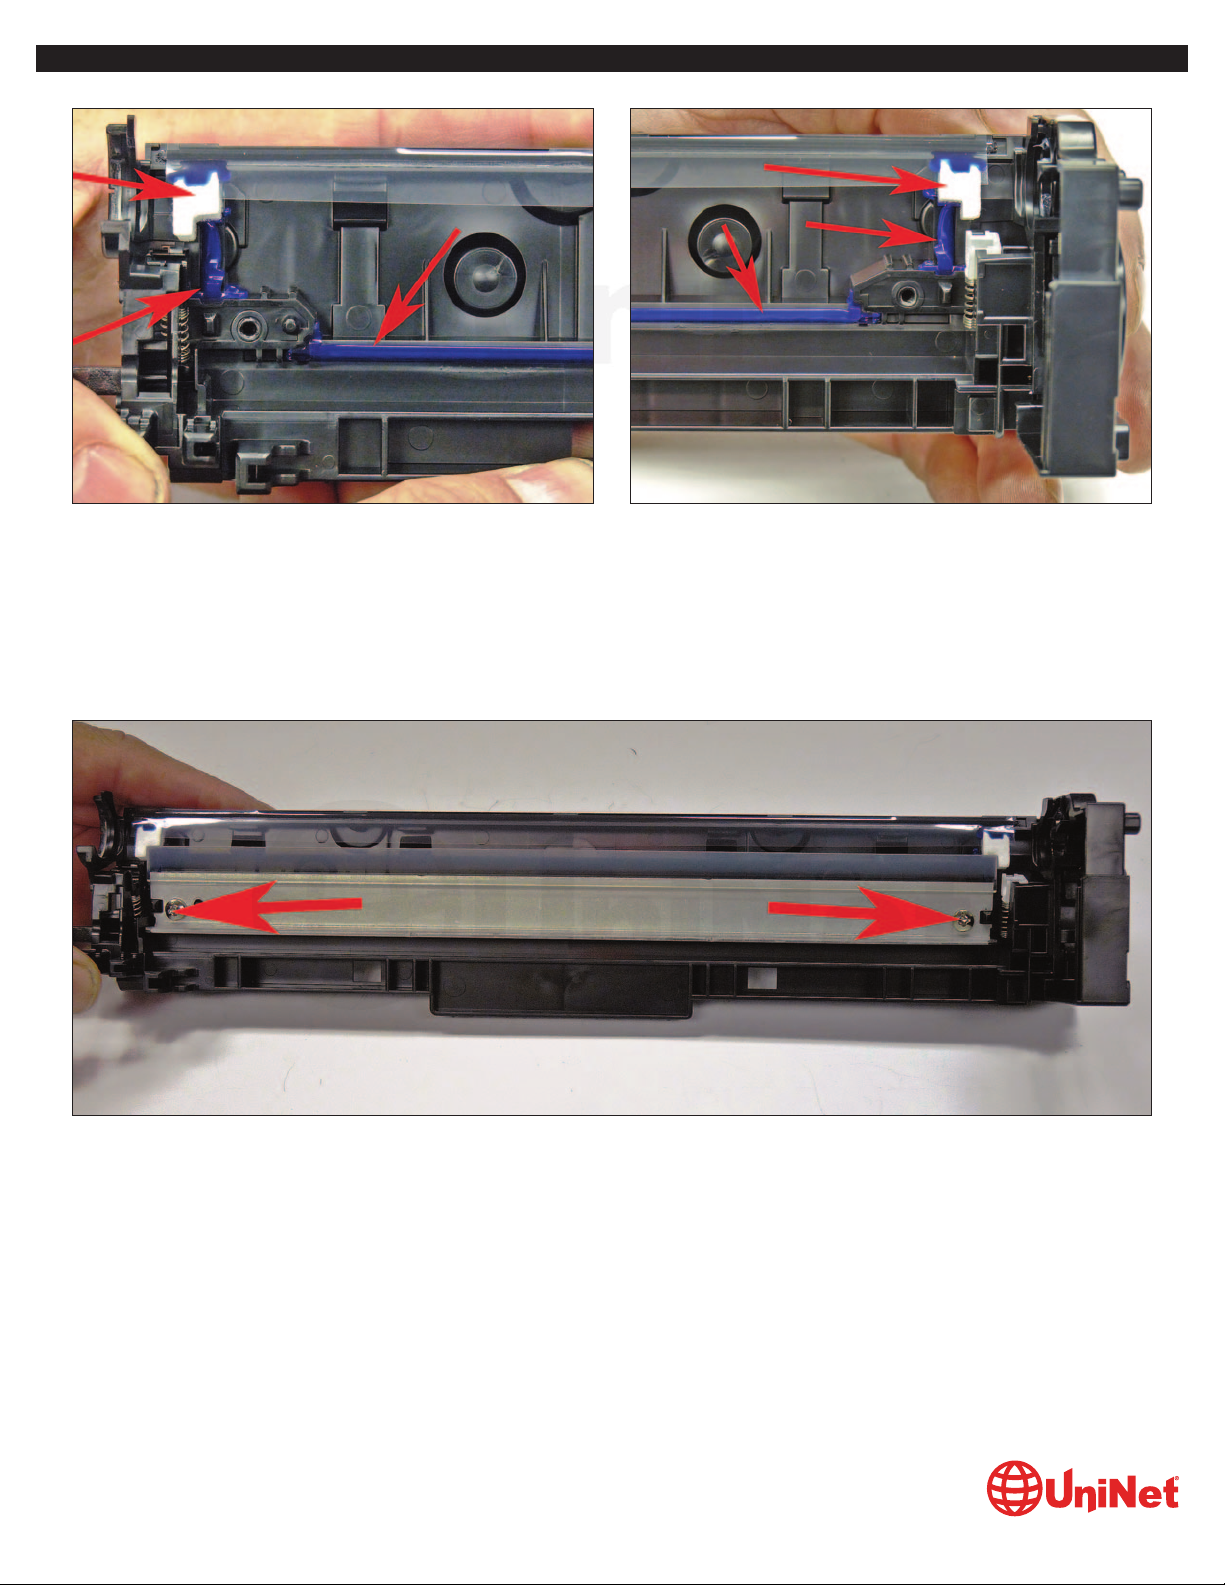
12. On the supply chamber, remove the two screws from the gear side end cap.
Remove the end cap.
Be careful of the spring-loaded drum drive gear. It will come loose.
13. Remove the two gears. 14. Pry off the white inner end cap.
Page 9

15. Remove the large and small gears as shown.
HP PRO M452 / MFP 477 (CF410/11/12/13 A/X-HP 410 SERIES) TONER CARTRIDGE REMANUFACTUIRNG INSTRUCTIONS
16. Slide the developer roller over and remove.
Be careful not to lose the two round bushings or alignment tab.
© 2017 UniNet Imaging Inc. All trademark names and artwork are property of their respective owners. Product brand names mentioned are intended to show compatibility only.
UniNet Imaging does not warrant downloaded information. Unauthorized sale, reproduction or distribution of this article is prohibited. For additional support, please contact techsupport@uninetimaging.com
www.uninetimaging.com
Page 10
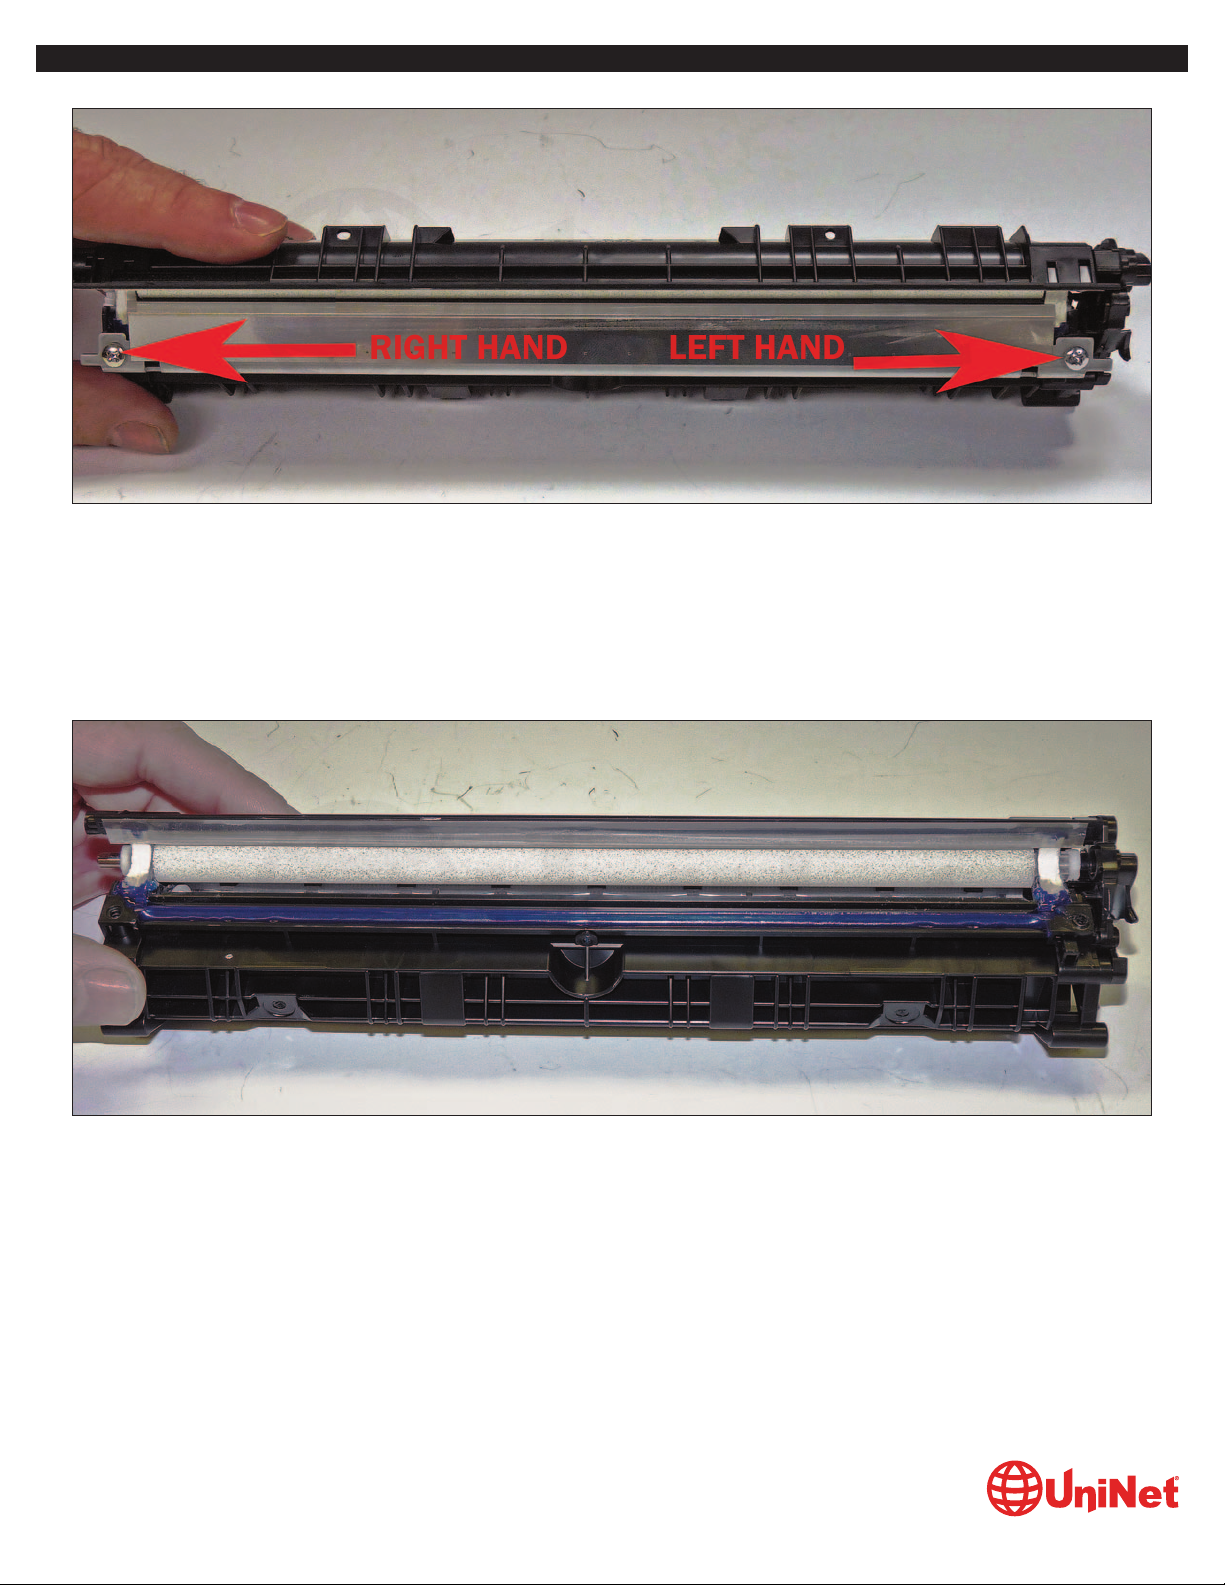
17. There are two screws holding the doctor blade in place.
The left screw is a normal thread screw. The right side uses a left-hand thread screw.
Be careful not to mix them up.
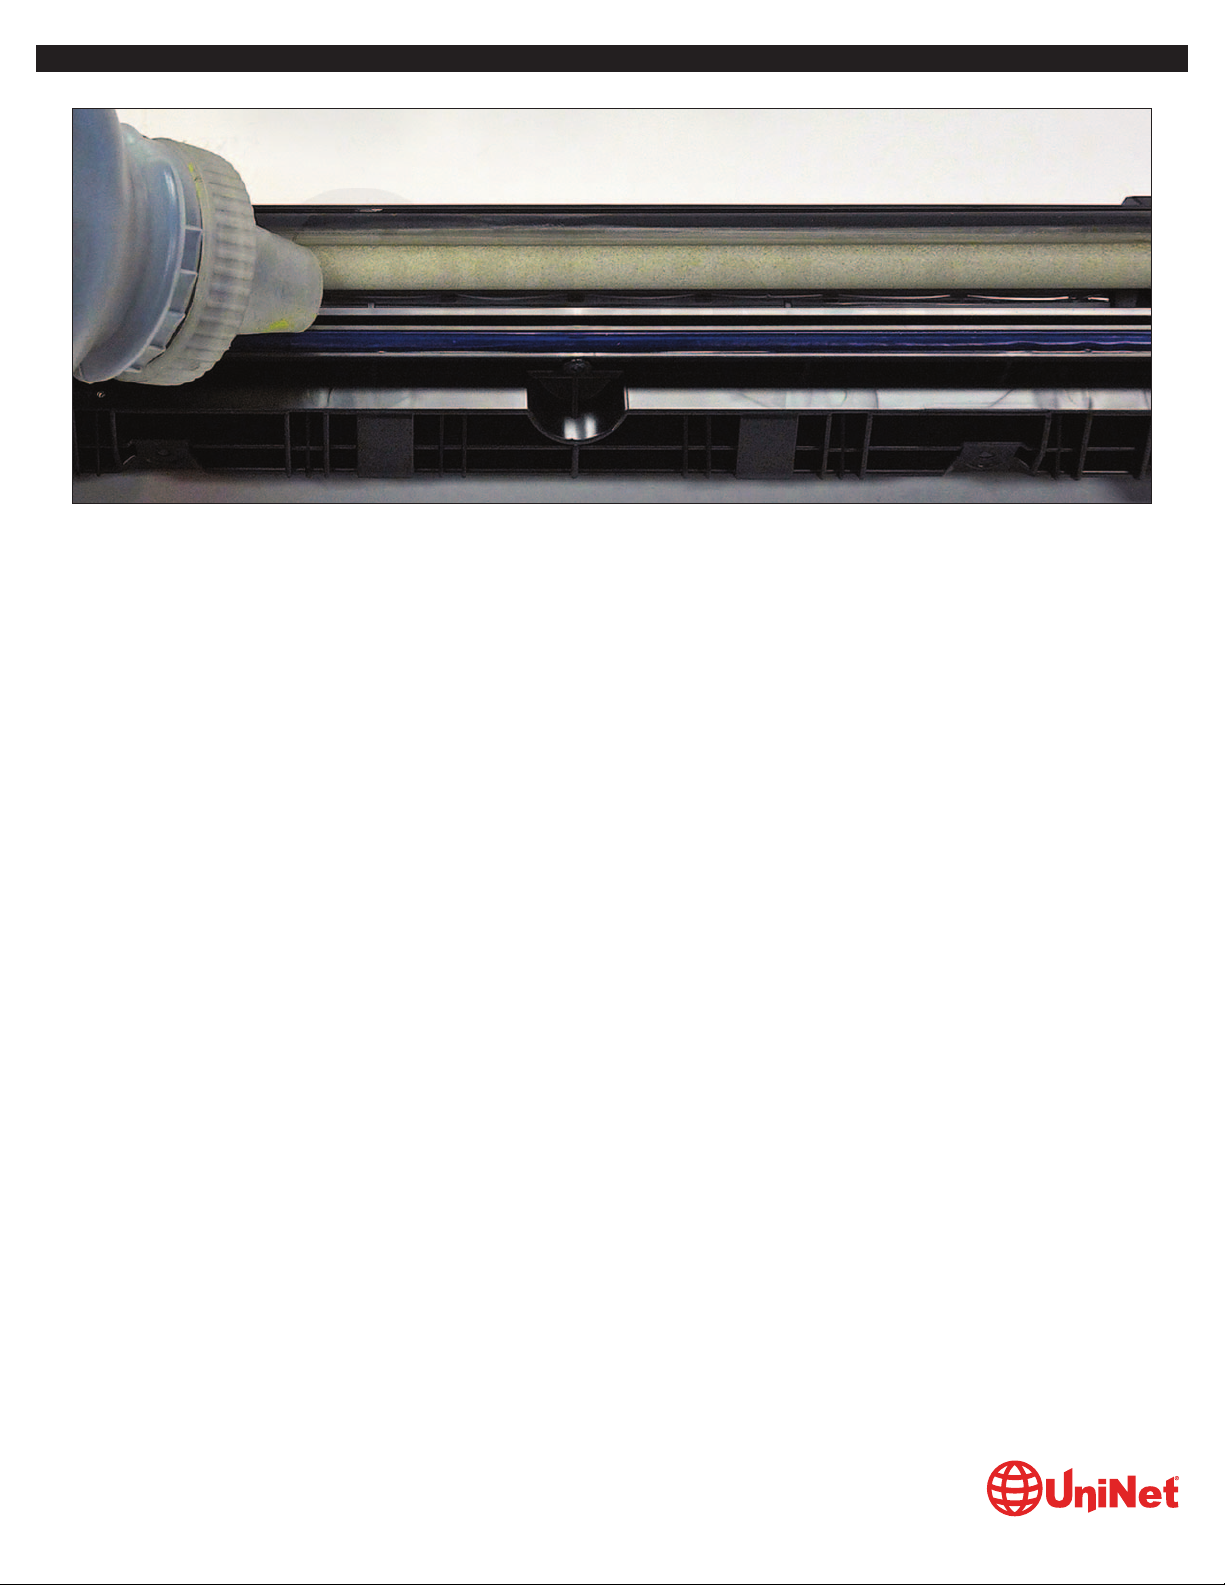
18. Vacuum out the remaining toner from the hopper from the slot next to the feed roller.
HP PRO M452 / MFP 477 (CF410/11/12/13 A/X-HP 410 SERIES) TONER CARTRIDGE REMANUFACTUIRNG INSTRUCTIONS
© 2017 UniNet Imaging Inc. All trademark names and artwork are property of their respective owners. Product brand names mentioned are intended to show compatibility only.
UniNet Imaging does not warrant downloaded information. Unauthorized sale, reproduction or distribution of this article is prohibited. For additional support, please contact techsupport@uninetimaging.com
www.uninetimaging.com
RIGHT HAND
LEFT HAND
Page 11
19. At this point while tight, you can fill the hopper with toner for use in the HP M252 series of printers.
HP PRO M452 / MFP 477 (CF410/11/12/13 A/X-HP 410 SERIES) TONER CARTRIDGE REMANUFACTUIRNG INSTRUCTIONS
© 2017 UniNet Imaging Inc. All trademark names and artwork are property of their respective owners. Product brand names mentioned are intended to show compatibility only.
UniNet Imaging does not warrant downloaded information. Unauthorized sale, reproduction or distribution of this article is prohibited. For additional support, please contact techsupport@uninetimaging.com
www.uninetimaging.com
Page 12

20. Clean the doctor blade foam seals.
Install the doctor blade and two screws.
Remember the right side uses the left-hand threaded screw!
HP PRO M452 / MFP 477 (CF410/11/12/13 A/X-HP 410 SERIES) TONER CARTRIDGE REMANUFACTUIRNG INSTRUCTIONS
© 2017 UniNet Imaging Inc. All trademark names and artwork are property of their respective owners. Product brand names mentioned are intended to show compatibility only.
UniNet Imaging does not warrant downloaded information. Unauthorized sale, reproduction or distribution of this article is prohibited. For additional support, please contact techsupport@uninetimaging.com
www.uninetimaging.com
RIGHT HAND THREAD LEFT HAND THREAD
Page 13

21. Install the developer roller.
Make sure both ends have the bushings in place and the left side also has the tab bushing, long side up.
22. Install the small and large gears as shown.
HP PRO M452 / MFP 477 (CF410/11/12/13 A/X-HP 410 SERIES) TONER CARTRIDGE REMANUFACTUIRNG INSTRUCTIONS
© 2017 UniNet Imaging Inc. All trademark names and artwork are property of their respective owners. Product brand names mentioned are intended to show compatibility only.
UniNet Imaging does not warrant downloaded information. Unauthorized sale, reproduction or distribution of this article is prohibited. For additional support, please contact techsupport@uninetimaging.com
www.uninetimaging.com
Page 14

23. Press the inner end cap in place. 24. Install the two gears on the feed and developer roller shafts.
25. Install the drum drive gear.
Make sure the white tab is facing up!
26. Install the end cap and two screws.
HP PRO M452 / MFP 477 (CF410/11/12/13 A/X-HP 410 SERIES) TONER CARTRIDGE REMANUFACTUIRNG INSTRUCTIONS
© 2017 UniNet Imaging Inc. All trademark names and artwork are property of their respective owners. Product brand names mentioned are intended to show compatibility only.
UniNet Imaging does not warrant downloaded information. Unauthorized sale, reproduction or distribution of this article is prohibited. For additional support, please contact techsupport@uninetimaging.com
www.uninetimaging.com
Page 15

HP PRO M452 / MFP 477 (CF410/11/12/13 A/X-HP 410 SERIES) TONER CARTRIDGE REMANUFACTUIRNG INSTRUCTIONS
© 2017 UniNet Imaging Inc. All trademark names and artwork are property of their respective owners. Product brand names mentioned are intended to show compatibility only.
UniNet Imaging does not warrant downloaded information. Unauthorized sale, reproduction or distribution of this article is prohibited. For additional support, please contact techsupport@uninetimaging.com
www.uninetimaging.com
27. Cut the chip holder with a flat blade in the two places indicated.
Remove and replace the chip.
28. Coat the drum with your preferred lubricant and install the drum in the waste hopper.
Page 16
29. Place the two halves together.
Lift up on the small white drum gear tab, while pulling the end cap out to align them properly.
30. Place a small piece of a good double-sided tape on the inside of the end cap.
Install the end cap.
HP PRO M452 / MFP 477 (CF410/11/12/13 A/X-HP 410 SERIES) TONER CARTRIDGE REMANUFACTUIRNG INSTRUCTIONS
© 2017 UniNet Imaging Inc. All trademark names and artwork are property of their respective owners. Product brand names mentioned are intended to show compatibility only.
UniNet Imaging does not warrant downloaded information. Unauthorized sale, reproduction or distribution of this article is prohibited. For additional support, please contact techsupport@uninetimaging.com
www.uninetimaging.com
TAB FITS INTO SLOT
Page 17
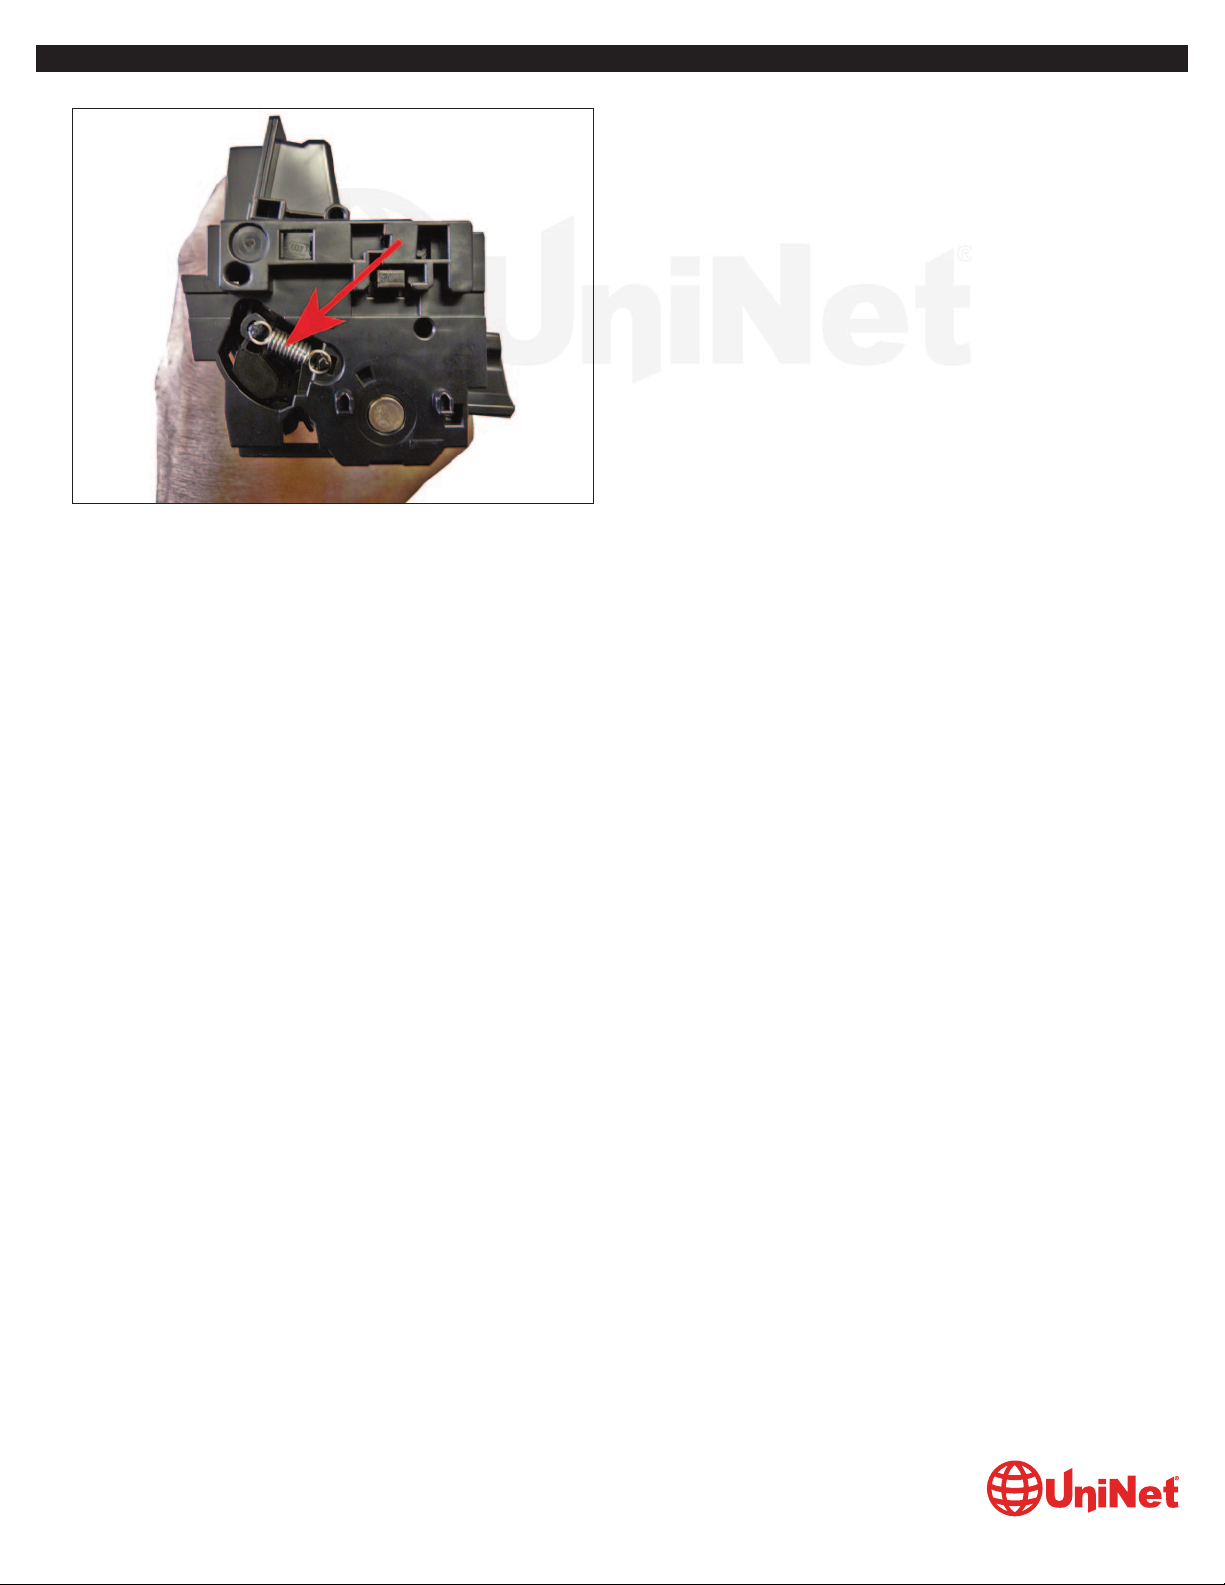
31. Install the spring.
TAKING TEST PRINTS
Supplies Status Page
1. Press OK to open the menus
2. Scroll until “REPORTS” appears on the display
3. Press OK
4. Scroll to the Supplies Status Menu
5. Press OK
6. Scroll until “Print Supplies Status Page” appears on the display
7. Press OK
REPETITIVE DEFECT CHART
Cartridge Station Pitch 67.0mm
ITB 66.7mm
OPC Drum 63.0mm
Fuser Pressure Roller 56.5mm
Fuser Sleeve 56.5mm
Transfer Rollers 51.5mm
Registration Roller 44.0mm
Primary Charge Roller 23.6mm
Developer Roller Sleeve 22.6mm
Output Kicker Rollers 11.0mm
HP PRO M452 / MFP 477 (CF410/11/12/13 A/X-HP 410 SERIES) TONER CARTRIDGE REMANUFACTUIRNG INSTRUCTIONS
© 2017 UniNet Imaging Inc. All trademark names and artwork are property of their respective owners. Product brand names mentioned are intended to show compatibility only.
UniNet Imaging does not warrant downloaded information. Unauthorized sale, reproduction or distribution of this article is prohibited. For additional support, please contact techsupport@uninetimaging.com
www.uninetimaging.com
 Loading...