

Page 1

HP 3PAR Management Plug-in and Recovery
Manager 2.3.0 Software
nl
for VMware vSphere
User Guide
Abstract
This guide is intended for VMware and database administrators responsible for backing up databases and provides information
how to install, configure, and use HP 3PAR Management Plug-in and Recovery Manager 2.3.0 Software for VMware vSphere®.
HP Part Number: QL226-96272
Published: May 2012
Page 2

© Copyright 2012 Hewlett-Packard Development Company, L.P.
The information contained herein is subject to change without notice. The only warranties for HP products and services are set forth in the express
warranty statements accompanying such products and services. Nothing herein should be construed as constituting an additional warranty. HP shall
not be liable for technical or editorial errors or omissions contained herein.
Acknowledgments
Intel®, Itanium®, Pentium®, Intel Inside®, and the Intel Inside logo are trademarks or registered trademarks of Intel Corporation or its subsidiaries
in the United States and other countries.
Microsoft®, Windows®, Windows® XP, and Windows NT® are U.S. registered trademarks of Microsoft Corporation.
Adobe® and Acrobat® are trademarks of Adobe Systems Incorporated.
Java and Oracle are registered trademarks of Oracle and/or its affiliates.
UNIX® is a registered trademark of The Open Group.
AIX is a registered trademark of the IBM Corporation
Cygwin is a trademark of Red Hat, Inc.
HP-UX is a registered trademark of the Hewlett-Packard Company.
Linux is a registered trademark of Linus Torvalds.
Microsoft Windows, and Windows NT are either registered trademarks or trademarks of Microsoft Corporation.
NEMA is a registered trademark of National Electrical Manufacturers Association.
Panasonic is a registered trademark of Matsushita Electric Industrial Co., Inc.
SecureCRT is a registered trademark of VanDyke Software, Inc.
Sun, Solaris, and Java are trademarks of Sun Microsystems, Inc.
UL is a registered trademark of Underwriters Laboratories Inc.
UNIX is a registered trademark of The Open Group.
WinZip is a registered trademark of WinZip Computing, Inc.
All other trademarks and registered trademarks are owned by their respective owners.
Federal Communications Commission Radio Frequency Interference Statement
WARNING: Changes or modifications to this unit not expressly approved by the party responsible for compliance could void the user’s authority
to operate the equipment.
This device complies with Part 15 of FCC Rules. Operation is subjected to the following two conditions (1) this device may not cause harmful
interference, and (2) this device must accept any interference received, including interference that may cause undesired operation.
This equipment has been tested and found to comply with the limits for a Class A digital device, pursuant to Part 15 of the FCC rules. These limits
are designed to provide reasonable protection against harmful interference when the equipment is operated in a commercial environment. This
equipment generates, uses, and can radiate radio frequency energy and, if not installed and used in accordance with the instruction manual, may
cause harmful interference to radio communications. Operation of this equipment in a residential area is likely to cause harmful interference in which
case the user will be required to correct the interference at his own expense.
Canadian Compliance Statement
This ClassA digital apparatus meets all requirements of the Canadian Interference-Causing Equipment Regulations.
Cet appareil numérique de la classe A respecte toutes les exigences du Règlement sur le matérial brouilleur du Canada.
Page 3

Contents
1 Overview..................................................................................................6
HP 3PAR Management Plug-in and Recovery Manager Software for VMware vSphere.......................6
HP 3PAR Management Plug-in for VMware vCenter.......................................................................6
Virtual Volume Details..........................................................................................................6
LUN Provisioning for Recovery Manager for VMware................................................................7
HP 3PAR Recovery Manager Software for VMware vSphere...........................................................7
TpdVmWebService..............................................................................................................8
RMWebAccess Library.........................................................................................................8
RMVMware Admin Tool........................................................................................................8
RMVMwareCLI....................................................................................................................8
RMVMware create Command...........................................................................................8
RMVMware InServRegister Command..............................................................................11
RMVMware VCenterRegister Command...........................................................................12
RMVMware createrc Command......................................................................................13
User Authentication.................................................................................................................13
VMware vCenter Server Login for HP 3PAR Virtual Volume and Virtual Copy Management..........14
HP 3PAR Storage System Login............................................................................................14
Network Ports used by HP 3PAR Management Plug-in and Recovery Manager Software for VMware
vSphere............................................................................................................................14
HP 3PAR Management Plug-in and Recovery Manager Software for VMware vSphere Interface........14
HP 3PAR Views in the vSphere Client........................................................................................15
Datastore View..................................................................................................................16
Virtual Machine View.........................................................................................................17
ESX Host View...................................................................................................................18
Cluster View......................................................................................................................18
Datacenter View................................................................................................................19
About Virtual Copy Management.............................................................................................20
Virtual Copy Data Consistency............................................................................................20
Virtual Copy Policy.............................................................................................................20
Datastore Virtual Copies.....................................................................................................21
Virtual Machine Virtual Copies............................................................................................21
Remote Virtual Copies........................................................................................................22
The Virtual Copy Browser....................................................................................................22
VMFS Snapshots................................................................................................................23
Scheduling Tool.................................................................................................................23
Host Explorer.........................................................................................................................23
VASA Support........................................................................................................................23
2 Installing, Registering, and Uninstalling HP 3PAR Management Plug-in and
Recovery Manager Software for VMware vSphere...........................................24
Supported Platforms................................................................................................................24
Pre-installation Requirements and Dependencies.........................................................................24
Allowing Port Selections with Windows 2008 Installation........................................................25
Installing HP 3PAR Management Plug-in and Recovery Manager Software for VMware vSphere........26
Support for VMware vCenter Server Linked Mode..................................................................28
Viewing and Installing HP 3PAR Management Plug-in Certificate...................................................29
Registering an SMS Certificate for the VASA Provider..................................................................29
Extracting the SMS Certificate.............................................................................................30
Installing the SMS Certificate...............................................................................................30
To Install the SMS Certificate Through the VASA Web Service.............................................30
Installing the SMS Certificate Manually............................................................................30
Contents 3
Page 4

Uninstalling HP 3PAR Management Plug-in and Recovery Manager Software for VMware vSphere....31
Upgrading from a Previous Version...........................................................................................31
Using Secure Service Connections........................................................................................31
Refreshing Plug-in Details....................................................................................................31
3 Using the Admin Tool to Modify Configuration Settings.................................32
Overview..............................................................................................................................32
The RMVMware Admin Tool.....................................................................................................32
vCenter Plug-in Tab.................................................................................................................32
vCenter Plug-in Configuration..............................................................................................33
Plug-in Registration.............................................................................................................35
vCenter Status...................................................................................................................36
Remote Copy Pairs.............................................................................................................36
Host Explorer Tab...................................................................................................................38
Host Explorer Configuration................................................................................................38
Storage System Mapping....................................................................................................39
vCenter Mapping..............................................................................................................40
The VASA Tab........................................................................................................................41
VASA Configuration...........................................................................................................41
Storage System Mapping....................................................................................................43
Storage System Credential Tab.................................................................................................44
4 Logging In and Working with Virtual Volumes..............................................46
Logging In.............................................................................................................................46
Viewing Virtual Volume Mapping.............................................................................................51
Viewing Volume Information................................................................................................52
The Upper Pane............................................................................................................52
The Lower Pane.............................................................................................................54
Refreshing Virtual Volume Information........................................................................................54
Creating Virtual Volumes and Datastores...................................................................................55
Creating a Virtual Volume from an Existing HP 3PAR System Template......................................55
Creating a Virtual Volume from Existing Datastores.................................................................58
Adding an ESX(i) Host to the vCenter Server..............................................................................59
5 Working with Virtual Copies......................................................................60
Viewing Virtual Copy Information.............................................................................................60
Viewing Virtual Disk Details for Virtual Copies.......................................................................61
Viewing Virtual Copy Event Logs..........................................................................................62
Creating New Virtual Copies...................................................................................................62
Mounting Virtual Copies..........................................................................................................63
Unmounting Virtual Copies......................................................................................................64
Restoring Datastores by Promoting a Virtual Copy.......................................................................64
Deleting a Virtual Copy...........................................................................................................65
Modifying Virtual Copy Policies................................................................................................65
Scheduling Virtual Copies........................................................................................................66
Restoring Virtual Disks and Guest OS Files and Directories...........................................................71
Restoring a Virtual Disk.......................................................................................................71
Restoring a Guest OS File or Directory from a Virtual Copy.....................................................72
6 Working with Host Explorer.......................................................................74
7 Working with VASA Provider......................................................................75
8 Working with Remote Copy.......................................................................79
Registering Remote Copy Pairs.................................................................................................79
Updating Registered Remote Copy Pairs Information....................................................................81
Viewing Host Information Summary...........................................................................................81
Viewing Existing and Newly Added Remote Copy Information......................................................81
4 Contents
Page 5

Creating a Remote Virtual Copy...............................................................................................82
Scheduling a Remote Copy Virtual Copy...................................................................................83
Removing Remote Virtual Copies...............................................................................................86
Removing Local Virtual Copies..................................................................................................86
Importing a Virtual Machine and Reverting to a Specific Point-in-Time Virtual Copy..........................87
Importing a Virtual Machine From a Remote Site and Reverting to a Specific Point-in-Time Virtual
Copy....................................................................................................................................87
9 Using HP 3PAR Peer Motion Manager Software with Recovery Manager.........89
10 Support and Other Resources...................................................................90
Related Documents.................................................................................................................90
Typographical Conventions......................................................................................................90
Advisories..............................................................................................................................91
A Troubleshooting for VASA..........................................................................92
VASA Provider Registration Related Issue....................................................................................92
Inspecting VASA Provider and vCenter Server Communication......................................................92
Alarm Type Message..........................................................................................................92
Event Type Message...........................................................................................................96
B Troubleshooting for HP 3PAR Management Plug-in......................................102
Resolving HP 3PAR Multi-tab Issue...........................................................................................102
Index.......................................................................................................103
Contents 5
Page 6

1 Overview
HP 3PAR Management Plug-in and Recovery Manager Software for VMware vSphere
VMware Virtual Infrastructure management suite has two components, VMware vCenter Server
and Virtual Infrastructure Client (vSphere Client). vCenter Server is a web service installed on a
Windows server. VI Client is a Windows desktop application, and is typically downloaded from
the vCenter Server.
HP 3PAR Management Plug-in and Recovery Manager Software for VMware vSphere is a suite of
services designed to work with the vCenter Server. The plug-in contains a web application and
deploys as a VI Client plug-in (a VI Client plug-in is an external Web application configured with
the vCenter Server for vSphere Clients to display their pages). The application also provides a
Host Explorer service to communicate and send ESX host configuration details to the HP 3PAR
Storage Systems. The plug-in also contains a software component that acts as a vSphere Storage
API for Storage Awareness (VASA) provider in the vSphere environment. HP 3PAR Management
Plug-in and Recovery Manager Software for VMware vSphere provides its own web servers.
HP 3PAR Management Plug-in and Recovery Manager Software for VMware vSphere includes the
following major components:
• HP 3PAR Management Plug-in for VMware vCenter - Displays virtual volume mapping for easy
identification of HP 3PAR volumes used by virtual machines and datastores. Also allows user
to provision LUNs to be used as Datastore or raw device.
• HP 3PAR Recovery Manager for VMware vSphere - Provides virtual copy management of HP
3PAR virtual copies and recovery of virtual machines and datastores.
• HP 3PAR Host Explorer for VMware vSphere - Discovers VMware ESX host configurations.
• HP 3PAR VASA Provider for VMware vSphere - Enables the vCenter Server to connect to
obtain information about available storage topologies, capabilities, and state.
HP 3PAR Management Plug-in for VMware vCenter
HP 3PAR Management Plug-in for VMware vCenter is a free vSphere Client plug-in. The plug-in
enables easy identification of HP 3PAR virtual volumes used by virtual machines and datastores
and displays commonly used volume properties and attributes. The plug-in also supports LUN
Provisioning that enables the creation of a virtual volume and/or datastore based on an existing
configuration or template.
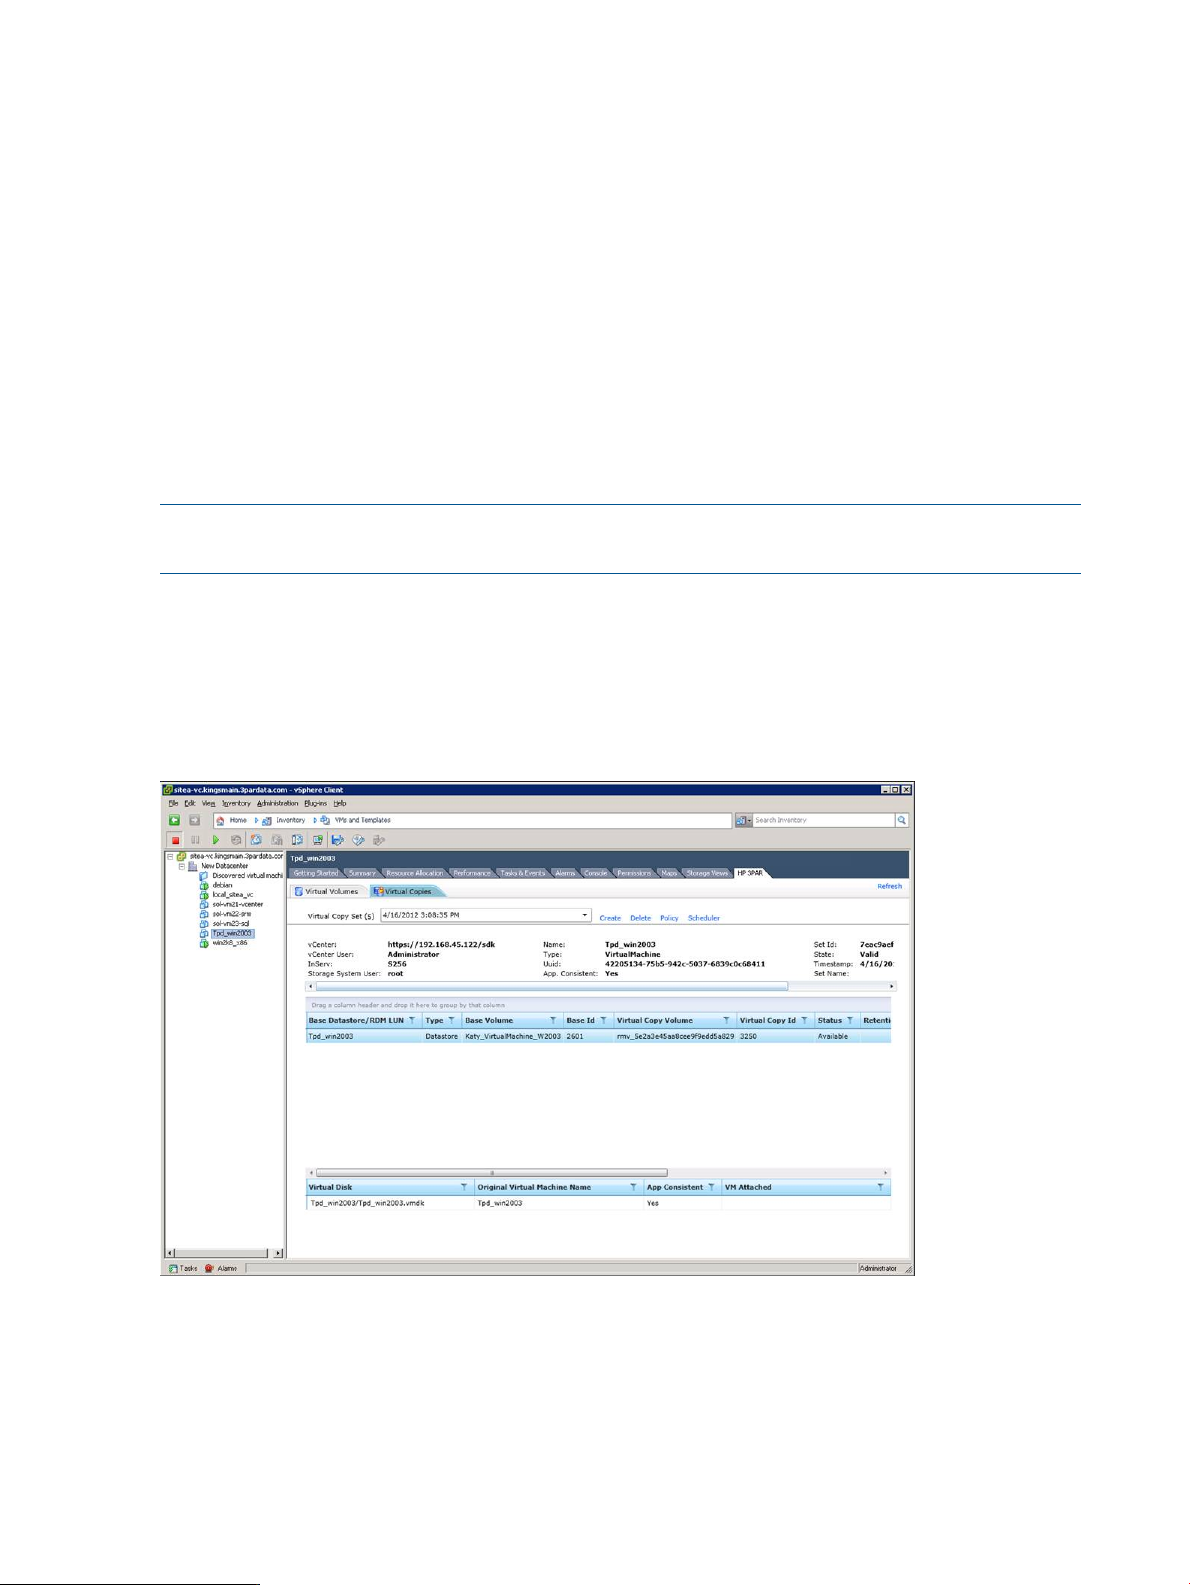
Virtual Volume Details
HP 3PAR Management Plug-in for VMware vCenter displays virtual volume information for each
volume used by a Virtual Machine (VM) or datastore via the HP 3PAR tab in the vSphere Client.
6 Overview
Page 7
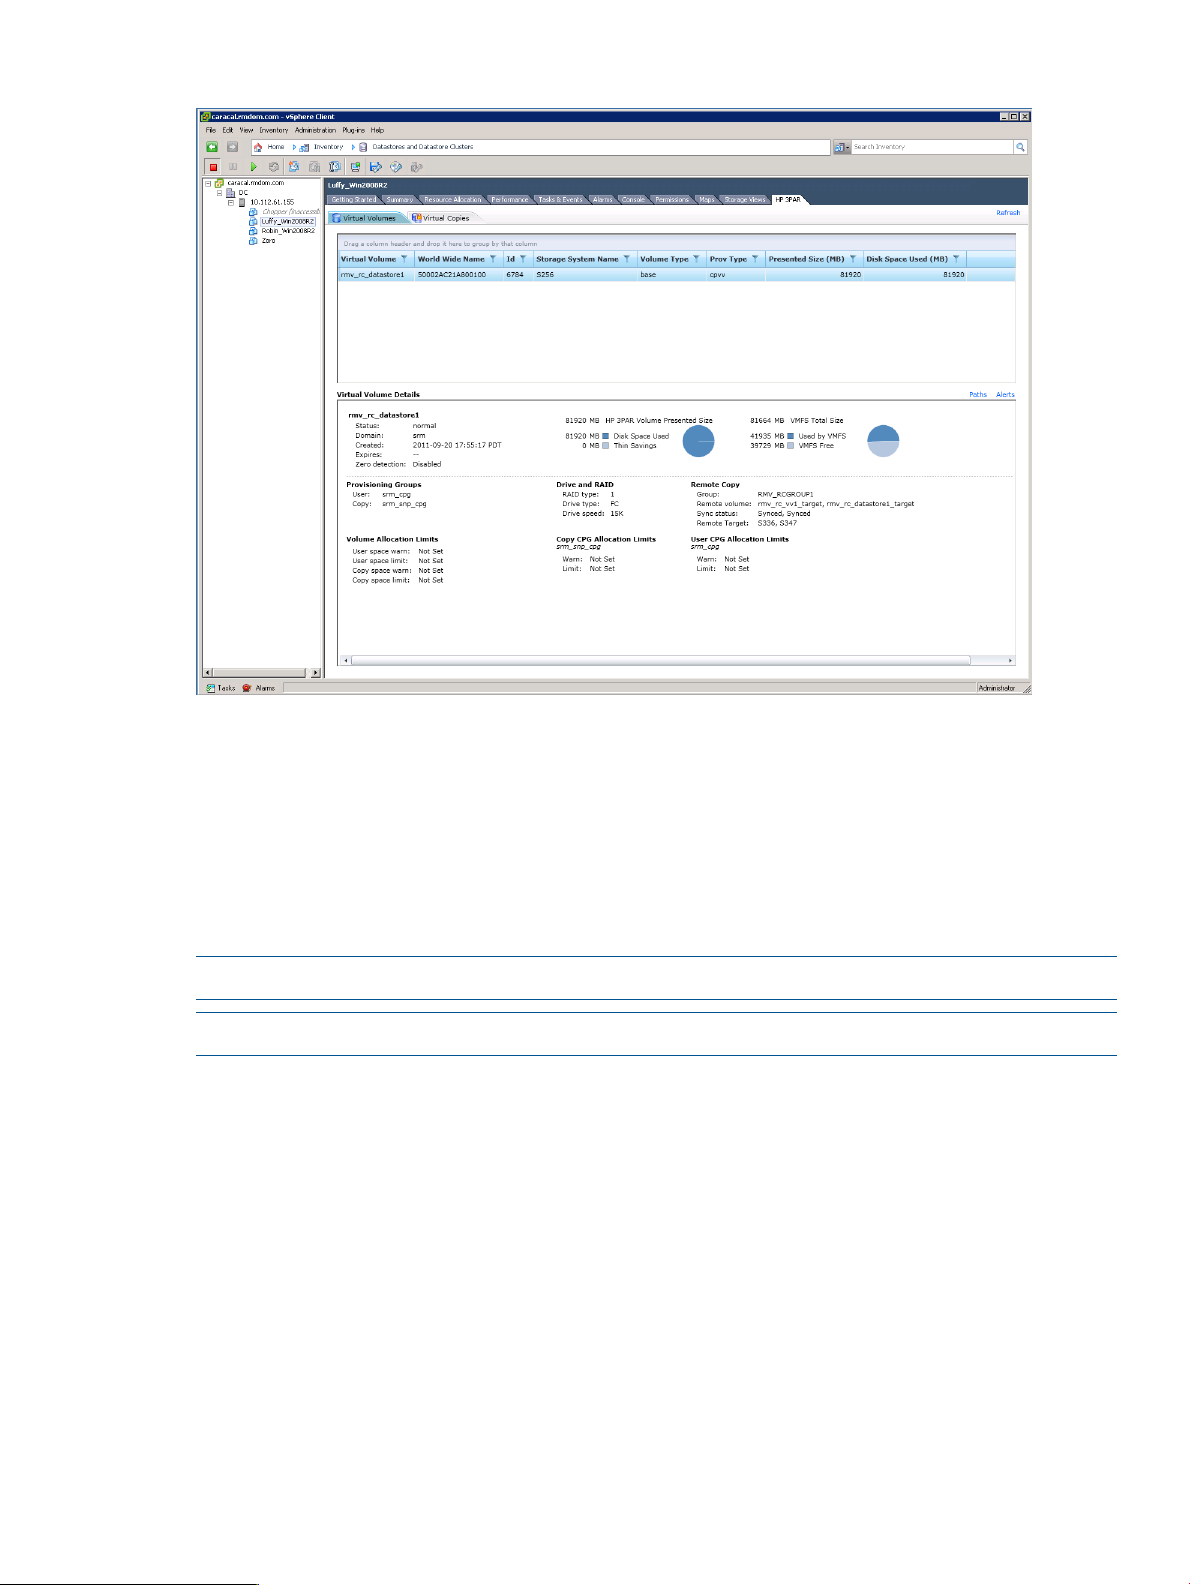
Figure 1 Viewing Datastore Virtual Volumes
See “Logging In and Working with Virtual Volumes” (page 46) for additional information about
viewing virtual volume details.
LUN Provisioning for Recovery Manager for VMware
This feature enables you to create virtual volumes based upon a storage system template or an
existing datastore and export the virtual volumes to the vCenter managed ESX(i) hosts.
For more details about creating and managing virtual volumes and datastores, see “Creating a
Virtual Volume from an Existing HP 3PAR System Template” (page 55)
NOTE: Only TPVV and CPVV provisioning are supported for this release.
NOTE: LUN provisioning does not require an RMV license.
HP 3PAR Recovery Manager Software for VMware vSphere
HP 3PAR Recovery Manager Software for VMware vSphere allows you to manage virtual copies
of VMs and datastores. It is comprised of the following four components:
• TpdVmWebService
• RMWebAccess Library
• RMVMware Admin Tool
• RMVMwareCLI
See “About Virtual Copy Management” (page 20) for additional information.
HP 3PAR Recovery Manager Software for VMware vSphere 7
Page 8

TpdVmWebService
TpdVmWebService is a restful Web service, which is deployed as a Windows Service. The major
functions of Recovery Manager for VMware vSphere are implemented with this module. These
functions are:
• Provides a custom Web server to deliver plug-in application Web pages. vCenter Servers are
configured with the address of this Web server during plug-in registration.
• Maps virtual machines and datastores to underlying HP 3PAR virtual volumes.
• Creates, browses, deletes, and mounts virtual copy based virtual copies of virtual machines
and datastores.
RMWebAccess Library
NOTE: RMWebAccess Library is deployed as a Windows component dll file and is installed
as part of Recovery Manager for VMware vSphere.
Similar to the InForm Command Line Interface (CLI) and InForm Management Console (IMC), the
RMWebAccess Library is used for interacting with the HP 3PAR Storage System array. The
RMWebAccess Library does not use InForm CLI but instead interacts with the InServ Tpd TCL Service
directly using secure network connections.
RMVMware Admin Tool
The RMVMware Admin Tool provides a Graphical User Interface (GUI) for administering Recovery
Manager for VMware vSphere registration with the vCenter server. This tool also includes Host
Explorer for VMware configuration, HP 3PAR Storage System credential management, HP 3PAR
VASA Provider configuration and Remote Copy paring configuration.
RMVMwareCLI
The RMVMware CLI module is the command line interface for Recovery Manager for VMware
vSphere.
NOTE: The recommended method for creating virtual copies is through the Graphical User
Interface (see “Working with Virtual Copies” (page 60) for complete details).
Four commands are provided through the CLI:
• RMVMware create
• RMVMware InServRegister
• RMVMware vCenterRegister
• RMVMware createrc
RMVMware create Command
The RMVMware create command creates a virtual copy on a datastore or a virtual machine.
The syntax for the RMVMware create command is as follows:
RMVMware Create
<[-ds "Datastore" [-consistency <yes/no> [-vmlist "VirtualMachine1, VirtualMachine2,
..."]]]|[-vm "VirtualMachine" [-consistency <yes/no>]
]>
[-setname "VirtualCopySetName"]
<[-vcserver "vCenterServerName" [-vcuid
8 Overview
Page 9

"vCenterServerUserID"] [-vcpwd "vCenterServerPassword"] | [-vcfile
"VMwareCredentialStoreFileLocation"] ]>
<[-inserv "InServName"] [-inservuid "InServUserID"]>
[-inservpwd "InServPassword"]
[-expiry "VirtualCopyExpiryInHour"]
[-retention "VirtualCopyRetentionInHour"]
The options and arguments used for this command are described as follows:
• -ds <Datastore>|-vm <VirtualMachine>
Creates a virtual copy on the specified <Datastore> or <VirtualMachine>. By default,
a VM consistent virtual copy is created. The VM name must be unique within vCenter Server.
The vCenter Server can manage multiple ESX hosts. The VM name should be unique across
ESX hosts.
The UUID of the datastore or virtual machine may also be used to create a virtual copy with
uuid-<myUUIDofDatastore> or uuid-<myUUIDofVirtualMachine> in place of the
Datastore or Virtual Machine name.
• -consistency <yes/no>
(Optional) Specifies whether or not (yes/no) the virtual copy is to maintain Virtual Machine
application consistency with supported data formats.
• -setname <VirtualCopySetName>
(Optional) Specifies that in addition to the virtual copy time stamp, the virtual copy set name
can be used to personalize the identity of the virtual copy set. By default, the name is set to
reflect the current time.
• -vcserver <vCenterServerName>
The VMware vCenter Server name or IP address. This option is required.
• -vcuid <vCenterServerUserID>
The VMware vCenter server login user name. This option is required.
• -vcpwd <vCenterServerPassword>
The VMware vCenter Server login password. This option is required unless -vcfile is used
to specify the credential store file.
• -vcfile <VMwareCredentialStoreFileLocation>
The VMware credential stores file location. The –vcfile option is optional when –vcpwd is
specified. For example, C:\Users\[User Name]\AppData\Roaming\VMware\
credstore\vicredentials.xml.
NOTE: For VMware credential store file creation, refer to the vCenterRegister option.
NOTE: To run the RMVMware CLI command with the vCenter Credential Store File, you
must be added as a user to have permission to access the credential file.
• -inserv <InServName>
The name of the HP 3PAR Storage System on which the VM or datastore resides. This option
is required.
HP 3PAR Recovery Manager Software for VMware vSphere 9
Page 10

• -inservuid <InServUserID>
The HP 3PAR Storage System user’s login name.
• -inservpwd <InServPassword>
The HP 3PAR Storage System login password. This option is not required if the Storage System
name, user ID, and password have been registered.
• -vmlist
Optional to provide Virtual Machine names for application consistency snapshot. If not set,
all Virtual Machines under the datastore is applied. This option can only be applied if
-consistency yes is specified.
• -expiry <VirtualCopyExpiryInHour>
(Optional) Sets the amount of time (in hours) before a virtual copy is deleted from the system
regardless of the maximum count. If an expiration time period is not specified with this option,
the virtual copy is deleted after it reaches the oldest position in the queue beyond the maximum
count specified through the policy settings. See “Working with Virtual Copies” (page 60) for
more details. If this option is not set, the default policy is applied.
• -retention <VirtualCopyRetentionInHour>
(Optional) Sets the amount of time (in hours) that virtual copies are retained, during which
period the virtual copy cannot be altered. The virtual copy is not deleted after the retention
period but is then available for modification and deletion. See “Working with Virtual Copies”
(page 60) for more details. If this option is not set, the default policy is applied.
Examples:
The following command will create an HP 3PAR Virtual Copy for the Datastore "My Datastore":
C:\> RMVMware create -ds "My Datastore" -vcserver vc365 -vcuid admin
-vcpwd pass2word -inserv s124 -inservuid rmvuser -inservpwd pass3word
As an alternative to entering in all the command line options when creating a virtual copy of a
Virtual Machine or a datastore, you can reference the server password or credentials from a given
file using the following command:
C:\ RMVMware create -ds "My Datastore" -vcserver vc365 -vcuid admin
-vcfile C:\vicredentials.xml -inserv s124 -inservuid rmvuser
NOTE: If duplicate datastore or virtual machine names exist under the same vCenter server, use
the following uuid-<myUUIDofDatastore> or uuid-<myUUIDofVirtualMachine>
commands in place of datastore or virtual name such as
uuid-4220f0f6-3aec-258b-dc41-949f596c6ba8.
10 Overview
Page 11

RMVMware InServRegister Command
The RMVMware InServRegister command registers HP 3PAR Storage System credentials. The
syntax for the RMVMware InServRegister command is as follows:
RMVMware InServRegister
<-inserv "InServName"> <-inservuid "InServUserID"> <-inservpwd
"InServPassword">
RMVMware InServRegister
<-remove> <-inserv "InServName"> <-inservuid "InServUserID">
RMVMware InServRegister <-display>
NOTE: User’s who do not have the administrative privileges required to access the RMVMware
Admin Tool can use the RMVMware InServRegister command to create the appropriate
registration.
The options and arguments used for this command are described as follows:
• -inserv <InServName>
Specifies the HP 3PAR Storage System’s login name to the vCenter Server. This option is
required.
• -inservuid <InServUserID>
Specifies the HP 3PAR Storage System’s login user name. This option is required.
• -inservpwd <InServPassword>
Specifies the HP 3PAR Storage System’s login password. This option is required when
registering an HP 3PAR Storage System.
• -remove
Removes a registered HP 3PAR Storage System configuration.
• -display
Displays all registered HP 3PAR Storage System credentials.
HP 3PAR Recovery Manager Software for VMware vSphere 11
Page 12

Example:
The following command will add a new entry for the HP 3PAR Storage System s124:
C:\> RMVMware InServRegister -inserv s124 -inservuid root -inservpwd pass2word
RMVMware VCenterRegister Command
The RMVMware VCenterRegister command manages the vCenter credentials. The syntax for
the RMVMware VCenterRegister command is as follows:
RMVMware VCenterRegister
<-vcserver "VCServerName"> <-vcuid "VCUserID"> <-vcpwd "VCPassword">
<-vcfile "CredentialFilePath">
RMVMware VCenterRegister <-remove> <-vcserver "VCServerName">
<-vcuid "VCUserID"> <-vcfile "CredentialFilePath">
RMVMware VCenterRegister <-display> <-vcfile "CredentialFilePath">
The options and arguments used for this command are described as follows:
• -vcserver <VCServerName>
Specifies the vCenter name.
• -vcuid <VCUserID>
Specifies the vCenter user name.
• -vcpwd <VCPassword>
Specifies the vCenter password.
• -vcfile <CredentialFilePath>
Specifies the path to the credential file.
• -display
Displays the content of the credential file.
• -remove
Removes the registered credential.
Example:
The following command will add a new entry for user Administrator on vCenter Server MyVC:
C:\> RMVMware VCenterRegister -vcserver MyVC -vcuid Administrator
-vcpwd myPassword -vcfile "c:\myCred.xml"
12 Overview
Page 13

RMVMware createrc Command
The RMVMware createrc command creates a remote virtual copy.
NOTE: When using the RMVMware createrc command, you must use the identical name of
the storage system registered in the HP 3PAR Storage system credential database.
The syntax for the RMVMware createrc command:
RMVMware Createrc <-rcgroup "RemoteCopyGroup"> [-consistency <yes|no>] <[-vcserver
"vCenterServerName" [-vcuid "vCenterServerUserID"] [-vcpwd "v
CenterServerPassword"] | [-vcfile "VMwareCredentialStoreFileLocation"] ]> <-remotehost
"RemoteHostName"> <[-inserv "InServName"] [-inservuid "InServUs
erID"]> [-inservpwd "InServPassword"] <[-remoteinserv "InServName"] [-remoteinservuid
"InServUserID"]> [-remoteinservpwd "InServPassword"] [-expiry "V
irtualCopyExpiryInHour"] [-retention "VirtualCopyRetentionInHour"]
DESCRIPTION:
Create HP 3PAR virtual copies based on remote copy groups.
OPTIONS:
-rcgroup: remote copy group name for which the HP 3PAR remote virtual copy will
be created (this parameter is case sensitive)
-vcserver: VMware vCenter Server name or IP address
-vcuid: VMware vCenter Server log in user name
-vcpwd: VMware vCenter Server user password, optional when -vcfile is specified
-vcfile: Optional VMware credential store file location
-remotehost: remote host where Recovery Manager for VMware vSphere is installed
to take remote snapshot on.
-inserv: local HP 3PAR Storage System name
-inservuid: local HP 3PAR Storage System user name, required when registered
-inservpwd: local HP 3PAR Storage System password, optional if -inserv is
registered
-remoteinserv: remote HP 3PAR Storage System name
-remoteinservuid: remote HP 3PAR Storage System user name, required when
registered
-remoteinservpwd: remote HP 3PAR Storage System password, optional if
-remoteinserv is registered
-consistency: Optional to set Virtual Machine application consistency to yes or
no.
-expiry: Optional to set HP 3PAR Virtual Copy expiration in hours (1-43800).
-retention: Optional to set HP 3PAR Virtual Copy retention in hours (1-43800).
EXAMPLE:
The following command will create HP 3PAR Virtual Copy for the remote copy group
RMV_RCGROUP_ASYNC:
C:\> RMVMware createrc -rcgroup RMV_RCGROUP_ASYNC -vcserver caracal -vcuid
administrator -vcpwd ssmssm -remotehost 10.112.61.225 -inserv s25
6 -inservuid root -remoteinserv s336 -remoteinservuid root -consistency yes
User Authentication
As stated earlier, HP 3PAR Management Plug-in and Recovery Manager Software for VMware
vSphere is deployed as a vSphere Client plug-in. You must first log into the vCenter Server before
accessing HP 3PAR Management Plug-in and Recovery Manager Software for VMware vSphere’s
features. HP 3PAR Management Plug-in and Recovery Manager Software for VMware vSphere
does not ask for a user name or password. Instead, it uses a user login credentials to access
VMware inventory. This credential sharing is the VMware recommended way for transparent plug-in
authentication.
User Authentication 13
Page 14

VMware vCenter Server Login for HP 3PAR Virtual Volume and Virtual Copy Management
HP 3PAR Management Plug-in and Recovery Manager Software for VMware vSphere creates a
new vCenter Server role named HP 3PAR Recovery Manager Administrator upon plug-in registration.
The following restrictions apply for the HP 3PAR Recovery Manager Administrator role:
• All non-administrator users must be in this role.
• If an administrator logs in as Administrator or DOMAIN\Administrator, the permission check
is skipped.
NOTE: For VM access, the HP 3PAR Recovery Manager Administrator role must be assigned at
the ESX server level or the cluster server level where the VM resides. For datastore access, the HP
3PAR Recovery Manager Administrator role must be assigned at the datacenter level.
HP 3PAR Storage System Login
HP 3PAR Management Plug-in and Recovery Manager Software for VMware vSphere has to
connect to an HP 3PAR storage array in order to obtain volume details for mapping and virtual
copy management. You can log on to a system on an on-demand basis and HP 3PAR Management
Plug-in and Recovery Manager Software for VMware vSphere does not save any storage system
user names or passwords locally on the desktop, or centrally on the server. When HP 3PAR
Management Plug-in and Recovery Manager Software for VMware vSphere needs to access an
HP 3PAR Storage System and no connection already exists, it will display an error and provide
instructions for entering the storage system name, user name, and password.
As a convenient option, you can use the auto login feature by selecting the “Remember Me” check
box when logging into a given system. In this case, the login details are stored in the Credential
database and you do not have to enter them every time you access the system. To replace the
currently saved credential, you must log out from the storage system and login again with “Remember
Me” checked for the new credential. To remove the currently saved credential, logout from the
storage system and login again with the same credential with “Remember Me” unchecked. You
can also remove the currently saved credential through the Admin Tool→Storage System Credential
tab.
NOTE: You must have a minimum of Edit level or 3PAR_RM level privileges for accessing the
Virtual Copies tab, and Browse level privileges for accessing the Virtual Volumes tab.
Network Ports used by HP 3PAR Management Plug-in and Recovery Manager Software for VMware vSphere
HP 3PAR Management Plug-in and Recovery Manager Software for VMware vSphere uses the
following network port:
9931 ( Recovery Manager service default port), 9997 (VASA default port), vCenter Server HTTP
port, and vCenter Server HTTPS port for secure access (between the vCenter Server, VI client, and
HP 3PAR Management Plug-in and Recovery Manager for VMware vSphere.
Firewalls, if any, must be configured to allow traffic to these ports with the outbound connections
rule set to allow (default) in order for HP 3PAR Management Plug-in and Recovery Manager for
VMware vSphere to function properly.
HP 3PAR Management Plug-in and Recovery Manager Software for VMware vSphere Interface
HP 3PAR Management Plug-in and Recovery Manager Software for VMware vSphere appears as
a tab in the vSphere Client. When the HP 3PAR tab is selected, the HP 3PAR Management Plug-in
14 Overview
Page 15
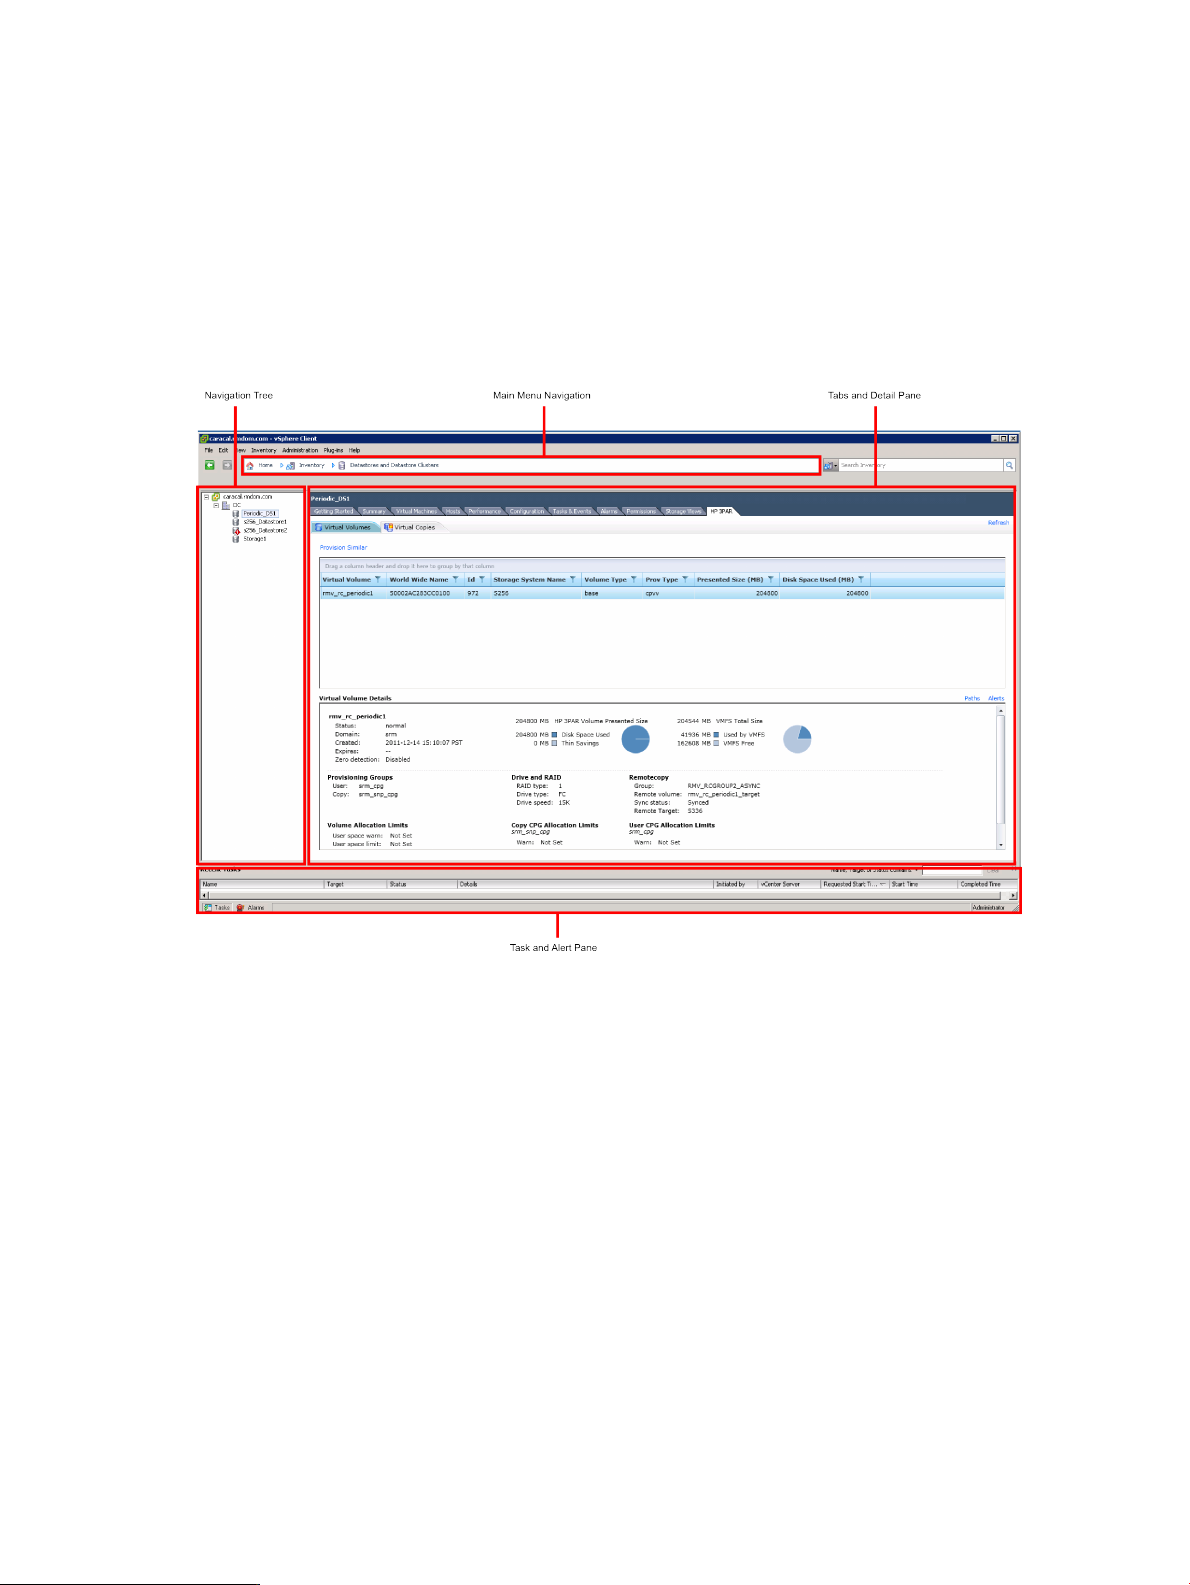
and Recovery Manager for VMware vSphere interface appears as shown in Figure 2 (page 15).
The interface is divided into the following:
• Main menu navigation
• Navigation tree
• Tabs and detail pane
• Tasks and alerts pane
The interface elements are referenced later in this guide .
Figure 2 HP 3PAR Management Plug-in and Recovery Manager Software for VMware vSphere
Interface
HP 3PAR Views in the vSphere Client
The HP 3PAR Management Plug-in and the Recovery Manager Software for VMware vSphere adds
its own plug-in views in the vSphere Client. Each plug-in view is associated with a VMware entity
such as a VM or datastore (Virtual Volume). The details of plug-in views are defined in an XML file
URL, which is registered with the vCenter Server during plug-in registration (see “Installing HP 3PAR
Management Plug-in and Recovery Manager Software for VMware vSphere” (page 26) for
information about registering HP 3PAR Management Plug-in and Recovery Manager Software for
VMware vSphere).
HP 3PAR Management Plug-in and Recovery Manager Software for VMware vSphere adds the
following views to the vSphere Client:
• Datastore View - Displays all virtual volumes associated with a datastore.
• Virtual Machine View - Displays all virtual volumes associated with a VM. Volumes that use
Raw Device Mapped (RDM) virtual disks are also displayed.
• ESX Host View - Displays all virtual volumes that are assigned to the ESX host.
• Cluster View - Displays all virtual volumes associated with every ESX host in the cluster.
• Datacenter View - The VMware datacenter has several ESX hosts and Clusters. This view
displays all virtual volumes associated with every ESX host in the datacenter.
HP 3PAR Views in the vSphere Client 15
Page 16
NOTE: HP 3PAR Management Plug-in and Recovery Manager Software for VMware vSphere
does not support a single ESX host mapped to multiple HP 3PAR Storage System host names. All
WWNs for each Fiber Channel host adaptor on the same ESX server should be used to create a
single host name on the storage system.
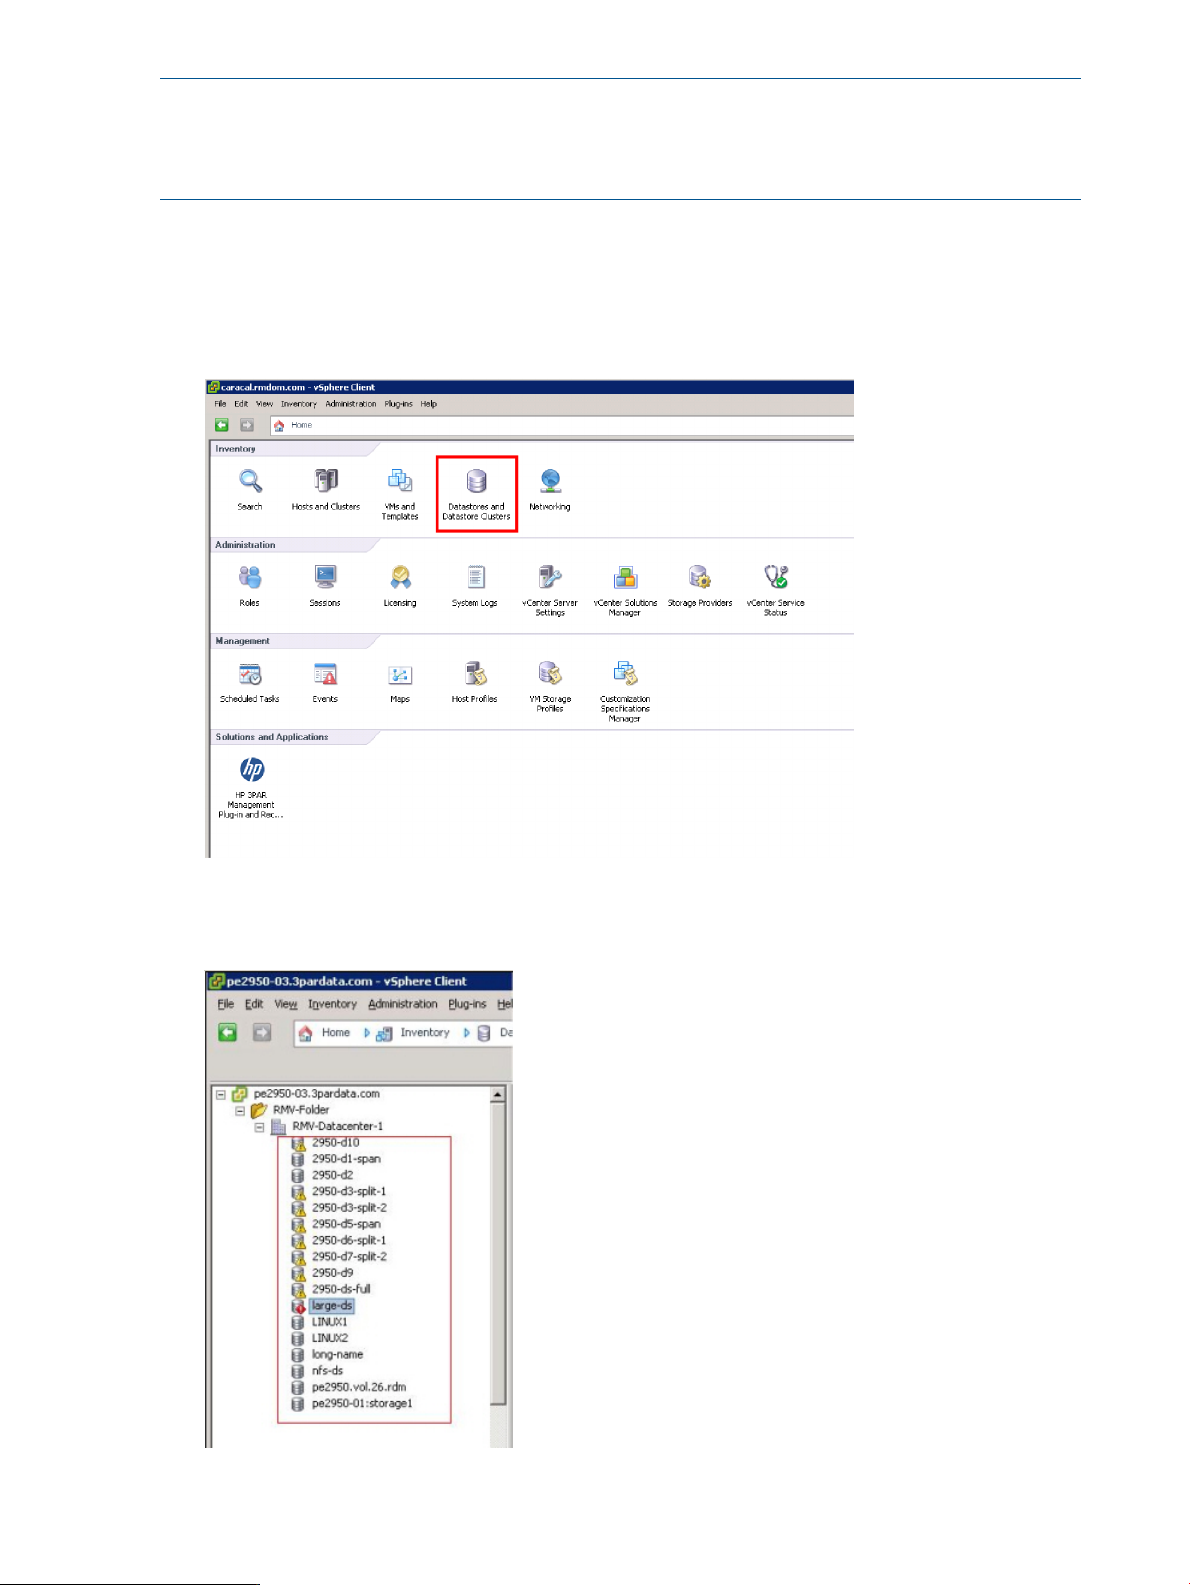
Datastore View
To access the datastore view:
1. Under Inventory from the vSphere Client home page, click Datastores.
Figure 3 Selecting Datastores
All datastores residing in the data center are displayed in the navigation tree.
Figure 4 Viewing Datastores in the Navigation Tree
16 Overview
Page 17
2. Select a datastore and then click the HP 3PAR tab.
Information about the virtual volumes associated with the datastore are displayed.
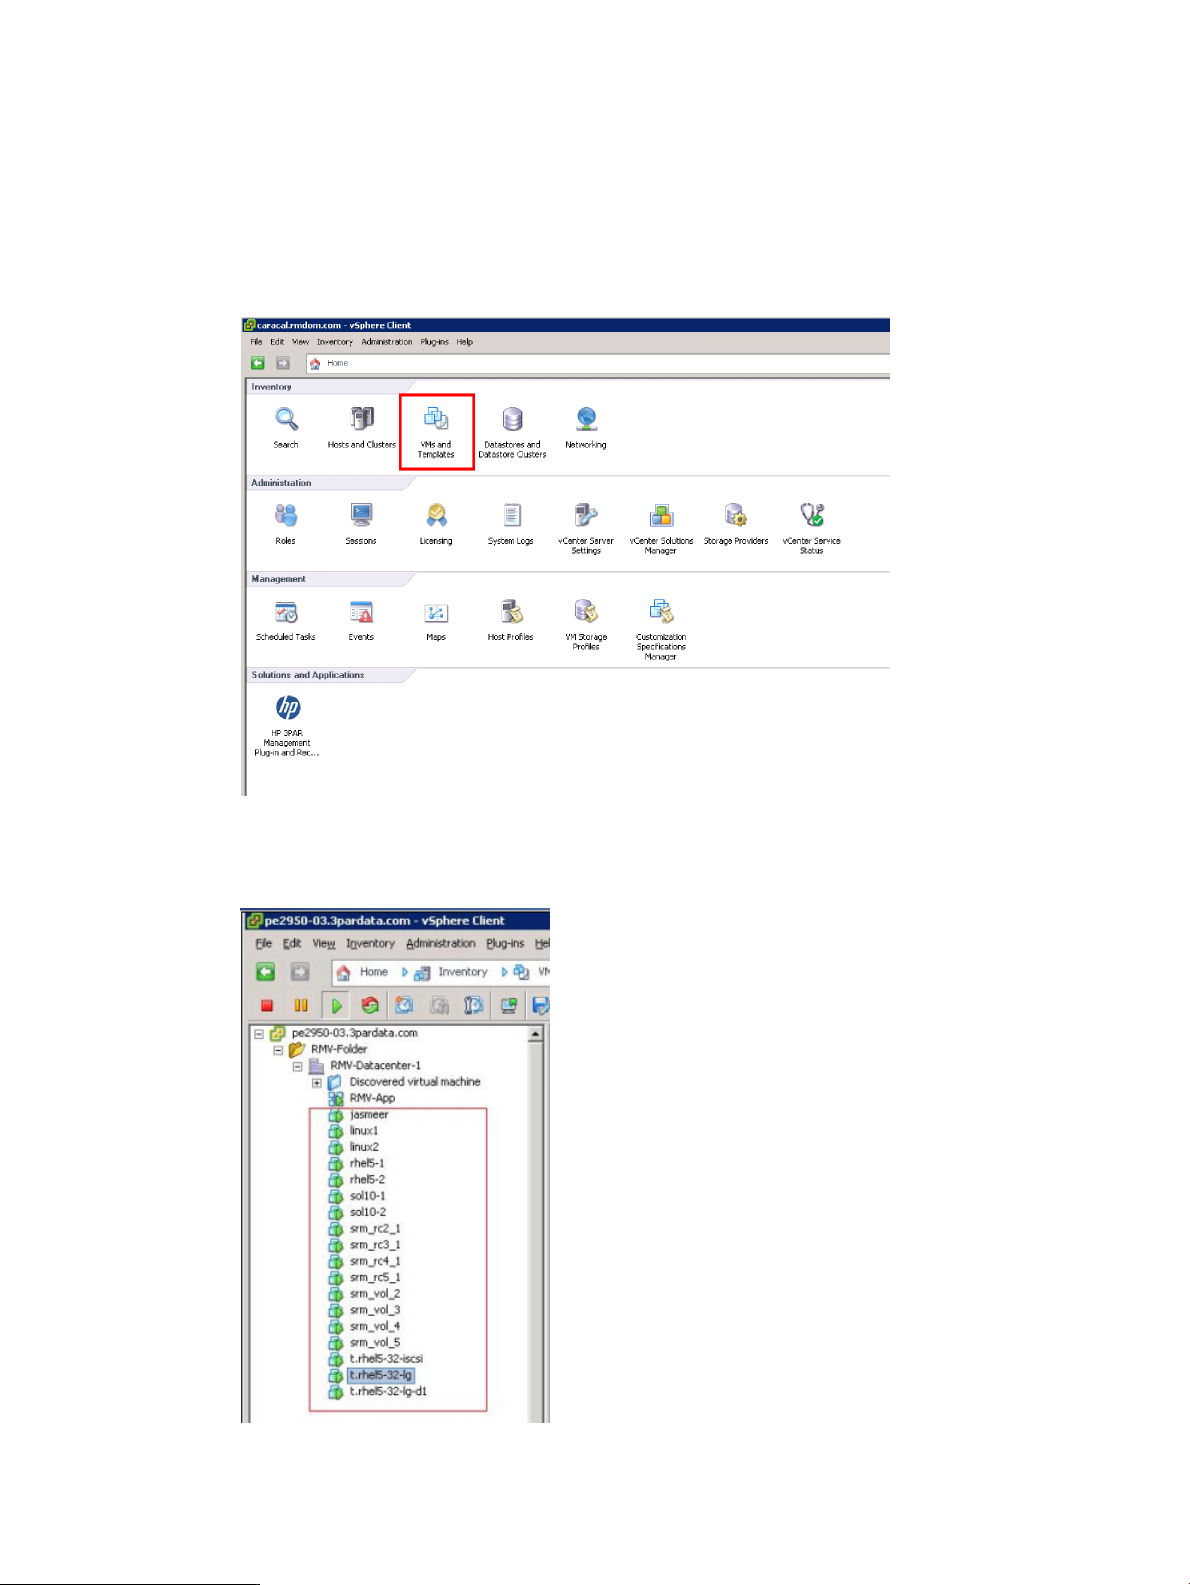
Virtual Machine View
To access the Virtual Machine (VM) view:
1. Under Inventory from the vSphere Client home page, click VMs and Templates.
Figure 5 Selecting VMs and Templates
All VMs in the data center are displayed in the navigation tree.
Figure 6 Viewing VMs in the Navigation Tree
HP 3PAR Views in the vSphere Client 17
Page 18
2. Select a VM and then click the HP 3PAR tab.
Information about the virtual volumes associated with the VM is displayed.
ESX Host View
To access the ESX host view:
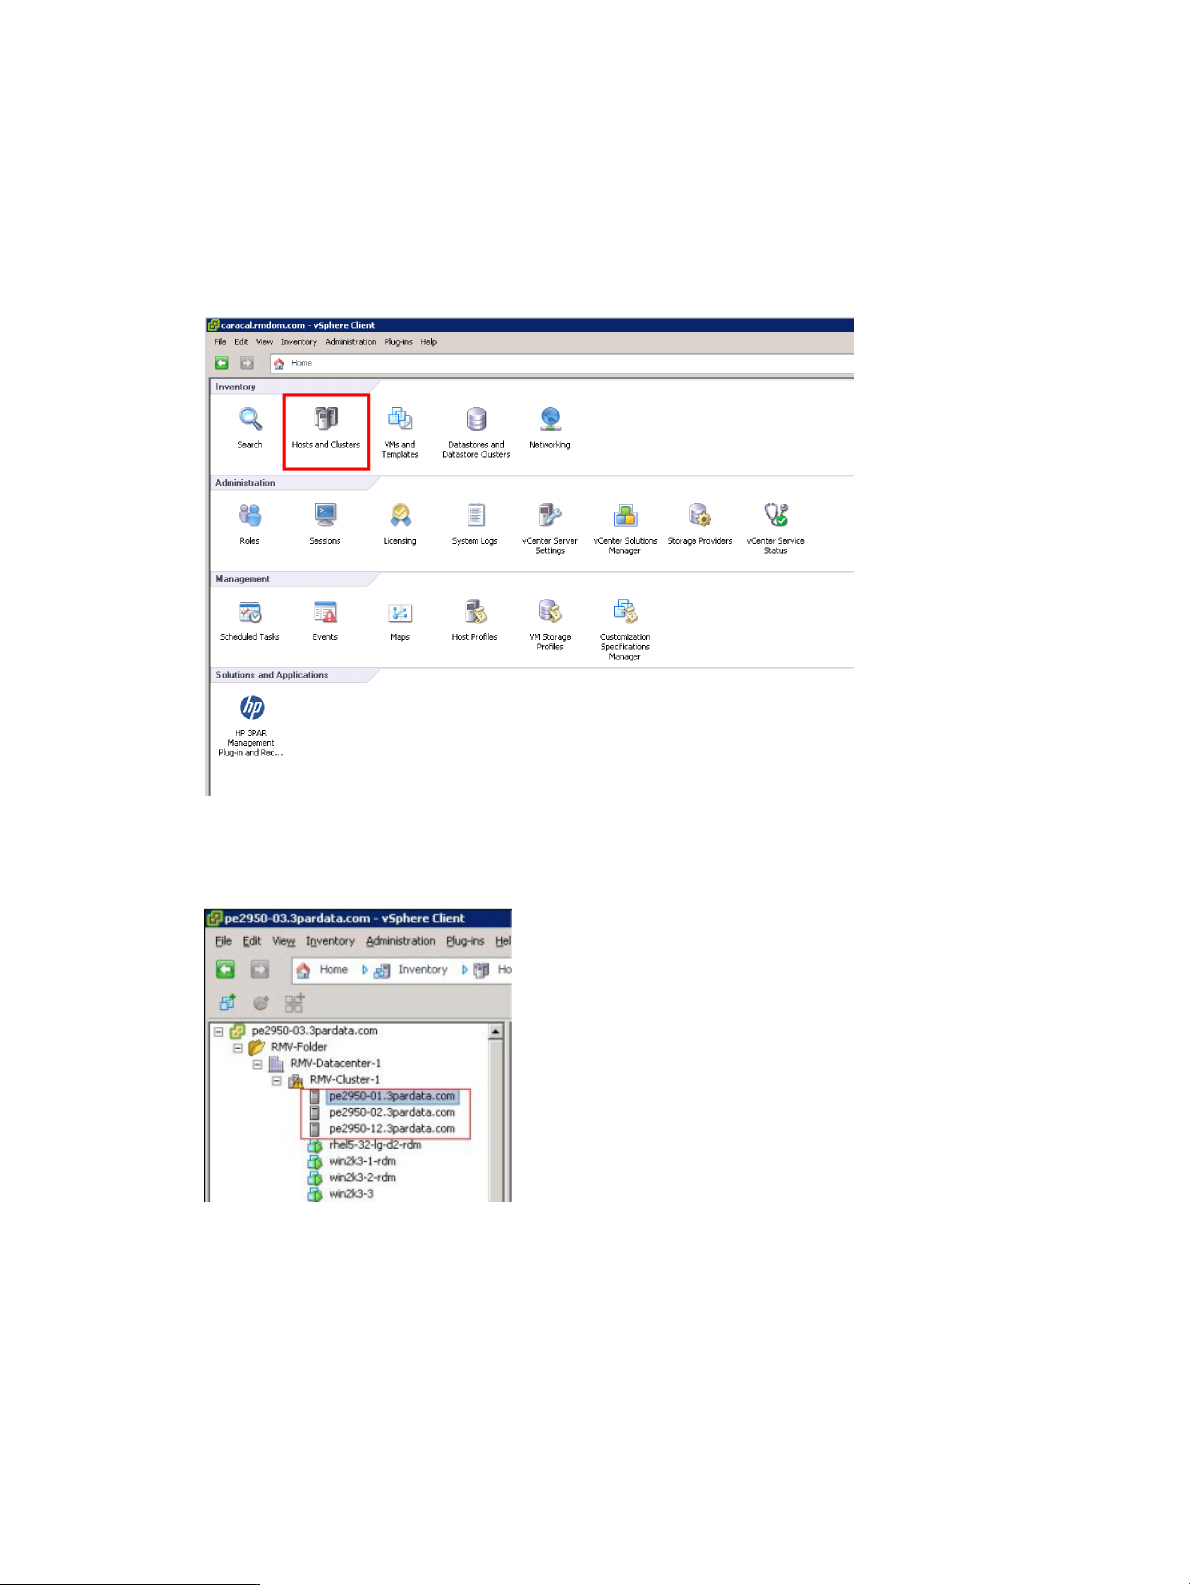
1. Under Inventory from the vSphere Client home page, click Hosts and Clusters.
Figure 7 Selecting Hosts and Clusters
All hosts in the data center are displayed in the navigation tree.
Figure 8 Viewing Hosts in the Navigation Tree
2. Select a host and then click the HP 3PAR tab.
Information about the virtual volumes associated with the host is displayed.
Cluster View
To access the cluster view:
18 Overview
Page 19
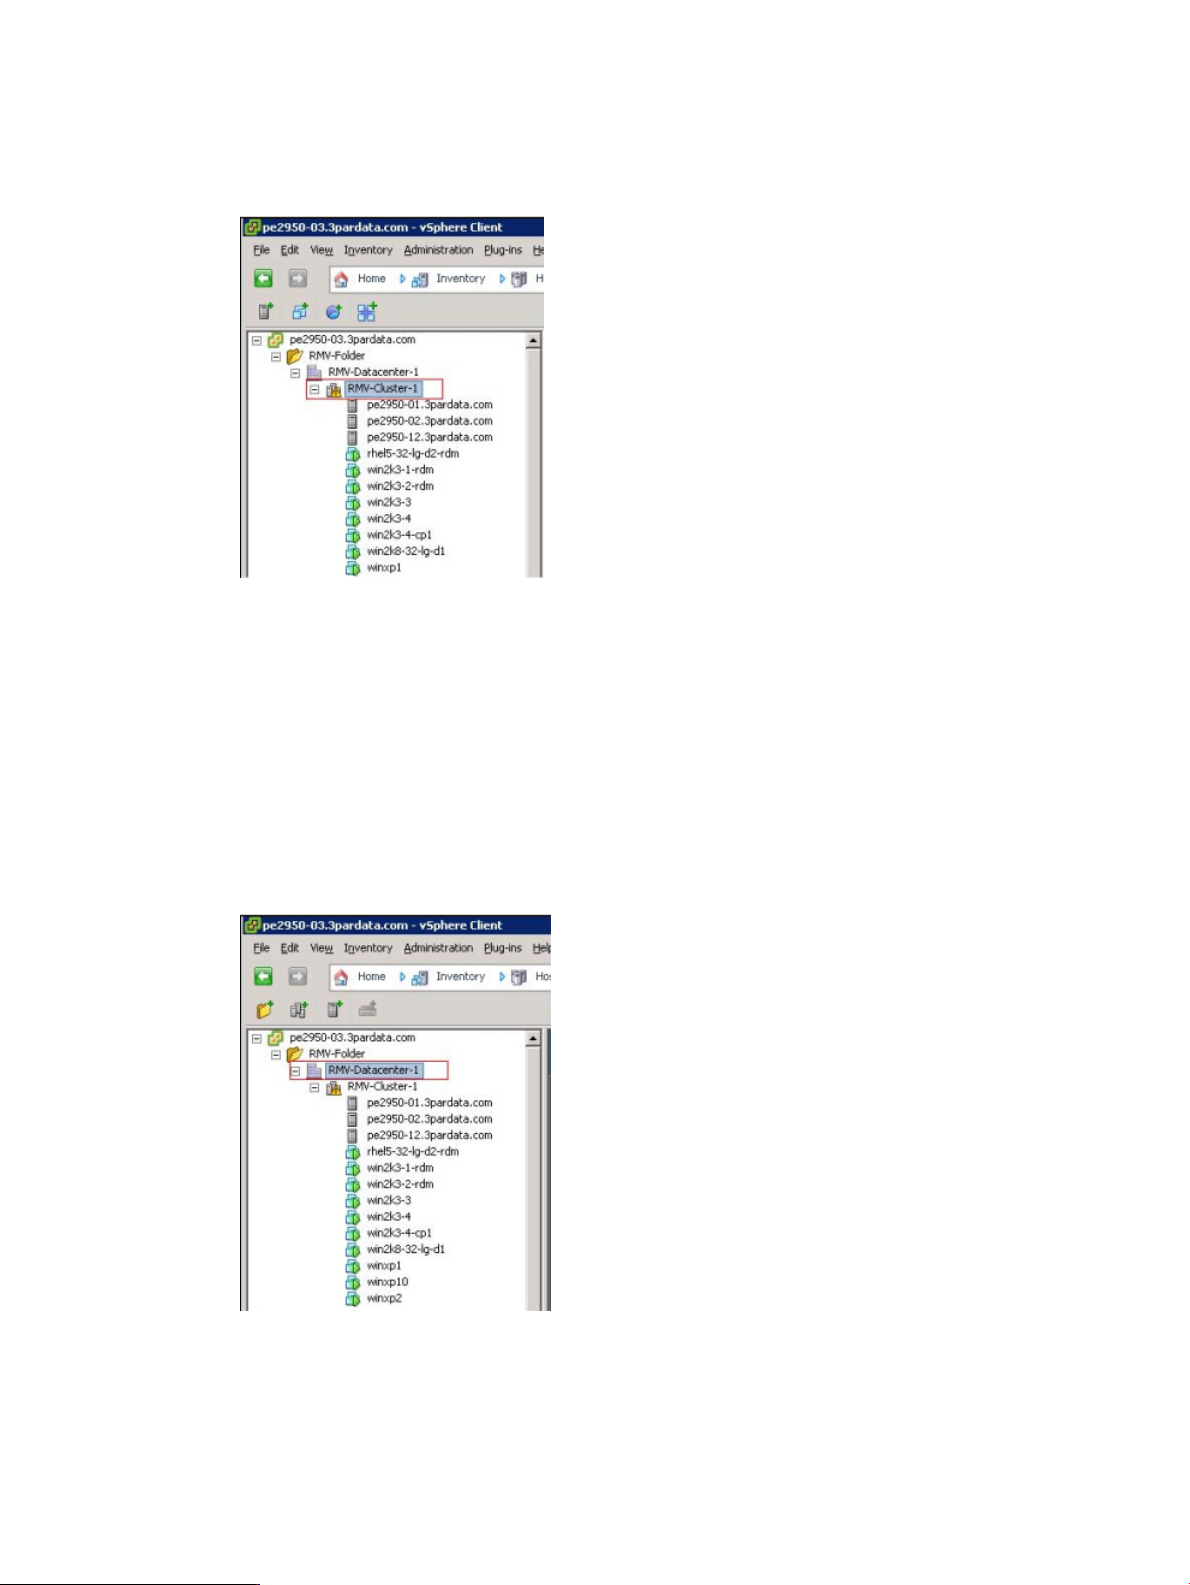
1. Under Inventory from the vSphere Client home page, click Hosts and Clusters (see Figure 7
(page 18)).
All clusters in the data center are displayed in the navigation tree.
Figure 9 Viewing Clusters in the Navigation Tree
2. Select a cluster and then click the HP 3PAR tab.
Information about the virtual volumes associated with the cluster is displayed.
Datacenter View
To access the datacenter view:
1. Under Inventory from the vSphere Client home page, click Datastores, VMs and Templates,
or VMs and Templates (see Figure 3 (page 16), Figure 5 (page 17), or Figure 7 (page 18)).
All datacenters are displayed in the navigation tree.
Figure 10 Viewing Datacenters in the Navigation Tree
2. Select a datacenter and then click the HP 3PAR tab.
Information about the virtual volumes associated with that datacenter is displayed.
HP 3PAR Views in the vSphere Client 19
Page 20

About Virtual Copy Management
NOTE: HP 3PAR Recovery Manager for VMware vSphere is not functional without the HP 3PAR
Recovery Manager for VMware vSphere license. Additionally, the HP 3PAR Virtual Copy license
is required for virtual copy operation and the HP 3PAR Virtual Lock license is required for using
the volume retention policy.
HP 3PAR Recovery Manager for VMware vSphere allows you to take LUN-level virtual copies of
Virtual Machines (VMs), datastores and remote copy groups. A datastore is created on one HP
3PAR volume, and a VM is created on one or more datastores. During VM virtual copy creation,
Recovery Manager for VMware vSphere will identify all the underlying HP 3PAR volumes and take
virtual copies simultaneously for all volumes to ensure consistency. Recovery Manager for VMware
vSphere manages this set of virtual copies as a single entity. Remote Copy virtual copies are based
at the Remote Copy group level (storage system), versus the virtual machine or datastore level
(VMware perspective).
NOTE: VMware Tools must be installed on the Guest OS in order for HP 3PAR Recovery Manager
for VMware vSphere to create successful VM/Application consistent virtual copies. Refer to VMware
documentation for more information about VMware Tools setup instructions.
Virtual Copy Data Consistency
Several types of data consistency are possible for VM virtual copies and backup.
NOTE: The current version of HP 3PAR Recovery Manager for VMware vSphere supports system
crash, VM and application consistent virtual copies.
• Crash Consistent - A simple virtual volume virtual copy without quiescing the memory blocks
inside the guest OS results in a crash consistent virtual copy of the VM. Data not flushed will
be lost, but all data written to the file system will be available. Sanity checking of file system
(fsck) is needed after recovery.
• VM Consistent - All file system blocks are flushed from the memory of a VM before a virtual
copy is taken. This ensures that no file system data is lost if the VM crashes. Checking of file
system (fsck) is not required after recovery. No application data is flushed from memory before
the virtual copy is taken
• Application Consistent - Application consistency is provided for HP 3PAR snapshots of Virtual
Machines for data compatibility with supported applications.
Virtual Copy Policy
Recovery Manager for VMware vSphere allows the creation of virtual copy policies for VMs and/or
datastores. Only one policy is permitted for every VM and/or datastore. Datastore and VM policies
exist independently; meaning a VM’s policy is independent of the policy of the datastore(s) of
virtual disks it is using.
In Recovery Manager for VMware vSphere, the virtual copy policy contains the following attributes:
• Maximum Number of Virtual Copy Sets - You can choose how many virtual copies to be
retained. Once this limit is reached, the earliest virtual copy will be deleted to allow the latest
virtual copy to be created.
• Enable expirable virtual copies - Allows you to specify that created virtual copies are removed
• Retain Virtual Copy Set - The supported number of hours, days, weeks, months, and years
20 Overview
according to a specified schedule and are not affected by the maximum count.
that a virtual copy set is retained.
Page 21

NOTE: The Retain Virtual Copy Set option requires the HP 3PAR Virtual Lock license. Contact
your local service provider for additional information.
• Ensure Application Consistency - This option is used to create virtual copies that adhere to
data format standards used by Microsoft VSS for guest operating systems. This option is only
available VM policy.
Datastore Virtual Copies
A datastore is created on a Fibre Channel or iSCSI LUN. During virtual copy creation, Recovery
Manager for VMware vSphere identifies the HP 3PAR volume used and takes a virtual copy of the
volume. Recovery Manager for VMware vSphere stores the details of all virtual disks and VMs
present in the datastore.
This feature has the following restrictions:
• The datastore must be on exactly one HP 3PAR volume. A datastore that spans across more
than one LUN is not supported.
• RDM LUNs defined in the datastore are not included in the virtual copy. It is possible that a
HP 3PAR LUN is used as RDM in a guest OS, which is defined in a datastore created on
another HP 3PAR LUN.
NOTE: A virtual copy of a datastore does not include any RDM 3PAR LUNs.
• All datastore virtual copies can be VM or crash consistent. File system and/or application
integrity checks must be performed in the guest OS for the crash consistent virtual copies after
restoration.
• Network File System (NFS) datastores are not supported.
• VMFS file systems spanning multiple hard disk partitions to create a single logical volume are
not supported.
• The datastore must not be on an ESX SAN boot disk. Virtual Copy operations are not supported
on datastores residing in ESX SAN boot disks.
For information about creating virtual copies, see “Creating New Virtual Copies” (page 62).
Virtual Machine Virtual Copies
A Virtual Machine (VM) configuration files are created in a datastore. VMDK virtual disks used by
VMs are created on one or more datastores. In addition, a VM can use HP 3PAR volumes directly
as RDM virtual disks. Recovery Manager for VMware vSphere identifies all of the HP 3PAR volumes
used by a VM and creates virtual copies of all of them simultaneously. A list of virtual disk names
and their type (RDM or VMDK) and configuration file name are also recorded in the repository
during virtual copy creation.
A VM virtual copy has the following restrictions:
• Virtual disks used by a VM must be from the HP 3PAR datastore, and the latter must satisfy
the conditions mentioned in “Datastore Virtual Copies” (page 21).
• If the VM uses more than one HP 3PAR volume, all of them must be from the same HP 3PAR
storage array.
• VMs that use a mix of HP 3PAR LUNs and third party LUNs are not supported.
• All VM virtual copies can be VM or crash consistent. File system and/or application integrity
checks must be performed in the guest OS after restoration for the crash consistent virtual
copies.
About Virtual Copy Management 21
Page 22
• VMs using NFS datastores are not permitted.
• VMFS file systems spanning multiple hard disk partitions to create a single logical volume are
not supported.
For information about creating VM virtual copies, see “Creating New Virtual Copies” (page 62).
Remote Virtual Copies
Remote Virtual Copies are based on the Remote Copy Group. If a VM or datastore uses virtual
volumes outside of the Remote Copy group, HP 3PAR Recovery Manager for VMware vSphere
cannot take a remote virtual copy of the group. Remote Virtual Copies require a remote host with
SAN connectivity to the target Storage System and reside on the remote storage system.
• VMs or datastores must be contained within the Remote Copy group
• Restore processes are currently performed manually
The Virtual Copy Browser
NOTE: You must have an HP 3PAR Recovery Manager for VMware vSphere license in order to
use the virtual copy browser.
In Recovery Manager for VMware vSphere, every virtual copy, VM, or datastore has its own
metadata, which is used in instances where a restoration is necessary. Metadata is kept in a local
file system of the server.
You can view virtual copy metadata at any time after it was created using the virtual copy browser
of the VM and datastore views of the plug-in.
Figure 11 Virtual Copy Browser
A virtual copy of a VM or datastore has the following properties:
• The virtual copy creation time.
• The HP 3PAR Storage System where virtual copy volumes exist.
• The virtual copy set name (optional).
22 Overview
Page 23

• The number of virtual copy volumes in the virtual copy.
• A list of pairs (source volume, virtual copy volume). Each pair can have a list of virtual disks
and/or VM names.
All virtual copies are organized in the browser based on their creation times. The browser displays
all relevant metadata so that you can make restore decisions faster and without actually mounting
virtual copy volumes.
The data shown in the virtual copy browser comes from the metadata repository and may not
reflect the current state of HP 3PAR Storage System. It is possible that volumes shown in the browser
may not exist in the HP 3PAR Storage System; for example, if a volume is deleted.
For information about viewing the Virtual Copy browser, see Figure 41 (page 54).
VMFS Snapshots
In order to maintain a VM consistent virtual copy, a VMFS snapshot will be created before creating
an HP 3PAR virtual copy and the VMFS copy will be deleted when the HP 3PAR virtual copy is
created. HP 3PAR virtual copies and VMFS snapshots cannot coexist. HP 3PAR virtual copy creation
in VM, Datastore, or Remote Copy will fail if there are preexisting VMFS snapshots for the VM.
NOTE: When creating a VMFS snapshot, VMware can fail the operation with the message:
“Cannot create a quiesced snapshot because the create snapshot operation exceeded the time
limit for holding off I/O in the frozen virtual machine.”
If this message is displayed, the VMware Tools process should be restarted, or reinstalled to resolve
the issue.
Scheduling Tool
You can automatically have virtual copies created according to a specified schedule by using the
scheduling tool (see “Scheduling Virtual Copies” (page 66) for details). You have the option of
scheduling when (hourly, daily, weekly, monthly) the virtual copy is to be created and then specifying
how often the task is to be performed. You can also schedule a virtual copy creation task to occur
on a one-time basis.
Host Explorer
Host Explorer for VMware communicates with the storage server over a TCP/IP connection and
provides detailed host configuration information. You can start the service and configure settings
through the Host Explorer tab available from the RMVMware Admin Tool GUI interface (see “Host
Explorer Tab” (page 38) for details).
VASA Support
Support is included for vSphere Storage APIs for Storage Awareness (VASA) that allows a VMware
administrators to view information about the physical storage array as well as the virtual data
store. For instance, you can get performance statistics from within vCenter associated with a LUN
on HP 3PAR disk arrays. For more information on VASA, refer to "Storage Providers" in vCenter
Server.
Host Explorer 23
Page 24

2 Installing, Registering, and Uninstalling HP 3PAR
Management Plug-in and Recovery Manager Software
for VMware vSphere
This chapter describes how to install, register, uninstall, and upgrade HP 3PAR Management Plug-in
and Recovery Manager Software for VMware vSphere.
Supported Platforms
For information about supported platforms, refer to the HP 3PAR InForm OS Configuration Matrix.
To obtain a copy of this documentation, go to http://www.hp.com/go/3par/, navigate to your
product page, click Support for your product, and then click Manuals.
Pre-installation Requirements and Dependencies
Prior to the installation of HP 3PAR Management Plug-in and Recovery Manager Software for
VMware vSphere, make sure that the following pre-installation requirements are met:
• HP 3PAR Recovery Manager Software for VMware vSphere is distributed as a Microsoft
installer MSI image, RMVMware_<platform>.msi, where <platform> can be x86 for
Windows 32 bit OS or x64 for Windows 64 bit OS.
• HP 3PAR Management Plug-in and Recovery Manager Software for VMware vSphere is
supported on Microsoft Windows 2008 x86, Windows 2008 x64, and Windows 2008 R2.
It is recommended that Windows be installed on a standalone system.
• HP 3PAR Management Plug-in and Recovery Manager Software for VMware vSphere supports
vCenter Server 4.1 and 5.0, ESX 4.0, ESXi 4.1 and 5.0, and vSphere 5.0.
NOTE: For full functionality and compatibility, it is recommended that you update to the
latest versions of vCenter Server and ESX. Both ESX 3.5. and vCenter Server 4.1 does not
support VASA.
• Microsoft.NET 4.0 Runtime is required or installation fails.
• The HP 3PAR Recovery Manager for VMware vSphere license and the HP 3PAR Virtual Copy
license is required for virtual copy operation.
• The HP 3PAR Virtual Lock license is required for setting retention policies in virtual copy
creation.
• The HP 3PAR Remote Copy license is required for remote virtual copy operation.
• You must have a minimum of Edit level privilege (or the 3PAR_RM role) for virtual copy
operations, and Browse level privilege for virtual volume operations.
• You must be an Administrator of the vCenter Server for plug-in registration.
NOTE: Silverlight is required only for the desktop. Recovery Manager for VMware vSphere server
does not require Silverlight.
• Desktops running vSphere clients (where HP 3PAR Management Plug-in and Recovery Manager
Software for VMware vSphere pages are displayed) must have the Microsoft web browser
plug-in Silverlight runtime installed. The controls of the Microsoft web browser plug-in Silverlight
are used for rendering HP 3PAR Management Plug-in and Recovery Manager Software for
VMware vSphere’s web pages. You will be prompted to download Silverlight the first time
HP 3PAR Management Plug-in and Recovery Manager Software for VMware vSphere’s web
pages are displayed if Silverlight is not already installed. If after you have downloaded and
24 Installing, Registering, and Uninstalling HP 3PAR Management Plug-in and Recovery Manager Software for VMware vSphere
Page 25
installed Silverlight, the page still displays "Get Microsoft Silverlight", you can reset the page
with following steps:
From the top menu bar, select Plug-ins\Manage Plug-ins to bring up the Plug-in Manager.
Right click HP 3PAR Recovery Manager Software for VMware vSphere and select Disable.
Right click HP 3PAR Recovery Manager Software for VMware vSphere again and select Enable.
Close the VI Client and reopen it again.
• VMs must have VMware Tools installed in order to perform virtual copy operations with
application consistency. Refer to VMware documentation for more information about VMware
Tools setup instructions.
• HP 3PAR Management Plug-in and Recovery Manager Software for VMware vSphere currently
only supports English localization.
Allowing Port Selections with Windows 2008 Installation
To set up HP 3PAR Management Plug-in and Recovery Manager Software for VMware vSphere
with the SSL port for communications, you need to grant full permission to the Administrator. Here
are the steps you should follow before the installation:
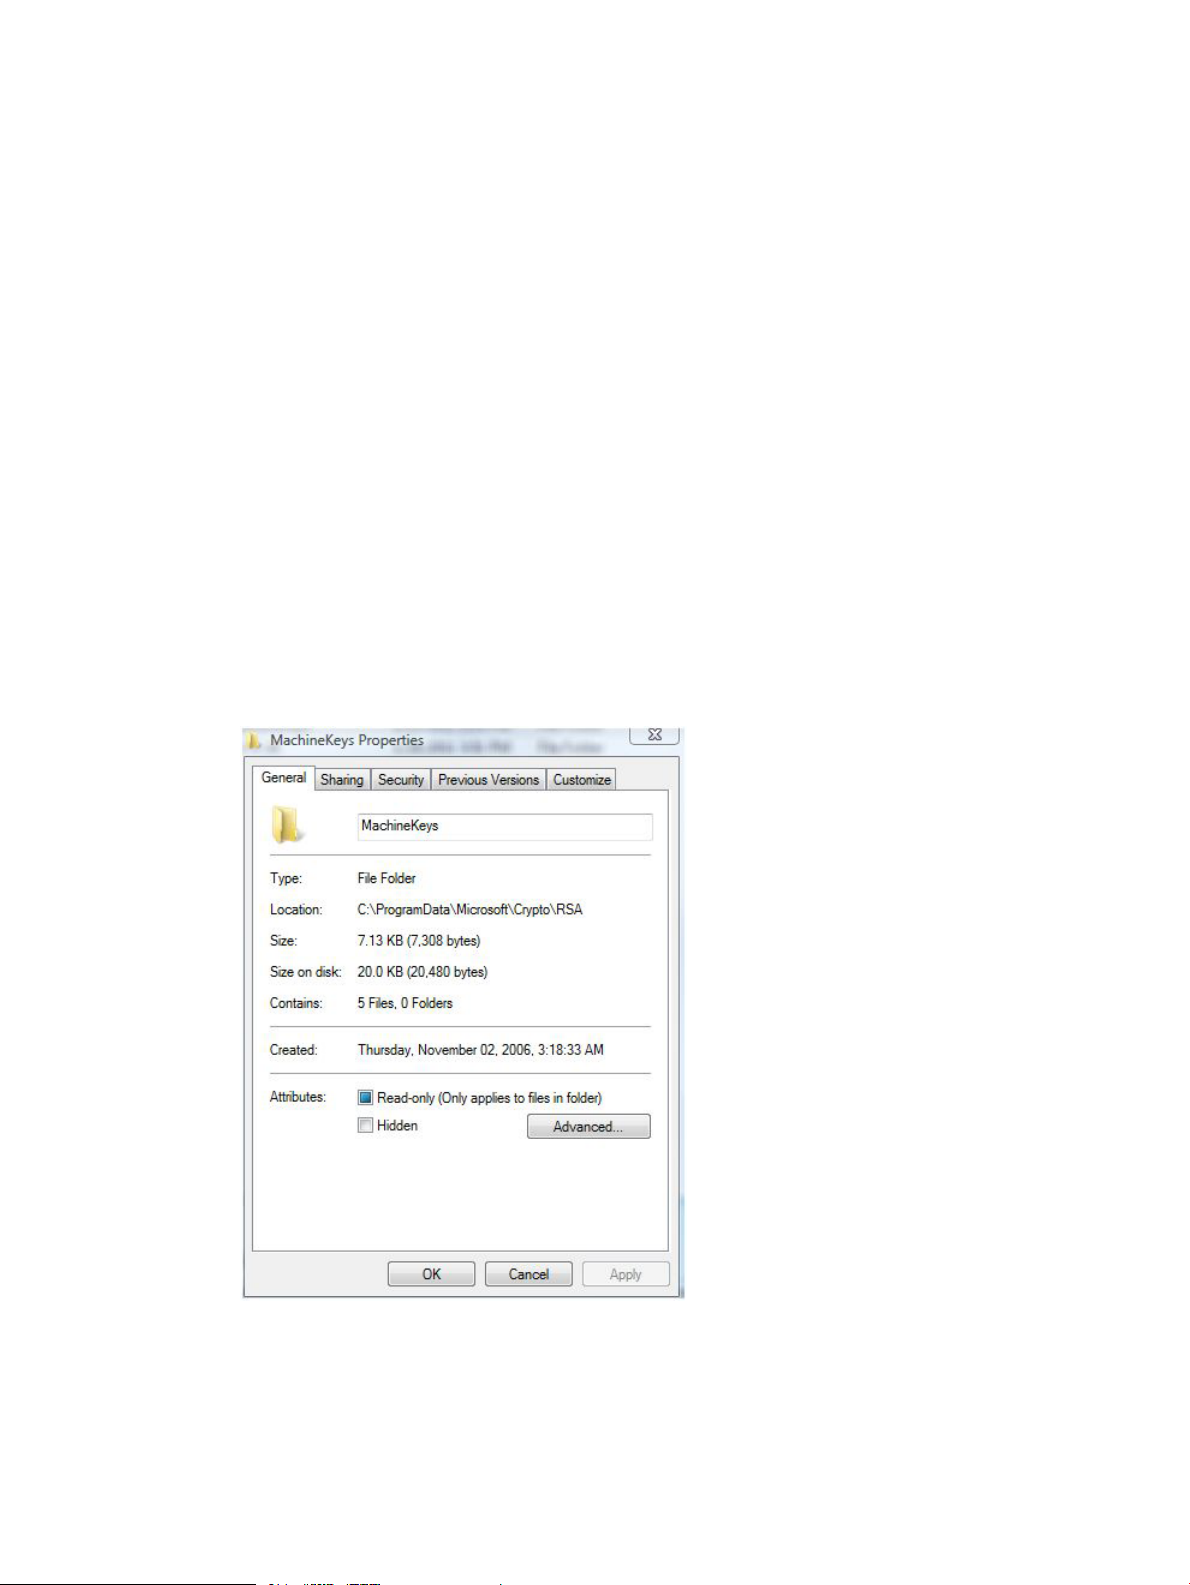
1. Open Explorer and go to <System Drive:>\ProgramData\Microsoft\Crypto\RSA.
You must explicitly type in the path since ProgramData is a hidden directory.
2. Left click MachineKeys and choose Properties.
The MachineKeys Properties Dialog appears (Figure 12 (page 25)).
Figure 12 MachineKeys Properties Dialog
3. Select the Security tab.
The Security Tab dialog appears (Figure 13 (page 26)).
Pre-installation Requirements and Dependencies 25
Page 26
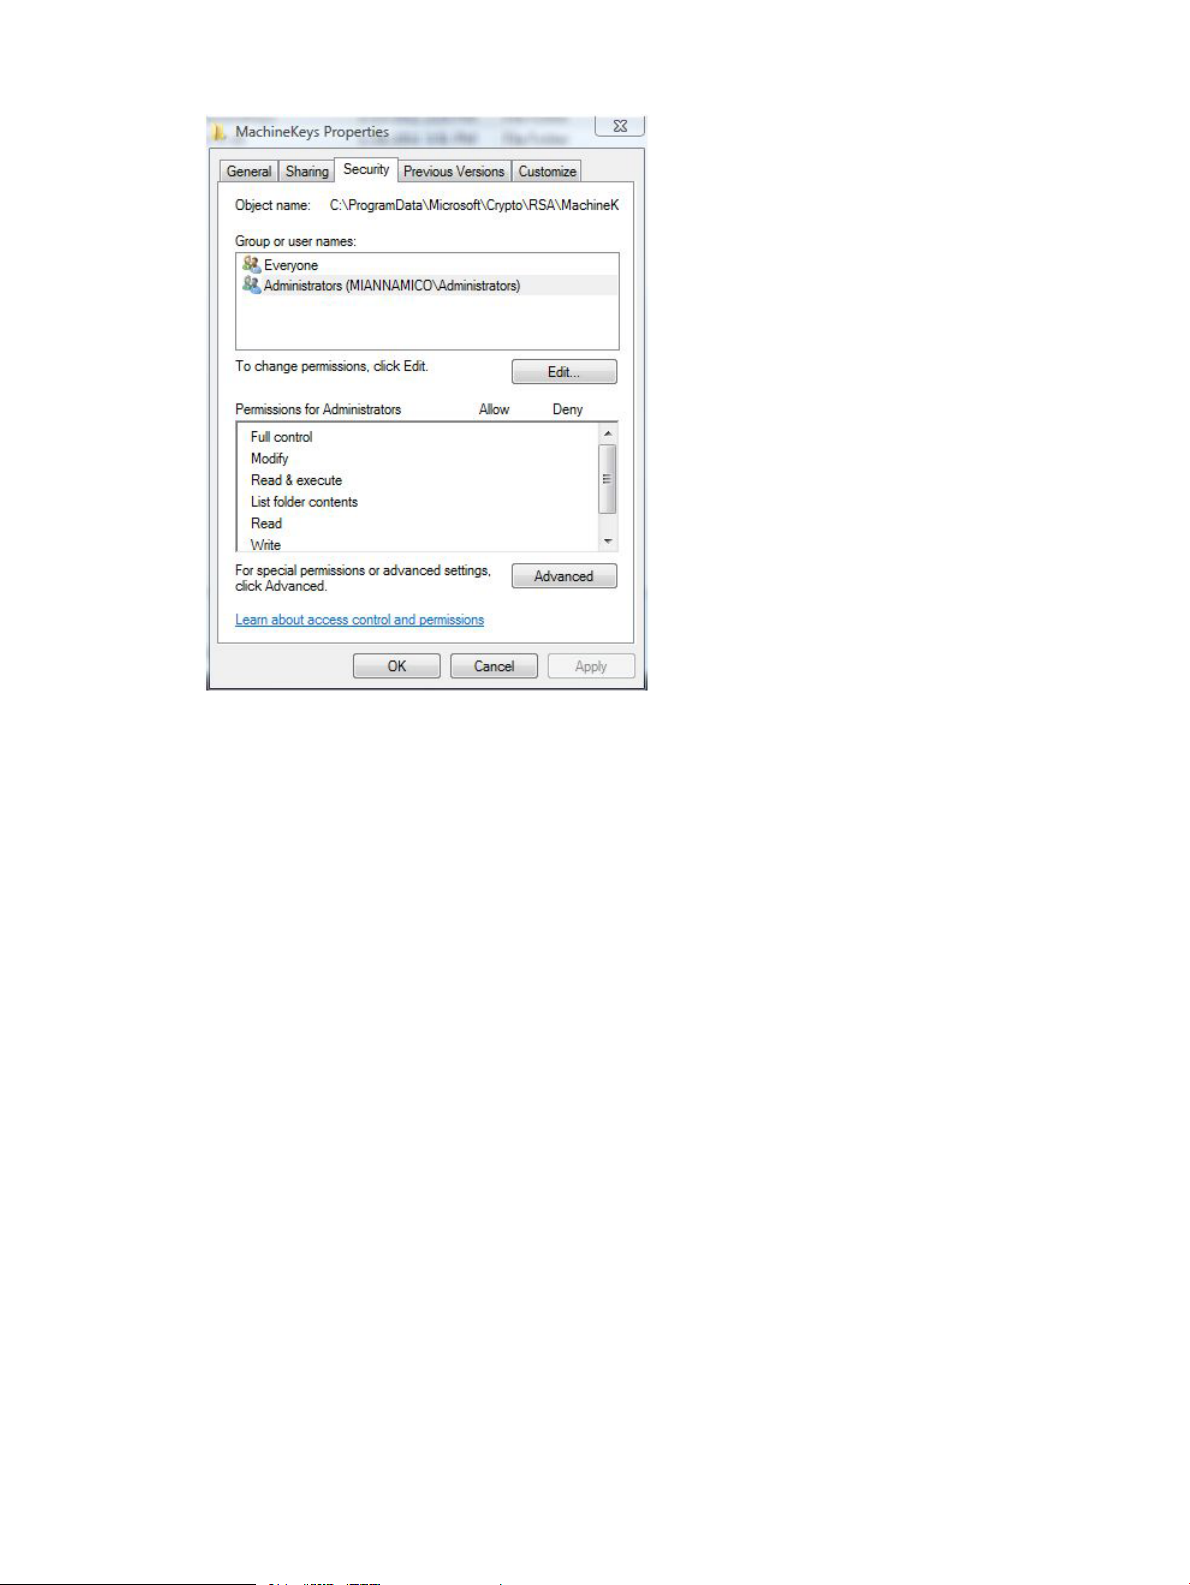
Figure 13 Security Tab Dialog
4. Under Group or user names, choose Administrators.
5. Under Permissions for Administrators, grant Full control.
6. Click OK.
You can now proceed with the installation if RMV is not previously installed onto the system.
For a system with RMV previously installed, complete the following steps before proceeding with
the installation:
1. Click Start, type mmc in the Search programs and files box, and press Enter.
2. On the File menu, click Add/Remove Snap-in.
3. Under Available snap-ins, double-click Certificates.
4. Select Computer account and click Next.
5. Click Local computer and click Finish.
6. Click Ok.
7. From the left pane, navigate to Console Root→Certificates (Local
Computer)→Personal→Certificates.
8. Delete 3PAR Plug-in.
Installing HP 3PAR Management Plug-in and Recovery Manager Software for VMware vSphere
HP 3PAR Management Plug-in and Recovery Manager Software for VMware vSphere is supported
in Windows 2008, and Windows 2008 R2. Both x86 and x64 are supported. The installation
package provides the following:
• RMVMware_x86.msi
• RMVMware_x64.msi
To install HP 3PAR Management Plug-in and Recovery Manager Software for VMware vSphere,
perform the following:
26 Installing, Registering, and Uninstalling HP 3PAR Management Plug-in and Recovery Manager Software for VMware vSphere
Page 27
1. Insert the HP 3PAR Management Plug-in and Recovery Manager Software for VMware vSphere
disc into your CD-ROM drive.
2. Double-click the installation package appropriate for your system to launch the installation
wizard.
NOTE: You must be an Administrator of the vCenter Server for plug-in registration.
NOTE: You must complete the information requested in the plug-in registration dialog box
in order to complete the HP 3PAR Management Plug-in and Recovery Manager Software for
VMware vSphere installation.
3. Follow the installation wizard instructions.
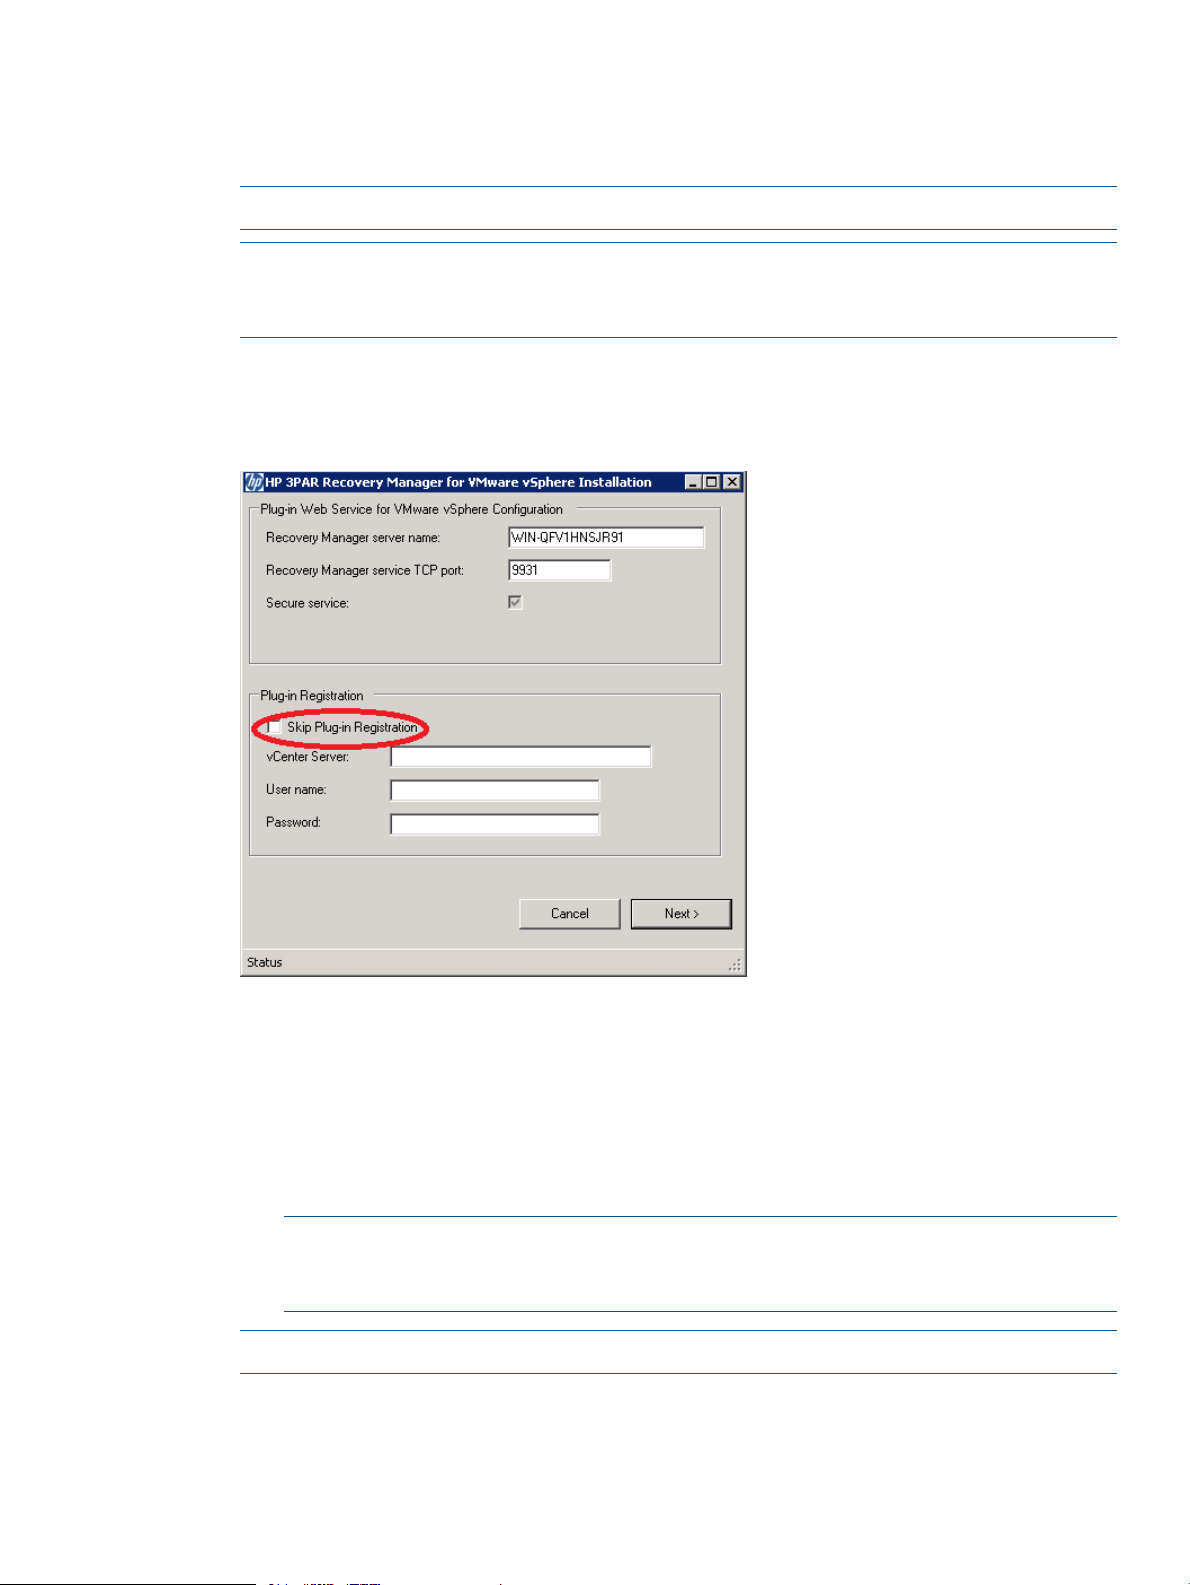
The plug-in registration dialog box appears.
Figure 14 Plug-in Registration Dialog
4. In the Plug-in Web Service for VMware vSphere Configuration group box, enter the following
information:
• Recovery Manager server name - The network host name known by the vCenter Server
where Recovery Manager is installed. Defaults to the local host name. An IP address can
be alternatively entered.
• Recovery Manager service TCP port - The default secure network port is 9931. The port
can be changed, however it cannot conflict with other usage.
NOTE: Windows 2008 installations need to grant full permissions to the Administrator
in order to be able to change port assignments. (see “Allowing Port Selections with
Windows 2008 Installation” (page 25) for details.
NOTE: VMware vCenter Server 4.1 and 5.0 are supported in this release.
5. As an option, you can select the “Skip Plug-in Registration” check box for RMV installations
on a remote site where a remote vCenter has not been installed. To manage a remote virtual
copy, the RMV server on the remote site needs to register to the vCenter during the installation
or via the Admin Tool after the installation.
Installing HP 3PAR Management Plug-in and Recovery Manager Software for VMware vSphere 27
Page 28

6. In the Plugin Registration group box, enter the following information:
• vCenter Server - The name of the vCenter Server.
• User name - The administrator user name.
• Password - The administrator user password.
NOTE: The same instance of HP 3PAR Management Plug-in and Recovery Manager Software
for VMware vSphere can be registered with multiple vCenter Servers. Use the RMVMware
Admin Tool to register HP 3PAR Management Plug-in and Recovery Manager Software for
VMware vSphere. Refer to “The RMVMware Admin Tool” (page 32) for instructions on
accessing the RMVMware Admin Tool and “Plug-in Registration” (page 35) for instructions
on registering the plug-in.
7. Click Next.
The VASA Provider Web Service Configuration is requested.
8. Supply the appropriate web service network port for the VASA provider, then click Next.
9. Click Close.
NOTE: HP 3PAR Management Plug-in and Recovery Manager Software for VMware vSphere
does support VMware vCenter Linked Mode server. For more information, follow the link:
https://www.vmware.com/products/vcenter-server/features.html.
Support for VMware vCenter Server Linked Mode
The HP 3PAR Management Plug-in supports a feature of VMware known as Linked Mode and
allows you to create and manage a Linked Mode group during or after vCenter Server installation.
Use the following instructions to install Recovery Manager for VMware in a Linked Mode
environment:
1. Verify the RMV server is associated with the same Active Directory domain as the vCenters.
2. Ensure the RMV plug-in is registered with all vCenters that associate with Linked Mode
configuration.
3. Log on to vSphere client using Active Domain user name.
4. After logging on to vSphere client, log on to an HP 3PAR storage system(s).
a. Go to Home Page and click the HP 3PAR Management Plug-in and Recovery Manager
Software for VMware vSphere. This opens to the storage system home page for one of
the vCenters.
b. Use a valid user name and password to log on to required storage systems.
28 Installing, Registering, and Uninstalling HP 3PAR Management Plug-in and Recovery Manager Software for VMware vSphere
Page 29
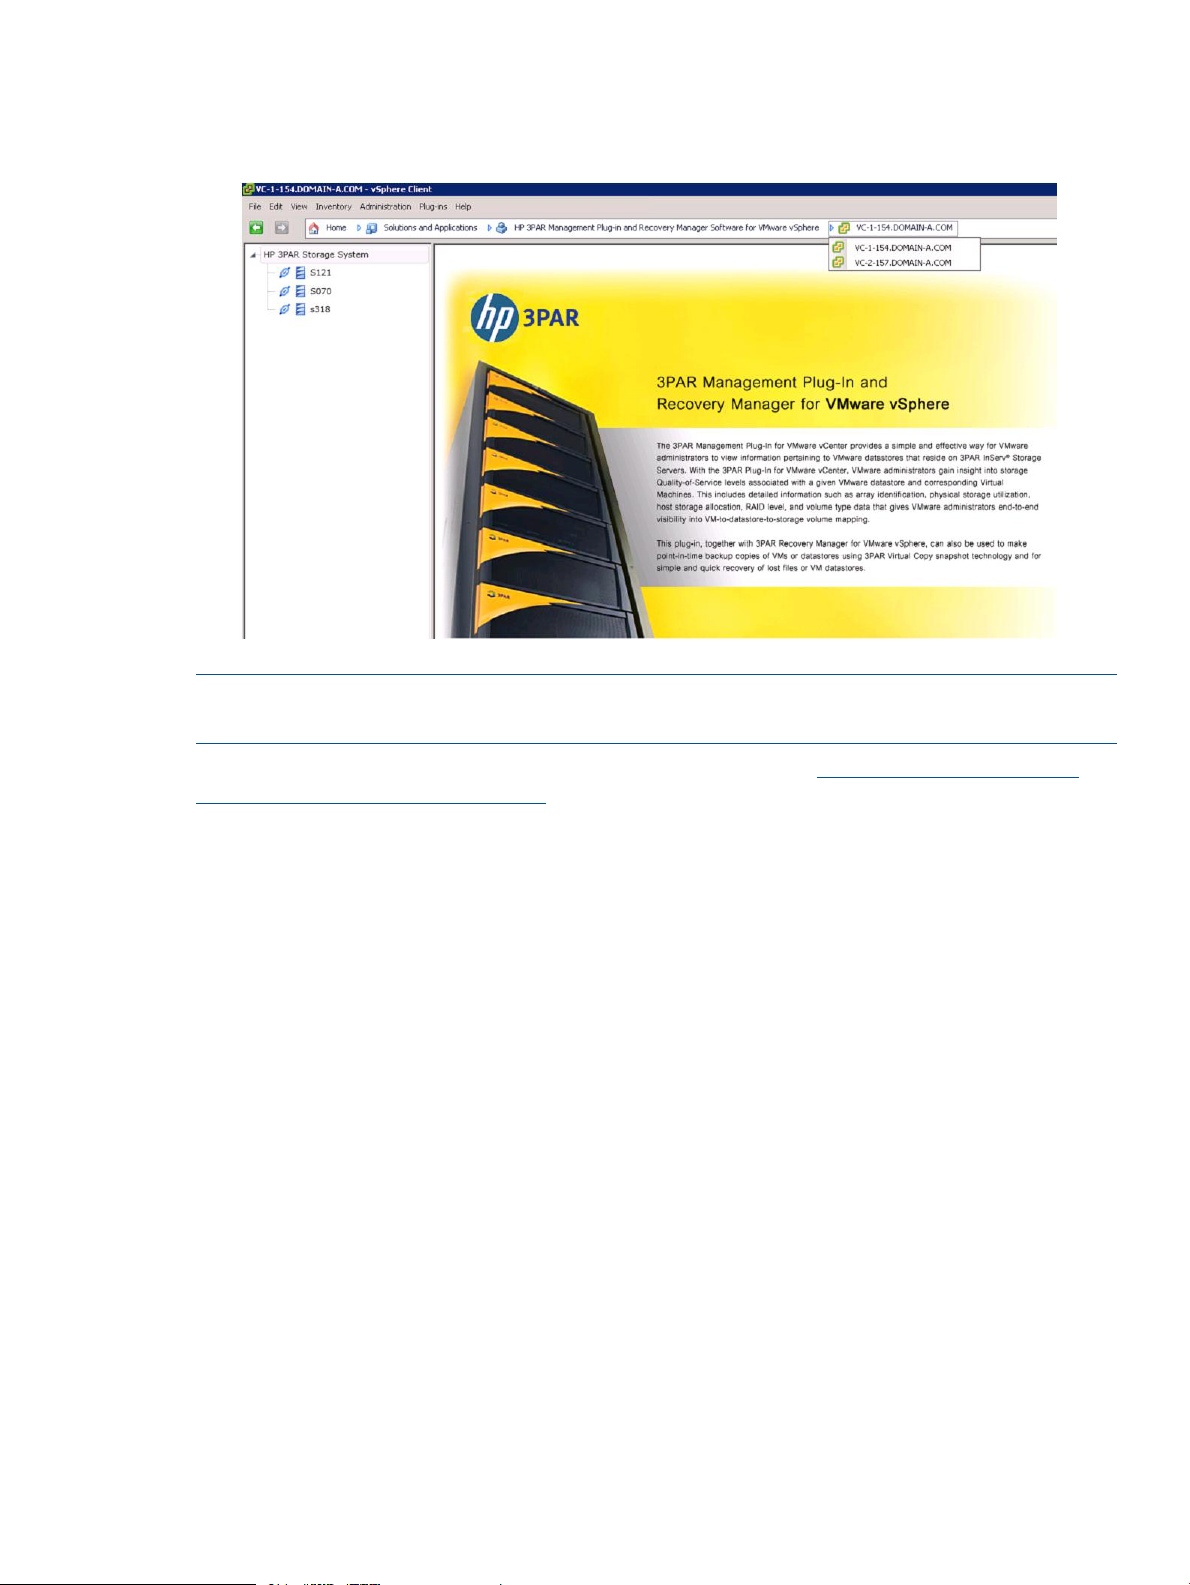
5. Repeat step 4 for the remaining vCenter servers by selecting a vCenter from the drop down
list.
Figure 15 vCenter Drop Down List
NOTE: Users may require to log on to the same storage system more than once if it is connected
to more than one vCenter.
For more information about VMware vCenter Linked Mode, go to https://www.vmware.com/
products/vcenter-server/features.html.
If you are experiencing HP 3PAR multi-tab issues, refer to “Resolving HP 3PAR Multi-tab Issue”
(page 102) for more details about how to resolve the issue.
Viewing and Installing HP 3PAR Management Plug-in Certificate
HP 3PAR Management Plug-in uses a self-signed certificate. If a Security Alert dialog box appears
and displays the certificate is not trusted, use the following steps to install the certificate.
1. Click View Certificate.
2. From the Certificate dialog box, click Install Certificate.
3. Continue to follow the Wizard. Select Place All certificates in the following store on Certificate
Store page and click Browse.
4. From the Select Certificate Store dialog box, select Trusted Root Certification Authorities and
click OK.
5. Complete the Wizard tasks.
6. Click OK to exit Certificate dialog box.
Registering an SMS Certificate for the VASA Provider
Both the vCenter Server and VASA Provider use SSL certificates. The VASA Provider support included
with Recovery Manager for VMware uses the same certificate used by the Plug-in web service.
However, before you can use the vCenter Server to register the VASA provider, you must manually
install the SMS certificate extracted from the vCenter server onto the VASA installed host. This
process is required for every vCenter Server you intend to register with the VASA provider. The
same process is also required if the SMS certificate has a new certificate. The SMS extraction and
installation process is provided in the following section.
Viewing and Installing HP 3PAR Management Plug-in Certificate 29
Page 30

Extracting the SMS Certificate
1. On vCenter Server installed host, go to the following location:
C:\Program Files\VMware\Infrastructure\jre\bin
2. Enter the following command specifying the location and name for the certificate file of your
choosing:
For Windows 2008
keytool -exportcert -v -keystore "c:\Programdata\VMware\VMware
VirtualCenter\SSL\sms.keystore" -file c:\temp\sms_new.cer -alias
sms
For Windows 2003
keytool -exportcert -v -keystore "C:\Documents and Settings\All
Users\Application Data\VMware\VMware VirtualCenter\SSL\sms.keystore"
-file c:\temp\sms_new.cer -alias sms
3. Press Enter when prompted to enter the keystore password.
If the export is successful, you should see the following type of confirmation:
“Certificate stored in file <your file path>”
Installing the SMS Certificate
You need to install the SMS certificate on the VASA Provider host's Local Computer/Trusted Root
Certification Authorities store.
There are two methods to install SMS certificate:
• Using the VASA Provider web service (only applicable when the VASA web service is running).
• Manually registering the certificate through the certification store.
To Install the SMS Certificate Through the VASA Web Service
Perform the following steps to install the SMS certificate through the VASA web service:
1. Open the browser and enter the path for the VASA certificate registration service as follows:
<vasa web service url>/Config/Register
Here is an example:
https://myvasaserver:9997/config/Register
2. If the Choose a digital certificate screen appears, click OK to continue.
The HP 3PAR VASA Provider Certificate Registration screen should appear.
NOTE: If a certificate error occurs, click the Continue to this website (not recommended) link.
3. Click Browse to locate the extracted certification file, then click Submit to send it to VASA
Provider.
Upon submission, a message is returned indicating whether the registration was successful.
If the registration was unsuccessful, try locating the required file again or try to install the SMS
Certificate manually as described in (“Installing the SMS Certificate” (page 30)).
Installing the SMS Certificate Manually
1. Copy the certification file to the VASA installed host.
2. Right click the certification file and select Install Certificate.
30 Installing, Registering, and Uninstalling HP 3PAR Management Plug-in and Recovery Manager Software for VMware vSphere
Page 31

3. Supply the appropriate responses and information requested by the Certificate Import Wizard.
4. On Certificate Store page, select the Place all certificates in the following store radio button
and click Browse.
5. For the Select Certificate Store dialog, check the Show physical stores check box.
6. Expand the Trusted Root Certificate Authorities tree and select Local Computer.
7. Click OK.
8. From the Certificate Store dialog, the certificate store path should appear as follows:
Trusted Root Certificate Authorities\Local Computer
9. Click Next and then Finish to complete the import process.
Uninstalling HP 3PAR Management Plug-in and Recovery Manager Software for VMware vSphere
To uninstall HP 3PAR Management Plug-in and Recovery Manager Software for VMware vSphere:
1. Click Start→Control Panel→Programs and Features.
2. Select HP 3PAR Management Plug-in and Recovery Manager for VMware vSphere from the
list of programs.
3. Click Uninstall.
4. If the secure network port is used, you need to unbind the port.
For installations on Windows 2008, run netsh http show sslcert to view port binding
information.
Upgrading from a Previous Version
When upgrading from a previous version, the installer detects whether a previous version is installed
and then either performs a new install or an upgrade. Before upgrading from a previous version,
consider the details provided in the following sections.
Using Secure Service Connections
When installing HP 3PAR Management Plug-in and Recovery Manager Software for VMware
vSphere 2.3.0 over an existing installation, you must first make sure that the previous version uses
secure service connections. If the previous version is using port 9930 (or any other unsecured port),
use the Admin Tool to enable the secure service option for the older version before performing the
upgrade. An upgrade is only applicable for version 2.1.0 and 2.2.0. See“Using the Admin Tool
to Modify Configuration Settings” (page 32) for details.
Refreshing Plug-in Details
When upgrading from a previous version, a prompt to update an existing plug-in registration
appears at the end of the installation. if you view plug-in details from the Plug-in Manger, the
version information is not updated to reflect the latest version. Use the Plugin Registration option
available through the RMVMware Admin Tool to unregister and then register the plug-in with the
vCenter server (see “Plug-in Registration” (page 35) for details).
Uninstalling HP 3PAR Management Plug-in and Recovery Manager Software for VMware vSphere 31
Page 32

3 Using the Admin Tool to Modify Configuration Settings
This chapter describes the default HP 3PAR Management Plug-in and Recovery Manager Software
for VMware vSphere configuration, as well as how to edit configuration settings using the
RMVMware Admin Tool.
Overview
HP 3PAR Management Plug-in and Recovery Manager Software for VMware vSphere is provided
with default configuration settings that are compatible with most environments. However, it is
recommended that you verify the default parameters and make appropriate changes as necessary.
RMVMware Admin Tool, a Graphical User Interface (GUI), is provided for making configuration
changes.
The RMVMware Admin Tool
The RMVMware Admin Tool is used to configure HP 3PAR Management Plug-in and Recovery
Manager Software for VMware vSphere, configure VASA, set the storage system credentials, and
configure Host Explorer for VMware.
NOTE: To use the RMVMware Admin Tool, you must have Administrator privileges. If you are
using Windows 2008, and have User Account Control activated, you need right click the
RMVMware Admin Tool and launch it using the Run as Administrator option.
To access the RMVMware Admin Tool click Start→Programs→HP 3PAR→HP 3PAR Management
Plug-in and Recovery Manager for VMware vSphere Admin.
The configuration options are accessed through the following tabs, which are discussed further in
the proceeding sections:
• vCenter Plug-in -- Configures the RMV plug-in for the vCenter Server.
• Host Explorer -- Configures the Host Explorer to retrieve appropriate ESX host information from
the vCenter Server.
• VASA -- Configure VASA functionality and HP 3PAR Storage System mapping.
• Storage System Credentials -- Configures the credential information for access to storage
systems.
vCenter Plug-in Tab
The vCenter Plug-in tab allows you to edit HP 3PAR Management Plug-in parameters for optimal
use in your environment (Figure 16 (page 33)).
32 Using the Admin Tool to Modify Configuration Settings
Page 33
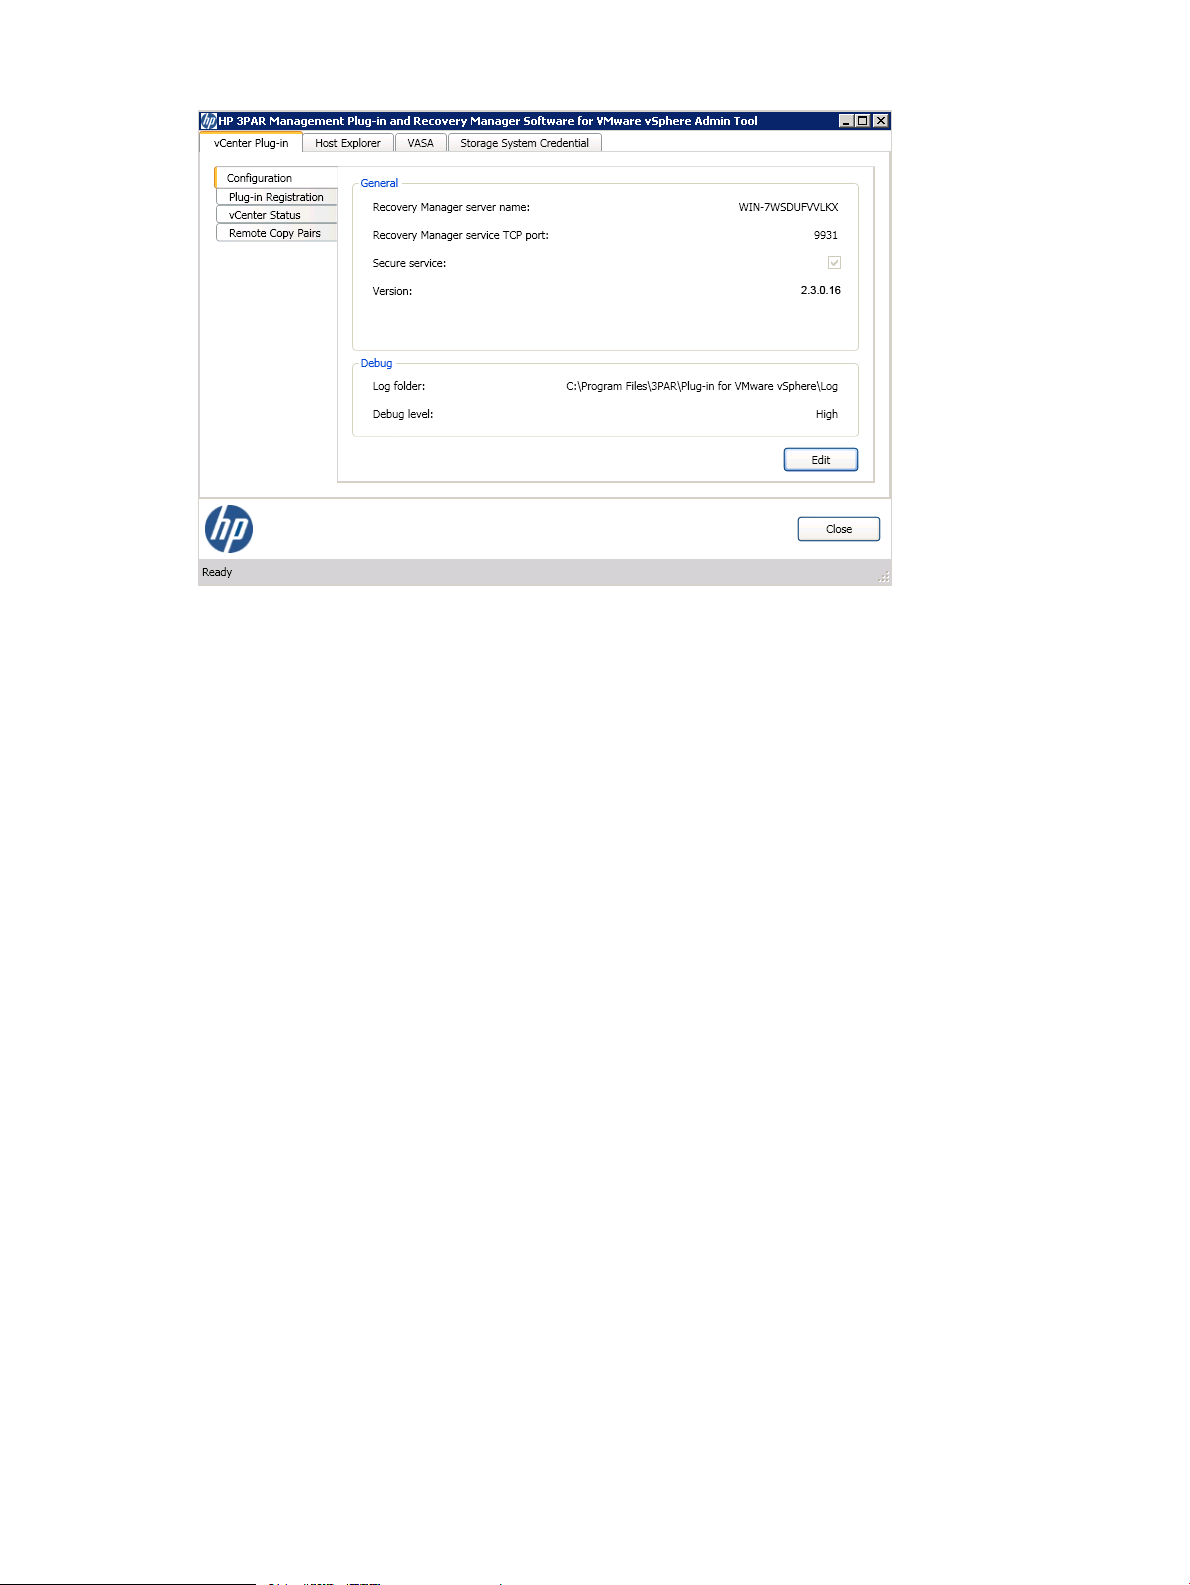
Figure 16 vCenter Plug-in Tab
Details concerning the fields of the vCenter Plug-in tab are provided in the following sections.
vCenter Plug-in Configuration
The vCenter Plug-in configuration is used to specify the host name and VM service port. Debug
settings can also be configured here.
To modify the information on the Configuration option:
vCenter Plug-in Tab 33
Page 34
1. Click Edit.
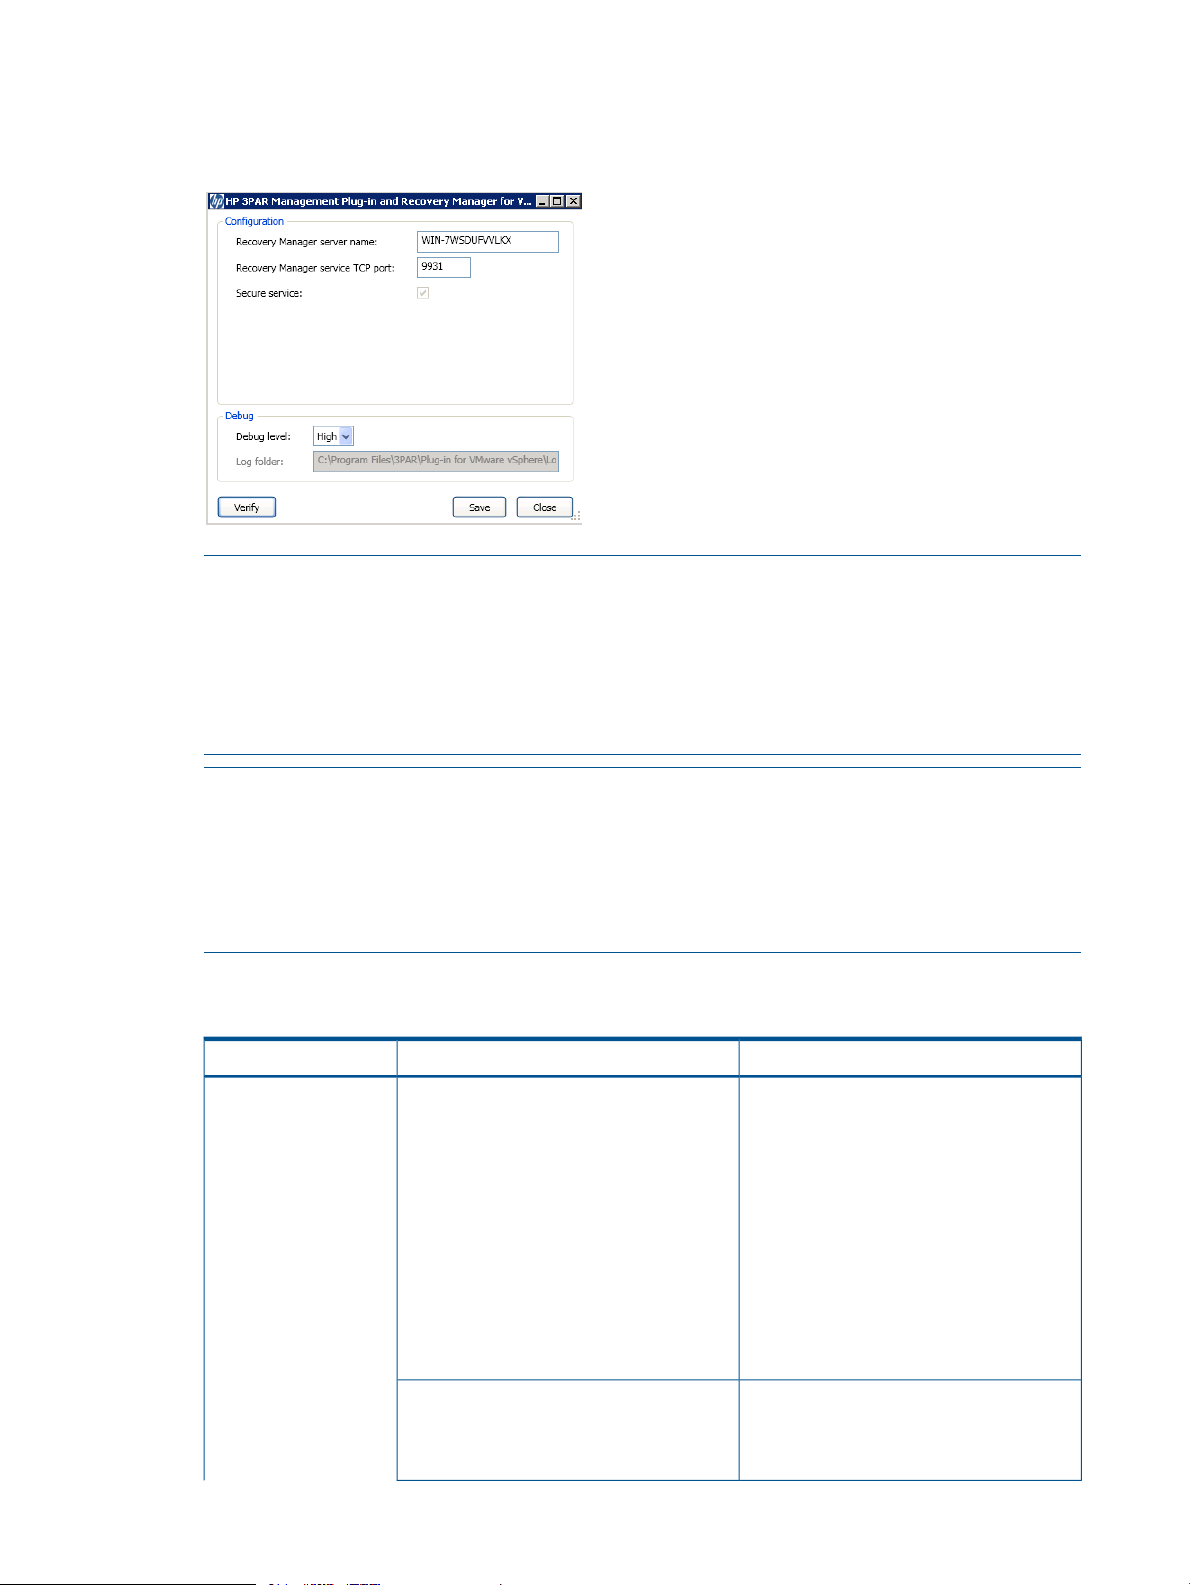
The Edit Configuration dialog box appears (Figure 17 (page 34)).
Figure 17 vCenter Plug-in Configuration
NOTE: If you wish to change the values of the Recovery Manager server name or Recovery
Manager service TCP port properties under the Configuration tab, you must unregister the HP
3PAR Management Plug-in and Recovery Manager Software for VMware vSphere plug-in
from all vCenter Servers prior to the change; restart HP 3PAR Management Plug-in and Recovery
Manager for VMware vSphere Web Service; and reregister the vCenter Servers again after
the change. If the HP 3PAR Recovery Manager Administrator is assigned in the vCenter server,
the privilege will be lost when the plug-in is unregistered. The role will need to be reassigned.
:
If you encounter the following message, Could not create port binding. SSL
Certificate add failed, Error: 1312 A specified session does not
exist. It may already have been terminated. , while changing the port number,
refer to “Allowing Port Selections with Windows 2008 Installation” (page 25) to add permission
and remove an existing certificate. Rerun the Admin Tool to change the port number.
The fields available from the Configuration tab are shown in Table 1 (page 34).
Table 1 Configuration Tab Fields
DescriptionFieldGroup
Recovery Manager server nameConfiguration
The network host of the server where HP
3PAR Management Plug-in and Recovery
Manager Software for VMware vSphere is
installed. The vCenter Server and all
desktops running the vSphere client using
the HP 3PAR plug-in must be able to reach
this server. The name is used while
registering the HP 3PAR plug-in with the
vCenter Server.
The fully qualified name of the DNS name
of the running server is the default name.
The name can be changed to any name or
IP address.
Recovery Manager service TCP port
34 Using the Admin Tool to Modify Configuration Settings
The network port number that the
TpdVmWebService Web service uses. The
default port is 9931 for secure connections.
This can be changed to any unused port.
Page 35
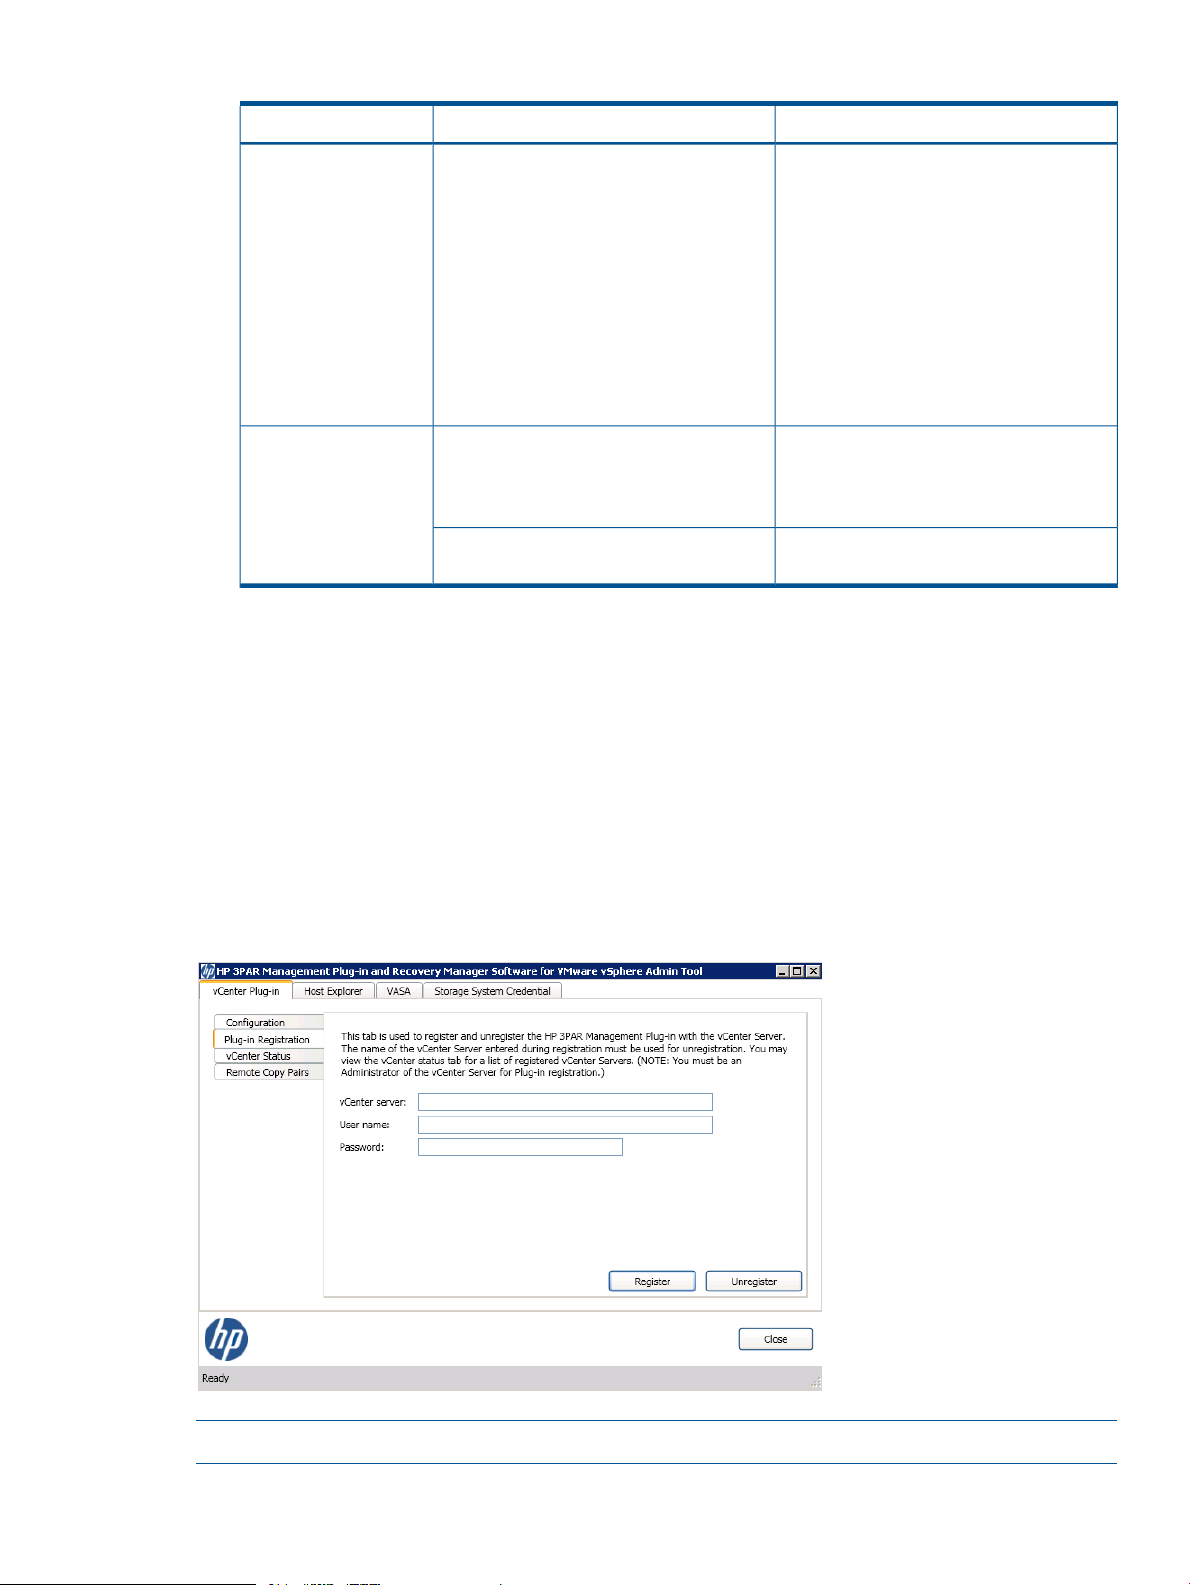
Table 1 Configuration Tab Fields (continued)
DescriptionFieldGroup
Secure service
Log folderDebug
Debug level
HP 3PAR Management Plug-in and
Recovery Manager Software for VMware
vSphere uses a secure Web service (using
SSL certificates) securing all interactions
between the VMware components (vCenter
Server and vSphere clients) and HP 3PAR
Management Plug-in and Recovery
Manager Software for VMware vSphere.
The SSL certificate for HP 3PAR
Management Plug-in and Recovery
Manager Software for VMware vSphere
(provided by HP 3PAR) must be installed.
The trace file name. The default file name
is <system drive>:\Program Files\
3PAR\Plug-In for Vmware
vSphere\Log.
Specifies the level of verbosity of the log
file. The default value is Low.
2. Modify the fields as necessary.
3. Click Verify.
The operating environment is examined and, if no configuration errors are reported, a dialog
appears indicating that the configuration has been completed successfully.
4. Click OK.
5. Click Save to save your changes.
Plug-in Registration
The Plug-in Registration option is used to register and unregister the HP 3PAR plug-in with the
vCenter Server is shown in (Figure 18 (page 35)).
Figure 18 Plug-in Registration
NOTE: You must be an Administrator of the vCenter Server for plug-in registration.
The fields available from the Plug-in Registration tab are shown in Table 2 (page 36).
vCenter Plug-in Tab 35
Page 36
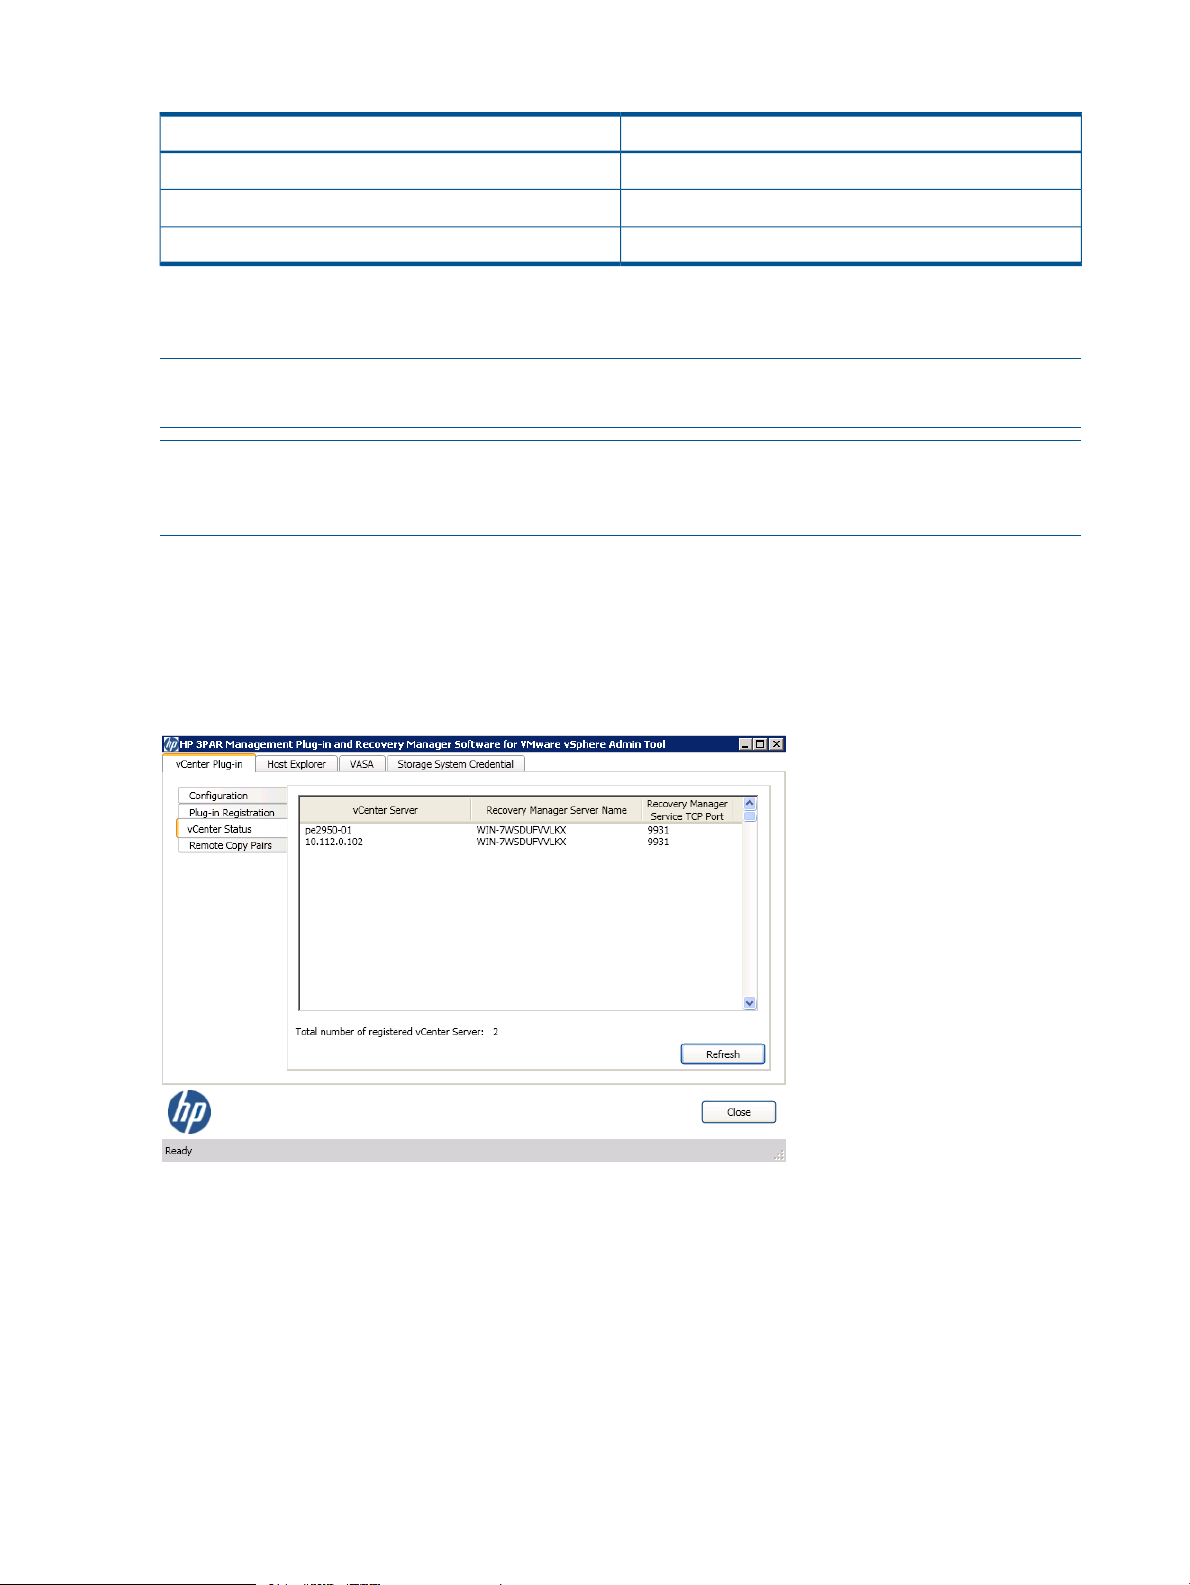
Table 2 Plugin Registration Option Fields
• If you are registering the plug-in, click Register.
• If you are unregistering the plug-in, click Unregister.
NOTE: The same instance of HP 3PAR Management Plug-in and Recovery Manager Software
for VMware vSphere can be registered with multiple vCenter Servers.
NOTE: The name of the vCenter Server entered during registration must be used for unregistering.
For example, if you used the fully qualified domain name to register, you must use the fully qualified
domain name to unregister.
vCenter Status
The vCenter Status option displays a list of vCenter Servers to which the HP 3PAR Management
Plug-in and Recovery Manager Software for VMware vSphere are registered. The vCenter Status
option is shown in (Figure 19 (page 36)).
DescriptionField
The name of the vCenter Server.vCenter Server
The administrator user name.User Name
The administrator user password.Password
Figure 19 vCenter Status Option
The vCenter server, Recovery Manager Service Name and Recovery Manager Service TCP port
are listed. The total number of registered vCenter Servers is also shown.
Remote Copy Pairs
The Remote Copy Pairs option is used to manage the registration of remote copy pairs between a
local and remote system. The Remote Copy Pairs option is shown in (Figure 19 (page 36)).
36 Using the Admin Tool to Modify Configuration Settings
Page 37
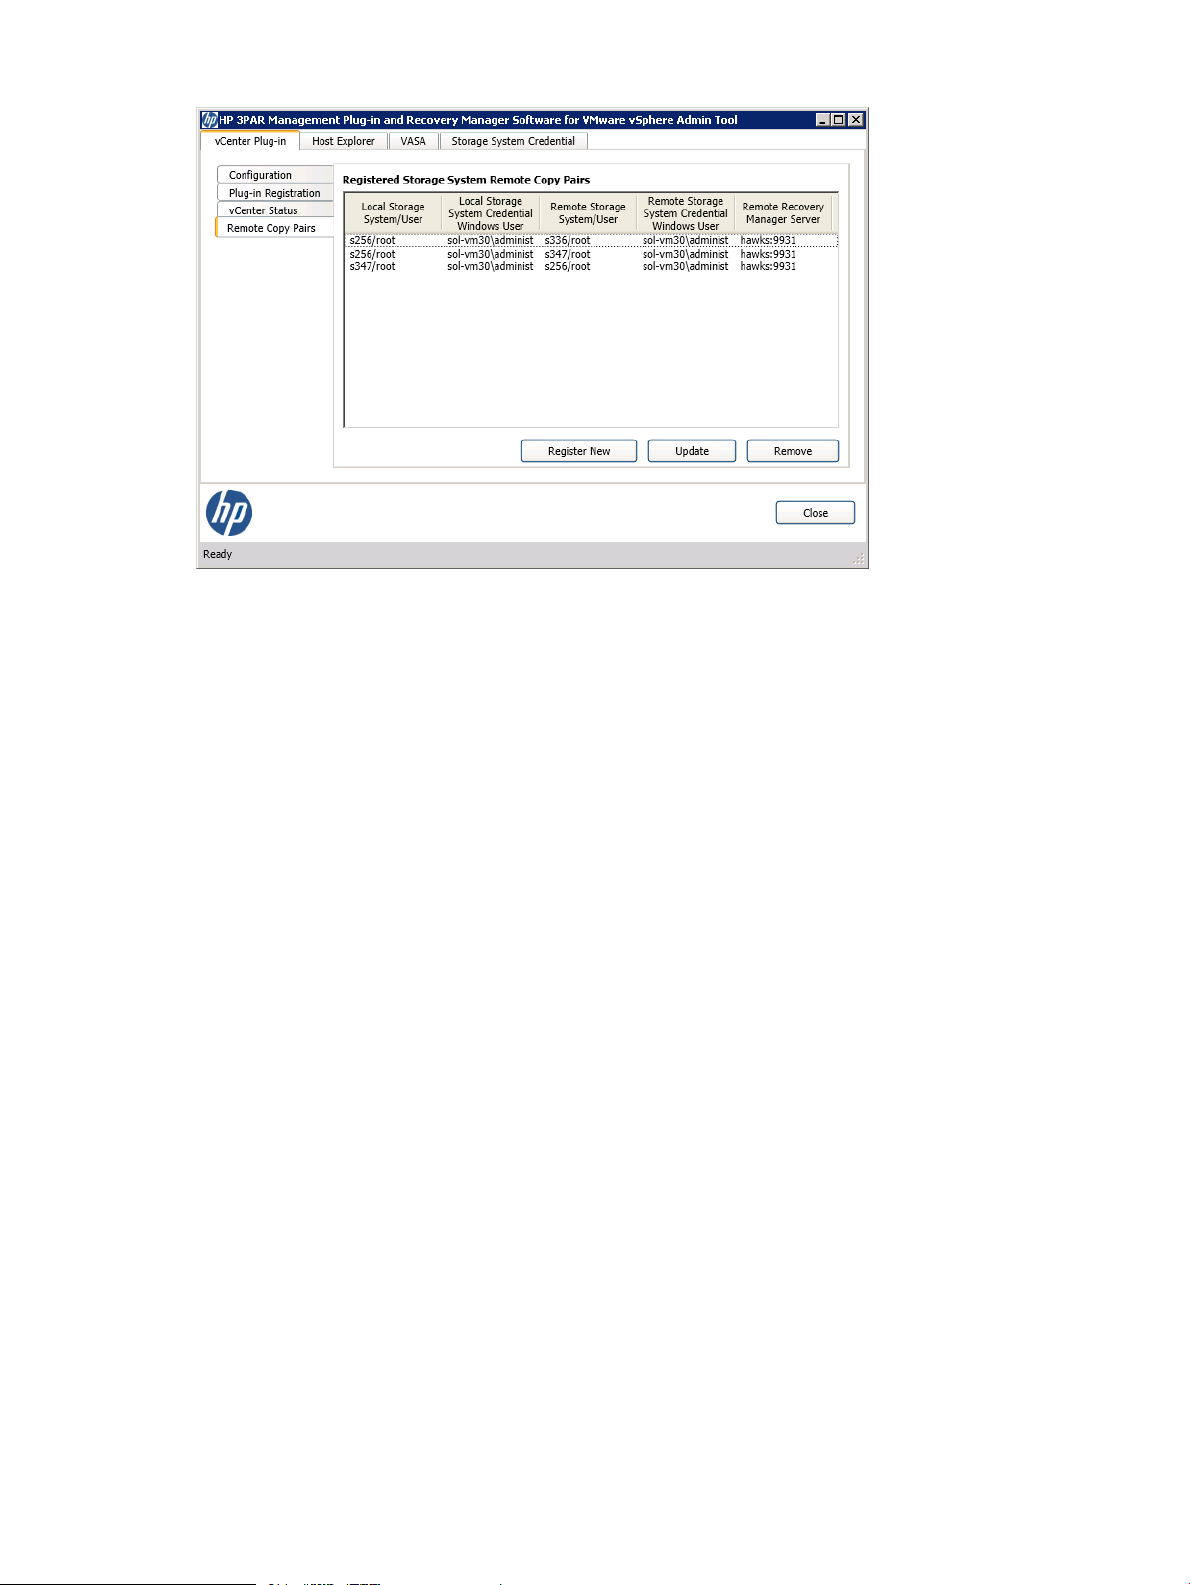
Figure 20 Remote Copy Pairs
The Remote Copy Pairs list shows currently registered storage system remote copy pairs. The fields
are as follows:
• Local Storage System/User - Name of the HP 3PAR Storage System and the associated user.
• Local Storage System Credential Windows User - Windows user credentials for the accessing
the local system.
• Remote Storage System/User - Name of the remote HP 3PAR Storage System and associated
user.
• Remote Storage System Credential Windows User - Windows user credentials for the accessing
the remote system.
• Remote Recovery Manager Server - Remote Recovery Manager Server host identifier.
To add a new remote copy pair registration, click the Register New button. The Register Remote
Copy Storage System Pair screen appears
vCenter Plug-in Tab 37
Page 38
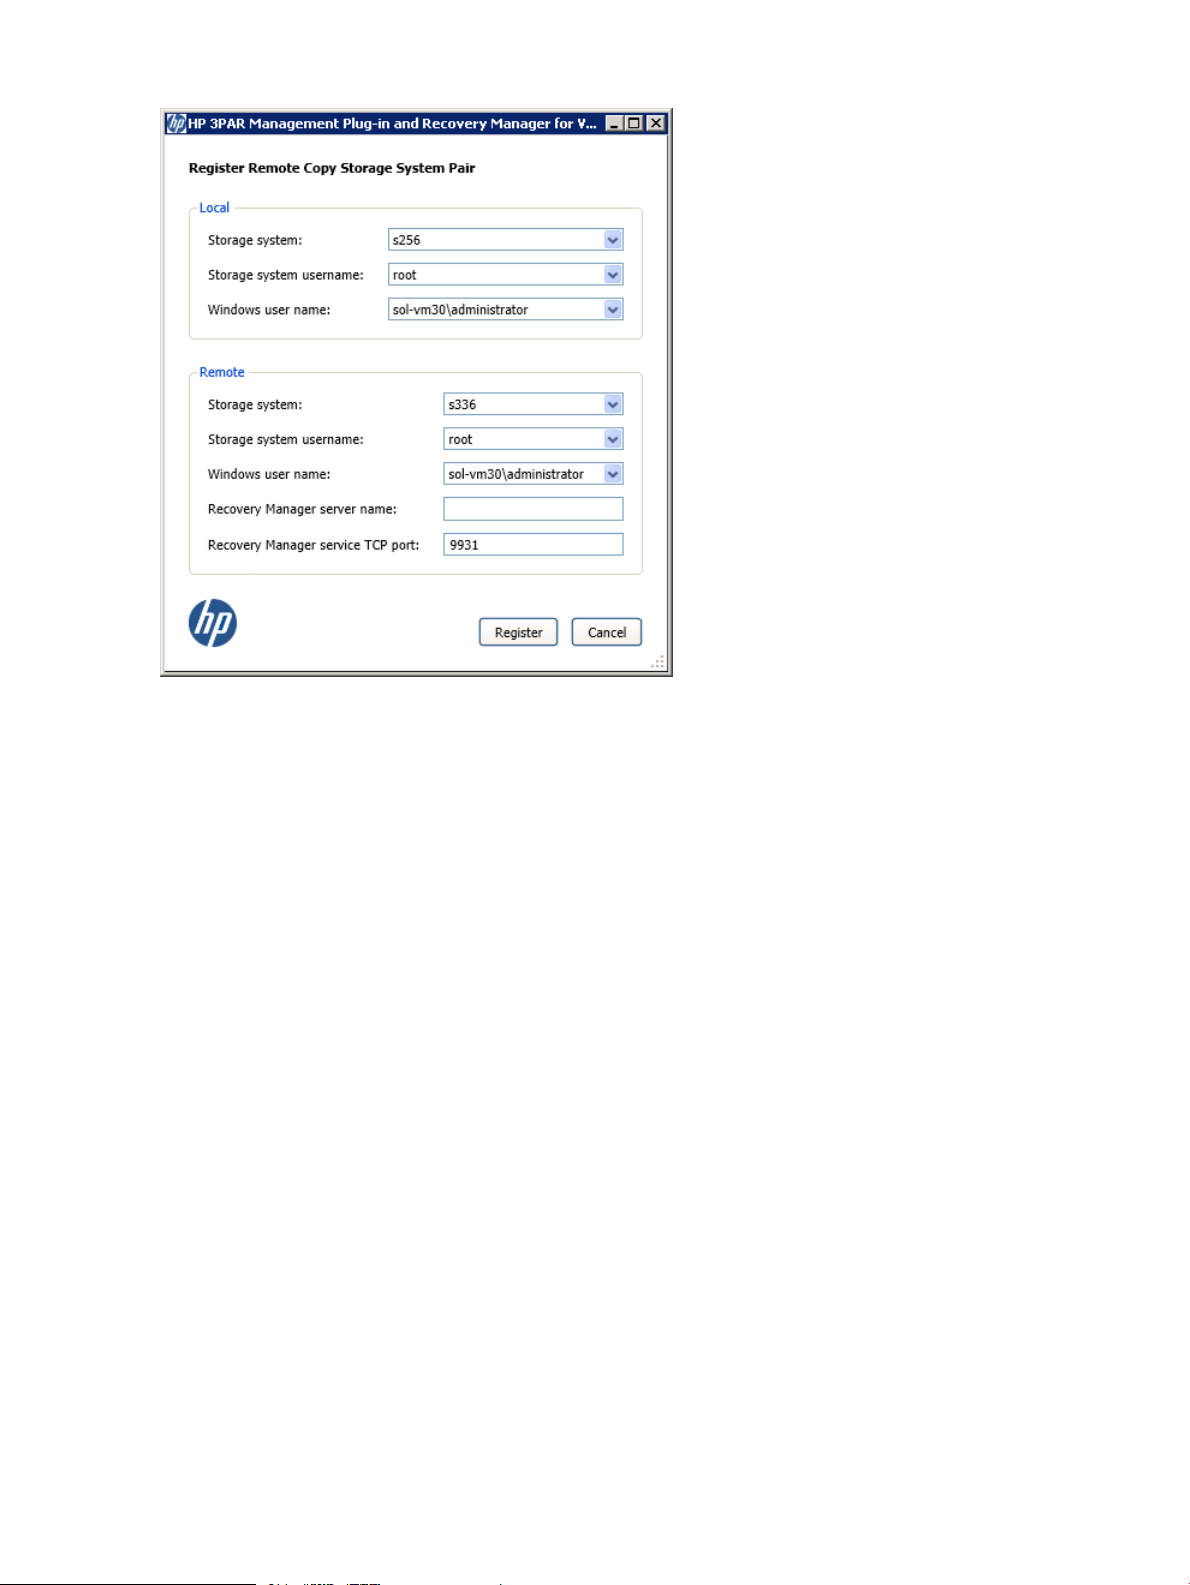
Figure 21 Register Remote Copy Storage System Pair
Host Explorer Tab
Host Explorer is a service that runs in the background and gathers ESX server information that is
managed via the vCenter server for the HP 3PAR Storage System. For Host Explorer to function
properly, it needs to know which vCenter server to connect for information as well as the name of
the system where the information will be sent.
Host Explorer Configuration
The Host Explorer configuration option is used to configure and check on the Host Explorer
Configuration (Figure 22 (page 39)).
38 Using the Admin Tool to Modify Configuration Settings
Page 39

Figure 22 Host Explorer Configuration Option
The selections available from Host Explorer Configuration screen are described in Table 3 (page 39).
Table 3 Host Explorer Configuration Option Fields
Change Refresh Interval
NOTE: The Host Explorer Service needs to be restarted after changing the refresh interval time.
Storage System Mapping
The Storage System Mapping option is used to map existing HP 3PAR Storage System credentials
to be used by Host Explorer for submitting corresponding ESX host information. The credentials
need to be created via Storage System Credential or RMVMware.exe with option VCenterRegister
prior to the mapping. Since Host Explorer uses the system ID obtained from ESX host information
to determine which HP 3PAR Storage System it is connected to, only one mapping is allowed per
storage system. The Host Explorer Storage System Mapping option appears (Figure 23 (page 40)).
DescriptionField
Starts the Host Explorer service.Start Service
Stops the Host Explorer service.Stop Service
Refreshes/restarts the Host Explorer service.Refresh Service
Allows you to change the refresh interval that determines how frequently the host explorer
service checks for host changes. The current state is compared with the previous state
and, if there have been any changes, the HP 3PAR Storage System is updated. The
default refresh interval is set to 12 hrs.
Indicates whether the HP 3PAR Host Explorer service is currently running.Status
Host Explorer Tab 39
Page 40
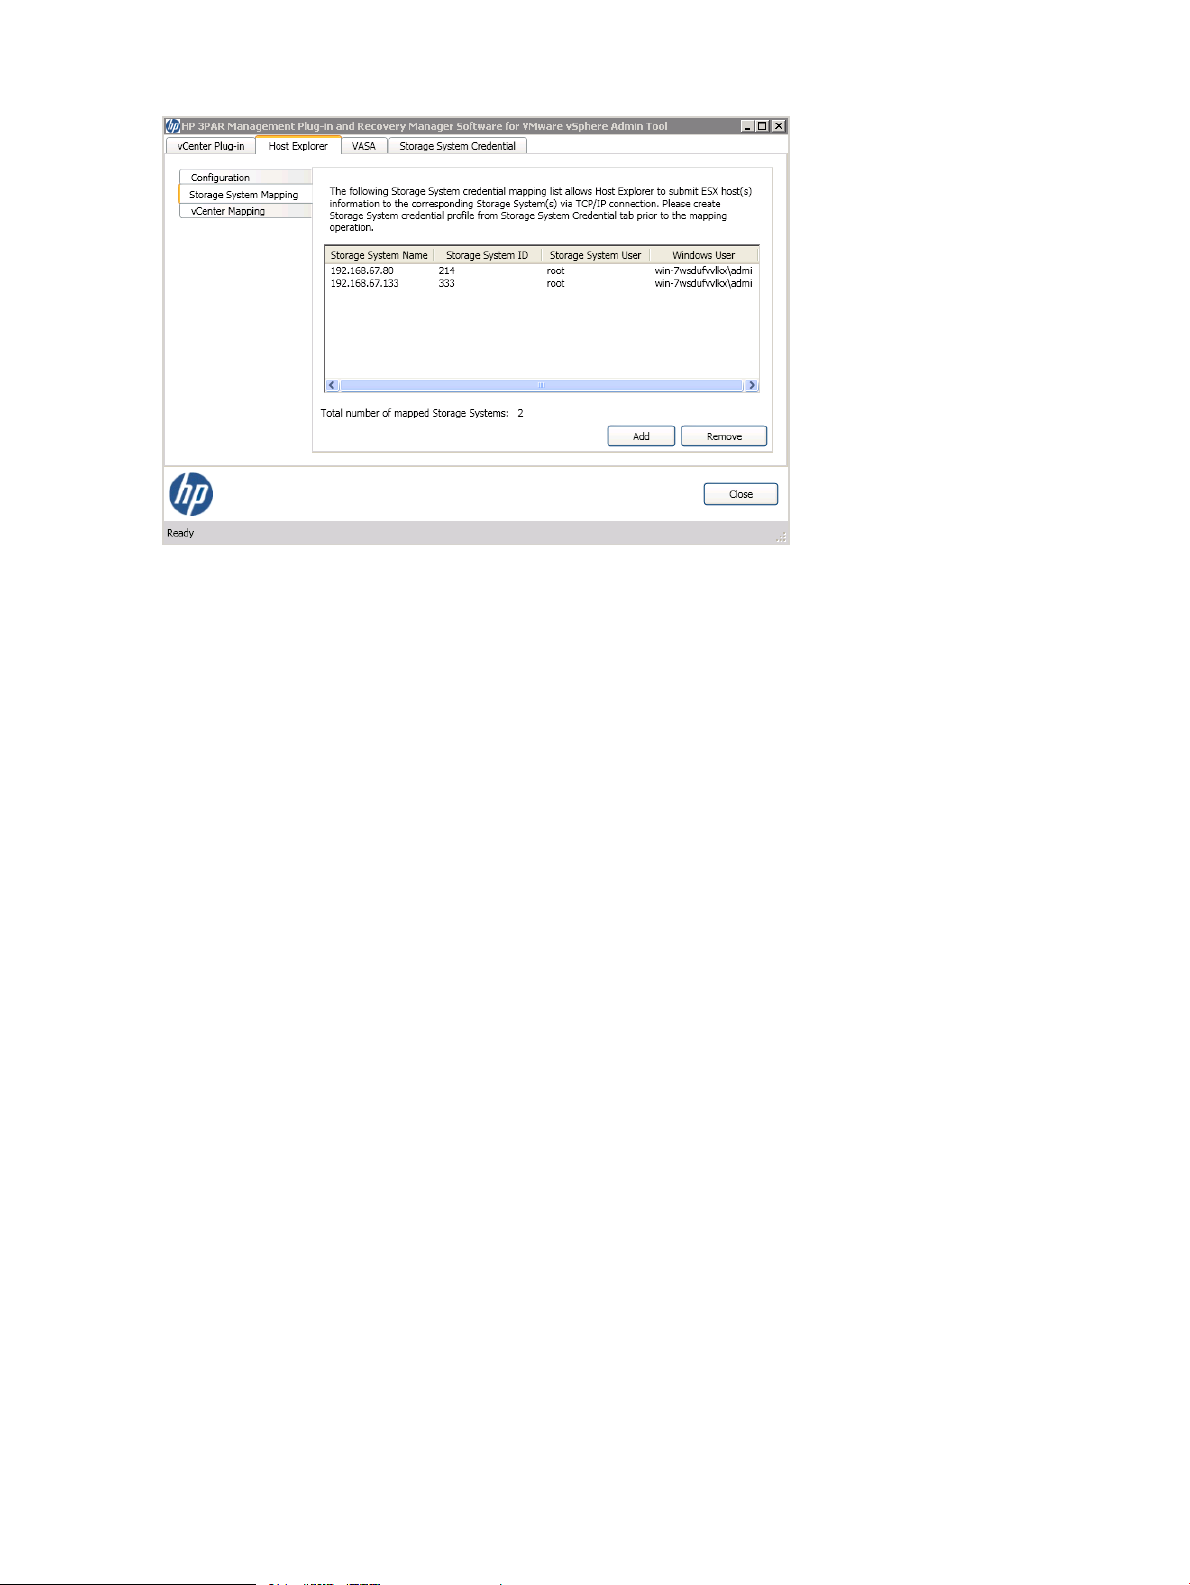
Figure 23 Host Explorer Storage System Mapping Option
The Storage System mapping list shows all the credentials that are currently defined. The fields are
as follows:
• Storage System Name - Name of the registered HP 3PAR Storage System.
• Storage System ID - System ID for the HP 3PAR Storage System.
• Storage System User - User name associated with the HP 3PAR Storage System.
• Windows User - Windows user who created the Storage System credential.
To add a mapping:
1. Click Add. The Map Registered HP 3PAR Storage System Credential dialog appears.
2. Choose the appropriate HP 3PAR Storage System entry from the list, then click OK.
You can only remove one entry at a time. Confirmation will be given during the removal
process.
If an HP 3PAR Storage System ID already exists on the mapping list, any registered entry that
has the same Storage System ID is filtered out.
vCenter Mapping
The vCenter Mapping option is used to map existing vCenter credential from a selected vCenter
Store Credential file for use by Host Explorer to make inquiries about ESX host information. The
vCenter Mapping option is shown in Figure 24 (page 41).
40 Using the Admin Tool to Modify Configuration Settings
Page 41
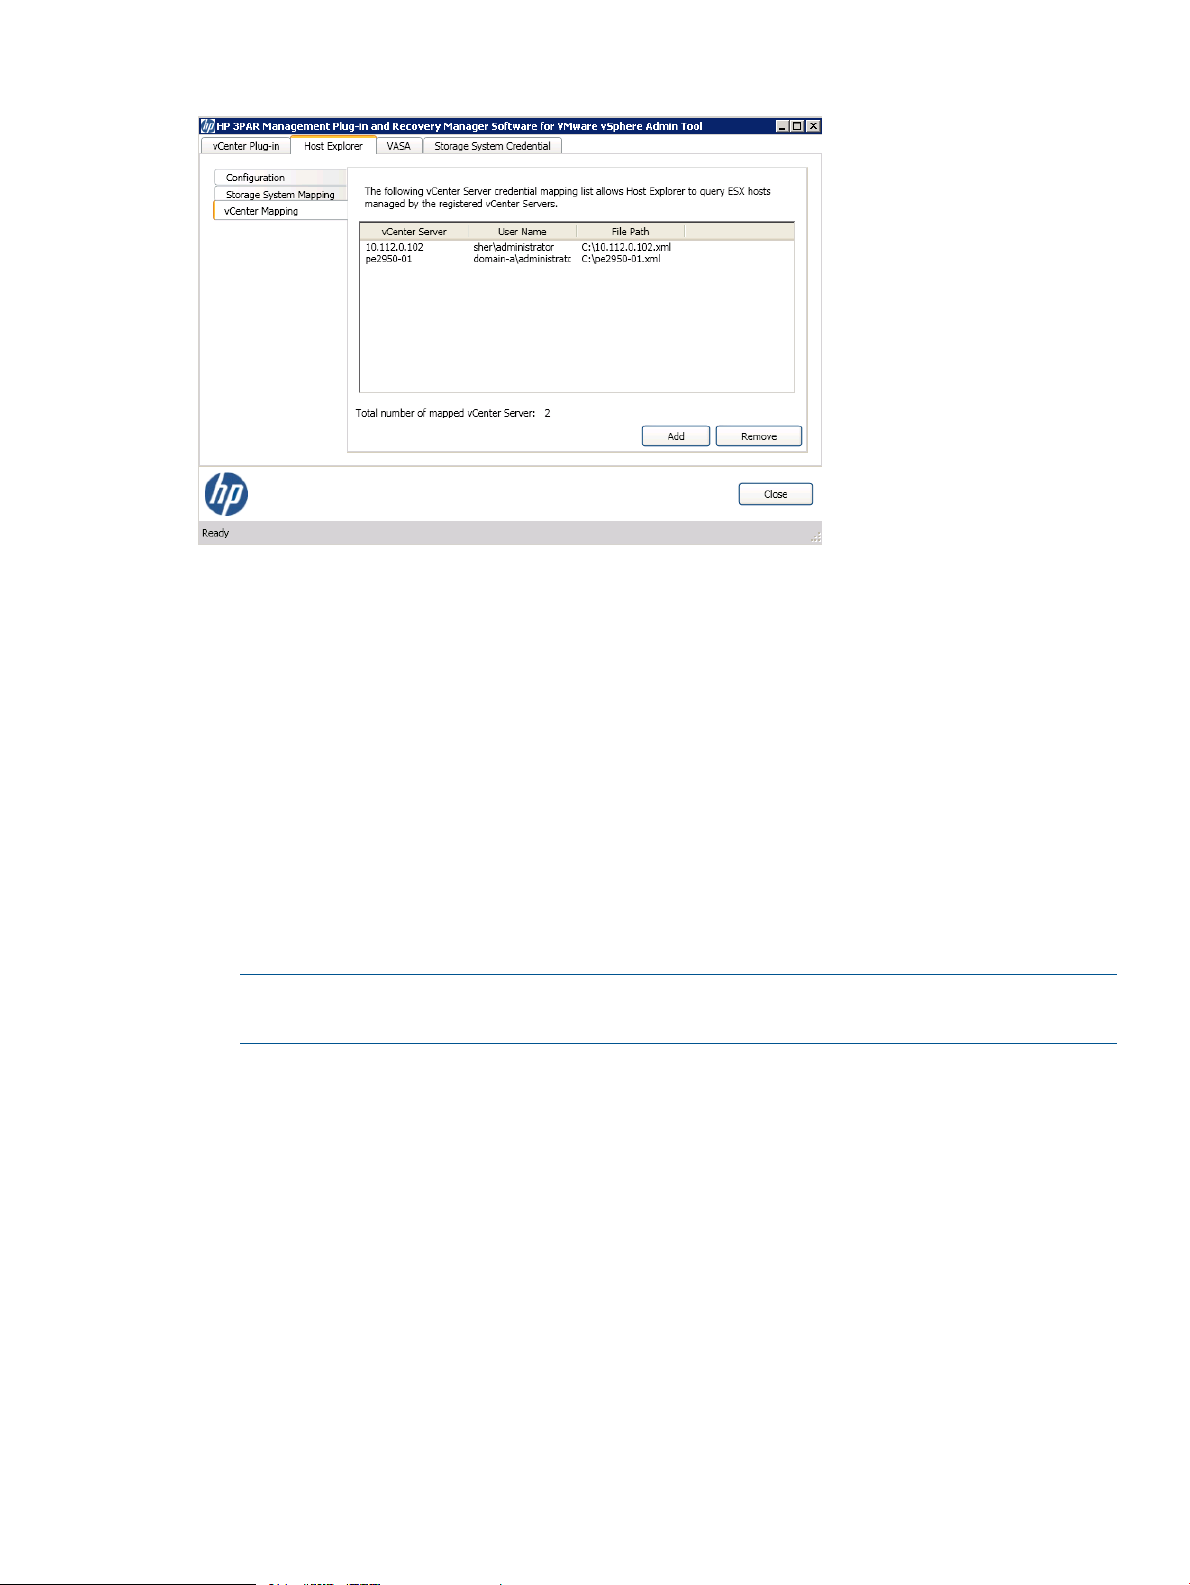
Figure 24 Host Explorer vCenter Mapping
The vCenter mapping list shows all the credentials that are currently defined. The fields are as
follows:
• vCenter Server - Name of the vCenter server.
• User Name - User name associated with the vCenter server.
• File Path - Location of the credential store file.
To add a mapping:
1. Click Add.
The Map Registered vCenter Server Credential dialog appears.
2. Click Browse to import an existing vCenter credential store file.
3. Choose the appropriate file from the list, then click Select.
You can only remove one entry at a time. Confirmation will be given during the removal
process.
NOTE: The vCenter Store Credentials file should be set to allow access permission for the
administrative group and system account.
The VASA Tab
A VASA Provider is a software component that acts as a server in the vSphere environment. A
vCenter Server connects to the VASA Provider to obtain information about available storage
topology, capabilities, and state. The vCenter Server can then provide the appropriate information
to vSphere clients.
VASA Configuration
The VASA Configuration option is used to examine and configure VASA capabilities for your
installation. (Figure 25 (page 42)).
The VASA Tab 41
Page 42

Figure 25 VASA Configuration
The selections available from VASA Configuration screen are described in Table 4 (page 42).
Table 4 VASA Configuration Options
DescriptionField
Shows the port to which the VASA web service is binding.VASA service TCP port
Shows whether secure service is selected.Secure service
Shows the URL address required to connect to VASA web service.Web service URL
Shows the folder where log files are stored.Log folder
Specifies the level of verbosity for the log file.Debug level
The default value is Medium.
To modify the VASA configuration options:
42 Using the Admin Tool to Modify Configuration Settings
Page 43

• Click the Edit button.
The Edit Configuration dialog box appears.
Table 5 VASA Configuration Edit Options
DescriptionField
Specifies a numeric value for binding a specified port.VASA service TCP port
Secure services
Debug level
If the debug level is modified, changes will be updated to the VASA web service immediately.
If the port number is modified, user will be prompted with a confirmation to restart the VASA
web service.
Storage System Mapping
Storage System mapping allows user to map existing HP 3PAR Storage System credentials to be
used by VASA to gather storage information in response to a request from a vCenter. The Storage
System credentials have to be created via Storage System Credential or RMVMware.exe with
InServRegister option prior to the mapping. Since VASA uses the system ID obtained from the ESX
host information to determine which Storage System it is connected to, only one mapping is allowed
per HP 3PAR Storage System. The Storage System Mapping option is shown in Figure 26 (page 43).
Indicates that secure communications are implemented. For security purposes, this
option is fixed and cannot be modified.
Specifies the debug level. There are three debug levels to choose from (low, medium,
high). Setting the level to high will log everything including communication request
and responses between SMS and VASA.
The location of the log folder is fixed.Log folder
Validates the port usage and SSL binding on the port.Verify (button)
Saves the current configuration.Save (button)
Closes the Edit dialog.Close (button)
Figure 26 VASA Storage System Mapping
The VASA Tab 43
Page 44

The Storage System mapping list shows all the credentials that are currently defined. The fields are
as follows:
Storage System Name -- Name of the registered HP 3PAR Storage System.
Storage System ID -- HP 3PAR Storage System ID or Storage System ID.
Storage System User -- Storage System User Name.
Windows User -- Windows user who created the Storage System credential.
To add a mapping:
1. Click Add.
The Map Registered HP 3PAR Storage System Credential dialog appears.
2. Choose the appropriate entry from the list, then click OK.
If a Storage System ID has already been mapped on the mapping list, the adding dialog filters
out any registered entry that has the same Storage System ID.
You also have the option of removing a credential mapping by selecting an entry from the list
and choosing the Remove button. You can only remove one entry at a time. Confirmation is
requested before the removal is performed.
If you encounter a problem when working with credentials, see “Troubleshooting for VASA”
(page 92) for explanations of the various error codes.
NOTE: If the changes to Storage System mapping list contains hosts that vCenter is currently
monitoring, the existing VASA session associated with the vCenter is invalidated.
Storage System Credential Tab
The Storage System Credential tab allows you to add, remove and validate Storage System
credentials associated with a specific Windows login account as shown in (Figure 27 (page 44)).
Figure 27 Storage System Credential Tab
44 Using the Admin Tool to Modify Configuration Settings
Page 45

You have the option of viewing all existing Windows users that have registered credentials, or you
can select a specific user from the list shown in the pull down menu.
A listing of registered credentials is shown for the selected users with fields defined as follows:
• Storage System Name - Name of the HP 3PAR Storage System.
• Storage System ID - System ID for the HP 3PAR Storage System.
• Storage System User - User name for accessing the HP 3PAR Storage System.
• Windows User - Windows user that created the credentials.
• Reserved By - If available, shows the component for which the credentials are reserved. If the
credential are cashed via the Plug-in auto login feature, then credentials are valid only for the
Plug-in and are not valid for accessing any other components. To create credential for auto
login purpose, the “Remember Me” check box must be checked when logging onto a given
Storage System.
To specify a new Storage System credential:
1. Click Add.
The HP 3PAR Storage System Credential Management dialog appears.
2. Enter the appropriate credential information for the HP 3PAR Storage System and user including
the valid password, then click OK.
You also have the option of removing or validating an entry. You can only remove one
credential at a time.
3. When you have finished, click Close.
When adding a new credential, it will be associated with the current Windows user login
account by default. The validation process returns the appropriate user privileges upon
successful connection and validation with the HP 3PAR Storage System. As an alternative,
when performing operations (e.g., remote copying) from a remote system , you can unselect
the Using current Windows logon user name option, and instead supply a specific Windows
user name (domain\username) associated with the user of the remote system.
CAUTION: Removing a Storage System credential that is currently used by Host Explorer,
the RMVMware CLI, VASA provider, Remote Copy Pairing or the scheduler will prevent these
components from operating normally.
Storage System Credential Tab 45
Page 46

4 Logging In and Working with Virtual Volumes
The HP 3PAR Management Plug-in for VMware vCenter is used for viewing virtual volume mapping.
You can also create and expose virtual volumes to an ESX host based on a template where you
fill in the details or based on the provisioning configuration of an existing Datastore. This chapter
explains how to log, view information about virtual volume mapping, and how to create new virtual
volumes.
NOTE: HP 3PAR Management Plug-in and Recovery Manager Software for VMware vSphere
supports Microsoft Internet Explorer as the Windows default browser.
NOTE: When configured with secure access to the vCenter Server, the Security Information "This
page contains both secure and non-secure items” will be displayed.
To enable the display of secure and non secure content:
1. Click Start→Settings→Control Panel→Internet Options.
2. On the Security tab, click Custom level→Miscellaneous.
3. Enable the Display Mixed content option.
4. Click OK.
Logging In
To start the HP 3PAR Management Plug-in for VMware vCenter:
46 Logging In and Working with Virtual Volumes
Page 47

1. Start the VMware vSphere Client on your desktop.
The VMware vSphere Client log in screen appears (Figure 28 (page 47)).
Figure 28 Logging into the vSphere Client
2. Log into the vSphere Client.
a. Enter the vCenter Server’s IP address or name.
b. Enter your user name and password.
c. Click Login.
The vCenter Server’s home page appears (Figure 29 (page 47)).
Figure 29 Virtual Center Home Page
Logging In 47
Page 48

3. Under Solutions and Applications, click HP 3PAR Management Plug-in and Recovery Manager
for VMware vSphere.
A list of storage systems associated with the ESX(i) host displays.
Figure 30 HP 3PAR Management Plug-in
To update the entire Storage System list, right-click the HP 3PAR Storage System root-entry and
select the Refresh in the popup menu option.
To manually add a storage system entry that is not on the list, right-click the HP 3PAR Storage
System and select connect. The HP Storage System connection screen appears requesting the
login details.
Figure 31 HP 3PAR Storage System Connection Screen
48 Logging In and Working with Virtual Volumes
Page 49

4. To connect to a specific storage system on the list, expand the list tree and click the desired
system to connect or right-click the desired entry to show the popup menu and select Login.
5. Enter the appropriate information In the connect dialog box:
a. Enter the HP 3PAR Storage System name or IP address.
b. Enter the Storage System user name and password.
c. Select the Remember Me check box to prevent having to log on each time you access
this system.
Logging In 49
Page 50

6. Click Login.
The Summary tab shows detailed information about the selected system including the following:
Figure 32 Storage System Summary
Table 6 Storage System Information Summary
ValueGeneral
Name of storage systemSystem name:
Model of storage systemSystem model:
Storage system serial numberSerial number:
Storage system ID numberSystem ID:
World Wide Name of storage systemSystem WWN:
Number of nodes available in storage systemNumber of nodes:
Nodes appearing onlineNodes online:
Login userLogged on as:
NOTE: You can login to a different Storage System credential by right-clicking the specific
Storage System and select Logout. Logging out does not remove the cached credential for
auto login. Refer “User Authentication” (page 13) for more information.
Figure 33 Logging In a Storage System
50 Logging In and Working with Virtual Volumes
Page 51
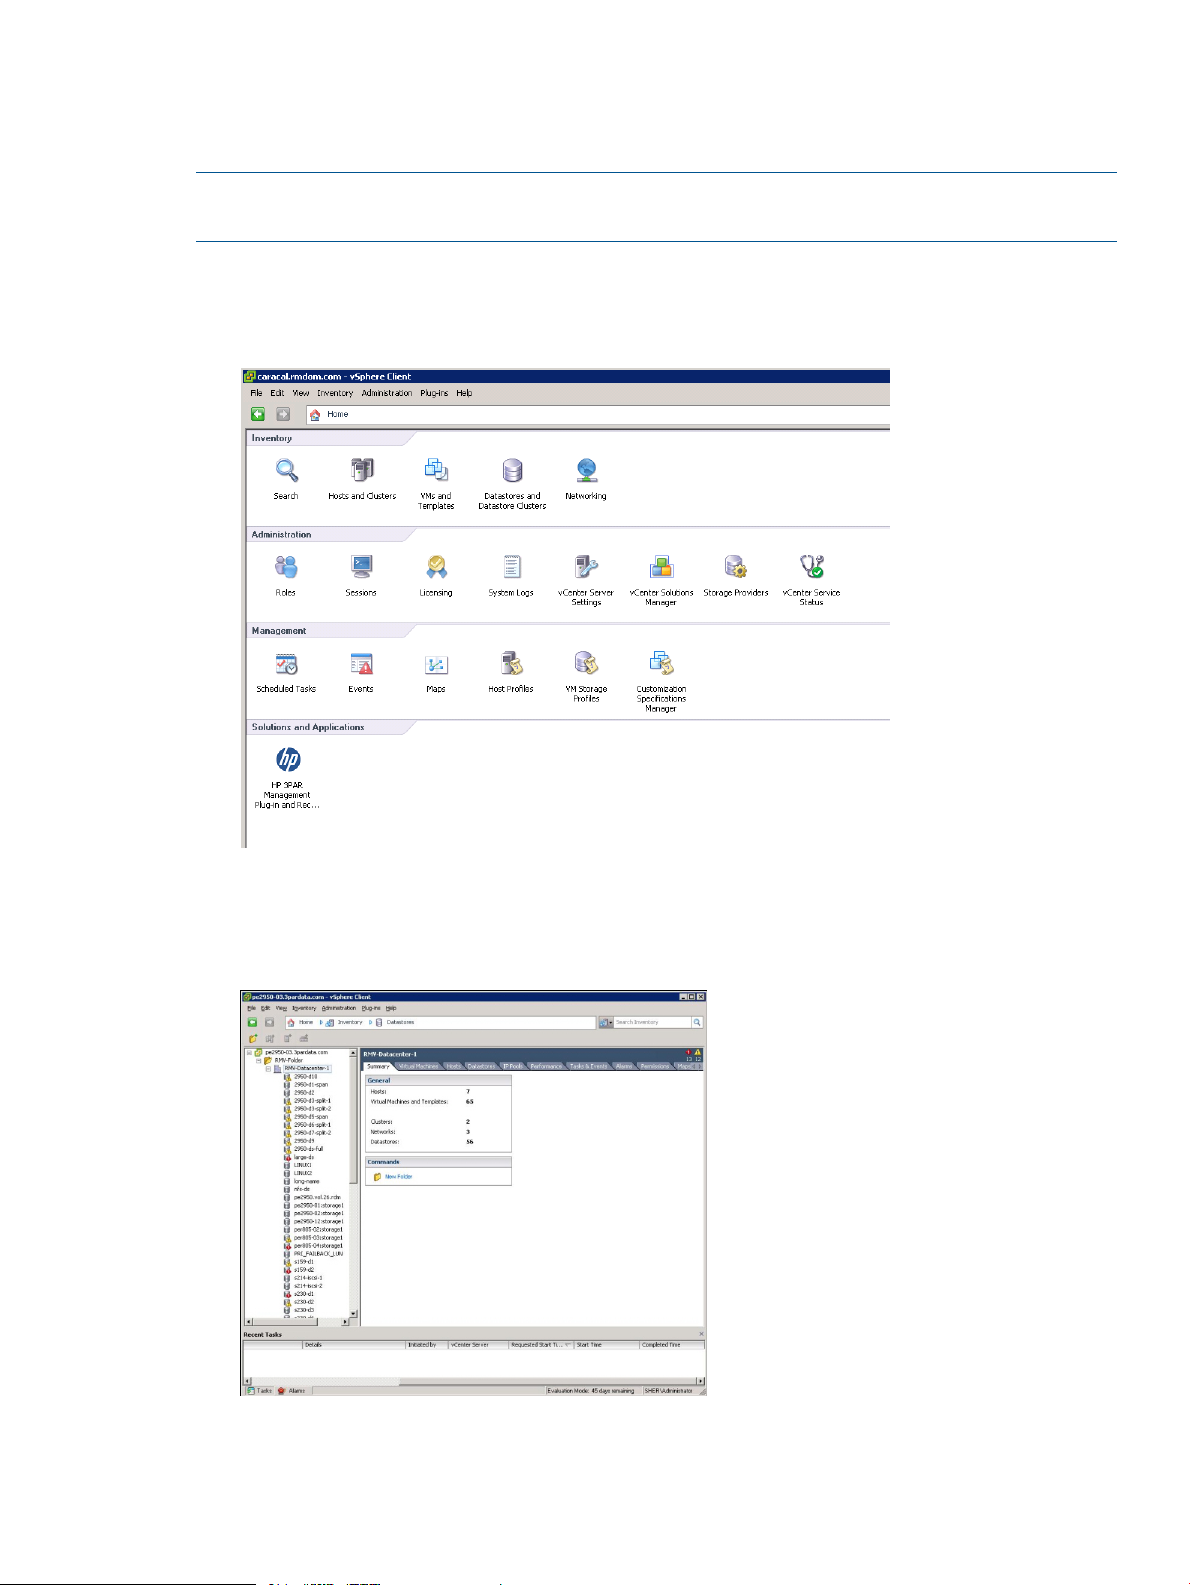
Viewing Virtual Volume Mapping
When logged in, you can view virtual volumes on the vCenter Server Virtual Machines (VMs) or
datastores.
NOTE: You can also view virtual volumes at the datacenter, cluster, and ESX host level. See “HP
3PAR Views in the vSphere Client” (page 15) for details.
1. In the main menu navigation, click Home.
2. Under Inventory, click VMs and Templates or Datastores (Figure 34 (page 51)).
Figure 34 Home Page
3. From the navigation tree, click the specific VM or datastore volume to view (Figure 35
(page 51)).
Figure 35 Selecting a Datastore
4. Click the HP 3PAR tab.
The information for all virtual volumes on the selected VM or datastore is displayed.
Viewing Virtual Volume Mapping 51
Page 52
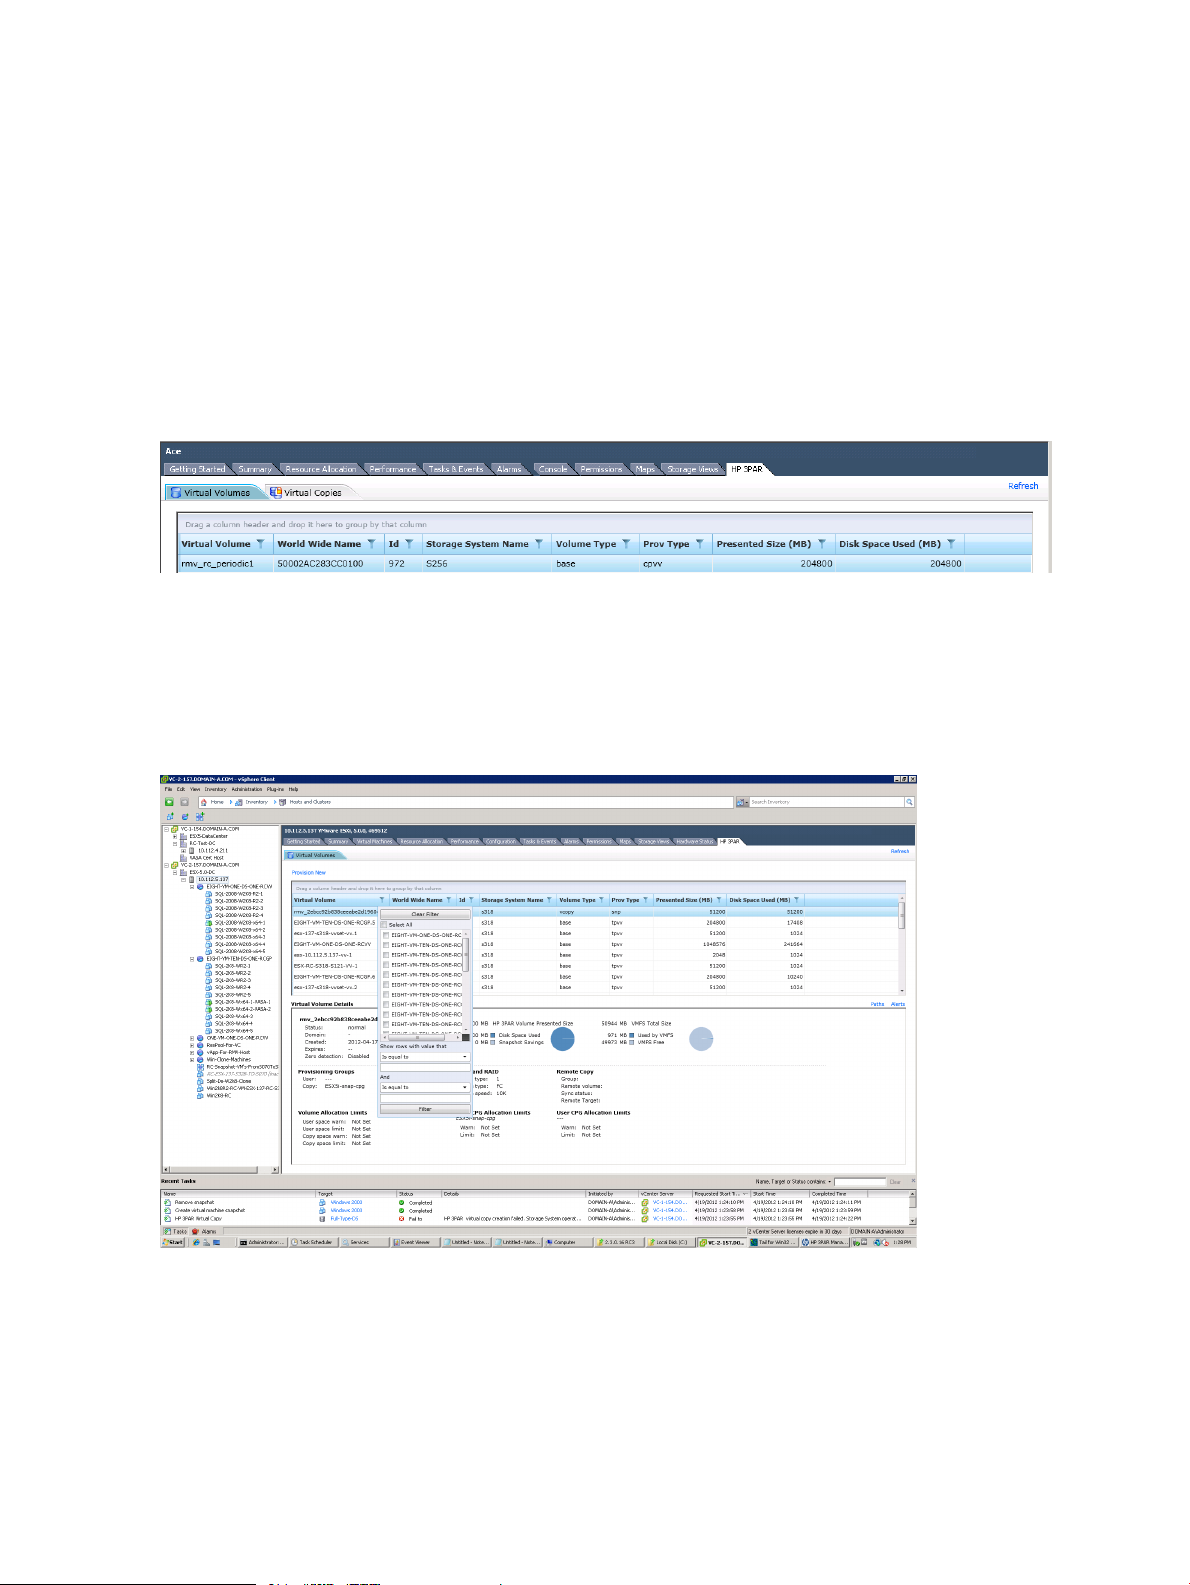
Viewing Volume Information
After selecting a VM or datastore, by default, all volumes on that VM or datastore are displayed
in the Virtual Volumes tab (as shown in Figure 36 (page 52)).
The virtual volume information is divided into an upper and lower pane in the detail pane of the
interface.
• The upper pane displays general volume information.
• The lower pane provides three buttons, Details (default), Paths, and Alerts.
The Upper Pane
The upper pane of the Virtual Volumes tab is displayed as shown in Figure 36 (page 52).
Figure 36 Viewing the Upper Pane of the Virtual Volumes Tab
The following filtering and sorting capabilities are provided:
• To filter, click the upper right corner of the column header. The virtual volume details in the
lower pane of the filtered virtual volumes are displayed. Click Clear Filter to clear the selected
filter.
Figure 37 Filtering Virtual Volumes
52 Logging In and Working with Virtual Volumes
Page 53
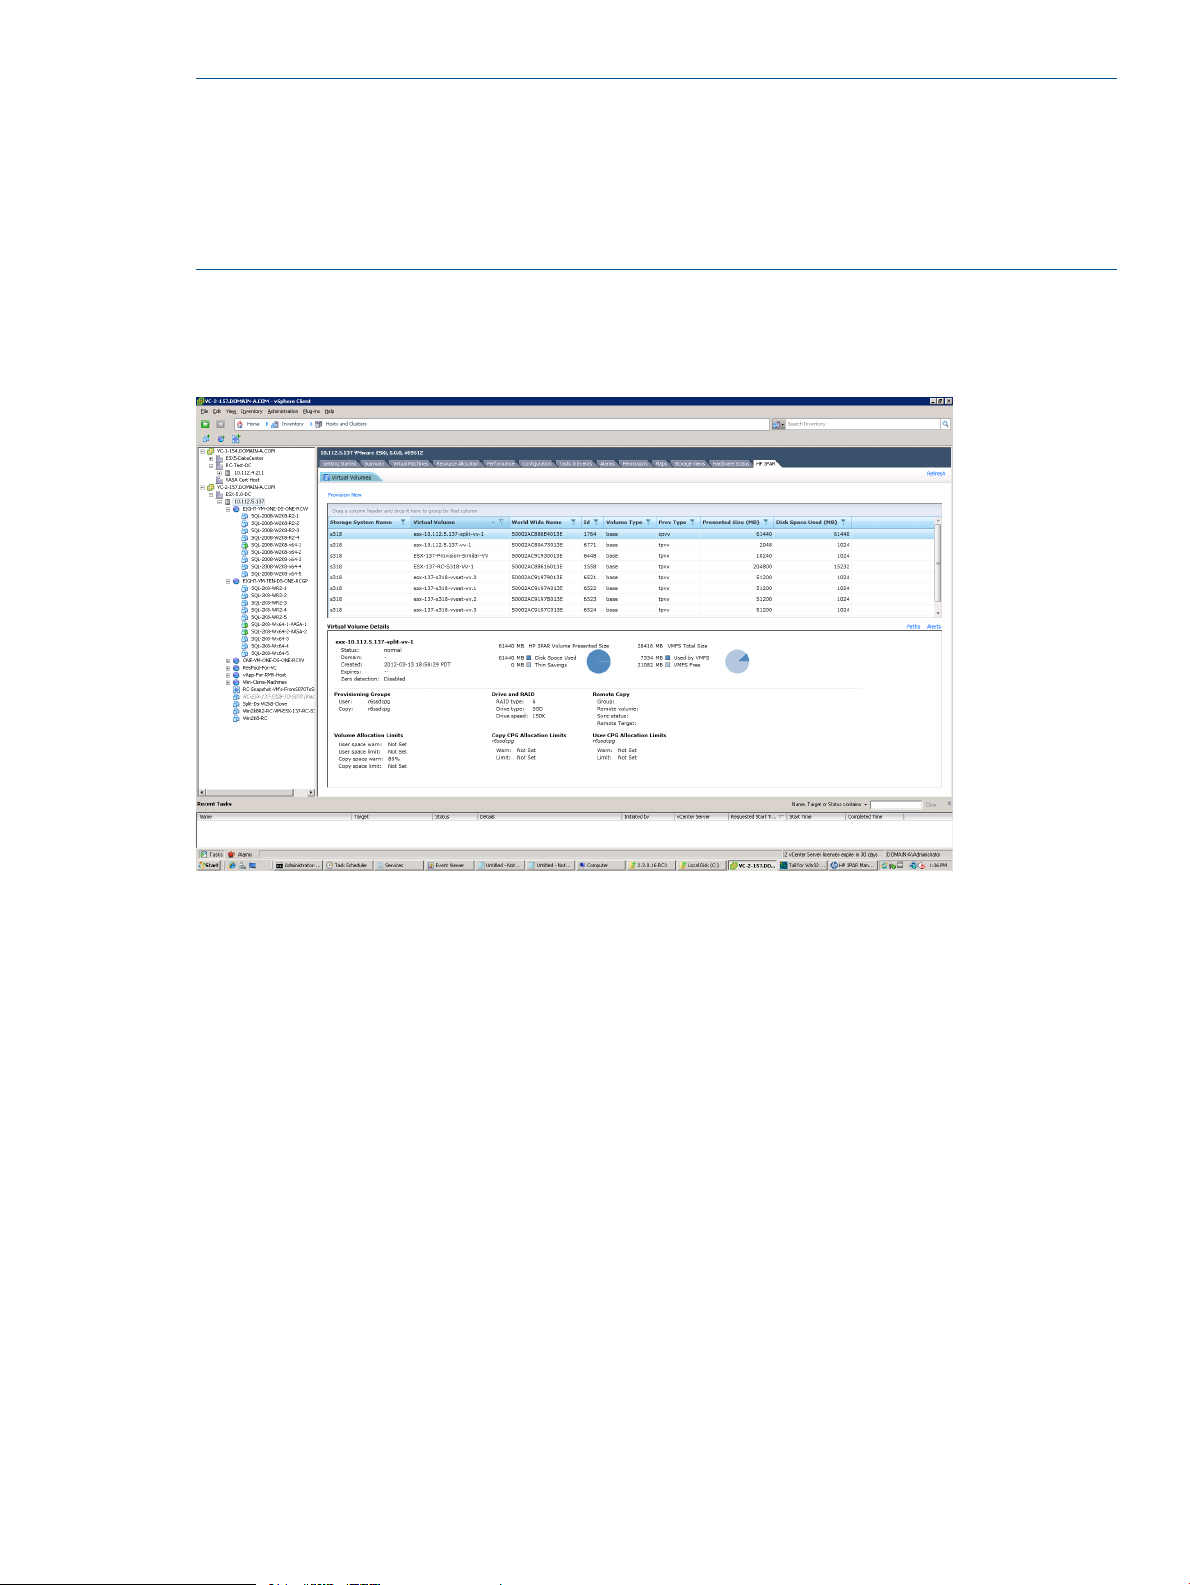
NOTE: The filter operation details panel may display incorrect volume details. To update the
details, select a volume from the grid to remove incorrect details.
You must provide both values for the filtering range.
Filters are applied to the set of volumes currently displayed in the grid. If you do multiple filtering
operations make sure that you clear the unwanted filter(s) before a new filter is applied. Otherwise
new filter will be applied to the previously filtered result set.
• To sort, drag a column header to group by that column. Click the selected upper right corner
of the column header to resume the default view.
Figure 38 Sorting Virtual Volumes
Viewing Virtual Volume Mapping 53
Page 54
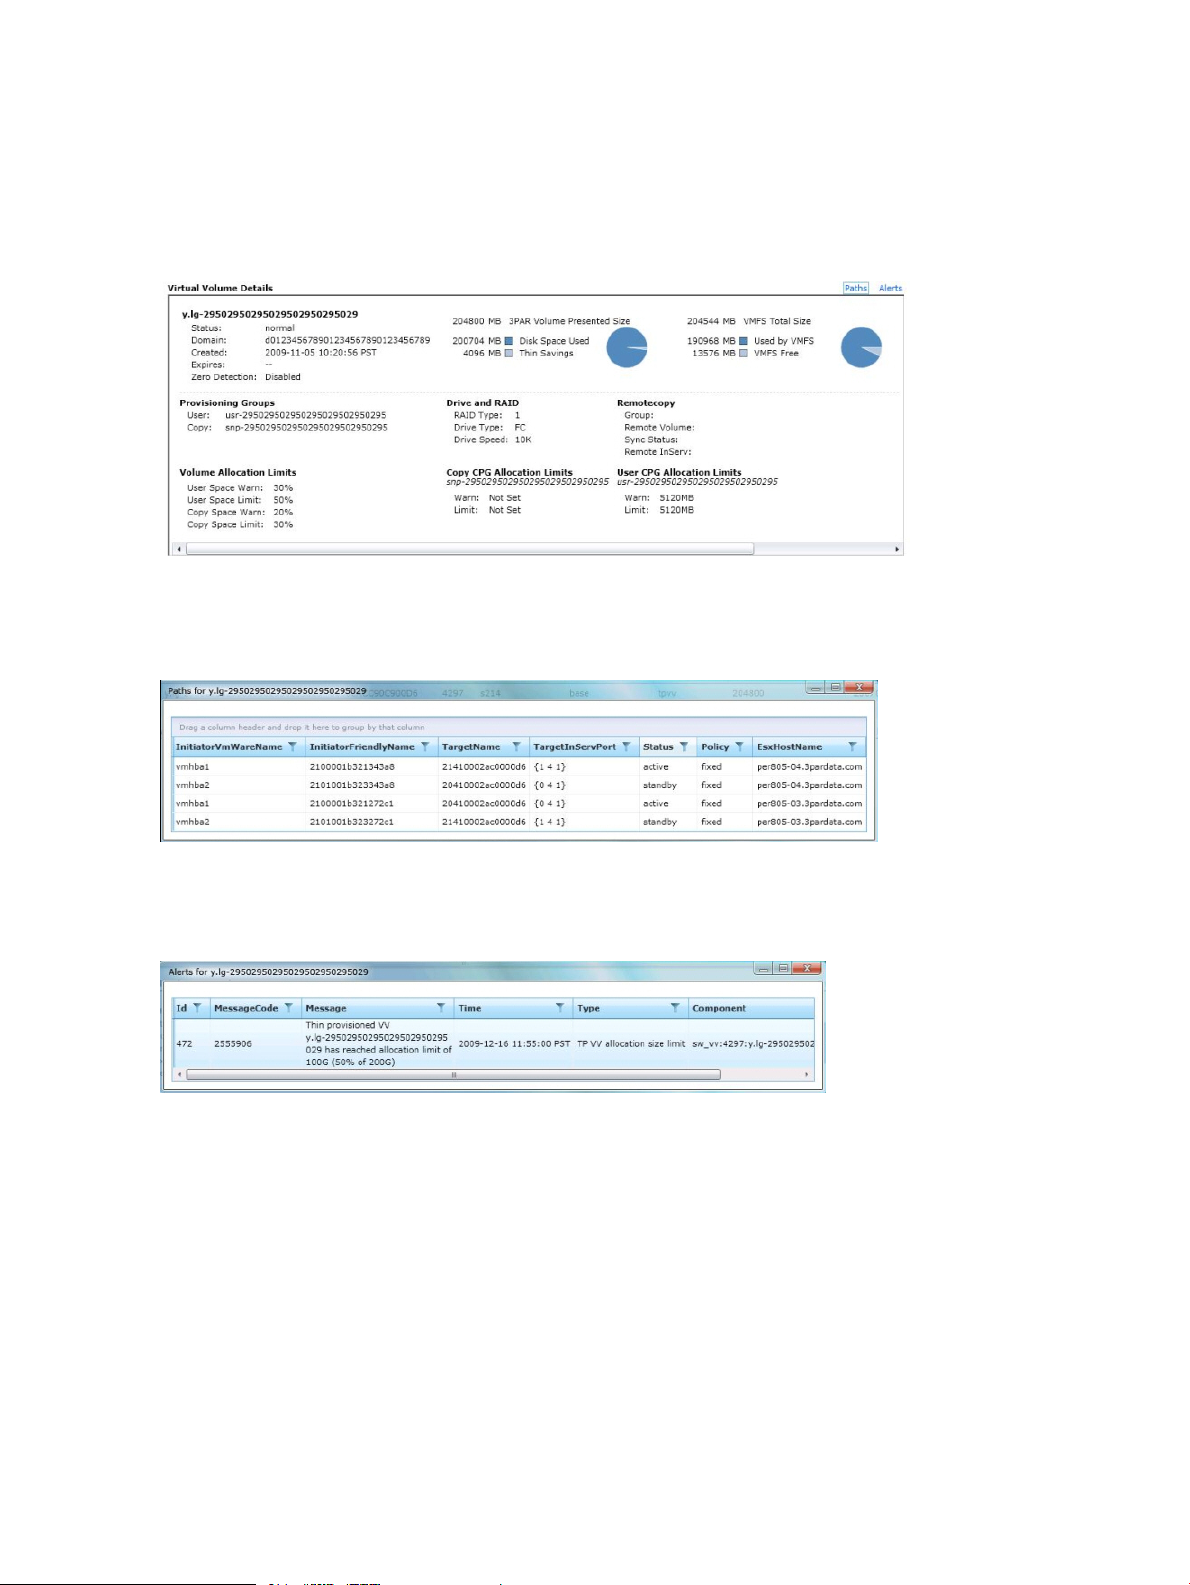
The Lower Pane
The lower pane of the Virtual Volumes tab displays information about the selected volume in the
upper pane. The lower pane provides three buttons, Details, Paths, and Alerts.
• Details (default when viewing the Virtual Volumes tab) displays details about the selected
volume in the upper pane (Figure 39 (page 54)).
Figure 39 Viewing Virtual Volume Details
• Paths displays path information about the selected volume (Figure 40 (page 54)).
Figure 40 Viewing the Volume Paths
• Alerts displays any alerts associated with the selected volume (Figure 41 (page 54)).
Figure 41 Viewing the Alerts
Refreshing Virtual Volume Information
A Refresh button is provided to update virtual volume information displayed in the HP 3PAR
Management Plug-in and Recovery Manager Software for VMware vSphere interface. The Refresh
button provides two options, Reload Current Page and Update Recovery Manager Cache.
• Select Reload Current Page if you have logged into an HP 3PAR Storage System and the pages
do not show volume details.
• Select Update Recovery Manager Cache if you have logged into an HP 3PAR Storage System
and the vCenter Server inventory has changed; such as newly added virtual machines or
datastores, changed HBA path policies, or added ESX hosts.
54 Logging In and Working with Virtual Volumes
Page 55

Creating Virtual Volumes and Datastores
You have the option of creating a new virtual volume on the HP 3PAR System and have it exported
to the vCenter managed ESX/ESX(i) host where it can be accessed.
Creating a Virtual Volume from an Existing HP 3PAR System Template
Follow these steps to create a new virtual volume:
1. In the main menu navigation, click Home→Inventory→Host and Clusters.
2. Go to the HP 3PAR→Virtual Volumes.
3. Click Provision New. The Provision Storage welcome screen appears with information
concerning the provisioning process.
Figure 42 Provisioning a New Virtual Volume
NOTE: To prevent the welcome screen from displaying in the future, select the “Skip this
page in the future when provisioning storage” check box.
4. Click Next to select a storage system template to be used for provisioning.
Figure 43 Provision Storage Template Selection
Creating Virtual Volumes and Datastores 55
Page 56
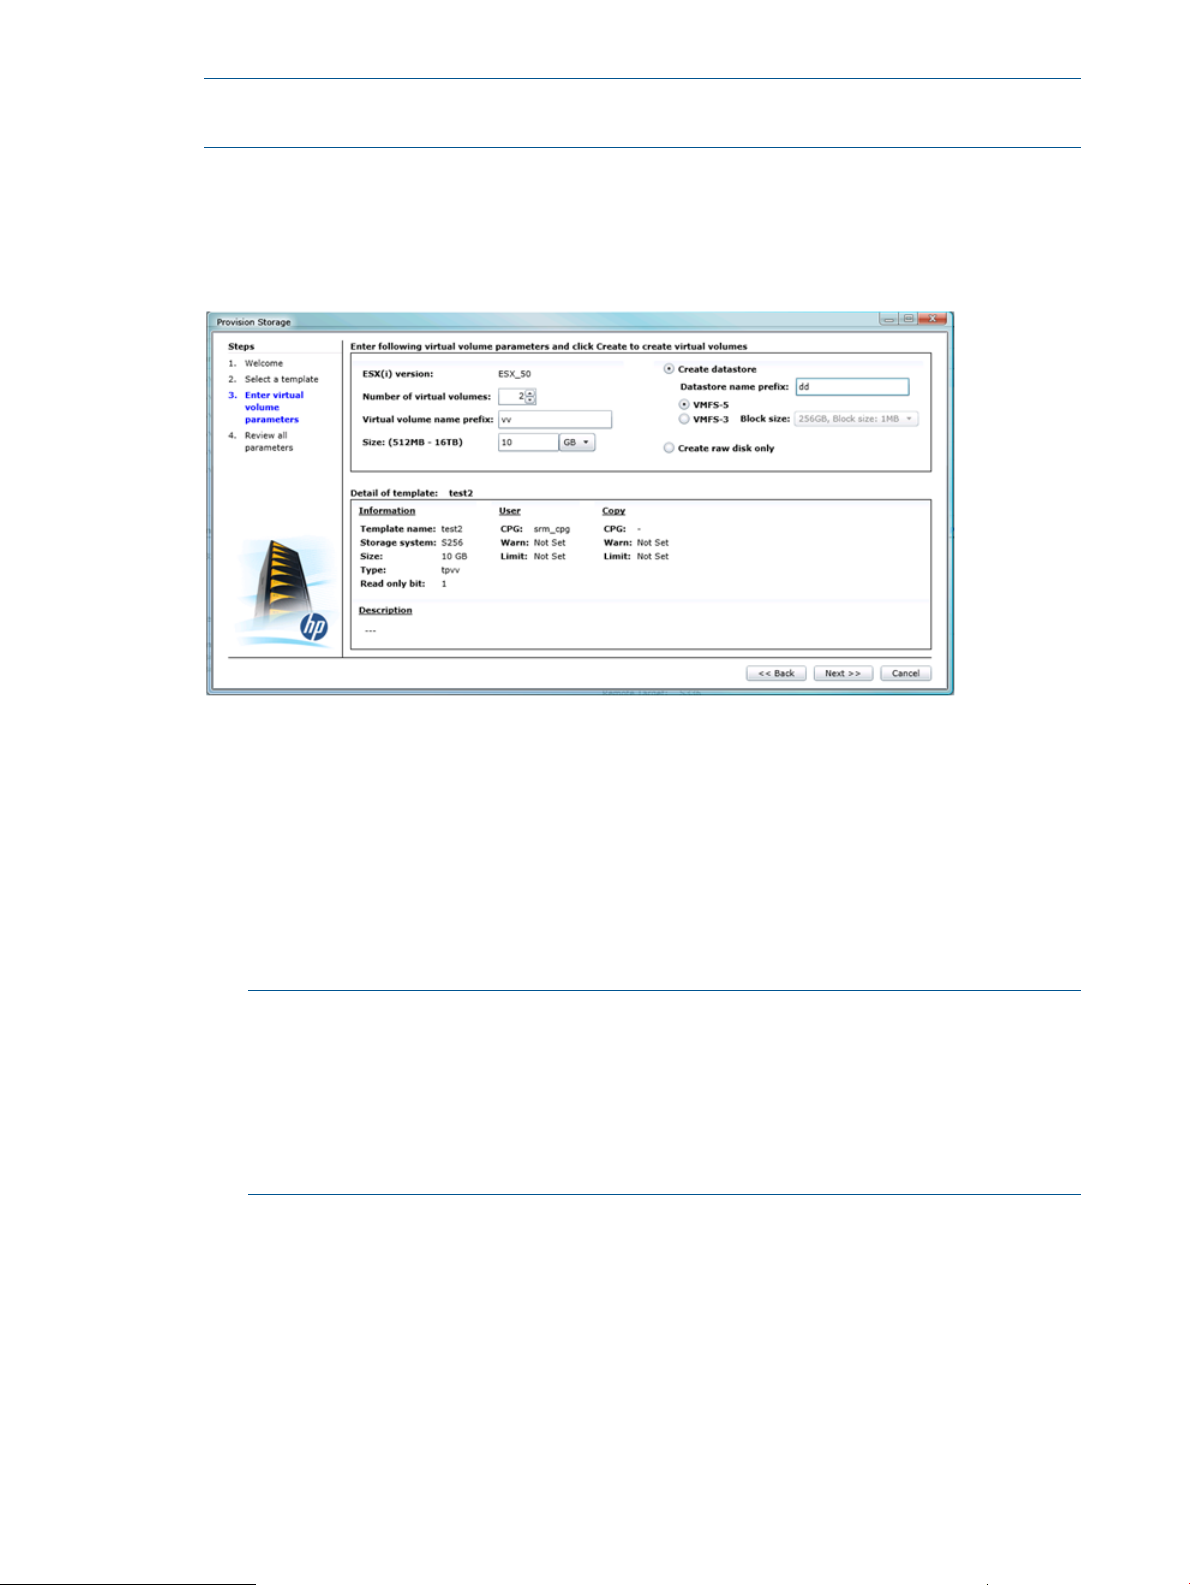
NOTE: Only templates configured with at least TPVV or CPVV type, size, and user CPG
from Storage Systems associated with the selected ESX(i) host are displayed.
5. Select an appropriate template from the list based on the summary of details, then click Next.
You are then asked to provide the virtual volume parameters for the virtual volume being
provisioned.
Figure 44 Virtual Volume Provisioning Parameters
6. Fill in the following parameters and click Next when done.
• Number of virtual volumes: - Number of virtual volumes to create (1 – 99). The default
is 1.
• Virtual volume name prefix - Name for the virtual volume (1 – 31 characters for single
volume creations or 1– 26 characters for multiple volume creations). If the number of
virtual volumes to be created is set to 1, the specified name is sufficient for creating the
virtual volume. When creating multiple virtual volumes, a decimal number is automatically
appended to the name prefix for each virtual volume that is created up to the maximum
limit (.0 - .9999).
NOTE: When choosing a name for creating virtual volumes, you must consider the
following:
◦ If the number of virtual volume count = 1, the virtual volume name is set to 31 and
the Datastore name is set to 42.
◦ If number of the virtual volume count > 1, the virtual volume name prefix is set to 26
and the Datastore name prefix is set to 31.
• Size (512 MB – 16 TB) - Size for the virtual volume. For VMFS-3, the VV size range is 512
MB to 2 TB, For VMFS-5, the VV size range is from 512 MB to 16 TB.
When specifying the size for a virtual volume, 256 MB is reserved for each node.
Depending on the cluster type, the minimum virtual volume size is calculated as 256 MB
times the number of nodes.
In a two node system, 512 MB is reserved when a TPVV is created. If an 80% user limit
is set for a 512 MB TPVV, only 410 MB of space can be allocated. However 512 MB
is the least amount required so the creation of the virtual volume fails. In other words, If
the allocation limit is set, the space after the % needs to be at least 512 MB in a 2 node
cluster.
56 Logging In and Working with Virtual Volumes
Page 57
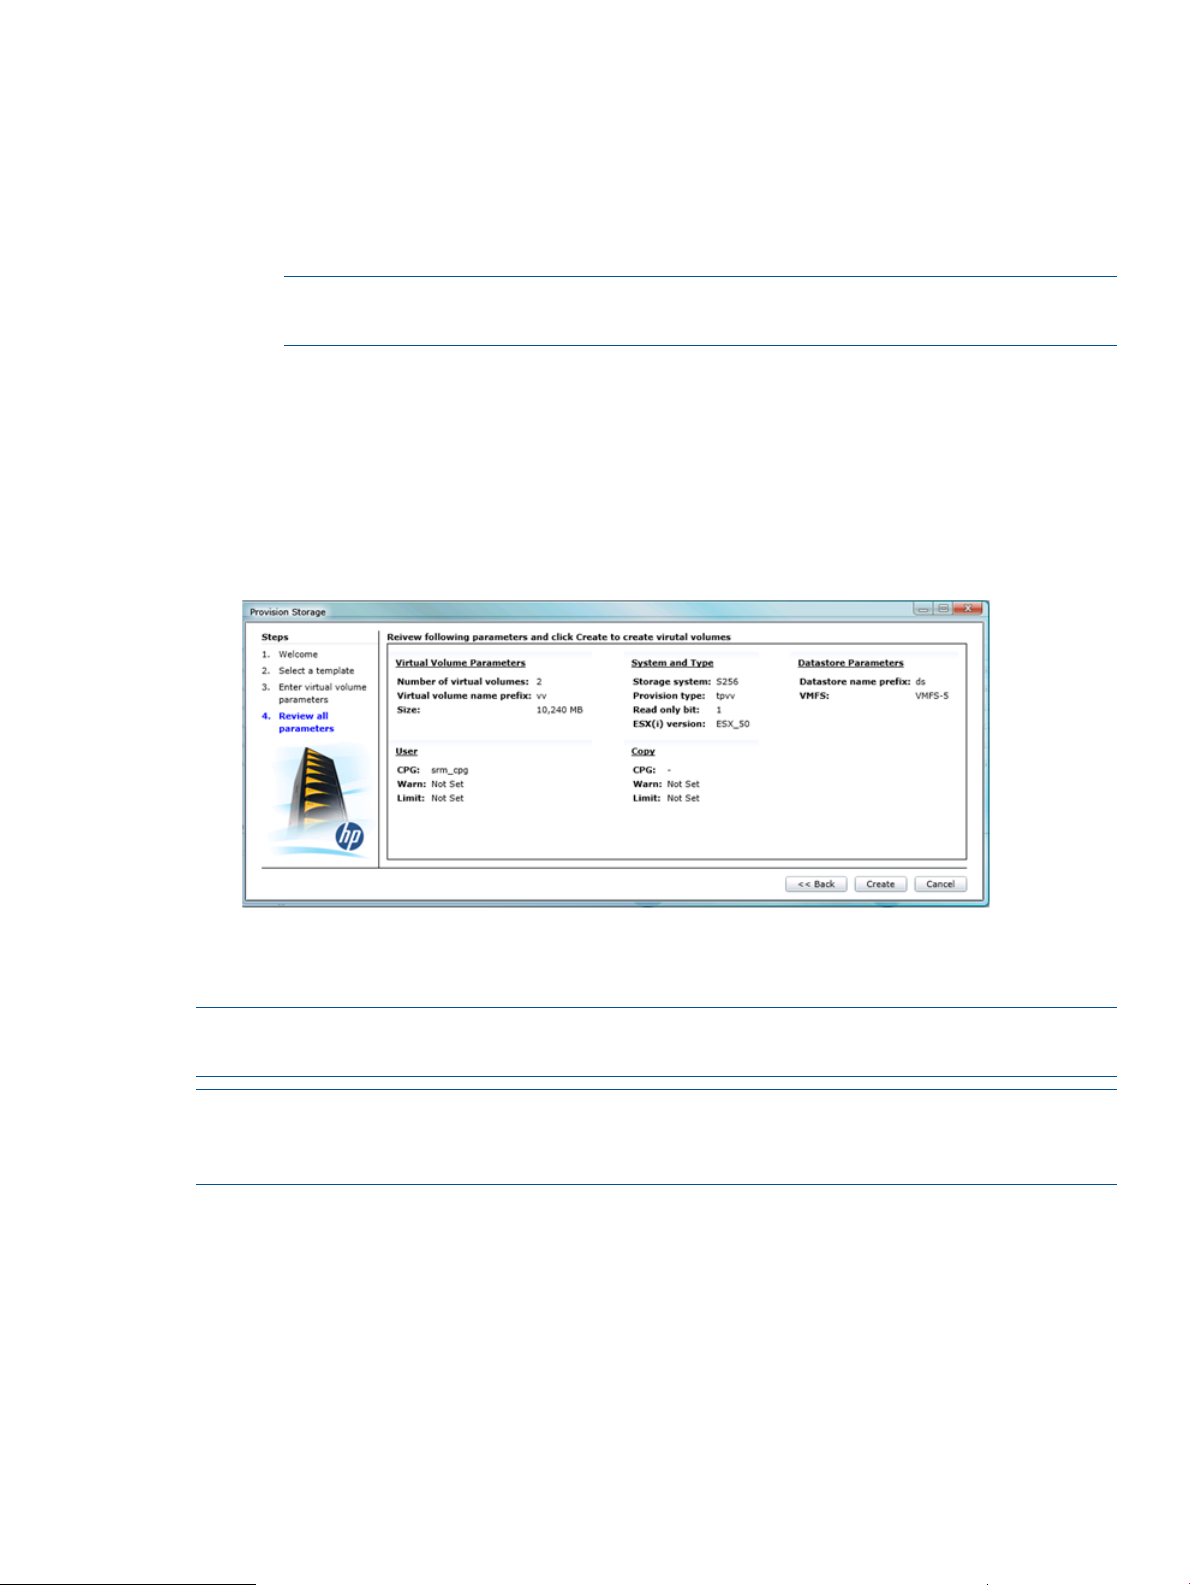
VV growth increment is 256 MB (i.e., If 520 MB is selected for a virtual volume, a VV
size of 768 MB is automatically created.
• Create datastore - Name for the datastore (1– 42 characters for single datastore creations
or 1– 31 characters for multiple datastore creations). If the number of virtual volumes to
be created is set to 1, the specified name is sufficient for creating the datastore. When
creating multiple datastores, a decimal number is automatically appended to the name
prefix for each datastore that is created up to the maximum limit (.0 - .9999).
NOTE: If the specified datastore name already exists regardless of its name case, the
operation will not be successful. The behavior is similar to vCenter datastore creation.
• VMFS-5/VMFS-3 option and Block Size - Specifies whether to use VMFS or VMFS-3. You
can optionally specify the block size. VMFS-5 is only valid for ESXi 5.0 or above hosts.
• Create raw disk only - Creates a raw disk when checked. By default, this option is not
checked and a datastore is automatically created.
After you click Next, a summary of the datastore that is to be created is shown so you can
review the details before creating the datastore.
Figure 45 Parameter Review
7. Review the parameters, then click Create. Click OK for each confirmation. A confirmation is
eventually shown indicating that the datastores have been created.
NOTE: If you choose “ESX Cluster”, the storage is assigned to the ESX Cluster hosts. Otherwise,
the storage is only created on the selected host.
NOTE: If the selected ESX(i) host is connected to a storage system and currently does not have
LUNs exposed to the host, you need to log in to the summary page and create an entry for the
storage system. For more information, refer to “HP 3PAR Storage System Login” (page 14).
Creating Virtual Volumes and Datastores 57
Page 58

Creating a Virtual Volume from Existing Datastores
Follow these steps to create a virtual volume from an existing datastore:
1. In the main menu navigation, click Menu→Inventory→Datastores and Datastore Clusters.
2. Go to HP 3PAR→Virtual Volumes.
Figure 46 HP 3PAR Virtual Volume Entries
3. Click Provision Similar. The Welcome page appears.
NOTE: To prevent the welcome page from displaying in the future, select the “Skip this page
in the future when provisioning storage” check box.
4. Click Next to enter the virtual volume parameters.
5. Enter the appropriate parameters, then click Next.
• Number of virtual volumes - Number of virtual volumes to be provisioned. You can specify
from 1 to 99 where 1 is the default.
• virtual volume name - Name for the virtual volume.
NOTE: When choosing a name for creating virtual volumes, you must consider the
following:
◦ If the number of virtual volume count equals 1, the virtual volume name is set to 31
and the Datastore name is set to 42.
◦ If number of the virtual volume count is greater than 1, the virtual volume name prefix
is set to 26 and the Datastore name prefix is set to 31.
• Size - Specifies the size. When selecting the datastore VMFS-3 type, the VV size range
is from 512 MB to 2 TB. When selecting the datastore VMFS-5 type, the size range for
the virtual volume is from 512 MB to 16 TB.
When specifying the size for a virtual volume, you must keep in mind that 256 MB is
reserved for each node. Depending on the cluster type, the minimum virtual volume size
is calculated as 256 MB times the number of nodes.
In a two node system, 512 MB is reserved when a TPVV is created. If an 80% user limit
is set for a 512 MB TPVV, only 410 MB of space can be allocated. However 512 MB
is the least amount required so the creation of the virtual volume fails. In other words, If
the allocation limit is set, the space after the % needs to be at least 512 MB in a 2 node
cluster.
58 Logging In and Working with Virtual Volumes
Page 59

VV growth increment is 256 MB (i.e., If 520MB is selected for a VV, it will automatically
create a VV size of 768 MB).
• Create datastore - Create a datastore.
• Create raw disk only - Create a raw disk only.
After you click Next, a summary of the datastore to be created is shown:
Figure 47 Virtual Volume Parameter Review
6. Review the parameters, then click Create. Click OK for each confirmation. A confirmation is
shown to indicate the datastores are created successfully.
NOTE: When creating virtual volumes from an existing datastore, the volume allocation limit
of the original virtual volume is also be applied to the newly created volume. Current operation
only supports TPVV or CPVV type.
Adding an ESX(i) Host to the vCenter Server
If an ESX(i) host with connection to HP 3PAR Storage System is added to the vCenter Server after
vSphere client is launched and the Storage System does not appear on the existing HP 3PAR
Storage System list, you can manually add the host.
To add an ESX(i) host to the vCenter Server:
1. Log on to vSphere client.
2. Go to Home→Solutions and Applications→HP 3PAR Management Plug-in and Recovery
Manager Software for VMware vSphere.
3. Select the storage system on the node tree pane view and right-click. Select Connect from the
option menu.
4. Enter the information of the storage system and click Login.
5. Verify the new storage system is added to the node tree pane.
6. Go to Home→Inventory→Hosts and Clusters→HP 3PAR.
7. Click Refresh, select Update Recovery Manager Cache option and click Refresh. All associated
HP 3PAR Storage System virtual volume information should display.
NOTE: Another way to refresh the internal inventory cache, close and reopen the vSphere
client.
Adding an ESX(i) Host to the vCenter Server 59
Page 60

5 Working with Virtual Copies
This chapter explains how to use HP 3PAR Recovery Manager Software for VMware vSphere to
manage virtual copies.
NOTE: In the following sections, the type of virtual copy being created, mounted, or modified is
dependent on whether a VM or datastore is selected from the navigation tree. For example, if you
have selected a datastore from the navigation tree, subsequent create, mount, or modify actions
performed will affect the selected datastore until a different datastore or VM is selected.
NOTE: The ability to manage virtual copies provided by HP 3PAR Recovery Manager Software
for VMware vSphere requires the HP 3PAR Recovery Manager Software for VMware vSphere and
Virtual Copy licenses.
NOTE: To add an ESX/ESX(i) host to the vCenter Server, refer to “Adding an ESX(i) Host to the
vCenter Server” (page 59).
Viewing Virtual Copy Information
In addition to viewing virtual volumes on the vCenter Server’s Virtual Machines (VMs) and datastores
when logged in, you can also view virtual copies.
To view a VM or datastore’s virtual copies:
1. Start the HP 3PAR Management Plug-in for VMware vCenter as described in “Logging In”
(page 46).
2. Follow the instructions in “Viewing Virtual Volume Mapping” (page 51).
60 Working with Virtual Copies
Page 61

3. Click the Virtual Copies tab.
Information about the selected VM or datastore virtual copies is displayed.
• Base/Datastore/RDM LUN
• Type
• Base Volume
• Base ID
• Virtual Copy Volume
• Virtual Copy ID
• Status – Can be Available, Mounted, Missing or Mismatched.
NOTE: When a virtual copy set is displayed as Missing, the virtual copy has been
deleted from the storage system. The delete operation is only allowed to remove the virtual
copy.
When a virtual copy set is displayed as Mismatched, the virtual copy is created on a
different storage system instead of its current connected system. The mismatch may be
caused by an HP 3PAR Peer Motion operation. The delete operation is only allowed to
remove the record. Manually remove the actual virtual copy from the originating storage
system.
• Retention
• Expiry
• Exported Host
• LUN ID
• ESX Host
• Virtual Copy Datastore
NOTE: The Virtual Copy timestamp displayed on the Virtual Copies tab is converted to the
local time zone of the vSphere Client. The Expiry and Retention values on the same display
are set to the time zone of the RMV server.
Viewing Virtual Disk Details for Virtual Copies
You can view details on the virtual disk associated with a virtual copy.
• Virtual Disk – Shows the virtual disk name.
• Original Virtual Machine Name – Provides additional information on the Virtual Machine
name associated with the VMDK. Snapshots created prior to version 2.3 will have this field
as N/A.
• Application Consistent – Provides information on whether this VMDK is application consistent.
• VM Attached – Shows whether the VM is attached.
Viewing Virtual Copy Information 61
Page 62

Viewing Virtual Copy Event Logs
Virtual copy operation event logs can be found at the vCenter Server level in the navigation tree,
the Tasks & Events tab, and the Events tab. Use the keyword HP 3PAR to select all events performed
by HP 3PAR Recovery Manager Software for VMware vSphere.
Figure 48 Viewing the Virtual Copy Event Log
Creating New Virtual Copies
Prior to creating a virtual copies, the following restrictions should be noted:
• Creating a virtual copy at the VM level requires available space on the datastore where the
VMDK file resides.
• Datastore creation from NFS drives is not supported from virtual copy operations.
• Recovery Manager for VMware vSphere requires VMFS snapshots. However, taking a VMFS
snapshot of a VM participating in disk sharing, such as Microsoft MSCS, is not supported
(this is a VMFS limitation).
NOTE: Virtual copy space must be available on the HP 3PAR Virtual Volume. In order to create
a virtual copy on an HP 3PAR base volume, the volume itself must have had virtual copy space
allocated during its creation.
To create a new virtual copy on the VM or datastore, perform the following:
1. Follow the instructions in “Viewing Virtual Copy Information” (page 60).
2. Click the Virtual Copies tab.
3. Click Create. You are then asked to supply the name for the virtual copy set.
NOTE: If you do not wish to name the virtual copy set, click OK. The created virtual copy
is identified by a date and time stamp.
4. (Optional) You can either accept the default name based on the time when the virtual copy
is created, or you can enter a name of your choosing. The virtual copy name cannot exceed
32 characters.
5. When creating the virtual copy, you have the choice of changing the Ensure Application
Consistency option (set by default) to specify whether or not the newly created virtual copy
62 Working with Virtual Copies
Page 63

should adhere to the data standards used by supported application. Selecting this option
ensures the data can be accessed with VM tools supporting these formats but may increase
the amount of data space and time required to create and access the virtual copy.
Figure 49 Ensure Application Consistency Option
NOTE: Application consistency is not supported on Exchange Databases that have been
configured using Physical Compatibility RDM LUNs. Application consistency is supported for
datastore virtual copy creation and you have the option to select a VM to reside on the
datastore.
6. Click OK. The virtual copy creation task is submitted and started.
Information regarding the virtual copy creation process is shown under Recent Tasks in lower
portion of the screen. Once the virtual copy has been created, an entry is reflected in the
Virtual Copy Set list.
NOTE: When working with virtual copies, you may need to refresh the display in order to
view the most accurate volume details. See “Refreshing Virtual Volume Information” (page 54).
NOTE: If the virtual copy operation fails, refer to the event log to review details. See “Viewing
Virtual Copy Event Logs” (page 62).
Mounting Virtual Copies
To mount a virtual copy:
1. Follow the instructions in “Viewing Virtual Copy Information” (page 60).
2. Click the Virtual Copies tab.
3. Select the virtual copy you wish to mount from the Virtual Copy Set list.
4. Right-click the virtual copy in the virtual copy table.
A menu appears providing two mount choices:
• Mount on ESX host as Datastore on - Select from a list of ESX/ESX(i) hosts managed by
the vCenter Server that share access to the HP 3PAR Storage System.
• Mount on Proxy Host - Select from a list of hosts not managed by the vCenter Server, but
which have access to the HP 3PAR Storage System.
NOTE: For ESX 3.5, the LVM.EnableResignature parameter must be set to “1” to allow mount
operations. The parameter can be found in the ESX host Configuration, Advanced Settings,
and LVM options.
Mounting Virtual Copies 63
Page 64

5. Click the mount type and then select an ESX host or Proxy Host from the menu that appears.
The Confirm dialog box appears.
6. Click OK.
The virtual copy mount task is submitted and a message indicates that the request is being
processed.
You can check the status column to see that the virtual copy has been mounted.
Unmounting Virtual Copies
NOTE: Recovery Manager for VMware vSphere does not check if the volume being unmounted
is in use. Ensure that the volume is inactive prior to unmounting.
To unmount a previously mounted virtual copy:
1. Follow the instructions in “Viewing Virtual Copy Information” (page 60).
2. Click the Virtual Copies tab.
3. Select the virtual copy you wish to unmount from the Virtual Copy Set list.
4. Right-click the mounted virtual copy in the virtual copy table.
5. Click Unmount... and then select the host.
The Confirm dialog box appears.
6. Click OK. A message indicates that the request is being processed and the mounted copy is
unmounted.
Restoring Datastores by Promoting a Virtual Copy
Normal restore scenarios involve restoring virtual disk images. In a VMFS datastore there can be
many virtual disks. Typically, you would identify the virtual disk to be restored and copy it over
the old one. However, in some cases the VMFS file system itself may be corrupted and all virtual
disks needs to be replaced. In such scenarios, promote one of the virtual copies to a base volume.
NOTE: If the underlying HP 3PAR volume used by the datastore belongs to an HP 3PAR Remote
Copy volume group, stop the Remote Copy volume group prior to running the datastore promote
operation.
To restore a datastore by promoting a virtual copy:
1. Follow the instructions in “Viewing Virtual Copy Information” (page 60). Make sure that you
are in the Datastores view as you can only promote datastores.
2. Click the Virtual Copies tab.
3. Select the virtual copy that you wish to promote from the Virtual Copy Set list.
4. Click Promote.
The Confirm dialog box appears.
5. Click OK.
The virtual copy promote task is submitted and a message is displayed indicating that request
is being processed.
64 Working with Virtual Copies
Page 65

Deleting a Virtual Copy
To delete a virtual copy:
1. Follow the instructions in “Viewing Virtual Copy Information” (page 60).
2. Click the Virtual Copies tab.
3. Select the virtual copy you wish to delete from the Virtual Copy Set list.
4. Click Delete.
The Confirm dialog box appears.
5. Click OK.
The virtual copy deletion task is submitted and started and you are asked to confirm your
intent to delete the virtual copy.
The virtual copy is then removed from the Virtual Copy Set list.
Modifying Virtual Copy Policies
Virtual copy policies can be defined for a given virtual machine or datastore.
To modify the policy of a virtual copy:
1. Follow the instructions in “Viewing Virtual Copy Information” (page 60).
2. Choose the virtual machine or datastore to which you want to apply a set of policies.
3. Click the Virtual Copies tab.
4. Click Policy.
The policy dialog appears.
a. Select the maximum number of virtual copy sets. Based on the order in which they are
created, non-expirable virtual copies are deleted when they reach a position in the queue
that exceeds this count.
b. (Optional) Select whether to enable expirable virtual copies. Expirable copies are removed
according to a specified schedule and are not affected by the maximum count.
When enabling the expirable virtual copies option, you must specify the length of time
(Days, Months, Years) from the current time that the virtual copies are to expire. You can
set the expiry period up to 1825 days.
NOTE: Expirable virtual copies are not included in the maximum count.
When enabling expirable virtual copies, you also have the choice of specifying how
existing non-expirable copies are handled.
• Delete the oldest when count reaches maximum. This is the recommended setting.
Select this option if you plan to create both expirable and non-expirable virtual
copies. All non-expirable copies (new and existing) will be counted against the
maximum count with the oldest being deleted as it exceeds the maximum count. The
RMVMware CLI and Scheduler have the option of overwriting the default policy.
However, virtual copies created using the GUI interface are bound by the default
policy.
• Phase out non-expirable virtual copies (Advanced).
Select this option if you plan to mostly create expirable virtual copies and want to
eventually phase out older non-expirable virtual copies. In this case, whenever a
newer expirable virtual copy is created, the oldest non-expirable copy will be deleted.
You can still create non-expirable virtual copies, as long as the aggregate count is
below the policy maximum.
Deleting a Virtual Copy 65
Page 66

NOTE: If all non-expirable virtual copies are in valid retention and have already reached
the maximum count, choosing the Enable expirable virtual copies option with the Phase
out non-expirable virtual copies setting will fail. If this happens, choose the Delete the
oldest when count reaches maximum option instead.
c. (Optional) Select a period of time to retain virtual copy sets.
A dialog box prompts you for the number of days to retain the virtual copy set.
i. Select the Retention Period.
ii. Select Hours, Days, Weeks, Months, or Years.
NOTE: Setting the retention policy requires the HP 3PAR Virtual Lock license on
the HP 3PAR Storage System.
NOTE: The virtual copy set can be retained for up to 1,825 days.
NOTE: When using both the expiry and retention options, the expiry value must
be equal to or greater than the retention value.
d. (Optional for VM’s) Select whether to ensure application consistency. This option is used
to create snapshots of virtual copy sets that adhere to data format standards used by the
VMware Tools.
NOTE: When installing or upgrading VMware tools, you must be sure to reboot VMware
on the system where it running otherwise application consistent snapshots may not be
valid even though they are reported as completed successfully. This situation can also
occur when the VMware tools have not been upgraded on the VM system following an
upgrade of the ESX server.
5. Click Save.
The virtual copy policy modification task is submitted and started. An alert appears indicating
that the new policy has been saved.
6. Click OK.
Scheduling Virtual Copies
You can automatically create virtual copies according to a specified schedule.
To view or create a scheduled virtual copy task:
1. Follow the instructions in “Viewing Virtual Copy Information” (page 60).
2. Click the Virtual Copies tab.
66 Working with Virtual Copies
Page 67

3. Click Scheduler. The Schedule List dialog Figure 50 (page 67) appears.
Figure 50 Schedule List Dialog
From the Scheduled List dialog, you can add a scheduled virtual copy creation task or modify
an existing one using the Schedule Task Wizard.
To add a new scheduled virtual copy task, follow these steps:
1. Click Add.
The Select Schedule Type dialog appears.
Figure 51 Select Schedule Type Dialog
2. Select the time when the scheduled copy creation task is to be performed. You have the option
of scheduling when (hourly, daily, weekly, monthly) the virtual copy is to be created. You can
also schedule a virtual copy creation task to occur on a one-time basis.
Scheduling Virtual Copies 67
Page 68
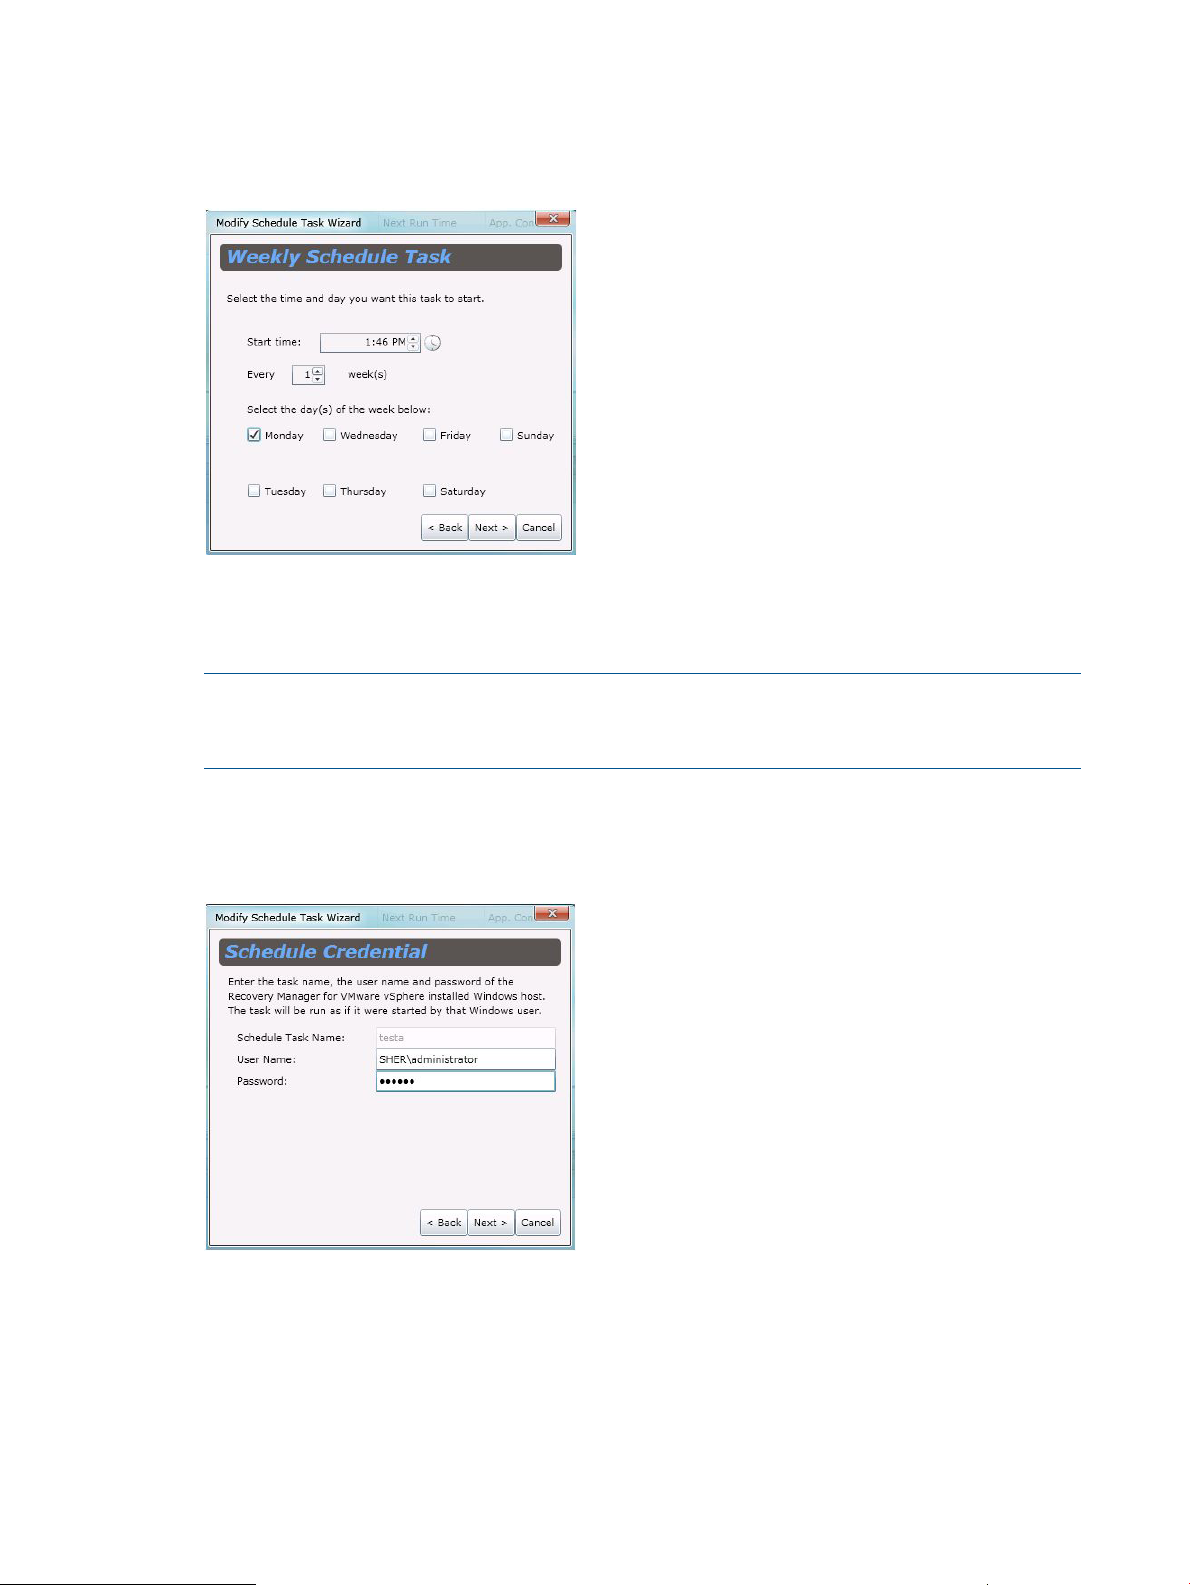
3. Click Next. The wizard will request the appropriate information based on the option time
frame you have chosen. As an example that shows the types of information you need to supply,
if you choose Weekly, the Weekly Schedule Task dialog appears.
Figure 52 Weekly Schedule Task
4. Enter the start time of the day when the task is to be run and then indicate how often the task
is performed in weeks. You also need to select the day(s) of the week when the task is to be
run.
NOTE: If the vCenter server and RMV server are in different time zones, the default date
and time are based on the RMV server and vCenter server respectively. You need to synchronize
the time differences when creating the schedule.
5. Click Next.
The Schedule Credential dialog appears.
Figure 53 Schedule Credential
6. Enter a name for the scheduled task and the associated user name and password. The task
name must be unique.
7. Click Next.
The Snapshot Configuration dialog appears.
68 Working with Virtual Copies
Page 69

Figure 54 Virtual Copy Configuration Dialog
8. Enter the appropriate vCenter server user name and location of the credential store file.
9. Specify whether or not to use application consistency for the scheduled task.
If application consistency was specified when the virtual copy was created for a Datastore,
you have the option (as shown in the red box) of applying the application consistency to all
Virtual Machines by selecting the Apply to all Virtual Machines button or specify specific
machines by choosing Apply to the following Virtual Machines and then selecting the relevant
machines.
10. Enter the HP 3PAR Storage System user name.
11. Specify any default policy overrides.
a. Specify the amount of time (in hours) before the virtual copy expires.
b. Specify the amount of time (in hours) to retain the virtual copy set.
12. Click Next. The Schedule Task Summary dialog appears.
Scheduling Virtual Copies 69
Page 70

Figure 55 Schedule Task Summary Dialog
If application consistency was specified when the virtual copy was created, the summary
includes this information as shown.
NOTE: To schedule a task for a given user, an associated vCenter Credential Store File must
first be created using the RMVMware CLI with vCenterRegister option. To be used with the
Scheduler, the credential file must have “System” account level privileges. In addition, to
schedule tasks for user’s other than yourself, you must be added as a user to have permission
to access their credential files.
If the credential file is created as a domain user, specify the domain user when setting up the
schedule. If a local user is to be used for the scheduler, add the local user permission to the
credential file.
NOTE: Tasks scheduled for a given HP 3PAR Storage System must have an associated
Storage System Credential registration completed using the RMVMware Admin Tool. In
addition, since the Storage System credential registration is only accessible by the creation
owner and a member of administrators, the user account must have access to the Storage
System registration data.
70 Working with Virtual Copies
Page 71
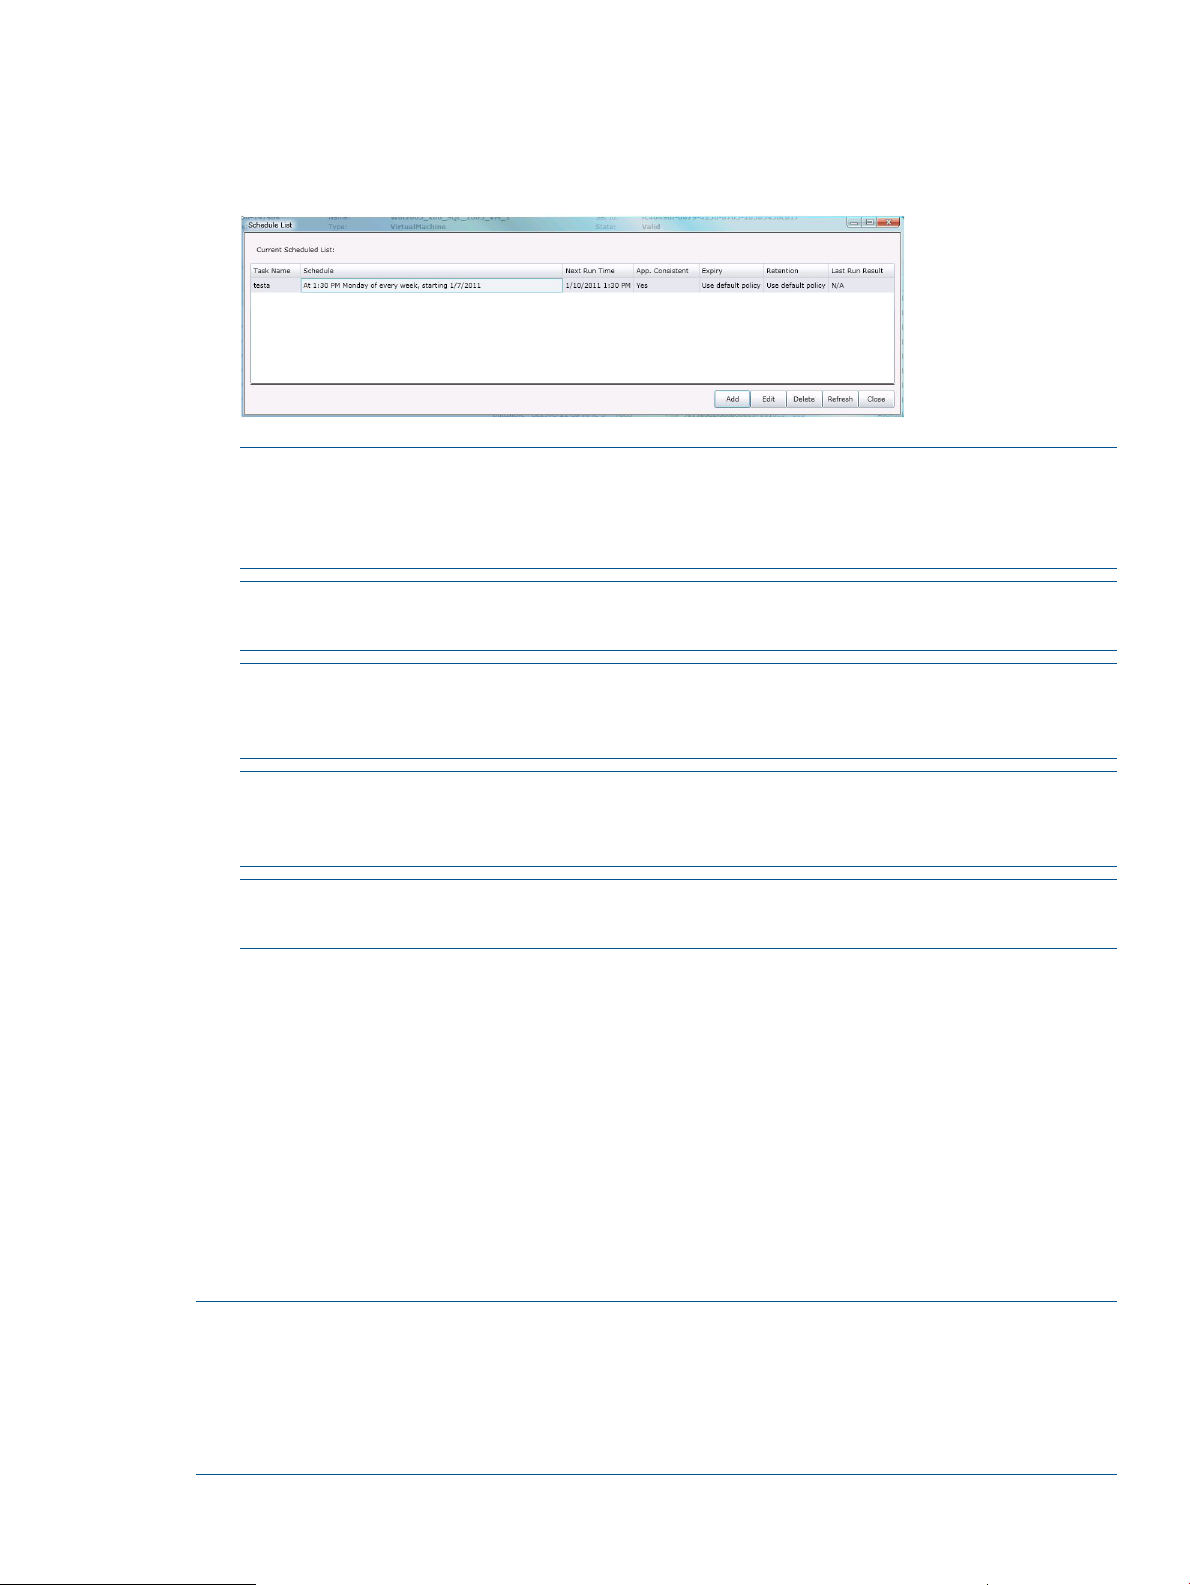
13. Click Finish to complete the scheduling of the virtual copy task.
A message indicates whether the task has been created successfully. A listing for the scheduled
task is now shown in the Schedule List.
Figure 56 Schedule List with Task
NOTE: If a VM or Datastore is removed, the associated scheduled tasks continues to run but
is no longer manageable from the HP 3PAR Management Plug-in and Recovery Manager
Software for VMware vSphere scheduling interface. In this case, the task needs to be manually
removed from the Windows Scheduler.
NOTE: If the username associated with the user that created a scheduled task changes, the
defined task is no longer operational.
NOTE: To be used in the scheduler, users must have the proper credentials created through
the vCenter Credential Store File using RMVMware CLI with the vCenterRegister option and
have a valid Storage System Credential registration established through the Admin Tool.
NOTE: Since Storage System credential registration is only accessible by the creation owner
and members of Administrator, user accounts used in the scheduler have to have access to
the registration data.
NOTE: Any user account that is used in the scheduler requires access permission to the
specified vCenter Store file.
Restoring Virtual Disks and Guest OS Files and Directories
The basic restore functionality provided in HP 3PAR Recovery Manager Software for VMware
vSphere is the ability to mount all, or some, virtual copy volumes on one or more ESX/ESX(i) hosts.
You can perform an actual restore by copying virtual disk images, or by mounting virtual disks on
VMs for guest OS level restore, by using already available VMware tools, most of which are
integrated with the VI Client. However, Recovery Manager for VMware vSphere also provides two
commands to simplify some of the commonly used restore user cases.
Restoring a Virtual Disk
After a datastore virtual copy has been mounted on an ESX/ESX(i) host (see “Mounting Virtual
Copies” (page 63), the virtual disks grid displays the context menu.
NOTE: When copying or cloning a Virtual Machine (VM) to a different datastore, the source
VM’s Universally Unique Identifier (UUID) is retained in the target VM. When using HP 3PAR
Management Plug-in and Recovery Manager Software for VMware vSphere to show the virtual
copies on the target VM, the virtual copies from the source VM will be displayed. To resolve this
problem, the target VM’s UUID should be changed. Refer to VMware documentation on how to
edit the VM’s UUID.
Restoring Virtual Disks and Guest OS Files and Directories 71
Page 72
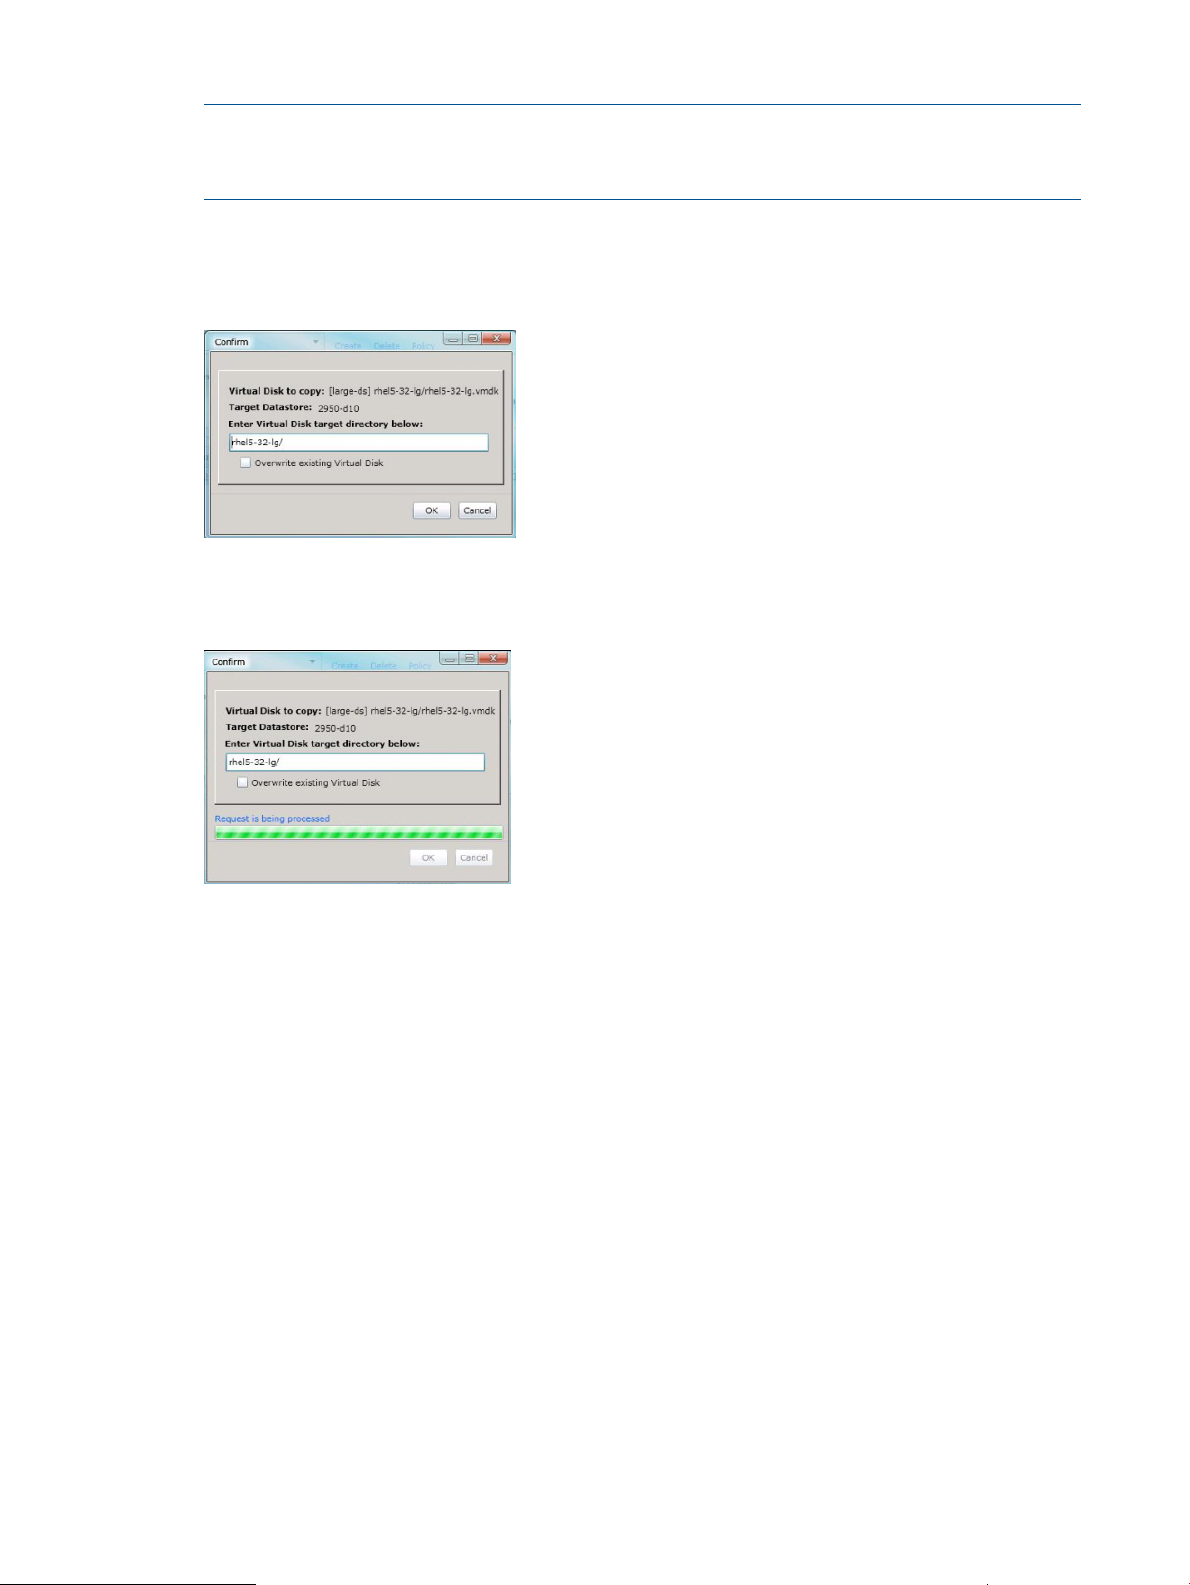
1. Right-click the virtual disk you wish to copy to a datastore and click Copy to Datastore.
NOTE: When using the Copy to Datastore option to copy a virtual disk to a datastore, it is
recommended that the copy and paste functions of the datastore browser be used in order to
preserve the VMware Thin Provisioning disk feature.
2. Select a datastore on the ESX host where the virtual copy is mounted.
3. Specify the target location and click OK.
Figure 57 Specifying the Target Location
The copying operation is initiated.
Figure 58 Initiating the Copy Operation
Restoring a Guest OS File or Directory from a Virtual Copy
The second context menu command available in virtual disks grid allows you to attach a virtual
disk available on the selected virtual copy to any of the VMs currently running on the ESX/ESX(i)
host where the virtual copy is mounted.
1. Right-click the virtual disk you wish to attach and click Mount on Virtual Machine.
2. Select a VM on the ESX/ESX(i) host where the virtual copy is mounted.
3. When prompted for confirmation, click OK.
4. Once the task is completed, verify that the selected VM appears under the VM Attached
column.
The remainder of the restore operation must be performed on the VM. This involves re-scanning
for new disks and mounting the file system, and then manually copying the files.
Once the restore is complete, the virtual disk can be unmounted from the VM.
5. Right-click the virtual disk to be unmounted and click Unmount from Virtual Machine <VM
name>.
72 Working with Virtual Copies
Page 73

6. When prompted for confirmation, click OK.
The unmount commences.
Virtual disks created using HP 3PAR virtual copy can be mounted on any VM. However, if
you try to mount the virtual copy virtual disk on the same VM, the VI client displays a prompted
question message.
In this case, you can choose whether to continue or not.
Restoring Virtual Disks and Guest OS Files and Directories 73
Page 74

6 Working with Host Explorer
The Host Explorer collects the following information and sends it to the Storage System:
• ESX/ESX(i) host operating system and version.
• Fibre Channel and iSCSI HBA details.
• Multi-path driver and current multi-path configuration.
• Device and path Information.
Use showhost –agent , showhost –agent -d and showhost –pathsum on the HP 3PAR
Storage System to get information sent by Host Explorer.
root@enodec1ce:S159# showhost -agent
Id Name ReportedName OS Arch OS_Ver OS_Patch
IP Multipath MPVer ClusterSW ClusterVer ClusterID ClusterName
2 per805-02 per805-02.3pardata.com VMware ESX Server5.0 vmnix-x86 5.0.0 419341
10.112.0.104 -- -- -- 5.0.0 -- PER-cluster
3 pe2950-10 pe2950-10.3pardata.com VMware ESX Server4.0 vmnix-x86 4.0.0 208167
10.112.1.76 -- -- -- -- -- --
5 per805-05 per805-05.3pardata.com VMware ESX Server5.0 vmnix-x86 5.0.0 419341
10.112.1.144 -- -- -- -- -- --
10 per805-01 per805-01.3pardata.com VMware ESX Server5.0 vmnix-x86 5.0.0 419341
10.112.0.103 -- -- -- 5.0.0 -- PER-cluster
16 pe2950-10-iscsi pe2950-10.3pardata.com VMware ESX Server4.0 vmnix-x86 4.0.0 208167
10.112.1.76 -- -- -- -- -- --
18 pe2970-23-iscsi pe2970-23.3pardata.com VMware ESX Server4.0 vmnix-x86 4.1.0 260247
10.112.4.213 -- -- -- -- -- --
21 pe2970-22 pe2970-22.3pardata.com VMware ESX Server4.0 vmnix-x86 4.1.0 260247
10.112.4.211 -- -- -- 4.1.0 -- ESX4-cluster
23 pe2970-24 pe2970-24.3pardata.com VMware ESX Server4.0 vmnix-x86 4.1.0 260247
10.112.4.215 -- -- -- 4.1.0 -- ESX4-cluster
74 Working with Host Explorer
Page 75

7 Working with VASA Provider
The communication between HP 3PAR VASA provider and vCenter server is a secure connection
based on SSL certificate and Windows credential. Before VASA Provider can be registered by
vCenter server, VASA provider requires that you extract the SMS certificate from vCenter server
and install it to the HP 3PAR Recovery Manager for VMware installed host to allow client certificate
negotiation in the Transport Layer. For instruction on how to extract and import the certificate,
please refers to Chapter 3.4 Registering an SMS Certificate for the VASA Provider. After the SMS
certificate has been installed, you can register the provider from the vCenter server by clicking on
the Storage Providers icon as shown below.
Figure 59 Registering the Provider
75
Page 76

From the Storage Providers view, click the Add link to bring up the Add Vendor Provider dialog.
Figure 60 Add Vendor Provider Screen
Table 7 Add Vendor Provider Information Fields
ValueField Name
Any name to identify the VASA provider.Name
URL
Login
VASA Service Web URL. For example
(https://<IPAddrOrHostName>:<VasaPort>/).
Windows user name to Recovery Manager for VMware
installed host.
Windows Password.Password
Once registration is successful, the provider status is available online.
NOTE: To register VASA Provider, the user must have the StorageViews Configure privilege.
VASA provider for HP 3PAR Storage System supports the Storage Capabilities profile as defined
by the VASA Specification.
• Provision type
• Virtual Volume type
• Drive type
• RAID type
• Whether or not the volume is in a Remote Copy group
The name and description of all HP 3PAR storage capabilities can be viewed from the Manage
Storage Capabilities pop-up from vCenter. To access the Manage Storage Capabilities window,
start from Home and then click VM storage Profiles from the Management tab. Click Manage
Storage Capabilities.
76 Working with VASA Provider
Page 77

Figure 61 Manage Storage Capabilities Screen
The name of an HP 3PAR storage capability has five parts and each identifies the value of one of
the volume attributes. The following table shows the volume attributes and possible values. (Please
refer to HP 3PAR documentation for details of these attributes)
77
Page 78

Table 8 VASA Storage Capability Volume Attributes
Storage Capability Name SegmentValueVolume Attribute
FullFully ProvisionedProvisioning Type
ThinThin Provisioned
BaseBase VolumeVolume Type
VCpyVirtual Copy Volume
FCFibre Channel DriveDrive Type
NLNear Line Drive
SSDSolid State Drive
MxMixed Drive
R0RAID 0RAID Type
R1RAID 1
R5RAID 5
R6RAID 6
Remote Copy
Remotecopy
RCRemote Copy Volume is in
NoRCVolume is not in Remotecopy
NOTE: Consult the appropriate VMware documentation for more details.
78 Working with VASA Provider
Page 79

8 Working with Remote Copy
A Remote Copy feature is now available for you to create and manage both Synchronous or
Periodic virtual copies at the RC Group level. In addition, the Remote Copy feature provides a GUI
interface and basic CLI command functionality to register, create, schedule, update and remove
Remote Copy pairings.
Use the Admin tool to register and configure Remote Copy Pairs before launching the vCenter
plug-in feature to create a snapshot of your system.
Ensure the following requirements are satisfied before registering a remote copy pair:
• Remote copy configuration already exists on the storage systems. Use the InForm CLI or IMC
GUI to create the remote copy configuration if they do not exists.
• Recovery Manager Software for VMware is already installed on the remote host situated in
a remote site.
• Establish IP access to the remote host.
NOTE: Mounting or restoring remote virtual copies is currently not supported by Recovery Manager
Software.
Registering Remote Copy Pairs
1. Launch Recovery Manager Software for VMware vSphere Admin Tool and click the HP 3PAR
Management Plug-in and Recovery Manager Software for VMware vSphere Admin
Tool→vCenter Plug-in.
2. Under the vCenter Plug-in tab, click Remote Copy Pairs tab.
Figure 62 Registering Remote Copy Pairs
3. Click Register New.
Registering Remote Copy Pairs 79
Page 80
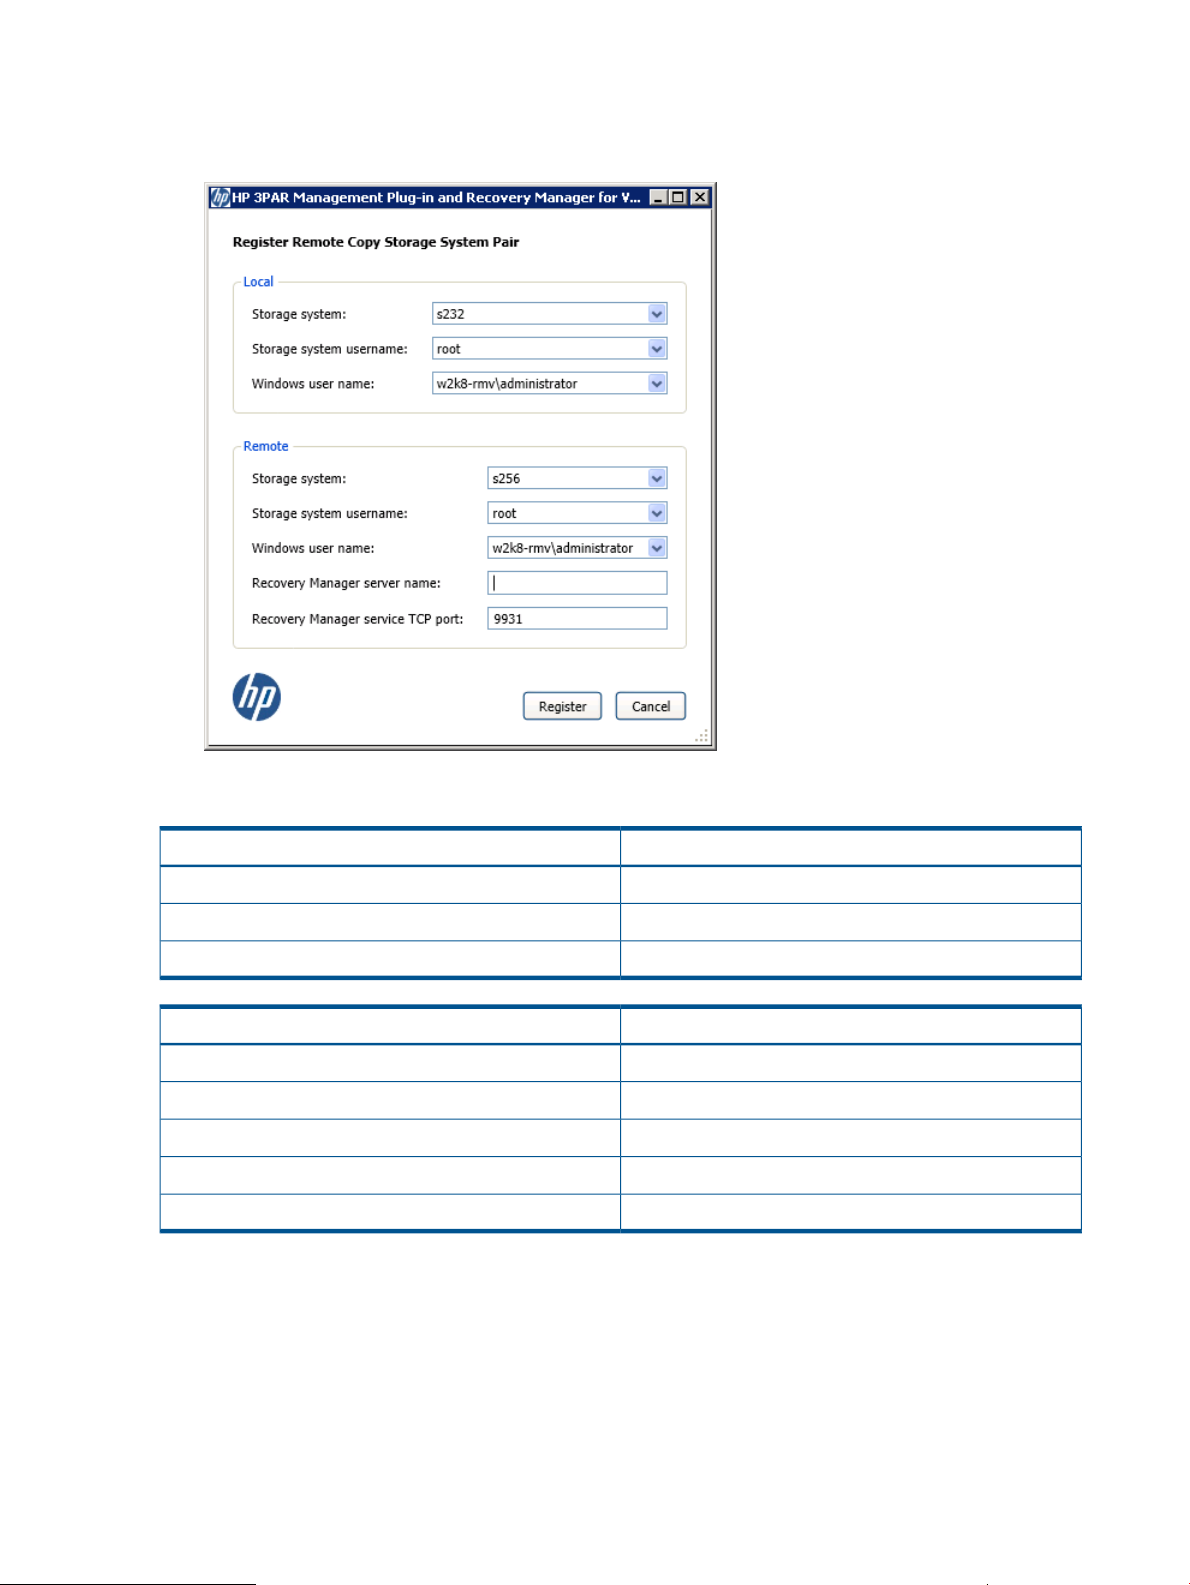
4. Enter the required information into the following fields for both Local and Remote systems.
Click Register.
Figure 63 Specifying Remote Copy Pair Details
Table 9 Register Remote Copy Storage System Pair Fields
ValueLocal
Name of local storage systemStorage system:
Name of user for local storage systemStorage System username:
Name of user for Microsoft WindowsWindows user name:
ValueRemote
Name of remote storage systemStorage system:
Name of user for remote storage systemStorage system username:
Name of user for Microsoft WindowsWindows user name:
Name of remote Recovery Manager server on remote siteRecovery Manager server name:
TCP port number of remote Recovery Manager serviceRecovery Manager service TCP port:
When the registration is successful, the Plug-in displays HP 3PAR Storage System pairing in the
Remote Copy Pairs tab.
80 Working with Remote Copy
Page 81

Updating Registered Remote Copy Pairs Information
1. Launch Recovery Manager Software for VMware vSphere Admin Tool and click the HP 3PAR
Management Plug-in and Recovery Manager Software for VMware vSphere Admin Tool tab.
2. Click Remote Copy Pairs tab.
3. Select a Remote Copy pair from the list and click Update.
4. Select the new system information from the Local and Remote drop-down menus. If applicable,
enter another RMV host name.
5. Click Update.
Viewing Host Information Summary
From the vSphere Plug-in Storage System tree pane, select a storage system, and click the Summary
in the detail pane to view the information of the storage system.
Figure 64 Storage System Summary
Table 10 Storage System Summary Information
ValueGeneral
Name of storage systemSystem name:
Model of storage systemSystem model:
Storage system serial numberSerial number:
Storage system ID numberSystem ID:
World Wide Name of storage systemSystem WWN:
Number of nodes available in storage systemNumber of nodes:
Nodes appearing onlineNodes online:
Login userLogged on as:
Viewing Existing and Newly Added Remote Copy Information
Use the vSphere Client to navigate and view registered storage system remote copy pairs and
remote copy groups for local and remote systems.
Launch vSphere Client, select Home at the top of navigation bar and click HP 3PAR Management
Plug-in... From the HP 3PAR Storage System tree pane, select a storage system and click the Remote
Copy tab.
Updating Registered Remote Copy Pairs Information 81
Page 82

Figure 65 Remote Copy Pair Summary
To view details of the Remote Copy Groups for local and remote storage systems, click the following
tabs:
• Summary: The tab provides details of Remote Copy group name of local and remote, mode
and operating status, and link type.
• Virtual Volumes/Machines: The tab lists the local Virtual Volumes and the corresponding
remote Virtual Volumes name, and other status in the Remote Copy Group.
• Remote Virtual Copies: The tab displays remote virtual copies creation and expiration dates,
retention, mode, and application consistent status. The Remote Virtual Copies Mapping displays
if you select a Remote Virtual Copy.
• Local Virtual Copies: The tab displays the details of the remote copy group(s) associated with
Source storage system and Remote Copy Group; Target Storage System and Remote Copy
Group; creation and expiration dates; and retention, mode, and application consistent status.
The Local Remote Copies Mapping displays if you select a Local Virtual Copy.
Creating a Remote Virtual Copy
You can create a Remote Virtual Copy for Remote Copy groups associated with a specific ESX
server. Other VMs from other ESX hosts will not be shown.
1. From the Remote Copy tab, select the desired storage system in the left pane.
a. From the upper right window, select the remote copy pair.
b. From the bottom right window, select the remote copy group.
c. Click Create Remote Virtual Copy.
2. Select the desired options for the Remote Virtual Copy.
• Enable expirable Virtual Copies
• Retain Virtual Copies
• Create remote virtual Copy with application consistency
82 Working with Remote Copy
Page 83
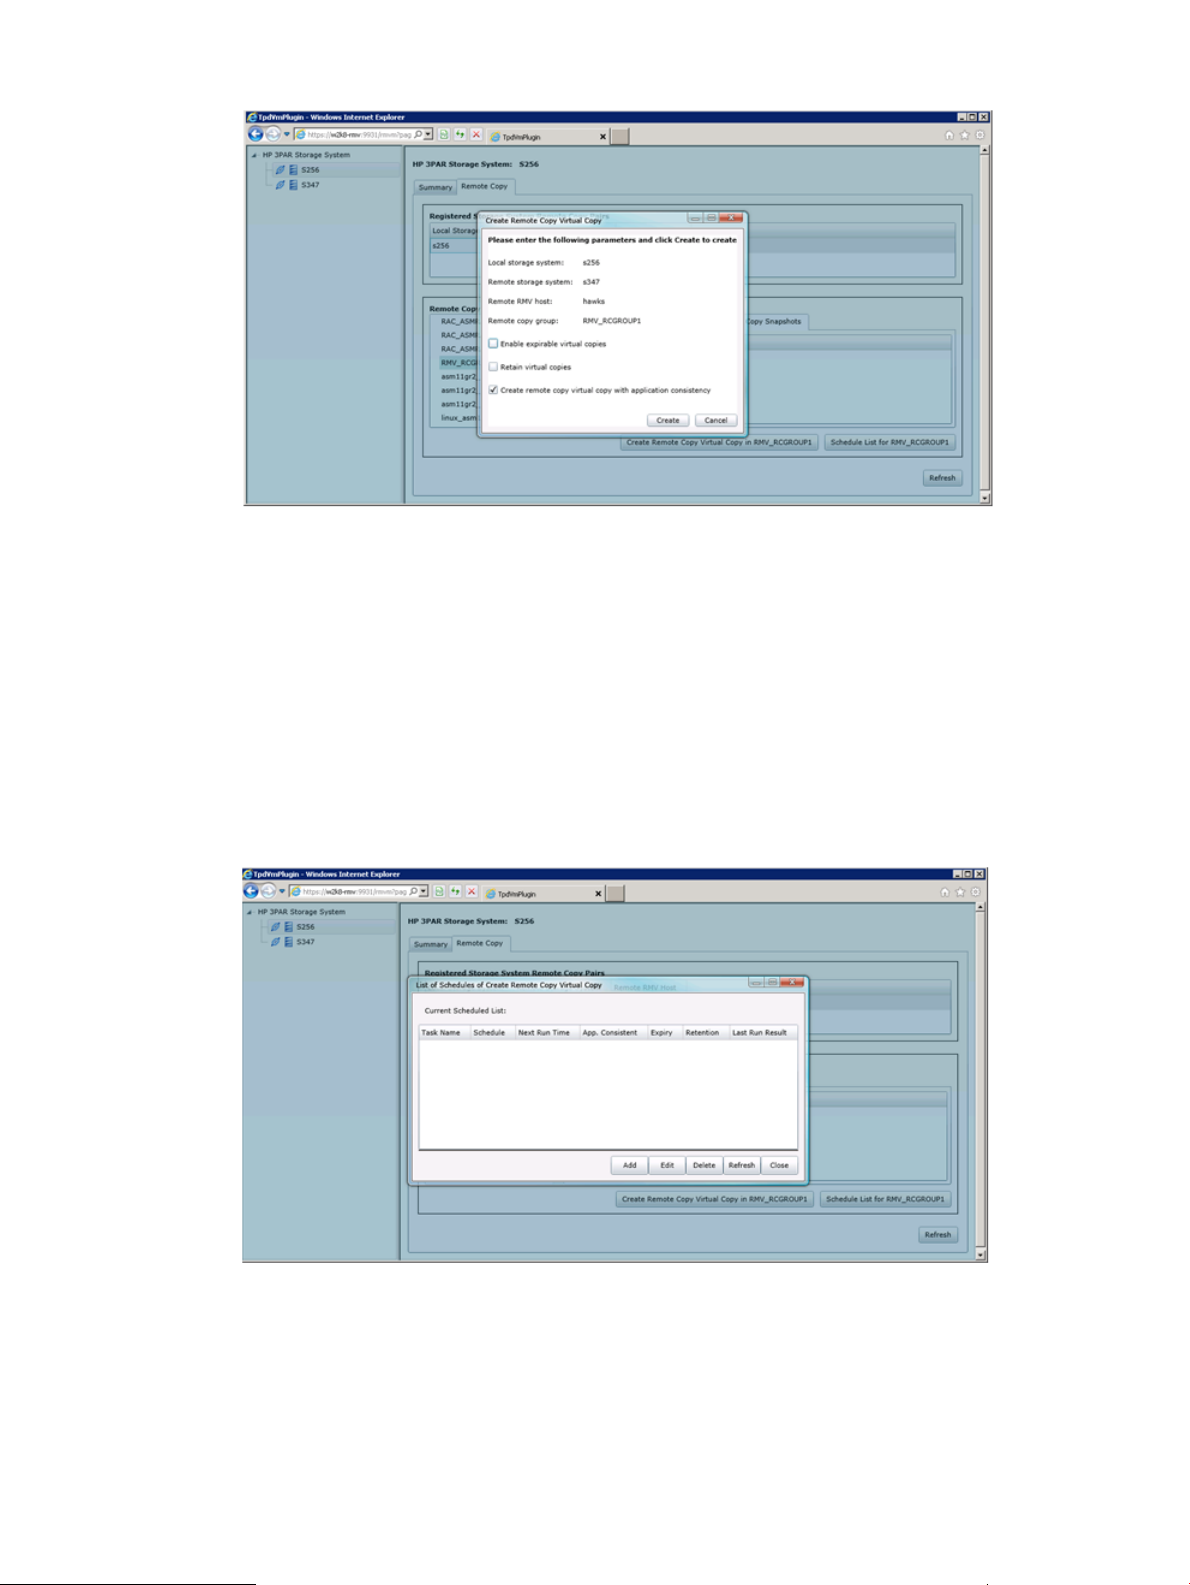
Figure 66 Create Remote Copy Virtual Copy
3. Click Create.
4. Click Yes to confirm.
5. Review the creation of the Virtual Copy in the Recent Tasks box at the bottom of the vSphere
client. Click OK to complete.
Scheduling a Remote Copy Virtual Copy
You can schedule a Remote Copy creation task or the selected Remote Copy group systems.
1. From the Remote Copy tab, click Scheduler.
2. Click Add.
Figure 67 Adding Create Remote Copy Virtual Copy
3. Choose the scheduling options for performing Virtual Copy creation tasks. Set the parameters
of the selected schedule option.
• Hourly Start time, Hour
• Daily Start time, Day
• Weekly Start time, Week, Day of the Week
Scheduling a Remote Copy Virtual Copy 83
Page 84
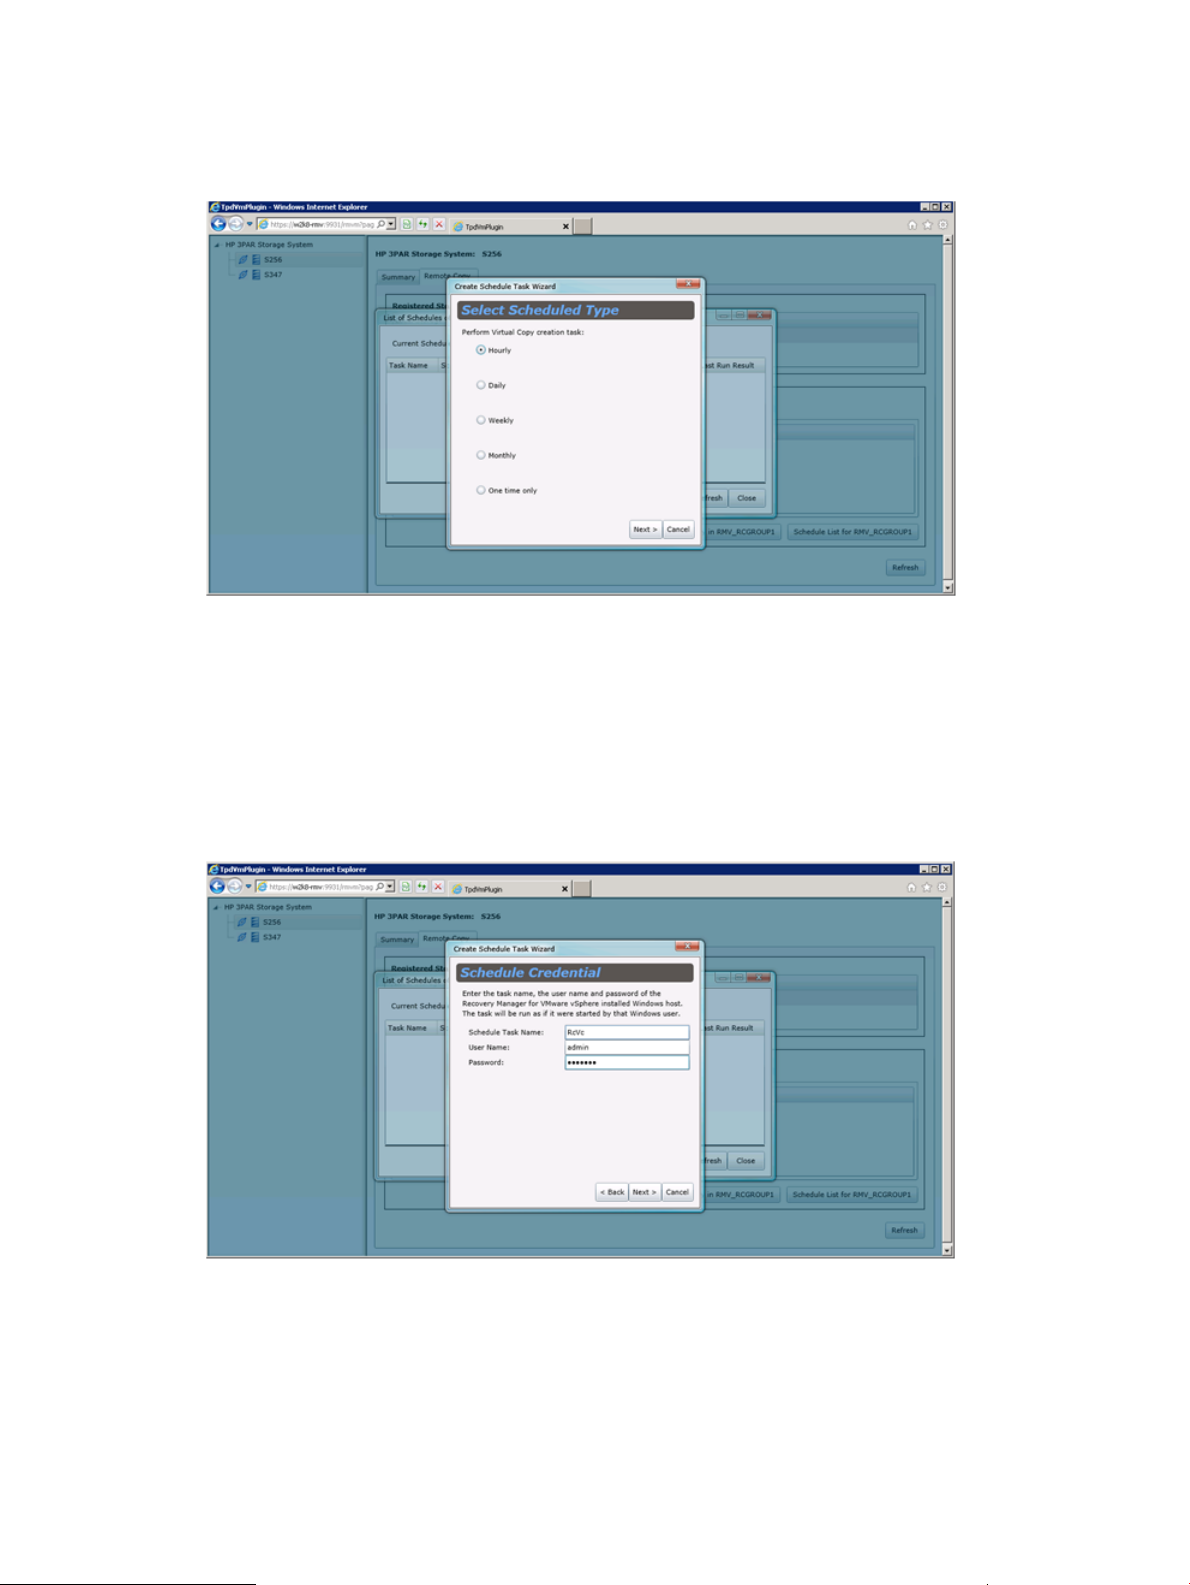
• Monthly Start time, Day of Every Month
• One time only Start Date, Start Time
Figure 68 Setting Scheduled Type for Performing Virtual Copy Creation Task
4. Click Next to continue.
5. Enter the credentials to complete the scheduled tasks.
• Schedule task name
• User name
• Password
Figure 69 Entering Schedule Credential
6. Click Next to continue.
7. Select the schedule task settings.
• vCenter server user
• vCenter credential store file
• Enable expirable virtual copies
84 Working with Remote Copy
Page 85
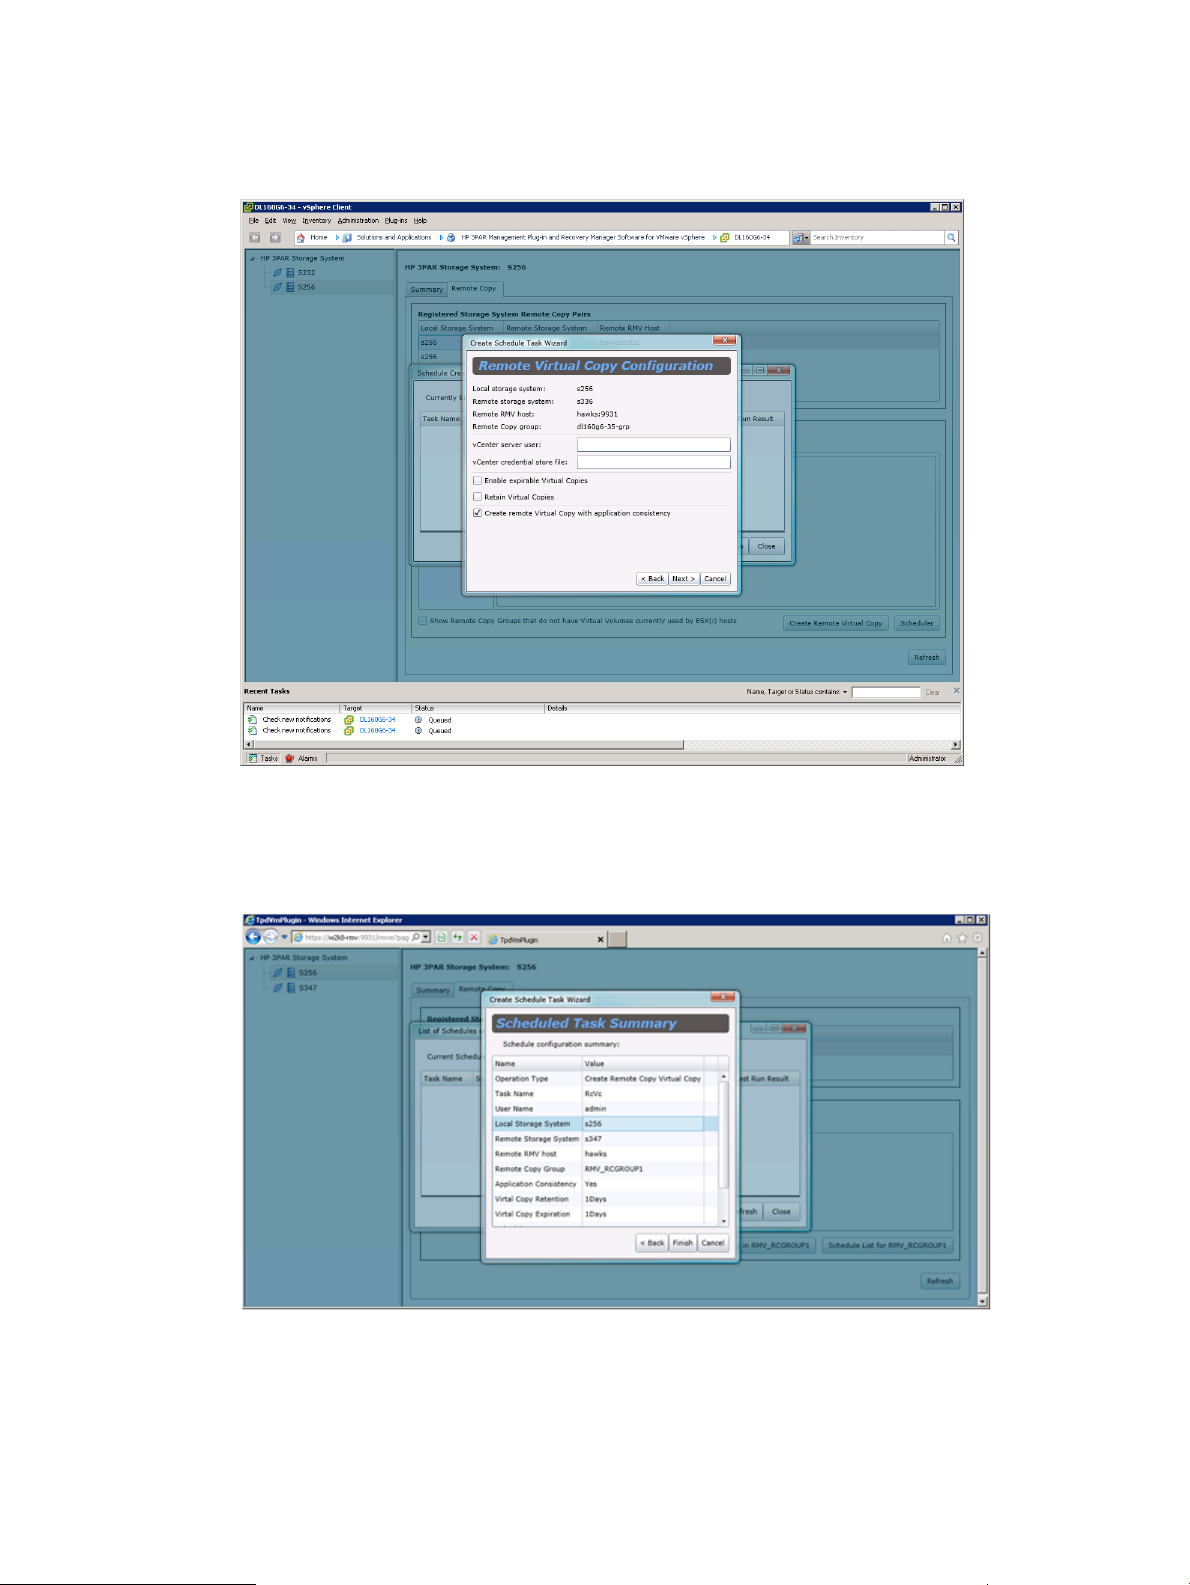
• Retain virtual copies
• Create remote copy virtual copy with application consistency
Figure 70 Setting RC Virtual Copy Configuration
8. Click Next to continue.
9. Review the Scheduled Task Summary before continuing.
Figure 71 Reviewing Scheduled Task Summary
10. Click Finish to exit.
Scheduling a Remote Copy Virtual Copy 85
Page 86

Removing Remote Virtual Copies
When a remote RC Group Virtual Copy under the Remote Virtual Copies tab is no longer required,
the tabs can be removed.
1. Click Remote Virtual Copies tab.
2. Select the specific remote virtual copy. To select multiple Remote virtual copies, press Ctrl and
click.
3. Click Remove Remote Virtual Copies.
Removing Local Virtual Copies
When a local RC Group Virtual Copy under the Local Virtual Copies tab is no longer required, the
tabs can be removed.
1. Click Local Virtual Copies tab.
2. Select the specific local virtual copy. To select multiple Local virtual copies, press Ctrl and
click.
3. Click Remove Local Virtual Copies.
86 Working with Remote Copy
Page 87

Importing a Virtual Machine and Reverting to a Specific Point-in-Time Virtual Copy
1. Issue setcopygroup failover to Failover the desired Remote Copy group from the
secondary site. Verify the Remote Copy group displays Primary-Rev.
2. (Optional) Select a desired virtual machine virtual copy and issue promotesv to revert.
NOTE: Issuing promotesv promotes the entire data of the virtual volume to a specific
point-in-time virtual copy. HP recommends creating a virtual copy as a recovery point from
the base volume before proceeding with the optional step.
3. Issue createvlun to expose the virtual volume to the ESX/ESX(i) host.
4. Go to vSphere vCenter Home→Datastores and Datastore Clusters→Hosts.
Right-click the ESX/ESX(i) host associated with the exposed LUN and select Rescan for
Datastores... to rescan.
5. Select the ESX/ESX(i) host from vCenter and click Configuration tab.
6. From Hardware located in left pane, click Storage to retrieve datastores view.
7. From the Datastore browser, add the virtual machine to the VirtualCenter Inventory.
a. Right-click the VMX file and select Add to Inventory.
b. Continue to follow the wizard.
8. Right-click the newly imported virtual machine and select Snapshot\Snapshot Manager.
9. From the Snapshot dialog, select the base virtual copy. Click Go to revert to the time the virtual
copy is created.
a. (Optional) When revert of snapshot is complete, click Delete All to remove all virtual
copies.
b. Click Close.
10. Update the network setting for the virtual machine.
11. Turn virtual machine power on. If you see a question mark, right-click the virtual machine and
select Guest\Answer Questions. Complete the questions to begin using the virtual machine.
Importing a Virtual Machine From a Remote Site and Reverting to a Specific Point-in-Time Virtual Copy
1. Failover the desired Remote Copy group of the storage system from the Secondary site with
the setrcopygroup failover command. The Remote Copy group Role displays Primary-Rev
when failover is complete.
2. (Optional) HP recommends creating a virtual copy and setting a recovery point from the base
volume before continuing with this step. Select a specific virtual copy of the storage system
and issue promotesv command to revert a Virtual Machine to a specific point-in-time.
NOTE: The promotesv command promotes the entire data in the Virtual volume to the
selected point-in-time virtual copy.
3. Issue createvlun command to expose the virtual volume to the ESX/ESX(i) host.
4. Connect to the vCenter Server and issue Rescan for Datastores... command to scan
for LUN exposed to the ESX/ESX(i) host.
5. Select the ESX/ESX(i) host from the vCenter Server navigation pane and click Configuration
tab in the detailed pane.
6. From the Hardware pane, click Storage to open the Datastores view.
NOTE: If the exported VLUN does not appear as Datastore under the storage view, continue
to follow Add Storage wizard without format disk option, and add the storage.
Importing a Virtual Machine and Reverting to a Specific Point-in-Time Virtual Copy 87
Page 88

7. To add the Virtual Machine to the VirtualCenter inventory from the Datastores browser:
a. Right-click the desired VMX file and select Add to Inventory.
b. Continue to follow the wizard.
8. Locate the newly imported VM, right-click and select Snapshot\Snapshot Manager.
NOTE: If Step 2 is not performed and the virtual copy is not application consistent, continue
on to Step 10.
9. From the Snapshot dialog box, select the base snapshot to revert to the time of the created
snapshot, and click Go to.
a. When the snapshot revert operation is complete, click Delete All to remove all snapshots.
b. Click Close.
10. Update the network setting for the VM.
11. Power on the VM. If you see a question mark, right-click the VM and select Guest\Answer
Questions.
12. Answer the following promoted questions to begin using the VM.
88 Working with Remote Copy
Page 89

9 Using HP 3PAR Peer Motion Manager Software with
Recovery Manager
HP 3PAR Peer Motion Manager is a feature of the HP 3PAR InForm Software and manages the
migration of data in between existing storage systems or third party storage arrays. HP 3PAR
Recovery Manager now supports HP 3PAR Peer Motion Manager data migration activities without
any impact on host operations while monitoring the primary storage system.
If the virtual volume is already in use by an ESX/ESX(i) host before initiating migration, the following
conditions applies:
• You must remove any virtual copies created and managed by Recover Manager for VMware.
The virtual copies created by a potential migrating virtual volume cannot migrate with its virtual
volume during an active Peer Motion migration operation.
• You must remove all virtual copy scheduler tasks associated with the Datastore or Virtual
Machines using the potential migrating virtual volume before migrating data. If the tasks are
not removed and occurs during migration, the following error message may display during
or after the migration operation, "Could not create HP 3PAR snapshot. Object Id:
vm:uuid-4208b1f5-e2ca-1061-c44c-19cf67bee619. Please login into Storage System 014D
Method: CliCreateNewSnapshot."
• Previously created virtual copies will display Mismatched status. You cannot use Virtual Copies
with Mismatched status for mounting or restoring operations.
• You must remove the mismatched virtual copies records from the interface. Note, this does
not remove the physical virtual copies from the original storage system. You must perform a
manual cleanup of the files.
For more information about performing Peer Motion data migration, refer to the HP 3PAR Peer
Motion User Guide. Go to http://www.hp.com/go/3par/, navigate to your product page, click
Support for your product, and then click Manuals.
89
Page 90

10 Support and Other Resources
This document provides information required to install, configure, and use HP 3PAR Management
Plug-in and Recovery Manager Software for VMware vSphere®.
Related Documents
The following documents may be useful when using HP 3PAR Management Plug-in and Recovery
Manager Software for VMware vSphere:
Table 11 Related documentation
information
manage HP 3PAR Storage Systems
configure and administer HP 3PAR Storage Systems
for VASA” (page 92)
Read the…For information about…
HP 3PAR InForm OS Command Line Interface ReferenceCLI commands and their usage
HP 3PAR InForm OS Messages and Operator’s GuideIdentifying storage system components and detailed alert
HP 3PAR InForm OS CLI Administrator’s ManualUsing the Command Line Interface (CLI) to configure and
HP 3PAR InForm OS Management Console Online HelpUsing the InForm Graphical User Interface (GUI) to
HP 3PAR Remote Copy Software User’s GuideUsing HP 3PAR Remote Copy
HP 3PAR InForm OS Messages and Operator’s GuideInterpreting error codes as described in “Troubleshooting
Platform-specific release levels
Typographical Conventions
The following typographical conventions are used in this document:
Table 12 Typographical Conventions
ABCDabcd
ABCDabcd
<ABCDabcd>
NOTE: The InServ Storage Server has been rebranded as HP 3PAR Storage System. There are
instances in this document where menu items and command output refer to the HP 3PAR Storage
System as InServ or InServ Storage Server.
For information about supported hardware and software
platforms, refer to the Single Point of Connectivity
Knowledge for HP Storage Products (SPOCK) Web site at
http://spock.corp.hp.com.
Used for dialog box elements such as
titles and button labels.
output, and for text you are to enter.
Used for variables in file names,
paths, and screen output, and
variables in user input.
ExampleMeaningTypeface
Enter your system name in the Value
box and click OK.
Found < 12 > 73G disks.Used for file names, paths, and screen
Enter cli at the Windows command
prompt.
[root@(systemID-nodeID)root]
To continue Enter your system
name ==> systemname
90 Support and Other Resources
Page 91

Advisories
To avoid injury to people or damage to data and equipment, be sure to observe the cautions and
warnings in this document. Always be careful when handling any electrical equipment.
WARNING! Warnings alert you to actions that can cause injury to people or irreversible damage
to data or the operating system.
CAUTION: Cautions alert you to actions that can cause damage to equipment, software, or data.
NOTE: Notes are reminders, tips, or suggestions that supplement the procedures included in this
guide.
Advisories 91
Page 92

A Troubleshooting for VASA
VASA Provider Registration Related Issue
If an error occurs during the VASA Provider registration process on the vCenter server, it might be
caused by one of the following issues:
• The port used by Recovery Manager for the VMware installed host is being blocked by firewall
or anti-virus software. By default, the VASA Web service uses port 9997 for communications.
The current port number can be obtained through the Admin Tool interface.
• A proper SMS certificate has not been properly installed on the Recovery Manager for VMware
host prior to the VASA provider registration. Refer to “Registering an SMS Certificate for the
VASA Provider” (page 29) for complete details.
Inspecting VASA Provider and vCenter Server Communication
VASA provider and vCenter server communications can be inspected by setting the log level to
"High" from the Configuration option from the VASA tab available from the Admin Tools. When
the log level is set to "High", the received soap requests and replied responses will be written to
the log file. Following are descriptions of the alarm and event messages that might be generated
and suggested actions for each.
Alarm Type Message
MESSAGE
(ID:300de) -{Info}
SUGGESTED ACTION
Refer to Alert Code 0x300de in HP 3PAR InForm OS Message and Operator's Guide.
MESSAGE
(ID:300fa) -{Info}
SUGGESTED ACTION
Refer to Alert Code 0x300fa in HP 3PAR InForm OS Message and Operator's Guide.
MESSAGE
(ID:400fa) -{Info}
SUGGESTED ACTION
Refer to Alert Code 0x400fa in HP 3PAR InForm OS Message and Operator's Guide.
MESSAGE
(ID:e0001) -{Info}
SUGGESTED ACTION
Refer to Alert Code 0xe0001 in HP 3PAR InForm OS Message and Operator's Guide.
MESSAGE
(ID:e0002) -{Info}
SUGGESTED ACTION
Refer to Alert Code 0xe0002 in HP 3PAR InForm OS Message and Operator's Guide.
92 Troubleshooting for VASA
Page 93

MESSAGE
(ID:e0006) -{Info}
SUGGESTED ACTION
Refer to Alert Code 0xe0006 in HP 3PAR InForm OS Message and Operator's Guide.
MESSAGE
(ID:110004) -{Info}
SUGGESTED ACTION
Refer to Alert Code 0x110004 in HP 3PAR InForm OS Message and Operator's Guide.
MESSAGE
(ID:150002) -{Info}
SUGGESTED ACTION
Refer to Alert Code 0x150002 in HP 3PAR InForm OS Message and Operator's Guide.
MESSAGE
(ID:15000c) -{Info}
SUGGESTED ACTION
Refer to Alert Code 0x15000c in HP 3PAR InForm OS Message and Operator's Guide.
MESSAGE
(ID:1a0002) -{Info}
SUGGESTED ACTION
Refer to Alert Code 0x1a0002 in HP 3PAR InForm OS Message and Operator's Guide.
MESSAGE
(ID:1a00de) -{Info}
SUGGESTED ACTION
Refer to Alert Code 0x1a00de in HP 3PAR InForm OS Message and Operator's Guide.
MESSAGE
(ID:1a00fa) -{Info}}
SUGGESTED ACTION
Refer to Alert Code 0x1a00fa in HP 3PAR InForm OS Message and Operator's Guide.
MESSAGE
(ID:230003) -{Info}
SUGGESTED ACTION
Refer to Alert Code 0x230003 in HP 3PAR InForm OS Message and Operator's Guide.
MESSAGE
(ID:230004) -{Info}
Inspecting VASA Provider and vCenter Server Communication 93
Page 94

SUGGESTED ACTION
Refer to Alert Code 0x230004 in HP 3PAR InForm OS Message and Operator's Guide.
MESSAGE
(ID:250002) -{Info}
SUGGESTED ACTION
Refer to Alert Code 0x250002 in HP 3PAR InForm OS Message and Operator's Guide.
MESSAGE
(ID:270001) -{Info}
SUGGESTED ACTION
Refer to Alert Code 0x270001 in HP 3PAR InForm OS Message and Operator's Guide.
MESSAGE
(ID:270002) -{Info}
SUGGESTED ACTION
Refer to Alert Code 0x270002 in HP 3PAR InForm OS Message and Operator's Guide.
MESSAGE
(ID:270003) -{Info}
SUGGESTED ACTION
Refer to Alert Code 0x270003 in HP 3PAR InForm OS Message and Operator's Guide.
MESSAGE
(ID:270004) -{Info}
SUGGESTED ACTION
Refer to Alert Code 0x270004 in HP 3PAR InForm OS Message and Operator's Guide.
MESSAGE
(ID:270005) -{Info}
SUGGESTED ACTION
Refer to Alert Code 0x270005 in HP 3PAR InForm OS Message and Operator's Guide.
MESSAGE
(ID:270006) -{Info}
SUGGESTED ACTION
Refer to Alert Code 0x270006 in HP 3PAR InForm OS Message and Operator's Guide.
MESSAGE
(ID:270007) -{Info}
SUGGESTED ACTION
Refer to Alert Code 0x270007 in HP 3PAR InForm OS Message and Operator's Guide.
94 Troubleshooting for VASA
Page 95

MESSAGE
(ID:270008) -{Info}
SUGGESTED ACTION
Refer to Alert Code 0x270008 in HP 3PAR InForm OS Message and Operator's Guide.
MESSAGE
(ID:270050) -{Info}
SUGGESTED ACTION
Refer to Alert Code 0x270050 in HP 3PAR InForm OS Message and Operator's Guide.
MESSAGE
(ID:2900de) -{Info}
SUGGESTED ACTION
Refer to Alert Code 0x2900de in HP 3PAR InForm OS Message and Operator's Guide.
MESSAGE
(ID:3700de) -{Info}
SUGGESTED ACTION
Refer to Alert Code 0x3700de in HP 3PAR InForm OS Message and Operator's Guide.
MESSAGE
(ID:3700fa) -{Info}
SUGGESTED ACTION
Refer to Alert Code 0x3700fa in HP 3PAR InForm OS Message and Operator's Guide.
MESSAGE
(ID:3800de) -{Info}
SUGGESTED ACTION
Refer to Alert Code 0x3800de in HP 3PAR InForm OS Message and Operator's Guide.
MESSAGE
(ID:3900fa) -{Info}
SUGGESTED ACTION
Refer to Alert Code 0x3900fa in HP 3PAR InForm OS Message and Operator's Guide.
MESSAGE
(ID:3a00de) -{Info}
SUGGESTED ACTION
Refer to Alert Code 0x3a00de in HP 3PAR InForm OS Message and Operator's Guide.
MESSAGE
(ID:3a00fa) -{Info}
Inspecting VASA Provider and vCenter Server Communication 95
Page 96

SUGGESTED ACTION
Refer to Alert Code 0x3a00fa in HP 3PAR InForm OS Message and Operator's Guide.
MESSAGE
(ID:30005) -{Info}
SUGGESTED ACTION
Refer to Alert Code 0x30005 in HP 3PAR InForm OS Message and Operator's Guide.
MESSAGE
(ID:10000003) -
SUGGESTED ACTION
This is an indication that a particular LUN has a change in its capability profile as the result of
being added to a Remote Copy group. Contact your storage administrator if this is not an intended
change.
MESSAGE
(ID:10000004) -
SUGGESTED ACTION
This is an indication that a particular LUN has a change in its capability profile as the result of
being removed from a Remote Copy group. Please contact your storage administrator if this is not
an intended change.
MESSAGE
(ID:1000000b) -Node status has been changed. Additional information: {Info}
SUGGESTED ACTION
This is an indication that a node has property or configuration changes. If this is not an intended
action, contact your storage administrator for assistance.
Event Type Message
MESSAGE
(ID:3000fa) -{Info}
SUGGESTED ACTION
Refer to Alert Code 0x3000fa in HP 3PAR InForm OS Message and Operator's Guide.
MESSAGE
(ID:3000de) -{Info}
SUGGESTED ACTION
Refer to Alert Code 0x3000de in HP 3PAR InForm OS Message and Operator's Guide.
MESSAGE
(ID:400fa) -{Info}
SUGGESTED ACTION
Refer to Alert Code 0x400fa in HP 3PAR InForm OS Message and Operator's Guide.
96 Troubleshooting for VASA
Page 97

MESSAGE
(ID:90001) -{Info}
SUGGESTED ACTION
Refer to Alert Code 0x90001 in HP 3PAR InForm OS Message and Operator's Guide.
MESSAGE
(ID:900fa) -{Info}
SUGGESTED ACTION
Refer to Alert Code 0x900fa in HP 3PAR InForm OS Message and Operator's Guide.
MESSAGE
(ID:a0001) -{Info}
SUGGESTED ACTION
Refer to Alert Code 0xa0001 in HP 3PAR InForm OS Message and Operator's Guide.
MESSAGE
(ID:a0002) -{Info}
SUGGESTED ACTION
Refer to Alert Code 0xa0002 in HP 3PAR InForm OS Message and Operator's Guide.
MESSAGE
(ID:e0001) -{Info}
SUGGESTED ACTION
Refer to Alert Code 0xe0001 in HP 3PAR InForm OS Message and Operator's Guide.
MESSAGE
(ID:e0002) -{Info}
SUGGESTED ACTION
Refer to Alert Code 0xe0002 in HP 3PAR InForm OS Message and Operator's Guide.
MESSAGE
(ID:e0005) -{Info}
SUGGESTED ACTION
Refer to Alert Code 0xe0005 in HP 3PAR InForm OS Message and Operator's Guide.
MESSAGE
(ID:1a0002) -{Info}
SUGGESTED ACTION
Refer to Alert Code 0x1a0002 in HP 3PAR InForm OS Message and Operator's Guide.
MESSAGE
(ID:1a00de) -{Info}
Inspecting VASA Provider and vCenter Server Communication 97
Page 98

SUGGESTED ACTION
Refer to Alert Code 0x1a00de in HP 3PAR InForm OS Message and Operator's Guide.
MESSAGE
(ID:1a00fa) -{Info}
SUGGESTED ACTION
Refer to Alert Code 0x1a00fa in HP 3PAR InForm OS Message and Operator's Guide.
MESSAGE
(ID:230003) -{Info}
SUGGESTED ACTION
Refer to Alert Code 0x230003 in HP 3PAR InForm OS Message and Operator's Guide.
MESSAGE
(ID:230004) -{Info}
SUGGESTED ACTION
Refer to Alert Code 0x230004 in HP 3PAR InForm OS Message and Operator's Guide.
MESSAGE
(ID:270006) -{Info}
SUGGESTED ACTION
Refer to Alert Code 0x270006 in HP 3PAR InForm OS Message and Operator's Guide.
MESSAGE
(ID:270007) -{Info}
SUGGESTED ACTION
Refer to Alert Code 0x270007 in HP 3PAR InForm OS Message and Operator's Guide.
MESSAGE
(ID:270012) -{Info}
SUGGESTED ACTION
Refer to Alert Code 0x270012 in HP 3PAR InForm OS Message and Operator's Guide.
MESSAGE
(ID:27000e) -{Info}
SUGGESTED ACTION
Refer to Alert Code 0x27000e in HP 3PAR InForm OS Message and Operator's Guide.
MESSAGE
(ID:27000f) -{Info}
SUGGESTED ACTION
Refer to Alert Code 0x27000f in HP 3PAR InForm OS Message and Operator's Guide.
98 Troubleshooting for VASA
Page 99

MESSAGE
(ID:270010) -{Info}
SUGGESTED ACTION
Refer to Alert Code 0x270010 in HP 3PAR InForm OS Message and Operator's Guide.
MESSAGE
(ID:270011) -{Info}
SUGGESTED ACTION
Refer to Alert Code 0x270011 in HP 3PAR InForm OS Message and Operator's Guide.
MESSAGE
(ID:270013) -{Info}
SUGGESTED ACTION
Refer to Alert Code 0x270013 in HP 3PAR InForm OS Message and Operator's Guide.
MESSAGE
(ID:270014) -{Info}
SUGGESTED ACTION
Refer to Alert Code 0x270014 in HP 3PAR InForm OS Message and Operator's Guide.
MESSAGE
(ID:270015) -{Info}
SUGGESTED ACTION
Refer to Alert Code 0x270015 in HP 3PAR InForm OS Message and Operator's Guide.
MESSAGE
(ID:270016) -{Info}
SUGGESTED ACTION
Refer to Alert Code 0x270016 in HP 3PAR InForm OS Message and Operator's Guide.
MESSAGE
(ID:270017) -{Info}
SUGGESTED ACTION
Refer to Alert Code 0x270017 in HP 3PAR InForm OS Message and Operator's Guide.
MESSAGE
(ID:270019) -{Info}
SUGGESTED ACTION
Refer to Alert Code 0x270019 in HP 3PAR InForm OS Message and Operator's Guide.
MESSAGE
(ID:27001a) -{Info}
Inspecting VASA Provider and vCenter Server Communication 99
Page 100

SUGGESTED ACTION
Refer to Alert Code 0x27001a in HP 3PAR InForm OS Message and Operator's Guide.
MESSAGE
(ID:27001b) -{Info}
SUGGESTED ACTION
Refer to Alert Code 0x27001b in HP 3PAR InForm OS Message and Operator's Guide.
MESSAGE
(ID:27001c) -{Info}
SUGGESTED ACTION
Refer to Alert Code 0x27001c in HP 3PAR InForm OS Message and Operator's Guide.
MESSAGE
(ID:2900de) -{Info}
SUGGESTED ACTION
Refer to Alert Code 0x2900de in HP 3PAR InForm OS Message and Operator’s Guide.
MESSAGE
(ID:30005) -{Info}
SUGGESTED ACTION
Refer to Alert Code 0x30005 in HP 3PAR InForm OS Message and Operator's Guide.
MESSAGE
(ID:10000001) - New LUN is created. Additional information: {Info}
SUGGESTED ACTION
No action is required. This indicates that a LUN is exposed to one of the monitored ESX host.
MESSAGE
(ID:10000002) - Existing LUN in 3PAR Storage Server has been removed. Additional information:
{Info}
SUGGESTED ACTION
This indicates that an existing exposure to the monitored ESX host has been removed. Please contact
your storage administrator if this is not an intended operation.
MESSAGE
(ID:10000005) - Existing LUN in 3PAR Storage Server has been renamed. Additional information:
{Info}
SUGGESTED ACTION
No action is required. This indicates that an already exposed LUN has a name change in the
storage system.
MESSAGE
(ID:10000007) - Existing LUN property has been updated due to changes to host. Additional
information: {Info}
100 Troubleshooting for VASA
 Loading...