

Page 1

HP StorageWorks
Application Recovery Manager
Installation and Licensing Guide
Manual Edition: December 2007
Manufacturing Part Number: T4395-96002
Release A.06.00
© Copyright 2007 Hewlett-Packard Development Company, L.P.
Page 2

Legal Notices
©Copyright 2007 Hewlett-Packard Development Company, L.P.
Hewlett-Packard Company makes no warranty of any kind with regard
to this material, including, but not limited to, the implied warranties of
merchantability and fitness for a particular purpose. Hewlett-Packard
shall not be liable for errors contained herein or for incidental or
consequential damages in conection with the furnishing, performance, or
use of this material.
This document contains proprietary information, which is protected by
copyright. No part of this document may be photocopied, reproduced, or
translated into another language without the prior written consent of
Hewlett-Packard. The information contained in this document is subject
to change without notice.
Microsoft® and Windows® are U.S. registered trademarks of Microsoft
Corporation.
Hewlett-Packard Company shall not be liable for technical or editorial
errors or omissions contained herein. The information is provided "as is"
without warranty of any kind and is subject to change without notice.
The warranties for Hewlett-Packard Company products are set forth in
the express limited warranty statements for such products. Nothing
herein should be construed as constituting an addition warranty.
ii
Page 3

Contents
1. Overview of the Installation Procedure
In This Chapter . . . . . . . . . . . . . . . . . . . . . . . . . . . . . . . . . . . . . . . . . . . . . . . . . . . . . . . . . 2
Overview of the Installation Procedure . . . . . . . . . . . . . . . . . . . . . . . . . . . . . . . . . . . . . . 3
The Remote Installation Concept . . . . . . . . . . . . . . . . . . . . . . . . . . . . . . . . . . . . . . . . . 6
Choosing the Cell Manager System . . . . . . . . . . . . . . . . . . . . . . . . . . . . . . . . . . . . . . . . . 8
Choosing the Application Recovery Manager User Interface System. . . . . . . . . . . . . . . 9
The Application Recovery Manager Graphical User Interface . . . . . . . . . . . . . . . . . . 9
2. Installing Application Recovery Manager on Your Network
In This Chapter . . . . . . . . . . . . . . . . . . . . . . . . . . . . . . . . . . . . . . . . . . . . . . . . . . . . . . . . 12
Installing the Application Recovery Manager Cell Manager (CM) and Installation
Server(s) (IS) . . . . . . . . . . . . . . . . . . . . . . . . . . . . . . . . . . . . . . . . . . . . . . . . . . . . . . . . . . 13
Installing a Cell Manager. . . . . . . . . . . . . . . . . . . . . . . . . . . . . . . . . . . . . . . . . . . . . . . 14
Installing Installation Servers. . . . . . . . . . . . . . . . . . . . . . . . . . . . . . . . . . . . . . . . . . . 21
Installing Application Recovery Manager Clients . . . . . . . . . . . . . . . . . . . . . . . . . . . . . 26
Application Recovery Manager Components. . . . . . . . . . . . . . . . . . . . . . . . . . . . . . . . 28
Remote Installation of Application Recovery Manager Clients . . . . . . . . . . . . . . . . . 29
Local Installation of the Application Recovery Manager Clients. . . . . . . . . . . . . . . . 35
MS Volume Shadow Copy Clients. . . . . . . . . . . . . . . . . . . . . . . . . . . . . . . . . . . . . . . . . . 38
MS Volume Shadow Copy Clients . . . . . . . . . . . . . . . . . . . . . . . . . . . . . . . . . . . . . . . . 38
HP StorageWorks Enterprise Virtual Array Integration. . . . . . . . . . . . . . . . . . . . . . 38
Installing Application Recovery Manager on Microsoft Cluster Server . . . . . . . . . . . . 40
Installing a Cluster-Aware Cell Manager . . . . . . . . . . . . . . . . . . . . . . . . . . . . . . . . . . 40
Installing Cluster-Aware Clients. . . . . . . . . . . . . . . . . . . . . . . . . . . . . . . . . . . . . . . . . 47
3. Maintaining the Installation
In This Chapter . . . . . . . . . . . . . . . . . . . . . . . . . . . . . . . . . . . . . . . . . . . . . . . . . . . . . . . . 52
Importing Clients to a Cell . . . . . . . . . . . . . . . . . . . . . . . . . . . . . . . . . . . . . . . . . . . . . . . 53
Importing an Installation Server to a Cell . . . . . . . . . . . . . . . . . . . . . . . . . . . . . . . . . . 55
Importing a Cluster-Aware Client to a Cell . . . . . . . . . . . . . . . . . . . . . . . . . . . . . . . . . 56
Microsoft Cluster Server . . . . . . . . . . . . . . . . . . . . . . . . . . . . . . . . . . . . . . . . . . . . . . . 56
Exporting Clients from a Cell . . . . . . . . . . . . . . . . . . . . . . . . . . . . . . . . . . . . . . . . . . . . . 58
Security Considerations. . . . . . . . . . . . . . . . . . . . . . . . . . . . . . . . . . . . . . . . . . . . . . . . . . 61
Security Layers. . . . . . . . . . . . . . . . . . . . . . . . . . . . . . . . . . . . . . . . . . . . . . . . . . . . . . . 61
Securing Clients . . . . . . . . . . . . . . . . . . . . . . . . . . . . . . . . . . . . . . . . . . . . . . . . . . . . . . 64
Strict Hostname Checking . . . . . . . . . . . . . . . . . . . . . . . . . . . . . . . . . . . . . . . . . . . . . . 69
iii
Page 4

Contents
Start Backup Specification User Right . . . . . . . . . . . . . . . . . . . . . . . . . . . . . . . . . . . . 71
Hiding the Contents of Backup Specifications . . . . . . . . . . . . . . . . . . . . . . . . . . . . . . 72
Host Trusts . . . . . . . . . . . . . . . . . . . . . . . . . . . . . . . . . . . . . . . . . . . . . . . . . . . . . . . . . . 72
Monitoring Security Events . . . . . . . . . . . . . . . . . . . . . . . . . . . . . . . . . . . . . . . . . . . . . 73
Uninstalling Application Recovery Manager Software . . . . . . . . . . . . . . . . . . . . . . . . . 74
Uninstalling an Application Recovery Manager Client . . . . . . . . . . . . . . . . . . . . . . . 75
Uninstalling the Cell Manager and Installation Server. . . . . . . . . . . . . . . . . . . . . . . 76
Changing Application Recovery Manager Software Components. . . . . . . . . . . . . . . . . 78
4. Application Recovery Manager Licensing
In This Chapter . . . . . . . . . . . . . . . . . . . . . . . . . . . . . . . . . . . . . . . . . . . . . . . . . . . . . . . . 80
Introduction . . . . . . . . . . . . . . . . . . . . . . . . . . . . . . . . . . . . . . . . . . . . . . . . . . . . . . . . . . . 81
License Checking and Reporting. . . . . . . . . . . . . . . . . . . . . . . . . . . . . . . . . . . . . . . . . . . 82
Cell Manager Related License . . . . . . . . . . . . . . . . . . . . . . . . . . . . . . . . . . . . . . . . . . . 82
Entity Based Licenses . . . . . . . . . . . . . . . . . . . . . . . . . . . . . . . . . . . . . . . . . . . . . . . . . 83
Capacity Based Licenses . . . . . . . . . . . . . . . . . . . . . . . . . . . . . . . . . . . . . . . . . . . . . . . 83
Capacity Based Licensing Examples. . . . . . . . . . . . . . . . . . . . . . . . . . . . . . . . . . . . . . 85
Producing a License Report on Demand . . . . . . . . . . . . . . . . . . . . . . . . . . . . . . . . . . . 86
Which Licenses Are Available? . . . . . . . . . . . . . . . . . . . . . . . . . . . . . . . . . . . . . . . . . . . . 88
Password Considerations . . . . . . . . . . . . . . . . . . . . . . . . . . . . . . . . . . . . . . . . . . . . . . . 88
Application Recovery Manager Passwords. . . . . . . . . . . . . . . . . . . . . . . . . . . . . . . . . . . 90
Obtaining and Installing Permanent Passwords Using
the HP OpenView AutoPass Utility. . . . . . . . . . . . . . . . . . . . . . . . . . . . . . . . . . . . . . . 91
Other Ways of Obtaining and Installing Permanent Passwords . . . . . . . . . . . . . . . . 93
Verifying the Password . . . . . . . . . . . . . . . . . . . . . . . . . . . . . . . . . . . . . . . . . . . . . . . . 95
Finding the Number of Installed Licenses . . . . . . . . . . . . . . . . . . . . . . . . . . . . . . . . . 96
Moving Licenses to Another Cell Manager System . . . . . . . . . . . . . . . . . . . . . . . . . . 96
5. Troubleshooting Installation
In This Chapter . . . . . . . . . . . . . . . . . . . . . . . . . . . . . . . . . . . . . . . . . . . . . . . . . . . . . . . 100
Name Resolution Problems when Installing the Cell Manager . . . . . . . . . . . . . . . . . 101
Verifying DNS Connections Within Application Recovery Manager Cell . . . . . . . . . 102
Using the omnicheck command . . . . . . . . . . . . . . . . . . . . . . . . . . . . . . . . . . . . . . . . . 102
Troubleshooting Installation of Application Recovery Manager. . . . . . . . . . . . . . . . . 105
Problems with Remote Installation of Clients . . . . . . . . . . . . . . . . . . . . . . . . . . . . . 106
Verifying Application Recovery Manager Client Installation . . . . . . . . . . . . . . . . . . 107
Using Log Files. . . . . . . . . . . . . . . . . . . . . . . . . . . . . . . . . . . . . . . . . . . . . . . . . . . . . . . . 108
Local Installation . . . . . . . . . . . . . . . . . . . . . . . . . . . . . . . . . . . . . . . . . . . . . . . . . . . . 108
iv
Page 5

Contents
Remote Installation . . . . . . . . . . . . . . . . . . . . . . . . . . . . . . . . . . . . . . . . . . . . . . . . . . 108
Application Recovery Manager Log Files . . . . . . . . . . . . . . . . . . . . . . . . . . . . . . . . . 109
Creating Installation Execution Traces . . . . . . . . . . . . . . . . . . . . . . . . . . . . . . . . . . . . 110
A. Appendix A
Application Recovery Manager A.06.00 Product Structure and Licenses . . . . . . . . . .A-2
Cell Manager Pack . . . . . . . . . . . . . . . . . . . . . . . . . . . . . . . . . . . . . . . . . . . . . . . . . . . .A-2
Functional Extensions . . . . . . . . . . . . . . . . . . . . . . . . . . . . . . . . . . . . . . . . . . . . . . . . .A-3
Application Recovery Manager Licensing Forms. . . . . . . . . . . . . . . . . . . . . . . . . . . . . .A-5
Glossary
Index
v
Page 6

Contents
vi
Page 7

Document History
Manual updates may be issued between editions to correct errors or
document product changes. To ensure that you receive updated or new
editions, subscribe to the appropriate product support service. See your
HP sales representative for details.
Table 1 Edition History
Part Number Manual Edition Product
T4395-96002 October 2006 Application Recovery
T4395-96002 December 2007 Application Recovery
Manager Release A.06.00
Manager Release A.06.00 with
patch APPRMWIN_00011.
vii
Page 8

viii
Page 9

Table 2
Conventions
The following typographical conventions are used in this manual.
Convention Meaning Example
Italic Book or manual
titles, and manual
page names
Provides emphasis You must follow these steps.
Specifies a variable
that you must supply
when entering a
command
Bold New terms The Cell Manager is the
Computer Text and items on the
computer screen
Command names Use the omnidbsmis
File and directory
names
Process names Check to see if
Refer to the HP
StorageWorks Application
Recovery Manager
Installation and Licensing
Guide for more information.
At the prompt type:
rlogin your_name where
you supply your login name.
main ...
The system replies: Press
Enter
command ...
c:\Program Files
Application Recovery
Manager Inet is running.
Window/dialog box
names
Text that you must
enter
Keycap Keyboard keys Press Return.
ix
In the Backup Options
dialog box...
At the prompt, type: ls -l
Page 10
See the online Help for information about the Application Recovery
Manager graphical user interface conventions.
Figure 1 Application Recovery Manager Graphical User Interface
Conventions
x
Page 11

In This Book
The HP StorageWorks Application Recovery Manager Installation and
Licensing Guide describes the installation of the Application Recovery
Manager product, the prerequisites that must be met before starting the
installation procedure, upgrading and licensing.
Audience
The manual is intended for administrators who are responsible for
installing and maintaining the environment and backup administrators
responsible for planning, installing and managing the backup
environment.
xi
Page 12

Organization
The manual is organized as follows:
Chapter 1 “Overview of the Installation Procedure” on page 1.
Chapter 2 “Installing Application Recovery Manager on Your
Network” on page 11.
Chapter 3 “Maintaining the Installation” on page 51.
Chapter 4 “Application Recovery Manager Licensing” on page 79.
Chapter 5 “Troubleshooting Installation” on page 99.
Appendix A “Appendix A” on page A-1.
Appendix B “Appendix B” on page B-1.
Glossary Definition of terms used in this manual.
xii
Page 13

Application Recovery Manager Documentation
Application Recovery Manager documentation comes in the form of
manuals and online Help.
Manuals Application Recovery Manager manuals are available in PDF format.
Install the PDF files during the Application Recovery Manager setup
procedure by selecting the User Interface component. Once installed,
the manuals reside in the <AppRM_home>\docs directory. You can also
find the manuals in PDF format at http://www.hp.com/support/manuals
HP StorageWorks Application Recovery Manager Installation
and Licensing Guide
This manual describes how to install the Application Recovery Manager
software, taking into account the architecture of your environment. This
manual also gives details on how to obtain the proper licenses for your
environment.
HP StorageWorks Application Recovery Manager Getting Started
Guide
This manual provides a simple and short procedure on how to install the
Application Recovery Manager software, create a simple backup
specification and run a backup and restore.
.
HP StorageWorks Application Recovery Manager Administrator’s
Guide
This manual describes typical configuration and administration tasks
performed by a backup administrator, such as disk array configuration,
configuring a backup, and restoring data.
HP StorageWorks Application Recovery Manager Command Line
Interface Reference
This manual describes the command line interface and provides
command syntaxes, describes command options, and provides examples
on command usage.
Online Help Application Recovery Manager provides context-sensitive (F1) Help and
Help Topics.
xiii
Page 14

The Help Topics provide complete information on how to plan,
configure, and use the Application Recovery Manager to backup and
restore your applications.
The context sensitive (F1) Help provides descriptions of the GUI
options which are available in a particular context or dialog window.
To access online help from the top-level directory on the installation DVD
without installing Application Recovery Manager, unzip
AppRM_help.zip and run AppRM_help.chm.
xiv
Page 15

Documentation Map
The following table shows where to find information of different kinds.
Shaded squares are a good place to look first.
Online Help
Backup XX X
Concepts/Techniques
CLI Reference
Installation X
Instant Recovery
Licensing X
Limitations X X X
Planning strategy
Procedures/Tasks
Recommendations X X
Requirements X X
Support matrices
Supported configurations X X
Troubleshooting
XX
XX X
XX
XXX
XXX
Getting
Started
Installation
Guide
Release
Notes
Admin
Guide
X
X
X
CLI Reference
X
xv
Page 16

xvi
Page 17

Contact Information
General
Information
Technical Support Technical support information can be found at the HP Electronic
Documentation
Feedback
Training
Information
General information about Application Recovery Manager can be found
at
http://www.hp.com/go/AppRM
Support Centers at
http://www.itrc.hp.com
Information about the latest Application Recovery Manager patches can
be found at
http://www.itrc.hp.com
HP does not support third-party hardware and software. Contact the
respective vendor for support.
Your comments on the documentation help us to understand and meet
your needs. You can provide feedback at
storagedocs.feedback@hp.com
For information on currently available HP StorageWorks training, see
the HP StorageWorks World Wide Web site at
http://education.hp.com/curr-storsan.htm
Follow the links to obtain information about scheduled classes, training
at customer sites, and class registration.
xvii
Page 18

xviii
Page 19

1 Overview of the Installation
Procedure
Chapter 1 1
Page 20

Overview of the Installation Procedure
In This Chapter
In This Chapter
This chapter provides an overview of the Application Recovery Manager
installation procedure and introduces concepts that apply to the
installation. The Application Recovery Manager Cell Manager and
Application Recovery Manager user interface are introduced.
Chapter 12
Page 21

Overview of the Installation Procedure
Overview of the Installation Procedure
Overview of the Installation Procedure
An Application Recovery Manager backup environment is a set of
systems with a common backup policy located in the same time zone and
existing on the same LAN/SAN. This network environment is referred to
as an Application Recovery Manager cell. A typical cell consists of a Cell
Manager, Installation Servers, and clients.
The Cell Manager is the main system that manages the cell from a
central point. It contains the Application Recovery Manager internal
database (IDB) and runs core Application Recovery Manager software
and session managers.
The IDB keeps track of created replicas and configuration of the cell.
The Installation Server (IS) is a computer or the Cell Manager
component that contains Application Recovery Manager software
repository used for remote client installations. This feature of
Application Recovery Manager greatly eases the software installation
process, particularly for remote clients.
A cell consists of one Cell Manager and usually several clients. A
computer system becomes an Application Recovery Manager client as
soon as you install one of the Application Recovery Manager software
components on it. The client components installed on a system depend on
the role of that system in your backup environment. The Application
Recovery Manager components can be installed either locally on a single
system, or distributed among many systems from Installation Servers.
The User Interface component is needed to access the Application
Recovery Manager functionality and is used to perform all configuration
and administration tasks. It must be installed on systems used for
backup administration. Application Recovery Manager provides a
graphical user interface (GUI) and command-line interface (CLI).
Client systems (application and backup systems) that are connected to
disk arrays must have the Application Recovery Manager ZDB Agent
and Microsoft Volume Shadow Copy Integration components installed.
The ZDB Agent enables you to back up data from the application
system to disk arrays or restore it. The backup system is typically
connected to a disk array and to one or multiple application systems.
Chapter 1 3
Page 22

Overview of the Installation Procedure
Overview of the Installation Procedure
Performing a backup on the backup system minimizes the load on the
application system. The VSS integration coordinates backup and restore
processes.
Before you install Application Recovery Manager on your network,
define the following:
✓ The system on which the Cell Manager will be installed. See the
support matrices at http://www.hp.com/support/manuals
for
supported operating systems and versions.
Each cell can have only one Cell Manager. You cannot run Application
Recovery Manager without having a Cell Manager installed.
✓ The systems that will be used to access Application Recovery
Manager functionality through the user interface. These systems
must have the User Interface component installed.
✓ The systems that will be backed up (application systems). These must
have the ZDB Agent and Microsoft Shadow Copy Integration
components installed.
✓ The systems that will have ZDB disk arrays connected (backup
systems). These must have a ZDB Agent and Microsoft Shadow Copy
Integration components installed.
✓ The system(s) on which the Application Recovery Manager
Installation Server(s) will be installed.
The choice of Installation Server computer is independent of the Cell
Manager and the system(s) on which the User Interface is installed.
The Cell Manager and Installation Server can be on the same system
or on different systems.
An Installation Server can be shared between multiple Application
Recovery Manager cells.
When you have determined the roles of the systems in your future
Application Recovery Manager cell, the installation procedure consists of
these general steps:
1. Checking the prerequisites for installation.
2. Installing the Application Recovery Manager Cell Manager.
3. Installing the Installation Server(s) and the User Interface.
4. Installing client systems either remotely (recommended option,
where possible), or locally from the CD-ROM.
Chapter 14
Page 23

Overview of the Installation Procedure
Overview of the Installation Procedure
NOTE You cannot remotely install an Application Recovery Manager client on a
system after an Installation Server has been already installed on this
system. To install an Installation Server and client component(s) on the
same system, you must perform a local client installation from the
Application Recovery Manager installation CD-ROM. In the Custom
Setup window, select all desired client components and the Installation
Server component.
Chapter 1 5
Page 24
Overview of the Installation Procedure
Overview of the Installation Procedure
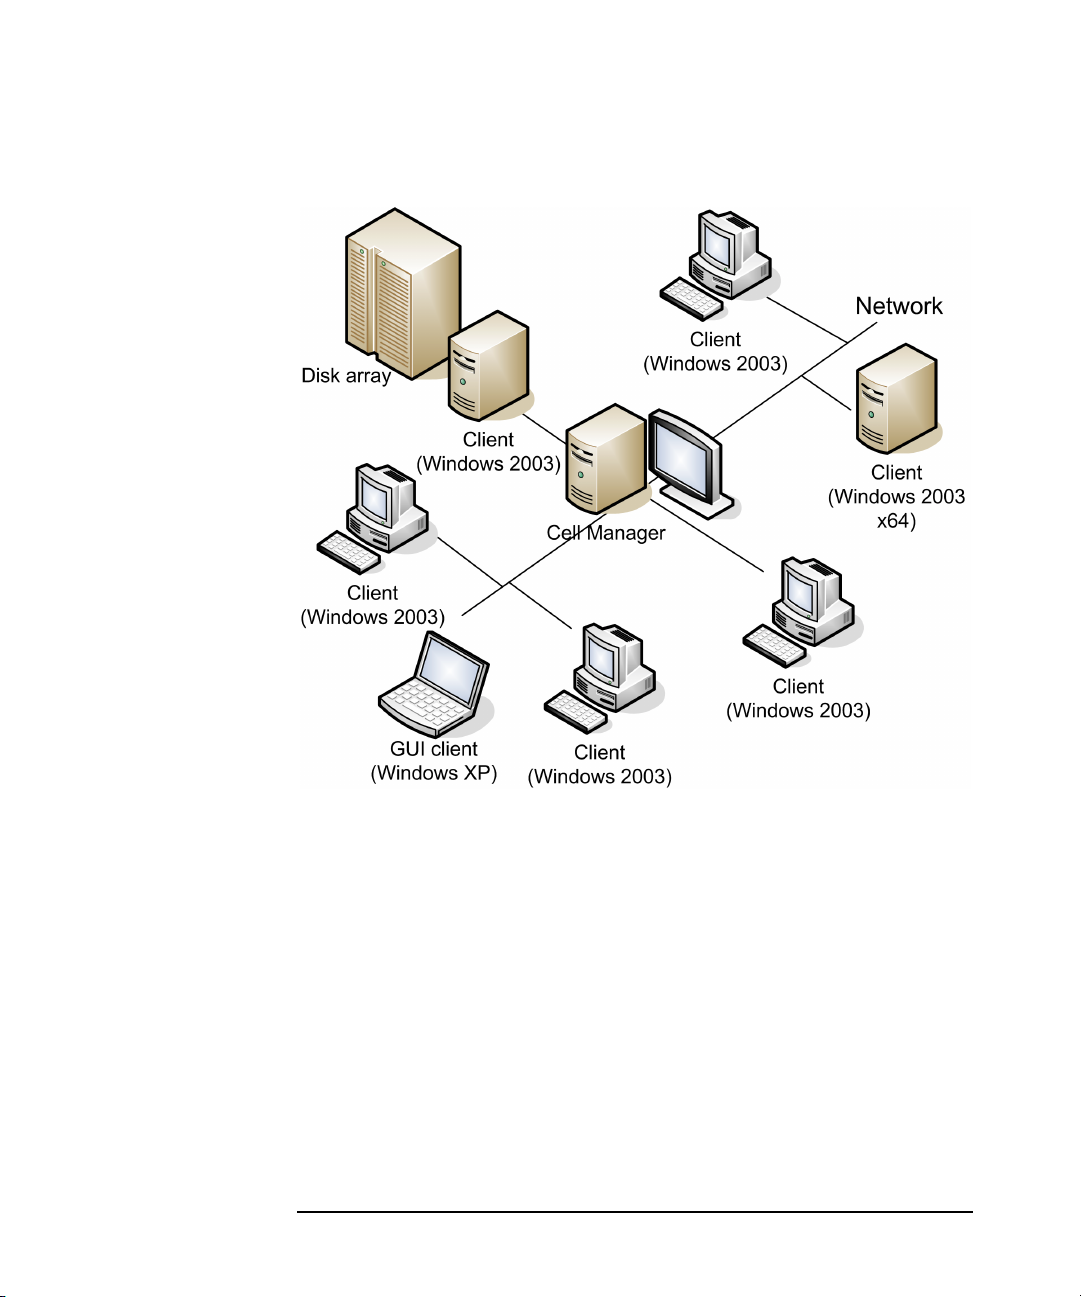
Figure 1-1 Application Recovery Manager Cell
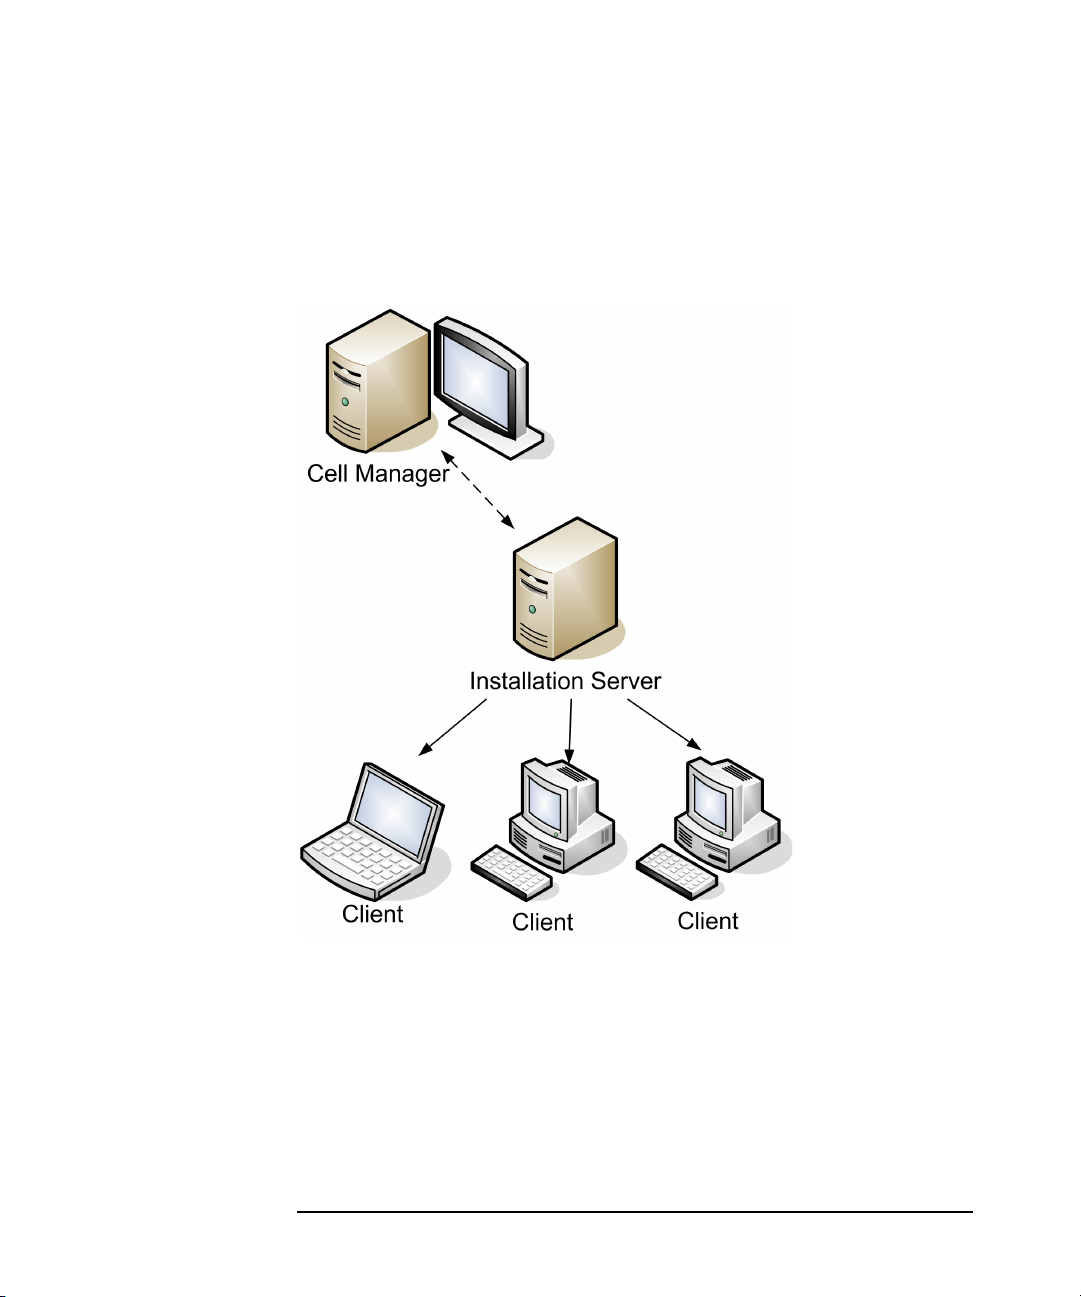
The Remote Installation Concept
Once you have installed the Application Recovery Manager Cell
Manager, User Interface, and Installation Server, you can distribute
Application Recovery Manager software to clients using remote
installation. See the Figure 1-2 on page 7.
Every time you perform a remote installation, you access the Installation
Server through the GUI. The User Interface component may be installed
on the Cell Manager, although this is not a requirement. Most likely you
would install the User Interface on many systems so that you would be
able to access the Cell Manager from different locations.
Client software can be distributed to any system from an Installation
Server.
Chapter 16
Page 25
Overview of the Installation Procedure
Overview of the Installation Procedure
For further information on the available installation methods for the
various Application Recovery Manager clients, refer to “Installing
Application Recovery Manager Clients” on page 26.
Figure 1-2 Application Recovery Manager Installation Concept
Chapter 1 7
Page 26

Overview of the Installation Procedure
Choosing the Cell Manager System
Choosing the Cell Manager System
The Cell Manager is the main system in the Application Recovery
Manager cell. The Cell Manager does the following:
• Manages the cell from one central point.
• Contains the IDB (files with information about backup and restore
sessions).
• Runs the core Application Recovery Manager software.
• Runs the Session Manager that starts and stops backup and restore
sessions and writes session information to the IDB.
Therefore, before deciding on which system in your environment to
install the Cell Manager, be aware of the following:
✓ Supported platforms
See the http://www.hp.com/support/manuals
supported versions/releases of these platforms.
✓ Reliability of the Cell Manager system
Since the Cell Manager contains the IDB and since backup and
restore cannot be performed if the Cell Manager is down, it is
important to choose a very reliable system in your environment for
the installation.
✓ Database required disk space
The Cell Manager holds the Application Recovery Manager Internal
Database (IDB). the IDB contains information regarding the backed
up data and session messages.
NOTE You do not have to use the Cell Manager as the graphical user interface
system.
What’s Next? To determine the requirements that your future Cell Manager system
must meet, refer to “Installing the Application Recovery Manager Cell
Manager (CM) and Installation Server(s) (IS)” on page 13.
for details of the
Chapter 18
Page 27

Overview of the Installation Procedure
Choosing the Application Recovery Manager User Interface System
Choosing the Application Recovery Manager
User Interface System
Application Recovery Manager provides the GUI and CLI. The user
interface is installed as an Application Recovery Manager software
component.
The system selected to control the cell will be used by a network
administrator or a backup operator.
However, in a large computer environment, it may be desirable to have
several systems on which the user interface runs.
The Application Recovery Manager GUI is simple to handle in
heterogeneous environments, because changing the locale is not
necessary.
See the http://www.hp.com/support/manuals
operating system versions/releases for the user interface. For more
information on local language support and the usage of non-ASCII
characters in file names, refer to online Help index: “language settings,
customizing”.
Once you have installed the user interface on a system in the cell, you
can remotely access the Cell Manager from that system. You do not have
to use the graphical user interface system on the Cell Manager.
for details on supported
The Application Recovery Manager Graphical User Interface
The Application Recovery Manager GUI is a powerful tool that provides
easy access to the Application Recovery Manager functionality. The main
window contains several views, such as Clients, Users, Backup,
Monitor, Instant Recovery, and Internal Database, allowing you to
perform all related tasks.
For example, in the Clients view, you can remotely install (add) clients
by specifying all the target systems and defining the installation paths
and options which are sent to the specified Installation Server. When the
setup on the client is running, a user sees only installation specific
messages displayed in the monitor window.
Chapter 1 9
Page 28
Overview of the Installation Procedure
Choosing the Application Recovery Manager User Interface System
Figure 1-3 Application Recovery Manager Graphical User Interface
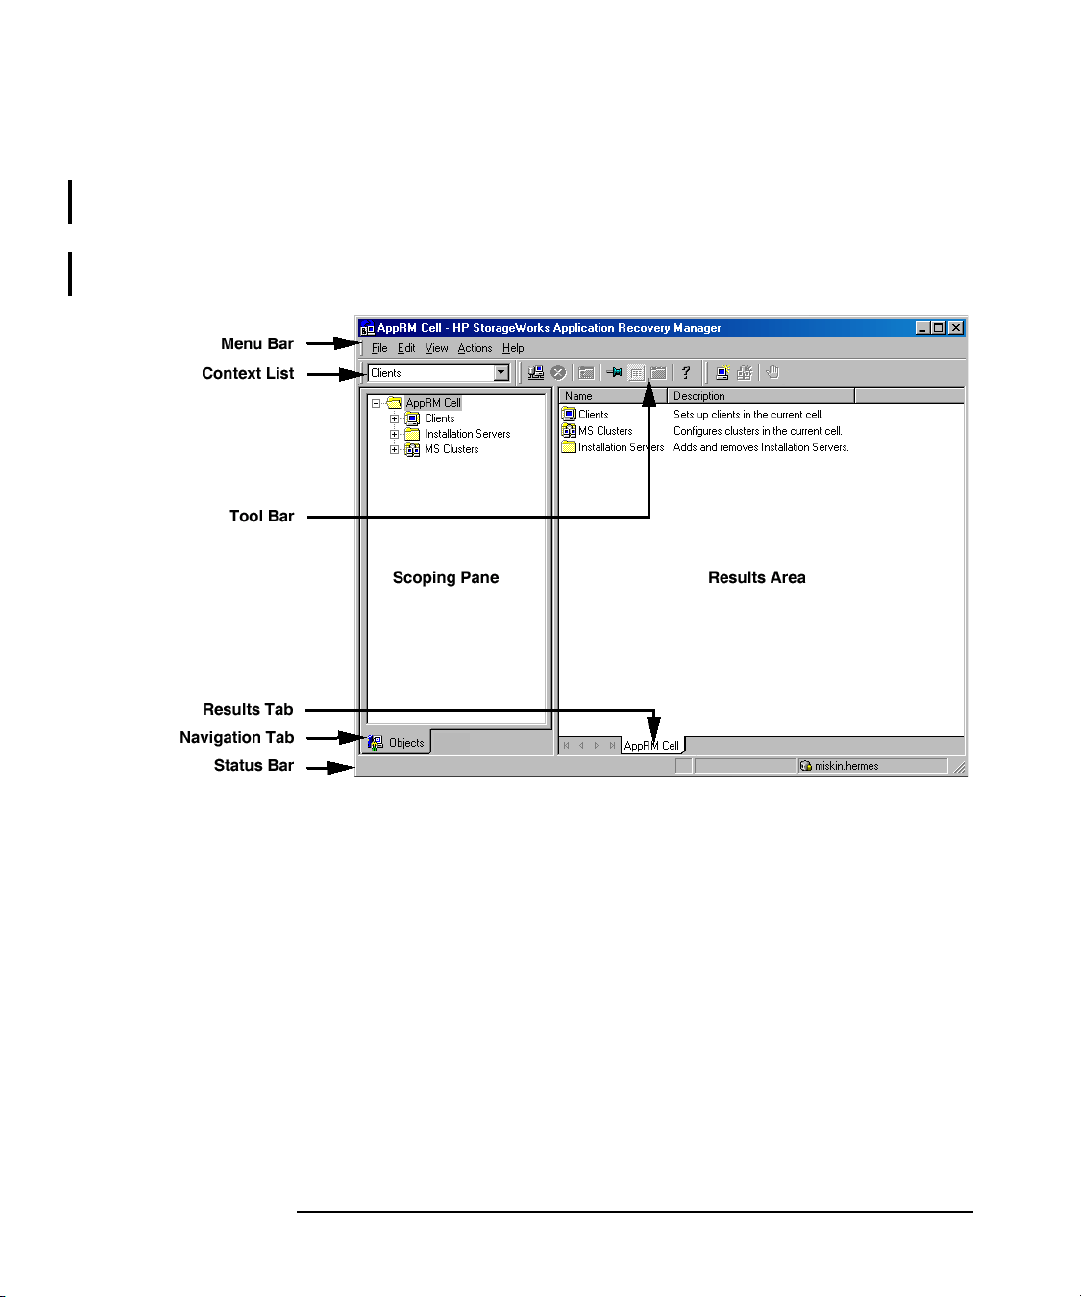
See also Figure 1 in the Preface, which defines the most important areas
of the Application Recovery Manager GUI.
Chapter 110
Page 29

2 Installing Application Recovery
Manager on Your Network
Chapter 2 11
Page 30

Installing Application Recovery Manager on Your Network
In This Chapter
In This Chapter
This chapter contains detailed instructions about:
• Installing the Application Recovery Manager Cell Manager (CM) and
Installation Servers (IS). Refer to “Installing the Application
Recovery Manager Cell Manager (CM) and Installation Server(s) (IS)”
on page 13.
• Installing the Application Recovery Manager clients. Refer to
“Installing Application Recovery Manager Clients” on page 26.
• Installing Application Recovery Manager on a Microsoft Cluster
Server. Refer to “Installing Application Recovery Manager on
Microsoft Cluster Server” on page 40.
Chapter 212
Page 31
Installing the Application Recovery Manager Cell Manager (CM) and Installation
Installing the Application Recovery Manager Cell Manager (CM) and Installation Server(s) (IS)
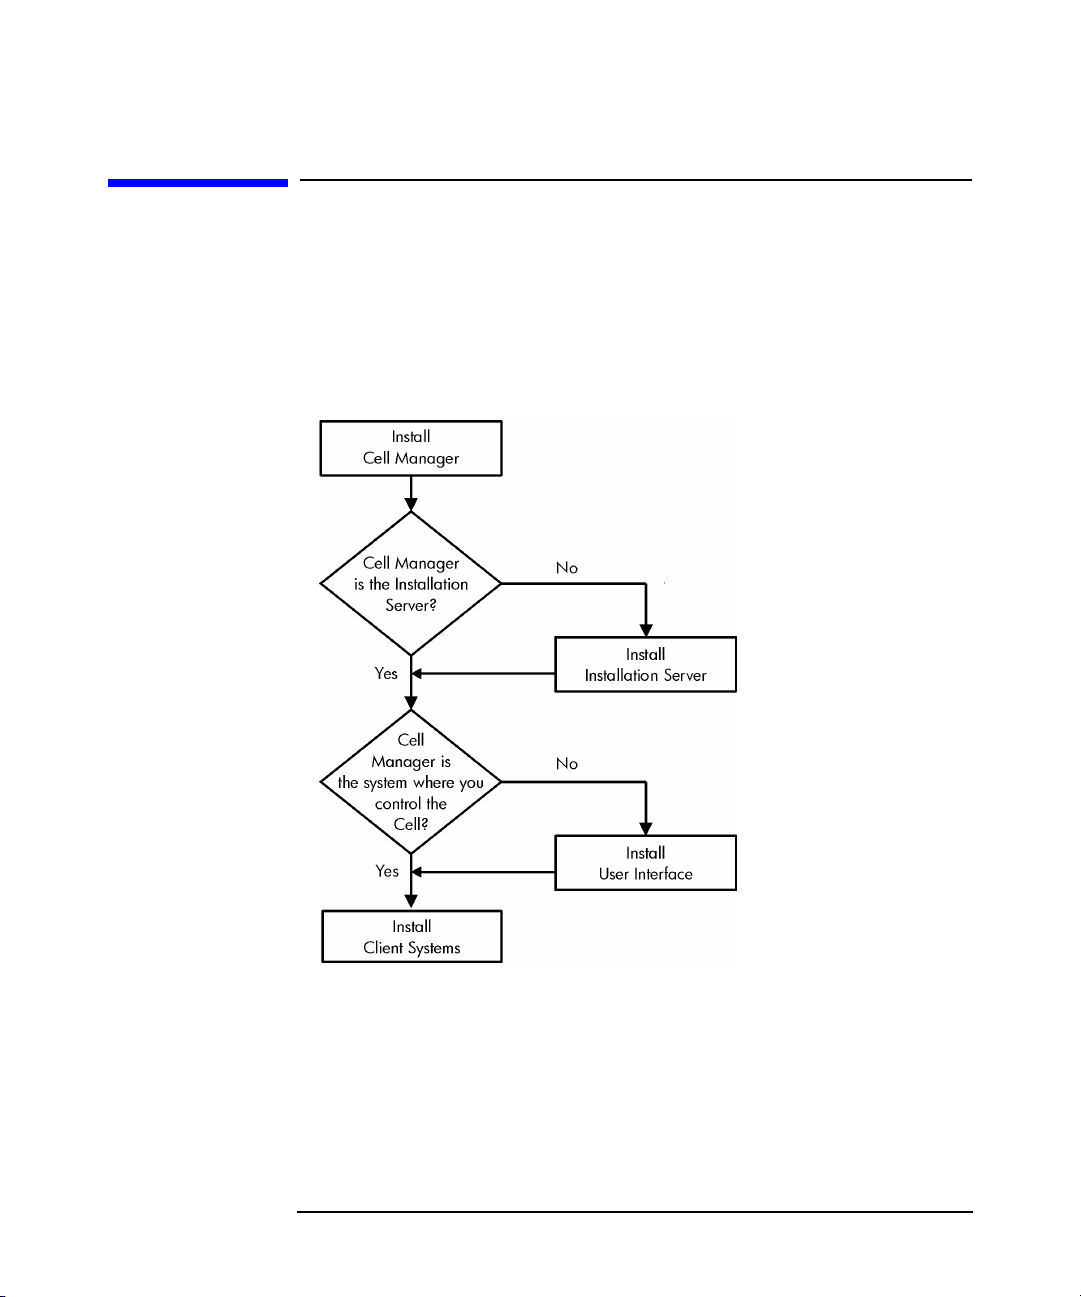
Refer to the Figure 2-1 for the flow of installation procedure:
Figure 2-1 Installation Procedure
Installing Application Recovery Manager on Your Network
Server(s) (IS)
If you install the Cell Manager and the Installation Server on the same
system, you can perform this task in one step.
Chapter 2 13
Page 32

Installing Application Recovery Manager on Your Network
Installing the Application Recovery Manager Cell Manager (CM) and Installation
Server(s) (IS)
IMPORTANT All configuration and session information files in an Application
Recovery Manager cell are stored on the Cell Manager. It is difficult to
transfer this information to another system. Therefore, ensure that the
Cell Manager is a reliable system in a stable, controlled environment.
Installing a Cell Manager
Prerequisites To install a Cell Manager, you must have Administrator rights. The
Windows system that will become your Cell Manager must meet the
following requirements:
✓ Have a supported Windows operating system installed. See the
http://www.hp.com/support/manuals
operating systems for the Cell Manager.
✓ Have Microsoft Internet Explorer 5.0 or higher.
✓ Have sufficient disk space for the Application Recovery Manager Cell
Manager software. Refer to the HP StorageWorks Application
Recovery Manager Release Notes for details.
for details on supported
✓ Have the port number 5555 (default) free. If this is not the case, refer
to “Changing the Default Port Number” on page B-28.
✓ Have a static IP address for the system on which the Cell Manager
will be installed. If the system is configured as a DHCP client, its IP
address changes; therefore, it is required to either assign a
permanent DNS entry for the system (and reconfigure it), or to
configure a DHCP server to reserve a static IP address for the system
(IP address is bound to the system's MAC address).
✓ Have the Microsoft implementation of the TCP/IP protocol installed
and running. The protocol must be able to resolve hostnames. The
computer name and the hostname must be the same. Refer to
“Setting Up the TCP/IP Protocol on Windows Systems” on page B-20
for information on installation and configuration of the TCP/IP
protocol.
✓ Have access to a CD-ROM drive.
Chapter 214
Page 33

Installing Application Recovery Manager on Your Network
Installing the Application Recovery Manager Cell Manager (CM) and Installation
Server(s) (IS)
✓ Ensure, that HP OpenView Storage Data Protector is not installed on
your system. If Data Protector is detected during the installation
procedure, the installation of the Application Recovery Manager will
be aborted.
Microsoft Terminal
Services Client
Cluster-Aware Cell
Manager
HP StorageWorks
Fast Recovery
Solution
✓ If you want to install Application Recovery Manager through
Microsoft Terminal Services Client, ensure that the system you want
to install Application Recovery Manager on has the Terminal Server
Mode specified as Remote Administration:
1. In the Windows Control Panel, click Administrative Tools
and then Terminal Services Configuration.
2. In the Terminal Services Configuration dialog box, click
Server Settings. Ensure that the Terminal Services server is
running in the Remote Administration mode.
Additional prerequisites and steps are required for installing a
cluster-aware Cell Manager. Refer to “Installing a Cluster-Aware Cell
Manager” on page 40.
You can install Application Recovery Manager on the same system where
you have the HP StorageWorks Fast Recovery Solution (FRS) installed.
These two products can coexist on the same system as long as they use
separate disk array volumes.
During the Application Recovery Manager setup, an existing FRS
installation is detected. Choose one of the three options: Continue with
installation, Cancel installation, or Deinstall FRS. Note that the
backups made with FRS cannot be restored with Application Recovery
Manager.
If you install Autopass during the Application Recovery Manager
installation and you later uninstall Application Recovery Manager, the
FRS licenses can no longer be used. If you want to keep the FRS licenses,
do not install Autopass during the Application Recovery Manager
installation.
Installation Procedure
To perform a new installation, follow these steps:
1. Insert the installation CD-ROM and run:
32-bit OS (on x86 or AMD64/Intel EM64T): \i386\setup.exe
Chapter 2 15
Page 34

Installing Application Recovery Manager on Your Network
Installing the Application Recovery Manager Cell Manager (CM) and Installation
Server(s) (IS)
64-bit OS (on AMD64/Intel EM64T): \x8664\setup.exe
The Application Recovery Manager Setup Wizard is displayed.
2. Follow the Setup Wizard and carefully read the license agreement.
Click Next to continue, if you accept the terms of the agreement.
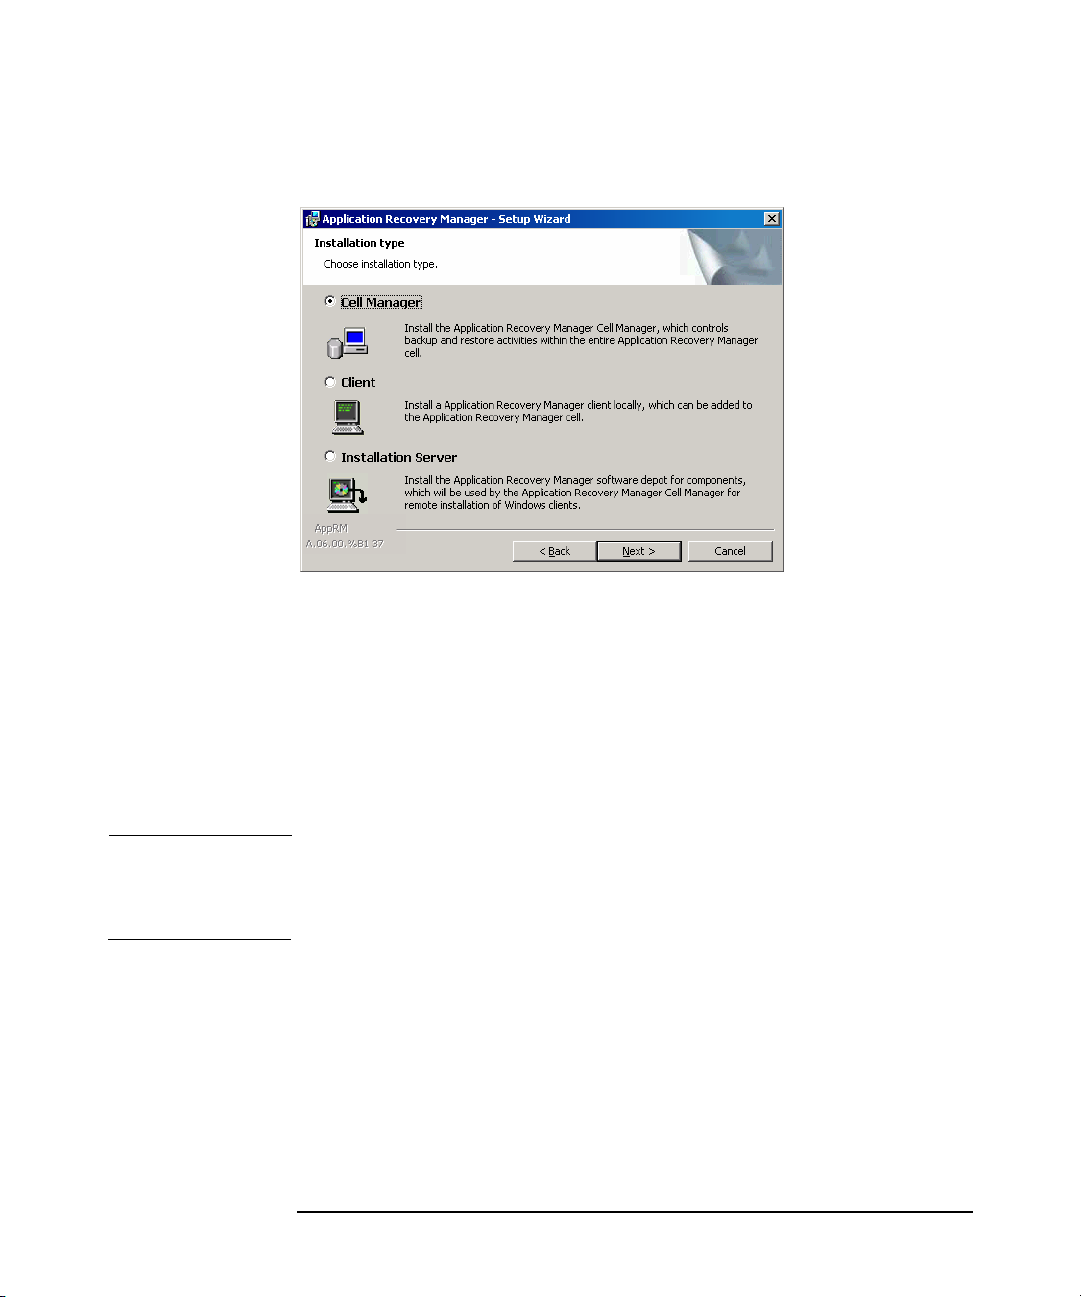
3. In the Installation Type page, select Cell Manager and then click
Next to install Application Recovery Manager Cell Manager software.
Figure 2-2 Selecting the Installation Type
4. Provide the username and password for the account under which the
Application Recovery Manager services will run. Click Next to
continue.
5. Click Next to install Application Recovery Manager in the default
folder.
Otherwise, click Change to open the Change Current Destination
Folder window and enter a new path.
6. In the Component Selection page, select the components you want
to install. For a list and descriptions of the Application Recovery
Manager components, see “Application Recovery Manager
Components” on page 28.
Chapter 216
Page 35

Installing Application Recovery Manager on Your Network
Installing the Application Recovery Manager Cell Manager (CM) and Installation
Figure 2-3 Selecting Software Components
User Interface, Installation Server, and Microsoft Volume
Shadow Copy Integration are selected by default. Click Next.
Server(s) (IS)
7. Windows 2003 SP1: If Application Recovery Manager detects
Windows Firewall on your system, the Windows Firewall
configuration page is displayed. Application Recovery Manager setup
will register all necessary Application Recovery Manager executables.
By default, the selected option is Initially, enable newly
registered Application Recovery Manager binaries to open
ports as needed. If you do not want to enable Application Recovery
Manager to open ports at the moment, deselect the option. However,
note that for proper functioning of Application Recovery Manager, the
executables must be enabled.
Click Next.
8. The component summary list is displayed. Click Install to start
installing the selected components. This may take several minutes.
Chapter 2 17
Page 36

Installing Application Recovery Manager on Your Network
Installing the Application Recovery Manager Cell Manager (CM) and Installation
Server(s) (IS)
Figure 2-4 Component Summary List
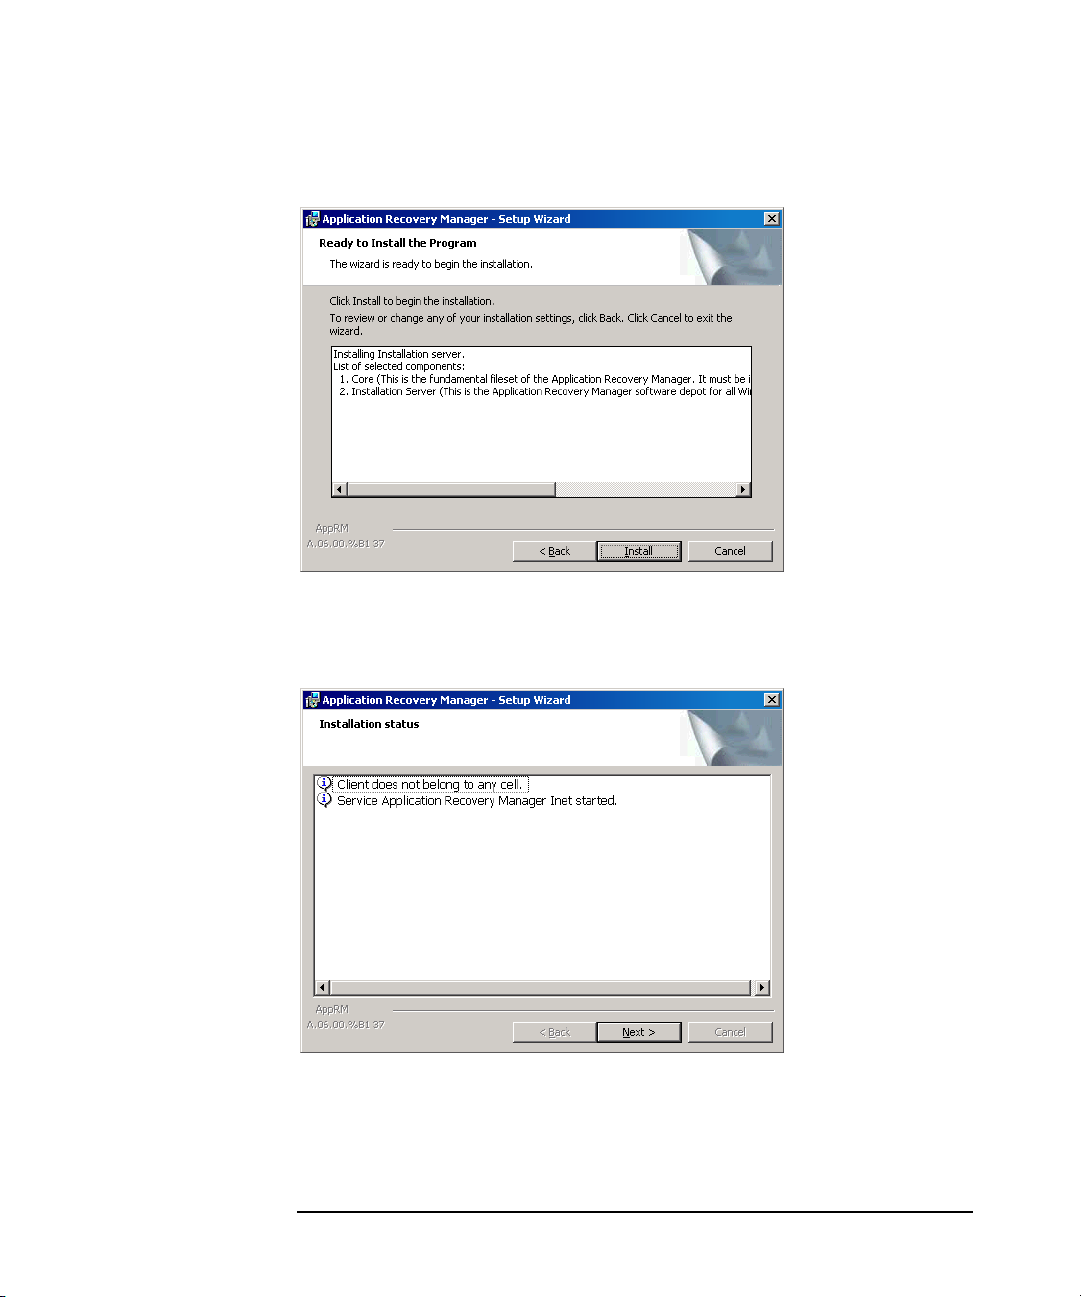
9. The Installation status page is displayed. Click Next.
Figure 2-5 Installation Status Page
10.On operating systems other than Windows x64, the Setup Wizard
enables you to install or upgrade the HP OpenView AutoPass utility if
you want to download and install passwords for the purchased
Chapter 218
Page 37

Installing Application Recovery Manager on Your Network
Installing the Application Recovery Manager Cell Manager (CM) and Installation
Server(s) (IS)
licenses directly through the internet from the HP password delivery
center web server. For more information on the AutoPass utility, refer
to “Obtaining and Installing Permanent Passwords Using the HP
OpenView AutoPass Utility” on page 91.
By default, the Start AutoPass installation or the Upgrade
AutoPass installation option is selected. It is recommended to
install the HP OpenView AutoPass utility. If you do not want to
install or upgrade AutoPass, deselect the option.
NOTE If HP StorageWorks Fast Recovery Solution (FRS) is installed on your
system and you install the AutoPass utility, the FRS licenses can no
longer be used when you uninstall Application Recovery Manager.
On Windows x64 operating systems, AutoPass is not installed.
To start using Application Recovery Manager immediately after
setup, select Start the Application Recovery Manager GUI.
Figure 2-6 Selecting AutoPass for Installation
Click Finish.
Chapter 2 19
Page 38

Installing Application Recovery Manager on Your Network
Installing the Application Recovery Manager Cell Manager (CM) and Installation
Server(s) (IS)
After the Installation
As soon as the setup is finished, the Cell Manager files are located in the
<AppRM_home>\bin directory and the software depot located in the
<AppRM_home>\Depot directory.
When the installation is finished, the following processes will be running
on the Cell Manager system in the <AppRM_home>\bin directory:
crs.exe The Application Recovery Manager
Cell Request Server (CRS) service
runs on the Cell Manager system and
is started when the Cell Manager
software is installed on the system.
CRS starts and controls backup and
restore sessions in the cell.
rds.exe The Application Recovery Manager
Raima Database Server (RDS)
service runs on the Cell Manager
system and is started when the Cell
Manager software is installed on the
system. RDS manages the IDB.
omniinet.exe The Application Recovery Manager
resident service that enables
communication with Application
Recovery Manager services on other
systems on the network. The
Application Recovery Manager
Inet service must run on all systems
in the Application Recovery Manager
cell.
Troubleshooting
In case of an unsuccessful setup, try to verify the requirements that are
checked by Setup itself and what could have caused the failure if they
had not been fulfilled. Refer to the “Prerequisites” on page 14.
This is the list of the requirements checked by Setup:
✓ Operating system version
✓ NSLookup, so that Application Recovery Manager is able to expand
hostnames
Chapter 220
Page 39

Installing Application Recovery Manager on Your Network
Installing the Application Recovery Manager Cell Manager (CM) and Installation
Server(s) (IS)
✓ Disk Space
✓ Administrative Rights
What’s Next?
At this stage, the Cell Manager is installed and – if it was selected – also
the Installation Server. Your next tasks are:
1. Install the Installation Server, if you have not installed it on the same
system as the Cell Manager. Refer to “Installing Installation Servers”
on page 21.
2. Distribute the software to clients. Refer to “Installing Application
Recovery Manager Clients” on page 26.
Installing Installation Servers
Installation Servers can be installed on the Cell Manager system or any
supported system that is connected to the Cell Manager by a LAN. See
the http://www.hp.com/support/manuals
operating systems for the Installation Server.
for details on supported
To keep the Installation Servers on systems separate from the Cell
Manager, install the corresponding software depot locally. The detailed
procedure is described in this section.
Prerequisites A Windows system that will become your future Installation Server must
meet the following requirements:
✓ Have one of the supported Windows operating systems installed. See
the http://www.hp.com/support/manuals
operating systems for the Installation Server.
✓ Have Microsoft Internet Explorer 5.0 or higher.
✓ Have enough disk space for the complete Application Recovery
Manager software depot. Refer to the HP StorageWorks Application
Recovery Manager Release Notes for details.
✓ Have access to a CD-ROM drive.
✓ Have the Microsoft implementation of the TCP/IP protocol up and
running. The protocol must be able to resolve hostnames. The
computer name and the hostname must be the same. Refer to
Chapter 2 21
for details on supported
Page 40

Installing Application Recovery Manager on Your Network
Installing the Application Recovery Manager Cell Manager (CM) and Installation
Server(s) (IS)
“Setting Up the TCP/IP Protocol on Windows Systems” on page B-20
for information on the installation and configuration of the TCP/IP
protocol.
Limitation Due to the security restrictions imposed by the Windows operating
system, Installation Server can be used to remotely install clients only in
the same domain.
IMPORTANT If you do not install the Installation Server on your network, you will
have to install every client locally from the CD-ROM.
NOTE You cannot remotely install an Application Recovery Manager client on
the system after an Installation Server has been installed on this system.
To install an Installation Server and client component(s) on the same
system, you must perform a local client installation. During the
installation procedure, select all desired client components and the
Installation Server component. Refer to “Installing Application Recovery
Manager Clients” on page 26.
Installation
Procedure
Follow these steps to install the Installation Server:
1. Insert the installation CD-ROM and run:
32-bit OS (on x86 or AMD64/Intel EM64T): \i386\setup.exe
64-bit OS (on AMD64/Intel EM64T): \x8664\setup.exe
The Application Recovery Manager Setup Wizard is displayed.
2. Follow the Setup Wizard and carefully read the license agreement.
Click Next to continue, if you accept the terms of the agreement.
3. In the Installation Type page, select Installation Server and
then click Next to install Application Recovery Manager software
depot.
Chapter 222
Page 41

Installing Application Recovery Manager on Your Network
Installing the Application Recovery Manager Cell Manager (CM) and Installation
Figure 2-7 Selecting the Installation Type
4. Click Next to install Application Recovery Manager on the default
folder.
Server(s) (IS)
Otherwise, click Change to open the Change Current Destination
Folder window and enter a new path.
5. Windows 2003 SP1: If Application Recovery Manager detects
Windows Firewall on your system, the Windows Firewall
configuration page is displayed. Application Recovery Manager setup
will register all necessary Application Recovery Manager executables.
By default, the selected option is Initially, enable newly
registered Application Recovery Manager binaries to open
ports as needed. If you do not want to enable Application Recovery
Manager to open ports at the moment, deselect the option. However,
note that for proper functioning of Application Recovery Manager, the
executables must be enabled.
Click Next.
6. The component summary list is displayed. Click Install to start
installing the selected components. This may take several minutes.
Chapter 2 23
Page 42
Installing Application Recovery Manager on Your Network
Installing the Application Recovery Manager Cell Manager (CM) and Installation
Server(s) (IS)
Figure 2-8 Component Selection Summary Page
7. The Installation status page is displayed. Click Next.
Figure 2-9 Installation Status Page
8. Click Finish.
Chapter 224
Page 43

Installing Application Recovery Manager on Your Network
Installing the Application Recovery Manager Cell Manager (CM) and Installation
Server(s) (IS)
As soon as the installation is finished, the software is, by default,
installed in the <AppRM_home>\Depot directory, which is shared so that
it can be accessed from the network.
What’s Next? At this point, you should have Installation Server installed on your
network. Now you should perform the following tasks:
1. If you have set up an independent Installation Server (i.e. not on the
Cell Manager) you must manually add (import) the system to the
Application Recovery Manager cell. Refer to “Importing an
Installation Server to a Cell” on page 55.
2. Distribute the software to clients. Refer to “Installing Application
Recovery Manager Clients” on page 26.
Chapter 2 25
Page 44

Installing Application Recovery Manager on Your Network
Installing Application Recovery Manager Clients
Installing Application Recovery Manager
Clients
You can install Application Recovery Manager clients remotely, by
distributing them using the Installation Server, or locally, from the
installation CD-ROM.
After you have installed the Application Recovery Manager clients and
eventually imported them into the Application Recovery Manager cell, it
is highly recommended to verify the installation and to protect clients
from unwarranted access. For procedure on verifying the client
installation, refer to “Verifying Application Recovery Manager Client
Installation” on page 107. For more information on security protection,
refer to “Security Considerations” on page 61.
NOTE Note that information regarding the installation and configuration of the
VSS and VDS hardware providers, as well as ZDB disk arrays is found in
the HP StorageWorks Application Recovery Manager Administrator’s
Guide.
Volume Shadow
Copy Service
ZDB Integrations Application Recovery Manager ZDB integrations are software
To be able to coordinate zero downtime backups of online databases and
Windows filesystem using the Microsoft Volume Shadow Copy Service,
install the Application Recovery Manager software component
Microsoft Volume Shadow Copy Integration. See “MS Volume
Shadow Copy Clients” on page 38.
components that allow you to back up data using ZDB disk arrays.
• For installing the integration with HP StorageWorks EVA, see “HP
StorageWorks Enterprise Virtual Array Integration” on page 38.
For details on supported platforms and components for a particular
Windows operating system, see the http://www.hp.com/support/manuals
.
Chapter 226
Page 45

Installing Application Recovery Manager on Your Network
Installing Application Recovery Manager Clients
Prerequisites To install a client, you must have the Administrator rights. The Windows
system that will become your future Application Recovery Manager
client system must meet the following requirements:
✓ Have Microsoft Internet Explorer 5.0 or higher.
✓ Have sufficient disk space for the Application Recovery Manager
client software. Refer to the HP StorageWorks Application Recovery
Manager Release Notes for details.
✓ Have port number 5555 (default) free.
✓ Have the Microsoft implementation of the TCP/IP protocol installed
and running. The protocol must be able to resolve hostnames. The
computer name and the hostname must be the same. Refer to
“Setting Up the TCP/IP Protocol on Windows Systems” on page B-20
for information on installation and configuration of the TCP/IP
protocol.
Limitation • Due to the security restrictions imposed by the Windows operating
system, Installation Server can be used to remotely install clients
only in the same domain.
Cluster-Aware
Clients
HP StorageWorks
Fast Recovery
Solution
Additional prerequisites are required for installing cluster-aware clients.
Refer to “Installing Cluster-Aware Clients” on page 47 for more details.
Before starting the installation procedure, decide which components you
need to install on your client system. For the list of the Application
Recovery Manager software components and their descriptions, see
“Application Recovery Manager Components” on page 28.
You can install Application Recovery Manager on the same system where
you have the HP StorageWorks Fast Recovery Solution (FRS) installed.
These two products can coexist on the same system as long as they use
different disk array volumes.
During the Application Recovery Manager setup, an existing FRS
installation is detected. If you install a client locally, choose one of the
three options: Continue with installation, Cancel installation, or
Deinstall FRS. Note that the backups made with FRS cannot be
restored with Application Recovery Manager. If you install a client
remotely, FRS is left on the system.
Chapter 2 27
Page 46

Installing Application Recovery Manager on Your Network
Installing Application Recovery Manager Clients
Installation
Procedures
It is recommended that you install clients remotely using the
Installation Server. You can also use the local client installation from the
installation CD-ROMs. For detailed procedures, refer to:
• For remote installation procedure: “Remote Installation of
Application Recovery Manager Clients” on page 29.
• For local installation procedure: “Local Installation of the Application
Recovery Manager Clients” on page 35.
Application Recovery Manager Components
For the latest information on the supported Windows system versions,
visit the HP StorageWorks Application Recovery Manager home page at
http://www.hp.com/support/manuals
These are the Application Recovery Manager components you can select
and their descriptions:
User Interface The User Interface includes the
.
Application Recovery Manager
graphical user interface and the
command-line interface. The software
is needed to access the Application
Recovery Manager Cell Manager and
must be installed at least on the
system that is used for managing the
cell.
MS Volume Shadow Copy Integration The MS Volume Shadow Copy
Integration component must be
installed on the systems where you
want to run backups coordinated by
Volume Shadow Copy Service.
HP StorageWorks EVA SMI-S Agent The HP StorageWorks EVA SMI-S
Agent component must be installed
on the application and the backup
system to integrate HP StorageWorks
Enterprise Virtual Array with
Application Recovery Manager.
Chapter 228
Page 47

Installing Application Recovery Manager on Your Network
Installing Application Recovery Manager Clients
Cluster Server The Cluster Server component must
be installed on all Application
Recovery Manager cluster-aware
clients.
Remote Installation of Application Recovery Manager Clients
This section describes the procedure for distributing the Application
Recovery Manager software to clients using the Installation Server
(remote installation or upgrade).
Prerequisites • See the http://www.hp.com/support/manuals
StorageWorks Application Recovery Manager Release Notes for the
information on supported Windows system versions, Application
Recovery Manager components, and for disk space requirements.
• At this point, you should have the Cell Manager and the Installation
Server(s) installed on your network.
NOTE The Installation Server must reside in a shared directory so that it is
visible throughout the network.
Distribute the software to clients using the Application Recovery
Manager user interface.
NOTE You cannot distribute software to clients in another Application Recovery
Manager cell. However, if you have an independent Installation Server,
you can import it into more than one cell. You can then distribute
software within different cells by using the GUI connected to each Cell
Manager in turn.
and refer to the HP
Chapter 2 29
Page 48

Installing Application Recovery Manager on Your Network
Installing Application Recovery Manager Clients
Adding Clients to
the Cell
To distribute the Application Recovery Manager software to the clients
that are not in the Application Recovery Manager cell yet, proceed as
follows:
1. Start the Application Recovery Manager graphical user interface:
Select Start->Programs->HP StorageWorks Application
Recovery Manager->Application Recovery Manager.
Refer to “The Application Recovery Manager Graphical User
Interface” on page 9 and to the online Help for details on the
Application Recovery Manager graphical user interface.
2. In the Application Recovery Manager GUI, switch to the Clients
context.
3. In the Scoping Pane, right-click Clients and click Add Clients.
4. If you have more than one Installation Server configured, select the
Installation Server to be used for installing the clients. Click Next.
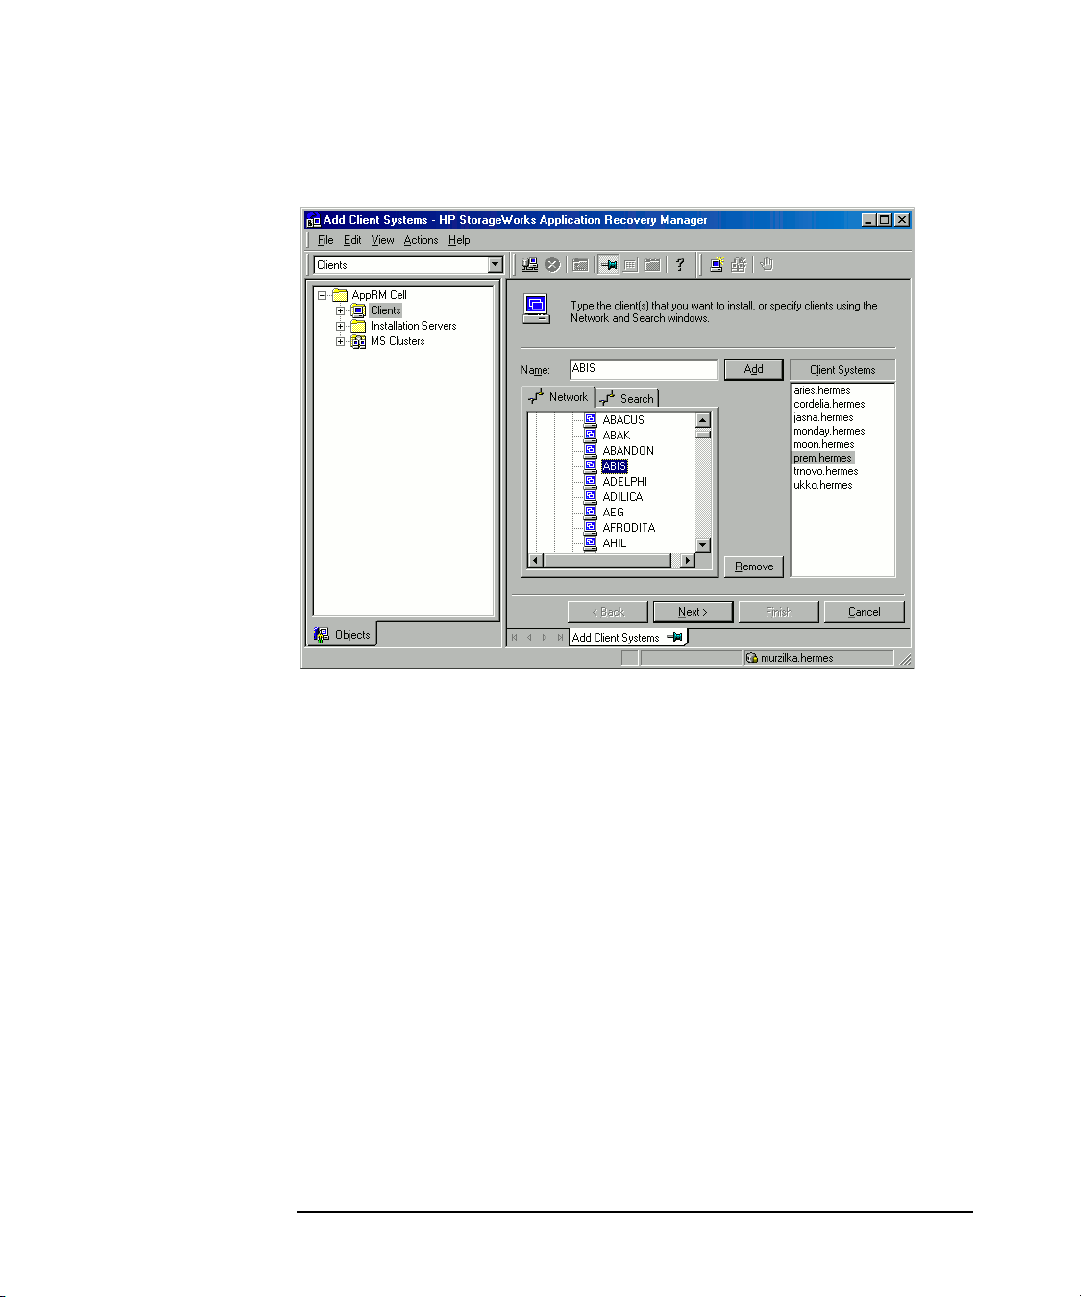
5. Type the names of the clients or search for the clients you want to
install as shown in Figure 2-10. Click Next.
Chapter 230
Page 49

Figure 2-10 Selecting Clients
Installing Application Recovery Manager on Your Network
Installing Application Recovery Manager Clients
6. Select the Application Recovery Manager components you want to
install as shown in Figure 2-11. See “Application Recovery Manager
Components” on page 28.
Chapter 2 31
Page 50

Installing Application Recovery Manager on Your Network
Installing Application Recovery Manager Clients
Figure 2-11 Selecting Components
To change the default user account and target directory for the
installation, click Options.
If you selected more than one client and you would like to install
different components on each client, click I want to customize
this option for client systems independently and then click
Next. Select the components you want to install for each client
independently.
Click Finish to start the installation.
7. During the installation and when asked, provide the data required
(username, password, and domain) to access the specific client system
and click OK.
As soon as a system has the Application Recovery Manager software
installed and is added to the Application Recovery Manager cell, it
becomes an Application Recovery Manager client.
Chapter 232
Page 51

Installing Application Recovery Manager on Your Network
Installing Application Recovery Manager Clients
NOTE Before you start using the Application Recovery Manager GUI on the
client system, add a user from that system to an appropriate Application
Recovery Manager user group. For the procedure and the descriptions of
available user rights, refer to the online Help.
Troubleshooting When the remote installation is finished, you can restart any failed
installation procedures using the GUI by clicking Actions and Restart
Failed Clients.
If the installation fails again, see “Troubleshooting Installation” on
page 99.
Adding
Components to
Clients
You can install additional Application Recovery Manager software
components on your existing clients and the Cell Manager. Components
can be added remotely or locally. For local installation, see “Changing
Application Recovery Manager Software Components” on page 78.
Prerequisite The Installation Server must be available.
To distribute the Application Recovery Manager software to clients in the
Application Recovery Manager cell, proceed as follows:
1. In the Application Recovery Manager GUI, switch to the Clients
context.
2. In the Scoping Pane, expand Clients, right-click a client, and then
click Add Components.
3. If you have more than one Installation Server configured, select the
Installation Server to be used for installing the components. Click
Next.
4. Select the clients on which you want to install the components as
shown in Figure 2-12. Click Next.
Chapter 2 33
Page 52

Installing Application Recovery Manager on Your Network
Installing Application Recovery Manager Clients
Figure 2-12 Selecting Clients
5. Select the Application Recovery Manager components you want to
install as shown in Figure 2-13. See “Application Recovery Manager
Components” on page 28.
Chapter 234
Page 53

Figure 2-13 Selecting Components
Installing Application Recovery Manager on Your Network
Installing Application Recovery Manager Clients
If you selected more than one client and you want to install different
components on each client, click I want to customize this option
for client systems independently and then click Next. Select the
components for each client independently.
Click Finish to start the installation.
Local Installation of the Application Recovery Manager Clients
Clients can be installed locally, from the installation CD-ROM:
1. Insert the CD-ROM and run:
32-bit OS (on x86 or AMD64/Intel EM64T): \i386\setup.exe
64-bit OS (on AMD64/Intel EM64T): \x8664\setup.exe
64-bit OS (on Itanium): \ia64\setup.exe.
2. In the Installation Type page, select Client. For Itanium clients,
the type is selected automatically.
Chapter 2 35
Page 54

Installing Application Recovery Manager on Your Network
Installing Application Recovery Manager Clients
3. Enter the name of the Cell Manager. Refer to Figure 2-14.
If your Cell Manager uses a different port then the default 5555,
change the port number. You can test if the Cell Manager is active
and uses the selected port by clicking Check response...
Click Next.
Figure 2-14 Choosing the Cell Manager
4. Click Next to install Application Recovery Manager on the default
folder.
Otherwise, click Change to open the Change Current Destination
Folder page and enter the path.
5. Select the Application Recovery Manager components that you want
to install.
For information on other Application Recovery Manager components,
refer to “Application Recovery Manager Components” on page 28.
Click Next.
6. Windows 2003 SP1: If Application Recovery Manager detects
Windows Firewall on your system, the Windows Firewall
configuration page is displayed. Application Recovery Manager setup
will register all necessary Application Recovery Manager executables.
By default, the selected option is Initially, enable newly
Chapter 236
Page 55

Installing Application Recovery Manager on Your Network
Installing Application Recovery Manager Clients
registered Application Recovery Manager binaries to open
ports as needed. If you do not want to enable Application Recovery
Manager to open ports at the moment, deselect the option. However,
note that for proper functioning of Application Recovery Manager, the
executables must be enabled.
Click Next.
7. The component selection summary page is displayed. Click Install
to install the selected components.
Figure 2-15 Component Selection Summary Page
8. The Installation status page is displayed. Click Next.
Chapter 2 37
Page 56

Installing Application Recovery Manager on Your Network
MS Volume Shadow Copy Clients
Figure 2-16 Installation Summary Page
9. To start using Application Recovery Manager immediately after
setup, select Launch Application Recovery Manager GUI.
Installing in a
Cluster
Click Finish.
MS Volume Shadow Copy Clients
To be able to perform zero downtime backups of the database
applications using the VSS writers, you need to select the MS Volume
Shadow Copy Integration component during the installation
procedure.
HP StorageWorks Enterprise Virtual Array Integration
To integrate HP StorageWorks EVA with Application Recovery Manager,
install the HP StorageWorks EVA SMI-S Agent Application Recovery
Manager software component to the application and backup systems.
You can install the HP StorageWorks EVA integration in a cluster
environment. For the supported cluster configurations and specific
installation requirements, see the HP StorageWorks Application
Recovery Manager Administrator’s Guide.
Chapter 238
Page 57

Installing Application Recovery Manager on Your Network
MS Volume Shadow Copy Clients
HP StorageWorks EVA disk array configuration and administration is
described in the HP StorageWorks Application Recovery Manager
Administrator’s Guide.
HP StorageWorks EVA Integration with Microsoft Exchange Server
The Microsoft Exchange Server database must be installed on the
application system source volumes. The following objects must be located
on the source volumes:
• Microsoft Information Store (MIS)
• optionally, Key Management Service (KMS)
• optionally, Site Replication Service (SRS)
To be able to back up transaction logs, disable Circular Logging on the
Microsoft Exchange Server.
HP StorageWorks EVA Integration with MS SQL
Microsoft SQL Server has to be installed on the application system. User
databases and system databases must reside on the disk array source
volumes. The system databases must be installed on different source
volumes than user databases.
Chapter 2 39
Page 58

Installing Application Recovery Manager on Your Network
Installing Application Recovery Manager on Microsoft Cluster Server
Installing Application Recovery Manager on
Microsoft Cluster Server
For supported operating systems for Microsoft Cluster Server
integration, see the http://www.hp.com/support/manuals
If your Cell Manager is to be cluster-aware, note that the virtual server
IP address should be used for licenses.
Installing a Cluster-Aware Cell Manager
Prerequisites Before you install the cluster-aware Cell Manager, make sure that you
do not have resources with the following names on the cluster:
OBVS_MCRS,OBVS_VELOCIS,OmniBack_Share
If they exist and you are performing a new installation, delete or rename
these resources, because Application Recovery Manager uses those
names for the Application Recovery Manager virtual server.
.
This can be done as follows:
1. Click Start ->Programs -> Administrative Tools -> Cluster
Administrator.
2. Check the resource list and delete or rename these resources, if
necessary.
To properly install and configure Application Recovery Manager in a
Microsoft Cluster Server environment, you must provide a domain
account with the appropriate user rights:
✓ Administrator rights on the Cell Manager
✓ Cluster Administrator rights within the cluster
✓ Password Never Expires
✓ Logon as a service
✓ User Cannot Change Password
✓ All logon hours are allowed
Chapter 240
Page 59

Installing Application Recovery Manager on Your Network
Installing Application Recovery Manager on Microsoft Cluster Server
NOTE When you are installing an Application Recovery Manager Cell Manager
as cluster-aware in a Microsoft Cluster environment, the Application
Recovery Manager User Account must be a domain user account, which
has all of the above mentioned user rights.
TIP An account with administrator rights on all the cluster systems is
required for a Cluster Server installation. It is recommended that you
use this account to install Application Recovery Manager as well. Invalid
user rights may result in Application Recovery Manager services
running in the standard, instead of the cluster-aware, mode.
Before you start installing the Cell Manager software on a cluster, check
the requirements:
✓ A cluster must be installed properly with all of its functionality. For
example, you must be able to move groups from one to another node
as many times as needed, with no problems with shared disk(s).
✓ At least one group in the cluster should have a <File Share>
resource defined. Application Recovery Manager will install its
database components on this <File Share> resource. Refer to the
cluster specific documentation in order to define <File Share>
resource. Note that the file share name of the <File Share> resource
cannot be OmniBack.
✓ If the virtual server does not exist in the same group as the <File
Share> resource group, a new virtual server must be created using a
free registered IP address and associating a network name with it.
✓ The <File Share> resource where Application Recovery Manager is
to be installed must have the IP Address, Network Name, and
Physical Disk set among the <File Share> dependencies. This is
necessary to ensure that Application Recovery Manager cluster group
will be able to run on any node independently of any other group.
✓ Ensure that only the cluster administrator has access to the <File
Share> resource and that he has full access to it.
✓ Each system of the cluster should be up and running properly.
Chapter 2 41
Page 60

Installing Application Recovery Manager on Your Network
Installing Application Recovery Manager on Microsoft Cluster Server
✓ If a system in the cluster has the Application Recovery Manager
software installed as non-cluster-aware, you need to uninstall it prior
to the setup.
✓ Application Recovery Manager must be installed on the same location
(drive and pathname) on all cluster nodes. Ensure that these
locations are free.
✓ Other Microsoft Installer based installations must not be running on
other cluster nodes.
Local Installation The Application Recovery Manager cluster-aware Cell Manager software
must be installed locally, from the CD-ROM. This can be done as follows:
1. Insert the installation CD-ROM and run:
32-bit OS (on x86 or AMD64/Intel EM64T): \i386\setup.exe
64-bit OS (on AMD64/Intel EM64T): \x8664\setup.exe
The Application Recovery Manager Setup Wizard displays.
2. Follow the Setup Wizard and carefully read the license agreement.
Click Next to continue, if you accept the terms of the agreement.
3. In the Installation Type page, select Cell Manager and then click
Next to install Application Recovery Manager Cell Manager software.
Chapter 242
Page 61
Installing Application Recovery Manager on Your Network
Installing Application Recovery Manager on Microsoft Cluster Server
Figure 2-17 Selecting the Installation Type
4. Setup automatically detects that it is running in a cluster
environment. Select Install cluster-aware Cell Manager to
enable a cluster setup.
Select the cluster group, the virtual hostname, and the cluster <File
Share> resource on which Application Recovery Manager shared files
and the database will reside.
NOTE If you select Install Cell Manager on this node only, the Cell
Manager will not be cluster aware. Refer to “Installing a Cell Manager”
on page 14.
Chapter 2 43
Page 62

Installing Application Recovery Manager on Your Network
Installing Application Recovery Manager on Microsoft Cluster Server
Figure 2-18 Selecting the Cluster Resource
5. Enter the username and password for the account that will be used to
start Application Recovery Manager services.
Figure 2-19 Entering the Account Information
6. Click Next to install Application Recovery Manager on the default
folder.
Chapter 244
Page 63

Installing Application Recovery Manager on Microsoft Cluster Server
Otherwise, click Change to open the Change Current Destination
Folder window and enter a new path.
7. In the Component Selection window, select the components you
want to install on all cluster nodes and cluster virtual servers. Click
Next.
The MS Cluster Integration component is selected automatically.
The selected components will be installed on all the cluster nodes.
8. The component selection summary page is displayed. Click Install.
9. The Installation setup page is displayed. Click Next.
Figure 2-20 Installation Status Page
Installing Application Recovery Manager on Your Network
10.To start Application Recovery Manager immediately after install,
select Start the Application Recovery Manager GUI.
On operating systems other than Windows x64, to install or
upgrade the HP OpenView AutoPass utility, select the Start
AutoPass installation or the Upgrade AutoPass installation
option.
It is not recommended to install the HP OpenView AutoPass utility in
Microsoft Cluster, because it will be installed only on the node used
for the installation. If you did install AutoPass, you must uninstall
Chapter 2 45
Page 64

Installing Application Recovery Manager on Your Network
Installing Application Recovery Manager on Microsoft Cluster Server
Application Recovery Manager from the same node on which it was
installed, when you decide to remove Application Recovery Manager
from the system.
On Windows x64 operating systems, AutoPass is not installed.
Click Finish to complete the installation.
Checking the
Installation
When the setup procedure has been completed, you can check whether or
not the Application Recovery Manager software has been properly
installed. Proceed as follows:
1. Check if the Cluster service account is assigned to the Application
Recovery Manager Inet service on each cluster node. Make sure the
same user is also added to the Application Recovery Manager admin
user group. The logon account type should be set to This account as
shown in Figure 2-21.
Figure 2-21 Application Recovery Manager User Account
2. Switch to the <AppRM_home>\bin directory and run the following
command:
omnirsh <host> INFO_CLUS
Chapter 246
Page 65

Installing Application Recovery Manager on Your Network
Installing Application Recovery Manager on Microsoft Cluster Server
where <host> is the name of the cluster virtual server
(case-sensitive). The output should list the names of the systems
within the cluster and the name of virtual server. If the output
returns 0 “NONE”, Application Recovery Manager is not installed in
the cluster-aware mode.
3. Start the Application Recovery Manager GUI, select the Clients
context, and then click MS Clusters. You should see the newly
installed systems listed in the Results Area.
Installing Cluster-Aware Clients
Prerequisites Before you install a cluster-aware Application Recovery Manager client,
the following prerequisites must be fulfilled:
✓ A cluster must be installed properly with all of its functionality on all
cluster nodes. For example, you must be able to move groups from one
to another node as many times as needed, with no problems with
shared disk(s).
✓ Each system of the cluster should be up and running properly.
Local Installation The Application Recovery Manager cluster-aware clients must be
installed locally, from the CD-ROM, on each cluster node. The cluster
nodes (Application Recovery Manager cluster clients) are imported to the
specified cell during the installation process. You will need then to
import the virtual server name.
The cluster Administrator account is required to perform the
installation. Apart from that, the cluster client setup is the same as for
the Windows client setup. The Cluster Integration component, which is
selected by default during the installation, must be installed in addition
to other Application Recovery Manager client components.
See “For details on supported platforms and components for a particular
Windows operating system, see the
http://www.hp.com/support/manuals.” on page 26 for information on how
to locally install an Application Recovery Manager client system. Note
that during the installation, Application Recovery Manager reports that
a cluster was detected.
Chapter 2 47
Page 66

Installing Application Recovery Manager on Your Network
Installing Application Recovery Manager on Microsoft Cluster Server
NOTE You can import a cluster-aware client to the Application Recovery
Manager cell that is managed using either the standard Cell Manager or
the cluster-aware Cell Manager.
Checking the
Installation
When the setup procedure has been completed, you can check whether or
not the Application Recovery Manager software has been properly
installed. Proceed as follows:
1. Check if the Cluster service account is assigned to the Application
Recovery Manager Inet service on each cluster node. Make sure the
same user is also added to the Application Recovery Manager admin
user group. The logon account type should be set to This account as
shown in Figure 2-22.
Figure 2-22 Application Recovery Manager User Account
2. Switch to the <AppRM_home>\bin directory.
3. Run the following command:
omnirsh <host> INFO_CLUS
Chapter 248
Page 67

Installing Application Recovery Manager on Your Network
Installing Application Recovery Manager on Microsoft Cluster Server
where <host> is the name of the cluster client system. The output
should return the name of the cluster-aware client system. If the
output returns 0 “NONE”, Application Recovery Manager is not
installed in the cluster-aware mode.
What’s Next? When the installation has been completed, you must import the virtual
server hostname (cluster-aware application) to the Application Recovery
Manager cell. See “Importing a Cluster-Aware Client to a Cell” on
page 56.
Chapter 2 49
Page 68

Installing Application Recovery Manager on Your Network
Installing Application Recovery Manager on Microsoft Cluster Server
Chapter 250
Page 69

3 Maintaining the Installation
Chapter 3 51
Page 70

Maintaining the Installation
In This Chapter
In This Chapter
This chapter describes the procedures most frequently performed to
modify the configuration of your backup environment. The following
sections provide information about:
• How to import clients to a cell using the graphical user interface.
Refer to “Importing Clients to a Cell” on page 53.
• How to import an Installation Server to a cell using the graphical
user interface. Refer to “Importing an Installation Server to a Cell” on
page 55.
• How to import clusters/virtual servers using the graphical user
interface. Refer to “Importing a Cluster-Aware Client to a Cell” on
page 56.
• How to export clients using the graphical user interface. Refer to
“Exporting Clients from a Cell” on page 58.
• How to ensure security using the graphical user interface. Refer to
“Security Considerations” on page 61.
• How to uninstall the Application Recovery Manager software. Refer
to “Uninstalling Application Recovery Manager Software” on page 74.
• How to add or remove Application Recovery Manager software
components. Refer to “Changing Application Recovery Manager
Software Components” on page 78.
• How to set up the TCP/IP protocol. Refer to “Setting Up the TCP/IP
Protocol on Windows Systems” on page B-20.
• How to change the Cell Manager name. Refer to “Changing the Cell
Manager Name” on page B-26.
• How to change the default port number. Refer to “Changing the
Default Port Number” on page B-28.
Chapter 352
Page 71

Maintaining the Installation
Importing Clients to a Cell
Importing Clients to a Cell
When you distribute Application Recovery Manager software to clients
using the Installation Server, the client systems are automatically added
to the cell. As soon as the remote installation has finished, the client
becomes a member of the cell.
When to Import? Clients that were installed locally from the installation CD-ROM must
be imported to the cell after the installation. Importing means
manually adding a computer to a cell after the Application Recovery
Manager software has been installed. When added to an Application
Recovery Manager cell, the system becomes an Application Recovery
Manager client. Once the system is a member of the cell, information
about the new client is written to the IDB, which is located on the Cell
Manager.
A client can only be a member of one cell. If you wish to move a client to a
different cell, you first export it from its current cell and then import it to
the new cell. For the procedure on how to export clients, refer to
“Exporting Clients from a Cell” on page 58.
IMPORTANT After you have installed Application Recovery Manager clients and
imported them to a cell, it is highly recommended to protect the clients
from access by unwanted cell authorities. Refer to “Securing Clients” on
page 64.
How to Import? You import a client system using the graphical user interface by
performing the following steps:
1. In the Context List, click Clients.
2. In the Scoping Pane, right-click Clients and click Import Client.
3. Type the name of the client or browse the network to select the client
you want to import. See Figure 3-1.
Chapter 3 53
Page 72

Maintaining the Installation
Importing Clients to a Cell
Figure 3-1 Importing a Client to the Cell
If you are importing a client configured with multiple LAN cards,
select the Virtual Host option. With this option you must import all
names of the same system.
Click Finish to import the client.
The name of the imported client is displayed in the Results Area.
Chapter 354
Page 73

Maintaining the Installation
Importing an Installation Server to a Cell
Importing an Installation Server to a Cell
When to Add? An Installation Server must be added to a cell if it is installed on a Cell
Manager, but you also want to use it to perform remote installations in
another cell. It must then be added to the other cell (using the GUI
connected to the Cell Manager of the other cell).
Unlike a client, an Installation Server can be a member of more than one
cell. Therefore it does not have to be deleted (exported) from one cell
before it can be added (imported) to another cell.
How to Add? The process for importing an Installation Server is similar to that for
importing a client. The task is performed using the Application Recovery
Manager GUI (connected to the Cell Manager of the cell to which the
Installation Server is to be added) by performing the following steps:
1. In the Context List, click Clients.
2. In the Scoping Pane, right-click Installation Servers, and then
click Import Installation Server to start the wizard. See Figure
3-1.
3. Enter or select the name of the system that you want to import. Click
Finish to import the Installation Server.
Chapter 3 55
Page 74

Maintaining the Installation
Importing a Cluster-Aware Client to a Cell
Importing a Cluster-Aware Client to a Cell
After you have locally installed the Application Recovery Manager
software on a cluster-aware client, import the virtual server representing
the cluster-aware client to the Application Recovery Manager cell.
Prerequisites • Application Recovery Manager must be installed on all cluster nodes.
• All cluster packages must be running within the cluster.
Microsoft Cluster Server
To import a Microsoft Cluster Server client to the Application Recovery
Manager cell, proceed as follows:
1. In the Application Recovery Manager GUI, switch to the Clients
context.
2. In the Scoping Pane, right-click MS Clusters and click Import
Cluster.
3. Type the name of the virtual server representing the cluster client to
be imported or browse the network to select the virtual server. See
Figure 3-2.
Chapter 356
Page 75

Maintaining the Installation
Importing a Cluster-Aware Client to a Cell
Figure 3-2 Importing a Microsoft Cluster Server Client to a Cell
4. Click Finish to import the cluster client.
TIP To import a specific cluster node or a virtual server, right click its cluster
in the Scoping Pane and click Import Cluster Node or Import Cluster
Virtual Server.
Chapter 3 57
Page 76

Maintaining the Installation
Exporting Clients from a Cell
Exporting Clients from a Cell
Exporting a client from an Application Recovery Manager cell means
removing its references from the IDB on the Cell Manager without
uninstalling the software from the client. This can be done using the
Application Recovery Manager GUI.
You may want to use the export functionality if you:
• Want to move a client to another cell
• Want to remove a client from the Application Recovery Manager cell
configuration which is no longer part of the network
• Want to fix problems caused by insufficient licenses
By exporting a client from a cell, the license becomes available to
some other system.
Prerequisites Before you export a client, check the following:
✓ All the occurrences of the client have been removed from backup
specifications. Otherwise, Application Recovery Manager will try to
back up unknown clients and this part of the backup specification will
fail. Refer to online Help index: “modifying, backup specification” for
instructions on how to modify backup specifications.
✓ The client does not have any connected and configured disk arrays.
Once the system is exported, it cannot access the disk array or the
VSS functionality.
How to Export? You export a client using the Application Recovery Manager GUI by
performing these steps:
1. In the Context List, click Clients.
2. In the Scoping Pane, click Clients, right-click the client system that
you want to export, and then click Delete. See Figure 3-3.
Chapter 358
Page 77

Figure 3-3 Exporting a Client System
Maintaining the Installation
Exporting Clients from a Cell
3. You will be asked if you want to uninstall Application Recovery
Manager software as well. Click No to export the client, and then click
Finish.
The client will be removed from the list in the Results Area.
NOTE You cannot export or delete an Application Recovery Manager client if
the Cell Manager is installed on the same system as the client you would
like to export. However, you can export the clients from systems where
only the client and Installation Server are installed. In this case,
Installation Server is also removed from the cell.
Microsoft Cluster
Server Clients
To export a Microsoft Cluster Server client from the Application
Recovery Manager cell, proceed as follows:
1. In the Context List, click Clients.
2. In the Scoping Pane, expand MS Clusters, right-click the cluster
client that you want to export, and then click Delete.
Chapter 3 59
Page 78

Maintaining the Installation
Exporting Clients from a Cell
3. You are asked if you also want to uninstall the Application Recovery
Manager software. Click No to only export the cluster client.
The cluster client will be removed from the list in the Results Area.
TIP To export a specific cluster node or a virtual server, right-click the cluster
node or virtual server in the Scoping Pane and click Delete.
Chapter 360
Page 79

Maintaining the Installation
Security Considerations
Security Considerations
This section describes the security elements of Application Recovery
Manager. It describes the advanced settings that can be used to enhance
the security of Application Recovery Manager with prerequisites and
considerations that have to be taken into account.
Since enhancing security in an entire environment requires additional
effort, many security features cannot be enabled by default.
The considerations described in this chapter apply not only when the
security settings are changed, but must also be followed when
configuring new users, adding clients, or making any other changes these
considerations apply to. Any changes in the security settings can have
cell-wide implications and should be carefully planned.
Security Layers
Security has to be planned, tested and implemented on different
security-critical layers to ensure the secure operation of Application
Recovery Manager. Such layers are Application Recovery Manager
clients, Cell Manager and users. This section explains how to configure
security on each of these layers.
Client Security
Application Recovery Manager agents installed on clients in the cell
provide numerous powerful capabilities, like access to all the data on the
system. It is important that these capabilities are available only to the
processes running on cell authorities (Cell Manager and Installation
Server), and that all other requests are rejected.
Before securing clients, it is important to determine a list of trusted
hosts. This list must include:
• Cell Manager
• Relevant Installation Servers
• For some clients also a list of clients that will access them remotely.
Chapter 3 61
Page 80

Maintaining the Installation
Security Considerations
IMPORTANT The list must contain all possible hostnames (or IP addresses) where
connections can come from. Multiple hostnames may be needed if any of
the above clients is multihomed (has multiple network adapters and/or
multiple IP addresses) or is a cluster.
If the DNS configuration in the cell is not uniform, additional
considerations may apply. For more information, refer to “Securing
Clients” on page 64.
While it may not always be necessary to secure each and every client in
the cell, it is important that the computers that other clients will trust
are secured themselves:
• Cell Manager
• Installation Servers
NOTE User interface clients do not need to be added to the list of trusted
clients. Depending on the user rights, you can either use the GUI to
access the complete Application Recovery Manager functionality or to
access only specific contexts.
Application Recovery Manager Users
Consider the following important aspects when configuring Application
Recovery Manager users:
• Some user rights are very powerful. For example, the User
configuration and Clients configuration user rights enable the
user to change the security settings.
• Even less powerful user rights bear an inherent risk associated with
them. Application Recovery Manager can be configured to restrict
certain user rights to reduce these risks. These settings are described
later on in this chapter. See also “Start Backup Specification User
Right” on page 71.
Chapter 362
Page 81

Maintaining the Installation
Security Considerations
• Application Recovery Manager comes with only a few predefined user
groups. It is recommended to define specific groups for each type of
user in the Application Recovery Manager environment to minimize
the set of rights assigned to them.
• The configuration of users is connected with user validation (see
“Strict Hostname Checking” on page 69). Enhanced validation can be
worthless without careful user configuration and vice versa - even the
most careful user configuration can be worked around without the
enhanced validation.
• It is important that there are no “weak” user specifications in the
Application Recovery Manager user list. Note that the host part of a
user specification is the strong part (especially with the enhanced
validation), while user and group parts cannot be verified reliably.
Any user with powerful user rights should be configured for the
specific client they will use for Application Recovery Manager
administration. If multiple clients are used, an entry should be added
for each client, rather than specifying such a user as user, group,
<Any>. Non-trusted users should not be allowed to log on to any of
those systems.
See also the online Help index: “configuring, users” for details on
configuring users.
Cell Manager Security
Cell Manager security is important because the Cell Manager has access
to all clients and all data in the cell.
Security of the Cell Manager can be enhanced via the strict hostname
checking functionality. However, it is important that the Cell Manager is
also secured as a client and that Application Recovery Manager users are
configured carefully. Refer to “Strict Hostname Checking” on page 69 and
“Securing Clients” on page 64.
Other Security Aspects
There are also some other security related aspects you should consider:
• Users should not have access to any of the trusted clients (Cell
Manager, Installation Servers). Even granting anonymous log on or
ftp access could introduce a serious risk to overall security.
• Disk arrays (and the clients they are connected to) must be physically
protected from unauthorized or untrusted personnel.
Chapter 3 63
Page 82

Maintaining the Installation
Security Considerations
• During backup or restore data is transferred via network. You should
provide sufficient separation from the untrusted network.
Refer also to the online Help for other security related aspects.
Securing Clients
After you have installed Application Recovery Manager clients and
imported them to a cell, it is highly recommended to protect the clients
from access by unwanted clients.
Application Recovery Manager allows you to specify from which cell
authorities (Cell Manager and Installation Servers) a client will accept
requests on the Application Recovery Manager port 5555. Consequently,
other computers will not be able to access such a client. See also “Client
Security” on page 61.
For tasks like backup and restore, starting pre- or post-execution scripts,
or importing and exporting clients, the client checks whether the
computer which triggers one of these tasks via the Application Recovery
Manager port (default 5555) is allowed to do so. This security mechanism
instructs the client to accept such actions only from the specified cell
authorities.
Consider
Exceptional
Situations
Before limiting the access to clients, consider the following circumstances
which may cause problems:
• A cell authority has several LAN cards and several IP
addresses/client names.
• The Cell Manager is cluster-aware.
Application Recovery Manager lets you specify not only one but a list of
systems that are explicitly authorized to connect as a cell authority to
the client. To avoid failure, prepare in advance such a list of all possible
valid client names for alternate cell authorities.
The list should include:
• All additional client names (for all LAN cards) of the cell authority.
• Client names of all cluster nodes where the Cell Manager might
failover, as well as a cluster virtual server hostname.
• The target system name to which a cell authority will be moved in
case of a total hardware failure of the cell authority.
Chapter 364
Page 83

Maintaining the Installation
Security Considerations
The concept of allowing and denying access can be applied to all systems
with Application Recovery Manager installed. For example, you can
allow or deny access of Cell Managers to clients, Cell Managers to Cell
Managers, Installation Servers to clients, or clients to clients.
NOTE If an Installation Server residing on a system other than the Cell
Manager is not added to the list of allowed clients, it will not have access
to a secured client. In this case, the operations dependent on the
Installation Server (such as checking installation, adding components
and removing clients) will fail. If you want these operations to be
available on the secured client, add the Installation Server to the list of
allowed clients.
How to Secure a
Client
To enable verification of a cell authority on the client side (secure a
client), perform the following steps in the Application Recovery Manager
GUI:
1. In the Context List, click Clients.
2. In the Scoping Pane, expand Clients, right-click the client(s) you
want to secure, and click Secure. See Figure 3-4.
Chapter 3 65
Page 84

Maintaining the Installation
Security Considerations
Figure 3-4 Securing a Client
3. Type the names of the systems that will be allowed to access the
selected client(s) or search for the systems using the Network (on
Windows GUI only) or Search tabs. Click Add to add each system to
the list. See Figure 3-5.
Chapter 366
Page 85

Figure 3-5 Enabling Security on Selected Client(s)
Maintaining the Installation
Security Considerations
The Cell Manager is automatically provided with access and added to
the list of trusted clients. You cannot exclude the Cell Manager from
the list.
4. Click Finish to add the selected systems to the allow_hosts file.
What Happens? Clients will verify the source for each request from other clients and
allow only those requests received from clients selected in the Enable
Security on selected client(s) window. These clients are listed in
the allow_hosts file. If a request is denied, the event is logged to the
inet.log file in the <AppRM_home>\log directory.
To secure all clients in the cell, perform the following steps in the
Application Recovery Manager GUI:
1. In the Context List, click Clients.
2. In the Scoping Pane, right-click Clients and click Cell Secure. See
Figure 3-6.
Chapter 3 67
Page 86

Maintaining the Installation
Security Considerations
Figure 3-6 Securing a Cell
3. Type the names of the systems that will be allowed to access all
clients in the cell or search for the systems using the Network or
Search tabs. Click Add to add each system to the list.
4. Click Finish to add the selected systems to the allow_hosts file.
What Happens? Clients will verify the source of each request and allow only those
requests received from clients selected in the Enable Security on Cell
Manager window. These clients are listed in the allow_hosts file. If a
request is denied, the event is logged to the inet.log file in the
<AppRM_home>\log directory.
When you secure an entire cell, all clients residing in this cell at the time
are secured. When you add new clients to the cell, you should also secure
them.
How to Remove
Security
If you want to remove security from the selected system(s), perform the
following steps in the Application Recovery Manager GUI:
1. In the Context List, click Clients.
Chapter 368
Page 87

Maintaining the Installation
Security Considerations
2. In the Scoping Pane, right-click the client(s) from which you want to
remove security and click Unsecure.
3. Click Yes to confirm that you allow access to the selected client(s).
If you want to remove security from all the clients in the cell, proceed as
follows:
1. In the Context List, click Clients.
2. In the Scoping Pane, right-click Clients and click Cell Unsecure.
3. Click Yes to confirm that you allow access to all client(s) in your cell.
The allow_hosts and deny_hosts Files
When you secure a client, the client names of the systems allowed to
access a client are written to the allow_hosts file. You can also explicitly
deny access to a client from certain computers by adding their names to
the deny_hosts file. These files are located in the
<AppRM_home>\Config\client directory.
Specify each client name in a separate line.
NOTE If you accidentally lock out a client, you can manually edit (or delete) the
allow_hosts file on this client.
The files are in double-byte format (Unicode).
Strict Hostname Checking
By default, the Cell Manager uses a relatively simple method for
validating users. It uses the hostname as known by the client where a
user interface or a ZDB Agent and VSSBAR are started. This method is
easier to configure and it provides a reasonable level of security in
environments where security is considered as “advisory” (i.e. malicious
attacks are not expected).
Chapter 3 69
Page 88

Maintaining the Installation
Security Considerations
The strict hostname checking setting on the other hand, provides
enhanced validation of users. The validation uses the hostname as it is
resolved by the Cell Manager using the reverse DNS lookup from the IP
obtained from the connection. This imposes the following limitations and
considerations:
Limitations • IP based validation of users can only be as strong as the anti-spoof
protection in the network. The security designer must determine
whether the existing network provides a sufficient degree of
anti-spoof safety for the particular security requirements. Anti-spoof
protection can be added by segmenting the network with firewalls,
routers, VPN, and such.
• The separation of users within a certain client is not as strong as the
separation between clients. In a high security environment, one must
not mix regular and powerful users within the same client.
• Hosts that are used in user specifications cannot be configured to use
DHCP, unless they are bound to a fixed IP and configured in the DNS.
Be aware of the limitations in order to correctly assess the degree of
safety that can be achieved with the strict hostname checking.
Hostname
Resolution
The hostname that Application Recovery Manager uses for validation
may differ between the default user validation and strict hostname
checking in the following situations:
• Reverse DNS lookup returns a different hostname. This can be either
intentional or can indicate misconfiguration of either the client or the
reverse DNS table.
• The client is multihomed (has multiple network adapters and/or
multiple IP addresses). Whether this consideration applies to a
specific multihomed client, depends on its role in the network and on
the way it is configured in the DNS.
• The client is a cluster.
The nature of checks that are enabled with this setting may require
reconfiguration of Application Recovery Manager users. Existing
specifications of Application Recovery Manager users must be checked to
see if they could be affected by any of the above reasons. Depending on
the situation, existing specifications may need to be changed or new
specifications added to account for all the possible IPs from which the
connections can come.
Chapter 370
Page 89

Maintaining the Installation
Security Considerations
Note that users have to be reconfigured also when reverting back to the
default user validation, if you had to modify user specifications when you
enabled the strict hostname checking. It is therefore recommended to
decide which user validation you would like to use and keep using it.
A prerequisite for a reliable reverse DNS lookup is a secure DNS server.
You must prevent physical access and log on to all unauthorized
personnel.
By configuring users with IPs instead of hostnames, you can avoid some
DNS related validation problems, but such configuration is more difficult
to maintain.
Requirement The enhanced validation does not automatically grant access for certain
internal connections. Therefore, when this validation is used, a new user
must be added for each of the following:
• It is required to add the user SYSTEM, NT AUTHORITY, <client> for
each client where a ZDB Agent and VSSBAR are installed. Note that
if Inet on a certain client is configured to use a specific account, this
account must have already been configured. For more information,
refer to the online Help index: “strict hostname checking”.
For detailed information on user configuration, refer to the online Help
index: “configuring, users”.
Enabling the Feature
To enable the strict hostname checking, set the StrictSecurityFlags
flag 0x0003 in the global options file.
For more information about the global options file, refer to the online
Help.
Start Backup Specification User Right
For general information about the Application Recovery Manager users
and user rights, refer to the online Help index: “users”.
The Start backup specification user right alone does not enable a
user to use the Backup context in the GUI. The user is allowed to start a
backup specification from the command line by using the omnib with the
-datalist option.
Chapter 3 71
Page 90

Maintaining the Installation
Security Considerations
NOTE By combining the Start Backup Specification with the Start
Backup user rights, a user is allowed to see the configured backup
specifications in the GUI and is able to start a backup specification or an
interactive backup.
Allowing users to perform interactive backups may not always be
desired. To allow interactive backups only for users who also have the
right to save a backup specification, set the StrictSecurityFlags flag
0x0200 in the global options file.
For more information on the global options file, refer to the online Help.
Hiding the Contents of Backup Specifications
In a high security environment, the contents of saved backup
specifications may be considered to be sensitive or even confidential
information. Application Recovery Manager can be configured to hide the
contents of backup specifications for all users, except for those who have
the Save backup specification user right. To do so, set the
StrictSecurityFlags flag 0x0400 in the global options file.
For more information about the global options file, refer to the online
Help.
Host Trusts
The host trusts functionality reduces the need to grant the Restore to
other clients user right to users when they only need to restore the
data from one client to another within a limited number of clients. You
can define groups of hosts that will trust each other with the data.
Host trusts are typically used in the following situations:
• For clients in a cluster (nodes and virtual server).
• If the hostname of a client is changed and the data from the old
backup objects needs to be restored.
• If there is a mismatch between the client hostname and backup
objects due to DNS issues.
• If a user owns several clients and needs to restore the data from one
client to another.
Chapter 372
Page 91

• When migrating data from one host to another.
Configuration To configure host trusts, create the
<AppRM_home>\Config\Server\cell\host_trusts file on a Cell
Manager.
The groups of hosts that trust each other are defined as lists of
hostnames enclosed in curly brackets. For example:
Example GROUP="cluster.domain.com"
{
cluster.domain.com
node1.domain.com
node2.domain.com
}
GROUP="Bajo"
{
Maintaining the Installation
Security Considerations
Client Security
Events
Cell Manager
Security Events
computer.domain.com
anothercomputer.domain.com
}
Monitoring Security Events
If you encounter problems using Application Recovery Manager, you can
use the information in the log files to determine your problem. For
example, logged events can help you to determine misconfigured users or
clients.
Client security events are logged in the inet.log file on every client in
the cell in the <AppRM_home>\log directory.
Cell Manager security events are logged in the security.log file in the
<AppRM_home>\log\server directory on the Cell Manager.
Chapter 3 73
Page 92

Maintaining the Installation
Uninstalling Application Recovery Manager Software
Uninstalling Application Recovery Manager
Software
If your system configuration changes, you may want to uninstall the
Application Recovery Manager software from the system or remove some
software components.
Uninstalling is removing all the Application Recovery Manager software
components from the system, including all references to this system from
the IDB on the Cell Manager computer. However, by default, the
Application Recovery Manager configuration data remains on the system
because you may need this data in the future upgrade of Application
Recovery Manager. If you want to remove the configuration data after
uninstalling the Application Recovery Manager software, delete the
directories where Application Recovery Manager was installed.
If you have some other data in the directory where Application Recovery
Manager is installed, make sure you copied this data to another location
before uninstalling Application Recovery Manager. Otherwise, the data
will be removed during the uninstallation process.
Uninstalling the Application Recovery Manager software from a cell
consists of the following steps:
1. Uninstalling the Application Recovery Manager client software using
the GUI. See “Uninstalling an Application Recovery Manager Client”
on page 75.
2. Uninstalling Application Recovery Manager Cell Manager and
Installation Server. See “Uninstalling the Cell Manager and
Installation Server” on page 76.
You can also uninstall Application Recovery Manager software
components without uninstalling the Cell Manager or client. See
“Changing Application Recovery Manager Software Components” on
page 78.
Chapter 374
Page 93

Maintaining the Installation
Uninstalling Application Recovery Manager Software
Prerequisites Before you uninstall the Application Recovery Manager software from a
computer, check the following:
✓ Make sure that all references to the computer are removed from the
backup specifications. Otherwise, Application Recovery Manager will
try to back up unknown systems and this part of the backup
specification will fail. Refer to online Help index: “modifying, backup
specification” for instructions on how to modify backup specifications.
✓ Make sure that no disk arrays are connected and configured on the
system that you want to uninstall. Once the system is exported, it
cannot access the disk array or the VSS functionality.
Uninstalling an Application Recovery Manager Client
NOTE The remote uninstallation procedure requires the Installation Server to
be installed.
You uninstall a client remotely by performing these steps in the
Application Recovery Manager GUI:
1. In the Context List, switch to the Clients context.
2. In the Scoping Pane, expand Clients, right-click the client you want
to uninstall, and then click Delete. You will be asked if you want to
uninstall the Application Recovery Manager software as well.
3. Click Yes to uninstall all the software components from the client,
and then click Finish.
The client will be removed from the list in the Results Area and the
Application Recovery Manager software will be deleted from its hard
disk.
Note that the Application Recovery Manager configuration data remains
on the client system. If you want to remove the configuration data, delete
the directories where Application Recovery Manager was installed.
Cluster Clients If you have cluster aware clients in your Application Recovery Manager
environment and you want to uninstall them, you must do this locally.
The procedure is the same as for uninstalling Cell Manager or
Installation Server. Refer to “Uninstalling the Cell Manager and
Installation Server” on page 76.
Chapter 3 75
Page 94

Maintaining the Installation
Uninstalling Application Recovery Manager Software
The cluster client will be removed from the list in the Results Area and
the Application Recovery Manager software will be deleted from its hard
disk.
Uninstalling the Cell Manager and Installation Server
This section describes the procedure of uninstalling the Application
Recovery Manager Cell Manager and Installation Server software.
Uninstalling on a
MS Cluster Server
System
If you have installed HP OpenView AutoPass utility together with
Application Recovery Manager on a Microsoft Cluster Server node, you
must uninstall Application Recovery Manager from the same node,
otherwise AutoPass will not be uninstalled.
To uninstall Application Recovery Manager software, follow these steps:
1. Make sure you have terminated all Application Recovery Manager
sessions and exited the GUI.
2. In Windows Control Panel, click Add/Remove Programs.
3. Depending on whether you installed HP OpenView AutoPass or not,
and if you want to remove the Application Recovery Manager
configuration data or not, different actions apply.
• If AutoPass utility was installed together with Application
Recovery Manager:
Select HP StorageWorks Application Recovery Manager
A.06.00 and click Change and then Next. In the Program
Maintenance dialog box, select Remove. To permanently remove
the Application Recovery Manager configuration data, select
Permanently remove the configuration data. Otherwise,
click Next.
If AutoPass was installed together with Application Recovery
Manager and Application Recovery Manager is the only
application using it, AutoPass is removed. Otherwise, AutoPass is
only unregistered with Application Recovery Manager but
remains installed.
Chapter 376
Page 95

Maintaining the Installation
Uninstalling Application Recovery Manager Software
• If AutoPass has not been installed:
— To uninstall Application Recovery Manager and leave the
Application Recovery Manager configuration data on the
system, select HP StorageWorks Application Recovery
Manager A.06.00 and click Remove.
— To uninstall Application Recovery Manager and remove the
Application Recovery Manager configuration data, select HP
StorageWorks Application Recovery Manager A.06.00,
click Change and then Next. In the Program Maintenance
dialog box, select Remove. Select Permanently remove the
configuration data and click Next.
4. When uninstalling is completed, click Finish to exit the wizard.
If AutoPass was removed during the uninstallation of the Cell
Manager, press
F5 in the Add/Remove Program windows to refresh
the list of installed programs and components.
Chapter 3 77
Page 96

Maintaining the Installation
Changing Application Recovery Manager Software Components
Changing Application Recovery Manager
Software Components
This section describes the procedure for removing and adding
Application Recovery Manager software components. For the list of
supported Application Recovery Manager components, refer to
http://www.hp.com/support/manuals
Application Recovery Manager software components can be added on the
Cell Manager or on a client using the Application Recovery Manager
GUI. You perform the remote installation of selected components using
the Installation Server functionality. For the detailed procedure refer to
“Remote Installation of Application Recovery Manager Clients” on
page 29.
The Application Recovery Manager components can be removed locally
on the Cell Manager or on a client.
To add or remove the Application Recovery Manager software
components, follow the steps below:
.
Cluster-Aware
Clients
1. In the Windows Control Panel, click Add or Remove Programs.
2. Select HP StorageWorks Application Recovery Manager A.06.00
and click Change.
3. Click Next.
4. In the Program Maintenance window, click Modify and then Next.
5. In the Custom Setup window, select the components you want to add
and/or unselect the software components you want to remove. Click
Next.
6. Click Install to start the installing or removing the software
components.
7. When the installation is completed, click Finish.
If you are changing the Application Recovery Manager software
components on the cluster-aware clients, it must be done locally, from the
CD-ROM, on each cluster node. After that, the virtual server hostname
has to be manually imported to the Application Recovery Manager cell
using the GUI.
Chapter 378
Page 97

4 Application Recovery Manager
Licensing
Chapter 4 79
Page 98

Application Recovery Manager Licensing
In This Chapter
In This Chapter
This chapter contains information about how Application Recovery
Manager licenses are checked and reported, and about how to obtain and
install Application Recovery Manager passwords.
Chapter 480
Page 99

Application Recovery Manager Licensing
Introduction
Introduction
The Application Recovery Manager A.06.00 product structure and
licensing consists of two main categories:
1. Cell Manager Pack
2. Functional Extensions
Passwords are bound to the Cell Manager and are valid for the entire
Application Recovery Manager cell.
Chapter 4 81
Page 100

Application Recovery Manager Licensing
License Checking and Reporting
License Checking and Reporting
Application Recovery Manager licenses are checked and if missing,
reported during various Application Recovery Manager operations, for
example:
• As a part of the Application Recovery Manager checking and
maintenance mechanism, the licenses are checked and, if missing,
reported in the Application Recovery Manager Event Log. Application
Recovery Manager Event Log is located on the Cell Manager in
<AppRM_home>\log\server\Ob2EventLog.txt. For more
information on Application Recovery Manager checking and
maintenance mechanism, see the online Help index: “Event Log,
Application Recovery Manager“.
• When the Application Recovery Manager User Interface is started, if
there are any missing licenses reported in the Application Recovery
Manager Event Log, an Event Log notification is displayed. For more
information on Application Recovery Manager Event Log, see the
online Help index: “Event Log, Application Recovery Manager“.
• When an Application Recovery Manager session is started, the
licenses are checked and, if missing, reported.
Application Recovery Manager licenses are with regard to their
characteristics grouped as follows:
• Cell Manager related license
• entity based licenses
• capacity based licenses
Cell Manager Related License
The Application Recovery Manager Cell Manager related license is an
HP StorageWorks Application Recovery Manager Cell Manager Windows
license-to-use (LTU).
When a certain Application Recovery Manager component, such as the
Cell Manager is present in the cell, only the presence of the required
basic or special license is checked.
Chapter 482
 Loading...