

Page 1

HP Application Recovery Manager
software
Integration guide
Part number: N/A
First edition: March 2008
Page 2

Legal and notice information
© Copyright 2008 Hewlett-Packard Development Company, L.P.
Confidential computer software. Valid license from HP required for possession, use or copying. Consistent
with FAR 12.211 and 12.212, Commercial Computer Software, Computer Software Documentation, and
Technical Data for Commercial Items are licensed to the U.S. Government under vendor's standard
commercial license.
The information contained herein is subject to change without notice. The only warranties for HP products
and services are set forth in the express warranty statements accompanying such products and services.
Nothing herein should be construed as constituting an additional warranty. HP shall not be liable for
technical or editorial errors or omissions contained herein.
Intel, Itanium, Pentium, Intel Inside, and the Intel Inside logo are trademarks or registered trademarks of
Intel Corporation or its subsidiaries in the United States and other countries.
Microsoft, Windows, Windows XP, and Windows NT are U.S. registered trademarks of Microsoft
Corporation.
Adobe and Acrobat are trademarks of Adobe Systems Incorporated.
Java is a US trademark of Sun Microsystems, Inc.
Oracle is a registered US trademark of Oracle Corporation, Redwood City, California.
UNIX is a registered trademark of The Open Group.
Page 3

Contents
Publication history .............................................................. 13
About this guide ................................................................. 15
Intended audience ............................................................................................. 15
Documentation set ............................................................................................. 15
Guides ...................................................................................................... 15
Online help ................................................................................................ 17
Documentation map .................................................................................... 17
Abbreviations ...................................................................................... 17
Map ................................................................................................... 17
Document conventions and symbols ..................................................................... 18
Application Recovery Manager graphical user interface ......................................... 19
General Information ........................................................................................... 20
HP technical support .......................................................................................... 20
Subscription service ........................................................................................... 21
HP websites ...................................................................................................... 21
Documentation feedback .................................................................................... 21
1 Integrating the Application Recovery Manager ZDB integrations
and Microsoft Volume Shadow Copy Service ......................... 23
Overview ......................................................................................................... 23
Zero downtime backup ................................................................................ 26
VSS backup types ....................................................................................... 27
Instant recovery with VSS ............................................................................. 27
Concepts .......................................................................................................... 28
Backup ...................................................................................................... 29
Data consistency .................................................................................. 30
Backup with the EVA hardware provider .................................................. 31
Backup with the XP VSS hardware provider .............................................. 31
Restore ...................................................................................................... 32
Microsoft Exchange Server 2007 writer concepts ............................................ 32
Backup ............................................................................................... 32
Restore ................................................................................................ 33
Integration guide 3
Page 4

Prerequisites and limitations ................................................................................ 33
Prerequisites ............................................................................................... 33
Limitations .................................................................................................. 34
Configuring the integration ................................................................................. 37
Configuring HP StorageWorks Enterprise Virtual Array ..................................... 38
Prerequisites ........................................................................................ 40
Configuring the Integration .................................................................... 39
Configuring HP StorageWorks Disk Array XP .................................................. 40
Prerequisites ........................................................................................ 40
Limitations ........................................................................................... 40
VSS and VDS provider configuration for backup and instant recovery ................ 41
Configuring the VSS Hardware Provider for EVA ....................................... 41
Configuring the VSS Hardware Provider for Disk Array XP ......................... 42
Microsoft Exchange Server writer specific configuration .................................... 42
Microsoft Exchange Server 2007 configuration in LCR environment ............. 42
Microsoft Exchange Server 2007 configuration in CCR environment ............ 42
Configuration check .................................................................................... 43
Backup ............................................................................................................ 44
Overview ................................................................................................... 44
Replica types ....................................................................................... 45
HP StorageWorks EVA specifics .............................................................. 46
HP StorageWorks Disk Array XP specifics ................................................ 46
Creating backup specifications using GUI ...................................................... 47
VSS specific backup options .................................................................. 54
Microsoft Exchange Server writer backup specifics .................................... 54
Microsoft Exchange Server 2007 writer backup specifics ........................... 56
Scheduling the backup ................................................................................ 58
Running an interactive backup ...................................................................... 59
Restore ............................................................................................................. 60
Overview ................................................................................................... 60
Restore using HP StorageWorks EVA .............................................................. 60
Switch of disks ..................................................................................... 60
Copy of replica data with the source volume retained ............................... 61
Copy of replica data with the source volume not retained .......................... 62
HP StorageWorks EVA considerations ..................................................... 62
Restore Using HP StorageWorks Disk Array XP ................................................ 63
HP StorageWorks Disk Array XP considerations ........................................ 63
Microsoft Exchange Server writer recovery specifics ......................................... 65
Microsoft Exchange Server 2007 recovery specifics .................................. 66
Instant recovery .......................................................................................... 68
Instant recovery procedure ..................................................................... 69
Additional steps after restore of a CCR copy to the original database .......... 78
Troubleshooting ................................................................................................. 78
4
Page 5

Before you begin ........................................................................................ 78
Checks and verifications .............................................................................. 79
Common problems ...................................................................................... 79
Backup problems ........................................................................................ 80
Restore problems ........................................................................................ 84
2 Application Recovery Manager Oracle integration .............. 87
Introduction ...................................................................................................... 87
Backup and restore types ............................................................................. 88
Integration concepts .......................................................................................... 88
Backup process .......................................................................................... 91
Configuring the integration ................................................................................. 93
Prerequisites ............................................................................................... 93
Limitations .................................................................................................. 94
Before you begin ........................................................................................ 94
Cluster-aware clients .................................................................................... 96
Configuring Oracle users on UNIX ................................................................ 96
Configuring Oracle databases ...................................................................... 97
Using the Application Recovery Manager GUI ......................................... 98
Using the Application Recovery Manager CLI ......................................... 101
What happens after the configuration? ................................................. 103
Checking the configuration ........................................................................ 104
Using the Application Recovery Manager GUI ....................................... 104
Using the Application Recovery Manager CLI ......................................... 104
Checking configuration for instant recovery ............................................ 105
Backup .......................................................................................................... 106
Creating backup templates ......................................................................... 106
Creating backup specifications ................................................................... 106
Examples of pre-exec and post-exec scripts on UNIX ............................... 115
Backing up with third–party backup software ................................................ 116
Starting backup sessions .................................................................................. 116
Considerations ......................................................................................... 116
Scheduling backup specifications ................................................................ 117
Running an interactive backup .................................................................... 118
Starting a backup using the GUI ........................................................... 118
Starting a backup using the CLI ............................................................ 118
Restore ........................................................................................................... 119
Instant recovery and database recovery ....................................................... 119
Instant recovery using the Application Recovery Manager GUI ................. 122
Instant recovery using the Application Recovery Manager CLI .................. 125
Recovery options ...................................................................................... 127
Integration with third–party backup software ................................................. 129
Integration guide 5
Page 6

Database recovery scenarios ............................................................... 129
Example of an RMAN recovery script .................................................... 131
Monitoring sessions ......................................................................................... 132
Monitoring current sessions ........................................................................ 133
Viewing previous sessions .......................................................................... 133
Troubleshooting ............................................................................................... 134
Before you begin ...................................................................................... 134
Checks and verifications ............................................................................ 134
Problems .................................................................................................. 136
3 Application Recovery Manager SAP R/3 integration .......... 139
Introduction .................................................................................................... 139
Integration concepts ........................................................................................ 140
ZDB flow ................................................................................................. 141
Application Recovery Manager SAP R/3 configuration file ................................... 143
Setting, retrieving, listing, and deleting Application Recovery Manager SAP R/3
configuration file parameters using the CLI ................................................... 145
Configuring the integration ............................................................................... 148
Prerequisites ............................................................................................. 149
Before you begin ...................................................................................... 149
Cluster-aware clients .................................................................................. 150
Configuring users ...................................................................................... 150
Configuring SQL*Net V2 or Net8 TNS listener ............................................. 152
Checking the connection ............................................................................ 153
Authentication password file ....................................................................... 153
Enabling archived logging ......................................................................... 154
Sharing directories on the application system ................................................ 155
HP-UX application system .................................................................... 156
Windows application system ................................................................ 156
Configuring SAP R/3 databases ................................................................. 157
Before you begin ................................................................................ 157
Using the Application Recovery Manager GUI ....................................... 157
Using the Application Recovery Manager CLI ......................................... 161
Checking the configuration ........................................................................ 163
Using the Application Recovery Manager GUI ....................................... 163
Using the Application Recovery Manager CLI ......................................... 164
Configuring the SAP R/3 parameter file ....................................................... 165
Backup .......................................................................................................... 165
Limitations ................................................................................................ 165
Considerations ........................................................................................ 166
Backing up with third–party backup software ......................................... 166
Creating backup specifications ................................................................... 166
6
Page 7

Modifying backup specifications ................................................................. 172
Scheduling backup specifications ................................................................ 172
Scheduling example ........................................................................... 172
Starting backup sessions ............................................................................ 173
Backup methods ................................................................................. 173
Using the Application Recovery Manager GUI ....................................... 174
Using the Application Recovery Manager CLI ......................................... 174
Using SAP BR*Tools ........................................................................... 174
Restore ........................................................................................................... 176
Considerations ......................................................................................... 176
Instant recovery ........................................................................................ 176
Considerations ................................................................................... 176
Instant recovery using the Application Recovery Manager GUI ................. 177
Instant recovery using the Application Recovery Manager CLI .................. 183
Localized SAP R/3 objects ......................................................................... 184
Monitoring sessions ......................................................................................... 184
Troubleshooting ............................................................................................... 185
Before you begin ...................................................................................... 185
Verifying the prerequisites (Oracle side) ....................................................... 185
Verifying the prerequisites (SAP side) ........................................................... 187
Verifying the configuration ......................................................................... 188
Verifying the backup configuration .............................................................. 189
Configuration and backup problems ............................................................ 189
Restore problems ...................................................................................... 191
A Appendix ..................................................................... 193
In this appendix .............................................................................................. 193
Reconfiguring an Oracle instance for instant recovery .......................................... 193
Examples for moving the control files and redo logs to different locations ........ 195
ZDB integrations omnirc variables ..................................................................... 197
Glossary ......................................................................... 201
Index .............................................................................. 225
Integration guide 7
Page 8

Figures
3
8
9
11
Application Recovery Manager graphical user interface ....................... 201
Actors of the traditional backup model ............................................... 252
Actors of the Application Recovery Manager VSS integration backup
model ............................................................................................ 26
Local VSS backup ............................................................................ 304
Transportable VSS backup ................................................................ 305
Selecting VSS transportable backup ................................................... 486
VSS transportable backup options ...................................................... 517
Selecting backup objects (Exchange Server 2007 LCR copy and SQL
writer) ............................................................................................ 52
Additional options for Microsoft Exchange Server 2007 in CCR
environment .................................................................................... 53
Selecting Microsoft Exchange Server 2003 storage groups ................... 5610
Selecting a replicated Microsoft Exchange Server 2007 storage
group ............................................................................................ 57
Scheduling a backup ....................................................................... 5912
Selecting Exchange Server 2003 writers components for instant
13
recovery ......................................................................................... 70
Selecting Exchange Server 2007 writers components for instant recovery
14
to a different location ....................................................................... 71
Restore to different location options (Exchange Server 2007 Writer) ....... 7415
Selecting instant recovery options (EVA integration) .............................. 7616
Selecting instant recovery options (XP integration) ................................ 7717
Error reported by registry .................................................................. 8318
Oracle integration concept ............................................................... 9019
Oracle integration backup flow ......................................................... 9120
8
Page 9

Finding the Oracle user .................................................................... 9621
Configuring Oracle - General (Windows) ........................................... 9922
Configuring Oracle - General (UNIX) ................................................. 9923
Configuring Oracle - Primary .......................................................... 10024
Configuring Oracle - Options .......................................................... 10125
XP backup options ......................................................................... 10826
EVA backup options ....................................................................... 10927
Specifying an Oracle Server system (Windows) ................................. 11028
Specifying an Oracle Server system (UNIX) ....................................... 11129
Selecting backup objects ................................................................ 11230
Backup offline option ..................................................................... 11331
Saving the backup specification ....................................................... 11432
Scheduling backups ....................................................................... 11833
Taking the Oracle resource group offline .......................................... 12134
Checking properties ....................................................................... 12135
Selecting a backup session for restore and selecting EVA options ......... 12336
Selecting a backup session for restore and selecting Disk Array XP
37
options ......................................................................................... 124
Oracle recovery options ................................................................. 12538
SAP R/3 integration architecture ...................................................... 14139
SAP R/3 ZDB session flow ............................................................. 14240
Specifying an SAP R/3 system and Oracle instance ........................... 15941
Configuring an SAP R/3 database — application client ..................... 16042
Configuring an SAP R/3 database — backup client ........................... 16143
Checking the SAP R/3 configuration ................................................ 16444
EVA backup options ....................................................................... 16845
XP backup options ......................................................................... 16946
Selecting backup objects ................................................................ 17047
Application specific options ........................................................... 17148
Integration guide 9
Page 10

Scheduling backups ....................................................................... 17349
SAP R/3 source options — EVA ...................................................... 17850
SAP R/3 source options — XP ......................................................... 17951
SAP R/3 recovery options .............................................................. 18352
Oracle backup and restore concepts when the
53
ZDB_ORA_INCLUDE_CF_OLF variable is set to 1 .............................. 199
10
Page 11

Tables
Edition history ................................................................................. 131
Documentation map ......................................................................... 172
Document conventions ...................................................................... 183
VSS specific backup options .............................................................. 544
Oracle backup options ................................................................... 1145
Supported disk arrays and array configurations ................................. 1396
SAP parameter file settings ............................................................. 1657
What is backed up ........................................................................ 1658
SAP R/3 backup options ................................................................ 1719
Integration guide 11
Page 12

12
Page 13

Publication history
Guide updates may be issued between editions to correct errors or document product
changes. To ensure that you receive updated or new editions, subscribe to the
appropriate product support service. See your HP sales representative for details.
Table 1 Edition history
ProductGuide editionPart number
March 2008N/A
Application Recovery Manager
Release A.06.10
Integration guide 13
Page 14

Publication history14
Page 15

About this guide
This guide provides information about:
• Integrating Oracle and Application Recovery Manager
• Integrating SAP R/3 and Application Recovery Manager
• Integrating application and Application Recovery Manager through the VSS
interface
Conceptual information can be found in the online Help.
Intended audience
This guide is intended for backup administrators who want to:
• configure
• back up
• and restore
database applications using Application Recovery Manager.
Documentation set
Other documents and online Help provide related information.
Guides
Application Recovery Manager guides are available in PDF format. Install the PDF
files during the Application Recovery Manager setup procedure by selecting the
English documentation and Help component on Windows or the OB2-DOCS
component on UNIX. Once installed, the guides reside in the AppRM_home\docs
directory on Windows and in the /opt/omni/doc/C/ directory on UNIX.
You can find these documents from the Manuals page of the HP Business Support
Center website:
Integration guide 15
Page 16

http://www.hp.com/support/manuals
In the Storage section, click Storage Software and then select your product.
• HP Application Recovery Manager software installation and licensing guide
This guide describes how to install the Application Recovery Manager software,
taking into account the operating system and architecture of your environment.
This guide also gives details on how to upgrade Application Recovery Manager,
as well as how to obtain the proper licenses for your environment.
• HP Application Recovery Manager software concepts guide
This guide describes Application Recovery Manager zero downtime backup and
instant recovery concepts and provides background information on how
Application Recovery Manager works in a zero downtime backup environment.
It is intended to be used with the task-oriented HP Application Recovery Manager
software administrator's guide and the HP Application Recovery Manager software
integration guide.
• HP Application Recovery Manager software administrator's guide
This guide describes how to configure and use the integration of Application
Recovery Manager with HP StorageWorks Enterprise Virtual Array and HP
StorageWorks Disk Array XP. It is intended for backup administrators or operators.
It covers the zero downtime backup and instant recovery.
• HP Application Recovery Manager software integration guide
This guide describes how to configure and use Application Recovery Manager
to perform zero downtime backup and instant recovery of Oracle, SAP R/3
applications. The guide also describes how to configure and use Application
Recovery Manager to perform backup and instant recovery using the Microsoft
Volume Shadow Copy Service.
• HP Application Recovery Manager software product announcements, software
notes, and references
This guide gives a description of new features of HP Application Recovery
Manager software A.06.10. It also provides information on supported
configurations (platforms and online database integrations, ZDB), required patches,
and limitations, as well as known problems and workarounds. An updated version
of the supported configurations is available at http://www.hp.com/support/
manuals
• HP Application Recovery Manager software command line interface reference
This guide describes the Application Recovery Manager Command Line Interface
commands, their options and usage as well as providing some basic command
line examples.
About this guide16
Page 17

Online help
Application Recovery Manager provides context-sensitive (F1) Help and Help Topics
for Windows and UNIX platforms.
You can access the online help from the top-level directory on the installation CD
without installing Application Recovery Manager:
•
Windows
•
UNIX
help system through AppRM_help.htm.
: Unzip AppRM_help.zip and open AppRM_help.chm.
: Unpack the zipped tar file AppRM_help.tar.gz, and access the online
Documentation map
Abbreviations
The guide titles are all preceded by the words “HP Application Recovery Manager
software”.
Map
The following table shows where to find information of different kinds. Shaded squares
are a good place to look first.
Table 2 Documentation map
Command line
interface reference
Online
Help
Getting
started
CLI
Integration
Administrator's
Concepts
Product
Installation
guide
announcements
XXXXInstallation
XXXLicensing
guide
Integration guide 17
guide
guide
XXXXXBackup
XXXConcepts/Techniques
XXXXXInstant recovery
reference
X
Page 18

Online
Help
Getting
started
CLI
Integration
Administrator's
Concepts
Product
Installation
guide
announcements
XSupport matrices
guide
guide
XXPlanning strategy
guide
XXXXXLimitations
XXXXProcedures/Tasks
XXXXRecommendations
XXXXXRequirements
reference
Supported
configurations
Document conventions and symbols
Table 3 Document conventions
ElementConvention
Cross-reference links and e-mail addressesBlue text: Table 3 on page 18
website addressesBlue, underlined text: http://www.hp.com
Text emphasisItalic text
• File and directory names
• System output
Monospace text
Monospace, italic text
• Code
• Commands, their arguments, and
argument values
• Code variables
• Command variables
X
XXXXTroubleshooting
About this guide18
Page 19

ElementConvention
Emphasized monospace texttext
CAUTION:
Indicates that failure to follow directions could result in damage to equipment or data.
IMPORTANT:
Provides clarifying information or specific instructions.
NOTE:
Provides additional information.
TIP:
Provides helpful hints and shortcuts.
Application Recovery Manager graphical user interface
Application Recovery Manager provides a cross-platform (Windows and UNIX)
graphical user interface. Refer to the online Help for information about the Application
Recovery Manager graphical user interface.
Integration guide 19
Page 20
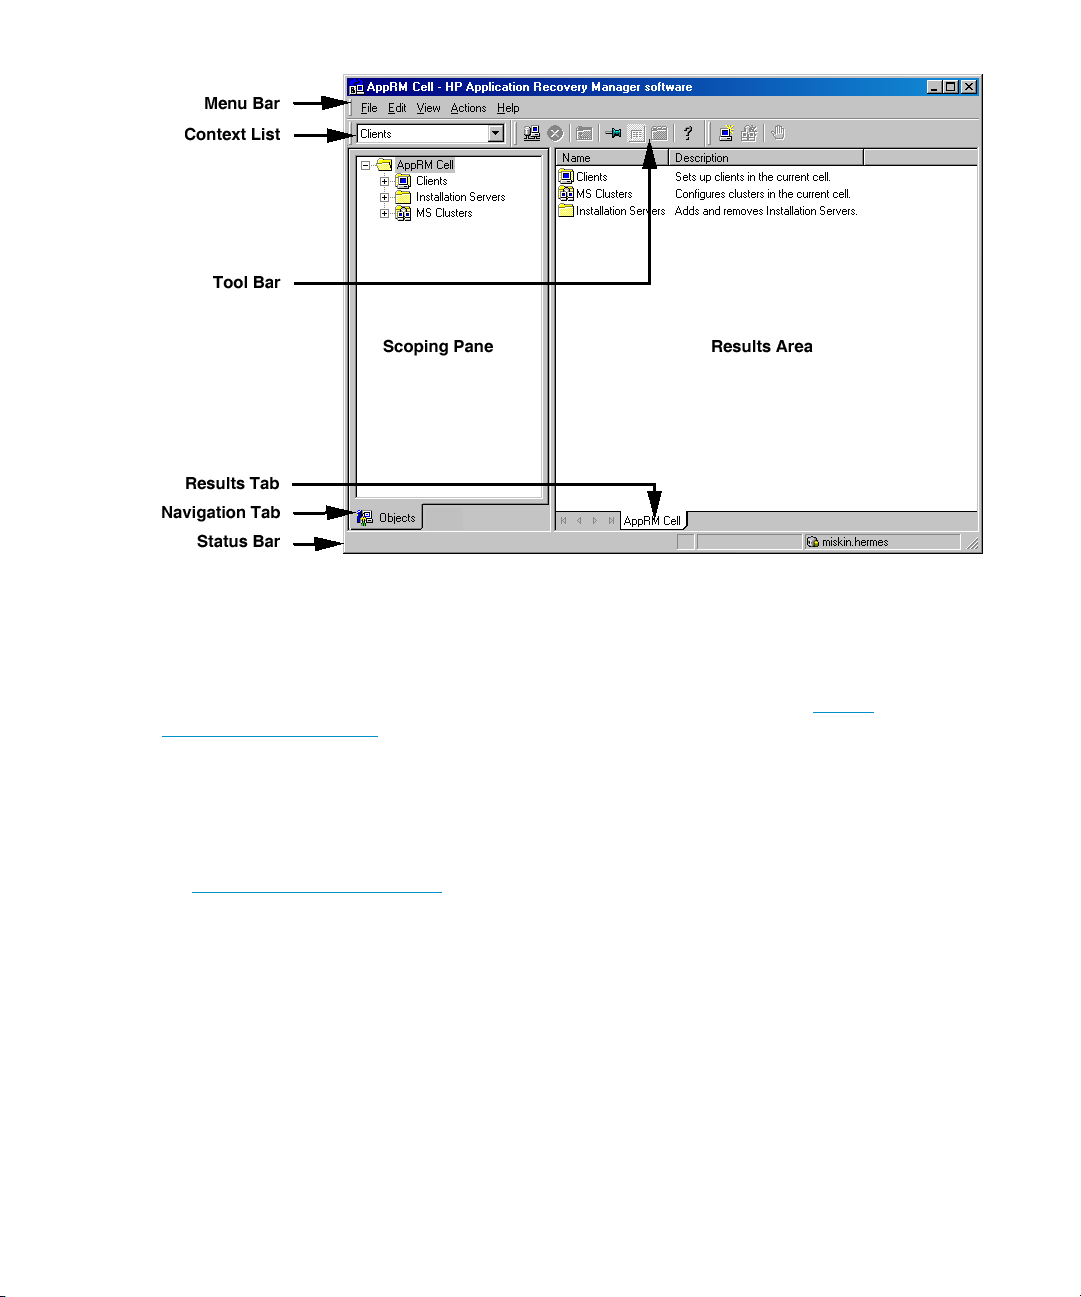
Figure 1 Application Recovery Manager graphical user interface
General Information
General information about Application Recovery Manager can be found at http://
www.hp.com/go/apprm.
HP technical support
For worldwide technical support information, see the HP support website:
http://www.hp.com/support
Before contacting HP, collect the following information:
• Product model names and numbers
• Technical support registration number (if applicable)
• Product serial numbers
• Error messages
• Operating system type and revision level
About this guide20
Page 21

• Detailed questions
Subscription service
HP recommends that you register your product at the Subscriber's Choice for Business
website:
http://www.hp.com/go/e-updates
After registering, you will receive e-mail notification of product enhancements, new
driver versions, firmware updates, and other product resources.
HP websites
For additional information, see the following HP websites:
• http://www.hp.com
• http://www.hp.com/go/software
• http://www.hp.com/service_locator
• http://www.hp.com/support/manuals
• http://www.hp.com/support/downloads
Documentation feedback
HP welcomes your feedback.
To make comments and suggestions about product documentation, please send a
message to AppRM.DocFeedback@hp.com. All submissions become the property of
HP.
Integration guide 21
Page 22

About this guide22
Page 23

1 Integrating the Application Recovery Manager ZDB integrations and Microsoft Volume Shadow Copy Service
Overview
A traditional backup process is based on the direct communication between the
backup application and the application whose data is backed up. This backup
method requires from the backup application an individual interface for each
application it backs up.
The number of applications on the market is constantly increasing. The necessity of
handling application specific features can cause difficulties in backup, restore, and
storage activities. An effective solution to this problem is introducing a coordinator
among the actors of the backup and restore process.
Volume Shadow Copy Service
Volume Shadow Copy Service (VSS) is a software service introduced by Microsoft on
Windows operating systems. This service collaborates with the backup application,
applications to be backed up, shadow copy providers, and the operating system
kernel to implement the management of volume shadow copies and shadow copy
sets.
Application Recovery Manager supports the integration with VSS.
The Application Recovery Manager Volume Shadow Copy integration provides a
unified communication interface that can coordinate backup and restore of an
application regardless of their specific features. With this approach, a backup
application does not need to handle each application to be backed up specifically.
Integration guide 23
Page 24

However, the production application as well as the backup application must conform
to the VSS specification.
Figure 2 on page 25 and Figure 3 on page 26 show the differences between the
traditional backup model and the model with the Application Recovery Manager
Microsoft Volume Shadow Copy integration.
24
Integrating the Application Recovery Manager ZDB integrations and Microsoft Volume
Shadow Copy Service
Page 25
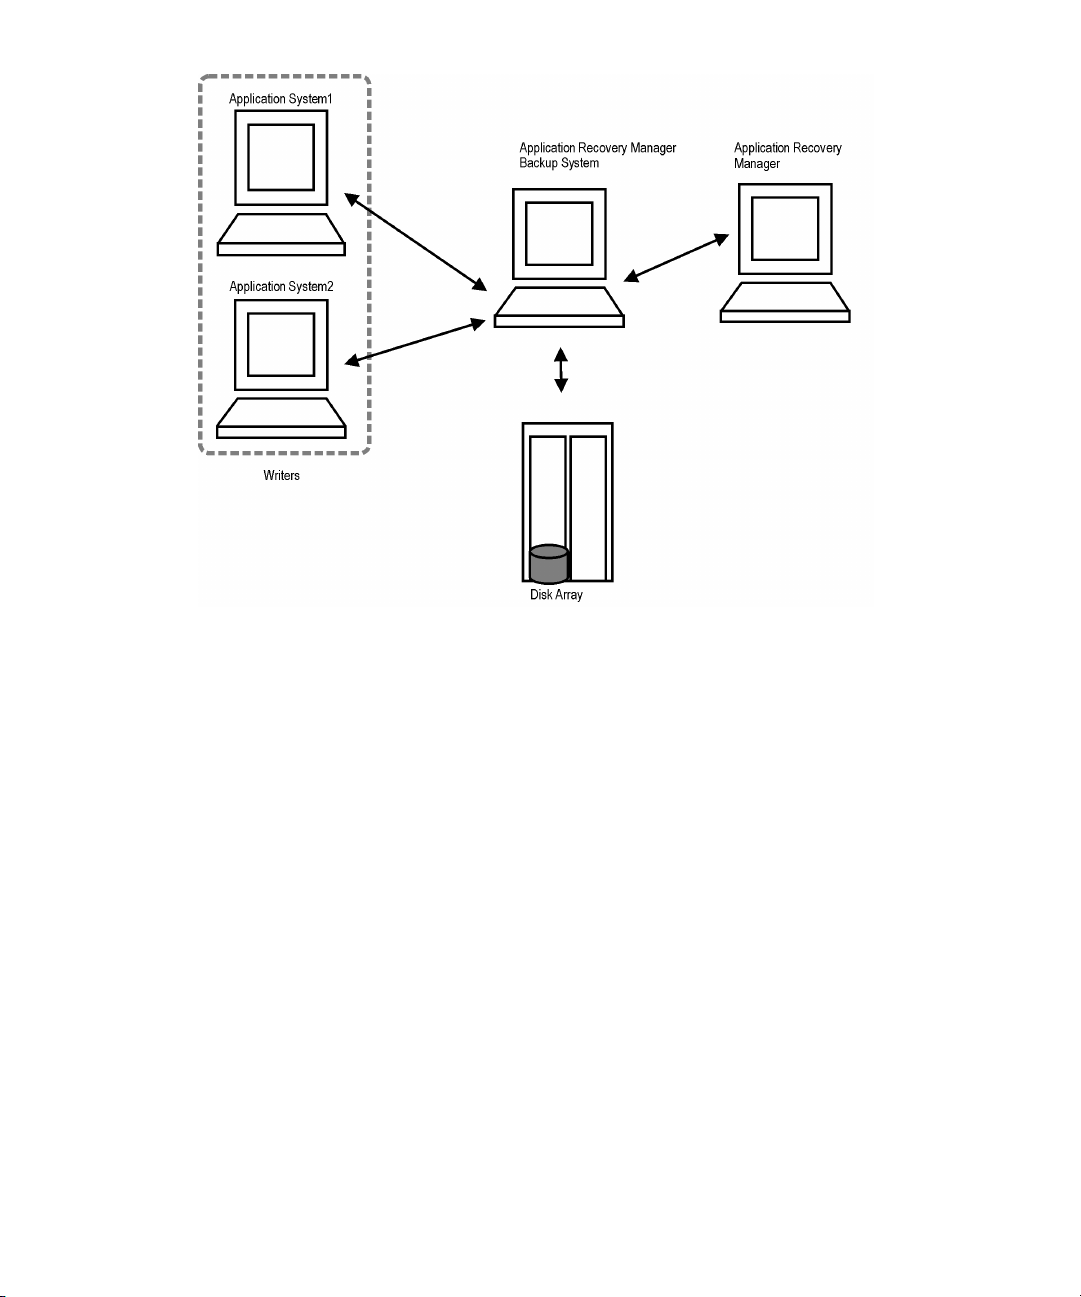
Figure 2 Actors of the traditional backup model
Integration guide 25
Page 26
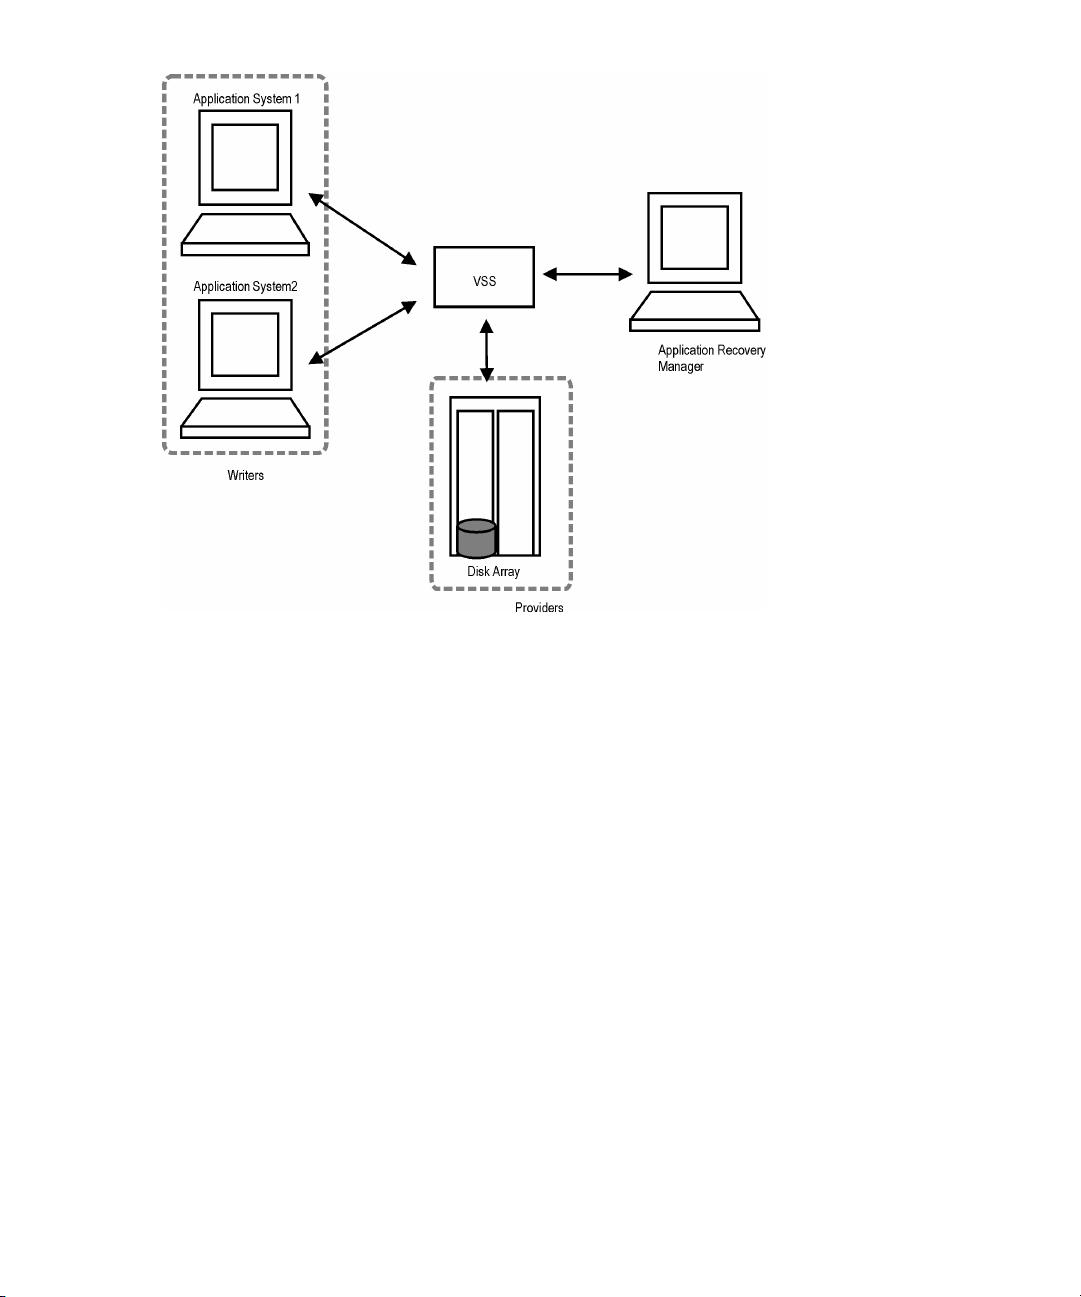
Figure 3 Actors of the Application Recovery Manager VSS integration
backup model
Without using the Volume Shadow Copy Service, Application Recovery Manager
has to communicate with each application to be backed up individually. The
Application Recovery Manager VSS integration introduces a unified backup and
restore interface and provides the coordination among the participants of the backup
and restore process.
Zero downtime backup
Zero downtime backup is a backup approach in which replication techniques are
used to minimize the impact of backup operations on an application system. A replica
of the data to be backed up is created first, and all subsequent backup operations
are performed on the replicated data rather than the original data.
As a backup occurs in the background while the application remains online and
available for use, the impact on your environment during a backup is minimal. The
recovery window is reduced as well by using the instant recovery (IR) functionality,
which enables recovery of vast amount of data in minutes rather than hours. This
26
Integrating the Application Recovery Manager ZDB integrations and Microsoft Volume
Shadow Copy Service
Page 27

makes ZDB and IR capabilities suitable for high-availability systems and mission-critical
applications.
Application Recovery Manager ZDB and IR techniques utilize snapshot technologies
of disk-based arrays. The following are the basic principles behind ZDB and IR:
• Create, at high speed, a copy of the data to be backed up and then perform
backup operations on the copy, rather than on the original data.
• Restore a backup copy of data, held on the array, to its original location on the
array to facilitate high-speed recovery.
VSS backup types
Application Recovery Manager supports only full backups.
The following backup types are available with the Application Recovery Manager
VSS integration:
• Local VSS backup
The shadow copy is backed up from the application system.
• Transportable backup
Instead of presenting the volume shadow copies to the application system they
are presented to an alternate system thus reducing the impact of post backup
activities, such as consistency checking. It also provides the option to mount the
backup replicas on a backup system.
Instant recovery with VSS
Instant recovery is a process in which a replica, produced by a VSS hardware
provider, is used to restore the contents of the source volumes to their states at the
time at which the replica was created. This process consists of the preparation and
actual recovery of data and, optionally, some post-restore actions that make that
data ready for use.
The Application Recovery Manager internal database (IDB) keeps track of data, such
as, which replicas from which system are kept on a particular disk array. The IDB
provides fast and convenient access to the data to be recovered.
Advanced features of Application Recovery Manager instant recovery:
• Ability to restore on different levels: session or object
• Ability to automatically start post-recovery scripts
Integration guide 27
Page 28

Instant recovery considerations
• The instant recovery functionality restores data from a replica on the backup
system to the source volumes on the application system. Therefore, using instant
recovery, it is only possible to selectively restore separate writer’s components if
they reside on separate source volumes.
Concepts
The Application Recovery Manager integration with Microsoft Volume Shadow Copy
Service and Virtual Disk Service provides backup and instant recovery functionality
for VSS writers that are certified by Application Recovery Manager.
Refer to the online Help for a general description of ZDB (snapshot backup) and
instant recovery concepts.
For a complete list of supported VSS writers and providers refer to the latest support
matrices at http://www.hp.com/support/manuals.
Benefits of using the integration
Advantages of using the Application Recovery Manager VSS integration are the
following:
• Unified backup interface is provided for all applications that provide a writer.
• Data integrity is provided on application level, because it is provided by the
writers. No interference is needed from the backup application.
VSSBAR agent
The central part of the integration is the VSSBAR agent, which links Application
Recovery Manager with the Microsoft Volume Shadow Copy Service. Application
Recovery Manager Microsoft Volume Shadow Copy integration uses the VSSBAR
agent for automatic browsing of VSS-aware writers, coordinating backup and restore.
VSSBAR agent is responsible for the following actions:
• detecting VSS writers
• examining and analyzing Writer Metadata Document (WMD)
• requesting shadow copy creation
28
Writer Metadata Document (WMD) is metadata provided by each writer. Writers
identify themselves by the metadata and instruct the backup application what to
back up and how to restore the data. Thus, Application Recovery Manager follows
the requirements provided by the writer when selecting the volumes to be backed
up and the restore method.
Integrating the Application Recovery Manager ZDB integrations and Microsoft Volume
Shadow Copy Service
Page 29

Backup
• coordinating restore session start
• requesting the instant recovery
During the Application Recovery Manager VSS integration backup, Application
Recovery Manager does not interact directly with each writer, but through the VSS
interface. It uses the VSSBAR agent to coordinate the backup process. The consistency
of data is a responsibility of the VSS writer and not dependent on Application
Recovery Manager functionality. The backup process of the VSS writers consists of
the following phases:
1. When you select writers and components you want to back up and start a VSS
integration backup, Application Recovery Manager communicates with the
Volume Shadow Copy Service (backup coordinator) to notify that the backup is
about to start.
2. The coordinator identifies all writers that support the VSS feature and passes the
list of available writers and their characteristics (Writer Metadata Document)
back to Application Recovery Manager.
3. Application Recovery Manager examines Writer Metadata and identifies the
volumes that contain the data to be backed up. Then the VSS informs available
writers about selected components.
4. Application Recovery Manager prepares a list of volumes (shadow copy set)
that must be put into consistent state, and passes the list back to the coordinator
for preparing a shadow copy.
5. The VSSBAR agent notifies the writers about the shadow copy creation. The VSS
mechanism ensures that there are no writes on the volume while the shadow
copy is being created.
6. When the writers are fully prepared for the consistent shadow copy backup, the
VSSBAR agent passes shadow copy creation requests to VSS.
7. After the shadow copy set is created, the VSSBAR agent coordinates the VDS
agent to gather information on the created replica that is needed for instant
recovery.
8. After the information is stored to the internal database, the replicas are
unpresented from the backup system. All replicas are set to read-only and are
unpresented from all systems to protect the backed up data, unless you specify
to mount the replica on the backup system.
Integration guide 29
Page 30
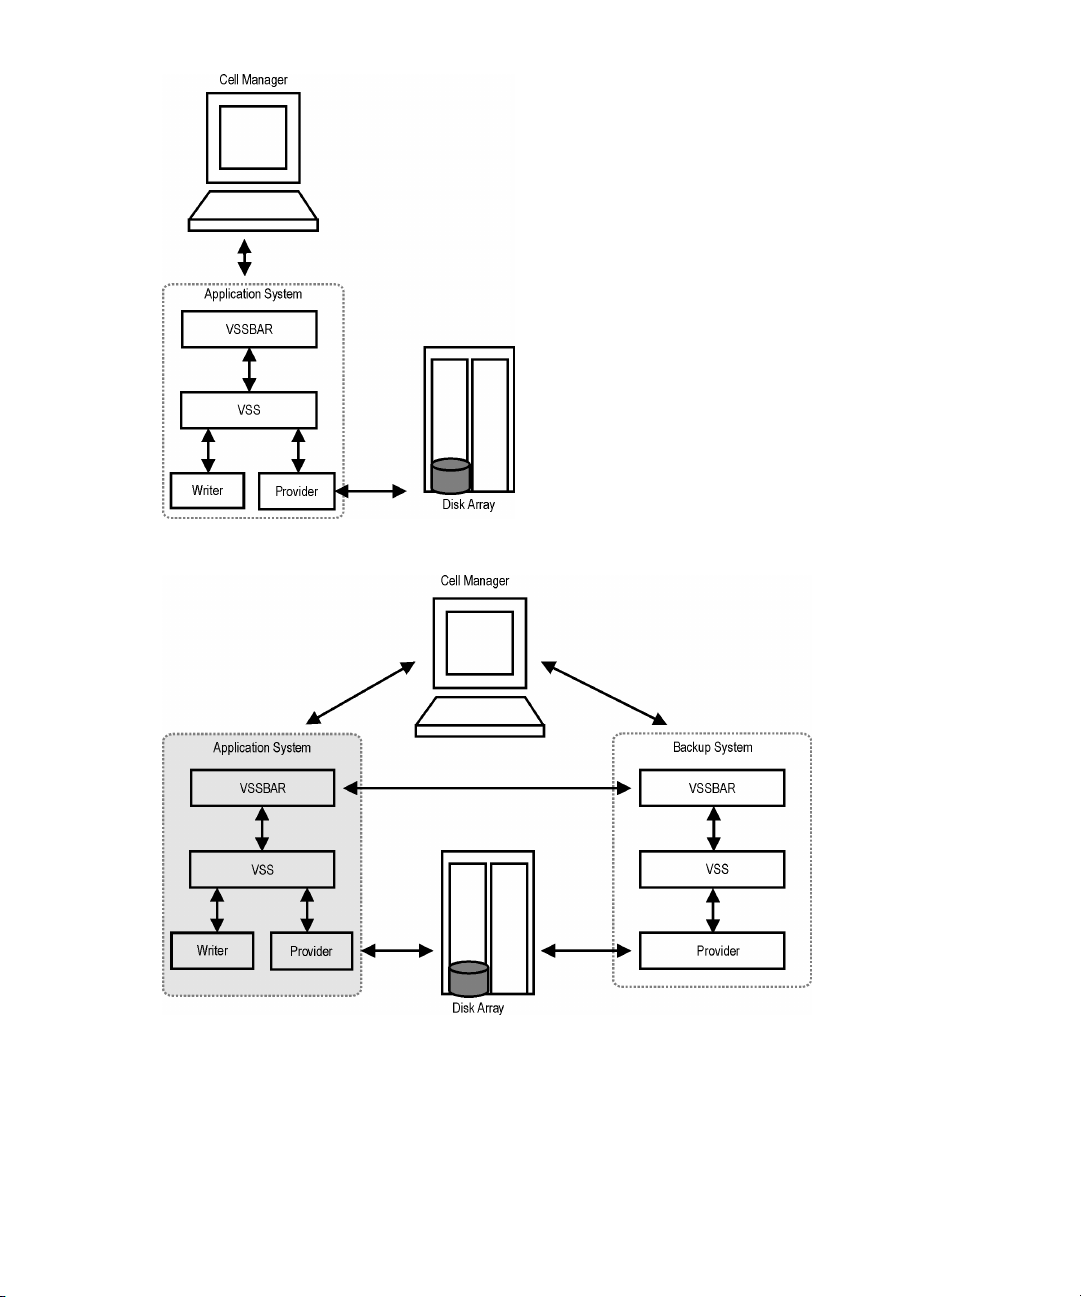
Figure 4 Local VSS backup
Figure 5 Transportable VSS backup
30
Integrating the Application Recovery Manager ZDB integrations and Microsoft Volume
Shadow Copy Service
Page 31

Data consistency
The filesystem backup does not guarantee application data consistency, only filesystem
consistency. Application data consistency can be achieved only by using supported
application writers, such as Microsoft Exchange Server 2003 writer.
Backup with the EVA hardware provider
There are three replica types available when backing up using the EVA hardware
provider:
• Standard snapshot
• Vsnap
• Snapclone
However, in the GUI, you can select only between snapshot and snapclone. When
you select snapshot replica type, standard snapshot is created by default. For instant
recovery, only snapclone is available. For more information, see
“Snapshot replica” on page 45.
Backup with the XP VSS hardware provider
There are two configuration modes available for the backup with the XP VSS hardware
provider:
• VSS Compliant Mode
When the XP provider is in the VSS compliant mode, the source volume (P-VOL)
and its replica (S-VOL) are in simplex, unpaired state after a backup. Therefore
the number of replicas (S-VOLs per a P-VOL) rotated is not limited. Restore from
a backup in such a configuration is possible only by switching of the disks.
• Resync Mode
When the XP provider is in the resync mode, the source volume (P-VOL) and its
replica (S-VOL) are in a suspended mirror relationship after a backup. The
maximum number of replicas (S-VOLs per a P-VOL) rotated is three provided that
MU range is 0-2 or 0, 1, 2. Restore from a backup in such a configuration is
possible only by re-synchronization of an S-VOL with its P-VOL.
Integration guide 31
Page 32

Restore
Restore from ZDB-to-disk sessions is performed using instant recovery. ZDB-to-disk
session information is saved in the IDB, and the related array-specific information
required for instant recovery is saved in the VSS database (VSSDB).
IMPORTANT:
During instant recovery, the whole replica is restored. This means not only are the
originally selected backup objects restored, but the complete content of all the volume
groups that contained them. After the instant recovery, the content is returned to the
states when the replica was created.
Microsoft Exchange Server 2007 writer concepts
Backup
With Microsoft Exchange Server 2007 you can use two models of replication to
protect your data:
• Local Continuous Replication (LCR)
With LCR, you can create and maintain an exact copy (LCR copy) of databases
in a storage group. An LCR copy is used in case of data corruption because you
can switch to the LCR copy in a few seconds. If an LCR copy is used for backup
and if it is located on a different disk than the original data, then the load on a
production database is minimal.
32
• Cluster Continuous Replication (CCR)
The same characteristics as with LCR apply to CCR. The difference is only that in
the CCR environment, databases and logs are replicated to separate servers.
Therefore, a CCR copy can be used for disaster recovery. You can perform
backups using VSS on your passive Exchange Server node where the CCR copy
is located and thus reducing the load on the active node.
The replicated storage groups are represented as a new Exchange writer instance,
Exchange Replication Service. They are backed up like original or production storage
groups. Backups of the replicated storage groups (LCR and CCR copies) are possible
only using VSS.
Integrating the Application Recovery Manager ZDB integrations and Microsoft Volume
Shadow Copy Service
Page 33

Restore
With Microsoft Exchange Server 2007 writer you can restore your data not only to
the original location (from where the backup was performed) but also to a different
location. You can restore:
• A whole storage group (including LCR or CCR copies)
• A single store (including LCR or CCR copies)
You can restore them to:
• Original storage group
• Different storage group
• Non-Exchange location. After restore is completed, Recovery Storage Group
(RSG) can be created automatically.
• Recovery server (different client and different storage group)
If you perform restore to a different storage group, you can access single mailboxes
or individual mails on an alternate location without the need to compromise the
original storage group with a potentially unsuccessful restore operation. Also, if the
whole server is destroyed, a restore to an alternate Exchange server (recovery server)
will minimize downtime of your mailboxes.
Prerequisites and limitations
This is a list of prerequisites and limitations for the Application Recovery Manager
Microsoft Volume Shadow Copy Service integration. Additional limitations and
recommendations that are not directly connected to the integration (such as operating
system and GUI limitations) and disk array limitations are listed in the HP Application
Recovery Manager software product announcements, software notes, and references.
Prerequisites
Common prerequisites
• Before you begin, ensure that you have correctly installed and configured
Application Recovery Manager, writers and VSS and VDS hardware providers.
Refer to the:
• HP Application Recovery Manager software product announcements, software
notes, and references for an up-to-date list of supported versions, platforms,
disk arrays, limitations, and other information.
Integration guide 33
Page 34

• HP Application Recovery Manager software installation and licensing guide
on how to install Application Recovery Manager on various architectures and
how to install the Application Recovery Manager Microsoft Volume Shadow
Copy Service integration and ZDB agents.
• Writers and shadow copy providers documentation for instructions on how
to install and configure writers and providers on your system.
• To be able to perform a backup and instant recovery, ensure that the source
volumes do not reside on GPT (GUID Partition Table) disks. If the system where
you want to install an application database has GPT disks, convert them to MBR
(Master Boot Record) disks using the Windows Management Console. For
instructions on how to perform the conversion, see the Microsoft Windows Help.
VSS transportable snapshot prerequisites
For VSS transportable snapshots there are additional prerequisites:
• The backup system must be configured to accept connections from the application
system.
• The VSS and VDS hardware providers must be installed and configured on the
application and backup system. Refer to the provider documentation for details.
Limitations
For a list of general Application Recovery Manager limitations, see the HP Application
Recovery Manager software product announcements, software notes, and references.
Common integration-specific limitations
• To run a VSS integration backup, the writer’s data must be on an NTFS filesystem.
• The VSS integration backup of writers which store their data on network shared
volumes is not supported.
• Preview is not possible for VSS backup sessions.
• With Microsoft Exchange Server 2007 which is running in a CCR environment
and whose database copy resides on the backup system, there are three particular
situations where you need to consider additional steps for performing instant
recovery:
• When Disk Array XP VSS hardware provider is used, and the application
system, where the production database resides, and the backup system, where
the database copy resides, are connected to two different disks arrays that
are not configured in the same SAN. In such configuration, the application
system does not see LUNs on the backup system and vice versa.
34
Integrating the Application Recovery Manager ZDB integrations and Microsoft Volume
Shadow Copy Service
Page 35

• When Enterprise Virtual Array (EVA) VSS hardware provider is used, and the
disks array of the application system and the disk array of the backup system
are not controlled by the same Command View.
• When the Disk Array XP VSS hardware provider is used in the resync mode,
no matter if one or two disk arrays are used.
In the above situations, there is only one instant recovery scenario that is
supported. For a successful instant recovery, follow the steps:
1. Fail over Exchange Server, so that your production database resides on the
former backup system where the database copy resided before.
2. Perform instant recovery.
3. After the instant recovery session completes, fail back Exchange Server. This
action will ensure that all backup LUNs are available on the same backup
system where the database copy resides.
NOTE:
It is recommended that both production and replication server systems are using
disks of the same disk array. If this is not possible, the disks of both disk arrays
must be visible to both systems.
Enterprise Virtual Array limitations
• With the EVA provider, if there are too many source volumes selected for backup
(more than four), the creation of snapshots may take too long and VSS may fail
the snapshots creation process.
It is strongly recommended not to specify too many objects in a backup
specification, since they might reside on more than four source volumes. This
means that, for example, a Microsoft Exchange Server storage group should not
reside on more than four source volumes, and only one storage group should be
selected for backup in this case. The same limitations applies to Microsoft SQL
Server databases.
Disk Array XP limitations
• If the Disk Array XP VSS hardware provider is in the VSS compliant mode, and
there is a heavy I/O load on the disk array, the replica creation may take a long
time. Consequently, the backup session may fail.
By default, Application Recovery Manager waits for a maximum of 45 minutes
(2700 seconds) for mirrors to become synchronized. If synchronization is not
Integration guide 35
Page 36

completed when the waiting period expires, Application Recovery Manager
aborts the backup session.
You can increase the waiting period duration by setting the
OB2VSS_WAIT_TIMEOUT omnirc variable. The variable value determines the
period (in seconds) for which Application Recovery Manager agent waits for
mirrors, which are created in one session, to become fully synchronized. If the
OB2VSS_WAIT_TIMEOUT variable is set to more than 2 hours (7200 seconds),
you should additionally increase the value of the global variable SmIdleTimeout
past the value of OB2VSS_WAIT_TIMEOUT. The value of SmIdleTimeout
should be specified in minutes, rather than seconds.
If backup sessions are lengthy and there is a possibility that VSS backup window
will not be met, it is highly recommended that you first switch the Disk Array XP
VSS hardware provider to resync mode. Afterwards, consecutively run backup
sessions until the backup session count reaches the current value of the Number
of replicas rotated option. This will start creation of replicas that will be used in
scheduled backups. Shadow copy creation failures or timeouts in these backup
sessions can be ignored.
• There is a problem with Microsoft Exchange Server 2007 when running in a CCR
environment with Disk Array XP as the VSS hardware provider, and where the
backup system is the virtual server. In such setup, in case of a failover, the backup
system may change the physical node where the virtual server runs.
Such physical node change may happen in two cases:
• When backup sessions are configured to always use the system where the
database copy resides (in the GUI, the Exchange Replication service instance
is selected as the backup object, and the additional Exchange option Revert
the active node on failure is selected).
• When the system where the production database resides is used as the backup
system.
The problem does not occur in a setup where the backup system is a physical
node. In such setup, in case of a failover, the next backup session will fail to
rotate replicas which were used in the oldest session. Such replica rotation failure
should not prevent the current session from succeeding. Consider the following:
• If only one disk array is used, ensure that the VSS hardware provider does
not run out of disk space (LUNs that belong to secondary volumes (S-VOLs))
due to replica rotation failure.
• If two disk arrays are used, ensure that the second array is configured in the
same way as the first disk one.
As soon as the old backup system is up and running, you should use the
omnidbvss command to manually delete all the sessions that should have been
deleted in the replica rotation process. Do not use tools like Command View XP
36
Integrating the Application Recovery Manager ZDB integrations and Microsoft Volume
Shadow Copy Service
Page 37

or RAID Manager XP for this purpose. Do not delete references from the ZDB
database before you make sure that all LUNs that had been created in that backup
session have been deleted from the array.
• If the Disk Array XP VSS hardware provider is in the resync mode, and the backup
system is configured as the virtual server in a quorum cluster, you must create a
host group on the disk array that contains host bus adapter (HBA) World Wide
Names (WWNs) from all physical systems in your cluster.
If such host group is not created, your backups may fail after the cluster fails over
from one physical node to the other. If a failover occurs, the backup session will
fail to rotate the oldest replica and will not free the MU number that has been
used for the mirror replica in that session. As a consequence, a new backup
session will not have a free MU number available to create a new mirror and the
session will fail. You can prevent this failure by setting the Number of replicas
rotated option to a value of 1 and configure the Disk Array XP VSS hardware
provider to use all available MU numbers.
• Dynamic disks (Logical Disk Manager partitions) are not supported.
• GPT disks are not supported.
Configuring the integration
The Application Recovery Manager Microsoft Volume Shadow Copy integration by
itself does not require any configuration steps neither on the Application Recovery
Manager nor on the application side. However, some applications such as Microsoft
Exchange Server may require additional configuration steps. For details, see the
appropriate sections. You must also configure the VSS and VDS hardware providers.
Prerequisites
You may check which writers and providers are installed and registered on your
system using the following Windows operating system command:
• For a list of writers: VSSadmin list writers
• For a list of VSS providers: VSSadmin list providers
• VDS hardware providers should be present in the list of installed software. Check
Control Panel > Add/Remove Programs.
Only non-system writers are supported, because instant recovery cannot be performed
on a system disk.
• Disable the operating system option Automatic mounting of new volumes. At
Command Prompt, run:
mountvol /N
Integration guide 37
Page 38

• Do not manually mount target volumes that have been created by Application
Recovery Manager.
Configuring HP StorageWorks Enterprise Virtual Array
This section describes how to configure the Application Recovery Manager HP
StorageWorks Enterprise Virtual Array (EVA) integration for use with the VSS
integration.
Prerequisites
• Install
HP storage components and licenses:
• HP StorageWorks Virtual Controller Software (VCS or XCS) and Command
View (CV) EVA. See the VCS and CV EVA documentation for installation
instructions. See the support matrices on the web for information on supported
product versions.
• HP Operations Manager software (HP StorageWorks SMI-S EVA provider
part).
• HP StorageWorks Business Copy (BC) EVA microcode and license.
• If the alternate paths solution is used, install HP MPIO DSM for EVA.
• An EVA license for, at least, basic and snapshot operation.
38
• Install
• Make sure the same operating system (and its version) is installed on the
• Connect EVA to the application and backup systems through the SAN. Backup
For supported backup and connectivity topologies, see HP Application Recovery
Manager software administrator's guide.
For general Application Recovery Manager and integration-specific limitations, see
HP Application Recovery Manager software product announcements, software notes,
and references.
Application Recovery Manager components and licenses:
• An instant recovery license.
• HP StorageWorks EVA SMI-S Agent.
For installation and licensing information, see the HP Application Recovery
Manager software installation and licensing guide.
application and backup systems.
system must be connected to the same SAN as the EVA.
Integrating the Application Recovery Manager ZDB integrations and Microsoft Volume
Shadow Copy Service
Page 39

Configuring the Integration
Before you start configuration, make sure you met the prerequisites described in
“Prerequisites” on page 40. Then set the login information for SMIS-S EVA provider
running on a management system.
To set, delete, list, or check the login information, use the omnidbsmis —ompasswd
CLI command. For command syntax and examples, see the HP Application Recovery
Manager software command line interface reference.
The information you provide is kept in the ZDB database for EVA integration (SMISDB).
For each management systems you configure, the following information is stored:
• Hostname as recognized in the IP network.
• Port number through which SMI-S Agent communicates (default - 5988). If SMI-S
provider accepts the SSL-based connection, the default port number is 5989.
• User name and encoded password for SMI-S EVA provider login.
SMISDB resides on the Cell Manager in: AppRM_home\db40\smisdb.
Considerations
If a failover from the active to the standby management system happens, proceed
as follows:
• If standby and failed management systems have the same hostname, no action
is needed.
• If standby and failed management systems have different hostnames, remove the
failed system from the Application Recovery Manager configuration, and then
add the new management system.
IMPORTANT:
It is recommended to use the default port number (5988 for non-SSL and 5989 for
SSL-based SMI-S provider connection settings).
It is also recommended to run
omnidbsmis -ompasswd -check [-host HostName] before backup or instant
recovery to verify the configuration of SMI-S EVA Provider.
Integration guide 39
Page 40

Configuring HP StorageWorks Disk Array XP
This section describes how to configure the Application Recovery Manager HP
StorageWorks Disk Array XP integration for use with the VSS integration.
Prerequisites
• Install
Disk Array XP components and licenses:
• RAID Manager library on the application and backup systems. See the RAID
Manager library documentation for installation instructions.
RAID Manager Library is firmware-dependant. Consult the HP sales
representative for information on which version of RAID Manager and RAID
Manager Library to use.
• Business Copy (BC) XP microcode and a license for, at least, basic and
business copy operation.
• XP VSS and VDS provider.
• Device specific module (MPIO DSM) 2.0.
• Install
• Make sure the same operating system (and its version) is installed on the
• Connect the application and backup systems to the same Disk Array XP.
• Assign LUNs to the respective ports.
• Pre-configure the LDEVs for the VSS snapshot creation and put them in the SVOL
Limitations
• Second-level mirrors are not supported.
• You cannot switch between the VSS compliant mode and resync mode during
Application Recovery Manager components and licenses:
• An instant recovery license.
• The HP StorageWorks XP Agent.
For installation and licensing information, see the HP Application Recovery
Manager software installation and licensing guide.
application and backup systems.
host group. If you perform restore using VDS, you need to put new LDEVs in the
SVOL host group after the restore, since the VDS restore switches the disks and
the replica becomes the source volume. Add as many new LDEVS as you used
them for restore.
execution of a backup session.
40
Integrating the Application Recovery Manager ZDB integrations and Microsoft Volume
Shadow Copy Service
Page 41

• Maximum three replicas (S-VOLs) can be created for a source volume (P-VOL) if
the XP provider is in the resync mode.
For supported backup and connectivity topologies, see HP Application Recovery
Manager software administrator's guide.
For general Application Recovery Manager and integration-specific limitations, see
HP Application Recovery Manager software product announcements, software notes,
and references.
VSS and VDS provider configuration for backup and instant recovery
To be able to perform backup and instant recovery, you must configure the VSS and
VDS provider for EVA or Disk Array XP. Perform the configuration task before you
run the backup for the first time.
Refer to the hardware provider documentation for details on how to configure the
provider.
Configuring the VSS Hardware Provider for EVA
Open the HP StorageWorks VSS Configuration Utility for EVA and follow the steps
below:
1. Ensure that the correct management appliance IP Address is specified.
2. Click on Login and in the Login dialog box, enter the username and password.
3. Select SnapClone as the Snapshot Type.
4. Click Select Disk Group. Select the disk group where the disks that you intend
to back up for instant recovery reside.
Open the HP StorageWorks VDS Configuration Utility for EVA and follow the steps
below:
1. Ensure that the correct Appliance IP Address is specified.
2. Click on Login and in the Login dialog box, enter the username and password.
After you once performed this procedure, the VSS and VDS providers are ready to
be used for instant recovery.
Integration guide 41
Page 42

Configuring the VSS Hardware Provider for Disk Array XP
Before you run backups, open the HP StorageWorks XP VSS Hardware Provider
Configuration Utility and choose the configuration mode for your backups: VSS
Compliant Mode or Resync Mode.
NOTE:
Changing the modes between backup sessions can impact the restore. For details, see
“HP StorageWorks Disk Array XP considerations” on page 63.
Microsoft Exchange Server writer specific configuration
A backup of the Microsoft Exchange database can be considered successful only if
the consistency check of the replicated datafiles succeeds.
It is recommended that the database stores and transaction logs reside on different
source volumes. In this case, you can restore only stores and perform roll-forward
recovery, Otherwise, if both are on the same source volume, all data residing on this
volume must be restored.
Microsoft Exchange Server 2007 configuration in LCR environment
When configuring an LCR environment, ensure that the original database and the
database copy have the same directory structure for their files. Otherwise, after
restore of an LCR copy to original database, mounting of the database will not be
correct.
Microsoft Exchange Server 2007 configuration in CCR environment
If you have a CCR environment where a production database resides on a different
EVA disk array than its copy and if the backup system is different from the application
system, ensure that:
• The backup system is connected to the same disk array where the replicas (volume
shadow copies) of backup objects (either production database or database copy)
will be created. For example, if you back up the production database, the backup
system must be connected to the same disk array on which the production
database resides. If you back up the database copy, then the backup system must
be connected to the same disk array on which the database copy resides.
42
Integrating the Application Recovery Manager ZDB integrations and Microsoft Volume
Shadow Copy Service
Page 43

• The VSS/VDS hardware provider is configured for the same Command View on
both EVAs due to the hardware provider limitation, which can detect only one
EVA disk array.
Otherwise, the presentation of replicas to the backup system fails and consequently
the backup session fails.
Also in case where the application and backup systems are the same, ensure that
the VSS/VDS hardware provider is configured for the same Command View on both
EVAs. Otherwise, rotation and deletion of old replicas from other EVA cannot be
performed.
Note that if a failover of the production and copy databases happens, the backup
using the same backup specification as before failover will fail, since the backup
system is no longer connected to the disk array where the new replicas reside. In this
case, you can:
• Perform manual failover of the production and copy databases to enable the
same configuration as before the first failover.
• Create a new backup specification with the new backup objects specified.
• Change the backup system connection to the disk array where the new replicas
reside.
For restore limitation of this scenario, see “Limitations” on page 67.
Configuration check
With instant recovery, it is possible to selectively restore separate writer’s components
if they reside on separate source volumes. Instant recovery of separate components
also requires that the volumes with components data should not contain any other
data. The configuration check detects, whether there are more than one component
on the volume and whether there is any other data besides the component’s data.
At backup time, Application Recovery Manager can check whether the individual
components can be selectively restored using the instant recovery functionality. At
instant recovery time, Application Recovery Manager, can check whether the data
required for the components restore is available.
In case of the Microsoft Exchange Server Writer, it is checked, whether the whole
storage group should be restored, or whether the separate database stores can be
restored individually. In case of the MSDE Writer, it is checked, whether the user,
system, and log files are on separate volumes.
If the check fails for a component during the backup, you will not be able to select
this component for the instant recovery, you will need to recover all writer components.
If the check fails during the instant recovery, the instant recovery session will fail.
Integration guide 43
Page 44

Configuration check modes
You can select between three configuration check modes:
• Strict
If any file or folder on the volume does not belong to the component, the backup
or instant recovery fails.
• Non-strict
If any folder on the volume does not belong to the component, the backup or
instant recovery fails.
• Disabled
A check detects whether there is more than one component on the volume and
whether there is any other data besides the component’s data on the volume, but
the session will not fail.
IMPORTANT:
If the configuration check is disabled for an instant recovery, you will lose the data that
does not belong to a component, but resides on the same volume as the component.
Disable configuration check only if instant recovery cannot be performed with an enabled
configuration check and only if you are sure that this will not result in a loss of data
during the instant recovery.
The configuration check should not be disabled except for the cases when instant
recovery cannot be performed with an enabled configuration check. Due to the
specific behavior, some writers (not applicable to the MSDE Writer and Microsoft
Exchange Server writers) may create temporary files on components volumes during
backup and instant recovery causing the check failure. In such cases, instant recovery
will not be possible.
Backup
Overview
To run backups and restores of the VSS writers and filesystems, you need to configure
the Application Recovery Manager Microsoft Volume Shadow Copy Service
integration backup specifications.
To configure the backup using the VSS integration, perform the following steps:
44
Integrating the Application Recovery Manager ZDB integrations and Microsoft Volume
Shadow Copy Service
Page 45

Configuration steps
1. Configure disk arrays needed for the backup.
2. Create an Application Recovery Manager VSS backup specification specifying
the VSS components to back up, as well as the Application Recovery Manager
backup options that define the behavior of your backup or restore session.
The Microsoft SQL Server or Microsoft Exchange Server has to be running on the
application system for a backup to start.
Replica types
The two basic families of replicas available with Application Recovery Manager are
split mirror and snapshot.
Split mirror replica
This type of replica is produced using mirroring technology, provided by HP
StorageWorks Disk Array XP. Mirroring technology allows a duplicate (a mirror) of
the filesystem or application data to be created during normal application use. When
a replica is required, a disk from the S-VOL host group is first synchronized with the
(P-VOL) and after that the pair is split leaving a fixed copy, or an independent split
mirror replica of the source volume. Depending on the configuration mode set in the
VSS hardware provider, two types of mirror replicas are possible after the pair is
split:
• If the provider is in the VSS compliant mode, the replica is independent copy or
clone of the source volume with no pair relationship between the replica and its
source volume.
• If the provider is in the resync mode, the replica and its source volume are in the
suspended mirror relationship enabling restore of such replica only by
re-synchronization the replica with its source volume.
Snapshot replica
This type of replica is produced using snapshot technology, provided by HP
StorageWorks Enterprise Virtual Array.
In the case of a snapshot replica, no synchronization is required before creating the
fixed point-in-time copies because a snapshot is a logical copy of the pointers to the
data rather than the data itself. Snapshot replicas are considered to be created almost
instantaneously and are immediately available for use. However, in some
implementations, background processes may continue for some time afterwards.
Integration guide 45
Page 46

A range of snapshot techniques is available, each with its own particular merits from
the storage and data processing points of view. Application Recovery Manager
supports the following snapshot replica types using the EVA hardware provider:
• Snapshot with pre-allocation of disk space (standard snapshot).
• Snapshot without pre-allocation of disk space (vsnap or Virtually Capacity-Free
Snapshot).
• A full copy of the source volume (original virtual disk), independent of the original
virtual disk ((snap)clone).
You select the replica type in the GUI when creating a backup specification. However,
you can choose only between clone or snapshot replica type or you select default.
If Snapshot (Differential) is selected, standard snapshots are created by default. To
create vsnaps, configure the hardware provider to create vsnaps prior creating a
backup specification.
If Default is selected, the replica type created will be the one which is configured in
the hardware provider.
Note that for instant recovery, only snapclone is available.
HP StorageWorks EVA specifics
Replica creation and reuse
A new replica is created and added to the replica set when the specified Number
of replicas rotated is not reached.
The oldest replica in the set is deleted and the new one is created when the specified
Number of replicas rotated is reached.
Limitations
• When a cloning process of a source volume is in progress, another snapshot (any
type) of that source volume cannot be created.
• Only one type of target volume per source volume can exist on an EVA disk array
at the same time. For example, the creation of a snapclone may fail if a snapshot
or vsnap for the same source volume exists on the array. Such replicas should be
deleted first using the Application Recovery Manager command omnidbvss.
HP StorageWorks Disk Array XP specifics
• For backups in resync mode, the number is limited to a maximum of three replicas
(S-VOLs) per source volume (P-VOL). If you use the same P-VOL in more than one
46
Integrating the Application Recovery Manager ZDB integrations and Microsoft Volume
Shadow Copy Service
Page 47

backup specification, note that the Number of replicas rotated should not be more
than three in all backup specifications together.
• You can change the XP hardware provider mode between different backup
sessions using the same backup specification, but this is not recommended when
you use replica rotation, because restore of such a backup can fail. For details,
see “HP StorageWorks Disk Array XP considerations” on page 63.
Creating backup specifications using GUI
The procedure below shows how to back up Microsoft VSS objects using the
Application Recovery Manager GUI. Some writers have specific limitations. For
writers specific limitations, see:
• For Microsoft Exchange Server specifics, see
“Microsoft Exchange Server writer backup specifics” on page 54.
To create a new backup specification, proceed as follows:
1. In the HP Application Recovery Manager software GUI, switch to the Backup
context.
2. In the Scoping Pane, expand Backup Specifications.
3. Right-click MS Volume Shadow Copy Writers and click Add Backup.
Integration guide 47
Page 48

4. In the Create New Backup dialog box, select the backup type. You can choose
between the following types:
• Local backup
This type is used for single host VSS backup.
• VSS transportable backup
Use this option to create a shadow copy or replica on the application system
and present it to the backup system.
48
Figure 6 Selecting VSS transportable backup
Integrating the Application Recovery Manager ZDB integrations and Microsoft Volume
Shadow Copy Service
Page 49

5. Specify the following options:
• The name of the application system.
When backing up cluster-aware writers (such as SQL Server via the MSDE
Writer or SqlServerWriter, or Exchange Server in the CCR environment),
specify the virtual server name given in the particular writer resource group
as the application system.
• For transportable backup, the name of the backup system.
• To enable restore using Application Recovery Manager, leave Track the
replica for instant recovery selected.
IMPORTANT:
If you clear Track the replica for instant recovery, a restore from this backup
will not be possible using Application Recovery Manager.
• If you leave selected Track the replica for instant recovery, specify the
configuration check mode. For information on the options, see
“Configuration check” on page 43.
• If you clear Track the replica for instant recovery, you can specify the replica
type:
Default The replica type created
depends on the provider
configuration.
Mirror/Clone (Plex) A target volume, independent
from its source volume is
created:
• With EVA provider,
snapclone is created.
• With XP provider, the
replica created depends
on the provider mode
(clone in case of VSS
compliant mode, or mirror
in case of resync mode).
Snapshot (Differential) A target volume, dependent
on its source volume is
Integration guide 49
Page 50

created: by default, standard
snapshot (disk space is
pre-allocated).
This replica type is not
supported by XP provider.
A provider may support one or both types. If you select an unsupported
replica type, the backup will fail.
For more information on EVA provider replica types, see
“Snapshot replica” on page 45.
Optionally, specify the configuration, mount, and replica management options:
• Select Keep the replica after the backup to keep the replica on a disk array
after backup. If this option is not selected, the replica is deleted after backup.
By default, this option is automatically selected if Track the replica for instant
recovery is set, and cannot be deselected.
• During a VSS backup session, a virtual replica is immediately available for
use. However, in the background, the copy process runs for some time to
copy all data from the source to the target storage. To avoid the slowdown
of the copy process caused by the by the integrity check process (Exchange
Server), use the Wait for the replica to complete option. The integrity check
resumes after the time specified in Wait up to n minutes (default: 60) is
reached even if the copy process is not finished. The Attempt to minimize
wait option resumes the integrity check process after the copy process has
finished if it is finished before the specified time.
• With XP provider, deselect the option Wait for the replica to complete because
it is not applicable to this integration and a warning message is displayed
during backup if the option is selected.
50
For details, press F1.
Click Next.
Integrating the Application Recovery Manager ZDB integrations and Microsoft Volume
Shadow Copy Service
Page 51

Figure 7 VSS transportable backup options
Integration guide 51
Page 52

6. Select the backup objects you want to back up.
Figure 8 Selecting backup objects (Exchange Server 2007 LCR copy
and SQL writer)
52
NOTE:
Do not select too many objects because they might reside on more than
four source volumes. If the objects reside on more than four source volumes,
create several backup specifications where objects do not reside on more
than four source volumes.
If a writer requires all of its components to be backed up, lower-level items are
automatically selected. If you select such a writer for backup, all its components
will be backed up.
If a writer has no components to be backed up, it is not displayed in the list of
writers, and is not backed up when the full client is selected.
The Filesystem item displays all mounted disks. If another disk is mounted under
a disk, the parent disk is displayed twice. The first item is the parent disk (for
example c:) and the second one is the container for the mountpoint (for example
Integrating the Application Recovery Manager ZDB integrations and Microsoft Volume
Shadow Copy Service
Page 53

c:\mnt\1). To select a mounted disk, select the mountpoint. A hardware
provider is required for this backup object.
Microsoft Exchange Writer: Optionally, to specify options for the consistency
check of Microsoft Exchange Server Writer, right-click Microsoft Exchange Writer
and click Additional options.
Microsoft Exchange Server 2007 Writer in a CCR environment: Optionally, to
specify cluster options, right-click Microsoft Exchange Writer and click Additional
options.
Figure 9 Additional options for Microsoft Exchange Server 2007
in CCR environment
7. Following the wizard, select the backup options and schedule your backup.
TIP:
If you are not sure about selecting the backup options, keep the default
values.
Refer to online Help for details about the options common to all Application
Recovery Manager backup specifications.
8. Once you have defined all backup options and the schedule, you need to name
and save the newly-created backup specification. You have now completed the
creation of a Microsoft Volume Shadow Copy Writers backup specification.
9. You can review the newly-created and saved backup specification in the Backup
context, under the specified group of backup specifications.
Integration guide 53
Page 54

10. You can run backup using one of the following methods:
• Schedule the backup of an existing Microsoft Volume Shadow Copy Writers
backup specification using the Application Recovery Manager Scheduler.
• Start an interactive backup of an existing Microsoft Volume Shadow Copy
Writers backup specification.
VSS specific backup options
Table 4 VSS specific backup options
DescriptionOption
Specify a command that will be started by vssbar.exe on the
Pre-exec
Post-exec
application system before the backup. Do not use double quotes. Type
only the name of the command, not the pathname. The command must
reside in AppRM_home\bin.
Specify a command that will be started by vssbar.exe on the
application system after the backup. Do not use double quotes. Type only
the name of the command, not the pathname. The command must reside
in AppRM_home\bin.
Microsoft Exchange Server writer backup specifics
The Microsoft Exchange Server Writer supports the following Microsoft Exchange
backup types:
Backup types
The Microsoft Exchange Server Writer supports the following Microsoft Exchange
backup types:
• Full - backs up databases, transaction logs, and checkpoint files. The transaction
• Copy - a Full backup, but the logs are not truncated. This type of backup is not
Limitations
• You can back up only the whole server or full storage groups. Single stores cannot
• With Exchange Server 2003, only one VSS backup session can be running on
54
logs are truncated.
intended for use in recovering failed systems.
be backed up.
the same application system at once. With Exchange Server 2007, only one VSS
Integrating the Application Recovery Manager ZDB integrations and Microsoft Volume
Shadow Copy Service
Page 55

backup session backing up a specific storage group can be running on the same
application system at once. Consequently, if you start a backup while another
one is in progress, the latter waits until the first one finishes.
Recommendations
• With EVA provider, an Exchange storage group should not reside on more than
four source volumes.
• Configuration with transaction logs residing on different source volume than stores
enables you to perform a rollforward recovery when only the stores are lost.
• Create one backup specification for each storage group and schedule them in a
row.
Writer stabilization
After each Microsoft Exchange Server Writer backup, Application Recovery Manager
by default waits 10 minutes for Microsoft Exchange Server Writer to stabilize. You
can disable this option or you can reduce the waiting time using the
OB2VSS_EXCHANGE_WRITER_STABILIZATION omnirc variable.
Consistency check
A backup of the Microsoft Exchange Server database is considered as successful
only if the consistency check of the replicated datafiles succeeds. To enable
consistency check, click on a created backup specification, right-click Microsoft
Exchange Writer in the Source tab, and then click Additional options.
The consistency check can also be run before instant recovery.
Integration guide 55
Page 56

Figure 10 Selecting Microsoft Exchange Server 2003 storage groups
Microsoft Exchange Server 2007 writer backup specifics
In an LCR or CCR environment, the replicated storage groups are represented as a
new instance of Exchange writer, Exchange Replication Service. The replicated storage
groups are backed up in the same way as original production storage groups.
You can select any of these storage groups (original or replicated) for a backup.
However, you cannot select both in the same backup specification. See
Figure 11 on page 57.
56
Integrating the Application Recovery Manager ZDB integrations and Microsoft Volume
Shadow Copy Service
Page 57

Figure 11 Selecting a replicated Microsoft Exchange Server 2007
storage group
In a CCR environment, you can select a cluster node from where you want your
backup to be performed, regardless of which instance (Information Store or Replication
Service) resides on this node. If you select the cluster node, Application Recovery
Manager backs up any available instance on this node ignoring the selection of the
instance in the GUI even if you, for example, select the replicated storage group
(Exchange Replication Service) as backup object.
To specify the cluster node from where you want to perform backup of any instance
residing on this node, right-click an Exchange writer and select the node in the
additional options dialog box under Back up any available instance from node. See
Figure 11 on page 57.
When backing up Replication Service instance, it may happen that it cannot be
backed up due to the following reasons:
• The selected node is not available.
• The status of the storage group to be backed up is not "Healthy".
• Application Recovery Manager is not running on the selected node.
Integration guide 57
Page 58

• Vssbar.exe could not be started on the selected node.
To avoid the session failure, you can select the option Revert to active node on failure
in the same dialog box. The backup will be restarted on the original server (active
cluster node) and the original storage group will be backed up. If Information Store
instance is backed up, this option is ignored.
Limitations
• In a CCR environment, if a storage group or a replicated storage group
(Replication Service instance) is selected for backup, no other writer (for example,
filesystem writer or SQL Server writer) can be selected to be backed up in the
same backup session. This is because the two writers are located on different
servers and an Application Recovery Manager limitation is that two different
servers cannot be backed up in the same session.
• In an LCR or CCR environment, a storage group can control only one store.
Scheduling the backup
For more detailed information on scheduling, refer to the online Help index:
“scheduled backups”.
To schedule a backup specification, perform the following steps in the Application
Recovery Manager GUI:
1. In the HP Application Recovery Manager software GUI, switch to the Backup
context.
58
2. In the Scoping Pane, expand Backup, then Backup Specifications. Click MS
Volume Shadow Copy Writers.
A list of available backup specifications is displayed in the Results Area.
3. Double-click the backup specification you want to schedule and click the Schedule
tab to open the Schedule property page.
4. In the Schedule property page, select a date in the calendar and click Add to
open the Schedule Backup dialog box.
Integrating the Application Recovery Manager ZDB integrations and Microsoft Volume
Shadow Copy Service
Page 59

5. Specify Recurring, Time options, Recurring options, and Session options.
Figure 12 Scheduling a backup
6. Click OK to return to the Schedule property page.
7. Click Apply to save the changes.
Running an interactive backup
An interactive backup can be started using the Application Recovery Manager GUI
by following these steps:
1. In the HP Application Recovery Manager software GUI, switch to the Backup
context.
2. In the Scoping Pane, expand Backup; then expand the Backup Specifications
and the MS Volume Shadow Copy Writers items.
3. Right-click the backup specification you want to run, and then select Start Backup
from the pop-up menu.
The Start Backup dialog box appears.
4. Click OK. Upon successful completion of the backup session, a Session
Completed Successfully message appears.
Integration guide 59
Page 60

Restore
You can restore the Application Recovery Manager Microsoft Volume Shadow Copy
Service integration backup objects using the Application Recovery Manager GUI.
Overview
Instant recovery restores data directly from a replica to source volumes. All data in
the replica is restored (regardless of selections during backup). For instant recovery
concepts, see the HP Application Recovery Manager software concepts guide.
Restore can be performed:
• Using Microsoft Virtual Disk Service (VDS)
• Using a disk array integration (HP StorageWorks EVA or HP StorageWorks Disk
With this method, a switch of a replica from the specified backup session with
the source volume is performed. Information about the replica is deleted from the
VSSDB, therefore, it is not possible to perform another instant recovery from that
replica. For more information about the switch method, see
“Switch of disks” on page 60.
In case of XP integration, this type of restore can be performed if a backup was
created with the XP provider in the VSS compliant mode.
Array XP)
Restore using HP StorageWorks EVA
Depending on the instant recovery options you select in the Application Recovery
Manager GUI, instant recovery can be performed in three ways.
Switch of disks
With this method, the source volume is unpresented and the target volume (replica)
is presented in the place of the source volume. You can select to retain the old source
volume. However, you cannot retain the replica and perform another restore from
this backup.
Advantages
• Restore is very fast.
• The old source volume can be retained after restore.
60
Integrating the Application Recovery Manager ZDB integrations and Microsoft Volume
Shadow Copy Service
Page 61

• If you select the Restore using Microsoft Virtual Disk Service option, you can restore
your data without using HP StorageWorks EVA SMI-S Agent.
Disadvantages
• It is not possible to perform another restore from the same backup.
• With the EVA intergration, this method of instant recovery changes the physical
location of the application production data. After instant recovery, a replica
becomes the source volume, therefore, the physical location of the original storage
changes. The application starts running on the physical disks that were used for
backup. Thus, if a replica to be restored belongs to a different disk group than
its source volume, the disk group of the replica becomes the disk group of the
source volume after instant recovery.
To perform this type of restore, select the Restore using Microsoft Virtual Disk Service
option or the Restore using HP StorageWorks EVA and Switch to the replica options
in the Application Recovery Manager GUI.
Copy of replica data with the source volume retained
With this method, a new copy from a replica is created in the same disk group in
which the source volume resides. When the copy is finished, a switch of disks between
the source and the new copy is performed. The old source volume is retained.
You can also select to retain the replica and thus enable to perform another restore
from this backup.
Advantages
• The old source volume is retained after restore.
• Disk group of the source volume is not changed after instant recovery.
• Another restore from the same backup is possible.
Disadvantages
• Restore is not as fast as with the "switch of disks" method.
• Physical location of the application production data changes.
To perform this type of restore, select the Copy replica data to the source location
option and leave selected the Retain source for forensics option in the Application
Recovery Manager GUI.
Integration guide 61
Page 62

Copy of replica data with the source volume not retained
With this method, the source volume is directly overwritten by the replica. The old
source volume is not retained and if the restore session fails, the original application
data residing on the source volumes is lost.
You can select to retain the replica and thus enable to perform another restore from
this backup.
Advantages
• Disk group of the source volume is not changed after instant recovery.
• Physical location of the application production data remains the same.
• Another restore from the same backup is possible.
Disadvantages
• Restore is not as fast as with the "switch of disks" method.
• The "old" source volume is lost during restore.
To perform this type of restore, select the Copy replica data to the source location
option and clear the Retain source for forensics option in the Application Recovery
Manager GUI.
HP StorageWorks EVA considerations
• After instant recovery, the replica used in the session can become the source
volumes (physical location of the original application data changes). This depends
on the restore options you select in the GUI.
Additionally, if a replica resides in another disk group than the source volumes,
this replica disk group becomes the disk group of the source volumes.
62
• Depending on the restore options you select in the GUI, the restored replica can
be deleted from the replica set after instant recovery. In this case, you cannot run
instant recovery using the same session ID again.
• If you restore using HP StorageWorks EVA, before instant recovery, it is
recommended to check if the SMI-S CIMOMs were configured properly in the
Application Recovery Manager cell by running the omnidbsmis -ompasswd
-check [HostName] command.
This command performs a health check of you environment, which may help
identify such potential problems as wrong user name or password provided, a
broken network connection, a DNS resolution problem, and so on.
Integrating the Application Recovery Manager ZDB integrations and Microsoft Volume
Shadow Copy Service
Page 63

IMPORTANT:
After instant recovery, restored filesystems are mounted to the same mount points or
drive letters as they were at the backup time. If these mount points or drive letters have
other filesystems mounted, these filesystems are automatically dismounted before instant
recovery, and the restored filesystems are mounted afterwards.
Restore Using HP StorageWorks Disk Array XP
This type of restore can be performed if a backup was created with the XP provider
in the resync mode.
With this type of restore, the XP integration agent (SSEA) synchronizes an S-VOL with
its P-VOL and then splits the pair during the restore.
If the option Wait for the replica to complete is selected, SSEA waits for the
re-synchronization or copy process to complete (normal restore). Only then, the source
volume is available. If this option is not selected, the source volume is immediately
available while the re-synchronization or copy process is running in the background
(quick restore).
IMPORTANT:
The old source volume is not retained after restore so if the restore session fails the original
application data is lost.
HP StorageWorks Disk Array XP considerations
• Restore depends on the XP hardware provider mode which was used during
backup. If the VSS compliant mode was used, you can restore your data only
using VDS. If the resync mode was used, you can restore your data only using
HP StorageWorks Disk Array XP.
• You can switch between the XP hardware provider modes between different
backup sessions using the same backup specification, but this is not recommended
if the specified number of replicas rotated is more than 1 because restore will fail
in the following situations:
• If you perform a backup in one mode and then the same backup in the other
mode, restore of the backup performed in the VSS compliant mode (the "switch
of disks" restore) will fail because the relationship between the S-VOL and its
Integration guide 63
Page 64

P-VOL will be detected from the other backup performed in the resync mode.
This pair relationship should not be removed during restore and thus a switch
of the source volume with the replica cannot be performed.
To restore such a backup, perform one of the following prior to restore:
• Manually remove the S-VOLs that were created during backups made in
resync mode using the omnidbvss command.
• Set the variable OB2VSS_FORCE_INSTANT_RECOVERY in the omnirc
file and enable the restore option Retain source for forensics in the GUI.
This option must be selected to preserve the pair relationship between the
S-VOL and its P-VOL created in the backup performed in the resync mode.
• If you perform restore using re-synchronization (the "copy of replica data"
restore) and the production source volume (P-VOL) is not presented on the
system, the restore is aborted. This can happen if you have at least two backups
created in different mode and you performed the "switch of disks" restore
before "the copy of replica data" restore.
To restore such a backup, perform one of the following prior to restore:
• Manually present the P-VOL on the application system.
• Set the variable OB2VSS_FORCE_INSTANT_RECOVERY in the omnirc
file.
The following considerations apply to restore using HP StorageWorks Disk Array XP
only:
64
• Only three first-level mirrors can be used for instant recovery. Six additional
(cascading) copies are not supported.
• You cannot start another instant recovery using the same disk on the application
system at the same time. A session can be started only after the preceding session
using the same disk on the application system finishes synchronization.
IMPORTANT:
After instant recovery, restored filesystems are mounted to the same drive letters as they
were at the backup time. If these drive letters have other filesystems mounted, these
filesystems are automatically dismounted before instant recovery, and the restored
filesystems are mounted afterwards.
Integrating the Application Recovery Manager ZDB integrations and Microsoft Volume
Shadow Copy Service
Page 65

Microsoft Exchange Server writer recovery specifics
This section provides specific information on the instant recovery point-in-time, and
rollforward restore of the Microsoft Exchange Server Writer.
With Microsoft Exchange Server 2003, you can restore a whole storage group or
individual stores only to the original location. With Microsoft Exchange Server 2007
Writer, you can restore a whole storage group or individual stores to the original
and to a different location. For details, see
“Microsoft Exchange Server 2007 recovery specifics” on page 66.
If you restore to the original location, note that restore will fail if you do not select
all objects residing on the target volume to be restored. If for example you have four
stores and transaction logs on the target volume to be restored and would like to
restore only one store, the restore fails since it can restore only all objects residing
on the target volume. Due to this fact, the following configuration scenarios are
possible when restoring Microsoft Exchange Server Writer:
• Transaction logs and database stores are on the same target volume.
You cannot select only the database stores for instant recovery in the GUI. If the
transaction logs and/or database stores are lost, the whole storage group (or all
objects residing on the target volume) should be recovered.
In this case, you can perform only point-in-time restore. The transaction logs will
be replaced with the backed up logs.
• Transaction logs and database stores are on different target volumes.
You can select only the database stores for instant recovery in the GUI. If a data
store is lost, it can be recovered separately providing that it resides alone on the
target volume to be recovered. Otherwise, all stores residing on the target volume
must be selected for restore. If the transaction logs are lost, the whole storage
group should be recovered.
In this case, you can perform both point-in-time or rollforward restore.
To perform a point-in-time restore of Microsoft Exchange Server writer, select the
whole storage group. The transaction logs will be replaced with the backed up
logs.
To perform a rollforward restore, select only the database stores and original
location. The existing logs will be applied to the restored databases. However,
note that rollforward restore will not be possible if the point-in-time restore of the
same session was performed before.
Integration guide 65
Page 66

Microsoft Exchange Server 2007 recovery specifics
Exchange Server 2007 offers additional restore option:
• Restore to a different location than the location from where the backup was made
(original location).
The following restore scenarios are supported:
• Restore of a whole storage group or individual stores to the original location.
• Restore of LCR and CCR copies (their storage groups or individual stores) to the
original database.
• Restore of a whole storage group (including LCR or CCR copies) or individual
stores to a different location:
• Restore to a different storage group
Data can be restored to a different storage group. Exchange Server can then
replay the restored logs to bring the restored database up to date. If you
perform restore to a different storage group, you can access single mailboxes
or individual mails on an alternate location without the need to compromise
the original storage group with a potentially unsuccessful restore operation.
• Restore to a non-Exchange location
Data can be restored to a non-Exchange location. Once the data is restored,
it is not managed by Exchange Server.
• Restore to a non-Exchange location and creating Recovery Storage Group
(RSG)
Data can be restored to a non-Exchange location and after that a Recovery
Storage Group can be created for the databases. Exchange Server recognizes
the Recovery Storage Group created by Application Recovery Manager, which
is called AppRM RSG.
66
• Restore to Recovery Server
If a whole Exchange Server system is unusable, then the whole storage group
can be restored to some other Exchange Server system (Recovery Server) and
some other storage group. If the target system is identical to original (the same
host name, storage groups names, stores names, and the same directory
structure), restore can be started as normal restore to original location. If there
are differences, then restore to a different location must be used.
To restore to a different location, right-click the storage group or store or logs to
be restored and click Restore as. Select the target location for all the components
you want to restore.
Integrating the Application Recovery Manager ZDB integrations and Microsoft Volume
Shadow Copy Service
Page 67

Prerequisites
You can restore two storage groups to both original and a different location in the
same restore session if the target restore client system is the same.
During restore to original location, all stores in the storage group to be restored are
dismounted even if only one store from the storage group will be restored. Stores are
left dismounted after the restore.
• For restore to a different location, Inet must run under domain account that has
the permissions assigned to the Exchange Server Administrators group. The
account must also be a member of the local Administrators group on that computer.
• If you restore to different storage group and if there are any dismounted stores
you want to use for the restore, mount them before the restore. Otherwise,
Application Recovery Manager cannot list them for the target selection in the GUI.
If this is done while the Application Recovery Manager GUI is opened, you can
refresh the current GUI page by clicking Reload in the MS Exchange additional
options dialog box.
IMPORTANT:
If you restore to a non-Exchange location and create RSG, check that Recovery Storage
Group does not already exist on this location. If Recovery Storage Group already exists,
it will be deleted by Application Recovery Manager. All data stored in the existing
Recovery Storage Group will be lost.
Limitations
• Restore to an LCR or CCR storage group copy (Exchange Replication Service
instance) is not supported due to the Microsoft Exchange Server limitations. Restore
of an LCR or CCR copy to original location will be performed to the original
database (Exchange Information Store) and not to the database copy (Exchange
Replication Service).
• When restoring to a different location, you cannot restore a specific database
store without the transaction logs. When a store is selected for restore, logs are
automatically included for the restore.
• Only one storage group can be restored with the option Restore to a non-Exchange
location and create RSG. This is due to the Microsoft Exchange Server limitation
that only one RSG per server is supported.
• You cannot mount public folders to RSG due to the Microsoft Exchange Server
limitations.
Integration guide 67
Page 68

• All stores in a RSG must originate from the same storage group due to the
Microsoft Exchange Server limitations.
• If you have a CCR environment where the original database resides on a different
EVA disk array than the database copy and you perform backup of the database
copy, note that the restore of this copy to original database will fail, because
restore to a different disk array is not supported. In this case, perform manual
failover of the databases before the restore.
• Restore to a different location is only possible using Microsoft Virtual Disk Service.
With XP hardware provider this means that restore to a different location is
possible only after a backup in VSS compliant mode.
• With the XP VSS provider, if a backup of an LCR or CCR storage group copy is
performed in the resync mode, restore of such backup to the original location
(original database or Exchange Information Store) by default fails.
The reason is that the source volumes, on which the database copy (or Exchange
Replication Service) resides, are in the suspended mirror relationship with the
replicas, which should be restored to the original database.
To perform such restore, the source volumes presented to the database copy are
first unpresented from the database copy and presented to the original database.
This results in the lack of source disks presented to the database copy, so you
should again set up the CCR or LCR environment after restore.
To enable such restore, set the omnirc variable
OB2VSS_FORCE_INSTANT_RECOVERY to 1, perform restore, and after it,
manually set up the LCR or CCR environment.
Instant recovery
For general information on instant recovery, refer to the online Help.
The Application Recovery Manager VSS integration provides instant recovery of
MSDE Writer, SqlServer Writer, Microsoft Exchange Server 2003 Writer, and
Microsoft Exchange Server 2007 Writer.
You can selectively restore separate writer’s components only if they reside on separate
target volumes. Instant recovery of separate components also requires that the target
volumes with components data should not contain any other data. If you do not select
all writer’s components residing on the target volumes to be restored, the restore
fails.
Before starting an instant recovery, Application Recovery Manager checks whether
the data that is required for the components restore is available. If the check fails,
the instant recovery session also fails, ensuring that no data that does not belong to
the components is lost.
68
Integrating the Application Recovery Manager ZDB integrations and Microsoft Volume
Shadow Copy Service
Page 69

For Exchange Server 2007 writer specifics (prerequisites and limitations), see
“Microsoft Exchange Server 2007 recovery specifics” on page 66.
Limitations
• The number of replicas available for instant recovery is limited by Number of
replicas rotated, which sets the size of the replica set. You can view these replicas
in the Instant Recovery GUI context by expanding Restore Sessions. Replicas are
identified by the backup specification name and the session ID. Other information,
such as time when the replica was created, is also provided. Alternately, you can
use CLI to list sessions (for information about the omnidbvss command, see the
HP Application Recovery Manager software command line interface reference).
• Concurrent restores utilizing the same backup system or the same application
system are not supported. Restores utilizing the same backup system or the same
application system must be performed serially.
• For restore of Exchange Server 2007 writer data to a different location, the
Microsoft Virtual Disk Service restore options and the HP StorageWorks EVA
restore options are not available.
• For additional Exchange Server 2007 writer limitations, see
“Microsoft Exchange Server 2007 recovery specifics” on page 66.
Instant recovery procedure
Prerequisites
• For Exchange Server 2007, in case of CCR or LCR restore of the database copy,
mount (bring online) the target store. If you cannot mount the target store (for
example, if the files are missing or the database is corrupted), proceed as follows:
Using the Exchange Management Console, delete the files of the database you
wish to mount, then perform mount operation, and then confirm the message to
create an empty database.
• For Exchange Server 2003, manually dismount the databases to be recovered.
1. In the HP Application Recovery Manager software GUI, switch to the Instant
Recovery context.
Integration guide 69
Page 70

2. In the Scoping Pane, expand MS Volume Shadow Copy Writers under Restore
Objects, expand the writer you want to restore and click the backup session
from which you want to perform the restore.
70
Figure 13 Selecting Exchange Server 2003 writers components for
instant recovery
Integrating the Application Recovery Manager ZDB integrations and Microsoft Volume
Shadow Copy Service
Page 71

Figure 14 Selecting Exchange Server 2007 writers components for
instant recovery to a different location
Integration guide 71
Page 72

3. In the Source property page, specify writers and/or components for recovery.
Select the configuration check mode. For more information, see
“Configuration check” on page 43.
To perform additional steps after the instant recovery before recovering the
database, such as restoring logs backed up using third–party backup software,
select the No recovery option. Application Recovery Manager will not perform
a database recovery and you can finish the recovery steps (such as applying
transaction logs) later on manually.
If the option is not selected, all recovery steps are finished. In such a case,
additional tasks cannot be performed.
This option is available only for the SQLServer writer and Microsoft Exchange
Server 2007 writer. It is not supported for Microsoft Exchange writer, where the
transaction logs are always applied when the store is mounted.
Exchange Server Writer: Optionally, to specify options for the consistency check
of a Microsoft Exchange writer, right-click the writer and click Additional options.
You can perform point-in-time or rollforward restore of Microsoft Exchange Server
writer. For more information, see
“Microsoft Exchange Server writer recovery specifics” on page 65.
Exchange Server 2007 Writer:
If you restore an LCR or CCR copy to the original location, note that restore will
be performed to the original database (Exchange Information Store) and not to
the database copy (Exchange Replication Service).
72
To perform restore to a different location:
a. Right-click a storage group, a store, or logs and click Restore as.
b. In the MS Exchange Additional options dialog box, select the target location
for the components you want to restore: target server, target storage group,
and target stores. The following options are possible:
• Restore to a different store
This option is selected by default. It enables you to select the target stores
for each store to be restored (original stores). Select the target server
first and then from the Original and Target drop-down list, select the
stores pairs. For example, to restore only one store, select only one
target store for the original store you want to restore. Note that only
stores cannot be restored, so logs are automatically selected in the
restore session to different location.
• Restore to a non-Exchange location
Integrating the Application Recovery Manager ZDB integrations and Microsoft Volume
Shadow Copy Service
Page 73

Select this option to restore your data to a non-Exchange location. This
means that the restored data will not be managed by Exchange Server
and Recovery Storage Group (RSG) will not be created. You can create
RSG when data is restored. Select the target server first and then from
the Original drop-down list, select the stores to be restored.
• Restore to a non-Exchange location and create RSG
Select this option to restore your data to a non-Exchange location. After
restore, Application Recovery Manager will create a Recovery Storage
Group called AppRM RSG on the target server. The stores that you have
selected and logs will be restored to this recovery group. Select the
target server first and then from the Original drop-down list, select the
stores to be restored.
Optionally, select the mount location for the storage group if you want to
be different than default, which is C:\Omni_Mnt.
Integration guide 73
Page 74

Figure 15 Restore to different location options (Exchange Server
2007 Writer)
74
Integrating the Application Recovery Manager ZDB integrations and Microsoft Volume
Shadow Copy Service
Page 75

4. Optionally, select the VDS or disk array options under the Options tab.
For both types of restore, to retain the source volume, select Retain source for
forensics.
For a Restore using HP StorageWorks EVA, additional options are available:
• The restore method: Copy replica data to the source volume or Switch the
replica.
If you select Copy replica data to the source volume, a full copy of the replica
is created in the source storage (the copy is then switched with the source
volume). A virtual copy is created and immediately available for use.
However, in the background, the copy process runs for some time to copy
all data from the replica to the source storage. To avoid the slowdown of
the copy process caused by application use or the integrity check process
(Exchange Server), use this option. The restore resumes after the time specified
in Wait up to n minutes (default: 60) is reached (even if the copy process is
not finished) or after the copy process has finished if it is finished before the
specified time.
• To delete the replica after the restore, select Delete replica after successful
restore.
For details, press F1.
These options are not available if you restore Exchange Server 2007 writer to
a different location.
Integration guide 75
Page 76

Figure 16 Selecting instant recovery options (EVA integration)
76
Integrating the Application Recovery Manager ZDB integrations and Microsoft Volume
Shadow Copy Service
Page 77

Clusters
Figure 17 Selecting instant recovery options (XP integration)
5. Click Restore.
6. If you restored Microsoft Exchange Server writers data, manually re-mount the
database stores. If you restored the data to AppRM RSG, manually re-mount the
stores in the RSG.
7. If you restored an LCR or CCR copy to the original database, perform additional
steps:
• In case of an LCR restore, it is recommended to seed the restored database
to synchronize the restored original database with its copy. For more
information, see the web page http://technet.microsoft.com/en-us/library/
aa995973.aspx.
• In case of a CCR restore, see
“Additional steps after restore of a CCR copy to the original database” on page
78 for information on additional steps.
To perform an instant recovery in the cluster environment, use the above instant
recovery procedure. Use virtual hostnames. For details on performing an instant
Integration guide 77
Page 78

recovery in cluster configurations, see the HP Application Recovery Manager software
administrator's guide.
Additional steps after restore of a CCR copy to the original database
In a CCR environment, after an instant recovery of a CCR copy to the original
database residing on the application system, perform the following steps to enable
normal operation of the original and copy databases:
CAUTION:
Do not move the clustered mailbox server without first performing the following steps. If
you move the server (using the Move-ClusteredMailboxServer cmdlet), you can
risk data loss.
1. Mount the restored store on the application system.
2. On the passive node, where the copy of the database exists, delete the
transaction logs.
3. On the passive node, use the Update-StorageGroupCopycmdlet to seed the
storage group copy or to re-synchronize the original and copy storage group.
4. On the passive node, use the Resume-StorageGroupCopy cmdlet to resume
the storage group copy.
You can now move the clustered mailbox server to other node by using the
Move-ClusteredMailboxServer cmdlet.
Troubleshooting
This lists problems you might encounter when using the Application Recovery Manager
Microsoft Volume Shadow Copy integration with ZDB integration.
For general Application Recovery Manager troubleshooting information, see the
online Help.
Before you begin
• Ensure that the latest official Application Recovery Manager patches are installed.
See the online Help index: “patches” on how to verify this.
78
Integrating the Application Recovery Manager ZDB integrations and Microsoft Volume
Shadow Copy Service
Page 79

• See the HP Application Recovery Manager software product announcements,
software notes, and references for general Application Recovery Manager
limitations, as well as recognized issues and workarounds.
• See http://www.hp.com/support/manuals for an up-to-date list of supported
versions, platforms, and other information.
Checks and verifications
• On the application and backup systems, examine system errors reported in:
HP-UX: /var/opt/omni/log/debug.log
Windows: AppRM_home\log\debug.log
• With the XP integration, ensure that RAID Manager Library is correctly installed
on both the application and backup systems.
Check if the libsvrrm.dll file exists in the RMLIB_home directory.
Common problems
Problem
Backup or instant recovery aborts due to VDS problems.
A backup or instant recovery session aborts with the following error:
Failed to load VDS service.
This error can appear as a result of abnormal termination of a VDS service.
Integration guide 79
Page 80

Actions
1. Stop the Virtual Disk Service (VDS):
• Check that Virtual Disk Service is started, stop it using the command net
stop vds or via the Control Panel.
• If the above step does not help, stop the Virtual Disk Service by terminating
the process vds.exe using the Task Manager. VDS will be started
automatically as needed.
• Alternatively, you could also log in to the system again and check if the
system requests your confirmation to stop a crashed VDS. If it does,
reconfigure the debugger to launch automatically to avoid similar problems
in the future. This can be done by setting the
HKLM\SOFTWARE\Microsoft\Windows
NT\CurrentVersion\AeDebug value Auto to 1.
2. Check your configuration.
Successful Application Recovery Manager backup or restore completion is
influenced by a number of factors imposed by non-Application Recovery Manager
components, including Microsoft Exchange Server and VSS. One of the factors
is timing, which in turn is impacted by environmental conditions such as I/O
loads, storage device activity and concurrent Application Recovery Manager
actions.
To inhibit potential issues, it is recommended that you balance Application
Recovery Manager activity across the available activity or maintenance window.
If you encounter issues, review and possibly reduce concurrent Application
Recovery Manager activities such as concurrent backups or restores.
Backup problems
Problem
Microsoft Exchange Server writer backup failed.
When you start a backup of a Microsoft Exchange Server 2003 Writer, the following
error is displayed:
[MAJOR]: Writer ‘Microsoft Exchange Writer’ failed to prepare files
for backup.
80
Integrating the Application Recovery Manager ZDB integrations and Microsoft Volume
Shadow Copy Service
Page 81

Action
Problem
The reason may be the failure of the previous backup and, due to a Microsoft
Exchange Server 2003 issue, the Exchange Server Writer could not perform a proper
cleanup.
Restart the Information Store.
For more information, see the web page http://support.microsoft.com/kb/945424/
en-us.
Microsoft Exchange Server 2003 aborts the backup if the shadow copy creation takes
over 20 seconds.
If an Exchange Server 2003 Writer is being backed up, the session can fail with
VSSBAR reporting:
Snapshot could not be created.
In the application event log on the application system, the following event is recorded:
Event Type: Error
Event Source: ESE Event
Category: (16)
Event ID: 2004
Information Store (4916) Shadow copy 3 time-out (20000 ms).
Action
Problem
The following can help to solve the problem:
• Limit the number of users that are accessing the management system.
• Reduce the number of volumes in a snapshot set. Create a backup specification
dedicated to each storage group instead of one specification for the whole server.
See “Microsoft Exchange Server writer backup specifics” on page 54.
Snapshots (volume shadow copies) creation fails with EVA provider.
During a VSS backup, the following error is displayed:
[Critical] It was not possible to create Volume Shadow Copies.
Integration guide 81
Page 82

Action
Problem
Action
Problem
If there are too many source volumes selected for backup (more than four) it may
happen that the creation of snapshots takes too long and VSS fails the snapshots
creation process.
Do not select too many objects in a backup specification because they might reside
on more than four source volumes. This means that for example a Microsoft Exchange
Server storage group should not reside on more than four source volumes and only
one storage group should be specified for backup in this case. The same applies to
a Microsoft SQL Server database.
No HP StorageWorks SMI-S EVA provider login entries are configured within SMISDB.
Add the login information for HP StorageWorks SMI-S EVA provider by running:
omnidbsmis -ompasswd -add HostName [-ssl] [-port PortNumber]
[-user Username] [-passwd Password]
Configuration of an HP StorageWorks SMI-S EVA CIMOM failed
Action
Problem
82
Run the following command to perform a health check of you environment, which
may help identify any potential problems that occurred during the configuration:
omnidbsmis -ompasswd -check [HostName]
Volume shadow copies cannot be imported due to low space in registry and
consequently backup fails.
If one of the following errors is reported during backup:
• By Application Recovery Manager:
[Critical] It was not possible to import Volume Shadow Copies from
application host.
Integrating the Application Recovery Manager ZDB integrations and Microsoft Volume
Shadow Copy Service
Page 83

Action
• By Windows operating system:
Figure 18 Error reported by registry
it means that the Windows registry is out of space.
If there are too many entries in the Windows system registry, the registry runs out of
space and consequently backup fails. Although Application Recovery Manager does
not write anything to registry directly, the registry contains entries about all volumes
and disks ever presented on the system recorded by the volume storage driver.
The registry should be cleaned up. For information on how to clean the registry, see
the web page http://support.microsoft.com/kb/277222/en-us.
In case of problems with the installation of the Scrubber utility provided by Microsoft,
contact Microsoft Product Support Services.
It is recommended to perform registry management tasks periodically to prevent the
registry from filling.
Problem
Application Recovery Manager reports “Volume was not removed”.
A backup session reports the error:
Volume 'StorageID', which is part of backup 'backupID', was not removed.
This error may appear if the replica on the disk array is removed but the entry in the
VSS database (VSSDB) remains intact.
For example, this may happen:
• If a backup fails and there is no replica and the reference that was created during
the process could not be removed due to network problems.
• In a cluster environment on Disk Array XP, when the backup system is a virtual
server, or during local backup when the application system (which is the same
Integration guide 83
Page 84

Action
Problem
Action
as the backup system) is a virtual server. In this case, after a failover, replicas on
the other (failed-over) system cannot be properly removed from the database.
To remove the false entry from the VSSDB:
1. In the error messages, find the ID of the session which could not remove the
target volume.
2. Run:
omnidbvss -remove session SessionID -reference
where SessionID is the session whose target volume(s) could not be removed.
3. Upon successful removal, the command displays Removing references of
session SessionID from VSSDB.
P-VOL has no paired S-VOL.
Check the XP configuration as follows:
BC: All P-VOLs on the application system must have associated BC S-VOLs on the
backup system.
Restore problems
Problem
Instant recovery of the Microsoft Exchange Server Writer fails.
This problem may occur if the Microsoft Exchange Writer is not in the stable state.
Check this by running VSSadmin list writers from the command prompt.
Action
Bring the Exchange Server Writer to a stable state by restarting the Microsoft
Exchange Information Store.
Problem
After restore, the system restart error is displayed.
84
Integrating the Application Recovery Manager ZDB integrations and Microsoft Volume
Shadow Copy Service
Page 85

Action
In some cases, if the HBAs are changed on the application system, the software driver
from previous HBAs can cause this error after restore.
Remove older drivers of uninstalled HBAs from the application system.
Integration guide 85
Page 86

86
Integrating the Application Recovery Manager ZDB integrations and Microsoft Volume
Shadow Copy Service
Page 87

2 Application Recovery Manager Oracle integration
Introduction
You can employ a variety of backup strategies to best meet your system priorities. If
database availability is the highest priority, for instance, your backup strategy should
include online backups that are performed frequently to minimize recovery time. This
strategy limits downtime, but uses system resources more intensively. The Application
Recovery Manager zero downtime backup (ZDB) functionality offers online backup
capabilities with minimal degradation of the application system performance.
Supported disk arrays
The following disk arrays can be used for ZDB of Oracle:
• HP StorageWorks Disk Array XP (XP)
• HP StorageWorks Enterprise Virtual Array (EVA)
Advantages
The advantages of using Application Recovery Manager Oracle ZDB integration are:
• ZDB reduces the performance degradation of the application system.
• The tablespaces are in backup mode (online backup) or the database is shut
down (offline backup) only during the short period required to create a replica
(split the mirror disks or create snapshots).
• The load to the application system is significantly reduced. Following the replica
creation, tape backup using third–party backup software can be started on the
copied data, at leisure, using a separate backup system.
The Application Recovery Manager Oracle ZDB integration offers online and offline
backup of your Oracle Server System (application system).
Integration guide 87
Page 88

The online backup concept is widely used since it enables high application availability.
Offline backup requires shutting down the database while creating a replica, and
therefore does not offer high availability.
Backup and restore types
Backup
Using Application Recovery Manager, you can perform the following types of backup:
• Online ZDB
During the creation of a replica, the database on the application system is in hot
backup mode. Using third–party backup software, you can subsequently perform
streaming of the data to tape media on the backup system.
• Offline ZDB
During the creation of a replica, the database is shut down on the application
system. Therefore, the database is not available during the short time that it takes
to create the replica. Using third–party backup software, you can subsequently
perform streaming of the data to tape media on the backup system.
IMPORTANT:
Backup of archived logs and control file cannot be done with the Application Recovery
Manager Oracle integration. Backup of archive logs and control file has to be done
using third–party backup software. Using Application Recovery Manager, you can only
facilitate a control file backup by copying the control file to a specified location.
Restore
Using Application Recovery Manager and the disk array integrations, you can perform
a full database restore and database recovery. Database recovery is possible if the
archive logs and control file are provided. You can perform database recovery from
the archive logs available on the disk or by using your own supplied recovery script.
Integration concepts
See the HP Application Recovery Manager software concepts guide for a general
description of ZDB and instant recovery concepts.
Application Recovery Manager Oracle integration88
Page 89

Depending on the location of the Oracle control file, online redo log files, and SPFILE,
the following two options are possible:
• Oracle control file, online redo log files, and SPFILE reside on a different volume
group (if LVM is used) or source volume than Oracle datafiles.
By default, instant recovery is enabled if this option is selected in the GUI.
• Oracle control file, online redo log files, and SPFILE reside on the same volume
group (if LVM is used) or source volume as Oracle datafiles.
By default, instant recovery is not enabled, even if this option is selected in the
GUI. You can enable instant recovery by setting the ZDB_ORA_INCLUDE_CF_OLF,
ZDB_ORA_INCLUDE_SPF, and ZDB_ORA_NO_CHECKCONF_IR omnirc variables
to 1. See “ZDB integrations omnirc variables” on page 197.
IMPORTANT:
If you enable instant recovery by setting the above mentioned variables, note
that the control file, SPFILE, and online redo logs are overwritten during instant
recovery.
Figure 19 on page 90 shows the architecture of the Application Recovery Manager
Oracle integration. The figure illustrates the configuration, in which the backup of
an Oracle database can be performed on the backup system using third–party backup
software. It presents the default integration behavior, where Oracle control file, online
redo log files, and SPFILE reside on different disk array source volumes than the
Oracle data files. For more information on alternative Oracle backup and restore
concepts, see “ZDB integrations omnirc variables” on page 197.
Integration guide 89
Page 90

Figure 19 Oracle integration concept
SM The session manager controls backup and restore
sessions and writes the session information to the
IDB.
Disk Array Agent The disk array Agents (ZDB Agents) are SSEA (on
XP), and SMISA (on EVA).
Application Recovery Manager Oracle integration90
Page 91

Backup process
Figure 20 Oracle integration backup flow
See the HP Application Recovery Manager software administrator's guide for a
general description of the ZDB session flow and for an explanation of actions triggered
by ZDB options.
This section provides only the information relevant to the Application Recovery
Manager Oracle integration.
Integration guide 91
Page 92

Operations on a replica (mounting, activating volume/disk groups...) described
below are dependent on or triggered by ZDB options. See the HP Application
Recovery Manager software administrator's guide for more information on these
options.
• Backup Session Manager reads an Oracle backup specification and the backup
is started on the application system.
• In the case of online backup, the database is switched to the backup mode. In
the case of an offline backup session, the database is shut down.
• The following is checked:
• The configuration for instant recovery (if this option is selected).
• If the database files are on the disk array.
• If the database files are on the same source volumes as the control file, redo
logs, or SPFILE. (In this case, an error is reported.)
• Application Recovery Manager retrieves a list of files or raw disks to be included
in the replica creation from the Oracle database and starts the resolving process.
The list is used only to determine the source volumes to be replicated.
If the location for control file copy is specified during configuration, Application
Recovery Manager makes a copy of the control file to the specified directory on
the application system. If the specified location is on a source volume, the source
volume will be replicated during the backup.
• A ZDB Agent (SSEA or SMISA) is started on the application and backup systems
and creates a replica of the source volumes on which the database is installed.
• In the case of an online backup, the database files are taken out of the backup
mode after the replica is created.
In the case of an offline backup, the Oracle database is started by ob2rman.pl
after the replica is created.
• Application Recovery Manager starts the procedure to prepare the replica on the
backup system. In this step, volume groups on the backup system are enabled
(UNIX systems) and, unless the database is installed on raw disks, the mount
points containing the Oracle database files are mounted.
• A ZDB Agent then mounts the database on the backup system to the mount points,
specified in the GUI.
• The remaining ZDB options are processed and details of the session are written
to the ZDB database. The session then finishes.
Application Recovery Manager Oracle integration92
Page 93

NOTE:
A replica of the archive logs is not created; therefore, the archive logs should be backed
up from the application system, using third–party backup software.
The backup is not performed using RMAN and is not registered within Oracle.
Configuring the integration
Prerequisites
• It is assumed that you are familiar with the Oracle database administration and
the basic Application Recovery Manager functionality.
• You need a license to use the Application Recovery Manager Oracle integration.
Additional licenses are required for instant recovery and for the online extension.
See the HP Application Recovery Manager software installation and licensing
guide for information about licensing.
• Before you begin, ensure that you have correctly installed and configured the
Oracle Server and Application Recovery Manager systems. See the:
• HP Application Recovery Manager software product announcements, software
notes, and references or http://www.hp.com/support/manuals for an
up-to-date list of supported versions, platforms, devices, and other information.
• HP Application Recovery Manager software installation and licensing guide
for instructions on how to install Application Recovery Manager on various
architectures and how to install an Application Recovery Manager disk array
integration (XP or EVA) with Oracle.
• Oracle Recovery Manager User’s Guide and References for Oracle concepts
and backup/recovery strategies using Recovery Manager (not supported by
Application Recovery Manager).
• Oracle Backup and Recovery Guide for the configuration and use of Recovery
Manager, as well as for Oracle backup terminology and concepts.
• Oracle Enterprise Manager User’s Guide for information about backup and
recovery with the Oracle Enterprise Manager, as well as information about
SQL*Plus.
• An Application Recovery Manager disk array integration (XP or EVA) must be
correctly installed and configured. For installation, see the HP Application Recovery
Manager software installation and licensing guide. For configuration, see the HP
Application Recovery Manager software administrator's guide.
Integration guide 93
Page 94

• The Oracle Server software must be installed on the application system and the
• Oracle net services must be properly configured and running (on the application
• To enable offline backup, Oracle listener should be configured statically and not
Limitations
• The Oracle database identifier (DBID) must be a unique in an Application Recovery
• Individual tablespaces or datafiles cannot be backed up, only the whole database
• RAC configuration is supported only on HP-UX with SLVM managed raw disks
• Offline backup is not supported for RAC configurations.
Oracle target database must be open or mounted there.
system) for the Oracle target database. The net services are needed for the
Application Recovery Manager Oracle agent to be connected to the Oracle
database on the application system through Oracle.
See the Oracle Recovery Manager User’s Guide and References for more
information about different connection options.
See “Troubleshooting” on page 134 for details about how to check the prerequisites
listed above.
with the autoconfigure option.
Manager cell. If you clone a database you must change the DBID.
can be backed up.
on HP StorageWorks Disk Array XP.
Before you begin
• Identify the Oracle database user that will be used by Application Recovery
Manager for backup. This user must have the SYSDBA privilege granted. For
example, it could be the Oracle user sys, which is created during database
creation.
See the Oracle documentation for more information on user privileges in Oracle.
• From the application system, using SQL*Plus, connect to the target database by
specifying the user, password, and net connect identifier. Connect to the target
database as the database administrator.
Example
If the user name for the target database is system, password manager, net
service name PROD, then the command will look like:
sqlplus /nolog
Application Recovery Manager Oracle integration94
Page 95

SQL> connect system/manager@PROD as sysdba;
Connected.
• For online backup only, enable the Oracle automatic log archiving:
1. Shut down the Oracle target database instance on the application system.
2. Back up the entire database using a filesystem backup.
3. Select the location for archive logs:
• If SPFILE is used:
Run:
alter system set log_archive_dest=path_to_archive_logs
SCOPE=SPFILE;
• If the init.ora file is used:
Run:
log_archive_start=true
log_archive_dest=path_to_archive_logs
The default path of the file is:
Windows:
UNIX:
ORACLE_HOME\database\initDB_NAME.ora
ORACLE_HOME/dbs/initDB_NAME.ora
where DB_NAME is the name of the Oracle database instance.
4. Mount the target database and to enable the archive log mode, start SQL*Plus
and type:
Example
startup mount
alter database archivelog;
alter database open;
If the user name for the target database is system, password manager,
and instance name PROD, then the commands will look like:
sqlplus /nolog
SQL> connect system/manager@PROD as sysdba;
Connected.
SQL> startup mount;
SQL> alter database archivelog;
Statement processed.
SQL> archive log start;
Statement processed.
SQL> alter database open;
Integration guide 95
Page 96

5. Back up the entire database.
Cluster-aware clients
In cluster environment, if you intend to use the Application Recovery Manager CLI,
set the Application Recovery Manager environment variable OB2BARHOSTNAME to
the virtual server name. Set the variable on the Oracle Server system as follows:
Windows:
UNIX:
RAC:
only the virtual IP and the virtual hostname parameters and distribute it among the
RAC nodes.
set OB2BARHOSTNAME=virtual_server_name
export OB2BARHOSTNAME=virtual_server_name
To enable instant recovery, create an MC/ServiceGuard package containing
Configuring Oracle users on UNIX
On UNIX, to start an Oracle backup session, a user needs to perform an operating
system logon to the system where an Oracle Server is running.
If properly configured, this user is allowed to back up or restore an Oracle database.
To start a backup of an Oracle database using Application Recovery Manager, the
user must also become the owner of the Application Recovery Manager backup
specification.
As the owner of the backup specification, the Oracle user must be added to the
Application Recovery Manager admin or operator user group.
You can identify this user by running the following command on the Oracle Server
system:
ps -ef|grep ora_pmon_DB_NAME
or
ps -ef|grep ora_lgwr_DB_NAME
Figure 21 Finding the Oracle user
The example above states that the user ora has sufficient privileges within the Oracle
database to back up and restore the database. Therefore, this user must be added
Application Recovery Manager Oracle integration96
Page 97

to the corresponding Application Recovery Manager user group (admin or
operator) and must also become the owner of the backup specification to be able
to back up the Oracle database using Application Recovery Manager.
IMPORTANT:
Additionally, the user root on the Oracle Server has to be added to the Application
Recovery Manager admin or operator user group for both, the application and
backup system.
The user account for the added Oracle user must have the same numerical user ID
and group ID on the backup system and on the application system (for example,
UNIX user ora and UNIX group dba). The Oracle user must be identical on both
systems.
For information on how to add a user to a user group, see the online Help index:
“adding users”.
After the two users are added to the Application Recovery Manager admin or
operator user group, Application Recovery Manager sessions can be started under
the user account with all the necessary privileges required to perform an Oracle
database backup with Application Recovery Manager.
MC/ServiceGuard:
user root) to the Application Recovery Manager admin or operator group on
the virtual server and on every physical and virtual node in the cluster.
If two or more Oracle users have the same user ID, all of them must be added to the
Application Recovery Manager admin or operator user group.
In a cluster environment, add both users (the Oracle user and the
Configuring Oracle databases
Configuring an Oracle database involves preparing the environment for starting a
backup. The environment parameters such as the Oracle home directory and the
connection string to the database are saved in the Application Recovery Manager
Oracle configuration files on the Cell Manager. The database must be open during
the configuration procedure. The configuration must be done for each Oracle
database.
To configure an Oracle database, use the Application Recovery Manager GUI or
CLI.
Integration guide 97
Page 98

Using the Application Recovery Manager GUI
Configure an Oracle database when you create first backup specification for the
database. Start with the procedure described in
“Creating backup specifications” on page 106 and at Step 6 on page 111 proceed
as follows:
Application Recovery Manager Oracle integration98
Page 99

1. In the Configure Oracle dialog box and in the General page, specify the
pathname of the Oracle Server home directory.
Figure 22 Configuring Oracle - General (Windows)
Figure 23 Configuring Oracle - General (UNIX)
Integration guide 99
Page 100

2. In the Primary page, specify the login information to the primary database.
Note that the user must have the SYSDBA privilege granted.
In Services, type the net service name for the primary database instance. The
backup will be performed on the system where this database instance resides.
RAC:
List all net services names for the primary database separated by a comma.
Figure 24 Configuring Oracle - Primary
Application Recovery Manager Oracle integration100
 Loading...