

Page 1
HP LaserJet MFP
Analog Fax Accessory 300
Send Fax Driver Guide
Guide du pilote Envoi de télécopies
Guía del controlador envío de fax
Guia do driver de envio de fax
Page 2

12234
Page 3

HP LaserJet MFP
Analog Fax Accessory 300
English
Send Fax Driver Guide
Page 4

Copyright Information
© 2005 Copyright
Hewlett-Packard Development
Company, L.P.
Reproduction, adaptation or
translation without prior written
permission is prohibited, except
as allowed under the copyright
laws.
The information contained
herein is subject to change
without notice.
The only warranties for HP
products and services are set
forth in the express warranty
statements accompanying such
products and services. Nothing
herein should be construed as
constituting an additional
warranty. HP shall not be liable
for technical or editorial errors or
omissions contained herein.
Part number: Q3701-90933
Edition 1, 2/2006
Trademark Credits
Windows® is a U.S. registered
trademark of the Microsoft
Corporation.
Page 5

ENWW iii
Page 6

iv ENWW
Page 7

Contents
1 Setting up
System requirements . . . . . . . . . . . . . . . . . . . . . . . . . . . . . . . . . . . . . . 2
Operating system . . . . . . . . . . . . . . . . . . . . . . . . . . . . . . . . . . . . . 2
Displays. . . . . . . . . . . . . . . . . . . . . . . . . . . . . . . . . . . . . . . . . . . . . 2
Printer . . . . . . . . . . . . . . . . . . . . . . . . . . . . . . . . . . . . . . . . . . . . . . 2
Hardware. . . . . . . . . . . . . . . . . . . . . . . . . . . . . . . . . . . . . . . . . . . . 2
Network . . . . . . . . . . . . . . . . . . . . . . . . . . . . . . . . . . . . . . . . . . . . . 2
Installing the MFP Send Fax driver. . . . . . . . . . . . . . . . . . . . . . . . . . . . 3
Determining if the MFP Send Fax driver
is supported by the MFP . . . . . . . . . . . . . . . . . . . . . . . . . . . . 3
Upgrading the MFP firmware and downloading the driver . . . . . . 3
Verifying that the MFP e-mail feature is configured (optional). . . . 5
Configuring the billing code feature (optional). . . . . . . . . . . . . . . . 6
Installing the driver . . . . . . . . . . . . . . . . . . . . . . . . . . . . . . . . . . . . 6
Uninstalling the HP MFP Send Fax driver . . . . . . . . . . . . . . . . . . . . . 16
2 Faxing
Sending a fax to a single recipient . . . . . . . . . . . . . . . . . . . . . . . . . . . 18
Sending a fax to multiple recipients . . . . . . . . . . . . . . . . . . . . . . . . . . 20
Sending a fax by using the phone book . . . . . . . . . . . . . . . . . . . . . . . 23
Canceling a fax job. . . . . . . . . . . . . . . . . . . . . . . . . . . . . . . . . . . . . . . 26
Inserting special characters in the fax number. . . . . . . . . . . . . . . . . . 27
Editing the phone book. . . . . . . . . . . . . . . . . . . . . . . . . . . . . . . . . . . . 28
Adding names to the phone book . . . . . . . . . . . . . . . . . . . . . . . . 28
Removing names from the phone book. . . . . . . . . . . . . . . . . . . . 29
Editing names in the phone book . . . . . . . . . . . . . . . . . . . . . . . . 30
3 Configuration
Setting the sender information . . . . . . . . . . . . . . . . . . . . . . . . . . . . . . 34
Setting the fax quality. . . . . . . . . . . . . . . . . . . . . . . . . . . . . . . . . . . . . 35
Setting the notification settings. . . . . . . . . . . . . . . . . . . . . . . . . . . . . . 36
Setting the cover page information. . . . . . . . . . . . . . . . . . . . . . . . . . . 38
Setting the preview preference. . . . . . . . . . . . . . . . . . . . . . . . . . . . . . 39
Setting the fax driver printer preferences . . . . . . . . . . . . . . . . . . . . . . 39
Setting the billing code configuration . . . . . . . . . . . . . . . . . . . . . . . . . 41
4 Troubleshooting
Functional errors. . . . . . . . . . . . . . . . . . . . . . . . . . . . . . . . . . . . . . . . . 44
The test page does not print . . . . . . . . . . . . . . . . . . . . . . . . . . . . 44
The e-mail notification is disabled. . . . . . . . . . . . . . . . . . . . . . . . 44
An e-mail confirmation is not received. . . . . . . . . . . . . . . . . . . . . 45
ENWW v
Page 8

PC FAX SEND does not appear on the MFP control panel . . . . 45
The bitmap does not appear or print on the cover page . . . . . . . 46
The preview does not appear . . . . . . . . . . . . . . . . . . . . . . . . . . . 46
A billing code is required after disabling the feature . . . . . . . . . . 46
The billing code text box does not appear. . . . . . . . . . . . . . . . . . 47
The default fields do not refresh . . . . . . . . . . . . . . . . . . . . . . . . . 49
Changed settings do not take effect . . . . . . . . . . . . . . . . . . . . . . 49
Changed settings do not take effect in
a Point and Print installation. . . . . . . . . . . . . . . . . . . . . . . . . 50
Warning messages. . . . . . . . . . . . . . . . . . . . . . . . . . . . . . . . . . . . . . . 51
PC fax feature may be disabled at the MFP warning . . . . . . . . . 51
Cover page functionality will not be available warning . . . . . . . . 52
Error messages . . . . . . . . . . . . . . . . . . . . . . . . . . . . . . . . . . . . . . . . . 53
vi ENWW
Page 9

1
Setting up
You can use the HP LaserJet MFP Send Fax driver to send faxes
from your computer to on e or more HP multifunction peripherals
(MFP). After it is installed, the driver can be accessed by printing to
the MFP Send Fa x printer driver.
This guide describes the fax functions that are included with the
MFP Send Fax driver and prov ides instructions about the following
tasks:
● Install the fax driver
● Send faxes
● Configure fax settings
● Troubleshoot problems
ENWW 1
Page 10

System requirements
Operating system
The MFP Send Fax driver is supported on the following operating
systems:
● Windows 2000
● Windows XP
● Windows XP Professional x64
● Windows Server 2003
● Windows Server 2003 x64
Displays
The MFP Send Fax module supports display types that have a
super video graphics adapter (SVGA) resolution of 800 x 600 pixels
or greater.
Printer
The following products support the MFP Send Fax driver:
● HP LaserJet 4345mfp
● HP Color LaserJet 4730mfp
● HP LaserJet 9040mfp
● HP LaserJet 9050mfp
● HP Color LaserJet 9500mfp
Hardware
The HP LaserJet MFP Analog Fax Accessory 300 must be installed
in the MFP before installing the MFP Send Fax driver. See the
HP LaserJet MPF Analog Fax Accessory 300 Fax Guide for more
information about installing this hardware.
Network
The MFP Send Fax printer driver must be used on a network printer.
It is not intended to be used on a local printer.
2 Chapter 1 Setting up ENWW
Page 11

Installing the MFP Send Fax driver
This section provides instructions about the following tasks:
● Determining if the MFP Send Fax driver is supported by the MFP
● Upgrading the MFP firmware and downloading the driver
● Verifying that the MFP e-mail feature is configured (optional)
● Configuring the billing code feature (optional)
● Installing the driver
Determining if the MFP Send Fax driver is supported by the MFP
The most current versions of the MFP firmware contain support for
the MFP Send Fax driver. To deter mine if your MFP firmware
supports the MFP Send Fax driver, use the following steps:
1 On the MFP control panel, press Menu.
2 Scroll to and touch FAX.
3 Scroll to and touch FAX SEND.
4 Scroll to and touch PC FAX SEND.
Note If PC FAX SEND does not appear in y our MFP menu, upgrade the MFP
firmware.
5 Touch ENABLED.
6 Touch EXIT.
Upgrading the MFP firmware and downloading the driver
To upgrade the MFP firmware and download the MFP Send Fax
driver, use the following steps:
1 View the configuration information on the MFP control panel to
determine the current firmware version.
a On the MFP control panel, press Menu.
b Touch INFORMATION.
c Touch PRINT CONFIGURATION. The configuration page
prints.
d The firmware datecode is listed in the section called Device
Information.
ENWW Installing the MFP Send Fax driver 3
Page 12

Note The firmware datecode is in the following format: YYYYMMDD
XX.XXX.X. The first string of numbers is the date, where YYYY
represents the year , MM represen ts the month, and DD represents t he
date. For example, a firmware datecode that begins with 20040225
represents February 25, 2004. The second string of numbers
represents the revision number of the firmware.
2 Go to Software & driver downloads for your MFP.
a Go to
www.hp.com .
b Type the MFP model number in the Search text box and
press Enter.
c In the Select a product pane in the Searc h results windo w,
select the specific MFP model number where the firmware
will be installed.
d In the Product Quick Links pane, click Software & driver
downloads.
3 Download the most current firmware.
a In the Select operating system pane, clic k Cross operat ing
system (BIOS, Firmware, Diagnostics, etc.).
b If the date that is listed in the Firmware table is more recent
than the datecode that is printed on the MFP configuration
page, click Download next to the appropriate file.
Note Different firmware files are a va ilable f or the v arious operating syste ms.
c In the File Download dialog box that opens, click Save.
d In the File Name text box in the Save As windo w that opens ,
type the location on your computer where you want to save
the firmware update file.
e Click Save.
f After the file has been downloaded, close th e File Do wnlo ad
dialog box, if necessary.
4 Download the MFP Send Fax driver.
a Click Back to return to the Select operating system pane.
Note If you do not return to the Select operating system pane when you
click Back, see step 2 for instructions about navigating to the Select
operating system pane.
b In the Select operating system pane, click the appropriate
operating system.
4 Chapter 1 Setting up ENWW
Page 13

Note The MFP Send Fax driver is supported on Windows 2000,
Windows XP, Windows XP Professional x64, Windows Server 2003,
and Windows Server 2003 x64.
c In the Driver table that appears, click Download next to the
HP MFP Send Fax driver.
d In the File Download dialog box that opens, click Save.
e In the File Name text box on the Save As window t hat opens,
type the location on your computer where you want to save
the MFP Send Fax driver file.
f Click Save.
g After the file has been downloaded, close the File Do wnlo ad
dialog box if necessary.
5 Install the downloaded firmware file. See the appropriate MFP
user guide for instructions about installing the remote firmware
update (RFU):
• HP LaserJet 4345mfp Series User Guide
• HP Color LaserJet 4730mfp User Guide
• HP LaserJet 9040mfp/9050mfp User Guide
• HP Color LaserJet 9500mfp User Guide
Verifying that the MFP e-mail feature is configured (optional)
The e-mail function on the MFP must be configured in order to
receive an e-mail notification when a fax has been sent by using
the MFP Send Fax driver.
Note The e-mail notification fe ature is optional.
See the appropriate MFP user guide f or instructions about configuring
the e-mail function:
● HP LaserJet 4345mfp Series User Guide
● HP Color LaserJet 4730mfp User Guide
● HP LaserJet 9040mfp/9050mfp User Guide
● HP Color LaserJet 9500mfp User Guide
ENWW Installing the MFP Send Fax driver 5
Page 14

Configuring the billing code feature (optional)
HP MFP Send Fax supports the use of billing codes when sending
faxes.
Note The billing code feature is optional.
To enable the billing code feature through the MFP control panel, use
the following steps:
1 On the MFP control panel, press Menu.
2 Scroll to and touch FAX.
3 Scroll to and touch FAX SEND.
4 Scroll to and touch BILLING CODE.
5 Touch CUSTOM to open the billing code screen.
6 Use the up and down arrows to select the minimum number of
digits in the billing code.
7 Touch OK to enable the billing code feature.
Note Touch OFF to disable the billing code feature.
Installing the driver
To install the MFP Send Fax driver by using the Add a Printer wizard
in Windows, use the following steps:
1 In Windows Explorer, double-click on the downloaded
MFP Send Fax driver executable file to extract the driver files.
2 Click Start, click Settings, and then click Printers and Faxes.
3 In the Printer Tasks pane in the Printers and Faxes window,
click Add a printer.
4 In the Add Printer Wizard welcome dialog box, click Next.
6 Chapter 1 Setting up ENWW
Page 15
5 Under Local or Network Printer, select Local printer attached
to this computer. Click Next.
Note Select Local printer attached to this computer to install the
MFP Send Fax driver on a network printer. The printer name is
HP MFP Send Fax when the driver is installed on a local printer.
If you select A network printer, or a printer attached to another
computer, then the IP address of the computer is required. Some
features, such as fa x pre view, are not availab le if the drive r is installed
by using the network printer installation (Point and Print).
The MFP Send Fax driver cannot be installed on a a printer that is
connected to the computer by a serial or parallel po rt. It must be on a
network.
6 If your computer is a lready co nnected to the MF P, under Select a
Printer Port, select Use the following port.
Note If your computer is not connected to the MFP, go to step 8.
ENWW Installing the MFP Send Fax driver 7
Page 16
7 In the Use the following port drop-down menu, select the name
or IP address of the MFP. Click Next and then go to step 13.
8 If your computer is not connected to the MF P, select Create a
new port under Select a Printer Port.
9 In the Type of port drop-down menu, select Standard TCP/IP
Port. Click Next.
8 Chapter 1 Setting up ENWW
Page 17
10 In the Add Standard TCP/IP Printer Port Wizard dialog box,
click Next.
11 Under Add Port, type the MFP printer name or IP address in the
Printer Name or IP Address text box and then click Next.
Note The default port name is the name that you t yped in the Printer Name
or IP Address te xt box. You can change this name by typing a new
name in the Port Name text box.
ENWW Installing the MFP Send Fax driver 9
Page 18

12 Click Finish.
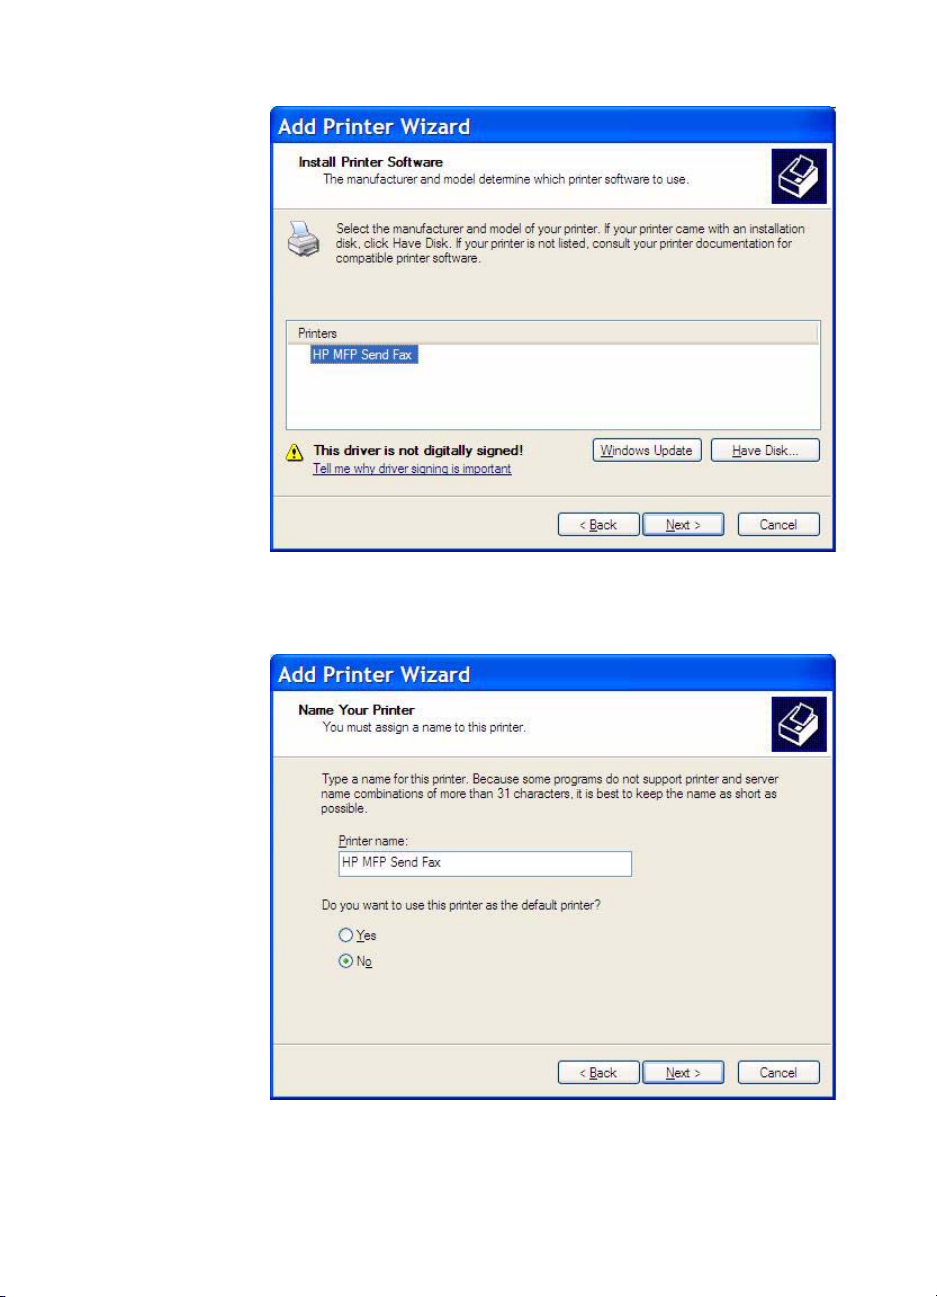
13 Under Install Printer Software, click Have Disk.
14 In the Install From Disk dialog box, click Browse.
15 Browse to and select the MFP Send Fax driv er .INF file extracted
in step 1.
Note Two versions of the .INF file are available: a 32-bit version for
Windows 2000, Windows XP, and Windows Server 2003 and a
64-bit version for Windows XP Professional x64 and
Windows Server 2003 x64.
A The s pecified location does not contain inf ormation about y our
printer message appears if yo u select the wrong version of the file.
16 Click OK.
10 Chapter 1 Setting up ENWW
Page 19
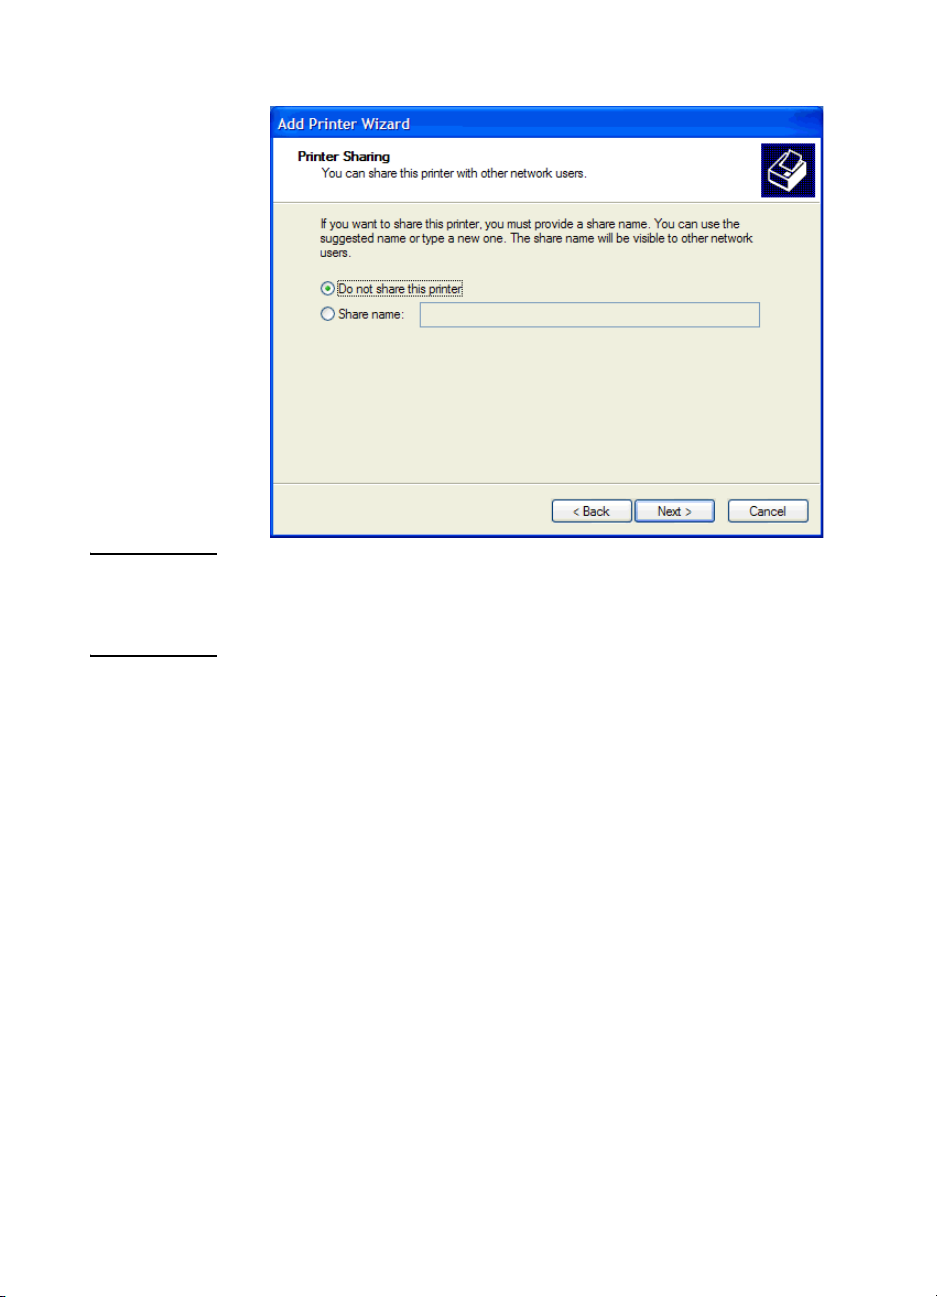
17 Under Install Printer Software, click Next.
18 In the Printer name text box under Name Your Printer, type a
name for the printer. The default printer name is HP MFP Send
Fax.
19 Click Next.
ENWW Installing the MFP Send Fax driver 11
Page 20
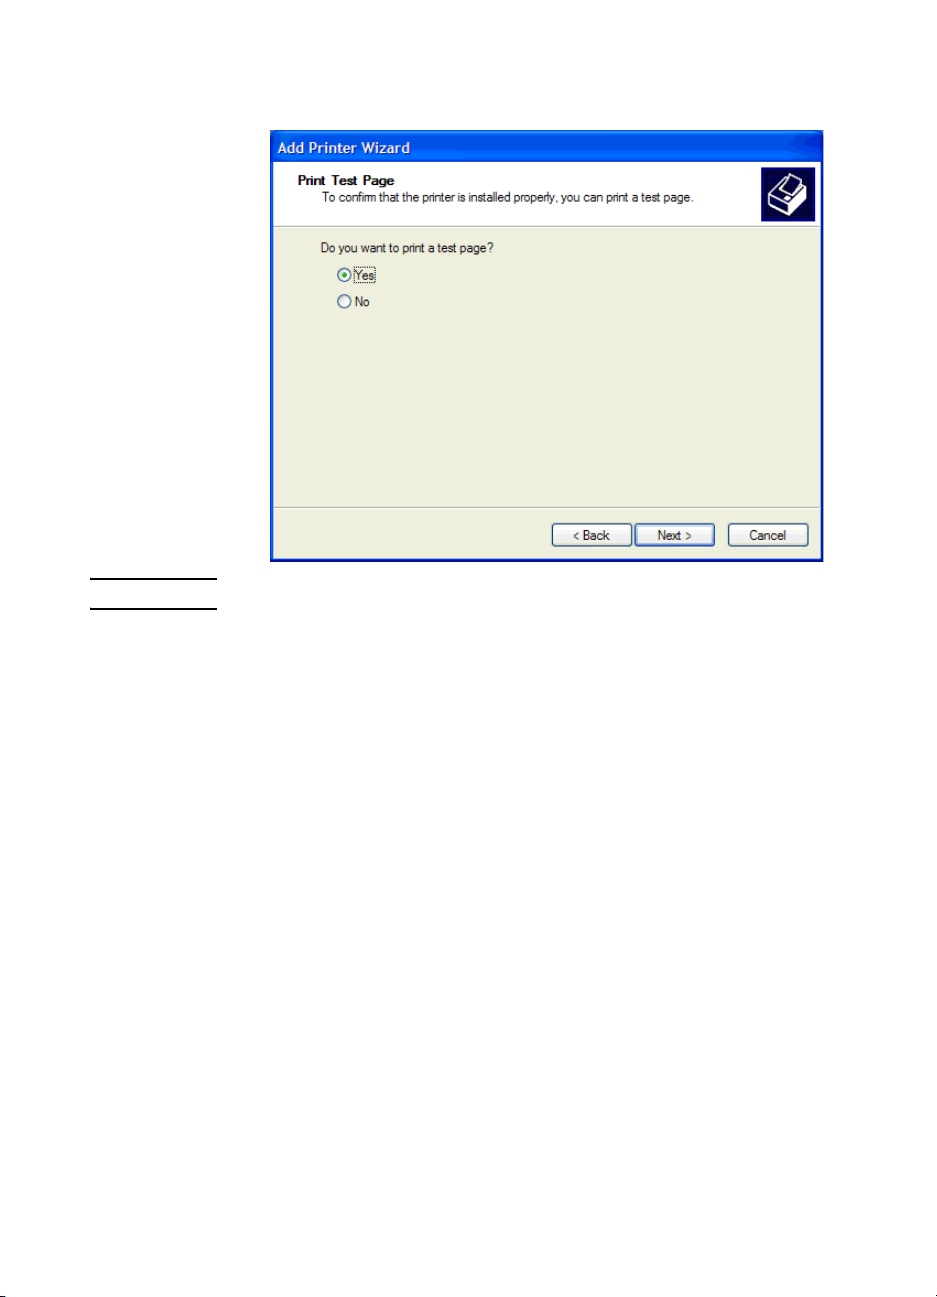
20 Under Printer Sharing, click Next.
Note You can share the printer by selecting Share name on the Printer
Sharing window . The MFP Send Fax driver is then av ailable for a P oint
and Print connection. Some features, such as fax preview, are not
availab le if the driver is accessed by using a Point and Print connection.
12 Chapter 1 Setting up ENWW
Page 21
21 Under Print Test Page, select Yes to print a test page and then
click Next.
Note Selecting Yes to print a test page sends a fax. No page is printed.
a On the Completing the Add Printer Wizard dialog box,
click Finish to complete the wizard and continue sending a
test fax.
ENWW Installing the MFP Send Fax driver 13
Page 22
b In the HP MFP Send Fax dialog box, click the Fax Job tab.
Note The Setup information is not required to send a test p age.
To set the default sender inf ormation and fax set tings f or all f ax es, see
“Configuration” on page 33.
14 Chapter 1 Setting up ENWW
Page 23
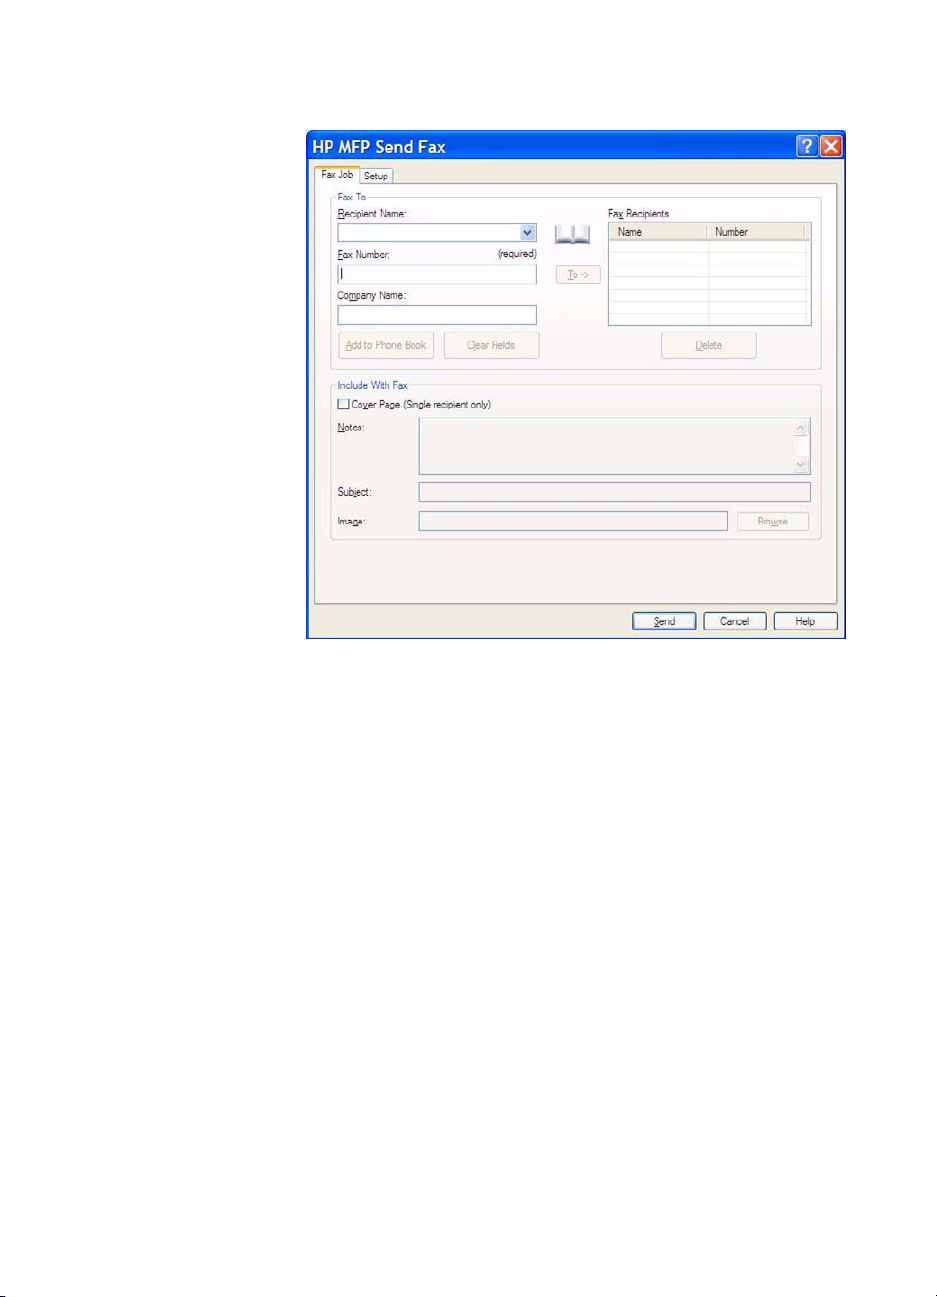
c In the Fax Number text box under Fax To, type the fax
number where the test page will be sent.
d Click Send.
ENWW Installing the MFP Send Fax driver 15
Page 24
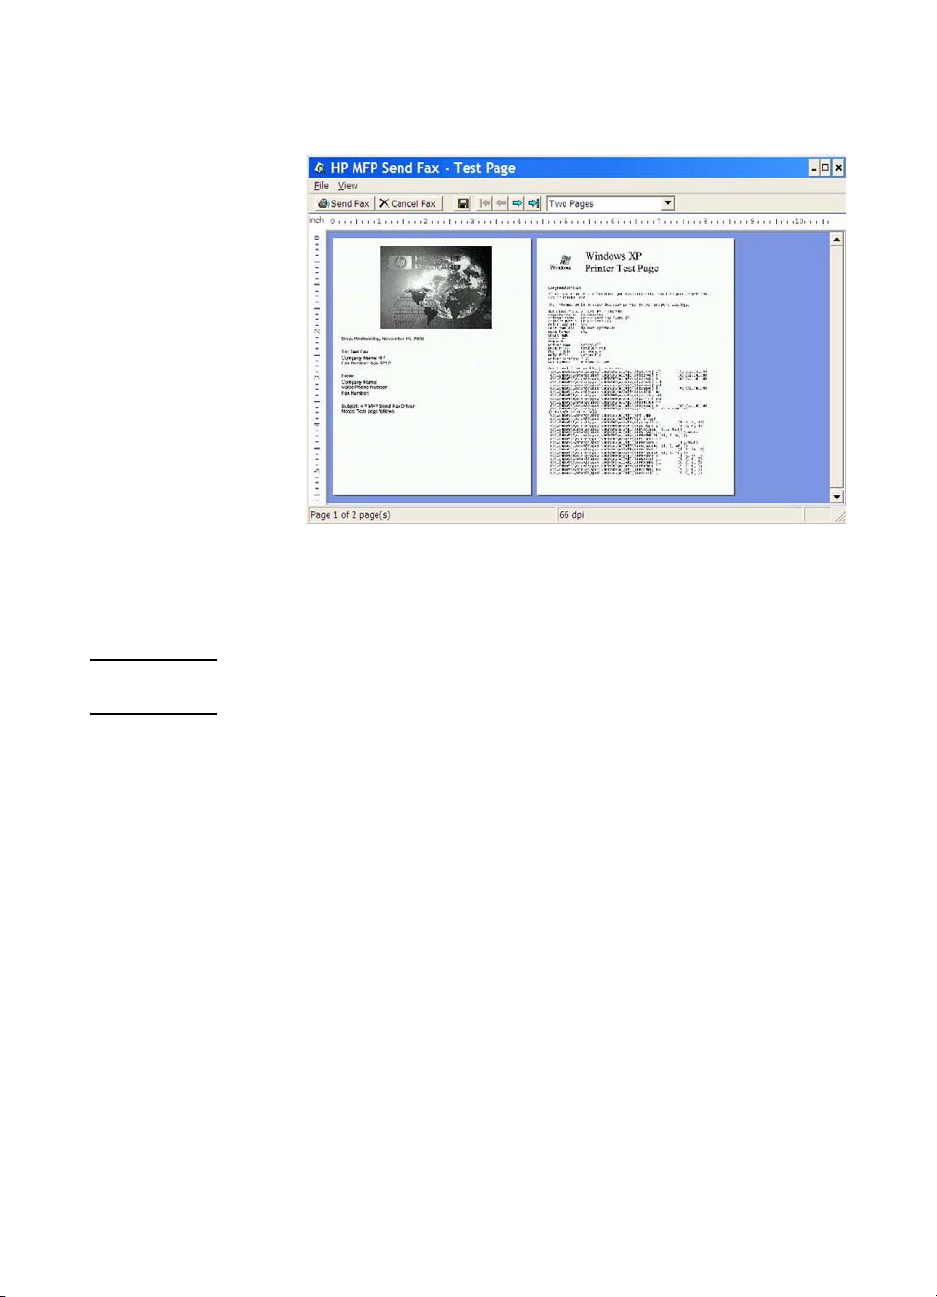
e The preview window opens if you selected Show Preview
Before Sending Fax on the Setup tab. On the toolbar, click
Send Fax.
f A message appears asking if the test page printed. Verify that
the test page printed on the receiving fax machine and then
click OK.
Note The test page is delivered to the f ax nu mber that y ou typed in t he Fax
Number text bo x on the Fax Job tab.
Uninstalling the HP MFP Send Fax driver
To uninstall the MFP Send Fax driver, use th e following steps:
1 Click Start, click Settings, and then click Printers and Faxes.
2 In the Printers and Faxes window, right-click the MFP printer
where MFP Send Fa x is insta lle d an d th en cl ick Delete.
3 Click Start, click Settings, and then click Printers and Faxes.
4 Right-click in the Printers and Faxes window and then click
Server Properties.
5 In the Print Server Properties dialog box, click Drivers.
6 Select the MFP Send Fax driver and then click Remove.
7 Click OK.
16 Chapter 1 Setting up ENWW
Page 25

2
Faxing
This chapter provides information about sending faxes and using the
MFP Send Fax phone book:
● Sending a fax to a single recipient
● Sending a fax to multiple recipients
● Sending a fax by using t he phone book
● Canceling a fax job
● Inserting special characters in the fax number
● Editing the phone book
ENWW 17
Page 26

Sending a fax to a single recipient
To send a fax to a single recipient, use the f ollowing steps:
1 Open the document to be faxed in the software program in which
it was created.
2 Click File and then click Print.
3 Select the HP MFP Send Fax driver from the list of printers.
4 Click OK or Print.
Note Click the button that sends a document to the printer. This might not
be labeled the same way in all programs.
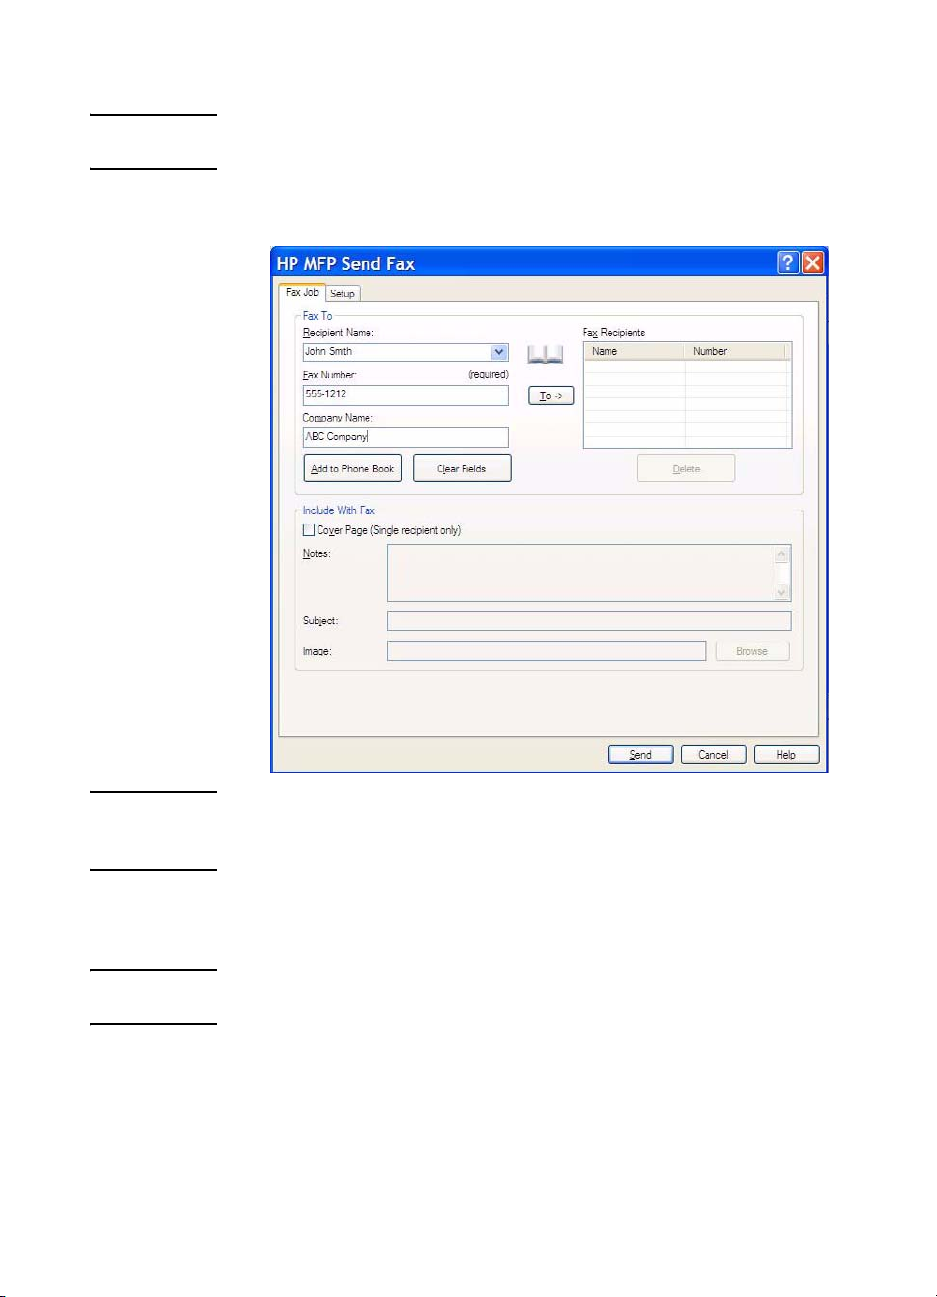
5 Under Fax To in the HP MFP Send Fax dialog box, type the
recipient name, f ax number, and company name. The f ax number
is the only required information.
Note See “Inserting special characters in the fax number” on pag e 27 for a
list of special characters that you can use in the Fax Number text field.
18 Chapter 2 Faxing ENWW
Page 27
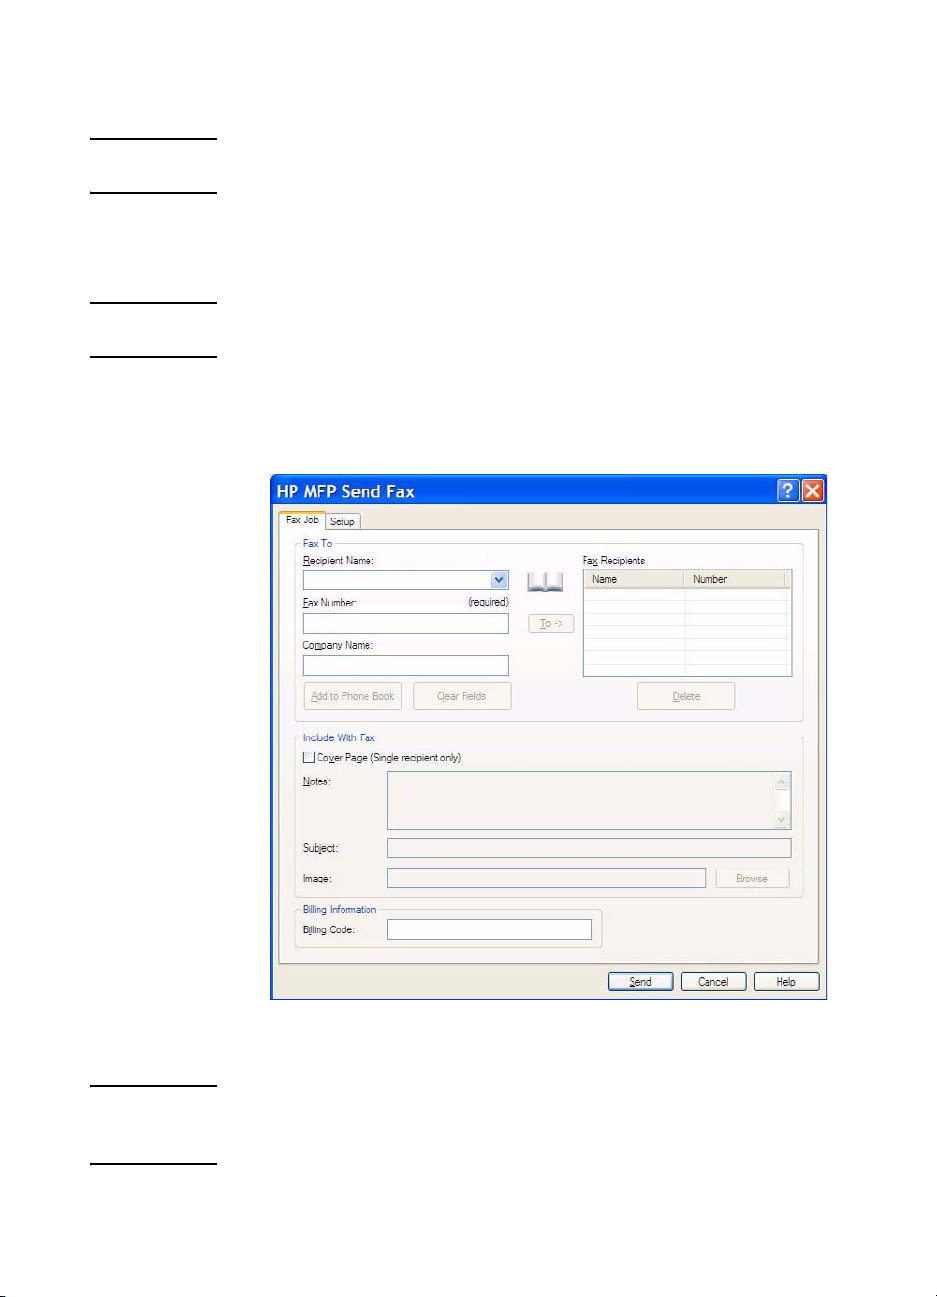
6 Click Add to Phone Book to add the recipient information to the
MFP Send Fax phone book. This step is optional.
Note Click Clear Fields to remove all of the values in the Recipient Name,
Fax Number, and Company Name text boxes.
7 The default cover page information appears under Include With
Fax in the HP MFP Send Fax dialog box. This inf ormation can be
changed for any individual fax job.
Note To set the default cov er page settings f o r all f axes , see “Con figuration”
on page 33.
8 If the billing code feature is enabled, type the billing code under
Billing Information in the HP MFP Send Fax dialog box. The
billing code can be changed for any individual fax job.
9 To send the fax with the default sender, fax quality, notification
information, and preview preferences, click Send.
Note Click the Setup tab in the HP MFP Send Fax dialog box to view the
sender, fax quality, notificati on, and p re view settings. This information
can be changed for any individual fax job. Click Send to send the fax.
ENWW Sending a fax to a single recipient 19
Page 28
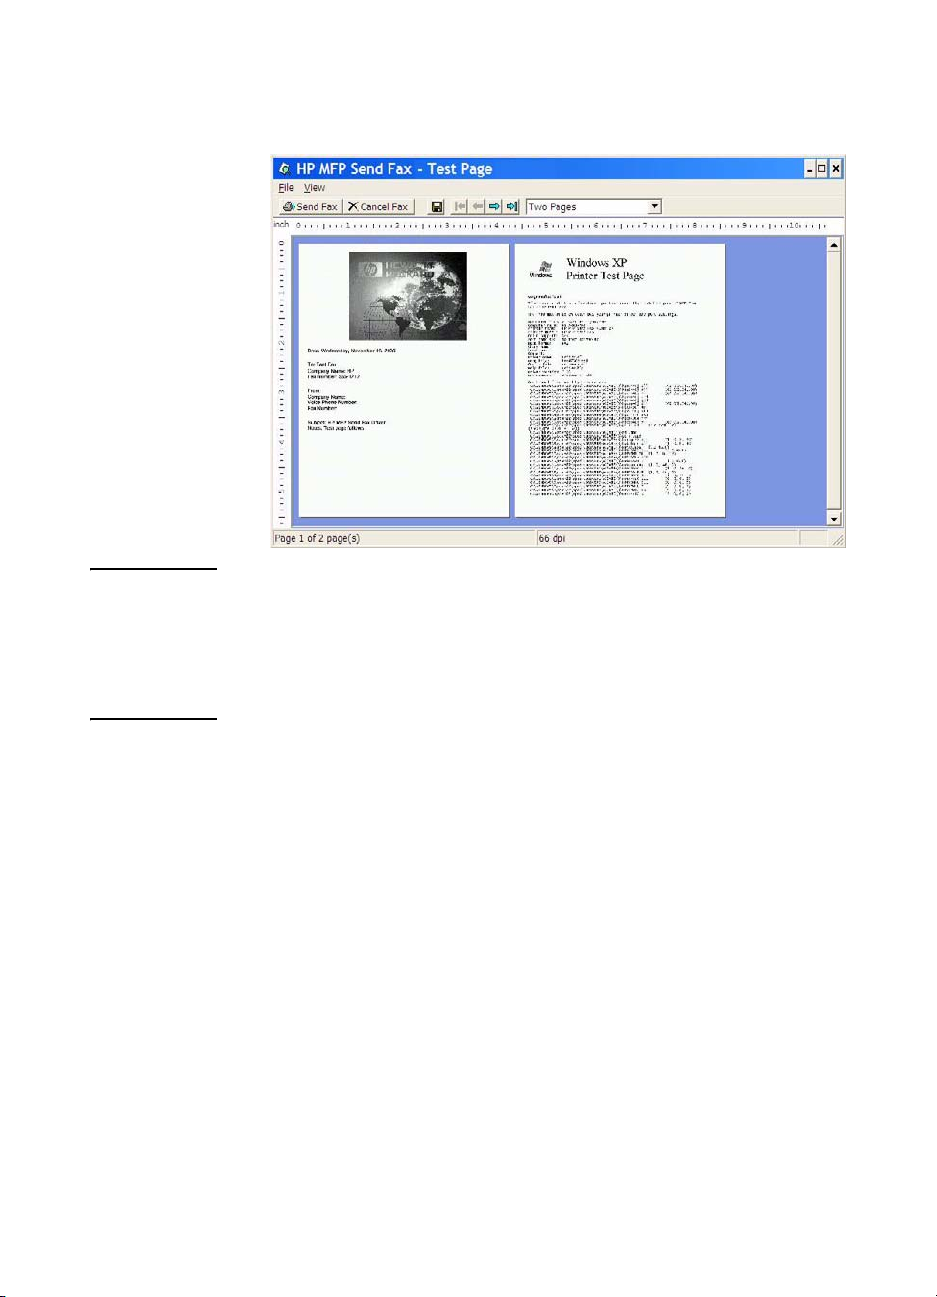
10 If you selected Show Preview Before Sending F ax on the
Setup tab, a preview of the fax job appears. Review the fax for
accuracy.
Note The preview function is not available when you use Point and Print.
Point and Print is a Windows feature that you can use to connect, print,
or fax to a remote printer without using installation disks. Files and
configuration information are automatically downloaded from the print
server to the client.
11 Click View or use the zoom drop-down menu to change the size
of the document preview.
12 Click the arrow buttons to navigate through the document.
13 Click Send Fax to send the f ax or clic k Cancel F a x to edit the fax
settings.
Sending a fax to multiple recipients
To send a fax to a multiple recipients, use the following steps:
1 Open the document to be faxed in the software program in which
it was created.
2 Click File and then click Print.
3 Select the HP MFP Send Fax driver from the list of printers.
20 Chapter 2 Faxing ENWW
Page 29
4 Click OK or Print.
Note Click the button that sends a document to the printer. This might not
be labeled the same way in all programs.
5 Under Fax To in the HP MFP Send Fax dialog box, type the
recipient name, fax number, and company name .
Note The fax number is the only required information. See “Inserting special
characters in the fax number” on page 27 for a list of special characters
that you can use in the Fax Number text field .
6 Click Add to Phone Book to add the recipient information to the
MFP Send Fax phone book. This step is optional.
Note Click Clear Fields to remove all of the values in the Recipient Name,
Fax Number, and Company Name text boxes.
7 Click To -> to add the recipient information to the F ax Recipients
field.
8 Repeat steps 5 through 7 for each f ax recipie nt. The f ax is sent to
all of the names that appear in the Fax Recipients field.
ENWW Sending a fax to multiple recipients 21
Page 30

Note Cover Page (Single recipient only) is disabled when the second
recipient is added to the Fax Recipients field. A cover pag e cannot be
used when you send faxes to multiple recipients.
9 If the billing code feature is enabled, type the billing code under
Billing Information in the HP MFP Send Fax dialog box. The
billing code can be changed for any individual fax job.
10 To send the fax with the default sender, fax quality, notification
information, and preview preferences, click Send.
Note Click the Setup tab on the HP MFP Send Fax dialog box to view the
sender, fax quality, notificati on, and p re view settings. This information
can be changed for any individual fax job. Click Send to send the fax.
22 Chapter 2 Faxing ENWW
Page 31

11 If you selected Show Preview Before Sending F ax on the
Setup tab, a preview of the fax job appears. Review the fax for
accuracy.
Note The preview function is not available when you use Point and Print.
Point and Print is a Windows feature that you can use to connect, print,
or fax to a remote printer without using installation disks. Files and
configuration information are automatically downloaded from the print
server to the client.
12 Click View or use the zoom drop-down menu to change the size
of the document preview.
13 Click the arrow buttons to navigate through the document.
14 Click Send Fax to send the f ax or clic k Cancel F a x to edit the fax
settings.
Sending a fax by using the phone book
To send a fax by using the phone book, use the following steps:
1 Open the document to be faxed in the software program in which
it was created.
2 Click File and then click Print.
3 Select the HP MFP Send Fax driver from the list of printers.
ENWW Sending a fax by using the phone book 23
Page 32

4 Click OK or Print.
Note Click the button that sends a document to the printer. This might not
be labeled the same way in all programs.
5 Under Fax To in the HP MFP Send Fax dialog bo x, clic k the book
icon.
6 In the Phone Book dialog box, select the name of each fax
recipient and click To -> to populate the Fax Recipients field.
7 After you have added all of the fax recipients to the Fax
Recipients field, click OK.
24 Chapter 2 Faxing ENWW
Page 33

8 Under Include With Fax in the HP MFP Send Fax dialog box,
clear Cover Page (Single recipient only) if it is selected.
Note A cover page cannot be used wh en sending faxes to multiple recipients .
If you do not clear Cover Page (Single recipient only), the following
error message appears:
9 If the billing code feature is enabled, type the billing code under
Billing Information in the HP MFP Send Fax dialog box. The
billing code can be changed for any individual fax job.
10 To send the fax to all of the f ax recipients with the default sender,
fax quality, notification information, and pre view pref erence s, clic k
Send.
ENWW Sending a fax by using the phone book 25
Page 34

Note Click the Setup tab on the HP MFP Send Fax dialog box to view the
sender, fax quality, notificati on, and p re view settings. This information
can be changed for any individual fax job. Click Send to send the fax.
11 If you selected Show Preview Before Sending F ax on the
Setup tab, a preview of the fax job appears. Review the fax for
accuracy.
Note The preview function is not available when you use Point and Print.
Point and Print is a Windows feature that you can use to connect, print,
or fax to a remote printer without using installation disks. Files and
configuration information are automatically downloaded from the print
server to the client.
12 Click View or use the zoom drop-down menu to change the size
of the document preview.
13 Click the arrow buttons to navigate through the document.
14 Click Send Fax to send the f ax or clic k Cancel F a x to edit the fax
settings.
Canceling a fax job
Three methods are available to cancel a f ax job:
1 Click Cancel Fax in the fax preview window.
2 On the MFP control panel, press the fax icon and then press the
red Stop/Cancel button.
26 Chapter 2 Faxing ENWW
Page 35

Note The status message Processing job must appear on the MFP wh en the
red Stop/Cancel button is pressed to cancel the fax.
3 On the MFP control panel, cancel faxes by using the fax menus.
a On the MFP control panel, press Menu.
b Scroll to and touch FAX.
c Scroll to and touch CANCEL CURRENT TRANSMISSION.
Note Scroll to and touch CANCEL ALL PENDING TRANSMISSIONS to
cancel all of the pending fax transmissions.
d Touch EXIT.
Inserting special characters in the fax number
The Fax Number text field accepts special characters in addition to
the numbers 0 through 9.
Table 1: Special characters
Special
Function
Character
- Use a hyphen in the fax number to mak e the
number easier to read.
( ) Use parenthesis in the fax number to make the
number easier to read.
[ ] Use an opening and closing bracket to hide a
portion of the fax number so that it does not print on
the fax cover sheet, call reports, or e-mail
confirmations. For example, a fax number might
include a calling-card access code. Type brackets
around the calling-card access code portion of the
fax number to prevent sho wing this information.
* The ast erisk is transmitted as a touch-tone.
# The number sign is transmitted as a touch-tone.
, A comma represents a 2-second pause when the
fax number is dialed. Use multiple commas for a
longer pause during dialing.
ENWW Inserting special characters in the fax number 27
Page 36

Editing the phone book
The phone book can be used to store the contact information that
appears under Fax To in the HP MFP Send Fax dialog box. Names
can be added and removed from the phone book.
The MFP Send Fax phone book is saved in the system registry.
HP does not recommend editing or copying this file.
Adding names to the phone book
To populate the phone book, use the following steps:
1 Under Fax To in the HP MFP Send Fax dialog bo x, clic k the book
icon.
2 In the Phone Book dialog box, click Add.
28 Chapter 2 Faxing ENWW
Page 37

3 In the Add to Phone Book dialog box, type the recipient name,
fax number, and company name in the text boxes.
4 Click OK.
5 In the Phone Book dialog box, click Add to add additional
names.
6 Click OK when y ou are f inish ed adding n ames to t he phone b ook.
Note Contacts cannot be imported into the MFP Send F ax phone book from
external e-mail programs.
Removing names from the phone book
To remove names from the phone book, use the following steps:
1 Under Fax To in the HP MFP Send Fax dialog bo x, clic k the book
icon.
ENWW Editing the phone book 29
Page 38

2 In the Phone Book dialog box, select the name that you want to
delete and then click Delete.
3 Click OK when you are done deleting names from the phone
book.
Editing names in the phone book
To edit names in the phone book, use the following steps:
1 Under Fax To in the HP MFP Send Fax dialog bo x, clic k the book
icon.
30 Chapter 2 Faxing ENWW
Page 39

2 In the Phone Book dialog box, select the name that you want to
edit and then click Edit.
3 In the Edit Phone Book Entry dialog box, edit the recipient
name, fax num ber, and company name in the text boxes.
4 Click OK when you are done editing.
ENWW Editing the phone book 31
Page 40

32 Chapter 2 Faxing ENWW
Page 41

Configuration
3
This chapter provides information about configuring the default
settings for the MFP Send Fax driver by using the Edit Defaults
button on the Setup tab:
● Setting the sender information
● Setting the fax quality
● Setting the notification settings
● Setting the cover page information
● Setting the preview preference
● Setting the fax driver printer preferences
● Setting the billing code configuration
Note The default settings might ha ve been set during the installation process.
ENWW 33
Page 42

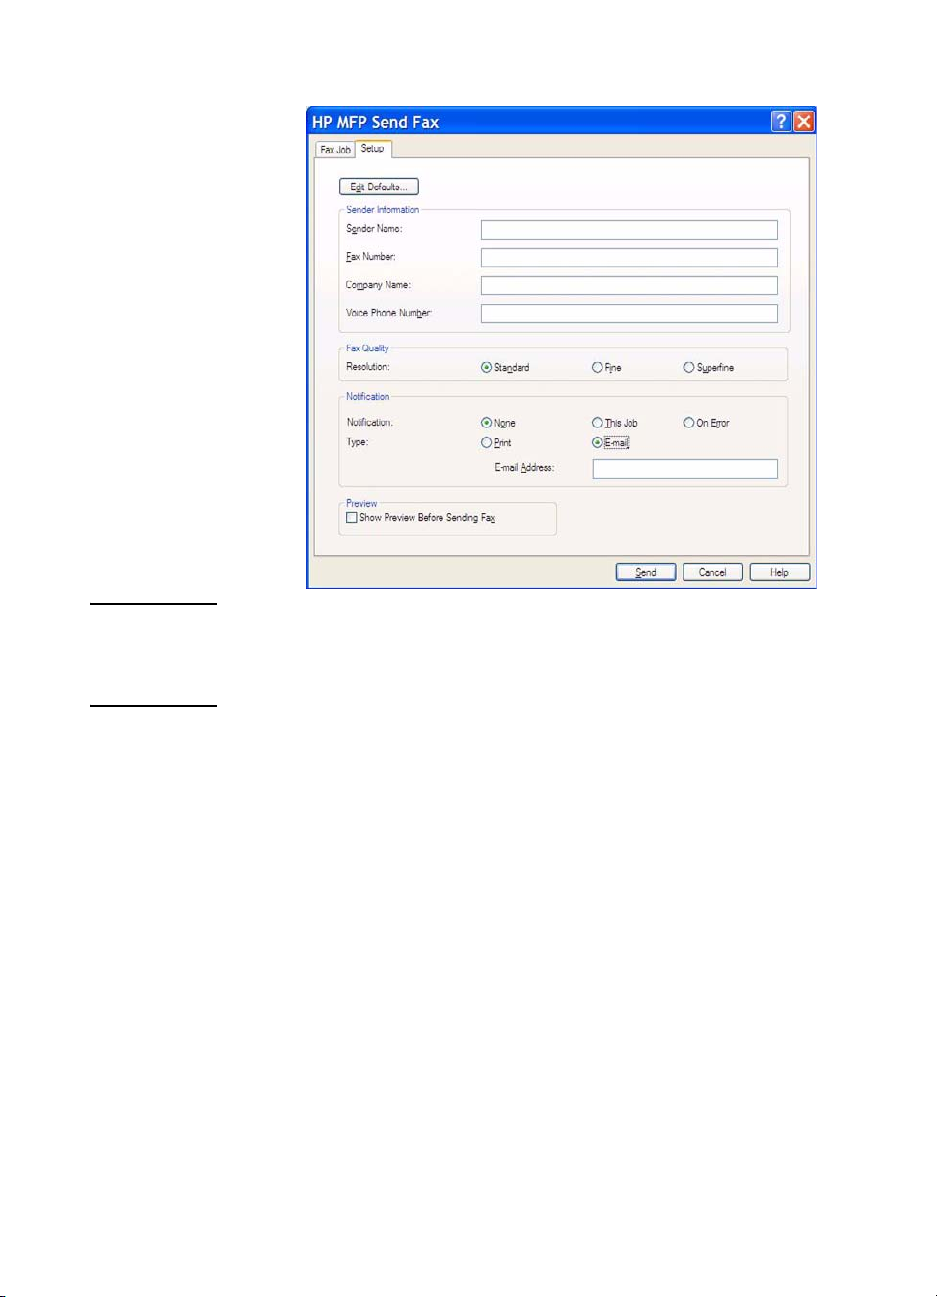
Setting the sender information
The default sender information is included on all faxes that you send
using the MFP Send Fax driver, including cover pages. The sender
information can be changed f or individual fax es using the text fields
on the Setup tab.
Note A cover page cannot be used when you send faxes to multiple
recipients.
To set the default sender information, use the following steps:
1 On the Setup tab, click Edit Defaults.
2 Under Sender Information in the Default Settings dialog box,
type the default sender name, company name, fax number, and
voice phone number.
34 Chapter 3 Configuration ENWW
Page 43

Note The information in the sender information fields on the Setup tab is
updated the first time that the sender information is entered in the
sender information fields in the Default Settings dialog box. If the
default sender information is changed later, the sender information
fields on the Setup tab are not refreshed. The changes are saved,
but the information does not appear in the dialog box. To show the
new information, exit from the MFP Send Fax driver and then restart
the driver.
3 Click OK.
Note To set all of the default information at the same time, select the
fax quality, notification, cover page, and preview settings and then
click OK.
Setting the fax quality
The fax quality setting defines the resolution that the MFP uses to
send the fax. The quality settings are as follows:
● Standard: 200 x 100 dots per inch (dpi)
● Fine: 200 x 200 dpi
● Superfine: 300 x 300 dpi
To set the fax quality, use the following steps:
1 On the Setup tab, click Edit Defaults.
ENWW Setting the fax quality 35
Page 44
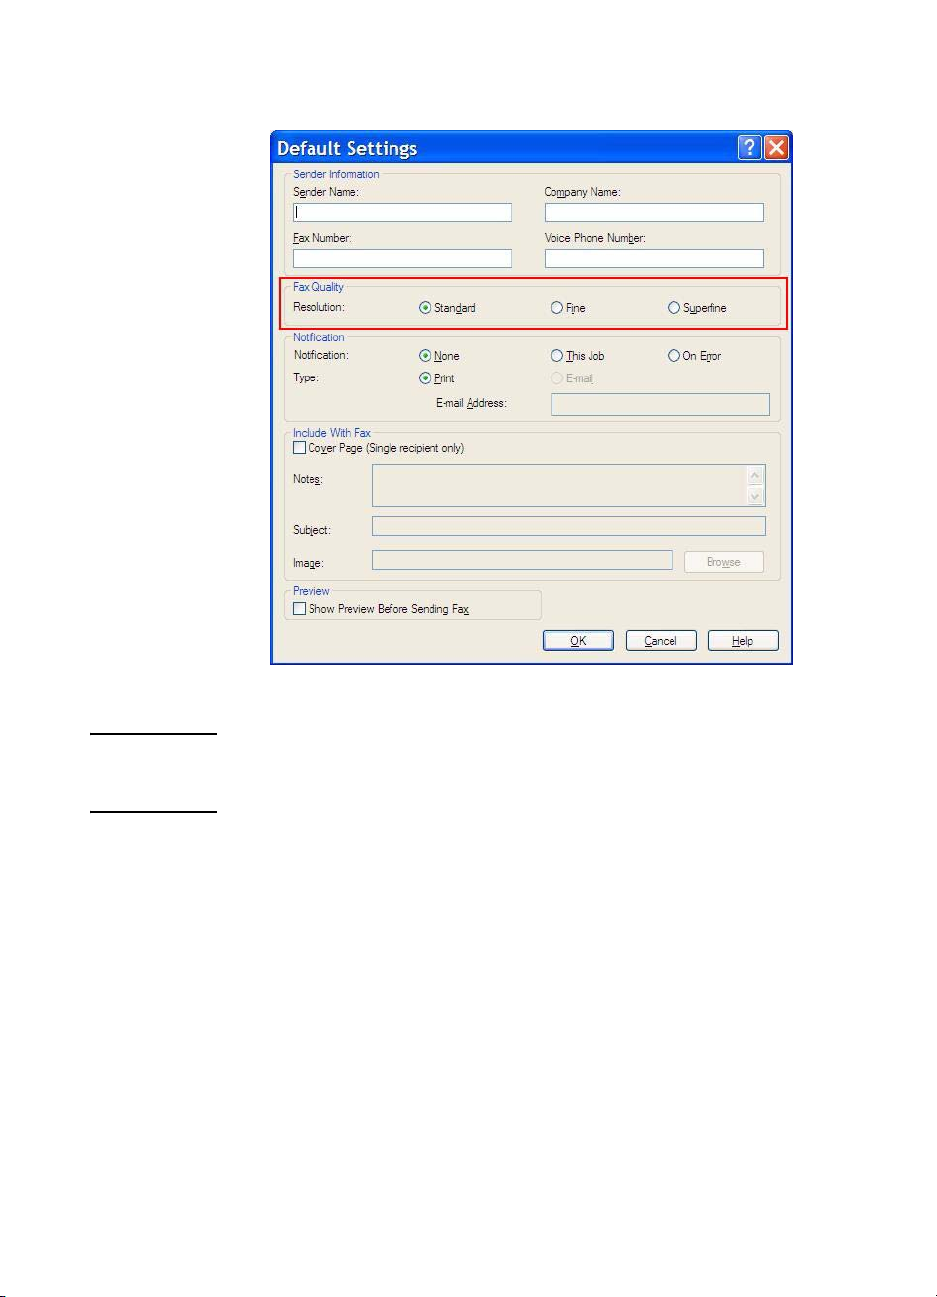
2 Under Fax Quality in the Default Settings dialog box, se lect th e
default quality for sending faxes.
3 Click OK.
Note To set all of the default information at the same time , select the sender
information, notification, cover page, and preview settings and then
click OK.
Setting the notification settings
The notification settings determine when and how notification of the
status of an outgoing fax is sent.
To change the notification settings, use the following steps:
1 On the Setup tab, click Edit Defaults.
36 Chapter 3 Configuration ENWW
Page 45

2 Under Notification in the Default Settings dialog box, select
when to receive notifications:
• None: notification is not sent.
• This Job: notification is sent when a fax is sent.
• On Error: notification is sent when an error occurs.
3 Select the type of notification to send:
• Print: notification is printed on the default printer.
• E-mail: notification is sent in an e-mail message. Type the
e-mail address in the E-mail Address text box.
Note The e-mail function must be configured on the MFP in or der to receive
an e-mail notification.
4 Click OK.
Note To set all of the default information at the same time , select the sender
information, fax quality, cover page, and previe w settings and then click
OK.
ENWW Setting the notification settings 37
Page 46

Setting the cover page information
Standardize the look of the fax cover page by using a default cover
page. Fields are included for notes, a subject line, and a company
logo or other image. The cover page settings can be modifi ed on the
Fax Job tab for individual fax jobs.
Note A cover page can only be included with faxes that are sent to single
recipients.
To change the cover page information, use the following steps:
1 On the Setup tab, click Edit Defaults.
2 Under Include With Fax in the Default Settings dialog box,
select Cover Page (Single recipient only).
3 In the Notes text box, type the default notes.
4 In the Subject text box, type the default subject line.
5 Click Browse to include an image on the cover page.
38 Chapter 3 Configuration ENWW
Page 47

6 Browse to and select a bitmap image file, such as a company logo.
Note The bitmap image is conv erted to gra yscale on t he cover sheet and is
located in the top one-third of the pag e.
7 Click OK.
Note To set all of the default information at the same time , select the sender
information, fax quality , notification, and pre view settings and then click
OK.
Setting the preview preference
The preview pr eference can be set to automatically preview e very fax
job before it is sent.
To preview every fax job before it is sent, use the following steps:
1 On the Setup tab, click Edit Defaults.
2 Under Preview in the Default Settings dialog box, select Show
Preview Before Sending Fax to preview each f ax automatically
before it is sent.
3 Click OK.
Note To set all of the default information at the same time , select the sender
information, fax quality, notification, and cover page settings and then
click OK.
Setting the fax driver printer preferences
To set the basic MFP Send Fax driver printing options through
Windows, use the following steps:
1 Click Start, click Settings, and then click Printers and Faxes.
2 On the Printers and Faxes window, right-click HP MFP Send
Fax and then click Printing Preferences.
ENWW Setting the preview preference 39
Page 48

3 In the HP MFP Send Fax Document Properties dialog box,
click Paper/Quality to set the default paper and quality
properties. To save the defau lt paper settings and close the dialog
box, click OK.
Note The Advanced tab on the HP MFP Send Fax Document Properties
dialog box does not contain an y information that affects th e MFP Send
Fax driv er. This tab is a standard Windows tab and cannot be remov ed
for this driver.
40 Chapter 3 Configuration ENWW
Page 49

4 Click Services to check the status of the printer and supplies or
to start the embedded Web server. The Services tab options
only appear if the MFP Send Fax driver is connected to a valid
TCP/IP port.
Note See the appropriate MFP user guide for more information about the
Embedded Web server.
5 To save any changes to the default settings and close the dialog
box, click OK.
Setting the billing code configuration
HP MFP Send Fax supports the use of billing codes when sending
faxes.
To enable or disable the billing code feature through the MFP control
panel after the MFP Send Fax driver has been installed, use the
following steps:
1 On the MFP control panel, press Menu.
2 Scroll to and touch FAX.
3 Scroll to and touch FAX SEND.
4 Scroll to and touch BILLING CODE.
ENWW Setting the billing code configuration 41
Page 50
5 Touch CUSTOM to open the billing code screen.
6 Use the up and down arrows to select the minimum number of
digits in the billing code.
7 Touch OK to enable the billing code feature or touch OFF to
disable the billing code feature.
Note If the billing code feature is enabled on the MFP, a billing code entry is
required for walk-up fax jobs sent from the MFP.
8 Click Start, click Settings, and then click Printers and Faxes.
9 Under Printer Tasks on the Printers and Faxes window,
right-click the name of the MFP and then click Properties.
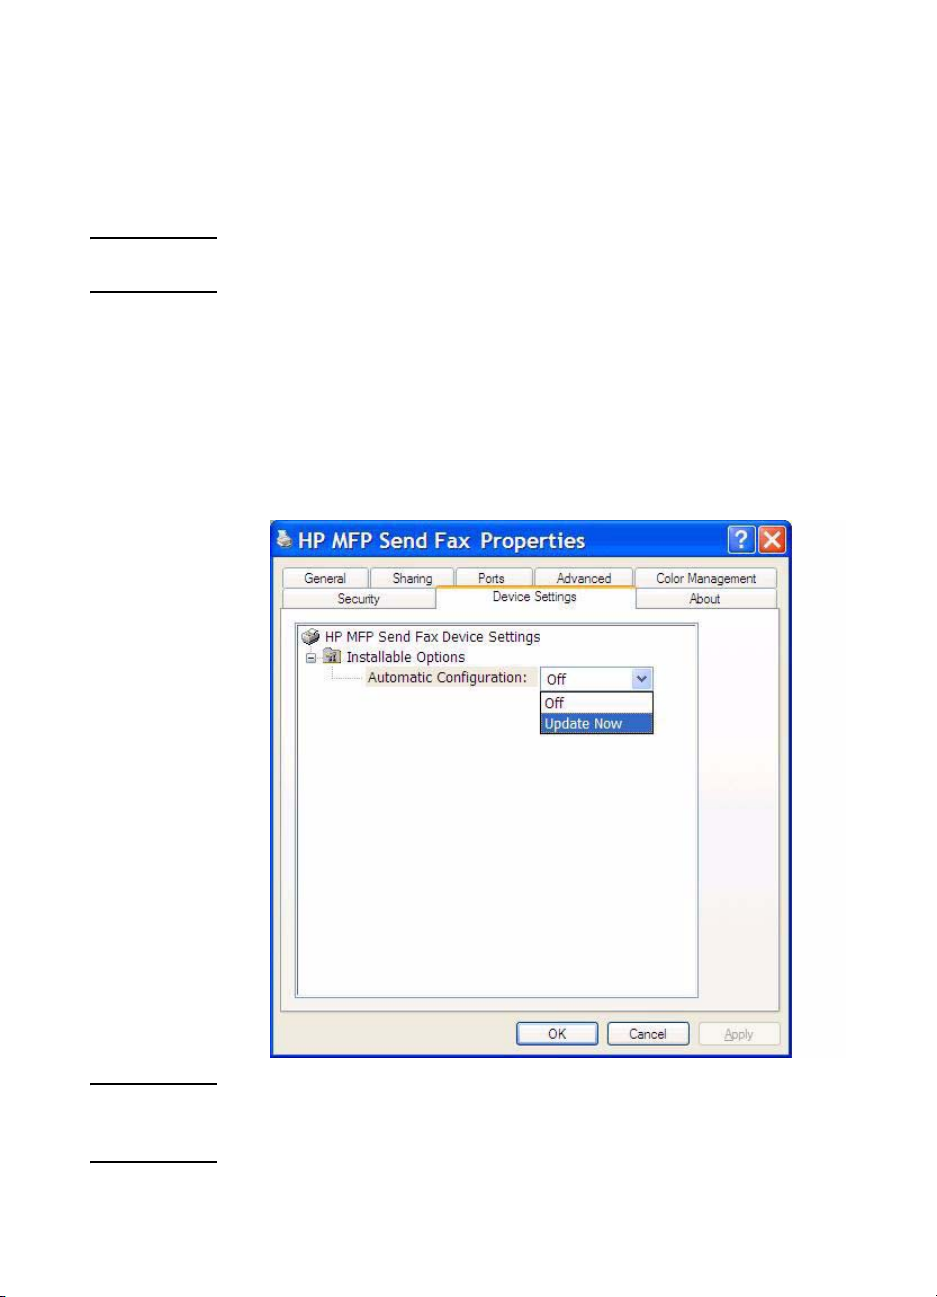
10 In the HP MFP Send Fax Properties dialog box, click Device
Settings.
11 In the Automatic Configuration: drop-down menu, select
Update Now.
Note Update Now stays selected in the Automatic Configuration
drop-down menu briefly. If y ou wait a few seconds or return to this dialog
box later, Off will be selected in the drop-down menu.
12 Click OK.
42 Chapter 3 Configuration ENWW
Page 51

4
Troubleshooting
Use the information in this chapter to troubleshoot general fax issues:
● Functional errors
• The test page does not print
• The e-mail notification is disabled
• An e-mail confirmation is not received
• PC FAX SEND does not appear on the MFP control panel
• The bitmap does not appear or print on the cover page
• The preview does not appear
• A billing code is required after disabling the feature
• The billing code text box does not appear
• The default fields do not re fresh
• Changed settings do not take effect
• Changed settings do not take effect in a Point and Print
installation
● Warning messages
• PC fax feature may be disabled at the MFP warning
• Cover page functionality will not be available warning
● Error messages
ENWW 43
Page 52

Functional errors
The following sections describe issues that might occur when using
the HP MFP Send Fax driv er.
The test page does not print
View the MFP Send F ax configura tion inf ormation on the MFP control
panel to determine if the driver installation wa s successful and the PC
Fax Send feature is enabled.
To view the configuration information, use the following steps:
1 On the MFP control panel, press Menu.
2 Scroll to and touch FAX.
3 Scroll to and touch FAX SEND.
4 Scroll to and touch PC FAX SEND.
5 Touch ENABLED.
6 Touch EXIT.
The e-mail notification is disabled
The e-mail notification type is disabled under Notification on the
Setup tab in the HP MFP Send Fax dialog box because the e-mail
function is not enabled on the MFP.
See the appropriate user guide for instructions about configuring the
e-mail function:
● HP LaserJet 4345mfp Series User Guide
● HP Color LaserJet 4730mfp User Guide
● HP LaserJet 9040mfp/9050mfp User Guide
● HP Color LaserJet 9500mfp User Guide
To update the HP MFP Send Fax settings after enabling the e-mail
feature on the MFP, use the following steps:
1 Click Start, click Settings, and then click Printers and Faxes.
2 Under Printer Tasks on the Printers and Faxes window,
right-click the name of the MFP and then click Properties.
3 In the HP MFP Send Fax Properties dialog box, click Device
Settings.
44 Chapter 4 Troubleshooting ENWW
Page 53

4 In the Automatic Configuration drop-down menu, select
Update Now.
5 Click OK.
An e-mail confirmation is not received
No e-mail confirmation is sent if the receiving fax machine does not
answer, is busy, or if the number of redials that is configured on
the MFP has not been reached. After the MFP has reached the
configured number of redials, confirmation notification is sent.
PC FAX SEND does not appear on the MF P control panel
PC FAX SEND does not appear on the MFP control panel after
installing the MFP Send Fax driver.
Firmware is packaged in bundles called remote firmware updates
(RFU). These bundles contain firmware updates for the MFP and
different sub-systems located in the MFP. When the RFU bundle is
sent to the MFP, the MFP sends the individual firmware updates to
its other sub-systems. Sometimes, not all of these updates happen
at the same time.
ENWW Functional errors 45
Page 54

To complete the firmware update, use the following steps:
1 Verify that the MFP firmware has been updated to the most
current version available. If the firmware has not been updated,
see “Upgrading the MFP firmware and do wnloading the driver ” on
page 3.
2 Turn the MFP off and then turn it on again.
3 On the MFP control panel, press Menu.
4 Scroll to and touch FAX.
5 Scroll to and touch FAX SEND.
6 Scroll to and touch PC FAX SEND.
7 Touch ENABLED.
8 Touch EXIT.
If PC FAX SEND still does not appear on the MFP control panel, see
the HP LaserJet MFP Analog Fax Accessory 300 Fax Guide to
ensure that the analog fax accesso ry is configured correctly.
If the analog fax accessory is configured correctly and PC FAX SEND
still does not appear on the MFP control panel, contact HP Customer
Care.
The bitmap does not appear or print on the cover page
The bitmap file will not appear or print on the cover page if the bitmap
file is too large. The fax image-rendering process will bypass
rendering the image on the cover page if the performance of the
computer would be significantly reduced. Reduce the size of the
bitmap to include it on the cover page.
The preview does not appear
To see a preview of the fax job, select Show Preview Before
Sending Fax on the Setup tab.
A billing code is required after disabling the feature
A billing code is required in the Billing Code text box on the Fax Job
tab after the billing code feature has been disabled at the MFP.
To update the driver so that the Billing Code text box does not
appear on the Fax Job tab, use the following steps:
1 Click Start, click Settings, and then click Printers and Faxes.
46 Chapter 4 Troubleshooting ENWW
Page 55

2 Under Printer Tasks on the Printers and Faxes window,
right-click the name of the MFP and then click Properties.
3 In the HP MFP Send Fax Properties dialog box, click Device
Settings.
4 In the Automatic Configuration: drop-down menu, select
Update Now.
5 Click OK.
The billing code text box does not appear
If the billing code feature was disabled at the MFP when the MFP
Send Fax driver was installed, the Billing Code text box does not
appear on the Fax Job tab.
To enable billing codes through the MFP control panel and make the
Billing Code text box available on the Fax Job tab, use the follo wing
steps:
1 On the MFP control panel, press Menu.
2 Scroll to and touch FAX.
3 Scroll to and touch FAX SEND.
4 Scroll to and touch BILLING CODE.
ENWW Functional errors 47
Page 56

5 Touch CUSTOM to open the billing code screen.
6 Use the up and down arrows to select the minimum number of
digits in the billing code.
7 Touch OK to enable billing codes.
8 Click Start, click Settings, and then click Printers and Faxes.
9 Under Printer Tasks on the Printers and Faxes window,
right-click the name of the MFP and then click Properties.
10 In the HP MFP Send Fax Properties dialog box, click Device
Settings.
11 In the Automatic Configuration: drop-down menu, select
Update Now.
12 Click OK.
48 Chapter 4 Troubleshooting ENWW
Page 57

The default fields do not refresh
The information in the sender information fields on the Setup tab is
updated the first time that the sender information is entered in the
sender information fields in the Default Settings dialog box. If the
default sender information is changed later, the sender information
fields on the Setup tab are not refreshed. The changes are saved, b ut
the information does not appear in the dialog box. To show the new
information, exit from the MFP Send Fax driver and then restart the
driver.
Changed settings do not take effect
The MFP Send Fax driver captures fax configuration information
during installation. If settings are changed after the drive r is insta lled,
complete a manual update by using the Update Now feature to
synchronize the driver with the MFP settings.
To synchronize the driver with the MFP settings using Update Now,
use the following steps:
1 Click Start, click Settings, and then click Printers and Faxes.
2 Under Printer Tasks in the Printers and Faxes window,
right-click the name of the MFP and then click Properties.
3 In the HP MFP Send Fax Properties dialog box, click Device
Settings.
ENWW Functional errors 49
Page 58

4 In the Automatic Configuration: drop-down menu, select
Update Now.
5 Click OK.
Changed settings do not take effect in a Point and Print installation
If you are using a Point and Print installation, the notification, billing
code, billing-code length, and fax-enabled features cannot be
refreshed by using the Update Now feature. To make these setting
changes take effect in a Point a nd Print installation, delete the Send
Fax printer and then reinstall the printer.
Note The fax pre vie w function is not a v ailable when y ou use Point and Print.
50 Chapter 4 Troubleshooting ENWW
Page 59

Warning messages
The following warning messages might appear when you use the
HP MFP Send Fax driver.
PC fax feature may be disabled at the MFP warning
The PC fax feature may be disabled at the MFP warning appears if
the driver port has been c han ge d.
To update the configuration settings, use the following steps:
1 In the MFP Send Fax Warning message box, click OK.
2 Verify that the MFP firmware has been updated to the most
current version available. See “Determining if the MFP Send Fax
driver is supported by the MFP” on page 3.
3 V erify that the PC FAX SEND feature is enabled on the MFP. See
“Uninstalling the HP MFP Send Fax driver” on page 16.
4 Click Start, click Settings, and then click Printers and Faxes.
5 Under Printer Tasks on the Printers and Faxes window,
right-click on the name of the MFP and then click Properties.
6 In the HP MFP Send Fax Properties dialog box, click Device
Settings.
ENWW Warning messages 51
Page 60

7 In the Automatic Configuration: drop-down menu, select
Update Now.
8 Click OK.
Cover page functionality will not be available warning
The cover pa ge functionality will not be available warning appears
when a fax is sent to more than one recipient and Cover Page
(Single recipient only) is selected on the Fax Job tab.
● Click Yes to send the fax without a cover page to all recipients.
● Click No to return to the Fax Job tab.
52 Chapter 4 Troubleshooting ENWW
Page 61

Error messages
If a fax problem occur s that prevents or interrupts sending or
receiving a fax, an error message is generated that helps determine
the cause of the problem. See table 2 for a list of error messages,
the possible causes of the message, and solutions to the error.
Table 2: Error messages
Error
Message
At least one
fax number is
required
Missing
required
information:
Billing Code
The billing
code must be
at least “n”
digits
Missing
required
information:
E-mail address
Cause Solution
A fax number was not
typed in the Fax Number
text box on the Fax Job
.
tab
A billing code was not
typed in the Billing Code
text box on the Fax Job
tab. This error only occurs
when billing codes are
enabled.
The billing code was
configured on the MFP to
contain a specified
number of digits. This
error occurs when billing
codes are enabled and
the billing code in the
Billing Code text box on
the Fax Job tab does not
contain the correct
number of digits.
An e-mail address was
not typed in the E-mail
address text box on the
Setup tab when E-mail
notification was
selected.
Type a fax number in the
Fax Number text box on
the Fax Job tab.
Type a billing code in the
Billing Code text box on
the Fax Job tab.
Check the billing code
that is typed in the Billing
Code text box on the Fax
Job tab. Type a billing
code with the specified
number of digits.
Type an e-mail address in
the in the E-mail address
text box on the Setup tab.
Warning: This
is a duplicate
entry. Please
enter a
different name
or fax number.
ENWW Error messages 53
A duplicate entry was
added to the phone book.
Type a different name or
fax number.
Page 62

Table 2: Error messages
Error
Message
The file cannot
be found
The e-mail
address is not
in a
recognized
format. Do you
still want to
use it?
Cause Solution
A fax was sent with an
invalid Image path
specified in the Image
text box on the Fax Job
tab or the Setup tab.
A fax was sent with a path
to a missing image file
specified in the Image
text box on the Fax Job
tab or the Setup tab.
A fax was sent with a path
to an invalid file type
specified in the Image
text box on the Fax Job
tab or the Setup tab.
The e-mail address in the
E-mail address text box
on the Setup tab is not a
valid e-mail address.
Type a valid path to the
image in the Image text
box on the Fax Job tab or
the Setup tab.
Type a valid path to the
image in the Image text
box on the Fax Job tab or
the Setup tab.
Type a valid path to a
bitmap image in the
Image text box on the
Fax Job tab or the Setup
tab.
Click Yes to send the
e-mail to the specified
address.
Click No to return to the
Setup tab to change the
e-mail address.
Reached
maximum
number of
entries
54 Chapter 4 Troubleshooting ENWW
The Fax Recipients list
contains the maximum
number of fax recipients.
The F ax Recipients list is
limited to 100 entries.
The phone book contains
the maximum number of
entries.
The phone book is limited
to 500 entries.
The maximum number of
fax numbers has been
entered. Send the fax to
any remaining recipients
by using a separate fax
job.
Remove entries in the
phone book.
Page 63

HP LaserJet MFP
Analog Fax Accessory 300
Français
Guide du pilote
Envoi de télécopies
Page 64

Copyright
© 2005 Copyright
Hewlett-Packard Development
Company, L.P.
Il est interdit de reproduire,
adapter ou traduire ce manuel
sans autorisation expresse par
écrit, sauf dans les cas permis
par les lois régissant les droits
d’auteur.
Les informations contenues
dans ce document sont sujettes
à modification sans préavis.
Les seules garanties
concernant les produits et
services HP sont énoncées
dans la garantie qui
accompagne ces produits et
services. Rien en ceci ne devra
être interprété comme
constituant une garantie
supplémentaire. HP ne pourra
être tenue pour responsable des
erreurs techniques et
rédactionnelles ou des
omissions présentes dans ce
document.
Numéro de référence :
Q3701-90933
Edition 1, 2/2006
Marques
Windows® est une marque
déposée aux Etats-Unis de
Microsoft Corporation.
Page 65

FRWW iii
Page 66

iv FRWW
Page 67

Sommaire
1 Installation
Configuration requise . . . . . . . . . . . . . . . . . . . . . . . . . . . . . . . . . . . . . . 2
Système d’exploitation. . . . . . . . . . . . . . . . . . . . . . . . . . . . . . . . . . 2
Affichage . . . . . . . . . . . . . . . . . . . . . . . . . . . . . . . . . . . . . . . . . . . . 2
Imprimante. . . . . . . . . . . . . . . . . . . . . . . . . . . . . . . . . . . . . . . . . . . 2
Matériel . . . . . . . . . . . . . . . . . . . . . . . . . . . . . . . . . . . . . . . . . . . . . 2
Réseau . . . . . . . . . . . . . . . . . . . . . . . . . . . . . . . . . . . . . . . . . . . . . 2
Installation du pilote MFP Send Fax. . . . . . . . . . . . . . . . . . . . . . . . . . . 3
Déterminer si le pilote MFP Send Fax est pris en
charge par le périphérique MFP. . . . . . . . . . . . . . . . . . . . . . . 3
Mise à niveau du micrologiciel du périphérique MFP et
téléchargement du pilote . . . . . . . . . . . . . . . . . . . . . . . . . . . . 4
Vérification de la configuration de la fonction de
courrier électronique du périphérique MFP (facultatif) . . . . . . 6
Configuration de la fonction de code de
facturation (facultatif) . . . . . . . . . . . . . . . . . . . . . . . . . . . . . . . 7
Installation du pilote. . . . . . . . . . . . . . . . . . . . . . . . . . . . . . . . . . . . 7
Désinstallation du pilote HP MFP Send Fax. . . . . . . . . . . . . . . . . . . . 19
2 Envoi de télécopies
Envoi d’une télécopie à un destinataire unique . . . . . . . . . . . . . . . . . 22
Envoi d’une télécopie à plusieurs destinataires . . . . . . . . . . . . . . . . . 25
Envoi d’une télécopie à l’aide de l’annuaire . . . . . . . . . . . . . . . . . . . . 28
Annulation d’une tâche de télécopie. . . . . . . . . . . . . . . . . . . . . . . . . . 32
Insertion de caractères spéciaux dans le numéro
de télécopieur . . . . . . . . . . . . . . . . . . . . . . . . . . . . . . . . . . . . . . . 32
Edition de l’annuaire. . . . . . . . . . . . . . . . . . . . . . . . . . . . . . . . . . . . . . 33
Ajout de noms à l’annuaire . . . . . . . . . . . . . . . . . . . . . . . . . . . . . 34
Suppression de noms de l’annuaire . . . . . . . . . . . . . . . . . . . . . . 35
Edition de noms dans l’annuaire . . . . . . . . . . . . . . . . . . . . . . . . . 36
3 Configuration
Définition des informations d’expéditeur. . . . . . . . . . . . . . . . . . . . . . . 40
Définition de la qualité de télécopie . . . . . . . . . . . . . . . . . . . . . . . . . . 41
Définition des paramètres de notification . . . . . . . . . . . . . . . . . . . . . . 42
Définition des informations de page de garde . . . . . . . . . . . . . . . . . . 44
Définition de la préférence d’aperçu. . . . . . . . . . . . . . . . . . . . . . . . . . 46
Définition des préférences d’imprimante du pilote
de télécopieur . . . . . . . . . . . . . . . . . . . . . . . . . . . . . . . . . . . . . . . 46
Définition de la configuration de code de facturation . . . . . . . . . . . . . 48
FRWW v
Page 68

4 Dépannage
Erreurs fonctionnelles. . . . . . . . . . . . . . . . . . . . . . . . . . . . . . . . . . . . . 52
La page de test ne s’imprime pas . . . . . . . . . . . . . . . . . . . . . . . . 52
La notification par courrier électronique est désactivée . . . . . . . 52
Aucune confirmation par courrier électronique n’est reçue. . . . . 54
PC FAX SEND (ENVOI DE TELECOPIE PC) ne s’affiche pas
sur le panneau de commande du périphérique MFP. . . . . . 54
Le bitmap n’apparaît pas ou ne s’imprime pas sur
la page de garde . . . . . . . . . . . . . . . . . . . . . . . . . . . . . . . . . 55
L’aperçu ne s’affiche pas. . . . . . . . . . . . . . . . . . . . . . . . . . . . . . . 55
Un code de facturation est requis après la désactivation
de la fonction . . . . . . . . . . . . . . . . . . . . . . . . . . . . . . . . . . . . 55
La zone de texte de code de facturation ne s’affiche pas . . . . . . 56
Les champs par défaut ne s’actualisent pas. . . . . . . . . . . . . . . . 58
Les paramètres modifiés ne prennent pas effet . . . . . . . . . . . . . 58
Les paramètres modifiés ne prennent pas effet
dans une installation Pointage et Impression. . . . . . . . . . . . 59
Messages d’avertissement. . . . . . . . . . . . . . . . . . . . . . . . . . . . . . . . . 60
Avertissement « La fonction de télécopie PC peut être
désactivée au niveau du périphérique MFP » . . . . . . . . . . . 60
Avertissement « La fonctionnalité de page de garde
ne sera pas disponible » . . . . . . . . . . . . . . . . . . . . . . . . . . . 62
Messages d’erreur . . . . . . . . . . . . . . . . . . . . . . . . . . . . . . . . . . . . . . . 62
vi FRWW
Page 69

1
Installation
Vous pouvez utiliser le pilote HP LaserJet MFP Send Fax pour
envoyer des télécopies à partir de votre ordinateur vers un ou
plusieurs périphériques multifonction (MFP) HP. Une fois le pilote
installé, vous pouvez y accéder en imprimant vers le pilote
d’imprimante MFP Send Fax.
Ce guide décrit les fonctions de télécopie incluses avec le pilote
MFP Send Fax et fournit des instructions sur les tâches suivantes :
● Installation du pilote de télécopie
● Envoi de télécopie s
● Configuration des paramètres de tél écopie
● Résolution de problèmes
FRWW 1
Page 70

Configuration requise
Système d’exploitation
Le pilote MFP Send Fax est pris en charge sous les systèmes
d’exploitation suivants :
● Windows 2000
● Windows XP
● Windows XP Professional x64
● Windows Server 2003
● Windows Server 2003 x64
Affichage
Le pilote MFP Send Fax prend en charge les types d’affichage dotés
d’une résolution SVGA de 800 x 600 pixels ou supérieure.
Imprimante
Les produits suivants prennent en charge le pilote MFP Send Fax :
● HP LaserJet 4345mfp
● HP Color LaserJet 4730mfp
● HP LaserJet 9040mfp
● HP LaserJet 9050mfp
● HP Color LaserJet 9500mfp
Matériel
L’accessoire télécopieur analogique du périphérique
MFP HP LaserJet 300 doit être installé dans ce dernier avant
l’installation du pilote MFP Send Fax. Pour plus d’informations sur
l’installation de ce matériel, reportez-vous au Guide du télécopieur de
l’accessoire télécopieur analogique du périphérique MFP
HP LaserJet 300.
Réseau
Le pilote d’imprimante MFP Send Fax doit être utilisé sur une
imprimante réseau. Il n’est pas destiné à être employé sur une
imprimante locale.
2 Chapitre 1 Installation FRWW
Page 71

Installation du pilote MFP Send Fax
Cette section fournit des instructions concernant les tâches
suivantes :
● Déterminer si le pilote MFP Send Fax est pris en charge par le
périphérique MFP
● Mise à niveau du micrologiciel du périphérique MFP et
téléchargement du pilote
● Vérification de la configuration de la fonction de courrier
électronique du périphérique MFP (facultatif)
● Configuration de la fonction de code de facturation (facultatif)
● Installation du pilote
Déterminer si le pilote MFP Send Fax est pris en charge par le périphérique MFP
Les versions les plus actuelles du micrologiciel du périphérique MFP
contiennent une prise en charge du pilote MFP Send Fax. Pour
déterminer si votre micrologiciel MFP prend en charge le pilote
MFP Send Fax, procédez comme suit :
1 Sur le panneau de commande du périphérique MFP, appuyez
sur Menu.
2 Faites défiler jusqu’à TLCP, puis touchez la sélection.
3 Faites défiler jusqu’à ENVOYER TELECOPIE, puis touchez la
sélection.
4 Faites défiler jusqu’à PC FAX SEND (ENVOI DE TELECOPIE
PC), puis touchez la sélection.
Remarque Si PC FAX SEND (ENVOI DE TELECOPIE PC) ne s’affiche pas dans
le menu du périphérique MFP, mettez à niveau le micrologiciel.
5 Touchez ACTIVE.
6 Touchez QUITTER.
FRWW Installation du pilote MFP Send Fax 3
Page 72

Mise à niveau du micrologiciel du périphérique MFP et téléchargement du pilote
Pour mettre à niveau le micrologiciel du périphérique MFP et
télécharger le pilote MFP Send Fax, procédez comme suit :
1 Affichez les informations de configuration du panneau de
commande du périphérique MFP pour déterminer la version
actuelle du micrologiciel.
a Sur le panneau de commande du périphérique MFP, appuyez
sur Menu.
b Touchez INFORMATIONS.
c Touchez IMPRIMEZ PAGE. La page de configuration
s’imprime.
d Le code de date du micrologiciel est répertorié dans la
section Informations sur le périphérique.
Remarque Le code de date du micrologiciel a le format suivant : AAAAMMJJ
XX.XXX.X. La première chaîne de nombres représente la date, où
AAAA indique l’année, MM le mois et JJ le jour. P ar e x emple, un code
de date de micrologiciel qui commence par 20040225 représente le
25 février 2004. La deuxième chaîne de nombres représente le
numéro de révision du micrologiciel.
2 Accédez à la section Software & driver downloads
(Téléchargement de logiciels et pilotes) pour votre
périphérique MFP.
a Accédez au site
b Dans la zone de texte Search (Rechercher), entrez le
numéro de modèle du périphérique MFP, puis appuyez sur la
touche Entrée.
c Dans le volet Select a product (Sélection d’u n produ it) de la
fenêtre Search results (Résultats de la recherche),
sélectionnez le numéro de modèle du périphérique MFP
spécifique sur lequel le micrologiciel sera installé.
d Dans le volet Product Quick Links (Liens rap ides de
produit), cliquez sur Software & driver downloads
(Téléchargement de logiciels et pilotes).
4 Chapitre 1 Installation FRWW
www.hp.com.
Page 73

3 Téléchargez le micrologiciel le plus récent.
a Dans le volet Select operating system (Sélection d’un
système d’exploitation), clique z sur Cross operating syst em
(BIOS, Firmware, Diagnostics, etc.) (Système
multi-plateforme [BIOS, microlo giciels, diagnostics, etc.]).
b Si la date répertoriée dans le tableau de micrologiciels est
plus récente que le code de date imprimé sur la pa g e de
configuration du périphérique MFP, cliquez sur Download
(Télécharger) en regard du fichier approprié.
Remarque Différents fichiers de micrologiciel sont disponibles pour les divers
systèmes d’exploitation.
c Dans la boîte de dialogue File Download (Téléchargement
de fichier) qui s’affiche, cliquez sur Save (Enregistrer).
d Dans la zone de texte File Name (Nom du fichier) de la
fenêtre Save As (Enregistrer sous) qui s’affiche, entrez
l’emplacement dans lequel enregistrer le fichier de mise à
jour du micrologiciel sur l’ordinateur.
e Cliquez sur Save (Enregistrer).
f Une fois le fichier téléchar gé, f ermez la boîte de dialogu e File
Download (Téléchargement de fichier), si nécessaire.
4 Téléchargez le pilote MFP Send Fax.
a Cliquez sur Back (Précédent) pour revenir au volet Select
operating system (Sélection d’un système d’exploitation).
Remarque Si vous ne re v enez pa s au volet Select operating system (Sélection
d’un système d’exploitation) lorsque vous cliquez sur Back
(Précédent), passez à l’étape 2 pour obtenir des instruc tio ns sur la
navigation vers ce volet.
b Dans le volet Select operating system (Sélection d’un
système d’exploitation), cliquez sur le système d’exploitation
approprié.
Remarque Le pilote MFP Send Fax est pris en charge sous Windows 2000,
Windows XP, Windows XP Professional x64, Windows Server 2003 et
Windows Server 2003 x64.
c Dans le tableau de pilotes qui s’aff iche, cliquez sur Download
(Télécharger) en regard du pilote HP MFP Send Fax HP.
d Dans la boîte de dialogue File Download (Téléchargement
de fichier) qui s’affiche, cliquez sur Save (Enregistrer).
FRWW Installation du pilote MFP Send Fax 5
Page 74

e Dans la zone de texte File Name (Nom du fichier) de la
fenêtre Save As (Enregistrer sous) qui s’affiche, entrez
l’emplacement dans lequel enregistrer le fichier du pilote
MFP Send Fax sur l’ordinateur.
f Cliquez sur Save (Enregistrer).
g Une fois le fichier téléchargé, f ermez la boîte de dialogue File
Download (Téléchargement de fichier), si nécessaire.
5 Installez le fichier du micrologiciel téléchargé. Reportez-vous au
manuel d’utilisation du périphérique MFP approprié pour obtenir
des instructions concernant l’installation de la mise à jour distante
du micrologiciel (RFU) :
• Manuel d’utilisation du périphérique
HP LaserJet 4345mfp Series
• Manuel d’utilisation du périphérique
HP Color LaserJet 4730mfp
• Manuel d’utilisation du périphérique
HP LaserJet 9040mfp/9050mfp
• Manuel d’utilisation du périphérique
HP Color LaserJet 9500mfp
Vérification de la configuration de la fonction de courrier électronique du périphérique MFP (facultatif)
La fonction de courrier électronique du périphérique MFP doit être
configurée afin de pouvoir recevoir une notification électronique lors
de l’envoi d’une téléco pie via le pilote MFP Send Fax.
Remarque La fonction de notification par courrier électronique est facultative.
Reportez-vous au manuel d’utilisation du périphérique MFP
approprié pour obtenir des instructions concernant la configuration de
la fonction de courrier électronique :
● Manuel d’utilisation du périphérique HP LaserJet 4345mfp Series
● Manuel d’utilisation du périphérique HP Color LaserJet 4730mfp
● Manuel d’utilisation du périphérique
HP LaserJet 9040mfp/9050mfp
● Manuel d’utilisation du périphérique HP Color LaserJet 9500mfp
6 Chapitre 1 Installation FRWW
Page 75

Configuration de la fonction de code de facturation (facultatif)
Le pilote HP MFP Send Fax prend en charge l’emploi de codes de
facturation lors de l’envoi de télécopies.
Remarque La fonction de code de facturation est facultative.
Pour acti ver la fonction de code de facturation via le panneau de
commande du périphérique MFP, procédez comme suit :
1 Sur le panneau de commande du périphérique MFP, appuyez
sur Menu.
2 Faites défiler jusqu’à TLCP, puis touchez la sélection.
3 Faites défiler jusqu’à ENVOYER TELECOPIE, puis touchez la
sélection.
4 Faites défiler jusqu’à CODE FACTURATION, puis touchez la
sélection.
5 Appuyez sur PERSO pour afficher l’écran de code de facturation.
6 Utilisez les flèches vers le haut et vers le bas pour sélectionner le
nombre minimum de chiffres dans le code de facturation.
7 Touchez OK pour activer la fonction de code de facturation.
Remarque Touchez DESACTIVE pour désactiver la fonction de code de
facturation.
Installation du pilote
Pour installer le pilote MFP Send Fax en utilisant l’assistant Ajout
d’imprimante de Windows, procédez comme suit :
1 Dans l’Explorateur Windows, cliquez deux fois sur le fichier
exé cutable du pilote MFP Send Fax téléchargé pour extraire les
fichiers du pilote.
2 Cliquez sur Start (Démarrer), sur Settings (Par amètres), puis sur
Printers and Faxes (Imprimantes et télécopieurs).
3 Dans le volet Printer Tasks (Tâches d’imprimante) de la fenêtre
Printers and Faxes (Imprimantes et télécopieurs), cliquez sur
Add a printer (Ajouter une imprimante).
4 Dans la boîte de dialogue de bienvenue de l’Add Printer Wizard
(Assistant Ajout d’imprimante), cliquez sur Next (Suivant).
FRWW Installation du pilote MFP Send Fax 7
Page 76

5 Sous Local or Network Printer (Imprimante locale ou réseau),
sélectionnez Local printer attached to this computer
(Imprimante locale connectée à cet ordinateur). Cliquez sur Next
(Suivant).
Remarque Sélectionnez Local printer attached to this computer (Imprimante
locale connectée à cet ordinateur) pour installer le pilote
MFP Send Fax sur une imprimante réseau. Le nom de l’imprimante
devient HP MFP Send Fax lorsque le pilote est installé sur une
imprimante locale.
Si vous sélectionnez A network printer, or a printer attached to
another computer (Une imprimante réseau ou une imprimante
connectée à un autre ordinateur), l’adresse IP de l’ordinateur est
requise. Certaines fonctions, telles que l’aperçu de t élécopie , ne sont
pas disponibles si le pilote est installé via l’installation d’une imprimante
réseau (Po intage et Impression).
Le pilote MFP Send Fax ne peut pas être installé sur u ne im primante
connectée à l’ordinateur via un port série ou parallèle. L’imprimante
doit être située sur un réseau.
6 Si l’ordinateur est déjà connecté au périphérique MFP, sous
Select a Printer Port (Sélectionner un port d’imprimante),
choisissez Use the following port (Utiliser le port suivant).
Remarque Si l’ordinateur n’est pas connecté au périphérique MFP, passez à
l’étape 8.
8 Chapitre 1 Installation FRWW
Page 77

7 Dans le menu déroulant Use the following port (Utiliser le port
suivant), sélectionnez le nom ou l’adresse IP du périphérique
MFP. Cliquez sur Next (Suivant), puis passez à l’étape 13.
8 Si l’ordinateur n’est pas connecté au périphérique MFP,
sélectionnez Create a new port (Créer un nouveau port) sous
Select a Printer Port (Sélectionner un port d’imprimante).
FRWW Installation du pilote MFP Send Fax 9
Page 78

9 Dans le menu déroulant T ype of port (Type de port), sélectionnez
Standard TCP/IP Port (Port TCP/IP standard). Cliquez sur Next
(Suivant).
10 Dans la boîte de dialogue Add Sta nda rd TCP/IP Prin te r Port
Wizard (Assistant Ajout de port imprimante TCP/IP standard),
cliquez sur Next (Suivant).
10 Chapitre 1 Installation FRWW
Page 79

11 Sous Add Port (Ajouter un port), entrez l’adresse IP ou le nom
d’imprimante du périphérique MFP dans la zone de te xte Printer
Name or IP Address (Nom d’imprimante ou adresse IP), puis
cliquez sur Next (Suivant).
Remarque Le nom de port par défaut est le no m que vous av ez entré dans la z one
de texte Printer Name or IP Address (Nom d’imprimante ou adresse
IP). Vous pouvez modifier ce nom en en saisissant un nouveau dans
la zone de texte Port Name (N om du po rt).
12 Cliquez sur Finish (Terminer).
FRWW Installation du pilote MFP Send Fax 11
Page 80

13 Sous Install Printer Software (Installer le logiciel d’impression),
cliquez sur Have Disk (Disque fourni).
14 Dans la boîte de dialogue Install From Disk (Installer à partir du
disque), cliquez sur Browse (Parcourir).
15 Recherchez et sélectionnez le fichier .INF du pilote
MFP Send Fax extrait à l’étape 1.
12 Chapitre 1 Installation FRWW
Page 81

Remarque Deux versions du fichier .INF sont disponib les : une version 32 bits pour
Windows 2000, Windows XP et Windows Server 2003, ainsi qu’une
version 64 bits pour Windows XP Professional x64 et
Windows Server 2003 x64.
Un message The specified location does not contain inf ormation
about your printer (L’emplacement spécifié ne contient aucune
information concernant votre imprimante) s’affiche si vous sélectionne z
la version incorrecte du fichier.
16 Cliquez sur OK.
17 Sous Install Printer Software (Installer le logiciel d’impression),
cliquez sur Next (Suivant).
FRWW Installation du pilote MFP Send Fax 13
Page 82

18 Dans la zone de texte Printer name (Nom d’imprimante) située
sous Name Your Printer (Nommez votre imprimante), entrez un
nom pour l’imprimante. Le nom d’imprimante par défaut est
HP MFP Send Fax.
19 Cliquez sur Next (Suivant).
20 Sous Printer Sharing (Partage d’imprimante), cliquez sur Next
(Suivant).
14 Chapitre 1 Installation FRWW
Page 83

Remarque Vous pouvez partager l’imprimante en sélectionnant Share name
(Nom du partage) dans la fenêtre Printer Sharing (Partage
d’imprimante). Le pilote MFP Send Fax de vient ensuite disponible pour
une connexion P ointage et Impression. Certaines fonctions, telles que
l’aperçu de télécopie, ne sont pas disponib les si l’accès au pilote
s’effectue via une connexion Pointage et Impression.
21 Sous Print Test Page (Imprimer une page de test), sé lectionnez
Yes (Oui) pour imprimer une page de test, puis cliquez sur Next
(Suivant).
Remarque La sélection de Yes (Oui) pour l’impression d’une page de test env oie
une télécopie. Aucune page n’est imprimée.
a Dans la boîte de dialogue Completing the Add Printer
Wizard (Fin de l’Assistant Ajout d’imprimante), cliquez sur
Finish (Terminer) pour quitter l’assistant et poursuivre l’envoi
d’une télécopie de test.
FRWW Installation du pilote MFP Send Fax 15
Page 84

b Dans la boîte de dialogue HP MFP Send Fax, cliquez sur
l’onglet Fax Job (Tâche de télécopie).
Remarque Les informations de l’onglet Setup (Configuration) ne sont pas requises
pour envoyer une page de test.
Pour définir les in formations d’e xpéditeur par déf aut et les paramètres
de télécopie pour toutes les télécopies, reportez-vous à la section
« Configuration », page 39.
16 Chapitre 1 Installation FRWW
Page 85

c Dans la zone de texte Fax Number (Numéro de télécopie)
située sous Fax To (Envoyer à), entrez le numéro de
télécopieur auquel envoyer la page de test.
d Cliquez sur Send (Envoyer).
FRWW Installation du pilote MFP Send Fax 17
Page 86

e La fenêtre d’aperçu s’affiche si v ous a v ez coché la case Show
Preview Before Sending F ax (Afficher un aperçu avant
d’envoyer la télécopie) dans l’onglet Setup (Configuration).
Sur la barre d’outils, cliquez sur Send Fax (Envo y er télécopie).
f Un message vous invite à confirmer l’impression de la page
de test. Vérifiez que la page de test a été imprimée sur le
télécopieur de réception, puis cliquez sur OK.
Remarque La page de test est délivrée au numéro de télé copieu r que vous avez
saisi dans la zone de texte Fax Number (Numéro de télécopie) de
l’onglet Fax Job (Tâche de télécopie).
18 Chapitre 1 Installation FRWW
Page 87

Désinstallation du pilote HP MFP Send Fax
Pour désinstaller le pilote MFP Send Fax, procédez comme suit :
1 Cliquez sur Start (Démarrer), sur Settings (Par amètres), puis sur
Printers and Faxes (Imprimantes et télécopieurs).
2 Dans la fenêtre Printers and Faxes (Imprimantes et
télécopieurs), cliquez avec le bouton droit sur l’imprimante MFP
sur laquelle le pilote MFP Send Fax est installé, puis cliquez sur
(Supprimer).
3 Cliquez sur Start (Démarrer), sur Settings (Par amètres), puis sur
Printers and Faxes (Imprimantes et télécopieurs).
4 Cliquez avec le bouton droit dans la fenêtre Printers and Faxes
(Imprimantes et télécopieurs), puis cliquez sur Server
Properties (Propriétés du serveur).
5 Dans la boîte de dialogue Print Server Properties (Propriétés
du serveur d’impression), cliquez sur Drivers (Pilotes).
6 Sélectionnez le pilote MFP Send Fax, puis cliquez sur Remove
(Supprimer).
7 Cliquez sur OK.
FRWW Désinstallation du pilote HP MFP Send Fax 19
Page 88

20 Chapitre 1 Installation FRWW
Page 89

2
Envoi de télécopies
Ce chapitre fournit des informations concernant l’envoi de télécopies
et l’utilisation de l’annuaire MFP Send Fax :
● Envoi d’une télécopie à un destinataire unique
● Envoi d’une télécopie à plusieur s destinataires
● Envoi d’une télécopie à l’aide de l’annuaire
● Annulation d’une tâche de télécopie
● Insertion de caractères spéciaux dans le numéro de télécopieur
● Edition de l’annuaire
FRWW 21
Page 90

Envoi d’une télécopie à un destinataire unique
Pour envoyer une télécopie à un destinataire unique, procédez
comme suit :
1 Ouvrez le document à télécopier dans le logiciel dans lequel il a
été créé.
2 Cliquez sur File (Fichier), puis sur Print (Imprimer).
3 Sélectionnez le pilote HP MFP Send Fax dans la liste
d’imprimantes.
4 Cliquez sur OK ou sur Print (Imprimer).
Remarque Cliquez sur le bouton qui permet d’envoyer un document à l’imprimante.
Ce bouton peut ne pas porter le même nom dans tous les programmes.
5 Sous Fax To (Envoyer à) dans la boîte de dialogue
HP MFP Send Fax, entrez le nom du destinataire, le numéro du
télécopieur et le nom de l’entreprise. Le numéro du télécopieur
est la seule information requise.
Remarque Reportez-vous à la section « Insertion de caractères spéciaux dans le
numéro de télécopieur », page 32, pour obtenir une liste des
caractères spéciaux que vous pouvez utiliser dans le champ Fax
Number (Numéro de télécopie).
22 Chapitre 2 Envoi de télécop ies FRWW
Page 91

6 Cliquez sur Add to Phone Book (Ajouter à l’annuaire) pour ajouter
les informations du destinataire à l’annuaire MFP Send Fax. Cett e
étape est facultativ e.
Remarque Cliquez sur Clear Fields (Effacer les champs) pou r supp rimer toutes
les valeurs des zones de texte Nom du destinataire, Numéro de
télécopie et Nom de l’entreprise.
7 Les informations de page de garde par défaut sont indiquées
sous Include With Fax (Inclure avec la télécopie) dans la boîte
de dialogue HP MFP Send Fax. Ces informations peuvent être
modifiées pour toute tâche de télécopie individuelle.
Remarque Pour déf inir les paramètres de page de garde par défaut pour toutes
les télécopies, reportez-vous à la section « Configuration », page 39.
8 Si la fonction de code de f acturation est activ ée, entrez le code de
facturation sous Billing Information (Inf ormations de f acturation)
dans la boîte de dialogue HP MFP Send Fax. Le code de
facturation peut êtr e modifié pour toute tâche de télécopie
individuelle.
FRWW Envoi d’une télécopie à un destinataire unique 23
Page 92

9 Pour envoyer la télécopie à l’aide des paramètres par défaut de
destinataire, de qualité de télécopie , d’informations de notificatio n
et de préférences d’aperçu, cliquez sur Send (Envoyer).
Remarque Cliquez sur l’onglet Setup (Configuration) de la boîte de dialogue
HP MFP Send Fax pour afficher les paramètres de destinataire, de
qualité de télécopie, de notification et d’aperçu. Ces informations
peuvent être modifiées pour toute tâche de télécopie individuelle.
Cliquez sur Send (Envoyer) pour envoyer la télécopie.
10 Si vous avez coché la case Show Preview Before Sending Fax
(Afficher un aperçu avant d’envoyer la télécopie) dans l’onglet
Setup (Configuration), un aperçu de la tâche de télécopie
s’affiche. Vérifiez les informations de la télécopie.
Remarque La fonction d’aperçu n’est pas disponible lorsque vous utilisez la
fonctionnalité Pointage et Impression.
La fonctionnalité Pointage et Impression est une fonction Windows que
vous pouvez utiliser pour vous connecter, imprimer ou télécopier vers
une imprimante distante sans l’emploi de disques d’installation. Les
informations de configuration et les fichiers sont automatiquement
téléchargés du serveur d’impression vers le client.
11 Cliquez sur View (Affichage) ou utilisez le menu déroulant de
zoom pour modifier la taille de l’aperçu du document.
12 Cliquez sur les boutons fléchés pour naviguer dans le document.
13 Cliquez sur Send Fax (Envoyer télécopie) pour envoyer la
télécopie ou sur Cancel Fax (Annuler la télécopie) pour modifier
les paramètres de la télécopie.
24 Chapitre 2 Envoi de télécop ies FRWW
Page 93

Envoi d’une télécopie à plusieurs destinataires
Pour envoyer une télécopie à plusieurs destinataires, procédez
comme suit :
1 Ouvrez le document à télécopier dans le logiciel dans lequel il a
été créé.
2 Cliquez sur File (Fichier), puis sur Print (Imprimer).
3 Sélectionnez le pilote HP MFP Send Fax dans la liste
d’imprimantes.
4 Cliquez sur OK ou sur Print (Imprimer).
Remarque Cliquez sur le bouton qui permet d’envoyer un document à l’imprimante.
Ce bouton peut ne pas porter le même nom dans tous les programmes.
5 Sous Fax To (Envoyer à) dans la boîte de dialogue
HP MFP Send Fax, entrez le nom du destinataire, le numéro
du télécopieur et le nom de l’entreprise.
FRWW Envoi d’une télécopie à plusieurs destinataires 25
Page 94

Remarque Le numéro du télécopieur est la seule information requise.
Reportez-vous à la section « Insertion de caractères spéciaux dans le
numéro de télécopieur », page 32, pour obtenir une liste des
caractères spéciaux que vous pouvez utiliser dans le champ
Fax Number (Numéro de télécopie).
6 Cliquez sur Add to Phone Book (Ajouter à l’annuaire ) pour
ajouter les informations du destinataire à l’annuaire
MFP Send Fax. Cette étape est facultative.
Remarque Cliquez sur Clear Fields (Effacer les champs) pou r supp rimer toutes
les valeurs des zones de texte Nom du destinataire, Numéro de
télécopie et Nom de l’entreprise.
7 Cliquez sur To -> (A -) pour ajouter les informations de
destinataire au champ Fax Recipients (Destinataires télécopie).
8 Répétez les étapes 5 à 7 pour chaque destinataire de la
télécopie. La télécopie est envoyée à tous les noms figurant
dans le champ Fax Recipients (Destinataires télécopie).
Remarque L’option Cover Page (Single recipient only) (Page de garde
[destinataire unique seulement]) est désactivée lorsqu’un deuxième
destinataire est ajouté au champ Fax Recipients (Destinataires
télécopie). Il n’est pas possible d’utiliser une page de garde lors de
l’envoi de télécopies à plusieurs destinataires.
26 Chapitre 2 Envoi de télécop ies FRWW
Page 95

9 Si la fonction de code de f act urati on est activ ée , entr ez le code de
facturation sous Billing Information (Informations de facturation)
dans la boîte de dialogue HP MFP Send Fax. Le code de
facturation peut être modifié pour toute tâche de télécopie
individuelle.
10 Pour envoyer la télécopie à l’aide des paramètres par défaut de
destinataire, de qualité de télécopie , d’informations de notificatio n
et de préférences d’aperçu, cliquez sur Send (Envoyer).
Remarque Cliquez sur l’onglet Setup (Configuration) de la boîte de dialogue
HP MFP Send Fax pour afficher les paramètres de destinataire, de
qualité de télécopie, de notification et d’aperçu. Ces informations
peuvent être modifiées pour toute tâche de télécopie individuelle.
Cliquez sur Send (Envoyer) pour envoyer la télécopie.
FRWW Envoi d’une télécopie à plusieurs destinataires 27
Page 96

11 Si vous avez coché la case Show Preview Before Sending Fax
(Afficher un aperçu avant d’envoyer la télécopie) dans l’onglet
Setup (Configuration), un aperçu de la tâche de télécopie
s’affiche. Vérifiez les informations de la télécopie.
Remarque La fonction d’aperçu n’est pas disponible lorsque vous utilisez la
fonctionnalité Pointage et Impression.
La fonctionnalité Pointage et Impression est une fonction Windows que
vous pouvez utiliser pour vous connecter, imprimer ou télécopier vers
une imprimante distante sans l’emploi de disques d’installation. Les
informations de configuration et les fichiers sont automatiquement
téléchargés du serveur d’impression vers le client.
12 Cliquez sur View (Affichage) ou utilisez le menu déroulant de
zoom pour modifier la taille de l’aperçu du document.
13 Cliquez sur les boutons fléchés pour naviguer dans le document.
14 Cliquez sur Send Fax (Envoyer télécopie) pour envoyer la
télécopie ou sur Cancel Fax (Annuler la télécopie) pour modifier
les paramètres de la télécopie.
Envoi d’une télécopie à l’aide de l’annuaire
Pour envoyer une télécopie à l’aide de l’annuaire, procédez
comme suit :
1 Ouvrez le document à télécopier dans le logiciel dans lequel il a
été créé.
2 Cliquez sur File (Fichier), puis sur Print (Imprimer).
28 Chapitre 2 Envoi de télécop ies FRWW
Page 97

3 Sélectionnez le pilote HP MFP Send Fax dans la liste
d’imprimantes.
4 Cliquez sur OK ou sur Print (Imprimer).
Remarque Cliquez sur le bouton qui permet d’envoyer un document à
l’imprimante. Ce bouton peut ne pas porter le même nom dans tous
les programmes.
5 Sous Fax To (Envoyer à) dans la boîte de dialogue
HP MFP Send Fax, cliquez sur l’icône de livre.
6 Dans la boîte de dialogue Phone Book (Ann uaire), séle ctionnez
le nom de chaque destinataire de la télécopie, puis cliquez sur
To -> (A -) pour peupler le champ Fax Recipie nts (Destinataires
télécopie).
7 Une fois tous les destinataires de la télécopie ajoutés au champ
Fax Recipients (Destinataires télécopie), cliquez sur OK.
FRWW Envoi d’une télécopie à l’aide de l’annuaire 29
Page 98

8 Sous Include With Fax (Inclure avec la télécopie) dans la boîte
de dialogue HP MFP Send Fax, désactivez la case Cover Page
(Single recipient only) (Page de garde [destinataire unique
seulement]) si elle est sélectionnée.
Remarque Il n’est pas possible d’utiliser une page de garde lors de l’envoi de
télécopies à plusieurs destinataires. Si vous ne désactivez pas la case
Cover Page (Single recipient only) (Page de garde [destinataire
unique seulement]), le message d’erreur suivant s’affiche :
9 Si la fonction de code de f act urati on est activ ée , entr ez le code de
facturation sous Billing Information (Informations de facturation)
dans la boîte de dialogue HP MFP Send Fax. Le code de
facturation peut être modifié pour toute tâche de télécopie
individuelle.
30 Chapitre 2 Envoi de télécop ies FRWW
Page 99
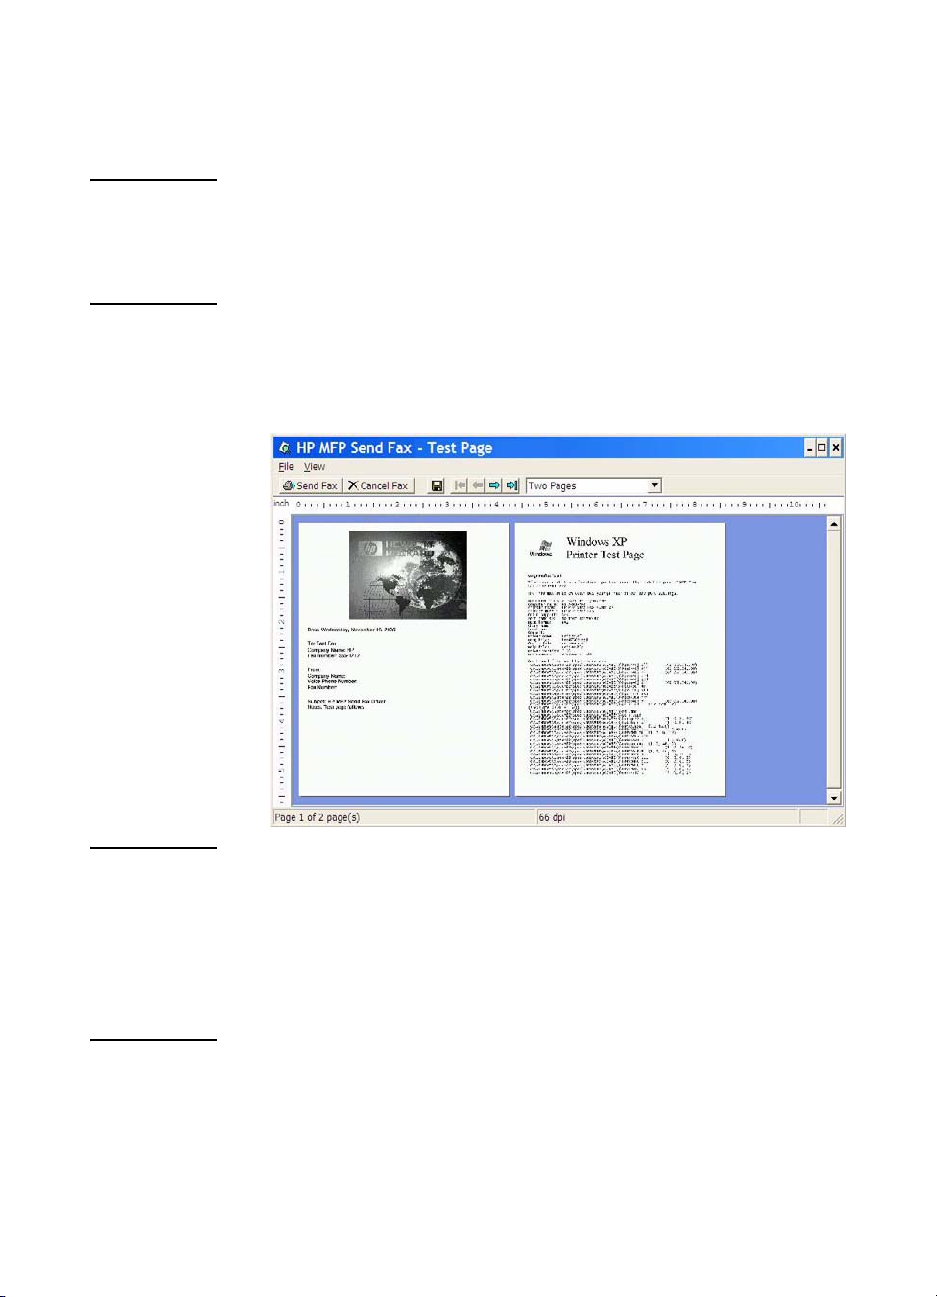
10 Pour envoyer la télécopie à tous les destinataires de télécopie
avec les paramètres par défaut de destinataire, de qualité de
télécopie, d’inf ormations de notification et de préférences
d’aperçu, cliquez sur Send (Envoyer).
Remarque Cliquez sur l’onglet Setup (Configuration) de la boîte de dialogue
HP MFP Send Fax pour afficher les paramètres de destinataire, de
qualité de télécopie, de notification et d’aperçu. Ces informations
peuvent être modifiées pour toute tâche de télécopie individuelle.
Cliquez sur Send (Envoyer) pour envoyer la télécopie.
11 Si vous avez coché la case Show Preview Before Sending Fax
(Afficher un aperçu avant d’envoyer la télécopie) dans l’onglet
Setup (Configuration), un aperçu de la tâche de télécopie
s’affiche. Vérifiez les informations de la télécopie.
Remarque La fonction d’aperçu n’est pas disponible lorsque vous utilisez la
fonctionnalité Pointage et Impression.
La fonctionnalité Pointage et Impression est une fonction Windows que
vous pouvez utiliser pour vous connecter, imprimer ou télécopier vers
une imprimante distante sans l’emploi de disques d’installation. Les
informations de configuration et les fichiers sont automatiquement
téléchargés du serveur d’impression vers le client.
12 Cliquez sur View (Affichage) ou utilisez le menu déroulant de
zoom pour modifier la taille de l’aperçu du document.
13 Cliquez sur les boutons fléchés pour naviguer dans le document.
14 Cliquez sur Send Fax (Envoyer télécopie) pour envoyer la
télécopie ou sur Cancel Fax (Annuler la télécopie) pour modifier
les paramètres de la télécopie.
FRWW Envoi d’une télécopie à l’aide de l’annuaire 31
Page 100

Annulation d’une tâche de télécopie
Trois méthodes permettent d’annuler une tâche de télécopie :
1 Cliquez sur Cancel Fax (Annuler la télécopie) dans la fenêtre
d’aperçu de télécopie.
2 Sur le panneau de commande du périphérique MFP, appuyez sur
l’icône de télécopie, puis appuyez sur le bouton Stop/Cancel
(Arrêter/Annuler) de couleu r rouge.
Remarque Le message d’état Processing job (T r aitement de la tâche) doit s’afficher
sur le périphérique MFP lors d’une pression sur le bouton Stop/Cancel
(Arrêter/Annuler) de couleu r rouge pour annuler la télécopie.
3 Sur le panneau de commande du périphérique MFP, annulez les
télécopies via les menus de télécopie.
a Sur le panneau de commande du périphérique MFP, appuyez
sur Menu.
b Faites défiler jusqu’à TLCP, puis touchez la sélection.
c Faites défiler jusqu’à ANNULER TRANSMISSION EN
COURS, puis touchez la sélection.
Remarque Faites défiler jusq u’à ANNULER TOUTES LES TRANSMISSIONS EN
COURS, puis touchez la sélection pour annule r toutes les transmissions
de télécopie en cours.
d Touchez QUITTER.
Insertion de caractères spéciaux dans le numéro de télécopieur
Outre les chiffres 0 à 9, le champ Fax Number (Numéro de télécopie)
accepte des caractères spéciaux.
Tableau 1 : Caractères spéciaux
Caractère
spécial
- Utilisez un tiret dans le numéro de télécopieur pour
( ) Utilisez une parenthèse dans le numéro de télécopieur
32 Chapitre 2 Envoi de télécop ies FRWW
Fonction
simplifier la lecture du numéro.
pour simplifier la lecture du numéro.
 Loading...