

Page 1
HPE Altoline 6921 48SFP+
4
3
1
5
2
2
1
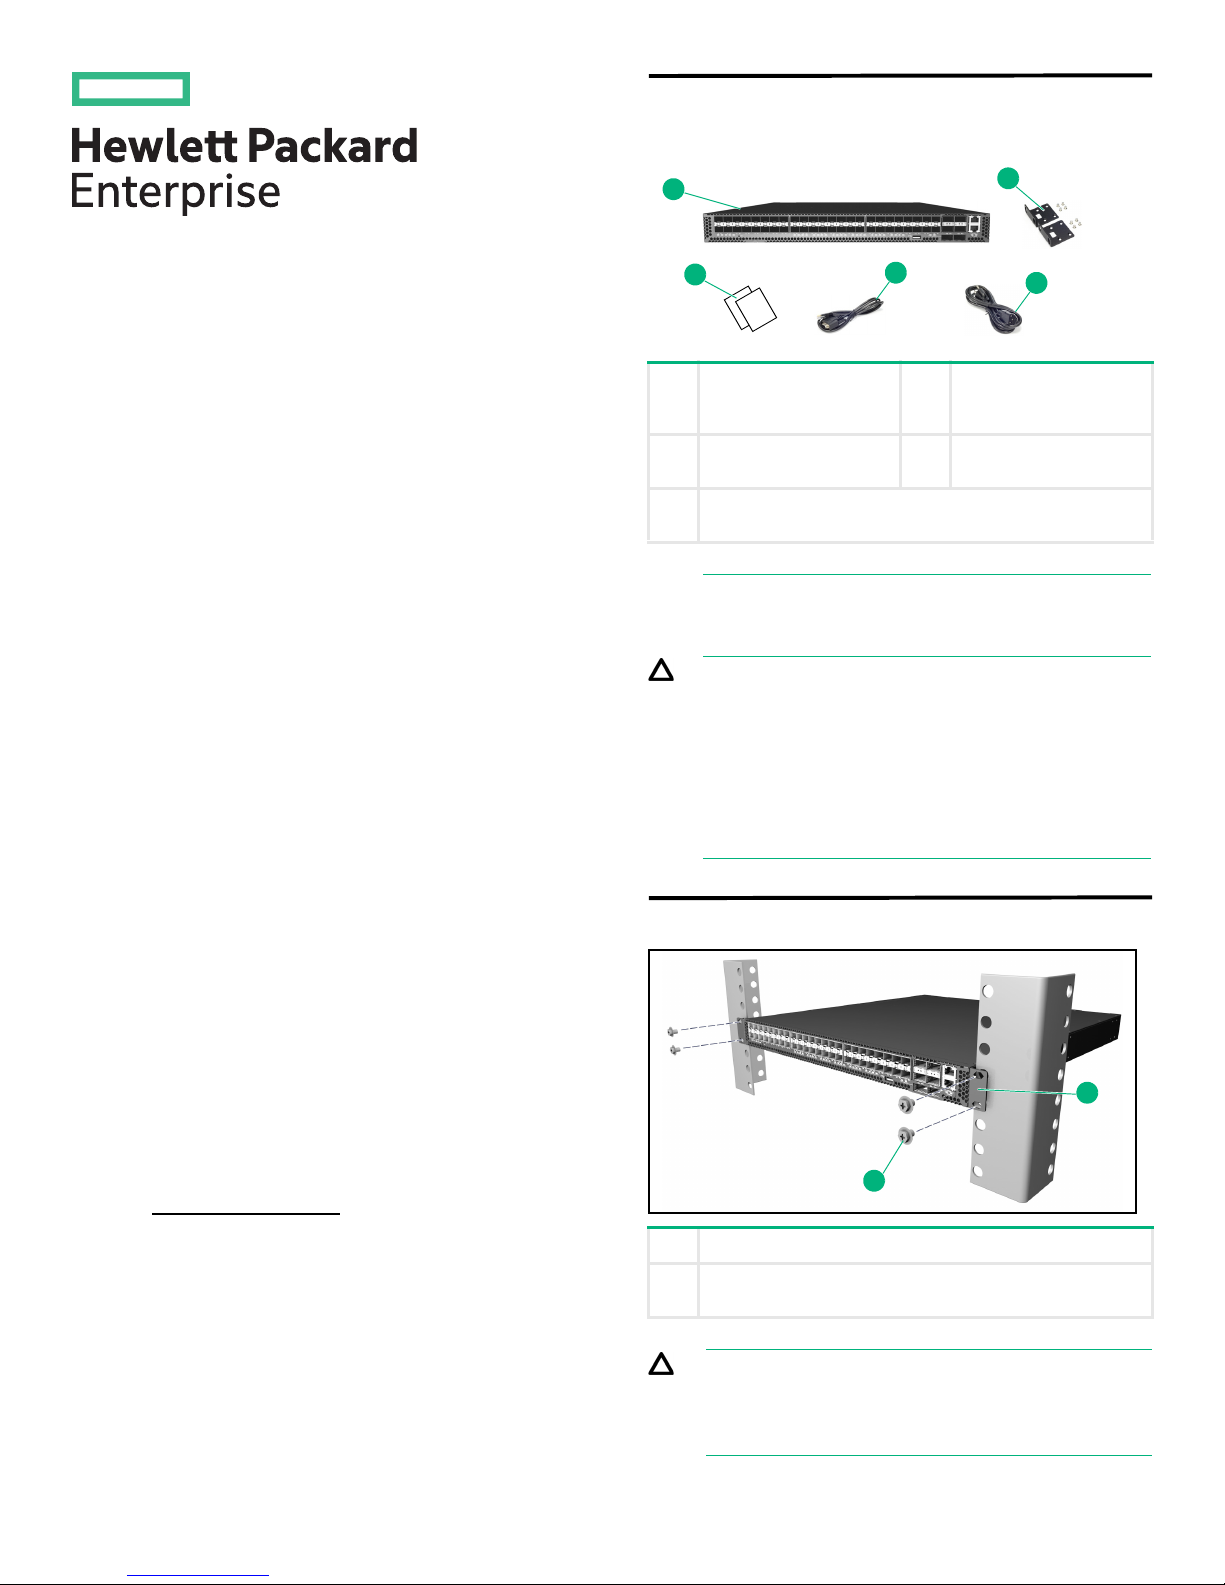
Step 1: Unpack the switch and check
contents
6QSFP+ x86 ONIE AC
Switch
Quick Start Guide
1 HPE Altoline 6921
48SFP+ 6QSFP+ x86
ONIE AC Switch
3 Country-specific power
cord(s)
5 Documentation—Quick Start Guide (this document) and
Safety and Regulatory Information
NOTE: The switch has the Open Network
Installer Environment (ONIE) software preloaded, but no switch software image pre-loaded.
CAUTION: The switch includes plug-in power
supply and fan tray modules that are installed into
its chassis. All installed modules must have a
matching airflow direction. That is, all modules
must have a front-to-back (F2B) airflow direction,
or all modules must have a back-to-front (B2F)
airflow direction. The airflow direction of fan trays
is indicated by text printed on the modules.
2 Rack mounting kit — 2
brackets and 8 screws
4 Console cable — RJ-45
to DB-9
Step 2: Mount the switch
© Copyright 2016 Hewlett Packard Enterprise Development LP
The information contained herein is subject to change without notice.
Documentation feedback
Send any errors, suggestions, or comments to Documentation
Feedback ([email protected]
Part Number: 5200-1162
Published: April 2016
Edition: 1
Printed in Taiwan
E042016-AP-R01
).
*5200-1162*
150200001459A R01
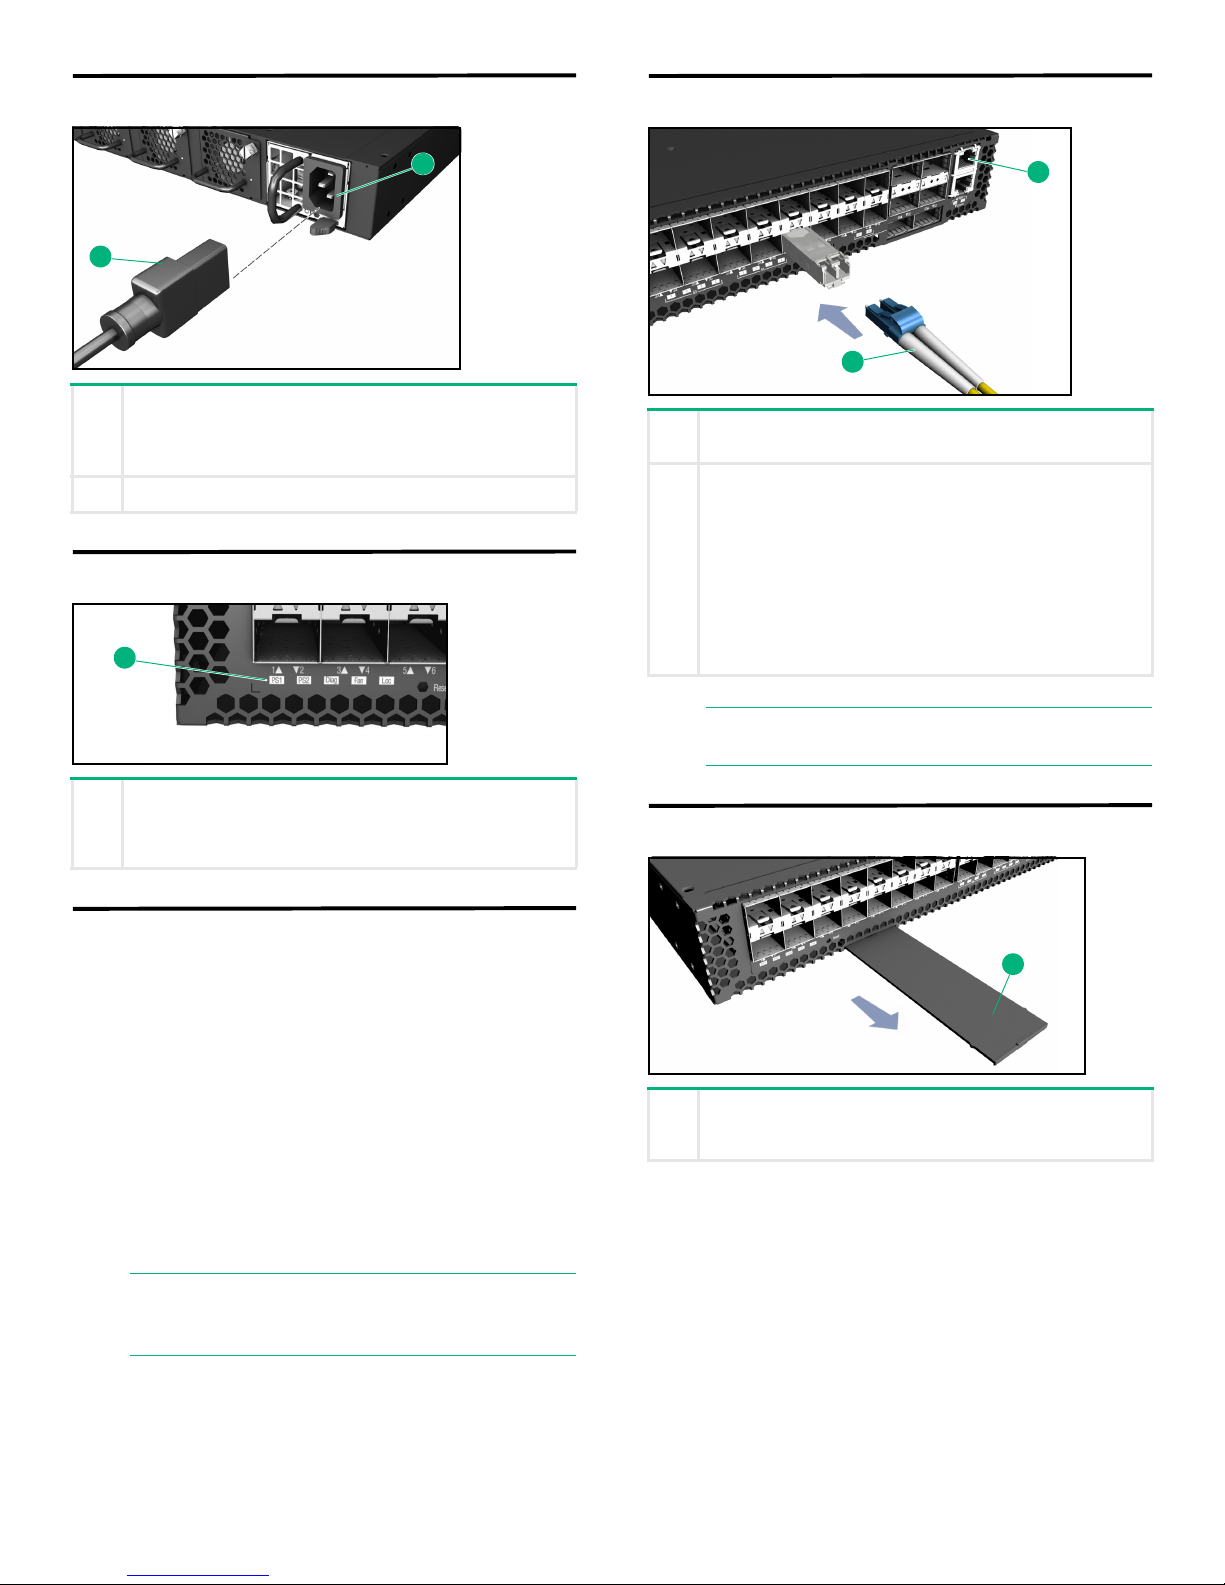
1 Attach the brackets to the switch.
2 Use the screws supplied with the rack to secure the
switch in the rack.
CAUTION: Installing the switch in a rack
requires two people. One person should position
the switch in the rack, while the other secures it
using the rack screws.
Page 2
Step 3: Connect power
1
2
1
2
1
1
1 Install one or two universal AC power modules in the
switch.
The switch supports up to two PSUs that must have the
same matching airflow direction as the installed fan tray.
2 Connect an external AC power source to the modules.
Step 4: Verify switch operation
Step 6: Connect network cables
1 For the RJ-45 Management port, connect 100-ohm
Category 5, 5e or better twisted-pair cable.
2 Connect DAC cables to the SFP+/QSFP+ slots. Or first
install SFP+/QSFP+ transceivers and then connect fiber
optic cabling to the transceiver ports.
The following transceivers are supported:
◆
40GBASE-CR4
◆
40GBASE-SR4
◆
10GBASE-CR
◆
10GBASE-SR
◆
1000BASE-SX
◆
1000BASE-LX
1 Verify basic switch operation by checking the system
LEDs.
When operating normally, the PSU1/PSU2, Diag, and
Fan LEDs should all be on green.
Step 5: Perform initial system boot
1. If the network operating system (NOS) installer is
located on a network server, first connect the RJ-45
Management (Mgmt) port to the network using 100ohm Category 5, 5e or better twisted-pair cable. (Not
required if the NOS installer is located on attached
storage.)
2. Boot the switch. Wait for the ONIE software to locate
and execute the NOS installer, and then wait for the
installer to load the NOS software image.
Subsequent switch boots will bypass ONIE and
directly run the NOS software.
NOTE: Refer to the network operating system
(NOS) installer and NOS documentation for
details on software options and set up for ONIE.
NOTE: As connections are made, check the port
status LEDs to be sure the links are valid.
Step 7: View the product label
1 The switch product label is located below SFP+ ports 7–
12 on left side of the front panel. Pull the label out to view
the product information.
Page 3

Hardware specifications
Switch Chassis
Size (WxDxH) 442.5 x 473 x 43.95 mm (17.42x 18.62 x 1.73
Weight 8.95 kg (19.73 lb), with two installed PSUs
Temperature Operating: 0°C to 40°C (32°F to 104°F)
Humidity Operating: 5% to 95% (non-condensing)
Operating
Altitude
Acoustics Noise Emission LpA=61.1 dB at virtual
Power
Consumption
AC PSU
Power AC Input
Rating
System AC
Input Rating
Power DC
Output Rating
Regulatory Compliances
Emissions EN 55022:2010, Class A
inches)
Storage: -40°C to 70°C (-40°F to 158°F)
Up to 3000 m (10,000 ft)
workspace according to DIN 45635 T.19
282 Watts maximum
100–240 VAC, 50-60 Hz, 400 Watts, hot
pluggable
100–240 VAC, 50-60 Hz, 6–3 A
5 VDC @ 3 A
12 VDC @ 33 A
EN 61000-3-2:2014, Class A
EN 61000-3-3:2013
FCC Class A
VCCI Class A
CE Mark
Installation precautions
Warnings
• The rack or cabinet should be adequately secured to
prevent it from becoming unstable, tilting, or falling.
• Devices installed in a rack or cabinet should be mounted
as low as possible, with the heaviest devices at the bottom
and progressively lighter devices above.
Cautions
• Ensure the power source circuits are properly grounded,
then use the power cord supplied with the switch to
connect to the AC power source.
• If your installation requires a different power cord than the
one supplied with the switch and/or power supply, be sure
the cord is adequately sized for the switch’s current
requirements. In addition, be sure to use a power cord
displaying the mark of the safety agency that defines the
regulations for power cords in your country/region. The
mark is your assurance that the power cord can be used
safely with the switch and power supply.
• When installing the switch, the AC outlet should be near
the switch and should be easily accessible in case the
switch must be powered off.
• Ensure the switch does not overload the power circuits,
wiring, and over-current protection. To determine the
possibility of overloading the supply circuits, add together
the ampere ratings of all devices installed on the same
circuit as the switch and compare the total with the rating
limit for the circuit. The maximum ampere ratings are
usually printed on the devices near the AC power
connectors.
• Do not install the switch in an environment where the
operating ambient temperature exceeds its specification.
• Ensure the airflow around the switch is not restricted.
Leave at least 7.6 cm (3 inches) for cooling.
For additional safety and regulatory information, and switch
recycling information, refer to the safety and regulatory
documentation on the Hewlett Packard Enterprise website at
www.hpe.com/support/Safety-Compliance-EnterpriseProducts
Immunity EN 55024:2010
IEC 61000-4-2/3/4/5/6/8/11
Safety UL 60950-1/CSA C22 2 No. 60950-1
EN/IEC 60950-1
EN60850-1/IEC 60825-1
Power cords
Argentina
Australia/New Zealand
Brazil
Chile
China
Continental Europe
Denmark
India
Israel
Japan
Malaysia
Switzerland
South Africa
South Korea
Ta iw a n
Thailand
United Kingdom/Hong Kong/Singapore
United States/Canada/Mexico
WARNING
FOR INDOOR USE ONLY. The switch, AC power cord,
and all connected cables are not designed for outdoor
use.
8121-0729
8121-0837
8121-1071
8121-0735
8121-0943
8121-0731
8121-0733
8121-0564
8121-1004
8121-1143
8121-0739
8121-0738
8121-0737
8121-0731
8121-0964
8121-0734
8121-0739
8121-1141
Page 4

CAUTION
Disconnect all power supply cords before servicing.
Débranchez tous les cordons d'alimentation avant
l'entretien.
Japan power cord warning
China altitude warning
仅适用于海拔 2000 米以下地区安全使用
Russia/Belarus/Kazakhstan/CEE safety
HPE USA corporate address
Hewlett Packard Enterprise
3000 Hanover Street, Palo Alto, California, 94304 U.S.A.
GNU General Public License notice
This product includes code licensed under the GNU General
Public License, the GNU Lesser General Public License, and/or
certain other open source licenses. A complete machinereadable copy of the source code corresponding to such code is
available upon request. In addition, the “make” files contained in
the product and used to build the product along with instructions
on modifying and building the product are available from Hewlett
Packard Enterprise. This offer is valid to anyone in receipt of this
information and shall expire three years following the date of the
final distribution or support of this product version by Hewlett
Packard Enterprise.
To obtain such source code on CD/DVD, please send a check or
money order in the amount of US $10.00 to:
Hewlett Packard Enterprise
Attn: HPN Open Source Query
M/S 5554
8000 Foothills Blvd.
Roseville, CA 95747
USA
Please specify the product and version for which you are
requesting source code.
You may also request a copy of this source code by contacting
the HPN Open Source Query Team via email at:
Hewlett Packard Enterprise will charge a fee of $10.00 to cover
the costs of manufacturing and shipping the CD/DVD containing
the source code.
 Loading...