

Page 1

user reference
hp color LaserJet 9500mfp
Page 2

Page 3
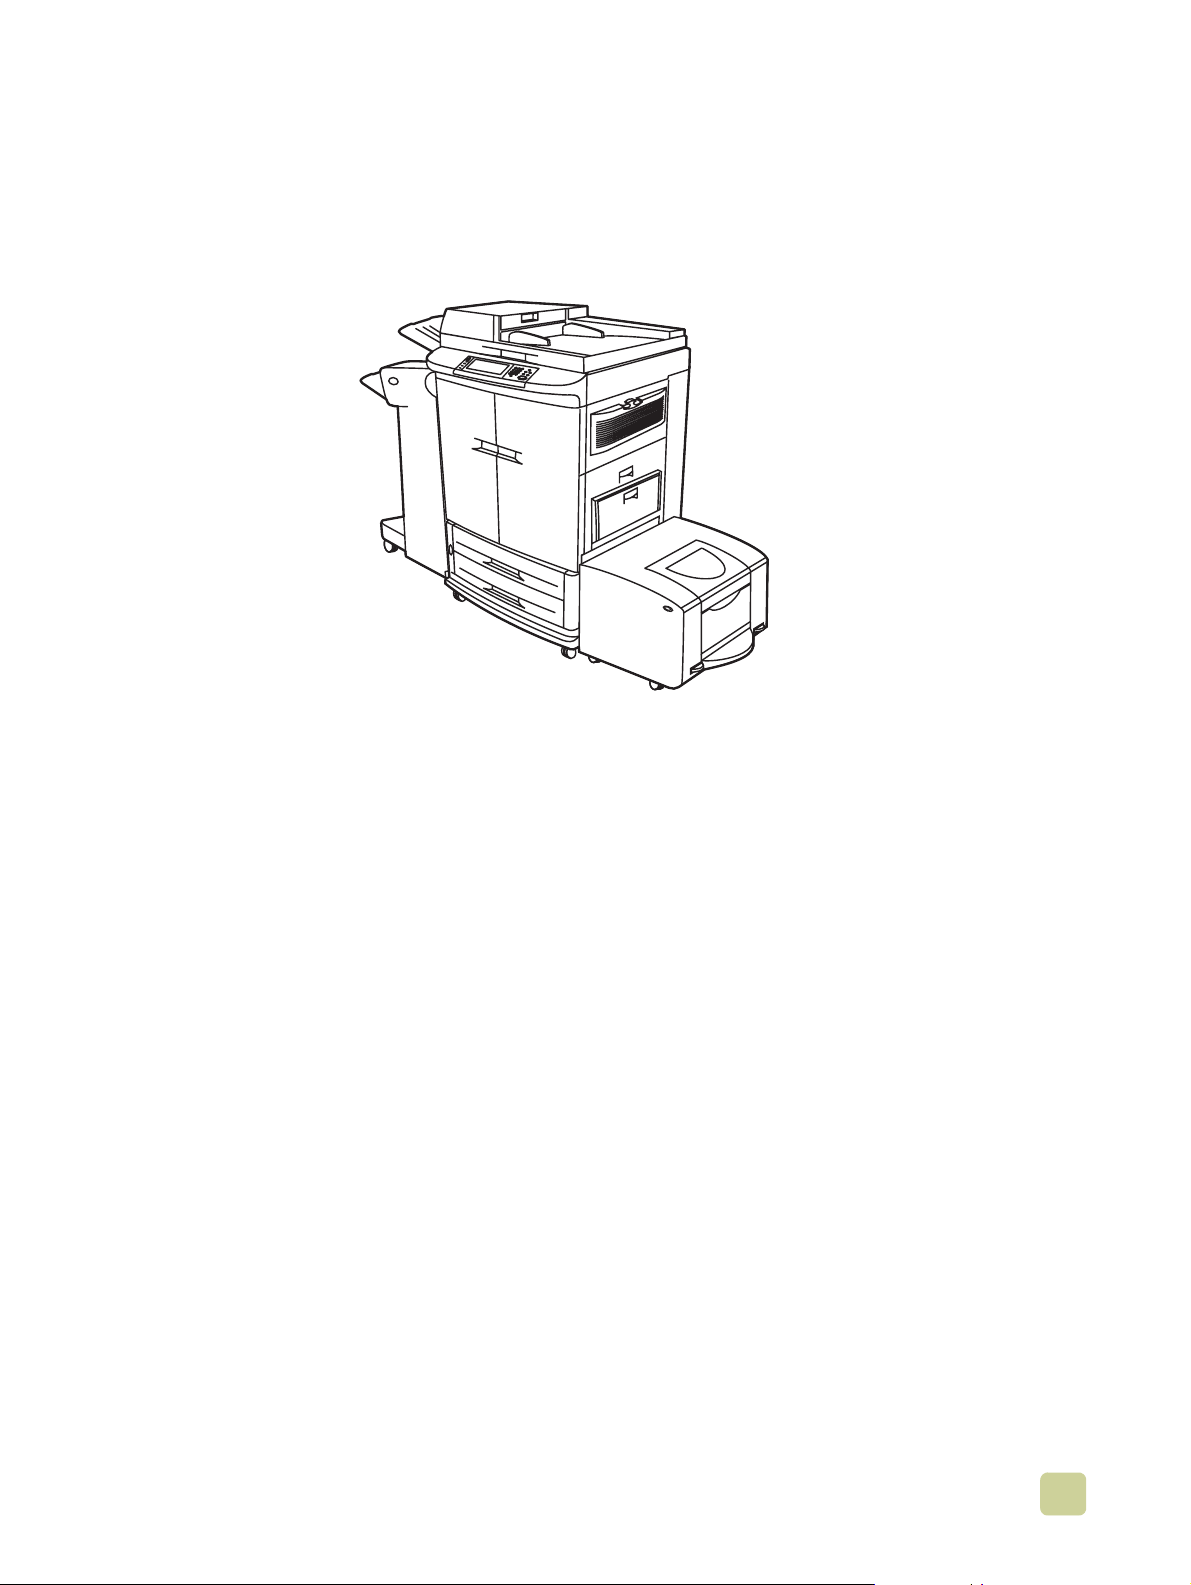
HP Color LaserJet 9500mfp
user reference guide
i
Page 4

Copyright and License
© 2004 Copyright Hewlett-Packard Development Company, LP
Reproduction, adaptation or translation without prior written permission is prohibited,
except as allowed under the copyright laws.
Edition 2, 10/2004
The information contained herein is subject to ch ange without notice.
The only warranties for HP products and services are set forth in the express warranty
statements accompanying such products and services. Nothing herein should be
construed as constituting an additional warranty. HP shall not be liable for technical or
editorial errors or omissions contained herein.
Trademark Credits
Acrobat®, Adobe®, Adobe Photoshop®, and PostScript® are trademarks of Adobe
Systems Incorporated.
Corel® is a trademark or registered trademark of Corel Corporation and Corel Corporation
Limited.
HP-UX® Release 10.20 and later and HP-UX Release 11.00 and later (in both 32- and
64-bit configurations) on all HP 9000 computers are Open Group UNIX 95 branded
products.
Linux is a U.S. registered trademark of Linus Torvalds.
Microsoft®, Windows®, and Windows NT® are U.S. registered trademarks of Microsoft
Corporation.
PANTONE®* is Pantone, Inc.’s check-standard trademark for color.
UNIX® is a registered trademark of The Open Group.
E
NERGY STAR® is a U.S. registered service mark of the United States Environmental
Protection Agency.
ii ENWW
Page 5

Contents
1 MFP basics
MFP components . . . . . . . . . . . . . . . . . . . . . . . . . . . . . . . . . . . . . . . . . . . . . . . . . . . . . . . 2
Control panel. . . . . . . . . . . . . . . . . . . . . . . . . . . . . . . . . . . . . . . . . . . . . . . . . . . . . . . 4
Features and benefits . . . . . . . . . . . . . . . . . . . . . . . . . . . . . . . . . . . . . . . . . . . . . . . . . . . . 6
Copying. . . . . . . . . . . . . . . . . . . . . . . . . . . . . . . . . . . . . . . . . . . . . . . . . . . . . . . . . . . 6
E-mail . . . . . . . . . . . . . . . . . . . . . . . . . . . . . . . . . . . . . . . . . . . . . . . . . . . . . . . . . . . . 6
Fax . . . . . . . . . . . . . . . . . . . . . . . . . . . . . . . . . . . . . . . . . . . . . . . . . . . . . . . . . . . . . . 6
Printing . . . . . . . . . . . . . . . . . . . . . . . . . . . . . . . . . . . . . . . . . . . . . . . . . . . . . . . . . . . 6
Media . . . . . . . . . . . . . . . . . . . . . . . . . . . . . . . . . . . . . . . . . . . . . . . . . . . . . . . . . . . . 6
Print cartridges and image drums. . . . . . . . . . . . . . . . . . . . . . . . . . . . . . . . . . . . . . . 8
Connectivity . . . . . . . . . . . . . . . . . . . . . . . . . . . . . . . . . . . . . . . . . . . . . . . . . . . . . . . 8
Setting the MFP defaults . . . . . . . . . . . . . . . . . . . . . . . . . . . . . . . . . . . . . . . . . . . . . . . . . . 9
Setting the MFP device defaults . . . . . . . . . . . . . . . . . . . . . . . . . . . . . . . . . . . . . . . . 9
Setting the MFP driver defaults. . . . . . . . . . . . . . . . . . . . . . . . . . . . . . . . . . . . . . . . 10
Printer drivers and software. . . . . . . . . . . . . . . . . . . . . . . . . . . . . . . . . . . . . . . . . . . . . . . 12
Printer drivers and software for Windows . . . . . . . . . . . . . . . . . . . . . . . . . . . . . . . . 12
Printer drivers and software for Macintosh computers . . . . . . . . . . . . . . . . . . . . . . 13
Additional printer drivers. . . . . . . . . . . . . . . . . . . . . . . . . . . . . . . . . . . . . . . . . . . . . 16
Help system. . . . . . . . . . . . . . . . . . . . . . . . . . . . . . . . . . . . . . . . . . . . . . . . . . . . . . . . . . .17
“What is this?” Help. . . . . . . . . . . . . . . . . . . . . . . . . . . . . . . . . . . . . . . . . . . . . . . . . 17
“Show me how” Help. . . . . . . . . . . . . . . . . . . . . . . . . . . . . . . . . . . . . . . . . . . . . . . . 17
“Error” Help . . . . . . . . . . . . . . . . . . . . . . . . . . . . . . . . . . . . . . . . . . . . . . . . . . . . . . . 17
Additional information . . . . . . . . . . . . . . . . . . . . . . . . . . . . . . . . . . . . . . . . . . . . . . . 18
Loading input trays . . . . . . . . . . . . . . . . . . . . . . . . . . . . . . . . . . . . . . . . . . . . . . . . . . . . . 19
Loading tray 2 and tray 3. . . . . . . . . . . . . . . . . . . . . . . . . . . . . . . . . . . . . . . . . . . . . 22
Changing and setting the media size and type for a tray . . . . . . . . . . . . . . . . . . . . 29
Loading the staple cartridge (multifunction finisher) . . . . . . . . . . . . . . . . . . . . . . . . . . . . 31
Loading the staple cartridge (3,000-sheet stapler/stacker) . . . . . . . . . . . . . . . . . . . . . . . 33
2 Copying
Copy-screen layout . . . . . . . . . . . . . . . . . . . . . . . . . . . . . . . . . . . . . . . . . . . . . . . . . . . . . 36
Copying instructions . . . . . . . . . . . . . . . . . . . . . . . . . . . . . . . . . . . . . . . . . . . . . . . . . . . . 37
Copying by using the default settings . . . . . . . . . . . . . . . . . . . . . . . . . . . . . . . . . . . 37
Copying by using user-defined settings . . . . . . . . . . . . . . . . . . . . . . . . . . . . . . . . . 39
Copying from the scanner glass . . . . . . . . . . . . . . . . . . . . . . . . . . . . . . . . . . . . . . . 41
Copying by using the ADF . . . . . . . . . . . . . . . . . . . . . . . . . . . . . . . . . . . . . . . . . . . 41
Using Job Mode . . . . . . . . . . . . . . . . . . . . . . . . . . . . . . . . . . . . . . . . . . . . . . . . . . . 41
Copying books . . . . . . . . . . . . . . . . . . . . . . . . . . . . . . . . . . . . . . . . . . . . . . . . . . . . 42
Creating a job to be copied later. . . . . . . . . . . . . . . . . . . . . . . . . . . . . . . . . . . . . . . 42
Copy settings. . . . . . . . . . . . . . . . . . . . . . . . . . . . . . . . . . . . . . . . . . . . . . . . . . . . . . . . . .43
Color copies or black and white copies. . . . . . . . . . . . . . . . . . . . . . . . . . . . . . . . . . 43
Reduce or enlarge . . . . . . . . . . . . . . . . . . . . . . . . . . . . . . . . . . . . . . . . . . . . . . . . . 43
Adjust the lightness/darkness. . . . . . . . . . . . . . . . . . . . . . . . . . . . . . . . . . . . . . . . . 43
Enhance the document. . . . . . . . . . . . . . . . . . . . . . . . . . . . . . . . . . . . . . . . . . . . . . 43
Copying multiple sized originals . . . . . . . . . . . . . . . . . . . . . . . . . . . . . . . . . . . . . . . . . . . 44
Setting copy defaults . . . . . . . . . . . . . . . . . . . . . . . . . . . . . . . . . . . . . . . . . . . . . . . . . . . . 44
iii
Page 6

3 E-mail
Sending documents. . . . . . . . . . . . . . . . . . . . . . . . . . . . . . . . . . . . . . . . . . . . . . . . . . . . . 47
Steps for sending . . . . . . . . . . . . . . . . . . . . . . . . . . . . . . . . . . . . . . . . . . . . . . . . . . 47
Scan settings. . . . . . . . . . . . . . . . . . . . . . . . . . . . . . . . . . . . . . . . . . . . . . . . . . . . . . . . . .48
Authentication . . . . . . . . . . . . . . . . . . . . . . . . . . . . . . . . . . . . . . . . . . . . . . . . . . . . . . . . .49
Using the auto-complete function . . . . . . . . . . . . . . . . . . . . . . . . . . . . . . . . . . . . . 49
Using the address book. . . . . . . . . . . . . . . . . . . . . . . . . . . . . . . . . . . . . . . . . . . . . . . . . . 50
Creating a recipient list . . . . . . . . . . . . . . . . . . . . . . . . . . . . . . . . . . . . . . . . . . . . . . 50
4 Faxing
Connecting the fax to a phone line . . . . . . . . . . . . . . . . . . . . . . . . . . . . . . . . . . . . . . . . . 52
Verifying the fax operation . . . . . . . . . . . . . . . . . . . . . . . . . . . . . . . . . . . . . . . . . . . . . . . . 53
Establishing the required fax settings . . . . . . . . . . . . . . . . . . . . . . . . . . . . . . . . . . . . . . . 53
Using the Fax Settings menu . . . . . . . . . . . . . . . . . . . . . . . . . . . . . . . . . . . . . . . . . 53
Setting or verifying the date and time . . . . . . . . . . . . . . . . . . . . . . . . . . . . . . . . . . . 54
Setting or verifying the location. . . . . . . . . . . . . . . . . . . . . . . . . . . . . . . . . . . . . . . . 54
Setting or verifying the fax header . . . . . . . . . . . . . . . . . . . . . . . . . . . . . . . . . . . . . 55
Fax feature screen. . . . . . . . . . . . . . . . . . . . . . . . . . . . . . . . . . . . . . . . . . . . . . . . . . . . . . 56
Status message bar. . . . . . . . . . . . . . . . . . . . . . . . . . . . . . . . . . . . . . . . . . . . . . . . . . . . . 56
Sending faxes . . . . . . . . . . . . . . . . . . . . . . . . . . . . . . . . . . . . . . . . . . . . . . . . . . . . . . . . . 57
Sending a fax by typing the number manually . . . . . . . . . . . . . . . . . . . . . . . . . . . . 57
Sending a fax by using speed dial . . . . . . . . . . . . . . . . . . . . . . . . . . . . . . . . . . . . . 58
Sending a fax by using phone book numbers. . . . . . . . . . . . . . . . . . . . . . . . . . . . . 58
Canceling a fax . . . . . . . . . . . . . . . . . . . . . . . . . . . . . . . . . . . . . . . . . . . . . . . . . . . . . . . . 60
Canceling the current fax transmission. . . . . . . . . . . . . . . . . . . . . . . . . . . . . . . . . . 60
Canceling all pending faxes . . . . . . . . . . . . . . . . . . . . . . . . . . . . . . . . . . . . . . . . . . 60
Changing the notification setting . . . . . . . . . . . . . . . . . . . . . . . . . . . . . . . . . . . . . . . . . . . 61
Speed dial . . . . . . . . . . . . . . . . . . . . . . . . . . . . . . . . . . . . . . . . . . . . . . . . . . . . . . . . . . . . 61
Changing the sharpness setting . . . . . . . . . . . . . . . . . . . . . . . . . . . . . . . . . . . . . . . . . . . 62
Changing the background setting . . . . . . . . . . . . . . . . . . . . . . . . . . . . . . . . . . . . . . . . . . 62
Changing the light/dark setting . . . . . . . . . . . . . . . . . . . . . . . . . . . . . . . . . . . . . . . . . . . . 63
Receiving faxes . . . . . . . . . . . . . . . . . . . . . . . . . . . . . . . . . . . . . . . . . . . . . . . . . . . . . . . . 63
Remote fax configuration. . . . . . . . . . . . . . . . . . . . . . . . . . . . . . . . . . . . . . . . . . . . . . . . . 64
Web browser. . . . . . . . . . . . . . . . . . . . . . . . . . . . . . . . . . . . . . . . . . . . . . . . . . . . . . 64
HP Web Jetadmin. . . . . . . . . . . . . . . . . . . . . . . . . . . . . . . . . . . . . . . . . . . . . . . . . . 64
HP MFP Digital Sending Software Configuration Utility . . . . . . . . . . . . . . . . . . . . . 65
Establishing optional fax settings. . . . . . . . . . . . . . . . . . . . . . . . . . . . . . . . . . . . . . . . . . . 65
Setting the modem volume . . . . . . . . . . . . . . . . . . . . . . . . . . . . . . . . . . . . . . . . . . . 66
Setting the ringer volume . . . . . . . . . . . . . . . . . . . . . . . . . . . . . . . . . . . . . . . . . . . . 66
Setting error correction mode . . . . . . . . . . . . . . . . . . . . . . . . . . . . . . . . . . . . . . . . . 66
Setting JBIG compression mode . . . . . . . . . . . . . . . . . . . . . . . . . . . . . . . . . . . . . . 67
Setting outgoing fax resolution . . . . . . . . . . . . . . . . . . . . . . . . . . . . . . . . . . . . . . . . 67
Setting the overlay header . . . . . . . . . . . . . . . . . . . . . . . . . . . . . . . . . . . . . . . . . . . 67
Setting dialing mode . . . . . . . . . . . . . . . . . . . . . . . . . . . . . . . . . . . . . . . . . . . . . . . . 68
Setting dialing and detection options. . . . . . . . . . . . . . . . . . . . . . . . . . . . . . . . . . . . . . . . 68
Setting a dialing prefix. . . . . . . . . . . . . . . . . . . . . . . . . . . . . . . . . . . . . . . . . . . . . . . 68
Setting the redial-on-busy feature. . . . . . . . . . . . . . . . . . . . . . . . . . . . . . . . . . . . . . 69
Setting redial-on-no-answer . . . . . . . . . . . . . . . . . . . . . . . . . . . . . . . . . . . . . . . . . . 69
Setting redial interval . . . . . . . . . . . . . . . . . . . . . . . . . . . . . . . . . . . . . . . . . . . . . . . 69
Setting dial-tone detection . . . . . . . . . . . . . . . . . . . . . . . . . . . . . . . . . . . . . . . . . . . 70
Setting billing codes. . . . . . . . . . . . . . . . . . . . . . . . . . . . . . . . . . . . . . . . . . . . . . . . . . . . . 70
Setting rings-to-answer . . . . . . . . . . . . . . . . . . . . . . . . . . . . . . . . . . . . . . . . . . . . . . . . . . 70
Stamp received faxes . . . . . . . . . . . . . . . . . . . . . . . . . . . . . . . . . . . . . . . . . . . . . . . . . . . 71
Setting the fit-to-page option . . . . . . . . . . . . . . . . . . . . . . . . . . . . . . . . . . . . . . . . . . . . . . 71
iv ENWW
Page 7

Setting the paper tray . . . . . . . . . . . . . . . . . . . . . . . . . . . . . . . . . . . . . . . . . . . . . . . . . . . 71
Setting the destination bin . . . . . . . . . . . . . . . . . . . . . . . . . . . . . . . . . . . . . . . . . . . . . . . . 72
Blocking incoming faxes . . . . . . . . . . . . . . . . . . . . . . . . . . . . . . . . . . . . . . . . . . . . . . . . . 72
Secure settings . . . . . . . . . . . . . . . . . . . . . . . . . . . . . . . . . . . . . . . . . . . . . . . . . . . . . . . . 74
Changing your PIN . . . . . . . . . . . . . . . . . . . . . . . . . . . . . . . . . . . . . . . . . . . . . . . . . 74
Setting fax forwarding . . . . . . . . . . . . . . . . . . . . . . . . . . . . . . . . . . . . . . . . . . . . . . . . . . . 74
Scheduling fax printing . . . . . . . . . . . . . . . . . . . . . . . . . . . . . . . . . . . . . . . . . . . . . . . . . . 75
Initiate polling receive . . . . . . . . . . . . . . . . . . . . . . . . . . . . . . . . . . . . . . . . . . . . . . . . . . . 76
Printing the fax call report . . . . . . . . . . . . . . . . . . . . . . . . . . . . . . . . . . . . . . . . . . . . . . . . 76
Scheduling fax-call report printing . . . . . . . . . . . . . . . . . . . . . . . . . . . . . . . . . . . . . . . . . . 78
Printing the fax activity log. . . . . . . . . . . . . . . . . . . . . . . . . . . . . . . . . . . . . . . . . . . . . . . . 78
Printing the billing code report. . . . . . . . . . . . . . . . . . . . . . . . . . . . . . . . . . . . . . . . . . . . . 79
Clearing the fax activity log and billing code report . . . . . . . . . . . . . . . . . . . . . . . . . . . . . 79
Printing the blocked fax list report . . . . . . . . . . . . . . . . . . . . . . . . . . . . . . . . . . . . . . . . . . 80
Printing the speed dial list report . . . . . . . . . . . . . . . . . . . . . . . . . . . . . . . . . . . . . . . . . . . 80
Is your fax set up correctly?. . . . . . . . . . . . . . . . . . . . . . . . . . . . . . . . . . . . . . . . . . . . . . . 81
What type of phone line are you using? . . . . . . . . . . . . . . . . . . . . . . . . . . . . . . . . . 81
Are you using a phone-line splitter? . . . . . . . . . . . . . . . . . . . . . . . . . . . . . . . . . . . . 81
Are you using a surge-protection device?. . . . . . . . . . . . . . . . . . . . . . . . . . . . . . . . 81
Are you using a phone company voice-messaging service
or an answering machine? . . . . . . . . . . . . . . . . . . . . . . . . . . . . . . . . . . . . . . . . . . . 82
Checking fax status . . . . . . . . . . . . . . . . . . . . . . . . . . . . . . . . . . . . . . . . . . . . . . . . . . . . . 82
Fax feature is not operating . . . . . . . . . . . . . . . . . . . . . . . . . . . . . . . . . . . . . . . . . . . . . . . 83
General fax problems. . . . . . . . . . . . . . . . . . . . . . . . . . . . . . . . . . . . . . . . . . . . . . . . . . . . 84
Receiving fax problems . . . . . . . . . . . . . . . . . . . . . . . . . . . . . . . . . . . . . . . . . . . . . . . . . . 86
Sending fax problems . . . . . . . . . . . . . . . . . . . . . . . . . . . . . . . . . . . . . . . . . . . . . . . . . . . 88
Error codes . . . . . . . . . . . . . . . . . . . . . . . . . . . . . . . . . . . . . . . . . . . . . . . . . . . . . . . . . . .89
Service settings . . . . . . . . . . . . . . . . . . . . . . . . . . . . . . . . . . . . . . . . . . . . . . . . . . . . . . . . 90
Customer support . . . . . . . . . . . . . . . . . . . . . . . . . . . . . . . . . . . . . . . . . . . . . . . . . . . . . . 90
World Wide Web. . . . . . . . . . . . . . . . . . . . . . . . . . . . . . . . . . . . . . . . . . . . . . . . . . . 90
E-mail . . . . . . . . . . . . . . . . . . . . . . . . . . . . . . . . . . . . . . . . . . . . . . . . . . . . . . . . . . . 90
Fax product specifications . . . . . . . . . . . . . . . . . . . . . . . . . . . . . . . . . . . . . . . . . . . . . . . . 91
Replacement parts and accessories . . . . . . . . . . . . . . . . . . . . . . . . . . . . . . . . . . . . . . . . 91
Regulatory information and warranties . . . . . . . . . . . . . . . . . . . . . . . . . . . . . . . . . . . . . . 91
5 Printing
Using the printer driver . . . . . . . . . . . . . . . . . . . . . . . . . . . . . . . . . . . . . . . . . . . . . . . . . . 94
Opening the printer driver . . . . . . . . . . . . . . . . . . . . . . . . . . . . . . . . . . . . . . . . . . . . . . . . 94
Changing the settings for a print job using a computer. . . . . . . . . . . . . . . . . . . . . . 94
Changing default settings . . . . . . . . . . . . . . . . . . . . . . . . . . . . . . . . . . . . . . . . . . . . 94
Printing on both sides of paper (duplexing). . . . . . . . . . . . . . . . . . . . . . . . . . . . . . . . . . . 96
Printing on special print media . . . . . . . . . . . . . . . . . . . . . . . . . . . . . . . . . . . . . . . . . . . . 97
Choosing and printing on envelopes. . . . . . . . . . . . . . . . . . . . . . . . . . . . . . . . . . . . 97
Printing on envelopes . . . . . . . . . . . . . . . . . . . . . . . . . . . . . . . . . . . . . . . . . . . . . . . 98
Printing on letterhead, prepunched paper, or preprinted paper (single-sided) . . . . 99
Printing on labels . . . . . . . . . . . . . . . . . . . . . . . . . . . . . . . . . . . . . . . . . . . . . . . . . . 99
Printing on transparencies . . . . . . . . . . . . . . . . . . . . . . . . . . . . . . . . . . . . . . . . . . . 99
Printing on heavy paper and card stock . . . . . . . . . . . . . . . . . . . . . . . . . . . . . . . . 100
Creating the effect of a full-bleed image . . . . . . . . . . . . . . . . . . . . . . . . . . . . . . . . 101
Printing watermarks. . . . . . . . . . . . . . . . . . . . . . . . . . . . . . . . . . . . . . . . . . . . . . . . . . . . 101
Printing a cover or a different first page. . . . . . . . . . . . . . . . . . . . . . . . . . . . . . . . . . . . . 102
Adding a blank page (job separator page) or back cover to the end
of a print job (computer only). . . . . . . . . . . . . . . . . . . . . . . . . . . . . . . . . . . . . . . . . . . . . 104
Adding a blank page to the beginning of all print jobs (job separator page). . . . . 104
v
Page 8

Printing multiple page images on one side of a sheet of paper. . . . . . . . . . . . . . . . . . . 106
Customizing tray 1 operation. . . . . . . . . . . . . . . . . . . . . . . . . . . . . . . . . . . . . . . . . . . . . 107
Printing from tray 1 when the loaded paper is requested . . . . . . . . . . . . . . . . . . . 107
Manually feeding paper from tray 1. . . . . . . . . . . . . . . . . . . . . . . . . . . . . . . . . . . . 107
Using the job-storage features. . . . . . . . . . . . . . . . . . . . . . . . . . . . . . . . . . . . . . . . . . . . 108
Private jobs . . . . . . . . . . . . . . . . . . . . . . . . . . . . . . . . . . . . . . . . . . . . . . . . . . . . . . 108
Stored jobs . . . . . . . . . . . . . . . . . . . . . . . . . . . . . . . . . . . . . . . . . . . . . . . . . . . . . . 109
QuickCopy jobs. . . . . . . . . . . . . . . . . . . . . . . . . . . . . . . . . . . . . . . . . . . . . . . . . . . 110
Proof and hold jobs. . . . . . . . . . . . . . . . . . . . . . . . . . . . . . . . . . . . . . . . . . . . . . . . 112
Printing a booklet. . . . . . . . . . . . . . . . . . . . . . . . . . . . . . . . . . . . . . . . . . . . . . . . . . . . . . 114
Selecting an output bin for print jobs . . . . . . . . . . . . . . . . . . . . . . . . . . . . . . . . . . . . . . . 116
3,000-sheet stacker and 3,000-sheet stapler/stacker. . . . . . . . . . . . . . . . . . . . . . 116
Multifunction finisher . . . . . . . . . . . . . . . . . . . . . . . . . . . . . . . . . . . . . . . . . . . . . . . 117
8-bin mailbox. . . . . . . . . . . . . . . . . . . . . . . . . . . . . . . . . . . . . . . . . . . . . . . . . . . . . 117
Selecting an output location at the control panel . . . . . . . . . . . . . . . . . . . . . . . . . 118
Selecting the stapler for a print job . . . . . . . . . . . . . . . . . . . . . . . . . . . . . . . . . . . . . . . . 119
Selecting the stapler . . . . . . . . . . . . . . . . . . . . . . . . . . . . . . . . . . . . . . . . . . . . . . . 119
Basic network printing setup . . . . . . . . . . . . . . . . . . . . . . . . . . . . . . . . . . . . . . . . . . . . . 120
6 Control-panel menus
Retrieve job menu . . . . . . . . . . . . . . . . . . . . . . . . . . . . . . . . . . . . . . . . . . . . . . . . . . . . . 126
Information menu. . . . . . . . . . . . . . . . . . . . . . . . . . . . . . . . . . . . . . . . . . . . . . . . . . . . . . 127
Paper handling menu . . . . . . . . . . . . . . . . . . . . . . . . . . . . . . . . . . . . . . . . . . . . . . . . . . 128
Configure device menu . . . . . . . . . . . . . . . . . . . . . . . . . . . . . . . . . . . . . . . . . . . . . . . . . 130
Originals submenu . . . . . . . . . . . . . . . . . . . . . . . . . . . . . . . . . . . . . . . . . . . . . . . . 130
Copying submenu. . . . . . . . . . . . . . . . . . . . . . . . . . . . . . . . . . . . . . . . . . . . . . . . . 131
Enhancement submenu . . . . . . . . . . . . . . . . . . . . . . . . . . . . . . . . . . . . . . . . . . . . 132
Sending submenu. . . . . . . . . . . . . . . . . . . . . . . . . . . . . . . . . . . . . . . . . . . . . . . . . 132
Printing submenu . . . . . . . . . . . . . . . . . . . . . . . . . . . . . . . . . . . . . . . . . . . . . . . . . 134
PCL submenu . . . . . . . . . . . . . . . . . . . . . . . . . . . . . . . . . . . . . . . . . . . . . . . . . . . . 136
Print quality submenu . . . . . . . . . . . . . . . . . . . . . . . . . . . . . . . . . . . . . . . . . . . . . . 138
System setup submenu . . . . . . . . . . . . . . . . . . . . . . . . . . . . . . . . . . . . . . . . . . . . 140
I/O submenu . . . . . . . . . . . . . . . . . . . . . . . . . . . . . . . . . . . . . . . . . . . . . . . . . . . . . 145
Resets submenu. . . . . . . . . . . . . . . . . . . . . . . . . . . . . . . . . . . . . . . . . . . . . . . . . . 149
Diagnostics menu . . . . . . . . . . . . . . . . . . . . . . . . . . . . . . . . . . . . . . . . . . . . . . . . . . . . . 150
7 Using color and fonts
HP ImageREt 4800. . . . . . . . . . . . . . . . . . . . . . . . . . . . . . . . . . . . . . . . . . . . . . . . 153
Managing color . . . . . . . . . . . . . . . . . . . . . . . . . . . . . . . . . . . . . . . . . . . . . . . . . . . 154
Matching colors. . . . . . . . . . . . . . . . . . . . . . . . . . . . . . . . . . . . . . . . . . . . . . . . . . . 156
Color samples. . . . . . . . . . . . . . . . . . . . . . . . . . . . . . . . . . . . . . . . . . . . . . . . . . . . 157
Printing color samples. . . . . . . . . . . . . . . . . . . . . . . . . . . . . . . . . . . . . . . . . . . . . . 158
Four-color printing (CMYK) . . . . . . . . . . . . . . . . . . . . . . . . . . . . . . . . . . . . . . . . . . 158
Using fonts. . . . . . . . . . . . . . . . . . . . . . . . . . . . . . . . . . . . . . . . . . . . . . . . . . . . . . . . . . .159
Installing fonts. . . . . . . . . . . . . . . . . . . . . . . . . . . . . . . . . . . . . . . . . . . . . . . . . . . . 159
Understanding the MFP font defaults . . . . . . . . . . . . . . . . . . . . . . . . . . . . . . . . . . 159
Selecting fonts. . . . . . . . . . . . . . . . . . . . . . . . . . . . . . . . . . . . . . . . . . . . . . . . . . . . 160
Selecting PCL fonts at the MFP control panel . . . . . . . . . . . . . . . . . . . . . . . . . . . 160
Printing a list of available MFP fonts. . . . . . . . . . . . . . . . . . . . . . . . . . . . . . . . . . . 160
Using PostScript fonts. . . . . . . . . . . . . . . . . . . . . . . . . . . . . . . . . . . . . . . . . . . . . . 160
Using fonts on a network. . . . . . . . . . . . . . . . . . . . . . . . . . . . . . . . . . . . . . . . . . . . 161
Adding support for fonts to a printer hard disk or Flash Memory card . . . . . . . . . 161
Using special effects with typefaces (Windows only) . . . . . . . . . . . . . . . . . . . . . . 162
vi ENWW
Page 9

8 Selecting and using media
Selecting high-quality media. . . . . . . . . . . . . . . . . . . . . . . . . . . . . . . . . . . . . . . . . 163
Using non-HP-brand media . . . . . . . . . . . . . . . . . . . . . . . . . . . . . . . . . . . . . . . . . 163
Ordering supported media . . . . . . . . . . . . . . . . . . . . . . . . . . . . . . . . . . . . . . . . . . 164
Setting media size and type . . . . . . . . . . . . . . . . . . . . . . . . . . . . . . . . . . . . . . . . . 164
Supported types of media. . . . . . . . . . . . . . . . . . . . . . . . . . . . . . . . . . . . . . . . . . . 172
Selecting media for your document. . . . . . . . . . . . . . . . . . . . . . . . . . . . . . . . . . . . 175
Printing by type and size of media . . . . . . . . . . . . . . . . . . . . . . . . . . . . . . . . . . . . 188
Advanced settings . . . . . . . . . . . . . . . . . . . . . . . . . . . . . . . . . . . . . . . . . . . . . . . . . . . . . 189
Print modes. . . . . . . . . . . . . . . . . . . . . . . . . . . . . . . . . . . . . . . . . . . . . . . . . . . . . . 189
Storing media . . . . . . . . . . . . . . . . . . . . . . . . . . . . . . . . . . . . . . . . . . . . . . . . . . . . 195
Media-related copy-quality and print-quality issues . . . . . . . . . . . . . . . . . . . . . . . 196
9 Managing and maintaining
Using the MFP memory. . . . . . . . . . . . . . . . . . . . . . . . . . . . . . . . . . . . . . . . . . . . . . . . . 200
Using HP Toolbox . . . . . . . . . . . . . . . . . . . . . . . . . . . . . . . . . . . . . . . . . . . . . . . . . . . . . 204
Supported operating systems . . . . . . . . . . . . . . . . . . . . . . . . . . . . . . . . . . . . . . . . 204
Supported browsers . . . . . . . . . . . . . . . . . . . . . . . . . . . . . . . . . . . . . . . . . . . . . . . 204
To view HP Toolbox. . . . . . . . . . . . . . . . . . . . . . . . . . . . . . . . . . . . . . . . . . . . . . . . 204
HP Toolbox sections . . . . . . . . . . . . . . . . . . . . . . . . . . . . . . . . . . . . . . . . . . . . . . . 205
Other links. . . . . . . . . . . . . . . . . . . . . . . . . . . . . . . . . . . . . . . . . . . . . . . . . . . . . . . 205
Status tab . . . . . . . . . . . . . . . . . . . . . . . . . . . . . . . . . . . . . . . . . . . . . . . . . . . . . . . 205
Alerts tab. . . . . . . . . . . . . . . . . . . . . . . . . . . . . . . . . . . . . . . . . . . . . . . . . . . . . . . . 205
Device Settings button . . . . . . . . . . . . . . . . . . . . . . . . . . . . . . . . . . . . . . . . . . . . . 206
HP Toolbox links . . . . . . . . . . . . . . . . . . . . . . . . . . . . . . . . . . . . . . . . . . . . . . . . . . 206
Using the embedded Web server . . . . . . . . . . . . . . . . . . . . . . . . . . . . . . . . . . . . . . . . . 207
Managing supplies. . . . . . . . . . . . . . . . . . . . . . . . . . . . . . . . . . . . . . . . . . . . . . . . . . . . . 210
Checking supplies levels. . . . . . . . . . . . . . . . . . . . . . . . . . . . . . . . . . . . . . . . . . . . 210
Ordering supplies . . . . . . . . . . . . . . . . . . . . . . . . . . . . . . . . . . . . . . . . . . . . . . . . . 212
Storing supplies . . . . . . . . . . . . . . . . . . . . . . . . . . . . . . . . . . . . . . . . . . . . . . . . . . 212
Replacing and recycling the supplies . . . . . . . . . . . . . . . . . . . . . . . . . . . . . . . . . . 213
Using the image drums. . . . . . . . . . . . . . . . . . . . . . . . . . . . . . . . . . . . . . . . . . . . . 217
Image transfer kit . . . . . . . . . . . . . . . . . . . . . . . . . . . . . . . . . . . . . . . . . . . . . . . . . 221
Image cleaning kit. . . . . . . . . . . . . . . . . . . . . . . . . . . . . . . . . . . . . . . . . . . . . . . . . 227
Image fuser kit . . . . . . . . . . . . . . . . . . . . . . . . . . . . . . . . . . . . . . . . . . . . . . . . . . . 231
Cleaning procedures . . . . . . . . . . . . . . . . . . . . . . . . . . . . . . . . . . . . . . . . . . . . . . . . . . . 234
Cleaning the ADF . . . . . . . . . . . . . . . . . . . . . . . . . . . . . . . . . . . . . . . . . . . . . . . . . 234
Cleaning the post charger. . . . . . . . . . . . . . . . . . . . . . . . . . . . . . . . . . . . . . . . . . . 238
Cleaning the fuser input . . . . . . . . . . . . . . . . . . . . . . . . . . . . . . . . . . . . . . . . . . . . 240
Installing firmware updates . . . . . . . . . . . . . . . . . . . . . . . . . . . . . . . . . . . . . . . . . . . . . . 242
Downloading the new firmware to the MFP . . . . . . . . . . . . . . . . . . . . . . . . . . . . . 242
Remote firmware update through a local Windows port . . . . . . . . . . . . . . . . . . . 243
Remote firmware update through a Windows network . . . . . . . . . . . . . . . . . . . . . 244
Remote firmware update for UNIX systems . . . . . . . . . . . . . . . . . . . . . . . . . . . . . 244
Remote firmware update by using FTP on a direct network connection . . . . . . . 245
Remote firmware update by using FTP through a browser. . . . . . . . . . . . . . . . . . 246
Remote firmware update using the HP LaserJet utility (Mac OS 8.6 and 9.x only)247
Remote firmware update using the LPR command . . . . . . . . . . . . . . . . . . . . . . . 248
Using HP Web Jetadmin to download the firmware to the MFP . . . . . . . . . . . . . . 248
MFP messages during firmware update . . . . . . . . . . . . . . . . . . . . . . . . . . . . . . . 249
Troubleshooting a firmware update . . . . . . . . . . . . . . . . . . . . . . . . . . . . . . . . . . . 250
Managing and configuring printer drivers . . . . . . . . . . . . . . . . . . . . . . . . . . . . . . . . . . . 251
Using the HP Web Jetadmin software plug-in. . . . . . . . . . . . . . . . . . . . . . . . . . . . 252
Using the customization utility. . . . . . . . . . . . . . . . . . . . . . . . . . . . . . . . . . . . . . . . 252
vii
Page 10

Relocating the MFP. . . . . . . . . . . . . . . . . . . . . . . . . . . . . . . . . . . . . . . . . . . . . . . . . . . . 253
Before you move the MFP. . . . . . . . . . . . . . . . . . . . . . . . . . . . . . . . . . . . . . . . . . . 253
After the MFP is in the new location . . . . . . . . . . . . . . . . . . . . . . . . . . . . . . . . . . . 254
10 Problem solving
Clearing jams. . . . . . . . . . . . . . . . . . . . . . . . . . . . . . . . . . . . . . . . . . . . . . . . . . . . . . . . . 257
Jam clearing locations . . . . . . . . . . . . . . . . . . . . . . . . . . . . . . . . . . . . . . . . . . . . . 257
Clearing jams from the input-tray areas . . . . . . . . . . . . . . . . . . . . . . . . . . . . . . . . 259
Clearing jams from the duplexer. . . . . . . . . . . . . . . . . . . . . . . . . . . . . . . . . . . . . . 269
Clearing jams from the output areas. . . . . . . . . . . . . . . . . . . . . . . . . . . . . . . . . . . 271
Solving repeated jams . . . . . . . . . . . . . . . . . . . . . . . . . . . . . . . . . . . . . . . . . . . . . 290
Understanding MFP messages . . . . . . . . . . . . . . . . . . . . . . . . . . . . . . . . . . . . . . . . . . . 291
Using the MFP help system . . . . . . . . . . . . . . . . . . . . . . . . . . . . . . . . . . . . . . . . . 291
If a message persists . . . . . . . . . . . . . . . . . . . . . . . . . . . . . . . . . . . . . . . . . . . . . . 291
Interpreting control-panel messages. . . . . . . . . . . . . . . . . . . . . . . . . . . . . . . . . . . 292
Solving output-quality problems . . . . . . . . . . . . . . . . . . . . . . . . . . . . . . . . . . . . . . . . . . 317
Output-quality troubleshooting procedures. . . . . . . . . . . . . . . . . . . . . . . . . . . . . . 318
Print Quality Troubleshooting Pages . . . . . . . . . . . . . . . . . . . . . . . . . . . . . . . . . . 318
Solving persistent output-quality problems . . . . . . . . . . . . . . . . . . . . . . . . . . . . . . 319
Solving MFP problems. . . . . . . . . . . . . . . . . . . . . . . . . . . . . . . . . . . . . . . . . . . . . . . . . . 331
MFP hardware issues . . . . . . . . . . . . . . . . . . . . . . . . . . . . . . . . . . . . . . . . . . . . . . 331
MFP control-panel issues . . . . . . . . . . . . . . . . . . . . . . . . . . . . . . . . . . . . . . . . . . . 332
Media-handling issues . . . . . . . . . . . . . . . . . . . . . . . . . . . . . . . . . . . . . . . . . . . . . 333
MFP-output issues . . . . . . . . . . . . . . . . . . . . . . . . . . . . . . . . . . . . . . . . . . . . . . . . 335
PostScript issues. . . . . . . . . . . . . . . . . . . . . . . . . . . . . . . . . . . . . . . . . . . . . . . . . . 338
Software issues. . . . . . . . . . . . . . . . . . . . . . . . . . . . . . . . . . . . . . . . . . . . . . . . . . . 338
Communication issues . . . . . . . . . . . . . . . . . . . . . . . . . . . . . . . . . . . . . . . . . . . . . 339
Duplexer issues. . . . . . . . . . . . . . . . . . . . . . . . . . . . . . . . . . . . . . . . . . . . . . . . . . . 341
Selecting an alternate PPD (Macintosh only) . . . . . . . . . . . . . . . . . . . . . . . . . . . . . . . . 342
Communicating with an HP Jetdirect print server . . . . . . . . . . . . . . . . . . . . . . . . . . . . . 343
Checking the MFP configuration . . . . . . . . . . . . . . . . . . . . . . . . . . . . . . . . . . . . . . . . . . 344
Menu map. . . . . . . . . . . . . . . . . . . . . . . . . . . . . . . . . . . . . . . . . . . . . . . . . . . . . . . 345
Configuration page . . . . . . . . . . . . . . . . . . . . . . . . . . . . . . . . . . . . . . . . . . . . . . . . 346
Jetdirect page . . . . . . . . . . . . . . . . . . . . . . . . . . . . . . . . . . . . . . . . . . . . . . . . . . . 348
Supplies status pages. . . . . . . . . . . . . . . . . . . . . . . . . . . . . . . . . . . . . . . . . . . . . . 349
Usage page. . . . . . . . . . . . . . . . . . . . . . . . . . . . . . . . . . . . . . . . . . . . . . . . . . . . . . 351
PCL or PS font list. . . . . . . . . . . . . . . . . . . . . . . . . . . . . . . . . . . . . . . . . . . . . . . . . 352
Print demo page . . . . . . . . . . . . . . . . . . . . . . . . . . . . . . . . . . . . . . . . . . . . . . . . . . 353
Print RGB samples . . . . . . . . . . . . . . . . . . . . . . . . . . . . . . . . . . . . . . . . . . . . . . . . 354
Print CMYK samples. . . . . . . . . . . . . . . . . . . . . . . . . . . . . . . . . . . . . . . . . . . . . . . 354
File directory page . . . . . . . . . . . . . . . . . . . . . . . . . . . . . . . . . . . . . . . . . . . . . . . . 356
Event log page . . . . . . . . . . . . . . . . . . . . . . . . . . . . . . . . . . . . . . . . . . . . . . . . . . . 357
Printing a paper-path test . . . . . . . . . . . . . . . . . . . . . . . . . . . . . . . . . . . . . . . . . . . . . . . 358
Setting registration. . . . . . . . . . . . . . . . . . . . . . . . . . . . . . . . . . . . . . . . . . . . . . . . . . . . . 358
A Specifications
Physical specifications. . . . . . . . . . . . . . . . . . . . . . . . . . . . . . . . . . . . . . . . . . . . . . . . . . 359
Power requirements and circuit capacity. . . . . . . . . . . . . . . . . . . . . . . . . . . . . . . . . . . . 360
Power consumption . . . . . . . . . . . . . . . . . . . . . . . . . . . . . . . . . . . . . . . . . . . . . . . . . . . . 360
Acoustical specifications¹ . . . . . . . . . . . . . . . . . . . . . . . . . . . . . . . . . . . . . . . . . . . . . . . 361
Operating and storage environment . . . . . . . . . . . . . . . . . . . . . . . . . . . . . . . . . . . . . . . 361
viii ENWW
Page 11

B Support information
Information from the MFP . . . . . . . . . . . . . . . . . . . . . . . . . . . . . . . . . . . . . . . . . . . 363
Customer support and MFP repair assistance . . . . . . . . . . . . . . . . . . . . . . . . . . . 364
Warranties and license . . . . . . . . . . . . . . . . . . . . . . . . . . . . . . . . . . . . . . . . . . . . . . . . . 364
Extended warranty . . . . . . . . . . . . . . . . . . . . . . . . . . . . . . . . . . . . . . . . . . . . . . . . 364
Color print cartridge/image drum warranty . . . . . . . . . . . . . . . . . . . . . . . . . . . . . . 364
HP software license terms . . . . . . . . . . . . . . . . . . . . . . . . . . . . . . . . . . . . . . . . . . 366
C Regulatory
Environmental product stewardship program . . . . . . . . . . . . . . . . . . . . . . . . . . . . . . . . 369
Protecting the environment . . . . . . . . . . . . . . . . . . . . . . . . . . . . . . . . . . . . . . . . . . 369
FCC statement . . . . . . . . . . . . . . . . . . . . . . . . . . . . . . . . . . . . . . . . . . . . . . . . . . . . . . . 371
Regulatory statements. . . . . . . . . . . . . . . . . . . . . . . . . . . . . . . . . . . . . . . . . . . . . . . . . . 372
Declaration of Conformity . . . . . . . . . . . . . . . . . . . . . . . . . . . . . . . . . . . . . . . . . . . 372
EU Statement for Telecom Operation . . . . . . . . . . . . . . . . . . . . . . . . . . . . . . . . . . 373
Canadian DOC Regulations . . . . . . . . . . . . . . . . . . . . . . . . . . . . . . . . . . . . . . . . . 373
VCCI Statement (Japan). . . . . . . . . . . . . . . . . . . . . . . . . . . . . . . . . . . . . . . . . . . . 373
Korean EMI Statement . . . . . . . . . . . . . . . . . . . . . . . . . . . . . . . . . . . . . . . . . . . . . 374
Laser Statement for Finland . . . . . . . . . . . . . . . . . . . . . . . . . . . . . . . . . . . . . . . . . 374
Taiwan Class A Statement . . . . . . . . . . . . . . . . . . . . . . . . . . . . . . . . . . . . . . . . . . 375
Taiwan Battery Statement. . . . . . . . . . . . . . . . . . . . . . . . . . . . . . . . . . . . . . . . . . . 375
Product Information Sheet . . . . . . . . . . . . . . . . . . . . . . . . . . . . . . . . . . . . . . . . . . 375
D Setting up the MFP
Preparing a location for the MFP . . . . . . . . . . . . . . . . . . . . . . . . . . . . . . . . . . . . . 378
Unpacking and setting up the MFP. . . . . . . . . . . . . . . . . . . . . . . . . . . . . . . . . . . . 379
Removing and loading the consumables . . . . . . . . . . . . . . . . . . . . . . . . . . . . . . . 384
Installing the finishing device . . . . . . . . . . . . . . . . . . . . . . . . . . . . . . . . . . . . . . . . 387
Unpacking and installing the 2,000-sheet side input tray (tray 4) . . . . . . . . . . . . . 388
Setting the MFP language . . . . . . . . . . . . . . . . . . . . . . . . . . . . . . . . . . . . . . . . . . 390
Loading media in tray 2 and tray 3 . . . . . . . . . . . . . . . . . . . . . . . . . . . . . . . . . . . . 391
Loading media in the 2,000-sheet side input tray (tray 4) . . . . . . . . . . . . . . . . . . . 392
Using the control panel . . . . . . . . . . . . . . . . . . . . . . . . . . . . . . . . . . . . . . . . . . . . . 392
Configurating e-mail . . . . . . . . . . . . . . . . . . . . . . . . . . . . . . . . . . . . . . . . . . . . . . . 393
Installing the printing software . . . . . . . . . . . . . . . . . . . . . . . . . . . . . . . . . . . . . . . 394
Index
ix
Page 12

x ENWW
Page 13

1
MFP basics
Now that the MFP (multifunction peripheral) is set up, take a few moments to set your
defaults and get to know the MFP. This chapter contains info rmation about the following
topics:
● MFP components
● Features and benefits
● Setting the MFP defaults
● Printer drivers and software
● Help system
● Loading input tra ys
● Loading the staple cartridge (multifunction finisher)
● Loading the staple cartridge (3,000-sheet stapler/stacker)
ENWW 1 MFP basics 1
Page 14

MFP components
The following figures show the components of the HP Color LaserJet 9500mfp.
1
2
3
4
5
6
7
Figure 1: MFP components (front view)
1 the ADF (automatic document
feeder) output bin
2 the control panel (including the
touch-screen graphical display)
3 the finishing device
(3,000-sheet stapler/stacker,
3,000-sheet stacker,
multifunction finisher, or 8-bin
mailbox)
4 the front doors
5 the power switch
6 tray 2
7 tray 3
8 the ADF feeder
8
9
10
11
12
13
9 the ADF
10 the ozone fan and filter
11 the right door
12 tray 1
13 the 2,000-sheet side input
tray (tray 4)
2 MFP components ENWW
Page 15
1
2
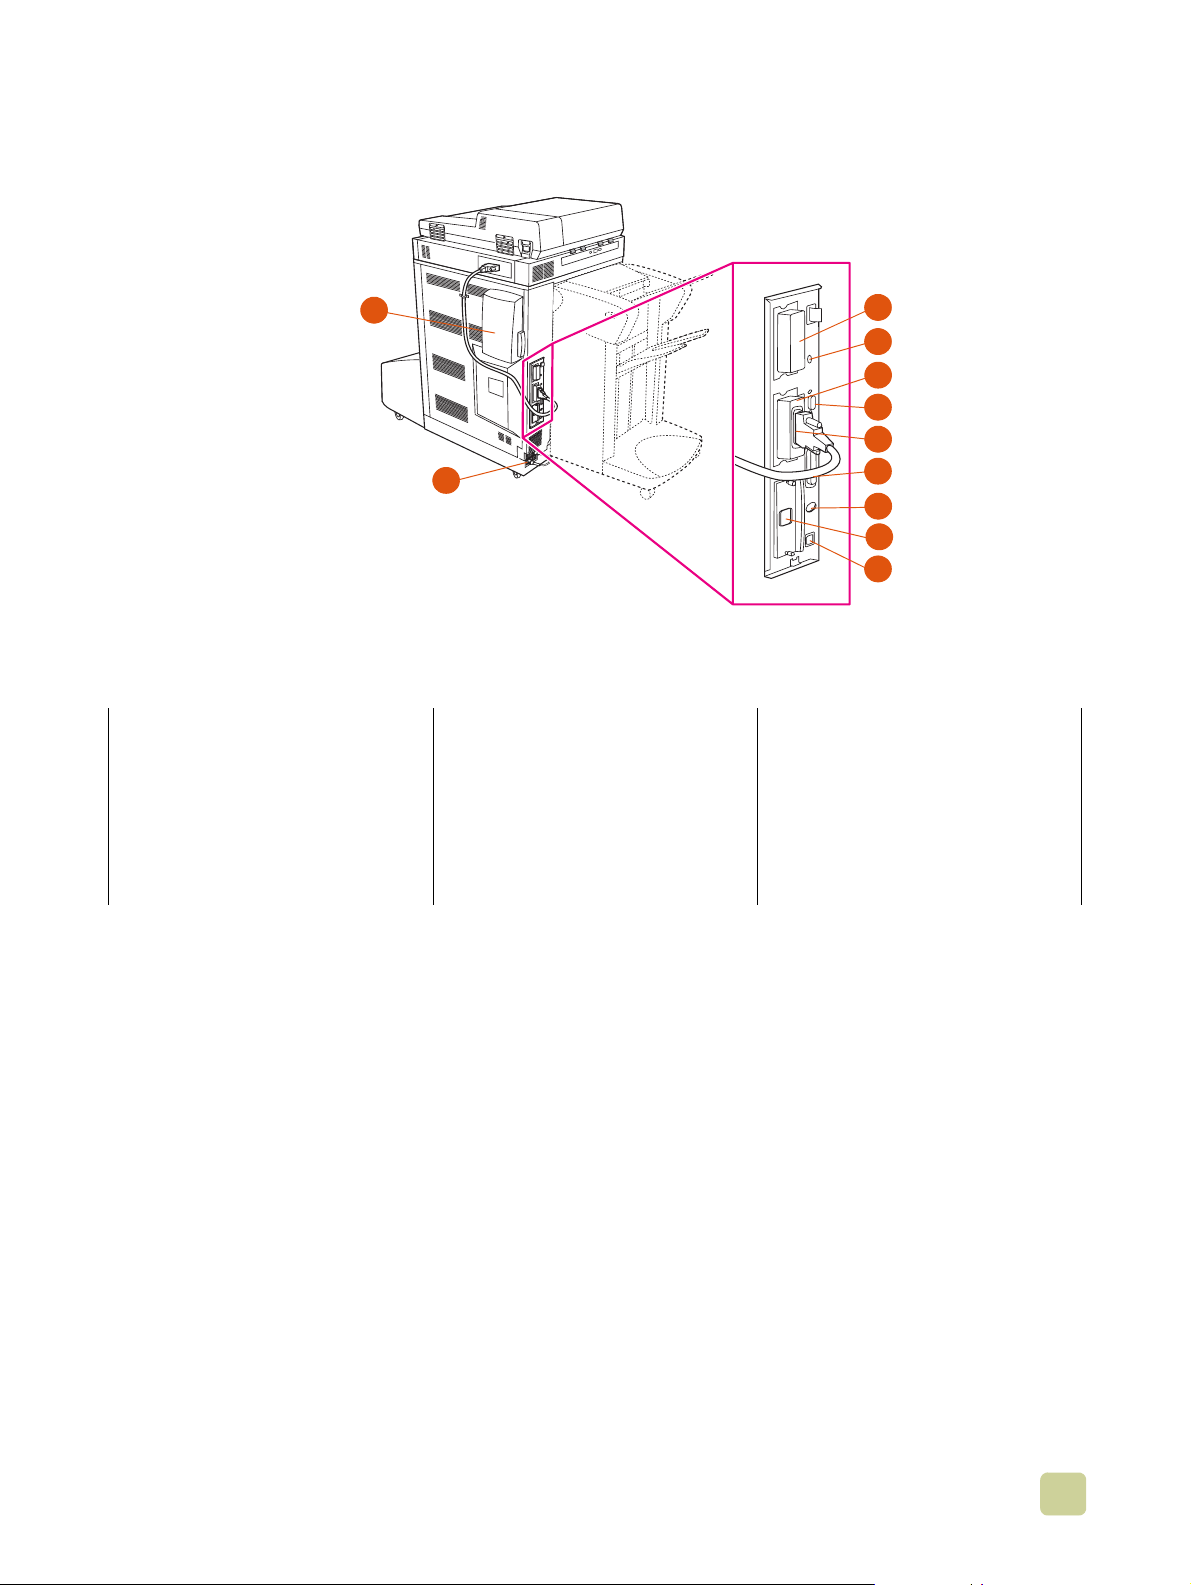
Figure 2: MFP components (rear view)
3
4
5
6
7
8
9
10
11
1 the air filter
2 the power-cord connector
3 the hard disk (EIO)
4 the disk-drive security lock
5 the RJ11 connector (to the
external fax line)
6 the HP JetLink connector
7 the copy connect card
(enhanced input/output [EIO])
8 the parallel port
9 the FIH (foreign interface
harness) connector
10 the ethernet network card
(EIO)
11 the USB port
ENWW 1 MFP basics 3
Page 16

Control panel
The control panel includes a touch-screen graphical display, three job-control buttons, a
numeric keypad, and three light-emitting diode (LED) indicator lights.
For more information about the control-panel menus, see “Control-panel menus” on
page 123.
Display
contrast
adjustment
Ready light (green)
Data light (green)
Attention light (orange)
Features and buttons Function
Touch-screen
graphical display
Numeric keypad
CLEAR button (C)
SLEEP button
MENU button
S
TATUS button
TOP button
S
RESET button
TART button
S
ISPLAY CONTRAST
D
ADJUSTMENT
T
OUCH-SCREEN
GRAPHICAL
SLEEP Use this to put the MFP in Sleep Mode.
ENU Use this to open the MFP Information, Configuration, and other
M
TATUS This button shows the current jobs and their progress, and also shows
S
ESET Use this button to reset the job settings to user-defined default values.
R
S
TOP Use this button to cancel the active job.
S
TART Use this button to begin a copy job, start digital sending or faxing, or
C This is the Clear button which resets the number of copies to one.
N
UMERIC KEYPAD Use the keypad to type numeric values for the number of copies that
DISPLAY
Use this to adjust the amount of contrast on the control-panel display.
This touch-screen display provides the user with text and graphical
information about the configuration and status of the MFP. The touch
screen allows you to control all of the MFP functions and features.
menus.
the status of the trays and supplies.
continue a job that has been interrupted.
are required and to specify other numeric values.
4 MFP components ENWW
Page 17

Interpreting control-panel lights
Use the following table to interpret the control-panel lights.
Light State Indication
Ready (green) Off The MFP is off, offline, or has experienced an error.
On The MFP is ready to print.
Blinking The MFP is going offline.
Data (green) Off The MFP ha s no data to print.
On The MFP has data to print, but is not ready or is offline.
Blinking The MFP is processing or is printing the data.
Attention
(orange)
Off The MFP is fu nctioning without error.
On The MFP has experienced a critical error. Note the error
message, and then turn the MFP off and on again.
Blinking Action is required. See the control-panel display.
Control-panel home screen
The home screen, or main menu, displays the three basic functions of the MFP. Touch the
corresponding icon to copy, send e-mail, or fax. If additional optional functionality is
installed (such as send to network), those icons also appear on the home screen.
1
2
3
1 touch this to use the copy screen
2 touch this to use the e-mail screen
3 touch this to use the fax screen
ENWW 1 MFP basics 5
Page 18

Features and benefits
The HP Color LaserJet 9500mfp (C8549A) is designed to be shared by a workgroup, and
can be used to copy, digitally send, print, and fax b lac k- and-white or color do cuments . The
MFP can function as a standalone device and does not requir e co nn ec tio n to a co mp u te r.
With the exception of netwo rk printing, you can select all functions at the control panel.
Copying
● color or black and white
● modes for text, photo, glossy photo, and mixed originals
● a Job Interrupt feature (at copy boundaries)
● multiple pages per sheet (N-up layout)
● operator-attendance anima tions (for example, paper-jam recovery)
● an auto-configure feature that matches output to MFP settings
● the ability to copy books
● a sleep feature that saves energy
● one-pass duplex scanning
● heavy-media original modes
● e-mail compatibility
● an address book
Fax
● HP LaserJet MFP Analog Fax Accessory 300 (standard in some countries/regions)
● speed dial
● a phone book (when the HP MFP Digital Sending Configuration Utility is configured)
● remote fax configuration
Printing
● color printing at speeds up to 24 pages per minute (ppm)
● a 533-MHz processor
● automatic duplex printing (printing on both sides of the paper)
Media
● supported media sizes:
•Letter
•Letter-R
• Legal
•Executive
• Statement
6 Features and benefits ENWW
Page 19

•8.5x13
•11x17
•12x18
•A3
•A4
•A4-R
•A5
•RA3
•B5
•Executive
•Postcard
•8K
•16K
• Envelope #10
• Envelope monarch (tray 1 only)
• Envelope C5 (tray 1 only)
• Envelope DL (tray 1 only)
• Envelope B5 (tray 1 only)
•Custom
● Supported media weight of 64 grams per square meter (g/m²) t o 220 g/m² (17 - to 60-lb
bond)
● Input
• Tray 1 (100-sheet multipurpose tray): Use this multipurpose tray for paper,
transparencies, labels, and envelopes. Tray 1 holds up to 100 sheets of 75 g/m
2
(20-lb bond) paper, 20 transparencies, or 10 envelopes. This tray also handles
heavy media and is designed to accommod ate the narro west and widest media that
the MFP suppor ts.
• Trays 2 and 3 (500-sheet input trays): These trays automatically sense several
standard paper sizes up to ledger/A3 and accommodate printing on custom-size
paper and transparencies.
• 2,000-sheet side input tray (tray 4): This tray automatically senses standard
media sizes. Use this tray for letter/A4 media only.
• Duplex printing (duplexer): The duplexer provides printing on both sides of paper
for all of the supported paper types.
• ADF: This tray can hold up to 50 sheets of A3/ledger media or up to 100 sheets of
A4/letter media.
● Output
• ADF output bin: Holds up to 100 sheets of media.
• One of the following finishing devices is required with the HP Color LaserJet
9500mfp:
• 3,000-sheet stacker: This finishing device stacks up to 3,000 sheets of paper in the order in which
they were printed. Bin 1 (face-up bin) holds up to 125 sheets of paper, and bin 2 (face-down bin)
holds up to 3,000 sheets of paper.
ENWW 1 MFP basics 7
Page 20

• 3,000-sheet stapler/stacker: In addition to stacking, this finishing device provides multiposition
stapling for up to 50 sheets of 75 g/m2 (20-lb) paper per staple, or an equivalent job height of 5.5 mm
(0.22 inch) thickness. Bin 1 (face-up bin) holds up to 125 sheets of paper, and bin 2 (face-down bin)
holds up to 3,000 sheets of paper.
• Multifunction finisher: This finishing device produces professional-looking booklets and brochures
through finishing options such as multiposition stapling, stacking, and job separation. Provides 1,000
sheets of stacking capacity (stacker bin), stapling for as many as 50 sheets of paper per document,
plus folding and saddle stitching of booklets that contain up to 10 sheets of paper. The booklet bin
holds up to 50 booklets.
• 8-bin mailbox: This finishing device provides a high-capacity output that increases the MFP’ s output
capacity to 2,000 sheets of standard media. Each of the eight bins holds up to 250 sheets of media.
The 8-bin mailbox can also provide a full set of stacking options in four different operational modes:
mailbox, stacker, job separator, and sorter/collator (copy separator).
Print cartridges and image drums
● separate print cartridges and image drums decrease the cost per page
● supplies status indicators appear on the control panel
● a supplies status page (which can be printed by using the control panel) shows the
toner gauge, page count, and information about paper sizes that have been used
● the no-shake cartridge design simplifies installation and replacement
● the MFP authenticates HP print cartridges and image drums
Each of the four print cartridges contains toner in one of four colors: cyan, magenta,
yellow , and b lack. Each print cartridge works with a matching image drum that contains the
corresponding color.
Connectivity
● three enhanced input/output (EIO) slots support the following cards:
• HP Jetdirect EIO cards (Fast Ethernet 10/100TX, LocalTalk, wireless, and others)
• Copy connect card
• Hard disk (20-gigabyte [GB])
● IEEE 1284 type-C parallel connection
● foreign interface harness connection (FIH)
● Copy connect board
● HP Jet-Link (for paper-handling devices)
● fax
● universal serial bus (USB)
Note Additional EIO cards, including USB and IEEE 1394 EIO, are available from Hewlett-
Pac kard (www.hp.com
EIO cards, see the documentation that is supplied with these cards.
) or other vendors. F or information about installing and connecting
8 Features and benefits ENWW
Page 21

Setting the MFP defaults
Certain printing features and hardware (such as the duplex-printing accessory or a
finishing device) must be configured through the printing-system software.
Setting the MFP device defaults
You can create default MFP device settings for several printing, copying, faxing, e-mail,
and network features.
To set device defaults at the control panel
1 Press the MENU button.
2 Scroll to and touch C
3 Scroll to and touch the configuration item that you want. These items include the
following:
● copying
● enhancement
● sending
● printing
● system setup
ONFIGURE DEVICE.
To set device defaults by using eToolbox (Windows only)
1 Click on Start.
2 Click on Programs.
3 Click on HP color LaserJet 9500mfp.
4 Click on HP LaserJet Toolbox.
5 Click on the configuration item that you want.
Note You can only configure status alerts. Press the Alerts tab to perform this function.
To set device defaults by using HP Web Jetadmin
1 Download HP Web Jetadmin at www.hp.com/go/webjetadmin.
2 Install HP Web Jetadmin and follow the directions to configure your MFP using
HP Web Jetadmin.
3 See the HP Jetdirect Administrators Guide for more information.
ENWW 1 MFP basics 9
Page 22

Setting the MFP driver defaults
You can configure the MFP to use driver default settings.
T o set driver defaults in Micr osoft® Windows 98, Windo ws Millennium
Edition (Me), Windows NT® 4.0, and Windows 2000
1 Click the Start button, point to Settings, and then click Printers.
2 Right-click the HP color LaserJet 9500mfp icon, and then click Properties.
3 On the Device setting or Configure tab, select your MFP Model and make sure that
the configuration items for your MFP are correct.
4 Click More to view and change other configuration options.
5 Click OK to return to the Configure tab.
6 Click OK to save your configuration, and to close the printer driver.
To set driver defaults in Windows 98 and Windows Me
1 Click the Start button, point to Settings, and then click Printers.
2 Right-click the HP color LaserJet 9500mfp icon, and then click Properties.
3 Change any of the settings on the Finishing, Effects, Paper, Destination, Basics,
and Color tabs (the PostScript (PS) driver also includes a PS tab). These settings are
now the defaults for the MFP.
4 Click OK to save your settings, and to close the printer driver.
To set driver defaults in Windows NT 4.0
1 Click the Start button, point to Settings, and then click Printers and Faxes.
2 Right-click the HP color LaserJet 9500mfp icon, and then click Document Defaults.
3 Change any of the settings on the Finishing, Effects, Paper, Output, Basics, Job
Storage, Color, Configure, and NT Forms tabs (the PS driver also includes PS and
Status tabs). These settings are now the defaults for the MFP.
4 Click OK to save your settings and configurat ion, and to close the printer driver.
To set driver defaults in Windows 2000 and Windows XP
1 Click the Start button, point to Settings, and then click Printers (Windows 2000) or
Printers and Faxes (Windows XP).
2 Right-click the HP color LaserJet 9500mfp icon, and then click Printing
Preferences.
3 Change any of the settings on the Advanced, Paper/Quality, Effects, Finishing,
Output, Job Storage, and Color tabs. These settings are now the defaults for the
MFP.
4 Click OK to save your settings, and to close the printer driver.
10 Setting the MFP defaults ENWW
Page 23

To set driver defaults in Macintosh (OS 9.2 to 9.2.x)
1 On the File menu, click Print.
2 Change the settings you want on the various pop-up menus.
3 Click or select Save Settings in the lower left corner.
To set driver defaults in Macintosh (OS 10.1 and later)
1 On the File menu, click Print.
2 Change the settings you want on the various pop-up menus.
3 Select the Presets pull-down tab, and then select Save As.
ENWW 1 MFP basics 11
Page 24

Printer drivers and software
The printer drivers that are provided on the CD-ROM must be installed in order to take full
advantage of the printer features. The other software programs on the CD-ROM are
recommended but are not requ ired for operation. See the Readme file on the CD-ROM for
more information.
The CD-ROM includes software that is designed for end users and for network
administrators that are using the following operating systems:
● Windows NT 4.0, Windows 95, Windows 98, and Windows Me
● Windows 2000 and Windows XP
● Mac OS 7.5 or later
● Mac OS 8.6 to 9.x
● Mac OS X (10.1 or later)
The most recent printing system software and other software utilities are availab le from the
Internet. See www.hp.com/go/webjetadmin
Printer drivers and software for Windows
This section contains information about the HP printer driver s and software that are
available for MFPs that are running Windows operating systems.
for more information.
Available printer drivers
● PCL 5c
● PCL 6
● PS
Select the correct printer driver for your needs
● Use the PCL 6 printer driver to take full advantage of the printer features. Use of the
PCL 6 printer driver is recommended unless backw ard compatibility with previous PCL
printer drivers or older printers is necessary.
● Use the PS printer driver for compatibility with HP postscript 3 emulation needs or for
PS font dual inline memory module (DIMM) support.
● Use the PCL 5c printer driver if you want printed results to look comparable to those
from legacy printers.
Note The printer automatically switches betw een P ostScript (PS) and Printer Control Language
(PCL) printer languages.
Printer-driver help
Each printer driver has context-sensitive help screens that can be activated from the Help
button, the F1 key, or the question mark symbol in the upper-right corner in the printer
driver (depending on the Windows operating system that is runn in g) . These help screens
give detailed information about the specific printer driver and the task you are performing.
Printer-driver help is separate from the software-program help.
12 Printer drivers and software ENWW
Page 25

Printer drivers and software for Macintosh computers
This section contains information about the HP printer driver s and software that are
available for MFPs that are running Macintosh op eratin g sys te ms.
Printer Driver Client software
● PS ● PS PPDs and printer dialog
extensions (PDEs)
● HP LaserJet Utility* (8.6 to 9.2)
● Fonts*
● Help files (English only)
*These software products are not supported in Traditional Chinese, Simplified Chinese, Korean, Japanese,
Czech, Russian, and Turkish languages.
Printing system software components
Printer drivers provide access to the printer features and let the computer communicate
with the printer (by using a printer language). Use the LaserWriter 8.6 or later printer
drivers, which are PS printer drivers. The LaserWriter 8.6 printer driver comes with the
Mac OS or can be obtained directly from Apple. Only PS PPDs are included.
The PS PPDs for Mac OS 9 and earlier, in combination with the LaserWriter 8.6 printer
driver, provide access to the printer features and let the computer communicate with the
printer. Use the Apple LaserWriter 8.6 printer driver that comes with the computer. An
installation program for the PPDs and other software is provided on the CD.
Use PDEs and PPDs for Mac OS X.
To install printer drivers from Mac OS 8.6 to 9.2
1 Connect the network cable between the HP Jetdirect print server and a network port.
2 Insert the CD-ROM into the CD-ROM drive. The CD-ROM menu runs automatically. If
the CD-ROM menu does not run automatically, double-click the CD-ROM icon on the
desktop, and then double-click the Installer icon. This icon is located in the Installer/
<language> folder of the Starter CD-ROM (where <language> is your language
preference). (For example, the Installer/English folder contains the Installer icon for
the English printer software.)
3 Follow the instructions on the computer screen.
4 Open the Chooser located in the Apple menu (upper left corner).
5 Click LaserWriter 8.
6 Click the appropriate zone if required.
7 Click on the printer name and then select Create or Setup.
Note The icon on the desktop will appear to be generic. All the print panels will appear in the print.
ENWW 1 MFP basics 13
Page 26

To install printer drivers from Mac OS 10.1 and later
1 Connect the network cable between the HP Jetdirect print server and a network port.
2 Insert the CD-ROM into the CD-ROM drive. The CD-ROM menu runs automatically. If
the CD-ROM menu does not run automatically, double-click the CD-ROM icon on the
desktop, and then double-click the Installer icon. This icon is located in the Installer/
<language> folder of the Starter CD-ROM (where <language> is your language
preference). (For example, the Installer/English folder contains the Installer icon for
the English printer software.)
3 Double-click the HP LaserJe t In st al le rs folder.
4 Follow the instructions on the computer screen.
5 Double-click the Installer icon for the desired language.
6 On your computer hard drive, double-click Applications, Utilities, and then Print
Center.
7 Click Add Printer.
8 Select the appropriate network selection.
9 Select the printer name.
10 Click Add Printer.
11 Close the Print Center (10.1 and 10.2) or the Printer Setup Utility (10.3) by clicking the
close button in the upper-left corner.
Installing Macintosh printing system software for direct connections
(USB)
Note Macintosh computers do not support parallel port connections.
This section explains how to install the printing system software for Mac OS 8.6, Mac OS
9.x, and Mac OS 10.1 and later.
The Apple LaserWriter driver must be installed to use the PPD files with Mac OS 8.6 to
9.x. Use the Apple LaserWriter 8 driver that came with your Macintosh computer.
To install the printing system software
1 Connect a USB cable between the USB port on the printer and the USB port on the
computer. Use a standard 2-meter USB cable.
2 Close all software programs that are open or running.
3 Insert the printer CD-ROM into the CD-ROM drive and run the installer.
The CD-ROM menu runs automatically. If the CD-ROM menu does not run
automatically, double-click the CD-ROM icon on the desktop, and then double-click
the Installer icon. This icon is located in the Installer/<language> folder of the Star ter
CDROM (where <language> is your language preference).
4 Follow the instructions on the computer screen.
5 Restart the comp ut er.
14 Printer drivers and software ENWW
Page 27

6 For Mac OS 8.6 to 9.x
• From HD/Applications/Utilities, open the Apple Desktop Printer Utility.
• Double-click Printer (USB), and then click OK.
• Next to USB Printer Selection, click Change.
• Select the printer, and then click OK.
• Next to Postscript® Printer Description (PPD) File, click Auto Setup and then
select Create.
• Save the printer setup.
• Click on the Desktop Printer Icon that was just created.
• On the Printing menu, click Set Default Printer.
For Mac OS X
Note If OS X and 9x (Classic) are installed on the same computer, the installer will show both
the Classic and the OS X installation options.
• From HD/Applications/Utilities/Print Center or Printer Setup Utility, start the Print
Center.
• If the printer appears in the Printer list, delete the printer.
• Click Add.
• From the drop-down menu on the top, select USB.
• From the printer Model List, select HP.
• Under Model Name, select HP color Laserjet 9500mfp, and th en click Add.
7 Print a Test Page or a page from any software program to make sure that the software
is correctly installed.
If installation fails, reinstall the software. If this fails, see the installa tion notes or readme
files on the printer CD-ROM or the flyer that came in the printer box, or go to
www.hp.com/go/clj9500mfp
The icon on the desktop will appear to be generic. All the print panels will appear in the
print dialog in an application.
for help or more information.
Printer-driver Help
Use the following steps to open the printer-driver Help.
1 Open the Help menu.
2 Select Help Center.
3 Click HP LaserJet Printer Help.
These help screens give detailed in formation about using the printer. Printer-driver help is
separate from the software-program help.
ENWW 1 MFP basics 15
Page 28

HP LaserJet Utility (OS 8.6 to 9.x only)
The HP LaserJet Utility provides access to features that are not available in the printer
driver. The illustrated screens simplify the selection of printer features. Use the
HP LaserJet Utility to perform the following tasks:
● Customize the printer control-panel messages.
● Name the printer, assign it to a zone on the network, download files and fonts, and
change most of the printer settings.
● Set a password for the printer.
● From the computer, lock out functions on the printer control panel to prevent
unauthorized access. (See the printer-driver help.)
● Configure and set the printer for Internet Protocol (IP) or AppleTalk printing.
● Initialize disk or flash memory (not available in the PS printer driver).
● Manage fonts in RAM, disk, or flash memory.
● Administer job-retention features.
Note The HP LaserJet Utility is not supported for the Korean, Ja panese, Simplified Chinese, and
Traditional Chinese languages.
See the HP LaserJet Utility Help on your computer for more information.
Fonts
Eighty screen fonts are installed that correspond with the PS fonts that re side in the
printer. An additional 136 fonts are available on the Adobe® font dual inline memory
module (DIMM) accessory.
Additional printer drivers
You can obtain the following additional printer drivers by downloading them from the
Internet or by requesting them from an HP- authorized service or support provider. (See
www.hp.com/go/clj9500mfp
● OS/2 PCL 5c and PCL 6 prin te r driver
● OS/2 PS2 printer driver
● Linux*
● UNIX®*
* Network printer installation for UNIX and other network operating systems is available from the
Internet or through a local HP-authorized distributor.
Note If the CD-ROM does not include the printer driver you want, or if the printer driver is not
listed here, read the Readme files to see if the appropriate printer driver is availab le. If not,
contact the manufact urer of the operati ng system or distributor an d request a driver f or the
printer.
for more information.)
16 Printer drivers and software ENWW
Page 29

Help system
At any time, you can gain access to the Help system on the touch screen of the graphical
display by pressing , located in the upper-left or upper-right corner of each screen.
“What is this?” Help
The MFP provides information about any topic on the touch screen of the graphical
display. On the top level screen, touch , and then touch What is this?. After touching
What is this?, a pop-up dialog box asks you to “Touch any item for help.” After to uching
an item, a pop-up dialog box opens and displays information about the item you touched.
After reading the information, touch a clear space on the screen to remove the What is
this? pop-up dialog box.
“Show me how” Help
Using Show me how Help, the MFP shows you how to use the MFP features.
1 Touch .
2 Touch S
by using the scroll bar to view and touch the required topic.
Show me how also appears on a What is this ? pop-up dialog bo x if the item y ou ch ose is
a function that includes instructions.
HOW ME HOW . You can choose a topic from the Show Me How Index screen
Print this topic
You can print any of the Show me how instructions b y touching the Print This Topic
button at the top of the Show Me How screen.
1 Touch .
1 Touch S
2 Scroll through the available topics and then select the topic that you want to print.
HOW ME HOW .
“Error” Help
There are some error messages that provide additional help information. Some of these
include graphics to assist in solving problems.
ENWW 1 MFP basics 17
Page 30

Additional information
Environmental features
See “Protecting the environment” on page 369.
Firmware updates
Firmware is the instructions or data that are programmed directly into the circuitry of the
MFP. Firmware controls the operation of the MFP. Firmware updates include new features
or fixes for existing errors or bugs. The MFP can use newer versions of its firmware as
they become available. To obtain the latest firmware, go to
www.hp.com/go/clj9500mfp
firmware updates easily to one or to many MFPs, use the HP Web Jetadmin software (go
to www.hp.com/go/webjetadmin
HP EIO hard disk
The EIO hard-disk can be used to store selected print jobs, support RIP Once technology
(the ability to print, at maximum speed, multiple copies of complex pages), and
permanently store downloaded fo nts and forms in the MFP. Unlike standard memory,
many items on the EIO hard disk remain in the MFP even when the MFP is turned off.
Fonts downloaded to the EIO hard disk are available to all users of the MFP.
For security, the EIO hard disk can be write-protected through software and locked by
using the security lock slot.
and follow the instructions on the screen. To download
).
Security lock slot
The security lock slot helps deter theft of the MFP hard disk and the data it contains by
locking the slot with a security cable accessory that is sold by vendors. For more
information about compatible disk drive and formatter locks that are available through
other vendors, see the HP Global Solutions Catalog at www.hpgsc.com
Print Solutions Data Sheet at www.hp.com
Windows users
Hewlett-Packard occasionally introduces new software tools for use with your MFP and
accessories. These tools are available from the Internet. For more information, go to
www.hp.com/go/clj9500mfp
Macintosh users
Use the HP LaserJet Utility to download fonts and files. For more information, see
“HP LaserJet Utility (OS 8.6 to 9.x only)” on page 16 or the HP LaserJet Utility Help that is
included with the HP LaserJet Utility.
for the addresses of the HP Web sites.
.
or the HP Secure
18 Help system ENWW
Page 31

Loading input trays
This section contains information about loading standard- and custom-size media into
tray 1, tray 2, tray 3, and the 2,000-sheet side input tray (tray 4). See Selecting and using
media in chapter 8 for more information about media.
CAUTION To avoid a jam, never add or remove paper f rom tray 1 or open tray 2, tray 3, or the 2,000-
sheet side input tray (tray 4) while printing or copying from that tray.
To avoid damaging the MFP, print labels and enve lope s o nly from t ray 1. Send labels and
envelopes t o the face-up bin. Print on only one side of labels and envelopes.
For paper specifications, see “Recommended media” on page 172.
1
3
4
To load media in tray 1
Tray 1 is a multipurpose tray that holds a stack of media up to
5 mm (0.2 inch) in height, which equals approximately 100 sheets
of 75 g/m² (20-lb paper), 10 envelopes, or 20 transparencies.
(See “Supported media sizes for input and output” on page 180.)
If media is loaded in tra y 1, the MFP default is to print media from
tray 1 first.
Tray 1 provides a convenient way to print envelopes,
transparencies, custom-size paper, or other types of media
without having to unload the other trays. It can also be used as a
convenient addit ional input tray.
Use this procedure to load media in tray 1.
1 Open tray 1.
2 Pull the first tra y extension out until it stops. If you are printing
on large media, also extend the second tray extension out
until it stops.
3 Load (orient) media according to size and finishing options.
For single-sided printing on preprinted pap er, load the side to
be printed on face up. For double-sided printing (duplexing)
on preprinted paper, load the first side to be printed on face
down. For more information about how to orient the media
size that you are using, see “Orienting media” on page 168.
Note
To avoid jams, print sheets of labels one sheet at a time.
4 Adjust the paper guides so they lightly touch the paper stack,
but do not bend the paper. Make sure the paper fits under the
tabs on the paper guides and not above the load level
indicators.
5 Look at the control-panel display within a few seconds of
loading the paper. (Remove and reload the media if the time
has already elapsed.)
6 If the control panel does not display the message TRAY 1
<TYPE> <SIZE>, then the tray is ready to use.
ENWW 1 MFP basics 19
Page 32

7 If the control panel displays TRAY 1 <TYPE> <SIZE>, touch O
to change the size and type configuratio n. The size menu is
displayed.
K
8 Touch A
9 Touch A
NY SIZE. The control panel displays SETTING SAVED.
NY TYPE. The control panel displays SETTING SAVED.
10 If the control panel displays TRAY 1 ANY SIZE ANY TYPE, then
the tray is ready for occasional one-time use for a variety of
paper.
11 Touch E
XIT to accept the size and type settings.
20 Loading input trays ENWW
Page 33

8
To load tray 1 when the same paper is used for
multiple jobs
Use the following procedure if tray 1 is loaded continually with the
same type of paper, and the paper is not usually removed from
tray 1 between print jobs. The following procedures can also
increase the MFP performance when printing from tray 1.
10
11
CAUTION
To avoid a jam, never add or remove paper from a tray while
printing from that tray.
1 Touch M
2 Touch P
3 Touch T
ENU.
APER HANDLING.
RAY 1 SIZE.
4 Touch the correct paper size. The control panel displays
SETTING SAVED.
Note
If you select CUSTOM as the paper size, also select the unit of
measure (the X and Y dimensions).
5 Touch T
RAY 1 TYPE.
6 Touch the correct paper type. The control panel displa ys
SETTING SAVED.
7 Touch E
XIT to exit the menus.
8 Open tray 1.
9 Pull the first tra y extension out until it stops. If you are printing
on large media, also extend the second tray extension out
until it stops.
10 Load (orient) media according to size and finishing options.
For single-sided printing on preprinted pap er, load the side to
be printed on face up. For double-sided printing (duplexing)
on preprinted paper, load the first side to be printed on face
down.
CAUTION
To avoid jams, print sheets of labels one sheet at a time.
11 Adjust the paper guides so they lightly touch the paper stack,
but do not bend the paper. Make sure the paper fits under the
tabs on the guides and not above the load level indicators.
12 Look at the control-panel display within a few seconds of
loading the paper. The tray configuration is displayed.
(Remove and reload the media if the time has already
elapsed.)
13 Touch E
XIT to exit the menus. The tray is ready to use.
ENWW 1 MFP basics 21
Page 34

1
Loading tray 2 and tray 3
Tray 2 and tray 3 hold up to 500 sheets of standard media.
To load detectable standard-size media in tray 2
and tray 3
Use this procedure to load detectable standard-size media in the
tray. The following are the detectable sizes, which are marked
2
inside the tra y:
● A4
● Letter
● A3
● Legal
3
● Executive
● 11 x 17
● B4
● B5
● A4-R
● Letter-R
4
CAUTION
To avoid a jam, never add or remove media from a tray while
printing from that tray.
1 Pull the tray open until it stops.
2 Adjust the left (Y) media guide by pressing the tab on the
5
6
guide and set the guide to the correct media size.
3 Adjust the front (X) media guide by pressing the tab on the
guide and set the guide to the correct media size.
4 Load (orient) the media according to size.
CAUTION
Do not load more media than the maximum that is indicated by
the media-fill triangles at the back of the tray.
5 Set the custom/standard switch to Standard.
6 Slide the tray into the MFP.
7 Look at the control panel within a few seconds of closing the
tray. (Open and close the tray if the time has already
elapsed.) The control panel displays the tray size and type
configuration. Do one of the f ollowing.
● If the size and type settings are correct, touch EXIT to accept
the settings.
22 Loading input trays ENWW
Page 35

● If the size and type settings are not correct, t ouch OK. The
TRAY N SIZE=*<SIZE> menu is displayed.
8 To change the size setting, touch the correct paper size. The
message SETTING SAVED is displa y ed for a moment, and then
the tray type menu is displayed.
Note
Depending on the size that you selected, the MFP might prompt
you to move the Custom/Standard switch in the tray to another
position. The MFP might also prompt you to move the paper
guides. Follow the instructions on the control panel, close the
tray, and then repeat this procedure starting with step 7.
9 To change the type setting, touch the correct paper type. The
message SETTING SAVED is displa y ed f or a moment, an d then
the size and type settings are displayed.
Note
If you are using media that is lighter or heavier than 75 g/m² to
105 g/m² (20 to 28 lb), or if you are using coated media or
transparencies, set the media type for the tray.
10 If the size and type settings are correct, touch E
XIT to accept
the settings. The tray is ready to use.
Note
See “Selecting media for your document” on page 175 for more
information about selecting types of media.
ENWW 1 MFP basics 23
Page 36

1
To load undetectable standard-size media in tray 2
and tray 3
Use this procedure to load undetectable standard-size media in
the tray. The following are the undetectable sizes, which are
marked inside the tray:
● 8K
4
5
● 16K
● A5
● Statement
● Executive
● 8.5 x 13 (216 x 330 mm)
CAUTION
To avoid a jam, never add or remove media from a tray while
printing from that tray.
1 Pull the tray open until it stops.
2 Press the tab on the front (X) paper guide and slide the guide
all the way out.
6
3 Press the tab on the left (Y) paper guide and slide the guide
all the way out.
4 Load (orient) the media according to size.
Note
For more information about how to orient the media size that you
are using, see “Orienting media” on page 168.
7
5 Adjust the left (Y) media guide by pressing the tab on the
guide and slide the guide until it gently touches the paper.
6 Adjust the front (X) media guide by pressing tab on the guide
and slide the guide until it gently touches the paper.
7 Set the Custom/Standard switch to Custom.
8 Slide the tray into the MFP.
8
9 Look at the control panel within a few seconds of closing the
tray. (Open and close the tray if the time has already
elapsed.) The control panel displays the tray size and type
configuration. Do one of the f ollowing:
● If the size and type settings are correct, touch EXIT to accept
the settings.
● If the size and type settings are not correct, t ouch OK. The
TRAY N SIZE=*<SIZE> menu is displayed.
10 To change the size setting, touch the correct paper size. The
message SETTING SAVED is displa y ed for a moment, and then
the tray type menu is displayed.
24 Loading input trays ENWW
Page 37

Note
Depending on the size that you selected, the MFP might prompt
you to move the Custom/Standard switch in the tray to another
position. The MFP might also prompt you to move the paper
guides. Follow the instructions on the control panel, close the
tray, and then repeat this procedure starting with step 9.
11 To change the type setting, touch the correct paper type. The
message SETTING SAVED is displa y ed f or a moment, an d then
the size and type settings are displayed.
Note
If you are using media that is lighter or heavier than 75 g/m² to
105 g/m² (20 to 28 lb), or if you are using coated media or
transparencies, set the media type for the tray.
12 If the size and type settings are correct, touch E
XIT to accept
the settings. The tray is ready to use.
Note
See “Selecting media for your document” on page 175 for more
information about selecting types of media.
ENWW 1 MFP basics 25
Page 38

1
To load custom media in tray 2 and tray 3
Use this procedure to load custom-size media in the tray.
CAUTION
To avoid a jam, never add or remove media from a tray while
printing from that tray.
4
1 Pull the tray open until it stops.
2 Press the tab on the front (X) paper guide and slide the guide
all the way out.
3 Press the tab on the left (Y) paper guide and slide the guide
all the way out.
4 Load (orient) the media according to size.
5
Note
For more information about how to orient the media size that you
are using, see “Orienting media” on page 168.
5 Set the Custom/Standard switch to Custom.
6 Adjust the left (Y) media guide by pressing the tab on the
6
7
guide and slide the guide until it gently touches the paper.
7 Adjust the front (X) media guide by pressing tab on the guide
and slide the guide until it gently touches the paper.
8 Note the orientation of the paper , as well as the v alue of the X
dimension and the Y dimension. The X and Y dimensions are
marked in the tray. You will need this information for a later
step.
9 Slide the tray into the MFP.
10 Look at the control panel within a few seconds of closing the
tray. (Open and close the tray if the time has already
elapsed.) The control panel displays the tray size and type
configuration. Do one of the f ollowing:
● If the size and type settings are correct, touch EXIT to accept
the settings. The tray is ready to use. (You do not need to
9
26 Loading input trays ENWW
complete the rest of this procedure unless you want to
configure the exact cu stom dimension. See t he f ollo wing note
for more information.)
● To change the size setting, touch OK. The TRAY N
SIZE=*<SIZE> menu is displayed.
Page 39

Note
If the size displayed on the control panel is CUSTOM, then the tray
size is set to ANY CUSTOM. The tray will match any custom-size
print job, even if the print-job dimensions are different from the
dimensions of the paper that is loaded in the tray. If you prefer,
you can specify the exact dimensions of the custom-size paper
that is loaded in the tray. When you specify e xact dimension s , the
dimensions are displayed as the size, rather than CUSTOM.
11 Touch C
USTOM. The Unit of Measure menu is displayed.
Note
The MFP might prompt you to move the Custom/Standard switch
in the tray to another position. The MFP might also prompt you to
move the paper guides. Follo w the instructions on the control
panel, close the tray, and then repeat this procedure starting with
step 10.
12 Touch the unit of measure (M
ILLIMETERS or INCHES). (If you
are using the measurement on the tray guide, select
M
ILLIMETERS.)
13 Use the numeric keypad to select the X (front to back)
dimension.
14 Touch O
K.
15 Use the numeric keypad to select t he Y (left to right)
dimension.
16 Touch O
K. The control panel displays SETTING SAVED for a
moment. The tray size in dimensions is then displayed.
17 To change the type setting, touch the correct paper type. The
message SETTING SAVED is displa y ed f or a moment, an d then
the size and type settings are displayed.
Note
If you are using media that is lighter or heavier than 75 g/m² to
105 g/m² (20 to 28 lb), or if you are using coated media or
transparencies, set the media type for the tray.
18 Touch E
XIT to accept the settings. The tray is ready to use.
Note
See “Selecting media for your document” on page 175 for more
information about selecting types of media.
ENWW 1 MFP basics 27
Page 40

1
2
To load the 2,000-sheet side input tray (tray 4)
The 2,000-sheet side input tray (tray 4) holds up to 2,000 sheets
of media. For media specifications, see “Recommended media”
on page 172.
The 2,000-sheet side input tray (tray 4) only supports A4- or
letter-size media. If you are using media that is lighter or heavier
than 75 g/m
media, set the media type for the tray. To set the media type for
the tray or to use other sizes of media, see “Setting media size
and type” on page 164.
CAUTION
To avoid a jam, never add or remove media from the tray while
printing from that tray.
2
to 105 g/m2 (20 to 28 lb), or if you are using coated
3
Use this procedure to load media in the 2,000-sheet side input
tray (tray 4).
1 Open the top door, and then open the bottom door.
2 Load the media so that the side to be printed on faces up and
the long edge is toward the MFP (short edge is toward the
MFP if you are making booklets). Do not load more media
than the maximum that is indicated by the media-fill triangles
at the back of the 2,000-sheet side input tray (tray 4).
Note
The number of sheets that can be loaded might vary depending
on the type of media. Use the media-fill triangles to determine
how much media to load.
Make sure that the corners of the media are not folded.
The 2,000-sheet side input tray (tray 4) supports letter, A4, A4-R,
and letter-R media.
3 Close the bottom door, and then close the top door.
4 The control-panel display promp ts you to select the size and
type of the media that you want to use.
5 Scroll to the size that you want and select it.
6 Scroll to the type you want and select it.
Note
See “Selecting media for your document” on page 175 for more
information about selecting types of media.
28 Loading input trays ENWW
Page 41

Changing and setting the media size and type for a tray
You can configure the MFP input trays by type and size. You can load different media in
the input trays and then request media by type or size.
Note If you have used previous HP LaserJet printers or MFPs, you might be accustomed to
configuring tray 1 to first mode or cassette mode. To duplicate the settings for first mode,
configure tray 1 for Size = ANYSIZE and Type = ANY. To duplicate the settings for cassette
mode, set either the size or type for tray 1 to a setting other than ANY.
The following instructions are used to configur e the trays at the MFP control panel. You
can also configure the trays from your computer by using the embedded Web server. For
more information, see “Using the embedded Web server” on page 207.
To set or change media size for tray 1
1 Press the MENU button.
2 Touch P
3 Touch T
4 Touch the paper size that is loaded.
5 Touch E
APER HANDLING.
RAY 1 SIZE.
XIT to exit the menus.
To set a standard size for tray 2, tray 3, and the 2,000-sheet side input
tray (tray 4)
The MFP automatically detects the size that is loaded, so you do not need to set the size
manually.
To set or change a custom size for tray 2 and tray 3
1 Make sure that the switch inside the tray t hat you want to configure is in the Custom
position.
2 A message on the control panel prompts you to specify the paper size.
3 Touch the appropriate unit of measure (M
M
ILLIMETERS because the marks on the tray guides are in millimeters.)
4 Use the numeric keypad to specify the tray X (front-to-back) dimension.
5 Use the numeric keypad to specify the tray Y (left-to-right) dimension.
6 Touch E
XIT to exit the menus.
ILLIMETERS or INCHES). (The default is
Note See “Setting media size and type” on page 164 for more information.
ENWW 1 MFP basics 29
Page 42

To set or change a media type for any tray
1 Determine the correct media-type selection for your media. See “Supported types of
media” on page 172 for more information.
2 Press the M
3 Touch P
4 Touch T
5 Touch the appropriate type setting for the media that you are using.
Note The default media type is plain.
6 Touch E
Note For a description of media types, see “Selecting and using media” on page 163.
ENU button.
APER HANDLING.
RAY X TYPE.
XIT to exit the menu.
To select the media type in Windows 95, Windows 98, Windows Me,
and Windows NT 4.0
1 Open the printer driver (see “Changing th e settings f or a print job using a computer ” on
page 94).
2 On the Paper tab, in the Type is drop-down list, select the type that matches the
control-panel setting.
3 Click OK.
To select the media type in Windows 2000 and Windows XP
1 Open the printer driver (see “Changing th e settings f or a print job using a computer ” on
page 94).
2 On the Paper/Quality tab, in the Type is drop-down list, select the type that matches
the control-panel setting.
3 Click OK.
30 Loading input trays ENWW
Page 43

Loading the staple cartridge (multifunction finisher)
Use this procedure to load staples in the multifunction finisher.
The message STAPLER LOW ON STAPLES appears on the control panel if the staple cartridge
has 20 to 50 staples remaining. The message STAPLER OUT OF STAPLES appears on the
control panel if the stapler cartridge contains no more staples.
1
2
To load the staple cartridge
1 Open the stapler-unit door.
2 Slide the stapler unit toward you.
3 Turn the large, green knob until you see the blue dot (this
indicates that the stapler is fully open).
4 Turn the small, green knob at the top of the stapler unit
clockwise until the staple cartridge moves to the left of the
stapler unit.
CAUTION
The blue dot must appear in the window of the stapler unit before
you remove the staple cartridge. If you try to remove the staple
cartridge before the blue dot appears in the window, you could
damage the finishing device .
3
4
ENWW 1 MFP basics 31
Page 44

5
5 On the empty staple cartridge, squeez e the tabs together an d
pull the empty cartridge out.
6 Insert the new staple cartridge so that it locks into place.
7 Slide the stapler unit into the finishing device.
8 Close the stapler-unit door.
6
7
8
32 Loading the stapl e cartridge (multifunction finisher) ENWW
Page 45

Loading the staple cartridge (3,000-sheet stapler/stacker)
Use this procedure to load staples in the 3,000-sheet stapler/stacker.
The message STAPLER LOW ON STAPLES appears on the control panel if the staple cartridge
has 20 to 50 staples remaining. The message STAPLER OUT OF STAPLES appears on the
control panel if the stapler cartridge contains no more staples.
1
2
To load the staple cartridge
1 Move the 3,000-sheet stapler/stacker away from the MFP.
2 Open the stapler unit door.
3 On the empty staple cartridge, pull up on the green tab, and
then pull the empty cartridge out.
4 Insert the new staple cartridge, and push down on the green
tab so that the cartridge locks into place.
5 Close the stapler unit door and attach the 3,000-sheet
stapler/stacker to the MFP.
3
4
5
ENWW 1 MFP basics 33
Page 46

34 Loading the stapl e cartridge (3,000-sheet stapler/stacker) ENWW
Page 47

2
Copying
This MFP functions as a standalone, walk-up color or black-and-white copier—you do not
have to have software installed or have your computer turned on to make copies. You can
easily adjust copy settings at the control panel. Originals can be copied using either the
ADF or the scanner glass. The MFP can process copying, printing, and digital-sending
jobs simultaneously.
This chapter provides information about how to make b lack-and-white or color copies and
how to change copy settings. It is helpful to review the section about control-panel
operation before using the MFP copying functions. See “Control panel” on page 4 in
chapter 1. This chapter contains information about the following topics:
● Copy-screen layout
● Copying instructions
● Setting copy defaults
ENWW 2 Copying 35
Page 48

Copy-screen layout
The following figure and table provide information about features and buttons on the copy
screen.
Features and buttons Function
(Help)
Provides access to “What is this?” Help or “Show me How.”
R
EADY Indicates that the MFP is ready to copy. (Additional status messages
might appear on this line.)
ESCRIBE ORIGINAL Allows you to select size, type, orientation, image content, and
D
additional features of the original copy.
OLOR COPIES Allows you to select color copies.
C
B
LACK COPIES Allows you to select black and white copies.
R
EDUCE/ENLARGE Reduces or enlarges the size of the copy.
IGHT/DARK Increases or decreases the brightness of the copy.
L
COPY SETTINGS Displays settings that descri be the output features of the document,
such as paper size, simplex/duplex, and stapling.
S
TART Starts copying the document.
ACK Moves back one screen on the control-panel display.
B
C
ANCEL Each lower-level screen (any screen below the main screen) on the
touch screen includes a C
ANCEL option. Touching CANCEL negates any
changes that you made, and takes you back to the previous screen.
OK Each lower-level screen on the touch screen includes an OK option.
Touching O
K accepts any changes that you made, and takes you to the
next screen.
36 Copy-screen layout ENWW
Page 49

Copying instructions
For standard-size media, the size of the original is automatically detected when the
document is placed on the scanner glass or in the ADF, and the appropriate size of media
is used for the copy. You can override the auto-detect feature by specifying the required
input (DESCRIBE ORIGINAL) and output (COPY SETTINGS) at the control panel.
Note Use the scanner glass to cop y small, lightweight (less than 46 g/m2, or 12 lb), or irregularly
sized originals, such as receipts, newspaper clippings, photographs, or old, delicate,
valuable, or worn documents. The scanner glass is also used t o copy books, ma gazines,
and manuals.
Use the MFP to make as many as 99 9 copies of a document. The ADF can be loaded with
up to 50 sheets of ledger/A3 media or 100 sheets of letter/A4 media (depending on the
thickness of the pages).
Note The 8.5 x 13 and 12 x 18 media sizes are not supported for copying.
This section provides instructions for the following copying tasks:
● Copying by using the default settings
● Copying by using user- defined settings
● Copying from the scanner glass
● Copying by using the ADF
● Copying books
● Creating a job to be copied later
Copying by using the default settings
The following are the default settings for copying:
● One copy
● Letter- or A4-size original and letter-size copy
Note The MFP automatically detects the original size and ma kes a sa me-size copy. The f act ory
default paper-size setting is Letter or A4 only if no media size is detected.
● Black and white (color copies can be selected)
● Page Orientation: Portrait
● Number of Sides: One
● Page Content: Mixed (mixed text and graphics)
● Job Mode: Off
● Heavy Paper: Off
To make color copies by using the default settings
1 Place the document face-down on the scanner glass or in the ADF.
2 Touch C
3 Select color copies.
OPY.
ENWW 2 Copying 37
Page 50

4 Touch S
TART.
To make black and white copies by using the default settings
1 Place the document face-down on the scanner glass or in the ADF.
2 Touch C
OPY.
3 Select black copies.
4 Touch S
TART.
38 Copying instructions ENWW
Page 51

Copying by using user-defined settings
Use the following steps to change the settings for your copies.
To make copies by using settings other than the default settings
1 Place the original face-down on the scanner glass or in the ADF.
2 Touch the copy icon on the control panel. The copy screen appears on the graphical
display.
3 Touch C
OLOR or BLACK & WHITE copies.
4 Make any necessary adjustments to the contrast and the re ducti on or en lar gemen t by
using the L
IGHT/DARK bar and the REDUCE/ENLARGE option in the image-modification
section of the graphical display.
5 Touch D
A
DVANCED options. After you make your select ions, touch OK.
ESCRIBE ORIGINAL to view your options. You can select BASIC options or
Note If you select Mixed on the Page Content tab, y ou can use the Advanced tab to select the
emphasis for text or photo, or for text or glossy photo.
Basic tab What to select
IZE Select Book or the media size of your original.
S
PAGE ORIENTATION Select Portrait or Landscape.
UMBER OF SIDES Select 1-sided or 2-sided.
N
AGE CONTENT Select Text, Photo, Glossy Photo, or Mixed.
P
Advanced tab What to select
EAVY PAPER Select Heavy Paper if your original is heavy paper
H
and you are using the ADF.
OB MODE If you are combining multiple flatbed scans into a
J
single job, select Job Mode.
Note The original settings menu has a button that allo ws you to describe the content of the original
to be copied.
Description of use
Text Optimize for the best text quality.
Photo Optimize for printed or half-tone original graphics.
Glossy photo Optimize for glossy photographs and for continuous tone photographic
originals.
Mixed Optimize for mixed text and graphics.
Advanced (button) An adjustment to optimize more toward text or graphics in mixed mode.
ENWW 2 Copying 39
Page 52

6 Touch C
more options.
Basic tab What to select
IZE Select Auto (media size is matched to original size),
S
UMBER OF SIDES Select 1-sided or 2-sided.
N
BACK SIDE ORIENTATION Select Normal or Flip (applies when 2-sided copying
AGES PER SHEET Select 1, 2, 4, or Booklet.
P
ORDERS Select Border or No Border when you are printing
B
TAPLE Stapling options depend on your finishing device and
S
OPY SETTINGS to view your options. You can touch the Advanced tab to see
or the copy size that you want. Be sure that you have
loaded the correct media size in the tray.
is selected).
If 4 pages per sheet is selected, “Z” or “N” ordering is
tailored to the page orientation, and the option to put a
border around each smaller page appears.
“Z” ordering “N” ordering
multiple pages per sheet.
the media size that you selected. For the 3,000-sheet
stapler/stacker , the selections are None, Corner, 1, 2,
3, or 6. For the multifunction finisher, the selections
are None, 1, 2, or Booklet.
Advanced tab W hat to select
COLLATION Select Collated or Uncollated.
UTPUT BIN Select the output destination for your finishing device.
O
OB STORAGE Select On to indicate that the copy job should be
J
stored on the MFP rather than printed. Select Off to
copy the job normally. See “C reating a job to be
copied later” on page 42 for more information.
NHANCE Increases or reduces sharpness, and removes
E
background.
CALE TO FIT Select On to slightly reduce the image so that it fits in
S
the printable area.
7 When you are finished, touch O
K to return to the main copy screen.
Note The page icon in the COPY section of the graphical display shows a representative image
of the copy.
8 Using the numeric keypad, specify the number of copies, and then press S
TART.
40 Copying instructions ENWW
Page 53

Copying from the scanner glass
Use the scanner glass to cop y small, ligh tw eig ht (le s s tha n 46g/m² or 12 lb), or irregularly
sized originals, such as receipts, newspaper clippings, photographs, or old or worn
documents. The scanner glass is also used to copy books, magazines, and manuals.
1 Place the document face-down on the scanner glass.
2 Make any image modifications, and choose any copy settings, if necessary. See
“Copying by using user-defined settings” on page 39 for the available settings.
3 If you are making only one copy, press S
the numeric keypad to select the number of copies (up to 999), and then press S
TART. If you are making multiple copies, use
TART
to begin copying.
Copying by using the ADF
Using the ADF, you can make as many as 999 copies of a document that has as many as
100 pages (depending on the thickness of the pages).
1 Load the document face- down into th e ADF. The MFP can automatically detect sev eral
standard paper sizes.
2 Make any image modifications, and select any copy settings if necessary. See
“Copying by using user-defined settings” on page 39 for the available settings.
If you are making only one copy, press S
numeric keypad to specify t he required number of copies, and then press S
TART. If you are making multiple copies, use the
TART.
Using Job Mode
Use the Job Mode feature to build a single print job from multiple scans. You can use either
the ADF or the scanner glass. The settings for the first scan are used for subsequent
scans.
1 Touch C
OPY.
2 Touch D
3 Touch A
4 In the JOB MODE check box, touch O
ESCRIBE ORIGINAL.
DVANCED.
N.
5 Select any output settings, if necessary.
6 After each page is scanned, the control panel prompts you for more pages.
7 Do one of the following:
• If the job contains more pages, load th e ne xt pa ge, and then press the
• If the job contains no more pages, touch F
INISHED to print.
START button.
Note In Job Mode, if you scan the fir st page of a document by using the ADF, then you must scan
all of the pages in that document b y using the ADF. If you scan the first page of a document
by using the flatbed scanner , then y ou must scan all of the pages in that document by using
the flatbed scanner.
ENWW 2 Copying 41
Page 54

Copying books
You can use the scanner glass to copy books.
1 Place the book face-down on the scanner glass.
2 Align the book. The book is correctly aligned if the book b inding is in line with the bo ok
icon at the top of the scanner glass.
3 Touch C
4 Touch D
OPY.
ESCRIBE ORIGINAL.
5 Select Book as the size.
6 Touch O
K.
Note You can skip a page by touching the Skip Page button above the page icon. Touch the
button once to skip the left page and twice to skip the right page. Press the button three
times to cancel page skipping. If y ou don’t skip a page using the Skip P age button, left side
and right side pages will be copied.
7 Touch C
OPY SETTINGS.
8 Select any output settings that you want. Select the paper size that is the closest
match to the actual size of the book that you are copying.
9 Touch O
K.
10 Using the numeric keypad, specify the n umber of copies you want.
11 Press S
TART.
Creating a job to be copied later
Turning on the stored job setting indicates that you want the copy job to be stored on the
MFP hard disk, and that you will print the job later.
1 Select your basic copy settings (see “Copying by using user-defined settings” on
page 39).
2 Touch the Advanced tab.
3 For the Job Stora ge option, select On.
A pop-up dialog box appears, asking for the User Name, Job Name, and Personal
Identification Number (PIN), if required. The keyboard appears when you select User
Name and Job Name. The PIN is a four-digit number that can be typed by using the
numeric keypad.
4 Type the User Name.
5 Type the Job Name.
6 Type the PIN if you want to control access to the stored copy job.
7 Touch O
8 Press S
K.
TART.
See “To print a stored job” on page 110 for information about printing a stored job.
42 Copying instructions ENWW
Page 55

Copy settings
The MFP features the following image-modification functions on the main touch screen.
Note Press the RESET button to return all of the settings to their default values.
Color copies or black and white copies
At the home screen, touch COPY and then touch the circle below COLOR copies or BLACK &
W
HITE copies to select the appropriate type of copies . If COLOR is selected, COLOR COPIES:
appears in the upper-right corner of the control-panel display. If B
selected, B
LACK COPIES: appears in the upper-right corner of the control-panel display.
Reduce or enlarge
The MFP has an autoscaling feature. If the original paper size differs from the copy paper
size, the MFP can autodet ect a size mi smatch betw een the original page size and the cop y
page size. The scanned image of the original page is reduced or e nlarged automatically to
match the copy paper size. You can override autoscaling by using the reduce and enlarge
feature.
The MFP can reduce copies to as little as 25% of t he original size and e nlarge copies to as
much as 400% of the original (200% when using the ADF).
LACK & WHITE is
To reduce or enlarge your copies, touch the arrows on the R
you reach the size that you want. The scale percentage box in the center of the R
E
NLARGE button indicates the percentage of reduction or enlargement. You can also touch
100% to display the keypad to type the number that you want. Touch O
changes.
EDUCE/ENLARGE button until
EDUCE/
K to save the
Adjust the lightness/darkness
You can adjust the lightness and the darkness of the copied output by touching the arrows
on the L
IGHT/DARK bar in the default copy screen.
Enhance the document
Touch the Copy Settings tab and then touch the Advanced tab to gain access to the
embedded enhancement screen that allo ws you to adjust the level of background re moval
from the copied image, and increase or decrease the sharpness of the copied image.
Background Removal
If you are copying a document that is printed on colored paper or the original is thin and
makes the backside image sho w thro ugh, y ou can enhance y our copy quality by removing
the background. Adjust the amount of background removal by touching the arrows on the
B
ACKGROUND REMOVAL CONTROL. The slider moves to t he lighter or darker area of the
B
ACKGROUND REMOVAL CONTROL bar for increased or decreased background removal.
ENWW 2 Copying 43
Page 56

Sharpness
The SHARPNESS CONTROl specifies the sharpness setting that the scanner uses when the
MFP scans your original. Sharpness enhances the edges of the original so that f aint or fine
text and graphics are reproduced more sharply. Adjust the amount of sharpness by
touching the arrows on the S
HARPNESS CONTROL bar.
Copying multiple sized originals
If the original document contains mixed-size originals, for example, a letter-size document
with several legal-size charts, see “Using Job Mode” on page 41 for more information.
Setting copy defaults
The defaults for several copy settings can be controlled by the administrator. To set or
change the following copy defaults, perform the following steps:
1 Touch M
2 Touch C
3 Touch C
ENU.
ONFIGURE DEVICE.
OPYING.
4 Select the copy setting that you want to change.
Copy setting Description
COLOR MODE Sets the MFP to default to color or black and white copies.
NUMBER OF SIDES The copy can have one side (simplex) or two sides (duplex) printed on
each page.
COLLATE If collate is OFF, each page is copied separately. If collate is ON, the
document is collated.
COPIES Indicates the number of copi es that will be produced.
STAPLE SUBMENU Appears if a stapling finishing device is attached.
SHARPNESS Indicates the sharpness of the image when it is copied.
BACKGROUND REMOVAL Indicates how much background is removed when an image is copied.
Note See “Copying submenu” on page 131 for more information.
44 Copying multiple sized originals ENWW
Page 57

3
To configure the embeded Send to e-mail feature, you must either know the Internet
Protocol (IP) address or hostname of the Simple Mail Transfer Protocol (SMTP) server on
your network, or use the Find Servers menu option to attempt to locate the server. The
MFP uses SMTP to send e-mail messages with attachmen ts containing the image that is
scanned at the MFP.
Optionally, you can configure the MFP to use the Lightweight Directory Access Protocol
(LDAP) to connect to a directory server so that you can easily address an e-mail that will
be sent from the MFP. Directory servers contain recipient names (for example, “John
Smith”), and associated e-mail addresses (jsmith@hp.com).
When the MFP is configured to use LDAP, users simply type the first few characters of a
recipient’s name. The MFP searches the directory server for names that match and uses
the closest matching name. In most environments, the Embedded Web Server must be
used to correctly configure LDAP.
Note If you do not know the IP address or hostname of the SMTP or LDAP servers on your
network, ask your network or e-mail administrator for this information.
1 Touch M
2 Touch C
3 Touch S
4 Touch E-
5 You can touch F
and SMTP servers. If this is successful, go to step 8. Otherwise, go to step 6.
6 Touch SMTP G
server. If a LDAP server is available, touch L
address or hostname of the LDAP server.
7 Touch O
8 Touch T
ENU.
ONFIGURE DEVICE.
ENDING.
MAIL.
IND SEND GATEWAYS to let the MFP search the local netw ork for LDAP
ATEWAY and then enter the IP address or hostname of the SMTP
DAP GATEWAY and then enter the IP
K.
EST SEND GATEWAYS to test the configuration.
ENWW 3 E-mail 45
Page 58
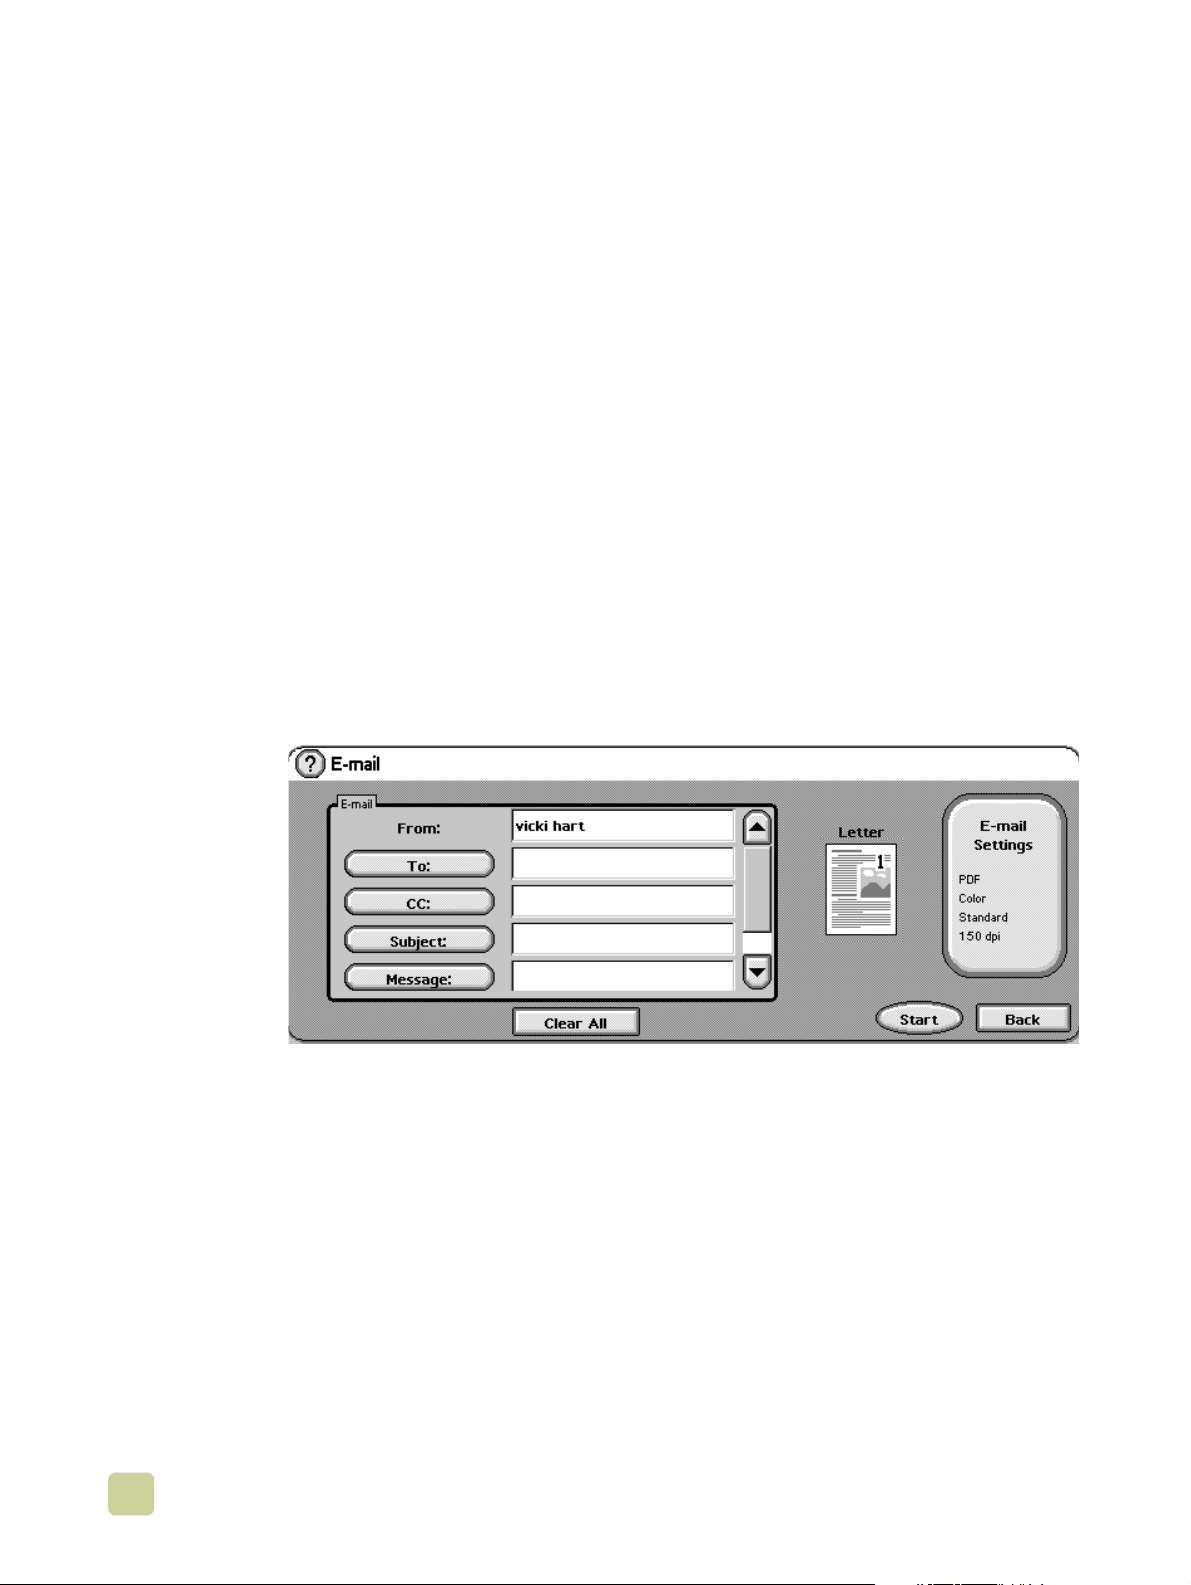
The MFP offers color-scanning and digital-sending capabilities. Using the control panel,
you can scan black-and-white or color documents and send them to an e-mail address as
an e-mail attachment. To use digital sending, the MFP must be connected to a local area
network (LAN). The MFP connects directly to your LAN by using the Jetdirect ethernet
card. This chapter addresses both scanning and sending, because they are fully
integrated functions.
Digital sending offers the following benefits:
● Sends documents to multiple e-mail addresses, saving time and delivery costs.
● Delivers files in black-and-white or in color. Files can be sent in different file formats
that the recipient can manipulate.
● Provides verification that e-mail was delivered correctly.
With digital sending, documents are scanned into the MFP memory and sent to an e-mail
address or multiple addresses as an e-mail attachment. Digit al do cu m en ts ca n be sent in
several graphics formats, such as PDF, JPEG, and TIFF (see “Using the auto-complete
function” on page 49), enabling recipients to manipulate the document file in various
programs to meet their specific needs. Documents arrive in near-original quality, and then
can be printed, stored, or forwarded.
The HP Digital Sending Software offers the additional bene fits of sending to a f ax machine,
authenticating the user for security purposes, and scanning to a folder. This chapter
contains information about the following topics:
● Sending documents
● Using the address book
46 ENWW
Page 59

Sending documents
The MFP scans at a 600 pixels-per-inch (ppi) resolution. The MFP scans both black-andwhite and color originals. You can place originals either on the scanner glass or in the ADF.
The scanner glass accommodates all sizes of media, including irregular-size documents,
books, stapled documents, previously folded documents, and photographs.
You can use the default settings or change the scanning preference and file formats. The
following are the default settings:
● Color
● .PDF file (requires the recipient to ha v e an Adobe® Acrobat® viewer to vie w the e- mail
attachment)
Steps for sending
1 Place the document on the glass or in the ADF.
2 Select the type of destination:
•E-mail
•Fax
• Folder (additional software is required)
• Secondary e-mail (additional software is required)
• Workflow (additional software is required)
3 If prompted, type your user name and password. For more information, see
“Authentication” on page 49.
4 Type the information that is needed for sending to the specific file destination. E-mail:
Complete the From:, To:, CC:, BCC:, and Subject: fields. Your user name or other
default might appear in the From: field. If so, you might not be able to change it.
• Fax:
Complete the Fax Numbers: field. If prompted, type your user name and password.
For more information, see “Authentication” on page 49.
• Folder (additional software is required): Select a folder destination from the list or type a
folder path, if you are an authenticated user.
• Secondary e-mail (additional software is required): Complete the From:, To:, CC:, BCC:,
and Subject: fields. Your user name or other default might appear in the From: field. If so,
you might not be able to change it.
• Workflow (additional software is required): Select a Workflow destination. Type the
requested information for the document.
5 Optional. Use SETTINGS to change the default settings for the scanned document that
you are creating (for example, change the type of file fo rmat that you want). F or more
information, see “Scan settings” on page 48.
6 Optional. Use D
ESCRIBE ORIGINAL to change the default settings (for example,
document size) for the document that you are sending. If you are sending a doublesided document, you must describe the original as a two-sided document.
7 Press S
TART to begin sending.
8 When you are finished, remove the document from the MFP.
ENWW 3 E-mail 47
Page 60

Scan settings
Use SETTINGS on the control panel to change the settings for the scanned document that
you are creating (for example, the file type that you want).
Note Scan settings do not apply to the f ax send options.
Setting Options Description
Scan
Black & White
preference
Color
File type .PDF
.TIFF
.MTIFF
.JPEG
Use this option when the original is black and white, or when you
want to send a more complex original as black and white in order
to reduce file size and transmission time.
Use this option when the original contains shades of gray, a mix of
text and illustrations, or a mix of color and black-and-white areas.
This choice increases file size and transmission time.
This is the default setting, offering the best overall text and
graphics quality. Recipients must have Adobe® Acrobat® Reader
installed on their computers to read this type of file. When used for
E-mail, this option produces one e-mail attachment that contains
all of the scanned pages.
This is a standard file type that can be brought into software
programs and modified by the recipient. When used for E-mail,
this option produces one e-mail attachment for each scanned
page.
This is a multipage .TIFF file that saves multiple scanned pages as
a single file. The files can be brought into software programs and
modified by the recipient. When used for E-mail, this option
produces one e-mail attachment that contains all of the scanned
pages.
This file type is best for viewing through an Internet browser. The
files can be brought into software programs and modified by the
recipient. When used for E-mail, this option produces one e-mail
attachment for each scanned page.
Resolution The following options are available:
● 75 DPI
● 150 DPI
● 200 DPI
● 300 DPI
File size The following options are available:
● Small
● Standard
● Large
48 Scan settings ENWW
Page 61

Authentication
Authentication is a security feature. When the administrator has turned on authentication,
you must type your network credentials to use the MFP digital sending features.
For Windows networking systems, you must supply the following information for
authentication:
● Username
● Password
● Domain
For Novell networking systems and Novell Bindery, you must supply the following
information for authentication:
● Username
● Password
● Server
Certain digital sending features (e-mail, fax) or destinations within a feature (network
folders, workflows) might require user authentication. After you have been authenticated,
you will not be asked to re-authenticate for the remainder of the session. If you select
Logoff from the control panel, press the R
will have to re-authenticate.
ESET button, or allow the MFP to time out, you
Using the auto-complete function
When you open the To, CC, or From screens in the Send to E-mail feature, the autocomplete function is invoked. As you type the required address or name at the keyboard
screen, the MFP automatically searches the addr ess book list and brings the first matching
address into the text line of the keyboard screen. Then you can select that name by
touching E
you type a character that does not match any entry in th e lis t, th e auto-complete text is
removed from t he display to show that you are typing an address that is not in the addre ss
book.
NTER, or continue typing the name until auto-complete finds the correct entry. If
ENWW 3 E-mail 49
Page 62

Using the address book
The private address book and the local address book store frequently-used e-mail
addresses. These books can be shared between MFPs that use the same server to
access the HP MFP Digital Sending software.
Note Addresses can be added or deleted to the private and local address books, but you must
be authenticated in order to add ad dresses to y our priv ate address book. If authent ication
is not complete, the addresses are added to the local address book.
The address book is activated b y selecting the address book icon in the displa y dialog bo x.
When the A
to add or delete items in the address books. When the E
B
OOK - ADD and ADDRESS BOOK - DELETE appear on the control-panel display.
The B
You can send to a list of recipients by using the MFP address book feature. See your
system administrator for information about configuring address lists.
Creating a recipient list
Complete these steps on the touch screen of the graphical display:
LL or LOCAL button are selected, an EDIT button appears. Use the EDIT button
DIT button is selected, ADDRESS
ACK button returns you to the previous screen.
1 Touch E-
2 Touch T
MAIL.
O: to gain access to the keyboard screen.
3 Type the first letter of the name.
Note The MFP starts at the beginning of the address list unless you t ype in the firs t letter of the
name.
4 Touch to gain access to the address book.
5 Navigate in the address book using the scroll bar.
6 Highlight the name to select a recipient, and then touch the A
You can also select a distribution list by touching the A
recipient from a local list by touching the L
and then touch the A
DD button to add the name to your list of recipients.
OCAL button. Highlight the appropriate names,
LL or LOCAL button, or add a
DD button.
You can remove a recipient from your list by scrolling to highlight the recipient, and then
touching the R
EMOVE button.
7 The names in the recipient list are placed into the text line of the keyboard screen. If
you want to, you can add a recipient that is not in the address book by typing the email address on the keyboard.
8 Touch O
9 Finish typing CC: and S
check the list of recipients by touching the down arrow in the T
K on the keyboard screen.
UBJECT: on the Send To E-mail screen, if necessary. You can
O: text line.
10 Press S
TART.
50 Using the address book ENWW
Page 63

Faxing
4
Note In some countries/regions, the HP LaserJet MFP Analog Fax Accessory 300 is standard
on the HP Color LaserJet 9500mfp. The HP LaserJet MFP Analog Fax Accessory 300
requires telecommunication certification by country/region. Check with your sales
representative or at www.hp.com/clj9500mfp/fax/countries-regions
countries/regions that offer fax as a standard capability.
When configuring the required fax settings for location, some countries/regions are
supported but do not have an entry in the Location setting list. These additional countries/
regions can be supported by selecting another alternate country/region from the Location
settings list.The following table lists additional supported countries/regions and the
acceptable alternate country/region to select to support that country/region.
for a list of the certified
Country/region support
To select this country/
region
Estonia Norway, Sweden, or Russian Federation
Iceland Denmark, Norway, or Sweden
Latvia Norway, Sweden, or Russian Federation
Liechtenstein Austria or Switzerland
Lithuania Norway, Sweden, or Russian Federation
Morocco Spain
Slovenia Hungary or Poland
Select this country/region from the location setting list
ENWW 4 Faxing 51
Page 64
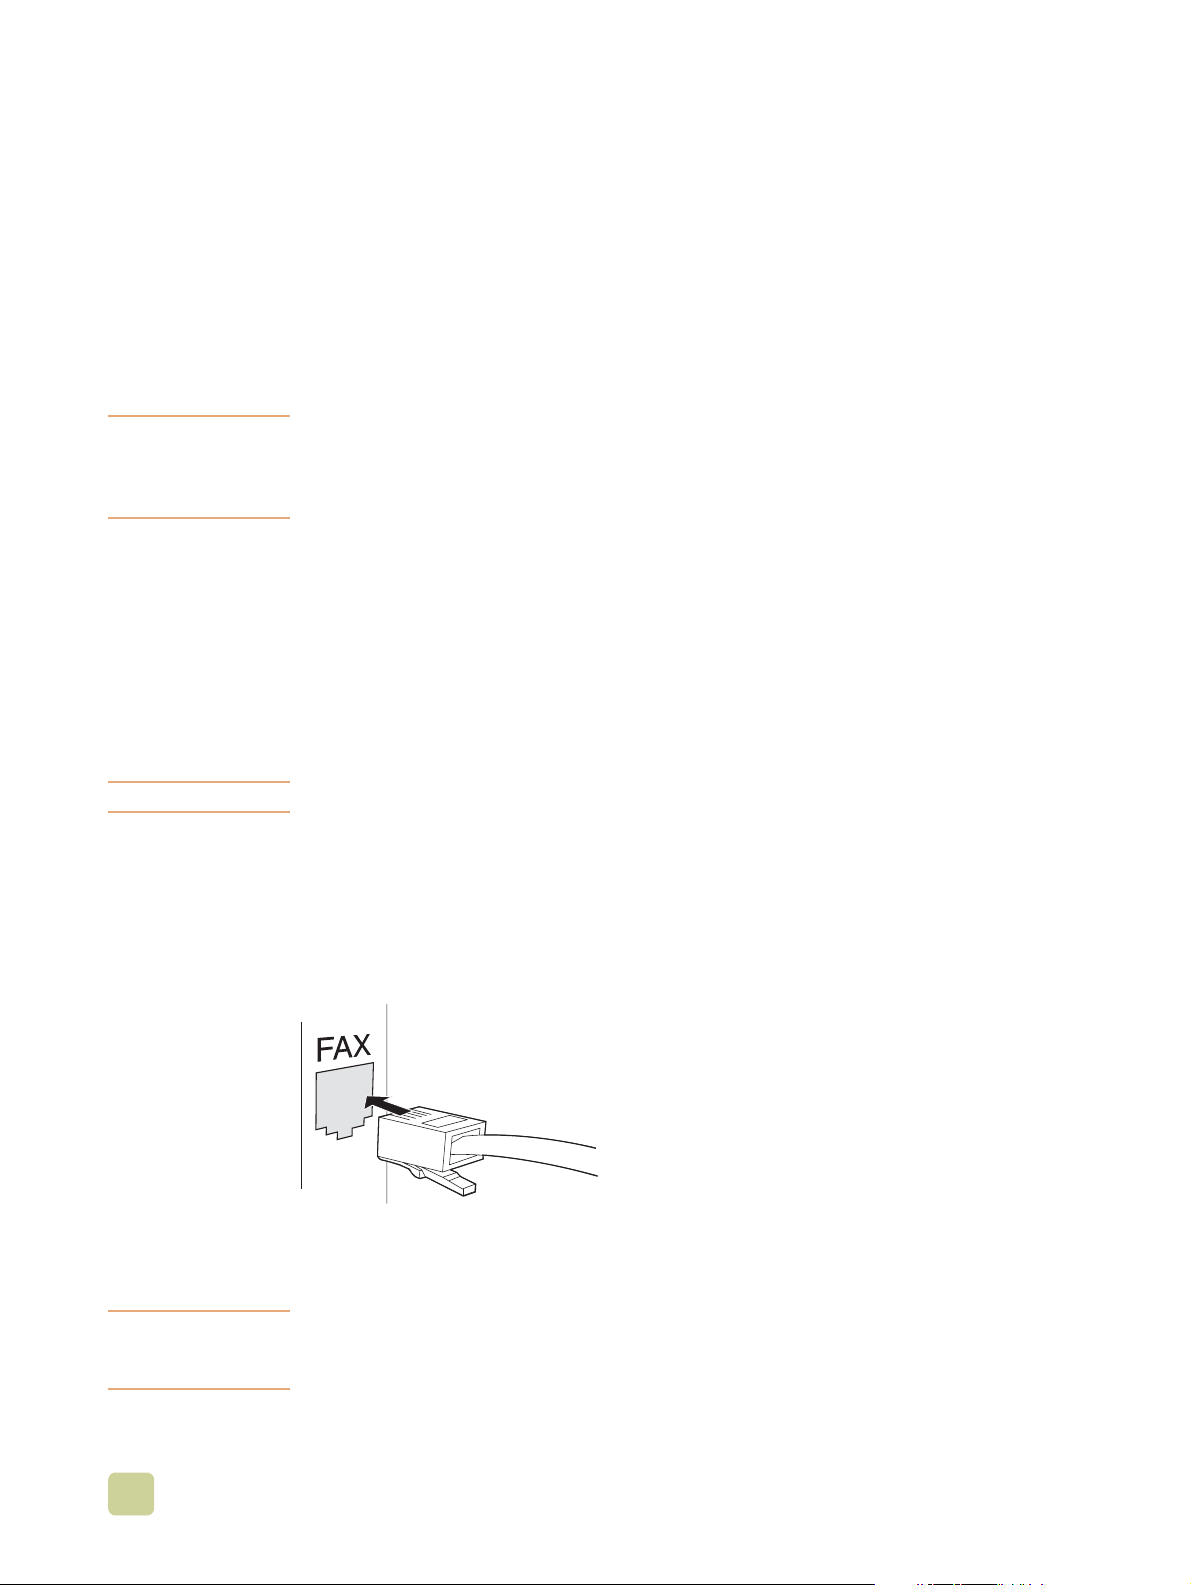
The MFP can function as a standalone analog f ax machine . The inf ormation in this chapter
helps you complete the following tasks:
● Perform initial setup configuration
● Send faxes
● Configure fax settings
● Perform advanced f ax features
● Use fax logs and reports
● Troubleshoot problems
This chapter also provides product specificatio ns.
Note Although the MFP also supports LAN faxing through the HP MFP Digital Sending Software
Configuration Utility , that utility is av ailable as an option and is not discussed in this chapter .
For information about LAN faxing, see the HP MFP Digital Sending Software User Guide
or the HP MFP Digital Sending Software Support Guide.
Connecting the fax to a phone line
When connecting the fax to a phon e line, make sure that the phone line for the fax is a
dedicated line that is not used by any other devices. This line should be an analog line,
because the fax will not function correctly when it is connected to some digital PBX
systems. If you are unsure about what type of line you have, contact your telecom
provider.
Note Use the phone cord that comes with the fax to make sure that the fax functions correctly.
Follow these instructions to connect the fax to a phone jack.
1 Locate the phone cord that is included with the fax kit. Plug one end of the cord into
the fax phone jack. The fax phone jack is located on the back of the MFP on the
formatter plate, next to the other connectors. Make sure that the cord is plugged into
the fax phone jack com pletely and securely.
2 Plug the other end of the phone cord completely into the pho ne jack on the wall to
finish the installation.
Note The fax function for the HP Color LaserJet 9500mfp will not function until the required items
are entered into the appropriate menus on the control pa nel. See “Establishing the required
fax settings” on page 53.
52 Connecting the fax to a phone line ENWW
Page 65

Verifying the fax operation
Verify that the MFP fax is functioning by checking the MFP control-panel display. The fax
option should appear on the screen. However, until the required settings are established,
the option is gray and the text “Not Configu red” appears across it. To use the analog fax,
see Establishing the required fax settings.
Establishing the required fax settings
After the fax is installed, you must establish these settings before you can use the fax:
● Date and time
● Location (country/region)
● Fax header (phone number and company name)
This information is used in the fax header that is printed on all outgoing faxes.
Note In the U.S . and many other countries/regions, set ting the date, time, location, phon e number
and company name is a legal requirement.
Because the fax reads some of these settings from th e MFP, a value might already be set.
Verify the value that appears to make sure that the information is correct.
Using the Fax Settings menu
Use the Fax Settings menu to establish the required fax settings. Press the MENU button
on the MFP control panel to open the Fax Settings menu.
Note If you hav e the HP MFP Digital Sending Software installed and the LAN f ax is enabled, the
fax settings do not appear on the menu because the settings are only used to configure
the analog fax. Only one type of fax can be enabled at a time, and only th e controls for that
fax appear on the control-panel display. If y ou w ant to use analog fax when the LAN fax is
enabled, use the HP MFP Digital Sending Software Configuration Utility to disable the LAN
fax. See “To set the analog MFP fax settings from the HP MFP Digital Sending Software
Configuration Utility” on page 65.
ENWW 4 Faxing 53
Page 66

The following figure shows the control-panel with the fax option visible.
Touch-screen
graphical display
Fax option
MENU button
START button
Figure 3: Fax option
Setting or verifying the date and time
The date and time setting f or the f ax is th e same v alue as the MFP date and time sett ing. If
you are turning on the MFP for the first time, you will be prompted for this information.
To verify or change the date and time settings
1 Press the MENU button.
2 Scroll to and touch F
3 Scroll to and touch F
4 Scroll to and touch D
AX.
AX SETUP REQUIRED.
ATE/TIME.
5 Select the date and time formats, and then type the date and time.
Setting or verifying the location
The location setting identifies the country/region where the MFP is located. This setting
selects the date/time f ormat and the minimum an d maximu m rings-to-ans w er r ange f or the
country/region. Because this setting is a legal requirement in some countries/regions, it
must be set before the f ax can oper ate . If you are turning on the MFP for the first time , you
will be prompted for this information.
To verify or change the location
1 Press the MENU button.
2 Scroll to and touch F
3 Scroll to and touch F
AX.
AX SETUP REQUIRED.
4 Scroll to and touch F
5 Scroll to and touch L
AX HEADER.
OCATION.
6 Scroll through the list until your country/region appea rs, and then touch the country/
region to select it.
54 Establishing the required fax settings ENWW
Page 67

Setting or verifying the fax header
The fax header setting is used to set a phone number and company name that appear in
the fax header. This information is required and must be set.
To verify or change the phone number and the company name
1 Press the MENU button.
2 Scroll to and touch F
3 Scroll to and touch F
4 Scroll to and touch F
5 Scroll to and touch P
6 Type a phone number and then touch O
7 Touch C
OMPANY NAME.
8 Type the company name, and then touch O
AX.
AX SETUP REQUIRED.
AX HEADER.
HONE NUMBER.
K.
K.
If the fax option appears on the control- panel display and the message “Not Configured”
does not appear, you have completed the setup and can use the fax feature.
ENWW 4 Faxing 55
Page 68

Fax feature screen
Use the Fax feature screen to send faxes. Press the Fax option that appears on the MFP
control-panel display to open this screen.
Note The Phone Book option appears only if y ou set the feature in the HP MFP Digital Sending
Software Configuration Utility.
Status message bar
While the MFP is sending and receiving faxes, status information such as Ready,
Receiving call, and Page sent appears in the status bar at the top of some touch-screens.
56 Fax feature screen ENWW
Page 69

Sending faxes
Use one of three basic methods to specify numbers to send a fax:
● Type the number manually
● Specify the number by using speed dial
● Specify the number by using the phon e book (available only if the HP MFP Digital
Sending Software Configuration Utility is installed and the phone book has been
populated)
Note For online inf ormation about sending a f ax, touch ? on the screen to open the Help menu,
and then touch SEND A FAX under the list of help topics.
When using the numeric ke ypad to type a phone number, include any pauses or other
numbers such as area codes, access codes for n umbers outside a PBX system (usually a
9 or 0), or a long-distance prefix. A two-second pause can be included by typing a
comma (,). If the fax prefix setting is set to automatically include the dialing prefix, you do
not need to type it. See “Setting billing codes” on page 70 for more information.
Note Faxes that fail because the number was busy or the receiving fax did not answer, f or
example, are deleted from memory.
Sending a fax by typing the number manually
Use the following procedure to send a fax by typing the number.
1 Place the document in the ADF or on the scanner glass.
2 On the control-panel display, touch the Fax option. You might be prompted to type a
user name and password.
3 Touch S
original. The following settings are available:
• page size (such as letter or A4)
• 1-sided or 2-sided printing
• page content (text, mixed text and graphics, or graphics and photos)
• orientation (portrait or landscape)
If the settings do not match, complete the following steps:
a. Touch D
b. Make any changes that are required to describe your original.
Note You can also change how you are notified about the status of a fax (that is, if the fax was
sent or if an error occurred that prev ented it from being sent ), by touching the F ax Settings
option to view the notification settings, and then making any appropriate changes. This
setting changes the notification only for the current fax.
ETTINGS. Verify that the DESCRIBE ORIGINAL settings are appropriate for your
ESCRIBE ORIGINAL to open the Original Setting screen.
c. When all of the settings are complete, touch O
K to return to the Fax screen.
4 Type a phone number by using the keyboard that appears on the control-panel
display.
ENWW 4 Faxing 57
Page 70

Note If a two-second pause is needed, type a comma (, ) after a prefix n umber ( such as a “9 ” or
“0”) to allow the internal phone system time to reach an outside line before the remainder
of the number is dialed.
5 To specify additional phone numbers, touch N
EXT NUMBER.
Note T o remov e a number from the list, scroll to and highlight the number and then touch REMOVE.
6 Touch S
S
TART button on the control panel.)
TART to send the fax. (You can touch START on the touch-screen or press the
Note When a fax is sent, it is first copied into memory. After the entire document is stored, the
fax is sent and is then deleted from memory.
Sending a fax by using speed dial
Use the following procedure to send a fax by using speed dial.
Note Before sending a f ax b y using speed dial, you must create a speed dial . To create a single
speed dial or a speed-dial group, see “To create a speed dial” on page 61.
1 Follow steps 1 through 3 in the procedure “Sending a fax by typing the number
manually” on page 57.
2 Scroll to and touch S
3 Touch the check box in front of the speed dial name that you want to send the fax to.
4 Touch O
K. The speed dial name should be listed on the Fax Recipient screen.
PEED DIAL.
5 Touch S
S
TART button on the control panel.)
TART to send the fax. (You can touch START on the touch-screen or press the
Sending a fax by using phone book numbers
The fax phone book feature is only available when the MFP is configured to use the
HP MFP Digital Sending Configuration Utility.
If the MFP has not been configured for use with this software, the Phone Book button will
not appear. To configure the MFP for use with the HP MFP Digital Sending Configuration
software, see the HP MFP Digital Sending Software User Guide or the HP MFP Digital
Sending Software Support Guide.
Also, when Authentication is turned on in the HP MFP Digital Sending Configuration Utility,
personal fax numbers from your Microsoft Exchange contact list appear in the phone book.
Note You cannot add to or delete fax n umbers from the phone book on this de vice. F ax numbers
can only be added or deleted using the Address Book Manager (ABM) on t he Digital Send
Server or by changing your contact list.
58 Sending faxes ENWW
Page 71

If you have the HP MFP Digital Sending Configuration Utility installed on your MFP you
can use the following procedure to send a fax by using the phone book.
1 Follow steps 1 through 3 in the procedure “Sending a fax by typing the number
manually” on page 57.
2 Scroll to and touch P
3 Scroll to and highlight a name or a number in the list, and then touch A
HONE BOOK.
DD to include
the name or number in the windo w. You can add as many names and numbers as y ou
want to.
4 Touch D
book entry. The P
the phone book. The A
ETAILS to view the fax number or list of fax numbers for the selected phone-
ERSONAL option shows only the entries from the user's contact list in
LL option provides a merged list of the pub lic f ax entries and the
personal entries from the contact list.
5 Touch O
K to return to the Fax screen. The list of fax names appears in the Recipients
window.
6 Touch S
S
TART button on the control panel.)
TART to send the fax. (You can touch START on the touch-screen or press the
ENWW 4 Faxing 59
Page 72

Canceling a fax
Canceling the current fax transmission
The Cancel Current Transmission menu appears only if an outgoing fax call is in
progress.
Note The cancel operation can require up to 30 seconds to complete.
1 Press the M
2 Touch F
3 Scroll to and touch C
Note While a fax or fax es are being deleted, a “Canceling fax” message appears in the status bar.
ENU button.
AX.
ANCEL CURRENT TRANSMISSION.
Canceling all pending faxes
This feature deletes all of the outgoing faxes that are stored in memory. However, if a fax
is in the process of being transmitted, that fax is not deleted.
Note If any outgoing faxes are waiting in me mory, they are also deleted.
1 Press the M
2 Touch F
3 Scroll to and touch C
ENU button.
AX.
ANCEL ALL PENDING TRANSMISSIONS.
60 Canceling a fax ENWW
Page 73

Changing the notification setting
Use the notification setting to specify when and how you are notified of the status of an
outgoing fax. This setting applie s to the current fax only. To change the setting
permanently, change the default setting. See “Scheduling fax-call report printing” on
page 78.
1 On the control panel main screen, touch the F
2 Touch S
3 Touch F
ETTINGS.
AX SETTINGS.
AX option.
4 Perform one of the following actions on the Notify tab:
• Touch N
• Touch T
5 Touch P
ONE to turn off notification, and then touch OK.
HIS JOB or ON ERROR to turn on notification and continue to the next step.
RINT to receive a printed notification, or touch E-MAIL to make the control-
panel keyboard available.
Note The e-mail notification works if you ha v e configured e-mail. If “Not Conf igured” appears on
the e-mail option, e-mail is not conf igu red. To configure e-mail, use the MFP e-mail menu
settings.
6 If you selected e-mail, use the control-panel keyboard to type an e-mail address, and
then touch O
K.
Speed dial
Use speed dial to assign a speed dial name to a single number or a group of numbers.
You can send a fax to that number or numbers by selecting the speed dial name.
To create a speed dial
1 Touch the FAX option.
2 Touch S
3 Touch the Edit tab.
4 Touch N
5 Type a number by using the control-panel keyboard. If y ou want to specify more than
one number, touch N
to define all of the numbers for the speed dial.
6 Touch N
7 Type a name for the speed dial using the control-panel keyboard.
8 Touch O
Note After you have created a speed dial group, you cannot add or delete individual numbers
from it.
ENWW 4 Faxing 61
PEED DIAL.
EW SPEED DIAL.
EXT NUMBER and then specify another number. Repeat this step
AME.
K.
Page 74

To delete a speed dial
1 Touch the FAX option.
2 Touch S
PEED DIAL.
3 Touch the Edit tab.
4 Touch D
ELETE SPEED DIAL.
5 Touch the check box in front of the speed dial that you want t o delete. You might need
to scroll up or down to find the speed dia l nam e. You can delete more than one speeddial groups by placing a check mark in front of other names.
6 Touch D
7 Touch Y
8 Touch O
ELETE.
ES.
K.
Changing the sharpness setting
Use the Sharpness setting to specify the resolution that the scanner uses when the MFP
scans your original. Sharpness enhances the edges of the original so that f a int or f ine text
and graphics are reproduced more sharply.
Note Increasing sharpnes s increases resolution, which also increases the transmission time.
To change the sharpness setting
1 Touch the FAX option.
2 Touch S
3 Touch the F
ETTINGS.
AX SETTINGS option.
4 On the Enhance tab, touch the left arro w to decr ease the sharpness or touch the right
arrow to increase the sharpness of the image.
5 Touch O
K.
Changing the background setting
If you are f axing a document that is printed on colored paper, you can enhance your fax
copy quality by rem oving the background t hat might cause your fax copy to streak or blur.
To change the background setting
1 Touch the FAX option.
2 Touch S
3 Touch F
4 On the Enhance tab, touch the left arrow to increase the appearance of background
or touch the right arrow to decrease the background.
ETTINGS.
AX SETTINGS.
5 Touch O
K.
62 Changing the sharpness setting ENWW
Page 75

Changing the light/dark setting
The light/dark setting adjusts how light or dark the transmitted image will appear on the
recipient’s fa x machine.
To change the light/dark setting
1 Touch the FAX option.
2 Touch S
3 Touch the Light arrow to lighten the image or touch the Dark arrow to darken the
image.
4 Touch O
Receiving faxes
When the fax receives incoming faxes, it stores them in memory before printing. After the
entire fax is stored, it is printed and then deleted from memory. However, if fax printing is
set (turned on), then all of the incoming faxes are stored in memory and none are printed.
When the fax printing has been set and is then turned off, all of the stored faxes are
printed. See “Scheduling fax printing” on page 75.
You can change the fax receive default settings to modify the way a fax is received:
● Select the number of rings-to-answer
● Print date, time, and page number on faxes (stamp)
● Select input paper tray and destination bin
● Forward faxes to another number
● Block faxes from certain numbers
● Fax pr int ing
ETTINGS.
K.
For information about changing these menu settings, see “Remot e fax configuration” on
page 64 and “Secure settings” on page 74.
Note You cannot cancel incoming faxes.
ENWW 4 Faxing 63
Page 76

Remote fax configuration
In addition to using the MFP control panel for fax configuration, network administrat ors can
configure the fax remotely by using various software tools. Because the MFP contains an
embedded Web server (EWS), admini str a t ors can config ure t he fax by using either a Web
browser or HP Web Jetadmin. If it installed in the MFP, administrators can also use the
HP MFP Digital Sending Software Configuration Utility to configure the fax on a networkconnected computer. These tools provide access to most of the fax configuration settings
that are available on the MFP fax menu. Network administrators configure the se ttings,
and then users can change the settings at the MF P control panel.
Note HP MFP Digital Sending Software Configuration Utility can be used to turn the analog fax
feature on or off from the MFP control panel. If the analog fax is disabl ed by using the utility ,
and then the MFP is detached from the utility, you will not see Send to Fax in the EWS or
HP Web Jetadmin Digital Sending menu. See “To set the analog MFP fax settings from the
HP MFP Digital Sending Software Configur ation Utility” on page 65 to turn on the analog
fax for the MFP.
Web browser
Use the MFP EWS to gain access to and set the analog fax settings.
To use a Web browser to gain access to the EWS fax setting screens
1 Type the IP address of the MFP in the browser URL address bar and press Enter to
open the EWS Configure MFP screen.
2 Click the Digital Sending tab.
3 Click the Send to Fax tab.
4 On the Fax Settings screen, make any appropriate changes to the settings and then
touch O
5 Click the Edit tab to open the Advanced MFP Modem Settings screen and establish
additional fax settings.
K.
HP Web Jetadmin
For detailed information about HP Web Jetadmin, see the HP Web Jetadmin Reference
Manual.
Note Before HP Web Jetadmin can open the MFP Digital Sending configuration pages, the
hpjdigsending.fpm plug-in must be installed. I f you do not have this plug-in, you can
download it at www.hp.com
about installing plug-ins.
To set the analog MFP fax settings through HP Web Jetadmin
. See the HP Web Jetadmin Reference Manual for information
1 Start HP Web Jetadmin.
2 In the At a Glance text box, type the IP address of the MFP in the Quick Device Find
text box, and then select GO to show the device stat us in the right pane. Select Digital
Sending from the status drop-down menu.
64 Remote f ax configuration ENWW
Page 77

3 On the Digital Send Settings menu, select Send to Fax.
4 On the Fax Settings screen, make any appropriate changes to the settings and then
click OK.
5 Click the Edit tab to open the Advanced MFP Modem Settings screen for additional
fax settings.
Administrators can configure a single MFP or perform multiple device configurations. Use
the Multiple device mode to configure se v er al MFPs at one time. F or inf ormation about this
feature, see the HP Web Je ta dm in Refere nce Manual.
HP MFP Digital Sending Software Configuration Utility
Use the following procedure to set analog fax settings for the MFP.
Note This utility also contains all of the necessar y settings for the LAN fax functionality.
To set the analog MFP fax settings from the HP MFP Digital Sending
Software Configuration Utility
1 Start the utility to open the main screen.
2 Select the MFP and then touch C
3 Select the Send to Fax tab.
4 To enable the fax capabilities on the MFP, select the Enable Sent to Fax check box.
To access Analog Fax settings, select directly from the mfp’s internal modem from
the Send Faxes... drop-down list. On the Fax Settings screen make any changes to
the settings and then touch O
5 Click the Edit tab to open the Advanced MFP Modem Settings screen and establish
additional fax settings.
You can configure a single MFP or perform multiple device configurations. For more
information about the HP MFP Digital Sending Software Configuration Utility, see the
HP MFP Digital Sending Software User Guide or the HP MFP Digital Sending Software
Support Guide.
ONFIGURE MFP.
K.
Establishing optional fax settings
Use the following procedures when you want to establish fax settings in addition to those
that are required for fax functionality.
Note Depending on the capabilities of and settings that you have established for your f ax method,
some of these options might not be available or configurable.
ENWW 4 Faxing 65
Page 78

Setting the modem volume
Use the following procedure to set the modem volume.
To set the modem volume
1 Press the MENU button.
2 Touch F
3 Scroll to and touch F
4 Scroll to and touch M
5 Scroll to and touch O
AX.
AX SETUP OPTIONAL.
ODEM VOLUME.
FF, MEDIUM (default), or LOUD.
Setting the ringer volume
Use the following procedure to set the ringer volume f or the local fax.
To set the ringer volume
1 Press the MENU button.
2 Touch F
3 Scroll to and touch F
4 Scroll to and touch R
5 Scroll to and touch O
AX.
AX SETUP OPTIONAL.
INGER VOLUME.
FF, MEDIUM (default), or LOUD.
Setting error correction mode
Normally, the fax monitors the signals on the telephone line while it is sending or receiving
a fax. If the fax detects an error during the transmission and the error corre ct ion setting is
on, the fax can request that the error portion of the fax be resent.
You should turn off error correction only if you are ha ving tro uble send ing or receiving a f ax
and you are willing to accept the errors in the transmission. Turning off the setting might be
useful when you are trying to send a fax overseas or receive one from overseas, or if you
are using a satellite telephone connection.
To turn error correction mode on or off
1 Press the MENU button.
2 Touch F
3 Scroll to and touch F
4 Scroll to and touch E
5 Touch O
66 Establishing optional fax settings ENWW
AX.
AX SETUP OPTIONAL.
RROR CORRECTION MODE.
N (default) to turn on error correction mode, or touch OFF to turn it off.
Page 79

Setting JBIG compression mode
Because using JBIG compression can reduce phone charges by reducing the fax
transmission time, JBIG compression mode is the preferred setting. However, this mode
might cause compatibility problems with some older fax machines, in which case you
might need to disable it.
Note JBIG compression only works when the receiving f ax contains JBIG compression.
To turn JBIG compression on or off
1 Press the MENU button.
2 Touch F
3 Scroll to and touch F
4 Scroll to and touch J
5 Touch O
AX.
AX SETUP OPTIONAL.
BIG COMPRESSION.
N to turn on JBIG compression , or tou ch OFF (default) to turn it off.
Setting outgoing fax resolution
Use this setting to establish the resolution for outgoing fax tr ansmission s. The sending fax
determines the maximum resolution that the receiving fax supports, and then uses a
resolution that is defined by a combination of this setting and the information about the
receiving fax.
Note If the fax is wider than 8.5 inches, the fax will automatically select fine or standard resolution
in order to reduce the transmission time.
To set the outgoing fax resolution
1 Press the MENU button.
2 Touch F
3 Scroll to and touch F
4 Scroll to and touch D
AX.
AX SEND.
EFAULT RESOLUTION.
5 Touch S
(300 x 300 dpi) to select the resolution.
Note The higher the resolution, the longer t he transmission time that is required.
TANDARD (200 x 100 dpi), FINE (200 x 200 dpi; default), or SUPERFINE
Setting the overlay header
The overla y header, which consists of the date, time, company name, phone number, and
page number, is printed at the top of the page on outgoing faxes. This setting determines
whether the header is appended to the top of the page or is printed as an overlay. If the
header is appended to the top of a pa ge, it moves data downward on the page, which can
result in data at the bottom of a page being pushed to an additional page. If the header is
printed as an overla y, it does not push any page data, but the header might print over data
at the top of the page.
ENWW 4 Faxing 67
Page 80

Note When fax fo rwardi ng is turned on, the ov erla y header is alw a ys appended to the top of the
page, even if the overlay feature is turned on.
To select how the header is printed
1 Press the MENU button.
2 Touch F
3 Scroll to and touch F
4 Scroll to and touch O
5 Touch Y
AX.
AX SEND.
VERLAY HEADER.
ES to print the header as an overlay, or touch NO (default) to append the
header to the top of the page.
Setting dialing mode
The dialing mode setting sets the type of dialing that is used when sending a fax. Specify
either tone (touch-tone phones) or pulse (rotary-dial phones).
To set dialing mode
1 Press the MENU button.
2 Touch F
3 Scroll to and touch F
4 Scroll to and touch D
5 Touch T
pulse dialing.
AX.
AX SEND.
IALING MODE.
ONE (default) to set the fax for tone dialing, or touch PULSE to set the fax for
Setting dialing and detection options
Use the following procedures to set a dialing prefix, redial options, or tone detection.
Setting a dialing prefix
Use the dialing prefix setting to specify a prefix n umber (such as a “9 ” to gain access to an
outside line) that is automatically added to all phone numbers when they are dialed.
To set a dialing prefix
Note You might need a pause between the prefix and t he phone number . To insert a two second
pause, type a comma (,).
1 Press the M
2 Touch F
3 Scroll to and touch F
4 Scroll to and touch D
ENU button.
AX.
AX SEND.
IAL PREFIX.
68 Setting dialing and detection options ENWW
Page 81

5 Touch O
FF (default) to turn off dialing prefix, or touch CUSTOM to see the keyboard on
the control-panel display and type a prefix.
6 Type the prefix number(s), and then touch O
K.
Setting the redial-on-busy feature
The redial-on-busy setting specifies the n umber of times (0 thro ugh 9) that the f ax redials a
number when it is busy. The interval between retries is established in the redial interval
setting.
To set redial-on-busy
1 Press the MENU button.
2 Touch F
3 Scroll to and touch F
4 Scroll to and touch R
5 Scroll to and touch the number of redial attempts (the default is 3), an d then touch O
AX.
AX SEND.
EDIAL ON BUSY.
Setting redial-on-no-answer
The redial-on-no-ans wer sett ing selects the number of times th e f ax r edials if the receiving
fax does not answer. The number of retries is either 0 or 1 (in the U.S.) or 0 to 2,
depending on the country/region. The interval between retries is established in the redial
interval setting.
K.
To set redial-on-no-answer
1 Press the MENU button.
2 Touch F
3 Scroll to and touch F
4 Scroll to and touch R
5 Scroll to and touch the number (default=0), and then touch O
AX.
AX SEND.
EDIAL ON NO ANSWER.
K.
Setting redial interval
Use the redial interval setting to specify the number of minutes between retries if the
receiving fax is busy or does not answer.
To set redial interval
1 Press the MENU button.
2 Touch F
3 Scroll to and touch F
4 Scroll to and touch R
5 Scroll to and touch the number (1 through 5 minutes; default=5), and then touch O
AX.
AX SEND.
EDIAL INTERVAL.
K.
ENWW 4 Faxing 69
Page 82

Setting dial-tone detection
Use the detect dial-tone setting to specify whether the fax checks for a dial tone before
sending a fax.
To turn dial-tone detection on or off
1 Press the MENU button.
2 Touch F
AX.
3 Scroll to and touch F
4 Scroll to and touch D
5 Touch O
N (default) to enable dial tone detection, or touch OFF to disable dial tone
detection.
Setting billing codes
When the billing code setting is turned on, you are prompted to type a number when
sending a fax. This number appears on the billing code report. To view the billing code
report, either print the report (see “Printing the billing code report” on page 79) or use a
software program to view it.
To set billing codes
1 Press the MENU button.
2 Touch F
3 Scroll to and touch F
4 Scroll to and touch B
5 Touch C
number of digits that you want in the billing code, and then touch O
billing codes setting, touch O
AX.
USTOM to open the billing code screen. Scroll to and touch the minimum
AX SEND.
ETECT DIAL TONE.
AX SEND.
ILLING CODE.
K. To turn of f the
FF (default).
Setting rings-to-answer
Use the rings-to-answe r setting to specify the number of times the phone rings before the
call is answered by the fax.
To set the number of rings-to-answer
1 Press the MENU button.
2 Touch F
3 Scroll to and touch F
4 Scroll to and touch R
5 Scroll to and touch the number of rings, and then touch OK.
Note The default setting range for rings-to-answer is specific to the country/region where the
MFP is located.
70 Setting billing codes ENWW
AX.
AX RECEIVE.
INGS TO ANSWER.
Page 83

Stamp received faxes
The stamp received faxes setting enables or disables stamping incoming faxes. The
stamp prints the date, time, phone number, and page number on each incoming page.
To turn the stamp feature on or off
1 Press the MENU button.
2 Touch F
3 Scroll to and touch F
4 Scroll to and touch S
5 Touch N
AX.
AX RECEIVE.
TAMP RECEIVED F AXES.
O (default) to turn off the stamp feature, or touch YES to turn it on.
Setting the fit-to-page option
When selecting a page size to print a fax, the MFP determines the closest page size that
matches the intended size and se lects it from t he siz es tha t are available in the MFP. If the
fit-to-page setting is turned on and the received image is larger than that page size, the
MFP attempts to scale the image to fit the page. If this setting is turned off and an incoming
image is larger than the page, the image is split across pages.
To turn the fit-to-page feature on or off
1 Press the MENU button.
2 Touch F
3 Scroll to and touch F
4 Touch F
5 Touch O
AX.
AX RECEIVE.
IT TO PAGE.
N to turn on fit-to-page, or touch OFF (default) to turn it off.
Setting the paper tray
The paper tray setting selects the MFP tray fr om which to pull paper for printing faxes.
To select the paper tray
1 Press the MENU button.
2 Touch F
3 Scroll to and touch F
4 Scroll to and touch F
5 Scroll to and touch the number for the tray (default=0), and then touch O
ENWW 4 Faxing 71
AX.
AX RECEIVE.
AX PAPER TRAY.
K.
Page 84

Setting the destination bin
The destination bin setting specifies the MFP output bin to r eceive the printed fax.
To set the destination bin
1 Press the MENU button.
2 Touch F
AX.
3 Scroll to and touch F
4 Scroll to and touch F
5 Scroll to and touch the number of the bin (default=0), and then touch O
Blocking incoming faxes
Use the blocked-fax list setting to block faxes from senders that you specify. Create a list
of phone numbers. When a fax is received from any of those numbers, it is stored in
memory and immediately deleted without being printed.
To create a blocked-fax list
1 Press the MENU button.
2 Touch F
3 Scroll to and touch F
4 Scroll to and touch B
5 Scroll to and touch A
6 Type a number and touch O
AX.
AX RECEIVE.
AX DESTINATION BIN.
K.
AX RECEIVE.
LOCKED FAX LIST.
DD BLOCKED NUMBER.
K.
7 To add additional numbers, repeat steps 5 and 6.
To remove numbers from the blocked-fax list
1 Press the MENU button.
2 Touch F
3 Scroll to and touch F
4 Scroll to and touch B
5 Scroll to and touch R
6 Scroll through the numbers to highlight one that you want to remove, and then touch
the phone number to remove it. Repeat this step for any numbers that you want to
remove.
7 Touch O
72 Setting the destination bin ENWW
AX.
AX RECEIVE.
LOCKED FAX LIST.
EMOVE BLOCKED NUMBER.
K.
Page 85

To clear all numbers from the blocked-fax list
1 Press the MENU button.
2 Touch F
AX.
3 Scroll to and touch F
4 Scroll to and touch B
5 Scroll to and touch C
6 Touch Y
ES to clear all numbers from the list, or touch NO to exit and retain the
numbers.
AX RECEIVE.
LOCKED FAX LIST.
LEAR ALL BLOCKED NUMBERS.
ENWW 4 Faxing 73
Page 86

Secure settings
The fax f orwarding and fax printing are secure features that require a personal
identification number (PIN). You are required to create a PIN the first time you use either
setting. After you create that PIN, you can use it to gain access to both features. That is, if
you have created a PIN for fax forwarding, you use the same PIN to ga in access to fax
printing, and vice versa. An individual can create only one PIN for access to both of these
secure settings.
Changing your PIN
Use this procedure to change your existing PIN.
To change your PIN
1 Press the MENU button.
2 Touch F
3 Scroll to and touch F
4 Scroll to and touch F
5 Scroll to and touch C
AX.
AX RECEIVE.
ORWARD FAX or FAX PRINTING.
HANGE PIN.
6 Use the keypad on the control panel to type your existing PIN, and then touch O
7 Use the keypad on th e control panel to type a new PIN (at least four digits), and then
touch O
8 Verify the PIN by typing it again, and then touch O
K.
K.
Setting fax forwarding
Use the forwar d fax setting to forward all of the faxes that the MFP receives to another
phone number. When fax forward is enabled, th e receiving MFP prints the fax (if fax
printing is enabled, the fax is printed when the lock is disabled) and also forwards the fax
to the specified number.
Note Fax forwarding is attempted only once. No retry option exists.
To set fax forwarding
K.
1 Press the MENU button.
2 Touch F
3 Scroll to and touch F
4 Scroll to and touch F
AX.
AX RECEIVE.
ORWARD FAX.
5 Use the keypad on the control panel to type y ou r PIN (which must cont ain at least f o ur
digits), and then touch O
K. If you have an existing PIN, the FORWARD TO NUMBER
screen appears. If you have not previously created a PIN, you are prompted to verify
the new PIN. Retype the PIN, and then touch O
6 Scroll to and touch F
AX FORWARDING.
K.
74 Secure settings ENWW
Page 87

7 Scroll to and touch F
ORWARD TO NUMBER.
8 Type the phone number that you w ant the fax to be forwarded to , and the n touch O
turn on fax forwarding.
Scheduling fax printing
Use fax printing to specify when faxes print.
When the fax receives incoming faxes, it stores them in memory before printing. After the
entire fax is stored, it is printed and then deleted from memory. However, if fax printing is
set (turned on), then all of the incoming faxes are stored in memory and none are printed.
When fax printing has been set and is then turned off, all stored of the faxes are printed.
You can also use the Retrieve Job menu to gain access to fax jobs that are stored in
memory while fax printing is enabled. See “Retrieve job menu” on page 126 for more
information.
Fax printing can be turned on and off ma nually or scheduled to g o on and off automatically
during specified days of the week. The fax printing schedule can be set to lock out an
entire day (24 hours) or a time period during the day. Only one lockout period can be set,
but it can be applied to any number of days. Use the fax printing setting to set the lock out
period (see “To create a fax printing schedule” on page 76).
To turn fax printing on or off
K to
Note Prior to enabling a fax- printing schedule, y ou must set up a schedule. See “To create a fax
printing schedule” on page 76.
1 Press the M
2 Touch F
3 Scroll to and touch F
4 Scroll to and touch F
5 Type your PIN (which must be at least four digits) and then touch O
ENU button.
AX.
AX RECEIVE.
AX PRINTING.
K. If you do not
have a PIN, you will be prompted to create one.
6 Touch F
AX PRINTING MODE.
7 Select a fax printing mode:
• Touch S
TORE ALL RECEIVED FAXES to disable printing of f ax es an d store all rece iv ed
faxes to memory.
• Touch P
RINT ALL RECEIVED FAXES to allow all stored fax es to print and to print all
faxes as received.
• Touch C
REATE FAX PRINTING SCHEDULE to use the fax printing schedule to
automatically turn on and turn off the printing of faxes.
8 Touch O
K.
Note Fax printing and fax forwarding use the same PIN. If you have created a PIN for fax
forwarding, also use that PIN here.
ENWW 4 Faxing 75
Page 88

To create a fax printing schedule
1 Press the MENU button.
2 Touch F
3 Scroll to and touch F
4 Scroll to and touch F
5 Type your PIN and then touch O
AX.
AX RECEIVE.
AX PRINTING.
K. If you do not have a PIN, y ou will be prompted to
create one.
6 Touch C
7 Touch P
the lockout period when faxes store to memory), select a time, and then touch O
8 Touch P
REATE FAX PRINTING SCHEDULE to display the schedule settings.
RINT END TIME to set the schedule start time when faxes will not print (begin
K.
RINT START TIME to set the schedule start time when faxes begin printing (end
the lockout period when f ax es are not sto red to memory), select a time, and then touch
O
K.
9 Scroll to and touch S
CHEDULE DAYS.
10 Scroll to and touch a day of the week to see the loc kout settings , and then complete on
of the following actions:
• Touch S
• Touch P
TORE ALL FAXES to lock out the day.
RINT FAXES AS SCHEDULED to use the PRINT START TIME or PRINT END TIME
schedule for that selected day.
Repeat this step for each day that you want to lock out.
11 Touch O
K.
Initiate polling receive
If someone else has set up a fax to be polled, you can request that the fax be sent to your
MFP. This is known as polling another product.
To initiate polling receive
1 Press the MENU button.
2 Touch F
3 Scroll to and touch F
4 Scroll to and touch I
5 Use the keyboard to type a polling receive number, and then touch O
AX.
Printing the fax call report
The Fax Call Report is a brief report that indicates the status of the last f ax that was sent o r
received. You can choose to have a thumbnail representation of the fax included in the
report.
AX FUNCTIONS.
NITIATE POLLING RECEIVE.
K.
1 Press the M
2 Touch F
ENU button.
AX.
76 Initiate polling receive ENWW
Page 89

3 Scroll to and touch R
EPORTS.
4 Scroll to and touch F
AX CALL REPORT.
5 If you want a thumbnail of the first page of the fax, touch T
then complete one of the following actions:
• Touch Y
• Touch N
6 Touch P
ES to include a thumbnail of the first page.
O if you do not want a thumbnail on the report.
RINT FAX CALL REPORT to print a report for the most recent fax transmission.
HUMBNAIL ON REPORT and
ENWW 4 Faxing 77
Page 90

Scheduling fax-call report printing
Use the When To Print Report setting to specify the conditions for printing the fax-call
report.
1 Press the M
2 Touch F
3 Scroll to and touch R
4 Scroll to and touch F
5 To include the thumbnail of each fax first page , touch T
ENU button.
AX.
EPORTS.
AX CALL REPORT.
HUMBNAIL ON REPORT and then
complete one of the following actions:
• Touch Y
• Touch N
6 Scroll to and touch W
ES to include a thumbnail of the first page report.
O if you do not want a thumbnail on the report.
HEN TO PRINT REPORT to specify when to print this report, and
then touch any of the following options:
•E
VERY FAX ERROR
•SEND FAX ERROR
•RECEIVE FAX ERROR
•EVERY FAX
•SEND FAX ONLY
•NEVER
Note If you select NEVER, you will have no indication (other than the touch-screen status-bar
message) that a fa x was not transmitted unless you print a fax activity log.
Printing the fax activity log
The fax activity log provides a chronological history of faxes that were received, sent, or
deleted, and of any errors that occurred. This log includes the following information:
● Date and time of all faxes that were received or sent, or which failed to be tr ansmitted
● Identification (phone number, if available)
● Duration (off-hook time)
● Number of pages
● Result (successfully sent, pending, or failed to send [which includes error type and
code])
The database stores the most recent 500 faxes. Older faxes are deleted from the log. If
you want to use the log for record-keeping purposes, you should print the log periodically
(no less often than ev ery 500 faxes) and then clear it. See “Clearing the fax activity log and
billing code report” on page 79.
78 Scheduling fax-call report printing ENWW
Page 91

To print the fax activity log
1 Press the MENU button.
2 Touch F
3 Scroll to and touch R
4 Scroll to and touch P
AX.
EPORTS.
RINT FAX ACTIVITY LOG.
Printing the billing code report
The billing code report is a list of the most recent 500 faxes that were successfully sent,
listed by billing code. The report includes the following information:
● Billing code number
● Date and time of all faxes that were successfully sent
● Identification number
● Duration (off hook time)
● Number of pages sent
● Result (success)
The database stores the most recent 500 faxes. Older faxes are deleted from the data
base. If you w ant to use the report f or record ke eping purposes, y ou should print the report
periodically (no less often than every 500 faxes) and then clear it. See Clearing the fax
activity log and billing code report for more information.
To print the billing code report
1 Press the MENU button.
2 Touch F
3 Scroll to and touch R
4 Scroll to and touch P
AX.
EPORTS.
RINT BILLING CODES REPORT.
Clearing the fax activity log and billing code report
The fax activity log and the billing code report use the same database. Because this
setting clears the database, it also clears both the activity log and the billing report data.
To clear the fax database
1 Press the MENU button.
2 Touch F
3 Scroll to and touch F
4 Scroll to and touch C
5 Touch Y
AX.
AX FUNCTIONS.
LEAR ACTIVITY LOG.
ES to clear all entries or touch NO to retain the entries and exit .
ENWW 4 Faxing 79
Page 92

Printing the blocked fax list report
You can print a list of faxes that were blocked from the MFP.
To print the blocked fax list report
1 Press the MENU button.
2 Touch F
3 Scroll to and touch R
4 Scroll to and touch P
AX.
EPORTS.
RINT BLOCKED FAX LIST.
Printing the speed dial list report
A speed dial list report lists the fax numbers that are assigned to speed dial names.
To print the speed dial list report
1 Press the MENU button.
2 Touch F
3 Scroll to and touch R
4 Scroll to and touch P
AX.
EPORTS.
RINT SPEED DIAL LIST.
80 Printing the blocked fax list report ENWW
Page 93

Is your fax set up correctly?
Use the following checklist to help identify the cause of any fax-related problems that you
encounter.
● Are you using the phone cord that came with the MFP?
The fax functionality has been tested with the supplied phone cord to meet RJ11
specifications. Do not substitute another phone cord. The analog fax requires an
analog phone cord. It also requires an analog phon e connection.
● Is the fax/phone line connector seated in the socket on the fax?
Make sure that the phone jack is well seated in the socket. The connector should be
inserted all the way into the socket, until it is secure.
● Is the phone jack on the wall working?
Verify that a dial tone exists by attaching a phone to the phone jack on the wall. Can
you hear a dial tone, and can you make a phone call?
What type of phone line are you using?
● Dedicated line: A standard fax/phone number assigned to receive or send faxes.
● PBX system: A business-environment phone system. Standard home phones and the
fax use an analog phone signal. Some PBX systems are digital and might not be
compatible with the fax. You need to have access to a standard analog phone line to
be able to send and receive faxes.
● Roll-over lines: A phone system feature where a new call “rolls over” to the next
available line when the first incoming line is busy. Try attaching the fax to the first
incoming phone line. The fax will answer th e phone after it rings the number of times
that is set in the rings-to-answer setting (see “Setting rings-to-answer” on page 70).
Note Roll-over lines can cause problems with the ability to receive fax es. HP recommends that
you do not use roll-over lines.
Are you using a phone-line splitter?
Parallel or “T” phone-line splitters should not be used with the fax because they can
degrade the quality of the phone signal.
Are you using a surge-protection device?
A surge-protection device ca n be used betw een t he w all jack and the fax to protect the fax
against electrical power that passes through th e phone lines. These devices can cause
some fax communicatio n problems by degrading the quality of the phone signal. If y ou are
having problems sending or receiving faxes and are using one of these devices, connect
the fax directly to the phone jack on the wall to determine whether the problem is with the
surge-protection device.
ENWW 4 Faxing 81
Page 94

Are you using a phone company voice-messaging service or an answering machine?
If the rings-to-answer setting for the messaging service is lower than the rings-to-answer
setting for the fax, the messaging service answers the call and the fax is not able to
receive faxes. If the rings-to-answer setting for the fax is lower than that of the messaging
service, the fax answers all calls and no calls are routed to the messaging service.
Checking fax status
If the analog fax does not appear to be functioning, print a Fax Accessory Page to check
the status. Use the following steps to print this page:
1 Press the M
2 Scroll to and touch I
3 Scroll to and touch P
ENU button.
NFORMATION PAGE.
RINT CONFIGURATION.
4 On the Fax Accessory Page, under the Hardware Information heading, check the
Modem Status.
The following table identifies the status conditions and possible solutions.
OPERATIONAL / ENABLED1 - The analog fax is installed and ready.
OPERATIONAL / DISABLED1 - The fax is installed and operational.
However, HP Digital Sending utility has
either disabled the MFP fax feature or
has enabled LAN fax. When LAN fax is
enabled, the analog fax feature is
disabled. Only one fax feature (either
LAN fax or analog fax) can be enabled
at a time.
NON-OPERATIONAL /
ENABLED/DISABLED
DAMAGED /
ENABLED/DISABLED
A firmware failure has been identified.
1
The firmware should be uploaded. See
“Customer support” on page 90.
The fax has failed. Reseat the fax card
1
and check for bent pins. If the status is
still DAMAGED, replace the analog fax
card.
1 - ENABLED indicates that the analog fax is enabled (turned on).
DISABLED indicates that LAN fax is turned on and the analog fax is turned
off.
82 Checking fax status ENWW
Page 95

Fax feature is not operating
Use this table to identify and solve fax malfunctions.
Problem Cause Solution
The fax is installed but the
option does not appear on
the MFP control-panel
display.
The fax menus are not
appearing on the MFP
control-panel display.
HP Digital Sending Software
utility has disabled the analog
fax feature.
The fax is not operating
correctly.
Use the HP Digital Sending
Software utility to enable the
analog fax feature.
● Check the fax status. See
“Checking fax status” on
page 82. If the status is NON-
OPERATIONAL, you might
need to install new firmware.
● If the status is DAMAGED and
you just installed the card, try
reseating the card and check
for bent pins.
● If the status is DAMAGED and
the card is installed correctly,
you might need to replace the
card.
The formatter board is faulty. Contact your HP service
representative for service. See
“Customer support” on page 90.
The LAN fax is enabled. This is normal operation. When the
HP Digital Sending Software
enables LAN fax, the analog fax is
disabled and the fax menu, which
is used only for the analog fax,
does not appear.
ENWW 4 Faxing 83
Page 96

General fax problems
Use this table to solve fax problems.
Problem Cause Recommended action
The fax was not
transmitted.
An OUT OF MEMORY
message appears on the
status message bar.
The print quality of a
photo is poor or prints as
a gray box.
Even after the C
button on the MFP
keyboard was pressed to
cancel a fax transmission,
the fax was still sent.
No Phone Book feature
appears.
The fax settings do not
seem to be available in
HP Web Jetadmin.
ANCEL
The JBIG mode is enabled
and the receiving fax does not
have JBIG capability.
The MFP storage disk is full. Delete some files from the disk.
The Page Content mode
setting is incorrect.
The CANCEL button on the
keyboard does not cancel fax
transmissions.
The Phone Book feature has
not been enabled.
The fax settings in HP Web
Jetadmin are located on the
Digital Send Settings menu
Turn JBIG off. See “Setting JBIG
compression mode” on page 67.
Try setting the Page Content
mode to Graphics or Text and
Graphics. See “Sending a fax by
typing the number manually” on
page 57.
Cancel faxes by using the Fax
menu. See “Canceling a fa x” o n
page 60.
Use the HP MFP Digital Sending
Software Configuration utility to
enable the phone book feature.
Click the Digital Send Settings
menu and then click Send to Fax.
See “HP Web Jetadmin” on
page 64.
The header is being
appended to the top of the
page when the overlay is
enabled.
A mix of names and
numbers appears in the
recipients box.
The fax call report prints
at an unwanted time,
even when fax printing is
on.
One page fax prints as
two pages.
If the fax has been forwarded,
the fax will append the
overlay header to the top of a
page when overlay is set.
It is normal for both names
and numbers to appear,
depending on where they are
from. The phone book lists
names and all other
databases list numbers.
The fax printing does not
control printing of the fax call
report. The fax call report
settings need to be changed.
The fax header is being
appended to the top of the
fax, pushing text to a second
page.
No action is necessary.
No action is necessary.
Specify when to print a fax call
report. See “Scheduling fax-call
report printing” on page 78.
If you want ev ery one-page fax to
print on one page, set the overlay
header to overlay mode. See
“Setting the overlay header” on
page 67.
84 General fax problems ENWW
Page 97

Problem Cause Recommended action
The document stops
feeding in the middle of
faxing.
The volume for sounds
coming from the fax is too
loud or too quiet.
A jam might be present in the
ADF.
The volume setting needs to
be adjusted.
See “Jam in the automatic
document feeder (ADF) cover” on
page 258.
See “Setting the modem volume”
on page 66 and “Setting the ringer
volume” on page 66 for more
information about changing the
sound-volume settings.
ENWW 4 Faxing 85
Page 98

Receiving fax problems
Use this table to solve problems that might occur when receiving faxes.
Problem Cause Solution
Incoming fax calls are not
being answered by the fax
(no fax detected).
The rings-to-answer setting
might not be set correctly.
The phone cord might not be
connected correctly, or the
phone cord is not working.
The phone line might not be
working.
A voice-messaging service
might be interfering with the
fax’s ability to answer calls.
Check the rings-to-answer setting.
See “Setting rings-to-answer” on
page 70.
See “Connecting the f ax to a phone
line” on page 52 to check the
installation. Make sure that you are
using the phone cord that came
with the fax.
Disconnect the fax from the phone
jack on the wall an d co nn ect a
phone. Try to make a phone call to
verify that the phone line is
working.
Take one of the following actions:
● Discontinue the messaging
service
● Get a phone line that you can
dedicate to fax calls
● Decrease the rings-to-answer
for the fax to a number less
than the rings-to-answer for the
voice mail (see “Setting rings-
to-answer” on page 70)
Faxes are transmitting or
being received very
slowly.
You might be sending or
receiving a very complex fax,
such as one that contains
many graphics.
The receiving fax machine
might have a slow modem
speed.
The resolution of the sent or
received fax is very high. A
higher resolution typically
results in better quality, but
also requires a longer
transmission time.
Complex faxes take longer to send
or receive.
The fax only sends the fax at the
fastest modem speed the receiving
fax machine can use.
If you are receiving a f a x, call an d
ask the sender to decrease the
resolution and resend the fax.
If you are sending a fax, decrease
the resolution (see “Setting
outgoing fax resolution” on
page 67) and change the Page
Content mode setting (see
“Sending a fax by typ i ng th e
number manually” on page 57).
86 Receiving fax problems ENWW
Page 99

Problem Cause Solution
Faxes are transmitting or
being received very
slowly (continued).
Faxes are not printing to
the MFP.
If the phone-line connection is
poor, the fax and the
receiving fax machine slow
down the transmission to
adjust for errors.
The input tray that is specified
for fax feeding contains no
media.
The fax printing is set. If fax printing is turned on, faxes
The MFP is out of toner. The MFP stops printing as soon as
1 Cancel and resend the fax.
2 Have the phone company
check the phone line.
Load media. Any faxes that were
received while the input tray was
empty are stored and will be
printed after the tray is refilled.
will not print until the lock is
disabled. If you want to print your
faxes, see “To turn fax printing on
or off” on page 75.
it runs out of toner. Any faxes that
are received are stored in memory
and are printed when the toner is
replaced.
ENWW 4 Faxing 87
Page 100

Sending fax problems
Use this table to solve problems that might occur when sending faxes.
Problem Cause Solution
Faxes stop during
sending.
The MFP is receiving
faxes but is not sending
them.
The fax machine that you are
sending to might be
malfunctioning.
Your phone line might not be
working.
If the fax is on a PBX system,
the PBX system might be
generating a dial tone that the
fax cannot detect.
The phone connection might
be poor.
The fax machine that you are
sending to might be
malfunctioning.
Your phone line might not be
working.
Tr y sending to another fax
machine.
Disconnect the fax from the phone
jack on the wall an d co nn ect a
phone. Try to make a phone call to
verify that the phone line is
working.
Disable the detect dial-tone setting
(see “Setting dial-tone detection”
on page 70).
Tr y again later.
Tr y sending to another fax
machine.
Disconnect the fax from the phone
jack on the wall an d co nn ect a
phone. Try to make a phone call to
verify that the phone line is
working.
Outgoing fax calls dial
repeatedly.
Sent faxes are not arriving
at the receiving fax
machine.
The fax automatically redials
a fax number if t he Re dia l On
Busy option is set to ON, or if
the Redial On No Answer is
set to ON.
The receiving fax machine
might be off or might have an
error condition, such as bein g
out of paper.
A fax might be in memory
because it is waiting to redial
a busy number, or other jobs
ahead of it are waiting to be
sent.
This is normal operation. If you do
not want the fax to retry sending
faxes, set Redial on Busy to 0 (see
“T o set redial-on-busy” on page 69)
and set Redial On No Answer to 0
(see “To set redial-on-no-answer”
on page 69).
Call the recipient to make sure the
fax machine is on and ready to
receive faxes.
If a fax job is in memory for either
of these reasons, an entry for the
job appears in the fax log. Print the
fax activity log (see “Printing the
fax activity log” on page 78), and
check the Result column for jobs
that have a Pending designation.
88 Sending fax problems ENWW
 Loading...