

Page 1

HP CD-Writer Plus
user’s guide
Page 2

Laser Safety
This unit employs a laser. Do not remove the cover or attempt to service this
device due to the possibility of eye damage.
CAUTION
Use of controls or adjustments or performance of procedures other than those
specified herein may result in hazardous laser radiation exposure.
Contains: Class 1 Laser Product
Innehåller: Klass 1 Laserapparat
Sisältää: Luokan 1 Laserlaite
Enhält: Klasse 1 Laser-Produkt
DANGER: INV ISIBLE LASER RADIATION WHEN OPEN. AVOID DIRECT
EXPOSURE TO BEAM.
DANGER: RADIATIONS INVISIBLES DU LASER EN CAS D’OUVERTURE. EVITER
TOUT EXPOSITION DIRECTE AU FAISCEAU .
VORSICHT: UNSICHTBARE LASERSTRAHLUNG, WENN ABDECKUNG
GEÖFFNET. NICHT DEM STRAHL AUSSETZEN.
ADVARSEL: USYNLIG LASERSTRÅLING VED ÅBNING. UNDGÅ UDS/ETTELSE
FOR STRÅLING.
ADVARSEL: USYNLIG LASERSTRÅLING NÅR DEKSEL ÅPNES. UNNGÅ
EKSPONERING FOR STRÅLEN.
VARNING: OSYNLIG LASERSTRÅLNING NÄR DENNA DEL ÄR ÖPPNAD.
STRÅLEN ÄR FARLIG.
VARO! NÄKYMÄTÖN AVATTAESSA OLET ALTTIINA LASERSÄTEILYLLE. ÄLÄ
KATSO SÄTEESEN.
Copyright 2000. Hewlett-Packard Company. All rights reserved.
Hewlett-Packard is a registered trademark of the Hewlett-Packard Company. Microsoft and Windows are U.S. registered
trademarks of Microsoft Corporation. Names of products mentioned herein are used for identification purposes only and
may be trademarks and/or registered trademarks of their respective company.
Page 3

Table of Contents
Contents of th e El e ctronic User’s Guide . . . . . . . . . . . . . . . . . . . . . . . . . .2
Installation Notes
Read the Install a tion Poster. . . . . . . . . . . . . . . . . . . . . . . . . . . . . . . . . . . .3
How to Set the CD-Wri te r P lus as Master or Slave . . . . . . . . . . . . . . . . . .3
How to Find the ID E Con nectors . . . . . . . . . . . . . . . . . . . . . . . . . . . . . . .5
How to Connect th e IDE D ata Cable. . . . . . . . . . . . . . . . . . . . . . . . . . . . .7
How to Connect an Audio Cable. . . . . . . . . . . . . . . . . . . . . . . . . . . . . . .10
About Making CDs
When Should I Use CD-R (Recordable or Write-Once) Discs? . . . . . . . .13
When Should I Us e CD - RW (ReWritable) Discs? . . . . . . . . . . . . . . . . . .13
How do I Make CDs Tha t Ca n be Read on Other Computers?. . . . . . . .14
When is the DirectCD Software Useful? . . . . . . . . . . . . . . . . . . . . . . . . .14
How do I Make Audi o CDs?. . . . . . . . . . . . . . . . . . . . . . . . . . . . . . . . . . .14
Can I Avoid Swapping Audio CDs In an d Out of the Drive? . . . . . . . . .15
Can I Use the New 80 M i nute Audio CDs? . . . . . . . . . . . . . . . . . . . . . . .15
Solving Installation Problems
Things to Try Firs t . . . . . . . . . . . . . . . . . . . . . . . . . . . . . . . . . . . . . . . . . .17
Installation Troubleshooting. . . . . . . . . . . . . . . . . . . . . . . . . . . . . . . . . .17
Warranty Information
Hewlett-Packa r d L i m ited Warranty Statement . . . . . . . . . . . . . . . . . . . .21
Customer Support
HP Customer Care O nline www.hpcdwriter.com. . . . . . . . . . . . . . . . . .23
Your Local Res e ller. . . . . . . . . . . . . . . . . . . . . . . . . . . . . . . . . . . . . . . . . .23
HP Customer Care b y P ho n e. . . . . . . . . . . . . . . . . . . . . . . . . . . . . . . . . .24
Before You Conta ct HP . . . . . . . . . . . . . . . . . . . . . . . . . . . . . . . . . . . . . .24
Telephone Num b e r s. . . . . . . . . . . . . . . . . . . . . . . . . . . . . . . . . . . . . . . . .28
Returning a Dri v e. . . . . . . . . . . . . . . . . . . . . . . . . . . . . . . . . . . . . . . . . . .30
1
Page 4

2 Contents of the Electronic User’s Guide
Contents of the Electronic User’s Guide
Additional information is available in the electronic User’s Guide that
was installed you your CD-Writer’s program group. The electronic User’s
Guide provides hardware and software information that is not included
in this manual. The guide is provided in HTML format and uses your web
browser to display its contents.
The User’s Guide provides information about:
■ Starting and using CD-Writer software
■ Sharing CDs
■ CD care
■ Troubleshooting
■ Product specifications
■ Warranty
■ Software license agreements
■ Regulatory information
■ How to contact HP
Page 5

Installation Notes
Read the Installation Poster
The Quick-Start installation poster de scribes how to install your CDWriter Plus drive. Follow the instructions on the poster and refer to this
chapter of the User’s Guide if you need additional information about:
■ How to set the CD-Writer Plus as Master or Slave
■ How to find the IDE connectors on your computer
■ How to connect the IDE data cable
■ How to connect an audio cable
How to Set the CD-Writer Plus as Master
or Slave
When you place Software Disc 1 in your CD-ROM and click Install CDW r it er P lus the software analyzes your computer and makes a
recommendation about connecting the CD-Writer Plus hardware.
The Install Recommendation tells you whether the jumper on the CD-
Writer Plus should be set as Master or Slave for your computer.
Find the pairs of pins labeled Master, Slave, and Cable Select on the back
of the CD-Writer Plus. No tice tha t on e pai r o f pin s ha s a s ma ll pl ast ic c ap
or jumper. This jumper can be pulled off using your fingers, tweezers, or
needlenose pliers, and placed on a different pair of pins to change the
setting.
3
Page 6

4 How to Set the CD-Writer Plus as Master or Slave
NOTE: The appearance of the back of your drive may vary slightly from the
illustrations. All installation steps are valid for your drive.
Slave
Check the back of the new drive and
make sure the jumper is on the center
location (Sla ve ).
Don’t use
Cable Select
This is a jumper. You can pull
it off and place it on another
pair of pins to change the setting.
or Master
Check the back of the new drive and
make sure the jumper is on the right-
hand location (Master).
Page 7

How to Find the IDE Connectors 5
How to Find the IDE Connectors
When you place Software Disc 1 in your CD-ROM and click Install CDW r it er P lus the software analyzes your computer and makes a
recommendation about connecting the CD-Writer Plus hardware.
The Install Recommendation tells you whether the CD-Writer Plus
should be connected to the primary or secondary controller in your
computer.
If the Install Recommendation states that your CD-Writer Plus drive will share
the data cable with another device (such as a CD-ROM drive), follow the cable
already attached to the other device down to the circuit board in order to locate
the IDE controller that you need. If you find an extra connector along that
cable, simply attach that connector to the CD-Writer Plus drive.
Locate the recommended 40-pin IDE controller’s connector (primary or
secondary) on your computer’s motherboard.
The IDE connectors are on the motherboard, which is the largest circuit
board in your computer, taking up most of the bottom of a desktop
computer or the side of a tower computer.
See your computer’s
manual if you need
help finding the
IDE connector
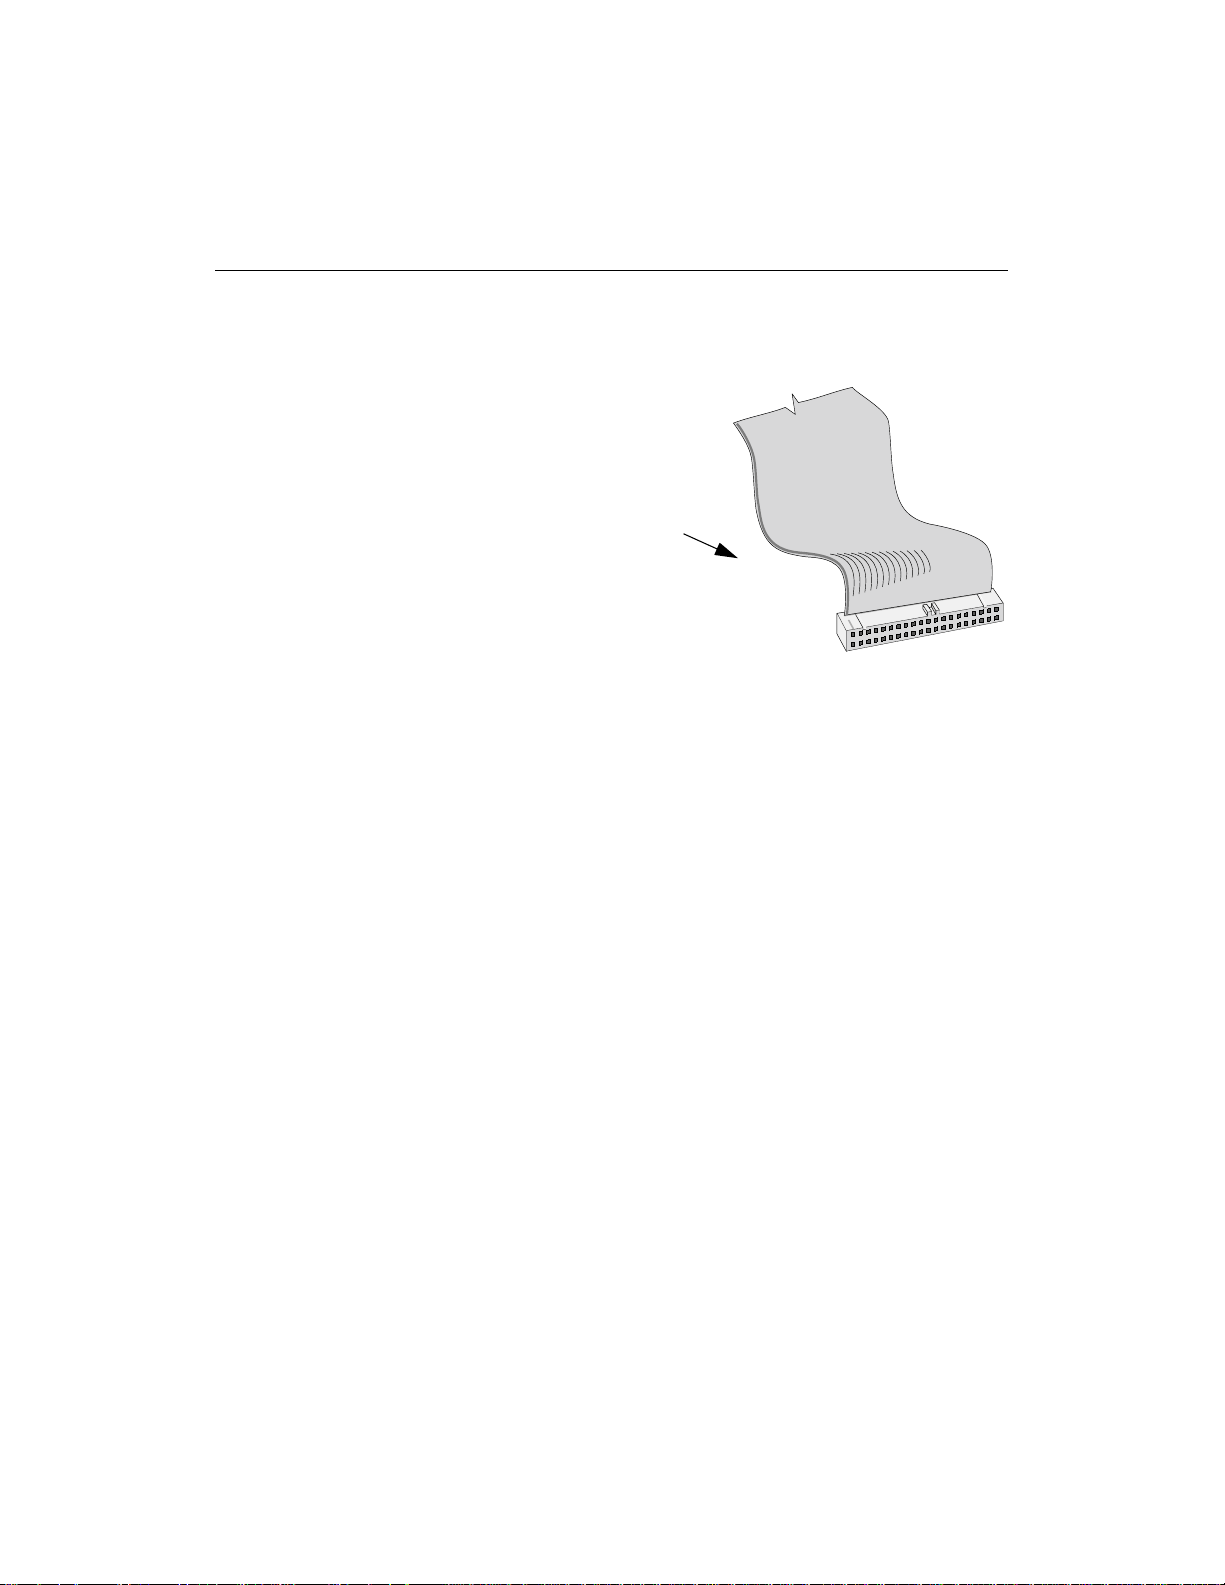
IDE connectors are usually found in pairs and may look like any of the
following:
IDE connectors
Page 8
6 How to Find the IDE Connectors
You will see a variety of connectors
inside your computer that look similar
to the 40-pin connect or, but have
more or fewer pins. Find the
connectors that are the correct size to
fit the cable that came in the box with
your drive .
The IDE connectors may be hidden by some of the computer’s cables or
may be behind a drive.
Many computers have an IDE hard drive or CD-ROM that connects to
the motherboard through an IDE controller. The data cables on these
drives have the same width as the data cable included with your CDWriter Plus. If your computer has an IDE hard drive or CD-ROM drive,
you can follow the data cable from the back of one of those drives to find
the IDE controller.
Computer manufacturers use a wide variety of labels for IDE connectors.
Look on your computer’s circuit boards for printing identifying the
primary and secondary connectors, such as:
- PRI and SEC
- IDE-0 and IDE-1
- IDE-1 and IDE-2
- HD and CD-ROM (most common devices to be attached)
- PCI-IDE and ISA-IDE
Page 9

How to Connect the IDE Data Cable 7
How to Connect the IDE Data Cable
When you place Software Disc 1 in your CD-ROM and click Install CDW r it er P lus the software analyzes your computer and makes a
recommendation about connecting the CD-Writer Plus hardware.
The Install Recommendation tells you whether there will be one or two
devices connected to the IDE data cable.
CAUTION: Do not attach the CD-Writer Plus drive to a sound board’s IDE
controller.
Most data cable connectors are keyed to fit only one way. If your
connector is not keyed to fit only one way make sure the cable’s colored
edge is aligned with PIN-1 where it connects to the CD-Writer Plus drive
and where it connects to the IDE controller on the motherboard. Among
the labels you may find that identify PIN-1 on the motherboard are PIN1,
1 or a small triangle pointing to the pin.
CAUTION: Make sure that you are attaching the cable correctly! You must
locate PIN-1 on each connector and attach the cable so that the edge with the
color stripe is aligned with PIN-1. If the cable is attached incorrectly, your
computer may not boot up.
Page 10

8 How to Connect the IDE Data Cable
PIN-1
Look for a label identifying PIN-1 next
to the IDE connector. The data cable’s
colored edge is aligned with PIN-1 of
the IDE connector. This illustration
shows a specific computer . Y ours may
look different. PIN-1 could be on
either side of the IDE connector.
colored stripe on
the data cable
Colored stripe on
the data cable
PIN-1
The cable’s colored edge is aligned
with PIN-1 on the CD-Writer Plus
drive.
Page 11

How to Connect the IDE Data Cable 9
One Device
The OPTIONAL data cable that came with the
CD-W riter Plus drive is only used if there is no
cable already attached to the recommended
IDE controller in your computer system or
the cable supplied with your computer is not
long enough.
Use the connectors at the two ends of the
cable.
PIN-1
CD-Writer Plus
drive (on end connector)
Unused connector
Two Devices
Attach the CD-Writer Plus to whichever
connector is not in use (center or end) on the
data cable already installed in your computer
(DO NOT swap conn e ct ors).
The OPTIONAL data cable that came with the
CD-W riter Plus is only used if there is no spare
connector for the CD-Writer Plus on your
cable or your cable is not long enough.
PIN-1
DriveDrive
CD-Writer Plus
drive (either location
not in use)
PIN-1
Drive
Colored stripe
aligned with
each PIN-1
IDE controller
located inside
your computer
PIN-1
Motherboard
Follow the
data cable
already
attached to the
other IDE device
in your
computer to
locate the IDE
controller.
Colored stripe
aligns with
each PIN-1
IDE controller
located inside
your computer
PIN-1
Motherboard
Page 12

10 How to Connect an Audio Ca b le
How to Connect an Audio Cable
You do not need an audio cable to record music.
The audio cable is used only for listening to music
CDs through your computer’s sound system.
When the CD-Writer Plus drive records music or
data, it uses the data cable, not the audio cable.
Using an existing audio cable
If your sound board already has a spare audio cable with an MPC-2
connector (shown above), plug the MPC-2 connector into the Audio
opening on the back of the CD-Writer Plus drive.
Adding an audio cable
When using a different audio cable, make sure the cable has the proper
connectors that fit both your sound card and the CD-Writer’s Audio
connector. The CD-Writer Plus requ ir es an MPC-2 con necto r. Attach the
connector to the drive as shown.
MPC-2 connector
Audio cable
Page 13

How to Connect an Audio Ca b le 11
Next, connect the other end of the audio cable to the sound board inside
your computer.
Tips for connect ing the audio cable to the sound b oa r d
■ Identify the sound board.
T o identify the sound board look for microphone connectors on the back
of your computer. The circuit board inside the computer attached to the
microphone connectors is the sound board.
■ Identify the audio connectors on the sound board.
The audio connectors have four prongs and are often on the outer edge
of the sound board. On many sound boards the connecto rs for the audi o
cable are labeled CD IN.
The audio cable may connect horizontally or vertically to the sound
board. The connectors only fit one way. If a connector doesn’t fit, try
turning it around.
■ Some sound boards have more than one audio cable connector. If when
you turn your computer back on you get no sound, try using a different
connector on your sound board.
Page 14

12 How to Connect an Audio Ca b le
Page 15

About Making CDs
When Should I Use CD-R (Recordable or
Write-Once) Discs?
Files copied to a CD-R disc are permanently recorded on the disc. The
space the files occupy on the disc cannot be used for an yt hing else.
Use CD-R discs to:
■ Share your CDs with users that have standard CD-ROM drives
■ Make audio CDs
■ Permanently save files
When Should I Use CD-RW (ReWritable)
Discs?
With CD-RW discs you can write, erase, and rewrite files easily from your
software app lications or from the Windows Explorer. Since not all CDROM drives can read CD-RW discs, these discs are better suited for use on
your own computer.
Use CD-RW discs to :
■ Save work in progre ss such as presentations and do cuments
■ Make weekly archives of files on yo ur hard drive
■ Tran sp o rt files between the office and home if you have a CD-Writer
Plus at each location, or have an external CD-Writer Plus to use on
your computers
13
Page 16

14 How do I Make CDs That Can be Rea d on Ot h er Com puters?
How do I Make CDs That Can be Read on
Other Computers?
Use the Easy CD Creator (Data) software and CD-R discs when you want
to create CDs you can share with other users, for example if you want to
send the CD to your co-workers.
Virtually all CD-ROM drives and operating systems (Windows 95,
Windows 98, Windows NT, Windows 3.x, and DOS) can read CD-R discs
made with Easy CD Creator (Data).
See your electronic User’s Guide for instructions about starting and using
Easy CD Creator.
When is the DirectCD Software Useful?
With DirectCD you can simply drag and drop files onto the CD-Writer
Plus icon to make CDs. Use DirectCD when you want to create data CDs
(not audio) to use on your own computer.
When you save to a dis c wi thin a software application or Windows
Explorer, Direct CD copies the file directly to the disc.
DirectCD allows you to organize CD-R discs when you eject them so they
can be read by most CD-ROM drives under Windows 95, Windows 98,
and Windows NT 4.0 Service Pack 3 or later.
See your electronic User’s Guide for instructions about starting and using
Easy CD Creator.
How do I Make Audio CDs?
Use Easy CD Creator (Audio) and CD-R discs to create audio CDs.
See your electronic User’s Guide for instructions about starting and using
Easy CD Creator.
Page 17

Can I Avoid Swapping Audio CDs In and Out of the Drive? 15
Can I Avoid Swapping Audio CDs In and
Out of the Drive?
Making an audio CD may involve swapping CDs in and out of drives
many times. For example, if you make the CD using your CD-Writer Plus
as both the source and destination drive, you will need to swap CDs
every time a new track is copied to the CD-Writer Plus drive.
To minimize the number of times you swap CDs:
1. Copy the tracks to your hard drive using E asy CD Creator. This is
called pre-recording audio tracks to wave files.
Approximately 10 MB of space on the hard drive are required for each
minute of music.
2. Once all the tracks are on your hard drive, copy them to the CD using
Easy CD Creator.
The User’s Guide provides a step by step description of how to use Easy
CD Creator to copy the audio tracks to the hard drive and then on to a
CD. Select the electronic User’s Guide from the HP CD-Writer Plus
program group.
Can I Use the New 80 Minute Audio CDs?
HP does not currently support the new 80 minute audio CDs even
though the HP CD-Writer Plus and the included software are capable of
using them. The manufacturing process for creating 80 minute CD-R
discs is extremely difficult and the resulting discs do not consistently
meet HP’s standards for reliability at the time of this printing.
Page 18

16 Can I Use the New 80 Minute Audio CDs?
Page 19

Solving Installation
Problems
If you need further assistance after reviewing this chapter, contact HP
Customer Care directly by calling the appropriate telephone number
from the list beginning on page 28.
Things to Try First
Try the following suggestions if your CD-Writer Plus drive does not
appear under Windows Explorer once you have completed the
installation. If the problem persists, see the Instal lat ion Troubleshooting
section below.
■ Make sure the com pute r is plug ge d in an d t hat each dev ice ha s po wer.
■ Turn off the computer’s power, wait 20 seconds, then turn it on again.
■ Run the HP CD-Writer T oolbox (only available in English) to get
troubleshooting help. Click the Start button on your taskbar, select
Programs, HP CD-Writer Plus, and click Troubleshooting.
Installation Troubleshooting
For any suggestions below that requires you to remove the computer’s
cover, first shut down and unplug your computer .
Touch something metallic (the edge of a metal desk, a file cabinet, or an
unpainted part of your computer’s case) to discharge static electricity before
touching anything inside your computer. Static electricity can damage your
computer’s internal parts.
17
Page 20

18 Installation Troublesho oting
Ejecting a Stuck CD.
You can eject a stuck CD even when your drive’s power is off. Use this
procedure only if the normal eject functions do not work!
■ Straighten a standard paper clip.
■ Insert one end of the straightened paper clip into the emergency eject
pinhole on the front panel of the drive.
■ Apply steady, gentle pressure until the dri v e door begins to open.
■ Gently pull the drive door open and remove the CD.
■ If you cannot open the tray, shut down your computer, restart it, and
repeat the steps above.
Make sure the CD-Writer Plus drive is receiving power.
■ Press the eject button to open and close the CD-Writer Plus' tray. If
the tray opens and closes, the drive is receiving power.
■ If the drive is not receiving power, check that a power cable is plugged
into the rear of the drive.
■ Swap the power cable to the drive with a power cable going to
another device you know is working.
Make sure the IDE data cable is connected at both ends.
■ Unplug the IDE data cable at both ends and then reconnect it.
■ Double-check each connector along the data cable and straighten any
bent pins. The connectors are inserted properly when all pins are
covered and the col ored stri pe on the side of the data cable lines up
with PIN-1 of each connector.
■ If you have another IDE data cable that you know is working, swap
cables to make sure you do not have a bad cable.
Make sure the jumper on the back of the CD-Writer Plus is set
correctly
■ Check the Install Recommendation to see if the CD-Writer Plus
should be connected as Master or Slave.
If you do not have an Install Recommendation, place Software Disc 1
in the CD-ROM drive, click the Start button on the Windows
taskbar, select Run, type
D:\ASSIST\ASSIST (where D: is your
CD-ROM’s drive letter) and click OK.
Page 21

Installation Troublesho oting 19
■ Find the pairs of pins labeled Ma st e r, Slave, and Cable Se lect on the
back of the CD-Writer Plus. Make sure the small plastic cap or jumper
is on the setting specified in the Install Recommendation. The jumper
can be pulled off using your fingers, tweezers, or needle-nose pliers,
and placed on a different pair of pins to change the setting.
■ If the device sharing the data cable with the CD-Writer Plus is set to
Cable Select, its position on the data cable (middle or end) is very
important. If you changed this device’s position on the cable (from
the middle connector to the end connector or vice versa) change it
back to its original position.
If you must change t he original position of the d evice sharing the
data cable with the CD-Writer Plus, make sure that you have one
device set as master and one de v i ce se t as slave.
Make sure your computer meets the minimum system
requirements.
■ Does your computer meet the minimum system requirements? (See
Minimum System Requirements in the electronic User’s Guide or on
the box.)
Check the Readme file, the electronic User’s Guide, online
information resources, and diagnostic software.
■ Check the Readme file that came with the CD-Writer Plus drive. To
view the Readme file, click the Start button on your taskbar, select
Programs, HP CD-Writer Plus, Information, and selec t
Readme.
■ The electronic User’s Guide contains additional troubleshooting
information. To view the User’ s Guide, click the Start button on yo ur
taskbar, select Programs, HP CD-Wri ter Pl us, Information, and
select User’s Guide.
■ Visit the HP CD-Writer web site at http://www.hpcdwriter.com and
click on Te chnical Support to get immediate access to a wealth of
up-to-date information 24 hours a day, seven days a week.
■ Advanced users may want to use the diagnostic tool provided for the
drive. Click on the Start menu on the taskbar, then select
Programs, HP CD-Writer Plus, Utilities, and Diagnose.
Page 22

20 Installation Troublesho oting
Page 23

Customer Support
HP Customer Care Online
www.hpcdwriter.com
Visit the HP CD-Writer web site at http://www.hpcdwriter.com and click
on Technical Support to get immediate access to a wealth of up-to-
date information 24 hours a day, seven days a week. You will find
troubleshooting documents, maintenance and efficiency tips, ideas for
using your products and much more.
Your Local Reseller
If you need help with your drive, your local reseller has the latest
information regarding HP products and services and can provide support
under HP’ s comprehensive menu of reseller services. If yo ur reseller is not
able to help, you can obtain support from HP directly. The list of
telephone numbers begins on page 2 6 .
21
Page 24

22 HP Customer Care by Phone
HP Customer Care by Phone
HP Customer Care will provide you with personal service to help you get
the results you expect from your Hewlett-Packard CD-Writer solution.
To contact your personal HP Customer Care consultant by telephone, call
the number for your region listed under the section Telephone Numbers
beginning on page 26.
Be advised that a charge of $2.50 US dollars per minute (maximum of
$35) will be charged for telephone assistance. Charges begin when you
are connected with a consultant.
HP will waive technical-support fees for customers whose drives require
repairs and are still within their stated warranty period. (See your
electronic User’s Guide for warranty information.)
NOTE: Prices and information are subject to change without notice.
Before You Contact HP
■ Check the troubleshooting tips pro vi ded in th is Installation Supplement
and the electronic User’s Guide.
■ If you received an error message, write it down before you call.
■ Make sure you are at your computer and have your drive installed when
you call.
■ Gather the information in the table below.
The diagnostic utility provides most of the information. Click Start on
the taskbar , th en point to Programs, HP CD-Writer Plus, Utilities,
and click Diagnose. Select the drive and then click on the Drive Da ta
tab. For help finding information not provided by the diagnostic utility
see the next page.
Information (Help on page 23) For your computer
Drive series number
Drive firmware version
Page 25

Before You Contact HP 23
Information (Help on page 23) For your computer
Drive serial number
Computer brand and model
Operating syste m a nd version? Window s 9 5 , Windows 98, or
Windows NT 4.0
Vers ion Number:
(for NT) Service Pack Number:
Amount of memory installed
Other CD-ROM or DVD-ROM
drives? yes/no
(If yes, list them)
Sound card? yes/no Type:
IDE controller settings Primary / Secondary / Other
IRQ _______
I/O base address _______
Master in use?_______
Slave in use?_______
Other IDE devices connected? yes/
no
(If yes, list them)
IDE adapter board brand/model, if
any
Passed Drive Self-Diagnostics test?
yes/no
Where to Find This Information
Drive series number
The drive’s series number appears on the front of the new drive. Example:
7500 Series
Drive firmware version
Drive information, including firmware version, can be found by clicking
on the Start menu on the taskbar, then selecting Programs, HP CDW r it er P lus, Utilities, and Diagnose. Select the drive and then click
Page 26

24 Before You Contact HP
on the Drive Data tab. The firmware version is listed in the FW Rev
dialog box. Example: Firmware: 1.0
Drive serial number
The HP drive serial number appears on the underside of the tray as well
as on the main label on the back of the drive.
You can also obtain the drive serial number by clicking on the Start
menu on the taskbar, then selecting Programs, HP CD-Writer Plus,
Utilities, and Diagnose. Select the drive to check and then click on the
Drive Data tab. The drive serial nu mber is amon g the informa tion
displayed.
Computer brand and model
The computer brand appears on the front of your computer and in the
documentation that came with your comput er. Example: HP Pavilion 8490
Operating system and amount of memory (RAM) instal led
In Windows 95 and Windows 98, from the Start menu on the taskbar,
select Settings and then Control Panel. Double-click on System.
Select the General tab. The version number appears below Microsoft
Windows 98, and the amount of memory installed is displayed in the
lower part of the screen. Example: 4.10.1998 and 128.0 MB RAM
In Windows NT (while signed on as Administrator), from the Start menu
on the task bar, select Programs, Administrative Tools (Common),
and W indows N T Diagno stics. Select the Version tab and write down
the version number and service pack number; for example: 4.00.1381 and
Service Pack 3. Then select the Memory tab and write down the amount
of memory listed under Physical Memory - Total; for example: 32 MB RAM
Other CD-ROM or DVD-ROM drives
In Windows 95 and Windows 98, from the Start menu on the taskbar,
select Settings and then Control Panel. Double-click on System.
Select the Device Manager tab. Double-click on CDROM. Write down
the names of the devices that are displayed. Example: Toshiba DVD-ROM
SD-M1202
In Windows NT from the Start menu on the taskba r , select Settings and
then Control Panel. Doub le- click on SCSI Adapters. Look for CDROMs or DVD-ROMs in the computer by double-clicking the entries
displayed. Example: Toshiba CD-ROM XM-6102B
Page 27

Before You Contact HP 25
Sound card
In Windows 95 and Windows 98 from the Start menu on the taskbar ,
select Settings and then Control Panel. Double-click on System.
Select the Device Manager tab. Double-click on Sound, video, and
game controllers. Write down the names of the devices that are
displayed. Example: Sound Blaster
In Windows NT from the Start menu on the taskba r , select Settings and
then Control Panel. Double-click on Multimedia, select the Devices
tab, and double-click Audio Devices. The sound card is listed under Audio
Devices. Example: Sound Blaster
IDE controller settings
1. Insert the CD labeled “Software Disc 1” into your CD-ROM drive.
2. Click the Start button on the task bar,
type D:\ASSIST\ASSIST /S (where D: is your CD-ROM’s drive letter)
and click on OK.
3. Print the results. You wil l hav e a list of techni cal information about
each IDE controller in your system and each device attached.
Other IDE devices
select Run,
Any devices attached to IDE controllers in your computer system, such as
a CD-ROM drive, hard drive, tape drive, and so on. Example: HP Colorado
5GB
IDE adapter board brand/model
If you are using a paddle board to add another IDE controller to your
computer system, check the manual that came with your IDE board.
Example: GSI 2C
Drive Self-Diagnostics test
Click Start on the taskbar, then select Programs, HP CD-Writer
Plus, Utilities, and Diagnose. Select the drive and then click on the
Tests tab. Select Drive Self-Diagnostics and click Perform Test.
The most recent diagnostic utility results are saved in C:/Program Files/
Diagnose/Logs as DRIVELOG.TXT and TESTLOG.TXT.
Page 28

26 Telephone Numbers
Telephone Numbers
For telephone num b er up da tes:
http://www.hp.com/support/phone_support
USA
Literature and dealer referral. . . . . . . . . . . 970-635-1500
HP Customer Care . . . . . . . . . . . . . . . . . . 970-635-1500
(Fee-based technical support. $2.50 US dollars per minute/$35 maximum)
Canada/Europ e/ Middle East/Africa/Latin Am erica/Asia/
Pacific
In some countries, in addition to the normal local charges, there will be a fee for
HP technical support. Prices and times may vary by country and are subject to
change without notice.
Canada (M-F, 8:00-20:00 Eastern Time)
HP Customer Care in English and French 905-206-4663
Europe/Middle East/Africa (M-F, 8:30-18:00 Central European Time)
Austria . . . . . . . . . . . . . . . . . . . . . . . . . . .0711 420 10 80
Belgium
- Dutch . . . . . . . . . . . . . . . . . . . . . . . . . . . . 02 626 88 06
- French . . . . . . . . . . . . . . . . . . . . . . . . . . . . 02 626 88 07
Czech Republic . . . . . . . . . . . . . . . . . . . . .02 613 07 310
Denmark . . . . . . . . . . . . . . . . . . . . . . . . . . . .39 29 40 99
Finland . . . . . . . . . . . . . . . . . . . . . . . . . . . . 02 03 47 288
France . . . . . . . . . . . . . . . . . . . . . . . . . . . . 01 43 62 3434
Germany . . . . . . . . . . . . . . . . . . . . . . . . . 0180 52 58 143
Greece (M-F, CET + 1hr) . . . . . . . . . . . . . . . 01 689 6411
Hungary. . . . . . . . . . . . . . . . . . . . . . . . . . . . 01 343 0310
Ireland. . . . . . . . . . . . . . . . . . . . . . . . . . . . .01 662 55 25
Israel (M-F, CET + 1hr) . . . . . . . . . . . . . . . . 09 952 4848
Italy . . . . . . . . . . . . . . . . . . . . . . . . . . . . . .02 2 641 0350
Netherlands. . . . . . . . . . . . . . . . . . . . . . . .020 606 87 51
Norway . . . . . . . . . . . . . . . . . . . . . . . . . . . . .22 11 62 99
Poland (M-F , CET + 1hr) . . . . . . . . . . . . . . 022 865 9999
Portugal. . . . . . . . . . . . . . . . . . . . . . . . . . . .01 318 00 65
Russia (M-F, CET + 2 hrs) . . . . . . . . . . . . . 095 797 3520
South Africa (M-F , CET + 1hr). . . . . . . . . . . 011 8061030
Spain . . . . . . . . . . . . . . . . . . . . . . . . . . . . . .90 23 21 123
Page 29

Returning a Drive 27
Sweden . . . . . . . . . . . . . . . . . . . . . . . . . . . .08 61 92 170
Switzerland (French/Italian/German). . . 08 48 80 11 11
Turkey (M-F, CET + 1hr) . . . . . . . . . . . . . 0212 224 5925
United Kingdom . . . . . . . . . . . . . . . . . . . 0171 512 52 02
English language support for
other countries . . . . . . . . . . . . +44 171 512 52 02
Latin America
Argentina (M-F, 8:30-19:30) . . . . . (54) (11) 47 78 83 80
Brazil (M-F, 8:00-19:00). . . . . . . . . . . (55) (11) 829 6612
Chile (M-F, 8:30-18:30) . . . . . . . . . . (56) (2) 800 360999
Mexico (M-F, 8:30-18:30) . . . . . . . (52) (5) 800 22 14700
. . . . . . . . . . . . . . . . . . . . . . . . . . . . (52) (5) 800 90 52900
Venezuela (M-F, 9:00-18:00) . . . . . . . . (58) (2) 207 8488
Asia/Pacific
Australia (M-F 9:00- 17:00 for
All Capital Cities) . . . . . . . . . . . . . (03) 8877 8000
China (M-F, 8:30-17:30) . . . . . Hotline (010) 6564 5959
Hong Kong (M-F, 9:00-17:00) . . . . . . . . . . . . 800 967729
India (M-F, 9:30-17:30) . . . . . . . . . . . . . (91) 11 6826035
Indonesia (M-F, 9:00-17:00) . . . . . . . . . . . . . . .350 3408
Korea (M-F, 9:00-18:00, Sat. 9:00-13:00). (02) 3270 0700
. . . . . . . . . . . . . . . . . . . . . . . . . . 080 999 0700 (toll free)
Malaysia (M-F, 9:00-17:00) . . . . . . . . . . . . . . . .295 2566
New Zealand (M-F, 9:00-17:00,
Auckland Time). . . . . . . . . . . . . . . . 0800 733 547
Philippines (M-F, 9:00-17:00) . . . . . . . . . . . . . . 867 3551
Singapore (M-F, 9:00-17:00) . . . . . . . . . . . (65) 272 5300
T aiwan (M-F, 8:30-20:00). . . . . . . . . . . . . (02) 2717 0055
Thailand (M-F , 9:00-17:00) . . . . . . . . . . . . . . . .661 3900
Vietnam (M-F, 9:00-17:00) . . . . . . . . . . . . . . . .823 4530
Returning a Drive
If your Hewlett-Packard product requires repair or replacement, call the
appropriate number for your country from the list beginning on page 26
to receive instructions.
Page 30

28 Returning a Drive
Copyright © Hewlett-Packard Co. 1999
This information is subject to change without
notice and is provided “as is” with no warranty.
Helwett-Packard shall not be liable for any direct,
indirect, special, incidental, or consequential damages
in connection with the use of this material.
Page 31

2000, Hewlett-Packard, Palo Alto 94304
English
IDE HP CD-Writer
 Loading...