

Page 1
USER INSTRUCTIONS
FP centrifugal pump
Multi-stage, single suction and radial joint plan pump type
centrifugal pump
PCN=71576286 – 07/06 (E)
Installation
Operation
Maintenance
Page 2

CONTENTS
FP USER INSTRUCTIONS ENGLISH 71576286 - 07/06
PAGE
PAGE
1 INTRODUCTION AND SAFETY ...........................4
1.1 General...........................................................4
1.2 CE marking and approvals.............................4
1.3 Disclaimer.......................................................4
1.4 Copyright........................................................4
1.5 Duty conditions...............................................4
1.6 Safety.............................................................5
1.7 Safety labels summary...................................8
1.8 Specificmachine performance .......................8
1.9 Noise level......................................................9
2 TRANSPORT AND STORAGE...........................10
2.1 Consignment receipt and unpacking............10
2.2 Handling.......................................................10
2.3 Lifting............................................................11
2.4 Storage.........................................................11
2.5 Recycling and end of product life.................11
3 PUMP DESCRIPTION.........................................11
3.1 Configurations..............................................11
3.2 Nomenclature...............................................12
4 INSTALLATION....................................................13
4.1 Location........................................................13
4.2 Foundation ...................................................13
4.3 Grouting........................................................14
4.4 Initialalignment ............................................14
4.5 Piping ...........................................................15
4.6 Electrical connections...................................16
4.7 Final shaft alignment check..........................17
4.8 Protection systems.......................................17
6 MAINTENANCE...................................................21
6.1 General.........................................................21
6.2 Maintenance schedule .................................22
6.3 Spare parts ...................................................24
6.4 Recommended spares and consumable..........
items ...................................................................25
6.5 Disassembly.................................................25
7 FAULTS; CAUSESAND REMEDIES ..................26
8 PARTS LIST AND DRAWINGS ...........................27
8.1 Sectional drawings .......................................27
8.2 Sectional drawings part list...........................32
8.3 General arrangement drawing......................34
9 CERTIFICATION .................................................34
10 OTHER RELEVANT DOCUMENTATION AND
MANUALS...............................................................34
10.1 Supplementary User Instructions ...............34
10.2 Change notes.............................................34
10.3 Additional sources of information ...............34
5 COMMISSIONING, START-UP, OPERATION AND
SHUTDOWN...........................................................17
5.1 Direction of rotation......................................17
5.2 Guarding.......................................................17
5.3 Priming and auxiliary supplies......................18
5.4 Starting the pump.........................................18
5.5 Running the pump........................................19
5.6 Stopping andshutdown................................20
5.7 Hydraulic, mechanical and electrical duty....21
5.8 Pumps for Food Use or Potable Water........21
Page 2 of 35
Page 3

INDEX
FP USER INSTRUCTIONS ENGLISH 71576286 - 07/06
PAGE
PAGE
Additional sources (10.3).......................................34
Alignment of shafting (see 4.2, 4.4 and 4.7)
ATEX marking (1.6.4.2)...........................................7
CE marking and approvals (1.2)..............................4
Certification (9) ......................................................34
Change notes (10.2)..............................................34
Cleaning prior to operation (5.8.1) ........................21
Commissioning, start-up, operation (5) .................17
Compliance, ATEX (1.6.4.1)....................................6
Configurations (3.1)...............................................11
Copyright (1.4).........................................................4
Direction of rotation (5.1).......................................17
Disassembly (6.5)..................................................25
Discharge piping (4.5.3) .......................................16
Disclaimer (1.3)........................................................4
Dismantling (see 6.5, Disassembly)......................25
Drawings (8.1).......................................................27
Duty conditions (1.5)................................................4
Electrical connections (4.6) ...................................16
End of product life (2.5).........................................11
Faults; causes and remedies (7)...........................26
Final checks (4.5.4) ..............................................16
First pump start up (5.4.2) ....................................18
Foundation (4.2)....................................................13
Forces and moments (see 4.5.1)...........................15
General arrangement drawing (8.3) ......................34
Gland packing (6.2.5)............................................23
Grouting (4.3).........................................................14
Guarding (5.2)........................................................17
Handling (2.2)........................................................10
Hydraulic, mechanical and electrical duty (5.7) .....21
Inspection (6.2.2 and 6.2.3)...................................23
Installation (4)........................................................13
Internal coating (6.2.6)...........................................24
Lifting (2.3).............................................................11
Location (4.1).........................................................13
Maintenance (6).....................................................21
Maintenance schedule (6.2) ..................................22
Mechanical seal (6.2.4) .........................................23
Nomenclature (3.2)................................................12
Nameplate (1.7.1)....................................................8
Operating limits (see 3.1) ......................................12
Ordering spare parts (6.3.1)..................................24
Parts lists (8.2).......................................................32
Piping (4.5) ............................................................15
Protection systems (4.8)........................................17
Pump masses (2.2.2) ............................................10
Receipt and unpacking (2.1)..................................10
Recommended fill quantities (see 6.2.1)...............23
Recommended grease lubricants (see 6.2.1) ....... 23
Recommended spares (6.4)..................................25
Recycling (2.5).......................................................11
Replacement parts (see 6.3 and 6.4) ....................24
Running the pump (5.5).........................................19
Safety action (1.6.3).................................................5
Safety markings (1.6.1)............................................5
Safety, protection systems (see 1.6 and 4.8)
Sectional drawings (8.1) ........................................27
Sound level (see 1.9, Noise level) ...........................9
Sources, additional information (10.3)...................34
Spare parts (6.3)....................................................24
Specific machine performance (1.8)........................8
Standard maintenance (6.2.1) ..............................22
Starting the pump (5.4)..........................................18
Stop/start frequency (5.5.6) ...................................20
Stopping and shutdown (5.6).................................20
Storage, pump (2.4)...............................................11
Storage, spare parts (6.3.2)...................................25
Suction piping (4.5.2) ............................................16
Supplementary manuals or information sources...34
Thermal expansion (4.4.1) ....................................14
Transport and storage (2) .....................................10
Trouble-shooting (see 7)........................................26
Vibration (5.5.5).....................................................20
Warning labels (1.7.2)..............................................8
Page 3 of 35
Page 4
FP USER INSTRUCTIONS ENGLISH 71576286 - 07/06
1 INTRODUCTION AND SAFETY
1.1 General
These instructions must always be kept
close to the product's operating location or
directly with the product.
Flowserve products are designed, developed and
manufactured with state-of-the-art technologies in
modern facilities. The unit is produced with great
care and commitment to continuous quality control,
utilizing sophisticated quality techniques, and safety
requirements.
Flowserve is committed to continuous quality
improvement and being at service for any further
information about the product in its installation and
operation or about its support products, repair and
diagnostic services.
These instructions are intended to facilitate
familiarization with the product and its permitted use.
Operating the product in compliance with these
instructions is important to help ensure reliability in
service and avoid risks. The instructions may not
take into account local regulations; ensure such
regulations are observed by all, including those
installing the product. Always coordinate repair
activity with operations personnel, and follow all
plant safety requirements and applicable safety and
health laws and regulations.
These instructions must be read prior to
installing, operating, using and maintaining the
equipment in any region worldwide. The
equipment must not be put into service until all
the conditions relating to safety noted in the
instructions, have been met.
1.2 CE marking and approvals
It is a legal requirement that machinery and
equipment put into service withincertain regions of
the world shall conform with the applicable CE
Marking Directives covering Machinery and, where
applicable, Low Voltage Equipment, Electromagnetic
Compatibility (EMC), Pressure Equipment Directive
(PED) and Equipment for Potentially Explosive
Atmospheres (ATEX).
To confirmtheApprovalsapplying and iftheproduct is
CE marked,check theserialnumberplate markings
andtheCertification.(Seesection9,Certification.)
1.3 Disclaimer
Informationinthese UserInstructions is believed
to be reliable. In spite of all the effortsof Flowserve
PumpDivision to providesound andall necessary
informationthe content of thismanualmayappear
insufficient and is not guaranteedby Flowserve as
to itscompleteness or accuracy.
Flowserve manufacturesproducts to exacting
International QualityManagement System Standards
ascertified and auditedbyexternal QualityAssurance
organizations.Genuineparts andaccessorieshave
beendesigned,tested andincorporated intothe
products to help ensure their continuedproduct quality
andperformanceinuse. As Flowserve cannot test
parts and accessoriessourcedfrom other vendors the
incorrect incorporationof such parts and accessories
mayadversely affectthe performance andsafety
featuresof the products.The failuretoproperlyselect,
installoruseauthorized Flowserveparts and
accessoriesisconsideredtobemisuse.Damageor
failurecausedbymisuseisnotcovered by the
Flowserve warranty. In addition, anymodification of
Flowserve productsorremovaloforiginal components
mayimpairthesafetyof theseproducts in their use.
1.4 Copyright
All rights reserved. No part of these instructions may
be reproduced, stored in a retrieval system or
transmitted in any form or by any means without
prior permission of Flowserve Pump Division.
1.5 Duty conditions
This product has been selected to meet the
specifications of your purchaser order. The
acknowledgement of these conditions has been sent
separately to the Purchaser.Acopy should be kept
with these instructions.
The product must not be operated beyond
the parameters specified for the application. If
there is any doubt as to the suitability of the
product for the application intended, contact
Flowserve for advice, quoting the serial number.
Whereapplicable the Directives andanyadditional
Approvals coverimportantsafetyaspects relating to
machinery and equipment and thesatisfactory
provision of technicaldocumentsandsafety
instructions.Whereapplicablethisdocument
incorporatesinformation relevanttothese Directives
andApprovals.
If the conditions of service on your purchase order
are going to be changed (for example liquid
pumped, temperature or duty) it is requested that the
user seeks the written agreement of Flowserve
before start up.
Page 4 of 35
Page 5
FP USER INSTRUCTIONS ENGLISH 71576286 - 07/06
1.6 Safety
1.6.1 Summary of safety markings
These UserInstructions containspecific safety
markingswherenon-observanceof an instruction
would causehazards.Thespecific safetymarkings
are:
This symbol indicates electrical safety
instructions where non-compliance will involve a
high risk to personal safety or the loss of life.
This symbol indicates safety instructions where
non-compliance would affect personal safety and
could result in loss of life.
This symbol indicates “hazardous substances
and toxic fluid” safety instructions where noncompliance would affect personalsafetyand could
result in loss of life.
This symbol indicates safety
instructions where non-compliance will involve some
risk to safe operation and personal safety and would
damage the equipment or property.
This symbol indicates explosive atmosphere
zone marking according to ATEX. It is used in safety
instructions where non-compliance in the hazardous
area would cause the risk of an explosion.
This symbol is used in safety instructions to
remind not to rub non-metallic surfaces with a dry
cloth; ensure cloth is damp. It is used where non-
compliance in the hazardous area would cause the
risk of an explosion.
Thissign is notasafetysymbol butindicates
an important instruction intheassemblyprocess.
1.6.2 Personnel qualification and training
All personnel involved in the operation, installation,
inspection and maintenance of the unit must be
qualified to carry out the work involved. If the
personnel in question do not already possess the
necessary knowledge and skill, appropriatetraining
and instruction must be provided. If required the
operator may commission the manufacturer/supplier
to provide applicable training.
Always coordinate repair activity with operations and
health and safety personnel, and follow all plant
safety requirements and applicable safety and health
laws and regulations.
1.6.3 Safety action
This is a summary of conditions and actions to
prevent injury to personnel and damage to the
environment and to equipment. For products
used in potentially explosive atmospheres
section 1.6.4 also applies.
NEVER DO MAINTENANCE WORK
WHEN THE UNIT IS CONNECTED TO POWER
GUARDS MUST NOT BE REMOVED WHILE
THE PUMP IS OPERATIONAL
DRAIN THE PUMP AND ISOLATE
PIPEWORK BEFORE DISMANTLING THE PUMP
The appropriate safety precautions should be taken
where the pumped liquids are hazardous.
FLUORO-ELASTOMERS (When fitted.)
When a pump has experienced temperatures over
250 ºC (482 ºF), partial decomposition of fluoroelastomers (example: Viton) will occur. In this
condition these are extremely dangerous and skin
contact must be avoided.
HANDLING COMPONENTS
Many precision parts have sharp corners and the
wearing of appropriate safety gloves and equipment
is required when handling these components. To lift
heavy pieces above 25 kg (55 lb) use a crane
appropriate for the mass and in accordance with
current local regulations.
THERMAL SHOCK
Rapid changes in the temperature of the liquid within
the pump can cause thermal shock, which can result
in damage or breakage of components and should
be avoided.
NEVER APPLYHEAT TO REMOVE
IMPELLER
Trapped lubricantor vapour could cause an
explosion.
HOT (and cold) PARTS
If hot or freezing components or auxiliary heating
supplies can present a danger to operators and
persons entering the immediate area action must be
taken to avoid accidental contact. If complete
protection is not possible, the machine access must
be limited to maintenance staff only, with clear visual
warnings and indicators to those entering the
immediate area. Note: bearing housings must not be
insulated and drive motors and bearings may be hot.
If the temperature is greater than 68 °C (175 °F)
or below 5 °C (20 °F) in a restricted zone, or
exceeds local regulations, action as above shall
be taken.
Page 5 of 35
Page 6
FP USER INSTRUCTIONS ENGLISH 71576286 - 07/06
HAZARDOUS LIQUIDS
Whenthe pumpishandling hazardousliquids care
mustbetakentoavoidexposure to the liquid by
appropriatesittingof the pump,limiting personnel
access andbyoperator training.If the liquid is
flammable and/or explosive, strict safetyprocedures
mustbeapplied.
Gland packing must not be used when pumping
hazardous liquids.
PREVENT EXCESSIVE EXTERNAL
PIPE LOAD
Do not use pump as a support for piping. Do not
mount expansion joints, unless allowed by
Flowserve in writing, so that their force, due to
internal pressure, acts on the pump flange.
ENSURE CORRECT LUBRICATION
(See section 5, Commissioning, startup, operation
and shutdown.)
START THE PUMP WITH OUTLET
VALVE PART OPENED
(Unless otherwise instructed at a specific point in the
User Instructions.)
This is recommended to minimize the risk of
overloading and damaging the pump motor at full or
zero flow. Pumps may be started with the valve
further open only on installations where this situation
cannot occur. Pump outlet valve shall may need to
be adjusted to comply with the duty following the
run-up process. (See section 5, Commissioning
start-up, operation and shutdown.)
NEVER RUN THE PUMP DRY
1.6.4 Products used in potentially explosive
atmospheres
Measures are required to:
Avoid excess temperature.
Prevent build up of explosive mixtures.
Prevent the generation of sparks.
Prevent leakages.
Maintain the pump to avoid hazard.
Thefollowing instructions for pumpsand pumpunits
wheninstalledinpotentiallyexplosiveatmospheres
mustbefollowed to helpensureexplosionprotection.
Bothelectricaland non-electricalequipmentmustmeet
therequirements of EuropeanDirective 94/9/EC.
1.6.4.1 Scope of compliance
Useequipment onlyinthe zoneforwhichitis
appropriate.Alwayscheckthat the driver, drive
couplingassembly, seal and pumpequipment are
suitablyratedand/orcertifiedfor the classification of
thespecific atmosphere in whichthey aretobe
installed.
Where Flowservehassuppliedonlythe bare shaft
pump, the Ex rating applies only to the pump. The
partyresponsible for assemblingthepump set shall
selectthe coupling,driverand any additional
equipment, with the necessary CE Declaration of
Conformity establishing it is suitable for the area in
which it is to be installed.
Theoutputfrom a variablefrequency drive(VFD)can
causeadditionalheatingaffects in themotor and so,for
pumps setswith a VFD,theATEX Certificationfor the
motor muststate thatitis covers the situation where
electrical supply isfrom the VFD.This particular
requirementstill applieseven if the VFDis in a safe
area.
INLET VALVES TO BE FULLY OPEN
WHEN PUMP IS RUNNING
Runningthe pump at zero flow or below the
recommended minimum flow continuouslywillcause
damage to the seal.
DO NOT RUN THE PUMP AT
ABNORMALLYHIGH OR LOW FLOW RATES
Operating at a flow rate higher than normal or at a
flow rate with no backpressure on the pump may
overload the motor and cause cavitations. Low flow
rates may cause a reduction in pump/bearing life,
overheating of the pump, instability and
cavitations/vibration.
Page 6 of 35
Page 7
FP USER INSTRUCTIONS ENGLISH 71576286 - 07/06
1.6.4.2 Marking
An example of ATEX equipment marking is shown
below.The actual classification of the pump will be
engraved on the nameplate.
II 2 GD c IIC 135 ºC (T4)
Equipment Group
I = Mining
II = Non-mining
Category
2 or M2 = High level protection
3 = normallevelof protection
Gas and/or Dust
G = Gas; D= Dust
c = Constructionalsafety
(in accordance with prEn13463-5)
Gas Group (EquipmentCategory2 only)
IIA–Propane (typical)
IIB–Ethylene (typical)
IIC – Hydrogen (typical)
Maximum surfacetemperature (Temperature Class)
(see section 1.6.4.3)
1.6.4.3 Avoiding excessive surface temperatures
ENSURE THE EQUIPMENT TEMPERATURE
CLASS IS SUITABLE FOR THE HAZARD ZONE
Pumps have a temperature class as stated in the
ATEX Ex rating on the nameplate. These are based
on a maximum ambient of 40 °C (104 °F); refer to
Flowserve for higher ambient temperatures.
The responsibility for compliance with the
specified maximum liquid temperature is with the
plant operator.
Temperature classification “Tx” is used when the
liquid temperature varies and the pump could be
installed in different hazardous atmospheres. In this
case the user is responsible for ensuring that the
pump surface temperature does not exceed that
permitted in the particular hazardous atmosphere.
If an explosive atmosphere exists during the
installation, do not attempt to check the direction of
rotation by starting the pump unfilled. Even a short
run time may give a high temperature resulting from
contact between rotating and stationary
components. Furthermore, confinement of liquid in
the pump and pipes must be avoided (valve closed).
If the liquid heats up this may cause excessive
pressure and lead to bursting of pump components.
Where there is any risk of the pump being run against
a closed valve generating high liquid and casing
externalsurface temperaturesit is recommended that
users fit an external surface temperature protection
device.
Avoid mechanical, hydraulic or electrical overload by
using motor overload trips, temperature monitor or a
power monitor and make routine vibration monitoring
checks.
In dirty or dusty environments, regular checks must
be made and dirt removed from areas around close
clearances, bearing housings and motors.
1.6.4.4 Preventing the build up of explosive
mixtures
The surface temperature on the pump is influenced
by the temperature of the liquid handled. The
maximum permissible liquid temperature depends
on the temperature class and must not exceed the
values in the table that follows.
The temperature rise at the seals, bearings and due
to the minimum permitted flow rate is taken into
account in the temperatures stated.
Temperature limit of liquid
handled (* depending on
material and construction
variant - check which is
lower)
Consult Flowserve
Consult Flowserve
115 °C (239 °F) *
180 °C (356 °F) *
275 °C (527 °F) *
400 °C (752 °F) *
Temperature
class to
prEN 13463-1
T6
T5
T4
T3
T2
T1
Maximum
surface
temperature
permitted
85 °C (185 °F)
100 °C (212°F)
135 °C (275°F)
200 °C (392°F)
300 °C (572°F)
450 °C (842°F)
Page 7 of 35
ENSURE PUMP IS PROPERLY FILLED AND
VENTED AND DOES NOT RUN DRY.
Ensure pump and relevant suction and discharge
pipeline system is totally filled with liquid at all times
during the pump operation, so that an explosive
atmosphere is prevented. In addition it is essential to
make sure that seal chambers, auxiliary shaft seal
systems and any heating and cooling systems are
properly filled.
If the operation of the system cannot avoid this
condition the fitting of an appropriate dry run
protection device is recommended (eg liquid
detection or power monitor).
To avoid potential hazards from fugitive emissions of
vapour or gas to atmosphere the surrounding area
must be well ventilated.
Page 8
FP USER INSTRUCTIONS ENGLISH 71576286 - 07/06
1.6.4.5 Preventing sparks
To prevent a potential hazard from mechanical
contact, the coupling guard must be non-sparking.
To avoid the potential hazard from random induced
current generating a spark the ground contact on the
baseplate must be used.
Avoid electrostatic charge: do not rub non-
metallic surfaces with a dry cloth, ensure cloth is
damp.
The coupling must be selected to comply with
94/9/EC and correct alignment must be maintained.
Additional requirements for metallic pumps on
non-metallic baseplates
When metallic components are fitted on a nonmetallic baseplate they must be individually earthed.
1.6.4.6 Preventing leakage
The pump must only be used to handle liquids
for which it has been approved to have the correct
corrosion resistance.
It is recommended that a maintenance plan and
schedule is adopted. (See section 6, Maintenance.)
1.7 Safety labels summary
1.7.1 Nameplate
For details of nameplate, see the Declaration of
Conformity, or separate documentation included with
these User Instructions.
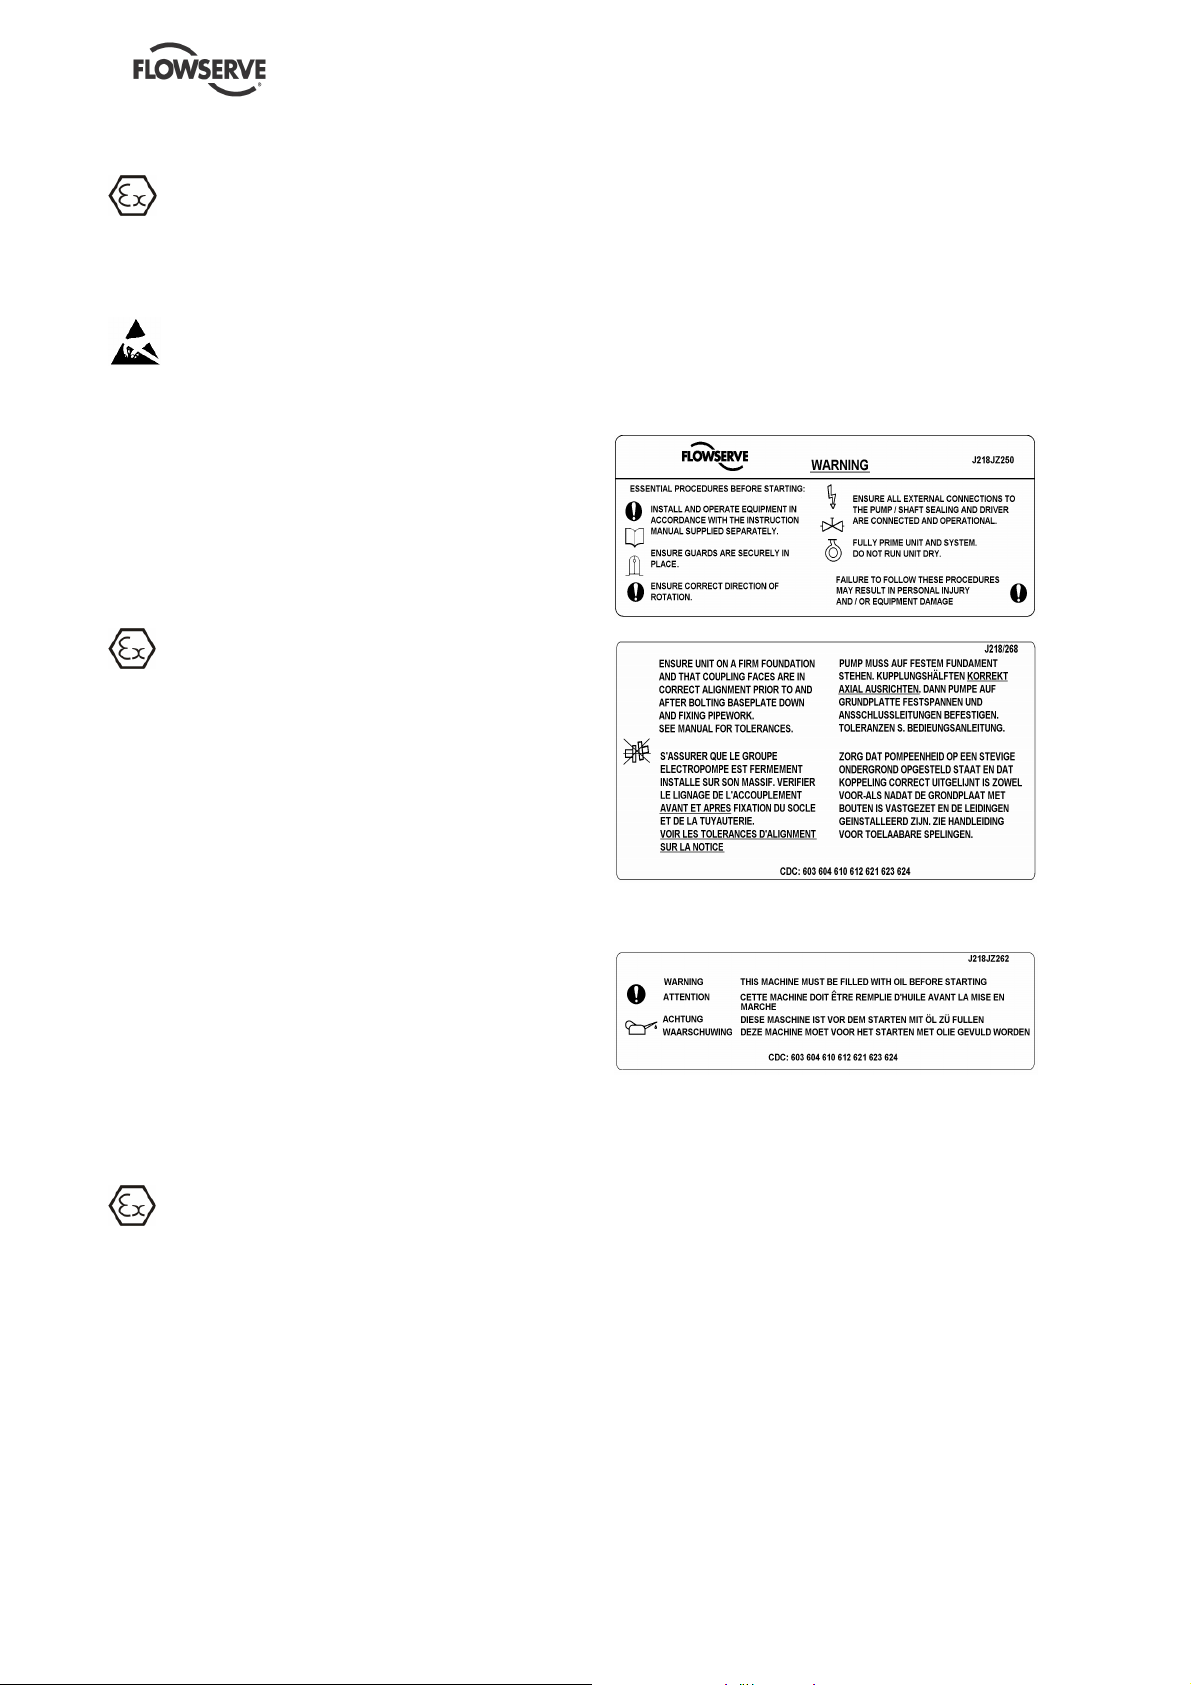
1.7.2 Warning labels
Avoid entrapment of liquid in the pumpand associated
piping duetoclosingof suction anddischarge valves,
which couldcause dangerous excessive pressures to
occur if there is heat input to theliquid.This canoccur
ifthepump is stationary or running.
Bursting of liquid containing parts due to freezing
must be avoided by draining or protecting the pump
and ancillary systems.
Where there is the potential hazard of a loss of a
seal barrier fluid or external flush, the fluid must be
monitored.
If leakage of liquid to atmosphere can result in a
hazard, the installation of a liquid detection device is
recommended.
1.6.4.7 Maintenance to avoid the hazard
CORRECT MAINTENANCE IS REQUIRED
TO AVOID POTENTIAL HAZARDS WHICH GIVE A
RISK OF EXPLOSION
Theresponsibilityforcompliancewith
maintenance instructions is withtheplant
operator.
Oil lubricated units only:
1.8 Specific machine performance
For performance parameters see section 1.5, Duty
conditions. When the contract requirement specifies
these to be incorporated into User Instructions these
are included here. Where performance data has
been supplied separately to the purchaser these
should be obtained and retained with these User
Instructions if required.
To avoid potential explosion hazards during
maintenance, the tools, cleaning and painting
materials used must not give rise to sparking or
adversely affect the ambient conditions. Where there
is a risk from such tools or materials; maintenance
must be conducted in a safe area.
Page 8 of 35
Page 9

FP USER INSTRUCTIONS ENGLISH 71576286 - 07/06
1.9 Noise level
When pump noise level exceeds 85dBAattention
must be given to prevailing Health and Safety
Legislation, to limit the exposure of plant operating
personnel to the noise.The usual approach is to
control exposure time to the noise or to enclose the
machine to reduce emitted sound. You may have
already specified a limiting noise level when the
equipment was ordered, however if no noise
requirements were defined then machines above a
certain power level will exceed 85 dB(A). In such
situations consideration must be given to the fitting
of an acoustic enclosure to meetlocal regulations.
Pump noise level is dependent on a number of
factors- the type of motor fitted, the operating
capacity, pipework design and acoustic
characteristics of the building. Typical sound
pressure levels measured in dB and A-weighted are
shown in the table below.
The figures are indicative only, they are subject to a
+3 dB tolerance, and cannot be guaranteed.
The values are based on the noisiest ungeared
electric motors which are likely to be encountered.
They are LpAsound pressure levels at 1m (3.3ft)
from the directly driven pump, for "free field over a
reflecting plane". For estimating LwAsound power
level (re 1 pW) add 14 dB(A) to the sound pressure
value.
If a pump only has been purchased, for fitting with
your own driver, then the "pump only" noise levels
from the table should be combined with the level for
the driver obtained from the supplier. If the motor is
driven by an inverter, it may show an increase in
noise level at some speeds. Consult a Noise
Specialist for this calculation
For units driven by equipment other than
electric motors or units contained within enclosures,
see the accompanying information sheets and
manuals.
Typicalsound pressurelevel,dBA, LpAat 1 m reference 20 μPa(LwAsound power1 pW whereLpA>85 dBA)
and speed
kW (hp)
<0.55 (<0.75)
0.75 (1) 74 66 67 62 67 62 63 62
1.1 (1.5) 74 68 67 64 67 64 65 64
1.5 (2) 77 70 70 66 70 66 66 66
2.2 (3)
3 (4) 81 74 74 70 74 70 70 70
4 (5) 82 75 75 71 75 71 71 71
5.5 (7.5) 90 (99) 77 83 73 76 73 72 71
7.5 (10)
11(15) 91 (100) 80 84 76 78 76 74 73
15 (20) 92 (101) 83 85 (94) 79 80 79 76 75
18.5 (25) 92 (101) 83 85 (94) 79 80 79 76 75
22 (30)
30 (40) 100 (109) 85 (94) 93 (102) 81 84 80 80 76
37 (50) 100 (109) 86 (95) 93 (102) 82 84 80 80 76
45 (60) 100 (109) 87 (96) 93 (102) 83 84 80 80 76
55 (75)
75 (100) 100 (109) 90 (99) 95 (104) 86 (95) 88 (97) 81 83 78
90 (120) 100 (109) 90 (99) 95 (104) 86 (95) 90 (99) 81 85 (94) 78
110(150) 100 (109) 91 (100) 95 (104) 87 (96) 91 (100) 83 86 (95) 79
150 (200)
3550 r/min 2900 r/min 1750 r/min 1450 r/minMotor size
Pump and
motor
dBA
71 66 64 62 64 62 63 62
78 72 71 68 71 68 68 68
90 (99) 78 83 74 77 74 73 72
92 (101) 83 85 (94) 79 81 79 77 75
100 (109) 88 (97) 95 (104) 84 86 (95) 81 82 77
101 (110) 92 (101) 96 (105) 88 (97) 91 (100) 83 86 (95) 79
Pump
only
dBA
Pump and
motor
dBA
Pump
only
dBA
Pump and
motor
dBA
Pump
only
dBA
Pump and
motor
dBA
Pump
only
dBA
Page 9 of 35
Page 10

FP USER INSTRUCTIONS ENGLISH 71576286 - 07/06
In areas where the staff has to intervene, remember
that when the level of the sound pressure is:
Below 70 dBA :It is not necessary to take
special precautions.
Above 70 dBA :People working continuously in
the machine room must be
supplied with protective devices
against noise.
Below 85 dBA :No particular measures need to
be taken for casual visitors
staying in the room during a
limited period.
Above 85 dBA :The room must be considered as a
dangerous area because of the
noise and a warning sign must be
fixed at each entry warning the
people coming into the room, even
for a short period, that they must
wear hearing protection.
Above 105 dBA:Special hearing protection adapted
to this noise level and to the
spectral noise components must
be installed and a warning sign to
this effect erected at each entry.
The staff in the room must wear
ear protection.
Make sure that the noise, which travels through the
walls and windows, does not generate too high
noise levels in the machine room's surroundings.
2 TRANSPORT AND STORAGE
2.1 Consignment receipt and unpacking
Immediately after receipt of the equipment it must be
checked against the delivery and shipping
documents for its completeness and that there has
been no damage in transportation.
Any shortage and or damage must be reported
immediately to Flowserve Pump Division and
received in writing within one month of receipt of the
equipment. Later claims cannot be accepted.
Check any crate, boxes and wrappings for any
accessories or spare parts that may be packed
separately with the equipment or attached to
sidewalls of the box or equipment.
Each product has a unique serial number. Check
that this number corresponds with that advised and
always quote this number in correspondence as well
as when ordering spare parts or further accessories.
2.2 Handling
2.2.1 General instructions concerning handling
Boxes, crates, pallets or cartons may be unloaded
using forklift vehicles or slings dependent on their
size and construction. See 2.3.1 for positioning of
slings.
To lift heavy pieces above 25 kg (55 lb), use a winch
adapted to the mass and in accordance with the
current local regulations.
To lift machines or pieces with one or several
suspension rings, only use hooks and chains in
compliance with the local regulations concerning
safety. Never put cables, chains or ropes directly on
or in the suspension rings. Cables, chains or lifting
ropes must never present excessive bending.
Never bend the lifting hooks, suspension rings,
chains, etc., which should only be made to endure
stresses within, calculated limits. Remember that the
capacity of a lifting device decreases when the
direction of the lifting force direction makes an angle
with the device axis.
To increase the safety and the efficiency of the lifting
device, all the lifting elements must be as
perpendicular as possible. If necessary a lifting
beam can be placed between the winch and the
load.
When heavy pieces are lifted up, never stay or work
under the load or in the area, which could be in the
path of the load if it were to swing or fall away.
Never leave a load hanging from a winch. The
acceleration or the slowing-down of lifting equipment
must stay in the safety limits for the staff. A winch
must be positioned in such a way that the load will
be raised perpendicularly. Where possible
necessary precautions must be taken to avoid the
swing of the load, using for example two winches
making approximately the same angle, below 30°,
with the vertical.
2.2.2 Pump masses
All masses are in kg:
Mass of
bareshaft
pump
1 stage 37 54 78 80 204 205 530 600
2 stages 37 54 92 94 243 240 605 720
3 stages 42 61 106 108 282 275 680 840
4 stages 47 68 120 122 321 310 755 960
5 stages 52 75 134 136 360 345
6 stages 57 82 148
50FP65FP80FP100FP122FP125FP152FP202
FP
7 stages 62 89
Page 10 of 35
Page 11
FP USER INSTRUCTIONS ENGLISH 71576286 - 07/06
All motors (for masses see the motor
description plate) must be handled with a winch.
For masses above 25 kg (55lb), manual
handling is forbidden.
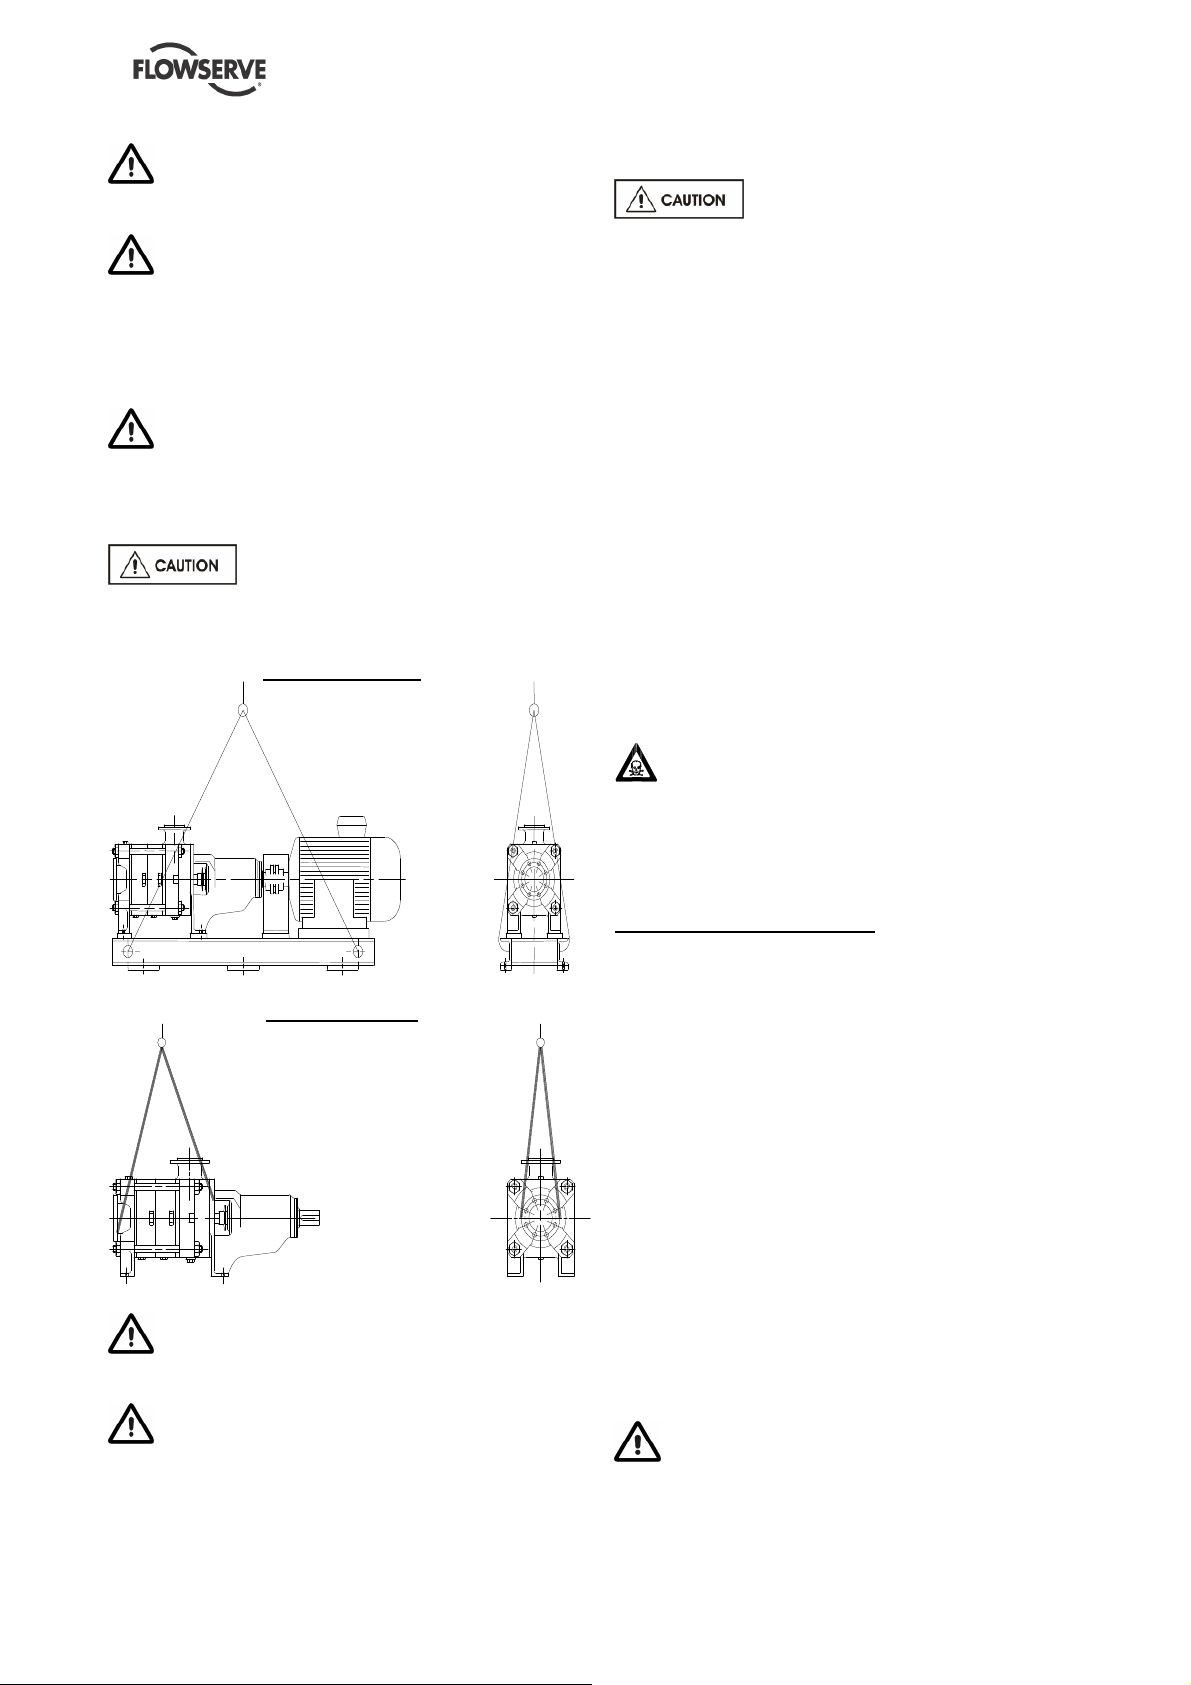
2.3 Lifting
2.3.1 Slinging of motor pumps units
Use handling means in accordance with motor
pump unit mass mentioned on the CE plate. For the
masses of the pumps bare end of shaft see table §
2.2.2 and nameplate.
To avoid distortion, the pump unit
should be lifted as shown.
Motor pump unit
2.4 Storage
Store the pump in a clean, dry
location away from vibration. Leave piping
connection covers in place to keep dirt and other
foreign material out of pump casing. Turn pump at
intervals to prevent brinelling of the bearings and the
seal faces, if fitted, from sticking.
Do not store pumps starting on the fan guard.
The pump may be stored as above for up to 6
months. Consult Flowserve for preservative actions
when a longer storage period is needed.
2.5 Recycling and end of product life
At the end of the service life of the product or its
parts, the relevant materials and parts should be
recycled or disposed of using an environmentally
acceptable method and local regulations. If the
product contains substances which are harmful to
the environment, these should be removed and
disposed of in accordance with current regulations.
This also includes the liquids and or gases in the
"seal system" or other utilities.
Bareshaft pump
When handling always wear gloves, safety
boots and an industrial safety helmet.
Make sure that hazardous substances or toxic
fluid are disposed of safely and that the correct
personal protective equipment is used. The safety
specifications must be in accordance with the
current regulations at all times.
3 PUMP DESCRIPTION
3.1 Configurations
The multi-stagecentrifugal pump is designed for the
pumping of cold water or all clear liquids which are
not solid and liquid mixtures, non-corrosive, nonabrasive or non-explosive when in contact with the
pump motor unit and its working parts (Important: for
other liquids consult FLOWSERVE for beforehand
advice).
The FP type pump is a centrifugal, multi-stage,
single suction and radial joint plan pump.
The modular design (2 hydraulics by pump type,
number of stages variation) enables an accurate
pump adjustment to the required operating
conditions.
It can be driven by electric motor, steam turbine, or
petrol or diesel motor.
For masses above 25 kg (55lb), manual
handling is forbidden.
The pump must be stored in a non-explosive,
ventilated location, sheltered from bad weather, dust
and vibrations.
Page 11 of 35
Page 12

FP USER INSTRUCTIONS ENGLISH 71576286 - 07/06
Density...........................................................1
Viscosity ..............................................1 mm²/s
Frequency .................50 Hz (1450 - 2900 min-1)
...................................60 Hz (1750 - 3500 min-1)
Maximum number of stages (according to
rotation speed)
3500
-1
min
50 FP 6 7 7 7
Maximum working pressure at discharge
................................................................25 bars
Maximum working pressure at suction....16 bars
except 122-152 and 202 FP.................... 10 bars
Maximum pumped fluid temperature ......105°C
impeller and diffuser for CAST IRON or BRONZE.
Minimum pumped fluid temperature .......-10 °C
Maximum ambient temperature.............. 40 °C
Maximum solid suspension.....................50 g/m
3
65 FP 4 6 7 7
80 FP 3 5 6 6
100 FP 3 5 6 6
122 FP 4 5
125 FP 2 3 4 5
152 FP & 202
FP
The maximum speed is shown on the
pump nameplate.
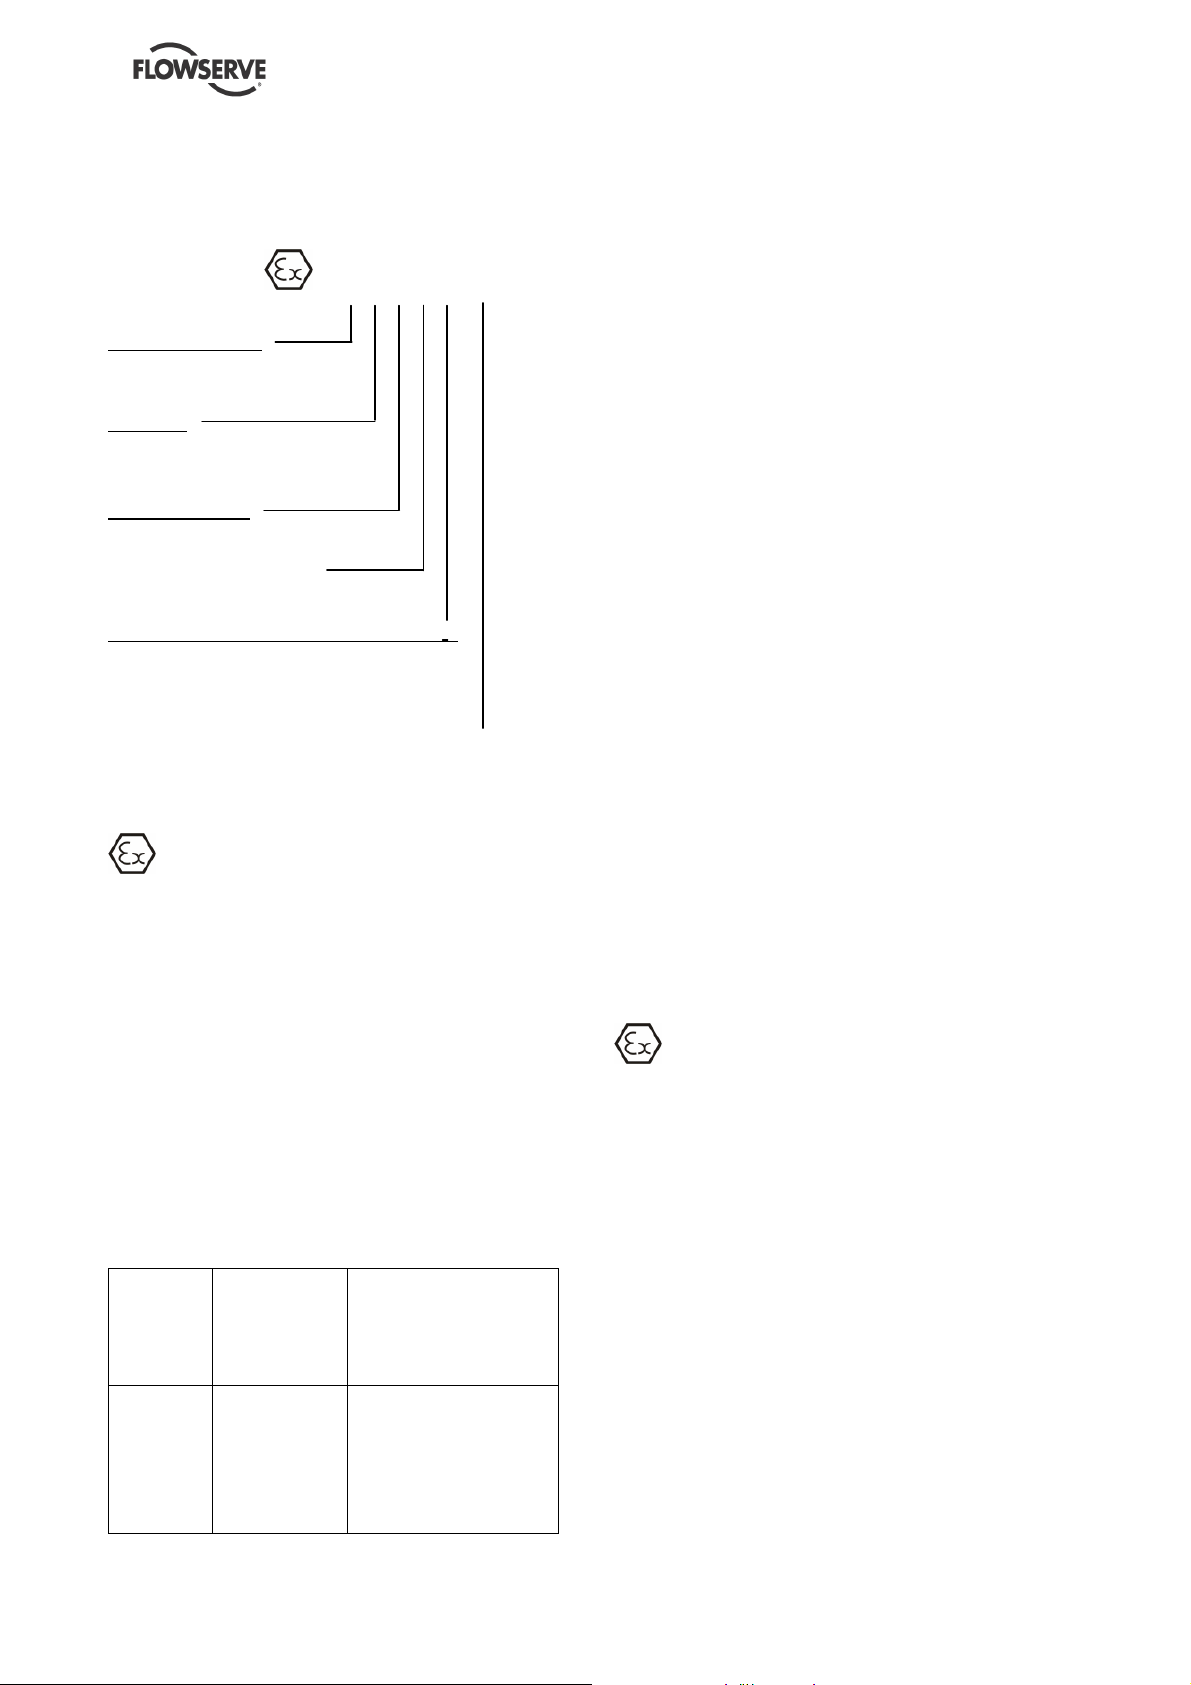
3.2 Nomenclature
Characteristics shown on the nameplate fixed on the pump are as shown below:
Each pump is supplied with the following nameplate:
2900
min
1750
-1
min
3 4
1450
-1
min
-1
Speed of rotation
Pump type
Flow rate
Head
Radial/thrust bearing
Year of construction +
Manufacture number
Each pump unit is supplied with the following nameplate:
Mass of the set
Mass
Maximum admissible
Pressure at 20 °C
Maximum / minimum
temperature
Page 12 of 35
Page 13

4 INSTALLATION
NF E 27 811
Equipment operated in hazardous locations
must complywith the relevant explosion protection
regulations. See section 1.6.4, Products used in
potentially explosive atmospheres.
All equipment must be grounded.
FP USER INSTRUCTIONS ENGLISH 71576286 - 07/06
4.1 Location
The pump should be located to allow room for
access, ventilation, maintenance and inspection with
ample headroom for lifting and should be as close as
practicable to the supply of liquid to be pumped.
4.2 Foundation
Provide sufficient space in the foundation to
accommodate the anchor bolts. If necessary,
provide concrete risers.
Usually the pump and its drive are mounted on a
common base plate. If not, individual base plates
underneath each machine foot shall be installed.
Base plates are to be fully grouted.
4.2.1 Setting the base plate for anchoring
a) Clean the foundation surface thoroughly.
b) Put shims on the foundation surface (approx 20-
25 mm thick), one on each side of the bolt hole
(as an alternative, leveling screws can be used).
There are many methods of installing
pump units to their foundations. The correct method
depends on the size of the pump unit, its location
and noise vibration limitations. Non-compliance with
the provision of correct foundation and installation
may lead to failure of the pump and, as such, would
be outside the terms of the warranty.
The base plate should be mounted onto a firm
foundation, either an appropriate thickness of quality
concrete or sturdy steel framework. It should NOT
be distorted or pulled down onto the surface of the
foundation, but should be supported to maintain the
original alignment.
Anchor bolts must be in accordance with the foot
boltholes. Use anchor bolts of accepted standards
and sufficient to ensure seave fitting in the
foundation. Particularly, this applies to individual
plates where the anchor bolts have to withstand the
driving torque.
c) Lay the base plate and level in both directions
with extra shims. The base plate should be level
to within 0.5 mm per 1 m.
d) If anchor bolts have been pre-cast in the
foundation slightly tighten the anchor bolts.
Otherwise let them hang in the foundation holes.
Page 13 of 35
Page 14

FP USER INSTRUCTIONS ENGLISH 71576286 - 07/06
4.3 Grouting
4.3.1 Base plate grouting
a) Prepare the site for grouting. Before grouting
clean the foundation surface thoroughly and
provide external barriers as shown:
Barriers
b) Prepare grouting product (concrete, resin) in
accordance with manufacturers' instructions.
4.4.1 Thermal expansion
The pump and motor will normally
have to be aligned at ambient temperature and
should be corrected to allow for thermal expansion
at operating temperature. In pump installations
involving high liquid temperatures, the unit should be
run at the actual operating temperature, shut down
and the alignment checked immediately.
4.4.2 Alignment methods
Ensure pump and driver are isolated
electrically and the half couplings are disconnected.
Ensure that the pump pipework, suction and
discharge, is disconnected.
The alignment MUST be checked.
Although the pump will have been aligned at the
factory it is most likely that this alignment will have
been disturbed during transportation or handling. If
necessary, align the motor to the pump, not the
pump to the motor.
c) Use grouting products with anti-shrinking
components.
d) Togrout up to the required level. Polish
surfaces. Take necessary precautions to avoid
air bubbles.
e) Lay-down the barrier, break external angles, and
polish the different surfaces.
f) After grout starts to cure, definitively tighten
anchor bolts.
g) Control the alignment such as described as
follows.
4.4 Initial alignment
Alignment
Parallelism and concentricity check:
Check the alignment at three or four
points, before pipeworks assembly.
with arule with acomparator
Admissible margin for a motor with roller bearings:
= 0.15 mm parallel checking
= 0.1 mm angular checking
Angular checking:
with a sliding rule with a caliper gauge
Before connecting the couplings
verify the motor rotation direction.
The alignment will be definitive only
after pipework connection (see § 4.5.1).
Page 14 of 35
Page 15

FP USER INSTRUCTIONS ENGLISH 71576286 - 07/06
If necessary, improve the machine alignment:
Complete unit mounted on common base plate:
The machines are first aligned accurately in our
workshops. Usually, any misalignment observed on-
site is due to a wrong adjustment under the base
plate (disturbed during transport or because of
forces exerted by the pipework). It is only necessary
to rectify the adjustment under base plate. If it
proves to be insufficient, modify the motor and the
pipeworks adjustment.
Pump and motor mounted on individual base
plates:
Machines are (or must be) first mounted on their
own base plate in the workshop. Once the pump is
set, it will be regarded as the fixed piece. Any
alignment necessary shall be carried out on the
motor.
Never connect the electric motor
before the setting has been completely finished.
4.5 Piping
The user must verify that the equipment is
isolated from any external sources of vibration.
Protective covers are fitted to the
pipe connections to prevent foreign bodies entering
during transportation and installation. Ensure that
these covers are removed from the pump before
connecting any pipes.
4.5.1 Suction and discharge pipework
The dimensions of the pipes do not directly depend
on suction and discharge diameters of the pump.
a) First, choose a flow speed < 2 m/s at suction,
and about 3 m/s at discharge.
b) Take into account the available NPSH, which
must be superior to the required NPSH of the
pump.
When designing the pipes (§ 4.5.2.1, § 4.5.2.2, §
4.5.3.1) take necessary precautions in order not to
exceed maximum allowed strains.
Forces and moments applied to the pump flanges
must never exceed the values shown in the table
below:
Pipe
Layout flanges
Vertical pipe
Horizontal pipe
DN
40 30 40 35 60 23 27 34 49
50 40 50 45 80 27 30 37 54
65 50 68 58 102 30 33 40 60
80 60 75 70 120 32 36 44 65
100 80 100 90 160 36 41 50 74
125 100 125 110 200 44 52 63 92
150 120 150 135 240 53 62 75 110
perpendicular to the shaft
200 162 200 180 314 69 79 97 144
40 40 30 35 60 23 27 34 49
50 50 40 45 80 27 30 37 54
65 68 50 58 102 30 33 40 60
80 75 60 70 120 32 36 44 65
100 100 80 90 160 36 41 50 74
125 125 100 110 200 44 52 63 92
150 150 120 135 240 53 62 75 110
perpendicular to the shaft
200 200 162 180 314 69 79 97 144
40 35 30 40 60 23 27 34 49
50 45 40 50 80 27 30 37 54
65 58 50 68 102 30 33 40 60
80 70 60 75 120 32 36 44 65
100 90 80 100 160 36 41 50 74
125 110 100 125 200 44 52 63 92
150 135 120 150 240 53 62 75 110
Pipe parallel to the axis
200 180 162 200 314 69 79 97 144
Forces (daN) Moments (daN.m)
FYFZF
X F
MYMZM
X M
Never use pump as a support for
piping.
Do not mount expansion joints in
such a way that their force, due to internal pressure,
may act on the pump flange.
Maximum forces and moments allowed on the pump
flanges vary with the pump size and type. These
external strains may cause misalignment, hot
bearings, worn couplings, vibrations and the
possible failure of the pump casing.
Page 15 of 35
Ensure piping and fittings are flushed
before use.
Ensure piping for hazardous liquids is
arranged to allow pump flushing before removal of
the pump.
Page 16

FP USER INSTRUCTIONS ENGLISH 71576286 - 07/06
4.5.2 Suction piping
4.5.2.1 Design of a flooded suction line
The suction line must be as short and direct as
possible, never mount an elbow directly on the inlet
flange of the pump.
Valve
Non-return valve
Continous flow
valve
Flooded suction configuration
a) Avoid sharp elbows or sudden narrowing. Use
convergent 20° (total angle).
b) Arrange thepipework so that there are no air
pockets (no bulges).
c) If high points cannot be avoided in suction line,
provide them with air relief cocks.
d) If a strainer is necessary, its net area should be
three or four times the area of the suction pipe.
e) If an inlet valve is necessary, choose a model
with direct crossing.
c) If a foot valve is necessary, do not oversize it
because it would generate pulsations (valve
beating).
Do not tighten flanges before the final
check (see § 4.5.4).
4.5.3 Discharge piping
4.5.3.1 Design of a discharge line
a) If discharge line is provided with a divergent, its
total angle will be between 7° and 12°.
b) Install the discharge valve after the non-return
valve downstream.
c) The non-return valve will be set in the discharge
pipe to protect the pump from any excessive
pressure surge and from reverse rotation.
If necessary, a control manometer can be connected
on the pipework.
Control manometer
Do not tighten flanges before the final
check (see § 4.5.4).
4.5.2.2 Design of a suction lift line
The inlet pipe must be as short and as direct as
possible, never place an elbow directly on the pump
inlet nozzle.
Valve
Non-returnvalve
SUFFICIENTIMMERSION
I:
I 3xD
Valvestrainer
Sump suction configuration
a) Avoid sharp elbows or sudden narrowing. Use
convergent 20° (total angle) with upright
generating.
b) Arrange that the suction pipework is inclined
upwards towards the pump ensuring that there
are no peaks.
Setting of the control manometer
Do not tighten flanges before the final
check (see § 4.5.4).
4.5.4 Final checks
a) Check the tightening of anchor bolts. Tighten
them if necessary.
b) Check that protective covers on suction and
discharge flanges are removed.
c) Check that holes of pipework flanges are parallel
and correspond to those of the pump.
d) Tighten suction and discharge flanges.
4.6 Electrical connections
Electrical connections must be made
by a qualified Electrician in accordance with relevant
local national and international regulations. This
includes any grounding.
It is important to be aware of the EUROPEAN
DIRECTIVE on potentially explosive areas where
compliance with IEC60079-14 is an additional
requirement for making electrical connections.
Page 16 of 35
Page 17

FP USER INSTRUCTIONS ENGLISH 71576286 - 07/06
Avoid mechanical, hydraulic or electrical
overload by using motor overload trips or a power
monitor and make routine vibration monitoring.
It is important to be aware of the EUROPEAN
DIRECTIVEon electromagneticcompatibilitywhen
wiring up andinstallingequipmentonsite.Attention
mustbepaidtoensurethat the techniques usedduring
wiring/installationdonot increaseelectromagnetic
emissions or decreasetheelectromagnetic immunityof
theequipment,wiringoranyconnecteddevices. If in
anydoubt,contact Flowserve for advice.
The motor must be wired up in
accordance with the motor manufacturer's
instructions (normally supplied within the terminal
box) including any temperature, earth leakage,
current and other protective devices as appropriate.
If there are any circumstances in which the system
can allow the pump to run dry, or start up empty, a
power monitor should be fitted to stop the pump or
prevent it from being started. This is particularly
relevant if the pump is handling a flammable liquid.
If leakage of product from the pump or its associated
sealing system can cause a hazard it is
recommended that an appropriate leakage detection
system is installed.
To prevent excessive surface temperatures at
bearings it is recommended that temperature or
vibration monitoring are carried out. See sections
5.5.4 and 5.5.5.
If a defect of cooling can lead to temperature higher
than those acceptable a system of cooling
surveillance must be installed.
The identification nameplate should be checked to
ensure the power supply is appropriate.
A device to provide emergency stopping shall be
fitted.
Carry out the ground connections according to the
current local regulations.
To avoid any risk of jamming, the direction of
rotation will be checked after priming of the pump (§
5.3.1, 5.3.2) and before the first start (§ 5.4.2).
4.7 Final shaft alignment check
a) Check the alignment pump-motor according to
the procedure § 4.4.2. Rectify if necessary by
adjusting the motor only.
b) Check by hand that the pump turns freely. A
binding indicates a distortion of the pump, which
is due to excessive pipes strains. If necessary
the pipework design must be re-examined.
c) If it provided, connect auxiliary pipe systems
(hydraulic, pneumatic, sealing system).
d) Control tightness and functionality of auxiliary
piping.
4.8 Protection systems
The following protection systems are
recommended particularly if the pump is installed in
a potentially explosive area or is handling a
hazardous liquid. If in doubt consult Flowserve.
If there is any possibility of the system allowing the
pump to run against a closed valve or below
minimum continuous safe flow a protection device
should be installed to ensure the temperature of the
liquid does not rise to an unsafe level.
Except when explicitly required by the customer in
the specifications, when a possibility of reverse
rotation exists the customer must install a reverse
rotation protection device.
The customer must install all equipment required to
avoid water hammer.
5 COMMISSIONING, START-UP,
OPERATION AND SHUTDOWN
These operations must be carried out by
fully qualified personnel.
5.1 Direction of rotation
Starting or operating pumps with the
wrong direction of rotation can be harmful to the
pumps. Ensure that the pump rotation is the same
as the arrow on the pump casing. It is preferable to
check the direction of rotation before installing the
coupling. If not, the pump must be filled in with the
liquid before start-up.
If maintenance work has been carried
out to the site's electricity supply, the direction of
rotation should be re-checked as above in case the
supply phasing has been altered.
5.2 Guarding
Guarding is supplied fitted to the pump set.
If this has been removed or disturbed ensure that all
the protective guards around the pump coupling and
exposed parts of the shaft are securely fixed.
Page 17 of 35
Page 18

FP USER INSTRUCTIONS ENGLISH 71576286 - 07/06
5.3 Priming and auxiliary supplies
Where there is any risk of the pump being run
against a closed valve generating high liquid and
casing external surface temperatures it is
recommended that users fit an external surface
temperature protection device.
Ensure all electrical, hydraulic,
pneumatic, sealant and lubrication systems (as
applicable) are connected and operational.
Ensure the inlet pipe and pump
casing are completely full of liquid before starting
continuous duty operation.
These operations must be carried out by personnel
with approved qualifications.
5.3.1 Priming of a flooded pump
a) As discharge valve is closed, fill the pump by
opening the valve at suction.
b) Let air escape by removing the plugs situated on
the flange of the discharge casing and suction
casing (for the 122, 152 to 202 FP pumps). For
the 50 to 125 FP pumps, plugs are located on
pipework.
c) The discharge pipe is headed and there is a by-
pass valve on the check valve, open slightly the
discharge valve and the by-pass of the check
valve.
d) When the pump is totally free of air bubbles,
replace the plugs.
c) When the pump is totally free of air bubbles,
replace the plugs.
Air escape
Air escape
Priming of sump suction pump with foot valve
*Without foot valve:
Priming may be accomplished by means of venting
system.
Foot valves are not recommended when
the pumped liquid has suspended solid particles.
They may lodge between foot valve seat and
shutter.
5.4 Starting the pump
5.4.1 Bring controls and preparation before the
first starting and after each service call
Airescape
Airescape
Priming of a flooded pump
5.3.2 Priming of a sump suction pump
* With foot valve:
a) Fill suction pipe and casing with liquid from an
independent source (pressure 1 to 2 bars).
b) Let air escape by removing the plugs situated on
the flange of the discharge casing and suction
casing (for the 122, 152 to 202 FP pumps). For
the 50 to 125 FP pumps, plugs are located on
pipes.
Necessarily:
a) Check the tightening of the different plugs.
b) Check that the gland lightly tightens the packing
rings.
c) Risk of seal ring overheating.
d) Check the direction of rotation of the motor.
Refer to the rotation arrow of the pump.
e) Install all protection systems and more
particularly the coupling guard and the shield
grid (reference [9331]) of the bearing.
f) Open all suction valves (if existing).
g) Close the outlet valve and the bypass valve.
h) Ensure inlet pipe and pump casing are
completely full of liquid.
5.4.2 First pump start-up
Suction valves must be fully open
when pump is running. Never run the pump dry, it
will cause damage.
Page 18 of 35
Page 19

a) Start motor and check outlet pressure.
2445
2110
4200
4610
4240
4213
b) If pressure is satisfactory, slowly OPEN outlet
valve.
c) Do not run the pump with the outlet valve closed
for a period longer than 30 seconds.
d) If NO pressure, or LOW pressure, STOP the
pump. Refer to faultfinding chart for fault
diagnosis.
The pump should run smoothly and without
vibration.
The pump must never run at a capacity of less than
10% of that at the best efficiency.
Never remove a plug when the pump is
running.
5.5 Running the pump
5.5.1 Venting the pump
Vent the pump to enable all trapped air to
escape taking due care with hot or hazardous
liquids.Under normal operating conditions, after the
pump has been fully primed and vented, it should be
unnecessary to re-vent the pump.
5.5.2Pump fitted with a stuffing box
If the pump has a packed gland there must be some
leakage from the gland. Gland nuts should initially
be finger tight only. Leakage should take place soon
after the stuffing box is pressurized. If no leakage
takes place the packing will begin to overheat. If
overheating takes place the pump should be
stopped and allowed to cool before being restarted.
When the pump is restarted it should be checked to
ensure leakage is taking place at the packed gland.
FP USER INSTRUCTIONS ENGLISH 71576286 - 07/06
Shield grids being removed during installation
of the gland packing, it must be ensured that they
are replaced as soon as this operation is completed.
5.5.3 Pump fitted with mechanical seal
A mechanical seal ensures a seal without leakage
and does not need any adjustment. Nevertheless if a
light leakage occurs during start-up, it should
disappear after the initial running in of the friction
faces.
When adjusting an operating stuffing box
(shield grids removed for this operation) the operator
must be very careful. Safety gloves are compulsory
and loose clothes are not allowed (above all to the
arms) to avoid being caught by the pump shaft.
The pump should be run for ten minutes with steady
leakage and the gland nuts tightened by 10 degrees
at a time until leakage is reduced to an acceptable
level. The temperature of the gland should be
checked after each round of tightening. If the
temperature starts to climb rapidly then back off the
gland nuts until the temperature drops down. Wait
for the temperature to stabilize before tightening
again.The leakage must not be reduced below a
rate of 20 drops per minute. Bedding in of the
packing may take several hours.
Page 19 of 35
NEVER RUN A MECHANICAL SEAL
DRY, EVEN FOR A SHORT WHILE.
SAFETY INSTRUCTIONS WHEN THE PUMP IS
RUNNING:
If hot or freezing components of the machine
can present a danger to operators, they must be
shielded to avoid accidental contact. If a 100 %
protection is not possible, the machine access must
be confined to the maintenance staff only.
If the temperature is greater than 80 °C, a
warning plate must be clearly placed on the pump.
Page 20

FP USER INSTRUCTIONS ENGLISH 71576286 - 07/06
It is strictly forbidden to open switch
cupboards, switch boxes, or all other live electric
equipment. If it is necessary to open them in order to
take readings, to carry out tests or adjustments for
example, only a skilled technician may do them with
adapted tools. Make sure that physical protections
against electrical risks are used.
5.5.4 Bearings
If the pumps are working in a potentially
explosive atmosphere, temperature or vibration
monitoring at the bearings is recommended.
If bearing temperatures are to be monitored it is
essential that a benchmark temperature is recorded
at the commissioning stage and after the bearing
temperature has stabilized.
Record the bearing temperature (t) and the
ambient temperature (ta)
Estimate the likely maximum ambient
temperature (tb)
Set the alarm at (t+tb-ta+5) C [(t+tb-ta+10) F]
and the trip at 100 C (212 F) for oil lubrication
and 105 C (220 F) for grease lubrication
It is important, particularly with grease lubrication, to
keep a check on bearing temperatures. After start up
the temperature rise should be gradual, reaching a
maximum after approximately 1.5 to 2 hours. This
temperature rise should then remain constant or
marginally reduce with time.
5.5.5 Normal vibration levels, alarm and trip
For guidance, pumps generally fall under a
classification for rigid support machines within the
International rotating machinerystandards and the
recommended maximum levels below are based on
those standards.
Alarm and trip values for installed
pumps should be based on the actual
measurements (N) taken on site on the bearing
housings of the pump in the fully commissioned as
new condition.
Vibration Velocity - unfiltered
Normal N 5.6 (0.22)
Alarm N x 1.25 7.1 (0.28)
Shutdown Trip N x 2.0 11.2 (0.44)
Horizontal Configuration
mm/s (in./s) r.m.s.
5.5.6 Stop/start frequency
Pump sets are normally suitable for the number of
equally spaced stop/starts per hour shown in the
table below. Check actual capability of the driver and
control/starting system before commissioning.
Motor rating kW (hp)
Up to 15 (20) 15
Between 15 (20) and 90 (120) 10
90 (120) to 150 (200) 6
Above 150 (200) Refer
Maximumstop/starts
per hour
Where duty and standby pumps are installed it is
recommended that they are run alternately every
week.
5.6 Stopping and shutdown
5.6.1 Stopping and restarting in continuous
running
According to hydraulic conditions of the installation
and its automation degree, stop and restart
procedures can have different forms. Nevertheless
all of them must respect imperatively the following
rules:
Stopping:
a) Avoid that the unit turns in the opposite direction
to the normal running.
b) Make sure that the discharge line pressure does
not reach the foot valve.
c) Avoid a continuous running below the authorized
flow rate (see § 5.4.2).
The example (N) value is given for the preferred
operating flow region (typically this may extend to 70
to 120 % of the pump best efficiency point); outside
the preferred flow region the actual vibration
experienced may be multiplied by up to 2.
These standard values can vary with the rotational
speed and the power absorbed by the pump. For
any special case, do not hesitate to consult us.
Measuring vibration at regular intervals will then
show any deterioration in pump or system operating
conditions.
Page 20 of 35
Restart:
a) Ensure that the pump is completely full of liquid.
b) Ensure a continuous supply with a sufficient
available NPSH.
c) Ensure a backpressure so that the motor power
is not in excess.
d) Respect the starting frequency
imposed by the motor manufacturer.
e) Protect the pump against water hammer
when stopping or starting.
Page 21

FP USER INSTRUCTIONS ENGLISH 71576286 - 07/06
Shutdown:
Close the outlet valve and stop the
motor. Eventually close the inlet valve.
For prolonged shutdowns and
especially when ambient temperatures are likely to
drop below freezing point, the pump and any cooling
and flushing arrangements must be drained or
otherwise protected.
5.7 Hydraulic, mechanical and electrical duty
This product has been supplied to meet the
performance specifications of your purchase order,
however it is understood that during the life of the
product these may change. The following notes may
help the user decide how to evaluate the
implications of any change. If in doubt contact your
nearest Flowserve office.
5.7.1 Specific gravity (SG)
Pumpcapacity and total head in meters (feet) do not
change with SG, however pressure displayed on a
pressure gauge is directly proportional to SG. Power
absorbed is also directly proportional to SG. It is
therefore important to check that any change in SG
will not overload the pump driver or over-pressurize
the pump.
NPSHrequired(NPSHR) is the minimum head required
at theimpeller inlet, above the vapour pressureofthe
pumped liquid,toavoid excessivecavitationand
extremeperformancedegradation.
It is important thatNPSHA> NPSHR. Themargin
betweenNPSHA> NPSHRshould be as large as
possible.
If any change in NPSHAis proposed, ensure these
margins are not significantly eroded. Refer to the
pump performance curve to determine exact
requirements particularly if flow has changed.
If in doubt please consult your nearest Flowserve
office for advice and details of the minimum
allowable margin for your application.
5.7.5 Pumped flow
Flow must not fall outside the minimum and
maximum continuous safe flow shown on the pump
performance curve and or data sheet.
5.8 Pumps for Food Use or Potable Water
If the pump has not been specifically ordered for a
food or drinking water application it must not be
used for these types of applications. If it has been
ordered for this type of application the following
recommendations are to be followed.
5.7.2 Viscosity
For a given flow rate the total head reduces with
increased viscosity and increases with reduced
viscosity. Also for a given flow rate the power
absorbed increases with increased viscosity, and
reduces with reduced viscosity. It is important that
checks are made with your nearest Flowserve office
if changes in viscosity are planned.
5.7.3 Pump speed
Changing pump speed effects flow, total head,
power absorbed, NPSHR, noise and vibration. Flow
varies in direct proportion to pump speed, head
varies as speed ratio squared and power varies as
speed ratio cubed. The new duty, however, will also
bedependent on the system curve. If increasing the
speed, it is important therefore to ensure the
maximum pump working pressure is not exceeded,
the driver is not overloaded, NPSHA> NPSHR, and
that noise and vibration are within local requirements
and regulations.
5.7.4 Net positive suction head (NPSHA)
NPSH available (NPSHA) is the head available at the
impeller inlet, above the vapour pressure of the
pumped liquid.
5.8.1 Cleaning prior to operation
Pumps that are to be used for a food or drinking
water application should be cleaned before being
put into initial operation and after the installation of
spare parts that are in contact with the liquid.
Cleaning once the pump has been commissioned
will depend on the application and operating
conditions. The user must ensure that the cleaning
procedures are suitable for the application and
operating conditions, and local regulations.
6 MAINTENANCE
6.1 General
If a belt drive is used, the assembly and
tension of the belts must be verified during regular
maintenance procedure.
In dirty or dusty environments, regular checks
must be made and dirt removed from areas around
close clearances, bearing housings and motors.
Page 21 of 35
Page 22

It is the plant operator's responsibility to
ensure that all maintenance, inspection and
assembly work is carried out by authorized and
qualified personnel who have adequately
familiarized themselves with the subject matter by
studying this manual in detail (see also section
1.6.2).
Any work on the machine must be performed when it
is at a standstill.It is imperative that the procedure
for shutting down the machine is followed, as
described in section 5.6.
On completion of work all guards and safety devices
must be re-installed and made operative again.
Before restartingthe machine, the relevant
instructions listed in section 5, Commissioning, start
up, operation and shut downmust be observed.
Oil and grease leaks may make the ground
slippery. Machine maintenance must always
begin and finish by cleaning the ground and the
exterior of the machine.
If platforms, stairs and guardrails are required for
maintenance, they must be placed for easy access
to areas where maintenance and inspection are to
be carried out. The positioning of these accessories
must not limit access or hinder the lifting of the part
to be serviced.
FP USER INSTRUCTIONS ENGLISH 71576286 - 07/06
a) The pump must be completely vented and
drained and rendered inert before any
disassembly operation.
b) Any auxiliary systems installed must be
monitored, if necessary, to ensure they function
correctly.
c) During cleaning of the pump ensure the
compatibility between the cleaning products and
the gaskets.
d) Verify the condition of the gaskets.
e) Gland packings must be adjusted correctly to
give visible leakage and concentric alignment of
the gland follower to prevent excessive
temperature of the packing or follower.
Mechanical seals should present no leakage.
f) Check for any leaks from gaskets and seals.
The correct functioning of the shaft seal must be
checked regularly.
g) Check bearing lubricant level, and if the hours
run show a lubricant change is required.
h) Check that the duty condition is in the safe
operating range for the pump.
i) Check vibration, noise level and surface
temperature at the bearings to confirm
satisfactory operation.
j) Check the tightness of the connections.
k) Check dirt and dust is removed from areas
around close clearances, bearing housings and
motors.
l) Check coupling alignment and re-align if
necessary.
m) Verify the correct operation of the system.
When air or compressed inert gas is used in
the maintenanceprocess, the operator and anyone
in the vicinity must be careful and have the
appropriate protection. DO NOT SPRAY air or
compressed inert gas on skin. DO NOT DIRECT an
air or gas jet towards other people. Never use air or
compressed inert gas to clean clothes.
Before working on the pump, take measures to
prevent an uncontrolled start. Put a warning board
on the starting device with the words:
"Machine under repair: do not start".
With electric drive equipment, lock the main switch
open and withdraw any fuses. Put a warning board
on the fuse box or main switch with the words:
"Machine under repair: do not connect".
Never clean equipment with inflammable solvents or
carbon tetrachloride.Protect yourself against toxic
fumes when using cleaning agents.
6.2 Maintenance schedule
It is recommended that a maintenance plan
and schedule is adopted, in line with these User
Instructions. It should include the following:
The equipment used for maintenance and
disassembly in an ATEX zone must be in conformity
with the requirements zone.
Our specialist service personnel can help with
preventative maintenance records and provide
condition monitoring for temperature and vibration to
identify the onset of potential problems.
If any problems are found the following sequence of
actions should take place:
a) Refer to section 7, Faults; causes and remedies,
for fault diagnosis.
b) Ensure equipment complies with the
recommendations in this manual.
c) Contact Flowserve if the problem persists.
6.2.1 Standard maintenance
Roller bearing
The bearings fitted are prepacked with grease at the
factory. When the regreasing period is reached it is
necessary to remove as much of the old grease as
possible with a clean lint free cloth and repack the
bearings with fresh grease.
Page 22 of 35
Page 23

FP USER INSTRUCTIONS ENGLISH 71576286 - 07/06
LUBRICATION
PUMP
TYPE
50 FP 8000 8000 5500 5500 16 10
65 FP 8000 8000 5500 5500 16 10
80 FP 8000 8000 5500 5500 16 10
100 FP 8000 8000 5500 5500 16 10
122 FP 8000 7500 30 17
125 FP 8000 7500 4000 4000 30 17
152 FP 4000 3000 50 30
202 FP 4000 3000 50 30
FREQUENCY (h.)*
1450
1750
-1
min
-1
min
2900
min
3500
-1
min
QUANTITY (gr.)
Coupling
opposed
-1
side
Coupling
side
* At least once a year.
The grease used in factory for first filling is:
SHELL ALVANIA R2
Its equivalents: MOBIL : Mobilux EP 2,
TOTAL : Multis 2,
ELF : ELF MULTI
6.2.2Routine inspection (daily/weekly)
The following checks should be made
and the appropriate action taken to remedy any
deviations:
a) Check operating behavior.Ensure noise,
vibration and bearing temperatures are normal.
b) Check that there are no abnormal fluid or
lubricant leaks (static and dynamic seals) and
that any sealant systems (if fitted) are full and
operating normally.
c) Pumpfitted with a stuffing box: leakage of 20
drops per minute.
d) Pump fitted with a mechanical seal: no leakage.
e) Check the level and condition of oil lubricant. On
grease lubricated pumps, check running hours
since last recharge of grease or complete
grease change.
6.2.3Periodic inspection (six monthly)
a) Check foundation bolts for
security of attachment and corrosion.
b) Check pump-running records for hourly usage to
determine if bearing lubricant requires changing.
c) The coupling should be checked for correct
alignment and worn driving elements.
If a check shows a bad running of the
motor pump unit, the user must:
a) Refer to the "fault finding chart" chapter 7
of this leaflet to apply the recommended
solutions.
b) Ensure that your equipment corresponds to the
arrangements of this leaflet.
c) Contact FLOWSERVE after-sales Department if
the problem persists.
6.2.4 Mechanical seals
The current maintenance is limited to seal control. It
is necessary to detect any small leakage which
announces the beginning of the deterioration of
friction faces or secondary seal elements (rings,
bellows, synthetic membranes). It is advisable to
stop the pump as soon as possible. Have an
approved seal vendor replace or repair the seal.
6.2.5 Gland packing
6.2.5.1 Pump fitted with a packed gland
A well run in and correctly adjusted packing gland
requires little maintenance.
If, after some time, the leakage becomes too great,
the gland should be tightened again in order to
return these to a normal level.
If re-tightening is not possible, new packing must be
installed
6.2.5.2 Gland packing inspection and removal
a) Remove the shield guards.
b) Slide back the gland.
c) Remove the packing rings with an extractor
designed for this purpose (including the lantern
ring if it exists; note its position and its direction
of rotation).
d) Inspect the state of the sleeve surface; the
presence of many marked grooves will indicate
that it must be replaced.
e) Carefully clean the different pieces of the
packing gland.
6.2.5.3 Gland packing fitting
If the packing is supplied as cord the packing must
be cut so that the external diameter is lightly
tightened and there is an initial gap between the
sleeve and the packing ring.
For that purpose, wind the packing helically around
the shaft sleeve or a chuck of the same diameter.
(Take precautions to avoid damaging sleeve)
Page 23 of 35
Page 24

FP USER INSTRUCTIONS ENGLISH 71576286 - 07/06
Example of straight Example of bevel cut
Ensure a tightening on the stuffing
box housing and not on the sleeve.
SETTING OF PACKING
Follow the instructions:
a) Assemble of the packing in S.
b) Stagger by about 90° between two rings.
c) Assemble packing after packing.
After setting the last packing ring, secure the
packing with the gland and tighten the nut by hand.
After tightening, the shaft should turn by hand as
easily as before the setting of the packing.
PUMP
TYPE
50 FP 24 30 46 70 M10 48 600 8
65 FP 24 30 46 70 M10 48 600 8
80 FP 32 40 60 86 M12 63 800 10
100 FP 32 40 60 86 M12 63 800 10
122 FP 45 55 75 100 M12 45 850 10
125 FP 40 50 70 96 M12 60 1000 10
152 FP 55 70 95 135 M12 78 1100 12
202 FP 65 80 109 150 M16 91 1200 14
DIMENSIONS IN MILLIMETERS PACKING
D1 D2 D3 D4 D5 L1 Lgth
For arrangement of packing, see section 8.1,
Sectional drawings.
6.2.6 Internal coating
If the pump has an internal coating, this coating
must be inspected periodically. Any wear or cracks
of the coating found must be immediately repaired.
Failure to do this may lead to accelerated wear of
the coating during operation and corrosion of the
exposed base metal, depending on the material and
pumped liquid. Special attention must be paid to the
coating edges. Any loss of coating material is
considered to be normal wear and tear on the pump
and is not considered as warranty. Flowserve has
applied the coatings according to the supplier's
instructions but will not be held responsible for
coating wear or cracks that may develop over time.
6.3 Spare parts
6.3.1 Ordering of spares
Flowserve keeps records of all pumps that have
been supplied. When ordering spares the following
information should be quoted:
The pump size and serial number are shown on the
pump nameplate.
To ensure continued satisfactory operation,
replacement parts to the original design specification
should be obtained from Flowserve. Any change to
the original design specification (modification or use
of a non-standard part) will invalidate the pump’s
safety certification.
Page 24 of 35
1) Pump serial number.
2) Pump size.
3) Part name
4) Part number
5) Number of parts required.
Page 25

FP USER INSTRUCTIONS ENGLISH 71576286 - 07/06
6.3.2 Storage of spares
Spares should be stored in a clean dry area away
from vibration. Inspection and re-treatment of
metallic surfaces (if necessary) with preservative is
recommended at 6 monthly intervals.
6.4 Recommended spares and consumable items
50 FP, 65 FP, 80 FP, 100 FP, 125 FP: [2250] -
[3011-01] - [3011-02] - [4130]- [4590] - [4610]
122 FP, 152 FP, 202 FP: [2250]- [3011-01] - [301102] - [4130] - [4590-01] - [4590-02] - [4610-01] [4610-02] - [4610-03] - [4610-04]
a) Destroy all the gaskets after dismantling, replace
them when reassembling.
b) IT IS RECOMMENDED THAT
BEARINGS ARE NOT REUSED AFTER ANY
REMOVAL FROM THE SHAFT.
c) After serving during two years, replace the gland
packing.
c) Wait for the moment when the pump casing is
cooled and at ambient temperature.
d) DRAIN PUMP.
e) Dismantle inlet and outlet pipeworks as well as
all pipeworks.
f) REMOVE PUMP TAKING INTO
ACCOUNT SAFETY (§ 1) AND HANDLING
(§ 2.2) PROCEDURES.
ANY DISASSEMBLY, REPAIR OR
REASSEMBLY WILL BE CARRIED OUT UNDER
FLOWSERVE' RESPONSABILITY, EITHER
DIRECTLY BY THE AFTER-SALES SERVICE OR
BY OTHER FLOWSERVE-AGENTS WHO WILL
GET THE REQUIRED INSTRUCTIONS AND
APPROVALS. THIS IS THE CASE OF
AUTHORIZED REPAIRERS WHOSE ADDRESSES
AND TELEPHONE NUMBERS WILL BE GIVEN
ON REQUEST.
6.5 Disassembly
Refer to section 1.6, Safety, and section 6
Maintenance, before dismantling the pump.
Before dismantling the pump for
overhaul, ensure genuine Flowserve replacement
parts are available. Refer to sectional drawings for
part numbers and identification.
REPAIR OF THE PUMP
If the pump presents abnormalities or a
persistent malfunction, contact immediately:
FLOWSERVE
After-sales Service
Tel.: 02 43 40 57 57
(33) 2 43 40 57 57
Fax.: 02 43 40 58 17
(33) 2 43 40 58 17
According to the After-sales Service instructions,
disassembly will be limited to the dismantling of the
pump:
a) DISCONNECT THE UNIT FROM
POWER.
b) Close the inlet valve (if fitted) and outlet valve.
Page 25 of 35
Page 26

7 FAULTS; CAUSES AND REMEDIES
POSSIBLE CAUSES SOLUTIONS
Pump or suction pipe not completelyfilled - Check and complete filling
Air bubbles in pipes - Check and desecrate the pipes
Suction level too low - Check: the available NPSH > the requiredNPSH
Wrong rotation - Reverse 2 phases on motor terminalboxes
The motor is running on 2 phasesonly - Check and control the motor electrical powersupply
Motor running too low - Checktheconnection inthe terminal box according to the
Total manometric head system higher than
pump differential head
Total manometric head system lower than
pump differential head
Pipes (valves, filter...) - Control, dismantle and clean
Insufficient flow rate - Check the suction and discharge pipes (valves, back
Worn wear-ring surfaces - Foresee pump mending. CONSULT FLOWSERVE
Seizure, jamming - CONSULT FLOWSERVE
Excessive strains on flanges - Check the flange connections and eliminate strains (pipe
Defective gland packing on the shaft - Check and replace all the gland packingparts
Defective motor bearings - CONSULT FLOWSERVE
Specific gravity or viscosity of liquid too high - Consult our local agent to analyze the problem
Misalignment - Check the alignment of the pump and ofitsdriver
Foundations not sufficiently rigid
FP USER INSTRUCTIONS ENGLISH 71576286 - 07/06
Insufficient flow rate
Irregular pump running
Driver overloaded
Mechanical seal leak
Equipment vibration
Excessive pump casing temperature
- Reduce geometrical suction lift
- Reduce head losses in pipes and infittings(diameter
increase and appropriate fittingpositions)
- Check valves and strainers
- Check the immersion head of the suctionvalve
voltage
- Check the discharge head
- Check the head losses in discharge pipes (partly closed valve,
foreign particles, back pressuretoohigh)
- Modify the installation or changethe pump set
-Throttle at discharge valve or trim the impeller (contact our
local agent) CONSULT FLOWSERVE
pressure)
positioning or elastic sleevesmounting)
- Mechanical seal: CONSULT FLOWSERVE
- Check the setting of base plates: tightening,bad adjustment,
seal
Insufficient pressure
Pump looses prime after starting
POSSIBLE CAUSES SOLUTIONS
Rotation speed too low (check thedriver) - Check the connection in the terminal boxaccording to the
Presence of air - Check and de-aerate
Suction pressure insufficient - Check: the available NPSH > the requiredNPSH
Mechanical defects - CONSULT FLOWSERVE
Air leak in the suction pipe - Check suction pipe is airtight
Restriction in suction pipe - Check diameter of suction pipe
Suction level too low - Check the NPSH >NPSH
Obstruction of suction pipe - Check condition of pipe
Defective gland packing on the shaft - Check and replace all the gland packing.
Defective gasket - CONSULT FLOWSERVE
voltage
- Reduce geometrical suction lift
- Reduce head losses in pipes and infittings(diameter increase
and appropriate fitting positions)
- Check valves and strainers
- Check the immersion head ofthesuction valve
- Mechanical seal: CONSULT FLOWSERVE
Page 26 of 35
Page 27

8 PARTS LIST AND DRAWINGS
8.1 Sectional drawings
8.1.1 122 FP Pumps
FP USER INSTRUCTIONS ENGLISH 71576286 - 07/06
Page 27 of 35
Page 28

8.1.2 152 FP Pumps
FP USER INSTRUCTIONS ENGLISH 71576286 - 07/06
Page 28 of 35
Page 29

8.1.3202 FP Pumps
FP USER INSTRUCTIONS ENGLISH 71576286 - 07/06
Page 29 of 35
Page 30

8.1.4 50 FP Pumps
FP USER INSTRUCTIONS ENGLISH 71576286 - 07/06
Page 30 of 35
Page 31

8.1.565 FP, 80 FP, 100 FP, 125 FP Pumps
FP USER INSTRUCTIONS ENGLISH 71576286 - 07/06
Page 31 of 35
Page 32

FP USER INSTRUCTIONS ENGLISH 71576286 - 07/06
8.2 Sectional drawings part list
8.2.1 Parts list pumps 122 FP
N DESIGNATION N DESIGNATION
1130 Suction casing 4120 Stuffing box gland
1140 Discharge casing 4130 Gland packing
1160 Stage casing 4131 Follower
1410-01 Diffuser 4590 Gasket
1410-02 Diffuser 4610-01
1500-01 Casing wear ring 4610-02
1500-02 Casing wear ring 4610-03
1500-03 Casing wear ring 6515 Drain plug
1500-04 Casing wear ring 6544 Circlip
Round section joint
ring
Round section joint
ring
Round section joint
ring
8.2.2 Parts list pumps 152 FP
N DESIGNATION N DESIGNATION
1130 Suction casing 4134 Lantern ring
1140 Discharge casing 4590-01 Gasket
1160 Stage casing 4590-02 Gasket
1410-01 Diffuser 4610-01
1410-02 Diffuser 4610-02
1500-01 Casing wear ring 4610-03
1500-02 Casing wear ring 4610-04
2110 Pump shaft 6515 Drain plug
2250 Impeller 6569 Plug
2410 Interstage sleeve 6571 Tie bolt
Round section joint
ring
Round section joint
ring
Round section joint
ring
Round section joint
ring
2110 Pump shaft 6571 Tie bolt
2250 Impeller 6572 Stud
2410 Interstage sleeve 6577 Hexagon head bolt
2450 Shaft sleeve 6578 Threaded plug
2540 Thrower 6581-01 Hexagon nut
2905 Washer 6581-02 Hexagon nut
2910 Shaft nut 6700-01 Key
3011-01 Radial ball bearing 6700-02 Key
3011-02 Radial ball bearing 6700-03 Key
3200 Bearing housing 6700-04 Key
3260 Bearing cover 6814 Grub screw
3853 Grease nipple 9331 Cover plate
2450 Shaft sleeve 6572 Stud
2540 Thrower 6577-01 Hexagon head bolt
2905 Washer 6577-02 Hexagon head bolt
2910 Shaft nut 6577-03 Hexagon head bolt
3011-01 Radial ball bearing 6578-01 Threaded plug
3011-02 Radial ball bearing 6578-02 Threaded plug
3200 Bearing housing 6581-01 Hexagon nut
3260 Bearing cover 6581-02 Hexagon nut
3853 Grease nipple 6700-01 Key
4110
4120 Stuffing box gland 6700-03 Key
4130 Gland packing 6700-04 Key
Stuffing box
housing
6700-02 Key
4131 Follower 9331 Cover plate
Page 32 of 35
Page 33

FP USER INSTRUCTIONS ENGLISH 71576286 - 07/06
8.2.3Parts list pumps 202 FP
N DESIGNATION N DESIGNATION
1130 Suction casing 4590-01 Gasket
1140 Discharge casing 4590-02 Gasket
1160 Stage casing 4610-01
1410-01 Diffuser 4610-02
1410-02 Diffuser 4610-03
1500 Casing wear ring 4610-04
2110 Pump shaft 6515 Drain plug
2250 Impeller 6569 Plug
2410 Interstage sleeve 6571 Tie bolt
2450 Shaft sleeve 6572 Stud
Round section joint
ring
Round section joint
ring
Round section joint
ring
Round section joint
ring
8.2.4 Parts list pumps 50 FP
N DESIGNATION N DESIGNATION
1130 Suction casing 3853 Grease nipple
1140 Discharge casing 4120 Gland
1150 Stage casing 4130 Gland packing
1410 Diffuser 4132
1470 Diffuser plate 4590 Gasket
1500 Casing wear ring 4610
2110 Pump shaft 6515 Drain plug
2250 Impeller 6544 Circlip
2410 Interstage sleeve 6571 Tie bolt
2450 Shaft sleeve 6572 Stud
Stuffing box neck
bush
Round section joint
ring
2540 Thrower 6577-01 Hexagon head bolt
2905 Washer 6577-02 Hexagon head bolt
2910 Shaft nut 6577-03 Hexagon headbolt
3011-01 Radial ball bearing 6578-01 Threaded plug
3011-02 Radial ball bearing 6578-02 Threaded plug
3200 Bearing housing 6581-01 Hexagon nut
3260 Bearing cover 6581-02 Hexagon nut
3853 Grease nipple 6700-01 Key
4110
4120 Stuffing box gland 6700-03 Key
4130 Gland packing 6700-04 Key
4131 Follower 9331 Cover plate
Stuffing box
housing
6700-02 Key
2520 Loose collar 6577 Hexagon head bolt
2540 Thrower 6578 Threaded plug
2905 Washer 6581-01 Hexagon nut
2910 Shaft nut 6581-02 Hexagon nut
3011-01 Radial ball bearing 6581-03 Hexagon nut
3011-02 Radial ball bearing 6700-01 Key
3200 Bearing housing 6700-02 Key
3260 Bearing cover 9331 Cover plate
Page 33 of 35
Page 34

FP USER INSTRUCTIONS ENGLISH 71576286 - 07/06
8.2.5 Parts list pumps 65 FP, 80 FP, 100 FP, 125
FP
N DESIGNATION N DESIGNATION
1130 Suction casing 4120 Gland
1140 Discharge casing 4130 Gland packing
1150 Stage casing 4132
1410 Diffuser 4590 Gasket
1470 Diffuser plate 4610
1500 Casing wear ring 6515 Drain plug
2110 Pump shaft 6544 Circlip
2250 Impeller 6571 Tie bolt
2410 Interstage sleeve 6572 Stud
2450 Shaft sleeve 6577-01 Hexagon head bolt
2520 Loose collar 6577-02 Hexagon head bolt
Stuffing box neck
bush
Round section joint
ring
9 CERTIFICATION
Certificates determined from the Contract
requirements are provided with these instructions
where applicable. Examples are certificates for CE
marking, ATEX marking etc. If required, copies of
other certificates sent separately to the Purchaser
should be obtained from the Purchaser for retention
with these User Instructions.
10 OTHER RELEVANT
DOCUMENTATION AND MANUALS
10.1 Supplementary User Instructions
Supplementary instructions such as for a driver,
instrumentation, controller, seals, sealant system etc
are provided as separate documents in their original
format. If further copies of these are required they
should be obtained from the supplier for retention
with these User Instructions.
10.2 Change notes
Ifanychanges, agreedwith Flowserve Pump Division,
aremadetotheproductafterits supply, a recordofthe
details should be maintained with these User
Instructions.
2540 Thrower 6578 Threaded plug
2905 Washer 6581-01 Hexagon nut
2910 Shaft nut 6581-02 Hexagon nut
3011-01 Radial ball bearing 6581-03 Hexagon nut
3011-02 Radial ball bearing 6581-04 Hexagon nut
3134 Support foot 6700-01 Key
3200 Bearing housing 6700-02 Key
3260 Bearing cover 9331 Cover plate
3853 Grease nipple
8.3 General arrangement drawing
Thetypicalgeneral arrangement drawingandany
specificdrawings requiredbythe contract willbesent
to thePurchaserseparately unless thecontract
specificallycallsforthesetobeincluded intotheUser
Instructions. If required, copies of other drawings
sent separately to the Purchaser should be obtained
from the Purchaser and retained with these User
Instructions.
10.3 Additional sources of information
Reference 1:
NPSH for Rotor dynamic Pumps: a reference guide,
Euro pump Guide No. 1, Euro pump & World Pumps,
Elsevier Science, United Kingdom, 1999.
Reference 2:
PumpingManual,9thedition,T.C.Dickenson,
ElsevierAdvancedTechnology, UnitedKingdom, 1995.
Reference 3:
Pump Handbook, 2ndedition, Igor J. Karassik et al,
McGraw-Hill Inc., New York, 1993.
Reference 4:
ANSI/HI 1.1-1.5, Centrifugal Pumps - Nomenclature,
Definitions, Application and Operation.
Reference 5:
ANSI B31.3 - Process Piping.
Page 34 of 35
Page 35

FP USER INSTRUCTIONS ENGLISH 71576286 - 07/06
www.flowserve.com
Repair & Service Fax:
+33243
40 58 17
Your Flowserve factory contacts:
Flowserve Pompes
Route d'Angers - 72234 ARNAGE
BP 305, 72001 LE MANS Cedex, France
Telephone (24 hours): +33 2 43 40 58 47
Sales & Admin: +33 2 43 40 57 57
Local Flowserve factory representatives:
North America:
Flowserve
5310 Taneytown Pike, PO Box 91
Taneytown, MD 21787-0091, USA
Telephone: +1 (410) 756 2602
Customer Service FAX: +1 (410) 756 2615
Parts inquiry/Order PH: +1 (800) 526 3569
FLOWSERVE REGIONAL
SALES OFFICES:
USA and Canada
Flowserve Corporation
5215 North O’Connor Blvd.,
Suite 2300
Irving, Texas 75039-5421 USA
Telephone 1 972 443 6500
Fax 1 972 443 6800
Europe, Middle East, Africa
Worthing S.P.A.
Flowserve Corporation
Via Rossini 90/92
20033 Desio (Milan) Italy
Telephone 39 0362 6121
Fax 39 0362 303396
Latin America and Caribbean
Flowserve Corporation
6840 Wynnwood Lane
Houston, Texas 77008 USA
Telephone 1 713 803 4434
Fax 1 713 803 4497
Asia Pacific
Flowserve Pte. Ltd
200 Pandan Loop #06-03/04
Pantech 21
Singapore128388
Telephone 65 6775 3003
Fax 65 6779 4607
South America:
Flowserve do Brasil Ltda
Av. Don Helder Camara, 5451
20771-001 Rio de Janerio
Tel: +55-21-2108-4000
Fax: +55-21-2108-4184
To find your local Flowserve representative please
use the Sales Support Locator System found at
 Loading...