

Page 1
hp officejet
7100 series
all-in-one
reference guide
Page 2

© Copyright Hewlett-Packard Company
2002
All rights are reserved. No part of the
document may be photocopied,
reproduced, or translated to another
language without the prior written consent of
Hewlett-Packard Company.
Portions Copyright © 1989-2001 Palomar
Software Inc. The HP OfficeJet 7100 Series
includes printer driver technology licensed
from Palomar Software, Inc.
www.palomar.com
Copyright © 1999-2001 Apple Computer,
Inc.
Apple, the Apple logo, Mac, Mac logo,
Macintosh, and Mac OS are trademarks of
Apple Computer, Inc., registered in the U.S.
and other countries.
Publication number: C8380-90183
First edition: September 2001
Printed in U.S.A., Mexico, Germany,
Singapore, or China
®
Windows
ME
are U.S.-registered trademarks of Microsoft
Corporation.
Intel
trademarks of Intel Corporation.
, Windows NT®, Windows
®
, Windows XP®, and Windows 2000®
®
and Pentium® are registered
notice
The information contained in this document
is subject to change without notice and
should not be construed as a commitment by
the Hewlett-Packard Company.
Hewlett-Packard assumes no
responsibility for any errors that
may appear in this document, nor
does it make expressed or implied
warranty of any kind with regard to
this material, including, but not
limited to, the implied warranties of
merchantability and fitness for a
particular purpose.
The Hewlett-Packard Company shall not be
liable for incidental or consequential
damages in connection with, or arising out
of the furnishing, performance, or use of this
document and the program material which it
describes.
Note: Regulatory information can be found
in the “Technical information” section of the
Support and Specifications Booklet.
It is not lawful in many places to make
copies of the following items. When in
doubt, check with a legal representative first.
• Governmental paper or documents:
- Passports
- Immigration papers
- Selective service papers
- Identification badges, cards, or
insignias
• Governmental stamps:
- Postage stamps
- Food stamps
• Checks or drafts drawn on
Governmental agencies
• Paper currency, traveler’s checks, or
money orders
• Certificates of deposit
•Copyrighted works
safety information
Warning! To
prevent fire or
shock hazard,
do not expose
this product to
rain or any type
of moisture.
Always follow basic safety precautions when
using this product to reduce risk of injury
from fire or electric shock.
WARNING: potential shock
hazard
1 Read and understand all instructions in
the setup poster.
2 Use only a grounded electrical outlet
when connecting the unit to a power
source. If you do not know whether the
outlet is grounded, check with a
qualified electrician.
3 Observe all warnings and instructions
marked on the product.
4 Unplug this product from wall outlets
before cleaning.
5 Do not install or use this product near
water or when you are wet.
6 Install the product securely on a stable
surface.
7 Install the product in a protected
location where no one can step on or
trip over the line cord, and where the
line cord will not be damaged.
8 If the product does not operate
normally, see the online
Troubleshooting help.
9 No operator-serviceable parts inside.
Refer servicing to qualified service
personnel.
10 Use in a well-ventilated area.
Page 3

contents
1 get help . . . . . . . . . . . . . . . . . . . . . . . . . . . . . . . . . . . . . . . . . . . 1
2 quick start . . . . . . . . . . . . . . . . . . . . . . . . . . . . . . . . . . . . . . . . . 3
tutorial . . . . . . . . . . . . . . . . . . . . . . . . . . . . . . . . . . . . . . . . . . . . . . 3
before you begin. . . . . . . . . . . . . . . . . . . . . . . . . . . . . . . . . . . . . 3
front panel features . . . . . . . . . . . . . . . . . . . . . . . . . . . . . . . . . . . 3
make a copy . . . . . . . . . . . . . . . . . . . . . . . . . . . . . . . . . . . . . . . 5
enhance your copy . . . . . . . . . . . . . . . . . . . . . . . . . . . . . . . . . . . 5
copy from the automatic document feeder . . . . . . . . . . . . . . . . . . . 6
menu button review . . . . . . . . . . . . . . . . . . . . . . . . . . . . . . . . . . . 6
front panel overview. . . . . . . . . . . . . . . . . . . . . . . . . . . . . . . . . . . . . 8
use your hp officejet with a computer . . . . . . . . . . . . . . . . . . . . . . . . 10
review the hp director . . . . . . . . . . . . . . . . . . . . . . . . . . . . . . . . 10
hp officejet menu functions . . . . . . . . . . . . . . . . . . . . . . . . . . . . . . . 13
3 load originals and load paper. . . . . . . . . . . . . . . . . . . . . . . . . . 15
print using 4800 optimized dpi . . . . . . . . . . . . . . . . . . . . . . . . . . . . 15
print using 4800 optimized dpi in Windows. . . . . . . . . . . . . . . . . 15
print using 4800 optimized dpi in Macintosh OS 9 . . . . . . . . . . . . 16
print using 4800 optimized dpi in Macintosh OS X . . . . . . . . . . . . 17
load originals . . . . . . . . . . . . . . . . . . . . . . . . . . . . . . . . . . . . . . . . 17
load originals on the glass . . . . . . . . . . . . . . . . . . . . . . . . . . . . . 17
load originals in the automatic document feeder . . . . . . . . . . . . . . 18
load paper . . . . . . . . . . . . . . . . . . . . . . . . . . . . . . . . . . . . . . . . . . 19
load envelopes . . . . . . . . . . . . . . . . . . . . . . . . . . . . . . . . . . . . . . . 20
tips for loading other types of paper in the main tray . . . . . . . . . . . . . 22
choose the paper tray and set the paper type . . . . . . . . . . . . . . . . . . 23
set the paper size. . . . . . . . . . . . . . . . . . . . . . . . . . . . . . . . . . . . . . 24
learn more . . . . . . . . . . . . . . . . . . . . . . . . . . . . . . . . . . . . . . . . . . 24
4 use the scan features. . . . . . . . . . . . . . . . . . . . . . . . . . . . . . . . . 25
scan an original . . . . . . . . . . . . . . . . . . . . . . . . . . . . . . . . . . . . . . 25
scan to a different software program . . . . . . . . . . . . . . . . . . . . . . 26
stop scanning . . . . . . . . . . . . . . . . . . . . . . . . . . . . . . . . . . . . . . . . 26
learn more . . . . . . . . . . . . . . . . . . . . . . . . . . . . . . . . . . . . . . . . . . 26
5 use the copy features . . . . . . . . . . . . . . . . . . . . . . . . . . . . . . . . 27
make copies . . . . . . . . . . . . . . . . . . . . . . . . . . . . . . . . . . . . . . . . . 27
make a copy . . . . . . . . . . . . . . . . . . . . . . . . . . . . . . . . . . . . . . 27
increase copy speed or quality . . . . . . . . . . . . . . . . . . . . . . . . . . 27
reduce or enlarge a copy. . . . . . . . . . . . . . . . . . . . . . . . . . . . . . 28
make copies lighter or darker . . . . . . . . . . . . . . . . . . . . . . . . . . . 28
change color intensity . . . . . . . . . . . . . . . . . . . . . . . . . . . . . . . . 28
enhance text sharpness and photo colors . . . . . . . . . . . . . . . . . . . 28
i
Page 4

contents
set the number of copies . . . . . . . . . . . . . . . . . . . . . . . . . . . . . . .29
change settings for all copy tasks . . . . . . . . . . . . . . . . . . . . . . . . .29
perform special copy jobs. . . . . . . . . . . . . . . . . . . . . . . . . . . . . . . . .30
copy at 4800 optimized dpi . . . . . . . . . . . . . . . . . . . . . . . . . . . .30
copy a photo . . . . . . . . . . . . . . . . . . . . . . . . . . . . . . . . . . . . . . .30
fit a copy to the page . . . . . . . . . . . . . . . . . . . . . . . . . . . . . . . . .31
print several copies on one page . . . . . . . . . . . . . . . . . . . . . . . . .31
print two originals on one page . . . . . . . . . . . . . . . . . . . . . . . . . . 32
shift image to increase the margin . . . . . . . . . . . . . . . . . . . . . . . .33
make two-sided copies . . . . . . . . . . . . . . . . . . . . . . . . . . . . . . . .33
collate copies. . . . . . . . . . . . . . . . . . . . . . . . . . . . . . . . . . . . . . .34
make a poster . . . . . . . . . . . . . . . . . . . . . . . . . . . . . . . . . . . . . .34
prepare a color T-shirt transfer . . . . . . . . . . . . . . . . . . . . . . . . . . .35
stop copying. . . . . . . . . . . . . . . . . . . . . . . . . . . . . . . . . . . . . . . . . .36
learn more . . . . . . . . . . . . . . . . . . . . . . . . . . . . . . . . . . . . . . . . . . .36
copy setup menu options . . . . . . . . . . . . . . . . . . . . . . . . . . . . . . . . .36
6 use a photo card . . . . . . . . . . . . . . . . . . . . . . . . . . . . . . . . . . . . 37
what is a photo card? . . . . . . . . . . . . . . . . . . . . . . . . . . . . . . . . . . .37
insert a photo card . . . . . . . . . . . . . . . . . . . . . . . . . . . . . . . . . . . . .37
cards inserted incorrectly . . . . . . . . . . . . . . . . . . . . . . . . . . . . . . .38
save files to the computer . . . . . . . . . . . . . . . . . . . . . . . . . . . . . . . . .38
view and edit image files . . . . . . . . . . . . . . . . . . . . . . . . . . . . . . . . .38
use the hp photo view center . . . . . . . . . . . . . . . . . . . . . . . . . . . .38
use the hp workplace . . . . . . . . . . . . . . . . . . . . . . . . . . . . . . . . .39
print from a photo card . . . . . . . . . . . . . . . . . . . . . . . . . . . . . . . . . .39
print a proof sheet . . . . . . . . . . . . . . . . . . . . . . . . . . . . . . . . . . .39
print all photos . . . . . . . . . . . . . . . . . . . . . . . . . . . . . . . . . . . . . .40
print individual photos. . . . . . . . . . . . . . . . . . . . . . . . . . . . . . . . .40
print a DPOF file. . . . . . . . . . . . . . . . . . . . . . . . . . . . . . . . . . . . .41
use a proof sheet. . . . . . . . . . . . . . . . . . . . . . . . . . . . . . . . . . . . . . .41
fill out the proof sheet . . . . . . . . . . . . . . . . . . . . . . . . . . . . . . . . .41
scan a proof sheet . . . . . . . . . . . . . . . . . . . . . . . . . . . . . . . . . . .42
learn more . . . . . . . . . . . . . . . . . . . . . . . . . . . . . . . . . . . . . . . . . . .43
photo card functions menu options. . . . . . . . . . . . . . . . . . . . . . . . . . .44
7 use the fax features . . . . . . . . . . . . . . . . . . . . . . . . . . . . . . . . . .45
send a fax . . . . . . . . . . . . . . . . . . . . . . . . . . . . . . . . . . . . . . . . . . .45
send a fax from your hp officejet. . . . . . . . . . . . . . . . . . . . . . . . . .45
use speed dial entries to send a fax . . . . . . . . . . . . . . . . . . . . . . .46
send a color fax . . . . . . . . . . . . . . . . . . . . . . . . . . . . . . . . . . . . .46
broadcast a fax to multiple recipients . . . . . . . . . . . . . . . . . . . . . . 47
schedule a fax . . . . . . . . . . . . . . . . . . . . . . . . . . . . . . . . . . . . . . . . 47
cancel a scheduled fax . . . . . . . . . . . . . . . . . . . . . . . . . . . . . . . .47
receive a fax. . . . . . . . . . . . . . . . . . . . . . . . . . . . . . . . . . . . . . . . . .48
receive a fax automatically. . . . . . . . . . . . . . . . . . . . . . . . . . . . . .48
receive a fax manually . . . . . . . . . . . . . . . . . . . . . . . . . . . . . . . .48
print reports . . . . . . . . . . . . . . . . . . . . . . . . . . . . . . . . . . . . . . . . . .48
generate automated reports . . . . . . . . . . . . . . . . . . . . . . . . . . . . .49
ii
hp officejet 7100 series
Page 5

generate manual reports . . . . . . . . . . . . . . . . . . . . . . . . . . . . . . 49
redial a number automatically . . . . . . . . . . . . . . . . . . . . . . . . . . . . . 49
adjust the volume. . . . . . . . . . . . . . . . . . . . . . . . . . . . . . . . . . . . . . 50
set up speed dialing. . . . . . . . . . . . . . . . . . . . . . . . . . . . . . . . . . . . 50
create individual speed-dial settings. . . . . . . . . . . . . . . . . . . . . . . 50
create group speed-dial settings . . . . . . . . . . . . . . . . . . . . . . . . . 50
set the date and time . . . . . . . . . . . . . . . . . . . . . . . . . . . . . . . . . . . 51
set the fax header . . . . . . . . . . . . . . . . . . . . . . . . . . . . . . . . . . . . . 52
enter text . . . . . . . . . . . . . . . . . . . . . . . . . . . . . . . . . . . . . . . . . . . 52
reprint the faxes in memory . . . . . . . . . . . . . . . . . . . . . . . . . . . . . . . 53
use an answering machine or pc modem . . . . . . . . . . . . . . . . . . . . . 53
learn more . . . . . . . . . . . . . . . . . . . . . . . . . . . . . . . . . . . . . . . . . . 54
fax feature menu options. . . . . . . . . . . . . . . . . . . . . . . . . . . . . . . . . 55
8 maintain your hp officejet . . . . . . . . . . . . . . . . . . . . . . . . . . . . . 57
clean the glass . . . . . . . . . . . . . . . . . . . . . . . . . . . . . . . . . . . . . . . 57
clean the lid backing . . . . . . . . . . . . . . . . . . . . . . . . . . . . . . . . . . . 57
clean the exterior . . . . . . . . . . . . . . . . . . . . . . . . . . . . . . . . . . . . . . 57
install the automatic document feeder . . . . . . . . . . . . . . . . . . . . . . . . 58
work with printheads and ink cartridges . . . . . . . . . . . . . . . . . . . . . . 58
print a self-test report . . . . . . . . . . . . . . . . . . . . . . . . . . . . . . . . . 58
check the ink level . . . . . . . . . . . . . . . . . . . . . . . . . . . . . . . . . . . 58
perform color calibration . . . . . . . . . . . . . . . . . . . . . . . . . . . . . . 59
handle printheads . . . . . . . . . . . . . . . . . . . . . . . . . . . . . . . . . . . 59
verify a printhead needs to be replaced . . . . . . . . . . . . . . . . . . . . 59
replace the printheads . . . . . . . . . . . . . . . . . . . . . . . . . . . . . . . . 61
handle ink cartridges. . . . . . . . . . . . . . . . . . . . . . . . . . . . . . . . . 63
replace the ink cartridges. . . . . . . . . . . . . . . . . . . . . . . . . . . . . . 63
align the printheads. . . . . . . . . . . . . . . . . . . . . . . . . . . . . . . . . . 65
clean the printheads . . . . . . . . . . . . . . . . . . . . . . . . . . . . . . . . . 66
clean the ink cartridge contacts. . . . . . . . . . . . . . . . . . . . . . . . . . 66
clean the printhead contacts. . . . . . . . . . . . . . . . . . . . . . . . . . . . 67
replacement alternatives. . . . . . . . . . . . . . . . . . . . . . . . . . . . . . . 69
override the ink level gauge . . . . . . . . . . . . . . . . . . . . . . . . . . . . 70
restore factory defaults . . . . . . . . . . . . . . . . . . . . . . . . . . . . . . . . . . 70
set the country or language. . . . . . . . . . . . . . . . . . . . . . . . . . . . . . . 71
set the power save mode time . . . . . . . . . . . . . . . . . . . . . . . . . . . . . 72
maintenance menu options . . . . . . . . . . . . . . . . . . . . . . . . . . . . . . . 73
contents
9 additional setup information . . . . . . . . . . . . . . . . . . . . . . . . . . . 75
possible installation problems . . . . . . . . . . . . . . . . . . . . . . . . . . . . . 75
selecting an hp officejet on a network (Macintosh) . . . . . . . . . . . . . . . 76
connect your hp officejet to your computer . . . . . . . . . . . . . . . . . . . . 77
connect your parallel cable adapter . . . . . . . . . . . . . . . . . . . . . . 77
setup for simple sharing . . . . . . . . . . . . . . . . . . . . . . . . . . . . . . . 78
connect your usb port . . . . . . . . . . . . . . . . . . . . . . . . . . . . . . . . 78
connect your hp officejet to a phone, modem, or answering machine . . 79
remove and reinstall your hp officejet software. . . . . . . . . . . . . . . . . . 79
learn more . . . . . . . . . . . . . . . . . . . . . . . . . . . . . . . . . . . . . . . . . . 80
reference guide
iii
Page 6

contents
index. . . . . . . . . . . . . . . . . . . . . . . . . . . . . . . . . . . . . . . . .81
iv
hp officejet 7100 series
Page 7
get help
1
help description win mac
Setup Poster The Setup Poster provides instructions for setting up and
configuring your HP Officejet. Make sure you use the correct
poster for your operating system (Windows or Macintosh).
Product Tour The tour provides a brief introduction to the HP Officejet and
its capabilities, so you can start using it immediately. You can
take the tour immediately after installing the HP Officejet
software, or to take the tour at any time, do the following:
1 Double-click the HP Officejet 7100 Series shortcut on
the Windows desktop.
2 In the HP Director, click Help, then choose Product Tour.
3 After the Product Tour dialog box appears, insert the
HP Officejet 7100 Series CD-ROM into your computer’s
CD-ROM drive, and click Search.
User’s Guide The onscreen User’s Guide provides detailed information on
using your HP Officejet and its features. It also provides
detailed information on topics ranging from paper types to
using other programs with your HP Officejet.
For Windows users: Go to the Director, click Help, and then
choose User’s Guide.
For Macintosh users: Go to the Director, click Tools, and then
choose View Onscreen Guide.
Reference Guide This printed Reference Guide contains information on using
your HP Officejet and provides additional troubleshooting
assistance for the installation process.
Support and
Specifications
booklet
Troubleshooting
help
Internet help and
technical support
The printed Support and Specifications booklet provides
information for your HP Officejet, including how to order
supplies and accessories, technical specifications, support,
and warranty information.
To access troubleshooting information, go to the Director,
click Help, then choose Troubleshooting. Troubleshooting is
also available via the Help button that appears on some error
messages.
If you have Internet access, you can get help from the
HP website at:
www.hp.com/support
The website also provides answers to frequently-asked
questions.
XX
X
XX
XX
XX
X
XX
1
Page 8
chapter 1
help description win mac
Readme file After you install your software, you can access the Readme
XX
file from either the HP Officejet 7100 Series CD-ROM or the
HP Officejet 7100 Series program folder. To access the
Readme file, do the following:
For Windows: go to the Windows taskbar, click Start, point
to Programs or All Programs (XP), point to Hewlett-Packard,
point to HP Officejet 7100 Series, and then choose View the
Readme File.
For Macintosh: go to the
HD:Applications:HP Officejet Software folder.
Dialog-box help For Windows: Clicking Help in a dialog box displays
X
information about options and settings within the dialog box.
To get help while working in a
dialog box, click Help.
Accessories guide The Accessories guide provides information on attaching and
setting up the HP 250-sheet plain paper tray, as well as how
to load paper into it. It also includes information about the
two-sided printing accessory.
2
hp officejet 7100 series
XX
Page 9

2
tutorial
quick start
You can perform many functions using either the front panel or the HP Officejet
software.
Even if you do not connect your HP Officejet to a computer, you can use the front
panel to copy, print photos, or fax documents. You can change a wide variety
of settings using the front-panel buttons and menu system.
This brief tutorial teaches you how to use your HP Officejet to make a copy,
adjust copy settings, and change settings. This is not a comprehensive tutorial;
its purpose is to familiarize you with the front panel and the different buttons. It
should take about ten minutes to complete the tutorial, after which you can
experiment on your own.
Note: We highly recommend that you take this tutorial before you start
using your HP Officejet for daily tasks.
Review the table of contents or the index to find out about the other front-panel
tasks covered in this Reference Guide.
before you begin
Do the following:
• Follow the instructions in the Setup Poster to set up your HP Officejet. You
should install the HP Officejet software before connecting the HP Officejet
to the computer.
• If you are using Macintosh OS X, once the HP Officejet software is
installed, add your printer to the Print Center. For more information, see
add your hp officejet in the onscreen User’s Guide.
• Make sure paper is loaded in the main tray. If you need more information,
see load paper on page 19.
• Have available a color photograph or picture that is smaller than Letter or
A4 size. You will use this image for tutorial activities.
• Obtain a two or three-page document. You will use it for tutorial activities.
front panel features
The front panel is divided into the following main regions:
• Fax area
• Keypad
• Shared buttons and front-panel display
•Copy area
•Scan area
•On button
3
Page 10
chapter 2
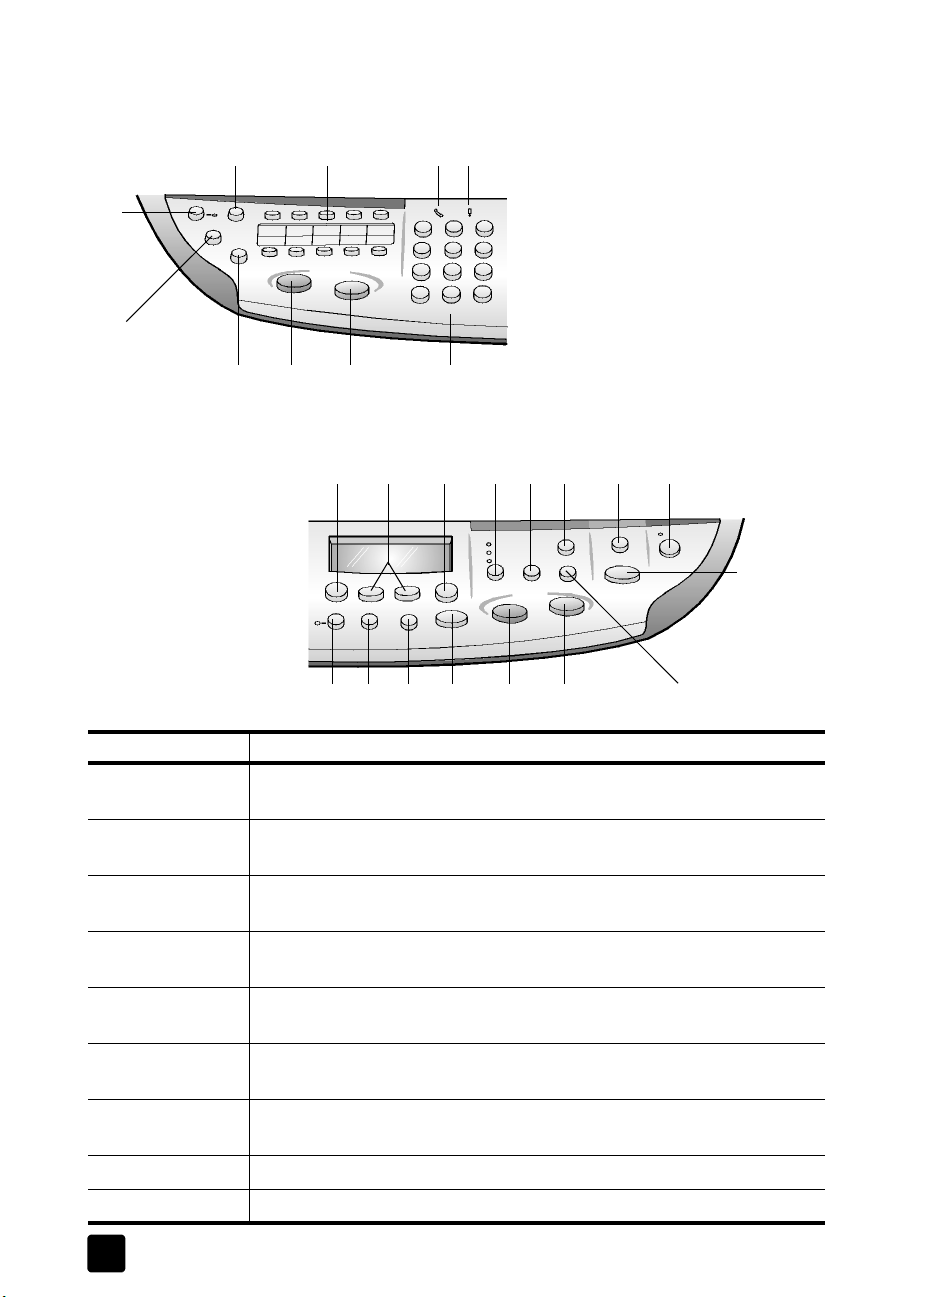
d
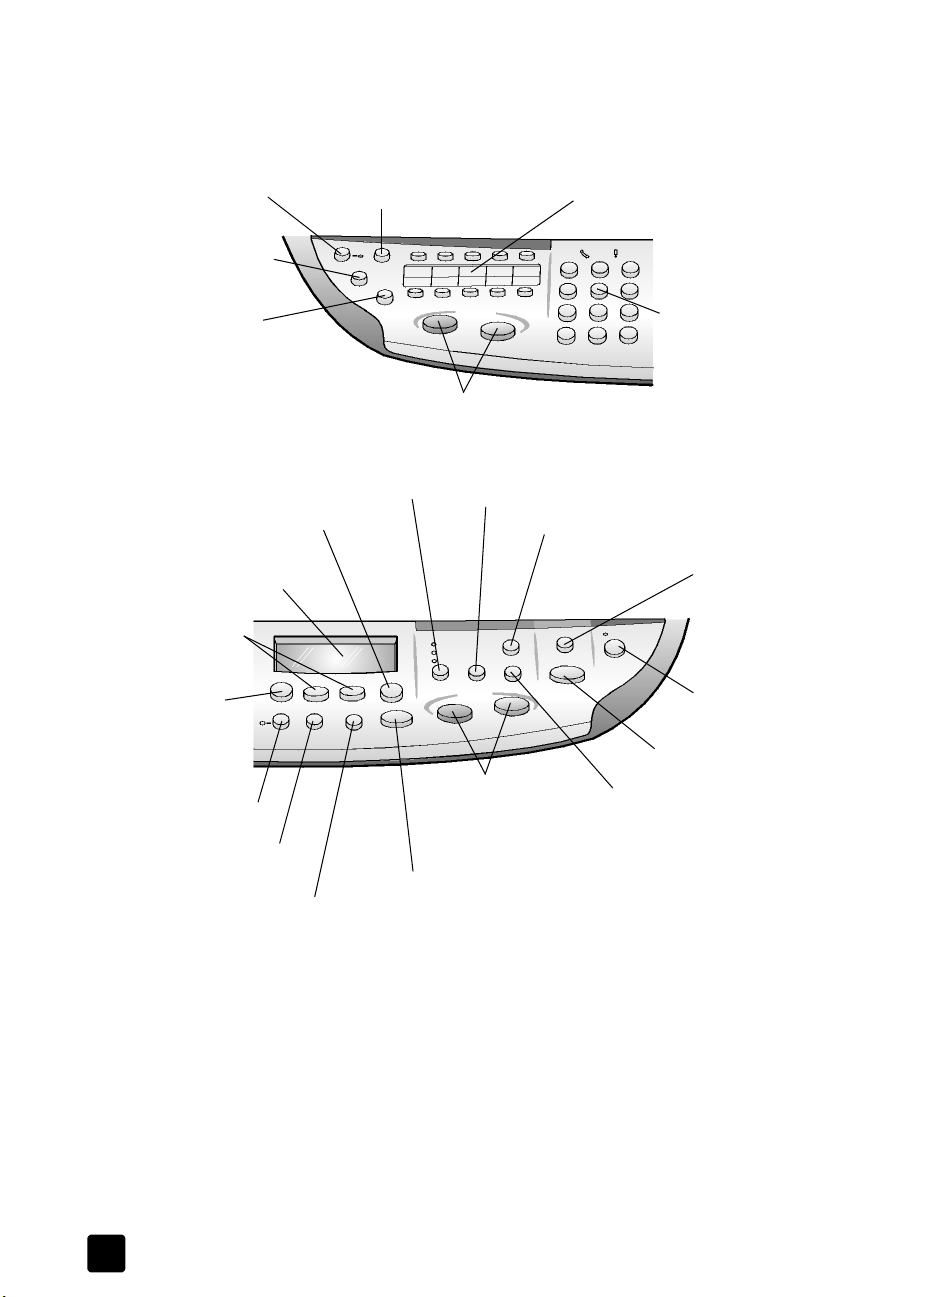
Review the illustrations below and identify the location of the buttons on the front
panel. You will not use all of the front-panel features in the tutorial, but you may
find it helpful to note the locations of all the buttons.
Left side of the front panel showing the Fax area and the keypa
Turn Auto Answer on/off.
Change the fax resolution.
Redials the most recently
dialed number.
Right side of the front panel showing the shared buttons and front-panel display, the Copy area, and
the Scan area
Select a currently displayed menu
item or value.
Front-panel display.
Scroll through settings
options.
Access photo card,
copy, fax, scan, and
network settings
options.
Make two-sided copies.
Choose the paper type and
paper tray.
Scroll through speed-dial entries.
Start fax.
Set the copy quality.
Stop a job or exit a menu.
Access one-touch speed-dial buttons.
Choose the number of copies.
Reduce or enlarge a copy.
Start a copy.
Access special copy features,
such as Fit to Page, Mirror,
MarginShift, or Poster.
Use keypad to dial fax
numbers or enter text.
Select a specific
software program
to scan to, or a
computer, if on a
network
Turn the
HP Officejet on
or off.
Start a scan.
Make brightness and contrast adjustments when faxing and copying.
4
hp officejet 7100 series
Page 11
make a copy
Follow the instructions below to make a copy of your color photo or picture.
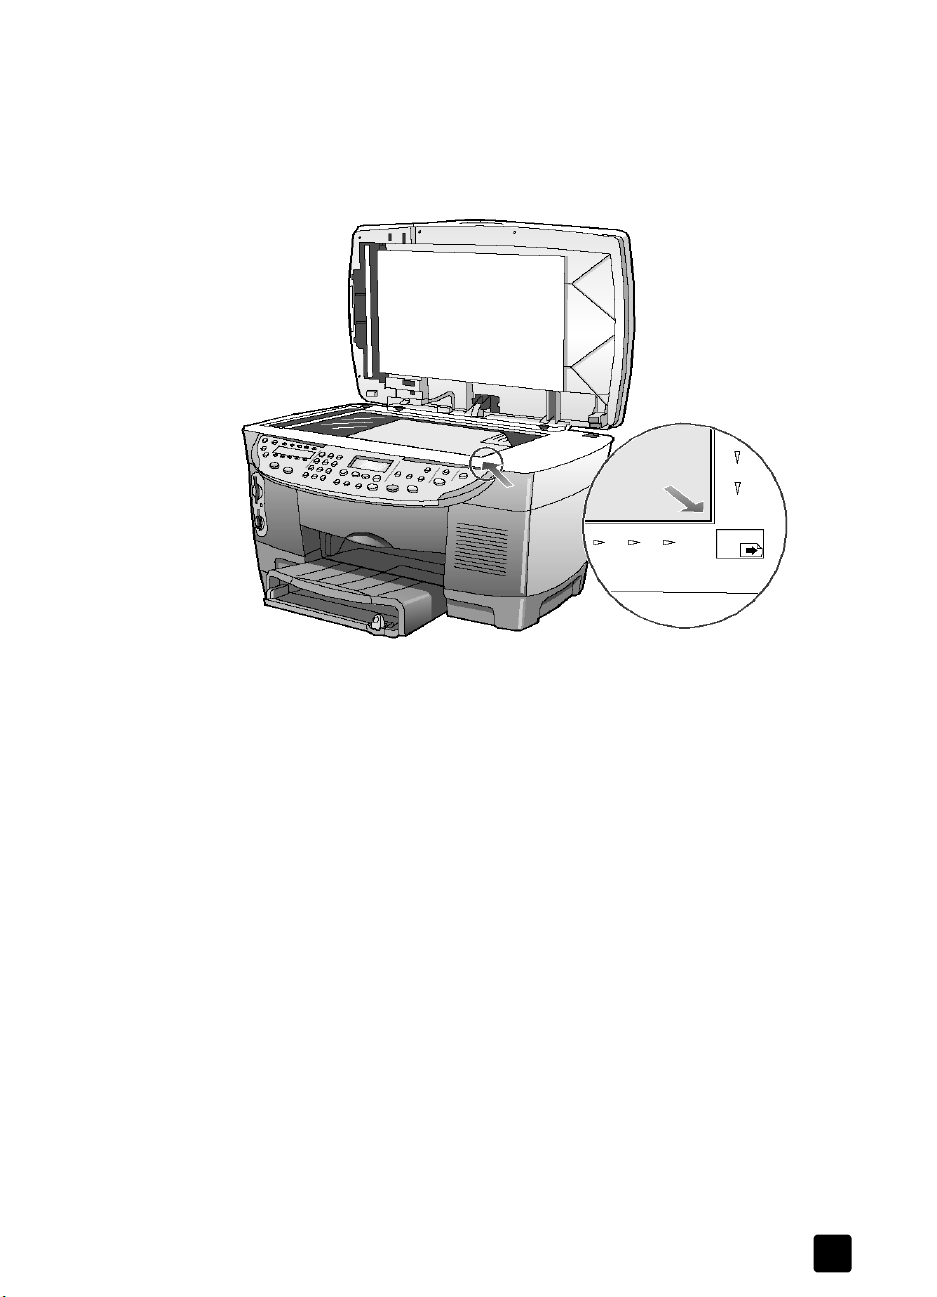
1 Open the lid of your HP Officejet and place your picture face down in the
quick start
bottom-right corner of the scanner glass with the sides of the picture
touching the right and bottom edges.
Top edge of
original
2 In the Copy area of the front panel, press Start Copy, Color.
If you had wanted to save the picture to the computer, you would have
pressed Start Scan. If you had wanted to fax the picture, you would have
pressed the Black or Color button in the Fax area. For this tutorial, you will
continue making a copy.
The default is a single copy. Pressing the Start Copy, Color button on the
HP Officejet automatically prints one color copy of the picture on the glass.
If you had pressed the Start Copy, Black button, the HP Officejet would
have made a single grayscale copy of your color picture.
enhance your copy
1 Without moving your photo or picture from the glass, press the Number of
Copies button two times until 2 Copies is showing.
2 Press Start Copy, Black on the front panel.
The HP Officejet makes two black and white copies of your picture.
Notice that you did not have to do anything else but select the number of
copies and press a start key. Now you will change an additional setting
before making more copies.
3 Press Number of Copies one more time to increase the copies to 3.
4 Press the Reduce/Enlarge button.
Custom 100% appears in the front-panel display.
Use this option to reduce or enlarge your picture.
reference guide
5
Page 12
chapter 2
5 Press 5 and then the 0 button on the keypad so that 50% appears, then
press Enter.
6 Press Color on the front panel.
The HP Officejet prints three color copies of your picture, reduced by
50%.
If you do not do anything else with your HP Officejet, the settings that you
adjusted will return to their default settings within two minutes. The number
of copies returns to one and the copy percentage returns to 100%.
7 If you do not want to wait, press Cancel.
Next you will use one of the Special Features options to enlarge your
photograph.
8 Press Special Features until Fit to Page appears.
9 Press Enter.
10 Press Start Copy, Black or Start Copy, Color.
A copy of your picture is printed, which fills the whole page.
Next, you will review the automatic document feeder.
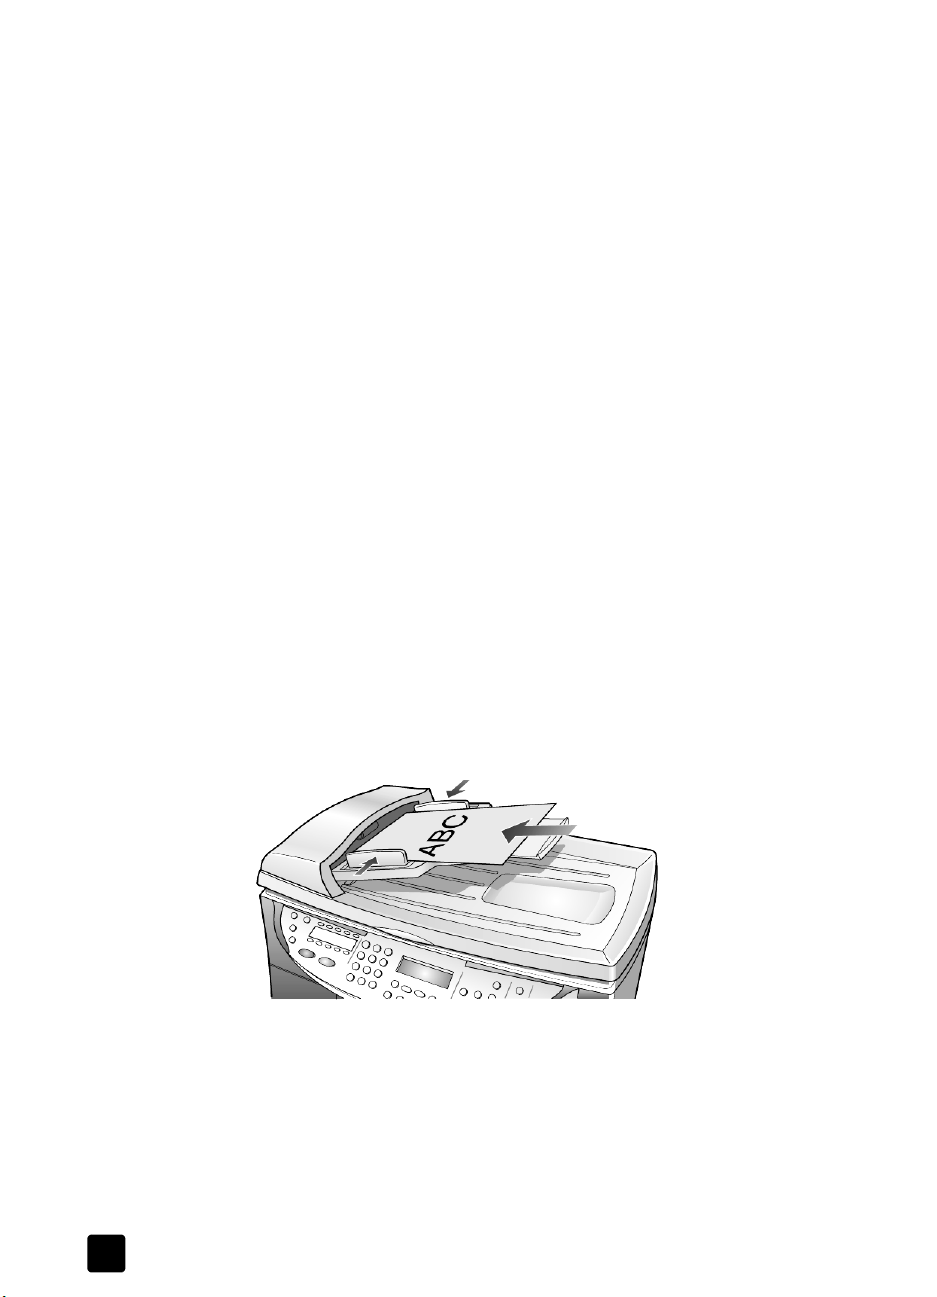
copy from the automatic document feeder
Your HP Officejet has an automatic document feeder (ADF), which you can use
to load multiple originals for faster copying, faxing, or scanning. In the next part
of this tutorial, you are going to make a fast copy of your two or three-page
document.
1 Remove the photo from the glass.
2 Place the two or three originals face-up in the automatic document feeder.
3 Adjust the paper-width guide to fit the size of your original.
A message appears on the front-panel display indicating that the originals
are loaded.
menu button review
6
4 Press the Quality button until Fast is lit.
5 Press Start Copy, Black or Start Copy, Color.
The documents are fed through the ADF and are quickly copied.
Next, you will review the Menu button.
The Menu button lets you enter the menu system that you use to change photo
card, fax, and copy settings, as well as perform maintenance and print reports.
hp officejet 7100 series
Page 13

1 Press Menu.
The first submenu appears, which depends on what model of HP Officejet
you have.
2 Press Menu repeatedly to view all the submenus.
The submenus are as follows:
– 0:Photo Card (some models)
–1:Copy Setup
– 2:Fax Functions
– 3:Print Report
– 4:Speed Dial Setup
– 5:Basic Fax Setup
– 6:Advanced Fax Setup
– 7:Status and Maintenance
– 8:Network Setup (if network hardware is installed, advanced users
only)
Some options are available only on certain models of your HP Officejet.
3 Press Menu.
4 Press 7, then press 1.
This selects Status and Maintenance, then selects the Check Ink Level.
The ink supply levels for both the black ink cartridge (#14) and the tri-color
ink cartridge (#14) appear in the front-panel display.
5 Press Cancel to clear the front-panel display, if desired.
This concludes the brief tutorial.
Review the rest of this Reference Guide to find out how to make other
changes and use other features.
quick start
reference guide
7
Page 14
chapter 2
f
l
front panel overview
t side of the front pane
Le
24
1
6
3
5
7
89
Right side of the front panel
12 13
10
2219 23 2420 21
1411 15
16
17 18
26
25
feature purpose
1 Auto Answer: when the green light is on, fax transmissions will
automatically be accepted.
2 Speed Dial: use to access speed-dial numbers that have been set up from
the front panel or with the HP Director software.
3 One-Touch Speed-Dial Buttons: use to access the first 10 speed-dial
entries.
4 Phone Hook: the green LED in the shape of a phone indicates that the fax
line is in use when lit.
5 Needs Attention: the amber LED in the shape of an exclamation point
indicates that the device needs attention.
6 Resolution: use to set the fax resolution to Fine, Standard, 300 dpi, or
Photo. It will remain at the most recent setting until changed.
7 Pause/Redial: redials the most recently dialed number when in the ready
state. Inserts a pause (hyphen) when in the dialing state.
8 Start Fax - Black: starts a black and white fax.
9 Start Fax - Color: starts a color fax.
8
hp officejet 7100 series
Page 15

feature purpose
10 Keypad: use to dial fax numbers, and enter numbers such as the quantity
of copies or percentages when reducing or enlarging. You can also enter
text using the keypad.
11 Menu: use to access the menu system. The menus that are available
depend which model of the HP Officejet you have. Menu options include;
Photo Card Functions, Copy Setup, Fax Functions, Print Report, Speed
Dial Setup, Basic Fax Setup, Advanced Fax Setup, Status & Maintenance,
and Network Setup.
12 Arrows: use to scroll through menu settings, through options within
settings, or to move forward or backward to erase a text entry.
13 Enter: use to select or save the displayed setting.
14 Quality: use to select the quality of the copy from Best, Normal, or Fast.
15 Number of Copies: use to change the number of copies for this copy job.
This button can be used in conjunction with the arrow keys or the keypad
to make additional copies.
16 Reduce/Enlarge: use to reduce or enlarge an original to a specified
image size on paper loaded in the selected tray. The original may be fed
from the automatic document feeder (ADF) or placed on the glass.
17 Scan To: use to access a list of software programs that an image can be
scanned to. You must configure the Scan To list using the HP Officejet
software on the PC prior to using this feature.
quick start
18 On: turns the HP Officejet on and off.
19 Two-Sided Copy: use to make hands-free two-sided copies. Available only
20 Tray Select/Paper Type: use to select the paper type. The main paper tray
21 Lighter/Darker: use to adjust the lightness and darkness of the copies you
22 Cancel: use to stop a job, exit a menu, or exit button settings.
23 Start Copy - Black: use to start a black and white copy.
24 Start Copy - Color: use to start a color copy.
25 Special Features: use to access options that let you reduce or enlarge to
reference guide
if you have the two-sided printing accessory and the automatic document
feeder (ADF).
supports plain paper and specialty papers. If your HP Officejet has the
250-sheet plain paper tray, use this button to select both the paper type
and the paper tray to use.
make and the faxes you send.
a specified copy image size on paper loaded in the selected tray. The
options are Normal, Fit to Page, Which Size?, Poster, 2 on 1, MarginShift
and Mirror.
9
Page 16

chapter 2
feature purpose
26 Start Scan: use to start the scan of an original from the ADF or the glass
to the designated Scan To destination. If no change was made to the Scan
To destination, the image will be scanned to the HP Photo View Center
(Windows) or HP Scan Window (Macintosh) if the HP Officejet software
is installed.
use your hp officejet with a computer
If you installed the HP Officejet software on your computer according to the
Setup Poster, you can access all the features of the HP Officejet using the
HP Director.
review the hp director
The HP Director is available through the desktop shortcut.
For Windows Users: Do one of the following:
• Double-click the HP Officejet 7100 Series shortcut on the Windows
desktop.
• In the Windows taskbar, click Start, point to Programs or All Programs
(XP), point to Hewlett-Packard, choose HP Officejet 7100 Series, then
choose HP Director.
For Macintosh Users: Double-click the HP Director icon on the desktop.
See the HP Officejet 7100 Series: Onscreen User’s Guide for comprehensive
onscreen information about the Director.
For Windows Users: Go to the HP Director, click Help, and then choose User’s
Guide.
For Macintosh Users: Go to the HP Director, click Tools, and then choose View
Onscreen Guide.
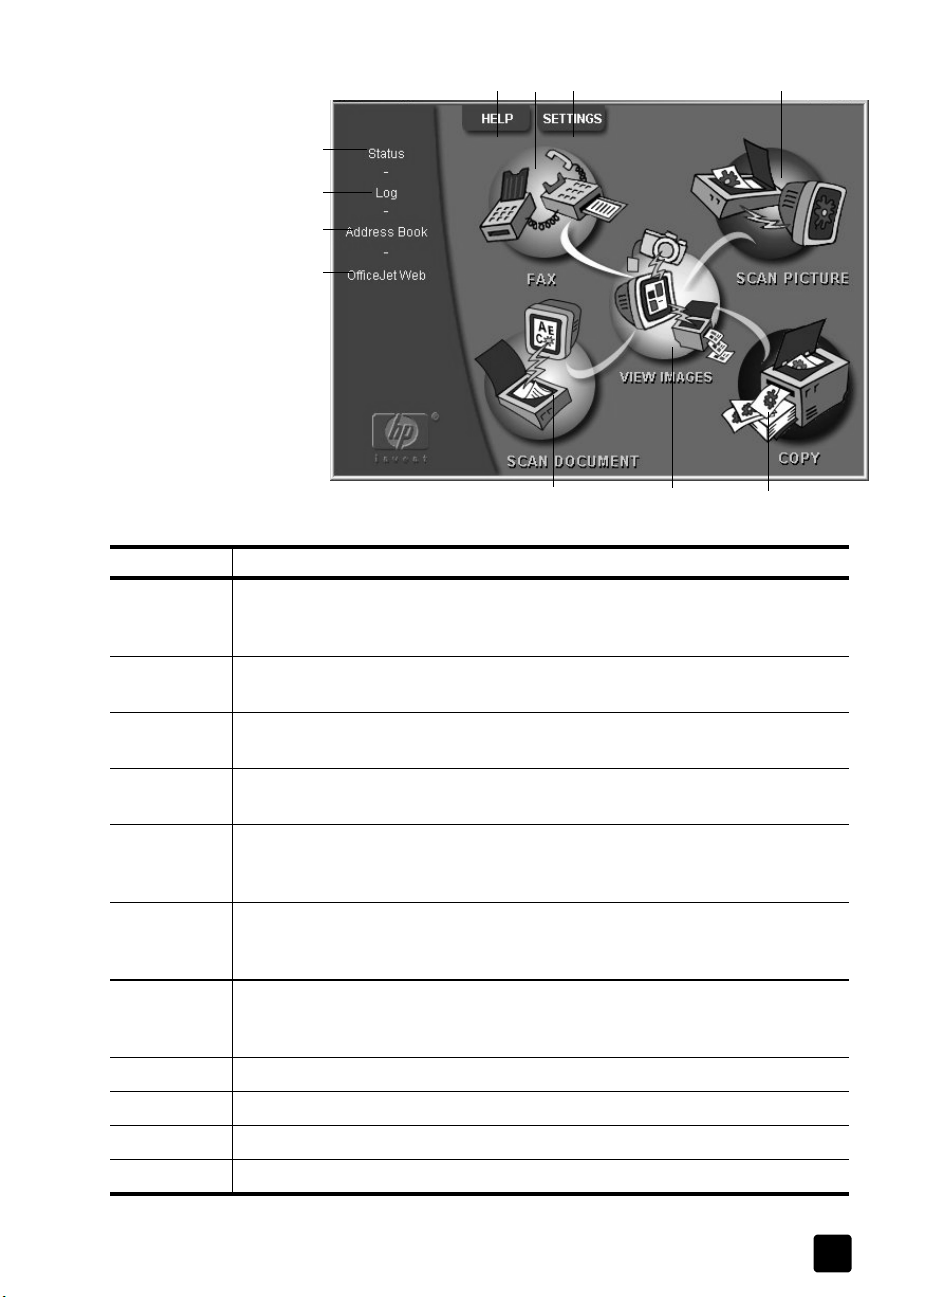
The following figure shows some of the features available through the
HP Director for Windows.
10
hp officejet 7100 series
Page 17
quick start
21
3
11
10
9
8
feature purpose
1 Help: provides access to onscreen assistance in the form of an onscreen User’s
Guide, Troubleshooting, Product Tour, Director Help, and information about
your HP Officejet.
4
567
2 Fax: displays the Send Fax dialog box where you can enter the fax recipient
information, specify the fax quality and color, and start a fax job.
3 Settings: displays dialog boxes that allow you to view or change various
settings for print, scan, copy, photo card, Director, maintenance, and fax.
4 Scan Picture: scans a picture and displays it in the HP Photo View Center after
first previewing it in the HP Image Viewer.
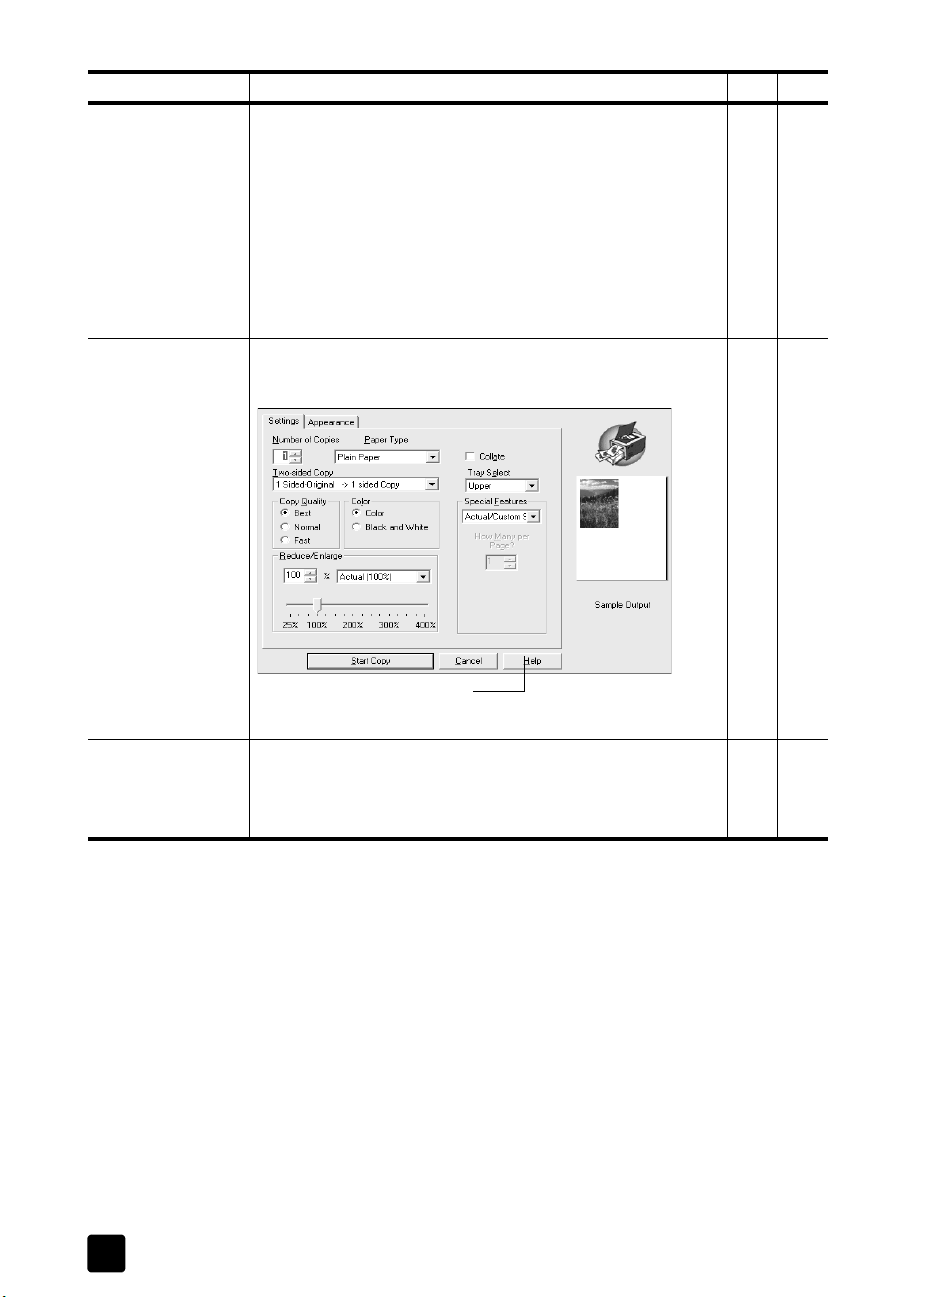
5 Copy: displays the Copy dialog box where you can select the paper type,
number of copies, the color, the size, the Creative Copy features, and start a
copy.
6 View Images: displays the Photo View Center, where you can view and edit
images, use creative printing, make and print a photo album, print, e-mail, or
fax an image, upload an image to the web, or save an image.
7 Scan Document: scans the document and displays it in the HP Image Viewer for
previewing. After you accept the preview, the document is scanned into the text
editing program that you have set up.
8 OfficeJetWeb: launches your browser and accesses the HP Officejet website.
9 Address Book: provides access to the Windows address book.
10 Log: displays a list of faxes recently sent and received.
11 Status: displays the status window.
reference guide
11
Page 18

chapter 2
Feature Purpose
The following figure shows some of the features available through the
HP Director for Macintosh. Consult the legend for a brief explanation of a
specific feature.
1
2
3
4
5
6
7
8
9
10
11
The Director for Macintosh, in OS9 and OSX
1 HP Workplace: displays the HP Workplace, where you can view thumbnails,
view and edit images, print single or multiple photos.
2 Scan: scans a document or photo into the HP Scan Window, where you can
select a destination.
3 Scan Chooser: provides a short cut to the chooser, where you can select the
HP Officejet 7100 Series as the scanning device.
4 Copy: copies in black and white or color.
5 Fax: scans a document and opens the fax program.
6 Email: scans a document or photo and attaches it to an e-mail message.
7 OCR: scans a document and converts it to text for editing in a word processor.
8 Tools: accesses the Toolbox, which you can use to maintain and configure the
HP Officejet 7100 Series.
9 Customize: displays options for customizing the appearance and functionality
of the Director and scanning.
10 Help: accesses Help for assistance with the HP Officejet software.
11 About: accesses copyright information about the HP Officejet software.
12
hp officejet 7100 series
Page 19

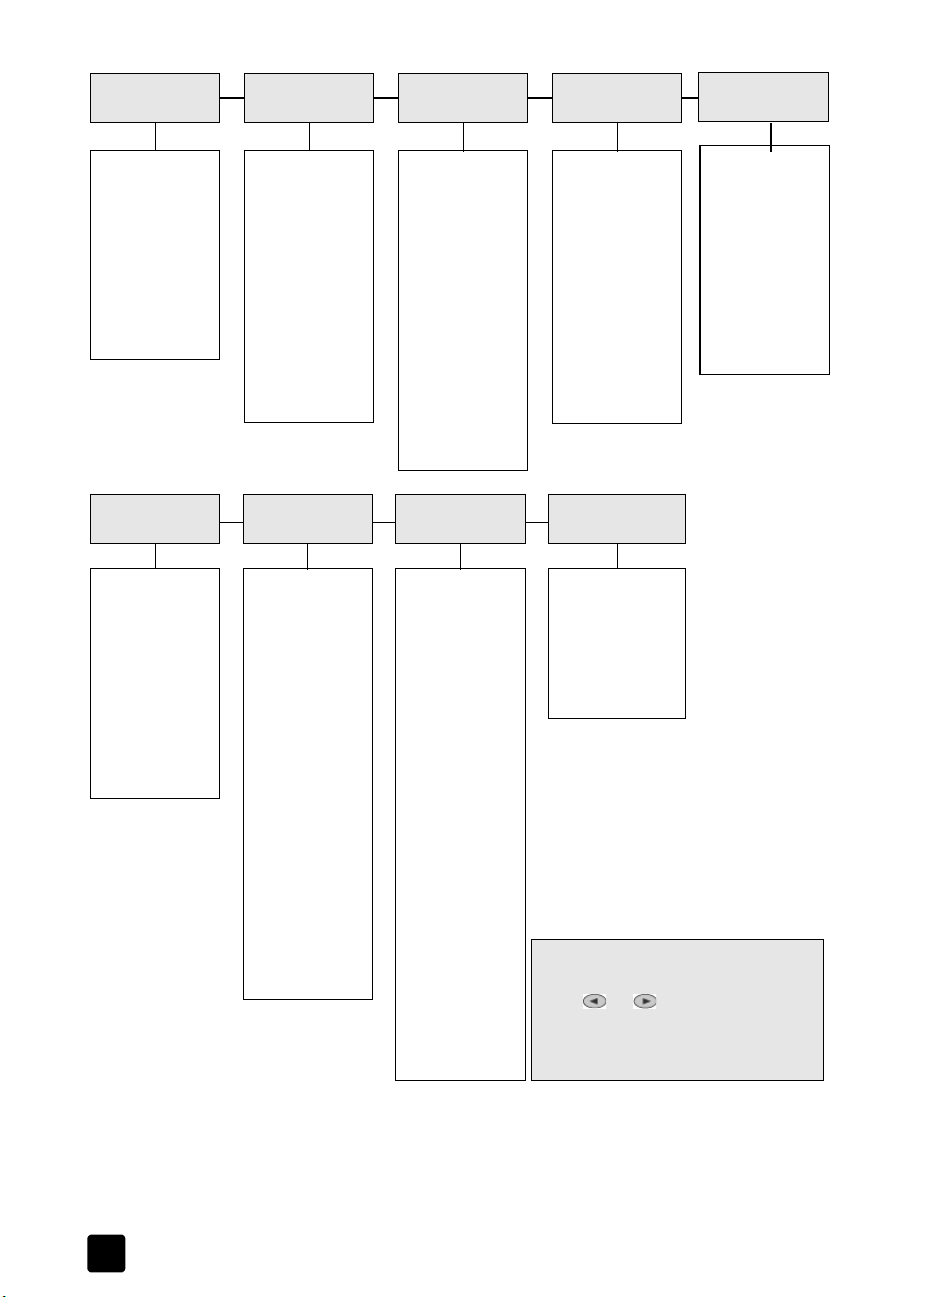
hp officejet menu functions
Access Menu functions by pressing the corresponding numbers for each menu
option. For example: to set the language and country, press Menu, then press 7
and 7. This automatically selects the Status and Maintenance menu, then selects
the Set Country and Language option.
Not all features are available on all models.
quick start
reference guide
13
Page 20
chapter 2
0:Photo Card
Functions
1:Save Photos to
PC
2:Print Proof
Sheet
3:Scan Proof
Sheet
4: Print Photos
5:Basic Fax
Setup
1:Date and Time
2:Fax Header
3:Rings to
Answer
4:Paper Size
5:Tone or Pulse
Dialing
1:Copy Setup
0: Collation
1:Enhancements
2:Paper Size
3:Color Intensity
4:Set Copy
Defaults
5:Restore Copy
Factory Settings
6:Advanced
Fax Setup
1:Automatic
Reports Setup
2:Answer Ring
Pattern
3:Busy Redial
4:No Answer
Redial
5:Automatic
Reduction
6:Backup Fax
Reception
7:Erro r
Correction Mode
8:Silent Detect
2:Fax
Functions
1:Scan and Fax
Black Only
2:Send Fax Later
Black Only
3:Fax
Forwarding
Black Only
4: Polling to
Receive
5:Reprint Faxes
in Memory
7:Status and
Maintenance
1:Check Ink
Level
2:Clean
PrintHeads
3:Align
PrintHeads
4:Perform Color
Calibration
5:Restore
Factory Defaults
6:Set Power
Save Mode Time
7:Set La n g u ag e
and Country/
Region
8:Ring and Beep
Volume
3:Print Report
1:Last
Transaction
2:Fax Log
3:Speed Dial List
4:Menu Settings
5:Self-Test Report
6:Automatic
Reports Setup
8:Network
Setup
JetDirect
CFG IPX/SPX
CFG TCP/IP
CFG LINK
Press Menu to display the menu
functions.
Press or to move to the setting
you want.
Enter to select the displayed
Press
setting.
4:Speed Dial
Setup
1:Individual
Speed Dial
2:Group Speed
Dial
3:Delete Speed
Dial
4:Print Speed
Dial List
14
hp officejet 7100 series
Page 21

load originals and load paper
3
You can copy from originals loaded on the glass or in the automatic document
feeder. You can also print and copy onto a variety of paper types, weights,
sizes, and transparency films. It is important, however, that you choose the right
paper and make sure that it is loaded correctly and not damaged.
print using 4800 optimized dpi
Print using 4800 Optimized dpi to get the best print quality when you are
printing your photos on photo paper. With this setting the HP Officejet prints
significantly slower. To achieve 4800 Optimized dpi, you must select one of the
following types of photo paper:
– hp premium photo paper
– hp premium plus photo paper, matte
– hp premium plus photo paper, glossy
– hp colorfast photo paper, glossy
– hp photo paper
– snapshot photo media, 4 x 6 (Windows only)
– Other Photo Papers (Windows only)
Note: All other paper types, including hp photo quality paper, matte finish
and hp everyday photo paper, semi gloss, will print at 1200 dpi.
print using 4800 optimized dpi in Windows
1 Open the photo you wish to print.
2 Load the photo paper in the main paper tray. For more information, see
load paper on page 19 and tips for loading other types of paper in the
main tray on page 22.
3 From the program’s File menu, select Print, then Properties
and then click the Setup tab.
4 In the Paper Type list, choose a type of photo paper.
Your HP Officejet automatically sets the Print Quality to Best.
5 In the Paper Size list, choose the appropriate paper size.
6 In the Photo Paper Printing area, select 4800 x1200 Optimized dpi.
or Preferences,
15
Page 22

chapter 3
select 4800 x1200 Optimized dpi for high resolution photo printing
7 Click OK to close the dialog box, and then click OK or Print in your
program’s Print dialog box to begin printing.
print using 4800 optimized dpi in Macintosh OS 9
1 Open the photo you wish to print.
2 Load the photo paper in the main paper tray. For more information, see
load paper on page 19 and tips for loading other types of paper in the
main tray on page 22.
3 From the program’s File menu, select Print.
The Print dialog box opens.
4 Select Paper Type/Quality from the list.
5 Select the Quality tab.
6 In the Paper Selection area, select Photo Paper from the Group list.
7 In the Paper Selection area, select the appropriate photo paper from the
Type list.
Your HP Officejet automatically sets the Quality to Best.
8 In the Quality area, select the High Resolution Photo
Note: You must select Photo Paper from the Group list before you can
access this option.
9 Click OK.
option.
16
hp officejet 7100 series
Page 23
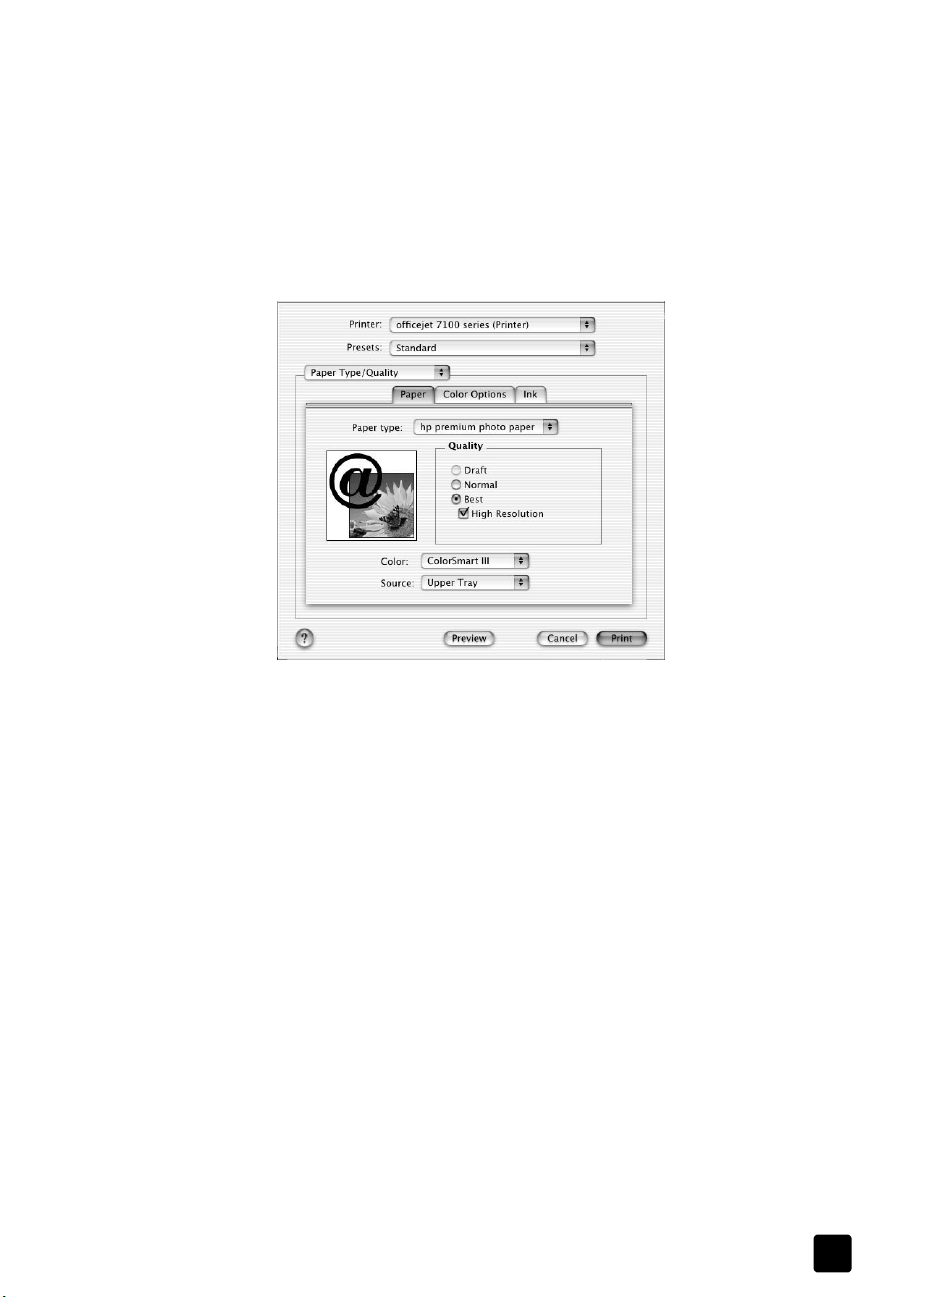
print using 4800 optimized dpi in Macintosh OS X
1 Open the photo you wish to print.
2 Load the photo paper in the main paper tray. For more information, see
load paper on page 19 and tips for loading other types of paper in the
main tray on page 22.
3 From the program’s File menu, select Print.
The Print dialog box opens.
4 Select Paper Type/Quality from the list.
load originals and load paper
5 In the Paper tab, choose a type of photo paper from the Paper type list.
6 In the Quality area, select the High Resolution
7 Click Print.
load originals
Your HP Officejet provides two ways to load originals for copying, scanning,
and faxing. You can do the following:
• Load originals on the glass
• Load originals in the automatic document feeder
load originals on the glass
You can copy or scan any original by placing it on the glass.
reference guide
Macintosh OS X
Your HP Officejet automatically sets the Quality to Best.
option.
Note: You must select a type of photo paper from the Paper type list before
you can access this option.
Note: Many of the Special Features options, such as Which Size? or Poster,
will not work correctly if the glass and lid backing are not clean. For more
information, see clean the glass and clean the lid backing on page 57.
17
Page 24
chapter 3
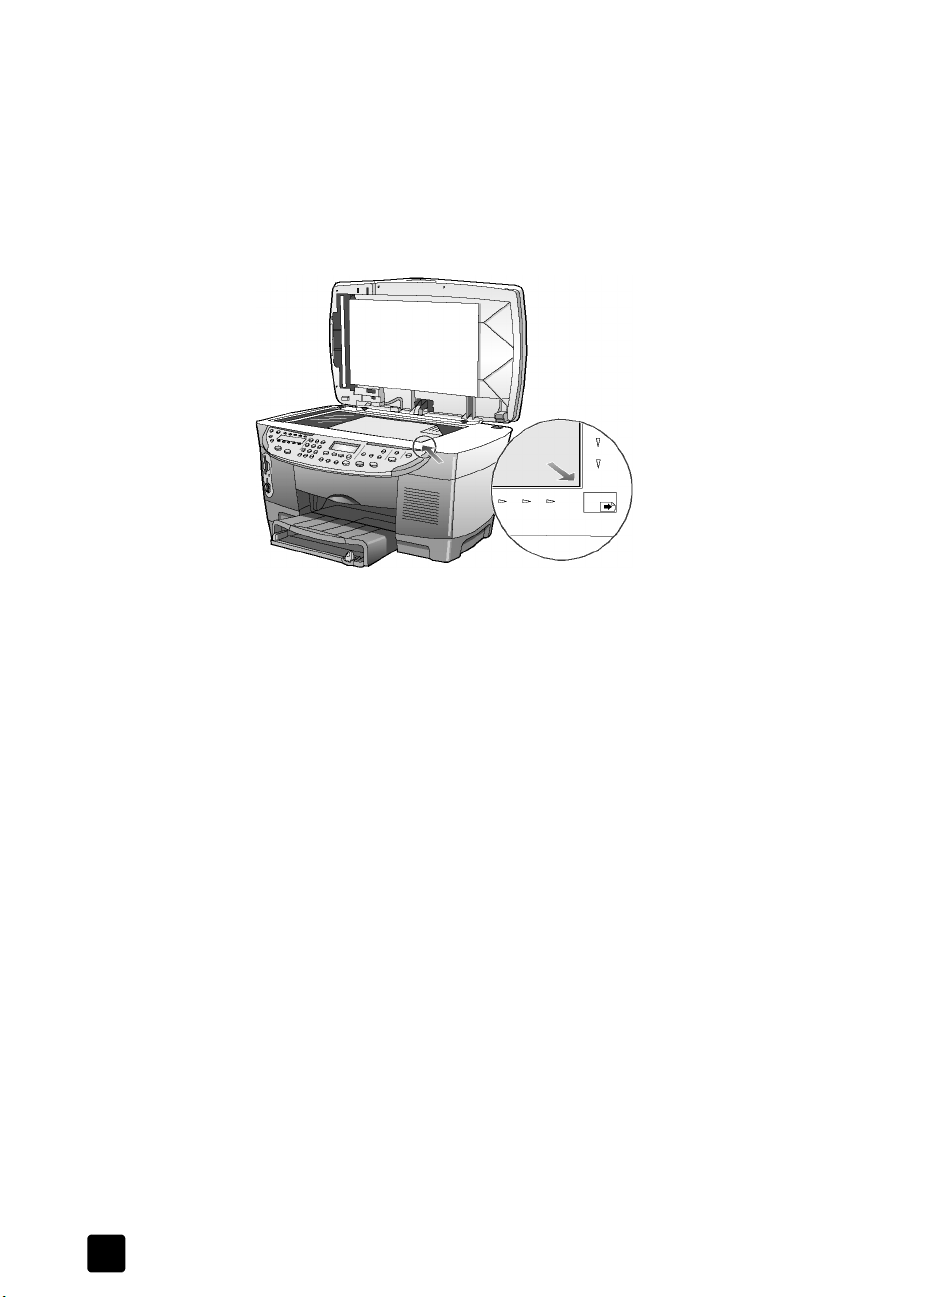
1 Lift the lid and place the original face down on the glass in the bottom-
right corner with the sides of the originals touching the right and bottom
edges.
It is important to use the bottom-right corner when using the copy, fax, or
scan feature.
Tip: If you are copying from a transparency (that is, your original
is printed on transparency film), place a blank piece of paper on
top of the transparency.
Top edge of
original
2 Close the lid.
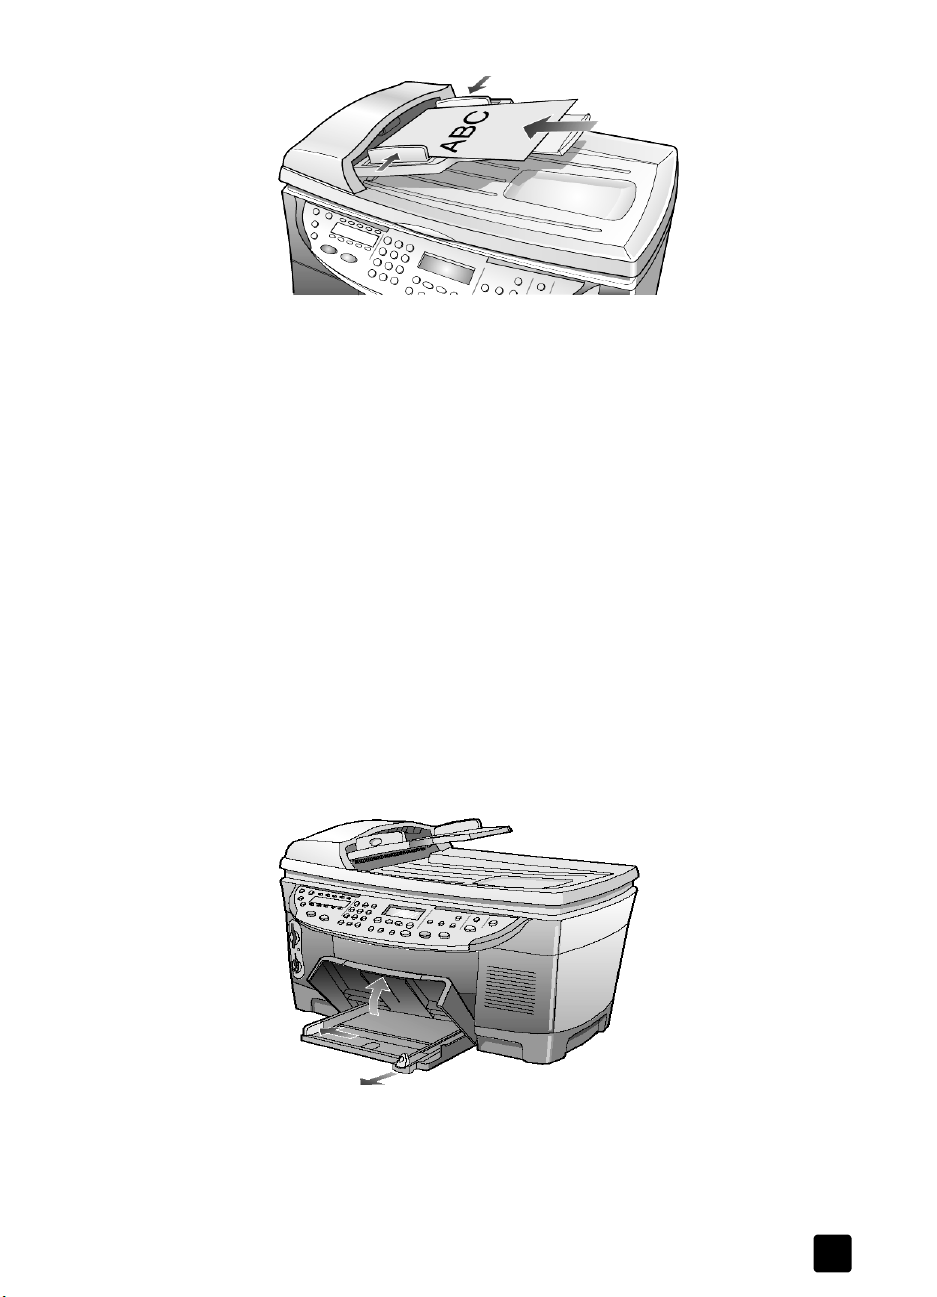
load originals in the automatic document feeder
Your HP Officejet has an automatic document feeder (ADF), which you can use
to load up to 50 originals of the following paper types:
•Plain Paper
16 to 24 lb. long grain only
• Specialty Paper
– HP Premium Inkjet Paper
–HP Bright White Inkjet Paper
You can also use the ADF to load the following types of originals, but you must
load them one sheet at a time:
• Other specialty papers, such as glossy paper
• Overhead transparencies, such as HP Premium Inkjet Transparency Media
• Photo paper, such as Kodak EktaColor Edge-5 (glossy)
• Real Estate paper (single sheet only)
1 Place all originals in the ADF print side up.
2 Adjust the paper-width guide to fit the size of your original.
A message appears on the display indicating that the originals are
loaded.
18
hp officejet 7100 series
Page 25
load paper
load originals and load paper
Following is the basic procedure for loading paper. There are specific
considerations for loading certain types of paper, transparency film, and
envelopes. After you review this procedure, see tips for loading other types of
paper in the main tray on page 22 and load envelopes on page 20.
For best results, adjust the paper settings each time you change paper types or
paper sizes. For more information, see choose the paper tray and set the paper
type on page 23.
If you have the HP 250-sheet plain paper tray, you can load paper into both the
main paper tray and the 250-sheet plain paper tray. If you have the 250-sheet
plain paper tray, you should use it for plain paper only. Please refer to the
Accessories guide that comes with the paper tray for information about installing
the tray, loading paper, and adjusting paper-width and paper-length guides.
Caution! You must also have the two-sided printing accessory
installed to use the 250-sheet plain paper tray.
reference guide
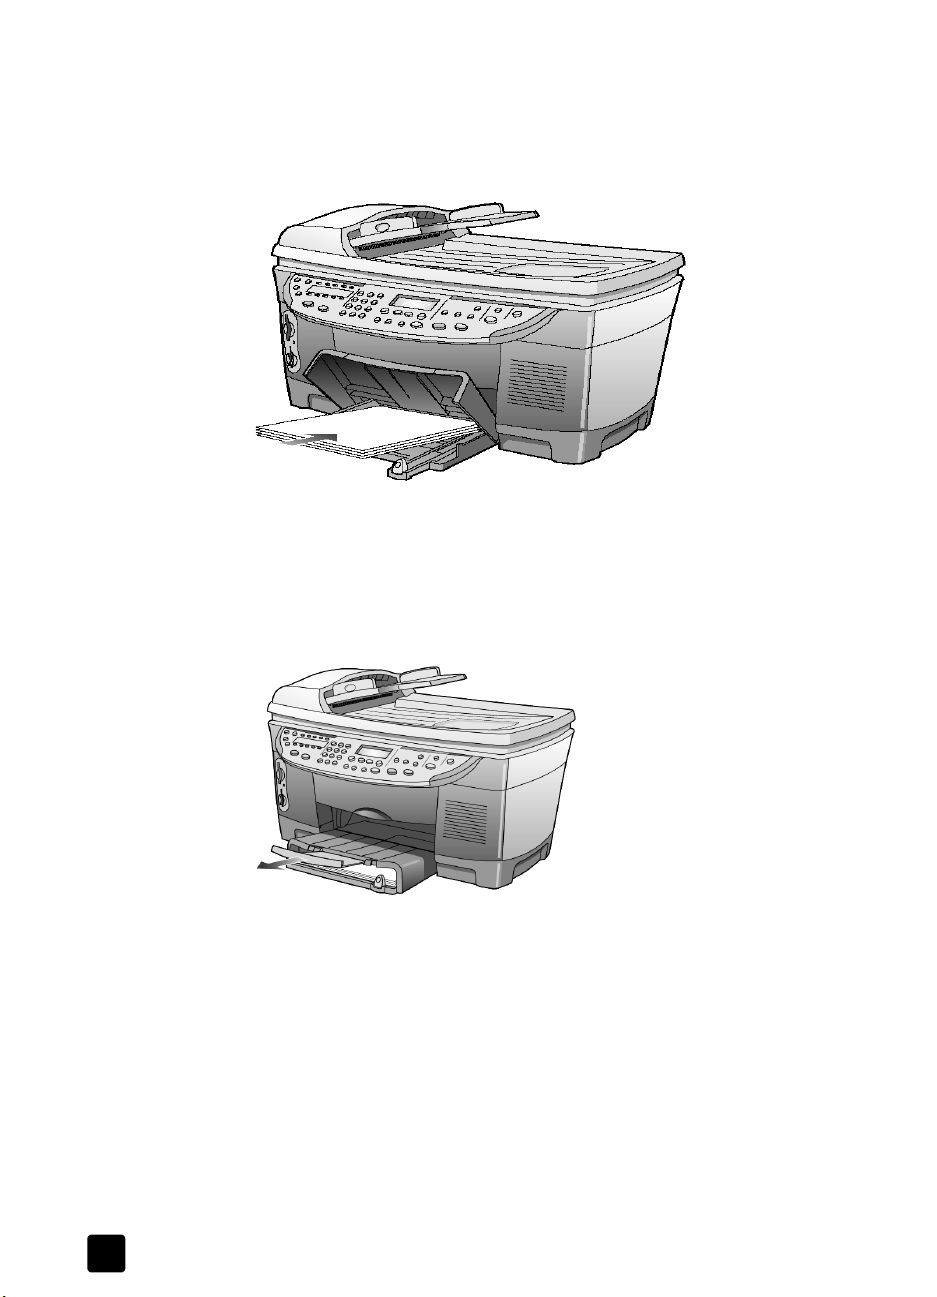
to load the main paper tray
1 Lift the output tray up until it catches in the raised position, and slide the
paper-width and paper-length guides to their outermost positions.
2 Tap the stack on a flat surface to align the edges of the paper, and then
check the paper for the following:
– Make sure it is free of rips, dust, wrinkles, and curled or bent edges.
– Make sure all the paper in the stack is the same size and type, unless
you are working with photo paper.
19
Page 26
chapter 3
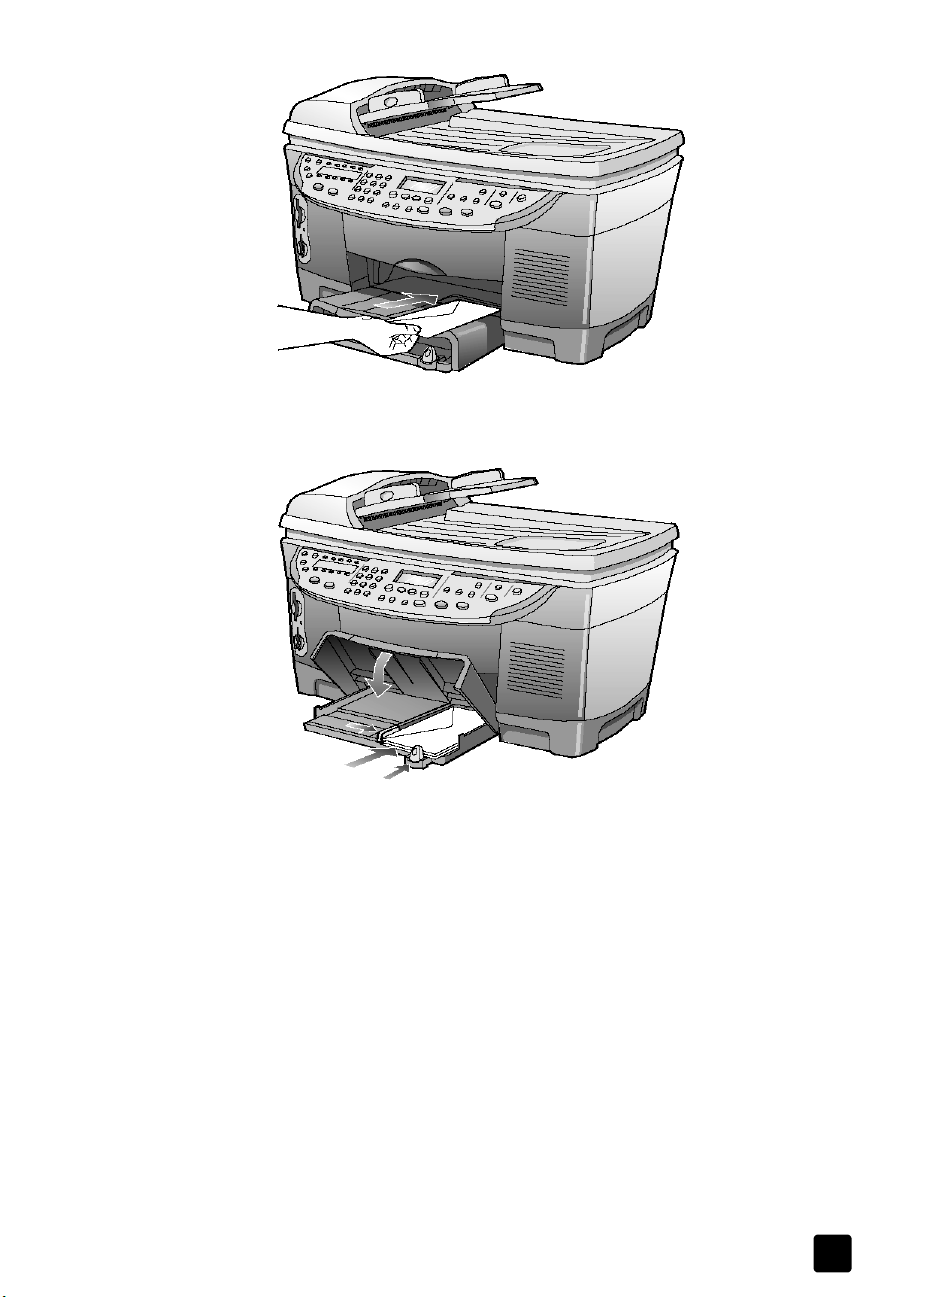
3 Insert paper into the main tray print-side down until it stops. If you are
using letterhead, insert the top of the page first.
Be careful not to use too much or too little paper. Check that the stack of
paper contains several sheets but is no higher than the top of the paperlength guide.
4 Slide the paper-width and paper-length guides in until they stop at the
edges of the paper. Make sure that the paper stack lies flat in the main
tray and fits under the tab of the paper-length guide.
5 Lower the output tray.
6 To prevent printed paper from falling off the tray, fully extend the output-
tray extender.
To load the 250-sheet plain paper tray
` Review the Accessories guide that came with the 250-sheet plain paper
load envelopes
Your HP Officejet provides two methods for working with envelopes. Do not use
shiny or embossed envelopes, or envelopes that have clasps or windows.
• If you are printing one envelope, slide the envelope into the envelope slot,
20
tray for information on loading paper in this accessory.
which is located on the right side toward the back of the output tray. Insert
the envelope with the flap up and on the left, as shown in the illustration.
Slide the envelope on the top until it stops.
hp officejet 7100 series
Page 27
load originals and load paper
• If you are printing multiple envelopes, remove all paper from the main
tray, and then slide a stack of envelopes into the tray, with the envelope
flaps up and to the left (print-side down), until they stop.
reference guide
Adjust the paper-width guide against the envelopes (be careful not to bend
the envelopes). Make sure the envelopes fit within the tray (do not
overload it).
Consult the help files in your word processing software for details on how
to format text for printing on envelopes.
21
Page 28

chapter 3
tips for loading other types of paper in the main tray
The following table provides guidelines for loading certain types of paper and
transparency film. For best results, adjust the paper settings each time you
change paper types and paper sizes. For more information, see choose the
paper tray and set the paper type on page 23.
paper tips
HP papers
• HP Premium Inkjet Paper: Locate the gray arrow on the nonprinting side
of the paper, and then insert paper with the arrow side facing up.
• HP Premium or Premium Plus Photo Paper: Load the glossy (print) side
down. Always load at least five sheets of regular paper in the main tray
first, and then place the photo paper on top of the regular paper.
• HP Premium Inkjet Transparency Film: Insert the film so that the white
transparency strip (with arrows and the HP logo) is on top and is going
into the tray first.
• HP Iron-On T-shirt Transfers: Flatten the transfer sheet completely before
using it; do not load curled sheets. (To prevent curling, keep transfer
sheets sealed in the original package until you are ready to use them.)
Manually feed one sheet at a time, with the unprinted side facing down
(the blue stripe faces up).
• HP Greeting Cards, Glossy Greeting Cards, or Textured Greeting
Cards: Insert a small stack of HP greeting-card paper, with the printside down into the main tray until it stops.
• HP Restickable Inkjet Stickers: Place the sheets in the main tray, printside (sticker-side) down.
Legal-size paper Fully extend the paper-length guide and make sure that the main tray is
pushed all the way in.
Postcards
(only works with
printing)
Labels
(works only with
printing)
4” x 6” Photo
paper (works only
with printing)
22
Insert a stack of postcards with the print-side down into the main tray until
it stops. Line the postcards up on the right side of the main tray, slide the
width guide up against the left side of the cards, and then slide the
paper-length guide in until it stops.
• Always use letter-size or A4-size label sheets designed for use with
HP inkjet products (like Avery Inkjet Labels), and make sure that the
labels are not over two years old.
• Fan the stack of labels to make sure none of the pages are sticking
together.
• Place a stack of label sheets on top of standard paper in the main tray,
print-side down. Do not insert labels one sheet at a time.
Insert the photo paper with the print-side down into the main tray until it
stops. Place the long edge of the photo paper against the right side of the
main tray, slide the paper-width guide up against the long edge of the
photo paper, and slide the paper-length guide in until it stops. If the photo
paper you are using has perforated tabs, load the photo paper so that the
tabs are closest to you.
hp officejet 7100 series
Page 29
paper tips
load originals and load paper
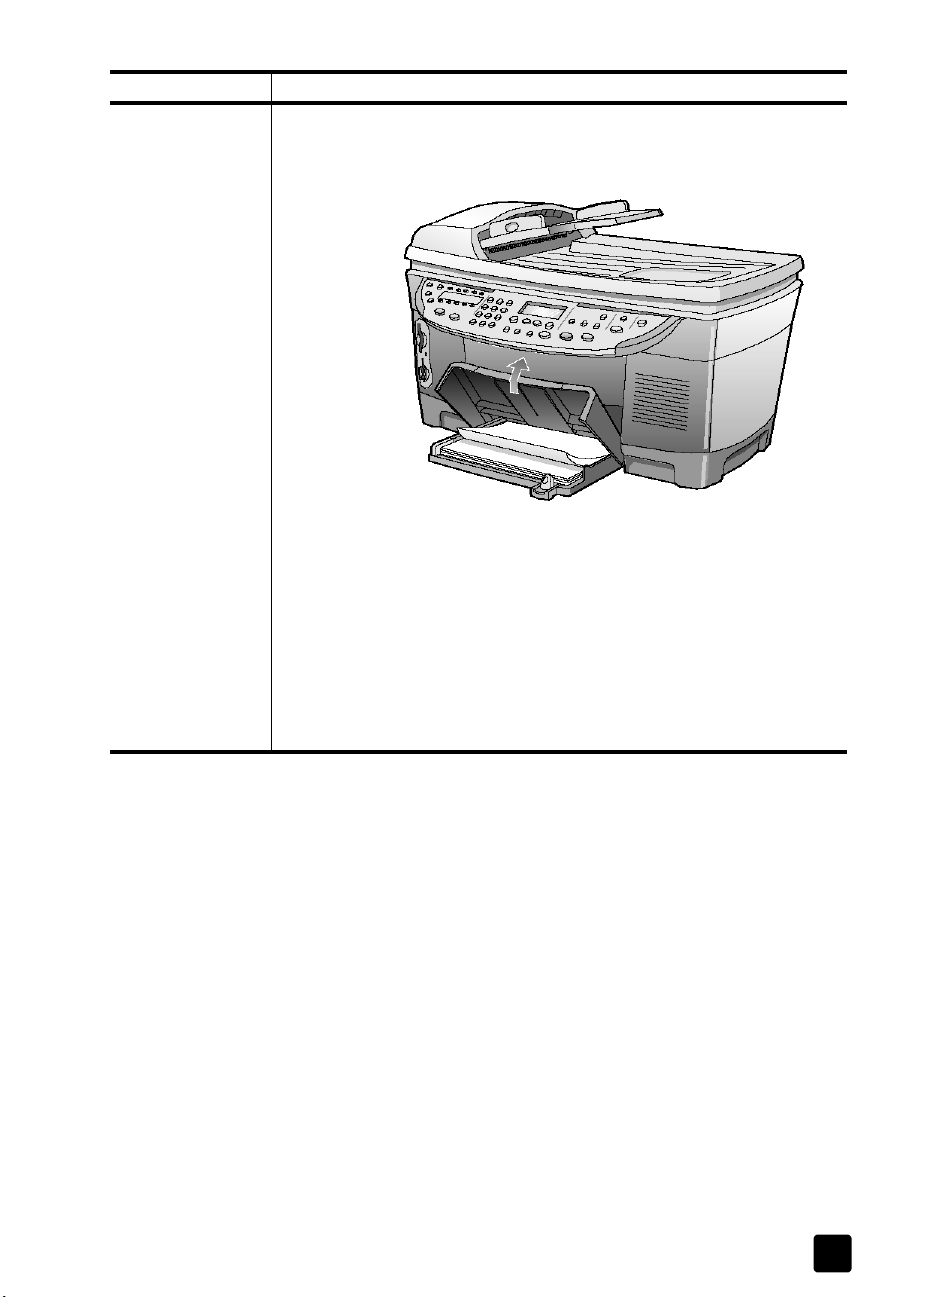
Continuous
(banner) paper
(works only with
printing)
Continuous banner paper is also known as computer or z-fold paper.
• Before loading banner paper, remove all other paper from the main
tray, then raise the output tray until it catches in the raised position.
Raise the output
tray until it stays in
the raised position.
Insert first edge of
paper into the main
tray.
• If you use non-HP banner paper, use 20-lb. paper and fan the paper
before loading it.
• Verify that the stack of banner paper contains at least five pages in the
stack.
• Carefully tear off the perforated edge strips from both sides of the
paper stack, if any, and unfold and refold the paper to make sure the
pages do not stick together.
• Put the paper in the main tray so that the unattached edge is at the top
of the stack. Insert the first edge into the main tray until it stops, as
shown in the illustration above.
choose the paper tray and set the paper type
If you want to use a different type of paper, such as photo paper, transparency
film, banner paper, or envelopes, simply load that paper in the main tray. You
should then change the paper type settings to ensure the best print quality.
If you have installed HP 250-sheet plain paper tray, that paper tray is the default
paper tray that is used for copying. If you load a different type of paper in the
main paper tray, you need to not only change the paper type settings, but also
specify the paper tray to use.
Caution! You must also have the two-sided printing accessory
installed to use the 250-sheet plain paper tray.
You can change copy settings from the front panel or from the HP Director.
When you change settings using the front panel, the copy settings are reset two
minutes after the unit completes the copy.
HP recommends paper type settings according to the type of paper you’re using.
For more information, see recommended paper-type settings for copying in the
onscreen User’s Guide.
reference guide
23
Page 30

chapter 3
1 Press Tray Select/Paper Type.
If you have both paper trays, press Tray Select/Paper Type until the
desired paper tray is selected, indicated by the dot on the left.
2 When copying from the main tray, press until the appropriate paper
type appears.
3 Press Enter to choose the displayed paper type.
set the paper size
For more information, see adjust paper settings for printing in the onscreen
User’s Guide.
1 Press Menu.
2 Press 1, then press 2.
This selects Copy Setup, then selects Paper Size.
3 Press until the desired size appears, then press Enter to select it.
learn more
See the load section in the onscreen User’s Guide to learn more about the
following:
• Recommended paper-type settings for printing
• Recommended paper-type settings for copying
24
hp officejet 7100 series
Page 31

4
use the scan features
Scanning is the process of converting text and pictures into an electronic format
for your computer. You can scan just about anything:
•Text documents
•Photos
•Magazine articles
• 3D objects (be careful not to scratch the glass) to put into catalogs and
flyers
Because the scanned image or text is in an electronic format, you can bring it
into your word processor or graphics program and modify it to suit your needs.
You can do the following:
• Scan text from an article into your word processor and quote it in a report,
saving you a lot of retyping.
• Scan in a logo and use it in your publishing software, allowing you to print
business cards and brochures for yourself.
• Scan in photos and e-mail them to coworkers and friends, create a
photographic inventory of your office or home, or create an electronic
scrapbook.
To use the scan features, your HP Officejet and computer must be connected and
turned on. The HP Officejet software should also be installed on your computer
prior to connecting the computer to the HP Officejet.
If your HP Officejet is connected to a network, you can scan to any of the
computers that are on the network from the front panel or computer. The other
computers on the network must also have the HP Officejet software installed.
scan an original
You can start a scan from your computer or from your HP Officejet.
to scan an original from your Windows computer
1 Load your original on the glass or in the automatic document feeder (ADF).
2 Press Start Scan.
A scan of the original appears in the HP Image Viewer.
3 In the HP Image Viewer, you can edit the scanned image. When you have
finished, click Accept.
The HP Officejet does a final scan of the original and sends the image to
the HP Photo View Center.
See the onscreen User’s Guide for more information about using the
HP Image Viewer.
25
Page 32

chapter 4
to scan an original from your Macintosh computer
1 Load your original on the glass or in the automatic document feeder (ADF).
For more information, see load originals on page 17.
2 Press Start Scan.
A scan of the original appears in the HP Scan Window.
3 In the HP Scan Window, you can preview the image, change the image
type, and select a different destination. Select a destination, then click Send
Now!.
The HP Officejet does a final scan of the original and sends the image to
the HP Workplace.
See the onscreen User’s Guide for more information about using the
HP Workplace.
scan to a different software program
If you prefer to scan your document to a software program other than the
HP Photo View Center or HP Workplace, you can choose a different program
from the Scan To list that appears in the front-panel display. The HP Officejet
scans the document, launches the selected software program, and displays the
scanned image in that program.
1 Load your original.
For more information, see load originals on page 17.
2 Press Scan to then press to scroll through the Scan To list until the
desired scan-to software program appears.
3 If you have more than one computer networked to the HP Officejet, you
see a list of computers that have the HP Officejet software installed on
them. Press to scroll through the Scan To list until the desired scan-to
software program appears.
4 Press Start Scan to begin the scan.
The HP Officejet scans your original and displays it in the selected software
program.
stop scanning
You can stop a scan by pressing the Cancel button located on the front panel.
learn more
See the scanning section in the onscreen User’s Guide to learn more about:
• Scanning text
• Scanning from a software program
• Editing scanned images
• Changing scan settings
• Change the scan-to settings for scanning text or images
• Scanning to a brochure or flyer
26
hp officejet 7100 series
Page 33

5
The copy features let you do the following:
• Produce high-quality color and black-and-white copies using a variety of
• Reduce or enlarge the size of the copies you make from 25% to 400% of
• Make the copy lighter or darker, adjust the color intensity, select the
• Use special copying features to create a poster, make many sizes of
• Make two-sided copies or copy from two-sided documents.
make copies
You can make copies using the front panel of your HP Officejet or by using the
HP Officejet software on your computer. Many copy features are available using
either method. However, you may find that the software offers easier access to
special copy features.
All copy settings that you select on the front panel are reset two minutes after the
HP Officejet completes the copy, unless you save the settings as the default
settings. For more information, see change settings for all copy jobs in the
onscreen User’s Guide.
use the copy features
paper types and sizes, including iron-on transfers.
the copy’s original size. (Percentages may vary between models.)
number of copies, and specify the quality of the copies you make.
photos, make high-quality copies of photos using special photo paper, or
to create transparencies.
make a copy
1 Load your original on the glass or in the automatic document feeder (ADF).
2 Press Start Copy, Black or Start Copy, Color.
increase copy speed or quality
The HP Officejet provides three options that affect copy speed and quality.
• Best produces the highest quality for all paper and eliminates the banding
(striping) effect that sometimes occurs in solid areas. Best copies more
slowly than the other quality settings.
• Normal delivers high-quality output and is the recommended setting for
most of your copying. Normal copies faster than Best.
• Fast copies faster than the Normal setting. The text is of comparable
quality to the Normal setting, but the graphics may be of lower quality.
Using Fast also cuts down on the frequency of replacing your ink
cartridges, because it uses less ink.
1 Load your original on the glass or in the ADF.
2 Press Quality until the green light in front of the desired quality is lit.
27
Page 34

chapter 5
3 Press Start Copy, Black or Start Copy, Color.
reduce or enlarge a copy
You can reduce or enlarge a copy of an original using either the Reduce/
Enlarge button or the Special Features buttons. This section explains the Reduce/
Enlarge features only.
For more information about Special Features options, see perform special copy
jobs on page 30 for information about using Fit to Page, Which Size?, Poster, 2
on 1, Margin Shift, or Mirror.
1 Press Reduce/Enlarge to choose one of the following:
– Custom 100%— lets you enter the percentage to reduce or enlarge
– Full Page 91% — lets you reduce an original to 91% of its original
– Legal/Letter 72% — reduces an original to 72% of its original size,
2 If you are using the Custom option, press or to reduce or enlarge
the copy.
You can also enter a number using the keypad.
3 Press Start Copy, Black or Start Copy, Color.
make copies lighter or darker
Use Lighter/Darker to adjust the lightness and darkness of the copies you make.
1 Press Lighter/Darker.
2 Press to lighten the copy or to darken it.
The circle moves to the left or right, depending on the button you press.
3 Press Start Copy, Black or Start Copy, Color.
your copy.
size, which prevents cropping that may occur if you make a full-size
(100%) copy.
which lets you copy a legal-sized original to letter-sized paper.
change color intensity
You can adjust color intensity to make colors on your copy more vivid or more
subtle.
1 Press Menu.
2 Press 1 and then press 3.
This selects Copy Setup, and then selects Color Intensity.
3 Press to make the image more pale or to make the image more
vivid.
The range of color intensity values appears as a circle on a scale on the
front-panel display.
4 Press Start Copy, Black or Start Copy, Color.
enhance text sharpness and photo colors
Use Text enhancements to sharpen edges of black text. Use Photo for
photographs or pictures to enhance light colors that may otherwise appear
white.
28
hp officejet 7100 series
Page 35

Text enhancement is the default option. You can turn off Text enhancement by
selecting Photo or None if the following occur:
• Stray dots of color surround some text on your copies.
• Large, black typefaces look splotchy (not smooth).
• Thin, colored objects or lines contain black sections.
• Horizontal grainy or white bands appear in light- to medium-gray areas.
1 Press Menu.
2 Press 1, then press 1.
This selects Copy Setup, and then selects Enhancements.
3 Press until the desired enhancement (Text, Photo, Text and Photo, or
None) appears.
4 Press Start Copy, Black or Start Copy, Color.
set the number of copies
You can set the number of copies using the front panel.
1 Press Number of Copies.
2 Press until the desired number of copies appear, or use the keypad to
enter the desired number of copies.
3 Press Start Copy, Black or Start Copy, Color.
change settings for all copy tasks
Save the copy settings you use most often by setting them as the default. This
includes changes to Copy Setup options in the menu system, as well as other
Copy area settings.
1 Make any desired changes to the Copy Setup options.
2 Make any desired changes to the button settings in the Copy Area.
3 Press Menu.
4 Press 1, then press 4.
This selects Copy Setup, and then selects Set Copy Defaults.
Your settings are saved.
use the copy features
reference guide
29
Page 36

chapter 5
perform special copy jobs
In addition to supporting standard copying, your HP Officejet can also do the
following:
• copy at 4800 optimized dpi
• copy a photo
• fit a copy to the page
• print several copies on one page
• print two originals on one page
• shift image to increase the margin
• make two-sided copies
• collate copies
• make a poster
• prepare a color T-shirt transfer
copy at 4800 optimized dpi
Copy at 4800 Optimized dpi to get the best print quality when you are printing
on photo paper. This copy setting causes the HP Officejet to print significantly
slower. To copy using 4800 Optimized dpi, you must use hp photo paper or
hp premium photo paper.
1 Load the photo on the glass.
2 Load the photo paper in the main paper tray. If you have the HP 250-sheet
plain paper tray, do not load the photo paper into that tray. For more
information, see load paper on page 19 and tips for loading other types
of paper in the main tray on page 22.
3 Press Tray Select/Paper Type until the Upper Tray is selected.
4 Press until the desired photo paper type option appears, and then
press Enter to select it.
Note: You must select hp photo paper or hp premium photo paper in order
to copy at 4800 Optimized dpi.
Tip: To enlarge a photo automatically to a full page, press
Special Features until Fit to Page appears, then press Enter. For
more information, see below.
5 Press Quality until the green light in front of Best is lit.
6 Press
Start Copy, Black or Start Copy, Color.
30
copy a photo
1 Load the photo on the glass.
2 If you are using photo paper, you must load it in the main paper tray. If
you have the HP 250-sheet plain paper tray, do not load photo paper into
that tray.
3 Press Tray Select/Paper Type until the Upper Tray is selected, as shown by
the dot.
If you do not have the HP 250-sheet plain paper tray, the upper tray (main
tray) is selected by default.
hp officejet 7100 series
Page 37

4 When Upper Tray is selected, press until the desired photo paper
option appears, then press Enter to select it.
For more information, see recommended paper-type settings for copying
in the onscreen User’s Guide.
Tip: To enlarge a photo automatically to a full page, press
Special Features until Fit to Page appears, then press Enter. For
more information, see below.
5 Press Menu.
6 Press 1, then press 1 again.
This selects Copy Setup, and then selects Enhancements.
7 Press until Photo appears, then press Enter to select it.
8 Press Start Copy, Black or Start Copy, Color.
fit a copy to the page
Use Fit to Page when you want to automatically enlarge or reduce your original
to fit the paper size you have loaded.
Tip: Make sure that the glass is clean and the original has been
placed in the bottom-right corner of the glass. You cannot use the
automatic document feeder (ADF) for this feature.
use the copy features
Original
1 Load the original on the glass.
2 Load the appropriate paper.
3 Press Special Features until Fit to Page appears.
4 Press Enter.
5 Press Start Copy, Black or Start Copy, Color.
print several copies on one page
You can place multiple copies of an original on one page by selecting a photo
size and then selecting the number of copies you want.
There are several common photo sizes available from the Which Size? option,
which you access from the Special Features button. After you select one of the
available sizes, you may be prompted to select the number of copies that can
be placed on the page if there is room for more than one.
Fit to Page
reference guide
31
Page 38

chapter 5
l
l
Origina
Copy
1 Load the original on the glass.
2 Load the appropriate paper in the main tray.
3 Press Special Features until Which Size? appears.
4 Press until the desired photo size appears, then press Enter.
5 When How Many? appears, press to select the number of images that
will fit on a page.
Some larger sizes do not prompt you for a number of images.
6 Press Enter to select the number of photos you want to appear on a page.
7 Press Start Copy, Black or Start Copy, Color.
Tip: If the number of copies of the photo on a single page does
not come out as expected, try turning the original on the glass 90
degrees and start the copy again.
print two originals on one page
You can print two different letter- or A4-sized originals on one page using the 2
on 1 feature. The copied images will appear side by side on the page in a
landscape format. You can use the automatic document feeder (ADF) to load the
originals or place them directly on the glass.
You cannot collate when making a 2 on 1 copy. Clipping may occur with legalsize originals.
This feature can be used with the Two-Sided Copy button to make 2 on 1, twosided copies. See make two-sided copies on page 33.
1 Place the first original on the glass. If you are using the ADF, load both
originals there.
2 Press Special Features until 2 on 1 59% appears, then press Enter.
Two Orig i n alsTwo origina
s on one page
32
hp officejet 7100 series
Page 39

3 Press Start Copy, Black or Start Copy, Color.
l
4 If you placed your first original on the glass you will be prompted to Place
2nd original on glass, then press Enter.
shift image to increase the margin
The MarginShift feature lets you shift the image to the left or right to increase the
margin for binding. You can also adjust the reduction/enlargement percentage
in this mode by entering a number on the numeric keypad.
use the copy features
1 Load the original on the glass or in the ADF.
2 Press Special Features until MarginShift 100% appears.
3 Press or to shift the margin to the left or to the right.
Each step is a ¼-inch (6.35 mm) shift.
4 If you wish to change the reduction/enlargement percentage as well,
enter a number using the keypad, then press Enter.
Tip: If you do not wish to change the reduction/enlargement
percentage, press Enter after you have selected the amount of
MarginShift you want.
5 Press Start Copy, Black or Start Copy, Color.
make two-sided copies
The Two-Sided Copy button on the front panel lets you automatically make
two-sided copies from single-sided or double-sided originals that are letter- or
A4-sized.
Note: You can make two-sided copies automatically only if your
HP Officejet has an HP two-sided printing accessory. The two-sided
printing accessory is standard equipment with some models or can be
purchased separately.
1 Load your letter- or A4-sized originals in the ADF.
You cannot make two-sided copies from legal-sized originals loaded in the
automatic document feeder (ADF).
2 Press the Two-Sided Copy button.
Origina
MarginShift
reference guide
33
Page 40

chapter 5
l
3 Choose one of the following by pressing until the desired setting
appears and then press Enter.
– 1-sided original, 1-sided copy
This option produces a standard single-sided copy from a single-sided
original.
– 1-sided original, 2-sided copy
This option takes 2 single-sided originals and produces a two-sided
copy.
– 2-sided original, 1-sided copy
This option produces single-sided copies of a two-sided original.
– 2-sided original, 2-sided copy
This option produces a two-sided copy from a two-sided original.
4 Press Start Copy, Black or Start Copy, Color.
collate copies
The collate feature lets you produce sets of copies in the exact order that they
are scanned from the automatic document feeder (ADF). The collate feature is
available only on certain models. You must copy more than one original to use
the collate feature.
1 Load originals in the ADF.
2 Press Menu,
3 Press 1, then press 0.
This selects Copy Setup, then selects Collation.
4 Press until the desired setting (On or Off) appears, then press Enter.
If you turn the feature on, the front panel displays Collation On.
5 Press Start Copy, Black or Start Copy, Color.
make a poster
34
When you use the Poster feature you divide your original into sections, then
enlarge the sections so you can assemble them into a poster.
Origina
Poster
Tip: You can print a poster from a file on your computer. For
more information, see print a poster in the onscreen User’s Guide.
1 Load the original on the glass.
Tip: You cannot use the automatic document feeder (ADF) when
making a poster.
hp officejet 7100 series
Page 41

2 Load the appropriate paper in the main tray.
l
3 Press Special Features until Poster appears.
The option Poster 2 pages Wide appears by default.
4 Press to select how wide you want the poster to be.
5 Press Enter to confirm your selection.
6 Press Start Copy, Black or Start Copy, Color.
Tip: After you select the poster width, the HP Officejet adjusts the
length automatically to maintain the proportions of the original. If
the original cannot be enlarged to the selected poster size, an
error message appears that tells you the number of pages wide
that are possible. Select a smaller poster size and make the copy
again.
prepare a color T-shirt transfer
Use the Iron-On feature to reverse text and images so that they appear
backwards. After you iron a transfer onto a T-shirt, the picture appears properly
on the shirt.
use the copy features
Origina
Iron-On
Tip: We recommend that you practice applying a T-shirt transfer
on an old garment first.
1 Load the original on the glass or in the ADF.
2 Load the T-shirt transfer paper in the main tray.
3 Press Tray Select/Paper Type until the Upper Tray is selected.
4 Press until Iron-On appears and then press Enter to select it.
Selecting this option automatically activates the Mirror function.
5 Press Start Copy, Black or Start Copy, Color.
reference guide
35
Page 42

chapter 5
stop copying
` To stop copying, press Cancel on the front panel.
learn more
See the copy section in the onscreen User’s Guide to learn more about the
following:
•Perform special copying
• Change color intensity
• Enhance text sharpness and photo colors
• Change settings for copying
copy setup menu options
The following options are available in the Copy Setup menu.
Copy Setup
0:Collation
1:Enhancements
2:Paper Size
3:Color Intensity
4:Set Copy
Defaults
5:Restore Copy
Factory Settings
Press Menu to display the Copy Setup options.
Press
Press
and to move to the setting you want.
Enter to select the displayed setting.
36
hp officejet 7100 series
Page 43

use a photo card
6
Photo card features are available only on certain models of the HP Officejet
7100 Series.
After you take photos with your digital camera, you can print them immediately
or save them directly to your computer.
what is a photo card?
If your digital camera uses a photo card to store photos, you can insert the photo
card into your HP Officejet to print or save your photos. Your HP Officejet has
three different slots for photo cards.
Your HP Officejet can read SmartMedia, CompactFlash, Secure Digital and
Memory Stick photo cards.
SmartMedia
Memory Stick
Note: You can use only one photo card in your HP Officejet at a time.
insert a photo card
` Insert the photo card into the appropriate slot on your HP Officejet.
Reading camera photo card... appears on the front-panel display. The light
next to the card slot blinks green when the card is being accessed.
When the HP Officejet is finished reading the card, another message
appears showing the number of files found on the photo card.
You can safely remove the card only when the light is off.
CompactFlash
Secure Digital
37
Page 44

chapter 6
cards inserted incorrectly
If you insert a photo card backwards, the light next to the card slot blinks amber
and the front panel displays an error message such as Photo card is in
backwards or Gold side should face left.
save files to the computer
You can save files directly from a photo card to your computer. If you are using
Windows, you can save photos to your computer and view them in the
HP Photo View Center. For the Macintosh, you can save the photos to your
computer, then view them in the HP Workplace. Once saved, you can edit them,
create photo collages or album pages — the possibilities are endless.
When your HP Officejet is connected to a computer, you should save all the
photos to your computer. This allows you to reuse your photo card.
For Windows: files are saved by default in month and year folders depending
on when the photos were taken. The folders are created under the C:\My
Documents\My Pictures\ folder, or C:\Documents and
Settings\<username>\My Documents\My Pictures\ folder for Windows 2000
or Windows XP.
For Macintosh: files are saved to the computer in the default location
HardDrive\Documents\HP All-in-One Data\Photos\ directory.
to save files to the computer when inserting the card
1 Insert the photo card into the appropriate slot on your HP Officejet.
2 Press 1 when Save Photos to PC? appears on the front-panel display.
3 If your HP Officejet is on a network, you are also asked to identify the
desired computer.
to save files to the computer when the card is already inserted
1 Press Menu.
2 Press 0, and then press 1.
This selects Photo Card Functions, then selects Save Photos to PC.
3 Press Enter.
view and edit image files
Your operating system (Windows or Macintosh) determines where you view and
edit images on your photo card.
use the hp photo view center
The HP Photo View Center is a Windows software program for viewing and
editing image files. You can print images, send images by e-mail or fax, upload
images to a website, or use images in printing projects with the
HP Photo View Center.
38
hp officejet 7100 series
Page 45

When you save photo card files to your computer, the HP Photo View Center
opens automatically and displays thumbnails (small versions) of your images. If
you want to open the HP Photo View Center at a later time, open the HP Director
and click the View Images icon, which is located in the middle of the Director
window.
use the hp workplace
The HP Workplace is a Macintosh software program for editing and organizing
your documents. In addition to adding text or other graphic elements to your
saved photos, you can also use the Custom Print feature to print your photos in
standard photo sizes, print an index page, print T-shirt transfers, banners, and
posters. For more information about the HP Workplace, see the onscreen User’s
Guide.
print from a photo card
If you choose not to save the files from your photo card to the computer, you can
use the front panel to print directly from a photo card. In fact, you can print
photos from your photo card without being connected to a computer. You can
print a proof sheet, all photos on a photo card, or selected photos. If your digital
camera supports it, you can also print photos using the Digital Print Order
Format (DPOF).
print a proof sheet
A proof sheet, which may be several pages long, shows thumbnail views of
photos stored on the photo card. The file name, photo number, and date appear
under each thumbnail.
A proof sheet is a simple and convenient way to request and make prints directly
from a photo card.
You can use the proof sheet photo number to select which photos to print. This
number may be different from the number associated with the photo on your
digital camera. If you add photos to, or delete photos from your photo card, you
will need to reprint the proof sheet to see the new photo numbers. See use a
proof sheet on page 41 for information on what to do next with your proof sheet.
use a photo card
reference guide
to print a proof sheet when first inserting the card
1 Insert the photo card into the appropriate slot on your HP Officejet.
2 Press 2 when Save Photos to PC? appears on the front-panel display.
At this point, you do not want to save the photos, but instead, choose an
option to print the proof sheet.
3 Press until Proof Sheet appears, then press Enter.
The proof sheet is printed. If you have more than 20 photos on the card,
you can select the range of photos to be printed on the proof sheet.
to print a proof sheet from a card that is already inserted
1 press Menu.
2 Press 0, and then press 2.
This selects Photo Card Functions, then selects Print Proof Sheet.
39
Page 46

chapter 6
print all photos
print individual photos
The proof sheet is printed. If you have more than 20 photos on the card,
you can select the range of photos to be printed on the proof sheet.
If you simply want to print all photos on your card, use the following procedure.
1 Do one of the following:
– If your card is already in the slot, press Menu, press 0, then press 4.
This selects Photo Card Functions, then selects Print Photos.
– If your card is not in the slot, insert the photo card, and press 2 when
Save Photos to PC? appears.
2 Press until Photos on Card appears, then press Enter.
3 Press Enter again to select All.
4 Press to select a photo size, then press Enter.
5 Press to select a paper type, then press Enter.
6 Press to select the number of copies, then press Enter.
All photos on the card are printed.
If you don’t know the photo number for individual photos, you may want to print
a proof sheet to help you select individual photos to print.
40
Photo number
Date
File name
1 Do one of the following:
– If your card is already in the slot, press Menu, press 0, then press 4.
This selects Photo Card Functions, then selects Print Photos.
– If your card is not in the slot, insert the photo card, and press 2 when
Save Photos to PC? appears.
2 When Print What? appears, press until Photos on Card appears, then
press Enter.
3 Press to select Custom, then press Enter.
4 Use the keypad to enter the photo numbers for the photos you want to
print.
5 Press or Enter to enter the next photo number.
A comma is inserted automatically as the cursor advances to the right.
Tip: You can specify a range using a dash, which you enter by
pressing the Symbols button (*) on the keypad.
hp officejet 7100 series
Page 47

Note: You can erase entries by pressing . As the bottom line is filled,
the data entry field scrolls left to show the number as it is entered.
6 Press Enter when you have typed all the photo numbers for the photos you
want to print.
7 Press to select a photo size, then press Enter.
8 Press to select a paper type, then press Enter.
9 Press to select the number of copies, then press Enter.
The selected photos are printed.
print a DPOF file
The Digital Print Order Format (DPOF) is an industry-standard print file request
that can be created by some digital cameras. Consult your digital camera
documentation to see if it supports Digital Print Order Format (DPOF).
The DPOF file is stored by the digital camera on a photo card and specifies the
following information:
• Which photos to print
• The quantity of each photo to be printed
1 Do one of the following:
– If your card is already in the slot, press Menu, press 0, then press 4.
– If your card is not in the slot, insert the photo card, and press 2 when
2 When Print What? Use DPOF appears, press Enter.
3 Press to select a photo size, then press Enter.
4 Press to select a paper type, then press Enter.
use a photo card
This selects Photo Card Functions, then selects Print Photos.
Save Photos to PC? appears.
use a proof sheet
After printing a proof sheet, fill in the circles and place the proof sheet on the
glass. The proof sheet is scanned and photo prints are generated.
fill out the proof sheet
Fill out the proof sheet to select the photos you want to print, as well as the
number of prints, the image size, the paper size, and the type of border or frame
you would like.
reference guide
41
Page 48

chapter 6
scan a proof sheet
step 1: Select the photos you want
by filling in the circles located
underneath each photo with a dark
pen.
step 2: Select the number of prints,
image size, paper size, and
borders & frames.
step 3: Place sheet on scanner at
bottom right corner. Press Menu,
0, 3.
After you print a proof sheet and fill it out, simply scan it to print chosen photos
from your photo card.
1 Load paper in the main tray, such as photo paper.
2 Make sure that the photo card is inserted in the appropriate slot on your
HP Officejet.
3 Fill out step 1 of the proof sheet, which lets you select the photos you want
to print by filling in the circles underneath the thumbnail images.
4 Fill out step 2 of the proof sheet, which lets you select the number of prints,
the image size, and the paper size for your photos. You can also choose
the type of border and frame you would like for your photos.
Tip: Select only one option in each section of the proof sheet.
5 Place the top of the proof sheet face down on the scanner glass as shown
in the following figure.
42
hp officejet 7100 series
Page 49

use a photo card
Top ed ge of
original
6 Close the lid.
7 If you have the lower paper tray installed, press Tray Select/Paper Type to
select the main paper tray.
Note: If you have the lower paper tray installed, and it is set as the default
paper tray, make sure that you select the upper (main) paper tray if you are
printing on photo paper. If you are printing on plain paper, you can print
from either paper tray.
8 Press Menu.
9 Press 0, then press 3.
This selects Photo Card Functions, then selects Scan Proof Sheet.
The proof sheet is scanned and the HP Officejet prints the photos you
specified on the proof sheet from the paper in the upper tray.
learn more
reference guide
See the onscreen User’s Guide to learn more about the following:
• Use the HP Photo View Center or HP Workplace
• Find and select images on your photo card
• Edit images
• Create projects
• Make and print photo albums
• E-mail an image
• Upload a scanned image on the web
• Send images to another program
• Print a scanned image
43
Page 50

chapter 6
photo card functions menu options
0:Photo Card
Functions
1:Save Photos to
PC
2:Print Proof
Sheet
3:Scan Proof
Sheet
4: Print Photos
44
hp officejet 7100 series
Page 51

7
/off
ll th
send a fax
use the fax features
Using your HP Officejet, you can do the following:
• Send and receive paper faxes
• Send a computer file as a fax
• Send and receive color faxes
Your HP Officejet lets you send a fax in a variety of configurations. These include
the following:
• Sending a paper fax (legal, letter, or A4) using the front panel or
computer.
• Sending a paper fax with a computer-generated cover page using the
computer.
• Sending a computer file with or without a cover page using the computer.
• Sending a computer generated cover page as a single-page fax using the
computer.
See the onscreen User’s Guide for more information about sending faxes
and creating cover pages using your computer.
Note: By default, your HP Officejet prints a report only if there is a problem
with sending or receiving a fax. A confirmation message indicating that an
item was successfully sent appears briefly on the front-panel display after
each transaction. If you need printed confirmation that your faxes are
successfully sent, see print reports on page 48 for information about report
options.
See the illustration that follows to reacquaint yourself with the buttons in the Fax
area of the front panel.
Turn Auto Answer on
Change the resolution of
the fax.
Redials the most recently
dialed number.
.
send a fax from your hp officejet
Follow these steps to send a fax from your HP Officejet.
Scro
rough speed-dial entries.
Access one-touch speed-dial buttons.
Use keypad to dial fax
numbers or enter text.
Start fax.
45
Page 52

chapter 7
1 Load your original.
For more information, see load originals on the glass on page 17 and load
originals in the automatic document feeder on page 18.
Note: You must use the automatic document feeder (ADF) for multi-page
faxes.
2 Enter the fax number using the keypad.
3 Press Start Fax, Black or Start Fax, Color.
4 If there is no original in the document feeder, you will be asked Send from
Glass? Press 1 for Yes or 2 for No.
If you press 1 for Yes, the document is scanned from the glass. If you press
2 for No, the front-panel display message asks you to Load original in
document feeder. After you load the document, the HP Officejet begins to
send the fax.
use speed dial entries to send a fax
When sending faxes to frequently used numbers, consider setting up and using
speed dial entries. Using a speed-dial entry lets you send a fax by pressing just
a few buttons. Speed dial entries do not appear unless you have set them up
first. For more information on speed dialing, see set up speed dialing on
page 50.
1 Load your original.
2 Press the Speed Dial button.
Tip: Alternately, if the speed-dial entry you want to use is in the
first 10 entries, you can use one of the one-touch speed-dial
buttons. You can then press Start Fax, Black or Start Fax, Color
immediately.
3 Do one of the following to locate the desired number:
– Press until the desired speed-dial entry appears.
– Enter the number for the speed dial entry using the keypad.
4 When the speed-dial number that you want appears, press Start Fax,
Black or Start Fax, Color.
send a color fax
46
You can send and receive color faxes to and from other color fax machines. If
you attempt to send a color fax to a recipient who has a black-and-white fax
machine, your HP Officejet sends the fax in black and white.
To ensure the best quality when sending faxes in color, we recommend that you
use a color original rather than a color copy if possible.
In addition, you cannot send a color fax to a group using the speed-dial
features. To fax in color to a group, send the fax from the computer. For more
information, see send a fax from your computer in the onscreen User’s Guide.
1 Load your original.
For more information, see load originals on page 17.
2 Enter the fax number using the keypad, speed dial button, or one-touch
speed-dial buttons.
3 Press Start Fax, Color.
hp officejet 7100 series
Page 53

broadcast a fax to multiple recipients
If you send a fax from your HP Officejet, broadcasting lets you send a blackand-white fax to one group, which can contain up to 20 individual speed-dial
entries. To use broadcasting, the fax must fit into your HP Officejet’s memory.
If you send a fax from your computer, broadcasting lets you send it to an
unlimited number of groups and individuals.
1 Load your original.
2 Press Speed Dial until the desired group speed-dial entry appears.
3 Press Start Fax, Black.
schedule a fax
You can schedule a black-and-white fax to be sent later during the same day (for
example, when telephone lines are not as busy). If you use the front panel, you
can select a single recipient or group.
Using the computer to schedule a fax, you can schedule multiple faxes for
different delivery dates and times. For more information, see schedule a fax in
the onscreen User’s Guide.
When the specified time is reached, your fax is automatically sent as soon as a
connection can be made.
1 Load your original on the glass or in the ADF.
For more information, see load originals on page 17.
2 Press Menu.
3 Press 2, then press 2 again.
This will select Fax Functions and Send Fax Later Black Only.
4 Enter the Send Time using the numeric keypad.
5 Press 1 for AM or 2 for PM.
6 When Enter fax number appears, enter the fax number of the recipient or
select the group using the Speed Dial button.
7 When Store Fax Now? appears, press 1 for Yes, or 2 for No.
If you selected 1, the document is scanned to memory and is sent at the
selected time. If you select 2, a message may appear reminding you to
Load the original before the send time (if your documents are loaded in the
ADF, you will not see this message).
use the fax features
cancel a scheduled fax
reference guide
You can cancel a fax stored in memory or one that is currently in progress.
1 Press Menu.
2 Press 2, then press 2 again.
This selects Fax Functions and Send Fax Later Black Only.
The control panel displays Scheduled Fax in Memory and the scheduled
time and fax #.
3 When Cancel? 1 = Yes 2= No appears, press 1 to cancel the scheduled
fax.
47
Page 54

chapter 7
receive a fax
Depending on how you set up your HP Officejet, you can receive faxes
automatically or manually. For more information, see set the answer mode in
the onscreen User’s Guide.
For more information about using your HP Officejet with voice mail or with an
answering machine, see use other configurations with your fax features in the
onscreen User’s Guide.
Your HP Officejet is automatically set to receive and print received faxes (unless
you have turned the auto-answer feature off). If you receive a legal-size fax and
your HP Officejet is not currently loaded with legal-size paper, the unit
automatically reduces the fax so that it fits on the paper that is loaded, unless
you have disabled the automatic-reduction feature. For more information, see
set automatic reduction in the onscreen User’s Guide.
receive a fax automatically
When you turn on your HP Officejet, it automatically turns on the Auto Answer
feature. Confirm this by making sure the green light next to the Auto Answer
button is turned on. If the light is not on follow the instructions below.
` Press the Auto Answer button until the green light is lit.
When you select Yes, Cancelled Scheduled Fax appears on the front-panel
display.
receive a fax manually
Before manually receiving a fax to your HP Officejet, we recommend that you
remove any originals from the glass.
1 Press the Auto Answer button until the green light is off.
2 When your HP Officejet rings, pick up the handset of a telephone that is
3 If you hear fax tones, do one of the following:
print reports
You can set up your HP Officejet to print error reports and confirmation reports
for each fax you send and receive. You can also manually print reports as you
need them.
This disables the automatic answering feature.
on the same telephone line as your HP Officejet (a handset can be
plugged into the back of the HP Officejet using one of the RJ-11 accessory
ports).
–Press Start Fax, Black.
– If you are receiving from an extension phone (on the same telephone
line as your HP Officejet, but not connected directly to it), press 123
on your phone. Wait for the fax tones, then hang up the telephone.
Note: Reports must be printed on letter or A4 paper sizes only. Before you
begin printing reports, make sure the letter or A4 paper is loaded in the
main paper tray. For information on loading paper, see load paper on
page 19.
48
hp officejet 7100 series
Page 55

generate automated reports
1 Press Menu.
2 Press 3, then press 6.
This selects the Print Report menu, then selects the Automatic Reports Setup
option.
3 Press to scroll through the following report types.
– Every Error, which prints whenever there is any kind of fax error
(default).
– Send Error, which prints whenever there is a transmission error.
– Receive Error, which prints whenever there is a receiving error.
– Every Fax, which confirms every time a fax is sent or received.
– Send Only, which prints every time a fax is sent.
– Off, which does not print automatic fax reports.
4 After the option that you want appears, press Enter.
generate manual reports
1 Press Menu, then press 3.
This selects the Print Report menu.
2 Press to scroll through the following report types.
– 1:Last Transaction, which indicates the status of the last fax sent.
– 2:Fax Log, which lists approximately the last 40 faxes sent and
received.
– 3:Speed Dial List, which lists your individual and group numbers.
– 4:Menu Settings, which lists in outline form the entire menu system and
indicates the current and default settings.
– 5:Self-Test Report, which prints a self-test report. For more information,
see print a self-test report in the onscreen User’s Guide.
– 6:Automatic Reports Setup, which is the automatic reports setting
described in generate automated reports on page 49.
3 Select the report you want, then press Enter.
use the fax features
redial a number automatically
You can set your HP Officejet to redial a busy or an unanswered number
automatically. The default setting for Busy Redial is Redial. The default setting
for No Answer Redial is No Redial. The number of redial attempts is 5 times.
1 Press Menu.
2 Press 6, then press 3.
This selects the Advanced Fax Setup menu, then selects the Busy Redial
option.
3 Press to display Redial or No Redial options.
4 When the desired setting appears, press Enter to select it.
5 Press Menu.
6 Press 6, then press 4.
reference guide
49
Page 56

chapter 7
This selects the Advanced Fax Setup menu, then selects the No Answer
Redial option.
7 Press to display Redial or No Redial options.
8 When the desired setting appears, press Enter to select it.
adjust the volume
Your HP Officejet provides three levels for adjusting the ring and speaker
volume. The ring volume is the volume of the phone rings. The speaker volume
is the level of everything else, such as the dial and fax tones. The default setting
is Soft.
1 Press Menu.
2 Press 7, then press 8.
This selects the Status and Maintenance, then selects the Ring and Beep
Volume option.
3 Press to select one of the options: Soft, Loud, or Off.
4 Press Enter.
set up speed dialing
Through your HP Officejet or your computer, you can assign entries to fax
numbers you use often. This lets you dial those numbers quickly using the front
panel’s Speed Dial button or one-touch speed-dial buttons. You can create up to
130 individual and group speed-dial entries (varies by HP Officejet model).
You can use speed-dial entries only from the front panel.
create individual speed-dial settings
You can enter fax numbers that you will reuse frequently.
1 Press Menu.
2 Press 4, and then press 1.
This selects the Speed Dial Setup menu, then selects the Individual Speed
Dial option.
The first unassigned speed-dial entry appears on the display.
3 Press Enter to select the displayed speed-dial entry.
4 Enter the fax number to assign to that number, then press Enter.
Tip: To enter a two-second pause within a number sequence,
press Symbols repeatedly until a dash appears.
5 Enter the person’s or company’s name, then press Enter.
For more information, see enter text on page 52.
6 When Enter Another? appears, press 1 for Yes, if you want to set up
another number, or press 2 for No to exit.
create group speed-dial settings
You can create a distribution list of up to 20 individual speed-dial entries so that
you can send a fax to all of them at the same time.
50
hp officejet 7100 series
Page 57

use the fax features
To use a fax number in a speed-dial group, the number must already have an
assigned speed-dial entry. You can include only individual speed-dial entries.
You can’t assign a group to another group.
1 Press Menu.
2 Press 4, then press 2.
This selects the Speed Dial Setup menu, then selects the Group Speed Dial
option.
3 Choose one of the following:
– If this is your first group, the first unassigned number appears. Press
Enter to select it.
– If this is not your first group, 1=New 2=Edit appears. Press 1 to create
a new group. The first unassigned number appears. Press Enter to
select it.
4 When Add 1 of 20 appears, press until the appropriate speed-dial
number appears, then press Enter to select it.
The selected number and corresponding name appear on the display.
5 Choose one of the following:
– If the displayed number is correct, press Enter to add it to the group.
– To select a different number, press or until the appropriate
speed-dial number appears, then press Enter to select it.
6 When Add Another appears, press 1 for Yes if you want to add another
individual number to the group, or press 2 for No.
7 When you are done selecting individual numbers, enter a name for the
group.
For more information, see enter text on page 52.
8 Press Enter to save the group.
9 When Another group? appears, press 1 for Yes if you want to create
another group, or press 2 for No to exit.
set the date and time
You can set the date and time from the front panel. When a fax is transmitted,
the current date and time are printed along with the fax header. The date and
time format is based upon the language and country setting.
Normally the computer software sets the date and time automatically.
1 Press Menu.
2 Press 5, then press 1.
This selects the Basic Fax Setup menu, then selects the Date and Time
option.
3 Enter the month, day, and year (last two digits only) by pressing the
appropriate number on the keypad.
The underline cursor presented initially beneath the first digit advances
automatically to each digit after, each time you press a button. The time
prompt automatically appears after you enter the last digit of the date.
4 Enter the hours and minutes.
reference guide
51
Page 58

chapter 7
The AM/PM prompt automatically appears after the last digit of the time is
entered.
5 Press 1 for AM or 2 for PM.
The new time and date settings appear on the front panel.
set the fax header
The fax header is usually set up during installation using the Fax Setup Wizard.
If you need to change it, you can use the Fax Setup Wizard from the
HP Director, or you can follow these steps to enter your name and fax number
from the front panel.
Note: In Hungary, the subscriber identification code (fax header) can be
set or changed only by authorized personnel. For more information, contact
your authorized HP dealer.
1 Press Menu.
2 Press 5, then press 2.
This selects the Basic Fax Setup menu, then selects the Fax Header option.
3 When Your Name appears, enter your name using the keypad as
described in the next section, enter text on page 52.
4 Press Enter.
5 When you are prompted, use the keypad to enter your fax number.
6 After you finish entering your fax number, press Enter.
enter text
52
The following list provides tips for entering text using the front-panel keypad.
• Press the keypad numbers that correspond to the letters of a name.
ABC
2
• Press a button multiple times to see a letter first in lowercase and then in
uppercase. The first letter of a word is set to uppercase automatically.
These letters correspond to this number, and so on.
hp officejet 7100 series
Page 59

use the fax features
JKL
5
• After the correct letter appears, press , then press the number that
corresponds to the next letter in the name. Again, press multiple times until
the correct letter appears.
• The cursor automatically advances to the right 1.5 seconds after the last
button is pressed.
• To insert a space, press Space (#).
• To enter a symbol, such as @, press Symbols (*) repeatedly to scroll
through the list of available symbols, which are: *, -, &, ., / (), ‘, =, #, @,
_, and !.
• If you make a mistake, press to clear it, then make the correct entry.
• After you are done entering text, press Enter to store your entries.
To get this character:
Press 5 this many times:
reprint the faxes in memory
Your HP Officejet can store a limited number of fax pages in its memory, with
the number of pages depending on the model you purchased. When your
HP Officejet runs out of memory to store faxes, it will not receive any more fax
calls until the stored faxes are printed.
Reprint Faxes in Memory enables you to reprint a fax stored in memory. For
example, if your ink cartridge runs out of ink or paper becomes jammed when
printing a fax. This option prints all faxes in memory; press Cancel to stop
printing faxes you do not need.
1 Press Menu.
2 Press 2, then press 5.
This selects the Fax Functions menu, then selects the Reprint Faxes in
Memory option.
The faxes are printed from memory.
j1k2l3J4K5L65
7
use an answering machine or pc modem
An answering machine or PC modem can be connected directly to the
HP Officejet. If you are connecting a PC modem, turn off the modem’s faxreceive feature.
reference guide
53
Page 60

chapter 7
learn more
• If you have an answering machine connected directly to the HP Officejet,
verify that it is set to Auto Answer. Then set the Rings to Answer setting on
the HP Officejet to a number greater than the rings to answer setting for the
answering machine. For more information, see receive a fax automatically
on page 48 or set the rings to answer setting in the onscreen User’s
Guide.
• If you have an answering machine that automatically shuts off when
another phone extension has been picked up, it is not necessary to
connect the answering machine directly to the HP Officejet.
• If you use an answering machine that will share the phone line with the
HP Officejet, set the HP Officejet to receive faxes manually if the following
items are true:
– The answering machine does not have an automatic shutoff feature
when an extension phone is picked up.
– The answering machine is not directly connected to the back of the
HP Officejet.
• If you answer a phone and hear fax tones, press 1 2 3 on your phone to
accept the fax. Fax tones indicate that the HP Officejet is prepared to
receive the incoming fax. You should then hang up the receiver. When the
HP Officejet is set to receive faxes manually, you must be available to
respond to the incoming call or your HP Officejet cannot receive faxes.
See receive a fax on page 48 for more information.
See the fax section in the onscreen User’s Guide to learn more about the
following:
• Use a cover page and creating a cover page template
•Preview a fax
• Change resolution and contrast
• Forward faxes to another number
• Change fax settings from the Director
54
hp officejet 7100 series
Page 61

7:Status and
6:Advanced
5:Basic Fax
use the fax features
Maintenance
1:Check Ink
Level
2:Clean
PrintHeads
3:Align
PrintHeads
4:Perform Color
Calibration
5:Restore
Factory Defaults
6:Set Power
Save Mode Time
7:Set La n g u ag e
and Country/
Region
8:Ring and Beep
Volume
Fax Setup
1:Automatic
Reports Setup
2:Answer Ring
Pattern
3:Busy Redial
4:No Answer
Redial
5:Automatic
Reduction
6:Backup Fax
Reception
7:Erro r
Correction Mode
8:Silent Detect
Setup
1:Date and Time
2:Fax Header
3:Rings to
Answer
4:Paper Size
5:Tone or Pulse
Dialing
fax feature menu options
The following options are available for fax functions.
reference guide
3:Print Report 4:Speed Dial
2:Fax
Setup
1:Individual
Speed Dial
2:Group Speed
Dial
3:Delete Speed
Dial
4:Print Speed
Dial List
1:Last Transaction
2:Fax Log
3:Speed Dial List
4:Menu Settings
5:Self-Test Report
6:Automatic
Reports Setup
Enter to select the displayed
Functions
1:Scan and Fax
Black Only
2:Send Fax Later
Black Only
3:Fax
Forwarding
Black Only
4: Polling to
Receive
5:Reprint Faxes
in Memory
Press Menu to display the menu
functions.
Press or to move to the setting
you want.
Press
setting.
55
Page 62

chapter 7
56
hp officejet 7100 series
Page 63

maintain your hp officejet
8
This section provides instructions for keeping your HP Officejet in top working
condition. Perform these maintenance procedures as necessary.
clean the glass
Dirty glass, from fingerprints, smudges, hair, and so on, slows down
performance and affects the accuracy of special features such as Fit to Page and
Copy.
1 Turn off the unit, unplug the power cord, and raise the lid.
2 Clean the glass with a soft cloth or sponge slightly moistened with a
3 Dry the glass with a chamois or cellulose sponge to prevent spotting.
nonabrasive glass cleaner.
Caution! Do not use abrasives, acetone, benzene, or carbon
tetrachloride on the glass; these can damage it. Do not place
liquids directly on the glass. They may seep under it and damage
the unit.
clean the lid backing
Minor debris can accumulate on the white document-backing located
underneath the unit’s lid.
1 Turn off the unit, unplug the power cord, and raise the lid.
2 Clean the white document-backing with a soft cloth or sponge slightly
moistened with a mild soap and warm water.
3 Wash the backing gently to loosen debris; do not scrub the backing.
4 Dry the backing with a chamois or soft cloth.
Caution! Do not use paper-based wipes as these may scratch the
backing.
5 If this does not clean the backing well enough, repeat the previous steps
using isopropyl (rubbing) alcohol, and wipe the backing thoroughly with a
damp cloth to remove any residual alcohol.
clean the exterior
Use a soft, damp, lint-free cloth to wipe dust, smudges, and stains off the case.
The interior of the unit does not require cleaning. Keep fluids away from the
interior of the unit as well as the front panel.
57
Page 64

chapter 8
install the automatic document feeder
If you remove the automatic document feeder tray for any reason, you can
replace it easily. Use the illustration below, and make sure the tray snaps into
place.
work with printheads and ink cartridges
As you discovered when you installed your HP Officejet, the ink delivery system
consists of both ink cartridges, which contain the ink, and printheads, which
control the print quality. To ensure the best print quality from your HP Officejet,
you well need to preform some simple maintenance procedures, and when
prompted by a front-panel message, replace the ink cartridges or printheads.
print a self-test report
If you are experiencing problems with printing, before cleaning or replacing the
ink cartridges or printheads, you should print a self-test report. This report
provides useful information about both your ink cartridges and your printheads,
including status information, installation and expiration dates, and ink levels. It
is useful to know the ink cartridge expiration dates, so you can purchase
replacements before that date.
1 Press Menu.
2 Press 3, and then press 5.
This selects the Print Report menu, then selects Self-Test Report.
A self-test report is printed for your HP Officejet, which may indicate the
source of any problems you may be having. For example, you may notice
that one color does not print evenly across the page, which may indicate
a problem with the corresponding printhead.
check the ink level
58
An easy way to check the ink supply level can be done from the front panel.
1 Press Menu.
2 Press 7, then press 1.
This selects the Status and Maintenance menu, then selects the Check Ink
Level option.
A message in the front-panel display lets you know how much ink you
have left, for both black (#14) and tri-color ink (#14) cartridges.
3 Press Cancel to exit the menu.
hp officejet 7100 series
Page 65

perform color calibration
The Color Calibration option prints out a report that lets you manually improve
your color printing or copying. You should perform this procedure only if you
see problems with color tints, such as noticeably incorrect flesh tones.
1 Press Menu.
2 Press 7, then press 4.
This selects the Status and Maintenance menu, then selects the Perform
Color Calibration option.
A Color Calibration report is printed.
3 Follow the instructions on the report to determine the correct Color Patch
Number.
4 At the prompt on the front-panel display, enter the Color Patch Number,
then press Enter.
handle printheads
Before you replace or clean a printhead, you should know the part names and
how to handle the printhead.
maintain your hp officejet
Printhead handle
Ink nozzles
Do not touch the copper contacts, the ink nozzles, or the printhead tower.
verify a printhead needs to be replaced
If a printhead error message appears on the front-panel display, verify that the
printhead needs to be replaced.
1 Turn the unit off and then turn it on.
If the error message still appears, continue with the following steps.
2 Open the print-carriage access door by lifting the handle until the door
locks into place.
The print carriage moves to the center of the unit.
Printhead tower
Copper contacts
Plastic tape
reference guide
59
Page 66

chapter 8
3 After the print carriage stops moving, release the gray print carriage latch
and then lift the print carriage to access the printheads.
4 Remove the old printhead by lifting the printhead handle and pulling
upward.
Pull the printhead handle upward
5 If there is plastic tape on the failed printhead, remove the plastic tape.
6 Push the failed printhead firmly down into the appropriate slot using the
printhead handle. Do not touch the printhead tower, and do not remove
the printhead handle.
60
hp officejet 7100 series
Page 67

7 Move the print carriage latch down, and make sure the loops catch the
hooks. Snap the latch into place, then close the print carriage access
door.
8 If the error message still appears, remove and reinsert the printhead again
and close the print carriage access drawer.
9 If the error message still appears, replace the printhead as described in
the following section.
replace the printheads
If you experience print quality issues that cannot be resolved by cleaning your
printheads and you have verified that the printheads need to be replaced, you
may need to replace them. You may also see front-panel display messages that
indicate when individual printheads need to be replaced.
See the Support and Specifications booklet for information on ordering
replacement printheads.
1 Turn on the unit, then open the print-carriage access door by lifting the
handle until the door locks into place.
The print carriage moves to the center of the unit.
maintain your hp officejet
reference guide
2 After the print carriage stops moving, release the gray print carriage latch
and then lift the print carriage to access the printheads.
61
Page 68

chapter 8
Caution! To avoid damaging the printer, remove a printhead only
when a replacement is available. If a printhead is removed
without being replaced:
– Close the print carriage and the print-carriage access door.
– Replace the printhead within 24 hours.
– Never remove an ink cartridge and a printhead at the same time.
3 Remove the old printhead by lifting the printhead handle and pulling
upward.
Pull the printhead handle upward
62
4 Remove the new printhead from its packaging and, being careful to touch
only the black plastic, gently remove the plastic tape.
Caution! Do not touch the copper contacts, the printhead tower,
or the ink nozzles.
Printhead tower
Copper contacts
Ink nozzles
removing the plastic tape from the printhead
Plastic tape
5 Match the color on the top of the printhead to the color on the printhead
carriage.
6 Push the new printhead firmly down into the appropriate slot using the
printhead handle. Do not touch the printhead tower, and do not remove
the printhead handle.
hp officejet 7100 series
Page 69

7 Move the print carriage latch down, and make sure the loops catch the
hooks. Snap the latch into place, then close the print carriage access
door.
8 After the message appears in the front-panel display, press Enter to align
the printheads.
A page prints to confirm alignment. You can discard or recycle this page.
If the page does not appear, see the Troubleshooting help, which you
access from the HP Director.
handle ink cartridges
Before you replace or clean an ink cartridge, you should know the part names
and how to handle them.
maintain your hp officejet
Copper
contacts
replace the ink cartridges
Front-panel display messages appear under the following conditions to let you
know that you should replace your ink cartridges.
• Low ink levels
• Ink cartridges are approaching their expiration dates
See the Support and Specifications booklet for information on ordering
replacement ink cartridges.
reference guide
Release button
Plastic tape
Do not touch the copper contacts, and hold the
cartridge away from you as you remove the plastic
tape so the ink does not spill on you or your clothing.
Caution! If you ignore the messages and do not replace the ink
cartridges, eventually the HP Officejet will stop working
completely to avoid damaging the printheads.
63
Page 70

chapter 8
1 Turn on the unit, then open the print-carriage access door by lifting the
handle until the door locks into place.
The print carriage moves to the center of the unit.
2 After the carriage stops moving, press the gray button to release the ink
cartridge, then pull it up and out of its slot.
Caution! To avoid damaging the printer, remove an ink cartridge
only when a replacement is available. If an ink cartridge is
removed without being replaced:
– Close the print carriage and the print-carriage access door.
– Replace the ink cartridge within 24 hours.
– Never remove an ink cartridge and a printhead at the same time.
64
3 Remove the new ink cartridge from its packaging and, being careful to
touch only the black plastic, gently remove the plastic tape.
Caution! Hold the cartridge away from you as you remove the
plastic tape so the ink does not spill on you or your clothing.
hp officejet 7100 series
Page 71

maintain your hp officejet
Caution! Do not touch the copper contacts.
4 Push the new ink cartridge firmly down into the appropriate slot until it
clicks into place.
Note the color bars on the print carriage.
The ink-cartridge label should be face-up after the cartridge is inserted.
Color bars
align the printheads
reference guide
place the ink cartridges into their respective slots on the left and right
5 Close the print-carriage access door.
The HP Officejet prompts you to align the printheads every time you install or
replace a printhead or ink cartridge. Aligning the printheads ensures highquality output.
Printhead alignment is a two-step process that requires two sheets of plain white
paper. An alignment pattern will be printed on each page. The first page is
automatically calibrated for you as it prints. You then calibrate the second page
manually by using the scanner glass (not the ADF.)
Note: If your HP Officejet has both upper and lower input trays, the white
paper must be loaded in the upper tray.
to align the printheads from the front panel
1 Press Menu, 7, and 3.
2 The HP Officejet will print two alignment pattern sheets. This process may
take several minutes.
You can recycle or discard the first alignment sheet.
65
Page 72

chapter 8
3 Load the top of the second alignment sheet, which is named Instructions to
Perform 4800 Optimized DPI Alignment, face down on the scanner glass
in the front, right corner.
4 Press Enter on the front panel when prompted.
5 The process may take a several minutes. When 4800 optimized align
complete displays, the alignment process is complete.
to troubleshoot the alignment process
If an error occurs after the first alignment page is printed, you may receive an
error message on the display of the front panel or a blank page will print. Verify
the following items:
– Make sure that you have removed the nozzle tape from all printheads.
– Make sure that you are using clean sheets of A4 or letter sized plain
white paper. Do not use special, photo, odd-sized, color, or previously
marked paper.
– If you have two input trays, make sure that you have the plain white
paper loaded in the upper tray.
– Make sure that the paper in the input tray is not skewing during the
printing of the alignment pattern. If necessary, reload the paper in the
input tray.
If an error occurs after you scan the second alignment page, verify the following
items:
– Be sure that you are using the Instructions to Perform 4800 Optimized
DPI Alignment page when performing the scanning process.
– Make sure that you have positioned the second alignment page
properly on the scanner glass. The alignment page should be placed
on the front, right corner of the glass. The scan will fail if the page is
positioned improperly or placed print side up.
– Make sure that the paper in the input tray is not skewing during the
printing of the alignment pattern. If necessary, reload the paper in the
input tray.
After correcting the problem, restart the alignment process.
clean the printheads
Use this feature when the Self-Test Report shows streaking or white lines through
any of the colored bars. Do not clean printheads unnecessarily. This wastes ink
and shortens the life of your printheads.
1 Press Menu.
2 Press 7, then press 2.
This selects the Status and Maintenance menu, then selects the Clean
PrintHeads option.
If copy or print quality still seem poor after you clean the printheads,
replace the printhead that is affected.
clean the ink cartridge contacts
Clean the ink cartridge contacts only if you get repeated front panel messages
prompting you to check a cartridge after you already have.
66
hp officejet 7100 series
Page 73

maintain your hp officejet
Caution! Do not remove both ink cartridges at the same time.
Remove and clean them one at a time.
Make sure you have the following materials available:
• A clean, lint-free cloth
• Distilled, filtered, or bottled water (do not use tap water, as it may contain
contaminants that can damage the printheads)
Caution! Be careful not to get ink on your hands or clothing.
1 Turn the unit on and open the print-carriage access door.
The print carriage moves to the center.
2 After the print carriage has moved to the center, unplug the power cord
from the back of the unit.
Warning! It is very important that you disconnect the printer from its
electrical power source before touching the ink cartridge contacts.
Electrical shock or severe damage to the printer can occur if you touch the
contacts while there is electrical power to the printer. Do not use the On
button to turn the printer off.
3 Press the gray button to release the ink cartridge, then pull it up and out of
its slot.
4 Inspect the ink cartridge contacts and the contacts inside the ink cartridge
socket for ink and debris buildup.
5 Clean any visible ink deposits with a clean, soft, lint-free cloth.
If necessary, moisten the cloth with one drop of water.
6 Place the ink cartridge back into the holder.
7 Repeat if necessary for the other ink cartridge.
8 Close the door and plug in the unit.
Because you removed an ink cartridge from its holder, the HP Officejet
needs to align the printheads.
9 After the message appears in the front-panel display, press Enter to align
the printheads.
A page is printed to confirm alignment.
clean the printhead contacts
Clean the printhead copper contacts only if you get repeated front panel
messages prompting you to check a printhead after you already have.
reference guide
67
Page 74

chapter 8
Caution! Do not remove all printheads at the same time. Remove
and clean them one at a time.
Make sure you have the following materials available:
• A clean, lint-free cloth
• Distilled, filtered, or bottled water (do not use tap water, as it may contain
contaminants that can damage the printheads).
Caution! Be careful not to get ink on your hands or clothing.
1 Turn the unit on and open the print-carriage access door.
The print carriage moves to the center.
2 After the print carriage has moved to the center, unplug the power cord
from the back of the unit.
Warning! It is very important that you disconnect the printer from its
electrical power source before touching the printhead contacts. Electrical
shock or severe damage to the printer can occur if you touch the contacts
while there is electrical power to the printer. Do not use the On button to
turn the printer off.
3 Release the gray print carriage latch and then lift the print carriage to
access the printheads.
4 Remove the printhead by lifting the printhead handle and pulling upward.
5 Inspect the copper contacts and the contacts inside the printhead socket
for ink and debris buildup.
6 Clean any visible ink deposits with the clean, soft, lint-free cloth.
If necessary, moisten the cloth with one drop of water.
Caution! Clean only the copper contacts in the front of the
printhead, and wipe upwards only. Do not clean the ink nozzles
on the under side of the printhead. They can become damaged
or clogged by this type of cleaning.
68
hp officejet 7100 series
Page 75

maintain your hp officejet
Do not touch the printhead
tower.
Do not touch the
ink nozzles on the
underside of the
printhead.
Clean only the copper
contacts in the front of the
printhead.
Clean only the copper
contacts in the back of the
print carriage.
7 Place the printhead back into the holder.
8 Repeat cleaning of other printheads, if necessary.
9 Move the print carriage latch down, and make sure the loops catch the
hooks. Snap the latch into place, then close the print-carriage access door.
10 Close the door and plug in the unit.
After cleaning the contacts, you should align the printheads.
11 Press Menu.
12 Press 7, then press 3.
This selects the Status and Maintenance menu, then selects the Align
PrintHeads option.
A page prints to confirm printhead alignment. You can either discard or
recycle this page. If the page does not appear, see the Troubleshooting
help, which you access from the HP Director.
replacement alternatives
To get the best performance from your HP Officejet, we recommend using only
genuine Hewlett-Packard supplies. See the Support and Specifications booklet
for information on ordering replacement ink cartridges and printheads.
non-hp ink cartridges
The Ink Level Gauge may not work properly with a non-HP ink cartridge. If you
choose to print with a non-HP ink cartridge, you may not know when the
cartridge is running low or empty. Printing with an empty ink cartridge may
seriously damage the printheads.
reference guide
Caution! Damage that results from modifying or refilling HP ink
cartridges or the use of non-HP ink is specifically excluded from
the warranty coverage for the printer and printer supplies.
69
Page 76

chapter 8
Any damage resulting from the use of a non-HP ink cartridge is not the
responsibility of Hewlett-Packard.
refilled ink cartridges
To install a refilled HP ink cartridge, you must override the Ink Level Gauge.
override the ink level gauge
Overriding the Ink Level Gauge disables the printer’s ink level tracking feature,
but allows you to use a refilled cartridge.
Caution! If you use the override sequence described below, you
will disable the Ink Level Gauge for your ink cartridge. If you
choose to continue printing with an ink cartridge that has had its
Ink Level Gauge disabled, you will not know when the cartridge
is running low or empty. Printing with an empty cartridge may
seriously damage your printheads. Damage that results from
continued use of an ink cartridge with a disabled Ink Level Gauge
is not the responsibility of Hewlett-Packard. Damage that results
from the use of non-HP ink is not the responsibility of HewlettPacka rd.
The Ink Level Gauge is automatically reset when a different ink cartridge is
installed in the printer.
Overriding the Ink Level Gauge does not affect ink cartridge expiration dates.
The printer cannot use an expired ink cartridge.
Follow these steps to override the Ink Level Gauge:
to override the ink level gauge for the black ink cartridge
1 Press and at the same time, then release.
2 On the keypad, press in order, 7, 8, 9.
3 When the prompt appears asking if you want to override the ink level
gauge, press 1 for Yes, or 2 for No.
to override the ink level gauge for the tri-color ink cartridge
1 Press and at the same time, then release.
2 On the keypad, press in order, 4, 5, 6.
3 When the prompt appears asking if you want to override the ink level
gauge, press 1 for Yes, or 2 for No.
Always install an ink cartridge before performing an Ink Level Gauge override.
restore factory defaults
You can restore the original factory settings to what they were when you
purchased your HP Officejet. Choosing to restore your factory defaults restores
all settings, except copy settings, speed-dial entries, date, and fax header
information.
You can perform this process from the front panel only.
1 Press Menu.
2 Press 7, then press 5.
70
hp officejet 7100 series
Page 77

This selects the Status and Maintenance menu, then selects the Restore
Factory Defaults option.
The factory default settings are restored.
set the country or language
Usually, the language and country are set when you install the HP Officejet. If
you need to reset either the country or the language, use the following
procedure. The following table lists the available language codes.
Code Language
11 English
12 Espanol
13 Francais
14 Deutsch
15 Portugues
16 Nederlands
17 Italiano
18 Dansk
19 Suomi
20 Norsk
maintain your hp officejet
reference guide
21 Svenska
Tip: If you accidentally choose the wrong language and are
unable to read the front-panel display, simply follow the first 3
steps using the keypad to choose the correct language. You may
also consider printing a Self-Test report to identify the country and
language that have been selected.
1 Press Menu.
2 Press 7, then press 7, then press Enter.
This selects the Status and Maintenance menu, then selects the Set Country
and Language option.
3 To select the language, you can do the following:
– Press until the desired language appears.
– Wait until the desired language appears on the front panel display.
4 Enter the two-digit number corresponding to the language on the keypad.
For example: for English, you would enter 11.
5 After entering the language, you are prompted to confirm that the
language you selected is the one you want.
6 Press 1 for Yes and 2 for No.
7 After the language is selected, you are prompted with all the countries for
that selected language.
71
Page 78

chapter 8
8 To select the country, you can:
– Press until the desired country appears.
– Wait until the desired country appears on the front panel display.
9 Enter the two-digit number corresponding to the country on the keypad.
For example: for USA, you would enter 10.
10 After entering the country, you are prompted to confirm that the country or
region you selected is the one you want.
11 Press 1 for Yes or 2 for No.
You can confirm the country and language by printing a Self-Test Report.
12 Press Menu, press 3, and then press 5 to print the Self-Test report.
set the power save mode time
The bulb in your HP Officejet remains on for a specified period so that the unit
is immediately ready to respond to your request. When the HP Officejet has not
been used within that specified period, it turns the bulb off to preserve power
and displays Power Save On in the front-panel display. (You can exit this mode
by pressing any button on the front panel.)
Your unit is automatically set to enter power-save mode after 12 hours. Follow
these steps if you want the HP Officejet to enter this mode earlier.
1 Press Menu.
2 Press 7, then press 6.
This selects the Status and Maintenance menu, then selects the Set Power
Save Mode Time option.
3 Press
until the desired time appears, then press Enter.
72
hp officejet 7100 series
Page 79

maintenance menu options
maintain your hp officejet
3:Print Report
1:Last
Transaction
2:Fax Log
3:Speed Dial List
4:Menu Settings
5:Self-Test Report
6:Automatic
Reports Setup
Use Menu to display the Status and Maintenance
menu options.
Press and to move to the setting you want.
Press
Enter to select the displayed setting.
7:Status and
Maintenance
1:Check Ink
Level
2:Clean
PrintHeads
3:Align
PrintHeads
4:Perform Color
Calibration
5:Restore
Factory Defaults
6:Set Power
Save Mode Time
7:Set Langu a g e
and Country/
Region
8:Ring and Beep
Volume
reference guide
73
Page 80

chapter 8
74
hp officejet 7100 series
Page 81

additional setup information
9
This section covers how to handle messages that may or may not appear during
installation, how to set up the connection between your computer and your
HP Officejet, and how to add and remove the HP Officejet software. The
standard installation instructions are provided in your Setup Poster, which you
should keep for later use.
For comprehensive information, see the fully-searchable onscreen User’s Guide,
which is accessible only if the software has been installed. To access the guide
for Windows, go to the Director, click Help, and then choose User’s Guide.
To access the guide for Macintosh, go to the Director, click Tools, and then
choose View Onscreen Guide.
possible installation problems
If you follow the instructions in the Setup Poster correctly, you should not have any
problems with the installation of your HP Officejet. If you do not follow the
instructions, you may see any of the following problems:
If Microsoft’s New Hardware Found message does not appear
If you installed the HP Officejet software first as requested on the Setup Poster,
and you are a Windows 98/2000/ME/XP user, a series of Microsoft New
Hardware Found messages should have appeared on your screen during
software installation.
If the Microsoft messages did not appear, try the following:
• Verify that you are using a high-speed (12 Mbps) USB cable and that it
does not exceed five meters in length (16.4 feet).
• Verify that the computer is USB-ready. For more information about
determining whether your computer is USB-ready, see your computer’s
documentation or check with the computer’s manufacturer.
• Verify that the cable is plugged fully into your HP Officejet and directly
connected to the USB port on your computer. After the cable is connected
properly, turn your HP Officejet off and then on again.
• Turn your HP Officejet off and then on again, then restart your computer.
• If the previous steps do not solve the problem, remove and reinstall the
software. For more information, see remove and reinstall your hp officejet
software on page 79.
If the Fax Setup Wizard does not appear
Follow the instructions explained above.
If the New Hardware Message appears (Windows 98, 2000, XP, or ME)
If you set up your HP Officejet and connect it directly to your computer before
you install the software, you may encounter one of the following messages:
75
Page 82

chapter 9
To avoid errors, install the HP Officejet software before you connect the
HP Officejet to your computer. If the Add New Hardware Wizard or Found New
Hardware Wizard dialog box appeared and you clicked Next or OK, do the
following:
1 Press Esc to exit.
2 Turn off your HP Officejet.
3 Follow the software installation steps outlined in the Setup Poster that came
with your HP Officejet.
If the previous version installed message appears
If you receive a message that you have a previously installed version, you will not
be able to finish installing the HP Officejet software.
You will have to uninstall the previously installed version in order to install the
HP Officejet software.
If your computer is unable to communicate with your HP Officejet
If communication cannot be established between your computer and
HP Officejet (for example, the HP Officejet status icon has the yellow error
triangle), try the same tasks outlined under If Microsoft’s New Hardware Found
message does not appear on page 75.
selecting an hp officejet on a network (Macintosh)
If your HP Officejet model supports networking, you can use automatic discovery
or manual setup to locate your printer using the HP All-in-One Setup Assistant
(Hard Disk:Applications:HP All-in-One Software:HP All-in-One Setup Assist).
Automatic discovery allows you to select from a list of printers on your network.
Manual setup allows you to type in the network IP address to access the desired
printer.
1 In the Paper size dialog box, select a default paper size and click Continue.
2 In the HP All-in-One Setup Assistant dialog box, click Next.
3 Select TCP/IP.
You can select a printer automatically or manually:
76
hp officejet 7100 series
Page 83

To set up automatically:
–Click the Rescan TCP/IP button. A list of available printers appears in
the Network Devices dialog box.
– In the Network Devices dialog box, select the desired printer.
–Click OK.
OR
To set up manually:
–Click the Create button.
– Enter the network IP address for the desired printer.
–Click OK.
4 Complete the HP-All-in-One Setup Assistant.
connect your hp officejet to your computer
Your HP Officejet supports HOT Swapping, meaning you can connect to the
HP Officejet while the power is on at your computer and on the HP Officejet.
This section covers the following topics:
• connect your parallel cable adapter
• setup for simple sharing
• connect your usb port
For more information about networking options and installation and
configuration issues, see the parallel cable adapter flyer or the HP JetDirect
200m print server connector booklet.
additional setup information
connect your parallel cable adapter
Your HP Officejet can be connected to your computer with your parallel printing
cable and the parallel cable adapter.
Simply attach your parallel printing cable to the parallel cable adapter and plug
the parallel cable adapter into the port on the back of your HP Officejet. The
parallel cable adapter should click into place when correctly attached.
Note: Should you need to disconnect your parallel adapter from the
HP Officejet, press the buttons found on the top and bottom of the adapter
and pull the adapter straight out. You may need to disconnect the power
cord to access the lower button on the adapter.
reference guide
77
Page 84

chapter 9
setup for simple sharing
Your HP Officejet can be shared by two different computers by having both
computers connected directly to the HP Officejet. Both computers must have the
HP Officejet software installed. The list below shows the supported combinations
of communication between the HP Officejet and your computers.
The following communication configurations can be used with your HP Officejet:
• HP JetDirect 200m print server connector (network) and USB (Windows
• Parallel cable adapter (parallel) and USB (Windows only)
connect your usb port
Connecting to your HP Officejet with USB is straightforward. Simply plug one
end of the USB cable into the back of your computer and the other in the back
of the HP Officejet.
and Macintosh)
Note: Simple Sharing is supported by connecting to the HP Officejet in one
of the following configurations: HP Officejet to two Windows computers or
HP Officejet to two Macintoshes. You cannot mix platforms, that is, you
cannot connect the HP Officejet to both a Windows computer and a
Macintosh.
Note: There can be up to 10 client computers on the network portion of the
200m print server connector and USB combination.
what works what does not work
Plugging into the USB port on your
computer
Plugging into a powered hub that is
connected to the USB port on your
Plugging into the USB port located
on the keyboard
Plugging into a non-powered USB
hub
computer
Note: AppleTalk is not supported.
connecting to the USB port on your computer
78
hp officejet 7100 series
Page 85

additional setup information
connect your hp officejet to a phone, modem, or answering
machine
This section explains how to connect your HP Officejet to various office devices:
• phone: connect a phone to the HP Officejet so it can use the same phone
connection as the fax line
• modem: connect a modem to your HP Officejet so it can use the same
phone connection
• answering machine: set your HP Officejet to direct voice calls to the
answering machine and fax calls to the HP Officejet
Note: For information on connecting your HP Officejet to your computer
and phone system, see the Setup Poster that came with the unit.
to connect your hp officejet to a phone, modem, or answering machine
1 Remove the white plastic stopper from connector 2 on the back of the
HP Officejet.
connector 2 on the HP Officejet
2 If you want to connect more than one device to the HP Officejet, you can
use connector 3.
3 Connect the phone cord from the phone, modem, or answering machine to
connector 2 or 3.
Caution! Do not use the phone cord that came with the
HP Officejet for this purpose. That phone cord must connect
connector 1 on the HP Officejet to the wall jack for your phone
system. See the Setup Poster for details.
connector 1 on the HP Officejet
4 If you are connecting an answering machine, see use an answering
machine or pc modem in the onscreen User’s Guide for information on
correctly setting the number of rings.
If you are connecting a modem, turn off its fax-receive feature. See your onscreen
User’s Guide for information on tone versus pulse dialing and phone services.
remove and reinstall your hp officejet software
Do not simply delete the HP Officejet program files from your hard drive. Be sure
to remove them properly using the uninstall utility provided in the HP Officejet
program group.
reference guide
79
Page 86

chapter 9
learn more
to uninstall from a Windows computer
1 On the Windows taskbar, click Start, choose Programs or All Programs
(XP), choose Hewlett-Packard, choose hp officejet 7100 series, then
choose HP Uninstaller.
2 Follow the directions on the screen.
3 If you are asked whether you would like to remove shared files, click No.
Other programs that use these files may not work properly if the files are
deleted.
4 After the program finishes removing the software, disconnect your
HP Officejet, and restart your computer.
5 To reinstall the software, insert the HP Officejet 7100 Series CD-ROM into
your computer’s CD-ROM drive, and follow the instructions that appear.
to uninstall from a Macintosh computer
1 Double-click on Applications:HP All-in-One Software folder.
2 Double-click on Uninstaller.
3 Follow the directions that appear on the screen.
See the additional setup information section in the onscreen User’s Guide to
learn more about:
• Set up your HP Officejet for network printing
• Understand point-and-print and peer-to-peer networks
•Set up the host
• Set up a point-and-print client
• Set up a peer-to-peer client (Windows 98 server to 2000 client)
80
hp officejet 7100 series
Page 87

index
Numerics
2 on 1 feature, 32
250-sheet plain paper tray, 9,
19, 20, 23
4800 Optimized dpi
copy,
30
print, 15
A
address book, sending faxes to
50
groups,
adjust settings
copy,
29
fax, 50
adjust sound volume for fax, 50
align printheads, 65
auto-answer button, 8, 48
automatic document feeder
copy from,
load originals in, 18
use for two-sided copies, 33
6
B
banner paper, tips on
loading,
basic fax setup, 55
best copy quality, 27
broadcast a fax, 47
busy redial, 49
buttons
auto-answer,
cancel, 9
front panel, 3
keypad, 9, 52
lighter/darker, 9, 28
menu, 6, 9
number of copies, 9, 29
quality, 9, 27
reduce/enlarge, 9, 28
resolution, 8
scan to, 9, 26
special features, 9, 32, 33,
23
48
34
speed dial, 8, 46, 50
start scan, 10, 25
tray select/paper type, 9,
35
two-sided copy, 33
C
cancel
button,
9
copy, 36
scan, 26
scheduled fax, 47
cartridge
check ink level,
clean contacts, 66
replace ink cartridges, 63
change paper tray, 23
clean
ink cartridge contacts,
printhead contacts, 67
printheads, 66
the exterior, 57
the glass, 57
the lid backing, 57
collate copies, 34
color
46
fax,
improve printing, 59
intensity of copy, 28
CompactFlash, 37
connect
a modem,
a phone, 79
an answering machine, 79
connect your parallel cable
adapter,
continuous paper, tips on
loading,
contrast, enhance photo
colors,
copy
2 on 1,
4800 Optimized dpi, 30
an original, 31
buttons, 3
change default settings, 29
color intensity, 28
darken, 9, 28
defaults, 29
enhancements, 28
enlarge, 28
fit to page, 31
from ADF, 6
lighten, 9, 28
58
66
79
77
23
28
32
make a poster, 34
make copies, 5, 27
photo, 30
quality, 9, 27
reduce, 28
set number of copies, 5, 29
several copies on a
31
page,
special copy jobs, 30
speed, 27
stop, 36
T-shirt transfer, 35
two-sided copies, 9, 33
country setup, 71
D
darken a copy, 28
date setup, 51
default settings
change for copy,
restore factory defaults, 70
delay fax, 47
director review, 10
double-sided copies, 33
DPOF, print, 41
29
E
enhancements, 28
enlarge a copy, 9, 28, 31
enter text from keypad, 52
envelopes, load, 20
error reports, fax, 48
exclamation light (needs
attention),
8
F
factory defaults
change for copying,
restore, 70
fast copy quality, 27
fax
adjust volume,
answering machine, 53
auto redial, 49
auto-answer, 8
broadcast, 47
busy redial, 49
buttons, 3
cancel scheduled fax, 47
29
50
81
Page 88

index
confirmation reports, 48
create group speed-dial
settings,
create individual speed-dial
settings,
delay send, 47
enter text, 52
error reports, 48
header, 52
pc modem, 53
print reports, 48
receive, 48
receive manually, 48
redial numbers
automatically,
reports, 45, 49
reprint fax in memory, 53
resolution, 8
schedule send, 47
send, 45
send fax to multiple
recipients,
send in color, 46
send using speed dial
settings,
set the header, 52
speed dialing, 50
transaction reports, 49
fax functions menu, 55
fit to page, 31
front panel
enter text,
features, 3
overview, 8
print photos, 39
scan from, 25
tutorial, 3
front-panel display, 3
set language, 71
50
50
8, 49
47
46
52
G
glass cleaning, 57
greeting cards, load, 22
group speed-dial settings,
creating,
50
H
header, fax, 52
help, 1
hp director, 10–12
hp officejet
menu functions,
simple sharing, 78
software, 10
hp papers, tips on loading, 22
13
hp two-sided printing
accessory,
33
I
image, shift, 33
individual speed-dial settings,
create,
50
ink cartridges
check ink level,
clean, 66
refill, 70
replace, 63
ink level
check,
58
low, 63
override gauge, 70
inkjet paper, load, 22
intensity of color copy, 28
introduction to the Director, 10
iron-on, 35
58
K
keypad, 9
enter text, 52
L
labels, load, 22
lamp power save mode, 72
language setup, 71
legal-size paper
copy from,
tips on loading, 22
lid backing, clean, 57
light power save mode, 72
lighten or darken copies, 9, 28
load
250-sheet plain paper
tray,
change the paper type, 23
envelopes, 20
ink cartridges, 63
multiple originals, 6
original in the ADF, 6, 18
original on the glass, 17
paper, 19
photo paper, 22
postcards, 22
printheads, 61
set the paper size, 24
tips, 22
lower paper tray, see 250-sheet
plain paper tray
28
19
M
main paper tray, load, 19
maintenance
align printheads,
check ink level, 7
clean the exterior, 57
clean the glass, 57
clean the lid backing, 57
clean the printheads, 66
power save mode time, 72
printhead replacement
verification,
replace ink cartridges, 63
replace printheads, 61
restore factory defaults, 70
self-test report, 58
margins, increase, 33
memory card see photo card
Memory Stick,
menus, 55
advanced fax setup, 55
copy setup, 36
fax functions, 55
photo card functions, 44
print reports, 73
speed dial setup, 55
status and maintenance, 55,
65
59
37
73
multiple recipients
create groups,
send fax to, 47
50
N
no answer redial, 49
normal copy quality, 27
number of copies, 9
set, 5, 29
numbers, redialing, 49
O
originals
how to place in the ADF,
how to place on glass, 17
multiple copies, 31
print two on one page, 32
output tray, 23
extender, 20
P
paper
change default size for
copy,
23
change the type, 23
load, 19
recommended, 18, 19
set the size, 24
tips on loading, 22–23
paper size, change for
copy,
23
18
82
hp officejet 7100 series
Page 89

index
paper tray
select,
9
set, 23
parallel cable adapter, 77
phone hook light, 8
photo card
CompactFlash,
insert a card, 37
inserted incorrectly, 38
Memory Stick, 37
Photo View Center, 38
print a DPOF file, 41
print a proof sheet, 39
print all photos, 40
print individual photos, 40
print photos from, 39
save files to computer, 38
scan a proof sheet, 42
SmartMedia, 37
types, 37
what is a photo card, 37
photo mode enhancement, 30
photo paper, load, 22
Photo View Center, 38
photo view center, 25
photos
copy,
30
enhance copy, 28
print, 39
print a DPOF file, 41
print all, 40
print individual photos, 40
save, 38
view, 38
postcards, load, 22
poster, copy to, 34
power save mode setup, 72
power save mode time, 72
print
4800 Optimized dpi,
all photos, 40
color calibration report, 59
continuous (banner) paper,
tips on loading,
DPOF file, 41
envelopes, 20
fax reports, 48
faxes in memory, 53
individual photos, 40
photos from photo card, 39
proof sheet, 39
self-test report, 58
print cartridges, see ink
cartridges
printheads
37
15
23
align,
65
clean, 66, 67
load, 61
replace, 61
replacement verification, 59
proof sheet
print,
39
scan, 42
use, 41
Q
quality, 27
quick start, 3
review the director, 10
use with a computer, 10
R
receive, fax, 48
redialing, numbers, 49
reduce a copy, 5, 9, 28, 31
reinstall software, 79
remove software, 79
reports
automatic fax,
color calibration, 59
fax, 45
manual fax, 49
self-test, 58
restore factory settings, 70
ring and beep volume, set, 50
49
S
save
a scanned image,
photos to computer, 38
scan
buttons,
different destination, 26
from front panel, 25
proof sheet, 42
stop, 26
schedule
cancel scheduled fax,
fax, 47
self-test report, 58
send
delay fax,
fax, 45
fax to multiple recipients, 47
set
country and language,
date and time, 51
fax header, 52
number of copies, 29
power save mode, 72
speed dialing, 50
3
47
25
47
71
settings
best copy quality,
copy a photo, 30
copy color intensity, 28
copy defaults, 29
copy quality, 27
copy speed, 27
country and language, 71
darken a copy, 28
date and time, 51
enlarge a copy, 28
fast copy quality, 27
fax header, 52
lighten a copy, 28
normal copy quality, 27
paper tray, 23
power save mode, 72
reduce a copy, 28
ring and beep volume, 50
save copy, 29
text enhancement, 28
setup
additional information,
simple sharing, 78
shift margins, 33
SmartMedia, 37
software
introduction,
remove and reinstall, 79
sound volume, adjust, 50
special features, 9, 32, 33, 34
limitations, 17
speed dialing
buttons,
create group settings, 50
create individual
enter text, 52
set up, 50
to send fax, 46
stickers, load, 22
stop
copy,
scan, 26
supply, check ink level, 58
8
settings,
36
27
75
10
50
T
text
enhance,
enter from keypad, 52
time setup, 51
transparency film
recommend choices,
tips on loading, 22
troubleshooting
28
19
reference guide
83
Page 90

index
remove and reinstall
software,
79
T-shirt transfer, 35
load, 22
tutorial, 3
before you begin, 3
front panel features, 3
make a copy, 5
two-sided copies, 9, 33
U
USB cable installation, 78
V
volume, adjust for fax, 50
84
hp officejet 7100 series
Page 91

Page 92

Page 93

Page 94

Page 95

Page 96

Visit the hp officejet information center
It has everything you need to get the most value from your HP Officejet.
• Technical Support
• Supplies and Ordering Information
•Project Tips
• Ways to Enhance Your Product
www.hp.com/support
© 2002 Hewlett-Packard Company
Printed in the U.S.A., Mexico, Germany, Singapore, or China.
*C8380-90183*
*C8380-90183*
C8380-90183
 Loading...