

Page 1

Making Standard SIMM s Work / Memory Upgrade on the HP LaserJet 6MP / 5M
*** I am not responsible for your ruining your perfectly good and <sarcasm>highly valuable</sarcasm>
the unit had the standard 3 Megabytes installed and that it also sports two empty 72 pin SIMM slots, much like those
Page
1
of 412/14/2003
72 pin SIMMs or your HP LaserJet printer. Proceed with CAUTION and NOTE: This procedure worked on
my 6MP and MAY NOT WORK FOR YOU AND COULD DAMAGE YOUR EQUIPMENT. Read these instructions
in entirety before beginning work.***
Overview
I am a bit of a computer and electronics junkie and recently had the opportunity to purchase a close to new HP
LaserJet 6MP at auction for next to nothing. Being the curious chap that I am, I wondered how much RAM the thing
had and if I could possibly upgrade it cheaply (ie: not have to buy the HP-approved upgrade modules). I found that
found on older 486 motherboards. This really peaked my interest because I have a bag of totally worthless SIMMs
laying around that I figured I could use. After doing a little research, I found that:
l
The following HP LaserJet printers seem to use the same type of RAM: 5, 5M, C3100A, 6MP, 5Si MOPIER, 5Si
MX, 5Si, 5Si NX, 5M, 5, 5N, 5se, 4+, 6P, 6Pxi, 6Pse, 5P, 5MP, 4MV, 4P, 4MP, DesignJet: 750C, 750C Plus,
700, 330, 350C, DeskJet: 1600CM, 1600C, 1600CN, PaintJet XL300
l
Depending on your printer, you may have a different maximum capacity. The memory capacity on the 6MP is
35 Megs (Two 16 MB sticks + PostScript card RAM + Internal RAM).
l
HP used a technology called “presence detection” that essentially jumpers unused pins on SIMM memory
modules together in certain sequences to tell the printer how much RAM is installed and what type it is.
l
Any 72 pin RAM SIMM can be used on the 6MP so long as it is 70ns or slower speed and is equipped with
“presence detection” or jumpered pins.
*Most of this information I obtained from a newsgroup posting titled “SIMM Identification for LaserJets”, Author
Unknown and eBay auctions for SIMM modules for the HP printers.
Being that I had a whole bag of RAM that I could sacrifice and some free time on a boring Sunday afternoon, I
decided to try to make my SIMMS work in my 6MP LaserJet printer. The first attempts worked on a 4 meg SIMM, but
I wanted to max out the RAM, so I perfected my technique on a second set of RAM. This process is detailed below.
Required Supplies & Tools
You will need a few tools to operate on your RAM and make it compatible with your LaserJet, DesignJet, DeskJet, or
PaintJet printer. They are pictured below (click the picture to enlarge in a popup):
The needed tools are:
l
15 watt (or lower) soldering iron - too hot an iron will burn your memory componets
l
Multimeter - digital or analog doesn’t matter so long as you can detect continuity (use the OHM setting)
l
Stranded wire to use for jumpers (one strand per jumper) - speaker wire works well
l
Needle-nosed pliers help hold the hot wire while you solder
l
Solder wire, of course
l Wire cutters
l
Grounding strap (optional, but highly recommended) to discharge static electricity
Page 2

Identifying your RAM
jumpers onto the RAM. I found the following chart online in a newsgroup post titled
The first step that you should take it to verify how much RAM your printer already has. To do so, plug in your printer,
s pagecount and how much RAM is installed in the printer. If you have less than 35
s side panel where the RAM is hidden. On the 6MP LaserJet, the RAM is
Page
2
of 412/14/2003
More than likely you will have the same situation that I did. I tested the RAM for continuity between pin 72 and pins
67-70; none of my pins had continuity (were connected to each other). If you find that pin 72 is connected to any
other of the pins 67-70 on your RAM module, then you may just have “presence detect” enabled RAM that will work
out of the box in your Hewlett Packard printer. Before you start soldering jumpers, test the RAM in the printer and
see if it’s recognized.
If you don’t have continuity between pin 72 of your SIMM and any of the pins 67-70, then you will need to solder
“SIMM Identification for
LaserJets”:
"I” indicates infinite resistance to pin 72.
"G” indicates <10 ohms to pin 72 (typically a short-circuit).
pin pin pin pin size speed
70 69 68 67
I I I I not a valid SIMM
I I I G not a valid SIMM
I I G I not a valid SIMM
I I G G not a valid SIMM
I G I I 8 MB 70 ns
I G I G 1 MB 70 ns
I G G I 2 MB 70 ns
I G G G 4 MB 70 ns
G I I I 8 MB 80 ns
G I I G 1 MB 80 ns
G I G I 2 MB 80 ns
G I G G 4 MB 80 ns
G G I I 8 MB 100 ns
G G I G 1 MB 100 ns
G G G I 2 MB 100 ns
G G G G 4 MB 100 ns
This chart tells you what pins should be shorted on your RAM module to work with the HP printer you have. I knew
that the SIMMs I had were either 8meg or 16 meg modules and so started by eliminating any other sizes from the
list of possible jumper configurations. NOTE: 70ns or SLOWER RAM is required. Also, using the wrong type of RAM in
your printer should not damage it, but might.
It could very well be that you have RAM that is so old you have idea how many megabytes it is or how fast it is. If
this is the case, you only have a limited number of possibilities in soldering jumpers on. GO FOR IT!
The operation begins
load paper and turn it on. After the printer warms up and the lights stop flashing, depress both the test print and
resume buttons on the left top of the 6MP to print a status report page. This page tells you what modules you have
installed in the printer, the printer’
megabytes total in your printer, then you have room to expand! If you have only 3 megabytes, you are at the
standard level of RAM. Anything in between means that there is already a memory upgrade in the printer, but that
shouldn’t stop you from maximizing it! 72 pin SIMMs are so cheap nowadays that there is no reason not to. You will
be surprised how much faster your printer spools and prints because spool times are drastically reduced with more
RAM.
The first thing I did was to remove the printer’
Page 3
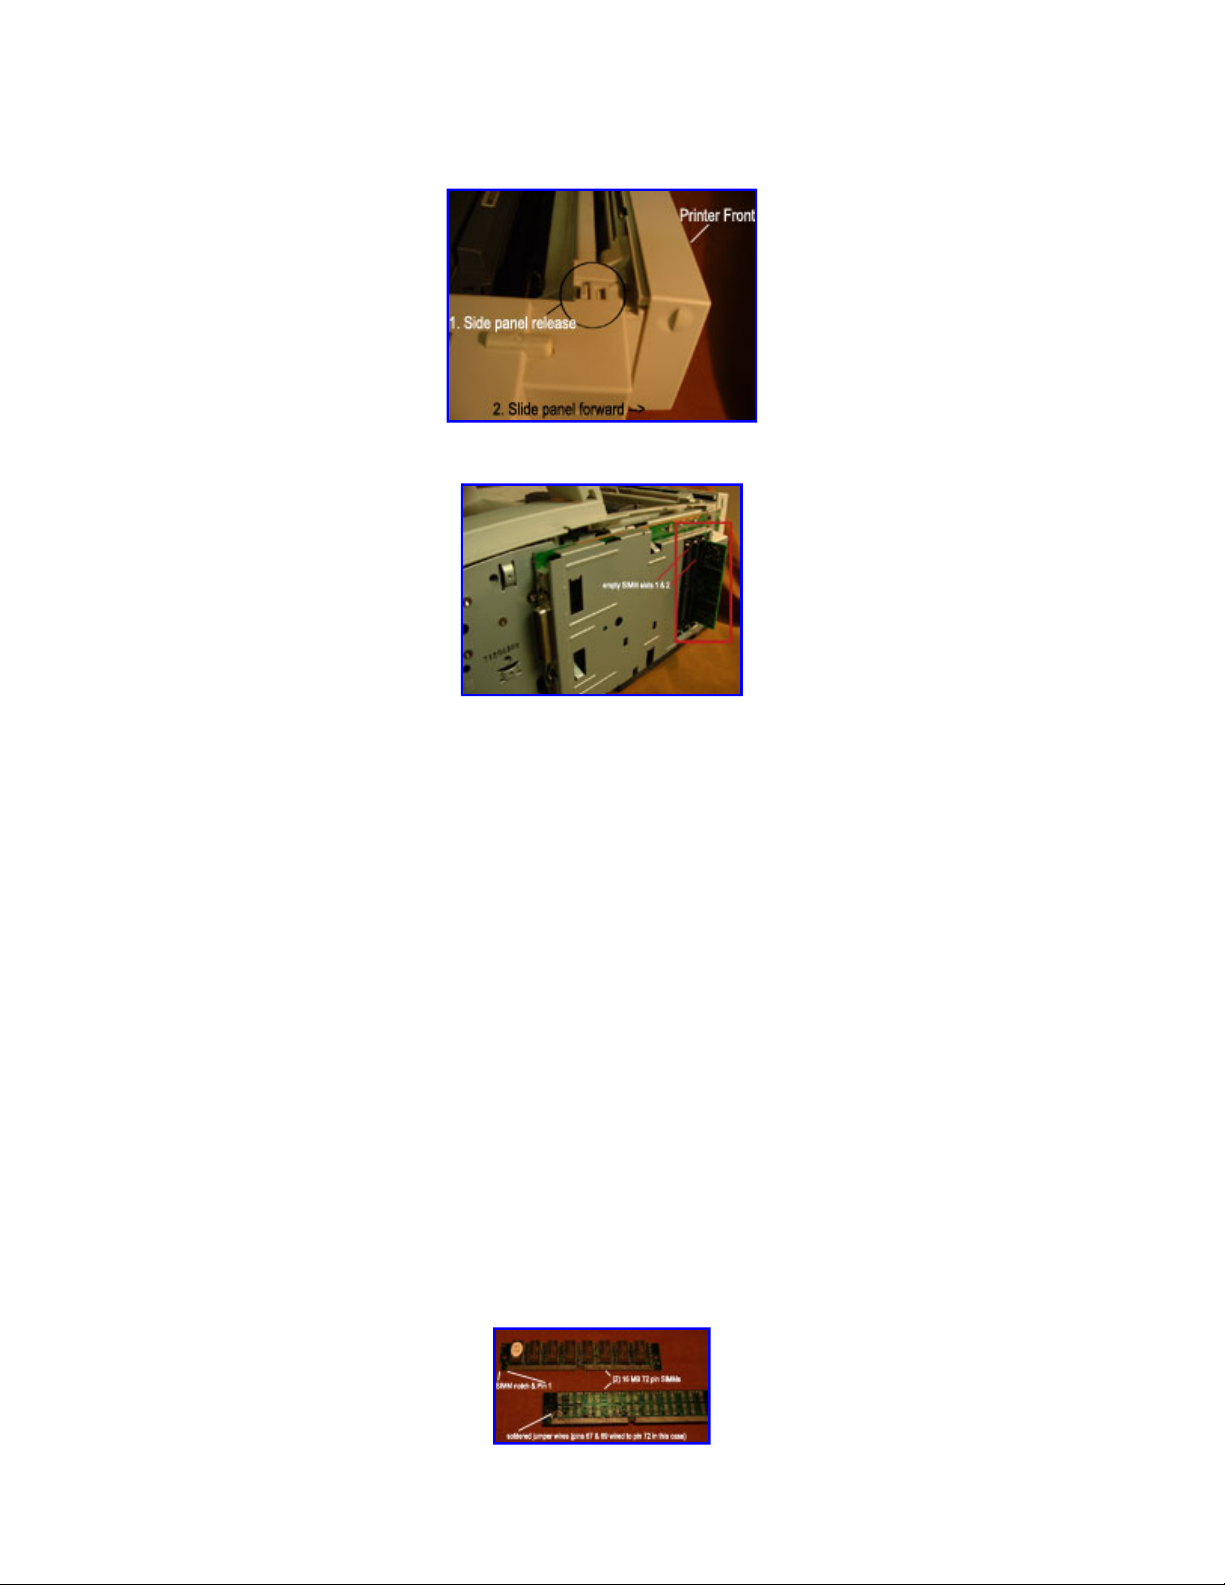
located under a removable cover on the left front of the printer. You can see a picture of where the release is below.
side panel. To remove the side panel, raise the toner cover, depress the side panel release button and slide the panel
Page
3
of 412/14/2003
You need to raise the top cover where the toner goes and the power cable cover on the left rear before removing the
toward the front of the printer.
After you have removed the side panel, you should see three SIMM slots. On of the slots is most likely filled with a
PostScript SIMM if you have a PS enabled printer. The other two slots are where we will install our modded RAM. A
picture of the slots and the PostScript SIMM on my laser printer is below:
After you have the covers off, you can start soldering your SIMMs. This is a bit of a trial and error process, especially
if you are not sure what type of RAM you have or if you have little experience soldering. Hopefully you do have
experience soldering or things might get a little hairy. Using the chart above with the Ground / Infinite designations,
solder the jumpers to match your configuration. I would recommend the following:
l
Cut the wire strand / jumper long to solder the first point - this makes it easier to hold
l
Tin the jumper ends before soldering. Tin the RAM pin contacts before soldering also.
l
Don’t rest the soldering iron on the RAM too much or you may damage your SIMM from heat.
l
Hold the wire with pliers (it gets HOTTT!).
l
I soldered my jumpers on the back of my single-side RAM modules to make maneuvering my hands easier.
l
Solder as high on the RAM contact point as possible to prevent interference when installing in the SIMM slots.
l
Use as little solder as possible and make a good contact.
l
Check for bridges between RAM contacts before installing. Use your multimeter to make sure only the pins
you soldered register a short or continuity.
l
If you are soldering more than 2-3 jumpers on the SIMM, I would recommend jumpering the pins in series
and not all on pin 72. This will make the soldering easier.
l
Wear your static strap to prevent damaging the sensitive RAM.
After you have soldered the SIMM with a configuration referenced in the chart above, carefully place the RAM in the
printer one SIMM at a time and print a test page. If the test lights go through their sequence and finish illuminated
as normal (with only the ready light lit), AND your total RAM shows up correctly on the printer test report, you were
successful! If not, try another jumper configuration after you have turned the printer off and carefully removed the
SIMM.
Finishing up
After you have soldered your SIMMs, you should have something that looks like the following:
Page 4

When you have successfully tested your RAM and everything is working as expected, close up the printer and go
Page
4
of 412/14/2003
about your business! The installed SIMMs look like this in my printer:
Credits / RestrictionsCredit for the chart featured, titled “SIMM Identification for LaserJets” goes to Author
Unknown. It could very well be that this document is from HP, but I could not find it on their site or find a posting
online with the original author intact. If you wrote this or have a copyright, please let me know and I will post it
accordingly.
Dennis Little is the author of this document and images. Use and reproduction is permitted so long as this document
remains intact in its entirety and references keycruncher.com and Dennis Little as the source.
A PDF of this document is available here:
Pictures were taken with my new FujiFilm S3000 3 megapixel digital camera if you are interested. I am an amateur
photographer and it takes great pictures and lets me play with SLR-like functions. Good deal for little money, this
one is. It also takes a variety of filters and lenses readily available in all major brands.
 Loading...