

Page 1

Installation Guide
HP Colorado 5GB and 8GB External Tape Drives
Chapter 1: Getting Started
Viewing the Online User’s Guide . . . . . . . . . . . . . . . . . . . . . . . . . . . 2
Checking Your Tape-Drive Package. . . . . . . . . . . . . . . . . . . . . . . . . 3
Chapter 2: Connecting the Hardware
Installing Your External Tape Drive . . . . . . . . . . . . . . . . . . . . . . . . . 4
If You Have Problems . . . . . . . . . . . . . . . . . . . . . . . . . . . . . . . . . . . . 8
Using the Tape Drive on Other Computers. . . . . . . . . . . . . . . . . . . . 9
Chapter 3: Installing the Software
Checking Your Parallel Ports. . . . . . . . . . . . . . . . . . . . . . . . . . . . . . . 11
Interchangeability of Tapes . . . . . . . . . . . . . . . . . . . . . . . . . . . . . . . . 11
Installing Colorado Backup for Your Operating System. . . . . . . . . . 12
Installing Colorado Backup for DOS. . . . . . . . . . . . . . . . . . . . . . 12
Installing Colorado Backup for Windows . . . . . . . . . . . . . . . . . . 17
Installing Colorado Backup for Windows 95. . . . . . . . . . . . . . . . 2 3
Configuring the Drive for Windows NT 4.0 . . . . . . . . . . . . . . . . 27
If You Have Problems . . . . . . . . . . . . . . . . . . . . . . . . . . . . . . . . . . . . 29
Chapter 4: Using Tapes and Caring for Your Drive
Choosing Tapes for Your Tape Drive . . . . . . . . . . . . . . . . . . . . . . . . 32
Inserting a Tape . . . . . . . . . . . . . . . . . . . . . . . . . . . . . . . . . . . . . . . . . 33
Removing a Tape. . . . . . . . . . . . . . . . . . . . . . . . . . . . . . . . . . . . . . . . 34
Caring for Your Tape Drive. . . . . . . . . . . . . . . . . . . . . . . . . . . . . . . . 34
Chapter 5: Technical Information
Minimum System Requirements . . . . . . . . . . . . . . . . . . . . . . . . . . . . 35
Hardware Requirements. . . . . . . . . . . . . . . . . . . . . . . . . . . . . . . . 35
Colorado Backup for DOS Requirements . . . . . . . . . . . . . . . . . . 36
Colorado Backup for Windows Requirements . . . . . . . . . . . . . . 36
Colorado Backup for Windows 95 Requirements . . . . . . . . . . . . 37
Windows NT 4.0 . . . . . . . . . . . . . . . . . . . . . . . . . . . . . . . . . . . . . 37
LAN Installation. . . . . . . . . . . . . . . . . . . . . . . . . . . . . . . . . . . . . . 37
What Affects Performance. . . . . . . . . . . . . . . . . . . . . . . . . . . . . . . . . 38
Drive Specifications. . . . . . . . . . . . . . . . . . . . . . . . . . . . . . . . . . . . . . 39
Software License Agreement for External Drives. . . . . . . . . . . . . . . 43
Returning Your Drive . . . . . . . . . . . . . . . . . . . . . . . . . . . . . . . . . . . . 45
Chapter 6: Customer Support Services
Support for Your Tape Drive and Colorado Backup Software . . . . . 46
Page 2

Chapter 1: Getting Started
This
Installation Guide
n
Connect the tape drive to your parallel port (and printer, if needed)
n
Install the software
n
Select and use tapes with your drive
When you finish, your tape drive will be ready to make a backup. For more
information, see the online
shows you how to:
User’s Guide.
V i ewing the Online User’s Guide
The Software Installation CD contains a
n
Use the Colorado Backup software to back up, restore, and verify data
n
Recover from a hard drive crash
Windows 95
If the Colorado Backup software has already been installed, from the
Programs, Colorado Backup, User’s Guide
select
Guide.
You can also view the
Installation CD, click on
drive letter), then click on the
User’s Guide
Start, Run
User’s Guide
User’ s Guide
on the CD. To do this, insert the Software
, type
D:\SETUP
button.
that shows you how to:
Start
menu,
to view the electronic
(where D: is your CD-ROM’s
User’s
Windows 3.1
Insert the Software Installation CD, click on
your CD-ROM’s drive letter), then click on the
the option of installing the Acrobat Rea der software if you do not already have it.
File, Run
User’s Guide
D:\SETUP
, type
button. You will have
(where D: is
2
Page 3
Getting Started 3
DOS
If you installed the software from the Software Installation CD, the online User’s
Guide is on your hard drive in the same dire ctory as the software. If you installed the
software from a diskette, the online User’s Guide is on that disk ette. To access the
User’s Guide, open the file DOSGUIDE.TXT with any ASCII text editor.
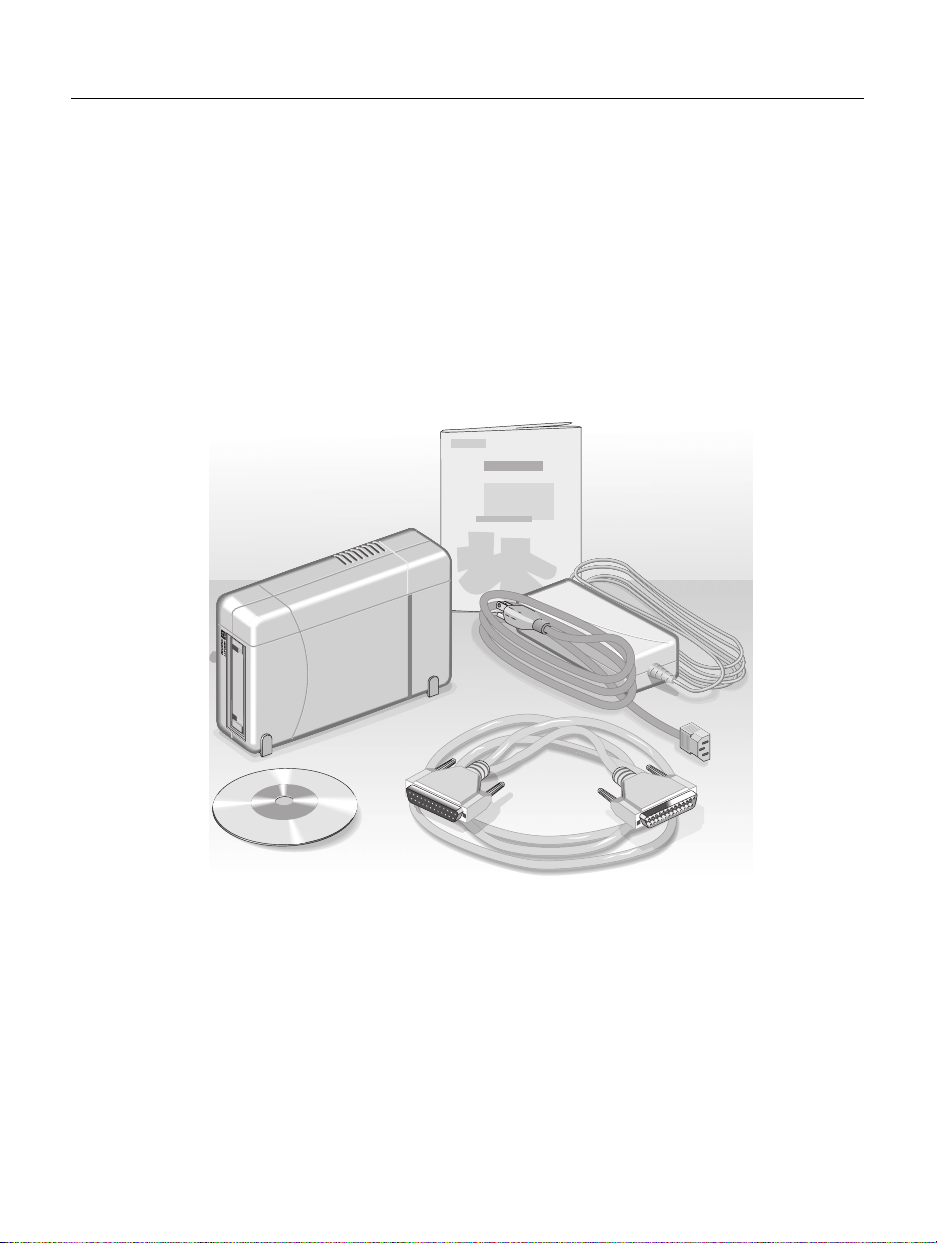
Checking Your Tape-Drive Package
Check each item to ensure you have everything you need.
Installation
Guide
Power Supply and
Power Cord
(U.S. vers io n shown
other versions may vary.)
Software
Installation
CD
HP Colorado
External Tape
Drive
Data Cable
Page 4
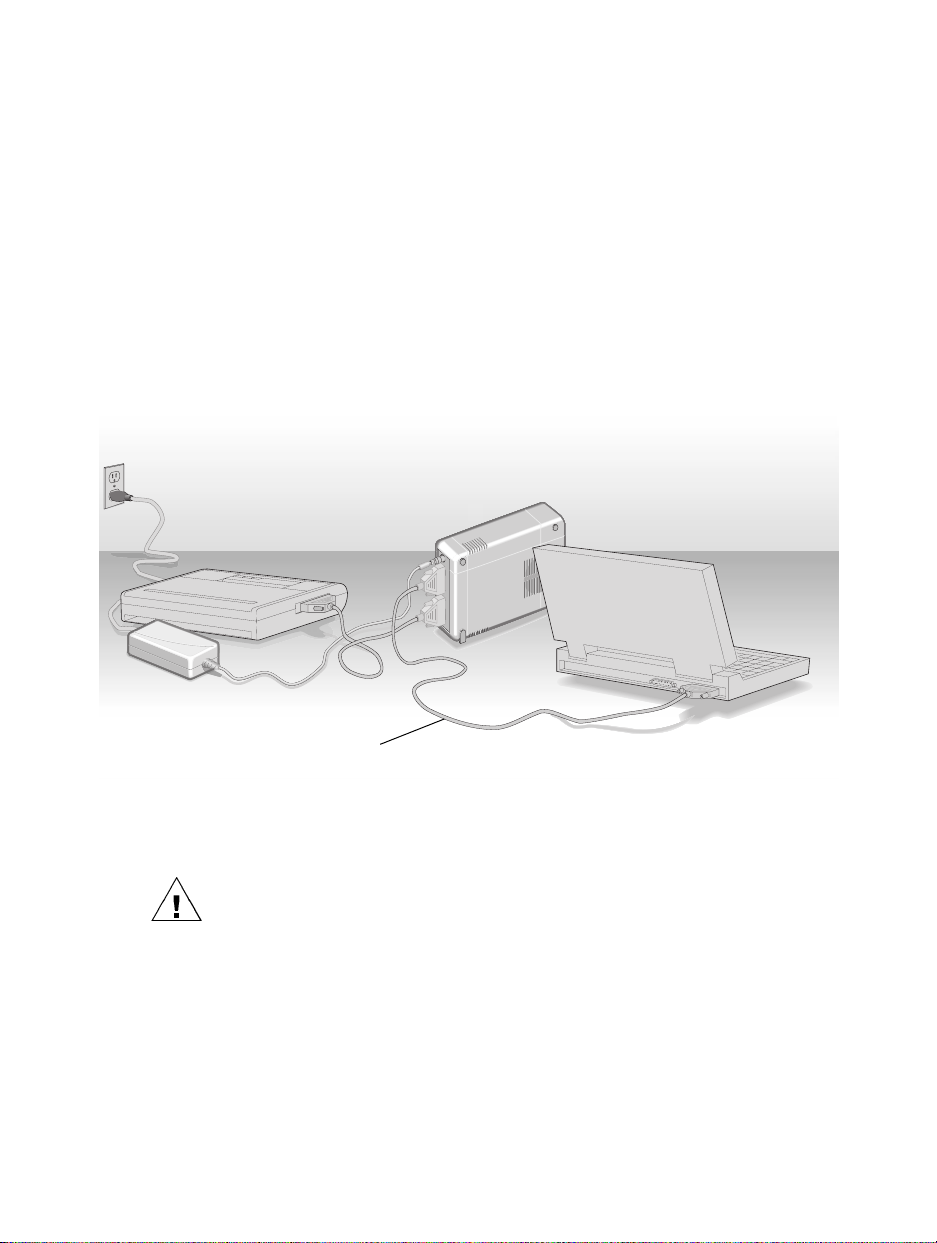
Chapter 2: Connecting the Hardware
Installing Your External Tape Drive
NOTE: Before you begin this installation, make sure your computer meets the
requirements listed in “Minimum System Requirements” on page 35.
HP Colorado
External Tape Drive
Printer (if attached)
Tape Drive’s
Power Supply
and Power Cord
Tape Drive’s Da ta Ca ble
Computer
The illustration above shows a hardware setup that will be similar to yours after you
complete the step-by-step installation instructions in this section.
WARNING: DO NOT, under any circumstances, open the external tape drive’s case.
If you suspect pr ob lems with y our driv e, serv ice must b e perfo rmed by a ce rtified HP
technician. See the telephone numbers at the back of this manual.
4
Page 5
Connecting the Hardware 5
1. Turn OFF your computer.
NOTE: To save space on your desk, tip the HP Colorado tape drive up on its side.
NOTE: This tape drive can be used with laptops, desktops, and towers that meet
minimum system requirements listed on page 35. The following illustrations show it
attached to a laptop computer.
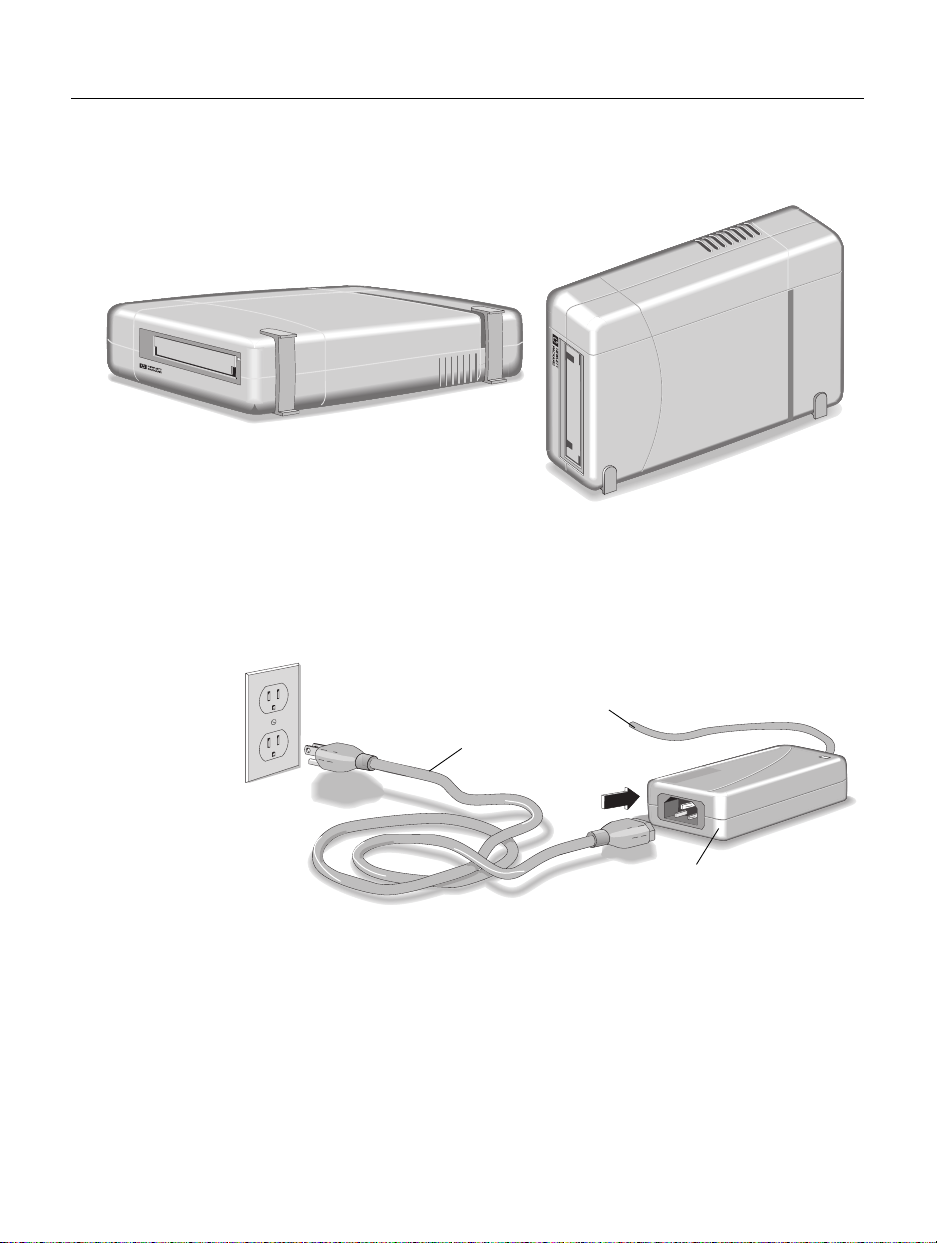
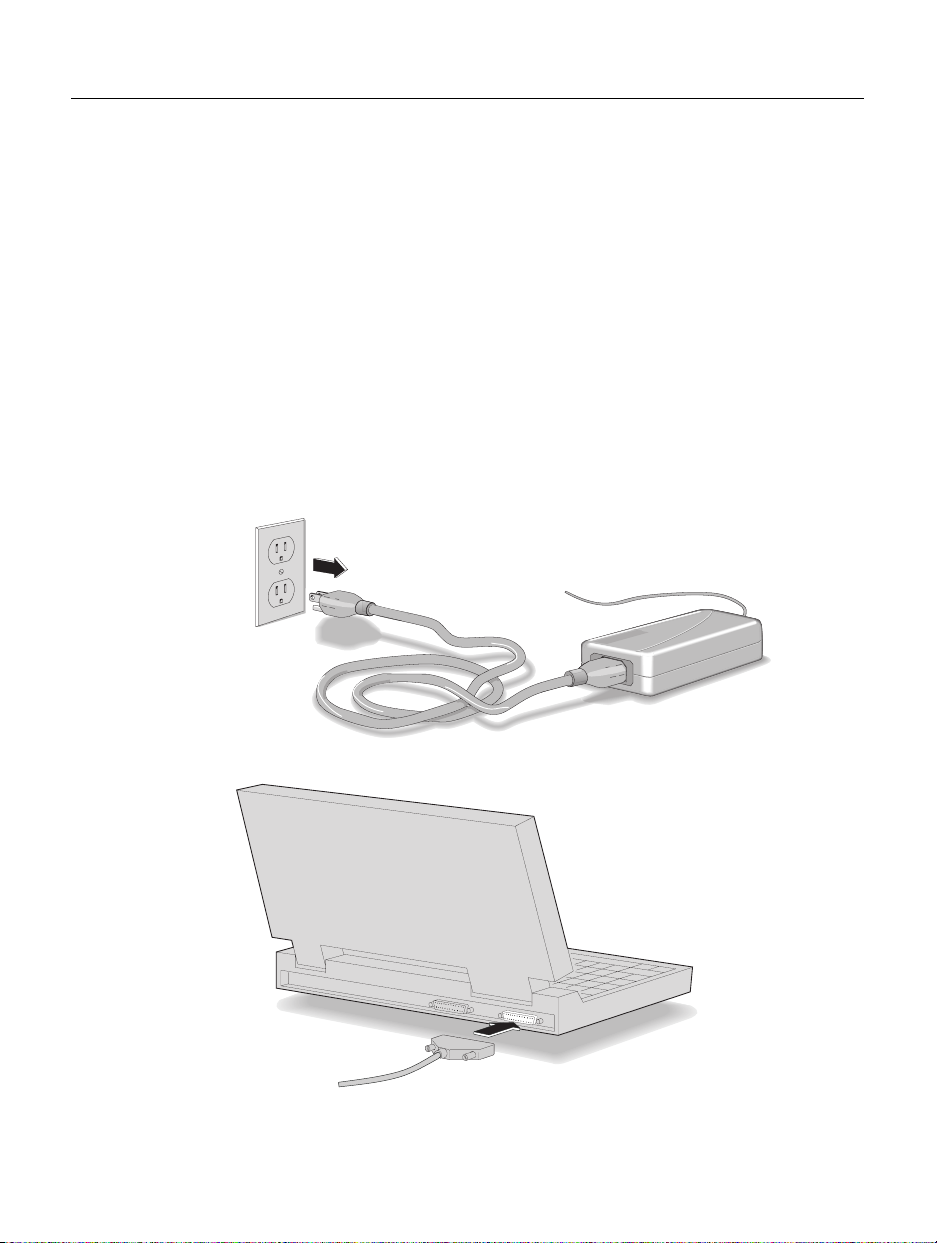
2. Connect one en d of th e po w e r co rd into the power supply and the other end to a wall
outlet or power strip. (The power plug and outlet may look different in your country.)
Power Cord
To HP Colorado tape drive
Power Supply
Page 6
6 Installation Guide
3. Plug the tape-drive power cord into the drive.
Tape-drive power cord
NOTE: If it is ever necessary to cycle the power to your HP Colorado drive,
disconnect the power cord from the wall outlet. There is no power switch on the tape
drive.
The power supply is designed to automatically switch into low-energy mode when
the drive is not in use. Th e HP Colorado tape drive may be safely left plug ged in at a ll
times.
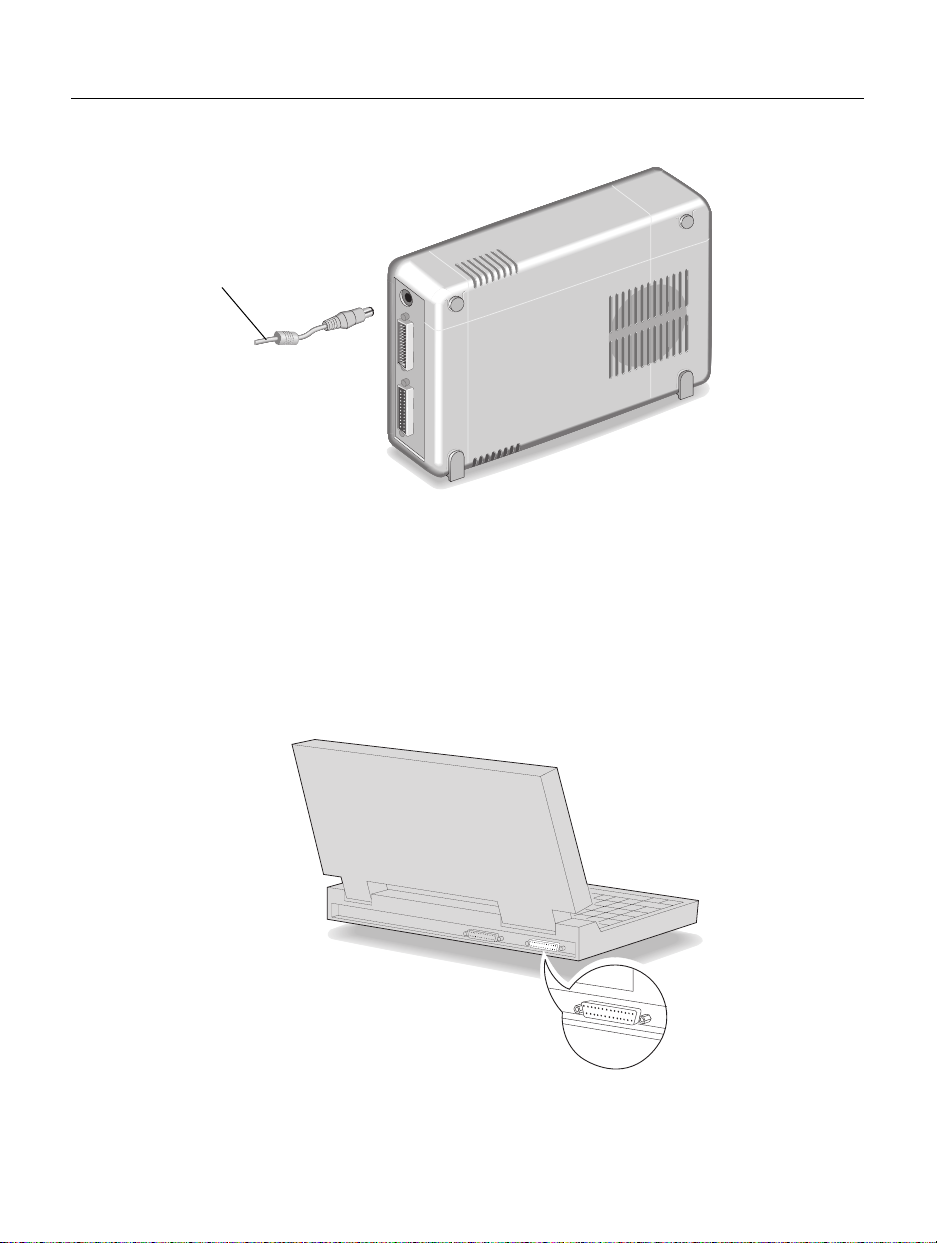
4. Locate the parallel port connector on your computer (your printe r might already be
attached to the parallel port).
Select any available parallel
port. Your tape drive can share
a parallel port with a pri nt er.
Parallel ports have
receptacles for 25 pins.
If you have a printer attac he d to yo ur co m pu t e r, go to the next step.
If you do not have a printer attached, proceed to step 6.
Page 7
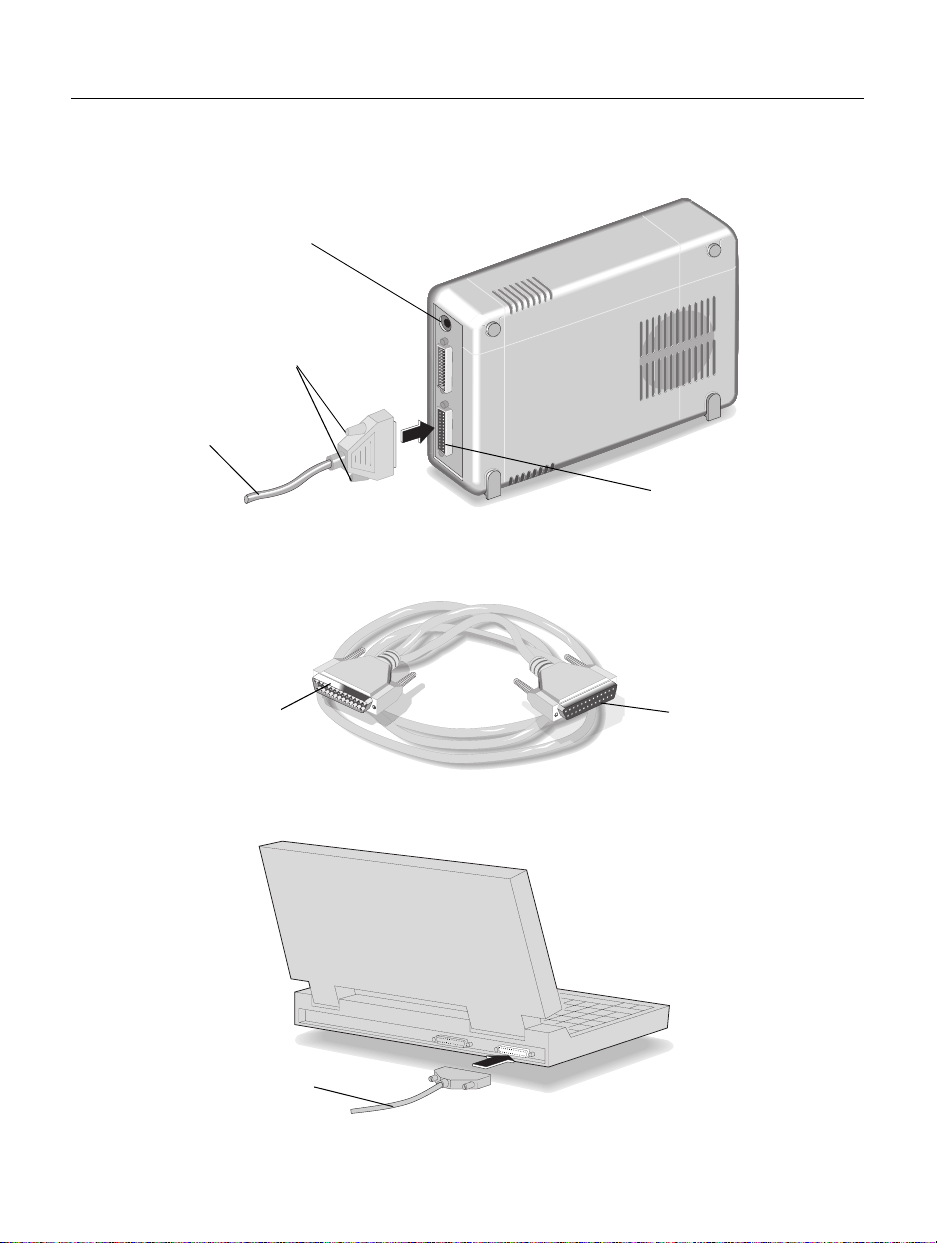
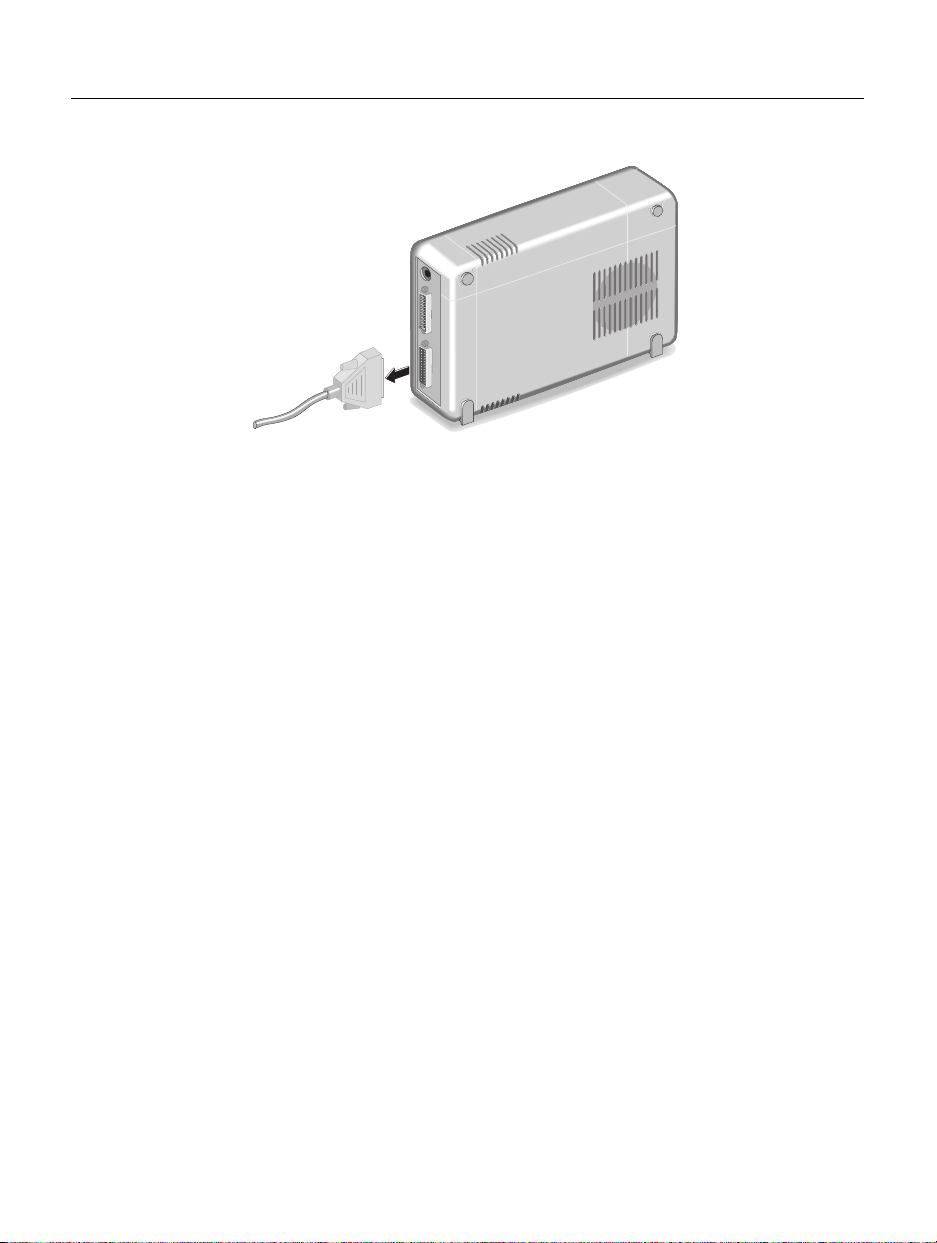
5. If you have a printer cable attached to the computer’ s para llel port, disconne ct it from
Drive’s power connector
Secure the conn ector by
tightening the re taining
screws.
Printer ’s data cable
(If a printer is sharing the
parallel port with the tape
drive)
Connecting the Hardware 7
the computer and plug it into the tape drive’s connector shown below.
Printer connector
The data cable that came with you r driv e atta c hes t o the com pu ter’s parallel port and
the tape drive’s remaining 25-pin connector.
Attach this end to
the tape drive.
6. Attach the t ape -driv e d ata c a ble to y ou r co m pute r’s parallel port and hand tigh te n th e
connector’s retaining screws.
Tape-drive data cable
Attach this en d to the
computer ’s parallel port.
Page 8
8 Installation Guide
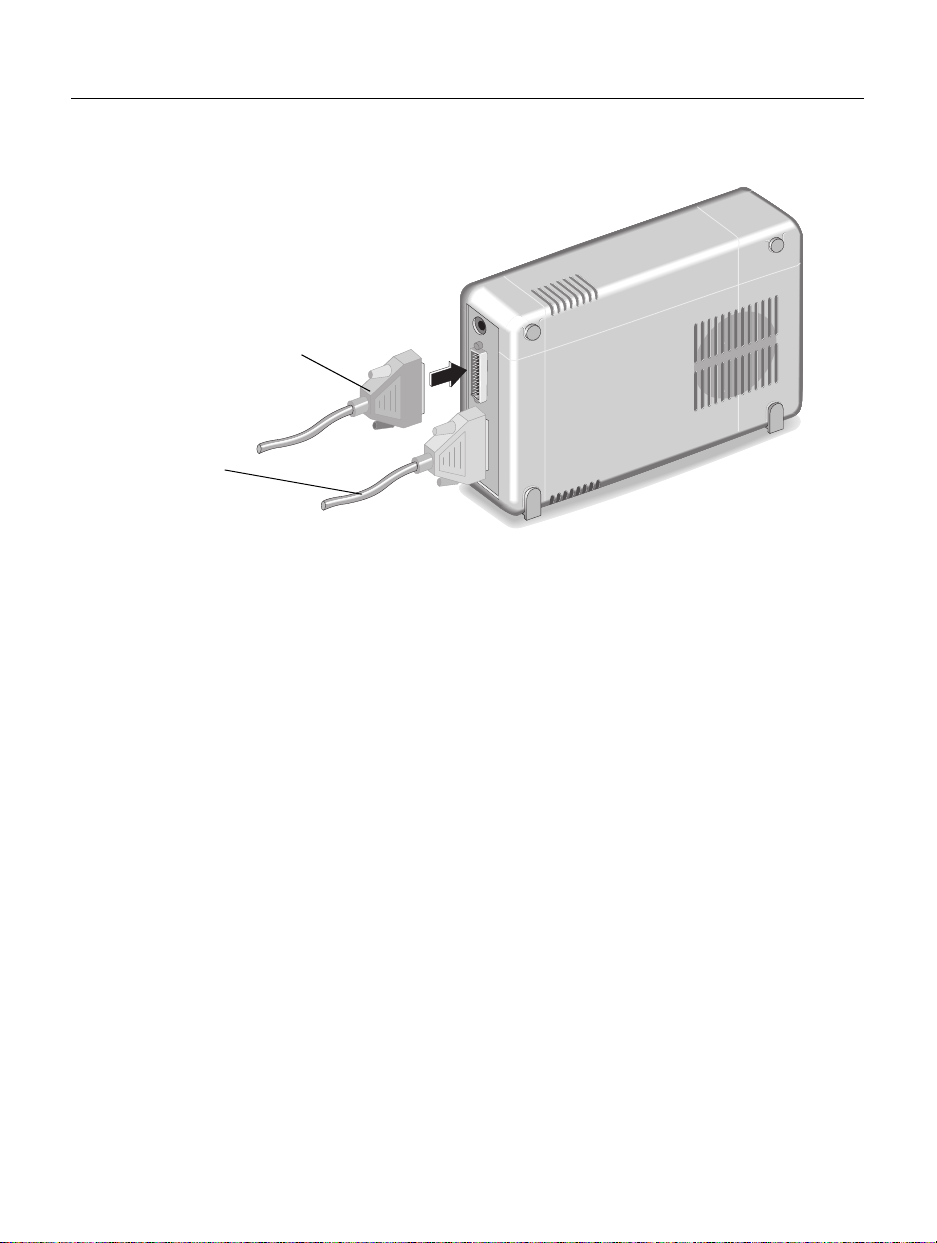
7. Attach the cable’s remaining connector to the tape drive and secure it by tightening
the retaining screws.
Tape-drive data cable
Printer cable
(Only if you are sharing the
port with a printe r)
If You Have Problems
After connecting your tape drive and turning on your c om p ute r, the computer should
start (boot) as it normally does. If it does not, check the following items:
n
Is the computer power cord plugged in?
n
Is each device plugged in and turned on?
n
Are all cables proper ly plugged into the back of your computer?
n
If you verify all of these and still have problems, try turning off your computer.
Wait at least 20 seconds before turning it back on.
n
If you have a printer connected to the HP Col orado tape drive, turn off the
computer’s power. Disconnect the tape drive and the printer. Reconnect only
your tape drive to the parallel port, then turn the computer on and start Colorado
Backup. If tape drive works, it is likely you have a conflict with the printer.
Page 9
Connecting the Hardware 9
Using the Tape Drive on Other Computers
The software installation CD that came with your tape drive allows you to install
Colorado Backup for DOS, Windows 3.x, and Windows 95. You can disconnect the
tape drive and move it to another computer as long as the other computer meets the
installation requirements described in the section “Minimum System Requirements”
on page 35.
The first time you connect the tape drive to another computer, you must also install
any necessary software.
To move the tape drive to another computer:
1. Turn OFF your computer.
2. Unplug the tape drive from the outlet or power strip. (There is no power switch on the
tape drive.)
3. Disconnect the data cable f rom the back of your computer.
Page 10
10 Installation Guide
4. Disconnect the printer cable, if any, from the back of your tape drive.
Y ou can now connect the tape drive to another computer by following the instructions
given previousl y in this manual. See “Con necting the Hardware” on page 4.
NOTE: Remember to turn the computer OFF before attaching the tape drive.
The first time you attach the drive to a computer , see “Installi ng Colorado Backu p for
Your Oper ating System” on page 12.
Each additional time, after attaching the tape drive to that computer:
n
turn ON the computer
n
start Colorado Backup
Page 11

Chapter 3: Installing the Software
Checking Your Parallel Ports
Before installing the software, you should check your computer’s parallel port
settings to ensure the maximum performance from your tape drive. There are
currently four types of parallel ports on the market: (listed from the slowest data
transfer rate to the fastest) unidirectional, bidirectional, Enhanced Parallel Port
(EPP), and Extended Capa bilities Port (ECP).
New computers are likely to have at least an Enhanced Parallel Port (EPP), wh ich
allows the maximum performance from your tape drive. Consult your computer’s
documentation to learn if you have an EPP or ECP port. If you have one, verify that it
is configured to the fastest possible setting.
Interchange ability of Tapes
The Colorado Backup software for DOS, Windows 3.1, Windows 95, and the
Windows NT applet have the following interchangeability:
Y o u creat ed the backup using:
Colorado Backup
You can restore backups using:
Colorado Backup for DOS ver. 5.0 Y es No Y es No
Colorado Backup for Windows ver. 3.1 No Yes No No
Colorado Backup for Windows 95 ver. 3.2 Yes Yes Yes No
Windows NT 4.0 Backup Applet No No No Yes
CAUTION: If you create backups under more than one operating system, use a
separate set of tapes for each operating system. Label each tape appropriately.
for DOS ver. 5.0
Colorado Backup
for Windows ver.
3.1
Colorado Backup
for Windows 95
ver. 3.2
Windows NT 4.0
Backup Applet
11
Page 12

12 Installation Guide
Installing Colorado Backup for Your Operating System
Your paralle l-port tape drive can easily be shared amo ng computers using different
operating systems. Changing the drive between computers is as easy as attaching it to
the parallel port and starting Colorado Backup. The Colorado Backup software
installation CD includes the files fo r installing the backup software for DOS,
Windows, and Windows 95. Your tape drive can also be configured to work with
Windows NT 4.0. Select the environment you work in and tur n to the appropriate
section for installation instructions:
n
DOS—page 12
n
Windows—page 17
n
Windows 95—page 23
n
Windows NT 4.0—page 27
NOTE: If your computer has a power-management feature that shuts off your
computer after a speci fied period of time since the la st keyboard input, you may
experience problems with certain operati ons that exceed the time limit. Turn off the
power-management feature when performing a long running operation such as a
total or full-system backup. Check your computer’s manuals to find out how to turn
off or change the time lim it of the power-management feature.
Installing Colorado Backup for DOS
NOTE: Do not install Colorado Backup for DOS for use in Windows 95. This
application does not support Windows 95 conventions such as long filenames and
backups of the registry. See “Installing Colorado Backup for Windows 95” on
page 23.
1. Attach the tape driv e to your paralle l po rt as d escribe d in “Con nectin g the Ha rdware”
on page 4. The drive must be attached to install and configure the software.
2. Insert the software installation CD into your CD-ROM drive. If your computer does
not have a CD-ROM, see page 35.
Page 13
Installing the Software 13
3. At the DOS prompt, type
D:\SETUP
and press ENTER (where D: is your CD-
ROM’s drive letter).
The following screen appears:
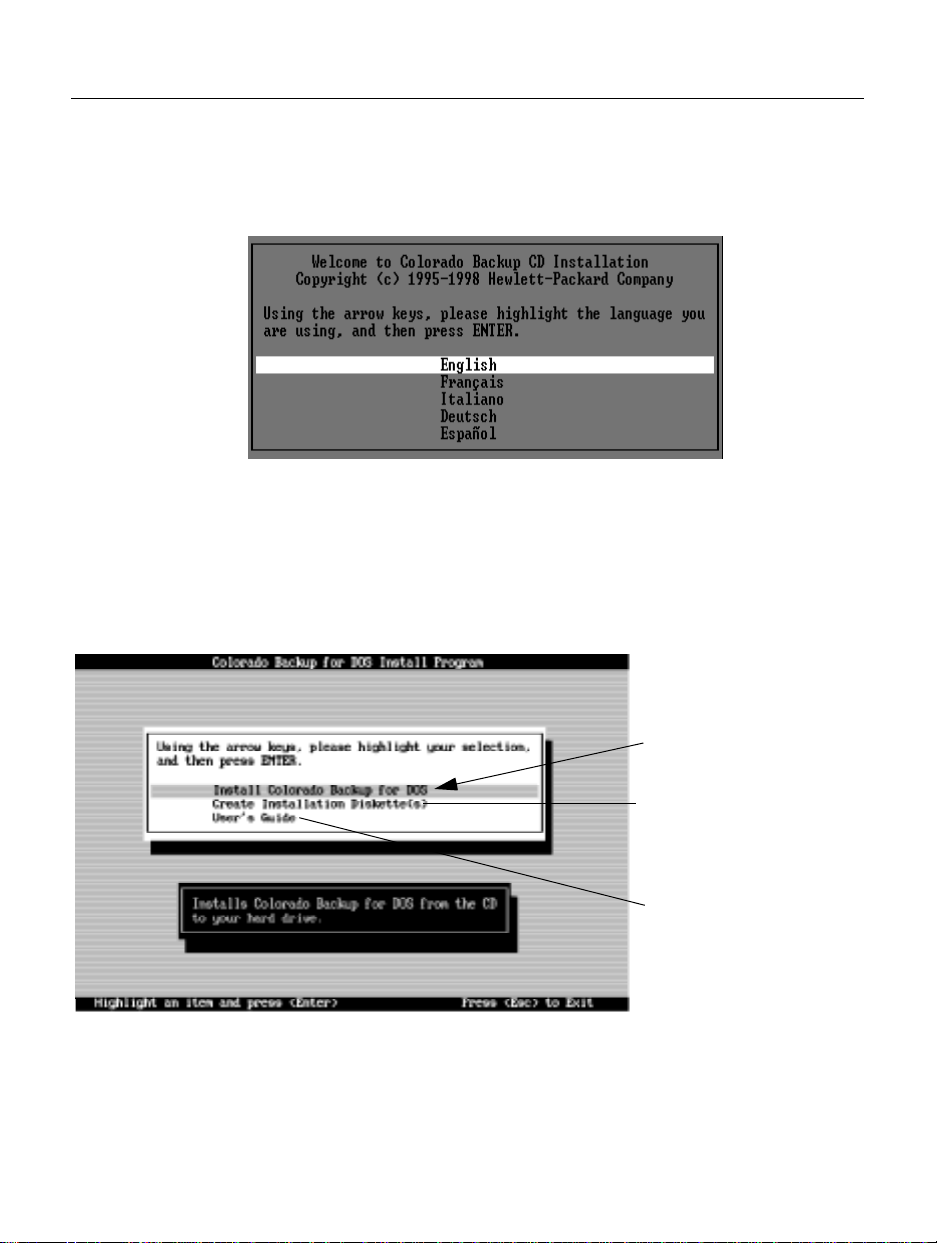
4. Select the desired language or leave the d e fault and press
The following screen appears:
Highlight here and press
ENTER to install the software.
ENTER
.
Highlight here and press ENTER
to make an installation diskette to
use on another computer that does
not have a CD-ROM drive.
Highlight here and press ENTER
for information abou t how to
view the online User’s Guide.
Page 14
14 Installation Guide
5. Select Install Colorado Backup for DOS.
The following screen appears:
Highlight here and
press ENTER.
Highlight here and
press ENTER.
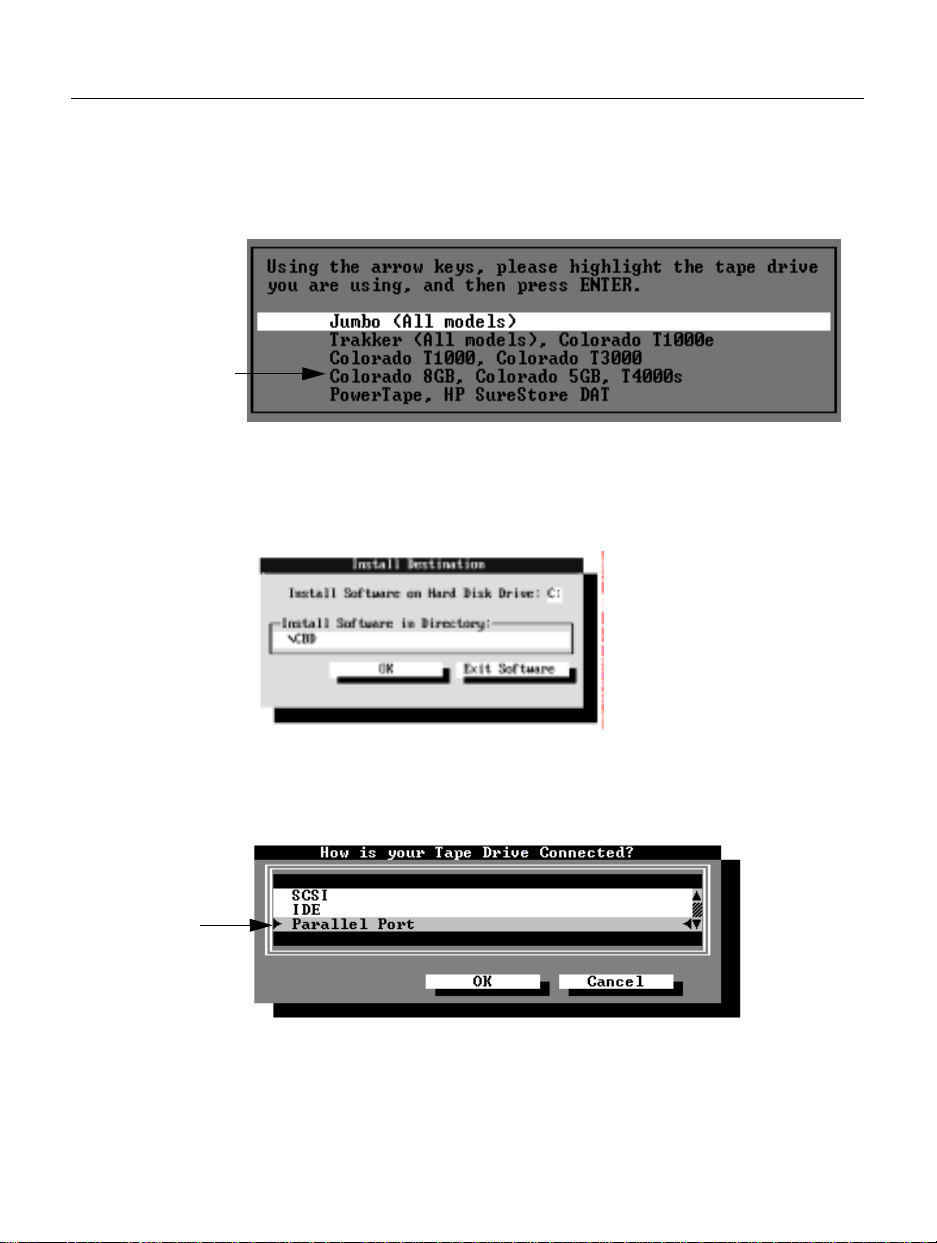
6. Select Colorado 8GB, Colorado 5GB, T4000s and press
ENTER
.
The following screen appears.
7. Either accept the default directory name of C:\CBD or type a different drive letter and
directory name whe re you want Colorado Backup installed. Select OK.
The following screen appears:
8. Highlight Pa rallel Port and select OK.
Page 15
Installing the Software 15
The following screen appears.
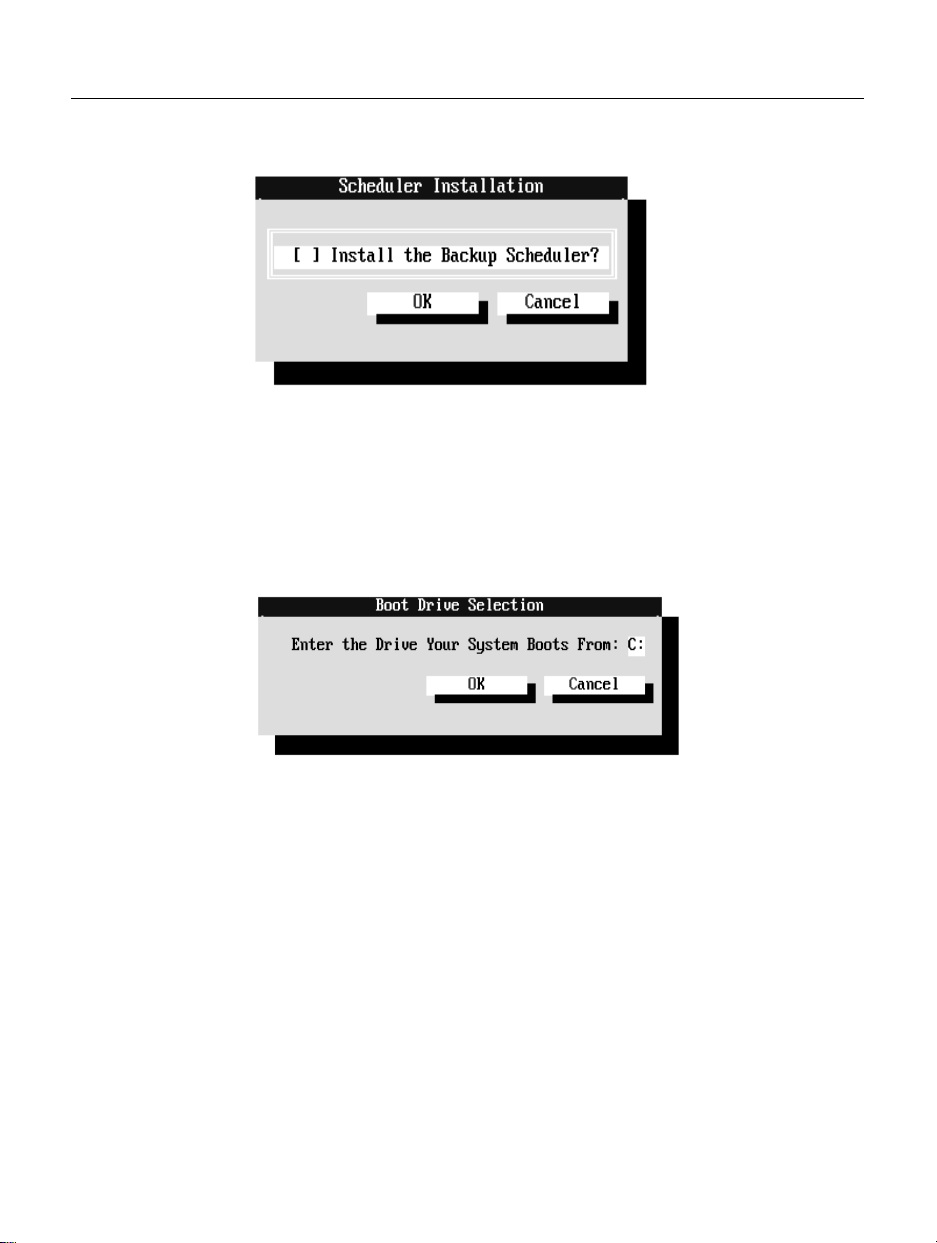
9. If you want to be able to schedule backups to start automatically while you are away
from your computer, press the spacebar to mark the check box. If you want to save
the additional hard drive space required for this feature or do not wish to do
unattended backups, leave the check box empty. Select OK.
The Colorado Backup files are then cop ied to your hard drive.
When all the files have been copied to your hard drive, the following screen appears.
10. If the letter of the drive from which your computer boots is not C:, enter the correct
letter. (C: is the most common boot drive.) Select OK.
11. A screen appears indicating that the software installation was successful. Select OK.
Colorado Backup aut om a tic a lly closes leaving you at the DOS prompt.
12. Remove the software insta llatio n CD fro m yo ur CD-ROM driv e an d st ore it in a safe
place.
13. Reboot by pressing
CTRL+ALT+DEL
14. To start the Colorado Backup software, at the DOS prompt type
.
CD \CBD
(or the
name of the installat ion directory you en tered in
ENTER
step 7) and press
15. Type
TAPE
and press
.
ENTER
.
Page 16

16 Installation Guide
The Main screen appears:
Menu bar
commands from here.
Command push buttons
To copy files from your
hard drive to a tape, select
this button.
To restore files on tape to a
hard drive, select this
button.
To compare files on tape to
files on your hard drive (in
order to verify that you will
be able to restore your
backup), select this butt on.
: Select menu
16. If the Colorado Backup window does not appear or you receive an error message, see
“If You Have Problems” on page 29.
If you are ready to perform tape operations, read:
Status line:
Displays a short
help message.
n
“Using Tapes and Caring for Your Drive” on page 32.
n
The online Colorado Backup User’s Guide or click on Help! inside the software
to learn how to back up and restor e data , com p are file s, a nd use th e ap plic atio n’s
options and features.
For more information on accessing the User’s Guide, see “Viewing the Online
User’s Guide” on page 2.
Page 17

Installing the Software 17
Installing Colorado Backup for Windows
NOTE: Do not install Colorado Backup for Windows 3.1 for use in Windows 95. This
application does not support Windows 95 conventions such as long filenames and
backups of the registry. See “Installing Colorado Backup for Windows 95” on
page 23.
1. Connect the tape drive to your parallel port as described in “Connecting the
Hardware” on page 4. The drive must be attached to install and configure the
software.
2. Insert the software installation CD into your CD-ROM drive. If your computer does
not have a CD-ROM, see page 35.
3. In Windows, open the Program Manager window, if it is not already open.
4. From the Windows’ Program Manager, Click on the
Run box appear s .
5. In the Command Line box, type
CD-ROM’s drive letter).
The following screen appears:
6. Select the desired language or leave the d e fault and click
D:\SETUP
File
and press
menu and select
ENTER
(where D: is your
Next.
Run
. The
Page 18

18 Installation Guide
The following screen appears:
7. Click on the Install button.
The following screen appears:
Click here to install th e software
Click here to make an installation
diskette to use on an other computer
that does not have a CD-ROM drive.
Click here to view the online User’s
Guide. The first time you click here,
you will have the optio n of
installing Acrobat Reade r software,
if you do not already have it.
.
8. Either accept the default installation directory of C:\CBW or type in a new di rectory
name. Then click on OK.
9. A dialog box appears explainin g t hat the installation process must alt er your
AUTOEXEC.BAT, CONFIG.SYS, WIN.INI, and SYS TEM.INI files. Current copies
of these files are saved with the extension OLD in the directory indicated in the
previous step. Click on OK to proceed.
The Colorado Backup files are then cop ied to the directory indicated in step 8.
Page 19

This is the
configuration you
are performing.
Installing the Software 19
10. After the files are copied, the Colo rado Backup main window appears with a dia log
box indicating that Windows needs to be restarted b efore Colo rado Ba ckup will work
properly. Make sure all applications are closed and click on OK. Colorado Backup
and Windows are exited and restarted. When the main wi ndow reappears, you are
ready to configure the tape drive.
Configuration begins with the following dialog box. Click on any Help button if you
need more information about the displayed dialog box.
11. Accept the default setting by clicking on OK.
The following screen appears:
12. Click on Yes.
13. You are notified that the configuration process was successful. Click on OK.
A dialog box appears indicatin g that t he instal lation is co mplete an d the settin gs ha ve
been saved. It also contains br ief instructions for creating an automa ted backup
system.
Page 20

20 Installation Guide
14. Click on OK. Colorado Backup for Windows shuts down, leaving you in Windows’
Program Manager with the Colorado Backup for Windows program group displayed.
Double-click on
this icon to sta rt
Colorado Backup.
Double-click on
this icon to set up
an automated
backup schedule.
15. The software is now installed. You can open the software and make your first backup,
or you can set up the Automated Daily Backup as de scr ibed in the followin g st eps.
16. If you want Colorado Backup to automati cally make backups of your files at a
designated time each day, double-click on the Automated Daily Backup icon in the
Colorado Backup for Windows program group.
The scheduling dialog box appears.
Double-click on
this icon to
backup all files
that have changed
since your last
backup.
Double-click on
this icon to start a
backup of all files
on all local ha rd
drives.
When turned on, the Automated Daily Backup feat ure creates the following
operations:
n
Automated Total—This operation runs each Monday. The tape is erased to
make room for a Total backup of all detected local hard drives. It then copies all
files—applications, systems files, and data files—from each detected local hard
drive. The files on tape are then compared to the original hard drive files to
ensure their accuracy. This provides a complete copy of your hard drive(s) at the
time of the backup.
n
Automated Modified—This operation runs each day from Tuesday to Su nday,
backing up only files that have been edited or added since your last backup. Each
backup creates a separate volume which is added to the tape after each previous
Page 21

Installing the Software 21
backup volume. The combination of Mon d ay ’s Total and the six Modifie d
backups gives you an up-to-date copy of all files.
17. To create an automated backup system, select On. The default time of 11:59 p.m.
(23:59 if you are using a 24-hour cl ock) appears as the scheduled time for the daily
backup.
18. Accept the default time or enter the ti me you prefer to have your backups run
automatically. Click on OK.
19. An explanation of the Automated Daily Backup appears. Click on OK.
An icon labeled Col or ado Scheduler appear s on your desktop.
The presence of the Scheduler icon indicates that the macros will run at their
specified times if you:
n
Leave a tape in your tape drive
n
Exit out of Colorado Backup for Windows
n
Leave your computer on with Windows running
20. Remove the software insta llatio n CD fro m yo ur CD-ROM driv e an d st ore it in a safe
place.
21. To open Colorado Backup, double-click on the Backup icon.
Page 22

22 Installation Guide
The Colorado Backup main window appears.
Floppy-drive icon:
One for each floppy
drive installed in your
computer.
Hard-drive icon: One
for each hard drive
installed on your
computer. If you are
connected to a
network, mapped
drives and network
servers also appear.
Tape-drive icon: Labeled with
“No Tape” when there is no
tape in the drive.
Quick Reference: Click on one of the
eight buttons at the bottom of the
window to see instructions for that
operation.
22. If the Colorado Backup window does not appear or you receive an error message, see
“If You Have Problems” on page 29.
If you are ready to perform tape operations, read:
n
“Using Tapes and Caring for Your Drive” on page 32.
n
The online User’s Guide or the online Help to learn how to back up and restore
data, compare files, and us e th e application’s options and features.
For more information on accessing the User’s Guide, see “Viewing the Online
User’s Guide” on page 2.
Page 23

Installing the Software 23
Installing Colorado Backup for Windows 95
NOTE: Do not use Colorado Backup for Windows 95 to backup Novell servers.
Colorado Backup for DOS can backup Novell 2.x and 3.x servers or Colorado
Backup for Windows (3.1 or 3.11) can backup Novell 3.x servers.
NOTE: Colorado Backup for Windows 95 can back up computers over your Windows
95 and Windows for Workgroups networks. However, Colorado Backup for Windows
95 will only back up the Windows 95 registry of the computer to which your tape
drive is attached. The Windows 95 registry of a remote computer will not be backed
up.
1. You will need two formatted, 3.5” (1.44 MB) diskettes labeled “Recovery Disk #1”
and “Recovery Disk #2” to use in step 13.
2. Connect the tape drive to your parallel port as described in “Connecting the
Hardware” on page 4. The drive must be attached to install and configure the
software.
3. Insert the software installation CD into your CD-ROM drive. If your computer does
not have a CD-ROM, see page 35.
4. If the first screen does not appear automatically, click the
Windows 95 task bar, select
drive letter), then click on OK. The following screen appears:
Run
, type D:\SETUP (where D: is your CD-ROM’s
Start
button on the
Page 24

24 Installation Guide
5. Select the desired language or leave the d e fault. Click on Next.
The following menu appears:
Click here to install the software.
Click here to make a set of
installation diskettes to use on
another computer that does not have
a CD-ROM drive.
Click here to view the online User’s
Guide. The first time yo u clic k he re,
you will have the option of
installing Acrobat Read er soft wa re,
if you do not already hav e it .
Click here to view the CD’s contents.
6. Click on the Install button. Follow the instructions on the screen.
7. When prompted to r e start your computer, click on Yes. Your computer is restarted
and Windows 95 reappears with the Colorado Backup icon on the desktop.
8. Exit the menu wind ow a nd rem ove the sof tw are in st allat ion CD fro m yo ur CD -ROM
drive and store it in a safe place.
9. To start Colorado Backup, double-click on the Colorado Backup icon in the
program group that appears on your desktop, or:
n
Click the Start button.
n
Highlight Programs.
n
Select the Colorado Backup program group.
n
Select the Colorado Backup program.
10. A registration screen appears. Follow the instructions on the screen to register your
Colorado Backup software.
Page 25

Installation Guide 25
11. The Recovery Disk Creation screen appears:
12. Click on the Create Recovery Disks Now button. The following screen appears:
13. Insert the formatted, 3.5” (1.44 MB) diskette labeled “Recovery Disk #1” into your
floppy drive. You must use your primary, or bootable floppy drive. Click on
Continue.
14. When prompted, remove Recovery Disk #1 from the drive and insert the diskette
labeled “Recove ry Disk #2.” Click on OK to cont inue.
Page 26

26 Installation Guide
15. Click on Continue. When all the necessary files have been copied to the diskette, the
following screen appears:
16. Remove “Recovery Disk #2” from the fl oppy drive and write protect both diskettes.
Store the two recovery disk s to gether in a safe place.
17. Click on OK. The Colorado B ackup main window appears.
18. If the Colorado Backup window does not appear or you receive an error message, see
“If You Have Problems” on page 29.
If you are ready to perform tape operations, read:
n
“Using Tapes and Caring for Your Drive” on page 32.
n
Read the User’s Guide or the online Help t o learn how to back up and restore
data, compare files, and us e th e application’s options and features. To read the
online help while you are using Colorado Backup, select Help from t he menu
bar.
For more information on accessing the User’s Guide, see “Viewing the Online
User’s Guide” on page 2.
Page 27

Installing the Software 27
Configuring the Drive for Windows NT 4.0
Your HP Colorado tape drive can be successfully installed with Windows NT 4.0.
Use the backup application that is part of the standa rd Windows NT 4.0 setup.
Simply install the tape drive’s driver files by following the directions below.
1. Attach the tape driv e to your paralle l po rt as de scribed in “Connec ting t he Hard ware”
on page 4. The drive must be attached to install and configure the software.
2. Start up your computer and log in with Administrative rights.
3. Insert the software installation CD into your CD-ROM drive. If your computer does
not have a CD-ROM, see page 35.
4. If the first screen does not appear automatically, click the
Windows NT task bar, select
drive letter), then click on
5. Select the desired language or leave the d e fault. Click on
Run
, type D:\SETUP (where D: is your CD-ROM’s
OK.
The following screen appears:
Start
button on the
Next.
Page 28

28 Installation Guide
The following menu appears:
6. Click on the Install button.
The following screen appears:
Click here to install the required
driver files for the tape drive.
Click here to view the CD’s
contents.
7. Select Colorado 5GB or 8GB (external) then click Next. Follow the instructions o n
the screen.
8. You are prompted to install the HP Colorado external driver files. Click on Yes.
9. When prompted to r e start your computer, click on Yes.
10. Your computer is restarte d and Windows NT reappears. Log in with Administrative
rights.
11. Go to the Control Panel and choose the Tape Devices icon.
Page 29

Installing the Software 29
12. Go to the Drivers tab and click on Add.
13. Windows NT creates a list of tape drives. Click on Have Disk button.
14. When prompted to enter the path for the manufacturer’s files, type
D: is you CD-ROM’s drive letter). If your computer does not have a CD-ROM, see
page 35.
15. Click OK.
16. A list of tape devices appears. Select Hewlett-Packard Colorado IDE. The
necessary files are copied to your system.
17. Restart the system. If no services fail, the drive is ready to use. If services fail, please
contact our QuickFax ser vice for document 5228. The Qui ckFax phone numbers are
listed on pag e 46.
18. Start the Backup application by clicking on Start, Programs, Administrative Tools,
and Backup.
19. Use NT Backup online Help to learn how to back up and restore data, compare files,
and use the application’s options and features.
If You Have Problems
Try the following sug ges tio ns:
n
Exit out of all applications. T urn off the computer’ s po wer, wait 20 seconds, then
turn it on again. Unplug the tape drive and then plug it in again. (This is called
cycling power.) Then start Colorado Backup.
D:\NT
(where
n
Verify that your computer meets the requirements listed in “Minimum System
Requirements” on pa ge 35 for the operating system in which you are using
Colorado Backup.
n
Does the drive move the tape when the tape is inserted? If not, check the power
connections to the tape drive.
n
Disconnect all the cables, look for and straighten any pins, and then reconnect the
cables. Sometimes just reconnecting a cable aligns it correctly or adju sts the pin
connections, fi xing a faulty connection.
n
If you have a printer connected to the HP Col orado tape drive, turn off the
computer’s power. Disconnect the tape drive and the printer. Reconnect only
your tape drive to the parallel port, then turn the computer on and start Colorado
Backup. If Colorado Backup works properly, it is likely you have a conflict with
Page 30

30 Installation Guide
the printer.
n
Make sure that th ere is no switch box anywhere in the HP Co lorado drive’s
cabling configuration.
n
Your par allel port may be using the same IRQ setting as some other devic e in
your computer system. For example, a sound board or fax/modem board may be
using the same IRQ. I f you discover conflicts, change the I RQ setting on the
other device. Refer to the manuals that came with your computer and other
devices for instructions.
n
If your tape drive works, but the data transfer rate is noticeably slow or the tape
repeatedly starts and stops (as opposed to running continual ly for long periods),
consult your computer’s documentation to view and edit the paralle l po rt’s
CMOS settings. Newer computers are likely to have enhanced parallel ports
(EPP) or extended capabilities ports (ECP), which transfer data much faster than
unidirectional, bi-directio na l, or com patib le ports. Some fac to ry sett ing s may
have the EPP or ECP ports set as a slower unidirectional port. Cha nging the
CMOS settings in this case can greatly improve the tape drive’s performance.
n
Make sure you are using t he r ight type of tape. See “Choosing Tapes for Your
Tape Drive” on page 32.
n
Windows an d Win dows 95 use rs: If the tape-drive icon appears with a red mark
through it, the software either cannot find the drive at the selecte d settings, or the
inserted tape is not compatible. (Windows 3.x users can click on the tape icon to
read the error message.) Exit the software and restart it. If the mark remains, try
the operation with a different tape.
n
If your computer has a power-manage ment feature that shuts off your computer
after a specified period of time since the last keyboard input, you may experience
problems with certain operations that exceed the time limit. Turn off the powermanagement feature wh en p erform in g a lo ng ru nn ing o pe ra tion such as a total or
full-system backup. Check your computer’s manuals to find out how to tu rn off
or change the time limit of the power-management feature.
n
Check the read-me file on the software installation CD that came with your tape
drive or the HP web sit e (see page 46) for any late-breaking troubl eshooting
information.
Achieving optimal performance
Run SCANDISK.EXE and DEFRAG.EXE on your hard drive before using your tape
drive for the first time (see your DOS, Windows 3.x or Windows 95 manual for more
information). Then run them periodically after that. These programs improve access
times to the hard drive, which will help improve the tape drive’s performance.
Page 31

Installing the Software 31
Printer Status Monitor Software
NOTE: This is only a problem if your printer is connected to the back of the tape
drive.
If your printer came with a program that notifies you about the status of the printer
(such as when it is out of paper), this printer status monitor software might cause
problems. The printer status monitor software checks the status of your printer every
few seconds. If this happens while you are writing data to your tape, it will cause data
corruption. Turn off the printer status monitor software to prevent this problem.
Check the information that came with your printer to find out how to do this.
Known Compatibility Problems
n
Check the Readme file on the software installation CD for additional
information.
n
Check the web site listed on page 46 for the most recent information.
n
Acer computers, some models P75 to P120
DO NOT connect the tape drive to the printer (parallel) port. On these models ,
connecting an external st orage device, such as the HP Colorado drive, to the
parallel port will da mag e th e p ort. Co nt ac t yo ur c ompu te r m anu fa ct ure r for more
information.
n
Okidata printer model 4w
Printer no longer works or problems printing a file after connecting it to the tape
drive
n
Your par allel port may be using the same IRQ setting as some other devic e in
your computer system. For example, a sound board or fax/modem board may be
using the same IRQ. I f you discover conflicts, change the I RQ setting on the
other device. Refer to the manuals that came with your computer and other
devices for instructions.
n
If your printer is atta ched to the tape drive, printing documents while using the
tape drive will yiel d u npr edi ctab l e re sult s and is n ot a sup por ted function. This is
because the printer and tape dri ve are sharing the same data cable.
Page 32

Chapter 4: Using Tapes and Caring for Your Drive
Choosing Tapes for Your Tape Drive
To ensure the highest level of performance, HP Colorado brand tapes (which have
been fully tested with your drive) are recommended.
Part No Product
C4427A 1 pack TR-3 3.2 GB
minicartridge
C4427B 2 pack TR-3 3.2 GB
minicartridge
C4427D 5 pack TR-3 3.2 GB
minicartridge
C4429A 1 pack HP Colorado
5.0 GB cartridge
C4429B 2 pack HP Colorado
5.0 GB cartridge
C4429D 5 pack HP Colorado
5.0 GB cartridge
C4425A 1 pack TR-4 8.0 GB
minicartridge
C4425B 2 pack TR-4 8.0 GB
minicartridge
C4425D 5 pack TR-4 8.0 GB
minicartridge
RW Rea d/Write, R Read only
HP
Colorado
T3000
RW R R
RW R R
RW R R
HP
Colorado
5GB
RW RW RW
RW RW RW
RW RW RW
HP
Colorado
8GB
RW RW
RW RW
RW RW
HP
Colorado
4i/e
32
Page 33

Using Tapes and Caring for Your Drive 33
In Windows 95 only, your tape drive can also read from but NOT write to backup
tapes made using Colorado Backup software and a Jumbo 250, 350, 700, 1400;
Trakker 250, 350, or 700; T1000; or T3000 tape drive.
The following section explains how to insert your tapes. Please note the differences
between the HP Colorado cartridges and the standard mini-data cartri dge when they
are fully inserted.
CAUTION: Do not erase C4425 or C4429 tapes with bulk erasers. Magnetic bulk
erasing removes tracking reference points that are placed on the tape at the factory.
Withou t the se points, th e tape s cannot be read by your tape drive. The Erase utility i n
Colorado Backup is the safest and quic kest method of r emov ing da ta fr o m your tape s.
Inserting a Tape
1. Align the tape with the tape -d rive do o r. The record/play area faces the door and go es
in first.
2. Insert the tape with the metal base plate facing away from the colored strip on the
tape drive.
3. Steady the drive with one han d and pu sh the tap e into the tap e dri ve with the othe r.
You will feel it lock into place.
After the cartridge is inserted, you will hear the sound of the tape being wound back
and forth. This soun d indica tes that th e tape dri ve is find ing the be ginning of the tape ,
determining the tape’s length and format, and posit ioning th e driv e’s read/write head.
Note the difference s between the two cartridge types when they are fully inserted.
HP Colorad o cartridge
Travan cartridge
Metal base plate
on tape
Approximately 1” (2.5c m) of the
cartridge extends out of the dri ve
when fully inserted.
or
Colored strip
The wider HP Colorado cartridge spans the
entire width of the drive ’s opening.
Page 34

34 Installation Guide
Standard mini cartridge
Metal base plate
on tape
Approximately 0.75” (2cm) of the
cartridge extends out of the drive
when fully inserted.
Removing a Tape
1. Wait until the light on the front of y ou r ta p e driv e qu its b lin king. (DO NOT remove a
tape during an operation. See the CAUTION note below.)
2. Steady the drive with one hand and grasp the tape cartridge with the other. Pull the
cartridge straight out.
CAUTION: Interfering with a tape during operations may cause data loss, and may
make the tape temporarily unrecordable. If, during a backup, you pull the tape out of
the drive, turn off the p ower to th e compu te r, or firmly bump the tape, you will not be
able to read the data currently written to the tape. Also, the tape will not be
recordable until it is erased with Colorado Backup’s Erase utility. (Never use a
magnetic bulk eraser to erase your HP Colorado C4425 or C4429 tapes. Bulk
erasers remove reference points on the tape that are vital. Removing these points
makes tapes unusable.)
Colored strip
Mini-data cartridges are narrower, leaving gaps on
each side of the tape when inserted.
Caring for Your Tape Drive
You do not need to perform any routine maintenance on the HP Colorado tape drive.
CAUTION: Do NOT clean the read/write head of an HP Colorado tape drive.
CAUTION: Do NOT degauss or demagnetize the read/write head of an HP Colorado
tape drive. Damage to your tape drive will re sult.
Page 35

Chapter 5: Technical Information
Minimum System Requirements
Hardware Requirements
Your computer must meet or exceed these requirements:
n
An IBM-compatible computer
Wind ows 3. 1, 4 86/ 25 MH z clas s or high er for Windows 95 or W i ndow s NT 4.0) .
n
A parallel port
computers) have at least one parallel port to send and receive data to and from
devices such as printers and tape drives. Ports are commonly referred to as LPT1,
LPT 2, and LPT3.
n
A CD-ROM drive to install the backup software.
f your computer does not have a CD-RO M drive:
I
. All IBM-compatible computers (desktop, tower, and laptop
(486/16 MHz class or higher for DOS and
Y ou can make installation diskettes by using another computer to which you
have access.
Insert the software installation CD, run the SETUP program, and select
Create Installation Disks.
or SETUP (Window 3.x, Windows 95 or NT).
n
See the operating system requirements on the following pages.
From the diskettes, run either INSTALL (DOS)
35
Page 36

36 Installation Guide
Colorado Backup for DOS Requirements
Installing Colorado Backup for DOS requires:
n
DOS 5.0 or higher.
ENTER
press
n
A minimum of 512 KB of conventional memory.
To ide nt i fy yo ur ver s io n, typ e
.
improve with more available mem ory. To check free memory, type
ENTER
DOS prompt and pr e s s
. The value listed after “Largest exe cuta bl e
program size” should be at least 524,288.
n
6 MB of available hard d r ive space (
MB of space for operations overhead). To check available hard drive s pace, type
CHKDSK
at the DOS prompt and press
should be at least 6 MB.
Colorado Backup for Windows Requirements
Installing Colorado Backup for Windows requires:
n
Windows version 3.1 or 3.11 running in 386 E nhanced mode.
version and mode, from the Program Manager, open the
About Program Manager
Mode” must appear in the box.
. The software version is listed and “386 Enhanced
VER
at the DOS prompt and
Performance is likely to
MEM
at the
1 MB for the software and an additional 5
ENTER
. “Bytes available on hard drive”
To verify your
Help
menu, then select
n
4 MB of RAM in Windows 3.1
8 MB of RAM in Windows for Workgroups
n
10 MB of available hard drive space
(5 MB for the software and an additional 5
MB of space for operations overhead). To check available hard drive space,
double-click on the
File Manager
icon in the
Main
program group. Then click
on the icon for the hard drive where Colorado Backup is to be installed (C: is the
default). The amount of free hard drive space appears at the bottom of the
window. It must be at least 10,000 KB.
In addition, the fo llowing is recommended but not required:
n
Your computer might be running either the SHARE.EXE or VSHARE.386 (but
not both). If either is running, you will find SHARE.EXE in either your
CONFIG.SYS or AUTOEXEC.BAT file, and VSHARE.386 will be in your
SYSTEM.INI file.
See your Microsoft Windows User’s Guide for more information.
Page 37

Technical Information 37
Colorado Backup for Windows 95 Requirements
Installing Colorado Backup for Windows 95 requires:
n
Windows 95
n
8 MB of RAM
n
20 MB of available hard drive space
5 MB of space for operations overhead). To check available hard drive space,
double-click on
which the backup soft ware will be installe d; open the
Properties
(15 MB for the software and an additional
My computer
. Available hard drive space must be at least 20 MB.
; click on the icon representing the hard drive on
File
menu and select
Windows NT 4.0
You can use the Windows NT Backup applet with this tape drive.
LAN Installation
When using Colorado Backup on a LAN, the tape drive hardware and software must
be installed in a workstation. Do not instal l them on the network server. For other
LAN installation options, call the Cheyenn e Custo mer Sup p ort ph on e num ber listed
on page 46.
NOTE: Do not use Colorado Backup for Windows 95 to backup Novell servers.
Colorado Backup for DOS can backup Novell 2.x and 3.x servers or Colorado
Backup for Windows (3.1 or 3.11) can backup Novell 3.x servers.
NOTE: Colorado Backup for Windows 95 can back up computers over your Windows
95 and Windows for Workgroups networks. However, Colorado Backup for Windows
95 will only back up the Windows 95 registry of the computer to which your tape
drive is attached. The Windows 95 registry of a remote computer will not be backed
up.
Page 38

38 Installation Guide
What Affects Performance
How well your new HP tape drive functions, particularly how fast it writes data to
tape, depends on a nu mber of factors. Some of these factors are listed below.
Processor (CPU)
which your computer transfers data to and fr om the tape drive.
RAM
. Your c omputer must have enough memory available to handle its operating
system, the backup software, and the data you are transferring to and from t ape. The
system should not have to swap data to and from the hard drive. Shut down other
programs during a backup to ensure optimal speed.
Parallel Port Type.
in determining the speed at which your HP Colorado tape drive runs. Possible
parallel port types are:
n
Standard parallel port (SPP) which is sometimes called unidirectional, bidirectional, or compatible
n
Enhanced paral lel port (EPP)
n
Extended capabilities port (ECP)
TIP
: Check your computer’s specificati ons to see which kind of para lle l port was
installed. Sometimes a fast ECP/EP P port wi ll be set u p as a slow stand ard mode port
at the factory (for example, some HP Vectra models). Check your computer’s manual
to find out how to reset it to the faster speed. If that d oesn’t work you can also install
a faster parallel port.
I/O and IRQ.
are the computer resources used by the parallel port. The HP Colorado tape drive will
have better performance on a parallel port set to:
. The type and speed of your proc essor greatly affects the speed at
The type of parallel port on your computer has a major influence
The IRQ (interrupt request level) and I/O (input/output) base address
IRQ 7 with I/O base address 378, or
IRQ 5 with I/O base address 278
Most computers automatically assign these. But, depending on your computer’s
configuration, these settings may be different.
Your pa r a llel port may have a conflict with another device (such as your sound card
or FAX/modem) if both are assigned the same IRQ or I/O settings. If there is a
conflict, change the settings on the other device. To find out if your computer has a
conflict:
Page 39

Technical Information 39
In Windows 95, right-click on the My Computer icon, select Properties, select the
Device Manager tab, double-click on the computer icon to see a list of which device
is using each resource setting on your computer.
For optimum performance, run SCANDISK.EXE and DEFRAG.EXE on your hard
drive (see “Achieving optimal performance” on page 30).
Refer to your computer manual or contact your computer vendor if you have any
questions about your computer’s configuration or capabilities.
Drive Specifi ca ti o ns
Backup Speed
Performance will vary greatly depending on the speed of your system, the current
fragmentation of your hard drive, and the number and type of files being backed up.
Data transfer rate: up to 648 KBps
Tape speed, Read/write: up to 102 inches per second
Search/rewind: 120 i nches per second
Load time: 15 seconds
Tape Format
QIC-3095
Number of tracks: 73
Bit density: 67,733
Encoding method: RLL1,7
Error Correction: 6-level Reed-Solomon
Interface
Parallel
Reliability Specifications
15
Hard error rate: <1 in 10
Mean time between failure: 250,000 hours predicted
Warranty: 2-year limited warranty
Power Requirements
Tape drive: +16 Vdc @ 1.3 A
Power supply: 100-240 VAC, 50/60 Hz, 1.0 A
bits read with Reed-Solomon ECC
Page 40

40 Installation Guide
Specified Operating Temperature
Minimum: 5
o
C (41o F)
Maximum: 35o C (95o F)
Certifications
UL, cUL, TÜV, NOM, CE, meets or exceeds FCC Class B requirements
Federal Communications Commission R.F. Interference Statement
WARN ING: This equipment has bee n tested and found to compl y with the limits for a Clas s B digi tal
device, pursuant to Part 15 of FCC Rules. These limits are de signed to provide reasonabl e protection
against harmful interference in a residential installation. This equipment generates, uses and can radiate
radio frequency ene rgy and, if not installed and used i n accordance with the instructions, may cause
harmful interference to radio com munications. However, there is no guar antee that interference will not
occur in a particular installation. If this equipment does cause harmfu l interference to radio or te le vision
reception, which can be det erm i n e d by turning the equipment off and on, the us er is e ncouraged to try to
correct the interference by one or more of the foll o w ing measures:
n
Reorient or reloca te the receiving antenna .
n
Increase the separati on be tween the equipment and receiver.
n
Connect the equipment into an outlet on a circuit different from that to which the receiver is
connected.
n
Consult the dealer or an experienced radio/T V technician for help.
CAUTION: Changes or modifications of this equipment not expressly approved by Hewlett-Packard, could
result in violation of Par t 15 of FCC rules.
To maintain compliance with FCC rules and regulations, use prope rly shielded cables with this device.
User’s manual statement for VCCI class B product
Translation for VCCI class B product
This equipment is in the Class B category information t ec hnology equipment based on the rules of
Voluntary Co ntrol Council For Interference by Information Technology Equipment (VCCI). Although
aimed for residential area operation, radio inte rfe rence may be caused when used ne ar a radio or TV
receiver.
Read the instructions for correct operation.
Page 41

Technical Information 41
Korean RRL Statement
Notice
Europe: This drive shall be installed only with an EN60950 (IEC95 0) approved Power supply.
USA/Canada: This drive is for use only with IBM compatible UL
®
listed personal computers.
FCC Declaration of Conformity
According to 47CFR, Parts 2 and 15, Class B Computer Peripherals:
This device compli es wit h Part 15 of the FCC Rules. Operation is subje ct to the following two conditi ons:
(1) this device may not cause harmful interference (2) thi s d evi c e m u st a ccept any interference received
including interference that may cause undesired operations. Thi s applies to all product options.
August 1, 1997
Richard M. Spangler, Quality Manager
Notice for Canada
This digital apparatus does not exceed the Class B limits for radio noise emissions from digital apparatus as
set out in the radio interference regulations of the Canadian Department of Com mu nications
Le présent appareil num éri qu e n'émet pas de bruits radioélectriques dépassant les limites applicables a ux
appareils numériques de Classe B prescrites dans le règlement sur le brouillage radioélectrique édicté par le
Ministère des Communic ations du Canada.
Page 42

42 Installation Guide
DECLARATI ON OF CONFORMITY
according to ISO/IEC Guide 22 and EN 45014
Manufacturer’s Name:
Manufacturer’s Address:
declares that the product
Product Name:
Model Number:
Product Options:
conforms to the following Product Specifications:
Safety:
EMC:
Supplementary Information:
The product herewith complies with the requirements of the Low Voltage Directive
73/23/EEC and the EMC directive 89/336/EEC and carries the “CE” mark accordingly.
August 01, 1997 Richard Spangler, Quality Manager
European contact: Your local Hewlett-Packard Sales and Service Office or Hewlett-Packar d GmbH, Department
HP-TRE, Herrenberger Str aβe 130, D-71034 Böblingen (FAX: +49-7031-143143).
Hewlett-Packard Company
815 SW 14th Street, Building E
Loveland, Colorado 80537
HP Colorado 5GB external
C4361A
All
EN60950:1992 + A1:1993, + A2:1993, + A3:1995
EN 55022:1994 Class B
EN 50082-1:1992
IEC 801-2:1991 - 4kV CD, 8kV AD
IEC 801-3:1984 - 3V/m
IEC 801-4:1988 - 1kV Power Lines, 0.5kV Signal Lines
ENV 50140:1993 - 3V/m
.
DECLARATI ON OF CONFORMITY
according to ISO/IEC Guide 22 and EN 45014
Manufacturer’s Name:
Manufacturer’s Address:
declares that the product
Product Name:
Model Number:
Product Options:
conforms to the following Product Specifications:
Safety:
EMC:
Supplementary Information:
The product herewith complies with the requirements of the Low Voltage Directive
73/23/EEC and the EMC directive 89/336/EEC and carries the “CE” mark accordingly.
August 01, 1997 Richard Spangler, Quality Manager
European contact: Your local Hewlett-Packard Sales and Service Office or Hewlett-Packar d GmbH, Department
HP-TRE, Herrenberger Str aβe 130, D-71034 Böblingen (FAX: +49-7031-143143).
Hewlett-Packard Company
815 SW 14th Street, Building E
Loveland, Colorado 80537
HP Colorado 8GB external
C4388A
All
EN60950:1992 + A1:1993, + A2:1993, + A3:1995
EN 55022:1994 Class B
EN 50082-1:1992
IEC 801-2:1991 - 4kV CD, 8kV AD
IEC 801-3:1984 - 3V/m
IEC 801-4:1988 - 1kV Power Lines, 0.5kV Signal Lines
ENV 50140:1993 - 3V/m
Page 43

Installation Guide 43
Software License Agreement for External Drives
ATTENTION: USE OF THE SOFTWARE IS SUBJECT TO THE HP SOFTWARE LICENSE TERMS
SET FORTH BELOW. USING THE SOFTWARE INDICATES YOUR ACCEPTANCE OF THESE
LICENSE TERMS. IF YOU DO NOT ACCEPT THESE LICENSE TERMS, YOU MAY RETURN THE
SOF TWARE FOR A FULL REFUND. IF THE SOFTWARE IS BUNDLED WITH ANOTHER
PRODUCT, YOU MAY RETURN THE ENTIRE UNUSED PRODUCT FOR A FULL REFUND.
HP SOFTWARE LICENSE TERMS
License Grant.
conjunction with the HP hard ware product that accompanied the Software. “Use” means storing, loading,
installing, executing or displaying the Software. You may not modify the Software or disable any licensing
or control features of the Software.
Ownership.
confers no title or ownership in the Software and is not a sale of any rights in the Software. HP’s third party
suppliers may protect th e ir ri ght s in the event of any violatio n of these License Terms.
Copies and Adaptations.
or when copying or adaptation is an essential step in the authorized Use of the Software . You must
reproduce all copyright notices in the original Software on all copies or adaptations. You may not copy the
Software onto any bullet in board or similar system.
No Disassembly or Decryption.
written consent is obtained. In som e ju risdictions, HP’s consent may not be required for limited
disassembly or decompilation. Upon request, you will provide HP with reasonably detailed information
regarding any disassembly or decompilation. You may not decrypt the Softw are unl ess decryption is a
necessary part of the operation of the Software.
Transfer
must deliver the Softwa re, including any copies and related documentation, to the transferee. The
transferee must accept these License Terms as a condition to the transfer.
T ermination
Terms. Upon termination, you must immediately destroy the Software, together with all copies, adaptations
and merged portions in any form.
Export Requirements.
violation of any appli ca bl e la ws or regulations.
U.S. Government Restricted Rights.
developed entirely at private expense. They are delivered and licensed as “commercial computer software”
as defined in DFARS 252.227-7013 (Oct 1988), DFARS 252.211-7015 (May 1991) or DFARS 252.2277014 (Jun 1995), as a “commercial item” as defined in FAR 2.101(a), or as “Restricted computer software”
as defined in FAR 52.227-19 (Jun 1987) (or any equivalent agency regulation or contract clause),
whichever is applicable. You have only those rights provided for such Software and any accompanying
documentation by the ap pl ic able FAR or DFARS clause or the HP sta ndard software agreement for the
product involved.
HP grants you a lice ns e to Use multiple copies of the Software but only for Use in
The Software is owned and cop yri ght ed by HP or its third party suppliers. Your license
Y ou may only make copies or adaptations of the Software for archival purposes
You may not disassem bl e or dec om pi le the Software unless HP’s prior
. Your lic ense will automatically te rminate upon any transfer of t h e Software. Upon transfer, you
. HP may terminate your license upon notice for failure to comply with any of these License
You may not e xport or re-export the Software or any copy or adaptation in
The Software and any ac companying documentation ha v e been
Page 44

44 Installation Guide
Hewlett-Packard Limited Warranty Statement
HP Colorado Tape Drive
DURATION OF LIMITED WARRANTY
1. HP warrants to you, the end-user customer, that HP hardware, accessories and supplies will be free from
defects in materials and workmanship after the da te of purchase, for the period specified above. If HP
receives notice of such defe ct s duri ng the warranty period, HP will, at its optio n, e ither repair or replace
products which prove to be de fective. Replacement products may be either new or lik e-n ew.
2. HP warrants to you that HP software will not fa il to execute its programming instructions after the date
of purchase, for the period spec ified above, due to defects in material and workmanshi p whe n properly
installed and used. If HP receives not ic e of suc h de fe cts during the warranty period, HP will replace
software media which does not exe c ute its programming instructions due to such defects.
3. HP does not warrant that the operation of HP products will be uninterrupted or error free. If HP is unable,
within a reasonable time, to repair or replace any product to a condition as warranted, you will be entitled to
a refund of the purchase price upon prompt return of the produ ct.
4. HP products may contai n remanufactured parts equ ivalent to new in performance or m ay have been
subject to incidental use.
5. Warranty does not apply to defects resulting from (a) improper or inadequate maintenance or calibration,
(b) software, interfacing, parts or supplies not supplied by HP, (c) unauthorized modification or misuse, (d)
operation outside of the published environmental specifications for the product, or (e) improper site
preparation or mainten ance.
6. HP MAKES NO OTHER EXPRESS WARRANTY WHETHER WRITTEN OR ORAL. ANY
IMPLIED WARRANTY OF MERCHANTABILITY OR FITNESS FOR A PARTICULAR PURPOSE IS
LIMITED TO THE DURATION OF THE EXPRESS W ARRANTY SET FORTH ABOVE. Some states or
provinces do not allow lim i ta ti ons on the duration of an implied warranty, so the above limitation or
exclusion might not apply to you. This warranty gives you specific legal rights and you m ight also have
other rights that vary from state to state, or province to province.
7. TO THE EXTENT ALLOWED BY LOCAL LAW, THE REMEDIES IN THIS WARRANTY
ST ATEMENT ARE YOUR SOLE AND EXCLUSIVE REMEDIES. EXCEPT AS INDICATED ABOVE,
IN NO EVENT WILL HP OR ITS SUPPLIERS BE LIABLE FOR LOSS OF DATA OR FOR DIRECT,
SPECIAL, INCIDENTAL, CONSEQUENTIAL (INC LUDING LOST PROFIT OR DATA), OR OTHER
DAMAGE, WHETHER BASED IN CONTRACT, TORT, OR OTHERWISE. Some countries, States or
provinces do not allow the exclusion or limitation of incidental or consequenti al dam a ges, so the above
limitation or excl usi on may not apply to you.
FOR CONSUMER TRANSACTIONS IN AUSTRALIA AND NEW ZEALAND: THE WARRANTY
TERMS CONTAINED IN THIS STA T EMENT, EXCEPT TO THE EXTENT LAWFULLY PE RMITTED,
DO NOT EXCLUDE, RESTRICT OR MODIFY AND ARE IN ADDITION TO THE MANDATORY
STATUTORY RIGHTS APPLICABLE TO THE SALE OF THIS PRODUCT TO YOU.
Hardware - 2 year
Software - 90 days
Page 45

Technical Information 45
Returning Your Drive
All countries other than the USA:
Customer Support at the ph one number listed on page 47 of this guide to receive instruct ions.
In the USA:
Call the number liste d on page 47. Customer Suppor t will help you determine if your drive is defective.
Provide the product type, serial number, and date of purchase. You will be given a return authoriz at ion
number. Keep the return authorization (RA) number for future reference.
Securely repackage the product (in the original packaging if possible) to prevent shipping damage and
mark the return authorizatio n num be r on t he box and in the box along with your nam e and address.
All product returns must have an accompanying return authorization number. To ensure timely and accurate
processing of your return, the number must be clearly printed on the outside of the box.
Use the appropriate address for yo ur location. A traceable shipping m et hod is recommended. The postage,
shipping and insurance ch arges incurred in shipping to Hewlett -Packard will be paid by Purchaser and all
risk for the product s hall remain with Pu rc has er until such time as H ewlett-Packard takes receipt of the
product.
Once your product is receive d at Hewl et t-Pa ckard, we will ship the replaceme nt product. Hewlett-Packard
will pay shipping charges to the Purchaser for replacement product cove red under warranty.
If the product is still under warranty, there is no charge for the replacement. If the product is not covered
under warranty, an exchange cost will be quo te d when the return authorization number is issued.
If your Hewlett-Packard product requires repair or repl ac ement, follow these instr uc ti ons:
If your Hewlett-Packar d product requires repair or replace me nt , call
Page 46

Chapter 6: Customer Support Services
Support for Your Tape Drive and Colorado Backup Software
If you need help with your tape drive, your local reseller has the latest information regarding HP
products and services and c an pr ovi de support under HP's comprehensive m en u of reseller
services. If your reseller is not able to help, or you are having software problems, you can obtain
support from HP directly either through free 24-hours/day interactive electronic services or by
telephone (free du ring warranty).
America Online
CompuServe
World Wide Web
Bulletin board site (8,N,1,F, 1200-28.8K baud)
Europe . . . . . . . . . . . . . . . . . . . . . . . . . . . . . . . . . . . . . . . . . . . . . .+31 (0)495 546909
Asia/Pacific
QuickFax Faxback Service
Simply dial the fax num ber from a touch-tone phone or Group 3 fax machine and follow the
voice prompts to selec t th e index of available support and product information docum ents.
USA and Canada . . . . . . . . . . . . . . . . . . . . . . . . . . . .800-368-9673 or 970-635-1510
Europe
. . . . . . . . . . . . . . . . . . . . . . . . . . . . . . . . . . . . . . . . . . . .Keyword: hpstor
. . . . . . . . . . . . . . . . . . . . . . . . . . . . . . . . . . . . . . . . . . . . . . . . . .Go HPSYS
. . . . . . . . . . . . . . . . . . . . . . . ht tp ://www.hp.com/go/colorado_support
Australia . . . . . . . . . . . . . . . . . . . . . . . . . . . . . . . . . . . . . . . . . . .(03) 9890 0276
Korea. . . . . . . . . . . . . . . . . . . . . . . . . . . . . . . . . . . . . . . . . .Hitel: (02) 762-0228
Access: Go HPK
Chollian: (02) 220-2001
New Zealand . . . . . . . . . . . . . . . . . . . . . . . . . . . . . . . . . . . . . . . . .(09) 356 6642
Taiwan. . . . . . . . . . . . . . . . . . . . . . . . . . . . . . . . . . . . . . . . . . . . . . .(02)9233233
First Name: HP
Last Name: BBS
Austria (free line) . . . . . . . . . . . . . . . . . . . . . . . . . . . . . . . . . . . . . . . .0660 8128
Belgium (free line)
- Dutch . . . . . . . . . . . . . . . . . . . . . . . . . . . . . . . . . . . . . . . . . . . . . . .0800 11906
- French. . . . . . . . . . . . . . . . . . . . . . . . . . . . . . . . . . . . . . . . . . . . . . .0800 17043
Denmark (free line). . . . . . . . . . . . . . . . . . . . . . . . . . . . . . . . . . . . . . .800 10453
Finland (free line) . . . . . . . . . . . . . . . . . . . . . . . . . . . . . . . . . . . . . . .9800 13134
France (free line). . . . . . . . . . . . . . . . . . . . . . . . . . . . . . . . . . . . . . . . .05 905900
Germany (free line). . . . . . . . . . . . . . . . . . . . . . . . . . . . . . . . . . . . 0130 810 061
Italy (free line) . . . . . . . . . . . . . . . . . . . . . . . . . . . . . . . . . . . . . . . . .1678 59020
46
Page 47

Customer Support Services 47
Netherlands (free line) . . . . . . . . . . . . . . . . . . . . . . . . . . . . . . . . . . 06 022 2420
Norway (free line). . . . . . . . . . . . . . . . . . . . . . . . . . . . . . . . . . . . . . . . 800 11319
Spain (free line) . . . . . . . . . . . . . . . . . . . . . . . . . . . . . . . . . . . . . . . .900 993123
Sweden (free line). . . . . . . . . . . . . . . . . . . . . . . . . . . . . . . . . . . . . . .020 795743
Switzerland (free line)
- French. . . . . . . . . . . . . . . . . . . . . . . . . . . . . . . . . . . . . . . . . . . . . . . . .155 1526
- German. . . . . . . . . . . . . . . . . . . . . . . . . . . . . . . . . . . . . . . . . . . . . . . .155 1527
United Kingdom (free line). . . . . . . . . . . . . . . . . . . . . . . . . . . . . . .0800 960271
Other locations in Europe (t oll line) . . . . . . . . . . . . . . . . . . +31 (0)20 681 5792
Asia/Pacific
Australia . . . . . . . . . . . . . . . . . . . . . . . . . . . . . . . . . . . . . . . . . . .(03) 9272 2627
China . . . . . . . . . . . . . . . . . . . . . . . . . . . . . . . . . . . . . . . . . . . .(8610) -6 5055280
Japan . . . . . . . . . . . . . . . . . . . . . . . . . . . . . . . . . . . . . . . . . . . . . . .(3) 3335-8622
Korea. . . . . . . . . . . . . . . . . . . . . . . . . . . . . . . . . . . . . . . . . . . . . . .(02) 769-0543
New Zealand . . . . . . . . . . . . . . . . . . . . . . . . . . . . . . . . . . . . . . . . .(09) 356 6642
Singapore . . . . . . . . . . . . . . . . . . . . . . . . . . . . . . . . . . . . . . . . . . .(65) 291-7951
Taiwan. . . . . . . . . . . . . . . . . . . . . . . . . . . . . . . . . . . . . . . . . . . . . . .(02)7195589
. . . . . . . . . . . . . . . . . . . . . . . . . . . . . . . . . . . . . . . . . . Colorado_Support@hp.com
E-mail
FTP Site
Telephone
. . . . . . . . . . . . . . . . . . . . . . . . . . . . . . . . . . . . . . . . . . . . . . . . . . . . . . ftp.hp.com
Login: . . . . . . . . . . . . . . . . . . . . . . . . . . . . . . . . . . . . . . . . . . . . . . .anonymous
Password: . . . . . . . . . . . . . . . . . . . . . . . . . . . . . . . . . . . . (Your email address)
Directory: . . . . . . . . . . . . . . . . . . . . . . ./pub/information_storage/hp-colorad o
USA and Canada (M-F, 6 a.m.- 6 p.m. Mountain time)
Literature and dealer referral . . . . . . . . . . . . . . . . . . . . . . . . . . . . 970-635-1500
Canada (for French-speaking customers)
pour assistance en fran ça is . . . . . . . . . . . . . . . . . . . . . . . . . . . . 1-800-387-3867
During warranty period
- Technical support . . . . . . . . . . . . . . . . . . . . . . . . . . . . . . . . . . . . 970-635-1500
After warranty period (charges begin onl y when you connect to a Support Technician, prices
are subject to change without notice)
Technical Support . . . . . . . . . . . . . . . . . . . . . . . . . . . . . . . . . . . . .800-810-0130
(Per incident fee of $25 US dollars charged to
Visa, MasterCard or American Express)
U.S. only Technical Support. . . . . . . . . . . . . . . . . . . . . . . . . . . . .900-555-1800
($2.50 per minute/maximum of $25. You must be 18 years
of age or have parental perm ission to call 900 numbers.)
Europe (M-F, 8:30-18:00 Central European Time)
Use these Technical Support numbers during and after your warranty pe riod. No charge for
Technical Support during warranty period. Per incid en t ch arge after warranty period.
Austria (German) . . . . . . . . . . . . . . . . . . . . . . . . . . . . . . . . . . . . . . .06 60 63 86
Belgium
- Dutch . . . . . . . . . . . . . . . . . . . . . . . . . . . . . . . . . . . . . . . . . . . . . .02 626 88 06
- French. . . . . . . . . . . . . . . . . . . . . . . . . . . . . . . . . . . . . . . . . . . . . .02 626 88 07
Denmark . . . . . . . . . . . . . . . . . . . . . . . . . . . . . . . . . . . . . . . . . . . . . .39 29 40 99
Finland . . . . . . . . . . . . . . . . . . . . . . . . . . . . . . . . . . . . . . . . . . . . . .02 03 47 288
France . . . . . . . . . . . . . . . . . . . . . . . . . . . . . . . . . . . . . . . . . . . . . 04 50 43 98 53
Germany . . . . . . . . . . . . . . . . . . . . . . . . . . . . . . . . . . . . . . . . . . .0180 52 58 143
Ireland (English). . . . . . . . . . . . . . . . . . . . . . . . . . . . . . . . . . . . . . .01 662 55 25
Italy. . . . . . . . . . . . . . . . . . . . . . . . . . . . . . . . . . . . . . . . . . . . . . . .02 2 641 0350
Page 48

48 Customer Support Services
Netherlands. . . . . . . . . . . . . . . . . . . . . . . . . . . . . . . . . . . . . . . . . . 0 20 606 8751
Norway . . . . . . . . . . . . . . . . . . . . . . . . . . . . . . . . . . . . . . . . . . . . . . .22 11 62 99
Portugal. . . . . . . . . . . . . . . . . . . . . . . . . . . . . . . . . . . . . . . . . . . . . .01 44 17 199
Spain . . . . . . . . . . . . . . . . . . . . . . . . . . . . . . . . . . . . . . . . . . . . . . . .90 23 21 123
Sweden . . . . . . . . . . . . . . . . . . . . . . . . . . . . . . . . . . . . . . . . . . . . . .08 61 92 170
Switzerland (French, Italian, and German). . . . . . . . . . . . . . . . . 08 48 80 11 11
United Kingdom . . . . . . . . . . . . . . . . . . . . . . . . . . . . . . . . . . . . .0171 512 52 02
English language suppor t from other countries . . . . . . . . . . +44 171 512 52 02
Asia/Pacific
Australia (M-F 7am-7pm, East ern Standard Time) . . . . . . . . . .(03) 9272 8000
China (M-F 8:30-17:30) . . . . . . . . . . . . . . . . . . . . . . . . . . . . . (8610)-6262566 6
extensions 5602 throug h 5609, 5611 and 5612
Korea (M-F, 8:30-19:00). . . . . . . . . .(02) 3270-07 00 / 080-999-0700 (toll free)
New Zealand (M-F, 9am to 9pm Auckland Time) . . . . . . . . . . . .( 09) 356 6640
Singapore (M-F, 9:00-17:00) . . . . . . . . . . . . . . . . . . . . . . . . . . . . (65) 271-7233
Taiwan (M-F, 8:30-17:30). . . . . . . . . . . . . . . . . . . . . . . . . . . . . . .(02) 717-9609
FAX
USA . . . . . . . . . . . . . . . . . . . . . . . . . . . . . . . . . . . . . . . . . . . . . . . . . . . .970-667-0997
Asia/Pacific
Australia . . . . . . . . . . . . . . . . . . . . . . . . . . . . . . . . . . . . . . . . . . .(03) 9272 4099
Korea. . . . . . . . . . . . . . . . . . . . . . . . . . . . . . . . . . . . . . . . . . . . . .(02) 3270-0707
New Zealand. . . . . . . . . . . . . . . . . . . . . . . . . . . . . . . . . . . . . (+61 3) 9272 4099
Singapore . . . . . . . . . . . . . . . . . . . . . . . . . . . . . . . . . . . . . . . . . . .(65) 278-9225
Taiwan. . . . . . . . . . . . . . . . . . . . . . . . . . . . . . . . . . . . . . . . . . . . . . .(02)5140276
(8610)-62614174
(8610)-62624175
(8610)-62614176
R
Copyright 1998. Hewlett-Packard, a division of Hewlett-Packard. All rights reserved. Hewlett-Packard is a registered trademark of the
Hewlett-Packard Company. Wind ows, Windows 95, and Windows NT are U.S. registered trademarks of Microsoft Corp. Travan is a U.S.
registered trademark of 3M.
C4388-90100 March 1998
Hewlett-Packard, 815 SW 14th Street Bldg. E, Loveland, CO 80537
PRINTED IN USA
 Loading...