

Page 1

HP Open Source Middleware Stacks Blueprint:
Web Server on HP ProLiant Servers with SUSE Linux
Enterprise Server Version 10
HP Part Number: 5991-5565
Published: August 2007
Edition: 3.0
Page 2

© Copyright 2007 Hewlett-Packard Development Company, L.P.
Legal Notice
Confidential computer software. Valid license from HP required for possession, use or copying. Consistent with FAR12.211and 12.212, Commercial
Computer Software, Computer Software Documentation, and Technical Data for Commercial Items are licensed to the U.S. Government under
vendor's standard commercial license.
The information contained herein is subject to change without notice. The only warranties for HP products and services are set forth in the express
warranty statements accompanying such products and services. Nothing herein should be construed as constituting an additional warranty. HP
shall not be liable for technical or editorial errors or omissions contained herein.
Acknowledgments
Intel and Itanium are trademarks or registered trademarks of Intel Corporation or its subsidiaries in the United States and other countries.
Java is a US trademark of Sun Microsystems, Inc.
Page 3

Table of Contents
Introduction............................................................................................................................................9
Executive Summary...........................................................................................................................9
Intended Audience............................................................................................................................9
Scope and Purpose............................................................................................................................9
HP Services........................................................................................................................................9
Typographic Conventions...............................................................................................................10
HP Encourages Your Comments.....................................................................................................10
HP Open Source Web Server Middleware Stack..................................................................................11
Web Server Stack Architecture........................................................................................................11
Installing and Verifying the Linux Distribution...................................................................................13
Installing the Linux Distribution.....................................................................................................13
Required Packages and Installation Recommendations............................................................13
Verifying the Linux Distribution Installation.............................................................................14
Installing, Configuring, and Managing Web Server Middleware Stack Components.........................15
Configuring the Basic Apache HTTP Server...................................................................................15
Installing and Configuring Sun JDK on an HP Proliant System.....................................................15
Installing and Configuring Tomcat.................................................................................................17
Advanced Apache HTTP Server Features.......................................................................................18
Using the Apache HTTP Server Benchmarking Tool.................................................................18
Apache HTTP Server Status and Information...........................................................................19
Configuring and Using the Modules....................................................................................19
Apache HTTP Server Log...........................................................................................................21
Using the Error Log to Diagnose the Apache HTTP Server ................................................21
Using Webalizer to Perform Apache HTTP Server Log Analysis........................................21
Using Virtual Host Support.......................................................................................................22
Using Apache HTTP Server URL Redirection...........................................................................23
Using Apache HTTP Server Proxy Features..............................................................................24
Error Responses and Redirects...................................................................................................25
Customizing Plain Text Responses.......................................................................................25
Customizing Local URL Redirect Responses.......................................................................25
Customizing External URL Redirect Responses...................................................................26
Using Per-User Web Directories.................................................................................................26
Integrating the Web Server Stack Components...............................................................................27
Configuring the Apache and Tomcat Connector ......................................................................27
Integrating the Apache Web Server and PHP............................................................................29
Integrating the Apache Web Server and Perl.............................................................................29
Integrating the Apache Web Server and Python........................................................................30
Connecting Tomcat to a Database...................................................................................................30
Connecting Tomcat and MySQL................................................................................................31
Obtaining and Installing the JDBC Drivers..........................................................................31
Creating a New Data Source.................................................................................................31
Configuring the MySQL Server............................................................................................32
Testing MySQL Database Connectivity................................................................................32
Connecting Tomcat and Oracle.......................................................................................................33
Obtaining and Installing the Oracle JDBC Driver......................................................................34
Creating an Oracle Data Source.................................................................................................34
Configuring the Oracle Server...................................................................................................34
Testing the Oracle Database Connectivity.................................................................................34
Connecting Tomcat to MySQL or Oracle Using Hibernate ............................................................36
Installing Hibernate, Tomcat, and JDK......................................................................................36
Configuring a Database Driver in Tomcat.................................................................................36
Adding Test Data to the Databases............................................................................................36
Table of Contents 3
Page 4

Creating a Simple Application in Tomcat..................................................................................37
Verifying the Simple Application Operation.............................................................................41
Secure the Web Server Stack............................................................................................................42
Enabling HTTPS Support in the Apache HTTP Server.............................................................42
Apache HTTP Server Authorization .........................................................................................43
Creating a Test index.html File.............................................................................................43
Configuring the Authorized Overrides................................................................................43
Creating a Password File......................................................................................................44
Creating the Distributed Configuration File........................................................................44
Restarting the Apache HTTP Server ....................................................................................44
Verifying the Authentication and Authorization Operations..............................................44
Protecting Apache HTTP Server Authorization with Symas CDS............................................44
Configuring CDS and LDAP Services..................................................................................44
Configuring Apache HTTP Server Services.........................................................................45
Protecting Tomcat Authorization with Symas CDS...................................................................46
Monitor Tomcat with OpenView Tomcat SPI.......................................................................................48
Software Prerequisites and Reference Guides.................................................................................49
Tomcat SPI Components .................................................................................................................49
Tools...........................................................................................................................................50
Policies........................................................................................................................................50
Appendix A: Checklist for Building a Web Server Middleware Stack.................................................51
Appendix B: Frequently Asked Questions...........................................................................................53
Appendix C: Vendor Information Reference........................................................................................54
Appendix D: Hibernate Test Application Source Code........................................................................55
4 Table of Contents
Page 5

List of Figures
1 Web Server Stack Architecture......................................................................................................12
2 Web Server Hardware Environment.............................................................................................13
3 YaST Software Selection and System Tasks...................................................................................14
4 SUSE Installation Settings ............................................................................................................14
5 Tomcat Successful Installation Verification...................................................................................17
6 Apache Server Status.....................................................................................................................20
7 Apache Server Information...........................................................................................................20
8 Webalizer Usage Report................................................................................................................22
9 Connecting the Apache Web Server and Tomcat Web Container.................................................27
10 JSP Examples Page to Test mod_jk................................................................................................28
11 Tomcat Connections Using JDBC .................................................................................................31
12 Tomcat Connecting MySQL Test Page..........................................................................................33
13 Oracle Database Test.....................................................................................................................35
14 Verifying the Simple Application Configuration..........................................................................41
15 SSL_Enabled Apache.....................................................................................................................43
16 OVOW Architecture......................................................................................................................49
5
Page 6

6
Page 7

List of Tables
1 Software Test Configuration..........................................................................................................12
2 Required OVOW Patches..............................................................................................................49
3 SE-SPI Applications of the Tool Group.........................................................................................50
4 SE SPI Applications of the Policy Group.......................................................................................50
7
Page 8

8
Page 9
Introduction
Executive Summary
The HP Open Source Integrated Portfolio (HP OSIP) comprises a range of products and services
designed to verify that customers can successfully realize the cost and feature benefits of adopting
open source software in their IT environments. HP Open Source foundation components include
the base components of an open source-based ecosystem. HP servers and storage are validated
to run the Linux operating system together with the supported commercial Linux distribution.
HP Open Source Middleware Stacks offer building block applications, such as the Web Server;
technical blueprints, such as this document, describing how to integrate individual components
of a technology stack; and consulting services to speed the successful implementation of an open
source strategy.
Intended Audience
The intended audience for this document is enterprise customers who are evaluating or deploying
an open source Web Server on HP ProLiant servers running SUSE Linux Enterprise Server Version
10 (SLES10).
Scope and Purpose
This blueprint provides technical information for the implementation of an open source Web
Server Middleware Stack. It covers installation of the initial Linux distribution and middleware
building blocks, integration of the components, and steps for verification of stack functionality.
The software components described in this paper are tested and validated to run on HP ProLiant
servers and StorageWorks products.
HP provides quality assurance from extensive integration testing with open source software and
HP hardware so that you can confidently deploy the complete stack. Once you have completed
a successful evaluation, you have the flexibility to “do it yourself” or get assistance from HP to
incorporate open source stacks into your existing IT infrastructure.
HP Services
HP Open Source Consulting Services can help you build and integrate open source and commercial
software across multiple operating systems (OS) environments. Additionally, HP Open Source
Support Services provide industry leading technical support for all the products HP sells,
including hardware, operating systems, and open source middleware.
NOTE: While HP does not offer support for JDK, JVM, and components directly, a number of
commercial support options are available for these components. HP can help you integrate those
offerings into one support strategy.
To learn more about HP Open Source Consulting and Support Services, contact your local HP
sales representative or visit the HP Business and IT Services website at:
http://www.hp.com/hps
Introduction 9
Page 10

Typographic Conventions
This document uses the following typographical conventions.
Command
ComputerOut
Ctrl-x A key sequence. A sequence such as Ctrl-x indicates that
ENVIRONVAR The name of an environment variable, for example, PATH.
[ERRORNAME]
Key The name of a keyboard key. Return and Enter both refer
Term The defined use of an important word or phrase.
UserInput
VARIABLE
\ (continuation character)
... The preceding element can be repeated an arbitrary number
| Separates items in a list of choices.
A command name or qualified command phrase.
Text displayed by the computer.
you must hold down the key labeled Ctrl while you press
another key or button.
The name of an error, usually returned in the errno
variable.
to the same key.
Commands and other text that you type.
The name of a placeholder in a command, function, or
other syntax display that you replace with an actual value.
A backslash (\) at the end of a line of code (such as a
command) indicates that the following line of code is
contiguous, and you must not insert a line break. This
convention facilitates the typesetting of long lines of code
examples on a printed page. If you cut and paste sample
code from this publication, ensure that you remove
backslash characters at line endings.
of times.
HP Encourages Your Comments
HP encourages your comments concerning this document. We are committed to providing
documentation that meets your needs. Send any errors found, suggestions for improvement, or
compliments to:
feedback@fc.hp.com
Include the document title, manufacturing part number, and any comment, error found, or
suggestion for improvement you have concerning this document.
10
Page 11

HP Open Source Web Server Middleware Stack
The following components comprise the HP OSMS Web Server Middleware Stack:
Apache Web Server The Apache Web Server is a mature open source web server that has
become the de facto standard because of its high adoption rate on
the Internet.
Apache Tomcat
Hibernate Hibernate is an object/relational persistence and query service for
mod_jk
mod_ssl
Perl Perl (Practical Extraction and Report Language) has long been a
PHP PHP is a scripting language that can be embedded in HTML pages,
Python Python is an object-oriented language that has a clean, straightforward
JDK The Java Platform Standard Edition Development Kit (JDK) is a
Apache Tomcat (or Tomcat) is a J2EE servlet and Java™ Server Pages
(JSP) engine for developing and deploying web applications. It also
includes other features, such as an embedded web server.
Java. Hibernate provides support for collections and object relations,
and composite types. In addition to persisting objects, Hibernate
provides a rich query language to retrieve objects from the database,
and an efficient caching layer and Java Management Extensions (JMX)
support. User-defined data types and composite primary keys give
additional flexibility to support legacy applications.
The mod_jk module is commonly used to allow Tomcat to handle
Java Servlet and JSP requests while Apache httpd handles requests
for static and dynamic contents implemented in PHP, Perl, or Python.
The mod_ssl module provides a Secure Sockets Layer (SSL) and
Transport Layer Security (TLS) implementation that allows web
applications running within the Apache Web Server to communicate
securely with their respective clients. Communication can still occur
over standard HTTP while running mod_ssl.
popular text-processing language. Recently, Perl has become popular
for the development and deployment of web applications.
allowing developers to add more dynamic contents to their web
applications. A large portion of the PHP syntax is similar to C and
Java.
syntax. Python can be extended to exploit facilities implemented in
other programming languages, such as C and C++.
development platform for building Java-based applications and
components.
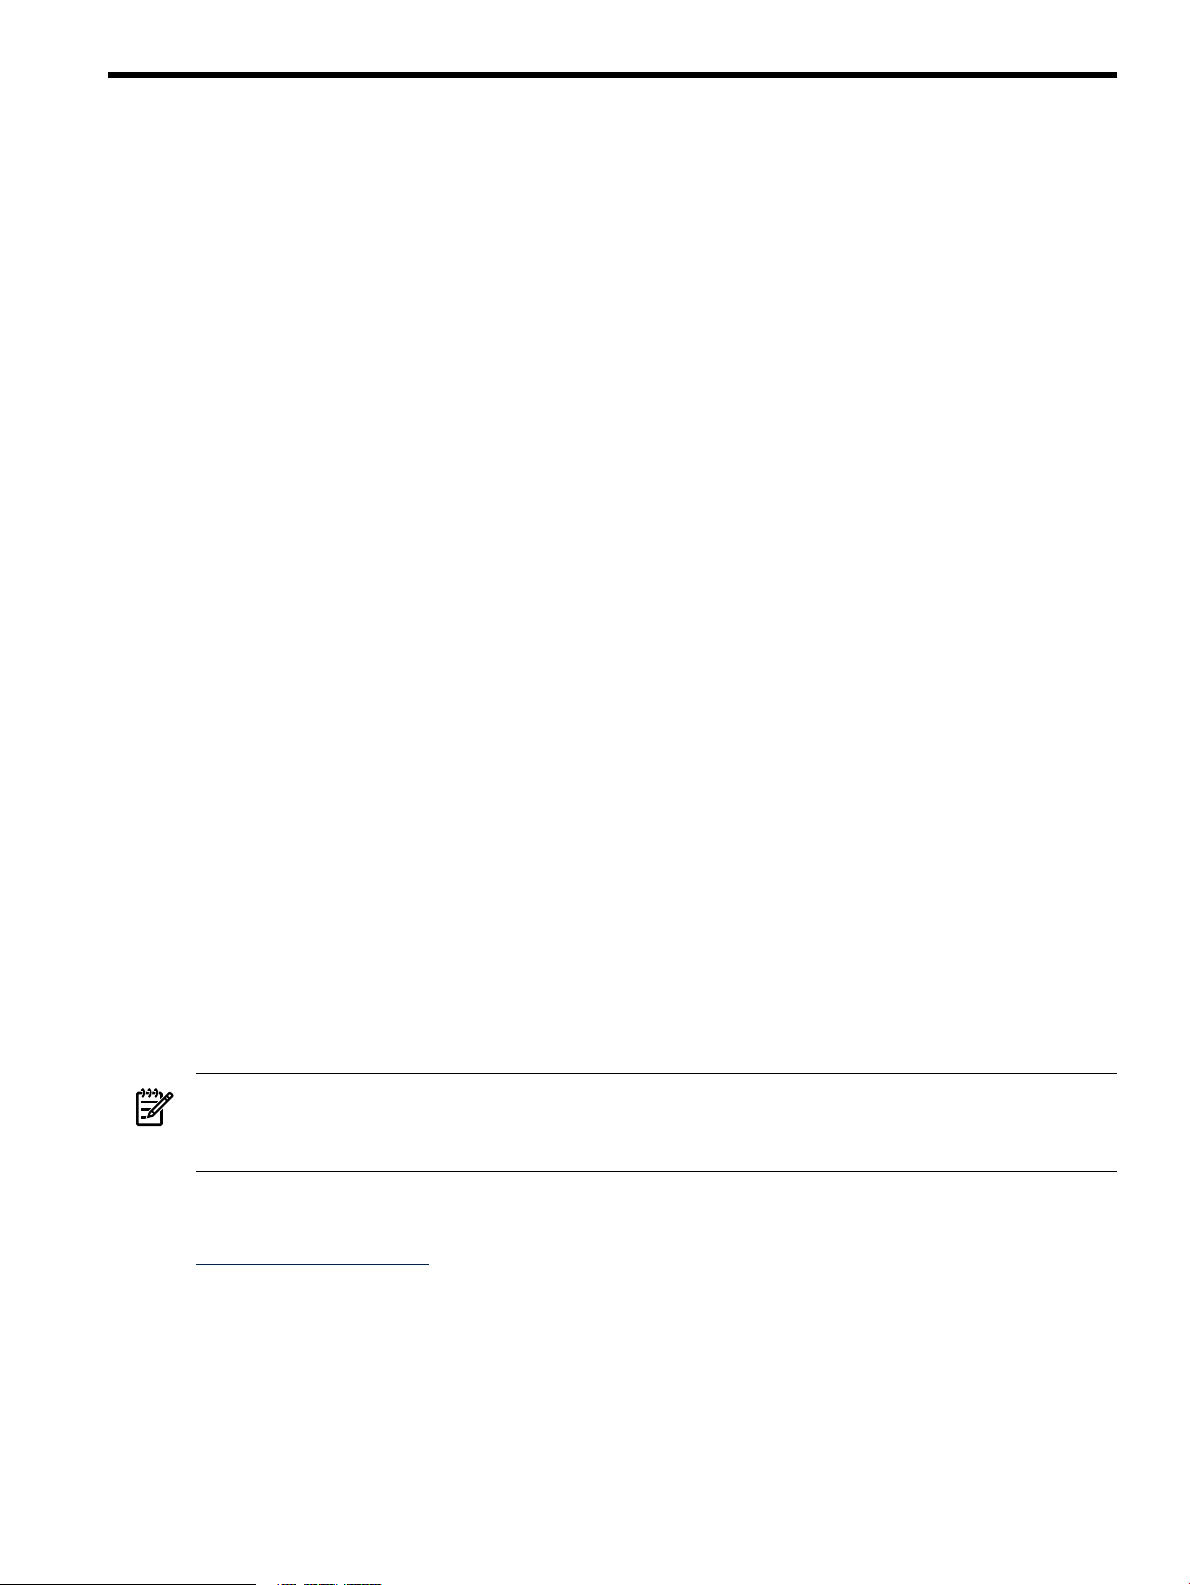
Web Server Stack Architecture
This section provides architecture, configuration, and the software environment for a web server
stack. Figure 1 shows the logical architecture of the stack.
HP Open Source Web Server Middleware Stack 11
Page 12
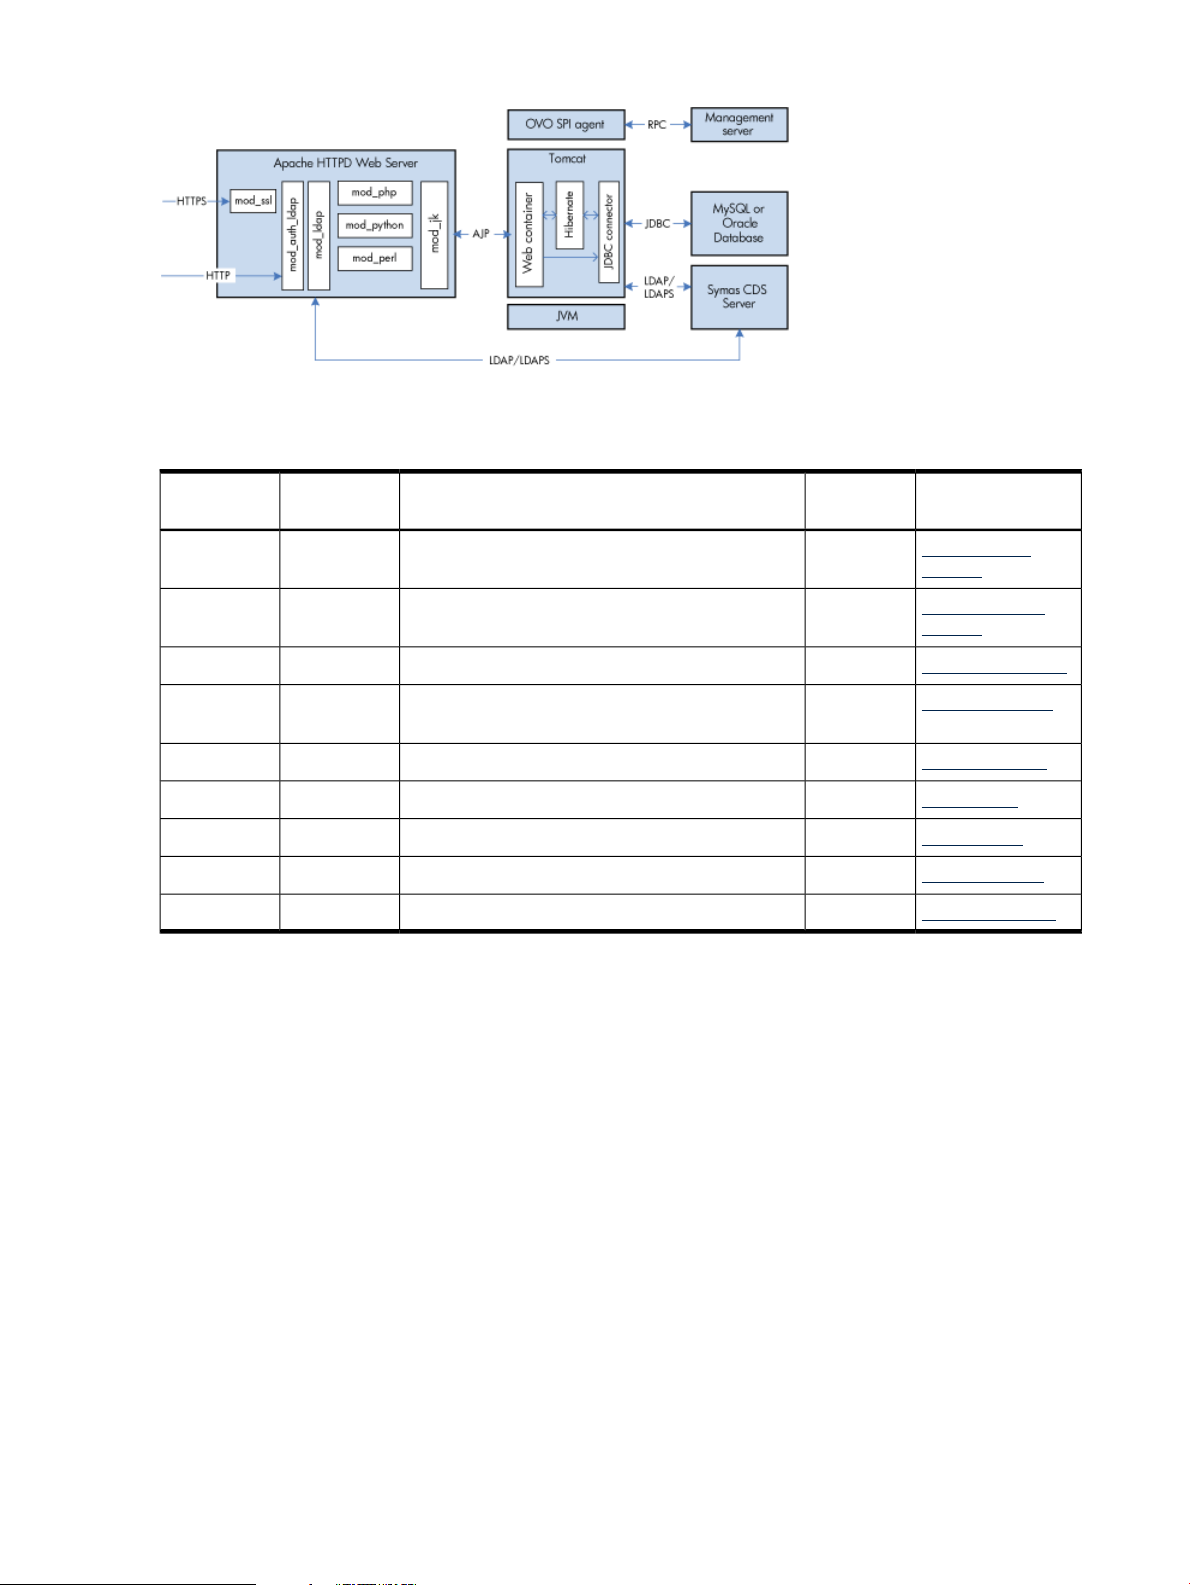
Figure 1 Web Server Stack Architecture
Table 1 lists the software used to test the configurations described in this blueprint.
Table 1 Software Test Configuration
Software
Tomcat
Version
2.2.0-21.2Apache httpd
5.5.20Apache
3.2.1Hibernate
2.2.0-21.2mod_ssl
1.2.20mod_jk
5.8.8-14.2Perl
5.1.2-29.5PHP
2.4.2-18.2Python
1.5.0_10Sun JDK
apache2.2.0-21.2.x86_64.rpm
apache-tomcat-5.5.20.tar.gz
hibernate-3.2.1.tar.gz
apache2-prefork-2.2.0-21.2.x86_64.rpm
tomcat-connectors-1.2.20-src.tar.gz
perl-5.8.8-14.2.x86_64.rpm
php-5.1.2-29.5.x86_64.rpm
python-2.4.2-18.2.x86_64.rpm
jdk-1_5_0_10-linux-amd64-rpm.bin
Novell
Apache
Website LinkDistributorPackage NamePackage
Apache httpd
website
Apache Tomcat
website
Hibernate websiteHibernate
mod_ssl websiteNovellInclude with
mod_jk websiteApache
Perl websiteNovell
PHP websiteNovell
Python websiteNovell
Sun Java websiteSun
12
Page 13
NOTE: The installation and configuration of the MySQL and Oracle databases are not covered
in this blueprint. The MySQL and Oracle databases are installed on a separate HP ProLiant
servers with database files on Modular Smart Array (MSA) 1000 storage. All other software listed
in Table 1 are installed on HP ProLiant servers, as displayed in Figure 2.
Figure 2 Web Server Hardware Environment
Figure 2 shows a basic configuration consisting of multiple nodes of an Apache Web Server as
the load balancer. The key processes that occur are as follows:
• Connection of the Apache Web Server and the Tomcat Web Container, using the mod_jk
module.
• Connection of Apache Tomcat Server to a database, such as MySQL or Oracle, using a JDBC
Driver.
• Support from Apache Web Server for login authentication using Java Authentication and
Authorization Service (JAAS) with the Symas Connexitor Directory Services (CDS) Server.
• Use of an additional, required OpenView Management Server to host HP OpenView
Operations (OVO) for manageability through the Apache Web Server.
For a checklist that provides high-level guidelines for building the web server stack, see “Appendix
A: Checklist for Building a Web Server Middleware Stack” (page 51).
Installing and Verifying the Linux Distribution
This section describes how to build a Web Server Middleware Stack, beginning with the
installation of the Linux distribution.
Installing the Linux Distribution
Complete instructions for installation of a Linux distribution are outside the scope of this
document. This section provides information to verify installation of the required packages for
the OSMS Web Server.
Required Packages and Installation Recommendations
The Web Server Middleware Stack depends on several software package groups included with
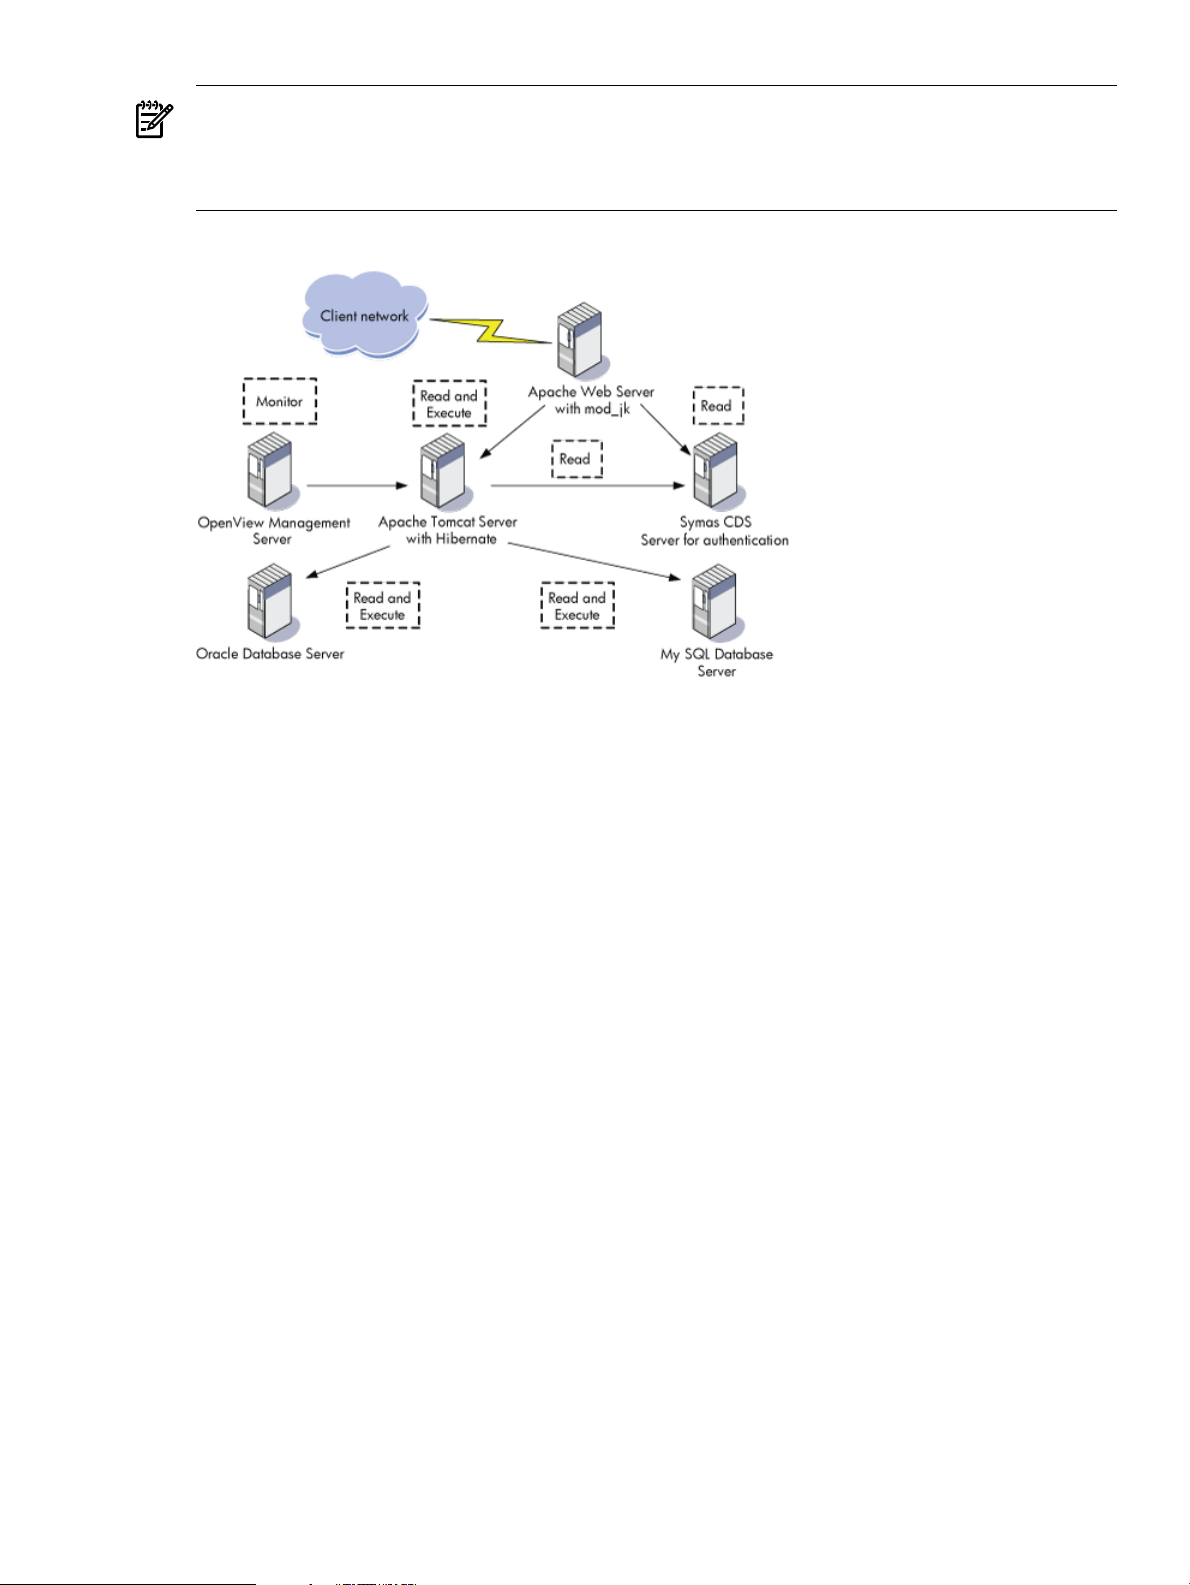
the SLES10 distribution media. To verify package selection, perform the following steps:
1. From the Installation Settings screen of YaST, select the Software tab.
Installing and Verifying the Linux Distribution 13
Page 14
2. Under the Primary Functions heading, select Web and LAMP Server and under the
Development heading, select C/C++ Compiler and Tools as displayed in Figure 3.
Figure 3 YaST Software Selection and System Tasks
3. Select the Details button to display a table with the detailed software package selections.
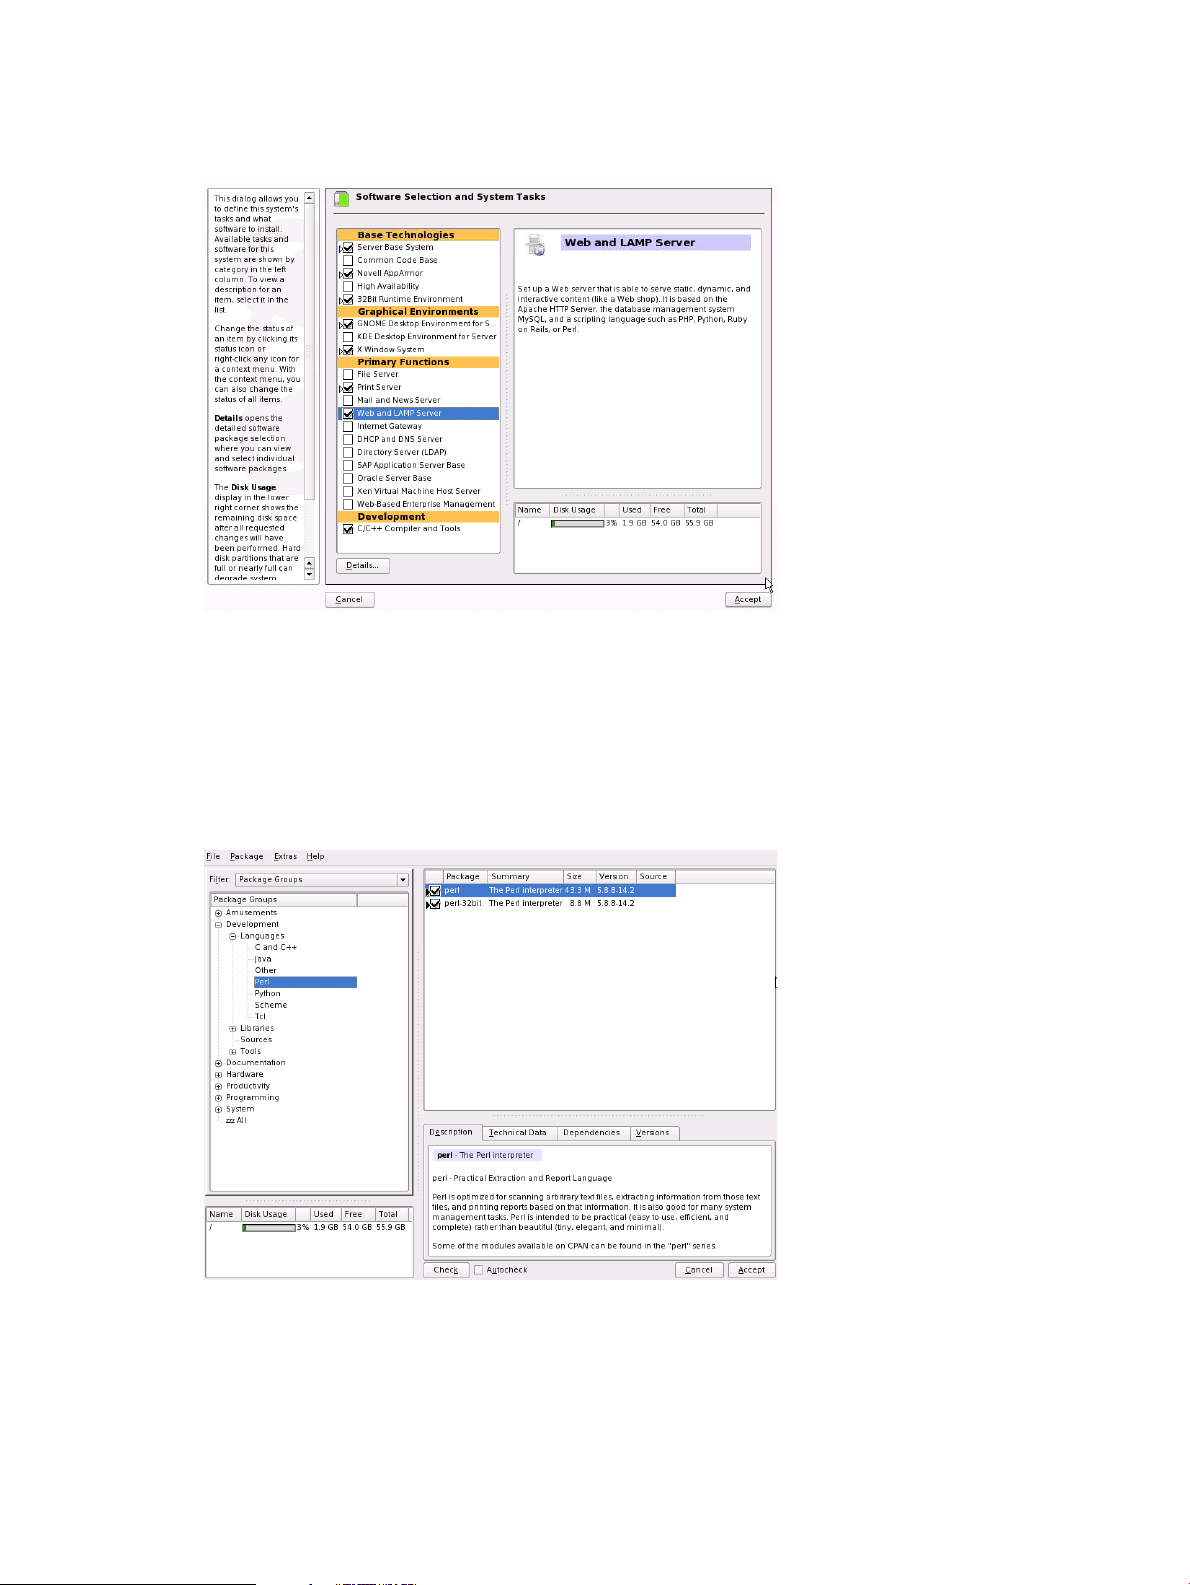
4. From the Filter options drop-down list, select Package Groups.
5. In the Package Groups pane, expand the Development group and select Languages from
the expanded list.
Verify that the perl and python components are selected as displayed in Figure 4
Figure 4 SUSE Installation Settings
6. From the Productivity packages group, select Networking.
Verify that the apache2, apache2-prefork, php5, apache2-mod_perl, apache2-mod_php5,
apache2-mod_python, and webalizer components are selected.
Verifying the Linux Distribution Installation
To verify installation of the necessary packages, enter the following command:
14
Page 15
# rpm –q apache2 apache2-prefork apache2–mod_perl apache2–mod_python \
apache2–mod_php5 webalizer
If any of these packages are not installed, locate the RPM package on the Linux distribution
media, and install the missing package.
NOTE: By default, the installation enables the iptables firewall, which prevents external
systems from accessing ports below 1024. See “Appendix B: Frequently Asked Questions”
(page 53) and verify the firewall is disabled or the appropriate rules are set to allow the Apache
and Tomcat connection. The system verification steps described later in this document will not
work if the iptables firewall is improperly configured.
Installing, Configuring, and Managing Web Server Middleware Stack Components
This section explains how to install, configure, and manage the Web Server middleware stack
components not included in the Linux distribution along with other related components. All
components are distributed as RPM packages or binaries, therefore, you can install and remove
all the components separately. Table 1 (page 12) lists the appropriate version and additional
information. You must install the following components separately:
• SUN JDK
• Tomcat
Configuring the Basic Apache HTTP Server
Use the following procedure to configure a basic Apache HTTP Server.
1. Start Apache by entering the following:
# /etc/init.d/apache2 start
2. Verify that Apache starts successfully by ensuring that messages similar to the following
appear in the log file /var/log/apache2/error_log:
[Sat Feb 03 12:41:21 2007] [notice] Apache/2.2.0 (Linux/SUSE) configured -- resuming normal operations
3. Create a file named /srv/www/htdocs/apache.html and add the following lines:
<HTML>
<HEAD>
</HEAD>
<BODY DIR="LTR">
<P ALIGN=CENTER STYLE="margin-bottom: 0cm">
<FONT FACE="Times New Roman, serif">
<FONT SIZE=6>Apache http server worked !</FONT>
</FONT></P>
</BODY>
</HTML>
Verify the Apache installation by opening a browser and entering the following website:
http://<YOUR_WEB_SERVER_IP>/apache.html
The following message appears:
Apache HTTP server worked !
Installing and Configuring Sun JDK on an HP Proliant System
For an HP Proliant system, the following procedure to install and configure a Sun Java
Development Kit (JDK):
Installing, Configuring, and Managing Web Server Middleware Stack Components 15
Page 16

1. Download the Sun JDK package from the Java website and install as follows (see Table 1
(page 12) for the correct version and website link):
Change to the Sun JDK install package directory, as appropriate for your system, and install
the package by entering the following command:
# chmod 755 jdk-1_5_0_10-linux-amd64-rpm.bin
# ./jdk-1_5_0_10-linux-amd64-rpm.bin
2. Create a symbolic link for Sun JDK by entering the following:
# ln -s /usr/java/jdk1.5.0_10 /usr/local/jdk
3. The JAVA_HOME environment variable must be properly set before stack components, such
as Tomcat, can begin executing.
To export the JAVA_HOME environment variable, modify the system file that is appropriate
for your shell, /etc/profile.d/alljava.sh or /etc/profile.d/alljava.csh:
For the alljava.sh file, add the following lines:
if [ -x /usr/local/jdk/bin/java ] ; then
export PATH=$PATH:/usr/local/jdk/bin
export JAVA_BINDIR=/usr/local/jdk/bin
export JAVA_ROOT=/usr/local/jdk
export JAVA_HOME=/usr/local/jdk
export JRE_HOME=/usr/local/jdk
unset JDK_HOME
unset SDK_HOME
export JDK_HOME=/usr/local/jdk
export SDK_HOME=/usr/local/jdk
else
if [ -x /usr/lib/java/jre/bin/java ] ; then
# it is IBMJava2-JRE or SunJava2-JRE
export PATH=$PATH:/usr/lib/java/jre/bin
export JAVA_BINDIR=/usr/lib/java/jre/bin
export JAVA_ROOT=/usr/lib/java
export JAVA_HOME=/usr/lib/java/jre
export JRE_HOME=/usr/lib/java/jre
unset JDK_HOME
unset SDK_HOME
fi
fi
For the alljava.csh file, add the following lines:
if ( -x /usr/local/jdk/bin/java ) then
setenv PATH ${PATH}:/usr/local/jdk/bin
setenv JAVA_BINDIR /usr/local/jdk/bin
setenv JAVA_ROOT /usr/local/jdk
setenv JAVA_HOME /usr/local/jdk
setenv JRE_HOME /usr/local/jdk
unsetenv JDK_HOME
unsetenv SDK_HOME
setenv JDK_HOME /usr/local/jdk
setenv SDK_HOME /usr/local/jdk
else
if (-x /usr/lib/java/jre/bin/java)then
#it is IBMJava2-JRE or SunJava2-JRE
setenv PATH ${PATH}:/usr/lib/java/jre/bin
setenv JAVA_BINDIR /usr/lib/java/jre/bin
setenv JAVA_ROOT /usr/lib/java
setenv JAVA_HOME /usr/lib/java/jre
setenv JRE_HOME /usr/lib/java/jre
unsetenv JDK_HOME
unsetenv SDK_HOME
endif
endif
16
Page 17
4. Log out of the system, and then log back in to start using the revised profile.
5. Verify the Sun JDK installation was successful by entering the following:
# java –version
The following messages appear:
java version "1.5.0_10"
Java(TM) 2 Runtime Environment, Standard Edition (build 1.5.0_10-b03)
Java HotSpot(TM) 64-Bit Server VM (build 1.5.0_10-b03, mixed mode)
Installing and Configuring Tomcat
The following procedure provides the steps for installing and configuring Tomcat.
NOTE: Prior to installing Apache Tomcat, you must verify that JDK is installed and configured
on your system.
1. Download the Tomcat Web Server package from the Apache Software Foundation website
and follow the instructions provided to install it. See Table 1 (page 12) for the correct version
and website link.
NOTE: In the following steps, it is assumed that Tomcat is installed in
/usr/local/apache-tomcat; if Tomcat is installed in a different directory, replace
/usr/local/apache-tomcat with the correct path.
2. Set the CATALINA_HOME environment variable to the Tomcat directory path by editing
/etc/profile and adding the following lines to the end of the file:
CATALINA_HOME=/usr/local/apache-tomcat
export CATALINA_HOME
3. Log out of the system, and then log back in to it to start using the revised profile.
4. Start Tomcat by entering the following:
# /usr/local/apache-tomcat/bin/startup.sh
The following messages appear:
Using CATALINA_BASE: /usr/local/apache-tomcat
Using CATALINA_HOME: /usr/local/apache-tomcat
Using CATALINA_TMPDIR: /usr/local/apache-tomcat/temp
Using JRE_HOME: /usr/local/jdk
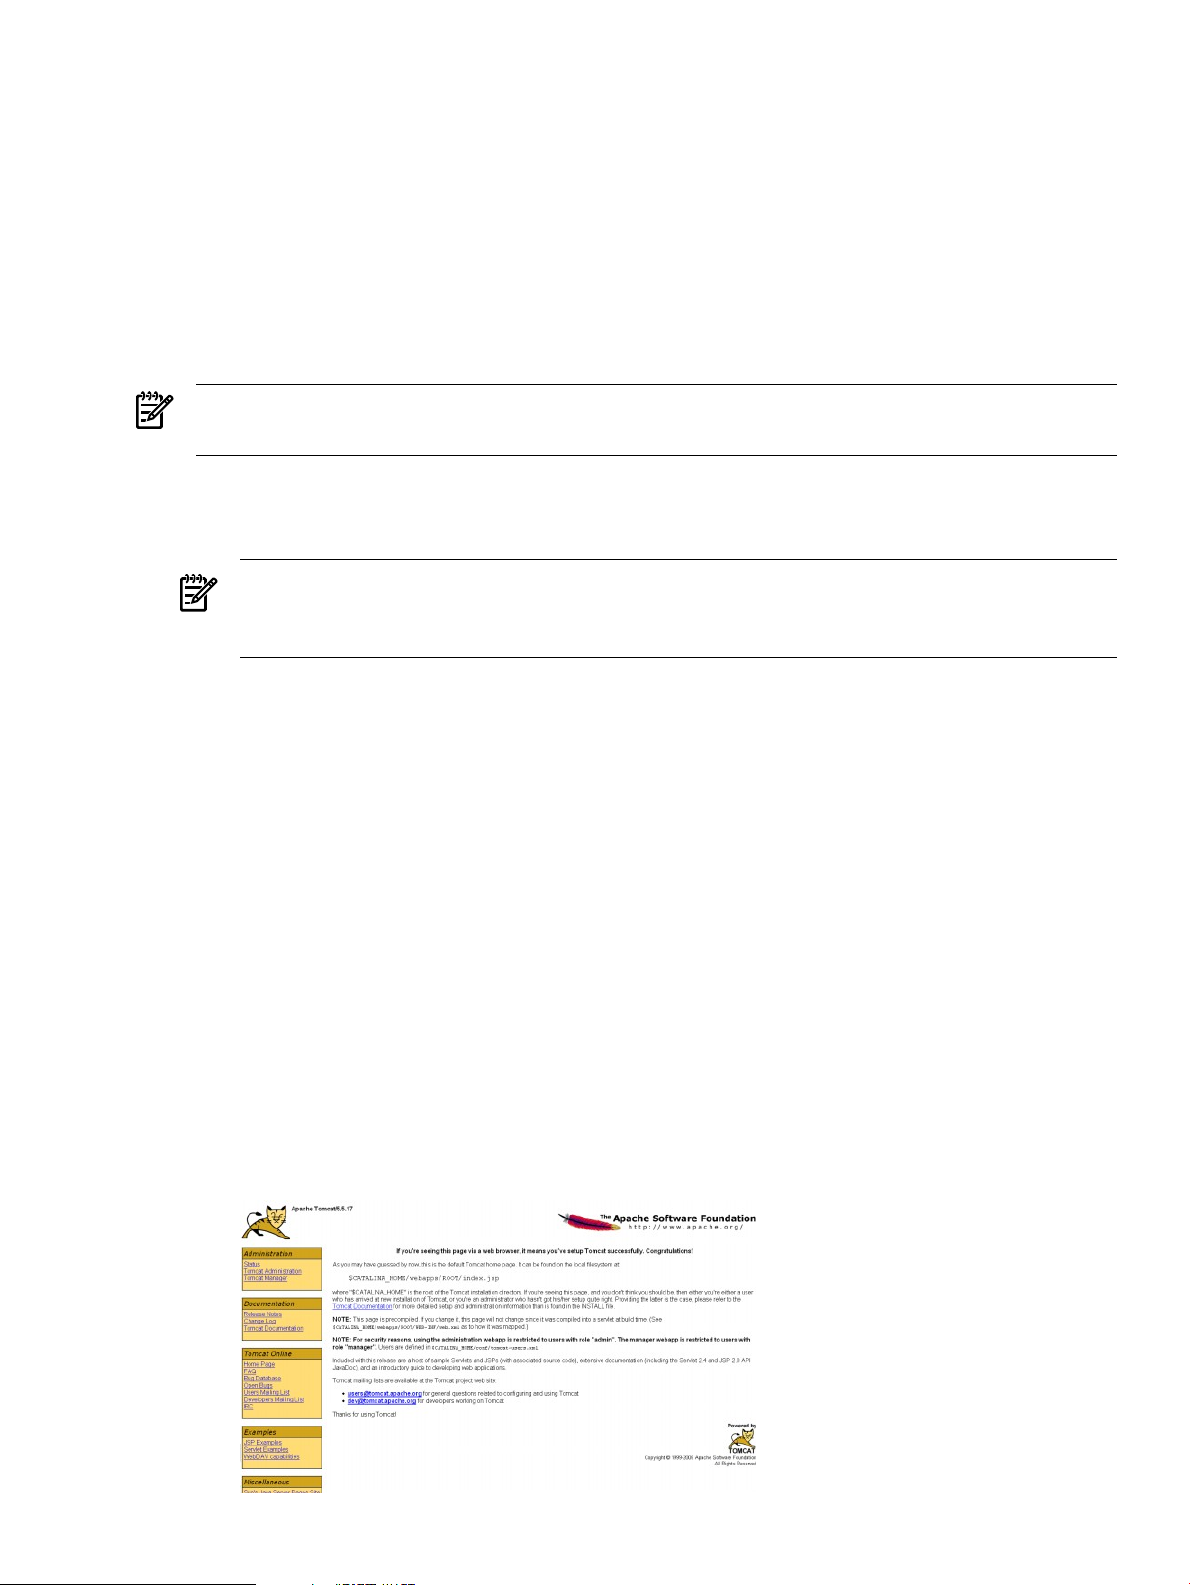
5. Verify that the Tomcat installation once the startup is complete by opening a browser and
entering the following URL:
http://<YOUR_TOMCAT_SERVER_IP>:8080
The Tomcat web page is displayed as in Figure 5.
Figure 5 Tomcat Successful Installation Verification
Installing, Configuring, and Managing Web Server Middleware Stack Components 17
Page 18
NOTE: If the iptables firewall is enabled, you will not be able to connect to Tomcat from
a remote computer.
6. If necessary, stop Tomcat by entering the following command:
# /usr/local/apache-tomcat/bin/shutdown.sh
The following messages appear:
Using CATALINA_BASE: /usr/local/apache-tomcat
Using CATALINA_HOME: /usr/local/apache-tomcat
Using CATALINA_TMPDIR: /usr/local/apache-tomcat/temp
Using JRE_HOME: /usr/local/jdk
Advanced Apache HTTP Server Features
The following section describes several widely used Apache HTTP Server features.
Using the Apache HTTP Server Benchmarking Tool
The benchmarking tool is supplied with the Apache HTTP Server and is used to benchmark your
Apache HTTP Server and monitor its performance. For example, you can use the benchmarking
tool to perform concurrency requests to an Apache HTTP Server. Use the following command
to start using the benchmarking tool:
# /usr/ab2
Additionally, you can verify the stability of the Apache HTTP Server by running a basic stress
test on the test system. The following steps show a stress test for an example system:
1. Create a file using the following path name: /srv/www/htdocs/abtest.html
2. Add the following lines to the file you created in Step 1:
<HTML>
<HEAD>
</HEAD>
<BODY DIR="LTR">
<P ALIGN=CENTER STYLE="margin-bottom: 0cm">
<FONT FACE="Times New Roman, serif">
<FONT SIZE=6>The page is used for Apache benchmarking test !</FONT>
</FONT>
</P>
</BODY>
</HTML>
3. Perform a concurrency request to the test system by logging into another system and entering
the following command:
# ab2 -c 1000 -n 1000 http://<YOUR_WEB_SERVER_IP>/abtest.html
Where:
• The value of the -n option sets the number of requests.
• The value of the -c option sets the number of concurrency requests.
4. Monitor the access status on the test system by displaying the end of the access log file. To
do this, enter the following command:
# tail -f /var/log/apache2/access_log
The system displays messages similar to the following:
10.101.2.28 - - [03/Feb/2007:12:49:53 -0500] "GET / HTTP/1.0" 200 44 "-" "ApacheBench/2.0.40-dev"
10.101.2.28 - - [03/Feb/2007:12:49:53 -0500] "GET / HTTP/1.0" 200 44 "-" "ApacheBench/2.0.40-dev"
10.101.2.28 - - [03/Feb/2007:12:49:53 -0500] "GET / HTTP/1.0" 200 44 "-" "ApacheBench/2.0.40-dev"
10.101.2.28 - - [03/Feb/2007:12:49:53 -0500] "GET / HTTP/1.0" 200 44 "-" "ApacheBench/2.0.40-dev"
10.101.2.28 - - [03/Feb/2007:12:49:53 -0500] "GET / HTTP/1.0" 200 44 "-" "ApacheBench/2.0.40-dev"
10.101.2.28 - - [03/Feb/2007:12:49:53 -0500] "GET / HTTP/1.0" 200 44 "-" "ApacheBench/2.0.40-dev"
18
Page 19

You can force a heavier load on the Apache HTTP Server by increasing the number of concurrency
requests with the -c option, and by prolonging the testing round by increasing the number of
requests with the -n option.
NOTE: If you encounter the following error:
socket: Too many open files (24)
You can correct the error by entering the following:
# ulimit -n <NUMBER>
This command increases the limit on the number of open files only for the current shell session.
The increased limit is applicable to the newly launched commands on that shell after the change.
Commands that you launched previously continue to use the previous limit.
Apache HTTP Server Status and Information
You can obtain various pieces of information regarding your Apache HTTP Server by configuring
the mod_status and mod_info module requests within the httpd.conf configuration file.
The mod_status module is configured using the server-status request and the mod_info
module is configured using the server-info request. For example, you can find out the current
hosts and requests being processed, whether the server was started or restarted, and basic server
configuration information. These two functions help you monitor your Apache HTTP Server.
Configuring and Using the Modules
Use the following steps to enable these two modules to collect and display information.
1. Edit the /etc/apache2/mod_status.conf file and add the following lines:
<IfModule mod_status.c>
<Location /server-status>
SetHandler server-status
Order deny,allow
Deny from all
Allow from YOUR_WEB_BROWSER_IP
</Location>
</IfModule>
2. Edit the /etc/apache2/mod_info.conf file and add the following lines:
<IfModule mod_info.c>
<Location /server-info>
SetHandler server-info
Order deny,allow
Deny from all
Allow from YOUR_WEB_BROWSER_IP
</Location>
</IfModule>
3. Modify the /etc/sysconfig/apache2 file by appending the following to the
APACHE_MODULES definition:
info status
The APACHE_MODULES definition should now look like the following:
APACHE_MODULES="actions alias auth_basic authn_file authz_host
authz_groupfile authz_default authz_user authn_dbm autoindex cgi
dir env expires include log_config mime negotiation setenvif ssl
suexec userdir php5 info status"
4. Restart the Apache HTTP Server for the changes take effect.
Installing, Configuring, and Managing Web Server Middleware Stack Components 19
Page 20

5. Verify that the /etc/apache2/sysconfig.d/loadmodule.conf file contains the
following lines:
LoadModule info_module /usr/lib64/apache2-prefork/mod_info.so
LoadModule status_module /usr/lib64/apache2-prefork/mod_status.so
If these two lines exist , then the two modules have loaded successfully.
Use the following procedure to verify the server status and display the server information web
page:
1. Verify the server status by opening a browser and entering the following URL:
http://<YOUR_WEB_SERVER_IP>/server-status
The Apache Server Status web page opens, as shown in Figure 6.
Figure 6 Apache Server Status
2. Display the server information web page by opening a browser and entering the following
website:
http://<YOUR_WEB_SERVER_IP>/server-info
The Apache Server Information web page opens, as shown in Figure 7.
Figure 7 Apache Server Information
20
Page 21

Apache HTTP Server Log
The Apache HTTP Server provides a detailed and flexible information-logging mechanism. The
two most important log files are the error and access logs. The default location for the Apache
HTTP Server log files is the following directory: /var/log/apache2
Using the Error Log to Diagnose the Apache HTTP Server
The Apache HTTP Server records diagnostic information and all errors encountered while
processing requests to the error log file, error_log.
For example, if you visit a nonexistent URL, the following 404 error is generated:
The requested URL /non-exist/ was not found on this server.
All error information is recorded in the default error log file, which you can obtain by entering
the following command:
# tail –f /var/log/apache2/error_log
The following message is added to the end of the file:
[Sat Feb 03 13:03:55 2007] [error] [client 10.100.0.86] File does not exist:
/srv/www/htdocs/non-exist
Using Webalizer to Perform Apache HTTP Server Log Analysis
Webalizer is an analysis tool that you can use to generate detailed usage reports using the
information recorded in the Apache HTTP Server logs. Webalizer provides easy-to-read reports
in HTML format that you can customize for your needs.
Use the following procedure to set up Webalizer:
1. Modify the Webalizer configuration file, /etc/webalizer.conf, by adding the following
lines:
LogFile /var/log/apache2/access_log
OutputDir /srv/www/htdocs/webalizer
2. Restart the Apache server by entering the following:
# /etc/init.d/apache2 restart
3. Run the Webalizer program to generate a report:
# webalizer
A message similar to the following appears:
Webalizer V2.01-10 (Linux 2.6.16.21-0.8-smp) English
Using logfile /var/log/apache2/access_log (clf)
DNS Lookup (10): 1 addresses in 1.00 seconds, 1/sec
Using DNS cache file dns_cache.db
Creating output in /srv/www/htdocs/webalizer
Hostname for reports is 'bl35p-16'
Reading history file... webalizer.hist
Generating report for February 2007
Generating summary report
Saving history information...
307 records in 1.00 seconds, 307/sec
Verify that the server status configuration is correct by opening a browser and entering the
following website:
http://<YOUR_WEB_SERVER_IP>/webalizer
Figure 8 shows an example of a Webalizer usage report web page.
Installing, Configuring, and Managing Web Server Middleware Stack Components 21
Page 22

Figure 8 Webalizer Usage Report
For detailed information, see the Webalizer website at:
http://www.mrunix.net/webalizer/
Using Virtual Host Support
A virtual host runs more than one website on a single server. For example, www.website1.com
and www.website2.com can be hosted on the same server.
The most widely used virtual host is "name-based," which means that multiple names are running
on one IP address. Because the user provides the hostname as part of the URL, the user is not
aware that various websites are using the same IP address.
The following example steps illustrate the use of virtual hosting:
1. To configure virtual hosting, you must resolve two host names to the same IP address. One
method is to edit the /etc/hosts file of the client system as follows:
• For Windows systems, edit the C:\WINDOWS\system32\drivers\etc\hosts file.
• For Linux systems, edit the /etc/hosts file.
2. Add the following line:
<YOUR_WEB_SERVER_IP> www.website1.com www.website2.com
3. Verify that both websites resolve to the same IP address by entering the following commands:
# ping www.website1.com
# ping www.website2.com
4. Create the following two directories:
/srv/www/htdocs/website1
/srv/www/htdocs/website2
5. Create the following file:
/srv/www/htdocs/website1/index.html
6. Populate the file that you created in Step 5 with the following lines:
<HTML>
<HEAD>
</HEAD>
<BODY DIR="LTR">
<P ALIGN=CENTER STYLE="margin-bottom: 0cm">
<FONT FACE="Times New Roman, serif">
<FONT SIZE=6>This is www.website1.com</FONT>
</FONT></P>
</BODY>
</HTML>
7. Create the following file:
/srv/www/htdocs/website2/index.html
22
Page 23

8. Populate the file that you created in Step 7 with the following lines:
<HTML>
<HEAD>
</HEAD>
<BODY DIR="LTR">
<P ALIGN=CENTER STYLE="margin-bottom: 0cm">
<FONT FACE="Times New Roman, serif">
<FONT SIZE=6>This is www.website2.com</FONT>
</FONT></P>
</BODY>
</HTML>
9. Configure virtual hosting by creating a file named
/etc/apache2/vhosts.d/vhosts.conf and adding the following lines:
NameVirtualHost *:80
<VirtualHost *:80>
DocumentRoot /srv/www/htdocs/website1
ServerName www.website1.com
</VirtualHost>
<VirtualHost *:80>
DocumentRoot /srv/www/htdocs/website2
ServerName www.website2.com
</VirtualHost>
10. Restart your Apache HTTP server for the changes to take effect.
11. Verify that the virtual hosting configuration operates properly by opening a browser and
entering the following website:
www.website1.com
The following message appears:
This is www.website1.com
Open a second browser and enter the following website:
www.website2.com
The following message appears:
This is www.website2.com
Using Apache HTTP Server URL Redirection
The following procedure illustrates the use of the URL redirection feature which allows you to
configure the Apache HTTP server to send requests for one URL to another URL. This requires
the use of two servers that are both running Apache HTTP server.
1. On the first server, create the following directory:
/srv/www/htdocs/testdir
2. On the second server, create the following HTML file:
/srv/www/htdocs/test.html
3. Add the following lines to the file you created in Step 2:
<HTML>
<HEAD>
</HEAD>
<BODY DIR="LTR">
<P ALIGN=CENTER STYLE="margin-bottom: 0cm">
<FONT FACE="Times New Roman, serif">
<FONT SIZE=6>The URL redirect is successful!</FONT>
</FONT></P>
Installing, Configuring, and Managing Web Server Middleware Stack Components 23
Page 24

</BODY>
</HTML>
4. Edit the following configuration file:
/etc/apache2/default-server.conf
Add the following line to the preceding file:
Redirect permanent /testdir http://<ANOTHER_WEB_SERVER_IP>/test.html
5. Use the following command to restart your Apache HTTP server, for the preceding changes
to take effect:
# /etc/init.d/apache2 restart
6. Verify that the URL redirect configuration is correct by opening a browser and entering the
following website:
http://<YOUR_WEB_SERVER_IP>/testdir
The following message appears:
The URL redirect is successful!
Using Apache HTTP Server Proxy Features
The proxy features within the Apache HTTP server enable your server to act as a Proxy server
(a network gateway).
The following procedure illustrates the use of URL redirection. The procedure requires the use
of three systems that are all running identical Linux distributions. The first system functions as
an Apache HTTP server, the second functions as the Apache Proxy server, and the third system
is a web client.
1. Start the Apache HTTP server on the first system.
2. Modify the /etc/sysconfig/apache2 file by appending the following string to the
APACHE_MODULES definition:
proxy proxy_connect proxy_ftp proxy_http
The APACHE_MODULES definition should now look like the following:
APACHE_MODULES="actions alias auth_basic authn_file authz_host authz_groupfile authz_default authz_user
authn_dbm autoindex cgi dir env expires include log_config mime negotiation setenvif ssl suexec userdir
php5 info status proxy proxy_connect proxy_ftp proxy_http"
24
3. On the second system, which acts as the Apache Proxy server, edit the following file:
/etc/apache2/default-server.conf
Add the following lines to the preceding file:
ProxyRequests On
ProxyVia On
<Proxy *>
Order deny,allow
Deny from all
Allow from all
</Proxy>
4. Restart the Apache HTTP server, so the Apache Proxy server will take effect on the second
system, by entering the following:
# /etc/init.d/apache2 restart
5. Using the benchmarking tool, test the Apache Proxy server using the third system, which
acts as the web client:
# ab2 -c 10 -n 10 -X <YOUR_PROXY_SERVER_IP>:80 \
http://<YOUR_WEB_SERVER_IP>/test.html
Page 25

6. View the access log file on the Apache Proxy server. Messages similar to the following are
contained in the file:
YOUR_WEB_BROSWER_IP - - [03/Feb/2007:13:30:48 -0500] "GET http://YOUR_WEB_SERVER_IP/test.html HTTP/1.0"
200 206 "-" "ApacheBench/2.0.40-dev"
View the access log file on the Apache HTTP server. Messages similar to the following are
contained in the file:
YOUR_PROXY_SERVER_IP - - [24/May/2007:11:38:46 +0800] "GET /test.html HTTP/1.1" 200 206 "-"
"ApacheBench/2.0.40-dev"
These messages verify that the Apache Proxy server configuration is successful.
Error Responses and Redirects
The following three types of error responses can be customized and are addressed in this section:
• Plain text
• Local URL redirect
• External URL redirect
Customizing Plain Text Responses
The following is an example of how to customize a plain text error response:
1. Edit the following file:
/etc/apache2/errors.conf
In the preceding file, change (or add, if it does not exist already) the following line:
ErrorDocument 404 "The page you requested does not exist! Plain text example"
2. Restart your Apache HTTP server for the changes take effect.
3. Verify the custom text error message by opening a browser and entering the following
website:
http://<YOUR_WEB_SERVER_IP>/non-exist
The following message appears:
The page you requested does not exist! Plain text example
Customizing Local URL Redirect Responses
The following is an example for customizing a local URL redirect error message:
1. Edit the following file:
/etc/apache2/errors.conf
In the preceding file, change (or add, if it does not exist already) the following line:
ErrorDocument 404 "/missing.html"
2. Create the following HTML file:
/srv/www/htdocs/missing.html
Add the following lines to the preceding file:
<HTML>
<HEAD>
</HEAD>
<BODY DIR="LTR">
<P ALIGN=CENTER STYLE="margin-bottom: 0cm">
<FONT FACE="Times New Roman, serif">
<FONT SIZE=6>The page you request does not exist!
Local redirects example</FONT></FONT></P>
</BODY>
</HTML>
Installing, Configuring, and Managing Web Server Middleware Stack Components 25
Page 26

3. Verify the custom local URL redirect message by opening a browser and entering the
following website:
http://<YOUR_WEB_SERVER_IP>/non-exist
The following message appears:
The page you request does not exist!
Local redirects example
Customizing External URL Redirect Responses
The URL redirect feature allows you to trap a missing link error (404 error) in a browser on a
local server, display a message, and then redirect it to a URL on an external server. The following
steps illustrate how to customize external URL redirect responses. The process requires the use
of two servers; one that acts as local server, another that acts as an external server. Use the
following procedure to customize external URL redirect responses:
1. Edit the following configuration file:
/etc/apache2/errors.conf
In the preceding file, change (or add, if it does not exist already) the following line:
ErrorDocument 404 http://<EXTERNAL_WEB_SERVER_IP>/missing.html
2. Create the following HTML file:
/srv/www/htdocs/missing.html
Populate the preceding file with the following lines:
<HTML>
<HEAD>
</HEAD>
<BODY DIR="LTR">
<P ALIGN=CENTER STYLE="margin-bottom: 0cm">
<FONT FACE="Times New Roman, serif">
<FONT SIZE=6>The page you request does not exist!
External redirects example</FONT></FONT></P>
</BODY>
</HTML>
3. Verify the custom external URL redirect message by opening a browser and entering the
following website:
http://<YOUR_WEB_SERVER_IP>/non-exist
The following message appears:
The page you request does not exist!
External redirects example
Using Per-User Web Directories
Using the UserDir function, each user is allowed to have a personal website in their home
directory on servers that have multiple users. Visiting a URL with its name in the form
http://example.com/~username displays the contents of the home directory of the user.
The following is an example for configuring per-user web directories:
1. Add a user named tester to your server by entering the following commands:
# useradd -m tester
2. Create an HTML file named /home/tester/public_html/index.html that contains
the following lines:
<HTML>
<HEAD>
</HEAD>
<BODY DIR="LTR">
26
Page 27

<P ALIGN=CENTER STYLE="margin-bottom: 0cm">
<FONT FACE="Times New Roman, serif">
<FONT SIZE=6>The is personal homepage of user tester .</FONT>
</FONT></P>
</BODY>
</HTML>
3. Verify that the per-user web directory configuration was successful by opening a browser
and entering the following website:
http://<YOUR_WEB_SERVER_IP>/~tester
The following message appears:
The is personal homepage of user tester.
Integrating the Web Server Stack Components
This section describes the commonly used configurations for the Web server stack components.
Configuring the Apache and Tomcat Connector
The following section explains how to use the mod_jk module from the Apache Jakarta Project
(AJP) to connect the Apache Web server and the Tomcat Web Container.
The Apache HTTP server uses URL pattern rules, defined in the Apache Web server configuration
file, to determine which requests to handle and which to forward. It handles content, such as
static HTML pages, images, and CGI scripts. The Tomcat connector (mod_jk) uses the AJP
protocol to forward all requests for JSPs, servlets, and web functionality to Tomcat as shown in
Figure 9.
Figure 9 Connecting the Apache Web Server and Tomcat Web Container
The following example provides the steps to configure Apache Web server routing requests
under the DOCUMENT_ROOT/jsp-examples/ directory to the Tomcat server:
1. Download the mod_jk module from the Apache Software Foundation (see Table 1 (page 12)
for the correct version and website link), and follow the instructions provided to build the
mod_jk.so shared library. If necessary, copy the mod_jk.so file into the appropriate
directory as follows:
/usr/lib64/apache2/modules
2. Edit the Apache Web server configuration file, /etc/apache2/default-server.conf,
adding the following lines:
#Load mod_jk
LoadModule jk_module /usr/lib64/apache2/mod_jk.so
#Configure mod_jk
JkShmFile /var/log/apache2/memory.shm
JkWorkersFile /etc/apache2/workers.properties
JkLogFile /var/log/apache2/mod_jk.log
JkLogLevel info
Installing, Configuring, and Managing Web Server Middleware Stack Components 27
Page 28

3. Insert the following line below the DocumentRoot line:
JkMount /jsp-examples/* worker1
4. Before you can verify the Tomcat and Apache integration, you must set Tomcat to listen for
AJP13 requests. The JK module uses AJP to communicate with Tomcat so, you must verify
that the AJP <Connector> element is enabled in the Tomcat file server.xml and that this
file is placed inside the <Service> element.
Verify that the following lines are included and not commented out in the
$CATALINA_HOME/conf/server.xml file.
<Connector port="8009"
enableLookups="false" redirectPort="8443" protocol="AJP/1.3" />
5. Create the following file:
/etc/apache2/conf/workers.properties
Add the following lines to the preceding file:
# Define 1 real worker using ajp13
worker.list=worker1
# Set properties for worker1 (ajp13)
worker.worker1.type=ajp13
worker.worker1.host=<YOUR_TOMCAT_SERVER_IP>
worker.worker1.port=8009
worker.worker1.lbfactor=50
worker.worker1.cachesize=10
worker.worker1.cache_timeout=600
worker.worker1.socket_keepalive=1
worker.worker1.socket_timeout=300
6. If necessary, start Tomcat it by entering the following command:
# $CATALINA_HOME/bin/startup.sh
7. Restart Apache by entering the following command:
# /etc/init.d/apache2 restart
8. Verify that you can connect to Tomcat through the standard HTTP port served by Apache
by navigating to the website:
http://<YOUR_HOSTNAME>/jsp-examples/
Figure 10 show an example of the JSP Examples page.
Figure 10 JSP Examples Page to Test mod_jk
28
If there are any errors, check the following log files:
Page 29

/var/log/apache2/error_log
/var/log/apache2/access_log
/var/log/apache2/mod_jk.log
Integrating the Apache Web Server and PHP
The Apache Web server that is shipped with the supported Linux distribution includes a built-in
PHP module. Therefore, no extra configuration is required for Apache. Use the following
procedure to configure PHP:
1. Verify that PHP is installed by entering the following command:
# rpm -q php5 apache2-mod_php5
2. Create the following test file:
/srv/www/htdocs/test.php
Add the following lines to the preceding file:
<?
## test.php
phpinfo();
?>
3. Verify that PHP works by opening a browser and navigating to the following website :
http://<YOUR_HOSTNAME>/test.php
A web page containing the PHP version and license numbers is displayed.
Integrating the Apache Web Server and Perl
The apache2–mod_perl module integrates a Perl interpreter into the Apache Web server,
allowing you to use Perl when creating web applications. Use the apache2–mod_perl module
provided by the Linux distribution.
To test the installation, perform the following steps:
1. Verify that the apache2–mod_perl module is installed by entering the following command:
# rpm -q php5 apache2-mod_php5
2. Create a sample file test file named /srv/www/cgi-bin/test.pl and add the following
lines:
#!/usr/bin/perl
print "Content-type: text/plain\n\n";
print "Hello World!\n";
3. Assign execute permissions to the file by entering the following command:
# chmod +x /srv/www/cgi-bin/test.pl
4. Edit the /etc/sysconfig/apache2 file by adding perl to the line with APACHE_MODULES.
After completing this edit, the line should look like the following:
APACHE_MODULES=”... ... perl”
5. Restart Apache by entering the following command:
# /etc/init.d/apache2 restart
If there are any errors, check the following log files:
/var/log/apache2/error_log
/var/log/apache2/access_log
Installing, Configuring, and Managing Web Server Middleware Stack Components 29
Page 30

Integrating the Apache Web Server and Python
The apache2–mod_python module embeds the Python environment into the Apache Web
server. Embedding this environment avoids the run-time overhead of starting the Python
environment externally.
Use the apache2–mod_python package provided by the Linux distribution.
1. Verify that the apache2–mod_python module is installed by entering the following
command:
# rpm -q python apache2-mod_python
2. Edit the /etc/sysconfig/apache2 file by adding python to the line with
APACHE_MODULES.
After completing this edit, the line should look like the following:
APACHE_MODULES="... ... python"
3. Create the following test file:
/srv/www/htdocs/test.py
Add the following lines to the preceding file
from mod_python import apache
def handler(req):
req.content_type = 'text/plain'
req.write("Hello World!")
return apache.OK
4. Edit the following file:
/etc/apache2/conf.d/mod_python.conf
Add the following lines to the preceding file:
<Directory
AddHandler mod_python .py
PythonHandler test
PythonDebug On
</Directory>
5. Restart Apache by entering the following command:
# /etc/init.d/apache2 restart
6. Verify that Python works by opening a browser and navigating to:
http://<YOUR_HOSTNAME>/test.py
The web page displays the following text:
Hello World!
If there are any errors, check the following log files:
/var/log/apache2/error_log
/var/log/apache2/access_log
Connecting Tomcat to a Database
Connecting Tomcat to a database requires a JDBC driver for that particular database . The driver
is responsible for translating calls from Java programs to the native protocol that is understood
by the database. Figure 11 depicts the connection between Tomcat and a database using JDBC.
30
Page 31

Figure 11 Tomcat Connections Using JDBC
Tomcat uses the data-source concept to create database connections. A data source must be
configured in an XML configuration file. The data source provides details about the target
database, such as the database server IP address and login credentials. The JDBC driver connects
to the database and the username/password combination is used to login to the database. For
Tomcat 5.5, a data source is configured either in $CATALINA_HOME/conf/context.xml or in
/META-INF/context.xml within the web applications. By default, the data source support in
Tomcat is based on the Database Connection Pool (DBCP), which is used to create active
connections and manage the lifecycle of the individual connections automatically.
Connecting Tomcat and MySQL
MySQL is the leading open source database, and is used widely for web application middleware
environments. MySQL stores relational data and enables fast, simple access and updates to stored
data through the standard JDBC APIs. These APIs are supplied by MySQL in the form of the
Connector/J software. This section describes the steps to connect Tomcat to MySQL.
Obtaining and Installing the JDBC Drivers
Perform the following steps on the Tomcat web server:
1. Download the MySQL JDBC driver 5.0 from the MySQL website:
http://dev.mysql.com/downloads/connector/j/5.0.html
2. Unzip the downloaded packages by entering the following command:
# tar zxf mysql-connector-java-<version>.tar.gz
3. Install the JDBC driver for Tomcat by entering the following command:
# cp mysql-connector-java-<version>-.jar $CATALINA_HOME/common/lib
Creating a New Data Source
To create a data source binding for a JDBC driver, perform the following steps on the Tomcat
web server:
Installing, Configuring, and Managing Web Server Middleware Stack Components 31
Page 32

1. Create a data source descriptor file named $CATALINA_HOME/conf/context.xml and
insert the following lines:
<Context>
…
<Resource name="jdbc/mysqlDB" auth="Container"
type="javax.sql.DataSource"
driverClassName="com.mysql.jdbc.Driver"
url="jdbc:mysql://<IP_OR_NAME_OF_MYSQL_SERVER>:3306/<DATABASE_NAME>"
username="<DB_USERNAME>"
password="<DB_PASSWORD>" maxActive="10" maxIdle="10" maxWait="-1" />
</Context>
For example:
<Resource name="jdbc/mysqlDB" auth="Container"
type="javax.sql.DataSource"
driverClassName="com.mysql.jdbc.Driver"
url="jdbc:mysql://191.168.1.100:3306/osmsdb" username="osmsusr"
password="osmspass" maxActive="10" maxIdle="10" maxWait="-1" />
2. Start the Tomcat web server by entering the following command:
# $CATALINA_HOME/bin/startup.sh
Configuring the MySQL Server
To configure the MySQL database, perform the following steps on the MySQL server:
1. Verify that the MySQL server is running properly by entering the following command:
# ps -ef|grep mysqld
If the MySQL server is running, a process named mysqld displays in the output; otherwise,
enter the following command:
# /etc/init.d/mysql start
2. If the database used in the Tomcat data source does not exist, create the database by entering
the following command:
# mysqladmin -u root -p create osmsdb
The name of the database created in the command is osmsdb.
3. If the database user in the Tomcat data source does not exist, create the user and grant the
appropriate privileges by entering the following commands from the mysql prompt:
mysql> grant all on osmsdb.* to osmsuser@'%.%.%.%' identified by \
'osmsuser';
mysql> flush privileges;
The user named osmsuser with the password osmspass is created and is granted all
operation privileges on the database osmsdb.
Testing MySQL Database Connectivity
To test the connectivity between Tomcat and MySQL, perform the following steps on the Tomcat
web server:
32
Page 33

1. Create a JSP file named $CATALINA_HOME/webapps/ROOT/mysqltest.jsp and insert
the following lines:
<%@page contentType="text/html" import="java.io.*,java.sql.*,
javax.sql.*,javax.naming.*"%>
<html>
<head>
<title>Tomcat->MySQL Test </title>
<link rel="stylesheet" href="style_master.css" type="text/css">
<meta http-equiv="cache-control" content="no-cache">
</head>
<body>
<%
InitialContext ctx = new InitialContext();
DatabaseMetaData dm = null;
DataSource ds = (DataSource)ctx.lookup("java:comp/env/jdbc/mysqlDB");
Connection conn = null;
Statement stmt = null;
try {
conn = ds.getConnection();
dm =conn.getMetaData();
out.println("Connected to-> database version"
+dm.getDatabaseProductVersion());
}catch (Exception sqlex) {
out.println(sqlex.getMessage());
}finally{
conn.close();
}
%>
</body>
</html>
2. If needed, start Tomcat by entering the following command:
# $CATALINA_HOME/bin/startup.sh
3. Verify Tomcat is connecting to MySQL by opening a browser and navigating to the following
website:
http://<YOUR_HOSTNAME>:8080/mysqltest.jsp
The test page opens as shown in Figure 12.
Figure 12 Tomcat Connecting MySQL Test Page
Connecting Tomcat and Oracle
Oracle is the leading commercial relational database. It is generally used to store and manage
sensitive and mission-critical data. As with MySQL, Oracle can also be used as the persistence
Installing, Configuring, and Managing Web Server Middleware Stack Components 33
Page 34

layer for web applications. A JDBC connector for Oracle is needed to integrate an external Oracle
Database server with the Tomcat Web server. This section describes the steps for connecting the
Tomcat Web server to an Oracle database.
Obtaining and Installing the Oracle JDBC Driver
Perform the following steps from the Tomcat Web server:
1. Download the JDBC driver for Oracle 10g Release 2 from the Oracle website at:
http://www.oracle.com/technology/software/tech/java/sqlj_jdbc/index.html
NOTE: For the Oracle JDBC driver with JDK 1.4 and 1.5, use the ojdbc14.jar file.
2. Copy the JDBC driver to the Tomcat environment by entering the following command:
# cp ojdbc14.jar $CATALINA_HOME/common/lib
Creating an Oracle Data Source
To create a data source binding for the Oracle JDBC driver data source, perform the following
on the Tomcat Web server:
Create a file named $CATALINA_HOME/conf/context.xml and insert the following lines:
<Context>
…
<Resource name="jdbc/oracleDB" type="javax.sql.DataSource"
password="<DB_PASSWORD>"
driverClassName="oracle.jdbc.driver.OracleDriver"
maxIdle="2" maxWait="5000" username="<DB_USERNAME>"
url="jdbc:oracle:thin:@ <IP_OR_NAME_OF_ORACLE_SERVER>:1521:<ORACLE_SID>" maxActive="4"/>
</Context>
For example:
<Resource name="jdbc/oracleDB" type="javax.sql.DataSource"
password="osmspass"
driverClassName="oracle.jdbc.driver.OracleDriver"
maxIdle="2" maxWait="5000" username="osmsusr"
url="jdbc:oracle:thin:@192.168.1.100:1521:OSMSDB" maxActive="4"/>
Configuring the Oracle Server
Perform the following steps on the Oracle Database server:
1. Verify that the Oracle server and the listener are running by entering the following command:
# lsnrctl status
2. Create a database user and grant the proper privileges, which should be the same as the
user in the $CATALINA_HOME/conf/context.xml file, by entering the following
commands:
# sqlplus / as sysdba
SQL> create user osmsusr identified by osmspass;
SQL> grant connect,resource to osmsusr;
Testing the Oracle Database Connectivity
Test the connectivity between the Tomcat server and the Oracle database by performing the
following steps on the Tomcat Web server:
34
Page 35

1. Create a JSP file named $CATALINA_HOME/webapps/ROOT/oracleTest.jsp and insert
the following lines:
<%@page contentType="text/html" import="java.io.*,java.sql.*,
javax.sql.*,javax.naming.*"%>
<html>
<head>
<title>Tomcat->Oracle Test </title>
<link rel="stylesheet" href="style_master.css" type="text/css">
<meta http-equiv="cache-control" content="no-cache"></head>
<body>
<%
InitialContext ctx = new InitialContext();
DatabaseMetaData dm = null;
DataSource ds = (DataSource)ctx.lookup("java:comp/env/jdbc/oracleDB");
Connection conn = null;
Statement stmt = null;
try {
conn = ds.getConnection();
dm =conn.getMetaData();
out.println("Connected to-> database version"
+dm.getDatabaseProductVersion());
}catch (Exception sqlex) {
out.println(sqlex.getMessage());
}finally{
conn.close();
}
%>
</body>
</html>
2. If the Tomcat Web server is not running, start it by entering the following command:
# $CATALINA_HOME/bin/startup.sh
3. Verify that the Oracle test page is displayed (Figure 13 ) by opening a browser and navigating
to the following website:
http://<YOUR_HOSTNAME>:8080/oracleTest.jsp
Figure 13 Oracle Database Test
Installing, Configuring, and Managing Web Server Middleware Stack Components 35
Page 36

Connecting Tomcat to MySQL or Oracle Using Hibernate
Hibernate is an open-source object and relational mapping framework. It uses a lightweight
object encapsulation for JDBC and allows JAVA developers to access data from databases using
JAVA objects. Hibernate is designed to run in a managed environment, such as the environment
of the web server. With Hibernate, you only need to configure a small part of the environment.
Hibernate inherits database connections from the application server. Therefore, it is easy to create
an enterprise application that uses Hibernate capabilities in the same way as other capabilities
available in the application server. You can obtain Hibernate and Hibernate tools from the product
websites. See Table 1 (page 12) for the appropriate links.
This section provides an example demonstrating the use of Hibernate for web applications using
a MySQL or Oracle database.
Installing Hibernate, Tomcat, and JDK
Download the Hibernate package, including tools, from the Hibernate website and install it using
the instructions provided. See Table 1 (page 12) for the correct version and website link.
Verify that you have installed and configured both Sun JDK and Tomcat before proceeding. For
additional information, see “Installing and Configuring Tomcat” (page 17).
Configuring a Database Driver in Tomcat
Verify that MySQL or Oracle are configured as data sources for Tomcat as described in
“Connecting Tomcat to a Database” (page 30) before proceeding.
To verify that the mysql-connector-java-<VERSION>.jar or ojdbc14.jar are configured,
go to the $CATALINA_HOME/common/lib directory and verify that the corresponding file exists.
Adding Test Data to the Databases
In order to verify that the MySQL or Oracle database interact properly with Tomcat, you must
populate the database with test data.
Add test data to the MySQL database using the following steps:
1. Log in to the MySQL command line tool by entering the following command:
# mysql -u root -p <PASSWORD>
2. Create a database named osmsdb and create a table named USERS by entering the following
commands:
mysql> create database osmsdb;
mysql> use osmsdb;
mysql> create table USERS(
mysql> User_id int(10) auto_increment not null primary key,
mysql> First_name varchar(30) not null,
mysql> Last_name varchar(30) not null
mysql> );
36
3. Add a user named osmsusr that uses the password osmspass and grant the appropriate
privileges to it by entering the following commands
mysql> create user 'osmsusr'@'%.%.%.%';
mysql> grant all on osmsdb.* to 'osmsusr'@'%.%.%.%' identified \
by 'osmspass';
Add test data to the Oracle database using the following steps:
Page 37

1. Log in to Oracle using the user name osmsusr and password osmspass by entering the
following command:
# sqlplus osmsusr/osmspass@osmsdb_ora
2. In the Oracle database identified by the Oracle SID, osmsdb_ora, create a table named
USERS, and then sequence with the osmsusr user by entering the following commands:
SQL> Create sequence hibernate_sequence start with 10 increment by
1 min value 10 maxvalue 999999999999;
SQL> Create table USERS ( user_id number(10) not null, first_name
varchar(30) not null, last_name varchar2(30) not null);
SQL> Alter table USERS add ( constraint user_primary_key primary
key(user_id) using index);
NOTE: The Oracle sequence, HIBERNATE_SEQUENCE, is used to generate a primary key
for the table named USERS.
Creating a Simple Application in Tomcat
You must create a simple application within Tomcat to facilitate verification of this functionality.
This simple application implements the insert, update, select, and delete functions for the USERS
table in the MySQL or Oracle database.
Use the following steps to create a simple application in Tomcat:
1. Create a directory named $CATALINA_HOME/webapps/SimpleDemo that contains the
appropriate subdirectories by entering the following commands:
# mkdir $CATALINA_HOME/webapps/SimpleDemo
# mkdir $CATALINA_HOME/webapps/SimpleDemo/META-INF
# mkdir $CATALINA_HOME/webapps/SimpleDemo/WEB-INF
# mkdir $CATALINA_HOME/webapps/SimpleDemo/WEB-INF/classes
# mkdir $CATALINA_HOME/webapps/SimpleDemo/WEB-INF/lib
2. Configure the MySQL or Oracle data source by creating a file named
$CATALINA_HOME/conf/Catalina/localhost/SimpleDemo.xml. Add the following
lines, depending on whether your database is MySQL or Oracle:
For a MySQL database server:
<Context>
<Resource
name="MySqlDS"
type="javax.sql.DataSource"
password="osmspass"
driverClassName="com.mysql.jdbc.Driver"
maxIdle="10"
maxWait="5000"
username="osmsusr"
url="jdbc:mysql://IP_OR_HOSTNAME_OF_DB_SERVER:3306/osmsdb"
maxActive="15"/>
</Context>
For an Oracle database server:
<Context>
<Resource
name="OracleDS"
type="javax.sql.DataSource"
password="osmspass"
driverClassName="oracle.jdbc.driver.OracleDriver"
maxIdle="10"
Installing, Configuring, and Managing Web Server Middleware Stack Components 37
Page 38

maxWait="5000"
username="osmsusr"
url="jdbc:oracle:thin:@IP_OR_HOSTNAME_OF_DB_SERVER:1521:osmsdb_ora"
maxActive="15"/>
</Context>
Where: IP_OR_HOSTNAME_OF_DB_SERVER is the MySQL or Oracle database server name
or IP address.
3. Add the Hibernate3 JAR files to the application library by copying the following files from
the Hibernate3 installation directory to
$CATALINA_HOME/webapps/SimpleDemo/WEB-INF/lib:
hibernate3.jar
dom4j-1.6.1.jar
cglig-2.1.3.jar
commons-logging-1.0.4.jar
commons-collections-2.1.1.jar
ehcache-1.1.jar
asm.jar
asm-attrs.jar
antlr-2.7.6rc1.jar
4. Hibernate uses a configuration file named hibernate.cfg.xml to obtain the database
connection information and mapping file information.
Create a Hibernate configuration file named
$CATALINA_HOME/webapps/SimpleDemo/WEB-INF/classes/hibernate.cfg.xml.
Add the following lines, depending on whether your database is MySQL or Oracle:
For a MySQL database server:
<?xml version='1.0' encoding='UTF-8'?>
<!DOCTYPE hibernate-configuration PUBLIC
"-//Hibernate/Hibernate Configuration DTD 3.0//EN"
"http://hibernate.sourceforge.net/hibernate-configuration-3.0.dtd">
<hibernate-configuration>
<session-factory>
<property name="show_sql">true</property>
<property name="connection.datasource">java:comp/env/MySqlDS</property>
<property name="dialect">org.hibernate.dialect.MySQLDialect</property>
<mapping resource="com/hp/osms/hibernate/Users.hbm.xml" />
</session-factory>
</hibernate-configuration>
For an Oracle database server:
<?xml version='1.0' encoding='UTF-8'?>
<!DOCTYPE hibernate-configuration PUBLIC
Installing,Configuring,and Managing Web Application Server Middleware Stack
Components 33 "-//Hibernate/Hibernate Configuration DTD 3.0//EN"
"http://hibernate.sourceforge.net/hibernate-configuration-3.0.dtd">
<hibernate-configuration>
<session-factory>
<property name="show_sql">true</property>
<property name="connection.datasource">java:comp/env/OracleDS</property>
<property name="dialect">org.hibernate.dialect.Oracle9Dialect</property>
<mapping resource="com/hp/osms/hibernate/Users.hbm.xml" />
</session-factory>
</hibernate-configuration>
38
NOTE: The values of OracleDS and MySqlDS are the data source names that are configured
in the Tomcat Web server.
5. In Hibernate, a unit of work is named a session that is managed by SessionFactory.
To retrieve data for a session, create a utility named HibernateSessionFactory.java
located in $CATALINA_HOME/webapps/SimpleDemo/WEB-INF/classes/com/hp \
Page 39

/osms/hibernate/utility and add the following lines so the application can interact
with Hibernate:
package com.hp.osms.hibernate.utility;
import org.hibernate.HibernateException;
import org.hibernate.Session;
import org.hibernate.cfg.Configuration;
public class HibernateSessionFactory {
private static String CONFIG_FILE_LOCATION = "/hibernate.cfg.xml";
private static final ThreadLocal<Session> threadLocal = new ThreadLocal<Session>();
private static Configuration configuration = new Configuration();
private static org.hibernate.SessionFactory sessionFactory;
private static String configFile = CONFIG_FILE_LOCATION;
private HibernateSessionFactory() {
}
public static Session getSession() throws HibernateException {
Session session = (Session) threadLocal.get();
if (session == null || !session.isOpen()) {
if (sessionFactory == null) {
rebuildSessionFactory();
}
session = (sessionFactory != null) ? sessionFactory.openSession():null;
threadLocal.set(session);
}
return session;
}
public static void rebuildSessionFactory() {
try {
configuration.configure(configFile);
sessionFactory = configuration.buildSessionFactory();
} catch (Exception e) {
System.err.println("Can not create SessionFactory!!");
e.printStackTrace();
}
}
public static void closeSession() throws HibernateException {
Session session = (Session) threadLocal.get();
threadLocal.set(null);
if (session != null)
session.close();
}
public static org.hibernate.SessionFactory getSessionFactory() {
return sessionFactory;
}
public static void setConfigFile(String configFile) {
HibernateSessionFactory.configFile = configFile;
sessionFactory = null;
}
}
6. Compile the HibernateSessionFactory.java file by entering the following commands:
# cd $CATALINA_HOME/webapps/SimpleDemo/WEB-INF/classes/com/hp \
/osms/hibernate/utility
# javac -cp $CATALINA_HOME/webapps/SimpleDemo \
/WEB-INF/lib/hibernate3.jar HibernateSessionFactory.java
The file HibernateSessionFactory.class is generated.
7. Create a Hibernate mapping file named Users.hbm.xml, in the directory
$CATALINA_HOME/webapps/SimpleDemo/WEB-INF/classes/com/hp/osms/hibernate
according to the definition in the USERS table that contains the following lines:
<?xml version="1.0"?>
<!DOCTYPE hibernate-mapping PUBLIC "-//Hibernate/Hibernate Mapping DTD 3.0//EN"
"http://hibernate.sourceforge.net/hibernate-mapping-3.0.dtd">
<hibernate-mapping>
<class name="com.hp.osms.hibernate.Users" table="USERS">
<id name="userId" type="java.lang.Long">
<column name="USER_ID" precision="10" scale="0" />
<generator class="native">
<param name="sequence"> HIBERNATE_SEQUENCE</param>
</generator>
</id>
Installing, Configuring, and Managing Web Server Middleware Stack Components 39
Page 40

<property name="firstName" type="java.lang.String">
<column name="FIRST_NAME" length="30" />
</property>
<property name="lastName" type="java.lang.String">
<column name="LAST_NAME" length="30" />
</property>
</class>
</hibernate-mapping>
8. Hibernate uses a Plain Old Java Object (POJO) to pass values between the application tier
and the persistent tier. Change your default directory to the following path:
# cd $CATALINA_HOME/webapps/SimpleDemo/WEB-INF/classes \
/com/hp/osms/hibernate
In this directory, create a Hibernate POJO file named
$CATALINA_HOME/webapps/SimpleDemo/WEB-INF \
/classes/com/hp/osms/hibernate/Users.java according to the mapping file for
your application. Add the following lines:
package com.hp.osms.hibernate;
public class Users implements java.io.Serializable {
private Long userId;
private String firstName;
private String lastName;
public Users() {
}
public Users(String firstName, String lastName) {
this.firstName = firstName;
this.lastName = lastName;
}
public Long getUserId() {
return this.userId;
}
public void setUserId(Long userId) {
this.userId = userId;
}
public String getFirstName() {
return this.firstName;
}
public void setFirstName(String firstName) {
this.firstName = firstName;
}
public String getLastName() {
return this.lastName;
}
public void setLastName(String lastName) {
this.lastName = lastName;
}
}
40
9. Compile a Hibernate POJO file and move the class file into
$CATALINA_HOME/webapps/SimpleDemo/WEB-INF \
/classes/com/hp/osms/hibernate/Users.java by entering the following command:
# javac Users.java
The preceding command creates a class file named:
$CATALINA_HOME/webapps/SimpleDemo/WEB-INF \
/classes/com/hp/osms/hibernate/Users.class
10. Test Hibernate functionality such as inserting, updating, deleting, and retrieving data from
the database, by creating a sample JSP file named
$CATALINA_HOME/webapps/SimpleDemo/hibernate.jsp.
The following code fragment from hibernate.jsp shows how to use Hibernate to insert
data into the database:
Page 41

org.hibernate.Session hbsession = HibernateSessionFactory.getSession();
try{
Transaction tx = hbsession.beginTransaction();
Users users= new Users();
users.setFirstName("Smith");
users.setLastName("Barney");
hbsession.save(users);
hbsession.flush();
tx.commit();
}catch(HibernateException he){
he.printStackTrace();
}finally
{
if(hbsession!=null)
HibernateSessionFactory.closeSession();
}
NOTE: See “Appendix D: Hibernate Test Application Source Code” (page 55) for the
complete source code.
11. Restart Tomcat to make the configuration effective by entering the following:
# $CATALINA_HOME/bin/shutdown.sh
# $CATALINA_HOME/bin/starup.sh
Verifying the Simple Application Operation
Verify that the simple application operates properly to ensure that the connection between Tomcat
to MySQL and Oracle is operational by opening a browser and entering the following website:
http://<YOUR_HOSTNAME>:8080/SimpleDemo/hibernate.jsp
The OSMS Hibernate Test web page is displayed as shown in Figure 14.
Figure 14 Verifying the Simple Application Configuration
Installing, Configuring, and Managing Web Server Middleware Stack Components 41
Page 42

Secure the Web Server Stack
This section covers web server security.
• Data Transportation—Secure Sockets Layer (SSL) is a widely used technology to protect
data transfer. SSL enablement methods for both the Apache Web server and Tomcat
Application server.
• Application Authentication— Apache Web server provides a built-in authorization module
to enable access protection. Alternatively, Symas CDS provides a directory service solution
based on OpenLDAP, Berkeley DB, Cyrus SASL, and OpenSSL for more fine-grained
authentication purposes. CDS is an integrated authentication and authorization-based
security mechanism for enterprise applications managed and deployed in Apache httpd
and Tomcat Web servers. The directory server can store credential information and
application privileges about the users who are granted or forbidden access to specific
resources. In addition to controlling access based on user identities, OpenLDAP can control
access based on other attributes such as network address, transport, encryption strength,
dynamic relationships, and so on (for example, sets). Some applications or web pages in
specific applications in Apache Web server or Tomcat require access only by authenticated
users. Symas CDS provides this authentication mechanism by storing user credentials in
the directory server.
Enabling HTTPS Support in the Apache HTTP Server
The mod_ssl module provides an SSL implementation that allows web applications running
within the Apache Web server to communicate securely with their respective clients.
Communication can still occur over standard HTTP.
To enable HTTP over SSL (HTTPS), perform the following steps:
1. Run the shell script /usr/bin/gensslcert to create dummy ssl keys for mod_ssl.
This tool copies the /etc/apache2/ssl.crt/ca.crt file to /srv/www/htdocs/CA.crt
and creates the following key files:
• /etc/apache2/ssl.crt/ca.crt
• /etc/apache2/ssl.key/server.key
• /etc/apache2/ssl.crt/server.crt
• /etc/apache2/ssl.csr/server.csr
2. Edit the /etc/sysconfig/apache2 file by adding ssl to the APACHE_MODULES definition
and SSL to the APACHE_SERVER_FLAGS definition.
After completing the edits, the lines should look like the following:
APACHE_MODULES="... ssl ..."
APACHE_SERVER_FLAGS="SSL"
3. Create an SSL virtual host configuration file by copying template file to perform the test:
# cp /etc/apache2/vhosts.d/vhost-ssl.template \
/etc/apache2/vhosts.d/vhost-ssl.conf
4. Restart Apache by entering the following:
# /etc/init.d/apache2 restart
42
Page 43

5. Perform the test by navigating to the website located at:
https://<YOUR_HOSTNAME>
Verify that the certificate is displayed as in Figure 15:
Figure 15 SSL_Enabled Apache
Apache HTTP Server Authorization
The Apache default document root is:
/srv/www/htdocs
A directory named test must exist in the document root directory. In the following sections,
access to the test directory is restricted, and that access to the user directory for TESTNAME
using the password PASSWORD has been granted.
Creating a Test index.html File
Create the following test HTML file:
/srv/www/htdocs/test/index.html
Add the following lines to the preceding file:
<HTML>
<HEAD></HEAD>
<BODY DIR="LTR">
<P ALIGN=CENTER STYLE="margin-bottom: 0cm">
<FONT FACE="Times New Roman, serif">
<FONT SIZE=6>The Authentication and Authorization worked !</FONT>
</FONT></P>
</BODY>
</HTML>
Configuring the Authorized Overrides
To authorize overrides, configure the httpd.conf file allow using the following steps:
1. Edit the following file:
/etc/apache2/default-server.conf
2. Find the following data item for the directory /srv/www/htdocs in the preceding file:
AllowOverride None.
3. Modify the value of the data item as follows: AllowOverride AuthConfig.
Installing, Configuring, and Managing Web Server Middleware Stack Components 43
Page 44

Creating a Password File
Create a password file to contain the HTTPS server passwords using the following steps:
1. Create the password directory by entering the following command:
# mkdir /etc/apache2/passwd
2. Create and update the user password file by entering the following command:
# htpasswd2 -c /etc/apache2/passwd/mypasswords TESTNAME
New password: <*******>
Re-type new password: *******
Creating the Distributed Configuration File
You can create a distributed configuration file, which you place in a directory, that contains
configuration directives specific to that directory and all its subdirectories. This allows you the
flexibility of defining how your entire directory structure is configured on a per-directory basis.
Use the following procedure to create the .htaccess distributed configuration file:
1. Create the following file:
/srv/www/htdocs/test/.htaccess
2. Add the following lines to the file you created in Step 1:
AuthType Basic
AuthName "Restricted Files"
AuthUserFile /etc/httpd/conf/passwd/mypasswords
Require user TESTNAME
Restarting the Apache HTTP Server
Restart Apache by entering the following command:
# /etc/init.d/apache2 restart
Verifying the Authentication and Authorization Operations
Verify that the Apache HTTP server authenticates and authorizes server access properly by
performing the following steps:
1. Open a browser window and navigate to the following website at:
http://<YOUR_WEB_SERVER_IP>/test/
2. When prompted, log in with the user name TESTNAME and the password PASSWORD.
If the login succeeds, the following message appears:
The Authentication and Authorization worked !
If the login fails, the following message appears:
Authorization Required
Protecting Apache HTTP Server Authorization with Symas CDS
Symas CDS is a service that can be used by applications to authenticate users and grant
authorization. It can protect the contents in Apache using an Apache module, mod_auth_ldap,
within the Linux distribution. Another Apache module, mod_ldap, can also be used as part of
the LDAP connection pooling and resulting cache services. When a request for the protected
data arrives, the LDAP directory looks at all entries to find a unique match. If it is found,
mod_auth_ldap uses the domain name (DN) of the entry and the password provided by the
HTTP client to bind the directory server.
44
Configuring CDS and LDAP Services
Use the following procedure to configure the CDS and LDAP services:
Page 45

NOTE: In the steps for this procedure:
rootdn is set to"cn=Manager,dc=example,dc=com"
rootpw is set to secret in the slapd.conf file
1. Create a file named webbase.ldif that contains the following lines:
dn: dc=example,dc=com
objectClass: dcObject
objectClass: organization
dc: example
o: example
dn: dc=osm,dc=example,dc=com
objectClass: dcObject
objectClass: organizationalUnit
dc: osm
ou: osm
dn: ou=people,dc=osm,dc=example,dc=com
objectClass: organizationalUnit
ou: people
dn: uid=tomy,ou=people,dc=osm,dc=example,dc=com
objectClass: inetOrgPerson
uid: tomy
sn: tom
cn: tom yan
mail:tom.yan@example.com
carLicense:sea4321
userPassword: tom
dn: uid=benw,ou=people,dc=osm,dc=example,dc=com
objectClass: inetOrgPerson
uid: benw
sn: ben
cn:ben won
mail:ben.won@example.com
userPassword: ben
dn: ou=groups,dc=osm,dc=example,dc=com
objectClass: organizationalUnit
ou: groups
dn: cn=tomcat,ou=groups,dc=osm,dc=example,dc=com
objectClass: groupOfUniqueNames
cn: tomcat
uniqueMember: uid=benw,ou=people,dc=osm,dc=example,dc=com
2. Add these records into the directory using the ldapadd command by entering the following
command:
# /opt/symas/bin/ldapadd -x -D " cn=Manager,dc=example,dc=com " \
-w secret –f webbase.ldif
Configuring Apache HTTP Server Services
Use the following procedure to configure the Apache HTTP server services:
Installing, Configuring, and Managing Web Server Middleware Stack Components 45
Page 46

1. Edit the following file:
/etc/apache2/default-server.conf
Add the ldap and authnz_ldap modules to the APACHE_MODULES line. Once this edit is
complete, the line should look like the following:
APACHE_MODULES= "... ... ldap authnz_ldap"
2. Create the following file:
/srv/www/htdocs/ldaptest/index.html
Add the following lines to the preceding file:
<HTML>
<HEAD>
<title>Test Apache & CDS integration</title>
<meta http-equiv=Content-Type content="text/html; charset=gb2312">
</HEAD>
<BODY>
<P ALIGN=CENTER STYLE="margin-bottom: 0cm">
<FONT FACE="Times New Roman, serif" SIZE=6>
The Authentication and Authorization worked! </FONT>
</P>
</BODY>
</HTML>
3. Edit the following file:
/etc/apache2/default-server.conf
Add the following lines to the preceding file:
<Directory "/var/www/html/ldaptest">
Options Indexes FollowSymLinks
AllowOverride None
order allow,deny
allow from all
AuthType Basic
AuthName Internal
AuthBasicProvider ldap
AuthzLDAPAuthoritative off
AuthLDAPURL ldap://<YOUR_LDAP_SERVER_IP>/dc=osm,dc=example,dc=com?uid??(objectclass=*)
require valid-user
AuthLDAPBindDN cn=Manager,dc=example,dc=com
AuthLDAPBindPassword secret
</Directory>
4. Restart Apache by entering the following command:
# /etc/init.d/apache2 restart
5. Verify that the Apache LDAP authentication is operating properly by navigating to the
website located at:
http://<YOUR_WEB_SERVER_IP>/ldaptest/
6. When prompted, log in with the user name tomy and the password tom.
If the login succeeds, the following message appears: .
The Authentication and Authorization worked !
If the login fails, the following message appears:
Authorization Required
Protecting Tomcat Authorization with Symas CDS
Symas CDS can be used by Tomcat web applications to authenticate users and grant authorization.
This section describes how to protect a web application in Tomcat.
46
Page 47

1. Create a web application named myweb in your Tomcat Web server by adding the following
code to the file $CATALINA_HOME/conf/server.xml:
TIP: To apply the following <Realm/> configuration to all of your virtual machines, insert
it between the <Engine/> tags. You can also apply it to the scope of a virtual host by
inserting it between the <Host/> tags because this relies on the content being protected.
<Realm className="org.apache.catalina.realm.JNDIRealm"
connectionURL="ldap://YOUR_CDS_SERVER_IP:389"
connectionName="cn=Manager,dc=example,dc=com"
connectionPassword="secret"
userPattern="uid={0},ou=people,dc=osm,dc=example,dc=com"
roleBase="ou=groups,dc=osm,dc=example,dc=com"
roleName="cn"
roleSearch="(uniqueMember={0})"
/>
2. Next, avoid a conflict by commenting out the Tomcat default authentication setting lines as
follows:
<!-<Realm className="org.apache.catalina.realm.UserDatabaseRealm"
resourceName="UserDatabase"/>
-->
3. Edit the $CATALINA_HOME/webapps/myweb/WEB-INF/web.xml application file and add
the following lines:
<?xml version="1.0" encoding="ISO-8859-1"?>
<web-app xmlns="http://java.sun.com/xml/ns/j2ee"
xmlns:xsi="http://www.w3.org/2001/XMLSchema-instance"
xsi:schemaLocation="http://java.sun.com/xml/ns/j2ee /
http://java.sun.com/xml/ns/j2ee/web-app_2_4.xsd" version="2.4">
<security-constraint>
<display-name>Example Security Constraint</display-name>
<web-resource-collection>
<web-resource-name>Protected Area</web-resource-name>
<url-pattern>/*</url-pattern>
<http-method>GET</http-method>
<http-method>PUT</http-method>
<http-method>POST</http-method>
</web-resource-collection>
<auth-constraint>
<role-name>tomcat</role-name>
</auth-constraint>
</security-constraint>
<login-config>
<auth-method>BASIC</auth-method>
<realm-name>Single Sign-on Example</realm-name>
</login-config>
<security-role>
<role-name>tomcat</role-name>
</security-role>
</web-app>
4. Create a file named, $CATALINA_HOME/webapps/myweb/index.html, and add the
following lines:
<HTML>
<HEAD>
<TITLE>Test Tomcat & CDS integration</TITLE>
<meta http-equiv=Content-Type content="text/html; charset=gb2312">
</HEAD>
<BODY>
Installing, Configuring, and Managing Web Server Middleware Stack Components 47
Page 48

<P ALIGN=CENTER STYLE="margin-bottom: 0cm">
<FONT FACE="Times New Roman, serif" SIZE=6>
Integration of tomcat and CDS succeed! </FONT>
</P>
</BODY>
</HTML>
5. Configure the directory service as described in “Configuring CDS and LDAP Services”
(page 44).
6. Restart Tomcat by entering the following commands:
# $CATALINA/bin/shutdown.sh
# $CATALINA/bin/startup.sh
7. Verify that the Tomcat LDAP authentication is operating properly by navigating to the
following website:
http://<YOUR_TOMCAT_SERVER_IP>:port/<YOUR_APPLICATION_NAME>
For example:
http://10.101.1.26:8080/myweb/index.html
8. When prompted, log in with the user name tomy and the password tom.
If the login fails, the following message appears:
Access to the requested resource has been denied.
The tomy user does not belong to the tomcat group so the authentication failed. This failure
proves that the Apache Web server authentication services are operating properly.
This can be verified further by entering the user name benw and password ben. The following
message appears:
Integration of tomcat and CDS succeed!
Monitor Tomcat with OpenView Tomcat SPI
Tomcat is a free, open-source implementation of the Java Servlet and JavaServer Pages technologies
that was developed as part of the Jakarta project from the Apache Software Foundation (ASF).
Tomcat 5 implements the Servlet 2.3 and JavaServer Page 1.2 specifications from Java Software.
It includes many additional features making it a useful platform for developing and deploying
web applications and services. For more information regarding the Tomcat Servlet Engine, see
the Tomcat website as listed in Table 1 (page 12).
HP enhances the OSMS Web Services by using HP OpenView Operations Gallery Smart Plug-Ins
(OVO SPIs). HP OVO is a distributed client/server software solution designed to provide
service-driven event and performance management of business-critical enterprise systems,
applications, and services.
The SPI for Tomcat (Tomcat SPI) provides availability, resource, and process monitoring for the
Tomcat Servlet Engine from one central management console. This software is provided free to
all customers of HP OVO for use under the terms and conditions documented on the download
web page. This SPI provides powerful, centralized tools to monitor and manage the operation
of multiple installations of Tomcat servers.
Tomcat-SPI provides powerful, centralized tools to monitor and manage the operation of multiple
installations of the Tomcat Servlet Engine. The features include the following:
• Monitor availability of Tomcat servers
• Monitor CPU utilization by the server
• Monitor memory utilization by the server
• Monitor processes
48
Page 49

NOTE: The HP OVO Management server runs on either HP-UX or Windows systems. The
examples in this blueprint use HP OVOW.
Figure 16 illustrates the SPIs architecture and OpenView components.
Figure 16 OVOW Architecture
Software Prerequisites and Reference Guides
Before attempting to install the Tomcat SPI, verify that you have a functional HP OVOW 7.5
installation, including an HP OVOW Management Console and the Linux OVO SPI agents for
the Tomcat server. In addition, various OVOW patches are required. Table 2 list these patches:
Table 2 Required OVOW Patches
A.07.31Linux Service Discovery
Support patch
A.07.32OVO Message and Action
Agent patch
A.07.33OVO Message and Action
Agent patch
The SPI installation and configuration documents can be found on the HP OpenView website
at:
http://managementsoftware.hp.com/products/spi/
For information about installing the HP OVOW agent, see the HP OpenView Operations for Windows
Installation Guide at:
http://ovweb.external.hp.com/ovnsmdps/pdf/ovow75_install.pdf
DependenciesPatch NameVersionPatch Description
OVOW_00187OVOW_00198
OVOW_00166OVOW_00213
NoneOVOW_00234
Tomcat SPI Components
The Tomcat SPI installs the following default components on the HP OVO Management server
and are described in the following sections:
• Tools
• Policies
Monitor Tomcat with OpenView Tomcat SPI 49
Page 50

Tools
Table 3 provides an overview of the Tools group in the Tomcat Servlet Engine SPI (SESPI).
Table 3 SE-SPI Applications of the Tool Group
DescriptionServlet Engine SPI
Policies
Configure Tomcat Instrumentation
Creates the SESPI directory and configurations files and libraries required
by the SPI.
Shuts down Tomcat server process.Shutdown Tomcat
Starts the Tomcat server process.Start Tomcat
Stops the log monitor daemons.Start Log Monitor
Stops the log monitor daemons.Stop Log Monitor
Table 4 provides an overview of the Policy group in the Tomcat SESPI:
Table 4 SE SPI Applications of the Policy Group
Measurement
Threshold
Measurement
Threshold
Open Message
Interface
SESPI-Tomcat-CPU Usage
of the Tomcat server.
SESPI-Tomcat-Mmry Usage
usage of the Tomcat
server.
SESPI-Messages
for displaying error
messages from the SPI.
Polling
IntervalDescriptionPolicy NamePolicy Type
Threshold
90%5 minutesMonitorsthe CPU usage
90%5 minutesMonitors the memory
--Provides the interface
Service Auto Discovery
Scheduled Task
SESPI-Tomcat Service
Discovery
SESPI-Tomcat-Monitor
Process
--Provides discovery of
the Tomcat Servlet
engine.
-1 minuteMonitors the Process of
the Tomcat server.
50
Page 51

Appendix A: Checklist for Building a Web Server Middleware Stack
The following checklist is intended to assist you in building a Web Server Middleware Stack in
your environment.
StatusComplete these steps:
Install and verify the Linux installation.1
Configure the basic Apache HTTP Server (page 15).2
Install and configure Sun JDK or BEA JRockit.3
Install and configure Tomcat (page 17).4
5
Implement any advanced Apache HTTP server features—Optional
(page 18).
Integrate the Web Server stack components (page 27).6
a. Configure the Apache Web server and Tomcat connector.
b. Integrate the Apache Web server and PHP.
c. Integrate the Apache Web server and Perl.
d. Integrate the Apache Web server and Python.
Connect Tomcat to a MySQL (page 31) or Oracle Server (page 33).7
a. Download the JDBC drivers.
b. Create a data source.
c. Configure the MySQL or Oracle server.
d. Test the MySQL or Oracle server connectivity
Connect Tomcat to MySQL or Oracle using Hibernate (page 36).8
a. Install Hibernate3, Tomcat, and JDK.
b. Configure MySQL or Oracle drivers in Tomcat.
c. Add test data to the database.
11
d. Create a simple demonstration application in Tomcat.
e. Verify the simple demonstration application operation.
Enable HTTPS support in the Apache HTTP Server (page 42).9
Implement Apache HTTP Server authorization (page 43).10
a. Create a test HTML file.
b. Configure the authorized overrides.
c. Create a password file.
d. Create the distributed configuration file.
e. Restart the server.
f. Verify the authentication and authorization operations.
Implement Apache HTTP Server authorization with Symas CDS
(page 44).
a. Configure CDS and LDAP services.
b. Configure Apache HTTP Server services.
Appendix A: Checklist for Building a Web Server Middleware Stack 51
Page 52

StatusComplete these steps:
Implement Tomcat authorization with Symas CDS (page 46).12
Configure Tomcat monitoring with HP OVOW (page 48).13
52
Page 53

Appendix B: Frequently Asked Questions
Q: How do I disable firewall settings?
A: By default, SLES has a firewall enabled. This prevents external systems from accessing ports
below 1024. Enter the following to disable the firewall:
# /sbin/SuSEfirewall2 stop
CAUTION: Disabling the firewall is not advisable. If any external applications need to
communicate with the system, open only those specific ports for outside access rather than fully
disabling the firewall.
Q: How do I open specific ports without disabling the firewall?
A: SLES by default prevents external systems from connecting to any of the reserved port numbers
(0 to 1023). To open a specific port, use one of the following three methods:
Configure with YaST:
To open a specified port using the YaST GUI, perform the following steps:
1. From the YaST Control Center, access the YaST GUI.
2. Select Security and Users Firewall.
From the YaST GUI, you can perform some of the following tasks:
• Configure firewall boot scripts
• Stop the firewall, if it's running
• Save settings to the script /etc/sysconfig/SuSEfirewall2
• Start the firewall with new settings
Configure manually:
To manually open a specified port, perform the following steps:
1. Use the YaST module System Services (runlevel) to enable SuSEfirewall2 in your runlevel
(the setting will most likely be 3 or 5). This sets the symlinks for the SuSEfirewall2_*
scripts to the /etc/init.d/rc?.d/ directories.
2. Modify the /etc/sysconfig/SuSEfirewall2 file. A number of example scenarios can
be found in /usr/share/doc/packages/SuSEfirewall2/EXAMPLES.
For the easiest configuration, you only need to add the TCP ports to FW_SERVICES_EXT_TCP.
For example, the following configuration enables HTTP, SSH and Tomcat services when
the firewall is up:
FW_SERVICE_EXT_TCP="±80 443 22 8080 8443 8009"
3. Test and start the firewall using one of the following SuSEfirewall2_* scripts:
/sbin/SuSEfirewall2 test
/sbin/SuSEfirewall2 start
Configure using the iptables command:
To open a specified port using the iptables command, enter the following::
# iptables -I INPUT -s 0/0 -d 0/0 -p tcp \
--dport <port number> --syn -j ACCEPT
# iptables -save /sbin/SuSEfirewall2 restart
For example:
# iptables -I INPUT -s 0/0 -d 0/0 \-p tcp
--dport 80 --syn -j ACCEPT
# iptables-save /sbin/SuSEfirewall2 restart
Appendix B: Frequently Asked Questions 53
Page 54

Appendix C: Vendor Information Reference
This appendix provides references to the vendors that are referenced in the HP OSMS Web Server
stack. These web resources contain a wealth of information and HP encourages you to review
each of them.
Apache HTTP Server Version 2.2
Documentation
Provides all the documentation associated with Version
2.2 of the Apache HTTP server, including Release Notes,
Reference Manual, User's Guide, and Other Topics:
http://httpd.apache.org/docs/2.2
The Apache Tomcat 5.5 Servlet/JSP
Container Documentation Index
PHP Documentation Contains the PHP online documents in multiple languages:
Perl Documentation Contains the core documentation for Perl Version 5.8.8,
Python Documentation Includes a documentation index that covers such
Hibernate Getting Started Contains a step-by-step guide that describes Hibernate as
Hibernate FAQs Contains the Hibernate FAQs that offers helpful advice
Contains the Apache Tomcat 5.5 Servlet/JSP Container
Introduction, User Guide, Reference, and developer
documents for Java developers who want to contribute to
the Apache Tomcat project:
http://tomcat.apache.org/tomcat-5.5-doc/index.html
http://www.php.net/docs.php
that can be downloaded in both HTML and PDF formats:
http://perldoc.perl.org
documents as the Python Tutorial, Beginner’s Guide to Python,
and additional documentation:
http://www.python.org/doc/
a technology that handles mapping between Java objects
and relational database tables:
http://www.hibernate.org/152.html
regarding concepts, common problems, and performance
issues:
http://www.hibernate.org/9.html
54
Hibernate Wiki Contains the Hibernate Wiki, a discussion forum regarding
design details and other aspects of Hibernate:
http://www.hibernate.org/37.html
Page 55

Appendix D: Hibernate Test Application Source Code
This appendix provides the contents of the following two Hibernate Test Application source
code files:
• HibernateSessionFactory.java
• hibernate.jsp
The following are the contents of the HibernateSessionFactory.java file:
package com.hp.osms.hibernate.utility;
import org.hibernate.HibernateException;
import org.hibernate.Session;
import org.hibernate.cfg.Configuration;
public class HibernateSessionFactory {
private static String CONFIG_FILE_LOCATION = "/hibernate.cfg.xml";
private static final ThreadLocal<Session> threadLocal = new ThreadLocal<Session>();
private static Configuration configuration = new Configuration();
private static org.hibernate.SessionFactory sessionFactory;
private static String configFile = CONFIG_FILE_LOCATION;
private HibernateSessionFactory() {
}
public static Session getSession() throws HibernateException {
Session session = (Session) threadLocal.get();
if (session == null || !session.isOpen()) {
if (sessionFactory == null) {
rebuildSessionFactory();
}
session = (sessionFactory != null) ? sessionFactory.openSession():null;
threadLocal.set(session);
}
return session;
}
public static void rebuildSessionFactory() {
try {
configuration.configure(configFile);
sessionFactory = configuration.buildSessionFactory();
} catch (Exception e) {
System.err.println("Can not create SessionFactory!!");
e.printStackTrace();
}
}
public static void closeSession() throws HibernateException {
Session session = (Session) threadLocal.get();
threadLocal.set(null);
if (session != null)
session.close();
}
public static org.hibernate.SessionFactory getSessionFactory() {
return sessionFactory;
}
public static void setConfigFile(String configFile) {
HibernateSessionFactory.configFile = configFile;
sessionFactory = null;
}
}
The following are the contents of the hibernate.jsp file:
<%@ page language="java" import="java.util.*,
org.hibernate.HibernateException, org.hibernate.Query,org.hibernate.Transaction,
com.hp.osms.hibernate.utility.HibernateSessionFactory,
com.hp.osms.hibernate.Users" pageEncoding="ISO-8859-1"%>
<!DOCTYPE HTML PUBLIC "-//W3C//DTD HTML 4.01 Transitional//EN">
<html>
<head><title>Simple Hibernate test Page</title>
<meta http-equiv="pragma" content="no-cache">
<meta http-equiv="cache-control" content="no-cache">
<meta http-equiv="expires" content="0">
</head>
<%!
Appendix D: Hibernate Test Application Source Code 55
Page 56

public void showData(JspWriter out,List list)
{
Iterator it = list.iterator();
try{
out.print("<table width='100%' border='1' cellspacing='0' cellpadding='0'><tr>");
out.print("<tr><td bgcolor='E2E6F1'><div align='center'>UserID<br></div></td>");
out.print("<td bgcolor='E2E6F1'><div align='center'>FirstName<br></div></td>");
out.print("<td bgcolor='E2E6F1'><div align='center'>LastName<br></div></td></tr>");
while(it.hasNext())
{ Users users = (Users)it.next();
out.print("<tr><td><div + align='center'>"+users.getUserId()
+ "<br></div></td>");
out.print("<td><div align='center'>"+users.getFirstName()
+ "<br></div></td>");
out.print("<td><div align='center'>"+users.getLastName()
+ "<br></div></td></tr>");
}
out.print("</tr></table>");
}catch(Exception e){e.printStackTrace();}
}
%>
<%!
org.hibernate.Session hbsession = null;
void initSession()
{ hbsession = HibernateSessionFactory.getSession();}
public List queryAll()//query table users from database
{
List list = null;
try{
String hsql = "from Users";
org.hibernate.Query query = hbsession.createQuery(hsql);
list = query.list();
return list;
}catch(HibernateException he)
{ he.printStackTrace();
return list; }
}
public Long insert()
{
try{ Transaction tx = hbsession.beginTransaction();
Users users= new Users();
users.setFirstName("Smith");
users.setLastName("Barney");
hbsession.save(users);
hbsession.flush();
tx.commit();
return users.getUserId();
}catch(HibernateException he){ he.printStackTrace();
return null;}
}
public void update(Long userID)
{
try{ Transaction tx = hbsession.beginTransaction();
Users users = (Users)hbsession.get(Users.class,userID);
users.setLastName("root");
hbsession.save(users);
hbsession.flush();
tx.commit();
}catch(HibernateException he){ he.printStackTrace();}
}
public void delete(Long userID)
{
try{Transaction tx = hbsession.beginTransaction();
String hsql = "delete Users where user_id="+userID;
Query query = hbsession.createQuery(hsql);
query.executeUpdate();
tx.commit();
}catch(HibernateException he){ he.printStackTrace();}
}
public void clean()
56
Page 57

{ HibernateSessionFactory.closeSession(); }
%>
<body><div align="center"><font size="7">OSMS Hibernate Test Page</font>
<%initSession();%>
</div><h2>1.Retrieve data from table USERS via hibernate<br>
<%showData(out,queryAll());%>
<h2>2.Insert firstname 'Smith',lastname 'Barney' into table USERS
and show the query result via hibernate<br>
<%Long userId=insert();%>
<%showData(out,queryAll());%>
<h2>3.Update lastname of the record which inserted in step 2 to 'root'
and retrieve it via hibernate<br>
<%update(userId);%>
<%showData(out,queryAll());%>
<h2>4.Delete the test data then query again via hibernate<br>
<%delete(userId);%>
<%showData(out,queryAll());%>
<%clean();%>
</body>
</html>
Appendix D: Hibernate Test Application Source Code 57
 Loading...