

Page 1

HP 3PAR Cluster Extension Software Administrator Guide
Abstract
This guide contains detailed instructions for configuring and troubleshooting HP 3PAR Cluster Extension Software in Microsoft
Windows environments. The intended audience has independent knowledge of related software and of the HP 3PAR storage
system and its software.
HP Part Number: 5697-2263
Published: November 2012
Edition: 3
Page 2

© Copyright 2012 Hewlett-Packard Development Company, L.P.
Confidential computer software. Valid license from HP required for possession, use or copying. Consistent with FAR 12.211 and 12.212, Commercial
Computer Software, Computer Software Documentation, and Technical Data for Commercial Items are licensed to the U.S. Government under
vendor's standard commercial license.
The information contained herein is subject to change without notice. The only warranties for HP products and services are set forth in the express
warranty statements accompanying such products and services. Nothing herein should be construed as constituting an additional warranty. HP shall
not be liable for technical or editorial errors or omissions contained herein.
Acknowledgments
Intel®, Itanium®, Pentium®, Intel Inside®, and the Intel Inside logo are trademarks or registered trademarks of Intel Corporation or its subsidiaries
in the United States and other countries.
Microsoft®, Windows®, Windows® XP, and Windows NT® are U.S. registered trademarks of Microsoft Corporation.
Adobe® and Acrobat® are trademarks of Adobe Systems Incorporated.
Oracle and Java are registered trademarks of Oracle and/or its affiliates.
Page 3

Contents
1 HP 3PAR Cluster Extension features...............................................................6
Integration into cluster software (Graphical user interface)..............................................................6
CLI for easy integration..............................................................................................................6
Disaster tolerance through geographical dispersion.......................................................................6
Automated redirection of mirrored disks.......................................................................................7
Metropolitan distance support....................................................................................................7
Fully Automatic Failover and Failback..........................................................................................8
No server reboot......................................................................................................................8
No single point of failure...........................................................................................................8
Synchronous mode support........................................................................................................8
Storage system configurations.....................................................................................................8
1-to-1 configuration...............................................................................................................9
N-to-1 and 1-to-N configurations..........................................................................................10
Processes and components.......................................................................................................10
HP 3PAR Remote Copy.......................................................................................................10
Synchronous replication.................................................................................................12
User configuration file.........................................................................................................12
Force Flag.........................................................................................................................12
Planning for HP 3PAR Cluster Extension.....................................................................................12
Cluster setup considerations................................................................................................12
Windows clustering.......................................................................................................12
Windows Server 2008/2008 R2/2012......................................................................12
Node Majority quorum in Windows Clustering.............................................................12
Node Majority with File Share Witness.......................................................................13
Cluster Shared Volume for Windows Server 2012.........................................................13
Configuration tool (clx3PARconfig.exe)..................................................................................15
HP 3PAR InForm Management Console or HP 3PAR InForm CLI ...............................................15
IP network considerations....................................................................................................15
SAN fabric considerations..................................................................................................15
2 Configuring HP 3PAR Cluster Extension.......................................................16
Integrating HP 3PAR Cluster Extension with MSFC.......................................................................16
Configuring HP 3PAR Cluster Extension.....................................................................................16
Starting the HP 3PAR Configuration Tool...............................................................................16
Defining the HP 3PAR configuration information using the GUI.................................................17
Defining the HP 3PAR configuration information using the CLI..................................................20
Importing and exporting configuration information.................................................................21
Exporting configuration settings using the GUI..................................................................21
Exporting configuration settings using the CLI....................................................................21
Importing configuration settings using the GUI..................................................................21
Importing configuration settings using the CLI....................................................................21
Adding a HP 3PAR Cluster Extension resource............................................................................21
Adding HP 3PAR Cluster Extension resource using the Failover Cluster Management GUI............22
Adding HP 3PAR Cluster Extension resource using cluster.exe...................................................22
Example......................................................................................................................22
Adding HP 3PAR Cluster Extension resource using the Microsoft Failover Cluster PowerShell
Cmdlets............................................................................................................................23
Configuring more than one resource in a service or application...............................................23
Changing a HP 3PAR Cluster Extension resource name................................................................23
Configuring HP 3PAR Cluster Extension resources........................................................................23
Setting Microsoft cluster-specific resource and service or application properties...............................24
Setting HP 3PAR Cluster Extension-specific resource properties......................................................27
Contents 3
Page 4

Setting HP 3PAR Cluster Extension resource properties using the GUI........................................27
Using Failover Cluster Management to set resource properties.............................................27
Using Failover Cluster Management to set resource properties of a CLX resource on which a
CSV disk is dependant (Windows Server 2012 and Windows Server 2012 Server Core)........28
Using the resource configuration tool to set resource properties ..........................................29
Configuring cluster node data center assignments..............................................................30
Configuring HP 3PAR storage system...............................................................................31
Selecting a volume group...............................................................................................32
Changing Remote Copy volume group settings..................................................................32
Configuring takeover actions..........................................................................................33
Setting HP 3PAR Cluster Extension resource properties using the MMC ....................................33
Setting HP 3PAR Cluster Extension resource properties using the CLI.........................................33
Setting HP 3PAR Cluster Extension resource properties using the Microsoft Failover PowerShell
Cmdlets............................................................................................................................34
Setting HP 3PAR Cluster Extension properties using a UCF......................................................34
Adding dependencies on a HP 3PAR Cluster Extension resource...................................................35
Adding dependencies using Failover Cluster Management .....................................................35
Adding dependencies using the CLI.....................................................................................36
Adding dependencies using the PowerShell...........................................................................36
Configuration of HP 3PAR CLX for CSV disk on Windows Server 2012..........................................37
Disaster-tolerant configuration example using a file share.............................................................37
Managing HP 3PAR Cluster Extension resources.........................................................................39
Bringing a resource online..................................................................................................39
Taking a resource offline.....................................................................................................40
Deleting a resource............................................................................................................40
Using Hyper-V Live Migration with HP 3PAR Cluster Extension.......................................................40
Timing considerations for Windows Clustering (MSFC)................................................................41
Bouncing service or application................................................................................................41
Creating array password file....................................................................................................41
Administration........................................................................................................................42
Remote management of HP 3PAR Cluster Extension resources in a cluster..................................42
System resources................................................................................................................43
Logs.................................................................................................................................43
Hyper-V Live Migration log entries........................................................................................43
Virtual Machine Management hosted on a Cluster Shared Volume on Windows Server 2012...........43
3 User configuration file and HP 3PAR Cluster Extension objects........................47
User configuration file.............................................................................................................47
File structure......................................................................................................................47
Specifying object values.....................................................................................................48
COMMON objects.................................................................................................................48
APPLICATION objects..............................................................................................................49
Sample configuration file.........................................................................................................53
4 CLI commands and utilities........................................................................55
CLI commands.......................................................................................................................55
clx3PARrun.......................................................................................................................55
Configuring the CLI.................................................................................................................56
Creating the HP 3PAR Remote Copy environment...................................................................56
Configuring the HP 3PAR storage system...............................................................................56
Installing HP 3PAR InForm Command Line Interface (CLI).........................................................57
Creating and configuring the user configuration file................................................................57
Timing considerations.........................................................................................................57
Restrictions for customized implementations...........................................................................58
Cluster Extension Cmdlets for CSV and Virtual Machine Management...........................................58
Pre-execution and post-execution programs................................................................................67
4 Contents
Page 5

Pre-execution return codes...................................................................................................68
Post-execution return codes..................................................................................................68
5 Troubleshooting........................................................................................69
Logs......................................................................................................................................69
Log facility.............................................................................................................................69
HP 3PAR Cluster Extension logs ...............................................................................................70
HP 3PAR storage system log or sysmgr log.................................................................................71
Error return codes...................................................................................................................71
Log files.................................................................................................................................72
Start errors.............................................................................................................................72
Failover error handling............................................................................................................73
Failing physical disk resources during online attempt of the resource group....................................73
Cannot connect to HP 3PAR storage system................................................................................74
Resource disk failure when HP 3PAR Cluster Extension is online....................................................75
Cluster Extension and HP 3PAR Command Line (CLI) Install/Upgrade............................................75
Change of HP 3PAR storage system IP or password file................................................................75
Host persona settings..............................................................................................................75
no_fail_wrt_on_err settings.......................................................................................................75
Remote Copy and 3PAR Virtual Domains...................................................................................76
Promote issue.........................................................................................................................76
Cluster Extension Autopass troubleshooting................................................................................76
HP 3PAR Target arrays not configured with Remote Copy Links.....................................................76
6 Support and other resources......................................................................78
Contacting HP........................................................................................................................78
New and changed information in this edition.............................................................................78
Related information.................................................................................................................78
Whitepapers.....................................................................................................................78
HP websites......................................................................................................................78
Typographic conventions.........................................................................................................79
Glossary....................................................................................................80
Index.........................................................................................................81
Contents 5
Page 6

1 HP 3PAR Cluster Extension features
HP 3PAR Cluster Extension offers protection against application downtime due to a fault, failure,
or site disaster by extending a local cluster between data centers over metropolitan distance. HP
3PAR Cluster Extension reinstates critical applications at a remote site within minutes of an adverse
event, integrating your open-system clustering software and HP 3PAR Remote Copy to automate
failover and failback between sites. This dual integration enables the cluster software to verify the
status of the storage and the server cluster. The cluster software can then make correct failover and
failback decisions, thus minimizing downtime and accelerating recovery.
Integration into cluster software (Graphical user interface)
HP 3PAR Cluster Extension Software provides tight integration with the cluster software and is
managed as a resource of the clustered application service (like a disk or IP address).
HP 3PAR Cluster Extension integrates with Microsoft Failover Cluster (MSFC).
For supported cluster software versions, see the HP SPOCK website: http://www.hp.com/storage/
spock
HP 3PAR Cluster Extension can be configured using the Failover Cluster Management GUI. HP
3PAR Cluster Extension offers full integration into the GUI so that you can easily set and change
resource values.
CLI for easy integration
HP 3PAR Cluster Extension provides a CLI to enable disaster tolerant environments if no cluster
software is available for your operating system or if you want to integrate HP 3PAR Remote Copy
with your choice of cluster software. This feature is useful if you use custom software to migrate
application services from one system to another or if you want HP 3PAR Cluster Extension to check
the Remote Copy volume group member states to ensure that you can automatically start your
application service on the local storage system. For detailed information, see “CLI commands and
utilities” (page 55).
Disaster tolerance through geographical dispersion
Using two or more storage systems, HP 3PAR Remote Copy feature copies data to a remote data
center. Cluster solutions using HP 3PAR Remote Copy disk mirroring are called metropolitan clusters
or geographically dispersed clusters. In this arrangement, a server is a member of the same cluster
dispersed over two or more sites. In such clusters, the server is relieved from writing any I/O request
to the disk more than one time because the storage system controls the replication process (see
Figure 1 (page 7)).
6 HP 3PAR Cluster Extension features
Page 7
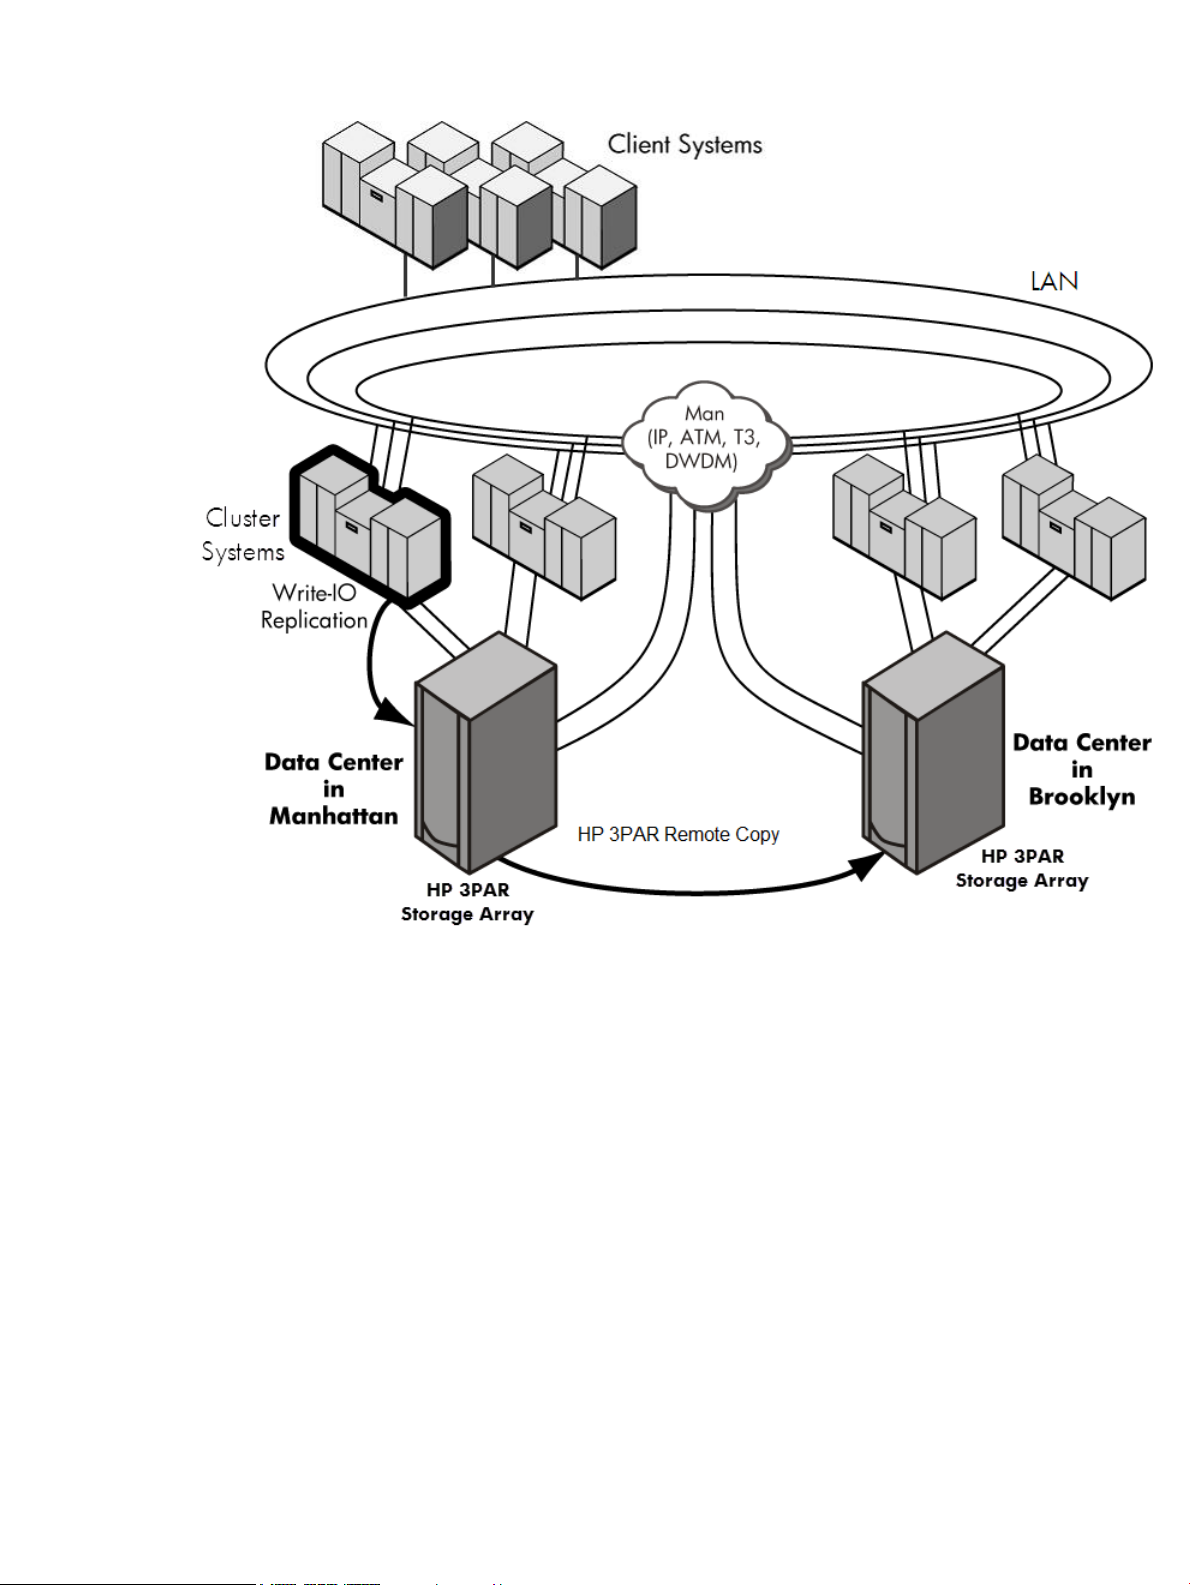
Figure 1 Physical replication using HP 3PAR Remote Copy
HP 3PAR Remote Copy-mirrored disks have a read/write-enabled primary (local) disk and a
read-only secondary (remote) disk. Current cluster software products cannot distinguish between
read-only and write-enabled disks, and cannot enable disk access if the disk is not write-enabled
during the server boot process.
With HP 3PAR Cluster Extension, the consistency and concurrency of the data can be checked
when the resource comes online in the remote data center. The capability for restoring the
application service after the failure of the server, the array, or the datacenter is called disaster
tolerance.
Automated redirection of mirrored disks
Storage systems with HP 3PAR Remote copy automatically redirect the mirroring destination. This
means that HP 3PAR Remote Copy almost instantaneously swaps the primary/secondary relationship
of Remote Copy volume group members if the application must access the destination disk (virtual
volume). This feature ensures that the disks are always accessible when failover to a remote data
center occurs.
Metropolitan distance support
Determined by the distance and latency requirements for the HP 3PAR Remote Copy Software and
cluster server.
Automated redirection of mirrored disks 7
Page 8

Fully Automatic Failover and Failback
Automated failover and failback reduces the complexity involved in a disaster recovery situation.
It is protection against the risk of downtime, whether planned or unplanned.
No server reboot
Disks on the server on both the primary and secondary sites are recognized during the initial system
boot in a HP 3PAR Cluster Extension environment; therefore LUN presentation and LUN mapping
changes are not necessary during failover or failback for a truly hand-free disaster tolerant solution.
No single point of failure
Supreme redundancy: identical configuration of established SAN infrastructure redundancies are
implemented on remote site.
Synchronous mode support
HP 3PAR Remote Copy software offers synchronous data transfer mode between storage systems
and host. Synchronous data transfers offer the highest levels of data protection. With synchronous
operations, both the primary and secondary copies are identical and concurrent at all times.
Synchronous mirroring ensures that data copies are identical, to prevent critical data loss in the
event of a failure or disaster. In this mode, data is written simultaneously to the mirrored cache of
the primary storage system and the secondary storage system, in real time, before the application
I/O is completed, thus ensuring the highest possible data consistency. Synchronous replication is
appropriate when exact consistency is critical to the business application.
Storage system configurations
Cluster configurations typically consist of two or more server systems connected to a shared storage
system. HP 3PAR Cluster Extension allows the dispersion of data center resources by enabling
cluster systems to take advantage of HP 3PAR storage systems configured for Remote Copy
operations. HP 3PAR Cluster Extension uses HP 3PAR InForm OS Command Line Interface (CLI) to
control the HP 3PAR storage systems (and Remote Copy) with the cluster software, and uses cluster
software to react to system hardware and application failures.
HP 3PAR Cluster Extension behavior is based on four major considerations:
• Cluster software failover behaviors
• HP 3PAR Cluster Extension user settings
• The replication mode setting for HP 3PAR Remote Copy, which is used to configure the remote
replication feature of a 3PAR storage system environment based on your needs for application
service availability, data concurrency, and replication performance
• Remote Copy volume group and virtual volume status information
HP 3PAR Cluster Extension supports the following configurations:
• 1-to-1
• N-to-1 (the logical configuration must be a one-to-one configuration). See Figure 2 (page 9).
• 1-to-N (the logical configuration must be a one-to-one configuration). See Figure 2 (page 9).
NOTE: Synchronous long distance and unidirectional remote copy configurations are not
supported.
8 HP 3PAR Cluster Extension features
Page 9
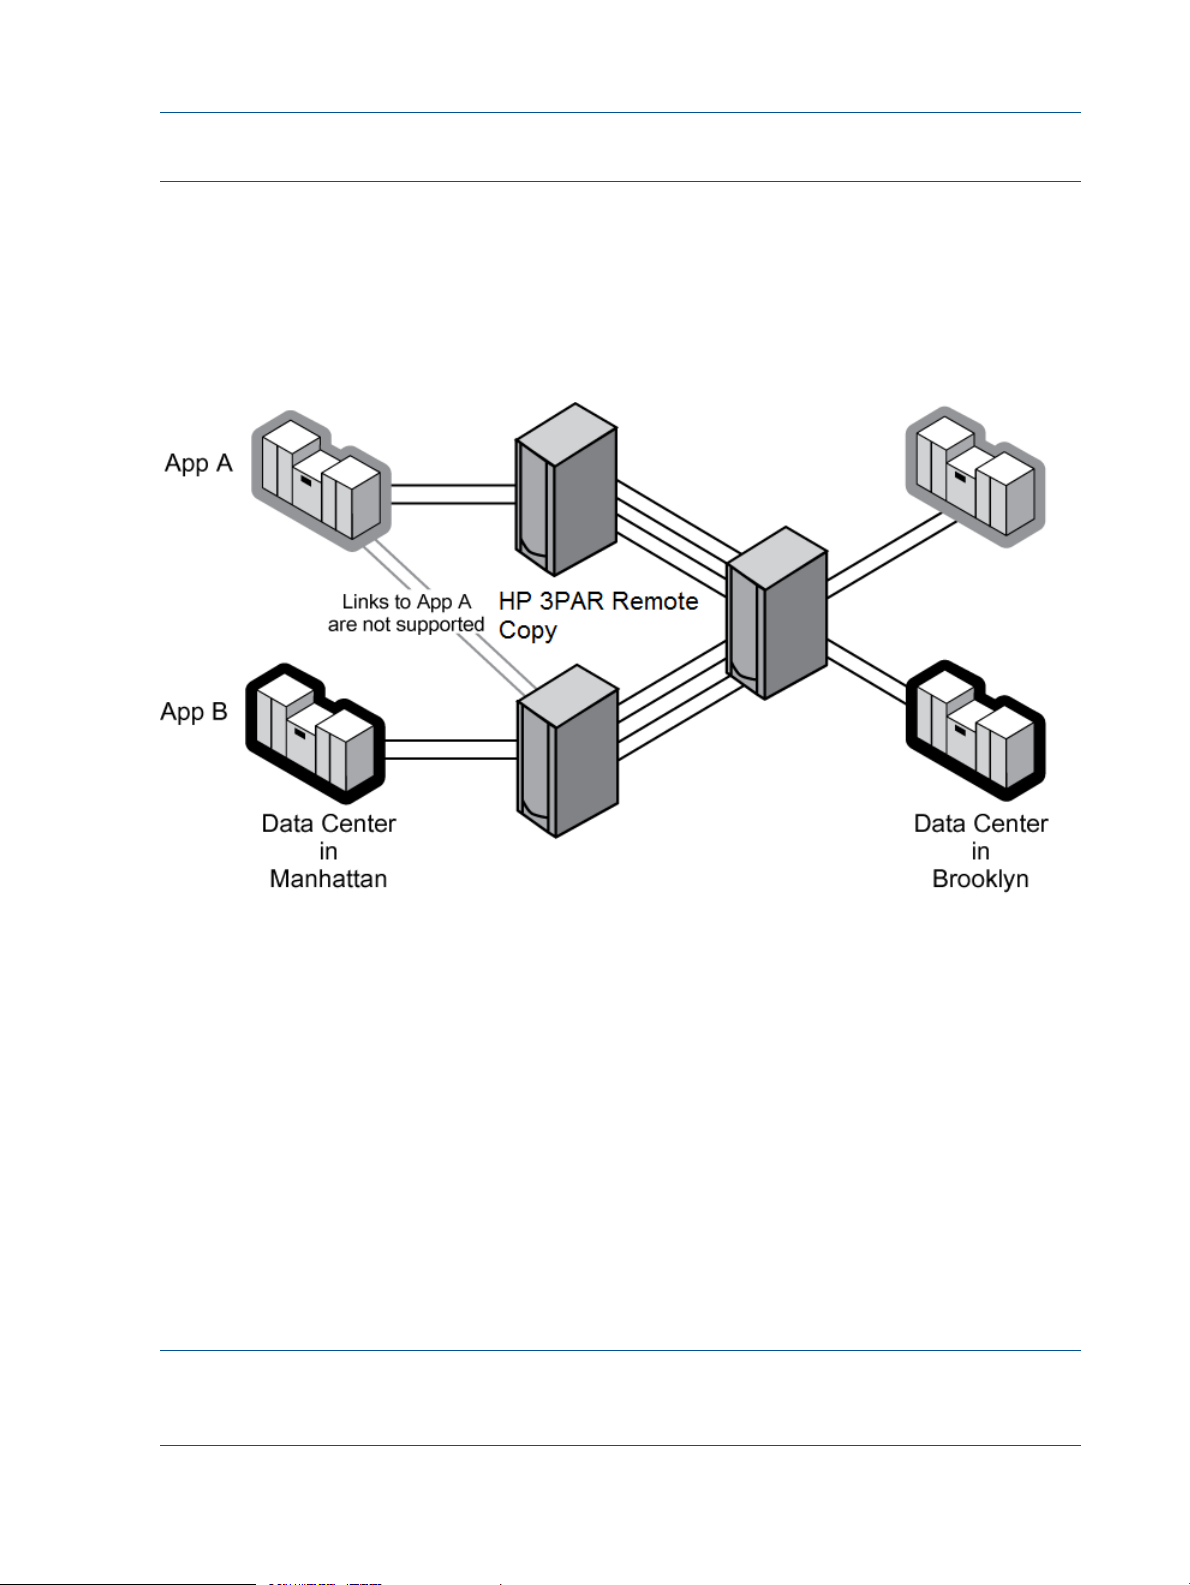
1-to-1 configuration
When setting up a one-to-one configuration (see Figure 2 (page 9)), consider the following:
• Cluster nodes are split between two or more geographically dispersed data center sites and
use redundant, diversely routed network connections for intra-cluster communications. Those
links must be as reliable as possible to prevent false failover operations or split-brain situations.
• Each cluster node connected to a HP 3PAR storage system should have redundant I/O paths
to the HP 3PAR storage system. Connections to both the source (primary) and the destination
(secondary) copy of the application disk set are not allowed from the same host. Configure
your servers only in the zone that allows access to the local HP 3PAR storage system.
• HP recommends a minimum of two cluster nodes per site. This allows for preferred local failover
in case of server system failure. Local failover operations are faster than remote failover
between HP 3PAR storage systems because you do not need to change the mirroring direction
of the Remote Copy volume group members.
• You can deploy HP 3PAR Cluster Extension in environments where several clusters use the
same HP 3PAR storage system pair.
• You can use HP 3PAR Remote Copy in synchronous replication mode between two HP 3PAR
storage systems connected using FC switches and extender hardware.
• HP 3PAR Cluster Extension supports synchronous replication mode in all the configurations
supported by HP 3PAR Remote Copy Software.
• The HP 3PAR Remote Copy links must have redundant, separately routed links. The cluster
network must have redundant, separately routed links. However, cluster networks and HP
3PAR Remote Copy can share the same links if the link technology is protocol independent
(for example, WDM) or if the FC protocol is transformed into IP.
Figure 2 1-to-1 configuration
Storage system configurations 9
Page 10
N-to-1 and 1-to-N configurations
NOTE: The restrictions outlined in “1-to-1 configuration” (page 9) also apply to N-to-1
configurations.
When setting up an N-to-1 or 1-to-N configuration (see Figure 3 (page 10)), consider the following:
• HP 3PAR Cluster Extension uses the unit of Remote Copy volume groups as the failover unit.
This means all virtual volumes or members of a Remote Copy volume group will be failed over
if the cluster software moves disk access from one cluster node to another.
• A given HP 3PAR Cluster Extension resource can manage only one Remote Copy group.
Figure 3 N-to-1 and 1-to-N configuration
Processes and components
For Windows Clustering (MSFC), HP 3PAR Cluster Extension is shipped as a resource DLL. The
installation of HP 3PAR Cluster Extension also includes a CLI for custom HP 3PAR Remote Copy
integration. Customized solutions for failover application services must implement HP 3PAR Cluster
Extension through the CLX CLI (clx3PARrun.exe) prior to the disk activation procedure on the
server.
The installation of HP 3PAR Cluster Extension also includes a CLI for custom HP 3PAR Remote Copy
integration. Customized solutions for failover application services must implement HP 3PAR Cluster
Extension through the CLX CLI (clx3PARrun.exe) prior to the disk activation procedure on the
server.
HP 3PAR Remote Copy
HP 3PAR Remote Copy is a product that allows you to copy virtual volumes from one HP 3PAR
storage system to another. The copy can be used for disaster recovery, backup, or data migration.
NOTE: HP 3PAR Remote Copy requires 3PAR Remote Copy licenses for all storage servers
participating in a Remote Copy replication. See the 3PAR InForm OS Concepts Guide for additional
information on licensing and features.
10 HP 3PAR Cluster Extension features
Page 11
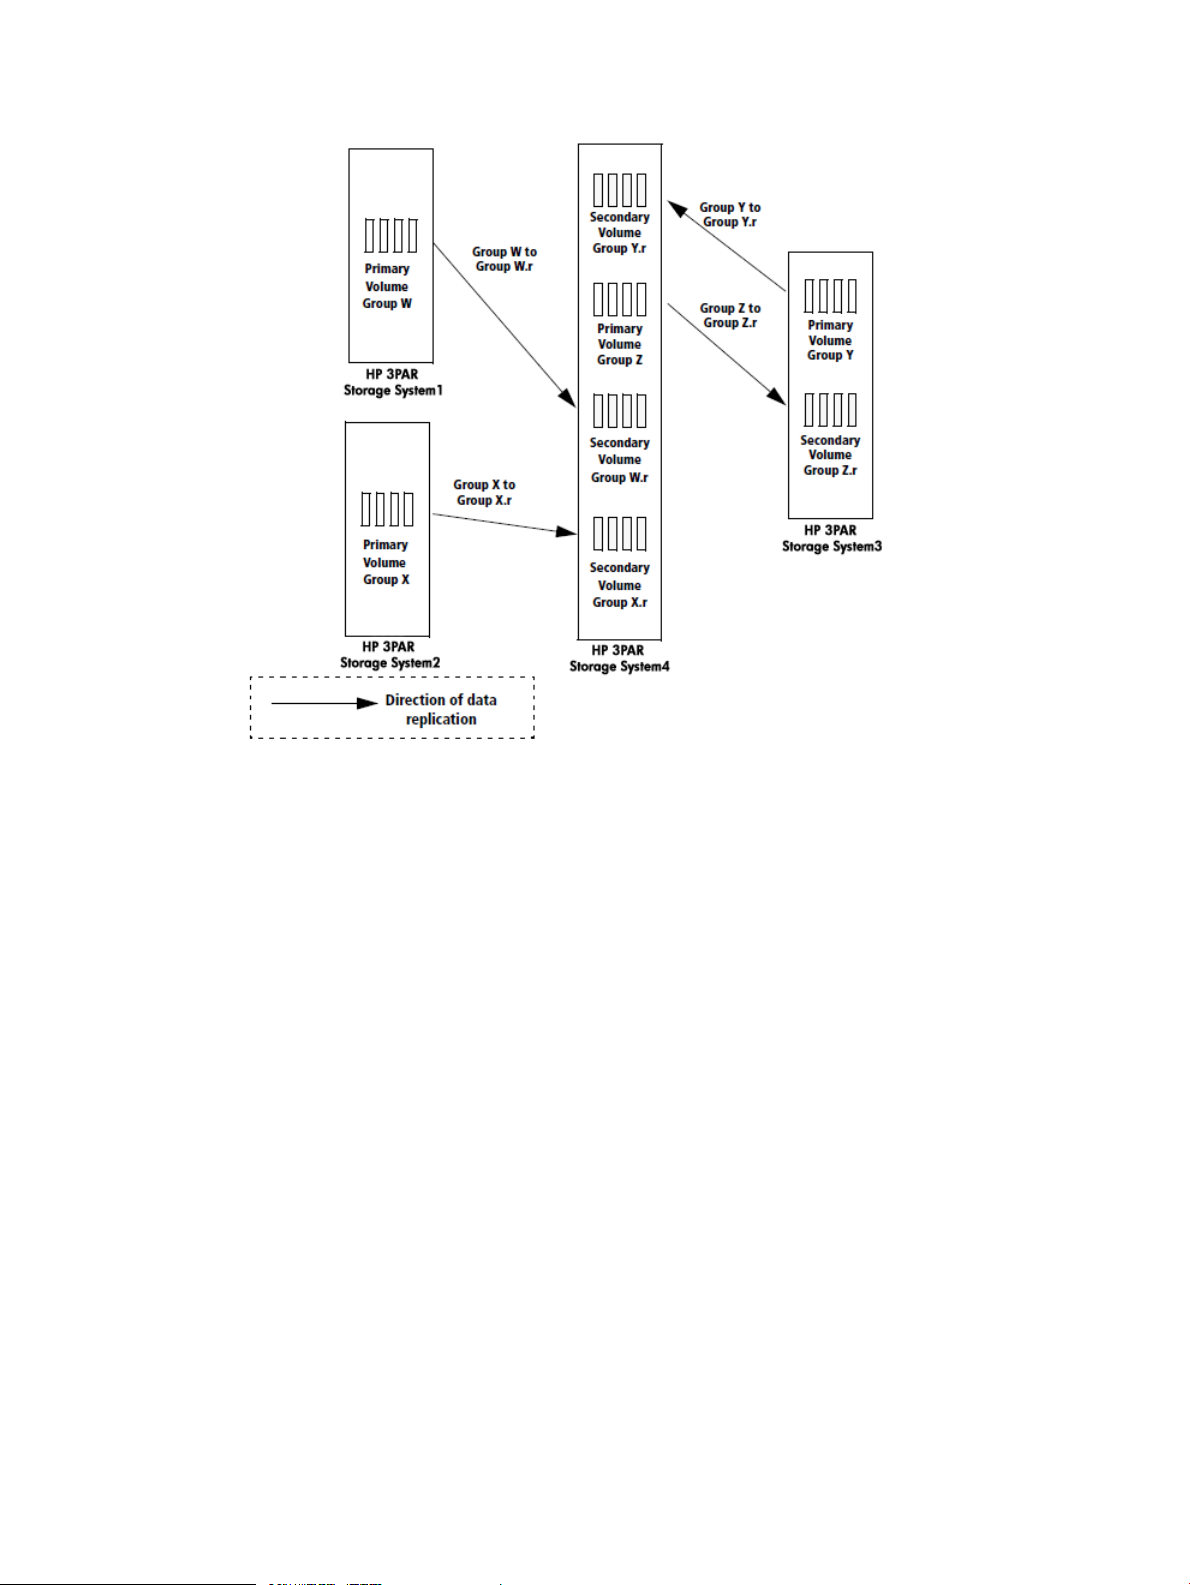
Figure 4 Relationship of primary versus secondary volume groups on primary and backup storage
servers
Remote Copy pairs
Remote Copy configurations are based on the relationship between a storage system pair, also
known as the Remote Copy pair. Within this pair, the primary storage system is the system that
holds the volumes that are copied to a backup or secondary storage system, also known as a
remote storage system.
Remote Copy volume groups
Remote Copy operations are performed on groups of virtual volumes called Remote Copy volume
groups. A Remote Copy volume group is a group of volumes on the same storage system that are
logically related and for which there is a cross-volume ordering of writes. Remote Copy volume
groups are used when data needs to be consistent across a group of volumes in order for databases
or other applications to process data correctly.
Remote Copy uses volume groups to define a set of volumes for which applications might issue
dependent writes.
Remote Copy ensures that the data in the volumes within a group maintain write consistency. When
Remote Copy operations are started or stopped, this is done for the whole group. When point-in-time
snapshots of such volumes are created, writes to all volumes in the group are blocked for a brief
moment to assure a consistent point-in-time copy of the whole Remote Copy volume group.
You must configure a single Remote Copy volume group for a cluster group in Windows clustering.
This Remote Copy volume group must include all virtual volumes being used for the application
service. The Remote Copy volume group is the unit in which HP 3PAR Cluster Extension failover
operations are carried out. A given HP 3PAR Cluster Extension cluster resource can manage only
one Remote Copy volume group.
Processes and components 11
Page 12

Synchronous replication
Using synchronous mode, all write requests from the server are first transferred to the remote storage
system. After each I/O has been mirrored in the cache area of the remote storage system, it is
acknowledged to the local storage system. The write request is then acknowledged to the server.
User configuration file
HP 3PAR Cluster Extension provides a user configuration file to customize failover behavior. You
can specify all customizable objects of HP 3PAR Cluster Extension in this file.
See “User configuration file” (page 47) for more information.
Force Flag
The force flag forces HP 3PAR Cluster Extension to skip the internal logic and enables write access
to the local virtual volumes regardless of the Remote Copy volume group member state. You can
set this flag when you are sure that the current site contains the latest data, even though a previous
application service startup process failed because HP 3PAR Cluster Extension discovered a Remote
Copy volume group member state that could not be handled automatically.
To use the force flag feature, before starting the application service that uses HP 3PAR Cluster
Extension, you must create a file called application_name.forceflag in the directory specified
by the ApplicationDir property. While using clx3PARrun to use the force flag feature, use
the operand –forceflag to eliminate the need of creating the application_name.forceflag
file . The application_name.forceflag is the name of the HP 3PAR Cluster Extension resource.
Before creating this file, ensure that the application service is not running elsewhere. This file is
removed after it is detected by HP 3PAR Cluster Extension.
You cannot use the force flag if the local virtual volume state is a combination of secondary and
syncing, which indicates that a copy operation is in progress. A disk cannot be put in read/write
access mode when a write operation is in progress to that virtual volume; in this case, HP 3PAR
Cluster Extension returns a global error.
Planning for HP 3PAR Cluster Extension
Consider the dependencies described in this section before configuring HP 3PAR Cluster Extension.
Cluster setup considerations
Windows clustering
Windows Clustering depends on a quorum resource to maintain a persistent log of cluster
configuration changes and status, as well as a single point to resolve any possible events that
could result in a split-brain situation. HP 3PAR Cluster Extension supports the following quorum
configurations in which one site failure will not cause the entire cluster to fail.
Windows Server 2008/2008 R2/2012
• Node Majority
• Node and File Share Majority
NOTE: HP 3PAR Cluster Extension does not support quorum configuration which includes disk
witness.
Node Majority quorum in Windows Clustering
The Node Majority resource ensures that the cluster's configuration data is stored locally on the
nodes and that it is kept consistent across the different disks. This allows cluster topologies where
the nodes do not need shared access to a quorum disk.
(Number of nodes in the cluster/2) +1
12 HP 3PAR Cluster Extension features
Page 13

This ensures that more than 50% of the nodes will have an up-to-date copy of the configuration
information.
The cluster service does not start (and bring resources online) if there are 50% or less of the
configured nodes up and running. The cluster service waits, trying to restart, until a quorum is
established when more nodes join. This feature guarantees that the cluster has the latest and most
up-to-date configuration. This also means that, in a geographically dispersed cluster, you must
distribute the nodes evenly between two data centers and have an arbitrator node in a third site
or separate protected area to be able to survive a single data center failure.
Node Majority with File Share Witness
The file share witness feature is an improvement to the Node Majority quorum model. This feature
lets you use a file share that is external to the cluster as an additional "vote" to determine the status
of the cluster in a Node Majority quorum cluster deployment.
Consider a two-node Node Majority quorum cluster. Because an Node Majority quorum cluster
can only run when the majority of the cluster nodes are available, a two-node Node Majority
quorum cluster is unable to sustain the failure of any cluster node. This is because the majority of
a two-node cluster is two. To sustain the failure of any one node in an Node Majority quorum
cluster, you must have at least three devices that can be considered as available. The file share
witness feature enables you to use an external file share as a witness. This witness acts as the third
available device in a two-node Node Majority quorum cluster. Therefore, with this feature enabled,
a two-node Node Majority quorum cluster can sustain the failure of a single cluster node.
Additionally, the file share witness feature provides the following two functions:
• It helps protect the cluster against a problem that is known as a split brain. This problem occurs
if the two nodes in a Node Majority quorum cluster cannot communicate with each other. In
this situation, each cluster node is unable to determine whether the loss of communication
occurred because the other cluster node failed, or whether the loss of communication occurred
because of a problem with the network. The file share witness can designate one of the cluster
nodes as the surviving cluster node. That cluster node can then determine that it should continue
to run the cluster. In this scenario, the surviving cluster node can determine that the other cluster
node failed, or that the other cluster node was not sanctioned by the file share witness.
• It helps protect the cluster against a problem that is known as a partition in time. This problem
occurs if the following conditions are true:
◦ Cluster node A is running, but cluster node B is not running.
◦ Cluster node A stops running.
◦ Cluster node B tries to run the cluster.
In this situation, cluster node B may not have the cluster state information that was updated
on cluster node A. Therefore, cluster node B may run the cluster by using incorrect state
information. The file share witness feature helps prevent this problem by detecting that
the cluster state has changed. The file share witness feature prevents the cluster node that
contains outdated cluster state information from running the cluster.
NOTE: See Microsoft documentation for more details on Microsoft Failover quorum configuration.
Cluster Shared Volume for Windows Server 2012
Cluster Shared Volume is a feature of Microsoft Failover Cluster which allows all nodes in the
cluster with the ability to directly access the same volume without changing ownership of the disk
resource. The result of the feature is that all nodes in a cluster can use the same volume to host
actively running Virtual Machines at the same time. CSV manages storage access differently than
regular clustered disks. CSV Volume is a shared disk containing NTFS partitions. CSV gives you
the ability to store multiple VHDs on a single LUN and run the associated VMs on any cluster node.
Planning for HP 3PAR Cluster Extension 13
Page 14
This will make your cluster work quicker. Additionally, CSV enables Live Migration which allows
you to move a running VM from one node to another node with zero downtime. Since disk
ownership no longer needs to change when a VM moves to another node, this makes the process
quicker and safer, allowing clients to remain connected while the virtual machine is moved to
another node in the cluster. The CSV disk resource which is owned by a cluster node is called as
coordinate node. The VMs which are hosted on the CSV disk can be owned by either coordinated
node or any other node of the cluster. When a disk is in the available storage group, it can be
converted to CSV. When a CSV disk is created in the Failover Cluster, internally, a hidden role
will be created by the failover cluster which is not visible in the Failover Cluster GUI, but visible
through cluster.exe command output. Only CSV disk is shown in the Failover Cluster GUI. The
name of the CSV role is in the form of a GUID. For every highly available VM created on the CSV,
there will be a role created in the Failover Cluster which is independent of the CSV role. The
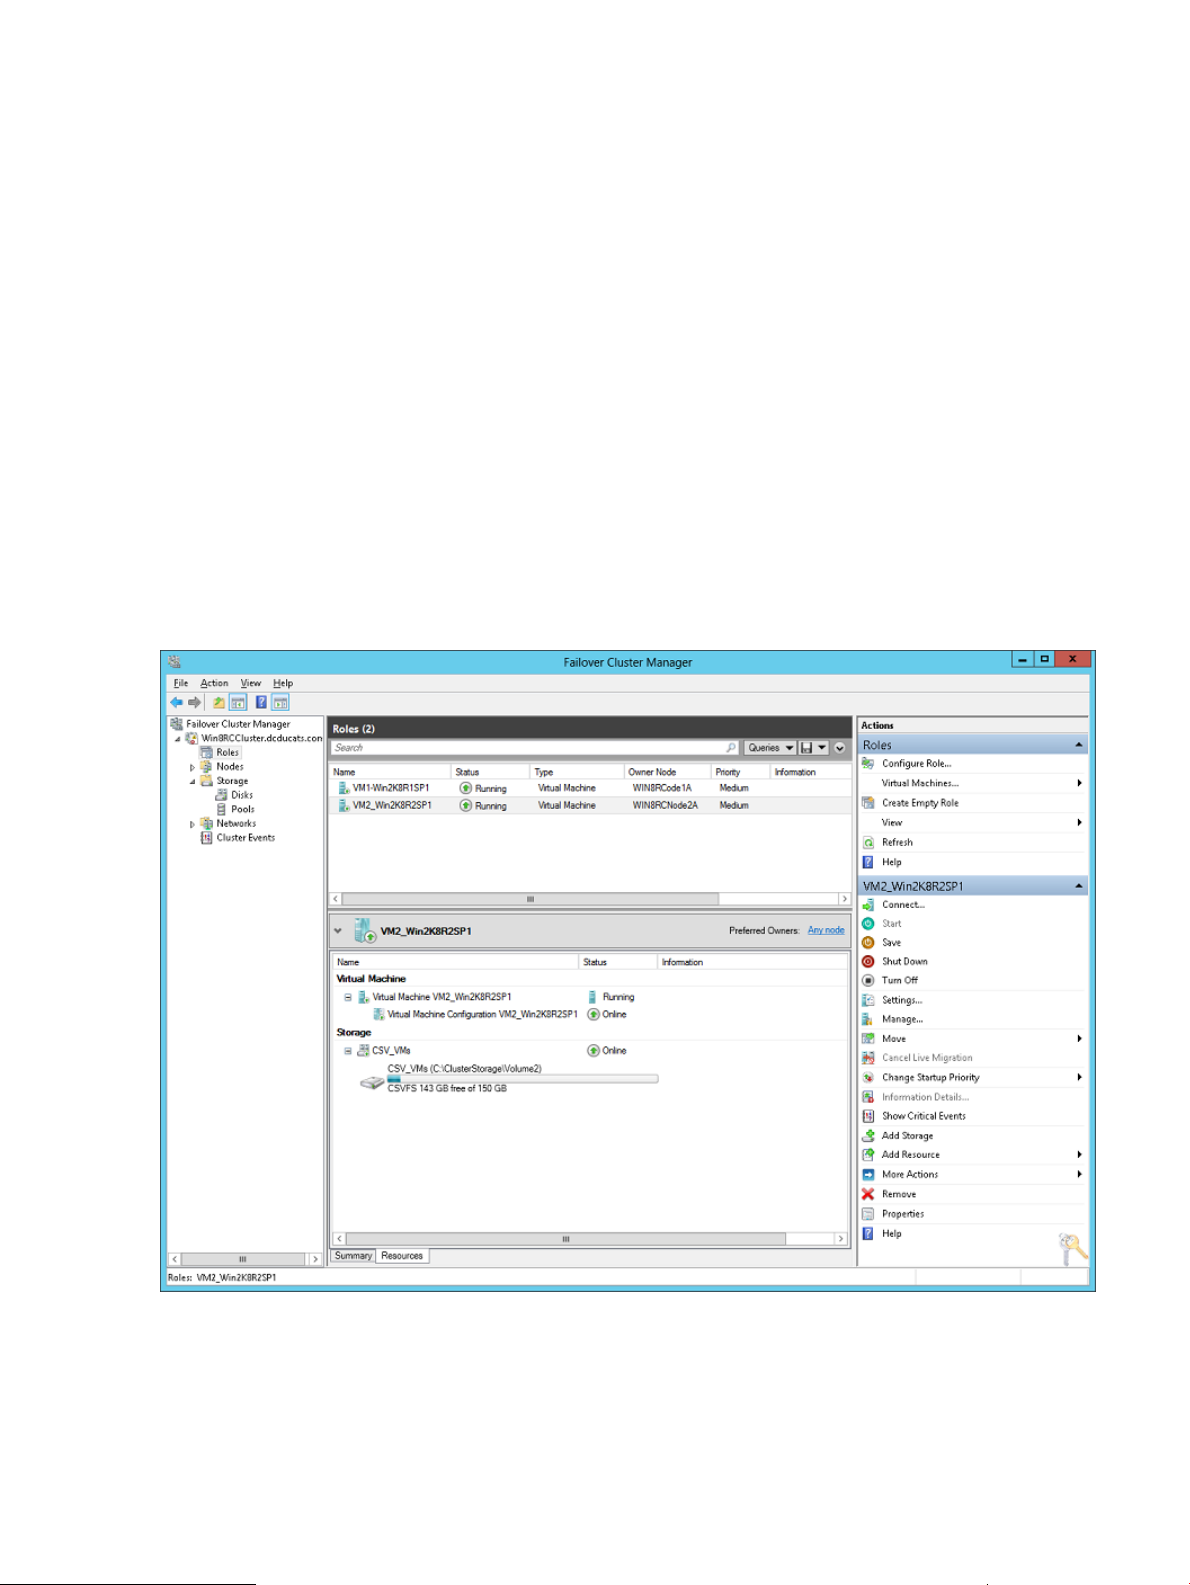
following screenshot has two virtual machines created on a single CSV Disk. For each virtual
machine there is a role created.
In a multi-site storage array replicated environment, CSV disks are replicated to the remote
datacenter using the array based remote replication feature. VMs residing in the CSV disk can run
on any cluster nodes (physical servers). In case of disaster to the primary datacenter, CSV disks
need to be brought online in the secondary datacenter. For this, storage failover needs to be done
after checking the CLX disaster recovery rules before cluster brings the CSV disk online. This is
where CLX comes into picture to swap replication direction and perform the storage failover in an
automated fashion to add failover capabilities for the CSV disks in the clustering environment.
3PAR Cluster Extension supports CSV disk on Windows Server 2012 in addition to non CSV disk
support. Configuration of CSV disk for CLX is similar to configuration of normal disk for CLX support.
Since the CSV role is hidden and not seen in Failover Cluster GUI, CLX has provided PowerShell
Cmdlets to configure Cluster Extension 3PAR resource for the CSV disk. See “Cluster Extension
Cmdlets for CSV and Virtual Machine Management” (page 58) on how to configure CSV disk for
CLX.
14 HP 3PAR Cluster Extension features
Page 15

Configuration tool (clx3PARconfig.exe)
HP 3PAR Cluster Extension uses the configuration tool(clx3PARconfig.exe) to store
configuration and access information for each configured management server. This tool stores
information in the clx3parcfg file. However, because the clx3parcfg file cannot be edited
with a standard text editor, management server entries can only be added, modified, and deleted
using the configuration tool that is included with the standard installation of HP 3PAR Cluster
Extension.
HP 3PAR InForm Management Console or HP 3PAR InForm CLI
HP 3PAR InForm Management Console or HP 3PAR InForm CLI is used to create virtual volumes
and configure the HP 3PAR storage system.
IP network considerations
HP 3PAR CLI is essential to Cluster Extension which communicates with the HP 3PAR storage system
over the IP network. HP recommends that you provide reliable network connections for cluster node
to HP 3PAR storage system communications.
SAN fabric considerations
Ensure that cluster nodes in the zoning configuration recognize their respective (local) HP 3PAR
storage system, but not the remote HP 3PAR storage system.
Planning for HP 3PAR Cluster Extension 15
Page 16

2 Configuring HP 3PAR Cluster Extension
After installing HP 3PAR Cluster Extension, use the configuration tool to define the HP 3PAR Cluster
Extension setup configuration. Use Failover Cluster Management (Windows Server 2008/2008
R2/2012), or cluster commands in the CLI or Microsoft Failover Cluster PowerShell Cmdlets to add
and configure resources.
Integrating HP 3PAR Cluster Extension with MSFC
To integrate HP 3PAR Cluster Extension with MSFC:
1. Define the setup configuration for the HP 3PAR Cluster Extension application. For instructions,
see “Configuring HP 3PAR Cluster Extension” (page 16).
2. Add a HP 3PAR Cluster Extension resource. For instructions, see “Adding a HP 3PAR Cluster
Extension resource” (page 21).
3. Configure the HP 3PAR Cluster Extension resource. For more information, see “Configuring
HP 3PAR Cluster Extension resources” (page 23) .
Add dependencies on the HP 3PAR Cluster Extension resource. For instructions, see “Adding
dependencies on a HP 3PAR Cluster Extension resource” (page 35).
Configuring HP 3PAR Cluster Extension
After installation, you must define the configuration setup using the HP 3PAR Cluster Extension
Configuration Tool.
You can configure HP 3PAR Cluster Extension with the GUI or the CLI. Use the following instructions
for the GUI. For instructions on performing HP 3PAR Cluster Extension configuration tasks with the
CLI, see “Defining the HP 3PAR configuration information using the GUI” (page 17).
Starting the HP 3PAR Configuration Tool
To start the HP 3PAR Cluster Extension Configuration Tool:
• For Windows Server 2008/2008 R2: Double-click the HP 3PAR CLX Configuration Tool icon
on the desktop, or select Start→All Programs→Hewlett-Packard→HP 3PAR Cluster Extension
Software→HP 3PAR Cluster Extension Configuration Tool.
• For Windows Server 2012: Double-click the HP 3PAR CLX Configuration Tool icon on the
desktop, or select Start→All Apps→Hewlett-Packard→HP 3PAR Cluster Extension Software→HP
3PAR Cluster Extension Configuration Tool.
• For Server Core or Hyper-V Server: Open a command window and enter clx3PARconfig
–I.
The HP 3PAR CLX Configuration Tool window appears.
16 Configuring HP 3PAR Cluster Extension
Page 17
Defining the HP 3PAR configuration information using the GUI
To define configuration information using the GUI:
1. Open the configuration tool.
For instructions, see “Starting the HP 3PAR Configuration Tool” (page 16)
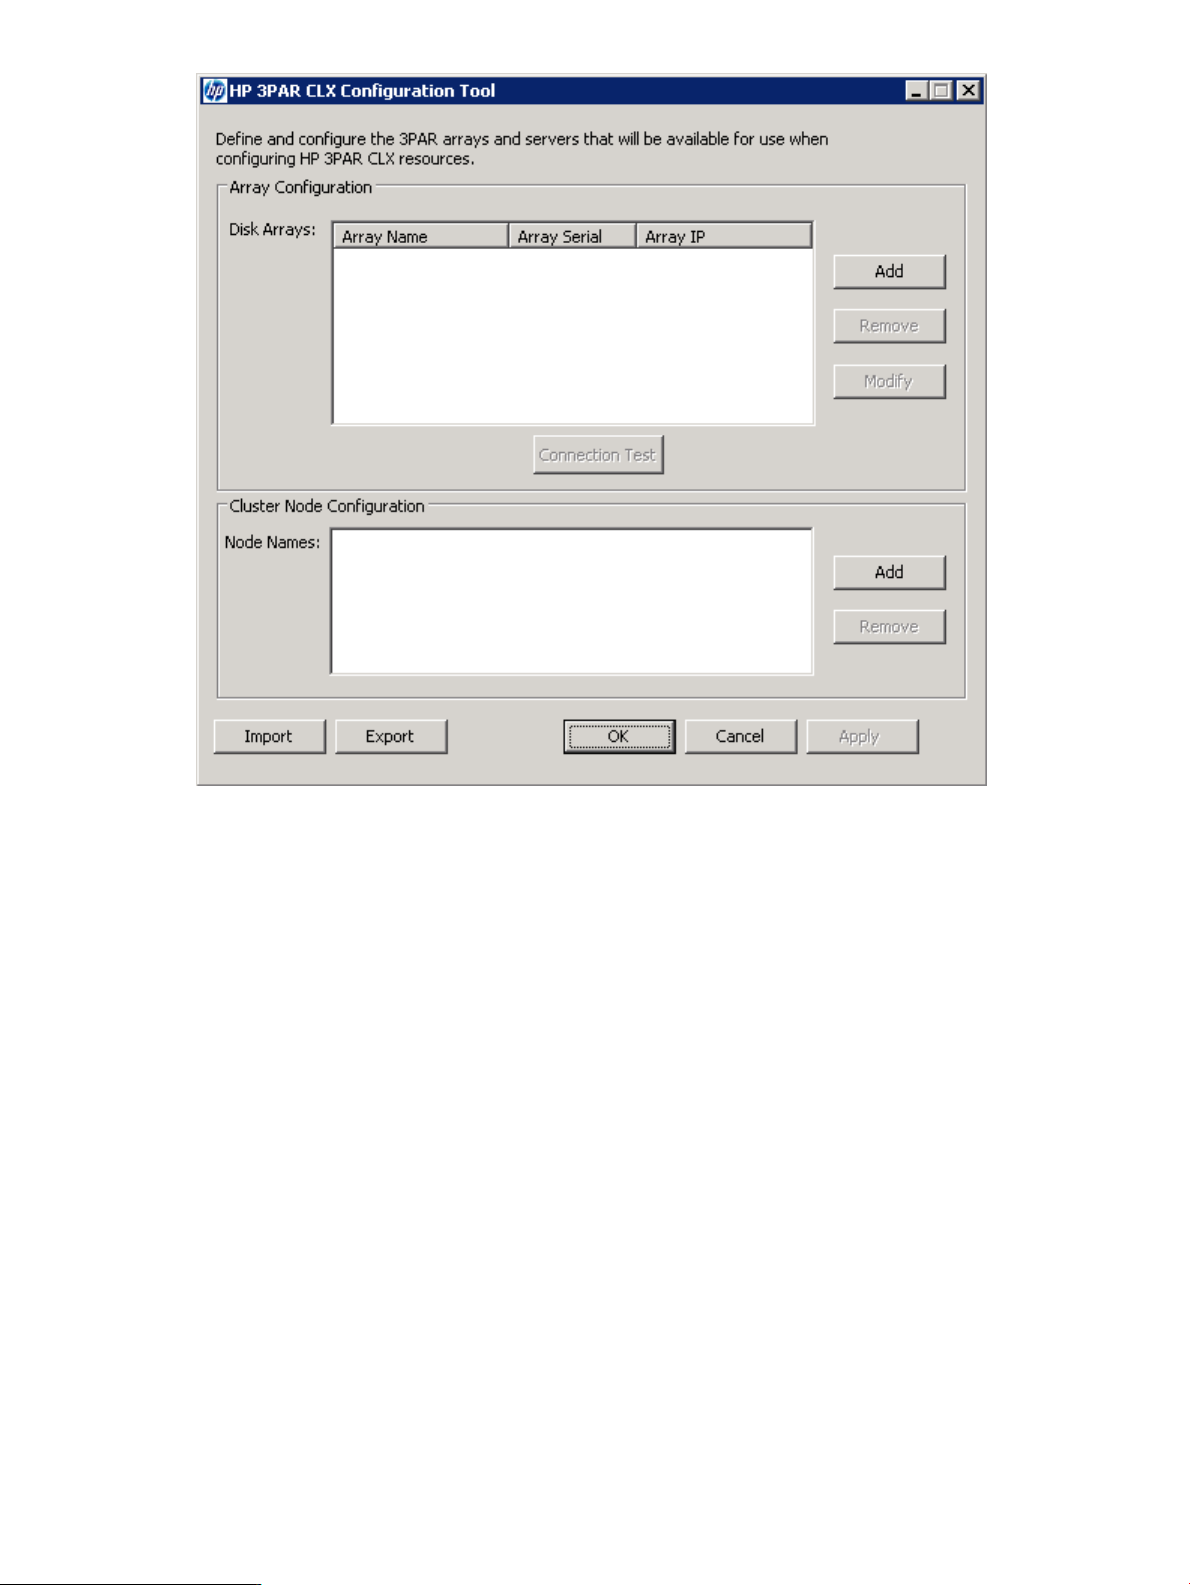
2. Click Add in the Array Configuration section to open the Add Array dialog box.
Configuring HP 3PAR Cluster Extension 17
Page 18
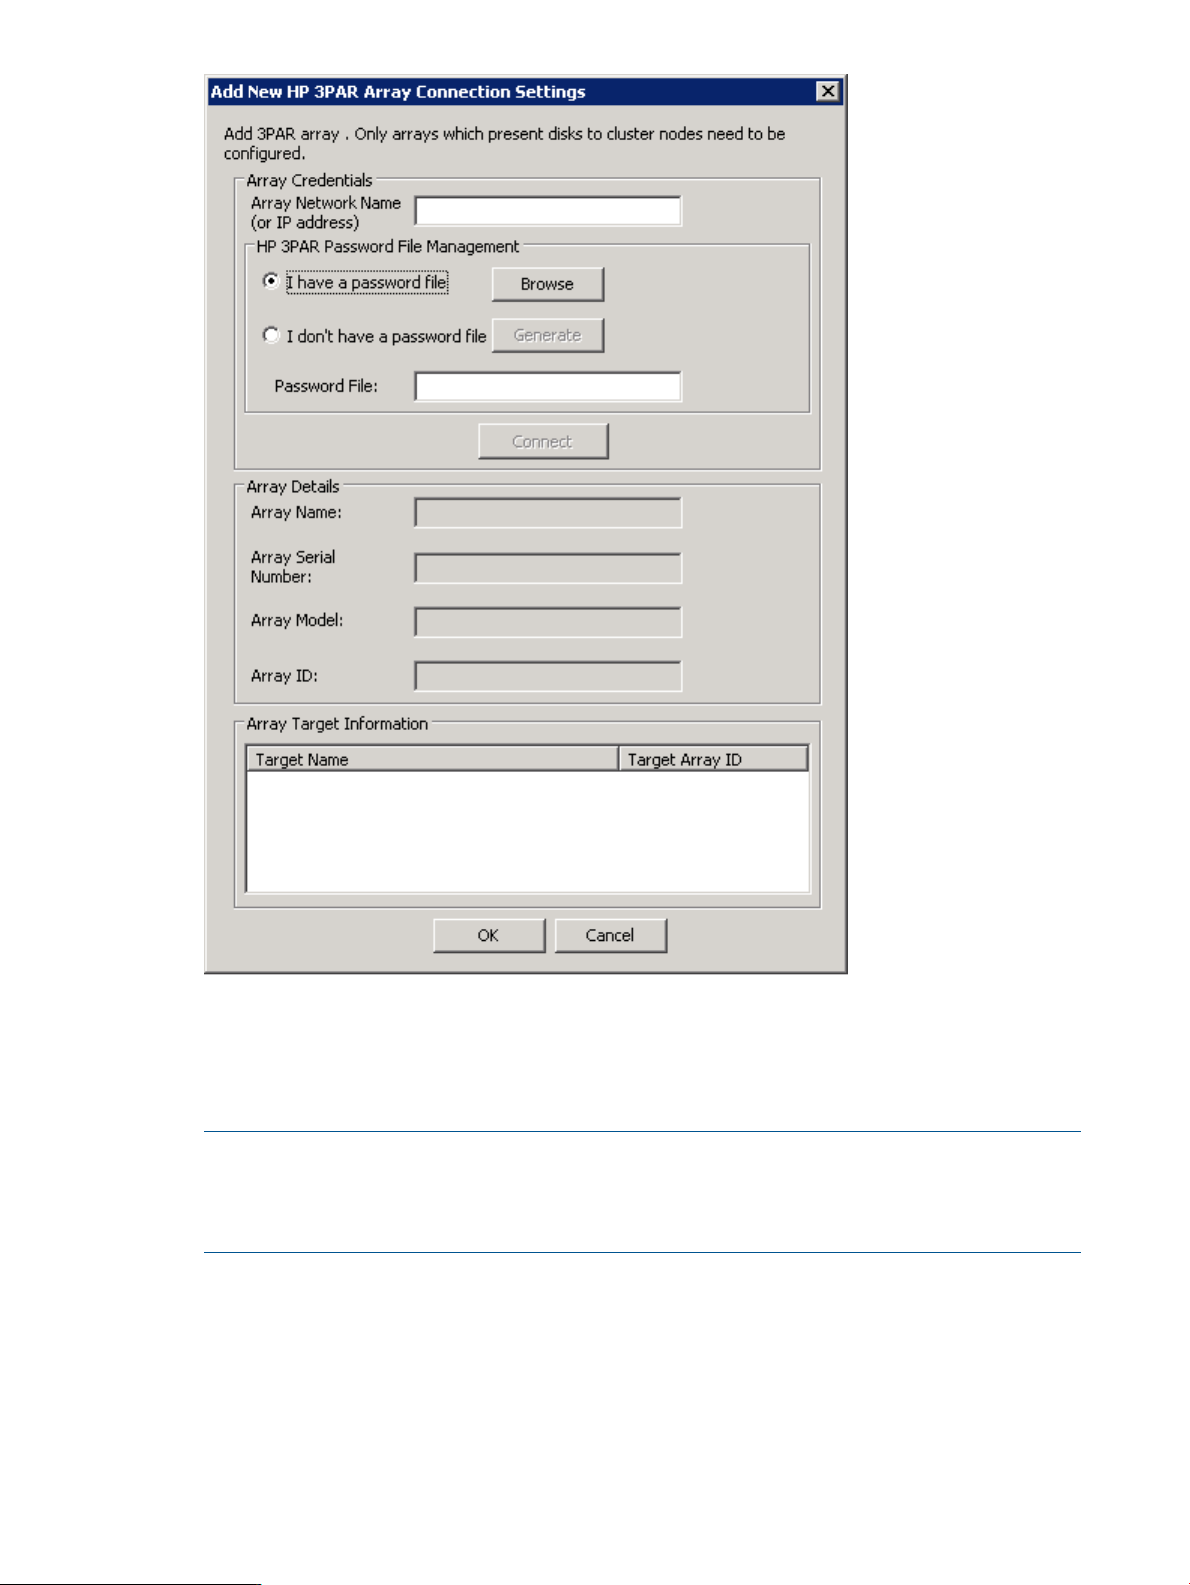
3. Enter the Array Network Name.
4. If you have a password file, click Browse to select the password file.
If you don’t have a password file, select I don’t have a password file radio button and click
Generate button to open HP 3PAR password file generator dialog box.
NOTE: On Server Core Failover cluster nodes, during the CLX Configuration using the CLX
Configuration Tool, if user wants to generate password file using I don’t have a password file
option, user needs to manually enter the password file path rather than clicking on the Browse
button and selecting the folder location.
18 Configuring HP 3PAR Cluster Extension
Page 19
Provide the required information and click Generate button to generate new HP 3PAR password
file for the given array.
• User: HP 3PAR user
• Password: HP 3PAR password for the given user.
• Password file name: The name of the password file that will be generated on clicking
Generate button. This is an optional parameter; the default value will be
<System>_<User>.pwd.
• Password file path: The windows directory where the HP 3PAR password file needs to
be created.
5. Click Connect to connect to the array.
The array details (Array Name, Array Serial Number, Array Model, and Array ID) and the
array target information appears on the Add Array dialog box.
NOTE: If the Remote Copy link is down between the array and the defined targets, Cluster
Extension will not be able to obtain the target array information. The value in the target array
ID will be NA and a warning message is displayed. However, you can continue with the array
configuration, but you cannot configure Cluster Extension resources for the volume groups
between the array and the failed targets. Verify the Remote Copy link between the array and
the failed targets. Launch the HP 3PAR Cluster Extension Configuration Tool and use the Modify
array option, and click Connect on the Modify HP 3PAR storage system Connection Settings
dialog to obtain the correct target information.
6. Click OK to add the array information into the cluster configuration.
The HP 3PAR CLX Configuration Tool window appears.
7. Click Add in the Cluster Node Configuration section to open the Add Server dialog box.
The available servers are listed.
Configuring HP 3PAR Cluster Extension 19
Page 20
8. Select the servers that are possible owners of the HP 3PAR Cluster Extension-managed disks,
and click OK.
NOTE: See the Microsoft Windows Clustering documentation for more information about
possible owners.
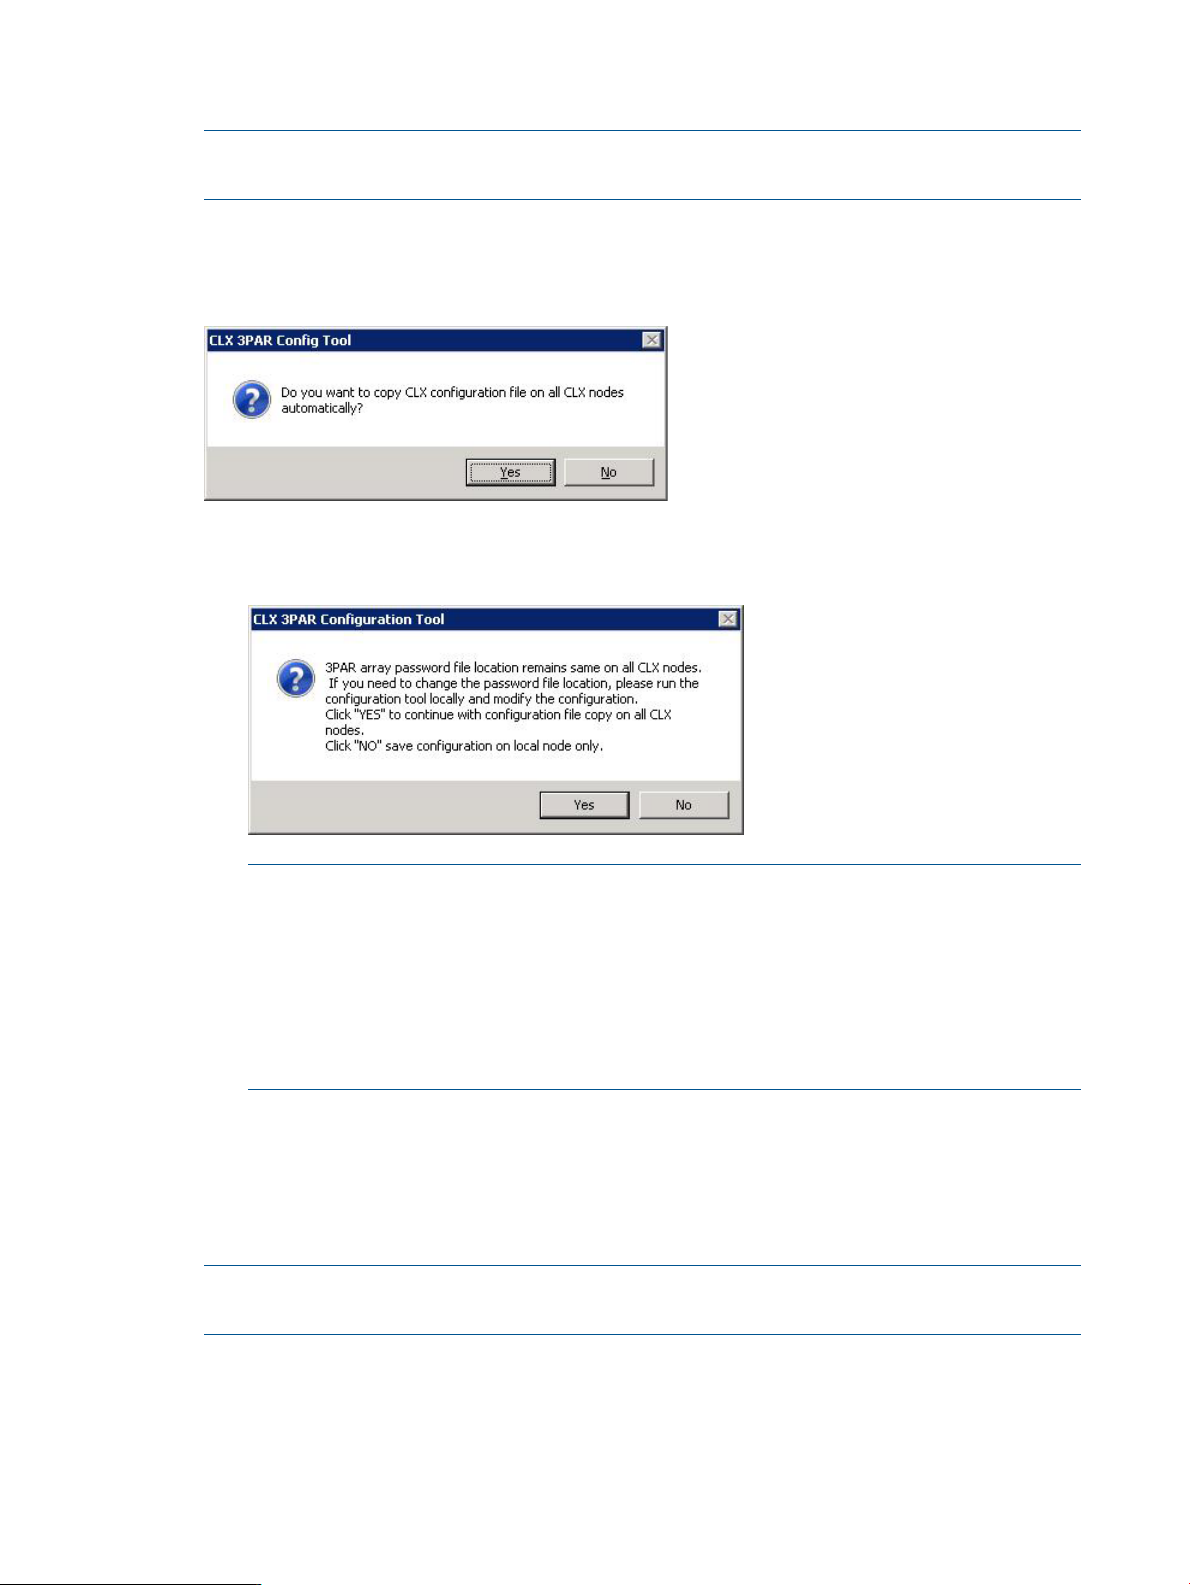
9. Click OK.
You will be prompted to confirm if you want to automatically copy the configuration file on
all the cluster nodes used by Cluster Extension.
a. If you select Yes, the configuration information is automatically copied to all cluster nodes
used by Cluster Extension.
NOTE: You must create or copy the array password file on all cluster nodes used by
Cluster Extension. Ensure that the appropriate path is reflected in the configuration
information of each node. During configuration, you will be prompted to confirm if you
want to copy the configuration file on all cluster nodes. If you choose to copy the HP
3PAR Cluster Extension configuration file automatically, the same password file location
is retained on all cluster nodes. If the password file location on each cluster node is
different, ensure that you change the password file location by running the HP 3PAR
Cluster Extension Configuration Tool locally.
b. If you select No, configuration information is saved locally.
You can use the import and export features to copy the HP 3PAR Cluster Extension
configuration file clx3PARcfg from one cluster node to another.
Your configuration information is saved in the clx3PARcfg file in the
%HPCLX_3PAR_PATH%\bin directory.
NOTE: To verify the connectivity between array and cluster nodes, select one or more
configured HP 3PAR storage systems and click Connection Test.
Defining the HP 3PAR configuration information using the CLI
You can configure HP 3PAR Cluster Extension using the CLI command clx3PARconfig.
Enter clx3PARconfig /help to view usage information.
20 Configuring HP 3PAR Cluster Extension
Page 21

1. Use the following command to add arrays:
clx3PARconfig ARRAY /ADD [{NAME=<array network name|array IP
address>PWF=<password file path>}] [{NAME=<array network name |
array IP address>PWF=<password file path>}]...]
2. Use the following command to add the available cluster nodes:
clx3PARconfig SERVER /ADD [NAME=servername] [NAME=servername...]
3. Use the procedures in “Importing and exporting configuration information” (page 21) to copy
the configuration information to the other cluster nodes.
Importing and exporting configuration information
The import feature allows you to define the configuration setup using an existing configuration file.
The export feature allows you to save a copy of an existing configuration.
Use the import and export features to copy the HP 3PAR Cluster Extension configuration file
(clx3PARcfg) from one cluster node to another.
Exporting configuration settings using the GUI
1. Open the configuration tool.
For instructions, see “Starting the HP 3PAR Configuration Tool” (page 16).
2. Click Export.
3. When prompted, choose a save location, enter a file name, and then click Save.
4. Click OK to save and close the configuration tool.
Exporting configuration settings using the CLI
1. Open a command window.
2. Enter clx3PARconfig EXPORT /FILE=filepath, where filepath specifies the save
location and file name.
Importing configuration settings using the GUI
1. Open the configuration tool.
2. For instructions, see “Starting the HP 3PAR Configuration Tool” (page 16).
3. Click Import.
4. When prompted, choose the configuration file, and then click Open.
5. Click OK to save and close the configuration tool.
Importing configuration settings using the CLI
1. Open a command window.
2. Enter clx3PARconfig IMPORT /FILE=filepath, where filepath specifies the file
location and name.
Adding a HP 3PAR Cluster Extension resource
IMPORTANT: In Failover Cluster Management for Windows Server 2012, the term services and
applications for resource groups is changed to roles. In this guide, the term services and applications
refers to roles for Windows Server 2012 and services and applications for Windows Server
2008/2008 R2.
Adding a HP 3PAR Cluster Extension resource 21
Page 22

To use 3PAR Cluster Extension, you must add an HP 3PAR Cluster Extension resource in the cluster
management application. Follow one of the following ways to add CLX 3PAR Cluster Extension
resource.
• Use the Failover Cluster Management GUI or cluster commands in the CLI or PowerShell
Cmdlets. For instructions, see “Adding HP 3PAR Cluster Extension resource using the Failover
Cluster Management GUI” (page 22) or “Adding HP 3PAR Cluster Extension resource using
cluster.exe” (page 22) or “Adding HP 3PAR Cluster Extension resource using the Microsoft
Failover Cluster PowerShell Cmdlets” (page 23)
• For Server Core or Hyper-V Server, use one of the following:
Failover Cluster Management GUI on the remote management station◦
◦ HP 3PAR Resource Configuration Tool on CLX nodes
◦ Cluster commands in CLX nodes
◦ Microsoft Failover Cluster PowerShell Cmdlets.
For Server Core or Hyper-V Server also, cluster commands and PowerShell Cmdlets can be
used as mentioned in the first bullet.
CAUTION: Do not use the following characters in Cluster Extension resource names: \ / : * ? "
< > |. Using these characters might affect the creation of the resourcename.online file, which
is used for the HP 3PAR Cluster Extension resource health check mechanism.
Adding HP 3PAR Cluster Extension resource using the Failover Cluster Management GUI
Use the procedure in this section to add a resource using the Failover Cluster Management GUI.
For instructions on using the CLI, see “Adding HP 3PAR Cluster Extension resource using cluster.exe”
(page 22).
1. Add a service or application in the Failover Cluster Management GUI, as described in your
Microsoft documentation.
2. Right-click the service or application and select Add a resource > More resources > Add Cluster
Extension 3PAR.
NOTE: This step is applicable for creating CLX resources for non CSV disks on Windows Server
2008/2008 R2/2012. Using Failover Cluster Management GUI, we cannot add CLX resource
for the CSV disk. See “Configuration of HP 3PAR CLX for CSV disk on Windows Server 2012”
(page 37) for configuring CLX resource for CSV disk on Windows Server 2012.
Adding HP 3PAR Cluster Extension resource using cluster.exe
You can use Cluster Command to add a HP 3PAR Cluster Extension resource.
Use the following command to add an HP 3PAR Cluster Extension resource:
cluster resource resource_name /create /group:service_or_application_name
/type:"Cluster Extension 3PAR"
NOTE: For Windows Server 2012, Microsoft Failover Cluster Command Interface feature will
not be enabled by default when user adds the Microsoft Failover Clustering feature. User need to
explicitly select this feature to install on the cluster node.
Example
This command adds an HP 3PAR Cluster Extension resource called clx_fileshare to the
CLX_SHARE service or application.
22 Configuring HP 3PAR Cluster Extension
Page 23

cluster resource clx_fileshare /create /group:CLX_SHARE /type:"Cluster
Extension 3PAR"
Adding HP 3PAR Cluster Extension resource using the Microsoft Failover Cluster PowerShell Cmdlets
NOTE: On Windows Server 2012 Server Core, Failover Cluster PowerShell interface is not
enabled by default when the Failover Cluster feature is enabled. User should explicitly enable this
feature for using the PowerShell Cmdlets.
Use the following command to add HP 3PAR Cluster Extension resource:
Add-ClusterResource -Name "resource_name" -Group
“service_or_application_name” -ResourceType "Cluster Extension 3PAR"
Example:
This command adds an HP 3PAR Cluster Extension resource called clx_fileshare to the
CLX_SHARE service or application.
Add-ClusterResource -Name "clx_fileshare" -Group “CLX_SHARE”
-ResourceType "Cluster Extension 3PAR"
Configuring more than one resource in a service or application
To create more than one HP 3PAR Cluster Extension resource in a service or application:
1. Create two (or more) Remote Copy volume groups and create a resource for each Remote
Copy volume group.
2. Make every physical disk resource in the cluster service or application depend on both (all)
resources within the cluster service or application. This ensures that any disk in the cluster
service or application can go online only if both (all) Remote Copy volume groups are failed
over correctly.
Changing a HP 3PAR Cluster Extension resource name
This section describes how to change a HP 3PAR Cluster Extension resource name.
In this procedure, you use the Failover Cluster Management GUI to change a resource name. For
Server Core or Hyper-V Server, use the MMC or Powershell Cmdlets to run the Failover Cluster
Management GUI from a remote node or use cluster commands in the CLI to change the resource
name. See “Setting HP 3PAR Cluster Extension resource properties using the CLI” (page 33) or
“Setting HP 3PAR Cluster Extension resource properties using the Microsoft Failover PowerShell
Cmdlets” (page 34) for instructions.
1. Open Failover Cluster Management.
2. Open the resource Properties window and click the General tab.
3. Enter a new name in the Resource Name field.
4. Click OK to save your changes and close the window.
Configuring HP 3PAR Cluster Extension resources
HP 3PAR Cluster Extension resource properties are configured using the Failover Cluster Management
GUI, or cluster commands in the CLI.
• For information about Microsoft Failover Cluster Service properties that affect HP 3PAR Cluster
Extension, see “Setting Microsoft cluster-specific resource and service or application properties”
(page 24).
• For information on HP 3PAR Cluster Extension-specific properties, see “Setting HP 3PAR Cluster
Extension-specific resource properties” (page 27).
Changing a HP 3PAR Cluster Extension resource name 23
Page 24

Before configuring HP 3PAR Cluster Extension resources, review the HP 3PAR Cluster Extension
objects described in “User configuration file and HP 3PAR Cluster Extension objects” (page 47).
NOTE: User does not need to configure resources of type "Cluster Extension 3PAR for VM
Management". Only resources of type "Cluster Extension 3PAR" needs to be configured for the
storage disks.
When configuring HP 3PAR Cluster Extension resources, note the following:
• If the Failover Cluster Management GUI is used to configure a HP 3PAR Cluster Extension
resource, configuring the resource using a user configuration file (UCF file) is not required.
• HP 3PAR Cluster Extension creates a file called resource_name.online to indicate that
the HP 3PAR resource is online on the local node. This file is created in the directory specified
by the ApplicationDir resource property. If the resource is taken offline, this file is deleted.
• Windows Server 2008 only: If a HP 3PAR Cluster Extension resource is not configured, the
resource icon in the Failover Cluster Management GUI shows the message not configured
next to the resource status.
• The HP 3PAR Cluster Extension resource must be the first resource for all other disk resources.
• The resource's PendingTimeout value must be equal to or greater than the value specified
for the ResyncWaitTimeout attribute.
Setting Microsoft cluster-specific resource and service or application properties
Microsoft allows you to set specific failover parameter and threshold values for a service or
application, and for a resource. Some of these values must be changed for HP 3PAR Cluster
Extension to enable manual recovery actions in case of a disaster.
To set Microsoft cluster-specific resource properties:
• For Windows Server 2008/2008 R2/2012, use the Failover Cluster Management GUI or
cluster commands in the CLI or use PowerShell Cmdlets.
• For Server Core or Hyper-V Server, use cluster commands in the CLI or use PowerShell Cmdlets.
TIP:
You can use the GUI option for Server Core or Hyper-V Server by using the MMC to manage a
cluster remotely. For more information about using the MMC, see your Microsoft documentation.
HP 3PAR Cluster Extension requirements for Failover Cluster Management resource properties are
described in Table 1 (page 25). If there is no required value for a property, the valid and/or
default values are specified. Set these properties in the resource properties window or the CLI. If
you use the CLI, use the following command:
cluster.exe resource <ResourceName> /prop PropertyName="PropertyValue".
For PowerShell, use the following command:
Get-ClusterResource "Resource_name" | Set-ClusterParameter -Name
"property_name" -Value "value_to_set"
For more information about setting resource properties, see your Microsoft documentation.
24 Configuring HP 3PAR Cluster Extension
Page 25

Table 1 Setting resource properties and values in the GUI
ValueDescriptionFormatProperty
Check Interval )
IsAlivePollInterval (CLI)
Interval )
LooksAlivePollInterval (CLI)
IntegerThorough Resource Health
IntegerBasic Resource Health Check
Used to poll “Alive” state for
the resource. Also used by
HP 3PAR Cluster Extension
to perform HP 3PAR Remote
Copy start operations if
auto_recover policy is set
for a particular Remote
Copy volume group.
Decreasing this value allows
faster resource failure
detection but also consumes
more system resources.
Set this value in the
Advanced Policies tab of the
resource properties window
in Failover Cluster
Management.
the resource. Decreasing this
value allows for faster
resource failure detection but
also consumes more system
resources.
Set this value in the
Advanced Policies tab of the
resource properties window
in Failover Cluster
Management.
GUI: 01:00 mm:ss (Default)
CLI: 60000 milliseconds
(Default)
GUI: 00:05 mm:ss (Default)Used to poll “Alive” state for
CLI: 5000 milliseconds
(Default)
restart on current node –
Maximum restarts in the
specified period )
RestartThreshold (CLI)
over all resources in this
service or application
RestartAction (CLI)
restart on current node –
Period for restarts
IntegerIf a resource fails, attempt
can be 0 (Required)
automatically restarted after
it has failed.
Set this value in the Policies
tab of the resource
properties window in
Failover Cluster
Management.
IntegerIf restart is unsuccessful, fail
will be failed over if a restart
is unsuccessful.
Set this value in the Policies
tab of the resource
properties window in
Failover Cluster
Management.
IntegerIf a resource fails, attempt
time for restart.
Set this value in the Policies
tab of the resourceRestartPeriod (CLI)
properties window in
Failover Cluster
Management.
0 (Required)Defines whether a resource
Check (Required)Defines whether resources
CLI: 2 restart and
affect the group
(Required)
GUI: 15:00 mm:ss (Default)Determines the amount of
CLI: 900000 milliseconds
(Default)
PendingTimeout (CLI)
IntegerPending timeout (GUI)
for status resolution. For
more information, see
“Timing considerations for
Setting Microsoft cluster-specific resource and service or application properties 25
GUI: 03:00 mm:ssUsed to specify the timeout
CLI: 180000 milliseconds
(Default)
Page 26

Table 1 Setting resource properties and values in the GUI (continued)
ValueDescriptionFormatProperty
Windows Clustering
(MSFC)” (page 41).
Set this value in the Policies
tab of the resource
properties window in
Failover Cluster
Management.
HP 3PAR Cluster Extension requirements for service or application properties are described in
Table 2 (page 26). If no specific value is required, the default value is listed. Set these values in
the Failover tab of the service or application properties window or in the CLI. For more information
about setting service or application properties, see your Microsoft documentation.
TIP: To change the properties in Table 2 (page 26) with the CLI, use the following command:
cluster group groupname /prop propertyname="propertyvalue".
For PowerShell, use the following command:
Get-ClusterResource "Resource_name" | Set-ClusterParameter -Name
"property_name" -Value "vale_to_set"
Table 2 Service or application properties and values
failback or Allow failback)
CLI: AutoFailbackType
CLI: FailoverPeriod
the specified period
CLI: FailoverThreshold
ValueDescriptionFormatProperty
IntegerGUI: Failback (Prevent
StringGUI: Period
IntegerGUI: Maximum failures in
Prevents automatic failback
of a service or application
to its primary system.
Transfer the service or
application back manually
after the failure has been
recovered. This allows
recovery of all possible
failure sources and pair
resynchronization (if
necessary) while the
application service is still
running.
hours) over which the cluster
6 (Default) service attempts
to failover a service or
application. See “Timing
considerations for Windows
Clustering (MSFC)”
(page 41) for more
information.
Determines the number of
failover attempts. In case of
subsequent system failure,
the default value allows
cluster service to transfer the
service or application to
each system. If all cluster
systems are not members of
the cluster, the service or
application might restart
automatically.
GUI: Prevent failback
CLI: 0 (required)
6 (Default)Determines the time (in
Number of nodes in the
cluster minus 1.
26 Configuring HP 3PAR Cluster Extension
Page 27

Table 2 Service or application properties and values (continued)
ValueDescriptionFormatProperty
If this value is set to a
number higher than the
current number of clustered
systems for the cluster group,
the service or application
will continue to restart until
either the
FailoverThreshold
value or the
FailoverPeriod
timeout value is reached.
Setting HP 3PAR Cluster Extension-specific resource properties
Changes to resource properties take effect when the resource is brought online again. For instructions
on changing resource properties, see:
• “Setting HP 3PAR Cluster Extension resource properties using the GUI” (page 27)
• “Setting HP 3PAR Cluster Extension resource properties using the MMC ” (page 33)
• “Setting HP 3PAR Cluster Extension resource properties using the CLI” (page 33)
• “Setting HP 3PAR Cluster Extension properties using a UCF” (page 34)
Setting HP 3PAR Cluster Extension resource properties using the GUI
This section describes the procedures for setting HP 3PAR Cluster Extension resource properties
with a GUI. You can perform these procedures through the resource configuration utility using the
cluster software GUI Failover Cluster Management or the standalone resource configuration utility
in Server Core or Hyper-V Server.
TIP: For information on managing HP 3PAR Cluster Extension resources from a remote management
station through the MMC, see“Setting HP 3PAR Cluster Extension resource properties using the
MMC ” (page 33) .
Using Failover Cluster Management to set resource properties
To set resource properties, use the Failover Cluster Management GUI:
1. Open Failover Cluster Management.
2. Double-click the HP 3PAR Cluster Extension resource in the summary pane to open the Properties
window.
3. Click the Parameters tab.
Setting HP 3PAR Cluster Extension-specific resource properties 27
Page 28

4. Make the necessary parameter changes, and then click OK.
Using Failover Cluster Management to set resource properties of a CLX resource on which a CSV disk is dependant (Windows Server 2012 and Windows Server 2012 Server Core)
In case of a CSV disk, it is possible to create a CLX resource in the CSV group and make CSV disk
dependent on the CLX resource. After creating the CLX resource in the CSV group, the CLX resource
does not appear in the Windows Server 2012 Failover Cluster Manager GUI.
In the Failover Cluster Manager GUI, only CSV disk is visible, but not the role in which CSV disk
exists.
A CLX resource can be created in the CSV role. But, it will not be visible in the Failover Cluster
Manager GUI.
In order to set the parameters of CLX resource on which the CSV disk is dependent, the CLX
parameters are populated in the physical disk resource properties page under HP 3PAR CLX
Settings.
To set the resource properties of a CLX resource on which a CSV disk is dependant for Windows
Server 2012, use the Failover Cluster Management GUI:
1. Open Failover Cluster Management.
2. Double-click the CSV disk in the summary pane to open the Properties window.
3. Click the HP 3PAR CLX Settings tab.
28 Configuring HP 3PAR Cluster Extension
Page 29

4. Make the necessary parameter changes, and then click OK.
NOTE: HP 3PAR CLX Settings tab in the properties window of a CSV disk is visible only if that
CSV disk is dependant on a "Cluster Extension 3PAR" resource.
Alternatively, users can also use HP 3PAR Resource Configuration Tool (Clx3PARResConfig.exe)
to configure the CLX resource on which the CSV is dependent.
Using the resource configuration tool to set resource properties
To set CLX resource properties, users can also use the HP 3PAR Cluster Extension resource
configuration tool. When using the resource configuration tool:
• You must run the tool on a Server Core or Hyper-V cluster node. You cannot run the tool on
a remote management station.
• You cannot use the resource configuration tool to add or delete a resource.
• You can use the tool to configure multiple resources at one time. This saves time because you
can switch resources from the tool menu.
• The resource configuration tool is recommended for Hyper-V and Server Core environments
because the properties you enter are validated. When you configure HP 3PAR Cluster Extension
resource properties from a remote management station or through the CLI, the properties you
enter are not validated.
To use the resource configuration tool:
1. Open a command window and enter CLX3PARRESCONFIG.EXE.
2. Select the resource you want to change in the 3PAR CLX resource menu.
3. Make the necessary parameter changes, and then click OK.
Setting HP 3PAR Cluster Extension-specific resource properties 29
Page 30
NOTE: In Server Core and Hyper V Server, users can only use the CLX3PARRESCONFIG.EXE
as the GUI is not present.
Configuring cluster node data center assignments
To configure cluster node data center assignments from the cluster software Parameters tab or the
resource configuration tool:
1. To add a cluster node:
a. Click Add to open the Add Server Data center Assignment window.
b. Select a cluster node from the Pre-Configured host list.
c. Assign the cluster node to a data center selected from the Data center list.
d. Click OK to save and close the window.
2. To remove a cluster node, select the node, and then click Remove.
30 Configuring HP 3PAR Cluster Extension
Page 31

3. To modify a cluster node, select the node, and then click Modify.
4. Click Apply to finish your modifications and leave the window open, or click OK to save your
changes and close the Properties window.
Configuring HP 3PAR storage system
To configure HP 3PAR storage systems from the cluster software Parameters tab or the resource
configuration tool:
1. To add a storage system:
a. Click Add to open the Add Array Data center Assignment window.
b. Select a storage system from the Storage System Name list.
c. Assign the storage system to a data center selected from the Data center list.
d. Click OK to save and close the window.
2. To remove a storage system, select the storage system, and then click Remove.
3. To modify a storage system, select the storage system, and then click Modify.
4. Click Apply to finish your modifications and keep the window open, or click OK to save your
changes and then close the Properties window.
Setting HP 3PAR Cluster Extension-specific resource properties 31
Page 32
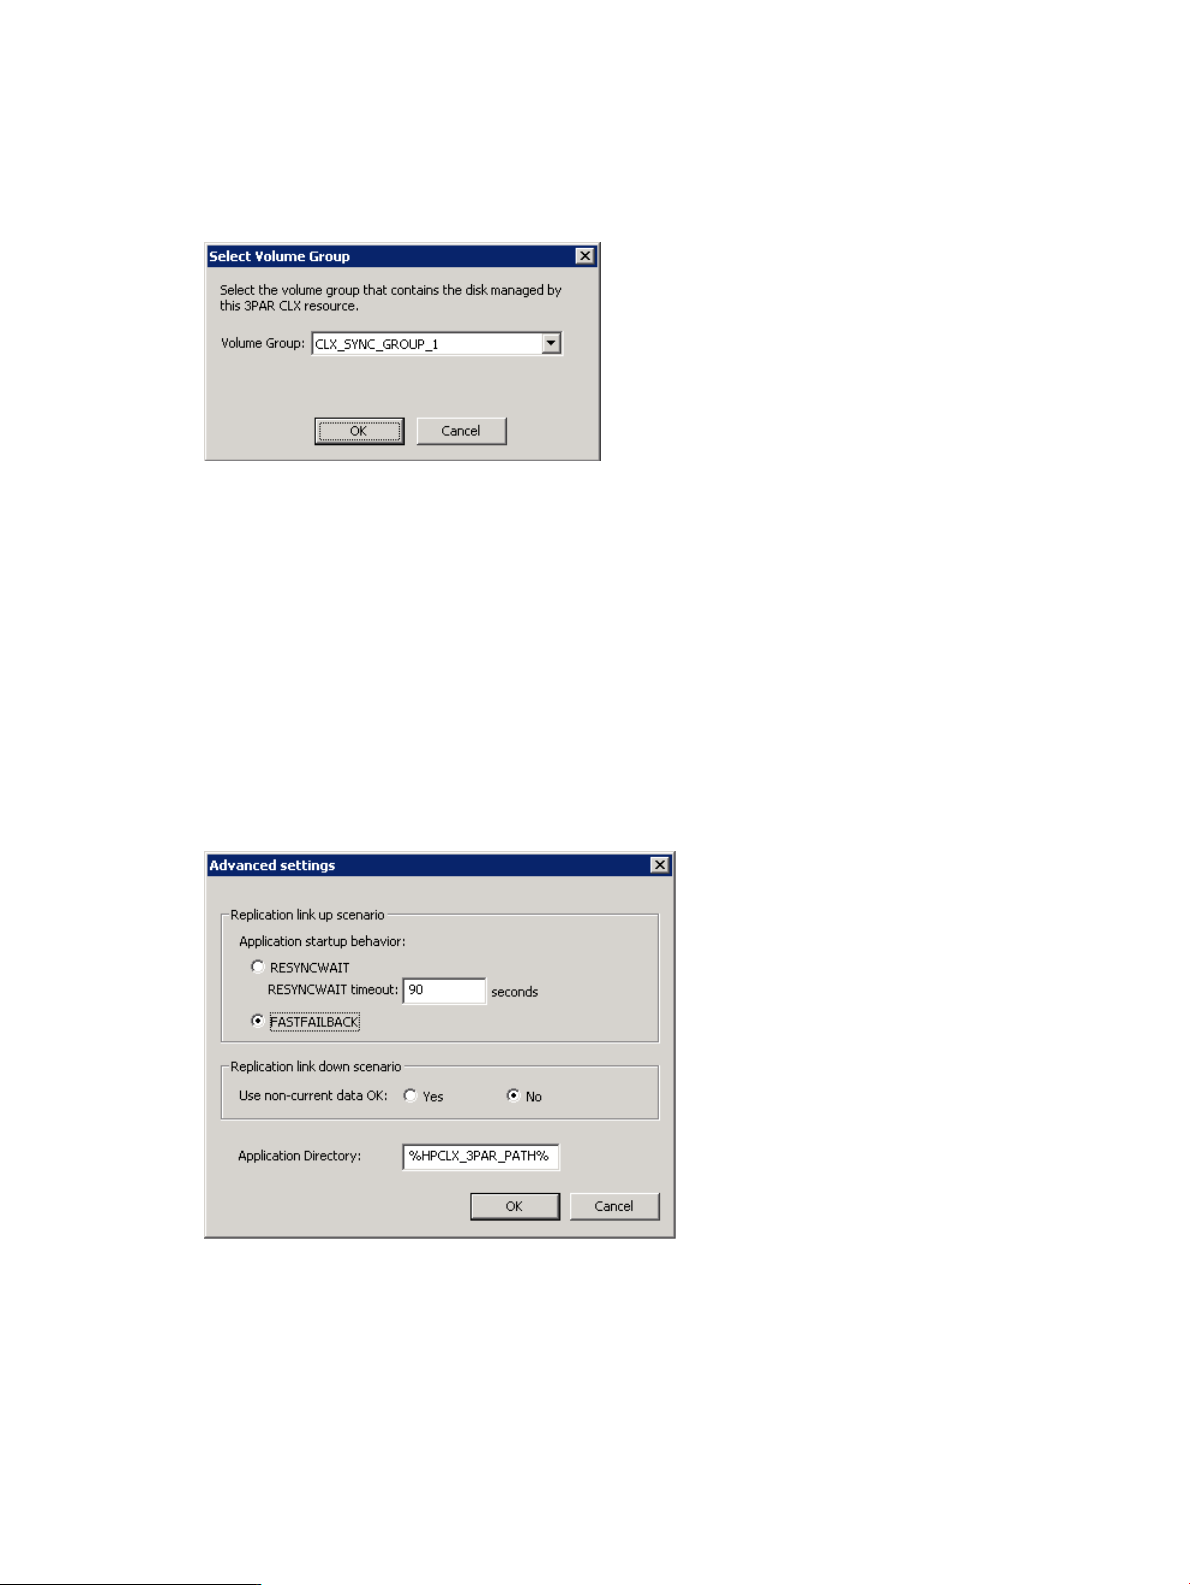
Selecting a volume group
Use the cluster software Parameters tab or the resource configuration tool to select the Remote
Copy volume group containing the disk that will be managed by the HP 3PAR Cluster Extension
resource.
1. Click Browse.
2. Select a volume group, and then click OK.
3. Click Apply to finish your modifications and keep the window open, or click OK to save your
changes and then close the Properties window.
Changing Remote Copy volume group settings
The cluster software resource configuration GUI and the resource configuration tool displays the
Remote Copy volume group name, replication mode, and replication status. Use the cluster software
Parameters tab or the resource configuration tool to edit the advanced Remote Copy volume group
settings to control failover behavior for the Remote Copy volume group that you use with HP 3PAR
Cluster Extension.
1. Click Advanced Settings.
The Advanced settings dialog box appears.
Use this dialog box to configure the Remote Copy volume group behavior.
• The settings in the Replication link up scenario section affect the failover behavior when
the HP 3PAR Remote Copy link is up.
• The settings in the Replication link down scenario section affect the failover behavior
when the HP 3PAR Remote Copy link is down.
2. Select RESYNCWAIT or FASTFAILBACK for the ApplicationStartup behavior.
32 Configuring HP 3PAR Cluster Extension
Page 33

3. If you selected RESYNCWAIT in Step 2, set the RESYNCWAIT timeout value.
• Enter the RESYNCWAIT timeout value, in seconds.
4. Select YES or NO as the UseNonCurrentDataOk value in the Replication link down scenario
section.
5. Enter the path of the application directory. The application directory is where HP 3PAR Cluster
Extension searches for application-specific files, such as the force flag or online file.
6. Click OK to save your changes and close the Advanced settings window.
7. Click Apply to save your changes and leave the window open, or click OK to save your
changes and close the Properties window.
Configuring takeover actions
Pre-executables and post-executables can be defined to be executed before or after HP 3PAR
Cluster Extension invokes its takeover functions. Use the cluster software Parameters tab or the
resource configuration tool to add or remove pre/post executable scripts.
1. Click Pre/Post Exec to display the Pre/Post Executable Properties dialog box.
2. Update the PreExecScript, PostExecScript, and PostExecCheck values as needed, and then
click OK.
3. Click Apply to finish your modifications and leave the Properties window open, or click OK
to save your changes and close the window.
Setting HP 3PAR Cluster Extension resource properties using the MMC
If you are using Server Core or Hyper-V Server, you can manage a cluster remotely by using the
MMC to run Failover Cluster Management.
NOTE: When you configure HP 3PAR Cluster Extension resource properties from a remote
management station through the MMC which uses the standard Microsoft Properties tab, the
properties you enter are not validated. You must enter the property values accurately, and verify
them against the HP 3PAR Cluster Extension documentation.
When you use this option, you will see the default Microsoft properties page instead of the HP
3PAR Cluster Extension Parameters tab. For more information about using the MMC, see “Remote
management of HP 3PAR Cluster Extension resources in a cluster” (page 42) and your Microsoft
documentation.
Setting HP 3PAR Cluster Extension resource properties using the CLI
The cluster commands in this section can be used with Windows server core and non server core
environments.
The Windows cluster default properties for a resource can be changed using the following command:
cluster resource <resource_name> /privprop [<object_name=value|"value1
value2 ...">]
Setting HP 3PAR Cluster Extension-specific resource properties 33
Page 34

NOTE: When you configure HP 3PAR Cluster Extension resource properties using the CLI, the
properties you enter are not validated, so you must enter the property values accurately, and verify
them against the HP 3PAR Cluster Extension documentation.
You can display all attributes of the HP 3PAR Cluster Extension resource clx_fileshare with
the following command:
cluster resource clx_fileshare /privprop
The following example sets the UseNonCurrentDataOk property for the resource
clx_fileshare to NO:
cluster resource clx_fileshare /privprop UseNonCurrentDataOk=NO
For more information on the available properties, see “User configuration file and HP 3PAR Cluster
Extension objects” (page 47).
The following example changes the name of the resource 3PAR Cluster Extension
resource1 to 3PAR Cluster Extension resource2:
cluster resource "3PAR Cluster Extension resource1" /ren:"3PAR Cluster
Extension resource2"
Setting HP 3PAR Cluster Extension resource properties using the Microsoft Failover PowerShell Cmdlets
The cluster commands in this section can be used with Windows Server 2008/2008 R2/2012,
Server Core, or Hyper-V Server. The Windows cluster default properties for a resource can be
changed using the command: Get-ClusterResource "resource_name" |
Set-ClusterParameter -Name "property_name" -Value "value_to_set"
NOTE: When you configure HP 3PAR Cluster Extension resource properties using the PowerShell,
the properties you enter are not validated, so you must enter the property values accurately, and
verify them against the HP 3PAR Cluster Extension documentation.
The following example sets the UseNonCurrentDataOk property for the resource
clx_fileshare to NO
Get-ClusterResource "clx_fileshare" | Set-ClusterParameter -Name
"UseNonCurrentDataOk" -Value NO
For more information on the available properties, see “User configuration file and HP 3PAR Cluster
Extension objects” (page 47)
Setting HP 3PAR Cluster Extension properties using a UCF
You can use a UCF to configure certain HP 3PAR Cluster Extension properties. Properties that you
can configure in a UCF include:
• LogLevel
• ClusterNotifyCheckTime
• ClusterNotifyWaitTime
• StatusRefreshTime
• HP3PARCLICommandTimeout
IMPORTANT: If you plan to use the default values for these properties, no UCF is required.
To configure properties using a UCF:
1. Take the HP 3PAR Cluster Extension resource offline.
2. Open the sample UCF.cfg file located in %ProgramFiles%\Hewlett-Packard\Cluster
Extension 3PAR\sample.
34 Configuring HP 3PAR Cluster Extension
Page 35

3. Update the file with the property values you want to use.
For more information on the available properties, see “User configuration file and HP 3PAR
Cluster Extension objects” (page 47).
4. Save the file and copy it to the following directory on all cluster nodes: %ProgramFiles%\
Hewlett-Packard\Cluster Extension 3PAR\conf.
5. Bring the HP 3PAR Cluster Extension resource online.
Adding dependencies on a HP 3PAR Cluster Extension resource
HP 3PAR Cluster Extension Software must be the first resource in the resource chain of a Windows
cluster service or application. All resources that depend on the disk resource, such as a file share,
and all disk resources (physical disks), must be configured for dependency on the HP 3PAR Cluster
Extension resource.
To add dependencies:
• Use the Failover Cluster Management GUI, cluster commands in the CLI, or the MMC for
remote management.
• For Server Core or Hyper-V Server, use cluster commands in the CLI or the MMC.
Adding dependencies using Failover Cluster Management
You can add dependencies with the GUI on a local node or by using the MMC to run the Failover
Cluster Management application.
1. Open Failover Cluster Management.
2. Select a service or application that has HP 3PAR Cluster Extension resource.
3. Double-click a disk in the summary pane.
4. Click the Dependencies tab, and then click Insert.
5. Select the HP 3PAR Cluster Extension resource in the Resource menu.
Adding dependencies on a HP 3PAR Cluster Extension resource 35
Page 36

6. Click OK to add the selected dependency.
Adding dependencies using the CLI
The cluster commands in this section can be used with Server Core or Hyper-V Server.
To add a dependency on a HP 3PAR Cluster Extension resource using the CLI, use the following
command:
cluster resource physical_disk_resource
/adddependency:Cluster_Extension_3PAR_resource
The following command adds a dependency on the HP 3PAR Cluster Extension clx_fileshare
resource to the physical disk resource Disk_32b_00b:
cluster resource Disk_32b_00b /adddependency:clx_fileshare
Adding dependencies using the PowerShell
1. To add dependency on a HP 3PAR Cluster Extension resource using the PowerShell, use the
following command:
Add-ClusterResourceDependency -Resource <Name_of_the_disk_resource>
– Provider <CLX3PAR_Resource_Name>
2. The following command adds a dependency on the HP 3PAR Cluster Extension
clx_fileshare resource to the physical disk resource Disk_32b_00b:
Add-ClusterResourceDependency -Resource “Disk_32b_00b”-Provider
clx_fileshare
36 Configuring HP 3PAR Cluster Extension
Page 37

Configuration of HP 3PAR CLX for CSV disk on Windows Server 2012
Configuration of CLX resource for the CSV disk is a two steps process. This is almost similar to the
configuration of CLX for non CSV disk.
• Creation of CLX resource in the CSV Role
CSV disk resides in its own role in the Failover Cluster. CSV disk is visible in the Failover
Cluster Manager GUI but the role in which the CSV disk resides is not visible to the user. Due
to this restriction, user will not be able to create CLX resource in the CSV role to manage the
CSV disk using Failover Cluster Manager GUI.
To overcome this limitation, CLX has provided PowerShell Cmdlets to create CLX resource in
the CSV role and set the dependency of CSV disk on CLX resource. For more information, see
“Cluster Extension Cmdlets for CSV and Virtual Machine Management” (page 58).
• Setting the private properties for the CLX resource
After creating the CLX resource in the CSV role and setting the dependency of CSV disk on
the CLX resource, the private properties of the CLX resource must be configured. Since the
CSV role is not visible in the Failover Cluster Manager GUI, CLX resource created in the CSV
role is also not visible to the user in the Failover Cluster Manager GUI. See “ Using Failover
Cluster Management to set resource properties of a CLX resource on which a CSV disk is
dependant (Windows Server 2012 and Windows Server 2012 Server Core)” (page 28) for
information on how to set the private properties of CLX resource created in the CSV role.
Once the above steps are completed, CLX is ready to manage CSV disks.
Disaster-tolerant configuration example using a file share
The following example assumes that your environment includes:
• Four nodes (host1_DCA, host2_DCA, host3_DCB and host4_DCB)
• Two HP 3PAR storage systems with Serial number 1301811 and 1301812
• A Remote Copy volume group configured as VG_CLX01
• An Node Majority arbitrator node in a third site or separate protected area
• A pre-executable clxpre.exe to be invoked by the software
Figure 5 (page 38) illustrates failover options and shows a second cluster group CLX_IIS. The
resource CLX_FILESHARE is part of the service group CLX_SHARE and must be brought online
before the physical disk resources Disk_3PAR_LUN25.
Configuration of HP 3PAR CLX for CSV disk on Windows Server 2012 37
Page 38

Figure 5 Service or application example
Figure 6 Resource tree for service or application CLX_SHARE
HP 3PAR Cluster Extension is configured as a single resource to enable read/write access to the
physical disk resource used for the CLX_SHARE cluster group. The physical disk resource depends
on the HP 3PAR Cluster Extension resource and can be brought online only when the HP 3PAR
Cluster Extension resource is already online. The network card is not attached to this resource tree
and is configured with the CLX_SHARE service or application IP address and network name.
The file share can be started when all the resources are online.
To configure the resource according to the configuration shown in the Figure 5 (page 38):
38 Configuring HP 3PAR Cluster Extension
Page 39

1. Log in to the host3_DCB system with the Administrator account.
2. Create the file share service or application with all previously mentioned resources and its
dependencies, except the HP 3PAR Cluster Extension resource on host3_DCB.
3. Create a new resource of type HP 3PAR Cluster Extension and add systems host2_DCA,
host3_DCB and host4_DCB to its possible owners.
4. Change the restart behavior of the resource so that the resource can be restarted and that the
restart affects the service or application. Set the number of restarts to 0.
5. Edit the properties in the Parameters tab to configure your resource. Configure Remote Copy
volume group and the respective HP 3PAR storage mapping for DCA and DCB (DC_A_Hosts,
and DC_B_Hosts.
6. (Optional step) Click the Pre/Post Exec button and add clxpre.exe with its full path. (The
clxpre.exe program is an example. It is not included with this product.
7. Add a dependency on the resource CLX_FILESHARE to the physical disk resource
Disk_3PAR_LUN25.
8. Check the cluster service group and resource settings using the following commands:
C:\>cluster group CLX_SHARE /prop
C:\>cluster resource CLX_FILESHARE /prop
9. Set the CLX resource property as below:
C: \cluster resource CLX_FILESHARE /ProP RestartAction=0
C: \cluster resource CLX_FILESHARE /ProP
Set the CLX resource property as below:
a. Click the Policies tab of the Failover Cluster Management Properties window.
b. For the HP 3PAR Cluster Extension resource property response to resource failure, select
If resource fails, do not restart.
10. Bring the service or application online on host3_DCB, and verify that the resource and all
other CLX_SHARE service or application resources are brought online.
11. Take the service or application offline, and verify that all resources are stopped.
12. Bring the service or application online again, and verify that all resources are available.
13. Check the cluster service settings of nodes host4_DCB, the service or application and resource
settings.
14. Move the service or application to node host4_DCB and verify that all resources are available.
15. Check the cluster service settings of systems host2_DCA, the service or application and
resource settings.
16. Move the service or application to node host2_DCA and verify that all resources are available.
17. Check the cluster service settings of node host1_DCA, the service or application and resource
settings.
18. Take the service or application offline and verify that all resources are stopped.
19. Change the resource to be able to restart on another system.
Managing HP 3PAR Cluster Extension resources
You can manage resources by bringing them online and offline, or by deleting them.
Bringing a resource online
Resources are usually brought online automatically when the service or application is brought
online. You might need to move the service or application to the node where you want to bring
the resource online.
Managing HP 3PAR Cluster Extension resources 39
Page 40

To bring resources online:
• Use Failover Cluster GUI or Cluster CLI or Microsoft PowerShell Cmdlets.
• For Server Core or Hyper-V Server, use the CLI or the MMC or Microsoft PowerShell Cmdlets.
For more information on using this command, see your Microsoft documentation.
Taking a resource offline
Resources are usually taken offline automatically when the service or application is taken offline.
Taking a resource offline causes resources that depend on that resource to go offline.
When taking resources offline:
• Use Failover Cluster GUI or Cluster CLI or Microsoft PowerShell Cmdlets.
• For Server Core or Hyper-V Server, use the CLI or the MMC or Microsoft PowerShell Cmdlets.
For more information on using this command, see your Microsoft documentation.
Deleting a resource
Deleting a running resource causes the resource and its dependents to go offline.
CAUTION: Deleting a running resource does not remove the resource_name.online file.
When deleting resources:
• Use Failover Cluster GUI or Cluster CLI or Microsoft PowerShell Cmdlets.
• For Server Core or Hyper-V Server, use the CLI or the MMC or Microsoft PowerShell Cmdlets.
• For more information on deleting resources, see your Microsoft documentation.
Using Hyper-V Live Migration with HP 3PAR Cluster Extension
Live migration is a managed failover of VM resources. Live migration should be performed when
all of the solution constituents are in a healthy state, all the servers and systems are running, and
all the links are up. Ensure that the underlying infrastructure is in a healthy state before performing
live migration.
HP 3PAR Cluster Extension has the capability of discovering unfavorable storage-level conditions
for performing live migration. In response to these conditions, HP 3PAR Cluster Extension will stop
or cancel the live migration process and inform the user. This is accomplished with no VM downtime.
For example, if live migration is initiated while VM data residing on the storage system is still
merging and not in sync, HP 3PAR Cluster Extension will proactively cancel the live migration and
inform the user to wait until the disks are fully in sync. Without this feature, live migration might
fail or the VM might come online in the remote data center with inconsistent data.
The HP 3PAR Cluster Extension StatusRefreshInterval property, which you can configure
in a UCF for each application, specifies the time interval between consecutive array status gathering
operations before the live migration to the target cluster node occurs. By adjusting this property,
you can increase the probability of getting the correct HP 3PAR storage system status to ensure a
successful live migration. The default StatusRefreshInterval value is 300 seconds. For more
information about configuring this property, see “Setting HP 3PAR Cluster Extension properties
using a UCF” (page 34).
TIP: For more information about using Hyper-V Live Migration with HP 3PAR Cluster Extension,
see the white paper Live Migration across data centers and disaster tolerant virtualization
architecture with HP StorageWorks Cluster Extension and Microsoft Hyper-V on the white papers
website: www.hp.com/storage/whitepapers.
40 Configuring HP 3PAR Cluster Extension
Page 41

Timing considerations for Windows Clustering (MSFC)
HP 3PAR Cluster Extension gives priority to storage system operations over cluster software
operations. If HP 3PAR Cluster Extension is invoked during a virtual volume synchronization/full
synchronization operation, or is gathering information about the remote storage system, it waits
until the requested status information is reported. This ensures the priority of data integrity over
cluster software failover behavior. However, this behavior can cause a failure of HP 3PAR Cluster
Extension resources in some cases:
• When HP 3PAR Cluster Extension communicates with the HP 3PAR storage system, online
operations could time out depending on the settings of the command time out configuration.
• When a virtual volume resynchronization/ full synchronization is in progress, the software
waits until the Remote Copy volume group is in a synced state if the ApplicationStartup
resource property is set to RESYNCWAIT. In case of resynchronization, the delta between the
source and destination virtual volume could be large enough for the resynchronization process
to exceed the resource PendingTimeout value.
• The values of the ResyncWaitTimeout properties must be less than the configured resource
PendingTimeout value.
In general, because the failover environment is dispersed into two (or more) data centers, the
failover time cannot be expected to be the same as that in a single data center with a single shared
disk device. Therefore, the following values of the HP 3PAR Cluster Extension resource and the
service or application using that resource, must be adjusted, based on failover tests performed to
verify the proper configuration setup: FailoverPeriod, RestartPeriod, PendingTimeout,
LookAlive, and IsAlive.
In addition, FailoverPeriod value of the service or application must be higher than the
RestartPeriod value of the resource and both must be higher than the resource's
PendingTimeout value. Microsoft Cluster provides two properties to adjust state change
recognition or resolution:
• IsAlive
• LookAlive
NOTE: For Windows Server 2008/2008 R2/2012, the IsAlive and LookAlive properties
are replaced by the Thorough Resource Health Check Interval and Basic Resource
Health Check Interval properties.
Bouncing service or application
HP 3PAR Cluster Extension will alternate (start and fail) between local nodes if the
ApplicationStartup property has been set to FASTFAILBACK and no remote system is
available until the service or application restart limit has been reached.
Creating array password file
HP 3PAR Cluster Extension uses HP 3PAR CLI commands to manage the HP 3PAR storage system
objects. HP 3PAR CLI can be installed on the client machine to manage the HP 3PAR storage
systems remotely. Each CLI session requires a user name and an encrypted password for successful
command execution. Alternatively, a onetime password file can be generated for subsequent use.
Generated password file is specific to the HP 3PAR storage system. However, it can be copied to
other systems for use. HP 3PAR Cluster extension requires this password file for its operations. For
each array managed by HP 3PAR Cluster Extension, appropriate password files must be generated
and configured during the HP 3PAR Cluster Extension configuration.
After you log into the HP 3PAR command shell (using the valid username and password credentials),
use following command to generate the password file:
setpassword -u <user name> -saveonly -file <file name>
Timing considerations for Windows Clustering (MSFC) 41
Page 42

The generated password file is stored in the directory from where the command shell is launched.
For example, if you use %HP 3PAR CLI PATH% to login to the command shell, the generated
password file location will be <HP 3PAR CLI PATH>\bin.
IMPORTANT: If there is any change in the configured IP address of the array or password file
location and content, Cluster Extension will fail to communicate with the array and will not perform
the required actions. At any point of time, you can launch the HP 3PAR Configuration tool and
use the Connection Test option to verify connectivity and array credentials, and take necessary
action.
Administration
Cluster Extension administration includes remote management of resources and monitoring of
system resources and logs.
Remote management of HP 3PAR Cluster Extension resources in a cluster
You can use the MMC with Failover Cluster Management to manage clusters and configure HP
3PAR Cluster Extension resources. Note the following when configuring HP 3PAR Cluster Extension
resources by using the MMC from a remote management station:
• When you use the MMC to remotely configure HP 3PAR Cluster Extension resource properties
in a Server Core or Hyper-V Server cluster node, the Failover Cluster Management GUI on
the remote management station displays the standard Microsoft Properties tab instead of the
customized HP 3PAR Cluster Extension Parameters tab. For more information about the
Parameters tab, see “Setting HP 3PAR Cluster Extension resource properties using the MMC
” (page 33).
• When you install HP 3PAR Cluster Extension into a Windows Server 2008/2008 R2/2012
environment, the resource extension DLL is registered by default, which prevents you from
configuring a HP 3PAR Cluster Extension resource from a remote management station. If you
need to remotely configure a HP 3PAR Cluster Extension resource in a Windows Server
2008/2008 R2/2012 based cluster, unregister clx3PARmscsEx.dll from the cluster node,
which allows you to configure the HP 3PAR Cluster Extension resource using the standard
Microsoft Properties tab. Use the command cluster
/UNREGADMINEXT:Clx3PARmscsEx.dll to unregister the DLL.
CAUTION: Configuring HP 3PAR Cluster Extension resources using the MMC from a remote
management station is supported using only the standard Microsoft Properties tab. Do not try
to use the customized HP 3PAR Cluster Extension Parameters tab for this purpose.
• If you see the customized HP 3PAR Cluster Extension Parameters tab when you try to configure
HP 3PAR Cluster Extension resource from a remote management station using the MMC, you
must unregister clx3PARmscsEx.dll from the cluster node. Use the command cluster/
UNREGADMINEXT:clx3PARmscsEx.dll to unregister the DLL. Unregistering the DLL allows
you to configure the resource using the standard Microsoft Properties tab. This situation might
occur if you have a cluster with both Server Core or Hyper-V Server and Windows Server
2008/2008 R2/2012 cluster nodes.
• When you configure HP 3PAR Cluster Extension resource properties from a remote management
station through the MMC, which uses the standard Microsoft Properties tab, the properties
you enter are not validated, so you must enter the property values accurately, and verify them
against the HP 3PAR Cluster Extension documentation.
• On Windows Server 2012 Failover Cluster, user cannot use the MMC to remotely configure
the CLX resource on which CSV disk is dependent. Hence in Windows 2012 Server Core
machine, user has to launch HP 3PAR Resource Configuration Tool (Clx3PARResConfig.exe)
to configure the CLX resource for the CSV disk. In non-servercore Windows Server 2012,
42 Configuring HP 3PAR Cluster Extension
Page 43

users can use the CLX resource configuration utility integrated with CSV cluster resource in the
Failover Cluster or use the HP 3PAR Resource Configuration Tool (Clx3PARResConfig.exe)
to configure the CLX resource for CSV disk.
System resources
Monitor the system resources on a regular basis as part of Windows administration. If any system
resource usage by the cluster service is reaching maximum levels, stop and then restart the cluster
service. This action automatically fails over the resources and resets system resources. See the
Windows cluster documentation for information about how to stop a cluster service.
An alternate method is to manually move all resources to another node in the cluster before stopping
the cluster service. After all resources are successfully moved to another node, stop and then restart
the cluster service; then, manually move back all resources.
Logs
If the HP 3PAR Cluster Extension log files need to be cleared and reset (for example, to reduce
disk space usage), you can delete the files. HP 3PAR Cluster Extension automatically creates new
log files.
NOTE: On Windows Server 2012, if VM management functionality is used by customer, the
logs for this feature will be created in the same location. But the name of the file is VMClxMscs.log
TIP: Archive the log files before deleting them.
Hyper-V Live Migration log entries
In the HP 3PAR Cluster Extension log file (clxmscs.log), live migration messages include the
prefix CLX_LM to help you differentiate live migration issues from HP 3PAR Cluster Extension log
messages.
For example:
[10/12/09 20:13:02][2136][CLX_LM: CLXVMDISK04-App01][INFO] CLX detected
that Live Migration for VM "Virtual Machine VM04" has begun.
[10/12/09 20:13:02][2136][CLX_LM: CLXVMDISK04-App01][INFO] CLX started
gathering VM "Virtual Machine VM04" specific storage information.
Virtual Machine Management hosted on a Cluster Shared Volume on Windows Server 2012
Cluster Shared Volumes of Windows Server 2012, support virtualized workloads to create virtual
machines on Cluster Shared Volumes in the Failover Cluster Manager. These VMs are the highly
available virtual machines as these are managed by the Failover Cluster.
CSV Disk resource can be owned by one cluster node whereas highly available VMs which are
created on the CSV disk can be owned by the same cluster node or any other cluster node. The
node which owns the CSV disk resource is called as the co-ordinator node. In a multi-site storage
array replicated environment, clustering of nodes is spread across the datacenter. For non CSV
disks, the application role like VM role contains the application resource, disk resource and the
CLX resource together, which means that in whichever cluster node the disk resource is online, the
application resource like VM resource would be online too. Therefore, the entire application role
like VM role containing the application resource, disk resource and the CLX resource together
would be owned by a cluster node. With the CSV feature in place, the CSV disk can be owned
by any cluster node and highly available VMs which are created on the CSV disk running on the
same cluster node or the different cluster node as that of the CSV.
Virtual Machine Management hosted on a Cluster Shared Volume on Windows Server 2012 43
Page 44

If the highly available VMs are running on a cluster node which is in a different datacenter then
the VMs will run in the redirected-access mode. This is because, the replicated disk in the datacenter
where VM is running is usually presented to the cluster node as read-only on the storage array.
Which means the I/O operations of the VMs on to the CSV disk is carried over the IP network to
the coordinated node in the other datacenter and the coordinated node will take care of committing
the I/O to the disk. Due to this, VMs may incur a performance penalty especially if the distance
between the datacenter is long. This is where the CLX VM management feature plays a role.
The CLX for VM management ensures that the highly available VMs and the coordinated node of
the CSV disk are always running in the cluster nodes of the same datacenter.
NOTE: A new cluster resource type called “Cluster Extension 3PAR for VM Management” is
introduced to support the VM management in a cluster. This resource type is available only on
Windows Server 2012 or Windows Server 2012 Server Core.
If the user does not need VMs running on a CSV disk which is in the redirected access mode, then
the user needs to configure resources of type "Cluster Extension 3PAR for VM Management" in
the corresponding VM role.
Steps to configure CLX feature for VM Management functionality for a highly available VM created
on a CSV disk:
1. Create a CSV disk in the Failover Cluster Manager. The newly created CSV disk should be
managed by the CLX to do storage failover. The CSV role in which the CSV disk is residing
is not visible in the Failover Cluster GUI.
2. To create a Cluster Extension 3PAR cluster resource in the hidden CSV role, CLX has provided
PowerShell Cmdlet to perform the required operation. For more information, see “Cluster
Extension Cmdlets for CSV and Virtual Machine Management” (page 58)
3. Once the Cluster Extension 3PAR resource is created in the CSV role, configure the CLX
Resource private properties. See “ Using Failover Cluster Management to set resource properties
of a CLX resource on which a CSV disk is dependant (Windows Server 2012 and Windows
Server 2012 Server Core)” (page 28)
4. Creation of highly available VMs on CSV disk is similar to the steps for creation of highly
available VMs on a normal disk. Follow the steps to create the highly available VM on the
CSV disk.
5. Once the highly available VM is created on the CSV disk, configure the CLX feature for the
VM management functionality for that VM. This can be done using PowerShell Cmdlet or
manual steps.
Following steps should be followed for enabling a VM for VM Management functionality:
Using PowerShell Cmdlet
CLX has provided PowerShell Cmdlet to make all the VMs which are created on a CSV disk for
VM management functionality. If the user wants only specific set of VMs to have the VM management
functionality, follow the manual steps as described below to make a specific VM for VM management
functionality. For more information, see “Cluster Extension Cmdlets for CSV and Virtual Machine
Management” (page 58).
Manual Steps:
If user wants only specific set of VMs of a CSV disk to have VM management functionality, follow
the steps.
44 Configuring HP 3PAR Cluster Extension
Page 45

1. Create a cluster resource of resource type “Cluster Extension 3PAR for VM Management” in
the VM Role.
NOTE: Corresponding CSV is dependant on CLX.
Example: Using the PowerShell
Add-ClusterResource -Name VM_MGMT_Res -Group VM4_2k12 -ResourceType
"Cluster Extension 3PAR for VM Management"
2. Set the dependency of VM configuration resource on the newly created resource of resource
type “Cluster Extension 3PAR for VM Management”.
Example: Using the PowerShell
Add-ClusterResourceDependency -Resource VM_MGMT_Res -Provider
“Virtual Machine Configuration VM4_2k12”
The configuration is now complete and the VM role is enabled with VM management functionality.
Behavior of VM Management functionality in various disaster scenarios
This section describes various disaster scenarios and how the VM management functionality behaves
in these scenarios:
1. CSV disk owning cluster node and the VM owning cluster node are in different datacenter and
the VM Role is offline:
When user tries to bring the VM role online, the online operation fails as owner nodes of the
respective resource are running in different datacenters. Once the resource fails on the cluster
node, depending on the cluster role failover policies, the role behaves accordingly.
2. CSV disk owner node and the VM owner node are in same datacenter and the VM Role is
offline:
When user tries to bring the VM role online, the online operation succeeds as owner nodes
of the respective resource are running in same datacenters.
3. The cluster node which owns the CSV disk fails or the CSV disk fails and the CSV disk moves
to a node in the same datacenter or CSV disk is moved manually to a node in the same
datacenter:
In this scenario, since the CSV disk is moved to a node in the same datacenter, all the VMs
continue to run on their respective cluster nodes. There will not be any change in the ownership
for the VMs.
4. The cluster node which owns the CSV disk fails or the CSV disk fails and the CSV disk moves
to a node in the remote datacenter or CSV disk is moved manually to a node in the remote
datacenter:
In this scenario, all the VMs which are configured with CLX feature for VM management will
wait for the CSV disk to come online on a cluster node in the remote datacenter. Since the
CSV disk is moved to a node in the remote datacenter, all the VMs which are running in the
respective cluster nodes in the primary datacenter will be live migrated by CLX to cluster nodes
in the remote datacenter. Every role has next preferred node property. Selection of the target
node for the live migration will be based on how the next preferred owner property has been
set for the VM role.
Preferred Owners is not set: In this scenario, the next preferred owner node will be selected
randomly among the cluster nodes which are there in the remote datacenter. The selected
cluster node should be up. If not, search will continue until a cluster node is found in the remote
datacenter.
Preferred Owners is partially set: In this scenario, cluster nodes which are not part of the next
preferred owner node property, will be added to the list in the order of NodeID. Next preferred
owner which is in the same datacenter as the datacenter where CSV disk is owned will be
Virtual Machine Management hosted on a Cluster Shared Volume on Windows Server 2012 45
Page 46

selected from that list. The selected cluster node should be up. If not, search will continue in
the list until a cluster node is found in the remote datacenter.
Preferred Owners is completely set: Since all cluster nodes are part of the next preferred owner
node property list, the next preferred owner node will be selected from this list. The selected
cluster node should be up and should be in the same datacenter as the datacenter where CSV
disk is owned. If not, search will continue in the list until a cluster node is found in the remote
datacenter.
5. When VM owning node goes down and the VM moves to a node in the remote datacenter:
In this scenario, the VM fails to come online on the remote datacenter and the cluster tries to
bring it online on a node in the local datacenter.
6. When VM owning node goes down and the VM moves to the next preferred node in the same
datacenter:
In this scenario, the VM tries to come online on the next preferred node in the same datacenter.
46 Configuring HP 3PAR Cluster Extension
Page 47

3 User configuration file and HP 3PAR Cluster Extension
objects
Objects (also called properties in this document) define the HP 3PAR storage system environment
and failover/failback behavior. You can customize HP 3PAR Cluster Extension objects in the user
configuration file or in the cluster software.
User configuration file
For the CLI implementation of HP 3PAR Cluster Extension, the user configuration file UCF.cfg is
used to configure application service-specific information. UCF.cfg describes the dependencies
between application services and HP 3PAR Remote Copy volume groups in one file for all
application services in the cluster.
A UCF.cfg file is available in the HP 3PAR Cluster Extension sample directory %ProgramFiles%\
Hewlett-Packard\Cluster Extension 3PAR\sample. This file can be copied and modified
to suit a specific configuration.
After the user configuration file has been created, it must be copied to the /conf directory on all
cluster nodes.
%ProgramFiles%\Hewlett-Packard\Cluster Extension 3PAR\conf
For more information, see “Sample configuration file” (page 53)and “Creating and configuring
the user configuration file” (page 57).
Windows Clustering
HP 3PAR Cluster Extension integration with Windows cluster does not require a user configuration
file when the standard environment for HP 3PAR Cluster Extension is used. The HP 3PAR Cluster
Extension objects that are integrated with Windows cluster can be configured as resource private
properties in the cluster software. See “Configuring HP 3PAR Cluster Extension” (page 16) for
more information.
File structure
The configuration file consists of a COMMON section and an APPLICATION section. These sections
are distinguished by control tags. HP 3PAR Cluster Extension uses the following objects as control
tags:
• COMMON
• APPLICATION
Objects have one of the following formats:
string
list
A definition of an object; for example, COMMON or APPLICATIONtag
A number; for example, a timeout valueinteger
A name, which can include alphabetic and numeric characters and underscores; for
example, an application startup value
A list of space-separated strings, for example, a list of host names (lists of numbers are
stored as lists of strings)
Text that is a comment starts with the pound (#) symbol and continues until the end of the line.
Comments can start on a new line or be part of a line specifying an object.
User configuration file 47
Page 48

Specifying object values
You do not need to change the default settings unless you want to change the degree of protection
for your Remote Copy volume group members. If you change an object, you may need to change
additional objects as well. For example, if RESYNCWAIT has been specified for the
ApplicationStartup object, the ResyncWaitTimeout object must be specified.
Objects are supported according to the requirements or capabilities of the cluster software, as
indicated in Table 3 (page 48).
Table 3 Common and application objects
Windows ClusterCLIObject
••COMMON
••LogDir
••LogLevel
••APPLICATION
••ApplicationDir
••ApplicationStartup
•ClusterNotifyCheckTime
•ClusterNotifyWaitTime
+ Required
• Supported
••DC_A_Hosts+
••DC_B_Hosts+
••DC_A_InServStorage_SerNum+
••DC_B_InServStorage_SerNum+
••RCVolumeGroupA+
••RCVolumeGroupB+
••PostExecCheck
••PostExecScript
••PreExecScript
••ResyncWaitTimeout
•StatusRefreshInterval
••UseNonCurrentDataOk
••HP3PARCLICommandTimeout
COMMON objects
The COMMON section is used to set the environment of HP 3PAR Cluster Extension.
The COMMON tag can appear in the configuration file only once. The COMMON object does
not require any value.
Objects of the type COMMON can appear only one time. Those objects must be placed after the
COMMON tag in the configuration file.
If the default values fit your environment, there is no need to specify them in the file.
48 User configuration file and HP 3PAR Cluster Extension objects
Page 49

COMMON
Format tag
Description Distinguishes between general (common) and application-specific objects.
LogDir
Format String
Description (Optional) Defines the path to the HP 3PAR Cluster Extension log file.
Default
value
%ProgramFiles%\Hewlett-Packard\Cluster Extension 3PAR\log
LogLevel
Format String
Description (Optional) Defines the logging level used by HP 3PAR Cluster Extension.
Valid values error (default): Logs only error messages for events that are unrecoverable.
warning: Logs error messages and warning messages for events that are
recoverable.
info: Logs error messages, warning messages, and additional information, such
as disk status.
trace: Logs error messages, warning messages, info messages, and messages that
report on execution status, useful for troubleshooting.
APPLICATION objects
The APPLICATION section defines the failback behavior of HP 3PAR Cluster Extension for each
application service. APPLICATION is a multitag that can appear in the configuration file for each
application service using HP 3PAR Cluster Extension.
The APPLICATION object requires the name of the application service as its value. The objects
specified after an APPLICATION tag must appear only once per application. As with COMMON
objects, APPLICATION objects have predefined default values.
HP 3PAR Cluster Extension uses the following rules to define objects:
• If you use the default value, you do not need to specify the object.
• The pre-execution and post-execution functions in HP 3PAR Cluster Extension will not be
processed if the associated object values are empty. This is the default setting.
To set APPLICATION object values for the CLI, modify the user configuration file.
To set APPLICATION object values for MSFC, use Failover Cluster Management GUI.
APPLICATION
Format Tag
Description Distinguishes between general and application-specific objects. Specify the name
of the application service. The format of its value is equivalent to a string value.
ApplicationDir
Format String
Description Specifies the directory where HP 3PAR Cluster Extension searches for
application-specific files, such as the force flag or online file.
If ApplicationDir is set to a nonexistent drive, HP 3PAR Cluster Extension is
unable to create the online file and cannot bring the resource online.
APPLICATION objects 49
Page 50

If ApplicationDir is not set, HP 3PAR Cluster Extension uses the local
%HPCLX_3PAR_PATH% values as defined in the registry.
Default
values
Files application_name.forceflag
%HPCLX_3PAR_PATH%
CLX_application_name.online
If specified in a user configuration file, resource_name is the value of the
APPLICATION tag; otherwise, resource_name is the value of the HP 3PAR Cluster
Extension resource name.
ApplicationStartup (Optional)
Format String
Description Specifies where a cluster group should be brought online.
The ApplicationStartup object can be customized to determine whether an
application service starts locally or is transferred back to the remote data center (if
possible) to start immediately without waiting for disk pair resynchronization. This
object is used only if an application service has already been transferred to the
secondary site and no recovery procedure has been applied to the Remote Copy
volume group (the Remote Copy volume group has not been recovered and is not
in a normal state). This process is considered a failback attempt without prior Remote
Copy volume group recovery.
HP 3PAR Cluster Extension can detect the most current copy of your data based on
the Remote Copy volume group information. If HP 3PAR Cluster Extension detects
that the remote HP 3PAR storage system has the most current data, it orders a
resynchronization of the local disk from the remote disk, or it stops the startup process
to enable the cluster software to fail back to the remote HP 3PAR storage system.
If a resynchronization is ordered, HP 3PAR Cluster Extension monitors the progress
of the copy process. If the application service was running on a secondary HP 3PAR
storage system without a replication link, a large number of records may need to
be copied. If the copy process takes longer than the configured application startup
timeout value, the application startup will fail.
Windows cluster
If the ApplicationStartup resource property is set to FASTFAILBACK, and the
FailoverThreshold value is set to a number higher than the current number of
clustered systems for the service or application, the service or application will restart
on configured nodes until one of the following conditions is met:
• The resource is brought online in the remote data center.
• The resource failed because the FailoverThreshold value has been reached.
• The resource failed because the FailoverPeriod timeout value has been reached.
CAUTION: Disable subsequent automated failover procedures for recovery failback
operations. If you want to use HP 3PAR Cluster Extension capabilities to recover a
suspended Remote Copy volume group state during a failover, ensure that subsequent
failover operations are disabled in case the recovery attempt fails. To disable
subsequent failover attempts, set the FailoverThreshold to zero (0) until the
recovery operation has finished successfully.
Valid values FASTFAILBACK (default)
50 User configuration file and HP 3PAR Cluster Extension objects
Page 51

The cluster group is brought online in the remote data center (if possible) without
waiting for resynchronization. The application startup process is stopped locally and
HP 3PAR Cluster Extension reports a data center error. Depending on the cluster
software, the application service cannot start on any system in the local data center,
and the cluster software transfers the application service back to the remote data
center. Use this value to provide the highest level of application service availability.
In a two-node cluster, this process does not work because the target failback system
is not available. In this case, the application service must be started manually, or
the ApplicationStartup object must be set to RESYNCWAIT.
RESYNCWAIT
The online operation in the local cluster group must wait until the Remote Copy
volume group status is no longer in syncing state. HP 3PAR Remote Copy initiates
a resynchronization of the local virtual volume based on the remote virtual volume.
HP 3PAR Cluster Extension monitors the syncing process. If no copy progress is made
after configured ResyncWaitTimeout value, HP 3PAR Cluster Extension returns
a global error. If RESYNCWAIT has been specified for the ApplicationStartup
object, the ResyncWaitTimeout object must be specified, in case HP 3PAR Cluster
Extension should wait for resynchronization changes for more or less than 90
seconds, which is the default.
Files application_name.forceflag
CLX_application_name.online
If specified in a user configuration file, resource_name is the value of the
APPLICATION tag; otherwise, resource_name is the value of the HP 3PAR Cluster
Extension resource name.
ClusterNotifyCheckTime
Format Integer
Description Specifies how often HP 3PAR Cluster Extension will check for VM live migration state
changes.
Default
value
10 seconds
ClusterNotifyWaitTime
Format Integer
Description Specifies the amount of time that HP 3PAR Cluster Extension will monitor for VM live
migration state changes.
Default
value
5 seconds
DC_A_Hosts (Required)
Format List
Description This space-separated list defines the cluster nodes in data center A.
DC_B_Hosts (Required)
Format List
Description This space-separated list defines the cluster nodes in data center B.
APPLICATION objects 51
Page 52

DC_A_ InServStorage_SerNum (Required)
Format String
Description The serial number of the HP 3PAR storage system located in data center A.
DC_B_ InServStorage_SerNum (Required)
Format String
Description The serial number of the HP 3PAR storage system located in data center B.
RCVolumeGroupA (Required)
Format String
Description HP 3PAR Remote Copy volume group name on configured DCA HP 3PAR storage
system, containing the application service disk set.
RCVolumeGroupB (Required)
Format String
Description HP 3PAR Remote Copy volume group name on configured DCB HP 3PAR storage
system, containing the application service disk set.
NOTE: HP 3PAR InForm Management Console (IMC) will not provide details of RCVolumeGroupA
and RCVolumeGroupB. Use HP 3PAR CLI command showrcopy groups to find out the exact
name for RCVolumeGroupA and RCVolumeGroupB. For Example, for a group clx_vg_01
displayed in the Management Console GUI, RCVolumeGroupA can be obtained from logging
into DCA HP 3PAR storage system command line and executing the command showrcopy groups.
PostExecCheck (Optional)
Format String
Description The PostExecCheck object is used to configure HP 3PAR Cluster Extension to
gather 3PAR virtual volumes status information after the takeover procedure. That
information will be passed to the post-executable. In case of a remote data center
failure, it could be time consuming to gather that information, especially if your
post-executable does not need any Remote Copy volume group status information.
The arguments passed to the post-executable will include only the local disk status
if the PostExecCheck object is set to NO.
Valid values YES
NO (default)
PostExecScript (Optional)
Format String
Description Specifies an executable with its full path name to be invoked after the failover action
or failover procedure.
You can include environment variables in path names.
Do not specify arguments to be passed to the executable.
PreExecScript (Optional)
Format String
Description Specifies an executable with its full path name to be invoked before the failover
action or failover procedure.
You can include environment variables in path names.
52 User configuration file and HP 3PAR Cluster Extension objects
Page 53

Do not specify arguments to be passed to the executable.
ResyncWaitTimeout (Optional)
Format Integer
Description Specifies the value (in seconds) for checking the status of the Remote Copy volume
group resynchronization. It might take some time to resynchronize member virtual
volumes. You can set this value if the ApplicationStartup property is set to
RESYNCWAIT.
Default
value
90
StatusRefreshInterval
Format Integer
Description Specifies how often HP 3PAR Cluster Extension will gather HP 3PAR storage array
volume group information.
Default
value
300 seconds
UseNonCurrentDataOk (Optional)
Format String
Description When the replication link is down, this property specifies whether HP 3PAR Cluster
Extension can fail over to the destination site when the data at the destination site
might not be current.
If a HP 3PAR Remote Copy link goes down, and the resource is moved to the remote
data center:
• Setting this value to YES means that, regardless of whether or not the data is
current in the remote data center, the resource will come online.
• Setting this value to NO means that the resource will not come online on the
remote data center since data might not be current.
Valid values YES (default)
NO
HP3PARCLICommandTimeout
Format Integer
Description Specifies timeout value (in seconds) for HP 3PAR storage system command execution.
The timeout value is used whenever HP 3PAR Cluster Extension communicates with
the HP 3PAR storage system. If the storage system is not responding within the
configured timeout value, the command will time out and returns an error to the
application.
Default
value
90 seconds
Sample configuration file
The following is a sample UCF.cfg file:
COMMON
#LogLevel info # error|info default: error (optional)
#HP3PARCLICommandTimeout 60
#HP3PARRCPeriodicLinkDownTimeout 250
Sample configuration file 53
Page 54

# The APPLICATION part defines failover information for the application specified
# as value of the APPLICATION tag. For example, the command - clx3PARrun CLXSer # will use the below settings to check and allow access to the disk set specified
# as volume Group CLX_VG.
# Necessary object when clx3PARrun is used are:
# APPLICATION, DC_A_InServStorage_SerNum, DC_B_InServStorage_SerNum,
#RCVolumeGroupA, RCVolumeGroupB, DC_A_Hosts and DC_B_Hosts
APPLICATION CLXSer # package/service/cluster group test_application
DC_A_InServStorage_SerNum 1302871 # 1302871 is the data center A HP 3PAR
array serial number
#DC_B_InServStorage_SerNum 1302835 # 1302835 is the data center B HP 3PAR
array serial number
#RCVolumeGroupA CLX_VG # CLX_VG is the data center A HP
3PAR Remote Copy volume group name
#RCVolumeGroupB CLX_VG.r2835 # CLX_VG.r2835 is the data
center B HP 3PAR Remote Copy volume group name
#DC_A_Hosts clx_node1 clx_node2 # clx_node1, clx_node2 are data centre A cluster
nodes
#DC_B_Hosts clx_node3 clx_node4 # clx_node3, clx_node4 are data centre B cluster
nodes
#ApplicationStartup resyncwait # values: fastfailback | resyncwait # Setting the
fastfailback property will behave as resyncwait property when clx3PARrun is used
#UseNonCurrentDataOk yes # values: yes | no #Default value is yes which causes the
failover operation to succeed at the destination site when the data at the
destination site might not be current. On setting the value to No the resource
will not come online at the destination site since the data might not be current.
NOTE: When you configure a UCF file, remove the # symbol for the properties you want to
configure.
54 User configuration file and HP 3PAR Cluster Extension objects
Page 55

4 CLI commands and utilities
Using its CLI and command-line utilities, HP 3PAR Cluster Extension can be integrated with almost
any cluster software.
CLI commands
The HP 3PAR Cluster Extension CLI command clx3PARrun can be:
• Used as a standalone utility
• Integrated into any cluster software or custom application
clx3PARrun
Description Use clx3PARrun to manually prepare the application service's
disk set before an existing application service start procedure is
invoked. You can use clx3PARrun in custom solutions and startup
scripts.
When using clx3PARrun, the status of the associated volume
group is checked to ensure that access to the virtual volume(s) will
occur under data consistency and concurrency situations only.
You must invoke clx3PARrun before the application service disk
set can be activated; it is considered an online-only program.
However, the CLI features provide the same disaster recovery
features as the integrated versions of HP 3PAR Cluster Extension.
Syntax clx3PARrun [–version] [–forceflag] app_name
Operands Displays the HP 3PAR Cluster Extension version–version
–forceflag Force startup
app_name Application name configured in the UCF.cfg file
Example 1 This example assumes you have defined an APPLICATION tag
named my-exchange in the UCF.cfg file, and have specified all
necessary objects, including the RCVolumeGroupA and
RCVolumeGroupB objects, to map the Remote Copy volume group
to the application service my-exchange. HP 3PAR Cluster Extension
will check the virtual volume set mapped to the application service
my-exchange, run the necessary failover procedure, and generate
a return code.
# clx3PARrun my-exchange
Example 2 This example assumes you have defined an APPLICATION tag
named my-exchange in the UCF.cfg file and have specified all
necessary objects, including the RCVolumeGroupA and
RCVolumeGroupB objects, to map the Remote Copy volume group
to the application service my-exchange. HP 3PAR Cluster Extension
will check the virtual volume set mapped to the application service
my-exchange, and run the necessary failover procedure to enable
read/write access to the virtual volumes.
# clx3PARrun -forceflag my-exchange
CLI commands 55
Page 56

Related information
clx3PARrun expects only the app_name parameter, which
•
uniquely identifies an application service in the APPLICATION
section of the user configuration file.
• To force a Remote Copy volume group failover, use the
–forceflag option.
CAUTION: The forceflag option is an emergency switch used
to manually activate your virtual volume. If the forceflag option
has been specified, HP 3PAR Cluster Extension will not check any
consistency or concurrency rules before activating the virtual volume
in the associated volume group.
Return codes clx3PARrun exits with one of the following return codes:
OK Application service can be started.0
ERROR_GLOBAL Application service could not start on any node in either
1
site on either HP 3PAR storage system.
ERROR_DC Application service could not start on any node in the local site
2
on the local HP 3PAR storage system.
ERROR_LOCAL Application service could not start on this node.3
ERROR_REPLICATION_IO_NOT_STARTED Application service can be started
13
but Remote Copy replication is not started for the Remote Copy volume
group.
ERROR_REPLICATION_IO_STARTING Application service can be started but
14
Remote Copy replication is being started for the Remote Copy volume group.
Configuring the CLI
The following configuration steps are required before using the HP 3PAR Cluster Extension CLI:
1. “Creating the HP 3PAR Remote Copy environment” (page 56)
2. “Configuring the HP 3PAR storage system” (page 56)
3. “Installing HP 3PAR InForm Command Line Interface (CLI)” (page 57)
4. “Creating and configuring the user configuration file” (page 57)
Creating the HP 3PAR Remote Copy environment
HP support personnel are trained to set up HP 3PAR Remote Copy environments. You can create
and configure Remote Copy volume groups by either using the HP 3PAR InForm Management
Console GUI or CLI. For more information, see HP 3PAR Remote Copy User Guide.
Configuring the HP 3PAR storage system
To configure the HP 3PAR storage system you must:
• Create hosts
• Create virtual volumes and add a LUN presentation
• Create Remote Copy volume groups
• Add a LUN presentation to the secondary virtual volumes
For detailed procedures, see the HP 3PAR InForm Management Console User Guide or the HP
3PAR InForm CLI Administrator’s Manual.
56 CLI commands and utilities
Page 57

Installing HP 3PAR InForm Command Line Interface (CLI)
HP 3PAR Cluster Extension communicates with the HP 3PAR storage system using the HP 3PAR
InForm Command Line Interface (CLI). Ensure that you install the supported version of HP 3PAR
Command Line Interface (CLI) on a host where clx3PARrun can be used.
Creating and configuring the user configuration file
The CLI expects as an argument the name configured as the APPLICATION tag value.
The following is an example of a customized user configuration file when using clx3PARrun:
#
COMMON
#LogLevel info # error|info default: error (optional)
# The APPLICATION part defines failover information for the application
# specified as value of the APPLICATION tag.
# For example, the command - clx3PARrun CLXTEST1 — will use the below
# settings to check and allow access to the disk set specified as volume
# Group CLX_VGTEST1. Example includes similar kind of settings for another
# cluster group CLXTEST2.
# Necessary object when clx3PARrun is used are:
# APPLICATION, DC_A_InServStorage_SerNum, DC_B_InServStorage_SerNum,
# RCVolumeGroupA, RCVolumeGroupB, DC_A_Hosts and DC_B_Hosts
#APPLICATION CLXTEST1 # package/service/cluster group test_application
#DC_A_InServStorage_SerNum 1302871 # 1302871 is the data center A HP 3PAR
array serial number
#DC_B_InServStorage_SerNum 1302835 # 1302835 is the data center B HP 3PAR
array serial number
#RCVolumeGroupA CLX_VGTEST1 # CLX_VGTEST1 is the data center A
HP 3PAR Remote Copy volume group name
#RCVolumeGroupB CLX_VGTEST1.r2835 # CLX_VGTEST1.r2835 is the data
center B HP 3PAR Remote Copy volume group name
#DC_A_Hosts clx_node1 clx_node2 # clx_node1, clx_node2 are data centre A cluster
nodes
#DC_B_Hosts clx_node3 clx_node4 # clx_node3, clx_node4 are data centre B cluster
nodes
#ApplicationStartup fastfailback # values: fastfailback | resyncwait
#UseNonCurrentDataOk yes # values: yes | no #Default value is yes which causes the
failover operation to succeed at the destination site when the data at the destination
site might not be current. On setting the value to No the resource will not come
online at the destination site since the data might not be current.
#APPLICATION CLXTEST2 # package/service/cluster group test_application
#DC_A_InServStorage_SerNum 1302871 # 1302871 is the data center A HP 3PAR
array serial number
#DC_B_InServStorage_SerNum 1302835 # 1302835 is the data center B HP 3PAR
array serial number
#RCVolumeGroupA CLX_VGTEST2 # CLX_VGTEST2 is the data center A
HP 3PAR Remote Copy volume group name
#RCVolumeGroupB CLX_VGTEST2.r2835 # CLX_VGTEST2.r2835 is the data
center B HP 3PAR Remote Copy volume group name
#DC_A_Hosts clx_node1 clx_node2 # clx_node1, clx_node2 are data centre A cluster
nodes
#DC_B_Hosts clx_node3 clx_node4 # clx_node3, clx_node4 are data centre B cluster
nodes
#ApplicationStartup resyncwait # values: fastfailback | resyncwait
#UseNonCurrentDataOk yes # values: yes | no #Default value is yes which causes the
failover operation to succeed at the destination site when the data at the
destination site might not be current. On setting the value to No the resource
will not come online at the destination site since the data might not be current.
Timing considerations
HP 3PAR Cluster Extension gives priority to storage system operations over cluster software
operations. If HP 3PAR Cluster Extension is invoked at the point when virtual volumes of Remote
Copy volume group are in resynchronization or full synchronization operation or is gathering
information about the remote storage system, it waits until the requested status information is
reported. This ensures the priority of data integrity over cluster software failover behavior. Because
the failover timing depends on the configuration of your Remote Copy environment, load on the
Configuring the CLI 57
Page 58

HP 3PAR storage system and the settings in the UCF.cfg file, you must evaluate the following
considerations:
• HP 3PAR Cluster Extension uses HP 3PAR Command Line Interface (CLI) to communicate with
the HP 3PAR storage system, depending on the settings of HP 3PAR command timeout property,
and the number of Remote Copy volume groups managed by HP 3PAR storage systems, the
online operation could time out. This can also happen if clx3PARrun is used in a script or
called by another program or 3PAR storage system IP cannot be reached.
• In the UCF.cfg file, if the ApplicationStartup attribute is set to RESYNCWAIT, HP 3PAR
Cluster Extension tries to resynchronize virtual volumes and waits until the Remote Copy volume
group is in a synced state. Depending on the amount of data to be transferred, it could take
hours to resynchronize. If this is the case, clx3PARrun may take some time to return. Do not
stop clx3PARrun, use the HP 3PAR Management Console GUI or CLI to check the progress
of syncing.
• Depending on the amount of data that is out of sync between the source and destination virtual
volumes while the Remote Copy link(s) is unavailable, a resynchronization or a complete copy
operation is initiated when the Remote Copy link(s) is re-established. The amount of delta data
to be transferred between the source and destination virtual volume could be large enough
for the copy process to take some time.
• To prevent the failover timeout trigger from terminating a failover command before it is finished,
the time to copy an average amount of daily processed (write) data should be measured and
the resource online timeout interval should be adjusted accordingly. Use only one (the slowest)
link used for Remote Copy to measure the copy time. This ensures that the average daily
generated data can be transferred fast enough from the remote HP 3PAR storage system, even
in the event of a single surviving replication link between the HP 3PAR storage systems. In
general, because the failover environment is dispersed into two (or more) data centers, the
failover time cannot be expected to be the same as it would be in a single data center with
a single shared disk device.
Restrictions for customized implementations
The following restrictions apply when using the HP 3PAR Cluster Extension CLI:
• The HP 3PAR Cluster Extension CLI command clx3PARrun must be invoked before the
associated disk resources are activated on a server.
• Associated disk resources must not be activated on any other system. If other disk resources
are activated, HP 3PAR Cluster Extension may remove write-access rights for those disk devices
(putting them in read-only mode).
Cluster Extension Cmdlets for CSV and Virtual Machine Management
The following PowerShell Cmdlets are supported by CLX to perform various operations:
• Add-CSVDependencyOnCLX3PAR
• Add-VMDependencyOnCLX3PAR
• Get-VMOnClusterSharedVolumeListForCLX3PAR
As part of the CLX installation, these Cmdlets are registered on every node of the cluster. Before
invoking any of these Cmdlets, user needs to load the snap-in in every PowerShell session. To load
the Snap-In, CLX has provided a PowerShell script file AddClx3PARCmdletsSnapIn.ps1 which
exists at the location <CLX Install Directory>\bin.
User needs to run this script that will load the PowerShell Snap-In. Once the Snap-In is loaded,
user can run the supported Cmdlets to perform the various required operations. These Cmdlets are
available till the PowerShell session exists. Once the session is closed, the Snap-In will get unloaded
and these Cmdlets will not available to the user.
58 CLI commands and utilities
Page 59

Another way to unload the CLX PowerShell Snap-In is to run the PowerShell script
RemoveClx3PARCmdletsSnapIn.ps1 located at <CLX Install Directory>\bin directory.
NAME:
Add-CSVDependencyOnCLX3PAR
SYNOPSIS:
Adds a cluster resource of type "Cluster Extension 3PAR" to the list of resources and makes the
given cluster shared volume dependent on this cluster resource (CLX resource), using AND as the
connector, within a failover cluster.
Existing dependencies will remain in the list. Dependency of CSV on CLX ensures that a CSV comes
online only after CLX resource has come online..
SYNTAX:
Add-CSVDependencyOnCLX3PAR [-CSVDiskName <String>] [<CommonParameters>]
DESCRIPTION:
This cmdlet tries to create a resource of type "Cluster Extension 3PAR" to the list of resources and
makes the given cluster shared volume dependent on this cluster resource. Cluster resource of type
"Cluster Extension 3PAR" would also be called as “CLX resource” interchangeably.
The cmdlet first tries to find out if there is already a cluster resource of type "Cluster Extension
3PAR" in the CSV group (role) to which the CSV belongs.
If there is no resource of type "Cluster Extension 3PAR" in the corresponding CSV group, then the
cmdlet first creates a resource of type "Cluster Extension 3PAR" in the CSV group and then makes
the CSV resource in the CSV group dependent on the newly created resource of type "Cluster
Extension 3PAR".
If CLX resource already exists in the given CSV role, then the cmdlet checks whether CSV is already
dependent on the resource of type "Cluster Extension 3PAR". If the CSV is already dependent on
the CLX resource, then the cmdlet moves to the next CSV (if user has not specified any particular
CSV). In the absence of dependency on the existing CLX resource, the cmdlet creates a dependency
of CSV resource in the CSV group on resource of type "Cluster Extension 3PAR".
Due to this configuration, whenever CSV role is brought online, resource of type "Cluster Extension
3PAR" is the first resource to come online and then the dependent CSV disk comes online. This
ensures that CLX resource can do all the necessary storage related status gathering and failover
operations before CSV disk can come online.
PARAMETERS:
-CSVDiskName <String>
Specifies the cluster shared volume name which will be made dependent on resource of type
"Cluster Extension 3PAR”.
falseRequired?
namedPosition?
Default value
falseAccept pipeline input?
falseAccept wildcard characters?
<CommonParameters>
This cmdlet supports the common parameters: Verbose, Debug, ErrorAction,
ErrorVariable, WarningAction, WarningVariable, OutBuffer and OutVariable.
For more information, see about_CommonParameters ((http://go.microsoft.com/fwlink/?
LinkID=113216)
INPUTS:
Cluster Extension Cmdlets for CSV and Virtual Machine Management 59
Page 60

Does not accept input objects.
OUTPUTS:
Does not return object.
NOTES:
CSV resource has to be offline while trying to add the dependency.
The Confirm parameter and the Force switch parameter are provided.
The cmdlet performs the operations irrespective of the storage array type of CSV.
Online help for the cmdlet is not supported.
Example 1
C:\PS>Add-CSVDependencyOnCLX3PAR
This command first finds out all the cluster shared volumes in the cluster. After getting all such CSV
it tries to make each CSV dependent on resource of type "Cluster Extension 3PAR".
If CSV is already dependent on "Cluster Extension 3PAR", then the cmdlet moves to the next CSV
in the cluster.
However if there is no existing dependency on "Cluster Extension 3PAR" but resource of this type
is existing in the corresponding CSV group, CSV resource is made dependent on the existing
"Cluster Extension 3PAR" type resource. If it is not present, a new resource of type "Cluster Extension
3PAR" is created and CSV resource is made dependent on it.
While creating the dependency, CSV resource should be offline else dependency is not created.
PS C:> Add-CSVDependencyOnCLX3PAR
Logs will be generated with default "info" log level. For changing the
logging level, configure LogLevel parameter in UCF.cfg file at file
location: C:\Program Files\Hewlett-Packard\Cluster Extension 3PAR\conf\
UCF.cfg
Cmdlet Log Location: C:\Program Files\Hewlett-Packard\Cluster Extension
3PAR\log\CLXCmdlet.log
Add-CSVDependencyOnCLX3PAR
All CSV in the cluster will be made dependent on CLX 3PAR. Continue?
[Y] Yes [N] No [S] Suspend [?] Help (default is "Y"): y
Starting with the steps to create and add dependency of cluster shared
volume(s) on "Cluster Extension 3PAR"
TOTAL CLUSTER SHARED VOLUME(S) IN THE CLUSTER: 6
Resource of type "Cluster Extension 3PAR" to be created with Name:
"CLX_3PAR_864e7b5e-c46f-4611-b046-29470bd4bd07" in CSV Owner Group:
"864e7b5e-c46f-4611-b046-29470bd4bd07"
Resource of type "Cluster Extension 3PAR" to be created with Name:
"CLX_3PAR_Cluster Disk 1" in CSV Owner Group:
"864e7b5e-c46f-4611-b046-29470bd4bd07"
Created the resource "CLX_3PAR_Cluster Disk 1" in CSV Owner Group:
"864e7b5e-c46f-4611-b046-29470bd4bd07"
Added the dependency of CSV: "Cluster Disk 1" on "Cluster Extension
3PAR" type resource: "CLX_3PAR_Cluster Disk 1"
Resource of type "Cluster Extension 3PAR" to be created with Name:
"CLX_3PAR_Cluster Disk 2" in CSV Owner Group:
"0f145465-1186-4bbb-b9e2-2fde4cb1127d"
60 CLI commands and utilities
Page 61

Created the resource "CLX_3PAR_Cluster Disk 2" in CSV Owner Group:
"0f145465-1186-4bbb-b9e2-2fde4cb1127d"
Added the dependency of CSV: "Cluster Disk 2" on "Cluster Extension
3PAR" type resource: "CLX_3PAR_Cluster Disk 2"
Resource of type "Cluster Extension 3PAR" to be created with Name:
"CLX_3PAR_Cluster Disk 3" in CSV Owner Group:
"a71654bf-6c77-42c1-95dd-025ea8c4f225"
Created the resource "CLX_3PAR_Cluster Disk 3" in CSV Owner Group:
"a71654bf-6c77-42c1-95dd-025ea8c4f225"
Added the dependency of CSV: "Cluster Disk 3" on "Cluster Extension
3PAR" type resource: "CLX_3PAR_Cluster Disk 3"
Resource of type "Cluster Extension 3PAR" to be created with Name:
"CLX_3PAR_Cluster Disk 4" in CSV Owner Group:
"618ab9b8-53d2-49a1-a18d-a27912a46adb"
Created the resource "CLX_3PAR_Cluster Disk 4" in CSV Owner Group:
"618ab9b8-53d2-49a1-a18d-a27912a46adb"
Cannot add the dependency of CSV: "Cluster Disk 4" on "Cluster Extension
3PAR" type resource: "CLX_3PAR_Cluster Disk 4" as the resource is online
Resource of type "Cluster Extension 3PAR" to be created with Name:
"CLX_3PAR_Cluster Disk 5" in CSV Owner Group:
"b3efe970-e107-4510-829a-14d30eaedbec"
Created the resource "CLX_3PAR_Cluster Disk 5" in CSV Owner Group:
"b3efe970-e107-4510-829a-14d30eaedbec"
Cannot add the dependency of CSV: "Cluster Disk 5" on "Cluster Extension
3PAR" type resource: "CLX_3PAR_Cluster Disk 5" as the resource is online
Resource of type "Cluster Extension 3PAR" to be created with Name:
"CLX_3PAR_Cluster Disk 6" in CSV Owner Group:
"d2bdcccf-6afc-4c96-a38f-cf6eb2f8e8d7"
Created the resource "CLX_3PAR_Cluster Disk 6" in CSV Owner Group:
"d2bdcccf-6afc-4c96-a38f-cf6eb2f8e8d7"
Cannot add the dependency of CSV: "Cluster Disk 6" on "Cluster Extension
3PAR" type resource: "CLX_3PAR_Cluster Disk 6" as the resource is online
CLX 3PAR Resource NameCluster Shared Volume Name
CLX_3PAR_Cluster Disk 1Cluster Disk 1
CLX_3PAR_Cluster Disk 2Cluster Disk 2
CLX_3PAR_Cluster Disk 3Cluster Disk 3
TOTAL CLUSTER SHARED VOLUMES IN THE CLUSTER FOR WHICH CLX 3PAR DEPENDENCY
ADDED: 3
Example 2
C:\PS>Add-CSVDependencyOnCLX3PAR -CSVDiskName "Cluster Disk 1"
This command tries to make CSV "Cluster Disk 1" dependent on resource of type "Cluster Extension
3PAR".
If CSV is already dependent on "Cluster Extension 3PAR", then the cmdlet does not do anything.
However if there is no existing dependency on "Cluster Extension 3PAR" but resource of this type
is existing in the corresponding CSV group, CSV resource is made dependent on the existing
Cluster Extension Cmdlets for CSV and Virtual Machine Management 61
Page 62

"Cluster Extension 3PAR" type resource. If it is not present, a new resource of type "Cluster Extension
3PAR" is created and CSV resource is made dependent on it.
While creating the dependency, CSV resource should be offline, else dependency is not created.
PS C:> Add-CSVDependencyOnCLX3PAR -CSVDiskName "Cluster Disk 1"
Logs will be generated with default "info" log level. For changing the
logging level, configure LogLevel parameter in UCF.cfg file at file
location: C:\Program Files\Hewlett-Packard\Cluster Extension 3PAR\conf\
UCF.cfg
Cmdlet Log Location: C:\Program Files\Hewlett-Packard\Cluster Extension
3PAR\log\CLXCmdlet.log
Add-CSVDependencyOnCLX3PAR
CSV: Cluster Disk 1 will be made dependent on CLX 3PAR. Continue? [Y]
Yes [N] No [S] Suspend [?] Help (default is "Y"): y
Starting with the steps to create and add dependency of cluster shared
volume(s) on "Cluster Extension 3PAR"
Resource of type "Cluster Extension 3PAR" to be created with Name:
"CLX_3PAR_Cluster Disk 1" in CSV Owner Group:
"864e7b5e-c46f-4611-b046-29470bd4bd07"
Created the resource "CLX_3PAR_Cluster Disk 1" in CSV Owner Group:
"864e7b5e-c46f-4611-b046-29470bd4bd07"
Added the dependency of CSV: "Cluster Disk 1" on "Cluster Extension
3PAR" type resource: "CLX_3PAR_Cluster Disk 1"
CLX 3PAR Resource NameCluster Shared Volume Name
CLX_3PAR_Cluster Disk 1Cluster Disk 1
TOTAL CLUSTER SHARED VOLUMES IN THE CLUSTER FOR WHICH CLX 3PAR DEPENDENCY
ADDED: 1
RELATED LINKS:
http://www.hp.com/go/clx
Name:
Add-VMDependencyOnCLX3PAR
SYNOPSIS:
Adds a resource of type "Cluster Extension 3PAR for VM Management" to the list of resources on
which a particular "Virtual Machine Configuration" type of resource depends, using AND as the
connector, within a failover cluster. Existing dependencies will remain in the list. Dependency of
VM configuration on CLX ensures that a virtual machine comes online only after CLX resource has
come online.
SYNTAX:
Add-VMDependencyOnCLX3PAR [-CSVDiskName <String>] [<CommonParameters>]
Description:
This cmdlet tries to create a dependency of "Virtual Machine Configuration" which is residing on
a cluster shared volume onto a resource of type "Cluster Extension 3PAR for VM Management."
The cmdlet first tries to find out if there is already a resource of type "Cluster Extension 3PAR for
VM Management" in a VM role.
If it is existing, cmdlet checks whether "Virtual Machine Configuration" resource in the VM role is
already dependent on the resource of type "Cluster Extension 3PAR for VM Management". If the
62 CLI commands and utilities
Page 63

"Virtual Machine Configuration" resource is already dependent on the CLX resource, the cmdlet
moves to the next VM configuration on a CSV. In the absence of dependency on the existing CLX
resource the cmdlet creates a dependency of "Virtual Machine Configuration" resource in the VM
role on resource of type "Cluster Extension 3PAR for VM Management".
If there is no resource of type "Cluster Extension 3PAR for VM Management" in the VM role then
cmdlet first creates a resource of type "Cluster Extension 3PAR for VM Management" in the VM
role and then makes the "Virtual Machine Configuration" resource in the VM role dependent on
the newly created resource of type "Cluster Extension 3PAR for VM Management".
A virtual machine configuration resource is brought online after the "Cluster Extension 3PAR for
VM Management" type resource that it depends on. Likewise, virtual machine configuration resource
is taken offline before the "Cluster Extension 3PAR for VM Management" type resource that it
depends on.
PARAMETERS:
-CSVDiskName <String>
Specifies the cluster shared volume name for which all the virtual machine(s) residing on it will be
made dependent on resource of type "Cluster Extension 3PAR for VM Management".
falseRequired?
namedPosition?
Default value
falseAccept pipeline input?
falseAccept wildcard characters?
<CommonParameters>
This cmdlet supports the common parameters: Verbose, Debug, ErrorAction,
ErrorVariable, WarningAction, WarningVariable, OutBuffer and OutVariable.
For more information, see about_CommonParameters (http://go.microsoft.com/fwlink/?
LinkID=113216).
INPUTS:
Does not accept input object.
OUTPUTS:
Does not return object.
NOTES:
The VM roles created using failover cluster Manager GUI are supported.
"Virtual Machine Configuration" resource has to be offline while trying to add the dependency.
If a VM is residing on a CSV which is not dependent on resource of type "Cluster Extension 3PAR",
then an error is thrown and no further operations are performed on that VM.
The Confirm parameter and the Force switch parameter are provided.
The cmdlet performs the operations irrespective of the storage array type of CSV.
Online help for the cmdlet is not supported.
Example 1
C:\PS>Add-VMDependencyOnCLX3PAR
This command first finds out all the virtual machine configuration resources which are residing on
all the cluster shared volumes. After getting all such virtual machine configurations, it tries to make
each virtual machine configuration dependent on resource of type "Cluster Extension 3PAR for VM
Management".
Cluster Extension Cmdlets for CSV and Virtual Machine Management 63
Page 64

If virtual machine configuration is already dependent on "Cluster Extension 3PAR for VM
Management", then the cmdlet moves to the next virtual machine configuration on a CSV.
However if there is no existing dependency on "Cluster Extension 3PAR for VM Management" but
resource of this type is already existing in the VM role, virtual machine configuration resource is
made dependent on the existing "Cluster Extension 3PAR for VM Management" type resource. If
it is not present, a new resource of type "Cluster Extension 3PAR for VM Management" is created
and virtual machine configuration resource is made dependent on it.
While creating the dependency virtual machine configuration resource should be offline else
dependency is not created.
If a virtual machine configuration is residing on a cluster shared volume which is not dependent
on resource of type "Cluster Extension 3PAR", then an error is thrown and no further operations
are performed on that VM.
PS C:\> Add-VMDependencyOnCLX3PAR
Logs will be generated with default "info" log level. For changing the
logging level, configure LogLevel parameter in UCF.cfg file at file
location: C:\Program Files\Hewlett-Packard\Cluster Extension 3PAR\conf\
UCF.cfg
Cmdlet Log Location: C:\Program Files\Hewlett-Packard\Cluster Extension
3PAR\log\CLXCmdlet.log
Add-VMDependencyOnCLX3PAR
All VM residing in cluster will be made dependent on CLX 3PAR. Continue?
[Y] Yes [N] No [S] Suspend [?] Help (default is "Y"): y
Starting with the steps to create and add dependency of virtual machines
residing on CSV on "Cluster Extension 3PAR for VM Management".
TOTAL VIRTUAL MACHINE(S) IN THE CLUSTER: 1
VM role: "New Virtual Machine" is present on cluster shared volume :
"Cluster Disk 1" which is not dependent on resource of type "Cluster
Extension 3PAR". Ensure that cluster shared volume is made dependent
on "Cluster Extension 3PAR" before doing further operations.
Resource of type "Cluster Extension 3PAR for VM Management" to be created
with Name: "CLX_3PAR_New Virtual Machine" in virtual machine role "New
Virtual Machine"
Created the resource "CLX_3PAR_New Virtual Machine" in virtual machine
role: "New Virtual Machine"
Added the dependency of Virtual Machine Configuration in VM Role New
Virtual Machine" on "Cluster Extension 3PAR for VM Management" type
resource: "CLX_3PAR_New Virtual Machine"
CLX Resource NameVirtual Machine Role
CLX_3PAR_New Virtual MachineNew Virtual Machine
Total virtual machines in the cluster residing on CSV: 1
TOTAL VIRTUAL MACHINES IN THE CLUSTER FOR WHICH CLX 3PAR DEPENDENCY
ADDED: 1
Example 2
C:\PS>Add-VMDependencyOnCLX3PAR -CSVDiskName "Cluster Disk 1"
This command first finds out all the virtual machine configurations which are residing on the cluster
shared volume "Cluster Disk 1". After getting all virtual machine configurations on the provided
64 CLI commands and utilities
Page 65

cluster shared volume, it tries to make each virtual machine configuration resource dependent on
resource of type "Cluster Extension 3PAR for VM Management".
If virtual machine configuration is already dependent on "Cluster Extension 3PAR for VM
Management", then the cmdlet moves to the next virtual machine configuration on the provided
CSV.
However if there is no existing dependency on "Cluster Extension 3PAR for VM Management" but
resource of this type is already existing in the VM role, virtual machine configuration resource is
made dependent on the existing "Cluster Extension 3PAR for VM Management" type resource. If
it is not present, a new resource of type "Cluster Extension 3PAR for VM Management" is created
and virtual machine configuration resource is made dependent on it.
While creating the dependency virtual machine configuration resource should be offline else
dependency is not created.
If a virtual machine configuration is residing on a cluster shared volume which is not dependent
on resource of type "Cluster Extension 3PAR" an error is thrown and no further operations are
performed on that VM.
PS C:\> Add-VMDependencyOnCLX3PAR -CSVDiskName "Cluster Disk 1
Logs will be generated with default "info" log level. For changing the
logging level, configure LogLevel parameter in file UCF.cfg at file
location: C:\Program Files\Hewlett-Packard\Cluster Extension 3PAR\conf\
UCF.cfg
Cmdlet Log Location: C:\Program Files\Hewlett-Packard\Cluster Extension
3PAR\log\CLXCmdlet.log
Add-VMDependencyOnCLX3PAR
All VM residing on CSV: Cluster Disk 1 will be made dependent on CLX
3PAR. Continue? [Y] Yes [N] No [S] Suspend [?] Help (default is "Y"):
y
Starting with the steps to create and add dependency of virtual machines
residing on CSV on "Cluster Extension 3PAR for VM Management".
TOTAL VIRTUAL MACHINE(S) IN THE CLUSTER: 1
Resource of type "Cluster Extension 3PAR for VM Management" to be created
with Name: "CLX_3PAR_New Virtual Machine" in virtual machine role "New
Virtual Machine"
Created the resource "CLX_3PAR_New Virtual Machine" in virtual machine
role: "New Virtual Machine"
Added the dependency of Virtual Machine Configuration in VM Role New
Virtual Machine" on "Cluster Extension 3PAR for VM Management" type
resource: "CLX_3PAR_New Virtual Machine"
CLX Resource NameVirtual Machine Role
CLX_3PAR_New Virtual MachineNew Virtual Machine
Total virtual machines in the cluster residing on CSV: 1
TOTAL VIRTUAL MACHINES IN THE CLUSTER FOR WHICH CLX 3PAR DEPENDENCY
ADDED: 1
RELATED LINKS:
http://www.hp.com/go/clx
NAME:
Get-VMOnClusterSharedVolumeListForCLX3PAR
Cluster Extension Cmdlets for CSV and Virtual Machine Management 65
Page 66

SYNOPSIS:
Gets the list of virtual machines which reside on a cluster shared volume.
SYNTAX:
Get-VMOnClusterSharedVolumeListForCLX3PAR [-CSVDiskName <String>
[<CommonParameters>]
DESCRIPTION:
This cmdlet tries to get the list of all virtual machines which reside on a CSV. If the CSV name is
specified, then the virtual machines which reside on that particular CSV are only listed. However
if no CSV name is specified, then all the virtual machines which are residing on a CSV are listed
with their corresponding CSV names.
PARAMETERS:
-CSVDiskName <String>
Specifies the cluster shared volume name for which all the virtual machines will be listed.
falseRequired?
namedPosition?
Default value
falseAccept pipeline input?
falseAccept wildcard characters?
<CommonParameters>
This cmdlet supports the common parameters: Verbose, Debug,ErrorAction,
ErrorVariable, WarningAction, WarningVariable,OutBuffer and OutVariable.
For more information, see about_CommonParameters http://go.microsoft.com/fwlink/?
LinkID=113216
INPUTS:
Does not accept input object.
OUTPUTS:
Does not return a object.
NOTES:
The cmdlet performs the operations irrespective of the storage array type of CSV.
Online help for the cmdlet is not supported.
Example 1
C:\PS>Get-VMOnClusterSharedVolumeListForCLX3PAR
In this example, the cmdlet lists all the virtual machines which reside on a cluster shared volume.
PS C:\> Get-VMOnClusterSharedVolumeListForCLX3PAR
Cmdlet Log Location: C:\Program Files\Hewlett-Packard\Cluster Extension
3PAR\log\CLXCmdlet.log
Starting with the steps to get virtual machines on cluster shared volumes
in the cluster.
Getting the virtual machine(s) created on all cluster shared volumes
in the cluster.
66 CLI commands and utilities
Cluster Shared Volume NameVirtual Machine Role
Cluster Disk 1New Virtual Machine
Page 67

Total virtual machines in the cluster on cluster shared volumes: 1
Total virtual machines in the cluster: 1
Example 2
C:\PS>Get-VMOnClusterSharedVolumeListForCLX3PAR -CSVDiskName "Cluster
Disk 1"
In this example, the cmdlet lists all the virtual machines which reside on CSV "Cluster Disk 1"
PS C:\> Get-VMOnClusterSharedVolumeListForCLX3PAR -CSVDiskName "Cluster
Disk 1"
Cmdlet Log Location: C:\Program Files\Hewlett-Packard\Cluster Extension
3PAR\log\CLXCmdlet.log
Starting with the steps to get virtual machines on cluster shared volumes
in the cluster.
Getting the virtual machine(s) created on CSV: Cluster Disk 1
Cluster Shared Volume NameVirtual Machine Role
Cluster Disk 1New Virtual Machine
Total virtual machines in the cluster on the provided cluster shared
volume: 1
Total virtual machines in the cluster: 1
RELATED LINKS:
http://www.hp.com/go/clx
Pre-execution and post-execution programs
HP 3PAR Cluster Extension can invoke pre-execution and post-execution programs prior to or after
a HP 3PAR Cluster Extension failover/failback function. These programs can be any executable,
and must be able to provide return codes to HP 3PAR Cluster Extension. If the programs add
significant execution time to the application service startup process, the timeout values for the
startup process must be adjusted in the cluster software.
HP 3PAR Cluster Extension transfers information as CLI arguments to the pre-execution and
post-execution programs. You must not specify CLI arguments. Pre-executables and post-executables
must be specified by full path in the PreExecScript and PostExecScript objects. If no
executable is specified (there is an empty value for the object), no preprocessing or postprocessing
is performed. If the object is not defined, then the argument value is empty.
The following arguments are transferred to the scripts in this order:
1. Resource name
2. DC A HP 3PAR storage system serial number
3. DC B HP 3PAR storage system serial number
4. DC A Remote Copy volume group
5. DC B Remote Copy volume group
6. DC A host (server) names
7. DC B host (server) names
8. Replication mode
9. Local replication role
10. Remote replication role
11. Remote copy link status
12. Failsafe policy
13. Remote Copy volume group status
Pre-execution and post-execution programs 67
Page 68

14. Remote Copy volume group virtual volume status
15. AutoRecover
16. Application directory path (ApplicationDir object)
17. Log file location (LogDir object)
Pre-executables and post-executables must supply a return code. The return code is used to determine
whether a failover function is called.
Pre-execution return codes
DescriptionTextPre-execution return code
Pre-executable OK and failover action allowed.PRE_OK_TAKEOVER0
CAUTION: If the pre-execution program returns 1, 2, 3 or 5, a properly configured post-executable
is not executed. If a failover function fails, the post-executable is not executed.
Post-execution return codes
PRE_ERROR_GLOBAL1
PRE_ERROR_DC2
PRE_ERROR_LOCAL3
Pre-executable failed; no failover; stop application service
cluster-wide. Microsoft Cluster service does not allow
cluster-wide or data-center-wide disabling of resources.
This is local error behavior.
Pre-executable failed; no failover; stop application service
in this data center. MSFC does not allow cluster-wide or
data-center-wide disabling of resources. This is local error
behavior.
Pre-executable failed; no failover; stop application service
on this system.
Pre-executable failed; failover action allowed.PRE_ERROR_TAKEOVER4
Pre-executable OK; no failover; no post-exec.PRE_OK_NOTKVR_NOPST5
DescriptionTextPre-execution return code
Post-executable OK; continue.POST_OK0
CAUTION: Operating system scripts and/or batch files return 0 if the program was successfully
executed. To return a different value, use the following line as the last statement in your pre- or
post-executable: Windows batch file: exit /b exitcode.
68 CLI commands and utilities
POST_ERROR_GLOBAL1
POST_ERROR_DC2
POST_ERROR_LOCAL3
Post-executable failed; stop application service
cluster-wide. MSFC does not allow cluster-wide or
data-center-wide disabling of resources. This is local
error behavior.
Post-executable failed; stop application service in this
data center. MSFC does not allow cluster-wide or
data-center-wide disabling of resources. This is local
error behavior.
Post-executable failed; stop application service on this
system.
Post-executable failed; continue without error.POST_ERROR_CONTINUE4
Page 69

5 Troubleshooting
To troubleshoot problems with HP 3PAR Cluster Extension, one must understand HP 3PAR Remote
Copy environments. See the Remote Copy User's Guide for more information on Remote Copy
configuration and volume group states. See the HP 3PAR Cluster Extension log for any cluster
specific information. However, it always keeps its own log files in its default log location.
CAUTION: HP 3PAR Cluster Extension cannot handle Remote Copy volume group states
automatically and correctly, if they result from manual manipulations (either through HP 3PAR
InForm GUI or CLI or through any other means).
Logs
The following logs are available for troubleshooting:
• Event logs
• Cluster related log messages logged by Windows Cluster (%windir%\cluster\reports\
cluster.log)
• Messages logged by Cluster Extension (%HPCLX_3PAR_PATH%\log\clxmscs.log)
• CLX cmdlet logs (%HPCLX_3PAR_PATH%\log\CLXCmdlet.log)
• 3PAR storage system log file (sysmgr log file)
Follow the order depicted in the flow diagram to troubleshoot problems.
Log facility
The logging module of HP 3PAR Cluster Extension provides log messages to the cluster software
as well as to the HP 3PAR Cluster Extension log file. The HP 3PAR Cluster Extension log file includes
disk status information and is located by default in this directory:
%ProgramFiles%\Hewlett-Packard\Cluster Extension 3PAR\log\
Logs 69
Page 70

HP 3PAR Cluster Extension logs
The logging module of HP 3PAR Cluster Extension provides log messages to the cluster software
and to the HP 3PAR Cluster Extension log file. The HP 3PAR Cluster Extension log file includes
Remote copy volume group status information.
By default, the HP 3PAR Cluster Extension log file is located in the %ProgramFiles%\
Hewlett-Packard\Cluster Extension 3PAR\log\ directory.
To clear and reset the log file, for example, to reduce disk space usage, archive the log file and
then delete it. A new log file is automatically generated.
The following shows a typical log entry and description of the fields, including timestamps,
component IDs, and message IDs.
Sample log file
Line 1: The process begins for a Cluster Extension resource CLX03 using HP 3PAR Cluster Extension
version number 3.00.00.
Line 2: Cluster Extension internal configuration file version.
Line 3 - 5: The warning message for a temporary license.
Line 6: The host name where a Cluster Extension resource is being brought online in the data center
(A or B).
Line 7: The remote data center nodes status.
Line 8-28 : Configuration details of the Cluster Extension resource before failover. The configuration
details will be used to take failover decisions.
70 Troubleshooting
Page 71

In the current example, the state of the local Remote Copy (RC) group is “primary” (virtual volumes
having read/write access) and the state of the remote RC group is “secondary” (virtual volumes
having read-only access). The RC link status is UP and the replication status is started.
Line 30: The status of the Cluster Extension takeover action.
Line 31: The encoded Cluster Extension execution path.
Line 32: Online status of Cluster Extension resources.
Line 33: Creating <CLX resource name>.online file to check resource health.
Line 34: End of the Cluster Extension execution process.
HP 3PAR storage system log or sysmgr log
A task, identified by task IDs is generated for each operation in the 3PAR storage system. Task
manager commands provides information regarding the tasks in the system.
For more information, see Managing Tasks section in HP 3PAR CLI Administrator’s Manual.
NOTE: Match the 3PAR storage system time with the cluster node time so that tasks can be easily
mapped to Cluster Extension operations.
For detailed log messages from HP 3PAR storage system, do the following:
1. Login with the 3parsvc user using HP 3PAR CLI.
2. Run showsys.
This will indicate the master node on that system.
3. On the CLI shell, enter copyfile <nodeid>:/var/log/tpd/sysmgr /tmp/xxxsysmgr.
If master node ID is 1, then copyfile 1:/var/log/tpd/sysmgr /tmp/sysmgr.
4. In the above example, the file sysmgr will be copied to the <SystemDrive:>\tmp directory.
Error return codes
HP 3PAR Cluster Extension provides the following error return codes for failover operations:
local error
data center error
global error
DescriptionError return codes
Prohibits an application service startup on the local system.
This can be caused by the inability of HP 3PAR Cluster
Extension to enable disk access, or the misconfiguration
of the storage system environment.
Prohibits an application service startup on any system in
the local data center. This error is returned if the disk state
indicates that it makes no sense to allow any other system
connected to the same storage system to access the disks.
Windows clustering does not allow cluster-wide or
data-center-wide disabling of resources. This is local error
behavior.
Returned if the configuration or the disk state do not allow
an automatic application service startup process. Manual
intervention is required in such cases. Windows clustering
does not allow cluster-wide or data-center-wide disabling
of resources. This is local error behavior.
Replication I/O not started error
Replication I/O between the primary and secondary
Remote Copy volume group is not started. Use HP 3PAR
Management GUI or CLI to check if the replication status
is started or not. You can manually start the Remote
HP 3PAR storage system log or sysmgr log 71
Page 72

DescriptionError return codes
Copy replication using HP 3PAR Management GUI or CLI
when required.
Replication I/O starting error
When HP 3PAR Cluster Extension is integrated into the cluster software, an error message string
and integer value are displayed. For the CLI, a return code is displayed. For more information,
see “CLI commands” (page 55).
Log files
Log files assist you in locating and identifying problems. Timestamps, component IDs, and message
IDs are included.
• HP 3PAR Cluster Extension-related messages are logged by MSFC to the file cluster.log
• For each system, HP 3PAR Cluster Extension keeps its own log file in its default log location.
Replication I/O between the primary and secondary
Remote Copy volume group is started. Use HP 3PAR
Management GUI or CLI to check if the replication status
is started or not. You can manually start the Remote
Copy replication using HP 3PAR Management GUI or CLI
when required.
in the location %windir%\Cluster\Reports.
Log locationLog file
%HPCLX_3PAR_PATH%\logclxmscs.log
%HPCLX_3PAR_PATH%\logVMClxMscs.log (For VM Management on
Windows Server 2012 only)
• HP 3PAR Cluster Extension messages can also be found in the following:
◦ MSFC log file [%windir\cluster\reports\cluster.log]
Always disable automatic service or application failover when merging or resynchronizing
Remote Copy volume groups. A failure of the resynchronization source while resynchronizing
can lead to noncurrent data on the resynchronization target.
Start errors
• Generic startup or initialization logic errors can occur when the path to the HP 3PAR Cluster
Extension binaries has not been set in the PATH environment variable and the processes (for
example the cluster service) have not recognized the %HPCLX_3PAR_PATH% variable. To fix
this problem, restart the cluster service.
• If the required components of HP 3PAR Cluster Extension are not available, a file (clxlog.log
) is generated that can be used for troubleshooting. The file is usually in the working directory
of the operating system (%SYSTEMROOT%).
• HP 3PAR Cluster Extension returns a local error if any of the following occurs:
◦
%HPCLX_3PAR_PATH%\logCLXCmdlet.log
HP 3PAR Cluster Extension does not find the user configuration file for clx3PARrun in
the correct directory location.
◦ An error occurs after initialization.
72 Troubleshooting
Page 73

Failover error handling
Windows Cluster automatically fails over resource groups if the system where resource group is
running on becomes unavailable. This is part of the cluster functionality. Also, this means that if a
problem occurs with the HP 3PAR storage system, a resource group online process will be stopped.
The behavior of HP 3PAR Cluster Extension is highly configurable. Depending upon the customer
setting, Cluster Extension is used to prevent resource groups from going online automatically under
the wrong conditions.
Cluster Extension will return local, data center-wide or even cluster-wide errors to prevent accidental
access to the resource group’s virtual volumes. HP does not recommend restarting a failed resource
group without investigating the problem. A failed Cluster Extension resource indicates the need to
check the status of the Remote Copy volume group and its member virtual volumes and decide
whether it is safe to continue or not.
HP 3PAR Cluster Extension services, resources, or resource groups return a data center error and
fail the resource if the Remote Copy volume group status indicates that the problem experienced
locally would not be solved on another system connected to the same HP 3PAR storage system.
Depending on the resource group and resource property values, the resource tries to start on
different nodes several times. If the remote data center is down, this would look like the resource
group is alternating between the surviving systems. This happens until the previously mentioned
resource and resource group property values are reached or you disable the restarting of the
resource. This could be also the case if the ApplicationStartup resource property has been
set to FASTFAILBACK. If a 3PAR storage system state has been discovered that does not allow
bringing the resource group online on any system in the cluster, a cluster error would be reported
and the resource would fail on all systems. This could lead to the same behavior as described for
a HP 3PAR Cluster Extension data center error.
Failing physical disk resources during online attempt of the resource group
When resource groups that use HP 3PAR Cluster Extension to failover Remote Copy volume group
are brought online, physical disk resources may fail due to the following reasons:
• The physical disk resource does not have a dependency on its HP 3PAR Cluster Extension
resources/packages configured. Review the setup steps for HP 3PAR Cluster Extension
resources.
• The fibre channel path or connectivity between the servers and the storage systems may be
broken. So user has to review the FC connectivity between the servers and the storage systems.
• If the storage array is brought back online or started after the array shutdown due to the
datacenter disaster or Inform OS upgrade, at times the status of the remote copy volume group
may go to the failsafe status as soon as the array is brought back online. The status of the
remote copy volume group is marked as failsafe by the Inform OS after the array comes
online and when the replication roles are primary at one side and primary-rev at the other
side. At this time, the physical disk resource may fail to come online in the Microsoft failover
cluster host whenever the cluster application role tries to come online on the server cluster host
which is connected to the rebooted storage array.
One of the scenarios to get in to the failsafe status can be explained as follows.
The replication roles for a remote copy volume group are primary in one datacenter (primary)
and secondary in the other datacenter (secondary) and the corresponding application in the
Microsoft failover cluster are online in the primary datacenter. In case a disaster such as power
outage happens in the primary datacenter, the application tries to failover to the failover
cluster host in the secondary datacenter. The application comes online successfully in the
failover cluster host in the secondary datacenter if the CLX property UseNonCurrentDataOk
is set to Yes. Once application comes online, the replication role in the secondary datacenter
turns to primary-rev from secondary.
Failover error handling 73
Page 74

Later, when the power outage in the primary datacenter is corrected and the storage array is
brought back online, the status of the remote copy volume group goes to the failsafe status.
At this time, if we failback the corresponding cluster application role from the secondary
datacenter to one of the hosts in the primary datacenter, then the physical disk resources may
fail to come online even though CLX resource has come online successfully.
This issue occurs if the LUN WWNs of the virtual volumes in the RC Groups are same for both
the primary and secondary storage arrays.
To avoid this situation (physical disk resources not coming online), ensure that the disk rescan
is done in the Microsoft failover cluster hosts manually before you failback the corresponding
cluster application role from the secondary datacenter to the host in the primary datacenter.
Also, the physical disk must be connected to the primary datacenter storage array as soon as
the storage array is brought back online.
Another way to avoid this situation is to configure the CLX preexec script which does the
rescan of the disks. The preexec script can be configured in CLX as
DiskRescanDiskpart.bat in the same Windows folder and having the following line in
this script.
echo rescan | diskpart
NOTE: The syntax of the command in the preexec script must be proper, otherwise preexec
script operation fails and then the CLX failover operation also does not succeed.
• If the storage array in the secondary datacenter is brought back online or started after the
array shutdown due to the datacenter disaster or Inform OS upgrade, the disks presented to
the hosts in the secondary datacenter are not recognized by the Windows operating system.
Due to this issue, if Failover of the cluster resources is triggered to the secondary datacenter,
the disk cluster resource does not come online even though the corresponding CLX resource
comes online.
To avoid this situation (physical disk resources not coming online), ensure that the disk rescan
is done in the Microsoft Failover cluster hosts manually, connected to the secondary datacenter
storage array as soon as the storage array is brought back online and before you Failover
the corresponding cluster application role to the secondary datacenter hosts.
Another way to avoid this situation is to configure the CLX preexec script which does the
rescan of the disks. The preexec script can be configured in CLX as
DiskRescanDiskpart.bat in the same Windows folder and having the following line in
this script.
echo rescan | diskpart
NOTE: The syntax of the command in the preexec script must be proper, otherwise preexec
script operation fails and then the CLX failover operation also does not succeed.
Cannot connect to HP 3PAR storage system
During HP 3PAR Cluster Extension configuration, if you are unable to connect to the 3PAR storage
system, ensure that the storage system is up and running, and the network ports are functioning
properly. To check for response from the storage system over the network, use the ping command
from cluster nodes to the storage system's network name or IP address.
ping <storage system network name or IP address>
If you are using storage system network name, verify it is resolving to proper IP address using
nslookup command from the cluster nodes.
nslookup <storage system network name>
74 Troubleshooting
Page 75

Resource disk failure when HP 3PAR Cluster Extension is online
In a cluster resource group, if the Cluster Extension resource is online but dependent disk resource
is failing:
• Ensure that the fibre channel connectivity between the servers and the storage systems is up
and running.
• Verify that the disk resource is dependent to the Cluster Extension resource.
• Ensure that the Remote Copy volume group managed by the Cluster Extension resource contains
the virtual volume which is correctly mapped to the configured disk resource.
• On a cluster node where the Cluster Extension resource is online, ensure that the presented
virtual volume is having read/write access on the HP 3PAR storage system.
• Using HP 3PAR Management GUI, verify that the virtual volume is having read/write access
on HP 3PAR storage system where Cluster Extension resource is online.
• Rescan disks using Disk Management.
Cluster Extension and HP 3PAR Command Line (CLI) Install/Upgrade
While installing or upgrading HP 3PAR Command Line Interface (CLI), the environment variable
Path will be updated with the CLI install directory. Occasionally, this change does not take effect
and you may have to re-login to Windows. HP recommends that you test the CLI commands after
you install or upgrade HP 3PAR CLI and try to re-login, if the commands fail due to the binary not
found error.
Change of HP 3PAR storage system IP or password file
If there is change in the configured HP 3PAR storage system's IP address in the Cluster Extension
configuration or if the configured password file is missing or corrupt, Cluster Extension will fail to
communicate with the storage system and cannot perform any Cluster Extension failover operations.
You can use the Connection Test option of HP 3PAR Cluster Extension configuration tool to verify
connectivity of configured storage systems. To change HP 3PAR storage systems settings, use the
Modify option in the HP 3PAR Cluster Extension configuration tool and save the configuration file
on all cluster nodes.
Host persona settings
Host personas are a set of behaviors that permit hosts connected to FC ports on the HP 3PAR
storage system to deviate from the default host behavior. By assigning a persona to a host, multiple
host types that require distinct customized responses can share a HP 3PAR storage system port.
For example, hosts running Windows operating systems can all connect to the same HP 3PAR
storage system port.
You can set the host persona number when the host is created or modify it later. To display, create,
modify, and remove host personas, use the HP 3PAR CLI commands or the HP 3PAR Management
Console. For instructions on displaying, creating, modifying, and removing host personas, see the
HP 3PAR InForm CLI Administrator’s Manual or the HP 3PAR InForm Management Console Online
Help.
NOTE: Host persona setting varies based on the Windows operating system installed on the
cluster nodes. For more information, see the HP 3PAR Implementation Guide.
no_fail_wrt_on_err settings
The no_fail_wrt_on_err policy applies only to synchronous Remote Copy.
The no_fail_wrt_on_err group policy (default policy) allows writes to a primary Remote Copy
volume group even though the link between the systems in the Remote Copy pair is broken.
Resource disk failure when HP 3PAR Cluster Extension is online 75
Page 76

Continuing to write changes despite a broken link leads to a loss of synchronization between
primary and secondary Remote Copy volume groups. The no_fail_wrt_on_err policy is used
when you would rather keep the applications that are writing the data running, even when the
Remote Copy has failed and become out of sync. After the error that caused the broken link is
resolved, you must manually restart the Remote Copy operation between the members of the Remote
Copy pair to bring the Remote Copy in sync again.
NOTE: HP 3PAR Cluster Extension supports only the Remote Copy volume groups with
no_fail_wrt_on_err policy. For information on setting the Remote Copy volume group policies,
see the Remote Copy Commands section in HP 3PAR Remote Copy User’s Guide .
Remote Copy and 3PAR Virtual Domains
Remote Copy checks HP 3PAR Virtual Domains (domains) on the remote system to ensure that the
virtual volume is mirrored to the same domain name as the local domain name. The domain needs
to be called a correct domain name. For more information on domains, see the HP 3PAR Concepts
Guide and for instructions on setting up domains, see the HP 3PAR CLI Administrator’s Manual.
NOTE: When configuring the HP 3PAR storage system password file for Cluster Extension usage,
user in the password file should have access to all the domains of Remote Copy virtual volumes
managed by Cluster Extension.
Promote issue
When the data copy is going on between the primary and the secondary Remote Copy volume
groups, if the Remote Copy link is broken for some reason, the Remote Copy volume groups go
to the stopped state and the snapshots of the secondary volumes start getting promoted to the
base volumes. This is the design of 3PAR Remote Copy. This activity may take some time to complete.
At this time, if the start or restore operation is attempted on the Remote Copy volume groups,
then this operation may fail with the error Promote operation is going on. At this time, if
the local replication role is secondary, the remote replication role is primary, and the remote copy
link is up, Cluster Extension executes stop, reverse, and start operations for the Remote Copy
volume group. If the stop and reverse operation succeed, then the secondary volumes become
read-write and Cluster Extension resource comes online even though the start operation may
fail. If the start operation fails, replication I/O does not start from the new primary volumes to
the new secondary volumes.
Cluster Extension Autopass troubleshooting
Cluster Extension uses Autopass as a framework for licensing checks. Autopass provides Graphical
User Interface and a Command Line Interface to perform licensing specific operations, and they
are well integrated into the Cluster Extension. For the GUI, Autopass needs a compatible JRE version
installed on the system. For the supported JRE version see the Cluster Extension SPOCK. In case
the GUI is not working due to environmental issues related to JRE, CLI can be used to perform the
licensing specific operations like install and uninstall.
HP 3PAR Target arrays not configured with Remote Copy Links
Sometimes CLX Configuration Tool is not able to add an array even through the password file
exists and PATH variable is set properly for the HP 3PAR Inform CLI, you can still execute HP 3PAR
Inform CLI command locally. The root cause for this problem is that the HP 3PAR Inform CLI command
showrcopy for this array does not show any target information (in case if target array is not
configured). Hence, configure the 3PAR remote copy for the array first, and then add the array to
CLX configuration through CLX configuration tool.
Configuration of CLX resource for CSV disk on Windows Server 2012 : When user wants to
configure the resource properties for a CLX resource using the Failover Cluster Manager, the HP
76 Troubleshooting
Page 77

3PAR CLX Setting tab will not be visible, if the CSV disk dependency on the CLX resource is not
set.
HP 3PAR Target arrays not configured with Remote Copy Links 77
Page 78

6 Support and other resources
Contacting HP
For worldwide technical support information, see the HP support website:
http://www.hp.com/support
Before contacting HP, collect the following information:
• Product model names and numbers
• Technical support registration number (if applicable)
• Product serial numbers
• Error messages
• Operating system type and revision level
• Detailed questions
New and changed information in this edition
• HP 3PAR Cluster Extension support for Windows Server 2012.
• HP 3PAR Cluster Extension support for Windows Server 2003 is not available in this release.
Related information
The following documents [and websites] provide related information:
• HP 3PAR Cluster Extension Software Installation Guide
• HP 3PAR Cluster Extension Software Release Notes
You can find these documents on the Manuals page of the HP Business Support Center website:
http://www.hp.com/support/manuals
In the Storage section, click Storage software and then select your product.
Whitepapers
The following white paper is available at www.hp.com/storage/whitepapers:
• Live Migration across data centers and disaster tolerant virtualization architecture with HP
StorageWorks Cluster Extension and Microsoft Hyper-VTM
• Implementing HP StorageWorks Cluster Extension for Windows in a VMware Virtual Machine
NOTE: The above whitepaper is specific to HP P6000 (EVA) and HP P9000 (XP) storage systems,
but the functionally is also applicable for HP 3PAR storage systems.
HP websites
For additional information, see the following HP websites:
• http://www.hp.com
• http://www.hp.com/go/storage
• http://www.hp.com/service_locator
• http://www.hp.com/support/manuals
• Single Point of Connectivity Knowledge (SPOCK)
78 Support and other resources
Page 79

• http://www.hp.com/support/downloads
• http://www.hp.com/storage/whitepapers
Typographic conventions
Table 4 Document conventions
ElementConvention
Cross-reference links and e-mail addressesBlue text: Table 4 (page 79)
Website addressesBlue, underlined text: http://www.hp.com
Bold text
Monospace text
Monospace, italic text
• Keys that are pressed
• Text typed into a GUI element, such as a box
• GUI elements that are clicked or selected, such as menu
and list items, buttons, tabs, and check boxes
Text emphasisItalic text
• File and directory names
• System output
• Code
• Commands, their arguments, and argument values
• Code variables
• Command variables
Emphasized monospace textMonospace, bold text
WARNING! Indicates that failure to follow directions could result in bodily harm or death.
CAUTION: Indicates that failure to follow directions could result in damage to equipment or data.
IMPORTANT: Provides clarifying information or specific instructions.
NOTE: Provides additional information.
TIP: Provides helpful hints and shortcuts.
Typographic conventions 79
Page 80

Glossary
3PAR Remote Copy A product that allows you to copy virtual volumes from one HP 3PAR storage system to another.
CLI Command-line interface. An interface comprised of various commands which are used to control
operating system responses.
cluster A group of controller nodes connected via the same storage server backplane. The nodes in a
cluster operate as a unified system, separate from any other clusters that may share the same
service processor.
CLX Cluster Extension.
data distribution Pushing copies of data to geographic locations to make it more easily accessible to many
customers.
data migration Moving data to a new location or to one with a larger capacity.
fabric A network of Fibre Channel switches or hubs and other devices.
failover A role-reversal process where the backup Remote Copy volume group is converted to the primary
Remote Copy volume group.
GUID Globally Unique IDentifier.
heartbeat A periodic synchronization signal issued by cluster software or hardware to indicate that a node
is an active member of the cluster.
high availability Redundant systems, software, and information technology processes to reduce the risk of downtime.
No single point of failure.
LU Logical Unit
MNS Majority node set quorum. A quorum-capable resource introduced by Microsoft. A single quorum
resource that allows you to build clusters with nodes that are geographically separated.
MSFC Microsoft Failover Cluster.
primary volume
group
quorum In MSFC, a cluster resource that has been configured to maintain essential cluster data and
Remote Copy links The method by which information is sent and received between Remote Copy targets.
secondary volume
group
split-brain
syndrome
target The description of a Remote Copy system on one HP 3PAR storage system in the Remote Copy
virtual volume A virtual storage unit created by mapping data from one or more logical disks.
VM Virtual Machine.
volume group A group of virtual volumes that are logically related and for which there is a cross-volume ordering
World Wide Name
(WWN)
A Remote Copy volume group that reside on the local or primary HP 3PAR storage system.
recovery information. If a node fails, the quorum acts as a tie-breaker and is transferred to a
surviving node to ensure that data remains consistent within the cluster.
A Remote Copy volume group that reside on the remote or backup HP 3PAR storage system.
A state of data corruption can occur if a cluster is reformed as subclusters of nodes at each site,
and each subcluster assumes authority, starting the same set of applications and modifying the
same data.
pair.
of writes.
A 64- or 128-bit identifier that uniquely identifies the address of a component on the fabric.
80 Glossary
Page 81

Index
Symbols
3PAR Cluster Extension
Features, 6
Integration, 6
Processes and components, 10
3PAR Remote Copy, 10
Volume groups, 11
A
Adding
HP 3PAR Cluster Extension resource, 21
Adding dependencies
using CLI, 36
using Failover Cluster Management, 35
using PowerShell, 36
Administration, 42
APPLICATION objects, 49
ApplicationDir
description, 49
ApplicationStartup
description, 50
AutoFailbackType
Description, 26
B
Basic Resource Health Check Interval
Description, 25
Bouncing service or application, 41
C
CLI
integration, 6
Cluster Extension Cmdlets, 58
Cluster setup considerations
Cluster Shared Volume, 13
Node Majority quorum, 12
Node Majority with File Share Witness, 13
Windows clustering, 12
ClusterNotifyCheckTime
description, 51
UCF requirement, 34
ClusterNotifyWaitTime
description, 51
UCF requirement, 34
clx3PARrun command, 55
Command line interface
Configuring, 56
Restrictions, 58
COMMON objects, 48
Configuration
HP 3PAR Cluster Extension, 16
Configuration information
Exporting, 21
Importing, 21
Configuration tool, 15
Configurations
Storage systems, 8
Contacting HP, 78
Conventions
Text symbols, 79
D
DC_A_ InServStorage_SerNum
description, 52
DC_A_Hosts
description, 51
DC_B_ InServStorage_SerNum
description, 52
DC_B_Hosts
description, 51
Disaster tolerance, 6
Document
Related information, 78
Typographic conventions, 79
Documentation
HP website, 78
E
Exporting
Configuration information, 21
F
FailoverPeriod
Description, 26
FailoverThreshold
Description, 26
FASTFAILBACK value
description, 51
Features
3PAR Cluster Extension, 6
CLI, 6
Disaster tolerance, 6
Integration with cluster software, 6
Redirection of mirrored disks, 7
Files
Configuration tool, 15
Force flag, 12
User configuration, 12
Force flag, 12
H
HP
Technical support, 78
HP 3PAR Cluster Extension
Configuration, 16
HP 3PAR Remote Copy
Synchronous replication, 12
HP3PARCLICommandTimeout
description, 53
Hyper-V Live Migration, 40
Hyper-V Live Migration log enteries, 43
81
Page 82

I
Importing
Configuration information, 21
Integration
CLI, 6
with cluster software, 6
IsAlivePollInterval
Description, 25
L
Live migration, 40, 43
LogDir
description, 49
LogLevel
description, 49
UCF requirement, 34
LooksAlivePollInterval
Description, 25
M
Microsoft Management Console, 24
Mirrored disks
Automated redirection, 7
N
New and changed information, 78
P
PendingTimeout
Description, 25
Post-execution programs, 67
Return codes, 68
PostExecCheck
description, 52
PostExecScript
description, 52
Pre-execution programs, 67
Return codes, 68
PreExecScript
description, 52
Processes and components
3PAR Cluster Extension, 10
R
RCVolumeGroupA
description, 52
RCVolumeGroupB
description, 52
Related documentation, 78
Remote management, 24
HP 3PAR Cluster Extension resources, 42
Resource properties
using CLI, 33
using GUI, 27
using Microsoft Failover PowerShell Cmdlets, 34
using MMC, 33
using UCF, 34
Resources
Bringing online, 39
Deleting resource, 40
Taking offline, 40
Response to resource failure
Description, 25
RestartAction
Description, 25
RestartPeriod
Description, 25
RestartThreshold
Description, 25
RESYNCWAIT value
description, 51
ResyncWaitTimeout
description, 53
Return codes
Post-execution, 68
Pre-execution, 68
S
Sample user configuration file, 53
StatusRefreshInterval
description, 53
UCF requirement, 34
Storage systems
Configurations, 8
Consolidated volume group site configuration, 10
one-to-one configuration, 9
Symbols in text, 79
Synchronous replication mode, 12
T
Technical support
HP, 78
Service locator website, 78
Text symbols, 79
Thorough Resource Health Check Interval
Description, 25
Timing considerations, 41
Troubleshooting, 69
3PAR Cluster Extension logs, 70
3PAR Storage System log or sysmgr log, 71
Error return codes, 71
Log facility, 69
Log files, 72
Logs, 69
Start errors, 72
Typographic conventions, 79
U
UseNonCurrentDataOK
description, 53
User configuration file, 12, 47
Creating, 57
V
Volume groups, 11
W
Websites
82 Index
Page 83

HP , 78
Product manuals, 78
83
 Loading...