

Page 1
HP Color LaserJet 2820/2830/2840
Software Technical Reference
Page 2

Page 3

HP Color LaserJet 2820/2830/2840
Software Technical Reference
Page 4

Copyright
Trademarks
© 2005 Copyright Hewlett-Packard
Development Company, L.P.
Reproduction, adaptation or translation
without prior written permission is prohibited,
except as allowed under the copyright laws.
The information in this document is subject
to change without notice.
The only warranties for HP products and
services are set forth in the express warranty
statements accompanying such products
and services. Nothing herein should be
construed as constituting an additional
warranty. HP shall not be liable for technical
or editorial errors or omissions contained
herein.
Edition 1, 04/2005
Adobe®, Acrobat®, and PostScript® are
either registered trademarks or trademarks
of Adobe Systems Incorporated in the United
States and/or other countries/regions.
EnergyStar® and the Energy Star logo® are
US registered marks of the United States
Environmental Protection Agency.
Linux is a U.S. registered trademark of Linus
Torvalds.
Microsoft®, Windows®, and Windows NT®
are U.S. registered trademarks of Microsoft
Corporation.
Pentium® is a US registered trademark of
Intel Corporation.
UNIX® is a registered trademark of The
Open Group.
Page 5

Table of contents
1 Purpose and scope
Introduction ............................................................................................................................................2
HP LaserJet all-in-one product comparison ..........................................................................................3
Software availability and fulfillment .......................................................................................................6
Ordering software .................................................................................................................6
Documentation availability and localization ...........................................................................................8
2 Software overview for Windows
Operating systems ..............................................................................................................................12
Supported Windows operating systems .............................................................................12
Fully supported operating systems ....................................................................12
Print-only supported operating systems .............................................................12
Windows system requirements ...........................................................................................12
Windows operating system requirements ..........................................................13
Operating system requirements for print-only support .......................................13
Printing from other operating systems ................................................................................13
Software component information .........................................................................................................15
New HP LaserJet all-in-one software features ...................................................................15
HP LaserJet all-in-one software for Windows .....................................................................15
Software component comparison .......................................................................................17
Software component availability .........................................................................................18
Software component localization ........................................................................................19
HP Extended Capabilities ....................................................................................................................26
HP Director ..........................................................................................................................................27
Select Device ......................................................................................................................28
Status ..................................................................................................................................28
Settings ...............................................................................................................................30
Scan Picture and Scan Document ......................................................................................31
Transfer Images ..................................................................................................................31
Send a Fax .........................................................................................................................32
HP Image Zone ...................................................................................................................32
HP Document Viewer .........................................................................................................33
Support ...............................................................................................................................34
How Do I .............................................................................................................................35
Creative Ideas .....................................................................................................................35
HP Shopping .......................................................................................................................35
Utilities ................................................................................................................................35
Software Update .................................................................................................................36
Scanning system .................................................................................................................................37
ENWW iii
Page 6

Scanning methods ..............................................................................................................37
HP Scan software ...............................................................................................................38
E-mail .................................................................................................................40
Scan drivers ........................................................................................................................40
TWAIN driver ......................................................................................................41
TWAIN compatibility ..........................................................................41
TWAIN scanning does not work with some programs
...........................................................................................41
Additional information about TWAIN .................................41
TWAIN driver user interface ..............................................................42
WIA driver ..........................................................................................................43
HP Send Fax software ........................................................................................................................45
Faxing to multiple recipients ...............................................................................................46
Creating a cover page ........................................................................................................47
Faxing without first printing and scanning the document ....................................................47
Available product configurations .........................................................................................................49
Software features by connection type .................................................................................49
Supported configurations ....................................................................................................50
Direct connection ...............................................................................................50
Network connection options ...............................................................................50
Local connection that uses Microsoft peer-to-peer networking
(Windows only) ..................................................................................50
Networking requirements ...................................................................51
Multitasking capabilities ......................................................................................................51
Differences between the network-connected and direct-connected configurations ............52
Supported third-party software ............................................................................................................53
Text-recognition software ...................................................................................................53
About text-recognition reliability .........................................................................53
Other PC fax programs .......................................................................................................53
3 Windows HP unidriver features
Introduction ..........................................................................................................................................55
HP PCL 6 and PS emulation unidriver features (for Windows 2000 and Windows XP) ......................56
Access to drivers ................................................................................................................56
Help system ........................................................................................................................56
What's this? Help ...............................................................................................57
Context-sensitive Help .......................................................................................57
Constraint messages .........................................................................................57
HP postscript level 3 emulation support .............................................................................57
Driver tab features ..............................................................................................................58
Printing Preferences tab set ...............................................................................58
Advanced tab features .......................................................................58
Paper/Output settings .......................................................60
Copy Count setting ...........................................60
Graphic settings ................................................................60
Image Color Management settings ...................60
TrueType Font settings .....................................61
Document Options ............................................................61
Advanced Printing Features .............................62
iv ENWW
Page 7

Color Printing Mode (HP PCL 6 Unidriver
only) ..................................................................62
Print Optimizations (HP PCL 6 Unidriver
only) ..................................................................62
PostScript Options (PS Emulation Unidriver
only) ..................................................................62
PostScript Output option ..................63
TrueType Font Download option
..........................................................63
PostScript Language Level ..............64
Send PostScript Error Handler .........64
Mirrored Output ................................64
Printer Features ................................................64
Print All Text as Black ......................64
Send TrueType as Bitmap
(HP PCL 6 Unidriver only) ................64
Raster Compression (HP PCL 6
Unidriver only) ..................................65
Layout Options .................................................65
Page Order ......................................65
Paper/Quality tab features .................................................................65
Print Task Quick Sets ........................................................66
Default Print Settings ........................................67
User Guide Print Settings .................................67
Type new Quick Set name here .......................67
Paper Options group box ..................................................67
Size is: ..............................................................68
Use Different Paper/Covers check box ............69
Source Is: drop-down menu .............................69
Type is: drop-down menu .................................69
Use Different Paper/Covers options .................70
Front Cover and Back Cover
options .............................................71
First Page, Other Pages, and Last
Page options ....................................72
Document preview image ..................................................73
Effects tab features ............................................................................73
Print Task Quick Sets ........................................................74
Resizing options group box ...............................................74
Actual Size setting ............................................74
Print Document On setting ...............................74
Scale to Fit option .............................................74
% of Normal Size option ...................................75
Document preview image ..................................................75
Watermarks group box ......................................................76
Current watermarks ..........................................77
Watermark message ........................................77
Message angle .................................................77
Font attributes ...................................................77
Name ...............................................78
ENWW v
Page 8

Color ................................................78
Shading ............................................79
Size ..................................................79
Style .................................................79
Default settings ................................79
Finishing tab features ........................................................................80
Print Task Quick Sets ........................................................80
Document Options ............................................................81
Correct Order for Straight Paper Path check
box ....................................................................81
Print on Both Sides (Manually) check box
...........................................................................81
Manually printing on both sides
..........................................................81
Flip Pages Up ...................................................81
Booklet layout ...................................................82
Book and booklet printing ................82
Printing a Booklet .............................82
Printing a book .................................83
Pages per Sheet ...............................................83
Print Page Borders ...........................................83
Page Order .......................................................83
Document preview image ..................................................84
Orientation group box ........................................................84
Portrait option button ........................................84
Landscape option button ..................................84
Rotate by 180 degrees check box ....................85
Color tab ............................................................................................85
Print Task Quick Sets ........................................................86
Color options .....................................................................86
Automatic color settings ....................................................86
Manual color settings ........................................................86
Text, Graphics, and Photographs sections .......................87
Neutral Grays ...................................................87
General .............................................................................88
Edge Control .....................................................88
Halftone ............................................................88
RGB Color ........................................................89
Print in Grayscale ..............................................................89
Printer Properties tab set ...................................................................................89
Device Settings ..................................................................................89
Form to Tray Assignment ..................................................91
Font Substitution Table .....................................................91
External Fonts (HP PCL 6 Unidriver only) .........................92
Installing external fonts .....................................93
Removing external fonts ...................................93
Installable Options .............................................................93
Tray 2 ...............................................................94
Allow Manual Duplexing ...................................94
Printer Memory .................................................94
vi ENWW
Page 9

About tab features .............................................................................96
4 Windows HP traditional driver features
HP Traditional PCL 6 Driver features (for Windows 98 SE and Windows Me) .................................100
Help system ......................................................................................................................100
What's this? Help .............................................................................................100
Context-sensitive Help .....................................................................................100
Constraint messages .......................................................................................101
Bubble Help ......................................................................................................101
Finishing tab features .......................................................................................................104
Print Task Quick Sets .......................................................................................105
Default Print Settings .......................................................................105
User Guide Print Settings ................................................................105
Custom Print Task Quick Sets .........................................................105
Document Options ...........................................................................................105
Correct Order for Straight Paper Path .............................................106
Print on Both Sides (Manually) ........................................................106
Manually printing on both sides .......................................................107
Flip Pages Up ..................................................................................107
Manually printing on both sides .......................................................107
Booklet Printing ...............................................................................108
Pages per Sheet ..............................................................................110
Document preview image .................................................................................110
Print Quality ......................................................................................................111
Current Setting ................................................................................111
Graphics Settings group box ...........................................................111
Output Settings group box ...............................................................112
Font Settings group box ..................................................................112
Effects tab features ...........................................................................................................112
Print Task Quick Sets .......................................................................................113
Document preview image .................................................................................114
Fit To Page .......................................................................................................114
Print Document On ..........................................................................114
PostScript Passthrough (PS Emulation
Unidriver only) ..................................................94
Additional Device Settings options (PS Emulation
Unidriver only) ...................................................................94
Available PostScript Memory ............................95
Output Protocol .................................................................95
Send CTRL-D Before Each Job ........................................95
Send CTRL-D After Each Job ...........................................95
Convert Gray Text to PostScript Gray ...............................95
Convert Gray Graphics to PostScript Gray .......................96
Add Euro Currency Symbol to PostScript Fonts ...............96
Job Timeout ......................................................................96
Wait Timeout .....................................................................96
Minimum Font Size to Download as Outline .....................96
Maximum Font Size to Download as Outline ....................96
Activating booklet printing ...............................................109
Printing a booklet cover ...................................................109
ENWW vii
Page 10

Scale to Fit .......................................................................................114
% of Normal Size .............................................................................115
Watermarks ......................................................................................................115
Current Watermarks ........................................................................116
Watermark Message .......................................................................117
Message Angle ................................................................................117
Font Attributes .................................................................................117
Name ...............................................................................117
Color ................................................................................117
Shading ...........................................................................118
Size .................................................................................119
Default settings ...............................................................119
Paper tab features ............................................................................................................119
Print Task Quick Sets .......................................................................................120
Paper Options group box .................................................................................121
Size is: .............................................................................................121
Custom Paper Size ..........................................................................122
Name drop-down menu ...................................................123
Dynamic command button ..............................................123
Width and height controls ................................................125
Custom width and height control limits ............................125
Paper and envelope icons ..............................125
Measurement Units button ..............................................125
Close button ....................................................................126
Use Different Paper/Covers check box ...........................................126
Use Different Paper/Covers options ................................................126
Front Cover and Back Cover options ..............................127
First Page, Other Pages, and Last Page options ............128
Source Is: drop-down menu ............................................................129
Type is: drop-down menu ................................................................130
Document preview image .................................................................................130
Printer image ....................................................................................................131
Basics tab features ...........................................................................................................131
Print Task Quick Sets .......................................................................................132
Copies ..............................................................................................................132
Orientation ........................................................................................................132
Portrait .............................................................................................132
Landscape .......................................................................................133
Rotate by 180 degrees ....................................................................133
Document preview image .................................................................................133
About ................................................................................................................133
Color tab features .............................................................................................................134
Print Task Quick Sets .......................................................................................134
Color Options ...................................................................................................135
Manual Color Options ......................................................................................135
Document preview image .................................................................................137
Configure tab features ......................................................................................................137
Paper-handling options ....................................................................................138
Optional Paper Sources ..................................................................139
Other Options ...................................................................................................139
viii ENWW
Page 11

Fonts ................................................................................................140
Printer Memory ................................................................................141
Include Types in Application Source List selection ..........................141
Printer image ....................................................................................................141
Windows PS Emulation Driver features (for Windows 98 SE and Windows Me) ..............................142
HP postscript level 3 emulation support ...........................................................................142
Paper tab features ............................................................................................................142
Paper size ........................................................................................................143
Layout ..............................................................................................................144
Orientation ........................................................................................................144
Paper source ....................................................................................................144
Copies ..............................................................................................................144
Custom button ..................................................................................................144
Unprintable Area button ...................................................................................144
About button .....................................................................................................144
Restore Defaults button ...................................................................................144
Graphics tab features .......................................................................................................144
Resolution ........................................................................................................145
Color Control ....................................................................................................145
Choose Rendering Intent button ......................................................146
Halftoning .........................................................................................................146
Special .............................................................................................................146
Scaling .............................................................................................................146
Restore Defaults button ...................................................................................146
Device Options tab features .............................................................................................146
Available printer memory (in KB) .....................................................................147
Printer features .................................................................................................147
Installable options ............................................................................................147
Restore Defaults button ...................................................................................147
PostScript tab features .....................................................................................................147
PostScript Output Format .................................................................................148
PostScript header .............................................................................................149
PostScript error info .........................................................................................149
Advanced .........................................................................................................149
Restore Defaults ..............................................................................................151
5 Macintosh software overview
Supported Macintosh operating systems ..........................................................................................154
Supported e-mail programs ...............................................................................................................155
All-in-one software for Macintosh ......................................................................................................156
Software components for Macintosh ................................................................................156
Software features not available on Macintosh operating systems ....................................157
Software component availability for Macintosh .................................................................157
Software component localization ......................................................................................158
Ordering software for Macintosh .......................................................................................158
HP EWS Device Configuration .........................................................................................159
Access ..............................................................................................................159
HP EWS Device Configuration screens ...........................................................159
Status ..............................................................................................160
System .............................................................................................160
ENWW ix
Page 12

System requirements for a direct connection (Macintosh) ................................................................164
Installation overview ..........................................................................................................................165
Installation options .............................................................................................................................166
Installation dialog-box options for Macintosh ....................................................................................171
HP LaserJet all-in-one uninstall instructions for Macintosh ...............................................................183
6 The HP Toolbox
Overview of the HP Toolbox ..............................................................................................................186
System requirements ........................................................................................................................188
Key features ......................................................................................................................................189
Configuration options ........................................................................................................................192
Print .................................................................................................161
Fax ...................................................................................................161
Networking .......................................................................................162
Installation instructions for all Macintosh OSs — Animated Getting Started Guide ..........166
Macintosh installation instructions for direct connections .................................................168
Installation instructions for Mac OS 9.2.2 .........................................................168
Installation instructions for Mac OS X ..............................................................169
Macintosh installation instructions for networked computers ............................................169
Starting the HP Toolbox ....................................................................................................186
Structure ...........................................................................................................................186
Opening screen ................................................................................................................186
Navigation .........................................................................................................................187
Web browser requirements ...............................................................................................188
Other requirements ...........................................................................................................188
Scan to e-mail or a folder ..................................................................................................189
Receive faxes to this computer .........................................................................................190
Receive Alert messages for device events .......................................................................190
HP Device pop-up alert messages ...................................................................191
System-tray icon alert ......................................................................................191
E-mail alert .......................................................................................................191
HP Toolbox section ...........................................................................................................192
Status tab .........................................................................................................192
Device Status ..................................................................................193
Supplies Status ................................................................................194
Setup Status Alerts ..........................................................................195
Set up E-mail Alerts .........................................................................197
Device Configuration .......................................................................199
Network Configuration .....................................................................202
Print Info Pages ...............................................................................204
Event Log ........................................................................................204
Fax tab .............................................................................................................205
Fax Tasks ........................................................................................206
Fax Phone Book ..............................................................................207
Fax Phone Book - Edit Entry ...........................................................208
Fax Phone Book - Create a New Group ..........................................209
Fax Phone Book - Edit a Group .......................................................210
Import information into the Fax Phone Book ...................................211
Fax Phone Book – Import – Select Entries ......................................213
Fax Send Log and Fax Receive Log ...............................................214
x ENWW
Page 13

Fax Viewer .......................................................................................216
Fax Data Properties .........................................................................217
Fax Reports screen .........................................................................218
Detailed Fax Settings ......................................................................219
Fax: How do I... ? ............................................................................220
Scan to tab .......................................................................................................221
Scan to E-mail or Folder ..................................................................221
Preferences .....................................................................................222
How do I... ? ....................................................................................224
Troubleshooting tab .........................................................................................224
Troubleshooting Process .................................................................225
Troubleshooting Information ............................................................225
Control Panel Messages .................................................................226
Clearing Jams ..................................................................................227
Print Problems screen .....................................................................228
Scan Problems ................................................................................229
Copy Problems ................................................................................230
Fax Problems ..................................................................................231
Memory Card Problems ...................................................................232
Troubleshooting Tools .....................................................................233
Animated Demonstrations ...............................................................234
Documentation tab ...........................................................................................235
How do I... ? screens .......................................................................235
Print: How do I... ? ...........................................................................236
Fax: How do I... ? ............................................................................236
Copy: How do I... ? ..........................................................................237
Scan: How do I... ? ..........................................................................238
Photo: How do I... ? .........................................................................238
Network: How do I... ? .....................................................................239
Other: How do I... ? .........................................................................240
User Guide ......................................................................................240
Device Settings section ....................................................................................................241
System Settings tab .........................................................................................242
Device Information ...........................................................................242
Paper Handling ................................................................................243
Print Quality .....................................................................................246
Print Density ....................................................................................249
Print Modes .....................................................................................251
System Setup ..................................................................................254
Volumes ...........................................................................................256
Date/Time ........................................................................................257
Service .............................................................................................257
Device Polling ..................................................................................259
Save/Restore ...................................................................................260
Print Settings tab ..............................................................................................261
Printing ............................................................................................261
PCL5e ..............................................................................................262
PostScript ........................................................................................263
Memory Card ...................................................................................263
Fax Settings tab ...............................................................................................265
ENWW xi
Page 14

General ............................................................................................265
Fax Send .........................................................................................265
Fax Receive .....................................................................................267
Fax Setup Wizard ............................................................................269
Copy Settings tab .............................................................................................275
Copying ...........................................................................................275
Reduce / Enlarge .............................................................................276
Network Settings ...............................................................................................................276
IP Configuration ...............................................................................................277
Advanced .........................................................................................................279
SNMP ...............................................................................................................280
Network Configuration ......................................................................................282
Password .........................................................................................................284
Other screens ...................................................................................................................284
About HP Toolbox ............................................................................................285
Select Device ...................................................................................................286
Current Alerts ...................................................................................................286
HP Toolbox – text only .....................................................................................286
Product Registration .........................................................................................287
Order Supplies .................................................................................................288
Product Support ...............................................................................................289
7 Software installation for Windows operating systems
Installation overview ..........................................................................................................................292
Installation options .............................................................................................................................294
Windows installation for direct connections ......................................................................294
Setting up Windows sharing (peer-to-peer networking) ...................................294
Setting up the host computer running Windows 98 SE,
Windows Me, Windows NT 4.0, or Windows 2000 ..........................295
Setting up the host computer running Windows XP ........................295
Setting up client computers running Windows 98 SE,
Windows Me, or Windows 2000 ......................................................295
Setting up client computers running Windows XP ...........................296
Windows Installation for computers on a network ............................................................296
Network setup ..................................................................................................296
Windows installation instructions for networked computers .............................297
Installing the print driver only ............................................................................................298
Print driver installation for Windows 98 SE or Windows Me ............................298
Print-driver installation for Windows 2000, Windows XP, or
Windows Server 2003 ......................................................................................298
Printing-system software installation .................................................................................................300
Animated Install Guide ......................................................................................................300
Printing-system software installation ................................................................................301
USB installation dialog box options for Windows .............................................305
Network installation dialog box options for Windows .......................................315
Uninstall .............................................................................................................................................326
Uninstall instructions for Windows ....................................................................................326
Uninstalling HP Image Zone in Windows operating systems ...........................326
Uninstalling a Typical or Minimum installation .................................................326
xii ENWW
Page 15

Files not removed and manual uninstall (Windows) .........................................................329
8 Engineering details
Media attributes .................................................................................................................................332
Media sources and destinations .......................................................................................332
Source commands ............................................................................................................332
Media types and sizes ......................................................................................................332
Readme .............................................................................................................................................337
Windows Readme .............................................................................................................337
Macintosh Readme ...........................................................................................................349
Using the HP LaserJet all-in-one software Uninstall component
(recommended) ...............................................................................326
Using the Windows Add or Remove Programs component ............327
Uninstalling a Minimum installation ..................................................................327
Uninstalling an Add-Printer installation ............................................................328
Windows 98 SE or Windows Me .....................................................328
Windows 2000 or Windows XP .......................................................329
Media features and attributes ...........................................................................333
Custom media sizes .........................................................................................335
Media-type commands .....................................................................................335
Introduction ......................................................................................................337
Purpose of this document ................................................................337
Who needs this software? ...............................................................338
Overview of the printing-system components ..................................338
Late-breaking information ................................................................................340
Known issues and workarounds ......................................................340
Issues fixed ......................................................................................346
Installation Instructions .....................................................................................347
Installation options ...........................................................................347
Installing software on Windows 98 SE, Windows 2000, and
Windows XP ....................................................................................347
Uninstaller ........................................................................................347
Technical assistance ........................................................................................348
Customer support ............................................................................348
Web .................................................................................................348
HP software and support services — additional information ...........348
Legal statements ..............................................................................................348
Trademark notices ...........................................................................348
Warranty and copyright ...................................................................348
Information about the hp LaserJet all-in-one software version 5.8 ..................349
Contents ..........................................................................................349
Supported HP Products ...................................................................349
Supported Operating Systems ........................................................349
For OSX Users Only ........................................................................349
How to Configure a Print or Fax Queue ..........................349
To configure a print queue for your
HP LaserJet all-in-one ....................................349
To configure a fax queue for your
HP LaserJet all-in-one (fax models only)
.........................................................................350
ENWW xiii
Page 16

For OS 9.2.2 users only ...................................................................350
For More Information .......................................................................350
Copyright .........................................................................................350
HP System Diagnostics .....................................................................................................................352
System ..............................................................................................................................352
Devices .............................................................................................................................352
Applications ......................................................................................................................353
HP Applications ................................................................................................................354
Logging .............................................................................................................................354
Troubleshooting .................................................................................................................................356
Port communication ..........................................................................................................356
Overview ..........................................................................................................356
USB port connections ......................................................................................356
Device conflicts in Windows .............................................................................356
Opening the Windows Device Manager ..........................................357
Check for device conflicts ................................................................357
Guidelines for troubleshooting and resolving device conflicts .........358
Installed Devices .............................................................................359
File to E-mail utility ............................................................................................................360
Standalone scrubber .........................................................................................................362
Two-pass cleaning-page utility .........................................................................................362
Collect.bat utility ................................................................................................................362
E-mail ................................................................................................................................363
My Scans directory ...........................................................................................................363
Summary of HP Toolbox known issues .............................................................................................364
Firewalls block HP Toolbox communication .....................................................................364
USB drivers are unsigned .................................................................................................364
Second restart is required after installation ......................................................................364
Problems occur after device replacement or restoration of factory defaults .....................364
Receive-to-PC problems occur after receiving a large number of faxes ..........................365
After experiencing fax communication problems, Receive to PC problems occur ...........365
Intermittent scan problems occur ......................................................................................366
A need to enabling or disabling HP Toolbox arises ..........................................................366
Index...................................................................................................................................................................369
xiv ENWW
Page 17

List of tables
Table 1-1 Features of the HP LaserJet all-in-one products ............................................................................3
Table 1-2 CD part numbers for the HP LaserJet all-in-one software .............................................................6
Table 1-3 User documentation availability and localization ............................................................................8
Table 2-1 Software components for Windows ..............................................................................................15
Table 2-2 Software component comparison .................................................................................................17
Table 2-3 Software component availability for the HP Color LaserJet 2820/2830/2840 all-in-one ..............18
Table 2-4 Software component localization by language, A-K .....................................................................20
Table 2-5 Software component localization by language, L-Z .....................................................................21
Table 2-6 Supported e-mail programs ..........................................................................................................40
Table 2-7 Software features by connection type ..........................................................................................49
Table 2-8 Multitasking capabilities ...............................................................................................................51
Table 3-1 Standard paper types and engine speeds ...................................................................................69
Table 3-2 Watermark color values ...............................................................................................................78
Table 3-3 Page orientation ...........................................................................................................................81
Table 4-1 Bubble Help messages ..............................................................................................................102
Table 4-2 Page orientation .........................................................................................................................107
Table 4-3 Selected paper size ....................................................................................................................108
Table 4-4 Watermark color values .............................................................................................................117
Table 4-5 Custom media sizes ...................................................................................................................125
Table 4-6 Close dialog box text strings ......................................................................................................126
Table 4-7 Standard paper types and engine speeds .................................................................................130
Table 5-1 Supported e-mail programs ........................................................................................................155
Table 5-2 Software components for Macintosh ..........................................................................................156
Table 5-3 Software component availability for Macintosh ..........................................................................158
Table 5-4 CD part numbers for the HP LaserJet all-in-one software .........................................................159
Table 6-1 Browsers supported by HP Toolbox ...........................................................................................188
Table 6-2 Alerts ..........................................................................................................................................196
Table 6-3 Preferences for Scan to E-mail or a Folder ................................................................................222
Table 6-4 Paper Handling options and settings .........................................................................................243
Table 6-5 Print Quality options and settings ...............................................................................................247
Table 6-6 Print Density options and settings ..............................................................................................249
Table 6-7 Print mode settings and default fuser modes .............................................................................253
Table 6-8 Printing options and settings ......................................................................................................262
Table 6-9 Copying options and settings .....................................................................................................275
Table 6-10 Reduce / Enlarge options and settings ......................................................................................276
Table 6-11 Advanced Network Settings options and settings ......................................................................280
Table 8-1 HP Color LaserJet 2820/2830/2840 media sources and destinations .......................................332
Table 8-2 Media-source commands ...........................................................................................................332
Table 8-3 Supported features and attributes, by driver ..............................................................................333
Table 8-4 Supported media types ..............................................................................................................334
ENWW xv
Page 18

Table 8-5 Custom media sizes ...................................................................................................................335
Table 8-6 Media-type commands ...............................................................................................................335
Table 8-7 Devices installed by the HP Color LaserJet 2820/2830/2840 software in Windows 2000 and
Windows XP ...............................................................................................................................360
Table 8-8 Devices installed by the HP Color LaserJet 2820/2830/2840 software in Windows 98 SE and
Windows Me ...............................................................................................................................360
xvi ENWW
Page 19

List of figures
Figure 2-1 HP Director screen .......................................................................................................................27
Figure 2-2 Device Status screen ...................................................................................................................29
Figure 2-3 Device Selection screen ...............................................................................................................31
Figure 2-4 My Images screen ........................................................................................................................32
Figure 2-5 HP Document Viewer screen .......................................................................................................34
Figure 2-6 HP Image Zone Help screen ........................................................................................................35
Figure 2-7 HP Software Update screen .........................................................................................................36
Figure 2-8 hp LaserJet Scan dialog box ........................................................................................................39
Figure 2-9 Scan Settings dialog box ..............................................................................................................39
Figure 2-10 TWAIN driver user interface .........................................................................................................42
Figure 2-11 Scan Preferences – Web Page Dialog .........................................................................................43
Figure 2-12 hp LaserJet Send Fax dialog box – user interface .......................................................................45
Figure 2-13 hp LaserJet Send Fax dialog box – multiple recipients ................................................................46
Figure 2-14 hp LaserJet Send Fax dialog box – cover page ...........................................................................47
Figure 3-1 A typical constraint message .......................................................................................................57
Figure 3-2 Advanced tab – HP PCL 6 Unidriver ............................................................................................59
Figure 3-3 Advanced tab – PS Emulation Unidriver ......................................................................................59
Figure 3-4 Advanced tab - PS Emulation Unidriver - PostScript Options ......................................................63
Figure 3-5 Paper/Quality tab .........................................................................................................................66
Figure 3-6 Paper Options group box .............................................................................................................68
Figure 3-7 Front Cover setting .......................................................................................................................71
Figure 3-8 First Page, Other Pages, and Last Page options .........................................................................72
Figure 3-9 Effects tab ....................................................................................................................................73
Figure 3-10 Preview images - Legal on Letter; Scale to Fit off (left) and on (right) .........................................75
Figure 3-11 Watermark Details dialog box ......................................................................................................76
Figure 3-12 Finishing tab - HP PCL 6 Unidriver ..............................................................................................80
Figure 3-13 Page-order preview images .........................................................................................................84
Figure 3-14 Color tab .......................................................................................................................................85
Figure 3-15 Color Settings dialog box .............................................................................................................87
Figure 3-16 Device Settings tab - HP PCL 6 Unidriver ....................................................................................90
Figure 3-17 Device Settings tab - PS Emulation Unidriver ..............................................................................90
Figure 3-18 Font Substitution Table ................................................................................................................92
Figure 3-19 Font Installer dialog box ...............................................................................................................92
Figure 3-20 About tab ......................................................................................................................................97
Figure 4-1 A typical constraint message .....................................................................................................101
Figure 4-2 A property page with a Bubble Help icon ...................................................................................102
Figure 4-3 Finishing tab - HP Traditional PCL 6 Driver ...............................................................................104
Figure 4-4 Document Options group box ....................................................................................................106
Figure 4-5 Page-order preview images .......................................................................................................110
Figure 4-6 Print Quality Details dialog box - HP Traditional PCL 6 Driver ...................................................111
ENWW xvii
Page 20

Figure 4-7 Effects tab - HP Traditional PCL 6 Driver ...................................................................................113
Figure 4-8 Preview images - Legal on Letter; Scale to Fit off (left) and on (right) .......................................114
Figure 4-9 Watermark Details dialog box ....................................................................................................116
Figure 4-10 Paper tab - HP Traditional PCL 6 Driver ....................................................................................120
Figure 4-11 Paper Options group box ...........................................................................................................121
Figure 4-12 Custom Paper Size dialog box ...................................................................................................122
Figure 4-13 Front Cover setting .....................................................................................................................128
Figure 4-14 First Page, Other Pages, and Last Page options .......................................................................129
Figure 4-15 Basics tab – HP Traditional PCL 6 Driver ..................................................................................131
Figure 4-16 About This Driver dialog box ......................................................................................................133
Figure 4-17 Color tab .....................................................................................................................................134
Figure 4-18 Manual Color Options dialog box ...............................................................................................135
Figure 4-19 Configure tab ..............................................................................................................................138
Figure 4-20 More Configuration Options dialog box ......................................................................................139
Figure 4-21 Configure Font DIMMs dialog box ..............................................................................................140
Figure 4-22 Paper tab - HP PS traditional driver ...........................................................................................143
Figure 4-23 Graphics tab ...............................................................................................................................145
Figure 4-24 Image Color Management dialog ...............................................................................................146
Figure 4-25 Device Options tab .....................................................................................................................147
Figure 4-26 PostScript tab .............................................................................................................................148
Figure 4-27 Advanced PostScript options .....................................................................................................150
Figure 5-1 HP EWS Device Configuration – Status tab ..............................................................................160
Figure 5-2 HP EWS Device Configuration – System tab .............................................................................161
Figure 5-3 HP EWS Device Configuration – Print tab .................................................................................161
Figure 5-4 HP EWS Device Configuration – Fax tab ...................................................................................162
Figure 5-5 HP EWS Device Configuration – Networking tab .......................................................................163
Figure 5-6 Start Here icon ...........................................................................................................................167
Figure 5-7 Macintosh install – Animated Getting Started Guide ..................................................................167
Figure 5-8 Congratulations! Your all-in-one setup is complete screen ........................................................168
Figure 5-9 Authenticate dialog box ..............................................................................................................171
Figure 5-10 License dialog box – HP Software License Agreement .............................................................172
Figure 5-11 Installing dialog box – progress indicator ...................................................................................172
Figure 5-12 If you are using a USB cable... dialog box .................................................................................173
Figure 5-13 Restart alert ................................................................................................................................173
Figure 5-14 hp all-in-one Setup Assistant – Introduction ...............................................................................174
Figure 5-15 hp all-in-one Setup Assistant – Select Device ...........................................................................175
Figure 5-16 hp all-in-one Setup Assistant – User Identification .....................................................................176
Figure 5-17 hp all-in-one Setup Assistant – Phone Line ...............................................................................177
Figure 5-18 hp all-in-one Setup Assistant – Outside Line .............................................................................178
Figure 5-19 hp all-in-one Setup Assistant – Distinctive Ring .........................................................................179
Figure 5-20 hp all-in-one Setup Assistant – Answering Machine ..................................................................180
Figure 5-21 hp all-in-one Setup Assist – Finish .............................................................................................181
Figure 5-22 hp all-in-one Setup Assistant – Congratulations ........................................................................182
Figure 6-1 HP Device Alert – LOAD PAPER ...............................................................................................191
Figure 6-2 Device Status screen .................................................................................................................194
Figure 6-3 Supplies Status screen ..............................................................................................................195
Figure 6-4 Set up Status Alerts screen ........................................................................................................196
Figure 6-5 Set up E-mail Alerts screen – 1 of 2 ...........................................................................................197
Figure 6-6 Set up E-mail Alerts screen – 2 of 2 ...........................................................................................198
Figure 6-7 Device Configuration screen – 1 of 4 .........................................................................................199
xviii ENWW
Page 21

Figure 6-8 Device Configuration screen – 2 of 4 .........................................................................................200
Figure 6-9 Device Configuration screen – 3 of 4 .........................................................................................201
Figure 6-10 Device Configuration screen – 4 of 4 .........................................................................................202
Figure 6-11 Network Configuration screen ....................................................................................................203
Figure 6-12 Print Information Pages screen ..................................................................................................204
Figure 6-13 Event Log screen .......................................................................................................................205
Figure 6-14 Fax Tasks screen .......................................................................................................................206
Figure 6-15 Fax Phone Book screen .............................................................................................................208
Figure 6-16 Fax Phone Book – Edit Entry screen .........................................................................................209
Figure 6-17 Fax Phone Book - Create a New Group screen .........................................................................210
Figure 6-18 Fax Phone Book - Edit a Group screen .....................................................................................211
Figure 6-19 Import information into the Fax Phone Book screen ..................................................................212
Figure 6-20 Fax Phone Book – Import – Select Entries screen ....................................................................214
Figure 6-21 Fax Send Log screen .................................................................................................................215
Figure 6-22 Fax Receive log screen ..............................................................................................................215
Figure 6-23 Fax Viewer screen .....................................................................................................................217
Figure 6-24 Fax Data Properties screen .......................................................................................................218
Figure 6-25 Fax Reports screen ....................................................................................................................219
Figure 6-26 Detailed Fax Settings screen .....................................................................................................220
Figure 6-27 Fax: How do I... ? screen ...........................................................................................................220
Figure 6-28 Scan to E-mail or a Folder screen ..............................................................................................221
Figure 6-29 Preferences for Scan to E-mail or a Folder screen ....................................................................222
Figure 6-30 Scan: How do I... ? screen .........................................................................................................224
Figure 6-31 Troubleshooting Process screen ................................................................................................225
Figure 6-32 Troubleshooting tools screen .....................................................................................................226
Figure 6-33 Control panel messages screen .................................................................................................227
Figure 6-34 Clearing jams screen .................................................................................................................228
Figure 6-35 Print problems screen ................................................................................................................229
Figure 6-36 Scan problems screen ...............................................................................................................230
Figure 6-37 Copy problems screen ...............................................................................................................231
Figure 6-38 Fax problems screen ..................................................................................................................232
Figure 6-39 Memory card problems screen ...................................................................................................233
Figure 6-40 Troubleshooting Tools screen ....................................................................................................234
Figure 6-41 Animated Demonstrations screen ..............................................................................................235
Figure 6-42 Print: How do I... ? screen ..........................................................................................................236
Figure 6-43 Fax: How do I? screen ...............................................................................................................237
Figure 6-44 Copy: How do I... ? screen .........................................................................................................237
Figure 6-45 Scan: How do I... ? screen .........................................................................................................238
Figure 6-46 Photo: How do I... ? screen ........................................................................................................239
Figure 6-47 Network: How do I... ? screen ....................................................................................................239
Figure 6-48 Other: How do I... ? screen ........................................................................................................240
Figure 6-49 User Guide screen .....................................................................................................................241
Figure 6-50 Device Information screen .........................................................................................................242
Figure 6-51 Paper Handling screen ...............................................................................................................243
Figure 6-52 Print Quality screen ....................................................................................................................247
Figure 6-53 Print Density screen ...................................................................................................................249
Figure 6-54 Print Modes screen ....................................................................................................................252
Figure 6-55 System Setup screen .................................................................................................................255
Figure 6-56 Volumes screen .........................................................................................................................256
Figure 6-57 Date/Time screen .......................................................................................................................257
ENWW xix
Page 22

Figure 6-58 Service screen ...........................................................................................................................258
Figure 6-59 Device Polling Settings screen ...................................................................................................260
Figure 6-60 Save / Restore Settings screen ..................................................................................................261
Figure 6-61 Printing screen ...........................................................................................................................262
Figure 6-62 PCL5e screen ............................................................................................................................263
Figure 6-63 PostScript screen .......................................................................................................................263
Figure 6-64 Memory Card Printing Settings screen ......................................................................................264
Figure 6-65 General Settings screen .............................................................................................................265
Figure 6-66 Send screen ...............................................................................................................................267
Figure 6-67 Receive screen ..........................................................................................................................268
Figure 6-68 Fax Setup Wizard – Welcome screen ........................................................................................269
Figure 6-69 Fax Setup Wizard – Fax Identification: User Information screen ...............................................270
Figure 6-70 Fax Setup Wizard – Fax Setup: Dial prefix screen ....................................................................271
Figure 6-71 Fax Setup Wizard – Fax Setup: Distinctive Ring screen ............................................................272
Figure 6-72 Fax Setup Wizard – Fax Setup: Fax Line screen .......................................................................272
Figure 6-73 Fax Setup Wizard – Fax Setup Confirmation screen .................................................................273
Figure 6-74 Fax Setup Wizard – Fax identification: Fax & Voice Number screen .........................................273
Figure 6-75 Fax Setup Wizard – Finish Fax Setup screen ............................................................................274
Figure 6-76 Fax Setup Wizard – Settings Saved screen ...............................................................................274
Figure 6-77 Copying screen ..........................................................................................................................275
Figure 6-78 Reduce / Enlarge screen ............................................................................................................276
Figure 6-79 IP Configuration screen ..............................................................................................................278
Figure 6-80 Advanced Network Settings screen ...........................................................................................279
Figure 6-81 SNMP screen .............................................................................................................................281
Figure 6-82 Network Configuration screen ....................................................................................................282
Figure 6-83 Password screen ........................................................................................................................284
Figure 6-84 About toolbox screen .................................................................................................................285
Figure 6-85 Current Alerts screen .................................................................................................................286
Figure 6-86 Text-only Toolbox screen ...........................................................................................................287
Figure 6-87 Text-only screen – sample expanded section ............................................................................287
Figure 6-88 Product Registration screen .......................................................................................................288
Figure 6-89 Order Supplies screen ...............................................................................................................289
Figure 6-90 Product Support screen .............................................................................................................290
Figure 7-1 Animated Install Guide – Welcome screen ................................................................................300
Figure 7-2 Congratulations! Your all-in-one setup is complete screen ........................................................301
Figure 7-3 HP Color LaserJet 2820/2830/2840 CD Browser screen ...........................................................302
Figure 7-4 HP Color LaserJet 2820/2830/2840 documentation ..................................................................303
Figure 7-5 HP Color LaserJet 2820/2830/2840 Online Support ..................................................................304
Figure 7-6 USB install – Welcome to the Install Wizard dialog box .............................................................305
Figure 7-7 USB install – Check for recommended installation updates (optional) dialog box .....................305
Figure 7-8 USB install – Installation Options dialog box ..............................................................................306
Figure 7-9 USB Install – sample System Requirements Results dialog box ...............................................307
Figure 7-10 USB install – License Agreement dialog box .............................................................................307
Figure 7-11 USB install – HP Extended Capabilities dialog box ...................................................................308
Figure 7-12 Welcome to the HP Product Survey Program screen ................................................................308
Figure 7-13 USB install – Destination Folder dialog box ...............................................................................309
Figure 7-14 USB install – Ready to Install dialog box ...................................................................................310
Figure 7-15 USB install – Connection Type dialog box .................................................................................310
Figure 7-16 USB install – Connect Your Device Now dialog box ..................................................................311
Figure 7-17 USB install – Device Found dialog box ......................................................................................312
xx ENWW
Page 23

Figure 7-18 USB install – Time Remaining dialog box ..................................................................................312
Figure 7-19 USB install – Restart your computer dialog box .........................................................................313
Figure 7-20 USB install – Congratulations! Software installation complete dialog box .................................313
Figure 7-21 USB install – Test Page dialog box ............................................................................................314
Figure 7-22 Sign Up Now screen ..................................................................................................................314
Figure 7-23 HP Registration screen ..............................................................................................................315
Figure 7-24 Network install — Welcome dialog box ......................................................................................316
Figure 7-25 Network install – Sample screen showing current progress ......................................................316
Figure 7-26 Network install – Licence Agreement dialog box .......................................................................317
Figure 7-27 Network install – HP Extended Capabilities dialog box ..............................................................317
Figure 7-28 Welcome to the HP Product Survey Program screen ................................................................318
Figure 7-29 Network install – Thank you for buying another HP product! dialog box ....................................318
Figure 7-30 Network install – Ready to Install dialog box ..............................................................................319
Figure 7-31 Network install – Connection Type dialog box ...........................................................................319
Figure 7-32 Network install – Identify Printer dialog boxIdentify Printer ........................................................320
Figure 7-33 Network install – Searching dialog box ......................................................................................320
Figure 7-34 Network install – Specify Printer dialog box ...............................................................................321
Figure 7-35 Network install – Printer Found dialog box .................................................................................321
Figure 7-36 Network install – Confirm Settings dialog box ............................................................................322
Figure 7-37 Network install – Confirm Changing Setting dialog box .............................................................322
Figure 7-38 Network Install – Set Network Protocol dialog box ....................................................................323
Figure 7-39 Network install – Congratulations! Software installation complete dialog box ...........................323
Figure 7-40 Network install – Test Page dialog box ......................................................................................324
Figure 7-41 Sign Up Now screen ..................................................................................................................324
Figure 7-42 HP Registration screen ..............................................................................................................325
Figure 8-1 HP System Diagnostics – System tab ........................................................................................352
Figure 8-2 HP System Diagnostics – Devices tab .......................................................................................353
Figure 8-3 HP System Diagnostics – Applications tab ................................................................................353
Figure 8-4 HP System Diagnostics – HP Applications tab ..........................................................................354
Figure 8-5 HP System Diagnostics – Logging tab .......................................................................................355
Figure 8-6 Sample Device Manager screen – Windows XP ........................................................................359
Figure 8-7 File to E-mail – sample e-mail message with files attached .......................................................361
ENWW xxi
Page 24

xxii ENWW
Page 25

1 Purpose and scope
This chapter provides information about the following topics:
●
Introduction
●
HP LaserJet all-in-one product comparison
●
Software availability and fulfillment
●
Documentation availability and localization
Purpose and scope
ENWW 1
Page 26

Purpose and scope
Introduction
This software technical reference (STR) provides information about and troubleshooting tips for the allin-one software for the HP Color LaserJet 2820/2830/2840 all-in-one products.
This document is prepared in an electronic format to serve as a quick-reference tool for Customer Care
Center (CCC) agents, support engineers, system administrators, management information systems
(MIS) personnel, and end users, as appropriate.
NOTE This STR describes software that is shipped on the all-in-one software CD that comes
with the HP LaserJet all-in-one product. This STR does not describe drivers that will become
available on the web.
The following information is included in this technical reference:
■ Overview of software and platforms
■ Procedures for installing and uninstalling software components
■ Descriptions of problems that can arise while using the HP LaserJet all-in-one products, and known
solutions to those problems
NOTE An addendum to this STR describes system modification information, including file lists
and changes to registry keys.
2 Chapter 1 Purpose and scope ENWW
Page 27

HP LaserJet all-in-one product comparison
The following table contains descriptions of the three HP LaserJet all-in-one products that are described
in this STR.
Table 1-1 Features of the HP LaserJet all-in-one products
Feature HP Color LaserJet 2820 HP Color LaserJet 2830 HP Color LaserJet 2840
HP Product number Q3948A Q3949A Q3950A
Purpose and scope
Memory ■ 4 megabytes (MB) of ROM/
flash memory
■ 96 MB of RAM, expandable
to 224 MB
■ 4 MB of ROM/flash memory
■ 96 MB of RAM, expandable
to 224 MB.
■ 4 MB of ROM/flash memory
■ 96 MB of RAM, expandable
to 224 MB.
■ Mass storage driver for
Windows
Windows Me,
Windows 2000, and
Windows XP. This driver
provides access to memory
card slots on the product.
The HP Color
LaserJet 2840 can read the
following memory-card
types:
■ CompactFlash
■ Ultra CompactFlash
■ Smart Media
■ Memory Stick
■ Secure Digital
■ Multi Media Card
■ XD Card
®
98 SE,
ENWW
Speed ■ Prints and copies up to
20 pages per minute (ppm)
for Letter-size paper
■ Prints and copies up to 19
ppm for A4-size paper
■ Prints and copies up to 4 ppm
in color for Letter/A4-size
paper
Connectivity ■ A High-speed universal serial
bus (USB) port
■ 10/100Base-T network
Jetdirect port
For more information, see the
HP Color LaserJet
2820/2830/2840 User Guide.
■ Prints and copies up to
20 ppm for Letter-size
paper
■ Prints and copies up to 19
ppm for A4-size paper
■ Prints and copies up to 4
ppm in color for Letter/A4size paper
■ A high-speed USB port
■ 10/100Base-T network
Jetdirect port
■ Fax port
■ Prints and copies up to
20 ppm for Letter-size
paper
■ Prints and copies up to 19
ppm for A4-size paper
■ Prints and copies up to 4
ppm in color for Letter/A4size paper
■ A high-speed USB port
■ 10/100Base-T network
Jetdirect port
■ Fax port
HP LaserJet all-in-one product comparison
3
Page 28

Purpose and scope
Table 1-1 Features of the HP LaserJet all-in-one products (continued)
Feature HP Color LaserJet 2820 HP Color LaserJet 2830 HP Color LaserJet 2840
HP Product number Q3948A Q3949A Q3950A
Paper handling
Print ■ 1200 dots per inch (dpi)
■ One 50-sheet automatic
document feeder (ADF);
maximum media size, 216 x
356 mm (8.5 x 14 inches)
■ One 125-sheet or 10-
envelope media input tray
(tray 1); maximum media
size, 216 x 356 mm (8.5 x 14
inches)
■ A Letter/A4-size flatbed
scanner
effective output quality
(600x600x2 dpi using HP
Resolution Enhancement
Technology [REt] 2400)
■ Printer command language
(PCL) Level 6
■ Adobe® PostScript® (PS)
Level 3 emulation
■ One 50-sheet ADF;
maximum media size, 216 x
356 mm (8.5 x 14 inches)
■ One 125-sheet media input
tray (tray 1); maximum
media size, 216 x 356 mm
(8.5 x 14 inches)
■ One 250-sheet media input
tray (tray 2) for standard
Letter/A4 sizes.
■ A Letter/A4-size flatbed
scanner
■ 1200 dpi effective output
quality (600x600x2 dpi
using HP REt 2400)
■ Printer command language
(PCL) Level 6
■ PS Level 3 emulation
■ One 50-sheet ADF;
maximum media size, 216 x
356 mm (8.5 x 14 inches)
■ One 125-sheet media input
tray (tray 1); maximum
media size, 216 x 356 mm
(8.5 x 14 inches)
■ One 250-sheet media input
tray (tray 2) for standard
Letter/A4 sizes.
■ A Letter/A4-size flatbed
scanner
■ 1200 dpi effective output
quality (600x600x2 dpi
using HP REt 2400)
■ Printer command language
Level 6 (PCL 6)
■ PCL 6 (black and white) for
Windows 2000 and
Windows XP
■ PS Level 3 emulation
Fax (monochrome) ■ Not available for the
HP Color LaserJet 2820
Copy ■ Reduce/enlarge feature
■ Up to 20-ppm automatic
collation for black and white
Letter/A4-size paper; 4 ppm
for color.
Scan ■ 24-bit
■ 1,200 pixels per inch (ppi)
color scanning (optimal); up
to 19,200 ppi (interpolated)
Energy savings The HP Color LaserJet 2820/2830/2840 automatically conserves electricity by substantially reducing
power consumption when it is not in use. As an ENERGY STAR® partner, Hewlett-Packard Company
has determined that this product meets ENERGY STAR® guidelines for energy efficiency. ENERGY
STAR® is a U.S. registered service mark of the United States Environmental Protection Agency.
■ Full-functionality fax
capabilities with a V.34 fax,
including a phone book; fax
from ADF, flatbed, or
computer; and delayed-fax
features
■ 4 MB of flash memory for
storing faxes and phonebook entries
■ Reduce/enlarge feature
■ Up to 20-ppm automatic
collation for black and white
Letter/A4-size paper; 4 ppm
for color.
■ 24-bit
■ 1,200 ppi color scanning
(optimal); up to 19,200 ppi
(interpolated)
4 Chapter 1 Purpose and scope ENWW
Page 29

Table 1-1 Features of the HP LaserJet all-in-one products (continued)
Feature HP Color LaserJet 2820 HP Color LaserJet 2830 HP Color LaserJet 2840
HP Product number Q3948A Q3949A Q3950A
Purpose and scope
ENWW
HP LaserJet all-in-one product comparison
5
Page 30

Purpose and scope
Software availability and fulfillment
Ordering software
To order the software if the CD is damaged or missing, contact HP Support at the following Web site.
www.hp.com/support/clj2800series
To request the software CD by phone, see the following Web site for the correct contact number for your
country/region:
welcome.hp.com/country/us/en/wwcontact.html
The following table presents the part numbers and language groups on the software CDs for the
HP Color LaserJet 2820/2830/2840 all-in-one products.
Table 1-2 CD part numbers for the HP LaserJet all-in-one software
Part number Description Languages included on CD
Q3948–60177
Q3948–60180 Windows software CD for the HP Color
Windows software CD for the HP Color
LaserJet 2820/2830/2840 all-in-one products
LaserJet 2820/2830/2840 all-in-one products
■ Danish
■ Dutch
■ English
■ Finnish
■ French
■ German
■ Italian
■ Norwegian
■ Portuguese
■ Spanish
■ Swedish
■ Czech
■ English
■ Hungarian
■ Polish
■ Russian
■ Turkish
Q3948–60181 Windows software CD for the HP Color
LaserJet 2820/2830/2840 all-in-one products
■ English
■ Korean
■ Simplified Chinese
■ Thai
6 Chapter 1 Purpose and scope ENWW
Page 31

Table 1-2 CD part numbers for the HP LaserJet all-in-one software (continued)
Part number Description Languages included on CD
■ Traditional Chinese
Q3948–60183 ReadIRIS V9.0 software CD for the HP Color
LaserJet 2820/2830/2840 all-in-one product
NOTE The ReadIRIS CD is not set up at fulfillment.
The CD will be available from Global Support
Organization (GSO) or HP Parts due to contractual
and licensing agreements.
The ReadIRIS user interface
is available in the following
languages:
■ Dutch
■ English
■ French
■ German
■ Italian
■ Spanish
■ Portuguese-Brazilian
NOTE ReadIRIS
can perform text
recognition (also
known as optical
character
recognition, or OCR)
in 124 languages.
See
Table 2-4
Software component
localization by
language, A-K and
Table 2-5 Software
component
localization by
language, L-Z for a
list of these
languages.
Purpose and scope
ENWW
NOTE If you need a replacement CD or newer version of the software than what was shipped
with the product, go to the following Web site:
www.hp.com/support/clj2800series
Click CD-ROM Order Page to order, or click Download drivers and software to get the software
update.
Software availability and fulfillment
7
Page 32

Purpose and scope
Documentation availability and localization
The documentation in the following table is available for the HP Color LaserJet 2820/2830/2840 all-inone product.
Table 1-3 User documentation availability and localization
Document name Languages Part number Location
HP Color LaserJet
2820/2830/2840 User Guide
■ Danish
■ Dutch
■ English
■ Finnish
■ French
■ German
■ Hungarian
■ Indonesian
Italian
■ Korean
■ Norwegian
■ Polish
■ Portuguese (Brazilian)
■ Russian
■ Simplified Chinese
■ Spanish
Q3948-90901 (EN) The HP Color LaserJet
2820/2830/2840 User Guide
is available in electronic
format on the HP LaserJet allin-one software CD.
■ Swedish
■ Thai
■ Traditional Chinese
■ Turkish
HP LaserJet 2820/2830/2840
Start Guide
■ Dutch
■ English
■ French
■ German
■ Hebrew
■ Italian
■ Portuguese (Brazilian)
■ Spanish
Q3948-90921 The HP LaserJet
2820/2830/2840 Start Guide
is available in hard copy and
comes in the box with your HP
LaserJet all-in-product .
8 Chapter 1 Purpose and scope ENWW
Page 33

Table 1-3 User documentation availability and localization (continued)
Document name Languages Part number Location
■ Arabic
■ Bulgarian
■ Danish
■ English
■ Finnish
■ Hebrew
■ Norwegian
■ Swedish
■ English
■ Estonian
■ Kazakh
■ Latvian
■ Lithuanian
■ Russian
■ Turkish
Q3948–90922
Purpose and scope
Q3948-90923
Q3948–90924
■ Croatian
■ English
■ Greek
■ Romanian
■ Slovenian
■ Czech
■ English
■ Hungarian
■ Polish
■ Slovak
■ English
■ Indonesian
■ Simplified Chinese
■ Thai
■ Traditional Chinese
Q3948–90925
Q3948–90926
ENWW
■ Vietnamese
Documentation availability and localization
9
Page 34

Purpose and scope
The HP Color LaserJet 2820/2830/2840 User Guide is available, on a print-on-demand basis, in the
languages shown in the following table.
Language Part number
English (EN) Q3948-90901
Czech (CS) Q3948-90902
Danish (DN) Q3948-90903
Dutch (NL) Q3948-90904
Finnish (FI) Q3948-90905
French (FR) Q3948-90906
German (DE) Q3948-90907
Hungarian (HU) Q3948-90908
Italian (IT) Q3948-90909
Korean (KO) Q3948-90910
Norwegian (NO) Q3948-90911
Polish (PL) Q3948-90912
Portuguese (PT) Q3948-90913
Russian (RU) Q3948-90914
Simplified Chinese (ZHCN) Q3948-90915
Spanish (ES) Q3948-90916
Swedish (SV) Q3948-90917
Traditional Chinese (ZHTW) Q3948-90918
Thai (TH) Q3948-90919
Turkish (TR) Q3948-90920
10 Chapter 1 Purpose and scope ENWW
Page 35

2 Software overview for Windows
This chapter provides information about the following topics:
●
Operating systems
●
Software component information
●
HP Extended Capabilities
●
HP Director
●
Scanning system
●
HP Send Fax software
●
Available product configurations
Windows
Software overview for
●
Supported third-party software
NOTE For information about the HP LaserJet all-in-one software for Macintosh operating
systems, see
Macintosh software overview.
ENWW 11
Page 36

Operating systems
This section contains information about the following topics:
■ Supported Windows operating systems
■ Windows system requirements
■ Printing from other operating systems
Software overview for
Windows
Supported Windows operating systems
The all-in-one software for the HP Color LaserJet 2820/2830/2840 all-in-one products supports the
following operating systems.
Fully supported operating systems
The following Windows operating systems fully support the HP Color LaserJet 2820/2830/2840 all-inone through the software installer, and drivers for these operating systems are available on the software
CD that comes with the product.
■ Microsoft® Windows 98 Second Edition (Windows 98 SE)
■ Windows 98 Millennium Edition (Windows Me)
■ Microsoft Windows 2000
■ Microsoft Windows XP (32-bit)
NOTE Microsoft Windows 98First Edition does not support the HP Color
LaserJet 2820/2830/2840.
Windows 98 SE and Windows Me support only the Minimum Installation, not the Typical
Installation.
Print-only supported operating systems
The following operating systems have print-only support for the HP LaserJet all-in-one product software.
■ Windows XP Intel 64-bit (driver available only on the Web)
■ Windows Server 2003 (driver available only on the Web)
■ Windows NT® 4.0 (network connection only; driver available only on the Web)
You must use the Add Printer Wizard to install the print driver for these operating systems. The print
driver for these operating systems is available at the HP support Web site for your product:
www.hp.com/support/clj2800series
Windows system requirements
The HP Color LaserJet 2820/2830/2840 all-in-one products can function as standalone copiers (and, in
the case of HP Color LaserJet 2830 and HP Color LaserJet 2840 all-in-one products, standalone fax
machines) without installing the software, but certain functions are not available unless the full
HP LaserJet all-in-one software is installed. If you have a computer, HP strongly recommends installing
12 Chapter 2 Software overview for Windows ENWW
Page 37

the HP LaserJet all-in-one software. This provides the full functionality of the HP LaserJet all-in-one
products and is the easiest method for setting required features.
The HP LaserJet all-in-one software has the following minimum system requirements.
Windows operating system requirements
■ Microsoft Windows 98 SE, Windows Me, Windows 2000, or Windows XP operating system
■ Processor and RAM requirements:
■ For Windows 98 SE: a Pentium® II processor or greater, with 64 MB of RAM (256 MB
recommended)
■ For Windows Me: a Pentium II processor or greater, with 64 MB of RAM (256 MB recommended)
■ For Windows 2000 and Windows XP: a Pentium II processor or greater, with 192 MB of RAM
(256 MB recommended)
■ Available hard disk space:
■ Windows NT 4.0: 10 MB
■ Windows 98 SE and Windows Me: 100 MB
■ Windows 2000, Windows XP, and Windows Server 2003: 550 MB
■ A 2x or faster CD-ROM drive (required for installation)
■ A direct connection to a computer for full product functionality requires a USB port.
NOTE If the USB port has another device attached to it, such as an external storage device,
the device must be disconnected or you must add an additional USB port. You can add an
additional USB port by using a hub, or by installing an additional USB card.
Operating system requirements for print-only support
■ A computer running Windows XP (Intel 64-bit), Windows Server 2003, or Windows NT 4.0
■ A computer that meets your operating-system requirements for processing speed (in MHz) and RAM
(in MB)
Printing from other operating systems
Windows
Software overview for
ENWW
NOTE For information about the HP LaserJet all-in-one software for Macintosh operating
systems, see
You can also print to the HP LaserJet all-in-one product from any operating system that complies with
the PCL command language, such as OS/2, UNIX®, or Linux systems. The OS/2 drivers will be
available, shortly after the product release, from the HP support Web site.
UNIX systems require a Model Script to set up the UNIX environment for printing. The HP LaserJet III
model script, or any generic HP LaserJet printer Model Script, should work. These files are written and
provided by the individual UNIX vendor. Users of HP-UX can check for availability of the Model Script
and the support model at the following Web site:
Macintosh software overview.
Operating systems
13
Page 38

www.hp.com/support/net_printing
Click the Support & Drivers link.
Linux users should check for the availability of drivers at the following Web site:
www.hp.com/go/linuxprinting
NOTE The Linux drivers are supported through the Linux community.
Software overview for
The HP Color LaserJet 2820/2830/2840 all-in-one series print drivers have been tested and have printonly support with Windows Terminal Server or Citrix Metaframe.
Windows
14 Chapter 2 Software overview for Windows ENWW
Page 39

Software component information
This section contains information about the following topics:
●
New HP LaserJet all-in-one software features
●
HP LaserJet all-in-one software for Windows
●
Software component comparison
●
Software component availability
●
Software component localization
New HP LaserJet all-in-one software features
The HP LaserJet all-in-one software includes new features since the release of the HP LaserJet 3015,
3020, 3030, and 3380 all-in-one products. The following are new features for the HP Color
LaserJet 2820/2830/2840 all-in-one:
■ New installer. The HP LaserJet all-in-one products include a new installer that improves the
software installation process and supports a software-first installation.
■ Software-first is the recommended installation method.
■ You have the option to perform a Minimum installation, which consists of print and scan drivers
and, on the HP Color LaserJet 2840, a storage driver to gain access to photo card slots as well.
Windows
Software overview for
■ HP Director. The HP Director provides access to the software programs, default settings, status,
and onscreen Help installed specifically for the HP Color LaserJet 2820/2830/2840. By using the
HP Director, you can scan various types of originals (pictures, documents, and slides), transfer
images from a camera or photo memory card, send faxes, make copies, view and print images or
video clips, go to the HP Shopping Web site, and update your HP software.
■ Improved network scanning
■ HP Image Zone. Use the HP Image Zone to work with photos, scanned images, and video clips.
You can edit images, create printing projects, and send images.
■ HP Document Viewer. Use the HP Document Viewer to display thumbnails and full-page views of
your images and documents. You can annotate images and text, change the document format, and
print.
■ Mass storage driver. On the HP Color LaserJet 2840, the mass storage driver provides access to
memory card slots for CompactFlash, UltraCompactFlash, Smart Media, Memory Stick, Secure
Digital, Multi Media Card, and XC Card memory cards.
HP LaserJet all-in-one software for Windows
The HP Color LaserJet 2820/2830/2840 all-in-one products include the following software components
and programs for Microsoft Windows operating systems.
Table 2-1 Software components for Windows
ENWW
Components Description
Software component information
15
Page 40

Table 2-1 Software components for Windows (continued)
Components Description
HP installer Installs the HP LaserJet all-in-one software based on the hardware it detects from the host
computer.
Uninstaller Removes files and folders that were installed when the HP LaserJet all-in-one software was
Scrubber utility After running the uninstaller, removes files and folders that were installed when the HP LaserJet
HP Scan software
Software overview for
HP LaserJet Fax software Provides access to the fax functions on your HP LaserJet all-in-one product.
HP Toolbox Provides a Web-based interface to manage the HP LaserJet all-in-one products. Use the
Windows
Driver software Use the driver software to print, fax, and scan with the computer and the HP Color LaserJet 2830
originally installed on the computer.
all-in-one software was originally installed on the computer.
1
Provides access to the scan functions on your HP Color LaserJet 2820/2830/2840 all-in-one.
HP Toolbox to perform the following tasks:
■ Monitor the status of the product.
■ Change the print, fax, and copy settings for the product.
■ Use the scanning functionality from the control panel of the product.
■ Set the scan-to e-mail addresses and the scan-to folder locations.
■ Find troubleshooting information and instructions for performing basic tasks.
■ Receive Status Alerts when certain events occur or conditions exist on the product.
and HP Color LaserJet 2840 all-in-one products, and to print and scan with the HP Color
LaserJet 2820 all-in-one product.
This software includes the following drivers:
ReadIRIS Professional
V9.0 text-recognition
software by IRIS
■ The HP PCL 6 Unidriver and HP Traditional PCL 6 Driver. The HP PCL 6 Unidriver(color) and
HP PCL 6 Unidriver (black and white) are installed by default in Windows 2000, Windows XP,
and Windows Server 2003. The HP Traditional PCL 6 Driver is installed by default in
Windows 98 SE and Windows Me. The HP PCL 5e Unidriver and HP Traditional
PCL 5e Driver are supported, but are not included in the printing-system software.
■ The PS print driver and PostScript printer description (PPD) file for printing with PS level 3
emulation. This driver is not installed by default. To install the PS Emulation Unidriver or
PS Emulation Driver, use the Add Printer wizard.`
■ The HP Color LaserJet 2820/2830/2840 Fax (PC fax) driver
■ Scan drivers
■ TWAIN driver. TWAIN is an industry-standard scanning protocol. Scanning from the
HP LaserJet all-in-one product can be initiated from any TWAIN-compliant software
program.
■ Windows Image Acquisition (WIA) driver. WIA scanning (Windows XP only) can be
started from a WIA-compliant program or from the computer. WIA has its own user
interface that is relatively simple and does not contain the wide range of image quality
options that are available in the TWAIN driver user interface.
■ Mass storage driver for access to memory card slots on the product.
Converts scanned images into text that can be edited in word-processing programs.
The user interface is localized into six languages. However, the software supports text-recognition
in 124 languages.
16 Chapter 2 Software overview for Windows ENWW
Page 41

Table 2-1 Software components for Windows (continued)
Components Description
ReadIRIS Pro V9.0 supports text recognition in 2-byte Asian characters. You must have your
operating system set up to display 2-byte characters in order to see the resulting text.
NOTE For better text-recognition scanning results, start ReadIRIS and scan directly into
the program. ReadIRIS V9.0 automatically starts a wizard to help you through this process.
When ReadIRIS is installed on the computer, it appears as an option in the destination
drop-down box in the HP Scan software. If you select ReadIRIS as the destination, your
image is scanned into .TIFF format and ReadIRIS starts automatically to begin the textrecognition process.
NOTE The ReadIRIS software uses a separate installer that comes on a separate CD.
The initial release of the HP Color LaserJet 2820/2830/2840 includes READIRIS
Professional V9.0 software. Future releases will include ReadIRIS V10.0
Online Help Provides help for using the software for the HP Color LaserJet 2820/2830/2840 all-in-one products.
The user documentation for these products is included on the installation CD as both .CHM (online
help) files and Adobe Acrobat® .PDF files. The software CD uses a version of Adobe Acrobat
Reader that remains on the CD and does not need to be installed on the computer. However, you
need a web browser installed on the computer in order to view the contents from any .CHM file.
1
The HP Color LaserJet 2820 does not support faxing.
Software component comparison
The following table lists the differences between the HP Color LaserJet 2820/2830/2840 all-in-one
software feature set compared to the software for the HP LaserJet 3015, 3020, 3030, and 3380 all-inone products.
Table 2-2 Software component comparison
Windows software components HP LaserJet 3015, HP LaserJet 3020 and
3030, and HP LaserJet 3380 all-in-one
products
HP installer X X
Uninstaller X X
Driver software X X
HP PCL 6 Unidriver (Black and White) X
HP Director X
HP Color
LaserJet 2820/2830/2840 all-inone products
1
Windows
Software overview for
ENWW
HP Document Viewer X
HP LaserJet Send Fax/Fax Driver X X
Network Receive to PC fax functionality X
HP Scan software X X
HP Image Zone X
ReadIRIS Professional text-recognition
software by IRIS
V8.0 V9.0
Software component information
2
3
17
Page 42

Table 2-2 Software component comparison (continued)
Windows software components HP LaserJet 3015, HP LaserJet 3020 and
Online Help
HP Toolbox and Fax Management X X (in Windows 2000 and
Scan Application X X
TWAIN drivers X X
Software overview for
Windows
WIA drivers X X
Scrubber utility X X
Online user guide X X
Web Registration X X
1
Two installers run in sequence.
2
This feature is not supported on the HP Color LaserJet 2820 all-in-one.
3
This feature is disabled.
Software component availability
The following table lists the availability of the HP LaserJet all-in-one software components by operating
system.
3030, and HP LaserJet 3380 all-in-one
products
X X
HP Color
LaserJet 2820/2830/2840 all-inone products
Windows XP only)
Table 2-3 Software component availability for the HP Color LaserJet 2820/2830/2840 all-in-one
Component Windows 98 S
E and
Windows Me
Drivers
HP Traditional PCL 6 Driver
PS Emulation Driver X
HP PCL 6 Unidriver (color) X
HP PCL 6 Unidriver (black and white) X
PS Emulation Unidriver X
HP traditional Postscript Printer Description (PPD) X
UNIX Model Script
Linux print drivers and model script
Fax driver X
Fax software X
TWAIN scan driver X X
WIA scan driver X
X
Windows 2000
and
Windows XP
1
4
UNIX Linux
2
X
3
X
Scan Application X
Installers
18 Chapter 2 Software overview for Windows ENWW
Page 43

Table 2-3 Software component availability for the HP Color LaserJet 2820/2830/2840 all-in-one (continued)
Component Windows 98 S
E and
Windows Me
Common Windows Installer
X X
CD Browser X X
Fonts X
.INF File (Add Printer) X X
Bidirectional communication
Direct Connect Bidirectional Communications
X X
Remote management and status
HP Web Jetadmin
Applet for HP Web Jetadmin
6
6
X X
X X
HP Toolbox X
Online Documentation
HP Color LaserJet 2820/2830/2840 User Guide
Hewlett-Packard Color LaserJet 2820/2830/2840 Allin-one Install Notes
7
X X
X X
Help systems X X
Windows 2000
and
Windows XP
5
UNIX Linux
Windows
Software overview for
HP Color LaserJet 2820/2830/2840 Animated Getting
X X
Started Guide
Other
PS Fonts
X X
HP Director X
HP Image Zone X
HP Document Viewer X
1
This driver is installed through the Add Printer Wizard only.
2
This component is available at the following Web site: www.hp.com/support/net_printing
3
This component is available at the following Web site: www.hp.com/go/linuxprinting
4
This driver is available for Windows XP only.
5
Fonts are installed only during a Typical Installation, not a Minimum Installation.
6
This component is available at the following Web site: www.hp.com/go/webjetadmin
7
This document is also available at the following Web site: www.hp.com/support/clj2800series
Software component localization
The following table provides localization information about the all-in-one software components for the
HP Color LaserJet 2820/2830/2840.
NOTE A language key follows each table.
ENWW
Software component information
19
Page 44

Table 2-4 Software component localization by language, A-K
Component
HP Toolbox 2000, XP X X X X X X X X X X
HP Director 2000, XP X X X X X X X X X X
HP Image Zone 2000, XP X X X X X X X X X X
HP Document
Software overview for
Windows
Viewer
HP Traditional
PCL 6 Driver and
PS Emulation
Driver
HP PCL 6
Unidriver (color,
and black and
white) and
PS Emulation
Unidriver
Common
Windows
Installer
Online manuals
(.PDF)
1
Operating
system
2000, XP X X X X X X X X X X
98SE, Me X X X X X X X X X X
2000, XP, 2003
Server
98SE, Me, 2000,
XP
98SE, Me, 2000,
XP
ARBGCSDEDNELENESETFI FRHEHRHUID IT KKK
X X X X X X X X X X
X X X X X X X X X X
X X X X X X X2X X
O
Scan drivers 98SE, Me, 2000,
XP
ReadIRIS text
recognition
ReadIRIS UI 98SE, Me, 2000,
1
Components that are not available in a specific language are supported in English.
2
HP Color LaserJet 2820/2830/2840 User Guide only.
98SE, Me, 2000,XPX X X X X X X X X X X X X X
XP
X X X X X X X X X X
X X X X X
Language key for Table 2-4 Software component localization by language, A-K:
■ AR = Arabic
■ BG = Bulgarian
■ CS = Czech
■ DE = German
■ DN = Danish
■ EL = Greek
■ EN = English
■ ES = Spanish
■ ET = Estonian
20 Chapter 2 Software overview for Windows ENWW
Page 45

■ FI = Finnish
■ FR = French
■ HE = Hebrew
■ HR = Croatian
■ HU = Hungarian
■ ID = Indonesian
■ IT = Italian
■ KK = Kazakh
■ KO = Korean
Table 2-5 Software component localization by language, L-Z
Component
HP Toolbox 2000, XP X X X X X X X X X X
HP Director 2000, XP X X X X X X X X X
HP Image Zone 2000, XP X X X X X X X X X
HP Document
Viewer
HP Traditional
PCL 6 Driver and
PS Emulation
Driver
HP PCL 6
Unidriver and
PS Emulation
Unidriver
Common Windows
Installer
Online manuals
(.PDF)
Scan drivers 98SE, Me, 2000,XPX X X X X X X X X X X X X X X
1
Operating system LT LV NL NOPL PT RORUSKSL SV TH TR VI ZH
2000, XP X X X X X X X X X
98SE, Me X X X X X X X X X X
2000, XP, 2003
Server
98SE, Me, 2000,
XP
98SE, Me, 2000,
XP
X X X X X X X X X X
X X X X X X X X X
X X X X X X X X
C
N
ZH
T
W
Windows
Software overview for
ENWW
ReadIRIS text
recognition
ReadIRIS UI 98SE, Me, 2000,
1
Components that are not available in a specific language are supported in English.
98SE, Me, 2000,XPX X X X X X X X X X X X X X
X X
XP
Software component information
21
Page 46

Language key for Table 2-5 Software component localization by language, L-Z:
■ LT = Lithuanian
■ LV = Latvian
■ NL = Dutch
■ NO = Norwegian
■ PL = Polish
Software overview for
■ PT = Portuguese
Windows
■ RO = Romanian
■ RU = Russian
■ SK = Slovak
■ SL = Slovenian
■ SV = Swedish
■ TH = Thai
■ TR = Turkish
■ VI = Vietnamese
■ ZHCN = Simplified Chinese
■ ZHTW = Traditional Chinese
The ReadIRIS text-recognition software component is also available in the following languages:
■ Afaan Oromo
■ American English
■ British English
■ Afrikaans
■ Albanian
■ Arabic
■ Aymara
■ Asturian
■ Azeri Latin
■ Balinese
■ Basque
■ Bemba
■ Bikol
22 Chapter 2 Software overview for Windows ENWW
Page 47

■ Bislama
■ Brazilian
■ Breton
■ Bulgarian - English
■ Byelorussian
■ Byelorussian - English
■ Catalan
■ Cebuano
■ Chamorro
■ Corsican
■ Esperanto
■ Faroese
■ Fijian
■ Frisian
■ Friulian
■ Galician
■ Ganda
■ Greek - English
■ Greenlandic
■ Haitian (Creole)
■ Hani
■ Hiligaynon
■ Icelandic
■ Ido
Windows
Software overview for
ENWW
■ Ilocano
■ Interlingua
■ Irish (Gaelic)
■ Japanese
■ Javanese
■ Kapampangan
■ Kicongo
Software component information
23
Page 48

■ Kinyarwanda
■ Kurdish
■ Latin
■ Luba
■ Luxemburgh
■ Macedonian
Software overview for
■ Macedonian-English
Windows
■ Madurese
■ Malagasy
■ Malay
■ Maltese
■ Manx (Gaelic)
■ Maori
■ Mayan
■ Minangkabau
■ Nahuatl
■ Numeric
■ Nyanja
■ Nynorsk
■ Occitan
■ Papiamento
■ Pidgin English
■ Quechua
■ Rhaeto-Roman
■ Rundi
■ Russian - English
■ Samoan
■ Sardinian
■ Scottish (Gaelic)
■ Serbian
■ Serbian - English
24 Chapter 2 Software overview for Windows ENWW
Page 49

■ Serbian (Latin)
■ Shona
■ Somali
■ Sotho
■ Sudanese
■ Swahili
■ Tagalog
■ Tahitian
■ Tatar
■ Tok Pisin
■ Tonga
■ Tswana
■ Turkmen
■ Ukrainian
■ Ukrainian-English
■ Waray
■ Welsh
■ Wolof
■ Xhosa
■ Zapotec
■ Zulu
Windows
Software overview for
ENWW
Software component information
25
Page 50

HP Extended Capabilities
When you install your HP Color LaserJet 2820/2830/2840, you have the option of participating in HP's
voluntary program for communication between your system and HP. This feature, available through
software that is included on your printing-system software CD, helps HP monitor toner usage.
At the time of the invitation (about two weeks after installation), full disclosure of the information to be
communicated is provided. Participation is entirely voluntary, and the impact on your processing and
connecting speed is negligible. Personal information is never sent to HP unless you give permission.
TCP/IP addresses are used only to enable the connection and for security purposes.
Software overview for
Windows
If you decline the invitation, the dialog box does not appear again later, and no data will be gathered.
26 Chapter 2 Software overview for Windows ENWW
Page 51

HP Director
Use the HP Director to gain access to the product-specific software, default settings, status, and
onscreen Help. By using the HP Director, you can scan various types of originals (pictures, documents,
and slides), send faxes, make copies, view and print images or video clips, go to the HP Shopping Web
site, and update your HP software. If you have the HP Color LaserJet 2840, you can also transfer images
from a camera or photo memory card.
To start the HP Director, click Start, click Programs, click HP, and then select HP Director. You can
also double-click the click the HP Director icon on your desktop shortcut. The following screen appears.
Figure 2-1 HP Director screen
Windows
Software overview for
The following options are available on this screen:
■ Select Device
■ Status
■ Settings
■ Help
■ Scan Picture
■ Scan Document
■ Transfer Images (HP Color LaserJet 2840 only)
■ Send a Fax
■ HP Image Zone
■ HP Document Viewer
■ Support
■ How Do I
■ Creative Ideas
ENWW
■ HP Shopping
■ Utilities
HP Director
27
Page 52

■ Software Update
Select Device
If more than one HP device is installed on your system, use this drop-down menu to select the one you
want to use.
Status
Software overview for
Click Status to open the HP Toolbox Device Status screen, as shown in the following illustration.
Windows
28 Chapter 2 Software overview for Windows ENWW
Page 53

Windows
Software overview for
ENWW
Figure 2-2 Device Status screen
HP Director
29
Page 54

Settings
When you click Settings, the options that are available depend on the capabilities and configuration of
your HP Color LaserJet 2820/2830/2840 all-in-one. The following table lists various options and settings
that might be accessible from the Settings menu.
Setting Details
Scan Settings & Preferences ■ Scan Picture Settings
Software overview for
Windows
Fax Settings & Setup (not available on the HP Color
LaserJet 2820 all-in-one)
Print Settings Click this setting to specify default settings for print jobs,
Copy Settings Click this setting to specify default settings that affect all copy
■ Scan Document Settings
■ Scan Slide Settings
■ Scan Negative Settings
■ Scan Preferences Settings
■ Button Settings
■ Scan to... Setup
■ Fax Settings
■ Fax Speed Dial Settings
■ Fax Setup Wizard
■ Fax Cover Page
■ Fax Log
■ Test Fax Setup
maintain your HP Color LaserJet 2820/2830/2840 all-in-one,
or set up a remote print driver, for example.
jobs.
E-Mail Settings Click this setting to specify default settings for the e-mail
software program.
Image Transfer Settings Click this setting to specify default settings that affect all
transfer sessions.
Camera Share Menu Setup (for the HP Color LaserJet 2840
only)
HP Instant Share Setup Click this setting to register your network-enabled HP device
Network Settings Click this setting to modify current network settings for the
Click this setting to set up an HP device, such as a digital
camera, to work with the HP Instant Share tool.
and set up the HP Instant Share.
HP Color LaserJet 2820/2830/2840 all-in-one. If the device is
not set up for networking, a message appears explaining that
this feature is not available.
CAUTION If you are not familiar with changing
network settings, do not modify the settings in the
window that appears. Incorrect settings could prevent
networked computers from communicating with the
device.
30 Chapter 2 Software overview for Windows ENWW
Page 55

Setting Details
Auto Prompt Settings
Change Appearance Click this setting to change the color appearance of the
Click this setting to cause the HP Director to appear
automatically when you load a document into the automatic
document feeder (ADF). This option appears only if your
HP device has an ADF and supports this function.
To enable this feature, select the Automatically display the
HP Director when a document is loaded check box.
HP Director.
Scan Picture and Scan Document
When you click Scan Picture or Scan Document, the HP LaserJet Scan software opens. For more
information about scanning pictures and documents, see
Scanning system.
Transfer Images
Digital images can be created and stored on digital imaging devices such as digital cameras and memory
cards, and then transferred to a computer for printing or sharing with the HP Image Zone Transfer
software.
NOTE This feature is available only on the HP Color LaserJet 2840 all-in-one.
Windows
Software overview for
When you click Transfer Images, the following screen appears.
ENWW
Figure 2-3 Device Selection screen
HP Director
31
Page 56

Send a Fax
When you click Send a Fax, the HP LaserJet Send a Fax software opens. For more information about
sending faxes, see
NOTE This feature is not available for the HP Color LaserJet 2820 product.
HP Send Fax software.
HP Image Zone
Software overview for
When you click HP Image Zone, the HP Image Zone screen appears.
Windows
Figure 2-4 My Images screen
32 Chapter 2 Software overview for Windows ENWW
Page 57

Four tabs are available on the Image Zone UI:
■ My Images. You can navigate to any images in your system from the Folders Menu at the left of
the screen.
■ Edit. Select an image and click the Edit tab to open and make changes to the image.
■ Projects. Click this tab to use your photos and other images in creative print projects such as photo
album pages, cards, CD labels, calendars, flyers, and brochures. These projects contain predefined
layouts with picture holders and text objects that you can customize. The available projects vary
depending on the HP device you have installed.
■ HP Instant Share. Select the HP Instant Share tab to share photos with colleagues using e-mail,
online albums, and an online photo-finishing service.
You can also open the HP Image Zone software independently of the HP Director by clicking Start,
clicking Programs, clicking HP, and then selecting HP Image Zone.
HP Document Viewer
The HP Document Viewer is a software program that you can use to organize your scanned documents
(.JPG and .TIFF), annotate them with text and graphics, print them, convert them to text, and send them
in e-mail or fax them. You can also display and print Word, text, and .PDF files.
When you click HP Document Viewer, the HP Document Viewer screen appears.
Windows
Software overview for
ENWW
HP Director
33
Page 58

Software overview for
Windows
Figure 2-5 HP Document Viewer screen
Two tabs are available on the HP Document viewer screen:
■ View Thumbnails. This view shows thumbnail images of the images in the folder that is selected.
You can navigate to any images in your system by using the Folders Menu at the left of the screen.
■ View Page. Select an image or document and click the View Page tab to view the image or
document.
Support
If you have access to the web, you can click the Support icon to open the HP support web page for the
HP Color LaserJet 2820/2830/2840 product.
34 Chapter 2 Software overview for Windows ENWW
Page 59

You can also open the web page directly by going to the following Web site:
www.hp.com/support/clj2800series
How Do I
Click the How Do I icon to open the HP Toolbox to the Print: How do I…? screen on the
Documentation tab. For more information about the HP Toolbox, see the
this guide. For more information about the Documentation tab, see
The HP Toolbox chapter in
Documentation tab.
Creative Ideas
When you click the Creative Ideas icon, the Image Zone Help opens, as shown in the following
illustration. You can navigate through the Help system for HP Image Zone instructions, information about
creative projects, or troubleshooting and support.
Windows
Software overview for
ENWW
Figure 2-6 HP Image Zone Help screen
HP Shopping
If you have access to the Web, you can click the HP Shopping icon to gain access to the HP Shopping
Web site.
Utilities
When you click the Utilities icon, the HP Toolbox opens. For more information about the HP Toolbox,
see the
The HP Toolbox chapter in this guide.
HP Director
35
Page 60

Software Update
If you have Internet access, you can click the Software Update icon to open the Welcome to HP
Software Update dialog box, which is shown in the following illustration. This software automatically
checks the web for updates to the HP Color LaserJet 2820/2830/2840 software.
Software overview for
Windows
Figure 2-7 HP Software Update screen
You can also gain access directly to the latest software for the product by navigating to the following
Web site:
www.hp.com/support/clj2800series
36 Chapter 2 Software overview for Windows ENWW
Page 61

Scanning system
This section contains information about the following topics.
●
Scanning methods
●
HP Scan software
●
Scan drivers
Scanning methods
You can scan from your HP LaserJet all-in-one product by using any of the following methods.
■ Open the HP Director. Click Start, click Programs, click HP, click HP Director, and then click either
Scan Pictures or Scan Documents.
■ From the HP LaserJet all-in-one product control panel. On the HP LaserJet all-in-one product
control panel, press the S
list, and then press the S
CAN TO
button. Use the < or > buttons to make a selection from following
TART SCAN
or the E
NTER
button.
Windows
NOTE Scanning from the product control panel is possible only after it has first been
configured in the HP Toolbox.
See The HP Toolbox for information about the following options;
■ If you select an e-mail address that you had previously added in the HP Toolbox, your scanned
item is sent to that e-mail recipient as an attachment.
■ If you select a folder location that you had previously added in the HP Toolbox, your scanned
item is saved in the folder location you specify.
■ If you select MY SCANS, you will save the scanned item to the <current user's home>\My
Documents\My Scans directory on your computer.
CAUTION If you move the My Documents folder, the My Scans folder does not follow
to the new location. It remains hard-coded to the current-user's home, and scan jobs
continue to be stored there.
■ If you select ADD NEW E-MAIL, the HP Toolbox automatically opens on your computer, and
you can add e-mail recipients.
■ If you select ADD NEW FOLDER, the HP Toolbox automatically opens on your computer, and
you can add additional folder locations.
■ From a TWAIN- or WIA-compliant software program. Check the Help system in the software
program to learn how to scan from a TWAIN- or WIA-compliant scanner from within that program.
Software overview for
ENWW
■ From the Camera and Scanner Wizard on Windows XP. In Windows XP, click Start, click Control
Panel, double-click Scanners and Cameras, and then double-click the HP LaserJet all-in-one
product scanner icon. The Camera and Scanner Wizard appears. Follow the onscreen directions
to save your scanned item to a file.
Scanning system
37
Page 62

HP Scan software
Use the HP Scan software to scan from the HP LaserJet all-in-one product or to read from a file and
then complete any of the following tasks with the data:
■ Save the scanned item to a file.
■ Attach the scanned item to an e-mail.
■ Perform text recognition on the scanned item through ReadIRIS (if ReadIRIS text-recognition
software is installed on the computer).
Software overview for
■ Open the scanned item with any third-party software program that supports the drag-and-drop
function.
Windows
The HP LaserJet Scan software is set up to scan by default , but the General tab does provide an
override to read a scanned item from a file. This is helpful both for testing when a scanner is not available
and for converting existing files into some other output file type. The following file types are currently
supported:
■ .BMP
■ .GIF
■ .JPG
■ .PDF
■ .TIFF (both regular and compressed)
The following file types are supported as output in ReadIRIS.
■ .BMP
■ .DCA
■ .DOC
■ .DW
■ .HTM
■ .MM
■ .PDF
■ .RTF
■ .TXT
■ .WP
■ .WPS
■ .WS
■ .WS2
The HP LaserJet Scan software is composed of a simple user interface that provides only a Where
should the data go? drop-down menu and a Settings button.
38 Chapter 2 Software overview for Windows ENWW
Page 63

Figure 2-8 hp LaserJet Scan dialog box
Click Settings to open a more detailed property dialog box called the Scan Settings dialog box, where
you can make changes to the scan settings. The tabs that are available in the Scan Settings dialog
box depend on the destination that you select on the HP LaserJet Scan dialog box. For example,
the E-mail tab appears only if the selected destination is Send it through e-mail. Quick Sets are also
available to store settings that you use on a regular basis.
Windows
Software overview for
ENWW
Figure 2-9 Scan Settings dialog box
If you do not change any settings in the Scan Settings dialog box, the HP LaserJet Scan software
prompts you for any needed information, such as a file name if you are sending the scanned item to a
file folder or an e-mail address if you are sending the scanned item in e-mail. If you specify an e-mail
address in the Scan Settings dialog box before you scan your item, the e-mail is sent automatically
without the new message dialog box opening.
Because the Scan Settings dialog box contains only a limited set of variables; more functionality is
available when using command-line arguments.
Every time the HP LaserJet Scan software is used, an HPPSCAN2.LOG file is generated within the
current user's temporary directory. The HPPSCAN2.LOG file develops a log of operations and aids in
troubleshooting problems.
Scanning to a file sends the scanned image to a MY SCANS directory in your MY DOCUMENTS folder.
Scanning system
39
Page 64

Selecting the third-party destination option saves the scanned image to a file of the specified file type.
The HP LaserJet Scan software then starts the specified software program by appending the filename
after the software filename. Because the HP LaserJet Scan software does not support automatic
discovery of software programs, you must specify the correct software program and specify a file type
that your program supports. The HP LaserJet Scan software opens when the filename is passed as a
Software overview for
command-line argument.
Windows
The HP LaserJet all-in-one software for Windows supports only 32-bit, messaging application
programming interface (MAPI)-compliant e-mail programs, and does not support Internet-based e-mail
programs such as Hotmail or Yahoo. The following table lists some examples of supported e-mail
programs.
Table 2-6 Supported e-mail programs
Program Name Windows OS Macintosh OS
CAUTION If you move the My Documents folder, the My Scans folder does not follow to the
new location. It remains hard-coded to the current-user's home, and scan jobs continue to be
stored there.
NOTE The HP LaserJet Scan software does not support multipage scanning from the flatbed.
Multipage scanning from the scanner flatbed is supported when you scan from the HP Director,
the HP Image Zone, or the HP Document Viewer.
Microsoft Entourage Mac OS X
Microsoft Outlook Yes; Outlook 97, Outlook 98, Outlook 2000, Outlook XP Mac OS 9 and Mac OS X
Microsoft Outlook Express Yes Mac OS 9
Lotus Notes Yes; V3.0 and later
E-mail is always sent through your default e-mail client. To see what your default e-mail client is in
Windows XP (the path varies for other Windows operating system), click Start, click Settings, click
Control Panel, click Network and Internet Options, click Internet Options, click the Programs tab,
and see the E-mail setting.
Sending a scan to e-mail generally uses the simple MAPI protocol. If you add the e-mail address prior
to scanning, extended MAPI might be used to avoid security messages while the program tries to send
the e-mail automatically. Setting a MapiLevel registry key forces the scan program to always use either
simple or extended MAPI. This might be required if scanning to e-mail fails even when your default email client is set up correctly.
Scan drivers
The HP Color LaserJet 2820/2830/2840 all-in-one product software includes the following integrated
scan drivers.
■ TWAIN driver
■ Windows Image Acquisition (WIA) driver
40 Chapter 2 Software overview for Windows ENWW
Page 65

NOTE A network administrator must initiate the scan and fax features. Faxing is not available
for the HP Color LaserJet 2820 product.
TWAIN driver
The HP Color LaserJet 2820/2830/2840 all-in-one product software includes a TWAIN driver user
interface that provides great flexibility and a wide range of image-quality options. TWAIN is an industry
standard scanning protocol, and you can initiate scans from the HP LaserJet all-in-one product by using
any TWAIN-compliant program.
The current supported scan language is peripheral management language (PML).
NOTE The TWAIN driver does not support duplex scanning.
TWAIN compatibility
TWAIN-compliant programs can acquire documents directly from the HP LaserJet all-in-one product.
Programs that follow the TWAIN standards should work. (HP LaserJet all-in-one products support the
required core functions for TWAIN compliance, but have only limited support for extended TWAIN
options.)
TWAIN scanning does not work with some programs
For programs that are not TWAIN-compliant, use the following process as a workaround.
1 Use the HP LaserJet Scan software to scan the document in .TIFF format (or any other file type that
the software supports) into a folder.
2 Import the .TIFF file into the program.
Additional information about TWAIN
For more information about TWAIN, visit the following Web site:
www.twain.org
Windows
Software overview for
ENWW
Scanning system
41
Page 66

TWAIN driver user interface
Software overview for
Windows
Figure 2-10 TWAIN driver user interface
The TWAIN user interface contains the following options:
■ New Scan. Use this control to rescan the image. Flatbed previews are always at 75 dpi and in color:
■ Accept. Use this control to rescan the image if the original is on a flatbed scanner and then to send
the image back to program with the specified settings.
■ Resize. Use this control to change the selection area for final scan. The final scan is performed
within this selection area.
■ Lighten/Darken. Use this control to lighten or darken the scanned image.
■ Color Adjustment. Use this control to adjust the color on the scanned image.
■ Resolution. Use this option to designate the final resolution for the image. The software interpolates
resolutions that are above 1200 dpi.
■ Mirror. Use this option to flip the scanned image horizontally.
■ Invert Colors. Use this control to invert the colors in the scanned image.
■ Descreen. Use this control to apply a special algorithm that detects and removes undesirable
patterns from the scanned image. Choosing this option automatically triggers a rescan because the
descreen operation must take place as the image data is flowing in from the scanner.
■ Rotate. Use this control to rotate the scanned image 90°.
42 Chapter 2 Software overview for Windows ENWW
Page 67

■ Zoom. Use this control to zoom in on the selected area of the scan. This automatically starts a
rescan if one is needed to obtain a clear image.
■ Reset Tools. Use this option to reset all the controls to their default values.
To set additional scan settings, on the Scan menu, click Scan preferences.
Figure 2-11 Scan Preferences – Web Page Dialog
Windows
Software overview for
The Scan Preferences dialog box contains three tabs: Automatic, Quality vs. Speed, and Preview.
However, the HP LaserJet Scan software supports only the options on the Automatic tab. The following
options are available on the Automatic tab.
■ Automatically straighten scanned images
■ Automatically adjust exposure
■ Automatically adjust color
■ Use enhanced color
■ Prompt for additional scans from glass/TMA.
■ Restore Defaults
WIA driver
Use any of the following methods to open the Windows Image Acquisition (WIA) scanning feature for
Windows XP.
■ Start WIA scanning through a WIA-compliant software program.
■ Right-click on the scanner icon in the My Computer folder, and click Scan.
■ Right-click on the scanner icon in the My Computer folder, and click Scanner Wizard.
ENWW
■ Right-click on the scanner icon in the Scanners and Cameras folder in the Control Panel, and
click Scan.
■ Right-click on the scanner icon in the Scanners and Cameras folder in the Control Panel, and
click Scanner Wizard.
Scanning system
43
Page 68

WIA has its own user interface. It is relatively simple and does not contain the wide range of imagequality options that are available in the TWAIN driver user interface.
When you use the WIA scan driver, you must modify the brightness and contrast after you perform the
scan. Contrast or brightness modifications cannot be set on the device. Only native device resolutions
are supported and software interpolation is not performed. The WIA scan driver supports these scan
types:ADF or Flatbed, but It does not support duplex scanning. The WIA scan driver supports the
following compression types:
■ None
Software overview for
■ .JPG
■ .GIF
Windows
■ .TIFF
44 Chapter 2 Software overview for Windows ENWW
Page 69

HP Send Fax software
NOTE The HP Color LaserJet 2820 all-in-one product does not support faxing.
Use the HP Send Fax software to send faxes from your computer. To use the HP Send Fax software,
click Start, click Programs, click HP, select the name of your HP LaserJet all-in-one product, and then
click Send Fax.
Windows
Software overview for
ENWW
Figure 2-12 hp LaserJet Send Fax dialog box – user interface
NOTE The HP Send Fax software works together with the HP Toolbox. If you turn off the
HP Toolbox, you cannot use some of the HP Send Fax software features, such as using the fax
phone book or editing your personal data. Cover pages are completed with the your name,
company name, phone number, and fax number as you typed them when they were last edited.
However, you can still preview and send faxes.
HP Send Fax software
45
Page 70
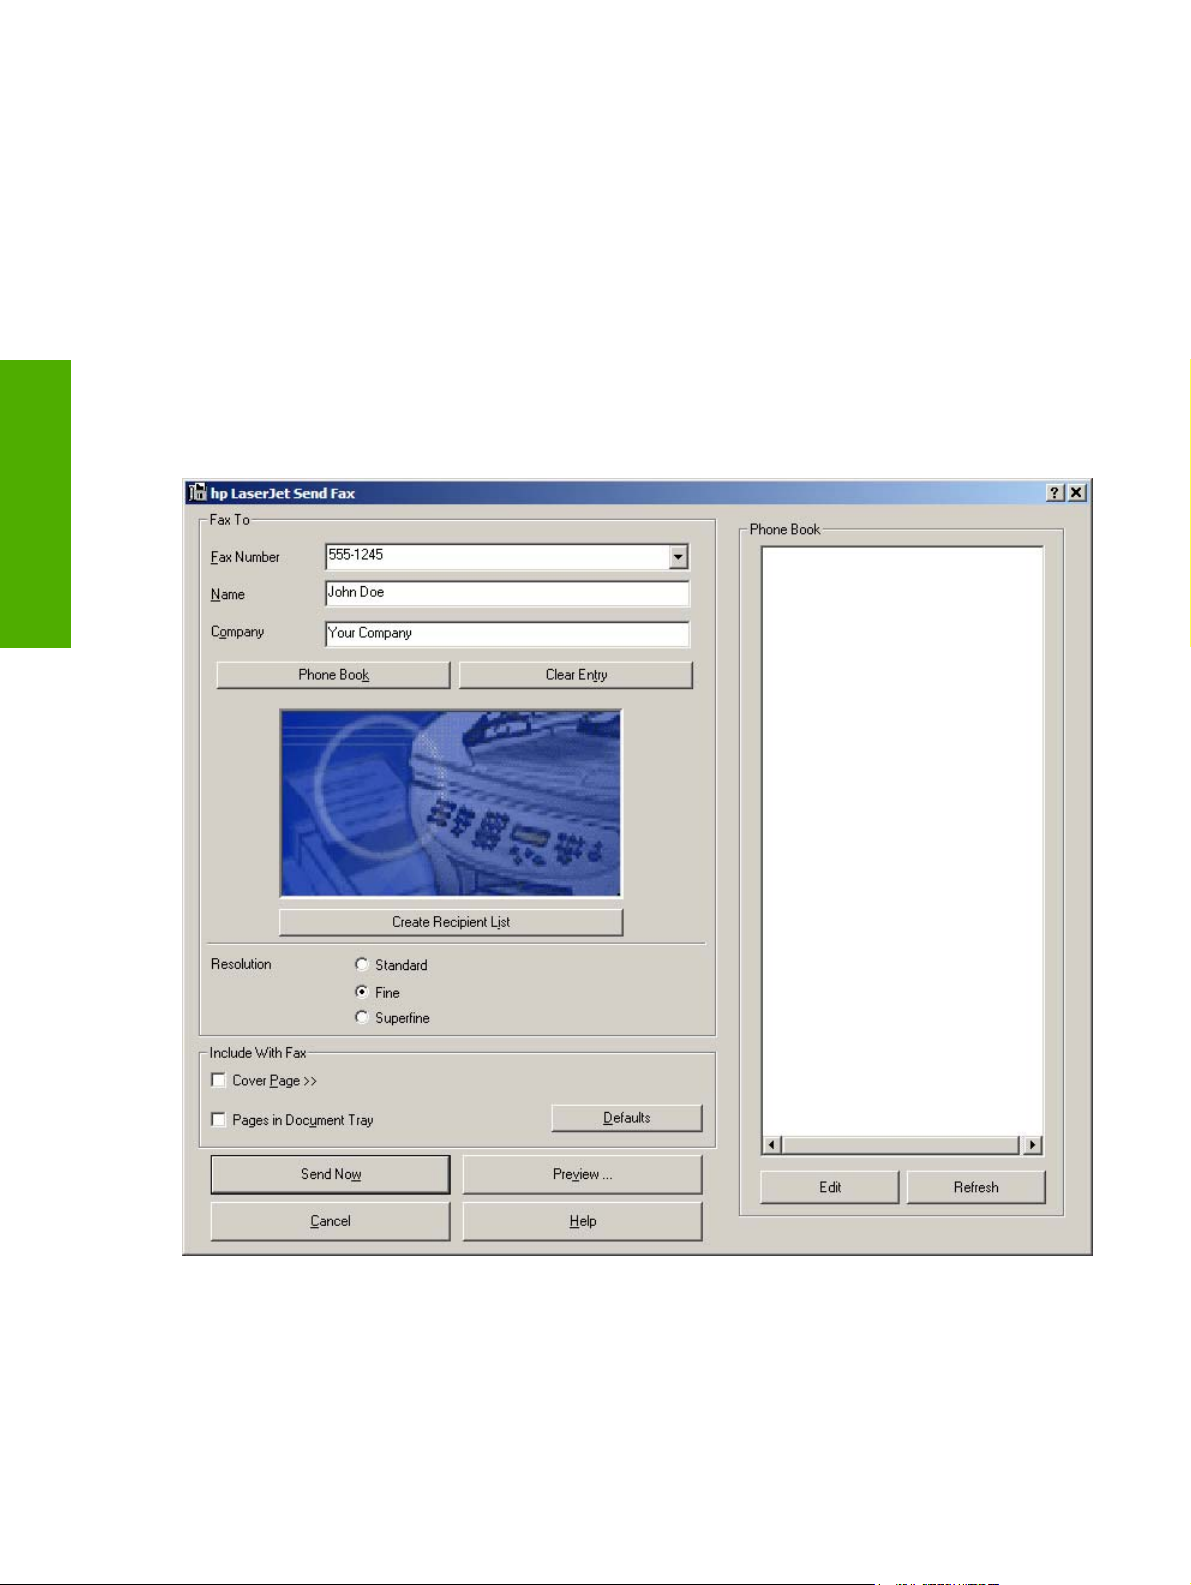
In some cases, faxing from the computer is more convenient than faxing from the HP LaserJet all-inone control panel, such as in the following examples.
■ Faxing to multiple recipients
■ Creating a cover page
■ Faxing without first printing and scanning the document
Software overview for
Windows
Faxing to multiple recipients
If you need to send a fax to multiple recipients, use the HP Send Fax software to type the names and
fax numbers of each recipient easily. The hp LaserJet Send Fax dialog box is shown in the following
illustration.
Figure 2-13 hp LaserJet Send Fax dialog box – multiple recipients
If you have stored entries in the fax phone book in the HP Toolbox software, you can click Phone
Book on the Send Fax screen to select the recipients for the fax quickly. Or you can type in the entries
at your keyboard and click Add To List. To add new entries to the fax phone book in the HP Toolbox,
click Edit to open the HP Toolbox.
46 Chapter 2 Software overview for Windows ENWW
Page 71

Creating a cover page
If you want to create a cover page to accompany your fax, click Cover Page.
Windows
Software overview for
ENWW
Figure 2-14 hp LaserJet Send Fax dialog box – cover page
After you run the HP Toolbox Fax Setup Wizard (you need to do this only once for the life of the software),
your name, company name, phone number, and fax number are entered automatically into the coverpage template. The recipient’s data is automatically filled in, too. When you click Cover Page, the
Notes section appears. To view a filled-in cover page template, select one from the drop-down menu
and click Preview.
Faxing without first printing and scanning the document
One of the most useful features of the Send Fax software is the ability to fax documents without first
printing and scanning them. For example, if you want to send a Microsoft Word document, open the
HP Send Fax software
47
Page 72

document, click File, click Print, and then select the Fax Printer Driver from the drop-down menu of
printers.
The HP Send Fax software starts with the document already attached. If you want to view the fax, click
Preview. You can add a scanned document by clicking Pages in Document Tray. You can add a cover
page by clicking Cover Page.
Software overview for
Windows
48 Chapter 2 Software overview for Windows ENWW
Page 73

Available product configurations
This section contains information about the following topics:
■ Software features by connection type
■ Supported configurations
■ Configuration options
■ Multi-tasking capabilities by connection type
■ Differences between network and direct connection configurations
Software features by connection type
The HP Color LaserJet 2820/2830/2840 all-in-one products can function in one of three installations:
■ As a standalone fax and copier not connected to a computer. (The HP Color LaserJet 2820 product
does not offer fax capability.)
■ Directly connected to a computer. (If the product is connected to a computer running
Windows 98 SE, Windows Me, Windows 2000, or Windows XP, you can share the product with
other network users [for printing].)
■ Connected to a network.
The product works in any of these situations, but some features are not available. The following table
shows which features are available depending on how you connect the product.
Table 2-7 Software features by connection type
Feature or Function Connected directly to
computer (local user)
Printing from the computer to
the product
Faxing electronic documents
from the computer (PC faxing)
Combining paper and PC fax
documents in a fax
Scan to e-mail X X
X X X
X X
X X
1
Connected directly to
computer, but shared with
other users
2
Connected to network
Windows
Software overview for
ENWW
OCR software for converting
scanned images to text
documents that can be edited
Access through the software
to the fax options
X X
X X
Available product configurations
49
Page 74

Table 2-7 Software features by connection type (continued)
Feature or Function Connected directly to
Access through the software
to the product setup options
and setup for speed-dial
numbers
1
Available to the user of the computer that is directly connected to the product.
2
Available to the other users who are using the network when Microsoft Windows sharing is enabled from the computer that is
Software overview for
directly connected to the product. When the computer that is directly connected to the product is on a local area network (LAN),
the product can be shared with other computers on the network. Users of the shared computers can only print from their
computers to the product.
Windows
Supported configurations
This section includes information about the following topics:
■ Direct connection
■ Network connections
Direct connection
In the direct (or local) configuration, the HP LaserJet all-in-one product is connected directly to the host
computer with a USB cable. In this configuration, the product is not shared. A single user has complete
physical control over the product. Most users are familiar with using peripherals that are directly
connected to their computers. In this configuration, you have access to all of the product features.
computer (local user)
X X
1
Connected directly to
computer, but shared with
other users
2
Connected to network
Network connection options
The following networking options are available for the HP Color LaserJet 2820/2830/2840 all-in-one
products:
Local connection that uses Microsoft peer-to-peer networking (Windows only)
●
Networking requirements
●
Local connection that uses Microsoft peer-to-peer networking (Windows only)
Use Microsoft Windows to share a local printer over the network. The operating system handles all of
the networking issues. The product prints in this configuration, but only the local computer can use the
faxing and scanning functionality; network faxing and scanning are not supported in this configuration.
Also, because Microsoft peer-to-peer networking is unidirectional, network users do not receive printerstatus messages when they print to the product.
NOTE HP does not support vending drivers across operating systems that have different print-
driver architectures, such as HP Traditional drivers and HP Unidrivers. To use a mix of operating
systems, you must install an alternate print driver and download the driver for the specific
operating system.
50 Chapter 2 Software overview for Windows ENWW
Page 75

Networking requirements
The following are required for your HP LaserJet all-in-one product to work on a network connection.
■ An installed network that uses the TCP/IP network protocol.
■ A cable for your type of network connections (not included).
Multitasking capabilities
The HP Color LaserJet 2820/2830/2840 all-in-one products are designed to carry out multiple tasks
simultaneously. You can initiate tasks when they are needed, without waiting.
The HP LaserJet all-in-one products perform multiple tasks such as printing, scanning, copying, faxing,
and sending faxes directly from a computer (PC faxing). Depending on which functions are in use, the
HP LaserJet all-in-one product can perform many functions at the same time. This high level of
multitasking is made possible by the two separate paper paths (a print paper path and a scan paper
path) in the HP LaserJet all-in-one products. Additionally, these products feature at least 96 MB of
memory that can efficiently manage multiple tasks, and a scan-ahead feature that quickly clears the
scan paper path for subsequent jobs.
Windows
The following table shows which tasks the HP LaserJet all-in-one products can perform while another
function is already in use.
NOTE The HP LaserJet all-in-one products can perform multiple tasks when directly connected
to a computer or when connected to a network. The fax and scan functions are not available
when using a Windows sharing (peer-to-peer) connection.
NOTE The HP Color LaserJet 2820 all-in-one product does not support faxing.
Table 2-8 Multitasking capabilities
If the
product is:
Printing a file Yes. Prints
Printing a
paper fax
Receiving a
paper fax
You can:
Send a print
job
when the first
print job
ends.
Yes. Prints
when fax
printing ends.
Yes. Prints
when fax
printing ends.
Receive a
paper fax
Yes. Prints
when the first
print job
ends.
Yes. Prints
when the first
job ends.
No.
Telephone
line is in use.
Send a paper
fax
Yes Yes Yes No No
Yes Yes Yes Ye. Yes. Copies
Yes. Sends
when the first
fax job ends.
Receive a PC
fax
No.
Telephone
line is in use.
Send a PC
fax
Yes. Sends
when the first
fax job ends.
Scan to thePCCopy
scan and
print when fax
printing ends.
Yes Yes
Software overview for
ENWW
Sending a
paper fax
Copying Yes. Prints
Yes No.
when copying
ends.
Telephone
line is in use.
Yes. Prints
when copying
ends.
Yes. Sends
when the first
fax job ends.
Yes, if the
scanner is not
in use.
No.
Telephone
line is in use.
Yes Yes Yes, if the
Yes. Sends
when the first
fax job ends.
Yes, if the
scanner is not
in use.
scanner is not
in use.
Available product configurations
Yes, if the
scanner is not
in use.
Yes. Second
copy begins
when the first
51
Page 76

Table 2-8 Multitasking capabilities (continued)
copy job
ends.
Sending a PC
fax
Receiving a
PC fax
Scanning No Yes No. The
Software overview for
Windows
Differences between the network-connected and direct-connected configurations
When using a network, you can perform nearly all of the product functions just as if your HP LaserJet
all-in-one product were directly connected to your computer. The following are a few exceptions:
■ One-touch scanning with the Start Scan button on the control panel of the HP LaserJet all-in-one
product is not supported on networked HP LaserJet all-in-one products. The Start Scan button on
the control panel of the HP LaserJet all-in-one product starts the HP LaserJet Scan software on the
computer in direct connections.
■ The Scan to e-mail or folder functionality is turned off by default for network connections. You
must turn on this function in the HP Toolbox for networked computers.
Yes No.
Telephone
line is in use.
Yes No.
Telephone
line is in use.
Yes. Sends
when the first
fax job ends.
Yes. Sends
when the first
fax job ends.
scanner is in
use.
No.
Telephone
line is in use.
No.
Telephone
line is in use.
Yes Yes No. The
Yes. Sends
when the first
fax job ends.
Yes. Sends
when the first
fax job ends.
Yes, if the
scanner is not
in use.
Yes Yes
scanner is in
use.
Yes
No. The
scanner is in
use.
■ The Scan to e-mail or folder entries will be prefixed with a host name abbreviation for networked
computers in order to differentiate among computers on the network.
52 Chapter 2 Software overview for Windows ENWW
Page 77

Supported third-party software
This section describes third-party software programs that are supported by your HP Color
LaserJet 2820/2830/2840 all-in-one software.
Text-recognition software
The HP all-in-one product software has an integrated text-recognition feature. This feature is also known
as optical character recognition, or OCR. Text-recognition capability is also provided by the third-party
software program ReadIRIS, which is included on a separate CD that comes with the HP LaserJet allin-one product.
About text-recognition reliability
Text-recognition software turns an image into computer-editable text by analyzing the image and
defining the characters. The accuracy obtained through text-recognition software depends on the
quality, size, and structure of the original document, and on the quality of the scan itself. To obtain the
best possible results when using text-recognition software, use the following guidelines:
■ Process only pages that contain 9-point text or larger.
■ Limit pages that contain underlining, forms, graphics, rotated text, photographs, and handwriting.
■ Scan images squarely.
■ Make sure that the pages are free of extraneous marks.
Windows
Software overview for
■ Maximize the scanning resolution.
■ Process only pages that have crisp, clear text. Letters that have gaps, that "bleed" along their edges,
or that touch other letters do not work well. Text that is aligned closely to nontext items, such as
graphics, might also degrade text-recognition results.
■ Fine-tune the amount of black and white on scanned images. See the user guide for information.
■ Avoid scanning from thin media that has information printed on the back side. The information on
the back can bleed through.
Even if you follow these recommendations, you might still get less-than-perfect results. This is because
text-recognition technology itself is evolving and is still less than perfect.
Other PC fax programs
The PC fax program that came with the product is the only PC fax program that works with the product.
If you want to continue to use your PC fax program, you must use it with the modem you already have
connected to your computer, rather than with the product. Using two PC fax programs can cause both
programs to work incorrectly.
ENWW
Supported third-party software
53
Page 78

Software overview for
Windows
54 Chapter 2 Software overview for Windows ENWW
Page 79

3 Windows HP unidriver features
Introduction
This chapter includes the following information.
●
HP PCL 6 and PS emulation unidriver features (for Windows 2000 and Windows XP)
NOTE A PCL 5e driver is not included on the HP Color LaserJet 2820/2830/2840 printing-
system software CD. However, the HP Traditional PCL 5e Driver is supported through the
printer's firmware.
features
Windows HP unidriver
ENWW
Introduction
55
Page 80

HP PCL 6 and PS emulation unidriver features (for Windows 2000 and Windows XP)
This section contains the following information.
●
Access to drivers
●
Help system
●
HP postscript level 3 emulation support
●
Driver tab features
Access to drivers
To gain access to driver settings from within most software programs, click File, click Print, and then
click Properties. The appearance and names of the driver tabs that appear can vary, depending on the
operating system. These settings apply only while the software program is open.
You can also control the drivers directly from the Printers folder. These settings change the default
settings used across all software programs.
Windows HP unidriver
features
■ In Windows 2000, click Start, click Settings, click Printers, right-click the printer name, and then
click Printing Preferences to gain access to the same set of driver tabs that the software program
controls.
■ In Windows XP, click Start, click Printers and Faxes (Windows XP Professional) or Printers and
Other Hardware Devices (Windows XP Home) to gain access to the same set of driver tabs that
the software program controls.
If, after right-clicking the printer name, you click Properties, you gain access to a different set of tabs
that control the driver behavior and driver connections. For information about the Properties tabs that
are described in this chapter, see the following sections.
Printer Properties tab set for the HP PCL 6 Unidriver and PS Emulation Unidriver (for Windows 2000
■
and Windows XP)
Configure tab features for the HP Traditional PCL 6 Driver (for Windows 98 SE or Windows Me)
■
■
Device Options tab features for the PS Emulation Driver (for Windows 98 SE or Windows Me)
Help system
The HP Color LaserJet 2820/2830/2840 HP PCL 6 and PS emulation unidrivers include a full-featured
Help system to provide assistance with printing and configuration options. The following Help options
are available.
■ What's this? Help
■ Context-sensitive Help
■ Constraint messages
56 Chapter 3 Windows HP unidriver features ENWW
Page 81

What's this? Help
"What's this?" Help is supported in Windows 2000 and Windows XP. You can gain access to "What's
this?" Help messages in any of the following ways:
■ Right-click a control and click What's this?, and a pop-up Help window appears.
■ Click the ? button at the upper-right corner of the frame, next to the X, to change the cursor to an
arrow with a question mark. Use this special cursor to select a control, and the pop-up Help window
for that feature appears.
■ Press the F1 key, and the Help window for the currently selected control appears.
Context-sensitive Help
Press the Help button on a driver tab or in a dialog box, and context-sensitive Help appears.
Constraint messages
Constraint messages are unsolicited messages that appear in response to specific actions you take.
These messages alert you to selections that are illogical or impossible given the capabilities of the printer
or the current settings of other controls. For example, if you click Print on Both Sides and then change
the paper type to Transparency, a message appears asking you to resolve this conflict.
Figure 3-1 A typical constraint message
Whenever a constraint message appears with Restore my previous settings or Keep this setting,
and I will change it later buttons, the action of the buttons is as follows:
■ ClickRestore my previous settings and then click OK to reject the change that was just made,
returning the control to its previous value.
■ Click Keep this setting, and I will change it later and then click OK to accept the change that was
just made, allowing you to go back into the driver settings to resolve the conflict.
HP postscript level 3 emulation support
The HP postscript level 3 emulation maintains full compatibility with Adobe PS Level 3 when PS Level
3 soft fonts are purchased from Adobe.
features
Windows HP unidriver
ENWW
HP PCL 6 and PS emulation unidriver features (for Windows 2000 and Windows XP)
57
Page 82

Windows HP unidriver
features
A set of 92 PS Level 3 soft fonts is included with the printing-system software. If you want to permanently
install the fonts in the printer, HP postscript level 3 emulation fonts are also available from HP in an
optional font DIMM.
Users of Adobe-licensed applications might also have the right to use the Adobe PS level 3 print drivers
from Adobe with the HP LaserJet printer postscript level 3 emulation PPD, available on the HP LaserJet
printer software CD or from the HP Web site. When using the Adobe PS Level 3 print driver, users must
comply with all Adobe licensing agreements, as stated on the Adobe Web site at
support/downloads/license.html.
www.adobe.com/
Driver tab features
This section describes the options available on each tab of the HP PCL 6 and PS emulation unidriver
interfaces:
■ Printing Preferences tab set
■ Printer Properties tab set
Printing Preferences tab set
The printer Printing Preferences tabs contain information for formatting documents for the HP Color
LaserJet 2820/2830/2840 all-in-one. You can gain access to the Printing Preferences tabs either
through your software program or through the Windows Printers folder. For more information, see the
Access to drivers section for Windows 2000 and Windows XP.
The following tabs are included in Printing Preferences tab set:
■ Advanced tab features
■ Paper/Quality tab features
■ Effects tab features
■ Finishing tab features
■ Color tab features
Advanced tab features
You can use the Advanced tab to change the layout of printed pages. Use this tab to configure special
controls that are not commonly used, as well as features such as paper size and copies, in the driver.
The following illustration shows the Advanced tab.
58 Chapter 3 Windows HP unidriver features ENWW
Page 83

Figure 3-2 Advanced tab – HP PCL 6 Unidriver
features
Windows HP unidriver
ENWW
Figure 3-3 Advanced tab – PS Emulation Unidriver
HP PCL 6 and PS emulation unidriver features (for Windows 2000 and Windows XP)
59
Page 84

Windows HP unidriver
features
The Advanced tab contains the following controls:
■ Paper/Output settings
■ Graphic settings
■ Document Options settings
Paper/Output settings
The Paper/Output settings contain the following options:
■ Copy Count setting
Copy Count setting
This driver setting is useful for software programs that do not provide a copy count. If a copy count is
available in the software program, set the copy count in the software program.Copy Count specifies
the number of copies to print.
The number of copies that you request appears in the Copy Count option. You can select the number
by typing in the box or by using the up and down arrows to the right of the text box. For the HP Color
LaserJet 2820/2830/2840 all-in-one product, valid entries are numbers from 1 to 9999. The copies value
will not advance from the maximum number (9999) to 1 when the up arrow is used, or change from 1
to the maximum number (9999) when the down arrow is used. When you click another group box or
leave the Advanced tab, invalid entries into the edit box (such as non-numerical input, numbers less
than 1, or numbers greater than the maximum allowed) change to the last valid value that appeared in
the box. The default number of copies is 1.
Because you can set the number of copies that you want from some software programs, conflicts can
arise between the software program that you are using and the driver. In most cases, the software
program and the driver communicate, so that the number of copies set in one location (such as the
program) will appear in the other (such as the driver). For some programs, this communication does not
happen, and the copies values are treated independently. For these programs, setting 10 copies in the
program and then setting 10 copies in the driver will result in 100 copies (10 x 10) being printed. It is
recommended that you set the number of copies in the program, wherever possible.
Graphic settings
The Graphic settings contain the following options.
■ Image Color Management settings.
■ TrueType Font settings.
Image Color Management settings
This control lists the available Image Color Management (ICM) options used for printing color graphics.
ICM, a set of calculations for color matching, makes it possible for programs to adjust colors before
60 Chapter 3 Windows HP unidriver features ENWW
Page 85

printing so that the color of images displayed on the screen more closely match the color of images
when printed. The following options are available:
■ ICM Method. The ICM Method setting specifies how to print your color graphics. To enable Image
Color Management, click ICM Method. The drop-down menu beside this setting becomes
highlighted.
■ If you want the calculations for color matching to be performed on the host computer before it
sends the document to the printer, click ICM Handled by Host System.
■ If you want the calculations for color matching to be performed on your printer, click ICM
Handled by Printer. In this case, a set of rules for mapping the colors will be created and
downloaded to the printer (which must be PostScript language level 2 or higher). The printer
will use these rules to adjust colors in the document.
■ ICM Intent. The ICM Intent setting specifies how color images are created to produce the best-
looking image on the printed page.
■ If you are printing a chart or using fully saturated, bright colors, click Graphics to achieve the
best quality.
■ For photographs or pictures where the colors blend together, click Pictures to maximize the
contrast.
■ If your document uses a color that you need to match exactly, and you are sending the document
to a printer that has that specific color of ink, click Proof.
■ If you want to preview the color settings from another printer, click Match.
TrueType Font settings
This option specifies the TrueType font settings. The following settings are available.
■ Substitute with Device Font. This setting causes the printer to use equivalent fonts for printing
documents that contain TrueType fonts. This permits faster printing; however, you might lose special
characters that the printer font does not support. This is the default setting.
■ Download as Softfont. This setting causes TrueType fonts to be downloaded and used for printing,
instead of using printer fonts.
Document Options
The Document Options settings contain the following controls:
■ Advanced Printing Features
■ Color Printing Mode (HP PCL 6 Unidriver only)
■ Print Optimizations (HP PCL 6 Unidriver only)
■ PostScript Options (PS Emulation Unidriver only)
features
Windows HP unidriver
ENWW
■ Printer Features
■ Layout Options
HP PCL 6 and PS emulation unidriver features (for Windows 2000 and Windows XP)
61
Page 86

Advanced Printing Features
When the Advanced Printing Features setting is Enabled, metafile spooling is turned on and
Finishing tab options such as Page Order, Booklet Layout, and Pages per Sheet are available,
depending on your product. For normal printing, leave the Advanced Printing Features setting at the
default (Enabled). If compatibility problems occur, you can disable the feature. However, some
advanced printing features might still be available in the print driver, even though they have been
disabled. If you select an advanced printing feature in the print driver that has been disabled on the
Advanced tab, the feature is automatically turned on again.
Color Printing Mode (HP PCL 6 Unidriver only)
The Color Printing Mode specifies whether to print in color or black and white. The default setting is
True Color (24 bpp). Use the Monochrome mode to sharpen details in graphics or to speed up the
printing of your color document.
Print Optimizations (HP PCL 6 Unidriver only)
The default setting for Print Optimizations is Enabled. When this feature is enabled and your document
contains overlapping text and graphics, text placed on top of a graphic might not print correctly. If the
printed output is not correct, you can disable this feature. When disabled, print optimization features,
such as substituting device fonts for TrueType fonts and scanning for horizontal and vertical rules, are
turned off.
Windows HP unidriver
PostScript Options (PS Emulation Unidriver only)
features
The following PostScript options appear in the PS Emulation Unidriver:
62 Chapter 3 Windows HP unidriver features ENWW
Page 87
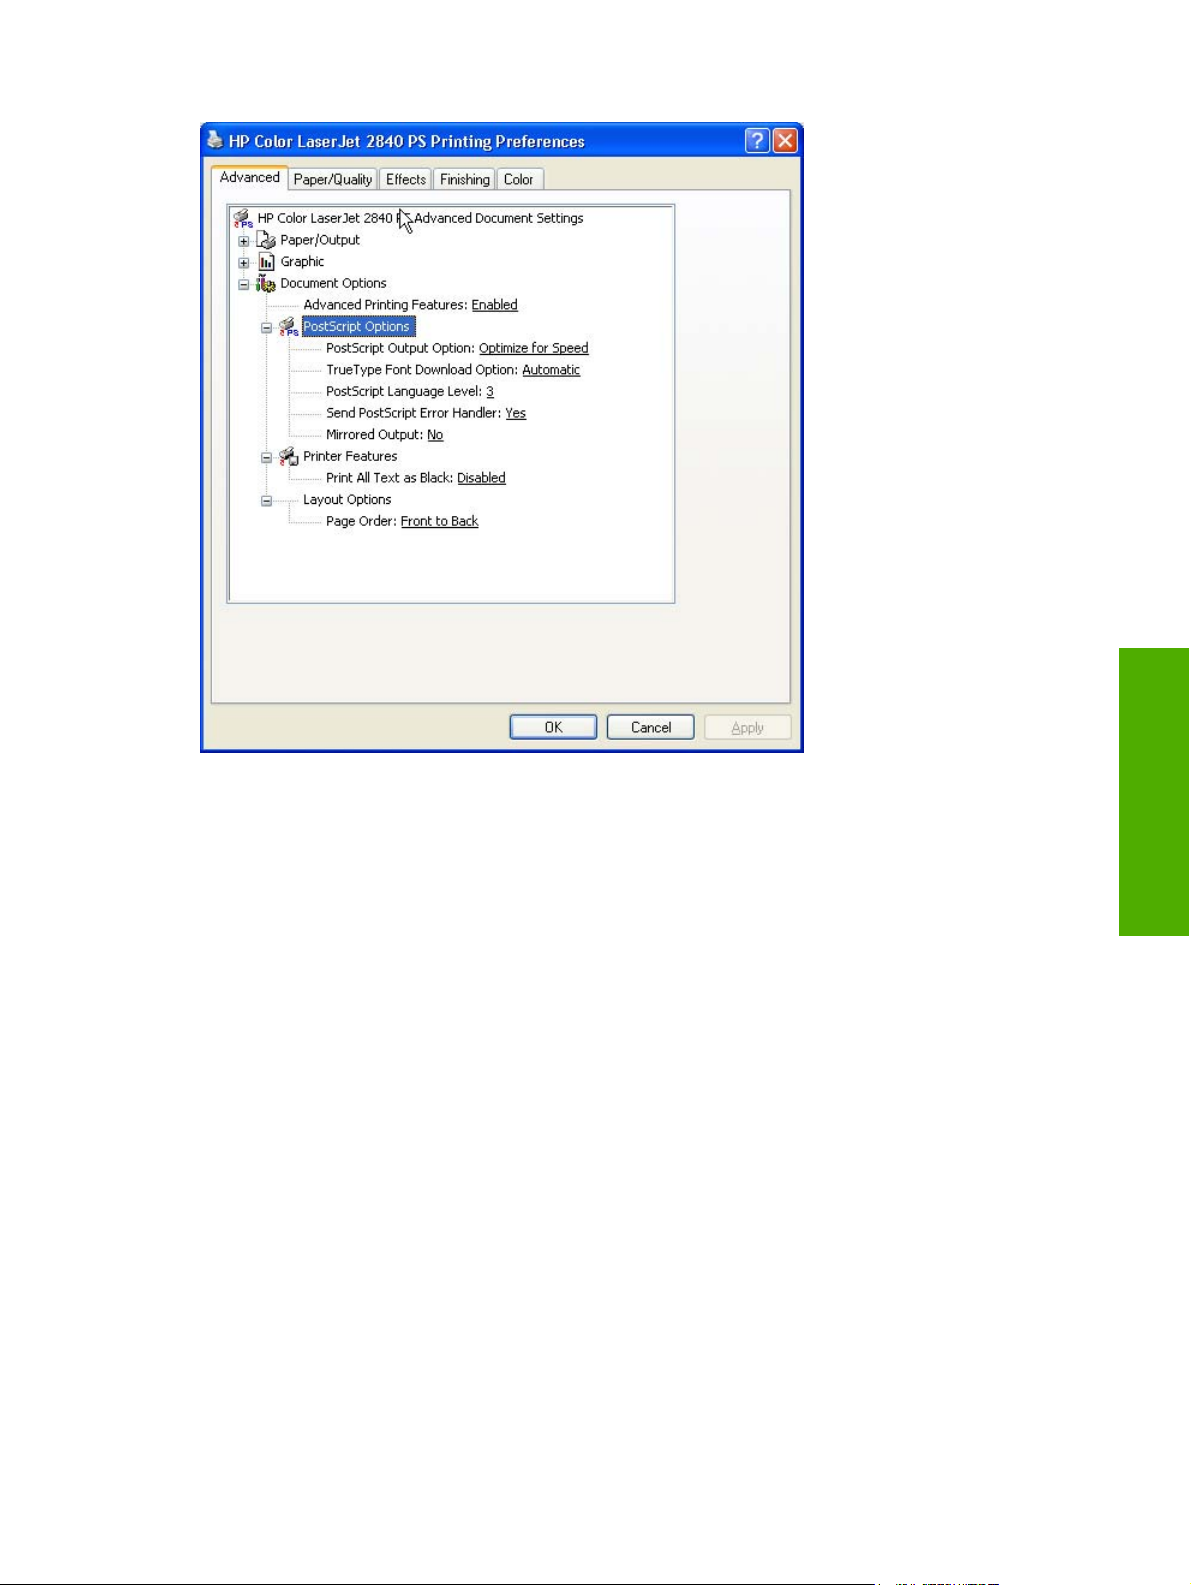
Figure 3-4 Advanced tab - PS Emulation Unidriver - PostScript Options
■ PostScript Output Option
■ TrueType Font Download Option
■ PostScript Language Level
■ Send PostScript Error Handler
■ Mirrored Output
PostScript Output option
The PostScript Output Option specifies the output format for PS files. Generally, you use the default
setting, Optimize for Speed, to print your documents.
To create a file that conforms to the Adobe Document Structuring Conventions (ADSC), click Optimize
for Portability. Each page of the document will be a self-contained object. This is useful if you want to
create a PS file and print it on a different product. If you want to include the file as an image in another
document that is printed from a different software program, click Encapsulated PostScript (EPS). The
Archive Format creates a PS file that you can use later.
TrueType Font Download option
The TrueType Font Download Option specifies how TrueType fonts are downloaded. The default
setting of Automatic allows the PS driver to decide which format is best. If you want to download the
TrueType font as a scalable outline font, click Outline. To download the TrueType font as a bitmap font,
features
Windows HP unidriver
ENWW
HP PCL 6 and PS emulation unidriver features (for Windows 2000 and Windows XP)
63
Page 88

click Bitmap. If your printer is a TrueType rasterizer printer, click Native TrueType to download the
TrueType font as an outline font.
PostScript Language Level
The PostScript Language Level option specifies which PS language level to use, from 1 to 3. The
highest level supported by the HP Color LaserJet 2820/2830/2840 all-in-one is 3, and this is the default
setting. Some printers support multiple levels.
It is usually best to select the highest number available, because a higher language level provides more
features. In some instances you should use level 1, such as when you are printing a file to disk, and
that file will be printed by someone who uses a level-1 printer.
Send PostScript Error Handler
The Send PostScript Error Handler setting specifies whether a PS error-handler message is sent. If
you want the printer to print an error page when an error occurs in the print job, click Yes. The default
setting is Yes.
Mirrored Output
This control specifies mirrored output. Click Yes to print a mirror image of your document by reversing
the horizontal coordinates. The default setting is No.
Windows HP unidriver
Printer Features
features
The following Printer Features are available:
■ Print All Text as Black
■ Send True Type as Bitmap (HP PCL 6 Unidriver only)
■ Raster Compression (HP PCL 6 Unidriver only)
Print All Text as Black
The Print All Text as Black feature is Disabled by default. When Enabled is selected, the driver prints
all text as black regardless of the original document text color. Color text is printed as black, except for
white text, which remains white. (White text is a reliable method of printing reverse typeface against a
dark background.) This setting does not affect graphic images on the page, nor does it affect any text
that is part of a graphic.Print All Text as Black remains enabled only for the current print job. When
the current print job is completed, Print All Text as Black is automatically disabled.
Alternatively, to print all text as black, use the black and white HP PCL 6 Unidriver This driver is installed
by default, together with the color HP PCL 6 Unidriver, during a Typical Installation.
Send TrueType as Bitmap (HP PCL 6 Unidriver only)
Send True Type as Bitmap provides an alternative for those software programs that encounter
problems when using TrueType fonts for special graphic purposes such as shading, rotation, or slanting.
The setting is Disabled (off) by default. The TrueType fonts are first converted to bitmap soft fonts before
downloading. The Enabled setting causes the driver to send TrueType fonts to the printer as outlines,
which retains the standard format (outline) of the fonts.
64 Chapter 3 Windows HP unidriver features ENWW
Page 89

Raster Compression (HP PCL 6 Unidriver only)
Use the Raster Compression feature to select the graphics compression method:
■ Automatic. The software determines the best compression method to use.
■ Best Quality. Forces the software to use a lossless compression method. (Lossless means that no
data is lost during compression.)
■ Maximum Compression. Where applicable, requires the software to always use a lossy
compression method (some data is lost). Choosing this option increases the print speed
performance, but does decrease print image quality.
Layout Options
The Layout Options section includes the following option:
■ Page Order
Page Order
Page Order specifies the order in which the pages of your document are printed. Front to Back prints
the document so that page 1 prints first. Back to Front prints the document so that page 1 prints last.
The Back to Front setting is useful if you are printing to a face-up output bin to achieve output in the
correct order.
NOTE The page-ordering operation works on whole sheets of paper rather than on individual
logical pages. Accordingly, if you set Pages per Sheet (on the Finishing tab) to be greater than
one, the ordering of logical pages on a physical sheet of paper does not change.
Paper/Quality tab features
Use the Paper/Quality tab to specify the size, type, and source of the media for your HP Color
LaserJet 2820/2830/2840 all-in-one. You can also use this tab to indicate different paper-selection
choices for the first page, other pages, and back cover of the document. The following illustration shows
the Paper/Quality tab.
features
Windows HP unidriver
ENWW
HP PCL 6 and PS emulation unidriver features (for Windows 2000 and Windows XP)
65
Page 90

Windows HP unidriver
features
Figure 3-5 Paper/Quality tab
The Paper/Quality tab contains the following controls:
■ Print Task Quick Sets group box
■ Paper Options group box
■ Document preview image
Print Task Quick Sets
The first group box in the upper portion of the Paper/Quality tab is Print Task Quick Sets. Any change
to the Print Task Quick Sets group box that is made on the Paper/Quality tab affects most of the
Printing Preferences driver tabs (the Paper/Quality, Effects, Finishing, and Job Storage tabs)
because they are all the same control.
Use Print Task Quick Sets to store the current combination of driver settings (except the settings on
the Advanced tab). Print Task Quick Sets are either preset by network-administrator settings or userdefined printing specifications (such as media size, pages per sheet, and so on). The Print Task Quick
Sets setting does not appear on the driver Properties tabs.
The following selections are available in the Print Task Quick Sets drop-down menu:
■ Default Print Settings
■ User Guide Print Settings
■ Type a new Quick Set name here
66 Chapter 3 Windows HP unidriver features ENWW
Page 91

Default Print Settings
When you select Default Print Settings, nearly all of the settings are restored to the combination that
existed after the driver was installed (the original settings). However, if the attribute combinations that
are associated with watermark definitions, custom paper sizes, or the User Guide Print Settings quick
set have been changed or deleted, the original settings are not restored.
Type a new Quick Set name here appears in the Print Task Quick Sets menu automatically if no
other driver settings have been changed since the driver was installed, or if all of the driver settings
match the original settings. Otherwise, the setting in the Print Task Quick Sets menu is the same label
that appeared when you last closed the printing Properties dialog box by clicking OK.
User Guide Print Settings
The User Guide Print Settings option provides a Print Task Quick Sets for optimal printing of the
HP Color LaserJet 2820/2830/2840 User Guide.
Type new Quick Set name here
By default, the Print Task Quick Sets menu is set to Type new Quick Set name here. When you
change any of the default settings on any of the Printing Preferences driver tabs and you want to save
the configuration as a Print Task Quick Set, highlight the words Type new Quick Set name here, type
the name you want for your new Print Task Quick Set, and then click Save. Print Task Quick Sets are
saved in the system registry. To delete a Print Task Quick Set, select it from the drop-down menu and
click Delete.
NOTE Administrators can predefine Print Task Quick Sets for their users. These administrator
Print Task Quick Sets are defined on the server and are available to users, but usually cannot
be modified by users. Users can also define Print Task Quick Sets for their own use. User-defined
Print Task Quick Sets are described later in this section.
You can store a maximum of 25 Print Task Quick Sets on a particular system. If you attempt to save
too many, a message box appears that reads, "There are too many Print Task Quick Sets defined.
Please delete some before adding new ones."
Paper Options group box
The settings specified in the Paper Options group box on the Paper/Quality tab apply to all of the
pages of the document. The following illustration shows the Paper Options group box and the selections
available by default.
features
Windows HP unidriver
ENWW
HP PCL 6 and PS emulation unidriver features (for Windows 2000 and Windows XP)
67
Page 92

Windows HP unidriver
features
Figure 3-6 Paper Options group box
The appearance of the Paper Options group box changes when the Use Different Paper/Covers
check box is selected. The following settings in the Paper Options group box are available:
Size is:
■
■
Source Is: drop-down menu
■
Type is: drop-down menu
■
Use Different Paper/Covers options
Size is:
The Size is: setting is a drop-down menu that lists all of the supported media sizes.
You can specify size for all the settings in the Paper Options group box. You must use the same size
of media for the entire print job. That is, if the print job uses Letter-size media, any option that you select
from the available Use Different Paper options must also use Letter-size media.
NOTE Certain software programs can override the size command and specify different media
sizes within a single document.
For the Other Pages and Back Cover settings, you can select a source (tray) and media type that differ
from the settings selected for First Page. If a conflict exists among media source, media size, and/or
media type, and you choose to keep the conflicting settings, the settings are processed in the following
order: media size, media type, and then media source.
Because driver settings are overridden by media-size settings in most software programs, it is generally
best to use the driver to set media size only for software programs that lack a media-size setting, such
as NotePad, or when you are producing a book or a booklet that does not require different media sizes.
NOTE When you use a software program with a media-size setting, you can specify different
media sizes within a single document by using the Use Different Paper/Covers options. For
more information, see
For information about media sizes, see the Media types and sizes section of this guide.
68 Chapter 3 Windows HP unidriver features ENWW
Use Different Paper/Covers options.
Page 93

To create a custom paper size, click Start, click Settings, and then click Printers (Windows 2000) or
Printers and Faxes (Windows XP or Windows Server 2003). Click the File menu, click Server
Properties, and then select the Create a new form check box. Specify a name and dimensions for your
paper size, and then click the Save Form button. This new paper size will be included in any list of paper
sizes in the driver and application tabs. The print dialogs for various software programs also often have
settings that allow you to create custom paper sizes.
Use Different Paper/Covers check box
When the Use Different Paper check box is selected and different options are configured, the Size is:,
Source is:, and Type is: menus change, offering a variety of options. For more information, see
Use
Different Paper/Covers check box.
Source Is: drop-down menu
The Source is: setting specifies the source tray to use for printing a document. The list of source trays
depends on the printer accessories. Any optional source trays that are installed through the Device
Settings tab also appear here.
The Source is: drop-down menu can contain the following options:
■ Automatically select
■ Printer Auto Select
■ Manual Feed in Tray 1
■ Tray 1 (125-sheet multipurpose tray)
■ Tray 2 (250-sheet tray; optional for the HP Color LaserJet 2820 and HP Color LaserJet 2830 all-in-
one products)
The default setting is Automatically Select. When this setting is selected, the printer uses the source
tray that supports the media size that you have selected. If you select a source tray other than
Automatically select, make sure that the correct media size is loaded in the source tray.
For information about media sources, see the
Media types and sizes section of this guide.
Type is: drop-down menu
The Type is: drop-down menu shows all the paper types that the HP Color LaserJet 2820/2830/2840
series printer supports. When you use the default setting, Unspecified, the printer uses the default
media type, which is usually Plain.
The following standard paper types appear in the lists.
Table 3-1 Standard paper types and engine speeds
Paper type Engine speed
Plain Full
Preprinted Full
Letterhead Full
features
Windows HP unidriver
ENWW
Transparency Black and white: full
Color: 1/4 speed
HP PCL 6 and PS emulation unidriver features (for Windows 2000 and Windows XP)
69
Page 94

Table 3-1 Standard paper types and engine speeds (continued)
Paper type Engine speed
Windows HP unidriver
features
Prepunched
Labels 1/2 speed
Bond Full
Recycled Full
Color Full
Light (< 70 g/m2)
Heavy (91 to 105 g/m2)
Cardstock (106 to 163 g/m2)
Gloss (75 to 105 g/m2)
Heavy Gloss (106 to 163 g/m2)
Tough Paper (Gloss Film) 1/2 speed
Envelope 1/2 speed
Full
Full
Full
1/2 speed
Full
Black and white: 1/2 speed
Color: 1/4 speed
The default setting is Unspecified, and the program selects the media type. If you select a different
setting, make sure the correct media type is loaded in the tray that you selected in the Source is: setting.
For more information about media types, see the
Media types and sizes section of this guide.
Use Different Paper/Covers options
You can print books that include different media types by using the Use Different Paper/Covers options.
When you select the Use Different Paper/Covers check box, the following settings can appear in the
group box, along with associated options:
■ Front Cover
■ First Page
■ Other Pages
■ Last Page
■ Back Cover
To use Use Different Paper/Covers options, you must configure the setting for the print job. Each option
for the Use Different Paper/Covers setting is described in the sections that follow this procedure. Use
the following instructions to configure the setting.
70 Chapter 3 Windows HP unidriver features ENWW
Page 95

To configure the Use Different Paper/Covers options for a print job
For each option, you can set a different tray using the Source Is: drop-down menu. For some options,
the Type is: drop-down menu is also available.
1 To use different paper or cover stock, select the Use Different Paper/Covers check box. A list of
options appears in the dialog box. The full set of selections is visible when you use the down arrow
button to the right of the list to scroll.
2 To use different media for the pages within the print job, select the appropriate option (Front Cover,
First Page, Other Pages, Last Page, or Back Cover) in the dialog box. A check mark appears to
the left of the option when you change a setting using the Source is: or Type is: drop-down menus.
3 Click OK to print.
NOTE You must use the same size of media for the entire print job. All options that you select
from the available Use Different Paper/Covers options use the size selected in the First
Page settings.
When you change the type and source of the paper and covers, the settings you select remain
configured until you close the application software.
Each option for the Use Different Paper/Covers setting is described in the following sections, in the
order they appear in the pane below the Use Different Paper/Covers check box.
Front Cover and Back Cover options
Use these options to include a blank or preprinted front cover or back cover on a document.
The following illustration shows the Front Cover setting and options. These options are the same for
the Back Cover setting.
Figure 3-7 Front Cover setting
features
Windows HP unidriver
ENWW
HP PCL 6 and PS emulation unidriver features (for Windows 2000 and Windows XP)
71
Page 96

The Front Cover and Back Cover options are as follows:
■ Add a Blank or Preprinted Cover check box
■ Source is: drop-down menu
■ Type is: drop-down menu
When you select Front Cover or Back Cover, you must also select the Add a Blank or Preprinted
Cover check box to enable the setting. When you select this check box, the Source is: and Type is:
drop-down menus become available and a check mark appears next to the Back Cover option.
The Source is: setting specifies the source tray to use for adding a back cover to the document. The
list of source trays depends on the printer accessories. Any optional media trays that are installed
through the Configure tab also appear here. For more information about the Source is: setting, see
the
The Type is: drop-down menu shows all of the media types that the printer supports. For more
Windows HP unidriver
information about the Type is: drop-down menu settings, see the Type is: in the
menu section of this chapter.
NOTE The Back Cover options are not available when the Booklet Layout setting is enabled
on the Finishing tab. For two-page-per-sheet (2-up) booklet printing, you can obtain a cover by
selecting different media for the first page only. The back cover setting is unavailable, because
this page would otherwise be printed in the middle of a booklet.
Source Is: drop-down menu section of this chapter.
Type is: drop-down
features
First Page, Other Pages, and Last Page options
Use these options to select an alternative media size, type, or source for the first page, other pages, or
last page of a document. The following illustration shows the appearance of the Paper Options group
box when you select the Use Different Paper/Covers check box.
Figure 3-8 First Page, Other Pages, and Last Page options
The First Page, Other Pages, and Last Page options are as follows:
■ Size is: drop-down menu
■ Source is: drop-down menu
■ Type is: drop-down menu
72 Chapter 3 Windows HP unidriver features ENWW
Page 97

The Size is: driver setting for the first page applies to the entire print job. When this is set, the setting
becomes unavailable for all the other Use Different Paper/Covers options.
Document preview image
The document preview image is a line-drawn image of a page that represents graphics and text. The
document preview image is always oriented so that the contents of the page are right-side-up. The
document preview image appears in the upper-right corner of the Finishing, Effects, Paper/Quality,
and Color tabs.
Switching between tabs does not change the location or appearance of the document preview image.
When you move the mouse over the document preview image, the mouse cursor changes from an arrow
to a gloved hand. You can toggle between portrait and landscape page orientation by clicking the image.
Effects tab features
Use the Effects tab to create unique paper effects such as scaling and watermarks. The following
illustration shows the Effects tab.
Figure 3-9 Effects tab
The Effects tab contains the following controls:
■ Print Task Quick Sets group box
■ Resizing Options group box
■ Document preview image
■ Watermarks group box
features
Windows HP unidriver
ENWW
HP PCL 6 and PS emulation unidriver features (for Windows 2000 and Windows XP)
73
Page 98

Print Task Quick Sets
Use the Print Task Quick Sets control to store the current combination of driver settings that are found
on all other Printing Preferences driver tabs. Print task quick sets are either preset or user-defined
printing specifications, such as paper size and pages per sheet. For more information, see
Quick Sets in the Paper/Quality tab section of this guide.
Resizing options group box
The Resizing Options group box consists of the following controls:
■ Actual Size (default)
■ Print Document On setting
■ Scale to Fit option
■ % of Normal Size setting
Actual Size setting
Actual Size is the default setting. It prints the document without changing the document size.
Print Task
Windows HP unidriver
features
Print Document On setting
Select the Print Document On option button to format the document for one paper size and then print
the document on a different paper size, with or without scaling the image to fit the new paper size.
The Print Document On control is disabled by either of the following conditions:
■ The % of Normal Size value is not 100.
■ The Pages per Sheet value (on the Finishing tab) is not 1.
When Print Document On is selected, the drop-down menu shows the media sizes on which you can
print. The list contains all of the standard media sizes that are supported by the selected media source
and any custom sizes that you have created. When Print Document On is selected, Scale to Fit is
automatically selected.
Scale to Fit option
The Scale to Fit option box specifies whether each formatted document page image is scaled to fit the
target paper size. By default, Scale to Fit is selected when Print Document On is selected. If the setting
is turned off, then the document page images will not be scaled, and are instead centered at full size
on the target paper. If the document size is larger than the target paper size, then the document image
is clipped. If it is smaller, then it is centered within the target paper. The following illustration shows
preview images for a document that is formatted for legal-size paper and where the Print Document
On check box is selected, and the target size is specified as Letter.
74 Chapter 3 Windows HP unidriver features ENWW
Page 99

Figure 3-10 Preview images - Legal on Letter; Scale to Fit off (left) and on (right)
When the size for which the document is formatted (that is, the logical size) differs from the target size,
the preview image uses a dashed gray line to show the boundaries of the logical page in relation to the
target page size.
% of Normal Size option
The % of Normal Size option provides a slider bar to use for scaling the percentage setting. The default
setting in the entry box is 100% of normal size. Normal size is defined as the paper size that is selected
within the driver or what the driver receives from the software program (if the software program does
not negotiate the paper size with the driver). The driver scales the page by the appropriate factor and
sends it to the product.
The limits of the range are from 25% to 400%, and any values outside the range are adjusted to those
limits as soon as the focus is removed from the control (that is, when the Tab key is pressed or another
control is selected).
Any change to the scale also changes the page preview, which increases or decreases from the upperleft corner of the preview.
The slider bar controls the scale directly. The value in the edit box changes as the scroll bar indicator
is dragged, and the preview image is updated to the new image scale. Each click on the scroll bar arrows
increases or decreases the scale by 1%. Each click on the slider bar affects the scale by 10%.
You cannot achieve an exact value by dragging the scroll bar indicator at the default Windows resolution;
use the scroll bar indicator to approximate the appropriate value, and then use the scroll bar arrows to
refine the value.
features
Windows HP unidriver
ENWW
The following settings disable % of Normal Size:
■ Print Document On (on the Effects tab) is selected
■ Pages per Sheet (on the Finishing tab) is not 1
Document preview image
The document preview image is a line-drawn image of a page that represents graphics and text. The
document preview image is always oriented so that the contents of the page are right-side-up. The
document preview image appears in the upper-right corner of most Printing Preferences driver tabs
(the Paper/Quality, Finishing, Effects and Color tabs).
Switching between tabs does not change the location or appearance of the document preview image.
When you move the mouse over the document preview image, the mouse cursor changes from an arrow
HP PCL 6 and PS emulation unidriver features (for Windows 2000 and Windows XP)
75
Page 100

to a gloved hand. You can toggle between portrait and landscape page orientation by clicking the
document preview image.
Watermarks group box
Use the Watermarks feature to select a watermark, create your own custom watermarks (text only), or
edit an existing watermark. The following watermarks are preset in the driver:
■ (none)
■ Confidential
■ Draft
■ SAMPLE
The drop-down menu shows alphabetically sorted watermarks that are currently available on the system,
plus the string "(none)", which indicates that no watermark is selected. This is the default setting. Any
watermark selected from this list appears in the preview image.
When the First Page Only check box is selected, the watermark is printed only on the first page of the
document. The First Page Only check box is disabled when the current watermark selection is "(none)".
Watermarks are applied to logical pages. For example, when Pages per Sheet is set to "4" and First
Windows HP unidriver
Page Only is turned off, four watermarks appear on the physical page (one on each logical page).
Click Edit, and the Watermark Details dialog box appears.
features
Figure 3-11 Watermark Details dialog box
The dialog box shows a preview image and provides options for creating a new watermark and
controlling the message angle and font attributes.
76 Chapter 3 Windows HP unidriver features ENWW
 Loading...