

Page 1
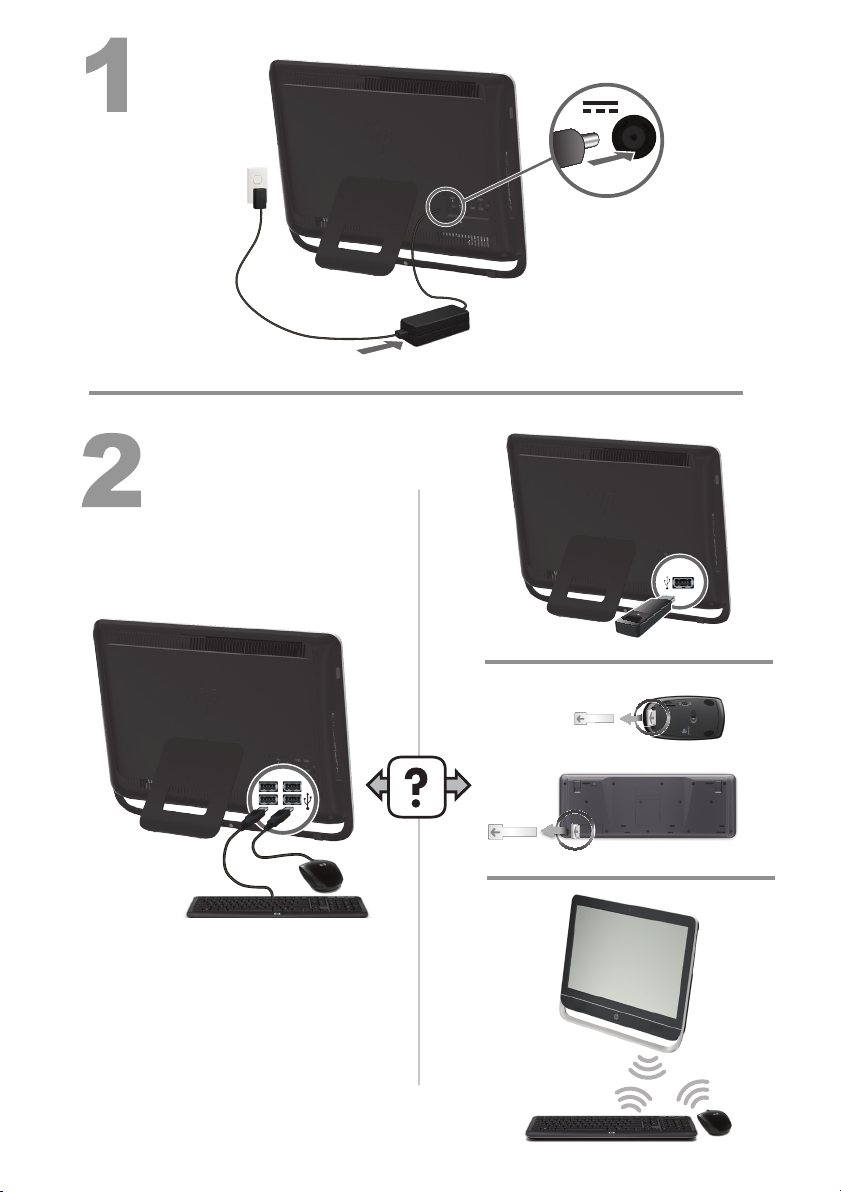
12” (30cm)
12” (30cm)
Page 2
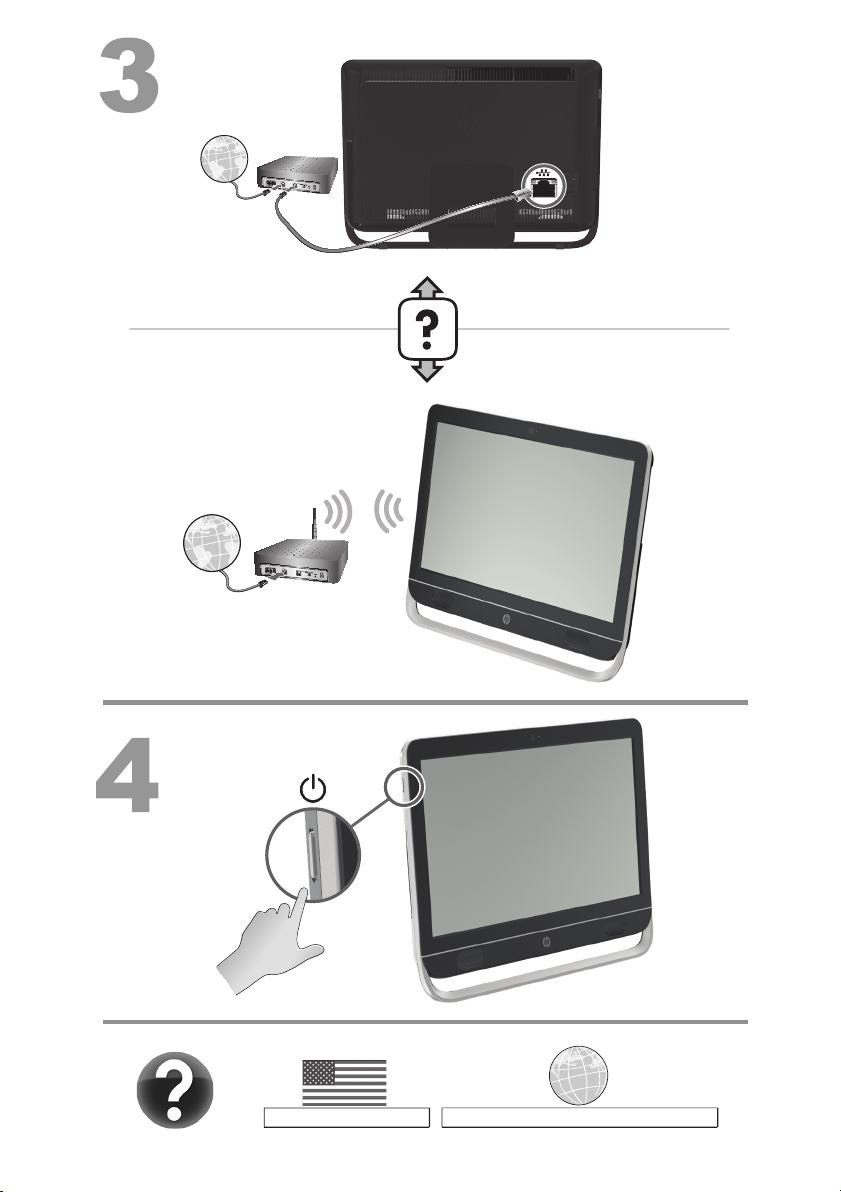
http://www.hp.com/go/contactHP
http://welcome.hp.com/country/us/en/wwcontact_us.html
Page 3

Copyright and License
© Copyright 2012 Hewlett-Packard
Development Company, L.P.
The information contained herein is subject to
change without notice. The only warranties for
HP products and services are set forth in the
express warranty statements accompanying
such products and services. Nothing herein
should be construed as constituting an
additional warranty. HP shall not be liable for
technical or editorial errors or omissions
contained herein.
This product incorporates copyright protection
technology that is protected by U.S. patents and
other intellectual property rights. Use of this
copyright protection technology must be
authorized by Macrovision, and is intended for
home and other limited viewing uses only
unless otherwise authorized by Macrovision.
Reverse engineering or disassembly is
prohibited.
Microsoft and Windows are trademarks of
Microsoft Corporation in the U.S. and other
countries.
HP supports lawful use of technology and does
not endorse or encourage the use of our
products for purposes other than those
permitted by copyright law.
Product notice
This guide describes features that are common
to most models. Some features may not be
available on your computer.
Warranty Print on Demand Statement
You can find the expressly provided HP Limited
Warranty applicable to your product located with
the user guides on your computer and/or on the
CD/DVD provided in the box. In some countries/
regions, HP may provide a printed HP Limited
Warranty in the box. For some countries/regions
where the warranty is not provided in printed
format, you may request a printed copy from
hp.com/go/orderdocuments or write to:
North America: Hewlett-Packard, MS POD,
11311 Chinden Blvd., Boise, ID 83714, USA
Europe, Middle East, Africa: Hewlett-Packard,
POD, Via G. Di Vittorio, 9, 20063 Cernusco s/
Naviglio (MI), Italy
Asia Pacific: Hewlett-Packard, POD, P.O. Box
200, Alexandra Post Office, Singapore 911507
When you request a printed copy of your
warranty, please include your product number,
warranty period (found on your service label),
name, and postal address.
IMPORTANT! Do NOT return your HP product
to the addresses above. For U.S. products, go
http://www.hp.com/go/contactHP. For
to
worldwide support, go to
http://welcome.hp.com/country/us/en/
wwcontact_us.html.
Page 4

Page 5

1 Getting information
Type of information Where to find
Set up your computer. Quick Setup (this Guide)
●
Use the computer.
●
Connect to the Internet.
●
Recover factory settings. Troubleshooting and Maintenance Guide on your computer. Select the HP
●
See how-to videos about
●
using the features of your
computer.
Learn how to use the
●
Microsoft Windows operating
system.
Find Windows password
●
information.
Find links to driver updates.
●
Read frequently asked
●
questions.
Troubleshoot the most
●
common computer hardware
and software issues.
Find electronic user guides
●
and specifications for your
computer model.
● Order parts and find
additional troubleshooting
help.
● Upgrade or replace
components of your
computer.
Find computer warranty
●
information.
Get up-to-date information
●
and help from the Windows
community.
Quick Setup (this Guide)
Support Assistant app on the Start screen, select My computer, and
then select User guides.
Visit
http://www.hp.com/supportvideos (English only)
Help and Support
From the Start screen, type h, and then select Help and Support. For
U.S. support, go to
support, go to
Windows troubleshooting tools
1. From the Start screen, type c, and then select Control Panel.
2. Select System and Security, and then under Action Center, select
Troubleshoot common computer problems.
Troubleshooting and Maintenance Guide on your computer. Select the HP
Support Assistant app on the Start screen, select My computer, and
then select User guides.
HP Support website:
Upgrading and Servicing Guide
HP Support website:
HP Worldwide Limited Warranty and Technical Support included with your
computer.
Select the HP Support Assistant app on the Start screen, select My
computer, and then select User guides.
http://www.hp.com/support/consumer-forum
http://www.hp.com/go/contactHP. For worldwide
http://welcome.hp.com/country/us/en/wwcontact_us.html.
http://www.hp.com/go/contactHP
http://www.hp.com/go/contactHP
1
Page 6

Type of information Where to find
Connect to a TV. Watching and Recording TV
●
Select the HP Support Assistant app on the Start screen, select My
computer, and then select User guides.
If the guide is not available there, visit
Maintain your computer. HP Support Assistant — Maintains your computer performance and
●
Find safety and regulatory
●
notices.
Find ergonomic information. Safety & Comfort Guide
●
resolves problems faster by using automated updates, on-board
diagnostics, and guided assistance.
Select the HP Support Assistant app on the Start screen.
Troubleshooting and Maintenance Guide
Select the HP Support Assistant app on the Start screen, select My
computer, and then select User guides.
Maintaining Your Computer (this Guide)
Regulatory, Safety and Environmental Notices
Select the HP Support Assistant app on the Start screen, select My
computer, and then select User guides or visit
contactHP.
Select the HP Support Assistant app on the Start screen, select My
computer, and then select User guides or visit
http://www.hp.com/go/contactHP.
http://www.hp.com/go/
http://www.hp.com/ergo.
2 Chapter 1 Getting information
Page 7

2 Setting up your computer
WARNING!
equipment:
• Place the computer in a location away from water, dust, moisture, and
soot. These can increase the inside temperature, or can cause fire or
electrocution.
• Do not disable the power cord grounding plug. The grounding plug is an
important safety feature.
• Plug the power cord in a grounded (earthed) outlet that is easily
accessible at all times.
• Disconnect power from the equipment by unplugging the power cord
from the electrical outlet. To prevent direct exposure to laser beam, do
not try to open the enclosure of the CD or DVD drives.
• The power supply is preset for the country/region in which you
purchased your computer. If you move, check the voltage requirements
for your new location before plugging the computer into an AC power
outlet.
The computer may be heavy; be sure to use ergonomically correct lifting
procedures when moving the computer.
To reduce the risk of serious injury read the Safety & Comfort Guide. The
guide is located on the web at
1. Place the computer so that all ventilation openings are unobstructed
and cabling is not in a walkway or where it can be stepped on or
damaged by placing furniture on it.
To reduce the risk of electrical shock or damage to your
http://www.hp.com/ergo.
2. Connect all power cords from the monitor, computer, and
accessories to a power surge protection device that is specifically
labeled as having surge protection, an uninterruptible power supply
(UPS), or a similar device. If the computer has a television tuner, or
a modem or telephone connection, protect the computer by using
surge protection with these signal inputs as well. Connect the
television cable or the telephone line cord to the surge protection
device, and then connect the device to the computer.
3. Download and install operating system updates.
3
Page 8

a. Find out what operating system and version your computer is
currently running.
(From the Start screen, type c, select Control Panel, select
System and Security, and then select System. The operating
system and version are shown under Specifications.)
b. Open your internet browser and go to
http://www.hp.com/go/
contactHP.
c. Select your country and language, if necessary, and click
Support & Drivers.
d. Select Download drivers and software (and firmware), type
your computer model name and number in the product field,
and press Enter.
e. If necessary, select your computer model from Product search
results.
f. Select your computer operating system.
g. Click Download next to each update you wish to download.
h. Follow the on-screen instructions to install each downloaded
update.
4. Look in the computer box for additional printed details or updates.
5. Read the Regulatory, Safety and Environmental Notices included
with your computer. Select the HP Support Assistant app on the
Start screen, select My computer, and then select User guides.
6. Read the Safety & Comfort Guide for proper workstation setup,
posture, health and work habits, and electrical and mechanical
safety information. Select the HP Support Assistant app on the
Start screen, select My computer, and then select User guides or
http://www.hp.com/ergo.
visit
After you complete the initial computer setup, you might want to install
additional software programs or hardware devices. Check the operating
system, memory, and other requirements listed before purchasing new
software or hardware for your computer. Follow the software
manufacturer's directions to install the new software.
4 Chapter 2 Setting up your computer
Page 9
NOTE:
Use only licensed original software. Installing copied software
could result in an unstable installation, infect the computer with a virus, or
be illegal.
Security solutions can deter theft, mishandling, and software attacks, but
cannot prevent them.
Connecting to the Internet
Steps to connect to the Internet:
1. Connect the hardware as shown on the setup view.
2. Get Internet service.
Sign up with an Internet Service Provider (ISP). If you already have
an account with an ISP, skip this step and follow the instructions
provided by the ISP.
3. Using your Internet connection through your ISP, open a web
browser and browse the Internet.
NOTE:
If you have issues connecting to the Internet, see Internet
access on page 15.
Connecting to the Internet
5
Page 10

3 Setting up additional features
Using Beats Audio™ (select models only)
Your HP TouchSmart PC features audio connectors (headphone and
Audio Out ) that are optimized for Beats Audio™ headphones and
external audio systems (purchased separately). Select HP TouchSmart
PC models also include four Beats-optimized internal speakers and a
Beats toggle button
Your computer comes ready for you to experience music with Beats
enabled. To disable Beats, press the Beats toggle button; the Beats off
icon appears on the screen. To turn Beats on, press the Beats toggle
button again. If your keyboard does not contain the Beats toggle button,
press Fn+B to enable and disable Beats. To view the Beats user
interface, from the Start screen, type b, and then select HP Beats Audio.
All you need to do is plug the Beats Audio headphones into the side
headphone connector to experience crisp and clear sound separation. To
experience the full capability of BEATS audio using the internal
speakers, HP recommends connecting a matching HP subwoofer to the
Sub connector on the back panel. If you are using an external audio
system, plug it into the Audio Out connector on the back panel.
on the keyboard.
6 Chapter 3 Setting up additional features
Page 11
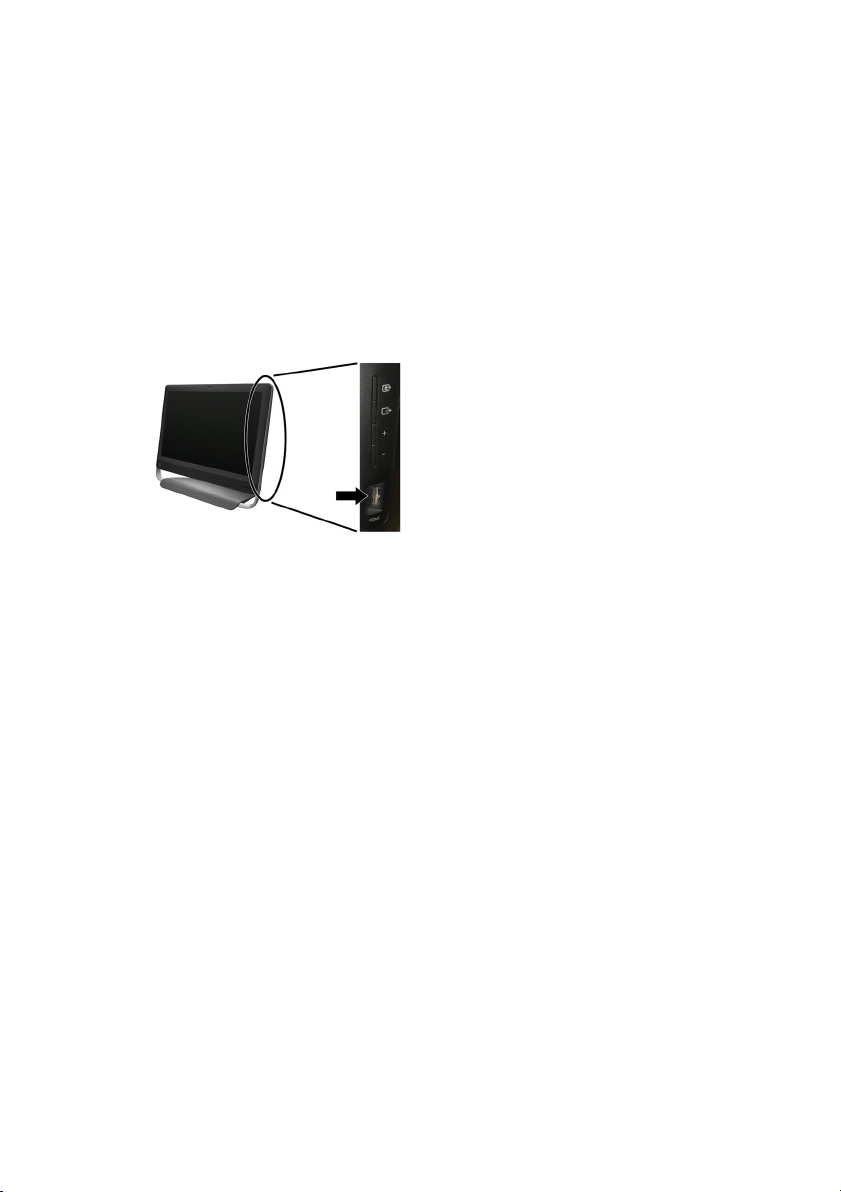
Using the HDMI port controls (select models only)
The right side of your computer may contain an HDMI port and volume
control buttons. Unless a device is plugged into the HDMI port, the
volume controls have no functionality. The HDMI controls are only
intended to control the settings of the device plugged into that port, and
do not control any other media devices on the system.
To use the HDMI port controls, plug a device into the HDMI port. Press
the menu button (the top button displayed). A new on-screen menu
displays. Using the +/- buttons, select brightness, volume, contrast, or
color balance.
When a device is plugged into the HDMI port, the volume on the
computer is muted. Pressing the +/- buttons on the side panel does not
change the volume of the computer.
Using the HDMI port controls (select models only)
7
Page 12

4 Maintaining your computer
Cleaning procedures
Keeping your computer system free of dust, dirt, and heat will prolong its life.
● Dust, pet hair, and other particles can build up, creating a blanket effect; as a result, components can
overheat or, in the case of the keyboard and mouse, not work smoothly and effectively.
Check your system once a month for visible signs of dust and debris, and clean it about once every three
●
months.
● Visit
Cleaning the computer
vents
www.hp.com/go/contactHP for additional cleaning instructions.
Air vents keep the computer cool. Keep these vents clean by using a small,
battery-powered vacuum cleaner. (A battery-powered vacuum cleaner eliminates
the risk of electric shock.)
1. Vacuum the vents on the computer case.
2. Remove any debris that has accumulated in and around the computer
connectors (for example, the Ethernet and USB connectors).
8 Chapter 4 Maintaining your computer
Page 13

Cleaning the keyboard and
mouse
Cleaning the screen (AiO
models only)
When cleaning the keyboard keys, use a low setting on a battery-powered vacuum
cleaner, to avoid removing key caps and springs.
1. Vacuum between the keys of the keyboard and along the grooves.
2. Use a clean, dry cloth and isopropyl (rubbing) alcohol to clean buildup on the
keyboard keys and along its edges.
3. Wipe the body of the mouse and the mouse cord by using cleaning wipes.
If you have a roller-ball mouse, clean the ball and rollers inside:
1. Turn the mouse upside down, and rotate the ball-cover ring counterclockwise
to remove the ring and release the roller ball.
2. Rinse the roller ball with soap and warm water.
3. Clean the rollers inside the mouse with a cotton swab dampened with
isopropyl (rubbing) alcohol.
4. After the roller ball and rollers are completely dry, replace the ball and ballcover ring.
Follow these steps to clean the screen:
1. Turn off the computer. From the Start screen, move your cursor to the lowerright corner of the screen to display the charms toolbar, and then select
Settings. Select the Power icon, and then select Shut down.
2. Disconnect the power cord from the wall.
3. Spray a small amount of mild glass cleaner on a soft cloth to clean the
screen.
4. Wipe the surface and left and right side of the screen to remove any dirt,
fingerprints, or other debris.
CAUTION:
cleaner into the cloth, and then wipe the sides and surface of the screen.
Do not use an abrasive cleaner or cloth when cleaning the sides or the surface of
the screen, because this could cause damage to the screen.
Do not spray or place the cleaner directly on the screen; spray the
Cleaning procedures
9
Page 14

5 Troubleshooting
Refer to the documentation provided by the product manufacturer for
information about peripheral-specific problems, such as issues with a
monitor or a printer. The following tables present some issues you might
encounter while installing, starting up, or using your computer and
possible solutions.
For more information or for additional troubleshooting options, see
Getting information on page 1.
Computer does not start
Symptom Possible solution
Error message:
Hard disk drive
error.
Computer will
not turn on or
start.
Restart the computer.
1. Press the Ctrl+Alt+Delete keys on the keyboard simultaneously.
2. Select the Power icon, and then select Restart.
Or, press and hold the Power button on the computer for 5 or more seconds to turn off
the computer, and then press the Power button to restart the computer.
3. If Windows opens, immediately back up all important data to a backup hard disk drive.
4. Contact Support, whether it was possible or not to start up Windows.
Either the hard disk drive or the system board may need to be replaced.
Ensure that the cables connecting the computer to the external power source are plugged in
properly. When the cables connecting the computer to the external power source are plugged
in properly, and the wall outlet is functioning, the green power supply light on the back of the
computer should be on; if it is not, contact Support.
Test the wall outlet by connecting a different electrical device to it.
10 Chapter 5 Troubleshooting
Page 15

Symptom Possible solution
Computer
seems to be
locked up and is
not responding.
Error message:
Invalid system
disk or NonSystem disk or
Disk error.
Use the Task Manager to close any programs not responding, or restart the computer:
1. Press the Ctrl+Alt+Delete keys on the keyboard simultaneously.
2. Select Task Manager.
3. Select the program that is not responding, and then select End task.
If closing programs does not work, restart the computer:
1. Press the Ctrl+Alt+Delete keys on the keyboard simultaneously.
2. Select the Power icon, and then select Restart.
Or, press and hold the Power button on the computer for 5 or more seconds to turn off
the computer, and then press the Power button to restart the computer.
When drive activity stops, remove the disc and press the spacebar on the keyboard. The
computer should start up.
Computer does not start
11
Page 16

Power
Symptom Possible solution
Computer does
not turn off
when the Power
button is
pressed.
Computer shuts
down
automatically.
Press and hold the Power button until the computer turns off. Check Power Settings.
The computer might be in an exceedingly hot environment. Let it cool down.
●
Ensure that computer air vents are not blocked and that the internal fan is running —
●
see
Cleaning procedures on page 8. (Your computer might not have an internal fan.)
Display (monitor)
Symptom Possible solution
Screen is blank. Press the space bar on the keyboard or move the mouse to make the screen display
visible again.
Press the Sleep button (select models only), or Esc on the keyboard, to resume from
Sleep mode.
Press the Power button to turn on the computer.
12 Chapter 5 Troubleshooting
Page 17

Keyboard and mouse (general)
Symptom Possible solution
Keyboard
commands and
typing are not
recognized by the
computer.
Mouse (with cable)
does not work or is
not detected.
Cursor does not
move using the
arrow keys on the
number keypad.
Cursor does not
respond to mouse
movement.
Use the mouse to turn off the computer, unplug and reconnect the keyboard to the back
of your computer, and then restart your computer.
Unplug and reconnect the mouse cable to your computer.
If the mouse is still not detected, turn off the computer, unplug and reconnect the mouse
cable, and then restart the computer.
Press Num Lock on the keyboard to turn off Num Lock, so that the arrow keys on the
number keypad can be used.
Use the keyboard to save changes in all open programs, and then restart your computer:
1. Press the Alt+Tab keys simultaneously to navigate to an open program.
2. Press Ctrl+S simultaneously to save your changes in the selected program (Ctrl+S
is the keyboard shortcut for Save on most—not all—programs).
3. Repeat step 1 and step 2 to save changes in all open programs.
4. After saving changes in all open programs, press the Power button to turn off the
computer.
5. After the shutdown is complete, unplug and reconnect the mouse connector to the
back of your computer, and then restart your computer.
Keyboard and mouse (general)
13
Page 18
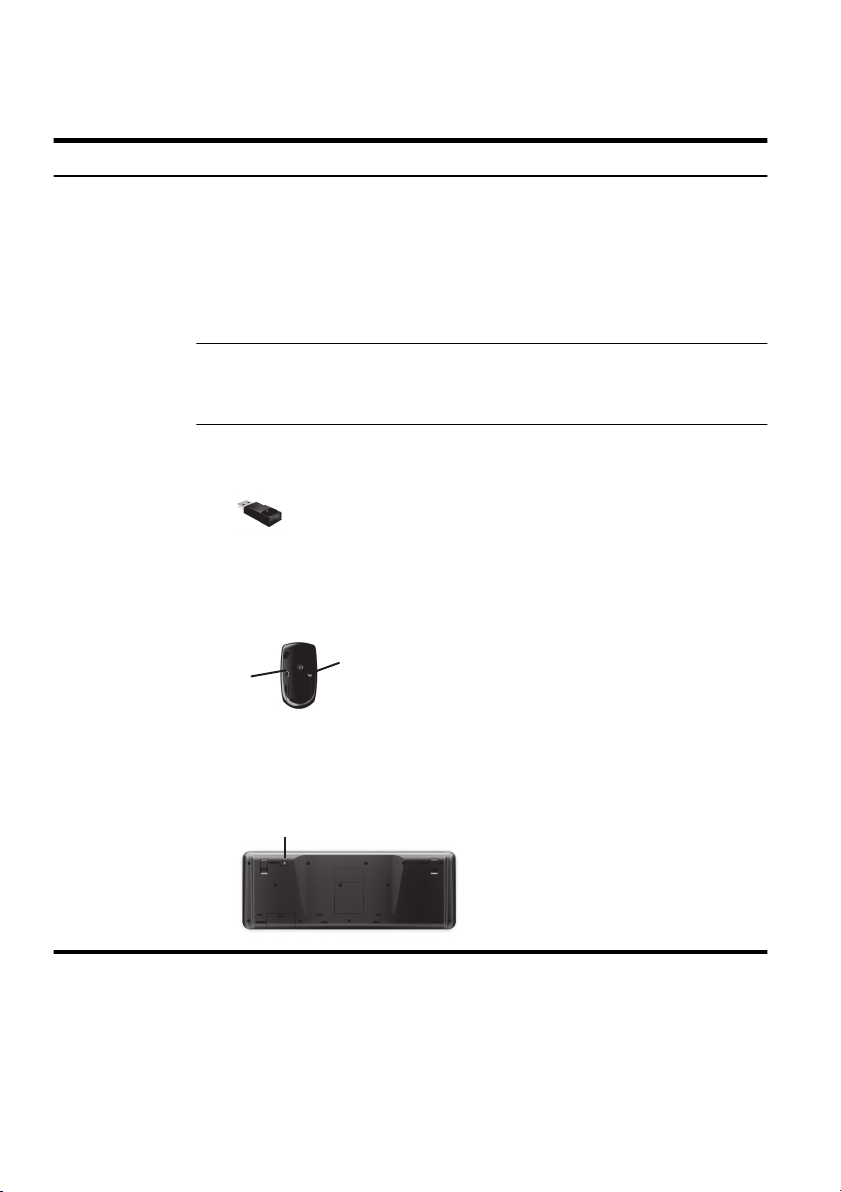
Keyboard and mouse (wireless)
A
Symptom Possible solution
Wireless keyboard
or mouse does not
work or is not
detected.
Ensure that you are using the wireless keyboard or wireless mouse within range of
●
the receiver, approximately 3 meters (10 feet) for normal use, and within 30 cm (12
inches) during initial setup or for re-synchronization.
Ensure that the mouse is not in Suspend mode, which occurs after 20 minutes of
●
inactivity. Click the left mouse button to reactivate it.
Replace the batteries in the keyboard and mouse.
●
Re-synchronize the keyboard and mouse to the receiver using the following steps.
●
The receiver, wireless keyboard, and wireless mouse shown in the following illustrations
are examples; your models might vary. IMPORTANT: During these steps, place the
wireless keyboard and wireless mouse on the same level as the receiver, within 30 cm
(12 inches) of the receiver, and away from interference from other devices.
1. Unplug the receiver from a USB connector on the computer, and then reconnect it.
Your computer model might have a connector dedicated to the receiver. If you have
a choice, use a USB connector on the front of the computer.
2. Check that the mouse is on (A), and push and hold the Connect button (B) on the
underside of the mouse for 5 to 10 seconds until the LED on the receiver lights or
stops flashing. The receiver connection session times out after 60 seconds. To
ensure that the connection was established, and that the receiver did not time out
instead, move the mouse and check for response on the screen.
B
Off
Connect
On
3. After the mouse connection is established, continue by using the steps that follow to
repeat the procedure for the keyboard.
4. Push and hold the Connect button (C) on the underside of the keyboard for 5 to 10
seconds until the LED on the receiver lights or stops flashing.
C
14 Chapter 5 Troubleshooting
Page 19

Speakers and sound
Symptom Possible solution
No sound is
produced.
Volume is very low
or unsatisfactory.
1. From the Start screen, type c, select Control Panel, and then select System and
Security.
2. Under Action Center, select Troubleshoot common computer problems, and
then select Troubleshoot audio playback.
If you are using built-in monitor speakers, use the monitor front-panel Volume button to
adjust volume. Use the front-panel buttons to enter the on-screen display (OSD) and
ensure that audio is enabled and that the volume is set appropriately.
Ensure that you connected powered (active) speakers and that they are turned on.
Turn off your computer, and then unplug and reconnect the speakers. Ensure that the
speakers are connected to an audio connector, not a Line In or headphone connector.
To resume from Sleep mode, press the Sleep button (select models only), or press Esc.
Unplug headphones if they are connected to your computer (or speaker system).
Ensure that you connected the speakers to the Audio Out (lime green) connector on the
back of the computer. (Additional audio connectors are used for multiple-channel
speakers.) Detached non-powered speakers (speakers without a separate power source,
such as batteries or a power cord) do not produce satisfactory sound. Replace the nonpowered speakers with powered speakers.
Internet access
Symptom Possible solution
Internet programs
do not start
automatically.
Log in to your ISP, and start the desired program.
Speakers and sound
15
Page 20

Symptom Possible solution
I cannot connect to
the Internet.
1. From the Start screen, type c, and then select Control Panel.
2. Under Network and Internet, select Connect to the Internet.
Verify that you are using the proper cables for your Internet connection type. Your
computer might have a dial-up modem and an Ethernet network adapter (also called a
network interface card, or NIC). A modem uses a standard telephone cable, whereas the
network adapter uses a network cable, to connect to a local area network (LAN). Do not
connect a telephone cable to the network adapter, and do not plug a network cable into a
telephone service line; doing so might damage the network adapter.
Run the wireless setup wizard:
1. From the Start screen, type c, select Control Panel, select Network and Internet,
and then select Network and Sharing Center.
2. In the Network and Sharing Center window, select Set up a new connection or
network to open the wizard, and then follow the on-screen instructions.
If your system has an external antenna, try to move the antenna to a better position. If the
antenna is internal, try to move the computer.
Try to connect again later, or contact your Internet service provider (ISP) for assistance.
16 Chapter 5 Troubleshooting
Page 21

Software troubleshooting
To repair
software
problems, try
these methods:
Updating device
drivers
Microsoft
System Restore
Turn the computer off completely and then turn it on again. This is the easiest (and
●
sometimes the best) way.
● Update the drivers (see Updating device drivers, following).
Use Microsoft System Restore Software program and hardware driver reinstallation (see
●
Microsoft System Restore, later in this table). — Restores your computer to a
configuration that was in use before the software was installed.
Reinstall the software program or hardware driver (see Software program and hardware
●
driver reinstallation, later in this table). — Restores the software (if it came with the
product) or hardware driver to factory defaults.
System Recovery (see Troubleshooting and Maintenance Guide on your computer.
●
Select the HP Support Assistant app on the Start screen, select My computer, and
then select User guides). — Erase and reformat the hard disk drive, and then reinstall
the operating system, programs, and drivers. This erases all data files you have
created.
Complete the following procedure to update a driver, or to revert to an earlier version of the
driver if the new one does not solve your problem:
1. From the Start screen, type c and then select Control Panel.
2. Select System and Security, and then in the System area, select Device Manager.
3. Select the arrow to expand the type of device you want to update or roll back. (For
example, DVD/CD-ROM drives).
4. Double-click the specific item (for example, HP DVD Writer 640b).
5. Select the Driver tab.
6. To update a driver, select Update Driver, and then follow the on-screen instructions.
Or, to revert to an earlier version of a driver, select Roll Back Driver, and then follow
the on-screen instructions.
If you have a problem that might be due to software that was installed on your computer, use
System Restore to return the computer to a previous restore point. You can also set restore
points manually.
NOTE:
program.
To start a system restore or to add restore points manually:
1. Close all open programs.
2. From the Start screen, type c, and then select Control Panel.
3. Select System and Security, select System, and then select System protection.
4. Select the System protection tab on the System Properties screen.
5. Follow the on-screen instructions.
Always use this System Restore procedure before you use the System Recovery
Software troubleshooting
17
Page 22

Software
program and
hardware driver
reinstallation
If any of your factory-installed software programs or hardware drivers are damaged, you can
reinstall them by using the Recovery Manager program (select models only).
NOTE:
came on CDs or DVDs included in the computer box. Reinstall these programs directly from
the CDs or DVDs.
Before you uninstall a program, be sure you have a way to reinstall it. Check to be sure that it
is still available from where you initially installed it (for example, discs or the Internet). Or
check to be sure that the program is in the list of programs you can reinstall from the
Recovery Manager.
To check the list of installable programs in the Recovery Manager:
1. From the Start screen, type r, and then select Recovery Manager. If prompted, select
2. Under I need help immediately, select Software Program Reinstallation.
3. Select Next at the Welcome screen. A list of programs opens. Check whether your
To reinstall a program using the Recovery Manager:
1. From the Start screen, type r, and then select Recovery Manager.
2. Select Software Program Reinstallation, and then select Next at the Welcome
3. Choose the program you want to install, select Next, and follow the on-screen
4. When you have finished reinstalling, restart the computer. Do not skip this last step.
To uninstall a program:
1. Close all software programs and folders.
2. From the Start screen, type c, and then select Control Panel.
3. Under Programs, select Uninstall a program.
4. Select the program you want to remove, and then select Uninstall.
Do not use the Recovery Manager program to reinstall software programs that
Yes to allow the program to continue.
program is there.
screen.
instructions.
You must restart the computer after recovering software programs or hardware drivers.
18 Chapter 5 Troubleshooting
Page 23

6 Support information
Ways to get help
Easy to reach. Easy to use. Award-winning HP Customer Support is our
promise to help you get the most from your computer. Whether with tools
located on your computer, from information on the web, by phone, or
through your local retailer, you’ll find what you need.
Before contacting the HP Customer Care Center, it’s important to have
the following information handy.
Model number
●
Product number
●
● Serial number
Software build number
●
Operating system
●
Purchase date
●
Please take a moment to write down your product information for future
reference.
The first four items on the list (model number, product number, serial
number, and software build number) can be viewed using HP Support
Information. From the Start screen, type s, and then select HP Support
Information.
Don’t forget to register!
http://www.hp.com/apac/register.
Go to:
Ways to get help
19
Page 24

Where to get help
1. Use Windows Help and Support for help with hardware and software
questions. From the Start screen, type h, and then select Help and
Support.
2. Use Support Assistant. From the Start screen, type h, and then
select HP Support Assistant. The HP Support Assistant provides
useful troubleshooting and diagnostics information and includes the
following:
E-mail support
●
HP Real Time Chat with qualified support specialists
●
Support phone numbers
●
3. For help online, go to the HP Customer Care Center website at
http://www.hp.com/go/contactHP.
Phone assistance to get you up and running is covered for thirty (30)
days from the time you purchased your computer. After thirty (30) days,
there may be a charge, but the helpful support is still available.
20 Chapter 6 Support information
Page 25

Customer support for repairs
If your computer needs to be repaired or to have parts replaced, you
have two choices:
You can easily replace many of your computer parts that are
●
considered consumer replaceable. This is the fastest method of
repair, as many times we can send the part directly to your home or
business in a few days. (This option may not be available in all
countries/regions.)
If a repair is necessary, the HP Customer Care Center will make
●
arrangements to fix your computer.
These services are covered during the warranty period.
There are a few limitations and exclusions to the warranty (as well as
some important details), which are described in the HP Worldwide
Limited Warranty and Technical Support guide.
Before upgrading your hardware
Any hardware upgrades that you intend to do should only be done after
you have completely set up your new computer. Refer to the setup
instructions in the beginning of this Guide for help with setting up. If you
have any problems setting up your system and turning it on, immediately
contact the HP Customer Care Center listed earlier in this guide, and an
HP Customer Representative will assist you. This must be done first
before attempting to upgrade your system.
By breaking the security seal on the back of the computer, you are
confirming that the computer was working properly before you attempted
to upgrade your system. Once the security seal has been broken, your
computer is then, to the extent allowed by local law, covered under the
terms and conditions listed in the HP Worldwide Limited Warranty and
Technical Support guide.
Customer support for repairs
21
Page 26

Droit d'auteur et licence
© Copyright 2012 Hewlett-Packard
Development Company, L.P.
Les informations contenues dans ce document
peuvent être modifiées sans préavis. Les
garanties relatives aux produits et aux services
HP sont décrites dans les déclarations de
garantie limitée expresse qui les
accompagnent. Aucun élément du présent
document ne peut être interprété comme
constituant une garantie supplémentaire. HP ne
saurait être tenu pour responsable des erreurs
ou omissions de nature technique ou
rédactionnelle qui pourraient subsister dans le
présent document.
Ce produit intègre une technologie de protection
des droits d’auteur qui est protégée par des
brevets américains et par d’autres droits à la
propriété intellectuelle. L'utilisation de cette
technologie de protection des droits d’auteur
doit être autorisée par Macrovision et est
destinée à l'usage des particuliers ou d'autres
utilisations de visualisation limitée dans
l'absence d'autre autorisation de Macrovision.
La rétroingénierie ou le désassemblage du
produit sont interdits.
Microsoft et Windows sont des marques
commerciales de Microsoft Corporation aux
Etats-Unis et dans d'autres pays.
HP est en faveur d'une utilisation licite des
technologies et n'appuie pas ni n'encourage
l'utilisation de produits pour d'autres fins que
celles autorisées par la loi sur les droits
d'auteur.
Informations sur le produit
Ce manuel décrit des fonctions communes à la
plupart des modèles. Cependant, certaines
fonctions peuvent ne pas être disponibles sur
votre ordinateur.
Déclaration de garantie imprimée sur
demande
Vous trouverez la garantie limitée HP
expressément fournie applicable à votre produit
dans les guides d'utilisateur de votre ordinateur
et/ou sur le CD/DVD livré avec la boîte. Pour
certains pays/certaines régions, une garantie
limitée HP imprimée est fournie avec la boîte.
Dans les pays/régions où la garantie n'est pas
fournie sous format imprimé, vous pouvez
demander une copie imprimée via l'adresse
hp.com/go/orderdocuments ou écrire à :
Amérique du nord : Hewlett-Packard, MS POD,
11311 Chinden Blvd., Boise, ID 83714, USA
Europe, Moyen-Orient, Afrique : HewlettPackard, POD, Via G. Di Vittorio, 9, 20063
Cernusco s/Naviglio (MI), Italy
Asie du Pacifique : Hewlett-Packard, POD, P.O.
Box 200, Alexandra Post Office, Singapour
911507
Lorsque vous demandez une copie imprimée de
votre garantie, veuillez inclure votre numéro de
produit, la période de garantie (qui se trouve sur
votre étiquette de service), votre nom et votre
adresse postale.
IMPORTANT NE PAS retourner votre produit
HP à l'adresse ci-dessus. Pour les produits des
États-Unis, rendez-vous sur le site à l'adresse
suivante :
http://www.hp.com/go/contactHP.
Pour une assistance technique au niveau
international, accédez au site
http://welcome.hp.com/country/us/en/
wwcontact_us.html.
Page 27

1 Obtenir des informations
Type d’informations Où trouver
● Configurer l'ordinateur. Guide d'installation rapide (ce guide)
● Utiliser l'ordinateur.
Connectez-vous à Internet.
●
Restaurer les paramètres
●
d’usine.
● Regarder les vidéos de
démonstration sur l'utilisation
des fonctions de l'ordinateur.
Apprendre à utiliser le
●
système d’exploitation
Microsoft Windows.
Trouver des informations sur
●
le mot de passe Windows.
Trouver des liens vers les
●
mises à jour des pilotes.
● Lire les questions
fréquemment posées.
Dépannez les problèmes
●
matériels et logiciels les plus
courants sur votre ordinateur.
Guide d'installation rapide (ce guide)
Guide de dépannage et de maintenance sur votre ordinateur.
Sélectionnez l'app HP Support Assistant sur l'écran Démarrer,
sélectionnez Mon ordinateur, puis sélectionnez Guides de l'utilisateur.
Consultez le site Web
uniquement).
Aide et support
Sur l'écran Démarrer, saisissez h, puis sélectionnez Aide et support.
Pour une assistance technique sur les États-Unis, accédez au site
http://www.hp.com/go/contactHP. Pour une assistance technique au
niveau international, accédez au site
en/wwcontact_us.html.
Outils de dépannage Windows
1. Sur l'écran Démarrer, saisissez c, puis sélectionnez Panneau de
configuration.
2. Sélectionnez Système et sécurité, puis sous Centre d'action,
sélectionnez Résoudre les problèmes fréquents de l'ordinateur.
Guide de dépannage et de maintenance sur votre ordinateur.
Sélectionnez l'app HP Support Assistant sur l'écran Démarrer,
sélectionnez Mon ordinateur, puis sélectionnez Guides de l'utilisateur.
http://www.hp.com/supportvideos (en anglais
http://welcome.hp.com/country/us/
● Recherchez les manuels de
l’utilisateur électroniques et
les caractéristiques de votre
modèle d’ordinateur.
Commandez des pièces et
●
recherchez une aide
supplémentaire pour le
dépannage.
Site Web Assistance HP :
wwcontact_us.html
http://welcome.hp.com/country/us/en/
1
Page 28

Type d’informations Où trouver
Mettez à jour ou remplacez
●
des composants de votre
ordinateur.
● Recherchez des informations
sur la garantie de votre
ordinateur.
● Recevez des informations à
jour et de l’aide de la part de
la communauté Windows.
Raccorder à un téléviseur. Regarder et enregistrer des émissions télévisées
●
● Maintenir votre ordinateur. HP Support Assistant : maintient les performances de votre ordinateur et
Guide de mise à jour et d'entretien courant
Site Web Assistance HP :
wwcontact_us.html
Garantie limitée internationale et assistance technique qui accompagne
votre ordinateur.
Sélectionnez l'app HP Support Assistant sur l'écran Démarrer,
sélectionnez Mon ordinateur, puis sélectionnez Guides de l'utilisateur.
http://www.hp.com/support/consumer-forum
Sélectionnez l'app HP Support Assistant sur l'écran Démarrer,
sélectionnez Mon ordinateur, puis sélectionnez Guides de l'utilisateur.
Si le manuel ne s’y trouve pas, rendez-vous sur
contactHP.
résout les problèmes plus rapidement grâce aux mises à jour
automatisées, aux diagnostics intégrés et à l’assistance guidée.
Sélectionnez l'app HP Support Assistant sur l'écran de démarrage.
Guide de dépannage et de maintenance
Sélectionnez l'app HP Support Assistant sur l'écran Démarrer,
sélectionnez Mon ordinateur, puis sélectionnez Guides de l'utilisateur.
Maintien de votre ordinateur (ce guide)
http://welcome.hp.com/country/us/en/
http://www.hp.com/go/
Recherchez des informations
●
sur la sécurité et la
réglementation.
● Trouver des informations
relatives à l'ergonomie.
Informations sur les réglementations, la sécurité et les conditions
d'utilisation
Sélectionnez l'app HP Support Assistant sur l'écran Démarrer,
sélectionnez Mon ordinateur, puis sélectionnez Guides de l'utilisateur
ou rendez-vous sur
Guide de sécurité et ergonomie du poste de travail
Sélectionnez l'app HP Support Assistant sur l'écran Démarrer,
sélectionnez Mon ordinateur, puis sélectionnez Guides de l'utilisateur
ou rendez-vous sur
2 Chapitre 1 Obtenir des informations
http://www.hp.com/go/contactHP.
http://www.hp.com/ergo.
Page 29

2 Configuration de votre ordinateur
AVERTISSEMENT ! Afin d'éviter tout risque de choc électrique ou de
dommages à votre équipement :
• Placez l'ordinateur dans un endroit éloigné et protégé de la poussière, de
l'humidité et de la suie. Ces éléments peuvent augmenter la température interne,
provoquer un incendie ou entraîner une électrocution.
• Ne désactivez pas la fiche de mise à la terre du cordon d'alimentation. La mise
à la terre est une caractéristique de sécurité importante.
• Branchez le cordon d'alimentation dans une prise électrique mise à la terre à
laquelle vous pouvez facilement accéder à tout moment.
• Mettez l'équipement hors tension en débranchant le cordon d'alimentation de la
prise électrique. Afin d'éviter une exposition directe au rayon laser, ne tentez pas
d'ouvrir le boîtier du lecteur de CD-ROM ou de DVD.
• Le bloc d'alimentation électrique est préréglé pour le pays ou la région où vous
avez acheté votre ordinateur. Si vous déménagez, vérifiez bien la tension requise
dans ce nouvel environnement avant de relier votre ordinateur à une prise de
courant.
L'ordinateur peut être très lourd ; veillez à adopter une position ergonomique
adéquate lors de sa manipulation.
Pour réduire les risques de blessures graves, lisez le guide Sécurité et
ergonomie du poste de travail. Le manuel est disponible sur le Web à l'adresse
http://www.hp.com/ergo.
1. Placez l'ordinateur de telle sorte qu'aucune ouverture de ventilation ne soit
obstruée et que le câblage ne se trouve pas dans un passage ou à un
endroit où quelqu’un risque de marcher dessus ou de l'endommager en
plaçant un meuble dessus.
2. Branchez tous les cordons d'alimentation du moniteur, de l'ordinateur et des
accessoires à un appareil de protection contre les sautes de puissance sur
lequel est mentionné tout spécialement une protection contre les sautes de
puissance, une alimentation sans coupure (UPS) ou tout autre appareil
similaire. Si l'ordinateur dispose d’un syntoniseur de télévision, d’un modem
ou d’une connexion téléphonique, protégez aussi votre ordinateur en
utilisant la protection contre les sautes de puissance à l’aide de ces entrées
des signaux. Connectez le câble de votre téléviseur ou le cordon de
téléphone à l’appareil de protection contre les sautes de puissance, puis
connectez l'appareil à l’ordinateur.
3. Télécharger et installer les mises à jour du système d'exploitation.
3
Page 30

a. Identifiez le système d'exploitation et la version actuels de votre
ordinateur.
(Sur l'écran Démarrer, saisissez c, sélectionnez Panneau de
configuration, sélectionnez Système et sécurité, puis sélectionnez
Système. Le système d'exploitation et la version sont indiqués, sous
Spécifications.)
b. Ouvrez votre navigateur Internet et allez sur
http://welcome.hp.com/
country/us/en/wwcontact_us.html.
c. Si besoin est, choisissez votre pays et la langue, puis cliquez sur
Support et pilotes.
d. Sélectionnez Téléchargement de pilotes et logiciels, tapez le nom et
la référence de votre ordinateur dans le champ du produit, puis
appuyez sur la touche Entrée.
e. Si nécessaire, sélectionnez votre modèle d'ordinateur dans les
Résultats de la recherche du produit.
f. Sélectionnez le système d'exploitation de votre ordinateur.
g. Cliquez sur Télécharger pour chaque mise à jour que vous souhaitez
télécharger.
h. Suivez les instructions à l'écran pour installer chaque mise à jour
téléchargée.
4. Vérifiez si le carton d'emballage de l'ordinateur contient des informations
détaillées supplémentaires sous forme imprimée ou des mises à jour.
5. Lisez les Informations sur les réglementations, la sécurité et les conditions
d'utilisation qui accompagnent votre ordinateur. Sélectionnez l'app HP
Support Assistant sur l'écran Démarrer, sélectionnez Mon ordinateur,
puis sélectionnez Guides de l'utilisateur.
6. Lisez le Guide de sécurité et ergonomie du poste de travail pour installer
correctement votre station de travail, savoir quelle posture prendre, avoir
quelques conseils relatifs à la santé et aux habitudes de travail et connaître
les consignes de sécurité concernant la mécanique et l’alimentation
électrique de votre système. Select the HP Support Assistant app on the
Start screen, select My computer, and then select User guides or visit
http://www.hp.com/ergo.
Après la configuration initiale de l’ordinateur, vous pouvez, si vous le souhaitez, y
installer des logiciels ou périphériques supplémentaires. Vérifiez la configuration
requise (système d’exploitation, mémoire, etc.) avant d'acheter un nouveau
logiciel ou un nouveau matériel pour votre ordinateur. Respectez les consignes
du fabricant du logiciel pour installer le nouveau logiciel.
4 Chapitre 2 Configuration de votre ordinateur
Page 31

REMARQUE : N'utilisez que des logiciels originaux concédés sous licence.
L'installation de logiciels copiés peut s'avérer instable, infecter l'ordinateur par un
virus, ou être illégale.
Les solutions de sécurité peuvent détecter le vol, les mauvaises manipulations et
les attaques logicielles, mais elles ne peuvent pas les éviter.
Connexion à Internet
Étapes pour vous connecter à Internet :
1. Branchez le matériel conformément à l'affiche d’installation
2. Accédez à un service Internet.
Ouvrez un compte auprès d'un Fournisseur d'Accès Internet (FAI) Si vous
disposez déjà d’un compte d’accès, passez cette étape et suivez les
instructions données par le fournisseur.
3. En utilisant votre connexion Internet par le biais de votre FAI, ouvrez un
navigateur Web et parcourez Internet.
REMARQUE : si vous avez des problèmes pour vous connecter à Internet,
consultez
Accès à Internet à la page 15.
Connexion à Internet
5
Page 32

3 Configuration de fonctions
supplémentaires
Utilisation de Beats Audio™ (sur certains modèles
uniquement)
Votre ordinateur HP TouchSmart est doté de connecteurs audio (casque et sortie
audio) optimisés pour des casques et des systèmes audio externes
Beats Audio™ (vendus séparément). Les modèles d'ordinateur HP TouchSmart
comprennent également quatre haut-parleurs internes optimisés pour Beats et un
bouton sur le clavier
Votre ordinateur est livré déjà prêt pour vous faire vivre la musique avec Beats
activé. Pour désactiver Beats, appuyez sur le Bouton bascule Beats; l'icone
Beats désactivé apparaîtra sur l'écran. Pour activer Beats, appuyez sur le Bouton
bascule Beats une fois encore. Si votre clavier ne comporte pas de bouton
bascule Beats, appuyez sur Fn+B pour activer et désactiver Beats. Pour
visualiser l'interface utilisateur Beats, sur l'écran Démarrer, saisissez b, puis
sélectionnez HP Beats Audio.
Il vous suffit de brancher le casque Beats Audio sur le connecteur latéral
approprié pour profiter d'un son distinct clair et limpide. Pour tirer parti de toutes
les fonctions de BEATS Audio au moyen des haut-parleurs internes, HP
recommande de connecter des enceintes intégrées (subwoofer) HP adaptées au
sous-connecteur sur le panneau arrière. Si vous utilisez un système audio
externe, branchez-le au connecteur de sortie audio situé sur le panneau arrière.
Utilisation du contrôle de Port HDMI (sur certains modèles
uniquement)
Le côté droit de votre ordinateur peut contenir un port HDMI et des boutons de
réglage du volume. À moins qu'un périphérique ne soit connecté au port HDMI,
les touches de réglage du volume n'ont aucune fonctionnalité. Les touches de
réglage HDMI servent uniquement à contrôler les paramètres du périphérique
connecté dans ce port et ne contrôlent aucun autre périphérique relié au
système.
Pour utiliser les touches de réglage du port HDMI, connectez un périphérique au
port HDMI. Appuyez sur la touche Menu (touche du haut). Un nouveau menu
s'affiche à l'écran. À l'aide des touches +/-, sélectionnez la luminosité, le volume,
le contraste ou la balance des couleurs.
permettant d'activer/désactiver Beats.
6 Chapitre 3 Configuration de fonctions supplémentaires
Page 33
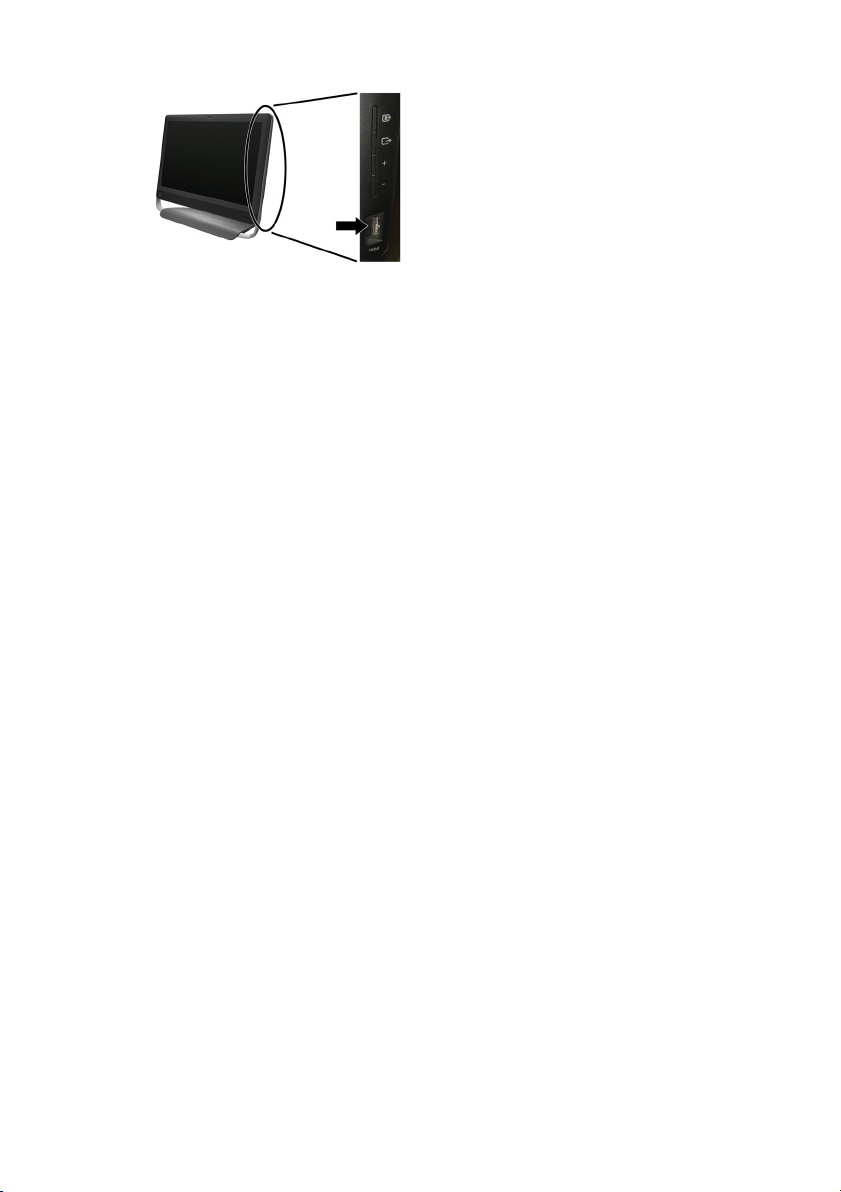
Lorsqu'un périphérique est connecté au port HDMI, le volume de l'ordinateur est
en mode muet. Les boutons +/- qui se trouvent sur le panneau latéral ne
contrôlent pas le volume de l'ordinateur.
Utilisation du contrôle de Port HDMI (sur certains modèles uniquement)
7
Page 34

4 Maintien de votre ordinateur
Procédures de nettoyage
Garder l’ordinateur propre, sans poussière ni saletés et à l’abri de la chaleur, permet de prolonger sa durée de
vie.
L'accumulation de poussière, de poils et d'autres particules peut créer un effet de couverture nuisible au
●
fonctionnement de l'ordinateur ; elle peut entraîner une surchauffe des composants ou, dans le cas du
clavier et de la souris, un fonctionnement aléatoire et inefficace.
Vérifiez votre système au minimum une fois par mois de tout signe visible de poussière et de débris, et
●
nettoyez-le au moins une fois tous les trois mois.
● Visitez la page
nettoyage.
welcome.hp.com/country/us/en/wwcontact_us.html pour plus d'informations sur le
Nettoyage des grilles
d’aération de l’ordinateur
Les fentes d'aération permettent de refroidir l'ordinateur. Nettoyez ces fentes à
l'aide d'un petit aspirateur manuel fonctionnant sur piles. Vous éviterez ainsi tout
risque d'électrocution.
1. Passez l'aspirateur sur les fentes d'aération du boîtier de l'ordinateur.
2. Retirez tout débris accumulé sur ou autour des ports de l’ordinateur (par
exemple, les connecteurs Ethernet et USB).
8 Chapitre 4 Maintien de votre ordinateur
Page 35

Nettoyage du clavier et de
la souris
Pour le nettoyage des touches du clavier, utilisez un petit aspirateur à piles pour
éviter d'endommager les touches ou les ressorts.
1. Aspirez entre les touches du clavier et le long des rainures.
2. Utilisez un chiffon sec et propre imbibé d’alcool isopropylique (à friction) pour
nettoyer l’accumulation de débris sur les touches et les bords du clavier.
3. Nettoyez la souris et son cordon avec des chiffons nettoyants.
Si vous utilisez une souris avec une boule, nettoyez aussi la boule et les roulettes
à l’intérieur :
1. Retournez la souris et tournez la couronne du couvercle au-dessus de la
boule dans le sens contraire des aiguilles d’une montre pour retirer la
couronne et dégager la boule.
2. Rincez la boule avec de l’eau tiède savonneuse.
3. Nettoyez les roulettes à l’intérieur de la souris avec un coton-tige imbibé
d’alcool isopropylique (à friction).
4. Une fois la boule et les roulettes complètement sèches, remettez-les en
place, ainsi que la couronne du couvercle.
Nettoyage de l'écran
(modèles AiO uniquement)
Suivez les étapes suivantes pour nettoyer l'écran tactile :
1. Éteignez l'ordinateur. Sur l'écran Démarrer, déplacez votre curseur vers le
coin inférieur droit de l'écran pour afficher la barre d'outils charmes, puis
sélectionnez Paramètres. Cliquez sur l’icône Allumer, puis choisissez
Arrêter.
2. Débranchez le cordon d'alimentation de la prise murale.
3. Vaporisez une petite quantité de nettoyant pour verre doux sur un chiffon
doux pour nettoyer l'écran tactile.
4. Essuyez la surface et les côtés gauche et droit de l'écran tactile pour retirer
la poussière, les traces de doigt et tout autre débris.
ATTENTION :
vaporisez le nettoyant sur le chiffon, puis essuyez-les bords et la surface de
l'écran.
Prenez soin de ne pas nettoyer les bords et la surface de l’écran au moyen d’un
produit ou d’un chiffon abrasif qui risquerait de détériorer l’écran tactile.
Ne pas vaporiser le nettoyant directement sur l'écran ;
Procédures de nettoyage
9
Page 36

5 Dépannage
Reportez-vous à la documentation fournie par le fabricant du produit pour obtenir
de plus amples informations sur les problèmes spécifiques aux périphériques,
comme les problèmes de moniteur ou d’imprimante. Les tableaux suivants
présentent quelques problèmes que vous pourriez rencontrer lors de
l’installation, du démarrage, ou de l’utilisation de votre ordinateur, ainsi que des
solutions possibles.
Pour plus d’informations ou des options supplémentaire pour le dépannage,
consultez
L’ordinateur ne démarre pas
Symptôme Solution
Obtenir des informations à la page 1.
Message
d'erreur : Erreur
de disque dur.
L'ordinateur
refuse de
démarrer ou de
s'allumer.
Redémarrez l'ordinateur.
1. Appuyez simultanément sur les touches Ctrl+Alt+Supprimer du clavier.
2. Cliquez sur l’icône Allumer, puis choisissez Redémarrer.
Ou appuyez sur le bouton de mise sous tension tout en le maintenant enfoncé
pendant cinq secondes ou plus pour éteindre l'ordinateur, puis appuyez de nouveau sur
ce même bouton pour redémarrer l'ordinateur.
3. Si Windows s'ouvre, procédez à une sauvegarde immédiate de toutes vos données
importantes sur un disque dur de sauvegarde.
4. Que vous ayez pu démarrer Windows ou non, contactez l'assistance technique.
Le remplacement du lecteur de disque dur ou de la carte mère peut s'avérer
nécessaire.
Assurez-vous que les câbles qui relient l’ordinateur à la source d’alimentation externe sont
correctement branchés. Lorsque les câbles reliant l’ordinateur à la source d’alimentation
externe sont bien branchés et que la prise murale fonctionne correctement, le témoin
d’alimentation vert à l’arrière de l’ordinateur doit s’allumer. Si ce n’est pas le cas, contactez
l’assistance technique.
Testez la prise murale en y connectant un autre dispositif électrique.
10 Chapitre 5 Dépannage
Page 37

Symptôme Solution
L’ordinateur
semble bloqué
et ne répond
pas.
Message
d'erreur :
Disque système
invalide ou
Disque non
système ou
Erreur disque.
Utilisez le Gestionnaire des tâches pour fermer les programmes qui ne répondent pas, ou
pour redémarrer votre ordinateur :
1. Appuyez simultanément sur les touches Ctrl+Alt+Supprimer du clavier.
2. Sélectionnez Task Manager (Gestionnaire de tâches).
3. Sélectionnez le programme qui ne répond pas, puis cliquez sur Terminer la tâche.
Si le problème persiste après avoir fermé le programme, redémarrez l’ordinateur :
1. Appuyez simultanément sur les touches Ctrl+Alt+Supprimer du clavier.
2. Cliquez sur l’icône Allumer, puis choisissez Redémarrer.
Lorsque le voyant d'activité s'éteint, retirez le disque et appuyez sur la barre d'espace du
clavier. L'ordinateur doit maintenant démarrer.
Alimentation
Symptôme Solution
Ou, appuyez sur le bouton de mise sous tension (Power) pendant cinq secondes ou
plus pour éteindre l’ordinateur, puis appuyez sur le bouton de mise sous tension
(Power) pour redémarrer l'ordinateur.
L'ordinateur ne
s'éteint pas
lorsque vous
appuyez sur le
bouton de mise
sous tension.
L’ordinateur
s’éteint
automatiqueme
nt.
Appuyez sur le bouton d'alimentation (Power) et maintenez-le enfoncé jusqu’à ce que
l’ordinateur s’éteigne. Vérifiez les paramètres d’alimentation.
La température ambiante est peut-être trop élevée. Laissez-le refroidir.
●
● Vérifiez que les aérations de l’ordinateur ne sont pas obstruées et que le ventilateur
interne fonctionne — consultez
que votre ordinateur ne soit pas équipé d’un ventilateur interne.)
Procédures de nettoyage à la page 8. (Il est possible
Alimentation
11
Page 38

Affichage (moniteur)
Symptôme Solution
L’écran n’affiche
rien.
Appuyez sur la barre d'espace du clavier ou déplacez la souris pour réactiver l'affichage.
Appuyez sur le bouton de Veille (certains modèles uniquement) ou sur la touche Échap
du clavier pour sortir du mode Veille.
Appuyez sur le bouton de mise sous tension (Power) pour mettre l'ordinateur en marche.
Clavier et souris (général)
Symptôme Solution
Votre ordinateur ne
reconnaît pas les
commandes ou les
combinaisons de
touches du clavier.
La souris (avec
câble) ne fonctionne
pas ou n'est pas
détectée après
l'installation.
Utilisez la souris pour éteindre l’ordinateur, déconnectez et reconnectez le clavier à
l’arrière de l’ordinateur, puis redémarrez votre ordinateur.
Débranchez et rebranchez le câble de la souris à l’ordinateur.
Si la souris n’est toujours pas détectée, éteignez l’ordinateur, déconnectez et
reconnectez le câble de la souris, puis rallumez l’ordinateur.
12 Chapitre 5 Dépannage
Page 39

Symptôme Solution
Le curseur ne se
déplace pas lorsque
les touches
fléchées du clavier
numérique sont
utilisées.
Le curseur ne suit
pas les
mouvements de la
souris.
Appuyez sur Verr Num sur le clavier pour désactiver Verr Num, afin de pouvoir utiliser les
touches fléchées du clavier numérique.
Utilisez le clavier pour enregistrer les modifications dans tous les programmes ouverts,
puis redémarrez votre ordinateur.
1. Appuyez simultanément sur les touches Alt+Tabulation pour accéder à un
programme ouvert.
2. Appuyez simultanément sur les touches Ctrl et S pour enregistrer vos modifications
dans le programme choisi. (Ctrl+S est le raccourci clavier de l'option Enregistrer
dans la plupart des programmes mais pas tous.)
3. Répétez les étapes 1 et 2 pour enregistrer les modifications dans tous les
programmes ouverts.
4. Après avoir enregistré des changements dans tous les programmes ouverts,
appuyez sur le bouton de mise sous tension (Power) pour éteindre l'ordinateur.
5. Une fois la procédure d'arrêt terminée, débranchez et rebranchez la prise de la
souris à l'arrière de l'ordinateur et redémarrez votre ordinateur.
Clavier et souris (général)
13
Page 40
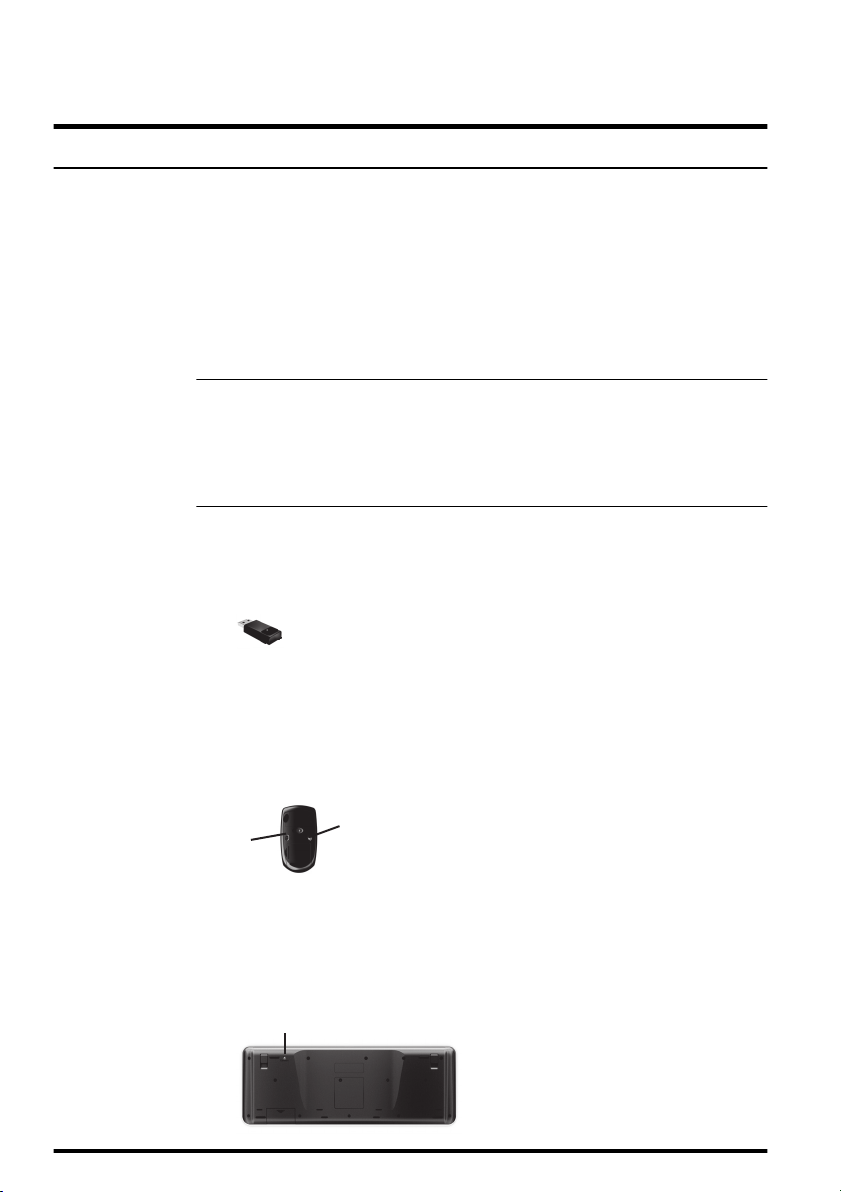
Clavier et souris (sans fil)
A
Symptôme Solution
Le clavier ou la
souris sans fil ne
fonctionne pas ou
n'est pas détecté(e)
après l'installation.
● Assurez-vous d’utiliser un clavier ou une souris sans fil situé à portée du récepteur,
approximativement 3 mètres (10 pieds) pour une utilisation normale, et 30 cm
(12 pouces) lors de la configuration initiale ou de la resynchronisation.
● Assurez-vous que la souris n’est pas en mode veille (après 20 minutes d'inactivité).
Cliquez sur le bouton gauche de la souris pour la réactiver.
Remplacez les piles du clavier et de la souris.
●
● Resynchronisez le clavier et la souris avec le récepteur en exécutant les étapes
suivantes.
Le récepteur, le clavier sans fil et la souris sans fil illustrés ci-après ne sont que de
simples exemples. Vos modèles peuvent varier. IMPORTANT : Au cours de ces étapes,
placez le clavier et la souris sans fil au même niveau que le récepteur, à 30 cm
(12 pouces) du récepteur, et à l’écart de toute source d’interférences, comme d’autres
périphériques.
1. Débranchez le récepteur d’un connecteur USB de votre ordinateur, puis
rebranchez-le. Le modèle de votre ordinateur peut disposer d’un connecteur dédié
pour le récepteur. Le cas échéant, utilisez un des connecteurs USB situés à l'avant
de l’ordinateur.
2. Vérifiez que la souris est bien allumée (A), puis appuyez et maintenez le bouton
Connexion enfoncé (B) sous la souris pendant 5 à 10 secondes jusqu'à ce que le
témoin lumineux du récepteur s'allume ou s'arrête de clignoter. Le récepteur se
déconnecte au bout de 60 secondes. Afin de vous assurer que la connexion a bien
été établie et que le récepteur ne s'est pas déconnecté, déplacez la souris et
vérifiez la réponse sur l'écran.
14 Chapitre 5 Dépannage
B
Off
Connect
On
3. Une fois la connexion avec la souris établie, continuez en suivant les étapes
suivantes pour répéter la procédure pour le clavier.
4. Appuyez sur le bouton Connexion (C) sous le clavier et maintenez-le enfoncé
pendant 5 à 10 secondes jusqu'à ce que le témoin du récepteur s'allume ou s'arrête
de clignoter.
C
Page 41

Haut-parleurs et son
Symptôme Solution
Il n’y a pas de son. 1. Sur l'écran Démarrer, saisissez c, sélectionnez Panneau de configuration, puis
sélectionnez Système et sécurité.
2. Sous Centre d'actions, sélectionnez Résoudre les roblèmes fréquents de
l'ordinateur, puis sélectionnez Dépanner audio playback.
Si vous utilisez des haut-parleurs intégrés dans le moniteur, utilisez le bouton de volume
du panneau avant du moniteur pour régler le volume. Utilisez les boutons du panneau
avant pour ouvrir l'interface OSD (réglage à l'écran) et vous assurer que le son (audio)
est activé et que le volume est réglé comme il se doit.
Assurez-vous d’avoir branché des haut-parleurs sous tension (actifs) et qu’ils sont
allumés.
Éteignez l'ordinateur, débranchez et rebranchez les haut-parleurs. Assurez-vous que les
haut-parleurs sont branchés dans un connecteur audio, pas dans un connecteur Line In
ou de casque d’écoute.
Pour quitter le mode Veille, appuyez sur le bouton Veille (certains modèles uniquement)
ou sur la touche Echap.
Débranchez les éventuels écouteurs connectés à l'ordinateur, ou votre système de hautparleurs.
Le volume est très
faible ou
insatisfaisant.
Assurez-vous d’avoir connecté les haut-parleurs au connecteur Audio Out (vert pâle) à
l’arrière de l’ordinateur. (D’autres connecteurs audio sont utilisés pour les haut-parleurs à
plusieurs canaux.) Des haut-parleurs non alimentés (haut-parleurs sans source
d’alimentation propre, comme des piles ou un câble d’alimentation) ne fournissent pas un
son suffisant. Remplacez-les par des haut-parleurs alimentés.
Accès à Internet
Symptôme Solution
Les programmes
Internet ne
démarrent pas
automatiquement.
Ouvrez une session Internet et lancez le programme de votre choix.
Haut-parleurs et son
15
Page 42

Symptôme Solution
Impossible d’établir
une connexion à
Internet.
1. Sur l'écran Démarrer, saisissez c, puis sélectionnez Panneau de configuration.
2. Sous Réseau et Internet, sélectionnez Connecter à Internet.
Vérifiez si vous utilisez des câbles adaptés à votre type de connexion Internet. Votre
ordinateur peut être équipé d’un modem pour réseau commuté et d’une carte réseau
Ethernet (également appelée carte d’interface réseau ou NIC). Un modem utilise un
câble de téléphone standard alors que la carte réseau utilise un câble réseau pour se
connecter à un réseau local (LAN). Ne connectez pas un câble téléphonique à la carte
réseau, et ne branchez pas un câble réseau sur une ligne téléphonique ; cela pourrait
endommager la carte réseau.
Exécutez l'assistant de configuration sans fil.
1. Sur l'écran Démarrer, saisissez c, sélectionnez Panneau de configuration,
sélectionnez Réseau et Internet, puis sélectionnez Centre Réseau et partage.
2. Dans la fenêtre Centre Réseau et partage, cliquez sur Configurer une connexion
ou un réseau pour ouvrir l’assistant, puis suivez les instructions qui s’affichent à
l’écran.
Si votre système dispose d’une antenne externe, essayez de placer l’antenne dans une
meilleure position. Si l’antenne est interne, essayez de déplacer l’ordinateur.
Essayez de vous connecter plus tard, ou prenez contact avec votre fournisseur d'accès à
Internet (FAI) pour obtenir de l’aide.
16 Chapitre 5 Dépannage
Page 43

Dépannage du logiciel
Pour corriger
des problèmes
logiciels,
essayez ces
méthodes :
Mise à jour des
pilotes de
périphériques
Éteignez complètement l'ordinateur puis rallumez-le. C'est la manière la plus facile (et
●
parfois la meilleure).
● Mettez à jour les pilotes (voir section suivante, « Mise à jour des pilotes de
périphériques »).
● Utilisez le programme Restauration du système de Microsoft et procédez à une
réinstallation des pilotes matériels (voir Restauration du système Microsoft plus loin
dans ce tableau). — Restaure la configuration qu'utilisait votre ordinateur avant
l'installation du logiciel.
● Réinstallez le programme ou le pilote matériel (voir « Réinstallation des logiciels et des
pilotes matériels » plus loin dans ce tableau). — Restaure les paramètres d'usine du
logiciel (s'il a été fourni avec le produit) ou du pilote matériel.
● Restauration du système (consultez le Guide de dépannage et de maintenance sur
votre ordinateur. Sélectionnez l'app HP Support Assistant sur l'écran Démarrer,
sélectionnez Mon ordinateur, puis sélectionnez Guides de l'utilisateur). — Efface et
reformate le disque dur, puis réinstalle le système d’exploitation, les programmes et les
pilotes. Cela efface tous les fichiers de données que vous avez créés.
Effectuez la procédure suivante pour mettre à jour un pilote ou revenir à une version
antérieure du pilote si le plus récent ne résout pas votre problème :
1. Sur l'écran Démarrer, saisissez c, puis sélectionnez Panneau de configuration.
2. Sélectionnez Système et sécurité, puis dans la zone Système, sélectionnez
Gestionnaire de périphérique (Device Manager).
3. Cliquez sur la flèche pour développer le type de périphérique que vous souhaitez mettre
à jour ou que vous voulez restaurer. (Les pilotes DVD/CD-ROM par exemple.)
4. Double-cliquez sur l'élément concerné (par exemple, HP DVD Writer 640b).
5. Sélectionnez l'onglet Pilote.
6. Pour mettre un pilote à jour, cliquez sur Mettre à jour le pilote et suivez les instructions
à l'écran.
Ou, pour revenir à une version antérieure d’un pilote, cliquez sur Restaurer le pilote et
suivez les instructions à l'écran.
Dépannage du logiciel
17
Page 44

Restauration du
système de
Microsoft
Si vous rencontrez un problème qui peut être dû à un logiciel installé sur votre ordinateur,
utilisez la fonction Restauration du système pour ramener votre ordinateur à son état lors
d’un point de reprise précédent. Vous pouvez aussi établir ces points manuellement.
REMARQUE :
programme Récupération système.
Utilisez toujours la procédure Restauration du système avant d’utiliser le
Pour lancer la restauration du système ou pour ajouter des point de restauration
manuellement :
1. Fermez tous les programmes.
2. Sur l'écran Démarrer, saisissez c, puis sélectionnez Panneau de configuration.
3. Sélectionnez Système et sécurité, sélectionnez Système, puis sélectionnez
Protection du système.
4. Cliquez sur l'onglet Protection sur l'écran des Propriétés du système.
5. Suivez-vous les instructions qui s’affichent à l’écran.
18 Chapitre 5 Dépannage
Page 45

Réinstallation
des logiciels et
des pilotes
Si une application ou un pilote installé en usine est endommagé, vous pouvez le réinstaller à
l'aide du programme Gestionnaire de réinstallation (certains modèles uniquement).
REMARQUE :
contenus sur les CD ou les DVD qui se trouvaient dans l’emballage de votre ordinateur.
Réinstallez ces programmes directement à partir des CD ou des DVD.
Avant de désinstaller un programme, assurez-vous que vous disposez d’un moyen de le
réinstaller ultérieurement. Assurez-vous d'être certain qu’il est encore disponible à l’endroit
d’où vous l’aviez installé initialement (par exemple, un disque ou Internet). Vous pouvez
aussi vous assurer que la liste des programmes que vous pouvez réinstaller à partir du
Gestionnaire de récupération.
Pour consulter la liste des programmes installables à partir du Gestionnaire de réinstallation :
1. Sur l'écran Démarrer, saisissez c, puis sélectionnez Gestionnaire de restauration. Si
vous y êtes invité, appuyez sur Oui pour autoriser le programme à continuer.
2. Dans J’ai besoin d’aide immédiatement, sélectionnez Réinstallation des logiciels.
3. Sélectionnez Suivant sur l’écran de bienvenue. Une liste de programmes s’ouvre.
Vérifiez si votre programme est présent.
Pour réinstaller un programme à l'aide du Gestionnaire de récupération :
1. Sur l'écran Démarrer, saisissez c, puis sélectionnez Gestionnaire de restauration.
2. Sélectionnez Réinstallation des logiciels, puis sélectionnez Suivant sur l’écran
Bienvenue .
3. Choisissez le programme que vous souhaitez réinstaller, sélectionnez Suivant et suivez
les instructions qui s'affichent à l’écran.
4. Après la récupération, redémarrez l'ordinateur. Cette dernière étape est impérative.
Vous devez toujours redémarrer l'ordinateur lorsque vous avez terminé de réinstaller
des applications ou des pilotes.
N'utilisez pas le Gestionnaire de réinstallation pour réinstaller les logiciels
Pour désinstaller un programme :
1. Fermez tous les programmes et les dossiers.
2. Sur l'écran Démarrer, saisissez c, puis sélectionnez Panneau de configuration.
3. Sous Programmes, sélectionnez Désinstaller un programme.
4. Choisissez le programme à supprimer, puis sélectionnez Désinstaller.
Dépannage du logiciel
19
Page 46

6 Informations sur l'assistance technique
Comment obtenir de l’aide
Simple d'accès. Facile à utiliser. Le service d'assistance clientèle HP déjà
plusieurs fois récompensé incarne notre engagement à vous aider pour profiter
au mieux de votre ordinateur. Que ce soit par le biais des outils installés sur votre
ordinateur, des informations disponibles sur Internet, par téléphone ou par
l'entremise de votre détaillant local, vous trouverez des réponses à tout.
Avant de contacter le Centre d'aide à la clientèle de HP, il est important d'avoir
les informations suivantes à portée de main.
Numéro de modèle
●
Numéro du produit
●
● Numéro de série
Numéro de version logicielle
●
Système d'exploitation
●
● Date d'achat
Nous vous invitons à prendre note des informations suivantes concernant votre
ordinateur en vue d'y faire référence ultérieurement.
Les quatre premiers éléments de la liste (numéro de modèle, numéro de produit,
numéro de série et numéro de version logicielle) peuvent être consultés à l'aide
de HP Support Information. Sur l'écran Démarrer, saisissez s, puis sélectionnez
HP Support Information.
N'oubliez pas d'enregistrer votre achat !
Rendez-vous sur :
Où obtenir de l'aide
1. Utilisez l’Aide et support Windows pour trouver les réponses à vos
questions concernant le matériel et les logiciels. Sur l'écran Démarrer,
saisissez h, puis sélectionnez Aide et support.
2. Utilisez l'Assistant support. Sur l'écran Démarrer, saisissez h, puis
sélectionnez HP Support Assistant. Le HP Support Assistant vous
apportera des informations utiles concernant le dépannage, vous pourrez y
trouver :
http://www.hp.com/apac/register.
20 Chapitre 6 Informations sur l'assistance technique
Page 47

Support par e-mail
●
Conversation en temps réel avec des spécialistes qualifiés de
●
l’assistance technique HP
Numéros de téléphone du support technique
●
3. Pour obtenir une aide en ligne, allez sur le site Web du Centre d'assistance
clientèle HP à l'adresse suivante :
wwcontact_us.html.
L'assistance téléphonique à votre disposition est offerte pendant une durée de
trente (30) jours à compter de la date d'achat de votre ordinateur. Passé ce délai
de trente (30) jours, le service d'assistance peut vous être facturé, mais il reste
disponible.
http://welcome.hp.com/country/us/en/
Assistance technique pour les réparations
Si votre ordinateur nécessite une réparation ou le remplacement de certaines
pièces, deux options s'offrent à vous :
Vous pouvez facilement remplacer un grand nombre de vos pièces
●
d'ordinateur considérées comme remplaçables par le cosommateur. Il s'agit
de la méthode la plus rapide de la réparation, d'autant plus que à maintes
reprises nous pouvons vous envoyer la pièce directement à votre domicile
ou votre entreprise en quelques jours. (Il se peut que cette option ne soit
pas disponible dans tous les pays/toutes les régions.)
● Si une réparation s'avère nécessaire, le Centre d'assistance clientèle HP
mettra tout en œuvre pour réparer votre ordinateur.
Ces services sont couverts pendant la période de garantie.
Il y a quelques limitations et exclusions à la garantie (ainsi que certains détails
importants), qui sont décrits dans le guide Garantie limitée internationale et
assistance technique .
Avant de procéder à la mise à jour de votre matériel
Si vous avez l'intention d'effectuer une mise à jour matérielle quelqu'en soit la
nature, assurez-vous d'abord que la configuration de votre nouvel ordinateur est
complète. Reportez-vous aux instructions de configuration au début de ce Guide
pour l'aide à la configuration. Si vous avez des problèmes pour configurer votre
système et le mettre en marche, entrez immédiatement en contact avec le
Centre d'assistance technique HP répertorié plus haut dans ce guide, et un
représentant à la clientèle HP vous viendra en aide. Cela doit être fait avant toute
tentative de mise à jour de votre système.
En brisant le sceau de sécurité à l'arrière de l'ordinateur, vous confirmez que
l'ordinateur fonctionnait correctement avant que vous ne tentiez de mettre à jour
votre système. Une fois le sceau de sécurité a été brisé, votre ordinateur est
alors, dans la mesure permise par la loi locale, couvert par les termes et
Assistance technique pour les réparations
21
Page 48

conditions figurant dans le Guide Garantie limitée internationale et assistance
technique .
22 Chapitre 6 Informations sur l'assistance technique
Page 49

Page 50

Page 51

Page 52

The power to make a change
Thank you for your purchase. HP is dedicated to producing the highest quality, best performing, and easiest to
use computers in the world. HP also designed this product with the environment in mind. If this computer is a
replacement for an older computer you no longer need, go to
help you dispose of your old computer with minimum impact on the planet.
www.hp.com/go/recycle to find out if HP can
Le pouvoir de changer les choses
Nous vous remercions pour votre achat. HP est spécialisé dans le développement et la fabrication
d'ordinateurs de très haute qualité et parmi les plus performants et les plus simples à utiliser dans le monde.
HP a également conçu ce produit dans un souci de respect de l'environnement. Si cet ordinateur vient en
remplacement d'un ancien ordinateur dont vous n'avez plus besoin, rendez-vous sur la page
www.hp.com/go/recycle pour savoir si HP peut vous aider à vous débarrasser de votre ancien
ordinateur avec un impact minimal pour la planète.
Printed in
*700604-DN1*
700604-DN1
 Loading...