

Page 1

User’s Guide
hp StorageWorks
1000ux/1900ux/2300ux
Optical Jukebox
First Edition (May 2004)
Part Number: AA966-90901
This guide describes procedures for operating and troubleshooting the HP StorageWorks
1000ux/1900ux/2300ux Optical Jukebox.
Page 2

© Copyright 2004 Hewlett-Packard Development Company, L.P.
Hewlett-Packard Company makes no warranty of any kind with regard to this material, including, but not limited to,
the implied warranties of merchantability and fitness for a particular purpose. Hewlett-Packard shall not be liable for
errors contained herein or for incidental or consequential damages in connection with the furnishing, performance,
or use of this material.
This document contains proprietary information, which is protected by copyright. No part of this document may be
photocopied, reproduced, or translated into another language without the prior written consent of Hewlett-Packard.
The information contained in this document is subject to change without notice. The only warranties for HP products
and services are set forth in the express warranty statements accompanying such products and services. Nothing
herein should be construed as constituting an additional warranty.
Microsoft®, MS-DOS®, MS Windows® and Windows® are U.S. registered trademarks of Microsoft Corporation.
UNIX® is a registered trademark of The Open Group.
Hewlett-Packard Company shall not be liable for technical or editorial errors or omissions contained herein. The
information is provided “as is” without warranty of any kind and is subject to change without notice. The warranties
for Hewlett-Packard Company products are set forth in the express limited warranty statements for such products.
Nothing herein should be construed as constituting an additional warranty.
Printed in the U.S.A.
HP StorageWorks 1000ux/1900ux/2300ux Optical Jukebox User’s Guide
First Edition (May 2004)
Part Number: AA966-90901
Regulatory Model Number: N3620N3Z
Page 3

Contents
About this Guide. . . . . . . . . . . . . . . . . . . . . . . . . . . . . . . . . . . . . . . . . . . . . . . . . . . .7
Related documentation . . . . . . . . . . . . . . . . . . . . . . . . . . . . . . . . . . . . . . . . . . . . . . . . . . . . . . . 8
Conventions . . . . . . . . . . . . . . . . . . . . . . . . . . . . . . . . . . . . . . . . . . . . . . . . . . . . . . . . . . . . . . . 8
Document conventions. . . . . . . . . . . . . . . . . . . . . . . . . . . . . . . . . . . . . . . . . . . . . . . . . . . . 8
Text symbols . . . . . . . . . . . . . . . . . . . . . . . . . . . . . . . . . . . . . . . . . . . . . . . . . . . . . . . . . . . 9
Getting help . . . . . . . . . . . . . . . . . . . . . . . . . . . . . . . . . . . . . . . . . . . . . . . . . . . . . . . . . . . . . . 10
HP technical support . . . . . . . . . . . . . . . . . . . . . . . . . . . . . . . . . . . . . . . . . . . . . . . . . . . . 10
HP storage web site . . . . . . . . . . . . . . . . . . . . . . . . . . . . . . . . . . . . . . . . . . . . . . . . . . . . . 11
HP authorized reseller . . . . . . . . . . . . . . . . . . . . . . . . . . . . . . . . . . . . . . . . . . . . . . . . . . . 11
1 Operations . . . . . . . . . . . . . . . . . . . . . . . . . . . . . . . . . . . . . . . . . . . . . . . . . . . . . . .13
Identifying panel features. . . . . . . . . . . . . . . . . . . . . . . . . . . . . . . . . . . . . . . . . . . . . . . . . . . . 14
Front panel features and descriptions. . . . . . . . . . . . . . . . . . . . . . . . . . . . . . . . . . . . . . . . 14
Back panel features and descriptions. . . . . . . . . . . . . . . . . . . . . . . . . . . . . . . . . . . . . . . . 15
Using Ultra Density Optical (UDO) disks . . . . . . . . . . . . . . . . . . . . . . . . . . . . . . . . . . . . . . . 18
Choosing a disk type . . . . . . . . . . . . . . . . . . . . . . . . . . . . . . . . . . . . . . . . . . . . . . . . . . . . 18
Labeling a disk cartridge . . . . . . . . . . . . . . . . . . . . . . . . . . . . . . . . . . . . . . . . . . . . . . . . . 19
Write-protecting an UDO disk. . . . . . . . . . . . . . . . . . . . . . . . . . . . . . . . . . . . . . . . . . . . . 20
Loading a disk into the drive . . . . . . . . . . . . . . . . . . . . . . . . . . . . . . . . . . . . . . . . . . . . . . 21
Maintaining UDO media . . . . . . . . . . . . . . . . . . . . . . . . . . . . . . . . . . . . . . . . . . . . . . . . . 22
Using mixed media. . . . . . . . . . . . . . . . . . . . . . . . . . . . . . . . . . . . . . . . . . . . . . . . . . . . . . . . . 24
Using application software. . . . . . . . . . . . . . . . . . . . . . . . . . . . . . . . . . . . . . . . . . . . . . . . . . . 26
Contents
2 Navigation . . . . . . . . . . . . . . . . . . . . . . . . . . . . . . . . . . . . . . . . . . . . . . . . . . . . . . .27
Control panel features and descriptions . . . . . . . . . . . . . . . . . . . . . . . . . . . . . . . . . . . . . . . . . 28
Using selection buttons . . . . . . . . . . . . . . . . . . . . . . . . . . . . . . . . . . . . . . . . . . . . . . . . . . 29
Jukebox menu tree . . . . . . . . . . . . . . . . . . . . . . . . . . . . . . . . . . . . . . . . . . . . . . . . . . . . . . . . . 30
Top-level menus. . . . . . . . . . . . . . . . . . . . . . . . . . . . . . . . . . . . . . . . . . . . . . . . . . . . . . . . 31
Second-level menus . . . . . . . . . . . . . . . . . . . . . . . . . . . . . . . . . . . . . . . . . . . . . . . . . . . . . 31
Control panel operations. . . . . . . . . . . . . . . . . . . . . . . . . . . . . . . . . . . . . . . . . . . . . . . . . . . . . 33
3HP StorageWorks 1000ux/1900ux/2300ux Optical Jukebox User’s Guide
Page 4

Contents
Ejecting a disk . . . . . . . . . . . . . . . . . . . . . . . . . . . . . . . . . . . . . . . . . . . . . . . . . . . . . . . . . 33
Entering the administration menu password . . . . . . . . . . . . . . . . . . . . . . . . . . . . . . . . . . 34
Changing the administration menu password . . . . . . . . . . . . . . . . . . . . . . . . . . . . . . . . . 35
Viewing the current SCSI IDs . . . . . . . . . . . . . . . . . . . . . . . . . . . . . . . . . . . . . . . . . . . . . 36
Default SCSI IDs. . . . . . . . . . . . . . . . . . . . . . . . . . . . . . . . . . . . . . . . . . . . . . . . . . . . 36
Changing the current SCSI IDs . . . . . . . . . . . . . . . . . . . . . . . . . . . . . . . . . . . . . . . . . . . . 37
Configuring the jukebox . . . . . . . . . . . . . . . . . . . . . . . . . . . . . . . . . . . . . . . . . . . . . . . . . 37
Setting an operating configuration. . . . . . . . . . . . . . . . . . . . . . . . . . . . . . . . . . . . . . . . . . 39
Retrieving log history. . . . . . . . . . . . . . . . . . . . . . . . . . . . . . . . . . . . . . . . . . . . . . . . . . . . 40
Running an internal test . . . . . . . . . . . . . . . . . . . . . . . . . . . . . . . . . . . . . . . . . . . . . . . . . . 44
3 Troubleshooting . . . . . . . . . . . . . . . . . . . . . . . . . . . . . . . . . . . . . . . . . . . . . . . . . . .49
Troubleshooting common problems. . . . . . . . . . . . . . . . . . . . . . . . . . . . . . . . . . . . . . . . . . . . 50
Retrieving log history. . . . . . . . . . . . . . . . . . . . . . . . . . . . . . . . . . . . . . . . . . . . . . . . . . . . . . . 56
Running an internal test . . . . . . . . . . . . . . . . . . . . . . . . . . . . . . . . . . . . . . . . . . . . . . . . . . . . . 56
Using HP StorageWorks Library and Tape Tools . . . . . . . . . . . . . . . . . . . . . . . . . . . . . . . . . 57
A Specifications . . . . . . . . . . . . . . . . . . . . . . . . . . . . . . . . . . . . . . . . . . . . . . . . . . . . .59
Environmental specifications . . . . . . . . . . . . . . . . . . . . . . . . . . . . . . . . . . . . . . . . . . . . . . . . . 60
Jukebox specifications . . . . . . . . . . . . . . . . . . . . . . . . . . . . . . . . . . . . . . . . . . . . . . . . . . . . . . 61
Drive specifications . . . . . . . . . . . . . . . . . . . . . . . . . . . . . . . . . . . . . . . . . . . . . . . . . . . . . . . . 62
Media specifications. . . . . . . . . . . . . . . . . . . . . . . . . . . . . . . . . . . . . . . . . . . . . . . . . . . . . . . . 63
Safety and regulatory specifications. . . . . . . . . . . . . . . . . . . . . . . . . . . . . . . . . . . . . . . . . . . . 64
B Safety and Regulatory. . . . . . . . . . . . . . . . . . . . . . . . . . . . . . . . . . . . . . . . . . . . . . .65
Federal Communications Commission Notice. . . . . . . . . . . . . . . . . . . . . . . . . . . . . . . . . . . . 66
Class A Equipment. . . . . . . . . . . . . . . . . . . . . . . . . . . . . . . . . . . . . . . . . . . . . . . . . . . . . . 66
Modifications . . . . . . . . . . . . . . . . . . . . . . . . . . . . . . . . . . . . . . . . . . . . . . . . . . . . . . . . . . 66
Cables. . . . . . . . . . . . . . . . . . . . . . . . . . . . . . . . . . . . . . . . . . . . . . . . . . . . . . . . . . . . . . . . 67
Declaration of Conformity for products marked with the FCC logo -
United States only . . . . . . . . . . . . . . . . . . . . . . . . . . . . . . . . . . . . . . . . . . . . . . . . . . . . . . 67
Canadian Notice (Avis Canadien) . . . . . . . . . . . . . . . . . . . . . . . . . . . . . . . . . . . . . . . . . . . . . 67
Class A Equipment. . . . . . . . . . . . . . . . . . . . . . . . . . . . . . . . . . . . . . . . . . . . . . . . . . . . . . 67
European Union Notice . . . . . . . . . . . . . . . . . . . . . . . . . . . . . . . . . . . . . . . . . . . . . . . . . . . . . 68
EC radio frequency interference statement (Europe only). . . . . . . . . . . . . . . . . . . . . . . . . . . 68
United Kingdom Telecommunications Act 1984. . . . . . . . . . . . . . . . . . . . . . . . . . . . . . . . . . 69
Herstellerbescheinigung . . . . . . . . . . . . . . . . . . . . . . . . . . . . . . . . . . . . . . . . . . . . . . . . . . . . . 70
English translation of German sound emission directive. . . . . . . . . . . . . . . . . . . . . . . . . . . . 70
Turvallisuusyhteenveto. . . . . . . . . . . . . . . . . . . . . . . . . . . . . . . . . . . . . . . . . . . . . . . . . . . . . . 70
4 HP StorageWorks 1000ux/1900ux/2300ux Optical Jukebox User’s Guide
Page 5

Contents
Laserturvallisuus . . . . . . . . . . . . . . . . . . . . . . . . . . . . . . . . . . . . . . . . . . . . . . . . . . . . . . . 70
Huolto. . . . . . . . . . . . . . . . . . . . . . . . . . . . . . . . . . . . . . . . . . . . . . . . . . . . . . . . . . . . . . . . 71
English translation of Finland regulatory information . . . . . . . . . . . . . . . . . . . . . . . . . . . . . . 71
BSMI notice . . . . . . . . . . . . . . . . . . . . . . . . . . . . . . . . . . . . . . . . . . . . . . . . . . . . . . . . . . . . . . 74
Japanese Notice . . . . . . . . . . . . . . . . . . . . . . . . . . . . . . . . . . . . . . . . . . . . . . . . . . . . . . . . . . . 75
Laser Device. . . . . . . . . . . . . . . . . . . . . . . . . . . . . . . . . . . . . . . . . . . . . . . . . . . . . . . . . . . . . . 75
Laser Safety Warnings. . . . . . . . . . . . . . . . . . . . . . . . . . . . . . . . . . . . . . . . . . . . . . . . . . . 75
CDRH regulations (USA only). . . . . . . . . . . . . . . . . . . . . . . . . . . . . . . . . . . . . . . . . . . . . . . . 76
Compliance with International Regulations. . . . . . . . . . . . . . . . . . . . . . . . . . . . . . . . . . . 76
Glossary. . . . . . . . . . . . . . . . . . . . . . . . . . . . . . . . . . . . . . . . . . . . . . . . . . . . . . . . .77
Index . . . . . . . . . . . . . . . . . . . . . . . . . . . . . . . . . . . . . . . . . . . . . . . . . . . . . . . . . . .79
5HP StorageWorks 1000ux/1900ux/2300ux Optical Jukebox User’s Guide
Page 6

Contents
6 HP StorageWorks 1000ux/1900ux/2300ux Optical Jukebox User’s Guide
Page 7

About This
Guide
This user guide provides information to help you:
■ Operate the jukebox
■ Troubleshoot the jukebox
“About This Guide” topics include:
■ Related documentation, page 8
■ Conventions, page 8
■ Getting help, page 10
About this Guide
About this Guide
7HP StorageWorks 1000ux/1900ux/2300ux Optical Jukebox User’s Guide
Page 8

About this Guide
Related documentation
In addition to this guide, HP provides corresponding information:
■
HP StorageWorks Optical 1000ux/1900ux/2300ux Jukebox Setup Guide
■
HP StorageWorks Optical 1000ux/1900ux/2300ux Jukebox Getting Started
Poster
Conventions
Conventions consist of the following:
■ Document convention s
■ Text symbols
Document conventions
This document follows the conventions in Table 1.
Table 1: Document conventions
Element Convention
Cross-reference links
Key and field names, menu items, buttons, and
dialogue box titles
File names, application names, and text
emphasis
User input, commands and directory names,
and system responses (output and messages)
Variables
Web site addresses Blue underlined sans serif font text
Blue text:
Bold
Italics
Monospace font
COMMAND NAMES
font unless they are case sensitive
<monospace, italic font>
(
http://www.hp.com
Figure 1
are uppercase monospace
)
8 HP StorageWorks 1000ux/1900ux/2300ux Optical Jukebox User’s Guide
Page 9
Text symbols
About this Guide
The following symbols may be found in the text of this guide. They have the
following meanings:
WARNING: Text set off in this manner indicates that failure to follow
directions in the warning could result in bodily harm or death.
AVERTISEMENT : le non-respect de ces instructions expose l'utilisateur
à des risques potentiellement très graves.
AVVERTENZA: La mancata osservanza delle indicazioni fornite in un
messaggio così evidenziato, può provocare lesioni personali o mettere
in pericolo la vita dell'utente.
VORSICHT: In dieser Form hervorgehobener Text weist darauf hin, dass die
Nichtbeachtung der Anleitungen zu Verletzungen oder zum Tod führen kann.
ADVERTENCIA: el texto con esta marca indica que si no se siguen las
instrucciones, pueden producirse lesiones corporales o incluso la muerte.
HP StorageWorks 1000ux/1900ux/2300ux Optical Jukebox User’s Guide
9
Page 10

About this Guide
Caution: Text set off in this manner indicates that failure to follow directions
could result in damage to equipment or data.
Note: Text set off in this manner presents commentary, sidelights, or interesting points
of information.
Getting help
If you still have a question after reading this guide, contact an HP authorized
service provider or access our web site:
HP technical support
Telephone numbers for worldwide technical support are listed on the following
HP web site:
http://www.hp.com
http://www.hp.com/support/
.
.
Note: For continuous quality improvement, calls may be recorded or monitored.
Be sure to have the following information available before calling:
■ Technical support registration or contract number (if applicable)
■ Product serial numbers
■ Product model names and numbers
■ Applicable error messages
■ Operating system type and revision level
■ Detailed, specific questions
■ HP StorageWorks Library and Tape Tools (L&TT) Support Ticket (if
applicable)
10 HP StorageWorks 1000ux/1900ux/2300ux Optical Jukebox User’s Guide
Page 11

HP storage web site
The HP web site has the latest information on this product. Access storage at:
http://www.hp.com/country/us/eng/p rodserv/storage.html
select the appropriate product or solution. You can also visit
http://www.hp.com/go/udo
HP authorized reseller
For the name of your nearest HP authorized reseller:
■ In the United States, call 1-800-345-1518
■ In Canada, call 1-800-263-5868
■ Elsewhere, see the HP web site for locations and telephone numbers:
http://www.hp.com
About this Guide
. From this web site,
.
.
HP StorageWorks 1000ux/1900ux/2300ux Optical Jukebox User’s Guide
11
Page 12

About this Guide
12 HP StorageWorks 1000ux/1900ux/2300ux Optical Jukebox User’s Guide
Page 13

Operations
This chapter describes the following:
■ Identifying panel features, page 14
■ Using Ultra Density Optical (UDO) disks, page 18
■ Using mixed media, page 24
■ Using application software, page 26
1
13HP StorageWorks 1000ux/1900ux/2300ux Optical Jukebox User’s Guide
Page 14
Operations
Identifying panel features
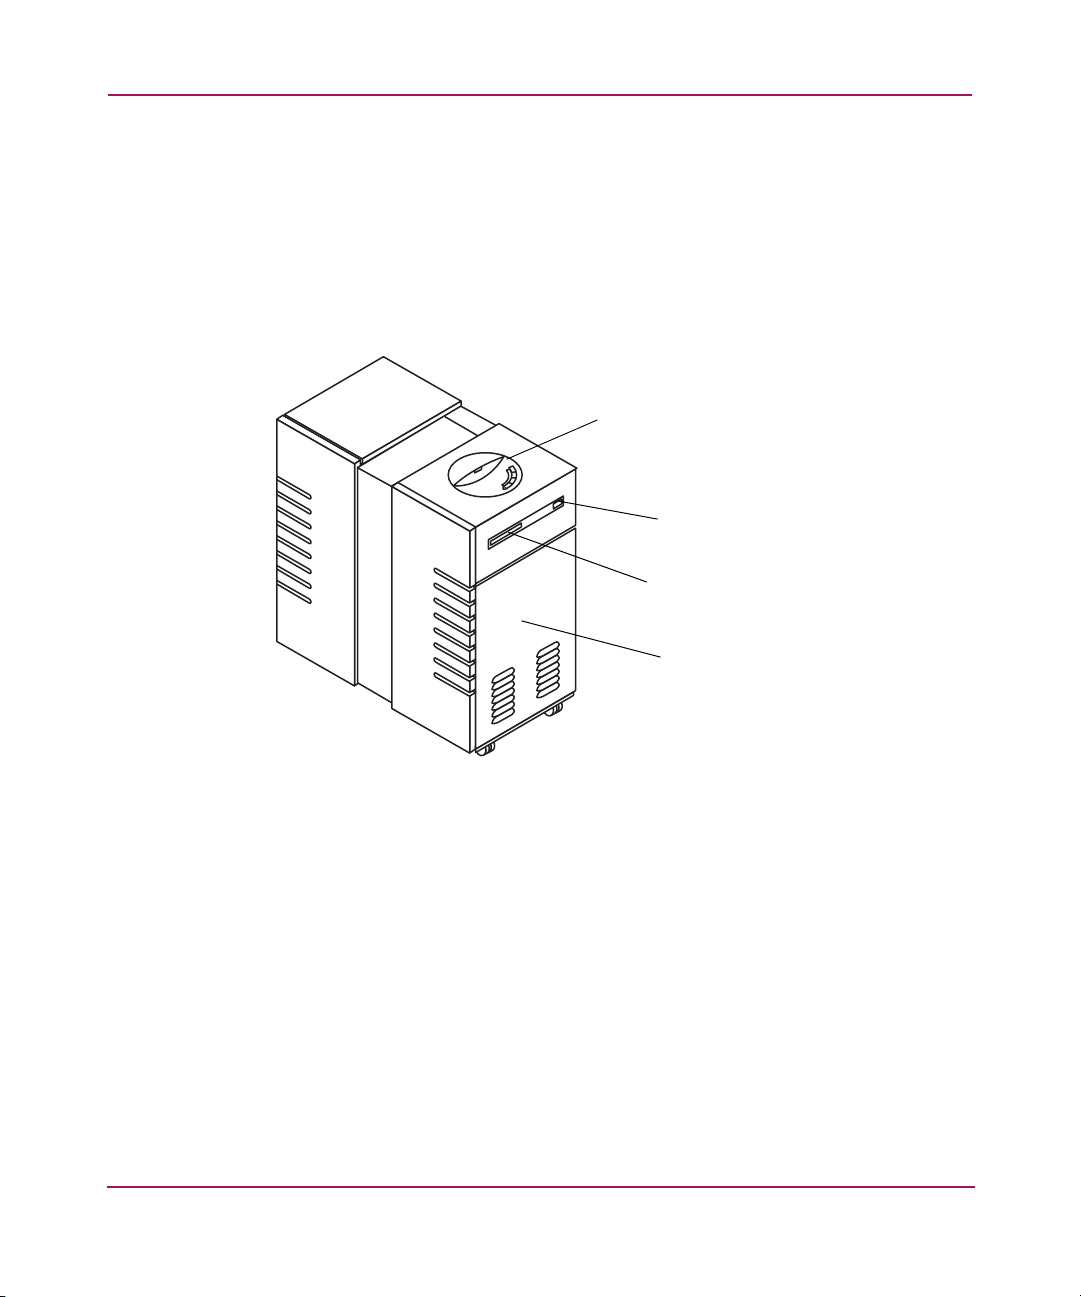
Identify the following panel features before you install the jukebox (see Figure 1
and Figure 2 on page 15).
Front panel features and descriptions
1
2
3
4
1 Control panel
2 Power switch
3 Mailslot
4 Front service access panel
Figure 1: Front panel features
■ Control panel—Used to manually control and monitor operation of the
jukebox. See the user’s guide for information on using the control panel.
■ Power switch—Turns power to the jukebox on and off. Located under the
panel through an access hole.
■ Mailslot—Used to insert and remove disks from the jukebox.
■ Front service access panel—A panel for service access that should only be
removed by qualified personnel.
14 HP StorageWorks 1000ux/1900ux/2300ux Optical Jukebox User’s Guide
Page 15
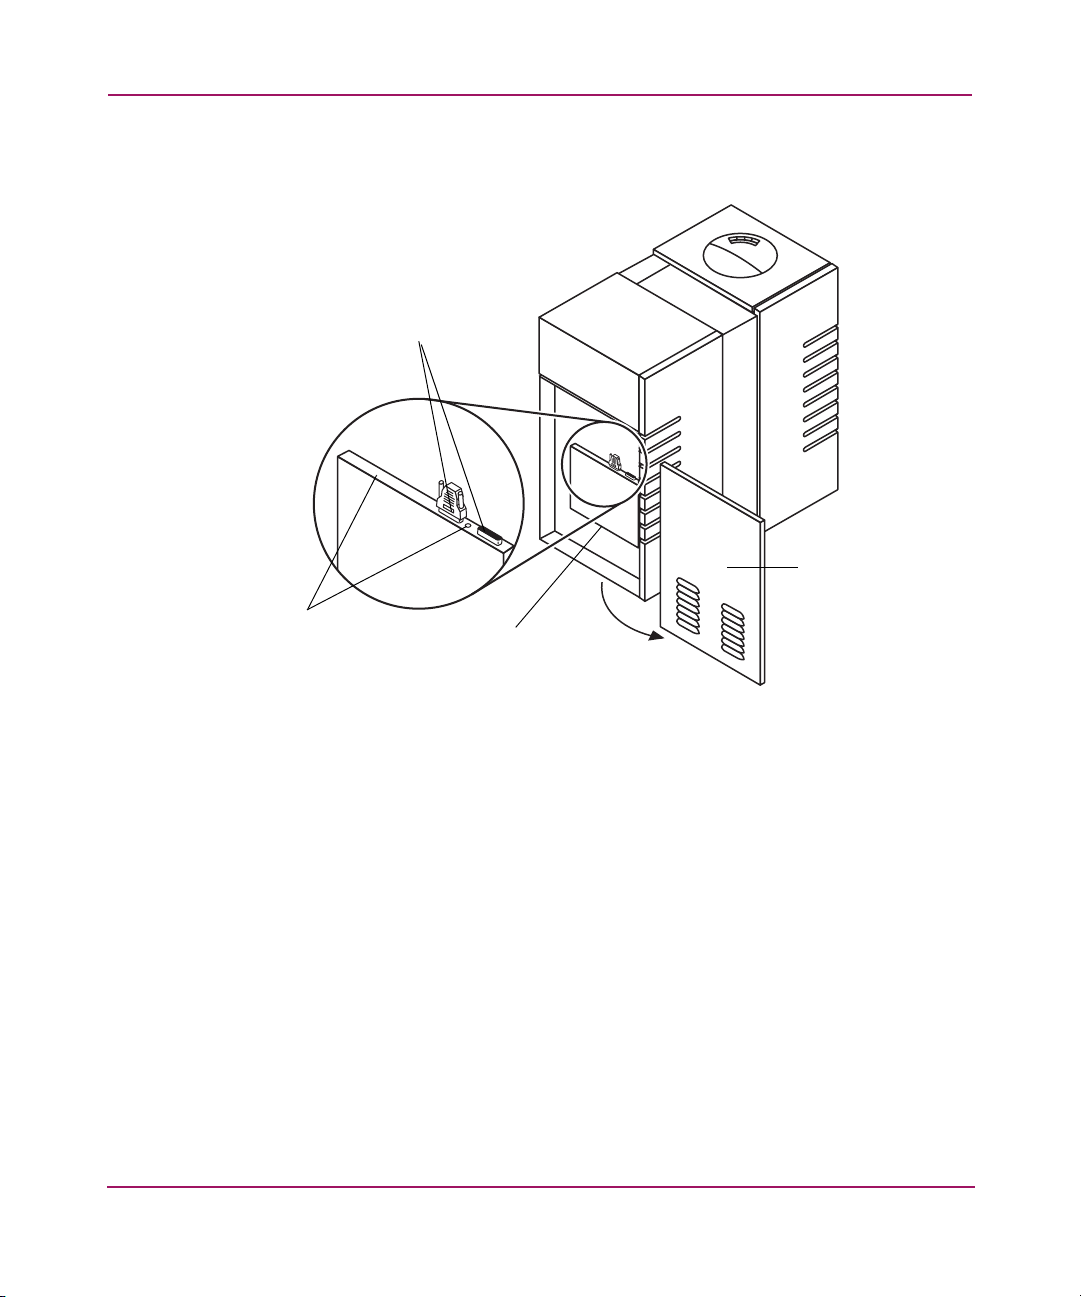
Back panel features and descriptions
2
Operations
4
1
1 Active bus indicator
2 SCSI ports
3
3 Power receptacle
4 Back access panel
Figure 2: Back panel features
■ Active bus indicator—Lit when the SCSI bus is acti ve.
■ SCSI ports—68-pin high-density SCSI connectors (Micro D-type). Used for
attaching the SCSI cable from the jukebox to the host computer. One port
must have a SCSI cable connected, and the other must have a SCSI terminator
connected to it.
■ Power receptacle—Used for connecting the power cord to the jukebox.
Located on the bottom of the power distribution assembly.
■ Back access panel—Covers the interface aseembly (1, 2 and 3 in Figure 2).
This panel is removed by pushing up on the panel (from the bottom) and then
pulling the panel out and away from the jukebox.
15HP StorageWorks 1000ux/1900ux/2300ux Optical Jukebox User’s Guide
Page 16

Operations
WARNING: TThis product can only be used with an HP approved power cord
for your specific geographic region. Use of a non-HP approved power cord
may result in: 1) noncompliance with individual, country-specific safety
requirements; 2) insufficient conductor ampacity that could result in
overheating with potential personal injury and/or property damage; and 3) a
fractured power cord, which could cause the internal contacts to be exposed,
which potentially could subject the user to a shock hazard. HP disclaims all
liability when HP-approved power cords are not used.
AVERTISEMENT : ce produit ne peut être utilisé qu'avec un cordon
d'alimentation approuvé par HP pour votre zone géographique. L'utilisation
d'un cordon d'alimentation non approuvé par HP vous expose à ce qui suit :
1) non-conformité aux spécifications de sécurité du pays concerné ;
2) intensité admissible du conducteur insuffisante pouvant provoquer une
surchauffe créant un risque de blessure ou d'endommagement du produit ;
et 3) rupture de cordon pouvant exposer les contacts internes et créer
un risque d'électrocution pour l'utilisateur. HP décline toute responsabilité
en cas d'utilisation d'un cordon d'alimentation non approuvé.
AVVERTENZA: È possibile utilizzare questo prodotto solo con un cavo di
alimentazione approvato da HP specifico per il paese di utilizzo. L'utilizzo di
cavi di alimentazione non approvati da HP può produrre: 1) non conformità
ai requisiti di sicurezza specifici del paese di utilizzo; 2) amperaggio del
conduttore insufficiente con conseguente surriscaldamento e potenziale rischio
di lesioni a persone e/o cose; 3) rottura del cavo di alimentazione con
conseguente esposizione dei contatti interni e potenziale rischio di scosse
elettriche per l'utente. HP declina qualsiasi responsabilità in caso di utilizzo
di cavi di alimentazione non approvati da HP.
16 HP StorageWorks 1000ux/1900ux/2300ux Optical Jukebox User’s Guide
Page 17
Operations
VORSICHT: Dieses Produkt darf ausschließlich mit einem von HP für die
Verwendung in Ihrem Land zugelassenen Netzkabel verwendet werden.
Die Verwendung eines nicht von HP zugelassenen Netzkabels kann
folgende Konsequenzen haben: 1) Nichteinhaltung spezifischer, nationaler
Sicherheitsbestimmungen; 2) Überschreiten der Strombelastbarkeit des
Netzkabels, was zu einer Überhitzung und in der Folge zu Verletzungen
und/oder Sachschäden führen kann; 3) Stromschlaggefahr durch offen
liegende Adern bei Kabelbruch. Für den Fall, dass nicht von HP zugelassene
Netzkabel verwendet werden, übernimmt HP keinerlei Haftung.
ADVERTENCIA: este producto sólo puede utilizarse con un cable de
alimentación aprobado por HP para su región geográfica específica.
El uso de un cable de alimentación no aprobado por HP puede provocar
lo siguiente: 1) el incumplimiento de requisitos de seguridad individuales
y específicos del país; 2) insuficiente corriente permanente admisible de
conductor que puede provocar un sobrecalentamiento y posibles lesiones
personales o daños a la propiedad; y 3) un cable de alimentación puede
romperse y exponer los contactos internos, lo que supone un peligro potencial
de descarga eléctrica para el usuario. HP renuncia a toda responsabilidad en
caso de utilizarse cables de alimentación no aprobados por HP.
17HP StorageWorks 1000ux/1900ux/2300ux Optical Jukebox User’s Guide
Page 18

Operations
Using Ultra Density Optical (UDO) disks
UDO media is an integral part of the storage process. This section describes the
following:
■ Choosing a disk type, page 18
■ Labeling a disk cartridge, page 19
■ Write-protecting an UDO disk, page 20
■ Maintaining UDO media, page 22
Note: For UDO media specifications, see “Media specifications” on page 63.
Choosing a disk type
Two disk types can be used in the jukebox.
Table 2: UDO disk types
Disk Type Description HP Part Number
Rewritable Designed for virtually
Write once, ready many
times (WORM)
unlimited read and write
cycles
Designed for permanent
storage of data that cannot
be altered or erased
Q2031A
Q2030A
T o order HP UDO media, contact your local HP Author ized Reseller or buy online
from
http://www.hp.com/go/storagemedia
18 HP StorageWorks 1000ux/1900ux/2300ux Optical Jukebox User’s Guide
.
Page 19
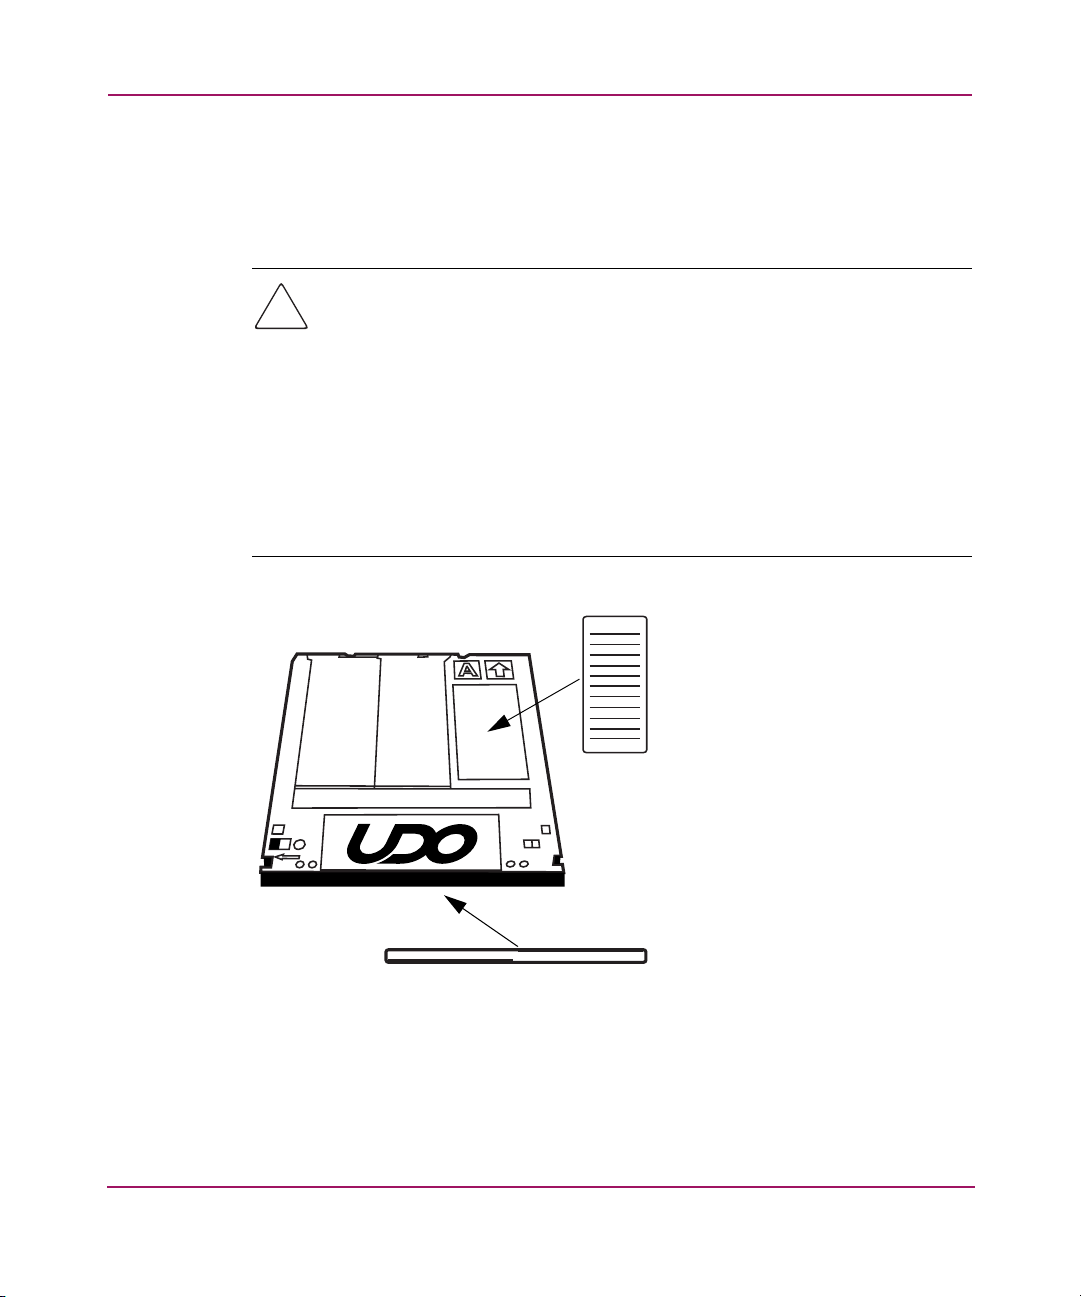
Labeling a disk cartridge
Make it a practice to label your UDO disk cartridges. Adhesive labels come with
each UDO disk for this purpose (see Figure 3).
Caution: In order to avoid damaging the drives and media:
Only apply labels to the areas designated in Figure 3. Never place labels over
the disk cartridge shutter or open the shutter for any reason.
Make sure the media is free of moisture and that all label corners are securely
fastened to the media shell.
Do not use disks with loosely attached labels.
Do not use disks with multiple labels applied. Always remove old labels before
applying new ones.
Operations
A
A
Figure 3: Labeling an UDO disk
B
19HP StorageWorks 1000ux/1900ux/2300ux Optical Jukebox User’s Guide
Page 20
Operations
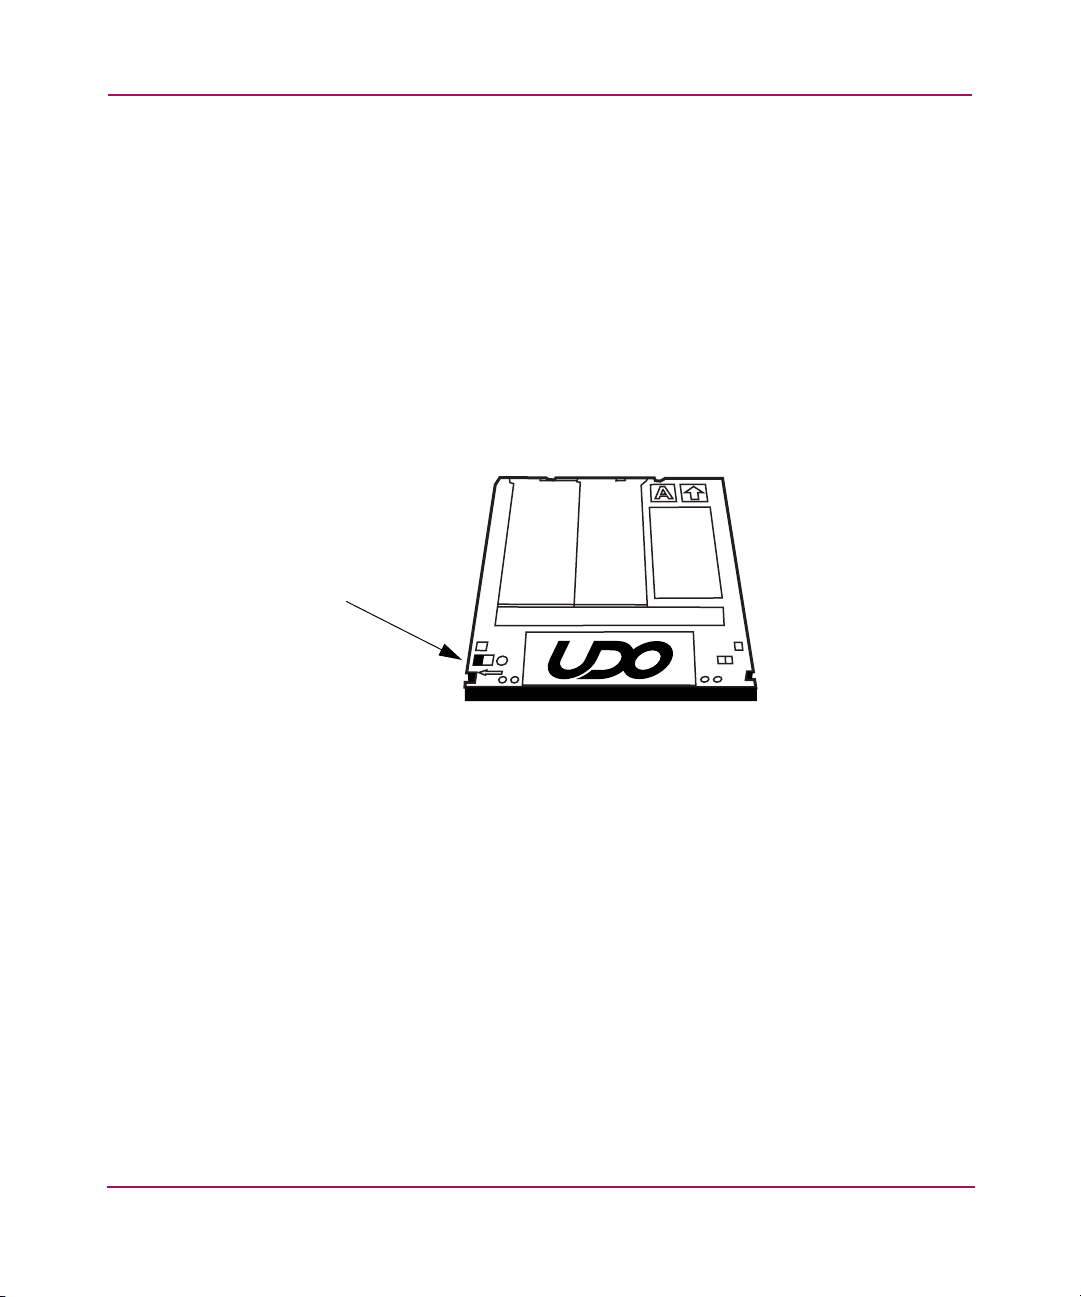
Write-protecting an UDO disk
Each side of an UDO disk can be write-protected.
With rewritable disks, this prev ents existing f iles from being altered or erased, and
new files from being written to the disk.
With WORM disks, existing files cannot be altered or erased regardless of whether
or not the disks have been write-protected. However, write-protecting a WORM
disk prevents additional files from being written to the disk.
To write-protect an UDO disk, slide the red write-protect switch to the left, as
indicated by the arrow on the cartridge (see Figure 4).
Write-protect switch
Figure 4: Write-protecting an UDO disk
20 HP StorageWorks 1000ux/1900ux/2300ux Optical Jukebox User’s Guide
Page 21
Loading a disk into the drive
Note: Label all disks before loading them into the jukebox. Some application software
packages require that you load and eject disks by using instructions in the software. If
you use a software application to manage files in the jukebox, check the software
documentation before proceeding with these steps.
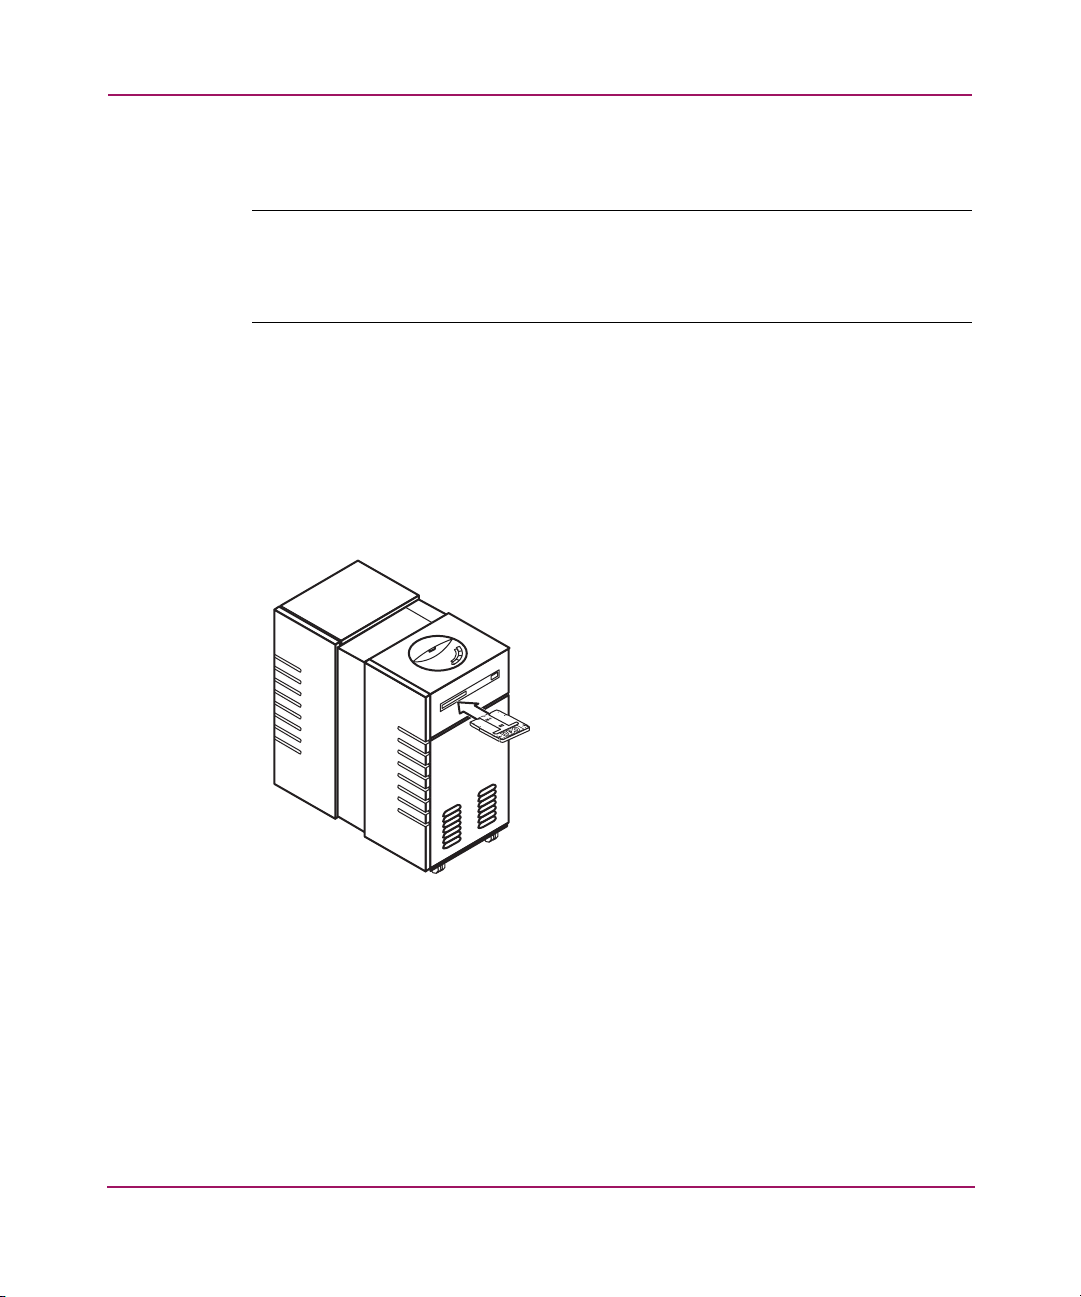
1. Start with READY, or LOAD *displaying on the control panel.
2. Load UDO media into the drive by inserting the disk gently but f irmly into the
mailslot, shutter end first, and with the side you want to access f acing up (A or
B). See Figure 5.
An incorrectly inserted disk will be rejected with CART IN WRONG
displaying briefly.
Operations
Figure 5: Loading media
3. LOAD SLOT # will display, with # flashing to indicate the number of the
first available storage slot in the jukebox. To select this storage slot number,
press LOAD or ENTER. To choose a different storage slot, press NEXT or
PREV until the desired slot number displays, and then press ENTER.
4. LOADING displays as the jukebox moves the disk to a slot. After the disk is
loaded into the storage slot, LOAD * displays. You can now load additional
disks by inserting them into the mailslot and repeating step 3 until you are
finished loading disks.
21HP StorageWorks 1000ux/1900ux/2300ux Optical Jukebox User’s Guide
Page 22

Operations
5. Press CANCEL to return to the READY state.
Maintaining UDO media
Follow these guidelines to ensure that your UDO disks remain in good condition.
■ Do not open the disk’s shutter and touch the disk surface.
■ Do not store the disk in a dusty location.
■ Do not store the disk in temperatures outside of 5ºC to 55ºC (41ºF to 122ºF).
■ Do not disassemble the disk.
22 HP StorageWorks 1000ux/1900ux/2300ux Optical Jukebox User’s Guide
Page 23
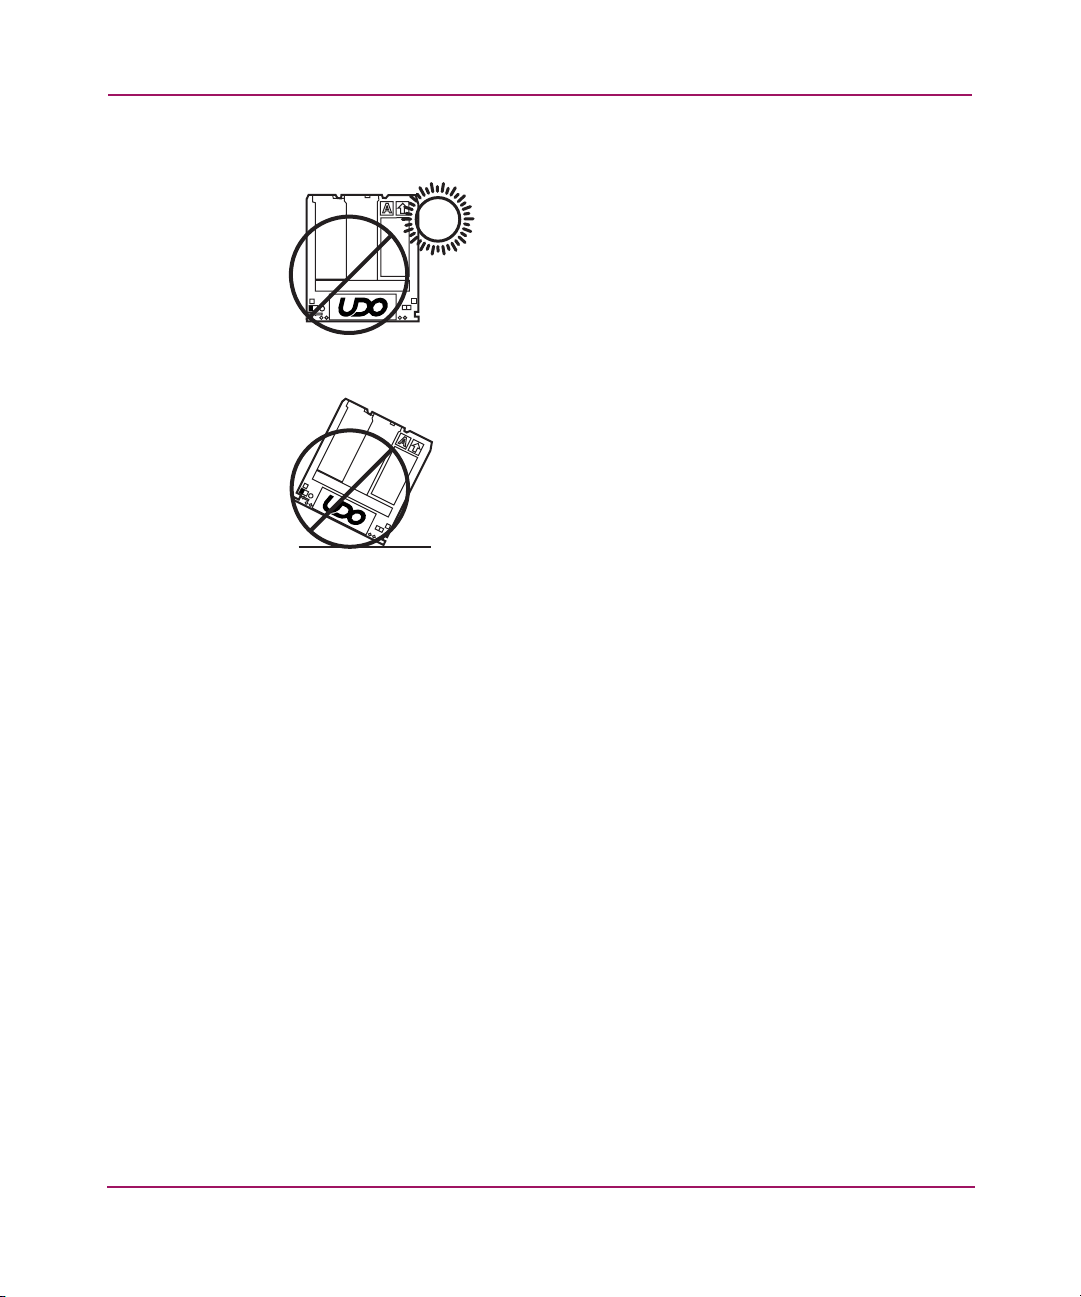
■ Do not expose the disk to direct sunlight.
■ Do not drop the disk.
Operations
23HP StorageWorks 1000ux/1900ux/2300ux Optical Jukebox User’s Guide
Page 24

Operations
Using mixed media
Mixed media refers to the option to backup to more than one drive type, such as
MO and UDO, within the same physical jukebox.
General considerations when using mixed media are as follows:
■ Some independent software vendor application packages do not support
mixed media. Consult your software pro vider to verify that your conf iguration
is supported.
■ The proper version of HP StorageWorks Library and Tape Tools (L&TT) is
required for diagnostic support. Please see the online quick specs of HP
L&TT for the most up to date information. They can be found at the following
web address.
http://www.hp.com/support/lttcompatibility
■ When loading media into a mixed media unit, the media will first be moved to
a media test station, where its drive compatibility can be determined, then it
will be moved to its final destination. This drive compatibility information is
reported over SCSI to the application software to identify which disks are
compatible with the installed drives.
■ In the TEST* control panel menu, an additional test called MEDIA TEST is
available that will move all of the disks in the unit (except those in drives) to
the media test station, then back to their original locations. This test can take
about 15 minutes in a fully loaded unit. This test can be used to establish the
drive compatibility of all of the disks in the unit if this information is thought
to be incorrect. This should only be necessary if disks have been moved
around by hand (during service, for example). During normal operation the
jukebox will automatically keep track of this information.
■ When a disk inventory occurs (by selecting the INIT ELEM STATUS front
panel command, or through a SCSI command) any disks that are found in the
unit that have an unkno wn type will be mo v ed into the media test station, then
back to their original location to determine their drive compatibility. Again,
this should only occur if disks are inserted by hand (during service) rather
than through the mailslot. When firmware is downloaded into the jukebox
controller, an initial inventory will occur automatically, and all of the disks
will be checked for their drive compatibility type.
24 HP StorageWorks 1000ux/1900ux/2300ux Optical Jukebox User’s Guide
Page 25

Operations
■ Some of the front panel tests will work differently and have different initial
requirements in a mixed media unit. For example, the DRIVE IO test will
require disks of both types in the unit and will only be able to load disks into
drives of the same type.
■ MO drives can only accept a SCSI address from 0 to 7.
25HP StorageWorks 1000ux/1900ux/2300ux Optical Jukebox User’s Guide
Page 26

Operations
Using application software
Note: While HP-UX does provide native file system support for UDO media, this
support is only for rewritable UDO media. Refer to the “Configuration” chapter in the
HP StorageWorks 1000ux/1900ux/2300ux Jukebox Setup Guide
this product for more information.
The HP StorageWorks 1000ux/1900ux/2300ux Jukebox supports a variety of
off-the-shelf software packages to manage your storage operations. For the latest
information on which application software packages are compatible with this
product, visit
http://www.hp.com/go/udo
that shipped with
.
26 HP StorageWorks 1000ux/1900ux/2300ux Optical Jukebox User’s Guide
Page 27

Navigation
This chapter describes the following:
■ Control panel features and descriptions, page 28
■ Jukebox menu tree, page 30
■ Control panel operations, page 33
2
27HP StorageWorks 1000ux/1900ux/2300ux Optical Jukebox User’s Guide
Page 28

Navigation
Control panel features and descriptions
The control panel enables manual control of all jukebox operations using four
buttons and an LED display. The SCSI IDs of the jukebox and its optical drives
can be set and changed, disks may be loaded and ejected, configurations can be
monitored and changed, performance information can be viewed, internal tests
can be run, and the jukebox can be secured from unauthorized use. See Figure 6
2
3
1
1 Swivel feature 2 Activity light
3 16-character display 4 Selection buttons
Figure 6: Control panel features
■ Swivel feature—The control panel assembly can be rotated either right or left.
■ Activity light—Lights up differently to indicate status:
4
— Steady green—Power is on.
— Flashing green—A drive is being accessed.
— Amber—A fault occurred.
■ 16-character display—Shows information about the current operation.
28 HP StorageWorks 1000ux/1900ux/2300ux Optical Jukebox User’s Guide
Page 29

■ Selection buttons—Press to perform the operations:
— CANCEL cancels the current operation or menu selection.
— PREV scrolls the display choice backwards by one.
— NEXT scrolls the display choice forward by one.
— ENTER selects the displayed choice.
Using selection buttons
Use the CANCEL, PREV, NEXT, and ENTER buttons to select tasks you want
the jukebox to perform. Each time you push the NEXT or PREV button, a task
choice appears. An “*” indicates that there is a menu beneath that choice, which
you can access by pressing the ENTER button.
Tip: To scroll through the menu options more quickly, push and hold the NEXT or PREV
button.
You can return to READY at an y time b y pressing CANCEL. In some cases, you
may need to press CANCEL more than once.
Navigation
29HP StorageWorks 1000ux/1900ux/2300ux Optical Jukebox User’s Guide
Page 30

Navigation
Jukebox menu tree
Figure 7 provides an overview of the jukebox menu tree.
READY
TEST*
PREV/NEXT PREV/NEXT PREV/NEXT
ADMIN*
ENTER
PSWD 000 000 000
ENTER
PREV/NEXT
LOAD* EJECT*
LOAD SLOT # EJECT SLOT #
INFO*
PREV/NEXTPREV/NEXT
ENTERENTER
(service use)
EXCHANGE DEMO
INIT MECHANICS
INIT ELEM STATUS
MAGAZINE IO
DRIVE IO
MAILSLOT IO
VERTICAL TEST
TRANSLATE TEST
FLIP TEST
PICKER TEST
FIND PLUNGE HOME
FINF VERT HOME
FIND XLATE HOME
PREV/NEXT
VERTICAL ENCODER
EMPTY DRIVES
EMPTY PICKER
FILL PICKER
EXERCISE MECH
WELLNESS TEST
CLEAR SOFT LOG
CLEAR HARD LOG
PLUNGE FULL SPD
PLUNGE 1/2 SPD
PLUNGE 1/4 SPD
MAILSLOT SENSORS
STARWARS
BOTTOM THUMB
TOP THUMB
TRANSLATE SENSOR
REVISION
JUKEBOX*
PRODUCT #
SN ###
FWTYPE xxx
DRIVES #
SLOTS ##
JKBX ODOMETERS*
HOURS
MOVES
FLIPS
XLATES
ROTATES
DRIVE LOADS*
DRIVE #
•
DRIVE FW*
D# REV x.
•
DRIVE SN*
D# ####
•
HARD ERRORS*
HARDWARE ERR #
FRU 1-3 #
MOTION <NAME>
SOURCE#
DESTINATION 1 #
DESTINATION 2 #
ODOMETER #
MICROMOVE 1-6 #
MICRONOVE ER #
TOP/BOTTOM PICKER
NORTH/SOUTH THUMB
SOFT ERRORS*
(same logs available as
under "HARD ERRORS")
RECOVERY ERRORS*
(same logs available as
under "HARD ERRORS")
PREV/NEXT
CONFIG* SCSI IDS*
RECOVERY ON/OFF
RESTORE DEFAULTS
CLEAR ODOMETERS
DUAL PICKER ON/OFF
STARWARS ON/OFF
NEW PASSWORD
SCSI LOG ON/OFF
SECURE ON/OFF
SECURE MAIL OUT/IN
POWER SECURE
ON/OFF
REP RECOVERED
ON/OFF
CONF40 ON/OFF
JKBX ID #
DRV 1 ID #
DRV 2 ID #
.
.
.
UPDATE
Figure 7: Jukebox menu tree
30 HP StorageWorks 1000ux/1900ux/2300ux Optical Jukebox User’s Guide
Page 31

Top-level menus
The jukebox has four top-level menus.
READY Indicates that jukebox is ready for operation.
ADMIN * Provides access to second-level menu choices. A
LOAD * Used to load disks into the jukebox mailslot.
EJECT * Used to eject disks from the jukebox mailslot.
Note: An “*” indicates that there are multiple choices available for the displayed menu
item. When an item is flashing, press ENTER to select it, or PREV or NEXT to display
additional choices.
Navigation
password is needed to access these choices.
Note: A default password of “000 000 000” is set at the
factory.
Second-level menus
The jukebox has four second-level menus.
TEST * Runs internal tests.
INFO * Retrieves performance information stored in the
CONFIG * Customizes the way the jukebox functions.
SCSI IDs * Displays SCSI IDs and allows you to change them.
Note: Internal tests should primarily be run by service
personnel. Only run a test when your service representative
requests that you do.
jukebox logs.
31HP StorageWorks 1000ux/1900ux/2300ux Optical Jukebox User’s Guide
Page 32

Navigation
Note: An “*” indicates that there are multiple choices available for the displayed menu
item. When an item is flashing, press ENTER to select it, or PREV or NEXT to display
additional choices.
32 HP StorageWorks 1000ux/1900ux/2300ux Optical Jukebox User’s Guide
Page 33

Control panel operations
The following operations can be performed from the jukebox control panel:
■ Ejecting a disk, page 33
■ Entering the administration menu password, page 34
■ Changing the administration menu password, page 35
■ Viewing the current SCSI IDs, page 36
■ Configuring the jukebox, page 37
■ Setting an operating configuration, page 39
■ Retrieving log history, page 40
■ Running an internal test, page 44
Note: For information on loading a disk, see “Loading a disk into the drive” on
page 21.
Ejecting a disk
Navigation
Note: Some application software packages require that you load and eject disks by
following the instructions in the software. If you use application software to manage
files in the jukebox, check the software documentation before proceeding with these
steps.
1. With READY displaying on the control panel, press NEXT until EJECT *
displays, and then press ENTER.
2. EJECT SLOT # displays, with the “#” flashing to indicate the first storage
slot in the jukebox that contains a disk.
■ To select the storage slot number that shows in the display, press
ENTER.
■ To choose a dif ferent storage slot, press NEXT or PREV until the desired
slot number displays, and then press ENTER.
EJECTING displays as the jukebox moves the disk to the mailslot. When the
disk is in the mailslot, the display returns to EJECT SLOT #.
33HP StorageWorks 1000ux/1900ux/2300ux Optical Jukebox User’s Guide
Page 34

Navigation
3. Remove the disk from the mailslot.
You can now eject additional disks by pressing ENTER and then following
step 1 through step 3 until you are finished ejecting the disks.
Note: When the last disk is ejected, EMPTY displays briefly before returning to
EJECT *.
4. Press CANCEL to return to the READY state.
Entering the administration menu password
READY > ADMIN* > PSWD 000 000 000
A nine digit numeric password is required to access menu choices beneath the
ADMIN* menu of the jukebox. The jukebox sh ips with a f actory defa ult passw ord
setting of 000 000 000.
Note: To change the administration menu password, see “Changing the administration
menu password” on page 35.
To access administration menu options using the factory default password:
1. With READY displaying on the control panel, press NEXT until ADMIN*
displays.
2. Press ENTER. PSWD 000 000 000 displays and the first set of three zeros
flashes.
■ If the default password 000 000 000 is still in effect, you can accept this
password by pressing ENTER three times (once for each set of three
zeros). TEST* displays, indicating that the password was accepted. You
are now in the menu tree below ADMIN*.
■ If you have already changed the password from the factory setting, then
continue with the following steps.
3. Press NEXT or PREV until the first number of your password displays and
then press ENTER. The middle set of three zeros flashes.
4. Press NEXT or PREV until the second number of your password displays
and then press ENTER. The third set of three zeros flashes.
34 HP StorageWorks 1000ux/1900ux/2300ux Optical Jukebox User’s Guide
Page 35

5. Press NEXT or PREV until the third number of your password displays and
then press ENTER. TEST * displays, indicating that the password was
accepted. You are now in the menu tree below ADMIN*.
Changing the administration menu password
READY > ADMIN* > PSWD 000 000 000 >CONFIG*
To protect the system from unauthorized access, change the password from the
factory default setting:
1. With READY displaying on the control panel, press NEXT until ADMIN*
displays, then press ENTER and enter the password.
2. TEST * displays, indicating that the password was accepted. Press NEXT
until CONFIG * displays and then press ENTER.
3. Press NEXT or PREV or until NEW PASSWORD displays and then press
ENTER.
4. NEW 000 000 000 displays and the first set of three zeros flashes. Press
NEXT or PREV until the new number you want to assign to the first part of
the password displays and then press ENTER. The second set of three zeros
flashes.
5. Press NEXT or PREV until the new number you w ant to assign to the second
part of the password displays and then press ENTER. The third set of three
zeros flashes.
6. Press NEXT or PREV until the new number you want to assign to the third
part of the password displays and then press ENTER.
Navigation
7. PASSWORD CHANGED displays. Press CANCEL three times to return to
READY.
8. Power off the jukebox, then power it back on to save the password to the
jukebox flash ROM.
Note: Be sure to document your new password. If you forget it, contact your service
representative to reset the security code to the factory default.
35HP StorageWorks 1000ux/1900ux/2300ux Optical Jukebox User’s Guide
Page 36

Navigation
Viewing the current SCSI IDs
READY > ADMIN* > SCSI IDS > VIEW IDS >
To view current SCSI IDs:
1. With READY displaying on the control panel, press NEXT until ADMIN*
displays and then press ENTER.
2. Enter the administration password (see “Entering the administration menu
password” on page 34).
3. Press NEXT until SCSI IDS displays and then press ENTER.
4. JKBX ID yy or DRIVE xx ID yy is displayed. Press NEXT or PREV to
scroll through the current SCSI IDs.
5. Press CANCEL to exit.
Default SCSI IDs
Table 3 lists the default SCSI IDs for the jukebox and drives
.
Table 3: Default SCSI IDs
Bus 1 ID
Jukebox 6
Drive 1 5
Drive 2 4
Drive 3 3
Drive 4 2
36 HP StorageWorks 1000ux/1900ux/2300ux Optical Jukebox User’s Guide
Page 37

Changing the current SCSI IDs
READY > ADMIN* > SCSI IDS >
To change the SCSI IDs:
1. Follow the instruction in “Viewing the current SCSI IDs” on page 36 until the
list of SCSI IDs is displayed.
2. Press NEXT until the setting you want to change displays, and then press
ENTER. The ID begins flashing.
3. Press NEXT or PREV until the new ID that you want displays and then press
ENTER.
4. Repeat step 2 and step 3 until you have changed all the IDs that need to be
updated.
5. Press NEXT until UPDATE displays, and then press ENTER.
6. UPDATE or WAIT FOR UPDATE and then IDS SAVED displays briefly.
— If the new settings do not conflict with other SCSI IDs on the bus, SCSI
IDS displays.
— If the new settings conflict with other IDs on the SCSI bus,
CONFLICT-ABORTED displays briefly and then VIEW IDS displays.
Any changes entered are lost, and you must repeat the above steps to set a
new ID.
7. Press CANCEL until READY displays.
Navigation
8. Power off the jukebox and then power it back on to save the IDs to the
jukebox flash ROM.
Configuring the jukebox
You can set configurations to customize the way the jukebox operates. Table 5
lists the jukebox configuration options.
37HP StorageWorks 1000ux/1900ux/2300ux Optical Jukebox User’s Guide
Page 38

Navigation
Table 5: Configuration options
Configuration Name Description Default
RECOVERY ON/OFF Toggles between ON and OFF. If the configuration is set
RECOVERY ON
to ON, the jukebox attempts to recover from errors; if the
configuration is set to OFF, the jukebox immediately
stops moving if an error condition occurs. The default
configuration is RECOVERY ON, and recovery should
remain ON under normal conditions.
RESTORE DEFAULTS Sets all jukebox configurations to default settings. NA
CLEAR ODOMETERS Sets all jukebox odometers to zero.
NA
Note: Used by service personnel only.
DUAL PICKER
ON/OFF
Toggles between ON and OFF. (The default setting is
DUAL PICKER ON, and dual picker mode should
remain ON under normal conditions.) If the
configuration is set to ON, the jukebox runs with dual
picker (disk transport) addressing ON; if the
configuration is set to OFF, the jukebox runs with dual
picker (disk transport) addressing OFF.
STARWARS ON/OFF Should be set to ON during normal operation. Toggles
between ON and OFF. The ON configuration enables
the vertical sensors; the OFF configuration disables the
vertical sensors.
Note: Used by service personnel only.
NEW PASSWORD Allows you to change the numerical password required
to access the menu choices under the ADMIN* menu on
the jukebox control panel.
SCSI LOG ON/OFF Should be set to OFF during normal operation. Toggles
between ON and OFF. Tracks internal SCSI states and
saves the information to a log.
Note: Used by service personnel only.
SECURE MS ON/OFF Toggles between ON and OFF. The ON configuration
disables
configuration
loading and ejecting disks. The OFF
enables
loading and ejecting disks.
DUAL PICKER
ON
STARWARS ON
000-000-000
SCSI LOG
OFF
SECURE MS
OFF
38 HP StorageWorks 1000ux/1900ux/2300ux Optical Jukebox User’s Guide
Page 39

Configuration Name Description Default
SECURE MAIL
OUT/IN
POWER SECURE
ON/OFF
REP RECOVERED
ON/OFF
CONF40 ON/OFF
Toggles between OUT and IN. Determines the
orientation of the mailslot when the SECURE
configuration is set to IN. When set to OUT, the mailslot
remains in its normal orientation. When set to IN, the
mailslot rotates in, making it inaccessible.
Toggles between ON and OFF. The ON configuration
retains your selection of the SECURE MS configuration
through power cycling (or power outage). The OFF
configuration allows the jukebox to return to the default
setting of this configuration after a power cycling.
Toggles between ON and OFF. When set to ON,
recovered errors are reported; when set to OFF,
recovered errors are not reported.
Caution: Changing this configuration may
result in a service call. Used by service
personnel only.
OUT
POWER
SECURE OFF
REP
RECOVERED
ON
NA
Setting an operating configuration
Navigation
READY > ADMIN* > CONFIG*
To set an operating configuration:
1. With READY displaying on the control panel, press NEXT until ADMIN*
displays.
2. Enter the administration password (see “Entering the administration menu
password” on page 34).
3. TEST* displays. Press NEXT until CONFIG* displays and then press
ENTER.
4. Press NEXT or PREV until the name of the configuration you want to set
displays and then press ENTER.
If the configuration has multiple settings, the current setting flashes. Proceed
to step 5. Otherwise, the configuration is set and a confirmation message
displays.
39HP StorageWorks 1000ux/1900ux/2300ux Optical Jukebox User’s Guide
Page 40

Navigation
5. If the current configuration setting is flashing, press NEXT or PREV until the
desired setting displays, and then press ENTER. OPTION SAVED displays
and then the configuration’s name and setting displays, indicating that the
configuration is set.
6. Press CANCEL to return to READY.
7. Power off the jukebox and then power it back on to save the configuration to
the jukebox flash ROM.
Retrieving log history
READY > ADMIN* > INFO*
To display information stored in the jukebox operating logs:
1. With READY displaying on the control panel, press NEXT until ADMIN*
displays.
2. Enter the administration password (see “Entering the administration menu
password” on page 34).
3. TEST* displays. Press NEXT until INFO* displays, and then press ENTER.
4. Press NEXT until the name of the log you want to access displays and then
press ENTER.
5. After you are finished viewing log information, press CANCEL to return to
READY.
40 HP StorageWorks 1000ux/1900ux/2300ux Optical Jukebox User’s Guide
Page 41

Information logs are described in Table 6.
Table 6: Information logs
Log name Description
REVISION
JUKEBOX*
■ PRODUCT #
■ SN #
■ FW TYPE ##
■ DRIVES #
■ SLOTS #
JKBX ODOMETERS*
■ HOURS
■ MOVES
■ FLIPS
■ XLATES
■ ROTATES
DRIVE LOADS*
■ DRIVE #
■ DRIVE FW*
■ DRIVE SN* Press ENTER to select the logs under this
Jukebox firmware version number.
Pressing ENTER allows you to select from the
following:
Product identification string
Serial number of the unit.
For factory use only.
Code that identifies the type
of firmware used in the unit.
Number of drives in the unit.
Number of storage slots in the unit.
Pressing ENTER allows you to select from the
following:
Number of operation hours (time the power was
on). Some of the time may be while in power
reduction mode.
Total moves and move attempts by the disk
transport mechanism.
Total disk transport mechanism flips.
Total disk transport mechanism horizontal
moves.
Total mailslot rotations.
Pressing ENTER allows you to select from the
following:
Total disk loads for the drive numbered “#.”
Press ENTER to select the logs under this
selection.
selection.
Navigation
41HP StorageWorks 1000ux/1900ux/2300ux Optical Jukebox User’s Guide
Page 42

Navigation
Table 6: Information logs (Continued)
Log name Description
HARD ERROR*
SOFT ERROR*
RECOVERY ERROR*
*
■
HARDWARE ERR #
Log of unrecoverable errors (commands that did
not successfully complete). Returns either NO
HARD ENTRIES or ENTRY #. (There may be
multiple hard error numbers.)
Press ENTER to view the log for the currently
displayed error, or press NEXT to select the next
error.
Log of recovered errors (commands that did not
complete successfully). Returns either NO SO FT
ENTRIES or ENTRY #. (There may be multiple
soft error numbers.)
Press ENTER to view the log for the currently
displayed error, or press NEXT to select the next
error.
Log of errors during the most recent move.
Returns either NO ENTRIES or the number of
recovery errors.
Press ENTER to view the log for the currently
displayed error, or press NEXT to select the next
error.
Internal diagnostics error number for the failure.
Note: FRUs are listed to show where to focus the troubleshooting efforts. The FRUs
are not listed to suggest that the components need replacement.
— *FRU 1 #
—*FRU 2 #
—*FRU 3 #
42 HP StorageWorks 1000ux/1900ux/2300ux Optical Jukebox User’s Guide
Field replaceable unit most likely to be at fault.
Field replaceable unit second most likely to be at
fault.
Field replaceable unit third most likely to be at
fault.
Page 43

Table 6: Information logs (Continued)
Log name Description
— MOTION
<name>
— SOURCE #
— DESTINATION
1 #
— DESTINATION
2 #
— ODOMETER #
—*MICROMOVE 1
#
—*MICROMOVE 2
#
—*MICROMOVE 3
#
— *MICROMOVE 4
#
—*MICROMOVE 5
#
Navigation
<name> indicates one of the following types of
movements taking place in the jukebox at the
time of the failure:
■ EXCHANGE
■ MOVE
■ POSITION
■ INIT ELEM
■ REZERO
■ ROTATE
■ DIAGNOSTIC
■ RESTORE
SCSI element number to which the source refers.
(This information is valid for MOVE, EXCHANGE,
and POSITION movements only.)
SCSI element to which the first destination refers.
(This information is valid for MOVE and
EXCHANGE movements only.)
SCSI element to which the second destination
refers. (This information is valid for the
EXCHANGE movement only.)
Move number in which the error occurred.
First jukebox micro-move for the original move
command issued prior to the failure.
Second jukebox micro-move for the original
move command issued prior to the failure.
Third jukebox micro-move for the original move
command issued prior to the failure.
Fourth jukebox micro-move for the original move
command issued prior to the failure.
Fifth jukebox micro-move for the original move
command issued prior to the failure.
43HP StorageWorks 1000ux/1900ux/2300ux Optical Jukebox User’s Guide
Page 44

Navigation
Table 6: Information logs (Continued)
Log name Description
*
—
#
■ *MICROMOVE ER #
■ TOP or BOTTOM
PICKER
■ NORTH or SOUTH
THUMB
Running an internal test
READY > ADMIN* >TEST*
This section describes self-diagnostic tests that are available on the jukebox.
MICROMOVE 6
Sixth jukebox micro-move for the original move
command issued prior to the failure. (This is the
last to be logged.)
Micro-move error that occurred.
Displays either TOP or BOTTOM indicating
which side of the disk transport mechanism was
active at the time of the error.
Displays either NORTH or SOUTH indicating
which thumb on the transport mechanism was
active at the time of the error.
Caution: Diagnostic tests should be run only by an authorized service
representative. Descriptions of the self-diagnostic tests are included in this
manual
internal diagnostic tests can corrupt your file system. In some rare instances,
your service representative may request that you run specific tests to provide
information before they come to your site, or you may receive a control panel
message to run a specific test.
for information purposes only
. If not properly completed, some of the
1. With READY displaying on the control panel, press NEXT until ADMIN*
displays.
2. Enter the administration password (see “Entering the administration menu
password” on page 44).
3. TEST* displays. Press ENTER.
4. Press NEXT until the name of the test you want to run displays and then press
ENTER to start the test.
44 HP StorageWorks 1000ux/1900ux/2300ux Optical Jukebox User’s Guide
Page 45

Navigation
Note: You may press CANCEL at any time to abort a test. A delay may occur while the
current test loop completes.
Table 7: Internal tests
Test Name Description
EXCHANGE DEMO
Used by service personnel only. Do not run this test if the
jukebox contains disks with file system data on them.
This test moves randomly-chosen optical disks to random
storage slot locations. This test displays FAIL if there are no
disks in the jukebox or if all storage slots are full. For best
results, the jukebox should contain as many disks as there
are drives, plus two additional disks. The transport and
mailslot must be empty. For mixed media jukeboxes, this test
requires two disks of each media type (MO and UDO).
INIT MECHANICS Runs the F IND PLUNGE HOME , FIND VERTICAL HOME,
FIND XLATE HOME, and INIT ELEM STATUS tests.
Each test is run one time per test loop.
INIT ELEM STATUS Physically scans the entire unit to determine which storage
slots contain disks and if the drives contain disks.
This test appears as ISTAT TEST in all control panel error
messages.
MAGAZINE IO Makes a combination of moves with a PASS/FAIL result. It
moves an optical disk from a randomly-chosen full slot to a
randomly-chosen empty slot with a random flip. It then
moves the disk back to its original storage slot with its
original orientation. This test displays FAIL if there are no
disks in the jukebox or if all storage slots are full. The drives
and mailslot must be empty.
DRIVE IO Makes a combination of moves with a PASS/FAIL result. It
moves an optical disk from a randomly-chosen full slot to a
randomly-chosen drive with a random flip. It then moves the
cartridge back to its original slot with its original orientation.
This test displays FAIL if there are no disks in the jukebox or
if all storage slots are full. The drives and mailslot must be
empty. For mixed media jukeboxes, this test requires one
disk of each media type (MO and UDO).
45HP StorageWorks 1000ux/1900ux/2300ux Optical Jukebox User’s Guide
Page 46

Navigation
Table 7: Internal tests (Continued)
Test Name Description
MAILSLOT IO Makes a combination of moves with a PASS/FAIL result. It
moves an optical disk from the lowest-numbered full slot to
the mailslot with a random flip. It then moves the cartridge
back to its original slot with its original orientation. This test
displays FAIL if there are no disks in the jukebox or if all
storage slots are full. The drives and mailslot must be empty.
VERTICAL TEST Moves the disk transport mechanism up and down the full
length of the rail. Returns PASS/FAIL. No disks are
required.
TRANSLATE TEST Moves the disk transport mechanism from side to side. No
disks are required.
FLIP TEST Makes a combination of moves with a PASS/FAIL result.
Flips the disk transport mechanism at various locations. No
disks are required.
PICKER TEST Flips the disk transport mechanism and switches active
thumbs. No disks are required.
FIND PLUNGE
HOME
Calibrates the disk transport mechanism, establishes the
mechanism’s orientation, and determines the reference
points in the picker travel path. Assumes that the mechanics
and servo system are functional. No disks are required.
FIND VERT HOME Recalibrates the vertical position of the disk transport
mechanism and verifies that the vertical path is clear. No
disks are required.
FIND XLATE HOME Calibrates the reference points for the side-to-side motion of
the disk transport mechanism. No disks are required.
VERTICAL
ENCODER
Moves the disk transport mechanism down to the lower stop,
moves it back up a short distance, and then moves it back
down. On the second downward motion the number of
digital pulses is counted and verified. Returns PASS/FAIL.
No disks are required.
EMPTY DRIVES
Used by service personnel only. Do not run this test if the
jukebox contains disks with file system data on them
.
Moves disks out of the drive mechanism(s) and returns them
to their home storage slot locations if the locations are
known. If the home storage location is not known, the
jukebox moves the disks into the first available empty storage
slot.
EMPTY PICKER Moves a disk from the disk transport mechanism to its home
storage slot location if that location is known, otherwise the
disk is placed into the first available empty storage slot.
46 HP StorageWorks 1000ux/1900ux/2300ux Optical Jukebox User’s Guide
Page 47

Navigation
Table 7: Internal tests (Continued)
Test Name Description
FILL PICKER
EXERCISE MECH Runs the VERTICAL TEST, TRANSLATE TEST, FLIP
WELLNESS TEST Checks the general capability of the jukebox. Requires one
CLEAR SOFT LOG
CLEAR HARD LOG
PLUNGE FULL SPD Allows the disk transport mechanics to run at full speed. This
PLUNGE 1/2 SPD
PLUNGE 1/4 SPD
MAILSLOT
SENSORS
STARWARS The display shows 0 0 0.
Used by service personnel only. Do not run this test if the
jukebox contains disks with file system data on them
Moves a disk into the disk transport mechanism from the first
storage slot containing a disk. This test must be run twice to
fill both containers in the disk transport mechanism.
TEST, MAGAZINE IO, DRIVE IO, and MAILSLOT IO
tests. Each test runs one time per test loop.
loaded disk. The drives, transport, and mailslot must be
empty. Runs INIT MECHANICS and EXERCISE
MECHANICS. Each test runs one time per test loop.
Used by service personnel only.
zero.
Used by service personnel only.
zero.
setting should always be used in normal jukebox operation.
Used by service personnel only.
Allows the disk transport mechanics to run at half speed.
Used by service personnel only.
Allows the disk transport mechanics to run at quarter speed.
Displays the current state of the mailslot sensors. If a sensor
is not blocked, a “0” is displayed. If a sensor is blocked, an
“*” is displayed. The display automatically updates when the
status changes.
Each “0" indicates one of the paths that the disk transport
mechanism follows in front of each stack of optical disks. If
the path is clear, a “0” displays; if the path is blocked
(because of an optical disk that is not inserted fully into its
storage slot for example), an “*” will be displayed. This
display is automatically updated if the status changes.
Sets the soft error log to
Sets the hard error log to
.
47HP StorageWorks 1000ux/1900ux/2300ux Optical Jukebox User’s Guide
Page 48

Navigation
Table 7: Internal tests (Continued)
Test Name Description
BOTTOM THUMB
Used by service personnel only.
Reports THUMB A, THUMB B, or NO THUMB. Looks at the
top and bottom thumb sensors and reports whether the
thumbs on the disk transport mechanism are in the forward
or back position. If THUMB A or THUMB B is returned, the
specified thumb is the forward position. If NO THUMB is
returned, both thumbs are in the back position.
TOP THUMB
Used by service personnel only.
Reports ON or OFF. Looks at the top thumb sensor which
reports whether or not the thumb that is currently on the top
side of the disk transport mechanism is in the forward
position. If ON is reported the thumb is in the back position;
if OFF is reported the thumb is in the forward position.
TRANSLATE
SENSOR
Reports ON or OFF after looking at the translate calibration
sensor. Display automatically updates if the status changes.
MEDIA TYPE This is available only in a mixed-media (MO and UDO) unit.
Moves all of the disks in the jukebox, except those in drives,
to the media test station, then back to their original positions
to determine the drive compatibility of all of the disks.
48 HP StorageWorks 1000ux/1900ux/2300ux Optical Jukebox User’s Guide
Page 49

Troubleshooting
This chapter describes the following:
■ Troubleshooting common problems, page 50
■ Retrieving log history, page 56
■ Running an internal test, page 56
■ Using HP StorageWorks Library and Tape Tools, page 57
3
49HP StorageWorks 1000ux/1900ux/2300ux Optical Jukebox User’s Guide
Page 50

Troubleshooting
Troubleshooting common problems
If the procedures in Table 8 do not address or resolve your problem, visit
http://www.hp.com/go/udo
support (see “Getting help” on page 10).
Table 8: Troubleshooting installation
Problem Solution
Power
Jukebox will not power on
Host computer system does not
recognize the jukebox or the drives
for additional assistance, or contact HP technical
■ Check that the power indicator light
on the control panel is on. If it is not,
make sure the power switch on the
front panel is on.
■ Replace the power cord.
■ Ensure the jukebox is not in an error
or failed state. If so, troubleshoot the
error before continuing.
■ Ensure the jukebox is connected and
powered on. The jukebox must be
on when booting the host computer
for the jukebox to be recognized.
■ If the jukebox is the last device on
the SCSI bus, check that it has been
terminated and that the maximum
cable length has not been
exceeded.
■ Check SCSI ID assignments and
resolve any conflicts.
■ Ensure you are connected to the
correct SCSI bus type. UDO
jukeboxes are LVDS devices.
■ If using a narrow (8-bit) HBA, make
sure that all addresses are in the
range 0 through 7.
■ For Windows operating systems, use
the device manager to rediscover
the jukebox.
■ For HP-UX, use ioscan to verify
that the HBA and attached devices
are claimed.
■ For other operating systems, refer to
the system administrators guide for
diagnosing missing peripherals.
50 HP StorageWorks 1000ux/1900ux/2300ux Optical Jukebox User’s Guide
Page 51

Table 8: Troubleshooting installation (Continued)
Problem Solution
■ Check that the application software
■ Check that the device is present on
■ Power cycle the jukebox and power
The power-on selftest failed and
DEVICE FAILED displays
Power to the jukebox failed while a disk
was in the drive and the display did not
return to
READY after the power came
■ Power cycle the jukebox.
■ If the power-on test continues to fail,
■ Power cycle the jukebox.
■ If READY does not display
back on
Troubleshooting
is compatible with the jukebox.
the system using HP StorageWorks
Library & Tape Tools, available from
http://www.hp.com/support/tape
tools
.
down the host. Wait until the
jukebox completes its power cycle
before powering up the host.
press
ENTER, write down the
displayed error code and a micro
move error, and contact your
support representative.
(power-on test is unsuccessful),
switch off the power and contact
your support representative.
Caution: Do not move the unit!
Moving the unit risks damaging
the optical drive.
No display messages appear ■ Ensure that the power cord is
connected.
■ Ensure that the power switch is on.
■ Power cycle the jukebox.
51HP StorageWorks 1000ux/1900ux/2300ux Optical Jukebox User’s Guide
Page 52

Troubleshooting
Table 8: Troubleshooting installation (Continued)
Problem Solution
Connection
Other SCSI devices no longer work
■ Check SCSI ID assignments and
when the jukebox is installed
■ Ensure that the SCSI ID for the HBA
■ Check for proper SCSI cabling and
■ Ensure the maximum cable length
Media
A disk is stuck in a drive
Cannot write to a disk
LOAD ERROR or FAILED displays
■ See “Ejecting a disk” on page 33.
■ Attempt to unload the disk using
■ If unsuccessful, contact your service
■ Check the host file system access
■ Eject the disk and check that the
■ If unsuccessful, contact your service
■ Press CANCEL. Insert the disk into
when a disk is inserted into the mailslot
■ If the light bar on the control panel
■ If unsuccessful, contact your service
INCOMPATIBLE displays when a disk
is loaded.
An attempt was made to load an
incompatible disk into the drive. Ensure
that you use UDO disks in UDO drives,
and MO disks in MO drives.
resolve any conflicts.
is different from that of the jukebox.
termination.
for the bus has not been exceeded
(12 meters for LVDS and 3 meters
for SE).
your application software.
representative.
permissions.
write-protect tab on each side of the
disk is in the write-enabled position
(see “Write-protecting an UDO
disk” on page 20).
representative.
the mailslot again.
is amber, cycle power to the
jukebox. When READY displays, try
loading the disk again.
representative.
52 HP StorageWorks 1000ux/1900ux/2300ux Optical Jukebox User’s Guide
Page 53

Table 8: Troubleshooting installation (Continued)
Problem Solution
RESERVED displays when a disk is
inserted into the mailslot
The SECURE MS configuration is set.
Disks cannot be loaded. To change this
setting, see “Setting an operating
configuration” on page 39.
MAILSLOT EMPTY displays when a
■ Remove and then replace the disk
disk is inserted into the mailslot
■ If the same error reappears, then the
DEST NOW FULL displays when a disk
is inserted into the mailslot
The jukebox moved a disk into the slot
you chose before your load command
executed.
■ Press CANCEL, select another slot
■ Initiate an INIT ELEM STATUS
TRANSPORT FULL displays when a
■ The disk transport mechanism
disk is inserted into the mailslot
■ Attempt an EMPTY PICKER test
■ If unsuccessful, contact your support
MAILSLOT SENSOR displays when a
disk is inserted into the mailslot
EJECT ERROR displays when a disk
■ Remove and then re-insert the disk.
■ If unsuccessful, the jukebox mailslot
■ Press CANCEL. Attempt to eject the
eject is attempted
■ If the light bar on the control panel
■ If there is no disk in the mailslot and
Troubleshooting
fully into the mailslot.
mailslot sensors are not detecting a
disk and may be defective. Contact
your service representative.
for the disk, and then reattempt a
load.
test (see“Internal tests” on page 45).
already contains a disk. Refer to
your host and application software
documentation for recovery
procedures.
(see “Internal tests” on page 45).
representative.
sensors may have failed. Contact
your service representative.
disk again.
is amber, cycle power to the jukebox
and try to eject the disk again when
READY displays.
this error message repeats, contact
your service representative.
53HP StorageWorks 1000ux/1900ux/2300ux Optical Jukebox User’s Guide
Page 54

Troubleshooting
Table 8: Troubleshooting installation (Continued)
Problem Solution
RESERVED displays when a disk eject is
attempted
The application software reserved the
element for its use or a security
configuration was set to prevent disk
ejection.
■ See “Setting an operating
■ Attempt the operation using your
EMPTY * displays when a disk eject is
attempted
TRANSPORT FULL displays when a
This is not an error. There are no disks in
the jukebox.
■ The disk transport mechanism
disk eject is attempted
■ Attempt an EMPTY PICKER test
■ If unsuccessful, contact your service
SOURCE NOW EMPTY displays when a
disk eject is attempted
The application software moved the disk
from the slot you chose before your eject
command executed.
■ Press CANCEL. You may have to
■ Initiate an INIT ELEM STATUS
MAILSLOT FULL displays when a disk
eject is attempted
A disk is in the mailslot. To remove the
disk, select EJECT *, select the slot you
want the disk ejected from again, and
eject the disk.
Operation
Forgot the password
■ Enter the default password (000
■ If unsuccessful, contact your service
configuration” on page 39.
application software.
already contains a disk. Refer to
your host and application software
documentation for recovery
procedures.
(see “Internal tests” on page 45).
representative.
wait for the application software to
replace the disk into the slot before
attempting another eject.
test (see“Internal tests” on page 45).
000 000).
representative.
54 HP StorageWorks 1000ux/1900ux/2300ux Optical Jukebox User’s Guide
Page 55

Troubleshooting
Table 8: Troubleshooting installation (Continued)
Problem Solution
You want to stop a test that is running Press CANCEL. The current test loop
continues until finished, then the test
stops.
55HP StorageWorks 1000ux/1900ux/2300ux Optical Jukebox User’s Guide
Page 56

Troubleshooting
Retrieving log history
In addition to the procedures listed in the previous sections, the jukebox log
history may assist in the troubleshooting process. See “Retrieving log history” on
page 40 for more information on how to access the log using the jukebox control
panel.
Running an internal test
If your service representative requests that you run an internal test, see “Running
an internal test” on page 44 for more information on how to access the test options
using the jukebox control panel.
56 HP StorageWorks 1000ux/1900ux/2300ux Optical Jukebox User’s Guide
Page 57

Using HP StorageWorks Library and Tape Tools
HP StorageWorks Library and Tape Tools (L&TT) is a robust diagnostic tool for
tape mechanisms, tape automation, magneto-optical and UDO products. L&TT
provides functionality for firmware downloads, verification of device operation,
maintenance procedures, failure analysis, corrective service actions and some
utility functions. Seamless integration is provided with HP’s hardware support
organization through generating and emailing support tickets. The support ticket
delivers a snapshot, or an in-depth view, of the storage system.
L&TT is a free download from the web and deploys in less than fiv e minutes. It is
ideal for customers who want ensured product reliability, self-diagnostics and
faster resolution of device issues.
Troubleshooting
For more information, visit
Figure 8: HP StorageWorks L&TT
http://www.hp.com/support/tapetools
.
57HP StorageWorks 1000ux/1900ux/2300ux Optical Jukebox User’s Guide
Page 58

Troubleshooting
58 HP StorageWorks 1000ux/1900ux/2300ux Optical Jukebox User’s Guide
Page 59

Specifications
This appendix describes the following:
■ Environmental specifications, page 60
■ Jukebox specifications, page 61
■ Drive specifications, page 62
■ Media specifications, page 63
■ Safety and regulatory specifications, page 64
A
59HP StorageWorks 1000ux/1900ux/2300ux Optical Jukebox User’s Guide
Page 60

Specifications
Environmental specifications
Table 9: Environmental specifications
Characteristic Specification
Temperature
Operating 10ºC to 32ºC (50ºF to 90ºF)
Non-operating (without media) -40ºC to 60ºC (-40ºF to 140ºF)
Gradient 10ºC (50ºF) per hour
Transportation (<14 consecutive days) -30ºC to 60ºC (-22ºF to 140ºF)
Humidity
Operating 10% to 80% RH
Non-operating (without media) 5% to 90% RH
Shock
Non-operating (without media) 10 cm tilt, drop test
Vibration (5 to 500 Hz)
Operating 0.21 g rms
Non-operating (random) 2.1 g rms
Non-operating (swept-sine) 0.5 g (0 to peak)
Power Requirements
Line voltage 100 to 240 VAC
Line frequency 50 to 60 Hz
Power consumption
Energy-saving mode Power savings when robotics are inactive
50 W maximum
60 HP StorageWorks 1000ux/1900ux/2300ux Optical Jukebox User’s Guide
Page 61

Jukebox specifications
Table 10: Jukebox specifications
Characteristic Specification
General
Average disk exchange time 6.5 seconds
MSBF (robotics) 2,000,000 swaps
Physical
Height 914 mm (36.0 in)
Width 869 mm (33.9 in)
Depth 482 mm (19.0 in)
Weight (net) 100 kg (220 lb)
Weight (shipping) 127 kg (280 lb)
Interface
SCSI interface Low-voltage differential SCSI (LVDS),
Certification
Safety UL 60950, CSA 60950, EN 60950, IEC
Emissions FCC Class A, CISPR 22, Class A
Laser EN 60825-1, CDRH
Specifications
68 pin
60950
61HP StorageWorks 1000ux/1900ux/2300ux Optical Jukebox User’s Guide
Page 62

Specifications
Drive specifications
Table 11: Drive specifications
Disk capacity 30 GB
Average seek 35 msec
Rotational speed
Data transfer rate (software and system
dependent)
Disk load time 5 sec typical/
Disk unload time 3 sec typical
Read/write compatibility Read/write UDO 1st generation format
Interface type SCSI LVD (68 pin)
MSBF 750,000 load/unload cycles
Read/write error rate (uncorrectable) < 1 per 10
Seek error rates ■ Recoverable: < 1 per 100,000
Characteristic Specification
■ 2100 RPM +/- 0.5% WORM
■ 1950 RPM +/- 0.5% Rewritable
■ Reads (max. sustained):
— WORM, 7.96 MB/sec
—Rewritable, 7.99 MB/sec
■ Writes (max. sustained):
— WORM, 3.98 MB/sec
—Rewritable, 3.99 MB/sec
■ Burst (synchronous): 40 MG/sec
■ Burst (asynchronous, data in):
6.7 MB/sec
■ Burst (asynchronous, data out):
40 MB/sec
only
20
bytes read
seeks
■ Hard error seeks: <1 per 10,000
seeks
Note: This product supports mixed drives. The supported configuration includes two
MO drives and two UDO drives only.
62 HP StorageWorks 1000ux/1900ux/2300ux Optical Jukebox User’s Guide
Page 63

Media specifications
Table 12: Media specifications
Characteristic WORM Specification
General
Recording capacity 30 GB 30 GB
Archival life (recorded) 50 years 50 years
Shelf life (unrecorded) 50 years 50 years
Warranty Limited Lifetime Warranty Limited Lifetime Warranty
Physical
Disk thickness 2.4mm (.1in) 2.4mm (.1in)
Outer diameter 130mm (5.12in) 130mm (5.12in)
Bytes per sector 8192 bytes 8192 bytes
Recording layer Phase change Phase change
Performance
Load-unload lifetime 20,000 cycles per side 20,000 cycles per side
Overwrite capability No Yes
Operating Environment
Operating humidity range 5ºC to 55ºC, 3% to 85% RH5ºC to 55ºC, 3% to 85%
Non-operating (storage)
humidity range
Specifications
Rewritable
Specification
RH
-10ºC to 55ºC, 3% to 90% RH-10ºC to 55ºC, 3% to
90% RH
Note: This product supports mixed media. The supported configuration includes two
MO drives and two UDO drives only.
63HP StorageWorks 1000ux/1900ux/2300ux Optical Jukebox User’s Guide
Page 64

Specifications
Safety and regulatory specifications
Table 13: Safety and regulatory specifications
Description Specification
UL Listed Mark UL 60950 (standard for safety of
TUV GS Mark (Germany) EN60950, IEC950 (standard for safety
CE Marking (European Union) Low Voltage Directive, 73/23/EEC,
CUL Mark (Canadian UL) CAN/CSA 22.2 No. 950 (standard for
Regulatory Series ID Number N3620N3Z, Class A
information technology equipment)
of information technology equipment,
third edition)
European Union
safety of information technology
equipment)
64 HP StorageWorks 1000ux/1900ux/2300ux Optical Jukebox User’s Guide
Page 65

Safety and Regulatory
This appendix describes the following safety and regulatory information for the
United States, Finland, Sweden, Germany, United Kingdom, European Union,
and Japan:
■ Federal Communications Commission Notice, page 66
■ Canadian Notice (Avis Canadien), page 67
■ European Union Notice, page 68
■ EC radio frequency interference statement (Europe only), page 68
■ EC radio frequency interference statement (Europe only), page 68
■ Herstellerbescheinigung, page 70
■ English translation of German sound emission directive, page 70
■ Turvallisuusyhteenveto, page 70
■ English translation of Finland regulatory information, page 71
■ BSMI notice, page 74
■ Japanese Notice, page 75
■ Laser Device, page 75
B
■ CDRH regulations (USA only), page 76
Note: In addition to the safety information in this appendix, also refer to the
that shipped with your product.
Guide
HP Safety
65HP StorageWorks 1000ux/1900ux/2300ux Optical Jukebox User’s Guide
Page 66

Safety and Regulatory
Federal Communications Commission Notice
Part 15 of the Federal Communications Commission (FCC) Rules and
Regulations has established Radio Frequency (RF) emission limits to provide an
interference-free radio frequency spectrum. Many electronic devices, including
computers, generate RF energy incidental to their intended function and are,
therefore, covered by these rules. These rules place computers and related
peripheral devices into two classes, A and B, depending upon their intended
installation. Class A devices are those that may reasonably be expected to be
installed in a business or commercial environment. Class B devices are those that
may reasonably be expected to be installed in a residential environment (that is,
personal computers). The FCC requires devices in both classes to bear a label
indicating the interference potential of the device as well as additional operating
instructions for the user.
The rating label on the device sho ws which class (A or B) the equipment falls into.
Class B devices hav e an FCC logo or FCC ID on the label. Class A devices do not
have an FCC logo or FCC ID on the label. Once the class of the device is
determined, refer to the following corresponding statement.
Class A Equipment
This equipment has been tested and found to comply with the limits for a Class A
digital device, pursuant to Part 15 of the FCC Rules. These limits are designed to
provide reasonable protection against harmful interference when the equipment is
operated in a commercial environment. This equipment generates, uses, and can
radiate radio frequency energy and, if not installed and used in accordance with
the instructions, may cause harmful interference to radio communications.
Operation of this equipment in a residential area is likely to cause harmful
interference, in which case the user will be required to correct the interference at
personal expense.
Modifications
The FCC requires the user to be notified that any changes or modifications made
to this device that are not expressly approved by Hewlett-Packard Company may
void the user's authority to operate the equipment.
66 HP StorageWorks 1000ux/1900ux/2300ux Optical Jukebox User’s Guide
Page 67

Safety and Regulatory
Cables
Connections to this device must be made with shielded cables with metallic
RFI/EMI connector hoods in order to maintain compliance with FCC Rules and
Regulations.
Declaration of Conformity for products marked with the FCC logo United States only
This device complies with Part 15 of the FCC Rules. Operation is subject to the
following two conditions: (1) this de vice may not cause harmful interference, and
(2) this device must accept any interference received, including interference that
may cause undesired operation.
For questions regarding this FCC declaration, contact:
Hewlett-Packard Company
Regulatory Engineer, MS E-200
825 14th Street S.W.
Loveland, CO 80537
Or, call
(970) 898-1738
To identify this product, refer to the Part, Series, or Model number found on the
product.
Canadian Notice (Avis Canadien)
Class A Equipment
This Class A digital apparatus meets all requirements of the Canadian
Interference-Causing Equipment Regulations.
Cet appareil numérique de la classe A respecte toutes les exigences du Règlement
sur le matériel brouilleur du Canada.
67HP StorageWorks 1000ux/1900ux/2300ux Optical Jukebox User’s Guide
Page 68

Safety and Regulatory
European Union Notice
Products bearing the CE marking comply with the EMC Directive (89/336/EEC)
and the Low Voltage Directive (73/23/EEC) issued by the Commission of the
European Community and if this product has telecommunication functionality, the
R&TTE Directive (1999/5/EC).
Compliance with these directives implies conformity to the following European
Norms (in parentheses are the equivalent international standards and regulations):
■ EN 55022 (CISPR 22) - Electromagnetic Interference
■ EN55024 (IEC61000-4-2, 3, 4, 5, 6, 8, 11) - Electromagnetic Immunity
■ EN61000-3-2 (IEC61000-3-2) - Power Line Harmonics
■ EN61000-3-3 (IEC61000-3-3) - Power Line Flicker
■ EN 60950 (IEC 60950) - Product Safety
EC radio frequency interference statement (Europe only)
WARNING: This is a class A product. In a domestic environment this product
may cause radio interference in which case the user may be required to take
adequate measures.
AVERTISEMENT : matériel de classe A. L'utilisation de ce matériel en zone
résidentielle est susceptible de générer des interférences nuisibles, auquel cas
l'utilisateur sera tenu d'y remédier à ses propres frais.
AVVERTENZA: Questo è un prodotto di Classe A. In un ambiente
residenziale, questo prodotto può causare interferenze radio. In tal caso,
l'utente è tenuto ad adottare opportune misure per eliminare il problema.
68 HP StorageWorks 1000ux/1900ux/2300ux Optical Jukebox User’s Guide
Page 69

Safety and Regulatory
VORSICHT: Dies ist ein Produkt der Klasse A. Bei Betrieb in Wohnräumen
kann dieses Produkt Störungen im Radio- und Fernsehempfang verursachen.
In diesem Fall ist der Benutzer dazu verpflichtet, geeignete Abhilfemaßnahmen
zu treffen.
ADVERTENCIA: este es un producto de clase A. En un entorno doméstico
este producto podría causar interferencias de radio, por lo que el usuario
debe tomar las medidas oportunas.
United Kingdom Telecommunications Act 1984
The Hewlett-Packard UDO products are approved under Approval Number
NS/G/1234/J/100003 for indirect connection to Public Telecommunication
Systems within the United Kingdom.
69HP StorageWorks 1000ux/1900ux/2300ux Optical Jukebox User’s Guide
Page 70

Safety and Regulatory
Herstellerbescheinigung
Diese Information steht im Zusammenhang mit den Anforderungen d er
Maschinenlärn information sverordnung vom 18 Januar 1991.
Schalldruckpegel Lp < 70 dB(A)
■ am arbeitsplatz
■ normaler betrieb
■ nach ISO 7779:1988/EN 27779:1991 (Typprüfung)
English translation of German sound emission directive
This statement is provided to comply with the requirements of the German Sound
Emission Directive, from 18 January 1991.
Sound pressure Lp < 70 dB(A)
■ at operator position
■ normal operation
■ according to ISO 7779: 1988/EN 2777 9: 1991 (type test)
Turvallisuusyhteenveto
Laserturvallisuus
LUOKAN 1 LASERLAITE
KLASS 1 LASER APPARAT
Hewlett-Packard optiset levymuistiasemat ovat käyttäjän kannalta turvallisia
luokan 1 laserlaitteita. Normaalissa käytössä levymuistiaseman kotelointi estää
lasersäteen pääsyn laitteen ulkopuolelle.
Laitteen turvallisuusluokka on määritetty standardin EN 60825 mukaisesti.
VAROITUS !
Laitteen käyttäminen muulla kuin käyttöohjeessa mainitulla tavalla saattaa altistaa
käyttäjän turvallisuusluokan 1 ylittävälle lasersäteilylle.
70 HP StorageWorks 1000ux/1900ux/2300ux Optical Jukebox User’s Guide
Page 71

Huolto
Safety and Regulatory
VARNING !
Om apparaten används på annat sätt än i bruksanvisning specificerats, kan
användaren utsättas för laserstrålning, som överskrider gränsen för laserklass 1.
Hewlett-Packard levymuistiasemien sisällä ei ole käyttäjän huollettavissa olevia
kohteita. Laitteen saa avata ja huoltaa ainoastaan sen huoltamiseen k ou lutettu
henkilö. Levymuistiaseman sisälle asennettujen luku-/kirjoitusyksiköiden
suojakoteloa ei tule avata huoltotoimenpiteiden yhteydessä.
VARO !
Mikäli luku-/kirjoitusyksikön suojakotelo avataan ja suojalukitus ohitetaan, olet
alttiina lasersäteilylle laitteen ollessa toiminnassa. Älä katso säteeseen.
VARNING !
Om skyddshöljet av den optiska drivmodulen öppnas och spärren urkopplas då
apparaten är i funktion, utsättas användaren för laserstrålning. Betrakta ej strålen.
Tiedot luku-/kirjoitusyksikössä käyte ttävän laserdiodin säteilyominaisuuksista:
Aallonpituus 660 nm
Teho 60 mW
Turvallisuusluokka 3B
English translation of Finland regulatory information
LASER SAFETY SUMMARY
LASER SAFETY
CLASS 1 LASER PRODUCT
Hewlett-Packard jukeboxes are for user safe class 1 laser products. In normal use
the enclosure of the optical drives prevents the laser beam from escaping outside
of the product.
The jukebox was type approved in Finland for laser safety by the National Board
of Labour Protection. The safety class of the products was defined according to
the resolution No 472/1985 of the Council of State and the standard EN 60825.
71HP StorageWorks 1000ux/1900ux/2300ux Optical Jukebox User’s Guide
Page 72

Safety and Regulatory
WARNING: The use of the product otherwise than specified in the user’s
manual may expose the user to laser radiation exceeding safety class 1.
AVERTISEMENT : l'utilisation de ce produit de façon non conforme à ce
qui est indiqué dans le manuel de l'utilisateur peut exposer l'utilisateur à des
rayonnements laser dangereux excédant les normes de sécurité établies pour
les matériels appartenant à la Classe 1.
AVVERTENZA: Il mancato rispetto delle indicazioni sull'utilizzo del prodotto
riportate nel manuale dell'utente, potrebbe esporre l'utente a radiazioni laser
superiori alla Classe 1 di sicurezza.
VORSICHT
: Bei unsachgemäßer Nutzung des Produkts (nicht gemäß der
Ausführungen im Benutzerhandbuch) kann der Benutzer Laserstrahlung
ausgesetzt werden, die die Grenzwerte der Laserschutzklasseklasse 1
übersteigt.
ADVERTENCIA: un uso del producto distinto de los especificados en
la guía de usuario puede producir una exposición peligrosa del usuario
a las radiaciones superando el nivel de seguridad 1.
72 HP StorageWorks 1000ux/1900ux/2300ux Optical Jukebox User’s Guide
Page 73

Safety and Regulatory
SERVICE
There are no user serviceable parts inside the jukebox. The jukebox products can
be serviced only by qualified service personnel. The optical drive mechanism(s)
installed inside the library system shall not be opened or disassembled during
service.
WARNING: If the enclosure of the optical drive mechanism is opened and the
safety interlock disabled, you may be exposed to the laser radiation when the
drive is operating. Avoid exposure to the beam.
AVERTISEMENT : si le boîtier du mécasnime d'entraînement optique s'ouvre et
que le verrou de sécurité est désactivé, vous risquerez d'être exposé aux rayons
laser lors du fonctionnement de l'unité. Évitez de vous exposer au faisceau.
AVVERTENZA: Se il contenitore del meccanismo dell'unità ottica è aperto
e il meccanismo di blocco di sicurezza è disabilitato, è possibile che l'utente
sia esposto a radiazioni laser durante il funzionamento dell'unità. Evitare
l'esposizione al raggio.
VORSICHT
die Sicherheitssperre deaktiviert ist, können Sie bei Betrieb des Laufwerks
Laserstrahlung ausgesetzt werden. Vermeiden Sie es, sich dem Laserstrahl
auszusetzen.
ADVERTENCIA: si el receptáculo del mecanismo de la unidad óptica se abre
y se desactiva el interbloqueo de seguridad, es posible que se exponga a
la radiación de láser cuando la unidad esté funcionando. Evite la exposición
al rayo.
: Wenn das Gehäuse des optischen Laufwerks geöffnet wird und
73HP StorageWorks 1000ux/1900ux/2300ux Optical Jukebox User’s Guide
Page 74

Safety and Regulatory
The information about the radiation characteristics of the laser diode used in the
optical drive mechanism:
Wavelength 680 nm
Power 60 mW
Class 3B laser
BSMI notice
74 HP StorageWorks 1000ux/1900ux/2300ux Optical Jukebox User’s Guide
Page 75

Japanese Notice
Safety and Regulatory
Laser Device
All HP systems equipped with a laser device comply with safety standards,
including International Electrotechnical Commission (IEC) 825. With specific
regard to the laser, the equipment complies with laser product performance
standards set by government agencies as a Class 1 laser product. The product does
not emit hazardous light; the beam is totally enclosed during all modes of
customer operation and maintenance.
Laser Safety Warnings
WARNING: To reduce the risk of exposure to hazardous radiation:
Do not try to open the laser device enclosure. There are no user-serviceable
components inside.
Do not operate controls, make adjustments, or perform procedures to the laser
device other than those specified herein.
Allow only HP authorized service technicians to repair the laser device.
75HP StorageWorks 1000ux/1900ux/2300ux Optical Jukebox User’s Guide
Page 76

Safety and Regulatory
CDRH regulations (USA only)
The Center for Devices and Radiological Health (CDRH) of the U.S. Food and
Drug Administration implemented regulations for laser products on August 2,
1976. These regulations apply to laser products manufactured from August 1,
1976. Compliance is mandatory for products marketed in the United States. The
labels and artwork shown below indicate compliance with CDRH regulations and
must be attached to laser products marketed in the United States.
WARNING: Use of controls or adjustments, or performing procedures other
than those specified in this manual may result in hazardous laser radiation
exposure.
Note: Complies with 21 CFR Chapter 1 Subchapter J.
Laser Class Information: A black on yellow label which reads, “Class 1 Laser
Product” printed in English, French, German, Finnish, Japanese, and Spanish.
Compliance with International Regulations
All HP systems equipped with laser devices comply with appropriate safety
standards, including IEC825.
76 HP StorageWorks 1000ux/1900ux/2300ux Optical Jukebox User’s Guide
Page 77

Glossary
This glossary defines terms used in this guide or related to this product and is not
a comprehensive glossary of computer terms.
cartridge
A plastic enclosure that contains an optical disk. The cartridge is labeled “A” or “B” to denote
separate sides of the optical disk. The optical disk is never removed from the cartridge.
driver
A program that allows the operating system to communicate with a peripheral device.
element
A SCSI term for any one of the autochanger components — drive, mailslot, storage slots, or
picker.
jukebox
A term synonymous with optical disk library or autochanger. This type of optical storage device
is often referred to as a “jukebox” because when a file is requested, the disk containing the file
is found, inserted into the drive, and the requested information is sent to the host computer
system, similar to the way a musical jukebox finds a record and moves it to the turntable when a
song is requested.
jukebox controller
The part of the jukebox that controls the sending and receiving of SCSI commands, and controls
the disk transport mechanism.
LAN
Local area network. A group of computers and peripherals physically connected so users can
share hardware and software resources.
Glossary
Glossary
mailslot
The area where disks are inserted and removed from the jukebox.
multifunction drive
An optical disk drive that supports both rewritable and WORM optical disks. The drive detects
the disk type by reading a factory-stamped code on the disk, and automatically determines
whether to operate in rewritable or WORM mode.
77HP StorageWorks 1000ux/1900ux/2300ux Optical Jukebox User’s Guide
Page 78

Glossary
optical disk
A term synonymous with the 5.25-inch optical disk. There are two types of optical disks:
rewritable and WORM.
optical disk library
See jukebox.
rewritable optical
An optical disk technology in which data can be repeatedly written using optical reading and
writing technology.
SCSI
An acronym for the Small Computer Systems Interface.
storage slot
An autochanger element that holds cartridges when the cartridges are not in a driv e or not being
ejected through the mailslot.
terminator
A resistor array device used for electrically terminating a SCSI bus. A SCSI bus must be
terminated at its two physical ends. A peripheral device uses a terminator only if it is at the end
of the bus.
ultra density optical
UDO (Ultra Density Optical), like HP's DVD+RW, uses Phase Change technology in order to
achieve increased data density on a 130mm disk. Phase Change technology uses a laser to read
and write from the active layer on the disk. The recording process uses the laser to heat each
data bit to a specific temperature. One temperature allows the bit to form a crystalline
(reflective) mark and a different temperature allows the bit to form an amorphous (less
reflective) mark. Data is read by using a low power laser beam to detect the difference in the
levels of reflectivity recorded on the disk.
write-once or WORM
An additional operating mode available with multifunction dri ves. When a write- once (WORM)
disk is inserted, the drive will write data, but will not write over data that has been previously
written. This feature is useful for applications that need permanent data security and audit trails.
write-protect
A feature that prevents data from being written to a disk. A write-protect tab is located on both
sides of the optical disk cartridge to enable write-protection on one or both surfaces of the disk.
78 HP StorageWorks 1000ux/1900ux/2300ux Optical Jukebox User’s Guide
Page 79

Index
A
access panel, service 14
administration menu password
changing 35
authorized reseller, HP 11
B
back panel 15
C
changing the SCSI IDs 37
configuration
setting 39
control panel 14
conventions
document 8
text symbols 9
D
diagnostic tests
running 44
disks
labeling 19
loading 21
maintaining 22
rewritable 18, 20
types 18
using 18
WORM 18, 20
write-protecting 20
document
conventions 8
related documentation 8
drive specifications 62
E
environmental specifications 60
European Union Notice 68
F
front access panel 14
G
getting help 10
H
help, obtaining 10
host
troubleshooting 50
Index
HP
Index
authorized reseller 11
storage web site 11
technical support 10
I
internal tests
listing of 45
internal tests, running 44
L
labeling disks 19
Library and Tape Tools 57
loading disks 21
79HP StorageWorks 1000ux/1900ux/2300ux Optical Jukebox User’s Guide
Page 80

Index
logs
listing of 41
retrieving 24, 40
M
mailslot 14
media
labeling 19
loading 21
maintaining 22
rewritable 18, 20
specifications 63
types 18
using 18
WORM 18, 20
write-protecting 20
mixed media 24
P
ports, SCSI 15
power
receptacle 15
switch 14
troubleshooting 50
R
related documentation 8
retrieving log history 40
S
SCSI bus type 50
SCSI IDs
changing 37
setting 36
SCSI interface ports 15
service access panel 14
setting the SCSI IDs 36
specifications
drive 62
environmental 60
media 63
switch
power 14
symbols in text 9
T
technical support, HP 10
tests
running 44
text symbols 9
troubleshooting 50, 52, 57
U
UDO media 18, 19, 20, 21, 22
W
warning
laser safety 75
web sites
HP storage 11
Library and Tape Tools 57
write-protecting disks 20
80 HP StorageWorks 1000ux/1900ux/2300ux Optical Jukebox User’s Guide
 Loading...