

Page 1
Page 2
Page 3

Model
211A
Table of Contents
List of Illustrations and Tables
TABLE OF CONTENTS
Section Page Section
I GENERAL INFORMATION
1.1
.
General Description
1.9
.
Damage in Transit
1.11
.
Power Transformer Conversion
OPERATING INSTRUCTIONS
2.1
.
Controls and Terminals
2 -1 1
.
Instrument Loading
.
2 -1 7
Ringing
2.19
.
External Sync Operation
2.22
.
Pulses
2 .24
.
Balanced Output
THEORY OF OPERATION
.
3 .1
Introduction
3.3
.
Sync Trigger
3.7
.
Multivibrator
3.12
.
Clipper Amplifier
3-1 5
.
Power Amplifier
Number
2 .1
.
Common Impedance Matching Networks
2.2
.
Front Panel Showing Operating Controls
2.3
.
Basic Output Circuit of
2.4
.
Method of Obtaining a Balanced
Output from the
3.1
.
Block Diagram Showing Operating
Controls of
4.1
.
Model
Amplifier and Power Supply
................
................
.............
.............
21
211A
21
1A
Bottom View Showing
.........
.........
..........
.
.
.......
.......
.........
.......
...........
.........
............
..........
..........
LlST OF ILLUSTRATIONS
.
.
211A
1A
......
.........
............
......
1-1
1-1 4.1
1-2 4.3
1-2 4.5
2-1
2-1
2 -1
2 -1
2-1
2-3
2-3
3-1
3 -1
3-1
3-1
3-1
3-2
Page Number
2-1 4.2
2 -2
3 -1 4.4
3 -3
3 -0 4.8
4-2 4.11
IV MAINTENANCE
.
.
4.3
.
4.5
.
4.6
.
.
4.7
.
.
4.9
. ...........
4.10
.
.
Introduction
.
Cabinet Removal
.
Equipment Required
.
4.7
Trouble Localization
.
4.12
Tube Replacement
.
4.15
Adjusting the Power Supply
.
4.20
Frequency Calibration
4.24
.
Adjusting External Sync Sensitivity
4.27
4.41
REPLACEABLE PARTS
5 .1
5.2
Model
Test Setup for Frequency Calibration
Test Setup for Sync Sensitivity
75-Ohm
Defects on Positive Portion
Model
Voltage and Resistance Diagram
Multivibrator and Power Supply
Output Section
Range Switch Detail
Attenuator Switch Detail
Sync Sensitivity
.
Waveform Observation and
Measurement
.
Servicing Etched Circuit
Boards
.
Introduction
.
Ordering Information
211A
Output Waveform which has
211A
.............
..........
........
........
.........
.....
.......
.........
..........
..............
.........
.............
........
Top View
Waveforms
..........
......
......
.........
.....
.....
..............
.........
..............
page
4-1
4-1
4-1
4-1
4-1
.
Page
4-5
4-6
.
.
4-6
LlST OF TABLES
Number Page
.
1.1
Specifications
.
4.1
Tube Replacement Chart
4.2
.
Test Equipment Required
4.3
.
Troubleshooting Chart
.
4.4
Calibration Chart
.
5.1
Reference Designation Index
5 .2
.
Replaceable Parts
................
..........
..........
...........
..............
........
.............
1-1
4-0
4-1
4-3
4-4
5-2
5
-7
Page 4
Section
Figure
I
1-1
Model
211A
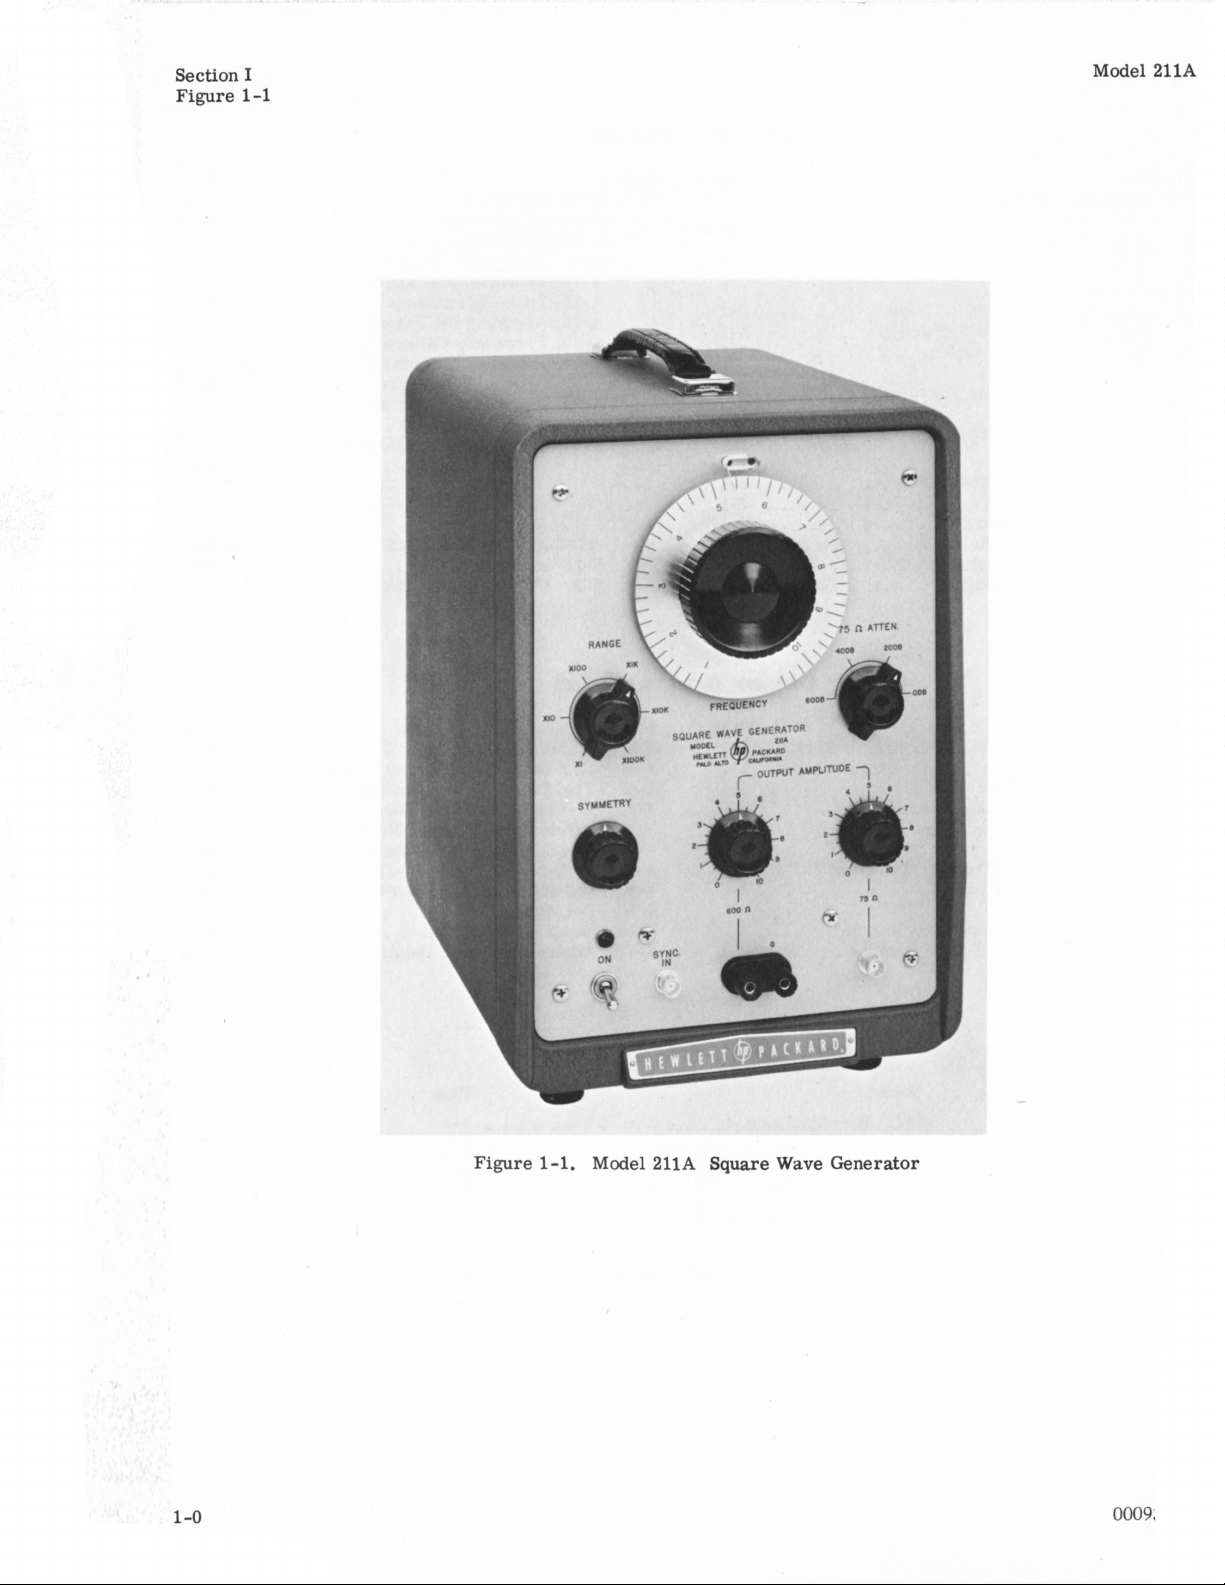
Figure
1-1.
Model
2llA
Square
Wave Generator
Page 5
Model 211A
Paragraphs
Section I
1-1
to 1-5
SECTION
GENERAL INFORMATION
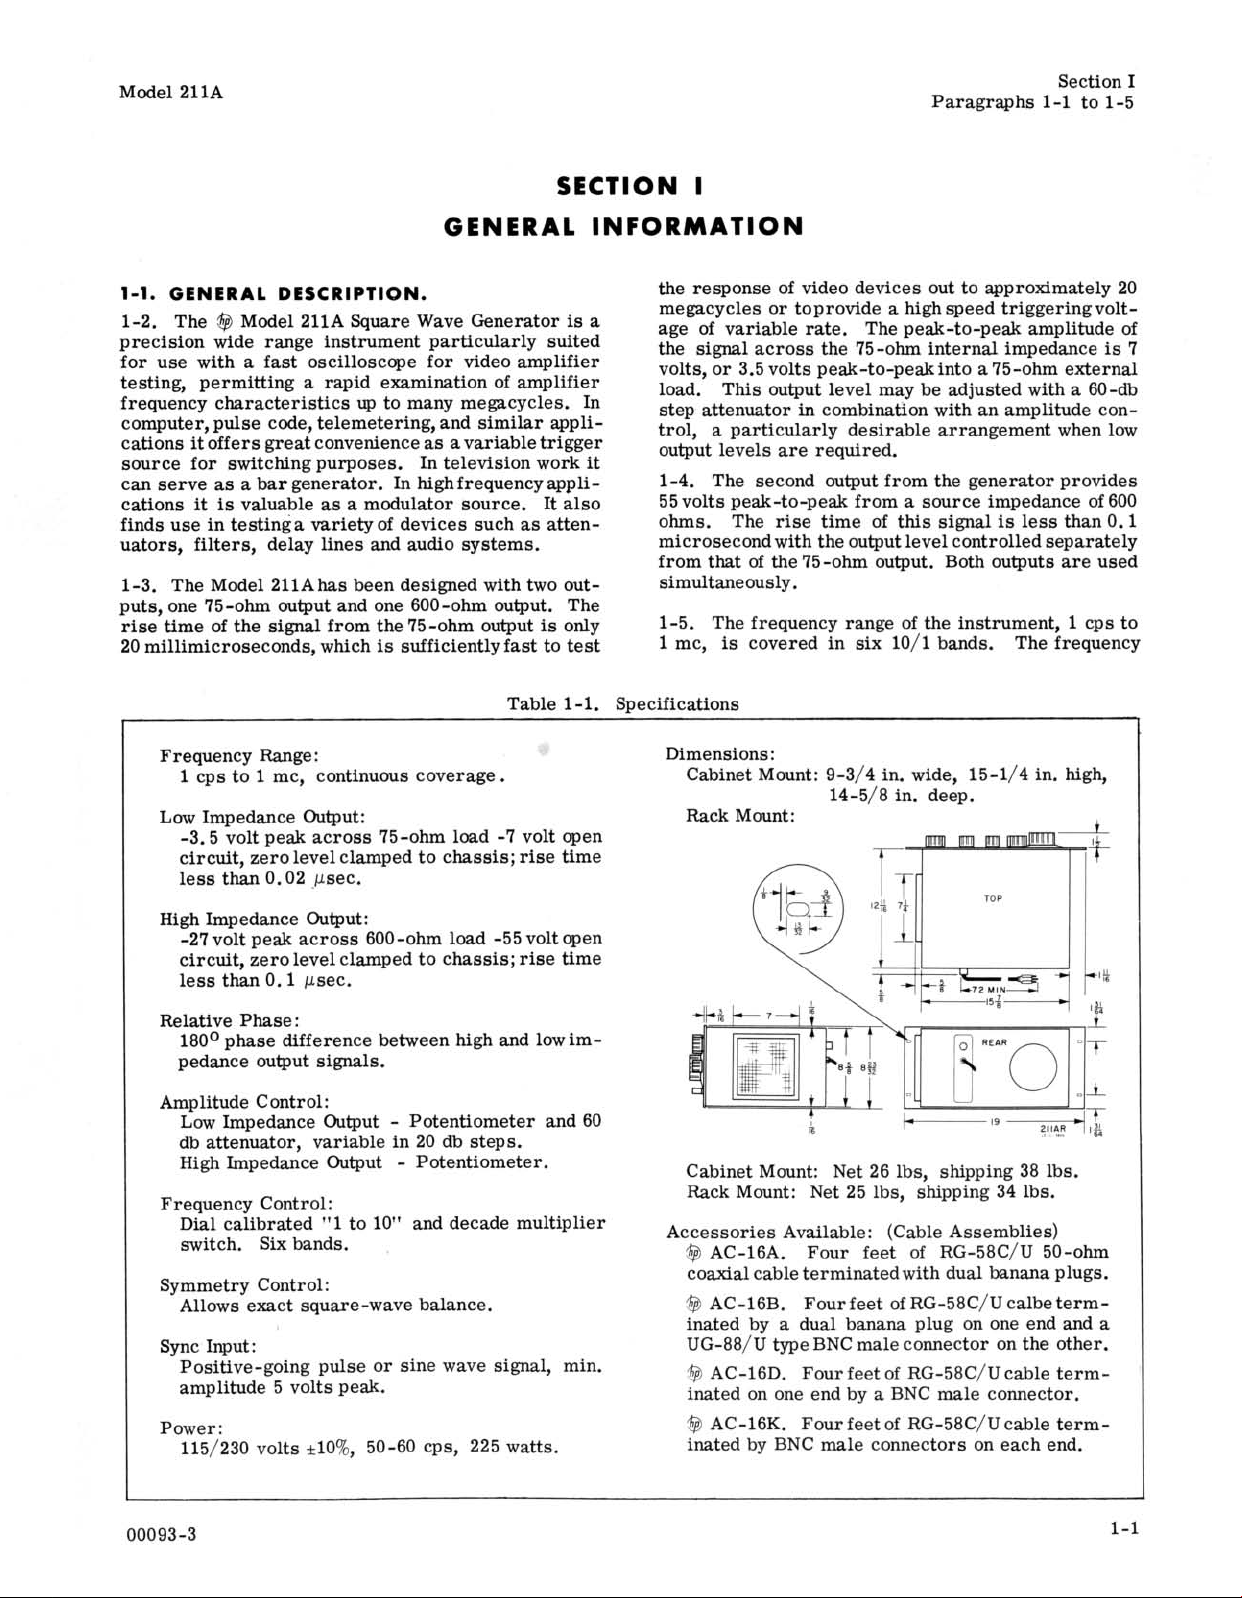
1-1.
GENERAL DESCRIPTION.
1-2. The @ Model 211A Square Wave Generator
precision wide range instrument particularly suited
for use with a fast oscilloscope for video amplifier
testing, permitting a rapid examination of amplifier
frequency characteristics
computer, pulse code, telemetering, and similar applications it offers great convenience as a variable trigger
source for switching purposes. In television work it
as
can serve
cations it
finds use in testinga variety of devices such
uators, filters, delay lines and audio systems.
1-3. The Model
puts, one 75-ohm output and one 600-ohm output. The
rise time of the
20 millimicroseconds, which
Frequency Range
Low
a bar generator. In highfrequency appli-
is
valuable as a modulator source. It also
2llAhas been designed with two out-
signal
1
cps to 1 mc, continuous coverage.
Impedance Output:
-3.5 volt peak across 75-ohm load -7 volt open
circuit, zero level clamped to chassis; rise time
less than 0.02
up
to many megacycles. In
from the 75-ohm output
is
sufficiently fast to test
:
pec.
as
is
Table
is
atten-
only
1-1.
the response of video devices out to approximately 20
a
megacycles or toprovide
age
the signal across the 75-ohm internal impedance
volts, or 3.5 volts peak-to-peakinto a 75-ohm external
load. This output level may be adjusted with a 60-db
step attenuator
trol, a particularly desirable arrangement when low
output levels are required.
1-4. The second output from the generator provides
55volts peak-to-peak from a source impedance of 600
ohms. The rise time of this signal
microsecond with the output level controlled separately
from that of the 75 -ohm output. Both outputs are used
simultaneously.
1-5. The frequency range of the instrument,
1
mc,
S~ecifications
Dimensions:
Cabinet Mount: 9-3/4 in. wide, 15-1/4 in. high,
Rack Mount:
I
a
high speed triggeringvolt-
of
variable rate. The peak-to-peak amplitude of
in
combination with an amplitude con-
is
less than 0.1
is
covered in six 10/l bands. The frequency
14-5/8 in. deep.
m
m
11
nmm!BDL
t
1
cps to
is
7
High Impedance Output:
-27 volt peak across 600-ohm load -55 volt open
circuit, zero level clamped to chassis; rise time
less than 0.1
Relative Phase
180° phase difference between high and lowim-
pedance output
Amplitude Control
Low
Impedance Output - Potentiometer and 60
db attenuator, variable in 20 db steps.
High Impedance Output
Frequency Control:
Dial calibrated
switch. Six bands.
Symmetry Control:
Allows exact square-wave balance.
Sync Input
Positive-going pulse or sine wave signal, min.
amplitude 5 volts peak.
Power:
ii5/230 volts +looh, 50-60 cps, 225 watts.
psec.
:
signals.
:
-
Potentiometer.
"1
to 10" and decade multiplier
:
Cabinet Mount: Net 26
Rack Mount: Net 25 lbs, shipping
Accessories Available: (Cable Assemblies)
@
AC-16A.
coaxial cable terminatedwith dual banana plugs.
@
AC-16B. Four feet of RG-58C/U calbe terminated by
UG-88/U type BNC male connector on the other.
$9
AC-16D. Four feet of RG-58C/U cable terminated on one end by
@
AC-16K. Four feet of RG-58C/U cable terminated by BNC male connectors on each end.
Four feet of RG-58C/U 50-ohm
a
dual banana plug on one end and
lbs,
shipping 38 lbs.
34
lbs.
a
BNC male connector.
a
Page 6
Section
I
Paragraphs 1-6 to 1-12
dial
is
linearly calibrated from 1 to 10. The six positions on the range switch multiply these calibrations in
decade steps.
For purposes of synchronization a
1-6.
is
ger circuit
located ahead of the multivibrator and
set to trigger on a minimum input sync
Schmitt trig-
signal
of 3 volts
is
peak, but a 5-volt peak sine wave or a positive pulse
is
signal
recommended for practical use. The sync
trigger provides a fast trigger of uniform rise and
amplitude which aids in
obtainingaccurate time switching of the frequency multivibrator, and at the same
time isolates the. multivibrator from the input wave-
If
form.
no sync signal is used the multivibrator
free-runs at a frequency controlled by the range switch
and the frequency control.
Model 211A
frequency or range. This local feedback together with
a regulated power supply assures an output essentially
free from amplitude variations over the entire frequency range from
1
cps to 1 mc once the
output
controls have been set.
1-9.
DAMAGE
IN
TRANSIT.
1-10. After unpacking the instrument, should any
shipping damage be discovered, follow the procedure
described in the "Claim for Damage" sheet in this
manual.
1-11.
POWER TRANSFORMER CONVERSION.
1-12. Should it be desired to operate the Model 211A
from a 210-250 volt source proceed as follows:
The multivibrator employs two type
1-7.
6CL6 power
pentodes with precision components in the rc timing
networks. Residual variation in tubes
or time con-
stants may be compensated by a symmetry control
which balances the relative plate voltage swing on the
multivibrator tubes.
1-8. Two outputs are taken from the frequency multivibrator to drive a push-pull clipper amplifier consisting of two
for four
parallel as the output power stage.
is
used in the power stage to stabilize the system
6CL6's. The clipper serves as the driver
6CL6 power tubes arranged in push-pull
Local feedback
against variations in output level with a change in
a. Remove the two bare wire jumpers from the
terminal strip located beneath the power transformer.
These jumpers connect the Black to the Black-Green
lead and the Black-Red to the Black-Yellow lead of
the power transformer primary.
b. Insert a new jumper on the terminal strip which
will connect the Black-Yellow to the Black-Green lead.
c. Change line fuse
F1 to one with a 1.25 ampere
slow-blow rating. As shown in the schematic diagram, this alteration changes the primary windings
of the power transformer from a parallel to a series
arrangement.
Page 7
Model 211A
Section
Paragraphs 2-1 to 2-21
I1
SECTION
OPERATING INSTRUCTIONS
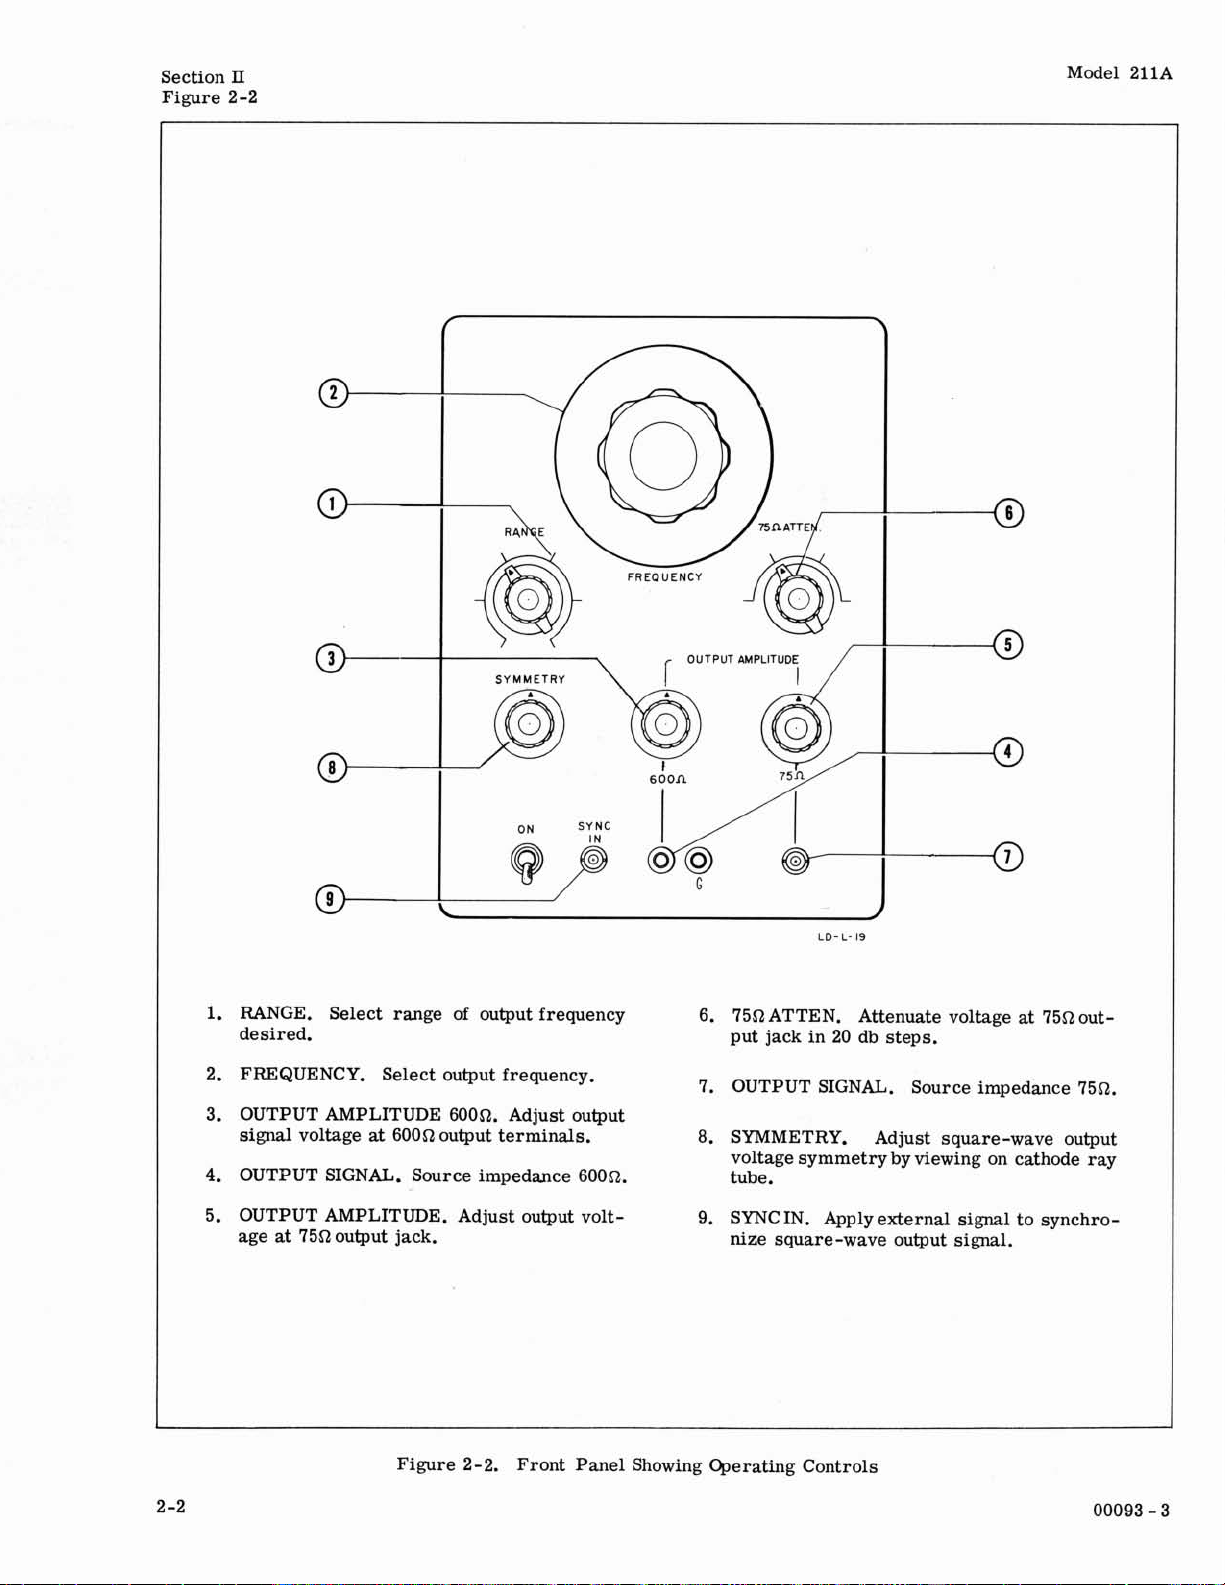
2-1. CONTROLS AND TERMINALS.
2-2. ON. Applies line voltage to the instrument.
2-3. RANGE. Switches time constants in the
vibrator circuit to establish various frequency ranges.
FREQUENCY.
to
produce
RANGE switch position.
2-5. OUTPUT AMPLITUDE. The 600 51 control
varies the amplitude of the signal at the 600 51 output
terminals. The 75 51 controlvaries the signal voltage
applied to the 75 51 output attenuator.
51
2-6. 75
jack in 20 db steps below the level set with the
OUTPUT AMPLITUDE control.
2-7. SYMMETRY. A balance potentiometer in the
multivibrator plate circuit which effectively balances
the amplitudes of the signals tothe multivibrator grids
and equalizes each square wave half cycle.
2-8. 600 51 OUTPUT. Two three-fourth inch spaced
binding posts which serve
a sync out connection when 7551 output
ATTEN. This control reduces the output
':lo
Varies
the
frequency change
as
the 600 51 output, or
is
On
in use.
multi-
grid
each
75
as
51
II
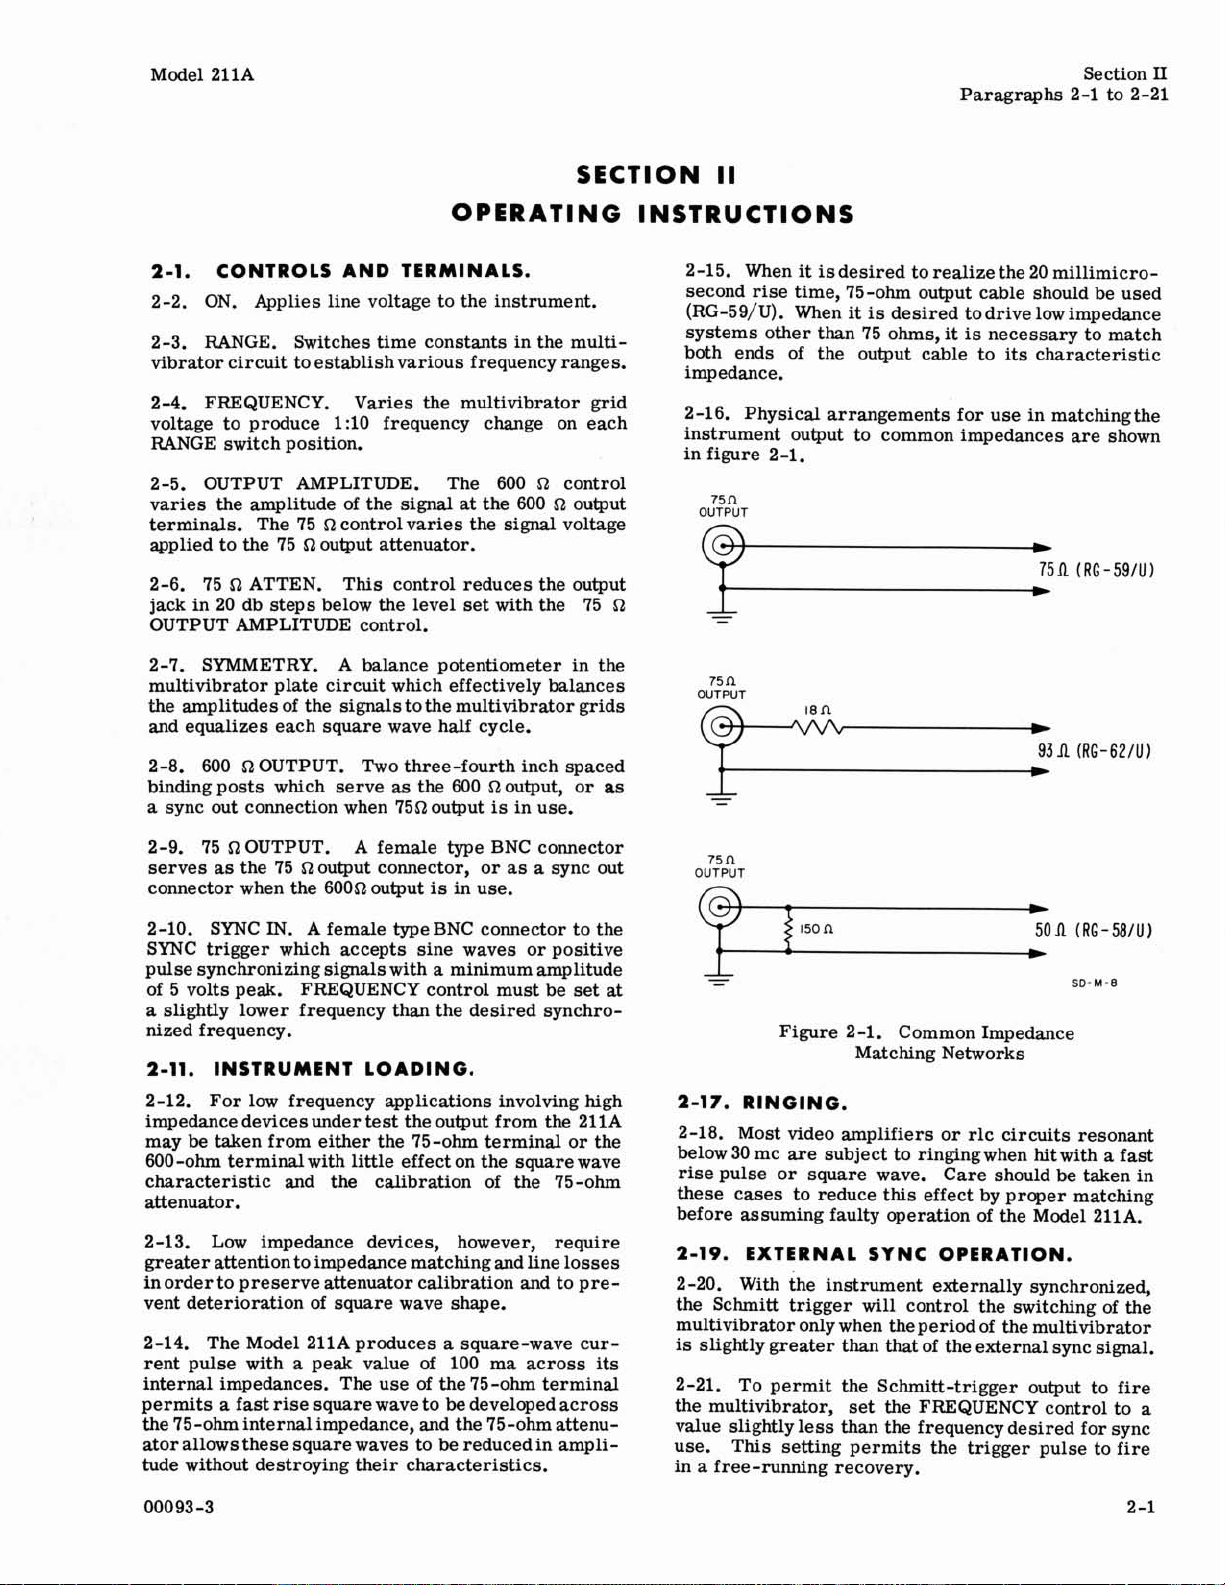
2-15. When it
second rise time, 75-ohm output cable should be used
(RG-59/U). When it
systems other than 75 ohms, it
both ends of the output cable to
impedance.
2-16. Physical arrangements for use in matchingthe
instrument output to common impedances are shown
in figure 2-1.
OUTPUT
75n
is
desired to realize the 20 millimicro-
is
desired to drive low impedance
is
necessary to match
its
characteristic
75fi (RG-59lU)
*
-
-
75
n
OUTPUT
t
93 A (RG-62lU)
b
-
-
2-9. 75
serves
connector when the 60051 output
2-10. SYNC
SYNC trigger which accepts sine waves or positive
pulse synchronizing
of 5 volts peak.
a
slightly lower frequency
nized frequency. Figure 2-1. Common Impedance
2-11. INSTRUMENT LOADING.
2-12. For low frequency applications involving high
impedance devices under test the output from the-211~
may
600-ohm terminal with little effect on the square wave
characteristic and the calibration of the 75-ohm
attenuator.
2-13.
greater attention to impedance matching and line losses
in order to preserve attenuator calibration and to prevent deterioration of square wave shape.
2-14.
rent pulse with
internal impedances. The use of the 75-ohm terminal
permits
the 75-ohm internal impedance, and the 75-ohm
ator allows these square waves to
tude without destroying their characteristics.
51
OUTPUT. A female type BNC connector
as
the 75 51 output connector, or as a sync out
is
in use.
IN.
A female typeBNC connector to the
signals
FREQUENCY control must be set at
be
taken from either the 75-ohm terminal or the
Low
impedance devices, however, require
The Model 211A produces
a
peak value of
a
fast rise square wave to
with a minimum amplitude
than
the desired synchro-
a
square-wave cur-
100 ma across
be
developed across
attenu-
be
reduced in ampli-
its
75
n
OUTPUT
77:.
-
Matching
2-17.
2-18. Most video amplifiers or rlc circuits resonant
below 30 mc are subject to ringingwhen
rise pulse or square wave.
these cases to reduce this effect by proper matching
before assuming faulty operation of the Model
2-19. EXTERNAL SYNC OPERATION.
2-20. With the instrument externally synchronized,
the Schmitt trigger will control the switching of the
multivibrator only when the period of the multivibrator
is
2-21. To permit the Schmitt-trigger output to fire
the multivibrator, set the FREQUENCY control to a
value slightly less
use. This setting permits the trigger pulse to fire
in
RINGING.
slightly greater than that of the external sync signal.
than
a
free-running recovery.
~etworks
hitwith a fast
Care should be taken in
the frequency desired for sync
(RG-581.
SD-M-8
211A.
2-1
Page 8
Section
Figure 2-2
II
Model 211A
OUTPUT AMPLIT
LD- L-
I9
1.
RANGE. Select range of output frequency 6. 7552ATTEN. Attenuate voltage at 7552out-
desired.
2. FREQUENCY. Select output frequency.
3. OUTPUT AMPLITUDE 60052. Adjust output
signal voltage
4.
OUTPUT SIGNAL. Source impedance 600% tube.
5. OUTPUT AMPLITUDE. Adjust output volt-
age at 7552 output jack.
at
60052 output terminals.
put jack in 20 db steps.
7. OUTPUT SIGNAL. Source impedance 7552.
8.
SYMMETRY. Adjust square-wave output
voltage symmetry by viewing on cathode ray
9.
SYNC IN. Apply external
nize square-wave output signal.
signal
to synchro-
-
Figure
2-2.
Front Panel Showing Operating Controls
00093
-
3
Page 9
Model 211A
Section
I1
Paragraphs 2-22 to 2-29
2-22.
PULSES.
2-23. The clipper amplifier and output tubes in the
Model 211A operate in a circuit designed for a
duty cycle. The balance of this circuit
is
maintained
50%
by the SYMMETRY control which balances the two
as
padding
range of
this
outputs from the multivibrator. Any alteration of
circuit attempting to generate pulses, such
the SYMMETRY potentiometer to extend
its
control, would overdrive one side of the clipper amplifier and output tubes beyond the 50% duty cycle factor
to the eventual damage of the instrument.
2-24.
BALANCED OUTPUT.
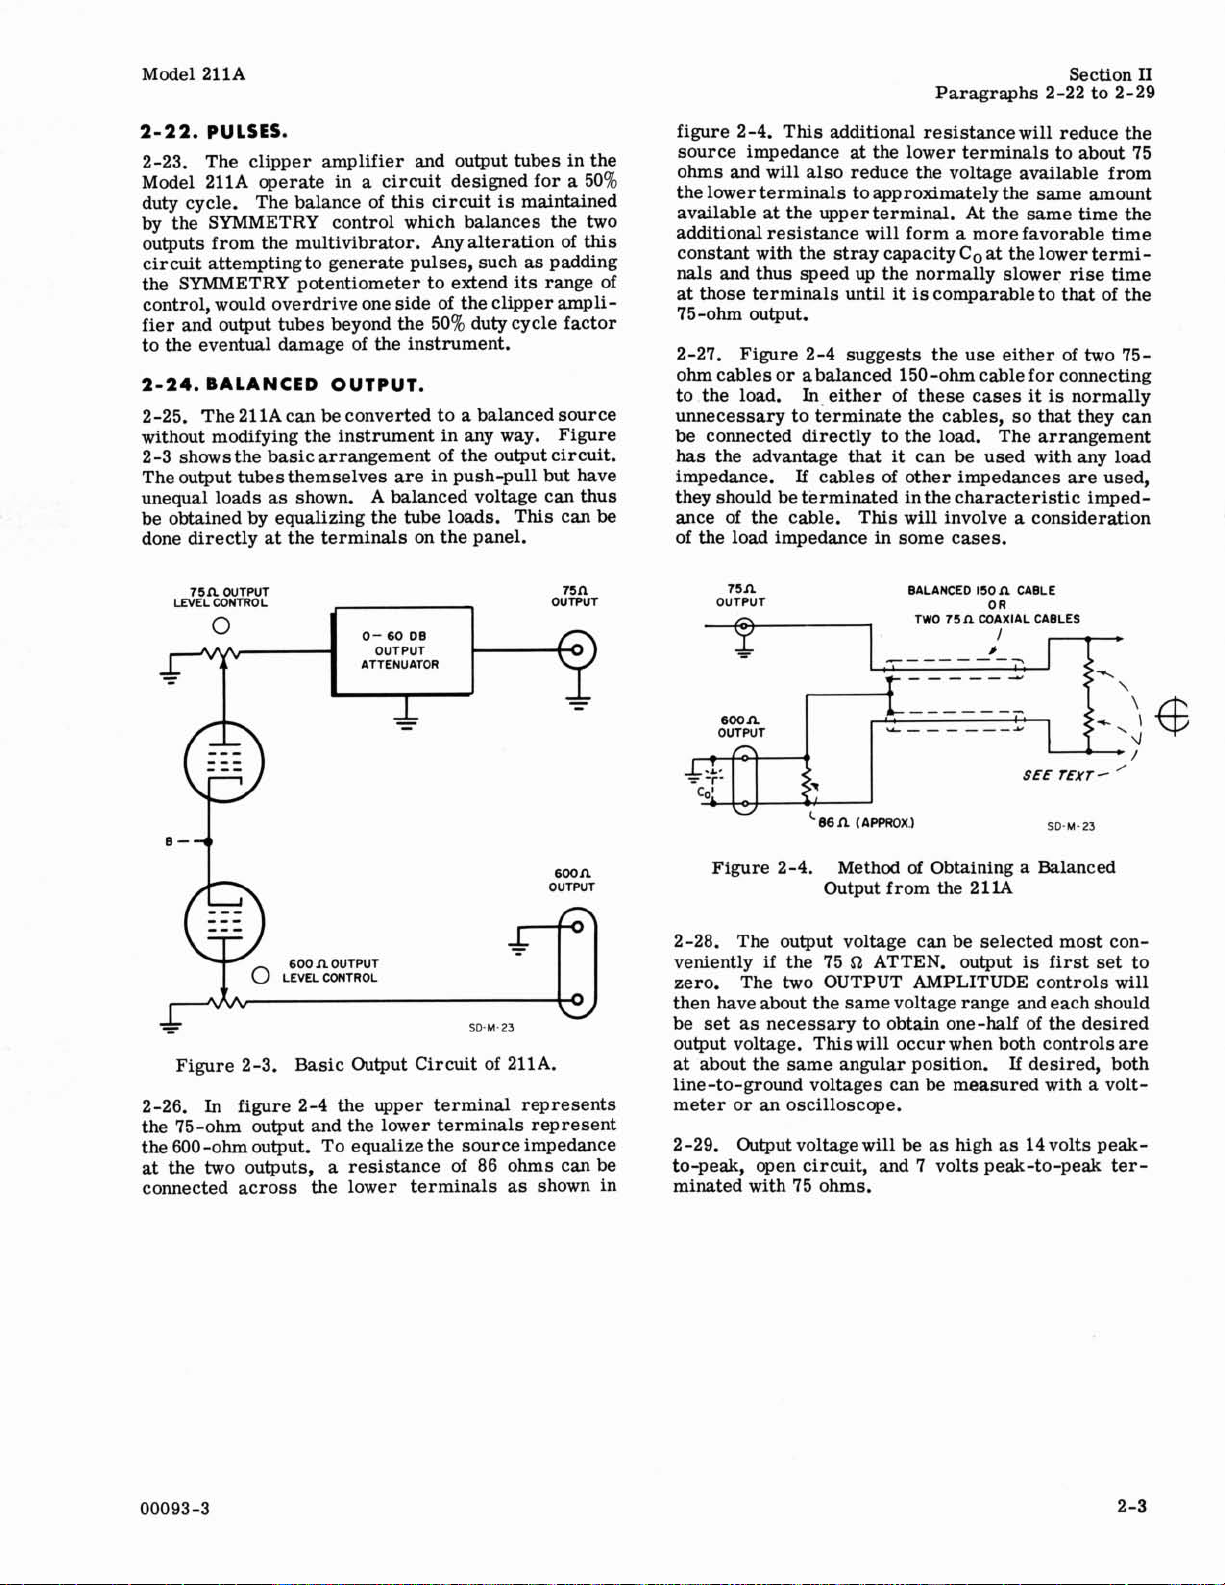
2 -25. The 21 1A can be converted to a balanced source
without modifying the instrument in any way. Figure
2-3 shows the basic arrangement of the output circuit.
The output tubesthemselves are in push-pull but have
unequal loads as
shown A balanced voltage can thus
be obtained by equalizing the tube loads. This can be
done directly
75n
LEVEL CONTROL
T
OUTPUT
at
the terminals on the panel.
OUTPUT
ATTENuATOR
nn
OUTPUT
figure 2-4. This additional resistance will reduce the
source impedance at the lower terminals to about 75
ohms and will also reduce the voltage available from
the lower terminals to approximately the same amount
available at the upperterminal. At the same time the
additional resistance will form a more favorable time
constant with the stray capacity
Co at the lower terminals and thus speed up the normally slower rise time
at those terminals until
comparable to
that
of the
it
is
75-ohm output.
2-27. Figure 2-4 suggests the use either of two
75-
ohm cables or abalanced 150-ohm cable for connecting
to the load.
In.
either of these cases
it
is
normally
unnecessary to terminate the cables, so that they can
be connected directly to the load. The arrangement
has
the advantage that
If
impedance.
cables of other impedances are used,
they should be terminated
ance of the cable. This will involve
it
can be used with any load
inthe characteristic imped-
a
consideration
of the load impedance in some cases.
75n
OUTPUT
BALANCED
TWO
75n
150n
CABLE
0
R
COAXIAL
1
cneLes
-
-------
OUTPUT
Figure 2-3. Basic Output Circuit of 211A.
2-26.
In
figure 2-4 the upper terminal represents
the 75-ohm output and the lower terminals represent
the 600-ohm output. To equalize the source impedance
at the two outputs, a resistance of 86 ohms can
connected across the lower terminals
as
be
shown in
SEE
TEXT-
'
Figure 2-4. Method
Output from the 2
of
Obtaining a Balanced
11A
2-28. The output voltage can be selected most conveniently if the 75
ATTEN. output
is
first set to
S2
zero. The two OUTPUT AMPLITUDE controls will
then have about the same voltage range and each should
as
be set
necessary to obtain one-half of the desired
output voltage. This will occur when both controls are
If
at about the same angular position.
desired, both
line-to-ground voltages can be measured with a volt-
meter or an oscilloscope.
2 -29. Output voltage will be as high as 14 volts
peak-
to-peak, open circuit, and 7 volts peak-to-peak ter-
minated with 75 ohms.
Page 10
Section
Figure
III
3-1
Model
211A
SYNC
IN
SCHMITT
TRIGGER
(SINE
OR
POS.
-
PULSE)
OSYMMETRY
\
\
\
\
\
\
\
\
I
,
AMPLITUDE
-
PLATE
COUPLED
Iw
-v
I----
\
\
\
\
\
\
\
\
\
\
CLIPPER
AMPLIFIER
\
\
-
POWER
AMPLIFIER
0
\
\
\
\
\
-
ATTENUATOR
\
\
\
-
-
o.20.40,
+600fL
+75n
-
-
P
\
\
\
-
\
-
\
I
-
Figure
3-1.
Block Diagram Showing Operating Controls of
211A
Page 11
Model 211A
Section
Paragraphs 3-1 to 3- 18
III
SECTION
CIRCUIT DESCRIPTION
3-1.
INT~?ODUCTION.
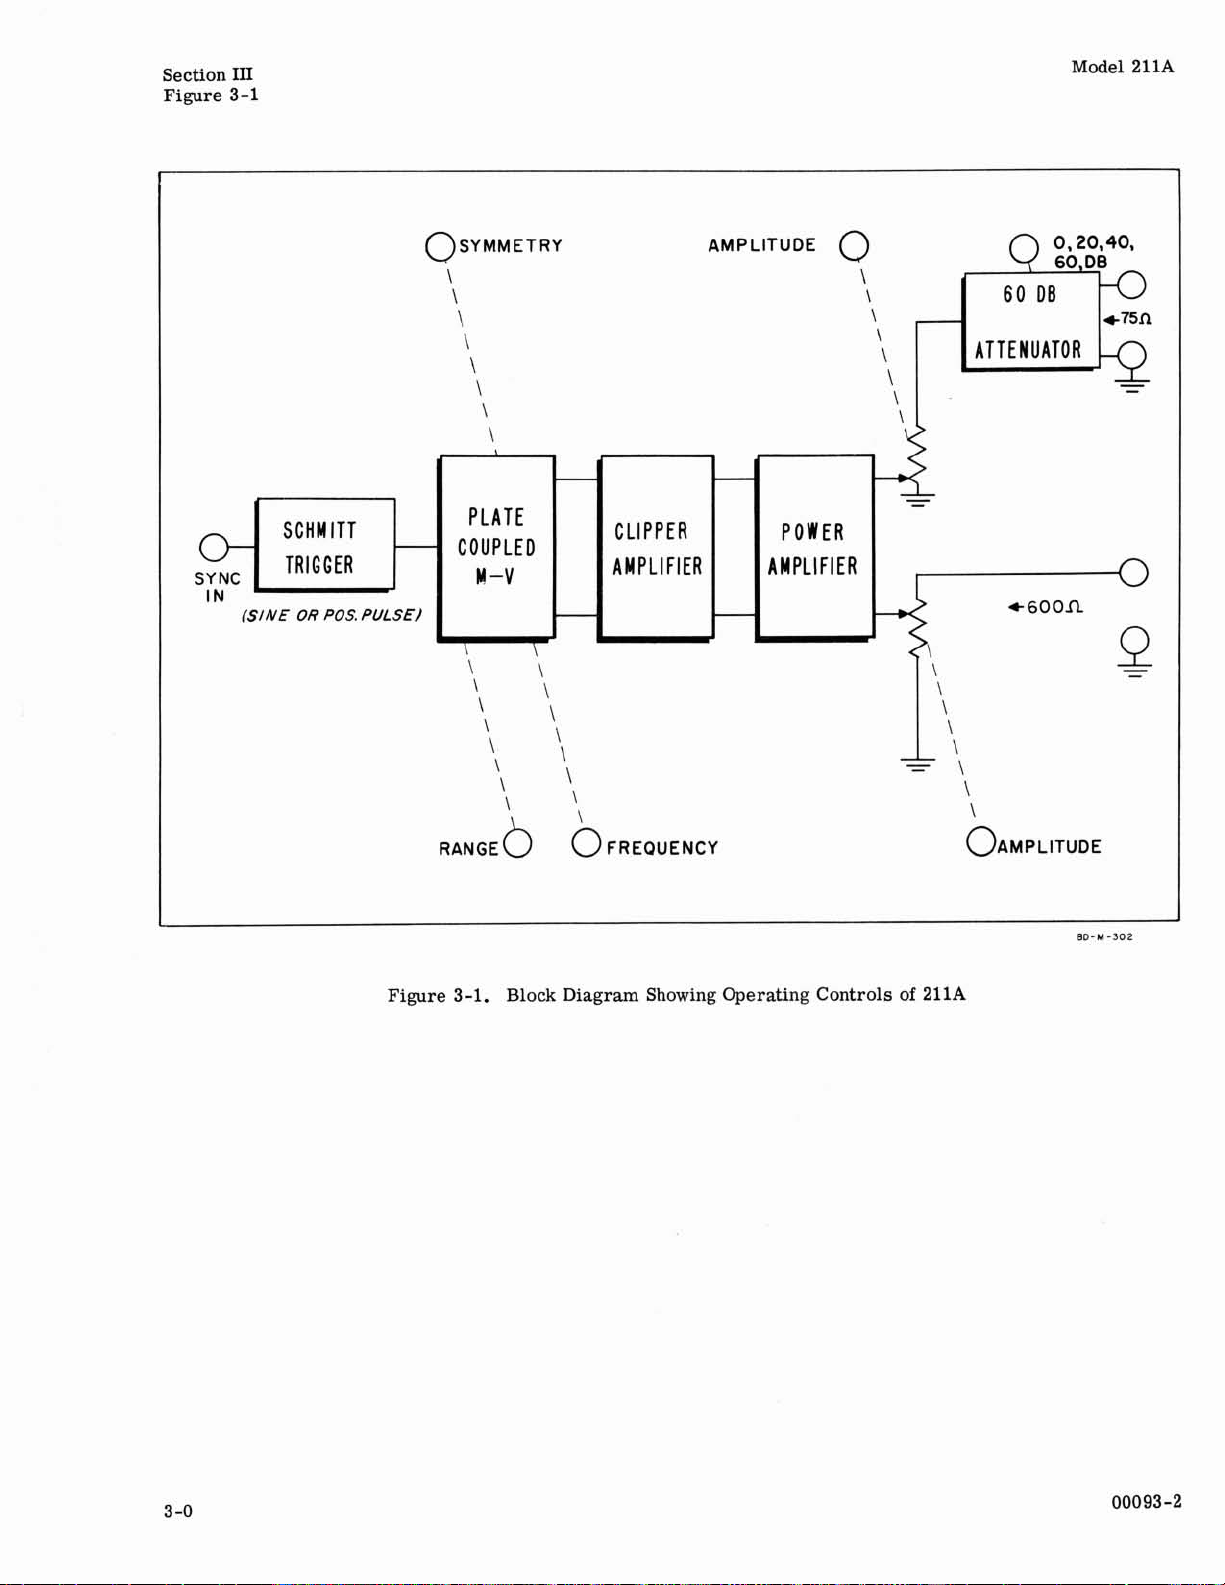
3-2. Maior circuit elements are shown in the circuit
diagram figure 3-1. Special aspects
block
circuit elements are discussed in subsequent paragraphs to supplement the general discussion in para-
1-1.
graph
3-3.
SYNC TRIGGER.
3-4.
The
sync trigger
switcheswith the application
on the input grid. The circuit configuration
tional for a Schmitt trigger except the
placed in the trigger-output circuit to produce spikes.
Since the Schmitt trigger changes state once on the
positive-going portion
the negative-going ~"rtio% two spikes are developed
across the
and the other negative.
3-5.
grid of one multivibrator tube (V3) cutting off conduction. Conduction then starts in V2. For the sync
trigger to effect a synchronized condition inthe multivibrator, the negative cut-off pulse from the trigger
must
cut-off in a free-running condition. This
lished
(with the FREQUENCY dial) to a value slightlv less
than
3-6.
the Schmitt-trigger circuit
adjusting the cathode level.
so that the triggering level
of the trigger input grid.
3-7.
3-8. The multivibrator (V2 and V3)
free-running, plate-coupled multivibrator. The frequency of operation
return voltage with R37 (FREQUENCY control) over
3-9. The RANGE switch S2 inserts various rc time
constants into the grid return circuit, and these time
constants establish the rate of decay for the cut-off
side of the multivibrator toward the voltage established
by the FREQUENCY control
3-10. The diode clamp controls the current of the con-
ducting side of the circuit and thus controls the voltage
drop across the plate load resistor of the conducting
half.
clamp control cathode follower V5. Since this adjustment determines the startingvoltage level for decay in
the section cutting off,
the frequency of operation, and
the instrument initially at 1000
The function of the clamps
L1, L2 differentiating circuit, one positive
The
reach
that
Output grid bias (effectively,sync sensitivity) in
This voltage
the grid
the
operator setting
of the incoming sync signals.
MULTIVIBRATOR.
is
is
a
Schmitt
of
a
of
an
is
of
V3
the
is
adjusted with R10, thus
R10
is
is
3 volts above the level
is
varied by adjusting the grid
R37.
established by adjusting
it
also exercises control over
it
cps on the XlOO range.
is
to stabilize the frequency
trigger
positive going signal
L1 and L2 are
signal and once on
through
the
tube
free-running
normally adjusted
is
a conventional,
is
used to calibrate
is
conven-
CR1
reaches
is
accomp-
R31
these
which
to
the 3-14. At high frequencies, the effective
rate
on the
Ill
of operation against changes in the circuit such as tube
aging, line voltage, and filiament fluctuations.
3-11. The output
push-pull drive for the clipper amplifier V6 and V7.
3-12.
3-13. Clipper amplifier tubes V6 and V7 alternately
conduct
drivers for the output tubes.
clipper
fier stage through a broadband inter stage network con-
sisting
the
R57, R58,
sensitive
of
ages
normal plate load resistors
are reduced to preserve fast rise time of the square
waves.
C21 through C23 to
~22 through
this path the high
and R58, since these are small compared to the nor-
mal
3-15.
3-16. The power amplifier consists of four type 6CL6
tubes arranged in push-pull parallel with a constant
resistance network in the cathode circuit, R65, R66,
R67, and L8. This network compensates for the effects of heater-cathode capacitance on the leading and
trailingedges of square wave output duringtube switching. The output tubes, like the clipper amplifier stage,
alternately conduct and cut-off. The compensating
network introduces a reactive transient into the cir-
cuit with a sign opposite to that produced by the tube
elements during switching.
3-17. Each side of the power amplifier furnishes a
separate output to the output stage of the instrument.
The low impedance output passes through a 75-ohm
potentiometer (OUTPUT AMPLITUDE control) to
75-ohm three-section pi-filter. The 600-ohm output
passes through a 600-ohm potentiometer (OUTPUT
AMPLITUDE control) to the output terminals. The
600a OUTPUT AMPLITUDE control
ometer and consists of two 1200-ohm sections
lel to accommodate heat dissipation requirements.
3-18. Since the power supply
to the chassis and the output
square wave
ground terminal. Thus the negative portion of the
source wave
portion
CLIPPER AMPLIFIER.
and cut-off in opposition, and serve as the
amplifier
of
C19,
associated
C21
to
the output tubes. ~h~ ,-.lipper amplifier
for
low
The
plate loads whichtheyparallel at highfrequencies.
POWER AMPLIFIER.
is
at ground potential.
from
the rnultivibrator furnishes
The outputs from the
are
dc-coupled to the power ampli-
and
R52,
C20
and
R53,
togetherwith
plate
load
and
C22.
maintain
resistors
This
a
including ~55, R56,
network
voltage on the grids
is
frequency
output
frequencies
high
frequency
B+
C-3
to
B+
frequency
is
actually negative with respect tothe
is
below ground potential and the positive
are
developed
(R56, R50, R51, ~54).
path
is
at
chassis ground, and by C20,
at
chassis ground.
plate loads become R55
is
negativewith respect
is
direct coupled, the
across
plate
defined
is
a dual potenti-
by
~h~~~~h
inparal-
volt-
the
loads
C19,
a
a
Page 12

Section IV
Table 4-1
-
TUBE
TYPE
Table 4-1. Tube Replacement Chart
FUNCTION
ADJUSTMENT REQUIRED
Model 211A
V1
V2
V3
V4
V5
V6
V7
V8
V9
V10
V11
V12
V13
V14
Vl5
6BQ7
6CL6
6CL6
6AL5
6 C4
6CL6*
6CL6*
6CL6*
6CL6*
6CL6*
6CL6*
5V3
6AS7GA
6BH6 Control Tube
1
5651
*Type 6197 tubes may
Schmitt trigger
1/2 Multivibrator
Multivibrator
1/2
Diode Clamp
Clamp Control Cathode Follower
7552 Output Clipper Amplifier
60052 Output Clipper Amplifier
7552 Output Tube
7552 Output Tube
60052 Output Tube
60052 Output Tube
Full-Wave Rectifier
Series Regulator
1
Reference Tube
be
used in place of type 6CL6 if desired
Adjust SYNC SENSITIVITY, paragraph 4-24
Recalibrate FREQUENCY dial, para. 4-20
dial,
dial,
dial,
para. 4-20
para. 4-20
para. 4-20
Recalibrate FREQUENCY
Recalibrate FREQUENCY
Recalibrate FREQUENCY
No adjustment
No adjustment
No adjustment
No adjustment
No adjustment
No adjustment
Check power supply output (paragraph 4-15)
Check power supply output (paragraph 4-15)
Check power supply output (paragraph 4-15)
Check power supply output (paragraph 4-15)
Page 13

Model 211A
Section IV
Paragraphs 4-1 to 4-18
SECTION
MAINTENANCE
4-1. INTRODUCTION.
4-2. This section contains instructions f or maintaining, troubleshooting, replacing tubes, and internal
adjustment of the Model 211A Square Wave Generator.
A systematic troubleshooting chart will assist in
localizing most troubles which may occur, and it
keyed to applicable paragraphs in the test tofacilitate
testing the instrument. Another chart includes instruc-
f
or tube replacement and subsequent adjustments.
tions
is
A table of important waveforms
a
discussion of techniques and equipment necessary to
observe these fast rise waveforms.
4-3.
CABINET REMOVAL.
4-4. To remove the instrument from the case, remove
the two machine screws
slide the instrument forward.
4-5. EQUIPMENT REQUIRED.
4-6. The test procedures in this section attempt to
isolate
a
of the instrument, however, require that the following
test equipment be available.
as
many probable difficulties
minimum of equipment. The nature and capabilities
Table 4-2. Test Equipment
onthe rear
given together with
of
the cabinet, and
as
possiblewith
Required
is
IV
failure possibilities.
chart should be performed
chart assumes that the section aheadof the one under
is
investigation
4-10.
normally operating instrument.
of importantwaveforms observed on
ment
ment and techniques needed to successfully observe
these fast rise waveforms (paragraph 4-27).
4-11. For
variable transformer toadjust the line voltage between
105 and 125 volts
satisfactory condition should operate over this range.
An instrument having marginal operation (from weak
tubes) can be quickly detected
weaknesses become easier to trace.
4-12. TUBE REPLACEMENT.
4-13. Tubes used in the Model 211A Square Wave
Generator are listed in table 4-1. A tube may be replaced with any
characteristics. Those tubes which require adjust-
ment when replaced are accompanied by
the applicable paragraphinthis section of the manual.
A voltage and resistance diagram
cluded (figure 4-7) which gives values measured on a
is
given, together with a discussion of the equip
operating correctly.
all
testing of the Model 211A the use of
The maintenance steps in the
inthe order given since the
has
In addition, a chart
a
typical instru-
is
recommended. An instrument in
at
low line voltages, and
tube
of
its
type having standard EIA
a
reference to
been in-
-
a
Adjustment
Frequency
Calibration
Output Wave
Characteristics
4-7.
TROUBLE LOCALIZATION.
4-8. The Model 211A Square Wave Generator
precision instrument designed conservatively for long
component life. Tube replacement and adjustments
will repair
Isolation
considering the basic sections of the instrument as
shown in the block diagram, figure 3-1.
4-9. The troubleshooting chart (see table 4-3) describes checks to be performed which locate specific
symptoms, together with possible causes and remedies. In the chart (table 4-3) only the tubes are
referenced,
ponents associatedwith the referenced tubes are also
a
of
a circuit failure
@Model 405 series or
Electronic frequency counter
(@
Model 523 or 524 series) or
an oscillator and oscilloscope
for Lissajous patterns.
High frequency oscilloscope with
dc input feature and
amplifier rise time of at least
0.012
psec, to check squarewave
leading edge output.
(@
Model 170A/162F)
majority of difficulties which develop.
is
frequently possible by
but it should be remembered that com-
412A.
a
vertical
is
a
4-14. The type
ruggedized equivalents, type 6197, to take advantage of
the benefits of
the
6CL6 apply equally to the 6197.
4-15. ADJUSTING THE POWER SUPPLY.
4-16. The power supply in the 211A must function
correctly before the instrument will operate properly.
Noise or variations in the regulated voltages may cause
the instrument to drift out of calibration and other
circuits to operate erratically.
4-17. To measure power supply voltage, connect a
dc voltmeter with
end terminal of
sis.
The voltage should be between -192 and -200 volts.
This voltage must be set to the point where regulation
is
obtained under high (115 volts
volts -10%) line conditions. A value of -195 volts
average for most instruments.
4-18.
lost under high-line conditions and excessive jitter
will occur in the leading edge of the output
wave.
and leading edge jitter will be noted under low-line
conditions. Excessive jitter in the leading edge of the
output square wave will indicate loss of regulation
more quickly than a dc voltmeter connected directly
across the output of the power supply. This check
If
If
the voltage
6CL6 tubes may be replacedwith their
.this premium type. All references to
i1%
calibrated accuracy between the
R10 (shown in figure 4-2) and the chas-
the voltage
+lo%)
is
set too low, regulation will be
is
set too high, loss of regulation
and low (115
is
square
Page 14

Section
Figure
4-1
IV
Model
211A
Figure
4-1.
Model
211A Bottom
View Showing Amplifier
and
Power Supply
00093-8
Page 15

Model 211A
Section IV
Table 4-3
Table 4-3. Troubleshooting Chart
AND
CHECKS
1.
POWER SUPPLY
With line voltage set at
of regulated supply
SYMPTOMS
115V, check that output
is
at correct value (see
figure 4-2)
Slowly vary supply voltage from 105 to 125 volts.
of
The negative output
the supply should not vary.
Excessive variation:
Low voltage:
High voltage:
Erratic voltage:
52
2. OUTPUT WAVEFORMS 75
Observe and measure output waveform at
OUTPUT
75
output terminals with a high-speed (30 mc
response) oscilloscope. See paragraph 4-27.
Adjust SYMMETRY control to mechanical
center.
Waveform grossly out of symmetry.
Cannot correct with control:
Leading edge rounding:
(75
52
Low peak voltage
(600
52
output normal)
Weak output (both 75S2 and 60052 outputs)
out)
:
:
POSSIBLE CAUSE
Replace V13, V14, V12 or
V15 in this order. V13,
V14 and V12 are most likely
to cause trouble.
Defective rectifier V12
or regulator V13.
Defective controltube
Vl4.
Defective reference tube
V15.
Defective V2 or V3.
Defective V6,
V8,
or V9.
Defective V6, V8, or V9.
Power Supply.
Defective V6 and/or
V7.
REMEDY
if
Readjust R92,
with
115V ac line. See
necessary,
paragraph 4 -15.
Replace tubes; check supply;
see paragraph 4-15.
Replace; check supply; see
paragraph 4-15.
Replace; check supply; see
paragraph 4-15.
Replace; recalibrate
XlOO
range. See DIAL CALIBRATION, this chart.
Replace. No adjustment.
Replace, No adjustment.
Check paragraph 4-15 and
this
POWER SUPPLY,
chart.
Replace. No adjustment.
With dc input feature on scope, check 1 cps
output
(be
sure dc amplifier in scope
is
balanced)
Sloping top on waveform:
Check leading edge
of
output at 1 mc
Rise time slow:
3. OUTPUT WAVEFORMS
60052 TERMINALS.
Observe and measure output waveforms at 600
terminals with a high frequency oscilloscope
with a rise time
response)
=
O.Ol2psec or less (30 mc
if
possible. See paragraph 4-27.
Leading edge rounding:
52
Low peak voltage (75
Check 600
52
output at 1 cps and 1 mc as des-
cribed above (step
normal)
2).
:
Defective V2 or V3.
Defective V6
Defective V6
thru V11.
thru
V11.
Defective V7, V10 or V11.
Defective V10 or V11
Replace; recalibrate
XlOO
range. See DIAL CALIBRATION, this chart.
Replace as necessary.
No adjustment.
Replace as necessary. No
adjustment.
Replace as necessary.
No adjustment.
Replace as necessary.
No adjustment.
Page 16

Section IV
Paragraphs 4-19 to 4-23
CHECKS AND SYMPTOMS
4. DIAL CALIBRATION
Check calibration at
setup shown in figure 4-3.
Calibration tracking off more at one end
than at other:
Slight deviation:
Unable to adjust with
Check
Table 4-3. Troubleshooting Chart
1000 cps on XlOO rangewith
R31:
(cont'd)
POSSIBLE CAUSE
Power supply not properly
set.
Out of adjustment.
Defective V2 and V3.
Defective V4,
Model 211A
REMEDY
Check power supply.
Adjust
paragraph 4-20.
Replace; recalibrate
range. See paragraph 4-20.
Replace; recalibrate
range. See paragraph 4-20.
R31 for 1000
s
.
XlOO
XlOO
See
5. INPUT
Drive sync in with 5-volt peak 1000 % signal.
Set 211A dial to 980 cps. Test setup shown
in figure 4-4.
Check range
is
valid only when
are known to be good. Failure of the power supply
to regulate
tubes. See table 4-3, Troubleshooting Chart.
4-19.
at a location where a 211A
supply can be adjusted to partially compensate for any
adverse effects in instrument performance. The nega-
tive dc output of the power supply
-200 volts in the text and the schematic diagrams in
this manual. The actual voltage in an instrument will
vary
4-20. FREQUENCY CALIBRATION.
4-21. The output from the
cps on the XlOO range with the FREQUENCY dial set
to 10. The operating frequency of the 211A on
range
current (bias) which
R31 in the clamp circuit. All other ranges are calibrated by adjusting the rc time constants
network after the XlOO range
4-22. The test setup for frequency calibration
shown in figure 4-3. The procedure
If
from this figure
is
TFUGGER
No sync:
of
sync to 950 cps.
Sync will not hold range:
1
Sync normal at
all
prcperly
prevailing high or low line conditions occur
kc lack
other tubes in the instrument
is
generally
is
as
just described.
211Ais adjusted tothe 1000
determined by the multivibrator operating
can
be adjusted by potentiometer
of
sync at 1 mc:
an
indication of weak
being used, the power
is
referred to as
theXlOO
inthe timing
is
correctly set.
is
is
as follows:
Defective
Defective CR1 or V1.
L2 open
V1
a. Set FREQUENCY
RANGE switch to
b. Connect instrument output to either a counter
or to the horizontal sweep of an oscilloscope with a
stable oscillator
c. Adjust
cps from the Model 211A on the counter, or a zero
beat Lissajous pattern on the scope.
d. Repeat steps a and b above using 100 cps, with
FREQUENCY
on the counter or a zero beat Lissajouspattern on scope.
4-23. Calibration of all ranges should be done in the
order shown in the Calibration Chart (table
frequency counter
measurement for steps 5 and
measurement. When using period measurement,
measure a total square wave period, rather than a
half-period, to eliminate SYMMETRY control effects.
A 0.01
tween the Model 211A output and the counter
input when making period measurement.
drivingthe vertical sweep at 1000 cps.
R31, shown in figure 4-2, to obtain 1000
dial
pf capacitor should be connected be-
Replace; adjust sync
tivity. See paragraph 4-24.
Replace; adjust sync
tivity. See paragraph 4-24.
Replace; adjust sync
tivity. See paragraph 4-24.
dial
on 211A to 10 and the
X100.
set to
1.
Adjust R98 to obtain 100 cps
is
used for calibration, use period
6,
rather than frequency
Note
sensi-
sensi-
sensi-
4-41.
If
a
Perform Steps in Order
1.
2.
3.
4.
5.
6.
Set Range to:
XlOO
X1K
XlOK
XlOOK
XI0
X1
Table 4-4. Calibration Chart
Set Dial to:
10
10
5
5
1
1
Adjust Pot.
Measure Frequency
Paragraphs 4-20, steps a through d
R2
R20
R19
R23
R24
1
10,000 cps
50,000 cps
500 kc
10 cps (100 ms)
1
cps (1000 ms)
Page 17

Model
211A
Section
Figure 4-2
IV
Figure 4-2. Model 211A
Top
View
Page 18

Section
Figures 4-3 and 4-4
IV
Model
211A
f
@
000
00-
\
-hp-
MoDEL ellA
SQUARE WAVE
@
@
GENERATOR
\<
USE
0.01
WHEN MAKING PERIOD
MEASUREMENT
UF CAPACITOR
-hp-
SERIES
FREQUENCY COUNTER
MODEL
523
OR 524
\
-~
/
0 0
0 0
0
LD-L-24BC
\
i
63
000
f
\
-hp- -hp-
MODEL200CD
WIDE RANGE
OSCILLATOR
Figure 4-3. Test Setup for Frequency Calibration
GND TO CHASSIS
OSCl LLOSCOPE
LOW CAPACITY
HIGH FREQUENCY
PROBE
f
0
>
MODEL 4000/H/L
VOLTMETER
@
\
VERT.
0
HORIZ.
0
LD-L-24BC
\
1
I
Figure 4-4. Test Setup for Sync Sensitivity Adjustment
Page 19

Model 211A Section IV
Paragraphs 4-24 to 4-39
4-24.
4-25,
the Schmitt-trigger tube
3 volts below cut-off. Operation
therefore requires an input signal of at least 3 volts
peak amplitude.
4-
sine wave of 2.1 volts rms (3.0 volts peak).
probe to pin
scope.
ADJUSTING EXTERNAL SYNC SENSITIVITY,
In
the no-signal condition the input section of
V1
is
biased approximately
of
the sync circuit
26. To adjust the sensitivity of the trigger:
IN
a. Drive the SYNC
connector with a 1000 cps
b. Connect oscilloscope through a law-capacity
See figure 4-4.
c.
6
of V1.
R10 to obtain a square-wave on oscillo-
Turn
megacycles.
This corresponds to
a
rise time of approximately 0.012 microseconds. Approximate rise
time of an oscilloscope can be calculated by dividing
is
bandwidth into 0.35. For example, if bandwidth
mc, the rise time
4-33, When using an oscilloscope with
sponse (rise time
still
be read in the rise time of the 75
is
approximately 0.012 microsecond.
a
=
0.012 microsecond),
30 mc re-
an
error will
52
output. The
30
true rise time of the 211A alone can be conveniently
is
computed, however. The formula
t
=
0
I
dtt
-
2
t2
where
to
tl
t2
=
=
=
as follows:
actual rise time in
microseconds
observed rise time
known rise time of
oscilloscope verti-
d. Turn
R10 to maximum cw and waveform on
cal amplifier
oscilloscope should disappear.
4-34. As an example, the measured values takenfrom
a
e. Adjust
R10 counterclockwise until negative pulse
just appears on oscilloscope.
is
f. This
correct adjustment of the SYNC sensi-
production unit which are shown in the waveform
charts figure
0.023
psec. The actual rise time
4-7A and 4-7B, indicate a rise time of
is
computed below:
tivity control for reliable external synchronization
a
positive-going pulse or sine wave signal having
with
a
minimum amplitude of 5 volts peak.
to
=
4-27.
4-28. The 211A
WAVEFORM OBSERVATION AND
MEASUREMENT*
is
very reliable in
that
it
is
for the
most part a "go" or "no go" type of circuit. If the
unit
is
operating normally, there
that
the rise time of the leading edge of the square
is
wave
is
a
slower than rated.
due to weak tubes, however,
part
has
been damaged and has changed value, the
is
very little chance
Generally slow rise time
it
is
possible that
if
0.0196 microseconds actual risetime
Square Wave Generator.
4-35. The typical waveforms shown in figure 4-7A, B
can be observed with the following equipment:
($9
a. Oscilloscope:
Model 170A with 162F Preamplifier, or Tektronix Type 545A with type
amplifier (use either instrument).
($9
b. Probe:
Model AC-21A
(10:l) or AC-21C (50:l).
of
the 211A
K
Pre-
rise time may be less than rated.
4-29.
The rise time
of
the 600-ohm output
is
less
than 0.1 microseconds with the OUTPUT AMPLITUDE
set at
maximum. Reducing the setting of the 600
SZ
OUTPUT AMPLITUDE control to approximately a dial
setting of "2" will give a voltage level approximately
the same
as
that from the 75-ohm output jack.
The
rise time will be improved due to reduced shunting
effect of circuit capacity.
the same as that from the 75-ohm output jack
A rise time of essentially
is
pos-
sible under these conditions.
4-30. A low capacity probe specifically designed for
high
frequencies should be used for observing waveforms. Certain probes may tend to ring at a high
frequency when hit with very fast pulses.
4-36. Use of
operating order as far as high frequency signals are
concerned, may cause the
slightly uneven across the top, even though
fectly square
determine
the 211A
square wave from the 75-ohm output.
4-37. Since the 211A square wave
with respect to ground, the highest part of the square
wave must be in fact
ling, ground the probe and note the position of the
trace on the graticule, then note
of the square wave exceeds the point of zero volts.
it does, the oscilloscope
an
oscilloscope which
1
mc square wave to look
at
low frequencies. A simple check to
if
the trouble
is
to use d-c couplingwhen observing a 1 mc
is
in the oscilloscope or in
at
zerovolts. While ond-c coup-
is
at fault.
is
not in good
it
is
is
negative going
if
the highest part
per-
If
4-31. To measure the rise time of the 600
which
is
approximately 0.1 microsecond,
scope with a bandwidth of 10 megacycles
quate. Excellent oscilloscopes for
the
@Model 160B or 150A.
TOACCURATELY MEASURE THE RISE TIME
4-32.
OF THE 75
HIGH
tical amplifier should
52
OUTPUT REQUIRES
SPEED OSCILLOSCOPE. The oscilloscope ver-
have a bandwidth of at least 30
is
this
purpose are
AN
EXTREMELY
SZ
output,
an
oscillo-
quite ade-
4-38.
one of the tubes in the
If
the oscilloscope
is
proven not to
be
at fault,
211Ais weak and should be re-
placed. The two situations are shown in figure 4-6.
4-39. When observing a
1
mc square wave there may
be a very small amount of overshoot or undershoot at
the leading edge of the bottom of the negative portion
is
of the square wave. This
normal. A shorted C24
will cause approximately 5-10 volts drop in amplitude
of the 600
output and a slightly slower rise time.
Page 20

Section
IV
Paragraphs 4-40 to 4-42
4-40.
ity or
R57
the square wave.
itors
If
C19, C20, C21, or C22 have too much capac-
if
the associated resistors R52, R53, R56, and
have low resistance, there will
If
the capacity
is
low or the associated resistors have for some
be
overshoot on
of
any of these capac-
reason increased in resistance, there will be under-
of
shoot or rounding of the corner
the leading edge of
the square wave. Before any changes in these parts
are made, however, every effort should be made to
this
is
correct the trouble with good tubes as
the nor
ma1 reason for poor waveshape. Unless these parts
have changed value, these circuits should not need
adjustment. No adjustment should be attemptedunless
a
30 megacycle oscilloscope
when the compensation
is
correct.
is
available to determine
CAUTION
To avoid accidental damage, always turn off
power before removing or installing circuit
board assemblies.
-
Model 112A
4-41.
4-42. The Model 211A
etched circuit boards;
SERVICING
ETCHED
is
i.
CIRCUIT
supplied with single-sided
e., conductive material
BOARDS.
located only on one side of the boards. Funneled eyelets insure good electrical contact between component
leads and conductor. When servicing these boards,
the following general rules should be followed:
a.
DO NOT APPLY EXCESSIVE HEAT to compo-
nents or conductor.
b.
To remove damaged components, clip leads near
component; then apply heat and remove leads with a
straight upward motion.
.
c. Use a toothpick or wooden splinter to clean compo-
nent mounting holes before installingnew components.
d.
APPLY SOLDER FROM CONDUCTOR SIDE of
board to insure good contact between eyelets,
comp.0-
nent lead, and conductor.
is
211
SYNCHROSCOPE
AT FAULT
AT FAULT
A
Figure 4-5. 75-ohm Output Waveform which has Defects on Positive Portion,
as Observed with a DC Coupled Oscilloscope
RO
Page 21

Model 211A
Section IV
Figure 4-6
IKC SQUARE WAVE
I MC SQUARE WAVE
600-ohm output
Amplitude control
set at "10"
pec/cm
0.1
50 volts/cm
600 -ohm output
Amplitude control
set at approx. "2"
5
volts/cm
75-ohm output
Controls set for
maximum output
5
volts/cm
7 5-ohm output
0.02
psec/cm
X50 attenuation
10 megohm probe
used
Gain adjusted to
give 10 divisions
vertical deflection
for ease in measuring rise time
leading edge
square wave
75-ohm output
of
of
V6
I
KC
200 kS/CM 082 pS/CM
SV/CM
PIN
2
SV/CM
V6 PIN6
200 pS/CM Oa2 bS/CM
20V/CM 20V/CM
V8
200 WS/CM 0.2 kS/CM
5 V/CM
PIN9
5 V/CM
I
MC
Same test conditions as for
Note that rise time
is
as at
Figure 4-6A
1
kc
NOTE: Since the circuit
the same at 1 mc
1
kc
Figure 4-6. Model 211A Waveforms
waveforms on
is
balanced, the
V7 and V10 are the
same as those on V6 and V8.
Figure 4-6B
Page 22

NOTES.
I. CONDITIONS OF MEASUREMENT
ALL VOLTAGES AND RESISTANCES MEASURED TO CHASSIS
WITH 20.000!llVOLT MULTIMETER UNLESS OTHERWISE
SPECIFIED
BY
ASTERISK(t1
lt
DC VOLTAGES SO MARKED MEASURED WITH 122 MEGOHM
INPUT IMPEDANCE VTVW
2. CONTROL SETTINGS
RANGE
.
XI00
FREQ DIAL : I0
3 li.looon
M = YEGOHM
N.C = NO CONNECTION
:*-
230VAC
N.C. 23lvAC
lad
'5
2
4'
19K
-
-
Figure
4-7.
Voltage
and
Resistance
Diagram
Page 23

SYNC TRIGGER
---
--CIS
".OW~
,
-
-
('
R37
.-
c.
h)
w
w
*
R3
3900
BROWN
-
1
[6S"q
I
BRW*
-
.OIlIF
540
IVSI
.Id
8.
..l*.U
.~.,..d
,on.
7:fLq
R98
5K
IV
MWL~.~ACKUD
I.
in,."d.d
lor
1.1
.I
).
*.
b.
.l*,...L~d
"..a
rn"."
cmmgn,.
6.
opn,i.m
.*..w..
ro"..",
-
-195v
mur*wr
3u*.
n,
h.
RY)
2700
.r
R12
422
L4
0
41
-TO
-9.5
-4
-5
"'
-5
-4
"6
TO TERMINALS
1
67
OF L8
.
R87*
am
.22UF FREO
V6
TO
6.3AG
IGRNDI*
Osl
6C4
CLAMP
CONTROL
IRI.6EI
-
-
-
SWITCH
.OIpF
RW
9a5K
@,
R31
50K
R32
I.03IY
ULIIU)ATE
IOOO'L
RME
.2PUF
XMO
TO
V7-1
colnsm
,*I.
."d
"."I
..F.od.<.d
*.~I.ll
111.-,,-
dn-il
m.,*.ur.
Figure
4-8.
Multivibrator
and
Power Supply
-195v
Page 24

leoosl
S2
-1
0------.,
I.OWI
.
.*
.
-19sv-
C 17
R4 0
IM
CLIPPER AMPLIFIER OUTPUT AMPLIFIER
RSI
R47
470
2000
R46 2aX)
at
R45
47
,-I
R43
27K
-Jo
V6
6CL6'"
I
-l60
,
R69
22OK
R7T 371.3
1
NOTES:
I
CONTROL SETTINGS:
75 ATTEN - 600s
RANGE -XI00
2.
+
0.
&.
fl
OF
PREMlVYNBEMPEU97MAYBEUSmlNRYX
FREQ DIAL- I0
ALL DC VOLTAGES MEASURED TO CHASSIS WITH
A VACUUM TUBE VOLTMETER HAVING 122 MEGOHM
INPUT IMPEDANCE
OPTIMUM VALUE SELECTED AT FACTORY. AVERAGE
VALUE SHOWN
OHMS UNLESS OTHERWISE NOTED.
PANEL
6CL6 IF OFSIRED.
CAPACITY IN PF. RESISTANCE IN
cmmo~
CHISSlS
LPANEL
I
MARKING
1180
371.3
41
-
-
-
I
Figure
4-9.
Output
Section
Page 25

-m-
(4)
REAR mEOFWAFfRS SHOWN.
(8)
FACING FRONTOF PANEL
ROTATION
OF
RANGE
IN
TO
Omrs
swrcn
CCW
UNLESS
KNOB
EWIVALENT
ATION OF ROTORS SHOWN AM.
(C)
CAPACITANCE IN U!JF UNLESS
OTHERWISE SHOWN.
(0)
RESISTANCE
OTHERWISE SHOWN.
,
CW
ROT-
I
L
---,
R21
,,&
@
-------
PANELEND
OF
SWITCH
I
-l
Figure
4-10.
Range
Switch Detail
Page 26

Section
IV
Figure 4-11
Model 211A
R75 91.67
M6 91.67
RIB 91.67
R79 91.67
RBI 91.67
40DB
-NOTES-
swlnn
OF
KNOB
IS
ROTORS SHOWN
(A1
REAR FACE OF WAFERS SHOWN
FACING FRONTOF PANEL,CW ROTATION OF
(8)
ATTENUPTOR
TO CCW ROTATION
IC1
CAPACITANCE IN UPF
(0)
RESISTANCE IN OHMS
EQUIVALENT
BELOW.
R72, , -75
OUTPUT AMPLITUDE CONTROC
SWITCH SHOWN IN 6006 POSITION
Figure 4-11. Attenuator Switch Detail
Page 27

Model 211A
Section
Paragraphs 5-1 to 5-7
V
SECTION
REPLACEABLE PARTS
5-1.
INTRODUCTION.
5-2. This section contains information for ordering
replacement parts. Table 5-1
numerical order of their reference designators and
indicates the description and
part, together with any applicable notes. Table 5-2
lists parts in alpha-numerical order of their
numbers and provides the following information on
each part:
a.
Description of the part (see
below).
b. Manufacturer of the part in a five-digit code;
see list of manufacturers in appendix
c.
Typical manufacturer's stock number.
d. Total quantity used in the instrument (TQ column).
e. Recommended spare part quantity for complete
maintenance during one year of isolated service
column).
5-3. Miscellaneous parts not indexed in table 5-1 are
listed at the end of table 5-2.
lists
parts in alpha- inquiry either to your authorized Hewlett-Packard
$3
stock number of each
'$3
list
of abbreviations
stock
(RS
V
5-4.
ORDERING INFORMATION.
5-5. To order a replacement part, address order or
sales representative or to
CUSTOMER SERVICE
Hewlett-Packard Company
395 Page Mill Road
Palo Alto, California,
or, in Western Europe, to
Hewlett-Packard S.
Rue du Vieux Billard No.
Geneva, Switzerland.
5-6. Specify the following information for each part:
a.
Model and complete serial number of instrument.
b. Hewlett-Packard stock number.
c. Circuit reference designator.
d. Description.
5-7. To order a part not listed in table 5-1, give
complete description of the part and include
tion and location.
A.
1
its
func-
a
=
assembly F =fuse
A
B
=
motor
C
=
capacitor
=
diode
CR
=
delay line
DL
DS
=
device signaling (lamp)
E
=
misc electronic part
a
=
amperes
bp
=
bandpass
bwo = backward wave
c
cer
cmo
coef
com = common
comp = compsition
conn = connection
crt
d:p
4
0)
A
A
o
oscillator
=
carbon
=
ceramic
=
cabinet mount only
=
coefficient
=
cathode-ray tube
=
deposited
meeting Electronic
Industries' Association standards will
normally result in
instrument operating
within specifications;
tubes and transistors
selected for best
performance will be
supplied if ordered
by @stock numbers.
REFERENCE DESIGNATORS
FL
=
filter
J
=
jack
K
=
relay
L
=
inductor
M = meter
MP = mechanical part
elect = electrolytic
encap= encapsulated
=
farads
f
fxd =fixed
Ge
=
germanium
=
ground (ed)
grd
h
=
henries
=
mercury
Hg
impg = impregnated
=
incandescent
incd
=
insulation (ed)
ins
K
=
kilo = 1000
lin
=
linear taper
log
=
logarithmic taper
m
=milli=10-~
M = megohms
ma
=
milliamperes
p
=
micro
minat = miniature
=
mfgl
mfr = manufacturer
=
metal film on glass
ABBREVIATIONS
mtg
my
NC
Ne
NO
NPO
nsr
obd = order
PP
piv
rect
plug
transistor
resistor
thermistor
switch
transformer
=
mounting
=
mylar
=
normally closed
=
neon
=
normally open
=
negative positive zero
(zero temperature
coefficient)
=
not separately
replaceable
scription tog
=
peak
=
printed circuit EIA = Tubes or transistors
board
picofarads
10-12 farads
peak- to- peak
peak inverse
voltage
position(s)
polystyrene
potentiometer
=
rectifier
'
by
de-
=
=
vacuum tube, neon
V
hlb, photocell, etc.
W
=
cable
X
=
socket
=
fuseholder
XF
WS = lampholder
Z
=
network
rot
=
rotary
=
root- mean- square
rms
rmo
=
rack mount only
S-b = slow-blow
Se
=
selenium
=
section(s)
sect
Si = silicon
=
silver
sil
sl
=
slide
td
=
time delay
Ti0 = titanium dioxide
2
=
toggle
to1 = tolerance
=
trimmer
trim
twt = travelingwavetube
=
variable
var
w/ = with
W
=
watts
ww
=
wirewound
w/o = without
*
=
optimum value
selected at factory,
average value
shown (part may
be omitted)
Page 28

Section V
Table 5-1
Model 211A
Table 5-1. Reference Designation Index
Circuit
Reference
C1
C2
C3
C4
C5
C6
C7
C8
C9
C10
C11
C12
C13
C14
C15, C16
C17, C18
C19, C20
C21, C22
C23, C24
C25
($3
Stock
0160-0051
0140-0033
0140-0035
0140-0090
0140-0018
0
140-0'009
0160-0022
0160-0018
0140-0035
0140-0090
0140-0018
0140-0009
0160-0022
0160-0018
0150-0012
0170-0002
0140-0098
0140-0099
0150-0012
0180-0025
No.
Description
C: fxd, my, 0.47 pf
C: fxd, mica, 5 pf
C: fxd, mica, 39 pf
C: fxd, mica, 200 pf
C: fxd, mica,
C: fxd, mica, 0.01
C: fxd, my, 0.1
C: fxd, my, 0.22
C: fxd, mica, 39 pf
C: fxd, mica, 200 pf *5%, 500 vdcw
C: fxd, mica,
C: fxd, mica, 0.01
C: fxd, my, 0.1
C: fxd, my, 0.22
C: fxd, cer,
C: fxd, my, 2
C: fxd, mica, 200 pf
C: fxd, mica,
C: fxd, cer, 0.01
C: fxd, elect, 4 sect, 20
1000 pf *5%, 500 vdcw
1000 pf *5%, 500 vdcw
0.01 pf *20%, 1000 vdcw
pf *20%, 400 vdcw
1000 pf
*lo%,
rt20%, 500 vdcw
*5%, 500 vdcw
*5%, 500 vdcw
pf *5%, 500 vdcw
pf *5%, 600 vdcw
pf
*lo%,
*5% , 5OOvdcw
pf *5%, 500 vdcw
pf *5%, 600 vdcw
pf
*lo%,
*I%,
*I%,
pf *20%, 1000 vdcw
#
400 vdcw
400 vdcw
400 vdcw
500 vdcw
500 vdcw
pf/sect. , 450 vdcw
Note
C26
C27
C28
thru
C33, C34
CR1
F1
I1
J1,
52
C32
0160-0013
0180-0011
0140-0004
0150-0012
1910-0009
2110-0015
2110-0021
2140-0012
1250-0118
1250-0083
C: fxd, my, 0.1
C: fxd, elect, 20 pf, 450 vdcw
C: fxd, mica, 15 pf
C: fxd, cer, 0.01
Diode,
Fuse, cartridge: 2.5 amp, s-b
Fuse, cartridge: 1.25 amp, s-b
Lamp, minat
Connector: BNC (rack model)
Connector: BNC (cabinet model)
Ge
(for 115
(for 230 V operation)
V
pf *10%, 400 vdcw
*lo%,
pf *20%, 1000 vdcw
operation)
:
2 pin base, 6.3 V, 0.15 amp, #12
500 vdcw
#
See
introduction to this section
00093-3
Page 29
Model 211A Section
Table 5-1
1
Circuit
Reference
@
Table
Stock
5-1. Reference Designation Index (conttd)
No.
Description
#
Note
V
L1
L2
L3
L4, L5
L6, L7
L8
P1
Rl
R2
R3
R4
R5
R6
R7
R8
R9
RlO
9140-0026
9140-0022
9140-0025
9140-0024
211A-60A
8120-0050
0687-1051
0690-1041
0690-2731
0687-1021
0690-2221
0693-4721
0693-3921
0687-3341
0690-8231
2100-0084
Inductor: RF, 6.8 ph
Inductor: RF, 500 ph
Not assigned
Inductor: RF, 4.7
Inductor: RF, 0.68 ph
Inductor: RF, (special)
Cord, power
R:
fxd,
CO~P,
R:
fxd, comp, lOOK ohms
R:
fxd, comp, 27K ohms
R:
fxd, comp, 1K ohms
R:
fxd, comp, 2.2K ohms i10%,
R:
fxd, comp, 4.7K ohms
R:
fxd, comp, 3.9K ohms
R:
fxd, comp, 330K ohms
R:
fxd, comp, 82K ohms
R:
vary comp, 50K ohms *20%, 1/3
1M
ph
*lo%,
*lo%,
1/2
*lo%,
*lo%,
*lo%,
*lo%,
*lo%,
*lo%,
W
1
1/2
1
1
W
W
W
1
W
2
W
2
W
1/2
W
W
W
Rll
R12
R13
R14
R15
R16
R17
R18
Rl9, R20
R21
R22
R23
R24
R25
R26
R27
0687-4701
0727-0073
0687-4701
2100-0079
0730-0079
0730-0087
0730-0096
0730-0118
2100-0013
2100-0063
0730-0045
2100-0013
2100-0074
0730-0079
0730-0087
0730-0096
R:
fxd, comp, 47 ohms a0%, 1/2
R: fxd, dep c, 422 ohms
R:
fxd, comp, 47 ohms
R:
vary comp, 250 ohms
R:
fxd, dep c, 216.3K ohms
R: fxd, dep c, 370K ohms
R:
fxd, dep c, 683.7K ohms
R:
fxd, dep c, 3.05M
R: vary comp, lin, 50K ohms *20%
R:
vary comp, lin, lOOK ohms
R:
fxd, dep c, 30.5K ohms
R:
vary comp, lin, 50K ohms *20%
R:
vary comp, lin, 1M E30%
R:
fxd, dep c, 216.3K ohms
R:
fxd, dep c, 370K ohms
R: fxd, dep c, 683.7K ohms
*I%,
*lo%,
*lo%
*l%, 1 W
*l%,
*I%,
*l%, 1 W
*I%,
*I%,
*l%,
*I%,
1/2
1/2
1
1
1
W
W
W
W
1
1
W
1
W
W
W
W
#
See introduction to this section
5 -3
Page 30

Section
Table 5-1
V
Table 5-1. Reference Designation
Model 211A
Index (contld)
Circuit
Reference
R28
R29
R30
R31
R32
R33
R34
R35
R36
R37
R38
R39, R40
R41
R42
R43
R44, R45
R46
R47
R48, R49
R50, R51
($3
Stock No.
0730-0118
0730-0017
0730-0065
2100-0084
0730-0106
0687-4701
0727-0073
0811 -0004
0687-4701
2100-0130
0690 -2721
0687-1051
0687-6831
0687-8231
0687-2731
0687-4701
0763-0001
0771-0002
0687-4701
0763-0001
Description
R:
fxd, dep c, 3.05 M
R:
fxd, dep c, 1.5K ohms
R:
fxd, dep c, 90.5K ohms
R:
var, comp, 50K ohms *20%, 1/3
R:
fxd, dep c, 1.031M
R:
fxd, comp, 47 ohms
R:
fxd, dep c, 422 ohms
R:
fxd,
ww,
540 ohms
R:
fxd, comp, 47 ohms
R:
var,
ww,
50K ohms
R:
fxd, comp, 2.7K ohms
R: fxd, comp, 1M
R:
fxd, comp, 68K ohms
R:
fxd, comp, 82K ohms
R:
fxd, comp, 27K ohms
R:
fxd, comp, 47 ohms
R:
fxd, mfgl, 2K ohms
R:
fxd, mfgl, 470 ohms
R:
fxd, comp, 47 ohms
R:
fxd, mfgl, 2K ohms
*I%,
*I%,
*lo%,
*I%,
*l%,
*lo%,
*l%,
*lo%,
1/2
*lo%,
*lo%,
flO%,
*lo%,
*I%,
*lo%,
*lo%,
*I%,
1
*I%,
*l%,
1
5
*lo%,
2
2
W
W
8
W
#
1
W
1/2
1/2
1/2
W
1/2
1/2
1/2
1/2
W
4
1/2
W
W
1
1
W
Note
W
W
W
W
W
W
W
W
W
W
W
R52, R53
R54
R55
R56, R57
R5 8
R59
thru'
R65
R66
R67
R68
R69
R70
R71
R72
R73
R64
0730-0091
0763-0001
0730-0007
0730-0066
0730-0007
0687-4701
0771-0002
0690-2711
0771-0002
0687-4701
0687-2241
0687-4701
2100-0075
2100-0076
0727-0324
R:
fxd, dep c, 479K ohms
R:
fxd, rnfgl, 2K ohms
R:
fxd, dep c, 230 ohms
R:
fxd, dep c, 95.5K ohms
R:
fxd, dep c, 230 ohms
R:
fxd, comp, 47 ohms *lo%, 1/2
R:
fxd, mfgl, 470 ohms
R:
fxd, comp, 270 ohms
R:
fxd, mfgl, 470 ohms
R:
fxd, comp, 47 ohms
R: fxd, comp, 220K ohms
R:
fxd, comp, 47 ohms
R:
var, comp, dual,l.2K ohms
R:
var, comp, 75 ohms
R:
fxd, dep c, 91.67 ohms
*l%,
*I%,
*l%, 1 W
*l%, 1 W
*lo%,
*lo%,
*lo%,
*lo%
*lo%,
do%,
*lo%
2
*I%,
,
1/2
*l%,
1
W
W
1
W
W
4
W
1
W
4
W
1/2
W
1/2
W
*lo%
1/2
W
W
#
See
introduction to this section
00093-3
Page 31
Model 211A Section
Table 5-1
Table
5-1. Reference Designation Index (cont 'd)
V
Circuit
Reference
R74
R75, R76
R7 7
R78, R79
R80
R81
R82
R83
R84
R85
R86
R87
R88, R89
R90
R91
@
Stock
0727-0323
0727-0324
0727-0323
0727-0324
0727-0323
0727-0324
0690-1241
0690-3331
0690-2251
0690-1021
0818-0008
0693-4701
0690-4731
0690-3341
No.
R:
fxd, dep c, 371.3 ohms
R:
fxd, dep c, 91.67 ohms
R:
fxd, dep c, 371.3 ohms
R:
fxd, dep c, 91.67 ohms
R:
fxd, dep c, 371.3 ohms
R:
fxd, dep c, 91.67 ohms
Not assigned
R:
fxd,
comp, 120K ohms
R:
fxd, comp, 33K ohms
R:
fxd,
CO~P,
R:
fxd, comp, 1000 ohms
R:
fxd,
ww,
Optimum value selected
average value shown
R:
fxd, comp, 47 ohms
R:
fxd, comp, 47K ohms
R:
fxd,
CO~P,
2.2M
800 ohms
330Kohms
Description
*l%,
*l%,
a%,
*l%,
*l%
*I%,
*lo%,
*lo%,
*lo%,
1
*lo%,
40
at
*lo%,
*lo%,
*lo%,
#
1/2 W
1/2 W
1/2 W
1/2
,
1/2 W
1/2 W
1
W
1
W
W
1
W
W
factory
2 W
1
W
1
W
Note
W
R92
R93
R94
thru
R97
R98
R99
RlOO
S1
S2
S3
T1
V1
V2, V3
V4
V5
R96
2100-0063
0690-2241
0687-2211
2100-0082
0690-2701
0690-4731
211A -19W
211A-19A
3101-0001
9100-0062
1932-0021
1923-0030
1930-0013
1921-0005
R:
var, comp, lin, lOOK ohms
R
fxd, comp, 220K ohms
Not assigned
R:
fxd, comp, 220 ohms
R:
var, comp, 5K ohms *20%, 1/2 W
R
fxd, comp, 27 ohms
Optimum value selected
average value shown
R:
fxd, comp, 47K ohms
Assy, range switch
Assy, attenuator switch
hitch,
Transformer, power
Tube, electron:
Tube, electron: 6CL6 or 6197
Tube, electron:
Tube, electron: 6C4
tog: SPST
6BQ7A
6AL5
*lO%,
*lo%,
*lo%,
at
factory
*lo%,
1
1
1/2
W
1
W
W
W
#
See introduction to this section
'5 -5
Page 32

Section
Table
V
5-1
Table
5-1.
Reference Designation Index (cont'd)
Model
211A
Circuit
Reference
V6
thru
V11
V12
V13
V14
V15
XV1
thru
XV3
XV4, XV5
XV6
thru
XVll
XV12, XV13
wi4, ~~15
@
Stock No.
1923-0030
1930-0020
1932-0019
1923-0027
1940-0001
1200-0062
1200-0053
1200-0062
1200-0020
1200-0009
#
Tube, electron:
Tube, electron:
Tube, electron:
Tube, electron:
Tube, electron:
6CL6
or
5V3
6AS7GA
6BH6
5651
6197
Socket, tube: 9 pin minat (for pc)
Socket, tube:
Socket, tube:
7
pin minat (for pc)
9
pin minat (for pc)
Socket, tube: octal
7
Socket, tube:
Pin minat
Note Description
#
See
introduction to this section
00093-3
Page 33

Model 211A
Section
Table 5-2
V
Table 5-2. Replaceable
Description
Assy , attenuator switch
Assy, range switch
Inductor: RF, (special)
C: fxd, mica, 15 pf
C: fxd, mica, 0.01
C: fxd, mica,
C: fxd, mica, 5 pf *20%, 500 vdcw
C: fxd, mica, 39 pf
C: fxd, mica, 200 pf
C: fxd, mica, 200 pf
C: fxd mica,
C: fxd, cer, 0.01
C: fxd, my,
C: fxd, my,
C: fxd, my, 0.1
C: fxd, my, 0.47
C: fxd, my, 2
C: fxd, elect, 20
1000 pf f5%, 500 vdcw
1000 pf *l%, 500 vdcw
0.1 pf
0.22
pf *20%, 400 vdcw
#
*lo%,
pf *5%, 500 vdcw
*5%, 500 vdcw
*5%, 500 vdcw
*I%,
pf *20%, 1000 vdcw
*lo%,
pfflO%,
pf *5%, 600 vdcw
pf
*lo%,
pf, 450 vdcw
500 vdcw
500 vdcw
400 vdcw
400 vdcw
400 vdcw
Parts
I
Mfr.
76433
04062
76433
7 643 3
76433
04062
04062
04062
56289
56289
56289
56289
00656
84411
56289
1
Mfr.
Part
No.
C: fxd, elect, 4 sect, 20
450 vdcw
R:
fxd, comp, 1K ohms f10%, 1/2
R:
fxd, comp, 1M *lo%, 1/2
R:
fxd, comp, 220 ohms
R:
fxd, comp, 220K ohms
R:
fxd, comp, 27K ohms
R:
fxd, comp, 330K ohms *lo%, 1/2
R:
fxd, comp, 47 ohms
R:
fxd, comp, 68K ohms *10%, 1/2
R:
fxd, comp, 82K ohms
R:
fxd, comp, 1K ohms *lo%,
R:
fxd, comp, lOOK ohms
R:
fxd, comp, 120K ohms *lo%,
R:
fxd, comp, 2.2K ohms
R:
fxd, comp, 220K ohms *lo%,
pf/sect,
W
*lo%,
&lo%,
*lo%,
*lo%,
*lo%,
*lo%,
*lo%,
1/2
1/2
1/2
1/2
1
W
1/2
W
W
1
W
1
W
1
W
1
W
W
W
W
W
W
W
56289
01121
01121
01121
01121
01121
01121
01121
01121
01121
01121
01121
01121
01121
01121
#See introduction to this section
5-7
Page 34

Section
Table 5-2
V
Table 5-2.
.Replacable
Parts
Model 211A
(contld)
@stock No.
0690-2251
0690-2701
0690-2711
0690-2721
0690-2731
0690-3331
0690-3341
0690-4731
0690-8231
0693-3921
0693-4701
0693-4721
0727-0073
.0727-0323
0727-0324
Description
R:
fxd, comp, 2.2M ohms
R:
fxd, comp, 27*ohms
R fxd, comp, 270 ohms
R:
fxd, comp, 2.7K ohms
R:
fxd, comp, 27K ohms
R:
fxd, comp, 33K ohms
R:
fxd, cornp, 330K ohms
R:
fxd, comp, 47K ohms
R:
fxd, comp, 82K ohms
R:
fxd, comp, 3.9K ohms
R:
fxd, comp, 47 ohms
R: fxd, comp, 4.7K ohms
R:
fxd, dep c, 422 ohms
R:
fxd, dep c, 371.3 ohms
R:
fxd, dep c, 91.67 ohms
#
*lo%,
*lo%,
&lo%,
*l%,
*lo%,
1
1
*lo%,
*lo%,
*lo%,
*lo%,
*lo%,
*lo%,
*lo%,
2
*lo%,
1/2
*I%,
*l%,
1
W
W
1
1
1
1
1
1
2
W
2
1/2
1/2
W
W
W
W
W
W
W
W
W
W
W
W
Mfr.
01121
01121
01121
01121
01121
01121
01121
01121
01121
01121
01121.
01121
19701
19701
19701
Mfr.
Part
No.
GB2251
GB2701
GB2711
GB2721
GB2731
GB3331
GB3341
GB4731
GB8231
HB3921
HB4701
HB4701
DC~/~BR~
DC~/~CR~ obd#
DC~/~CR~
obd#
obd#
RS
TQ
1
1
11
11
1
1
1
1
1
1
11
1
2
11
11
2
1
11
1
2
1
3
2
6
0730-0007
0730-0017
0730-0045
0730-0065
0730-0066
0730-0079
0730-0087
0730-0091
0730-0096
0730-0106
0730-0118
0763-0001
0771-0002
0811-0004
0818-0008
1200-0009
R:
fxd, dep
R:
fxd, dep c, 1.5K ohms
R:
fxd, dep c, 30.5K ohms
R:
fxd, dep
R; fxd, dep
R; fxd, dep c, 216.3K ohms
R:
fxd, dep c, 370K ohms
R: fxd, dep c, 479K ohms
R: fxd, dep c, 683.7 ohms
R:
fxd, dep c, 1.031~*1%,
R:
fxd, dep c, 3.05M
R:
fxd, mfgl, 2K ohms
R:
fxd, mfgl, 470 ohms
R:
fxd, ww, 540 ohms
R:
fxd, ww, 80Pohms *5%, 40
Socket, tube: 7 pin minat
c,
230 ohms
c,
90.5K ohms
c,
95.5 ohms
*l%,
*I%,
*I%,
*I%,
*I%,
*I%,
*l%,
*lo%,
*I%,
*I%,
*l%,
*l%,
*I%,
1
W
1
W
2
5
1
W
4
W
W
1
1
1
1
W
1
1
1
W
W
W
1
W
W
W
W
W
W
19701
19701
19701
19701
19701
19701
19701
19701
19701
19701
19701
07115
07115
71468
91431
91662
DClR5
DClR5 obd#
DClR5
DClR5 obd#
DClR5 obd#
DClR5
DClR5
DClR5
DClR5
DClR5
DClR5 obd#
TypeN30
LP1-4
obd#
OR-40
316PH-3702
obd#
obd#
obd#
obd#
obd#
obd#
obd#
2
1
1
1
1
1
1
1
1
2
1
2
1
2
1
2
1
2
1
1
2
1
4
1
1
3
1
1
11
1
2
#See introduction to this section
00093-3
Page 35

Model 211A
Table 5-2. Replacable
Parts
Section V
Table 5-2
(contld)
@Stock No.
1200-0020
1200-0053
1200-0062
1250-0083
1250-0118
1910-0009
1921-0005
1923-0027
1923-0030
1930-0013
1930-0020
1932-0019
1932-0021
1940-0001
2100-0013
2100-0063
2100-0074
2100-0075
2100-0076
Description
#
Socket, tube: octal
Socket, tube, 7 pin minat, (for pc)
Socket, tube, 9 pin minat, (for pc)
Connector: BNC (cabinet model)
Connector: BNC (rack model)
Diode,
Ge
Tube, electron: 6C4
Tube, electron:
6BH6
Tube, electron: 6CL6 or 6197
Tube, electron:
6AL5
Tube, electron: 5V3
Tube, electron:
6AS7GA
Tube, electron: 6BQ7A
Tube, electron: 5651
R: var,
R:
R: var,
R:
R:
comp, lin, 50K ohms
var, comp, lin, lOOK ohms
comp, lin, 1M *30%
var, comp, 1.2K ohms ~10%~
var, comp, 75 ohms
&lo%
Mfr.
71785
91662
91662
91737
91737
98925
80131
80131
80131
80131
80131
80131
80131
80131
71590
11237
11237
01121
01121
Mfr.
Part
No.
51A12272
3708-2-4
3908-2-4
UG-1094/~
8427
CTP-439
6C4
6BH6
6CL6
6AL5
5V3
6AS7GA
6BQ7A
5651
obd#
Type 45 obd#
Type45 obd#
JDlN056P122UA
JAlNO56S750UA
RS
TQ
2
1
2
1
9
1
0
0
2
1
11
11
11
8
8
11
11
11
11
11
4
1
2
1
1
1
1
1
1
1
2100-0079
2100-0082
2100-0084
2100-0130
2110-0015
2110-0021
2140-0012
3101-0001
8120-0050
R:
var, comp, 250 ohms
R:
var, cornp, 5K ohms *20%, 1/2
R:
var, cornp, 50K ohms e0%, 1/3
R:
var,
ww,
lin, 50K ohms
*lo%
*I%,
Fuse cartridge: 2.5 amp, s-b
(for 115 V operation)
Fuse cartridge: 1.25 amp s-b
(for 230 V operation)
Lamp, minat, 2 pin base
6.3
V,
0.15 amp, # 12
Switch, tog: SPST
Cord, power
#See introduction to this section
8
W
W
W
01121
11237
11237
98734
71400
71400
24455
34009
70903
JAlN056S251UA
UPM-45 obd#
CPM-45 obd#
obd#
MDL-2-1/2
MDL-1.25
GE-12
80994-H
obd#
1
1
1
1
2
1
11
1
10
0
0
1
1
1
1
1
1
.
5-9
Page 36

Section
V
Table 5-2
Table 5-2. Replacable .Parts
Model 211A
(contfd)
@Stock NO.
9100-0062
9140-0022
9140-0024
9140-0025
9140-0026
AC-1OC
AC-1OD
G-74K
G-74N
Z
G-74
G-99K
Description
#
Transformer, power
Inductor: RF, 500
ph
Inductor: RF, 0.68ph
Inductor: RF, 4.7 ph
Inductor: RF, 6.8 ph
MISCELLANEOUS
Assy; binding post, black
Assy: binding post, red
Knob: SYMMETRY OUTPUT
AMPLITUDE
Knob: RANGE, 75 ohms
ATTEN
Knob: ATTEN
Window, dial
Mfr.
98734
99848
99848
99848
99848
28480
28480
28480
28480
28480
28480
Mfr.
Part
4113
1500-15-501
203-11
213-11
215-11-68
AC-1OC
AC-1OD
G-74K
G-74N
G-74Z
G-99K
No.
RS
TQ
11
11
1
2
1
2
11
11
11
0
3
0
2
10
10
211A-40A
1400-0084
1450-0020
1450 -0022
3140-0010
3150-0004
3150-0006
3160-0013
Dial, frequency
Fuseholder
Pilot light, jewel
Lampholder
Fan motor
Filter,
Filter,
air,
air,
cabinet mount only
Fan blade
rack mount only
28480
75915
72765
72765
73793
82866
82866
06812
211A-40A
342014
14L15
2020AE
G5-CW-ER-6667
807390
obd#
0-04-27-4
10
11
10
10
1
1
11
11
11
#See introduction to this section
00093-
1
Page 37

Model 211A
APPENDIX
CODE
The following code numbers are from the Federal Supply Code for Manufacturers Cataloging Handbooks H4-1 (Name to Code)
and H4-2 (Code to Name) and their latest supplements. The date of revision and the date of the supplements used appear
the bottom of each page. Alphabetical codes have been arbitrarily assigned to suppliers not appearing in the H4 handbooks.
LIST OF MANUFACTURERS (Sheet
1
of
2)
Appendix
at
CODE CODE CODE
NO.
MANUFACTURER
0 0 3 3 4
Humidial Co.
Westrex Cors. New York. N.Y.
Garlock Packing Co..
Electronic Products Div.
Aerovox Corp. New
Amp, Inc. Harrisburg. Pa.
Aircraft Radio
Sangamo Electric
Ordill Division (capacitbn) Marion,
Goe Engineering Co. Lor Angeles. Calif.
Carl E.
Allen Bradley Co. Milwaukee. Wis.
Litton Industries, Inc.
Pacific Semiconductors, Inc.
Texas Instruments. Inc.
Transistor Products Div. Dallas. Texas
The Alliance Mfg. Co. Alliance, Ohio
Chassi-Trak Corp. Indianapolis, Ind.
Pacific Relays. Inc. Van Nuys, Calif.
Amerock Corp. Rockford,
Pulse Engineering Co. Santa Clara. Calif.
Ferroxcube Corp. of America
Cole Mfg. Co.
Amphenol-Borg Electronics Corp.
Radio Corp. of America
Semiconductor and Materials Div.
Vocaline Co. of America Inc.
Hopkins Engineering Co.
G.E. Semiconductor Products Dept.
Apex Machine 6 Tool Co. Dayton, Ohio
Eldema Corp. El Monte. Calif.
Transitron Electronic
Pyrofilm Resistor Co. Morristown. N.J.
Air Marine Motors, Inc. Los Angeles, Calif.
Arrow, Hart and
Elmenco Products Co. New York, N.Y.
Hi-0 Division of Aerovox Myrtle Beach, S.C.
Elgin National Watch Co.,
Electronics Division
Dymec Division of
Hewlett-Packard Co.
Sylvania Electric Prods., Inc.
Electronic Tube Div. Mountain View, Calif.
Motorola.
Prod. Div. Phoenix. Arizona
Filtron Co.,
Western Dlvls~on Culver City, Calif.
Automatic Electric Co. Northlake,
Sequoia Wire 6 Cable
Company Redwood City, Calif.
P
M Motor Co. Chicago, Ill.
Twentieth Century Plastics. Inc.
Westinghouse Electric Corp.,
Semi-Conductor Dept. Youngwood, Pa.
Ultronix. Inc. San Mateo, Calif.
lllumitronic Engineering Co.
Barber Colman
Metropolitan Telecommunications Corp.,
Metro Cap. Div. Brooklyn. N.Y.
Stewart Engineering Co. Santa Crux, Calif.
The Bassick Co. Bridgeport. Conn.
Beede Electrical Instrument Co., Inc.
Torrington Mfg. Co., West Div.
Corning Glass Works
Electronic Components Dept.
Cors. Boonton. N.J.
company
Holmes Corp.
Corn. Wakefield. Mass.
Hegeman Elect. Co.
Inc., Semiconductor
Inc:
Co.
ADDRESS
Colton, Calif.
Camden. N.J.
Bedford. Mass.
Los Angeles, Calif.
Beverly Hills, Calif.
Culver City, Calif.
Saugerties, N.Y.
Palo Alto. Calif.
Chicago,
Somerville, N.J.
old Saybrook. Conn.
San Fernando, Calif.
Syracuse, N.Y.
Hartford, Conn.
Burbank. Calif.
Palo Alto, Calif.
Lor Angeles, Calif.
Sunnyvale. Calif.
Rockford.
Penacook, N.H.
Van Nuys. Calif.
Bradford, Pa.
00015-22
Ievised:
NO.
MANUFACTURER
0 7 1
2 6 Digitran Co.
Transistor Electronics Corp.
Westinghouse Electric Corp.
Electronic Tube Div. Elmira. N.Y.
Avnet Corp. Los
Fairchild Semiconductor Corp.
Ill.
Ill.
Ill.
Ill.
Ill.
March
Continental Device Corp. Hawthorne. Calif.
Rheem Semiconductor Corp.
Shockley Semi-Conductor
Laboratories
Boonton Radio Corp. Boonton, N.J.
Engineering Co. Lor Angeles, Calif.
U.S.
Burgess Battery Co.
Sloan Company Burbank, Calif.
Cannon Electric Co.
Phoenix Div. Phoenix. Arix.
CBS Electronics Semiconductor
Operations, Div. of
MeI-Rain Indianapolis. Ind.
Babcock Relays, Inc. Costa Mesa. Calif.
Texas Capacitor Co. Houston, Texas
Electro
Mallory Batter Co of
Canada.
General Transistor Western Corp.
Ti-Tal. Inc. Berkeley, Calif.
Carborundum Co. Niagara Falls. N.Y.
CTS of
Chicago Telephone of California Inc.
Microwave Electronics Corp.
Duncan Electronics. Inc. Santa Ana, Calif.
General Instrument Corporation
Semiconductor Division Newark, N.J.
Imperial Electronics. Inc.
Melabs. Inc. Palo Alto. Calif.
Clarostat Mfg. Co. Dover. N.H.
Cornell Dubilier EIec. Corp.
The Daven Co. Livingston, N.J.
De Jur-Amrco Corporation
Delco Radio Div. of G. M. Corp.
E. I. DuPont and Co.. Inc. Wilmington, DeI.
Eclipse Pioneer. Div. of
Bendix Avidtior. Corp. Teterboro, N.J.
Thomas A. Edison Industries,
Div. of
Electra Manufacturing Co. Kansas City. Mo.
Electronic Tube Corp. Philadelphia. Pa.
Fansteel Metallurgical Corp.
The Fafnir Bearing Co.
Fed. Telephone and Radio Corp.
General Electric Co. Schenectadv. N.Y.
G.E.. Lamp Division
General Radio Co. West Concord, Mass.
Grobet File Co. of America, Inc.
Hamilton Watch Co. Lancaster, Pa.
Hewlett-Packard Co.
G.E. Receiving Tube Dept. Owensboro. Ky.
Lectrohm Inc. Chicago.
P. R. Mallory 6 Co., Inc. Indianapolis. Ind.
Mechanical Industries Prod. Co.
Miniature Precision Bearings, Inc.
191
Niagara Falls, Ontario, Canada
C.B.S. Inc.
Assemblims. Inc. Chicago.
~td.
o or onto.
Berne, Inc. Berne, Ind.
Long Island City
McGraw-Edison Co.
Nela Park. Cleveland. Ohio
ADDRESS
Pasadena, Calif.
Minneapolis, Minn.
Angeles, Calif.
Mountain View. Calif.
Mountain View, Calif.
Palo Alto. Calif.
Lowell, Mass.
Ill.
Ontario. Canada
Lor Angeles, Calif.
SO. ~aradena, Calif.
Palo Alto. Calif.
Buena Park, Calif.
So. Plainfield. N.J.
1,
N.Y.
Ind.
Kokomo,
West Orange, N.J.
No. Chicago.
New Britain, Conn.
Carlstadt. N.J.
Palo Alto, Calif.
From: F.S.C.
Ill.
Clifton, N.J.
Ill.
Akron. Ohio
Keene, N.H.
Handl
H4-1 Dated
H4-2 Dated
NO.
4
2 1 9 0
4
3
9 9
44
6
5 5
4 7 9 0 4
4 8 6
2 0
4 9 9
5 6 Raytheon Company Lexington, Mass.
5 4 2 9 4
5 5 0 2 6 Simpson Electric Co. Chicago,
5 5
9
3 3
5 5 9 3 8 Sorenson & Co., Inc. So. Norwalk. Conn.
5 6 1
3
5 6 2 8 9
5 9 4
4 6 Telex. Inc. St. Paul, Minn.
6
1
7
7
6
2 1 1 9 Universal Electric Co. Owosso, Mich.
6
4 9 5 9 Western Electric Co.. Inc.
6
5 0 9 2
6
6
3
4 6 Wollensak Optical Co.
7
0 2
7
7
0 3 0 9 Allied Control Co., Inc.
7
0 4 8 5 Atlantic India Rubber Works. Inc. Chicago,
7
0 5
6
7
0 9 0 3 Belden Mfg. Co. Chicago,
7
0
9 9
7
1 0 0 2
7
1 0 4 1
7
1 2 1
7
1 2
8 6 Camloc Fastener Corp. Paramus, N.J.
7
1 3 1 3 Allen D. Cardwell Electronic
7
1 4 0 0 Bussmann Fuse Div. of McGraw-
7
1 4 5 0
7
1
4 6 8 Cannon Electric Co. Los Angeles, Calif.
7
1
4 7 1
7
1 4 8 2 C. P. Clare & Co. Chicago,
7
1 5 2
7
1 5 9 0 Centralab Div. of Globe Union Inc.
7 1 7
0
7 1 7
4 4
7
1 7 5 3 A.
7 1 7
8 5 Cinch Mfg. Corp. Chicago.
7
1 9 8 4 Dow corning Corp. h4idland.-~ich.
7
2 1
3
7
2 3 5 4 John E. Fast & Co.
7
2 6 1 9 Dialiqht Corp. Brooklyn. N.Y.
7
2 6 5 6 General Ceramics Corp. Keasbey, N.J.
7 2 7
5
7 2 7
6
7
2 8 2 5
7
2 9 2
7
2 9 8 2 Erie Resistor Corp. Erie, Pa.
7
3 0 6
7 3 1
3
7
3
2
9 3 Hughes Products Division of
7 3 4 4
7
3 5
0
7
3 5
5
7
3 6 8 2 George K. Garrett Co., I'nc.
7
3
7
3 4 Federal Screw Products Co. Chicago,
7 3 7
4
7 3 7
9
book Supplements
January 1962
January
MANUFACTURER
Muter Co. Chicago,
0
C. A. Norgren Co. Englewood, Colo.
Ohmite Mfg. Co. Skokie.
Polaroid Corp. Cambridge, Mass.
Precision Thermometer and
Inst. Co. Philadelphia. Pa.
Shallcross Mfg. Co. Selma. N.C.
Sonotone Corp. Elmsford. N.Y.
7
Spaulding Fibre Co., Inc. Tonawanda, N.Y.
Sprague Electric Co. North Adams. Mass.
Union Switch and Signal Div. of
5
Westinghouse Air
Weston Inst. Div. of Daystrom, Inc.
6
Allen Mfg. Co. Hartford, Conn.
3
Amperite Co.. Inc.
8 Bird Electronic Corp. Cleveland, Ohio
Birnbach Radio Co.
Boston Gear Works Div. of
Murray Co. of Texas
8 Bud Radio Inc. Cleveland. Ohio
Prod. Corp.
Edison Co. St. Louis. Mo.
CTS Corp. Elkhart, Ind.
Cinema Engineering Co. Burbank, Calif.
8 Standard-Thomson Corp
Clifford Mfg. Co.
0
The Cornish Wire Co. New York, N.Y.
Chicaao Miniature Lams Works
0.
Smith Corp., Crowley Div.
6
Electro Motive Mfg. Co., Inc.
8 Girard-Hopkins Oakland. Calif.
5
Drake Mfg. Co. Chicago.
Hugh H. Eby Inc. Philadelphia, Pa.
8 Gudeman Co. Chicago,
1
Hansen Mfg. Co., Inc. Princeton. Ind.
8 Helipot Div. of Beckman
Instruments. Inc. Fullerton, Calif.
Hughes Aircraft Co.
Amperex Electronic Co., Div. of
5
North American Phillips Co., Inc.
6
Bradley Semiconductor Corp. Hamden. Conn.
9
Carling Electric, Inc. Hartford, Conn.
3
Fischer Special Mfg. Co. Cincinnati, Ohio
3
The General Industries Co.
8rakk Co. Swissvale, Pa.
~i;:
Newport Beach, Calif.
ADDRESS
Ill.
Ill.
Ill.
New York. N.Y.
Newark. N.J.
Rochester,' N.Y.
New York, N.Y.
New York. N.Y.
New York. N.Y.
Quincy. Mass.
Plainville. Conn.
Waltham, Mass.
Milwaukee, Wis.
West Orange, N.J.
Willimantic, Conn.
Chicaao.
-.
Chicaso.
-.
Ill.
Ill.
Ill.
Ill.
Ill.
Ill.
Ill.
Ill.
Hicksville. N.Y.
Philadelphia. Pa.
Ill.
Elyria. Ohio
1962
Page 38

Appendix
CODE
LIST
APPENDIX
OF
MANUFACTURERS (Sheet
2
of
2)
Model
211A
CODE
NO.
MANUFACTURER
Jennings Radio Mfg. Co.
J. H. Winns, and Sons
Industrial Condenser Corp. Chicago,
R.F. Products Division of Amphenol-
Borg Electronics Corp. Danbury, Conn.
E. F. Johnson Co. Waseca, Minn.
lnternational Resistance Co. Philadelphia, Pa.
Jones, Howard B.. Division
of Cinch Mfg.
James Knights Co. Sandwich.
Kulka Electric Corporation Mt. Vernon. N.Y.
Lenz Electric Mfg. Co. Chicago.
Littelfuse Inc. Des Plaines,
Lord Mfg Co. Erie, Pa.
C. W.
Micamold Electronic Mfg. Corp.
James
J. W. Miller Co.
Mo~dnock Mills San Leandro. Calif.
Mueller Electric Co. Cleveland, Ohio
Oak Manufacturing Co. Chicago,
Bendix Pacific Division of
Bendix
Phaostron Instrument and.
Electronic Co. South Pasadena. Calif.
Potter and Brumfield, Div. of American
Machine and Foundry Princeton,
Radio Condenser Co.
Radio Receptor Co., Inc.
Resistance Products Co. Harrisburg, Pa.
Shakeproof Division of Illinois
Tool Works
Signal Indicator Corp.
Tilley Mfg. Co.
Stackpole Carbon Co.
Tinnerman Products. Inc. Cleveland, Ohio
Transformer Engineers Pasadena, Calif.
Ucinite Co.
Veeder Root.
Wenco Mfg. Co. Chicago,
continental-~irt Electronics Corp.
Zierick
Mepco Division of
Sessions Clock Co. Morristown. N.J.
Schniher Alloy Products Elizabeth, N.J.
Times Facsimile Cor~. New York. N.Y.
Electronic Industries Association
Any brand tube meeting EIA
standards Washington, D.C.
Unimax Switch. Div. of
W.
Oxford Electric Corp.
Bourns Laboratories, Inc. Riverside, Calif.
Acro Div. of Robertshaw
Fulton Controls Co.
All Star Products Inc.
Hammerlund Co.. Inc.
Stevens, Arnold, Co.. Inc.
International
Wilkor Products.
Raytheon Mfg. Co.. Industrial
Components Div.. Industr.
Tube Operations Newton,
lnternational Rectifier Corp.
Barry Controls, Inc. Watertown. Mass.
Carter Parts Co. Skokie.
Jeffers Electronics Division of
Speer Carbon
Allen
Maquire Industries. Inc. Greenwich, Conn.
Sylvania Electric Prod.
Electronic Tube Div. Emporium, Pa.
Astron Co. East Newark. N.J.
Switchcraft, Inc. Chicago,
Metals and Controls Inc.. Div. of
Texas Instruments.
Spencer Prods. Attleboro, Mass.
Research Products
Corp.
Marwedel San Francisco. Calif.
Millen Mfg. Co.. Inc. Malden, Mass.
Corp. No. Hollywood. Calif.
Inc. Hartford, Conn.
Mfq. Corp.
L.
Maxson Corp.
Instruments, Inc.
Inc. Cleveland. Ohio
CO.
8. DuMont Labs.. Inc.
Inc.,
'lnc..
Gorp.
ADDRESS
San Jose, Calif.
Winchester. Mass.
Chicago,
Ill.
Ill.
Ill.
Ill.
Ill.
Brooklyn, N.Y.
Lor Angeles, Calif.
Ill.
Ind.
Camden, N.J.
Brooklyn. N.Y.
Elgin,
New York, N.Y.
San Francisco. Calif.
Newtonvillm, Mass.
Philadelphia, Pa.
New Rochelle, N.Y.
Wallingford. Conn.
Columbus
Defiance, Ohio
New York, N.Y.
New Haven. Conn.
El Segundo. Calif.
Ill.
St. Marys, Pa.
Ill.
Chicago.
Ill.
16,
Ohio
Boston. Mass.
Mas.
Ill.
Du Bois. Pa.
N.J.
Clifton.
Madison, Wis.
00015-22
Revised: 3 March
Ill.
CODE
NO.
MANUFACTURER
Rotron Manufacturing Co.,
Vector Electronic Co.
Western Washer Mfr. Co.
Carr Fastener Co. Cambridge. Mass.
New Hampshire Ball Bearing. Inc.
Pyramid Electric Co. Darlington, S.C.
Electro Cords Co.
Victory Engineering Corp.
Bendix Corp., Red Bank Div. Red Bank. N.J.
Smith, Herman H., Inc. Brooklyn. N.Y.
Gavitt Wire and Cable Co..
Div. of Amerace Corp. Brookfield, Mass.
Burroughs Corp.,
Electronic Tube Div. Plainfield. N.J.
Model
Eng. and Mfg., Inc.
Loyd Scruggs Co. Festus, Mo.
Arco Electronics. Inc. New York, N.Y.
A. J. Glesener Co.. Inc.
Good All Electric Mfg. Co.
Sarkes
Tarzian. Inc. Bloomington, Ind.
Boonton Molding Company Boonton. N.J.
R. M. Bracamonte
Koiled Kords, Inc. New Haven.
Seamless Rubber Co.
Clifton Precision Products
Radio Corp. of America. RCA
Electron Tube Div. Harrison. N.J.
Philco Corp. (Lansdale Division)
Western Fibrous Glass Products Co.
Cutler-Hammer. Inc. Lincoln.
Could-National Batteries. Inc. St. Paul. Minn.
General Electric Distributing Corp.
Carter Parts Div. of Economy Baler Co.
United Transformer Co. Chicago. 111.
U.S. Rubber Co.. Mechanical
Goods Div.
Bearing Engineering Co. San Francisco, Calif.
Connot Spring Mfg. Co. San Francisco. Calif.
Radio Materials Co. Chicago,
Augat Brothers.'lnc. Attleboro. Mass.
Dale Electronics, Inc. Columbus. Nebr.
Elco Corp. Philadelphia. Pa.
Gremar Mfg. Co., Inc.
K
F Development Co. Redwood City, Calif.
Minneapolis-Honeywell Regulator Co..
Micro-Switch Division Freeport,
Universal Metal Products Inc.
Sylvania Electric Prod.
Semiconductor Div. Woburn. Mass.
Robbins and Myers, Inc. New York. N.Y.
Steve~s Mfg. Co., Inc. Mansfield. Ohio
Insuline-Van Norman
Electronic Division Manchester, N.H.
Raytheon Mfg. Co., Industrial Components
Div., Receiving Tube Operation
Raytheon Mfg. Co., Semiconductor Div..
California Street Plant Newton. Mass.
Scientific Radio Products, Inc.
Tung-Sol Electric. Inc. Newark. N.J.
~urkss- right
Electronics Div. East Paterson. N.J.
Tru Ohm Prod. Dir. of Model
Engineering and Mfg. Co.
Worcester Pressed Aluminum Corp.
Allies Products
Continental Connector Corp. Woodside, N.Y.
Leecraft Mfg. Co., Inc. New York. N.Y.
Lerco Electronics,
National Coil Co. Sheridan. Wyo.
Vitramon, Inc. Bridgeport, Conn.
1962
&
Co.
Ind., Inc.
Corp.,
Corp. Miami, Fla.
Inc. Burbank, Calif.
ADDRESS
Inc.
Woodstock. N.Y.
Glendale. Calif.
Lor Angeles. Calif.
Peterborough. N.H.
Lor Angeles. Calif.
Union, N.J.
Huntington. Ind.
San Francisco. Calif.
Oqallala. Neb.
San Francisco, Calif.
Clifton Heights. Pa.
San Francisco, Calif.
Schenectady, N.Y.
Wakefield. Mass.
dassett
Inc..
From: F.S.C. Handbook
Conn.
Chicago.
Ill.
Lansdale, Pa.
Ill.
Ill.
Chicago,
Passaic. N.J.
Ill.
Ill.
Puente. Calif.
Quincy. Mass.
Loveland,
Colo.
Chicago,
Ill.
Worcester, Mass.
H4-1
Dated January
H4-2
Dated January
CODE
NO.
MANUFACTURER
9
5
3
5
4
Methode Mfg. Co.
9 5 9
8 7 Weckesser Co. Chicago, Ill.
9 6 0 6
7
Huggins Laboratories Sunnyvale, Calif.
Hi-Q Division of Aerovox Olean. N.Y.
9 6 0 9
5
9 6
2
5
6
Thordarson-Meissner Div. of
Maguire Industries, Inc. Mt. Carmel. Ill.
Solar Manufacturing Co.
9 6 2 9 6
9 6
3
3 0 Carlton Screw Co. Chicago,
9 6
3
4
1
Microwave Associates, Inc. Burlington.,Mass.
Ercel Transformer Co.
9 6
5 0 1
Industrial Retaining Ring Co. Irvington, N.J.
9 7 4 6
4
9 7
5
3 9 Automatic and Precision
9 7 9 6 6
9 8 1 4 1
9
9 8 2
9
9 8 4
9
9
9 8 9
9 8 9 7
9 9 1 0 9
9 9 3 1
9 9
9 9 7 0 7
9 9
9 9 8 4
9 9 9
9 9 9
9 9 9
THE FOLLOWING
BER ASSIGNED IN THE LATEST
THE FEDERAL SUPPLY CODE FOR MANUFACTURERS
HANDBOOK.
0 0 0 0
0
0 0 0 0
0 0 0 0
0 0 0 0
0 0 0 0
0
0 0 0 0
0 0 0
0 0 0 0
0 0 0 0
0 0 0 0
0
0 0 0
0 0 0
0 0 0
0 0 0
0 0
0 0
0 0 0
0
0 0 0
0 0
Mfq. Co. Yonkers. N.Y.
CBS Electronics.
Div. of
C.B.S.. Inc.
Axel Brothers Inc.
8
2
2
0
Francis
L.
7
8 Microdot. lnc. So. Pasadena. Calif.
8
2
9 1
0
5
8 7 3 4 Palo Alto Engineering
8 8
2
1
2
5 Clevite Transistor Prod.
8 lnternational Electronic
3
5
1
5
8
0 0 Delevan Electronics Corp.
8 Wilco Corporation Indianapolis, Ind.
3 4 Renbrandt, lnc. Boston. Mass.
4
2
5
7
F
0
0 0
1 Telefunken (c/o American
L Winchester Electronics. Inc.
M Western Coil Div. of Automatic
N
P
0 0 0
T Tcras Instruments, Inc.
U
0
W Webster Electronics Co. Inc.
X
Y
Z
0 0
A A British Radio Electronics Ltd.
8 B Precision Instrument Components Co.
C C Computer Diode Corp.
E E A. Williams Manufacturing Co.
F F Carmichael Corrugated Specialties
0
G G Goshen Die Cutting Service
0
H H Rubbercraft Corp.
1
I
0 0
K K Amatom New Rochelle. N.Y.
L L Avery Label Monrovia, Calif.
0
M M Rubber Eng.
Supplements
Mosley Pasadena. Calif.
Sealectro Corp. Mamaroneck, N.Y.
Carad Corp. Redwood City, Calif.
Co., Inc.
North Hills Electric Co. Mineola, N.Y.
Div. of Clevite Corp.
Research Corp.
Columbia Technical Corp.
Varian Associates Palo Alto. Calif.
Marshall Industries. Electron
Products Division Pasadena, Calif.
Control Switch Division, Controls Co.
of America
Hoffman Semiconductor Div. of
Hoffman Electronics Corp. Evanston.
Technology Instrument Corp.
of Calif.
H-P
VENDORS HAVE NO NUM-
Malco Tool and Die
Elite) New York. N.Y.
Ind., Inc. Redwood City, Calif.
Nahm-Bros.
Ty-Car Mfg. Co., Inc.
Tower Mfg. Corp. Providence. R.I.
Spruce Pine Mica Co.
Midland
Willow Leather Products Corp.
Birtcher Corporation, Industrial
1962
1962
S~ring Co. San Leandro. Calif.
Metals and Controls Div. Versailles, Ky.
Mfg. Co. Inc. Kansas City, Kans.
Division Monterey Park. Calif.
Development
b
ADDRESS
Chicago,
Ill.
Lor Angeles, Calif.
Oakland, Calif.
Danvers, Mass.
Jamaica, N.Y.
Palo Alto. Calif.
Waltham. Mass.
Burbank, Calif.
New York, N.Y.
El Segundo, Calif.
East Aurora. N.Y.
Newbury Park, Calif.
SUPPLEMENT
Los Angeles. Calif.
Santa Monica. Calif.
Holliston, Mass.
New York. N.Y.
Spruce Pine. N.C.
Washington. D.C.
Van
San Jose. Calif.
Richmond, Calif.
Torrance, Calif.
Hayward. Calif.
Ill.
Ill.
TC
Newark. N.J.
Nuys. Calif.
Lodi. N.J.
Goshen. Ind.
Page 39

MODEL 211A
SQUARE WAVE GENERATOR
To
adapt this manual
changes shown in tables.
Instrument
Applies to
serial prefixes
ERRATA:
Serial Prefix Make Manual Changes Instrument
all
Manual Serial Prefixed:
Manual Printed: 4/62
to
instruments
ERRATA
Figure
Figure 4-9, Output Section,
Table 5-1, Reference Designation Index,
Table 5-2, Replaceable Parts,
Section
4-8, Multivibrator and Power Supply,
F1 and S3: Reverse positions to show F1 connected between S3 and PI.
R30: Add asterisk beside R30 and change value to 75K.
S2: Add arrowhead on switch contact which connects 60 DB section of S2 to 7552 OUTPUT
connector
CR1: Change to Diode, Ge, @ Stock No. 1910-0016.
R30: Change to Resistor, fixed, deposited carbon, 75K ohms
selected at factory; average value shown.
V2, V3: Change
V5: Change
V6 thru V11:
0730-0065: Change to 0730-0058; R:
1910-0009:
1921-0005: Change to 1921-0030; Tube, electron:
1923-0030: Change to 1923-0066; Tube, electron:
Add 1923-0067; Tube, electron: 6CL6; Mfr. 82219; Mfr. Part No. 6CL6; TQ=6; RS6.
Under MISCELLANEOUS,
Change:
IV:
4-43. AIR FILTER
4-44. Inspect air-filter element periodically.
restricted and instrument overheats. Proceed as follows:
a.
b. Dry element thoroughly.
c.
in instrument. Research Products Company No. 3 Filter Coat
This adhesive
stores or from your local Hewlett-Packard sales office.
d. Install cleaned and coated air-filter element in instrument.
with other
52.
@
@
Stock No. to 1921-0030.
Change
Change to
G-74N
Add paragraphs 4-43 and 4-44 on page 4-8,
Remove element and wash in detergent and water.
Coat element with light film of filter oil (adhesive) before installing filter
is
available in "Handi-Koter" sprayer cans at most heating supply
serial
prefixes check for
Stock No. to 1923-0066.
($9
Stock No. to 1923-0067.
1910-0016; Diode, Ge; Mfr.
AC-1OC to 5060-0632
AC-1OD to 5060-0633
G-74K to 0370-0032
to 0370-0035
G-74
Z
G-99K to 5040-0600
to 0370-0045
026-
errata
Serial
Prefix Make Manual Changes
@
Stock No. 0730-0058.
fxd, dep c, 75K* ohms
28480; Mfr. Part No. 1910-0016.
6C4; Mfr. 86684.
6CL6; Mfr. 86684; Te2; Rs2.
Clean element before air flow
below, and make
*l%,
1W. Optimum value
*l%,
1W.
is
recommended.
is
Supplement A for
211A-900
Page 40

 Loading...